Embed Size (px)
Citation preview

Oracle Learn Cloud
What's New in Taleo Release 16B
July 2016

2
TABLE OF CONTENTS
REVISION HISTORY .................................................................................................................................................. 3 OVERVIEW ............................................................................................................................................................ 4 RELEASE FEATURE SUMMARY .................................................................................................................................... 5 BI REPORTING ENHANCEMENTS ................................................................................................................................. 6
New BI Reporting Standard Reports .................................................................................................................................. 6 Update to User Progress Data View ................................................................................................................................... 6
NEW AND UPDATED WIDGETS................................................................................................................................... 7 New Search Widget............................................................................................................................................................ 7 Important Information About the Search Widget............................................................................................................ 14 New Skills Widget ............................................................................................................................................................ 14 Updates to Learning Plans and My Tasks Widgets ........................................................................................................... 22
UPDATED WORDING FOR RECURRING SKILLS .............................................................................................................. 26 SUPERVISOR ROLES ............................................................................................................................................... 27
New Supervisor Roles Control Panel Menu Option ......................................................................................................... 27 Default Supervisors Role .................................................................................................................................................. 28 Adding New Supervisor Roles .......................................................................................................................................... 30 Adding Supervisor Permissions to a Supervisor Role ....................................................................................................... 30 Adding Supervisors to Supervisor Roles ........................................................................................................................... 31 New Supervisor Permission Attribute Icon ...................................................................................................................... 33 Old Functionality Removed from Supervisor Accounts.................................................................................................... 34
LEARNCENTER COURSE PLAYER UPDATES ................................................................................................................... 36 Update to the SCORM Import/Course Properties Page ................................................................................................... 37 Updates to the Course Options Page ............................................................................................................................... 38 Enhancements to the Course Player ................................................................................................................................ 39 New Workflows Within a Course ..................................................................................................................................... 40 Smart Navigation ............................................................................................................................................................. 41 New Inline Messaging for Multiple Attempts and Expired Attempts .............................................................................. 42 Credits Page Redesigned for LearnCenter Course Player................................................................................................. 45 Course Feedback Page ..................................................................................................................................................... 45 Course Completion Page .................................................................................................................................................. 46 Support for Deep Linking ................................................................................................................................................. 47 New Prerequisite Page ..................................................................................................................................................... 47
ILT SESSIONS SELECTOR UPDATED ............................................................................................................................ 48

3
REVISION HISTORY
This document will continue to evolve as existing sections change and new information is added. All updates are logged below, with the most recent updates at the top.
Date What's Changed Notes 08 JUL 2016 Initial Document Creation

4
OVERVIEW
This guide outlines the information you need to know about new or improved functionality included in Releases 16B for Oracle Learn Cloud. Each section includes a brief description of the feature, the steps you need to take to enable or begin using the feature, any tips or considerations that you should keep in mind, and the resources available to help you.
IMPORTANT: Oracle Learn Cloud platform and general technology updates can affect complex or custom LearnCenter pages. If you are using a custom CSS file, it is important to verify your site CSS with each product release. Based on changes in the platform, there is a chance that you could see alignment or positioning issues after a release due to the custom CSS used on your site. Often any updates that your CSS requires are minor and easy to make. Contact Customer Support through My Oracle Support for any additional information.
For Licensing Information, please refer to My Oracle Support DOC ID 1461788.1.
For the latest information on browser support, please refer to the Oracle Learn Cloud System Requirements document; My Oracle Support DOC ID 1461788.1.

5
RELEASE FEATURE SUMMARY
Some of the new Release 16B features are automatically available to Users after the upgrade and some require action from the User, the company administrator, or Oracle.
The table below offers a quick view of the actions required to enable each of the Release 16B features.
Action Required to Enable Feature
Feature Automatically
Available
End User Action
Required
Administrator Action
Required
Oracle Service Request Required
BI Reporting Enhancements New BI Reporting Standard Reports Update to User Progress Data View New and Updated Widgets New Search Widget New Skills Widget Updates to Learning Plan and My Task Widgets Updated Wording for Recurring Skills Updated Wording for Add/Edit Skills Page Supervisor Roles New Supervisor Roles Control Panel Menu Option Default Supervisors Role Adding New Supervisor Roles Adding Supervisor Permissions to a Supervisor Role Adding Supervisors to Supervisor Roles New Supervisor Permission Attribute Icon Old Functionality Removed from Supervisor Accounts Enhanced LearnCenter Course Player Update to the SCORM Import/Course Properties Page
Updates to the Course Options Page Enhancements to the Course Player New Workflows Within a Course Smart Navigation New Inline Messaging for Multiple Attempts and Expired Attempt
Credits Page Redesigned for LearnCenter Course Player
Course Feedback Page Course Completion Page Support for Deep Linking New Prerequisites Page ILT Sessions Selector Updated ILT Sessions Selector Updated

6
BI REPORTING ENHANCEMENTS
NEW BI REPORTING STANDARD REPORTS
There are two new standard reports for BI Reporting:
• Oracle Skill Progress Report – This report returns data regarding the progress a User has made toward achieving a single Skill. This report includes information about the items mapped to the Skill.
• Oracle Skill Summary Report – This report returns data regarding the progress a User has made toward achieving one or more assigned Skills. This report does not include mapped item data.
New BI Reporting Reports
UPDATE TO USER PROGRESS DATA VIEW
The User Progress Data View has been updated so that it now includes Learning Plan status information. This means you can include Learning Plan completion information in your User Progress reports.
Refer to online help for information on Data Views and instructions for running BI Reporting reports.

7
NEW AND UPDATED WIDGETS
There are two new Widgets included with Release 16B for Oracle Learn Cloud:
• Search • Skills
Both have been added to the Select Widget Type drop-down list that displays when you click Add Widget on the Widgets page.
New Widgets in the Select Widget Type Drop-down List
Additionally, there have also been some updates to the following:
• My Tasks Widget • Learning Plans Widget
All of the updates are described in the sections below.
NEW SEARCH WIDGET
The new Search Widget employs the same powerful search engine already in use with the Search dynamic object, but with the updated look and feel of the Widget User Interface.
New Search Widget as it Appears to End Users
Link to the customizable Search Widget on any LearnCenter page so that Users can quickly find available training along with the delivery options. Users can search for, and quickly find their Courses, Classes, Learning Plans, ILT Sessions, Enrollments, Training Offerings, External Training, and other LearnCenter Users. A minimum of 2 characters is required to search. A wild card is assumed at the end of each word or phrase unless you use quotes (“ “) around each search string. Quotes return exact matches.

8
Refer to online help for additional instructions on using the LearnCenter search engine (TOC > Dynamic Objects > LearnCenter Dynamic Objects > LearnCenter Search).
Click Advanced Search to display the Advanced Search window. This window makes it easy to do Boolean-style searches.
Advanced Search Window Makes Boolean Search Style User Friendly
Everything you type in Include All of These (AND) is considered required. All words you type in this box should be separated with a space. Each space is considered as “And”.
Everything you type in Include At Least One Of These (Or) is considered an “Or” phrase. All words you type in this box should be separated with a space. Each space is considered as “Or”.
You can connect the two statements (fields) by selecting the ‘And Search’ check box. This means it will search for everything in the top box AND everything in the bottom box. (If you are familiar with Boolean search methodology, this field is the equivalent of surrounding the items in the keyword search field with parenthesis.)

9
A logical set of facets is provided with the search results so that Users can filter them efficiently.
Example of Search Results Showing Highlighted Search Terms
Notice in the example above that search terms found are highlighted. Use of highlighting can be controlled during the Widget setup.
Users can click the item title to view details, or click the launch icon on the right side of the results to open and begin an item.
Search results can be narrowed using the facets that appear on the left side of the page. Selecting multiple facets further narrows results, and selecting fewer facets widens the search results. You can clear all selected facets and start over by clicking .
Example of Facets that Display Based on Search Results

10
Selecting a facet check box includes its related items in the search results. For each selected Item Types or Categories check box, the page refreshes, and the results are cumulative. For example, a User might want to only include search results that are Learning Plans and Enrollments. Selecting the Learning Plans and Enrollments check boxes displays only Learning Plans and Enrollments in the search results. Users can narrow the results by:
• Item Type – the types that display depend on what is displayed in the results. Each Item Type also displays the number of items that came up in the results. You can indicate which item types you want to display in the Widget setup. Users can launch certain items directly from the search results. If the item in the results is a User, the icon displays in the details, and Users can click it to launch the Com System. (Refer to online help for information about using the Com System.)
• Categories – displays if there are items mapped to Categories. If you only want to display certain Categories of items, you can indicate this during Widget setup. You can also use Categories in conjunction with Access Filters so that you only display certain Categories of items to specific Users. For example, perhaps you only want your sales team search for items in the Sales Category. (Refer to online help for details on using Access Filters.)
• Average Rating – displays if the Ratings and Reviews feature is active for this LearnCenter. (Refer to online help for details on activating Ratings and Reviews.) Users can use this to limit the results to only those items with a minimum rating.
• Cost – applies to the eCommerce feature and displays cost ranges. This facet only displays if you have enabled it in the Widget setup and you have eCommerce activated for the LearnCenter. Note that the field in the results will display if costs are turned on for display even if eCommerce is not enabled. (Refer to online help for details on activating eCommerce.) The cost ranges are customizable when you set up the Widget. Using this facet, a User can select training that fits within a particular budget. If items have no cost, “N/A” displays in its search results.
NOTE: LearnCenter places items in a cost range facet when they are over the minimum, and equal to or less than maximum. For example, if the cost ranges are 25-50; 50-100, and an item costs 50, it is included in the 25 to 50 facet, not the 50 to 100 facet.
• Start Date – only applies to Enrollments, ILT Sessions, and External Training. Using this facet, Users can look for a training start date that fits their individual schedules.
• ILT Locations - only applies to ILT Sessions. Using this facet, Users can look for training that takes place in locations that are most convenient to them.
Users can further narrow the results by selecting the Enrollments with Seats Available check box. Selecting this item displays only those Enrollments that have seats remaining.
You can customize which facets display in the Widget Setup. See below for instructions.

11
As with other LearnCenter Widgets, you can set up the Search Widget using a tabbed Add or Edit window.
Illustration of the Details Tab for Edit Search Widget
On the Details tab, indicate the Name, Description, and Status of your Widget and click Save.
Use the Content tab to indicate the content you want to display to Users on the Widget.
Illustration of the Content Tab for Edit Search Widget
Select the check boxes for the Learning Types to include in Search. If you want to exclude certain types, clear the check boxes. You can also indicate which Categories of items you want to include in the results. By default, All Categories is selected. You can manually select categories if you only want Users to search for items mapped to certain Categories. For example, perhaps you only want new employees searching for items that are mapped to your On-boarding Category, or your sales personnel searching for items mapped to your Sales Category.

12
You can restrict Widgets for certain audiences by using Access Filters. Refer to online help for instructions on Access Filters.
Use the Filters tab to indicate which facets should appear on the search results page.
Illustration of the Filters Tab for Edit Search Widget
Select the check boxes for the facets you want to include under Filters for Search Results.
If you are using eCommerce, you may want to include price ranges under Cost Range Results. Select the Cost check box to display the Cost Range Results fields. Type a value in the Under box. By default, all remaining ranges double the previous number based on your initial amount (for example 25, 50, 100, 200). You can edit these numbers if you want.

13
Use the Display tab to customize the field labels and other aspects of the Widget fields.
Illustration of the Display Tab for Edit Search Widget
You can give the Widget Header a custom label. The default label is “Search”. You can indicate whether you want search terms in the results to be highlighted by selecting Highlight search words. You can customize the wording on field labels as you can with other Widgets (refer to online help for instructions). You can indicate which Enrollments, ILT Sessions, and External Training events you want to show up in the search results by selecting (including) or clearing (excluding) Past, Current, or Future. You can indicate whether you want Users to have access to the Advanced Search window by selecting or clearing the Display Advanced Search Options check box.
Click Save when you are finished making changes.

14
IMPORTANT INFORMATION ABOUT THE SEARCH WIDGET
The Search Widget has greater capabilities than the LearnCenter Search Dynamic Object, and these require that we update the indexing of your data. This indexing will be done over the weekend following the general availability (GA) of release 16B, and should be completed by Monday morning 6am EST.
WHAT DOES THIS MEAN TO ME?
After 16B is deployed, the new Search Widget will be available and functional. However, some of the new features described above will not be available until the indexing is completed:
• Search results returned for Training Offerings • Search results returned for External Training • New Facets
o Average review ratings o Costs (eCommerce Users only) o Start Date o ILT Locations o Enrollments with Seats Available.
NEW SKILLS WIDGET
The Skills Widget provides Users with access to their Skills inventory so that they can quickly identify their current and expiring Skills, as well as those that have been newly assigned. Users can also view details related to all of their Skills, including the tasks required to complete an assigned Skill, and the opportunities for applying earned and in-process Skills.

15
Example of the Skills Widget as it Appears to End Users
There is a mini dashboard at the top of the Widget that summarizes a User’s Skills inventory. It includes:
• Skills Total – the total number of Skills associated with the current User. • Assigned – the number of Skills assigned to the current User that are not yet acquired. • Acquired – the number of Skills for which the User completed all required mapped tasks. • Expired – the number of Skills that have expired and need to be re-acquired by completing
mapped items.
You can customize which of these items displays on the Widget during the Widget setup.

16
Beneath the dashboard there is a summary list of all Skills, and Users can sort the results either by Skill Name or Status.
You Can Allow End Users to Sort Skills by Name or Status
Users can also use Filters to further refine the result list. The sorts and filters are customizable during the Widget setup.
You Can Allow End Users to Filter by Name, Description, or Category
In the example above, the filter is set up so that Users can search by Name, Description, or Category keywords.

17
Users can click each Skill to view further details. Clicking a Skill Name opens another window for viewing the Skill details.
Additional Information Can Be Made Available to End Users
Users can see a list of related Items such as completed and incomplete tasks, and they can get details about where a particular Skill is used within your organization (Certification Tracks, Job Profiles, and Competencies).
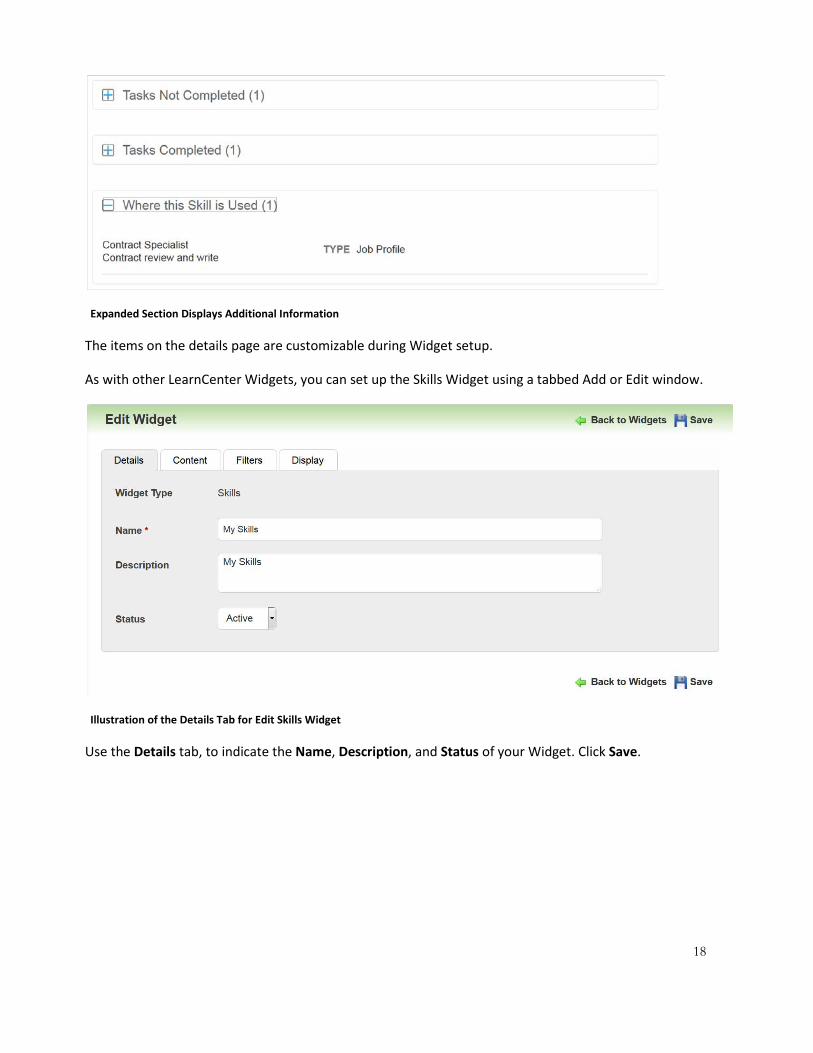
18
Expanded Section Displays Additional Information
The items on the details page are customizable during Widget setup.
As with other LearnCenter Widgets, you can set up the Skills Widget using a tabbed Add or Edit window.
Illustration of the Details Tab for Edit Skills Widget
Use the Details tab, to indicate the Name, Description, and Status of your Widget. Click Save.

19
Use the Content tab to indicate what items will make up your Widget.
Illustration of the Content Tab for Edit Skills Widget
Determine what displays in the Widget’s mini dashboard by selecting any of the following for Show Skills for Statuses:
• Acquired – the Skills a User has already acquired. • Assigned – the Skills a User has been assigned, but has not yet acquired. • Expired – the Skills a User has already acquired but which have expired and need to be re-
acquired.
Select any of the following for Show the Following Mapped Item Types for Acquiring and Using a Skill:
• Test Instances • Assignments • Courses

20
• Classes • Enrollments • Competencies • Certification Tracks • Job Profiles
You can also indicate which Categories of items you want to include. By default, All Categories is selected. You can manually select categories if you only want to include certain Categories.
Use the Filters tab to indicate what filters should be made available to assist Users in sorting the information that appears on the Widget.
Illustration of the Filters Tab for Edit Skills Widget
Select any of the following for Mini Dashboard:
• Total Skills - the total number of Skills associated with the User. • Acquired – the number of Skills the Users has acquired. • Assigned – the number of Skills assigned, but not yet acquired by the User. • Expired – the number of Skills that are expired.
From the drop-down list, select which of these will be set as the Default Filter for the page.
You can select which Filters for Skills is available for Users:
• Name • Description • Category

21
You may also indicate that you want to Only Show Skills with CE Credits (continuing education credits). By default, this check box is cleared (so that all Skills show, not just those with continuing education credits).
Use the Display tab to indicate what items display on the Widget.
Illustration of the Display Tab for Edit Skills Widget

22
Use the Display tab to customize the field labels and other aspects of the Widget details page. You can:
• Give the Widget Header a custom label. By default, the label is “My Skills”. • Specify whether you want to Display Mini Dashboard, and designate the Default Sort Order
of the items on the page. • Select the initial Widget view: Card or List. • Indicate which fields will display for Display for Skills Summary and Display for Skills
Details. • Customize the wording of field labels (refer to online help for instructions). • Indicate whether you want Tasks and Display Where Skill Is Used to display on the item
detail pages.
Click Save when you are finished making changes.
UPDATES TO LEARNING PLANS AND MY TASKS WIDGETS
There are a number of changes to existing Widgets included with this release.
You can now control whether the Percent Complete column (in the List View) or field (in the Card View) displays for Learning Plan and My Tasks Widgets by using the new Percent Complete List View check box on the Display tab of either Widget’s setup window.
New Ability to Display or Hide Percent Completed
Select the check box to display the column. Clear the check box to hide it. You might decide to hide Percent Complete if you want to refine the List View page layout, or because Percent Complete only applies to certain item types. Below is an example of a Learning Plan Widget in List View with the Percent Complete column hidden.

23
Illustration of Widget with No Percent Complete Column
You can now launch Courses and Classes from the summary list of both Learning Plan and My Tasks Widgets.
End Users Can Open Courses and Classes from the Details Page
Previously, you had to access Courses and Classes from the Courses or Classes details pages on the Learning Plan Widget, or a drop-down list on the My Tasks Widget.

24
In the My Tasks Widget, Enrollments now display the associated events. (This is optional and can be indicated on the Display tab during Widget setup.) Previously, only Assignments and Test Instances displayed associated events. Below is an example of a My Tasks Widget showing an Enrollment and its associated event type (ILT SESSION) and the event name (Sales Kickoff 2017 July).
Example of an Associated Event Type and Event Name
The associated event label is not limited to ILT Sessions. Other event types can display here. For example, an associated Class would be labeled as CLASS, followed by the actual Class name. A Test Instance would be labeled as TEST INTANCE, followed by the Test Instance name. In all cases, the event name is clickable, and opens a detail page for the associated event.
Also new for 16B, when Users select the associated event name to view details for an associated ILT SESSION, they can now view ILT Session addresses.

25
Address Information Now Displays to Users on ILT Session Detail Pages
Previously, only the Location/Room name displayed on this page.

26
UPDATED WORDING FOR RECURRING SKILLS
An update has been made to the wording in the Recurrence Pattern section of the Add Skill and Edit Skill pages (accessible from the Control Panel > Advanced Learning > Skills). When Monthly is selected, the Day_ of every _ option was changed to read as “Day_ of every_month(s)”.
Day Option Label has Been Modified
Refer to online help for complete instructions on adding or editing recurring Skills.

27
SUPERVISOR ROLES
With Release 16B for Oracle Learn Cloud we are introducing a new feature called Supervisor Roles. Similar to User Roles, Supervisor Roles enable Administrators to easily manage permissions for multiple Supervisors in one place. Previously, you could only update Supervisor Permissions one Supervisor at a time. Adding Supervisors to Supervisor Roles that have pre-defined permissions reduces the administrative overhead of managing permissions individually for each Supervisor. The Supervisor Roles feature includes the following:
• New Supervisor Roles menu option on the Users Control Panel menu • Default Supervisor Role to which all new Supervisors are added • Ability to create as many Supervisor Roles as needed • Ability to map Supervisors to multiple Supervisor Roles • All current and any future My Team Supervisor Permissions
In addition, a change was made to the Supervisor Permissions page. All of these items are detailed in the following sections.
NEW SUPERVISOR ROLES CONTROL PANEL MENU OPTION
There is a new Supervisor Roles menu option under Users on the Control Panel.
New Menu Option on the Control Panel

28
Click it to open the new Supervisor Roles page.
New Supervisor Roles Page
On this page you can add new Supervisor Roles, view and add Supervisors to a Supervisor Role ( ), edit the details of a Supervisor Role ( ), and view and change the Supervisor Permissions associated
with a Supervisor Role ( ). You can also change the Status of a Supervisor Role.
Refer to online help for instructions on changing the status of items.
DEFAULT SUPERVISORS ROLE
There is one default role called “Supervisors*”. All newly created Supervisors are automatically assigned to the Default Supervisors Role. Unlike the User Roles feature, you can remove Users from the default Supervisor Role.
All Supervisors who are added after the release of 16B are automatically assigned to the Default Supervisors Role. However, all Users who were Supervisors prior to Release 16B are not automatically added to the Default Supervisors Role. You can manually add pre-existing Supervisors to the default Supervisor Role if you choose, but it is not required.
IMPORTANT: If you have an extremely large number of Supervisors, or if you paid for a custom integration, and you want to add pre-existing Supervisors to the Default Supervisors Role, you are urged to work with Oracle Consulting Services before making any adjustments. Contact your Oracle Learn Cloud Account Manager for further details.

29
NOTE: You cannot edit the details for the Default Supervisors Role, and you cannot change its Status to Inactive.
Click to view or change the permissions of the Default Supervisors Role. The Supervisor Role Permissions page opens.
New Supervisor Role Permissions
The Default Supervisor Role is pre-populated with some commonly-granted Supervisor permissions. This was done to save you time, and to provide you with a starting guideline, but you can change the selections to suit your business needs.
All of the Supervisor Permissions are the same as those available on the pre-existing Supervisor Account Permissions page. On the Supervisor Account Permissions page, the permissions are granted to Supervisors individually. With Supervisor Roles, you grant a set of permissions to every Supervisor who is mapped to a Supervisor Role.

30
ADDING NEW SUPERVISOR ROLES
You can add as many Supervisor Roles as you want. On the Supervisor Roles page, click Add Supervisor Role.
New Add Supervisor Role Page
Type a Name and Description for the Supervisor Role. Select the Active check box if you want to make the Supervisor Role active and available for use (default), or clear the check box to make it Inactive until you are ready to use it. Click Save. Once saved, you can then add Supervisor Permissions and Supervisors to the Supervisor Role.
ADDING SUPERVISOR PERMISSIONS TO A SUPERVISOR ROLE
You can add specific Supervisor Permissions to individual Supervisor Roles to allow different sets of permissions to be granted to different types of Supervisors.
On the Supervisor Roles page, click next to the appropriate Supervisor Role. The Supervisor Role Permissions page opens.

31
Supervisors Mapped to Roles Are Granted that Role’s Permissions
Select the check boxes next to the top level permissions you want to include in the Supervisor Role (or clear the checkboxes to remove them from the Role). If you only want to include or exclude certain sub-permissions, click to expand the list, and then select or clear the appropriate sub-permission check boxes. Click Save when you are finished. The permission settings are applied to all Supervisors who are mapped to that Supervisors Role.
ADDING SUPERVISORS TO SUPERVISOR ROLES
By default, all newly created Supervisors are mapped to the default Supervisor Role, but you can add them to other Supervisor Roles that you have created. On the Supervisor Roles page, click next to a Supervisor Role. The View Supervisors Mapped to Role window opens.

32
You Can Add Supervisors to as Many Roles as Necessary
Click Add Supervisors. The Supervisor Selector window opens.
Supervisor Selector Window
Use the Find field to search for the Supervisors you want to include. When you click Search, a list of Supervisors matching the search criteria displays.
NOTE: Only Users who have already been made Supervisors on the Supervisor Accounts page can appear in the search results. Refer to online help for instructions on adding new Supervisors.

33
Select the Supervisors You Want to Map to the Role
Select the check boxes next to the Supervisors you want, and then click Return Selected. The Supervisors are now assigned to the Supervisor Role.
NOTE: When you remove Users from Supervisor Accounts, those Users are automatically removed from any Supervisor Roles to which they were mapped. If you later make a User a Supervisor again, they are only added to the default Supervisor Role. You will have to manually add them to any other Supervisor Roles to which you want them to belong.
NEW SUPERVISOR PERMISSION ATTRIBUTE ICON
Supervisors can be assigned to more than one Supervisor Role, and the permissions they are granted within each Supervisor Role are cumulative (they do not override each other). Supervisors may also have permissions that they have been granted at the individual Supervisor Account level. A new icon was added to the Supervisor Account Permissions page to help you to quickly gain insight into how a Supervisor gained permissions.

34
Attribution Window Makes it Easy to See Where a Supervisor’s Permissions Came From
Clicking the icon next to the permission opens the Attribution window which lists the sources from which the listed permissions were granted to the Supervisor. In the example above, the icon was clicked next to Manage Assignments. The resulting Attribution window shows that the Supervisor was granted the Manage Assignments permission from both the default Supervisor Role and the Mentor Role. Notice that the permission check boxes are not selectable (they are grayed out) when they have been granted via an assigned Supervisor Role.
OLD FUNCTIONALITY REMOVED FROM SUPERVISOR ACCOUNTS
Previously, on the Supervisor Account Users page, there was an option for a Supervisor to change any of his or her mapped Users’ User Permissions. The ability to do this has been removed due to conflicts with Role-based security.

35
Illustration of How this Page Used to Look
The icon and its functionality have been removed from this page. Notice that the icon is not displayed in the illustration of the updated page below.
Illustration of the Updated Page

36
LEARNCENTER COURSE PLAYER UPDATES
With Release 16B for Oracle Learn Cloud, LearnCenter Course Player includes more functionality, and the BETA designation has been removed. You may recall that LearnCenter Course Player differs from the Classic Course Player in that it works exclusively with the LearnCenter Widgets. The LearnCenter Course Player is part of the overall Learn mobile strategy, and supports next-generation HTML5 content that uses “responsive design.” Responsive design enables the player to scale to an appropriate size based on the viewing area of the device being used (a PC monitor, laptop, tablet, or phone). This gives Users the flexibility to complete training anywhere.
Example of a Course Launched from a Mobile Device
The LearnCenter Course Player launches single SCO, SCORM 1.2 content from Widgets.
AICC, LearnCenter WYSIWYG Courses, or SCORM 2004 Classes will continue to use the Classic Course Player.
In addition to the previously-released BETA functionality, the LearnCenter Course Player now includes the following:

37
• Complete Course player user interface / user experience • Launches single SCO, SCORM 1.2 Courses embedded in a Widget
o Modern inline Course play from the Widgets o Full page content views
• Ability to launch via deep link to Courses • Support for Course Player workflows
o WBT multiple attempts o Expired attempts o Expired completions o Electronic Signatures o Pre-test Assessments and Post-test Assessments o Post Course surveys o Feedback forms
• Flexible configuration via the SCORM Import or Course Properties page.
This What’s New document details the changes for this feature since its initial BETA release in version 15C. Refer to online help (TOC > LearnCenter Designer > LearnCenter Course Player) for additional information about the LearnCenter Course Player.
UPDATE TO THE SCORM IMPORT/COURSE PROPERTIES PAGE
New fields have been added to the Course Properties page. This page is accessible when you import a SCORM Course, or when you update the Course Properties for an individual SCO (via the Courses Control Panel menu > Courses > Select Courses > filter for individual SCOs and the click the appropriate SCO’s properties icon ).
All settings made to properties for a SCORM Course with regard to the new LearnCenter Course Player are independent of those for the Classic Course Player, and are labeled with “LearnCenter Course Player”.
There are new LearnCenter Course Player fields in the More Information section of the Course Properties page.

38
New Settings for the LearnCenter Course Player
You can use these fields to change certain properties of the LearnCenter Course Player Courses. With the Classic Course player, you had to either re-import a Course or go into HTML mode to access similar settings.
• LearnCenter Course Player Show Navigation Bar – select Inherited, Yes, or No from the drop-down list. Indicates whether you want the navigation bar to display to Users.
• LearnCenter Course Player Show Navigation Buttons - select Inherited, Yes, or No from the drop-down list. Indicates whether you want the navigation buttons to display to Users.
• LearnCenter Course Player Width in Pixels (Widget) – is always 100% because it launches from a Widget. This field is display only.
• LearnCenter Course Player Height in Pixels (Widget) - enter the height of the player as it will launch from the LearnCenter Widget.
UPDATES TO THE COURSE OPTIONS PAGE
Additional fields were added to LearnCenter Player section of the Course Options page. The word “BETA” has been removed from the section header.

39
New LearnCenter Course Options
Use the new fields to indicate how navigation will behave in your LearnCenter Player Courses.
• Show Navigation Bar – select Yes, No, or Inherited from the drop-down list. • Show Navigation Buttons - select Yes, No, or Inherited from the drop-down list.
What you set here indicates how all LearnCenter Course Player Courses behave. However, you can give individual Courses their own settings on the Course Properties page.
ENHANCEMENTS TO THE COURSE PLAYER
Additional enhancements have been made to the LearnCenter Course Player user experience and user interface.
As noted in the Widget Enhancements section of this What’s New document, Users can now launch Courses and Classes from the summary list of both Learning Plan and My Tasks Widgets. Previously, you had to access Courses and Classes from the Courses or Classes details pages on the Learning Plan Widget, or from a drop-down list on the My Tasks Widget.
40
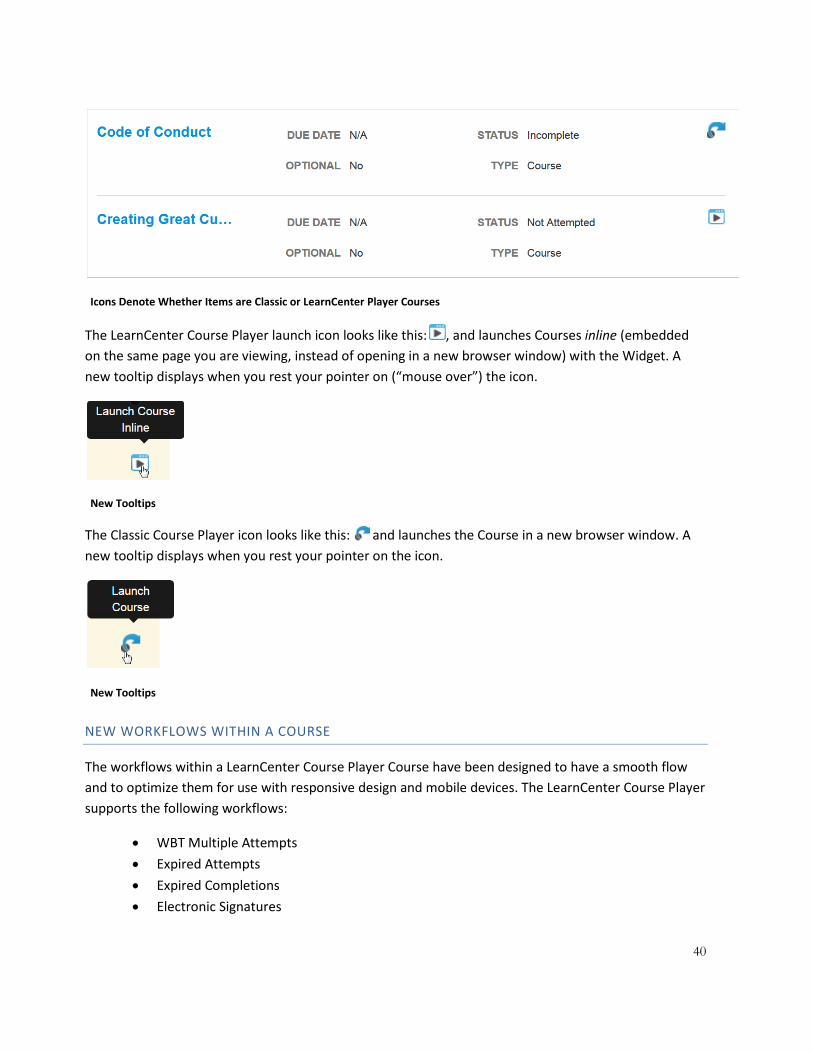
Icons Denote Whether Items are Classic or LearnCenter Player Courses
The LearnCenter Course Player launch icon looks like this: , and launches Courses inline (embedded on the same page you are viewing, instead of opening in a new browser window) with the Widget. A new tooltip displays when you rest your pointer on (“mouse over”) the icon.
New Tooltips
The Classic Course Player icon looks like this: and launches the Course in a new browser window. A new tooltip displays when you rest your pointer on the icon.
New Tooltips
NEW WORKFLOWS WITHIN A COURSE
The workflows within a LearnCenter Course Player Course have been designed to have a smooth flow and to optimize them for use with responsive design and mobile devices. The LearnCenter Course Player supports the following workflows:
• WBT Multiple Attempts • Expired Attempts • Expired Completions • Electronic Signatures

41
• Pre-test Assessments • Post-test Assessments • Post Course Surveys • Feedback Forms
Nearly everything is embedded and displayed inline. For example, Electronic Signatures associated with a Course are embedded directly on the page. Once completed and closed, the next page opens automatically within the player.
Pre-tests, Post-tests, Surveys and Certificates will open in new browser tabs (and not inline), because they are launched using the classic user interface.
SMART NAVIGATION
The LearnCenter Course Player navigation has been designed to make navigating through a Course intuitive. For example, Next and Back buttons only display on the player when they are relevant. This prevents Users from clicking navigation buttons on the player instead of within a Course.
Course Buttons and Course Player Buttons
The LearnCenter Course Player also forces Users to complete required steps (such as completing an Electronic Signature or Assessment) before they can click Next. The Course Player buttons are:
• - Next • - Back
• - Expand to Full Page View
• - Exit Full Screen View
• - Close Course
• - Open Course
Buttons also only appear where they make sense. For example, the Next button does not display on the player if the User can no longer move forward. The Back button does not display on the player until a User has moved past the first required page.

42
Now, no matter how Users exit a Course (whether they clicked the LearnCenter Course Player’s Back, Close, or they used breadcrumbs) the Course is closed and progress is recorded.
IMPORTANT: Closing a browser window instead of closing the LearnCenter Course Player to exit a Course does not necessarily mean that a User’s Course progress is fully recorded. LearnCenter performs background incremental saves, however there is never a guarantee that the User’s last action was recorded before he or she closes a browser window. There is no warning message to alert Users to this.
NEW INLINE MESSAGING FOR MULTIPLE ATTEMPTS AND EXPIRED ATTEMPTS
There is new messaging that appears on inline on Course pages. This means it appears directly on a Course page, and not as a pop-up message. This messaging is mainly used for Multiple Attempts and Expired Attempts. It can tell Users that they have already taken a Course, and whether they can retake or preview a Course. The messaging that displays depends on whether Multiple Attempts is active, and whether the Allow Course Preview check box is selected on the Course Options page. The following are some examples of the various messages Users may encounter based on settings for these two items.
In the example below, Multiple Attempts is active, and the Allow Course Preview check box is selected on the Course Options page. The messaging tells Users that they can either start a New Attempt, or look at the previous attempt in Preview mode.
Smart Course Messaging
Preview Mode enables Users to go through the workflow steps of a Course, but they cannot change any of the answers to questions, and a new attempt is not recorded in their training history.

43
If Multiple Attempts is active, but the Allow Course Preview check box is not selected on the Course Options page, the messaging tells Users that they can retake a completed Course, but there is no link to let them preview their previous attempt.
Smart Course Messaging
When Multiple Attempts is not active, and the Allow Course Preview check box is selected on the Course Options page, Users can only preview their previous attempt.
Smart Course Messaging

44
If Multiple Attempts is not active, and the Allow Course Previews check box is not selected on the Course Options page, different messaging displays. Users are advised that they have already taken a Course and the only available option is to close the Course.
Smart Course Messaging
Notice that in all cases, the User is shown the Start Date and Completed Date for the previous attempt on the Course page.
Another example of the inline messaging appears when Users have already completed Electronic Signatures.
Messaging for Electronic Signatures

45
CREDITS PAGE REDESIGNED FOR LEARNCENTER COURSE PLAYER
If there are any associated Credits with a Course, they are displayed upon completion of the Course in a new Credits page.
Redesigned Credits Page
Notice that the User in this example is given an option to select which Credit he wants. Previously achieved credits also display to Users, as do icons that allow Users to view and print their certificates.
COURSE FEEDBACK PAGE
If there are feedback forms, they appear in the Course workflow on a new feedback page.

46
Course Feedback Form
Users can record their feedback and click Save.
COURSE COMPLETION PAGE
A Course Completion page tells Users that it is now safe to close the Course and record the information as complete.
Messaging Indicates When Course Can Be Safely Closed

47
SUPPORT FOR DEEP LINKING
Deep linking is fully supported with the LearnCenter Course Player. This means you can put a link to a Course in an email message, on your Intranet, or other appropriate location and Users can click it to link directly to a Course in your LearnCenter. Additional details will be available in online help upon general availability (GA) of 16B.
If you are using the LearnCenter Product SSO functionality, Users would not have to log in to LearnCenter. (With other SSO setups, there is no guarantee as to whether Users would have to log in to LearnCenter.)
Refer to online help for information about deep linking.
NEW PREREQUISITE PAGE
If a Course has Prerequisites and Users have not yet completed them, they are first presented with a Prerequisites page when they click a URL to deep link to a Course.
New Prerequisites Page
There are no links to the Prerequisites on this page. Users must navigate to the Courses on the appropriate Course page to locate the links. They must complete Prerequisites first before they can attempt the Course from the Deep Link.
Refer to online help for information about Prerequisites.

48
ILT SESSIONS SELECTOR UPDATED
The ILT Sessions Selector page, which opens when you click ILT Sessions on the Survey Details page (Control Panel > Assessment/Surveys > Surveys > Add Survey), has been updated to use our standard user interface.
There is now a Filters section, paging buttons, and selectable option buttons that make it easy to search for and select the ILT Session you want to add to a Survey.
---

49
Copyright © 2016, Oracle and/or its affiliates. All rights reserved.
This document is provided for information purposes only, and the contents hereof are subject to change without notice. This document is not warranted to be error-free, nor subject to any other warranties or conditions, whether expressed orally or implied in law, including implied warranties and conditions of merchantability or fitness for a particular purpose. We specifically disclaim any liability with respect to this document, and no contractual obligations are formed either directly or indirectly by this document. This document may not be reproduced or transmitted in any form or by any means, electronic or mechanical, for any purpose, without our prior written permission.
Oracle and Java are registered trademarks of Oracle and/or its affiliates. Other names may be trademarks of their respective owners.
Intel and Intel Xeon are trademarks or registered trademarks of Intel Corporation. All SPARC trademarks are used under license and are trademarks or registered trademarks of SPARC International, Inc. AMD, Opteron, the AMD logo, and the AMD Opteron logo are trademarks or registered trademarks of Advanced Micro Devices. UNIX is a registered trademark of The Open Group.