Embed Size (px)
Citation preview

Oracle Labor Distribution
User’s Guide
Release 11i
December, 2001
Part Number: A85309-02

Oracle Labor Distribution User’s Guide, Release 11i
Part Number: A85309-02
Copyright © 1998, 2001, Oracle Corporation. All rights reserved.
Primary Author: Chris Davila, Ann Kuchins
Contributors: Christopher Andrews, Alagappan Arunachalam, Ves Bennett, Mary Brilliant, MohanChalagalla, Venkat Chamakura, Ravindra Cheruvu, Vijay Cirigiri, Joanna Crimmins, ChellappaDhanukodi, Kathleen Essig, Sonia Fuga, Rashmi Goyal, Neerav Handa, Richard Ho, William Hollowsky,Robin Inglis-Arkell, Prashant Kalia, Chandra Kalyana, Cynthia Kibbe, Ritesh Kumar, Carol AnnLapeyrouse, Simon Lee, Yi-Lu Liou, Julianna Litwin, Melinda Razon, Laura Soule, Jason McKnight,Subbarao Padmanabhuni, Abhijit Prasad, Bijoy Sarkar, Mollie Smilie, Subha Ramachandran, Lee-LinThye
The Programs (which include both the software and documentation) contain proprietary information ofOracle Corporation; they are provided under a license agreement containing restrictions on use anddisclosure and are also protected by copyright, patent and other intellectual and industrial propertylaws. Reverse engineering, disassembly or decompilation of the Programs, except to the extent requiredto obtain interoperability with other independently created software or as specified by law, is prohibited.
Program Documentation is licensed for use solely to support the deployment of the Programs and notfor any other purpose.
The information contained in this document is subject to change without notice. If you find any problemsin the documentation, please report them to us in writing. Oracle Corporation does not warrant that thisdocument is error-free. Except as may be expressly permitted in your license agreement for thesePrograms, no part of these Programs may be reproduced or transmitted in any form or by any means,electronic or mechanical, for any purpose, without the express written permission of Oracle Corporation.
If the Programs are delivered to the U.S. Government or anyone licensing or using the programs onbehalf of the U.S. Government, the following notice is applicable:
Restricted Rights Notice Programs delivered subject to the DOD FAR Supplement are "commercialcomputer software" and use, duplication and disclosure of the Programs including documentation, shallbe subject to the licensing restrictions set forth in the applicable Oracle license agreement. Otherwise,Programs delivered subject to the Federal Acquisition Regulations are "restricted computer software"and use, duplication and disclosure of the Programs shall be subject to the restrictions in FAR 52.227-19,Commercial Computer Software - Restricted Rights (June, 1987). Oracle Corporation, 500 OracleParkway, Redwood City, CA 94065.
The Programs are not intended for use in any nuclear, aviation, mass transit, medical, or other inherentlydangerous applications. It shall be licensee's responsibility to take all appropriate fail-safe, back up,redundancy and other measures to ensure the safe use of such applications if the Programs are used forsuch purposes, and Oracle disclaims liability for any damages caused by such use of the Programs.
Oracle is a registered trademark, and Enabling the Information Age, OracleMetaLink, Oracle Store, andSQL*Plus are trademarks or registered trademarks of Oracle Corporation. Other names may betrademarks of their respective owners.

Contents
Send Us Your Comments ............................................................................................................... xxv
Preface....................................................................................................................................................... xxvii
Audience for this Guide ................................................................................................................. xxviiiConventions ........................................................................................................................................ xxix
Special Conventions .................................................................................................................... xxixUsage Conventions....................................................................................................................... xxxReferences ...................................................................................................................................... xxx
Documentation Accessibility .......................................................................................................... xxxiOther Information Sources ............................................................................................................. xxxii
Online Documentation............................................................................................................... xxxiiRelated User’s Guides................................................................................................................ xxxiiGuides Related to All Products ............................................................................................... xxxiiiUser’s Guides Related to This Product................................................................................... xxxiiiInstallation and System Administration ................................................................................ xxxiiiOther Implementation Documentation................................................................................... xxxv
Training and Support ..................................................................................................................... xxxviiTraining...................................................................................................................................... xxxviiSupport....................................................................................................................................... xxxvii
Do Not Use Database Tools to Modify Oracle Applications Data....................................... xxxviiiAbout Oracle..................................................................................................................................... xxxixDocumentation Sales ............................................................................................................................ xlFeedback ................................................................................................................................................. xli
iii

1 Product Overview
Definition.............................................................................................................................................. 1-2Overview............................................................................................................................................... 1-2
Create and Maintain Labor Distribution Schedules ................................................................ 1-3Distribute Pay Amounts .............................................................................................................. 1-4Provide Interfaces to Other Payroll and Timecard Systems................................................... 1-4Distribution Adjustments ............................................................................................................ 1-4Create and Certify Effort Reports............................................................................................... 1-4Labor Encumbrances.................................................................................................................... 1-4Auto-Population of Expenditure Type and Natural Account ............................................... 1-5Reconciliation Reports ................................................................................................................. 1-5Scheduling and Distribution Reports ........................................................................................ 1-5Multiple Organization Compliance ........................................................................................... 1-5Summarize and Transfer Adjustments...................................................................................... 1-6Rollback of Labor Distribution Processes ................................................................................. 1-6Recovery Processes....................................................................................................................... 1-6Enhanced Workflow..................................................................................................................... 1-6Security........................................................................................................................................... 1-7Integration with Oracle Public Sector Budgeting .................................................................... 1-7Printing Options............................................................................................................................ 1-7
New Features in Labor Distribution ............................................................................................... 1-8
2 Introduction
Overview............................................................................................................................................... 2-2Setting Up Oracle Labor Distribution........................................................................................ 2-2Labor Scheduling .......................................................................................................................... 2-3Payroll Interface ............................................................................................................................ 2-3Non-Oracle Payroll Interface ...................................................................................................... 2-4Distribution Adjustments ............................................................................................................ 2-4Labor Encumbrance...................................................................................................................... 2-4Effort Reporting ............................................................................................................................ 2-5Reports............................................................................................................................................ 2-5Reconciliation and Control.......................................................................................................... 2-5Topical Essays ............................................................................................................................... 2-5Reference ........................................................................................................................................ 2-6
iv

Setting Up Oracle Labor Distribution ............................................................................................ 2-7Oracle Labor Distribution Setup Overview.............................................................................. 2-7Oracle Applications System Administration Setup................................................................. 2-7Labor Scheduling Setup............................................................................................................... 2-7Effort Reporting Setup ................................................................................................................. 2-8Labor Encumbrance Setup .......................................................................................................... 2-8Expenditure Type and Natural Account Auto-Population Setup......................................... 2-8
Labor Scheduling.............................................................................................................................. 2-10Labor Scheduling Procedures................................................................................................... 2-10
Payroll Interface ................................................................................................................................ 2-11Import Payroll Transactions Procedures................................................................................. 2-11Create Distribution Lines Procedures ..................................................................................... 2-11Summarize and Transfer Payroll Distributions Procedures ................................................ 2-11Archive and Retrieve Distributions History Procedures...................................................... 2-12
Non-Oracle Payroll Interface.......................................................................................................... 2-13Non-Oracle Payroll Interface Procedures ............................................................................... 2-13Pre-generated Distribution Lines Interface Procedures........................................................ 2-13
Distribution Adjustments ............................................................................................................... 2-14Distribution Adjustments Procedures..................................................................................... 2-14
Labor Encumbrances ........................................................................................................................ 2-15Labor Encumbrance Processes and Reports Procedures ...................................................... 2-15
Effort Reporting ................................................................................................................................ 2-16Effort Reporting Procedures ..................................................................................................... 2-16
Reports ................................................................................................................................................ 2-17Reports Procedures .................................................................................................................... 2-17
Reconciliation and Control ............................................................................................................. 2-18Reconciliation and Control Procedures................................................................................... 2-18
Topical Essays .................................................................................................................................... 2-19Oracle Labor Distribution Process ........................................................................................... 2-19Scheduling Hierarchy Process .................................................................................................. 2-19Labor Encumbrance Process ..................................................................................................... 2-19Data Entry Validations Process ................................................................................................ 2-19Effort Calculation Process ......................................................................................................... 2-20Effort Report Notification Workflow Process ........................................................................ 2-20Distribution Adjustments Approval Notification Workflow Process ................................ 2-20
v
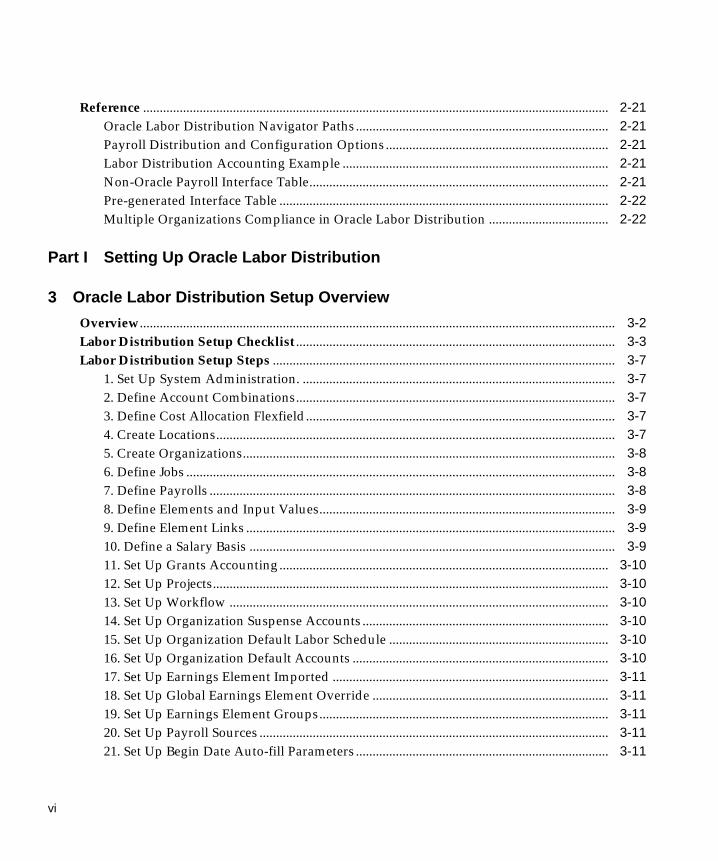
Reference ............................................................................................................................................ 2-21Oracle Labor Distribution Navigator Paths............................................................................ 2-21Payroll Distribution and Configuration Options................................................................... 2-21Labor Distribution Accounting Example ................................................................................ 2-21Non-Oracle Payroll Interface Table.......................................................................................... 2-21Pre-generated Interface Table ................................................................................................... 2-22Multiple Organizations Compliance in Oracle Labor Distribution .................................... 2-22
Part I Setting Up Oracle Labor Distribution
3 Oracle Labor Distribution Setup Overview
Overview............................................................................................................................................... 3-2Labor Distribution Setup Checklist ................................................................................................ 3-3Labor Distribution Setup Steps ....................................................................................................... 3-7
1. Set Up System Administration. .............................................................................................. 3-72. Define Account Combinations................................................................................................ 3-73. Define Cost Allocation Flexfield............................................................................................. 3-74. Create Locations........................................................................................................................ 3-75. Create Organizations................................................................................................................ 3-86. Define Jobs ................................................................................................................................. 3-87. Define Payrolls .......................................................................................................................... 3-88. Define Elements and Input Values......................................................................................... 3-99. Define Element Links ............................................................................................................... 3-910. Define a Salary Basis .............................................................................................................. 3-911. Set Up Grants Accounting................................................................................................... 3-1012. Set Up Projects....................................................................................................................... 3-1013. Set Up Workflow .................................................................................................................. 3-1014. Set Up Organization Suspense Accounts .......................................................................... 3-1015. Set Up Organization Default Labor Schedule .................................................................. 3-1016. Set Up Organization Default Accounts ............................................................................. 3-1017. Set Up Earnings Element Imported ................................................................................... 3-1118. Set Up Global Earnings Element Override ....................................................................... 3-1119. Set Up Earnings Element Groups....................................................................................... 3-1120. Set Up Payroll Sources ......................................................................................................... 3-1121. Set Up Begin Date Auto-fill Parameters ............................................................................ 3-11
vi

22. Set Up End Date Auto-fill Parameters............................................................................... 3-1123. Set Up Clearing Account ..................................................................................................... 3-1124. Set Up Effort Report Periods............................................................................................... 3-1225. Set Up Earnings Elements Included in Effort Reports .................................................... 3-1226. Modify Text Message on Effort Report ............................................................................. 3-1227. Create Users........................................................................................................................... 3-1228. Set Up Encumbrance Payroll and Assignment Selection ............................................... 3-1229. Set Up Default Encumbrance Period Definition for Organization................................ 3-1230. Set Up Encumbrance Earnings Element Selection........................................................... 3-1231. Set Up Payroll Effective Date Selection............................................................................. 3-1332. Setting Up Encumbrance Summarize and Transfer ........................................................ 3-1333. Set Up Lookup Tables .......................................................................................................... 3-1334. Define Expenditure Type Auto-Population Rules........................................................... 3-1335. Define Natural Account Auto-Population Rules............................................................. 3-1336. Set Up By-Pass Table............................................................................................................ 3-1337. Set Up Autopop Segment .................................................................................................... 3-14
4 System Administration Setup
Overview .............................................................................................................................................. 4-2System Administration Setup Checklist........................................................................................ 4-3System Administration Setup Steps ............................................................................................... 4-4
Step 6. Specify Site-Level and Responsibility-Level Profile Options.................................... 4-4
5 Labor Scheduling Setup
Definition ............................................................................................................................................. 5-3Overview .............................................................................................................................................. 5-3
Process............................................................................................................................................ 5-3Setting Up Organization Suspense Accounts Procedure............................................................ 5-8
Entering a General Ledger Accounting Flexfield .................................................................... 5-8Entering a Grants Accounting or Projects Instruction ............................................................ 5-9
Organization Suspense Accounts Window ................................................................................. 5-10Organization Suspense Accounts Window Description........................................................... 5-11Setting Up Organization Default Labor Schedule Procedure ................................................. 5-12
Entering a General Ledger Accounting Flexfield .................................................................. 5-12Entering a Grants Accounting or Projects Charging Instruction......................................... 5-13
vii

Organization Default Labor Schedule Window ......................................................................... 5-14Organization Default Labor Schedule Window Description................................................... 5-15Setting Up Organization Default Accounts Procedure ............................................................. 5-16
Entering a General Ledger Accounting Flexfield................................................................... 5-16Entering a Grants Accounting or Projects Instruction .......................................................... 5-17
Organization Default Accounts Window..................................................................................... 5-18Organization Default Accounts Window Description .............................................................. 5-19Setting Up Earnings Elements Imported Procedure .................................................................. 5-20Earnings Element Imported Window ........................................................................................... 5-21Earnings Element Imported Window Description ..................................................................... 5-22Setting Up Global Earnings Element Override Procedure ....................................................... 5-23
Entering a General Ledger Accounting Flexfield................................................................... 5-23Entering a Grants Accounting or Projects Instruction .......................................................... 5-24
Global Earnings Element Override Window .............................................................................. 5-25Global Earnings Element Override Window Description ........................................................ 5-26Setting Up Earnings Element Groups Procedure ....................................................................... 5-27Earnings Element Groups Window............................................................................................... 5-28Earnings Element Groups Window Description ........................................................................ 5-29Setting Up Payroll Sources Procedure .......................................................................................... 5-30Payroll Sources Window.................................................................................................................. 5-31Payroll Sources Window Description ........................................................................................... 5-32Setting Up Begin Date Auto-fill Parameters Procedure ............................................................ 5-33Begin Date Auto-fill Parameters Window.................................................................................... 5-34Begin Date Auto-fill Parameters Window Description ............................................................. 5-36Setting Up End Date Auto-fill Parameters Procedure................................................................ 5-37End Date Auto-fill Parameters Window ....................................................................................... 5-38End Date Auto-fill Parameters Window Description................................................................. 5-40Setting Up Clearing Account Procedure....................................................................................... 5-41Clearing Account Setup Window .................................................................................................. 5-42Clearing Account Setup Window Description............................................................................ 5-43
6 Effort Reporting Setup
Definition.............................................................................................................................................. 6-2Overview............................................................................................................................................... 6-2
Process ............................................................................................................................................ 6-2
viii

Setting Up Effort Report Periods Procedure ................................................................................. 6-4Effort Report Periods Window ......................................................................................................... 6-5Effort Report Periods Window Description .................................................................................. 6-6Setting Up Earnings Elements Included in Effort Reports......................................................... 6-7Earnings Elements Included in Effort Reports Window............................................................. 6-8Earnings Elements Included in Effort Reports Window Description ...................................... 6-9Modify Text Message in Effort Report Procedure ...................................................................... 6-10
Modify Certify Message ............................................................................................................ 6-10Create Review Message ............................................................................................................. 6-10
Effort Report Messages Window ................................................................................................... 6-12Effort Report Messages Window Description............................................................................. 6-15Creating Notification Users Procedure ......................................................................................... 6-16Create Users Window....................................................................................................................... 6-17Create Users Window Description Table ..................................................................................... 6-18
7 Labor Encumbrance Setup
Definition ............................................................................................................................................. 7-2Overview .............................................................................................................................................. 7-2
Process............................................................................................................................................ 7-2Setting Up Encumbrance Payroll and Assignment Selection Procedure ................................ 7-5Encumbrance - Payroll and Assignment Selection Window...................................................... 7-6Encumbrance - Payroll and Assignment Selection Window Description ............................... 7-7Setting Up Default Encumbrance Period Definition for Organization Procedure ................ 7-8Encumbrance - Default Encumbrance Period Definition Window........................................... 7-9Encumbrance - Default Encumbrance Period Definition Window Description .................. 7-10Setting Up Encumbrance Earnings Element Selection Procedure .......................................... 7-11Encumbrance - Earnings Element Selection Window ............................................................... 7-12Encumbrance - Earnings Element Selection Window Description......................................... 7-13Setting Up Encumbrance Options Procedure ............................................................................. 7-14Encumbrance - Creation Options Window.................................................................................. 7-15Encumbrance - Creation Options Window Description ........................................................... 7-16Setting Up Encumbrance Summarize Options Procedure........................................................ 7-17Encumbrance - Summarization Options Window ..................................................................... 7-18Encumbrance - Summarization Options Window Description ............................................... 7-20
ix

8 Expenditure Type and Natural Account Auto-Population Setup
Definition.............................................................................................................................................. 8-3Overview............................................................................................................................................... 8-3
Auto-Population Rules................................................................................................................. 8-3Process ............................................................................................................................................ 8-4References ...................................................................................................................................... 8-6
Setting Up Autopop Segment Procedure ....................................................................................... 8-7Auto-Population Segment Definition Window ............................................................................ 8-8Auto-Population Segment Definition Window Description...................................................... 8-9Setting Up Lookup Procedure ........................................................................................................ 8-10LOOKUPS (Auto Lookups) Window ............................................................................................ 8-11LOOKUPS (Auto Lookups) Window Description ..................................................................... 8-12Defining Expenditure Type Auto-Population Rules Procedure .............................................. 8-13
Defining Parameters................................................................................................................... 8-13Defining Parameter Expressions and Building Rule Expressions....................................... 8-13
Auto-Fill Expenditure Types Window .......................................................................................... 8-15Auto-Fill Expenditure Types Window Description ................................................................... 8-16Rules Window ................................................................................................................................... 8-17Rules Window Description ............................................................................................................. 8-18Defining Natural Account Auto-Population Rules Procedure................................................. 8-19
Defining Parameters................................................................................................................... 8-19Defining Parameter Expressions and Building Rule Expressions....................................... 8-19
Auto-Fill Natural Account Window .............................................................................................. 8-21Auto-Fill Natural Account Window Description........................................................................ 8-22Setting Up the By-Pass Table Procedure ...................................................................................... 8-23Bypass (By-Pass Expenditure Types) Window ............................................................................ 8-24Bypass (By-Pass Expenditure Types) Window Description ..................................................... 8-25
Part II Labor Scheduling
9 Labor Scheduling Procedures
Definition.............................................................................................................................................. 9-2Overview............................................................................................................................................... 9-2
Process ............................................................................................................................................ 9-2
x

Prerequisites ........................................................................................................................................ 9-6Creating and Updating Labor Schedules Procedure.................................................................... 9-7
Selecting Employee and Assignment ........................................................................................ 9-7Defining Labor Schedule Hierarchy Level ............................................................................... 9-7Defining Schedule Lines .............................................................................................................. 9-9Creating or Modifying Labor Schedules Using the Copy and Merge Functions.............. 9-10
Labor Scheduling Window ............................................................................................................. 9-12Labor Scheduling Window Description....................................................................................... 9-13Schedule Lines Window.................................................................................................................. 9-14Schedule Lines Window Description ........................................................................................... 9-19Viewing Labor Schedule Lines Procedure................................................................................... 9-23
Viewing Schedule Summary..................................................................................................... 9-23Viewing Monthly Schedule Summary .................................................................................... 9-24Viewing Payroll Period Schedule Summary .......................................................................... 9-24
Schedule Summary Window .......................................................................................................... 9-26Schedule Summary Window Description ................................................................................... 9-27Monthly Schedule Summary Window ......................................................................................... 9-28Monthly Schedule Summary Window Description .................................................................. 9-29Payroll Period Schedule Summary Window ............................................................................... 9-31Payroll Period Schedule Summary Window Description ........................................................ 9-32
Part III Payroll Interface
10 Import Payroll Transactions Procedures
Definition ........................................................................................................................................... 10-2Overview ............................................................................................................................................ 10-2
Process.......................................................................................................................................... 10-2Prerequisites ...................................................................................................................................... 10-6Importing Payroll Transactions Procedure .................................................................................. 10-7Rolling Back Oracle Payroll Import Procedure .......................................................................... 10-8
11 Create Distribution Lines Procedures
Definition ........................................................................................................................................... 11-2Overview ............................................................................................................................................ 11-2
xi

Process .......................................................................................................................................... 11-2Creating Distribution Lines Procedure ........................................................................................ 11-6Rolling Back Distribution Lines Procedure................................................................................. 11-7
12 Summarize and Transfer Payroll Distributions Procedures
Definition............................................................................................................................................ 12-2Overview............................................................................................................................................. 12-2
Process .......................................................................................................................................... 12-2Prerequisites....................................................................................................................................... 12-6Summarizing and Transferring Payroll Distributions Procedure .......................................... 12-7Recovering the Summarize and Transfer Payroll Distributions Procedure .......................... 12-8
13 Archive and Retrieve Distributions History Procedures
Definition............................................................................................................................................ 13-2Overview............................................................................................................................................. 13-2
Process .......................................................................................................................................... 13-2Archiving and Retrieving Distributions History Procedures .................................................. 13-3Generating Archive History Report Procedure........................................................................... 13-4
Part IV Non-Oracle Payroll Interfaces
14 Non-Oracle Payroll Interface Procedures
Definition............................................................................................................................................ 14-2Overview............................................................................................................................................. 14-2
Process .......................................................................................................................................... 14-2Prerequisites....................................................................................................................................... 14-8Maintaining Non-Oracle Payroll Interface Procedure............................................................... 14-9
Importing Non-Oracle Payroll Sublines Using the Maintenance of Non-OraclePayroll Sublines Window .......................................................................................................... 14-9Importing Non-Oracle Payroll Sublines Using the Concurrent Manager........................ 14-10
Maintenance of Non-Oracle Payroll Sublines Window, Payroll Period, Name,Source Tab ........................................................................................................................................ 14-12Maintenance of Non-Oracle Payroll Sublines Window Description, Payroll Period,Name, Source Tab............................................................................................................................ 14-13
xii

Maintenance of Non-Oracle Payroll Sublines Window, Element, Earned, CheckDate Tab ............................................................................................................................................ 14-15Maintenance of Non-Oracle Payroll Sublines Window Description, Element, Earned,Check Date Tab ............................................................................................................................... 14-16Maintenance of Non-Oracle Payroll Sublines Window, Amt, Dly Rate, Salary, D/CFlag Tab ............................................................................................................................................. 14-17Maintenance of Non-Oracle Payroll Sublines Window Description, Amt, Dly Rate,Salary, D/C Flag Tab ....................................................................................................................... 14-18Maintenance of Non-Oracle Payroll Sublines Window, Subline Start End Dates,FTE Tab ............................................................................................................................................. 14-19Maintenance of Non-Oracle Payroll Sublines Window Description, Subline Start EndDates, FTE Tab ................................................................................................................................. 14-20Rolling Back Non-Oracle Payroll Procedure............................................................................. 14-21
15 Pre-generated Distribution Lines Interface Procedures
Definition ........................................................................................................................................... 15-3Overview ............................................................................................................................................ 15-3
Features ........................................................................................................................................ 15-3Process.......................................................................................................................................... 15-3
Prerequisites ...................................................................................................................................... 15-8Importing Pre-generated Distribution Lines Procedure ........................................................... 15-9
Importing Pre-generated Distribution Lines Using the Maintenance ofPre-generated Distribution Lines Window............................................................................. 15-9Importing Pre-generated Distribution Lines Using the Concurrent Manager................ 15-10
Maintenance of Pre-generated Distribution Lines Window, Payroll Name, Period,Element Tab...................................................................................................................................... 15-12Maintenance of Pre-generated Distribution Lines Window Description, PayrollName, Period, Element Tab........................................................................................................... 15-13Maintenance of Pre-generated Distribution Lines Window, Pay Source, Dist Amt,D/C Flag Tab .................................................................................................................................... 15-15Maintenance of Pre-generated Distribution Lines Window Description, Pay Source,Dist Amt, D/C Flag Tab.................................................................................................................. 15-16Maintenance of Pre-generated Distribution Lines Window, GL Account Tab................... 15-17Maintenance of Pre-generated Distribution Lines Window Description, GL AccountTab...................................................................................................................................................... 15-18
xiii

Maintenance of Pre-generated Distribution Lines Window, Project, Task, AwardTab ...................................................................................................................................................... 15-19Maintenance of Pre-generated Distribution Lines Window Description, Project, Task,Award Tab......................................................................................................................................... 15-20Maintenance of Pre-generated Distribution Lines Window, Expenditure Organization,Type Tab ............................................................................................................................................ 15-21Maintenance of Pre-generated Distribution Lines Window Description,Expenditure Organization, Type Tab .......................................................................................... 15-22
Part V Distribution Adjustments
16 Distribution Adjustments Procedures
Definition............................................................................................................................................ 16-2Overview............................................................................................................................................. 16-2
Features ........................................................................................................................................ 16-2Process .......................................................................................................................................... 16-2
Prerequisites....................................................................................................................................... 16-7Adjusting Distributions Procedure ............................................................................................... 16-8Distribution Adjustments Window ............................................................................................ 16-10Distribution Adjustments Window Description ...................................................................... 16-13Approving the Distribution Adjustments Workflow Procedure ........................................... 16-16Summarizing and Transferring Adjustments Procedure ........................................................ 16-17Recovering Summarize and Transfer Adjustments Procedure ............................................. 16-18Generating Distribution Adjustment Register Report Procedure ........................................ 16-19
Part VI Labor Encumbrance
17 Labor Encumbrance Processes and Reports Procedures
Definition............................................................................................................................................ 17-2Overview............................................................................................................................................. 17-2
Processes ...................................................................................................................................... 17-2Review Posted Encumbrance Reports ..................................................................................... 17-6
Prerequisites....................................................................................................................................... 17-8Creating Encumbrance Lines Procedure ...................................................................................... 17-9
xiv

Summarizing and Transferring Encumbrances Procedure..................................................... 17-10Updating Encumbrance Lines Procedure................................................................................... 17-11Liquidating Encumbrances Procedure ....................................................................................... 17-12Archiving Encumbrance Lines Procedure.................................................................................. 17-13Retrieving Encumbrance Lines Procedure................................................................................. 17-14Generating Suspense Charge Encumbrance Report Procedure ............................................ 17-15Generating Organization Default Usage Encumbrance Report Procedure......................... 17-16
Part VII Effort Reporting
18 Effort Reporting Procedures
Definition ........................................................................................................................................... 18-3Overview ............................................................................................................................................ 18-3
Effort Reporting Process............................................................................................................ 18-3Effort Report Workflow Notification Process ........................................................................ 18-6Create Effort Report Window................................................................................................... 18-7
Prerequisites ...................................................................................................................................... 18-8Creating an Effort Report Template Procedure........................................................................... 18-9Create Effort Report Window ....................................................................................................... 18-10Create Effort Report Window Description ................................................................................ 18-16Creating Effort Report Procedure ................................................................................................ 18-18
GL Account Tab ........................................................................................................................ 18-18Project(s) Tab ............................................................................................................................. 18-19Organization(s) Tab.................................................................................................................. 18-19Award(s) Tab............................................................................................................................. 18-20
Warning Report ............................................................................................................................... 18-22Warning Report Description......................................................................................................... 18-23Reviewing, Approving, and Certifying Effort Report Workflow Procedure ...................... 18-24Review Effort Report Window ..................................................................................................... 18-26Review Effort Report Window Description .............................................................................. 18-27Printing Options Window............................................................................................................. 18-28Printing Options Window Description ...................................................................................... 18-29Generating Mass Print Effort Report Procedure ...................................................................... 18-30Mass Print Effort Reports Input Parameters Window............................................................. 18-31Mass Print Effort Reports Input Parameters Window Description ...................................... 18-32
xv

Generating Effort Certification Status (Aging) Report Procedure ........................................ 18-33Effort Certification Status (Aging) Report Window ................................................................ 18-34Effort Certification Status (Aging) Report ................................................................................. 18-35Effort Certification Status (Aging) Report Description ........................................................... 18-36Creating Ad Hoc Effort Report Procedure ................................................................................. 18-37
GL Account Tab ........................................................................................................................ 18-37Project(s) Tab ............................................................................................................................. 18-38Organization(s) Tab.................................................................................................................. 18-38Award(s) Tab............................................................................................................................. 18-39
Create Ad Hoc Effort Report Window ........................................................................................ 18-41Create Ad Hoc Effort Report Window Description.................................................................. 18-42
Part VIII Reports
19 Reports Procedures
Definition............................................................................................................................................ 19-3Overview............................................................................................................................................. 19-3
Employees Using Default Labor Schedules Report............................................................... 19-3Employee Labor Schedule Report ............................................................................................ 19-3Organization Default Labor Schedule Report ........................................................................ 19-4Default Account Report ............................................................................................................. 19-4Suspense Account Report.......................................................................................................... 19-4Distribution Adjustment History by Employee Report ........................................................ 19-4Distribution History by Project Report.................................................................................... 19-4Distribution History by Award Report ................................................................................... 19-5Distribution History by Organization ..................................................................................... 19-5
Generating Employees Using Default Labor Schedules Report Procedure.......................... 19-6Employees Using Default Labor Schedules -- Input Parameters Window............................ 19-8Printing Options Window ............................................................................................................... 19-9Printing Options Window Description ...................................................................................... 19-10Generating Employee Labor Schedule Report.......................................................................... 19-12Employee Labor Schedules Report -- Input Parameters Window......................................... 19-13Employee Labor Schedule Report Description......................................................................... 19-14Generating Organization Default Labor Schedule Report..................................................... 19-15Organization Default Labor Schedule Report -- Input Parameter Window ....................... 19-16
xvi

Generating Default Account Report Procedure........................................................................ 19-17Default Account Report -- Input Parameters Window ............................................................ 19-18Generating Suspense Account Report Procedure .................................................................... 19-19Suspense Account Report -- Input Parameters Window......................................................... 19-20Generating Distribution Adjustment History by Employee Report Procedure ................ 19-21Report Submission Window ........................................................................................................ 19-22Generating Distribution History by Project Report Procedure............................................. 19-23Distribution History by Project -- Input Parameters Window............................................... 19-24Generating Distribution History by Award Report Procedure ............................................. 19-25Distribution History by Award -- Input Parameters Window ............................................... 19-26Generating Distribution History by Organization Report Procedure ................................. 19-27Distribution History by Organization -- Input Parameters Window ................................... 19-28
Part IX Reconciliation and Control
20 Reconciliation and Control Reports Procedures
Definition ........................................................................................................................................... 20-2Overview ............................................................................................................................................ 20-2
Process.......................................................................................................................................... 20-2Generating Reconciliation and Control Reports Procedure..................................................... 20-4
Part X Topical Essays
A Labor Distribution Process
Definition ............................................................................................................................................. A-2Oracle Labor Distribution Process Flow Diagram ....................................................................... A-3Oracle Labor Distribution Process .................................................................................................. A-4
Setup............................................................................................................................................... A-4Labor Scheduling.......................................................................................................................... A-4Payroll Transactions..................................................................................................................... A-5Non-Oracle Payroll Transactions Interface............................................................................... A-5Create Distribution Lines ............................................................................................................ A-6Pre-generated Distribution Lines Interface............................................................................... A-6Summarize and Transfer Payroll Distributions ....................................................................... A-7
xvii
Distribution Adjustments ............................................................................................................ A-7Labor Encumbrance...................................................................................................................... A-8Effort Reporting ............................................................................................................................ A-8Reports............................................................................................................................................ A-8Reconciliation and Control.......................................................................................................... A-9
B Scheduling Hierarchy Process
Definition.............................................................................................................................................. B-2Process ................................................................................................................................................... B-3
Organization Suspense Account................................................................................................. B-3Organization Default Account.................................................................................................... B-3Default Labor Schedule................................................................................................................ B-4Employee Assignment ................................................................................................................. B-4Element Group .............................................................................................................................. B-4Earnings Element .......................................................................................................................... B-5Global Earnings Element ............................................................................................................. B-5
Scheduling Hierarchy Process Diagram ......................................................................................... B-7
C Labor Encumbrance Process
Definition............................................................................................................................................. C-2Labor Encumbrance Process Flow Diagram ................................................................................. C-3Labor Encumbrance Process ............................................................................................................ C-4
Setup .............................................................................................................................................. C-4Labor Scheduling ......................................................................................................................... C-4Create Encumbrance Lines......................................................................................................... C-5Summarize and Transfer Encumbrances ................................................................................. C-5Encumbrance History.................................................................................................................. C-5Update Encumbrance Lines ....................................................................................................... C-5Liquidate Encumbrances ............................................................................................................ C-6Reports........................................................................................................................................... C-6
D Data Entry Validations Process
Overview.............................................................................................................................................. D-2Data Entry Validations ...................................................................................................................... D-3
xviii

Labor Scheduling Validation Rules ........................................................................................... D-3Labor Scheduling Setup Deletion Validation Rules ................................................................ D-3Labor Scheduling Setup End-Dating Validation Rules........................................................... D-4Labor Scheduling Validation Errors .......................................................................................... D-6Labor Scheduling Validation Warnings.................................................................................... D-6Create Distribution Lines Validations ....................................................................................... D-6Other Validations ......................................................................................................................... D-7Custom Data Entry Validation ................................................................................................... D-7
E Effort Calculation Process
Definition ............................................................................................................................................. E-2Process................................................................................................................................................... E-2
Examples........................................................................................................................................ E-2
F Effort Report Notification Workflow Process
Overview .............................................................................................................................................. F-2Effort Report Notification Process ............................................................................................. F-2
The PSP Effort Report Item Type .................................................................................................... F-3Effort Report Approval and Certification Workflow Diagram .................................................. F-5Effort Report Approval and Certification Workflow Process ..................................................... F-6
Start (Node 1) ................................................................................................................................ F-6Notify Creator: Workflow Monitor (Node 2) ........................................................................... F-6Omit Approval Step (Node 3)..................................................................................................... F-6Update Effort Report Status to Approved (Node 4)................................................................ F-7Effort Report Certification1 (Node 5) ........................................................................................ F-7End (Node 6) ................................................................................................................................. F-7Effort Report Approval/Certification (Node 7)....................................................................... F-7End (Node 8) ................................................................................................................................. F-8
Effort Report Approval Workflow Diagram .................................................................................. F-9Effort Report Approval Workflow Process .................................................................................. F-10
Start (Node 1) .............................................................................................................................. F-10Can Employee Approve (Node 2)............................................................................................ F-10Verify Employee (Node 3)......................................................................................................... F-10Notify Approver: Approval Required (Node 4) .................................................................... F-11Get Final Approver’s Name (Node 5) ..................................................................................... F-11
xix

Notify Creator: Not Approved (Node 6)................................................................................. F-11Update Effort Report Status to Rejected (Node 7) ................................................................. F-11End (Node 8)................................................................................................................................ F-12Get Final Approver’s Name (Node 9)...................................................................................... F-12Notify Creator: Approved (Node 10)....................................................................................... F-12Update Effort Report Status to Approved (Node 11)............................................................ F-12And (Node 12)............................................................................................................................. F-13Effort Report Certification (Node 13) ...................................................................................... F-13End (Node 14).............................................................................................................................. F-13Notify Creator: No Response (Timeout) (Node 15)............................................................... F-13Update Effort Report Status to Superseded (Node 16) ......................................................... F-14End (Node 17).............................................................................................................................. F-14Notify Creator: No Approver Found (Node 18) .................................................................... F-14Update Effort Report Status to Superseded (Node 19) ......................................................... F-14End (Node 20).............................................................................................................................. F-15Select Approver (Node 21) ........................................................................................................ F-15Notify Creator: No Approver Found (Node 22) .................................................................... F-15Update Effort Report Status to Superseded (Node 23) ......................................................... F-15End (Node 24).............................................................................................................................. F-16
Customizing Effort Report Approval Workflow......................................................................... F-17Required Modifications ............................................................................................................. F-17Optional Customizations........................................................................................................... F-17Creating a New Custom Process .............................................................................................. F-17
Effort Report Certification Workflow Diagram ........................................................................... F-18Effort Report Certification Workflow Process ............................................................................. F-19
Start (Node 1) .............................................................................................................................. F-19Can Supervisor Certify (Node 2) .............................................................................................. F-19Find Supervisor (Node 3) .......................................................................................................... F-19Notify Certifier: Certification Required (Node 4) .................................................................. F-20Get Final Certifier’s Name (Node 5) ........................................................................................ F-20Notify Creator: Not Certified (Node 6) ................................................................................... F-20Update Effort Report Status to Rejected (Node 7) ................................................................. F-20End (Success) (Node 8)............................................................................................................... F-21Get Final Certifier’s Name (Node 9) ........................................................................................ F-21Notify Creator: Certified (Node 10) ......................................................................................... F-21
xx

Update Effort Report Status to Certified (Node 11) .............................................................. F-21And (Node 12)............................................................................................................................. F-22End (Node 13) ............................................................................................................................. F-22Notify Creator: No Response (Timeout) (Node 14)............................................................... F-22Notify Creator: No Certifier Found (Node 15)....................................................................... F-22Update Effort Report Status to Superseded (Node 16) ......................................................... F-23End (Node 17) ............................................................................................................................. F-23Select Certifier (Node 18)........................................................................................................... F-23Notify Creator: No Certifier Found (Node 19)....................................................................... F-23Update Effort Report Status to Superseded (Node 20) ......................................................... F-24End (Node 21) ............................................................................................................................. F-24
Customizing Effort Report Certification Workflow ................................................................... F-25Required Modifications ............................................................................................................. F-25Optional Customizations........................................................................................................... F-25
G Distribution Adjustments Approval Notification Workflow Process
Overview ............................................................................................................................................. G-2The PSP Distribution Adjustments Approval Item Type.......................................................... G-3Distribution Adjustments Approval Workflow Diagram.......................................................... G-4Distribution Adjustments Approval Workflow Process ............................................................ G-5
Start (Node 1) ............................................................................................................................... G-5Omit Approval (Node 2) ............................................................................................................ G-5Select Approver (Node 3) ........................................................................................................... G-5Notify Approver: Approval Required (Node 4) ..................................................................... G-6Get Final Approver [Approved] (Node 5) ............................................................................... G-6Record Approver (Node 6)......................................................................................................... G-6Notify Creator: Approved (Node 7) ......................................................................................... G-6End (Node 8) ................................................................................................................................ G-7Record Creator as Approver (Node 9) ..................................................................................... G-7Notify Creator: No Approval Required (Node 10)................................................................. G-7End (Node 11) .............................................................................................................................. G-8Notify Creator: No Approver Found (Node 12) ..................................................................... G-8Undo Distribution Adjustment (Node 13) ............................................................................... G-8End (Node 14) .............................................................................................................................. G-8Notify Creator: No Response [Timeout] (Node 15)................................................................ G-9
xxi

Undo Distribution Adjustment (Node 16) ............................................................................... G-9End (Node 17)............................................................................................................................... G-9Get Final Approver [Return with Comments] (Node 18)...................................................... G-9Notify Creator: Returned with Comments (Node 19).......................................................... G-10Undo Distribution Adjustment (Node 20) ............................................................................. G-10End (Node 21)............................................................................................................................. G-10Get Final Approver [Rejected] (Node 22)............................................................................... G-10Notify Creator: Rejected (Node 23) ......................................................................................... G-11Undo Distribution Adjustment (Node 24) ............................................................................. G-11And (Node 25)............................................................................................................................ G-11End (Node 26)............................................................................................................................. G-12
Customizing Distribution Adjustments Approval Workflow ................................................ G-13Required Modifications ............................................................................................................ G-13Optional Customizations.......................................................................................................... G-13
Part XI Reference
H Labor Distribution Navigation Paths
Navigation ........................................................................................................................................... H-2
I Distribution and Configuration Options
Overview................................................................................................................................................ I-2Payroll Distribution Process .............................................................................................................. I-2Configuration Options ........................................................................................................................ I-4Case 1 Diagram ..................................................................................................................................... I-5Case 2 Diagram ..................................................................................................................................... I-6Case 3 Diagram ..................................................................................................................................... I-7Case 4 Diagram ..................................................................................................................................... I-8
J Labor Distribution Accounting Example
Definition.............................................................................................................................................. J-2Payroll Balancing Overview ............................................................................................................. J-2
Reference ........................................................................................................................................ J-2Labor Costing Example ...................................................................................................................... J-3
xxii

Labor Costing................................................................................................................................. J-3Distribution Adjustments............................................................................................................. J-5
K Non-Oracle Payroll Interface Table
Non-Oracle Interface Table Field Description Table ................................................................... K-2Non-Oracle Interface Table Population Rules .............................................................................. K-4
L Pre-generated Interface Table
Pre-generated Interface Table Field Description Table ............................................................... L-2Pre-generated Interface Table Population Rules .......................................................................... L-4
M Multiple Organizations Compliance in Oracle Labor Distribution
Definition ............................................................................................................................................ M-2Overview ............................................................................................................................................. M-2
Features ......................................................................................................................................... M-2User Procedures.................................................................................................................................. M-4
Labor Distribution Responsibility............................................................................................. M-4Labor Distribution Setup............................................................................................................ M-5Labor Scheduling......................................................................................................................... M-6Labor Distribution Processes ..................................................................................................... M-7
Glossary
Index
xxiii

xxiv
Send Us Your Comments
Oracle Labor Distribution User’s Guide, Release 11i
Part Number: A85309-02
Oracle Corporation welcomes your comments and suggestions on the quality and usefulness of thispublication. Your input is an important part of the information used for revision.
■ Did you find any errors?■ Is the information clearly presented?■ Do you need more information? If so, where?■ Are the examples correct? Do you need more examples?■ What features did you like most?
If you find any errors or have any other suggestions for improvement, please indicate the documenttitle and part number, and the chapter, section, and page number (if available). You can send com-ments to us in the following ways:
■ Electronic mail: [email protected]■ FAX: 650-506-7800 Attn: Documentation Manager■ Postal service:
Oracle Corporation
Oracle Public Sector Applications Documentation Development
500 Oracle Parkway, MS 3op7
Redwood Shores, CA 94065
U.S.A
If you would like a reply, please give your name, address, telephone number, and (optionally) elec-tronic mail address.
If you have problems with the software, please contact Oracle Support Services.
xxv

xxvi

Preface
The Oracle Labor Distribution User’s Guide provides information on how to useOracle Labor Distribution.
The following sections are included in this preface:
■ Audience for this Guide
■ Conventions
■ Documentation Accessibility
■ Other Information Sources
■ Training and Support
■ Do Not Use Database Tools to Modify Oracle Applications Data
■ About Oracle
■ Documentation Sales
■ Feedback
xxvii
Audience for this GuideWelcome to Release 11i of the Oracle Labor Distribution User’s Guide.
This guide assumes users have a working knowledge of the following:
■ principles and customary practices of the business area
■ Labor Distribution
Oracle suggests that users who have never used Labor Distribution attend oneor more of the Labor Distribution training classes available through OracleUniversity.
■ Oracle Applications graphical user interface
To learn more about the Oracle Applications graphical user interface, read theOracle Applications User’s Guide.
See Other Information Sources for more information about Oracle Applicationsproduct information.
xxviii

ConventionsThe following conventions are observed:
■ special conventions
■ usage conventions
■ references
Special ConventionsThe following special conventions are observed:
bold Bold type denotes buttons or menu paths, as in the followingexample:
Submit and File - New - Open
UPPERCASE Uppercase text denotes Oracle keywords, statements, and statuses,as in the following example:
CONFIRMED
Courier Courier font denotes a mathematical formula, as in the followingexample:
2%/(100%-2%) x 360/((30-(10-0)) = 0.367
<> Angle brackets denote a user-selected value, as in the followingexample:
<Pagebreak 1>
[ ] Square brackets denote a description that assists the user, but is notactually a part of the application, as in the following example:
[field not available]
WARNING: Warnings alert users to the following type of information in thisguide:
WARNING: Warnings highlight text that warns of actions that couldresult in loss of data or incorrect processing.
xxix

Usage ConventionsThe following usage conventions are observed:
ReferencesAll references to specific chapters refer to chapters in this guide unless otherwisenoted.
Close the window. Indicates users should close the window using either the File - CloseForm command or by clicking on the x in the upper right-handcorner.
Note: The File - Close Form command produces different resultsdepending on the product and platform in use. For example,sometimes it closes only one window; at other times, it closes allopen windows. Users must familiarize themselves with how thecommand behaves in their own environments.
Descriptions ofGraphics
Textual descriptions accompany all graphics that appear in thisguide. Screen shot fields are described in the accompanying windowdescription tables.
Query appropriatedata.
Indicates users should query data in the window using View - Findor View - Query By Example - Enter.
For information on entering and querying data, see Entering andQuerying Data, Oracle Applications User’s Guide.
xxx

Documentation AccessibilityOur goal is to make Oracle products, services, and supporting documentationaccessible, with good usability, to the disabled community. To that end, ourdocumentation includes features that make information available to users ofassistive technology. This documentation is available in HTML format, and containsmarkup to facilitate access by the disabled community. Standards will continue toevolve over time, and Oracle Corporation is actively engaged with othermarket-leading technology vendors to address technical obstacles so that ourdocumentation can be accessible to all of our customers. For additional information,visit the Oracle Accessibility Program Web site athttp://www.oracle.com/accessibility/.
xxxi

Other Information SourcesUsers can choose from many sources of information, including onlinedocumentation, training, and support services, to increase their knowledge andunderstanding of Labor Distribution.
When this guide refers to other Oracle Applications documentation, use only theRelease 11i versions of those guides.
Online DocumentationAll Oracle Applications documentation is available online in HTML or PDF.
■ Online Help - The new features section, located in the product overviewchapter in the HTML help, describes new features in 11i. This information isupdated for each new release of Labor Distribution. The new features sectionalso includes information about any features that were not yet available whenthis guide was printed. For example, if the system administrator installssoftware from mini-packs or an upgrade, this section describes the newfeatures.
Online help patches with the latest help are available on MetaLink, as areDocumentation Update Notes (DUN). DUNs provide the latest information, asfound in the online help patches, in PDF format.
■ 11i Features Matrix - This document lists new features available by patch andidentifies any associated new documentation. The new features matrixdocument is available on MetaLink.
■ Readme File - Refer to the readme file for installed patches to learn about newdocumentation or documentation patches available for download.
Related User’s GuidesLabor Distribution shares business and setup information with other OracleApplications products. Users may want to refer to other user’s guides when settingup and using Labor Distribution.
Read the guides online by choosing Library from the expandable menu on theHTML help window, by reading from the Oracle Applications Document LibraryCD included in the media pack, or using a Web browser with a URL provided bythe system administrator.
Purchase printed guides, if required, from the Oracle Store athttp://oraclestore.oracle.com.
xxxii

Guides Related to All Products
Oracle Applications User’s GuideThis guide explains how to enter data, query, run reports, and navigate using thegraphical user interface available with this release of Labor Distribution and anyother Oracle Applications products. This guide also includes information on settinguser profiles, as well as running and reviewing reports and concurrent processes.
Access this user’s guide by choosing Getting Started with Oracle Applications fromany Oracle Applications help file.
User’s Guides Related to This ProductThis guide contains references to the following Oracle publications. Use the Release11i versions of these guides, unless otherwise specified.
■ Oracle Applications Flexfields Guide
■ Oracle Applications System Administrator’s Guide
■ Oracle Applications User’s Guide
■ Oracle Grants Accounting User’s Guide
■ Oracle HRMS Documentation Set
■ Oracle HRMS US Implementation Guide
■ Oracle General Ledger User’s Guide
■ Oracle Projects User’s Guide
Installation and System Administration
Oracle Applications ConceptsThis guide provides an introduction to the concepts, features, technology stack,architecture, and terminology for Oracle Applications, Release 11i. It is a useful firstbook to read before an installation of Oracle Applications. This guide alsointroduces the concepts behind Applications-wide features such as BusinessIntelligence (BIS), languages and character sets, and Self Service Web Applications.
xxxiii

Installing Oracle ApplicationsThis guide provides instructions for managing the installation of OracleApplications products. In Release 11i, much of the installation process is handledusing Oracle Rapid Install, which minimizes the time to install Oracle Applications,the Oracle8 technology stack, and the Oracle8i Server technology stack byautomating many of the required steps. This guide contains instructions for usingOracle Rapid Install and lists the tasks needed to complete an installation. Use thisguide in conjunction with individual product user’s guides and implementationguides.
Upgrading Oracle ApplicationsRefer to this guide when upgrading Oracle Applications Release 10.7 or Release 11.0products to Release 11i. This guide describes the upgrade process and lists databaseand product-specific upgrade tasks. To upgrade to Release 11i, users must be atRelease 10.7, in NCA, SmartClient, or character mode, or Release 11.0. Users cannotupgrade to Release 11i directly from releases prior to 10.7.
Maintaining Oracle ApplicationsUse this guide to run various AD utilities, such as AutoUpgrade, AutoPatch, ADAdministration, AD Controller, AD Relink, License Manager, and others. The guidecontains how-to steps, screenshots, and other information needed to run the ADutilities. This guide also provides information on maintaining the OracleApplications file system and database.
Oracle Applications System Administrator’s GuideThe guide provides planning and reference information for the Oracle Applicationssystem administrator. The guide contains information on how to define security,customize menus and online help, and manage concurrent processing.
Oracle Alert User’s GuideThis guide explains how to define periodic and event alerts to monitor the status ofOracle Applications data.
Oracle Applications Developer’s GuideThis guide contains the coding standards followed by the Oracle Applicationsdevelopment staff. It describes the Oracle Application Object Library componentsneeded to implement the Oracle Applications user interface (UI) described in theOracle Applications User Interface Standards for Forms-Based Products. It also provides
xxxiv

information to help users build custom Oracle Forms Developer 6i forms so thatthey integrate with Oracle Applications.
Oracle Applications User Interface Standards for Forms-Based ProductsThis guide contains the UI standards followed by the Oracle Applicationsdevelopment staff. It describes the UI for Oracle Applications products and how toapply this UI to the design of an application built by using Oracle Forms.
Other Implementation Documentation
Oracle Applications Product Update NotesUse this guide as a reference for upgrading an installation of Oracle Applications. Itprovides a history of the changes to individual Oracle Applications productsbetween Release 11.0 and Release 11i. It includes new features, enhancements, andchanges made to database objects, profile options, and seed data for this interval.
Oracle Workflow GuideThis guide explains how to define new workflow business processes as well ascustomize existing Oracle Applications-embedded workflow processes. Use thisguide to complete the setup steps necessary for any Oracle Applications productthat includes workflow-enabled processes.
Oracle Applications Flexfields GuideThis guide provides flexfields planning, setup, and reference information for theLabor Distribution implementation team, as well as for users responsible for theongoing maintenance of Oracle Applications product data. This manual alsoprovides information on creating custom reports on flexfields data.
Oracle eTechnical Reference ManualsEach eTechnical Reference Manual (eTRM) contains database diagrams and adetailed description of database tables, forms, reports, and programs for a specificOracle Applications product. This information helps users convert data fromexisting applications, integrate Oracle Applications data with non-Oracleapplications, and write custom reports for Oracle Applications products. OracleeTRM is available on MetaLink.
xxxv

Oracle Manufacturing APIs and Open Interfaces ManualThis manual contains up-to-date information about integrating with other OracleManufacturing applications and with other systems. The guide includes APIs andopen interfaces found in Oracle Manufacturing.
Oracle Order Management Suite APIs and Open Interfaces ManualThe manual contains up-to-date information about integrating with other OracleManufacturing applications and with other systems. The guide includes APIs andopen interfaces found in Oracle Order Management Suite.
Oracle Applications Message Reference ManualThis manual describes all Oracle Applications messages. The guide is available inHTML format on the documentation CD-ROM for Release 11i.
xxxvi

Training and Support
TrainingOracle offers a complete set of training courses to help users and their staffs masterLabor Distribution and reach full productivity quickly. These courses are organizedinto functional learning paths, so users take only those courses appropriate to theirjobs or areas of responsibility.
Users have a choice of educational environments. They can attend courses offeredby Oracle University at any one of our many Education Centers, or can arrange forour trainers to teach at their facility, or can employ the Oracle Learning Network(OLN), Oracle University’s online education utility. In addition, Oracle trainingprofessionals can tailor standard courses or develop custom courses to meet users’needs. For example, users can employ their own organizational structure,terminology, and data as examples in a customized training session delivered attheir own facility.
SupportFrom on-site support to central support, our team of experienced professionalsprovides the help and information needed to keep Labor Distribution working forall users. This team includes the technical representative, account manager, andOracle’s large staff of consultants and support specialists with expertise in users’specific business areas, managing an Oracle server, and users’ hardware andsoftware environments.
xxxvii

Do Not Use Database Tools to Modify Oracle Applications DataWe STRONGLY RECOMMEND that users never use SQL*Plus, Oracle DataBrowser, database triggers, or any other tool to modify Oracle Applicationstables, unless otherwise instructed.
Oracle Corporation provides powerful tools users can employ to create, store,change, retrieve, and maintain information in an Oracle database. But if usersemploy tools such as SQL*Plus to modify Oracle Applications data, they riskdestroying the integrity of the data and lose the ability to audit changes to the data.
Because Oracle Applications tables are interrelated, any change made using OracleApplications can update many tables at once. But when users modify OracleApplications data using anything other than Oracle Applications, users mightchange a row in one table without making corresponding changes in related tables.If the tables get out of synchronization with each other, users risk retrievingerroneous information and unpredictable results throughout Oracle Applications.
When users employ Oracle Applications to modify the data, Oracle Applicationsautomatically checks that the changes are valid. Oracle Applications also keepstrack of who changes the information. But if users enter information into databasetables using database tools, users can store invalid information. Users also lose theability to track who has changed the information because SQL*Plus and otherdatabase tools do not keep a record of changes.
xxxviii

About OracleOracle Corporation develops and markets an integrated line of software productsfor database management, applications development, decision support, and officeautomation, as well as Oracle Applications, an integrated suite of more than 160software modules for financial management, supply chain management,manufacturing, project systems, human resources, and customer relationshipmanagement.
Oracle products are available for mainframes, minicomputers, personal computers,network computers, and personal digital assistants, enabling organizations tointegrate different computers, different operating systems, different networks, andeven different database management systems, into a single, unified computing andinformation resource.
Oracle is the world’s leading supplier of software for information management, andthe world’s second largest software company. Oracle offers its database, tools, andapplication products, along with related consulting, education, and supportservices, in over 145 countries around the world.
xxxix

Documentation SalesTo order hard copy documentation, go to the Oracle Store athttp://oraclestore.oracle.com.
Support sales contact information by region and country is available athttp://www.oracle.com/support/index.html?contact.html.
xl

FeedbackThank you for using Labor Distribution and this user’s guide.
Oracle values comments and feedback. At the end of this guide is a Reader’sComment Form that users can employ to explain what they like or dislike aboutLabor Distribution or this user’s guide. Mail comments to the following address orcall us directly at (650) 506-8968.
Oracle Public Sector Applications Documentation Manager
Oracle Corporation
500 Oracle Parkway
Redwood Shores, CA 94065
U.S.A
Or, send electronic mail to [email protected].
xli

xlii

Product Overvie
1
Product OverviewThis chapter provides an overview of Oracle Labor Distribution. The followingsections are in this chapter:
■ Definition
■ Overview
■ New Features in Labor Distribution
w 1-1

Definition
DefinitionOracle Labor Distribution provides a flexible approach to the following:
■ scheduling employees
■ encumbering labor costs
■ distributing labor costs
Labor Distribution enables organizations to schedule, create, correct, and certifylabor cost distribution without a timecard system.
OverviewLabor Distribution is fully integrated with Oracle Human Resources, Oracle Payroll,Oracle General Ledger, Oracle Projects, and Oracle Grants Accounting.
Labor Distribution provides organizations and institutions with the ability toperform the following:
■ create and update employee labor schedules
■ distribute pay amounts
■ encumber salary and wages
■ provide interfaces to non-Oracle payroll and timecard systems
■ adjust posted labor distribution
■ create and certify employee effort reports
■ route effort reports for review, approval, and certification
■ route distribution adjustment for approval
Labor Distribution supports OMB A-21 Effort Reporting for institutions receivingfederal research funding.
Labor Distribution includes the following features:
■ Create and Maintain Labor Distribution Schedules
■ Distribute Pay Amounts
■ Provide Interfaces to Other Payroll and Timecard Systems
■ Distribution Adjustments
■ Create and Certify Effort Reports
1-2 Oracle Labor Distribution User’s Guide

Overview
■ Labor Encumbrances
■ Auto-Population of Expenditure Type and Natural Account
■ Reconciliation Reports
■ Scheduling and Distribution Reports
■ Multiple Organization Compliance
■ Summarize and Transfer Adjustments
■ Rollback of Labor Distribution Processes
■ Recovery Processes
■ Enhanced Workflow
■ Security
■ Integration with Oracle Public Sector Budgeting
■ Printing Options
Create and Maintain Labor Distribution SchedulesLabor Distribution enables the user to create labor schedules for each employeeassignment. These labor schedules are the basis for payroll labor distribution andencumbrances.
Each labor schedule provides a set of charging instructions that reflects thepercentage of earnings to be charged to General Ledger, Grants Accounting, orProjects. The charging instructions are entered on a schedule line that identifies thestart and end date and the percent of effort to be charged to one of the targetaccounts. Each employee assignment can have unlimited labor schedule lines.Labor schedules can be modified at any time to reflect changes in charginginstructions.
To simplify schedule line data entry, Labor Distribution includes default laborschedules for specific organizations and a user-defined schedule hierarchy. Defaultschedules can be created for a department, and the pay for all the employees in thatdepartment is charged on the basis of the default schedule.
Schedule hierarchies enable the user to create schedules at the employeeassignment, earnings element group, and earnings element levels. LaborDistribution uses the schedule hierarchy to determine which labor schedule to use.
Product Overview 1-3

Overview
Distribute Pay AmountsLabor Distribution enables users to distribute all types of pay to General Ledgeraccounts, Grants Accounting awards, and Projects based on labor schedules definedfor the employee assignment. Distribution amounts are calculated on a daily basis.
Provide Interfaces to Other Payroll and Timecard SystemsLabor Distribution provides integration with other non-Oracle payroll systems byproviding open interfaces to import non-Oracle payroll data and charginginstructions created by time management systems. The user populates an interfacetable with non-Oracle payroll data. The user can edit payroll entries beforedistributing them to their target accounts. These distributions can be used in effortreporting and can be adjusted.
Distribution AdjustmentsLabor Distribution enables users to adjust posted payroll distributions.Distributions to be adjusted are reversed and new distributions are created. Theuser must provide an explanation for the adjustment.
Adjustments are subject to appropriate security approvals. Adjustment approvalsare routed to appropriate personnel using Workflow. The adjustments are posted toGeneral Ledger, Grants Accounting, or Projects. After distribution adjustments areapproved and processed, new effort reports can be generated and approved tocertify the correct effort distribution for the effort report period.
Create and Certify Effort ReportsEffort reporting ensures accurate disbursement of labor charges. Effort reportssummarize the labor distributions made over a period of time. Certification of theeffort report by an employee or supervisor verifies distributions made againstactual work performed. Workflow routes effort reports to employees andsupervisors for review, approval, and certification.
Effort reports can be customized to meet the needs of an institution or organization.
Labor EncumbrancesLabor Distribution encumbers salary and wages and posts the encumbrances toGeneral Ledger, Grants Accounting, and Projects. By reserving funds from a budgetfor expenses committed yet not expended, a user can see what funds are available
1-4 Oracle Labor Distribution User’s Guide

Overview
and plan accordingly. As payroll charges are distributed to the target accounts,encumbrances can be liquidated.
Employee assignments can be selected for encumbrance by selecting the payrolls toencumber, thereby including all assignments in the selected payroll. Differentcharging instructions can be encumbered for differing time periods based on a 100%time period definition for each organization. Labor Distribution createsencumbrance lines for the future based on the employee’s organization and othersetup information.
A number of options are provided for summarizing and transferring encumbrancesto the appropriate target accounts.
Auto-Population of Expenditure Type and Natural AccountAuto-population of expenditure type and natural account automatically populatesexpenditure type and natural account fields during labor distribution. The userdefines and modifies the auto-fill mapping rules using a wide range of parameters.
Reconciliation ReportsA series of reconciliation reports enables users to view the step-by-step distributionof labor costs. Totals for each step are compared with totals from the previous stepto verify accurate labor cost distribution.
Scheduling and Distribution ReportsScheduling and Distribution reports show details about labor schedules, defaultlabor schedules, default accounts, suspense accounts, and actual distributions.
Multiple Organization ComplianceMultiple Organizations enables users to define multiple organizations and therelationships among them in a single installation and to secure access to data so thatusers can access only the information that is relevant to them.
Without multiple organizations, a user with multiple business entities must installLabor Distribution multiple times within the same database. MultipleOrganizations supports a single installation with any number of different logicalbusiness entities.
Product Overview 1-5

Overview
Summarize and Transfer AdjustmentsSummarize and Transfer Adjustments enables users to approve defined distributionadjustment batches without automatically transferring approved distributionadjustments to General Ledger, Grants Accounting, or Projects.
Summarize and Transfer Adjustments provides the following benefits to the user:
■ approve distribution adjustment batch without automatically running theSummarize and Transfer Adjustments process
■ summarize and transfer approved distribution batches at one time
■ redefine distribution adjustments for rejected adjustments during theSummarize and Transfer Adjustments process
Rollback of Labor Distribution ProcessesRolling back Labor Distribution processes enables users to correct errors afterrunning each process. This reduces the requirement to create distributionadjustments.
Rollback of Labor Distribution processes provides the following benefits to users:
■ Roll back of Oracle and Non-Oracle Payroll Import processes enables users toreimport the same payroll.
■ Rollback of Create Distribution Lines enables users to re-create distributionlines for lines that have not been summarized and transferred.
Recovery ProcessesIf there is a system crash or an abnormal termination while certain processes arerunning, Labor Distribution provides recovery processes that includes a log filewith a list of batches that terminated abnormally. The recovery processes are asfollows:
■ Recover Summarize and Transfer
■ Recover Summarize and Transfer Adjustments
Enhanced WorkflowLabor Distribution is integrated with Workflow to facilitate the approval processesin effort reporting and distribution adjustments. Workflow automates the approvaland certification processes.
1-6 Oracle Labor Distribution User’s Guide

Overview
SecurityLabor Distribution uses standard Oracle Applications security. Access andapprovals are controlled through responsibilities that are created and assigned tousers.
Integration with Oracle Public Sector BudgetingThe integration of Labor Distribution with Public Sector Budgeting enables thePublic Sector Budgeting user to access a labor schedule from Labor Distributioninstead of Oracle Human Resource Management Systems. This integration includesthe following features:
■ ability to bring salary distribution lines information into Public SectorBudgeting from Labor Distribution
■ ability to facilitate successful completion of budget worksheet with positionbudgeting
Printing OptionsPrinting Options enables users to print out hard copies of reports in their entirety.
Product Overview 1-7

New Features in Labor Distribution
New Features in Labor DistributionLabor Distribution, Release 11i, incorporates the following new features:
■ Distribution Adjustments Approval Notification Workflow
■ Multiple Organizations
■ ability to work with Oracle Projects and Grants Accounting
■ separate process for Summarize and Transfer of Distribution Adjustments
■ processes for rollback
■ recovery processes
■ printing options
■ Mass Print Effort Report
■ Archive and Retrieve Distributions History processes
■ Archive History Report
■ Archive and Retrieve Encumbrance Lines
■ Distribution Adjustment Register
■ ability to process assignments with zero work day
■ Organization Default Labor Schedule Report
■ Employee Labor Schedule Report
1-8 Oracle Labor Distribution User’s Guide

Introduc
2
IntroductionThis chapter describes how the Oracle Labor Distribution User’s Guide is organized.The following sections are in this chapter:
■ Overview
■ Setting Up Oracle Labor Distribution
■ Labor Scheduling
■ Payroll Interface
■ Non-Oracle Payroll Interface
■ Distribution Adjustments
■ Labor Encumbrances
■ Effort Reporting
■ Reports
■ Reconciliation and Control
■ Topical Essays
■ Reference
tion 2-1

Overview
OverviewThe Oracle Labor Distribution User’s Guide contains information needed tounderstand and use Oracle Labor Distribution.
This guide is divided into the following parts:
■ Setting Up Oracle Labor Distribution
■ Labor Scheduling
■ Payroll Interface
■ Non-Oracle Payroll Interface
■ Distribution Adjustments
■ Labor Encumbrance
■ Effort Reporting
■ Reports
■ Reconciliation and Control
■ Topical Essays
■ Reference
WARNING: Enhancements are added to this product regularly. Informationpresented here may be superseded by subsequent updates to online help. If there isa discrepancy between product functionality and the online help describing it,ensure that the system administrator has installed the most current updates toonline help.
Setting Up Oracle Labor DistributionImplementation of Labor Distribution requires setting up the following Oracleapplications:
■ System Administration
■ Human Resource Management Systems
■ General Ledger
■ Grants Accounting
■ Workflow
The following setup features in Labor Distribution are provided:
2-2 Oracle Labor Distribution User’s Guide

Overview
■ Labor Scheduling Setup
■ Effort Reporting Setup
■ Labor Encumbrance Setup
■ Expenditure Type and Natural Account Auto-Population Setup
The following guides must be used with the Oracle Labor Distribution User’s Guide toset up Oracle Applications and Oracle Financials:
■ Oracle Applications Flexfields Guide
■ Oracle Applications System Administrator’s Guide
■ Oracle Grants Management User’s Guide
■ Oracle Human Resources North American User’s Guide
■ Oracle HRMS US Implementation Guide
■ Oracle Projects User’s Guide
■ Oracle General Ledger User’s Guide
■ Oracle Workflow Guide
Complete setup checklists and detailed descriptions of setup steps that are requiredfor implementation of Labor Distribution are included in this guide.
Setup should be reviewed annually or as needed to update system security, reflectchanges in the organization's structure, or accommodate new requirements.
Labor SchedulingThe following procedure describes how to create, update, and review employeelabor schedules:
■ Labor Scheduling
Payroll InterfaceThe following procedures describe how to distribute pay amounts from OraclePayroll and transfer them to General Ledger, Projects, and Grants Accounting.
■ Import Payroll Transactions
■ Rollback Imported HRMS Payroll
■ Create Distribution Lines
Introduction 2-3

Overview
■ Roll Back Distribution Lines
■ Recover Liquidation Encumbrance
■ Recover Summarize and Transfer
Non-Oracle Payroll InterfaceThe following procedures describe how to summarize pay amounts fromnon-Oracle applications and transfer those transactions to Grants Accounting,Projects, and General Ledger:
■ Non-Oracle Payroll Interface
■ Rollback of Non-Oracle Payroll
■ Pre-generated Distribution Lines Interface
Distribution AdjustmentsThe following procedures describe how to adjust labor distributions that are alreadyposted to Grants Accounting, Projects, and General Ledger:
■ Distribution Adjustments
■ Resetting Incomplete Distribution Adjustments
■ Approve Adjustments
■ Summarize and Transfer Adjustments
■ Recover Summarize and Transfer Adjustments
■ Archive and Retrieve Distributions History
Labor EncumbranceThe following procedures describe how to use encumbrances:
■ Create Encumbrance Lines
■ Encumbrance Summarize and Transfer
■ Update Encumbrance Lines
■ Encumbrance Liquidation Process
■ Recover Liquidation Encumbrance
■ Recover Liquidation Encumbrance
2-4 Oracle Labor Distribution User’s Guide

Overview
Effort ReportingThe following procedures and reports describe effort reporting:
■ Create Effort Report Template
■ Create Effort Report
■ Review, Accept, or Return Effort Report with Comments Effort Reports
■ Effort Certification Status (Aging) Report
■ Create Ad Hoc Effort Report
ReportsThe following report procedures are described in this section:
■ Employees Using Default Labor Schedules
■ Default Account
■ Suspense Account
■ Distribution History by Employee
■ Distribution History by Project
■ Distribution History by Award
■ Distribution History by Organization
Reconciliation and ControlThe following procedure describes how to accomplish reconciliation and control:
■ Reconciliation and Control
Topical EssaysThe following processes are described in topical essays:
■ Oracle Labor Distribution
■ scheduling hierarchy
■ labor encumbrance
■ data entry validation
■ effort calculation
Introduction 2-5
Overview
■ effort report notification workflow
■ distribution adjustments approval workflow
ReferenceThe following topics are included in the reference section:
■ Oracle Labor Distribution navigator paths
■ payroll distribution and configuration options
■ labor distribution and accounting example
■ non-Oracle Interface table
■ pre-generated interface table
■ multiple organizations compliance in Oracle Labor Distribution
2-6 Oracle Labor Distribution User’s Guide

Setting Up Oracle Labor Distribution
Setting Up Oracle Labor DistributionThis section describes the setup procedures and requirements in Oracle Financials,Oracle Applications, Oracle Public Sector Applications, and Labor Distribution thatare required for implementation of Labor Distribution.
Oracle Labor Distribution Setup OverviewOracle Labor Distribution Setup Overview provides setup checklists and anoverview of the setup steps required for Labor Distribution.
Information on the labor distribution setup overview is provided in the followingchapter:
■ Oracle Labor Distribution Setup Overview, page 3-1
Oracle Applications System Administration SetupSetup of Oracle Applications System Administration is required to implementLabor Distribution.
Information on setup of System Administration is provided in the followingchapter:
■ System Administration Setup, page 4-1
Labor Scheduling SetupLabor scheduling setup is used to create, update, and review employee laborschedules. To set up labor scheduling, users define the following:
■ organization suspense accounts
■ organization default labor schedules
■ organization default accounts
■ earnings elements imported
■ global earnings element overrides
■ earnings element groups
■ payroll sources
■ begin date and end date auto-fill parameters
■ clearing account
Introduction 2-7

Setting Up Oracle Labor Distribution
Details on labor scheduling setup are provided in the following chapter:
■ Labor Scheduling Setup, page 5-1
Effort Reporting SetupEffort reporting setup is used to create effort reports. Users define the following:
■ effort report periods
■ earnings elements included in effort reporting
■ system default text messages displayed when certifying and reviewing an effortreport
■ Oracle notification users
Details on effort reporting setup are provided in the following chapter:
■ Effort Reporting Setup, page 6-1
Labor Encumbrance SetupLabor encumbrance setup is required for the use of labor encumbrance in LaborDistribution. The following components must be set up:
■ encumbrance payroll and assignment
■ default encumbrance period
■ encumbrance earnings elements
■ encumbrance options
■ encumbrance summarization options
Details on labor encumbrance setup are provided in the following chapter:
■ Labor Encumbrance Setup, page 7-1
Expenditure Type and Natural Account Auto-Population SetupExpenditure Type and Natural Account Auto-Population Setup defines theauto-population rules for expenditure types and natural accounts. Users completethe following tasks:
■ seed all parameters and their associated information into a lookup table tomake them available for setting up rules and executing rules
2-8 Oracle Labor Distribution User’s Guide

Setting Up Oracle Labor Distribution
■ define rules for expenditure types
■ define rules for natural accounts
■ set up lookup tables
■ set up the Bypass table
Details on setting up expenditure type and natural account auto-population rulesare provided in the following chapter:
■ Expenditure Type and Natural Account Auto-Population Setup, page 8-1
Introduction 2-9

Labor Scheduling
Labor SchedulingThis section describes features used to perform labor scheduling.
Labor Scheduling ProceduresThe Labor Scheduling procedure creates, reviews, and updates labor distributionschedules.
Details on employee selection and scheduling are provided in the followingchapter:
■ Labor Scheduling Procedures, page 9-1
2-10 Oracle Labor Distribution User’s Guide

Payroll Interface
Payroll InterfaceThis section describes the features used in salary distribution.
Import Payroll Transactions ProceduresThe Import Payroll Transactions procedure imports Oracle Payroll lines andpreformats them for the distribution lines process. These preformatted lines arecalled payroll sublines.
Details on importing payroll transactions are provided in the following chapter:
■ Import Payroll Transactions Procedures, page 10-1
Create Distribution Lines ProceduresThe Create Distribution Lines procedure generates distribution lines to be posted toGrants Accounting, Projects, and General Ledger accounts based on the laborschedules defined for the employee assignment together with the employee payrollsublines.
Details on creating distribution lines are provided in the following chapter:
■ Create Distribution Lines Procedures, page 11-1
Summarize and Transfer Payroll Distributions ProceduresThe Summarize and Transfer Payroll Distributions procedure reads andsummarizes the distribution lines created from the Create Distribution Linesprocess, which includes pre-generated distribution and distribution adjustments.This process includes transferring the distribution lines to Grants Accounting,Projects, and General Ledger.
Details on summarizing distribution lines and transfer are provided in thefollowing chapter:
■ Summarize and Transfer Payroll Distributions Procedures, page 12-1
Introduction 2-11

Payroll Interface
Archive and Retrieve Distributions History ProceduresThe Archive Distributions History concurrent process archives and purges datafrom the distributions history and distribution adjustment tables for use at a laterdate. The Retrieve Distributions History concurrent process retrieves the archiveddata.
Details on archiving and retrieving distributions history data are provided in thefollowing chapter:
■ Archive and Retrieve Distributions History Procedures, page 13-1.
2-12 Oracle Labor Distribution User’s Guide

Non-Oracle Payroll Interface
Non-Oracle Payroll InterfaceThis section describes the features used in non-Oracle payroll interface.
Non-Oracle Payroll Interface ProceduresThe non-Oracle payroll interface allows the user to import, review, edit, andvalidate payroll sublines that are created using a non-Oracle payroll system.
Details on the non-Oracle payroll interface are provided in the following chapter:
■ Non-Oracle Payroll Interface Procedures, page 14-1
Pre-generated Distribution Lines Interface ProceduresThe pre-generated distribution lines interface allows the user to import, review,edit, and validate unprocessed pre-generated distribution lines that were loadedusing a time management system before initiating the transfer process within LaborDistribution.
Details on the pre-generated distribution lines interface are provided in thefollowing chapter:
■ Pre-generated Distribution Lines Interface Procedures, page 15-1
Introduction 2-13

Distribution Adjustments
Distribution AdjustmentsThis section describes the features used in distribution adjustments.
Distribution Adjustments ProceduresDistribution adjustments allows the user to modify or approve distribution afterthey are posted to General Ledger, Projects, or Grants Accounting. Oracle Workflowis used to route the distribution adjustments through the approval process. Thischapter includes the Summarize and Transfer Adjustments procedure and theRecover Summarize and Transfer Adjustments procedure.
Details on distribution adjustments are provided in the following chapter:
■ Distribution Adjustments Procedures, page 16-1
2-14 Oracle Labor Distribution User’s Guide

Labor Encumbrances
Labor EncumbrancesThis section describes the features used in labor encumbrances.
Labor Encumbrance Processes and Reports ProceduresLabor encumbrances processes and reports allow the user to perform the followingtasks:
■ create encumbrances
■ summarize and post encumbrances to General Ledger, Projects, or GrantsAccounting
■ update encumbrances
■ liquidate encumbrances
■ review posted encumbrance reports
Details on labor encumbrance processes and reports are provided in the followingchapter:
■ Labor Encumbrance Processes and Reports Procedures, page 17-1
Introduction 2-15

Effort Reporting
Effort ReportingThis section describes the features used in effort reporting.
Effort Reporting ProceduresEffort reporting allows users to create and regenerate effort reports for an employeein order to review, accept, and certify the amount of pay distributed to GrantsAccounting, Projects, and General Ledger. Effort reports summarize the labordistributions made over a period of time for an employee. Workflow options can beenabled to route effort reports to employees and supervisors for approval andcertification.
Details on effort reporting are provided in the following chapter:
■ Effort Reporting Procedures, page 18-1
2-16 Oracle Labor Distribution User’s Guide

Reports
ReportsThis section describes the various management and operational reports that areprovided with Labor Distribution.
Reports ProceduresThe following reports are described in this chapter:
■ Employees Using Default Labor Schedules
■ Default Account
■ Suspense Account
■ Distribution History by Employee
■ Distribution History by Project
■ Distribution History by Award
■ Distribution History by Organization
Details on reports are provided in the following chapter:
■ Reports Procedures, page 19-1
Introduction 2-17
Reconciliation and Control
Reconciliation and ControlThis section describes the features used in reconciliation and control.
Reconciliation and Control ProceduresReconciliation and control allows users to ensure that reconciliation betweenprocesses can be accomplished and that amounts and records are accounted forbetween processes.
Details on reconciliation and control are provided in the following chapter:
■ Reconciliation and Control Reports Procedures, page 20-1
2-18 Oracle Labor Distribution User’s Guide

Topical Essays
Topical EssaysThis section describes the topical essays included in this user's guide.
Oracle Labor Distribution ProcessOracle Labor Distribution Process provides a process flow diagram and shows theinteraction between the different components in Labor Distribution.
Details on the labor distribution process are provided in the following chapter:
■ Labor Distribution Process, page A-1
Scheduling Hierarchy ProcessLabor schedules can be created at multiple levels associated with the employeeassignment and the assignment organization. The scheduling hierarchy processdetermines which labor schedule to use based on a defined priority.
Details on the scheduling hierarchy process are provided in the following chapter:
■ Scheduling Hierarchy Process, page B-1
Labor Encumbrance ProcessLabor Encumbrance Process provides a process flow diagram and shows theinteraction between the different components in the labor encumbrance process forLabor Distribution.
Details on the labor encumbrance process are provided in the following chapter:
■ Labor Encumbrance Process, page C-1
Data Entry Validations ProcessData Entry Validations Process describes the validation process and rules used inLabor Distribution for deleting items and changing begin and end dates.
Details on data entry validation are provided in the following chapter:
■ Data Entry Validations Process, page D-1
Introduction 2-19

Topical Essays
Effort Calculation ProcessEffort Calculation Process describes the process steps in effort calculation andprovides examples of the effort calculation process.
Details on the effort calculation process are provided in the following chapter:
■ Effort Calculation Process, page E-1
Effort Report Notification Workflow ProcessEffort Report Notification Workflow Process describes how Enhanced Workflow isused in effort reporting. Workflow diagrams illustrate how notifications are routed.
Details on the effort report notification workflow process are provided in thefollowing chapter:
■ Effort Report Notification Workflow Process, page F-1
Distribution Adjustments Approval Notification Workflow ProcessDistribution Adjustments Approval Notification Workflow Process describes howWorkflow is used in the distribution adjustments approval process. Workflowdiagrams illustrate how notifications are routed.
Details on the distribution adjustments approval workflow process are provided inthe following chapter:
■ Distribution Adjustments Approval Notification Workflow Process, page G-1
2-20 Oracle Labor Distribution User’s Guide

Reference
ReferenceThis section describes the reference topics included in this user’s guide.
Oracle Labor Distribution Navigator PathsOracle Labor Distribution Navigator Paths lists navigation paths for windows inLabor Distribution.
Details on navigator paths are provided in the following chapter:
■ Labor Distribution Navigation Paths, page H-1
Payroll Distribution and Configuration OptionsPayroll Distribution and Configuration Options describes how scheduling elementsare used in the scheduling hierarchy process and how setup configuration optionsalter the labor scheduling hierarchy.
Details on payroll distribution and configuration options are provided in thefollowing chapter:
■ Distribution and Configuration Options, page I-1
Labor Distribution Accounting ExampleLabor Distribution Accounting Example describes the accounting transactions thatare used in Oracle Labor Distribution. The example presents one example of howpayroll transactions, labor distribution transactions, and distribution transactionscan be selected in General Ledger.
Details on the labor distribution accounting example are provided in the followingchapter:
■ Labor Distribution Accounting Example, page J-1
Non-Oracle Payroll Interface TableNon-Oracle Payroll Interface Table describes the Non-Oracle Payroll Interface table.
Details on the non-Oracle Payroll Interface table are provided in the followingchapter:
■ Non-Oracle Payroll Interface Table, page K-1
Introduction 2-21

Reference
Pre-generated Interface TablePre-generated Interface Table describes the Pre-generated Interface table.
Details on the Pre-generated Interface table are provided in the following chapter:
■ Pre-generated Interface Table, page L-1
Multiple Organizations Compliance in Oracle Labor DistributionMultiple Organizations Compliance in Oracle Labor Distribution describes howMultiple Organizations is used in Labor Distribution.
Details on Multiple Organizations compliance in Labor Distribution are provided inthe following chapter:
■ Multiple Organizations Compliance in Oracle Labor Distribution, page M-1
2-22 Oracle Labor Distribution User’s Guide

Part I
Setting Up Oracle Labor Distribution

Oracle Labor Distribution Setup Ove
3
Oracle Labor Distribution Setup OverviewThis chapter provides an overview of the setup steps required for Oracle LaborDistribution. The following sections are in this chapter:
■ Overview
■ Labor Distribution Setup Checklist
■ Labor Distribution Setup Steps
rview 3-1

Overview
OverviewThis chapter provides a checklist of setup steps in Labor Distribution.
Complete all required setup steps for the following applications before beginningthe Labor Distribution setup steps.
■ Oracle Applications System Administration
■ Oracle General Ledger
■ Oracle Human Resource Management Systems
■ Oracle Grants Accounting
Note: Grants Accounting is optional.
■ Oracle Projects
Note: Oracle Projects is optional.
■ Oracle Workflow
3-2 Oracle Labor Distribution User’s Guide
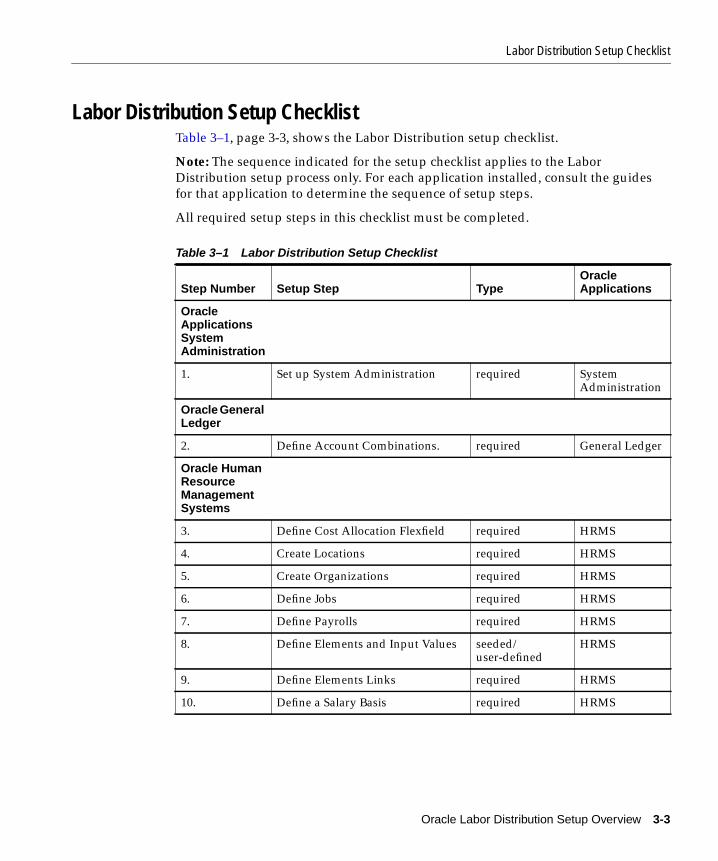
Labor Distribution Setup Checklist
Labor Distribution Setup ChecklistTable 3–1, page 3-3, shows the Labor Distribution setup checklist.
Note: The sequence indicated for the setup checklist applies to the LaborDistribution setup process only. For each application installed, consult the guidesfor that application to determine the sequence of setup steps.
All required setup steps in this checklist must be completed.
Table 3–1 Labor Distribution Setup Checklist
Step Number Setup Step TypeOracleApplications
OracleApplicationsSystemAdministration
1. Set up System Administration required SystemAdministration
Oracle GeneralLedger
2. Define Account Combinations. required General Ledger
Oracle HumanResourceManagementSystems
3. Define Cost Allocation Flexfield required HRMS
4. Create Locations required HRMS
5. Create Organizations required HRMS
6. Define Jobs required HRMS
7. Define Payrolls required HRMS
8. Define Elements and Input Values seeded/user-defined
HRMS
9. Define Elements Links required HRMS
10. Define a Salary Basis required HRMS
Oracle Labor Distribution Setup Overview 3-3

Labor Distribution Setup Checklist
Oracle GrantsAccounting
11. Set Up Grants Accounting. optional GrantsAccounting
OracleProjects
12. Set Up Projects optional Projects
Workflow
13. Set Up Workflow. required Workflow
LaborDistribution,LaborSchedulingSetup
14. Set Up Organization SuspenseAccounts
optional LaborDistribution
15. Set Up Organization Default LaborSchedule
optional LaborDistribution
16. Set Up Organization DefaultAccounts
optional LaborDistribution
17. Set Up Earnings ElementsImported
required LaborDistribution
18. Set Up Global Earnings ElementOverride
optional LaborDistribution
19. Set Up Earnings Element Groups optional LaborDistribution
20. Set Up Payroll Sources optional LaborDistribution
21. Set Up Begin Date Auto-fillParameters
optional LaborDistribution
22. Set Up End Date Auto-fillParameters
optional LaborDistribution
23. Set Up Clearing Account required LaborDistribution
Table 3–1 Labor Distribution Setup Checklist
Step Number Setup Step TypeOracleApplications
3-4 Oracle Labor Distribution User’s Guide

Labor Distribution Setup Checklist
EffortReportingSetup
24. Set Up Effort Report Periods required if effortreporting used
LaborDistribution
25. Set Up Earnings Elements Includedin Effort Reports
required if effortreporting used
LaborDistribution
26. Modify Text Message on EffortReport
required if effortreporting used
LaborDistribution
27. Create Notification Users required if effortreporting used
LaborDistribution
LaborEncumbranceSetup
28. Set Up Encumbrance Payroll andAssignment Selection
required ifencumbrancesused
LaborDistribution
29. Set Up Default EncumbrancePeriod Definition for Organization
required ifencumbrancesused
LaborDistribution
30. Set Up Encumbrance EarningsElement Selection
required ifencumbrancesused
LaborDistribution
31. Set Up Payroll Effective DateSelection
required ifencumbrancesused
LaborDistribution
32. Set Up Encumbrance Summarizeand Transfer
required ifencumbrancesused
LaborDistribution
ExpenditureType andNaturalAccount Auto-PopulationSetup
Table 3–1 Labor Distribution Setup Checklist
Step Number Setup Step TypeOracleApplications
Oracle Labor Distribution Setup Overview 3-5

Labor Distribution Setup Checklist
33. Set Up Lookups Table required ifauto-populationenabled
LaborDistribution
34. Define Expenditure TypeAuto-Population Rules
required ifauto-populationenabled
LaborDistribution
35. Define Natural AccountAuto-Population Rules
required ifauto-populationenabled
LaborDistribution
36. Set Up By-Pass Table required ifauto-populationenabled
LaborDistribution
37. Set Up Autopop Segment required ifNatural Accountauto-populationenabled
LaborDistribution
Table 3–1 Labor Distribution Setup Checklist
Step Number Setup Step TypeOracleApplications
3-6 Oracle Labor Distribution User’s Guide

Labor Distribution Setup Steps
Labor Distribution Setup StepsTo set up Labor Distribution, perform the following steps.
1. Set Up System Administration.Set up System Administration.
To set up System Administration, see System Administration Setup, page 4-1, andOracle Applications System Administrator’s Guide.
2. Define Account CombinationsAccounting flexfield combinations must be defined to use Labor Distribution.
WARNING: Labor Distribution may not allow users to select accounting flexfieldcombinations for the labor schedule if journals cannot be posted for those valuecombinations. For example, users may not be able to exit the accounting flexfieldwindow when setting up labor schedule lines if the selected accounting flexfieldcombination is not setup, enabled, and postable.
To define accounting flexfield combinations, see Defining Accounts, Oracle GeneralLedger User’s Guide.
3. Define Cost Allocation FlexfieldThe cost allocation flexfield must be defined and mapped to General Ledger to useLabor Distribution.
WARNING: The cost allocation flexfield segments to General Ledger segmentmapping must populate all fields of the General Ledger accounting flexfieldstructure. Otherwise, payroll costing does not post to General Ledger and payrollscannot be imported to Labor Distribution.
To define the cost allocation flexfield, see Key Flexfield Segments Window and CostAllocation Flexfield, Oracle Applications Flexfields Guide and Cost Allocation KeyFlexfield, Using Oracle HRMS - The Fundamentals.
To map the cost allocation flexfield to General Ledger accounting flexfield segments,see Running the Transfer to GL Process, Using Oracle HRMS - The Fundamentals.
4. Create LocationsLocation must be set up in Human Resources to use Labor Distribution.
Oracle Labor Distribution Setup Overview 3-7

Labor Distribution Setup Steps
To set up the location, see Setting Up Locations, Using Oracle HRMS - TheFundamentals.
5. Create OrganizationsOrganizations must be defined in Human Resources to use Multiple Organizationsin Labor Distribution.
For information on creating organizations, see Creating an Organization, UsingOracle HRMS - The Fundamentals.
6. Define JobsJobs must be defined in Human Resources to use Labor Distribution. If usingGrants Accounting, each employee assignment must have a job assigned to it.
To define jobs, see Defining a Job, Using Oracle HRMS - The Fundamentals.
7. Define PayrollsPayrolls must be defined in Human Resources to use Labor Distribution.
WARNING: Labor Distribution imports and redistributes all employee assignmentson a payroll for the earnings elements selected. If users want to exclude certainemployees from labor distribution, these employees must be assigned to a separatepayroll that is not to be imported to Labor Distribution.
Within Oracle Human Resources and Oracle Payroll, labor costs can be assigned atthe following hierarchical levels:
■ payroll
■ element link
■ organization
■ assignment
■ element entry
For payroll imported to Labor Distribution, it is recommended that costing be doneat the Payroll level. When distributing labor costs to General Ledger, Projects, orGrants Accounting charging instructions, Labor Distribution journals against thecosting account setup for the payroll.
WARNING: The costing account must be one of the clearing accounts selected inLabor Distribution; otherwise the payroll selected for import cannot be processed.
3-8 Oracle Labor Distribution User’s Guide
Labor Distribution Setup Steps
Note: The following settings must be defined as follows.
■ A payroll clearing costing account must be entered in the Costing field.
■ An appropriate General Ledger suspense account must be entered in theSuspense field.
For information on accounting transactions, see Labor Distribution AccountingExample, page J-3.
To define payroll groups, see Defining a Payroll, Using Oracle HRMS - TheFundamentals.
8. Define Elements and Input ValuesWARNING: Labor Distribution performs special calculations on the earningselement Regular Salary to account for changes in salary or wages. If users createother elements for these types of pay, no special calculations are performed forthose elements.
For information on defining elements and inputs, see Defining an Element andDefining an Element’s Input Values, Compensation and Benefits Using Oracle HRMS(US).
9. Define Element LinksWARNING: Labor Distribution imports and redistributes all pay amounts foremployees on the selected payrolls for the earnings elements selected. If users donot want the pay amount distributed, a separate earnings element that is notselected for import to Labor Distribution can be used.
WARNING: For earnings elements to be imported to Labor Distribution, if costingis set up at this level, the costing account must be identical to the clearing accountselected in Labor Distribution; otherwise, the payroll selected for import cannot beprocessed.
For information on defining element links, see Defining Element Links,Compensation and Benefits Using Oracle HRMS (US).
For information on accounting transactions, see Labor Distribution AccountingExample, page J-1.
10. Define a Salary BasisA salary basis must be defined in Labor Distribution to use Labor Distribution.
Oracle Labor Distribution Setup Overview 3-9

Labor Distribution Setup Steps
To define salary bases, see Defining a Salary Basis, Compensation and Benefits UsingOracle HRMS (US).
11. Set Up Grants AccountingSet up Grants Accounting. This step is optional.
To set up Grants Accounting, see Oracle Grants Accounting Setup Overview, OracleGrants Accounting User’s Guide.
12. Set Up ProjectsSet up Projects. This step is optional.
To set up Projects, see Planning Your Implementation, Oracle Projects User’s Guide.
13. Set Up WorkflowSet up Workflow to enable the effort reporting and distribution adjustmentsworkflow processes.
To set up Workflow, see Overview of Setting Up, Oracle Workflow Guide.
14. Set Up Organization Suspense AccountsDefine Grants Accounting and Projects charging instructions and General Ledgeraccounting flexfields to set up Organization Suspense Accounts.
To set up Organization Suspense Accounts, see Labor Scheduling Setup, page 5-1.
15. Set Up Organization Default Labor ScheduleDefine Grants Accounting and Projects charging instructions and General Ledgeraccounting flexfields and percentages to set up Organization Default LaborSchedule.
To set up Organization Default Labor Schedule, see Labor Scheduling Setup,page 5-1.
16. Set Up Organization Default AccountsDefine Grants Accounting charging instructions and General Ledger accountingflexfields to set up Organization Default Accounts.
3-10 Oracle Labor Distribution User’s Guide

Labor Distribution Setup Steps
To set up Organization Default Accounts, see Labor Scheduling Setup, page 5-1.
17. Set Up Earnings Element ImportedSelect payroll earnings elements to be imported during the payroll import process.
To select payroll earnings elements, see Labor Scheduling Setup, page 5-1.
18. Set Up Global Earnings Element OverrideDefine a set of charging instructions for a particular earnings element that overridesall of the employee, organization, and assignment schedule hierarchy selections.
To set up global earnings override, see Labor Scheduling Setup, page 5-1.
19. Set Up Earnings Element GroupsDefine earnings element groups at the site level.
To define earnings element groups, see Labor Scheduling Setup, page 5-1.
20. Set Up Payroll SourcesDefine source codes for the payroll source.
To define payroll sources, see Labor Scheduling Setup, page 5-1.
21. Set Up Begin Date Auto-fill ParametersSelect an auto-fill option for the begin date field.
To select a begin date auto-fill option, see Labor Scheduling Setup, page 5-1.
22. Set Up End Date Auto-fill ParametersSelect an auto-fill option for the end date field.
To select an end date auto-fill option, see Labor Scheduling Setup, page 5-1.
23. Set Up Clearing AccountSet up a clearing account to maintain balancing transactions.
To set up a clearing account, see Labor Scheduling Setup, page 5-1.
Oracle Labor Distribution Setup Overview 3-11

Labor Distribution Setup Steps
24. Set Up Effort Report PeriodsDefine calendar days used in a specific effort reporting period.
To define effort report periods, see Effort Reporting Setup, page 6-1.
25. Set Up Earnings Elements Included in Effort ReportsSelect earnings elements to be included in effort reports.
To select earnings elements to be included in effort reports, see Effort ReportingSetup, page 6-1.
26. Modify Text Message on Effort ReportModify the certify text message or the review text message for effort reports.
To modify the text message on an effort report, see Effort Reporting Setup, page 6-1.
27. Create UsersDefine employees as notification users to enable them to view, certify, and approveeffort reports.
To define employees as notification users, see Effort Reporting Setup, page 6-1.
28. Set Up Encumbrance Payroll and Assignment SelectionSet up encumbrance payroll and assignment selection to select specific payrollnames for encumbrance.
To set up encumbrance payroll and assignment selection, see Labor EncumbranceSetup, page 7-1.
29. Set Up Default Encumbrance Period Definition for OrganizationSet up the default encumbrance period to define a time period that is common forall employee assignments in a specified organization.
To define the default encumbrance period, see Labor Encumbrance Setup, page 7-1.
30. Set Up Encumbrance Earnings Element SelectionSelect earnings elements to be included in encumbrances.
3-12 Oracle Labor Distribution User’s Guide

Labor Distribution Setup Steps
To select encumbrance earnings elements, see Labor Encumbrance Setup, page 7-1.
31. Set Up Payroll Effective Date SelectionSelect the payroll effective date to post encumbrance transactions to General Ledgeror Grants Accounting.
For information on selecting the payroll effective date, see Labor EncumbranceSetup, page 7-1.
32. Setting Up Encumbrance Summarize and TransferSelect the encumbrance summarization option to expedite posting encumbrances toGeneral Ledger or Grants Accounting.
For information on selecting encumbrance summarization options, see LaborEncumbrance Setup, page 7-1.
33. Set Up Lookup TablesSeed all parameters and their associated information into a lookup table.
To seed the lookup tables, see Expenditure Type and Natural AccountAuto-Population Setup, page 8-1.
34. Define Expenditure Type Auto-Population RulesDefine auto-population rules for expenditure types.
To define auto-population rules for expenditure types, see Expenditure Type andNatural Account Auto-Population Setup, page 8-1.
35. Define Natural Account Auto-Population RulesDefine auto-population rules for natural accounts.
To define auto-population rules for natural accounts, see Expenditure Type andNatural Account Auto-Population Setup, page 8-1.
36. Set Up By-Pass TableSet up the By-Pass table to define expenditure types to be passed over byauto-population.
Oracle Labor Distribution Setup Overview 3-13

Labor Distribution Setup Steps
To set up the By-Pass table, see Expenditure Type and Natural AccountAuto-Population Setup, page 8-1.
37. Set Up Autopop SegmentSet up Autopop Segment to use auto-population.
To set up Autopop Segment, see Expenditure Type and Natural AccountAuto-Population Setup, page 8-1.
3-14 Oracle Labor Distribution User’s Guide

System Administration
4
System Administration SetupThis chapter describes System Administration setup steps that are required forOracle Labor Distribution. The following sections are in this chapter:
■ Overview
■ System Administration Setup Checklist
■ System Administration Setup Steps
Setup 4-1

Overview
OverviewThis chapter describes the setup steps that are required for System Administrationin Labor Distribution.
Use the Oracle Applications System Administrator’s Guide with this guide to completeor modify System Administration setup.
4-2 Oracle Labor Distribution User’s Guide

System Administration Setup Checklist
System Administration Setup ChecklistTable 4–1 shows the System Administration setup checklist.
All required setup steps in this checklist must be completed. Setup steps that needspecific settings or additional information to implement Oracle Labor Distributionare shown in bold italic and described in the following section, SystemAdministration Setup Steps, page 4-4.
Table 4–1 System Administration Setup Checklist
Step Number Setup Step
OracleApplicationsSystemAdministration
Oracle LaborDistribution
Step 1. Create an Oracle Applications User required required
Step 2. Create New Responsibilities optional required
Step 3. Implement Function Security optional required
Step 4. Create Additional Users required required
Step 5. Set Up Printers required required
Step 6. Specify Site-Level andApplication-Level Profile Options
required withdefaults
required withdefaults
Step 7. Define Concurrent Managers optional optional
Step 8. Define Request Sets optional optional
Step 9. Set Up AuditTrail optional optional
Step 10. Modify Language Prompts optional optional
Step 11. Modify Territory LOV Values optional optional
System Administration Setup 4-3

System Administration Setup Steps
System Administration Setup StepsAll required System Administration setup steps must be completed to use LaborDistribution.
Use the Oracle Applications System Administrator’s Guide with this guide to completeall required setup steps that are not described in this section.
Step 6. Specify Site-Level and Responsibility-Level Profile OptionsThis section includes the following parts:
■ Set Up Profile Option Levels
■ Set Up Profile Option Values
Set Up Profile Option LevelsThe common user profile options for Oracle Applications must be specified as partof Oracle Applications System Administration setup. There are a maximum of fourlevels at which a profile can be set: Site, Application, Responsibility, and User. Mostprofiles are seeded with default values at the site-level that serve as the defaultsuntil they are overridden at other levels.
If using single organization, the profile options are set at the site level. If MultipleOrganizations is implemented, all Labor Distribution profile values should be set atthe responsibility level.
Table 4–2 describes the profile option levels.
Table 4–2 Profile Option Levels
Feature Profile Option Name SiteApplica-tion
Respon-sibility User
LaborScheduling
PSP: Use Organization DefaultLabor Schedule
x x
PSP: Use Organization DefaultAccount
x x
PSP: Display OrganizationDefault Account
x x
PSP: FTE Options x x
PSP: FTE Attribute x x
4-4 Oracle Labor Distribution User’s Guide

System Administration Setup Steps
PSP: Generic Suspense AccountOrganization
x x
LaborScheduling
PSP: Organization to be shown inreports
x x
GL: Set of Books x x
HR: Business Group x x
MO: Operating Unit x x
SummarizeDistributionLines andTransfer
PSP: Enable Summarize &Transfer User Hooks
x x
Auto-Popu-lation
PSP: Use Auto-Population x x
DistributionAdjustments
PSP: Use Default GL PostingOverride Date
x x
DistributionAdjustments
PSP: Adjustment ApprovalTimeout in Days
x x
EffortReporting
PSP: Enable Effort Report UserHooks
x
CreateDistributionLines,SummarizeDistributionLines andTransfer
PSP: Use Non-Oracle EffectiveDate
x x
Maintenanceof Pre-gen-eratedDistributionLines
PSP: Use Suspense Account forPre-Gen Import
x x
Reports File Server: Enabled x x
Table 4–2 Profile Option Levels
Feature Profile Option Name SiteApplica-tion
Respon-sibility User
System Administration Setup 4-5

System Administration Setup Steps
Set Up Profile Option ValuesTable 4–3 describes the profile option values.
Concurrent: Save Output x x
Concurrent: Report Copies x x
Printer x x
Table 4–3 Labor Distribution Profile Option Values
Profile Option Name Value Description
PSP: Use OrganizationDefault Labor Schedule
yes or no enables user to use the Organization Default LaborSchedule; if enabled, the Use Organization Default LaborSchedule check box is selected in the Labor Schedulingwindow for every employee assignment
PSP: Use OrganizationDefault Account
yes or no if enabled, the organization default account is included inthe schedule hierarchy
PSP: Display OrganizationDefault Account
yes or no if enabled, the organization default account is displayedin the Schedule Lines, Monthly Schedule Summary, andPayroll Period Schedule Summary windows
Note: If this profile option is set to Yes, the UseOrganization Default Account profile option must also beset to Yes.
PSP: FTE Options attribute orBUDGET_VALUES
values selected from Oracle Human Resources
PSP: FTE Attribute attributes if enabled, user can select Attribute 1 through 30 in theassignment descriptive flexfield from Human Resources
Note: if enabled, PSP: FTE Options must be set toAttribute.
PSP: Generic SuspenseAccount Organization
generic suspenseaccount
any Organization can be set as the Generic SuspenseAccount Organization; must be set up at theResponsibility level
Note: Profile must be enabled if Multiple Organizations isimplemented, and a generic suspense account must belinked to each responsibility.
Table 4–2 Profile Option Levels
Feature Profile Option Name SiteApplica-tion
Respon-sibility User
4-6 Oracle Labor Distribution User’s Guide
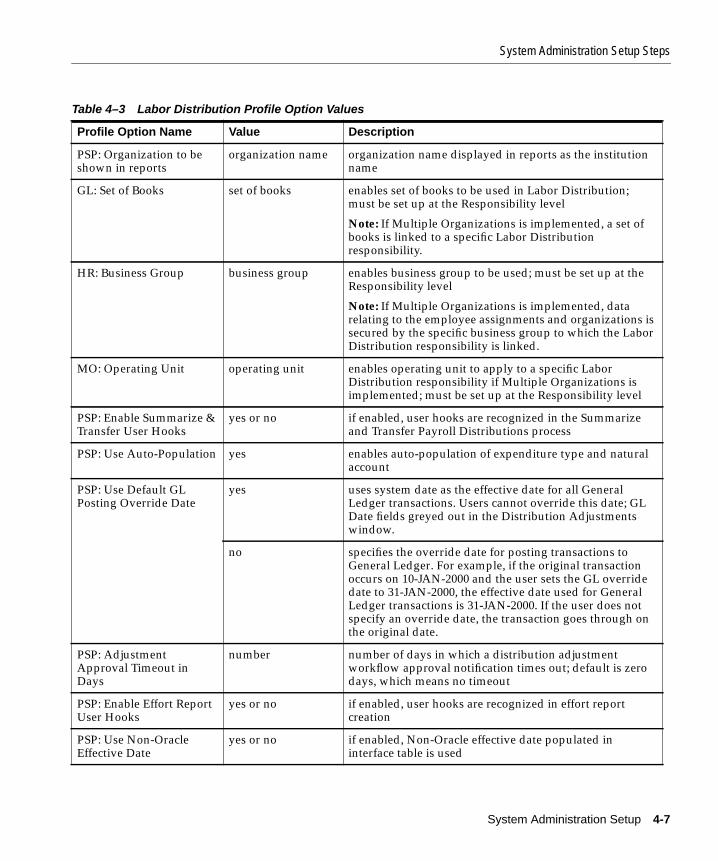
System Administration Setup Steps
PSP: Organization to beshown in reports
organization name organization name displayed in reports as the institutionname
GL: Set of Books set of books enables set of books to be used in Labor Distribution;must be set up at the Responsibility level
Note: If Multiple Organizations is implemented, a set ofbooks is linked to a specific Labor Distributionresponsibility.
HR: Business Group business group enables business group to be used; must be set up at theResponsibility level
Note: If Multiple Organizations is implemented, datarelating to the employee assignments and organizations issecured by the specific business group to which the LaborDistribution responsibility is linked.
MO: Operating Unit operating unit enables operating unit to apply to a specific LaborDistribution responsibility if Multiple Organizations isimplemented; must be set up at the Responsibility level
PSP: Enable Summarize &Transfer User Hooks
yes or no if enabled, user hooks are recognized in the Summarizeand Transfer Payroll Distributions process
PSP: Use Auto-Population yes enables auto-population of expenditure type and naturalaccount
PSP: Use Default GLPosting Override Date
yes uses system date as the effective date for all GeneralLedger transactions. Users cannot override this date; GLDate fields greyed out in the Distribution Adjustmentswindow.
no specifies the override date for posting transactions toGeneral Ledger. For example, if the original transactionoccurs on 10-JAN-2000 and the user sets the GL overridedate to 31-JAN-2000, the effective date used for GeneralLedger transactions is 31-JAN-2000. If the user does notspecify an override date, the transaction goes through onthe original date.
PSP: AdjustmentApproval Timeout inDays
number number of days in which a distribution adjustmentworkflow approval notification times out; default is zerodays, which means no timeout
PSP: Enable Effort ReportUser Hooks
yes or no if enabled, user hooks are recognized in effort reportcreation
PSP: Use Non-OracleEffective Date
yes or no if enabled, Non-Oracle effective date populated ininterface table is used
Table 4–3 Labor Distribution Profile Option Values
Profile Option Name Value Description
System Administration Setup 4-7

System Administration Setup Steps
PSP: Use SuspenseAccount for Pre-GenImport
yes or no if enabled, the Import process uses the Suspense Accountfor Pre-Generated distribution lines with invalid accounts
File Server: Enabled yes or no enables users to view reports in the concurrent manager
Concurrent: Save Output yes or no if enabled, the default value is the selected check box inthe Printing Options window that is used to print out ahard copy of a report in its entirety
Concurrent: ReportCopies
number default value for the number of copies to appear in thePrinting Options window that is used to print out a hardcopy of a report in its entirety
Printer printer default printer to appear in the Printing Options windowthat is used to print out a hard copy of a report in itsentirety
Table 4–3 Labor Distribution Profile Option Values
Profile Option Name Value Description
4-8 Oracle Labor Distribution User’s Guide

Labor Scheduling
5
Labor Scheduling SetupThis chapter describes how to set up labor scheduling. The following sections are inthis chapter:
■ Definition
■ Overview
■ Setting Up Organization Suspense Accounts Procedure
■ Organization Suspense Accounts Window
■ Organization Suspense Accounts Window Description
■ Setting Up Organization Default Labor Schedule Procedure
■ Organization Default Labor Schedule Window
■ Organization Default Labor Schedule Window Description
■ Setting Up Organization Default Accounts Procedure
■ Organization Default Accounts Window
■ Organization Default Accounts Window Description
■ Setting Up Earnings Elements Imported Procedure
■ Earnings Element Imported Window
■ Earnings Element Imported Window Description
■ Setting Up Global Earnings Element Override Procedure
■ Global Earnings Element Override Window
■ Global Earnings Element Override Window Description
■ Setting Up Earnings Element Groups Procedure
Setup 5-1

■ Earnings Element Groups Window
■ Earnings Element Groups Window Description
■ Setting Up Payroll Sources Procedure
■ Payroll Sources Window
■ Payroll Sources Window Description
■ Setting Up Begin Date Auto-fill Parameters Procedure
■ Begin Date Auto-fill Parameters Window
■ Begin Date Auto-fill Parameters Window Description
■ Setting Up End Date Auto-fill Parameters Procedure
■ End Date Auto-fill Parameters Window
■ End Date Auto-fill Parameters Window Description
■ Setting Up Clearing Account Procedure
■ Clearing Account Setup Window
■ Clearing Account Setup Window Description
5-2 Oracle Labor Distribution User’s Guide

Overview
DefinitionThe labor scheduling setup options provide users with flexibility in laborscheduling.
OverviewOracle Labor Distribution is set up to distribute payroll costs to one or morecharging instructions in Oracle Grants Accounting, Oracle Projects, or OracleGeneral Ledger.
Table 5–1 shows the charging instructions that must be entered for Projects andGrants Accounting.
ProcessThe labor scheduling setup process includes setting up the following:
■ Organization Suspense Accounts
■ Organization Default Labor Schedule
■ Organization Default Accounts
■ Earnings Elements Imported
■ Global Earnings Element Override
■ Earnings Element Groups
■ Payroll Sources
■ Begin Date and End Date Auto-fill Parameters
■ Clearing Account
Table 5–1 Projects and Grants Accounting Charging Instructions
Field Projects Grants Accounting
Project x x
Expenditure Organization x x
Expenditure Type x x
Task x x
Award x
Labor Scheduling Setup 5-3

Overview
Organization Suspense Accounts
Rules Setting up Organization Suspense Accounts is optional. Users can specifyGrants Accounting and Projects charging instructions and General Ledgeraccounting flexfields. Users specify the effective date range of the organizationsuspense account.
Once an organization suspense account is saved, the following rules apply:
■ An organization suspense account cannot be deleted if payrolls are importedfor the date range of the suspense account.
■ The begin date cannot be modified.
For information on validation rules, see Data Entry Validations Process, Data EntryValidations Process, page D-1.
Organization Default Labor ScheduleSetting up the Organization Default Labor Schedule is optional. Users make thisdetermination when setting up system profile options.
For information on setting up system profile options, see System AdministrationSetup, page 4-1
The Organization Default Labor Schedule setup procedure defines the organizationdefault labor schedule by specifying Grants Accounting and Projects charginginstructions and General Ledger accounting flexfields and percentages. Usersspecify the effective date range of the default labor schedule.
Rules Once the default labor schedule is saved, the following rules apply:
■ The default labor schedule cannot be deleted if payrolls are imported for thedate range of the default labor schedule.
■ The begin date cannot be modified.
For information on validation rules, see Data Entry Validations Process, page D-1.
Organization Default AccountsSetting up Organization Default Accounts is optional. Users make thisdetermination when setting up system profile options.
For information on setting up system profile options, see System AdministrationSetup, page 4-1.
5-4 Oracle Labor Distribution User’s Guide

Overview
The Organization Default Accounts setup procedure sets up an organization defaultaccount by specifying Grants Accounting and Projects charging instructions andGeneral Ledger accounting flexfields. Users specify the effective date range of thedefault account.
Rules Once the default account is saved, the following rules apply:
■ The default account cannot be deleted if payrolls are imported for the daterange of the organization default account.
■ The begin date cannot be modified.
For information on validation rules, see Data Entry Validations Process, page D-1.
Earnings Elements ImportedThe Earnings Elements Imported setup procedure enables users to define whichpayroll earnings elements are to be imported during the payroll import process andthe effective date range of the earnings element. Users can add or delete earningselements from the Earnings Element Imported setup window. The earnings elementcannot be deleted if there are payrolls imported for the defined dates.
Note: Only elements selected for import can be used in the Scheduling Hierarchyregion of the Schedule Lines window.
The following rules apply to Earnings Elements Imported:
■ The same earnings element can occur more than once as long as the periods donot overlap.
■ The end date of an earnings element can be extended as long as the new perioddoes not overlap with that of an already existing period of the same elementtype.
■ Once an earnings element import setup is saved, the begin date of an elementcannot be modified.
For information on validation rules, see Data Entry Validations Process, page D-1.
Global Earnings Element OverrideThe Global Earnings Element Override setup procedure creates a specific set ofcharging instructions for a particular earnings element. The global earnings elementoverrides all of the employee and assignment schedule hierarchy selections. Theglobal earnings element cannot be deleted if there are payrolls imported for thedefined dates.
Labor Scheduling Setup 5-5

Overview
The user specifies Grants Accounting and Projects charging instructions andGeneral Ledger accounting flexfields and percentages. The user also specifies theeffective date range of the override.
Rules Once the override schedule is saved, the following rules apply:
■ The override schedule cannot be deleted if there are payrolls imported for thedefined dates.
■ The begin date cannot be modified.
For information on validation rules, see Data Entry Validations Process, page D-1.
Earnings Element GroupsElement Groups are defined at the site level and are used to group earningselements. These classification groups identify a common distribution group of allearnings elements within that classification that are scheduled and distributed foran employee assignment.
Rules The following rules apply to the earnings element groups:
■ An earnings element can be active in only one group for a given day.
■ Once the earnings element group is saved, the begin date of an element groupcannot be modified.
For information on validation rules, see Data Entry Validations Process, page D-1.
Example A single schedule is created for an employee assignment at the ElementGroup level of Regular Salary where Regular Salary includes the earnings elementsof Regular Pay, Overtime, and Shift. Any Regular Pay, Overtime, and Shift earningselement that is paid to that employee assignment uses the labor schedule definedfor the Regular Salary element group. This means that the user does not have toindividually create a labor schedule for each earnings element.
For information on scheduling hierarchies, see Scheduling Hierarchy Process,page B-1.
Payroll SourcesThe Payroll Sources setup procedure is used to define source codes for payrollsources other than Oracle. The Source Type source code is used for validations onthe import of non-Oracle payroll sources and pregenerated distribution lines. It ispossible to have more than one source code for each payroll source type.
5-6 Oracle Labor Distribution User’s Guide

Overview
Begin Date and End Date Auto-fill ParametersThe Begin Date and End Date Auto-fill Parameters setup procedures are used toselect one of three options to auto-fill the begin date field and end date field in theSchedule Lines window for each charging instruction to Grants Accounting,Projects, and General Ledger.
Clearing AccountThe clearing account in Labor Distribution is used for all types of balancingtransactions. The clearing account maintains a balance of zero as transactions areprocessed. The clearing account can be used by users to verify that transactions areprocessing correctly by returning to a zero balance.
The clearing account is usually the same General Ledger account that was chargedwith employee payroll costs when they were transferred to General Ledger fromOracle Payroll. Use the Clearing Account setup procedure to change the clearingaccount.
For information on accounting transactions, see Labor Distribution AccountingExample, page J-1.
For information on defining payrolls, see Labor Scheduling Setup, page 5-1.
Labor Scheduling Setup 5-7

Setting Up Organization Suspense Accounts Procedure
Setting Up Organization Suspense Accounts ProcedureSetting up Organization Suspense Accounts includes the following:
■ Entering a General Ledger Accounting Flexfield
■ Entering a Grants Accounting or Projects Instruction
To set up organization suspense accounts, perform the following steps.
1. In Labor Distribution, navigate to the Organization Suspense Accounts windowas follows:
Setup - Organization Suspense Accounts
2. Perform one of the following tasks:
■ To set up a generic suspense account, select the Generic Suspense Accountcheck box.
■ To set up an organization suspense account, in the Organization field, selectan organization from the list of values.
Entering a General Ledger Accounting FlexfieldIf entering a General Ledger accounting flexfield, perform the following steps.
1. In the GL Account field, select a General Ledger account from the list of values.
A pop-up find window appears.
2. In the Shortcut Code field, enter a code from the list of values.
3. Click OK.
The Parameters pop-up window appears.
4. Enter data in each field as required from the list of values.
5. Click OK.
6. In the Begin Date field, enter the start date for the use of the General Ledgeraccount specified by the accounting flexfield.
7. Optionally, in the End Date field, enter the end date for the use of the GeneralLedger account specified by the accounting flexfield.
For information on end date validation rules, see Data Entry ValidationsProcess, page D-1.
8. Repeat steps 1 through 7 until completed.
5-8 Oracle Labor Distribution User’s Guide

Setting Up Organization Suspense Accounts Procedure
Note: Records must be end-dated before additional records can be created.
9. Optionally, in the Comments field, enter comments.
Entering a Grants Accounting or Projects InstructionIf entering a Grants Accounting or Projects charging instruction, perform thefollowing steps.
1. Enter data in the following fields as described in Table 5–2, page 5-11:
■ Project Number
■ Task Number
■ Award Number, for Grants Accounting only
■ Exp Org
■ Exp Type
■ Begin Date
■ End Date
2. Repeat Step 1 until completed.
Note: Records must be end-dated before additional records can be created.
3. Save or save and continue as follows:
File - Save or Save and Proceed
4. Close the window.
Labor Scheduling Setup 5-9

Organization Suspense Accounts Window
Organization Suspense Accounts Window
Figure 5–1 Organization Suspense Accounts Window
5-10 Oracle Labor Distribution User’s Guide

Organization Suspense Accounts Window Description
Organization Suspense Accounts Window Description
Table 5–2 Organization Suspense Accounts Window Description
Field Name Type Features Description
Organization required list of values organization name
Generic SuspenseAccount
display only check box indicates if this organization is to be used as genericsuspense account; corresponds to organizationselected as PSP: Generic Suspense AccountOrganization profile option
Account DetailsRegion
GL Account conditionallyrequired
list of values:pop-upwindow
General Ledger accounting flexfield; required if thereare no Grants Accounting or Projects charginginstructions
Project Number conditionallyrequired
list of values Grants Accounting or Projects project numbercharging instruction; required if there are no GeneralLedger accounting flexfields
Task Number conditionallyrequired
list of values Grants Accounting or Projects task number charginginstruction; required if there are no General Ledgeraccounting flexfields
Award Number conditionallyrequired
list of values Grants Accounting award number charginginstruction; required if there are no General Ledgeraccounting flexfields; not required if entering aProjects charging instruction
Exp Org conditionallyrequired
list of values Grants Accounting or Projects expenditureorganization charging instruction; required if thereare no General Ledger accounting flexfields
Exp Type conditionallyrequired
list of values Grants Accounting or Projects expenditure typecharging instruction; required if there are no GeneralLedger accounting flexfields
Begin Date required list of values:pop-upcalendar
effective start date of suspense account; cannot bemodified or deleted
End Date optional list of values:pop-upcalendar
effective end date of suspense account
Comments optional user setup comments
Labor Scheduling Setup 5-11

Setting Up Organization Default Labor Schedule Procedure
Setting Up Organization Default Labor Schedule ProcedureSetting up Organization Default Labor Schedule includes the following:
■ Entering a General Ledger Accounting Flexfield
■ Entering a Grants Accounting or Projects Charging Instruction
To set up organization default labor schedules, perform the following steps.
1. In Labor Distribution, navigate to the Organization Default Labor Schedulewindow as follows:
Setup - Org. Default Labor Schedules
2. In the Organization field, select an organization from the list of values.
3. In the Begin Date field, enter the effective start date for the OrganizationDefault Labor Schedule from the list of values.
4. Optionally, in the End Date field, enter the effective end date for theOrganization Default Labor Schedule from the list of values.
For information on deletion and end date validation rules, see Data EntryValidations Process, page D-1.
Entering a General Ledger Accounting FlexfieldIf entering a General Ledger accounting flexfield, perform the following steps.
1. In the GL Account field, select a General Ledger account from the list of values.
A pop-up find window appears.
2. In the Shortcut Code field, enter a code from the list of values.
3. Click OK.
The Parameters pop-up window appears.
4. From the list of values, enter data in each field as required.
5. Click OK.
6. In the % field, enter the distribution percentage to be applied to this accountingflexfield.
7. Repeat steps 1 through 6 until completed.
Note: Records must be end-dated before additional records can be created.
5-12 Oracle Labor Distribution User’s Guide

Setting Up Organization Default Labor Schedule Procedure
Entering a Grants Accounting or Projects Charging InstructionIf entering a Grants Accounting or Projects charging instruction, perform thefollowing steps.
1. Enter data in the following fields as described in Table 5–3, page 5-15:
■ Project Number
■ Task Number
■ Award Number, for Grants Accounting only
■ Exp Org
■ Exp Type
■ %
2. Repeat step 1 until completed.
Note: Records must be end-dated before additional records can be created.
3. Save or save and continue as follows:
File - Save or Save and Proceed
4. Close the window.
Labor Scheduling Setup 5-13

Organization Default Labor Schedule Window
Organization Default Labor Schedule Window
Figure 5–2 Organization Default Labor Schedule Window
5-14 Oracle Labor Distribution User’s Guide

Organization Default Labor Schedule Window Description
Organization Default Labor Schedule Window Description
Table 5–3 Organization Default Labor Schedule Window Description
Field Name Type Features Description
Organization required list of values organization name
Begin Date required list of values:pop-upcalendar
effective start date for default labor schedule; cannotbe modified or deleted
End Date optional list of values:pop-upcalendar
effective end date for default labor schedule
Default SchedulesRegion
GL Account conditionallyrequired
list of values:pop-upwindow
General Ledger accounting flexfield; required if thereare no Grants Accounting or Projects charginginstructions
Project Number conditionallyrequired
list of values Grants Accounting or Projects project numbercharging instruction; required if there are no GeneralLedger accounting flexfields
Task Number conditionallyrequired
list of values Grants Accounting or Projects project task numbercharging instruction; required if there are no GeneralLedger accounting flexfields
Award Number conditionallyrequired
list of values Grants Accounting project award number charginginstruction; required if there are no General Ledgeraccounting flexfields; not required if entering aProjects charging instruction
Exp Org conditionallyrequired
list of values Grants Accounting or Projects project expenditureorganization charging instruction; required if thereare no General Ledger accounting flexfields
Exp Type conditionallyrequired
list of values Grants Accounting or Projects project expendituretype charging instruction; required if there are noGeneral Ledger accounting flexfields
% required distribution percentage applied to schedule line fordates specified
Comments optional user setup comments
Labor Scheduling Setup 5-15

Setting Up Organization Default Accounts Procedure
Setting Up Organization Default Accounts ProcedureSetting up Organization Default Accounts includes the following:
■ Entering a General Ledger Accounting Flexfield
■ Entering a Grants Accounting or Projects Instruction
To set up organization default accounts, perform the following steps.
1. In Labor Distribution, navigate to the Organization Default Accounts windowas follows:
Setup - Organization Default Accounts
2. In the Organization field, select an organization from the list of values.
Entering a General Ledger Accounting FlexfieldIf entering a General Ledger accounting flexfield, perform the following steps.
1. In the GL Code field, select a General Ledger account from the list of values.
A pop-up find window appears.
2. In the Shortcut Code field, enter a code from the list of values.
3. Click OK.
The Parameters pop-up window appears.
4. From the list of values, enter data in each field as required.
5. Click OK.
6. In the Begin Date field, enter the start date for the use of the General Ledgeraccount specified by the accounting flexfield.
7. Optionally, in the End Date field, enter the end date for the use of the GeneralLedger account specified by the accounting flexfield.
For information on end date validation rules, see Data Entry ValidationsProcess, page D-1.
8. Repeat steps 1 through 7 until completed.
Note: Records must be end-dated before additional records can be created.
5-16 Oracle Labor Distribution User’s Guide

Setting Up Organization Default Accounts Procedure
Entering a Grants Accounting or Projects InstructionIf entering a Grants Accounting or Projects charging instruction, perform thefollowing steps.
1. Enter data in the following fields as described in Table 5–4, page 5-19:
■ Project Number
■ Task Number
■ Award Number, for Grants Accounting only
■ Exp Org
■ Exp Type
■ Begin Date
■ End Date
■ Comments
2. Repeat Step 1 until completed.
Note: Records must be end-dated before additional records can be created.
3. Save or save and continue as follows:
File - Save or Save and Proceed
4. Close the window.
Labor Scheduling Setup 5-17

Organization Default Accounts Window
Organization Default Accounts Window
Figure 5–3 Organization Default Accounts Window
5-18 Oracle Labor Distribution User’s Guide

Organization Default Accounts Window Description
Organization Default Accounts Window Description
Table 5–4 Organization Default Accounts Window Description
Field Name Type Features Description
Organization required list of values organization name
Account DetailsRegion
GL Account conditionallyrequired
list of values:pop-upwindow
General Ledger accounting flexfield; required if thereare no Grants Accounting charging instructions
Project Number conditionallyrequired
list of values Grants Accounting or Projects project numbercharging instruction; required if there are no GeneralLedger accounting flexfields
Task Number conditionallyrequired
list of values Grants Accounting or Projects project task numbercharging instruction; required if there are no GeneralLedger accounting flexfields
Award Number conditionallyrequired
list of values Grants Accounting award number charginginstruction; required if there are no General Ledgeraccounting flexfields; not required if entering aProjects charging instruction
Exp Org conditionallyrequired
list of values Grants Accounting or Projects expenditureorganization charging instruction; required if thereare no General Ledger accounting flexfields
Exp Type conditionallyrequired
list of values Grants Accounting or Projects expenditure typecharging instruction; required if there are no GeneralLedger accounting flexfields
Begin Date required list of values:pop-upcalendar
effective start date of the default account; cannot bemodified
End Date optional list of values:pop-upcalendar
effective end date of the default account
Comments optional user setup comments
Labor Scheduling Setup 5-19

Setting Up Earnings Elements Imported Procedure
Setting Up Earnings Elements Imported ProcedureTo set up earnings elements, perform the following steps.
1. In Labor Distribution, navigate to the Earnings Element Imported window asfollows:
Setup - Element Types
2. Enter data in each field of the Earnings Element Imported window as describedin Table 5–5, page 5-22.
3. To add a new line place the cursor in the Element Name field.
A new line appears.
4. Select an earnings element from the list of values.
5. Repeat Step 2.
6. Save or save and continue as follows:
File - Save or Save and Proceed
7. Close the window.
5-20 Oracle Labor Distribution User’s Guide

Earnings Element Imported Window
Earnings Element Imported Window
Figure 5–4 Earnings Element Imported Window
Labor Scheduling Setup 5-21

Earnings Element Imported Window Description
Earnings Element Imported Window Description
Table 5–5 Earnings Element Imported Window Description
Field Name Type Features Description
Element Name required list of values payroll earnings elements
Import required check box indicates element to be imported
Begin Date required list of values:pop-upcalendar
effective import start date
End Date optional list of values:pop-upcalendar
effective import end date
Comments optional user setup comments
5-22 Oracle Labor Distribution User’s Guide

Setting Up Global Earnings Element Override Procedure
Setting Up Global Earnings Element Override ProcedureSetting up Global Earnings Element Override includes the following:
■ Entering a General Ledger Accounting Flexfield
■ Entering a Grants Accounting or Projects Instruction
To set up a global earnings element override, perform the following steps.
1. In Labor Distribution, navigate to the Global Earnings Element Overridewindow as follows:
Setup - Global Earnings Elements
2. In the Element field, select an earnings element from the list of values.
3. In the Begin Date field, enter the effective start date for the global earningselement override from the list of values.
4. Optionally, in the End Date field, enter the effective end date for the globalearnings element override from the list of values.
For information on end date validation rules, see Data Entry ValidationsProcess, page D-1.
Entering a General Ledger Accounting FlexfieldIf entering a General Ledger accounting flexfield, perform the following steps.
1. In the GL Account field, select a General Ledger account from the list of values.
A pop-up find window appears.
2. In the Shortcut Code field, enter a code from the list of values.
The Parameters pop-up window appears.
3. Click OK.
4. From the list of values, enter data in each field as required.
5. Click OK.
6. In the% field, enter the distribution percentage to be applied to the accountingflexfield.
Labor Scheduling Setup 5-23

Setting Up Global Earnings Element Override Procedure
Entering a Grants Accounting or Projects InstructionIf entering Grants Accounting or Projects charging instructions, perform thefollowing steps.
1. Enter data in the following fields as described in Table 5–6, page 5-26:
■ Project Number
■ Task Number
■ Award Number, for Grants Accounting only
■ Exp Org
■ Exp Type
■ %
2. Save or save and continue as follows:
File - Save or Save and Proceed
3. Close the window.
5-24 Oracle Labor Distribution User’s Guide

Global Earnings Element Override Window
Global Earnings Element Override Window
Figure 5–5 Global Earnings Element Override Window
Labor Scheduling Setup 5-25

Global Earnings Element Override Window Description
Global Earnings Element Override Window Description
Table 5–6 Global Earnings Element Override Window Description
Field Name Type Features Description
Element required list of values earnings element
Begin Date required list of values:pop-upcalendar
effective start date of the override; cannot bemodified or deleted
End Date optional list of values:pop-upcalendar
effective end date of the override
Account DetailsRegion
GL Account conditionallyrequired
list of values:pop-upwindow
General Ledger accounting flexfield; required if thereare no Projects or General Ledger charginginstructions
Project Number conditionallyrequired
list of values Grants Accounting or Projects project numbercharging instruction; required if there are no GeneralLedger accounting flexfields
Task Number conditionallyrequired
list of values Grants Accounting or Projects project task numbercharging instruction; required if there are no GeneralLedger accounting flexfields
Award Number conditionallyrequired
list of values Grants Accounting project award number charginginstruction; required if there are no General Ledgeraccounting flexfields; not required if entering aProjects charging instruction
Exp Org conditionallyrequired
list of values Grants Accounting or Projects project expenditureorganization charging instruction; required if thereare no General Ledger accounting flexfields
Exp Type conditionallyrequired
list of values Grants Accounting or Projects project expendituretype charging instruction; required if there are noGeneral Ledger accounting flexfields
% required distribution percentage applied to schedule line fordates specified
Comments optional user setup comments
5-26 Oracle Labor Distribution User’s Guide

Setting Up Earnings Element Groups Procedure
Setting Up Earnings Element Groups ProcedureTo set up an earnings element group, perform the following steps.
1. In Labor Distribution, navigate to the Earnings Element Groups window asfollows:
Setup - Element Groups
2. Enter data in each field of the Earnings Element Groups window as described inTable 5–7, page 5-29.
3. Save or save and continue as follows:
File - Save or Save and Proceed
4. Close the window.
Labor Scheduling Setup 5-27

Earnings Element Groups Window
Earnings Element Groups Window
Figure 5–6 Earnings Element Groups Window
5-28 Oracle Labor Distribution User’s Guide

Earnings Element Groups Window Description
Earnings Element Groups Window Description
Table 5–7 Earnings Element Groups Window Description
Field Name Type Features Description
Element Group required earnings element group name
Begin Date required list of values:pop-upcalendar
effective start date for group; cannot be modified ordeleted
End Date optional list of values:pop-upcalendar
effective end date for group
Comments optional user setup comments
Earnings ElementsRegion
Element Name required list of values earnings element to be grouped under classification;can be active in only one group for a given day
Begin Date display only effective start date for element as part of group
End Date display only effective end date for element as part of group
Labor Scheduling Setup 5-29

Setting Up Payroll Sources Procedure
Setting Up Payroll Sources ProcedurePerform the following steps to set up payroll sources.
1. In Labor Distribution, navigate to the Payroll Sources window as follows:
Setup - Payroll Sources
2. To enter a new payroll source, enter data in each field as described in Table 5–8,page 5-32.
3. Save or save and continue as follows:
File - Save or Save and Proceed
4. To query all available payroll sources records, navigate as follows:
View - Find All
5. Close the window.
5-30 Oracle Labor Distribution User’s Guide

Payroll Sources Window
Payroll Sources Window
Figure 5–7 Payroll Sources Window
Labor Scheduling Setup 5-31

Payroll Sources Window Description
Payroll Sources Window Description
Table 5–8 Payroll Sources Window Description
Field Name Type Features Description
Header Region
Payroll Source Type required list of values payroll source type name
Source CodesRegion
Source Code required user-defined source code
Description required user description of source code
5-32 Oracle Labor Distribution User’s Guide

Setting Up Begin Date Auto-fill Parameters Procedure
Setting Up Begin Date Auto-fill Parameters ProcedureTo set up the begin date auto-fill parameter, perform the following steps.
1. In Labor Distribution, navigate to the Begin Date Auto-fill Parameters windowas follows:
Setup - Auto-fill Begin Date
2. Enter data in each field of the Begin Date Auto-fill Parameters window asdescribed in Table 5–9, page 5-36.
3. Save or save and continue as follows:
File - Save or Save and Proceed
4. Close the window.
Labor Scheduling Setup 5-33
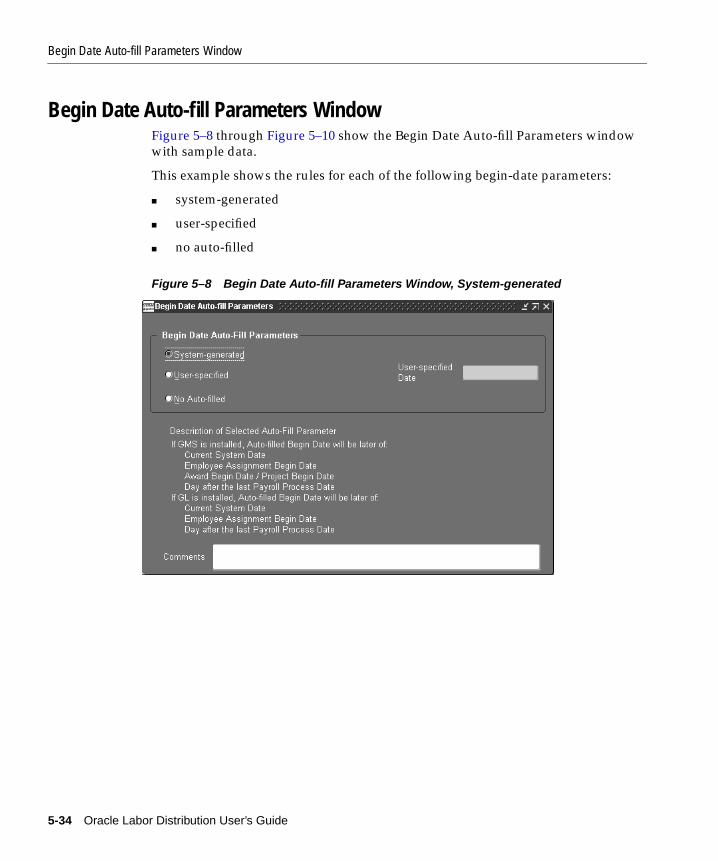
Begin Date Auto-fill Parameters Window
Begin Date Auto-fill Parameters WindowFigure 5–8 through Figure 5–10 show the Begin Date Auto-fill Parameters windowwith sample data.
This example shows the rules for each of the following begin-date parameters:
■ system-generated
■ user-specified
■ no auto-filled
Figure 5–8 Begin Date Auto-fill Parameters Window, System-generated
5-34 Oracle Labor Distribution User’s Guide

Begin Date Auto-fill Parameters Window
Figure 5–9 Begin Date Auto-fill Parameters Window, User-specified
Figure 5–10 Begin Date Auto-fill Parameters Window, No Auto-filled
Labor Scheduling Setup 5-35

Begin Date Auto-fill Parameters Window Description
Begin Date Auto-fill Parameters Window Description
Table 5–9 Begin Date Auto-fill Parameters Window Description
Field Name Type Features Description
Begin Date Auto-FillParameters Region
System-generated optional radio button indicates if begin date field automatically populatedbased on defined parameters
User-specified optional radio button indicates if users specify begin date
No Auto-filled optional radio button indicates if there is no begin date
User-specified Date optional list of values:pop-upcalendar
users specify auto-fill begin date
Description ofSelected Auto-FillParameter Region
Description ofSelected Auto-FillParameter
display only displays the auto-fill parameter rules for selectedbegin date auto-fill parameter
Comments optional user comments
5-36 Oracle Labor Distribution User’s Guide

Setting Up End Date Auto-fill Parameters Procedure
Setting Up End Date Auto-fill Parameters ProcedureTo set up the end date auto-fill parameter, perform the following steps.
1. In Labor Distribution, navigate to the End Date Auto-fill Parameters window asfollows:
Setup - Auto-fill End Date
2. Enter data in each field of the End Date Auto-fill Parameters window asdescribed in Table 5–10, page 5-40.
3. Save or save and continue as follows:
File - Save or Save and Proceed
4. Close the window.
Labor Scheduling Setup 5-37
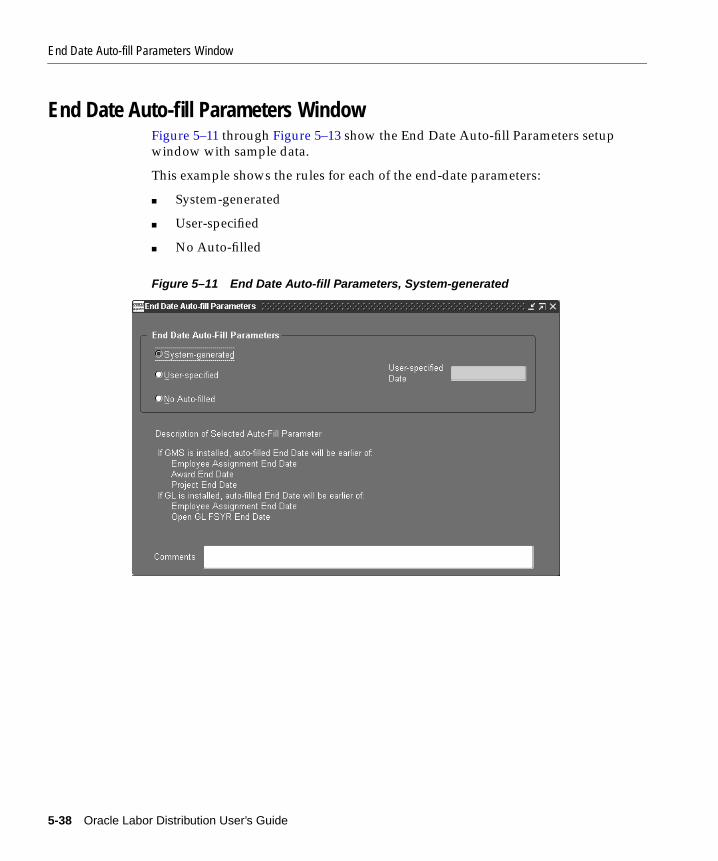
End Date Auto-fill Parameters Window
End Date Auto-fill Parameters WindowFigure 5–11 through Figure 5–13 show the End Date Auto-fill Parameters setupwindow with sample data.
This example shows the rules for each of the end-date parameters:
■ System-generated
■ User-specified
■ No Auto-filled
Figure 5–11 End Date Auto-fill Parameters, System-generated
5-38 Oracle Labor Distribution User’s Guide

End Date Auto-fill Parameters Window
Figure 5–12 End Date Auto-fill Parameters Window, User-specified
Figure 5–13 End Date Auto-fill Parameters Window, No Auto-filled
Labor Scheduling Setup 5-39

End Date Auto-fill Parameters Window Description
End Date Auto-fill Parameters Window Description
Table 5–10 End Date Auto-fill Parameters Window Description
Field Name Type Features Description
End Date Auto-FillParameters Region
System-generated optional radio button indicates if end date field automatically populatedbased on defined parameters
User-specified optional radio button indicates if users specify end date
No Auto-filled optional radio button indicates if there is no end date
User-specified Date optional list of values:pop-upcalendar
users specify auto-fill end date
Description ofSelected Auto-FillParameter Region
Description ofSelected Auto-FillParameter
display only displays the auto-fill rules for selected end dateauto-fill parameter
Comments optional user comments on setup
5-40 Oracle Labor Distribution User’s Guide

Setting Up Clearing Account Procedure
Setting Up Clearing Account ProcedureTo set up a clearing account, perform the following steps.
1. In Labor Distribution, navigate to the Clearing Account window as follows:
Setup - Clearing Account
2. To change the clearing account, in the Clearing Account field, select a clearingaccount from the list of values.
A pop-up find window appears.
3. In the Shortcut field, select a code from the list of values.
4. Click OK.
The Parameters pop-up window appears.
5. From the list of values, enter data in each field as required.
6. Click OK.
7. In the Comments field, enter a description of the clearing account.
8. Save or save and continue as follows:
File - Save or Save and Proceed
9. Close the window.
Labor Scheduling Setup 5-41

Clearing Account Setup Window
Clearing Account Setup Window
Figure 5–14 Clearing Account Setup Window
5-42 Oracle Labor Distribution User’s Guide

Clearing Account Setup Window Description
Clearing Account Setup Window Description
Table 5–11 Clearing Account Setup Window Description
Field Name Type Features Description
GL Account required list of values General Ledger clearing account
Comments required user-defined comments
Labor Scheduling Setup 5-43

Clearing Account Setup Window Description
5-44 Oracle Labor Distribution User’s Guide

Effort Reporting S
6
Effort Reporting SetupThis chapter describes the Effort Reporting Setup procedures. The followingsections are in this chapter:
■ Definition
■ Overview
■ Setting Up Effort Report Periods Procedure
■ Effort Report Periods Window
■ Effort Report Periods Window Description
■ Setting Up Earnings Elements Included in Effort Reports
■ Earnings Elements Included in Effort Reports Window
■ Earnings Elements Included in Effort Reports Window Description
■ Modify Text Message in Effort Report Procedure
■ Effort Report Messages Window
■ Effort Report Messages Window Description
■ Creating Notification Users Procedure
■ Create Users Window
■ Create Users Window Description Table
etup 6-1

Definition
DefinitionEffort Reporting Setup provides flexibility in the following areas:
■ effort report periods
■ earnings elements included in effort reporting
■ text messages on effort reports
OverviewEffort reports are created for specific employees for a specific period of time.
ProcessThe effort reporting setup process consists of the following:
■ Define Effort Report Periods
■ Define Earnings Elements Included in Effort Reports
■ Modify Text Message on Effort Report
■ Create Users
Define Effort Report PeriodsThe Effort Report Periods window is used to define the calendar days that are in aspecific period. Users select an effort report period when creating an effort report.The effort report period is used to create the percent of effort distributed to costobjectives according to the Oracle General Ledger account or Oracle GrantsAccounting charging instructions.
An effort period cannot be deleted once it has been used to create an effort report.
Define Earnings Elements Included in Effort ReportsThe Earnings Elements Included in Effort Reports window is used to select allearnings elements to be imported in an effort report and to indicate whether theelement is to be included in base compensation.
Modify Text Message on Effort ReportThe Effort Report Messages window is used to modify the certify message or to addand modify review messages that are displayed when certifying or reviewing aneffort report.
6-2 Oracle Labor Distribution User’s Guide

Overview
There can only be one certify message, but there can be more than one reviewmessage. The review messages appear in the list of values when the user returns aneffort report with comments.
Create UsersCreate Users procedure defines all employees as Oracle application users enablingemployees to perform the following workflow tasks:
■ review and approve their own effort reports
■ view their own effort report workflow notifications
■ review and approve employees’ effort reports, if qualified
■ certify effort reports, if qualified
■ approve distribution adjustments
In the Create Users window, the user clicks the Create Users button, and OracleLabor Distribution searches the Oracle Human Resources database to add or deletenew and former employees as notification users. This procedure must be repeatedregularly to update the database.
Effort Reporting Setup 6-3

Setting Up Effort Report Periods Procedure
Setting Up Effort Report Periods ProcedureTo set up effort report periods, perform the following steps.
1. In Labor Distribution, navigate to the Effort Report Periods window as follows:
Effort Reporting - Effort Report Periods
2. Enter data in each field of the Effort Report Periods window as described inTable 6–1, page 6-6.
3. Save or save and continue as follows:
File - Save or Save and Proceed
4. Close the window.
6-4 Oracle Labor Distribution User’s Guide

Effort Report Periods Window
Effort Report Periods Window
Figure 6–1 Effort Report Periods Window
Effort Reporting Setup 6-5

Effort Report Periods Window Description
Effort Report Periods Window Description
Table 6–1 Effort Report Periods Window Description
Field Name Type Features Description
Periods Region
Period Name required user-defined effortreport period name
Description required effort report perioddescription
From required list of values: pop-upcalendar
effort report periodstart date
To required list of values: pop-upcalendar
effort report periodend date
6-6 Oracle Labor Distribution User’s Guide

Setting Up Earnings Elements Included in Effort Reports
Setting Up Earnings Elements Included in Effort ReportsTo set up earnings elements to be included in effort reporting, perform thefollowing steps.
1. In Labor Distribution, navigate to the Earnings Elements Included in EffortReports window as follows:
Setup - Effort Report Element Types
2. To select an element to include in effort reporting, select the Use in Effort Reportcheck box.
3. To identify whether an earnings element is to be included in basecompensation, select the Base Compensation check box.
4. Save or save and continue as follows:
File - Save or Save and Proceed
5. Close the window.
Effort Reporting Setup 6-7

Earnings Elements Included in Effort Reports Window
Earnings Elements Included in Effort Reports Window
Figure 6–2 Earnings Elements Included in Effort Reports Window
6-8 Oracle Labor Distribution User’s Guide
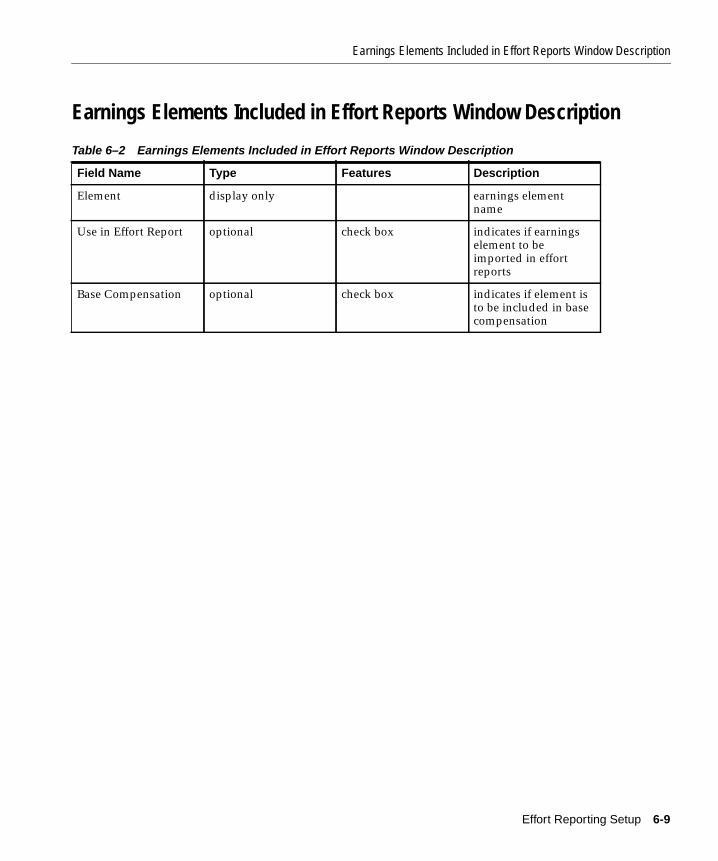
Earnings Elements Included in Effort Reports Window Description
Earnings Elements Included in Effort Reports Window Description
Table 6–2 Earnings Elements Included in Effort Reports Window Description
Field Name Type Features Description
Element display only earnings elementname
Use in Effort Report optional check box indicates if earningselement to beimported in effortreports
Base Compensation optional check box indicates if element isto be included in basecompensation
Effort Reporting Setup 6-9
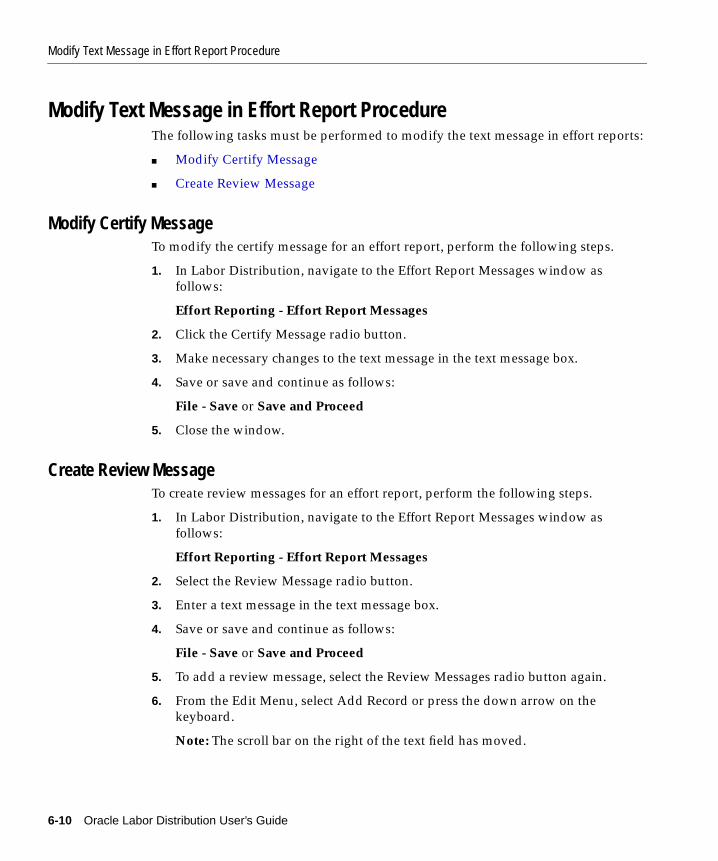
Modify Text Message in Effort Report Procedure
Modify Text Message in Effort Report ProcedureThe following tasks must be performed to modify the text message in effort reports:
■ Modify Certify Message
■ Create Review Message
Modify Certify MessageTo modify the certify message for an effort report, perform the following steps.
1. In Labor Distribution, navigate to the Effort Report Messages window asfollows:
Effort Reporting - Effort Report Messages
2. Click the Certify Message radio button.
3. Make necessary changes to the text message in the text message box.
4. Save or save and continue as follows:
File - Save or Save and Proceed
5. Close the window.
Create Review MessageTo create review messages for an effort report, perform the following steps.
1. In Labor Distribution, navigate to the Effort Report Messages window asfollows:
Effort Reporting - Effort Report Messages
2. Select the Review Message radio button.
3. Enter a text message in the text message box.
4. Save or save and continue as follows:
File - Save or Save and Proceed
5. To add a review message, select the Review Messages radio button again.
6. From the Edit Menu, select Add Record or press the down arrow on thekeyboard.
Note: The scroll bar on the right of the text field has moved.
6-10 Oracle Labor Distribution User’s Guide

Modify Text Message in Effort Report Procedure
7. Complete steps 4 through 6 until all messages are entered.
8. To review messages, scroll through the text message box.
9. Save or save and continue as follows:
File - Save or Save and Proceed
10. Close the window.
Effort Reporting Setup 6-11

Effort Report Messages Window
Effort Report Messages WindowFigure 6–3 through Figure 6–5 show the Effort Report Messages window.
Figure 6–3 Effort Report Messages Window, Certify Message
6-12 Oracle Labor Distribution User’s Guide

Effort Report Messages Window
Figure 6–4 and Figure 6–5 show two different review messages. Note thepositioning of the scroll bar button for each message.
Figure 6–4 Effort Report Messages Window, Review Message #1
Effort Reporting Setup 6-13

Effort Report Messages Window
Figure 6–5 Effort Report Messages Window, Review Message #2
6-14 Oracle Labor Distribution User’s Guide

Effort Report Messages Window Description
Effort Report Messages Window Description
Table 6–3 Effort Report Messages Window Description
Field Name Type Features Description
Message Region
Certify Message optional radio button message used tocertify effort reports
Review Message optional radio button message used toreview effort reports
[Message Box] optional user-modifiedmessage
Effort Reporting Setup 6-15

Creating Notification Users Procedure
Creating Notification Users ProcedureTo create Oracle notification users, perform the following steps.
1. In Labor Distribution, navigate to the Create Users window as follows:
Setup - Create Notification Users
2. Click Create Users.
Labor Distribution automatically creates the appropriate responsibilities foreach employee defined in Human Resources.
3. Close the window.
6-16 Oracle Labor Distribution User’s Guide

Create Users Window
Create Users Window
Figure 6–6 Create Users Window
Effort Reporting Setup 6-17

Create Users Window Description Table
Create Users Window Description Table
Table 6–4 Create Users Window Description
Field Name Type Features Description
Create Users required button initiates procedure toupdate Workflowusers
6-18 Oracle Labor Distribution User’s Guide

Labor Encumbrance S
7
Labor Encumbrance SetupThis chapter describes the Labor Encumbrance Setup procedures. The followingsections are in this chapter:
■ Definition
■ Overview
■ Setting Up Encumbrance Payroll and Assignment Selection Procedure
■ Encumbrance - Payroll and Assignment Selection Window
■ Encumbrance - Payroll and Assignment Selection Window Description
■ Setting Up Default Encumbrance Period Definition for Organization Procedure
■ Encumbrance - Default Encumbrance Period Definition Window
■ Encumbrance - Default Encumbrance Period Definition Window Description
■ Setting Up Encumbrance Earnings Element Selection Procedure
■ Encumbrance - Earnings Element Selection Window
■ Encumbrance - Earnings Element Selection Window Description
■ Setting Up Encumbrance Options Procedure
■ Encumbrance - Creation Options Window
■ Encumbrance - Creation Options Window Description
■ Setting Up Encumbrance Summarize Options Procedure
■ Encumbrance - Summarization Options Window
■ Encumbrance - Summarization Options Window Description
etup 7-1

Definition
DefinitionLabor Encumbrance Setup options provide users with flexibility in using the laborencumbrance functionality.
OverviewOracle Labor Distribution encumbers salary and wages and posts the encumbrancesto Oracle General Ledger, Oracle Projects, and Oracle Grants Accounting.
ProcessThe labor encumbrance setup process includes the following tasks:
■ Setting Up Encumbrance Payroll and Assignment Selection
■ Setting Up Default Encumbrance Period Selection
■ Setting Up Encumbrance Earnings Element Selection
■ Setting Up Payroll Effective Date Selection
■ Setting Up Encumbrance Summarize and Transfer
Setting Up Encumbrance Payroll and Assignment SelectionSetting Up Encumbrance Payroll and Assignment Selection enables users to selectspecific payroll names for encumbrance. In addition, users specify if all assignmentsin the selected payroll are to be included or excluded from encumbrance by default.Users can also specify whether to include or exclude individual employeeassignments for encumbrance. Therefore, if all employee assignments in a payrollare included or excluded in encumbrance by default, users can specify individualassignments to include or exclude in encumbrance. The assignments specified forinclusion or exclusion are used for all payroll periods in the specified payrolls
Setting Up Default Encumbrance Period SelectionThe default encumbrance period provides a common encumbrance time period forall employee assignments in a specified organization. This allows LaborDistribution to create encumbrance lines for the future based on the employee’sorganization. If a default encumbrance period is not defined for an organization,Labor Distribution uses the Generic Encumbrance Period for the site, which must beset up before encumbrances can be created.
7-2 Oracle Labor Distribution User’s Guide

Overview
The beginning of the default encumbrance period is determined by the earliestunpaid payroll that exists after the last paid payroll period for an assignment. Usersdefine the end date of this period. The end date may be specified for everyorganization listed in Oracle Human Resources.
The definition of the default encumbrance period is date-tracked. Users can definethe end date of the default encumbrance period with the effective date. Therefore,different end dates can be specified for the default encumbrance period for eachorganization between specific effective periods.
Setting Up Encumbrance Earnings Element SelectionSalary and wage encumbrances are based on earnings elements. Only regular andrecurring earnings elements can be selected for encumbrance.
Setting Up Payroll Effective Date SelectionThe Payroll Effective Date Selection option allows users to select the date thattransactions are posted to General Ledger or Grants Accounting. The defaulttransaction date is the payroll period’s end date. The options to select are as follows:
■ Begin Date
■ End Date, default
■ Check Date
■ Scheduled Run Date
■ Cutoff Date
Setting Up Encumbrance Summarize and TransferSummarization of encumbrances that are posted to General Ledger and GrantsAccounting can be based on the following options:
■ Time-based Encumbrance Summarization Options
■ Charging Instruction Based Encumbrance Summarization Options
Note: These options must be saved to successfully run the EncumbranceSummarize and Transfer process.
Labor Encumbrance Setup 7-3

Overview
Time-based Encumbrance Summarization Options Table 7–1 describes the time-basedencumbrance summarization options.
Charging Instruction Based Encumbrance Summarization Options Charging instructionoptions are based on whether transactions are posted to General Ledger or GrantsAccounting.
The options for summarizing encumbrances based on charging instructions fortransactions posted to General Ledger are as follows:
■ General Ledger charging instruction
■ charging instruction and employee
■ charging instruction, employee, and assignment
The option for summarizing encumbrances based on charging instructions fortransactions posted to Grants Accounting is as follows:
■ charging instruction and employee
Table 7–1 Time-based Encumbrance Summarization Options
Time-based Option Description
Payroll Period applies encumbrances by payroll period; any assignment’sschedule with an effective date that falls within the payrollperiod is encumbered on the payroll period’s effective dateselected at setup
General Ledger Period applies encumbrances by General Ledger period; anyassignment’s schedule with an effective date that falls withinthe General Ledger period is encumbered on the GeneralLedger period’s first date
7-4 Oracle Labor Distribution User’s Guide

Setting Up Encumbrance Payroll and Assignment Selection Procedure
Setting Up Encumbrance Payroll and Assignment Selection ProcedureTo set up encumbrance payroll and assignment selection, perform the followingsteps.
1. In Labor Distribution, navigate to the Encumbrance - Payroll and AssignmentSelection window as follows:
Labor Encumbrance - Enc Payroll Selection
2. Select one of the following options:
■ In the Payroll Name field, select a payroll from the list of values.
The employee assignments associated with the selected payroll appear inthe window.
■ In the Employee Name field, query an employee as follows:
View - Find All
3. Make changes as described in Table 7–2, page 7-7.
4. Save or save and continue as follows:
File - Save or Save and Proceed
5. Close the window.
Labor Encumbrance Setup 7-5

Encumbrance - Payroll and Assignment Selection Window
Encumbrance - Payroll and Assignment Selection Window
Figure 7–1 Encumbrance - Payroll and Assignment Selection Window
7-6 Oracle Labor Distribution User’s Guide

Encumbrance - Payroll and Assignment Selection Window Description
Encumbrance - Payroll and Assignment Selection Window Description
Table 7–2 Encumbrance - Payroll and Assignment Selection Window Description
Field Name Type Features Description
Payroll Region
Payroll Name required payroll name
Include the entirepayroll by default?
default check box indicates whether all individual employeeassignments are to be included in encumbrance
AssignmentsSelection Region
Employee Name defaultdisplay only
employee name; defaults when Payroll Nameselected or can query employee
Assignment Number defaultdisplay only
assignment number
Include required, ifexcluded notselected
check box indicates employee assignment to be included inencumbrance
Exclude required, ifincluded notselected
check box indicates employee assignment to be excluded inencumbrance
Labor Encumbrance Setup 7-7

Setting Up Default Encumbrance Period Definition for Organization Procedure
Setting Up Default Encumbrance Period Definition for OrganizationProcedure
To set up a default encumbrance period definition for an organization, perform thefollowing steps.
1. In Labor Distribution, navigate to the Encumbrance - Default EncumbrancePeriod Definition window as follows:
Labor Encumbrance - Enc Default Period
2. Enter data in each field of the Encumbrance - Default Encumbrance PeriodDefinition window as described in Table 7–3, page 7-10.
3. Save or save and continue as follows:
File - Save or Save and Proceed
4. Close the window.
7-8 Oracle Labor Distribution User’s Guide

Encumbrance - Default Encumbrance Period Definition Window
Encumbrance - Default Encumbrance Period Definition Window
Figure 7–2 Encumbrance - Default Encumbrance Period Definition Window
Labor Encumbrance Setup 7-9

Encumbrance - Default Encumbrance Period Definition Window Description
Encumbrance - Default Encumbrance Period Definition WindowDescription
Table 7–3 Encumbrance - Default Encumbrance Period Definition Window Description
Field Name Type Features Description
Generic EncumbrancePeriod
required check box indicates that organization selected is the genericencumbrance period. At least one organization mustbe selected.
Organization required list of values organization for which time period defined. At leastone time period must be defined as the genericencumbrance period.
DefaultEncumbrance PeriodDefinition Region
Default Period EndDate
required list of values:pop-upcalendar
default period end date; last date to run selectedencumbrance period; must be current date or later
Effective Start Date required list of values:pop-upcalendar
user-defined date
Effective End Date optional list of values:pop-upcalendar
user-defined date
Comments optional user-defined comments
7-10 Oracle Labor Distribution User’s Guide

Setting Up Encumbrance Earnings Element Selection Procedure
Setting Up Encumbrance Earnings Element Selection ProcedureTo set up encumbrance earnings element selection, perform the following steps.
1. In Labor Distribution, navigate to the Encumbrance - Earnings ElementSelection window as follows:
Labor Encumbrance - Enc Element Selection
2. Place the cursor on a new line.
3. Select an earnings element from the list of values.
4. Save or save and continue as follows:
File - Save or Save and Proceed
5. Close the window.
Labor Encumbrance Setup 7-11

Encumbrance - Earnings Element Selection Window
Encumbrance - Earnings Element Selection Window
Figure 7–3 Encumbrance - Earnings Element Selection Window
7-12 Oracle Labor Distribution User’s Guide
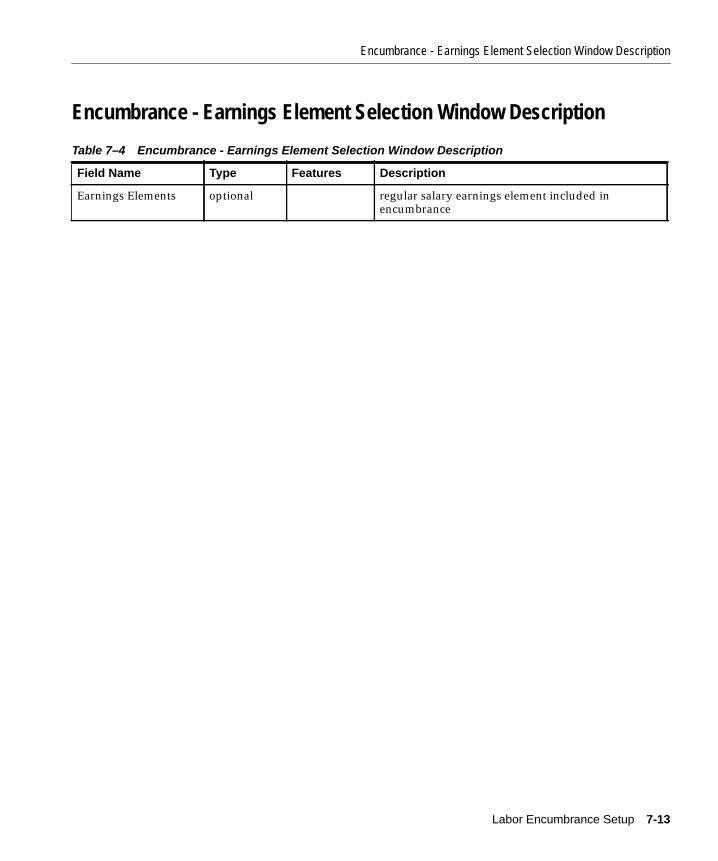
Encumbrance - Earnings Element Selection Window Description
Encumbrance - Earnings Element Selection Window Description
Table 7–4 Encumbrance - Earnings Element Selection Window Description
Field Name Type Features Description
Earnings Elements optional regular salary earnings element included inencumbrance
Labor Encumbrance Setup 7-13

Setting Up Encumbrance Options Procedure
Setting Up Encumbrance Options ProcedureWARNING: Users must access this window at least once and save the defaultsettings for encumbrances to work.
To set up encumbrance options, perform the following steps.
1. Navigate to the Encumbrance - Creation Options window as follows:
Labor Encumbrance - Enc Creation Options
2. To save the default settings, click Save on the toolbar.
3. To change the default settings, select the appropriate radio button as describedin Table 7–5, page 7-16.
4. Save or save and continue as follows:
File - Save or Save and Proceed
5. Close the window.
7-14 Oracle Labor Distribution User’s Guide

Encumbrance - Creation Options Window
Encumbrance - Creation Options Window
Figure 7–4 Encumbrance - Creation Options Window
Labor Encumbrance Setup 7-15

Encumbrance - Creation Options Window Description
Encumbrance - Creation Options Window Description
Table 7–5 Encumbrance - Creation Options Window Description
Field Name Type Features Description
Effective Date forPosting
Payroll End Date optional radio button payroll period end date; default
Payroll Begin Date optional radio button payroll period begin date
Payroll Check Date optional radio button constructive receipt of pay date when paychecksbecome negotiable
Payroll Scheduled RunDate
optional radio button payroll run date
Payroll Cutoff Date optional radio button final date for entering or charging payrollinformation before a run
7-16 Oracle Labor Distribution User’s Guide

Setting Up Encumbrance Summarize Options Procedure
Setting Up Encumbrance Summarize Options ProcedureTo set up encumbrance summarizing options, perform the following steps.
1. In Labor Distribution, navigate to the Encumbrance - Summarization Optionswindow as follows:
Labor Encumbrance - Enc Summarize Options
2. In the Summarize Option drop-down list, select Time Based or ChargingInstruction Based.
3. Select the appropriate radio button as described in Table 7–6, page 7-20.
4. Save or save and continue as follows:
File - Save or Save and Proceed
5. Close the window.
Labor Encumbrance Setup 7-17
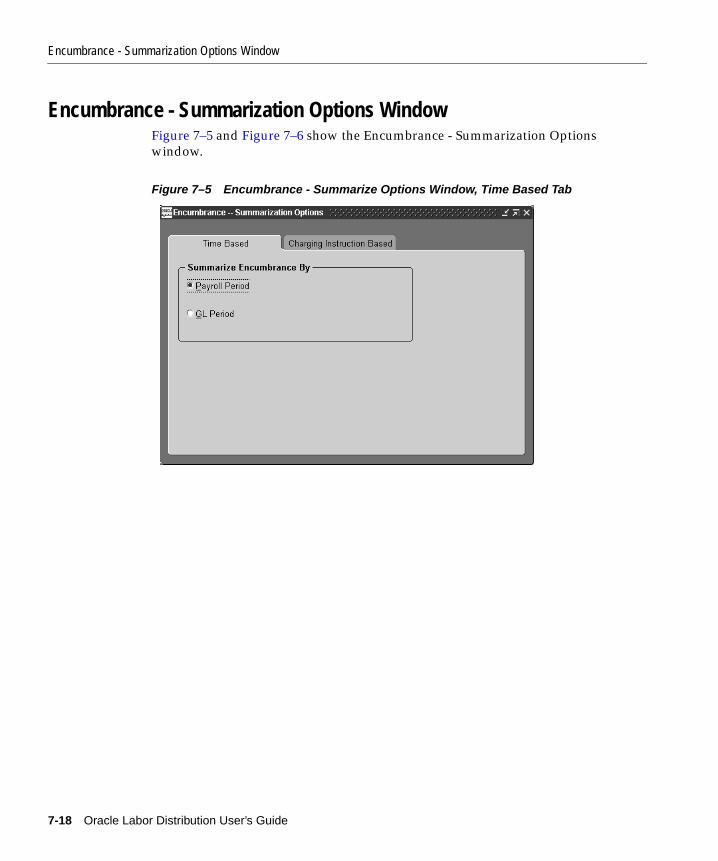
Encumbrance - Summarization Options Window
Encumbrance - Summarization Options WindowFigure 7–5 and Figure 7–6 show the Encumbrance - Summarization Optionswindow.
Figure 7–5 Encumbrance - Summarize Options Window, Time Based Tab
7-18 Oracle Labor Distribution User’s Guide

Encumbrance - Summarization Options Window
Figure 7–6 Encumbrance - Summarize Options Window, Charging Instruction BasedTab
Labor Encumbrance Setup 7-19

Encumbrance - Summarization Options Window Description
Encumbrance - Summarization Options Window Description
Table 7–6 Encumbrance - Summarization Options Window Description
Field Name Type Features Description
Time Based Tab,SummarizeEncumbrance ByRegion
Payroll Period default radio button encumbrances applied by payroll period
GL Period optional radio button encumbrances applied by General Ledger period
Charging InstructionBased Tab,SummarizeEncumbrance toGeneral Ledger byRegion
Charging Instruction default radio button encumbrances applied by charging instruction
Charging Instructionand Employee
optional radio button encumbrances applied by charging instruction andemployee
Charging Instruction,Employee andAssignment
optional radio button encumbrances applied by charging instruction,employee, and assignment
SummarizeEncumbrance ToGrants Accountingby Region
Charging Instructionand Employee
default radio button encumbrances applied by charging instruction
7-20 Oracle Labor Distribution User’s Guide

Expenditure Type and Natural Account Auto-Population S
8
Expenditure Type and Natural AccountAuto-Population Setup
This chapter describes how to set up auto-population for expenditure types andnatural accounts. The following sections are in this chapter:
■ Definition
■ Overview
■ Setting Up Autopop Segment Procedure
■ Auto-Population Segment Definition Window
■ Auto-Population Segment Definition Window Description
■ Setting Up Lookup Procedure
■ LOOKUPS (Auto Lookups) Window
■ LOOKUPS (Auto Lookups) Window Description
■ Defining Expenditure Type Auto-Population Rules Procedure
■ Auto-Fill Expenditure Types Window
■ Auto-Fill Expenditure Types Window Description
■ Rules Window
■ Rules Window Description
■ Defining Natural Account Auto-Population Rules Procedure
■ Auto-Fill Natural Account Window
■ Auto-Fill Natural Account Window Description
■ Setting Up the By-Pass Table Procedure
etup 8-1

■ Bypass (By-Pass Expenditure Types) Window
■ Bypass (By-Pass Expenditure Types) Window Description
8-2 Oracle Labor Distribution User’s Guide

Overview
DefinitionSetup of Expenditure Type and Natural Account Auto-Population provides forautomatic auto-population of expenditure type and natural account information foran employee’s charging instruction based on user-defined auto-fill mapping rules.
OverviewAuto-Population can be used for the following processes:
■ Create Distribution Lines
■ Summarize and Transfer Payroll Distributions
■ Distribution Adjustments
■ Import Pre-generated Distribution Lines
This section describes the following:
■ Auto-Population Rules
■ Process
■ References
Auto-Population RulesExpenditure Type and Natural Account Auto-Population setup procedures allowthe user to define rules for auto-population from a wide range of parameters thatare presented for selection. A rule calculator is used to build the rules.
Users can develop ordering rules to order and specify effective dates for theauto-population rules. Ordering rules ensure that one rule is used over another inthe event that multiple rules validate to true. This allows users to create multiplerules for the same expenditure type and to order them among the other rules asdesired. Effective dates ensure that a rule is used only for distribution lines with aproper payroll date.
Users can group rules by period type to achieve the following results:
■ Rules can be applied to specific employees based on their payroll.
■ The processing time needed to cycle through a set of rules when validatingthem is reduced.
Expenditure Type and Natural Account Auto-Population Setup 8-3

Overview
Only those rules grouped under a specific period type can be applied to a givenemployee when determining the correct expenditure type or natural account to use.
Users can override auto-population values from the list of values.
Note: The rules are specific to the business group and set of books of the logged-inresponsibility.
ProcessThe expenditure type and natural account auto-population setup process includesthe following:
■ Enabling or Disabling Auto-Population
■ Defining the Natural Account Segment for Auto-Population
■ Setting Up the Lookup
■ Defining Expenditure Type Auto-Population Rules and Defining NaturalAccount Auto-Population Rules
■ Setting Up the By-Pass Table
Enabling or Disabling Auto-PopulationAuto-Population is enabled or disabled by setting the appropriate profile option.
For information on setting up the auto-population profile option, see SystemAdministration Setup, page 4-1.
Defining the Natural Account Segment for Auto-PopulationIf auto-population is enabled, the Natural Account Segment for auto-populationmust be defined for the current responsibility.
Setting Up the LookupIn setting up the lookup, the user seeds the lookup table with all the parameters andtheir associated information to make these parameters available for setting up rulesand executing rules. The user must select parameters that the auto-population rulescan be based upon. The parameters selected in this setup appear in the list of valuesof the procedures defining auto-population rules.
Note: Lookup data is not partitioned by Multiple Organizations.
8-4 Oracle Labor Distribution User’s Guide

Overview
Defining Expenditure Type Auto-Population Rules and Defining Natural AccountAuto-Population RulesWhen defining expenditure type and natural account auto-population rules, theuser performs the following tasks:
■ selects the Period Type to group rules applying to a specific payroll as describedin Table 8–1, page 8-5.
■ selects the expenditure type or the natural account
■ selects effective start and end dates for a rule
■ defines rules by defining parameter expressions
■ builds a rule expression by combining parameter expressions with Booleanlogic using a rule calculator
■ saves validated rules
Setting Up the By-Pass TableThe By-Pass table stores the expenditure types that are to be passed over byauto-population. The auto-population process compares the current expendituretype on an employee’s labor schedule that is being used to distribute a line with theexpenditure types in the By-Pass table. If there is a match, auto-population returnsthis same expenditure type and skips any further processing of the rules.
Note: By-pass expenditure types are specific to the business group and set of booksof the logged-in responsibility.
Table 8–1 Period Type Description
Period Type Description
Calendar Month applies rules to all employee assignments belonging to apayroll based on a calendar month period
Semi-Month applies rules to all employee assignments belonging to apayroll based on a semi-month period
Bi-Weekly applies rules to all employee assignments belonging to apayroll based on a bi-weekly period
Weekly applies rules to all employee assignments belonging to apayroll based on a weekly period
Expenditure Type and Natural Account Auto-Population Setup 8-5

Overview
ReferencesTo define expenditure types, see Expenditure Types, Oracle Projects User’s Guide.
To define natural accounts, see Designing Your Account Segments and DefiningYour Account Structure, Oracle General Ledger User’s Guide.
8-6 Oracle Labor Distribution User’s Guide

Setting Up Autopop Segment Procedure
Setting Up Autopop Segment ProcedureTo set up the autopop segment for Multiple Organizations, perform the followingsteps.
1. In Labor Distribution, navigate to the Auto-Population Segment Definitionwindow as follows:
Setup - Auto-Population - Segment Setup
2. In the Segment field, select a segment name from the list of values.
3. Close the window.
Expenditure Type and Natural Account Auto-Population Setup 8-7

Auto-Population Segment Definition Window
Auto-Population Segment Definition Window
Figure 8–1 Auto-Population Segment Definition Window
8-8 Oracle Labor Distribution User’s Guide

Auto-Population Segment Definition Window Description
Auto-Population Segment Definition Window Description
Table 8–2 Auto-Population Segment Definition Window Description
Field Name Type Features Description
Auto-PopulationSegment Region
Segment required list of values natural account segment used for auto-population
Expenditure Type and Natural Account Auto-Population Setup 8-9

Setting Up Lookup Procedure
Setting Up Lookup ProcedureTo set up Lookup, perform the following steps.
1. In Labor Distribution, navigate to the LOOKUPS (Auto Lookups) window asfollows:
Setup - Auto-Population - Lookups Table
2. Enter data in each field of the LOOKUPS (Auto Lookups) window as describedin Table 8–3, page 8-12.
3. Save or save and continue as follows:
File - Save or Save and Proceed
4. Close the window.
8-10 Oracle Labor Distribution User’s Guide

LOOKUPS (Auto Lookups) Window
LOOKUPS (Auto Lookups) Window
Figure 8–2 LOOKUPS (Auto Lookups) Window
Expenditure Type and Natural Account Auto-Population Setup 8-11

LOOKUPS (Auto Lookups) Window Description
LOOKUPS (Auto Lookups) Window Description
Table 8–3 LOOKUPS (Auto Lookups) Window Description
Field Name Type Features Description
Parameter Class required list of values enabled flexfield segments for Human Resources JobKey Flexfield and project information from OracleGrants Accounting tables
Parameter required list of values parameter values associated with selected parameterclass
Datatype users datatype information; automatically populated whenparameter selected
8-12 Oracle Labor Distribution User’s Guide

Defining Expenditure Type Auto-Population Rules Procedure
Defining Expenditure Type Auto-Population Rules ProcedureThe Defining Expenditure Type Auto-Population Rules procedure includes thefollowing parts:
■ Defining Parameters
■ Defining Parameter Expressions and Building Rule Expressions
Defining ParametersTo define parameters, perform the following steps.
1. In Labor Distribution, navigate to the Auto-Fill Expenditure Types window asfollows:
Setup - Auto-Population - Expenditure Type
2. Enter data in each field of the Auto-Fill Expenditure Types window asdescribed in Table 8–4, page 8-16.
3. Perform one of the following steps:
■ save the record without defining a rule
■ go to Step 4 to re-order the sequence of Expenditure Types,
■ save the record and go to Step 8 to define a rule for an expenditure type
4. To re-order the sequence of Expenditure Types, place the cursor on the line to bereordered and click Re-Order.
The RE-ORDER pop-up window appears.
5. In the From field, enter the sequence number of the selected line.
6. In the To field, enter the new sequence number for the selected line.
7. Click OK.
8. To define a rule for the expenditure type, click Rules.
The Rules window appears.
Defining Parameter Expressions and Building Rule ExpressionsTo define parameter expressions, perform the following steps.
1. In the Parameter Class field, select a parameter class from the list of values.
Expenditure Type and Natural Account Auto-Population Setup 8-13

Defining Expenditure Type Auto-Population Rules Procedure
2. If required, in the Parameter field, select a parameter from the list of values.
3. In the Operand field, select an operand from the pop-up list.
4. In the Parameter Value field, enter a value from the list of values.
5. Repeat steps 1 through 4 until all expressions needed are entered.
6. Save the record as follows:
File - Save or Save and Proceed
7. In the calculator field, click the line numbers for a particular expression on thecalculator and combine them with the logic and parentheses buttons.
8. When the rule expression is complete, click OK.
A Note pop-up window appears acknowledging the validity of the rule orindicating an error.
9. If the rule is valid, click OK.
10. Save or save and continue as follows:
File - Save or Save and Proceed
11. Close the window.
8-14 Oracle Labor Distribution User’s Guide

Auto-Fill Expenditure Types Window
Auto-Fill Expenditure Types Window
Figure 8–3 Auto-Fill Expenditure Types Window
Expenditure Type and Natural Account Auto-Population Setup 8-15

Auto-Fill Expenditure Types Window Description
Auto-Fill Expenditure Types Window Description
Table 8–4 Auto-Fill Expenditure Types Window Description
Field Name Type Features Description
Auto-PopulationDefinition Region
Period Type required list of values window and displays rules, if any, defined forselected category
Seq. display only sequence number automatically generated aftersaving
Expenditure Type required list of values expenditure types
From required list of values:pop-upcalendar
start date; can be overridden
To optional list of values:pop-upcalendar
end date; can be overridden
Rule DefinitionRegion
Rule Definition users user-defined rule; displayed after rule defined
Re-Order button re-orders Expenditure Type lines
Rules optional button opens Rules window
8-16 Oracle Labor Distribution User’s Guide

Rules Window
Rules Window
Figure 8–4 Rules Window
Expenditure Type and Natural Account Auto-Population Setup 8-17

Rules Window Description
Rules Window Description
Table 8–5 Rules Window Description
Field Name Type Features Description
check box indicates Rules window is linked to master detailwindows, Auto-Fill Expenditure Types and Auto-FillNatural Account; master detail windows refreshedwhen data saved in Rules window
ParameterExpressions Region
Line users sequence number automatically generated whenrecord saved
Parameter Class required list of values parameter class
Parameter required list of values parameter
Datatype display only automatically populated based on parametersselected
Operand required list of values appropriate operand list for datatype selected
Parameter Value required list of values value to compare to the parameter with the operandchosen; automatically populated when operandselected
Define Rule Region
calculator required parameter expressions combined into a Booleanexpression using sequence numbers
rule definition display only successfully validated rule displayed with parameterexpressions substituted for sequence numbers usedduring calculator entry
8-18 Oracle Labor Distribution User’s Guide

Defining Natural Account Auto-Population Rules Procedure
Defining Natural Account Auto-Population Rules ProcedureThe Defining Natural Account Auto-Population Rules procedure includes thefollowing parts:
■ Defining Parameters
■ Defining Parameter Expressions and Building Rule Expressions
Defining ParametersTo define parameters, perform the following steps.
1. In Labor Distribution, navigate to the Auto-Fill Natural Account window asfollows:
Setup - Auto-Population - Natural Account
2. Enter data in each field of the Auto-Fill Natural Account window as describedin Table 8–6, page 8-22.
3. Perform one of the following steps:
■ save the record without defining a rule
■ go to Step 4 to re-order the sequence of Natural Accounts
■ save the record and go to Step 8 to define a rule for a natural account
4. To re-order the sequence of Natural Accounts, place the cursor on the line to bereordered and click Re-Order.
The RE-ORDER pop-up window appears.
5. In the From field, enter the sequence number of the selected line.
6. In the To field, enter the new sequence number for the selected line.
7. Click OK.
8. To define a rule for the natural accounts, click Rules.
The Rules window appears as shown in Figure 8–4.
Defining Parameter Expressions and Building Rule ExpressionsTo define parameter expressions, perform the following steps.
1. In the Parameter Class field, select a parameter class from the list of values.
Expenditure Type and Natural Account Auto-Population Setup 8-19

Defining Natural Account Auto-Population Rules Procedure
2. If required, in the Parameter field, select a parameter from the list of values.
3. In the Operand field, select an operand from the pop-up list.
4. In the Parameter Value field, enter a value from the list of values.
5. Repeat steps 1 through 4 until all expressions needed are entered.
6. Save the record as follows:
File - Save or Save and Proceed
7. In the calculator field, click the line numbers for a particular expression on thecalculator and combine them with the logic and parentheses buttons.
8. When the rule expression is complete, click OK.
A Note pop-up window appears acknowledging the validity of the rule orindicating an error.
9. If the rule is valid, click OK.
10. Save or save and continue as follows:
File - Save or Save and Proceed
11. Close the window.
8-20 Oracle Labor Distribution User’s Guide

Auto-Fill Natural Account Window
Auto-Fill Natural Account Window
Figure 8–5 Auto-Fill Natural Account Window
Expenditure Type and Natural Account Auto-Population Setup 8-21

Auto-Fill Natural Account Window Description
Auto-Fill Natural Account Window Description
Table 8–6 Auto-Fill Natural Account Window Description
Field yeah Type Features Description
Auto-PopulationDefinition Region
Period Type required list of values clears form and displays rules, if any, defined forselected category
Seq. users sequence number automatically generated aftersaving
Natural Account required list of values natural account
From required list of values:pop-upcalendar
start date; can be overridden
To optional list of values:pop-upcalendar
end date; can be overridden
Rule DefinitionRegion
Rule Definition users user-defined rule; displayed after rule defined
Re-Order button re-orders Natural Account lines
Rules button opens Rules window
8-22 Oracle Labor Distribution User’s Guide

Setting Up the By-Pass Table Procedure
Setting Up the By-Pass Table ProcedureTo set up the By-Pass table, perform the following steps:
1. In Labor Distribution, navigate to the Bypass (By-Pass Expenditure Types)window as follows:
Setup - Auto-Population - By-Pass Table
2. In the By-Pass Expenditure Types fields, select expenditure types from the list ofvalues.
3. Save or save and continue as follows:
File - Save or Save and Proceed
4. Close the window.
Expenditure Type and Natural Account Auto-Population Setup 8-23

Bypass (By-Pass Expenditure Types) Window
Bypass (By-Pass Expenditure Types) Window
Figure 8–6 Bypass (By-Pass Expenditure Types) Window
8-24 Oracle Labor Distribution User’s Guide

Bypass (By-Pass Expenditure Types) Window Description
Bypass (By-Pass Expenditure Types) Window Description
Table 8–7 Bypass (By-Pass Expenditure Types) Window Description
Field Name Type Features Description
Bypass ExpenditureType Region
Bypass ExpenditureTypes
optional list of values expenditure types bypassed
Expenditure Type and Natural Account Auto-Population Setup 8-25

Bypass (By-Pass Expenditure Types) Window Description
8-26 Oracle Labor Distribution User’s Guide

Part II
Labor Scheduling

Labor Scheduling Proce
9
Labor Scheduling ProceduresThis chapter describes how to create and update employee labor schedules. Thefollowing sections are in this chapter:
■ Definition
■ Overview
■ Prerequisites
■ Creating and Updating Labor Schedules Procedure
■ Labor Scheduling Window
■ Labor Scheduling Window Description
■ Schedule Lines Window
■ Schedule Lines Window Description
■ Viewing Labor Schedule Lines Procedure
■ Schedule Summary Window
■ Schedule Summary Window Description
■ Monthly Schedule Summary Window
■ Monthly Schedule Summary Window Description
■ Payroll Period Schedule Summary Window
■ Payroll Period Schedule Summary Window Description
dures 9-1

Definition
DefinitionLabor Scheduling is used to create, update, and review employee labor schedules.
OverviewA labor schedule specifies how an employee’s pay is to be distributed to OracleGrants Accounting, Oracle Projects, or Oracle General Ledger.
Multiple labor schedules can be created for each employee assignment. Eachschedule contains schedule lines with charging instructions for Grants Accounting,Projects, or General Ledger. Each payroll is distributed according to the schedulelines in effect for the period of the payroll to be distributed. An employee can havean unlimited number of schedule lines.
Users can define labor schedules at different levels and use a hierarchy structure todetermine the charging instructions in effect for a given day. Schedule hierarchiesprovide the user with the ability to create schedules at the employee assignment,earnings element group, earnings element, global earnings element, or organizationlevels.
For information on scheduling hierarchies, see Scheduling Hierarchy Process,page B-1.
For information on organization level schedules, see Labor Scheduling Setup,page 5-1.
ProcessTo create or update labor schedules at the employee or assignment level and toview labor schedule lines, the labor scheduling process consists of the followingtasks:
■ Select Employee and Assignment in Labor Distribution
■ Define Labor Schedule Hierarchy Level
■ Define Schedule Lines
■ Create or Modify Labor Schedules Using the Copy and Merge Functions
■ View Schedule Summary
■ View Monthly Schedule Summary
■ View Payroll Period Schedule Summary
9-2 Oracle Labor Distribution User’s Guide

Overview
Select Employee and Assignment in Labor DistributionUsers can select an employee assignment by navigating in Labor Distribution to theLabor Scheduling window and selecting an employee and an assignment. Tonavigate to the Schedule Lines window, users click the Schedule Lines button.
Users have the option of enabling the Organization Default Labor Schedule profileoption when setting up system profile options. For each employee assignment, anOrganization Default check box is displayed.
■ If users select Use Organization Default Labor Schedule during setup, theOrganization Default check box is automatically selected. The selected checkbox is viewed in the Labor Scheduling window.
■ If users do not select Use Organization Default Labor Schedule during setup,the Organization Default check box is not checked in the Labor Schedulingwindow.
For information on setting up system profile options, see System AdministrationSetup, page 4-1.
If the Organization Default check box is checked and an Organization Default LaborSchedule is defined, the Organization Default Labor Schedule is applied to eachpayroll earnings element to be processed when an earnings element does not have alabor schedule defined at either the Global Earnings Element, Element Group, orAssignment level.
Note: The check box in the Schedule Lines window is the same as the check box inthe Labor Scheduling window.
For information on scheduling hierarchies, see Scheduling Hierarchy Process,page B-1.
Define Labor Schedule Hierarchy LevelThe user selects one of the following levels of the labor schedule hierarchy to createa labor schedule:
■ assignment
■ element group
■ element type
Labor schedules can be added or deleted at the schedule hierarchy level.
Labor Scheduling Procedures 9-3

Overview
Note: Users must save the scheduling hierarchy before proceeding to definingschedule lines. This enables Labor Distribution to record the hierarchy levelselected.
For information on scheduling hierarchies, see Scheduling Hierarchy Process,page B-1.
Define Schedule LinesAt the hierarchy level selected, users can create an unlimited number of schedulelines for the labor schedule. Each schedule line includes the following:
■ General Ledger accounting flexfield, Grants Accounting, or Projects charginginstructions
■ begin and end dates for each schedule line
■ labor distribution percentage to be applied to each schedule line for the datespecified
For all the labor distribution lines specified for a labor schedule, Labor Distributiondisplays a detailed matrix in which days that have identical charging instructionsare separated into dynamic labor schedule lines period columns. The periodrepresents a set of continuous days for which the charging instructions are identical.
Create or Modify Labor Schedules Using the Copy and Merge FunctionsUsers can create or modify the labor schedules by using the copy or merge functionto perform the following tasks:
■ copy the schedule lines from the current labor schedule to create a newschedule for the same employee assignment or for a different employeeassignment
■ merge the schedule lines of the current labor schedule with the labor schedulelines present on an existing labor schedule for the same or for a differentemployee assignment
View Schedule SummaryAfter completing and saving the schedule lines, users can view a summary displayof how each earnings element and associated earnings group of the assignment isscheduled in the Schedule Summary window. This display allows the user to viewhow the entire assignment is scheduled.
The scheduling hierarchy that is displayed identifies the levels at which theassignment is scheduled. The highest level of the hierarchy displayed is the
9-4 Oracle Labor Distribution User’s Guide

Overview
organization default and earnings element is at the lowest level. Schedules at thelower level of the hierarchy take precedence over schedules at the higher level.
View Monthly Schedule SummaryIn the Monthly Schedule Summary window, users enter the begin date and enddate, and Labor Distribution displays a monthly summary of the schedule lines.
View Payroll Period Schedule SummaryIn the Payroll Period Schedule Summary window, users enter the begin date andend date, and Labor Distribution displays the schedule lines and percentages bypayroll periods.
Labor Scheduling Procedures 9-5

Prerequisites
Prerequisites❏ Employees to be scheduled must exist in Human Resources, have at least one
active assignment for the dates the labor schedules are to be created, and beassigned to a payroll.
To enter employees in Human Resources and assigning employees to a payroll,see Entering a New Person and The Employee Assignment, Managing PeopleUsing Oracle HRMS.
❏ The end date of the most recent payroll imported into Labor Distribution mustbe checked for the employee assignment because schedules can only beadjusted for dates after that end date.
9-6 Oracle Labor Distribution User’s Guide

Creating and Updating Labor Schedules Procedure
Creating and Updating Labor Schedules ProcedureThe following procedures are used to create employee labor schedules:
■ Selecting Employee and Assignment
■ Defining Labor Schedule Hierarchy Level
■ Defining Schedule Lines
■ Creating or Modifying Labor Schedules Using the Copy and Merge Functions
Selecting Employee and AssignmentTo select an employee and assignment, perform the following steps.
1. In Labor Distribution, navigate to the Labor Scheduling window as follows:
Labor Schedules
The Labor Scheduling window appears as shown in Figure 9–1, page 9-12.
2. In the Full Name field, query the list of employees as follows:
View - Find or View - Find All
If View - Find is selected, the Find Employees window appears.
3. Select an employe from the list of values.
4. Click Find.
5. If there are more than one assignments listed in the assignment region, select anassignment in the Assignment No. field.
6. Click Schedule Lines.
The Schedule Lines window appears.
7. Go to the following section:
Defining Labor Schedule Hierarchy Level
Defining Labor Schedule Hierarchy LevelDefine Labor Schedule at Hierarchy Level includes the following procedures:
■ Defining First Labor Schedule for the Employee Assignment
■ Adding a Labor Schedule
Labor Scheduling Procedures 9-7

Creating and Updating Labor Schedules Procedure
■ Deleting a Labor Schedule
Defining First Labor Schedule for the Employee AssignmentTo define a labor schedule hierarchy level when a labor schedule is not alreadycreated for the employee assignment, perform the following steps.
1. In the Schedule Hierarchy region of the Schedule Lines window, click theappropriate hierarchy level radio button for the labor schedule.
2. If Element Group or Element Type is selected, place the cursor in the ElementGroup or Element Type field and select an Element Group or Element Typefrom the list of values.
3. To create the scheduling hierarchy, save and continue as follows:
File - Save and Proceed
4. Go to the following section:
Defining Schedule Lines
Adding a Labor ScheduleTo add a labor schedule at a hierarchy level, perform the following steps.
1. In the Schedule Hierarchy region of the Schedule Lines window, click one of theradio buttons.
2. Add a new labor schedule as follows:
Edit - New Record
The schedule lines fields are cleared.
3. In the Schedule Hierarchy region of the Schedule Lines window, click theappropriate hierarchy level radio button for the labor schedule.
4. If Element Group or Element Type is selected, place the cursor in theAssignment, Element Group, or Element Type field and select an ElementGroup or Element Type from the list of values.
5. Save or save and continue as follows:
File - Save and Proceed
6. Go to the following section:
Defining Schedule Lines
9-8 Oracle Labor Distribution User’s Guide

Creating and Updating Labor Schedules Procedure
Deleting a Labor ScheduleTo delete a labor schedule at a hierarchy level, perform the following steps.
1. In the Schedule Hierarchy region of the Schedule Lines window, place thecursor in the Element Group or Element Type field.
2. To select the labor schedule to be deleted, navigate through the ScheduleHierarchy region using the down arrow on the keyboard.
3. Delete the labor schedule as follows:
Edit - Delete Record
4. Save or save and continue as follows:
File - Save and Proceed
5. Close the window.
Defining Schedule LinesTo define schedule lines, perform the following steps.
1. In the GL Account field, select a General Ledger account from the list of values.
If not entering a General Ledger accounting flexfield, go to Step 5.
Note: It is not possible to enter a Grants Accounting charging instruction and aGeneral Ledger accounting flexfield on the same line.
The accounting flexfield window appears.
2. Enter data in each required field from the list of values.
3. Click OK.
4. Enter data in each of the following fields as described in Table 9–2, page 9-19.
■ Start Date
■ End Date
■ %
If not entering Grants Accounting charging instructions, go to Step 6.
5. If entering Grants Accounting charging instructions, enter the data in thefollowing fields as described in Table 9–2, page 9-19.
■ Project
Labor Scheduling Procedures 9-9

Creating and Updating Labor Schedules Procedure
■ Task
■ Award
■ Organization
■ Exp. Type
■ Start Date
■ End Date
■ %
6. Repeat Steps 1 through 4 or Step 5 until all labor schedules and schedule linesare created for the selected employee assignment.
7. Click Refresh Display.
The matrix displays an updated schedule view where columns display datesthat have consistent charging instructions.
8. If no errors are displayed, save the schedule lines as follows:
File - Save or Save and Proceed
9. Repeat the Define Schedule Hierarchy and Define Schedule Lines proceduresuntil all labor schedules are created for the employee assignment.
10. To delete a schedule line, place the cursor on the line to be deleted and deletethe line as follows:
Edit - Delete
Note: A line cannot be deleted if it has already been distributed.
11. Click Refresh Display.
12. If no errors are displayed, save the schedule lines as follows:
File - Save or Save and Proceed
Creating or Modifying Labor Schedules Using the Copy and Merge FunctionsTo create or modify labor schedules using the copy and merge functions, performthe following steps.
WARNING: Labor Distribution does not perform validations on copy and merge tocheck whether the new or modified labor schedules exceed 100%. Users can reviewand correct all Copy To destinations when using the Merge to Existing Schedules
9-10 Oracle Labor Distribution User’s Guide

Creating and Updating Labor Schedules Procedure
functionality. If the labor schedule is not corrected at the time of distribution andtransfer, the entire distribution may be sent to the suspense account.
1. In the Schedule Hierarchy region, click Copy To.
The Copy To window appears as shown in Figure 9–6, page 9-18.
2. In the Assignment Number field, select an employee assignment from the list ofvalues.
3. Perform one of the following tasks:
■ To create a new labor schedule for the selected employee assignment or fora different employee assignment, click Copy to New Schedules.
Hierarchy values where no labor schedule exists for the selected employeeassignment are displayed. These values include assignment, elementgroups, and element types.
■ To update an existing labor schedule for the selected employee assignmentor for a different employee assignment, click Merge to Existing Schedules.
Hierarchy values where labor schedules exist for the selected employeeassignment are displayed. These include labor schedules defined at theassignment, element groups, and element type levels.
4. To select an assignment, select the Assignment check box.
5. To select an item in the Element Groups or Element Type regions, double clickthe item.
6. To select all items in the Element Groups or Element Type regions, click SelectAll.
7. To deselect an item in the Element Groups or Element Types region, select theitem and click Deselect.
8. Click Done.
9. Save or save and continue as follows:
File - Save or Save and Proceed
10. Close the window.
Labor Scheduling Procedures 9-11

Labor Scheduling Window
Labor Scheduling Window
Figure 9–1 Labor Scheduling Window
9-12 Oracle Labor Distribution User’s Guide

Labor Scheduling Window Description
Labor Scheduling Window Description
Table 9–1 Labor Scheduling Window Description
Field Name Type Features Description
Employee Region
Full Name display only employee full name; last name first
Employee No. display only employee identification number
Social Security display only employee social security number
Assignment No. display only assignment identification number
Job display only organization assignment
Position display only position assignment
Begin Date display only assignment start date
End Date display only assignment end date
FTE display only full-time equivalent employment status forassignment
DistributionInstructions Region
Org. Def. display only check box indicates if organization default labor schedule isused for assignment; if set up at the site level,Organization Default Labor Schedule used for allemployee's assignments and cannot be modified
Assignment display only check box indicates if labor schedule defined at Assignmentlevel
Element Group display only check box indicates if labor schedule defined at EarningsElement Group level
Element display only check box indicates if earnings element defined at Elementlevel
Schedule Lines button opens Schedule Lines window
Labor Scheduling Procedures 9-13

Schedule Lines Window
Schedule Lines WindowFigure 9–2 through Figure 9–5 show the Schedule Lines window with sample data.
Figure 9–2 shows sample data for General Ledger account charging instructions.The corresponding matrix shows the time periods that the charging instructions fallinto. The matrix allows the user to view the labor schedule for an employee on adaily basis.
Figure 9–2 Schedule Lines Window
9-14 Oracle Labor Distribution User’s Guide

Schedule Lines Window
Figure 9–3 Schedule Lines Window, Project and Task Fields
Labor Scheduling Procedures 9-15

Schedule Lines Window
Figure 9–4 Schedule Lines Window, Award and Organization Fields
9-16 Oracle Labor Distribution User’s Guide

Schedule Lines Window
Figure 9–5 Schedule Lines Window, Exp. Type Field
Labor Scheduling Procedures 9-17

Schedule Lines Window
Figure 9–6 Copy To Window
9-18 Oracle Labor Distribution User’s Guide

Schedule Lines Window Description
Schedule Lines Window Description
Table 9–2 Schedule Lines Window Description
Field Name Type Features Description
Employee Region
Full Name display only employee full name
Employee No. display only employee identification number
S.S.N. display only employee social security number
Assignment Region
Assignment display only assignment identification number
Org. display only organization component of assignment
Begin display only assignment start date
FTE optional assignment employment status
Payroll display only employee payment cycle
End default,display only
assignment end date
Schedule HierarchyRegion
Assignment optionallyrequired
radio button indicates if labor schedule defined at Assignmentlevel
Element Group optionallyrequired
radio button:list of values
indicates if labor schedule defined at EarningsElement Group level
Element Type optionallyrequired
radio button:list of values
indicates if labor schedule defined at Element level
Copy To button opens Copy To window
Labor Scheduling Procedures 9-19

Schedule Lines Window Description
Schedule LinesRegion
GL Account conditionallyrequired
pop-upwindow
General Ledger accounting flexfield; required if thereare no Grants Accounting or Projects charginginstructions
Project conditionallyrequired
list of values Grants Accounting or Projects project name; requiredif there are no General Ledger accounting flexfields
Note: To see the entire Project’s line, navigatehorizontally using the scroll bar.
Task conditionallyrequired
list of values Grants Accounting or Projects task number charginginstruction; required if there are no General Ledgeraccounting flexfields
Award conditionallyrequired
list of values Grants Accounting award number charginginstruction; required if there are no General Ledgeraccounting flexfields
Organization conditionallyrequired
list of values Grants Accounting or Projects organization charginginstruction; required if there are no General Ledgeraccounting flexfields
Exp. Type conditionallyrequired
list of values Grants Accounting or Projects expenditure typecharging instruction; required if there are no GeneralLedger accounting flexfields
Start Date required list of values:pop-upcalendar
charging instruction start date
Note: The end date of the most recent Oracle ornon-Oracle payroll imported into Labor Distributionis checked by Labor Distribution. Schedules can onlybe adjusted for dates after the end date of the lastprocessed payroll for the selected employeeassignment.
End Date optional list of values:pop-upcalendar
charging instruction end date
% required labor distribution percentage applied to thatschedule line for dates specified
Table 9–2 Schedule Lines Window Description
Field Name Type Features Description
9-20 Oracle Labor Distribution User’s Guide

Schedule Lines Window Description
[Matrix] display only displays dates with identical charging instructions
Note: Navigate horizontally using the Move Leftand Move Right buttons.
Refresh Display button updates display matrix
Schedule Summary button opens Schedule Summary window
Monthly Summary button opens Monthly Schedule Summary window
Payroll Period button opens Payroll Period Schedule Summary window
Copy To Window
Employee required list of values employee name to whom schedule line is copied ormerged
Assignment required list of values employee assignment
Copy to NewSchedules
button copies the schedule lines from the current laborschedule for the same employee assignment or for adifferent employee assignment
Merge to ExistingSchedules
button merges schedule lines of current labor schedule withlabor schedule lines present on an existing laborschedule for the same or for a different employeeassignment
Element Groups default If Copy to New Schedules is selected, displays theelement group hierarchy values where no laborschedule exists for the selected employeeassignment. If Merge to Existing Schedules isselected, displays element group hierarchy valuesthat do exist for the selected employee assignment. Ifa value is selected, it appears in the correspondingdestination window.
Element Types default If Copy to New Schedules is selected, displays theelement type hierarchy values where no laborschedule exists for the selected employeeassignment. If Merge to Existing Schedules isselected, displays element type hierarchy values thatdo exist for the selected employee assignment. If avalue is selected, it appears in the correspondingdestination window.
Assignment check box check box Users select Assignment check box to merge aschedule line to a labor schedule defined at theAssignment level.
Table 9–2 Schedule Lines Window Description
Field Name Type Features Description
Labor Scheduling Procedures 9-21

Schedule Lines Window Description
Select All button selects all items in Element Groups or Element Typeregions
Deselect button deselects items selected in the Element Groups orElement Types region
Cancel button closes window without saving
Done button indicates task completion
Table 9–2 Schedule Lines Window Description
Field Name Type Features Description
9-22 Oracle Labor Distribution User’s Guide

Viewing Labor Schedule Lines Procedure
Viewing Labor Schedule Lines ProcedureThe following procedures are used to view schedule lines:
■ Viewing Schedule Summary
■ Viewing Monthly Schedule Summary
■ Viewing Payroll Period Schedule Summary
Viewing Schedule SummaryPerform the following steps to view the schedule summary.
1. In Labor Distribution, navigate to the Labor Scheduling window as follows:
Labor Schedules
The Labor Scheduling window appears.
2. In the Full Name field, query the list of employees as follows:
View - Find or View - Find All
The Find Employees window appears
3. Select an employee.
Click Find
4. Click Schedule Lines.
The Schedule Lines window appears as shown in Figure 9–2, page 9-14.
5. Click Schedule Summary.
The Schedule Summary window appears as shown in Figure 9–7, page 9-26.
6. In the Begin field in the Display region, enter the start display date from the listof values.
7. In the End field in the Display region, enter the end display date from the list ofvalues.
8. Click Display.
A display appears summarizing how each earnings element of the assignmentis scheduled.
9. Close the window.
The Schedule Lines window appears as shown in Figure 9–2, page 9-14.
Labor Scheduling Procedures 9-23

Viewing Labor Schedule Lines Procedure
Viewing Monthly Schedule SummaryTo view the monthly schedule summary, perform the following steps.
1. In the Schedule Lines window, click Monthly Summary.
The Monthly Schedule Summary window appears as shown in Figure 9–8,page 9-28.
2. In the Begin field in the Display region, enter the start display date from the listof values.
3. In the End field in the Display region, enter the end display date from the list ofvalues.
4. In the Schedule Hierarchy region, select a hierarchy level to display.
5. Click Refresh Display.
A monthly summary of the schedule lines appears.
6. Repeat Steps 4 and 5 until finished.
7. Close the window.
The Schedule Lines window appears.
Viewing Payroll Period Schedule SummaryTo view the schedule lines by payroll period, perform the following steps.
1. In the Schedule Lines window, click Payroll Period.
The Payroll Period Schedule Summary window appears as shown inFigure 9–9, page 9-31.
2. In the Begin field of the Display region, enter the start display date from the listof values.
3. In the End field of the Display region, enter the end display date from the list ofvalues.
4. In the Schedule Hierarchy region, select a hierarchy level to display.
5. Click Refresh Display.
A monthly summary of the schedule lines appears.
6. Repeat Steps 4 and 5 until finished.
7. Close the window.
9-24 Oracle Labor Distribution User’s Guide

Viewing Labor Schedule Lines Procedure
The Schedule Lines window appears.
8. Close the Schedule Lines window.
Labor Scheduling Procedures 9-25

Schedule Summary Window
Schedule Summary Window
Figure 9–7 Schedule Summary Window
9-26 Oracle Labor Distribution User’s Guide

Schedule Summary Window Description
Schedule Summary Window Description
Table 9–3 Schedule Summary Window Description
Field Name Type Features Description
Employee Region
Full Name display only employee name
Employee Number display only employee identification number
Social Security display only employee social security number
Display Region
Begin required list of values:pop-upcalendar
schedule line for assignment begin date
End required list of values:pop-upcalendar
schedule line for assignment end date
Display button populates Earnings Element and Element Groupregions with appropriate data
Main Region
Assignment display only assignment identification number
Organization display only assignment organization name
Element Type display only lists earnings elements scheduled for assignment
Element Group display only lists element groups scheduled for assignment
Org Default display only indicates if earnings element defined at OrganizationDefault level
Assignment display only indicates if earnings element defined at Assignmentlevel
Element Group display only indicates if earnings element defined at ElementClass level
Element display only indicates if earnings element defined at Elementlevel
Labor Scheduling Procedures 9-27

Monthly Schedule Summary Window
Monthly Schedule Summary Window
Figure 9–8 Monthly Schedule Summary Window0
9-28 Oracle Labor Distribution User’s Guide

Monthly Schedule Summary Window Description
Monthly Schedule Summary Window Description
Table 9–4 Monthly Schedule Summary Window Description
Field Name Type Features Description
Employee Region
Full Name display only employee full name
Employee Number display only employee identification number
Social Security display only employee social security number
Assignment Region
Assignment display only assignment identification number
Organization display only organization component of employee's assignment
Begin display only assignment start date
FTE display only employment status of employee's assignment
Payroll display only employee payment cycle
End display only assignment end date
Schedule HierarchyRegion
Assignment display only Users can select but cannot add; indicates if earningselement defined at Assignment level.
Element Group display only Users can select but cannot add; indicates if earningselement defined at Element Type level.
Element Type display only Users can select but cannot add; indicates if earningselement defined at Element level.
Labor Scheduling Procedures 9-29
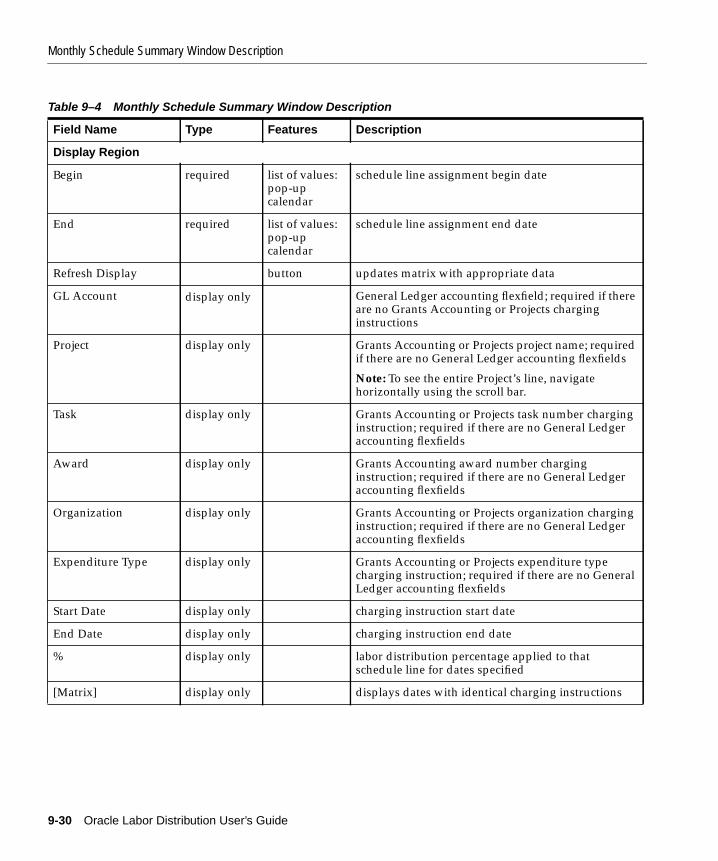
Monthly Schedule Summary Window Description
Display Region
Begin required list of values:pop-upcalendar
schedule line assignment begin date
End required list of values:pop-upcalendar
schedule line assignment end date
Refresh Display button updates matrix with appropriate data
GL Account display only General Ledger accounting flexfield; required if thereare no Grants Accounting or Projects charginginstructions
Project display only Grants Accounting or Projects project name; requiredif there are no General Ledger accounting flexfields
Note: To see the entire Project’s line, navigatehorizontally using the scroll bar.
Task display only Grants Accounting or Projects task number charginginstruction; required if there are no General Ledgeraccounting flexfields
Award display only Grants Accounting award number charginginstruction; required if there are no General Ledgeraccounting flexfields
Organization display only Grants Accounting or Projects organization charginginstruction; required if there are no General Ledgeraccounting flexfields
Expenditure Type display only Grants Accounting or Projects expenditure typecharging instruction; required if there are no GeneralLedger accounting flexfields
Start Date display only charging instruction start date
End Date display only charging instruction end date
% display only labor distribution percentage applied to thatschedule line for dates specified
[Matrix] display only displays dates with identical charging instructions
Table 9–4 Monthly Schedule Summary Window Description
Field Name Type Features Description
9-30 Oracle Labor Distribution User’s Guide

Payroll Period Schedule Summary Window
Payroll Period Schedule Summary Window
Figure 9–9 Payroll Period Schedule Summary Window
Labor Scheduling Procedures 9-31

Payroll Period Schedule Summary Window Description
Payroll Period Schedule Summary Window Description
Table 9–5 Payroll Period Schedule Summary Window Description
Field Name Type Features Description
Employee Region
Full Name display only employee full name
Employee Number display only employee identification number
Social Security display only employee social security number
Assignment Region
Assignment display only assignment identification number
Organization display only organization component of employee's assignment
Begin display only assignment start date
FTE display only employment status of employee's assignment
Payroll display only employee payment cycle
End display only assignment end date
Schedule HierarchyRegion
Assignment display only User can select but cannot add; indicates if earningselement defined at Assignment level
Element Group display only User can select but cannot add; indicates if earningselement defined at Element Type level
Element Type display only User can select but cannot add; indicates if earningselement defined at Element level
9-32 Oracle Labor Distribution User’s Guide

Payroll Period Schedule Summary Window Description
Display Region
Begin required list of values schedule line assignment begin date
End required list of values schedule line assignment end date
Refresh Display required button updates matrix with appropriate data
GL Account display only General Ledger accounting flexfield; required if thereare no Grants Accounting or Projects charginginstructions
Project display only Grants Accounting or Projects project name; requiredif there are no General Ledger accounting flexfields
Note: To see the entire Project’s line, navigatehorizontally using the scroll bar.
Task display only Grants Accounting or Projects task number charginginstruction; required if there are no General Ledgeraccounting flexfields
Award display only Grants Accounting award number charginginstruction; required if there are no General Ledgeraccounting flexfields
Organization display only Grants Accounting or Projects organization charginginstruction; required if there are no General Ledgeraccounting flexfields
Expenditure Type display only Grants Accounting or Projects expenditure typecharging instruction; required if there are no GeneralLedger accounting flexfields
Start Date display only charging instruction start date
End Date display only charging instruction end date
% display only labor distribution percentage applied to thatschedule line for dates specified
[Matrix] display only displays dates with identical charging instructions
Table 9–5 Payroll Period Schedule Summary Window Description
Field Name Type Features Description
Labor Scheduling Procedures 9-33

Payroll Period Schedule Summary Window Description
9-34 Oracle Labor Distribution User’s Guide

Part III
Payroll Interface

Import Payroll Transactions Proc
10
Import Payroll Transactions ProceduresThis chapter describes how to import payroll transactions. The following sectionsare in this chapter:
■ Definition
■ Overview
■ Prerequisites
■ Importing Payroll Transactions Procedure
■ Rolling Back Oracle Payroll Import Procedure
edures 10-1

Definition
DefinitionThe Import Payroll Transactions concurrent process imports Oracle Payroll linesand preformats them for the distribution process.
OverviewThis section describes the Import Payroll Transactions process.
ProcessThe Import Payroll Transactions process includes the following tasks:
■ Select Payroll to be Imported
■ Calculate Balance Amounts for Regular Salary Earnings Element
■ Create Payroll Sublines
■ Calculate Daily Pay Rate for the Subline
■ Store Sublines
■ Rollback Imported Payroll
Select Payroll to be ImportedTo select a payroll to be imported, users run the Import Payroll Transactionsconcurrent process.
Employee Assignments with Zero Work Day Zero work day situations occur when anemployee assignment is suspended or terminated during a previous payroll periodand the assignment is inactive during the payroll period being imported into LaborDistribution. Zero work day situations also occur when an employee is hired in apayroll period on a non-business day and there are no more business days in thatpayroll period after the hire date.
Processing of Employee Assignments with zero work day allows the import ofOracle payroll for employees with zero work day situations, irrespective ofemployee assignment status, active or non-active, as long as the employee’s finaltermination process in HRMS has not been completed.
Calculate Balance Amounts for Regular Salary Earnings ElementFor all earnings elements, Oracle Labor Distribution distributes the pay amountevenly across the payroll period with one exception, the Regular Salary earnings
10-2 Oracle Labor Distribution User’s Guide

Overview
element. Because salary is typically the largest pay amount and salary informationis directly available in Oracle Human Resources, Labor Distribution performs aspecial calculation for Regular Salary. This special calculation enables LaborDistribution to adjust daily pay amounts to account for salary increases. Thebalance amount is used for this special calculation for Regular Salary to account forany pay amount differences from pay that results from salary alone.
The balance amount, if any, is distributed evenly across the payroll period throughincorporation in the daily rate. Balance amounts are created only for the earningselement Regular Salary, which is a seeded element value in Human Resources.
Example If a salaried employee is on a biweekly payroll and is paid $1,000 on theearnings element Regular Salary, the daily rate is $100. If, in the next payroll period,the employee has a pay increase to $1,000 per week, the employee is paid $1,500with a daily rate of $100 for the first week and $200 for the second week.
If a user performs a manual override for that payroll and pays Regular Salary of$1,800, the balance amount would equal $300 and the daily rate would be $130 forthe first week and $230 for the second week.
Create Payroll SublinesLabor Distribution splits each employee, assignment, and earnings element payrollline into sublines based on dates of interest. The dates of interest are as follows:
■ date of salary or wage change
■ date of FTE change
■ date employment begins
■ date employment ends
■ date employee status becomes active
■ date employee status becomes inactive
■ date assignment begins
■ date assignment ends
■ organization change date
■ date job changes
■ date position changes
■ earnings element effective date begin
Import Payroll Transactions Procedures 10-3
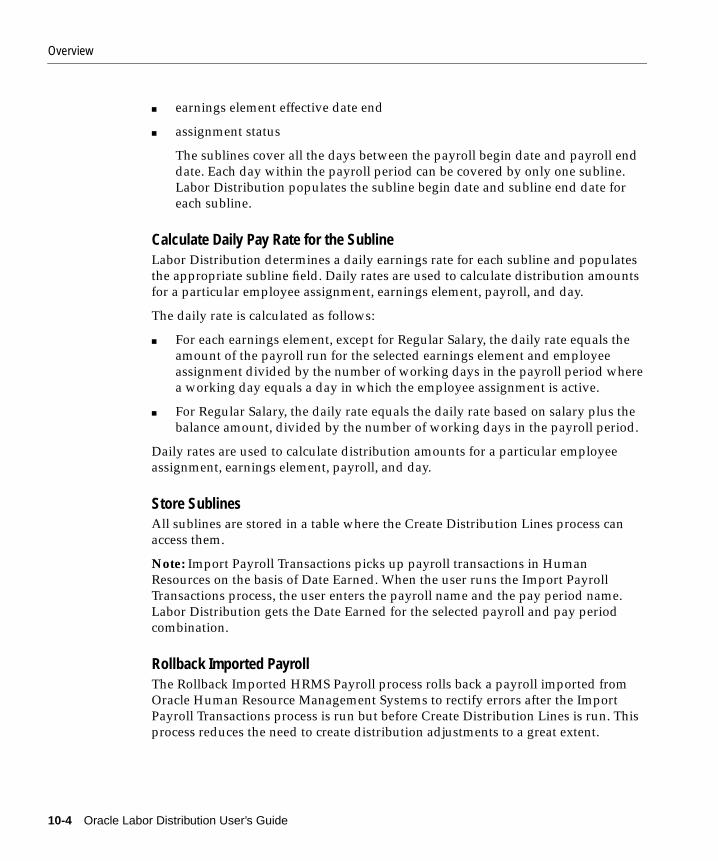
Overview
■ earnings element effective date end
■ assignment status
The sublines cover all the days between the payroll begin date and payroll enddate. Each day within the payroll period can be covered by only one subline.Labor Distribution populates the subline begin date and subline end date foreach subline.
Calculate Daily Pay Rate for the SublineLabor Distribution determines a daily earnings rate for each subline and populatesthe appropriate subline field. Daily rates are used to calculate distribution amountsfor a particular employee assignment, earnings element, payroll, and day.
The daily rate is calculated as follows:
■ For each earnings element, except for Regular Salary, the daily rate equals theamount of the payroll run for the selected earnings element and employeeassignment divided by the number of working days in the payroll period wherea working day equals a day in which the employee assignment is active.
■ For Regular Salary, the daily rate equals the daily rate based on salary plus thebalance amount, divided by the number of working days in the payroll period.
Daily rates are used to calculate distribution amounts for a particular employeeassignment, earnings element, payroll, and day.
Store SublinesAll sublines are stored in a table where the Create Distribution Lines process canaccess them.
Note: Import Payroll Transactions picks up payroll transactions in HumanResources on the basis of Date Earned. When the user runs the Import PayrollTransactions process, the user enters the payroll name and the pay period name.Labor Distribution gets the Date Earned for the selected payroll and pay periodcombination.
Rollback Imported PayrollThe Rollback Imported HRMS Payroll process rolls back a payroll imported fromOracle Human Resource Management Systems to rectify errors after the ImportPayroll Transactions process is run but before Create Distribution Lines is run. Thisprocess reduces the need to create distribution adjustments to a great extent.
10-4 Oracle Labor Distribution User’s Guide

Overview
After a payroll is rolled back, users can reimport the same payroll. This process canbe repeated several times.
Rollback Imported Payroll Rules The following rules apply to the Rollback ImportedHRMS Payroll process.
1. The Rollback Imported HRMS Payroll rolls back imported payrolls only forundistributed payrolls.
2. If the Create Distribution Lines process has been run, users must first roll backthe distribution lines and then roll back the payroll.
Note: If users attempt to roll back an imported payroll after running CreateDistribution Lines, a message appears advising the user to roll back thedistribution lines first.
For information on rolling back distribution lines, see Rolling Back DistributionLines Procedure, page 11-7.
3. If the Summarize and Transfer Payroll Distributions process has been run, theimported payroll cannot be rolled back. A message appears advising users thata rollback is not allowed.
Example 1 If the user runs the Reconciliation Report between Payroll Lines andSublines after running Import Payroll Transactions, any errors relating to thecreation of sublines, such as assignments and elements, are reported. Users can rollback the imported payroll and make changes to data in Human Resources or LaborDistribution.
For information on running Reconciliation Report between Payroll Lines andSublines, see Generating Reconciliation and Control Reports Procedure, page 20-4.
Example 2 If the user runs the Reconciliation Report between Payroll Sublines andDistribution Lines after running Create Distribution Lines, the user can identifydistribution lines that are not targeted for the correct transfer destination. To rectifythe distributions, the user rolls back the distribution lines and the imported payroll,makes changes to labor schedules, and reruns the two processes. This rollbackprocess is essential to preclude making adjustments in Distribution Adjustments fora large amount of distribution lines.
For information on running Reconciliation Report between Payroll Sublines andDistribution Lines, see Generating Reconciliation and Control Reports Procedure,page 20-4.
Import Payroll Transactions Procedures 10-5

Prerequisites
Prerequisites❏ Oracle Payroll Costing must be run, costed, and transferred to Oracle General
Ledger before initiating the Import Payroll Transactions procedure.
For information on payroll runs, see Payroll Runs and Processes, Running YourPayroll Using Oracle HRMS .
10-6 Oracle Labor Distribution User’s Guide

Importing Payroll Transactions Procedure
Importing Payroll Transactions ProcedureTo import payroll transactions, perform the following steps.
1. In Labor Distribution, navigate to the Submit Request window as follows:
Processes & Reports - Run
The Submit a New Request pop-up window appears.
2. Select the Single Request radio button.
3. Click OK.
The Submit Request window appears.
4. In the Name field, select PSP: Import Payroll Transactions from HRMS from thelist of values.
5. Click OK.
The Parameters pop-up window appears.
6. In the Payroll Name field, select a payroll from the list of values.
Note: Users select the period name corresponding to the payroll run they wantto import.
7. In the Period Name field, select a payroll period type from the list of values.
Note: The period type corresponds to the payroll period types in Oracle HumanResources. Users select the period type corresponding to the payroll run theywant to import.
8. To apply the parameters, click OK.
9. In the Submit Request window, click Submit.
The Requests window appears.
10. To view the report file, select the appropriate Request ID and click ViewOutput.
11. Close the window.
Import Payroll Transactions Procedures 10-7

Rolling Back Oracle Payroll Import Procedure
Rolling Back Oracle Payroll Import ProcedureTo roll back payroll imported from Human Resource Management Systems,perform the following steps.
1. In Labor Distribution, navigate to the Submit Request window as follows:
Processes & Reports - Run
The Submit a New Request pop-up window appears.
2. Select the Single Request radio button.
3. Click OK.
The Submit Request window appears.
4. In the Name field, select PSP: Rollback Imported HRMS Payroll from the list ofvalues.
5. Click OK.
The Parameters pop-up window appears.
6. In the Payroll Name field, select a payroll name from the list of values.
7. In the Period Name field, select a period name from the list of values.
8. To apply the parameters, click OK.
9. In the Submit Request window, click Submit.
The Requests window appears.
10. To view the report file, select the appropriate Request ID and click ViewOutput.
11. Close the window.
10-8 Oracle Labor Distribution User’s Guide

Create Distribution Lines Pro
11
Create Distribution Lines ProceduresThis chapter describes how to create distribution lines. The following sections are inthis chapter.
■ Definition
■ Overview
■ Creating Distribution Lines Procedure
■ Rolling Back Distribution Lines Procedure
cedures 11-1

Definition
DefinitionThe Create Distribution Lines concurrent process is used to distribute all types ofpay to Oracle Grants Accounting and Oracle Projects projects and awards and toOracle General Ledger accounts based on the labor schedules defined for theemployee assignment.
OverviewThe Create Distribution Lines process includes the following inputs:
■ payroll sublines generated by the Import Payroll Transactions process
■ payroll sublines exported into and maintained through the MaintainNon-Oracle Payroll Interface process
■ labor schedules defined within the labor scheduling process
■ Oracle Human Resources and Oracle Payroll information
■ General Ledger account information
■ Grants Accounting and Projects accounting information
Using these inputs, the Create Distribution Lines process calculates payrolldistribution records that generate transactions to be posted to either GrantsAccounting, Projects, or General Ledger.
Create Distribution Lines is run with auto-population if the auto-population profileoption is enabled and if auto-population is set up. Auto-population is used forassignments at the element type, element class, assignment, or default organizationlabor schedule levels. Auto-population is not used at the Suspense Account, DefaultOrganization Account, and Global Earnings Element levels.
For information on enabling the auto-population profile option, see SystemAdministration Setup, page 4-1.
For information on setting up auto-population, see Expenditure Type and NaturalAccount Auto-Population Setup, page 8-1.
ProcessThe Create Distribution Lines process consists of the following tasks:
■ Create Distribution Lines
11-2 Oracle Labor Distribution User’s Guide

Overview
■ Determine Labor Schedule and Charging Instructions to Be Used forDistribution
■ Calculate Distribution Amounts
■ Perform Validation of Charging Instructions
■ Produce Control Reports
■ Roll Back Distribution Lines
Create Distribution LinesFor each payroll subline, Oracle Labor Distribution creates one or more distributionlines. The number of distribution lines created depends on the following:
■ number of unique schedule lines across the payroll periods
■ number of working days in the payroll sublines
Example If the payroll subline covers January 16 to January 31, the number ofdistribution lines equals the number of Grants Accounting and Projects charginginstructions and General Ledger accounts for that employee assignment across allperiods of the earnings element labor schedule that includes a date in the periodfrom January 16 to January 31. As a result, distribution sublines are created for eachday in the payroll period, for each employee, assignment, element type, and foreach Grants Accounting and Projects charging instruction and General Ledgeraccount.
Determine Labor Schedule and Charging Instructions to Be Used for DistributionTo determine the labor schedule to be used for an earnings element on a payroll,Labor Distribution begins searching at the bottom of the schedule hierarchy andmoves upward until it finds a defined labor schedule or account for the day beingprocessed. The lower levels, which include Earnings Element, Element Group, andAssignment, are defined for the employee assignment linked to the earningselement on the payroll. The upper levels, which include Organization SuspenseAccount, Organization Default Account, and Default Labor Schedule, are defined atthe human resources organization level for the specified employee assignment.
For information on the labor scheduling hierarchy process and hierarchy rules, seethe following:
■ Scheduling Hierarchy Process, page B-1
■ Distribution and Configuration Options, page I-1
Create Distribution Lines Procedures 11-3

Overview
Calculate Distribution AmountsFor each distribution line, Labor Distribution calculates the amount to bedistributed for the Grants Accounting or Projects charging instruction or theGeneral Ledger account of that line for the dates of the distribution line. Thedistribution amount is calculated for each charging instruction for each day. Theamount for a single day is the daily rate. The distribution amount is then stored inthe Distribution Lines table.
Perform Validation of Charging InstructionsA final validation of the charging instructions is performed after the charginginstruction population is completed. All validations performed during laborscheduling are applied at this time with the following changes:
■ The expenditure item date used for validation is the effective date from thepayroll sublines.
■ All edit failures are considered errors.
■ If an edit failure occurs, the charging instruction is replaced by theorganizational suspense charging account.
For information on the validation process and rules, see Data Entry ValidationsProcess, page D-1.
Produce Control ReportsLabor Distribution provides control reports to assist the user with reconciling thepayroll sublines with the distribution lines generated. The following reports can beproduced:
■ Suspense Account Report
■ payroll reconciliation reports
For information on Suspense Account Report, see Reports Procedures, page 19-1.
For information on payroll reconciliation reports, see Reconciliation and ControlReports Procedures, page 20-1.
Roll Back Distribution LinesThe Roll Back Distribution Lines process rolls back distribution lines to rectifyerrors after the Create Distribution Lines process is run but before the Summarizeand Transfer Payroll Distributions process is run. This process reduces the need tocreate distribution adjustments to a great extent.
11-4 Oracle Labor Distribution User’s Guide

Overview
To roll back Oracle Payroll distributions, users specify the following:
■ payroll source name
■ payroll source code
■ optionally, payroll period to roll back a specific payroll
Note: If the user does not specify a payroll period, the process rolls back allOracle payroll distribution lines that are not summarized and transferred.
To roll back non-Oracle payroll distributions, users specify the following:
■ payroll source name
■ payroll source code
■ optionally, batch name to roll back a specific batch
Note: If the user does not specify a batch name, the process rolls back allnon-Oracle payroll distribution lines that are not summarized and transferred.
After the Roll Back Distribution Lines process is run, users run one of the followingprocesses to rectify errors:
■ Rollback Imported HRMS Payroll
■ Rollback of Non-Oracle Payroll
For information on rolling back Oracle Payroll distribution lines, see Rolling BackOracle Payroll Import Procedure, page 10-8.
For information on rolling back non-Oracle Payroll distribution lines, see RollingBack Non-Oracle Payroll Procedure, page 14-21.
Example If the user runs the Reconciliation Report between Payroll Sublines andDistribution Lines after running Create Distribution Lines, the user can identifydistributions that are not targeted for the correct transfer destination. To rectify thedistributions, the user rolls back the distribution lines and the imported Oracle ornon-Oracle payroll, makes changes to labor schedules, and reruns the processes.This rollback process is essential to preclude making adjustments in DistributionAdjustments for a large amount of distribution lines.
For information on running Reconciliation Report between Payroll Sublines andDistribution Lines, see Generating Reconciliation and Control Reports Procedure,page 20-4.
Create Distribution Lines Procedures 11-5

Creating Distribution Lines Procedure
Creating Distribution Lines ProcedureTo create distribution lines, perform the following steps.
1. In Labor Distribution, navigate to the Submit Request window as follows:
Processes & Reports - Run
The Submit a New Request pop-up window appears.
2. Select the Single Request radio button.
3. Click OK.
The Submit Request window appears.
4. In the Name field, select PSP: Create Distribution Lines from the list of values.
5. Click OK.
The Parameters pop-up window appears.
Note: If auto-population is enabled, Create Distribution Lines is run withauto-population.
6. In the Source type field, select a source type from the list of values.
7. In the Source code field, select a source code from the list of values.
8. In the Time period field, select a time period from the list of values.
9. In the Batch name field, select a batch name from the list of values.
10. To apply the parameters, click OK.
11. In the Submit Request window, click Submit.
The Requests window appears.
12. To view the report file, select the appropriate Request ID and click ViewOutput.
13. Close the window.
11-6 Oracle Labor Distribution User’s Guide

Rolling Back Distribution Lines Procedure
Rolling Back Distribution Lines ProcedureTo roll back distribution lines, perform the following steps.
1. In Labor Distribution, navigate to the Submit Request window as follows:
Processes & Reports - Run
The Submit a New Request pop-up window appears.
2. Select the Single Request radio button.
3. Click OK.
The Submit Request window appears.
4. In the Name field, select PSP: Roll Back Distribution Lines from the list ofvalues.
The Parameters pop-up window appears.
5. In the Source Type field, select a payroll name from the list of values.
Note: O indicates an Oracle payroll and N indicates a non-Oracle payroll batch.
6. In the Source Code field, enter a source code from the list of values.
Note: PAY indicates an Oracle payroll and NON-ORACLE indicates anon-Oracle payroll batch.
7. Perform one of the following:
■ If rolling back distribution lines from an Oracle payroll, in the Time PeriodId field, enter a time period from the list of values.
■ If rolling back distribution lines from a non-Oracle payroll batch, in theBatch Name field, select a batch from the list of values.
8. To apply the parameters, click OK.
9. In the Submit Request window, click Submit.
The Requests window appears.
10. To view the report file, select the appropriate Request ID and click ViewOutput.
11. Close the window.
Create Distribution Lines Procedures 11-7

Rolling Back Distribution Lines Procedure
11-8 Oracle Labor Distribution User’s Guide

Summarize and Transfer Payroll Distributions Proce
12
Summarize and Transfer PayrollDistributions Procedures
This chapter describes the Summarize and Transfer Payroll Distributions process.The following sections are in this chapter:
■ Definition
■ Overview
■ Prerequisites
■ Summarizing and Transferring Payroll Distributions Procedure
■ Recovering the Summarize and Transfer Payroll Distributions Procedure
dures 12-1

Definition
DefinitionThe Summarize and Transfer Payroll Distributions concurrent process reads andsummarizes the distribution lines created from the Create Distribution Linesprocess and transfers these lines to Oracle Grants Accounting, Oracle Projects, andOracle General Ledger for posting.
OverviewThis section describes the Summarize and Transfer Payroll Distributions process.
Note: If the Create Distribution Lines process was run with auto-populationenabled, the Summarize and Transfer Payroll Distributions process uses theauto-populated expenditure type or natural account in the distribution lines table.
ProcessThe Summarize and Transfer Payroll Distributions process includes the followingparts:
■ Select Records for Summarization and Distribution
■ Summarize Distribution Lines
■ Execute a Prenamed Procedure
■ Transfer Distribution Lines and Initiate Import
■ Produce Control Reports
■ Recover Summarize and Transfer Payroll Distributions
Select Records for Summarization and DistributionThe user submits a request to the concurrent manager and Labor Distributionselects the records for summarization and transfer. Summarize and Transfer PayrollDistributions reads the following tables to select records for summarization andtransfer:
■ Distribution Lines Table
■ Pre-Generated Distribution Lines Table
Distribution Lines Table Summarize and Transfer Payroll Distributions selects allpreviously unprocessed records and batches the records by payroll. Each batch andrecord is marked with a status indicating the state of processing that the batch and
12-2 Oracle Labor Distribution User’s Guide
Overview
record are in. This ensures that previously summarized and transferred records arenot transferred more than once.
Pre-Generated Distribution Lines Table Summarize and Transfer Payroll Distributionsreads the Pre-generated Distribution Lines table to select all previously unprocessedrecords and batches the records by reference identifiers. Each batch and record ismarked with a status identifying the state of processing that each batch and recordis in. This ensures that previously summarized and transferred records are nottransferred more than once.
Summarize Distribution LinesFor lines that are to be transferred to Grants Accounting or Projects, LaborDistribution summarizes the distribution lines and the pre-generated distributionlines at the employee, assignment, project, task, award, expenditure type,expenditure organization, and effective dates levels. The award level applies toGrants Accounting only.
For lines that are to be transferred to General Ledger, Labor Distributionsummarizes the distribution lines by employee, assignment, General Ledgeraccounting flexfields, and effective dates.
All summarized distribution lines are posted to the Distribution Lines Summarytable.
If General Ledger override date is specified for a batch, the Summarize and TransferPayroll Distributions process uses this date as the effective date in posting GeneralLedger transactions. If this date is not specified, the effective date is based on thedistribution dates on the distribution lines.
Processing of Employee Assignments with Zero Work Day Processing of employeeassignment with zero work day allows summarization and transfer of distributionlines, for employees with zero work day situations, irrespective of employeeassignment status.
The following rules apply:
■ If an employee has a non-active status and has a schedule charging to OracleGeneral Ledger, Labor Distribution does not change the posting date. GeneralLedger does not validate whether an employee has an active or non-activeemployee assignment status.
■ If an employee has a non-active assignment status and has a schedule chargingto Grants Accounting or Projects, Labor Distribution looks for the employee
Summarize and Transfer Payroll Distributions Procedures 12-3

Overview
assignment’s last active date and stores this date as the GMS Override Date.Grants Accounting or Projects then accepts the transfer of distribution lineswith a non-active employee assignment status.
For information on employee assignments with zero work day situations, seeEmployee Assignments with Zero Work Day, page 10-2.
Execute a Prenamed ProcedureUsers can customize and execute a prenamed procedure to update or populate theDistribution Lines Summary table with additional information to be transferred toGrants Accounting, Projects, or General Ledger.
Transfer Distribution Lines and Initiate ImportLabor Distribution transfers the summarized distribution lines from theDistribution Lines Summary table to Grants Accounting, Projects, and GeneralLedger and initiates the journal import programs and the transaction importprograms.
Produce Control ReportsLabor Distribution provides control reports to assist the user with reconciling thefollowing:
■ payroll information imported
■ distribution lines created and summarized
■ transfer of the lines to the Grants Accounting, Projects, and General Ledgerinterface tables
For information on distribution reports, see Reports Procedures, page 19-1.
Recover Summarize and Transfer Payroll DistributionsLabor Distribution provides the Recover Summarize and Transfer process if one ofthe following situations occurs while running the Summarize and Transfer PayrollDistributions process:
■ system crash
■ abnormal termination of the process
■ an inconsistency with one of the target systems that includes General Ledger,Grants Accounting, or Projects
12-4 Oracle Labor Distribution User’s Guide

Overview
After the recovery process is run, a message appears indicating that the processcompleted successfully.
PSP_PAYROLL_CONTROLS Table Status At the beginning of the PSP: Summarize andTransfer Payroll Distributions process, the status code in the PSP_PAYROLL_CONTROLS table is N for Normal; as the process is running, the status codechanges to I, for In Process. If the process completes successfully, the systemchanges the status code to P for Processed. If the process fails, the status code doesnot change from the I status.
The steps in the Recover Summarize and Transfer process are as follows:
1. If there is a failure, the user runs the PSP: Recover Summarize and TransferPayroll Distributions process.
If the failure is the result of an inconsistency with one of the target systems, therecovery process attempts to bring the process to a consistent state with at leastone of the target systems attaining a status of N or P depending on whetherthere is data left to be processed.
2. After Recover Summarize and Transfer Payroll Distributions brings the processto a consistent state for one target system, users must run the PSP: Summarizeand Transfer Payroll Distributions process again to bring the remaining targetsystems to a consistent state.
Summarize and Transfer Payroll Distributions Procedures 12-5

Prerequisites
Prerequisites❏ The Summarize and Transfer Payroll Distributions and the Use Default GL
Posting Override Date profile options must be set.
To set up system profile options, see System Administration Setup, page 4-1.
12-6 Oracle Labor Distribution User’s Guide

Summarizing and Transferring Payroll Distributions Procedure
Summarizing and Transferring Payroll Distributions ProcedureTo summarize distribution lines and transfer, perform the following steps.
1. In Labor Distribution, navigate to the Submit Request window as follows:
Processes & Reports - Run
The Submit a New Request pop-up window appears.
2. Select the Single Request radio button.
3. Click OK.
The Submit Request window appears.
4. In the Name field, select PSP: Summarize and Transfer Payroll Distributionsfrom the list of values.
The Parameters pop-up window appears.
Note: If Create Distribution Lines was run with auto-population enabled,Summarize and Transfer Payroll Distributions uses the expenditure type andnatural account auto-populated values.
5. Click OK.
6. In the Source type field, select a source type from the list of values.
7. In the Source code field, select a source code from the list of values.
8. In the Time period field, select a time period from the list of values.
9. In the Batch name field, select a batch name from the list of values.
10. To apply the parameters, click OK.
11. In the Submit Request window, click Submit.
The Requests window appears.
12. To view the report file, select the appropriate Request ID and click ViewOutput.
13. Close the window.
Note: Each time the Summarize and Transfer Payroll Distributions procedure is run,Labor Distribution updates the appropriate tables in Oracle Projects.
Summarize and Transfer Payroll Distributions Procedures 12-7

Recovering the Summarize and Transfer Payroll Distributions Procedure
Recovering the Summarize and Transfer Payroll Distributions ProcedureTo recover summarize and transfer payroll distributions, perform the followingsteps.
1. In Labor Distribution, navigate to the Submit Request window as follows:
Processes & Reports - Run
The Submit a New Request pop-up window appears.
2. Select the Single Request radio button.
3. Click OK.
The Submit Request window appears.
4. In the Name field, select PSP: Recover Summarize and Transfer PayrollDistributions from the list of values.
The Parameters pop-up window appears.
5. Click OK.
6. In the Source type field, select a source type from the list of values.
7. In the Source code field, select a source code from the list of values.
8. In the Time period field, select a time period from the list of values.
9. In the Batch name field, select a batch name from the list of values.
10. To apply the parameters, click OK.
11. In the Submit Request window, click Submit.
The Requests window appears.
12. To view the report file, select the appropriate Request ID and click ViewOutput.
13. Close the window.
12-8 Oracle Labor Distribution User’s Guide

Archive and Retrieve Distributions History Proce
13
Archive and Retrieve Distributions HistoryProcedures
This chapter describes the Archive and Retrieve Distribution History processes. Thefollowing sections are in this chapter:
■ Definition
■ Overview
■ Archiving and Retrieving Distributions History Procedures
■ Generating Archive History Report Procedure
dures 13-1

Definition
DefinitionThe Archive Distributions History concurrent process archives and purges datafrom the distributions history and distribution adjustment tables for use at a laterdate. The Retrieve Distributions History concurrent process retrieves the archiveddata.
OverviewThis section describes the Archive and Retrieve Distributions History processes.
ProcessThe Archive and Retrieve Distributions History processes include the following:
■ Archive and Retrieve Distributions History
■ Archive History Report
Archive and Retrieve Distributions HistoryIn order to maintain performance on current and prior year data, distributionshistory lines and distribution adjustment lines can be archived and retrieved at alater time.
The archive distributions history process identifies all history and summary linesfor the specified payroll, for those payroll periods falling within the given begin andend time periods, and archives and purges the respective tables. If there is a payrollperiod within the specified begin and end periods for which there are no lines in thehistory or summary tables, the process completes successfully and ignores thoseperiods for which no payroll information exists in Oracle Labor Distribution.
Archive History ReportThe Archive History Report provides users with an account of archived distributionand encumbrance lines.
13-2 Oracle Labor Distribution User’s Guide

Archiving and Retrieving Distributions History Procedures
Archiving and Retrieving Distributions History ProceduresTo archive the actual cost distributions for a period, perform the following steps.
1. In Labor Distribution, navigate to the Submit Request window as follows:
Processes & Reports - Run
The Submit a New Request pop-up window appears.
2. Select the Single Request radio button.
3. Click OK.
The Submit Request window appears.
4. In the Name field, select one of the following from the list of values:
■ PSP: Archive Distributions History
■ PSP: Retrieve Distributions History
The Parameters pop-up window appears.
5. In the Payroll Name field, select a payroll name from the list of values.
6. In the Begin Time Period field, select a beginning period from the list of values.
7. In the End Time Period field, select an ending period from the list of values.
8. Click OK.
9. In the Submit Request window, click Submit.
The Requests window appears.
10. To view the report file, select the appropriate Request ID and click ViewOutput.
11. Close the window.
Archive and Retrieve Distributions History Procedures 13-3

Generating Archive History Report Procedure
Generating Archive History Report ProcedureTo generate the Archive History Report for a period, perform the following steps.
1. In Labor Distribution, navigate to the Submit Request window as follows:
Processes & Reports - Run
The Submit a New Request pop-up window appears.
2. Select the Single Request radio button.
3. Click OK.
The Submit Request window appears.
4. In the Name field, select PSP: Archive History Report from the list of values.
The Parameters pop-up window appears.
5. In the Payroll Name field, select a payroll name from the list of values.
6. In the Begin Time Period field, select a beginning period from the list of values.
7. In the End Time Period field, select an ending period from the list of values.
8. Click OK.
9. In the Submit Request window, click Submit.
The Requests window appears.
10. To view the report file, select the appropriate Request ID and click ViewOutput.
11. Close the window.
13-4 Oracle Labor Distribution User’s Guide

Part IV
Non-Oracle Payroll Interfaces

Non-Oracle Payroll Interface Pro
14
Non-Oracle Payroll Interface ProceduresThis chapter describes how to import non-Oracle payroll systems. The followingsections are in this chapter:
■ Definition
■ Overview
■ Prerequisites
■ Maintaining Non-Oracle Payroll Interface Procedure
■ Maintenance of Non-Oracle Payroll Sublines Window, Payroll Period, Name,Source Tab
■ Maintenance of Non-Oracle Payroll Sublines Window Description, PayrollPeriod, Name, Source Tab
■ Maintenance of Non-Oracle Payroll Sublines Window, Element, Earned, CheckDate Tab
■ Maintenance of Non-Oracle Payroll Sublines Window Description, Element,Earned, Check Date Tab
■ Maintenance of Non-Oracle Payroll Sublines Window, Amt, Dly Rate, Salary,D/C Flag Tab
■ Maintenance of Non-Oracle Payroll Sublines Window Description, Amt, DlyRate, Salary, D/C Flag Tab
■ Maintenance of Non-Oracle Payroll Sublines Window, Subline Start End Dates,FTE Tab
■ Maintenance of Non-Oracle Payroll Sublines Window Description, Subline StartEnd Dates, FTE Tab
■ Rolling Back Non-Oracle Payroll Procedure
cedures 14-1

Definition
DefinitionNon-Oracle Payroll Interface enables the user to import, review, and edit payrollsublines created using a non-Oracle payroll system before initiating the CreateDistribution Lines process.
OverviewUsers who are likely to use the Non-Oracle Payroll Interface include the following:
■ institutions using non-Oracle payroll applications
■ institutions using Oracle Human Resources and Oracle Payroll that want todistribute certain labor costs that are not within the scope of the Oracle payrollgeneration
ProcessThe Non-Oracle Payroll Interface process includes the following parts:
■ Import Non-Oracle Sublines
■ Maintain Non-Oracle Payroll Interface
■ Non-Oracle Payroll Import Rollback
Import Non-Oracle SublinesThe methods for importing non-Oracle payroll sublines are as follows:
■ Importing Non-Oracle Payroll Sublines Using the Maintenance of Non-OraclePayroll Sublines Window
■ Importing Non-Oracle Payroll Sublines Using the Concurrent Manager
Importing Non-Oracle Payroll Sublines Using the Maintenance of Non-Oracle Payroll SublinesWindow This method includes importing sublines and validating each transaction.
Importing Non-Oracle Payroll Sublines Using the Concurrent Manager This methodincludes importing non-Oracle payroll sublines and validating each transaction.Oracle Corporation recommends using this method only if all transactions are valid.
The Import Non-Oracle Sublines concurrent process completes the following tasks:
■ reads the Non-Oracle Payroll Interface table
■ validates data in the Non-Oracle Payroll Interface table
14-2 Oracle Labor Distribution User’s Guide

Overview
■ imports valid records into the Payroll Control table
All sublines are stored in the Non-Oracle Payroll Interface table by an interfaceprogram developed by the user during implementation. The information to beincluded on each subline is described in Table 14–1, page 14-3.
Table 14–1 Non-Oracle Payroll Interface Table
Field Name Description
Payroll ID payroll cycle name; must be defined in HumanResources and linked to selected assignment
Payroll Period ID payroll period name; must be defined in HumanResources and linked to payroll name of interfacetable record
Person ID employee identifier; must be entered in HumanResources
Assignment ID assignment identifier; assignment must be linked toemployee in Human Resources
Element Type ID element type identifier; must be linked toassignment in Human Resources
Pay Amount pay amount equals daily rate minus number ofbusiness days between subline start and end dates
Date Earned date salary or wage earned
Check Date check date
Effective Date date used when transaction posted to GeneralLedger, Projects, or Grants Accounting
Payroll SourceCode
payroll batch source; payroll source code must beavailable in PSP_Payroll_Sources table
FTE full time equivalent employment status forassignment; value must not be greater than 10 andmust be entered in the 9.99 format
Status Code validation status of subline; changes to New whenrecord modified. Values are New, Valid, and Error.
Reason Code reason code; indicates what needs to be fixed
Payroll Interface ID table primary key
DR_CR_Flag D indicates debit
C indicates credit
Non-Oracle Payroll Interface Procedures 14-3

Overview
Each entry has a status code linked to it. The code values are as follows:
■ New
■ Error
■ Valid
■ Transferred
When the user populates the interface table, the status of all records is New. Ifusers make any changes to a record, the status of that record is changed to New.
Users see only the batches that have not been transferred. If errors occur duringthe import process, the process is terminated. Users should delete or correct theerror records in the source system or in the Maintenance of Non-Oracle PayrollSublines window.
Processing of employee assignments with a zero work day allows the import ofnon-Oracle payroll for employees with zero work day situations, irrespective ofemployee assignment status, active or non-active, as long as the employee’sfinal termination process in HRMS has not been completed.
Batch Name batch name
Error Code error lookup token
Subline Begin Date subline start date; must be a date after employeehire date in Human Resources
Subline End Date subline end date
Daily Rate forSubline
daily pay rate
Salary or WageUsed
salary batch used
GL PostingOverride Date
effective date for posting transactions to GeneralLedger; date to be specified if required to overridethis date to the Effective Date in PSP_DISTRIBUTION_LINES which is later summarizedand transferred to GL Accounts Interface
GMS PostingOverride Date
not currently used
Table 14–1 Non-Oracle Payroll Interface Table
Field Name Description
14-4 Oracle Labor Distribution User’s Guide

Overview
For information on employee assignments with zero work day situations, seeEmployee Assignments with Zero Work Day, page 10-2.
Upon successful completion of Import Non-Oracle Sublines, users can proceedto the Create Distribution Lines procedure and Summarize and Transfer PayrollDistributions procedure.
For information on creating distribution lines, see Create Distribution LinesProcedures, page 11-6.
For information on summarizing and transferring, see Summarizing andTransferring Payroll Distributions Procedure, page 12-7.
Maintain Non-Oracle Payroll InterfaceThe Maintenance of Non-Oracle Payroll Sublines window enables users to view theNon-Oracle Payroll Sublines Interface table and to make simple edits, corrections,and updates to the data.
The following steps illustrate the Maintain Non-Oracle Payroll Interface process:
1. The user navigates to the Maintenance of Non-Oracle Payroll Sublines windowand selects a payroll batch.
2. To run the Import Payroll Transactions concurrent process and to validate thetransactions, the user clicks Validate.
3. The user views the request in the concurrent manager.
If the process is complete with no errors, the Status field displays Normal andthe process is complete.
If there are errors, the Status field displays Error, and the user continues to Step4 in the process.
4. The user returns to the Maintenance of Non-Oracle Payroll Sublines window tocorrect the errors. The Maintenance of Non-Oracle Payroll Sublines windowdisplays the error status as follows:
■ The statuses of records with errors displays Error.
■ An error description appears in the window.
■ The error status is displayed for each row in the window.
5. After correcting errors, the user completes Steps 1 through 3 until all errors arecorrected.
Non-Oracle Payroll Interface Procedures 14-5

Overview
In the Non-Oracle Maintenance window, for Payroll Subline Start Date and SublineEnd Date, users can enter any dates before the final termination process date ofemployee assignment. If users enter a date after the final process termination date,an error message will appear. For information on employee assignments with zerowork day situations, see Employee Assignments with Zero Work Day, page 10-2.
Upon completion of Maintain Non-Oracle Payroll Interface, users can proceed tothe Import Non-Oracle Sublines concurrent process or the Create Distribution Linesprocedure and Summarize and Transfer Payroll Distributions procedure.
For information on creating distribution lines, see Create Distribution LinesProcedures, page 11-6.
For information on summarize distribution lines and transfer, see Summarize andTransfer Payroll Distributions Procedures, page 12-7.
Non-Oracle Payroll Import RollbackThe Rollback of Non-Oracle Payroll process rolls back the import of a non-Oraclepayroll batch to make changes after the Import Non-Oracle Sublines process is runbut before Create Distribution Lines is run. This process reduces the need to createDistribution Adjustments to a great extent.
After a payroll batch is rolled back, users can reimport the same batch. This processcan be repeated several times. The rollback process resets the status of thenon-Oracle payroll batch to allow import of the same batch. Users can view thesame batch in the Maintenance of Non-Oracle Payroll Sublines window.
Non-Oracle Payroll Import Rollback Rules The following rules apply to the Rollback ofNon-Oracle Payroll process.
1. The Rollback of Non-Oracle Payroll rolls back an imported payroll batch onlyfor an undistributed batch.
2. If the Create Distribution Lines process has been run, the user must first rollback the distribution lines and then roll back the non-Oracle payroll batch.
Note: If the user attempts to roll back import of a non-Oracle payroll batch afterrunning Create Distribution Lines, a message appears advising the user to rollback the distribution lines first.
For information on rolling back distribution lines, see Rolling Back DistributionLines Procedure, page 11-7.
14-6 Oracle Labor Distribution User’s Guide

Overview
3. If the Summarize and Transfer Payroll Distributions process has been run, thedistribution lines and the import of non-Oracle payroll batch cannot be rolledback.
Example 1 If the user runs the Reconciliation Report between Payroll Lines andSublines after running Import Non-Oracle Sublines, any errors relating to the laborschedules, such as assignments and elements, are reported. The user can roll backthe imported payroll batch and make changes to data in the Maintenance ofNon-Oracle Payroll Sublines window.
For information on running Reconciliation Report between Payroll Lines andSublines, see Generating Reconciliation and Control Reports Procedure, page 20-4.
Example 2 If the user runs the Reconciliation Report between Payroll Sublines andDistribution Lines after running Create Distribution Lines, the user can identifydistributions that are not targeted for the correct transfer destination. To rectify thedistributions, the user rolls back the distribution lines and the imported payrollbatch, makes changes to labor schedules, and reruns the two processes. Thisrollback process is essential to preclude making adjustments in DistributionAdjustments for a large amount of distribution lines.
For information on running Reconciliation Report between Payroll Sublines andDistribution Lines, see Generating Reconciliation and Control Reports Procedure,page 20-4.
Non-Oracle Payroll Interface Procedures 14-7

Prerequisites
Prerequisites❏ Earnings Elements to be imported must be predefined within Labor
Distribution.
To define earnings elements to be imported, see Labor Scheduling Setup,page 5-1.
❏ Non-Oracle payroll sources must be defined.
To define non-Oracle payroll sources, see Labor Scheduling Setup, page 5-1.
❏ The Non-Oracle Payroll Interface Table must be loaded with appropriate dataeither through a user-defined process or through the Maintenance ofNon-Oracle Payroll Sublines window.
For information on loading the Non-Oracle Payroll Interface Table, seeNon-Oracle Payroll Interface Table, page K-1.
14-8 Oracle Labor Distribution User’s Guide

Maintaining Non-Oracle Payroll Interface Procedure
Maintaining Non-Oracle Payroll Interface ProcedureUse one of the following methods to maintain the non-Oracle payroll interface:
■ Importing Non-Oracle Payroll Sublines Using the Maintenance of Non-OraclePayroll Sublines Window
■ Importing Non-Oracle Payroll Sublines Using the Concurrent Manager
Importing Non-Oracle Payroll Sublines Using the Maintenance of Non-Oracle PayrollSublines Window
To import non-Oracle payroll sublines using the Maintenance of Non-Oracle PayrollSublines window, perform the following steps.
1. In Labor Distribution, navigate to the Maintenance of Non-Oracle PayrollSublines window as follows:
Payroll Interface - Non-Oracle Sublines
The Maintenance of Non-Oracle Payroll Sublines window appears.
2. Select a batch name as follows:
View - Find
3. Select a batch and click OK.
4. To run the Import Non-Oracle Sublines process and validate those transactions,click Validate.
5. View the request in the concurrent manager as follows:
View - Requests
The Find Requests pop-up window appears.
6. Select the All My Requests radio button.
7. Click Find.
8. To view the report output, select the appropriate Request ID and click ViewOutput.
9. Close the window.
10. If there are errors, return to the Maintenance of Non-Oracle Payroll Sublineswindow to correct the errors as follows:
Payroll Interface - Non-Oracle Sublines
Non-Oracle Payroll Interface Procedures 14-9
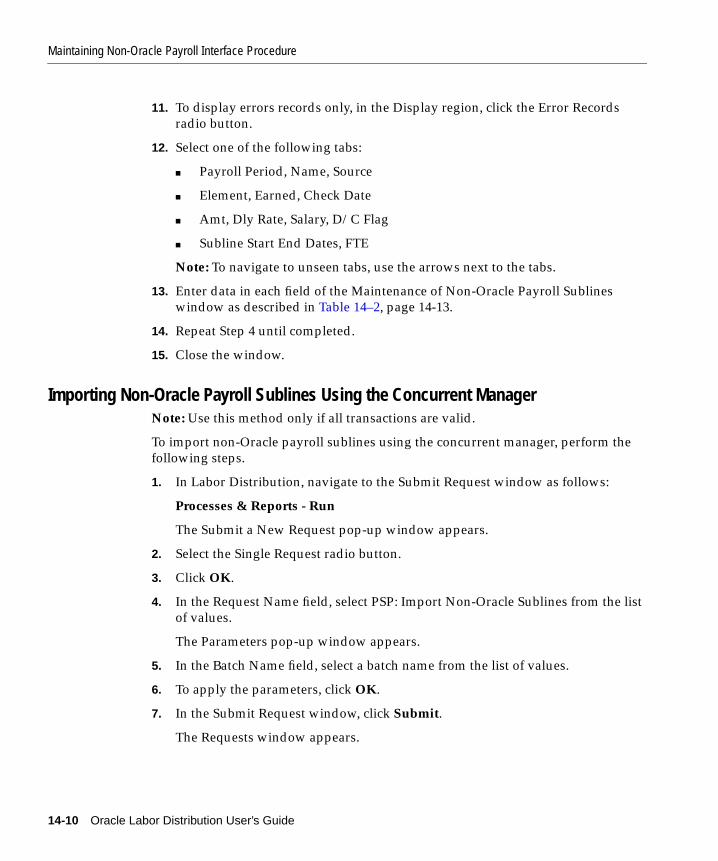
Maintaining Non-Oracle Payroll Interface Procedure
11. To display errors records only, in the Display region, click the Error Recordsradio button.
12. Select one of the following tabs:
■ Payroll Period, Name, Source
■ Element, Earned, Check Date
■ Amt, Dly Rate, Salary, D/C Flag
■ Subline Start End Dates, FTE
Note: To navigate to unseen tabs, use the arrows next to the tabs.
13. Enter data in each field of the Maintenance of Non-Oracle Payroll Sublineswindow as described in Table 14–2, page 14-13.
14. Repeat Step 4 until completed.
15. Close the window.
Importing Non-Oracle Payroll Sublines Using the Concurrent ManagerNote: Use this method only if all transactions are valid.
To import non-Oracle payroll sublines using the concurrent manager, perform thefollowing steps.
1. In Labor Distribution, navigate to the Submit Request window as follows:
Processes & Reports - Run
The Submit a New Request pop-up window appears.
2. Select the Single Request radio button.
3. Click OK.
4. In the Request Name field, select PSP: Import Non-Oracle Sublines from the listof values.
The Parameters pop-up window appears.
5. In the Batch Name field, select a batch name from the list of values.
6. To apply the parameters, click OK.
7. In the Submit Request window, click Submit.
The Requests window appears.
14-10 Oracle Labor Distribution User’s Guide

Maintaining Non-Oracle Payroll Interface Procedure
8. To view the report output, select the appropriate Request ID and click ViewOutput.
9. Close the window.
Non-Oracle Payroll Interface Procedures 14-11

Maintenance of Non-Oracle Payroll Sublines Window, Payroll Period, Name, Source Tab
Maintenance of Non-Oracle Payroll Sublines Window, Payroll Period,Name, Source Tab
Figure 14–1 Maintenance of Non-Oracle Payroll Sublines Window, Payroll Period,Name, Source Tab
14-12 Oracle Labor Distribution User’s Guide

Maintenance of Non-Oracle Payroll Sublines Window Description, Payroll Period, Name, Source Tab
Maintenance of Non-Oracle Payroll Sublines Window Description,Payroll Period, Name, Source Tab
Table 14–2 Maintenance of Non-Oracle Payroll Sublines Window Description, Payroll Period, Name,Source Tab
Field Name Type Features Description
Header Region
Batch Name required list of values imported batch name
GL Posting Date optional list of values effective posting date to General Ledger; cannot bemodified if the date is populated when loading datainto the interface table
Payroll Period, Name,Source Tab
Effective Date required list of values date used when transaction posted to GeneralLedger, Projects, or Grants Accounting
Person required list of values employee name; must be entered in HumanResources
Assignment required list of values assignment number. Assignment must be linked toemployee in Human Resources.
Payroll Name required list of values payroll cycle name; payroll name must be defined inHuman Resources and linked to the assignmentselected.
Payroll Period required list of values payroll period name; must be defined in HumanResources and linked to the assignment selected
Payroll Source required list of values payroll batch source; must be available in PSP_Payroll_Sources table
Status defaultdisplay only
validation status of pre-generated distribution line;changes to New when record modified. Values areNew, Valid, and Error.
Error DescriptionFooter Region
Error Description defaultdisplay only
describes errors for all records
Validate optional button validates records with New and Error statuses
Non-Oracle Payroll Interface Procedures 14-13

Maintenance of Non-Oracle Payroll Sublines Window Description, Payroll Period, Name, Source Tab
Display FooterRegion
All Records in Batch required/optional
radio button displays all records in batch
Error Records in Batch required/optional
radio button displays only records in batch with errors
Table 14–2 Maintenance of Non-Oracle Payroll Sublines Window Description, Payroll Period, Name,Source Tab
Field Name Type Features Description
14-14 Oracle Labor Distribution User’s Guide

Maintenance of Non-Oracle Payroll Sublines Window, Element, Earned, Check Date Tab
Maintenance of Non-Oracle Payroll Sublines Window, Element, Earned,Check Date Tab
Figure 14–2 Maintenance of Non-Oracle Payroll Sublines Window, Element, Earned,
Check Date Tab
Non-Oracle Payroll Interface Procedures 14-15

Maintenance of Non-Oracle Payroll Sublines Window Description, Element, Earned, Check Date Tab
Maintenance of Non-Oracle Payroll Sublines Window Description,Element, Earned, Check Date Tab
Table 14–3 describes the Maintenance of Non-Oracle Payroll Sublines window,Element, Earned, Check Date tab. For information on the header, footer, andDisplay regions, see Table 14–2, page 14-13.
Table 14–3 Maintenance of Non-Oracle Payroll Sublines Window Description, Element, Earned, CheckDate Tab
Field Name Type Features Description
Element, Earned,Check Date Tab
Effective Date required list of values date used when transaction posted to GeneralLedger, Projects, or Grants Accounting
Person required list of values employee name; must be entered in HumanResources
Assignment required list of values assignment number. Assignment must be linked toemployee in Human Resources.
Element Type required list of values payroll element type; must be linked to assignmentin Human Resources
Earned Date optional list of values date salary or wage earned
Check Date optional list of values check date
Status defaultdisplay only
validation status of pre-generated distribution line;changes to New when record modified. Values areNew, Valid, and Error.
14-16 Oracle Labor Distribution User’s Guide
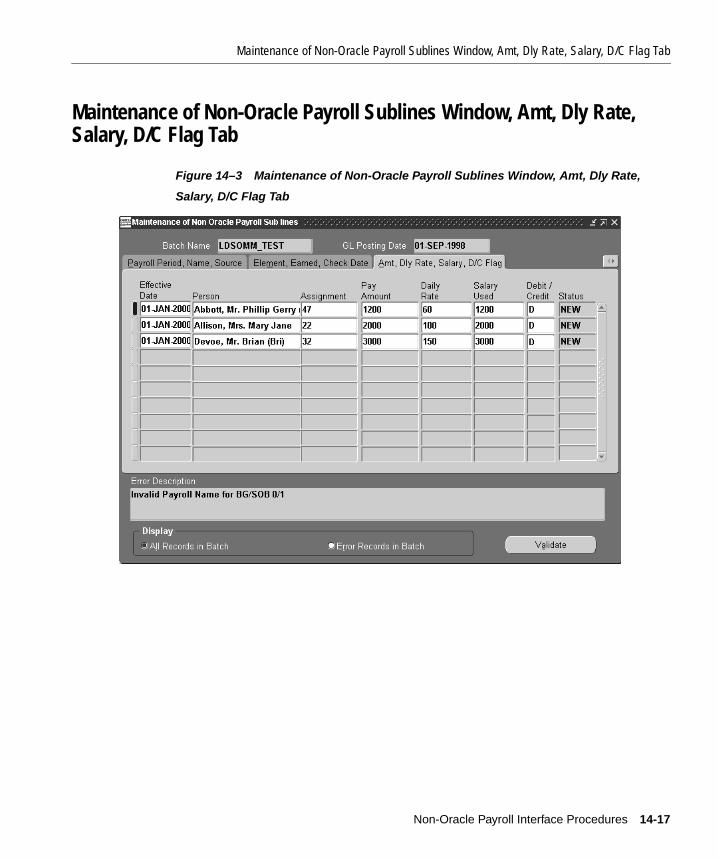
Maintenance of Non-Oracle Payroll Sublines Window, Amt, Dly Rate, Salary, D/C Flag Tab
Maintenance of Non-Oracle Payroll Sublines Window, Amt, Dly Rate,Salary, D/C Flag Tab
Figure 14–3 Maintenance of Non-Oracle Payroll Sublines Window, Amt, Dly Rate,
Salary, D/C Flag Tab
Non-Oracle Payroll Interface Procedures 14-17

Maintenance of Non-Oracle Payroll Sublines Window Description, Amt, Dly Rate, Salary, D/C Flag Tab
Maintenance of Non-Oracle Payroll Sublines Window Description, Amt,Dly Rate, Salary, D/C Flag Tab
Table 14–4 describes the Maintenance of Non-Oracle Payroll Sublines window, Amt,Dly Rate, Salary, D/C Flag tab. For information on the header and footer regions,see Table 14–2, page 14-13.
Table 14–4 Maintenance of Non-Oracle Payroll Sublines Window Description, Amt, Dly Rate, Salary, D/CFlag Tab
Field Name Type Features Description
Amt, Dly Rate,Salary, D/C Flag Tab
Effective Date required list of values date used when transaction posted to GeneralLedger, Projects, or Grants Accounting
Person required list of values employee name; must be entered in HumanResources
Assignment required list of values assignment number. Assignment must be linked toemployee in Human Resources.
Pay Amount optional list of values pay amount equals daily rate times number ofbusiness days between subline start and end dates
Daily Rate required list of values daily pay rate
Salary Used required list of values salary batch used
Debit/Credit required list of values indicates amount is debited or credited to an accountin General Ledger
Status defaultdisplay only
validation status of pre-generated distribution line;changes to New when record modified. Values areNew, Valid, and Error.
14-18 Oracle Labor Distribution User’s Guide

Maintenance of Non-Oracle Payroll Sublines Window, Subline Start End Dates, FTE Tab
Maintenance of Non-Oracle Payroll Sublines Window, Subline Start EndDates, FTE Tab
Figure 14–4 Maintenance of Non-Oracle Payroll Sublines Window, Subline Start End
Dates, FTE Tab
Non-Oracle Payroll Interface Procedures 14-19

Maintenance of Non-Oracle Payroll Sublines Window Description, Subline Start End Dates, FTE Tab
Maintenance of Non-Oracle Payroll Sublines Window Description,Subline Start End Dates, FTE Tab
Table 14–5 describes the Maintenance of Non-Oracle Payroll Sublines window,Subline Start End Dates, FTE tab. For information on the header, footer, and Displayregions, see Table 14–2, page 14-13.
Table 14–5 Maintenance of Non-Oracle Payroll Sublines Window Description, Subline Start End Dates,FTE Tab
Field Name Type Features Description
Subline Start EndDates, FTE Tab
Effective Date required list of values date used when transaction posted to GeneralLedger, Projects, or Grants Accounting
Person required list of values employee name; must be entered in HumanResources
Assignment required list of values assignment number. Assignment must be linked toemployee in Human Resources.
Start Date required list of values subline start date
End Date required list of values subline end date
FTE optional list of values full time equivalent employment status forassignment; must not be greater than 10 and must beentered in the 9.99 format
Status defaultdisplay only
validation status of pre-generated distribution line;changes to New when record modified. Values areNew, Valid, and Error.
14-20 Oracle Labor Distribution User’s Guide

Rolling Back Non-Oracle Payroll Procedure
Rolling Back Non-Oracle Payroll ProcedureTo roll back a non-oracle payroll batch, perform the following steps.
1. In Labor Distribution, navigate to the Submit Request window as follows:
Processes & Reports - Run
The Submit a New Request pop-up window appears.
2. Click the Single Request radio button.
3. Click OK.
The Submit Request window appears.
4. In the Name field, select PSP: Rollback of Non-Oracle Payroll from the list ofvalues.
The Parameters pop-up window appears.
5. In the Batch Name field, select a batch name from the list of values.
6. To apply the parameters, click OK.
7. In the Submit Request window, click Submit.
The Requests window appears.
8. To view the report output, select the appropriate Request ID and click ViewOutput.
9. Close the window.
Non-Oracle Payroll Interface Procedures 14-21

Rolling Back Non-Oracle Payroll Procedure
14-22 Oracle Labor Distribution User’s Guide

Pre-generated Distribution Lines Interface Pro
15
Pre-generated Distribution Lines InterfaceProcedures
This chapter describes how to use the pre-generated distribution lines interface. Thefollowing sections are in this chapter:
■ Definition
■ Overview
■ Prerequisites
■ Importing Pre-generated Distribution Lines Procedure
■ Maintenance of Pre-generated Distribution Lines Window, Payroll Name,Period, Element Tab
■ Maintenance of Pre-generated Distribution Lines Window Description, PayrollName, Period, Element Tab
■ Maintenance of Pre-generated Distribution Lines Window, Pay Source, DistAmt, D/C Flag Tab
■ Maintenance of Pre-generated Distribution Lines Window Description, PaySource, Dist Amt, D/C Flag Tab
■ Maintenance of Pre-generated Distribution Lines Window, GL Account Tab
■ Maintenance of Pre-generated Distribution Lines Window Description, GLAccount Tab
■ Maintenance of Pre-generated Distribution Lines Window, Project, Task, AwardTab
■ Maintenance of Pre-generated Distribution Lines Window Description, Project,Task, Award Tab
cedures 15-1

■ Maintenance of Pre-generated Distribution Lines Window, ExpenditureOrganization, Type Tab
■ Maintenance of Pre-generated Distribution Lines Window Description,Expenditure Organization, Type Tab
15-2 Oracle Labor Distribution User’s Guide

Overview
DefinitionThe Pre-generated Distribution Lines Interface process enables the user to review,edit, and validate unprocessed pre-generated distribution lines before initiating theImport Pre-generated Distribution Lines concurrent process within Oracle LaborDistribution. The distribution lines can then be posted to Oracle Grants Accounting,Oracle Projects, and to Oracle General Ledger accounts through the Summarize andTransfer Payroll Distributions process.
OverviewLabor Distribution imports already-distributed charges from time managementsystems and transfers them to Grants Accounting, Projects, and General Ledgeraccounts.
FeaturesThe Pre-generated Distribution Lines Interface process enables users to perform thefollowing tasks:
■ integrate timecard data with labor distribution data for reporting
■ post timecard information to Grants Accounting, Projects, and General Ledgerthrough Labor Distribution
ProcessThe Pre-generated Distribution Lines Interface process includes the following parts:
■ Import Pre-generated Distribution Lines
■ Maintain Pre-generated Distribution Lines Interface
Import Pre-generated Distribution LinesThe methods for importing pre-generated distribution lines are as follows:
■ Importing Pre-generated Distribution Lines Using the Maintenance ofPre-generated Distribution Lines Window
■ Importing Pre-generated Distribution Lines Using the Concurrent Manager
Pre-generated Distribution Lines Interface Procedures 15-3

Overview
Importing Pre-generated Distribution Lines Using the Maintenance of Pre-generatedDistribution Lines Window This method includes importing pre-generated distributionlines and validating each transaction.
Importing Pre-generated Distribution Lines Using the Concurrent Manager This methodincludes importing pre-generated distribution lines and validating each transaction.Oracle recommends using this method only if all transactions are valid.
The Import Pre-generated Distribution Lines concurrent process performs thefollowing tasks:
■ reads the Pre-generated Distribution Lines Interface table
■ validates data in the Pre-generated Distribution Lines Interface table
■ imports valid records into the Payroll Control table
The following information must be included on each line as described inTable 15–1.
Table 15–1 Pre-generated Distribution Lines Interface Table
Field Name Description
Distribution_Interface_ID
pre-generated distribution unique batchidentification number
Person_ID employee identifier; must be entered in OracleHuman Resources
Assignment_ID assignment number; must be linked to an employeein Oracle Human Resources
Element_Type_ID element type; must be linked to assignment inHuman Resources
Distribution_Date distribution date used when posting transactions toGeneral Ledger, Grants Accounting, and Projects
Distribution_Amount
amount distributed
Payroll_ID payroll cycle identifier; must be defined in HumanResources and linked to the selected assignment
Time_Period_ID payroll period identifier; must be defined in HumanResources and linked to payroll name of interfacetable record
DR_CR_Flag indicates debit or credit
15-4 Oracle Labor Distribution User’s Guide

Overview
Each entry has a status code. The status code values are as follows:
■ new
■ error
■ valid
■ transfer
When the user loads the interface table, the status of all records is New.
If errors occur during the import process, the process is terminated. Usersmust delete or correct the errors. Updates can be made in the source systemor in the Maintenance of Pre-generated Distribution Lines window.
Source_Code payroll batch source; must be available in PSP_Payroll_Sources table
GL_Code_Combination_ID
General Ledger accounting flexfield; required ifthere is no project and awards data entered
Project_ID Grants Accounting or Projects project identifier
Expenditure_Organization_ID
expenditure organization
Expenditure_Type project expenditure type
Task_ID task identifier linked to the selected project
Award_ID project award identifier
Status_Code validation status of pre-generated distribution line;changes to New when record modified and Validwhen Validated. Values are New, Valid, and Error.
Batch_Name unique batch name
Error_Code describes errors for all records
GL PostingOverride Date
effective date for posting transactions to GeneralLedger; date to be specified if required to overridethis date to the Effective Date in PSP_DISTRIBUTION_LINES, which is later summarizedand transferred to the GL Accounts Interface
GMS PostingOverride Date
not currently used
Table 15–1 Pre-generated Distribution Lines Interface Table
Field Name Description
Pre-generated Distribution Lines Interface Procedures 15-5

Overview
If the auto-population profile option is enabled and if auto-population is setup, the Auto-Populate Pre-Gen Distribution Table process substitutes theoriginal expenditure type or natural account with the auto-populatedvalues.
For information on enabling the auto-population profile options, seeSystem Administration Setup, page 4-1.
For information on setting up auto-population, see Expenditure Type andNatural Account Auto-Population Setup, page 8-1.
Processing of employee assignments with zero work day allows the importof Pre-generated Distribution Lines for employees with zero work daysituations, irrespective of employee assignment status, active or non-active,as long as the employee’s final termination process in HRMS has not beencompleted.
For information on employee assignments with zero work day situations,see Employee Assignments with Zero Work Day, page 10-2.
A suspense account will be used if the PSP: Use Suspense Account forPre-Gen Import profile option is set to Yes.
Upon completion of the Import Pre-generated Distribution Linesconcurrent process, users can proceed to the Summarize and TransferPayroll Distributions procedure.
For information on summarizing and transferring distribution lines, seeSummarizing and Transferring Payroll Distributions Procedure, page 12-7.
Maintain Pre-generated Distribution Lines InterfaceThe Maintenance of Pre-generated Distribution Lines window enables users to viewthe Pre-generated Distribution Lines Interface table and to make simple edits,corrections, and updates to the data.
In the Pre-generated Maintenance window for Distribution Date, users can enterany dates before the final termination process date of employee assignment. If usersenter a date after the final process termination date, an error message appears.
For information on employee assignments with zero work day situations, seeEmployee Assignments with Zero Work Day, page 10-2.
The following steps illustrate the Maintain Pre-generated Distribution Linesprocess:
15-6 Oracle Labor Distribution User’s Guide

Overview
1. The user navigates to the Maintenance of Pre-generated Distribution Lineswindow and selects a payroll batch.
2. To run the Import Pre-generated Distribution Lines process and to validate thetransactions, the user clicks Validate.
3. The user views the request in the concurrent manager.
If the process is complete with no errors, the Status field displays Normal andthe process is complete.
If there are errors, the Status field displays Error, and the user continues to Step4 in the process.
4. The user returns to the Maintenance of Pre-generated Distribution Lineswindow to correct the errors. The Maintenance of Pre-generated DistributionLines window displays the error status as follows:
■ The statuses of records with errors displays Error.
■ An error description appears in the window.
■ The error status is displayed for each row in the window.
5. After correcting errors, the user completes Steps 1 through 3 until all errors arecorrected.
Pre-generated Distribution Lines Interface Procedures 15-7

Prerequisites
Prerequisites❏ The Pre-generated Distribution Lines Interface table must be loaded with
appropriate data either through a user-defined process or through theMaintenance of Pre-generated Distribution Lines window.
To load the Pre-generated Distribution Lines Interface table, see Pre-generatedInterface Table, page L-1.
15-8 Oracle Labor Distribution User’s Guide

Importing Pre-generated Distribution Lines Procedure
Importing Pre-generated Distribution Lines ProcedureUse one of the following methods to import pre-generated distribution lines:
■ Importing Pre-generated Distribution Lines Using the Maintenance ofPre-generated Distribution Lines Window
■ Importing Pre-generated Distribution Lines Using the Concurrent Manager
Importing Pre-generated Distribution Lines Using the Maintenance of Pre-generatedDistribution Lines Window
To import pre-generated distribution lines using the Maintenance of Pre-generatedDistribution Lines window, perform the following steps.
1. In Labor Distribution, navigate to the Maintenance of Pre-generatedDistribution Lines window as follows:
Payroll Interface - Pre-Gen Distribution Lines
The Maintenance of Pre-generated Distribution Lines window appears.
2. Select a batch name as follows:
View - Find
3. Select a batch and click OK.
4. To run the Import Pre-generated Distribution Lines process and validate thosetransactions, click Validate.
5. View the request in the concurrent manager as follows:
View - Requests
The Find Requests pop-up window appears.
6. Select the All My Requests radio button.
7. Click Find.
8. To view the report file, select the appropriate Request ID and click ViewOutput.
9. If there are no errors, close the window.
10. If there are errors, return to the Maintenance of Pre-generated DistributionLines window to correct the errors as follows:
Payroll Interface - Pre-Gen Distribution Lines
Pre-generated Distribution Lines Interface Procedures 15-9

Importing Pre-generated Distribution Lines Procedure
11. To display errors only, in the Display region click the Error Records radiobutton.
12. Select one of the following tabs:
■ Payroll Name, Period, Element
■ Pay Source, Dist Amt, D/C Flag
■ GL Account
■ Project, Task, Award
■ Expenditure Organization, Type
Note: To navigate to unseen tabs, use the arrows next to the tabs.
13. Enter data in each field of the Maintenance of Pre-generated Distribution Lineswindow as described in Table 15–2, page 15-13.
14. Repeat Step 4 until completed.
15. Close the window.
Importing Pre-generated Distribution Lines Using the Concurrent ManagerNote: Use this method only if all transactions are valid.
To import pre-generated distribution lines using the concurrent manager, performthe following steps.
1. In Labor Distribution, navigate to the Submit Request window as follows:
Processes & Reports - Run
The Submit a New Request pop-up window appears.
2. Select the Single Request radio button.
3. Click OK.
4. In the Request Name field, select PSP: Import Pre-generated Distribution Linesfrom the list of values.
The Parameters pop-up window appears.
Note: If auto-population is enabled, the Import Pre-generated DistributionLines procedure uses auto-population.
5. In the Batch Name field, select a batch name from the list of values.
6. To apply the parameters, click OK.
15-10 Oracle Labor Distribution User’s Guide

Importing Pre-generated Distribution Lines Procedure
7. In the Submit Request window, click Submit.
The Requests window appears.
8. To view the report file, select the appropriate Request ID and click ViewOutput.
9. Close the window.
Pre-generated Distribution Lines Interface Procedures 15-11

Maintenance of Pre-generated Distribution Lines Window, Payroll Name, Period, Element Tab
Maintenance of Pre-generated Distribution Lines Window, Payroll Name,Period, Element Tab
Figure 15–1 Maintenance of Pre-generated Distribution Lines Window, Payroll Name,Period, Element Tab
15-12 Oracle Labor Distribution User’s Guide
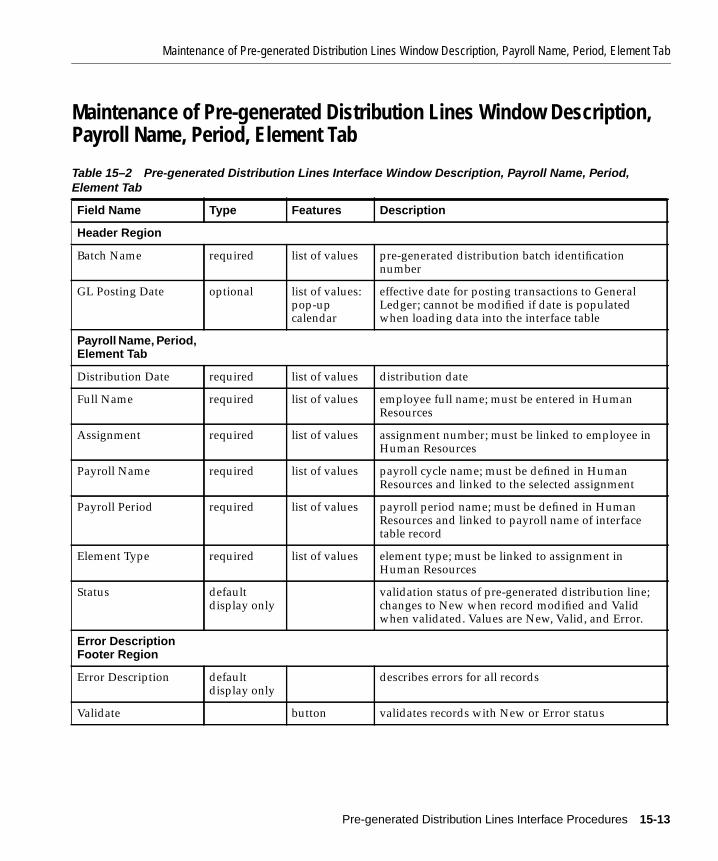
Maintenance of Pre-generated Distribution Lines Window Description, Payroll Name, Period, Element Tab
Maintenance of Pre-generated Distribution Lines Window Description,Payroll Name, Period, Element Tab
Table 15–2 Pre-generated Distribution Lines Interface Window Description, Payroll Name, Period,Element Tab
Field Name Type Features Description
Header Region
Batch Name required list of values pre-generated distribution batch identificationnumber
GL Posting Date optional list of values:pop-upcalendar
effective date for posting transactions to GeneralLedger; cannot be modified if date is populatedwhen loading data into the interface table
Payroll Name, Period,Element Tab
Distribution Date required list of values distribution date
Full Name required list of values employee full name; must be entered in HumanResources
Assignment required list of values assignment number; must be linked to employee inHuman Resources
Payroll Name required list of values payroll cycle name; must be defined in HumanResources and linked to the selected assignment
Payroll Period required list of values payroll period name; must be defined in HumanResources and linked to payroll name of interfacetable record
Element Type required list of values element type; must be linked to assignment inHuman Resources
Status defaultdisplay only
validation status of pre-generated distribution line;changes to New when record modified and Validwhen validated. Values are New, Valid, and Error.
Error DescriptionFooter Region
Error Description defaultdisplay only
describes errors for all records
Validate button validates records with New or Error status
Pre-generated Distribution Lines Interface Procedures 15-13

Maintenance of Pre-generated Distribution Lines Window Description, Payroll Name, Period, Element Tab
Display FooterRegion
All Records optional radio button displays all imported records
Error Records optional radio button displays imported records with errors only
Table 15–2 Pre-generated Distribution Lines Interface Window Description, Payroll Name, Period,Element Tab
Field Name Type Features Description
15-14 Oracle Labor Distribution User’s Guide

Maintenance of Pre-generated Distribution Lines Window, Pay Source, Dist Amt, D/C Flag Tab
Maintenance of Pre-generated Distribution Lines Window, Pay Source,Dist Amt, D/C Flag Tab
Figure 15–2 Maintenance of Pre-generated Distribution Lines Window, Pay Source,Dist Amt, D/C Flag Tab
Pre-generated Distribution Lines Interface Procedures 15-15

Maintenance of Pre-generated Distribution Lines Window Description, Pay Source, Dist Amt, D/C Flag Tab
Maintenance of Pre-generated Distribution Lines Window Description,Pay Source, Dist Amt, D/C Flag Tab
Table 15–3 describes the Maintenance of Pre-generated Distribution Lines window,Pay Source, Dist Amt, D/C Flag tab. For information on the header, footer, andDisplay regions, see Table 15–2, page 15-13.
Table 15–3 Maintenance of Pre-generated Distribution Lines Window Description, Pay Source, Dist Amt,D/C Flag Tab
Field Name Type Features Description
Pay Source, DistAmt, D/C Flag Tab
Distribution Date required list of values distribution date
Full Name required list of values employee full name; must be entered in HumanResources
Assignment required list of values assignment number; must be linked to employee inHuman Resources
Payroll Source required list of values payroll batch source; must be available in PSP_Payroll_Sources table
Distribution Amount required list of values amount distributed
D/C Flag required list of values indicates debit or credit
Status defaultdisplay only
validation status of pre-generated distribution line;changes to New when record modified and Validwhen validated. Values are New, Valid, and Error.
15-16 Oracle Labor Distribution User’s Guide

Maintenance of Pre-generated Distribution Lines Window, GL Account Tab
Maintenance of Pre-generated Distribution Lines Window, GL AccountTab
Figure 15–3 Maintenance of Pre-generated Distribution Lines Window, GL AccountTab
Pre-generated Distribution Lines Interface Procedures 15-17

Maintenance of Pre-generated Distribution Lines Window Description, GL Account Tab
Maintenance of Pre-generated Distribution Lines Window Description,GL Account Tab
Table 15–4 describes the Maintenance of Pre-generated Distribution Lines window,GL Account tab. For information on the header, footer, and Display regions, seeTable 15–2, page 15-13.
Table 15–4 Maintenance of Pre-generated Distribution Lines Window Description, GL Account Tab
Field Name Type Features Description
GL Account Tab
Distribution Date required list of values distribution date
Full Name required list of values employee full name; must be entered in HumanResources
Assignment required list of values assignment number; must be linked to employee inHuman Resources
GL Account conditionallyrequired
list of values General Ledger accounting flexfield; required if noother charging instruction entered
Status defaultdisplay only
validation status of pre-generated distribution line;changes to New when record modified and Validwhen validated. Values are New, Valid, and Error.
15-18 Oracle Labor Distribution User’s Guide

Maintenance of Pre-generated Distribution Lines Window, Project, Task, Award Tab
Maintenance of Pre-generated Distribution Lines Window, Project, Task,Award Tab
Figure 15–4 Maintenance of Pre-generated Distribution Lines Window, Project, Task,Award Tab
Pre-generated Distribution Lines Interface Procedures 15-19

Maintenance of Pre-generated Distribution Lines Window Description, Project, Task, Award Tab
Maintenance of Pre-generated Distribution Lines Window Description,Project, Task, Award Tab
Table 15–5 describes the Maintenance of Pre-generated Distribution Lines window,Project, Task, Award tab. For information on the header, footer, and Display regions,see Table 15–2, page 15-13.
Table 15–5 Maintenance of Pre-generated Distribution Lines Window Description, Project, Task, AwardTab
Field Name Type Features Description
Project, Task, AwardTab
Distribution Date required list of values distribution date
Full Name required list of values employee full name; must be entered in HumanResources
Assignment required list of values assignment number; must be linked to employee inHuman Resources
Project conditionallyrequired
list of values Grants Accounting or Projects project number;required if there is no General Ledger accountentered
Task conditionallyrequired
list of values task number linked to the selected project
Award conditionallyrequired
list of values project award number
Status defaultdisplay only
validation status of pre-generated distribution line;changes to New when record modified and Validwhen validated. Values are New, Valid, and Error.
15-20 Oracle Labor Distribution User’s Guide

Maintenance of Pre-generated Distribution Lines Window, Expenditure Organization, Type Tab
Maintenance of Pre-generated Distribution Lines Window, ExpenditureOrganization, Type Tab
Figure 15–5 Maintenance of Pre-generated Distribution Lines Window, ExpenditureOrganization, Type Tab
Pre-generated Distribution Lines Interface Procedures 15-21

Maintenance of Pre-generated Distribution Lines Window Description, Expenditure Organization, Type Tab
Maintenance of Pre-generated Distribution Lines Window Description,Expenditure Organization, Type Tab
Table 15–6 describes the Maintenance of Pre-generated Distribution Lines window,Expenditure Organization, Type tab. For information on the header, footer, andDisplay regions, see Table 15–2, page 15-13.
Table 15–6 Maintenance of Pre-generated Distribution Lines Window Description, ExpenditureOrganization, Type Tab
Field Name Type Features Description
ExpenditureOrganization, TypeTab
Distribution Date required list of values distribution date
Full Name required list of values employee full name; must be entered in HumanResources
Assignment required list of values assignment number; must be linked to employee inHuman Resources
Exp. Org. conditionallyrequired
list of values expenditure organization
Expenditure Type conditionallyrequired
list of values project expenditure type
Status defaultdisplay only
validation status of pre-generated distribution line;changes to New when record modified and Validwhen validated. Values are New, Valid, and Error.
15-22 Oracle Labor Distribution User’s Guide
Part V
Distribution Adjustments

Distribution Adjustments P
16
Distribution Adjustments ProceduresThis chapter describes the Distribution Adjustments process. The following sectionsare in this chapter:
■ Definition
■ Overview
■ Prerequisites
■ Adjusting Distributions Procedure
■ Distribution Adjustments Window
■ Distribution Adjustments Window Description
■ Approving the Distribution Adjustments Workflow Procedure
■ Summarizing and Transferring Adjustments Procedure
■ Recovering Summarize and Transfer Adjustments Procedure
■ Generating Distribution Adjustment Register Report Procedure
rocedures 16-1

Definition
DefinitionThe Distribution Adjustments process adjusts payroll distributions and posts thenew distributions to Oracle Grants Accounting, Oracle Projects, or Oracle GeneralLedger. Distribution Adjustments does not allow changes to total distributionamounts or changes to distribution dates.
OverviewDistribution Adjustments enables users to view, modify, and transfer payrolldistributions to Grants Accounting, Projects, or General Ledger. Once approved,adjustments are automatically posted to Grants Accounting, Projects, and GeneralLedger.
Auto-Population of natural account and expenditure type can be used withDistribution Adjustments if the auto-population profile option is enabled. Ifauto-population is enabled, a label appears in the lower section of the windowindicating that auto-population is on. Auto-population can be overridden bychoosing a natural account or expenditure type from the list of values.
For information on enabling the auto-population profile option, see SystemAdministration Setup, page 4-1.
This section describes the following:
■ Features
■ Process
FeaturesDistribution Adjustments allows users to perform the following tasks:
■ reverse original distributions
■ select new distributions
■ summarize and transfer new distribution transactions to Grants Accounting,Projects, and General Ledger
■ recover summarize and transfer adjustments
ProcessThe Distribution Adjustments process includes the following:
16-2 Oracle Labor Distribution User’s Guide

Overview
■ View the Distribution Lines
■ Select the Earnings Distributions to be Transferred
■ Specify the Adjustment
■ Submit the Adjustment
■ Approve Distribution Adjustments Workflow
■ Summarize and Transfer Adjustments
■ Recover Summarize and Transfer Adjustments
■ Distribution Adjustment Register Report
View the Distribution LinesUsers select the following five items, and Oracle Labor Distribution displays theassociated distribution lines for viewing:
■ employee
■ assignment
■ begin date
■ end date
■ earnings element
Select the Earnings Distributions to be TransferredUsers can select a distribution amount to transfer, and Labor Distribution reversesthe selected distribution amount. In the Actual Distributions region of theDistribution Adjustments window, users can select either one row for multiple daysor multiple rows if only one day is selected.
Users can override the GL Posting date if the PSP: Use Default GL Posting OverrideDate profile option is set to No.
For information on setting the PSP: Use Default GL Posting Override Date profileoption, see System Administration Setup, page 4-1.
Specify the AdjustmentOnce the reversing amounts are displayed in the Adjusted Distributions region ofthe Distribution Adjustments window, users cannot modify the reversing amounts.
Distribution Adjustments Procedures 16-3

Overview
Users enter Grants Accounting or Projects charging instructions or General Ledgeraccounts as transfer destinations. For each Grants Accounting and Projects charginginstruction and General Ledger account, users specify the modified distributionamount to be transferred in either dollar amounts or percentages.
Submit the AdjustmentUsers submit the transfer for validation. All of the validations performed duringlabor scheduling are applied. If the validations pass, the user is prompted to enter areason for the transfer and a unique identifier to group all of the specifiedtransactions as follows:
■ original distributions
■ distribution reversals
■ distribution transfers
The unique identifier provides a detailed audit trail for each transfer.
If a distribution transfer is affecting a previously certified distribution line, LaborDistribution marks the affected effort report as superseded and removes it fromcertified status.
Labor Distribution warns users if lines in the period have been adjusted.
For information on the validation process, see Data Entry Validations Process,page D-1.
Approve Distribution Adjustments WorkflowOracle Workflow routes the distribution adjustment to the appropriate approver forapproval. The approver has the following options:
■ approve the adjustment
■ reject the adjustment
■ return the adjustment with comments.
Users with the necessary permissions navigate to the Worklist window to approveor reject the transfer. The approver cannot modify the adjustment.
If the adjustment is approved, the distribution lines are summarized andtransferred to General Ledger, Projects, or Grants Accounting at the user’sconvenience as described in the following section, Summarize and TransferAdjustments. If the adjustment is rejected, the distribution lines revert to theoriginal charging instructions.
16-4 Oracle Labor Distribution User’s Guide

Overview
Summarize and Transfer AdjustmentsAfter distribution adjustments are defined and approved, the Summarize andTransfer Adjustments process is run as a separate process. Users can include one ormore batches in the process and can run the process at any time.
The steps in the PSP: Summarize and Transfer Adjustments process are as follows:
1. The user initiates the Summarize and Transfer Adjustments process.
2. The user gives the adjustment summary batch a unique name.
3. Labor Distribution searches for all the distribution adjustment batches that areapproved and must be summarized and transferred.
4. The Grants Accounting and Projects lines are compiled into one batch, and theGeneral Ledger lines are compiled into multiple batches.
5. The Summarize and Transfer Adjustments process combines all the batches andcreates an adjustment summary batch.
6. If a distribution line is rejected, only the batch that includes this line is rejected,not the entire adjustment summary batch.
7. The rejected batch is rolled back to what it was before the adjustment wasdefined.
Note: The Summarize and Transfer Adjustments does not use a suspenseaccount to resend rejected lines to General Ledger, Grants Accounting, orProjects.
8. The Summarize and Transfer Adjustments process provides a log file withdetails of batches and adjustment summary batches that terminated normallyand abnormally and the selection criteria included in the batches.
Employee Assignments with Zero Work Day Processing of employee assignments withzero work day allows summarization and transfer of adjustment lines foremployees with zero work day situations, irrespective of employee assignmentstatus.
The following rules apply:
■ If an employee has a non-active status and has a schedule charging to GeneralLedger, Labor Distribution uses the current Summarize and TransferAdjustments process. General Ledger does not validate whether an employeehas an active or non-active employee assignment status.
Distribution Adjustments Procedures 16-5

Overview
■ If an employee has a non-active assignment status and has a schedule chargingto Grants Accounting or Projects, Labor Distribution looks for the employeeassignment’s last active date and posts this date as the GMS Override Date.Grants Accounting or Projects then accepts the transfer of adjustment lines witha non-active employee assignment status.
In order to process zero work day situations, Workflow disables its validation on anemployee assignment status in order for it to process employee assignments with anon-active status.
For information on employee assignments with zero work day situations, seeEmployee Assignments with Zero Work Day, page 10-2.
Recover Summarize and Transfer AdjustmentsLabor Distribution provides the Recover Summarize and Transfer Adjustmentsprocess if one of the following situations occurs while running the Summarize andTransfer Adjustments process:
■ system crash
■ abnormal termination of the process
■ an inconsistency with one of the target systems that includes General Ledger,Grants Accounting, or Projects
The recovery process provides a log file with a list of adjustment summary batchesthat terminated abnormally and the selection criteria included in the terminatedbatches.
PSP_PAYROLL_CONTROLS Table Status Because multiple batches can be run with thePSP: Summarize and Transfer Adjustments process, the batches can be in differentstages of processing if a failure occurs. The status code in the PSP_PAYROLL_CONTROLS table is I for In Process.
The steps in the Recover Summarize and Transfer Adjustments process are asfollows:
1. If there is a failure, the user runs the PSP: Recover Summarize and TransferAdjustments process.
2. If the recovery process fails to produce a status code of P for Processed, the userreruns the PSP: Summarize and Transfer Adjustments process.
Note: The PSP: Summarize and Transfer Adjustments process picks up new andold batches if the recover process brings the batch to status N for Normal.
16-6 Oracle Labor Distribution User’s Guide

Prerequisites
Distribution Adjustment Register ReportThe Distribution Adjustment Register report summarizes distribution adjustmentscreated for employees by batch name, providing users with a report of approveddistribution adjustments and summarized and transferred distribution adjustmentswithin the given begin and end dates.
Prerequisites❏ The timeout system profile option for approvals must be defined if the user
wants to set a timeout for the Workflow approval process.
To define the PSP: Adjustment Approval Time Out in Days system profile, seeSystem Administration Setup, page 4-1.
Distribution Adjustments Procedures 16-7

Adjusting Distributions Procedure
Adjusting Distributions ProcedureTo execute distribution transfers, perform the following steps.
1. In Labor Distribution, navigate to the Distribution Adjustments window asfollows:
Distribution Adjustments - Define
The Find Distributions pop-up window appears.
2. In the Employee Name field or Assignment field, select an employee withcorresponding assignment from the list of values.
3. In the Begin Date field, enter a beginning date from the list of values.
4. In the End Date field, enter an ending date from the list of values.
5. In the Earnings Element field, enter an earnings element from the list of values.
6. Click Find.
The Distribution Adjustments window appears.
7. To transfer a distribution line, in the Actual Distributions region, select the TFcheck box.
Note: If the begin date is not the same as the end date, only one box can bechecked.
8. When all distribution lines to be transferred are selected, click Done.
The selected line appears in the Adjusted Distributions region of theDistribution Adjustments window.
9. To select the method of adjustment, in the Adjust By region, click one of thefollowing radio buttons:
■ Amount
■ Percent
Note: When adjusting credit amounts, only the Percent radio button can beselected.
10. In the Adjusted Distributions region, specify new charging instructions andamounts as described in Table 16–1, page 16-13.
11. Click Submit.
The Submit pop-up window appears.
16-8 Oracle Labor Distribution User’s Guide

Adjusting Distributions Procedure
12. In the Batch Name field, enter a batch name.
13. If necessary, enter a date in the GL Override field from the list of values.
14. In the comments field, enter comments describing the reasons for the transfer.
15. Click OK.
The Find Distributions pop-up window appears to enter another adjustment.
16. Close the window.
Distribution Adjustments Procedures 16-9

Distribution Adjustments Window
Distribution Adjustments Window
Figure 16–1 Distribution Adjustments Window, Before Adjustments
16-10 Oracle Labor Distribution User’s Guide

Distribution Adjustments Window
Figure 16–2 Distribution Adjustments Window, After Adjustments
Distribution Adjustments Procedures 16-11

Distribution Adjustments Window
Figure 16–3 Submit Pop-up Window
16-12 Oracle Labor Distribution User’s Guide

Distribution Adjustments Window Description
Distribution Adjustments Window Description
Table 16–1 Distribution Adjustments Window Description
Field Name Type Features Description
Employee Region
Full Name defaultdisplay only
employee name
Employee Number defaultdisplay only
employee identification number
Social Security defaultdisplay only
employee social security number
Assignment defaultdisplay only
employee assignment identification number
Transfer PeriodRegion
Begin Date defaultdisplay only
distribution transfer period start date
End Date defaultdisplay only
distribution transfer period end date
Element Class defaultdisplay only
element group
Earnings Element defaultdisplay only
user-defined earnings element
Actual DistributionsRegion
GL Account defaultdisplay only
General Ledger accounting flexfield
Project defaultdisplay only
Grants Accounting and Projects project charginginstruction
Note: Navigate horizontally to see the entire line byusing the scroll bar.
Task defaultdisplay only
Grants Accounting and Projects task numbercharging instruction
Award defaultdisplay only
Grants Accounting award number charginginstruction
Distribution Adjustments Procedures 16-13

Distribution Adjustments Window Description
Organization defaultdisplay only
Grants Accounting and Projects organizationcharging instruction
Expenditure Type defaultdisplay only
Grants Accounting and Projects expenditure typecharging instruction
Amount defaultdisplay only
dollar amount distributed for a specific period
% defaultdisplay only
percentage distributed for a specific period
TF optional check box indicates if distribution item is to be transferred
[%] defaultdisplay only
total percentage of distribution line to be transferred
[Total Amount] defaultdisplay only
total amount of distribution line to be transferred
Done required button indicates task completion
AdjustedDistributions Region
GL Account conditionallyrequired
General Ledger accounting flexfield; required if noGrants Accounting or Projects charging instruction isentered; auto-population value can be overriddenfrom the list of values
Project conditionallyrequired
identifies Grants Accounting or Projects projectcharging instruction; required if no General Ledgeraccount is entered
Note: Navigate horizontally to see the entire line byusing the scroll bar.
Task conditionallyrequired
Grants Accounting or Projects task number charginginstruction
Award conditionallyrequired
Grants Accounting award number charginginstruction
Organization conditionallyrequired
Grants Accounting or Projects organization charginginstruction
Expenditure Type conditionallyrequired
Grants Accounting or Projects expenditure typecharging instruction; auto-population value can beoverridden from the list of values
Amount optional dollar amount distributed for a specific period
Table 16–1 Distribution Adjustments Window Description
Field Name Type Features Description
16-14 Oracle Labor Distribution User’s Guide

Distribution Adjustments Window Description
% optional percentage distributed for a specific period
Unaccounted Balance defaultdisplay only
unaccounted balance that must become $0.00 beforesubmitting the transfer
Adjust By Region
Amount optionallyrequired
radio button indicates if adjusted by amount
Percent optionallyrequired
radio button indicates if adjusted by percent
GL Override Date optional If the PSP: Use Default GL Posting Override Dateprofile option is set to No, the user can enter atransaction posting date. Otherwise, the systemdefaults to the default date.
Autopop is ON default isAuto-population profileoption isenabled
button indicates if auto-population is enabled. If notenabled, button is not displayed.
Submit required button submits the transfer for validation
Submit Pop-upWindow
Batch Name required user-defined batch
GL Override Date optional date is specified to override the General Ledgerposting date
Comments optional user comments describing reason for transfer
Cancel button closes window without saving
OK button confirms action and closes window
Table 16–1 Distribution Adjustments Window Description
Field Name Type Features Description
Distribution Adjustments Procedures 16-15

Approving the Distribution Adjustments Workflow Procedure
Approving the Distribution Adjustments Workflow ProcedureTo approve a distribution adjustment, perform the following steps.
1. In Labor Distribution, navigate to the Worklist window as follows:
Workflow - Workflow User - Worklist
The Worklist window appears.
2. In the Subject column, double-click on a notification link.
The Notification Details window appears.
3. Click the Workflow Monitor icon.
The Distribution Adjustments window appears.
4. To approve the distribution adjustment, click Approve.
5. To reject the distribution adjustment, click Reject.
The distribution lines revert to the original charging instructions.
6. Close the window.
16-16 Oracle Labor Distribution User’s Guide

Summarizing and Transferring Adjustments Procedure
Summarizing and Transferring Adjustments ProcedureTo summarize and transfer adjustments to General Ledger, Projects, and GrantsAccounting, perform the following steps.
1. In Labor Distribution, navigate to the Submit Request window as follows:
Processes & Reports - Run
The Submit a New Request pop-up window appears.
2. Select the Single Request radio button.
3. Click OK.
The Submit Request window appears.
4. In the Name field, select PSP: Summarize and Transfer DistributionAdjustments from the list of values.
The Parameters pop-up window appears.
5. In the Source Type field, select a source type from the list of values.
6. To apply the parameters, click OK.
7. In the Submit Request window, click Submit.
The Requests window appears.
8. To view the report file, select the appropriate Request ID and click ViewOutput.
9. Close the window.
Distribution Adjustments Procedures 16-17

Recovering Summarize and Transfer Adjustments Procedure
Recovering Summarize and Transfer Adjustments ProcedureTo recover summarize and transfer adjustments to General Ledger, Projects, andGrants Accounting, perform the following steps.
1. In Labor Distribution, navigate to the Submit Request window as follows:
Processes & Reports - Run
The Submit a New Request pop-up window appears.
2. Select the Single Request radio button.
3. Click OK.
The Submit Request window appears.
4. In the Name field, select PSP: Recover Summarize and Transfer Adjustmentsfrom the list of values.
The Parameters pop-up window appears.
5. Select the parameters from the list of values.
6. To apply the parameters, click OK.
7. In the Submit Request window, click Submit.
The Requests window appears.
8. To view the report file, select the appropriate Request ID and click ViewOutput.
9. Close the window.
16-18 Oracle Labor Distribution User’s Guide

Generating Distribution Adjustment Register Report Procedure
Generating Distribution Adjustment Register Report ProcedureTo run the Distribution Adjustment Register, perform the following steps.
1. In Labor Distribution, navigate to the Submit Request window as follows:
Processes & Reports - Run
The Submit a New Request pop-up window appears.
2. Select the Single Request radio button.
3. Click OK.
The Submit Request window appears.
4. In the Name field, select PSP: Distribution Adjustment Register from the list ofvalues.
The Parameters pop-up window appears.
5. In the Begin Date field, enter the distribution adjustment creation start date.
6. In the End Date field, enter the distribution adjustment creation end date whichis greater than the start date.
7. In the Adjustment Batch Name field, select a distribution adjustment batch fromthe list of values, or leave the field empty to retrieve all batches for the specifiedperiod.
8. In the Submitted By field, select an employee name from the list of values, orleave the field empty to retrieve batches submitted by any employee for thespecified period.
9. In the Approved By field, select an employee name from the list of values, orleave the field empty to retrieve batches approved by any employee for thespecified period.
10. In the Assignment Org. Name field, select an employee assignmentorganization from the list of values, or leave the field empty to retrieve allbatches for employees having any assignment organization.
11. In the Primary Org. Name field, select an organization from the list of values, orleave the field empty to retrieve all batches for employees having any primaryassignment organization.
Note: A value may only be entered in either the Assignment Org. Name field orthe Primary Org. Name field.
12. Click OK.
Distribution Adjustments Procedures 16-19

Generating Distribution Adjustment Register Report Procedure
13. In the Submit Request window, click Submit.
The Requests window appears.
14. To view the report file, select the appropriate Request ID and click ViewOutput.
15. Close the window.
16-20 Oracle Labor Distribution User’s Guide

Part VI
Labor Encumbrance

Labor Encumbrance Processes and Reports Pro
17
Labor Encumbrance Processes andReports Procedures
This chapter describes the Labor Encumbrance Processes and Reports procedures.The following sections are in this chapter:
■ Definition
■ Overview
■ Prerequisites
■ Creating Encumbrance Lines Procedure
■ Summarizing and Transferring Encumbrances Procedure
■ Updating Encumbrance Lines Procedure
■ Liquidating Encumbrances Procedure
■ Archiving Encumbrance Lines Procedure
■ Retrieving Encumbrance Lines Procedure
■ Generating Suspense Charge Encumbrance Report Procedure
■ Generating Organization Default Usage Encumbrance Report Procedure
cedures 17-1
Definition
DefinitionLabor encumbrance allows users to differentiate unspent and uncommitted fundsfrom unspent funds. In Oracle Labor Distribution, the user can reserve funds byselecting charging instructions in Oracle General Ledger and Oracle GrantsAccounting. By reserving funds from a budget for expenses committed but notexpended, users can see a more accurate available funds figure.
OverviewThe encumbrance feature in Labor Distribution enables users to accomplish thefollowing:
■ avoid overspending on budgets for General Ledger accounts and GrantsAccounting awards
■ predict and channel cash outflow
■ ensure that actual and planned labor cost and salary do not exceed availablefunds and grants
■ modify posted encumbrances as requirements change
This section describes the labor encumbrance processes and reports.
ProcessesThe labor encumbrance process includes the following processes:
■ Create Encumbrance Lines
■ Encumbrance Summarize and Transfer
■ Update Encumbrance Lines
■ Encumbrance Liquidation Process
■ Archive and Retrieve Encumbrance Lines
Create Encumbrance LinesCreate Encumbrance Lines is a concurrent process that generates encumbrances forthe earnings element selected when setting up labor encumbrance. Encumbrancesare created at the payroll period level. This process only creates new encumbrancelines, which means that it cannot be used to create encumbrances for any timeperiod for which encumbrances are already created. The following exampleillustrates the Create Encumbrance Lines process.
17-2 Oracle Labor Distribution User’s Guide

Overview
Example If the user defines an encumbrance period from 01-Jan-99 to 30-Jun-99 andruns the Create Encumbrance Lines process, encumbrance lines for the January toJune period are created. If the user modifies the encumbrance period end-date to31-Dec-99 and runs the Create Encumbrance Lines process again, encumbrancelines are created only for the newly-defined period of time, which is 01-Jul-99 to31-Dec-99. To make changes to encumbrance lines already created, the user runs theUpdate Encumbrance Lines process.
Encumbrances for any payroll period equal the sum of all daily encumbrances foreach employee and assignment on that payroll and for each day in that payrollperiod. Based on similar logic, encumbrance for an employee assignment for a dayis calculated by taking the daily rate for the employee assignment, based on salary,wages, and standard work week, and multiplying that by the percentages in thelabor schedule line, based on charging instructions, for that date.
The pay amount for an employee assignment for each particular payroll period isobtained from Oracle Payroll.
For information on setting up earnings elements for labor encumbrance, see SettingUp Encumbrance Earnings Element Selection Procedure, page 7-11.
Encumbrance Rules Encumbrances are always created by payroll period for eachassignment, earnings element, and charging instruction. While generatingencumbrances, users select a payroll period. Based on the payroll selected, theencumbrance lines are created using the following rules:
1. All assignments in the user-specified payroll that are selected for encumbrancein the Encumbrance - Payroll and Assignment Selection window are used forcreating encumbrance lines.
2. Only the assignments from Rule 1 that have any of the earnings elementsspecified in the Encumbrance Earnings Elements Selection region of theEncumbrance - Earnings Element Selection window are encumbered.
3. For the employee assignments identified in Rule 2, the encumbrance periods aredetermined for all charging instructions of the assignment. For each charginginstruction, the encumbrance period is calculated by the following:
■ obtaining the Default Encumbrance Period Definition for Organizationend-date of the organization that the employee assignment belongs to
■ determining the Default Encumbrance Period Definition for Organizationbegin-date based on the first unpaid payroll for the assignment
Labor Encumbrance Processes and Reports Procedures 17-3

Overview
■ using the default organization’s charging instructions, which are set up inLabor Distribution, for the unaccounted schedule percentage if the charginginstructions do not account for 100% of an employee’s schedule
Note: The Organization Default Accounts labor schedule must be set up forall organizations and the Default Encumbrance Period Definition forOrganization for each organization must fall within the range of dates forwhich the Organization Default Accounts labor schedule contains validcharging instructions. If the Organization Default Accounts labor scheduleis not set up for any organization, the encumbrance lines that exceed theemployee’s labor schedule are posted to the Organization SuspenseAccount. The Organization Suspense Account must be set up in LaborDistribution.
■ calculating the encumbrance amount for each payroll period in theencumbrance period determined in Rule 3 by taking the pay amount for theemployee assignment based on salary, wage, and standard work week, andmultiplying that by the percentages in the labor schedule for that date andthe number of business days in the payroll period
■ identifying each encumbrance identified with the payroll it is associatedwith and the payroll effective date selected at the time of setup
■ validating each encumbrance line created for Grants Accounting usingGrants Accounting expenditure item validation rules
Encumbrance Summarize and TransferThe summarization of encumbrances organizes the detailed accounting data intomeaningful financial information in order to post this data to General Ledger orGrants Accounting. After the encumbrance lines are created, data exists for differentassignments and charging instructions based on the payroll period selected.Summarization allows users to perform the following tasks:
■ summarize encumbrance transactions based on a user-selected time period
■ summarize encumbrance transactions based on a user-selected charginginstruction grouping
Summarization Rules Summarization is based on the following rules:
1. All encumbrance lines are summarized.
2. The encumbrance lines are summarized based on the time period optionselected in the Time-based region of the Encumbrance - Summarization Optionssetup window.
17-4 Oracle Labor Distribution User’s Guide

Overview
If the Payroll Period summarization option is selected, then no furthersummarization is performed at the time period level. If other options areselected, summarization is based on the following rules:
■ The effective dates for each of the new summarized lines is calculated basedon the summarization option selected.
■ All the encumbrance lines with effective dates that fall within thesummarized lines’ effective dates are summed up as new lines and theireffective dates are calculated based on the summarization option selected.
3. Further grouping of data is based on the charging instruction method selected.If the selected option is by charging instruction, employee, and assignment,then no further summarization is required. Any other option selected requiressummarization of data to the level desired.
When summarization is for a Grants Accounting charging instruction,summarization is performed by charging instruction and employee.
When summarization is completed, the summarized encumbrance lines are postedto General Ledger and Grants Accounting. Any lines that are rejected by GeneralLedger or Grants Accounting are reposted to the suspense account.
The reasons for rejecting lines are stored in the summarization table. Theseencumbrances can be viewed by the user in any of the reports provided, which aredescribed in the Review Posted Encumbrances Reports section in this chapter. Thisallows the user to fix problems with these lines and run the Update EncumbranceLines process to post the encumbrances to the modified charging instructions.
Update Encumbrance LinesEncumbrances are updated by reversing existing encumbrances first and thencreating new encumbrances. The Update Encumbrance Lines process does notcreate additional encumbrance lines because the process does not create anyencumbrances for a date greater than the original Default Encumbrance PeriodDefinition for Organization used while creating the encumbrance lines that arebeing updated. To create lines for an incremental default encumbrance period, theCreate Encumbrance Lines process must be run.
Update Encumbrance Lines Process The following steps illustrate the UpdateEncumbrance Lines process:
1. The user specifies the payroll name for the encumbrances that are to beupdated.
Labor Encumbrance Processes and Reports Procedures 17-5

Overview
2. Labor Distribution liquidates encumbrances for periods for which payrolltransactions are already posted.
3. Labor Distribution reverses transactions for all unpaid payroll periods in thepayroll selected by posting the transactions to General Ledger or GrantsAccounting.
4. Labor Distribution creates new encumbrance lines for the payroll selected usingthe rules described in the Create Encumbrance Lines section in this chapter.
Encumbrance Liquidation ProcessLiquidating encumbrances involves removing encumbrances for periods for whichpayroll transactions are already posted.
Archive and Retrieve Encumbrance LinesThe Archive Encumbrance Lines and Retrieve Encumbrance Lines processesidentify all encumbrance history and encumbrance summary lines for the specifiedpayroll, for those payroll periods falling within the given begin and end timeperiods, and archives and purges the respective encumbrance tables. If there is apayroll period within the begin and end periods, for which there are noencumbrance lines in the encumbrance history or summary tables, the processcompletes successfully and ignores those periods for which no payroll informationexists in Labor Distribution.
The process only archives encumbrance lines from payroll periods for which thepayroll has been run and for those lines that have been liquidated in LaborDistribution. If users select any period for which the liquidation has not taken place,an error occurs.
Review Posted Encumbrance ReportsLabor encumbrance includes the following reports:
■ Suspense Charge Encumbrance Report
■ Organization Default Usage Encumbrance Report
Suspense Charge Encumbrance ReportIf an employee has invalid schedule lines, the encumbrance lines are posted to thesuspense account. The Suspense Charge Encumbrance Report provides a listing ofemployees with encumbrance lines posted to the suspense account.
17-6 Oracle Labor Distribution User’s Guide

Overview
Organization Default Usage Encumbrance ReportIf an employee has insufficient charging instructions for a labor schedule,encumbrance lines are posted to the Organization Default Account. TheOrganization Default Usage Encumbrance Report provides a listing by time periodof all employees with encumbrance lines posted to the Organization DefaultAccount.
Labor Encumbrance Processes and Reports Procedures 17-7

Prerequisites
Prerequisites❏ Earnings elements must be selected to generate encumbrances.
To select earnings elements for labor encumbrance, see Setting UpEncumbrance Earnings Element Selection Procedure, page 7-11.
❏ Assignments for selected payroll must be selected.
To select assignments for a selected payroll, see Setting Up EncumbrancePayroll and Assignment Selection Procedure, page 7-5.
❏ Default encumbrance period must be set up.
To set up the default encumbrance period, see Setting Up Default EncumbrancePeriod Definition for Organization Procedure, page 7-8.
❏ An Organization Suspense Account must be set up.
To set up an Organization Suspense Account, see Setting Up OrganizationSuspense Accounts Procedure, page 5-8.
❏ Time period options and charging instruction options must be selected.
To select time period options and charging instruction options, see Setting UpEncumbrance Options Procedure, page 7-14.
17-8 Oracle Labor Distribution User’s Guide

Creating Encumbrance Lines Procedure
Creating Encumbrance Lines ProcedureTo create encumbrance lines, perform the following steps.
1. In Labor Distribution, navigate to the Submit Request window as follows:
Processes & Reports - Run
The Submit a New Request pop-up window appears.
2. Select the Single Request radio button.
3. Click OK.
The Submit Request window appears.
4. In the Name field, select PSP: Create Encumbrance Lines from the list of values.
5. Click OK.
The Parameters pop-up window appears.
6. Select the Payroll Name from the list of values.
7. To apply the parameters, click OK.
8. In the Submit Request window, click Submit.
The Requests window appears.
9. To view the report file, select the appropriate Request ID and click ViewOutput.
10. Close the window.
Labor Encumbrance Processes and Reports Procedures 17-9

Summarizing and Transferring Encumbrances Procedure
Summarizing and Transferring Encumbrances ProcedureTo summarize and transfer encumbrances, perform the following steps.
1. In Labor Distribution, navigate to the Submit Request window as follows:
Processes & Reports - Run
The Submit a New Request pop-up window appears.
2. Select the Single Request radio button.
3. Click OK.
The Submit Request window appears.
4. In the Name field, select PSP: Encumbrance Summarize and Transfer from thelist of values.
5. Click OK.
The Parameters pop-up window appears.
6. Select the Payroll Name from the list of values.
7. To apply the parameters, click OK.
8. In the Submit Request window, click Submit.
The Requests window appears.
9. To view the report file, select the appropriate Request ID and click ViewOutput.
10. Close the window.
17-10 Oracle Labor Distribution User’s Guide

Updating Encumbrance Lines Procedure
Updating Encumbrance Lines ProcedureTo update encumbrance lines, perform the following steps.
1. In Labor Distribution, navigate to the Submit Request window as follows:
Processes & Reports - Run
The Submit a New Request pop-up window appears.
2. Select the Single Request radio button.
3. Click OK.
The Submit Request window appears.
4. In the Name field, select PSP: Update Encumbrance Lines from the list ofvalues.
5. Click OK.
The Parameters pop-up window appears.
6. Select the Payroll Name from the list of values.
7. To apply the parameters, click OK.
8. In the Submit Request window, click Submit.
The Requests window appears.
9. To view the report file, select the appropriate Request ID and click ViewOutput.
10. Close the window.
Labor Encumbrance Processes and Reports Procedures 17-11

Liquidating Encumbrances Procedure
Liquidating Encumbrances ProcedureTo liquidate encumbrances, perform the following steps.
1. In Labor Distribution, navigate to the Submit Request window as follows:
Processes & Reports - Run
The Submit a New Request pop-up window appears.
2. Select the Single Request radio button.
3. Click OK.
The Submit Request window appears.
4. In the Name field, select PSP: Encumbrance Liquidation Process from the list ofvalues.
5. Click OK.
The Parameters pop-up window appears.
6. Select the Payroll Name from the list of values.
7. To apply the parameters, click OK.
8. In the Submit Request window, click Submit.
The Requests window appears.
9. To view the report file, select the appropriate Request ID and click ViewOutput.
10. Close the window.
17-12 Oracle Labor Distribution User’s Guide

Archiving Encumbrance Lines Procedure
Archiving Encumbrance Lines ProcedureTo archive encumbered history lines for a period, perform the following steps.
1. In Labor Distribution, navigate to the Submit Request window as follows:
Processes & Reports - Run
The Submit a New Request pop-up window appears.
2. Select the Single Request radio button.
3. Click OK.
The Submit Request window appears.
4. In the Name field, select PSP: Archive Encumbrance Lines from the list ofvalues.
The Parameters pop-up window appears.
Note: Since encumbrance line history and summary are used on an ongoingbasis by the Update and Liquidate processes, the archiving process prevents theuser from mistakenly archiving live data.
5. In the Payroll Name field, select a payroll name from the list of values.
6. In the Begin Time Period field, select a beginning period from the list of values.
7. In the End Time Period field, select an ending period from the list of values.
8. Click OK.
9. In the Submit Request window, click Submit.
The Requests window appears.
10. To view the report file, select the appropriate Request ID and click ViewOutput.
11. Close the window.
Labor Encumbrance Processes and Reports Procedures 17-13

Retrieving Encumbrance Lines Procedure
Retrieving Encumbrance Lines ProcedureTo retrieve the encumbered history lines for a period, perform the following steps.
1. In Labor Distribution, navigate to the Submit Request window as follows:
Processes & Reports - Run
The Submit a New Request pop-up window appears.
2. Select the Single Request radio button.
3. Click OK.
The Submit Request pop-up window appears.
4. In the Name field, select PSP: Retrieve Encumbrance Lines from the list ofvalues.
The Parameters pop-up window appears.
5. In the Payroll Name field, select a payroll name from the list of values.
6. In the Begin Time Period field, select a beginning period from the list of values.
7. In the End Time Period field, select an ending period from the list of values.
8. Click OK.
9. In the Submit Request window, click Submit.
The Requests window appears.
10. To view the report file, select the appropriate Request ID and click ViewOutput.
11. Close the window.
17-14 Oracle Labor Distribution User’s Guide

Generating Suspense Charge Encumbrance Report Procedure
Generating Suspense Charge Encumbrance Report ProcedureTo print the Suspense Charge Encumbrance Report, perform the following steps:
1. In Labor Distribution, navigate to the Submit Request window as follows:
Labor Encumbrance - Enc Suspense Charge Report
2. Select the Payroll Name from the list of values.
3. Enter the beginning date in the Period From field.
4. Enter the ending date in the To field.
5. Click Show Organizations.
6. To include all organizations in the report, click >> (A).
7. To include a specific organization in the report, select an organization and click> (B).
8. To remove a specific organization from the report, select an organization andclick < (C).
9. To remove all organizations from the report, click << (D).
10. Click OK.
11. Click Run Report.
The Requests window appears.
12. To view the report file, select the appropriate Request ID and click ViewOutput.
13. Close the window.
Labor Encumbrance Processes and Reports Procedures 17-15

Generating Organization Default Usage Encumbrance Report Procedure
Generating Organization Default Usage Encumbrance Report ProcedureTo print the Organization Default Usage Encumbrance Report, perform thefollowing steps:
1. In Labor Distribution, navigate to the Submit Request window as follows:
Processes & Reports - Run
The Submit a New Request pop-up window appears.
2. Click the Single Request radio button.
3. Click OK.
The Submit Request window appears.
4. In the Name field, select PSP: Organization Default Usage Encumbrance Reportfrom the list of values.
5. Click OK.
The Parameters pop-up window appears.
6. Select the Payroll Name from the list of values.
7. To apply the parameters, click OK.
8. In the Submit Request window, click Submit.
The Requests window appears.
9. To view the report file, select the appropriate Request ID and click ViewOutput.
10. Close the window.
17-16 Oracle Labor Distribution User’s Guide

Part VII
Effort Reporting

Effort Reporting P
18
Effort Reporting ProceduresThis chapter describes the effort reporting process. The following sections are in thischapter:
■ Definition
■ Overview
■ Prerequisites
■ Creating an Effort Report Template Procedure
■ Create Effort Report Window
■ Create Effort Report Window Description
■ Creating Effort Report Procedure
■ Warning Report
■ Warning Report Description
■ Reviewing, Approving, and Certifying Effort Report Workflow Procedure
■ Review Effort Report Window
■ Review Effort Report Window Description
■ Printing Options Window
■ Printing Options Window Description
■ Generating Mass Print Effort Report Procedure
■ Mass Print Effort Reports Input Parameters Window
■ Mass Print Effort Reports Input Parameters Window Description
■ Generating Effort Certification Status (Aging) Report Procedure
rocedures 18-1

■ Effort Certification Status (Aging) Report Window
■ Effort Certification Status (Aging) Report
■ Effort Certification Status (Aging) Report Description
■ Creating Ad Hoc Effort Report Procedure
■ Create Ad Hoc Effort Report Window
■ Create Ad Hoc Effort Report Window Description
18-2 Oracle Labor Distribution User’s Guide

Overview
DefinitionThe Effort Reporting process enables users to create, review, revise, and certify theamount of salary distributed to Oracle Grants Accounting, Oracle Projects, andOracle General Ledger.
OverviewEffort reporting ensures accurate disbursement of labor charges. Effort reportssummarize the labor distributions over a period of time. An employee and asupervisor can verify distributions made against actual work performed. Thesupervisor certifies the effort report as accurate.
This section describes the following:
■ Effort Reporting Process
■ Effort Report Workflow Notification Process
■ Create Effort Report Window
Effort Reporting ProcessThe Effort Reporting process allows users to perform the following tasks:
■ Create Effort Report Template
■ Create Effort Report
■ Review, Accept, or Return Effort Report with Comments
■ Review and Certify Effort Report
■ Create an Effort Certification Status (Aging) Report
■ Create Ad Hoc Effort Report
■ Mass Print Effort Report
Create Effort Report TemplateAn effort report template defines a set of parameters that are used for a specifiedeffort reporting period. The selection criteria is saved as a template to be used at adifferent time. Users can add, delete, or modify templates as needed.
Effort Reporting Procedures 18-3

Overview
Create Effort ReportUsers create an effort report based on an employee's labor distribution history foruser-defined time periods. Users can generate a new effort report by selecting apreviously saved effort report template or creating a new template.
Users can create effort reports for the following:
■ individual employees
■ all employees who work for a selected supervisor
■ all employees in a selected People group
■ all the employees with the same General Ledger account, project, organization,or award
Labor Distribution automatically generates a warning report listing employees whomeet the selection criteria yet do not have an effort report created because there arepreviously created effort reports that overlap the selected time period for thoseemployees.
If one of the workflow options is enabled, Labor Distribution routes the effort reportbased on defined workflow rules. Workflow routes the effort report to the employeefor approval and then to the supervisor for certification.
Review, Accept, or Return Effort Report with CommentsEmployees can review, approve, or reject their own effort report. The Review EffortReport window includes a printing option to print out a hard copy of the report inits entirety.
The employee uses the Workflow Notifications Summary window for reviewingand approving effort reports.
For information on the reviewing, approving, or rejecting effort report procedure,see Reviewing, Approving, and Certifying Effort Report Workflow Procedure,page 18-24.
Review and Certify Effort ReportSupervisors review and certify an employee's effort report. The Review EffortReport includes a printing option to print out a hard copy of the report in itsentirety.
The supervisor uses the Workflow Notifications Summary window for reviewingand certifying effort reports.
18-4 Oracle Labor Distribution User’s Guide

Overview
For information on the certifying or rejecting effort report procedure, seeReviewing, Approving, and Certifying Effort Report Workflow Procedure,page 18-24.
Create an Effort Certification Status (Aging) ReportThe Effort Certification Status (Aging) Report provides the status of outstandingeffort certification reports for a specified reporting period by organizational unitand a given period name. The report summary is based on status and aging. TheEffort Certification Status (Aging) Report includes a printing option to print out ahard copy of the report in its entirety.
Reports based on status are grouped by the following categories:
■ Effort Reports Superseded
■ Effort Reports Not Approved
■ Effort Reports Approved but Not Certified
■ Effort Reports Returned for Correction
■ Effort Reports Certified
■ Warning Report
Aging is the number of days that an effort report has a particular status. Reportsbased on aging are grouped by the following categories:
■ 0 - 30 days
■ 31 - 60 days
■ 61 - 90 days
■ more than 91 days
Create Ad Hoc Effort ReportLabor Distribution allows users to create an ad hoc effort report. Creating an ad hoceffort report is the same as creating a normal effort report except that ad hoc effortreport versions are not saved and they cannot be used for certifying. Creating an adhoc effort report does not affect the creation of normal effort reports. Ad hoc effortreports are used to view an effort report before creating a final effort report.
Effort Reporting Procedures 18-5

Overview
Mass Print Effort ReportThe Mass Print Effort Report allows users to print multiple effort reports withoutchanging the status of the reports. The Mass Print Effort Report feature prints alleffort reports for those employees whose primary assignments belong to thespecified Organization name for the specified effort period. The user certifies andapproves the effort reports online using workflow.
Effort Report Workflow Notification ProcessThe following approval and certification processes are automated in Workflow:
■ Approval
■ Certification
ApprovalIf employees are allowed to review and accept their effort reports, the approvalprocess is used. Users can route effort reports to one or more individuals asapprovers and certifiers.
Workflow notifies the effort report creator of the status of the effort report andupdates the effort report in the database.
CertificationUpon receiving an effort report for certification, a supervisor can certify or reject aneffort report.
Workflow notifies the effort report creator of the status of the effort report andupdates the effort report in the database.
For information on the Workflow process, see Effort Report Notification WorkflowProcess, page F-1.
18-6 Oracle Labor Distribution User’s Guide

Overview
Create Effort Report WindowThe Create Effort Report window specifies the employees, assignments, anddistribution records to be used in generating an effort report for a specified effortreport window. Table 18–1 describes the regions of the Create Effort Report windowand the selection criteria for each region.
Table 18–1 Create Effort Report Window Overview
Region Selection Criteria
Boundary Template, previously created and saved
People Group
Effort Period
Employee Employee
Supervisor
Financial GL Account
Project Type
Project Class
Award
Award Type
Award Funding Source
Work Structure Organization(s)
Project(s)
Effort Reporting Procedures 18-7
Prerequisites
Prerequisites❏ Effort report periods must be defined for normal effort reports.
To define effort report periods, see Effort Reporting Setup, page 6-1.
❏ Earnings elements to be included in effort reporting must be selected.
To define earnings elements, see Effort Reporting Setup, page 6-1.
❏ The effort report text message must be set up.
To set up the effort report text message, see Effort Reporting Setup, page 6-1.
18-8 Oracle Labor Distribution User’s Guide
Creating an Effort Report Template Procedure
Creating an Effort Report Template ProcedureTo create an effort report template, perform the following steps.
1. In Labor Distribution, navigate to the Create Effort Report window as follows:
Effort Reporting - Create Effort Report
2. In the Template Name field, enter a template name.
3. In the Name field in the Effort Period region, select an effort report period fromthe list of values.
4. Enter data as needed in each field of the Create Effort Report window asdescribed in Table 18–2, page 18-16.
5. Click Save Template.
A Decision pop-up window appears.
6. Click Save As....
A Save pop-up window appears.
7. In the New Template Name field, enter a template name.
8. Click Save.
A Note pop-up window appears.
9. Click OK.
Effort Reporting Procedures 18-9

Create Effort Report Window
Create Effort Report WindowFigure 18–1 shows an effort report to be created for an employee using TemplateA.
Figure 18–1 Create Effort Report Window, Employee Tab
18-10 Oracle Labor Distribution User’s Guide

Create Effort Report Window
Figure 18–2 shows an effort report to be created for all employees with the sameGeneral Ledger account.
Figure 18–2 Create Effort Report Window, General Ledger Account Region
Effort Reporting Procedures 18-11

Create Effort Report Window
Figure 18–3 shows an effort report to be completed for all employees with the sameproject charging instructions.
Figure 18–3 Create Effort Report, Projects Tab
18-12 Oracle Labor Distribution User’s Guide

Create Effort Report Window
Figure 18–4 shows an effort report to be completed for all employees within thesame organization.
Figure 18–4 Create Effort Report Window, Organization(s) Tab
Effort Reporting Procedures 18-13

Create Effort Report Window
Figure 18–5 shows an effort report to be completed for all employees with the sameawards.
Figure 18–5 Create Effort Report, Award(s) Tab
18-14 Oracle Labor Distribution User’s Guide

Create Effort Report Window
Figure 18–6 shows an effort report to be completed for all employees who work forthe selected supervisor.
Figure 18–6 Create Effort Report, Supervisor Tab
Effort Reporting Procedures 18-15

Create Effort Report Window Description
Create Effort Report Window Description
Table 18–2 Create Effort Report Window Description
Field Name Type Features Description
Template NameRegion
[Template Name] optional list of values template name
Effort Period Region
Name required list of values effort report period name
Begin Date default effort report period start date
End Date default effort report period end date
Employee Tab
Employee Name optional drop-downlist
employee assignment; creates effort report forselected employee assignment; cannot be selected ifsupervisor selected
Supervisor Tab
Supervisor optional list of values supervisor name; creates effort report for allemployees working for selected supervisor; cannotbe selected if employee selected
People Group Region
People Group optional list of values creates effort report for all employees in selectedPeople group; user-defined in Oracle HumanResources setup
GL Account Region
GL Account optional list of values General Ledger accounting flexfield
Project(s) Tab
Project Class optional list of values project class; required if there is no General Ledgercode entered; can select by Class or Type
Project Type optional list of values project type; can select by Class or Type
Show Projects button displays project list for Project Class and Project Typeselected
[Project List] optional project list associated with Project Class and Type
18-16 Oracle Labor Distribution User’s Guide

Create Effort Report Window Description
Select All button selects all projects in project list to be included ineffort report
Deselect button selects projects to be excluded from effort report
Organization(s) Tab
Show Organizations button activates display of organizations in text box
[Organization List] optional organization list; creates effort reports for employeesin selected organizations
Select All button selects all organizations to be included in effortreport
Deselect button selects organizations to be excluded from effortreport
[Organization List] display only displays organizations to be included in effort report
Award(s) Tab
Type optional list of values award agreement type
Fund Source optional list of values funding source name
Show Awards button activates display of awards in drop-down list
[Award List] optional drop-downlist
award list associated with Type and Funding Source
Select All button selects all awards to be included in effort report
Deselect button selects awards to be excluded from effort report
[Organization List] display only displays awards to be included in effort report
Footer Region
Save Template button saves effort report template
Delete Template button deletes effort report template
Submit button sends request to concurrent manager to run effortreport
Table 18–2 Create Effort Report Window Description
Field Name Type Features Description
Effort Reporting Procedures 18-17

Creating Effort Report Procedure
Creating Effort Report ProcedureThe Create Effort Report window includes the following regions for enteringGeneral Ledger accounts, Grants Accounting or Projects instructions, andorganization information:
■ GL Account Tab
■ Project(s) Tab
■ Organization(s) Tab
■ Award(s) Tab
Note: The Award(s) tab applies only if Grants Accounting is installed.
To create effort reports, perform the following steps.
1. In Labor Distribution, navigate to the Create Effort Report window as follows:
Effort Reporting - Create Effort Report
2. Perform one of the following tasks:
■ In the Template field, select a template from the list of values.
■ In the Effort Period Name field, select a period from the list of values.
3. Enter data as needed in the following fields of the Create Effort Report windowas described in Table 18–2, page 18-16:
■ Employee Name, Employee tab
■ Employee Name, Supervisor tab
■ People Group
GL Account TabTo enter data in the GL Account tab, perform the following steps.
1. In the GL Account field, select an account from the list of values.
A General Ledger find pop-up window appears.
2. Select parameters from the list of values.
3. Click OK.
A General Ledger parameter window appears.
4. Select parameters from the list of values.
18-18 Oracle Labor Distribution User’s Guide

Creating Effort Report Procedure
5. To apply parameters, click OK.
6. If the data in the window is complete and no data is to be entered in theProject(s), Organization(s), or Award(s) tabs, go to Step 8 in the Awards tab.
Project(s) TabTo enter data in the Project(s) tab, perform the following steps.
1. To enter project data, select the Project(s) tab.
2. To display all projects, click Show Projects.
A list of related projects appears.
3. To display a selected list of projects, complete one or both of the followingsteps:
■ In the Project Class field, enter the type class code from the list of values.
■ In the Project Type field, enter the project type from the list of values.
4. Click Show Projects.
5. To select one project, double-click the project in the Projects tab.
A projects list appears.
6. To select all projects, click Select All.
The projects list appears in the box to the right.
7. To deselect a project, perform one of the following tasks:
■ Double-click the project.
■ Select the project and click Deselect.
8. If the data in the window is complete, go to Step 8 in the Awards tab.
Organization(s) TabTo enter data in the Organization(s) tab, perform the following steps.
1. To enter organization data, select the Organization(s) tab.
2. To display all organizations, click Show Organizations.
An organizations list appears.
Effort Reporting Procedures 18-19

Creating Effort Report Procedure
3. To select one organization, double-click the organization in the organizationstab.
4. To select all organizations, click Select All (K).
The organizations list appears in the box to the right.
5. To deselect an organization, perform one of the following tasks:
■ Double-click the organization.
■ Select the organization and click Deselect (J).
6. If the data in the window is complete, go to Step 8 in the Awards tab.
Award(s) TabTo enter data in the Award(s) tab, perform the following steps.
1. To enter award data, select Award(s) from the drop-down list.
2. To display all awards, click Show Awards.
An awards list appears.
3. To display a selected list of awards, complete one or both of the following steps:
■ In the Type field, select the award type from the list of values.
■ In the Fund Source field, enter the funding source from the list of values.
4. Click Show Awards.
An awards list appears.
5. To select one award, double-click the award in the Awards tab.
6. To select all awards, click Select All (I).
The awards list appears in the box to the right.
7. To deselect an award, perform one of the following tasks:
■ Double-click the award.
■ Select the award and click Deselect (G).
8. To submit the effort report to the concurrent manager, click Submit.
The Requests window appears.
If there is an error, a warning report appears as a separate request in theconcurrent manager.
18-20 Oracle Labor Distribution User’s Guide

Creating Effort Report Procedure
9. To view the report file, select the appropriate Request ID and click ViewOutput.
10. Close the window.
Effort Reporting Procedures 18-21

Warning Report
Warning ReportFigure 18–7 illustrates the Warning Report Description table as described inTable 18–3, page 18-23.
Figure 18–7 Warning Report
18-22 Oracle Labor Distribution User’s Guide

Warning Report Description
Warning Report Description
Table 18–3 Warning Report Description
Region Description
Header Section date report printed, effort report period, pagenumber, template name, effort report period name,effort report period begin and end dates, supervisorname, People group, date and time of error, GeneralLedger account, organization
REPORT NOT PRODUCED FOR THE FOLLOWINGEMPLOYEES
list of employees for whom a new effort report wasnot created because a previous effort report existswith overlapping dates
Effort Reporting Procedures 18-23

Reviewing, Approving, and Certifying Effort Report Workflow Procedure
Reviewing, Approving, and Certifying Effort Report Workflow ProcedureTo review, approve, and certify the effort report, the employee or supervisorperforms the following steps.
1. In Labor Distribution, navigate to the Worklist window as follows:
Workflow - Workflow User - Workflow List
The Worklist window appears.
2. In the Subject column, double click on the notification link.
The Notifications Summary window appears.
3. Click the Workflow Monitor icon.
The Review Effort Report window appears.
4. In the Employee name field, select the employee from the list of values.
The Employee Name, Employee Number, and Social Security fields arepopulated.
5. In the Name field, enter a period name from the list of values.
The Name, Begin Date, and End Date fields are populated.
6. To print a hard copy of the report in its entirety, click Printing Options.
The Printing Options window appears.
7. Enter data in the Printing Options window as described in Table 18–5,page 18-29.
8. Click OK.
9. Click Run Report.
A Note pop-up window appears acknowledging successful completion of therequest.
10. Click OK.
11. To review the effort report in the concurrent manager, in the Review EffortReport window, click Review.
The Requests window appears.
12. Click View Output.
The effort report appears.
18-24 Oracle Labor Distribution User’s Guide
Reviewing, Approving, and Certifying Effort Report Workflow Procedure
13. After reviewing the effort report, return to the Notification Details window.
14. To act upon the effort report, click one of the following buttons as appropriate:
■ Approve
■ Reject
■ Certified
■ Rejected
15. Close the Worklist window.
Effort Reporting Procedures 18-25

Review Effort Report Window
Review Effort Report Window
Figure 18–8 Review Effort Report Window
18-26 Oracle Labor Distribution User’s Guide

Review Effort Report Window Description
Review Effort Report Window Description
Table 18–4 Review Effort Report Window Description
Field Name Type Features Description
Employee Region
Employee Name required list of values employee name
Employee Number default employee number
Social Security default employee social security number
Effort Period Region
Name required list of values effort report period name; must select same periodused in the Create Effort Report procedure
Begin Date default effort report period start date
End Date default effort report period end date
Printing Options button opens Printing Options window
Review button opens effort report
Effort Reporting Procedures 18-27

Printing Options Window
Printing Options Window
Figure 18–9 Printing Options Window
18-28 Oracle Labor Distribution User’s Guide

Printing Options Window Description
Printing Options Window Description
Table 18–5 Printing Options Window Description
Field Name Type Features Description
Save all Output Files required check box If selected, report is saved to a fileand printed; if deselected, only ahard copy can be printed, and thereport is not saved.
Note: If the system profile valueConcurrent: Save Output is set toYes, the default value is theselected check box.
Notify the FollowingPeople
disabled
Print the Output to:Region
Style required list of values printing style
Printer required list of values printer
Note: The default value for theprinter is set up using the systemprofile value Printer in OracleApplications SystemAdministration.
Copies required number of copies to be printed
Note: The default value for thenumber of copies is set using thesystem profile value Concurrent:Report Copies in SystemAdministration.
Cancel button closes window without saving
OK button saves the printing options andreturns to the report parameterswindow
Effort Reporting Procedures 18-29

Generating Mass Print Effort Report Procedure
Generating Mass Print Effort Report ProcedureTo generate the Mass Print Effort Report, perform the following steps.
1. In Labor Distribution, navigate to the Mass Print Effort Reports InputParameters window as follows:
Effort Reporting - Mass Print Effort Report
2. Click Show Organizations.
3. To include all organizations in the report, click >> (A).
4. To include a specific organization in the report, select an organization and click> (B).
5. To remove a specific organization from the report, select an organization andclick < (C).
6. To remove all organizations from the report, click << (D).
7. In the Effort Period Name field, select the effort report period from the list ofvalues.
8. To print a hard copy of the report in its entirety, click Printing Options.
The Printing Options window appears as shown in Figure 18–9, page 18-28.
9. Enter data in the Printing Options window as described in Table 18–5.
10. Click OK.
11. Click Run Report.
The Requests window appears.
12. To view the report file, select the appropriate Request ID and click ViewOutput.
13. Close the window.
18-30 Oracle Labor Distribution User’s Guide

Mass Print Effort Reports Input Parameters Window
Mass Print Effort Reports Input Parameters Window
Figure 18–10 Mass Print Effort Reports Input Parameters Window
Effort Reporting Procedures 18-31

Mass Print Effort Reports Input Parameters Window Description
Mass Print Effort Reports Input Parameters Window Description
Table 18–6 Mass Print Effort Reports Input Parameters Window Description
Field Name Type Features Description
EmployeeOrganization(s)Region
Show Organizations required button activates display oforganizations indisplay list
[Organization List] required list of values organization list
>> (A) optional button includes allorganizations in report
> (B) required button includes specificorganizations in report
< (C) optional button removes specificorganizations fromreport
<< (D) optional button removes allorganizations fromreport
Effort Period Region
Name required list of values effort report periodname
Begin Date default effort report periodstart date
End Date default effort report periodend date
Printing Options optional button activates PrintingOptions window
Run Report required button runs Mass Print EffortReport
18-32 Oracle Labor Distribution User’s Guide
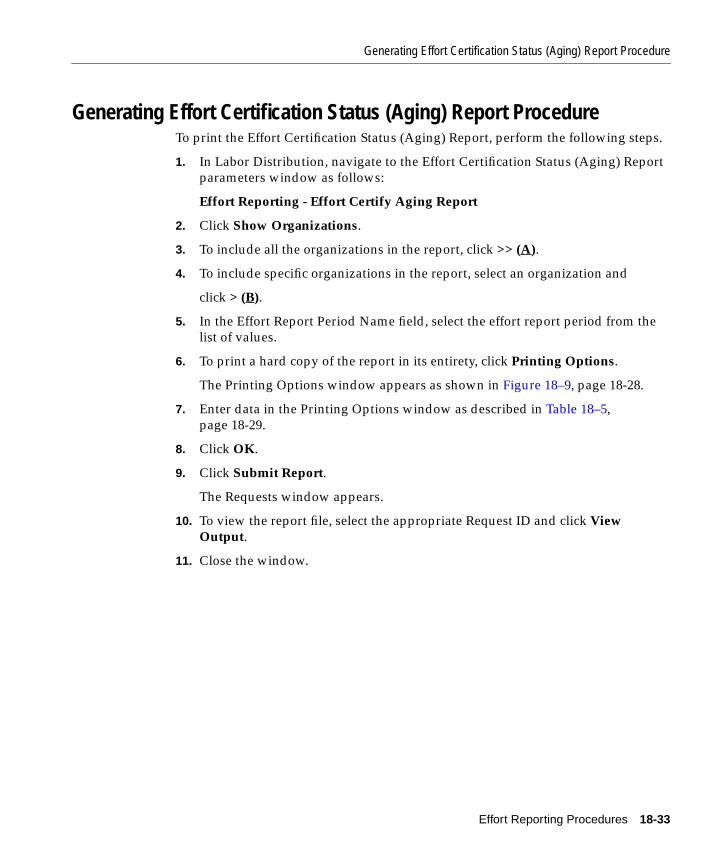
Generating Effort Certification Status (Aging) Report Procedure
Generating Effort Certification Status (Aging) Report ProcedureTo print the Effort Certification Status (Aging) Report, perform the following steps.
1. In Labor Distribution, navigate to the Effort Certification Status (Aging) Reportparameters window as follows:
Effort Reporting - Effort Certify Aging Report
2. Click Show Organizations.
3. To include all the organizations in the report, click >> (A).
4. To include specific organizations in the report, select an organization and
click > (B).
5. In the Effort Report Period Name field, select the effort report period from thelist of values.
6. To print a hard copy of the report in its entirety, click Printing Options.
The Printing Options window appears as shown in Figure 18–9, page 18-28.
7. Enter data in the Printing Options window as described in Table 18–5,page 18-29.
8. Click OK.
9. Click Submit Report.
The Requests window appears.
10. To view the report file, select the appropriate Request ID and click ViewOutput.
11. Close the window.
Effort Reporting Procedures 18-33

Effort Certification Status (Aging) Report Window
Effort Certification Status (Aging) Report Window
Figure 18–11 Effort Certification Status (Aging) Report Window
18-34 Oracle Labor Distribution User’s Guide

Effort Certification Status (Aging) Report
Effort Certification Status (Aging) ReportFigure 18–12 illustrates the Effort Certification Status (Aging) Report Description asdescribed in Table 18–7, page 18-36.
Figure 18–12 Effort Certification Status (Aging) Report Window
Effort Reporting Procedures 18-35
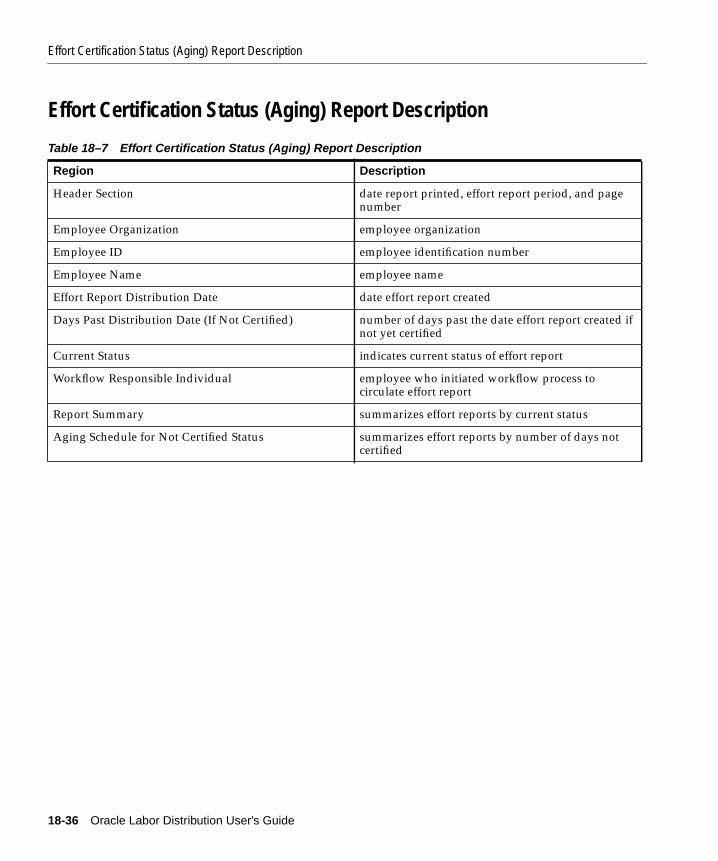
Effort Certification Status (Aging) Report Description
Effort Certification Status (Aging) Report Description
Table 18–7 Effort Certification Status (Aging) Report Description
Region Description
Header Section date report printed, effort report period, and pagenumber
Employee Organization employee organization
Employee ID employee identification number
Employee Name employee name
Effort Report Distribution Date date effort report created
Days Past Distribution Date (If Not Certified) number of days past the date effort report created ifnot yet certified
Current Status indicates current status of effort report
Workflow Responsible Individual employee who initiated workflow process tocirculate effort report
Report Summary summarizes effort reports by current status
Aging Schedule for Not Certified Status summarizes effort reports by number of days notcertified
18-36 Oracle Labor Distribution User’s Guide

Creating Ad Hoc Effort Report Procedure
Creating Ad Hoc Effort Report ProcedureThe Create Ad Hoc Effort Report window includes the following regions forentering accounts, Grants Accounting or Projects instructions, and organizationinformation:
■ GL Account Tab
■ Project(s) Tab
■ Organization(s) Tab
■ Award(s) Tab
Note: Awards tab is applicable only if Grants Accounting is installed.
To create effort reports, perform the following steps.
1. In Labor Distribution, navigate to the Create Ad Hoc Effort Report window asfollows:
Effort Reporting - Create Ad Hoc Report
2. Perform one of the following tasks:
■ In the Template field, select a template from the list of values.
■ In the Effort Period Name field, select a period from the list of values.
3. Enter data as needed in the following fields of the Create Ad Hoc Effort Reportwindow as described in Table 18–8, page 18-42:
■ Employee Name, Employee tab
■ Employee Name, Supervisor tab
■ People Group
GL Account Tab To enter data in the GL Account tab, perform the following steps.
1. In the GL Account field, select an account from the list of values.
A General Ledger find pop-up window appears.
2. Select parameters from the list of values.
3. To apply parameters, click OK.
Effort Reporting Procedures 18-37

Creating Ad Hoc Effort Report Procedure
4. If the data in the window is complete and no data is to be entered in theProject(s), Organization(s), or Award(s) tabs, go to Step 8 in the Awards tab.
Project(s) TabTo enter data in the Project(s) tab, perform the following steps.
1. To enter project data, select Project(s) from the drop-down list.
2. To display all projects, click Show Projects.
A list of related projects appears.
3. To display a selected list of projects, complete one or both of the followingsteps:
■ In the Project Class field, enter the type class code from the list of values.
■ In the Project Type field, enter the project type from the list of values.
4. Click Show Projects.
5. To select one project, double-click the project in the Projects tab.
A projects list appears.
6. To select all projects, click Select All.
The projects list appears in the box to the right.
7. To deselect a project, perform one of the following tasks:
■ double-click the project
■ select the project and click Deselect
8. If the data in the window is complete, go to Step 8 in the Awards tab.
Organization(s) TabTo enter data in the Organization(s) tab, perform the following steps.
1. To enter organization data, select Organization(s) from the drop-down list.
2. To display all organizations, click Show Organizations.
An organizations list appears.
3. To select one organization, double-click the organization in the organizationstab.
18-38 Oracle Labor Distribution User’s Guide

Creating Ad Hoc Effort Report Procedure
4. To select all organizations, click Select All (K).
The organizations list appears in the box to the right.
5. To deselect an organization, perform one of the following tasks:
■ double-click the organization
■ select the organization and click Deselect (J)
6. If the data in the window is complete, go to Step 8 in the Awards tab.
Award(s) TabTo enter data in the Award(s) tab, perform the following steps.
1. To enter award data, select Award(s) from the drop-down list.
2. To display all awards, click Show Awards.
An awards list appears.
3. To display a selected list of awards, complete one or both of the following steps:
■ In the Type field, select the award type from the list of values.
■ In the Fund Source field, enter the funding source from the list of values.
4. Click Show Awards.
An awards list appears.
5. To select one award, double-click the award in the Awards tab.
6. To select all awards, click Select All (I).
The awards list appears in the box to the right.
7. To deselect an award, perform one of the following tasks:
■ double-click the award
■ select the award and click Deselect (G)
8. To submit the effort report to the concurrent manager, click Submit.
The Requests window appears.
If there is an error, a warning report appears as a separate request in theconcurrent manager.
Effort Reporting Procedures 18-39

Creating Ad Hoc Effort Report Procedure
9. To view the report file, select the appropriate Request ID and click ViewOutput.
10. Close the window.
18-40 Oracle Labor Distribution User’s Guide

Create Ad Hoc Effort Report Window
Create Ad Hoc Effort Report Window
Figure 18–13 Create Ad Hoc Effort Report Window
Effort Reporting Procedures 18-41

Create Ad Hoc Effort Report Window Description
Create Ad Hoc Effort Report Window Description
Table 18–8 Create Ad Hoc Effort Report Window Description
Field Name Type Features Description
Template NameRegion
[Template Name] optional list of values template name
Effort Period Region
Name required list of values effort report period name
Begin Date default effort report period start date
End Date default effort report period end date
Employee Tab
Employee Name optional drop-downlist
employee assignment; creates effort report forselected employee assignment; cannot be selected ifsupervisor selected
Supervisor Tab
Supervisor optional list of values supervisor name; creates effort report for allemployees working for selected supervisor; cannotbe selected if employee selected
People Group Region
People Group optional list of values creates effort report for all employees in selectedPeople group; user-defined in Oracle HumanResources setup
GL Account Region
GL Account optional list of values General Ledger accounting flexfield
Project(s) Tab
Project Class optional list of values project class; required if there is no General Ledgercode entered; can select by Class or Type
Project Type optional list of values project type; can select by Class or Type
Show Projects button displays project list for Project Class and Project Typeselected
[Project List] optional project list associated with Project Class and Type
18-42 Oracle Labor Distribution User’s Guide

Create Ad Hoc Effort Report Window Description
Select All button selects all projects in project list to be included ineffort report
Deselect button selects projects to be excluded from effort report
Organization(s) Tab
Show Organizations button activates display of organizations in display list
[Organization List] optional organization list
Select All (K) button selects all organizations to be included in effortreport
Deselect (J) button selects organizations to be excluded from effortreport
[Organization List] display only displays organizations to be included in effort report
Award(s) Tab
Type optional list of values award agreement type
Fund Source optional list of values funding source name
Show Awards button activates display of awards in the drop-down list
[Award List] optional drop-downlist
award list associated with Type and Funding Source
Select All (I) button selects all awards to be included in effort report
Deselect (G) button selects awards to be excluded from effort report
[Organization List] display only drop-downlist
displays awards to be included in effort report
Footer Region
Save Template button saves effort report template
Delete Template button deletes effort report template
Submit button sends request to concurrent manager to run effortreport
Table 18–8 Create Ad Hoc Effort Report Window Description
Field Name Type Features Description
Effort Reporting Procedures 18-43

Create Ad Hoc Effort Report Window Description
18-44 Oracle Labor Distribution User’s Guide

Part VIII
Reports

Reports Proc
19
Reports ProceduresThis chapter describes how to create reports. The following sections are in thischapter:
■ Definition
■ Overview
■ Generating Employees Using Default Labor Schedules Report Procedure
■ Employees Using Default Labor Schedules -- Input Parameters Window
■ Printing Options Window
■ Printing Options Window Description
■ Generating Employee Labor Schedule Report
■ Employee Labor Schedules Report -- Input Parameters Window
■ Employee Labor Schedule Report Description
■ Generating Organization Default Labor Schedule Report
■ Organization Default Labor Schedule Report -- Input Parameter Window
■ Generating Default Account Report Procedure
■ Default Account Report -- Input Parameters Window
■ Generating Suspense Account Report Procedure
■ Suspense Account Report -- Input Parameters Window
■ Generating Distribution Adjustment History by Employee Report Procedure
■ Generating Distribution History by Project Report Procedure
■ Distribution History by Project -- Input Parameters Window
edures 19-1
■ Generating Distribution History by Award Report Procedure
■ Distribution History by Award -- Input Parameters Window
■ Generating Distribution History by Organization Report Procedure
■ Distribution History by Organization -- Input Parameters Window
19-2 Oracle Labor Distribution User’s Guide

Overview
DefinitionOracle Labor Distribution provides various management and operational reportsthat can be used for inquiry and analysis.
OverviewThe reports defined in this section are as follows:
■ Employees Using Default Labor Schedules Report
■ Employee Labor Schedule Report
■ Organization Default Labor Schedule Report
■ Default Account Report
■ Suspense Account Report
■ Distribution Adjustment History by Employee Report
■ Distribution History by Project Report
■ Distribution History by Award Report
■ Distribution History by Organization
The option to print a hard copy of the report in its entirety is included with eachreport parameter window.
Employees Using Default Labor Schedules ReportThe Employees Using Default Labor Schedules report provides a listing ofemployees and assignments for which the organization level default labor scheduleis to be used. The report is based on selected organizations, earnings elements, anda time period.
Employee Labor Schedule ReportThe Employee Labor Schedule Report provides a listing of employee laborschedules for a particular period of time and for selected organizations. The reportidentifies labor schedules that need correction before payroll is imported into LaborDistribution. Labor schedules with totals greater than 100% should be corrected toavoid payroll transactions going to a suspense account.
Users have the option of running the regular report for all of the selectedorganizations or the exception report for selected organizations. The exception
Reports Procedures 19-3

Overview
report provides details for the selected organizations that have schedules equallingless or greater than 100%.
Organization Default Labor Schedule ReportThe Organization Default Labor Schedule Report provides a listing of organizationlabor schedules for a particular period of time. The report also identifies the laborschedules that require correction before payroll is imported into Labor Distribution.Each labor schedule should equal 100% for each day. If the total is less than 100%,the remainder goes to a suspense account. Labor schedule with totals greater than100% should be corrected.
The report can be run in either Regular or Exception mode. In Regular mode, thereport provides schedule details and a schedule summary. In Exception mode, thereport provides organization schedules with a Default Labor Schedule less than100% and organization schedules with a Labor Schedule greater than 100%.
Default Account ReportThe Default Account report provides a listing of employees, assignments, andelements for which a default account of a particular organization is charged. Thisreport is based on selected organizations and a time period.
Suspense Account ReportThe Suspense Account report provides a listing of employees, assignments, andelements for which a suspense account for a particular organization is charged. Thisreport is based on selected organizations and a time period.
Distribution Adjustment History by Employee ReportThe Distribution Adjustment History by Employee report provides a detailed viewof the actual employee salary distributed for a given assignment period and earningelement. This report displays only earnings element labor schedules by employee.All input fields are required.
Distribution History by Project ReportThe Distribution History by Project report provides the labor distribution history byOracle Grants Accounting charging instruction by project. This report is based onselected Grants Accounting projects and a Grants Accounting period.
19-4 Oracle Labor Distribution User’s Guide

Overview
Distribution History by Award ReportThe Distribution History by Award report provides the labor distribution history byGrants Accounting charging instruction by award.
Note: If Grants Accounting is not installed, a warning message appears when theuser attempts to navigate to this window.
Distribution History by OrganizationThe Distribution History by Organization report provides the labor distributionhistory by charging instruction by organization.
Reports Procedures 19-5
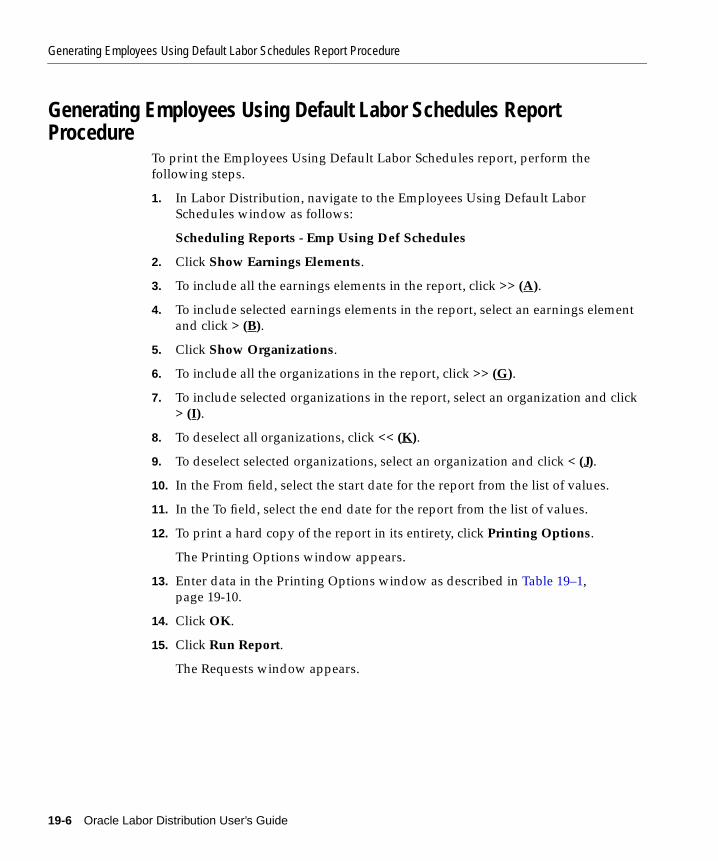
Generating Employees Using Default Labor Schedules Report Procedure
Generating Employees Using Default Labor Schedules ReportProcedure
To print the Employees Using Default Labor Schedules report, perform thefollowing steps.
1. In Labor Distribution, navigate to the Employees Using Default LaborSchedules window as follows:
Scheduling Reports - Emp Using Def Schedules
2. Click Show Earnings Elements.
3. To include all the earnings elements in the report, click >> (A).
4. To include selected earnings elements in the report, select an earnings elementand click > (B).
5. Click Show Organizations.
6. To include all the organizations in the report, click >> (G).
7. To include selected organizations in the report, select an organization and click> (I).
8. To deselect all organizations, click << (K).
9. To deselect selected organizations, select an organization and click < (J).
10. In the From field, select the start date for the report from the list of values.
11. In the To field, select the end date for the report from the list of values.
12. To print a hard copy of the report in its entirety, click Printing Options.
The Printing Options window appears.
13. Enter data in the Printing Options window as described in Table 19–1,page 19-10.
14. Click OK.
15. Click Run Report.
The Requests window appears.
19-6 Oracle Labor Distribution User’s Guide

Generating Employees Using Default Labor Schedules Report Procedure
16. To view the report file, select the appropriate Request ID and click ViewOutput.
17. Close the window.
Note: If no organization level default labor schedules are found for the providedorganization, earning element, and time period, an error message is displayed andthe report is not submitted.
Reports Procedures 19-7

Employees Using Default Labor Schedules -- Input Parameters Window
Employees Using Default Labor Schedules -- Input Parameters Window
Figure 19–1 Employees Using Default Labor Schedules -- Input Parameters Window
19-8 Oracle Labor Distribution User’s Guide

Printing Options Window
Printing Options Window
Figure 19–2 Printing Options Window
Reports Procedures 19-9

Printing Options Window Description
Printing Options Window Description
Table 19–1 Printing Options Window Description
Field Name Type Features Description
Save all Output files required check box If selected, the reportis saved to a file andprinted; if deselected,only a hard copy canbe printed, and thereport is not saved.
Note: If the systemprofile valueConcurrent: SaveOutput is set to Yes,the default value is theselected check box.
Notify the FollowingPeople
disabled
Print the Output to:Region
Style required list of values printing style
Printer required list of values printer
Note: The defaultvalue for the printer isset up using thesystem profile valuePrinter in OracleApplications SystemAdministration.
19-10 Oracle Labor Distribution User’s Guide

Printing Options Window Description
Copies required number of copies to beprinted
Note: The defaultvalue for the numberof copies is set usingthe system profilevalue Concurrent:Report Copies inSystemAdministration.
Cancel button closes windowwithout saving
OK button saves the printingoptions and returns tothe report parameterswindow
Table 19–1 Printing Options Window Description
Field Name Type Features Description
Reports Procedures 19-11

Generating Employee Labor Schedule Report
Generating Employee Labor Schedule ReportTo obtain details of employee labor schedules by organization, perform thefollowing steps:
1. In Labor Distribution, navigate to the Employee Labor Schedule Reportwindow as follows:
Scheduling Reports - Emp Labor Schedule Report
2. Click Show Organizations.
3. To include all organizations in the report, click >> (A).
4. To include selected organizations in the report, select an earnings element andclick > (B).
5. To deselect all selected organizations, click << (D).
6. To deselect a single selected organization, select an organization and click < (C).
7. In the Period From field, select the start date for the report from the list ofvalues.
8. In the To field, select the end date for the report from the list of values.
Note: The value in the To field must be greater than the value in the PeriodFrom field.
9. To print a hard copy of the report in its entirety, click Printing Options.
The Printing Options window appears.
10. Enter data in the Printing Options window as described in Table 19–1,page 19-9.
11. Click OK.
12. To run a regular report, click Run Report.
To run an exception report, click Exception Report.
The Requests window appears.
13. To view the report output, select the appropriate Request ID and click ViewOutput.
14. Close the window.
19-12 Oracle Labor Distribution User’s Guide

Employee Labor Schedules Report -- Input Parameters Window
Employee Labor Schedules Report -- Input Parameters Window
Figure 19–3 Employee Labor Schedules Report -- Input Parameters Window
Reports Procedures 19-13

Employee Labor Schedule Report Description
Employee Labor Schedule Report Description
Table 19–2 Employee Labor Schedule Report Description
Region Description
Header Section report type, labor schedule period, date and timereport run, and page number
Organization Name organization name
Employee Name employee name
Assgn. Number assignment number
Hierarchy schedule level
Charging Instructions account charged
Start beginning of labor schedule
End end of labor schedule
Percent percent charged to the account
19-14 Oracle Labor Distribution User’s Guide

Generating Organization Default Labor Schedule Report
Generating Organization Default Labor Schedule ReportTo obtain schedule details and schedule summary information by organization,perform the following steps:
1. In Labor Distribution, navigate to the Organization Default Labor ScheduleReport window as follows:
Scheduling Reports - Org Default Labor Schedule
2. In the Period From field, select the start date for the report from the list ofvalues.
3. In the To field, select the end date for the report from the list of values.
Note: The value in the To field must be greater than the value in the PeriodFrom field.
4. Click Show Organizations.
5. To include all organizations in the report, click >> (A).
6. To include a single selected organization in the report, select an organizationand click > (B).
7. To deselect all organizations, click << (D).
8. To deselect a single selected organization, select an organization and click < (C).
9. To print a hard copy of the report in its entirety, click Printing Options.
The Printing Options window appears.
10. Enter data in the Printing Options window as described in Table 19–1,page 19-10.
11. Click OK.
12. To run a regular report, click Run Report.
To run an exception report, click Exception Report.
The Requests window appears.
13. To view the report output, select the appropriate Request ID and click ViewOutput.
14. Close the window.
Reports Procedures 19-15

Organization Default Labor Schedule Report -- Input Parameter Window
Organization Default Labor Schedule Report -- Input Parameter Window
Figure 19–4 Organization Default Labor Schedule Report -- Input Parameters Window
19-16 Oracle Labor Distribution User’s Guide

Generating Default Account Report Procedure
Generating Default Account Report ProcedureTo print the Default Account report, perform the following steps.
1. In Labor Distribution, navigate to the Default Account Report window asfollows:
Distribution Reports - Default Acct. Charge Report
2. Click Show Organizations.
3. To include all the organizations in the report, click >> (A).
4. To include a single selected organization in the report, select an organizationand click > (B).
5. To deselect all organizations, click << (D).
6. To deselect a single selected organization, select an organization and click < (C).
7. In the From field, select the start date for the report from the list of values.
8. In the To field, select the end date for the report from the list of values.
Note: The value entered in the To field must be greater than the value entered inthe From field.
9. To print a hard copy of the report in its entirety, click Printing Options.
The Printing Options window appears.
10. Enter data in the Printing Options window as described in Table 19–1,page 19-10.
11. Click OK.
12. Click Run Report.
The Requests window appears.
13. To view the report file, select the appropriate Request ID and click ViewOutput.
14. Close the window.
Reports Procedures 19-17

Default Account Report -- Input Parameters Window
Default Account Report -- Input Parameters Window
Figure 19–5 Default Account Report -- Input Parameters Window
19-18 Oracle Labor Distribution User’s Guide

Generating Suspense Account Report Procedure
Generating Suspense Account Report ProcedureTo print the Suspense Account report, perform the following steps.
1. In Labor Distribution, navigate to the Suspense Account Report -- InputParameters window as follows:
Distribution Reports - Suspense Account Report
2. Click Show Organizations.
3. To include all the organizations in the report, click >> (A).
4. To include a selected single organization in the report, select an organizationand click > (B).
5. To deselect all organizations, click << (D).
6. To deselect a single selected organization, select an organization and click < (C).
7. In the From field, select the start date for the report from the list of values.
8. In the To field, select the end date for the report from the list of values.
Note: The value entered in the To field must be greater than the value entered inthe From field.
9. To print a hard copy of the report in its entirety, click Printing Options.
The Printing Options window appears.
10. Enter data in the Printing Options window as described in Table 19–1,page 19-10.
11. Click OK.
12. Click Run Report.
The Requests window appears.
13. To view the report file, select the appropriate Request ID and click ViewOutput.
14. Close the window.
Reports Procedures 19-19

Suspense Account Report -- Input Parameters Window
Suspense Account Report -- Input Parameters Window
Figure 19–6 Suspense Account Report -- Input Parameters Window
19-20 Oracle Labor Distribution User’s Guide

Generating Distribution Adjustment History by Employee Report Procedure
Generating Distribution Adjustment History by Employee ReportProcedure
To print the Distribution Adjustment History by Employee report, perform thefollowing steps.
1. In Labor Distribution, navigate to the Report Submission window as follows:
Distribution Adjustments - Distribution Adj. History by Emp.
The Report Submission window appears.
2. In the Employee Name field, select the employee and assignment from the listof values.
3. In the Begin Date field, select the start date of the report from the list of values.
4. In the End Date field, select the end date of the report from the list of values.
5. In the Earnings Element field, select an earnings element from the list of values.
6. To print a hard copy of the report in its entirety, click Printing Options.
The Printing Options window appears.
7. Enter data in the Printing Options window as described in Table 19–1,page 19-10.
8. Click OK.
9. Click Run Report.
The Requests window appears.
10. To view the report file, select the appropriate Request ID and click ViewOutput.
11. Close the window.
Reports Procedures 19-21

Report Submission Window
Report Submission Window
Figure 19–7 Report Submission Window
19-22 Oracle Labor Distribution User’s Guide
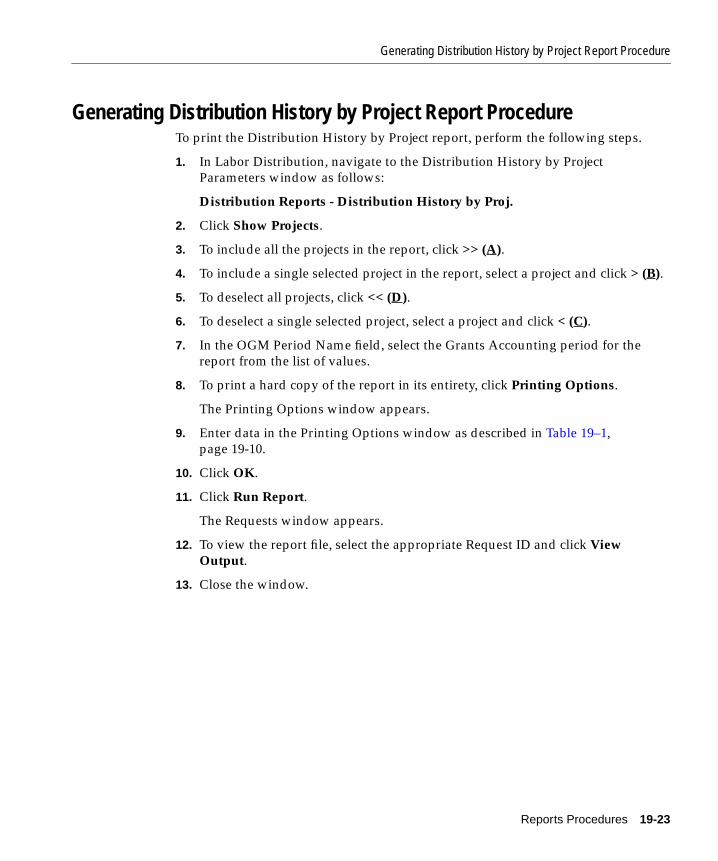
Generating Distribution History by Project Report Procedure
Generating Distribution History by Project Report ProcedureTo print the Distribution History by Project report, perform the following steps.
1. In Labor Distribution, navigate to the Distribution History by ProjectParameters window as follows:
Distribution Reports - Distribution History by Proj.
2. Click Show Projects.
3. To include all the projects in the report, click >> (A).
4. To include a single selected project in the report, select a project and click > (B).
5. To deselect all projects, click << (D).
6. To deselect a single selected project, select a project and click < (C).
7. In the OGM Period Name field, select the Grants Accounting period for thereport from the list of values.
8. To print a hard copy of the report in its entirety, click Printing Options.
The Printing Options window appears.
9. Enter data in the Printing Options window as described in Table 19–1,page 19-10.
10. Click OK.
11. Click Run Report.
The Requests window appears.
12. To view the report file, select the appropriate Request ID and click ViewOutput.
13. Close the window.
Reports Procedures 19-23

Distribution History by Project -- Input Parameters Window
Distribution History by Project -- Input Parameters Window
Figure 19–8 Distribution History by Project -- Input Parameters Window
19-24 Oracle Labor Distribution User’s Guide

Generating Distribution History by Award Report Procedure
Generating Distribution History by Award Report ProcedureTo print the Distribution History by Award report, perform the following steps.
1. In Labor Distribution, navigate to the Distribution History by AwardParameters window as follows:
Distribution Reports - Distribution History by Award
2. Click Show Awards.
3. To include all the awards in the report, click >> (A).
4. To include a single selected award in the report, select an award and click > (B).
5. To deselect all awards, click << (D).
6. To deselect a single selected award, select an award and click < (C).
7. In the OGM Period Name field, select the Grants Accounting period for thereport from the list of values.
8. To print a hard copy of the report in its entirety, click Printing Options.
The Printing Options window appears.
9. Enter data in the Printing Options window as described in Table 19–1,page 19-10.
10. Click OK.
11. Click Run Report.
The Requests window appears.
12. To view the report file, select the appropriate Request ID and click ViewOutput.
13. Close the window.
Reports Procedures 19-25
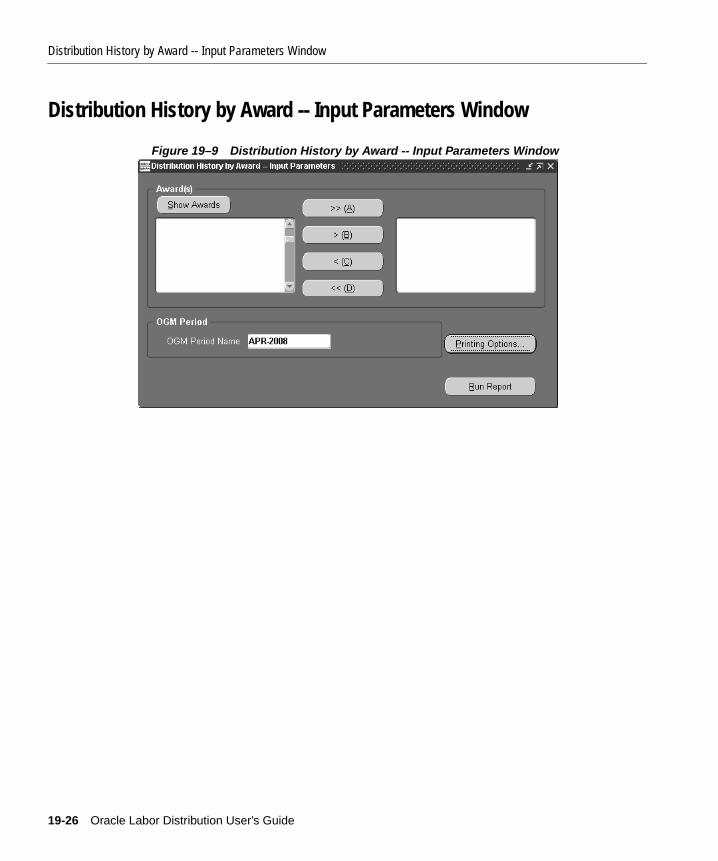
Distribution History by Award -- Input Parameters Window
Distribution History by Award -- Input Parameters Window
Figure 19–9 Distribution History by Award -- Input Parameters Window
19-26 Oracle Labor Distribution User’s Guide

Generating Distribution History by Organization Report Procedure
Generating Distribution History by Organization Report ProcedureTo print the Distribution History by Organization report, perform the followingsteps.
1. In Labor Distribution, navigate to the Distribution History by Organization --Input Parameters window as follows:
Distribution Reports - Distribution History by Org.
2. Click Show Organizations.
3. To include all the organizations in the report, click >> (A).
4. To include a single selected organization in the report, select an organizationand click > (B).
5. To deselect all organizations, click << (D).
6. To deselect a single selected organization, select an organization and click < (C).
7. In the Begin Date field, select the start date for the report from the list of values.
8. In the End Date field, select the end date for the report from the list of values.
9. To print a hard copy of the report in its entirety, click Printing Options.
The Printing Options window appears.
10. Enter data in the Printing Options window as described in Table 19–1,page 19-10.
11. Click OK.
12. Click Run Report.
The Requests window appears.
13. To view the report file, select the appropriate Request ID and click ViewOutput.
14. Close the window.
Reports Procedures 19-27

Distribution History by Organization -- Input Parameters Window
Distribution History by Organization -- Input Parameters Window
Figure 19–10 Distribution History by Organization -- Input Parameters Window
19-28 Oracle Labor Distribution User’s Guide

Part IX
Reconciliation and Control

Reconciliation and Control Reports P
20
Reconciliation and Control ReportsProcedures
This chapter describes the Reconciliation and Control procedure. The followingsections are in this chapter:
■ Definition
■ Overview
■ Generating Reconciliation and Control Reports Procedure
rocedures 20-1

Definition
DefinitionReconciliation and Control allows users to ensure reconciliation between processes.The basic principle in Oracle Labor Distribution is to ensure that amounts andrecords are accounted for. This means that there are ways to ensure that the amountdistributed and transferred between one process or application and the next areequal and that all of the records are accounted for in the process.
OverviewFor each of the processes, appropriate control structures are maintained and reportsand inquiries are available to confirm the reconciliation. When a problem existswith the reconciliation or when exceptions exist, users can view a report describingthe problem.
ProcessReconciliation reports are generated for the following payroll sources:
■ Oracle and Non-Oracle Payroll Sources
■ Pre-generated Distributions
Oracle and Non-Oracle Payroll SourcesThe Reconciliation and Control process generates the following reports for payrollsfrom Oracle and Non-Oracle sources:
■ Reconciliation Between Payroll Lines and Sublines Report
■ Reconciliation Between Distribution Lines and Payroll Sublines Report
■ Reconciliation Between Summarized Distributions and Distribution LinesReport
Reconciliation Between Payroll Lines and Sublines Report As a result of the ImportPayroll Transactions process, the sum of the amounts of the payroll sublines mustequal the sum of the amounts of the payroll lines coming from the payroll report.The amounts summarized by employee, assignment, and earnings element shouldmatch between the payroll lines and payroll sublines.
If the reconciliation report indicates errors and the Create Distribution Lines processhas not been run, users can roll back the Oracle payroll or the Non-Oracle payrollbatch to correct the errors.
20-2 Oracle Labor Distribution User’s Guide

Overview
For information on rolling back an Oracle payroll, see Import Payroll TransactionsProcedures, page 10-7.
For information on rolling back a non-Oracle payroll batch, see Rolling BackNon-Oracle Payroll Procedure, page 14-21.
Reconciliation Between Distribution Lines and Payroll Sublines Report As a result of theCreate Distribution Lines process, the sum of the dollar amounts of the distributionlines for any one set of payroll sublines must equal the sum of the dollar amounts ofthose payroll sublines in total and by employee, assignment, and earnings element.
If the reconciliation report indicates error and the Summarize and Transfer PayrollDistributions process has not been run, users can roll back the distribution lines tocorrect the errors.
For information on rolling back distribution lines, see Rolling Back DistributionLines Procedure, page 11-7.
Reconciliation Between Summarized Distributions and Distribution Lines Report As a resultof the Summarize and Transfer Payroll Distributions process, the sum of theamounts of the summarized lines for any one set of distribution lines must equalthe sum of the amounts of those distribution lines in total and by employee,assignment, and charging instructions.
Pre-generated DistributionsThe Reconciliation and Control process generates the following report forpre-generated distributions:
■ Reconciliation Between Summarized Distributions and Pre-generatedDistribution Lines Report
Reconciliation Between Summarized Distributions and Pre-generated Distribution LinesReport As a result of the Summarize and Transfer Payroll Distributions process, thesum of the amounts of the summarized lines for any one set of pre-generateddistribution lines must equal the sum of the amounts of those pre-generateddistribution lines in total and by employee, assignment, and charging instructions.
Reconciliation and Control Reports Procedures 20-3

Generating Reconciliation and Control Reports Procedure
Generating Reconciliation and Control Reports ProcedureTo create payroll sublines, perform the following steps.
1. In Labor Distribution, navigate to the Submit Request window as follows:
Processes & Reports - Run
The Submit a New Request pop-up window appears.
2. Select the Single Request radio button.
3. Click OK.
The Submit Request window appears.
4. In the Name field, select one of the following:
■ Reconciliation between distribution lines and summary
■ Reconciliation between pre-generated distribution lines and summary lines
■ Reconciliation between payroll lines and sublines
■ Reconciliation between sublines and distribution lines
The Parameters pop-up window appears.
5. In the Source Type field, select a source type from the list of values.
6. In the Source Code field, select a source code from the list of values.
7. If the source type is Oracle, in the Time Period field, select a time period fromthe list of values.
8. If the source type is not Oracle, in the Batch Name field, select a batch namefrom the list of values.
9. To apply the parameters, click OK.
10. In the Submit Request window, click Submit.
The Requests window appears.
11. To view the report file, select the appropriate Request ID and click ViewOutput.
12. Close the window.
20-4 Oracle Labor Distribution User’s Guide

Part X
Topical Essays

Labor Distribution Pro
A
Labor Distribution ProcessThis appendix contains a detailed discussion of the Oracle Labor Distributionprocess. The following sections are in this appendix:
■ Definition
■ Oracle Labor Distribution Process Flow Diagram
■ Oracle Labor Distribution Process
cess A-1

Definition
DefinitionThe purpose of this appendix is to provide an understanding of the Oracle LaborDistribution process. A process flow diagram shows the interaction between thedifferent components in Labor Distribution. Each process is briefly explained andchapter references are provided for more information.
A-2 Oracle Labor Distribution User’s Guide

Oracle Labor Distribution Process Flow Diagram
Oracle Labor Distribution Process Flow DiagramFigure A–1 shows the Oracle Labor Distribution Process Flow diagram as describedin the accompanying text.
Figure A–1 Oracle Labor Distribution Process Flow Diagram
Labor Distribution Process A-3

Oracle Labor Distribution Process
Oracle Labor Distribution ProcessThis section describes the Labor Distribution process flow diagram.
The Labor Distribution process includes the following components:
■ Setup
■ Labor Scheduling
■ Payroll Transactions
■ Non-Oracle Payroll Transactions Interface
■ Create Distribution Lines
■ Pre-generated Distribution Lines Interface
■ Summarize and Transfer Payroll Distributions
■ Distribution Adjustments
■ Labor Encumbrance
■ Effort Reporting
■ Reports
■ Reconciliation and Control
SetupLabor Distribution setup provides users with the ability to customize predefinedcomponents or modules through configuration options. These options, deliveredwith Labor Distribution, alleviate the need for software code modifications.
ReferenceFor information on Labor Distribution setup, see Labor Scheduling Setup, page 5-1.
Labor SchedulingLabor scheduling is an online process used to create, update, and review employeelabor schedules. The labor schedules are a required input for the Create DistributionLines process.
ReferenceFor information on labor scheduling, see Labor Scheduling Procedures, page 9-1.
A-4 Oracle Labor Distribution User’s Guide

Oracle Labor Distribution Process
Payroll TransactionsFor each payroll that is run, users initiate a concurrent process to export the payrollrun results in preparation for the Create Payroll Sublines process.
Create Payroll SublinesThe following are inputs for the Create Payroll Sublines process:
■ export payroll transactions
■ information from Oracle Human Resources
Based on these two inputs, payroll sublines are generated in preparation for theCreate Distribution Lines process.
ReferenceFor information on importing Oracle Payroll, see Import Payroll TransactionsProcedures, page 10-1.
Non-Oracle Payroll Transactions InterfaceIf users do not use Oracle Payroll or uses another payroll system in addition toOracle Payroll, the Non-Oracle Payroll Interface process is initiated to importtransactions from the interface table. This process feeds Maintain Non-OraclePayroll Transactions. Users must write their own process to export the appropriaterecords and load this interface table.
The Non-Oracle Payroll Transactions Interface includes the following:
■ Maintain Non-Oracle Payroll Interface
■ Import Non-Oracle Sublines
Maintain Non-Oracle Payroll InterfaceOnce a non-Oracle payroll interface is imported, the Maintain Non-Oracle PayrollInterface allows users to edit the imported file.
Import Non-Oracle SublinesThe Import Non-Oracle Sublines process reads the interface table and createsrecords in the Payroll Sublines table.
Labor Distribution Process A-5

Oracle Labor Distribution Process
Reference For information on maintaining non-Oracle payroll interface andimporting non-Oracle payroll sublines, see Non-Oracle Payroll InterfaceProcedures, page 14-1.
Create Distribution LinesThere are three inputs for the Create Distribution Lines process. They are as follows:
■ Create Payroll Sublines transactions
■ Maintain Non-Oracle Payroll Interface transactions
■ information from Oracle Human Resources
Based on the inputs, distribution lines are generated in preparation for theSummarize Distribution Lines and Transfer process.
To distribute payroll charges accurately, the system uses various employee-relatedevents, such as salary increase, to calculate an accurate distribution amount. Actualpayroll charges are distributed based on a daily rate. The daily rate is calculated bytaking the salary that is in effect for the weekdays based on the payroll period andappropriate employee events. The total distribution for any employee assignmentand earning classification or pay element cannot exceed 100% for any given day.
Labor Scheduling can be used to transfer pre-generated distribution charginginstructions from other systems such as time and attendance systems. LaborScheduling can also be used to distribute non-Oracle payrolls.
ReferenceFor information on Create Distribution Lines, see Create Distribution LinesProcedures, page 11-1.
Pre-generated Distribution Lines InterfaceThe Pre-generated Distribution Lines Interface table is used to import transactionsfrom timecard systems. Users must write their own process to export theappropriate records and to load this interface table. This process creates records inthe Pre-Generated Distribution Lines table.
The Pre-generated Distribution Lines Interface process includes the following:
■ Maintain Pre-generated Distribution Lines
■ Import Pre-generated Distribution Lines
A-6 Oracle Labor Distribution User’s Guide

Oracle Labor Distribution Process
Maintain Pre-generated Distribution LinesOnce pre-generated distribution lines are created in the interface table, MaintainPre-generated Distribution Lines allows users to edit the imported transactions.
Import Pre-generated Distribution LinesImport Pre-generated Distribution Lines reads the interface table and createsrecords in the Payroll Sublines table.
Reference For information on maintaining pre-generated distribution lines andimporting pre-generated distribution lines, see Pre-generated Distribution LinesInterface Procedures, page 15-1.
Summarize and Transfer Payroll DistributionsThe Summarize and Transfer Payroll Distributions process summarizes thedistribution lines and transfers the summarized transactions into the GeneralLedger, Oracle Projects, and Grants Accounting interface tables.
ReferenceFor information on summarizing distribution lines and transferring them to GeneralLedger, Projects, and Grants Accounting, see Summarize and Transfer PayrollDistributions Procedures, page 12-1.
Distribution AdjustmentsDistribution Adjustments involves changing labor distributions that have alreadybeen posted to General Ledger, Projects, and Grants Accounting. DistributionAdjustments can be made to each actual distribution or to a set of distributionsacross time. Labor Distribution reverses the original distribution transaction andcreates new distribution transactions.
Once the transfers are specified, they must be approved before they are processed.Users can configure workflow rules to determine appropriate routing andapprovals for modifying payroll distributions.
ReferenceFor information on distribution adjustments, see Distribution AdjustmentsProcedures, page 16-1.
Labor Distribution Process A-7

Oracle Labor Distribution Process
Labor EncumbranceLabor Encumbrance allows users to differentiate unspent and uncommitted fundsfrom unspent funds. The labor encumbrance process includes the followingprocesses:
■ create encumbrance lines
■ summarize and transfer encumbrances
■ update encumbrance lines
ReferenceFor information on the encumbrance processes and reports, see Labor EncumbranceProcesses and Reports Procedures, page 17-1.
For information on the encumbrance process, see Labor Encumbrance Process,page C-1.
Effort ReportingEffort reports can be created for specified time periods, by employee, groups ofemployees, or other selection criteria. Effort reports can be generated online or inhard-copy format.
Effort is calculated based on the actual amount of base salary distributed. Therefore,effort equals base pay.
Online forms can be routed to appropriate individuals using workflow rules. Userscan accept or return the report with comments. Users can also create ad hoc effortreports based on various user-selected parameters.
ReferenceFor information on effort reporting, see Effort Reporting Procedures, page 18-1.
ReportsLabor Distribution provides various management reports.
ReferenceFor information on reports, see Reports Procedures, page 19-1.
A-8 Oracle Labor Distribution User’s Guide

Oracle Labor Distribution Process
Reconciliation and ControlReconciliation and Control allows users to ensure reconciliation between processesby generating various reports.
ReferenceFor information on reconciliation and control, see Reconciliation and ControlReports Procedures, page 20-1.
Labor Distribution Process A-9

Oracle Labor Distribution Process
A-10 Oracle Labor Distribution User’s Guide

Scheduling Hierarchy Pro
B
Scheduling Hierarchy ProcessThis appendix describes the Scheduling Hierarchy process. The following sectionsare in this appendix:
■ Definition
■ Process
■ Scheduling Hierarchy Process Diagram
cess B-1
Definition
DefinitionOracle Labor Distribution allows users to create default labor schedules at thefollowing levels:
■ employee organization
■ employee assignment
■ earnings element
The Scheduling Hierarchy process is used to determine which labor schedule to usebased on the hierarchy.
B-2 Oracle Labor Distribution User’s Guide

Process
ProcessFigure B - 1 illustrates the Scheduling Hierarchy process. Labor Distribution beginssearching for a labor schedule at the lower level of the hierarchy and moves upwarduntil finding a labor schedule or account.
The Global Earnings Element labor schedule is at the lowest level of the schedulehierarchy. At the next three levels of the scheduling hierarchy, Element Type,Element Group, and Assignment labor schedules are defined for the employeeassignment. Schedules at the employee assignment level can apply to multipleearnings elements for an employee.
At the upper three levels of the scheduling hierarchy, Organization Default LaborSchedule, Organization Default Account, and Organization Suspense Account laborschedules are defined at the human resources organization level. Schedules at theemployee organization level can apply to many employees in that organization.
The Scheduling Hierarchy process consists of the following levels:
1. Organization
■ Suspense Account
■ Default Account
■ Default Labor Schedule
2. Employee Assignment
■ Assignment
■ Element Group
■ Earnings Element
3. Element
■ Global Earnings Element
Organization Suspense AccountThe Organization Suspense Account is set up to collect costs from labor distributionif charging instructions at any level of the scheduling hierarchy are missing.
Organization Default AccountThe Organization Default Account is set up to collect costs from labor distribution ifcharging instructions at the lower level of the scheduling hierarchy are missing.
Scheduling Hierarchy Process B-3

Process
Default Labor ScheduleUsers can create labor schedule lines for each organization. This labor schedule isused when the Organization Default Labor Schedule is selected at setup. Thisallows the user to create one labor schedule set at the Organization Default level forthat unique organization that applies to all assignments and the earnings elementsassociated with it.
ExampleA single schedule is created for the Budget Office. All assignments with anorganization of Budget Office and labor schedule set at the Organization Defaultlevel use the labor schedule defined for the organization of Budget Office. The userdoes not have to individually create a labor schedule for each employee assignmentthat is attached to the Budget Office.
Employee AssignmentUsers can create labor schedule lines for an employee assignment. This laborschedule is used when the Assignment box is checked in the Schedule Hierarchyregion of the Labor Scheduling window. This allows the user to create one laborschedule that applies to all earnings elements that may be paid to that assignment.
Labor schedules defined at the assignment level take precedence over laborschedules defined at the Organization level.
ExampleA single schedule is created at the employee assignment level. Any earningselement paid to that employee assignment uses the assignment labor schedule. Theuser does not have to individually create a labor schedule for each earnings elementthat an employee assignment might pay.
Element GroupElement groups are defined at the site level and are used to group earningselements. These groups can be used to identify a common distribution schedule towhich all earnings elements that are within the specified group are scheduled anddistributed to an employee assignment. This feature allows users to specify onedistribution profile for a group, and all elements associated with this group arescheduled and distributed based on the specified single profile for an employeeassignment.
B-4 Oracle Labor Distribution User’s Guide

Process
For an employee assignment, users can define a labor schedule for each elementgroup. This allows users to create one labor schedule that applies to all earningselements in a specified element group. Labor schedules defined at the elementgroup level take precedence over labor schedules defined at the Assignment andOrganization Default Schedule levels.
ExampleA single schedule is created for an employee assignment at the element group levelof Regular Salary, where Regular Salary includes the earnings elements of RegularPay, Overtime, and Shift. Any Regular Pay, Overtime, and Shift earnings elementthat is paid to the specified employee assignment uses the labor schedule definedfor the Regular Salary element group. The user does not have to individually createa labor schedule for each earnings element.
Earnings ElementUsers can create labor schedules for individual earnings elements. Labor schedulesdefined at the Earnings Element level take precedence over labor schedules definedat the Element Group, Assignment, and Organization Default Schedule levels.
ExampleA single schedule is created for an employee assignment at the earnings elementlevel. The user creates a schedule at the element group of Regular Salary, whichincludes the earnings element of Regular Pay, Overtime, and Shift. The user alsocreates a schedule for the Shift earnings element. Any pay for Shift pay uses theschedule for Shift and uses the Elements Group Schedule for any pay for RegularPay and Overtime.
The user can create an earnings element level labor schedule for any earningselement that an employee assignment is paid.
Global Earnings ElementUsers can define a Global Earnings Element labor schedule for an individualearnings element at the site level. This labor schedule is used only for the associatedearnings element and applies to all employee assignments. Users cannot select orchange the Global Earnings Element labor schedule in the employee assignmentlabor schedule. This allows the institution to create a global labor schedule thatapplies across the entire institution.
Scheduling Hierarchy Process B-5

Process
Labor schedules defined at the Global Earnings Element level take precedence overlabor schedules defined at the Earnings Element, Element Group, Assignment, andOrganization Default Schedule levels.
ExampleA Global Earnings Element Schedule is created for the earnings element of PaidTime Off. Any pay for Paid Time Off uses the Global Earnings Element Schedule,regardless of other scheduling instructions.
B-6 Oracle Labor Distribution User’s Guide

Scheduling Hierarchy Process Diagram
Scheduling Hierarchy Process DiagramFigure B–1 shows the Scheduling Hierarchy Process diagram as described in theaccompanying text.
Figure B–1 Scheduling Hierarchy Process Diagram
Scheduling Hierarchy Process B-7

Scheduling Hierarchy Process Diagram
B-8 Oracle Labor Distribution User’s Guide

Labor Encumbrance Pro
C
Labor Encumbrance ProcessThis appendix contains a detailed discussion of the Labor Encumbrance process inOracle Labor Distribution. The following sections are in this appendix:
■ Definition
■ Labor Encumbrance Process Flow Diagram
■ Labor Encumbrance Process
cess C-1

Definition
DefinitionThe purpose of this appendix is to provide an understanding of the LaborEncumbrance process in Labor Distribution. A process flow diagram shows theinteraction between the different components in Labor Distribution. Each process isbriefly explained and chapter references are provided for more information.
C-2 Oracle Labor Distribution User’s Guide
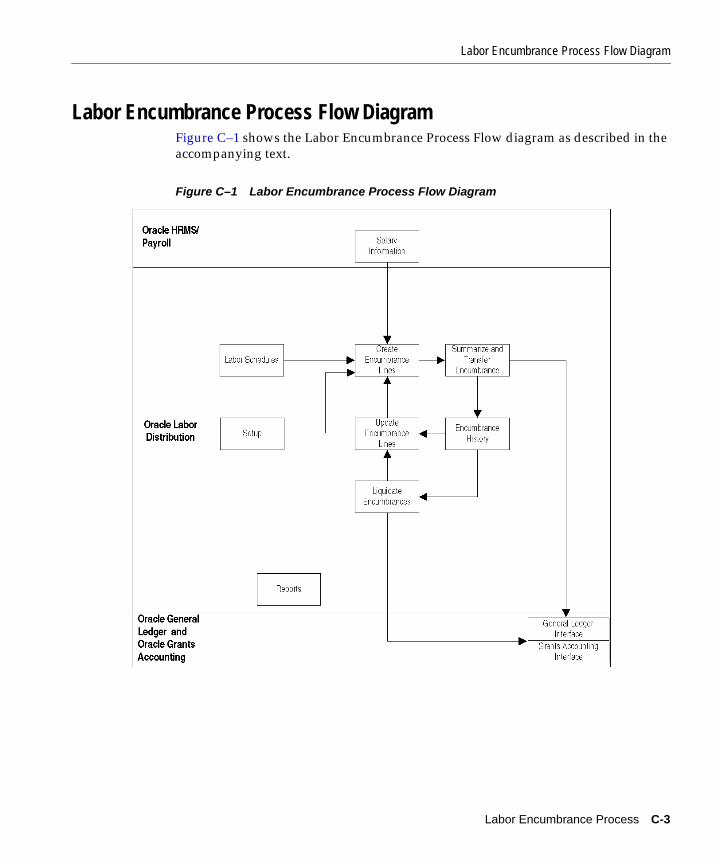
Labor Encumbrance Process Flow Diagram
Labor Encumbrance Process Flow DiagramFigure C–1 shows the Labor Encumbrance Process Flow diagram as described in theaccompanying text.
Figure C–1 Labor Encumbrance Process Flow Diagram
Labor Encumbrance Process C-3

Labor Encumbrance Process
Labor Encumbrance ProcessThis section describes the Labor Encumbrance process flow diagram.
The Labor Encumbrance process includes the following components:
■ Setup
■ Labor Scheduling
■ Create Encumbrance Lines
■ Summarize and Transfer Encumbrances
■ Encumbrance History
■ Update Encumbrance Lines
■ Liquidate Encumbrances
■ Reports
SetupLabor Encumbrance setup provides users with the ability to customize predefinedcomponents through configuration options. These options delivered with LaborDistribution alleviate the need for software code modifications.
ReferenceFor information on Labor Encumbrance setup, see Labor Encumbrance Setup,page 7-1.
Labor SchedulingLabor scheduling is an online process used to create, update, and review employeelabor schedules. The labor schedules are a required input for the CreateEncumbrance Lines process.
ReferenceFor information on labor scheduling, see Labor Scheduling Procedures, page 9-1.
C-4 Oracle Labor Distribution User’s Guide

Labor Encumbrance Process
Create Encumbrance LinesCreate Encumbrance Lines is a concurrent process that generates newencumbrances for the earnings elements selected when setting up laborencumbrances.
ReferenceFor information on creating encumbrance lines, see Labor Encumbrance Processesand Reports Procedures, page 17-1.
Summarize and Transfer EncumbrancesSummarize and Transfer Encumbrances is a concurrent process that posts data toOracle General Ledger and Oracle Grants Accounting. Setup options allow the userto group the data based on time period and charging instructions.
ReferenceFor information on summarizing and transferring encumbrances, see LaborEncumbrance Processes and Reports Procedures, page 17-1.
Encumbrance HistoryDuring the Summarize and Transfer Encumbrances process, an encumbrancehistory is stored in the tables to be used for Update Encumbrance Lines andEncumbrance Liquidation Process.
Update Encumbrance LinesUpdate Encumbrance Lines is a concurrent process that updates encumbrances thathave been posted to General Ledger and Grants Accounting. Data is imported fromthe encumbrance history generated during the Summarize and TransferEncumbrances process.
ReferenceFor information on updating encumbrances, see Labor Encumbrance Processes andReports Procedures, page 17-1.
Labor Encumbrance Process C-5

Labor Encumbrance Process
Liquidate EncumbrancesThe Encumbrance Liquidation Process is a concurrent process that liquidatesencumbrances before sending actual labor costs to General Ledger or GrantsAccounting. Setup options determine the process for liquidating encumbranceswhile posting actual transactions in Labor Distribution.
ReferenceFor information on liquidating encumbrances, see Labor Encumbrance Processesand Reports Procedures, page 17-1.
ReportsLabor Encumbrance includes the following reports:
■ Suspense Charge Encumbrance Report
■ Organization Default Usage Encumbrance Report
Reference■ For information on encumbrance reports, see Labor Encumbrance Processes
and Reports Procedures, page 17-1.
C-6 Oracle Labor Distribution User’s Guide

Data Entry Validations Pro
D
Data Entry Validations ProcessThis appendix describes the data entry validation process. The following sectionsare in this appendix:
■ Overview
■ Data Entry Validations
cess D-1

Overview
OverviewData entry validations in Oracle Labor Distribution are performed on the followingattributes:
■ Oracle Projects charging instructions
■ Oracle Grants Accounting charging instructions
■ Oracle General Ledger code combinations
The purpose of data entry validation in Labor Distribution is as follows:
■ to ensure that labor scheduled cannot be distributed more than 100% on anygiven day
■ to prevent deletion of any schedule line whose begin and end dates overlapwith the date of any distribution lines that are generated in the past
The validations that are performed for General Ledger code combinations are thesame as those performed for other Oracle financial applications.
The validations that are performed for Projects and Grants Accounting charginginstructions during the labor scheduling process are the same as those performedduring the Create Distribution Lines process.
D-2 Oracle Labor Distribution User’s Guide

Data Entry Validations
Data Entry ValidationsData Entry Validations consists of the following:
■ Labor Scheduling Validation Rules
■ Labor Scheduling Setup Deletion Validation Rules
■ Labor Scheduling Setup End-Dating Validation Rules
■ Labor Scheduling Validation Errors
■ Labor Scheduling Validation Warnings
■ Create Distribution Lines Validations
■ Other Validations
■ Custom Data Entry Validation
Labor Scheduling Validation RulesIn the Labor Scheduling window, the following validation rules are applied:
■ The expenditure item date used when validating the Grants Accountingcharging instruction is the begin date from the schedule line.
■ The message box displayed to the user indicates which particular entry failedvalidation.
■ All entry failures are considered errors or warnings.
■ If entry failures are considered errors, Labor Distribution does not allow theschedule line to be saved until a correction is entered and passes validation.
■ If entry failures are considered warnings, corrective action is not required, andthe schedule line can be saved without making corrections.
Labor Scheduling Setup Deletion Validation RulesLabor scheduling rules for deletions are as follows:
■ Element types can be deleted if the following conditions apply:
■ No payrolls for the element type dates exist.
■ No schedule lines for the element type dates exist.
■ No element groups are associated with the element type.
Data Entry Validations Process D-3

Data Entry Validations
■ If a global earnings element exists for this element type, the element typemust exist in the PSP element types table at least once or more to maintainreferential integrity.
■ An element type can be deleted from an element group if there are no schedulelines for the dates of the associated element group.
■ An element group can be deleted if there are no element types associated withit.
■ A global earnings element can be deleted if there are no payrolls for the dates ofthe global earnings element.
■ A default schedule can be deleted if there are no payrolls imported for the datesof the default schedule.
■ A default account can be deleted if there are no payrolls imported for thedefault account dates.
■ A suspense account can be deleted if there are no payrolls imported for thedates of the suspense account.
Labor Scheduling Setup End-Dating Validation RulesRules for end-dating apply to the following:
■ element type
■ element group
■ global element
■ default schedules
■ default accounts
■ suspense accounts
Element TypeEnd-dating rules for element types are as follows:
■ An element type can be end-dated to the last payroll import date.
■ An element type can be end-dated to the last schedule line date.
■ An element type in an element group must be end-dated to make the elementtype active for at least one day.
D-4 Oracle Labor Distribution User’s Guide

Data Entry Validations
■ An element type's end date can be extended if it does not overlap with otherinstances of this element type.
Element GroupEnd-dating rules for element groups are as follows:
■ An element group can be end-dated to the last payroll import date.
■ An element group can be end-dated to the date of the element group's lastschedule line.
■ An element group can be end-dated so that each element type associated with itcan be active for at least one day.
■ An element group's end date can be extended if it does not overlap with otherinstances of this element group.
Global ElementEnd-dating rules for global elements are as follows:
■ A global element can be end-dated to the last payroll date.
■ A global element's end date can be extended if there are no payrolls for theextended period and if the global element does not overlap with other instancesof this global element.
Default SchedulesEnd-dating rules for default schedules are as follows:
■ A default schedule can be end-dated to the last payroll date.
■ A default schedule's end date can be increased if there are no payrolls for theextended period and if the default schedule does not overlap with otherinstances of the default schedule organization.
Default AccountsEnd-dating rules for default accounts are as follows:
■ A default account can be end-dated to the last payroll date.
■ A default account's end date can be increased if there are no payrolls for theextended period and if the default account does not overlap with other defaultaccounts for this organization.
Data Entry Validations Process D-5

Data Entry Validations
Suspense AccountsEnd-dating rules for suspense accounts are as follows:
■ A suspense account can be end-dated to the last payroll date.
■ A suspense account's end date can be increased if there are no payrolls for theextended period and if the suspense account does not overlap with othersuspense or global accounts for this organization.
Labor Scheduling Validation ErrorsIn the Labor Scheduling window, entry failures of many charging instructions oraccounting flexfields are considered errors. Entry failure for charging instructionsinclude the following:
■ Project does not exist.
■ Task does not exist for the project.
■ Award does not exist.
■ Expenditure Organization does not exist.
■ Expenditure Type does not exist.
■ General Ledger code combination does not exist.
Labor Scheduling Validation WarningsIn the Labor Scheduling window, the following entry failures are consideredwarnings:
■ Project is not active for schedule line begin date.
■ Task is not active for schedule line begin date.
■ Award is not linked to the Project via an installment.
■ A new schedule line is entered which has a begin-date that includes a payrollthat has already been distributed.
Create Distribution Lines ValidationsDuring the Create Distribution Lines process, all entry failures are considerederrors. All charging account entry failures are posted to the organizational suspenseaccount.
D-6 Oracle Labor Distribution User’s Guide

Data Entry Validations
Other ValidationsOther data entry validations include the following:
■ End date can be changed if it is greater than the last payroll process date andcan be changed to a date greater than the payroll process date.
■ Begin date can be changed if it is greater than the last payroll process date andcan be changed to a date greater than the payroll process date.
■ New schedule lines can be created with a begin date that is greater than the lastpayroll process date.
■ Percentages cannot be changed on any schedule line if the schedule line hasalready been used in any payroll distribution.
Note: Users can change the end date and create a new record.
■ The end date of the most recent Oracle or non-Oracle payroll imported intoOracle Labor Distribution is checked by Labor Distribution. Schedules can onlybe adjusted for dates after the end date of the last processed payroll for theselected employee assignment.
Custom Data Entry ValidationUsers can define and program additional validation rules for the labor schedulingprocess that meet the needs of their unique business requirements.
Data Entry Validations Process D-7

Data Entry Validations
D-8 Oracle Labor Distribution User’s Guide

Effort Calculation Pro
E
Effort Calculation ProcessThis appendix describes the effort calculation process.The following sections are inthis appendix:
■ Definition
■ Process
cess E-1

Definition
DefinitionThe underlying concept of effort calculation is that effort equals the percentage ofpay distributed.
ProcessThe following steps illustrate the effort calculation process:
1. Determine the individual's meeting coverage criteria for the given effortreporting period.
2. Summarize all distribution lines, including transfers, where earnings elementsare not excluded from base pay and where begin and end dates fall completelywithin the effort reporting period.
3. Calculate the effort base for an individual employee by summing the totalapplicable distributions.
4. Calculate effort percentages by summing for each individual employee theapplicable distributions for each project and award combination and dividingthose amounts by the employee's effort base.
ExamplesThe following examples provide clarification of the effort calculation process.
Doctor Jane Doe Smith has one assignment, Principal Investigator. Her annualsalary was $60,000 ($5,000 per month) starting January 1, 1999. Her annual salarywas increased to $72,000 on April 16, 1999 ($5,500 for the month of April).
Dr. Smith was scheduled as follows:
Dr. Smith was paid as follows:
■ $5,000.00 per month for January through March
■ $2,500.00 for 1 - 15 April
Project 89AC Cardiology 01-Jan-1999 to 31-Mar-1999 100%
Project 756 Study 01-Apr-1999 to 20-Apr-1999 50%
Project 912 NIH Ca 01-Apr-1999 to 15-Apr-1999 50%
Project 3784 NSF S 16-Apr-1999 to 30-Apr-1999 50%
E-2 Oracle Labor Distribution User’s Guide

Process
■ $3,000.00 for 16 - 30 April
Dr. Smith's actual distributions were as follows:
Before any distribution adjustment, Dr. Smith's effort is calculated for the period ofFebruary 1 through April 30 as follows:
Project 89AC Cardiology 01-Jan-1999 to 31-Mar-1999 $15,000.00
Project 756 Study 01-Apr-1999 to 20-Apr-1999 $ 1,659.09
Project 912 NIH 01-Apr-1999 to 15-Apr-1999 $ 1,250.00
Note: Project 3784 NSF wasinvalid at the time ofdistribution; suspenseaccount posting is drivenby user setup options.
Cardiology Suspense 21-Apr-1999 to 30-Apr-1999 $ 1,090.91
Total $20,500.00
Project 89AC Cardiology $10,000.00/$15,500.00 = 64.52%
Project 756 Study $ 1,659.09/$15,500.00 = 10.70%
Project 912 NIH $ 1,250.00/$15,500.00 = 8.06%
Note: Project 3784 NSF wasinvalid at the time ofdistribution; suspenseaccount posting is driven bysetup options.
Total 100%
Effort Calculation Process E-3

Process
E-4 Oracle Labor Distribution User’s Guide
Effort Report Notification Workflow Pro
F
Effort Report Notification Workflow ProcessThis appendix contains a detailed discussion of the Effort Report NotificationWorkflow processes in Oracle Labor Distribution. The following topics are in thisappendix:
■ Overview
■ The PSP Effort Report Item Type
■ Effort Report Approval and Certification Workflow Diagram
■ Effort Report Approval and Certification Workflow Process
■ Effort Report Approval Workflow Diagram
■ Effort Report Approval Workflow Process
■ Customizing Effort Report Approval Workflow
■ Effort Report Certification Workflow Diagram
■ Effort Report Certification Workflow Process
■ Customizing Effort Report Certification Workflow
cess F-1

Overview
OverviewLabor Distribution uses Oracle Workflow to define and implement effort reportingprocesses.
Workflow features include the following:
■ Oracle Workflow Builder, a graphical tool that allows users to create businessprocess definitions
■ Workflow Engine, which implements process definitions at runtime
■ Notification System, which sends notifications and processes responses in aworkflow
Workflow functionality in Labor Distribution automatically routes effort reportsthroughout the organization and delivers electronic notifications to users regardingeffort reports that require their attention or processes that are completed.
Use Oracle Workflow Builder to customize workflows or to create new workflows.For information on Workflow, see Introduction to Workflow, Oracle Workflow Guide.
Effort Report Notification ProcessThe Effort Report Notification process includes the following subprocesses:
■ approval
■ notification
The Effort Report Notification workflow process is initiated in Labor Distributionwhen an effort report is created.
Notification is sent to approvers of the effort report. When the effort report isapproved, the effort report is sent to a supervisor for certification. The creator of theeffort report can monitor the status of the effort report. In order to automaticallyskip the approval step after the creation of an effort report, users can set the OmitApproval Step to yes.
An effort report created for a terminated employee is directly routed to thesupervisor for certification, skipping the employee’s approval process.
F-2 Oracle Labor Distribution User’s Guide

The PSP Effort Report Item Type
The PSP Effort Report Item TypeSeveral Workflow attributes are associated with the PSP Effort Report item type thatreference information in the application tables. The attributes are used andmaintained by function activities as well as notification activities throughout theprocess.
Table F–1 describes the attributes associated with PSP Effort Report.
Table F–1 Attributes Associated with the PSP Effort Report Item Type
Display Name Description TypeLength/Format/Lookup Type
Omit Approval Step for customizationpurposes
Lookup Yes/No
Can Employee Approve for customizationpurposes
Lookup Yes/No
Can Supervisor Certify for customizationpurposes
Lookup Yes/No
Process approval or certification Lookup Process
Template ID Number
Report ID effort report uniqueidentifier
Number
Begin Date effort report begin date Date
End Date effort report end date Date
Employee Person ID Number
Employee UserName Text 100
Employee Display Name Text 240
Creator UserName Text 100
Creator Display Name Text 240
Approver UserName Text 100
Approver Display Name Text 240
Certifier UserName Text 100
Certifier Display Name Text 240
Notes Text 2000
Effort Report Notification Workflow Process F-3

The PSP Effort Report Item Type
Review Effort Report Form
Workflow Monitor Form
Table F–1 Attributes Associated with the PSP Effort Report Item Type
Display Name Description TypeLength/Format/Lookup Type
F-4 Oracle Labor Distribution User’s Guide

Effort Report Approval and Certification Workflow Diagram
Effort Report Approval and Certification Workflow DiagramFigure F–1 shows the effort report workflow nodes as desribed in theaccompanying text.
Figure F–1 Effort Report Approval and Certification Step Workflow Diagram
Effort Report Notification Workflow Process F-5
Effort Report Approval and Certification Workflow Process
Effort Report Approval and Certification Workflow ProcessThis section describes the Effort Report Approval workflow diagram and processes.
Start (Node 1)This standard function activity marks the start of the process.
Notify Creator: Workflow Monitor (Node 2)This activity notifies the creator that the effort report was created and sent to theapprover.
Omit Approval Step (Node 3)When set to yes, this function activity skips the approval step, automaticallymarking any submitted effort report as approved, and then sends it to cerfication.
Function WF_STANDARD.NOOP
Result Type None
PrerequisiteActivities
None
Message Notification to Creator: Workflow Monitor Link
Result Type None
PrerequisiteActivities
Start
Function PSP_WF_EFF_PKG.OMIT_APPROVAL_STEP
Result Type Yes/No
PrerequisiteActivities
Notify creator: Workflow Monitor
F-6 Oracle Labor Distribution User’s Guide

Effort Report Approval and Certification Workflow Process
Update Effort Report Status to Approved (Node 4)This function activity updates the effort report status to approved in the database.
Effort Report Certification1 (Node 5)This process certifies effort reports.
End (Node 6)This function activity marks the end of the process.
Effort Report Approval/Certification (Node 7)This process sends the effort report to a supervisor for approval and if approved,the approval process calls up the certification process.
Function PSP_WF_EFF_PKG.STATUS_APPROVED
Result Type None
PrerequisiteActivities
Omit Approval Step: Yes
Message Effort Report Certification
Result Type None
PrerequisiteActivities
Update Effort Report Status to Approved
Function WF_STANDARD.NOOP
Result Type None
PrerequisiteActivities
Effort Report Certification1
Message Effort Report Approval/Certification
Result Type None
PrerequisiteActivities
Omit Approval Step: No
Effort Report Notification Workflow Process F-7

Effort Report Approval and Certification Workflow Process
End (Node 8)This standard function activity marks the end of the process.
Function WF_STANDARD.NOOP
Result Type None
PrerequisiteActivities
Effort Report Approval/Certification
F-8 Oracle Labor Distribution User’s Guide

Effort Report Approval Workflow Diagram
Effort Report Approval Workflow DiagramFigure F–2 shows the effort report workflow nodes as described in theaccompanying text.
Figure F–2 Effort Report Approval Workflow Diagram
Effort Report Notification Workflow Process F-9

Effort Report Approval Workflow Process
Effort Report Approval Workflow ProcessThis section describes the Effort Report Approval workflow diagram and processes.
Start (Node 1)This is a standard function activity that marks the start of the process.
Can Employee Approve (Node 2)This function activity checks to see whether employees can approve their own effortreports.
Verify Employee (Node 3)If employees can approve their effort reports, this function activity searches for theemployee.
Function WF_STANDARD.NOOP
Result Type None
PrerequisiteActivities
None
Function PSP_WF_EFF_PKG.CAN_EMPLOYEE_APPROVE
Result Type Yes/No
PrerequisiteActivities
Start
Function PSP_WF_EFF_PKG.VERIFY_EMPLOYEE
Result Type Found/Not Found
PrerequisiteActivities
Can Employee Approve
or
Notify Creator: Not Approved
or
Notify Creator: No Approver Found
F-10 Oracle Labor Distribution User’s Guide

Effort Report Approval Workflow Process
Notify Approver: Approval Required (Node 4)This activity notifies the employee that effort report approval is required.
Get Final Approver’s Name (Node 5)If the employee rejects the effort report, this function activity gets the finalapprover’s name.
Notify Creator: Not Approved (Node 6)This activity notifies the effort report creator that the effort report is not approvedby the employee.
Update Effort Report Status to Rejected (Node 7)This function activity updates the effort report status to rejected in the database.
Message Notification to Approver: Approval Required
Result Type Approval
PrerequisiteActivities
Verify Employee and Select Approver
Function PSP_WF_EFF_PKG.GET_APPROVAL_RESPONDER
Result Type None
PrerequisiteActivities
Notify Approver: Approval Required
Message Notification to Approver: Not Approved
Result Type Decision
PrerequisiteActivities
Get Final Approver’s Name
Function PSP_WF_EFF_PKG.STATUS_REJECTED
Result Type None
PrerequisiteActivities
Notify Creator: Not Approved
Effort Report Notification Workflow Process F-11

Effort Report Approval Workflow Process
End (Node 8)This function activity marks the end of the process.
Get Final Approver’s Name (Node 9)If the employee accepts the effort report, this function activity gets the finalapprover’s name.
Notify Creator: Approved (Node 10)This activity notifies the effort report creator that the effort report is approved bythe employee.
Update Effort Report Status to Approved (Node 11)This function activity updates the effort report status to approved in the database.
Function WF_STANDARD.NOOP
Result Type None
PrerequisiteActivities
Update Effort Report Status to Rejected
Function PSP_WF_EFF_PKG.GET_APPROVAL_RESPONDER
Result Type None
PrerequisiteActivities
Notify Approver: Approval Required
Message Notification to Creator: Approved
Result Type None
PrerequisiteActivities
Get Final Approver’s Name
Function PSP_WF_EFF_PKG.STATUS_APPROVED
Result Type None
PrerequisiteActivities
Notify Approver: Approval Required
F-12 Oracle Labor Distribution User’s Guide

Effort Report Approval Workflow Process
And (Node 12)This function activity completes when the Update Effort Report Status to Approvedand the Notify Creator: Approved branches converge.
Effort Report Certification (Node 13)This process certifies effort reports.
End (Node 14)This function activity marks the end of the process.
Notify Creator: No Response (Timeout) (Node 15)If the effort report is not approved or rejected within a specified period of time, thisactivity notifies the effort report creator.
Function WF_STANDARD.ANDJOIN
Result Type None
PrerequisiteActivities
Update Effort Report Status to Approved and Notify Creator:Approved
Result Type None
Required No
PrerequisiteActivities
Update Effort Report Status to Approved and Notify Creator:Approved
Function WF_STANDARD.NOOP
Result Type None
PrerequisiteActivities
Effort Report Certification
Message Notification to Creator: Timeout
Result Type Decision
PrerequisiteActivities
Notify Approver: Approval Required
Effort Report Notification Workflow Process F-13

Effort Report Approval Workflow Process
Update Effort Report Status to Superseded (Node 16)This function activity updates the effort report status to superseded in the database.
End (Node 17)This function activity marks the end of the process.
Notify Creator: No Approver Found (Node 18)This activity notifies the effort report creator that there is no approver to be found.
Update Effort Report Status to Superseded (Node 19)This function activity updates the effort report status to superseded in the database.
Function PSP_WF_EFF_PKG.STATUS_SUPERSEDED
Result Type None
PrerequisiteActivities
Notify Creator: No Response (Timeout)
Function WF_STANDARD.NOOP
Result Type None
PrerequisiteActivities
Update Effort Report Status to Superseded
Message Notification to Approver: No Approver Found
Result Type Decision
PrerequisiteActivities
Verify Employee
Function PSP_WF_EFF_PKG.STATUS_SUPERSEDED
Result Type None
PrerequisiteActivities
Notify Creator: No Approver Found
F-14 Oracle Labor Distribution User’s Guide

Effort Report Approval Workflow Process
End (Node 20)This function activity marks the end of the process.
Select Approver (Node 21)If employees do not approve their effort reports, this function activity selects theappropriate approver.
Notify Creator: No Approver Found (Node 22)This activity notifies the effort report creator that there is no approver to be found.
Update Effort Report Status to Superseded (Node 23)This function activity updates the effort report status to superseded in the database.
Function WF_STANDARD.NOOP
Result Type None
PrerequisiteActivities
Update Effort Report Status to Superseded
Function PSP_WF_EFF_PKG.SELECT_APPROVER
Result Type Found/Not Found
PrerequisiteActivities
Can Employee Approve
Message Notification to Approver: No Approver Found
Result Type Decision
PrerequisiteActivities
Select Approver
Function PSP_WF_EFF_PKG.STATUS_SUPERSEDED
Result Type None
PrerequisiteActivities
Notify Creator: No Approver Found
Effort Report Notification Workflow Process F-15

Effort Report Approval Workflow Process
End (Node 24)This function activity marks the end of the process.
Function WF_STANDARD.NOOP
Result Type None
PrerequisiteActivities
Update Effort Report to Superseded
F-16 Oracle Labor Distribution User’s Guide

Customizing Effort Report Approval Workflow
Customizing Effort Report Approval WorkflowThis section describes how the Effort Report Approval workflow process can becustomized.
Required ModificationsNo modifications are required to run the Effort Report Approval workflow process.
Optional CustomizationsOrganizations can make the following optional customizations:
■ Organizations can create new messages. Messages are used for notificationactivities in the workflow process.
■ Organizations can create new notifications and notification activities and canmodify the workflow process to accommodate these new activities.
Creating a New Custom ProcessIt is not recommended that organizations create their own custom process to replacethe Effort Report Approval workflow process.
Effort Report Notification Workflow Process F-17

Effort Report Certification Workflow Diagram
Effort Report Certification Workflow DiagramFigure F–3 shows the effort report certification nodes as described in theaccompanying text.
Figure F–3 Effort Report Certification Workflow Diagram
F-18 Oracle Labor Distribution User’s Guide
Effort Report Certification Workflow Process
Effort Report Certification Workflow ProcessThis section describes the Effort Report Certification workflow processes.
Start (Node 1)This is a standard function activity that marks the start of the process.
Can Supervisor Certify (Node 2)This function activity checks to see whether an employee’s supervisor can certifythe effort report.
Find Supervisor (Node 3)If supervisors can approve an employee’s effort reports, this function activitysearches for the supervisor.
Function WF_STANDARD.NOOP
Result Type None
PrerequisiteActivities
None
Function PSP_WF_EFF_PKG.CAN_SUPERVISOR_CERTIFY
Result Type Yes/No
PrerequisiteActivities
Start
Function PSP_WF_EFF_PKG.VERIFY_SUPERVISOR
Result Type Found/Not Found
PrerequisiteActivities
Can Supervisor Certify
or
Notify Creator: Not Certified
or
Notify Creator: No Certifier Found
Effort Report Notification Workflow Process F-19

Effort Report Certification Workflow Process
Notify Certifier: Certification Required (Node 4)This activity notifies the certifier that effort report certification is required.
Get Final Certifier’s Name (Node 5)If the certifier rejects the effort report, this function activity gets the final certifier’sname.
Notify Creator: Not Certified (Node 6)This activity notifies the effort report creator that the effort report is not certified.
Update Effort Report Status to Rejected (Node 7)This function activity updates the effort report certification status to rejected in thedatabase.
Message Notification to Certifier: Certification Required
Result Type Certification
PrerequisiteActivities
Find Supervisor and Select Certifier
Function PSP_WF_EFF_PKG.GET_CERTIFICATION_RESPONDER
Result Type None
PrerequisiteActivities
Notify Certifier: Certification Required
Message Notification to Creator: Not Certified
Result Type Decision
PrerequisiteActivities
Get Final Certifier’s Name
Function PSP_WF_EFF_PKG.STATUS_REJECTED
Result Type None
PrerequisiteActivities
Notify Creator: Not Certified
F-20 Oracle Labor Distribution User’s Guide

Effort Report Certification Workflow Process
End (Success) (Node 8)This function activity marks the end of the process.
Get Final Certifier’s Name (Node 9)If the effort report is certified, this function activity gets the final certifier’s name.
Notify Creator: Certified (Node 10)This activity notifies the effort report creator that the effort report is certified.
Update Effort Report Status to Certified (Node 11)This function activity updates the effort report status to certified in the database.
Function WF_STANDARD.NOOP
Result Type None
PrerequisiteActivities
Update Effort Report Status to Rejected
Function PSP_WF_EFF_PKG.GET_CERTIFICATION_RESPONDER
Result Type None
PrerequisiteActivities
Notify Certifier: Certification Required
Function Notification to Creator: Certified
Result Type None
PrerequisiteActivities
Get Final Certifier’s Name
Function PSP_WF_EFF_PKG.STATUS_CERTIFIED
Result Type None
PrerequisiteActivities
Notify Certifier: Certification Required
Effort Report Notification Workflow Process F-21

Effort Report Certification Workflow Process
And (Node 12)This function activity completes when the Update Effort Report Status to Certifiedand the Notify Creator: Certified branches converge.
End (Node 13)This function activity marks the end of the process.
Notify Creator: No Response (Timeout) (Node 14)If the effort report is not certified or rejected within a specified period of time, thisactivity notifies the effort report creator.
Notify Creator: No Certifier Found (Node 15)This activity notifies the effort report creator that there is no certifier to be found.
Function WF_STANDARD.ANDJOIN
Result Type None
PrerequisiteActivities
Update Effort Report Status to Certified
or
Notify Creator: Certified
Function WF_STANDARD.NOOP
Result Type None
PrerequisiteActivities
Effort Report Certification
Message Notification to Creator: Timeout
Result Type Decision
PrerequisiteActivities
Notify Certifier: Certification Required
Message Notification to Creator: No Certifier Found
Result Type Decision
PrerequisiteActivities
Find Supervisor
F-22 Oracle Labor Distribution User’s Guide

Effort Report Certification Workflow Process
Update Effort Report Status to Superseded (Node 16)This function activity updates the effort report status to superseded in the database.
End (Node 17)This function activity marks the end of the process.
Select Certifier (Node 18)If the supervisor does not certify an employee’s effort report, this function activityselects the appropriate certifier.
Notify Creator: No Certifier Found (Node 19)This activity notifies the effort report creator that there is no certifier to be found.
Function PSP_WF_EFF_PKG.STATUS_SUPERSEDED
Result Type None
PrerequisiteActivities
Notify Creator: No Certifier Found
Function WF_STANDARD.NOOP
Result Type None
PrerequisiteActivities
Update Effort Report Status to Superseded
Function PSP_WF_EFF_PKG.SELECT_CERTIFIER
Result Type Found/Not Found
PrerequisiteActivities
Can Supervisor Certify
Message Notification to Creator: No Certifier Found
Result Type Decision
PrerequisiteActivities
Select Certifier
Effort Report Notification Workflow Process F-23

Effort Report Certification Workflow Process
Update Effort Report Status to Superseded (Node 20)This function activity updates the effort report status to superseded in the database.
End (Node 21)This function activity marks the end of the process.
Function PSP_WF_EFF_PKG.STATUS_SUPERSEDED
Result Type None
PrerequisiteActivities
Notify Creator: No Certifier Found and Notify Creator: NoResponse (Timeout)
Function WF_STANDARD.NOOP
Result Type None
PrerequisiteActivities
Update Effort Report to Superseded
F-24 Oracle Labor Distribution User’s Guide

Customizing Effort Report Certification Workflow
Customizing Effort Report Certification WorkflowThis section describes how the Effort Report Certification workflow process can becustomized.
Required ModificationsNo modifications are required to run the Effort Report Certification workflowprocess.
Optional CustomizationsOrganizations can make the following optional customizations:
■ Organizations can create new messages. Messages are used for notificationactivities in the workflow process.
■ Organizations can create new notifications and notification activities, andmodify the workflow process to accommodate these new activities.
Effort Report Notification Workflow Process F-25

Customizing Effort Report Certification Workflow
F-26 Oracle Labor Distribution User’s Guide

Distribution Adjustments Approval Notification Workflow Proce
G
Distribution Adjustments ApprovalNotification Workflow Process
This appendix contains a detailed discussion of the Distribution AdjustmentsApproval Notification Workflow process in Oracle Labor Distribution. Thefollowing topics are in this appendix:
■ Overview
■ The PSP Distribution Adjustments Approval Item Type
■ Distribution Adjustments Approval Workflow Diagram
■ Distribution Adjustments Approval Workflow Process
■ Customizing Distribution Adjustments Approval Workflow
ss G-1

Overview
OverviewLabor Distribution uses Oracle Workflow to define and implement the distributionadjustments approval process.
Workflow features include the following:
■ Oracle Workflow Builder, a graphical tool that allows users to create businessprocess definitions
■ Workflow Engine, which implements process definitions at runtime
■ Notification System, which sends notifications and processes responses in aworkflow
Workflow functionality in Labor Distribution automatically routes distributionadjustments approval notifications throughout the organization and deliverselectronic notifications to users regarding distribution adjustments that require theirattention or processes that are completed.
Use Oracle Workflow Builder to customize workflows or to create new workflows.For information on Workflow, see Introduction to Workflow, Oracle Workflow Guide.
G-2 Oracle Labor Distribution User’s Guide

The PSP Distribution Adjustments Approval Item Type
The PSP Distribution Adjustments Approval Item TypeSeveral Workflow attributes are associated with the PSP Distribution AdjustmentsApproval item type that reference information in the application tables. Theattributes are used and maintained by function activities as well as notificationactivities throughout the process.
Table G–1 describes the attributes associated with PSP Distribution AdjustmentsApproval.
Table G–1 Attributes Associated with the PSP Distribution Adjustments ApprovalItem Type
Display Name Description TypeLength/Format/Lookup Type
Batch Name Text
Employee Person ID Number
Employee Display Name Text 240
Assignment Text
Earnings Element Text
Begin Date Date
End Date Date
Distribution Adjustment form Form
Creator UserName Text 100
Creator Display Name Text 240
Approver UserName Text 100
Approver Display Name Text 240
Note Text
Time Out time out for approver toapprove
Distribution Adjustments Approval Notification Workflow Process G-3

Distribution Adjustments Approval Workflow Diagram
Distribution Adjustments Approval Workflow DiagramFigure G–1 shows the distribution adjustments approval nodes as described in theaccompanying text.
Figure G–1 Distribution Adjustments Approval Workflow Diagram
G-4 Oracle Labor Distribution User’s Guide

Distribution Adjustments Approval Workflow Process
Distribution Adjustments Approval Workflow ProcessThis section describes the Distribution Adjustments Approval workflow process.
Start (Node 1)This is a standard function activity that marks the start of the DistributionAdjustments Approval process.
Omit Approval (Node 2)This function activity checks to see whether an approver is required for thedistribution adjustment.The system default is No. To customize this activity, use thePL/SQL stored procedure PSP_WF_ADJ_CUSTOM.OMIT_APPROVAL_CUSTOM.
Select Approver (Node 3)If an approver for the distribution adjustment is required, this function activitysearches for the approver. To customize this activity, use the PL/SQL storedprocedure PSP_WF_ADJ_CUSTOM.SELECT_APPROVER_CUSTOM.
Function WF_STANDARD.NOOP
Result Type None
PrerequisiteActivities
None
Function PSP_WF_ADJ_PKG.OMIT_APPROVAL
Result Type Yes/No
PrerequisiteActivities
Start
Function PSP_WF_ADJ_PKG.SELECT_APPROVER
Result Type Found/Not Found
or
Notify Creator: Returned with Comments
or
Notify Creator: No Response
Distribution Adjustments Approval Notification Workflow Process G-5

Distribution Adjustments Approval Workflow Process
Notify Approver: Approval Required (Node 4)This activity notifies the approver that approval for a distribution adjustment isrequired.
Get Final Approver [Approved] (Node 5)If the distribution adjustment is approved, this function activity searches for thefinal approver’s name.
Record Approver (Node 6)This function activity updates the database to approved with the approveridentifier.
Notify Creator: Approved (Node 7)This activity notifies the creator that the distribution adjustment is approved.
PrerequisiteActivities
Omit Approval
Message To Approver: Approval Required
Result Type Approval
PrerequisiteActivities
Select Approver
Function PSP_WF_ADJ_PKG.GET_APPROVAL_RESPONDER
Result Type None
PrerequisiteActivities
Notify Approver: Approval Required
Function PSP_WF_ADJ_PKG.RECORD_APPROVER
Result Type None
PrerequisiteActivities
Get Final Approver
Message To Creator: Approved
G-6 Oracle Labor Distribution User’s Guide

Distribution Adjustments Approval Workflow Process
End (Node 8)This function activity marks the end of the process.
Record Creator as Approver (Node 9)If the approval process is omitted, this function activity updates the distributionadjustment status in the database to approved with the creator as the approveridentifier. To customize this activity, use the PL/SQL stored procedure PSP_WF_CUSTOM.RECORD_CREATOR_CUSTOM.
Notify Creator: No Approval Required (Node 10)This activity notifies the distribution adjustment creator that no approval isrequired for the adjustment.
Result Type None
PrerequisiteActivities
Record Approver
Function WF_STANDARD.NOOP
Result Type None
PrerequisiteActivities
Notify Creator: Approved
Function PSP_WF_ADJ_PKG.RECORD_CREATOR
Result Type None
PrerequisiteActivities
Omit Approval
Message To Creator: No Approval Required
Result Type None
PrerequisiteActivities
Record Creator as Approver
Distribution Adjustments Approval Notification Workflow Process G-7

Distribution Adjustments Approval Workflow Process
End (Node 11)This function activity marks the end of the process.
Notify Creator: No Approver Found (Node 12)This activity notifies the creator that no approver was found.
Undo Distribution Adjustment (Node 13)As a result of this function activity, the distribution adjustment reverts to its originalstate.
End (Node 14)This function activity marks the end of the process.
Function WF_STANDARD.NOOP
Result Type None
PrerequisiteActivities
Notify Creator: No Approval Required
Message To Creator: No Approver Found
Result Type Decision
PrerequisiteActivities
Select Approver
Function PSP_WF_ADJ_PKG.UNDO_DISTRIBUTION_ADJUSTMENT
Result Type None
PrerequisiteActivities
Notify Creator: No Approver Found
Function WF_STANDARD.NOOP
Result Type None
PrerequisiteActivities
Undo Distribution Adjustment
G-8 Oracle Labor Distribution User’s Guide

Distribution Adjustments Approval Workflow Process
Notify Creator: No Response [Timeout] (Node 15)If the adjustment is not approved, rejected, or returned with comments within aspecified period of time, this activity notifies the distribution adjustment creatorthat there is no response to the distribution adjustment notification. The measure oftime is in days and the default value is 0, which means no timeout.
Undo Distribution Adjustment (Node 16)As a result of this function activity, the distribution adjustment reverts to its originalstate.
End (Node 17)This function activity marks the end of the process.
Get Final Approver [Return with Comments] (Node 18)If the distribution adjustment is returned with comments, this function activitysearches for the final approver.
Message To Creator: No Response
Result Type Decision
PrerequisiteActivities
Notify Approver: Approval Required
Function PSP_WF_ADJ_PKG.UNDO_DISTRIBUTION_ADJUSTMENT
Result Type None
PrerequisiteActivities
Notify Creator: No Response
Function WF_STANDARD.NOOP
Result Type None
PrerequisiteActivities
Undo Distribution Adjustment
Function PSP_WF_ADJ_PKG.GET_APPROVAL_RESPONDER
Result Type None
Distribution Adjustments Approval Notification Workflow Process G-9
Distribution Adjustments Approval Workflow Process
Notify Creator: Returned with Comments (Node 19)This activity notifies the creator that the distribution adjustment is returned withcomments.
Undo Distribution Adjustment (Node 20)As a result of this function activity, the distribution adjustment reverts to its originalstate.
End (Node 21)This function activity marks the end of the process.
Get Final Approver [Rejected] (Node 22)If a distribution adjustment is rejected, this function activity searches for the finalapprover.
PrerequisiteActivities
Notify Approver: Approval Required
Message To Creator: Returned with Comments
Result Type Decision
PrerequisiteActivities
Get Final Approver
Function PSP_WF_ADJ_PKG.UNDO_DISTRIBUTION_ADJUSTMENT
Result Type None
PrerequisiteActivities
Notify Creator: Returned with Comments
Function WF_STANDARD.NOOP
Result Type None
PrerequisiteActivities
Undo Distribution Adjustment
Function PSP_WF_ADJ_PKG.GET_APPROVAL_RESPONDER
G-10 Oracle Labor Distribution User’s Guide

Distribution Adjustments Approval Workflow Process
Notify Creator: Rejected (Node 23)This activity notifies the distribution adjustment creator that the distributionadjustment is rejected.
Undo Distribution Adjustment (Node 24)As a result of this function activity, the distribution adjustment reverts to its originalstate.
And (Node 25)This function activity completes when the Notify Creator: Rejected and the UndoDistribution Adjustment branches converge.
Result Type None
PrerequisiteActivities
Notify Approver: Approval Required
Message To Creator: Rejected
Result Type None
PrerequisiteActivities
Get Final Approver
Function PSP_WF_ADJ_PKG.UNDO_DISTRIBUTION_ADJUSTMENT
Result Type None
PrerequisiteActivities
Get Final Approver
Function WF_STANDARD.AND JOIN
Result Type None
PrerequisiteActivities
Notify Creator: Rejected and Undo Distribution Adjustment
Distribution Adjustments Approval Notification Workflow Process G-11

Distribution Adjustments Approval Workflow Process
End (Node 26)This function activity marks the end of the process.
Function WF_STANDARD.NOOP
Result Type None
PrerequisiteActivities
Notify Creator: Rejected and Undo Distribution Adjustment
G-12 Oracle Labor Distribution User’s Guide

Customizing Distribution Adjustments Approval Workflow
Customizing Distribution Adjustments Approval WorkflowThis section describes how the Distribution Adjustments Approval workflowprocess can be customized.
Required ModificationsNo modifications are required to run the Distribution Adjustments Approvalworkflow process.
Optional CustomizationsOrganizations can make the following optional customizations:
■ Organizations can create new messages. Messages are used for notificationactivities in the workflow process.
■ Organizations can create new notifications and notification activities and canmodify the workflow process to accommodate these new activities.
Distribution Adjustments Approval Notification Workflow Process G-13

Customizing Distribution Adjustments Approval Workflow
G-14 Oracle Labor Distribution User’s Guide

Part XI
Reference

Labor Distribution Navigation P
H
Labor Distribution Navigation PathsThis appendix lists navigation paths for windows in Oracle Labor Distribution. Thefollowing sections are in this appendix:
■ Navigation
aths H-1

Navigation
NavigationTable H–1 shows the navigation path for each window in Labor Distribution.
Table H–1 Navigation Paths
Window Navigation Path
Auto-Fill Expenditure Types Setup - Auto-Population -Expenditure Type
Auto-Fill Natural Account Setup - Auto-Population - NaturalAccount
Auto-Population SegmentDefinition
Setup - Auto-Population - SegmentSetup
Begin Date Auto-fill Parameters Setup - Auto-fill Begin Date
Bypass Expenditure Type Setup - Auto-Population - By-PassExpenditure Type
Clearing Account Setup Setup - Clearing Account
Create Ad Hoc Effort Report Effort Reporting - Create Ad HocReport
Create Effort Report Effort Reporting - Create EffortReport
Create Users Setup - Create Notification Users
Default Account Report - InputParameters
Distribution Reports - DefaultAcct. Charge Report
Distribution Adjustments Distribution Adjustments - Define
Distribution History by Award -Input Parameters
Distribution Reports - DistributionHistory by Award
Distribution History by Project -Input Parameters
Distribution Reports - DistributionHistory by Proj.
Distribution History byOrganization - Input Parameters
Distribution Reports - DistributionHistory by Org.
Earnings Element Groups Setup - Element Groups
Earnings Elements Imported Setup - Element Types
Effort Certification Aging (Status)Report
Effort Reporting - Effort CertifyAging Report
H-2 Oracle Labor Distribution User’s Guide

Navigation
Effort Report Messages Effort Reporting - Effort ReportMessages
Effort Report Periods Effort Reporting - Effort ReportPeriods
Employee Labor Schedule Report -Input Parameters
Scheduling Reports - Emp LaborSchedule Report
Employees Using Default LaborSchedules - Input Parameters
Scheduling Reports - Emp usingDef Schedules
Encumbrance - Creation Options Labor Encumbrance - Enc CreationOptions
Encumbrance - DefaultEncumbrance Period Definition
Labor Encumbrance - Enc DefaultPeriod
Encumbrance - Earnings ElementSelection
Labor Encumbrance - Enc ElementSelection
Encumbrance - Payroll andAssignment Selection
Labor Encumbrance - Enc PayrollSelection
Encumbrance - SummarizationOptions
Labor Encumbrance - EncSummarize Options
End Date Auto-fill Parameters Setup - Auto-fill End Date
Find Distributions Distribution Adjustments - Define
Global Earnings Element Override Setup - Global Earnings Elements
Include Elements in Effort Report Setup - Effort Report ElementTypes
Labor Scheduling Labor Schedules
Lookups (Auto Lookups) Setup - Auto-Population - LookupsTable
Maintenance of Non Oracle PayrollSub lines
Payroll Interface - Non OracleSublines
Maintenance of Pre-generatedDistribution Lines
Payroll Interface - Pre-GenDistribution Lines
Mass Print Effort Report Effort Reporting - Mass Print EffortReport
Table H–1 Navigation Paths
Window Navigation Path
Labor Distribution Navigation Paths H-3

Navigation
Monthly Schedule Summary Labor Schedules
Click Schedule Lines
Click Monthly Summary
Organization Default Accounts Setup - Organization DefaultAccounts
Organization Default LaborSchedule
Setup - Org. Default LaborSchedules
Organization Default LaborSchedule Report - InputParameters
Scheduling Reports - Org. DefaultLabor Schedule Report
Organization Suspense Accounts Setup - Organization SuspenseAccounts
Payroll Period Schedule Summary Labor Schedules
Click Schedule Lines
Click Payroll Period
Re-Order Setup - Auto-Population -Expenditure Type
Click Reorder
or
Setup - Auto-Population - NaturalAccount
Click Reorder
Payroll Sources Setup - Payroll Sources
Report Submission Distribution Adjustments -Distribution History By Emp.
Review Effort Report Effort Reporting - Review EffortReport
Table H–1 Navigation Paths
Window Navigation Path
H-4 Oracle Labor Distribution User’s Guide

Navigation
Rules Setup - Auto-Population -Expenditure Type
Click Rules
or
Setup - Auto-Population - NaturalAccount
Click Rules
Schedule Lines Labor Schedules
Click Schedule Lines
Schedule Summary Labor Schedules
Click Schedule Lines
Click Schedule Summary
Suspense Account Report - InputParameters
Distribution Reports - SuspenseAccount Report
Worklist Workflow - Workflow User -Worklist
Table H–1 Navigation Paths
Window Navigation Path
Labor Distribution Navigation Paths H-5

Navigation
H-6 Oracle Labor Distribution User’s Guide

Distribution and Configuration Optio
I
Distribution and Configuration OptionsThis appendix describes and illustrates the configuration options applied to thepayroll distribution process. The following sections are in this appendix:
■ Overview
■ Payroll Distribution Process
■ Configuration Options
■ Case 1 Diagram
■ Case 2 Diagram
■ Case 3 Diagram
■ Case 4 Diagram
ns I-1

Overview
OverviewThe purpose of this appendix is to provide an understanding of how schedulingelements are used in the payroll distribution process to configure labor schedules.
Payroll Distribution ProcessThe Payroll Distribution Process illustrates the interaction of the organization leveldefault labor schedule, organization default accounts, and organization suspenseaccount during distribution in the labor schedule hierarchy.
For a specific payroll run that has been exported to Oracle Labor Distribution andfor every payroll line that includes a single employee, assignment, and earningselement, Labor Distribution performs the following steps:
1. Identifies the Oracle Grants Accounting charging instruction or Oracle GeneralLedger account that determines labor distribution by using the labor schedulehierarchy.
Labor Distribution begins searching for a labor schedule at the lower level ofthe hierarchy and moves upward until it finds a labor schedule or account.
At the lower three levels of the scheduling hierarchy, Element Type, ElementGroup, and Assignment, labor schedules are defined for the employeeassignment.
At the upper three levels of the scheduling hierarchy, Organization Default,Organization Default Account, and Suspense Account, labor schedules aredefined at the human resources organization level for that employeeassignment.
2. Identifies and corrects incomplete labor schedules.
If a labor schedule is identified, Labor Distribution checks if the scheduledistributes 100% of the earnings element for the entire payroll period. If not,Labor Distribution adds a Grants Accounting suspense account charginginstruction or a General Ledger suspense account to the labor schedule basedon the Hierarchy for Balances on Incomplete Labor Schedules illustrated inFigure C - 1. This additional line includes valid dates equal to the times whenthe labor schedule distribution does not equal 100%.
Only one suspense account, either a Grants Accounting suspense account or aGeneral Ledger suspense account, can be set up for an organization.
3. Replaces Invalid, Closed, or Inactive charging instructions.
I-2 Oracle Labor Distribution User’s Guide

Payroll Distribution Process
For every Grants Accounting charging instruction and General Ledger accountline in the labor schedule, Labor Distribution checks if it is still valid. If thecharging instruction or account is invalid, Labor Distribution replaces it with aGrants Accounting suspense account charging instruction or a General Ledgersuspense account as illustrated in Figure I–1.
Only one suspense account, either a Grants Accounting suspense account or aGeneral Ledger suspense account, can be set up for an organization.
4. Distributes the Earnings Element.
Distribution and Configuration Options I-3

Configuration Options
Configuration OptionsThe diagrams in this section illustrate how the scheduling hierarchy process worksbased on the site implementation of the following configuration options:
■ Organization Level Default Labor Schedule for All Employees or Assignments
■ Organization Level Default Accounts
The diagrams are explained in the previous section, Payroll Distribution Process.
I-4 Oracle Labor Distribution User’s Guide
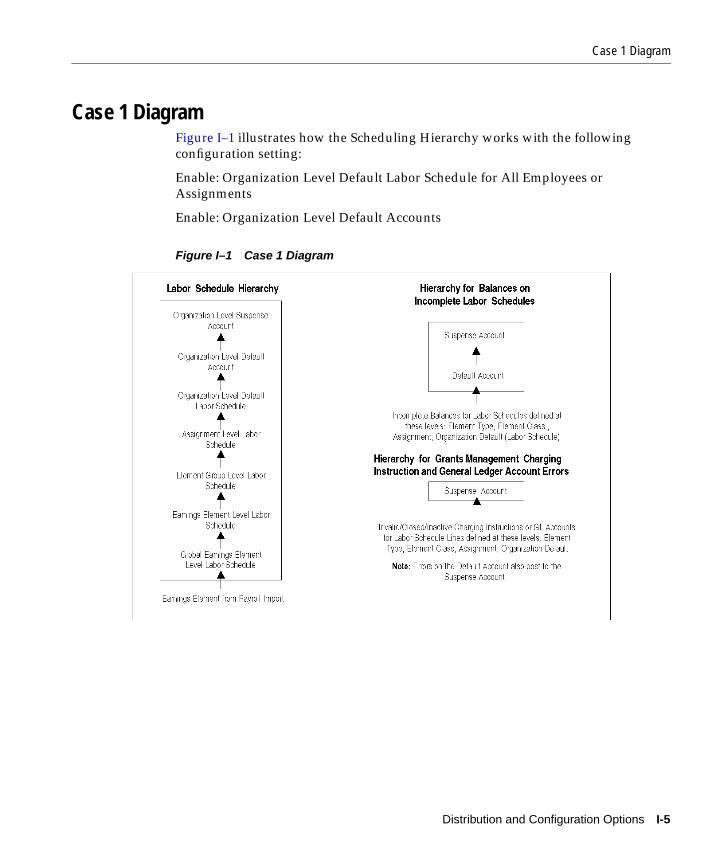
Case 1 Diagram
Case 1 DiagramFigure I–1 illustrates how the Scheduling Hierarchy works with the followingconfiguration setting:
Enable: Organization Level Default Labor Schedule for All Employees orAssignments
Enable: Organization Level Default Accounts
Figure I–1 Case 1 Diagram
Distribution and Configuration Options I-5

Case 2 Diagram
Case 2 DiagramFigure I–2 illustrates how the Scheduling Hierarchy works with the followingconfiguration setting:
Enable: Organization Level Default Labor Schedule for All Employees orAssignments
Disable: Organization Level Default Accounts; indicated in italics
Figure I–2 Case 2 Diagram
I-6 Oracle Labor Distribution User’s Guide
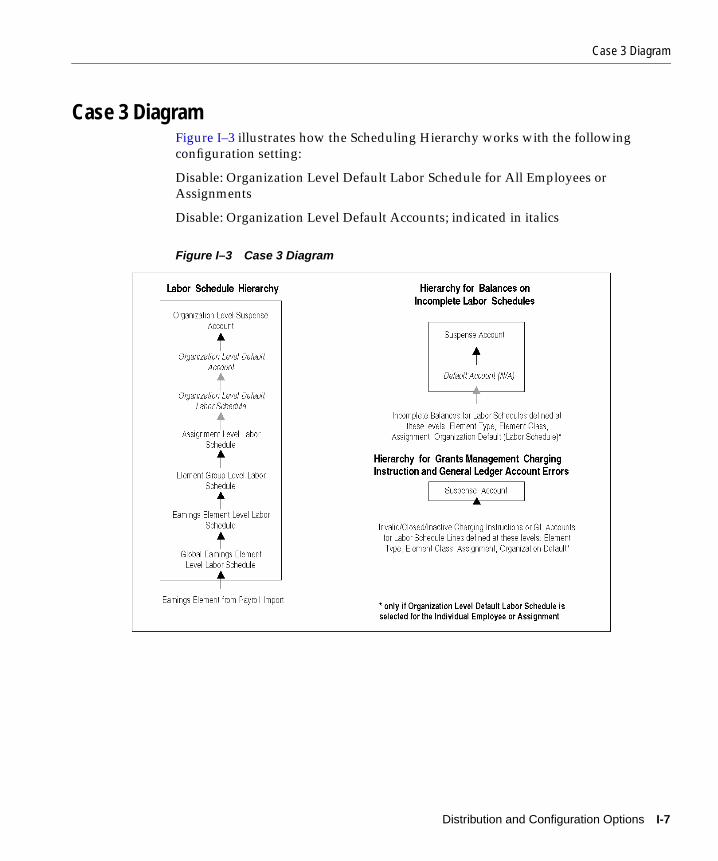
Case 3 Diagram
Case 3 DiagramFigure I–3 illustrates how the Scheduling Hierarchy works with the followingconfiguration setting:
Disable: Organization Level Default Labor Schedule for All Employees orAssignments
Disable: Organization Level Default Accounts; indicated in italics
Figure I–3 Case 3 Diagram
Distribution and Configuration Options I-7

Case 4 Diagram
Case 4 DiagramFigure I–4 illustrates how the Scheduling Hierarchy works with the followingconfiguration setting:
Disable: Organization Level Default Labor Schedule for All Employees orAssignments
Enable: Organization Level Default Accounts; indicated in italics
Figure I–4 Case 4 Diagram
I-8 Oracle Labor Distribution User’s Guide
Labor Distribution Accounting Exam
J
Labor Distribution Accounting ExampleThis appendix provides an example that describes the accounting transactions thatare used for Oracle Labor Distribution. The following sections are in this appendix:
■ Definition
■ Payroll Balancing Overview
■ Labor Costing Example
ple J-1

Definition
DefinitionThe purpose of this appendix is to provide an understanding of balancing journalentries that are created during payroll, labor distribution, and grants processing.
Payroll Balancing OverviewIn Oracle Human Resources, there is a hierarchy for payroll costing. Labor costs canbe assigned at the following levels with payroll at the highest level:
■ payroll
■ element link
■ organization
■ assignment
■ element entry
In Human Resources and Payroll, each earnings element is linked to a payroll usingthe Cost Allocation flexfield segments. Each earnings element and payrollcombination is costed using the payroll costing hierarchy, with the balancingaccount being an appropriate liability or cash account defined in the Element Linkwindow.
Entries made at the lower levels override entries at higher levels.
ReferenceFor information on labor costs, see The Oracle HRMS Cost Allocation Key FlexfieldExample, Using Oracle HRMS - The Fundamentals.
J-2 Oracle Labor Distribution User’s Guide
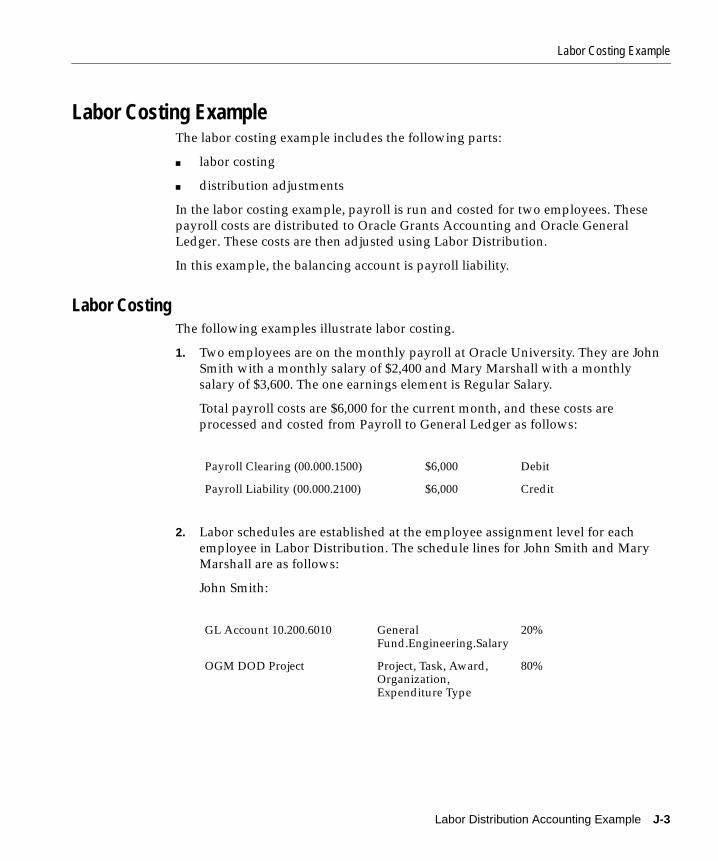
Labor Costing Example
Labor Costing ExampleThe labor costing example includes the following parts:
■ labor costing
■ distribution adjustments
In the labor costing example, payroll is run and costed for two employees. Thesepayroll costs are distributed to Oracle Grants Accounting and Oracle GeneralLedger. These costs are then adjusted using Labor Distribution.
In this example, the balancing account is payroll liability.
Labor CostingThe following examples illustrate labor costing.
1. Two employees are on the monthly payroll at Oracle University. They are JohnSmith with a monthly salary of $2,400 and Mary Marshall with a monthlysalary of $3,600. The one earnings element is Regular Salary.
Total payroll costs are $6,000 for the current month, and these costs areprocessed and costed from Payroll to General Ledger as follows:
2. Labor schedules are established at the employee assignment level for eachemployee in Labor Distribution. The schedule lines for John Smith and MaryMarshall are as follows:
John Smith:
Payroll Clearing (00.000.1500) $6,000 Debit
Payroll Liability (00.000.2100) $6,000 Credit
GL Account 10.200.6010 GeneralFund.Engineering.Salary
20%
OGM DOD Project Project, Task, Award,Organization,Expenditure Type
80%
Labor Distribution Accounting Example J-3

Labor Costing Example
Mary Marshall:
3. Through Labor Distribution, current payroll is matched with schedule lines foreach employee. Distribution Lines are created as follows:
4. Labor Distribution summarizes and transfers distribution lines to theappropriate General Ledger accounts and Grants Accounting projects asfollows:
■ General Ledger journal creates the following:
■ Grants Accounting import is as follows:
5. In Grants Accounting, concurrent processes are initiated to transfer labor coststo General Ledger. After these processes are complete, the following journalsare created according to the AutoAccounting setup in Grants Accounting:
GL Account 10.300.6010 GeneralFund.Cardiology.Salary
40%
OGM NSF Project Project, Task, Award,Organization,Expenditure Type
60%
John Smith GL 10.200.6010 $ 480
John Smith DOD Project $1,920
Mary Marshall GL 10.300.6010 $1,440
Mary Marshall NSF Project $2,160
GL 10.200.6010 $ 480 Debit
GL 10.300.6010 $1,440 Debit
Payroll Clearing $1,920 Credit
DOD Project $1,920
NSF Project $2,160
GL 20.000.6000 $4,080 Debit
J-4 Oracle Labor Distribution User’s Guide

Labor Costing Example
Note: The auto accounting setup in Grants Accounting must include anappropriate payroll clearing account. If it is important that the payroll clearingaccount net to zero, then the auto accounting setup in Grants Accounting mustgenerate the same payroll clearing account as defined in Labor Distribution.This labor costing example assumes that this is true.
For information on defining auto accounting, see How to Use AutoAccounting,Oracle Public Sector Receivables User’s Guide.
6. Table J–1 shows the entries for each General Ledger account. After all processesand steps are complete, the payroll clearing has a zero balance and appropriateGeneral Ledger accounts show debit balances for labor expenditures.
Distribution AdjustmentsThe logic for distribution adjustments is the same as that of regular LaborDistribution transactions.
The following examples illustrate distribution adjustments in the labor costingexample.
7. After the payroll was distributed, it was determined that only 50% of JohnSmith's time should have been charged to the DOD project instead of 80%. The
Payroll Clearing $4,080 Credit
Table J–1 General Ledger Journal Account Entries for Labor Costing
AccountExampleNumber Debit Credit
00.000.1500, Payroll Clearing 1. $6,000
4. $1,920
5. $4,080
00.000.2100, Payroll Liability 1. $6,000
10.200.6010, GeneralFund.Engineering.Salary
4. $ 480
10.300.6010, GeneralFund.Cardiology.Salary
4. $1,440
20.000.6000, RestrictedFund.General.Salary
5. $4,080
Labor Distribution Accounting Example J-5

Labor Costing Example
other 30% should be charged to the General Fund.Engineering.Salary account,10.200.6010.
After adjusting the distribution in the Distribution Adjustments window, theentries in the Adjusted Distributions region of the Distribution Adjustmentswindow are as follows, with the calculations shown in parentheses:
8. After the distribution adjustment is entered and approved, the following occursin General Ledger and Grants Accounting:
■ Labor Distribution creates the General Ledger journal. The journal entriesare as follows:
■ The Grants Accounting import is created as follows:
■ The Grants Accounting transfer to General Ledger process creates thefollowing import and posting using AutoAccounting.
DOD Project -$1,920
DOD Project $1,200 ($2,400 x 50%)
GL 10.200.6010 $ 720 ($2,400 X 30%)
Unaccounted Balance $ 0.00
GL 10.200.6010 $ 720 Debit
Payroll Clearing $ 720 Credit
DOD Project -$1,920
DOD Project $1,200
Payroll Clearing -$ 720 Credit
GL 20.000.6000 for DOD Project -$ 720 Debit (1,200-1,900)
J-6 Oracle Labor Distribution User’s Guide

Labor Costing Example
9. Table J–2 shows the entries for each General Ledger account transaction. LaborDistribution processes all adjustments as positive or negative debits and theclearing account as positive or negative credits.
10. After the payroll was distributed, it was determined that Mary Marshall shouldhave only 10% of her time charged to the General Fund in General Ledgerinstead of 40%. The other 30% should be charged to the NSF Project.
After adjusting the distribution in the Distribution Adjustments window, theentries in the Adjusted Distributions region of the Distribution Adjustmentswindow are as follows, with the calculations shown in parentheses:
Table J–2 General Ledger Journal Account Entries for Distribution Adjustments,John Smith
AccountExampleNumber Debit Credit
00.000.1500, Payroll Clearing 1. $6,000
4. $1,920
5. $4,080
7. $ 720
8. -$ 720
00.000.2100,Payroll Liability 1. $6,000
10.200.6010, GeneralFund.Engineering.Salary
4. $ 480
7. $ 720
10.300.6010, GeneralFund.Cardiology.Salary
4. $1,440
20.000.6000, RestrictedFund.General.Salary
5. $4,080
8. -$ 720
GL 10.300.6010 -$1,440
NSF Project $1,080 ($3,600 x 30%)
GL 10.300.6010 $ 360 ($3,600 x 10%)
Unaccounted Balance $ 0.00
Labor Distribution Accounting Example J-7

Labor Costing Example
11. After the distribution adjustment is entered and approved, the following occursto create journals in General Ledger.
■ Labor Distribution creates the General Ledger journal. The journal entriesare as follows:
■ The Grants Accounting import is created as follows:
■ The Grants Accounting transfer to General Ledger creates the followingimport and posting using AutoAccounting:
12. Table J–3 shows the entries for each General Ledger account transaction. LaborDistribution processes all adjustments as positive or negative debits and theclearing account as positive or negative credits.
GL 10.300.6010 -$1,080 Debit
Payroll Clearing -$1,080 Credit
DOD Project $1,080
Payroll Clearing $1,080 Credit
GL 20.000.6000 (for DOD Project) $1,080 Debit
Table J–3 General Ledger Journal Account Entries for Distribution Adjustments,Mary Marshall
AccountExampleNumber Debit Credit
00.000.1500, Payroll Clearing 1. $ 6,000
4. $1,920
5. $4,080
7. $ 720
8. -$ 720
10. -$1,080
11. $1,080
00.000.2100, Payroll Liability 1. $6,000
J-8 Oracle Labor Distribution User’s Guide

Labor Costing Example
10.200.6010, GeneralFund.Engineering.Salary
4. $ 480
7. $ 720
10.300.6010, GeneralFund.Cardiology.Salary
4. $1,440
10. -$1,080
Table J–3 General Ledger Journal Account Entries for Distribution Adjustments,Mary Marshall
AccountExampleNumber Debit Credit
Labor Distribution Accounting Example J-9

Labor Costing Example
20.000.6000, RestrictedFund.General.Salary
5. $4,080
8. -$ 720
11. 1,080
Table J–3 General Ledger Journal Account Entries for Distribution Adjustments,Mary Marshall
AccountExampleNumber Debit Credit
J-10 Oracle Labor Distribution User’s Guide

Non-Oracle Payroll Interface
K
Non-Oracle Payroll Interface TableThis appendix describes the Non-Oracle Payroll Interface table. The followingtopics are in this appendix:
■ Non-Oracle Interface Table Field Description Table
■ Non-Oracle Interface Table Population Rules
Table K-1

Non-Oracle Interface Table Field Description Table
Non-Oracle Interface Table Field Description TableThe interface table that contains data for sublines from non-Oracle sources is thePSP_PAYROLL_INTERFACE table. Table K–1 describes the various fields in thistable and their data types.
Table K–1 Non-Oracle Interface Table Field Description Table
NAME NULL? DATA TYPE
PAYROLL_INTERFACE_ID NOT NULL NUMBER(10)
PAYROLL_ID NOT NULL NUMBER(9)
PAYROLL_PERIOD_ID NOT NULL NUMBER(9)
PERSON_ID NOT NULL NUMBER(9)
ASSIGNMENT_ID NOT NULL NUMBER(9)
ELEMENT_TYPE_ID NOT NULL NUMBER(9)
PAY_AMOUNT NOT NULL NUMBER
EARNED_DATE DATE
CHECK_DATE DATE
EFFECTIVE_DATE NOT NULL DATE
PAYROLL_SOURCE_CODE NOT NULL VARCHAR2(30)
FTE NUMBER
REASON_CODE VARCHAR2(30)
SUB_LINE_START_DATE NOT NULL DATE
SUB_LINE_END_DATE NOT NULL DATE
DAILY_RATE NOT NULL NUMBER
SALARY_USED NOT NULL NUMBER
DR_CR_FLAG NOT NULL VARCHAR2(1)
STATUS_CODE NOT NULL VARCHAR2(1)
BATCH_NAME NOT NULL VARCHAR2(30)
ERROR_CODE VARCHAR2(30)
LAST_UPDATE_DATE NOT NULL DATE
LAST_UPDATED_BY NOT NULL NUMBER(15)
K-2 Oracle Labor Distribution User’s Guide

Non-Oracle Interface Table Field Description Table
LAST_UPDATE_LOGIN NOT NULL NUMBER(15)
CREATED_BY NOT NULL NUMBER(15)
CREATION_DATE NOT NULL DATE
GL_POSTING_OVERRIDE_DATE
DATE
GMS_POSTING_OVERRIDE_DATE
NOTCURRENTLYUSED
ATTRIBUTE1 throughATTRIBUTE15
Table K–1 Non-Oracle Interface Table Field Description Table
NAME NULL? DATA TYPE
Non-Oracle Payroll Interface Table K-3

Non-Oracle Interface Table Population Rules
Non-Oracle Interface Table Population RulesThis section describes the validation checks that are performed by LaborDistribution when validating and importing data from the interface tables. Clientswriting programs to load the interface table must ensure that the data enteredcomplies with the rules. If there is invalid data in the interface table, LaborDistribution traps the errors and allows the user to correct the errors using theNon-Oracle Sub-lines Maintenance window.
The validation checks performed before importing data are described as follows:
1. BATCH_NAME Sublines from non-Oracle sources are imported intoLabor Distribution based on the batches in which theywere loaded into the interface table. The batch namesin the interface table must be unique. Batch namesmust not be reused even after batches are loaded intoLabor Distribution and the transferred data is removedfrom the interface table.
2. PAYROLL_INTERFACE_ID The PAYROLL_INTERFACE_ID field is a means ofidentifying records within any batch. The loaderprogram can use a sequence that is created during theLabor Distribution installation process. The sequencethat is used for this purpose is PSP_PAYROLL_INTERFACE_S.
3. EFFECTIVE_DATE The EFFECTIVE _DATE field is used when atransaction is posted to Oracle Grants Accounting orOracle Public Sector General Ledger. This date field isused to check the validity of a number of other fields.
4. PERSON_ID The PERSON_ID field refers to the person for whomthe subline is created. The PERSON_ID must be a validID in Oracle Human Resource Management Systemsfor an active employee for the effective date specifiedin the record.
5. ASSIGNMENT_ID The ASSIGNMENT_ID field must be a validassignment for the PERSON_ID specified in the record.The field must also be defined in Human ResourceManagement Systems.
6. PAYROLL_ID The PAYROLL_ID field must refer to a valid payrollcycle name in Human Resource Management Systems.The payroll name referred to by this field must also bea valid payroll for the ASSIGNMENT_ID andEFFECTIVE_DATE specified by the record.
K-4 Oracle Labor Distribution User’s Guide

Non-Oracle Interface Table Population Rules
7. PAYROLL_PERIOD_ID The PAYROLL_PERIOD_ID field must refer to a validpayroll period in Human Resource ManagementSystems. The payroll period must be linked to thePAYROLL_ID on the effective date selected.
8. ELEMENT_TYPE_ID The ELEMENT_TYPE_ID field must refer to a validearnings element selected in the Earning ElementsImported window in Labor Distribution for the datesof the payroll period. The elements selected in thesetup window are valid element types in HumanResource Management Systems.
9. PAY_AMOUNT PAY_AMOUNT is the amount that is to be paid to anemployee over the subline date range specified. Payamount = daily rate x number of business daysbetween subline Start and End dates
10. EARNED_DATE EARNED_DATE is the date that the salary or wage isearned.
11. CHECK_DATE CHECK_DATE is the date that the check for the payamount is dated.
12. PAYROLL_SOURCE_CODE The PAYROLL_SOURCE_CODE field must refer to avalid non-Oracle source as specified in the PayrollSources window in Labor Distribution.
13. DR_CR_FLAG The DR_CR_FLAG field must contain either a D fordebit amount or C for credit amount.
14. STATUS_CODE All records loaded into the interface table by anexternal loader program must contain a status code ofN for New.
15. ERROR_CODE The ERROR_CODE field must not contain any value.This is filled by Labor Distribution when validatingand importing records.
16. SUB_LINE_START_DATE The SUB_LINE_START_DATE field must fall withinthe valid date range for the specified payroll period inthe PAYROLL_PERIOD_ID field. The date cannot fallbefore the assignment start date, and it must be beforethe subline end date.
17. SUB_LINE_END_DATE The SUB_LINE_END_DATE field must fall within thevalid date range for the specified payroll period in thePAYROLL_PERIOD_ID field. The date cannot be afterthe assignment end date, and it must be greater thanthe SUB_LINE_START_DATE.
Non-Oracle Payroll Interface Table K-5

Non-Oracle Interface Table Population Rules
18. GL_POSTING_OVERRIDE_DATE
Date is to be specified if required to override this dateto the Effective Date in PSP_DISTRIBUTION_LINESwhich is later transferred to the GL Accounts Interface.
19. GMS_POSTING_OVERRIDE_DATE
Not currently used
20. Invalid records No employee can be paid more than once for the sameassignment, earnings element, payroll period, andpayroll source for overlapping subline date ranges.This rule ensures that there are no two records with thesame ASSIGNMENT_ID, ELEMENT_TYPE_ID,PAYROLL_PERDIOD_ID, and PAYROLL_SOURCE_CODE for subline start and end dates that overlap eachother.
This rule is restricted to records in the same batch.
Table K–2 shows an example of two records in a batchthat would result in an error when importing the tworecords because of overlapping date ranges.
21. DAILY_RATE The external loader program must ensure that thePAY_AMOUNT field equals the product of DAILY_RATE and the number of working days, excludingSaturday and Sunday in every week, between thesubline start and subline end dates for each subline.
Note: Labor Distribution does not perform anyvalidation on the DAILY_RATE field. Therefore, if thisrule is not enforced, distribution results may turn outto be different from that expected.
Table K–2 Example of Invalid Records in a Batch with Overlapping Date Ranges
Assgn_ID Elmnt_ID Period_ID Pay_ID Srce_cde Start_Date End_Date Pay_amnt
10 201 220 22 NON_1 01-jan-97 10-jan-97 100
10 201 220 22 NON_1 20-dec-96 05-jan-97 200
K-6 Oracle Labor Distribution User’s Guide

Pre-generated Interface Table
L
Pre-generated Interface TableThis appendix describes the Pre-generated Interface Table. The following sectionsare in this appendix:
■ Pre-generated Interface Table Field Description Table
■ Pre-generated Interface Table Population Rules
L-1
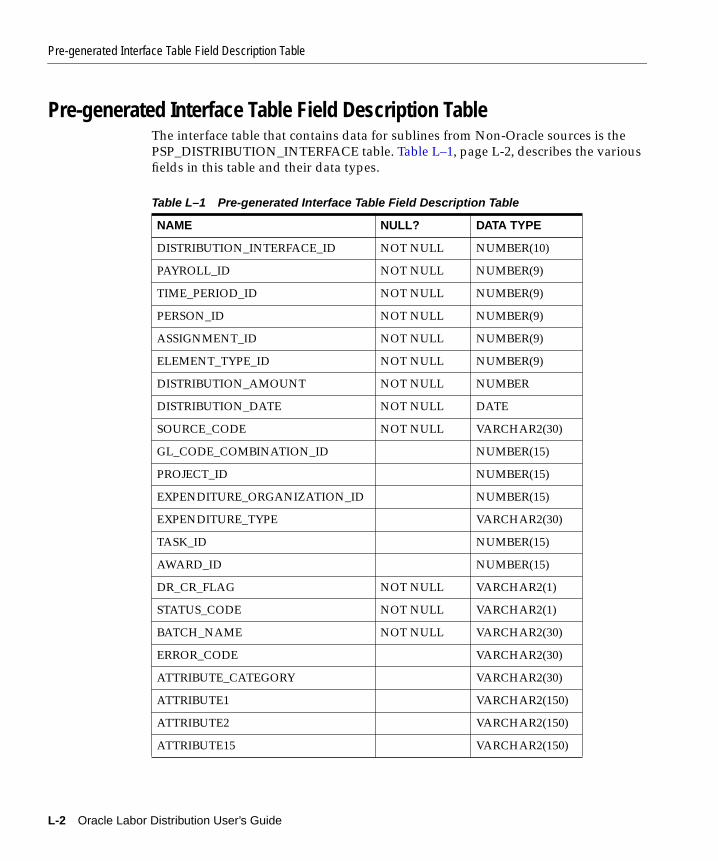
Pre-generated Interface Table Field Description Table
Pre-generated Interface Table Field Description TableThe interface table that contains data for sublines from Non-Oracle sources is thePSP_DISTRIBUTION_INTERFACE table. Table L–1, page L-2, describes the variousfields in this table and their data types.
Table L–1 Pre-generated Interface Table Field Description Table
NAME NULL? DATA TYPE
DISTRIBUTION_INTERFACE_ID NOT NULL NUMBER(10)
PAYROLL_ID NOT NULL NUMBER(9)
TIME_PERIOD_ID NOT NULL NUMBER(9)
PERSON_ID NOT NULL NUMBER(9)
ASSIGNMENT_ID NOT NULL NUMBER(9)
ELEMENT_TYPE_ID NOT NULL NUMBER(9)
DISTRIBUTION_AMOUNT NOT NULL NUMBER
DISTRIBUTION_DATE NOT NULL DATE
SOURCE_CODE NOT NULL VARCHAR2(30)
GL_CODE_COMBINATION_ID NUMBER(15)
PROJECT_ID NUMBER(15)
EXPENDITURE_ORGANIZATION_ID NUMBER(15)
EXPENDITURE_TYPE VARCHAR2(30)
TASK_ID NUMBER(15)
AWARD_ID NUMBER(15)
DR_CR_FLAG NOT NULL VARCHAR2(1)
STATUS_CODE NOT NULL VARCHAR2(1)
BATCH_NAME NOT NULL VARCHAR2(30)
ERROR_CODE VARCHAR2(30)
ATTRIBUTE_CATEGORY VARCHAR2(30)
ATTRIBUTE1 VARCHAR2(150)
ATTRIBUTE2 VARCHAR2(150)
ATTRIBUTE15 VARCHAR2(150)
L-2 Oracle Labor Distribution User’s Guide

Pre-generated Interface Table Field Description Table
LAST_UPDATE_DATE NOT NULL DATE
LAST_UPDATED_BY NOT NULL NUMBER(15)
LAST_UPDATE_LOGIN NOT NULL NUMBER(15)
CREATED_BY NOT NULL NUMBER(15)
CREATION_DATE NOT NULL DATE
GL_POSTING_OVERRIDE_DATE DATE
GMS_POSTING_OVERRIDE_DATE NOTCURRENTLYUSED
Table L–1 Pre-generated Interface Table Field Description Table
NAME NULL? DATA TYPE
Pre-generated Interface Table L-3

Pre-generated Interface Table Population Rules
Pre-generated Interface Table Population RulesThis section describes the validation checks that are performed by LaborDistribution when validating and importing data from the interface tables. Clientswriting programs to load the interface table must ensure that the data enteredcomplies with the rules. If there is invalid data in the interface table, LaborDistribution traps the errors and allows users to correct the errors using theMaintenance of Pre-Generated Distribution Lines window.
The validation checks performed before importing data are described as follows:
1. BATCH_NAME Pre-generated distribution lines from non-Oraclesources are imported into Labor Distribution based onthe batches in which they were loaded into theinterface table. The batch names in the interface tablemust be unique. Batch names must not be reused evenafter batches are loaded into Labor Distribution andthe transferred data is removed from the interfacetable.
2. DISTRIBUTION_INTERFACE_ID
The DISTRIBUTION_INTERFACE_ID field is a meansof identifying records within any batch. The loaderprogram can use a sequence that is created during theLabor Distribution installation process. The sequencethat is used for this purpose is PSP_PAYROLL_INTERFACE_S.
3. DISTRIBUTION_DATE The DISTRIBUTION _DATE field is used when atransaction is posted to Oracle Grants Accounting,Oracle Projects, or Oracle General Ledger. This datefield is used to check the validity of a number of otherfields.
4. PERSON_ID The PERSON_ID field refers to the person for whomthe subline is created. The PERSON_ID must be a validID in Oracle Human Resource Management Systemsfor an active employee for the effective date specifiedin the record.
5. ASSIGNMENT_ID The ASSIGNMENT_ID field must be a validassignment for the PERSON_ID specified in the record.The field must also be defined in Human ResourceManagement Systems.
L-4 Oracle Labor Distribution User’s Guide

Pre-generated Interface Table Population Rules
6. PAYROLL_ID The PAYROLL_ID field must refer to a valid payrollcycle name in Human Resource Management Systems.When there is a complete installation of HumanResource Management Systems, the payroll namereferred to by this field must also be a valid payroll forthe ASSIGNMENT_ID and EFFECTIVE_DATEspecified by the record.
7. TIME_PERIOD_ID The TIME_PERIOD_ID field must refer to a validpayroll period in Human Resource ManagementSystems. The payroll period must be linked to thePAYROLL_ID on the effective date selected.
8. ELEMENT_TYPE_ID The ELEMENT_TYPE_ID field must refer to a validearnings element selected in the Earning ElementsImported window in Labor Distribution. The elementsselected in the setup window are valid element typesin Human Resource Management Systems.
9. DISTRIBUTION_AMOUNT DISTRIBUTION_AMOUNT is the amount that is to bepaid to an employee over the subline date rangespecified.
12. PAYROLL_SOURCE_CODE The PAYROLL_SOURCE_CODE field must refer to avalid non-Oracle source as specified in the PayrollSources window in Labor Distribution.
13. DR_CR_FLAG The DR_CR_FLAG field must contain either a D fordebit amount or C for credit amount.
14. GL_CODE_COMBINATION_ID
The GL_CODE_COMBINATION (GL_CCID) fieldmust refer to a valid General Ledger account inGeneral Ledger. This field can contain a value only ifthe PROJECT_ID, EXPENDITURE_ORGANIZATION_ID, EXPENDITURE_TYPE, TASK_ID, and AWARD_ID(POETA) fields are NULL. During validation and theimport of sublines, Labor Distribution checks to ensurethat GL_CCID and the POETA are mutually exclusive.
15. PROJECT_ID The PROJECT_ID field must refer to a valid project inGrants Accounting and Projects. Labor Distributionensures that the PROJECT_ID field exists in the GrantsAccounting view GMS_PROJECT_EXPEND_V. Thisfield can contain a value only if the GL_CODE_COMBINATION_ID field does not. The PROJECT_IDfield and the GL_CODE_COMBINATION_ID fields aremutually exclusive and Projects is implemented.
Pre-generated Interface Table L-5

Pre-generated Interface Table Population Rules
16. EXPENDITURE_ORGANIZATION_ID
The EXPENDITURE_ORGANIZATION_ID field mustrefer to a valid Expenditure Organization in the GrantsAccounting view PA_ORGANIZATIONS_EXPEND_V.This field can contain a value only if the GL_CODE_COMBINATION_ID field does not contain a value ifProjects is implemented.
17. GL_POSTING OVERRIDE_DATE
Date is to be specified if required to override this dateto the Effective Date in PSP_DISTRIBUTION_LINESwhich is later transferred to the GL Accounts Interface.
18. GMS_POSTING_OVERRIDE_DATE
Not currently used
19. EXPENDITURE_TYPE The EXPENDITURE_TYPE field must be defined inProjects with an ST or STRAIGHT TIME systemlinkage function. If award is implemented, it musthave an allowability schedule related to an award. Thisfield can contain a value only if the GL_CODE_COMBINATION_ID field does not and Projects isimplemented.
20. TASK_ID The TASK_ID field must refer to a valid task in theOracle Projects view PA_TASKS_EXPEND_V and mustbe linked to the project identified by the fieldPROJECT_ID. This field can contain a value only if theGL_CODE_COMBINATION_ID field does not containa value and Projects is implemented.
21. AWARD_ID The AWARD_ID field must refer to a valid award inthe Grants Management view GMS_AWARDS_BASIC_V. This field can contain a value only if the GL_CODE_COMBINATION_ID field does not contain a value andawards is implemented.
22. ATTRIBUTE_CATEGORY,ATTRIBUTE1 throughATTRIBUTE15
The attribute fields are designed for DescriptiveFlexfields that are reserved for future use.
L-6 Oracle Labor Distribution User’s Guide

Multiple Organizations Compliance in Oracle Labor Distrib
M
Multiple Organizations Compliance inOracle Labor Distribution
This appendix describes Multiple Organizations compliance in Oracle LaborDistribution. The following sections are in this appendix:
■ Definition
■ Overview
■ User Procedures
ution M-1

Definition
DefinitionMultiple Organizations enables users to define multiple organizations and therelationships among them in a single installation of Labor Distribution.
OverviewMultiple Organizations provides secure access to Oracle Human Resources data.Without Multiple Organizations, any user who logs into Labor Distribution canaccess scheduling and distribution data for all employees in the entire site becauseLabor Distribution does not specify the data that can be accessed by different userseven if multiple business groups are defined in the implementation.
If Multiple Organizations is implemented, more than one Labor Distributionresponsibility can be set up linking each responsibility to a specified businessgroup, set of books, operating unit, and generic suspense account.
For information on Multiple Organizations, see Multiple Organizations in OracleApplications.
FeaturesMultiple Organizations includes the following features:
■ Business Group
■ Set of Books
■ Operating Unit
Business GroupIn Multiple Organizations, a Labor Distribution responsibility is linked to abusiness group set up in Human Resources. Data relating to employee assignmentsand organizations in a business group is accessible only to users using the relatedresponsibility.
For information on defining business groups, see Adapting and Creating a NewBusiness Group, Using Oracle HRMS - The Fundamentals.
Set of BooksIn Multiple Organizations, a Labor Distribution responsibility is linked to abusiness group defined in Oracle General Ledger. Payrolls in Human Resourcespoint to specific sets of books, and Multiple Organizations partitions the payroll
M-2 Oracle Labor Distribution User’s Guide

Overview
information according to the set of books that is linked to each Labor Distributionresponsibility.
For information on defining a set of books, see Defining Sets of Books, OracleGeneral Ledger User’s Guide.
Operating UnitIn Multiple Organizations, a Labor Distribution responsibility is linked to anoperating unit defined by the Multiple Organizations profile, MO: Operating Unit.The information relating to Oracle Projects charging instructions is derived in thesame manner as the Expenditure Entry feature in Projects. Depending on the profilefor operating unit, the assignments can be scheduled to Projects that belong to thespecified operating unit.
For information on operating units in Projects, see Support for MultipleOrganizations in Oracle Projects, Oracle General Ledger User’s Guide.
Multiple Organizations Compliance in Oracle Labor Distribution M-3

User Procedures
User ProceduresThis section describes how Multiple Organizations is used in Labor Distribution forthe following:
■ Labor Distribution Responsibility
■ Labor Distribution Setup
■ Labor Scheduling
■ Labor Distribution Processes
Labor Distribution ResponsibilityLabor Distribution responsibility is tied to a unique combination of one businessgroup, BG, one business group, SOB, and one operating unit, OU. If there aremultiple business groups, sets of books, and operating units, then multiple LaborDistribution responsibilities must be created for each BG-SOB-OU combination.
If Multiple Organizations is not implemented, the default Labor Distributionresponsibility uses the default Human Resources business group and the GeneralLedger default set of books.
If Multiple Organizations is implemented, users set up Labor Distributionresponsibilities and link these responsibilities to specific BG-SOB-OU combinationsby using the following profile options:
■ HR: Business Group
■ GL: Set of Books
■ MO: Operating Unit
■ PSP: Generic Suspense Account Organization
The PSP: Generic Suspense Account Organization profile identifies theOrganization that is denoted as having the Generic Suspense Account.
For each unique BG-SOB combination, users must select one organization in theLabor Distribution profile set. Multiple Organizations does not require anychanges in functionality for setting up a valid charging instruction for eachGeneric Suspense Account.
For information on defining system profiles, see System Administration Setup,page 4-1.
M-4 Oracle Labor Distribution User’s Guide

User Procedures
ExampleIf a user has one business group, BG1, and one set of books, SOB2, and twooperating units, OU1 and OU2, the user sets up two Labor Distributionresponsibilities. Figure M–1 illustrates how the responsibilities can be linked in acombination of BG, SOB, and OU. LD1 is linked to BG1, SOB1, and OU1. LD2 islinked to BG2 SOB2, and OU2.
Figure M–1 Multiple Organizations Combination Example
Labor Distribution SetupWith Multiple Organizations implemented, all the setup in Labor Distribution mustbe unique to each combination of business group and set of books. If there are twodifferent BG-SOB combinations, then the entire Labor Distribution setup must becompleted twice to use the application with two BG-SOB combinations. For everyunique BG-SOB combination, a unique setup must be made for Labor Distribution.
Labor Distribution data is partitioned only by business group and set of books. TheMO: Operating Unit profile is relevant only to the extent of determining the Projectsinformation as far as scheduling and distribution is concerned.
For each unique BG-SOB combination, a different Generic Suspense Account mustbe specified. This account is linked to the organization selected in the PSP: GenericSuspense Account Organization profile that is linked to the relevant responsibility.
A clearing account must be set up for each unique BG-SOB combination using theClearing Account window. A natural account auto-population segment must be setup in the Autopop Segment Setup (Autopop Segment Definition) window.
For information on setting up a clearing account, see Labor Scheduling Setup,page 5-1.
For information on setting up a natural account auto-population segment, seeExpenditure Type and Natural Account Auto-Population Setup, page 8-1.
Multiple Organizations Compliance in Oracle Labor Distribution M-5

User Procedures
ExampleIf there is only one business group and two sets of books, there could be a situationwhere one organization could end up having two records as far as the variousorganization defaults are concerned. For example, the Chemistry department couldhave one Organization Suspense Account pointing to an accounting flexfield inSOB1, which is set up by LD1 responsibility. It could also have another record forOrganization Suspense Account pointing to SOB2, which is set up by LD2responsibility. While each of these users are transparent to the occurrence of theduplicate record, the data is stored with the proper context of the business groupidentifier and the Set of Books identifier and therefore does not cause any conflictsduring any of the Labor Distribution processes. This partition occurs even if thedefault uses a Projects charging instruction instead of a General Ledger one.
Note: The same applies to Organization Default Labor Schedule, OrganizationDefault Accounts, Generic Suspense Account, and Global Earnings ElementOverride.
Figure M–2 illustrates the Labor Distribution setup example. LD1 is linked to BG1,SOB1, and OU1. LD2 is linked to BG1, SOB2, and OU1.
Figure M–2 Multiple Organizations In Labor Distribution Setup Example
Labor SchedulingWhen users log on to Labor Distribution with a specific responsibility, they canaccess and schedule labor schedules only for those employee assignments that arepart of the BG-SOB combination linked to the responsibility. This means that theemployee assignments belong to an Organization that is linked to the businessgroup, and their respective payrolls point to the set of books. In an implementationwhere there is only one business group and two sets of books, as described in theLabor Distribution setup example, the Human Resources data relating to employeesand organizations cannot be secured since both LD1 and LD2 point to the samebusiness group.
M-6 Oracle Labor Distribution User’s Guide

User Procedures
Data relating to employee assignments is further filtered based on the assignedpayroll, which determines the set of books that is relevant to the employeeassignment.
ExampleLabor Distribution is set up with two responsibilities, LD1 and LD2, because there isone business group and two sets of books. If Sarah Brown is on payroll PR1 and thispayroll points to SOB1, the employee assignment is available for scheduling onlywith responsibility LD1.
Figure M–3 illustrates a labor scheduling example. LD1 is linked to BG1, SOB1, andOU1, and PR1 is linked to SOB1. LD2 is linked to BG2, SOB2, and OU2.
Figure M–3 Multiple Organizations in Labor Scheduling Example
Labor Distribution ProcessesThis section describes the following processes:
■ Import Payroll Transactions from Human Resources
■ Import Non-Oracle Sublines
■ Create Distribution Lines
■ Import Pre-generated Distribution Lines
■ Summarize and Transfer Payroll Distributions
■ Distribution Adjustments and Summarize and Transfer Adjustments
Multiple Organizations Compliance in Oracle Labor Distribution M-7

User Procedures
■ Effort Report
■ Labor Encumbrance
Import Payroll Transactions from Human ResourcesIn the Import Payroll Transactions from Human Resources process, users selectpayroll name and time period for the payroll to be imported. Depending on theresponsibility used to access the application, users see a list of valid payrolls. Thesepayrolls are linked to the business group and to the set of books attached to theresponsibility. This ensures that payroll lines are imported for the relevantemployee assignments.
Import Non-Oracle SublinesPayroll lines from non-Oracle payroll sources are populated in an interface table asbatches based on a set of rules. These rules must ensure that one such batchcontains payroll lines pertaining to employee assignments that belong to the samepayroll. Since each payroll as defined in Human Resources can be part of only oneunique BG-SOB combination, such a rule ensures that the data imported in onebatch into Labor Distribution is grouped in such a manner that it can be linked to aresponsibility.
Create Distribution LinesIn the Create Distribution Lines process, users select a payroll name and payrollperiod if it is an Oracle payroll or a batch name if using non-Oracle payroll. Usersselect these parameters as long as such parameters are relevant to the specificBG-SOB combination that the responsibility is linked to.
The Create Distribution Lines process applies the appropriate schedules to thepayroll lines while creating the distribution lines. If an assignment has a valid laborschedule defined against it, this schedule is used. Since the context in terms of thebusiness group and the set of books is set at the responsibility level, the integrity ofdata in terms of assignments, payroll lines, and schedule lines is maintained.
If the organization defaults are used, the BG-SOB identifier ensures that the correctorganization defaults are picked up by the process to be used for creation of thedistribution lines. Even though any organization can have multiple records for eachdefault, as described in the Labor Distribution setup example, there can be only onerecord for any BG-SOB combination resulting in no loss of integrity.
M-8 Oracle Labor Distribution User’s Guide
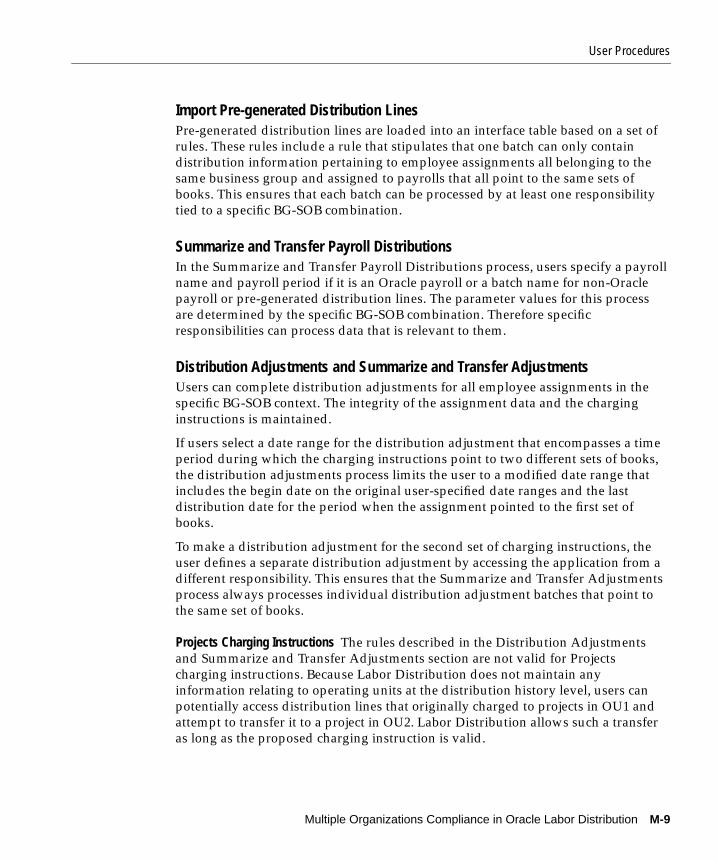
User Procedures
Import Pre-generated Distribution LinesPre-generated distribution lines are loaded into an interface table based on a set ofrules. These rules include a rule that stipulates that one batch can only containdistribution information pertaining to employee assignments all belonging to thesame business group and assigned to payrolls that all point to the same sets ofbooks. This ensures that each batch can be processed by at least one responsibilitytied to a specific BG-SOB combination.
Summarize and Transfer Payroll DistributionsIn the Summarize and Transfer Payroll Distributions process, users specify a payrollname and payroll period if it is an Oracle payroll or a batch name for non-Oraclepayroll or pre-generated distribution lines. The parameter values for this processare determined by the specific BG-SOB combination. Therefore specificresponsibilities can process data that is relevant to them.
Distribution Adjustments and Summarize and Transfer AdjustmentsUsers can complete distribution adjustments for all employee assignments in thespecific BG-SOB context. The integrity of the assignment data and the charginginstructions is maintained.
If users select a date range for the distribution adjustment that encompasses a timeperiod during which the charging instructions point to two different sets of books,the distribution adjustments process limits the user to a modified date range thatincludes the begin date on the original user-specified date ranges and the lastdistribution date for the period when the assignment pointed to the first set ofbooks.
To make a distribution adjustment for the second set of charging instructions, theuser defines a separate distribution adjustment by accessing the application from adifferent responsibility. This ensures that the Summarize and Transfer Adjustmentsprocess always processes individual distribution adjustment batches that point tothe same set of books.
Projects Charging Instructions The rules described in the Distribution Adjustmentsand Summarize and Transfer Adjustments section are not valid for Projectscharging instructions. Because Labor Distribution does not maintain anyinformation relating to operating units at the distribution history level, users canpotentially access distribution lines that originally charged to projects in OU1 andattempt to transfer it to a project in OU2. Labor Distribution allows such a transferas long as the proposed charging instruction is valid.
Multiple Organizations Compliance in Oracle Labor Distribution M-9

User Procedures
If users carry out a distribution adjustment from projects in OU1 to projects in OU2,the process completes successfully. If there is an anomaly in terms of cross charging,it is dealt with independent of Labor Distribution.
Effort ReportThe Create Effort Report window includes various selection criteria drawn fromHuman Resources, General Ledger, Grants Accounting, and Projects. However, theunderlying objective is to identify the employee assignment required to generateeffort reports. Each individual selection criterion is a filter to arrive at the subset ofassignments required to generate effort reports. An additional filter ensures that theBG-SOB context is maintained in any such selection. This filter ensures that theemployee assignment belongs to the relevant business group and the assignment’spayroll is pointing to the relevant set of books.
Labor EncumbranceIf Multiple Organizations is implemented, users set up the HR: Business Groupprofile option. The parameter values for this process are determined by the specificBG-SOB combination linked to a specific responsibility.
For information on setting up profile options, see System Administration Setup,page 4-1.
M-10 Oracle Labor Distribution User’s Guide

Glossary
account segment
One of up to 30 different sections of an accounting flexfield, which together makeup the General Ledger account code. Each segment is separated from the othersegments by a symbol, such as -, /, or \. Each segment typically represents anelement of the business structure, such as Company, Cost Center, or Account.
accounting flexfield
The code used to identify a general ledger account in Oracle Applications. Eachaccounting flexfield segment value corresponds to a summary or rollup accountwithin the chart of accounts.
accounting flexfield structure
The account structure defined to fit the specific needs of the organization. Userschoose the number of segments as well as the length, name, and order of eachsegment in the accounting flexfield structure.
alternate regions
A collection of logically related fields in a window, set apart from other fields by adrop-down list box.
assignment
An employee's assignment identifies the employee's role and payroll within abusiness group. The assignment is made up of a number of assignmentcomponents. Of these, organization is mandatory and payroll is a requiredcomponent for payment purposes.
Glossary-1

assignment number
A number that uniquely identifies an employee's assignment. An employee withmultiple assignments has multiple assignment numbers.
business unit
An organization which represents the consolidated enterprise, a major division, oran operation company. This entity partitions Oracle Human Resource ManagementSystems information.
DateTrack
When the user changes the effective date to past or future, DateTrack enables theuser to enter information that takes effect on the new effective date and to reviewinformation as of the new date.
descriptive flexfield
A field that an organization can extend to capture extra information not otherwisetracked by Oracle Applications. A descriptive flexfield appears on the form as asingle character, unnamed field. An organization can customize this field to captureadditional information unique to the business.
distribution line
A line corresponding to an accounting transaction for an expenditure item on aninvoice or the liability on a payment.
distribution line adjustments
An adjustment of a distribution line that has already been posted.
element
A component in the calculation of employee pay. Each element represents acompensation or benefit type, such as salary, wages, stock purchase plans, andpension contributions.
element link
The association of an element to one or more components of an employeeassignment. The link establishes employee eligibility for that element. Employeeswhose assignment components match the components of the link are eligible for theelement.
Glossary-2

expenditure type
An expenditure type is an implementation-defined classification of cost that usersassigns to each expenditure item. Expenditure types are grouped into expenditurecategories such as Labor, Expense Reports, Assets, and Vendor Invoices andrevenues categories such as Labor and Non-labor revenue. They are also made upof units of measure and system linkages which define a relationship between theexpenditure type and another system such as Oracle Public Sector Payables.Examples of expenditure types are Professional Labor, Clerical Labor, FacultyTenured Salary, Air Travel, Automobile Rental, Computer Services, and Supplies.
FTE
See full-time equivalency.
full-time equivalency
The sum of full-time positions plus part-time positions. For example, if adepartment has 3 full-time positions, 2 three-quarter time positions, 4 half-timepositions, and 1 quarter-time positions, the department has 10 staff, but a full-timeequivalency of 6.75 employees.
General Ledger account
A specific account within an organization's chart of accounts. A General Ledgeraccount is made up of the General Ledger accounting flexfield segments that aredefined for a set of books.
Grants Accounting charging instruction
A user-defined combination of Project, Organization, Expenditure Type, Task, andAward that specifies a particular charging instruction to Oracle Grants Accounting.These instructions constitute the Oracle Grants Accounting equivalent of a GeneralLedger account.
labor schedule
A collection of schedule lines that is defined at a single level of the labor schedulehierarchy. A single labor schedule specifies how all pay elements for an assignment,all pay elements in an element group, or a single pay element from a payroll is to bedistributed for a given employee and assignment. A special case labor schedule isan Organization Default Labor Schedule.
labor schedule hierarchy
A collection of labor schedules that specify how payroll pay elements associatedwith an employee and assignment are to be distributed.
Glossary-3

Labor Scheduling window
A window that displays an employee and the employee's assignments. Eachassignment is scheduled at one of the following levels of the schedule hierarchy:Assignment, Element Group, Element, or Organization Default.
natural account
A natural account is the segment that determines whether an account is an asset,liability, equity, revenue, or expense account. When chart of accounts is defined, onesegment must be defined as the natural account segment. Examples of naturalaccounts are Accounts Payable, Accounts Receivable, Revenue, Fixed Assets, andAccrued Liabilities.
operating unit
An organization that partitions data for subledger products, such as Payables,Receivables, Purchasing, and Oracle Order Entry. It is roughly equivalent to a singlepre-Multi-Org installation.
organization
A required component of employee assignments. Users can define as manyorganizations as required within a Business Group. Organizations can be internal,such as departments, or external, such as recruitment agencies. Users can structureorganizations into organizational hierarchies for reporting purposes and for systemaccess control.
payroll
A group of employees that Oracle Payroll processes together with the sameprocessing frequency, such as weekly, monthly, or bimonthly. Users can set up asmany payrolls as required within a business group.
period type
A time division in a budgetary calendar, such as week, month, or quarter.
region
A collection of logically related fields in a window, set apart from other fields by arectangular box or a horizontal line across the window.
report parameters
Inputs made when submitting a report to control the sorting, formatting, selection,and summarizing of information in the report.
Glossary-4

responsibility
Determines the data, windows, menus, reports, and concurrent programs to accessin Oracle Applications. It is linked to a data group. Several users can share the sameresponsibility, and a single user can have multiple responsibilities.
reversal
Method of correcting payroll runs or QuickPay runs after post-run processing hastaken place. The system replaces positive run result values with negative ones andnegative run result values with positive ones. Both old and new values remain onthe database.
salary basis
The period of time for which an employee's salary is quoted, such as hourly orannually. Defines a group of employees assigned to the same salary basis andreceiving the same salary element.
schedule line
A combination of Grants Accounting and General Ledger charging instructions,schedule line begin date, schedule line end date, and distribution percentage. Oneor more schedule lines constitute a labor schedule.
schedule line period
Contiguous days in the schedule lines in which the distribution percent is the same.
Schedule Lines
Window that is used to create a labor schedule by entering all schedule lines for thatlabor schedule.
Scheduling Summary
Window that summarizes all labor schedules for an employee and assignment. Thewindow also displays the hierarchy of labor schedules.
suspense account
An account that collects costs from labor distribution if charging instructions atlower levels are missing or if charging instructions at any level of the schedulinghierarchy are missing. For example, if an employee receives a Special ProductionBonus but no General Ledger account code for this earning type to debit exists inthe Cost Allocation flexfield, the cost of the bonus goes into the suspense account.
Glossary-5

system profile options
Features that allow system administrators and users to tailor Oracle LaborDistribution to their exact requirements.
zero work day
Zero work day situations occur when an employee assignment is suspended orterminated during a previous payroll period and the assignment is inactive duringthe payroll period being imported into Labor Distribution. Zero work day situationsalso occur when an employee is hired in a payroll period on a non-business day andthere are no more business days in that payroll period after the hire date.
Glossary-6

Index
Aaccount segment, Glossary-1accounting exampledistribution adjustments, J-5labor costing, J-3overview, J-2payroll balancing overview, J-2
accounting flexfield, Glossary-1accounting flexfield structure, Glossary-1adjusting distributions procedure, 16-8alternate regions, Glossary-1archive distributions history
definition, 13-2Archive Distributions History procedure, 13-3Archive Distributions History process, 13-2archive encumbrance lines procedure, 17-13Archive History Report procedure, 13-4Archive History Report process, 13-2assignment, Glossary-1assignment number, Glossary-2Auto-Fill Expenditure Types window
description, 8-16example, 8-15
Auto-Fill Natural Account windowdescription, 8-22example, 8-21
Autopop Segment Setup (Autopop SegmentDefinition) window
example, 8-8autopop segment setup procedure, 8-7auto-population
create distribution lines, 11-2distribution adjustments, 16-2
summarize and transfer payrolldistributions, 12-2
auto-population lookupsetup procedure, 8-10
auto-population rulessetup, 8-3
auto-population setupAuto-Fill Expenditure Types window
description, 8-16example, 8-15
Auto-Fill Natural Account windowdescription, 8-22example, 8-21
autopop segment procedure, 8-7Autopop Segment Setup (Autopop Segment
Definition) windowexample, 8-8
auto-population rules, 8-3BYPASS (By-Pass Expenditure Types) window
example, 8-24Bypass (By-Pass Expenditure Types) window
description, 8-25by-pass table procedure, 8-23defining expenditure type auto-population rules
procedure, 8-13defining natural account auto-population rules
procedure, 8-19definition, 8-3lookup procedure, 8-10Lookups (Auto Lookups) window
description, 8-12example, 8-11
overview, 8-3process, 8-4
Index-1

bypass table setup, 8-5define expenditure type and natural account
rules, 8-5enabling or disabling, 8-4lookup setup, 8-4natural account segment definition, 8-4natural account segment setup, 8-4
RULES windowdescription, 8-18example, 8-17
Bbegin date auto-fill
setup procedure, 5-33Begin Date Auto-fill Parameters window
description, 5-36example, 5-34
business unit, Glossary-2BYPASS (By-Pass Expenditure Types window
example, 8-24Bypass (By-Pass Expenditure Types) window
description, 8-25by-pass table
setup procedure, 8-23
Ccertifying or rejecting effort reports
procedure, 18-24clearing account
setup procedure, 5-41Clearing Account window
description, 5-43example, 5-42
configuration optionsCase 1 diagram, I-5Case 2 diagram, I-6Case 3 diagram, I-7Case 4 diagram, I-8overview, I-2
conventionsangle brackets, xxixbold, xxixClose Form command, xxx
Courier font, xxixgraphics descriptions, xxxquery data, xxxsquare brackets, xxixuppercase, xxixwarning symbol, xxix
Create Ad Hoc Effort Report procedure, 18-37Create Ad Hoc Effort Report window
description, 18-42example, 18-41
create and update labor schedules procedure, 9-7create distribution lines
auto-population, 11-2create distribution lines procedure, 11-6definition, 11-2overview, 11-2
process, 11-2process, 11-2
calculate distribution amounts, 11-4control reports, 11-4create, 11-3determine labor schedule and charging
instructions, 11-3validations, 11-4
rolling back distribution lines procedure, 11-7create distribution lines procedure, 11-6create effort report procedure, 18-18create effort report templates procedure, 18-9Create Effort Report window
description, 18-16example, 18-10
create encumbrance lines process, 17-9Create Users window, 6-17Creating Notification Users procedure, 6-16
Ddata entry validations, D-3
create distribution lines validations, D-6custom data entry validation, D-7labor scheduling, D-3labor scheduling setup deletion validation
rules, D-3labor scheduling setup end-dating, D-4labor scheduling validation errors, D-6
Index-2

labor scheduling validation warnings, D-6other validations, D-7overview, D-2
DateTrack, Glossary-2Default Account Report parameters window, 19-18Default Accounts procedure, 19-17default encumbrance period definition
setup procedure, 7-8define a salary basis, 3-9define account combinations, 3-7
General Ledger set up, 3-7define cost allocation flexfield, 3-7
Human Resources setup, 3-7define element links
Human Resources setup, 3-9define elements and input values
Human Resources setup, 3-9define jobs
Human Resources setup, 3-8define locations
Human Resources setup, 3-7define payrolls
Human Resources setup, 3-8defining expenditure type auto-population rules
procedure, 8-13defining natural account auto-population rules
setup procedure, 8-19descriptive flexfield, Glossary-2diagrams
Distribution Adjustments ApprovalWorkflow, G-4
Effort Report Approval and CertificationWorkflow, F-9
Effort Report Certification, F-18Effort Report Certification Workflow, F-18Labor Distribution Process Flow, A-3Labor Encumbrance Process, C-3Labor Encumbrance Process Flow, C-3Scheduling Hierarchy Process, B-7
distribution adjustments, 16-7adjusting distributions procedure, 16-8approving distribution adjustments Workflow
procedure, 16-16auto-population, 16-2definition, 16-2
distribution adjustment register, 16-19Distribution Adjustments window
description, 16-13example, 16-10
features, 16-2overview, 16-2
features, 16-2process, 16-2
process, 16-2approve distribution adjustments
workflow, 16-4recover summarize and transfer
adjustments, 16-6select earnings distributions to be
transferred, 16-3specify adjustment, 16-3submit adjustment, 16-4summarize and transfer adjustments, 16-5view distribution lines, 16-3
recover summarize and transfer adjustmentsprocess, 16-18
summarize and transfer adjustments to GL andGMS process, 16-17
distribution adjustments approval notificationworkflow
distribution adjustments approval workflowcustomizing, G-13process, G-5
overview, G-2PSP distribution adjustments approval item
type, G-3distribution adjustments approval workflow
notificationDistribution Adjustments Approval Workflow
diagram, G-4distribution adjustments procedures
Distribution Adjustment Register, 16-7Distribution Adjustments window
description, 16-13example, 16-10
Distribution History by Award Report parameterswindow, 19-26
Distribution History by Award Reportprocedure, 19-25
Distribution History by Employee Report
Index-3

procedure, 19-21Distribution History by Organization Report
parameters window, 19-28Distribution History by Organization Report
procedure, 19-27Distribution History by Project Report parameters
window, 19-24Distribution History by Project Report
procedure, 19-23distribution line, Glossary-2distribution line adjustments, Glossary-2
Eearnings element groups
setup procedure, 5-27Earnings Element Groups window
description, 5-29example, 5-28
earnings elements importedsetup procedure, 5-20
Earnings Elements Imported windowdescription, 5-22example, 5-21
effort calculation processdefinition, E-2process, E-2
examples, E-2Effort Certification Status (Aging) Report
description, 18-36example, 18-35
Effort Certification Status (Aging) Reportprocedure, 18-33
Effort Certification Status (Aging) window, 18-34Effort Report Certification Workflow
diagram, F-18Effort Report Message window, 6-12
description, 6-15effort report notification workflow, F-2
effort report approval and certification workflowcustomizing, F-17process, F-10
effort report certification workflowcustomizing, F-25process, F-19
Effort Report Certification workflowdiagram, F-18
overview, F-2PSP effort report item type, F-3
Effort Report Periods window, 6-5description, 6-6
effort report workflow notificationEffort Report Approval and Certification
Workflow diagram, F-9effort reporting
certifying or rejecting effort reportsprocedure, 18-24
Create Ad Hoc Effort Report procedure, 18-37Create Ad Hoc Effort Report window, 18-41
description, 18-42create effort report procedure, 18-18Create Effort Report window
description, 18-16example, 18-10
create templates procedure, 18-9definition, 18-3Effort Certification Status (Aging) Report
description, 18-36example, 18-35
Effort Certification Status (Aging) Reportprocedure, 18-33
Effort Certification Status (Aging) Reportwindow
example, 18-34Mass Print Effort Report
description, 18-32Mass Print Effort Report procedure, 18-30Mass Print Effort Reports Input Parameters
window, 18-31overview, 18-3
Create Effort Report window, 18-7process, 18-3workflow notification process, 18-6
prerequisites, 18-8Printing Options window
description, 18-29example, 18-28
process, 18-3ad hoc effort report, 18-5create ad hoc effort report, 18-5
Index-4

create effort report, 18-4create template, 18-3Effort Certification Status (Aging)
report, 18-5mass print effort report, 18-6review and certify effort report, 18-4review, accept, or return effort report with
comments, 18-4Review Effort Report window
description, 18-27example, 18-26
reviewing effort report Workflowprocedure, 18-24
reviewing, approving, and rejecting effort reportprocedure, 18-24
Warning Reportdescription, 18-23example, 18-22
effort reporting setupCreate Users window, 6-17Creating Notification Users procedure, 6-16definition, 6-2Effort Report Message window, 6-12
description, 6-15Effort Report Periods window, 6-5
description, 6-6Include Elements in Effort Report window, 6-8
description, 6-9Modify Text Message on Effort Report
procedure, 6-10overview, 6-2
process, 6-2process
create notification users, 6-3define earnings elements included in effort
reports, 6-2define effort report periods, 6-2modify text message on effort report, 6-2
Setting Up Earnings Elements in Effort Reportingprocedure, 6-7
Setting Up Effort Report Periods procedure, 6-4element, Glossary-2element link, Glossary-2Employee Labor Schedule Report
description, 19-14
Employee Labor Schedule Report parameterswindow, 19-13
Employee Labor Schedule Report procedure, 19-12Employees Using Default Labor Schedules Report
parameters window, 19-8Employees Using Default Schedules Report
procedure, 19-6encumbrance
see also labor encumbrance, 7-2Encumbrance - Creation Options window
description, 7-16example, 7-15
Encumbrance - Default Encumbrance PeriodDefinition window
description, 7-10example, 7-9
Encumbrance - Earnings Element Selection windowdescription, 7-13example, 7-12
Encumbrance - Payroll and Assignment Selectionwindow
description, 7-7example, 7-6
Encumbrance - Summarize Options windowdescription, 7-20example, 7-18
encumbrance creation options proceduresetup procedure, 7-14
encumbrance earnings element selectionsetup procedure, 7-11
encumbrance payroll and assignment selectionsetup procedure, 7-5
encumbrance processdefinition, C-2description, C-4diagram, C-3
encumbrance processesarchive encumbrance lines procedure, 17-13create encumbrance lines process, 17-9definition, 17-2generating Organization Default Usage
Encumbrance Report procedure, 17-16generating Suspense Charge Encumbrance
Report procedure, 17-15liquidate encumbrances process, 17-12
Index-5

overview, 17-2create encumbrance lines, 17-2liquidation, 17-6summarize and transfer, 17-4update encumbrance lines, 17-5
prerequisites, 17-8reports, 17-6retrieve encumbrance lines procedure, 17-14summarize and transfer encumbrances
process, 17-10updating encumbrance lines process, 17-11
encumbrance reportsOrganization Default Usage Encumbrance, 17-7Suspense Charge Encumbrance, 17-6
encumbrance summarize optionssetup procedure, 7-17
end date auto-fill parameterssetup procedure, 5-37
End Date Auto-fill Parameters windowdescription, 5-40example, 5-38
example, 9-26expenditure type, Glossary-3
Ffeatures, new, 1-8FTE, Glossary-3full-time equivalency, Glossary-3
GGeneral Ledger account, Glossary-3General Ledger setup
define account combinations, 3-7global earnings element override
setup procedure, 5-23Global Earnings Element Override window
description, 5-26example, 5-25
Grants Management charginginstruction, Glossary-3
HHuman Resources setup
define a salary basis, 3-9define cost allocation flexfield, 3-7define element links, 3-9define elements and input values, 3-9define jobs, 3-8define locations, 3-7define payrolls, 3-8
Iimport payroll transactions
definition, 10-2importing payroll transactions procedure, 10-7overview, 10-2prerequisites, 10-6process, 10-2
calculate balance amounts, 10-2calculate daily pay rate, 10-4calculate daily pay rate for the subline, 10-2create payroll sub-lines, 10-2create payroll sublines, 10-3payroll import rollback, 10-4select payroll, 10-2select payroll to be imported, 10-2store sub-lines, 10-2
roll back Oracle payroll import procedure, 10-8Include Elements in Effort Report window, 6-8
description, 6-9item type
effort report notification, F-3PSP Distribution Adjustments Approval, G-3
Llabor distribution accounting example
distribution adjustments, J-5labor costing, J-3overview, J-2payroll balancing, J-2
labor distribution processdefinition, A-2description, A-4diagram, A-3
Index-6
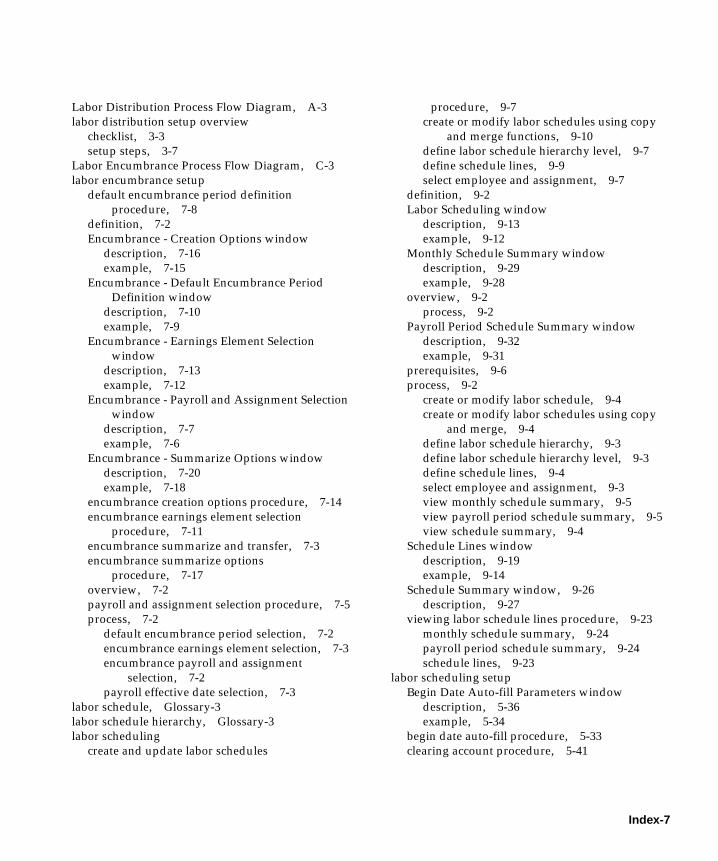
Labor Distribution Process Flow Diagram, A-3labor distribution setup overview
checklist, 3-3setup steps, 3-7
Labor Encumbrance Process Flow Diagram, C-3labor encumbrance setup
default encumbrance period definitionprocedure, 7-8
definition, 7-2Encumbrance - Creation Options window
description, 7-16example, 7-15
Encumbrance - Default Encumbrance PeriodDefinition window
description, 7-10example, 7-9
Encumbrance - Earnings Element Selectionwindow
description, 7-13example, 7-12
Encumbrance - Payroll and Assignment Selectionwindow
description, 7-7example, 7-6
Encumbrance - Summarize Options windowdescription, 7-20example, 7-18
encumbrance creation options procedure, 7-14encumbrance earnings element selection
procedure, 7-11encumbrance summarize and transfer, 7-3encumbrance summarize options
procedure, 7-17overview, 7-2payroll and assignment selection procedure, 7-5process, 7-2
default encumbrance period selection, 7-2encumbrance earnings element selection, 7-3encumbrance payroll and assignment
selection, 7-2payroll effective date selection, 7-3
labor schedule, Glossary-3labor schedule hierarchy, Glossary-3labor scheduling
create and update labor schedules
procedure, 9-7create or modify labor schedules using copy
and merge functions, 9-10define labor schedule hierarchy level, 9-7define schedule lines, 9-9select employee and assignment, 9-7
definition, 9-2Labor Scheduling window
description, 9-13example, 9-12
Monthly Schedule Summary windowdescription, 9-29example, 9-28
overview, 9-2process, 9-2
Payroll Period Schedule Summary windowdescription, 9-32example, 9-31
prerequisites, 9-6process, 9-2
create or modify labor schedule, 9-4create or modify labor schedules using copy
and merge, 9-4define labor schedule hierarchy, 9-3define labor schedule hierarchy level, 9-3define schedule lines, 9-4select employee and assignment, 9-3view monthly schedule summary, 9-5view payroll period schedule summary, 9-5view schedule summary, 9-4
Schedule Lines windowdescription, 9-19example, 9-14
Schedule Summary window, 9-26description, 9-27
viewing labor schedule lines procedure, 9-23monthly schedule summary, 9-24payroll period schedule summary, 9-24schedule lines, 9-23
labor scheduling setupBegin Date Auto-fill Parameters window
description, 5-36example, 5-34
begin date auto-fill procedure, 5-33clearing account procedure, 5-41
Index-7

Clearing Account windowdescription, 5-43example, 5-42
definition, 5-3Earnings Element Groups window
description, 5-29example, 5-28
earnings elements imported procedure, 5-20Earnings Elements Imported window
description, 5-22example, 5-21
End Date Auto-fill Parameters windowdescription, 5-40example, 5-38
end date auto-fill procedure, 5-37global earnings element override
procedure, 5-23Global Earnings Element Override window
description, 5-26example, 5-25
Organization Default Accounts procedure, 5-16Organization Default Accounts window
description, 5-19example, 5-18
Organization Default Labor Scheduleprocedure, 5-12
Organization Default Labor Schedule windowdescription, 5-15example, 5-14
Organization Suspense Accountsprocedure, 5-8
Organization Suspense Accounts windowdescription, 5-11example, 5-10
overview, 5-3payroll sources procedure, 5-30Payroll Sources window
description, 5-32example, 5-31
process, 5-3begin date and end date auto-fill
parameters, 5-7clearing account, 5-7Earnings Element Groups, 5-6Earnings Elements Imported, 5-5
Global Earnings Element Override, 5-5Organization Default Accounts, 5-4Organization Default Labor Schedule, 5-4Organization Suspense Accounts, 5-4payroll sources, 5-6
setupearnings element groups procedure, 5-27
Labor Scheduling window, Glossary-4description, 9-13example, 9-12
liquidate encumbrances process, 17-12Lookups (Auto Lookups) window
description, 8-12example, 8-11
Mmaintaining non-Oracle payroll interface
procedure, 14-9maintaining pre-generated distribution lines
procedure, 15-9Maintenance of Non Oracle Payroll Sublines
windowdescription, 14-13example, 14-12
Maintenance of Pre-generated Distribution LinesInterface window
description, 15-13example, 15-12
Mass Print Effort Reportdescription, 18-32
Mass Print Effort Report procedure, 18-30Modify Text Message in Effort Report
procedure, 6-10Monthly Schedule Summary window
description, 9-29example, 9-28
Multi-Org compliancefeatures, M-2overview, M-2user procedures, M-4
labor scheduling, M-6processes, M-7responsibility, M-4setup, M-5
Index-8

Nnatural account, Glossary-4navigator paths, H-2new features, 1-8Non-Oracle Interface Table Field Description
Table, K-2Non-Oracle Interface Table population rules, K-4non-Oracle payroll interface
definition, 14-2maintaining non-Oracle payroll interface
procedure, 14-9Maintenance of Non Oracle Payroll Sublines
windowdescription, 14-13example, 14-12
overview, 14-2prerequisites, 14-8process, 14-2
import non-Oracle payroll sublines, 14-2maintain non-Oracle payroll interface, 14-5rollback, 14-6
roll back non-Oracle payroll procedure, 14-21Notifications Summary distribution adjustments
prerequisites, 16-7
Ooperating unit, Glossary-4Oracle Public Sector Budgeting, 1-7organization, Glossary-4Organization Default Accounts
setup procedure, 5-16Organization Default Accounts window
description, 5-19example, 5-18
Organization Default Labor Schedulesetup procedure, 5-12
Organization Default Labor Schedule Reportparameters window, 19-16
Organization Default Labor Schedule Reportprocedure, 19-15
Organization Default Labor Schedule windowdescription, 5-15example, 5-14
Organization Default Usage EncumbranceReport, 17-7
Organization Default Usage Encumbrance Reportprocedure, 17-16
Organization Suspense Account windowexample, 5-10
Organization Suspense Accountssetup procedure, 5-8
Organization Suspense Accounts windowdescription, 5-11
Ppayroll, Glossary-4payroll distribution and configuration options
diagrams, I-5overview, I-2payroll distribution process, I-2
Payroll Period Schedule Summary windowdescription, 9-32example, 9-31
payroll sourcessetup procedure, 5-30
Payroll Sources windowdescription, 5-32example, 5-31
period type, Glossary-4pre-generated distribution lines
features, 15-3process, 15-3
import pre-generated distribution linesinterface, 15-3
maintain pre-generated distribution linesinterface, 15-6
pre-generated distribution lines interfacedefinition, 15-3maintaining pre-generated distribution lines
procedure, 15-9Maintenance of Pre-generated Distribution Lines
windowdescription, 15-13example, 15-12
overview, 15-3features, 15-3process, 15-3
Index-9

prerequisites, 15-8Pre-Generated Interface Table Field Description
Table, L-2Pre-Generated Interface Table population
rules, L-4Printing Options window
description, 18-29, 19-10example, 18-28, 19-9
product overviewdefinition, 1-2enhanced workflow, 1-6Oracle Public Sector Budgeting, 1-7overview, 1-2
auto-population, 1-5distribute pay amounts, 1-4distribution adjustments, 1-4effort reports, 1-4encumbrances, 1-4interfacing with other payroll and timecard
systems, 1-4labor distribution schedules, 1-3multiple organization, 1-5reconciliation reports, 1-5scheduling and distribution reports, 1-5summarize and transfer adjustments, 1-6
printing options, 1-7recovery processes, 1-6rollback processes, 1-6security, 1-7
profile optionssetup, 4-4
levels, 4-4values, 4-6
System Administration setup steps, 4-4Public Sector Budgeting, 1-7
Rreconciliation and control
definition, 20-2overview, 20-2
process, 20-2process, 20-2
Oracle and non-Oracle Payroll Sources, 20-2pre-generated distributions, 20-3
reconciliation and control reportsprocedure, 20-4
reconciliation and control reports procedure, 20-4recover summarize and transfer adjustments
process, 16-18region, Glossary-4report parameters, Glossary-4reports
Default Account Report parameterswindow, 19-18
definition, 19-3Distribution Adjustment Register, 16-7, 16-19Distribution History by Award Report
parameters window, 19-26Distribution History by Organization Report
parameters window, 19-28Distribution History by Project Report
parameters Window, 19-24Effort Certification Status (Aging) Report
description, 18-36example, 18-35
Effort Certification Status (Aging) Reportprocedure, 18-33
Employees Using Default Labor SchedulesReport parameters window, 19-8, 19-13
Generating Default Account Reportprocedure, 19-17
Generating Distribution History by AwardReport procedure, 19-25
Generating Distribution History by EmployeeReport procedure, 19-21
Generating Distribution History by OrganizationReport procedure, 19-27
Generating Distribution History by ProjectReport procedure, 19-23
Generating Employee Labor Schedule Reportprocedure, 19-12
Generating Employees Using Default SchedulesReport procedure, 19-6
Generating Organization Default Labor ScheduleReport procedure, 19-15
generating Suspense Account Reportprocedure, 19-19
Mass Print Effort Report, 18-6description, 18-32
Index-10

Mass Print Effort Report procedure, 18-30Organization Default Labor Schedule Report
parameters window, 19-16Organization Default Usage
Encumbrance, 17-7, 17-16overview, 19-3
Default Account, 19-4Distribution History by Award, 19-5Distribution History by Employee, 19-4Distribution History by Organization, 19-5Distribution History by Project, 19-4Employee Labor Schedule, 19-3Employees Using Default Labor
Schedules, 19-3Labor Schedules by Employee, 19-3Organization Default Labor Schedule, 19-4Suspense Account, 19-4
Printing Options windowdescription, 19-10example, 19-9
Suspense Account Report parameterswindow, 19-20
Suspense Charge Encumbrance, 17-6, 17-15Warning Report
description, 18-23example, 18-22
responsibility, Glossary-5retrieve distributions history
definition, 13-2Retrieve Distributions History procedure, 13-3Retrieve Distributions History process, 13-2retrieve encumbrance lines procedure, 17-14reversal, Glossary-5Review Effort Report window
description, 18-27example, 18-26
reviewing, approving, and rejecting effort reportprocedure, 18-24
roll back non-Oracle payroll procedure, 14-21roll back Oracle payroll import, 10-8rolling back distribution lines procedure, 11-7RULES window
description, 8-18example, 8-17
Ssalary basis, Glossary-5schedule line, Glossary-5schedule line period, Glossary-5Schedule Lines, Glossary-5schedule lines
viewing, 9-23Schedule Lines window
description, 9-19example, 9-14
Schedule Summary windowdescription, 9-27example, 9-26
scheduling hierarchydefinition, B-2diagram, B-7process, B-3
default labor schedule, B-4earnings element, B-5element group, B-4employee assignments, B-4global earnings element, B-5organization default account, B-3organization suspense account, B-3
Scheduling Summary, Glossary-5Setting Up Earnings Elements in Effort Reporting
procedure, 6-7Setting Up Effort Report Periods, 6-4setup
auto-population lookup procedure, 8-10begin date auto-fill procedure, 5-33by-pass table procedure, 8-23clearing account procedure, 5-41default encumbrance period definition
procedure, 7-8defining expenditure type auto-population rules
procedure, 8-13defining natural account auto-population
rules, 8-19earnings element groups procedure, 5-27earnings elements imported procedure, 5-20encumbrance creation options procedure, 7-14encumbrance earnings element selection
procedure, 7-11
Index-11

encumbrance payroll and assignment selectionprocedure, 7-5
encumbrance summarize optionsprocedure, 7-17
end date auto-fill procedure, 5-37global earnings element override
procedure, 5-23Organization Default Accounts procedure, 5-16Organization Default Labor Schedule
procedure, 5-12Organization Suspense Accounts
procedure, 5-8payroll sources procedure, 5-30
setup overviewlabor distribution
setup checklist, 3-3setup steps, 3-7
overview, 3-2summarize and transfer adjustments to GL and
GMS process, 16-17summarize and transfer encumbrances
process, 17-10summarize and transfer payroll distributions
definition, 12-2overview, 12-2
auto-population, 12-2process, 12-2
control reports, 12-4execute a prenamed procedure, 12-4recover summarize and transfer, 12-4select records, 12-2transfer lines and initiate import, 12-4
summarize distribution lines and transferauto-population, 12-2overview
process, 12-2process
prerequisites, 12-6recovering summarize and transfer
procedure, 12-8summarize distribution lines and transfer
procedure, 12-7suspense account, Glossary-5Suspense Account Report parameters
window, 19-20
Suspense Account Report procedure, 19-19Suspense Charge Encumbrance Report, 17-6Suspense Charge Encumbrance Report
procedure, 17-15System Administration setup
checklist, 4-3overview, 4-2profile options, 4-4
levels, 4-4values, 4-6
steps, 4-4system profile options, Glossary-6
Uupdate encumbrance lines process, 17-11
Vvalidation errors
labor scheduling, D-6validation rules
labor scheduling, D-3labor scheduling setup deletion, D-3labor scheduling setup end-dating, D-4
validation warningslabor scheduling, D-6
validationscreate distribution lines, D-6custom data entry, D-7other, D-7overview, D-2
viewing labor schedule lines procedure, 9-23
WWarning Report
description, 18-23example, 18-22
windowsAuto-Fill Expenditure Types, 8-15Auto-Fill Natural Account, 8-21Autopop Segment Setup (Autopop Segment
Definition, 8-8Begin Date Auto-fill Parameters, 5-34
Index-12

BYPASS (By-Pass Expenditure Types), 8-24Clearing Account, 5-42Create Ad Hoc Effort Report, 18-41Create Effort Report, 18-10Default Account Report, 19-18Distribution Adjustments, 16-10Distribution History by Award, 19-26Distribution History by Organization, 19-28Distribution History by Project Report, 19-24Earnings Element Groups, 5-28Earnings Elements Imported, 5-21Effort Certification Status (Aging), 18-34Employee Labor Schedules Report, 19-13Employees Using Default Labor Schedules, 19-8Encumbrance - Creation Options, 7-15Encumbrance - Default Encumbrance Period
Definition, 7-9Encumbrance - Earnings Element
Selection, 7-12Encumbrance - Earnings Element Selection
window, 7-13Encumbrance - Payroll and Assignment
Selection, 7-6Encumbrance - Summarize Options, 7-18End Date Auto-fill Parameters, 5-38Global Earnings Element Override, 5-25Labor Scheduling, 9-12Lookups (Auto Lookups), 8-11Maintenance of Non-Oracle Payroll
Sublines, 14-12Maintenance of Pre-generated Distribution Lines
Interface, 15-12Mass Print Effort Report, 18-31Monthly Schedule Summary, 9-28Organization Default Accounts, 5-18Organization Default Labor Schedule, 5-14,
19-16Organization Suspense Account, 5-10Payroll Period Schedule Summary, 9-31Payroll Sources, 5-31Printing Options, 18-28, 19-9Review Effort Report, 18-26RULES, 8-17Schedule Lines, 9-14Schedule Summary, 9-26
Suspense Account Report, 19-20Workflow
Effort Report Certificationdiagram, F-18
workflowapproving distribution adjustments
procedure, 16-16distribution adjustments
customizing, G-13item type, G-3overview, G-2process, G-5
Distribution Adjustments Approval Workflowdiagram, G-4
effort reportitem type, F-3overview, F-2process, F-10, F-19
effort report approvalcustomizing, F-17
Effort Report Approval and Certificationdiagram, F-9, G-4
effort report approval and certificationcustomizing, F-17, G-13process, F-10, G-5
Effort Report Approval Workflow diagram, F-9Effort Report Certification
diagram, F-18effort report certification
customizing, F-25process, F-19
reviewing effort report Workflowprocedure, 18-24
reviewing, approving, and certifying, 18-24
Zzero work day, Glossary-6
Index-13

Index-14