Embed Size (px)
Citation preview
1
ODT Screen Development
Oracle FLEXCUBE Enterprise Limits and Collateral Management ODT Screen Development
Oracle FLEXCUBE Universal Banking
Release 12.4.0.0.0
2
ODT Screen Development
Contents Contents ....................................................................................................................................................................... 2 1 Preface.................................................................................................................................................................. 7
1.1 Audience ......................................................................................................................................................... 7 1.2 Related Documents ......................................................................................................................................... 7
2 Introduction .......................................................................................................................................................... 8 2.1 How to use this Guide ..................................................................................................................................... 8
3 Overview of Screen Development for Oracle FLEXCUBE ................................................................................. 8 3.1 Radxml ............................................................................................................................................................ 9 3.2 Extensible Development.................................................................................................................................. 9 3.3 Design Steps .................................................................................................................................................... 9
Refer respective sections for detailed explanation of each step ......................................................................... 10 Saving Radxml ......................................................................................................................................................... 10 4 Header Information ............................................................................................................................................ 10 Fig 5.1 Oracle FLEXCUBE ODT Landing Page ......................................................................................................... 10 Fig 5.2 ODT Function Generation page highlighting the header section .................................................................... 11
4.1 Action ............................................................................................................................................................ 11 4.2 Function Id .................................................................................................................................................... 11 4.3 Save Xml Path ............................................................................................................................................... 12 4.4 Function Type ............................................................................................................................................... 13 4.5 Parent Function ............................................................................................................................................. 13 4.6 Parent Xml .................................................................................................................................................... 14 4.7 Function Category ......................................................................................................................................... 14 4.8 Header Template ........................................................................................................................................... 14 4.9 Footer Template ............................................................................................................................................ 14
5 Preferences ......................................................................................................................................................... 15 5.1 Module .......................................................................................................................................................... 16 5.2 Module Description ....................................................................................................................................... 16 5.3 Head office Function ..................................................................................................................................... 16 5.4 Logging Required .......................................................................................................................................... 17 5.5 Auto Authorization ........................................................................................................................................ 17 5.6 Tank Modification ......................................................................................................................................... 17 5.7 Field Log Required ........................................................................................................................................ 17 5.8 Excel Export Required .................................................................................................................................. 17 5.9 Multi Branch Access ..................................................................................................................................... 17 5.10 Txn Block Name ....................................................................................................................................... 18 5.11 Txn Field Name ........................................................................................................................................ 18 5.12 Branch Program ID ................................................................................................................................... 18 5.13 Process Code ............................................................................................................................................ 18 5.14 SVN Repository Url ................................................................................................................................. 18 5.15 Control String ........................................................................................................................................... 19
6 Data Sources ...................................................................................................................................................... 20 6.1 Creating a New Data Source ......................................................................................................................... 20
Fig 7.1 Adding a New Data Source ............................................................................................................................. 21 Fig 7.2 Add Table window ......................................................................................................................................... 22
6.1.1 Data Source Properties ....................................................................................................................... 22 Provide properties of the created data source. ..................................................................................................... 22
6.1.2 Data source columns ........................................................................................................................... 25 Fig 7.4 Adding Fields to created Data Source ....................................................................................................... 26 Column Name .......................................................................................................................................................... 26 This is an information column; tool will not allow the user to change the value. ........................................... 26
3
ODT Screen Development
Max Length ............................................................................................................................................................... 26 Data Type .................................................................................................................................................................. 26 Block Name ............................................................................................................................................................... 26 It is an information field, if the field is added to a block, that block name will be populated here. ............. 26 Field Name ................................................................................................................................................................ 26 Upload Table Column ............................................................................................................................................ 27 Not Required in Upload table ............................................................................................................................... 27
6.2 Guidelines and Best Practices ....................................................................................................................... 27 Follow the below practices while creating data sources for the screen. ............................................................ 28
6.3 Deletion of Data Sources ............................................................................................................................... 29 7 Data Blocks ........................................................................................................................................................ 30
7.1 Creation of a Data block ................................................................................................................................ 30 Fig 8.1 Adding a New Data Block ............................................................................................................................... 31
7.1.1 Data Block Properties ......................................................................................................................... 32 Provide properties for the created data block. ...................................................................................................... 32
7.1.2 Data Block Fields ................................................................................................................................ 35 Fig 8.8 Defining an Amount Data Block Field ............................................................................................................ 39 Fig 8.9 Defining Field as button .................................................................................................................................. 40 Fig 8.10 Defining Field as Checkbox .......................................................................................................................... 40 Fig 8.11 Defining Field as Date ................................................................................................................................... 41 Fig 8.12 Defining Field as Label ................................................................................................................................. 42 Fig 8.13 Defining Field as LOV .................................................................................................................................. 43 Fig 8.13 Defining Field as Radio button ...................................................................................................................... 44 Fig 8.14 Defining Field as Text Area .......................................................................................................................... 45 Both offline and online LOV can be maintained for the same field. .................................................................. 47 Offline Global LOV ................................................................................................................................................ 47 Defining of these LOV remains same as Global LOV, and functionality is same as offline LOV. ................ 47 Function Name: ........................................................................................................................................................ 52 Event Type: ............................................................................................................................................................... 52 Event Type can be ..................................................................................................................................................... 52
7.2 Guidelines and Best Practices ....................................................................................................................... 53 Note the following while attaching data sources to a data block ...................................................................... 53
7.3 Deletion of a Data Block ............................................................................................................................... 54 Deletion of Block Field: .......................................................................................................................................... 55 All the units needs to be regenerated after deletion of a data block or a block field ...................................... 56
7.4 Renaming of Data Block ............................................................................................................................... 56 Example: Summary data block if renamed will reflect in the summary node also....................................................... 57 Renaming Of Block Field: ...................................................................................................................................... 57 All the units need to be regenerated after renaming of a data block or a block field. .................................... 58 8 Screens ............................................................................................................................................................... 58
8.1 Creating a New Screen .................................................................................................................................. 58 8.1.1 Screen Properties ................................................................................................................................. 60 8.1.2 Tabs ..................................................................................................................................................... 62
Fig 9.4 Preview of a Sample Screen illustrating different portions of a Screen .......................................................... 63 For creating new tabs, developer can either ......................................................................................................... 63 i) Select add tab option from the right click menu of the screen portion (header/body)/footer) node. 63 ii) Clicking on add tab icon on the top right portion of screen portion screen. .......................................... 63 Fig 9.8 Preview of a Sample Screen illustrating Sections and Partitions .................................................................... 66 Fig 9.10 Adding Section window ................................................................................................................................ 67
8.2 Multiple Screens in Same Function Id .......................................................................................................... 69 While launching the function Id from FLEXCUBE; the main screen will be launched. ................................. 69 Fig 9.13 Preview of a Sample Screen illustrating Multiple Screens linked by Buttons ............................................... 69
8.3 Guidelines and Best Practices ....................................................................................................................... 70 While creating tabs, note the following ................................................................................................................. 70
4
ODT Screen Development
8.4 Deletion of Screens ....................................................................................................................................... 71 Any reference to the particular screen in any field set will also be reset to null. ............................................. 71 Tabs and Sections can also be deleted in a similar way. ..................................................................................... 71 Fig 9.15 Error Window during Deletion of Previous Release Elements ..................................................................... 72
8.4.1 Visible Flag .......................................................................................................................................... 72 8.5 Renaming Of Screens .................................................................................................................................... 73
Note that renaming of screens would be allowed only if they were created in the same release. ................ 73 Tabs and sections can be renamed in a similar way. ........................................................................................... 73 9 Field Sets ............................................................................................................................................................ 73
9.1 Creating a New Field Set ............................................................................................................................... 73 Fig 10.2 New Field Set window .................................................................................................................................. 74
9.1.1 Field Set Properties ............................................................................................................................. 75 Three options are there ........................................................................................................................................... 76 Note: Option for Manual selection of fields will not be provided. ............................................................... 76
9.1.2 Attaching Field to a Field Set .............................................................................................................. 77 Data Block Fields ..................................................................................................................................................... 77 Field Set Fields ......................................................................................................................................................... 78 Fig 10.4 Preview of a Sample Screen illustrating different Fields Sets ....................................................................... 78
9.2 Guidelines and Best Practices ....................................................................................................................... 78 9.3 Deletion of Field Set ..................................................................................................................................... 79
Note that deletion of field set is allowed only if the field set is created in the same release.......................... 79 9.3.1 Visible Flag .......................................................................................................................................... 79
9.4 Renaming of Field Set ................................................................................................................................... 80 10 LOVs .................................................................................................................................................................. 81
10.1 Defining LOVs ......................................................................................................................................... 81 Fig 11.2 Add LOV window ......................................................................................................................................... 82
10.1.1 LOV Name ....................................................................................................................................... 82 10.1.2 LOV Query ...................................................................................................................................... 82 10.1.3 LOV Column Details ....................................................................................................................... 82
Fig 11.3 Sample LOV Screen illustrating Reduction Fields ........................................................................................ 84 10.2 Attaching LOV to Block Field ................................................................................................................. 85
10.2.1 LOV name: ...................................................................................................................................... 85 10.2.2 Input By LOV Only: ........................................................................................................................ 85 10.2.3 LOV Validation Reqd: ..................................................................................................................... 85 10.2.4 Bind Variables: ............................................................................................................................... 85
Block Name: .............................................................................................................................................................. 85 Bind Variable: .......................................................................................................................................................... 85 Data Type: ................................................................................................................................................................. 85
10.2.5 Return Fields ................................................................................................................................... 86 Query Column: ......................................................................................................................................................... 86 Block Name: .............................................................................................................................................................. 86 Return Fld Name: ..................................................................................................................................................... 86 Select the data block field to which the result will be assigned. ........................................................................ 86 All the query Cols need not have a return field. .................................................................................................. 86
10.3 Guidelines and Best Practices ................................................................................................................... 87 10.4 Deletion and Renaming of LOVs ............................................................................................................. 87
11 Call Forms .......................................................................................................................................................... 87 11.1 Attaching Call Forms................................................................................................................................ 88
11.1.1 Function Id ...................................................................................................................................... 88 11.1.2 Parent Data Block ........................................................................................................................... 88 11.1.3 Relation Type .................................................................................................................................. 88 11.1.4 Call form Screen ............................................................................................................................. 88 11.1.5 Display Type ................................................................................................................................... 88 11.1.6 Active .............................................................................................................................................. 89 11.1.7 Screen Arguments ........................................................................................................................... 89
5
ODT Screen Development
Argument Name: ...................................................................................................................................................... 90 Source Block & Source Field: ................................................................................................................................ 90 Arg Value: ................................................................................................................................................................. 90
11.1.8 Dependent Fields ............................................................................................................................ 90 Fig 12.4 Maintaining Dependent Fields Information for a Call Form ......................................................................... 91
11.2 Guidelines and Best Practices ................................................................................................................... 91 12 Launch Forms .................................................................................................................................................... 92 Example: Screen for viewing accounting entries for a transaction ............................................................................. 92
12.1 Attaching Launch Forms .......................................................................................................................... 92 12.1.1 Function Id ...................................................................................................................................... 92 12.1.2 Active .............................................................................................................................................. 92 12.1.3 Screen Arguments ........................................................................................................................... 92
Argument Name: ...................................................................................................................................................... 93 Source Block & Source Field: ................................................................................................................................ 93 Arg Value: ................................................................................................................................................................. 93
12.1.4 Attaching Launch form to Main Screen Using Button .................................................................... 93 12.2 Guidelines and Best Practices ................................................................................................................... 94
13 Actions ............................................................................................................................................................... 94 13.1 Web Service Information .......................................................................................................................... 94
13.1.1 XSD Type identifier ......................................................................................................................... 94 13.1.2 Service name ................................................................................................................................... 94 13.1.3 Operation Id .................................................................................................................................... 95 13.1.4 Action Code ..................................................................................................................................... 95 13.1.5 Operation Code ............................................................................................................................... 95 13.1.6 Action Stage Type............................................................................................................................ 95
13.2 Amendable Field Information................................................................................................................... 96 13.2.1 All Records ...................................................................................................................................... 96 13.2.2 New Allowed ................................................................................................................................... 96 13.2.3 Delete Allowed ................................................................................................................................ 96 13.2.4 Mandatory ....................................................................................................................................... 96
Generated code also would perform validations based on the above preferences. ........................................ 97 Fig 14.2 Maintaining Amendable Fields Information ................................................................................................. 97 14 Summary ............................................................................................................................................................ 97 Fig 15.1 Summary Screen Properties .......................................................................................................................... 97
14.1 Designing Summary Screen ..................................................................................................................... 98 14.1.1 Title ................................................................................................................................................. 98 14.1.2 Data Block ...................................................................................................................................... 98 14.1.3 Data Source .................................................................................................................................... 98 14.1.4 Summary Type ................................................................................................................................. 98
Example: Bulk authorization screen ............................................................................................................................ 98 14.1.5 Summary Screen Size ...................................................................................................................... 98 14.1.6 Default Where Clause ..................................................................................................................... 98 14.1.7 Default Order By ............................................................................................................................. 98 14.1.8 Multi Branch Where Clause ............................................................................................................ 98 14.1.9 Main Summary Screen .................................................................................................................... 99 14.1.10 Summary Web Services Required .................................................................................................... 99 14.1.11 Data Block Fields............................................................................................................................ 99
Field name: ................................................................................................................................................................ 99 Query Field: .............................................................................................................................................................. 99 LOV Name: ............................................................................................................................................................... 99
14.1.12 Fields Ordering ............................................................................................................................. 100 14.1.13 Custom Buttons ............................................................................................................................. 102
Number of Rows: ................................................................................................................................................... 102 Number of Buttons/Row ...................................................................................................................................... 102 Number of Buttons per row can be maintained. ................................................................................................ 102
6
ODT Screen Development
Field Name: ............................................................................................................................................................. 102 Label: ........................................................................................................................................................................ 102 Function Name: ...................................................................................................................................................... 102
14.2 Guidelines and Best Practices ................................................................................................................. 103 15 Generation and Deployment of files ................................................................................................................ 103 Refer 05-ODT Generation, Deployment and Release of files.docx for detailed explanation. .............................. 103 16 Appendix .......................................................................................................................................................... 103
16.1 Screen Preview ....................................................................................................................................... 103 16.2 Locate Field ............................................................................................................................................ 105 16.3 Label Code Maintenance ........................................................................................................................ 106
16.3.1 Maintaining a New Label Code .................................................................................................... 107 16.3.2 Maintaining Missing labels ........................................................................................................... 107 16.3.3 Fetch All Label Codes for the Screen............................................................................................ 107 16.3.4 Updating an existing Label ........................................................................................................... 108
16.4 Search Feature ........................................................................................................................................ 108 16.5 Undo Feature .......................................................................................................................................... 108
ODT Screen Development .................................................................................................................................. 109
7
ODT Screen Development
1 Preface This document describes the process of FLEXCUBE Screen Development using Enterprise Limits and Collateral Management Development Workbench.
1.1 Audience This document is intended for FLEXCUBE Application developers/users that use ODT to develop various FLEXCUBE components.
To Use this manual, you need conceptual and working knowledge of the below:
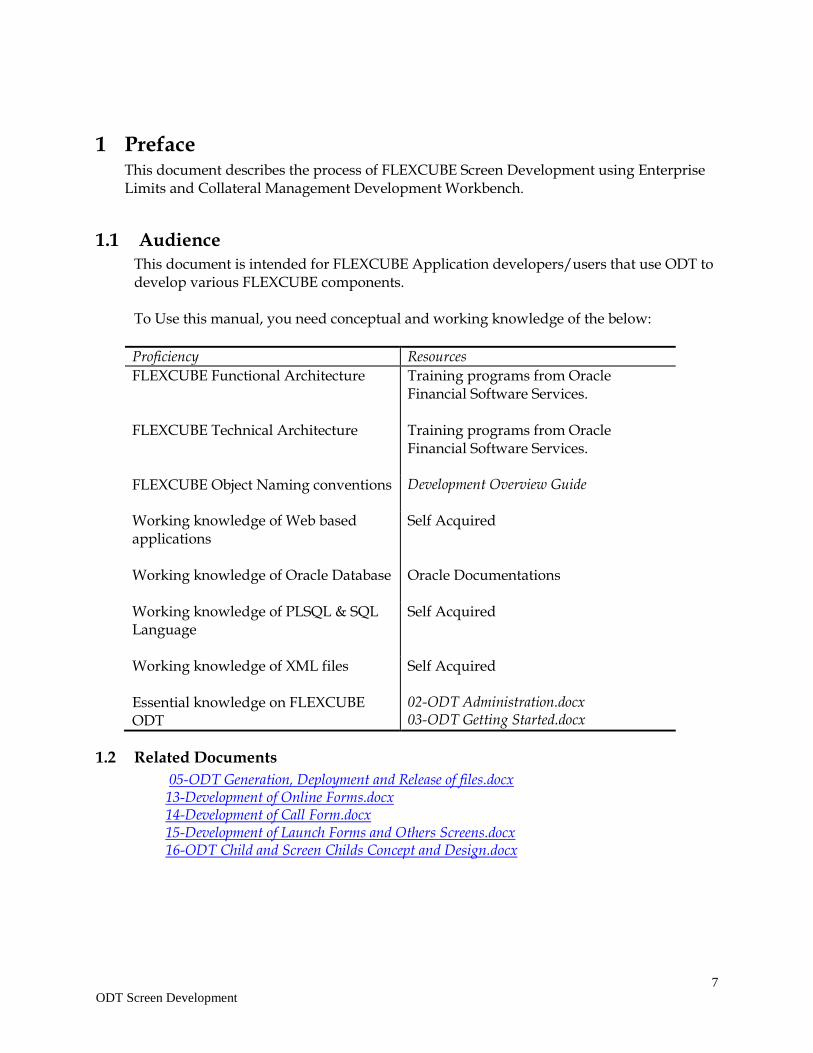
Proficiency Resources
FLEXCUBE Functional Architecture Training programs from Oracle Financial Software Services.
FLEXCUBE Technical Architecture Training programs from Oracle Financial Software Services.
FLEXCUBE Object Naming conventions Development Overview Guide
Working knowledge of Web based applications
Self Acquired
Working knowledge of Oracle Database
Oracle Documentations
Working knowledge of PLSQL & SQL Language
Self Acquired
Working knowledge of XML files Essential knowledge on FLEXCUBE ODT
Self Acquired 02-ODT Administration.docx 03-ODT Getting Started.docx
1.2 Related Documents
05-ODT Generation, Deployment and Release of files.docx 13-Development of Online Forms.docx 14-Development of Call Form.docx 15-Development of Launch Forms and Others Screens.docx 16-ODT Child and Screen Childs Concept and Design.docx
8
ODT Screen Development
2 Introduction
2.1 How to use this Guide
The information in this document includes:
Chapter 2 , “Introduction”
Chapter 3 , “Overview of Screen Development for Oracle FLEXCUBE”
Chapter 4 , “Header Information”
Chapter 5 , " Preferences”
Chapter 6, " Data Sources”
Chapter 7 , " Data Blocks”
Chapter 8 , " Screens”
Chapter 9 , " Field Sets”
Chapter 10 , " LOVs”
Chapter 11 , " Call Forms”
Chapter 12 , " Launch Forms”
Chapter 13 , " Actions”
Chapter 14 , "Summary”
Chapter 15 , " Generation and Deployment of Files”
Chapter 16 , " Appendix”
3 Overview of Screen Development for Oracle FLEXCUBE
Oracle FLEXCUBE ODT provides the developer with a user friendly console for designing and developing screens for Oracle FLEXCUBE.
ODT assist developers in designing screens with the capability of generating front end scripting files, PL/SQL Packages, Static data scripts, XSDs, Excel templates and html files.
This generated code performs validations and does some processing which is common across screens in FLEXCUBE; only the Business logic specific to the screen has to be added by the Developer in back end and front end units.
Example
Release Name: FC 11.3
Release Type: KERNEL, CLUSTER, CUSTOM
9
ODT Screen Development
ODT will generate all files and developers are supposed to add the business logic in designated units depending on
the Release Type.
3.1 Radxml ODT saves all the activities carried out by the developer in an xml file hereby referred to as radxml. Persistence of the screens is achieved through radxml. All the units required for the working of a screen can be generated from its radxml. If some changes are required on the screen in a future release, the same radxml can be loaded and changes can be done on this radxml. ODT can segregate the changes done on different releases and saves the radxml accordingly. Radxml will adhere to following naming convention Function Id name + _RAD.xml Example: FTDTRONL_RAD.xml
3.2 Extensible Development In extensible framework, any development on FLEXCUBE is classified as on any of the following stage (also referred to as release type)
i) KERNEL
This refers to the core product.
Example: FC 11.3
ii) CLUSTER
This refers to any region specific enhancements /developments done on top of the kernel
product. The changes done in a cluster pack will be non invasive to the kernel product.
Example: FC 11.3 India cluster
iii) CUSTOM
Any enhancements required by the customer/bank are done on this level. It will be non
invasive of the changes done in kernel and cluster packs
Example: Customizations for MODEL bank on FC 11.3 India cluster
ODT can segregate the changes done on different releases and saves the radxml accordingly. It generates the files depending on the release type and developers can add the business logic to the release type specific files. Thus the code remains non invasive of the existing code.
3.3 Design Steps Sequence of Steps to be followed while developing a screen in ODT is:
1. Identifying the data sources and their relations
2. Logically grouping the data sources into Data Blocks
3. Designing Screen Layout
4. Logically grouping the Block Fields into Field sets
10
ODT Screen Development
5. Attaching Call forms and launch forms if any
6. Defining LOVs
7. Designing Summary
8. Defining Actions
Refer respective sections for detailed explanation of each step Saving Radxml While Development, save radxml at constant intervals. Click on save icon in the top right for having the work. Radxml would be saved in the user directory maintained
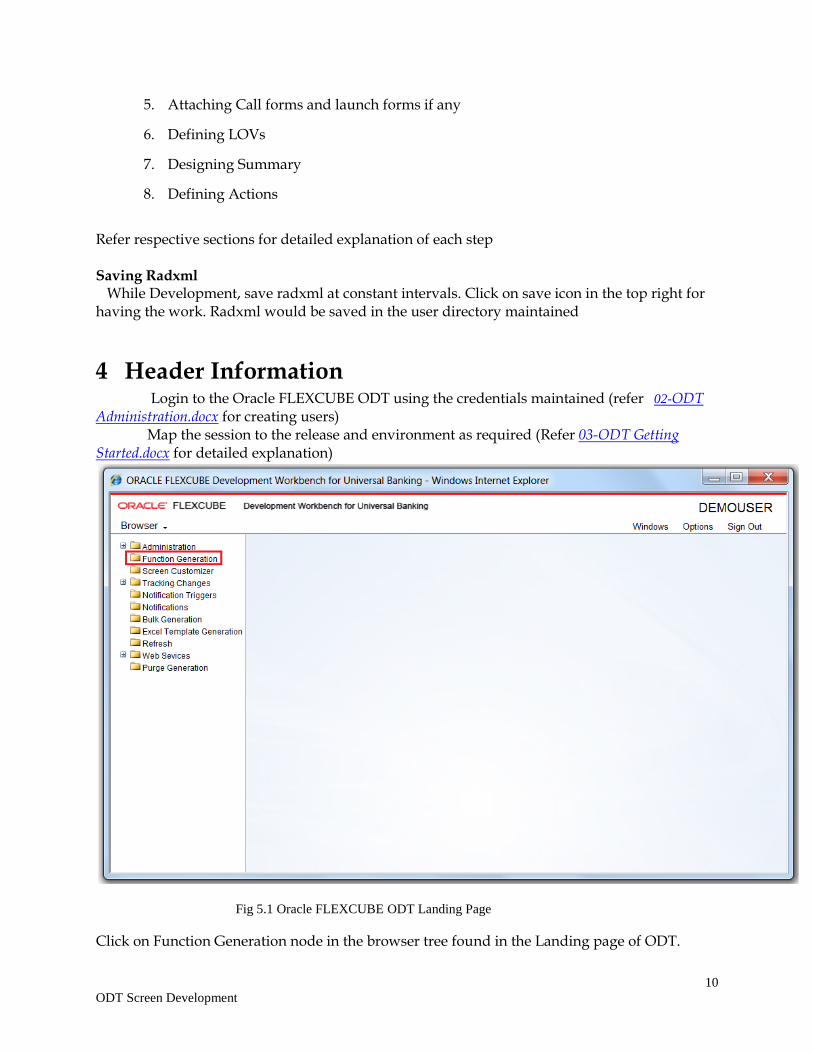
4 Header Information Login to the Oracle FLEXCUBE ODT using the credentials maintained (refer 02-ODT Administration.docx for creating users) Map the session to the release and environment as required (Refer 03-ODT Getting Started.docx for detailed explanation)
Fig 5.1 Oracle FLEXCUBE ODT Landing Page
Click on Function Generation node in the browser tree found in the Landing page of ODT.
11
ODT Screen Development
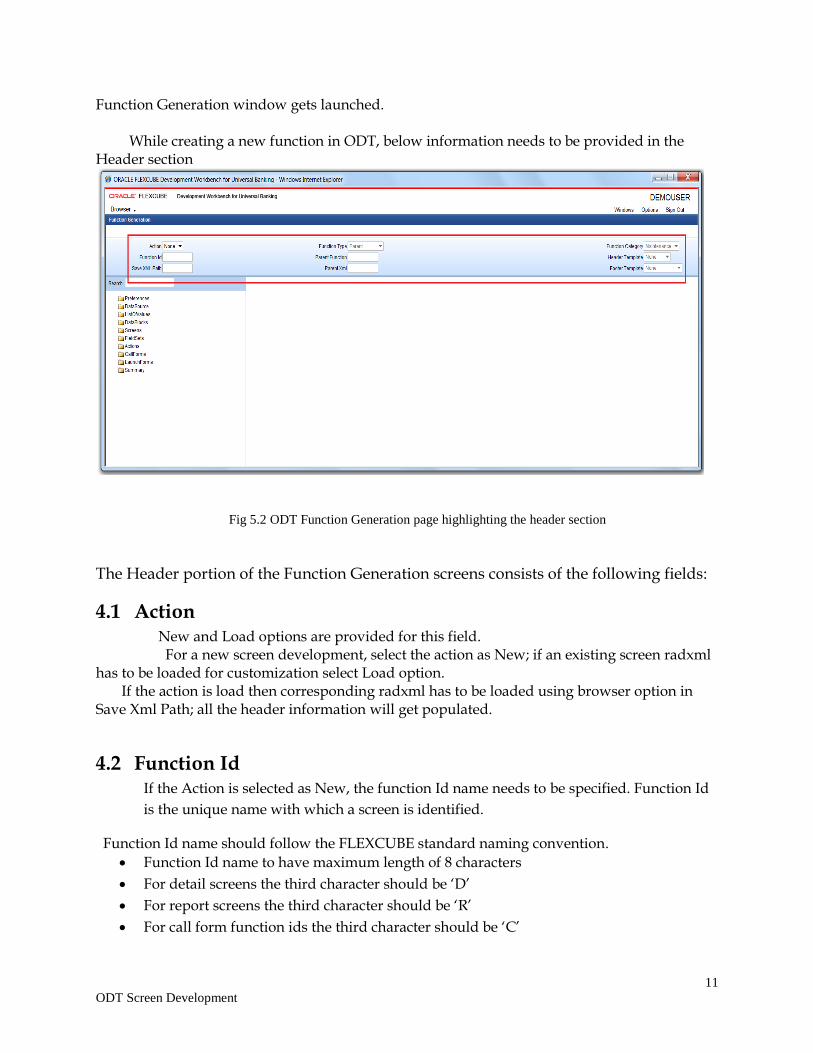
Function Generation window gets launched. While creating a new function in ODT, below information needs to be provided in the Header section
Fig 5.2 ODT Function Generation page highlighting the header section
The Header portion of the Function Generation screens consists of the following fields:
4.1 Action New and Load options are provided for this field.
For a new screen development, select the action as New; if an existing screen radxml has to be loaded for customization select Load option. If the action is load then corresponding radxml has to be loaded using browser option in Save Xml Path; all the header information will get populated.
4.2 Function Id If the Action is selected as New, the function Id name needs to be specified. Function Id
is the unique name with which a screen is identified.
Function Id name should follow the FLEXCUBE standard naming convention.
Function Id name to have maximum length of 8 characters
For detail screens the third character should be ‘D’
For report screens the third character should be ‘R’
For call form function ids the third character should be ‘C’
12
ODT Screen Development
First 2 characters should specify the module name for which the particular function id is
used(recommended)
Example:
For Funds Transfer Contract Input Screen name can be given as FTDTRONL
Here FT is the module (Funds Transfer), third letter D denotes it is a normal detail screen, and
Length of the function Id is 8.
If the action selected is Load, function Id field will be disabled. It will be picked up from
the radxml which is loaded.
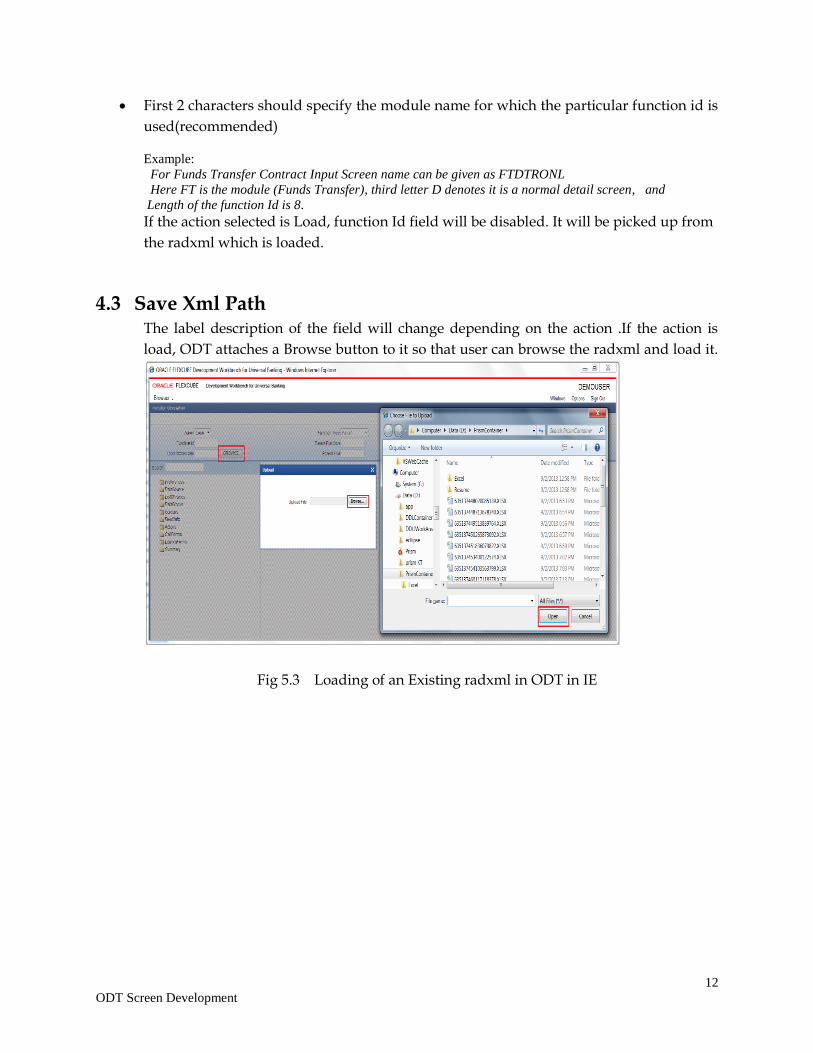
4.3 Save Xml Path The label description of the field will change depending on the action .If the action is
load, ODT attaches a Browse button to it so that user can browse the radxml and load it.
Fig 5.3 Loading of an Existing radxml in ODT in IE
13
ODT Screen Development
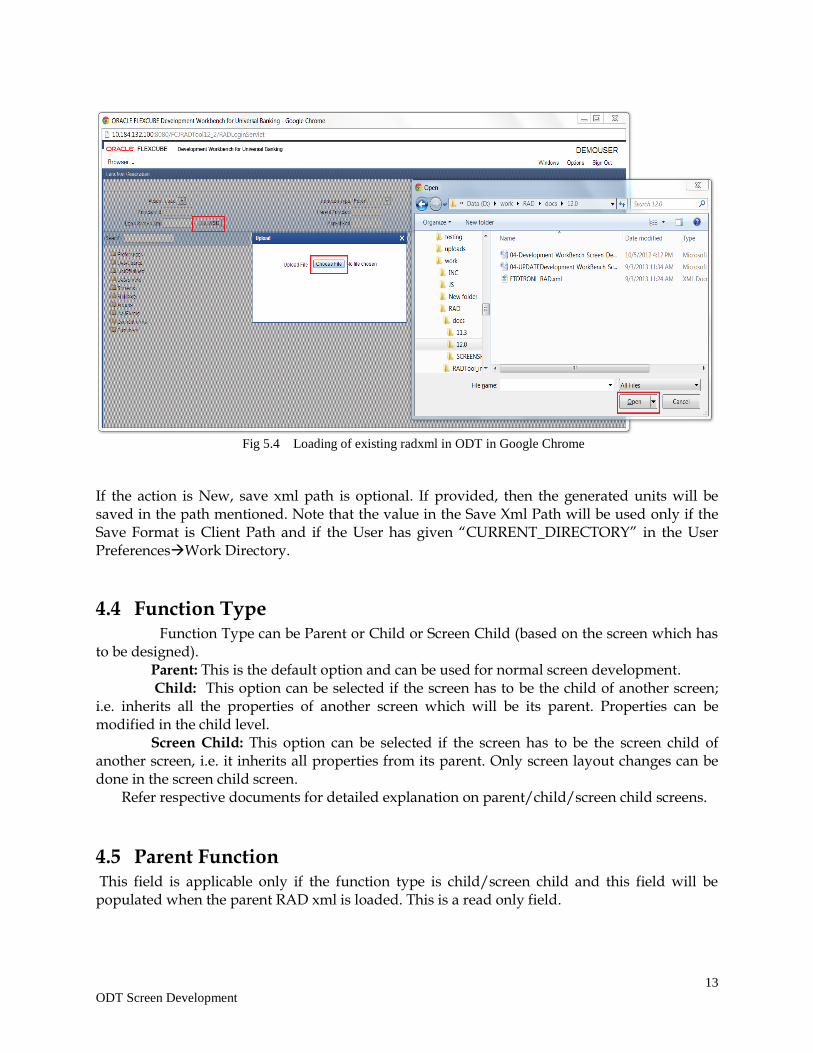
Fig 5.4 Loading of existing radxml in ODT in Google Chrome
If the action is New, save xml path is optional. If provided, then the generated units will be saved in the path mentioned. Note that the value in the Save Xml Path will be used only if the Save Format is Client Path and if the User has given “CURRENT_DIRECTORY” in the User PreferencesWork Directory.
4.4 Function Type Function Type can be Parent or Child or Screen Child (based on the screen which has to be designed). Parent: This is the default option and can be used for normal screen development. Child: This option can be selected if the screen has to be the child of another screen; i.e. inherits all the properties of another screen which will be its parent. Properties can be modified in the child level. Screen Child: This option can be selected if the screen has to be the screen child of another screen, i.e. it inherits all properties from its parent. Only screen layout changes can be done in the screen child screen. Refer respective documents for detailed explanation on parent/child/screen child screens.
4.5 Parent Function This field is applicable only if the function type is child/screen child and this field will be populated when the parent RAD xml is loaded. This is a read only field.
14
ODT Screen Development
4.6 Parent Xml This field is also applicable only if the Function type is child/screen child. If the Function Type is child/screen child user has to load the radxml of the Parent Function using browse button provided to this field. It is non editable field if the action is “Load”.
4.7 Function Category Provide Function category depending on the type of screen being developed. ODT provides the following options:
Maintenance: These screens are typically used to maintain static data used across the
system. These screens include product definition function as well.
Example: Branch Parameters Maintenance
Transaction: These screens are typically used to capture contract related data. Any
operations related to contracts are performed in these screens
Example: Funds Transfer Contract Input screen
Report: These screens are used to capture data required to generate a BI Publisher
canned reports.
Example: General Ledger balance report
Summary: If only query operation is required for the particular function Id, then
function category can be selected as Summary.
Others: If developer feels that existing handles provided in maintenance/transaction
screens in extensible framework is inadequate (or not necessary) for the screen; screen
can be designed as others. Note that all business logic would have to be manually
written by the developer for others screen.
4.8 Header Template A template can be selected for header. The following options are provided. None: This is the default header and should be used for all screens except workflow screens. Process: This template can be selected for workflow screens. The following Fields will be added to the header section as part of this template. 1) Workflow Reference
2) Priority
4.9 Footer Template A template can be selected for footer. The following options are provided.
None: This is the default value
Maint Audit: This template can be used for maintenance screens. Ensure that master
data source has the standard audit columns.
15
ODT Screen Development
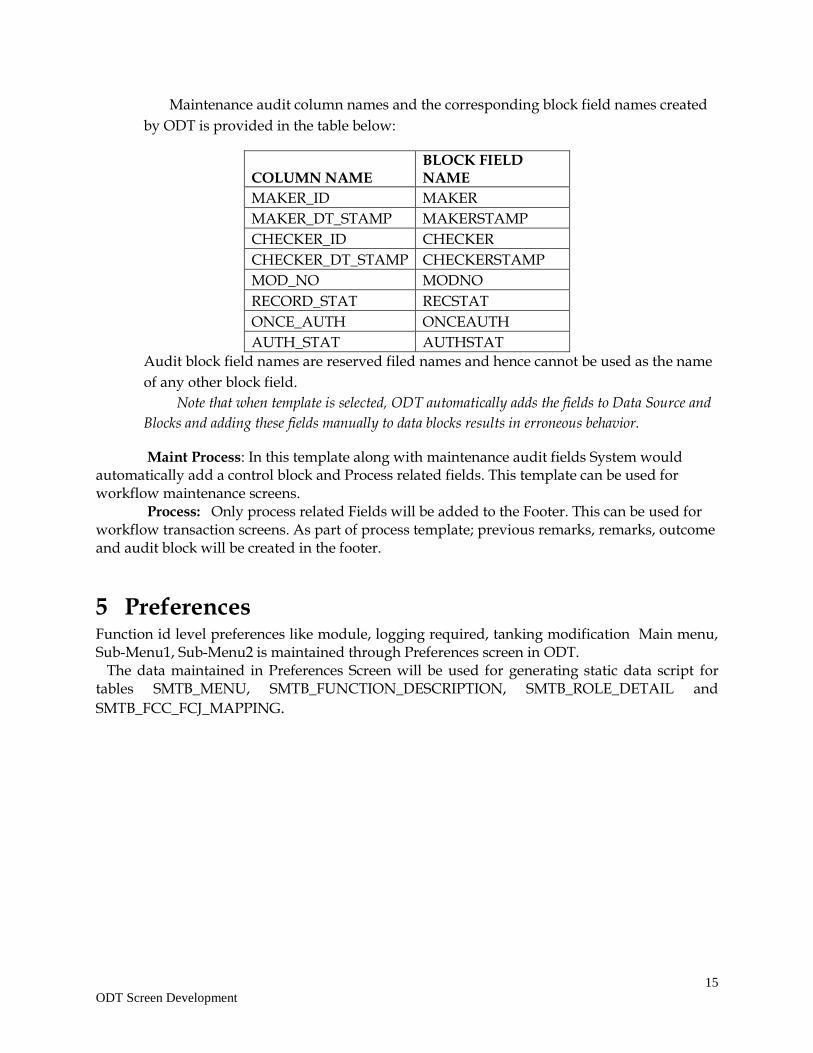
Maintenance audit column names and the corresponding block field names created
by ODT is provided in the table below:
COLUMN NAME BLOCK FIELD NAME
MAKER_ID MAKER
MAKER_DT_STAMP MAKERSTAMP
CHECKER_ID CHECKER
CHECKER_DT_STAMP CHECKERSTAMP
MOD_NO MODNO
RECORD_STAT RECSTAT
ONCE_AUTH ONCEAUTH
AUTH_STAT AUTHSTAT
Audit block field names are reserved filed names and hence cannot be used as the name
of any other block field.
Note that when template is selected, ODT automatically adds the fields to Data Source and
Blocks and adding these fields manually to data blocks results in erroneous behavior.
Maint Process: In this template along with maintenance audit fields System would automatically add a control block and Process related fields. This template can be used for workflow maintenance screens. Process: Only process related Fields will be added to the Footer. This can be used for workflow transaction screens. As part of process template; previous remarks, remarks, outcome and audit block will be created in the footer.
5 Preferences Function id level preferences like module, logging required, tanking modification Main menu, Sub-Menu1, Sub-Menu2 is maintained through Preferences screen in ODT. The data maintained in Preferences Screen will be used for generating static data script for tables SMTB_MENU, SMTB_FUNCTION_DESCRIPTION, SMTB_ROLE_DETAIL and
SMTB_FCC_FCJ_MAPPING.
16
ODT Screen Development
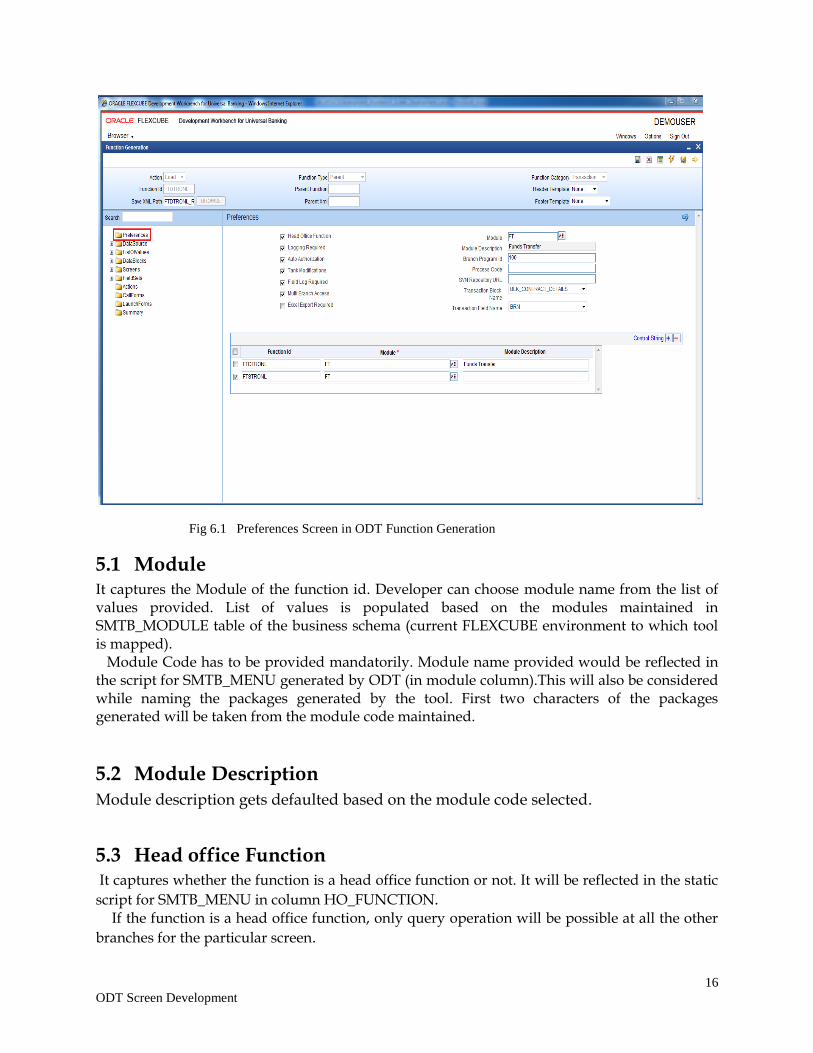
Fig 6.1 Preferences Screen in ODT Function Generation
5.1 Module It captures the Module of the function id. Developer can choose module name from the list of values provided. List of values is populated based on the modules maintained in SMTB_MODULE table of the business schema (current FLEXCUBE environment to which tool is mapped). Module Code has to be provided mandatorily. Module name provided would be reflected in the script for SMTB_MENU generated by ODT (in module column).This will also be considered while naming the packages generated by the tool. First two characters of the packages generated will be taken from the module code maintained.
5.2 Module Description Module description gets defaulted based on the module code selected.
5.3 Head office Function It captures whether the function is a head office function or not. It will be reflected in the static
script for SMTB_MENU in column HO_FUNCTION. If the function is a head office function, only query operation will be possible at all the other
branches for the particular screen.
17
ODT Screen Development
5.4 Logging Required It captures whether logging is required for the function or not. This will also be reflected in script generated for SMTB_MENU (column LOGGING_REQD). If this option is selected, all the request and response for the functionId will be logged in CSTB_MSG_LOG. This is used for View Change option.
5.5 Auto Authorization It captures whether Auto Authorization is allowed for the function or not. This will also be reflected in script generated for SMTB_MENU (column AUTO_AUTH). Note that auto authorization is possible only if it is allowed at function id level, user level and the branch level.
5.6 Tank Modification It captures whether modification to be tanked for the function or not. This will be reflected in TANK_MODIFICATIONS column of SMTB_MENU table script. If tank modification is enabled, then the record in that screen would be logged to logging tables and taken up for processing (untanking) in later stage during EOD operations. Currently this is applicable only for maintenance screens.
5.7 Field Log Required It captures whether field Logging is required for the function or not. This will be reflected in the FIELD_LOG_REQD column in SMTB_MENU. If field log required is enabled, then all operations on the screen will be logged to logging tables (STTB_FIELD_LOG.STTB_RECORD_LOG etc). Currently this is applicable only for maintenance screens.
5.8 Excel Export Required This field captures whether option to export records from summary screen to excel is required
5.9 Multi Branch Access It captures whether multi branch access is required for the function Id or not. This will be reflected in MULTIBRANCH_ACCESS column of SMTB_MENU table script generated. If multi branch access is allowed, then records of different branches for the screen can be modified from a single branch.
18
ODT Screen Development
5.10 Txn Block Name It captures the transaction Block Name. This is applicable only if multi branch access is allowed for the screen. Select the block from the select list which contains the field for branch code
5.11 Txn Field Name It captures the transaction Field Name. This is applicable only if multi branch access is allowed for the screen. Select list provides all the block fields for the transaction block selected. Choose the field for branch code from the list. Txn Block Name and Txn Field Name will be reflected in the system JavaScript file (SYS js) generated by ODT. Developer has to code for querying the records based on the branch code value of this field.
5.12 Branch Program ID It captures branch program id for the function.
5.13 Process Code This can be used to map which process needs to be initiated during screen launch. This is used for workflow screens.
5.14 SVN Repository Url This is applicable only if integration to SVN (version control tool) is required. Path of the SVN repository till the module needs to be provided in this field. In the multiple entry block, developer needs to maintain all the related function Id names for the screen. ODT will default the name of the function Id to the first row of the multiple entry along with the module maintained earlier. If any other function id is required for the particular screen, developer has to add the row. Example: For FTDTRONL screen, developer designs a detail screen. He also wants to add one summary screen to
the screen as well as gateway function Id for web services.
For this, he can add two new columns FTSTRONL (for summary) and FTGTRONL (for gateway operations) to
the block as shown below.
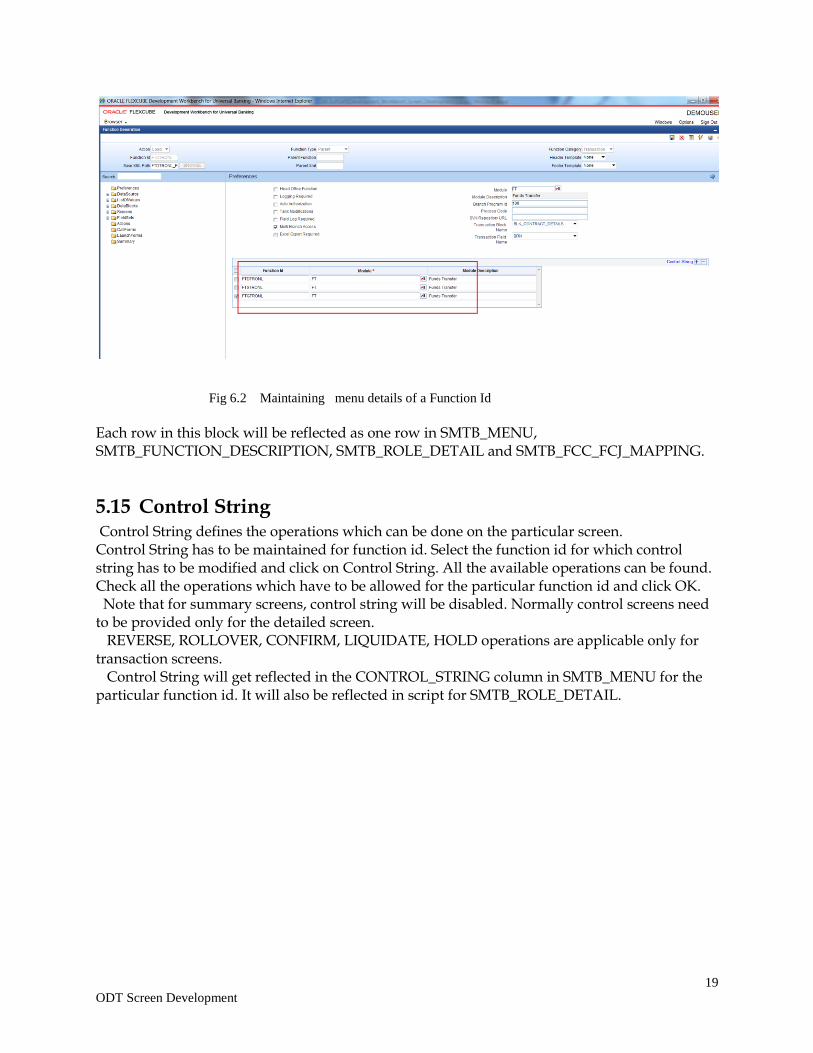
19
ODT Screen Development
Fig 6.2 Maintaining menu details of a Function Id
Each row in this block will be reflected as one row in SMTB_MENU, SMTB_FUNCTION_DESCRIPTION, SMTB_ROLE_DETAIL and SMTB_FCC_FCJ_MAPPING.
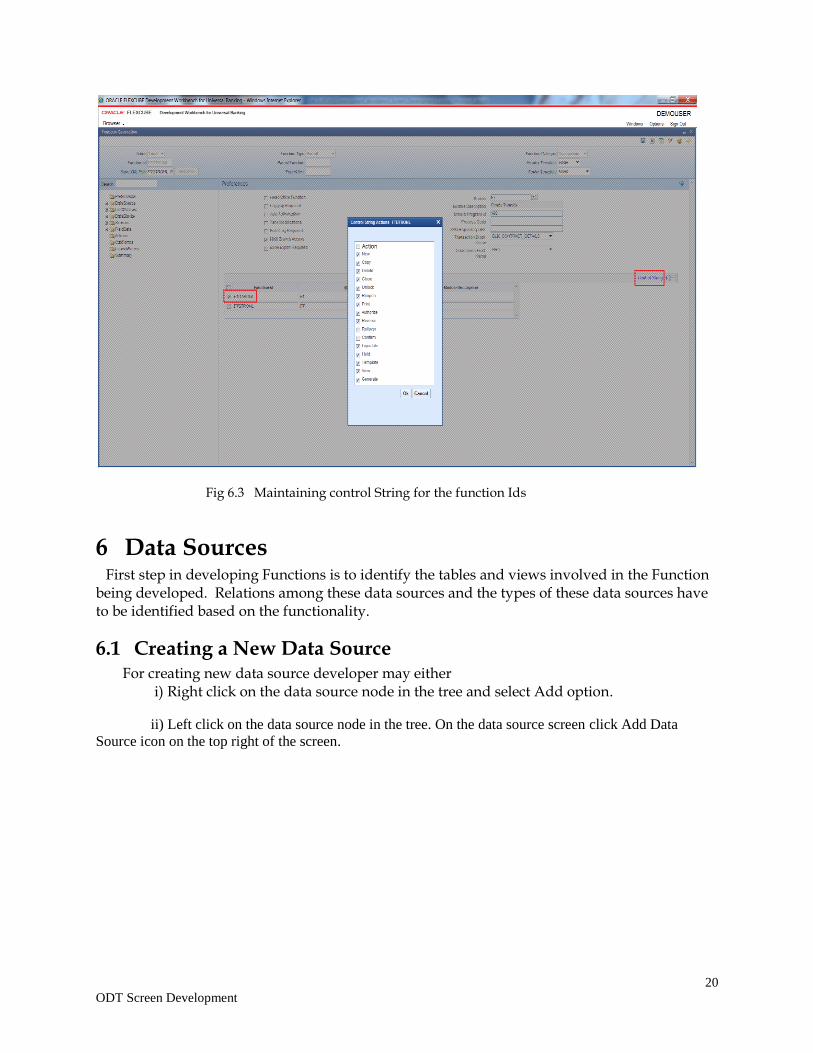
5.15 Control String Control String defines the operations which can be done on the particular screen. Control String has to be maintained for function id. Select the function id for which control string has to be modified and click on Control String. All the available operations can be found. Check all the operations which have to be allowed for the particular function id and click OK. Note that for summary screens, control string will be disabled. Normally control screens need to be provided only for the detailed screen. REVERSE, ROLLOVER, CONFIRM, LIQUIDATE, HOLD operations are applicable only for transaction screens. Control String will get reflected in the CONTROL_STRING column in SMTB_MENU for the particular function id. It will also be reflected in script for SMTB_ROLE_DETAIL.
20
ODT Screen Development
Fig 6.3 Maintaining control String for the function Ids
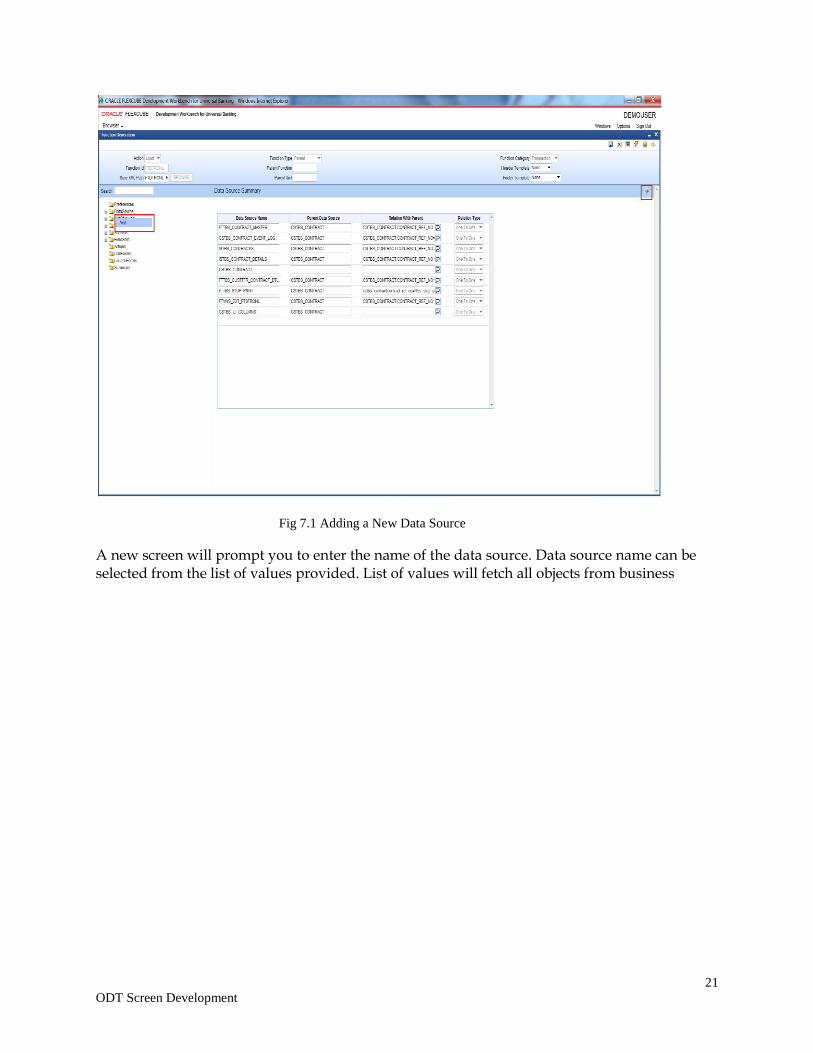
6 Data Sources First step in developing Functions is to identify the tables and views involved in the Function being developed. Relations among these data sources and the types of these data sources have to be identified based on the functionality.
6.1 Creating a New Data Source For creating new data source developer may either i) Right click on the data source node in the tree and select Add option.
ii) Left click on the data source node in the tree. On the data source screen click Add Data
Source icon on the top right of the screen.
21
ODT Screen Development
Fig 7.1 Adding a New Data Source
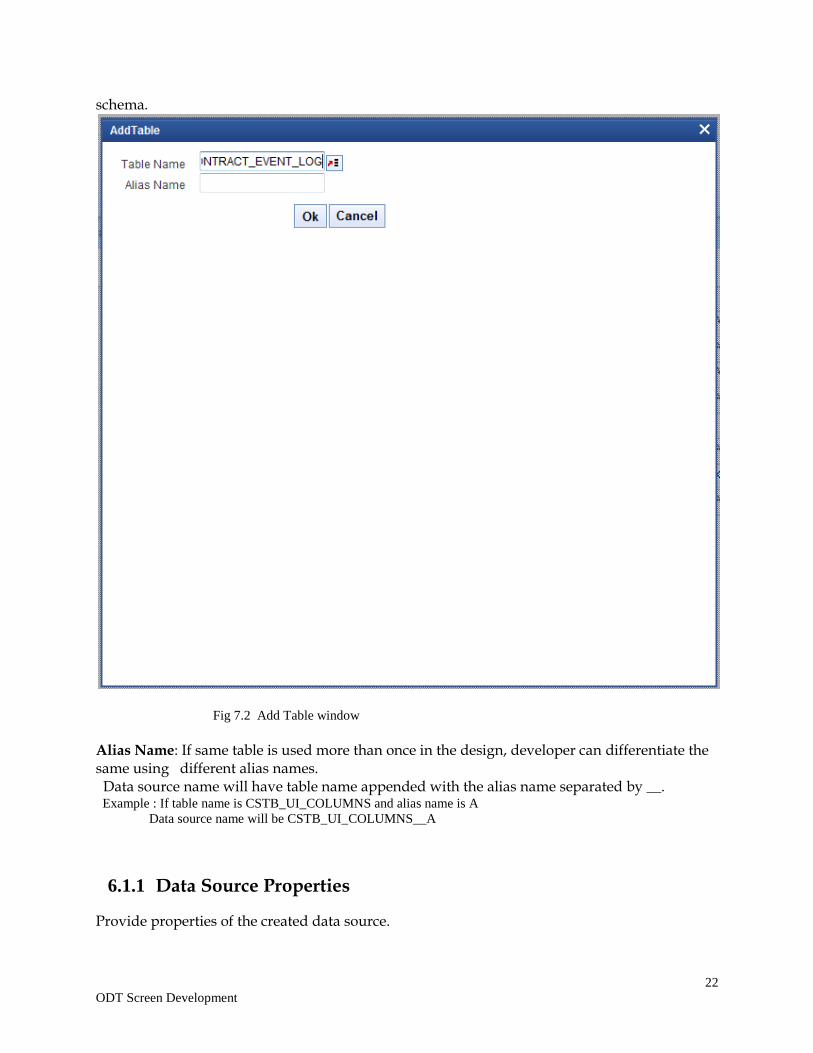
A new screen will prompt you to enter the name of the data source. Data source name can be selected from the list of values provided. List of values will fetch all objects from business
22
ODT Screen Development
schema.
Fig 7.2 Add Table window Alias Name: If same table is used more than once in the design, developer can differentiate the same using different alias names. Data source name will have table name appended with the alias name separated by __. Example : If table name is CSTB_UI_COLUMNS and alias name is A
Data source name will be CSTB_UI_COLUMNS__A
6.1.1 Data Source Properties
Provide properties of the created data source.
23
ODT Screen Development
6.1.1.1 Data Source This is a read only field. Data source name will be defaulted to this field.
6.1.1.2 Master This filed identifies whether this data source is the master data source for the screen.
Every screen should have one (and only one) master data source.
6.1.1.3 Relation Type Relation type can be selected for the selected data source with the parent, “One To One”
or “One To Many“. The relation should be one-to-many if the parent data source is Single
Record entry and child data source is Multi Record.
6.1.1.4 Multi Record This field tells about the type of data source in the screen, whether it is multiple Entry
record or the single Entry Record data source,
Select the field value “Yes” or “No” accordingly. Master Data source cannot be of multi
record type.
6.1.1.5 Pk Cols & Pk Type PK Cols and PK types are mandatory.
Provide the Primary key columns of the data source separated by tilde (~) in PK Col field
and its corresponding data types in PK Col field(also separated by tilde)
Example: If Pk Cols are CONTRACT_REF_NO (VARCHAR2) and VERSION_NO(NUMBER),
Pk Col can be provided as CONTRACT_REF_NO~VERSION_NO and
Pk Type can be provided as VARCHAR2~NUMBER
6.1.1.6 Parent Parent data source has to be mentioned for all data sources except the master data source. Select List provides all the data sources created till that point .Developer can choose the data source from the list. For master data source, parent should not be provided.
6.1.1.7 Relation Relation with parent has to be specified for all data sources except master data source. Keep the parent data source in the left side of the relation. Example:
If parent is STTM_CUSTOMER and child is STTM_CUST_ACCOUNT; and relationship is based on
CUSTOMER_NO and BRANCH_CODE, it has to be provided as
STTM_CUSTOMER.CUSTOMER_NO= STTM_CUST_ACCOUNT.CUSTOMER_NO AND
STTM_CUSTOMER.BRANCH_CODE= STTM_CUST_ACCOUNT.BRANCH_CODE
Note that relationship can be only with parent maintained and the current data source; a third table cannot be introduced in the relationship. Only simple Relational operators and ‘equal to’ can be used in the relationship.
24
ODT Screen Development
6.1.1.8 Where Clause This is an optional field. If only selected records of a particular data source is required, then where clause can be provided. Keyword WHERE need not be provided. Example: Where clause can be given as BRANCH_CODE=GLOBAL.CURRENT_BRANCH
The values of where clause field will be used in generating the query statements for current data source. During query of the record, this clause will be added in fn_sys_query of the generated main package
6.1.1.9 Default Order By This is an optional field. This can be provided for multi record data sources. While querying they would be fetched in the order by clause provided. Keyword ORDER BY is not required. Example: If we want to order by EVNET_SEQ_NO, default order by can be provided as EVENT_SEQ_NO
6.1.1.10 Type Data source can be selected depending on the Type requirement of the screen design. Options provided are:
Normal: Data from the screen will be persisted in the table. Code for persistence would be available in generated package
Query: The data source can be used for only querying the data; ODT will generate packages without insert or update statements on this data source.
InOnly : Tool will generate the packages without insert and update on this data .Request xml will contain the data source while response won’t contain it.
Summary: This data source can be used for summary and this data source will not be considered while generating the packages.
6.1.1.11 Mandatory If at least one record has to be provided for this data source, then the data source can be provided as mandatory.
6.1.1.12 Upload Table If adapter upload is required for the functionId, then data source should be mapped to its corresponding upload table.
25
ODT Screen Development
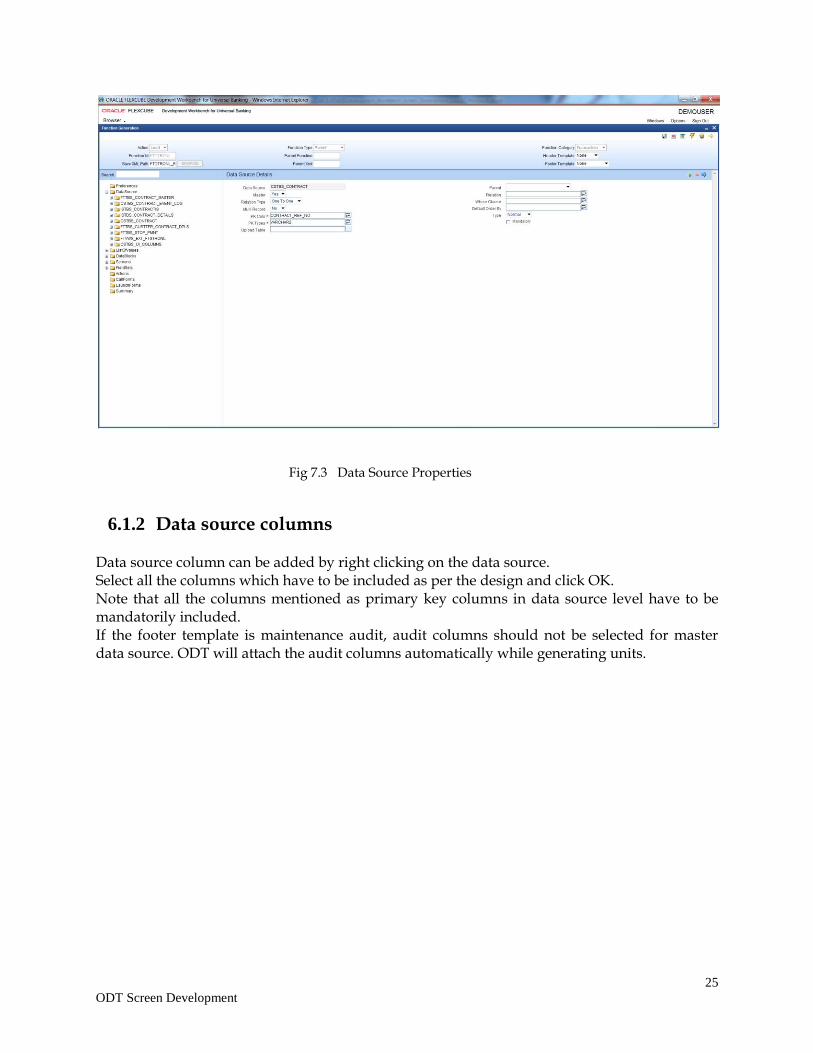
Fig 7.3 Data Source Properties
6.1.2 Data source columns Data source column can be added by right clicking on the data source. Select all the columns which have to be included as per the design and click OK. Note that all the columns mentioned as primary key columns in data source level have to be mandatorily included. If the footer template is maintenance audit, audit columns should not be selected for master data source. ODT will attach the audit columns automatically while generating units.
26
ODT Screen Development
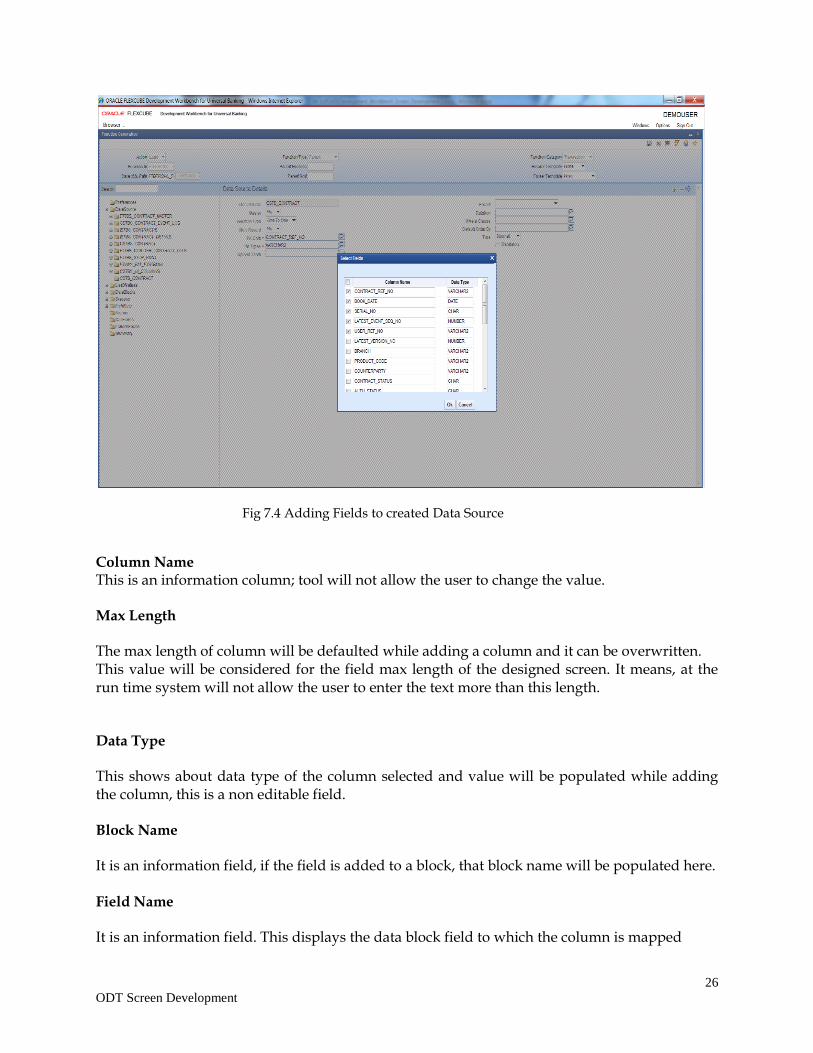
Fig 7.4 Adding Fields to created Data Source
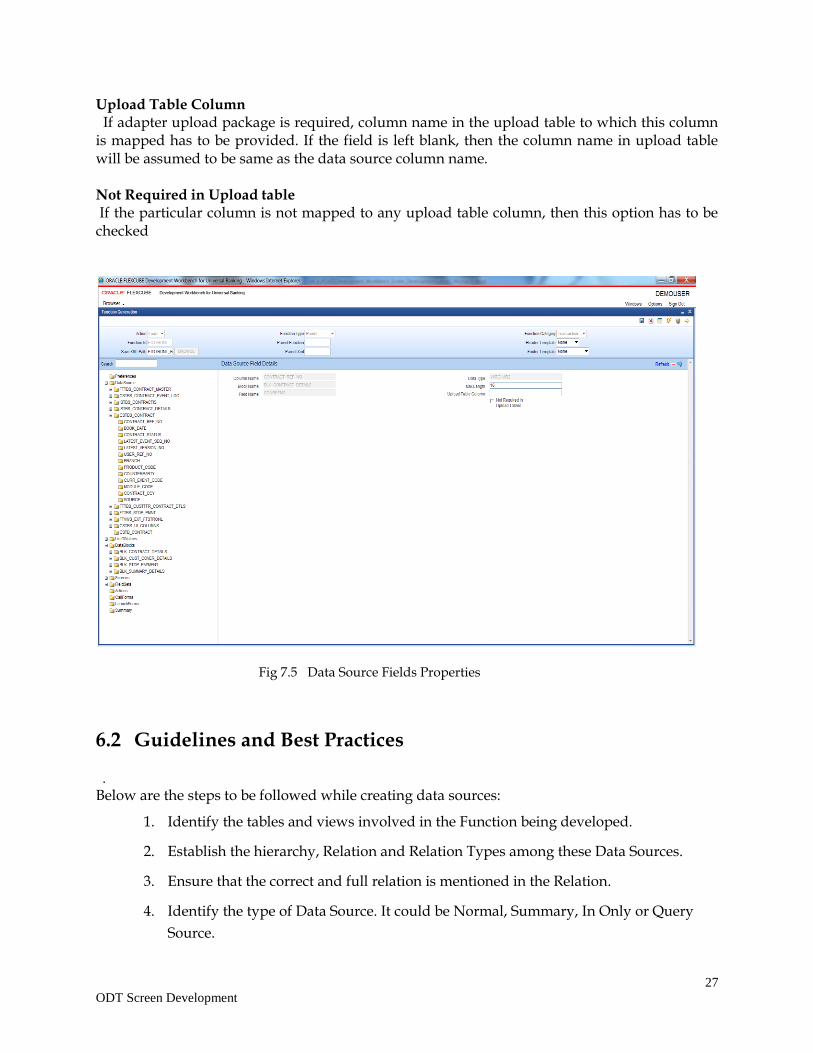
Column Name This is an information column; tool will not allow the user to change the value. Max Length The max length of column will be defaulted while adding a column and it can be overwritten. This value will be considered for the field max length of the designed screen. It means, at the run time system will not allow the user to enter the text more than this length. Data Type This shows about data type of the column selected and value will be populated while adding the column, this is a non editable field. Block Name It is an information field, if the field is added to a block, that block name will be populated here. Field Name It is an information field. This displays the data block field to which the column is mapped
27
ODT Screen Development
Upload Table Column If adapter upload package is required, column name in the upload table to which this column is mapped has to be provided. If the field is left blank, then the column name in upload table will be assumed to be same as the data source column name. Not Required in Upload table If the particular column is not mapped to any upload table column, then this option has to be checked
Fig 7.5 Data Source Fields Properties
6.2 Guidelines and Best Practices
.
Below are the steps to be followed while creating data sources:
1. Identify the tables and views involved in the Function being developed.
2. Establish the hierarchy, Relation and Relation Types among these Data Sources.
3. Ensure that the correct and full relation is mentioned in the Relation.
4. Identify the type of Data Source. It could be Normal, Summary, In Only or Query
Source.

28
ODT Screen Development
5. Ensure that there is only one master Data source for the Function.
6. Based on the number of records that the data source might have for the functionId,
set Multi Record to Y/N.
7. System automatically defaults the PK Column information from STTB_PK_COLS
while adding the data source. Based on the specific requirement of the function ID
this can be modified.
8. If the data source is mandatory, i.e. if it is a multi record data source and have to
have at least one record or if it’s a single record data source and is mandatory to
have the record, check the mandatory flag.
9. In case there is a need to have a default where clause or order by clause, mention the
same in the respective fields.
Follow the below practices while creating data sources for the screen.
Table/View/Synonym Names should adhere to the standard FLEXCUBE naming
conventions.
Tables or views should have 5th character as _ (underscore). Name should not have
underscores together (example: ACTB_TEST__ODT is wrong).
Synonyms should have an ‘S’ appended before the first underscore of its table/view
name.
Example: Synonym for ACTB_DAILY_LOG should be ACTBS_DAILY_LOG
Avoid using views as much as possible. Don’t create a view data source with type as
NORMAL. This will result in insert statements on the view in the packages generated.
Views can be used for query only purposes, i.e. select the data source type as query for
views. These can be used for designing summary data sources or a query block.
PK Cols and PK types need not be the same as the primary key of the tables. It depends
on the design logic.
If the data source is designed with relation type as 1:N with its parent ,then it should
have at least one more Pk col than its parent (assuming relationship is based on pk cols).
Example: Assume STTM_CUSTOMER is the parent data source (1:1) with Pk col as CUSTOMER_NO; STTM_CUST_ACCOUNT is the child of STTM_CUSTOMER with 1: N relation with parent .Here STTM_CUST_ACCOUNT should have at least 2 Pk Cols so that each record of the multi record can be uniquely distinguished. CUSTOMER_NO and ACCOUNT_NO can be provided as Pk col so that each record can be identified with its account no. Relationship can be STTM_CUSTOMER.CUSTOMER_NO= STTM_CUST_ACCOUNT.CUSTOMER_NO
Parent data source has to be above all of its child data sources in the tree.
29
ODT Screen Development
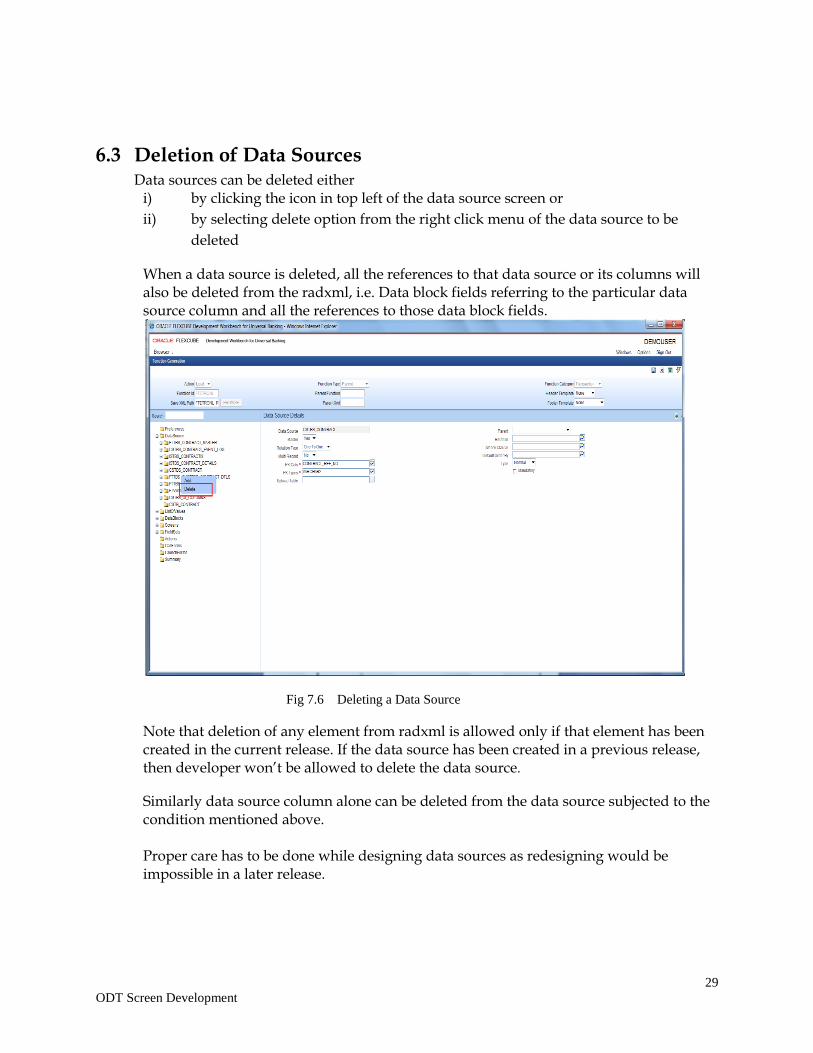
6.3 Deletion of Data Sources Data sources can be deleted either
i) by clicking the icon in top left of the data source screen or
ii) by selecting delete option from the right click menu of the data source to be
deleted
When a data source is deleted, all the references to that data source or its columns will also be deleted from the radxml, i.e. Data block fields referring to the particular data source column and all the references to those data block fields.
Fig 7.6 Deleting a Data Source
Note that deletion of any element from radxml is allowed only if that element has been created in the current release. If the data source has been created in a previous release, then developer won’t be allowed to delete the data source.
Similarly data source column alone can be deleted from the data source subjected to the condition mentioned above. Proper care has to be done while designing data sources as redesigning would be impossible in a later release.
30
ODT Screen Development
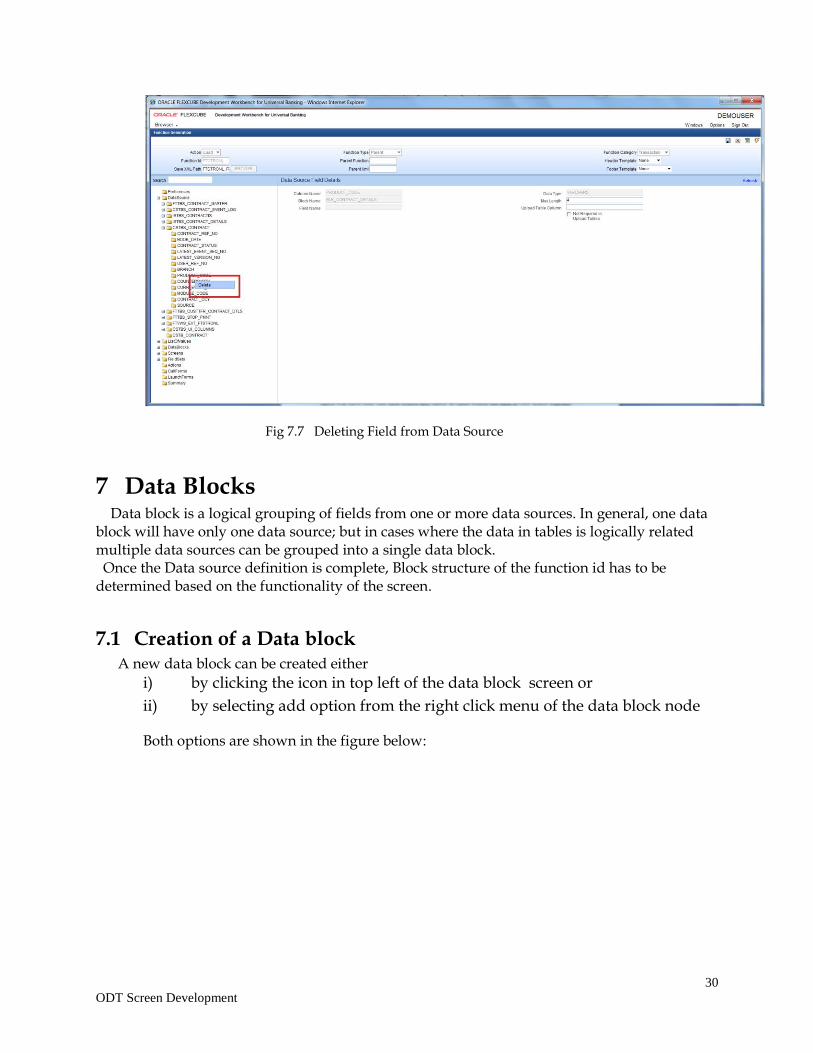
Fig 7.7 Deleting Field from Data Source
7 Data Blocks Data block is a logical grouping of fields from one or more data sources. In general, one data block will have only one data source; but in cases where the data in tables is logically related multiple data sources can be grouped into a single data block. Once the Data source definition is complete, Block structure of the function id has to be determined based on the functionality of the screen.
7.1 Creation of a Data block A new data block can be created either
i) by clicking the icon in top left of the data block screen or
ii) by selecting add option from the right click menu of the data block node
Both options are shown in the figure below:
31
ODT Screen Development
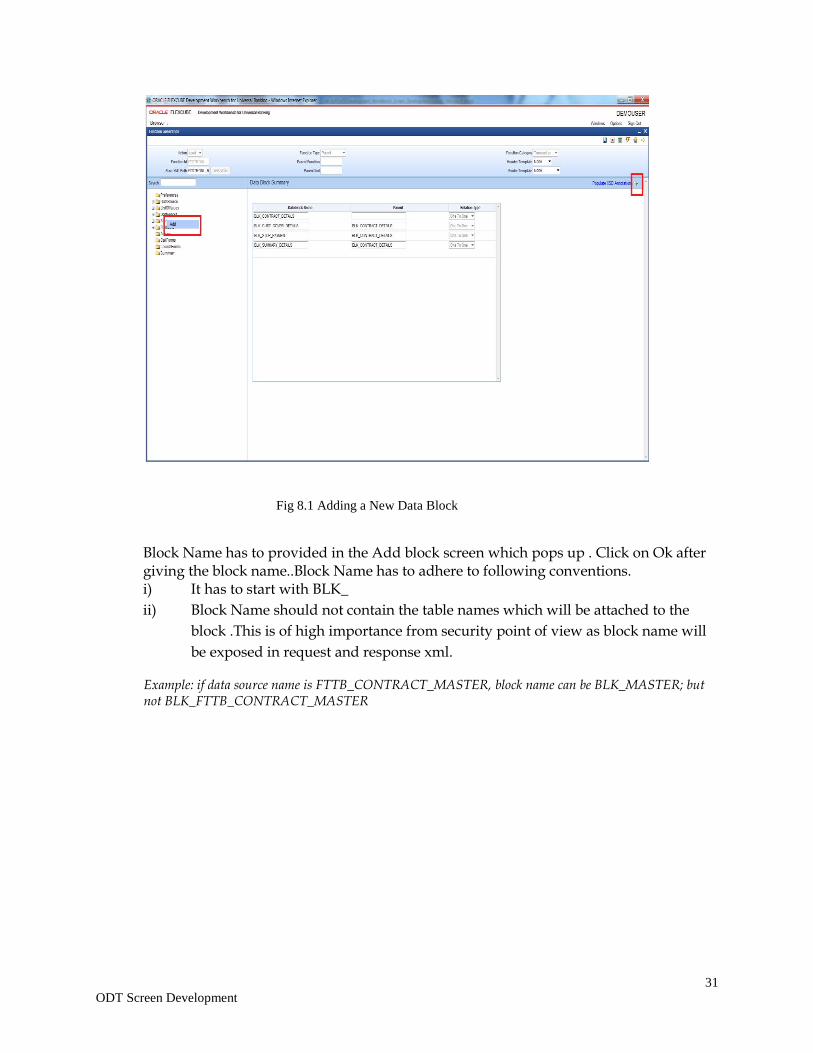
Fig 8.1 Adding a New Data Block
Block Name has to provided in the Add block screen which pops up . Click on Ok after giving the block name..Block Name has to adhere to following conventions. i) It has to start with BLK_
ii) Block Name should not contain the table names which will be attached to the
block .This is of high importance from security point of view as block name will
be exposed in request and response xml.
Example: if data source name is FTTB_CONTRACT_MASTER, block name can be BLK_MASTER; but not BLK_FTTB_CONTRACT_MASTER
32
ODT Screen Development
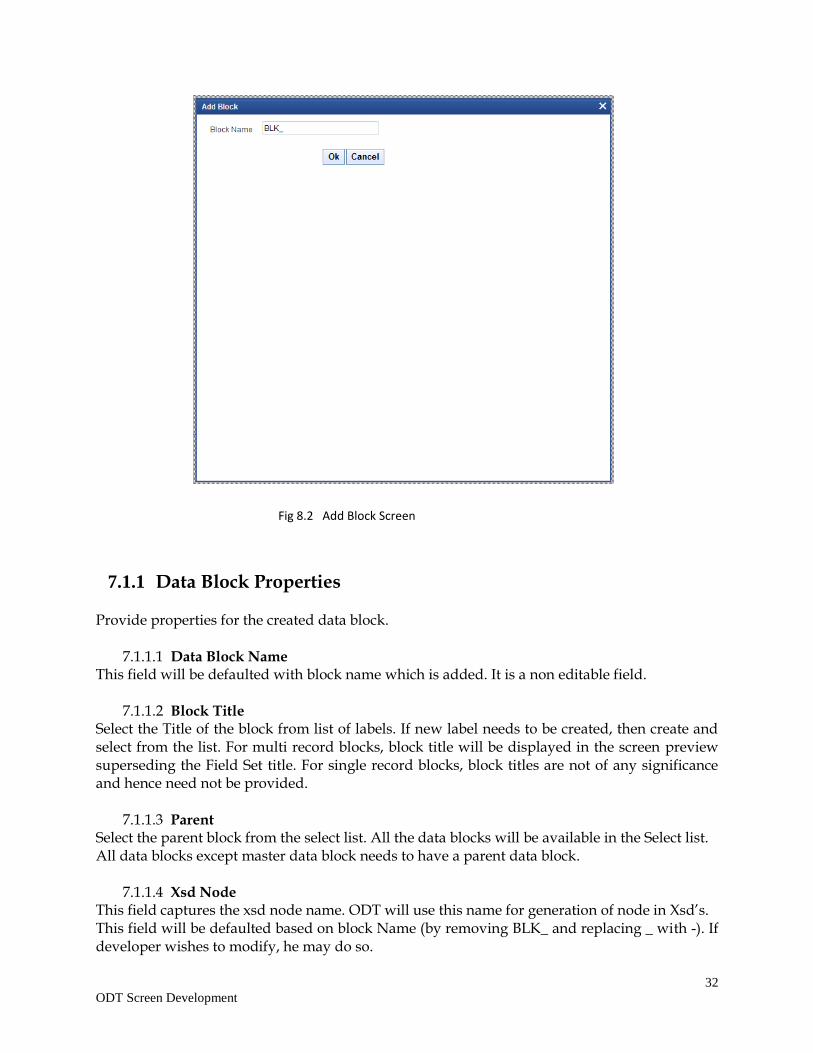
Fig 8.2 Add Block Screen
7.1.1 Data Block Properties Provide properties for the created data block.
7.1.1.1 Data Block Name This field will be defaulted with block name which is added. It is a non editable field.
7.1.1.2 Block Title Select the Title of the block from list of labels. If new label needs to be created, then create and select from the list. For multi record blocks, block title will be displayed in the screen preview superseding the Field Set title. For single record blocks, block titles are not of any significance and hence need not be provided.
7.1.1.3 Parent Select the parent block from the select list. All the data blocks will be available in the Select list. All data blocks except master data block needs to have a parent data block.
7.1.1.4 Xsd Node This field captures the xsd node name. ODT will use this name for generation of node in Xsd’s. This field will be defaulted based on block Name (by removing BLK_ and replacing _ with -). If developer wishes to modify, he may do so.

33
ODT Screen Development
7.1.1.5 Xsd Annotation
This field captures the annotation for the XSD node specified. Description of Block title label will be defaulted as Annotation which can be modified by the developer
7.1.1.6 Multi Record Using this field developer can decide block type, whether the block is single entry block or multiple entry blocks. Depending on this value, the field “data sources available” will be populated. If the value is “Yes” the field “data source available” will be populated with data sources which have flag Multi record “Yes” and vice versa. If the relation type is provided as one to one, multi record has to be yes and vice versa.
7.1.1.7 Block Pk fields Primary key fields of the block have to be provided here. If more than one field forms the primary key, it has to be separated by ~. This data is used for building change log of a screen
7.1.1.8 Relation Type The relation type with the parent data block has to be mentioned here. It can be One To One or One To Many.
7.1.1.9 Master Block One master block is mandatory while designing the screen and using this flag you can define a block as master.
7.1.1.10 Block Type Type of the block can be selected depends on the requirement, below are the description of the each type.
Control: If the block is used only for UI purpose, and it is not required for processing in the backend, then the block can identified as Control type. Only control fields can be added to the Control block.
Normal: This block will be used for normal processing .Request and response xml will contain this data block information.
Summary: Block which is used for creating the summary screen. For normal request xml, this block won’t be present in the request or response xml.
34
ODT Screen Development
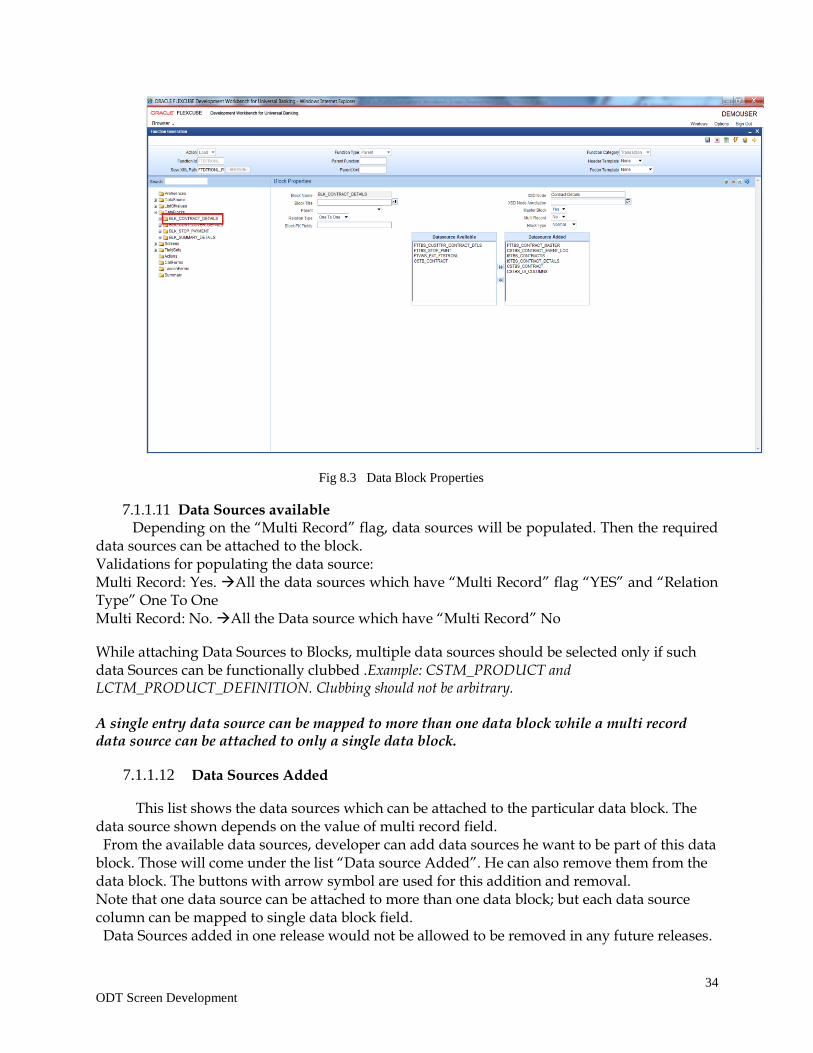
Fig 8.3 Data Block Properties
7.1.1.11 Data Sources available Depending on the “Multi Record” flag, data sources will be populated. Then the required data sources can be attached to the block. Validations for populating the data source: Multi Record: Yes. All the data sources which have “Multi Record” flag “YES” and “Relation Type” One To One Multi Record: No. All the Data source which have “Multi Record” No
While attaching Data Sources to Blocks, multiple data sources should be selected only if such data Sources can be functionally clubbed .Example: CSTM_PRODUCT and LCTM_PRODUCT_DEFINITION. Clubbing should not be arbitrary. A single entry data source can be mapped to more than one data block while a multi record data source can be attached to only a single data block.
7.1.1.12 Data Sources Added
This list shows the data sources which can be attached to the particular data block. The data source shown depends on the value of multi record field. From the available data sources, developer can add data sources he want to be part of this data block. Those will come under the list “Data source Added”. He can also remove them from the data block. The buttons with arrow symbol are used for this addition and removal. Note that one data source can be attached to more than one data block; but each data source column can be mapped to single data block field. Data Sources added in one release would not be allowed to be removed in any future releases.
35
ODT Screen Development
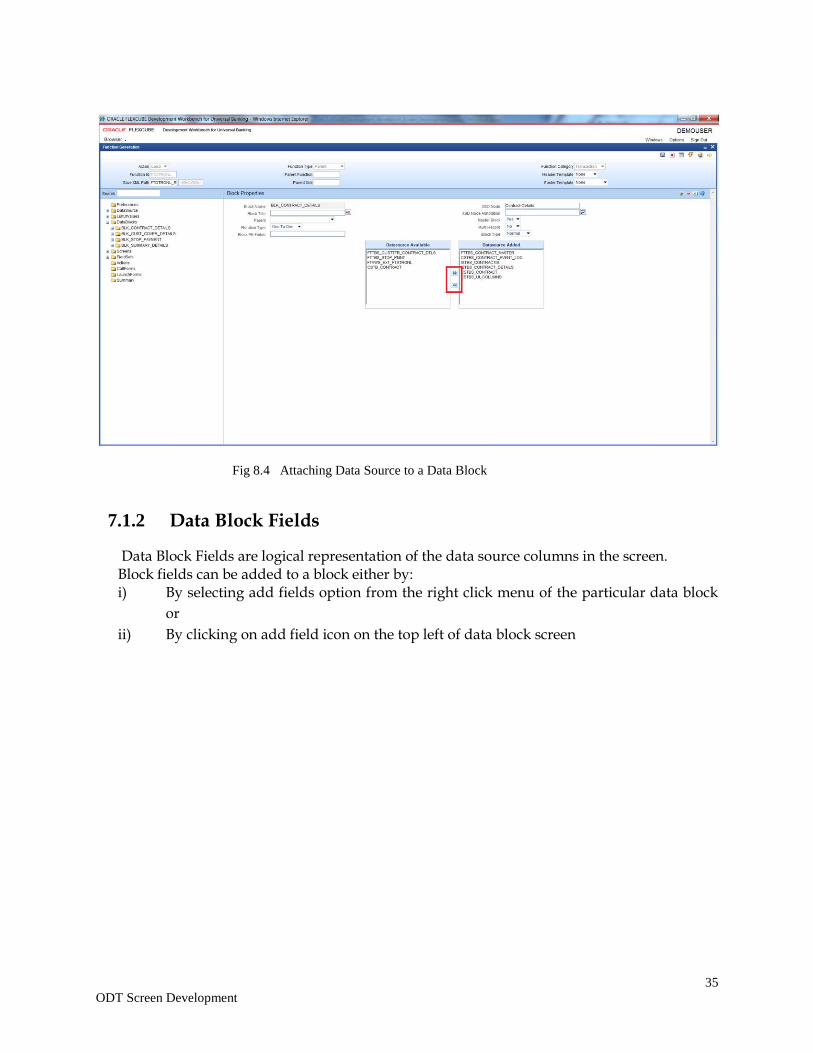
Fig 8.4 Attaching Data Source to a Data Block
7.1.2 Data Block Fields
Data Block Fields are logical representation of the data source columns in the screen. Block fields can be added to a block either by:
i) By selecting add fields option from the right click menu of the particular data block
or
ii) By clicking on add field icon on the top left of data block screen
36
ODT Screen Development
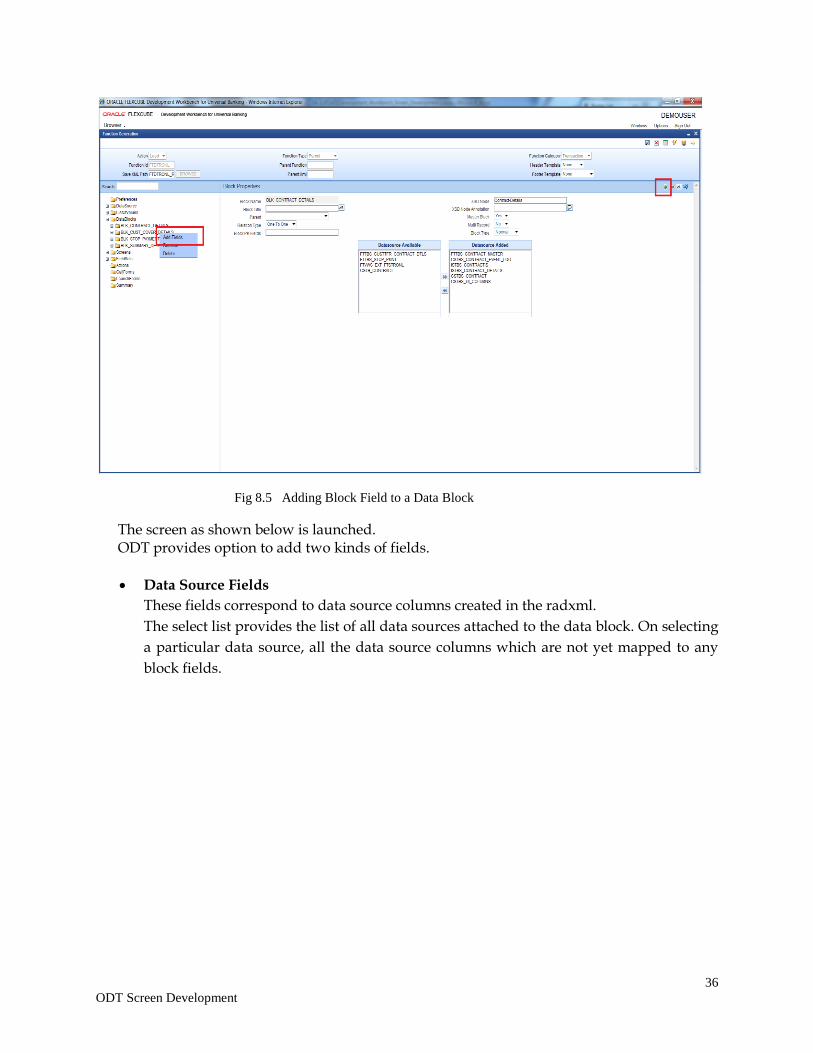
Fig 8.5 Adding Block Field to a Data Block
The screen as shown below is launched. ODT provides option to add two kinds of fields.
Data Source Fields
These fields correspond to data source columns created in the radxml.
The select list provides the list of all data sources attached to the data block. On selecting
a particular data source, all the data source columns which are not yet mapped to any
block fields.
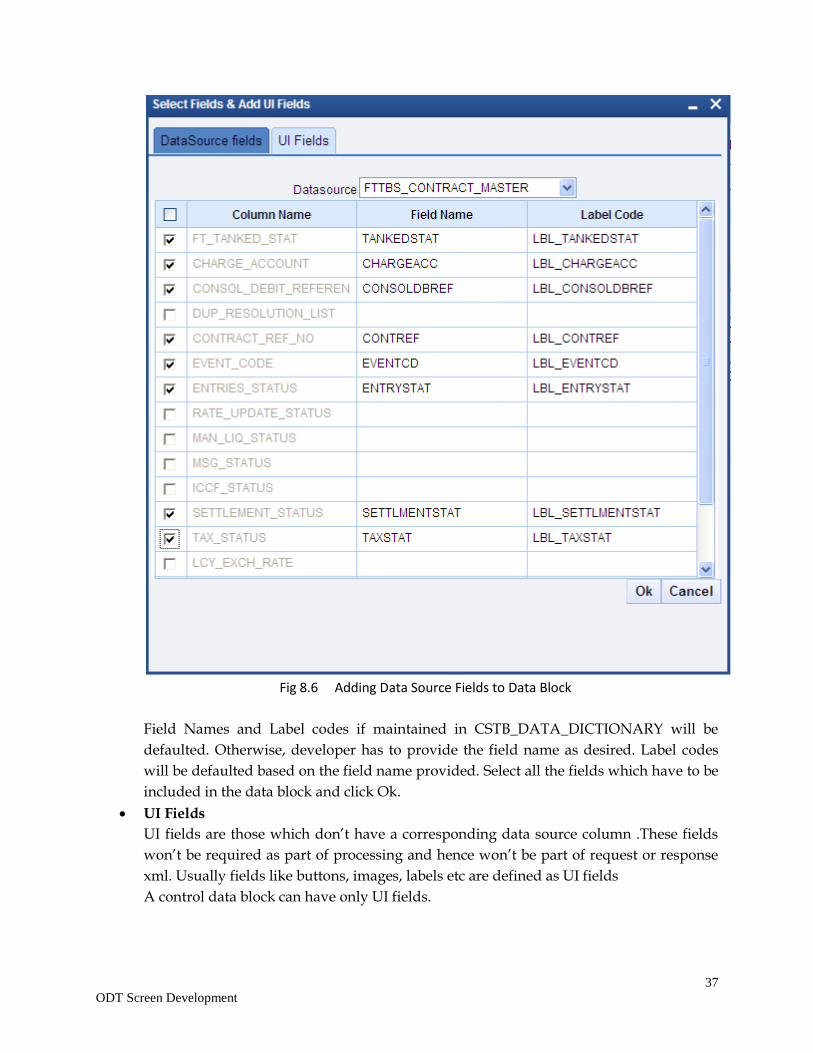
37
ODT Screen Development
Fig 8.6 Adding Data Source Fields to Data Block
Field Names and Label codes if maintained in CSTB_DATA_DICTIONARY will be
defaulted. Otherwise, developer has to provide the field name as desired. Label codes
will be defaulted based on the field name provided. Select all the fields which have to be
included in the data block and click Ok.
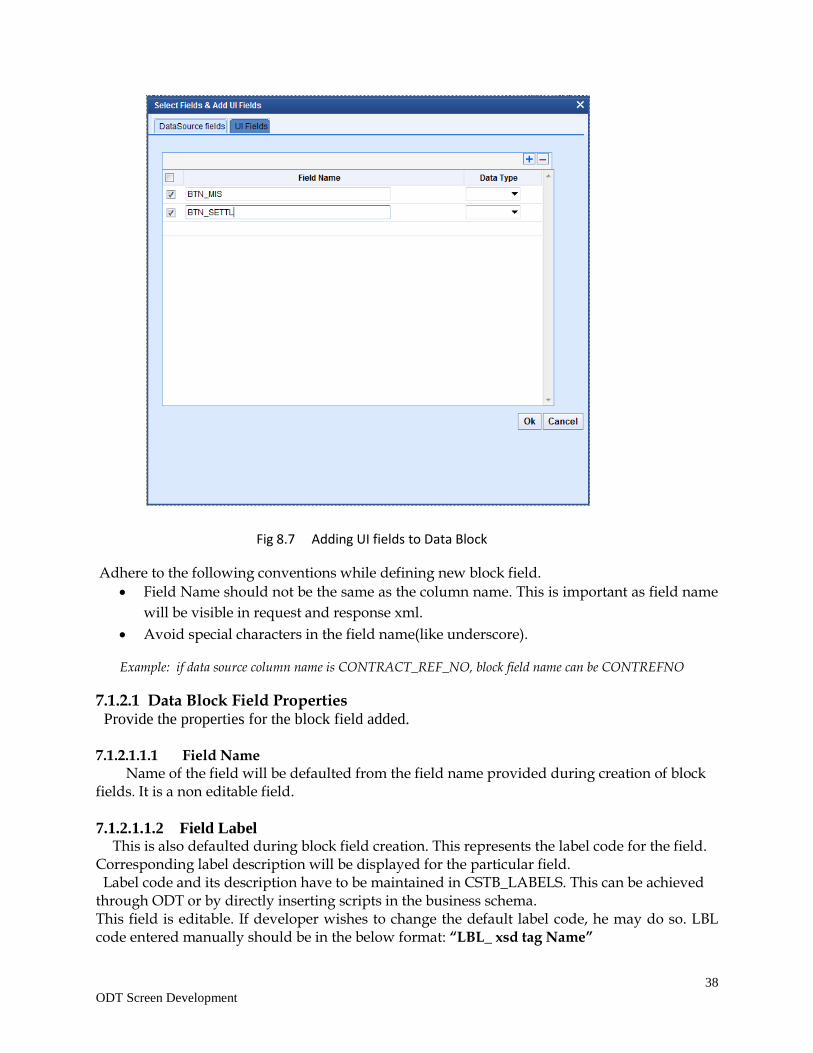
UI Fields
UI fields are those which don’t have a corresponding data source column .These fields
won’t be required as part of processing and hence won’t be part of request or response
xml. Usually fields like buttons, images, labels etc are defined as UI fields
A control data block can have only UI fields.
38
ODT Screen Development
Fig 8.7 Adding UI fields to Data Block
Adhere to the following conventions while defining new block field.
Field Name should not be the same as the column name. This is important as field name
will be visible in request and response xml.
Avoid special characters in the field name(like underscore).
Example: if data source column name is CONTRACT_REF_NO, block field name can be CONTREFNO
7.1.2.1 Data Block Field Properties Provide the properties for the block field added.
7.1.2.1.1.1 Field Name Name of the field will be defaulted from the field name provided during creation of block fields. It is a non editable field.
7.1.2.1.1.2 Field Label This is also defaulted during block field creation. This represents the label code for the field. Corresponding label description will be displayed for the particular field. Label code and its description have to be maintained in CSTB_LABELS. This can be achieved through ODT or by directly inserting scripts in the business schema. This field is editable. If developer wishes to change the default label code, he may do so. LBL code entered manually should be in the below format: “LBL_ xsd tag Name”

39
ODT Screen Development
7.1.2.1.1.3 XSD Tag It will be defaulted when a field is added and whenever the label code gets modified. This value is used in the xsd’s as xsd tag and same will be used for web service.
7.1.2.1.1.4 XSD Annotation Annotation for the xsd tag can be provided here. Description of the label code would be defaulted which can be modified by developer
7.1.2.1.1.5 Display Type Pre-defined values are available in the select box for this field. Value can be selected on requirement. This specifies the HTML display pattern for the field . Available options are:
Amount
The display type can be defined as Amount if it displays an amount. The field will be
formatted based on the currency which it picks from related block and Related Field.
Related block and Related Field values have to be mandatorily provided for Amount
fields. Related Field should come above the amount field in the screen and it should
hold the currency value for the amount.
Fig 8.8 Defining an Amount Data Block Field
Button
If the display type for the field is a button, display type has to be selected as button.
Action to be performed on clicking the button should be provided in the events tab
Button can launch a sub screen, launch form, call form or invoke a user defined
JavaScript function.
40
ODT Screen Development
Fig 8.9 Defining Field as button
Checkbox
Checkbox is used for displaying checkboxes. Attribute Name will be ON and OFF.
Attribute values can be provided as per design
In the figure shown below:
ON (checked) corresponds to Y in table and OFF to N
Default value is selected as N
Fig 8.10 Defining Field as Checkbox
41
ODT Screen Development
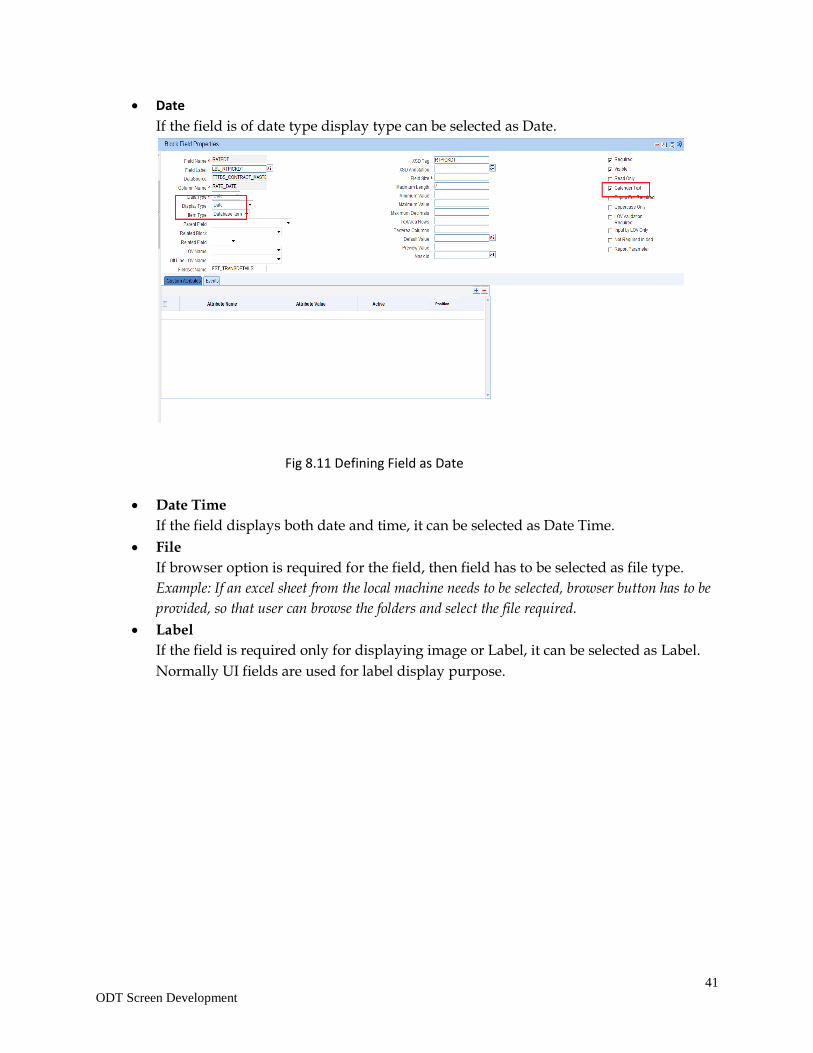
Date
If the field is of date type display type can be selected as Date.
Fig 8.11 Defining Field as Date
Date Time
If the field displays both date and time, it can be selected as Date Time.
File
If browser option is required for the field, then field has to be selected as file type.
Example: If an excel sheet from the local machine needs to be selected, browser button has to be
provided, so that user can browse the folders and select the file required.
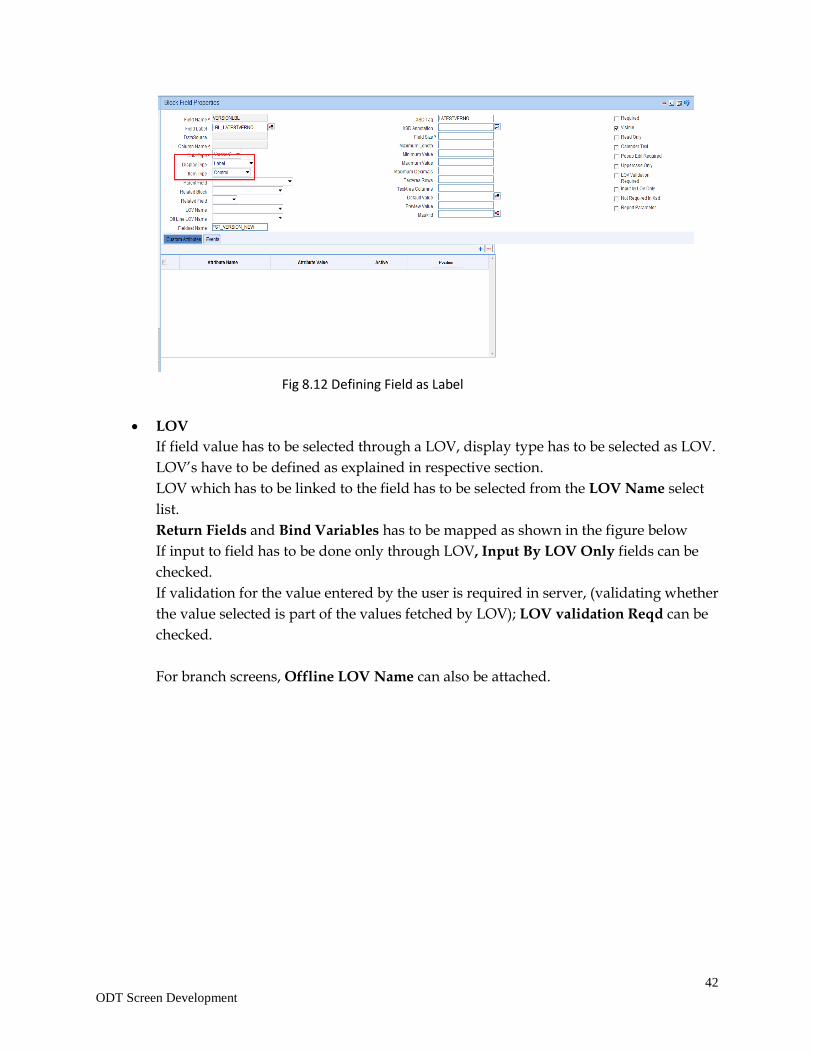
Label
If the field is required only for displaying image or Label, it can be selected as Label.
Normally UI fields are used for label display purpose.
42
ODT Screen Development
Fig 8.12 Defining Field as Label
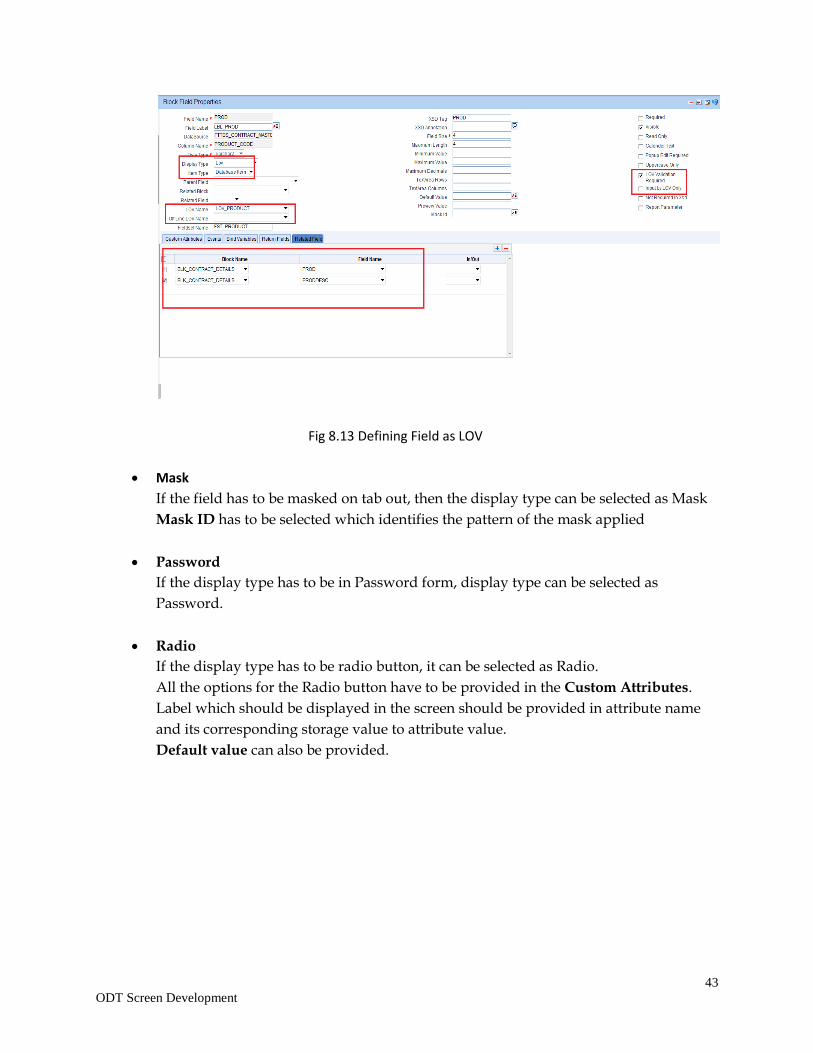
LOV
If field value has to be selected through a LOV, display type has to be selected as LOV.
LOV’s have to be defined as explained in respective section.
LOV which has to be linked to the field has to be selected from the LOV Name select
list.
Return Fields and Bind Variables has to be mapped as shown in the figure below
If input to field has to be done only through LOV, Input By LOV Only fields can be
checked.
If validation for the value entered by the user is required in server, (validating whether
the value selected is part of the values fetched by LOV); LOV validation Reqd can be
checked.
For branch screens, Offline LOV Name can also be attached.
43
ODT Screen Development
Fig 8.13 Defining Field as LOV
Mask
If the field has to be masked on tab out, then the display type can be selected as Mask
Mask ID has to be selected which identifies the pattern of the mask applied
Password
If the display type has to be in Password form, display type can be selected as
Password.
Radio
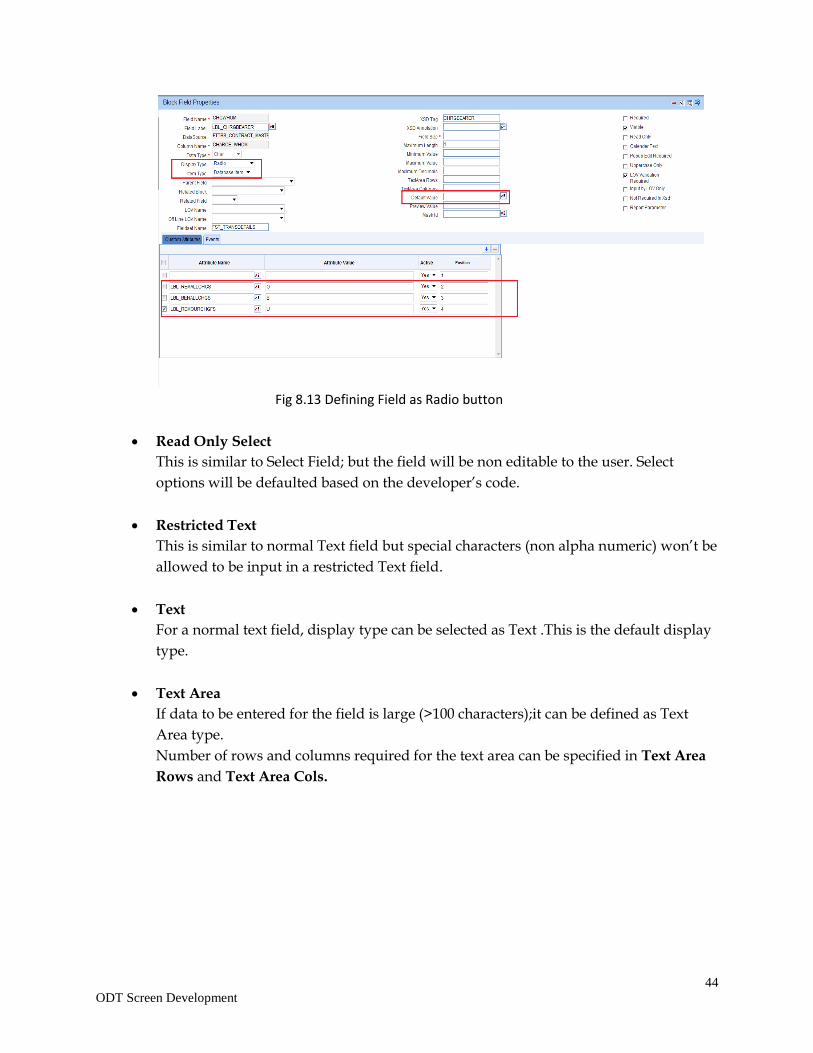
If the display type has to be radio button, it can be selected as Radio.
All the options for the Radio button have to be provided in the Custom Attributes.
Label which should be displayed in the screen should be provided in attribute name
and its corresponding storage value to attribute value.
Default value can also be provided.
44
ODT Screen Development
Fig 8.13 Defining Field as Radio button
Read Only Select
This is similar to Select Field; but the field will be non editable to the user. Select
options will be defaulted based on the developer’s code.
Restricted Text
This is similar to normal Text field but special characters (non alpha numeric) won’t be
allowed to be input in a restricted Text field.
Text
For a normal text field, display type can be selected as Text .This is the default display
type.
Text Area
If data to be entered for the field is large (>100 characters);it can be defined as Text
Area type.
Number of rows and columns required for the text area can be specified in Text Area
Rows and Text Area Cols.
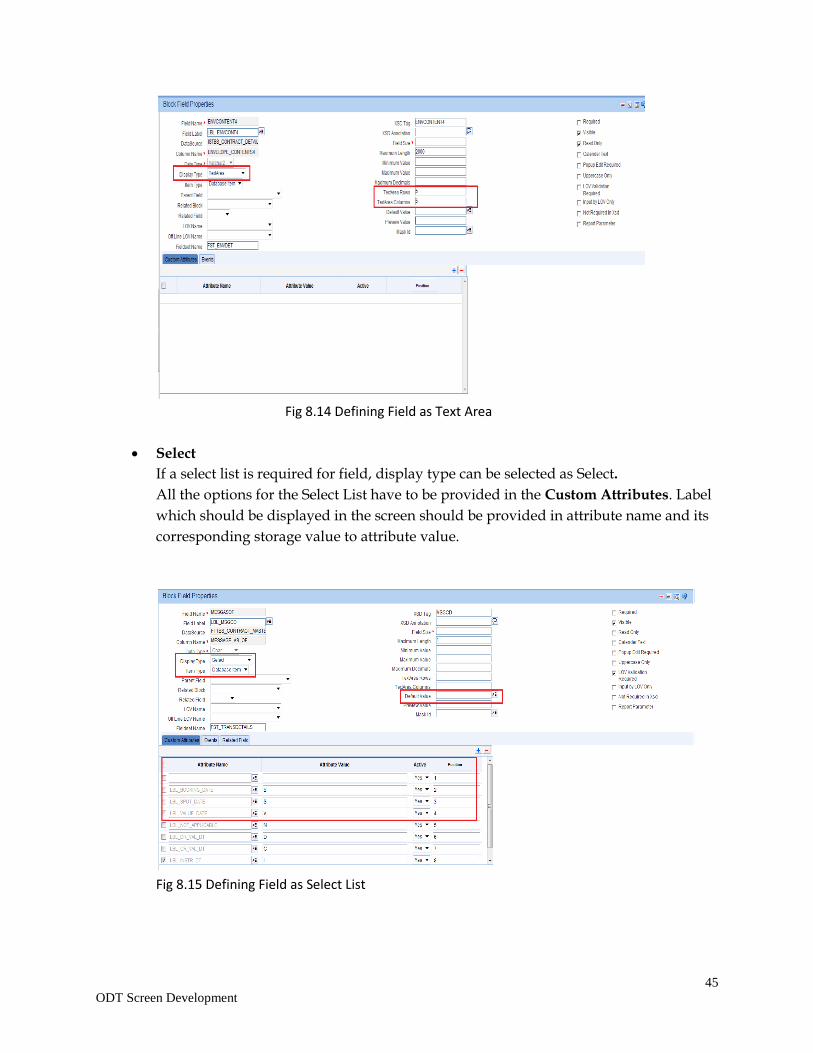
45
ODT Screen Development
Fig 8.14 Defining Field as Text Area
Select
If a select list is required for field, display type can be selected as Select.
All the options for the Select List have to be provided in the Custom Attributes. Label
which should be displayed in the screen should be provided in attribute name and its
corresponding storage value to attribute value.
Fig 8.15 Defining Field as Select List
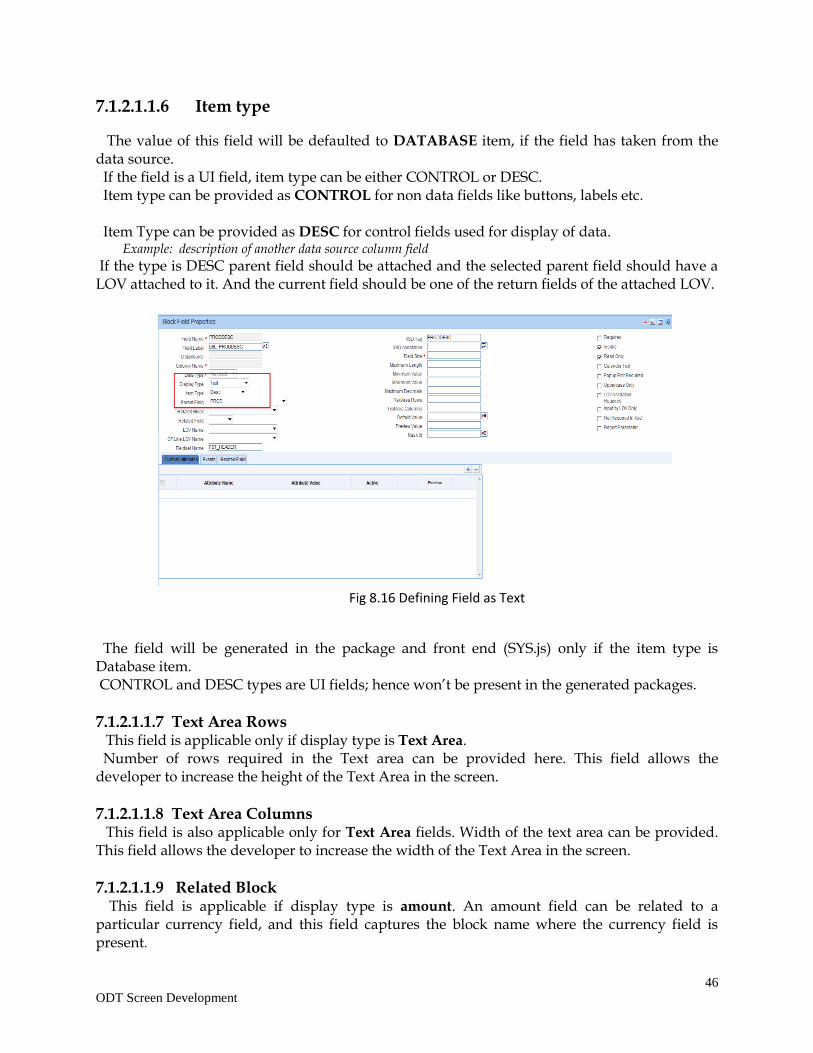
46
ODT Screen Development
7.1.2.1.1.6 Item type
The value of this field will be defaulted to DATABASE item, if the field has taken from the data source. If the field is a UI field, item type can be either CONTROL or DESC. Item type can be provided as CONTROL for non data fields like buttons, labels etc. Item Type can be provided as DESC for control fields used for display of data. Example: description of another data source column field
If the type is DESC parent field should be attached and the selected parent field should have a LOV attached to it. And the current field should be one of the return fields of the attached LOV.
Fig 8.16 Defining Field as Text
The field will be generated in the package and front end (SYS.js) only if the item type is Database item. CONTROL and DESC types are UI fields; hence won’t be present in the generated packages.
7.1.2.1.1.7 Text Area Rows This field is applicable only if display type is Text Area. Number of rows required in the Text area can be provided here. This field allows the developer to increase the height of the Text Area in the screen.
7.1.2.1.1.8 Text Area Columns This field is also applicable only for Text Area fields. Width of the text area can be provided. This field allows the developer to increase the width of the Text Area in the screen.
7.1.2.1.1.9 Related Block This field is applicable if display type is amount. An amount field can be related to a particular currency field, and this field captures the block name where the currency field is present.
47
ODT Screen Development
7.1.2.1.1.10 Related Field This field is also applicable only if display type is Amount.
Subsequent to the above field (Related Block), a field can be selected as a related field for an amount field. Selected Block’s (Related Block) fields will be available in the select box.
7.1.2.1.1.11 Parent Field If the Item Type of the selected field is Desc, a parent field should be attached and the
selected parent field should have a LOV attached to it. And the current field should be
one of the return fields of the attached LOV.
Note: This feature is provided to avoid Query data sources and should be used for all description Fields. If a particular field is selected as “Description Field” in ODT, the LOV for the Parent field should not have any Control Item as a bind variable.
7.1.2.1.1.12 Min Val Minimum value for a number field can be mentioned .ODT will generate validation for the minimum value of the field in the generated package as well as the frontend units.
7.1.2.1.1.13 Max Val Maximum value for a number field can be mentioned .ODT will generate validation for the maximum value of the field in the generated package as well as the frontend units.
7.1.2.1.1.14 Max Decimals Max Decimals for a number or amount field can be provided here.
7.1.2.1.1.15 LOV Name This is applicable only if the display type is LOV. LOV to be attached has to be selected from the select list. Select List will contain all the LOVs defined by the developer for the particular screen plus GLOBAL LOVS. Global LOV can be maintained across function id and same can be attached to a field. This will reduce development time. LOV can be selected from list of values attached to the field. These LOV are handled by the FLEXCUBE Infra. Global LOVs are stored in CSTB_LOV_INFO with function id as COMMON.
7.1.2.1.1.16 Offline LOV Name These LOV will be used by the Branch function id if the branch is in offline mode, offline LOV will be used. All the LOV will be populated which are defined in the LOV definition screen. Both offline and online LOV can be maintained for the same field. Offline Global LOV Defining of these LOV remains same as Global LOV, and functionality is same as offline LOV.
48
ODT Screen Development
7.1.2.1.1.17 Field set Name This is a non editable field and is defaulted based on the field set to which the particular field is mapped.
7.1.2.1.1.18 Data Type This is non editable field. This will be defaulted from the data type of the column to which the field is mapped. This has to be mandatorily provided.
7.1.2.1.1.19 Data Source This is a non editable field. This will default the table name of whose column is mapped to the particular field.
7.1.2.1.1.20 Column Name This is a non editable field. This will default the column name to which the particular field is mapped.
7.1.2.1.1.21 Max Length The max length of column will be defaulted while adding a field and it can’t be overwritten. This value will be considered for the field max length of the designed screen. It means, at the run time system will not allow the user to enter the text more than this length. The value of the field can be changed from data source column properties which will reflect in block field level as well. 7.1.2.1.1.22 Field Size Value will be defaulted while adding the field and same can be modified. This is the size which will reflect in the screen for the field. 7.1.2.1.1.23 Default Value A default value can be given to the selected field, system will use the default value at the run time and default value will be stored in the generated front end unit, it will not available in the generated packages. 7.1.2.1.1.24 Preview Value In the Screen Preview, if developer wishes to see the preview with some data; a preview value can be provided. 7.1.2.1.1.25 Mask Id This is used for enforcing some restrictions on the values that can be entered in some fields. The ids are present in sttb_field_mask. This is applicable only if the display type is Mask.
7.1.2.1.1.26 Popup Edit Reqd This can be checked for long text entries. A pop up edit screen would come along with the field. Popup edit will be provided for all fields whose field size is larger than 20 by FLEXCUBE Infra
49
ODT Screen Development
7.1.2.1.1.27 Required If the field is mandatory, this checkbox can be checked .This will force the user to enter value in this field. Asterisk (*) character would come along with the field in the screen.
7.1.2.1.1.28 Visible If the field is required for processing; but not to be shown in the screen .then it can be made invisible.
7.1.2.1.1.29 Input by LOV Only This is applicable only for LOV fields. This will force the user to use the LOV button to input the value instead of key in the value.
7.1.2.1.1.30 Calendar Text This is applicable if the fields has to be placed close to each other as in a calendar.
7.1.2.1.1.31 Upper Case Only If the field value has to be in Uppercase only, this option can be checked. This will convert the field value to Uppercase on tab out of that field in FLEXCUBE.
7.1.2.1.1.32 LOV Validation Reqd This is applicable only for LOV fields. If validation for the value input in LOV field is required, this option can be checked.
7.1.2.1.1.33 Not Reqd in XSD If the field is not to be included in XSD, then this option can be checked.
7.1.2.1.1.34 Report Parameter This is applicable only for Report Screens. If the field is a report Parameter, this option needs to be checked.
7.1.2.1.1.35 Read Only This will restrict the user from entering value to the field. Filed can be made non editable by checking this option.
7.1.2.1.1.36 Custom Attributes Attribute Name and values for SELECT, RADIO, CHECKBOX and READ ONLY SELECT fields has to be provided here. Attribute name corresponds to the Label Code whose description will appear in the screen. Attribute Value is the corresponding value which will be stored in the backend for the corresponding attribute. Active ODT does not allow the deletion of attribute elements if created in an earlier release. Hence if an attribute is no longer required, the attribute can be made inactive Position: Ordering of the attributes in the list can be manipulated using Position field. Position numbers can be modified. After changing the position values, position button has to be clicked; which will arrange all attributes in the new order
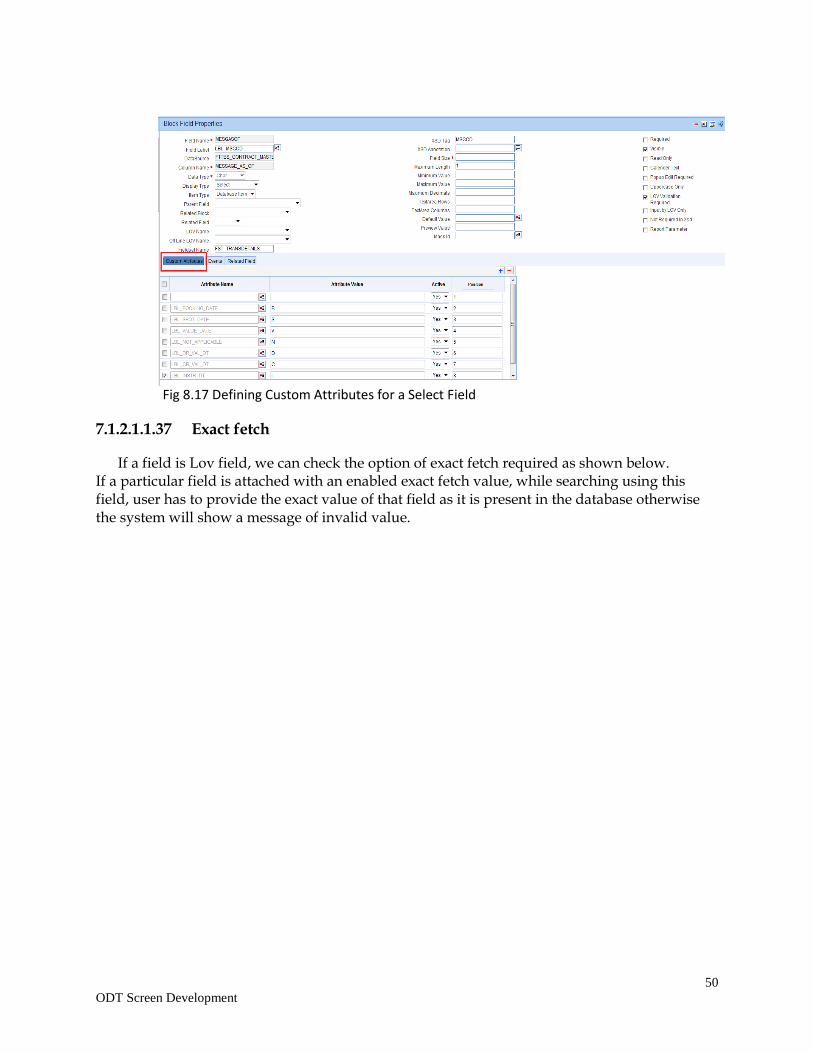
50
ODT Screen Development
Fig 8.17 Defining Custom Attributes for a Select Field
7.1.2.1.1.37 Exact fetch
If a field is Lov field, we can check the option of exact fetch required as shown below. If a particular field is attached with an enabled exact fetch value, while searching using this field, user has to provide the exact value of that field as it is present in the database otherwise the system will show a message of invalid value.
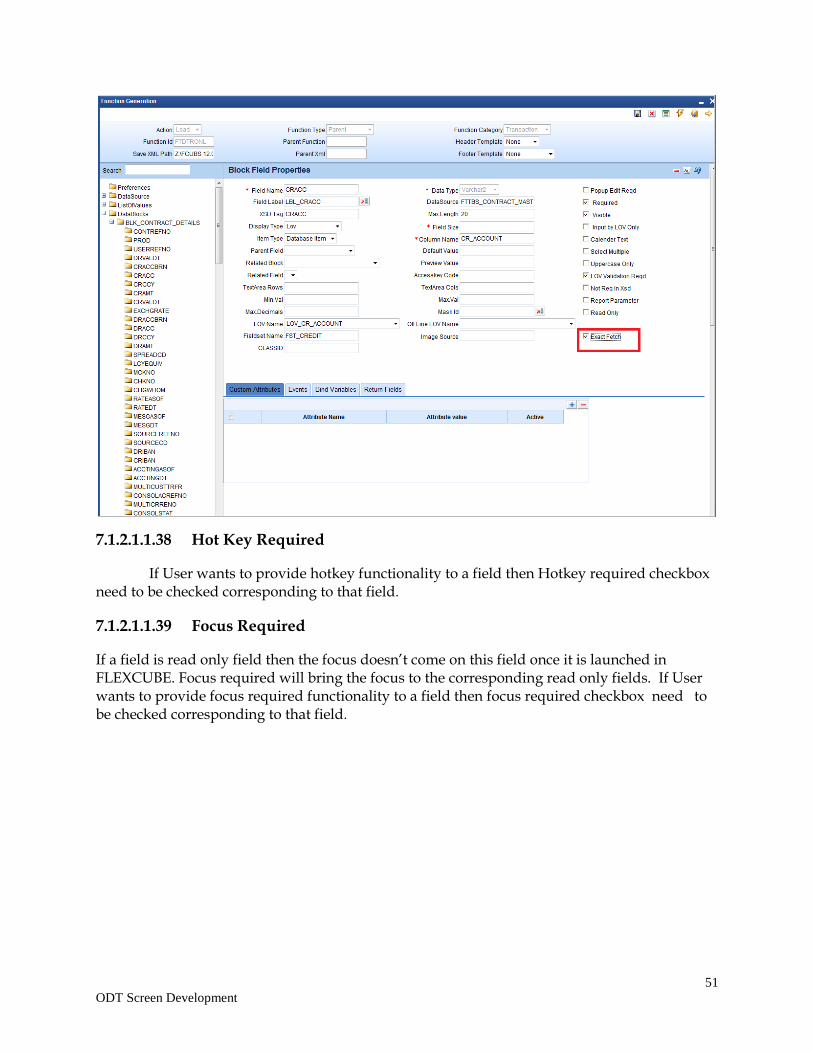
51
ODT Screen Development
7.1.2.1.1.38 Hot Key Required
If User wants to provide hotkey functionality to a field then Hotkey required checkbox need to be checked corresponding to that field.
7.1.2.1.1.39 Focus Required
If a field is read only field then the focus doesn’t come on this field once it is launched in FLEXCUBE. Focus required will bring the focus to the corresponding read only fields. If User wants to provide focus required functionality to a field then focus required checkbox need to be checked corresponding to that field.
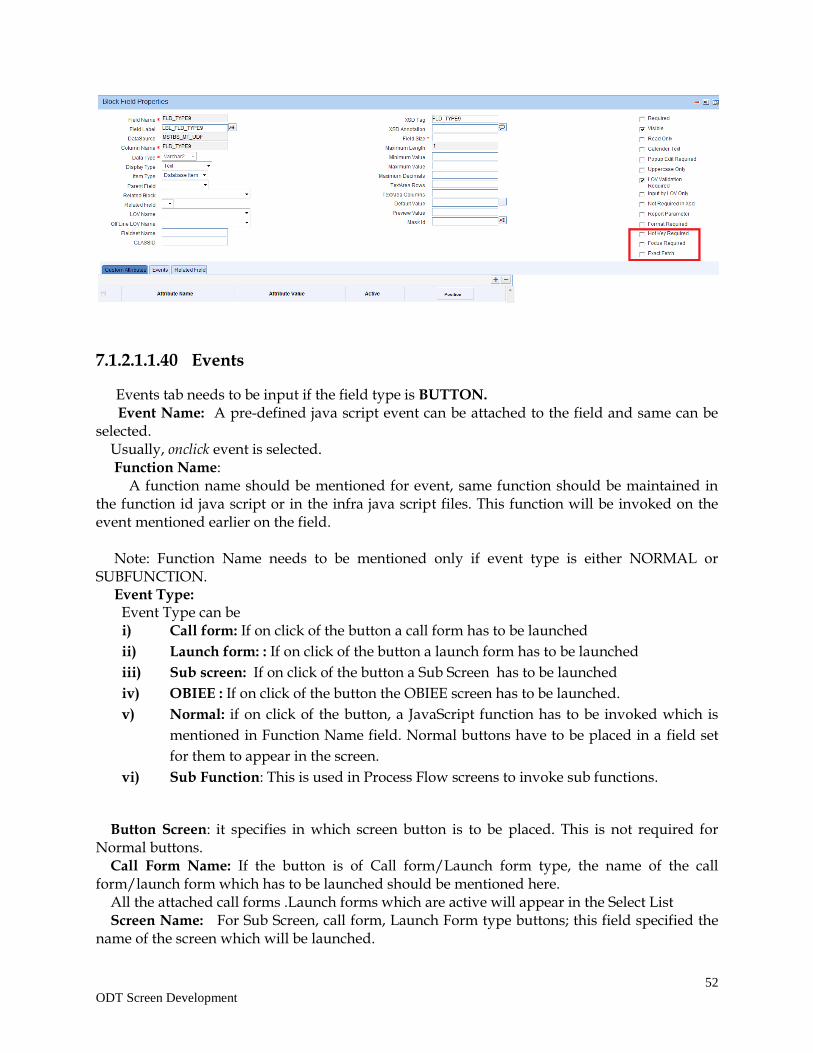
52
ODT Screen Development
7.1.2.1.1.40 Events
Events tab needs to be input if the field type is BUTTON.
Event Name: A pre-defined java script event can be attached to the field and same can be selected. Usually, onclick event is selected. Function Name: A function name should be mentioned for event, same function should be maintained in the function id java script or in the infra java script files. This function will be invoked on the event mentioned earlier on the field. Note: Function Name needs to be mentioned only if event type is either NORMAL or SUBFUNCTION. Event Type: Event Type can be
i) Call form: If on click of the button a call form has to be launched
ii) Launch form: : If on click of the button a launch form has to be launched
iii) Sub screen: If on click of the button a Sub Screen has to be launched
iv) OBIEE : If on click of the button the OBIEE screen has to be launched.
v) Normal: if on click of the button, a JavaScript function has to be invoked which is
mentioned in Function Name field. Normal buttons have to be placed in a field set
for them to appear in the screen.
vi) Sub Function: This is used in Process Flow screens to invoke sub functions.
Button Screen: it specifies in which screen button is to be placed. This is not required for Normal buttons. Call Form Name: If the button is of Call form/Launch form type, the name of the call form/launch form which has to be launched should be mentioned here. All the attached call forms .Launch forms which are active will appear in the Select List Screen Name: For Sub Screen, call form, Launch Form type buttons; this field specified the name of the screen which will be launched.
53
ODT Screen Development
7.1.2.1.1.41 Bind Variables
7.1.2.1.1.42 Return Fields
Bind Variables and return fields are required for LOV fields. Refer section on LOVS for
detailed explanation.
7.2 Guidelines and Best Practices
Below points to be noted while creating data blocks:
1. All Block Names Should start with BLK_ and the remaining portion of the block
name should be same as the XSD node of the Block Name in Upper case and ‘_'
replaced with ‘-‘.Avoid naming the block name same as that of the table name
2. Blocks also would have hierarchy and has to be chosen correctly.
3. Block Types are similar to data source types with an additional type ‘Control’.
4. After adding a block, ODT defaults the XSD node. Node name would be Block name
without BLK_ and in Sentence case. Also ‘_’ will be replaced with’-‘.
5. Parent block should be chosen from the list based on the hierarchy.
6. Similar to data sources, block also can be either Multi Record or single record type.
7. Block Title has to be selected from the LOV.
8. Relation type has to be mentioned as ‘One to One’ or ‘One to Many’.
9. One and only one block should be selected as Master Block.
Note the following while attaching data sources to a data block
1. The same data source can be selected in multiple blocks. However in case of Multi
record data sources, ODT allows the developer to attach the data source to only one
block.
2. One Multi Record block can have multiple data sources provided all of these data
sources have strict one to one relation.
3. In case of multiple data sources in a single data block, it is important to ensure that
the data in the attached data sources is functionally related and more importantly, a
row in one table would definitely have a row in other attached data sources as well.
Otherwise the generated code inserts records in all the tables always and this would
result in lot of dummy records in the database.
4. Parent data block has to be above its child data block in the browser tree. Developer
has the option to rearrange the order of the blocks in the tree (by drag and drop).
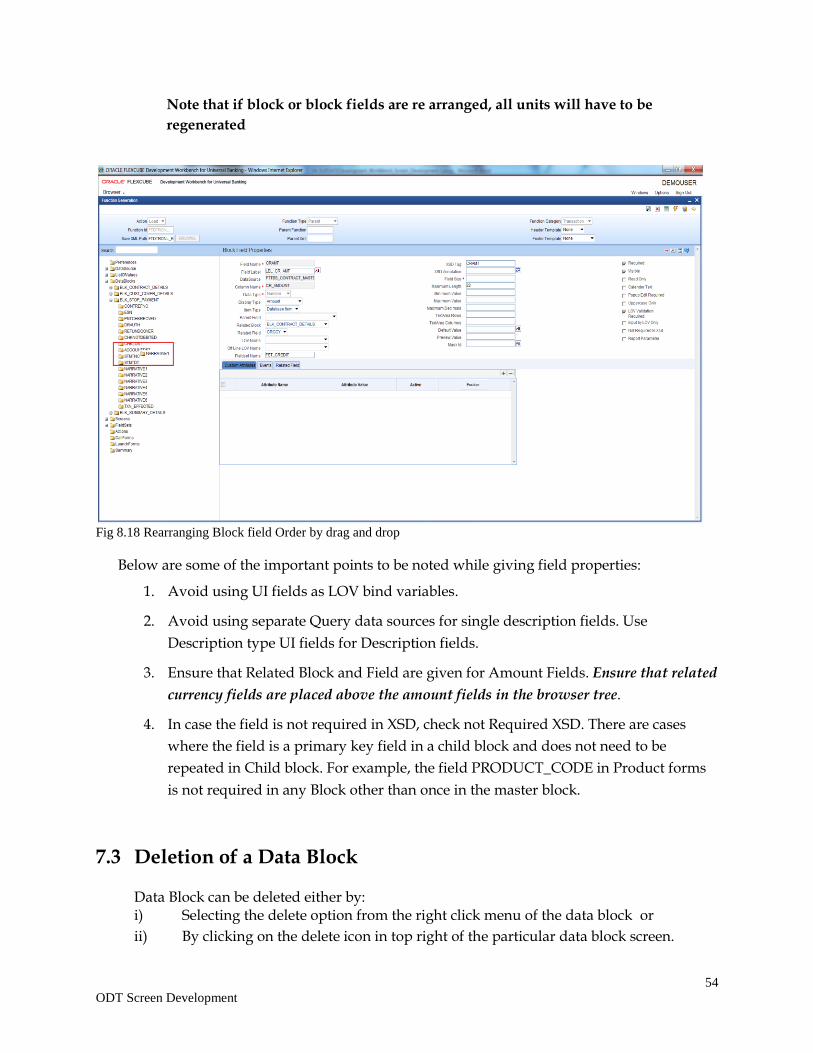
54
ODT Screen Development
Note that if block or block fields are re arranged, all units will have to be
regenerated
Fig 8.18 Rearranging Block field Order by drag and drop
Below are some of the important points to be noted while giving field properties:
1. Avoid using UI fields as LOV bind variables.
2. Avoid using separate Query data sources for single description fields. Use
Description type UI fields for Description fields.
3. Ensure that Related Block and Field are given for Amount Fields. Ensure that related
currency fields are placed above the amount fields in the browser tree.
4. In case the field is not required in XSD, check not Required XSD. There are cases
where the field is a primary key field in a child block and does not need to be
repeated in Child block. For example, the field PRODUCT_CODE in Product forms
is not required in any Block other than once in the master block.
7.3 Deletion of a Data Block
Data Block can be deleted either by: i) Selecting the delete option from the right click menu of the data block or
ii) By clicking on the delete icon in top right of the particular data block screen.
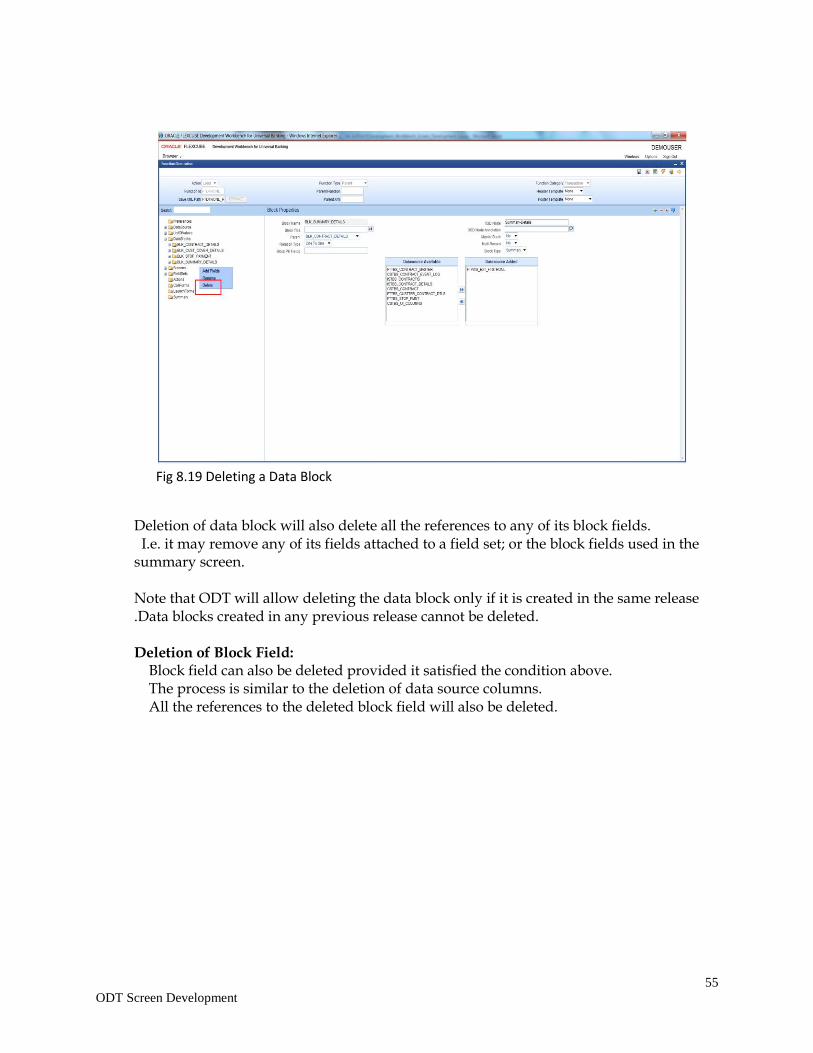
55
ODT Screen Development
Fig 8.19 Deleting a Data Block
Deletion of data block will also delete all the references to any of its block fields. I.e. it may remove any of its fields attached to a field set; or the block fields used in the summary screen. Note that ODT will allow deleting the data block only if it is created in the same release .Data blocks created in any previous release cannot be deleted. Deletion of Block Field: Block field can also be deleted provided it satisfied the condition above. The process is similar to the deletion of data source columns. All the references to the deleted block field will also be deleted.
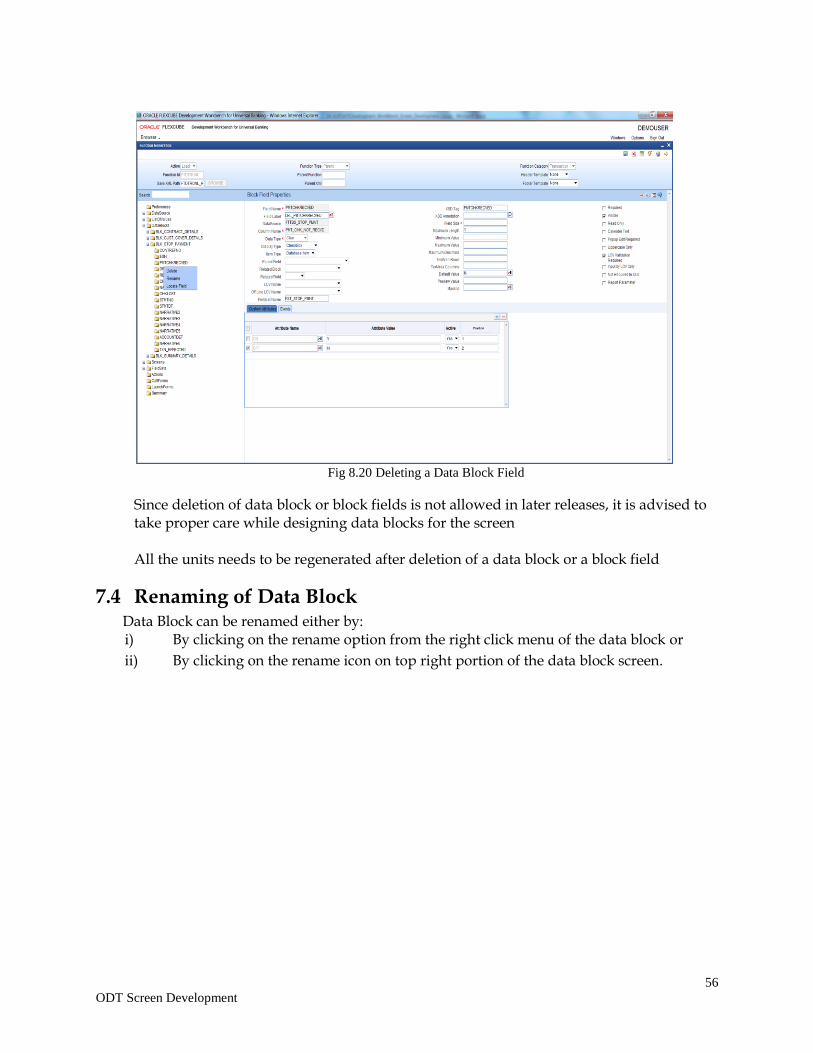
56
ODT Screen Development
Fig 8.20 Deleting a Data Block Field
Since deletion of data block or block fields is not allowed in later releases, it is advised to take proper care while designing data blocks for the screen All the units needs to be regenerated after deletion of a data block or a block field
7.4 Renaming of Data Block Data Block can be renamed either by:
i) By clicking on the rename option from the right click menu of the data block or
ii) By clicking on the rename icon on top right portion of the data block screen.
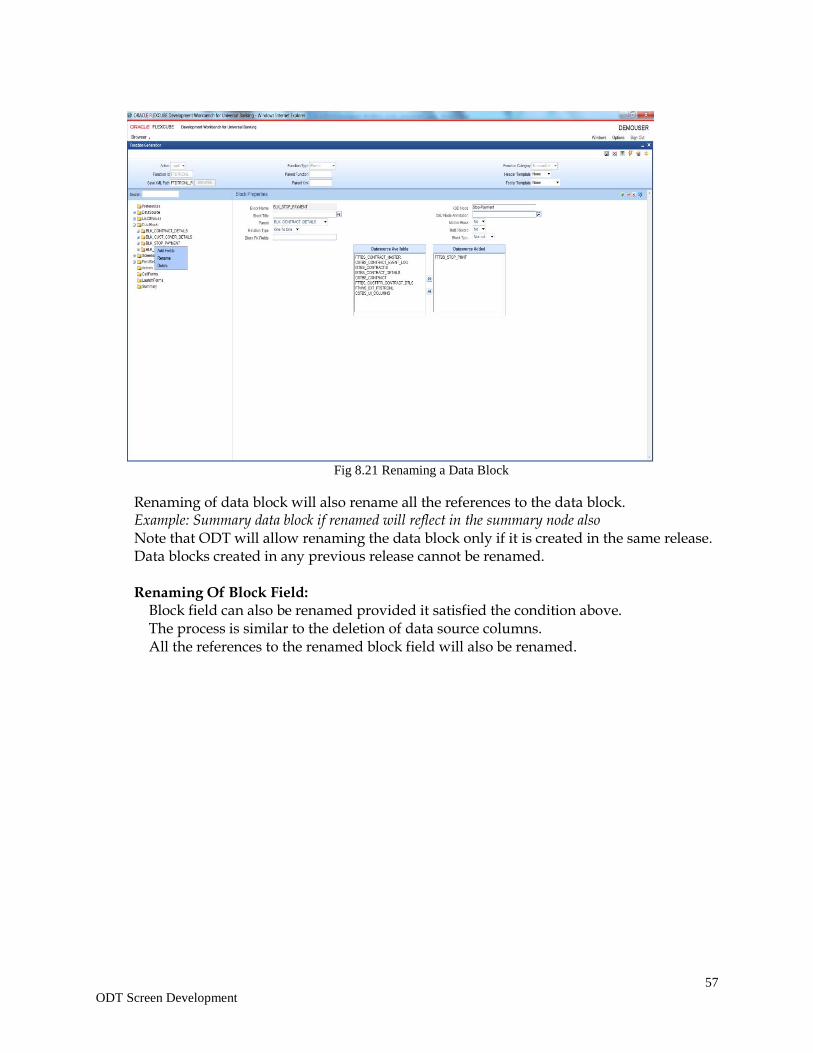
57
ODT Screen Development
Fig 8.21 Renaming a Data Block
Renaming of data block will also rename all the references to the data block. Example: Summary data block if renamed will reflect in the summary node also Note that ODT will allow renaming the data block only if it is created in the same release. Data blocks created in any previous release cannot be renamed. Renaming Of Block Field: Block field can also be renamed provided it satisfied the condition above. The process is similar to the deletion of data source columns. All the references to the renamed block field will also be renamed.
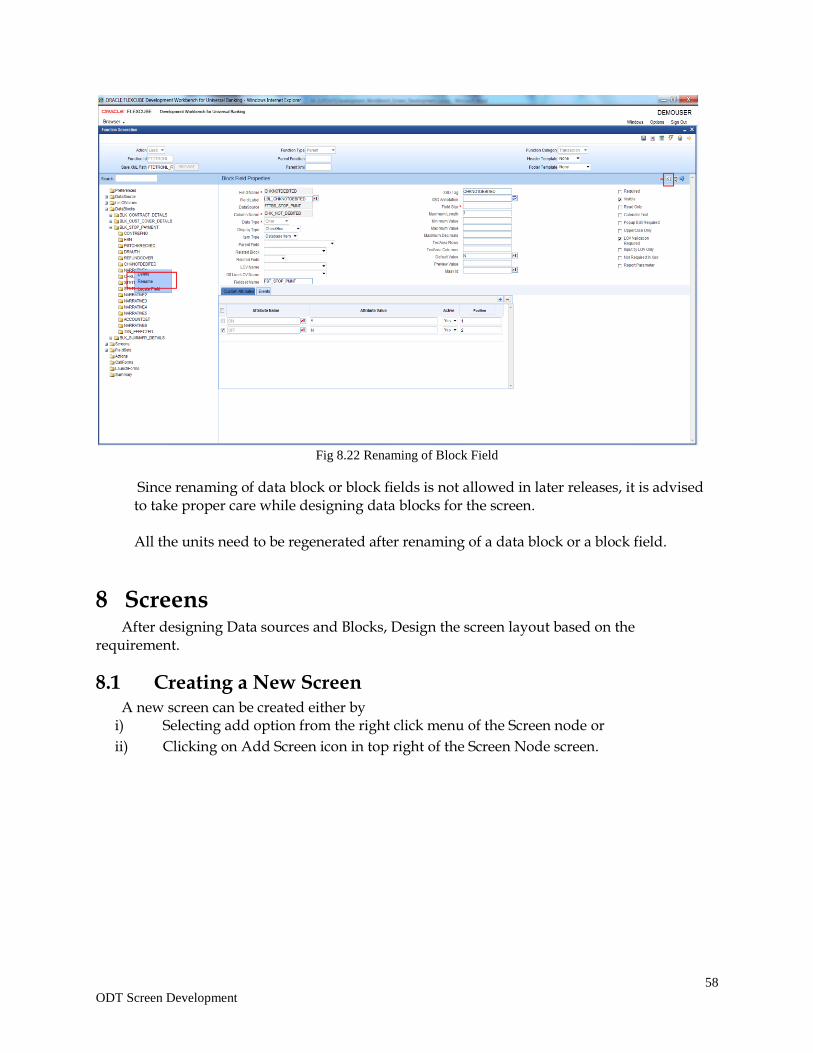
58
ODT Screen Development
Fig 8.22 Renaming of Block Field
Since renaming of data block or block fields is not allowed in later releases, it is advised to take proper care while designing data blocks for the screen. All the units need to be regenerated after renaming of a data block or a block field.
8 Screens After designing Data sources and Blocks, Design the screen layout based on the requirement.
8.1 Creating a New Screen A new screen can be created either by
i) Selecting add option from the right click menu of the Screen node or
ii) Clicking on Add Screen icon in top right of the Screen Node screen.
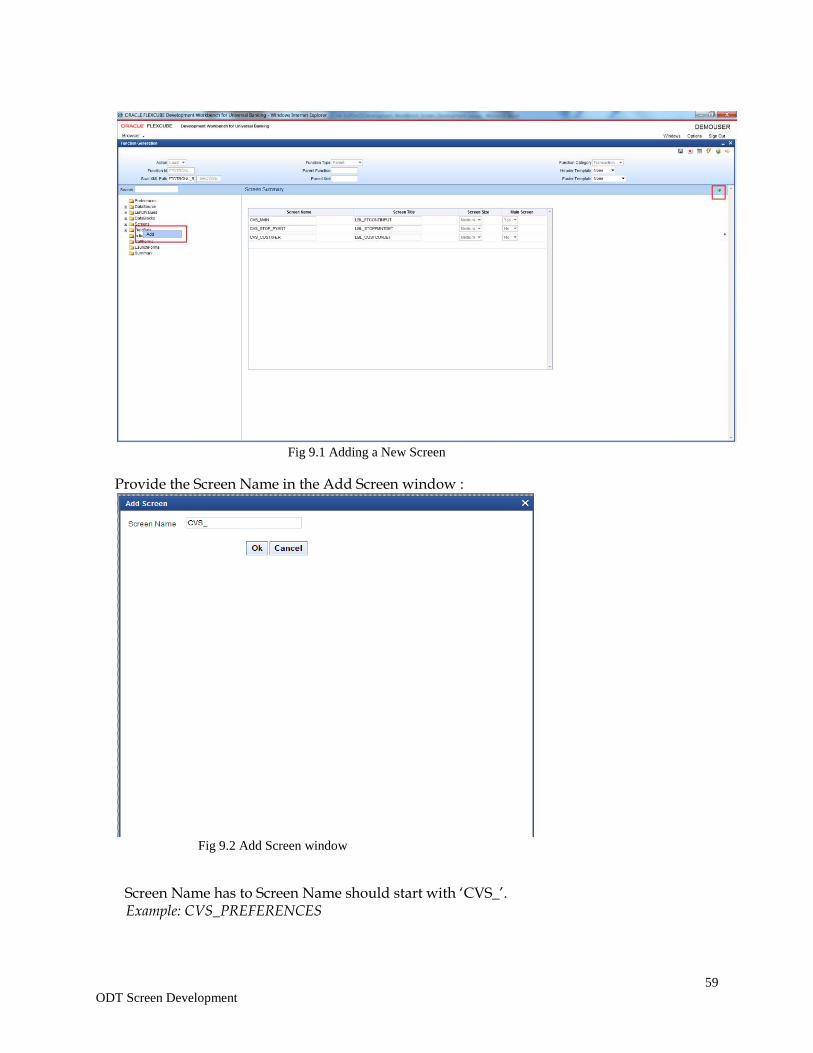
59
ODT Screen Development
Fig 9.1 Adding a New Screen
Provide the Screen Name in the Add Screen window :
Fig 9.2 Add Screen window
Screen Name has to Screen Name should start with ‘CVS_’. Example: CVS_PREFERENCES
60
ODT Screen Development
8.1.1 Screen Properties
Provide the properties of the screen as required:
8.1.1.1 Screen Name
This field value will be defaulted when screen is added and it is a non editable
field.
8.1.1.2 Screen Title
This field will have a label code for the screen title to be displayed. Label code can
be selected from list of values button .The label specified will appear in the Title bar
of the Screen.
8.1.1.3 Main Screen
This field identifies whether the screen created is the main screen for the
particular function id. FLEXCUBE function id should have one Main Screen.
Only the main screen will be launched from the FLEXCUBE when the
function id is launched. Other screens have to be launched from the main
screen by placing buttons on the main screen.
8.1.1.4 Visible
Screens can be made invisible if it not intended to be used.
The screens created in any previous release cannot be deleted. Hence visible flag has
to be unchecked to achieve the same.
8.1.1.5 OBIEE
If a screen is OBIEE screen then this checkbox needs to be checked. After selecting
the screen as OBIEE this screen needs to be attached to some event of a button. It is
mandatory to provide the Screen title and the corresponding button label, as both
details are required in the UIXML generation.
8.1.1.6 Screen Size
Depending on the number of fields in the screen, developer can choose the
size of the screen. Options provided are small, medium and large.
8.1.1.7 Exit Button Type
This field describes the EXIT and OK buttons for the screen. These buttons
are found in the bottom right corner of the screen.
If only CANCEL button is required, select Default Cancel.
If both OK and CANCEL buttons are required, select Default OK Cancel
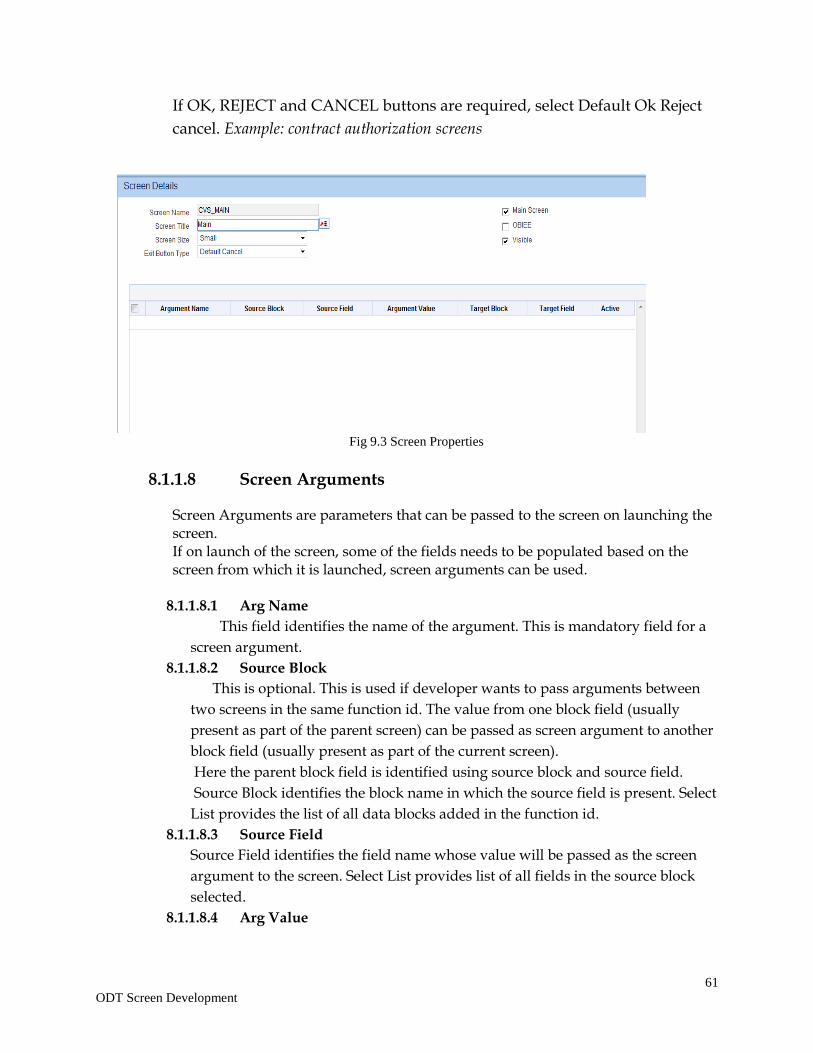
61
ODT Screen Development
If OK, REJECT and CANCEL buttons are required, select Default Ok Reject
cancel. Example: contract authorization screens
Fig 9.3 Screen Properties
8.1.1.8 Screen Arguments
Screen Arguments are parameters that can be passed to the screen on launching the screen. If on launch of the screen, some of the fields needs to be populated based on the screen from which it is launched, screen arguments can be used.
8.1.1.8.1 Arg Name
This field identifies the name of the argument. This is mandatory field for a
screen argument.
8.1.1.8.2 Source Block
This is optional. This is used if developer wants to pass arguments between
two screens in the same function id. The value from one block field (usually
present as part of the parent screen) can be passed as screen argument to another
block field (usually present as part of the current screen).
Here the parent block field is identified using source block and source field.
Source Block identifies the block name in which the source field is present. Select
List provides the list of all data blocks added in the function id.
8.1.1.8.3 Source Field
Source Field identifies the field name whose value will be passed as the screen
argument to the screen. Select List provides list of all fields in the source block
selected.
8.1.1.8.4 Arg Value
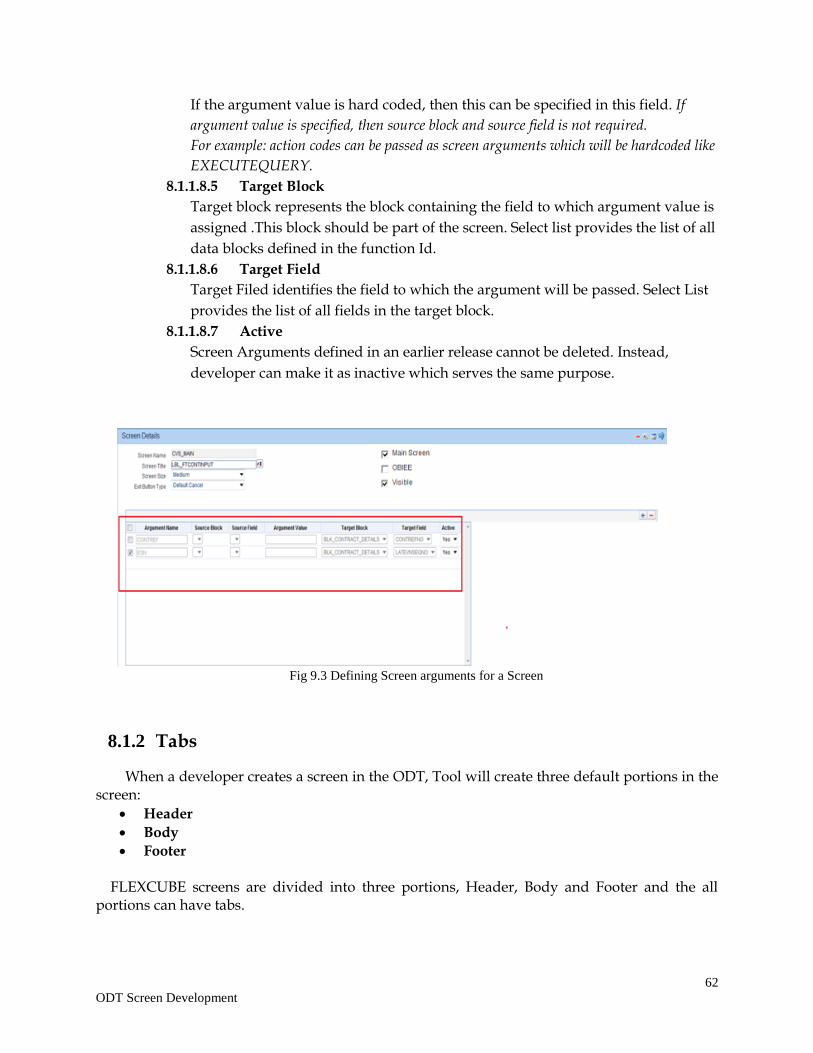
62
ODT Screen Development
If the argument value is hard coded, then this can be specified in this field. If
argument value is specified, then source block and source field is not required.
For example: action codes can be passed as screen arguments which will be hardcoded like
EXECUTEQUERY.
8.1.1.8.5 Target Block
Target block represents the block containing the field to which argument value is
assigned .This block should be part of the screen. Select list provides the list of all
data blocks defined in the function Id.
8.1.1.8.6 Target Field
Target Filed identifies the field to which the argument will be passed. Select List
provides the list of all fields in the target block.
8.1.1.8.7 Active
Screen Arguments defined in an earlier release cannot be deleted. Instead,
developer can make it as inactive which serves the same purpose.
Fig 9.3 Defining Screen arguments for a Screen
8.1.2 Tabs
When a developer creates a screen in the ODT, Tool will create three default portions in the screen:
Header
Body
Footer FLEXCUBE screens are divided into three portions, Header, Body and Footer and the all portions can have tabs.
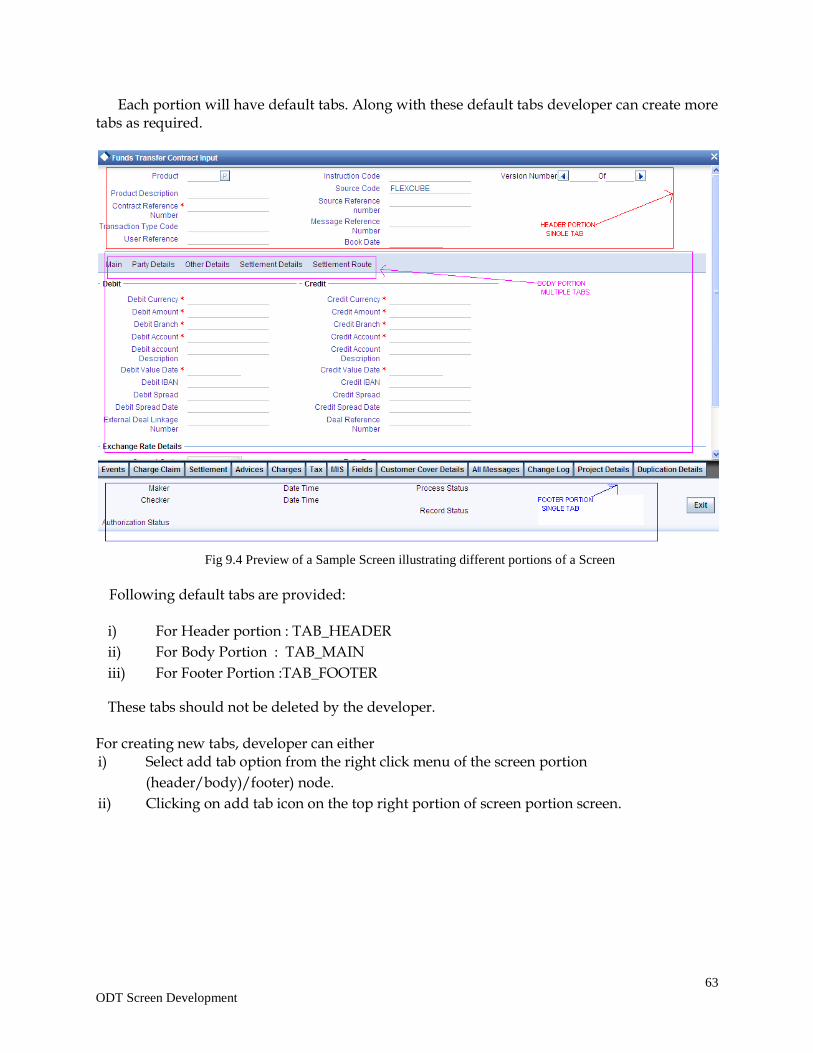
63
ODT Screen Development
Each portion will have default tabs. Along with these default tabs developer can create more tabs as required.
Fig 9.4 Preview of a Sample Screen illustrating different portions of a Screen
Following default tabs are provided:
i) For Header portion : TAB_HEADER
ii) For Body Portion : TAB_MAIN
iii) For Footer Portion :TAB_FOOTER
These tabs should not be deleted by the developer.
For creating new tabs, developer can either i) Select add tab option from the right click menu of the screen portion
(header/body)/footer) node.
ii) Clicking on add tab icon on the top right portion of screen portion screen.

64
ODT Screen Development
Fig 9.5 Adding Tabs to a Screen
Provide the name of the tab in the add tab screen.
Tab Name should start with TAB_. Example: TAB_PREFERENCES
8.1.2.1 Tab Properties Provide the properties for the tab as required.
8.1.2.1.1 Screen Name
This is a non editable and will be defaulted from the screen name of which the
tab is included
8.1.2.1.2 Tab Name
This is non editable and it shows the name of the tab provided during creation of
the screen
8.1.2.1.3 Tab Label
Label Code for the tab can be maintained here. Description of the Label will
appear as Tab Title in the screen
8.1.2.1.4 Tab Type
Tab type as data or service. Tab Type is Data for Normal case. If any call form
has to be embedded in the tab (example : Branch Screens),this can be selected as
Service
8.1.2.1.5 Visible
Tabs can be made invisible if it is not intended to be used.
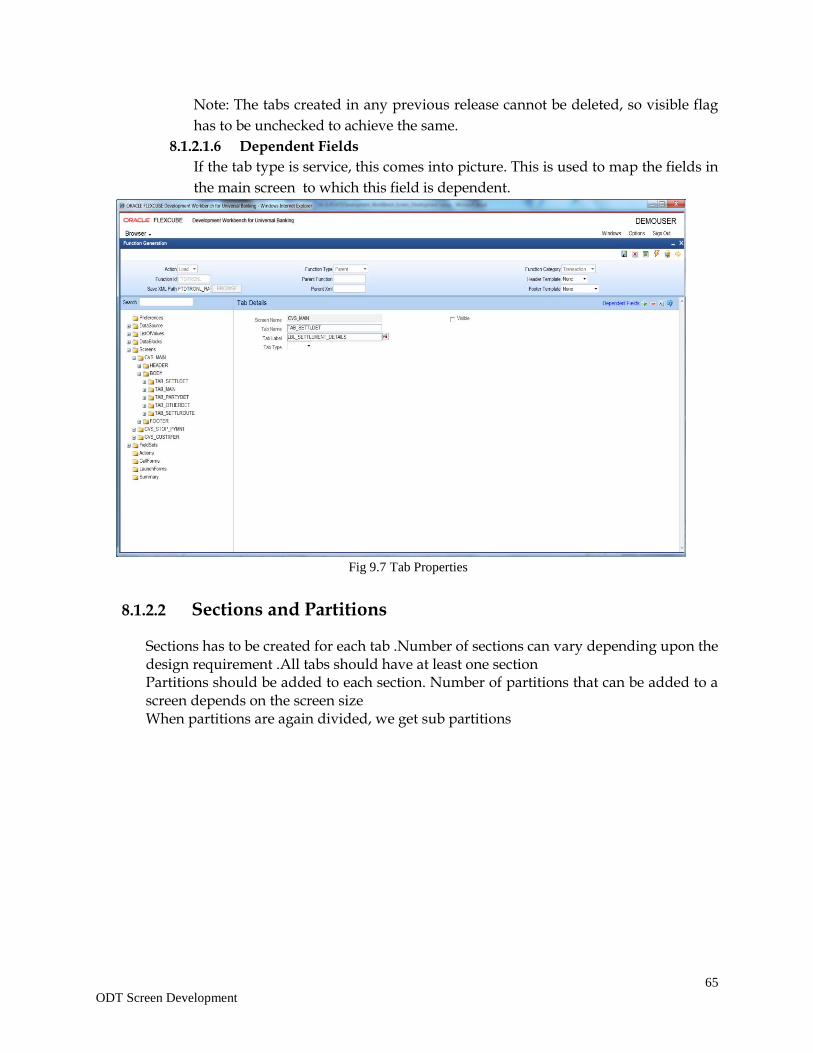
65
ODT Screen Development
Note: The tabs created in any previous release cannot be deleted, so visible flag
has to be unchecked to achieve the same.
8.1.2.1.6 Dependent Fields
If the tab type is service, this comes into picture. This is used to map the fields in
the main screen to which this field is dependent.
Fig 9.7 Tab Properties
8.1.2.2 Sections and Partitions
Sections has to be created for each tab .Number of sections can vary depending upon the design requirement .All tabs should have at least one section Partitions should be added to each section. Number of partitions that can be added to a screen depends on the screen size When partitions are again divided, we get sub partitions
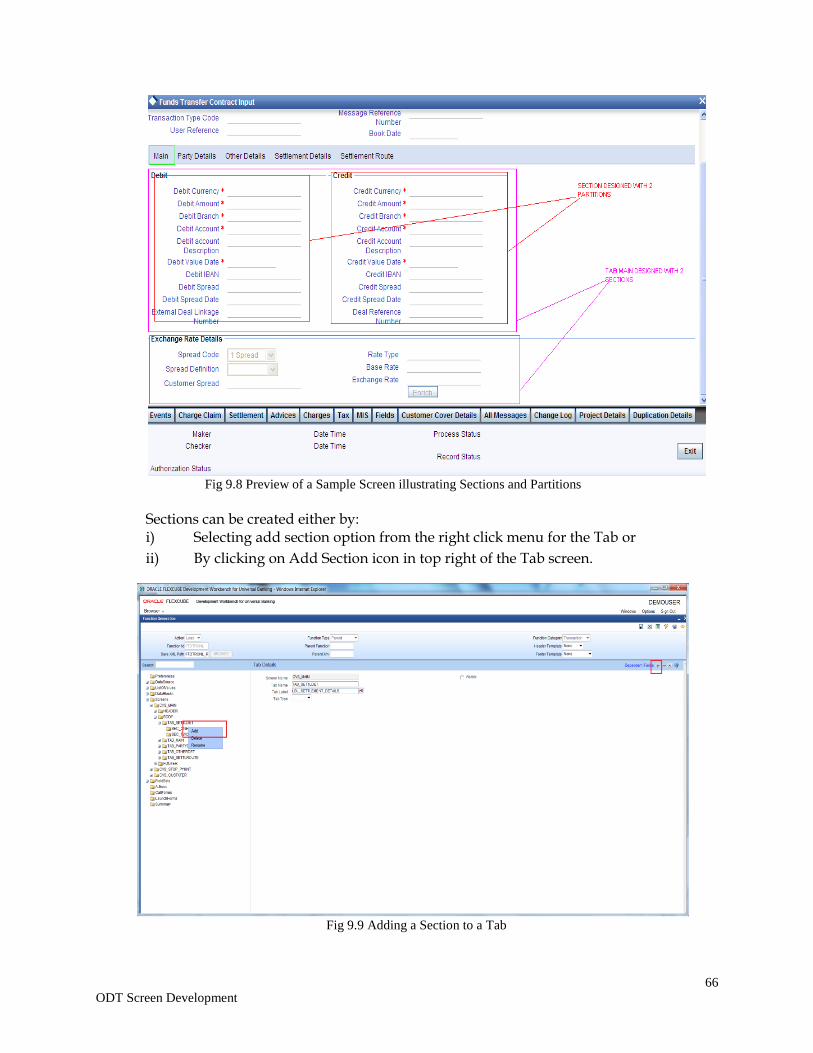
66
ODT Screen Development
Fig 9.8 Preview of a Sample Screen illustrating Sections and Partitions
Sections can be created either by: i) Selecting add section option from the right click menu for the Tab or
ii) By clicking on Add Section icon in top right of the Tab screen.
Fig 9.9 Adding a Section to a Tab
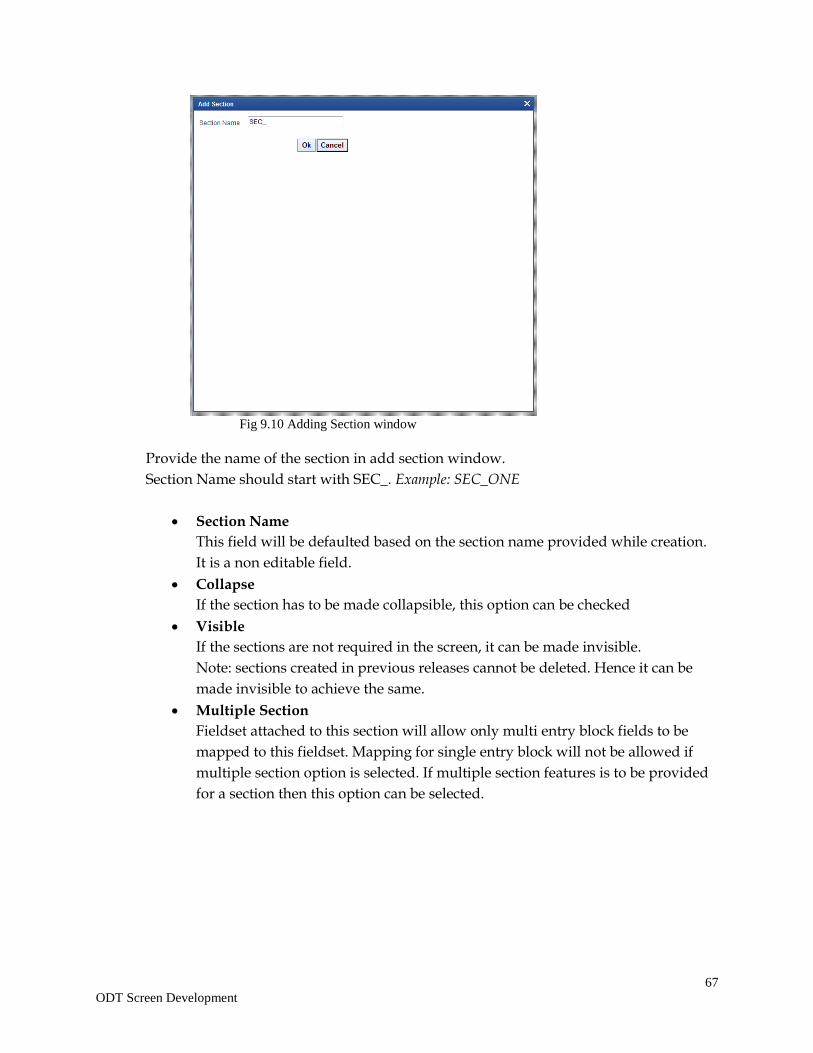
67
ODT Screen Development
Fig 9.10 Adding Section window
Provide the name of the section in add section window.
Section Name should start with SEC_. Example: SEC_ONE
Section Name
This field will be defaulted based on the section name provided while creation.
It is a non editable field.
Collapse
If the section has to be made collapsible, this option can be checked
Visible
If the sections are not required in the screen, it can be made invisible.
Note: sections created in previous releases cannot be deleted. Hence it can be
made invisible to achieve the same.
Multiple Section
Fieldset attached to this section will allow only multi entry block fields to be
mapped to this fieldset. Mapping for single entry block will not be allowed if
multiple section option is selected. If multiple section features is to be provided
for a section then this option can be selected.
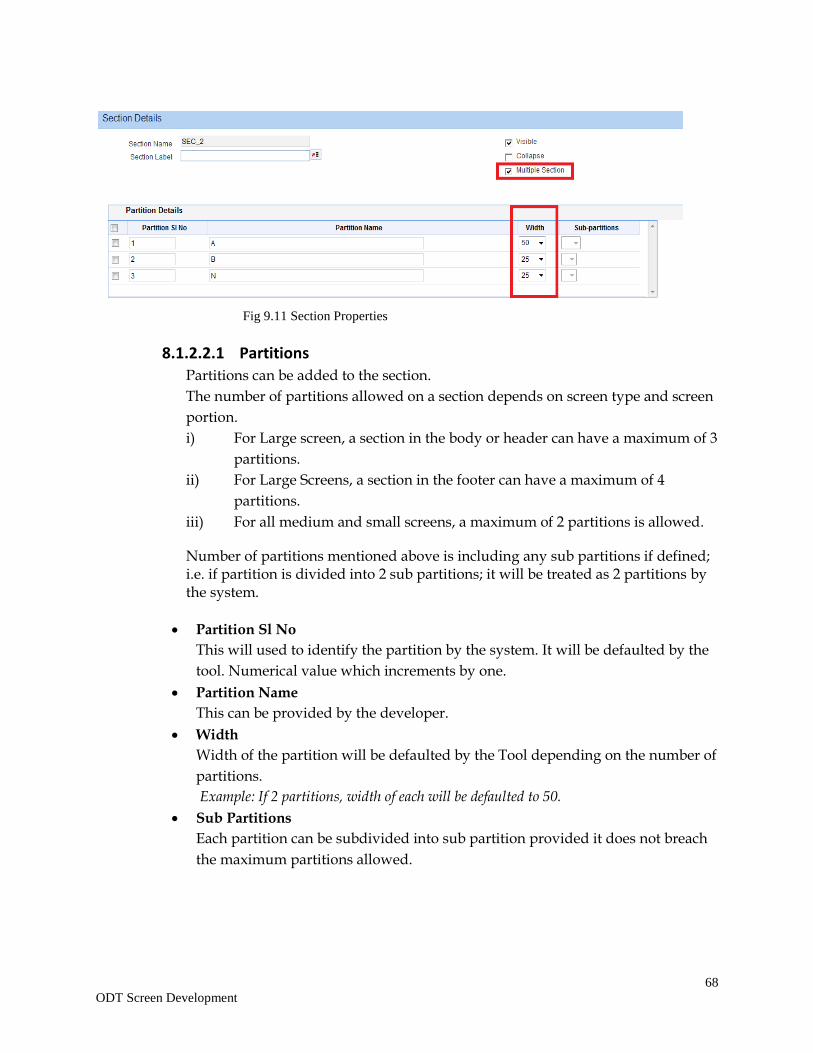
68
ODT Screen Development
Fig 9.11 Section Properties
8.1.2.2.1 Partitions
Partitions can be added to the section.
The number of partitions allowed on a section depends on screen type and screen
portion.
i) For Large screen, a section in the body or header can have a maximum of 3
partitions.
ii) For Large Screens, a section in the footer can have a maximum of 4
partitions.
iii) For all medium and small screens, a maximum of 2 partitions is allowed.
Number of partitions mentioned above is including any sub partitions if defined; i.e. if partition is divided into 2 sub partitions; it will be treated as 2 partitions by the system.
Partition Sl No
This will used to identify the partition by the system. It will be defaulted by the
tool. Numerical value which increments by one.
Partition Name
This can be provided by the developer.
Width
Width of the partition will be defaulted by the Tool depending on the number of
partitions.
Example: If 2 partitions, width of each will be defaulted to 50.
Sub Partitions
Each partition can be subdivided into sub partition provided it does not breach
the maximum partitions allowed.
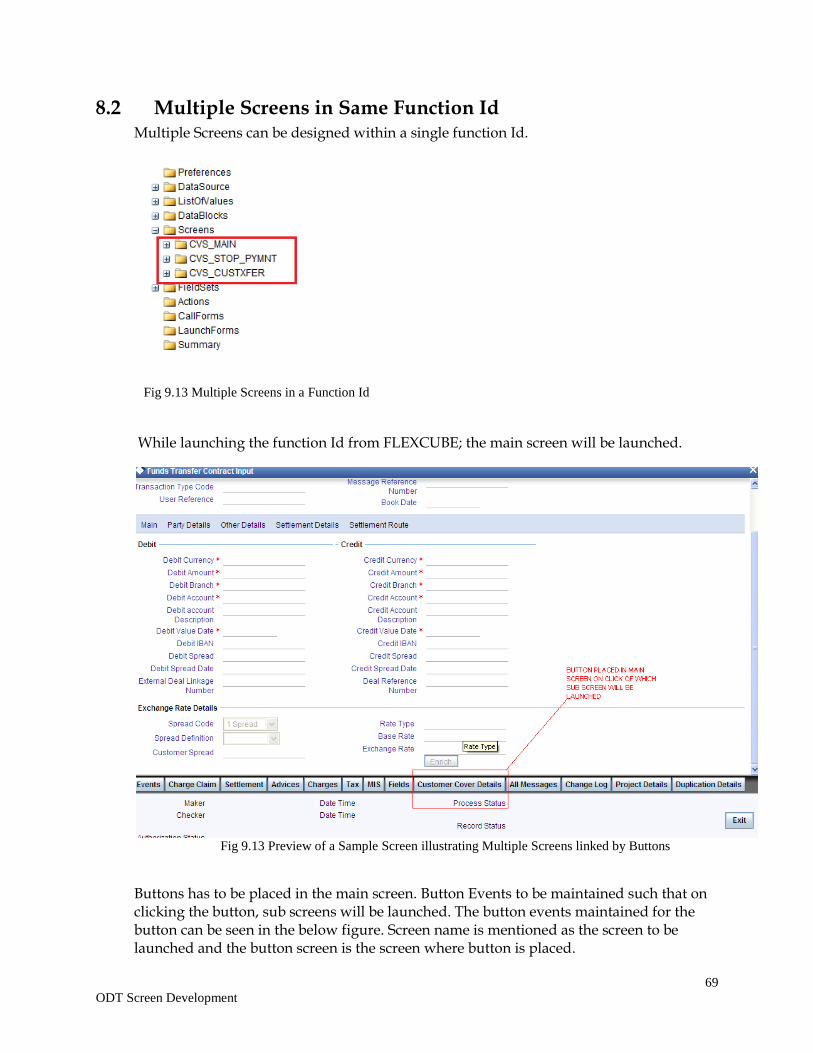
69
ODT Screen Development
8.2 Multiple Screens in Same Function Id Multiple Screens can be designed within a single function Id.
Fig 9.13 Multiple Screens in a Function Id
While launching the function Id from FLEXCUBE; the main screen will be launched.
Fig 9.13 Preview of a Sample Screen illustrating Multiple Screens linked by Buttons
Buttons has to be placed in the main screen. Button Events to be maintained such that on clicking the button, sub screens will be launched. The button events maintained for the button can be seen in the below figure. Screen name is mentioned as the screen to be launched and the button screen is the screen where button is placed.
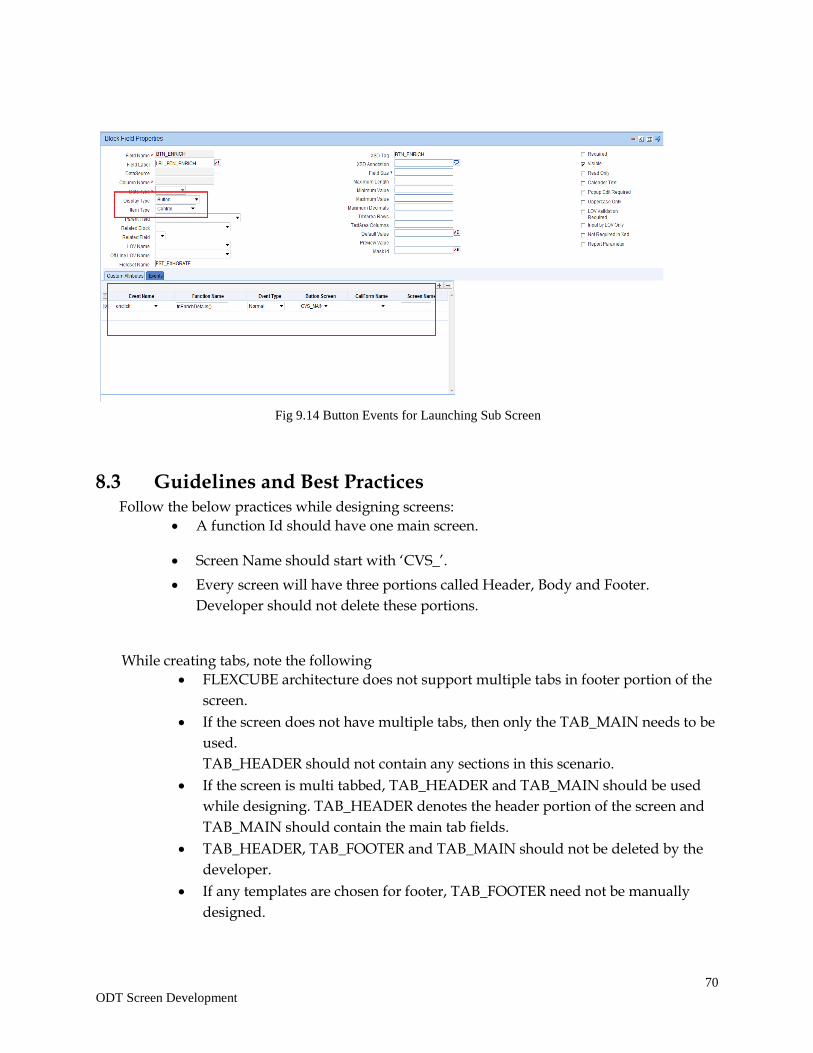
70
ODT Screen Development
Fig 9.14 Button Events for Launching Sub Screen
8.3 Guidelines and Best Practices Follow the below practices while designing screens:
A function Id should have one main screen.
Screen Name should start with ‘CVS_’.
Every screen will have three portions called Header, Body and Footer.
Developer should not delete these portions.
While creating tabs, note the following
FLEXCUBE architecture does not support multiple tabs in footer portion of the
screen.
If the screen does not have multiple tabs, then only the TAB_MAIN needs to be
used.
TAB_HEADER should not contain any sections in this scenario.
If the screen is multi tabbed, TAB_HEADER and TAB_MAIN should be used
while designing. TAB_HEADER denotes the header portion of the screen and
TAB_MAIN should contain the main tab fields.
TAB_HEADER, TAB_FOOTER and TAB_MAIN should not be deleted by the
developer.
If any templates are chosen for footer, TAB_FOOTER need not be manually
designed.
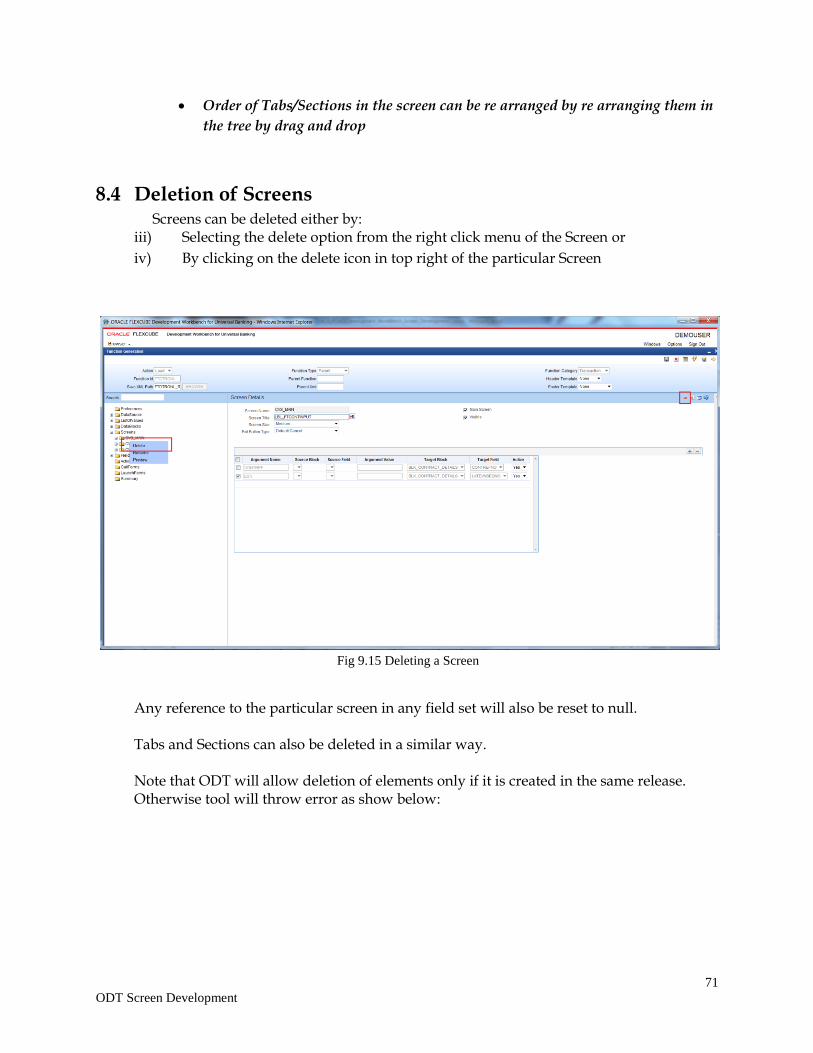
71
ODT Screen Development
Order of Tabs/Sections in the screen can be re arranged by re arranging them in
the tree by drag and drop
8.4 Deletion of Screens Screens can be deleted either by: iii) Selecting the delete option from the right click menu of the Screen or
iv) By clicking on the delete icon in top right of the particular Screen
Fig 9.15 Deleting a Screen
Any reference to the particular screen in any field set will also be reset to null. Tabs and Sections can also be deleted in a similar way. Note that ODT will allow deletion of elements only if it is created in the same release. Otherwise tool will throw error as show below:
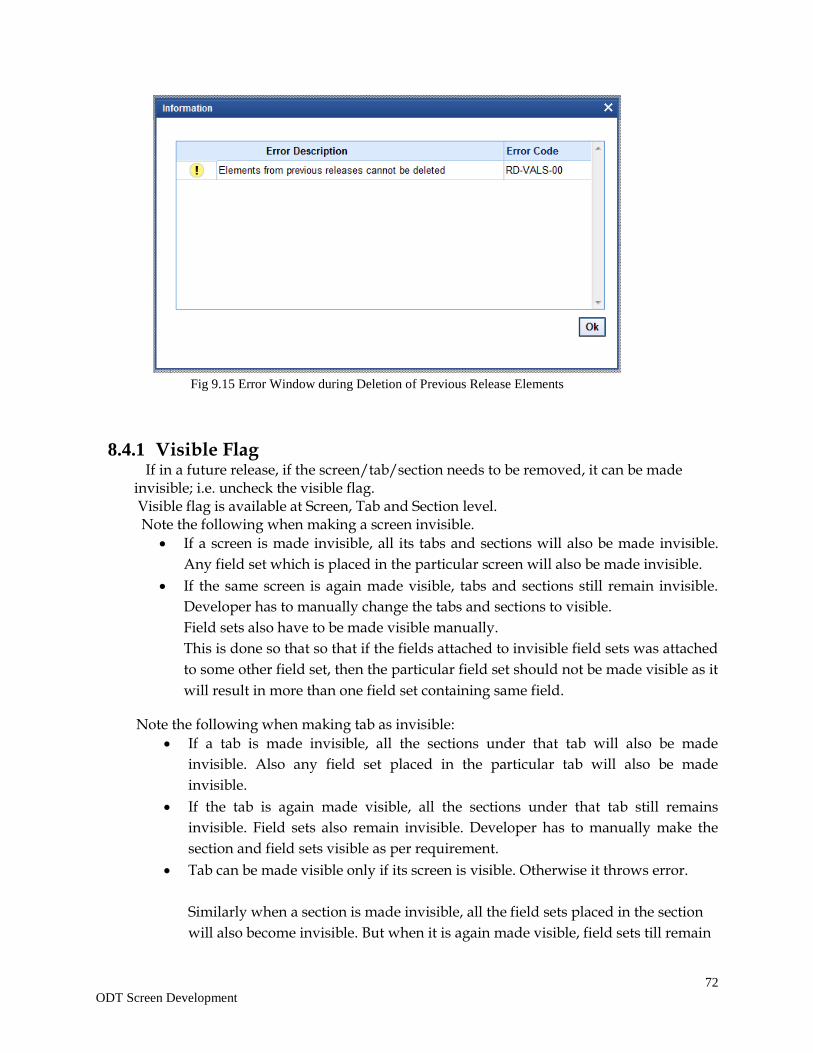
72
ODT Screen Development
Fig 9.15 Error Window during Deletion of Previous Release Elements
8.4.1 Visible Flag If in a future release, if the screen/tab/section needs to be removed, it can be made invisible; i.e. uncheck the visible flag. Visible flag is available at Screen, Tab and Section level. Note the following when making a screen invisible.
If a screen is made invisible, all its tabs and sections will also be made invisible.
Any field set which is placed in the particular screen will also be made invisible.
If the same screen is again made visible, tabs and sections still remain invisible.
Developer has to manually change the tabs and sections to visible.
Field sets also have to be made visible manually.
This is done so that so that if the fields attached to invisible field sets was attached
to some other field set, then the particular field set should not be made visible as it
will result in more than one field set containing same field.
Note the following when making tab as invisible:
If a tab is made invisible, all the sections under that tab will also be made
invisible. Also any field set placed in the particular tab will also be made
invisible.
If the tab is again made visible, all the sections under that tab still remains
invisible. Field sets also remain invisible. Developer has to manually make the
section and field sets visible as per requirement.
Tab can be made visible only if its screen is visible. Otherwise it throws error.
Similarly when a section is made invisible, all the field sets placed in the section
will also become invisible. But when it is again made visible, field sets till remain
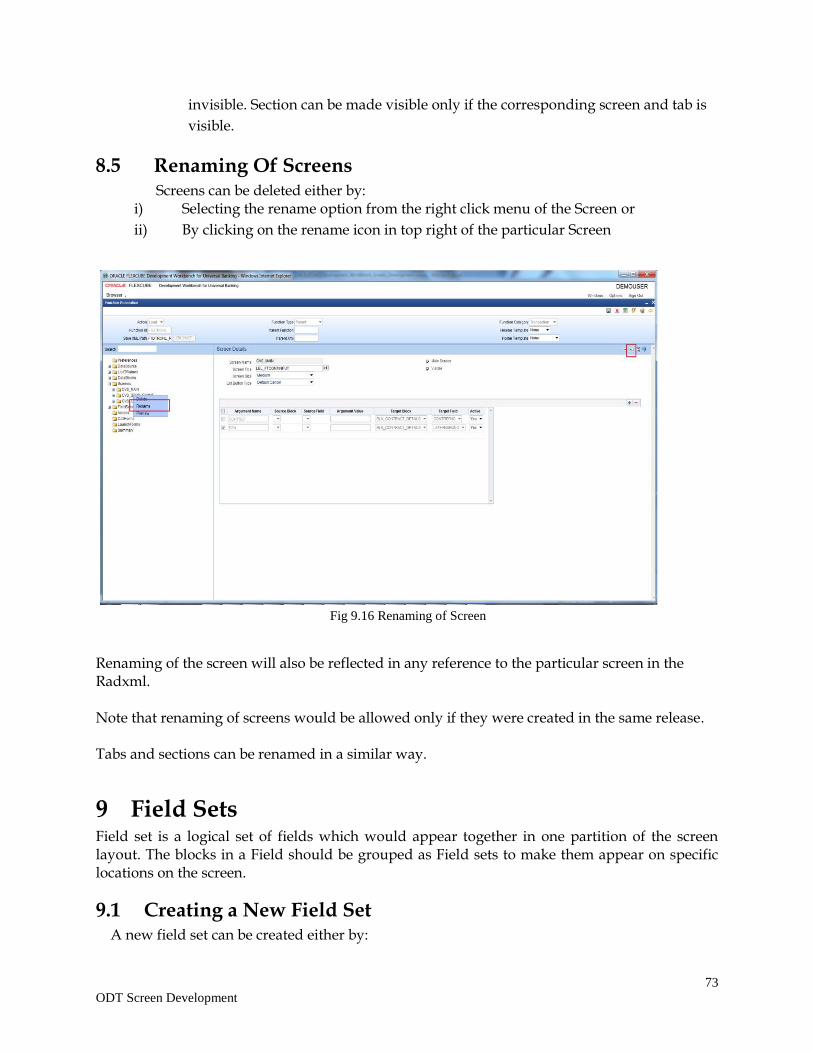
73
ODT Screen Development
invisible. Section can be made visible only if the corresponding screen and tab is
visible.
8.5 Renaming Of Screens Screens can be deleted either by: i) Selecting the rename option from the right click menu of the Screen or
ii) By clicking on the rename icon in top right of the particular Screen
Fig 9.16 Renaming of Screen
Renaming of the screen will also be reflected in any reference to the particular screen in the Radxml. Note that renaming of screens would be allowed only if they were created in the same release. Tabs and sections can be renamed in a similar way.
9 Field Sets Field set is a logical set of fields which would appear together in one partition of the screen layout. The blocks in a Field should be grouped as Field sets to make them appear on specific locations on the screen.
9.1 Creating a New Field Set A new field set can be created either by:
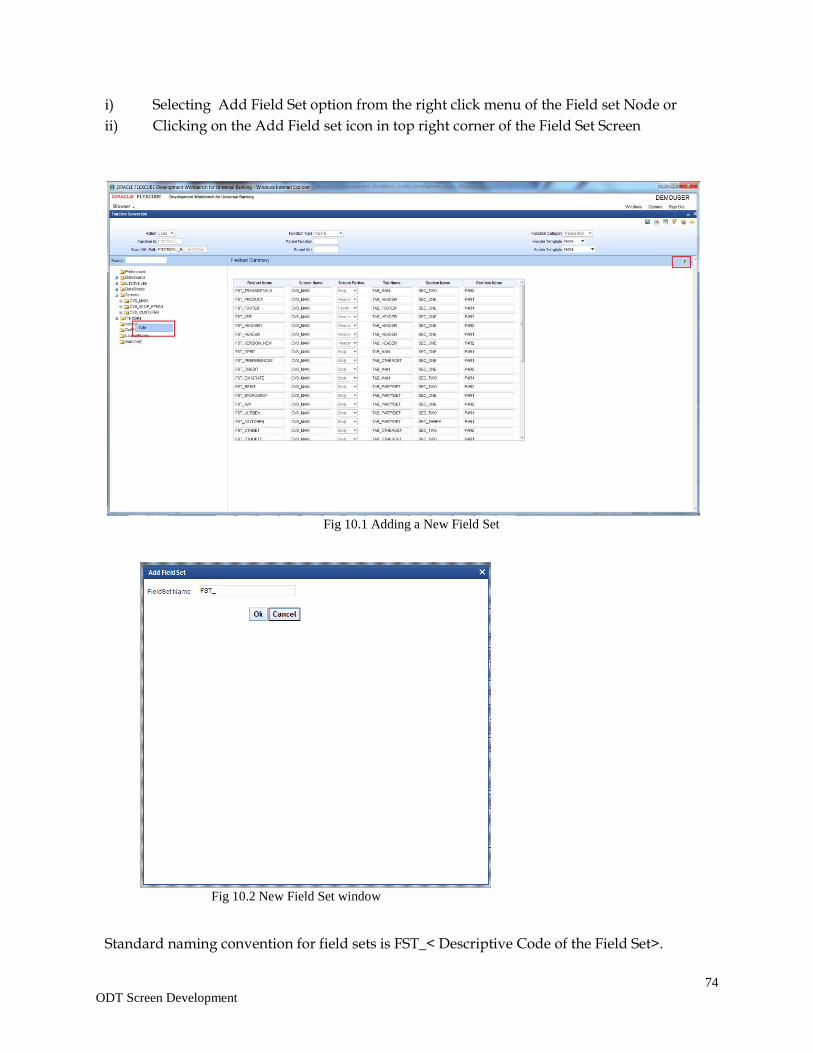
74
ODT Screen Development
i) Selecting Add Field Set option from the right click menu of the Field set Node or
ii) Clicking on the Add Field set icon in top right corner of the Field Set Screen
Fig 10.1 Adding a New Field Set
Fig 10.2 New Field Set window
Standard naming convention for field sets is FST_< Descriptive Code of the Field Set>.
75
ODT Screen Development
Example: FST_VERSION
9.1.1 Field Set Properties Provide the Field Set properties as required.
9.1.1.1 Field Set Name
This is a non editable field. Value is defaulted from the field set name provided
during creation.
9.1.1.2 Field Set Label
All field sets can have a title to them, and same can be mentioned in this field as
label code. Label code can be selected using the list of values attached to the field.
In the screen Field Set Title will appear as title for a field set.
9.1.1.3 Data Block
Data block has to be selected from select list. Select list provides the list of all data
blocks in the radxml. Developer can attach fields of the data block selected to the
field set.
Note that data block Name cannot be modified in a future release.
9.1.1.4 Multi Record
This is a non editable field. This will be defaulted based on the type of data block
selected.
If data block is of type multi record, field will be set to yes; otherwise to No.
9.1.1.5 View Type
View type option will be enabled only if multi record is yes.
If multi record is No, View Type is defaulted to Single.
If multi record is yes, developer can choose the view type as either Single or
Multiple View.
In Multiple View type, multi records are displayed in a table grid format.
In Single View type, only one record will be displayed at time. Navigation buttons
will be provided for viewing the next record.
9.1.1.6 Field Set height
Developer can provide the height of the field set. This is optional field
FLEXCUBE will calculate the standard height of the field set depending on the
number of fields and size of screen etc. Here ODT provides developer a provision
to over ride the standard settings.
9.1.1.7 No Of rows
76
ODT Screen Development
If view type is multiple, then number of rows in the multiple tables can be decided
using ‘No of rows’ field. This is optional field, Tool will default to 15 rows, if the
field value is null.
9.1.1.8 Field Set Type
Three options are there
1) Normal: This option will be for the normal field sets.
2) Image Set: If a fieldset is Image fieldset then this option needs to be chosen.
3) Version: If a fieldset represents version control field set then the field set type
should be version. If Field set Type is Version then the Selected Block must
have below mentioned fields
a)VERNO
b)LASTVERNO
Note: Option for Manual selection of fields will not be provided.
9.1.1.9 Screen Name
This field captures the name of the screen where the particular field set to be
added.
Select List provides the list of all Screens created in the Radxml.
9.1.1.10 Screen Portion
Select the Screen Portion where the field set has to be placed.
9.1.1.11 Tab Name
Select the tab name where the field set has to be placed. Select List will contain all
the tabs defined in the screen mentioned above.
9.1.1.12 Section Name
Select the section in the tab provided earlier to which the field set has to be placed.
Select List provides all the sections defined in the Tab mentioned above.
9.1.1.13 Partition Name
Select the partition in the section mentioned above where the field set will be
placed.
9.1.1.14 Horizontal Field Set
A field set can be horizontal if this flag is selected.
A horizontal field set will have fields horizontally arranged, where as in normal
field sets all the fields will be arranged vertically by default.
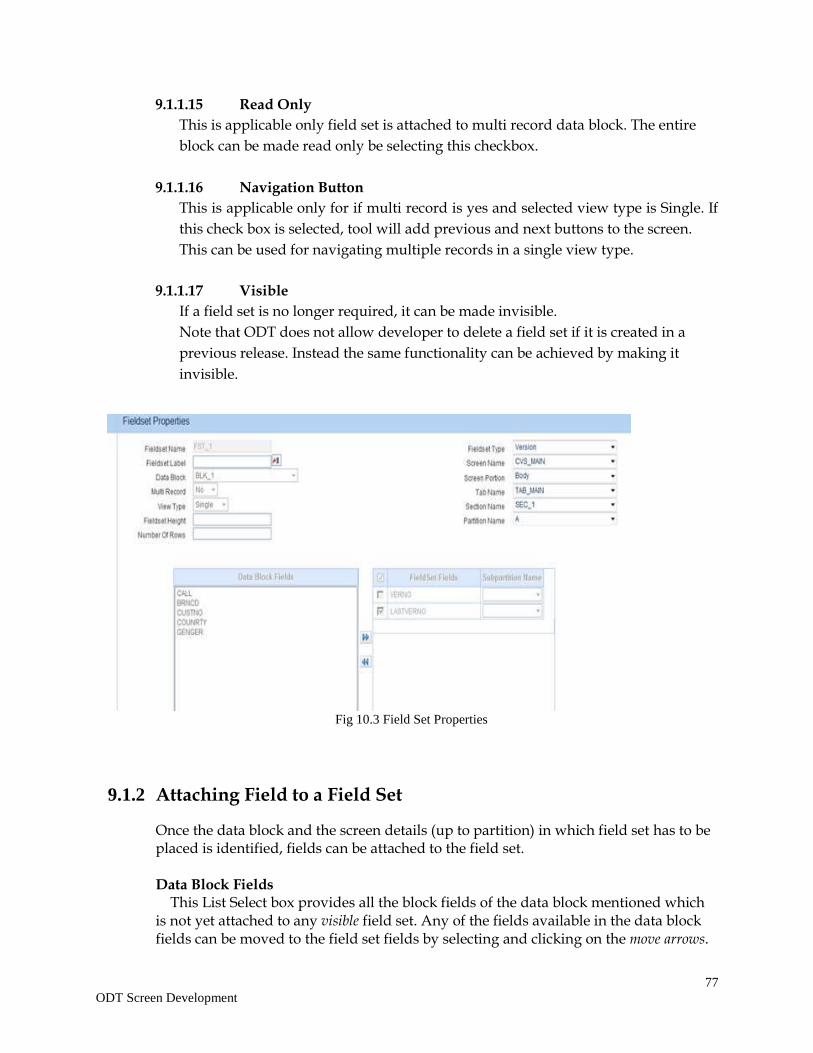
77
ODT Screen Development
9.1.1.15 Read Only
This is applicable only field set is attached to multi record data block. The entire
block can be made read only be selecting this checkbox.
9.1.1.16 Navigation Button
This is applicable only for if multi record is yes and selected view type is Single. If
this check box is selected, tool will add previous and next buttons to the screen.
This can be used for navigating multiple records in a single view type.
9.1.1.17 Visible
If a field set is no longer required, it can be made invisible.
Note that ODT does not allow developer to delete a field set if it is created in a
previous release. Instead the same functionality can be achieved by making it
invisible.
Fig 10.3 Field Set Properties
9.1.2 Attaching Field to a Field Set
Once the data block and the screen details (up to partition) in which field set has to be placed is identified, fields can be attached to the field set.
Data Block Fields This List Select box provides all the block fields of the data block mentioned which is not yet attached to any visible field set. Any of the fields available in the data block fields can be moved to the field set fields by selecting and clicking on the move arrows.
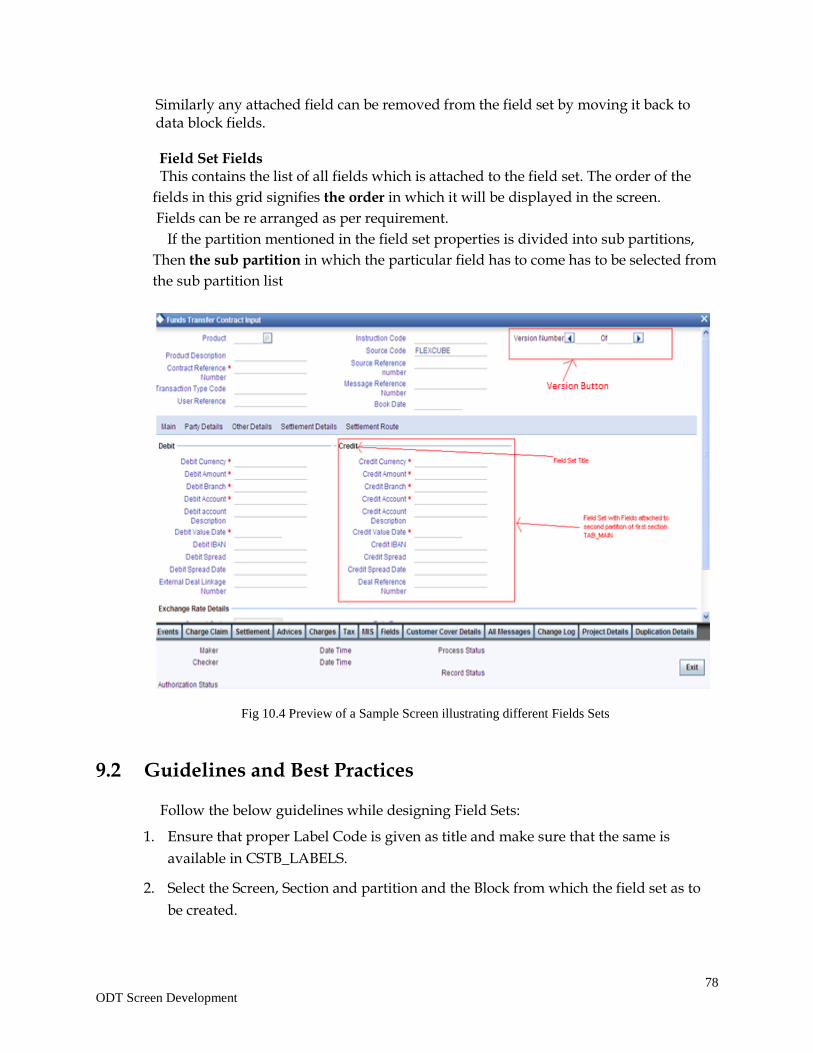
78
ODT Screen Development
Similarly any attached field can be removed from the field set by moving it back to data block fields. Field Set Fields This contains the list of all fields which is attached to the field set. The order of the
fields in this grid signifies the order in which it will be displayed in the screen.
Fields can be re arranged as per requirement.
If the partition mentioned in the field set properties is divided into sub partitions,
Then the sub partition in which the particular field has to come has to be selected from
the sub partition list
Fig 10.4 Preview of a Sample Screen illustrating different Fields Sets
9.2 Guidelines and Best Practices
Follow the below guidelines while designing Field Sets:
1. Ensure that proper Label Code is given as title and make sure that the same is
available in CSTB_LABELS.
2. Select the Screen, Section and partition and the Block from which the field set as to
be created.
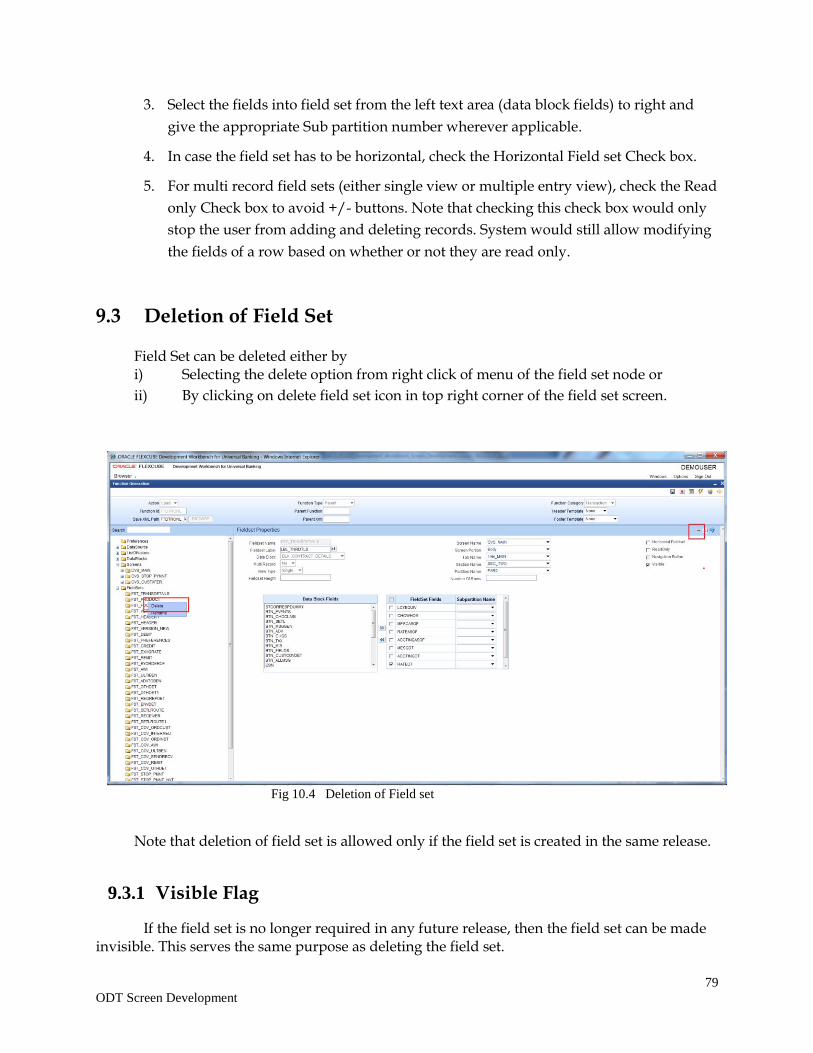
79
ODT Screen Development
3. Select the fields into field set from the left text area (data block fields) to right and
give the appropriate Sub partition number wherever applicable.
4. In case the field set has to be horizontal, check the Horizontal Field set Check box.
5. For multi record field sets (either single view or multiple entry view), check the Read
only Check box to avoid +/- buttons. Note that checking this check box would only
stop the user from adding and deleting records. System would still allow modifying
the fields of a row based on whether or not they are read only.
9.3 Deletion of Field Set
Field Set can be deleted either by i) Selecting the delete option from right click of menu of the field set node or
ii) By clicking on delete field set icon in top right corner of the field set screen.
Fig 10.4 Deletion of Field set
Note that deletion of field set is allowed only if the field set is created in the same release.
9.3.1 Visible Flag
If the field set is no longer required in any future release, then the field set can be made invisible. This serves the same purpose as deleting the field set.
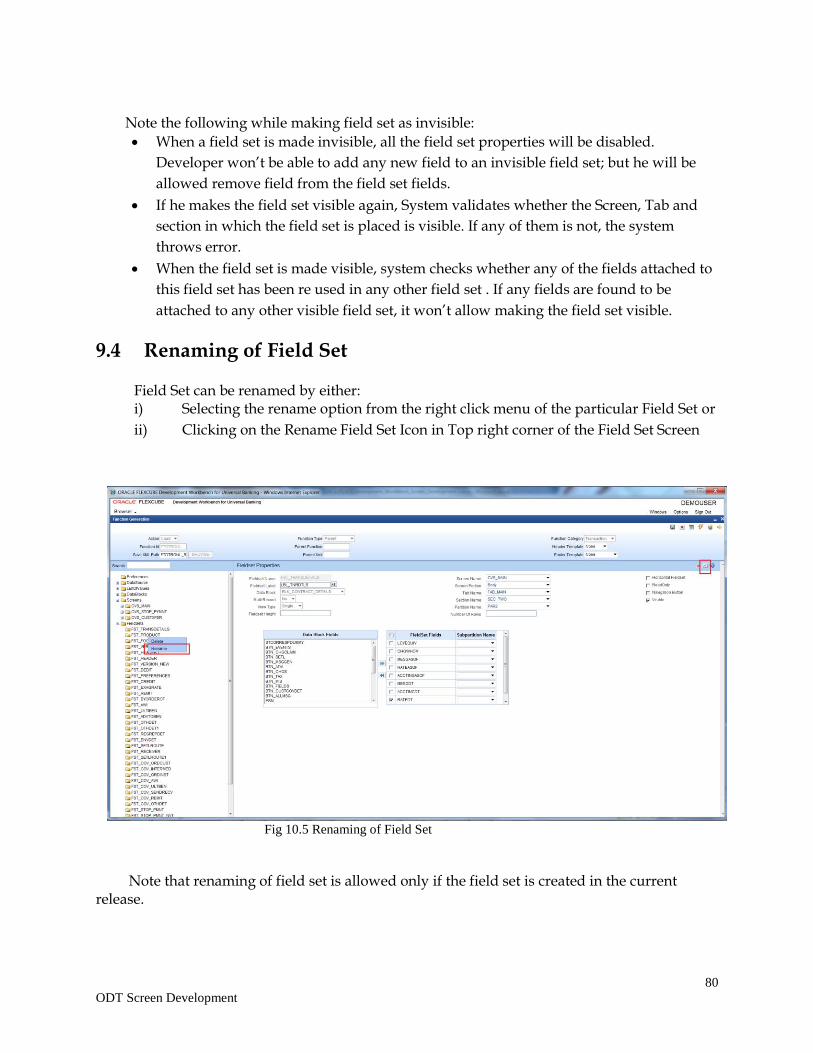
80
ODT Screen Development
Note the following while making field set as invisible:
When a field set is made invisible, all the field set properties will be disabled.
Developer won’t be able to add any new field to an invisible field set; but he will be
allowed remove field from the field set fields.
If he makes the field set visible again, System validates whether the Screen, Tab and
section in which the field set is placed is visible. If any of them is not, the system
throws error.
When the field set is made visible, system checks whether any of the fields attached to
this field set has been re used in any other field set . If any fields are found to be
attached to any other visible field set, it won’t allow making the field set visible.
9.4 Renaming of Field Set
Field Set can be renamed by either: i) Selecting the rename option from the right click menu of the particular Field Set or
ii) Clicking on the Rename Field Set Icon in Top right corner of the Field Set Screen
Fig 10.5 Renaming of Field Set
Note that renaming of field set is allowed only if the field set is created in the current release.
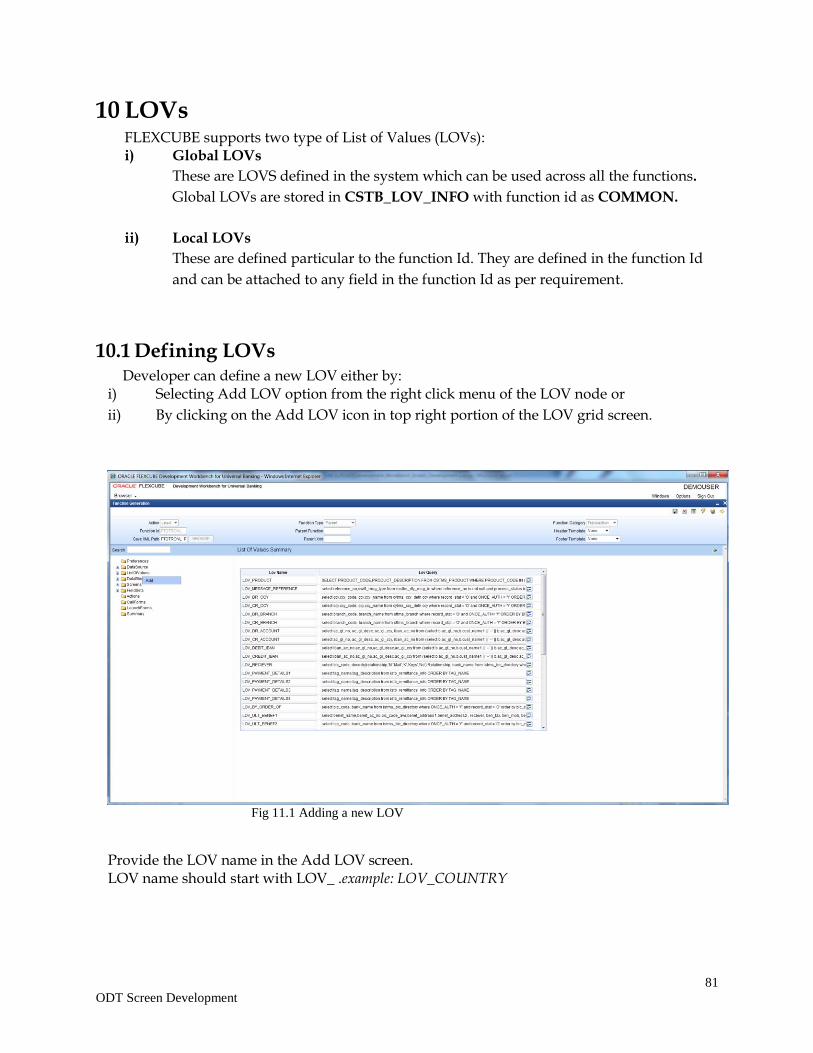
81
ODT Screen Development
10 LOVs FLEXCUBE supports two type of List of Values (LOVs): i) Global LOVs
These are LOVS defined in the system which can be used across all the functions.
Global LOVs are stored in CSTB_LOV_INFO with function id as COMMON.
ii) Local LOVs
These are defined particular to the function Id. They are defined in the function Id
and can be attached to any field in the function Id as per requirement.
10.1 Defining LOVs Developer can define a new LOV either by:
i) Selecting Add LOV option from the right click menu of the LOV node or
ii) By clicking on the Add LOV icon in top right portion of the LOV grid screen.
Fig 11.1 Adding a new LOV
Provide the LOV name in the Add LOV screen. LOV name should start with LOV_ .example: LOV_COUNTRY
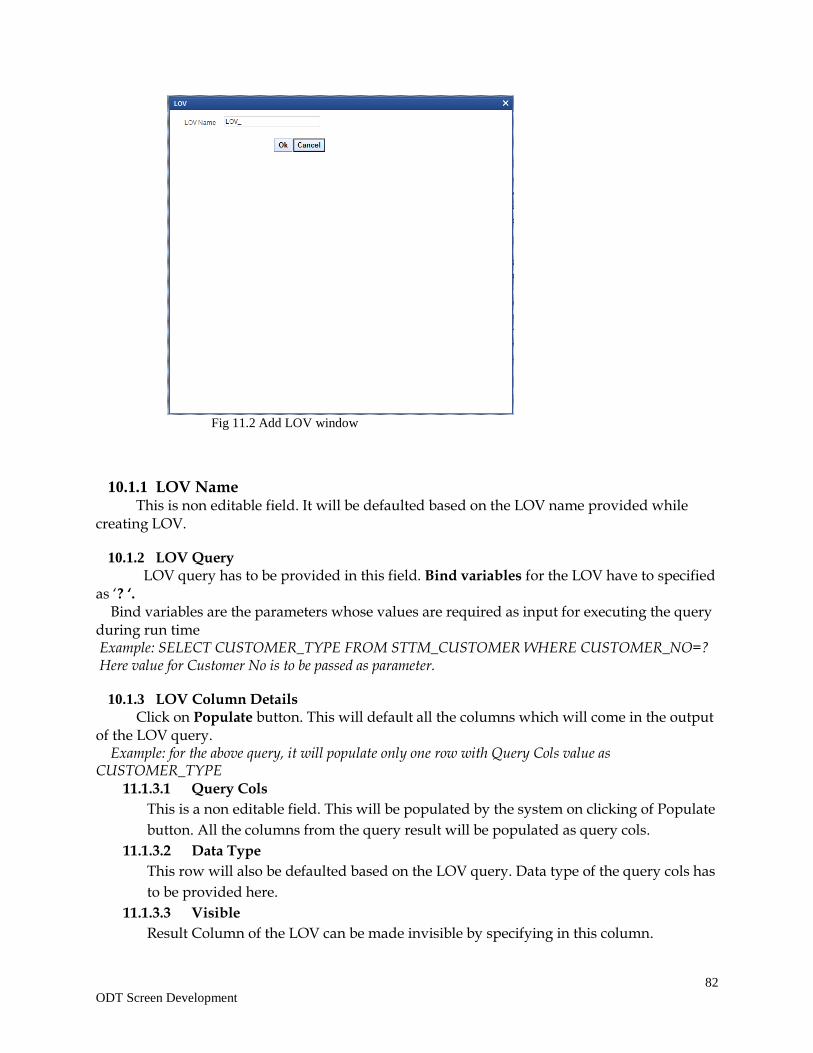
82
ODT Screen Development
Fig 11.2 Add LOV window
10.1.1 LOV Name This is non editable field. It will be defaulted based on the LOV name provided while creating LOV.
10.1.2 LOV Query LOV query has to be provided in this field. Bind variables for the LOV have to specified as ‘? ‘. Bind variables are the parameters whose values are required as input for executing the query during run time Example: SELECT CUSTOMER_TYPE FROM STTM_CUSTOMER WHERE CUSTOMER_NO=? Here value for Customer No is to be passed as parameter.
10.1.3 LOV Column Details Click on Populate button. This will default all the columns which will come in the output of the LOV query. Example: for the above query, it will populate only one row with Query Cols value as CUSTOMER_TYPE
11.1.3.1 Query Cols
This is a non editable field. This will be populated by the system on clicking of Populate
button. All the columns from the query result will be populated as query cols.
11.1.3.2 Data Type
This row will also be defaulted based on the LOV query. Data type of the query cols has
to be provided here.
11.1.3.3 Visible
Result Column of the LOV can be made invisible by specifying in this column.
83
ODT Screen Development
11.1.3.4 Reduction Fld
A field can be made as reduction of non reduction by using this flag.
If the field is a reduction field, then in the LOV screen in FLEXCUBE, user will have to
filter the list of values based on the reduction fields.
11.1.3.5 Reduction Fld Type
Display type of the reduction field can be specified here .Display type of the reduction
field can be either of the below given values:
TEXT
CHECK BOX
RADIO
SELECT
11.1.3.6 Redn/Col Label
The reduction fields should be provided with proper labels so that it description comes
in the LOV screen.
Label Codes has to be mandatorily maintained for the functioning of LOV screen.
Figure below explains the meaning of reduction labels:
11.1.3.7 Is Mandatory
If the reduction field id selected as ‘YES’, ODT will allow to select ‘Is mandatory’
option for a particular column . If ‘ Is mandatory ’ is selected as yes, ODT will ask for
minimum search character length. By default the value is 3. If field is mandatory and
minimum search character length is given as n , then while searching, user has to enter
minimum of n characters in order to search a particular value otherwise the system will
show error message.
11.1.3.8 Minimum Search Character length
If Is mandatory is selected as ‘YES’ , then only ODT will allow to enter values for Min
search character length. By default the value is 3. Any value less than 3 will not be
accepted. ODT will show alert message in case of any rule violation. Once the value for
Minimum search character length field is provided, user has to enter minimum
character length to fetch a value corresponding to that return field.
Figure below explains the Is mandatory and min search char len:
84
ODT Screen Development
Fig 11.3 Sample LOV Screen illustrating Reduction Fields
85
ODT Screen Development
10.2 Attaching LOV to Block Field LOVs have to be attached to the block field as per requirement. In the block field, select the display type as LOV.
10.2.1 LOV name:
Select List will contain both Local and Global LOVs. Developer has to select the LOV as required for the field.
10.2.2 Input By LOV Only: This field has to be checked if the field has to input through LOV only
10.2.3 LOV Validation Reqd: If validation for the entered value is required against the values fetched from LOV
query, this checkbox can be checked.
10.2.4 Bind Variables: Bind variables defined in the LOV query has to be mapped to corresponding data block field. During LOV query execution, the value of these data blocks will be picked up in place of bind variables (?). Click on button Default from LOV Definition. Number of rows corresponding to the number of bind variables in the query will be created. Below details has to be maintained in bind variable tab: Block Name: The block which contains the bind variable block field has to be selected from the list of all data blocks. Bind Variable: The block field which is the bind variable has to be selected from list of fields of the block selected. Data Type: The data type of the bind variable has to be mentioned here. This can be STRING, DATE, NUMBER etc. If more than one bind variable is present in the LOV query, bind variables has to be provided in the same order as it appears in the LOV query.
86
ODT Screen Development
Fig 11.4 Attaching LOV to a Block Field: Specifying bind variables
10.2.5 Return Fields Information regarding the return fields has to be provided in the Return Fields Tab. Developer has to map the block fields to which the selected values from LOV should be assigned. Click on button Default from LOV Definition. All Query Cols will be defaulted based on the LOV definition. Query Column: This will be defaulted by the system based on the LOV definition on clicking default button. Block Name: Provide the Block Name which contains the field to which the particular coulmn value has to assigned. Return Fld Name: Select the data block field to which the result will be assigned. All the query Cols need not have a return field. In the figure below AC_GL_NO is mapped to CRACC field. Therefore the value of result column AC_GL_NO from the selected record will be defaulted to CRACC field.
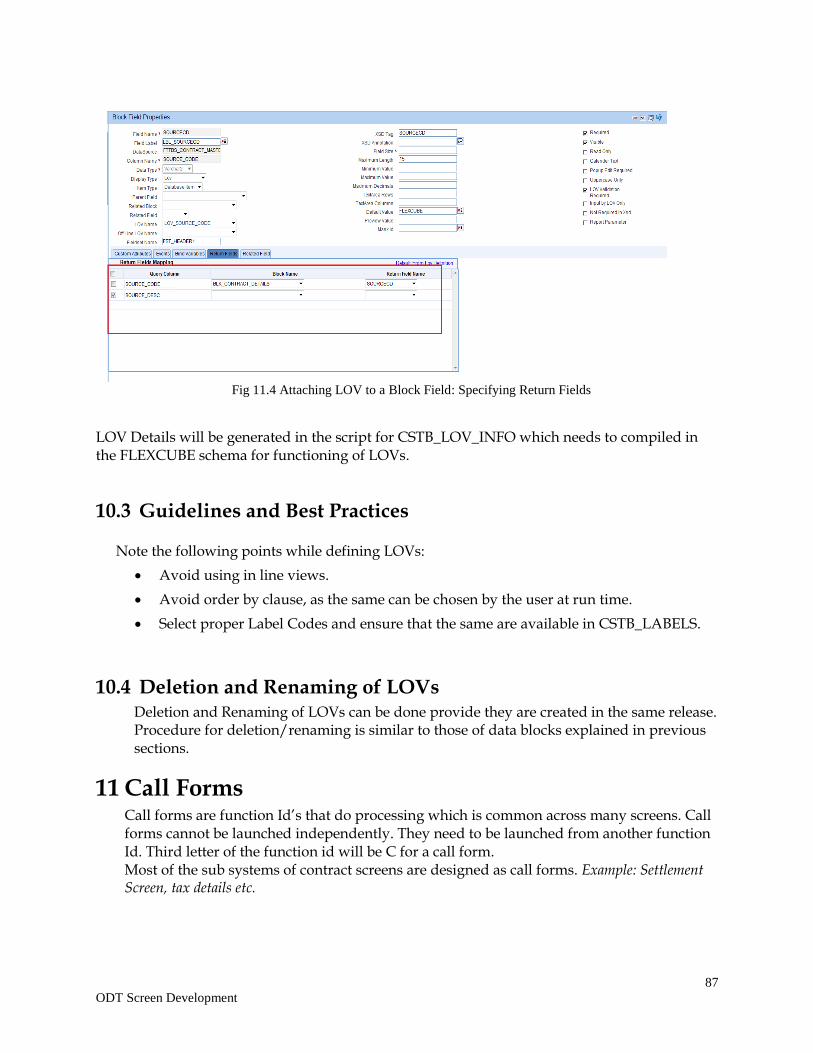
87
ODT Screen Development
Fig 11.4 Attaching LOV to a Block Field: Specifying Return Fields
LOV Details will be generated in the script for CSTB_LOV_INFO which needs to compiled in the FLEXCUBE schema for functioning of LOVs.
10.3 Guidelines and Best Practices
Note the following points while defining LOVs:
Avoid using in line views.
Avoid order by clause, as the same can be chosen by the user at run time.
Select proper Label Codes and ensure that the same are available in CSTB_LABELS.
10.4 Deletion and Renaming of LOVs Deletion and Renaming of LOVs can be done provide they are created in the same release. Procedure for deletion/renaming is similar to those of data blocks explained in previous sections.
11 Call Forms Call forms are function Id’s that do processing which is common across many screens. Call forms cannot be launched independently. They need to be launched from another function Id. Third letter of the function id will be C for a call form. Most of the sub systems of contract screens are designed as call forms. Example: Settlement Screen, tax details etc.
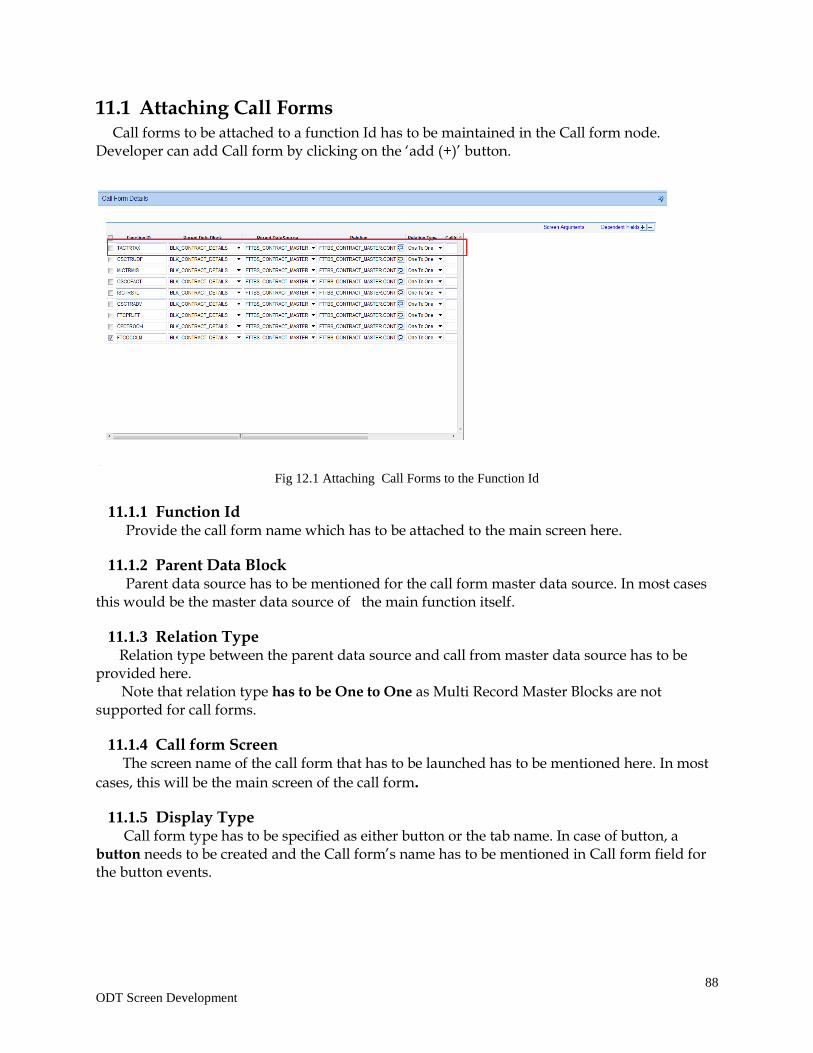
88
ODT Screen Development
11.1 Attaching Call Forms Call forms to be attached to a function Id has to be maintained in the Call form node. Developer can add Call form by clicking on the ‘add (+)’ button.
Fig 12.1 Attaching Call Forms to the Function Id
11.1.1 Function Id Provide the call form name which has to be attached to the main screen here.
11.1.2 Parent Data Block Parent data source has to be mentioned for the call form master data source. In most cases this would be the master data source of the main function itself.
11.1.3 Relation Type Relation type between the parent data source and call from master data source has to be provided here. Note that relation type has to be One to One as Multi Record Master Blocks are not supported for call forms.
11.1.4 Call form Screen The screen name of the call form that has to be launched has to be mentioned here. In most
cases, this will be the main screen of the call form.
11.1.5 Display Type Call form type has to be specified as either button or the tab name. In case of button, a button needs to be created and the Call form’s name has to be mentioned in Call form field for the button events.
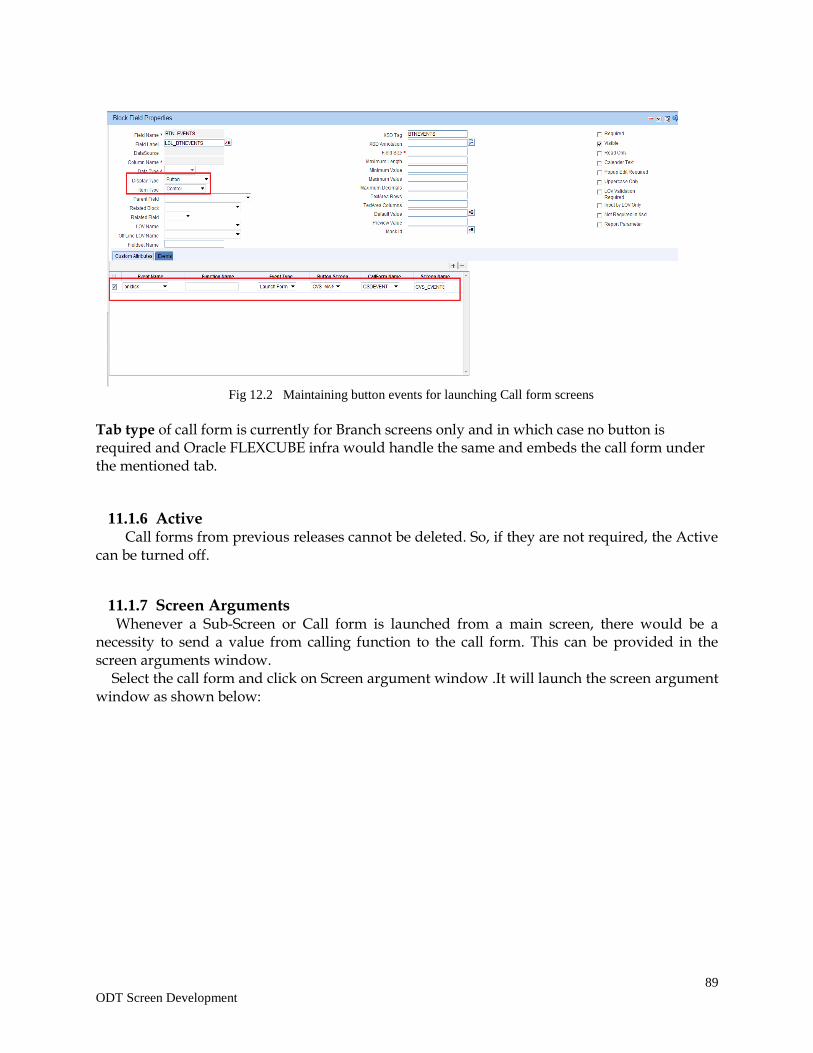
89
ODT Screen Development
Fig 12.2 Maintaining button events for launching Call form screens
Tab type of call form is currently for Branch screens only and in which case no button is required and Oracle FLEXCUBE infra would handle the same and embeds the call form under the mentioned tab.
11.1.6 Active Call forms from previous releases cannot be deleted. So, if they are not required, the Active can be turned off.
11.1.7 Screen Arguments Whenever a Sub-Screen or Call form is launched from a main screen, there would be a necessity to send a value from calling function to the call form. This can be provided in the screen arguments window. Select the call form and click on Screen argument window .It will launch the screen argument window as shown below:
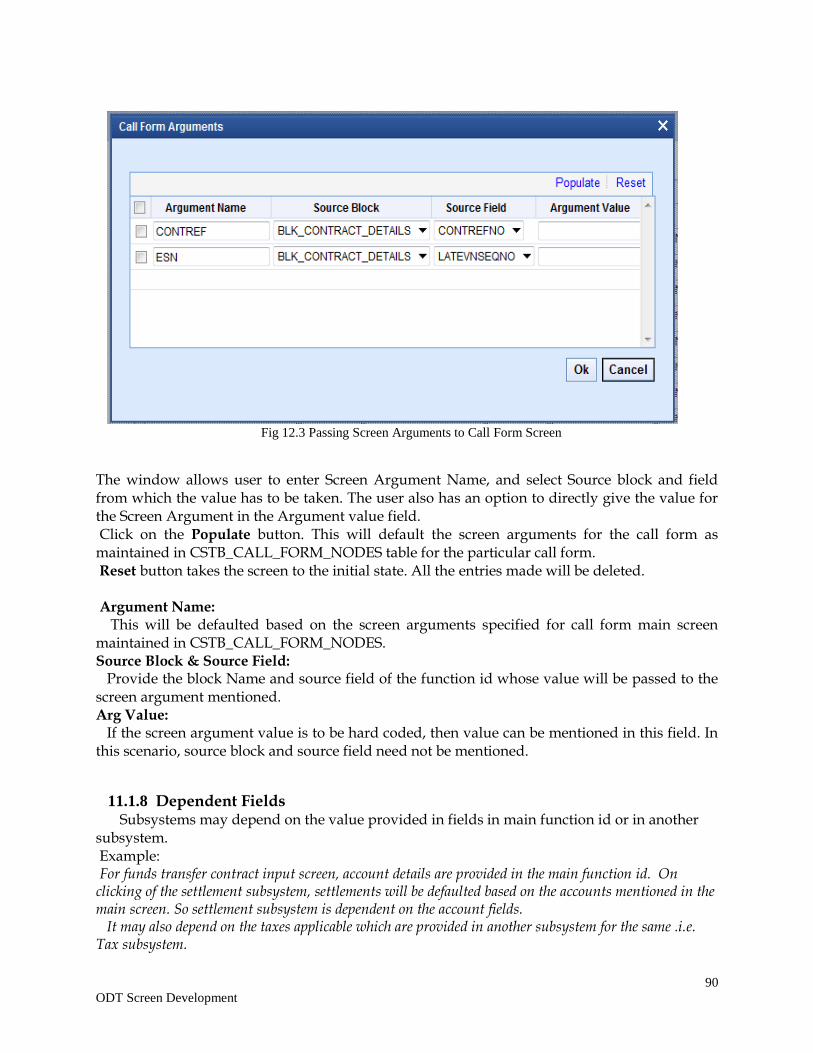
90
ODT Screen Development
Fig 12.3 Passing Screen Arguments to Call Form Screen
The window allows user to enter Screen Argument Name, and select Source block and field from which the value has to be taken. The user also has an option to directly give the value for the Screen Argument in the Argument value field. Click on the Populate button. This will default the screen arguments for the call form as maintained in CSTB_CALL_FORM_NODES table for the particular call form. Reset button takes the screen to the initial state. All the entries made will be deleted. Argument Name: This will be defaulted based on the screen arguments specified for call form main screen maintained in CSTB_CALL_FORM_NODES. Source Block & Source Field: Provide the block Name and source field of the function id whose value will be passed to the screen argument mentioned. Arg Value: If the screen argument value is to be hard coded, then value can be mentioned in this field. In this scenario, source block and source field need not be mentioned.
11.1.8 Dependent Fields Subsystems may depend on the value provided in fields in main function id or in another subsystem. Example: For funds transfer contract input screen, account details are provided in the main function id. On clicking of the settlement subsystem, settlements will be defaulted based on the accounts mentioned in the main screen. So settlement subsystem is dependent on the account fields. It may also depend on the taxes applicable which are provided in another subsystem for the same .i.e. Tax subsystem.
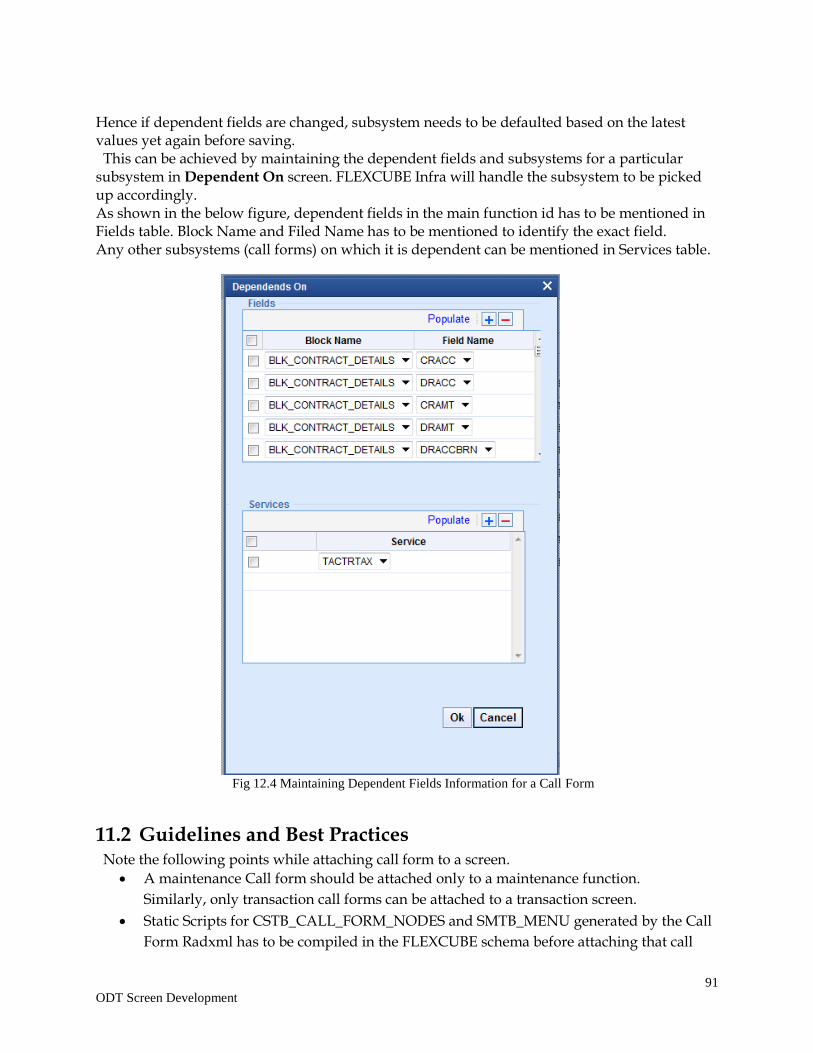
91
ODT Screen Development
Hence if dependent fields are changed, subsystem needs to be defaulted based on the latest values yet again before saving. This can be achieved by maintaining the dependent fields and subsystems for a particular subsystem in Dependent On screen. FLEXCUBE Infra will handle the subsystem to be picked up accordingly. As shown in the below figure, dependent fields in the main function id has to be mentioned in Fields table. Block Name and Filed Name has to be mentioned to identify the exact field. Any other subsystems (call forms) on which it is dependent can be mentioned in Services table.
Fig 12.4 Maintaining Dependent Fields Information for a Call Form
11.2 Guidelines and Best Practices Note the following points while attaching call form to a screen.
A maintenance Call form should be attached only to a maintenance function.
Similarly, only transaction call forms can be attached to a transaction screen.
Static Scripts for CSTB_CALL_FORM_NODES and SMTB_MENU generated by the Call
Form Radxml has to be compiled in the FLEXCUBE schema before attaching that call
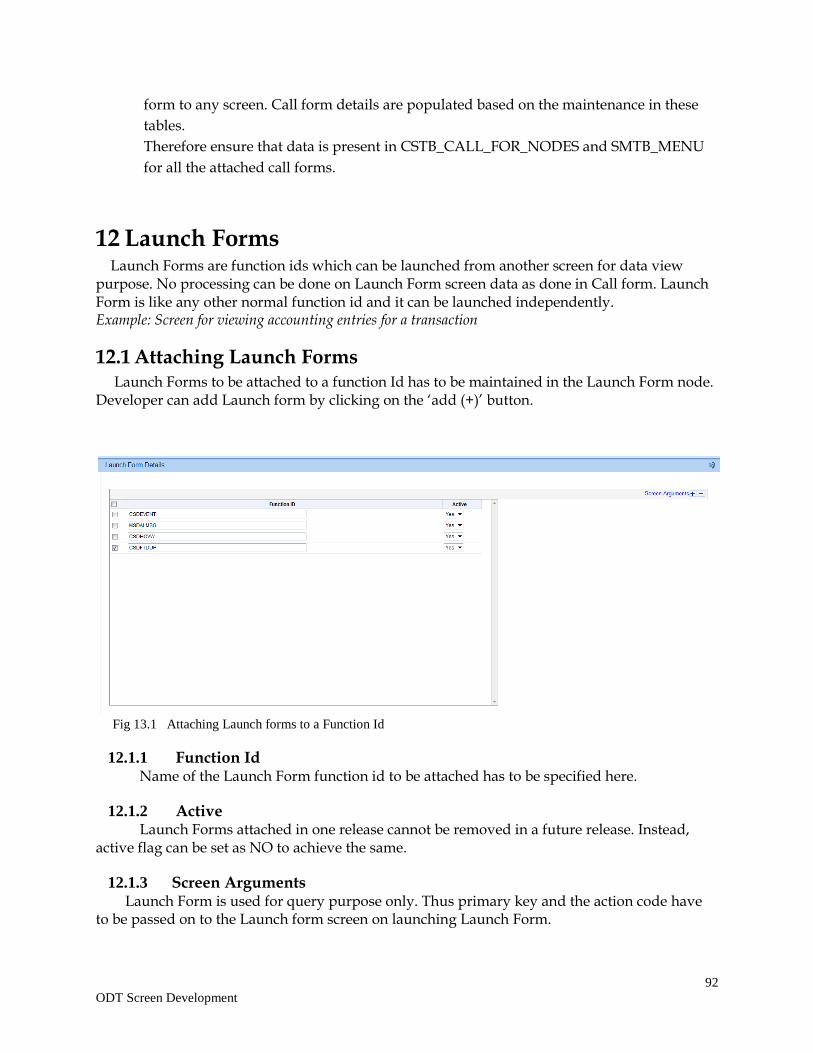
92
ODT Screen Development
form to any screen. Call form details are populated based on the maintenance in these
tables.
Therefore ensure that data is present in CSTB_CALL_FOR_NODES and SMTB_MENU
for all the attached call forms.
12 Launch Forms Launch Forms are function ids which can be launched from another screen for data view purpose. No processing can be done on Launch Form screen data as done in Call form. Launch Form is like any other normal function id and it can be launched independently. Example: Screen for viewing accounting entries for a transaction
12.1 Attaching Launch Forms Launch Forms to be attached to a function Id has to be maintained in the Launch Form node. Developer can add Launch form by clicking on the ‘add (+)’ button.
Fig 13.1 Attaching Launch forms to a Function Id
12.1.1 Function Id Name of the Launch Form function id to be attached has to be specified here.
12.1.2 Active Launch Forms attached in one release cannot be removed in a future release. Instead, active flag can be set as NO to achieve the same.
12.1.3 Screen Arguments Launch Form is used for query purpose only. Thus primary key and the action code have to be passed on to the Launch form screen on launching Launch Form.
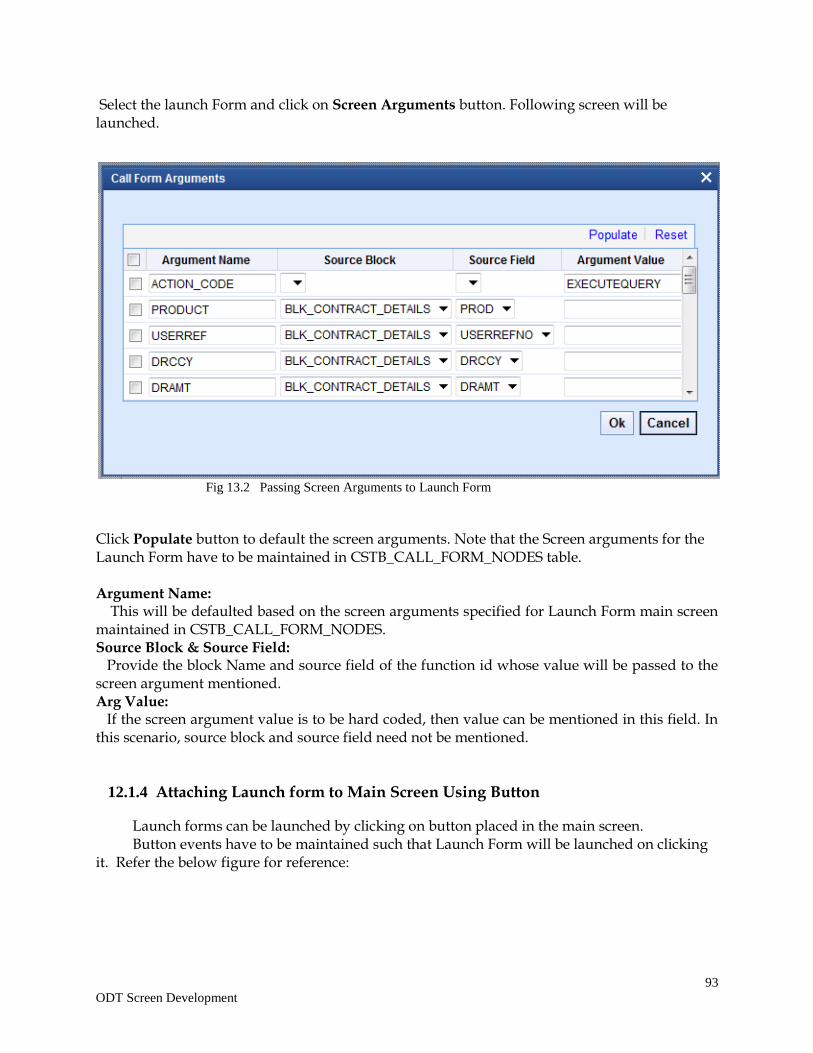
93
ODT Screen Development
Select the launch Form and click on Screen Arguments button. Following screen will be launched.
Fig 13.2 Passing Screen Arguments to Launch Form
Click Populate button to default the screen arguments. Note that the Screen arguments for the Launch Form have to be maintained in CSTB_CALL_FORM_NODES table. Argument Name: This will be defaulted based on the screen arguments specified for Launch Form main screen maintained in CSTB_CALL_FORM_NODES. Source Block & Source Field: Provide the block Name and source field of the function id whose value will be passed to the screen argument mentioned. Arg Value: If the screen argument value is to be hard coded, then value can be mentioned in this field. In this scenario, source block and source field need not be mentioned.
12.1.4 Attaching Launch form to Main Screen Using Button
Launch forms can be launched by clicking on button placed in the main screen. Button events have to be maintained such that Launch Form will be launched on clicking it. Refer the below figure for reference:
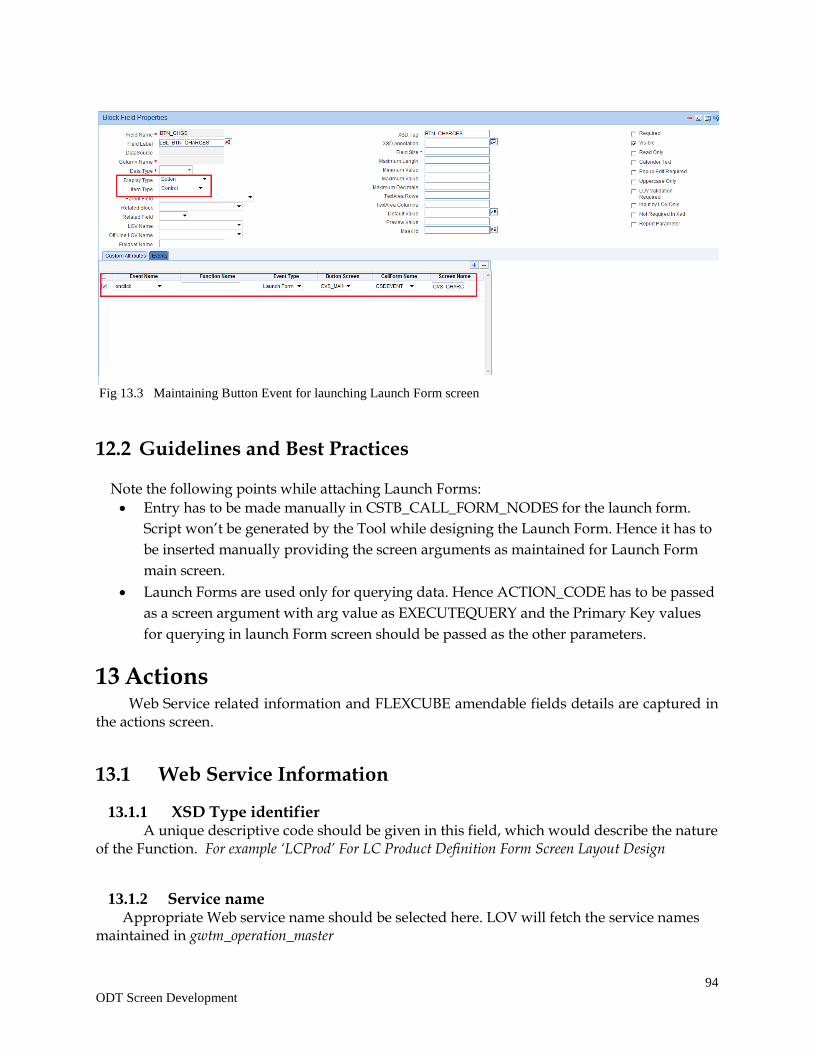
94
ODT Screen Development
Fig 13.3 Maintaining Button Event for launching Launch Form screen
12.2 Guidelines and Best Practices
Note the following points while attaching Launch Forms:
Entry has to be made manually in CSTB_CALL_FORM_NODES for the launch form.
Script won’t be generated by the Tool while designing the Launch Form. Hence it has to
be inserted manually providing the screen arguments as maintained for Launch Form
main screen.
Launch Forms are used only for querying data. Hence ACTION_CODE has to be passed
as a screen argument with arg value as EXECUTEQUERY and the Primary Key values
for querying in launch Form screen should be passed as the other parameters.
13 Actions Web Service related information and FLEXCUBE amendable fields details are captured in the actions screen.
13.1 Web Service Information
13.1.1 XSD Type identifier A unique descriptive code should be given in this field, which would describe the nature of the Function. For example ‘LCProd’ For LC Product Definition Form Screen Layout Design
13.1.2 Service name Appropriate Web service name should be selected here. LOV will fetch the service names maintained in gwtm_operation_master
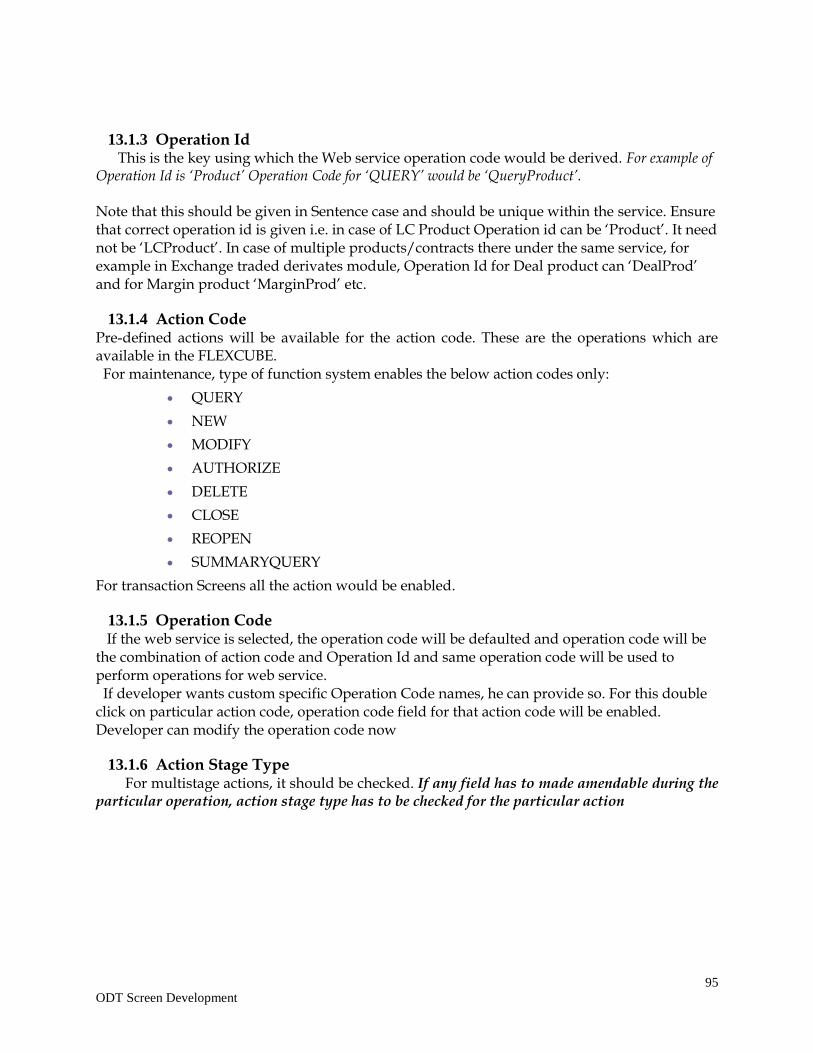
95
ODT Screen Development
13.1.3 Operation Id This is the key using which the Web service operation code would be derived. For example of Operation Id is ‘Product’ Operation Code for ‘QUERY’ would be ‘QueryProduct’. Note that this should be given in Sentence case and should be unique within the service. Ensure that correct operation id is given i.e. in case of LC Product Operation id can be ‘Product’. It need not be ‘LCProduct’. In case of multiple products/contracts there under the same service, for example in Exchange traded derivates module, Operation Id for Deal product can ‘DealProd’ and for Margin product ‘MarginProd’ etc.
13.1.4 Action Code
Pre-defined actions will be available for the action code. These are the operations which are available in the FLEXCUBE. For maintenance, type of function system enables the below action codes only:
QUERY
NEW
MODIFY
AUTHORIZE
DELETE
CLOSE
REOPEN
SUMMARYQUERY
For transaction Screens all the action would be enabled.
13.1.5 Operation Code If the web service is selected, the operation code will be defaulted and operation code will be the combination of action code and Operation Id and same operation code will be used to perform operations for web service. If developer wants custom specific Operation Code names, he can provide so. For this double click on particular action code, operation code field for that action code will be enabled. Developer can modify the operation code now
13.1.6 Action Stage Type For multistage actions, it should be checked. If any field has to made amendable during the particular operation, action stage type has to be checked for the particular action
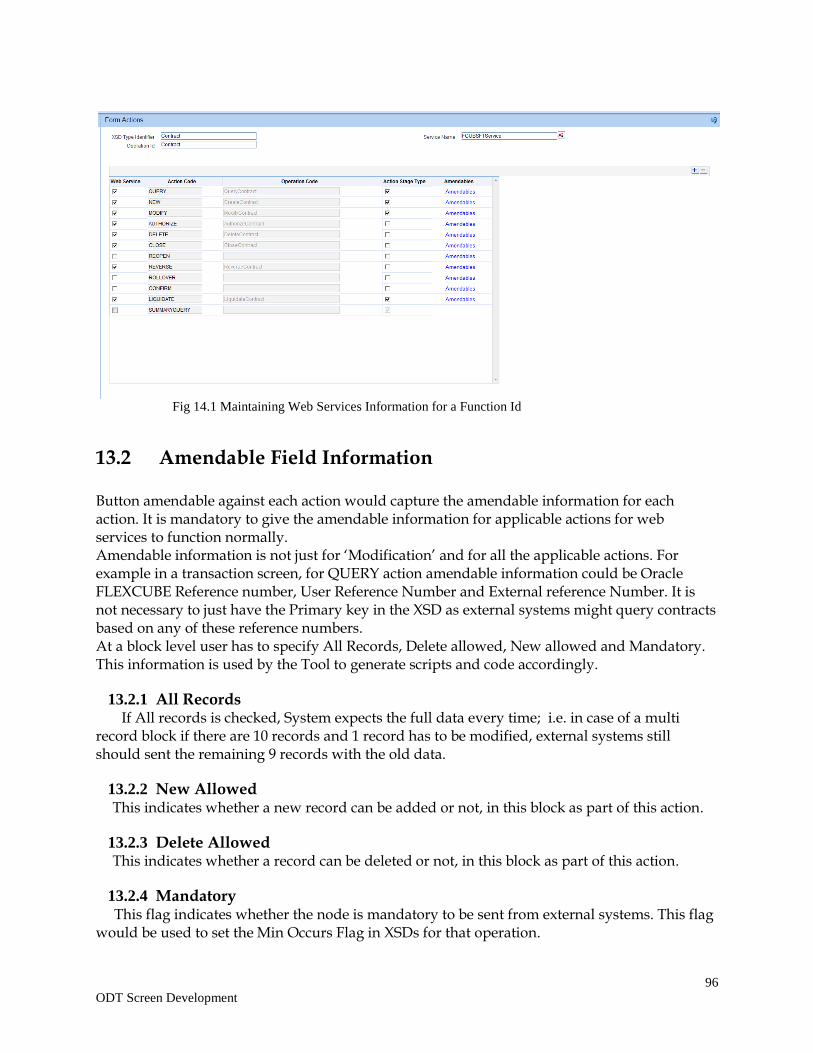
96
ODT Screen Development
Fig 14.1 Maintaining Web Services Information for a Function Id
13.2 Amendable Field Information Button amendable against each action would capture the amendable information for each action. It is mandatory to give the amendable information for applicable actions for web services to function normally. Amendable information is not just for ‘Modification’ and for all the applicable actions. For example in a transaction screen, for QUERY action amendable information could be Oracle FLEXCUBE Reference number, User Reference Number and External reference Number. It is not necessary to just have the Primary key in the XSD as external systems might query contracts based on any of these reference numbers. At a block level user has to specify All Records, Delete allowed, New allowed and Mandatory. This information is used by the Tool to generate scripts and code accordingly.
13.2.1 All Records If All records is checked, System expects the full data every time; i.e. in case of a multi record block if there are 10 records and 1 record has to be modified, external systems still should sent the remaining 9 records with the old data.
13.2.2 New Allowed This indicates whether a new record can be added or not, in this block as part of this action.
13.2.3 Delete Allowed This indicates whether a record can be deleted or not, in this block as part of this action.
13.2.4 Mandatory This flag indicates whether the node is mandatory to be sent from external systems. This flag would be used to set the Min Occurs Flag in XSDs for that operation.
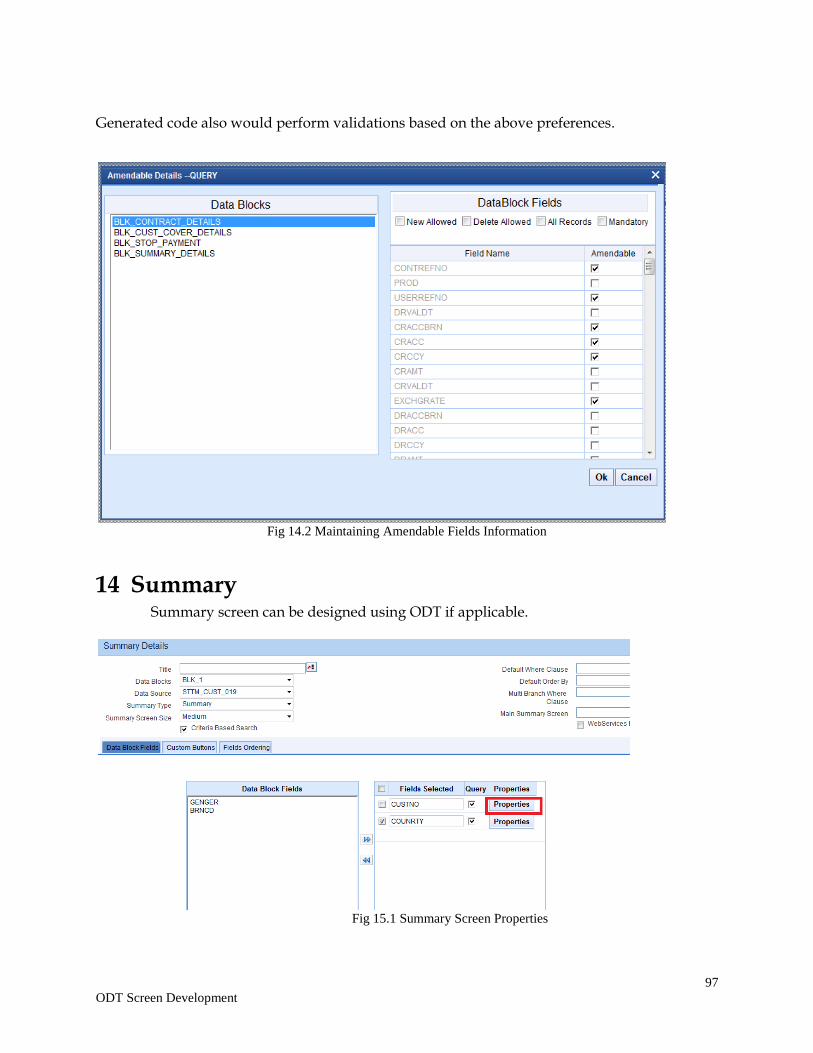
97
ODT Screen Development
Generated code also would perform validations based on the above preferences.
Fig 14.2 Maintaining Amendable Fields Information
14 Summary Summary screen can be designed using ODT if applicable.
Fig 15.1 Summary Screen Properties

98
ODT Screen Development
14.1 Designing Summary Screen
14.1.1 Title Summary screen title can be maintained here using a label code, and label code can be selected from the list of values attached to the field.
14.1.2 Data Block A block has to be selected as Summary Block. This block can be either one of the Single record blocks of the function or a block of type Summary. In most cases Master Block itself can be used for Summary also and if the requirement is to show some other information a new summary type block can be created and can be used.
14.1.3 Data Source Captures the data source name of the summary, on which query should happen for summary. This will also be the data source attached to the summary data block.
14.1.4 Summary Type Summary Type can be of:
Summary
This is the default option. For a normal summary screen to a function id, this option
can be used.
Query
This is defunct.
Bulk Authorization
Checkbox option will be provided in the Summary screen. User will have the option
to select multiple records in the summary screen at the same time and process it.
Example: Bulk authorization screen
Upload
14.1.5 Summary Screen Size Captures the size of the summary screen
14.1.6 Default Where Clause This field captures the default where clause for summary query.
14.1.7 Default Order By This field captures the default order by clause for summary query.
14.1.8 Multi Branch Where Clause This screen is applicable only if multi branch access is checked for the screen in Preferences node. This field captures the summary where clause for multi branch screens.
99
ODT Screen Development
14.1.9 Main Summary Screen Specifies the main form to be launched on clicking on a record from Summary Result . This is applicable only for Dashboard screens
14.1.10 Summary Web Services Required Specifies whether a web service for summary screen is required. SUMMARYQUERY action in Actions screen has to be selected as well for enabling web services for summary screen
14.1.11 Data Block Fields All the block fields present in the summary data block will appear in the text area to the left. Developer can select the block fields required in the summary screen and move it to the right. Field name: The required fields in the summary grid result can be moved to the right from data block fields. Query Field: Check the ‘Query’ for fields that need to appear in Query portion of the Summary screen. Note that maximum number of Query fields for any screen is 12. LOV Name: If the query option is checked, the properties button will be enabled, then on click of the button below screen will launch where lov name and its corresponding return and bind variables can be defined, even min search char length details can also be mentioned here.
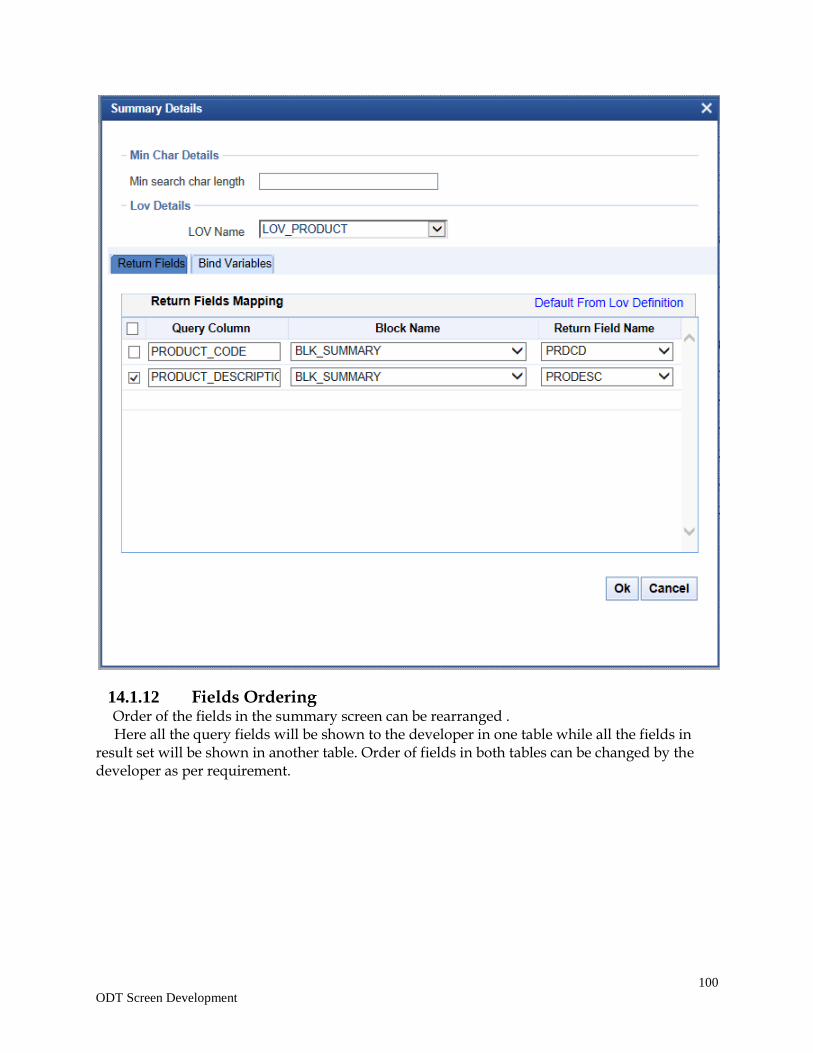
100
ODT Screen Development
14.1.12 Fields Ordering Order of the fields in the summary screen can be rearranged . Here all the query fields will be shown to the developer in one table while all the fields in result set will be shown in another table. Order of fields in both tables can be changed by the developer as per requirement.

101
ODT Screen Development
Preview of the Summary screen with different ordering of query fields and result set fields are shown below.
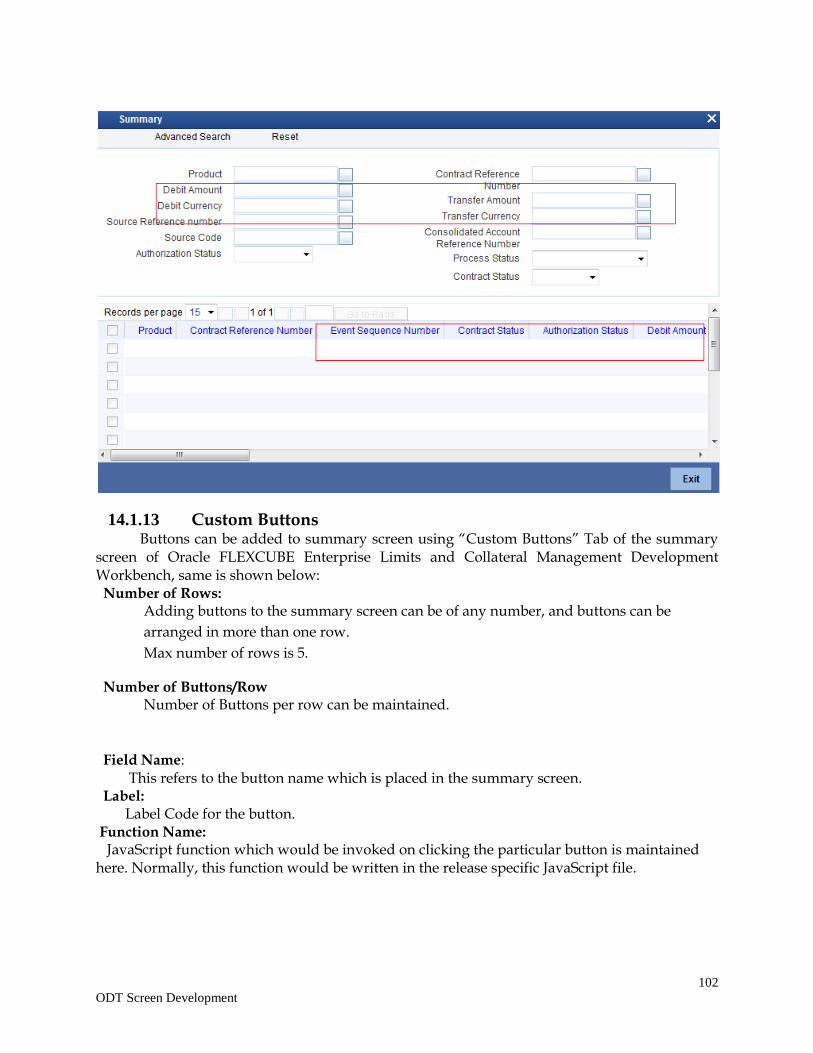
102
ODT Screen Development
14.1.13 Custom Buttons Buttons can be added to summary screen using “Custom Buttons” Tab of the summary screen of Oracle FLEXCUBE Enterprise Limits and Collateral Management Development Workbench, same is shown below: Number of Rows:
Adding buttons to the summary screen can be of any number, and buttons can be
arranged in more than one row.
Max number of rows is 5.
Number of Buttons/Row Number of Buttons per row can be maintained.
Field Name: This refers to the button name which is placed in the summary screen. Label: Label Code for the button. Function Name: JavaScript function which would be invoked on clicking the particular button is maintained here. Normally, this function would be written in the release specific JavaScript file.
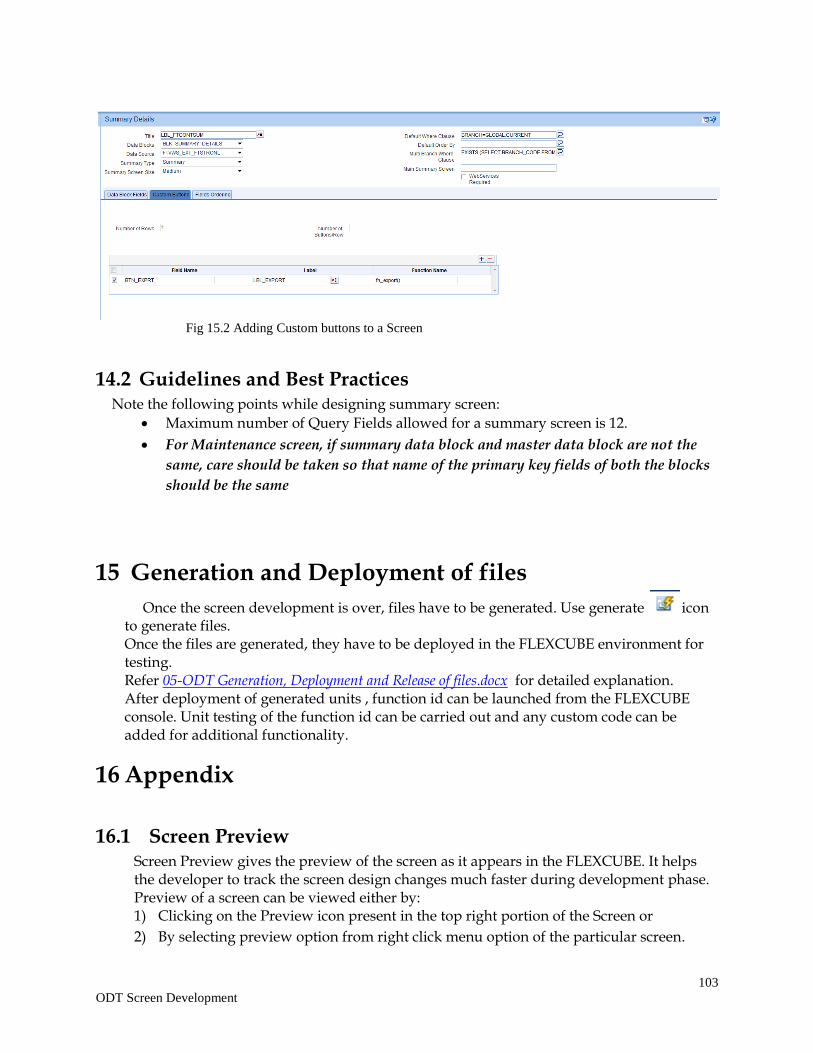
103
ODT Screen Development
Fig 15.2 Adding Custom buttons to a Screen
14.2 Guidelines and Best Practices Note the following points while designing summary screen:
Maximum number of Query Fields allowed for a summary screen is 12.
For Maintenance screen, if summary data block and master data block are not the
same, care should be taken so that name of the primary key fields of both the blocks
should be the same
15 Generation and Deployment of files
Once the screen development is over, files have to be generated. Use generate icon to generate files. Once the files are generated, they have to be deployed in the FLEXCUBE environment for testing. Refer 05-ODT Generation, Deployment and Release of files.docx for detailed explanation. After deployment of generated units , function id can be launched from the FLEXCUBE console. Unit testing of the function id can be carried out and any custom code can be added for additional functionality.
16 Appendix
16.1 Screen Preview Screen Preview gives the preview of the screen as it appears in the FLEXCUBE. It helps the developer to track the screen design changes much faster during development phase. Preview of a screen can be viewed either by: 1) Clicking on the Preview icon present in the top right portion of the Screen or
2) By selecting preview option from right click menu option of the particular screen.
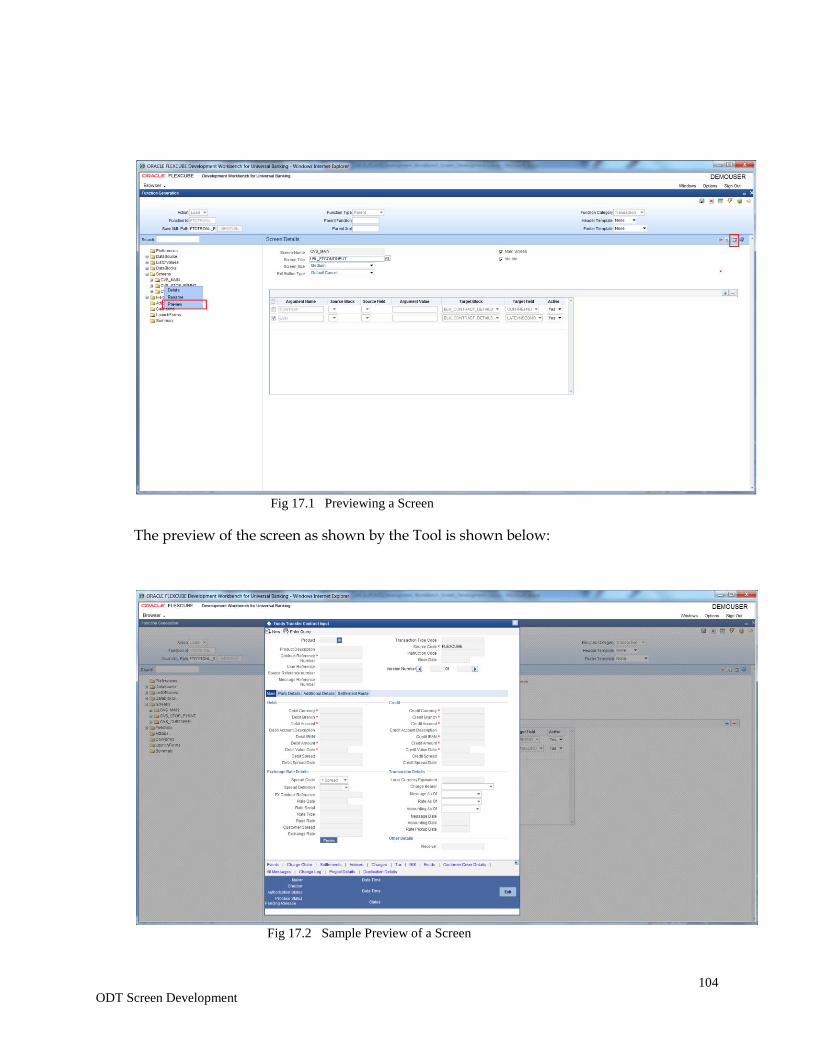
104
ODT Screen Development
Fig 17.1 Previewing a Screen
The preview of the screen as shown by the Tool is shown below:
Fig 17.2 Sample Preview of a Screen
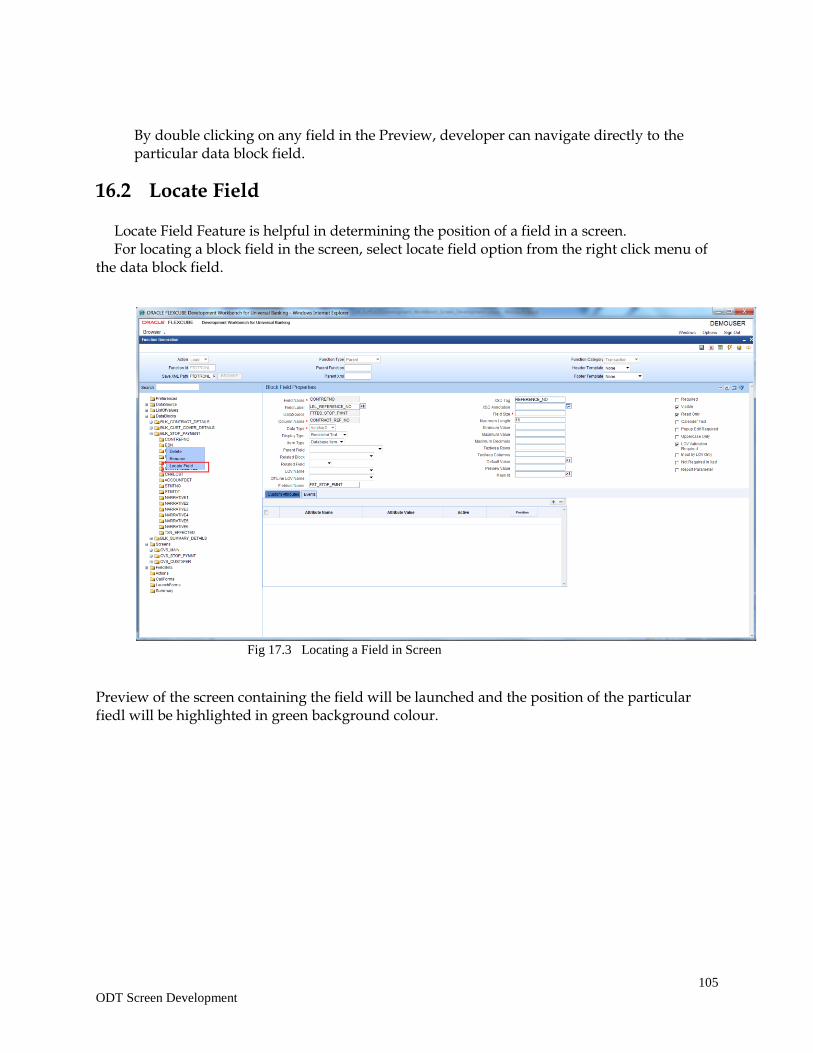
105
ODT Screen Development
By double clicking on any field in the Preview, developer can navigate directly to the particular data block field.
16.2 Locate Field
Locate Field Feature is helpful in determining the position of a field in a screen. For locating a block field in the screen, select locate field option from the right click menu of the data block field.
Fig 17.3 Locating a Field in Screen
Preview of the screen containing the field will be launched and the position of the particular fiedl will be highlighted in green background colour.
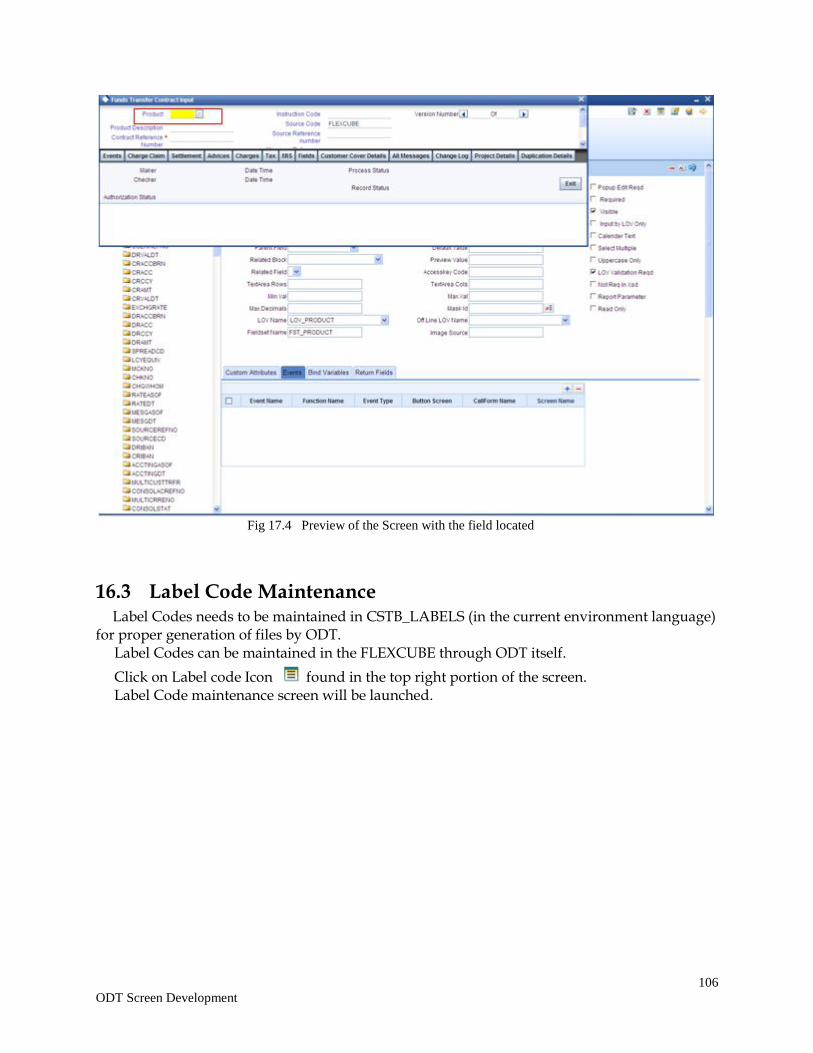
106
ODT Screen Development
Fig 17.4 Preview of the Screen with the field located
16.3 Label Code Maintenance Label Codes needs to be maintained in CSTB_LABELS (in the current environment language) for proper generation of files by ODT. Label Codes can be maintained in the FLEXCUBE through ODT itself.
Click on Label code Icon found in the top right portion of the screen. Label Code maintenance screen will be launched.
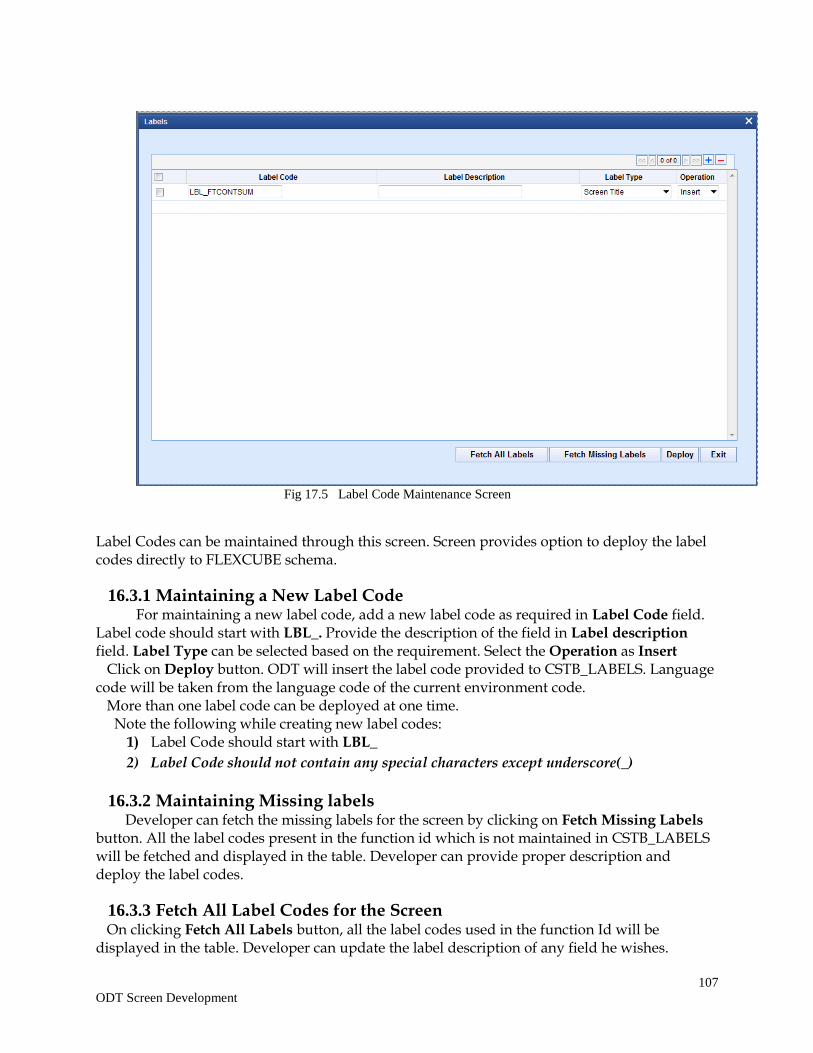
107
ODT Screen Development
Fig 17.5 Label Code Maintenance Screen
Label Codes can be maintained through this screen. Screen provides option to deploy the label codes directly to FLEXCUBE schema.
16.3.1 Maintaining a New Label Code For maintaining a new label code, add a new label code as required in Label Code field. Label code should start with LBL_. Provide the description of the field in Label description field. Label Type can be selected based on the requirement. Select the Operation as Insert Click on Deploy button. ODT will insert the label code provided to CSTB_LABELS. Language code will be taken from the language code of the current environment code. More than one label code can be deployed at one time. Note the following while creating new label codes:
1) Label Code should start with LBL_
2) Label Code should not contain any special characters except underscore(_)
16.3.2 Maintaining Missing labels Developer can fetch the missing labels for the screen by clicking on Fetch Missing Labels button. All the label codes present in the function id which is not maintained in CSTB_LABELS will be fetched and displayed in the table. Developer can provide proper description and deploy the label codes.
16.3.3 Fetch All Label Codes for the Screen On clicking Fetch All Labels button, all the label codes used in the function Id will be displayed in the table. Developer can update the label description of any field he wishes.
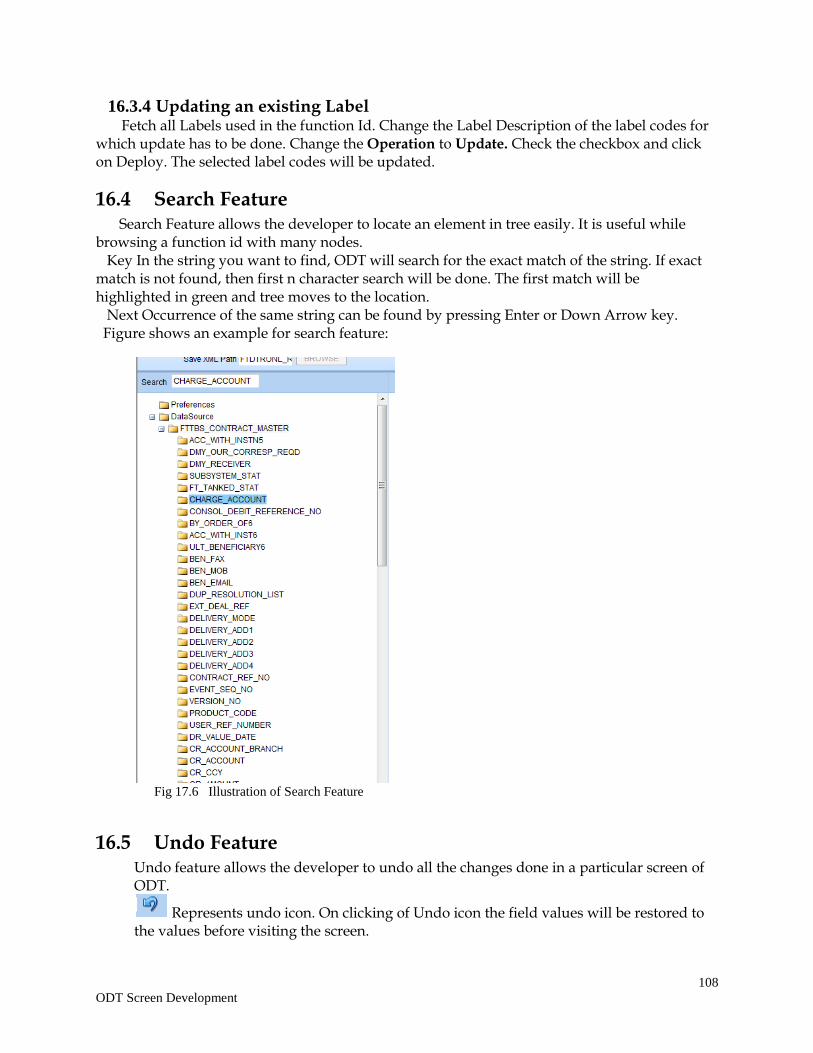
108
ODT Screen Development
16.3.4 Updating an existing Label Fetch all Labels used in the function Id. Change the Label Description of the label codes for which update has to be done. Change the Operation to Update. Check the checkbox and click on Deploy. The selected label codes will be updated.
16.4 Search Feature Search Feature allows the developer to locate an element in tree easily. It is useful while browsing a function id with many nodes. Key In the string you want to find, ODT will search for the exact match of the string. If exact match is not found, then first n character search will be done. The first match will be highlighted in green and tree moves to the location. Next Occurrence of the same string can be found by pressing Enter or Down Arrow key. Figure shows an example for search feature:
Fig 17.6 Illustration of Search Feature
16.5 Undo Feature Undo feature allows the developer to undo all the changes done in a particular screen of ODT.
Represents undo icon. On clicking of Undo icon the field values will be restored to the values before visiting the screen.

109
ODT Screen Development
ODT Screen Development [May] [2017] Version 12.4.0.0.0 Oracle Financial Services Software Limited Oracle Park Off Western Express Highway Goregaon (East) Mumbai, Maharashtra 400 063 India Worldwide Inquiries: Phone: +91 22 6718 3000 Fax:+91 22 6718 3001 www.oracle.com/financialservices/ Copyright © 2007, 2017, Oracle and/or its affiliates. All rights reserved. Oracle and Java are registered trademarks of Oracle and/or its affiliates. Other names may be trademarks of their respective owners. U.S. GOVERNMENT END USERS: Oracle programs, including any operating system, integrated software, any programs installed on the hardware, and/or documentation, delivered to U.S. Government end users are "commercial computer software" pursuant to the applicable Federal Acquisition Regulation and agency-specific supplemental regulations. As such, use, duplication, disclosure, modification, and adaptation of the programs, including any operating system, integrated software, any programs installed on the hardware, and/or documentation, shall be subject to license terms and license restrictions applicable to the programs. No other rights are granted to the U.S. Government. This software or hardware is developed for general use in a variety of information management applications. It is not developed or intended for use in any inherently dangerous applications, including applications that may create a risk of personal injury. If you use this software or hardware in dangerous applications, then you shall be responsible to take all appropriate failsafe, backup, redundancy, and other measures to ensure its safe use. Oracle Corporation and its affiliates disclaim any liability for any damages caused by use of this software or hardware in dangerous applications. This software and related documentation are provided under a license agreement containing restrictions on use and disclosure and are protected by intellectual property laws. Except as expressly permitted in your license agreement or allowed by law, you may not use, copy, reproduce, translate, broadcast, modify, license, transmit, distribute, exhibit, perform, publish or display any part, in any form, or by any means. Reverse engineering, disassembly, or decompilation of this software, unless required by law for interoperability, is prohibited. The information contained herein is subject to change without notice and is not warranted to be error-free. If you find any errors, please report them to us in writing. This software or hardware and documentation may provide access to or information on content, products and services from third parties. Oracle Corporation and its affiliates are not responsible for and expressly disclaim all warranties of any kind with respect to third-party content, products, and services. Oracle Corporation and its affiliates will not be responsible for any loss, costs, or damages incurred due to your access to or use of third-party content, products, or services.


![Licensing Guide Oracle FLEXCUBE Investor Servicing … · Licensing Guide [May] [2017] Version 12.4.0.0.0 Oracle Financial Services Software Limited Oracle Park Off Western Express](https://img.pdfslide.us/doc/110x75/5b79a6037f8b9a31308e15b3/licensing-guide-oracle-flexcube-investor-servicing-licensing-guide-may-2017.jpg)


![Oracle FLEXCUBE Process Flow Guide Oracle FLEXCUBE ... … · Oracle FLEXCUBE Process Flow Guide . Oracle FLEXCUBE Investor Servicing . Release 12.1.0.0.0 [October] [2015]](https://img.pdfslide.us/doc/110x75/5edb3fe7ad6a402d66655cdd/oracle-flexcube-process-flow-guide-oracle-flexcube-oracle-flexcube-process.jpg)

![Oracle FLEXCUBE BPMN Process Flow Definition … FLEXCUBE BPMN Process Flow Definition Guide Oracle FLEXCUBE Investor Servicing Release 12.4.0.0.0 [May] [2017]](https://img.pdfslide.us/doc/110x75/5ad0b4547f8b9a6c6c8e92ef/oracle-flexcube-bpmn-process-flow-definition-flexcube-bpmn-process-flow-definition.jpg)


![Oracle FLEXCUBE Process Flow Guide Oracle FLEXCUBE Universal Banking ... · Oracle FLEXCUBE Process Flow Guide Oracle FLEXCUBE Universal Banking Release 12.4.0.0.0 [May] [2017] 1-1](https://img.pdfslide.us/doc/110x75/5bb9760609d3f2d4678b7cf2/oracle-flexcube-process-flow-guide-oracle-flexcube-universal-banking-oracle.jpg)


![Configuring JMS on Weblogic Server 12c Oracle … · Configuring JMS on Weblogic Server 12c Oracle FLEXCUBE Universal Banking Release 12.4.0.0.0 [May] [2017]](https://img.pdfslide.us/doc/110x75/5b9580e309d3f2c2678c61bc/configuring-jms-on-weblogic-server-12c-oracle-configuring-jms-on-weblogic-server.jpg)