Embed Size (px)
Citation preview
Oracle® Enterprise Single Sign-on Logon Manager
How-To: Configuring ESSO-LM Event Logging
with the IBM DB2 Database
Release 11.1.1.2.0
20412-01
December 2010
2
Oracle Enterprise Single Sign-on Logon Manager How-To: Configuring ESSO-LM Event Logging with the IBM DB2 Database
Release 11.1.1.2.0
20412-01
Copyright © 2010, Oracle. All rights reserved.
The Programs (which include both the software and documentation) contain proprietary information; they are provided under
a license agreement containing restrictions on use and disclosure and are also protected by copyright, patent, and other
intellectual and industrial property laws. Reverse engineering, disassembly, or decompilation of the Programs, except to the
extent required to obtain interoperability with other independently created software or as specified by law, is prohibited.
The information contained in this document is subject to change without notice. If you find any problems in the documentation,
please report them to us in writing. This document is not warranted to be error-free.
Except as may be expressly permitted in your license agreement for these Programs, no part of these Programs may be
reproduced or transmitted in any form or by any means, electronic or mechanical, for any purpose.
If the Programs are delivered to the United States Government or anyone licensing or using the Programs on behalf of the
United States Government, the following notice is applicable:
U.S. GOVERNMENT RIGHTS Programs, software, databases, and related documentation and technical data delivered to U.S.
Government customers are "commercial computer software" or "commercial technical data" pursuant to the applicable Federal
Acquisition Regulation and agency-specific supplemental regulations. As such, use, duplication, disclosure, modification, and
adaptation of the Programs, including documentation and technical data, shall be subject to the licensing restrictions set forth
in the applicable Oracle license agreement, and, to the extent applicable, the additional rights set forth in FAR 52.227-19,
Commercial Computer Software--Restricted Rights (June 1987). Oracle USA, Inc., 500 Oracle Parkway, Redwood City, CA 94065.
The Programs are not intended for use in any nuclear, aviation, mass transit, medical, or other inherently dangerous
applications. It shall be the licensee's responsibility to take all appropriate fail-safe, backup, redundancy and other measures to
ensure the safe use of such applications if the Programs are used for such purposes, and we disclaim liability for any damages
caused by such use of the Programs.
Oracle, JD Edwards, PeopleSoft, and Siebel are registered trademarks of Oracle Corporation and/or its affiliates. Other names
may be trademarks of their respective owners.
The Programs may provide links to Web sites and access to content, products, and services from third parties. Oracle is not
responsible for the availability of, or any content provided on, third-party Web sites.
You bear all risks associated with the use of such content. If you choose to purchase any products or services from a third party,
the relationship is directly between you and the third party. Oracle is not responsible for:
(a) the quality of third-party products or services; or (b) fulfilling any of the terms of the agreement with the third party,
including delivery of products or services and warranty obligations related to purchased products or services. Oracle is not
responsible for any loss or damage of any sort that you may incur from dealing with any third party.
3
Table of Contents
Table of Contents .......................................................................................................................................... 3
Introduction .................................................................................................................................................. 4
About This Guide ....................................................................................................................................... 4
Prerequisites ............................................................................................................................................. 4
Terms and Abbreviations .......................................................................................................................... 4
3BAccessing ESSO-LM Documentation ......................................................................................................... 4
Configuring ESSO-LM Event Logging for IBM DB2 Database Support .......................................................... 5
Overview ................................................................................................................................................... 5
Step 1: Install and Configure the IBM DB2 Database ............................................................................... 6
Step 2: Set Up the Event Log Data Table .................................................................................................. 6
Step 3: Installing the Database Event Extension Component for ESSO-LM ............................................ 15
Step 4: Configuring ESSO-LM Event Logging for Database Support ....................................................... 16
Step 5: Testing Your Event Logging Configuration .................................................................................. 18
4
Introduction
About This Guide
This document describes how to configure ESSO-LM to store event log data in an IBM DB2 database and
how to prepare a database instance for this scenario. The instructions in this guide are based on IBM
DB2 version 8.2.
Prerequisites
Readers of this document should have a solid understanding of the IBM DB2 database and the ESSO-LM
Administrative Console. Information on ESSO-LM event logging is provided in the ESSO-LM
Administrative Console Help.
Terms and Abbreviations
The following table describes the terms and abbreviations used throughout this guide:
Term or Abbreviation Description
ESSO-LM Oracle Enterprise Single Sign-on Logon Manager
Agent ESSO-LM Client-Side Software
Console ESSO-LM Administrative Console
3BAccessing ESSO-LM Documentation
We continually strive to keep ESSO-LM documentation accurate and up to date. For the latest version of
this and other ESSO-LM documents, visit http://download.oracle.com/docs/cd/E15624_01/index.htm.

5
Configuring ESSO-LM Event Logging for IBM DB2 Database Support
Overview
In order to configure ESSO-LM to store event log data in a table in an IBM DB2 database, you must
complete the following steps:
1. If you have not already done so, install and configure the IBM DB2 database as described in the
vendor’s documentation. Use the “Typical” installation scenario when prompted.
2. Set up the event log data table.
3. Install the Database Event Extension component for ESSO-LM.
4. Configure ESSO-LM to store its event log data in the table you created.
5. Test your event logging configuration.
6
Step 1: Install and Configure the IBM DB2 Database
Before you begin configuring ESSO-LM event logging, install and configure an instance of the IBM DB2
database as described in the vendor’s documentation, if you have not already done so. Unless your
environment dictates otherwise, select the “Typical” installation scenario when prompted by the
installer.
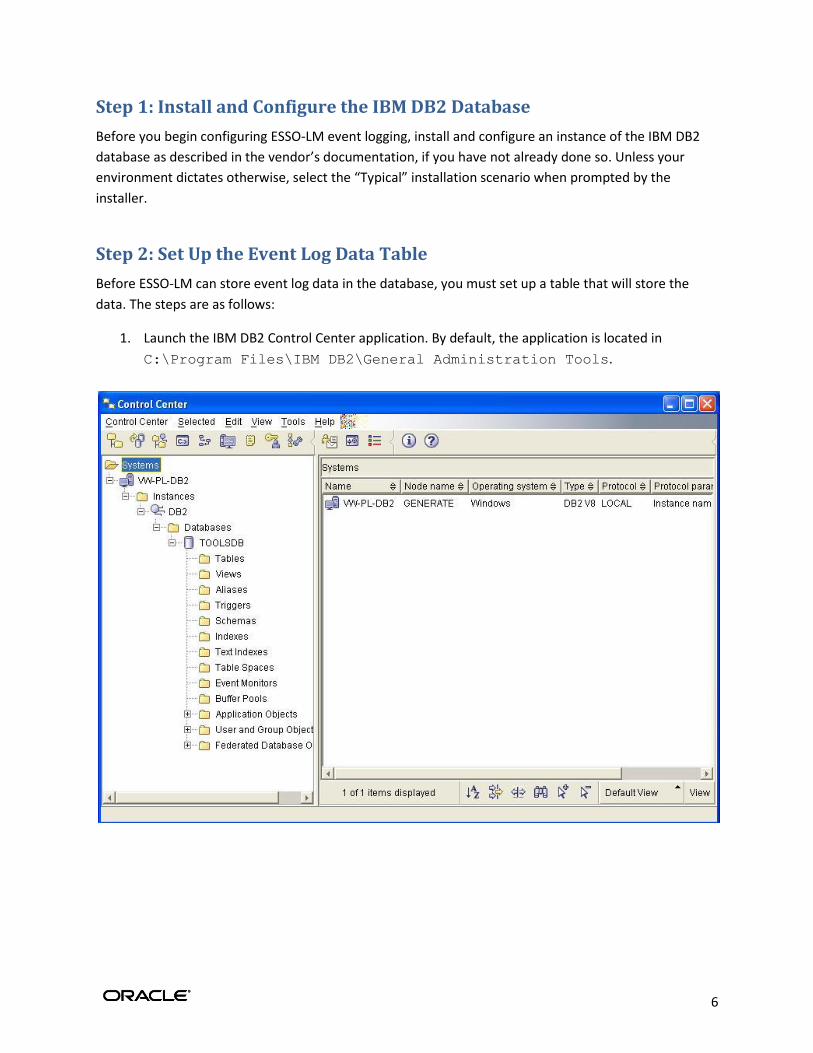
Step 2: Set Up the Event Log Data Table
Before ESSO-LM can store event log data in the database, you must set up a table that will store the
data. The steps are as follows:
1. Launch the IBM DB2 Control Center application. By default, the application is located in
C:\Program Files\IBM DB2\General Administration Tools.
7
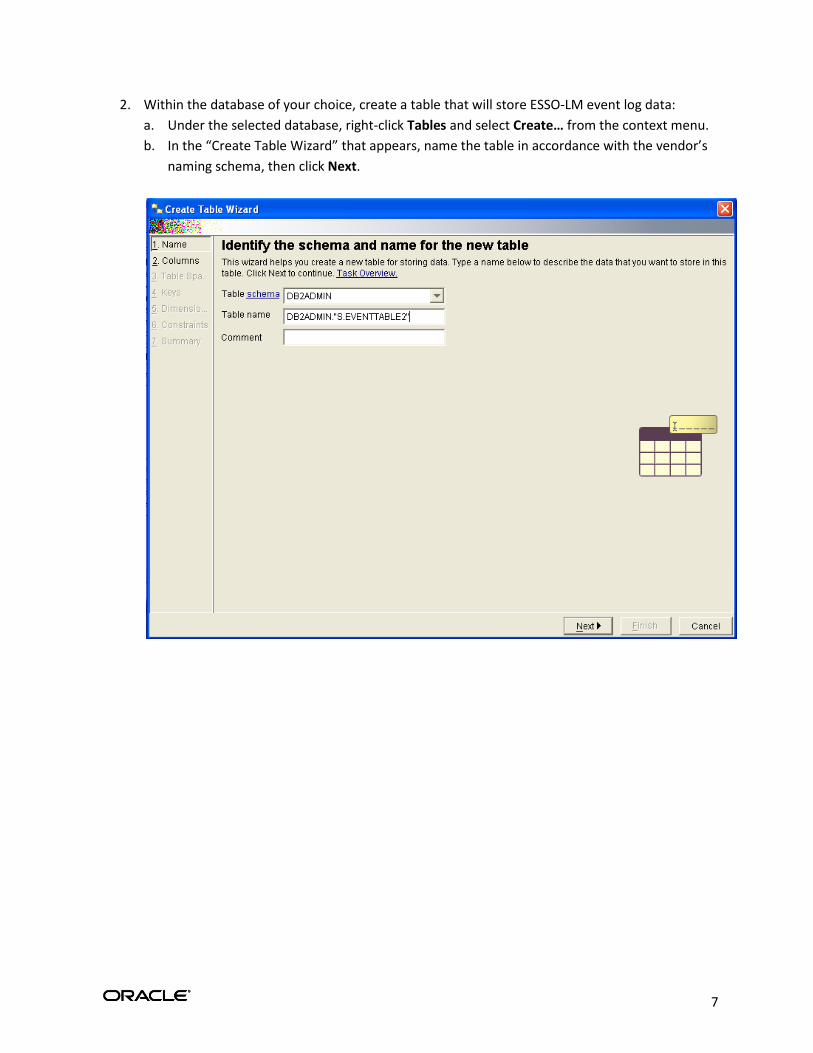
2. Within the database of your choice, create a table that will store ESSO-LM event log data:
a. Under the selected database, right-click Tables and select Create… from the context menu.
b. In the “Create Table Wizard” that appears, name the table in accordance with the vendor’s
naming schema, then click Next.
8
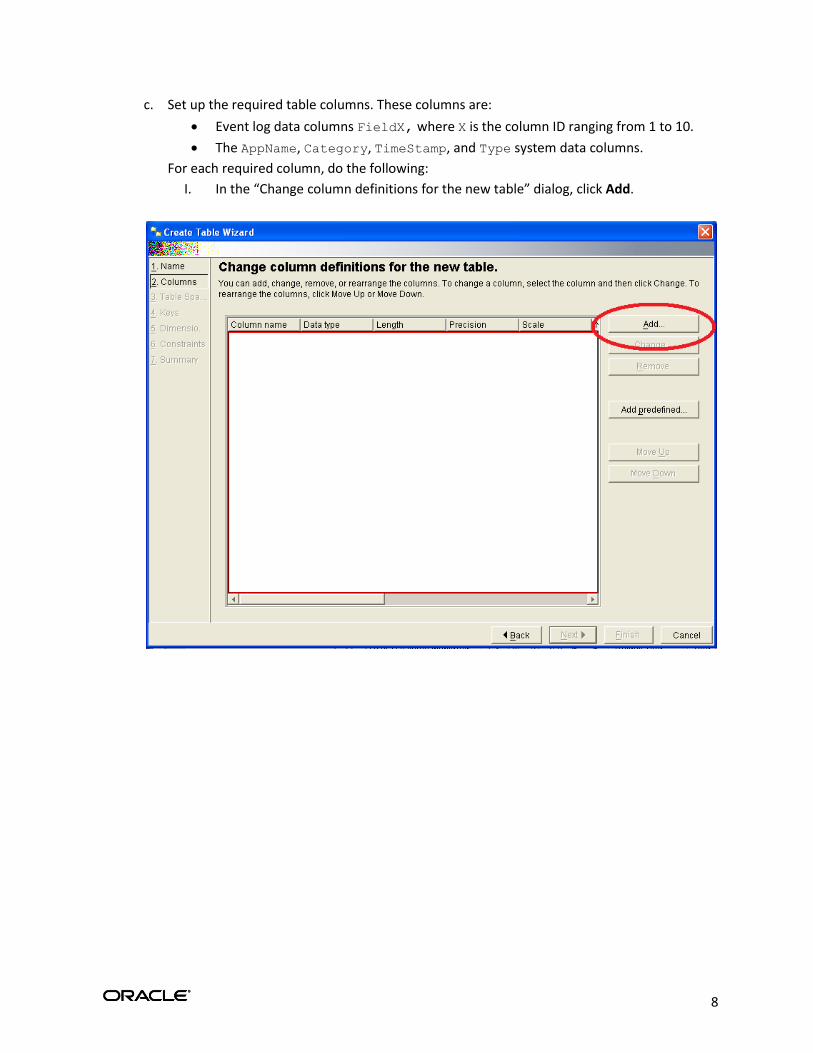
c. Set up the required table columns. These columns are:
Event log data columns FieldX, where X is the column ID ranging from 1 to 10.
The AppName, Category, TimeStamp, and Type system data columns.
For each required column, do the following:
I. In the “Change column definitions for the new table” dialog, click Add.

9
The “Add Column Dialog” appears.
10
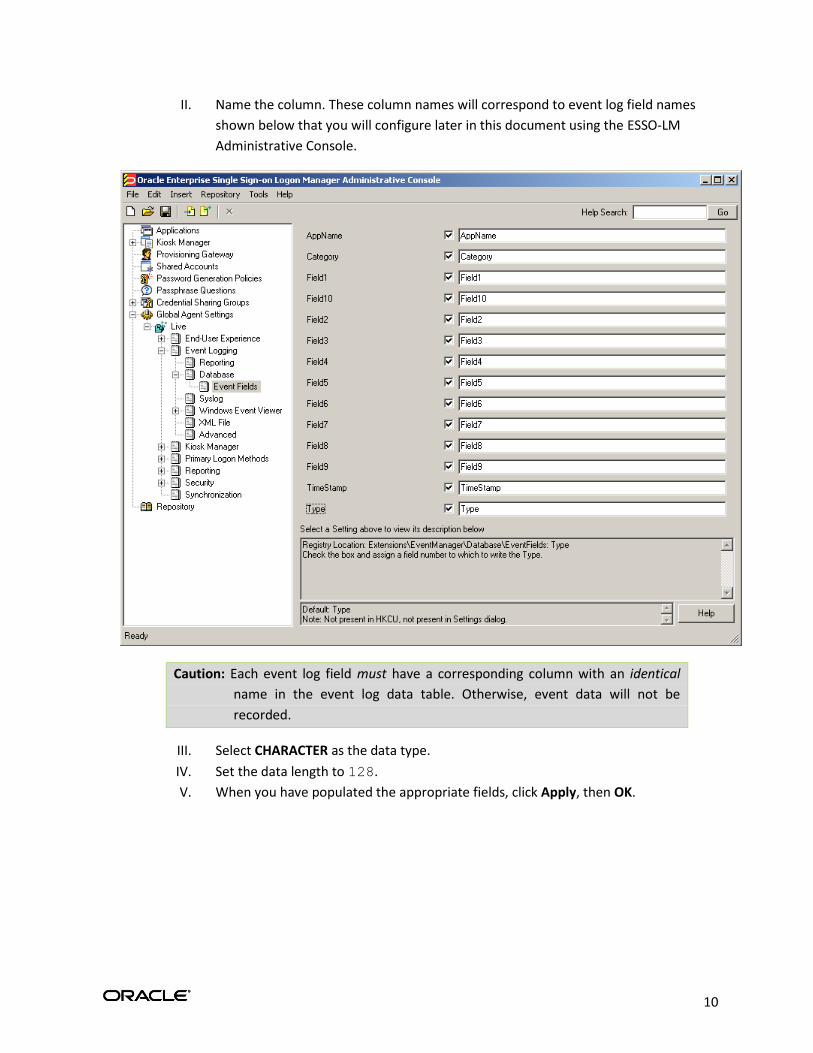
II. Name the column. These column names will correspond to event log field names
shown below that you will configure later in this document using the ESSO-LM
Administrative Console.
Caution: Each event log field must have a corresponding column with an identical
name in the event log data table. Otherwise, event data will not be
recorded.
III. Select CHARACTER as the data type.
IV. Set the data length to 128.
V. When you have populated the appropriate fields, click Apply, then OK.
11
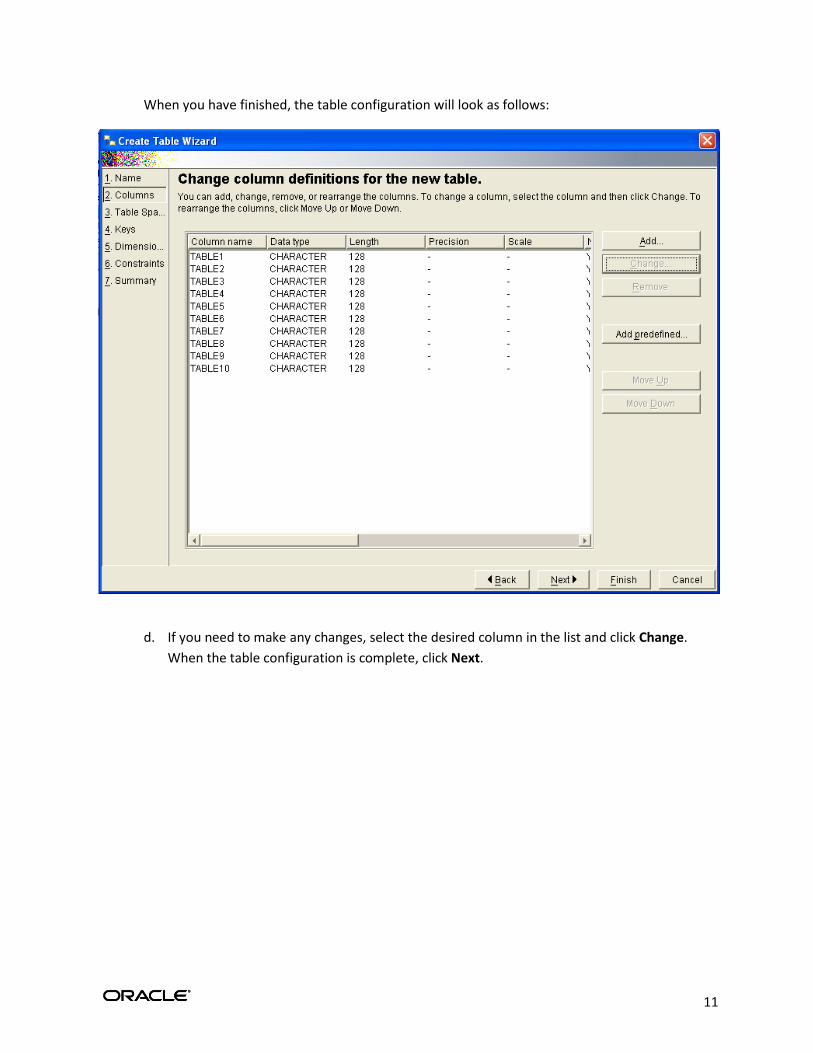
When you have finished, the table configuration will look as follows:
d. If you need to make any changes, select the desired column in the list and click Change.
When the table configuration is complete, click Next.
12
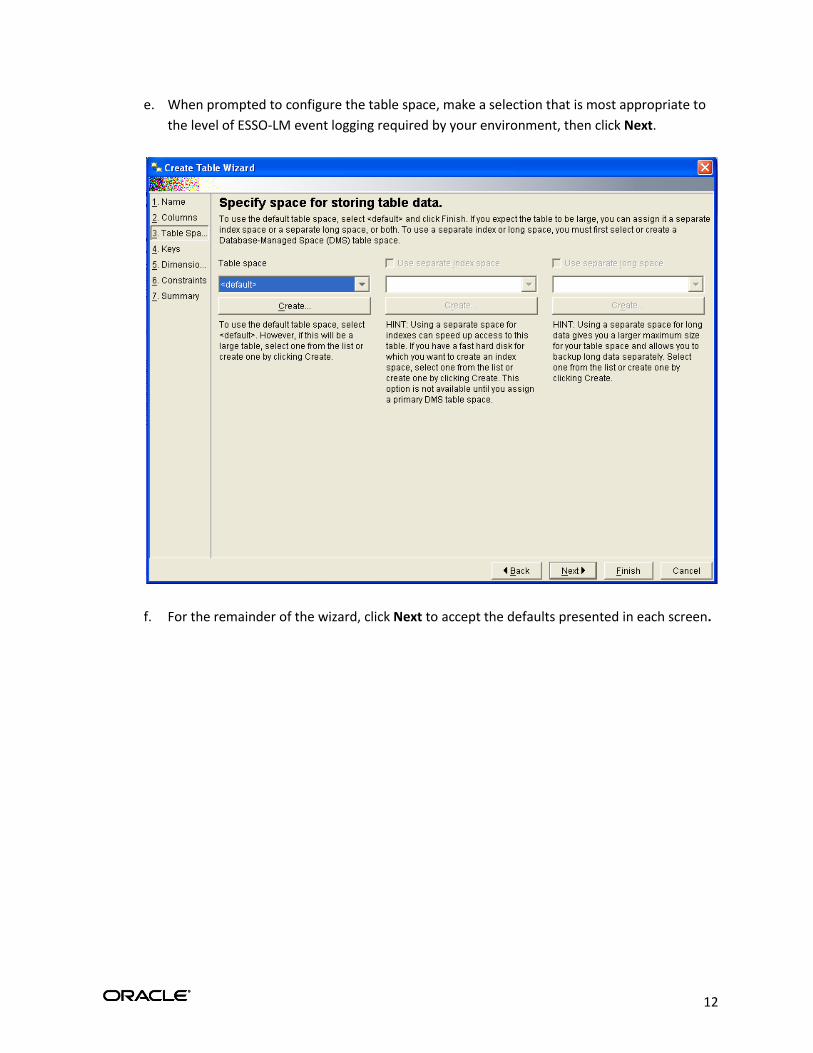
e. When prompted to configure the table space, make a selection that is most appropriate to
the level of ESSO-LM event logging required by your environment, then click Next.
f. For the remainder of the wizard, click Next to accept the defaults presented in each screen.
13
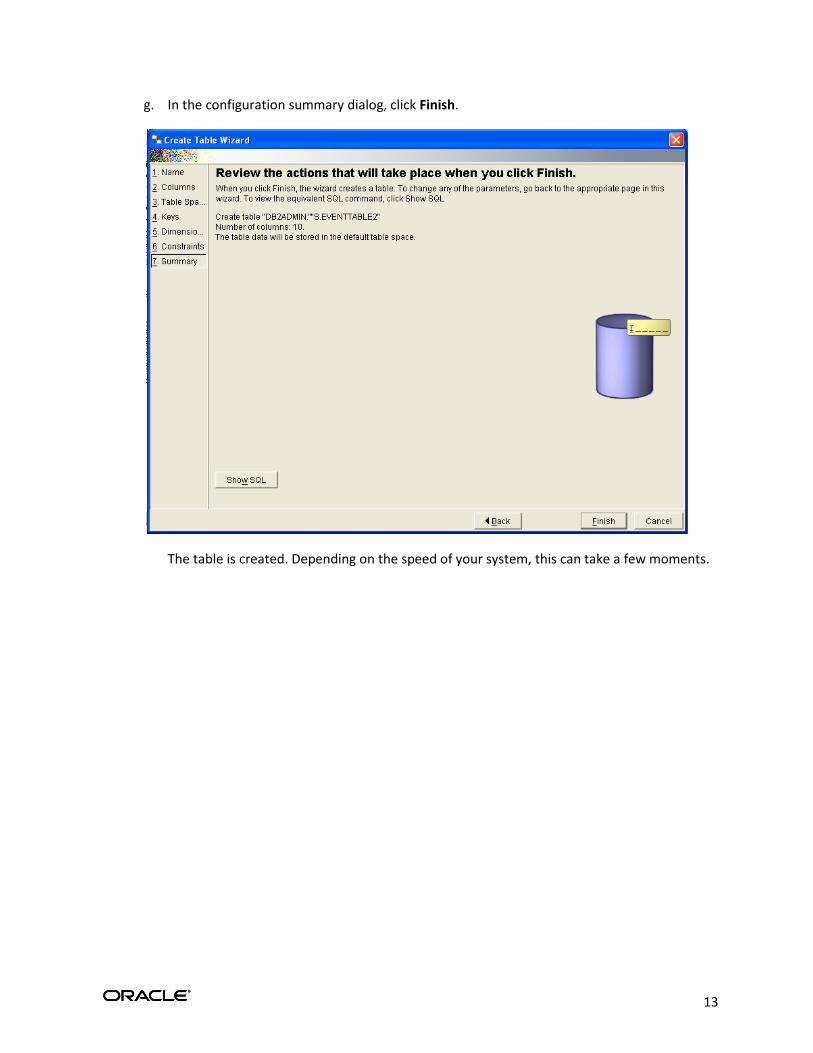
g. In the configuration summary dialog, click Finish.
The table is created. Depending on the speed of your system, this can take a few moments.
14
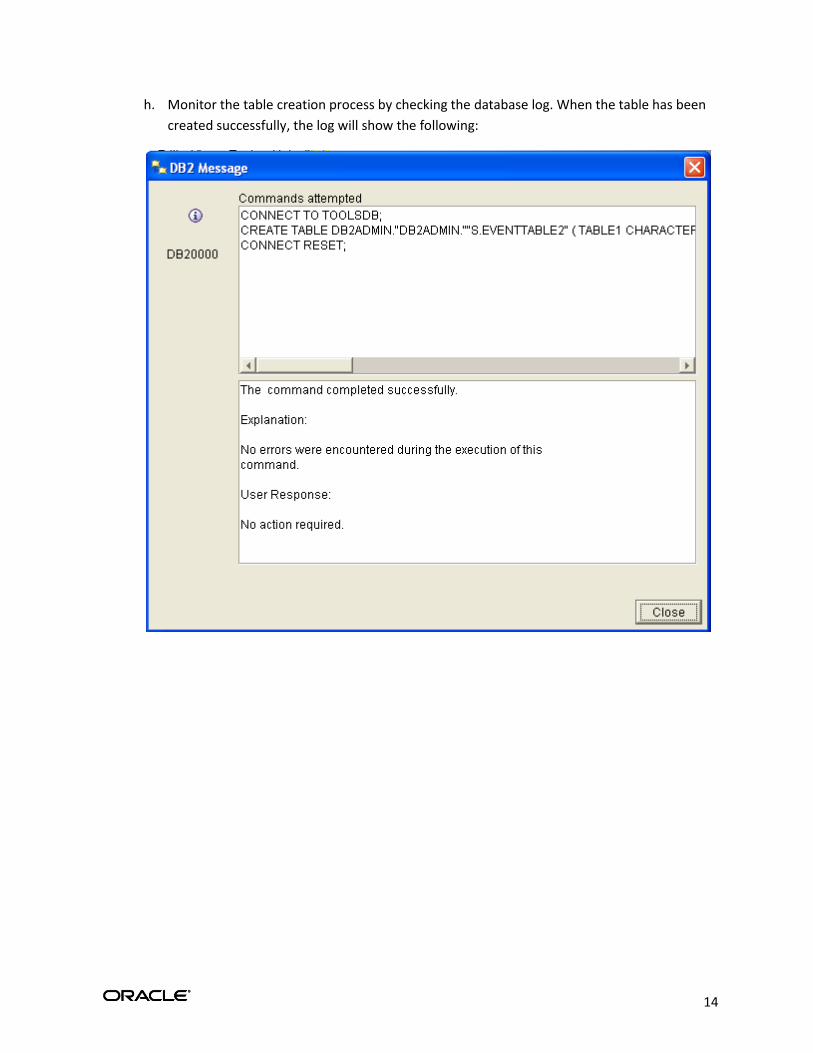
h. Monitor the table creation process by checking the database log. When the table has been
created successfully, the log will show the following:
15
Step 3: Installing the Database Event Extension Component for ESSO-LM
The Database Even Extension component must be installed in order for ESSO-LM to store event log data
in the database. To install the component, do the following:
1. Click Start Settings Control Panel.
2. In the Control Panel, double-click the Add/Remove Programs icon.
3. In the Add/Remove Programs applet, navigate to the ESSO-LM Agent entry and click Change.
4. In the ESSO-LM Agent installer, click Next.
5. In the “Program Maintenance” dialog, select Modify and click Next.
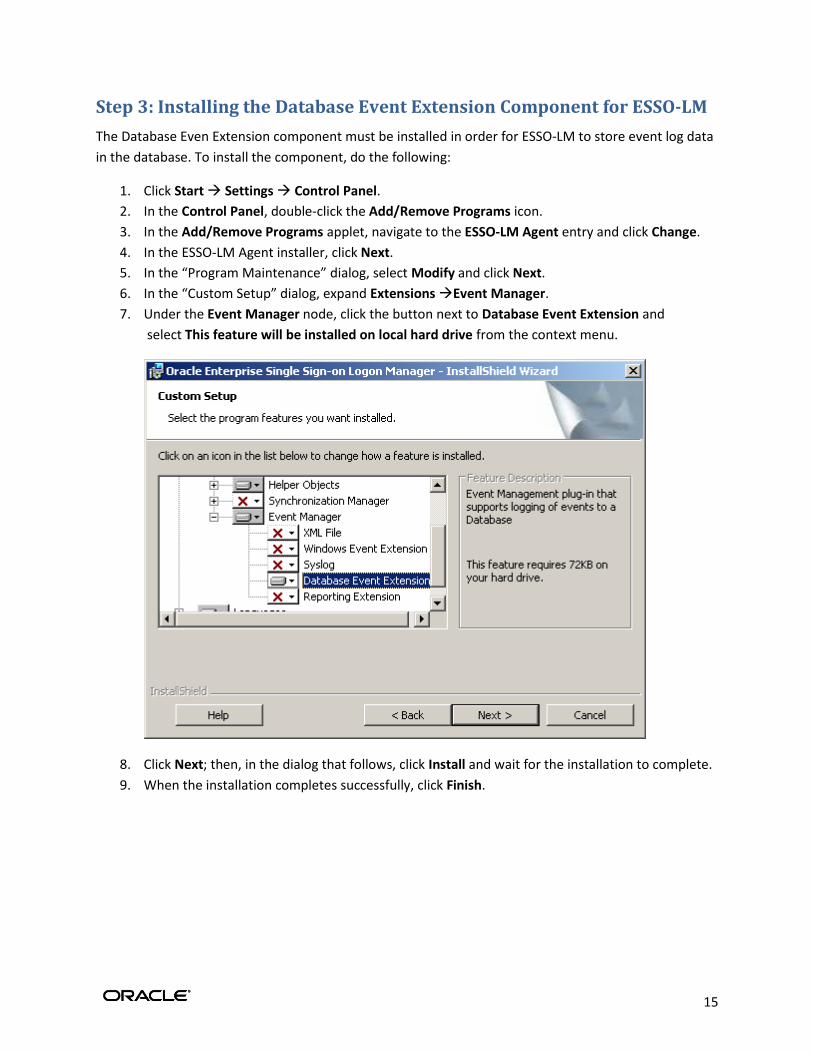
6. In the “Custom Setup” dialog, expand Extensions Event Manager.
7. Under the Event Manager node, click the button next to Database Event Extension and
select This feature will be installed on local hard drive from the context menu.
8. Click Next; then, in the dialog that follows, click Install and wait for the installation to complete.
9. When the installation completes successfully, click Finish.
16
Step 4: Configuring ESSO-LM Event Logging for Database Support
1. Launch the ESSO-LM Administrative Console and load your current configuration set.
2. In the tree, navigate to Global Agent Settings [Current Configuration Set] Event Logging.
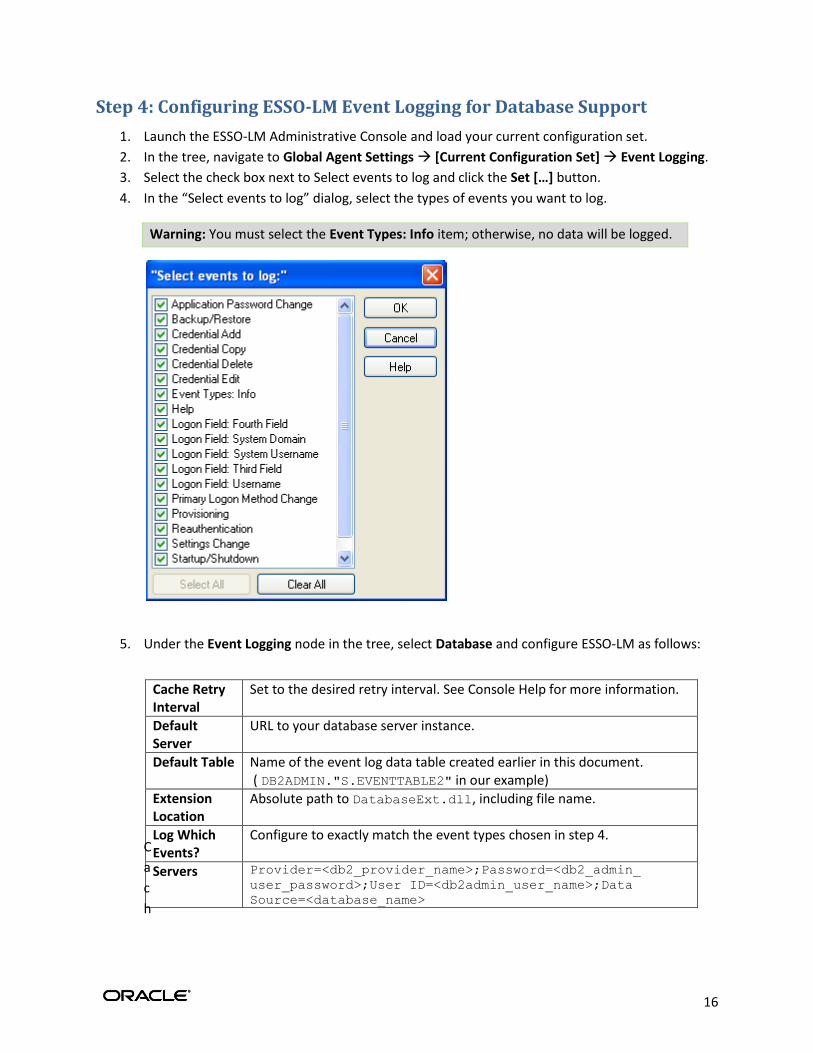
3. Select the check box next to Select events to log and click the Set […] button.
4. In the “Select events to log” dialog, select the types of events you want to log.
Warning: You must select the Event Types: Info item; otherwise, no data will be logged.
5. Under the Event Logging node in the tree, select Database and configure ESSO-LM as follows:
C
a
c
h
Cache Retry Interval
Set to the desired retry interval. See Console Help for more information.
Default Server
URL to your database server instance.
Default Table Name of the event log data table created earlier in this document. ( DB2ADMIN."S.EVENTTABLE2" in our example)
Extension Location
Absolute path to DatabaseExt.dll, including file name.
Log Which Events?
Configure to exactly match the event types chosen in step 4.
Servers Provider=<db2_provider_name>;Password=<db2_admin_
user_password>;User ID=<db2admin_user_name>;Data
Source=<database_name>
17
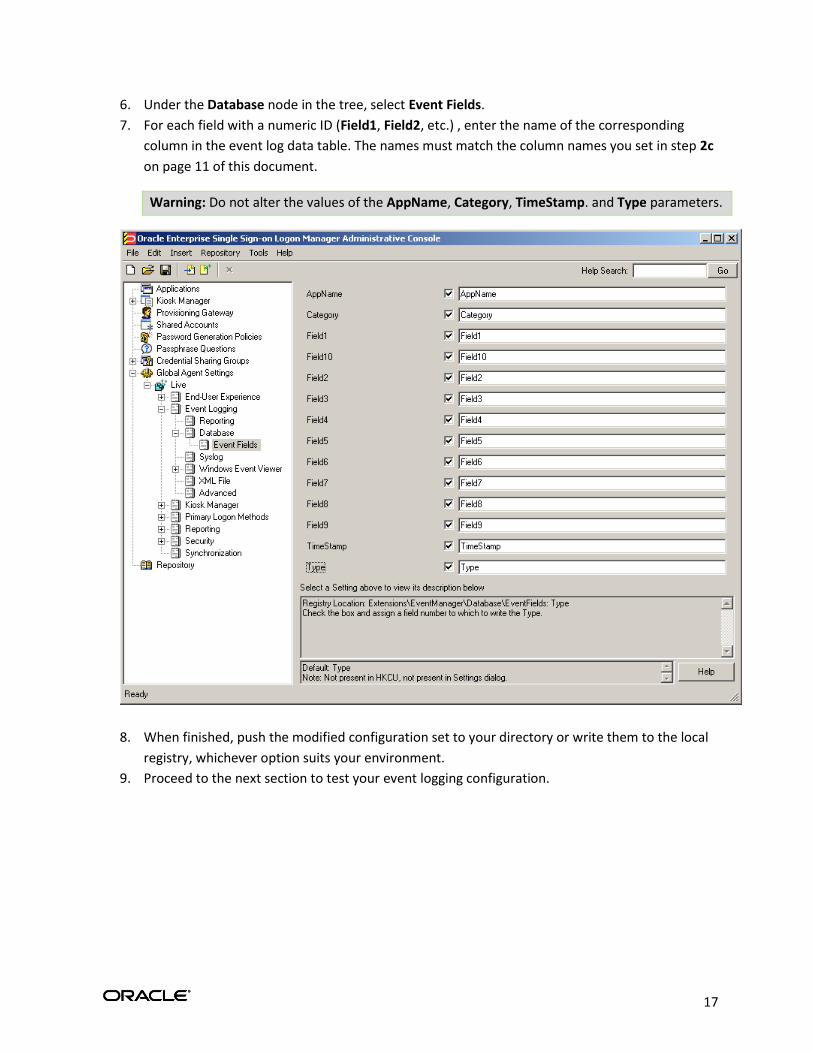
6. Under the Database node in the tree, select Event Fields.
7. For each field with a numeric ID (Field1, Field2, etc.) , enter the name of the corresponding
column in the event log data table. The names must match the column names you set in step 2c
on page 11 of this document.
Warning: Do not alter the values of the AppName, Category, TimeStamp. and Type parameters.
8. When finished, push the modified configuration set to your directory or write them to the local
registry, whichever option suits your environment.
9. Proceed to the next section to test your event logging configuration.
18
Step 5: Testing Your Event Logging Configuration
This simple test procedure allows you to check whether ESSO-LM is properly logging event data to the
database. In our example, you will press the Help button in the Logon Manager and check the database
to see if the button press is logged.
1. Open the Logon Manager and click Help.
2. Start the IBM DB2 Command Center. Typically, the shortcut is located in
Start Program Files IBM DB2 Command Line Tools.
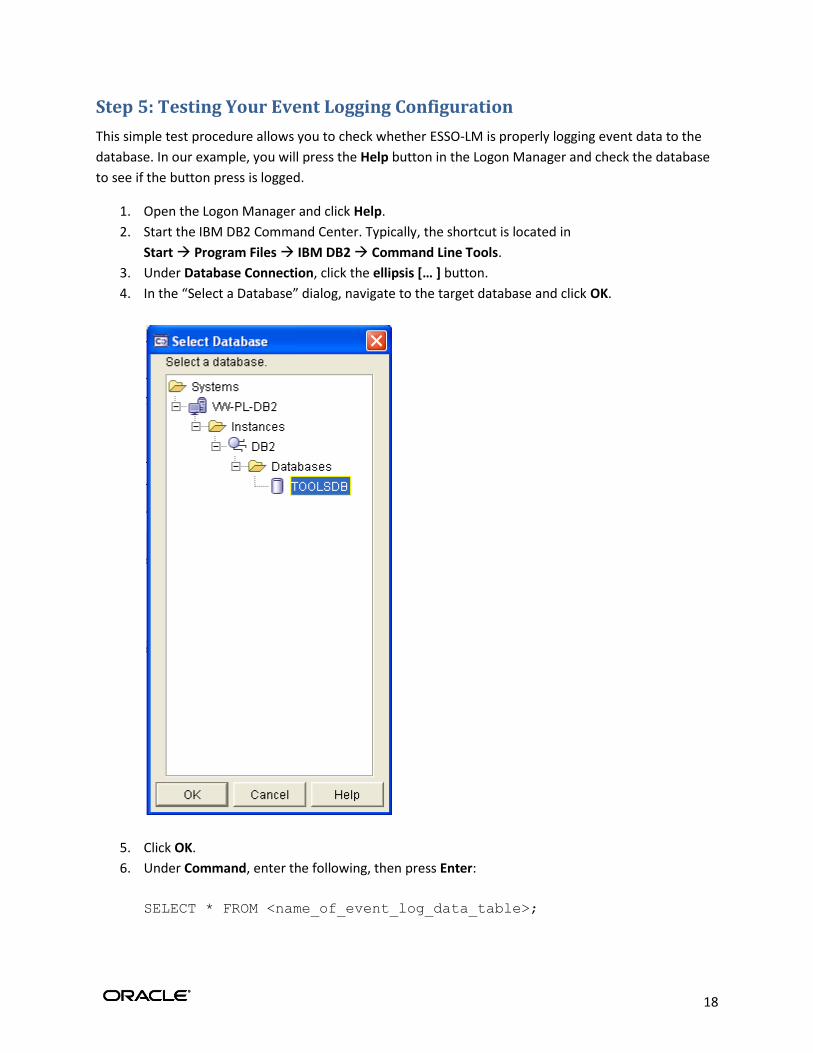
3. Under Database Connection, click the ellipsis [… ] button.
4. In the “Select a Database” dialog, navigate to the target database and click OK.
5. Click OK.
6. Under Command, enter the following, then press Enter:
SELECT * FROM <name_of_event_log_data_table>;
19
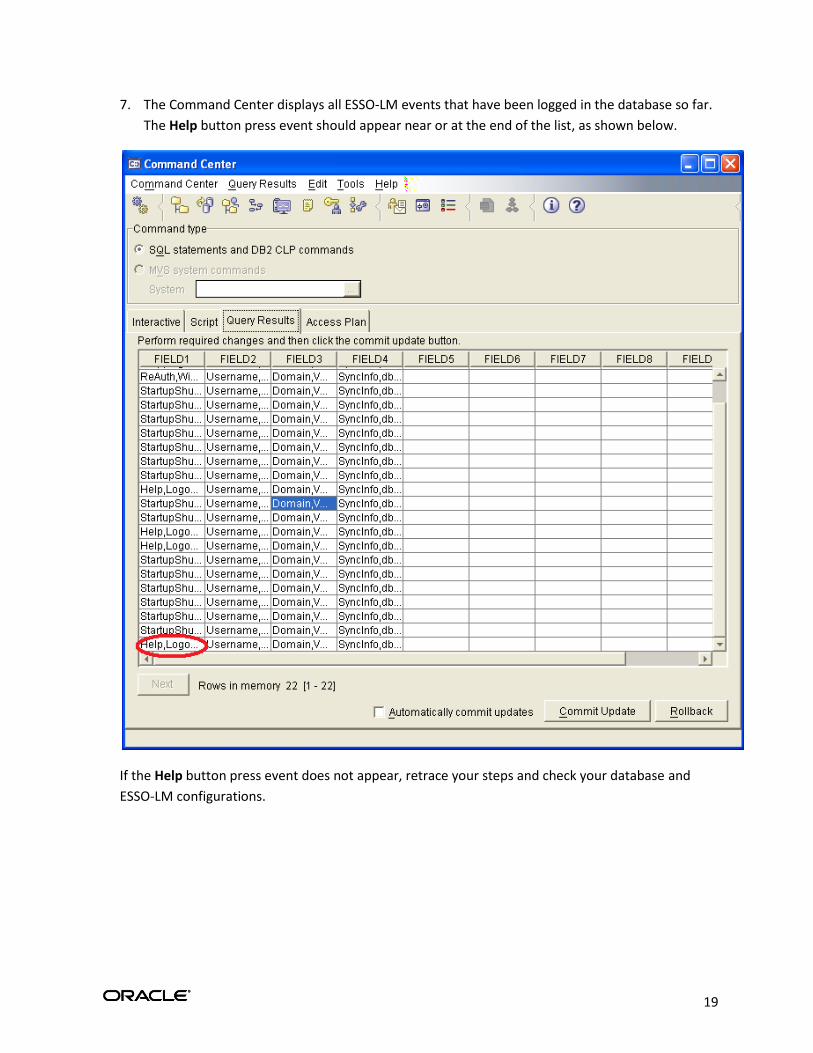
7. The Command Center displays all ESSO-LM events that have been logged in the database so far.
The Help button press event should appear near or at the end of the list, as shown below.
If the Help button press event does not appear, retrace your steps and check your database and
ESSO-LM configurations.