Embed Size (px)
Citation preview
Oracle Database Integration Guide Preface
Preface © 2015 Gemalto/SafeNet, All rights reserved. Part Number: 007-008670-001 (Rev AJ, 07/2015) All intellectual property is protected by copyright. All trademarks and product names used or referred to are the copyright of their respective owners. No part of this document may be reproduced, stored in a retrieval system or transmitted in any form or by any means, electronic, mechanical, chemical, photocopy, recording or otherwise without the prior written permission of SafeNet. SafeNet makes no representations or warranties with respect to the contents of this document and specifically disclaims any implied warranties of merchantability or fitness for any particular purpose. Furthermore, SafeNet reserves the right to revise this publication and to make changes from time to time in the content hereof without the obligation upon SafeNet to notify any person or organization of any such revisions or changes. SafeNet invites constructive comments on the contents of this document. These comments, together with your personal and/or company details, should be sent to the address below. SafeNet, Inc. 4690 Millennium Drive Belcamp, Maryland 21017 USA Limitations This document does not include the steps to set up the third-party software. The steps given in this document must be modified accordingly. Refer to Luna SA documentation for general Luna setup procedures. Disclaimers The foregoing integration was performed and tested only with the specific versions of equipment and software and only in the configuration indicated. If your setup matches exactly, you should expect no trouble, and Customer Support can assist with any missteps. If your setup differs, then the foregoing is merely a template and you will need to adjust the instructions to fit your situation. Customer Support will attempt to assist, but cannot guarantee success in setups that we have not tested. While multiple applications per partition is supported by the PKCS #11 standard, it is the customer’s responsibility to validate that applications sharing a partition do so in a manner that does not result in conflicts between the applications. Gemalto/SafeNet strongly recommends customers implement frequent, high quality backups of the key material held within the HSM in a manner consistent with the value of the data being protected by them. It is critical to align this backup strategy to with the application’s key management behavior. For example, backups must be refreshed immediately after the application performs any key rotation activities; backups should also be refreshed before any application or HSM upgrades are performed. This is particularly critical for data encryption applications, where loss of the keys renders the data inaccessible. Backups should be verified on a regular basis both to ensure they are usable and to ensure the team responsible for the system knows how to use them to perform a recovery.
© 2015 Gemalto/SafeNet, All rights reserved. i
Oracle Database Integration Guide Preface
SafeNet also recommends users thoroughly test all application and HSM upgrades before deploying them on production systems. Depending on the customer’s deployments behavior changes in the application or HSM may have an unexpected result. Technical Support If you encounter a problem while installing, registering or operating this product, please make sure that you have read the documentation. If you cannot resolve the issue, please contact your supplier or SafeNet support. SafeNet support operates 24 hours a day, 7 days a week. Your level of access to this service is governed by the support plan arrangements made between SafeNet and your organization. Please consult this support plan for further information about your entitlements, including the hours when telephone support is available to you. Technical Support Contact Information: Phone: 800-545-6608, 410-931-7520
ii © 2015 Gemalto/SafeNet, All rights reserved.
Oracle Database Integration Guide Table of Contents
Table of Contents
Preface ............................................................................................................................................................. i
Table of Contents ........................................................................................................................................ iii
Chapter 1 Introduction ................................................................................................................................ 1 Scope ......................................................................................................................................................................... 1 Supported Platforms .................................................................................................................................................. 1 Known issues ............................................................................................................................................................. 4 Prerequisites............................................................................................................................................................... 5
Chapter 2 Integrating Oracle Database 11gR1 (11.1.0.6) with Luna SA ........................................ 6 Setting up Luna SA for Transparent Data Encryption ............................................................................................... 6 Generating a Master Encryption Key for HSM-Based Encryption............................................................................ 6
Chapter 3 Integrating Oracle Database 11g R1 (11.1.0.7) with Luna SA ..................................... 10 Setting up Luna SA for Transparent Data Encryption ............................................................................................. 10 Generating a Master Encryption Key for HSM-Based Encryption.......................................................................... 10
Chapter 4 Integrating Oracle Database 11g R2 (11.2.0.1) with Luna SA ..................................... 15 Setting up Luna SA for Transparent Data Encryption ............................................................................................. 15 Generating a Master Encryption Key for HSM-Based Encryption.......................................................................... 15
Chapter 5 Integrating Oracle Database 11g R2 (11.2.0.2) with Luna SA ..................................... 26 Setting up Luna SA for Transparent Data Encryption ............................................................................................. 26 Generating a Master Encryption Key for HSM-Based Encryption.......................................................................... 27
Chapter 6 Integrating Oracle Database 11g R2 (11.2.0.3/11.2.0.4) with Luna SA/Luna PCI ... 31 Setting up Luna SA and Luna PCI for Transparent Data Encryption ...................................................................... 31 Generating a Master Encryption Key for HSM-Based Encryption.......................................................................... 32
Chapter 7 Integrating Multiple Oracle Database 11g R2 (11.2.0.3) with Luna SA ..................... 39 Setting up Luna SA for Transparent Data Encryption ............................................................................................. 39 Generating a Master Encryption Key for HSM-Based Encryption.......................................................................... 41
Chapter 8 Integrating Oracle Database 11gR2 RAC (11.2.0.3) with Luna HSM ......................... 49 Understanding the Oracle RAC ............................................................................................................................... 49 Oracle Database RAC Setup .................................................................................................................................... 49 Supported Platforms ................................................................................................................................................ 49 Setting up Luna HSM for Transparent Data Encryption with Oracle RAC ............................................................. 50 Verifying Oracle RAC Installation .......................................................................................................................... 50 Configuring the PKCS11 Provider on Oracle RAC Instances ................................................................................. 50 Migrating Master Encryption Key from software wallet to HSM ........................................................................... 52 Verifying that the 'traditional' software-based wallet is working fine: .................................................................... 52 TDE Tablespace Encryption .................................................................................................................................... 53 Test the Migration of Software Wallet to HSM Device .......................................................................................... 54 Setting up Oracle to Create Auto-Open Wallet ....................................................................................................... 58
Chapter 9 Integrating Oracle Database 12c with Luna ..................................................................... 63 Setting up Luna Client for Transparent Data Encryption ........................................................................................ 63 Generating a Master Encryption Key for HSM-Based Encryption.......................................................................... 63 Working with Pluggable Databases (PDB).............................................................................................................. 72
Chapter 10 Troubleshooting Tips .......................................................................................................... 77
© 2015 Gemalto/SafeNet, All rights reserved. iii

Oracle Database Integration Guide Table of Contents
iv © 2015 Gemalto/SafeNet, All rights reserved.
Oracle Database Integration Guide Chapter 1 Introduction
Chapter 1 Introduction
This document is intended to guide security administrators through the steps for the Oracle Database 11g and 12c Integration with Luna SA/ Luna PCI, and also covers the necessary information to install, configure and integrate Oracle Database Transparent Data Encryption (TDE) with SafeNet Luna SA / Luna PCI Hardware Security Module (HSM).
TDE provides the infrastructure necessary for implementing encryption. It enables to encrypt sensitive data stored in application table columns (such as credit card numbers etc.) or application tablespaces, the containers for all objects stored in a database TDE prevents data theft of confidential data stored on media. The motivation for the Oracle TDE to use the Luna SA HSM for EKM is because of the following reasons:
It is used to store the master encryption keys used for transparent data encryption. And the
master encryption key is never exposed in insecure memory. It also provides more secure computational storage. Luna SA HSM is a more secure alternative to the Oracle wallet.
Scope This document outlines the steps to integrate Oracle Database with SafeNet HSM. SafeNet HSM is used to secure the Master Encryption Key for Oracle TDE in FIPS 140-2 Approved HSM. While multiple applications per partition is supported by the PKCS #11 standard, it is the customer’s responsibility to validate that applications sharing a partition do so in a manner that does not result in conflicts between the applications. Gemalto/SafeNet strongly recommends customers implement frequent, high quality backups of the key material held within the HSM in a manner consistent with the value of the data being protected by them. It is critical to align this backup strategy to with the application’s key management behavior. For example, backups must be refreshed immediately after the application performs any key rotation activities; backups should also be refreshed before any application or HSM upgrades are performed. This is particularly critical for data encryption applications, where loss of the keys renders the data inaccessible.
Backups should be verified on a regular basis both to ensure they are usable and to ensure the team responsible for the system knows how to use them to perform a recovery.
SafeNet also recommends users thoroughly test all application and HSM upgrades before deploying them on production systems. Depending on the customer’s deployments behavior changes in the application or HSM may have an unexpected result.
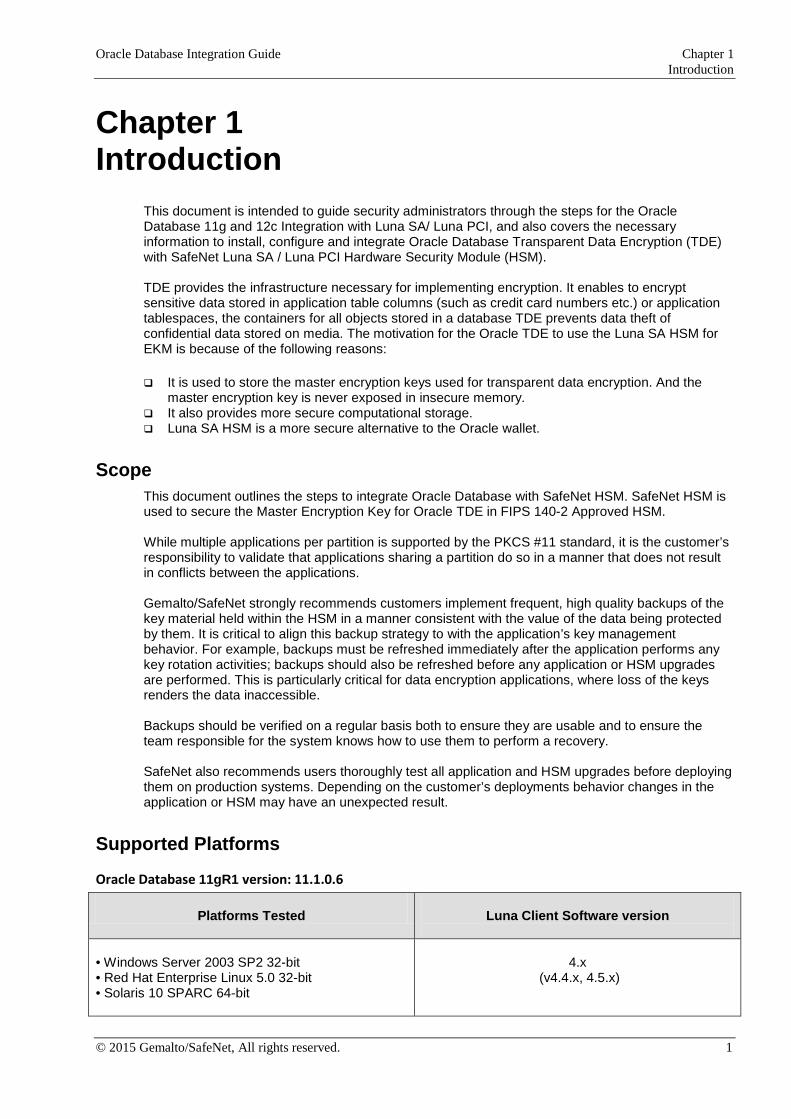
Supported Platforms
Oracle Database 11gR1 version: 11.1.0.6
Platforms Tested
Luna Client Software version
• Windows Server 2003 SP2 32-bit • Red Hat Enterprise Linux 5.0 32-bit • Solaris 10 SPARC 64-bit
4.x
(v4.4.x, 4.5.x)
© 2015 Gemalto/SafeNet, All rights reserved. 1
Oracle Database Integration Guide Chapter 1 Introduction
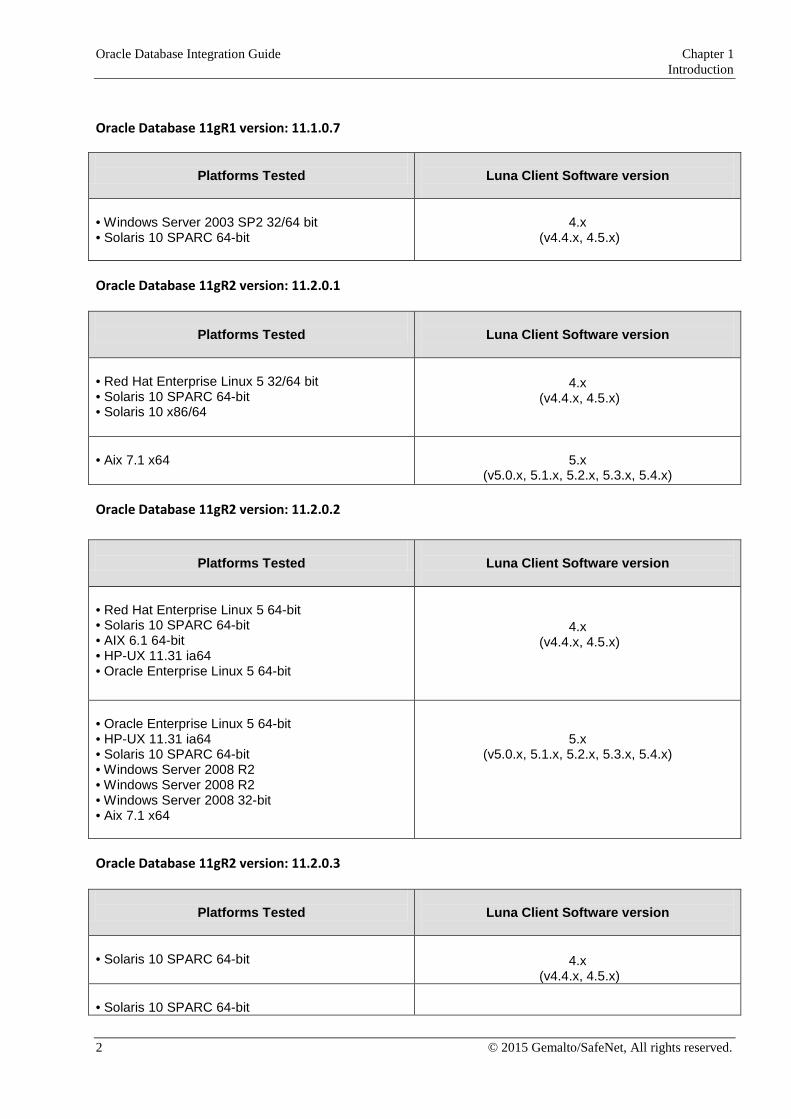
Oracle Database 11gR1 version: 11.1.0.7
Platforms Tested
Luna Client Software version
• Windows Server 2003 SP2 32/64 bit • Solaris 10 SPARC 64-bit
4.x
(v4.4.x, 4.5.x)
Oracle Database 11gR2 version: 11.2.0.1
Platforms Tested
Luna Client Software version
• Red Hat Enterprise Linux 5 32/64 bit • Solaris 10 SPARC 64-bit • Solaris 10 x86/64
4.x
(v4.4.x, 4.5.x)
• Aix 7.1 x64
5.x
(v5.0.x, 5.1.x, 5.2.x, 5.3.x, 5.4.x)
Oracle Database 11gR2 version: 11.2.0.2
Platforms Tested
Luna Client Software version
• Red Hat Enterprise Linux 5 64-bit • Solaris 10 SPARC 64-bit • AIX 6.1 64-bit • HP-UX 11.31 ia64 • Oracle Enterprise Linux 5 64-bit
4.x (v4.4.x, 4.5.x)
• Oracle Enterprise Linux 5 64-bit • HP-UX 11.31 ia64 • Solaris 10 SPARC 64-bit • Windows Server 2008 R2 • Windows Server 2008 R2 • Windows Server 2008 32-bit • Aix 7.1 x64
5.x (v5.0.x, 5.1.x, 5.2.x, 5.3.x, 5.4.x)
Oracle Database 11gR2 version: 11.2.0.3
Platforms Tested
Luna Client Software version
• Solaris 10 SPARC 64-bit
4.x
(v4.4.x, 4.5.x) • Solaris 10 SPARC 64-bit
2 © 2015 Gemalto/SafeNet, All rights reserved.
Oracle Database Integration Guide Chapter 1 Introduction
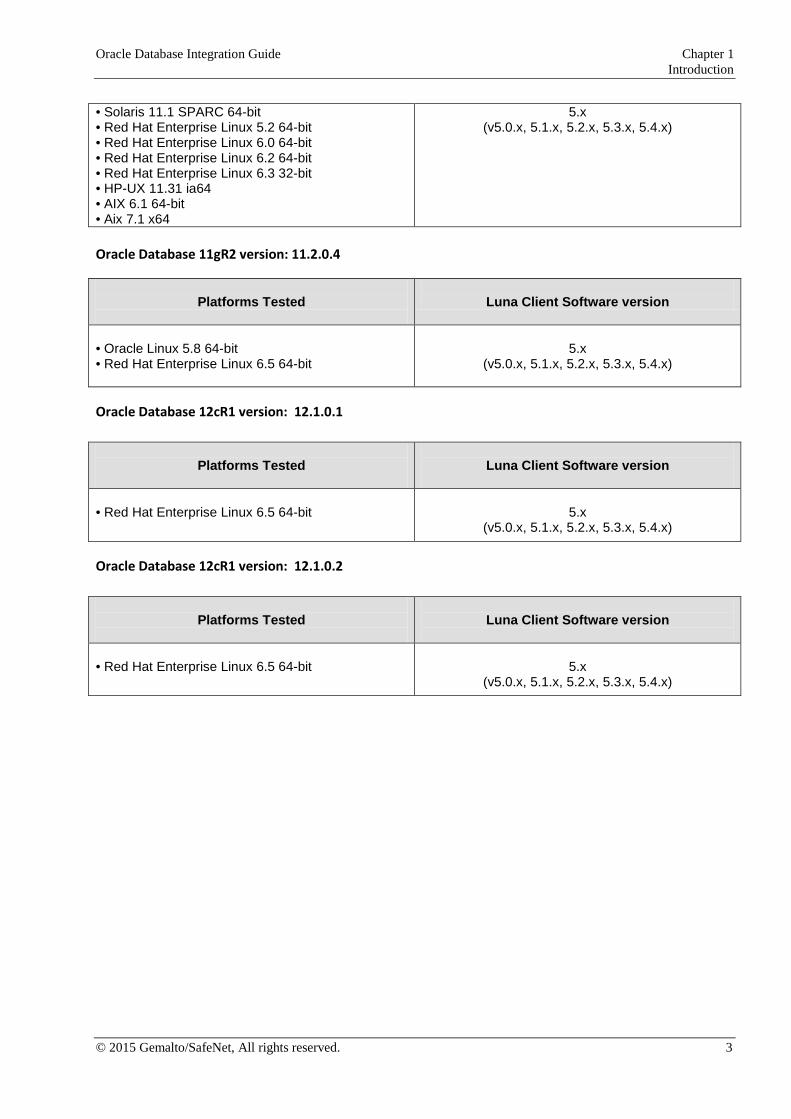
• Solaris 11.1 SPARC 64-bit • Red Hat Enterprise Linux 5.2 64-bit • Red Hat Enterprise Linux 6.0 64-bit • Red Hat Enterprise Linux 6.2 64-bit • Red Hat Enterprise Linux 6.3 32-bit • HP-UX 11.31 ia64 • AIX 6.1 64-bit • Aix 7.1 x64
5.x (v5.0.x, 5.1.x, 5.2.x, 5.3.x, 5.4.x)
Oracle Database 11gR2 version: 11.2.0.4
Platforms Tested
Luna Client Software version
• Oracle Linux 5.8 64-bit • Red Hat Enterprise Linux 6.5 64-bit
5.x
(v5.0.x, 5.1.x, 5.2.x, 5.3.x, 5.4.x)
Oracle Database 12cR1 version: 12.1.0.1
Platforms Tested
Luna Client Software version
• Red Hat Enterprise Linux 6.5 64-bit
5.x
(v5.0.x, 5.1.x, 5.2.x, 5.3.x, 5.4.x)
Oracle Database 12cR1 version: 12.1.0.2
Platforms Tested
Luna Client Software version
• Red Hat Enterprise Linux 6.5 64-bit
5.x
(v5.0.x, 5.1.x, 5.2.x, 5.3.x, 5.4.x)
© 2015 Gemalto/SafeNet, All rights reserved. 3
Oracle Database Integration Guide Chapter 1 Introduction
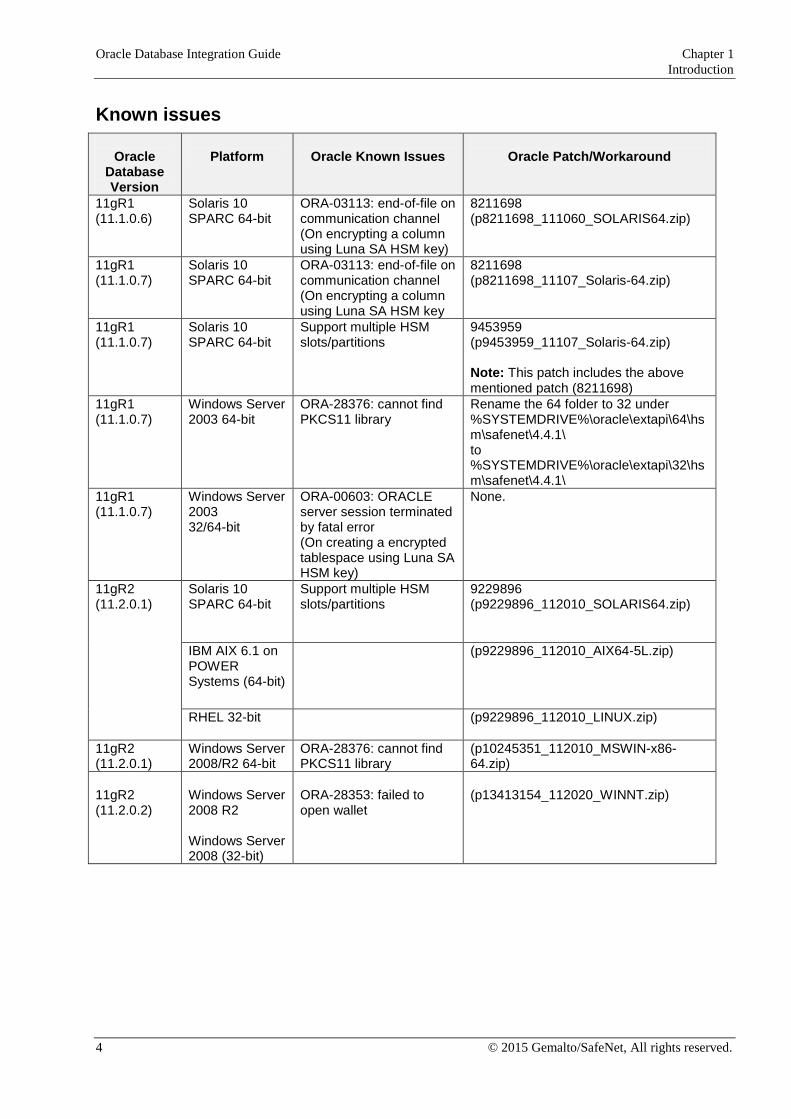
Known issues
Oracle Database Version
Platform
Oracle Known Issues
Oracle Patch/Workaround
11gR1 (11.1.0.6)
Solaris 10 SPARC 64-bit
ORA-03113: end-of-file on communication channel (On encrypting a column using Luna SA HSM key)
8211698 (p8211698_111060_SOLARIS64.zip)
11gR1 (11.1.0.7)
Solaris 10 SPARC 64-bit
ORA-03113: end-of-file on communication channel (On encrypting a column using Luna SA HSM key
8211698 (p8211698_11107_Solaris-64.zip)
11gR1 (11.1.0.7)
Solaris 10 SPARC 64-bit
Support multiple HSM slots/partitions
9453959 (p9453959_11107_Solaris-64.zip) Note: This patch includes the above mentioned patch (8211698)
11gR1 (11.1.0.7)
Windows Server 2003 64-bit
ORA-28376: cannot find PKCS11 library
Rename the 64 folder to 32 under %SYSTEMDRIVE%\oracle\extapi\64\hsm\safenet\4.4.1\ to %SYSTEMDRIVE%\oracle\extapi\32\hsm\safenet\4.4.1\
11gR1 (11.1.0.7)
Windows Server 2003 32/64-bit
ORA-00603: ORACLE server session terminated by fatal error (On creating a encrypted tablespace using Luna SA HSM key)
None.
11gR2 (11.2.0.1)
Solaris 10 SPARC 64-bit
Support multiple HSM slots/partitions
9229896 (p9229896_112010_SOLARIS64.zip)
IBM AIX 6.1 on POWER Systems (64-bit)
(p9229896_112010_AIX64-5L.zip)
RHEL 32-bit (p9229896_112010_LINUX.zip)
11gR2 (11.2.0.1)
Windows Server 2008/R2 64-bit
ORA-28376: cannot find PKCS11 library
(p10245351_112010_MSWIN-x86-64.zip)
11gR2 (11.2.0.2)
Windows Server 2008 R2 Windows Server 2008 (32-bit)
ORA-28353: failed to open wallet
(p13413154_112020_WINNT.zip)
4 © 2015 Gemalto/SafeNet, All rights reserved.
Oracle Database Integration Guide Chapter 1 Introduction
Prerequisites
Luna SA Setup Please refer to the Luna SA documentation for installation steps and details regarding configuring and setting up the box on Windows and UNIX systems. Before you get started ensure the following:
• Luna SA appliance has a secure admin password • Luna SA, and a hostname, suitable for your network • Luna SA network parameters are set to work with your network • Initialized the HSM on the Luna SA appliance. • Created and exchanged certificates between the Luna SA and your Client system. • Created a partition on the HSM, remember the partition password that will be later used by the
Oracle TDE. Register the Client with the partition. And run the "vtl verify" command on the client system to display a partition from Luna SA.
• Enabled Partition "Activation" and "Auto Activation" (Partition policy settings 22 and 23 (applies to Luna SA with Trusted Path Authentication [which is FIPS 140-2 level 3] only).
Luna PCI Setup Please refer to the Luna PCI documentation for installation steps and details regarding configuring and setting up the box on Linux systems. Before you get started ensure the following:
• Initialize the HSM on the Luna PCI appliance • Create a partition on the HSM. • Enable Partition "Activation" and "Auto Activation" (Partition policy settings 22 and 23 (applies to
Luna PCI with Trusted Path Authentication [which is FIPS 140-2 level 3] only)
Oracle Database Setup Oracle Database must be installed on the target machine to carry on with the integration process. For a detailed installation procedure of Oracle Database, please refer to the Oracle Database Documentation.
Luna SA FIPS Mode This integration is also tested with Luna SA HSM in FIPS mode.
Luna SA HA (High-Availability) Setup
Please refer to the Luna SA documentation for HA steps and details regarding configuring and setting up two or more Luna SA boxes on Windows and UNIX systems. You must enabled the HAOnly setting in HA for failover to work so that if primary goes down by some reason all calls automatically routed to secondary till primary gets up again. Important: If you are using the Luna SA 5.2.1 or above (Firmware 6.10.1 or above) you need the following setting in Chrystoki.conf (UNIX) and Crystoki.ini (Windows) along with HAOnly setting enabled. UNIX Misc = { PE1746Enabled=0; } Windows [Misc] PE1746Enabled=0 Note: Above setting along with HAOnly enabled required for HA failover to work uninterruptedly on Luna SA 5.2.1 or above (Firmware 6.10.1 or above).
© 2015 Gemalto/SafeNet, All rights reserved. 5
Oracle Database Integration Guide Chapter 2 Integrating Oracle Database 11g R1 (11.1.0.6) with Luna SA
Chapter 2 Integrating Oracle Database 11gR1 (11.1.0.6) with Luna SA
Setting up Luna SA for Transparent Data Encryption
To set up Luna SA for Transparent Data Encryption, perform the following:
Copy the Luna SA PKCS#11 library to the specified directory structure to ensure that the database is able to find this library. Use the following directory structure:
%SYSTEMDRIVE%\oracle\extapi\[32,64]\hsm\{Vendor}\{Version}\libXX.ext (Windows) /opt/oracle/extapi/[32,64]/hsm/{Vendor}/{Version}/libXX.ext (Linux/Solaris)
For example,
C:\oracle\extapi\32\hsm\safenet\4.4.1\cryptoki.dll (Windows) /opt/oracle/extapi/32/hsm/safenet/4.4.1/libshim.so (Linux/Solaris)
where,
[32, 64] specifies whether the supplied binary is 32-bits or 64-bits. Vendor stands for the name of the vendor supplying the library. Version refers to the version of the library. This should preferably be in a format:
number.number.number. The API name requires no special format. However, the XX must be prefixed with the word lib, as illustrated in the syntax. The extension, ext needs to be replaced by the extension of the library file.
Only one PKCS#11 library is supported at a time.
Generating a Master Encryption Key for HSM-Based Encryption
To start using HSM-based encryption, you need to have a master encryption key that will be stored inside the HSM. The master encryption key is used to encrypt or decrypt Oracle Transparent Data Encryption table keys inside the HSM. HSM can be used in the following ways to protect the Master Encryption Key:
An existing Master Encryption Key can be migrated onto the HSM. A Master Encryption Key can be directly generated onto the HSM.
Migrating Master Encryption Key onto the HSM
In Oracle Database Oracle Database 11gR1 (11.1.0.6), only the master encryption key for TDE Column Encryption can be migrated from the Oracle Wallet to an HSM; the master encryption key for TDE Tablespace Encryption can neither be created in nor migrated to an HSM; it relies completely on the Oracle Wallet. In order to migrate a Master Encryption Key for HSM-Based Encryption, perform the following instructions:
It is assumed that no wallet-based master encryption key is yet created in the directory you would
specify to create one.
6 © 2015 Gemalto/SafeNet, All rights reserved.
Oracle Database Integration Guide Chapter 2 Integrating Oracle Database 11g R1 (11.1.0.6) with Luna SA
To test TDE with Luna SA HSM, perform the following:
1. Verify that the 'traditional' software-based wallet is working fine:
1.1. Add the following to your $ORACLE_HOME/network/admin/sqlnet.ora – file: ENCRYPTION_WALLET_LOCATION =(SOURCE = (METHOD = FILE)(METHOD_DATA = (DIRECTORY = <path to the oracle wallet directory>)))
1.2. C:\sqlplus (Windows)
Connect to the database as 'system' $ sqlplus / as sysoper (Linux/Solaris) If the database is not yet started, you can start it using: SQL> startup
Password for ‘system’ can be set during Oracle installation. All dbapasswords throughout this
document has been set to “temp123#”.
1.3. Create an encryption wallet; the master keys for TDE Column Encryption and TDE Tablespace Encryption are added into it automatically; the double quotes are mandatory: SQL> alter system set encryption key identified by “wallet_password”; This creates an Oracle wallet with two master encryption keys: a master encryption key for TDE Column Encryption, and a master encryption key for TDE Tablespace Encryption; the latter cannot be re-keyed (rotated), and not migrated to an HSM unless the database is upgraded to Oracle Database 11g Release 2.
“wallet_password” must contain alphanumeric characters and have length more than or equal to
8 characters.
1.4. Encrypt the 'credit_limit' column of the 'CUSTOMERS' table which is owned by the user 'OE': SQL> alter table oe.customers modify (credit_limit encrypt using 'AES256' no salt);
1.5. With the next command, the values listed in the encrypted column are returned in clear text;
Transparent Data Encryption decrypts them automatically: SQL> select credit_limit from oe.customers where rownum <15;
1.6. The next command lists encrypted columns in your database:
SQL> select * from dba_encrypted_columns;
1.7. Finally, this view contains information about the wallet itself: SQL> select * from v$encryption_wallet;
1.8. Create an encrypted tablespace: On Windows: SQL> CREATE TABLESPACE securespace DATAFILE 'C:\app\Administrator\oradata\orcl\secure01.dbf' SIZE 10M ENCRYPTION using 'AES256' DEFAULT STORAGE(ENCRYPT); On Solaris/Linux: SQL> CREATE TABLESPACE securespace DATAFILE ' /opt/oracle/app/oracle/oradata/ORCL/secure01.dbf' SIZE 10M ENCRYPTION using 'AES256'
© 2015 Gemalto/SafeNet, All rights reserved. 7
Oracle Database Integration Guide Chapter 2 Integrating Oracle Database 11g R1 (11.1.0.6) with Luna SA
DEFAULT STORAGE (ENCRYPT);
1.9. Close the wallet: SQL> alter system set encryption wallet close;
SQL> exit
2. Test if the database can reach the HSM device:
2.1. Change your $ORACLE_HOME\network\admin\sqlnet.ora – file: ENCRYPTION_WALLET_LOCATION =(SOURCE = (METHOD = HSM)(METHOD_DATA = (DIRECTORY = <path to the oracle wallet directory>)))
2.2. C:\sqlplus (Windows)
Connect to the database as 'system' $ sqlplus / as sysoper (Linux/Solaris)
2.3. Migrate theTDE Column Encryption master encryption key onto the HSM device:
SQL> alter system set encryption key identified by “hsm_partition_pwd” migrate using “wallet_password; “hsm_partition_pwd” is the password for the HSM partition where the Master Encryption Key would be generated. The master key in the HSM device will not be used by TDE Tablespace Encryption; these rely on the software wallet created in step 1. The 'migrate using “wallet_password”' string re-encrypts the TDE Column Encryption table keys with the new HSM-based master key. The “wallet_password” is the password given the software wallet in step 1.
2.4. With the next command, the values listed in the encrypted column are returned in clear text; Transparent Data Encryption decrypts them automatically, now using the HSM master key: SQL> select credit_limit from oe.customers where rownum <15;
2.5. Close the wallet: SQL> alter system set encryption wallet close; SQL> exit
2.6. Start Oracle Wallet Manager from Start Menu:
2.7. Open the software-based wallet and click on 'Change Password'; use the same string you used for
the HSM wallet as the new password for the software based wallet in the form “hsm_partition_pwd”; click on “Save”, then “Exit”.
2.8. C:\sqlplus (Windows)
Connect to the database as 'system' $ sqlplus / as sysoper (Linux/Solaris)
SQL> alter system set encryption wallet open identified by “hsm_partition_pwd”
This opens both the HSM and the software wallet. 2.9. Close the wallet:
SQL> alter system set encryption wallet close; SQL> exit
2.10. Start Oracle Wallet Manager from Start Menu:
2.11. Open the software-based wallet, change the password back to the initial password, check 'Auto-
Login'; click on 'Save', then 'Exit'
8 © 2015 Gemalto/SafeNet, All rights reserved.
Oracle Database Integration Guide Chapter 2 Integrating Oracle Database 11g R1 (11.1.0.6) with Luna SA
2.12. Verify that an auto-open wallet has been created in the oracle wallet directory you specified in the sqlnet.ora file: You will find two wallets in this directory: “ewallet.p12” and “cwallet.sso”; the latter is the auto-open wallet; rename the encryption wallet: < path to the oracle wallet directory >rename ewallet.p12 ewallet.p24 so that Transparent Data Encryption does not try to open it.
2.13. Connect to the database as system and open the HSM wallet (the software is already open): SQL> alter system set encryption wallet open identified by “hsm_partition_pwd”;
Generating Master Encryption Key directly onto the HSM
In order to generate a Master Encryption Key for HSM-Based Encryption, perform the following instructions: It is assumed that no software or HSM based wallet is yet created.
1. Setting up Oracle to create Master Encryption Key onto HSM:
1.1. Add the following to your $ORACLE_HOME\network\admin\sqlnet.ora – file: ENCRYPTION_WALLET_LOCATION =(SOURCE = (METHOD = HSM)(METHOD_DATA = (DIRECTORY = <path to the oracle wallet directory>)))
1.2. C:\sqlplus (Windows)
Connect to the database as 'system' $ sqlplus / as sysoper (Linux/Solaris)
Password for ‘system’ can be set during Oracle installation.
1.3. Create an encryption wallet. The TDE Column Encryption master key would automatically be created onto the HSM, while the TDE Tablespace Encryption master encryption key is generated by the database into the Oracle wallet. SQL> alter system set encryption key identified by “hsm_partition_pwd”;
1.4. Encrypt the 'credit_limit' column of the 'CUSTOMERS' table which is owned by the user 'OE':
SQL> alter table oe.customers modify (credit_limit encrypt using 'AES256' no salt); For Solaris SPARC 64: “ORA-3113: end of file on communication channel” will be thrown. You
need to install patch 8211698 (p8211698_111060_SOLARIS64.zip) for Oracle 11g R1 (11.1.0.6.0)
1.5. With the next command, the values listed in the encrypted column are returned in clear text; Transparent Data Encryption decrypts them automatically: SQL> select credit_limit from oe.customers where rownum <15;
1.6. The next command lists encrypted columns in your database:
SQL> select * from dba_encrypted_columns;
1.7. Close the wallet: SQL> alter system set encryption wallet close;
© 2015 Gemalto/SafeNet, All rights reserved. 9
Oracle Database Integration Guide Chapter 3 Integrating Oracle Database 11g R1 (11.1.0.7) with Luna SA
Chapter 3 Integrating Oracle Database 11g R1 (11.1.0.7) with Luna SA Setting up Luna SA for Transparent Data Encryption
To set up Luna SA for Transparent Data Encryption, perform the following:
Copy the Luna SA PKCS#11 library to the specified directory structure to ensure that the database is able to find this library. Use the following directory structure:
%SYSTEMDRIVE%\oracle\extapi\[32,64]\hsm\{Vendor}\{Version}\libXX.ext (Windows) /opt/oracle/extapi/[32,64]/hsm/{Vendor}/{Version}/libXX.ext (Solaris)
For example,
C:\oracle\extapi\32\hsm\safenet\4.4.1\cryptoki.dll (Windows) /opt/oracle/extapi/32/hsm/safenet/4.4.1/libshim.so (Solaris)
For Windows 64-bit systems, give the 64-bit folder name as 32. This is a known issue with Oracle
on Windows 64-bit systems using Luna SA HSM.
where, [32, 64] specifies whether the supplied binary is 32-bits or 64-bits. Vendor stands for the name of the vendor supplying the library. Version refers to the version of the library. This should preferably be in a format:
number.number.number. The API name requires no special format. However, the XX must be prefixed with the word lib, as illustrated in the syntax. The extension, ext needs to be replaced by the extension of the library file.
Only one PKCS#11 library is supported at a time.
Generating a Master Encryption Key for HSM-Based Encryption
To start using HSM-based encryption, you need to have a master encryption key that will be stored inside the HSM. The master encryption key is used to encrypt or decrypt column encryption keys inside the HSM. HSM can be used in the following ways to protect the Master Encryption Key:
An existing Master Encryption Key for TDE column encryption can be migrated onto the
HSM. The Master Encryption Keys for TDE column encryption and TDE tablespace encryption
can be directly generated onto the HSM.
Migrating Master Encryption Key onto the HSM
In Oracle Database Oracle Database 11gR1 (11.1.0.7), only the master encryption key for TDE Column Encryption can be migrated from the Oracle Wallet to an HSM; the master encryption key for TDE Tablespace Encryption cannot be migrated to an HSM. If an Oracle Database 11gR1 (11.1.0.7) had never seen an Oracle Wallet, both master keys for TDE Column
10 © 2015 Gemalto/SafeNet, All rights reserved.
Oracle Database Integration Guide Chapter 3 Integrating Oracle Database 11g R1 (11.1.0.7) with Luna SA
Encryption and TDE Tablespace Encryption can be created in an HSM, but the master key for TDE Tablespace Encryption cannot be re-keyed (rotated) unless the database has been upgraded to Oracle Database 11g Release 2 (11.2.0.1). In order to migrate a Master Encryption Key for HSM-Based Encryption, perform the following instructions:
Apply http://updates.oracle.com/download/8421211.html and http://updates.oracle.com/download/9453959.html
It is assumed that no software-based wallet is yet created in the directory you would specify to
create one.
To test TDE with Luna SA HSM, perform the following: 1. Verify that the 'traditional' software-based wallet is working fine:
1.1. Add the following to your $ORACLE_HOME\network\admin\sqlnet.ora – file:
ENCRYPTION_WALLET_LOCATION = (SOURCE = (METHOD = FILE)(METHOD_DATA = (DIRECTORY = <path to the oracle wallet directory>)))
1.2. C:\sqlplus (Windows)
Connect to the database as 'system': $ sqlplus / as sysoper (Solaris) If the database is not yet started, you can start it using: SQL> startup Password for ‘system’ can be set during Oracle installation.
1.3. Create an encryption wallet; the master keys for TDE Column Encryption and TDE Tablespace Encryption are added into it automatically; the double quotes are mandatory: SQL> alter system set encryption key identified by “wallet_password”; This creates an Oracle wallet with two master encryption keys: a master encryption key for TDE Column Encryption, and a master encryption key for TDE Tablespace Encryption; the latter cannot be re-keyed (rotated), and not migrated to an HSM unless the database is upgraded to Oracle Database 11g Release 2.
“wallet_password” must contain alphanumeric characters and have length more than or equal
to 8 characters.
1.4. Encrypt the 'credit_limit' column of the 'CUSTOMERS' table which is owned by the user 'OE': SQL> alter table oe.customers modify (credit_limit encrypt using 'AES256' no salt 'nomac');
1.5. With the next command, the values listed in the encrypted column are returned in clear text;
Transparent Data Encryption decrypts them automatically: SQL> select credit_limit from oe.customers where rownum <15;
1.6. The next command lists encrypted columns in your database:
SQL> select * from dba_encrypted_columns;
1.7. Finally, this view contains information about the wallet itself: SQL> select * from v$encryption_wallet;
1.8. Create an encrypted tablespace: On Windows: SQL> CREATE TABLESPACE securespace DATAFILE 'C:\app\Administrator\oradata\orcl\secure01.dbf'
© 2015 Gemalto/SafeNet, All rights reserved. 11
Oracle Database Integration Guide Chapter 3 Integrating Oracle Database 11g R1 (11.1.0.7) with Luna SA
SIZE 10M ENCRYPTION using 'AES256' DEFAULT STORAGE (ENCRYPT); On Solaris: SQL> CREATE TABLESPACE securespace DATAFILE 'C:\app\Administrator\oradata\orcl\secure01.dbf' SIZE 10M ENCRYPTION using 'AES256' DEFAULT STORAGE (ENCRYPT);
1.9. Close the wallet: SQL> alter system set encryption wallet close;
SQL> exit
2. Test if the database can reach the HSM device:
2.1. Change your $ORACLE_HOME\network\admin\sqlnet.ora – file: ENCRYPTION_WALLET_LOCATION = (SOURCE = (METHOD = HSM)(METHOD_DATA = (DIRECTORY = <path to the oracle wallet directory>)))
2.2. C:\sqlplus (Windows)
Connect to the database as 'system': $ sqlplus / as sysoper (Solaris)
2.3. Migrate the TDE Column Encryption master key onto the HSM device:
SQL> alter system set encryption key identified by “hsm_partition_pwd” migrate using “wallet_password; “hsm_partition_pwd” is the password for the HSM partition where the Master Encryption Key would be generated. The master key in the HSM device will not be used by encrypted tablespaces; these rely on the software wallet created in step 1. The 'migrate using “wallet_password”' string re-encrypts theTDE Column Encryption table keys with the new HSM based master key. The “wallet_password” is the password given the software wallet in step 1.
2.4. With the next command, the values listed in the encrypted column are returned in clear text; Transparent Data Encryption decrypts them automatically, now using the HSM master key: SQL> select credit_limit from oe.customers where rownum <15;
2.5. Close the wallet: SQL> alter system set encryption wallet close; SQL> exit
2.6. Start Oracle Wallet Manager from Start Menu:
2.7. Open the software-based wallet and click on 'Change Password'; use the same string you used
for the HSM wallet as the new password for the software based wallet in the form “hsm_partition_pwd”; click on “Save”, then “Exit”.
2.8. C:\sqlplus (Windows)
Connect to the database as 'system': $ sqlplus / as sysoper (Solaris)
SQL> alter system set encryption wallet open identified by “hsm_partition_pwd”
This opens both the HSM and the software wallet. 2.9. Close the wallet:
SQL> alter system set encryption wallet close;
12 © 2015 Gemalto/SafeNet, All rights reserved.
Oracle Database Integration Guide Chapter 3 Integrating Oracle Database 11g R1 (11.1.0.7) with Luna SA
SQL> exit
2.10. Start Oracle Wallet Manager from Start Menu:
2.11. Open the software-based wallet, change the password back to the initial password, check 'Auto-Login'; click on 'Save', then 'Exit'
2.12. Verify that an auto-open software wallet has been created in the oracle wallet directory you specified in the sqlnet.ora file: You will find two wallets in this directory: “ewallet.p12” and “cwallet.sso”; the latter is the auto-open wallet; rename the encryption wallet: C:\< path to the oracle wallet directory >rename ewallet.p12 ewallet.p24 so that Transparent Data Encryption does not try to open it.
2.13. Connect to the database as system and open the HSM wallet (the software is already open): SQL> alter system set encryption wallet open identified by “hsm_partition_pwd”;
Generating Master Encryption Key directly onto the HSM
In order to generate a Master Encryption Key for HSM-Based Encryption, perform the following instructions:
It is assumed that no wallet or HSM based master key is yet created.
1. Setting up Oracle to create Master Encryption Key onto HSM:
1.1. Add the following to your $ORACLE_HOME\network\admin\sqlnet.ora – file: ENCRYPTION_WALLET_LOCATION = (SOURCE = (METHOD = HSM))
1.2. C:\sqlplus (Windows)
Connect to the database as 'system': $ sqlplus / as sysoper (Solaris) If the database is not yet started, you can start it using: SQL> startup
Password for ‘system’ can be set during Oracle installation. All dbapasswords throughout this
document has been set to “temp123#”.
1.3. The master keys for TDE Column Encryption and TDE Tablespace Encryption would automatically be created onto the HSM. SQL> alter system set encryption key identified by “hsm_partition_pwd”;
1.4. Encrypt the 'credit_limit' column of the 'CUSTOMERS' table which is owned by the user 'OE':
SQL> alter table oe.customers modify (credit_limit encrypt using 'AES256' 'nomac');
For Solaris SPARC 64 : “ORA-3113: end of file on communication channel” will be thrown. You need to install patch 8211698 (p8211698_11107_Solaris-64.zip) for Oracle 11g R1 (11.1.0.7.0).
1.5. With the next command, the values listed in the encrypted column are returned in clear text; Transparent Data Encryption decrypts them automatically: SQL> select credit_limit from oe.customers where rownum <15;
1.6. The next command lists encrypted columns in your database:
SQL> select * from dba_encrypted_columns;
© 2015 Gemalto/SafeNet, All rights reserved. 13

Oracle Database Integration Guide Chapter 3 Integrating Oracle Database 11g R1 (11.1.0.7) with Luna SA
1.7. Finally, this view contains information about the wallet itself: SQL> select * from v$encryption_wallet;
1.8. Create an encrypted tablespace:
On Windows: SQL> CREATE TABLESPACE securespace DATAFILE 'C:\app\Administrator\oradata\orcl\secure01.dbf' SIZE 10M ENCRYPTION using 'AES256' DEFAULT STORAGE (ENCRYPT);
You will receive ORA_3113 while creating an encrypted tablespace using master key from
HSM. This is a known issue with Oracle.
On Solaris: SQL> CREATE TABLESPACE securespace DATAFILE ' /opt/oracle/app/oracle/oradata/ORCL/secure01.dbf' SIZE 10M ENCRYPTION DEFAULT STORAGE (ENCRYPT); 1.9. Close the wallet:
SQL> alter system set wallet close; SQL> exit
14 © 2015 Gemalto/SafeNet, All rights reserved.
Oracle Database Integration Guide Chapter 4 Integrating Oracle Database 11g R2 (11.2.0.1) with Luna SA
Chapter 4 Integrating Oracle Database 11g R2 (11.2.0.1) with Luna SA
Setting up Luna SA for Transparent Data Encryption
To set up Luna SA for Transparent Data Encryption, perform the following:
Copy the Luna SA PKCS#11 library to the specified directory structure to ensure that the database is able to find this library. Use the following directory structure:
opt/oracle/extapi/[32,64]/hsm/{Vendor}/{Version}/libXX.ext
For example, /opt/oracle/extapi/32/hsm/safenet/4.4.1/libshim.so
where,
[32, 64] specifies whether the supplied binary is 32-bits or 64-bits. Vendor stands for the name of the vendor supplying the library. Version refers to the version of the library. This should preferably be in a format:
number.number.number. The API name requires no special format. However, the XX must be prefixed with the word lib, as illustrated in the syntax. The extension, ext needs to be replaced by the extension of the library file.
Only one PKCS#11 library is supported at a time.
Generating a Master Encryption Key for HSM-Based Encryption To start using HSM-based encryption, you need to have a master encryption key that will be stored inside the HSM. The master encryption key is used to encrypt or decrypt column encryption keys inside the HSM. HSM can be used in the following ways to protect the Master Encryption Key:
An existing Unified Master Encryption Key can be migrated onto the HSM. A Unified Master Encryption Key can be directly generated onto the HSM. Automatic master key synchronization across Oracle RAC instances.
Migrating Master Encryption Key onto the HSM
In order to migrate a Master Encryption Key for HSM-Based Encryption, perform the following instructions:
It is assumed that no software-based wallet is yet created in the directory you would specify to
create one.
To test TDE with Luna SA HSM, perform the following: 1. Verify that the 'traditional' software-based wallet is working fine:
Add the following to your $ORACLE_HOME\network\admin\sqlnet.ora – file: ENCRYPTION_WALLET_LOCATION = (SOURCE = (METHOD = FILE)(METHOD_DATA = (DIRECTORY = <path to the oracle wallet directory>)))
© 2015 Gemalto/SafeNet, All rights reserved. 15
Oracle Database Integration Guide Chapter 4 Integrating Oracle Database 11g R2 (11.2.0.1) with Luna SA
1.1. $ sqlplus
Connect to the database as 'system':
Password for ‘system’ can be set during Oracle installation.
1.2. Create an encryption wallet; the unified master encryption key is added into it automatically; the double quotes are mandatory: SQL> alter system set encryption key identified by “wallet_password”;
“wallet_password” must contain alphanumeric characters and have length more than or equal
to 8 characters.
1.3. Encrypt the 'credit_limit' column of the 'CUSTOMERS' table which is owned by the user 'OE': SQL> alter table oe.customers modify (credit_limit encrypt using 'AES256' no salt 'nomac');
1.4. With the next command, the values listed in the encrypted column are returned in clear text;
Transparent Data Encryption decrypts them automatically: SQL> select credit_limit from oe.customers where rownum <15;
1.5. The next command lists encrypted columns in your database:
SQL> select * from dba_encrypted_columns;
1.6. Finally, this view contains information about the wallet itself: SQL> select * from v$encryption_wallet;
1.7. Create an encrypted tablespace: SQL> CREATE TABLESPACE securespace DATAFILE '/opt/oracle/app/oracle/oradata/ORCL/secure01.dbf' SIZE 10M ENCRYPTION using 'AES256' DEFAULT STORAGE (ENCRYPT);
1.8. Close the wallet: SQL> alter system set encryption wallet close identified by “wallet_password”;
SQL> exit
2. Test if the database can reach the HSM device:
2.1. Change your $ORACLE_HOME\network\admin\sqlnet.ora – file: ENCRYPTION_WALLET_LOCATION = (SOURCE = (METHOD = HSM)(METHOD_DATA = (DIRECTORY = <path to the oracle wallet directory>)))
2.2. $ sqlplus Connect to the database as 'system':
2.3. Migrate the unified master encryption key onto the HSM device:
SQL> alter system set encryption key identified by “hsm_partition_pwd” migrate using “wallet_password;
To use multiple slots or partitions, the syntax to migrate the wallet-based master key to a slot or partition, use the following syntax: SQL> alter system set encryption key identified by "hsm_partition_pwd|<partition_name>" migrate using "wallet_password"; “hsm_partition_pwd” is the password for the HSM partition where the Master Encryption Key would be generated. The master key in the HSM device will not be used by encrypted tablespaces; these rely on the software wallet created in step 1. The 'migrate using
16 © 2015 Gemalto/SafeNet, All rights reserved.
Oracle Database Integration Guide Chapter 4 Integrating Oracle Database 11g R2 (11.2.0.1) with Luna SA
“wallet_password”' string re-encrypts the Transparent Data Encryption column keys with the new HSM based master key. The “wallet_password” is the password given the software wallet in step 1.
2.4. With the next command, the values listed in the encrypted column are returned in clear text; Transparent Data Encryption decrypts them automatically, now using the HSM master key: SQL> select credit_limit from oe.customers where rownum <15;
2.5. Close the wallet: SQL> alter system set encryption wallet close identified by “wallet_password”; SQL> exit
2.6. Start Oracle Wallet Manager from Start Menu:
2.7. Open the software-based wallet and click on 'Change Password'; use the same string you used
for the HSM wallet as the new password for the software based wallet in the form “hsm_partition_pwd”; click on “Save”, then “Exit”.
2.8. $ sqlplus Connect to the database as 'system': SQL> alter system set encryption wallet open identified by “hsm_partition_pwd”
This opens both the HSM and the software wallet. 2.9. Close the wallet:
SQL> alter system set encryption wallet close identified by “wallet_password”; SQL> exit
2.10. Start Oracle Wallet Manager from Start Menu:
2.11. Open the software-based wallet, change the password back to the initial password, check
'Auto-Login'; click on 'Save', then 'Exit'
2.12. Verify that an auto-open software wallet has been created in the oracle wallet directory you specified in the sqlnet.ora file: You will find two wallets in this directory: “ewallet.p12” and “cwallet.sso”; the latter is the auto-open wallet; rename the encryption wallet: $ < path to the oracle wallet directory >rename ewallet.p12 ewallet.p24 so that Transparent Data Encryption does not try to open it.
2.13. Connect to the database as system and open the HSM wallet (the software is already open): SQL> alter system set wallet open identified by “hsm_partition_pwd”; 3. Encrypt export files with Oracle Data Pump
Export files are used to share data with external business partners, or to keep data safe during upgrades or other changes to the database. Since the export files are stored outside of the database, the access controls enforced by the database no longer apply, which explains the need to encrypt these files:
3.1. SQL> create directory exp_dir as '$ORACLE_BASE';
SQL> exit 3.2. $ expdp system/temp123# TABLES=oe.customers DIRECTORY=exp_dir
DUMPFILE=table_exp_clear.dmp LOGFILE=table_exp_clear.log ENCRYPTION=none
At the end of the export process, Data Pump will report an error, which is triggered by the warning about encrypted columns from the source table being exported in clear text.
3.3. $ sqlplus system/temp123#
© 2015 Gemalto/SafeNet, All rights reserved. 17
Oracle Database Integration Guide Chapter 4 Integrating Oracle Database 11g R2 (11.2.0.1) with Luna SA
SQL> drop table oe.customers; SQL> exit;
3.4. $ impdp system/temp123# TABLES=oe.customers DIRECTORY=exp_dir
DUMPFILE=table_exp_clear.dmp LOGFILE=table_exp_clear.log 3.5. $ sqlplus system/temp123#
SQL> desc oe.cust; (<- column is encrypted) SQL> exit
3.6. Create an encrypted export file:
$ expdp system/temp123# TABLES=oe.customers DIRECTORY=exp_dir DUMPFILE=table_exp_enc.dmp LOGFILE=table_exp_enc.log ENCRYPTION=encrypted_columns_only ENCRYPTION_PASSWORD=pwd_for_enc_exp_file
3.7. $ system/temp123#
SQL> alter system set encryption key identified by "hsm_partition_pwd"; To use multiple slots or partitions, the syntax to generate master key to a slot or partition, use the following syntax: SQL> alter system set encryption key identified by "hsm_partition_pwd|<partition_name>"; SQL> drop table oe.cust; SQL> exit;
3.8. $ impdp system/temp123# TABLES=oe.customers DIRECTORY=exp_dir DUMPFILE=table_exp_enc.dmp LOGFILE=table_exp_enc.log ENCRYPTION_PASSWORD=pwd_for_enc_exp_file
3.9. sqlplus system/temp123#
SQL> desc oe.cust; (<- column is encrypted) SQL> alter table oe.cust modify (CREDIT_LIMIT decrypt); SQL> alter table oe.cust move tablespace securespace; SQL> select owner||'.'||table_name as "Owner.Table" from dba_tables where tablespace_name='securespace';
3.10. $ cd $ORACLE_BASE/oradata/$ORACLE_SID
$ strings secure01.dbf 3.11. $ expdp system/temp123# TABLESPACES=ENC_TBS DIRECTORY=exp_dir
DUMPFILE=tablespace_exp_enc.dmp LOGFILE=tablespace_exp_enc.log ENCRYPTION=all ENCRYPTION_MODE=transparent
3.12. $ sqlplus system/temp123#
SQL> alter system set encryption wallet close identified by "hsm_partition_pwd"; SQL> drop table OE.CUSTOMERS; SQL> exit
3.13. $ impdp system/temp123# TABLESPACES=securespace DIRECTORY=exp_dir
DUMPFILE=tablespace_exp_enc.dmp LOGFILE=tablespace_exp_enc.log
This fails because the wallet is not open … 3.14. $ sqlplus system/temp123#
SQL> alter system set encryption wallet open identified by "hsm_partition_pwd"; To use multiple slots or partitions, the syntax to generate master key to a slot or partition, use the following syntax:
SQL> alter system set encryption key identified by "hsm_partition_pwd|<partition_name>";
18 © 2015 Gemalto/SafeNet, All rights reserved.
Oracle Database Integration Guide Chapter 4 Integrating Oracle Database 11g R2 (11.2.0.1) with Luna SA
SQL> exit;
3.15. $ impdp system/temp123# TABLESPACES=securespace DIRECTORY=exp_dir
DUMPFILE=tablespace_exp_enc.dmp LOGFILE=tablespace_exp_enc.log 4. Encrypt database backups with Recovery Manager (RMAN) 4.1. $ rman
RMAN> connect target sunultra-45/temp123#; RMAN> set encryption on; RMAN> backup as compressed backupset database;
If this fails with an error that the database cannot be in 'noarchivelog' mode, change this with:
RMAN> exit
4.2. $ sqlplus / as sysoper
SQL> shutdown immediate SQL> startup mount SQL> alter database archivelog; SQL> alter database open; SQL> exit
And try the command again: $ rman RMAN> connect target sunultra-45/temp123#; RMAN> set encryption on; RMAN> backup as compressed backupset database;
4.3. $ sqlplus / as sysoper
SQL> shutdown immediate SQL> startup mount; SQL> exit;
4.4. $ rman
RMAN> connect target sunultra-45/temp123#; RMAN> restore database;
This fails because the wallet is not open, and proves that Oracle can encrypt and compress backup files ; open the wallet and try again:
4.5. $ sqlplus / as sysoper
SQL> alter system set encryption wallet open identified by "hsm_partition_pwd";
To use multiple slots or partitions, the syntax to generate master key to a slot or partition, use the following syntax:
SQL> alter system set encryption key identified by "hsm_partition_pwd|<partition_name>";
SQL> exit;
4.6. $ rman
RMAN> connect target sunultra-45/temp123#; RMAN> restore database; RMAN> recover database; RMAN> exit
4.7. $ sqlplus / as sysoper
SQL> alter database open;
© 2015 Gemalto/SafeNet, All rights reserved. 19
Oracle Database Integration Guide Chapter 4 Integrating Oracle Database 11g R2 (11.2.0.1) with Luna SA
Generating Master Encryption Key directly onto the HSM
In order to generate a Master Encryption Key for HSM-Based Encryption, perform the following instructions:
It is assumed that no software or HSM based wallet is yet created.
1. Setting up Oracle to create Master Encryption Key onto HSM: Add the following to your $ORACLE_HOME\network\admin\sqlnet.ora – file:
ENCRYPTION_WALLET_LOCATION = (SOURCE = (METHOD = HSM)) 1.1. $ sqlplus
Connect to the database as 'system':
Password for ‘system’ can be set during Oracle installation.
1.2. Create an encryption wallet. The unified master encryption key would automatically be created onto the HSM. SQL> alter system set encryption key identified by “hsm_partition_pwd”; To use multiple slots or partitions, the syntax to generate master key to a slot or partition, use the following syntax: SQL> alter system set encryption key identified by "hsm_partition_pwd|<partition_name>";
1.3. Encrypt the 'credit_limit' column of the 'CUSTOMERS' table which is owned by the user 'OE':
SQL> alter table oe.customers modify (credit_limit encrypt using 'AES256' no salt 'nomac'); 1.4. With the next command, the values listed in the encrypted column are returned in clear text;
Transparent Data Encryption decrypts them automatically: SQL> select credit_limit from oe.customers where rownum <15;
1.5. The next command lists encrypted columns in your database:
SQL> select * from dba_encrypted_columns; 1.6. Finally, this view contains information about the wallet itself:
SQL> select * from v$encryption_wallet; 1.7. SQL> CREATE TABLESPACE securespace
DATAFILE ' /opt/oracle/app/oracle/oradata/ORCL/secure01.dbf' SIZE 10M ENCRYPTION using 'AES256' DEFAULT STORAGE (ENCRYPT);
1.8. Close the wallet: SQL> alter system set wallet close identified by “wallet_password”; SQL> exit
2. Encrypt export files with Oracle Data Pump
Export files are used to share data with external business partners, or to keep data safe during upgrades or other changes to the database. Since the export files are stored outside of the database, the access controls enforced by the database no longer apply, which explains the need to encrypt these files:
2.1. SQL> create directory exp_dir as '$ORACLE_BASE'; SQL> exit
20 © 2015 Gemalto/SafeNet, All rights reserved.
Oracle Database Integration Guide Chapter 4 Integrating Oracle Database 11g R2 (11.2.0.1) with Luna SA
2.2. $ expdp system/temp123# TABLES=oe.customers DIRECTORY=exp_dir
DUMPFILE=table_exp_clear.dmp LOGFILE=table_exp_clear.log ENCRYPTION=none
At the end of the export process, Data Pump will report an error, which is triggered by the warning about encrypted columns from the source table being exported in clear text.
2.3. $ sqlplus system/temp123#
SQL> drop table oe.customers; SQL> exit;
2.4. $ impdp system/temp123# TABLES=oe.customers DIRECTORY=exp_dir
DUMPFILE=table_exp_clear.dmp LOGFILE=table_exp_clear.log 2.5. $ sqlplus system/temp123#
SQL> desc oe.cust; (<- column is encrypted) SQL> exit
2.6. Create an encrypted export file:
$ expdp system/temp123# TABLES=oe.customers DIRECTORY=exp_dir DUMPFILE=table_exp_enc.dmp LOGFILE=table_exp_enc.log ENCRYPTION=encrypted_columns_only ENCRYPTION_PASSWORD=pwd_for_enc_exp_file
2.7. $ system/temp123#
SQL> alter system set encryption key identified by "hsm_partition_pwd"; To use multiple slots or partitions, the syntax to generate master key to a slot or partition, use the following syntax:
SQL> alter system set encryption key identified by "hsm_partition_pwd|<partition_name>"; SQL> drop table oe.cust; SQL> exit;
2.8. $ impdp system/temp123# TABLES=oe.customers DIRECTORY=exp_dir
DUMPFILE=table_exp_enc.dmp LOGFILE=table_exp_enc.log ENCRYPTION_PASSWORD=pwd_for_enc_exp_file
2.9. sqlplus system/temp123#
SQL> desc oe.cust; (<- column is encrypted) SQL> alter table oe.cust modify (CREDIT_LIMIT decrypt); SQL> alter table oe.cust move tablespace securespace; SQL> select owner||'.'||table_name as "Owner.Table" from dba_tables where tablespace_name='securespace';
2.10. $ cd $ORACLE_BASE/oradata/$ORACLE_SID
$ strings secure01.dbf 2.11. $ expdp system/temp123# TABLESPACES=ENC_TBS DIRECTORY=exp_dir
DUMPFILE=tablespace_exp_enc.dmp LOGFILE=tablespace_exp_enc.log ENCRYPTION=all ENCRYPTION_MODE=transparent COMPRESSION=all; Oracle Data Pump can compress and encrypt.
2.12. $ sqlplus system/temp123#
SQL> alter system set encryption wallet close identified by "hsm_partition_pwd"; SQL> drop table OE.CUSTOMERS; SQL> exit
2.13. $ impdp system/temp123# TABLESPACES=securespace DIRECTORY=exp_dir
DUMPFILE=tablespace_exp_enc.dmp LOGFILE=tablespace_exp_enc.log
© 2015 Gemalto/SafeNet, All rights reserved. 21
Oracle Database Integration Guide Chapter 4 Integrating Oracle Database 11g R2 (11.2.0.1) with Luna SA
This fails because the wallet is not open …
2.14. $ sqlplus system/temp123#
SQL> alter system set encryption wallet open identified by "hsm_partition_pwd"; To use multiple slots or partitions, the syntax to generate master key to a slot or partition, use the following syntax:
SQL> alter system set encryption key identified by "hsm_partition_pwd|<partition_name>"; SQL> exit;
2.15. $ impdp system/temp123# TABLESPACES=securespace DIRECTORY=exp_dir
DUMPFILE=tablespace_exp_enc.dmp LOGFILE=tablespace_exp_enc.log 3. Encrypt database backups with Recovery Manager (RMAN) 3.1. $ rman
RMAN> connect target sunultra-45/temp123#; RMAN> set encryption on; RMAN> backup as compressed backupset database; If this fails with an error that the database cannot be in 'noarchivelog' mode, change this with: RMAN> exit
3.2. $ sqlplus / as sysoper
SQL> shutdown immediate SQL> startup mount SQL> alter database archivelog; SQL> alter database open; SQL> exit
and try the command again.
3.3. $ sqlplus / as sysoper
SQL> shutdown immediate SQL> startup mount; SQL> exit;
3.4. $ rman
RMAN> connect target sunultra-45/temp123#; RMAN> restore database;
This fails because the wallet is not open, and proves that Oracle can encrypt and compress backup files; open the wallet and try again:
3.5. $ sqlplus / as sysoper
SQL> alter system set encryption wallet open identified by "hsm_partition_pwd"; To use multiple slots or partitions, the syntax to generate master key to a slot or partition, use the following syntax: SQL> alter system set encryption key identified by "hsm_partition_pwd|<partition_name>"; SQL> exit;
3.6. $ rman
RMAN> connect target sunultra-45/temp123#;
22 © 2015 Gemalto/SafeNet, All rights reserved.
Oracle Database Integration Guide Chapter 4 Integrating Oracle Database 11g R2 (11.2.0.1) with Luna SA
RMAN> restore database; RMAN> recover database; RMAN> exit
3.7. $ sqlplus / as sysoper
SQL> alter database open; Using SwingBench to simulate user load
Swingbench is a free tool that is usually used to simulate large user populations accessing Oracle Real Application Cluster (RAC) to tune their performance parameters.
Download it from http://www.dominicgiles.com/swingbench/swingbench230422.zip, then unzip it into $HOME/swingbench.
Navigate to $HOME/swingbench/sql and edit soecreatedatatablespace.sql to create an encrypted tablespace:
create tablespace &tablespace datafile '&datafile' size &tsize reuse autoextend on next 50m maxsize unlimited extent management local uniform size 100k segment space management auto nologging ENCRYPTION using 'AES256' default storage(encrypt);
Next, edit soecreateindextablespace.sql to create an encrypted index tablespace:
create tablespace &indextablespace datafile '&indexdatafile' size &itsize reuse autoextend on next 50m maxsize unlimited extent management local uniform size 100k segment space management auto nologging ENCRYPTION using 'AES256' default storage(encrypt);
Edit $HOME/swingbench/swingbench.env to reflect your local settings, for example:
export JAVAHOME=$ORACLE_HOME/jdk
Edit $HOME/swingbench/bin/oewizard.xml to reflect your local settings, for example the values for the parameters dbapassword, indexdatafile, datafile, and connect string.
The dbapassword throughout this document is ‘temp123#’; the data and index tablespace are both stored in $ORACLE_BASE/oradata/$ORACLE_SID/
The connect string has the following format:
‘//host/service_name’; both values can be retrieved with: $ tnsping $ORACLE_SID
Also, edit the connect string in $HOME/swingbench/bin/swingconfig.xml to the correct value.
To setup swingbench, run $SWINGHOME/bin/oewizard, which will guide you through the setup process and create the necessary database objects (encrypted tablespaces (will fail when the wallet is not open), tables, users, etc.)
Start the character-based version of SwingBench to keep the load on the system down:
$ cd swingbench/bin $ ./charbench -v users,tpm,tps –a –rt 0:02 –uc 15
This will start swingbench with 15 users, running for 2 minutes.
Automatic Wallet Management across Oracle RAC Instances
In order to use Transparent Data Encryption across Oracle Real Application Cluster (RAC) instances, you need to setup an Oracle RAC environment. For test purposes, a 2-node Oracle
© 2015 Gemalto/SafeNet, All rights reserved. 23
Oracle Database Integration Guide Chapter 4 Integrating Oracle Database 11g R2 (11.2.0.1) with Luna SA
RAC is setup. For a detailed installation procedure of Oracle Database 11g Release 2 RAC, please refer to the Oracle documentation.
In Oracle Databases before 11g Release 2, it was recommended to have each RAC instance accessing its own Oracle Wallet; the Oracle wallet should not be stored on shared media. After each master key re-key operation on the first instance, the wallet containing the old and the new master key needed to be copied to all other instances. Then, the wallet needed to be closed and opened on each instance, to make sure all instances load the new master encryption key into database memory. With Oracle Database 11g Release2, it is recommended to store the wallet on a shared disk that is accessible to all instances at instance startup time. Each instance needs an individual sqlnet.ora file, which points to the shared wallet location (Oracle wallet or HSM)
It is assumed that no software or HSM based wallet is yet created.
1. Setting up Oracle RAC to create Master Encryption Key onto HSM:
1.1. Configure Luna SA on both the nodes. Refer to Chapter 1. 1.2. Copy the Luna SA PKCS#11 library libshim.so to /opt/oracle/extapi/[32,64]/hsm/safenet/4.4.1 as
given above in the Chapter on both the nodes.
1.3. Add the following to your $ORACLE_HOME\network\admin\sqlnet.ora – file on both nodes: ENCRYPTION_WALLET_LOCATION = (SOURCE = (METHOD = HSM)(METHOD_DATA = (DIRECTORY = <path to the oracle wallet directory>)))
1.4. $ sqlplus
Connect to the database as 'system':
Password for ‘system’ can be set during Oracle installation. All dbapasswords throughout this document has been set to “temp123#”.
1.5. Create an encryption wallet. The master key would automatically be created onto the HSM. Login to any of the nodes, e.g. Node 1 and issue the command: SQL> alter system set encryption key identified by “hsm_partition_pwd”; To use multiple slots or partitions, the syntax to generate master key to a slot or partition, use the following syntax:
SQL> alter system set encryption key identified by "hsm_partition_pwd|<partition_name>";
1.6. Encrypt the 'credit_limit' column of the 'CUSTOMERS' table which is owned by the user 'OE':
SQL> alter table oe.customers modify (credit_limit encrypt); 1.7. With the next command, the values listed in the encrypted column are returned in clear text; Transparent Data Encryption decrypts them automatically:
SQL> select credit_limit from oe.customers where rownum <15;
1.8. The next command lists encrypted columns in your database: SQL> select * from dba_encrypted_columns;
1.9. Finally, this view contains information about the wallet itself:
SQL> select * from v$encryption_wallet; 1.10. SQL> CREATE TABLESPACE securespace
DATAFILE ' /opt/oracle/app/oracle/oradata/ORCL/secure01.dbf' SIZE 10M ENCRYPTION
24 © 2015 Gemalto/SafeNet, All rights reserved.

Oracle Database Integration Guide Chapter 4 Integrating Oracle Database 11g R2 (11.2.0.1) with Luna SA
DEFAULT STORAGE (ENCRYPT);
1.11. Close the wallet by issuing the command on Node 2: SQL> alter system set wallet close; SQL> exit
1.12 Repeat the above Step on Node 1. An error message is thrown as “Wallet not open”.
1.13 Now open the wallet by issuing the following command on Node 1: SQL> alter system set wallet open identified by “hsm_partition_password”;
1.14 Repeat the above step on Node 2. An error message is thrown as “Wallet already open”.
This way Automatic Wallet Management works on multiple Oracle RAC instances.
© 2015 Gemalto/SafeNet, All rights reserved. 25
Oracle Database Integration Guide Chapter 5 Integrating Oracle Database 11g R2 (11.2.0.2) with Luna SA
Chapter 5 Integrating Oracle Database 11g R2 (11.2.0.2) with Luna SA
Setting up Luna SA for Transparent Data Encryption
To set up Luna SA for Transparent Data Encryption, perform the following:
Copy the Luna SA PKCS#11 library to the specified directory structure to ensure that the database is able to find this library. Use the following directory structure:
/opt/oracle/extapi/[32,64]/hsm/{Vendor}/{Version}/libXX.ext (Linux/Solaris/AIX/ HPUX)
%SYSTEMDRIVE%\oracle\extapi\[32,64]\hsm\{Vendor}\{Version}\libXX.ext (Windows)
For example,
/opt/oracle/extapi/64/hsm/safenet/4.4.1/libshim.so (OEL 5 64-bit)
/opt/oracle/extapi/64/hsm/safenet/4.4.1/libshim.so (RHEL 5 64-bit)
/opt/oracle/extapi/64/hsm/safenet/4.4.1/libshim.so (or libCryptoki2.so) (AIX 6.1 64-bit)
/opt/oracle/extapi/64/hsm/safenet/4.4.1/libCryptoki2_64.so (HPUX 11.31 IA64 with 4.4.1)
/opt/oracle/extapi/64/hsm/safenet/5.0.0/libCryptoki2_64.so (HPUX 11.31 IA64 with
5.0)
/opt/oracle/extapi/64/hsm/safenet/4.4.1/ libCryptoki2_64.so (Solaris 10 SPARC 64-bit with 4.4.1)
/opt/oracle/extapi/64/hsm/safenet/5.0.0/ libCryptoki2_64.so (Solaris 10 SPARC 64-
bit with 5.0.0)
C:\oracle\extapi\64\hsm\safenet\5.1.0\cryptoki.dll (Windows 2008 R2 with 5.1.0)
C:\oracle\extapi\32\hsm\safenet\5.1.0\cryptoki.dll (Windows Server 2008
32-bit with 5.1.0)
/opt/oracle/extapi/64/hsm/safenet/5.1.1/libCryptoki2_64.so (AIX 7.1 64-bit with 5.5.1)
where,
[32, 64] specifies whether the supplied binary is 32-bits or 64-bits. Vendor stands for the name of the vendor supplying the library. Version refers to the version of the library. This should preferably be in a format:
number.number.number. The API name requires no special format. However, the XX must be prefixed with the word lib, as illustrated in the syntax. The extension, ext needs to be replaced by the extension of the library file.
26 © 2015 Gemalto/SafeNet, All rights reserved.
Oracle Database Integration Guide Chapter 5 Integrating Oracle Database 11g R2 (11.2.0.2) with Luna SA
Note: On HPUX we need to perform the following 2 steps:
1. Rename the libCryptoki2_64.sl to libCryptoki2_64.so at the following location:
/opt/oracle/extapi/64/hsm/safenet/4.4.1/ (For Luna SA 4.4.1) /opt/oracle/extapi/64/hsm/safenet/5.0.0/ (For Luna SA 5.0)
2. After this we need to export these values as given below
LD_PRELOAD="libCsup.so.1 libstd_v2.so.1" export LD_PRELOAD
Only one PKCS#11 library is supported at a time.
If you are using Luna SA v5.0 and above on Red Hat Enterprise Linux then you need to do the following changes in the /etc/Chrystoki.conf file:
• Provide the reference of libshim library in the Crystoki2 section. • Add the Shim2 section that refers the LibCryptoki file in the /usr/lunasa/lib folder.
Chrystoki2 = { LibUNIX=/opt/oracle/extapi/64/hsm/safenet/5.0.0/libshim.so; } Shim2 = { LibUNIX=/usr//lib/libCryptoki2.so; }
If using 64 bit client then LibUNIX must be replaced with LibUNIX64 and LibCryptoki2.so
would be LibCryptoki2_64.so
Oracle user should have the read/write permission of the above directory and file and after logged on as oracle you need to export the following variables to start/connect the database: export ORACLE_SID=orcl export ORACLE_BASE=/u01/app/oracle (oracle installation directory) export ORACLE_HOME=$ORACLE_BASE/product/11.2.0/dbhome_1 export PATH=$PATH:$ORACLE_HOME/bin export TNS_ADMIN=$ORACLE_HOME/network/admin
Generating a Master Encryption Key for HSM-Based Encryption
To start using HSM-based encryption, you need to have a master encryption key that will be stored inside the HSM. The master encryption key is used to encrypt or decrypt column encryption keys inside the HSM. HSM can be used in the following ways to protect the Master Encryption Key:
An existing Unified Master Encryption Key can be migrated onto the HSM. A Unified Master Encryption Key can be directly generated onto the HSM. Automatic wallet management across Oracle RAC instances.
Migrating Master Encryption Key onto the HSM
In order to migrate a Master Encryption Key for HSM-Based Encryption, perform the following instructions:
© 2015 Gemalto/SafeNet, All rights reserved. 27
Oracle Database Integration Guide Chapter 5 Integrating Oracle Database 11g R2 (11.2.0.2) with Luna SA
It is assumed that no software-based wallet is yet created in the directory you would specify to create one.
To test TDE with Luna SA HSM, perform the following: 1. Verify that the 'traditional' software-based wallet is working fine:
1.1. Add the following to your $ORACLE_HOME\network\admin\sqlnet.ora – file:
ENCRYPTION_WALLET_LOCATION = (SOURCE = (METHOD = FILE)(METHOD_DATA = (DIRECTORY = <path to the oracle wallet directory>)))
1.2. Start the database: $ sqlplus / as sysoper If the database is not yet started, you can start it using:
SQL> startup 1.3. Connect to the database as ‘system’:
SQL> connect system/<password>
Password for ‘system’ can be set during Oracle installation. All dbapasswords throughout this document has been set to “temp123#”.
1.4. Create an encryption wallet; the master key is added into it automatically; the double quotes are mandatory:
SQL> alter system set encryption key identified by “wallet_password”; “wallet_password” must contain alphanumeric characters and have length more than or
equal to 8 characters.
1.5. Encrypt the 'credit_limit' column of the 'CUSTOMERS' table which is owned by the user 'OE': SQL> alter table oe.customers modify (credit_limit encrypt);
1.6. With the next command, the values listed in the encrypted column are returned in clear text;
Transparent Data Encryption decrypts them automatically: SQL> select credit_limit from oe.customers where rownum <15;
1.7. The next command lists encrypted columns in your database:
SQL> select * from dba_encrypted_columns;
1.8. Finally, this view contains information about the wallet itself: SQL> select * from v$encryption_wallet;
1.9. Create an encrypted tablespace: SQL> CREATE TABLESPACE securespace DATAFILE '/opt/oracle/app/oracle/oradata/ORCL/secure01.dbf' SIZE 10M ENCRYPTION DEFAULT STORAGE (ENCRYPT);
1.10. Close the wallet: SQL> alter system set wallet close identified by “wallet_password”; SQL> exit
2. Test if the database can reach the HSM device:
28 © 2015 Gemalto/SafeNet, All rights reserved.
Oracle Database Integration Guide Chapter 5 Integrating Oracle Database 11g R2 (11.2.0.2) with Luna SA
2.1. Change your $ORACLE_HOME\network\admin\sqlnet.ora – file: ENCRYPTION_WALLET_LOCATION =(SOURCE = (METHOD = HSM)(METHOD_DATA = (DIRECTORY = <path to the oracle wallet directory>)))
2.2. $ sqlplus Connect to the database as 'system':
2.3. Migrate the wallet onto the HSM device:
SQL> alter system set encryption key identified by “hsm_partition_pwd” migrate using “wallet_password; “hsm_partition_pwd” is the password for the HSM partition where the Master Encryption Key would be generated. The master key in the HSM device will not be used by encrypted tablespaces; these rely on the software wallet created in step 1. The 'migrate using “wallet_password”' string re-encrypts the Transparent Data Encryption column keys with the new HSM based master key. The “wallet_password” is the password given the software wallet in step 1.
2.4. With the next command, the values listed in the encrypted column are returned in clear text; Transparent Data Encryption decrypts them automatically, now using the HSM master key: SQL> select credit_limit from oe.customers where rownum <15;
2.5. Close the wallet: SQL> alter system set wallet close identified by “wallet_password”; SQL> exit
2.6. Start Oracle Wallet Manager from Start Menu:
2.7. Open the software-based wallet and click on 'Change Password'; use the same string you used
for the HSM wallet as the new password for the software based wallet in the form “hsm_partition_pwd”; click on “Save”, then “Exit”.
2.8. $ sqlplus Connect to the database as 'system': SQL> alter system set wallet open identified by “hsm_partition_pwd”
This opens both the HSM and the software wallet. 2.9. Close the wallet:
SQL> alter system set wallet close identified by “wallet_password”; SQL> exit
2.10. Start Oracle Wallet Manager from Start Menu:
2.11. Open the software-based wallet, change the password back to the initial password, check
'Auto- Login'; click on 'Save', then 'Exit'
2.12. Verify that an auto-open software wallet has been created in the oracle wallet directory you specified in the sqlnet.ora file: You will find two wallets in this directory: “ewallet.p12” and “cwallet.sso”; the latter is the auto-open wallet; rename the encryption wallet: $ < path to the oracle wallet directory >rename ewallet.p12 ewallet.p24 so that Transparent Data Encryption does not try to open it.
2.13. Connect to the database as system and open the HSM wallet (the software is already open): SQL> alter system set wallet open identified by “hsm_partition_pwd”;
© 2015 Gemalto/SafeNet, All rights reserved. 29
Oracle Database Integration Guide Chapter 5 Integrating Oracle Database 11g R2 (11.2.0.2) with Luna SA
Generating Master Encryption Key directly onto the HSM In order to generate a Master Encryption Key for HSM-Based Encryption, perform the following instructions: It is assumed that no software or HSM based wallet is yet created.
1. Setting up Oracle to create Master Encryption Key onto HSM:
1.1. Add the following to your $ORACLE_HOME\network\admin\sqlnet.ora – file: ENCRYPTION_WALLET_LOCATION =(SOURCE = (METHOD = HSM)(METHOD_DATA = (DIRECTORY = <path to the oracle wallet directory>)))
1.2. Start the database:
$ sqlplus / as sysoper If the database is not yet started, you can start it using: SQL> startup
1.3. Connect to the database as ‘system’:
SQL> connect system/<password>
Password for ‘system’ can be set during Oracle installation. All dbapasswords throughout this document has been set to “temp123#”.
1.4. Create an encryption wallet. The master key would automatically be created onto the HSM. SQL> alter system set encryption key identified by “hsm_partition_pwd”;
To use multiple slots or partitions, the syntax to generate master key to a slot or partition, use the following syntax: SQL> alter system set encryption key identified by "hsm_partition_pwd|<partition_name>";
1.5. Encrypt the 'credit_limit' column of the 'CUSTOMERS' table which is owned by the user 'OE':
SQL> alter table oe.customers modify (credit_limit encrypt); 1.6. With the next command, the values listed in the encrypted column are returned in clear text;
Transparent Data Encryption decrypts them automatically: SQL> select credit_limit from oe.customers where rownum <15;
1.7. The next command lists encrypted columns in your database:
SQL> select * from dba_encrypted_columns; 1.8. Finally, this view contains information about the wallet itself:
SQL> select * from v$encryption_wallet;
1.9. Create an encrypted tablespace: SQL> CREATE TABLESPACE securespace DATAFILE '/opt/oracle/app/oracle/oradata/ORCL/secure01.dbf' SIZE 10M ENCRYPTION DEFAULT STORAGE (ENCRYPT);
1.10. Close the wallet: SQL> alter system set wallet close identified by “wallet_password”; SQL> exit
30 © 2015 Gemalto/SafeNet, All rights reserved.

Oracle Database Integration Guide Chapter 6 Integrating Oracle Database 11g R2 (11.2.0.3/11.2.0.4) with Luna SA/Luna PCI
Chapter 6 Integrating Oracle Database 11g R2 (11.2.0.3/11.2.0.4) with Luna SA/Luna PCI
Setting up Luna SA and Luna PCI for Transparent Data Encryption
To set up Luna SA/Luna PCI for Transparent Data Encryption, perform the following:
Oracle requires the PKSC#11 library provided by HSM vendor. Copy the Luna SA PKCS#11 library to the specified directory structure recommended by Oracle to ensure that the database is able to find this library. Use the following directory structures for UNIX and Windows respectively: /opt/oracle/extapi/[32,64]/hsm/{VENDOR}/{VERSION}/libapiname.ext %SYSTEM_DRIVE%\oracle\extapi\[32,64]\hsm\{VENDOR}\{VERSION}\libapiname.ext
For example,
/opt/oracle/extapi/64/hsm/safenet/5.1.0/libshim.so (Linux) /opt/oracle/extapi/64/hsm/safenet/5.1.0/libCryptoki2_64.so (Solaris/AIX/HPUX)
Note: Rename the libCryptoki2_64.sl to libCryptoki2_64.so on HPUX. where,
[32,64] specifies whether the supplied binary is 32-bits or 64-bits VENDOR stands for the name of the vendor supplying the library VERSION refers to the version of the library. This should preferably be in a format, number.number.number apiname requires no special format. However, the apiname must be prefixed with the word lib, as illustrated in the syntax. .ext needs to be replaced by the extension of the library file. This extension is .so on Unix.
Only one PKCS#11 library is supported at a time. Oracle user should have the read/write
permission of the above directory.
If you are using Luna SA v5.0 and above or Luna PCI 5.0 on Red Hat Enterprise Linux or Oracle Linux then you need to do the following changes in the /etc/Chrystoki.conf file:
• Provide the reference of libshim library in the Crystoki2 section. • Add the Shim2 section that refers the LibCryptoki file in the /usr/lunasa/lib folder.
Chrystoki2 = { LibUNIX64=/opt/oracle/extapi/64/hsm/safenet/5.0.0/libshim.so; } Shim2 = { LibUNIX64=/usr/lib/libCryptoki2_64.so; }
If using 32 bit client then LibUNIX64 must be replaced with LibUNIX and LibCryptoki2_64.so
would be LibCryptoki2.so
© 2015 Gemalto/SafeNet, All rights reserved. 31
Oracle Database Integration Guide Chapter 6 Integrating Oracle Database 11g R2 (11.2.0.3/11.2.0.4) with Luna SA/Luna PCI
Oracle user should have the read/write permission of the above directory and file and after logged on as oracle you need to export the following variables to start/connect the database:
export ORACLE_SID=orcl export ORACLE_BASE=/u01/app/oracle (oracle installation directory) export ORACLE_HOME=$ORACLE_BASE/product/11.2.0/dbhome_1 export PATH=$PATH:$ORACLE_HOME/bin export TNS_ADMIN=$ORACLE_HOME/network/admin
Generating a Master Encryption Key for HSM-Based Encryption
To start using HSM-based encryption, you need to have a master encryption key that will be stored inside the HSM. The master encryption key is used to encrypt or decrypt column encryption keys inside the HSM. HSM can be used in the following ways to protect the Master Encryption Key:
An existing Unified Master Encryption Key can be migrated onto the HSM. A Unified Master Encryption Key can be directly generated onto the HSM. Automatic wallet management across Oracle RAC instances.
Migrating Master Encryption Key onto the HSM
In order to migrate a Master Encryption Key for HSM-Based Encryption, perform the following instructions:
It is assumed that no software-based wallet is yet created in the directory you would specify
to create one.
To test TDE with Luna SA HSM, perform the following:
1. Verify that the 'traditional' software-based wallet is working fine:
1.1. Add the following to your $ORACLE_HOME\network\admin\sqlnet.ora – file: ENCRYPTION_WALLET_LOCATION = (SOURCE = (METHOD = FILE)(METHOD_DATA = (DIRECTORY = <path to the oracle wallet directory>)))
1.2. Start the database: $ sqlplus / as sysoper If the database is not yet started, you can start it using:
SQL> startup 1.3. Connect to the database as ‘system’: SQL> connect system/<password>
Password for ‘system’ can be set during Oracle installation. All dbapasswords throughout
this document has been set to “temp123#”.
1.4. Create an encryption wallet; the master key is added into it automatically; the double quotes are mandatory:
SQL> alter system set encryption key identified by “wallet_password”; “wallet_password” must contain alphanumeric characters and have length more than or
equal to 8 characters.
1.5. Encrypt the 'credit_limit' column of the 'CUSTOMERS' table which is owned by the user 'OE': SQL> alter table oe.customers modify (credit_limit encrypt);
32 © 2015 Gemalto/SafeNet, All rights reserved.
Oracle Database Integration Guide Chapter 6 Integrating Oracle Database 11g R2 (11.2.0.3/11.2.0.4) with Luna SA/Luna PCI
1.6. With the next command, the values listed in the encrypted column are returned in clear text;
Transparent Data Encryption decrypts them automatically: SQL> select credit_limit from oe.customers where rownum <15;
1.7. The next command lists encrypted columns in your database:
SQL> select * from dba_encrypted_columns;
1.8. Finally, this view contains information about the wallet itself: SQL> select * from v$encryption_wallet;
1.9. Create an encrypted tablespace: SQL> CREATE TABLESPACE securespace DATAFILE '/u01/app/oracle/oradata/orcl/secure01.dbf' SIZE 10M ENCRYPTION DEFAULT STORAGE (ENCRYPT);
1.10. Create a table in the tablespace: SQL> create table employee (id number(5), name varchar(42), salary number(10)) TABLESPACE securespace;
1.11. Insert some values in employee table: SQL> Insert into employee values (001,'JOHN SMITH',10000); SQL> Insert into employee values (002,'SCOTT TIGER',20000); SQL> Insert into employee values (003,'DIANA HAYDEN',50000);
1.12. Display the contents of the EMPLOYEE table with the following command: SQL> select * from employee;
1.13. Close the wallet: SQL> alter system set encryption wallet close identified by “wallet_password”;
1.14. After closing the wallet execute the command to display the contents again: SQL> select * from employee;
You will get the following error that means you cannot list the contents of EMPLOYEE table, if wallet is closed.
ERROR at line 1: ORA-28365: wallet is not open
2. Test if the database can reach the HSM device:
2.1. Change your $ORACLE_HOME\network\admin\sqlnet.ora – file:
ENCRYPTION_WALLET_LOCATION = (SOURCE = (METHOD = HSM) (METHOD_DATA = (DIRECTORY = <path to the oracle wallet directory>)))
2.2. $ sqlplus Connect to the database as 'system':
2.3. Migrate the wallet onto the HSM device:
SQL> alter system set encryption key identified by “hsm_partition_pwd” migrate using “wallet_password;
“hsm_partition_pwd” is the password for the HSM partition where the Master Encryption Key would be generated. The master key in the HSM device will not be used by encrypted tablespaces; these rely on the software wallet created in step 1. The 'migrate using “wallet_password”' string re-encrypts the Transparent Data Encryption column keys with the new HSM based master key. The “wallet_password” is the password given the software wallet in step 1.
© 2015 Gemalto/SafeNet, All rights reserved. 33
Oracle Database Integration Guide Chapter 6 Integrating Oracle Database 11g R2 (11.2.0.3/11.2.0.4) with Luna SA/Luna PCI
2.4. With the next command, the values listed in the encrypted column are returned in clear text; Transparent Data Encryption decrypts them automatically, now using the HSM master key: SQL> select credit_limit from oe.customers where rownum <15;
2.5. Close the wallet: SQL> alter system set encryption wallet close identified by “wallet_password”; SQL> exit
2.6. Change the software wallet password to HSM partition password.
# orapki wallet change_pwd -wallet [wallet_location/ewallet.p12] -oldpwd <software wallet password > -newpwd <HSM partition password> When the password for both wallet and HSM partition will be same then both wallets will open/close by executing a single command.
2.7. $ sqlplus Connect to the database as 'system': SQL> alter system set encryption wallet open identified by “hsm_partition_pwd”
This opens both the HSM and the software wallet. 2.8. Check the wallet information with the following command:
SQL> Select * from v$encryption_wallet; 2.9. Close the wallet:
SQL> alter system set encryption wallet close identified by “hsm_partition_pwd”; SQL> exit
2.10. Change the password (if you wish to) back to the initial password for software based wallet
using orapki and create an auto-login software based wallet. # cd <path to the oracle wallet directory> # orapki wallet create -wallet . -auto_login When prompt for a password, enter the wallet_password. To use the auto-login wallet only on local system use auto_login_local instead of auto_login.
2.11. Verify that an auto-open software wallet has been created in the oracle wallet directory you specified in the sqlnet.ora file: You will find two wallets in this directory: “ewallet.p12” and “cwallet.sso”; the latter is the auto-open wallet; rename the encryption wallet: $ < path to the oracle wallet directory >rename ewallet.p12 ewallet.p24 so that Transparent Data Encryption does not try to open it. By default oracle opens the encryption wallet first and if it is not there then auto wallet will be selected.
2.12. Connect to the database as system and open the HSM wallet (the software is already open): SQL> alter system set encryption wallet open identified by “hsm_partition_pwd”; Generating Master Encryption Key directly onto the HSM
In order to generate a Master Encryption Key for HSM-Based Encryption, perform the following instructions:
It is assumed that no software or HSM based wallet is yet created.
1. Setting up Oracle to create Master Encryption Key onto HSM: 1.1. Add the following to your $ORACLE_HOME\network\admin\sqlnet.ora – file:
ENCRYPTION_WALLET_LOCATION = (SOURCE = (METHOD = HSM))
34 © 2015 Gemalto/SafeNet, All rights reserved.

Oracle Database Integration Guide Chapter 6 Integrating Oracle Database 11g R2 (11.2.0.3/11.2.0.4) with Luna SA/Luna PCI
1.2. Start the database: $ sqlplus / as sysoper If the database is not yet started, you can start it using: SQL> startup
1.3. Connect to the database as ‘system’:
SQL> connect system/<password>
Password for ‘system’ can be set during Oracle installation. All dbapasswords throughout this document has been set to “temp123#”.
1.4. Create an encryption wallet. The master key would automatically be created onto the HSM. SQL> alter system set encryption key identified by “hsm_partition_pwd”;
To use multiple slots or partitions, the syntax to generate master key to a slot or partition, use the following syntax: SQL> alter system set encryption key identified by "hsm_partition_pwd|<partition_name>"; Above command will be used when you have registered multiple SA partitions and want to
choose a particular one partition.
1.5. Encrypt the 'credit_limit' column of the 'CUSTOMERS' table which is owned by the user 'OE': SQL> alter table oe.customers modify (credit_limit encrypt);
1.6. With the next command, the values listed in the encrypted column are returned in clear text;
Transparent Data Encryption decrypts them automatically: SQL> select credit_limit from oe.customers where rownum <15;
1.7. The next command lists encrypted columns in your database:
SQL> select * from dba_encrypted_columns; 1.8. Finally, this view contains information about the wallet itself:
SQL> select * from v$encryption_wallet;
1.9. Create an encrypted tablespace: SQL> CREATE TABLESPACE securespace DATAFILE '/u01/app/oracle/oradata/orcl/secure01.dbf' SIZE 10M ENCRYPTION DEFAULT STORAGE (ENCRYPT);
1.10. Create a table in the tablespace:
SQL> create table employee (id number(5), name varchar(42), salary number(10)) TABLESPACE securespace;
1.11. Insert some values in employee table: SQL> Insert into employee values (001,'JOHN SMITH',10000); SQL> Insert into employee values (002,'SCOTT TIGER',20000); SQL> Insert into employee values (003,'DIANA HAYDEN',50000);
1.12. Display the contents of the EMPLOYEE table with the following command: SQL> select * from employee;
1.13. Close the wallet: SQL> alter system set encryption wallet close identified by “hsm_partition_pwd”;
1.14. After closing the wallet execute the command to display the contents again:
SQL> select * from employee;
© 2015 Gemalto/SafeNet, All rights reserved. 35
Oracle Database Integration Guide Chapter 6 Integrating Oracle Database 11g R2 (11.2.0.3/11.2.0.4) with Luna SA/Luna PCI
You will get the following error that means you cannot list the contents of EMPLOYEE table, if wallet is closed.
ERROR at line 1: ORA-28365: wallet is not open
1.15. Open the wallet: SQL> alter system set encryption wallet open identified by “hsm_partition_pwd”;
2. Setting up Oracle to create Auto-open HSM:
2.1 When TDE is used in ‘HSM only’ mode (never migrated from an Oracle Wallet):
a. The current entry in sqlnet.ora:
ENCRYPTION_WALLET_LOCATION = (SOURCE = (METHOD = HSM)) Needs to be changed to:
ENCRYPTION_WALLET_LOCATION = (SOURCE = (METHOD = HSM) (METHOD_DATA = (DIRECTORY = /etc/ORACLE/WALLETS/$ORACLE_SID)))
b. Create a (local) auto-open and encryption wallet in /etc/ORACLE/WALLETS/$ORACLE_SID:
# orapki wallet create -wallet . -auto_login[_local] When prompt for a password provide a paasword of at least 8 characters. It will be your software wallet password. Remember it for future use. Note: If you want to use that auto login wallet on the local system only then use -auto_login_local
c. Add the following entry to the empty wallets to enable an ‘auto-open’ HSM: # mkstore -wrl . -createEntry ORACLE.TDE.HSM.AUTOLOGIN <any-non-empty-string> Note: <any-non-empty-string> could be any string and it is used only one time e.g. HDJHEUI3256363
d. Oracle opens the encryption wallet first and if not present then auto wallet. Rename the encryption wallet (ewallet.p12) or move it out of the ‘ENCRYPTION_WALLET_LOCATION’ defined in ‘sqlnet.ora’ to a secure location; do not delete the encryption wallet and do not forget the wallet password.
e. Close the connection to the HSM with
SQL> alter system set encryption wallet close identified by “Partition_password”; and open it one last time with SQL> alter system set encryption wallet open identified by “Partition_password”;
This will insert “Partition_password” into the auto-open wallet; from now on, no password is required to access encrypted data with the TDE master encryption key stored in an HSM.
2.2 When TDE was never used before (you are using the TDE first time and want to create HSM auto login):
a. Create a new entry in sqlnet.ora:
36 © 2015 Gemalto/SafeNet, All rights reserved.
Oracle Database Integration Guide Chapter 6 Integrating Oracle Database 11g R2 (11.2.0.3/11.2.0.4) with Luna SA/Luna PCI
ENCRYPTION_WALLET_LOCATION = (SOURCE = (METHOD = HSM) (METHOD_DATA = (DIRECTORY = /etc/ORACLE/WALLETS/$ORACLE_SID)))
b. Create a (local) auto-open and encryption wallet in /etc/ORACLE/WALLETS/$ORACLE_SID:
# orapki wallet create -wallet . -auto_login[_local] When prompt for a password provide a paasword of at least 8 characters. It will be your software wallet password. Remember it for future use. Note: If you want to use that auto login wallet on the local system only then use -auto_login_local
c. Add the following entry to the empty wallets to enable an ‘auto-open HSM’: # mkstore -wrl . -createEntry ORACLE.TDE.HSM.AUTOLOGIN <any-non-empty-string>
Note: <any-non-empty-string> could be any string and it is used only one time e.g. HDJHEUI3256363
d. Oracle opens the encryption wallet first and if not present then auto wallet.Rename the encryption wallet (ewallet.p12) or move it out of the ‘ENCRYPTION_WALLET_LOCATION’ defined in ‘sqlnet.ora’ to a secure location; do not delete the encryption wallet and do not forget the wallet password.
e. Create a TDE master encryption key inside the HSM:
SQL> alter system set encryption key identified by “Partition_password”;
This will insert “Partition_password” into the auto-open wallet; from now on, no password is required to access encrypted data with the TDE master encryption key stored in an HSM.
2.3 When an HSM and an encryption wallet is in use:
At the end of a prior migration from Oracle Wallet to HSM, the wallet password was changed to the “Partition_password”; sqlnet.ora contains the following entry:
a. ENCRYPTION_WALLET_LOCATION = (SOURCE = (METHOD = HSM) (METHOD_DATA = (DIRECTORY = /etc/ORACLE/WALLETS/$ORACLE_SID)))
b. An auto-open HSM requires the wallet to be a (local) auto-open wallet as well; this (local) auto-open wallet will contain the TDE master key from the encryption wallet and the auto-open string for the HSM.
Create an auto-open wallet from the encryption wallet: # orapki wallet create -wallet . -auto_login[_local]
c. Continue at 4.c.)
2.4 When an HSM and a (local) auto-open wallet is in use:
a. At the end of a prior migration from Oracle Wallet to HSM, the wallet password was not changed
to the “Partition_password”; a (local) auto-open wallet is used instead and the encryption wallet was either renamed or removed from the “ENCRYPTION_WALLET_LOCATION”; sqlnet.ora contains the following entry: ENCRYPTION_WALLET_LOCATION = (SOURCE = (METHOD = HSM) (METHOD_DATA = (DIRECTORY = /etc/ORACLE/WALLETS/$ORACLE_SID)))
© 2015 Gemalto/SafeNet, All rights reserved. 37
Oracle Database Integration Guide Chapter 6 Integrating Oracle Database 11g R2 (11.2.0.3/11.2.0.4) with Luna SA/Luna PCI
b. Restore the encryption wallet from its secure location or rename it back to the original file name ewallet.p12
c. Add the following entry to the wallets to enable an ‘auto-open HSM’, applying the wallet password for the encryption wallet:
# mkstore -wrl . -createEntry ORACLE.TDE.HSM.AUTOLOGIN <any-non-empty-string>
d. Rename the encryption wallet or move it out of the ENCRYPTION_WALLET_LOCATION defined in sqlnet.ora, do not delete the encryption wallet and do not forget the wallet password.
e. Close the connection to the HSM with
SQL> alter system set encryption wallet close identified by “Partition_password”; and open it one last time with SQL> alter system set encryption wallet open identified by “Partition_password”;
This will automatically insert “Partition_password” into the auto-open wallet. From now on, no password is required to access encrypted data with the TDE master encryption key stored in an HSM.
2.5 When only an encryption wallet is in use (no HSM):
a. sqlnet.ora contains this entry: ENCRYPTION_WALLET_LOCATION = (SOURCE = (METHOD = FILE) (METHOD_DATA = (DIRECTORY = /etc/ORACLE/WALLETS/$ORACLE_SID)))
b. An auto-open HSM requires the wallet to be a (local) auto-open wallet as well; this (local) auto-open wallet will contain the TDE master key from the encryption wallet and the auto-open string for the HSM. Create an auto-open wallet from the encryption wallet:
# orapki wallet create –wallet . -auto_login[_local]
c. Continue at 6.b.)
2.6 When a (local) auto-open wallet is in use:
a. Add the following entry to the wallets to enable an ‘auto-open HSM’: # mkstore -wrl . -createEntry ORACLE.TDE.HSM.AUTOLOGIN <any-non-empty-string>
b. Change the entry in sqlnet.ora to:
ENCRYPTION_WALLET_LOCATION = (SOURCE = (METHOD = HSM) (METHOD_DATA = (DIRECTORY = /etc/ORACLE/WALLETS/$ORACLE_SID)))
c. Migrate the TDE column encryption master key from wallet to HSM with:
SQL> alter system set encryption key identified by “Partition_password” migrate using “wallet_password”; This will insert “Partition_password” into the auto-open wallet. From now on, no password is required to access encrypted data with the TDE master encryption key stored in an HSM.
d. Rename the encryption wallet or move it out of the ENCRYPTION_WALLET_LOCATION defined in sqlnet.ora; do not delete the encryption wallet and do not forget the wallet password.
38 © 2015 Gemalto/SafeNet, All rights reserved.
Oracle Database Integration Guide Chapter 7 Integrating Multiple Oracle Database 11g R2 (11.2.0.3) with Luna SA
Chapter 7 Integrating Multiple Oracle Database 11g R2 (11.2.0.3) with Luna SA
Setting up Luna SA for Transparent Data Encryption
Oracle supports one wallet for each database, so you need to register the multiple partitions
for multiple databases (one for each database instance) on a server hosting oracle database.
To set up Luna SA for Transparent Data Encryption for multiple databases, perform the following:
Oracle requires the PKSC#11 library provided by HSM vendor. Copy the Luna SA PKCS#11 library to the specified directory structure recommended by Oracle to ensure that the database is able to find this library. Use the following directory structures for UNIX and Windows respectively: /opt/oracle/extapi/[32,64]/hsm/{VENDOR}/{VERSION}/libapiname.ext %SYSTEM_DRIVE%\oracle\extapi\[32,64]\hsm\{VENDOR}\{VERSION}\libapiname.ext Here: [32,64] specifies whether the supplied binary is 32-bits or 64-bits VENDOR stands for the name of the vendor supplying the library VERSION refers to the version of the library. This should preferably be in a format, number.number.number apiname requires no special format. However, the apiname must be prefixed with the word lib, as illustrated in the syntax. .ext needs to be replaced by the extension of the library file. This extension is .so on Unix.
Only one PKCS#11 library is supported at a time. Oracle user should have the read/write
permission of the above directory.
For example, /opt/oracle/extapi/64/hsm/safenet/5.4.0/libshim.so (Linux)
© 2015 Gemalto/SafeNet, All rights reserved. 39
Oracle Database Integration Guide Chapter 7 Integrating Multiple Oracle Database 11g R2 (11.2.0.3) with Luna SA
If you are using Luna SA v5.0 and above on Red Hat Enterprise Linux or Oracle Linux then you need to do the following changes in the /etc/Chrystoki.conf file:
• Provide the reference of libshim library in the Crystoki2 section. • Add the Shim2 section that refers the LibCryptoki library.
For Example: 64 bit Client: Chrystoki2 = { LibUNIX64=/opt/oracle/extapi/64/hsm/safenet/5.4.0/libshim.so; } Shim2 = { LibUNIX64=/usr/lib/libCryptoki2_64.so; } 32 bit Client: Chrystoki2 = { LibUNIX=/opt/oracle/extapi/64/hsm/safenet/5.4.0/libshim.so; } Shim2 = { LibUNIX=/usr/lib/libCryptoki2.so; } Logged on as oracle user and export the following variables: export ORACLE_SID=sales export ORACLE_BASE=/u01/app/oracle (oracle installation directory) export ORACLE_HOME=$ORACLE_BASE/product/11.2.0/dbhome_1 export PATH=$PATH:$ORACLE_HOME/bin export TNS_ADMIN=$ORACLE_HOME/network/admin Here: ORACLE_SID (Oracle System Identifier) is the name of unique identifier that you have set while configuring the database which is uniquely identified the database from other instance running on same computer. In this guide we have configured two database instances with SID named SALES and ENGG that are running on port 1521 and 1526 respectively.
40 © 2015 Gemalto/SafeNet, All rights reserved.
Oracle Database Integration Guide Chapter 7 Integrating Multiple Oracle Database 11g R2 (11.2.0.3) with Luna SA
Generating a Master Encryption Key for HSM-Based Encryption
To start using HSM-based encryption, you need to have a TDE master key that will be stored inside the HSM. This TDE master encryption key is used to encrypt the table key and tablespace encryption key, which in turn is used to encrypt and decrypt data in the table column and tablespace respectively.
HSM can be used in the following ways to protect the Master Encryption Key:
An existing Unified Master Encryption Key can be migrated onto the HSM. A Unified Master Encryption Key can be directly generated onto the HSM. Automatic wallet management across Oracle RAC instances. to setup Oracle Database RAC with Luna HSM refer the Oracle Database RAC Integration
guide.
Migrating Master Encryption Key onto the HSM In order to migrate a Master Encryption Key for HSM-Based Encryption, perform the following instructions: It is assumed that no software-based wallet is created.
To test TDE with Luna SA HSM, perform the following:
1. Verify that the 'traditional' software-based wallet is working fine:
1.1. Add the following to your $ORACLE_HOME/network/admin/sqlnet.ora – file: ENCRYPTION_WALLET_LOCATION = (SOURCE = (METHOD = FILE)(METHOD_DATA = (DIRECTORY = /etc/oracle/wallet/$ORACLE_SID)))
Make sure that directory location is exist and oracle user has read/write permission to the
above directory.
1.2. Start the database: $ sqlplus / as sysoper If the database is not yet started, you can start it using:
SQL> startup 1.3. Connect to the database as ‘system’: SQL> connect system/<password>
Password for ‘system’ can be set during Oracle installation. All dbapasswords throughout
this document has been set to “temp123#”.
1.4. Create an encryption wallet; the master key is added into it automatically; the double quotes are mandatory: SQL> alter system set encryption key identified by “wallet_password”;
“wallet_password” must contain alphanumeric characters and have length more than or
equal to 8 characters.
1.5. Encrypt the 'credit_limit' column of the 'CUSTOMERS' table which is owned by the user 'OE': SQL> alter table oe.customers modify (credit_limit encrypt);
© 2015 Gemalto/SafeNet, All rights reserved. 41
Oracle Database Integration Guide Chapter 7 Integrating Multiple Oracle Database 11g R2 (11.2.0.3) with Luna SA
1.6. With the next command, the values listed in the encrypted column are returned in clear text; Transparent Data Encryption decrypts them automatically: SQL> select credit_limit from oe.customers where rownum <15;
1.7. The next command lists encrypted columns in your database:
SQL> select * from dba_encrypted_columns;
1.8. Finally, this view contains information about the wallet itself: SQL> select * from v$encryption_wallet;
1.9. Create an encrypted tablespace: SQL> CREATE TABLESPACE securespace DATAFILE '/u01/app/oracle/oradata/sales/secure01.dbf' SIZE 10M ENCRYPTION DEFAULT STORAGE (ENCRYPT);
1.10. Create a table in the tablespace: SQL> create table employee (id number(5), name varchar(42), salary number(10)) TABLESPACE securespace;
1.11. Insert some values in employee table: SQL> Insert into employee values (001,'JOHN SMITH',10000); SQL> Insert into employee values (002,'SCOTT TIGER',20000); SQL> Insert into employee values (003,'DIANA HAYDEN',50000);
1.12. Display the contents of the EMPLOYEE table with the following command: SQL> select * from employee;
1.13. Close the wallet: SQL> alter system set encryption wallet close identified by “wallet_password”;
1.14. After closing the wallet execute the command to display the contents again: SQL> select * from employee;
You will get the following error that means you cannot list the contents of EMPLOYEE table, if wallet is closed.
ERROR at line 1: ORA-28365: wallet is not open
1.15. Now logged on as oracle user in another console and export the following:
export ORACLE_SID=engg export ORACLE_BASE=/u01/app/oracle (oracle installation directory) export ORACLE_HOME=$ORACLE_BASE/product/11.2.0/dbhome_1 export PATH=$PATH:$ORACLE_HOME/bin export TNS_ADMIN=$ORACLE_HOME/network/admin Execute the above steps to another database and verify that software wallet ewallet.p12 file is created for both databases in the following directory: /etc/oracle/wallet/sales/ /etc/oracle/wallet/engg/
2. Test if the database can reach the HSM device:
2.1. Change your $ORACLE_HOME\network\admin\sqlnet.ora – file:
ENCRYPTION_WALLET_LOCATION = (SOURCE = (METHOD = HSM) (METHOD_DATA = (DIRECTORY = /etc/oracle/wallet/$ORACLE_SID)))
2.2. Start the database:
$ sqlplus / as sysoper
42 © 2015 Gemalto/SafeNet, All rights reserved.

Oracle Database Integration Guide Chapter 7 Integrating Multiple Oracle Database 11g R2 (11.2.0.3) with Luna SA
2.3. Connect to the database as 'system': SQL> connect system/<password>
2.4. Migrate the wallet onto the HSM device: SQL> alter system set encryption key identified by “hsm_partition_pwd|partition_name” migrate using “wallet_password;
“hsm_partition_pwd” is the password for the HSM partition and partition_name is the partition label where the Master Encryption Key would be generated. The master key in the HSM device will not be used by encrypted tablespaces; these rely on the software wallet created in step 1. The 'migrate using “wallet_password”' string re-encrypts the Transparent Data Encryption column keys with the new HSM based master key. The “wallet_password” is the password given the software wallet in step 1.4.
2.5. With the next command, the values listed in the encrypted column are returned in clear text; Transparent Data Encryption decrypts them automatically, now using the HSM master key: SQL> select credit_limit from oe.customers where rownum <15;
2.6. Close the wallet: SQL> alter system set encryption wallet close identified by “wallet_password”; SQL> exit
2.7. Change the software wallet password to HSM partition password.
# orapki wallet change_pwd -wallet [wallet_location/ewallet.p12] -oldpwd <software wallet password > -newpwd <HSM partition password> When the password for both wallet and HSM partition will be same then both wallets will open/close by executing a single command.
2.8. Start the database:
$ sqlplus / as sysoper
2.9. Connect to the database as 'system': SQL> connect system/<password>
2.10. Open the wallet: SQL> alter system set encryption wallet open identified by “hsm_partition_pwd|partition_name”
This opens both the HSM and the software wallet. 2.11. Check the wallet information with the following command:
SQL> Select * from v$encryption_wallet; 2.12. Close the wallet:
SQL> alter system set encryption wallet close identified by “hsm_partition_pwd”; SQL> exit
2.13. Change the password (if you wish to) back to the initial password for software based wallet
using orapki and create an auto-login software based wallet. # cd <path to the oracle wallet directory> # orapki wallet create -wallet . -auto_login To use the auto-login wallet only on local system use auto_login_local instead of auto_login.
2.14. Verify that an auto-open software wallet has been created in the oracle wallet directory you specified in the sqlnet.ora file: You will find two wallets in this directory: “ewallet.p12” and “cwallet.sso”; the latter is the auto-open wallet; rename the encryption wallet: $ < path to the oracle wallet directory >rename ewallet.p12 ewallet.p24 so that Transparent Data Encryption does not try to open it.
© 2015 Gemalto/SafeNet, All rights reserved. 43
Oracle Database Integration Guide Chapter 7 Integrating Multiple Oracle Database 11g R2 (11.2.0.3) with Luna SA
2.15. Connect to the database as system and open the HSM wallet (the software is already open): SQL> alter system set encryption wallet open identified by
“hsm_partition_pwd|partition_name”; 2.16. Now go to the another console in which you are connected with other database instance
whose ORACLE_SID=engg and execute the above commands. After step 2.4, verify that Master key move to the HSM partition.
Generating Master Encryption Key directly onto the HSM
In order to generate a Master Encryption Key for HSM-Based Encryption, perform the following instructions:
It is assumed that no software or HSM based wallet is yet created.
3. Setting up Oracle to create Master Encryption Key onto HSM: 3.1. Add the following to your $ORACLE_HOME/network/admin/sqlnet.ora – file:
ENCRYPTION_WALLET_LOCATION = (SOURCE = (METHOD = HSM)) 3.2. Start the database:
$ sqlplus / as sysoper If the database is not yet started, you can start it using: SQL> startup
3.3. Connect to the database as ‘system’:
SQL> connect system/<password>
Password for ‘system’ can be set during Oracle installation. All dbapasswords throughout this document has been set to “temp123#”.
3.4. Create an encryption wallet. The master key would automatically be created onto the HSM. SQL> alter system set encryption key identified by “hsm_partition_pwd|partition_name”;
Verify that Master Encryption key is generated on HSM partition that you used in the
above command.
3.5. Encrypt the 'credit_limit' column of the 'CUSTOMERS' table which is owned by the user 'OE': SQL> alter table oe.customers modify (credit_limit encrypt);
3.6. With the next command, the values listed in the encrypted column are returned in clear text;
Transparent Data Encryption decrypts them automatically: SQL> select credit_limit from oe.customers where rownum <15;
3.7. The next command lists encrypted columns in your database:
SQL> select * from dba_encrypted_columns; 3.8. Finally, this view contains information about the wallet itself:
SQL> select * from v$encryption_wallet;
3.9. Create an encrypted tablespace: SQL> CREATE TABLESPACE securespace DATAFILE '/u01/app/oracle/oradata/sales/secure01.dbf' SIZE 10M ENCRYPTION DEFAULT STORAGE (ENCRYPT);
3.10. Create a table in the tablespace:
44 © 2015 Gemalto/SafeNet, All rights reserved.
Oracle Database Integration Guide Chapter 7 Integrating Multiple Oracle Database 11g R2 (11.2.0.3) with Luna SA
SQL> create table employee (id number(5), name varchar(42), salary number(10)) TABLESPACE securespace;
3.11. Insert some values in employee table: SQL> Insert into employee values (001,'JOHN SMITH',10000); SQL> Insert into employee values (002,'SCOTT TIGER',20000); SQL> Insert into employee values (003,'DIANA HAYDEN',50000);
3.12. Display the contents of the EMPLOYEE table with the following command: SQL> select * from employee;
3.13. Close the wallet: SQL> alter system set encryption wallet close identified by “hsm_partition_pwd”;
3.14. After closing the wallet execute the command to display the contents again:
SQL> select * from employee;
You will get the following error that means you cannot list the contents of EMPLOYEE table, if wallet is closed.
ERROR at line 1: ORA-28365: wallet is not open
3.15. Open the wallet: SQL> alter system set encryption wallet open identified by “hsm_partition_pwd|partition_name”;
3.16. Now logged on as Oracle user in another terminal and export ORACLE_SID=engg for second database. Execute the above command and verify that you are able to generate the Master key on another partition and TDE is working as expected.
4. Setting up Oracle to create Auto-open HSM:
4.1 When TDE is used in ‘HSM only’ mode (never migrated from an Oracle Wallet):
a. The current entry in sqlnet.ora:
ENCRYPTION_WALLET_LOCATION = (SOURCE = (METHOD = HSM)) Needs to be changed to:
ENCRYPTION_WALLET_LOCATION = (SOURCE = (METHOD = HSM) (METHOD_DATA = (DIRECTORY = /etc/oracle/wallet/$ORACLE_SID)))
b. Create a (local) auto-open and encryption wallet in /etc/oracle/wallet/$ORACLE_SID:
# orapki wallet create -wallet . -auto_login[_local] It will prompt for wallet_password, provide the software wallet password. Note: If you want to use that auto login wallet on the local system only then use -auto_login_local
c. Add the following entry to the empty wallets to enable an ‘auto-open’ HSM: # mkstore -wrl . -createEntry ORACLE.TDE.HSM.AUTOLOGIN <any-non-empty-string> Note: <any-non-empty-string> could be any string consisting alphanumeric characters like “SDGF7e87sahgdh”. It will be used only once.
© 2015 Gemalto/SafeNet, All rights reserved. 45
Oracle Database Integration Guide Chapter 7 Integrating Multiple Oracle Database 11g R2 (11.2.0.3) with Luna SA
d. Oracle select the encryption wallet first and then auto wallet. Rename the encryption wallet (ewallet.p12) or move it out of the ‘ENCRYPTION_WALLET_LOCATION’ defined in ‘sqlnet.ora’ to a secure location; do not delete the encryption wallet and do not forget the wallet password.
e. Close the connection to the HSM with
SQL> alter system set encryption wallet close identified by “hsm_partition_pwd”; and open it one last time with SQL> alter system set encryption wallet open identified by “hsm_partition_pwd|partition_name”;
This will insert “hsm_partition_pwd|partition_name” into the auto-open wallet; from now on, no password is required to access encrypted data with the TDE master encryption key stored in an HSM.
4.2 When TDE was never used before (you are using the TDE first time and want to create HSM auto login):
a. Create a new entry in sqlnet.ora:
ENCRYPTION_WALLET_LOCATION = (SOURCE = (METHOD = HSM) (METHOD_DATA = (DIRECTORY = /etc/oracle/wallet/$ORACLE_SID)))
b. Create a (local) auto-open and encryption wallet in /etc/ORACLE/WALLETS/$ORACLE_SID:
# orapki wallet create -wallet . -auto_login[_local] It will prompt for wallet_password, provide the software wallet password. Note: If you want to use that auto login wallet on the local system only then use -auto_login_local
c. Add the following entry to the empty wallets to enable an ‘auto-open HSM’: mkstore -wrl . -createEntry ORACLE.TDE.HSM.AUTOLOGIN <any-non-empty-string>
Note: <any-non-empty-string> could be any string consisting alphanumeric characters like “SDGF7e87sahgdh”. It will be used only once.
d. Oracle select the encryption wallet first and then auto wallet. Rename the encryption wallet (ewallet.p12) or move it out of the ‘ENCRYPTION_WALLET_LOCATION’ defined in ‘sqlnet.ora’ to a secure location; do not delete the encryption wallet and do not forget the wallet password.
e. Create a TDE master encryption key inside the HSM:
SQL> alter system set encryption key identified by “hsm_partition_pwd|partition_name”;
This will insert “hsm_partition_pwd|partition_name” into the auto-open wallet; from now on, no password is required to access encrypted data with the TDE master encryption key stored in an HSM.
4.3 When an HSM and an encryption wallet is in use: At the end of a prior migration from Oracle Wallet to HSM, the wallet password was changed to the “Partition_password”; sqlnet.ora contains the following entry:
a. ENCRYPTION_WALLET_LOCATION = (SOURCE = (METHOD = HSM) (METHOD_DATA = (DIRECTORY = /etc/oracle/wallet/$ORACLE_SID)))
46 © 2015 Gemalto/SafeNet, All rights reserved.
Oracle Database Integration Guide Chapter 7 Integrating Multiple Oracle Database 11g R2 (11.2.0.3) with Luna SA
b. An auto-open HSM requires the wallet to be a (local) auto-open wallet as well; this (local) auto-open wallet will contain the TDE master key from the encryption wallet and the auto-open string for the HSM.
Create an auto-open wallet from the encryption wallet: # orapki wallet create -wallet . -auto_login[_local]
c. Continue at 4.c.)
4.4 When an HSM and a (local) auto-open wallet is in use:
a. At the end of a prior migration from Oracle Wallet to HSM, the wallet password was not changed
to the “hsm_partition_pwd”; a (local) auto-open wallet is used instead and the encryption wallet was either renamed or removed from the “ENCRYPTION_WALLET_LOCATION”; sqlnet.ora contains the following entry: ENCRYPTION_WALLET_LOCATION = (SOURCE = (METHOD = HSM) (METHOD_DATA = (DIRECTORY = /etc/oracle/wallet/$ORACLE_SID)))
b. Restore the encryption wallet from its secure location or rename it back to the original file name ewallet.p12
c. Add the following entry to the wallets to enable an ‘auto-open HSM’, applying the wallet password for the encryption wallet:
# mkstore -wrl . -createEntry ORACLE.TDE.HSM.AUTOLOGIN <any-non-empty-string>
d. Rename the encryption wallet or move it out of the ENCRYPTION_WALLET_LOCATION defined in sqlnet.ora, do not delete the encryption wallet and do not forget the wallet password.
e. Close the connection to the HSM with
SQL> alter system set encryption wallet close identified by “hsm_partition_pwd”; and open it one last time with SQL> alter system set encryption wallet open identified by “hsm_partition_pwd|partition_name”;
This will automatically insert “hsm_partition_pwd|partition_name” into the auto-open wallet. From now onwards, no password is required to access encrypted data with the TDE master encryption key stored in an HSM.
4.5 When only an encryption wallet is in use (no HSM):
a. sqlnet.ora contains this entry: ENCRYPTION_WALLET_LOCATION = (SOURCE = (METHOD = FILE) (METHOD_DATA = (DIRECTORY = /etc/oracle/wallet/$ORACLE_SID)))
b. An auto-open HSM requires the wallet to be a (local) auto-open wallet as well; this (local) auto-open wallet will contain the TDE master key from the encryption wallet and the auto-open string for the HSM. Create an auto-open wallet from the encryption wallet:
# orapki wallet create –wallet . -auto_login[_local]
c. Continue at 6.b.)
4.6 When a (local) auto-open wallet is in use:
© 2015 Gemalto/SafeNet, All rights reserved. 47
Oracle Database Integration Guide Chapter 7 Integrating Multiple Oracle Database 11g R2 (11.2.0.3) with Luna SA
a. Add the following entry to the wallets to enable an ‘auto-open HSM’: # mkstore -wrl . -createEntry ORACLE.TDE.HSM.AUTOLOGIN <any-non-empty-string>
b. Change the entry in sqlnet.ora to:
ENCRYPTION_WALLET_LOCATION = (SOURCE = (METHOD = HSM) (METHOD_DATA = (DIRECTORY = /etc/oracle/wallet/$ORACLE_SID)))
c. Migrate the TDE column encryption master key from wallet to HSM with:
SQL> alter system set encryption key identified by “hsm_partition_pwd|partition_name” migrate using “wallet_password”; This will insert “hsm_partition_pwd|partition_name” into the auto-open wallet. From now on, no password is required to access encrypted data with the TDE master encryption key stored in an HSM.
d. Rename the encryption wallet or move it out of the ENCRYPTION_WALLET_LOCATION defined in sqlnet.ora; do not delete the encryption wallet and do not forget the wallet password.
48 © 2015 Gemalto/SafeNet, All rights reserved.
Oracle Database Integration Guide Chapter 8 Integrating Oracle Database 11gR2 RAC (11.2.0.3) with Luna HSM
Chapter 8 Integrating Oracle Database 11gR2 RAC (11.2.0.3) with Luna HSM Understanding the Oracle RAC
A cluster comprises multiple interconnected computers or servers that appear as if they are one server to end users and applications. Oracle RAC enables you to cluster an Oracle database. Oracle RAC uses Oracle Clusterware for the infrastructure to bind multiple servers so they operate as a single system. Oracle Clusterware is a portable cluster management solution that is integrated with Oracle Database. Oracle Clusterware is also a required component for using Oracle RAC. In addition, Oracle Clusterware enables both non-cluster Oracle databases and Oracle RAC databases to use the Oracle high-availability infrastructure. Oracle Clusterware enables you to create a clustered pool of storage to be used by any combination of non-cluster and Oracle RAC databases . Non-cluster Oracle databases have a one-to-one relationship between the Oracle database and the instance. Oracle RAC environments, however, have a one-to-many relationship between the database and instances. Oracle RAC databases differ architecturally from non-cluster Oracle databases in that each Oracle RAC database instance also has: • At least one additional thread of redo for each instance • An instance-specific undo tablespace
The combined processing power of the multiple servers can provide greater throughput and Oracle RAC scalability than is available from a single server.
Oracle Database RAC Setup
You should familiarize yourself with Oracle Database RAC. Refer to the Oracle Database 11g R2 RAC documentation for more information to install and pre-installation requirements. The two machines utilized are denoted in the setup as follows: • RAC1.localdomain • RAC2.localdomain
Supported Platforms The following platforms are supported for Luna HSM:
Operating System SafeNet Luna HSM Oracle Database Software
Red Hat Enterprise Linux 5.8 (64 bit) Luna SA v5.2.1 f/w 6.10.1
11.2.0.3
Red Hat Enterprise Linux 6.0 (64 bit) Luna SA v5.1 f/w 6.2.1
11.2.0.3
© 2015 Gemalto/SafeNet, All rights reserved. 49
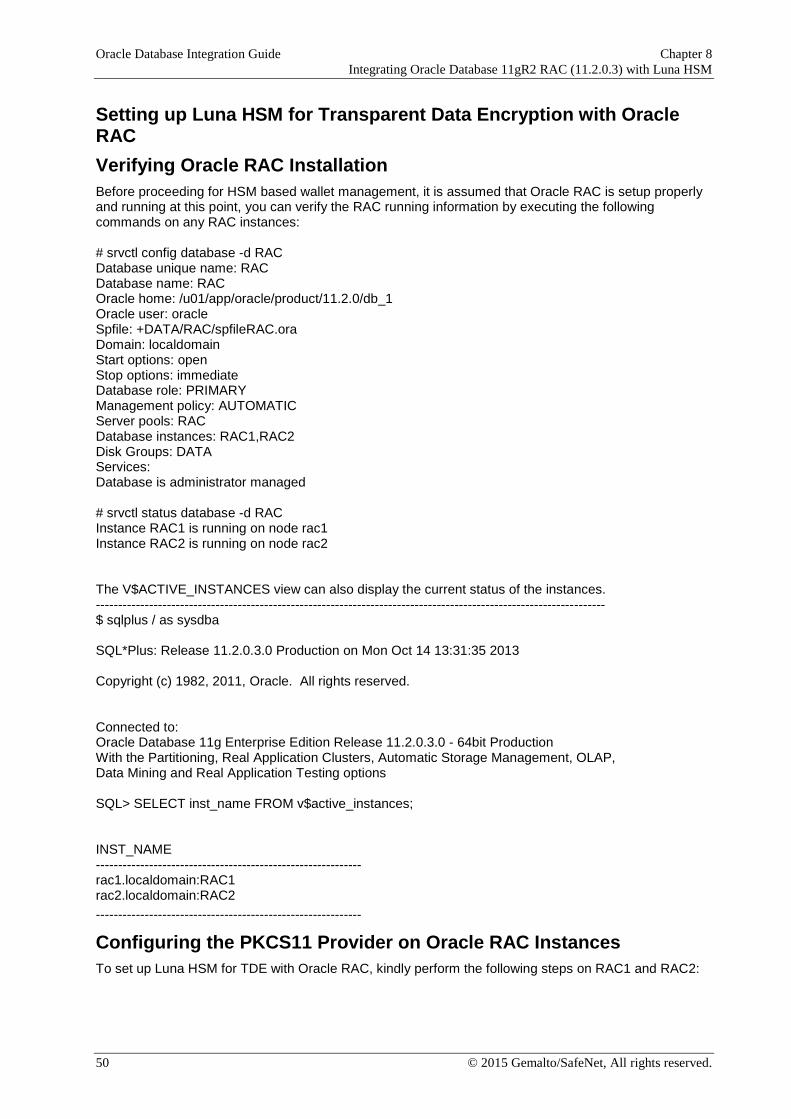
Oracle Database Integration Guide Chapter 8 Integrating Oracle Database 11gR2 RAC (11.2.0.3) with Luna HSM
Setting up Luna HSM for Transparent Data Encryption with Oracle RAC Verifying Oracle RAC Installation Before proceeding for HSM based wallet management, it is assumed that Oracle RAC is setup properly and running at this point, you can verify the RAC running information by executing the following commands on any RAC instances: # srvctl config database -d RAC Database unique name: RAC Database name: RAC Oracle home: /u01/app/oracle/product/11.2.0/db_1 Oracle user: oracle Spfile: +DATA/RAC/spfileRAC.ora Domain: localdomain Start options: open Stop options: immediate Database role: PRIMARY Management policy: AUTOMATIC Server pools: RAC Database instances: RAC1,RAC2 Disk Groups: DATA Services: Database is administrator managed # srvctl status database -d RAC Instance RAC1 is running on node rac1 Instance RAC2 is running on node rac2 The V$ACTIVE_INSTANCES view can also display the current status of the instances. ------------------------------------------------------------------------------------------------------------------- $ sqlplus / as sysdba SQL*Plus: Release 11.2.0.3.0 Production on Mon Oct 14 13:31:35 2013 Copyright (c) 1982, 2011, Oracle. All rights reserved. Connected to: Oracle Database 11g Enterprise Edition Release 11.2.0.3.0 - 64bit Production With the Partitioning, Real Application Clusters, Automatic Storage Management, OLAP, Data Mining and Real Application Testing options SQL> SELECT inst_name FROM v$active_instances;
INST_NAME ------------------------------------------------------------ rac1.localdomain:RAC1 rac2.localdomain:RAC2 ------------------------------------------------------------
Configuring the PKCS11 Provider on Oracle RAC Instances To set up Luna HSM for TDE with Oracle RAC, kindly perform the following steps on RAC1 and RAC2:
50 © 2015 Gemalto/SafeNet, All rights reserved.
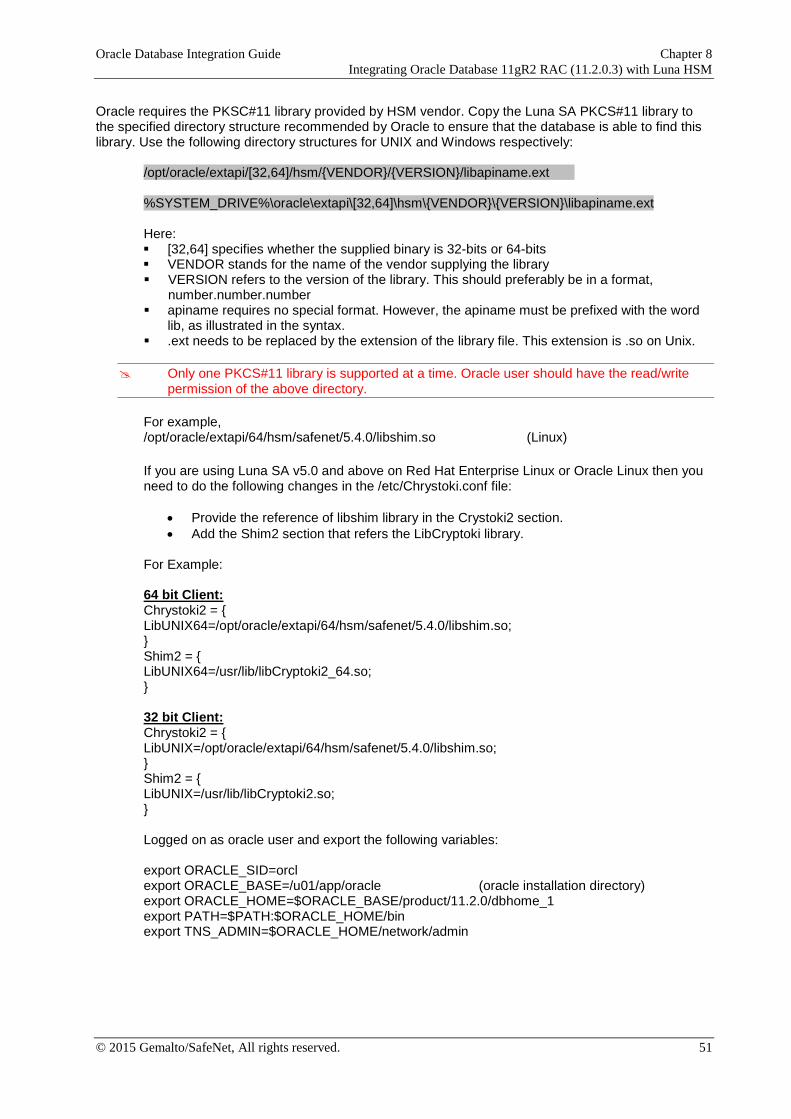
Oracle Database Integration Guide Chapter 8 Integrating Oracle Database 11gR2 RAC (11.2.0.3) with Luna HSM
Oracle requires the PKSC#11 library provided by HSM vendor. Copy the Luna SA PKCS#11 library to the specified directory structure recommended by Oracle to ensure that the database is able to find this library. Use the following directory structures for UNIX and Windows respectively:
/opt/oracle/extapi/[32,64]/hsm/{VENDOR}/{VERSION}/libapiname.ext %SYSTEM_DRIVE%\oracle\extapi\[32,64]\hsm\{VENDOR}\{VERSION}\libapiname.ext Here: [32,64] specifies whether the supplied binary is 32-bits or 64-bits VENDOR stands for the name of the vendor supplying the library VERSION refers to the version of the library. This should preferably be in a format, number.number.number apiname requires no special format. However, the apiname must be prefixed with the word lib, as illustrated in the syntax. .ext needs to be replaced by the extension of the library file. This extension is .so on Unix.
Only one PKCS#11 library is supported at a time. Oracle user should have the read/write
permission of the above directory.
For example, /opt/oracle/extapi/64/hsm/safenet/5.4.0/libshim.so (Linux)
If you are using Luna SA v5.0 and above on Red Hat Enterprise Linux or Oracle Linux then you need to do the following changes in the /etc/Chrystoki.conf file:
• Provide the reference of libshim library in the Crystoki2 section. • Add the Shim2 section that refers the LibCryptoki library.
For Example: 64 bit Client: Chrystoki2 = { LibUNIX64=/opt/oracle/extapi/64/hsm/safenet/5.4.0/libshim.so; } Shim2 = { LibUNIX64=/usr/lib/libCryptoki2_64.so; } 32 bit Client: Chrystoki2 = { LibUNIX=/opt/oracle/extapi/64/hsm/safenet/5.4.0/libshim.so; } Shim2 = { LibUNIX=/usr/lib/libCryptoki2.so; }
Logged on as oracle user and export the following variables: export ORACLE_SID=orcl export ORACLE_BASE=/u01/app/oracle (oracle installation directory) export ORACLE_HOME=$ORACLE_BASE/product/11.2.0/dbhome_1 export PATH=$PATH:$ORACLE_HOME/bin export TNS_ADMIN=$ORACLE_HOME/network/admin
© 2015 Gemalto/SafeNet, All rights reserved. 51
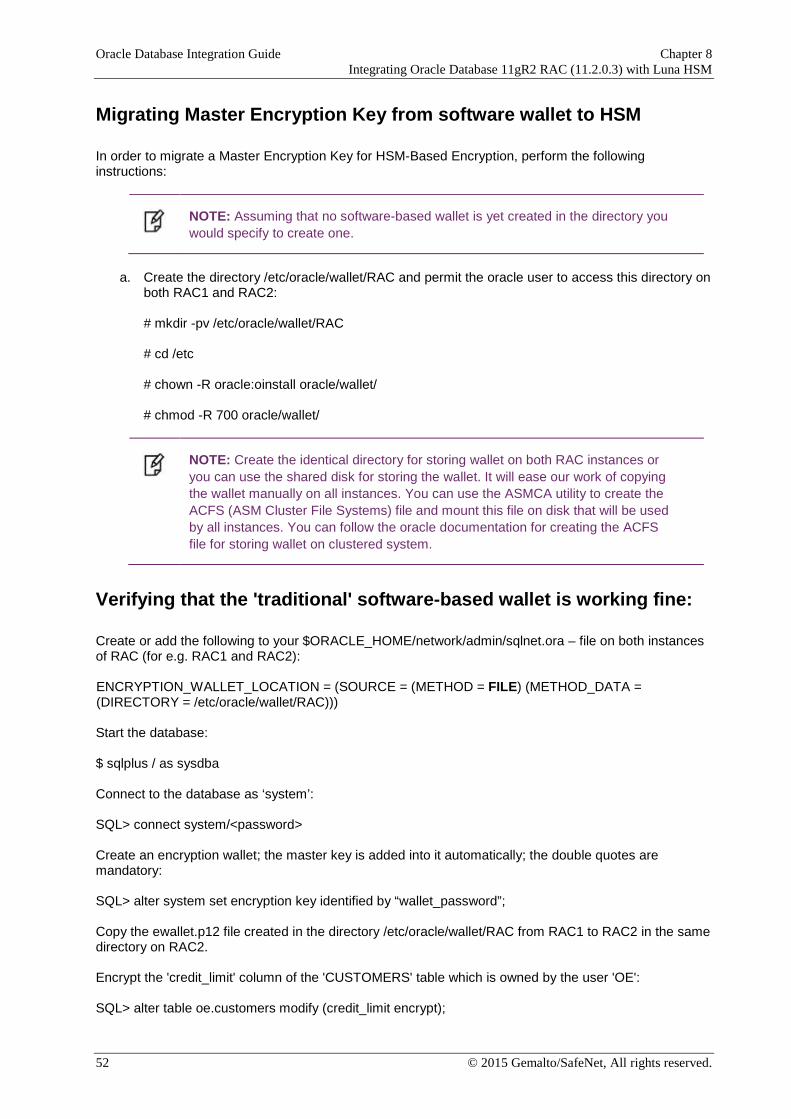
Oracle Database Integration Guide Chapter 8 Integrating Oracle Database 11gR2 RAC (11.2.0.3) with Luna HSM
Migrating Master Encryption Key from software wallet to HSM
In order to migrate a Master Encryption Key for HSM-Based Encryption, perform the following instructions:
NOTE: Assuming that no software-based wallet is yet created in the directory you would specify to create one.
a. Create the directory /etc/oracle/wallet/RAC and permit the oracle user to access this directory on
both RAC1 and RAC2:
# mkdir -pv /etc/oracle/wallet/RAC
# cd /etc
# chown -R oracle:oinstall oracle/wallet/
# chmod -R 700 oracle/wallet/
NOTE: Create the identical directory for storing wallet on both RAC instances or you can use the shared disk for storing the wallet. It will ease our work of copying the wallet manually on all instances. You can use the ASMCA utility to create the ACFS (ASM Cluster File Systems) file and mount this file on disk that will be used by all instances. You can follow the oracle documentation for creating the ACFS file for storing wallet on clustered system.
Verifying that the 'traditional' software-based wallet is working fine:
Create or add the following to your $ORACLE_HOME/network/admin/sqlnet.ora – file on both instances of RAC (for e.g. RAC1 and RAC2): ENCRYPTION_WALLET_LOCATION = (SOURCE = (METHOD = FILE) (METHOD_DATA = (DIRECTORY = /etc/oracle/wallet/RAC))) Start the database: $ sqlplus / as sysdba
Connect to the database as ‘system’: SQL> connect system/<password> Create an encryption wallet; the master key is added into it automatically; the double quotes are mandatory: SQL> alter system set encryption key identified by “wallet_password”; Copy the ewallet.p12 file created in the directory /etc/oracle/wallet/RAC from RAC1 to RAC2 in the same directory on RAC2. Encrypt the 'credit_limit' column of the 'CUSTOMERS' table which is owned by the user 'OE':
SQL> alter table oe.customers modify (credit_limit encrypt);
52 © 2015 Gemalto/SafeNet, All rights reserved.
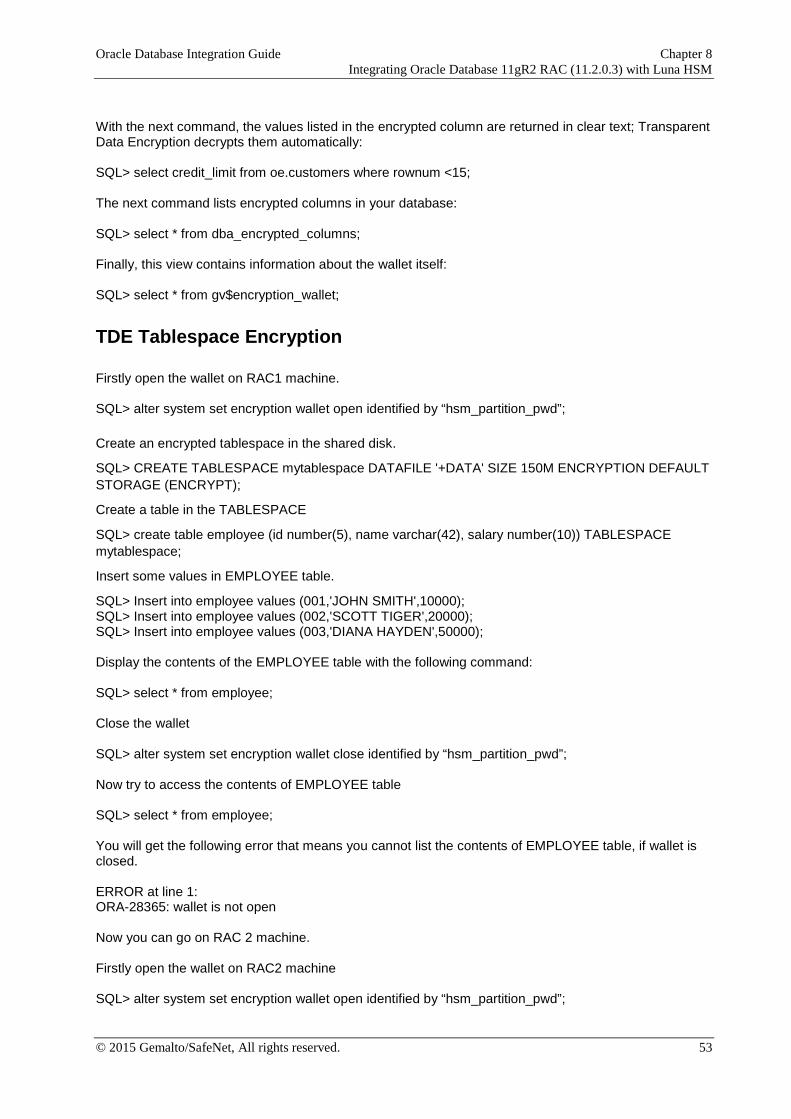
Oracle Database Integration Guide Chapter 8 Integrating Oracle Database 11gR2 RAC (11.2.0.3) with Luna HSM
With the next command, the values listed in the encrypted column are returned in clear text; Transparent Data Encryption decrypts them automatically:
SQL> select credit_limit from oe.customers where rownum <15;
The next command lists encrypted columns in your database: SQL> select * from dba_encrypted_columns;
Finally, this view contains information about the wallet itself: SQL> select * from gv$encryption_wallet;
TDE Tablespace Encryption
Firstly open the wallet on RAC1 machine. SQL> alter system set encryption wallet open identified by “hsm_partition_pwd”; Create an encrypted tablespace in the shared disk.
SQL> CREATE TABLESPACE mytablespace DATAFILE '+DATA' SIZE 150M ENCRYPTION DEFAULT STORAGE (ENCRYPT);
Create a table in the TABLESPACE
SQL> create table employee (id number(5), name varchar(42), salary number(10)) TABLESPACE mytablespace;
Insert some values in EMPLOYEE table.
SQL> Insert into employee values (001,'JOHN SMITH',10000); SQL> Insert into employee values (002,'SCOTT TIGER',20000); SQL> Insert into employee values (003,'DIANA HAYDEN',50000); Display the contents of the EMPLOYEE table with the following command: SQL> select * from employee; Close the wallet SQL> alter system set encryption wallet close identified by “hsm_partition_pwd”; Now try to access the contents of EMPLOYEE table SQL> select * from employee; You will get the following error that means you cannot list the contents of EMPLOYEE table, if wallet is closed. ERROR at line 1: ORA-28365: wallet is not open Now you can go on RAC 2 machine. Firstly open the wallet on RAC2 machine SQL> alter system set encryption wallet open identified by “hsm_partition_pwd”;
© 2015 Gemalto/SafeNet, All rights reserved. 53
Oracle Database Integration Guide Chapter 8 Integrating Oracle Database 11gR2 RAC (11.2.0.3) with Luna HSM
Now try to access the contents of EMPLOYEE table SQL> select * from employee; Close the wallet: SQL> alter system set encryption wallet close identified by “wallet_password”; SQL> exit Now onwards when you start the database you need to open the HSM based wallet to view the encrypted data. You can set the HSM based wallet to Auto-Login that will automatically open when database starts
NOTE: Above commands works for both RAC1 and RAC2 after copying the wallet on both instances.
Test the Migration of Software Wallet to HSM Device
Change the FILE to HSM in your $ORACLE_HOME/network/admin/sqlnet.ora – file on both instances of RAC (for e.g. RAC1 and RAC2):
ENCRYPTION_WALLET_LOCATION = (SOURCE = (METHOD = HSM) (METHOD_DATA = (DIRECTORY = /etc/oracle/wallet/RAC)))
Start the database: $ sqlplus / as sysdba
Connect to the database as ‘system’: SQL> connect system/<password>
Execute the following query to migrate the wallet onto the HSM device:
SQL> alter system set encryption key identified by “hsm_partition_pwd” migrate using “wallet_password;
“hsm_partition_pwd” is the password for the HSM partition where the Master Encryption Key would be generated.
Copy the ewallet.p12 file created in the directory /etc/oracle/wallet/RAC from RAC1 to RAC2 in the same directory on RAC2.
With the next command, the values listed in the encrypted column are returned in clear text; Transparent Data Encryption decrypts them automatically:
SQL> select credit_limit from oe.customers where rownum <15;
The next command lists encrypted columns in your database: SQL> select * from dba_encrypted_columns;
Finally, this view contains information about the wallet itself: SQL> select * from gv$encryption_wallet;
Close the wallet:
54 © 2015 Gemalto/SafeNet, All rights reserved.
Oracle Database Integration Guide Chapter 8 Integrating Oracle Database 11gR2 RAC (11.2.0.3) with Luna HSM
SQL> alter system set encryption wallet close identified by “wallet_password”; SQL> exit
NOTE: Above commands works for both RAC1 and RAC2 after copying the wallet on both instances.
You need to change the Software wallet password to HSM partition password .You can give the following command # orapki wallet change_pwd –wallet [wallet_location/ewallet.p12] –oldpwd <software wallet password > -newpwd <HSM partition password>
Start the database: $ sqlplus / as sysdba Connect to the database as ‘system’: SQL> connect system/<password>
SQL> alter system set encryption wallet open identified by “hsm_partition_pwd” This opens both the HSM and the software wallet. You can see the wallets status by executing the following:
SQL> select * from gv$encryption_wallet;
Close the wallet: SQL> alter system set encryption wallet close identified by “wallet_password”; SQL> exit
NOTE: Above commands works for both RAC1 and RAC2 after changing the wallet password on both instances. You can copy the wallet from one RAC instance to other after changing the wallet password on an instance.
Create the auto-login wallet on both the instances RAC1 and RAC2. Change the password (if you wish to) back to the initial password for software based wallet using orapki and create an auto-login software based wallet. # cd <path to the oracle wallet directory> # orapki wallet create -wallet . -auto_login When prompt for password, provide the software wallet password.
Verify that an auto-open software wallet has been created in the oracle wallet directory you specified in the sqlnet.ora file: You will find two wallets in this directory: “ewallet.p12” and “cwallet.sso”; the latter is the auto-open wallet;
Oracle selects encryption wallet first and then auto wallet. Rename or move the encryption wallet from the location you have specified in sqlnet.ora file: # cd /etc/oracle/wallet/RAC
© 2015 Gemalto/SafeNet, All rights reserved. 55
Oracle Database Integration Guide Chapter 8 Integrating Oracle Database 11gR2 RAC (11.2.0.3) with Luna HSM
# mv ewallet.p12 ewallet.p24
It will prevent the Transparent Data Encryption to open it.
NOTE: Rename the encryption wallet on both instances of RAC to make the local wallet to auto-login. You can copy the auto-login wallet and encryption wallet from one RAC instance to other after renaming the encryption wallet.
Connect to the database as system and open the HSM wallet (the software wallet is already open):
SQL> alter system set encryption wallet open identified by “hsm_partition_pwd”;
Now onwards when you start the database you need to open the HSM wallet only, local wallet remains open automatically.
Generating Master Encryption Key Directly on HSM
In order to generate a Master Encryption Key for HSM-Based Encryption, perform the following instructions:
NOTE: It is assumed that no traditional wallet is generated and database is not using TDE.
Create or add the following to your $ORACLE_HOME/network/admin/sqlnet.ora – file on both instances of RAC (for e.g. RAC1, RAC2): ENCRYPTION_WALLET_LOCATION = (SOURCE = (METHOD = HSM))
Start the database:
$ sqlplus / as sysdba
If the database is not yet started, you can start it using:
SQL> startup; Connect to the database as ‘system’:
SQL> connect system/<password>
Create an encryption wallet. The master key would automatically be created onto the HSM. SQL> alter system set encryption key identified by “hsm_partition_pwd”; To use multiple slots or partitions, the syntax to generate master key to a slot or partition, use the following syntax: SQL> alter system set encryption key identified by "hsm_partition_pwd|<partition_name>";
56 © 2015 Gemalto/SafeNet, All rights reserved.
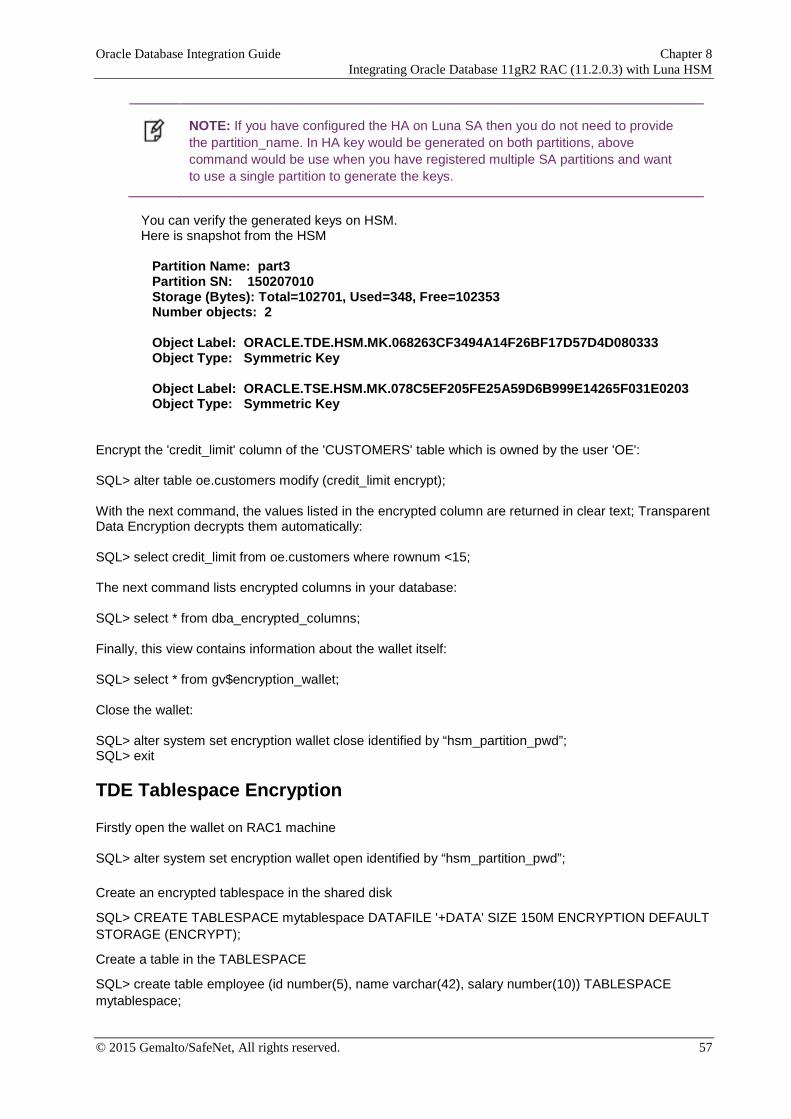
Oracle Database Integration Guide Chapter 8 Integrating Oracle Database 11gR2 RAC (11.2.0.3) with Luna HSM
NOTE: If you have configured the HA on Luna SA then you do not need to provide the partition_name. In HA key would be generated on both partitions, above command would be use when you have registered multiple SA partitions and want to use a single partition to generate the keys.
You can verify the generated keys on HSM. Here is snapshot from the HSM Partition Name: part3 Partition SN: 150207010 Storage (Bytes): Total=102701, Used=348, Free=102353 Number objects: 2 Object Label: ORACLE.TDE.HSM.MK.068263CF3494A14F26BF17D57D4D080333 Object Type: Symmetric Key Object Label: ORACLE.TSE.HSM.MK.078C5EF205FE25A59D6B999E14265F031E0203 Object Type: Symmetric Key
Encrypt the 'credit_limit' column of the 'CUSTOMERS' table which is owned by the user 'OE':
SQL> alter table oe.customers modify (credit_limit encrypt);
With the next command, the values listed in the encrypted column are returned in clear text; Transparent Data Encryption decrypts them automatically:
SQL> select credit_limit from oe.customers where rownum <15; The next command lists encrypted columns in your database: SQL> select * from dba_encrypted_columns;
Finally, this view contains information about the wallet itself: SQL> select * from gv$encryption_wallet; Close the wallet: SQL> alter system set encryption wallet close identified by “hsm_partition_pwd”; SQL> exit
TDE Tablespace Encryption
Firstly open the wallet on RAC1 machine SQL> alter system set encryption wallet open identified by “hsm_partition_pwd”; Create an encrypted tablespace in the shared disk
SQL> CREATE TABLESPACE mytablespace DATAFILE '+DATA' SIZE 150M ENCRYPTION DEFAULT STORAGE (ENCRYPT);
Create a table in the TABLESPACE
SQL> create table employee (id number(5), name varchar(42), salary number(10)) TABLESPACE mytablespace;
© 2015 Gemalto/SafeNet, All rights reserved. 57
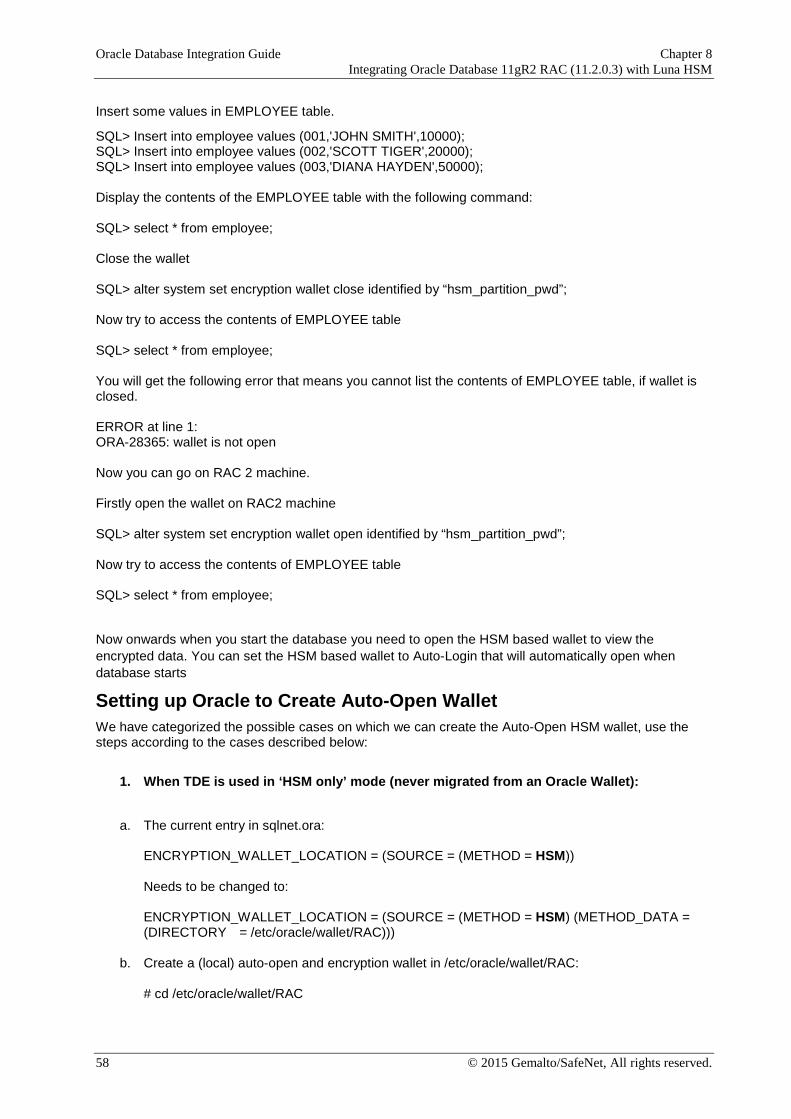
Oracle Database Integration Guide Chapter 8 Integrating Oracle Database 11gR2 RAC (11.2.0.3) with Luna HSM
Insert some values in EMPLOYEE table.
SQL> Insert into employee values (001,'JOHN SMITH',10000); SQL> Insert into employee values (002,'SCOTT TIGER',20000); SQL> Insert into employee values (003,'DIANA HAYDEN',50000); Display the contents of the EMPLOYEE table with the following command: SQL> select * from employee; Close the wallet SQL> alter system set encryption wallet close identified by “hsm_partition_pwd”; Now try to access the contents of EMPLOYEE table SQL> select * from employee; You will get the following error that means you cannot list the contents of EMPLOYEE table, if wallet is closed. ERROR at line 1: ORA-28365: wallet is not open Now you can go on RAC 2 machine. Firstly open the wallet on RAC2 machine SQL> alter system set encryption wallet open identified by “hsm_partition_pwd”; Now try to access the contents of EMPLOYEE table SQL> select * from employee;
Now onwards when you start the database you need to open the HSM based wallet to view the encrypted data. You can set the HSM based wallet to Auto-Login that will automatically open when database starts
Setting up Oracle to Create Auto-Open Wallet We have categorized the possible cases on which we can create the Auto-Open HSM wallet, use the steps according to the cases described below:
1. When TDE is used in ‘HSM only’ mode (never migrated from an Oracle Wallet):
a. The current entry in sqlnet.ora:
ENCRYPTION_WALLET_LOCATION = (SOURCE = (METHOD = HSM))
Needs to be changed to: ENCRYPTION_WALLET_LOCATION = (SOURCE = (METHOD = HSM) (METHOD_DATA = (DIRECTORY = /etc/oracle/wallet/RAC)))
b. Create a (local) auto-open and encryption wallet in /etc/oracle/wallet/RAC:
# cd /etc/oracle/wallet/RAC
58 © 2015 Gemalto/SafeNet, All rights reserved.
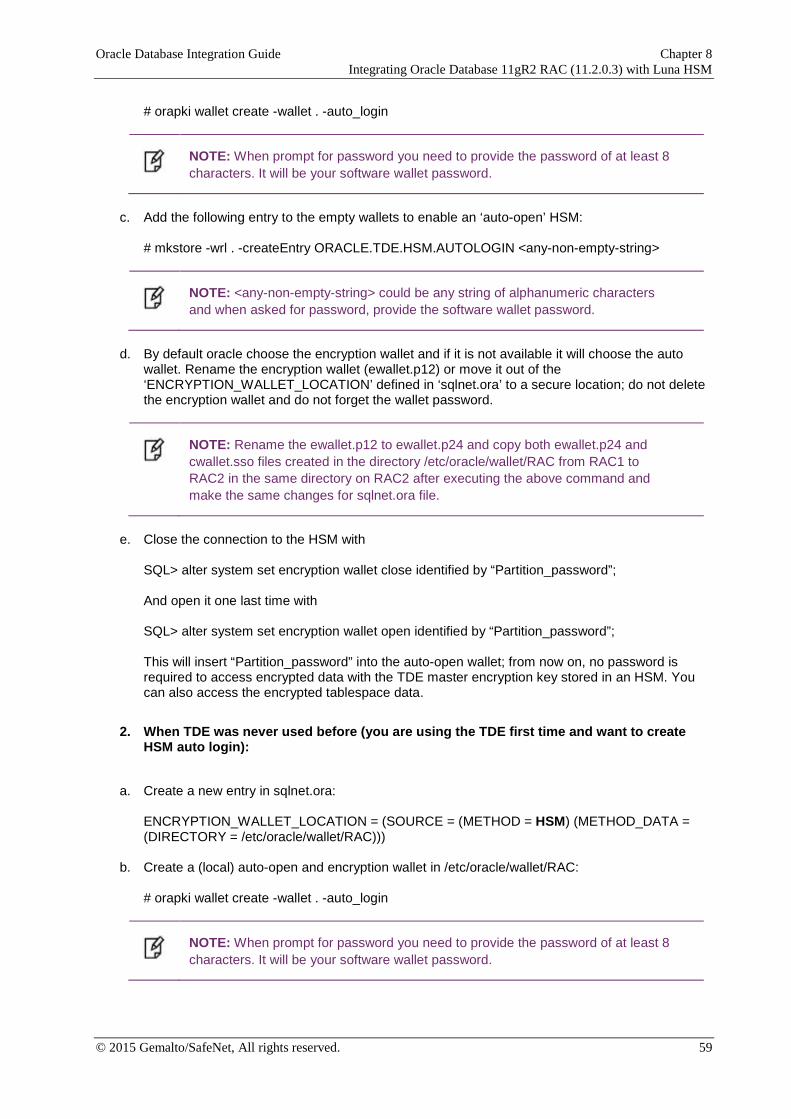
Oracle Database Integration Guide Chapter 8 Integrating Oracle Database 11gR2 RAC (11.2.0.3) with Luna HSM
# orapki wallet create -wallet . -auto_login
NOTE: When prompt for password you need to provide the password of at least 8 characters. It will be your software wallet password.
c. Add the following entry to the empty wallets to enable an ‘auto-open’ HSM:
# mkstore -wrl . -createEntry ORACLE.TDE.HSM.AUTOLOGIN <any-non-empty-string>
NOTE: <any-non-empty-string> could be any string of alphanumeric characters and when asked for password, provide the software wallet password.
d. By default oracle choose the encryption wallet and if it is not available it will choose the auto
wallet. Rename the encryption wallet (ewallet.p12) or move it out of the ‘ENCRYPTION_WALLET_LOCATION’ defined in ‘sqlnet.ora’ to a secure location; do not delete the encryption wallet and do not forget the wallet password.
NOTE: Rename the ewallet.p12 to ewallet.p24 and copy both ewallet.p24 and cwallet.sso files created in the directory /etc/oracle/wallet/RAC from RAC1 to RAC2 in the same directory on RAC2 after executing the above command and make the same changes for sqlnet.ora file.
e. Close the connection to the HSM with
SQL> alter system set encryption wallet close identified by “Partition_password”;
And open it one last time with
SQL> alter system set encryption wallet open identified by “Partition_password”;
This will insert “Partition_password” into the auto-open wallet; from now on, no password is required to access encrypted data with the TDE master encryption key stored in an HSM. You can also access the encrypted tablespace data.
2. When TDE was never used before (you are using the TDE first time and want to create HSM auto login):
a. Create a new entry in sqlnet.ora:
ENCRYPTION_WALLET_LOCATION = (SOURCE = (METHOD = HSM) (METHOD_DATA = (DIRECTORY = /etc/oracle/wallet/RAC)))
b. Create a (local) auto-open and encryption wallet in /etc/oracle/wallet/RAC:
# orapki wallet create -wallet . -auto_login
NOTE: When prompt for password you need to provide the password of at least 8 characters. It will be your software wallet password.
© 2015 Gemalto/SafeNet, All rights reserved. 59
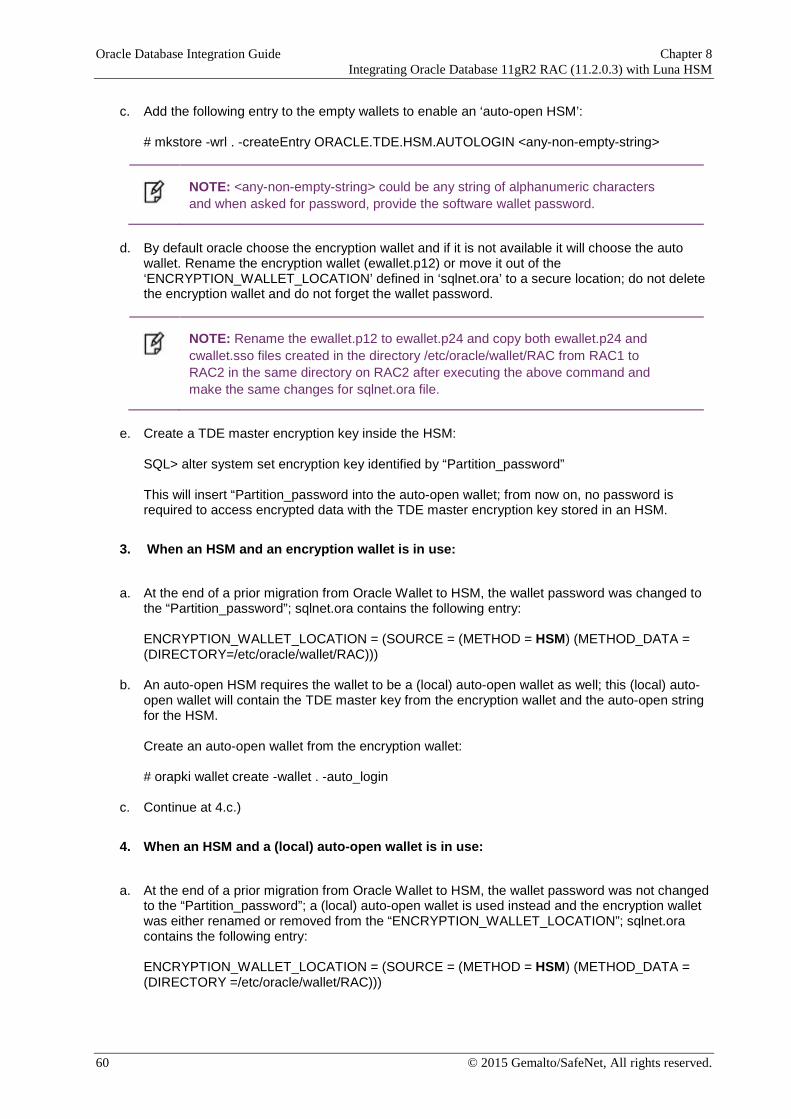
Oracle Database Integration Guide Chapter 8 Integrating Oracle Database 11gR2 RAC (11.2.0.3) with Luna HSM
c. Add the following entry to the empty wallets to enable an ‘auto-open HSM’:
# mkstore -wrl . -createEntry ORACLE.TDE.HSM.AUTOLOGIN <any-non-empty-string>
NOTE: <any-non-empty-string> could be any string of alphanumeric characters and when asked for password, provide the software wallet password.
d. By default oracle choose the encryption wallet and if it is not available it will choose the auto
wallet. Rename the encryption wallet (ewallet.p12) or move it out of the ‘ENCRYPTION_WALLET_LOCATION’ defined in ‘sqlnet.ora’ to a secure location; do not delete the encryption wallet and do not forget the wallet password.
NOTE: Rename the ewallet.p12 to ewallet.p24 and copy both ewallet.p24 and cwallet.sso files created in the directory /etc/oracle/wallet/RAC from RAC1 to RAC2 in the same directory on RAC2 after executing the above command and make the same changes for sqlnet.ora file.
e. Create a TDE master encryption key inside the HSM:
SQL> alter system set encryption key identified by “Partition_password”
This will insert “Partition_password into the auto-open wallet; from now on, no password is required to access encrypted data with the TDE master encryption key stored in an HSM.
3. When an HSM and an encryption wallet is in use:
a. At the end of a prior migration from Oracle Wallet to HSM, the wallet password was changed to
the “Partition_password”; sqlnet.ora contains the following entry: ENCRYPTION_WALLET_LOCATION = (SOURCE = (METHOD = HSM) (METHOD_DATA = (DIRECTORY=/etc/oracle/wallet/RAC)))
b. An auto-open HSM requires the wallet to be a (local) auto-open wallet as well; this (local) auto-open wallet will contain the TDE master key from the encryption wallet and the auto-open string for the HSM.
Create an auto-open wallet from the encryption wallet:
# orapki wallet create -wallet . -auto_login
c. Continue at 4.c.)
4. When an HSM and a (local) auto-open wallet is in use:
a. At the end of a prior migration from Oracle Wallet to HSM, the wallet password was not changed
to the “Partition_password”; a (local) auto-open wallet is used instead and the encryption wallet was either renamed or removed from the “ENCRYPTION_WALLET_LOCATION”; sqlnet.ora contains the following entry: ENCRYPTION_WALLET_LOCATION = (SOURCE = (METHOD = HSM) (METHOD_DATA = (DIRECTORY =/etc/oracle/wallet/RAC)))
60 © 2015 Gemalto/SafeNet, All rights reserved.
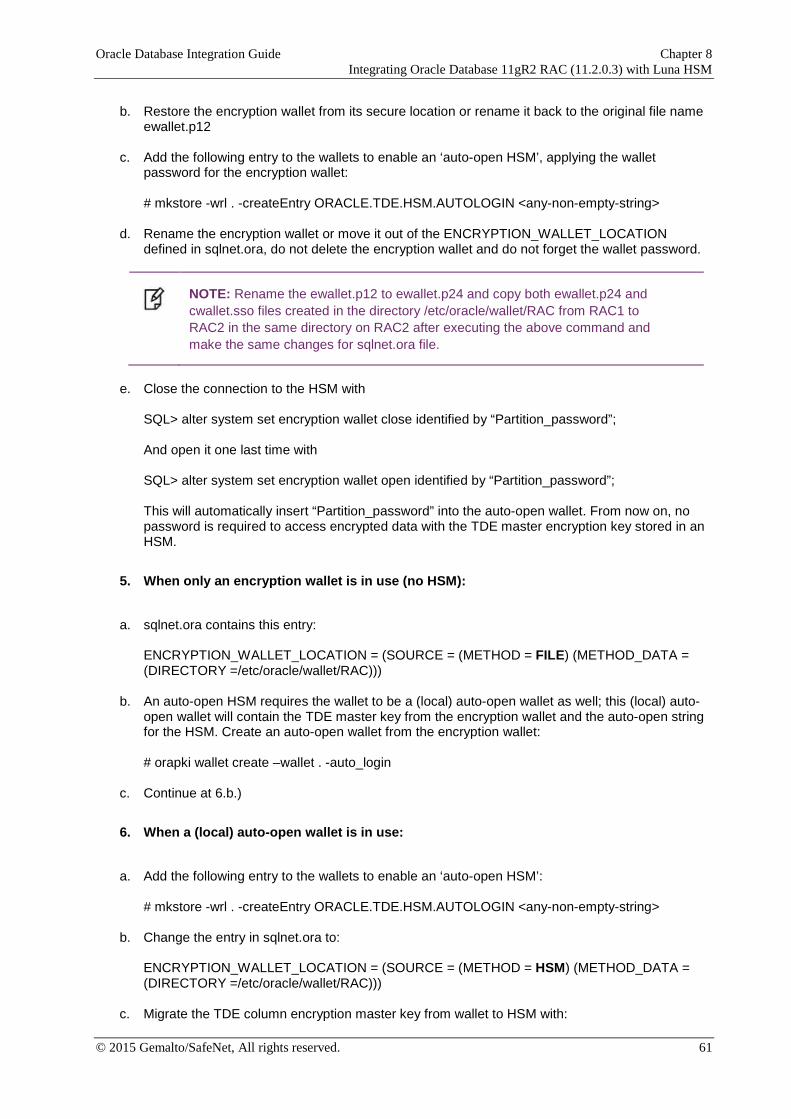
Oracle Database Integration Guide Chapter 8 Integrating Oracle Database 11gR2 RAC (11.2.0.3) with Luna HSM
b. Restore the encryption wallet from its secure location or rename it back to the original file name ewallet.p12
c. Add the following entry to the wallets to enable an ‘auto-open HSM’, applying the wallet password for the encryption wallet:
# mkstore -wrl . -createEntry ORACLE.TDE.HSM.AUTOLOGIN <any-non-empty-string>
d. Rename the encryption wallet or move it out of the ENCRYPTION_WALLET_LOCATION defined in sqlnet.ora, do not delete the encryption wallet and do not forget the wallet password.
NOTE: Rename the ewallet.p12 to ewallet.p24 and copy both ewallet.p24 and cwallet.sso files created in the directory /etc/oracle/wallet/RAC from RAC1 to RAC2 in the same directory on RAC2 after executing the above command and make the same changes for sqlnet.ora file.
e. Close the connection to the HSM with
SQL> alter system set encryption wallet close identified by “Partition_password”;
And open it one last time with
SQL> alter system set encryption wallet open identified by “Partition_password”;
This will automatically insert “Partition_password” into the auto-open wallet. From now on, no password is required to access encrypted data with the TDE master encryption key stored in an HSM.
5. When only an encryption wallet is in use (no HSM):
a. sqlnet.ora contains this entry:
ENCRYPTION_WALLET_LOCATION = (SOURCE = (METHOD = FILE) (METHOD_DATA = (DIRECTORY =/etc/oracle/wallet/RAC)))
b. An auto-open HSM requires the wallet to be a (local) auto-open wallet as well; this (local) auto-open wallet will contain the TDE master key from the encryption wallet and the auto-open string for the HSM. Create an auto-open wallet from the encryption wallet:
# orapki wallet create –wallet . -auto_login
c. Continue at 6.b.)
6. When a (local) auto-open wallet is in use:
a. Add the following entry to the wallets to enable an ‘auto-open HSM’:
# mkstore -wrl . -createEntry ORACLE.TDE.HSM.AUTOLOGIN <any-non-empty-string> b. Change the entry in sqlnet.ora to:
ENCRYPTION_WALLET_LOCATION = (SOURCE = (METHOD = HSM) (METHOD_DATA = (DIRECTORY =/etc/oracle/wallet/RAC)))
c. Migrate the TDE column encryption master key from wallet to HSM with:
© 2015 Gemalto/SafeNet, All rights reserved. 61
Oracle Database Integration Guide Chapter 8 Integrating Oracle Database 11gR2 RAC (11.2.0.3) with Luna HSM
SQL> alter system set encryption key identified by “Partition_password” migrate using “wallet_password”; This will insert “Partition_password into the auto-open wallet. From now on, no password is required to access encrypted data with the TDE master encryption key stored in an HSM.
d. Rename the encryption wallet or move it out of the ENCRYPTION_WALLET_LOCATION defined in sqlnet.ora; do not delete the encryption wallet and do not forget the wallet password.
NOTE: Rename the ewallet.p12 to ewallet.p24 and copy both ewallet.p24 and cwallet.sso files created in the directory /etc/oracle/wallet/RAC from RAC1 to RAC2 in the same directory on RAC2 after executing the above command and make the same changes for sqlnet.ora file.
62 © 2015 Gemalto/SafeNet, All rights reserved.
Oracle Database Integration Guide Chapter 9 Integrating Oracle Database 12c with Luna
Chapter 9 Integrating Oracle Database 12c with Luna
Setting up Luna Client for Transparent Data Encryption
To set up Luna SA/Luna PCI for Transparent Data Encryption, perform the following:
Copy the Luna SA /Luna PCI PKCS#11 library to the specified directory structure to ensure that the oracle database is able to find this library. Use the following directory structure:
/opt/oracle/extapi/[32,64]/hsm/{Vendor}/{Version}/libXX.ext (Linux/Solaris/AIX/ HPUX)
%SYSTEMDRIVE%\oracle\extapi\[32,64]\hsm\{Vendor}\{Version}\libXX.ext (Windows)
For example,
/opt/oracle/extapi/64/hsm/safenet/5.4.1/libCryptoki2_64.so (RHEL) where,
[32, 64] specifies whether the supplied binary is 32-bits or 64-bits. Vendor stands for the name of the vendor supplying the library. Version refers to the version of the library. This should preferably be in a format:
number.number.number. The API name requires no special format. However, the XX must be prefixed with the word lib, as illustrated in the syntax. The extension, ext needs to be replaced by the extension of the library file.
Only one PKCS#11 library is supported at a time.
Oracle user should have the read/write permission of the above directory and file and after logged on as oracle you need to export the following variables: export ORACLE_SID=orcl export ORACLE_BASE=/u01/app/oracle (oracle installation directory) export ORACLE_HOME=$ORACLE_BASE/product/12.1.0/dbhome_1 export PATH=$PATH:$ORACLE_HOME/bin export TNS_ADMIN=$ORACLE_HOME/network/admin
Generating a Master Encryption Key for HSM-Based Encryption
To start using HSM-based encryption, you need to have a master encryption key that will be stored inside the HSM. The master encryption key is used to encrypt or decrypt column encryption keys inside the HSM. HSM can be used in the following ways to protect the Master Encryption Key:
An existing Unified Master Encryption Key can be migrated onto the HSM. A Unified Master Encryption Key can be directly generated onto the HSM. HSM Auto-Login wallet use for TDE.
© 2015 Gemalto/SafeNet, All rights reserved. 63
Oracle Database Integration Guide Chapter 9 Integrating Oracle Database 12c with Luna
Migrating Master Encryption Key onto the HSM
In order to migrate a Master Encryption Key for HSM-Based Encryption, perform the following instructions:
It is assumed that no software-based wallet is yet created in the directory you would specify
to create one.
To test TDE with Luna HSM, perform the following:
1. Verify that the 'traditional' software-based wallet is working fine:
1.1. Add the following to your $ORACLE_HOME/network/admin/sqlnet.ora – file: ENCRYPTION_WALLET_LOCATION = (SOURCE = (METHOD = FILE)(METHOD_DATA = (DIRECTORY = <path to the oracle wallet directory>)))
1.2. Start the database:
$ sqlplus / as sysdba If the database is not yet started, you can start it using:
SQL> startup;
1.3. Grant ADMINISTER KEY MANAGEMENT or SYSKM privilege to SYSTEM and any user that you want to use.
SQL> GRANT ADMINISTER KEY MANAGEMENT TO SYSTEM; SQL> commit;
1.4. Connect to the database as ‘system’:
SQL> connect system/<password>
Password for ‘system’ can be set during Oracle installation. All dbapasswords throughout
this document has been set to “temp123#”.
1.5. Run the ADMINISTER KEY MANAGEMENT SQL statement to create the keystore. SQL> ADMINISTER KEY MANAGEMENT CREATE KEYSTORE 'keystore_location'
IDENTIFIED BY software_keystore_password; ‘keystore_location’ is the path to oracle wallet directory that you set in the sqlnet.ora file and
‘software_keystore_password’ must have length more than or equal to 8 characters.
1.6. Run the ADMINISTER KEY MANAGEMENT SQL statement to open the keystore. SQL> ADMINISTER KEY MANAGEMENT SET KEYSTORE OPEN IDENTIFIED BY software_keystore_password;
1.7. Set the master encryption key in the software keystore. SQL> ADMINISTER KEY MANAGEMENT SET KEY IDENTIFIED BY software_keystore_password WITH BACKUP USING 'backup_identifier';
64 © 2015 Gemalto/SafeNet, All rights reserved.
Oracle Database Integration Guide Chapter 9 Integrating Oracle Database 12c with Luna
WITH BACKUP creates a backup of the keystore. You must use this option for password-based keystores. Optionally, you can use the USING clause to add a brief description of the backup. Enclose this description in single quotation marks (' '). This identifier is appended to the named keystore file (for example, ewallet_time_stamp_emp_key_backup.p12, with emp_key_backup being the backup identifier).
1.8. Create a CUSTOMERS table in the database. SQL> CREATE TABLE CUSTOMERS (ID NUMBER(5), NAME VARCHAR(42), CREDIT_LIMIT NUMBER(10));
1.9. Enter some values in the CUSTOMERS table. SQL> INSERT INTO CUSTOMERS VALUES (001, 'George Bailey', 10000); SQL> INSERT INTO CUSTOMERS VALUES (002, 'Denial Vettory', 20000); SQL> INSERT INTO CUSTOMERS VALUES (003, 'MS Dhoni', 30000); SQL> INSERT INTO CUSTOMERS VALUES (004, 'Shahid Afridi', 40000);
1.10. Encrypt the 'CREDIT_LIMIT' column of the 'CUSTOMERS' table: SQL> ALTER TABLE CUSTOMERS MODIFY (CREDIT_LIMIT ENCRYPT);
1.11. With the next command, the values listed in the encrypted column are returned in clear text; Transparent Data Encryption decrypts them automatically: SQL> SELECT CREDIT_LIMIT FROM CUSTOMERS;
1.12. The next command lists encrypted columns in your database:
SQL> SELECT * FROM DBA_ENCRYPTED_COLUMNS;
1.13. Finally, this view contains information about the software keystore itself: SQL> SELECT * FROM V$ENCRYPTION_WALLET;
1.14. Create an encrypted tablespace:
SQL> CREATE TABLESPACE SECURESPACE DATAFILE '/u01/app/oracle/oradata/orcl/SECURE01.DBF' SIZE 150M ENCRYPTION DEFAULT STORAGE (ENCRYPT);
1.15. Create a table in the tablespace: SQL> CREATE TABLE EMPLOYEE (ID NUMBER(5),NAME VARCHAR(42),SALARY NUMBER(10)) TABLESPACE SECURESPACE;
1.16. Insert some values in EMPLOYEE table: SQL> INSERT INTO EMPLOYEE VALUES (001,'JOHN SMITH',15000); SQL> INSERT INTO EMPLOYEE VALUES (002,'SCOTT TIGER',25000); SQL> INSERT INTO EMPLOYEE VALUES (003,'DIANA HAYDEN',35000);
1.17. Display the contents of the EMPLOYEE table with the following command:
© 2015 Gemalto/SafeNet, All rights reserved. 65
Oracle Database Integration Guide Chapter 9 Integrating Oracle Database 12c with Luna
SQL> SELECT * FROM EMPLOYEE;
1.18. Close the keystore: SQL> ADMINISTER KEY MANAGEMENT SET KEYSTORE CLOSE IDENTIFIED BY software_keystore_password;
1.19. After closing the keystore execute the command to display the contents again: SQL> SELECT * FROM EMPLOYEE; You will get the following error that means you cannot list the contents of EMPLOYEE table, if keystore is closed. ERROR at line 1: ORA-28365: wallet is not open
1.20. Open the keystore: SQL> ADMINISTER KEY MANAGEMENT SET KEYSTORE OPEN IDENTIFIED BY software_keystore_password; SQL> exit
2. Test if the database can reach the HSM device:
2.1. Change your $ORACLE_HOME/network/admin/sqlnet.ora – file:
ENCRYPTION_WALLET_LOCATION = (SOURCE = (METHOD = HSM) (METHOD_DATA = (DIRECTORY = <path to the oracle wallet directory>)))
2.2. $ sqlplus / as sysdba
Connect to the database as 'system': SQL> connect system/<password> 2.3. Migrate the wallet onto the HSM device:
SQL> ADMINISTER KEY MANAGEMENT SET ENCRYPTION KEY IDENTIFIED BY "hsm_partition_pwd" MIGRATE USING software_keystore_password WITH BACKUP USING 'backup_identifier';
“hsm_partition_pwd” is the password for the HSM partition where the Master Encryption
Key would be generated. The migrate using software_keystore_password string re-encrypts the Transparent Data Encryption column keys and tablespace keys with the new HSM based master key. The software_keystore_password is the password given the software wallet in step 1.
2.4. With the next command, the values listed in the encrypted column are returned in clear text; Transparent Data Encryption decrypts them automatically, now using the HSM master key:
SQL> SELECT CREDIT_LIMIT FROM CUSTOMERS;
2.5. Change the password of software keystore to same as HSM partition password. SQL> ADMINISTER KEY MANAGEMENT ALTER KEYSTORE PASSWORD IDENTIFIED BY software_keystore_password SET hsm_partition_pwd WITH BACKUP USING ‘backup_identifier';
66 © 2015 Gemalto/SafeNet, All rights reserved.
Oracle Database Integration Guide Chapter 9 Integrating Oracle Database 12c with Luna
From now onwards when you open the keystore, it will open both software-based keystore as well as HSM-based keystore
2.6. Close the keystore: SQL> ADMINISTER KEY MANAGEMENT SET KEYSTORE CLOSE IDENTIFIED BY “hsm_partition_pwd”;
2.7. Open the keystore: SQL> ADMINISTER KEY MANAGEMENT SET KEYSTORE OPEN IDENTIFIED BY “hsm_partition_pwd”;
This opens both the HSM and the software keystore. 2.8. Check the wallet information with the following command:
SQL> SELECT * FROM V$ENCRYPTION_WALLET;
2.9. Change the password back to the initial password for software based wallet (if you want to do) and use the following syntax to create an auto-login keystore for a software keystore:
SQL> ADMINISTER KEY MANAGEMENT CREATE AUTO_LOGIN KEYSTORE FROM KEYSTORE 'keystore_location' IDENTIFIED BY software_keystore_password;
To use the auto-login wallet only on local system use LOCAL AUTO_LOGIN instead of AUTO_LOGIN.
2.10. Verify that an auto-open software keystore has been created in the oracle wallet directory you specified in the sqlnet.ora file: You will find two wallets in this directory: “ewallet.p12” and “cwallet.sso”; the latter is the auto-open wallet. Move or rename the encryption wallet so that oracle use auto-open wallet. # mv ewallet.p12 ewallet.p24
2.11. Restart the database and connect to the database as system and open the HSM keystore
(software wallet will open automatically):
SQL> ADMINISTER KEY MANAGEMENT SET KEYSTORE OPEN IDENTIFIED BY "hsm_partition_pwd”;
3. Create HSM Auto Wallet when HSM and Auto-Open Software wallet is in use: 3.1. Change the sqlnet.ora entries as follows:
ENCRYPTION_WALLET_LOCATION = (SOURCE = (METHOD = FILE) (METHOD_DATA = (DIRECTORY = /etc/oracle/wallet)))
3.2. Rename or move the Auto-Open wallet from the location mentioned in the sqlnet.ora file and move or rename the encryption wallet in to the wallet directory. # mv ewallet.p24 ewallet.p12
3.3. Restart the database and connect as a system.
3.4. Open the software keystore:
© 2015 Gemalto/SafeNet, All rights reserved. 67
Oracle Database Integration Guide Chapter 9 Integrating Oracle Database 12c with Luna
SQL> ADMINISTER KEY MANAGEMENT SET KEYSTORE OPEN IDENTIFIED BY software_keystore_password;
3.5. Add the HSM secret as a client. SQL> ADMINISTER KEY MANAGEMENT ADD SECRET ‘hsm_partition_password’ FOR CLIENT ‘HSM_PASSWORD’ IDENTIFIED BY software_keystore_password WITH BACKUP USING ‘backup_identifier'; The secret is the hardware security module password and the client is the
HSM_PASSWORD. HSM_PASSWORD is an Oracle-defined client name that is used to represent the HSM password as a secret in the software keystore.
3.6. Close the software keystore:
SQL> ADMINISTER KEY MANAGEMENT SET KEYSTORE CLOSE IDENTIFIED BY software_keystore_password;
3.7. Create (or recreate) Auto-Login keystore.
SQL> ADMINISTER KEY MANAGEMENT CREATE AUTO_LOGIN KEYSTORE FROM KEYSTORE '/etc/oracle/wallet' IDENTIFIED BY software_keystore_password;
3.8. Update the sqlnet.ora file to use the hardware security module. SQL> ENCRYPTION_WALLET_LOCATION = (SOURCE = (METHOD = HSM) (METHOD_DATA = (DIRECTORY = /etc/oracle/wallet)))
3.9. Restart the database and connect as a system.
3.10. Check the wallet information with the following command:
SQL> SELECT * FROM V$ENCRYPTION_WALLET;
Generating Master Encryption Key directly onto the HSM
In order to generate a Master Encryption Key for HSM-Based Encryption, perform the following instructions:
It is assumed that no software or HSM based wallet is yet created.
1. Setting up Oracle to create Master Encryption Key onto HSM:
1.1. Add the following to your $ORACLE_HOME/network/admin/sqlnet.ora – file: ENCRYPTION_WALLET_LOCATION = (SOURCE = (METHOD = HSM))
1.2. Start the database:
$ sqlplus / as sysdba If the database is not yet started, you can start it using: SQL> startup;
1.3. Grant ADMINISTER KEY MANAGEMENT or SYSKM privilege to SYSTEM and any user that you want to use.
68 © 2015 Gemalto/SafeNet, All rights reserved.
Oracle Database Integration Guide Chapter 9 Integrating Oracle Database 12c with Luna
SQL> GRANT ADMINISTER KEY MANAGEMENT TO SYSTEM;
SQL> commit;
1.4. Connect to the database as ‘system’:
SQL> connect system/<password>
Password for ‘system’ can be set during Oracle installation. All dbapasswords throughout this document has been set to “temp123#”.
1.5. Run the ADMINISTER KEY MANAGEMENT SQL statement to open the HSM keystore. SQL> ADMINISTER KEY MANAGEMENT SET KEYSTORE OPEN IDENTIFIED BY "hsm_partition_password";
1.6. Set the master encryption key in the software keystore. SQL> ADMINISTER KEY MANAGEMENT SET KEY IDENTIFIED BY "hsm_partition_password"; You can see the HSM partition contents to verify the generated keys on HSM, below is the snapshot of HSM partition contents: -------------------------------------------------------------------------------------------------------------------------- Partition Name: part7 Partition SN: 152042028 Storage (Bytes): Total=102701, Used=1848, Free=100853 Number objects: 5 Object Label: ORACLE.TDE.HSM.MK.0661286A8C71864F2ABF7891D044154D9A Object Type: Symmetric Key Object Label: DATA_OBJECT_SUPPORTED_IDEN Object Type: Data Object Label: ORACLE.SECURITY.KM.ENCRYPTION.30363631323836413843373138363446324142463738393144303434313534443941 Object Type: Data Object Label: DATA_OBJECT_SUPPORTED_IDEN Object Type: Data Object Label: ORACLE.TSE.HSM.MK.072AC159D9153C4FF0BF3BF931ED9693850203 Object Type: Symmetric Key
----------------------------------------------------------------------------------------------------------------------------- 1.7. Create a CUSTOMERS table in the database.
SQL> CREATE TABLE CUSTOMERS (ID NUMBER(5), NAME VARCHAR(42), CREDIT_LIMIT NUMBER(10));
1.8. Enter some values in the CUSTOMERS table. SQL> INSERT INTO CUSTOMERS VALUES (001, 'George Bailey', 10000); SQL> INSERT INTO CUSTOMERS VALUES (002, 'Denial Vettory', 20000); SQL> INSERT INTO CUSTOMERS VALUES (003, 'MS Dhoni', 30000); SQL> INSERT INTO CUSTOMERS VALUES (004, 'Shahid Afridi', 40000);
© 2015 Gemalto/SafeNet, All rights reserved. 69
Oracle Database Integration Guide Chapter 9 Integrating Oracle Database 12c with Luna
1.9. Encrypt the 'CREDIT_LIMIT' column of the 'CUSTOMERS' table: SQL> ALTER TABLE CUSTOMERS MODIFY (CREDIT_LIMIT ENCRYPT);
1.10. With the next command, the values listed in the encrypted column are returned in clear text; Transparent Data Encryption decrypts them automatically:
SQL> SELECT CREDIT_LIMIT FROM CUSTOMERS;
1.11. The next command lists encrypted columns in your database:
SQL> SELECT * FROM DBA_ENCRYPTED_COLUMNS;
1.12. Finally, this view contains information about the software keystore itself: SQL> SELECT * FROM V$ENCRYPTION_WALLET;
1.13. Create an encrypted tablespace:
SQL> CREATE TABLESPACE SECURESPACE DATAFILE '/u01/app/oracle/oradata/orcl/SECURE01.DBF' SIZE 150M ENCRYPTION DEFAULT STORAGE (ENCRYPT);
1.14. Create a table in the tablespace: SQL> CREATE TABLE EMPLOYEE (ID NUMBER(5),NAME VARCHAR(42),SALARY NUMBER(10)) TABLESPACE SECURESPACE;
1.15. Insert some values in EMPLOYEE table: SQL> INSERT INTO EMPLOYEE VALUES (001,'JOHN SMITH',15000); SQL> INSERT INTO EMPLOYEE VALUES (002,'SCOTT TIGER',25000); SQL> INSERT INTO EMPLOYEE VALUES (003,'DIANA HAYDEN',35000);
1.16. Display the contents of the EMPLOYEE table with the following command: SQL> SELECT * FROM EMPLOYEE;
1.17. Close the keystore: SQL> ADMINISTER KEY MANAGEMENT SET KEYSTORE CLOSE IDENTIFIED BY “hsm_partition_password”;
1.18. After closing the keystore execute the command to display the contents again: SQL> SELECT * FROM EMPLOYEE; You will get the following error that means you cannot list the contents of EMPLOYEE table, if keystore is closed. ERROR at line 1: ORA-28365: wallet is not open
1.19. Open the keystore: SQL> ADMINISTER KEY MANAGEMENT SET KEYSTORE OPEN IDENTIFIED BY “hsm_partition_password”; SQL> exit
70 © 2015 Gemalto/SafeNet, All rights reserved.
Oracle Database Integration Guide Chapter 9 Integrating Oracle Database 12c with Luna
2. Create HSM Auto Wallet
2.1. Close the hardware security module if it is open.
SQL> ADMINISTER KEY MANAGEMENT SET KEYSTORE CLOSE IDENTIFIED BY "hsm_partition_password";
2.2. Change the sqlnet.ora entries as follows: ENCRYPTION_WALLET_LOCATION = (SOURCE = (METHOD = FILE) (METHOD_DATA = (DIRECTORY = /etc/oracle/wallet)))
2.3. Create the software keystore in the appropriate location (for example, /etc/oracle/wallet).
SQL> ADMINISTER KEY MANAGEMENT CREATE KEYSTORE '/etc/oracle/wallet' IDENTIFIED BY software_keystore_password;
2.4. Open the software keystore:
SQL> ADMINISTER KEY MANAGEMENT SET KEYSTORE OPEN IDENTIFIED BY software_keystore_password;
2.5. Add the HSM secret as a client. SQL> ADMINISTER KEY MANAGEMENT ADD SECRET 'hsm_partition_password' FOR CLIENT 'HSM_PASSWORD' IDENTIFIED BY software_keystore_password WITH BACKUP USING ‘backup_identifier';
2.6. Close the software keystore:
SQL> ADMINISTER KEY MANAGEMENT SET KEYSTORE CLOSE IDENTIFIED BY software_keystore_password;
2.7. Create Auto-Login keystore.
SQL> ADMINISTER KEY MANAGEMENT CREATE AUTO_LOGIN KEYSTORE FROM KEYSTORE '/etc/oracle/wallet' IDENTIFIED BY software_keystore_password;
2.8. Update the sqlnet.ora file to use the hardware security module. ENCRYPTION_WALLET_LOCATION = (SOURCE = (METHOD = HSM) (METHOD_DATA = (DIRECTORY = /etc/oracle/wallet))) At this stage, close the wallet and open it one more time and the next time when a TDE operation executes, the hardware security module auto-login keystore opens automatically.
2.9. Restart the database and connect as a system.
2.10. Check the wallet information with the following command:
SQL> SELECT * FROM V$ENCRYPTION_WALLET;
© 2015 Gemalto/SafeNet, All rights reserved. 71
Oracle Database Integration Guide Chapter 9 Integrating Oracle Database 12c with Luna
Working with Pluggable Databases (PDB) A new feature for Oracle Database 12c is Multitenant Architecture, Oracle Multitenant delivers a new architecture that allows a multitenant container database to hold many pluggable databases. The multitenant architecture enables an Oracle database to function as a multitenant container database (CDB) that includes zero, one, or many customer-created pluggable databases (PDBs). A PDB is a portable collection of schemas, schema objects, and non-schema objects that appears to an Oracle Net client as a non-CDB. All Oracle databases before Oracle Database 12c were non-CDBs. About Containers in a CDB A container is either a PDB or the root container (also called the root). The root is a collection of schemas, schema objects, and non-schema objects to which all PDBs belong. Every CDB has the following containers: • Exactly one root: The root stores Oracle-supplied metadata and common users. A common user is a database user known in every container. The root container is named CDB$ROOT. • Exactly one seed PDB: The seed PDB is a system-supplied template that the CDB can use to create new PDBs. The seed PDB is named PDB$SEED. You cannot add or modify objects in PDB$SEED. • Zero or more user-created PDBs: A PDB is a user-created entity that contains the data and code required for a specific set of features. For example, a PDB can support a specific application, such as a human resources or sales application. No PDBs exist at creation of the CDB. You add PDBs based on your business requirements. Managing Pluggable Databases Purpose of PDBs You can use PDBs to achieve the following goals:
• Store data specific to a particular application
For example, a sales application can have its own dedicated PDB, and a human resources application can have its own dedicated PDB.
• Move data into a different CDB
A database is "pluggable" because you can package it as a self-contained unit, and then move it into another CDB.
• Isolate grants within PDBs
A local or common user with appropriate privileges can grant EXECUTE privileges on a package to PUBLIC within an individual PDB.
There are several ways to create a PDB but the most preferred one is to use DBCA utility. It is assumed that you have already created PDBs. For demonstrated purpose in this guide we are using the PDB with named “salespdb”.
72 © 2015 Gemalto/SafeNet, All rights reserved.
Oracle Database Integration Guide Chapter 9 Integrating Oracle Database 12c with Luna
TDE in Pluggable Databases Below are the steps to use TDE with Pluggable Databses:
1. Edit the tnsnames.ora file to add a new service for the newly created PDB. By default, the tnsnames.ora file is located in the ORACLE_HOME/network/admin directory or in the location set by the TNS_ADMIN environment variable. Ensure that you have properly set the TNS_ADMIN environment variable to point to the correct tnsnames.ora file.
For Example:
salespdb = (DESCRIPTION = (ADDRESS = (PROTOCOL = TCP)(HOST = localhost)(PORT = 1521)) (CONNECT_DATA = (SERVER = DEDICATED) (SERVICE_NAME = salespdb.localdomain) ) ) Where, salespdb is the new Pluggable database name.
2. Restart the Listener Service.
lsnrctl stop lsnrctl start
3. Start the sqlplus session to connect to PDB.
sqlplus / as sysdba SQL> alter pluggable database all open read write; Pluggable database altered. SQL> Connect system/<system_password>@Pluggable Database Service name For Example: SQL> connect system/temp123#@salespdb Connected.
4. Run the below grant commands to PDB Admin: SQL> GRANT ADMINISTER KEY MANAGEMENT TO salesadm; Grant succeeded. SQL> GRANT CREATE SESSION TO salesadm; Grant succeeded. SQL> GRANT CONNECT TO salesadm; Grant succeeded. SQL> GRANT DBA TO salesadm; Grant succeeded.
© 2015 Gemalto/SafeNet, All rights reserved. 73
Oracle Database Integration Guide Chapter 9 Integrating Oracle Database 12c with Luna
SQL> GRANT CREATE ANY TABLE TO salesadm; Grant succeeded. SQL> GRANT UNLIMITED TABLESPACE TO salesadm; Grant succeeded. SQL> ALTER USER salesadm PROFILE DEFAULT; User altered. SQL> commit; Commit complete.
Where, salesadm is the administrative user name created at the time of creating PDB.
5. Try connecting to PDB with PDB username and you should be able to connect it:
SQL> Connect pdbuser/<system_password>@Pluggable Database Service name For Example: SQL> connect salesadm/temp123#@salespdb Connected.
Generating TDE Master Encryption Key for PDB
1. Add the following to your $ORACLE_HOME/network/admin/sqlnet.ora – file: ENCRYPTION_WALLET_LOCATION = (SOURCE = (METHOD = HSM))
2. Start the sqlplus session to connect to PDB.
sqlplus / as sysdba SQL> Connect <pdb_admin>/<pdb_admin_password>@Pluggable Database Service name For Example: SQL> connect salesadm/temp123#@salespdb Connected
3. Run the ADMINISTER KEY MANAGEMENT SQL statement using the following syntax:
ADMINISTER KEY MANAGEMENT SET KEYSTORE OPEN IDENTIFIED BY “hsm_partition_password";
For example:
SQL> ADMINISTER KEY MANAGEMENT SET KEYSTORE OPEN IDENTIFIED BY "userpin2"; keystore altered.
74 © 2015 Gemalto/SafeNet, All rights reserved.
Oracle Database Integration Guide Chapter 9 Integrating Oracle Database 12c with Luna
Please make sure that keystore for CDB (root container) is opened and Master key for CDB is generated before opening the keystore and generating the Master key for PDB. Also do not configure HSM auto login for CDB until you generate the master key for PDB (all PDB in case multiple PDB are using the TDE). After generating the Master key for all PDBs you can configure the CDB for auto login and it will work for all PDBs as well.
4. Run the following SQL statement to create the PDB Master key:
ADMINISTER KEY MANAGEMENT SET KEY IDENTIFIED BY "hsm_partition_password";
For example: SQL> ADMINISTER KEY MANAGEMENT SET KEY IDENTIFIED BY "userpin2"; keystore altered.
This will generate a new master key and from now onwards any encryption/decryption operations performed within this pdb will use this master key. For example execute the following queries:
5. Create a CUSTOMERS table in the PDB.
SQL> CREATE TABLE CUSTOMERS (ID NUMBER(5), NAME VARCHAR(42), CREDIT_LIMIT NUMBER(10));
6. Enter some values in the CUSTOMERS table.
SQL> INSERT INTO CUSTOMERS VALUES (001, 'George Bailey', 10000);
SQL> INSERT INTO CUSTOMERS VALUES (002, 'Denial Vettory', 20000);
7. Encrypt the 'CREDIT_LIMIT' column of the 'CUSTOMERS' table:
SQL> ALTER TABLE CUSTOMERS MODIFY (CREDIT_LIMIT ENCRYPT);
8. With the next command, the values listed in the encrypted column are returned in clear text; Transparent Data Encryption decrypts them automatically:
SQL> SELECT CREDIT_LIMIT FROM CUSTOMERS;
9. The next command lists encrypted columns in your databases:
SQL> SELECT * FROM DBA_ENCRYPTED_COLUMNS;
10. Create an encrypted tablespace:
SQL> CREATE TABLESPACE SECURESPACE DATAFILE '/u01/app/oracle/oradata/orcl/salespdb/SECURE01.DBF' SIZE 150M ENCRYPTION DEFAULT STORAGE (ENCRYPT);
11. Create a table in the tablespace:
SQL> CREATE TABLE EMPLOYEE (ID NUMBER(5),NAME VARCHAR(42),SALARY NUMBER(10)) TABLESPACE SECURESPACE;
12. Insert some values in EMPLOYEE table: SQL> INSERT INTO EMPLOYEE VALUES (001,'JOHN SMITH',15000); SQL> INSERT INTO EMPLOYEE VALUES (002,'SCOTT TIGER',25000);
© 2015 Gemalto/SafeNet, All rights reserved. 75
Oracle Database Integration Guide Chapter 9 Integrating Oracle Database 12c with Luna
SQL> INSERT INTO EMPLOYEE VALUES (003,'DIANA HAYDEN',35000);
13. Display the contents of the EMPLOYEE table with the following command:
SQL> SELECT * FROM EMPLOYEE;
14. Close the keystore:
SQL> ADMINISTER KEY MANAGEMENT SET KEYSTORE CLOSE IDENTIFIED BY “hsm_partition_password”;
15. After closing the keystore execute the command to display the contents again:
SQL> SELECT * FROM EMPLOYEE;
You will get the following error that means you cannot list the contents of EMPLOYEE table, if keystore is closed.
ERROR at line 1: ORA-28365: wallet is not open
16. Open the keystore:
SQL> ADMINISTER KEY MANAGEMENT SET KEYSTORE OPEN IDENTIFIED BY “hsm_partition_password”;
The above queries are same as we did for root container but it will use the Master Encryption Key of PDB generated on HSM.
76 © 2015 Gemalto/SafeNet, All rights reserved.
Oracle Database Integration Guide Chapter 10 Troubleshooting Tips
Chapter 10 Troubleshooting Tips
Problem: Error message “ORA-43000: PKCS11: library not found” or “ORA-28376: cannot find PKCS11 library” when trying to generate Master Key on HSM or migrate keys from wallet to HSM.
1. Make sure that library path is set correctly, for example:
/opt/oracle/extapi/[32/64]/HSM/[x.x.x]/libcryptoki2_64.so
2. Ensure that oracle : oinstall is the owner : group of this directory with read/write permissions.
3. Make sure that 64-bit JVM is running on the machine on which we are using 64 bit client
because 32 bit JVM would not able to use the 64 bit library.
Problem: Error message in PDB database “ORA-46627: keystore password mismatch” when trying to open the keystore or generating Master Key on HSM.
1. Make sure that the provided HSM password is correct.
2. Ensure that HSM Auto_Login or Local_Auto_Login is not enabled for the CDB, if it
enabled then please use encryption wallet instead of auto wallet in CDB then perform this operation in PDB. After generating the Master Key for PDB you can enable the Auto_Login again in CDB and it works for all PDBs as well.
© 2015 Gemalto/SafeNet, All rights reserved. 77