Embed Size (px)
Citation preview
Oracle® Application Integration ArchitectureInstallation and Upgrade Guide for Pre-Built Integrations
Release 11.3
E28316-03
April 2013
Documentation for administrators that describes the installation, configuration and deployment process for the integrations released in Oracle Application Integration Architecture (AIA) Pre-Built Integrations 11.3, including Communications Pre-Built Integrations, Master Data Management (MDM) Pre-Built Integrations, Agile Product Lifecycle Management (PLM) Pre-Built Integrations as well as 3.1.1 Process Integration Packs (PIP) and Direct Integrations (DI). This guide provides an overview of the installation process for the AIA media pack, the software requirements for each integration as well as detailed steps to complete the install process successfully. Each integration has a specific configuration and deployment chapter for easy reference. The upgrade and uninstall steps are located in the final chapters of this guide.
Oracle Application Integration Architecture Installation and Upgrade Guide for Pre-Built Integrations, Release 11.3
E28316-03
Copyright © 2001, 2013, Oracle and/or its affiliates. All rights reserved.
Primary Author: Oracle Corporation
This software and related documentation are provided under a license agreement containing restrictions on use and disclosure and are protected by intellectual property laws. Except as expressly permitted in your license agreement or allowed by law, you may not use, copy, reproduce, translate, broadcast, modify, license, transmit, distribute, exhibit, perform, publish, or display any part, in any form, or by any means. Reverse engineering, disassembly, or decompilation of this software, unless required by law for interoperability, is prohibited.
The information contained herein is subject to change without notice and is not warranted to be error-free. If you find any errors, please report them to us in writing.
If this is software or related documentation that is delivered to the U.S. Government or anyone licensing it on behalf of the U.S. Government, the following notice is applicable:
U.S. GOVERNMENT END USERS: Oracle programs, including any operating system, integrated software, any programs installed on the hardware, and/or documentation, delivered to U.S. Government end users are "commercial computer software" pursuant to the applicable Federal Acquisition Regulation and agency-specific supplemental regulations. As such, use, duplication, disclosure, modification, and adaptation of the programs, including any operating system, integrated software, any programs installed on the hardware, and/or documentation, shall be subject to license terms and license restrictions applicable to the programs. No other rights are granted to the U.S. Government.
This software or hardware is developed for general use in a variety of information management applications. It is not developed or intended for use in any inherently dangerous applications, including applications that may create a risk of personal injury. If you use this software or hardware in dangerous applications, then you shall be responsible to take all appropriate fail-safe, backup, redundancy, and other measures to ensure its safe use. Oracle Corporation and its affiliates disclaim any liability for any damages caused by use of this software or hardware in dangerous applications.
Oracle and Java are registered trademarks of Oracle and/or its affiliates. Other names may be trademarks of their respective owners.
Intel and Intel Xeon are trademarks or registered trademarks of Intel Corporation. All SPARC trademarks are used under license and are trademarks or registered trademarks of SPARC International, Inc. AMD, Opteron, the AMD logo, and the AMD Opteron logo are trademarks or registered trademarks of Advanced Micro Devices. UNIX is a registered trademark of The Open Group.
This software or hardware and documentation may provide access to or information on content, products, and services from third parties. Oracle Corporation and its affiliates are not responsible for and expressly disclaim all warranties of any kind with respect to third-party content, products, and services. Oracle Corporation and its affiliates will not be responsible for any loss, costs, or damages incurred due to your access to or use of third-party content, products, or services.
iii
Contents
Preface ........................................................................................................................................................... xxxix
What's New in this Guide .................................................................................................................... xxxixCommon Oracle AIA Pre-Built Integration Guides ......................................................................... xxxixDocumentation Accessibility ..................................................................................................................... xlAdditional Resources.................................................................................................................................. xl
What's New in This Guide for Release 11.3 ................................................................................. xli
Part I Installing Pre-Built Integrations and AIA RV 3.1.1 PIPs and DIs
1 Understanding the Installation Process
1.1 Pre-Built Integrations Installation .................................................................................... 1-11.2 Cluster Installation ........................................................................................................... 1-31.3 Pre-Built Integrations Configuration ................................................................................ 1-41.3.1 Routing Rules Configuration in Enterprise Business Services ................................... 1-41.3.2 Installation, Configuration and Deployment Topologies ........................................... 1-51.4 Pre-Built Integrations Deployment .................................................................................. 1-51.4.1 Pre-Built Integrations Codeployment ........................................................................ 1-61.4.2 Pre-Built Integrations Security Policies ...................................................................... 1-61.4.2.1 Default Security Policies ...................................................................................... 1-61.4.2.2 Security Policy Validation ................................................................................... 1-61.4.3 Pre-Built Integrations Un-Deployment ...................................................................... 1-71.5 AIA Master Notes ............................................................................................................. 1-7
2 Software Requirements
2.1 Comms Agent Assisted Billing Care: SBL CRM - BRM Pre-Built Integration .................. 2-32.2 Comms Revenue Accounting: BRM - EBS Pre-Built Integration ...................................... 2-32.3 Comms Order to Cash: SBL CRM, OSM, and BRM Pre-Built Integration ........................ 2-42.4 Comms Order to Cash: SBL CRM and BRM Pre-Built Integration ................................... 2-42.5 Comms Order to Cash: SBL CRM and OSM Pre-Built Integration ................................... 2-42.6 Customer MDM Base Pack ............................................................................................... 2-42.7 Customer MDM: Siebel CRM ........................................................................................... 2-52.8 Customer MDM: EBS ....................................................................................................... 2-52.9 Customer MDM: Comms BRM ........................................................................................ 2-52.10 Customer MDM Routing Rules ........................................................................................ 2-5
iv
2.11 Customer MDM: Match Fetch Enterprise Composite Application ................................... 2-62.12 Product MDM: EBS .......................................................................................................... 2-62.13 Product MDM Base Pack .................................................................................................. 2-62.14 Product MDM: Comms BRM ........................................................................................... 2-62.15 Product MDM: Siebel CRM .............................................................................................. 2-62.16 Product MDM Routing Rules ........................................................................................... 2-62.17 Agile Product Lifecycle Management Integration Pack for Oracle E-Business Suite: Design
to Release ......................................................................................................................... 2-72.18 Agile Product Lifecycle Management Integration Pack for SAP ...................................... 2-82.19 Oracle Process Integration Pack for Oracle Utilities Field Work ...................................... 2-92.20 Oracle Customer Data Synchronization Integration Pack for Oracle Utilities Customer
Care and Billing and Siebel Energy ................................................................................. 2-92.21 Oracle Product Data Synchronization Integration Pack for Oracle Utilities Customer Care
and Billing and Siebel Energy ......................................................................................... 2-92.22 Design to Release: Agile PLM for Process - OPM PIP .................................................... 2-102.23 Order to Cash: Siebel CRM - EBS PIP ............................................................................. 2-102.24 Siebel CRM to OIC Integration ....................................................................................... 2-122.25 Lead to Order: CRM OD - EBS PIP ................................................................................. 2-132.26 Financials Ops Control: Oracle Retail - PSFT PIP ........................................................... 2-152.27 LSP Financial Mgmt: OTM - EBS PIP ............................................................................. 2-162.28 LSP Order Mgmt: OTM - EBS - Siebel CRM PIP ............................................................ 2-172.29 LSP Driver Mgmt: OTM - EBS PIP ................................................................................. 2-182.30 Value Chain Planning Integration Base Pack ................................................................. 2-192.31 Project Portfolio Mgmt: Primavera P6 - JDE E1 .............................................................. 2-192.32 Serialization and Tracking: OPSM - EBS ........................................................................ 2-20
3 Installing Pre-Built Integrations
3.1 Prerequisites ..................................................................................................................... 3-13.2 Using the Oracle AIA Pre-Built Integrations Installer ...................................................... 3-23.3 Pre-Built Integrations 11.3 and AIA RV 3.1.1 PIPs and DIs Delivered in this Release ...... 3-23.3.1 Pre-Built Integrations Delivered in this Release ........................................................ 3-33.3.2 AIA RV 3.1.1 PIPs and DIs Delivered in this Release ................................................. 3-43.4 How to Create Backups of your Customizations ............................................................. 3-53.5 Preinstallation Configuration ........................................................................................... 3-53.5.1 Design to Release: Agile - EBS Pre-Built Integration .................................................. 3-53.5.1.1 Installing Variant Management ........................................................................... 3-63.5.2 LSP Financial Mgmt: OTM - EBS PIP ......................................................................... 3-63.5.3 LSP Order Mgmt: OTM - EBS - Siebel CRM PIP ........................................................ 3-73.5.4 LSP Driver Mgmt: OTM - EBS PIP ............................................................................. 3-73.5.5 Value Chain Planning Integration Base Pack ............................................................. 3-73.6 How to Install the Pre-Built Integrations and AIA RV 3.1.1 PIPs and DIs ....................... 3-7
Part II Configuring and Deploying Pre-Built Integrations
4 Configuring and Deploying the Comms Agent Assisted Billing Care: SBL CRM - BRM Pre-Built Integration
4.1 Creating Oracle Data Integrator Repositories .................................................................. 4-1
v
4.2 Deployment Configuration Wizard .................................................................................. 4-24.2.1 Integration Server Details Screen ............................................................................... 4-24.2.2 Siebel CRM Server Details Screen .............................................................................. 4-24.2.3 Siebel CRM Database Details Screen .......................................................................... 4-34.2.4 Oracle Communications BRM Screen ........................................................................ 4-44.2.5 Oracle Data Integrator Access Information Details Screens ....................................... 4-44.2.6 Oracle Data Integrator Master Repository Details Screen .......................................... 4-54.2.7 Oracle Data Integrator Work Repository Details for Agent Assisted Billing Care
Screen ......................................................................................................................... 4-64.2.8 Session Pool Manager Details Screen ......................................................................... 4-64.3 Configuring and Deploying the Comms Agent Assisted Billing Care: SBL CRM - BRM
Pre-Built Integration ......................................................................................................... 4-74.3.1 Configuring the Comms Agent Assisted Billing Care: SBL CRM - BRM Pre-Built
Integration ................................................................................................................. 4-74.3.1.1 Specify Integration Server Details ....................................................................... 4-74.3.1.2 Specify Siebel CRM Server Details ...................................................................... 4-84.3.1.3 Specify Siebel CRM Database Details .................................................................. 4-84.3.1.4 Specify Oracle Communications BRM Details ..................................................... 4-84.3.1.5 Specify Oracle Data Integrator Access Details ..................................................... 4-84.3.1.6 Specify Oracle Data Integrator Master Repository Details .................................. 4-84.3.1.7 Specify Oracle Data Integrator Work Repository Details .................................... 4-94.3.1.8 Complete Configuration ...................................................................................... 4-94.3.2 Configuring using the Response File ......................................................................... 4-94.3.3 Deploying Mandatory Patches ................................................................................. 4-104.3.4 Deploying the Comms Agent Assisted Billing Care: SBL CRM - BRM Pre-Built
Integration ............................................................................................................... 4-104.4 Performing Postdeployment Configurations ................................................................. 4-114.4.1 Suppressing Auto-Retry and Preventing Multiple Error Notifications and Trouble
Tickets ...................................................................................................................... 4-114.4.2 Deploying Mandatory Patches ................................................................................. 4-114.5 Verifying Deployment .................................................................................................... 4-124.5.1 Error Messages During Comms Agent Assisted Billing Care: SBL CRM - BRM
Pre-Built Integration Deployment ............................................................................ 4-144.5.1.1 Failed to execute: Create user xxxxx identified by yyyyy .................................. 4-144.5.1.2 Unique Constraint Violation ............................................................................. 4-144.5.2 Validating Security Policies ..................................................................................... 4-154.6 Undeploying the Comms Agent Assisted Billing Care: SBL CRM - BRM Pre-Built
Integration ...................................................................................................................... 4-16
5 Configuring and Deploying the Comms Revenue Accounting: BRM - EBS Pre-Built Integration
5.1 Creating Oracle Data Integrator Repositories ................................................................... 5-15.2 Deployment Configuration Wizard .................................................................................. 5-25.2.1 Integration Server Details Screen ............................................................................... 5-25.2.2 Oracle E-Business Suite Server Details Screen ........................................................... 5-25.2.3 Oracle E-Business Suite Database Details Screen ....................................................... 5-35.2.4 Oracle Communications BRM Screen ........................................................................ 5-35.2.5 Oracle Data Integrator Access Information Details Screens ....................................... 5-4
vi
5.2.6 Oracle Data Integrator Master Repository Details Screen .......................................... 5-55.2.7 Oracle Data Integrator Work Repository Details for Revenue Accounting Screen .... 5-65.3 Configuring and Deploying the Comms Revenue Accounting: BRM - EBS Pre-Built
Integration ........................................................................................................................ 5-65.3.1 Configuring the Comms Revenue Accounting: BRM - EBS Pre-Built Integration ..... 5-65.3.1.1 Specify Integration Server Details ....................................................................... 5-75.3.1.2 Specify Oracle E-Business Suite Server Details ................................................... 5-75.3.1.3 Specify Oracle E-Business Suite Database Details ............................................... 5-75.3.1.4 Specify Oracle Communications BRM Details .................................................... 5-75.3.1.5 Specify Oracle Data Integrator Access Details ..................................................... 5-75.3.1.6 Specify Oracle Data Integrator Master Repository Details .................................. 5-85.3.1.7 Specify Oracle Data Integrator Work Repository Details .................................... 5-85.3.1.8 Complete Configuration ...................................................................................... 5-85.3.2 Configuring using the Response File ......................................................................... 5-95.3.3 Deploying the Comms Revenue Accounting: BRM - EBS Pre-Built Integration ........ 5-95.4 Verifying Deployment .................................................................................................... 5-105.4.1 Error Messages During Comms Revenue Accounting: BRM - EBS Pre-Built Integration
Deployment ............................................................................................................. 5-105.4.1.1 Failed to execute: Create user xxxxx identified by yyyyy .................................. 5-115.4.1.2 Unique Constraint Violation ............................................................................. 5-115.5 Undeploying the Comms Revenue Accounting: BRM - EBS Pre-Built Integration ........ 5-11
6 Configuring and Deploying the Comms Order to Cash: SBL CRM, OSM, and BRM Pre-Built Integration
6.1 Deployment Configuration Wizard ................................................................................. 6-16.1.1 Integration Server Details Screen ............................................................................... 6-16.1.2 Siebel CRM Server Details Screen .............................................................................. 6-26.1.3 Siebel CRM Database Details Screen ......................................................................... 6-36.1.4 Oracle Communications BRM Screen ........................................................................ 6-36.1.5 Oracle OSM Server Details Screen ............................................................................ 6-46.1.6 Session Pool Manager Details Screen ......................................................................... 6-56.2 Performing Predeployment Configurations ..................................................................... 6-56.2.1 Configuring the Timeout Values ............................................................................... 6-66.3 Configuring and Deploying the Comms Order to Cash: SBL CRM, OSM, and BRM
Pre-Built Integration ......................................................................................................... 6-66.3.1 Configuring the Comms Order to Cash: SBL CRM, OSM, and BRM Pre-Built
Integration ................................................................................................................. 6-66.3.1.1 Specify Integration Server Details ....................................................................... 6-76.3.1.2 Specify Siebel CRM Server Details ...................................................................... 6-76.3.1.3 Specify Siebel CRM Database Details .................................................................. 6-76.3.1.4 Specify Oracle Communications BRM Details .................................................... 6-76.3.1.5 Specify Oracle OSM Server Details ..................................................................... 6-76.3.1.6 Complete Configuration ...................................................................................... 6-86.3.2 Configuring Using the Response File ........................................................................ 6-86.3.3 Deploying Mandatory Patches .................................................................................. 6-86.3.4 Deploying the Comms Order to Cash: SBL CRM, OSM, and BRM Pre-Built Integration
6-96.4 Performing Postdeployment Configurations ................................................................... 6-9
vii
6.4.1 Adding Singleton property to ProcessFulfillmentOrderBillingAccountListOSMCFSCommsJMSConsumer Service .....6-10
6.4.2 Suppressing Auto-Retry and Preventing Multiple Error Notifications and Trouble Tickets ..................................................................................................................... 6-10
6.4.3 Supporting Message Priority ................................................................................... 6-116.4.4 Updating Internal ID for the BRM Instance BRM_01 ............................................... 6-126.4.5 Adding Security Policy to the
QueryProductClassAndAttributesSCECommsReqABCSImpl Service .................... 6-126.4.6 Setting up the AIA FMW Server .............................................................................. 6-136.4.7 Deploying Mandatory Patches ................................................................................. 6-146.5 Verifying Deployment .................................................................................................... 6-146.5.1 Validating Security Policies ..................................................................................... 6-166.6 Undeploying the Comms Order to Cash: SBL CRM, OSM, and BRM Pre-Built Integration .
6-18
7 Configuring and Deploying the Comms Order to Cash: SBL CRM and BRM Pre-Built Integration
7.1 Deployment Configuration Wizard .................................................................................. 7-17.1.1 Integration Server Details Screen ............................................................................... 7-27.1.2 Siebel CRM Server Details Screen .............................................................................. 7-27.1.3 Siebel CRM Database Details Screen .......................................................................... 7-37.1.4 Oracle Communications BRM Screen ........................................................................ 7-37.1.5 Session Pool Manager Details Screen ......................................................................... 7-47.2 Performing Predeployment Configurations ..................................................................... 7-47.2.1 Configuring the Timeout Values ................................................................................ 7-47.3 Configuring and Deploying the Comms Order to Cash: SBL CRM and BRM Pre-Built
Integration ........................................................................................................................ 7-57.3.1 Configuring the Comms Order to Cash: SBL CRM and BRM Pre-Built Integration .. 7-57.3.1.1 Specify Integration Server Details ....................................................................... 7-67.3.1.2 Specify Siebel CRM Server Details ...................................................................... 7-67.3.1.3 Specify Siebel CRM Database Details .................................................................. 7-67.3.1.4 Specify Oracle Communications BRM Details ..................................................... 7-67.3.1.5 Complete Configuration ...................................................................................... 7-67.3.2 Configuring using the Response File ......................................................................... 7-77.3.3 Deploying Mandatory Patches ................................................................................... 7-77.3.4 Deploying the Comms Order to Cash: SBL CRM and BRM Pre-Built Integration ..... 7-77.4 Performing Postdeployment Configurations ................................................................... 7-87.4.1 Suppressing Auto-Retry and Preventing Multiple Error Notifications and Trouble
Tickets ........................................................................................................................ 7-87.4.2 Supporting Message Priority ..................................................................................... 7-97.4.3 Updating Internal ID for the BRM Instance BRM_01 ............................................... 7-107.4.4 Setting up the AIA FMW Server .............................................................................. 7-117.4.5 Deploying Mandatory Patches ................................................................................. 7-117.5 Verifying Deployment .................................................................................................... 7-117.5.1 Validating Security Policies ..................................................................................... 7-137.6 Undeploying the Comms Order to Cash: SBL CRM and BRM Pre-Built Integration ..... 7-157.7 Replacing Test Order Orchestration with your Order Management System .................. 7-15
viii
8 Configuring and Deploying the Comms Order to Cash: SBL CRM and OSM Pre-Built Integration
8.1 Deployment Configuration Wizard ................................................................................. 8-18.1.1 Integration Server Details Screen ............................................................................... 8-18.1.2 Siebel CRM Server Details Screen .............................................................................. 8-28.1.3 Siebel CRM Database Details Screen ......................................................................... 8-38.1.4 Oracle OSM Server Details Screen ............................................................................. 8-38.1.5 Session Pool Manager Details Screen ......................................................................... 8-48.2 Configuring and Deploying the Comms Order to Cash: SBL CRM and OSM Pre-Built
Integration ........................................................................................................................ 8-58.2.1 Configuring the Comms Order to Cash: SBL CRM and OSM Pre-Built Integration .. 8-58.2.1.1 Specify Integration Server Details ....................................................................... 8-68.2.1.2 Specify Siebel CRM Server Details ...................................................................... 8-68.2.1.3 Specify Siebel CRM Database Details .................................................................. 8-68.2.1.4 Specify Oracle OSM Server Details ..................................................................... 8-68.2.1.5 Complete Configuration ...................................................................................... 8-68.2.2 Configuring using the Response File ......................................................................... 8-78.2.3 Deploying Mandatory Patches .................................................................................. 8-78.2.4 Deploying the Comms Order to Cash: SBL CRM and OSM Pre-Built Integration ..... 8-78.3 Performing Postdeployment Configurations ................................................................... 8-88.3.1 Suppressing Auto-Retry and Preventing Multiple Error Notifications and Trouble
Tickets ........................................................................................................................ 8-88.3.2 Supporting Message Priority ..................................................................................... 8-98.3.3 Adding Security Policy to the
QueryProductClassAndAttributesSCECommsReqABCSImpl Service .................... 8-108.3.4 Setting up the AIA FMW Server .............................................................................. 8-108.3.5 Deploying Mandatory Patches ................................................................................ 8-118.4 Verifying Deployment .................................................................................................... 8-128.4.1 Validating Security Policies ..................................................................................... 8-138.5 Undeploying the Comms Order to Cash: SBL CRM and OSM Pre-Built Integration ..... 8-14
9 Configuring and Deploying Customer MDM Base Pack
9.1 Deployment Configuration Wizard ................................................................................. 9-19.1.1 Integration Server Details Screen ............................................................................... 9-19.1.2 Oracle Customer Hub (OCH) Screen ......................................................................... 9-29.2 Overall Configuration and Deployment of MDM Customer Integrations ....................... 9-29.3 Configuring and Deploying the Customer MDM Base Pack ............................................ 9-39.3.1 Configuring the Customer MDM Base Pack .............................................................. 9-39.3.1.1 Specify Integration Server Details ....................................................................... 9-39.3.1.2 Specify Oracle Customer Hub Server Details ...................................................... 9-49.3.1.3 Complete Configuration ...................................................................................... 9-49.3.2 Configuring using the Response File ......................................................................... 9-49.3.3 Deploying the Customer MDM Base Pack ................................................................. 9-59.4 Verifying Deployment ...................................................................................................... 9-59.4.1 Validating Security Policies ....................................................................................... 9-69.5 Undeploying Customer MDM Base Pack ......................................................................... 9-7
ix
10 Configuring and Deploying Customer MDM: Siebel CRM
10.1 Deployment Configuration Wizard ................................................................................ 10-110.1.1 Integration Server Details Screen ............................................................................. 10-110.1.2 Siebel CRM Server Details Screen ............................................................................ 10-210.1.3 Siebel CRM Database Details Screen ........................................................................ 10-210.2 Session Pool Manager Details Screen ............................................................................. 10-310.3 Overall Configuration and Deployment of MDM Customer Integrations ..................... 10-310.4 Configuring and Deploying Customer MDM: Siebel CRM ............................................ 10-410.4.1 Configuring Customer MDM: Siebel CRM .............................................................. 10-410.4.1.1 Specify Integration Server Details ..................................................................... 10-510.4.1.2 Specify Siebel CRM Server Details .................................................................... 10-510.4.1.3 Specify Siebel CRM Database Details ................................................................ 10-510.4.1.4 Specify Session Pool Manager Details ............................................................... 10-510.4.1.5 Complete Configuration .................................................................................... 10-510.4.2 Configuring using the Response File ....................................................................... 10-610.4.3 Deploying Customer MDM: Siebel CRM ................................................................. 10-610.5 Postdeployment Configuration ...................................................................................... 10-710.6 Verifying Deployment .................................................................................................... 10-710.6.1 Validating Security Policies ..................................................................................... 10-810.7 Undeploying Customer MDM: Siebel CRM ................................................................. 10-10
11 Configuring and Deploying Customer MDM: E-Business Suite
11.1 Deployment Configuration Wizard ................................................................................ 11-111.1.1 Integration Server Details Screen ............................................................................. 11-111.1.2 Oracle E-Business Suite Server Details Screen ......................................................... 11-211.1.3 Oracle E-Business Suite Database Details Screen ..................................................... 11-211.2 Overall Configuration and Deployment of MDM Customer Integrations ..................... 11-311.3 Configuring and Deploying Customer MDM: EBS ........................................................ 11-311.3.1 Configure Customer MDM: EBS .............................................................................. 11-311.3.1.1 Specify Integration Server Details ..................................................................... 11-411.3.1.2 Specify Oracle E-Business Suite Server Details .................................................. 11-411.3.1.3 Specify Oracle E-Business Suite Database Details ............................................. 11-411.3.1.4 Complete Configuration .................................................................................... 11-411.3.2 Configuring using the Response File ....................................................................... 11-511.3.3 Deploying Customer MDM: EBS ............................................................................. 11-511.4 Verifying Deployment .................................................................................................... 11-611.4.1 Validating Security Policies ..................................................................................... 11-711.5 Undeploying Customer MDM: EBS ............................................................................... 11-8
12 Configuring and Deploying Customer MDM: Comms BRM
12.1 Deployment Configuration Wizard ................................................................................ 12-112.1.1 Integration Server Details Screen ............................................................................. 12-112.1.2 Oracle Communications BRM Screen ...................................................................... 12-212.2 Overall Configuration and Deployment of MDM Customer Integrations ..................... 12-212.3 Configuring and Deploying Customer MDM: Comms BRM ......................................... 12-312.3.1 Configure Customer MDM: Comms BRM ............................................................... 12-3
x
12.3.1.1 Specify Integration Server Details ..................................................................... 12-412.3.1.2 Specify Oracle Communications BRM Details .................................................. 12-412.3.1.3 Complete Configuration .................................................................................... 12-412.3.2 Configuring using the Response File ....................................................................... 12-412.3.3 Deploying the Customer MDM: Comms BRM ........................................................ 12-512.4 Verifying Deployment .................................................................................................... 12-612.5 Undeploying the Customer MDM: Comms BRM .......................................................... 12-6
13 Deploying Customer MDM: Routing Rules
13.1 Overall Configuration and Deployment of MDM Customer Integrations ..................... 13-113.2 Deploying Customer MDM: Routing Rules ................................................................... 13-113.3 Verifying Deployment .................................................................................................... 13-213.4 Undeploying Customer MDM: Routing Rules ............................................................... 13-3
14 Deploying Customer MDM: Match Fetch Enterprise Composite Application
14.1 Overall Configuration and Deployment of MDM Customer Integrations ..................... 14-114.2 Deploying Customer MDM: Match Fetch Enterprise Composite Application .............. 14-214.3 Verifying Deployment .................................................................................................... 14-214.4 Undeploying Customer MDM: Match Fetch Enterprise Composite Application .......... 14-3
15 Configuring and Deploying Product MDM Base Pack
15.1 Deployment Configuration Wizard ............................................................................... 15-115.1.1 Integration Server Details Screen ............................................................................. 15-115.1.2 Oracle PIM Server Details Screen ............................................................................ 15-215.1.3 Oracle PIM Database Details Screen ........................................................................ 15-215.2 Performing Predeployment Configurations ................................................................... 15-315.2.1 Configuring the Timeout Values ............................................................................. 15-315.3 Overall Configuration and Deployment of MDM Product Integrations ........................ 15-315.4 Configuring and Deploying the MDM Product Base Pack ............................................. 15-415.4.1 Configuring the MDM Product Base Pack ............................................................... 15-415.4.1.1 Specify Integration Server Details ..................................................................... 15-415.4.1.2 Specify Oracle PIM Server Details ..................................................................... 15-515.4.1.3 Specify Oracle PIM Database Details ................................................................ 15-515.4.1.4 Complete Configuration .................................................................................... 15-515.4.2 Configuring using the Response File ....................................................................... 15-515.4.3 Deploying the MDM Product Base Pack .................................................................. 15-615.5 Performing Postdeployment Configurations ................................................................. 15-715.5.1 Configuring Endpoint URLs for Oracle PIM Web Services ..................................... 15-715.5.2 Suppressing Auto-Retry and Preventing Multiple Error Notifications ................... 15-815.6 Verifying Deployment .................................................................................................... 15-815.6.1 Validating Security Policies ..................................................................................... 15-915.6.2 Validating User Credentials for PublicationService .............................................. 15-1015.7 Undeploying the MDM Product Base Pack .................................................................. 15-10
16 Configuring and Deploying Product MDM: Siebel CRM
16.1 Deployment Configuration Wizard ............................................................................... 16-1
xi
16.1.1 Integration Server Details Screen ............................................................................. 16-116.1.2 Siebel CRM Server Details Screen ............................................................................ 16-216.1.3 Siebel CRM Database Details Screen ........................................................................ 16-216.2 Session Pool Manager Details Screen ............................................................................. 16-316.3 Overall Configuration and Deployment of MDM Product Integrations ........................ 16-316.4 Configuring and Deploying Product MDM: Siebel CRM ............................................... 16-416.4.1 Configure Product MDM: Siebel CRM .................................................................... 16-416.4.1.1 Specify Integration Server Details ..................................................................... 16-416.4.1.2 Specify Siebel CRM Server Details .................................................................... 16-516.4.1.3 Specify Siebel CRM Database Details ................................................................ 16-516.4.1.4 Specify Session Pool Manager Details ............................................................... 16-516.4.1.5 Complete Configuration .................................................................................... 16-516.4.2 Configuring using the Response File ....................................................................... 16-616.4.3 Deploying Product MDM: Siebel CRM .................................................................... 16-616.5 Postdeployment Configuration ...................................................................................... 16-716.5.1 Configuring Session Pool Manager .......................................................................... 16-716.5.2 Updating Product.Source.PIP Property Value ......................................................... 16-716.5.3 Updating Integration Services ................................................................................. 16-716.6 Verifying Deployment .................................................................................................... 16-816.6.1 Validating Security Policies ..................................................................................... 16-916.7 Undeploying Product MDM: Siebel CRM .................................................................... 16-10
17 Configuring and Deploying Product MDM: E-Business Suite
17.1 Deployment Configuration Wizard ................................................................................ 17-117.1.1 Integration Server Details Screen ............................................................................. 17-117.1.2 Oracle E-Business Suite Server Details Screen ......................................................... 17-217.1.3 Oracle E-Business Suite Database Details Screen ..................................................... 17-217.2 Overall Configuration and Deployment of MDM Product Integrations ........................ 17-317.3 Configuring and Deploying Product MDM: EBS ........................................................... 17-317.3.1 Configuring Product MDM: EBS ............................................................................. 17-317.3.1.1 Specify Integration Server Details ..................................................................... 17-417.3.1.2 Specify Oracle E-Business Suite Server Details .................................................. 17-417.3.1.3 Specify Oracle E-Business Suite Database Details ............................................. 17-417.3.1.4 Complete Configuration .................................................................................... 17-417.3.2 Configuring using the Response File ....................................................................... 17-517.3.3 Deploying Product MDM: EBS ................................................................................ 17-517.4 Verifying Deployment .................................................................................................... 17-617.4.1 Validating Security Policies ..................................................................................... 17-717.5 Undeploying Product MDM: EBS .................................................................................. 17-8
18 Configuring and Deploying Product MDM: Comms BRM
18.1 Deployment Configuration Wizard ................................................................................ 18-118.1.1 Integration Server Details Screen ............................................................................. 18-118.1.2 Oracle Communications BRM Screen ...................................................................... 18-218.2 Overall Configuration and Deployment of MDM Product Integrations ........................ 18-218.3 Configuring and Deploying Product MDM: Comms BRM ............................................ 18-3
xii
18.3.1 Configuring Product MDM: Comms BRM .............................................................. 18-318.3.1.1 Specify Integration Server Details ..................................................................... 18-418.3.1.2 Specify Oracle Communications BRM Details .................................................. 18-418.3.1.3 Complete Configuration .................................................................................... 18-418.3.2 Configuring using the Response File ....................................................................... 18-418.3.3 Deploying the Product MDM: Comms BRM ........................................................... 18-518.4 Verifying Deployment .................................................................................................... 18-618.5 Undeploying the Product MDM: Comms BRM ............................................................ 18-6
19 Deploying Product MDM: Routing Rules
19.1 Overall Configuration and Deployment of MDM Product Integrations ........................ 19-119.2 Deploying Product MDM: Routing Rules ...................................................................... 19-119.3 Verifying Deployment .................................................................................................... 19-219.4 Undeploying Product MDM: Routing Rules .................................................................. 19-3
20 Configuring and Deploying Design to Release: Agile - EBS
20.1 Deployment Configuration Wizard ............................................................................... 20-120.1.1 Integration Server Details Screen ............................................................................. 20-120.1.2 Agile PLM Details Screen ........................................................................................ 20-220.1.3 Oracle E-Business Suite Server Details Screen ......................................................... 20-220.1.4 Oracle E-Business Suite Database Details Screen ..................................................... 20-320.1.5 Design to Release: Agile - EBS: E-Business Suite to Agile PLM Initial Load Screen 20-320.2 Performing Predeployment Configurations ................................................................... 20-420.3 Configuring and Deploying Design to Release: Agile - EBS Pre-Built Integration ......... 20-420.3.1 Configuring the Design to Release: Agile - EBS Pre-Built Integration ..................... 20-420.3.1.1 Specify Integration Server Details ..................................................................... 20-520.3.1.2 Specify Oracle E-Business Suite Server Details ................................................. 20-520.3.1.3 Specify Oracle E-Business Suite Database Details ............................................. 20-620.3.1.4 Specify Agile PLM Application Details ............................................................. 20-620.3.1.5 Specify Design to Release: Agile - EBS: E-Business Suite to Agile PLM Initial Load
Details ............................................................................................................... 20-620.3.1.6 Complete Configuration .................................................................................... 20-620.3.2 Configuring using the Response File ....................................................................... 20-720.3.3 Deploying the Design to Release: Agile - EBS Pre-Built Integration ........................ 20-720.4 Performing Postdeployment Configurations ................................................................. 20-820.4.1 Cluster Installation .................................................................................................. 20-820.4.2 Enabling Security ..................................................................................................... 20-820.4.3 Configuring Initial Load .......................................................................................... 20-920.4.4 Enabling the NPR & SYNC Flows ......................................................................... 20-1020.5 Verifying Deployment .................................................................................................. 20-1020.5.1 Validating Security Policies ................................................................................... 20-1520.6 Undeploying the Design to Release: Agile - EBS Pre-Built Integration ....................... 20-15
21 Configuring and Deploying Design to Release: Agile - SAP
21.1 Deployment Configuration Wizard ............................................................................... 21-121.1.1 Integration Server Details Screen ............................................................................. 21-1
xiii
21.1.2 Agile PLM Details Screen ......................................................................................... 21-221.1.3 Specify SAP Application Server Details ................................................................... 21-221.1.4 SAP Adapter Installation and Configuration ........................................................... 21-321.1.5 Postinstallation Considerations ............................................................................... 21-421.1.5.1 Verifying Directory Structure ............................................................................ 21-421.1.5.2 Copying the Library Files .................................................................................. 21-421.1.6 SAP Adapter Configuration ..................................................................................... 21-621.1.6.1 Configuring a File System Repository ............................................................... 21-621.1.6.2 Configuring the Oracle Database Repository for J2CA ..................................... 21-621.1.6.3 Configuring the Oracle Database Repository for BSE ....................................... 21-721.1.6.4 Configuring an HTTP Repository ...................................................................... 21-821.1.6.5 Application Explorer ......................................................................................... 21-821.1.6.6 Starting Application Explorer ............................................................................ 21-821.1.6.7 Creating a Configuration for J2CA Connector Application Using Application
Explorer ............................................................................................................. 21-821.1.6.8 Defining a New Configuration for J2CA ........................................................... 21-821.1.6.9 Configuring Settings for the J2CA Connector Application ................................ 21-921.1.6.10 Deploying the J2CA Connector Application Using the Oracle WebLogic Server
Administration Console .................................................................................... 21-921.1.6.11 Deploying the J2CA Installation Verification Program (IVP) Using the Oracle
WebLogic Server Administration Console ...................................................... 21-1021.1.6.12 Connecting to a J2CA Configuration Using Application Explorer .................. 21-1121.1.6.13 Creating a Configuration for Business Services Engine Using Application
Explorer ........................................................................................................... 21-1221.1.6.14 Configuring and Deploying Business Services Engine .................................... 21-1221.1.6.15 Deploying Oracle WLS Adapter Business Services Engine (BSE) Using the Oracle
WebLogic Server Administration Console ...................................................... 21-1321.1.6.16 Connecting to a BSE Configuration Using Application Explorer .................... 21-1421.1.6.17 SAP Inbound Adapter Configuration .............................................................. 21-1421.1.6.18 SAP Outbound Adapter Configuration ........................................................... 21-1521.2 Configuring and Deploying the Design to Release: Agile - SAP Integration ................ 21-1521.2.1 Configuring the Design to Release: Agile - SAP Integration .................................. 21-1521.2.1.1 Specify Integration Server Details ................................................................... 21-1621.2.1.2 Specify Agile PLM Details ............................................................................... 21-1621.2.1.3 Specify SAP Server Details .............................................................................. 21-1621.2.1.4 Complete Configuration .................................................................................. 21-1621.2.2 Configuring using the Response File ..................................................................... 21-1721.2.3 Deploying the Design to Release: Agile - SAP Integration ..................................... 21-1721.3 Performing Postdeployment Configurations ............................................................... 21-1821.3.1 Configuring the Agile PLM Credentials ................................................................ 21-1921.3.2 Enabling the NPR & SYNC Flows .......................................................................... 21-1921.4 Verifying Deployment .................................................................................................. 21-2021.5 Validating Security Policies .......................................................................................... 21-2221.6 Undeploying the Design to Release: Agile - SAP Integration ....................................... 21-24
xiv
22 Configuring and Deploying the Oracle Process Integration Pack for Oracle Utilities Field Work
22.1 Deployment Configuration Wizard ............................................................................... 22-122.1.1 Integration Server Details Screen ............................................................................. 22-122.1.2 Oracle Utilities Customer Care and Billing Server Details Screen ........................... 22-222.1.3 Oracle Utilities Work and Asset Management Server Details Screen ...................... 22-222.1.4 Oracle Utilities Mobile Workforce Management Server Details Screen ................... 22-322.1.4.1 Oracle Utilities Mobile Workforce Management Server Details Screen (Version
1.x) ..................................................................................................................... 22-322.1.4.2 Oracle Utilities Mobile Workforce Management Server Details Screen (Version
2.x) ..................................................................................................................... 22-422.2 Configuring and Deploying the Oracle Process Integration Pack for Oracle Utilities Field
Work .............................................................................................................................. 22-422.2.1 Configuring the Oracle Process Integration Pack for Oracle Utilities Field Work ... 22-422.2.1.1 Specify Integration Server Details ..................................................................... 22-522.2.1.2 Specify Utilities Mobile Workforce Management Services Details .................... 22-522.2.1.3 Specify Utilities Work and Asset Management Services Details ....................... 22-522.2.1.4 Specify Utilities Customer Care and Billing Services Details ............................ 22-522.2.1.5 Complete Configuration .................................................................................... 22-522.2.2 Configuring using the Response File ....................................................................... 22-622.2.3 Deploying the Oracle Process Integration Pack for Oracle Utilities Field Work ...... 22-622.3 Verifying Deployment .................................................................................................... 22-822.4 Undeploying the Oracle Process Integration Pack for Oracle Utilities Field Work ...... 22-10
23 Configuring and Deploying Customer Data Synchronization for Oracle Utilities CCB and Siebel Energy
23.1 Deployment Configuration Wizard ............................................................................... 23-123.1.1 Integration Server Details Screen ............................................................................. 23-123.1.2 Siebel CRM Server Details Screen ............................................................................ 23-223.1.3 Siebel CRM Database Details Screen ....................................................................... 23-323.1.4 Oracle Utilities Customer Care and Billing Server Details Screen ........................... 23-323.1.5 Session Pool Manager Details Screen ....................................................................... 23-323.2 Configuring and Deploying Customer Data Synchronization for Oracle Utilities CCB and
Siebel Energy Integration ............................................................................................... 23-423.2.1 Configuring the Customer Data Synchronization for Oracle Utilities CCB and Siebel
Energy Integration ................................................................................................... 23-423.2.1.1 Specify Integration Server Details ..................................................................... 23-523.2.1.2 Specify Siebel CRM Server Details .................................................................... 23-523.2.1.3 Specify Siebel CRM Database Details ................................................................ 23-523.2.1.4 Specify Utilities Customer Care and Billing Services Details ............................ 23-523.2.1.5 Specify Session Pool Manager Details ............................................................... 23-523.2.1.6 Complete Configuration .................................................................................... 23-623.2.2 Configuring using the Response File ....................................................................... 23-623.2.3 Deploying the Customer Data Synchronization for Oracle Utilities CCB and Siebel
Energy Integration ................................................................................................... 23-723.3 Verifying Deployment .................................................................................................... 23-923.4 Undeploying the Customer Data Synchronization for Oracle Utilities CCB and Siebel
Energy Integration ....................................................................................................... 23-10
xv
24 Configuring and Deploying Product Data Synchronization for Oracle Utilities CCB and Siebel Energy
24.1 Deployment Configuration Wizard ................................................................................ 24-124.1.1 Integration Server Details Screen ............................................................................. 24-124.1.2 Siebel CRM Server Details Screen ............................................................................ 24-224.1.3 Siebel CRM Database Details Screen ........................................................................ 24-324.1.4 Session Pool Manager Details Screen ....................................................................... 24-324.2 Configuring and Deploying Product Data Synchronization for Oracle Utilities CCB and
Siebel Energy Integration ............................................................................................... 24-424.2.1 Configuring the Product Data Synchronization for Oracle Utilities CCB and Siebel
Energy Integration ................................................................................................... 24-424.2.1.1 Specify Integration Server Details ..................................................................... 24-524.2.1.2 Specify Siebel CRM Server Details .................................................................... 24-524.2.1.3 Specify Siebel CRM Database Details ................................................................ 24-524.2.1.4 Specify Session Pool Manager Details ............................................................... 24-524.2.1.5 Complete Configuration .................................................................................... 24-524.2.2 Configuring using the Response File ....................................................................... 24-624.2.3 Deploying the Product Data Synchronization for Oracle Utilities CCB and Siebel
Energy Integration ................................................................................................... 24-624.3 Verifying Deployment .................................................................................................... 24-924.4 Undeploying the Product Data Synchronization for Oracle Utilities CCB and Siebel Energy
Integration .................................................................................................................... 24-10
Part III Configuring and Deploying AIA RV 3.1.1 PIPs and DIs
25 Configuring and Deploying the Design to Release: Agile PLM for Process - OPM PIP
25.1 Deployment Configuration Wizard ................................................................................ 25-125.1.1 PIP Server Details Screen ......................................................................................... 25-125.1.2 Agile PLM for Process Application Details .............................................................. 25-225.1.3 Oracle E-Business Suite Server Details Screen ......................................................... 25-225.1.4 Oracle E-Business Suite Database Details Screen ..................................................... 25-325.2 Configuring and Deploying Design to Release: Agile PLM for Process - OPM PIP ....... 25-325.2.1 Configuring the Design to Release: Agile PLM for Process - OPM PIP ................... 25-325.2.1.1 Specify PIP Server Details ................................................................................. 25-425.2.1.2 Specify Agile PLM for Process Application Details ........................................... 25-425.2.1.3 Specify Oracle E-Business Suite Server Details .................................................. 25-425.2.1.4 Oracle E-Business Suite Database Details Screen .............................................. 25-525.2.1.5 Complete Configuration .................................................................................... 25-525.2.2 Configuring using the Response File ....................................................................... 25-525.2.3 Deploying the Design to Release: Agile PLM for Process - OPM PIP ...................... 25-625.3 Performing Postdeployment Configurations ................................................................. 25-725.4 Verifying Deployment .................................................................................................... 25-725.4.1 Validating Security Policies ..................................................................................... 25-825.5 Undeploying the Design to Release: Agile PLM for Process - OPM PIP ........................ 25-9
xvi
26 Configuring and Deploying the Order to Cash for Siebel CRM - EBS PIP
26.1 Configuring Oracle Data Integrator (Optional) .............................................................. 26-126.1.1 Creating Oracle Data Integrator Repositories .......................................................... 26-126.1.2 Performing Postinstallation Configurations for ODI ............................................... 26-226.2 Deployment Configuration Wizard ............................................................................... 26-326.2.1 PIP Server Details Screen ......................................................................................... 26-326.2.2 Oracle E-Business Suite Server Details Screen ......................................................... 26-326.2.3 Oracle E-Business Suite Database Details Screen ..................................................... 26-426.2.4 Oracle Transportation Management (OTM) Server Details Screen (Optional) ........ 26-426.2.5 Oracle Transportation Management (OTM) Database Details Screen (Optional) .... 26-526.2.6 Siebel CRM Server Details Screen ............................................................................ 26-526.2.7 Siebel CRM Database Details Screen ....................................................................... 26-626.2.8 Oracle Data Integrator Access Details Screens (Optional) ....................................... 26-626.2.9 Oracle Data Integrator Master Repository Details Screen (Optional) ...................... 26-726.2.10 Oracle Data Integrator Work Repository Details for Order to Cash Screen (Optional) ..
26-726.2.11 Session Pool Manager Screen (Optional) ................................................................. 26-826.3 Configuring and Deploying the Order to Cash: Siebel CRM - EBS ................................ 26-826.3.1 Configuring the Order to Cash: Siebel CRM - EBS PIP ............................................ 26-826.3.1.1 Specify PIP Server Details ................................................................................. 26-926.3.1.2 Specify Oracle E-Business Suite Server Details ................................................. 26-926.3.1.3 Specify Oracle E-Business Suite Database Details ............................................. 26-926.3.1.4 Specify Oracle Transportation Management Server Details (Optional) .......... 26-1026.3.1.5 Oracle Transportation Management (OTM) Database Details Screen (Optional) ....
26-1026.3.1.6 Specify Siebel CRM Server Details .................................................................. 26-1026.3.1.7 Specify Siebel CRM Database Details .............................................................. 26-1026.3.1.8 Specify Oracle Data Integrator Access Details (Optional) ............................... 26-1026.3.1.9 Specify Oracle Data Integrator Master Repository Details (Optional) ............. 26-1126.3.1.10 Specify Oracle Data Integrator Work Repository Details for Order to Cash
(Optional) ........................................................................................................ 26-1126.3.1.11 Specify Session Pool Manager Details ............................................................. 26-1126.3.1.12 Complete Configuration .................................................................................. 26-1126.3.2 Configuring using the Response File ..................................................................... 26-1226.3.3 Deploying the Order to Cash: Siebel CRM - EBS ................................................... 26-1226.4 Performing Postdeployment Configurations ............................................................... 26-1326.4.1 Setting up Order to Cash PIP ................................................................................. 26-1426.4.2 Configuring Session Pool Manager ........................................................................ 26-1426.5 Verifying Deployment .................................................................................................. 26-1426.5.1 Validating Security Policies ................................................................................... 26-1826.6 Undeploying the Order to Cash: Siebel CRM - EBS PIP ............................................... 26-20
27 Configuring and Deploying Siebel CRM to OIC Integration
27.1 Configuring Oracle Data Integrator ............................................................................... 27-127.1.1 Creating Oracle Data Integrator Repositories .......................................................... 27-127.1.2 Performing Postinstallation Configurations for ODI ............................................... 27-227.2 Deployment Configuration Wizard ............................................................................... 27-2
xvii
27.2.1 PIP Server Details Screen ......................................................................................... 27-227.2.2 Oracle E-Business Suite Server Details Screen ......................................................... 27-327.2.3 Oracle E-Business Suite Database Details Screen ..................................................... 27-327.2.4 Siebel CRM Server Details Screen ............................................................................ 27-427.2.5 Siebel CRM Database Details Screen ........................................................................ 27-427.2.6 Oracle Data Integrator Access Details Screens ......................................................... 27-527.2.7 Oracle Data Integrator Master Repository Details Screen ........................................ 27-527.2.8 Oracle Data Integrator Work Repository Details for Siebel CRM to OIC Screen ..... 27-627.3 Configuring and Deploying Siebel CRM to OIC ............................................................ 27-627.3.1 Configuring Siebel CRM to OIC .............................................................................. 27-627.3.1.1 Specify PIP Server Details ................................................................................. 27-727.3.1.2 Specify Oracle E-Business Suite Server Details .................................................. 27-727.3.1.3 Specify Oracle E-Business Suite Database Details ............................................. 27-727.3.1.4 Specify Siebel CRM Application Details ............................................................ 27-727.3.1.5 Specify Siebel CRM Database Details ................................................................ 27-727.3.1.6 Specify Oracle Data Integrator Access Details ................................................... 27-727.3.1.7 Specify Oracle Data Integrator Master Repository Details ................................ 27-827.3.1.8 Specify Oracle Data Integrator Work Repository Details for Siebel CRM to OIC .....
27-827.3.1.9 Complete Configuration .................................................................................... 27-827.3.2 Configuring using the Response File ....................................................................... 27-927.3.3 Deploying the Siebel CRM to OIC Integration ......................................................... 27-927.4 Performing Postdeployment Configurations ............................................................... 27-1027.4.1 Associating the Oracle Data Integrator Console with the Work Repository .......... 27-1027.4.2 Populating the COMPENSATION_ORGANIZATION_ID Cross-Reference Manually ..
27-1027.4.3 Creating Siebel Views ............................................................................................ 27-1127.5 Verifying Deployment .................................................................................................. 27-1127.6 Undeploying the Siebel CRM to OIC Integration ......................................................... 27-13
28 Configuring and Deploying the Lead to Order: CRM OD - EBS PIP
28.1 Deployment Configuration Wizard ................................................................................ 28-128.1.1 PIP Server Details Screen ......................................................................................... 28-128.1.2 Oracle E-Business Suite Server Details Screen ......................................................... 28-228.1.3 Oracle E-Business Suite Database Details Screen ..................................................... 28-228.1.4 CRM On Demand Web Services Details Screen ....................................................... 28-328.1.5 Session Pool Manager Screen (Optional) ................................................................. 28-428.2 Performing Predeployment Configurations ................................................................... 28-428.3 Configuring and Deploying the Lead to Order: CRM OD - EBS PIP .............................. 28-528.3.1 Configuring the Lead to Order: CRM OD - EBS PIP ................................................ 28-528.3.1.1 Specify PIP Server Details ................................................................................. 28-628.3.1.2 Specify Oracle E-Business Suite Server Details .................................................. 28-628.3.1.3 Specify Oracle E-Business Suite Database Details ............................................. 28-628.3.1.4 Specify CRM On Demand Web Services Details ............................................... 28-628.3.1.5 Specify Session Pool Manager Details ............................................................... 28-628.3.1.6 Complete Configuration .................................................................................... 28-728.3.2 Configuring using the Response File ....................................................................... 28-7
xviii
28.3.3 Deploying the Lead to Order: CRM OD - EBS PIP .................................................. 28-828.4 Performing Postdeployment Configurations ............................................................... 28-1028.4.1 Populating the inventory_location_id cross-reference Table ................................. 28-1028.4.2 Defining the Application Context for E-Business Suite Service Calls .................... 28-1128.4.3 Updating the Oracle E-Business Suite Database .................................................... 28-1228.4.4 Updating the AIA Configuration Properties ......................................................... 28-1428.4.5 Configuring Session Pool Manager ........................................................................ 28-1428.5 Verifying Deployment .................................................................................................. 28-1428.5.1 Validating Security Policies ................................................................................... 28-1828.6 Undeploying the Lead to Order: CRM OD - EBS PIP ................................................... 28-21
29 Configuring and Deploying the Financials Ops Control: Oracle Retail - PSFT PIP
29.1 Configuring Oracle Data Integrator ............................................................................... 29-129.1.1 Creating Oracle Data Integrator Repositories .......................................................... 29-229.1.2 Performing Postinstallation Configurations for ODI ............................................... 29-229.2 Deployment Configuration Wizard ............................................................................... 29-329.2.1 PIP Server Details Screen ......................................................................................... 29-329.2.2 PeopleSoft FSCM Web Services Details Screen ........................................................ 29-429.2.3 PeopleSoft FSCM Application URL Details Screen .................................................. 29-429.2.4 PeopleSoft FSCM Database Connection Details Screen ........................................... 29-529.2.5 Oracle Retail Service Layer Connection Details Screen ............................................ 29-529.2.6 Oracle Retail Integration Bus Connection Details Screen ......................................... 29-529.2.7 Oracle Retail Database Connection Details Screen .................................................. 29-629.2.8 Oracle Data Integrator Access Details Screen .......................................................... 29-629.2.9 Oracle Data Integrator Master Repository Details Screen ........................................ 29-729.2.10 Oracle Data Integrator Work Repository for Retail to PeopleSoft Financials PIP Details
Screen ...................................................................................................................... 29-729.3 Configuring and Deploying the Financials Ops Control: Oracle Retail - PSFT PIP ........ 29-829.3.1 Configuring the Financials Ops Control: Oracle Retail - PSFT PIP .......................... 29-829.3.1.1 Specify PIP Server Details ................................................................................. 29-929.3.1.2 Specify PeopleSoft FSCM Web Services Details ................................................ 29-929.3.1.3 Specify PeopleSoft FSCM Application URL Details .......................................... 29-929.3.1.4 Specify PeopleSoft FSCM Database Connection Details .................................... 29-929.3.1.5 Specify Oracle Retail Service Layer Connection Details .................................... 29-929.3.1.6 Specify Oracle Retail Integration Bus Connection Details ................................. 29-929.3.1.7 Specify Oracle Retail Database Connection Details ........................................... 29-929.3.1.8 Specify Oracle Data Integrator Access Details ................................................. 29-1029.3.1.9 Specify Oracle Data Integrator Master Repository Details .............................. 29-1029.3.1.10 Specify Oracle Data Integrator Work Repository Details ................................ 29-1029.3.1.11 Complete Configuration .................................................................................. 29-1029.3.2 Configuring using the Response File ..................................................................... 29-1129.3.3 Deploying the Financials Ops Control: Oracle Retail - PSFT PIP ........................... 29-1129.4 Performing Postdeployment Configurations ............................................................... 29-1329.4.1 Configuring Retail to PeopleSoft Accounting Entries Integration ......................... 29-1329.4.2 Configuring Retail to PeopleSoft Invoice/Voucher Integration ............................ 29-14
xix
29.4.3 Configuring Web Services for Financials Ops Control: Oracle Retail - PSFT PIP (Optional) ............................................................................................................... 29-15
29.4.4 Creating Sequence Rights to PeopleSoft Database User (Required) ....................... 29-1529.4.5 Verifying the Database Connection (Optional) ...................................................... 29-1529.4.6 Setting Up and Exporting Domain Value Mappings (Required) ........................... 29-1629.4.7 Setting Up ORGANIZATION_ID XREF (Required) .............................................. 29-1629.5 Verifying Deployment .................................................................................................. 29-1729.5.1 Validating Security Policies ................................................................................... 29-2029.5.2 ODI Topology ........................................................................................................ 29-2129.5.3 ODI Designer ......................................................................................................... 29-2329.5.4 Error Messages During Financials Ops Control: Oracle Retail - PSFT PIP Deployment .
29-2429.5.4.1 Failed to execute: Create user xxxxx identified by yyyyy ................................ 29-2429.5.4.2 Unique Constraint Violation ........................................................................... 29-2529.6 Undeploying the Financials Ops Control: Oracle Retail - PeopleSoft PIP .................... 29-25
30 Configuring and Deploying the LSP Financial Mgmt: OTM - EBS PIP
30.1 Deployment Configuration Wizard ................................................................................ 30-130.1.1 PIP Server Details Screen ......................................................................................... 30-130.1.2 Oracle E-Business Suite Server Details Screen ......................................................... 30-230.1.3 Oracle E-Business Suite Database Details Screen ..................................................... 30-230.1.4 Oracle OTM Server Details Screen ........................................................................... 30-330.1.5 Oracle OTM Database Details Screen ....................................................................... 30-330.2 Configuring and Deploying the LSP Financial Mgmt: OTM - EBS PIP .......................... 30-430.2.1 Configuring the LSP Financial Mgmt: OTM - EBS PIP ............................................ 30-430.2.1.1 Specify PIP Server Details ................................................................................. 30-530.2.1.2 Specify Oracle E-Business Suite Server Details .................................................. 30-530.2.1.3 Specify Oracle E-Business Suite Database Details ............................................. 30-530.2.1.4 Specify Oracle OTM Server Details ................................................................... 30-530.2.1.5 Specify Oracle OTM Database Details ............................................................... 30-530.2.1.6 Complete Configuration .................................................................................... 30-530.2.2 Configuring using the Response File ....................................................................... 30-630.2.3 Deploying the LSP Financial Mgmt: OTM - EBS PIP ............................................... 30-630.3 Performing Postdeployment Configurations ................................................................. 30-830.4 Verifying Deployment .................................................................................................... 30-830.4.1 Validating Security Policies ................................................................................... 30-1130.5 Undeploying the LSP Financial Mgmt: OTM - EBS PIP ............................................... 30-12
31 Configuring and Deploying the LSP Order Mgmt: OTM - EBS - Siebel CRM PIP
31.1 Deployment Configuration Wizard ................................................................................ 31-131.1.1 PIP Server Details Screen ......................................................................................... 31-131.1.2 Oracle E-Business Suite Server Details Screen ......................................................... 31-231.1.3 Oracle E-Business Suite Database Details Screen ..................................................... 31-231.1.4 Oracle OTM Server Details Screen ........................................................................... 31-331.1.5 Oracle OTM Database Details Screen ....................................................................... 31-3
xx
31.1.6 Siebel CRM Server Details Screen ............................................................................ 31-431.1.7 Siebel CRM Database Details Screen ....................................................................... 31-431.2 Configuring and Deploying the LSP Order Mgmt: OTM - EBS - Siebel CRM PIP ......... 31-531.2.1 Configuring the LSP Order Mgmt: OTM - EBS - Siebel CRM PIP ............................ 31-531.2.1.1 Specify PIP Server Details ................................................................................. 31-631.2.1.2 Specify Oracle E-Business Suite Server Details ................................................. 31-631.2.1.3 Specify Oracle E-Business Suite Database Details ............................................. 31-631.2.1.4 Specify Oracle OTM Server Details ................................................................... 31-631.2.1.5 Specify Oracle OTM Database Details ............................................................... 31-631.2.1.6 Specify Siebel CRM Server Details .................................................................... 31-631.2.1.7 Specify Siebel CRM Database Details ................................................................ 31-731.2.1.8 Complete Configuration .................................................................................... 31-731.2.2 Configuring using the Response File ....................................................................... 31-731.2.3 Deploying the LSP Order Mgmt: OTM - EBS - Siebel CRM PIP .............................. 31-831.3 Performing Postdeployment Configurations ................................................................. 31-931.4 Verifying Deployment .................................................................................................... 31-931.4.1 Validating Security Policies ................................................................................... 31-1131.5 Undeploying the LSP Order Mgmt: OTM - EBS - Siebel CRM PIP .............................. 31-13
32 Configuring and Deploying the LSP Driver Mgmt: OTM - EBS PIP
32.1 Deployment Configuration Wizard ............................................................................... 32-132.1.1 PIP Server Details Screen ......................................................................................... 32-132.1.2 Oracle E-Business Suite Server Details Screen ......................................................... 32-232.1.3 Oracle E-Business Suite Database Details Screen ..................................................... 32-232.1.4 Oracle OTM Server Details Screen ........................................................................... 32-332.1.5 Oracle OTM Database Details Screen ...................................................................... 32-332.2 Configuring and Deploying the LSP Driver Mgmt: OTM - EBS PIP .............................. 32-432.2.1 Configuring the LSP Driver Mgmt: OTM - EBS PIP ................................................ 32-432.2.1.1 Specify PIP Server Details ................................................................................. 32-532.2.1.2 Specify Oracle E-Business Suite Server Details ................................................. 32-532.2.1.3 Specify Oracle E-Business Suite Database Details ............................................. 32-532.2.1.4 Specify Oracle OTM Server Details ................................................................... 32-532.2.1.5 Specify Oracle OTM Database Details ............................................................... 32-532.2.1.6 Complete Configuration .................................................................................... 32-532.2.2 Configuring using the Response File ....................................................................... 32-632.2.3 Deploying the LSP Driver Mgmt: OTM - EBS PIP ................................................... 32-632.3 Performing Postdeployment Configurations ................................................................. 32-832.3.1 Configuring Time Zone Property ............................................................................ 32-832.3.2 Migrating from AIA 2.x to AIA 11.3 ........................................................................ 32-832.3.3 Creating New Csf-Key and Configuring Flows to Use Csf-Key .............................. 32-832.4 Verifying Deployment .................................................................................................... 32-932.4.1 Validating Security Policies ................................................................................... 32-1132.5 Undeploying the LSP Driver Mgmt: OTM - EBS PIP ................................................... 32-12
33 Configuring and Deploying Value Chain Planning Base Pack Integration
33.1 Configuring Oracle Data Integrator ............................................................................... 33-133.1.1 Creating Oracle Data Integrator Repositories .......................................................... 33-1
xxi
33.1.2 Performing Postinstallation Configurations for ODI ............................................... 33-233.2 Deployment Configuration Wizard ................................................................................ 33-233.2.1 PIP Server Details Screen ......................................................................................... 33-333.2.2 JD Edwards EnterpriseOne Inbound Path ............................................................... 33-333.2.3 JD Edwards EnterpriseOne Outbound Path ............................................................ 33-333.2.4 Demantra Inbound Path .......................................................................................... 33-433.2.5 Demantra Outbound Path ........................................................................................ 33-433.2.6 APS Database Connection Details ............................................................................ 33-433.2.7 APS Inbound Path .................................................................................................... 33-433.2.8 APS Outbound Path ................................................................................................. 33-433.2.9 Oracle Data Integrator Access Details Screen .......................................................... 33-533.2.10 Oracle Data Integrator Master Repository Details ................................................... 33-533.2.11 Oracle Data Integrator Work Repository Details ..................................................... 33-533.3 Configuring and Deploying VCP Base Pack Integration ................................................ 33-633.3.1 Configuring VCP Base Pack Integration .................................................................. 33-633.3.1.1 Specify PIP Server Details ................................................................................. 33-733.3.1.2 Specify JD Edwards EnterpriseOne Inbound Path ............................................ 33-733.3.1.3 Specify JD Edwards EnterpriseOne Outbound Path ......................................... 33-733.3.1.4 Specify Demantra Inbound Path ....................................................................... 33-733.3.1.5 Specify Demantra Outbound Path ..................................................................... 33-733.3.1.6 Specify APS Database Connection Details ......................................................... 33-733.3.1.7 Specify APS Inbound Path ................................................................................. 33-833.3.1.8 Specify APS Outbound Path .............................................................................. 33-833.3.1.9 Specify Oracle Data Integrator Access Details ................................................... 33-833.3.1.10 Oracle Data Integrator Path for Exported DVMs Details .................................. 33-833.3.1.11 Specify Oracle Data Integrator Master Repository Details ................................ 33-833.3.1.12 Specify Oracle Data Integrator Work Repository Details .................................. 33-833.3.1.13 Complete Configuration .................................................................................... 33-933.3.2 Configuring using the Response File ....................................................................... 33-933.3.3 Deploying the VCP Base Pack Integration ............................................................... 33-933.4 Performing Postdeployment Configurations ............................................................... 33-1033.4.1 Configuring Environment Variables ...................................................................... 33-1133.4.2 Verifying Directory Structure ................................................................................ 33-1133.4.3 Launching the VCP Base Pack Integration Agent .................................................. 33-1133.4.4 Enabling AIA Error Handling (Optional) .............................................................. 33-1133.4.5 Updating the DTD files .......................................................................................... 33-1233.4.6 Applying Patch for Compatibility with ODI 11.1.1.5.0 .......................................... 33-1333.5 Verifying Deployment .................................................................................................. 33-1333.5.1 Validating Security Policies ................................................................................... 33-1633.6 Undeploying VCP Base Pack Integration ..................................................................... 33-16
34 Configuring and Deploying the Project Portfolio Mgmt: Primavera P6 - JDE E1 PIP
34.1 Deployment Configuration Wizard ................................................................................ 34-134.1.1 PIP Server Details Screen ......................................................................................... 34-134.1.2 JD Edwards EnterpriseOne Business Services Screen .............................................. 34-234.1.3 Primavera P6 Server Details ..................................................................................... 34-2
xxii
34.2 Configuring and Deploying the Project Portfolio Management: Primavera P6 - JDE E1 PIP34-3
34.2.1 Configuring the Project Portfolio Management: Primavera P6 - JDE E1 PIP ........... 34-334.2.1.1 Specify PIP Server Details ................................................................................. 34-434.2.1.2 Specify JD Edwards EnterpriseOne Business Services Details .......................... 34-434.2.1.3 Specify the Primavera P6 Server Details ........................................................... 34-434.2.1.4 Complete Configuration .................................................................................... 34-434.2.2 Configuring using the Response File ....................................................................... 34-534.2.3 Deploying the Project Portfolio Management: Primavera P6 - JDE E1 PIP .............. 34-534.3 Performing Postdeployment Configurations ................................................................. 34-634.4 Verifying Deployment .................................................................................................... 34-734.4.1 Validating Security Policies ..................................................................................... 34-834.5 Undeploying the Project Portfolio Mgmt: Primavera P6 - JDE E1 PIP ......................... 34-10
35 Configuring and Deploying the Serialization and Tracking: OPSM - EBS integration
35.1 Configuring Oracle Data Integrator ............................................................................... 35-135.1.1 Creating Oracle Data Integrator Repositories .......................................................... 35-135.1.2 Performing Postinstallation Configurations for ODI ............................................... 35-235.2 Deployment Configuration Wizard ............................................................................... 35-235.2.1 PIP Server Details Screen ......................................................................................... 35-335.2.2 Oracle Pedigree and Serialization Manager Database Details ................................. 35-335.2.3 Oracle E-Business Suite Server Details Screen ......................................................... 35-335.2.4 Oracle E-Business Suite Database Details Screen ..................................................... 35-435.2.5 Oracle Data Integrator Access Information Details Screen ...................................... 35-435.2.6 Oracle Data Integrator Master Repository Details Screen ........................................ 35-535.2.7 Oracle Data Integrator Work Repository for Serialization and Tracking: OPSM - EBS
Details Screen .......................................................................................................... 35-535.3 Configuring and Deploying the Serialization and Tracking: OPSM - EBS ..................... 35-635.3.1 Configuring Serialization and Tracking: OPSM - EBS ............................................ 35-635.3.1.1 Specify PIP Server Details ................................................................................. 35-735.3.1.2 Specify Oracle Pedigree and Serialization Manager Database Details .............. 35-735.3.1.3 Specify Oracle E-Business Suite Server Details ................................................. 35-735.3.1.4 Specify Oracle E-Business Suite Database Details ............................................. 35-735.3.1.5 Specify Oracle Data Integrator Access Details ................................................... 35-835.3.1.6 Specify Oracle Data Integrator Master Repository Details ................................ 35-835.3.1.7 Specify Oracle Data Integrator Work Repository for Serialization and Tracking:
OPSM - EBS Details ........................................................................................... 35-835.3.1.8 Complete Configuration .................................................................................... 35-835.3.2 Configuring using the Response File ....................................................................... 35-935.3.3 Deploying Serialization and Tracking: OPSM - EBS ................................................ 35-935.4 Performing Postdeployment Configurations ............................................................... 35-1035.4.1 Configuring Environment Variables ...................................................................... 35-1035.4.2 Launching the Serialization and Tracking: OPSM - EBS Agent ............................. 35-1135.4.3 Stopping the Serialization and Tracking: OPSM - EBS Agent ................................ 35-1135.4.4 Configuring ODI Variables .................................................................................... 35-1135.4.5 Configuring Web Services for Serialization and Tracking: OPSM - EBS (Optional) .......
35-12
xxiii
35.4.6 Verifying the Database Connection (Optional) ...................................................... 35-1235.4.7 Configuring the Remote OPSM JMS Queue in Serialization and Tracking: OPSM - EBS
(Required) .............................................................................................................. 35-1335.4.8 Configuring Cross Domain Security in Serialization and Tracking: OPSM – EBS
(Required) .............................................................................................................. 35-1335.4.9 Maintaining Serialization and Tracking: OPSM - EBS ........................................... 35-1535.4.10 Adding File permissions ........................................................................................ 35-1635.5 Verifying Deployment .................................................................................................. 35-1635.5.1 Validating Security Policies ................................................................................... 35-2035.6 Undeploying Serialization and Tracking: OPSM - EBS ................................................ 35-22
Part IV Upgrading Pre-Built Integrations
36 Upgrading Pre-Built Integrations
36.1 Understanding AIA Upgrade ......................................................................................... 36-136.1.1 Upgrading the AIA Release ..................................................................................... 36-236.1.2 Redeploying previously deployed PIPs and DIs ..................................................... 36-236.1.3 Merging Customizations and Extensions ................................................................ 36-236.2 Upgrading Pre-Built Integrations ................................................................................... 36-236.2.1 AIA Upgrade Requirements .................................................................................... 36-236.2.1.1 Software and Hardware Requirements ............................................................. 36-336.2.2 Performing Preupgrade Tasks for Pre-Built Integrations ......................................... 36-336.2.2.1 Performing Preupgrade Tasks for Design to Release: Agile - EBS 11.1 ............. 36-436.2.2.2 Performing Preupgrade tasks for the Design to Release: Agile - EBS 3.1 .......... 36-436.2.3 Performing Upgrade Process for Pre-Built Integrations .......................................... 36-436.2.4 Choosing the Existing Home Directory ................................................................... 36-436.2.5 Running the Directory Selection and Upgrade Process ........................................... 36-536.3 Upgrading AIA 11.2 Integrations ................................................................................... 36-536.3.1 Upgrading Design to Release: Agile - EBS ............................................................... 36-536.3.1.1 Running Upgrade Scripts for Design to Release: Agile - EBS ............................ 36-536.3.1.2 Performing Postupgrade Tasks for Design to Release: Agile - EBS ................... 36-636.3.2 Upgrading Design to Release: Agile - SAP .............................................................. 36-736.3.2.1 Performing Preupgrade Tasks for Design to Release: Agile - SAP ................... 36-736.3.2.2 Running Upgrade Scripts for Design to Release: Agile - SAP ........................... 36-736.3.2.3 Performing Postupgrade Tasks for Design to Release: Agile - SAP ................... 36-736.3.3 Upgrading Comms Agent Assisted Billing Care: SBL CRM - BRM ......................... 36-736.3.3.1 Performing Preupgrade Tasks for Comms Agent Assisted Billing Care: SBL CRM -
BRM ................................................................................................................... 36-836.3.3.2 Running Upgrade Scripts for Comms Agent Assisted Billing Care: SBL CRM -
BRM ................................................................................................................... 36-836.3.3.3 Performing Postupgrade Tasks for Comms Agent Assisted Billing Care: SBL CRM
- BRM ................................................................................................................. 36-836.3.4 Upgrading Comms Order to Cash: SBL CRM, OSM and BRM ................................ 36-936.3.4.1 Performing Preupgrade Tasks for Comms Order to Cash: SBL CRM, OSM and
BRM ................................................................................................................... 36-936.3.4.2 Running Upgrade Scripts for Comms Order to Cash: SBL CRM, OSM and BRM ....
36-9
xxiv
36.3.4.3 Performing Postupgrade Tasks for Comms Order to Cash: SBL CRM, OSM and BRM .................................................................................................................. 36-9
36.3.5 Upgrading Comms Order to Cash: SBL CRM and BRM ........................................ 36-1036.3.5.1 Performing Preupgrade Tasks for Comms Order to Cash: SBL CRM and BRM ......
36-1036.3.5.2 Running Upgrade Scripts for Comms Order to Cash: SBL CRM and BRM .... 36-1036.3.5.3 Performing Postupgrade Tasks for Comms Order to Cash: SBL CRM and BRM .....
36-1036.3.6 Upgrading Comms Order to Cash: SBL CRM and OSM ....................................... 36-1136.3.6.1 Performing Preupgrade Tasks for Comms Order to Cash: SBL CRM and OSM ......
36-1136.3.6.2 Running Upgrade Scripts for Comms Order to Cash: SBL CRM and OSM .... 36-1136.3.6.3 Performing Postupgrade Tasks for Comms Order to Cash: SBL CRM and OSM .....
36-1136.4 Upgrading AIA 3.1 PIPs and DIs ................................................................................. 36-1236.4.1 Upgrading the Design to Release: Agile - EBS ....................................................... 36-1236.4.1.1 Running Upgrade Scripts for the Design to Release: Agile - EBS .................... 36-1236.4.1.2 Performing Postupgrade Tasks for Design to Release: Agile - EBS ................. 36-1236.4.2 Upgrading the Design to Release: Agile PLM for Process - OPM PIP ................... 36-1336.4.2.1 Performing Preupgrade Tasks for the Design to Release: Agile PLM for Process -
OPM PIP .......................................................................................................... 36-1336.4.2.2 Running Upgrade Scripts for the Design to Release: Agile PLM for Process - OPM
PIP ................................................................................................................... 36-1436.4.2.3 Performing Postupgrade Tasks for the Design to Release: Agile PLM for Process -
OPM PIP .......................................................................................................... 36-1436.4.3 Upgrading the Lead to Order: CRM OD - EBS PIP ................................................ 36-1436.4.3.1 Performing Preupgrade Tasks for the Lead to Order: CRMOD - EBS PIP ...... 36-1536.4.3.2 Running Upgrade Scripts for the Lead to Order: CRM OD - EBS PIP ............. 36-1536.4.3.3 Performing Postupgrade Tasks for the Lead to Order: CRM OD - EBS PIP .... 36-1536.4.4 Upgrading the Order to Cash: Siebel CRM - EBS PIP ............................................ 36-1536.4.4.1 Performing Preupgrade Tasks for the Order to Cash: Siebel CRM - EBS PIP .. 36-1636.4.4.2 Running Upgrade Scripts for the Order to Cash: Siebel CRM - EBS PIP ......... 36-1636.4.4.3 Performing Postupgrade Tasks for the Order to Cash: Siebel CRM - EBS PIP 36-1636.4.5 Upgrading the LSP Order Mgmt: OTM - EBS - Siebel CRM PIP ............................ 36-1636.4.5.1 Performing Preupgrade Tasks for the LSP Order Mgmt: OTM - EBS - Siebel CRM
PIP ................................................................................................................... 36-1736.4.5.2 Running Upgrade Scripts for the LSP Order Mgmt: OTM - EBS - Siebel CRM PIP ..
36-1736.4.5.3 Performing Postupgrade Tasks for the LSP Order Mgmt: OTM - EBS - Siebel CRM
PIP ................................................................................................................... 36-1736.5 Performing Postupgrade Tasks for Pre-Built Integrations ........................................... 36-1736.6 Performing Postupgrade Tasks for AIA ....................................................................... 36-18
Part V Uninstalling Oracle AIA
37 Uninstalling Oracle AIA
37.1 Uninstalling Pre-Built Integrations and Foundation Pack .............................................. 37-137.2 Uninstalling PIP or DIs .................................................................................................. 37-1
xxv
37.3 Cleaning the Environment ............................................................................................. 37-237.4 Verifying Uninstall Processes ......................................................................................... 37-2
Part VI Appendix
A AIA Pre-Built Integrations Installer Screens
B Oracle Data Integrator Screen

xxvi
xxvii
List of Examples
4–1 Identical Database User Name Message .............................................................................. 4-144–2 Identical ODI Data Source Message...................................................................................... 4-145–1 Identical Database User Name Message .............................................................................. 5-115–2 Identical ODI Data Source Message...................................................................................... 5-116–1 Instance ID Specified in the BRM Payload Configuration File ......................................... 6-126–2 BRM Instance ID Specified in the Message Payload........................................................... 6-127–1 Instance ID Specified in the BRM Payload Configuration File ......................................... 7-107–2 BRM Instance ID Specified in the Message Payload........................................................... 7-1020–1 Queue......................................................................................................................................... 20-820–2 EBIBOMConfigurator.............................................................................................................. 20-828–1 Cross-References in the inventory_location_id XREF Table ........................................... 28-1128–2 Cross-Reference Validation Query...................................................................................... 28-1128–3 Oracle E-Business Suite Database Update Command...................................................... 28-1229–1 Property Name Modification ............................................................................................... 29-1329–2 Property Name Modification ............................................................................................... 29-1429–3 Identical Database User Name Message ............................................................................ 29-2429–4 Identical ODI Data Source Message.................................................................................... 29-25

xxviii
xxix
List of Figures
1–1 Flow of the Pre-Built Integrations Installation ....................................................................... 1-2A–1 Welcome Screen of the AIA Pre-Built Integrations Installer ............................................... A-1A–2 Prerequisite Checks Screen of the AIA Pre-Built Integrations Installer............................. A-2A–3 Installation Location Screen of the AIA Pre-Built Integrations Installer. .......................... A-3A–4 Installation Summary Screen of the AIA Pre-Built Integrations Installer ......................... A-4A–5 Warning Message....................................................................................................................... A-5A–6 Installation Progress Screen of the AIA Pre-Built Integrations Installer. .......................... A-6A–7 Installation Complete Screen of the AIA Pre-Built Integrations Installer. ........................ A-7B–1 Oracle Data Integrator Topology Screen ................................................................................ B-1B–2 JDBC Tab of the ODI Installer Screen ..................................................................................... B-2

xxx

xxxi
List of Tables
2–1 Oracle E-Business Suite 12.1.1 Seed Data Patch .................................................................... 2-52–2 Oracle E-Business Suite 11.5.10.CU2 Seed Data Patches...................................................... 2-52–3 Oracle E-Business Suite 11.5.10.2 Seed Data Patches............................................................ 2-62–4 Oracle E-Business Suite 12.1.1 Seed Data Patches................................................................. 2-62–5 Oracle Product Hub 12.1.3 or Higher Patch........................................................................... 2-62–6 Seed Data Patches for Oracle E-Business Suite R12.1.1 or 12.1.2 or 12.1.3 ..................... 2-112–7 Seed Data Patches for Oracle E-Business Suite 11.5.10.2................................................... 2-112–8 ODI Release 11.1.1.3 Patches ................................................................................................. 2-122–9 ODI Release 11.1.1.3 Patches ................................................................................................. 2-132–10 Oracle E-Business Suite R12.1.1 Seed Data Patches ........................................................... 2-132–11 Oracle E-Business Suite R12.1.2 and R12.1.3 Seed Data Patch ......................................... 2-132–12 Oracle E-Business Suite R12.1.2 Seed Data Patches ........................................................... 2-142–13 Oracle E-Business Suite R12.1.1 Seed Data Patches ........................................................... 2-142–14 Oracle E-Business Suite R11.5.10.2 Seed Data Patches ...................................................... 2-142–15 ODI Release 11.1.1.3 Patches ................................................................................................. 2-152–16 Oracle SOA Suite 11.1.1.6....................................................................................................... 2-162–17 Foundation Pack 11.1.1.6 (PS5) ............................................................................................. 2-162–18 Oracle Transportation Management (OTM) 6.2 ................................................................. 2-162–19 Oracle E-Business Suite R12.1.3 ............................................................................................ 2-172–20 Oracle SOA Suite 11.1.1.6....................................................................................................... 2-172–21 Foundation Pack 11.1.1.6 (PS5) ............................................................................................. 2-172–22 Oracle Transportation Management (OTM) 6.2 ................................................................. 2-182–23 OTM 6.1.1 Patches................................................................................................................... 2-182–24 Oracle SOA Suite 11.1.1.6....................................................................................................... 2-182–25 Foundation Pack 11.1.1.6 (PS5) ............................................................................................. 2-192–26 Oracle Transportation Management (OTM) 6.2 ................................................................. 2-192–27 Oracle E-Business Suite R12.1.3 ............................................................................................ 2-192–28 Seed Data Patches for Oracle E-Business Suite 12.1.2........................................................ 2-202–29 Seed Data Patches for Oracle E-Business Suite 11.5.10...................................................... 2-212–30 ODI Release 11.1.1.3 Patches ................................................................................................. 2-213–1 Preinstallation Configurations ................................................................................................. 3-73–2 Launching the AIA Pre-Built Integrations Installer.............................................................. 3-84–1 Prohibited IDs............................................................................................................................. 4-14–2 Integration Server Details Screen Fields................................................................................. 4-24–3 Siebel CRM Server Details Screen Fields................................................................................ 4-34–4 Siebel CRM Database Details Screen Fields........................................................................... 4-34–5 Oracle Communications BRM Details Screen........................................................................ 4-44–6 Oracle Data Integrator Access Information Details Screens Fields .................................... 4-54–7 Oracle Data Integrator Master Repository Details Screen Fields........................................ 4-54–8 Oracle Data Integrator Work Repository Details for Agent Assisted Billing Care Screen
Fields 4-64–9 Session Pool Manager Details Screen Fields .......................................................................... 4-64–10 Deployment Commands for the Comms Agent Assisted Billing Care Pre-Built Integration
4-104–11 No Authentication Service Policy Attachments for Comms Agent Assisted Billing Care:
SBL CRM - BRM 4-164–12 No Authentication Client Policy for Comms Agent Assisted Billing Care: SBL CRM - BRM
4-164–13 Undeployment Command for the Comms Agent Assisted Billing Care Pre-Built
Integration 4-165–1 Prohibited IDs............................................................................................................................. 5-15–2 Integration Server Details Screen Fields................................................................................. 5-25–3 Oracle E-Business Suite Server Details Screen Fields ........................................................... 5-3
xxxii
5–4 Oracle E-Business Suite Database Details Screen Fields ...................................................... 5-35–5 Oracle Communications BRM Screen Fields ......................................................................... 5-45–6 Oracle Data Integrator Access Information Details Screens Fields .................................... 5-55–7 Oracle Data Integrator Master Repository Details Screen Fields........................................ 5-55–8 Oracle Data Integrator Work Repository Details for Revenue Accounting Screen Fields......
5-65–9 Deployment Commands for the Comms Revenue Accounting Pre-Built Integration .... 5-96–1 Integration Server Details Screen Fields................................................................................. 6-26–2 Siebel CRM Server Details Screen Fields................................................................................ 6-26–3 Siebel CRM Database Details Screen Fields........................................................................... 6-36–4 Oracle Communications BRM Details Screen Fields ............................................................ 6-36–5 Oracle OSM Server Details Screen Fields ............................................................................... 6-46–6 Session Pool Manager Details Screen Fields .......................................................................... 6-56–7 Deployment Commands for the Comms Order to Cash for Siebel CRM, OSM and BRM.....
6-96–8 No Authentication Service Policy Attachments for Comms Order to Cash: SBL CRM,
BRM, and OSM 6-176–9 No Authentication Client Policy Attachments for Comms Order to Cash: SBL CRM, BRM,
and OSM 6-176–10 Undeployment Command for the Comms Order to Cash: SBL CRM, OSM, and BRM .........
6-187–1 Integration Server Details Screen Fields................................................................................. 7-27–2 Siebel CRM Server Details Screen Fields................................................................................ 7-27–3 Siebel CRM Database Details Screen Fields........................................................................... 7-37–4 Oracle Communications BRM Details Screen........................................................................ 7-37–5 Session Pool Manager Details Screen Fields .......................................................................... 7-47–6 Deployment Commands for the Comms Order to Cash: SBL CRM and BRM Pre-Built
Integration 7-87–7 No Authentication Service Policy Attachments for Comms Order to Cash: SBL and BRM...
7-147–8 No Authentication Client Policy Attachments for Comms Order to Cash: SBL and BRM.....
7-147–9 Undeployment Command for the Comms Order to Cash: SBL CRM and BRM Pre-Built
Integration 7-157–10 JMS Queues for AIA Interactions with Order Management System .............................. 7-168–1 Integration Server Details Screen Fields................................................................................. 8-28–2 Siebel CRM Server Details Screen Fields................................................................................ 8-28–3 Siebel CRM Database Details Screen Fields........................................................................... 8-38–4 Oracle OSM Server Details Screen........................................................................................... 8-38–5 Session Pool Manager Details Screen Fields .......................................................................... 8-58–6 Deployment Commands for the Comms Order to Cash: SBL CRM and OSM Pre-Built
Integration 8-88–7 No Authentication Service Policy Attachments for Comms Order to Cash: SBL and OSM ..
8-148–8 No Authentication Client Policy Attachments for Comms Order to Cash: SBL CRM and
OSM 8-148–9 Undeployment Command for the Comms Order to Cash: SBL CRM and OSM Pre-Built
Integration 8-159–1 Integration Server Details Screen Fields................................................................................. 9-19–2 Oracle Customer Hub (OCH) Screen Fields .......................................................................... 9-29–3 Deployment Commands for Customer MDM Base Pack .................................................... 9-59–4 Service Policy Attachments for Customer MDM Base Pack................................................ 9-79–5 No Authentication Service Policy Attachments for Customer MDM Base Pack ............. 9-79–6 Saml Opt On Client Policy Attachments for Customer MDM Base Pack ......................... 9-79–7 Undeployment Command for Customer MDM Base Pack ................................................. 9-7
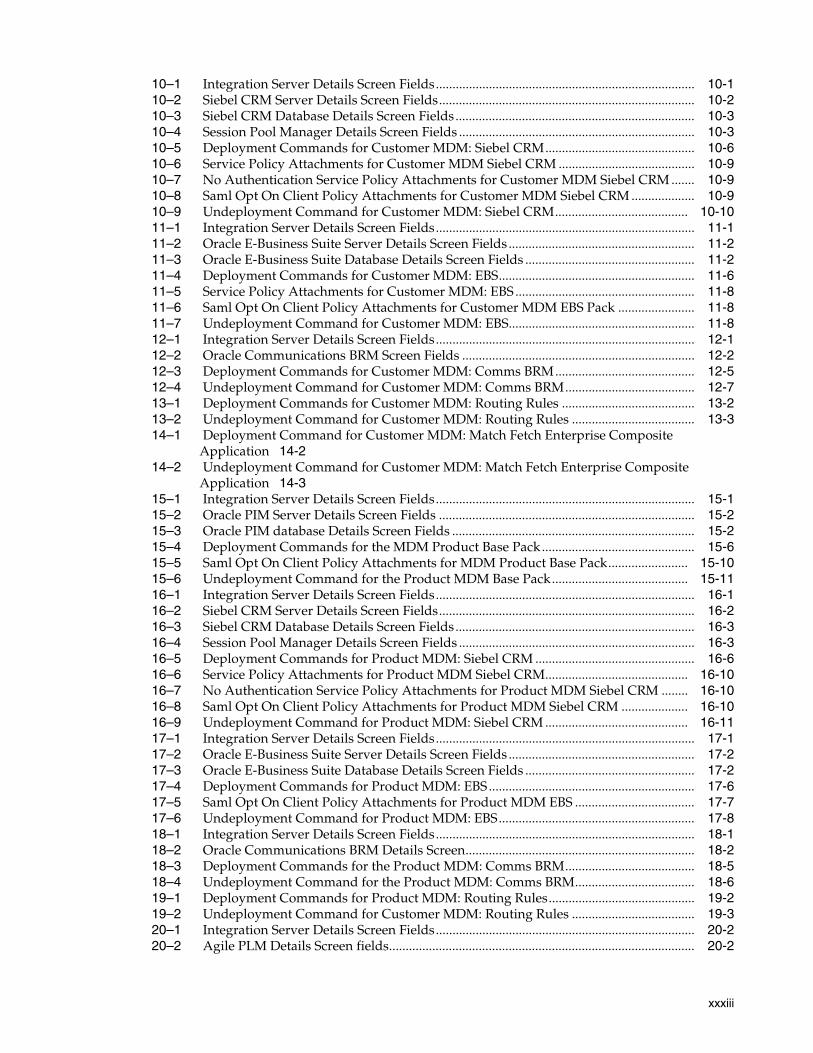
xxxiii
10–1 Integration Server Details Screen Fields.............................................................................. 10-110–2 Siebel CRM Server Details Screen Fields............................................................................. 10-210–3 Siebel CRM Database Details Screen Fields........................................................................ 10-310–4 Session Pool Manager Details Screen Fields ....................................................................... 10-310–5 Deployment Commands for Customer MDM: Siebel CRM............................................. 10-610–6 Service Policy Attachments for Customer MDM Siebel CRM ......................................... 10-910–7 No Authentication Service Policy Attachments for Customer MDM Siebel CRM ....... 10-910–8 Saml Opt On Client Policy Attachments for Customer MDM Siebel CRM ................... 10-910–9 Undeployment Command for Customer MDM: Siebel CRM........................................ 10-1011–1 Integration Server Details Screen Fields.............................................................................. 11-111–2 Oracle E-Business Suite Server Details Screen Fields ........................................................ 11-211–3 Oracle E-Business Suite Database Details Screen Fields ................................................... 11-211–4 Deployment Commands for Customer MDM: EBS........................................................... 11-611–5 Service Policy Attachments for Customer MDM: EBS ...................................................... 11-811–6 Saml Opt On Client Policy Attachments for Customer MDM EBS Pack ....................... 11-811–7 Undeployment Command for Customer MDM: EBS........................................................ 11-812–1 Integration Server Details Screen Fields.............................................................................. 12-112–2 Oracle Communications BRM Screen Fields ...................................................................... 12-212–3 Deployment Commands for Customer MDM: Comms BRM.......................................... 12-512–4 Undeployment Command for Customer MDM: Comms BRM....................................... 12-713–1 Deployment Commands for Customer MDM: Routing Rules ........................................ 13-213–2 Undeployment Command for Customer MDM: Routing Rules ..................................... 13-314–1 Deployment Command for Customer MDM: Match Fetch Enterprise Composite
Application 14-214–2 Undeployment Command for Customer MDM: Match Fetch Enterprise Composite
Application 14-315–1 Integration Server Details Screen Fields.............................................................................. 15-115–2 Oracle PIM Server Details Screen Fields ............................................................................. 15-215–3 Oracle PIM database Details Screen Fields ......................................................................... 15-215–4 Deployment Commands for the MDM Product Base Pack.............................................. 15-615–5 Saml Opt On Client Policy Attachments for MDM Product Base Pack........................ 15-1015–6 Undeployment Command for the Product MDM Base Pack......................................... 15-1116–1 Integration Server Details Screen Fields.............................................................................. 16-116–2 Siebel CRM Server Details Screen Fields............................................................................. 16-216–3 Siebel CRM Database Details Screen Fields........................................................................ 16-316–4 Session Pool Manager Details Screen Fields ....................................................................... 16-316–5 Deployment Commands for Product MDM: Siebel CRM ................................................ 16-616–6 Service Policy Attachments for Product MDM Siebel CRM........................................... 16-1016–7 No Authentication Service Policy Attachments for Product MDM Siebel CRM ........ 16-1016–8 Saml Opt On Client Policy Attachments for Product MDM Siebel CRM .................... 16-1016–9 Undeployment Command for Product MDM: Siebel CRM ........................................... 16-1117–1 Integration Server Details Screen Fields.............................................................................. 17-117–2 Oracle E-Business Suite Server Details Screen Fields ........................................................ 17-217–3 Oracle E-Business Suite Database Details Screen Fields ................................................... 17-217–4 Deployment Commands for Product MDM: EBS .............................................................. 17-617–5 Saml Opt On Client Policy Attachments for Product MDM EBS .................................... 17-717–6 Undeployment Command for Product MDM: EBS........................................................... 17-818–1 Integration Server Details Screen Fields.............................................................................. 18-118–2 Oracle Communications BRM Details Screen..................................................................... 18-218–3 Deployment Commands for the Product MDM: Comms BRM....................................... 18-518–4 Undeployment Command for the Product MDM: Comms BRM.................................... 18-619–1 Deployment Commands for Product MDM: Routing Rules............................................ 19-219–2 Undeployment Command for Customer MDM: Routing Rules ..................................... 19-320–1 Integration Server Details Screen Fields.............................................................................. 20-220–2 Agile PLM Details Screen fields............................................................................................ 20-2
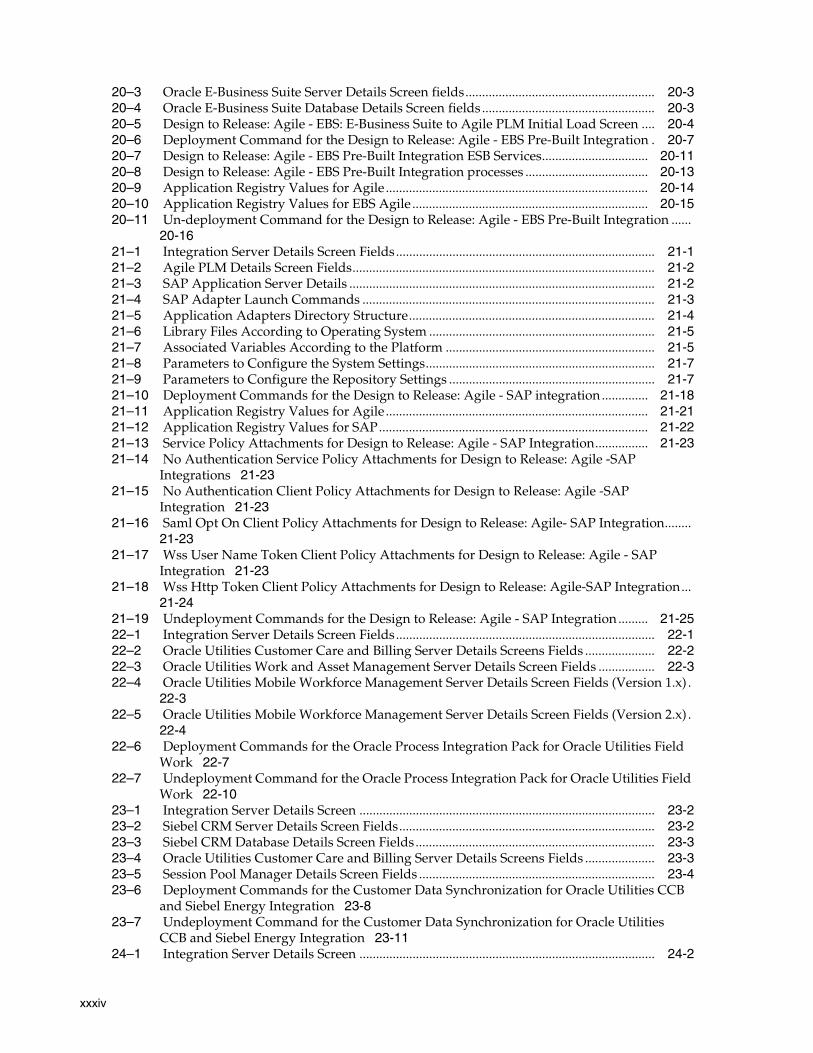
xxxiv
20–3 Oracle E-Business Suite Server Details Screen fields......................................................... 20-320–4 Oracle E-Business Suite Database Details Screen fields .................................................... 20-320–5 Design to Release: Agile - EBS: E-Business Suite to Agile PLM Initial Load Screen .... 20-420–6 Deployment Command for the Design to Release: Agile - EBS Pre-Built Integration . 20-720–7 Design to Release: Agile - EBS Pre-Built Integration ESB Services................................ 20-1120–8 Design to Release: Agile - EBS Pre-Built Integration processes ..................................... 20-1320–9 Application Registry Values for Agile ............................................................................... 20-1420–10 Application Registry Values for EBS Agile ....................................................................... 20-1520–11 Un-deployment Command for the Design to Release: Agile - EBS Pre-Built Integration ......
20-1621–1 Integration Server Details Screen Fields.............................................................................. 21-121–2 Agile PLM Details Screen Fields........................................................................................... 21-221–3 SAP Application Server Details ............................................................................................ 21-221–4 SAP Adapter Launch Commands ........................................................................................ 21-321–5 Application Adapters Directory Structure.......................................................................... 21-421–6 Library Files According to Operating System .................................................................... 21-521–7 Associated Variables According to the Platform ............................................................... 21-521–8 Parameters to Configure the System Settings..................................................................... 21-721–9 Parameters to Configure the Repository Settings .............................................................. 21-721–10 Deployment Commands for the Design to Release: Agile - SAP integration .............. 21-1821–11 Application Registry Values for Agile ............................................................................... 21-2121–12 Application Registry Values for SAP................................................................................. 21-2221–13 Service Policy Attachments for Design to Release: Agile - SAP Integration................ 21-2321–14 No Authentication Service Policy Attachments for Design to Release: Agile -SAP
Integrations 21-2321–15 No Authentication Client Policy Attachments for Design to Release: Agile -SAP
Integration 21-2321–16 Saml Opt On Client Policy Attachments for Design to Release: Agile- SAP Integration........
21-2321–17 Wss User Name Token Client Policy Attachments for Design to Release: Agile - SAP
Integration 21-2321–18 Wss Http Token Client Policy Attachments for Design to Release: Agile-SAP Integration...
21-2421–19 Undeployment Commands for the Design to Release: Agile - SAP Integration ......... 21-2522–1 Integration Server Details Screen Fields.............................................................................. 22-122–2 Oracle Utilities Customer Care and Billing Server Details Screens Fields ..................... 22-222–3 Oracle Utilities Work and Asset Management Server Details Screen Fields ................. 22-322–4 Oracle Utilities Mobile Workforce Management Server Details Screen Fields (Version 1.x) .
22-322–5 Oracle Utilities Mobile Workforce Management Server Details Screen Fields (Version 2.x) .
22-422–6 Deployment Commands for the Oracle Process Integration Pack for Oracle Utilities Field
Work 22-722–7 Undeployment Command for the Oracle Process Integration Pack for Oracle Utilities Field
Work 22-1023–1 Integration Server Details Screen ......................................................................................... 23-223–2 Siebel CRM Server Details Screen Fields............................................................................. 23-223–3 Siebel CRM Database Details Screen Fields........................................................................ 23-323–4 Oracle Utilities Customer Care and Billing Server Details Screens Fields ..................... 23-323–5 Session Pool Manager Details Screen Fields ....................................................................... 23-423–6 Deployment Commands for the Customer Data Synchronization for Oracle Utilities CCB
and Siebel Energy Integration 23-823–7 Undeployment Command for the Customer Data Synchronization for Oracle Utilities
CCB and Siebel Energy Integration 23-1124–1 Integration Server Details Screen ......................................................................................... 24-2
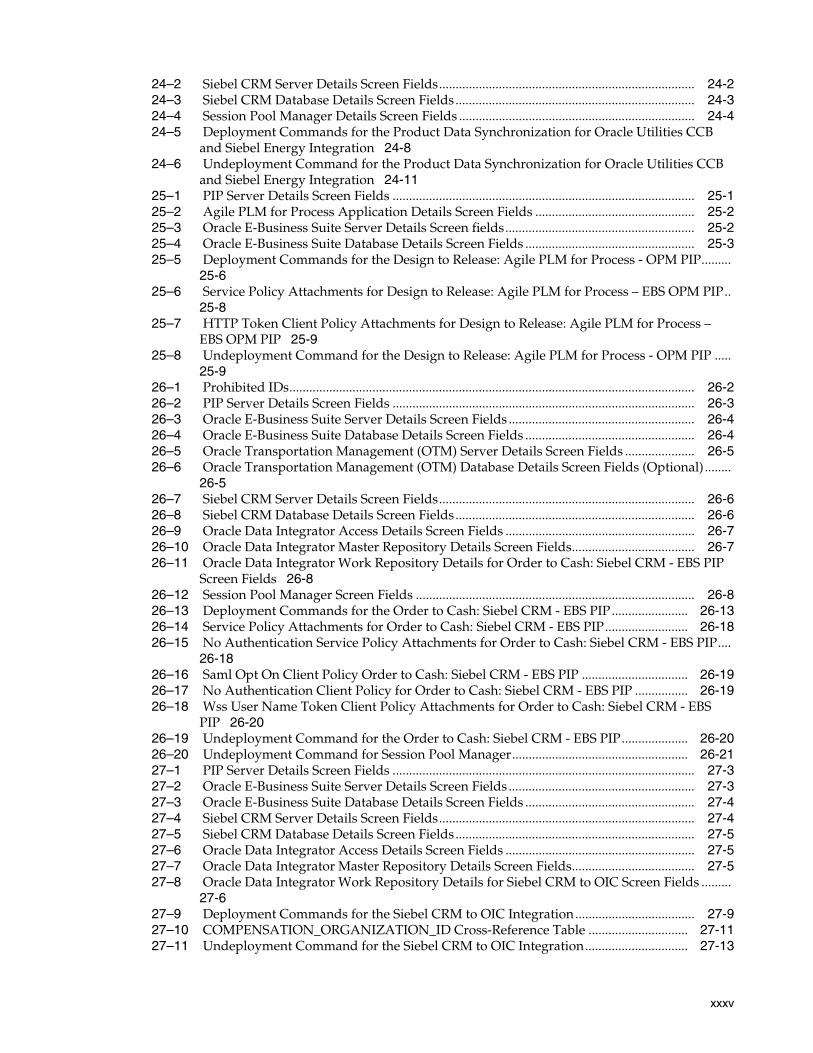
xxxv
24–2 Siebel CRM Server Details Screen Fields............................................................................. 24-224–3 Siebel CRM Database Details Screen Fields........................................................................ 24-324–4 Session Pool Manager Details Screen Fields ....................................................................... 24-424–5 Deployment Commands for the Product Data Synchronization for Oracle Utilities CCB
and Siebel Energy Integration 24-824–6 Undeployment Command for the Product Data Synchronization for Oracle Utilities CCB
and Siebel Energy Integration 24-1125–1 PIP Server Details Screen Fields ........................................................................................... 25-125–2 Agile PLM for Process Application Details Screen Fields ................................................ 25-225–3 Oracle E-Business Suite Server Details Screen fields......................................................... 25-225–4 Oracle E-Business Suite Database Details Screen Fields ................................................... 25-325–5 Deployment Commands for the Design to Release: Agile PLM for Process - OPM PIP.........
25-625–6 Service Policy Attachments for Design to Release: Agile PLM for Process – EBS OPM PIP..
25-825–7 HTTP Token Client Policy Attachments for Design to Release: Agile PLM for Process –
EBS OPM PIP 25-925–8 Undeployment Command for the Design to Release: Agile PLM for Process - OPM PIP .....
25-926–1 Prohibited IDs.......................................................................................................................... 26-226–2 PIP Server Details Screen Fields ........................................................................................... 26-326–3 Oracle E-Business Suite Server Details Screen Fields ........................................................ 26-426–4 Oracle E-Business Suite Database Details Screen Fields ................................................... 26-426–5 Oracle Transportation Management (OTM) Server Details Screen Fields ..................... 26-526–6 Oracle Transportation Management (OTM) Database Details Screen Fields (Optional)........
26-526–7 Siebel CRM Server Details Screen Fields............................................................................. 26-626–8 Siebel CRM Database Details Screen Fields........................................................................ 26-626–9 Oracle Data Integrator Access Details Screen Fields ......................................................... 26-726–10 Oracle Data Integrator Master Repository Details Screen Fields..................................... 26-726–11 Oracle Data Integrator Work Repository Details for Order to Cash: Siebel CRM - EBS PIP
Screen Fields 26-826–12 Session Pool Manager Screen Fields .................................................................................... 26-826–13 Deployment Commands for the Order to Cash: Siebel CRM - EBS PIP....................... 26-1326–14 Service Policy Attachments for Order to Cash: Siebel CRM - EBS PIP......................... 26-1826–15 No Authentication Service Policy Attachments for Order to Cash: Siebel CRM - EBS PIP....
26-1826–16 Saml Opt On Client Policy Order to Cash: Siebel CRM - EBS PIP ................................ 26-1926–17 No Authentication Client Policy for Order to Cash: Siebel CRM - EBS PIP ................ 26-1926–18 Wss User Name Token Client Policy Attachments for Order to Cash: Siebel CRM - EBS
PIP 26-2026–19 Undeployment Command for the Order to Cash: Siebel CRM - EBS PIP.................... 26-2026–20 Undeployment Command for Session Pool Manager..................................................... 26-2127–1 PIP Server Details Screen Fields ........................................................................................... 27-327–2 Oracle E-Business Suite Server Details Screen Fields ........................................................ 27-327–3 Oracle E-Business Suite Database Details Screen Fields ................................................... 27-427–4 Siebel CRM Server Details Screen Fields............................................................................. 27-427–5 Siebel CRM Database Details Screen Fields........................................................................ 27-527–6 Oracle Data Integrator Access Details Screen Fields ......................................................... 27-527–7 Oracle Data Integrator Master Repository Details Screen Fields..................................... 27-527–8 Oracle Data Integrator Work Repository Details for Siebel CRM to OIC Screen Fields .........
27-627–9 Deployment Commands for the Siebel CRM to OIC Integration.................................... 27-927–10 COMPENSATION_ORGANIZATION_ID Cross-Reference Table .............................. 27-1127–11 Undeployment Command for the Siebel CRM to OIC Integration............................... 27-13
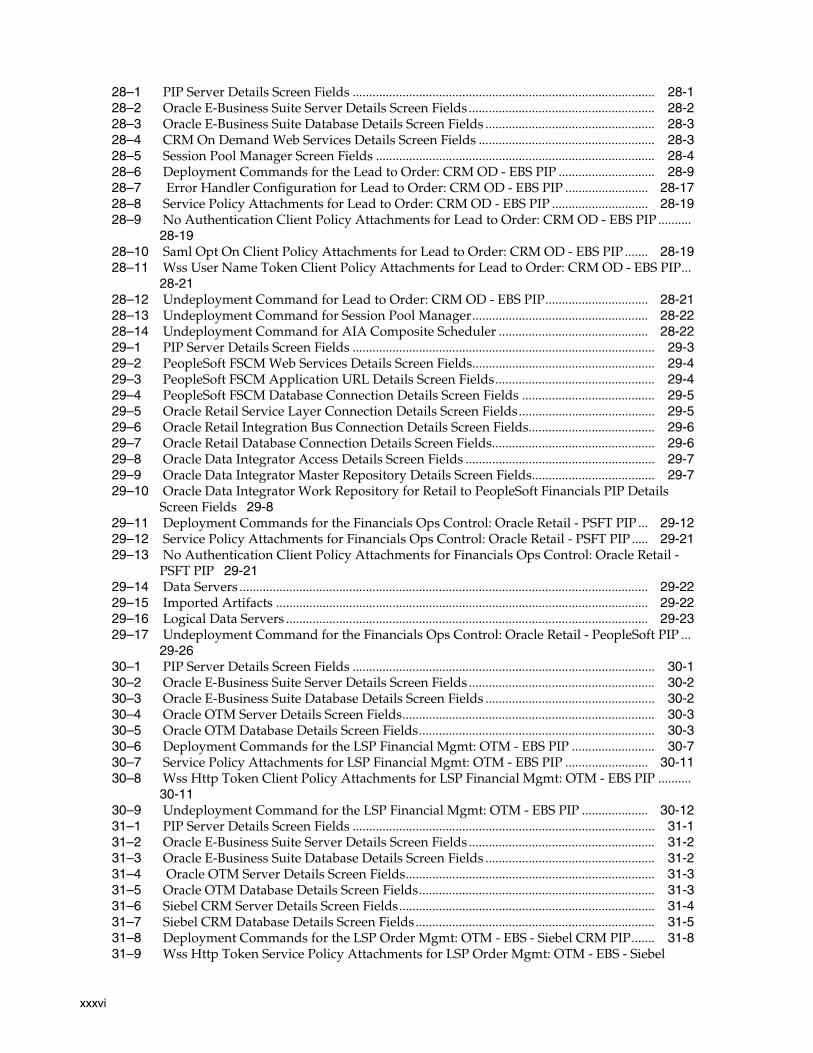
xxxvi
28–1 PIP Server Details Screen Fields ........................................................................................... 28-128–2 Oracle E-Business Suite Server Details Screen Fields ........................................................ 28-228–3 Oracle E-Business Suite Database Details Screen Fields ................................................... 28-328–4 CRM On Demand Web Services Details Screen Fields ..................................................... 28-328–5 Session Pool Manager Screen Fields .................................................................................... 28-428–6 Deployment Commands for the Lead to Order: CRM OD - EBS PIP ............................. 28-928–7 Error Handler Configuration for Lead to Order: CRM OD - EBS PIP ......................... 28-1728–8 Service Policy Attachments for Lead to Order: CRM OD - EBS PIP ............................. 28-1928–9 No Authentication Client Policy Attachments for Lead to Order: CRM OD - EBS PIP ..........
28-1928–10 Saml Opt On Client Policy Attachments for Lead to Order: CRM OD - EBS PIP ....... 28-1928–11 Wss User Name Token Client Policy Attachments for Lead to Order: CRM OD - EBS PIP...
28-2128–12 Undeployment Command for Lead to Order: CRM OD - EBS PIP............................... 28-2128–13 Undeployment Command for Session Pool Manager..................................................... 28-2228–14 Undeployment Command for AIA Composite Scheduler ............................................. 28-2229–1 PIP Server Details Screen Fields ........................................................................................... 29-329–2 PeopleSoft FSCM Web Services Details Screen Fields....................................................... 29-429–3 PeopleSoft FSCM Application URL Details Screen Fields................................................ 29-429–4 PeopleSoft FSCM Database Connection Details Screen Fields ........................................ 29-529–5 Oracle Retail Service Layer Connection Details Screen Fields......................................... 29-529–6 Oracle Retail Integration Bus Connection Details Screen Fields...................................... 29-629–7 Oracle Retail Database Connection Details Screen Fields................................................. 29-629–8 Oracle Data Integrator Access Details Screen Fields ......................................................... 29-729–9 Oracle Data Integrator Master Repository Details Screen Fields..................................... 29-729–10 Oracle Data Integrator Work Repository for Retail to PeopleSoft Financials PIP Details
Screen Fields 29-829–11 Deployment Commands for the Financials Ops Control: Oracle Retail - PSFT PIP ... 29-1229–12 Service Policy Attachments for Financials Ops Control: Oracle Retail - PSFT PIP..... 29-2129–13 No Authentication Client Policy Attachments for Financials Ops Control: Oracle Retail -
PSFT PIP 29-2129–14 Data Servers ........................................................................................................................... 29-2229–15 Imported Artifacts ................................................................................................................ 29-2229–16 Logical Data Servers ............................................................................................................. 29-2329–17 Undeployment Command for the Financials Ops Control: Oracle Retail - PeopleSoft PIP ...
29-2630–1 PIP Server Details Screen Fields ........................................................................................... 30-130–2 Oracle E-Business Suite Server Details Screen Fields ........................................................ 30-230–3 Oracle E-Business Suite Database Details Screen Fields ................................................... 30-230–4 Oracle OTM Server Details Screen Fields............................................................................ 30-330–5 Oracle OTM Database Details Screen Fields....................................................................... 30-330–6 Deployment Commands for the LSP Financial Mgmt: OTM - EBS PIP ......................... 30-730–7 Service Policy Attachments for LSP Financial Mgmt: OTM - EBS PIP ......................... 30-1130–8 Wss Http Token Client Policy Attachments for LSP Financial Mgmt: OTM - EBS PIP ..........
30-1130–9 Undeployment Command for the LSP Financial Mgmt: OTM - EBS PIP .................... 30-1231–1 PIP Server Details Screen Fields ........................................................................................... 31-131–2 Oracle E-Business Suite Server Details Screen Fields ........................................................ 31-231–3 Oracle E-Business Suite Database Details Screen Fields ................................................... 31-231–4 Oracle OTM Server Details Screen Fields........................................................................... 31-331–5 Oracle OTM Database Details Screen Fields....................................................................... 31-331–6 Siebel CRM Server Details Screen Fields............................................................................. 31-431–7 Siebel CRM Database Details Screen Fields........................................................................ 31-531–8 Deployment Commands for the LSP Order Mgmt: OTM - EBS - Siebel CRM PIP....... 31-831–9 Wss Http Token Service Policy Attachments for LSP Order Mgmt: OTM - EBS - Siebel
xxxvii
CRM PIP 31-1231–10 No Authentication Service Policy Attachments for LSP Order Mgmt: OTM - EBS - Siebel
CRM PIP 31-1231–11 Wss Http Token Client Policy Attachments for LSP Order Mgmt: OTM - EBS - Siebel CRM
PIP 31-1231–12 No Authentication Client Policy Attachments for LSP Order Mgmt: OTM - EBS - Siebel
CRM PIP 31-1331–13 Undeployment Command for the LSP Order Mgmt: OTM - EBS - Siebel CRM PIP.. 31-1332–1 PIP Server Details Screen Fields ........................................................................................... 32-132–2 Oracle E-Business Suite Server Details Screen Fields ........................................................ 32-232–3 Oracle E-Business Suite Database Details Screen Fields ................................................... 32-232–4 Oracle OTM Server Details Screen Fields............................................................................ 32-332–5 Oracle OTM Database Details Screen Fields....................................................................... 32-332–6 Deployment Commands for the LSP Driver Mgmt: OTM - EBS PIP.............................. 32-732–7 Service Policy Attachments for LSP Driver Mgmt: OTM - EBS PIP.............................. 32-1232–8 Wss Http Token Client Policy Attachments for LSP Driver Mgmt: OTM - EBS PIP .. 32-1232–9 Undeployment Command for the LSP Driver Mgmt: OTM - EBS PIP......................... 32-1333–1 PIP Server Details Screen Fields ........................................................................................... 33-333–2 JD Edwards EnterpriseOne Inbound Path Screen ............................................................. 33-333–3 JD Edwards EnterpriseOne Outbound Path Screen .......................................................... 33-333–4 Demantra Inbound Path Screen............................................................................................ 33-433–5 Demantra Outbound Path Screen......................................................................................... 33-433–6 APS Database Connection Details ........................................................................................ 33-433–7 APS Inbound Path................................................................................................................... 33-433–8 APS Outbound Path ............................................................................................................... 33-433–9 Oracle Data Integrator Access Details Screen Fields ........................................................ 33-533–10 Oracle Data Integrator Master Repository Details............................................................. 33-533–11 Oracle Data Integrator Work Repository Details ............................................................... 33-633–12 Deployment Commands for the VCP Base Pack Integration......................................... 33-1033–13 Environment Variable Configuration ................................................................................ 33-1133–14 Service Policy Attachments for VCP Base Pack Integration........................................... 33-1633–15 No Authentication Client Policy Attachments for VCP Base Pack Integration........... 33-1633–16 Undeployment Command for VCP Base Pack Integration ............................................ 33-1734–1 PIP Server Details Screen Fields ........................................................................................... 34-134–2 JD Edwards EnterpriseOne Business Services Screen Fields ........................................... 34-234–3 Primavera P6 Server Details Screen Fields.......................................................................... 34-234–4 Deployment Commands for the Project Portfolio Management: Primavera P6 - JDE E1 PIP
34-534–5 Service Policy Attachments for Project Portfolio Mgmt: Primavera P6 - JDE E1 PIP ... 34-834–6 Wss User Name Client Policy Attachments for Project Portfolio Mgmt: Primavera P6 - JDE
E1 PIP 34-934–7 No Authentication Client Policy Attachments for Project Portfolio Mgmt: Primavera P6 -
JDE E1 PIP 34-934–8 Undeployment Command for the Project Portfolio Mgmt: Primavera P6 - JDE E1 PIP.........
34-1035–1 PIP Server Details Screen Fields ........................................................................................... 35-335–2 Oracle Pedigree and Serialization Manager Database Details Screen Fields................. 35-335–3 Oracle E-Business Suite Server Details Screen Fields ........................................................ 35-435–4 Oracle E-Business Suite Database Details Screen Fields ................................................... 35-435–5 Oracle Data Integrator Access Information Details Screen Fields................................... 35-535–6 Oracle Data Integrator Master Repository Details Screen Fields..................................... 35-535–7 Oracle Data Integrator Work Repository for Serialization and Tracking: OPSM - EBS
Details Screen Fields 35-635–8 Deployment Commands for the Serialization and Tracking: OPSM - EBS.................... 35-935–9 Environment Variables to be Configured for the Serialization and Tracking: OPSM - EBS ..
xxxviii
35-1135–10 ODI Variables to be Configured for the Serialization and Tracking: OPSM - EBS ..... 35-1135–11 Properties to be Updated for Configuring the Remote OPSM JMS Queue.................. 35-1335–12 Serialization and Tracking: OPSM - EBS Location DVM XML ...................................... 35-1535–13 Verifying Data Servers for the Serialization and Tracking: OPSM - EBS ..................... 35-1835–14 Verifying Context in the Serialization and Tracking: OPSM - EBS ............................... 35-1935–15 Verifying Logical Data Servers for the Serialization and Tracking: OPSM - EBS ....... 35-1935–16 No Authentication Service Policy Attachments for Serialization and Tracking: OPSM - EBS
35-2135–17 Saml or User Name or Http Opt On Client Policy Attachments for Serialization and
Tracking: OPSM - EBS 35-2135–18 Undeployment Command for Serialization and Tracking: OPSM - EBS ..................... 35-2236–1 Launch Instructions for AIA Pre-Built Integrations Installer........................................... 36-436–2 Deployment Commands for Design to Release: Agile - EBS............................................ 36-636–3 Deployment Commands for Design to Release: Agile - SAP........................................... 36-736–4 Deployment Commands for Comms Agent Assisted Billing Care: SBL CRM - BRM.. 36-836–5 Deployment Commands for Comms Order to Cash: SBL CRM, OSM and BRM......... 36-936–6 Deployment Commands for Comms Order to Cash: SBL CRM and BRM .................. 36-1036–7 Deployment Commands for Comms Order to Cash: SBL CRM and OSM.................. 36-1136–8 Deployment Commands for Design to Release: Agile - EBS.......................................... 36-1236–9 Deployment Commands for the Design to Release: Agile PLM for Process - OPM PIP.........
36-1436–10 Deployment Commands for the Lead to Order: CRM OD - EBS PIP ........................... 36-1536–11 Deployment Commands for the Order to Cash: Siebel CRM - EBS PIP....................... 36-1636–12 Deployment Commands for the LSP Order Mgmt: OTM - EBS - Siebel CRM PIP..... 36-17
xxxix
Preface
Welcome to Oracle Application Integration Architecture Installation and Upgrade Guide for Pre-Built Integrations Release 11.3.
What's New in this Guide■ The Oracle Application Integration Architecture Installation and Upgrade Guide
for Pre-Built Integrations is restructured into a general installation chapter with an individual configuration and deployment chapter for each pre-built integration.
■ The term process integration pack is replaced with the term pre-built integrations.
■ The implementation guides are restructured into two parts: design and set up.
Part I - Design: This part provides functional overviews, activity diagrams, assumptions and constraints, and technical sequence diagrams and steps.
Part II - Set up: This part provides prerequisites, data requirements, and configuration steps.
■ Starting with this release, these integrations are no longer available:
– Oracle Design to Release Integration Pack for Agile PLM Product Lifecycle Management and JD Edwards EnterpriseOne 11.1 (Design to Release: Agile-JDE E1)
– Oracle Project Portfolio Management Integration Pack for Primavera P6 and E-Business Suite
Common Oracle AIA Pre-Built Integration GuidesOracle Application Integration Architecture Pre-Built Integrations 11.3 includes the following guides shared by all products delivered with this release:
■ Oracle Application Integration Architecture Installation and Upgrade Guide for Pre-Built Integrations Release 11.3
This guide provides an overview of the installation process, including how to install, configure, and deploy your pre-built integrations. The steps required to upgrade your pre-built integrations to the latest release are also provided.
■ Oracle Application Integration Architecture Pre-Built Integrations 11.1: Utilities Guide
This guide describes:
xl
– How to work with and configure Session Pool Manager (SPM), which is a service in the Oracle SOA Suite web server whose primary function is to manage a pool of web server session tokens that can be reused by BPEL flows.
– How to deploy and configure the AIACompositeScheduler. This is a utility component that is used by pre-built integrations to schedule a service-oriented architecture (SOA) composite to be invoked at the specified time interval.
■ Oracle Application Integration Architecture Pre-Built Integrations 11.3: Product-to-Guide Index
The Product-to-Guide index lists the guides that provide information for each product delivered in this release.
Documentation AccessibilityFor information about Oracle's commitment to accessibility, visit the Oracle Accessibility Program website at http://www.oracle.com/pls/topic/lookup?ctx=acc&id=docacc.
Access to Oracle SupportOracle customers have access to electronic support through My Oracle Support. For information, visit http://www.oracle.com/pls/topic/lookup?ctx=acc&id=info or visit http://www.oracle.com/pls/topic/lookup?ctx=acc&id=trs if you are hearing impaired.
Additional ResourcesThe following resources are also available:
■ Oracle Application Integration Architecture Foundation Pack:
Oracle AIA Pre-Built integrations require Foundation Pack 11.1.1.6.0 (RUP patch 14253266 or later) to be installed. Refer to the Foundation Pack documentation library on OTN to download the Foundation Pack guides at http://download.oracle.com/docs/cd/E21764_01/aia.htm.
■ Oracle Application Integration Architecture: Product-to-Guide Index:
Oracle Technology Network: http://www.oracle.com/technetwork/index.html
■ Known Issues and Workarounds:
My Oracle Support: https://support.oracle.com/
■ Release Notes:
Oracle Technology Network: http://www.oracle.com/technetwork/index.html
■ Documentation updates:
Oracle Technology Network: http://www.oracle.com/technetwork/index.html
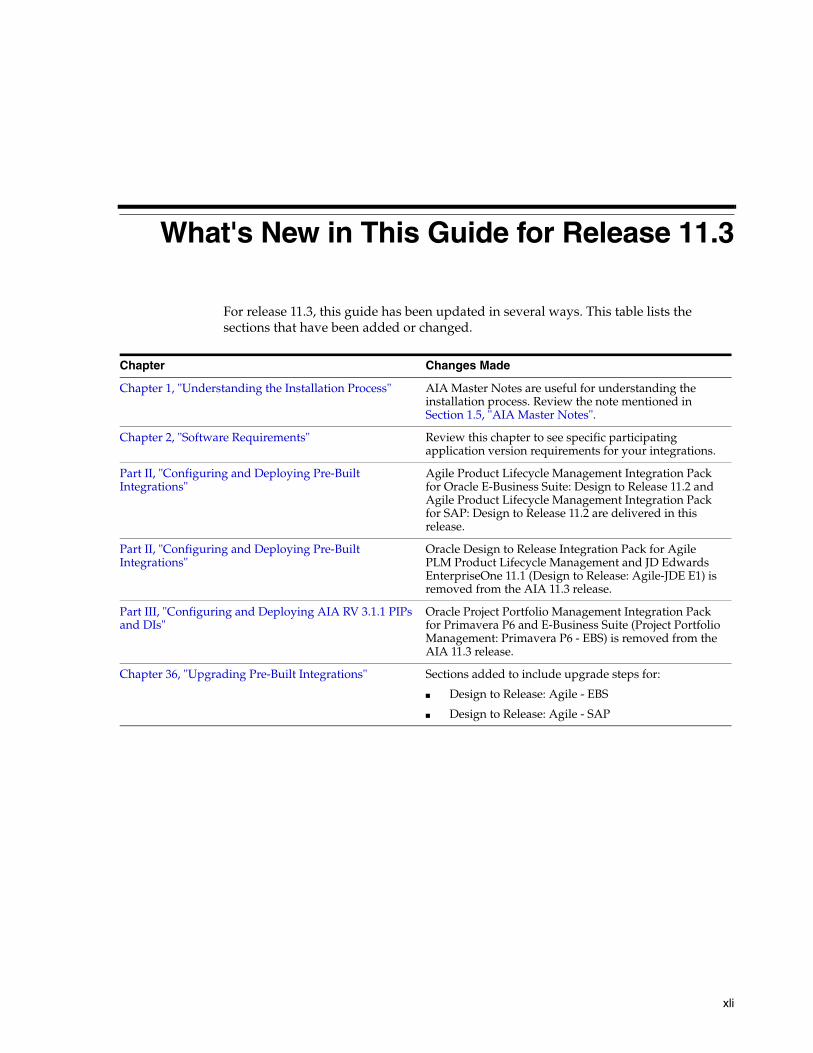
xli
What's New in This Guide for Release 11.3
For release 11.3, this guide has been updated in several ways. This table lists the sections that have been added or changed.
Chapter Changes Made
Chapter 1, "Understanding the Installation Process" AIA Master Notes are useful for understanding the installation process. Review the note mentioned in Section 1.5, "AIA Master Notes".
Chapter 2, "Software Requirements" Review this chapter to see specific participating application version requirements for your integrations.
Part II, "Configuring and Deploying Pre-Built Integrations"
Agile Product Lifecycle Management Integration Pack for Oracle E-Business Suite: Design to Release 11.2 and Agile Product Lifecycle Management Integration Pack for SAP: Design to Release 11.2 are delivered in this release.
Part II, "Configuring and Deploying Pre-Built Integrations"
Oracle Design to Release Integration Pack for Agile PLM Product Lifecycle Management and JD Edwards EnterpriseOne 11.1 (Design to Release: Agile-JDE E1) is removed from the AIA 11.3 release.
Part III, "Configuring and Deploying AIA RV 3.1.1 PIPs and DIs"
Oracle Project Portfolio Management Integration Pack for Primavera P6 and E-Business Suite (Project Portfolio Management: Primavera P6 - EBS) is removed from the AIA 11.3 release.
Chapter 36, "Upgrading Pre-Built Integrations" Sections added to include upgrade steps for:
■ Design to Release: Agile - EBS
■ Design to Release: Agile - SAP

xlii
Part IPart I Installing Pre-Built Integrations
and AIA RV 3.1.1 PIPs and DIs
This part describes how to install the pre-built integrations and AIA RV 3.1.1 PIPs and DIs delivered in this release.
This part contains the following chapters:
■ Chapter 1, "Understanding the Installation Process"
■ Chapter 2, "Software Requirements"
■ Chapter 3, "Installing Pre-Built Integrations"

1
Understanding the Installation Process 1-1
1Understanding the Installation Process
This guide provides an overview of the Oracle Application Integration Architecture (AIA) Pre-Built Integrations installation process that consists of installation, configuration and deployment.
This chapter includes the following sections:
■ Section 1.1, "Pre-Built Integrations Installation"
■ Section 1.2, "Cluster Installation"
■ Section 1.3, "Pre-Built Integrations Configuration"
■ Section 1.4, "Pre-Built Integrations Deployment"
■ Section 1.5, "AIA Master Notes"
1.1 Pre-Built Integrations InstallationPre-Built Integrations installation consists of three stages:
■ Installation
■ Configuration
■ Deployment
Note: For information about how to migrate 2.5 pre-built integrations to the 11.3 version, see Oracle Fusion Middleware Migration Guide for Oracle Application Integration Architecture Foundation Pack.

Pre-Built Integrations Installation
1-2 Oracle Application Integration Architecture Installation and Upgrade Guide for Pre-Built Integrations
Figure 1–1 Flow of the Pre-Built Integrations Installation
AIA Pre-Built Integrations Installer is built on Oracle Universal Installer (OUI) and enables you to install products included in Oracle AIA. AIA Pre-Built Integrations Installer is platform independent.
Pre-built integrations include multiple integration types:
■ Direct Integrations
■ Process Integration Packs
■ Partial Process Integration Packs
The Pre-Built Integrations 11.3 release delivers Direct Integrations (DI) and Process Integration Packs (PIP).
AIA Pre-Built Integrations Installer contains all the pre-built integrations as individual components, but does not install them individually. The AIA Pre-Built Integrations Installer lays down the pre-built integrations files inside AIA_HOME and installs all the components in the media pack.
You can also use AIA Pre-Built Integrations Installer to uninstall Oracle AIA.
For information about system requirements and supported platforms for Oracle Application Integration Architecture Foundation Pack, search for System Requirements and Supported Platforms for Oracle Application Integration Architecture Foundation Pack on http://www.oracle.com/technetwork/middleware/ias/downloads/fusion-certification-100350.html and download the xls file.
For information about system requirements and supported platforms for Oracle Application Integration Architecture 11.x, search for System Requirements and Supported Platforms for Oracle Application Integration Architecture 11.x on http://www.oracle.com/technetwork/middleware/ias/downloads/fusion-certification-100350.html and download the xls file.
The Deployment Configuration Wizard (DCW) defines the configurations needed for each pre-built integrations and guides you through the configuration. When you launch the DCW, you select the individual pre-built integrations to configure and enter the information required for the configuration. DCW prevents you from selecting mutually exclusive integrations.
For details about the DCW, see Section 1.3, "Pre-Built Integrations Configuration".
Cluster Installation
Understanding the Installation Process 1-3
For details about the configuration information required for your pre-built integrations, see the applicable pre-built integrations chapters in Part II, "Configuring and Deploying Pre-Built Integrations" and Part III, "Configuring and Deploying AIA RV 3.1.1 PIPs and DIs"of this guide.
When your pre-built integrations are configured, you run the pre-built integrations deployment command and specify the deployment plan.
For more details about Deployment, see Section 1.4, "Pre-Built Integrations Deployment"
For more details about the deployment information required for your pre-built integrations, see the applicable pre-built integrations chapters in Part II, "Configuring and Deploying Pre-Built Integrations" and Part III, "Configuring and Deploying AIA RV 3.1.1 PIPs and DIs"of this guide.
1.2 Cluster InstallationAIA Pre-Built Integrations Installer enables you to deploy the pre-built integration content directly to an existing AIA Foundation Pack cluster. You must successfully set up the AIA Foundation Pack cluster before attempting to deploy pre-built integrations on the cluster.
For more information on how to set up your Foundation Pack cluster see, Oracle Fusion Middleware Installation and Upgrade Guide for Oracle Application Integration Architecture Foundation Pack.
AIA PIPs and DIs (and AIA Foundation Pack) deploy to cluster nodes that are configured during the underlying SOA cluster setup.
Depending on how the SOA cluster is set up, the AIA PIPs and DIs deploy in different ways. The most common deployment options are:
■ Cluster nodes can be spread across different physical servers. This option is the most common for production deployments as it provides high-availability and is the Oracle recommended topology per the Enterprise Deployment Guide.
■ Cluster nodes can be present in the same physical server. This option provides increased throughput for the same hardware.
For more information on how to set up your SOA cluster, see Oracle Fusion Middleware Enterprise Deployment Guide for Oracle SOA Suite.
During the installation process, PIPs and DIs deploy to all nodes of the cluster in one flow. Repeating the steps provided in the guide on all nodes of the cluster is not required.
When providing the SOA server details on the AIA Foundation Pack Installer, the cluster name automatically appears in the list of available managed servers.
The Foundation Pack installation creates and configures a unique AIA Instance which identifies the cluster as a whole.
The PIP or DI is configured and deployed to this unique created AIA Instance. The complete configuration and deployment is directly targeted to the cluster as a whole.
AIA products deploy to all nodes of the SOA cluster. Additional nodes can be added to an existing SOA cluster.
Before you proceed to install and configure AIA PIPs or DIs to the cluster, check the successful setup of your SOA cluster and AIA Foundation Pack cluster setup by accessing appropriate URLs, such as Oracle Enterprise Manager, weblogic console and
Pre-Built Integrations Configuration
1-4 Oracle Application Integration Architecture Installation and Upgrade Guide for Pre-Built Integrations
AIA Home page from all the nodes participating in the cluster. Additional tests like sample deployments can also be done to ensure that the cluster setup is indeed working well.
1.3 Pre-Built Integrations ConfigurationOracle AIA DCW helps you configure the PIPs and DIs that are delivered in the pre-built integrations release. The screens that appear when you run the DCW are based on whether you choose to configure single or multiple pre-built integrations. This sections includes an overview of the configuration options available.
When you configure a pre-built integrations, DCW prompts for pre-built integrations specific information. For more information about the configuration information required for your pre-built integrations, see the applicable pre-built integrations chapters in Part II, "Configuring and Deploying Pre-Built Integrations" and Part III, "Configuring and Deploying AIA RV 3.1.1 PIPs and DIs".
When you configure multiple pre-built integrations, the following occurs:
■ When multiple pre-built integrations are selected for configuration at the same time, and these pre-built integrations have one or more common participating applications, DCW queries for common details only one time.
For example, if integration1 and integration2 both connect to Oracle E-Business Suite, then the information for this participating application is collected one time.
■ When configuring pre-built integrations over an existing configuration which has one or more integrations, and the new integration selected for configuration share one or more participating applications with existing pre-built integrations, then the common application information that is captured is shown to you. You can choose to change the captured information or keep it the same.
For example, when the first run of the DCW configures integration1 and the second run tries to configure integration2, and integration2 shares a participating application with integration1 such as Oracle E-Business Suite, then DCW shows the captured details and asks you to overwrite or not. If you choose not to overwrite then the details previously provided are retained.
1.3.1 Routing Rules Configuration in Enterprise Business ServicesEvery pre-built integrations has its own set of routing rules. These routing rules get delivered when you install Oracle AIA. However, the routing rules implementation can differ depending upon the various installation scenarios.
When you deploy a single pre-built integrations, the Enterprise Business Services (EBS) for that integration are deployed with all default routing rules delivered by Oracle AIA.
When you deploy multiple pre-built integrations (Comms pre-built integration and Core PIP) at the same time, the EBS that are used by multiple pre-built integrations do not get deployed. You must manually configure the routing rules to suit the functional
Note: The configuration screen sequence described in the specific pre-built integrations configuration and deployment chapters is based on the assumption that you are configuring a pre-built integrations for the first time, and that you are configuring one pre-built integrations at a time.
Pre-Built Integrations Deployment
Understanding the Installation Process 1-5
scenario for the combination of the pre-built integrations. However, the routing rules that were delivered through only one of pre-built integrations get deployed.
For more information about using and extending routing rules, see Oracle Fusion Middleware Developer's Guide for Oracle SOA Suite, "Creating Mediator Routing Rules".
The routing rules for the same EBS delivered through other integrations are available in AIA_HOME/pips/<PIP Name>/EBS. The install log provides information about the EBS for which you need configure routing rules. The install log reads, "<EBS Name> already deployed. The routing rules for PIP <PIP Name> have not been added. AIA_HOME/pips/<PIP Name>/EBS contains Oracle Delivered EBS with routing rules for this PIP".
For more information about how to use these delivered routing rules to design and implement your own Oracle AIA routing rules and the associated Oracle AIA configuration properties, see Oracle Fusion Middleware Developer's Guide for Oracle Application Integration Architecture Foundation Pack.
1.3.2 Installation, Configuration and Deployment TopologiesThere are several installation and deployment topologies possible using AIA Pre-Built Integrations Installer. Choose the installation that best suits your needs. For more details, see the whitepaper AIA Installation and Deployment -Strategies, Topologies and Flexibilities on http://www.oracle.com/index.html.
Only one instance of each participating application can participate in any given direct or process integration when configured through the DCW. After installing using AIA Pre-Built Integrations Installer, you can configure pre-built integrations to connect to multiple instances. You must customize the deployment commands to configure the specific pre-built integrations to connect to multiple instances. DCW does not support this configuration.
1.4 Pre-Built Integrations Deployment This section discusses the deployment of the pre-built integrations included in this release.
The deployment of a pre-built integrations is done through the deployment plan. The deployment plan and the configured AIAInstallProperties.xml are passed as parameters to the AIA Install Driver (AID) for deployment.
Note: Customers who are installing the Comms Agent Assisted Billing Care Pre-Built Integration and the Communications Order to Cash Pre-Built Integration do not have to perform this task.
Customers who are installing MDM Customer base along with one or more options pre-built integrations, do not have to perform this task when only MDM customer pre-built integrations are being deployed.
Customers who are installing MDM Product base along with one or more options pre-built integrations, do not have to perform this task when only MDM product pre-built integrations are being deployed.
Note: For EBS that are not shared between the pre-built integrations, all the default routing rules delivered with the pre-built integrations are deployed.
Pre-Built Integrations Deployment
1-6 Oracle Application Integration Architecture Installation and Upgrade Guide for Pre-Built Integrations
You must configure the AIAInstallProperties.xml with the corresponding pre-built integrations Server details. AID does not perform any checks to validate the AIAInstallProperties.xml has been configured with the corresponding pre-built integrations Server details.
Each pre-built integrations ships a main deployment plan, a supplementary deployment plan (optional) and a conditional policy file (optional). These files are passed as parameters to the AID with the configured AIAInstallProperties.xml. AID retrieves the required property values from the install properties file and deploys the pre-built integrations.
1.4.1 Pre-Built Integrations CodeploymentPIPs or DIs that do not belong to the same pre-built integrations group can be codeployed. For example, the Order to Cash: Siebel CRM - EBS and Customer Master Data Management Pre-Built Integrations. Before you install multiple PIPs or DIs on a single SOA instance, see the Oracle Application Integration Architecture PIP Functional Interoperability Configuration Guide and check whether your PIP or DI combination is supported on a single instance.
To install multiple PIPs that do not support codeployment, you must install each PIP or DI on a separate SOA instance. Installing unsupported PIP or DI combinations on a single SOA instance may require custom changes to accommodate any resulting functional impact or common PIP or DI components, such as common routing rules.
1.4.2 Pre-Built Integrations Security PoliciesAIA Pre-Built Integration composites are protected by Oracle Web Services Manager (WSM) security policies by default. In this release, the minimum protection provided by AIA services is authentication. The default policies are automatically applied when the integration is deployed, using either of the following strategies:
1. Global security policies are automatically attached to all composites matching the AIA naming conventions.
2. Local security policies are automatically attached to composites whose security requirements differ from the global policy or whose name does not match the AIA naming conventions.
For more information on how Global and Local security policies are attached during deployment, see Oracle Fusion Middleware Developer's Guide for Oracle Application Integration Architecture Foundation Pack, "Working with Security".
1.4.2.1 Default Security PoliciesAIA recommends hardening the services with message protection in the production environment. Before attempting to modify the default security policies, you must understand the Oracle WSM policy configuration and the global and local deployment strategies completely. Changes to the default policies without proper understanding could impact the integration's expected behavior.
AIA does not recommend disabling default policies completely.
For more information see Oracle Fusion Middleware Security and Administrator's Guide for Web Services.
1.4.2.2 Security Policy ValidationValidating that the default security policies are correctly deployed before running the integration is recommended.
AIA Master Notes
Understanding the Installation Process 1-7
For more information on how to validate the security policies for your integrations, see the latest applicable implementation guide.
1.4.3 Pre-Built Integrations Un-DeploymentTo un-deploy a pre-built integrations, you must un-deploy the PIPs or DIs included in it. The un-deployment of a PIP or DI is done through the un-deployment plan. The un-deployment plan and the configured AIAInstallProperties.xml are passed as parameters to AID for un-deployment.
For more details about the un-deployment information required for your integrations, see the applicable PIP or DI chapters in Part II, "Configuring and Deploying Pre-Built Integrations" and Part III, "Configuring and Deploying AIA RV 3.1.1 PIPs and DIs" of this guide.
1.5 AIA Master NotesAIA master notes provide you with a one-stop reference point for all the documentation available for your pre-built integrations. AIA master notes are stored on My Oracle Support (MOS) [https://support.oracle.com]. To find a specific master note, search in MOS using the note ID.
Note 1318600.1 is the main master note for the AIA 11.3 release and includes links to pre-built integration specific master notes. The specific master notes for each pre-built integration include links to:
■ Installation pre-requisites
■ Certification matrix
■ Software downloads and required patches
■ Release notes
■ Implementation guide
■ Known issues and workarounds
Before starting the installation process, review the master note for your specific pre-built integration.
AIA Master Notes
1-8 Oracle Application Integration Architecture Installation and Upgrade Guide for Pre-Built Integrations
2
Software Requirements 2-1
2Software Requirements
This chapter specifies the software requirements for all the integrations included in the Oracle Application Integration Architecture Installation and Upgrade Guide for Pre-Built Integrations. To make sure you meet the requirements before installation, see your integration-specific section in this chapter.
Note: Install AIA Foundation Pack before you install the integrations. Search for Oracle Fusion Middleware Installation and Upgrade Guide for Oracle Application Integration Architecture Foundation Pack in My Oracle Support, download and install Foundation Pack 11.1.1.6, RUP patch 14253266 or later. This guide is constantly updated and bug fixed.
2-2 Oracle Application Integration Architecture Installation and Upgrade Guide for Pre-Built Integrations
This chapter includes the following sections:
■ Section 2.1, "Comms Agent Assisted Billing Care: SBL CRM - BRM Pre-Built Integration"
■ Section 2.2, "Comms Revenue Accounting: BRM - EBS Pre-Built Integration"
■ Section 2.3, "Comms Order to Cash: SBL CRM, OSM, and BRM Pre-Built Integration"
■ Section 2.4, "Comms Order to Cash: SBL CRM and BRM Pre-Built Integration"
■ Section 2.5, "Comms Order to Cash: SBL CRM and OSM Pre-Built Integration"
■ Section 2.6, "Customer MDM Base Pack"
■ Section 2.7, "Customer MDM: Siebel CRM"
■ Section 2.8, "Customer MDM: EBS"
■ Section 2.9, "Customer MDM: Comms BRM"
■ Section 2.10, "Customer MDM Routing Rules"
■ Section 2.11, "Customer MDM: Match Fetch Enterprise Composite Application"
■ Section 2.12, "Product MDM: EBS"
■ Section 2.13, "Product MDM Base Pack"
Note: While this chapter lists a specific fix pack (FP) or patch set (PS) for a given supported participating application version, it is recommended that when you are ready to implement a pre-built integration you get the latest FP or PS for the respective applicable participating application version as specified in the AIA Certification Matrix (http://www.oracle.com/technetwork/middleware/ias/downloads/fusion-certification-100350.html).
Example A:
■ The AIA Certification Matrix lists the supported version of Oracle BRM for the 11.3 Comms pre-built integrations as follows:
– Oracle BRM 7.4 MPS1 (PS 12754752).
■ This chapter specifies the use of Oracle BRM 7.4 MPS1 (PS 12754752) because PS 12754752 is the latest available PS on BRM 7.4 for the 11.3 Comms Pre-Built Integrations release. It is recommended that you uptake the latest available BRM 7.4 PS when implementing the Comms pre-built integrations.
Example B:
■ The AIA Certification Matrix lists the supported version of Siebel CRM for the 11.3 Order To Cash Siebel CRM - EBS PIP as follows:
– Siebel CRM SIA 8.1.1.x (where x is 4 or greater, with ACR 474 or 508).
■ This chapter specifies the use of Siebel CRM SIA 8.1.1.6 (with ACR 474 or 508) because 8.1.1.6 is the latest available Siebel FP at the time of the AIA 11.3 release. It is recommended that you uptake the latest available Siebel CRM SIA 8.1.1.x FP (with ACR 474 or 508) when implementing the Order To Cash Siebel CRM - EBS PIP.
Comms Revenue Accounting: BRM - EBS Pre-Built Integration
Software Requirements 2-3
■ Section 2.14, "Product MDM: Comms BRM"
■ Section 2.15, "Product MDM: Siebel CRM"
■ Section 2.16, "Product MDM Routing Rules"
■ Section 2.17, "Agile Product Lifecycle Management Integration Pack for Oracle E-Business Suite: Design to Release"
■ Section 2.18, "Agile Product Lifecycle Management Integration Pack for SAP"
■ Section 2.19, "Oracle Process Integration Pack for Oracle Utilities Field Work"
■ Section 2.20, "Oracle Customer Data Synchronization Integration Pack for Oracle Utilities Customer Care and Billing and Siebel Energy"
■ Section 2.21, "Oracle Product Data Synchronization Integration Pack for Oracle Utilities Customer Care and Billing and Siebel Energy"
■ Section 2.22, "Design to Release: Agile PLM for Process - OPM PIP"
■ Section 2.23, "Order to Cash: Siebel CRM - EBS PIP"
■ Section 2.24, "Siebel CRM to OIC Integration"
■ Section 2.25, "Lead to Order: CRM OD - EBS PIP"
■ Section 2.26, "Financials Ops Control: Oracle Retail - PSFT PIP"
■ Section 2.27, "LSP Financial Mgmt: OTM - EBS PIP"
■ Section 2.28, "LSP Order Mgmt: OTM - EBS - Siebel CRM PIP"
■ Section 2.29, "LSP Driver Mgmt: OTM - EBS PIP"
■ Section 2.30, "Value Chain Planning Integration Base Pack"
■ Section 2.31, "Project Portfolio Mgmt: Primavera P6 - JDE E1"
■ Section 2.32, "Serialization and Tracking: OPSM - EBS"
2.1 Comms Agent Assisted Billing Care: SBL CRM - BRM Pre-Built Integration
The Comms Agent Assisted Billing Care: SBL CRM - BRM Pre-Built Integration requires:
■ Siebel CRM 8.1.1.x FP with ACR 474
■ BRM 7.4 MPS1 (PS patch 12754752) or BRM 7.5
■ ODI 11.1.1.5 plus patch 12837214
2.2 Comms Revenue Accounting: BRM - EBS Pre-Built IntegrationThe Comms Revenue Accounting: BRM - EBS Pre-Built Integration requires either:
■ EBS 12.1.3
■ EBS 12.1.1 or 12.1.2 (additional seed data patch 8344349 required for both versions)
Note: See the AIA Certification Matrix for the minimum Siebel CRM 8.1.1.x FP required for this release.
Comms Order to Cash: SBL CRM, OSM, and BRM Pre-Built Integration
2-4 Oracle Application Integration Architecture Installation and Upgrade Guide for Pre-Built Integrations
■ EBS 11.5.10 (additional seed data patch 6012471)
And this Pre-Built Integration requires:
■ BRM 7.4 MPS1 (PS patch 12754752) or BRM 7.5
■ ODI 11.1.1.5 plus patch 12837214
2.3 Comms Order to Cash: SBL CRM, OSM, and BRM Pre-Built Integration
The Comms Order to Cash: SBL CRM, OSM, and BRM Pre-Built Integration requires:
■ Siebel CRM 8.1.1.x FP with ACR 474
■ BRM 7.4 MPS1 (PS patch 12754752) or BRM 7.5
■ OSM 7.0.3
2.4 Comms Order to Cash: SBL CRM and BRM Pre-Built IntegrationThe Comms Order to Cash: SBL CRM and BRM Pre-Built Integration requires:
■ Siebel CRM 8.1.1.x with ACR 474
■ BRM 7.4 MPS1 (PS patch 12754752) or BRM 7.5
2.5 Comms Order to Cash: SBL CRM and OSM Pre-Built IntegrationThe Comms Order to Cash: SBL CRM and OSM Pre-Built Integration requires:
■ Siebel CRM 8.1.1.x FP with ACR 474
■ OSM 7.0.3
2.6 Customer MDM Base PackThe Customer MDM Base Pack requires:
■ Oracle Customer Hub (Siebel UCM) 8.1.1.x with ACR 437,ACR 475A, and ACR475B.
■ SOA patch 14104016
Note: See the AIA Certification Matrix for the minimum Siebel CRM 8.1.1.x FP required for this release.
Note: See the AIA Certification Matrix for the minimum Siebel CRM 8.1.1.x FP required for this release.
Note: See the AIA Certification Matrix for the minimum Siebel CRM 8.1.1.x FP required for this release.
Customer MDM Routing Rules
Software Requirements 2-5
2.7 Customer MDM: Siebel CRMThe Customer MDM: Siebel CRM requires Siebel CRM 8.1.1.x with ACR 474 or 8.0.0.x with ACR 437.
2.8 Customer MDM: EBSThe Customer MDM: EBS requires either Oracle E-Business Suite, version 12.1.1 or higher or Oracle E-Business Suite, version 11.5.10.CU2.
For more information on the patches you must apply for each version of Oracle E-Business Suite, see Table 2–1 or Table 2–2.
2.9 Customer MDM: Comms BRMThe Customer MDM: Comms BRM requires BRM 7.4 MPS1 (PS 12754752) or BRM 7.5.
2.10 Customer MDM Routing RulesThe Customer MDM Routing Rules requires:
■ Customer MDM Base Pack
Note: See the AIA Certification Matrix for the minimum Siebel CRM 8.1.1.x FP required for this release.
Note: See the AIA Certification Matrix for the minimum Siebel CRM 8.1.1.x FP or 8.0.0.x FP required for this release.
Table 2–1 Oracle E-Business Suite 12.1.1 Seed Data Patch
Product My Oracle Support Patch Number Description
TCA 8253604:R12.HZ.B AIA: HZ_AIA_CUSTOM_PKG RAISES UNHANDLED EXP DUE TO QUERY MISSING ORG STRIPE
Note: The patch listed in Table 2–1 is required for EBS version 12.1.1. Higher versions do not require patches.
Table 2–2 Oracle E-Business Suite 11.5.10.CU2 Seed Data Patches
Product My Oracle Support Patch Number Description
Customer 3618299 Patch 11i.HZ.N
Customer 4280097 HZ.N ONEOFF: CHANGES TO DSS TO ADD RESTRICTION OPTION FOR PARTY MERGE ON SUBMISSION
Customer 5046954 BACKPORT INTEGRATION SERVICES TO 11i
Customer 6434556 HZ.N ONEOFF: ORDER 2 CASH PHASE 2 CDH CHANGES
Trading Community 7171816 BO API: GET_ORG_CUSTS_UPDATED RETURNS PL/SQL NUMERIC OR VALUE ERROR
Trading Community 7209179 TCA API ENHANCEMENT NEEDED FOR AIA MDM PROJECT (PERSON)
Trading Community 7510070 AIA MDM: SQL FILE TO CREATE SUSBCRIBERS TO PERSON CUSTBO EVENTS
Customer MDM: Match Fetch Enterprise Composite Application
2-6 Oracle Application Integration Architecture Installation and Upgrade Guide for Pre-Built Integrations
■ Any of the available Customer MDM Option packs (optional)
2.11 Customer MDM: Match Fetch Enterprise Composite ApplicationThe Customer MDM: Match Fetch Enterprise Composite Application requires:
■ Customer MDM Base Pack
■ Any of the available Customer MDM Option packs (optional)
2.12 Product MDM: EBSThe Product MDM: EBS requires either Oracle E-Business Suite 11.5.10.2 or Oracle E-Business Suite 12.1.1.
For more information on the patches you must apply for each version of Oracle E-Business Suite, see Table 2–3 and Table 2–4.
2.13 Product MDM Base PackThe Product MDM Base Pack Pre-Built Integration requires Oracle Product Hub 12.1.3 or higher with the patch listed in Table 2–5.
2.14 Product MDM: Comms BRMThe Product MDM: Comms BRM requires BRM 7.4 MPS1 (PS 12754752) or BRM 7.5.
2.15 Product MDM: Siebel CRMThe Product MDM: Siebel CRM requires Siebel CRM 8.1.1.x with ACR 474.
2.16 Product MDM Routing RulesThe Product MDM Routing Rules requires:
■ Product MDM Base Pack
Table 2–3 Oracle E-Business Suite 11.5.10.2 Seed Data Patches
Product My Oracle Support Patch Number Description
PLM 7563732 EBI: 11i EBIZ patch to support Agile PLM Integration Pack 2.5 for Oracle E-Business Suite: Design to Release
PLM 7450177 PATCH FOR BOM AIA BPEL OBJECTS
Table 2–4 Oracle E-Business Suite 12.1.1 Seed Data Patches
Product My Oracle Support Patch Number Description
PLM 8481493:R12.BOM.C PATCH FOR BOM AIA BPEL OBJECTS
Table 2–5 Oracle Product Hub 12.1.3 or Higher Patch
Product My Oracle Support Patch Number Description
Oracle Product Hub 10433145:R12.EGO.C Post GA enhancements for AIA Product MDM 3.1
Note: See the AIA Certification Matrix for the minimum Siebel CRM 8.1.1.x FP required for this release.
Agile Product Lifecycle Management Integration Pack for Oracle E-Business Suite: Design to Release
Software Requirements 2-7
■ Any of the available Product MDM Option packs (optional)
2.17 Agile Product Lifecycle Management Integration Pack for Oracle E-Business Suite: Design to Release
The Design to Release: Agile - EBS / PIM Pre-Built Integration requires:
■ Agile Product Lifecycle Management release 9.3.1.1 and earlier require patch 12986698.
■ If Agile is running on Oracle Application Server (OAS), apply the following patches depending on your version. These patches are not required if Agile is running on Weblogic Server (WLS):
– Agile Product Lifecycle Management releases 9.2.2.6 with patch 10276383.
– Agile Product Lifecycle Management releases 9.2.2.7 with patch 10276386.
– Agile Product Lifecycle Management releases 9.3 with patch 10011995.
– Agile Product Lifecycle Management releases 9.3.0.1 with patch 10276392.
– Agile Product Lifecycle Management releases 9.3.0.2 with patch 10276395.
– Agile Product Lifecycle Management releases 9.3.1 with patch 10276397.
■ If Agile is running on WLS, you must select Enable Global Trust between the weblogic domains: Agile and FMW.
For more information on configuring security for a WebLogic domain, see Oracle Fusion Middleware Securing Oracle WebLogic Server.
■ Add the following patches for Variant Management (VM):
– If you are using VM and Agile 9.3.0.0, apply patches # 9233009 and # 10288124.
– If you are using VM and Agile 9.3.0.1, apply patches # 9305555 and # 10288124.
– If you are using VM and Agile 9.3.1, apply patch # 10288124.
– If you are using VM and Agile 9.3.1.2 is running on WLS, apply patch # 14458989.
For more information about deploying the Design to Release: Agile - EBS / PIM Pre-Built Integration extensions, see Deploying the Design to Release: Agile - EBS / PIM PIP Components on the Agile PLM Server.
■ One of the listed Oracle E-Business Suite: Discrete Manufacturing with the seed data patches:
– EBS 11i - 11.5.10CU2 + 11i.ATG_PF.H.delta.7 + 9945762 + 12374991
Note: If you are using Agile 9.3.1 on Weblogic and if you are using an Oracle RAC database for the FMW server, the database driver in Agile must be a thin client driver, not an XA driver, which is the default when creating a new data source in Agile.
Note: VM is not supported in Agile 9.3.0.2.
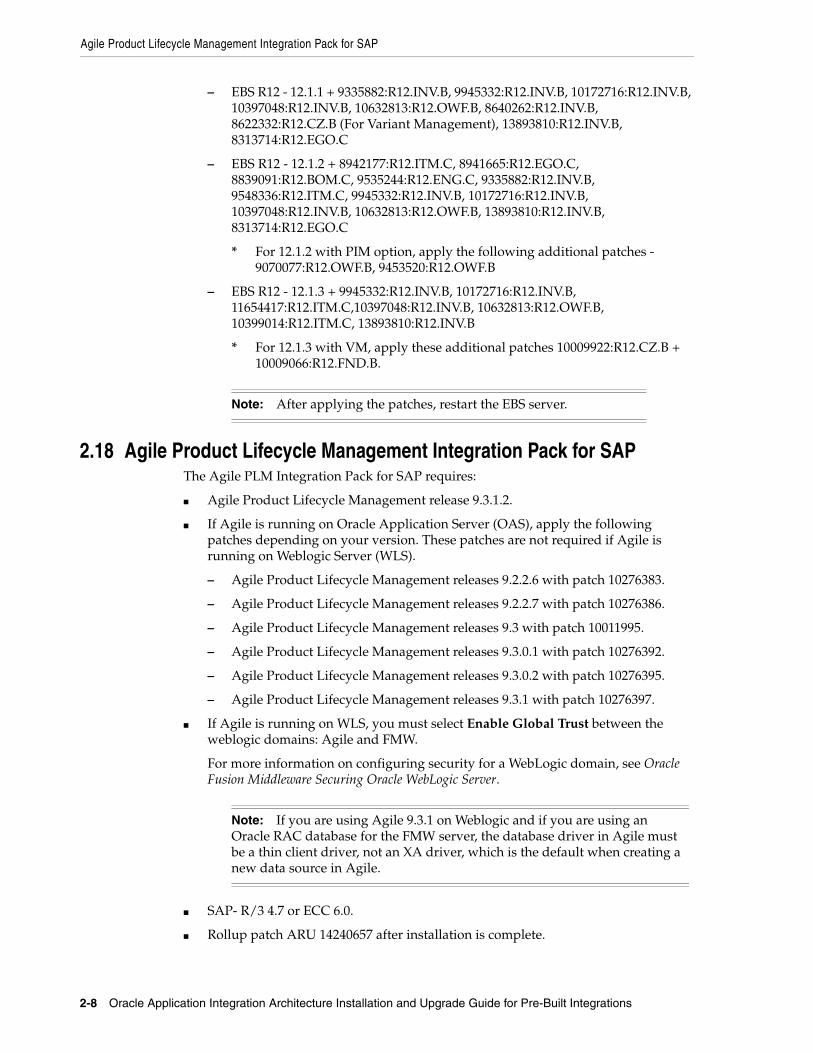
Agile Product Lifecycle Management Integration Pack for SAP
2-8 Oracle Application Integration Architecture Installation and Upgrade Guide for Pre-Built Integrations
– EBS R12 - 12.1.1 + 9335882:R12.INV.B, 9945332:R12.INV.B, 10172716:R12.INV.B, 10397048:R12.INV.B, 10632813:R12.OWF.B, 8640262:R12.INV.B, 8622332:R12.CZ.B (For Variant Management), 13893810:R12.INV.B, 8313714:R12.EGO.C
– EBS R12 - 12.1.2 + 8942177:R12.ITM.C, 8941665:R12.EGO.C, 8839091:R12.BOM.C, 9535244:R12.ENG.C, 9335882:R12.INV.B, 9548336:R12.ITM.C, 9945332:R12.INV.B, 10172716:R12.INV.B, 10397048:R12.INV.B, 10632813:R12.OWF.B, 13893810:R12.INV.B, 8313714:R12.EGO.C
* For 12.1.2 with PIM option, apply the following additional patches - 9070077:R12.OWF.B, 9453520:R12.OWF.B
– EBS R12 - 12.1.3 + 9945332:R12.INV.B, 10172716:R12.INV.B, 11654417:R12.ITM.C,10397048:R12.INV.B, 10632813:R12.OWF.B, 10399014:R12.ITM.C, 13893810:R12.INV.B
* For 12.1.3 with VM, apply these additional patches 10009922:R12.CZ.B + 10009066:R12.FND.B.
2.18 Agile Product Lifecycle Management Integration Pack for SAPThe Agile PLM Integration Pack for SAP requires:
■ Agile Product Lifecycle Management release 9.3.1.2.
■ If Agile is running on Oracle Application Server (OAS), apply the following patches depending on your version. These patches are not required if Agile is running on Weblogic Server (WLS).
– Agile Product Lifecycle Management releases 9.2.2.6 with patch 10276383.
– Agile Product Lifecycle Management releases 9.2.2.7 with patch 10276386.
– Agile Product Lifecycle Management releases 9.3 with patch 10011995.
– Agile Product Lifecycle Management releases 9.3.0.1 with patch 10276392.
– Agile Product Lifecycle Management releases 9.3.0.2 with patch 10276395.
– Agile Product Lifecycle Management releases 9.3.1 with patch 10276397.
■ If Agile is running on WLS, you must select Enable Global Trust between the weblogic domains: Agile and FMW.
For more information on configuring security for a WebLogic domain, see Oracle Fusion Middleware Securing Oracle WebLogic Server.
■ SAP- R/3 4.7 or ECC 6.0.
■ Rollup patch ARU 14240657 after installation is complete.
Note: After applying the patches, restart the EBS server.
Note: If you are using Agile 9.3.1 on Weblogic and if you are using an Oracle RAC database for the FMW server, the database driver in Agile must be a thin client driver, not an XA driver, which is the default when creating a new data source in Agile.
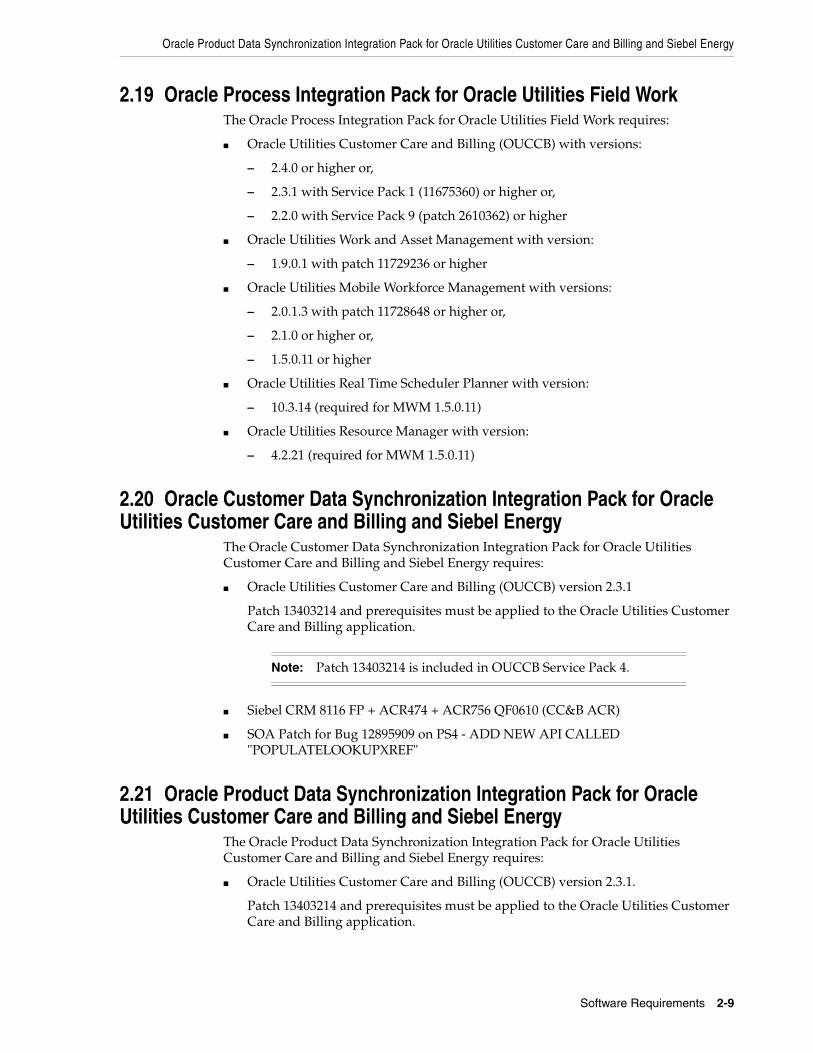
Oracle Product Data Synchronization Integration Pack for Oracle Utilities Customer Care and Billing and Siebel Energy
Software Requirements 2-9
2.19 Oracle Process Integration Pack for Oracle Utilities Field WorkThe Oracle Process Integration Pack for Oracle Utilities Field Work requires:
■ Oracle Utilities Customer Care and Billing (OUCCB) with versions:
– 2.4.0 or higher or,
– 2.3.1 with Service Pack 1 (11675360) or higher or,
– 2.2.0 with Service Pack 9 (patch 2610362) or higher
■ Oracle Utilities Work and Asset Management with version:
– 1.9.0.1 with patch 11729236 or higher
■ Oracle Utilities Mobile Workforce Management with versions:
– 2.0.1.3 with patch 11728648 or higher or,
– 2.1.0 or higher or,
– 1.5.0.11 or higher
■ Oracle Utilities Real Time Scheduler Planner with version:
– 10.3.14 (required for MWM 1.5.0.11)
■ Oracle Utilities Resource Manager with version:
– 4.2.21 (required for MWM 1.5.0.11)
2.20 Oracle Customer Data Synchronization Integration Pack for Oracle Utilities Customer Care and Billing and Siebel Energy
The Oracle Customer Data Synchronization Integration Pack for Oracle Utilities Customer Care and Billing and Siebel Energy requires:
■ Oracle Utilities Customer Care and Billing (OUCCB) version 2.3.1
Patch 13403214 and prerequisites must be applied to the Oracle Utilities Customer Care and Billing application.
■ Siebel CRM 8116 FP + ACR474 + ACR756 QF0610 (CC&B ACR)
■ SOA Patch for Bug 12895909 on PS4 - ADD NEW API CALLED "POPULATELOOKUPXREF"
2.21 Oracle Product Data Synchronization Integration Pack for Oracle Utilities Customer Care and Billing and Siebel Energy
The Oracle Product Data Synchronization Integration Pack for Oracle Utilities Customer Care and Billing and Siebel Energy requires:
■ Oracle Utilities Customer Care and Billing (OUCCB) version 2.3.1.
Patch 13403214 and prerequisites must be applied to the Oracle Utilities Customer Care and Billing application.
Note: Patch 13403214 is included in OUCCB Service Pack 4.
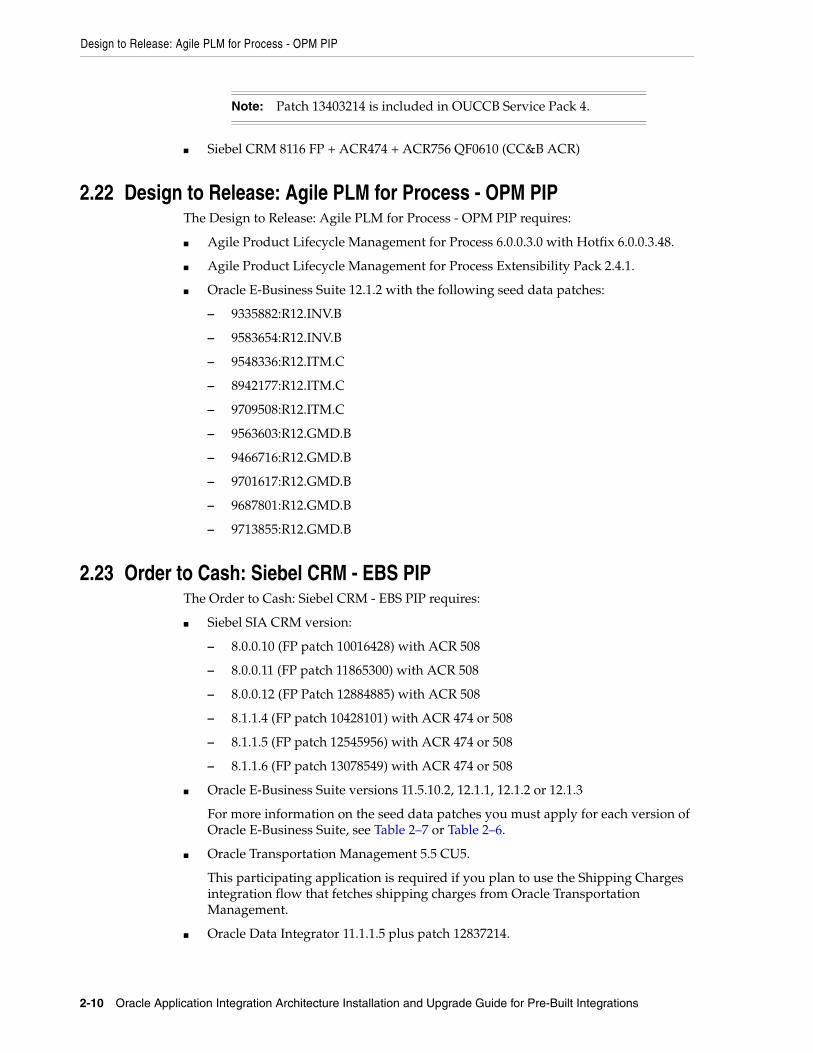
Design to Release: Agile PLM for Process - OPM PIP
2-10 Oracle Application Integration Architecture Installation and Upgrade Guide for Pre-Built Integrations
■ Siebel CRM 8116 FP + ACR474 + ACR756 QF0610 (CC&B ACR)
2.22 Design to Release: Agile PLM for Process - OPM PIPThe Design to Release: Agile PLM for Process - OPM PIP requires:
■ Agile Product Lifecycle Management for Process 6.0.0.3.0 with Hotfix 6.0.0.3.48.
■ Agile Product Lifecycle Management for Process Extensibility Pack 2.4.1.
■ Oracle E-Business Suite 12.1.2 with the following seed data patches:
– 9335882:R12.INV.B
– 9583654:R12.INV.B
– 9548336:R12.ITM.C
– 8942177:R12.ITM.C
– 9709508:R12.ITM.C
– 9563603:R12.GMD.B
– 9466716:R12.GMD.B
– 9701617:R12.GMD.B
– 9687801:R12.GMD.B
– 9713855:R12.GMD.B
2.23 Order to Cash: Siebel CRM - EBS PIPThe Order to Cash: Siebel CRM - EBS PIP requires:
■ Siebel SIA CRM version:
– 8.0.0.10 (FP patch 10016428) with ACR 508
– 8.0.0.11 (FP patch 11865300) with ACR 508
– 8.0.0.12 (FP Patch 12884885) with ACR 508
– 8.1.1.4 (FP patch 10428101) with ACR 474 or 508
– 8.1.1.5 (FP patch 12545956) with ACR 474 or 508
– 8.1.1.6 (FP patch 13078549) with ACR 474 or 508
■ Oracle E-Business Suite versions 11.5.10.2, 12.1.1, 12.1.2 or 12.1.3
For more information on the seed data patches you must apply for each version of Oracle E-Business Suite, see Table 2–7 or Table 2–6.
■ Oracle Transportation Management 5.5 CU5.
This participating application is required if you plan to use the Shipping Charges integration flow that fetches shipping charges from Oracle Transportation Management.
■ Oracle Data Integrator 11.1.1.5 plus patch 12837214.
Note: Patch 13403214 is included in OUCCB Service Pack 4.
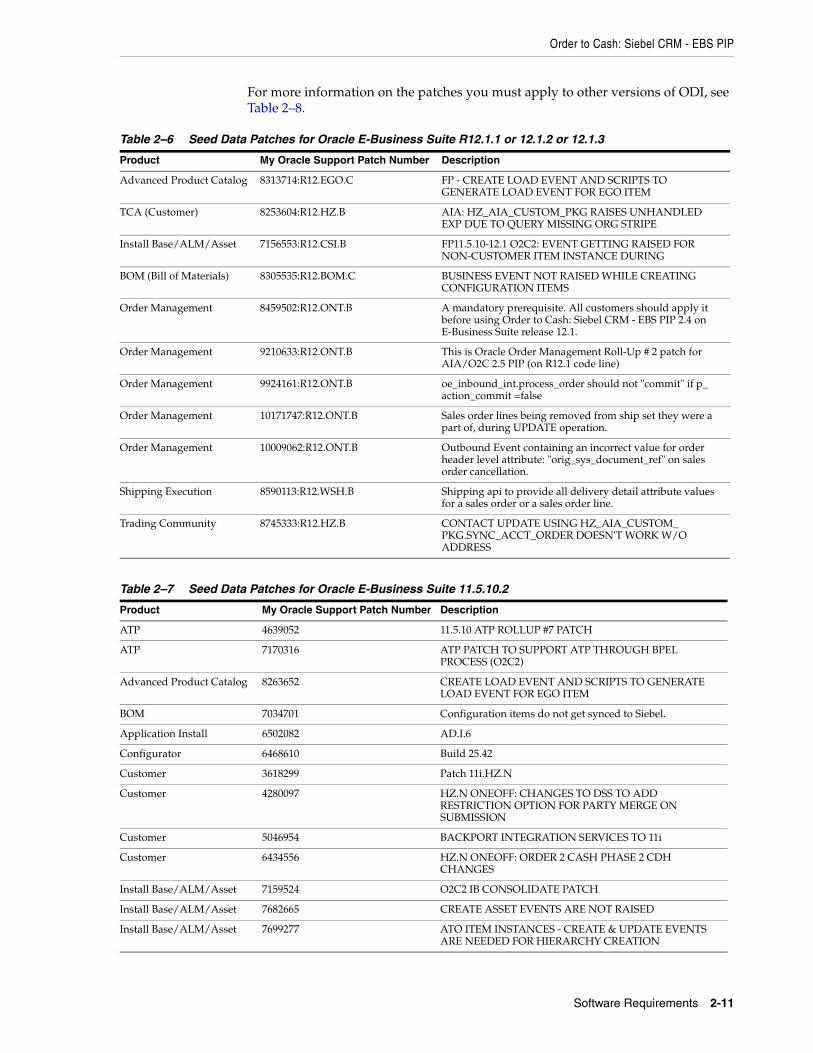
Order to Cash: Siebel CRM - EBS PIP
Software Requirements 2-11
For more information on the patches you must apply to other versions of ODI, see Table 2–8.
Table 2–6 Seed Data Patches for Oracle E-Business Suite R12.1.1 or 12.1.2 or 12.1.3
Product My Oracle Support Patch Number Description
Advanced Product Catalog 8313714:R12.EGO.C FP - CREATE LOAD EVENT AND SCRIPTS TO GENERATE LOAD EVENT FOR EGO ITEM
TCA (Customer) 8253604:R12.HZ.B AIA: HZ_AIA_CUSTOM_PKG RAISES UNHANDLED EXP DUE TO QUERY MISSING ORG STRIPE
Install Base/ALM/Asset 7156553:R12.CSI.B FP11.5.10-12.1 O2C2: EVENT GETTING RAISED FOR NON-CUSTOMER ITEM INSTANCE DURING
BOM (Bill of Materials) 8305535:R12.BOM.C BUSINESS EVENT NOT RAISED WHILE CREATING CONFIGURATION ITEMS
Order Management 8459502:R12.ONT.B A mandatory prerequisite. All customers should apply it before using Order to Cash: Siebel CRM - EBS PIP 2.4 on E-Business Suite release 12.1.
Order Management 9210633:R12.ONT.B This is Oracle Order Management Roll-Up # 2 patch for AIA/O2C 2.5 PIP (on R12.1 code line)
Order Management 9924161:R12.ONT.B oe_inbound_int.process_order should not "commit" if p_action_commit =false
Order Management 10171747:R12.ONT.B Sales order lines being removed from ship set they were a part of, during UPDATE operation.
Order Management 10009062:R12.ONT.B Outbound Event containing an incorrect value for order header level attribute: "orig_sys_document_ref" on sales order cancellation.
Shipping Execution 8590113:R12.WSH.B Shipping api to provide all delivery detail attribute values for a sales order or a sales order line.
Trading Community 8745333:R12.HZ.B CONTACT UPDATE USING HZ_AIA_CUSTOM_PKG.SYNC_ACCT_ORDER DOESN'T WORK W/O ADDRESS
Table 2–7 Seed Data Patches for Oracle E-Business Suite 11.5.10.2
Product My Oracle Support Patch Number Description
ATP 4639052 11.5.10 ATP ROLLUP #7 PATCH
ATP 7170316 ATP PATCH TO SUPPORT ATP THROUGH BPEL PROCESS (O2C2)
Advanced Product Catalog 8263652 CREATE LOAD EVENT AND SCRIPTS TO GENERATE LOAD EVENT FOR EGO ITEM
BOM 7034701 Configuration items do not get synced to Siebel.
Application Install 6502082 AD.I.6
Configurator 6468610 Build 25.42
Customer 3618299 Patch 11i.HZ.N
Customer 4280097 HZ.N ONEOFF: CHANGES TO DSS TO ADD RESTRICTION OPTION FOR PARTY MERGE ON SUBMISSION
Customer 5046954 BACKPORT INTEGRATION SERVICES TO 11i
Customer 6434556 HZ.N ONEOFF: ORDER 2 CASH PHASE 2 CDH CHANGES
Install Base/ALM/Asset 7159524 O2C2 IB CONSOLIDATE PATCH
Install Base/ALM/Asset 7682665 CREATE ASSET EVENTS ARE NOT RAISED
Install Base/ALM/Asset 7699277 ATO ITEM INSTANCES - CREATE & UPDATE EVENTS ARE NEEDED FOR HIERARCHY CREATION
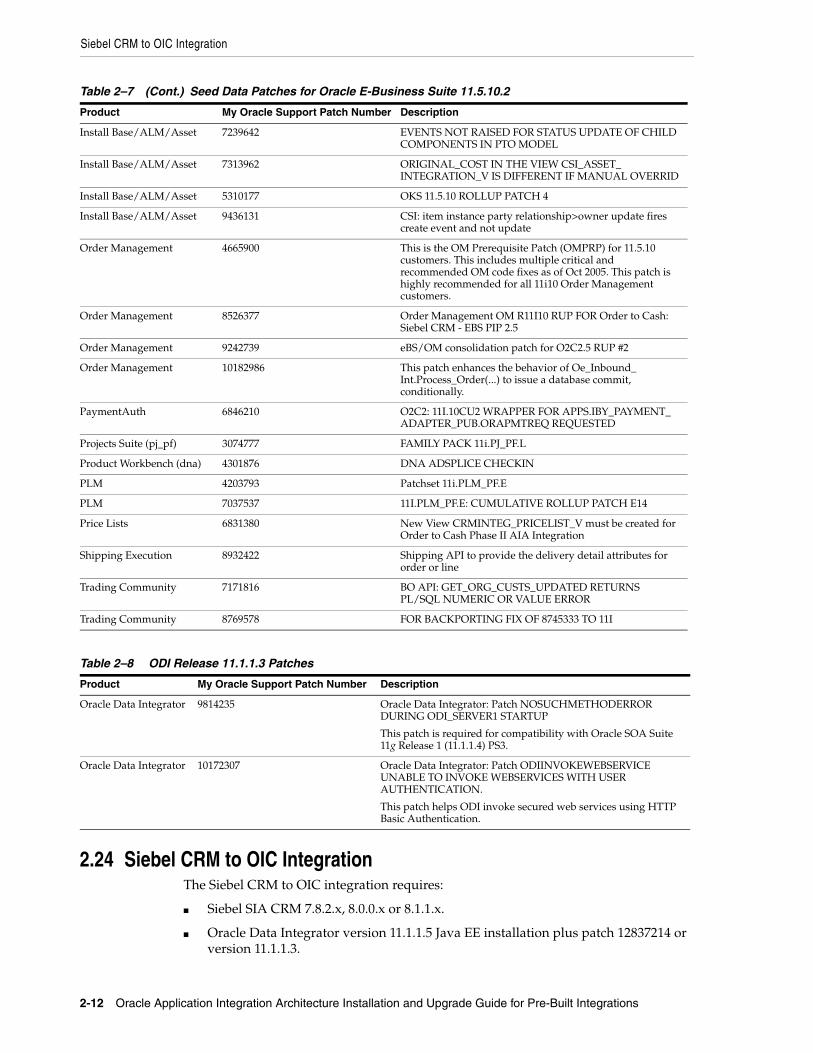
Siebel CRM to OIC Integration
2-12 Oracle Application Integration Architecture Installation and Upgrade Guide for Pre-Built Integrations
2.24 Siebel CRM to OIC IntegrationThe Siebel CRM to OIC integration requires:
■ Siebel SIA CRM 7.8.2.x, 8.0.0.x or 8.1.1.x.
■ Oracle Data Integrator version 11.1.1.5 Java EE installation plus patch 12837214 or version 11.1.1.3.
Install Base/ALM/Asset 7239642 EVENTS NOT RAISED FOR STATUS UPDATE OF CHILD COMPONENTS IN PTO MODEL
Install Base/ALM/Asset 7313962 ORIGINAL_COST IN THE VIEW CSI_ASSET_INTEGRATION_V IS DIFFERENT IF MANUAL OVERRID
Install Base/ALM/Asset 5310177 OKS 11.5.10 ROLLUP PATCH 4
Install Base/ALM/Asset 9436131 CSI: item instance party relationship>owner update fires create event and not update
Order Management 4665900 This is the OM Prerequisite Patch (OMPRP) for 11.5.10 customers. This includes multiple critical and recommended OM code fixes as of Oct 2005. This patch is highly recommended for all 11i10 Order Management customers.
Order Management 8526377 Order Management OM R11I10 RUP FOR Order to Cash: Siebel CRM - EBS PIP 2.5
Order Management 9242739 eBS/OM consolidation patch for O2C2.5 RUP #2
Order Management 10182986 This patch enhances the behavior of Oe_Inbound_Int.Process_Order(...) to issue a database commit, conditionally.
PaymentAuth 6846210 O2C2: 11I.10CU2 WRAPPER FOR APPS.IBY_PAYMENT_ADAPTER_PUB.ORAPMTREQ REQUESTED
Projects Suite (pj_pf) 3074777 FAMILY PACK 11i.PJ_PF.L
Product Workbench (dna) 4301876 DNA ADSPLICE CHECKIN
PLM 4203793 Patchset 11i.PLM_PF.E
PLM 7037537 11I.PLM_PF.E: CUMULATIVE ROLLUP PATCH E14
Price Lists 6831380 New View CRMINTEG_PRICELIST_V must be created for Order to Cash Phase II AIA Integration
Shipping Execution 8932422 Shipping API to provide the delivery detail attributes for order or line
Trading Community 7171816 BO API: GET_ORG_CUSTS_UPDATED RETURNS PL/SQL NUMERIC OR VALUE ERROR
Trading Community 8769578 FOR BACKPORTING FIX OF 8745333 TO 11I
Table 2–8 ODI Release 11.1.1.3 Patches
Product My Oracle Support Patch Number Description
Oracle Data Integrator 9814235 Oracle Data Integrator: Patch NOSUCHMETHODERROR DURING ODI_SERVER1 STARTUP
This patch is required for compatibility with Oracle SOA Suite 11g Release 1 (11.1.1.4) PS3.
Oracle Data Integrator 10172307 Oracle Data Integrator: Patch ODIINVOKEWEBSERVICE UNABLE TO INVOKE WEBSERVICES WITH USER AUTHENTICATION.
This patch helps ODI invoke secured web services using HTTP Basic Authentication.
Table 2–7 (Cont.) Seed Data Patches for Oracle E-Business Suite 11.5.10.2
Product My Oracle Support Patch Number Description
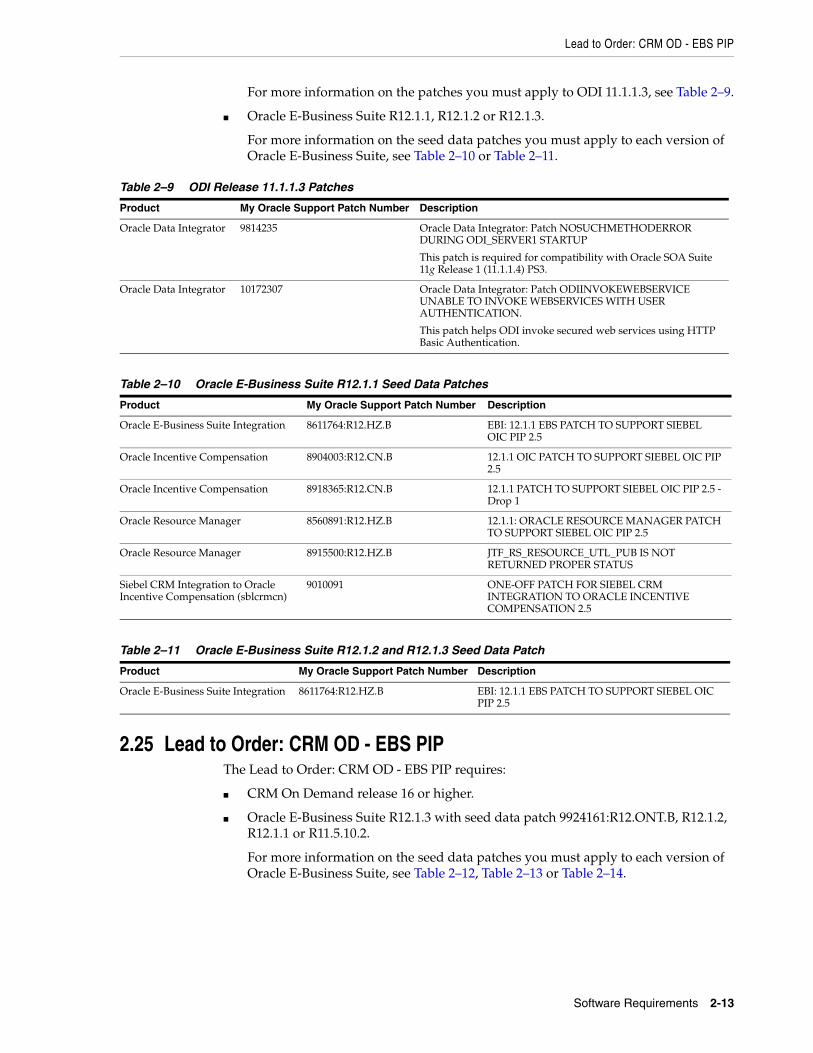
Lead to Order: CRM OD - EBS PIP
Software Requirements 2-13
For more information on the patches you must apply to ODI 11.1.1.3, see Table 2–9.
■ Oracle E-Business Suite R12.1.1, R12.1.2 or R12.1.3.
For more information on the seed data patches you must apply to each version of Oracle E-Business Suite, see Table 2–10 or Table 2–11.
2.25 Lead to Order: CRM OD - EBS PIPThe Lead to Order: CRM OD - EBS PIP requires:
■ CRM On Demand release 16 or higher.
■ Oracle E-Business Suite R12.1.3 with seed data patch 9924161:R12.ONT.B, R12.1.2, R12.1.1 or R11.5.10.2.
For more information on the seed data patches you must apply to each version of Oracle E-Business Suite, see Table 2–12, Table 2–13 or Table 2–14.
Table 2–9 ODI Release 11.1.1.3 Patches
Product My Oracle Support Patch Number Description
Oracle Data Integrator 9814235 Oracle Data Integrator: Patch NOSUCHMETHODERROR DURING ODI_SERVER1 STARTUP
This patch is required for compatibility with Oracle SOA Suite 11g Release 1 (11.1.1.4) PS3.
Oracle Data Integrator 10172307 Oracle Data Integrator: Patch ODIINVOKEWEBSERVICE UNABLE TO INVOKE WEBSERVICES WITH USER AUTHENTICATION.
This patch helps ODI invoke secured web services using HTTP Basic Authentication.
Table 2–10 Oracle E-Business Suite R12.1.1 Seed Data Patches
Product My Oracle Support Patch Number Description
Oracle E-Business Suite Integration 8611764:R12.HZ.B EBI: 12.1.1 EBS PATCH TO SUPPORT SIEBEL OIC PIP 2.5
Oracle Incentive Compensation 8904003:R12.CN.B 12.1.1 OIC PATCH TO SUPPORT SIEBEL OIC PIP 2.5
Oracle Incentive Compensation 8918365:R12.CN.B 12.1.1 PATCH TO SUPPORT SIEBEL OIC PIP 2.5 - Drop 1
Oracle Resource Manager 8560891:R12.HZ.B 12.1.1: ORACLE RESOURCE MANAGER PATCH TO SUPPORT SIEBEL OIC PIP 2.5
Oracle Resource Manager 8915500:R12.HZ.B JTF_RS_RESOURCE_UTL_PUB IS NOT RETURNED PROPER STATUS
Siebel CRM Integration to Oracle Incentive Compensation (sblcrmcn)
9010091 ONE-OFF PATCH FOR SIEBEL CRM INTEGRATION TO ORACLE INCENTIVE COMPENSATION 2.5
Table 2–11 Oracle E-Business Suite R12.1.2 and R12.1.3 Seed Data Patch
Product My Oracle Support Patch Number Description
Oracle E-Business Suite Integration 8611764:R12.HZ.B EBI: 12.1.1 EBS PATCH TO SUPPORT SIEBEL OIC PIP 2.5
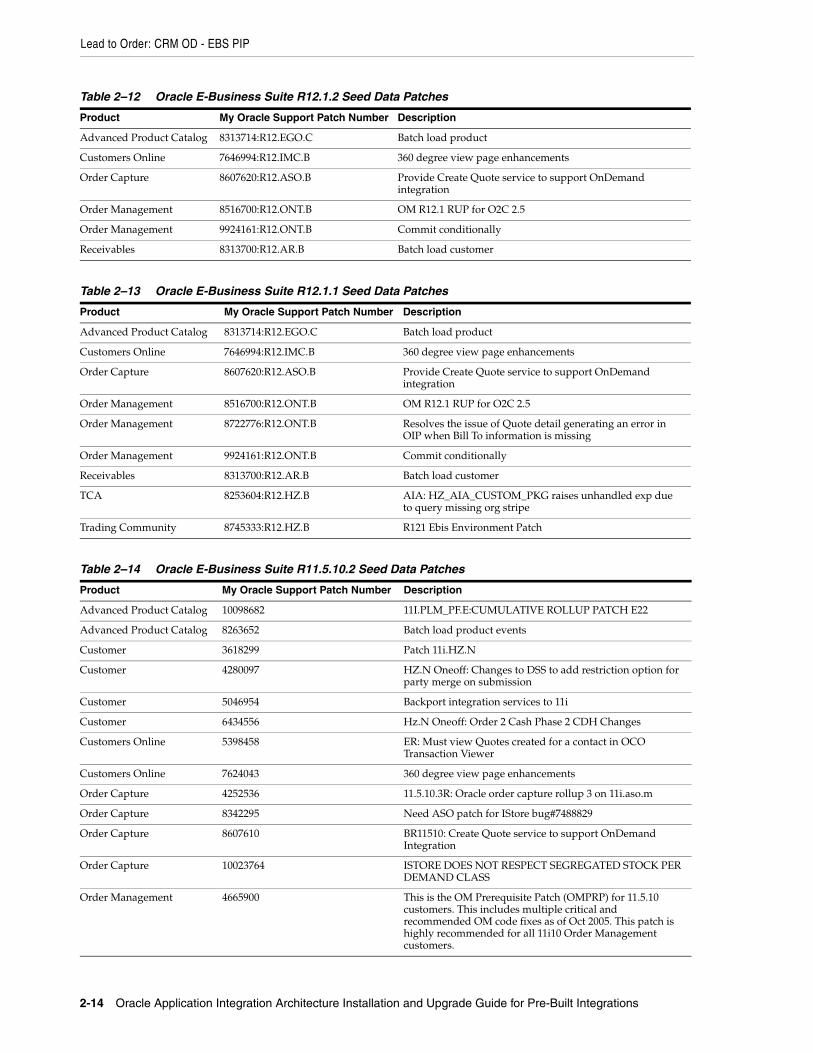
Lead to Order: CRM OD - EBS PIP
2-14 Oracle Application Integration Architecture Installation and Upgrade Guide for Pre-Built Integrations
Table 2–12 Oracle E-Business Suite R12.1.2 Seed Data Patches
Product My Oracle Support Patch Number Description
Advanced Product Catalog 8313714:R12.EGO.C Batch load product
Customers Online 7646994:R12.IMC.B 360 degree view page enhancements
Order Capture 8607620:R12.ASO.B Provide Create Quote service to support OnDemand integration
Order Management 8516700:R12.ONT.B OM R12.1 RUP for O2C 2.5
Order Management 9924161:R12.ONT.B Commit conditionally
Receivables 8313700:R12.AR.B Batch load customer
Table 2–13 Oracle E-Business Suite R12.1.1 Seed Data Patches
Product My Oracle Support Patch Number Description
Advanced Product Catalog 8313714:R12.EGO.C Batch load product
Customers Online 7646994:R12.IMC.B 360 degree view page enhancements
Order Capture 8607620:R12.ASO.B Provide Create Quote service to support OnDemand integration
Order Management 8516700:R12.ONT.B OM R12.1 RUP for O2C 2.5
Order Management 8722776:R12.ONT.B Resolves the issue of Quote detail generating an error in OIP when Bill To information is missing
Order Management 9924161:R12.ONT.B Commit conditionally
Receivables 8313700:R12.AR.B Batch load customer
TCA 8253604:R12.HZ.B AIA: HZ_AIA_CUSTOM_PKG raises unhandled exp due to query missing org stripe
Trading Community 8745333:R12.HZ.B R121 Ebis Environment Patch
Table 2–14 Oracle E-Business Suite R11.5.10.2 Seed Data Patches
Product My Oracle Support Patch Number Description
Advanced Product Catalog 10098682 11I.PLM_PF.E:CUMULATIVE ROLLUP PATCH E22
Advanced Product Catalog 8263652 Batch load product events
Customer 3618299 Patch 11i.HZ.N
Customer 4280097 HZ.N Oneoff: Changes to DSS to add restriction option for party merge on submission
Customer 5046954 Backport integration services to 11i
Customer 6434556 Hz.N Oneoff: Order 2 Cash Phase 2 CDH Changes
Customers Online 5398458 ER: Must view Quotes created for a contact in OCO Transaction Viewer
Customers Online 7624043 360 degree view page enhancements
Order Capture 4252536 11.5.10.3R: Oracle order capture rollup 3 on 11i.aso.m
Order Capture 8342295 Need ASO patch for IStore bug#7488829
Order Capture 8607610 BR11510: Create Quote service to support OnDemand Integration
Order Capture 10023764 ISTORE DOES NOT RESPECT SEGREGATED STOCK PER DEMAND CLASS
Order Management 4665900 This is the OM Prerequisite Patch (OMPRP) for 11.5.10 customers. This includes multiple critical and recommended OM code fixes as of Oct 2005. This patch is highly recommended for all 11i10 Order Management customers.
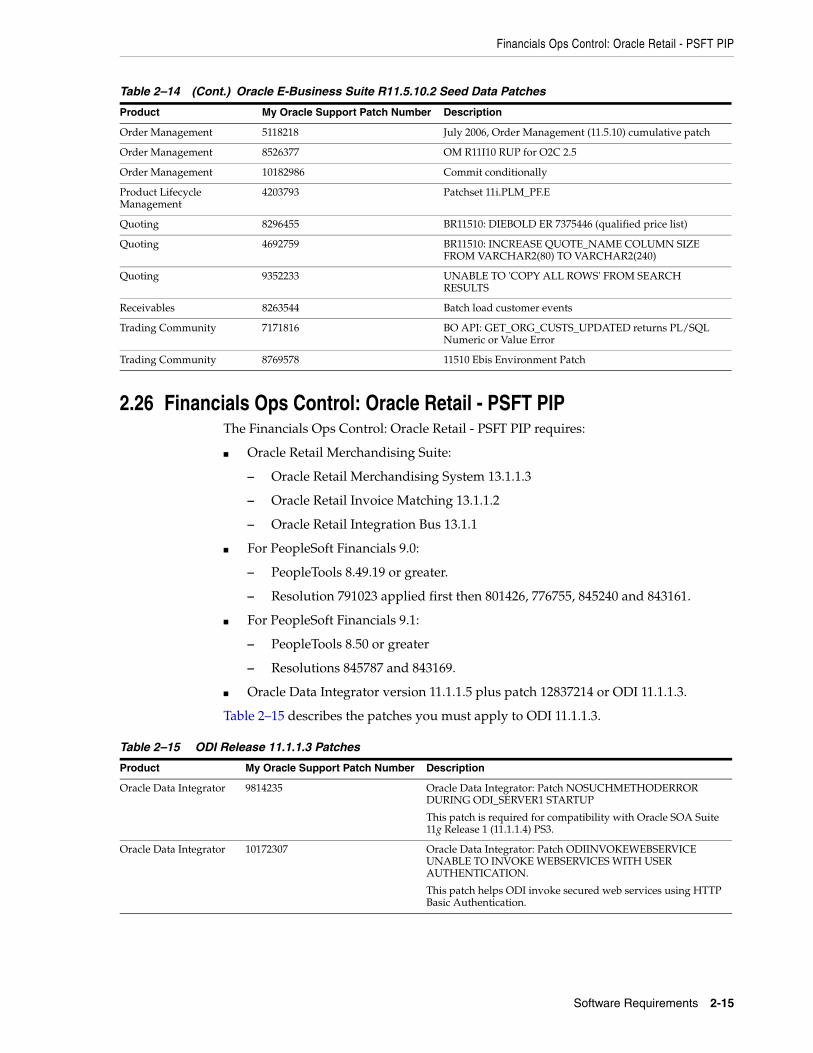
Financials Ops Control: Oracle Retail - PSFT PIP
Software Requirements 2-15
2.26 Financials Ops Control: Oracle Retail - PSFT PIPThe Financials Ops Control: Oracle Retail - PSFT PIP requires:
■ Oracle Retail Merchandising Suite:
– Oracle Retail Merchandising System 13.1.1.3
– Oracle Retail Invoice Matching 13.1.1.2
– Oracle Retail Integration Bus 13.1.1
■ For PeopleSoft Financials 9.0:
– PeopleTools 8.49.19 or greater.
– Resolution 791023 applied first then 801426, 776755, 845240 and 843161.
■ For PeopleSoft Financials 9.1:
– PeopleTools 8.50 or greater
– Resolutions 845787 and 843169.
■ Oracle Data Integrator version 11.1.1.5 plus patch 12837214 or ODI 11.1.1.3.
Table 2–15 describes the patches you must apply to ODI 11.1.1.3.
Order Management 5118218 July 2006, Order Management (11.5.10) cumulative patch
Order Management 8526377 OM R11I10 RUP for O2C 2.5
Order Management 10182986 Commit conditionally
Product Lifecycle Management
4203793 Patchset 11i.PLM_PF.E
Quoting 8296455 BR11510: DIEBOLD ER 7375446 (qualified price list)
Quoting 4692759 BR11510: INCREASE QUOTE_NAME COLUMN SIZE FROM VARCHAR2(80) TO VARCHAR2(240)
Quoting 9352233 UNABLE TO 'COPY ALL ROWS' FROM SEARCH RESULTS
Receivables 8263544 Batch load customer events
Trading Community 7171816 BO API: GET_ORG_CUSTS_UPDATED returns PL/SQL Numeric or Value Error
Trading Community 8769578 11510 Ebis Environment Patch
Table 2–15 ODI Release 11.1.1.3 Patches
Product My Oracle Support Patch Number Description
Oracle Data Integrator 9814235 Oracle Data Integrator: Patch NOSUCHMETHODERROR DURING ODI_SERVER1 STARTUP
This patch is required for compatibility with Oracle SOA Suite 11g Release 1 (11.1.1.4) PS3.
Oracle Data Integrator 10172307 Oracle Data Integrator: Patch ODIINVOKEWEBSERVICE UNABLE TO INVOKE WEBSERVICES WITH USER AUTHENTICATION.
This patch helps ODI invoke secured web services using HTTP Basic Authentication.
Table 2–14 (Cont.) Oracle E-Business Suite R11.5.10.2 Seed Data Patches
Product My Oracle Support Patch Number Description
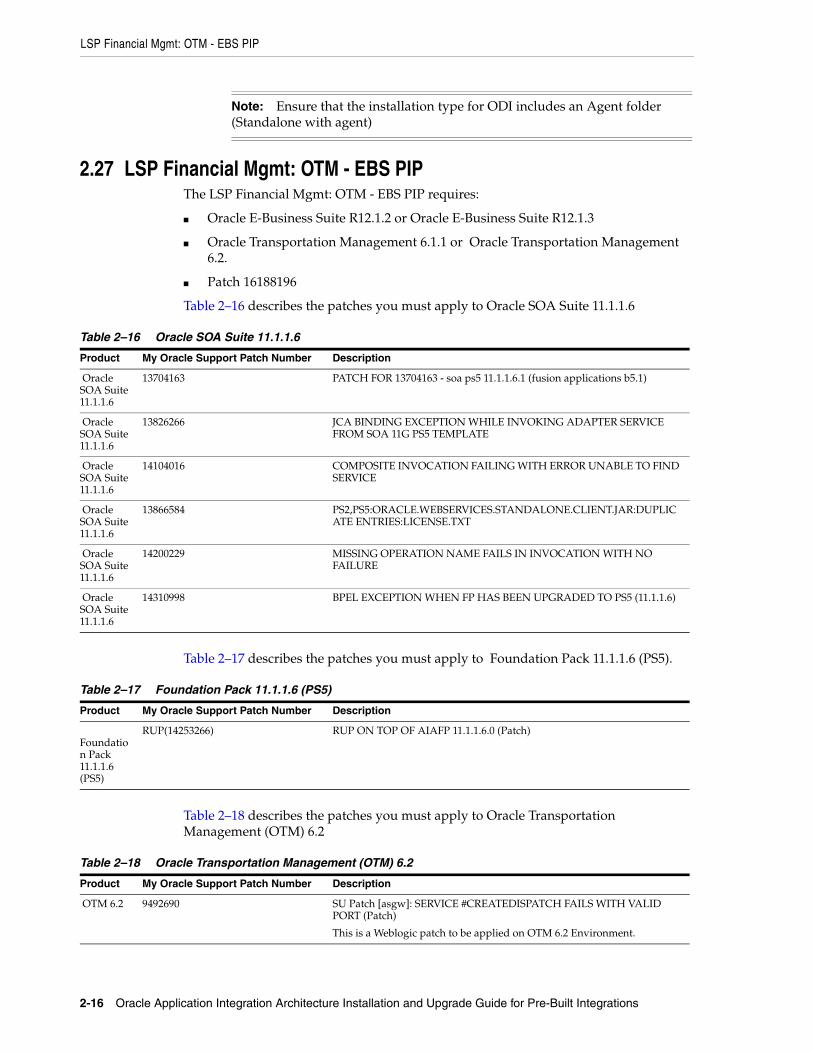
LSP Financial Mgmt: OTM - EBS PIP
2-16 Oracle Application Integration Architecture Installation and Upgrade Guide for Pre-Built Integrations
2.27 LSP Financial Mgmt: OTM - EBS PIPThe LSP Financial Mgmt: OTM - EBS PIP requires:
■ Oracle E-Business Suite R12.1.2 or Oracle E-Business Suite R12.1.3
■ Oracle Transportation Management 6.1.1 or Oracle Transportation Management 6.2.
■ Patch 16188196
Table 2–16 describes the patches you must apply to Oracle SOA Suite 11.1.1.6
Table 2–17 describes the patches you must apply to Foundation Pack 11.1.1.6 (PS5).
Table 2–18 describes the patches you must apply to Oracle Transportation Management (OTM) 6.2
Note: Ensure that the installation type for ODI includes an Agent folder (Standalone with agent)
Table 2–16 Oracle SOA Suite 11.1.1.6
Product My Oracle Support Patch Number Description
Oracle SOA Suite 11.1.1.6
13704163 PATCH FOR 13704163 - soa ps5 11.1.1.6.1 (fusion applications b5.1)
Oracle SOA Suite 11.1.1.6
13826266 JCA BINDING EXCEPTION WHILE INVOKING ADAPTER SERVICE FROM SOA 11G PS5 TEMPLATE
Oracle SOA Suite 11.1.1.6
14104016 COMPOSITE INVOCATION FAILING WITH ERROR UNABLE TO FIND SERVICE
Oracle SOA Suite 11.1.1.6
13866584 PS2,PS5:ORACLE.WEBSERVICES.STANDALONE.CLIENT.JAR:DUPLICATE ENTRIES:LICENSE.TXT
Oracle SOA Suite 11.1.1.6
14200229 MISSING OPERATION NAME FAILS IN INVOCATION WITH NO FAILURE
Oracle SOA Suite 11.1.1.6
14310998 BPEL EXCEPTION WHEN FP HAS BEEN UPGRADED TO PS5 (11.1.1.6)
Table 2–17 Foundation Pack 11.1.1.6 (PS5)
Product My Oracle Support Patch Number Description
Foundation Pack 11.1.1.6 (PS5)
RUP(14253266) RUP ON TOP OF AIAFP 11.1.1.6.0 (Patch)
Table 2–18 Oracle Transportation Management (OTM) 6.2
Product My Oracle Support Patch Number Description
OTM 6.2 9492690 SU Patch [asgw]: SERVICE #CREATEDISPATCH FAILS WITH VALID PORT (Patch)
This is a Weblogic patch to be applied on OTM 6.2 Environment.
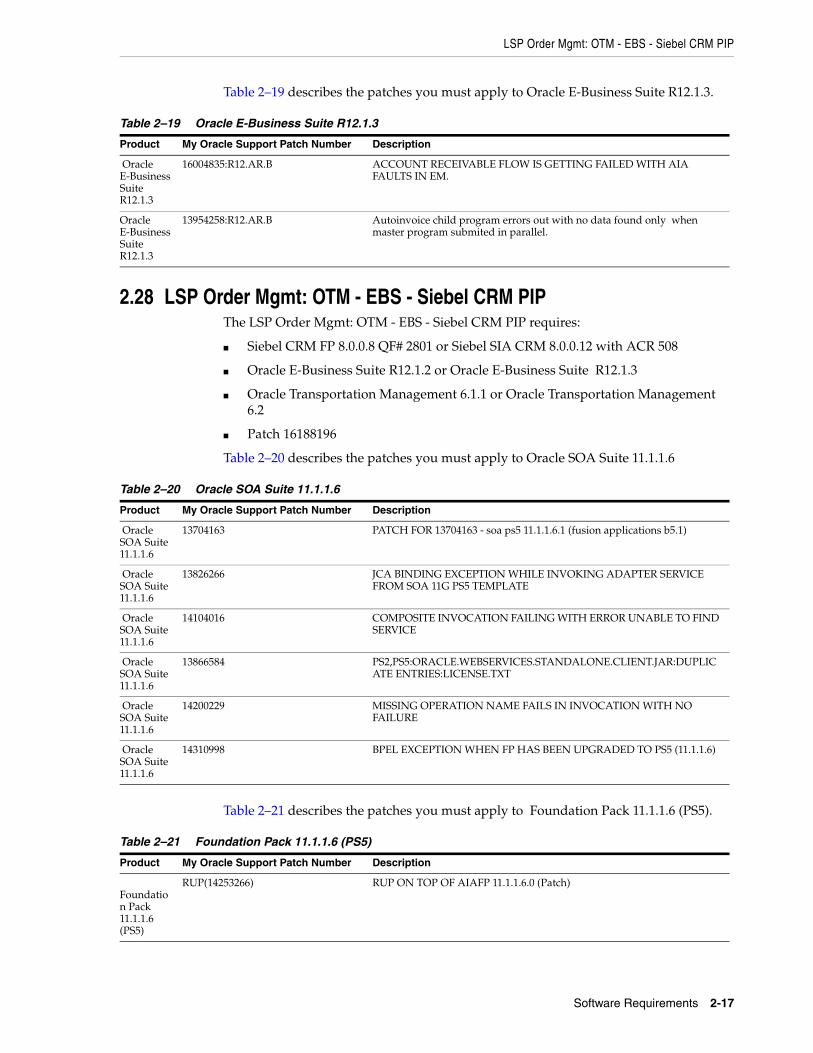
LSP Order Mgmt: OTM - EBS - Siebel CRM PIP
Software Requirements 2-17
Table 2–19 describes the patches you must apply to Oracle E-Business Suite R12.1.3.
2.28 LSP Order Mgmt: OTM - EBS - Siebel CRM PIPThe LSP Order Mgmt: OTM - EBS - Siebel CRM PIP requires:
■ Siebel CRM FP 8.0.0.8 QF# 2801 or Siebel SIA CRM 8.0.0.12 with ACR 508
■ Oracle E-Business Suite R12.1.2 or Oracle E-Business Suite R12.1.3
■ Oracle Transportation Management 6.1.1 or Oracle Transportation Management 6.2
■ Patch 16188196
Table 2–20 describes the patches you must apply to Oracle SOA Suite 11.1.1.6
Table 2–21 describes the patches you must apply to Foundation Pack 11.1.1.6 (PS5).
Table 2–19 Oracle E-Business Suite R12.1.3
Product My Oracle Support Patch Number Description
Oracle E-Business Suite R12.1.3
16004835:R12.AR.B ACCOUNT RECEIVABLE FLOW IS GETTING FAILED WITH AIA FAULTS IN EM.
Oracle E-Business Suite R12.1.3
13954258:R12.AR.B Autoinvoice child program errors out with no data found only when master program submited in parallel.
Table 2–20 Oracle SOA Suite 11.1.1.6
Product My Oracle Support Patch Number Description
Oracle SOA Suite 11.1.1.6
13704163 PATCH FOR 13704163 - soa ps5 11.1.1.6.1 (fusion applications b5.1)
Oracle SOA Suite 11.1.1.6
13826266 JCA BINDING EXCEPTION WHILE INVOKING ADAPTER SERVICE FROM SOA 11G PS5 TEMPLATE
Oracle SOA Suite 11.1.1.6
14104016 COMPOSITE INVOCATION FAILING WITH ERROR UNABLE TO FIND SERVICE
Oracle SOA Suite 11.1.1.6
13866584 PS2,PS5:ORACLE.WEBSERVICES.STANDALONE.CLIENT.JAR:DUPLICATE ENTRIES:LICENSE.TXT
Oracle SOA Suite 11.1.1.6
14200229 MISSING OPERATION NAME FAILS IN INVOCATION WITH NO FAILURE
Oracle SOA Suite 11.1.1.6
14310998 BPEL EXCEPTION WHEN FP HAS BEEN UPGRADED TO PS5 (11.1.1.6)
Table 2–21 Foundation Pack 11.1.1.6 (PS5)
Product My Oracle Support Patch Number Description
Foundation Pack 11.1.1.6 (PS5)
RUP(14253266) RUP ON TOP OF AIAFP 11.1.1.6.0 (Patch)
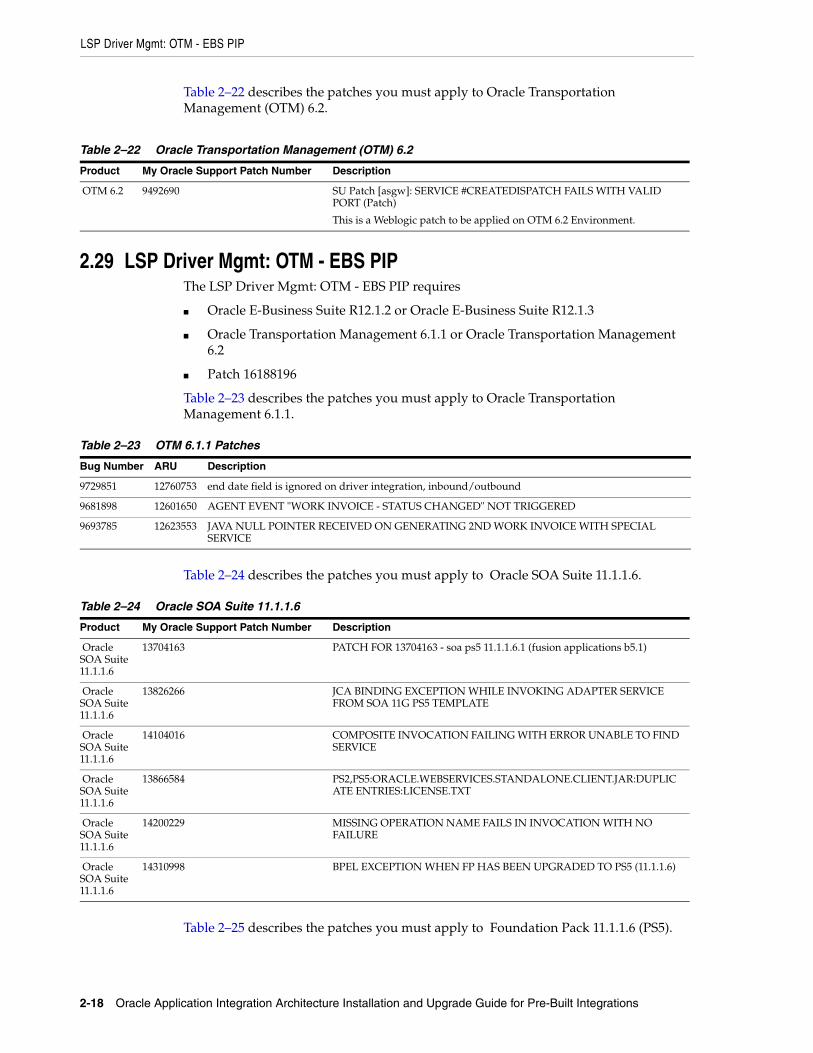
LSP Driver Mgmt: OTM - EBS PIP
2-18 Oracle Application Integration Architecture Installation and Upgrade Guide for Pre-Built Integrations
Table 2–22 describes the patches you must apply to Oracle Transportation Management (OTM) 6.2.
2.29 LSP Driver Mgmt: OTM - EBS PIPThe LSP Driver Mgmt: OTM - EBS PIP requires
■ Oracle E-Business Suite R12.1.2 or Oracle E-Business Suite R12.1.3
■ Oracle Transportation Management 6.1.1 or Oracle Transportation Management 6.2
■ Patch 16188196
Table 2–23 describes the patches you must apply to Oracle Transportation Management 6.1.1.
Table 2–24 describes the patches you must apply to Oracle SOA Suite 11.1.1.6.
Table 2–25 describes the patches you must apply to Foundation Pack 11.1.1.6 (PS5).
Table 2–22 Oracle Transportation Management (OTM) 6.2
Product My Oracle Support Patch Number Description
OTM 6.2 9492690 SU Patch [asgw]: SERVICE #CREATEDISPATCH FAILS WITH VALID PORT (Patch)
This is a Weblogic patch to be applied on OTM 6.2 Environment.
Table 2–23 OTM 6.1.1 Patches
Bug Number ARU Description
9729851 12760753 end date field is ignored on driver integration, inbound/outbound
9681898 12601650 AGENT EVENT "WORK INVOICE - STATUS CHANGED" NOT TRIGGERED
9693785 12623553 JAVA NULL POINTER RECEIVED ON GENERATING 2ND WORK INVOICE WITH SPECIAL SERVICE
Table 2–24 Oracle SOA Suite 11.1.1.6
Product My Oracle Support Patch Number Description
Oracle SOA Suite 11.1.1.6
13704163 PATCH FOR 13704163 - soa ps5 11.1.1.6.1 (fusion applications b5.1)
Oracle SOA Suite 11.1.1.6
13826266 JCA BINDING EXCEPTION WHILE INVOKING ADAPTER SERVICE FROM SOA 11G PS5 TEMPLATE
Oracle SOA Suite 11.1.1.6
14104016 COMPOSITE INVOCATION FAILING WITH ERROR UNABLE TO FIND SERVICE
Oracle SOA Suite 11.1.1.6
13866584 PS2,PS5:ORACLE.WEBSERVICES.STANDALONE.CLIENT.JAR:DUPLICATE ENTRIES:LICENSE.TXT
Oracle SOA Suite 11.1.1.6
14200229 MISSING OPERATION NAME FAILS IN INVOCATION WITH NO FAILURE
Oracle SOA Suite 11.1.1.6
14310998 BPEL EXCEPTION WHEN FP HAS BEEN UPGRADED TO PS5 (11.1.1.6)
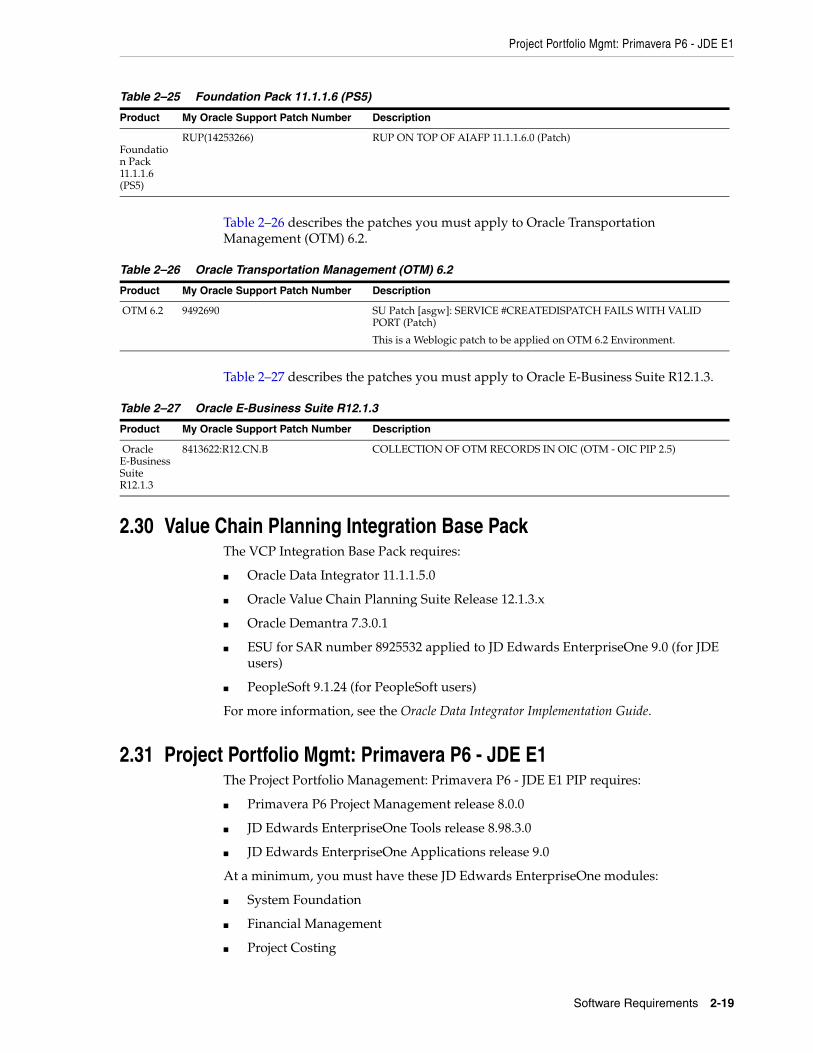
Project Portfolio Mgmt: Primavera P6 - JDE E1
Software Requirements 2-19
Table 2–26 describes the patches you must apply to Oracle Transportation Management (OTM) 6.2.
Table 2–27 describes the patches you must apply to Oracle E-Business Suite R12.1.3.
2.30 Value Chain Planning Integration Base PackThe VCP Integration Base Pack requires:
■ Oracle Data Integrator 11.1.1.5.0
■ Oracle Value Chain Planning Suite Release 12.1.3.x
■ Oracle Demantra 7.3.0.1
■ ESU for SAR number 8925532 applied to JD Edwards EnterpriseOne 9.0 (for JDE users)
■ PeopleSoft 9.1.24 (for PeopleSoft users)
For more information, see the Oracle Data Integrator Implementation Guide.
2.31 Project Portfolio Mgmt: Primavera P6 - JDE E1The Project Portfolio Management: Primavera P6 - JDE E1 PIP requires:
■ Primavera P6 Project Management release 8.0.0
■ JD Edwards EnterpriseOne Tools release 8.98.3.0
■ JD Edwards EnterpriseOne Applications release 9.0
At a minimum, you must have these JD Edwards EnterpriseOne modules:
■ System Foundation
■ Financial Management
■ Project Costing
Table 2–25 Foundation Pack 11.1.1.6 (PS5)
Product My Oracle Support Patch Number Description
Foundation Pack 11.1.1.6 (PS5)
RUP(14253266) RUP ON TOP OF AIAFP 11.1.1.6.0 (Patch)
Table 2–26 Oracle Transportation Management (OTM) 6.2
Product My Oracle Support Patch Number Description
OTM 6.2 9492690 SU Patch [asgw]: SERVICE #CREATEDISPATCH FAILS WITH VALID PORT (Patch)
This is a Weblogic patch to be applied on OTM 6.2 Environment.
Table 2–27 Oracle E-Business Suite R12.1.3
Product My Oracle Support Patch Number Description
Oracle E-Business Suite R12.1.3
8413622:R12.CN.B COLLECTION OF OTM RECORDS IN OIC (OTM - OIC PIP 2.5)
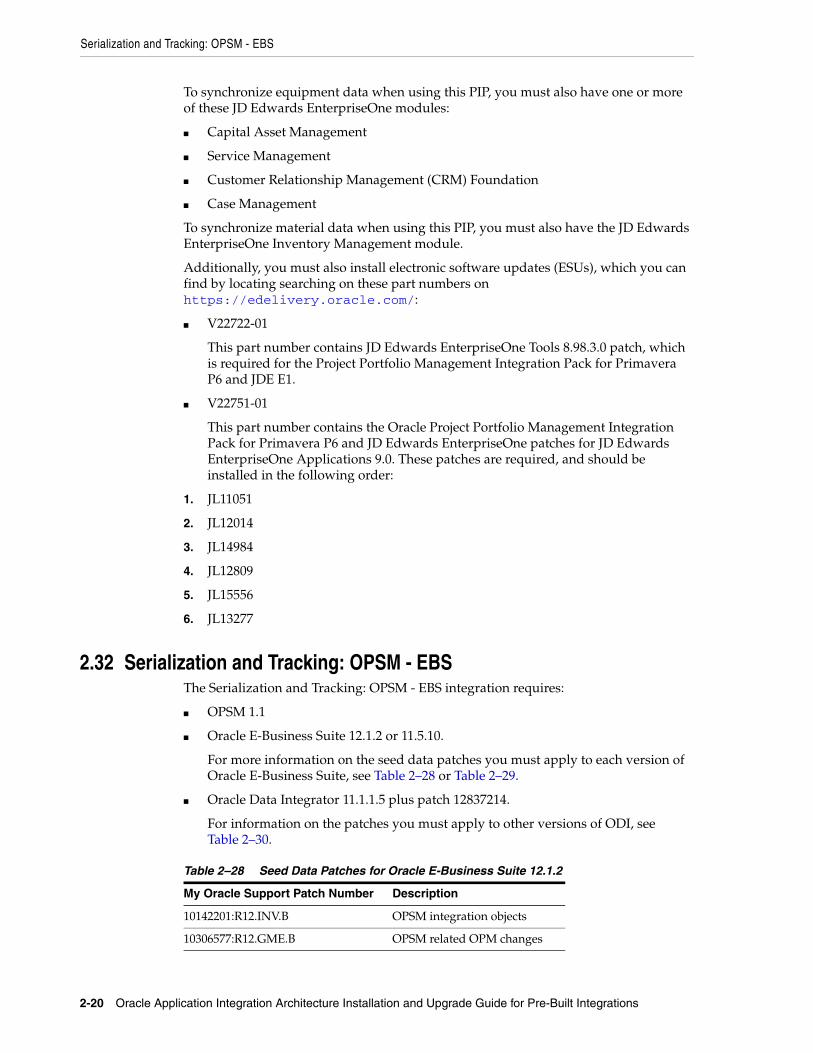
Serialization and Tracking: OPSM - EBS
2-20 Oracle Application Integration Architecture Installation and Upgrade Guide for Pre-Built Integrations
To synchronize equipment data when using this PIP, you must also have one or more of these JD Edwards EnterpriseOne modules:
■ Capital Asset Management
■ Service Management
■ Customer Relationship Management (CRM) Foundation
■ Case Management
To synchronize material data when using this PIP, you must also have the JD Edwards EnterpriseOne Inventory Management module.
Additionally, you must also install electronic software updates (ESUs), which you can find by locating searching on these part numbers on https://edelivery.oracle.com/:
■ V22722-01
This part number contains JD Edwards EnterpriseOne Tools 8.98.3.0 patch, which is required for the Project Portfolio Management Integration Pack for Primavera P6 and JDE E1.
■ V22751-01
This part number contains the Oracle Project Portfolio Management Integration Pack for Primavera P6 and JD Edwards EnterpriseOne patches for JD Edwards EnterpriseOne Applications 9.0. These patches are required, and should be installed in the following order:
1. JL11051
2. JL12014
3. JL14984
4. JL12809
5. JL15556
6. JL13277
2.32 Serialization and Tracking: OPSM - EBSThe Serialization and Tracking: OPSM - EBS integration requires:
■ OPSM 1.1
■ Oracle E-Business Suite 12.1.2 or 11.5.10.
For more information on the seed data patches you must apply to each version of Oracle E-Business Suite, see Table 2–28 or Table 2–29.
■ Oracle Data Integrator 11.1.1.5 plus patch 12837214.
For information on the patches you must apply to other versions of ODI, see Table 2–30.
Table 2–28 Seed Data Patches for Oracle E-Business Suite 12.1.2
My Oracle Support Patch Number Description
10142201:R12.INV.B OPSM integration objects
10306577:R12.GME.B OPSM related OPM changes
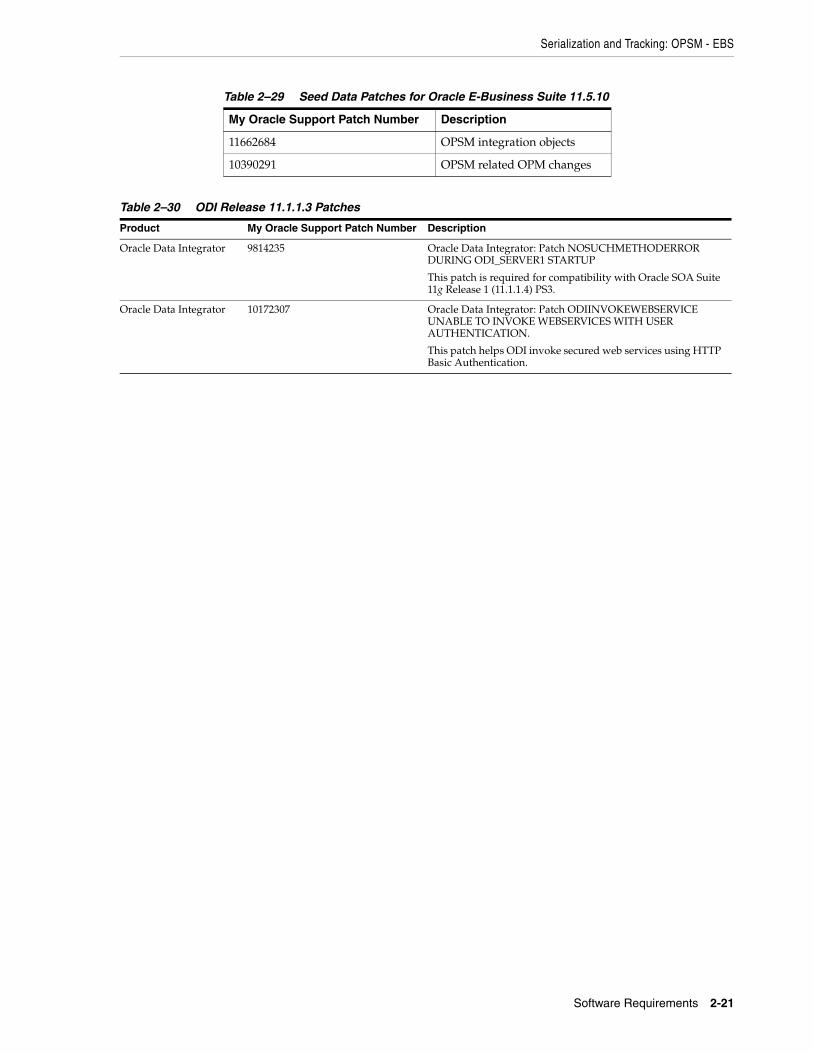
Serialization and Tracking: OPSM - EBS
Software Requirements 2-21
Table 2–29 Seed Data Patches for Oracle E-Business Suite 11.5.10
My Oracle Support Patch Number Description
11662684 OPSM integration objects
10390291 OPSM related OPM changes
Table 2–30 ODI Release 11.1.1.3 Patches
Product My Oracle Support Patch Number Description
Oracle Data Integrator 9814235 Oracle Data Integrator: Patch NOSUCHMETHODERROR DURING ODI_SERVER1 STARTUP
This patch is required for compatibility with Oracle SOA Suite 11g Release 1 (11.1.1.4) PS3.
Oracle Data Integrator 10172307 Oracle Data Integrator: Patch ODIINVOKEWEBSERVICE UNABLE TO INVOKE WEBSERVICES WITH USER AUTHENTICATION.
This patch helps ODI invoke secured web services using HTTP Basic Authentication.

Serialization and Tracking: OPSM - EBS
2-22 Oracle Application Integration Architecture Installation and Upgrade Guide for Pre-Built Integrations
3
Installing Pre-Built Integrations 3-1
3Installing Pre-Built Integrations
This chapter describes how to install pre-built integrations 11.3 and the Application Integration Architecture (AIA) release version (RV) 3.1.1 Process Integration Packs (PIP) and Direct Integrations (DI) that are delivered in this release using the AIA Pre-Built Integrations Installer.
This chapter includes the following sections:
■ Section 3.1, "Prerequisites"
■ Section 3.2, "Using the Oracle AIA Pre-Built Integrations Installer"
■ Section 3.3, "Pre-Built Integrations 11.3 and AIA RV 3.1.1 PIPs and DIs Delivered in this Release"
■ Section 3.4, "How to Create Backups of your Customizations"
■ Section 3.5, "Preinstallation Configuration"
■ Section 3.6, "How to Install the Pre-Built Integrations and AIA RV 3.1.1 PIPs and DIs"
3.1 Prerequisites■ Install Oracle SOA Suite 11.1.1.6 (PS5) with patches
13704163(RUP2)+13826266+14200229+14310998.
For information about how to install Oracle SOA Suite, see Oracle Fusion Middleware Installation Guide for Oracle SOA Suite and Oracle Business Process Management Suite.
■ Install Oracle AIA Foundation Pack 11.1.1.6, RUP patch 14253266 or later before you install the pre-built integrations.
For information about how to install the Oracle AIA Foundation Pack, see Oracle Fusion Middleware Installation and Upgrade Guide for Oracle Application Integration Architecture Foundation Pack.
■ Make a backup of any customizations. If you do not create a backup, your customizations are overwritten.
Note: SOA patch 13704163(RUP2) was originally created for Fusion Applications. However, this patch is required to fix issues encountered during Oracle's quality processes. Oracle confirms that this patch is certified to work with pre-built integrations and must be applied to your environment.
Using the Oracle AIA Pre-Built Integrations Installer
3-2 Oracle Application Integration Architecture Installation and Upgrade Guide for Pre-Built Integrations
For more information about backing up your customizations, see Section 3.4, "How to Create Backups of your Customizations"
■ If the products you are installing require database schemas, ensure that you have created these schemas in your database.
See the applicable pre-built integrations chapters in Part II, "Configuring and Deploying Pre-Built Integrations" and Part III, "Configuring and Deploying AIA RV 3.1.1 PIPs and DIs" of this guide to check if your PIP or DI require database schemas.
For more information about how to create database schemas, see Oracle Fusion Middleware Installation and Upgrade Guide for Oracle Application Integration Architecture Foundation Pack "Preparing for Foundation Pack Installation."
3.2 Using the Oracle AIA Pre-Built Integrations InstallerWhen you use the AIA Pre-Built Integrations Installer the following occurs.
1. You see a welcome screen that lists prerequisites and information about how to begin the installation process.
The following prerequisite system checks are performed:
– Operating system certification
– Recommended operating system packages
– Kernel parameters
– Recommended gilbc version
– Physical memory
2. You are prompted to enter the installation location.
3. You see an installation summary, which includes directory details, disk space required and available, and a list of the applications that are installed.
The list of applications include all the pre-built integrations and AIA RV 3.1.1 PIPs and DIs.
For more information about the pre-built integrations and AIA RV 3.1.1, see Section 3.3, "Pre-Built Integrations 11.3 and AIA RV 3.1.1 PIPs and DIs Delivered in this Release"
4. You can choose to save the Response file, which stores the values that you have input and are displayed on the installation summary page.
For detailed screenshots of the AIA Pre-Built Integrations Installer, see Appendix A, "AIA Pre-Built Integrations Installer Screens".
3.3 Pre-Built Integrations 11.3 and AIA RV 3.1.1 PIPs and DIs Delivered in this Release
The AIA Pre-Built Integrations Installer 11.3 is used to install pre-built integrations 11.3 and the individual 3.1.1 PIPs and DIs.
Pre-Built Integrations 11.3 and AIA RV 3.1.1 PIPs and DIs Delivered in this Release
Installing Pre-Built Integrations 3-3
3.3.1 Pre-Built Integrations Delivered in this ReleaseThe following Pre-Built Integrations are delivered in this release.
Communications Pre-Built Integrations
■ Oracle Communications Order to Cash Integration Pack for Siebel CRM, Oracle Communications Order and Service Management, and Oracle Communications Billing and Revenue Management 11.2
– Oracle Communications Order to Cash for Siebel CRM, OSM, and BRM Pre-Built Integration option
– Oracle Communications Order to Cash for Siebel CRM and BRM Pre-Built Integration option
– Oracle Communications Order to Cash for Siebel CRM and OSM Pre-Built Integration option
■ Siebel CRM Integration Pack for Oracle Communications Billing and Revenue Management: Agent Assisted Billing Care 11.2 (Comms Agent Assisted Billing Care: SBL CRM - BRM)
■ Oracle Communications Billing and Revenue Management Integration Pack for Oracle Business Suite: Revenue Accounting 11.1 (Comms Revenue Accounting: BRM - EBS)
Customer Master Data Management Pre-Built Integrations
■ Oracle Customer Master Data Management Integration Base Pack 11.1 (Customer MDM Base Pack)
■ Oracle Customer Master Data Management Integration Option for Siebel CRM 11.1 (Customer MDM: Siebel CRM)
■ Oracle Customer Master Data Management Integration Option for Oracle E-Business Suite 11.1 (Customer MDM: EBS)
■ Oracle Customer Master Data Management Integration Option for Oracle Communications Billing and Revenue Management 11.1 (Customer MDM: Comms BRM)
Product Master Data Management Pre-Built Integrations
■ Oracle Product Master Data Management Integration Base Pack 11.1 (Product MDM Base Pack)
■ Oracle Product Master Data Management Integration Option for Siebel CRM 11.1 (Product MDM: Siebel CRM)
Caution: The AIA Pre-Built Integrations Installer helps you install all of the pre-built integrations and AIA RV 3.1.1 PIPs and DIs that are delivered in this release. However it is important that you only configure and deploy the integrations that you are going to be using. Please see the individual integration chapters for instructions for configuring and deploying your integrations.
Caution: When choosing the Pre-Built Integrations to configure and deploy, you must only select one Oracle Communications Order to Cash Pre-Built Integration options that are listed.
Pre-Built Integrations 11.3 and AIA RV 3.1.1 PIPs and DIs Delivered in this Release
3-4 Oracle Application Integration Architecture Installation and Upgrade Guide for Pre-Built Integrations
■ Oracle Product Master Data Management Integration Option for Oracle E-Business Suite 11.1 (Product MDM: EBS)
■ Oracle Product Master Data Management Integration Option for Oracle Communications Billing and Revenue Management 11.1 (Product MDM: Comms BRM)
Product Lifecycle Management Pre-Built Integrations
■ Agile Product Lifecycle Management Integration Pack for Oracle E-Business Suite: Design to Release 11.2 (Design to Release: Agile-EBS)
■ Agile Product Lifecycle Management Integration Pack for SAP: Design to Release 11.2 (Design to Release: Agile-SAP)
Utilities Pre-Built Integrations
■ Oracle Process Integration Pack for Oracle Utilities Field Work 11.1
■ Oracle Customer Data Synchronization Integration Pack for Oracle Utilities Customer Care and Billing and Siebel Energy 11.1 (Customer Data Synchronization for Oracle Utilities CCB and Siebel Energy)
■ Oracle Product Data Synchronization Integration Pack for Oracle Utilities Customer Care and Billing and Siebel Energy 11.1 (Product Data Synchronization for Oracle Utilities CCB and Siebel Energy)
3.3.2 AIA RV 3.1.1 PIPs and DIs Delivered in this ReleaseThe following AIA RV 3.1.1 PIPs and DIs are delivered in this release:
■ Oracle Design to Release Integration Pack for Agile PLM for Process and Oracle Process Manufacturing (Design to Release: Agile PLM for Process - OPM)
■ Siebel CRM Integration Pack for Oracle Order Management: Order to Cash 3.1.1 (Order to Cash: Siebel CRM - EBS)
■ Siebel CRM Integration to Oracle Incentive Compensation 3.1.1 (Siebel CRM to OIC)
■ Oracle Lead to Order Integration Pack for Oracle CRM On Demand and Oracle E-Business Suite 3.1.1 (Lead to Order: CRM OD - EBS)
■ Oracle Financial Operations Control Integration Pack for Oracle Retail Merchandise Operations Management and PeopleSoft Enterprise Financials 3.1.1 (Financials Ops Control: Oracle Retail - PeopleSoft)
■ Oracle Financial Management Integration Pack for Oracle Transportation Management and Oracle E-Business Suite 3.1.1 (LSP Financial Mgmt: OTM - EBS)
■ Oracle Order Management Integration Pack for Oracle Transportation Management, Oracle E-Business Suite, and Siebel CRM 3.1.1 (LSP Order Mgmt: OTM - EBS - Siebel CRM)
■ Oracle Driver Management Integration Pack for Oracle Transportation Management and Oracle E-Business Suite 3.1.1 (LSP Driver Mgmt: OTM - EBS)
■ Oracle Value Chain Planning Integration Base Pack 3.1 (VCP Integration Base Pack)
■ Oracle Project Portfolio Management Integration Pack for Primavera P6 and JD Edwards EnterpriseOne 3.1.1 (Project Portfolio Mgmt: Primavera P6 - JDE E1)
Preinstallation Configuration
Installing Pre-Built Integrations 3-5
■ Oracle Serialization and Tracking Integration Pack for Oracle Pedigree and Serialization Manager and Oracle E-Business Suite 3.1.1 (Serialization and Tracking: OPSM - EBS)
3.4 How to Create Backups of your CustomizationsThis section discusses the key tasks that you must perform before you install the media pack or when you apply patches to your existing integrations:
■ Back up custom Enterprise Business Objects (EBOs):
These are Oracle AIA schema extensions performed on EBOs. Though the AIA Pre-Built Integrations Installer automatically preserves these schema extensions, it is advisable to back up the custom directory. For example, all custom xsd files for core EBOs can be accessed from AIA_HOME/AIAMetaData/AIAComponents/EnterpriseObjectLibrary/Core/Custom/EBO/ or AIA_HOME/AIAMetaData/AIAComponents/EnterpriseObjectLibrary/Industry/<Industry Name>/Custom/EBO
■ Back up custom extensible style sheet language transformations (XSLTs):
These are the extensions performed on the AIA Transformation style sheet. Oracle AIA does not contain any XSLTs for its components and utilities. Because the process content is delivered only in integrations, you must manually back up the XSLTs if you have developed any for the custom integrations, and reapply them as a post install step.
■ Back up custom Enterprise Business Services (EBS) Web Service Definition Language (WSDL):
If you have customized any EBS WSDL that is delivered / shipped with Oracle AIA, you must back it up and manually merge the changes that you made post installation.
■ Back up custom routing rules in the (EBS):
If you have defined any routing rules, on any of the EBS available as part of the integration, on top of the rules provided out of the box, you must manually take a back up of the EBS. You must merge the EBS manually as a post installation step.
■ Back up the AIAConfigurationProperties.xml file located in the $AIA_INSTANCE/AIAMetaData/config folder. Merge custom inclusions in the AIAConfigurationProperties.xml file and change properties as required after installation.
3.5 Preinstallation ConfigurationThis section discusses the preinstallation configuration steps you must complete for each Pre-Built Integrations or AIA R.V. 3.1.1 integration included in this release.
If your Pre-Built Integrations or AIA R.V. 3.1.1 integration is not mentioned in this section, it does not require preinstallation configuration.
3.5.1 Design to Release: Agile - EBS Pre-Built IntegrationIf Oracle E-Business Suite 12.1.x with PIM release is being used for integration installation, enable the Generate Item Number and Description Service in Oracle E-Business Suite. Before you enable this service, apply the required patches on Oracle E-Business Suite as mentioned in Chapter 2, "Software Requirements":
Preinstallation Configuration
3-6 Oracle Application Integration Architecture Installation and Upgrade Guide for Pre-Built Integrations
To enable the Generate Item Number and Description Service in Oracle E-Business Suite:1. Log in as SYSADMIN into Oracle Apps.
2. Go to the Integrated SOA Gateway responsibility.
3. Click Integration Repository.
4. Select view-by as Interface Type.
5. Navigate to Business Service Object, Discrete Manufacturing, Inventory Management.
6. Click Generate Item Number and Description Service.
7. Click Redeploy/Deploy Web Service.
You can view Deployed WSDL URL under Abstract WSDL URL.
8. Click the deployed WSDL link and verify whether WSDL is open. Also try accessing the imported schema location
http://<host>:<port>/webservices/AppsWSProvider/oracle/apps/inv/ebi/item/GenerateItemNumberService.xsd. You should get the following message in the browser:
"Return List Generated Item Number and Description"
On View Source, the XSD should be visible.
9. Provide Grant to the Integration User for this web service.
10. Select the method getItemListNumberDescription and click Create Grant on the bottom of the page.
11. Specify the user and click Apply.
If there any issues, see the Oracle E-Business Suite Integrated SOA Gateway Troubleshooting Guide, Release 12 (ID 726414.1) and Installing Oracle E-Business Suite Integrated SOA Gateway, Release 12 (ID 556540.1) on My Oracle Support [https://support.oracle.com].
3.5.1.1 Installing Variant ManagementVariant Management is a patch for the Agile PLM 9.3 release. To use Agile PLM 9.3 with Variant Management for Design to Release: Agile - EBS / PIM Pre-Built Integration, you must install the patch before you run the AIA Pre-Built Integrations Installer.
3.5.2 LSP Financial Mgmt: OTM - EBS PIPBefore you install the LSP Financial Mgmt: OTM - EBS PIP, ensure that "USERS" tablespace exists in the AIA database. You must create one if you do not find one.
To create a tablespace with the name "USERS" in the AIA database run the oracle database create tablespace command.
The following is a sample command to create the tablespace:
create tablespace users data file '[your file name]' size [file size]
Note: The Variant Management Installer and the relevant documentation can be obtained from Oracle Software Delivery Cloud.
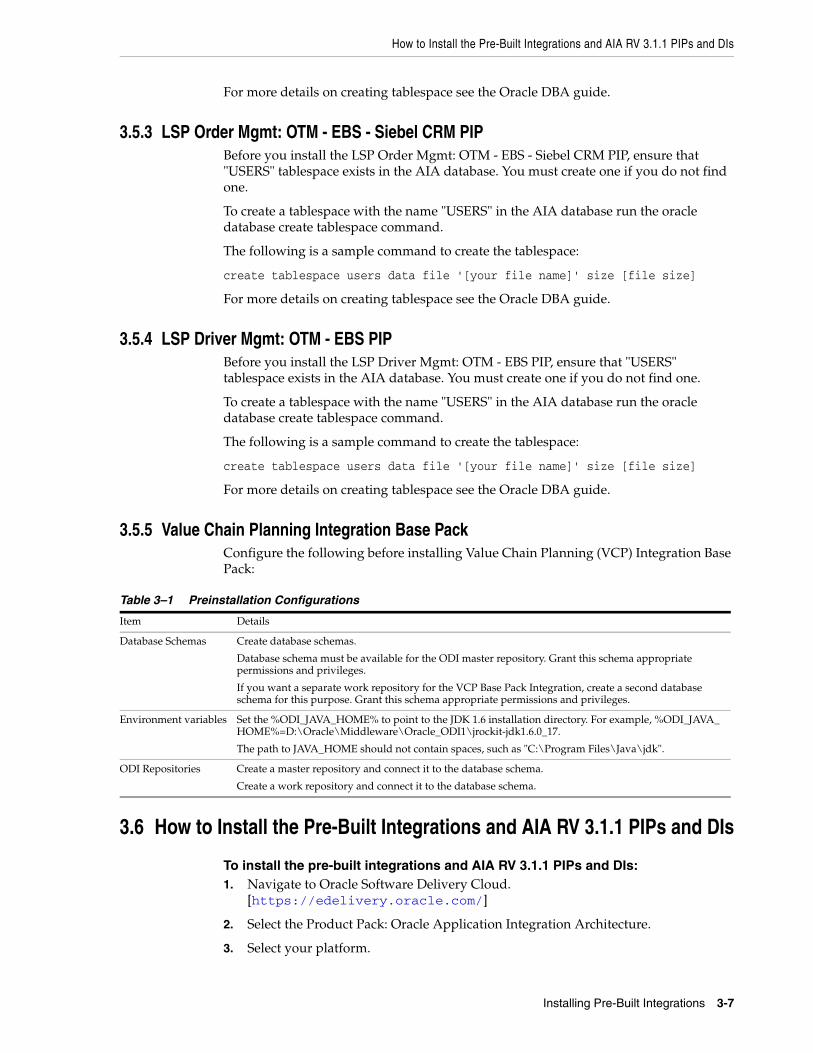
How to Install the Pre-Built Integrations and AIA RV 3.1.1 PIPs and DIs
Installing Pre-Built Integrations 3-7
For more details on creating tablespace see the Oracle DBA guide.
3.5.3 LSP Order Mgmt: OTM - EBS - Siebel CRM PIPBefore you install the LSP Order Mgmt: OTM - EBS - Siebel CRM PIP, ensure that "USERS" tablespace exists in the AIA database. You must create one if you do not find one.
To create a tablespace with the name "USERS" in the AIA database run the oracle database create tablespace command.
The following is a sample command to create the tablespace:
create tablespace users data file '[your file name]' size [file size]
For more details on creating tablespace see the Oracle DBA guide.
3.5.4 LSP Driver Mgmt: OTM - EBS PIPBefore you install the LSP Driver Mgmt: OTM - EBS PIP, ensure that "USERS" tablespace exists in the AIA database. You must create one if you do not find one.
To create a tablespace with the name "USERS" in the AIA database run the oracle database create tablespace command.
The following is a sample command to create the tablespace:
create tablespace users data file '[your file name]' size [file size]
For more details on creating tablespace see the Oracle DBA guide.
3.5.5 Value Chain Planning Integration Base PackConfigure the following before installing Value Chain Planning (VCP) Integration Base Pack:
3.6 How to Install the Pre-Built Integrations and AIA RV 3.1.1 PIPs and DIs
To install the pre-built integrations and AIA RV 3.1.1 PIPs and DIs:1. Navigate to Oracle Software Delivery Cloud.
[https://edelivery.oracle.com/]
2. Select the Product Pack: Oracle Application Integration Architecture.
3. Select your platform.
Table 3–1 Preinstallation Configurations
Item Details
Database Schemas Create database schemas.
Database schema must be available for the ODI master repository. Grant this schema appropriate permissions and privileges.
If you want a separate work repository for the VCP Base Pack Integration, create a second database schema for this purpose. Grant this schema appropriate permissions and privileges.
Environment variables Set the %ODI_JAVA_HOME% to point to the JDK 1.6 installation directory. For example, %ODI_JAVA_HOME%=D:\Oracle\Middleware\Oracle_ODI1\jrockit-jdk1.6.0_17.
The path to JAVA_HOME should not contain spaces, such as "C:\Program Files\Java\jdk".
ODI Repositories Create a master repository and connect it to the database schema.
Create a work repository and connect it to the database schema.
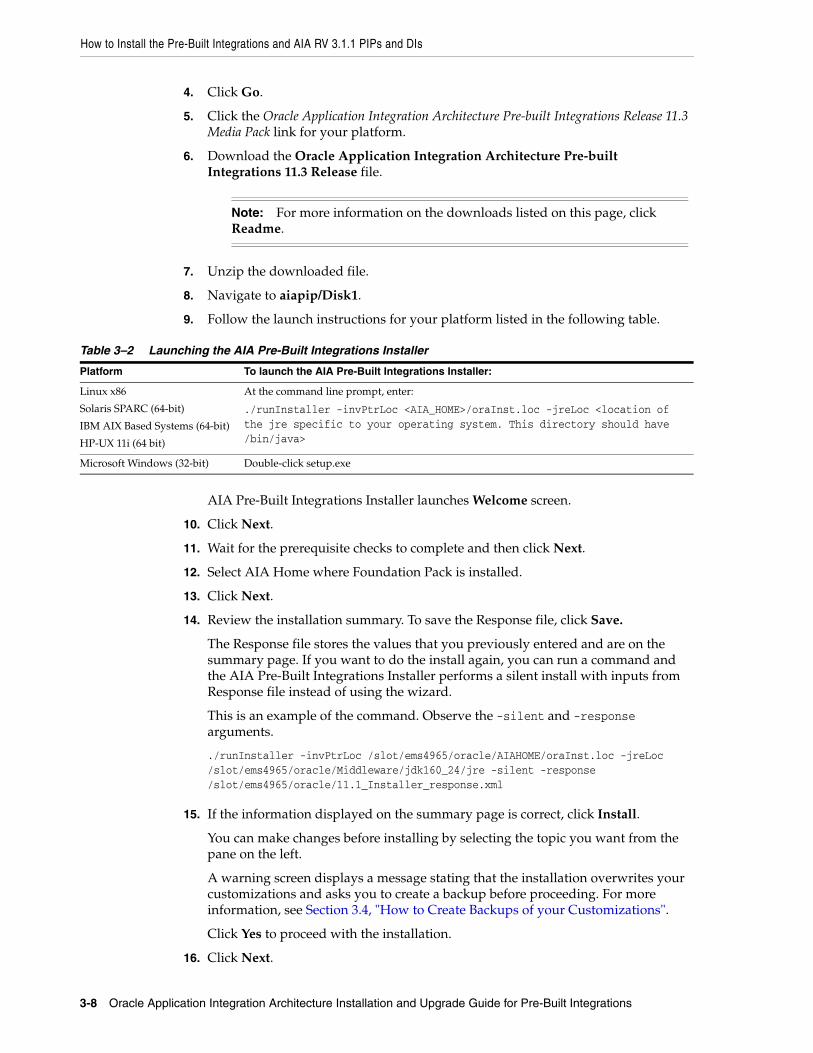
How to Install the Pre-Built Integrations and AIA RV 3.1.1 PIPs and DIs
3-8 Oracle Application Integration Architecture Installation and Upgrade Guide for Pre-Built Integrations
4. Click Go.
5. Click the Oracle Application Integration Architecture Pre-built Integrations Release 11.3 Media Pack link for your platform.
6. Download the Oracle Application Integration Architecture Pre-built Integrations 11.3 Release file.
7. Unzip the downloaded file.
8. Navigate to aiapip/Disk1.
9. Follow the launch instructions for your platform listed in the following table.
AIA Pre-Built Integrations Installer launches Welcome screen.
10. Click Next.
11. Wait for the prerequisite checks to complete and then click Next.
12. Select AIA Home where Foundation Pack is installed.
13. Click Next.
14. Review the installation summary. To save the Response file, click Save.
The Response file stores the values that you previously entered and are on the summary page. If you want to do the install again, you can run a command and the AIA Pre-Built Integrations Installer performs a silent install with inputs from Response file instead of using the wizard.
This is an example of the command. Observe the -silent and -response arguments.
./runInstaller -invPtrLoc /slot/ems4965/oracle/AIAHOME/oraInst.loc -jreLoc /slot/ems4965/oracle/Middleware/jdk160_24/jre -silent -response /slot/ems4965/oracle/11.1_Installer_response.xml
15. If the information displayed on the summary page is correct, click Install.
You can make changes before installing by selecting the topic you want from the pane on the left.
A warning screen displays a message stating that the installation overwrites your customizations and asks you to create a backup before proceeding. For more information, see Section 3.4, "How to Create Backups of your Customizations".
Click Yes to proceed with the installation.
16. Click Next.
Note: For more information on the downloads listed on this page, click Readme.
Table 3–2 Launching the AIA Pre-Built Integrations Installer
Platform To launch the AIA Pre-Built Integrations Installer:
Linux x86
Solaris SPARC (64-bit)
IBM AIX Based Systems (64-bit)
HP-UX 11i (64 bit)
At the command line prompt, enter:
./runInstaller -invPtrLoc <AIA_HOME>/oraInst.loc -jreLoc <location of the jre specific to your operating system. This directory should have /bin/java>
Microsoft Windows (32-bit) Double-click setup.exe
How to Install the Pre-Built Integrations and AIA RV 3.1.1 PIPs and DIs
Installing Pre-Built Integrations 3-9
17. To exit the AIA Pre-Built Integrations Installer, click Finish. The installation is complete.
18. Verify whether PIPManifest.xml file exists under each PIP or DI folder under <AIA_HOME>/pips/<PIP Folder>/config. For example, <AIA_HOME>/pips/Communications/O2A/config.

How to Install the Pre-Built Integrations and AIA RV 3.1.1 PIPs and DIs
3-10 Oracle Application Integration Architecture Installation and Upgrade Guide for Pre-Built Integrations

Part IIPart II Configuring and Deploying
Pre-Built Integrations
This part describes how to configure and deploy the pre-built integrations that are delivered in this release on Foundation Pack.
This part contains the following chapters:
■ Chapter 4, "Configuring and Deploying the Comms Agent Assisted Billing Care: SBL CRM - BRM Pre-Built Integration"
■ Chapter 5, "Configuring and Deploying the Comms Revenue Accounting: BRM - EBS Pre-Built Integration"
■ Chapter 6, "Configuring and Deploying the Comms Order to Cash: SBL CRM, OSM, and BRM Pre-Built Integration"
■ Chapter 7, "Configuring and Deploying the Comms Order to Cash: SBL CRM and BRM Pre-Built Integration"
■ Chapter 8, "Configuring and Deploying the Comms Order to Cash: SBL CRM and OSM Pre-Built Integration"
■ Chapter 9, "Configuring and Deploying Customer MDM Base Pack"
■ Chapter 10, "Configuring and Deploying Customer MDM: Siebel CRM"
■ Chapter 11, "Configuring and Deploying Customer MDM: E-Business Suite"
■ Chapter 12, "Configuring and Deploying Customer MDM: Comms BRM"
■ Chapter 13, "Deploying Customer MDM: Routing Rules"
■ Chapter 14, "Deploying Customer MDM: Match Fetch Enterprise Composite Application"
■ Chapter 15, "Configuring and Deploying Product MDM Base Pack"
■ Chapter 16, "Configuring and Deploying Product MDM: Siebel CRM"
■ Chapter 17, "Configuring and Deploying Product MDM: E-Business Suite"
■ Chapter 18, "Configuring and Deploying Product MDM: Comms BRM"
■ Chapter 19, "Deploying Product MDM: Routing Rules"
■ Chapter 20, "Configuring and Deploying Design to Release: Agile - EBS"
■ Chapter 21, "Configuring and Deploying Design to Release: Agile - SAP"
■ Chapter 22, "Configuring and Deploying the Oracle Process Integration Pack for Oracle Utilities Field Work"

■ Chapter 23, "Configuring and Deploying Customer Data Synchronization for Oracle Utilities CCB and Siebel Energy"
■ Chapter 24, "Configuring and Deploying Product Data Synchronization for Oracle Utilities CCB and Siebel Energy"
4
Configuring and Deploying the Comms Agent Assisted Billing Care: SBL CRM - BRM Pre-Built Integration 4-1
4Configuring and Deploying the CommsAgent Assisted Billing Care: SBL CRM - BRM
Pre-Built Integration
This chapter discusses how to configure and deploy the Siebel CRM Integration Pack for Oracle Communications Billing and Revenue Management: Agent Assisted Billing Care (Comms Agent Assisted Billing Care: SBL CRM - BRM).
This chapter includes the following sections:
■ Section 4.1, "Creating Oracle Data Integrator Repositories"
■ Section 4.2, "Deployment Configuration Wizard"
■ Section 4.3, "Configuring and Deploying the Comms Agent Assisted Billing Care: SBL CRM - BRM Pre-Built Integration"
■ Section 4.4, "Performing Postdeployment Configurations"
■ Section 4.5, "Verifying Deployment"
■ Section 4.6, "Undeploying the Comms Agent Assisted Billing Care: SBL CRM - BRM Pre-Built Integration"
4.1 Creating Oracle Data Integrator RepositoriesPrerequisite/Assumption: The Master Repository and the Work Repository are created in ODI.
You need not create a master repository. You can use an existing master repository if it exists on an Oracle database and the ID is between 126 and 999. If you are creating a new master repository, ensure that the repository ID is between 126 and 999.
You can use an existing work repository if it exists on an Oracle database and its ID is between 126 and 999. If its ID is not in that range, AIA advises you to create a repository with an ID between 126 and 999.
Table 4–1 details a list of ids you must avoid when creating master and work repositories.
Table 4–1 Prohibited IDs
Master Repository IDs Work Repository IDs
219 129
999 239
- 543
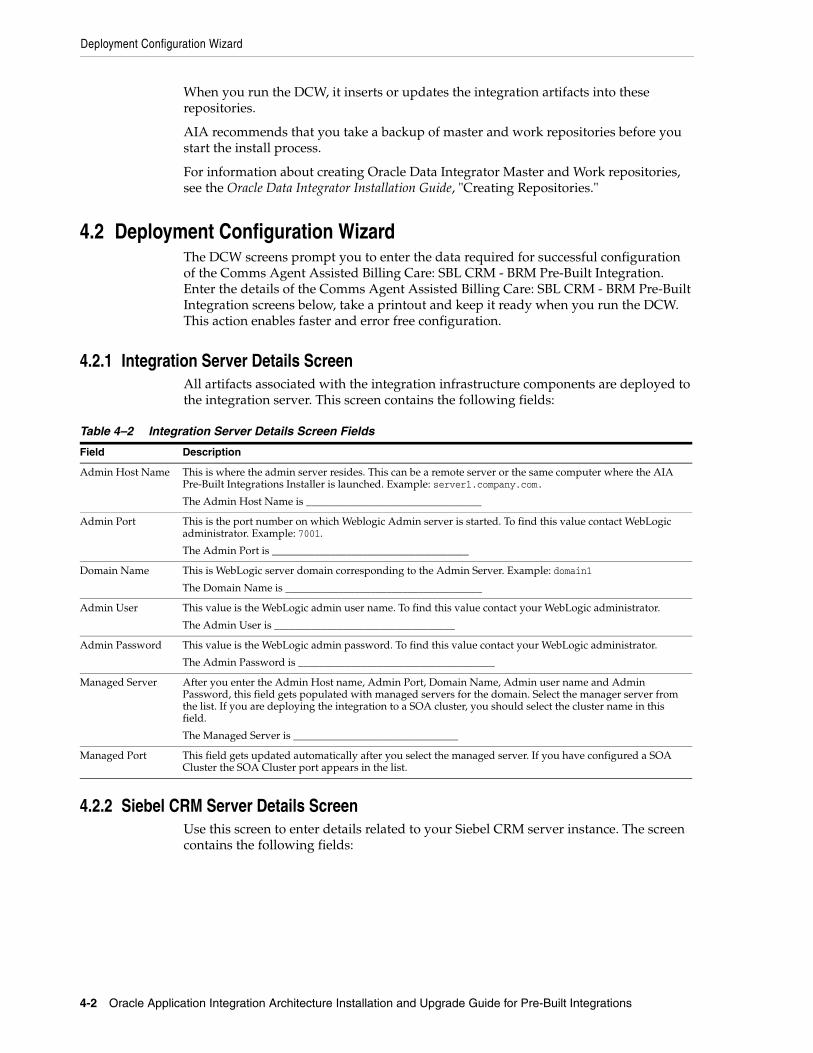
Deployment Configuration Wizard
4-2 Oracle Application Integration Architecture Installation and Upgrade Guide for Pre-Built Integrations
When you run the DCW, it inserts or updates the integration artifacts into these repositories.
AIA recommends that you take a backup of master and work repositories before you start the install process.
For information about creating Oracle Data Integrator Master and Work repositories, see the Oracle Data Integrator Installation Guide, "Creating Repositories."
4.2 Deployment Configuration WizardThe DCW screens prompt you to enter the data required for successful configuration of the Comms Agent Assisted Billing Care: SBL CRM - BRM Pre-Built Integration. Enter the details of the Comms Agent Assisted Billing Care: SBL CRM - BRM Pre-Built Integration screens below, take a printout and keep it ready when you run the DCW. This action enables faster and error free configuration.
4.2.1 Integration Server Details ScreenAll artifacts associated with the integration infrastructure components are deployed to the integration server. This screen contains the following fields:
4.2.2 Siebel CRM Server Details ScreenUse this screen to enter details related to your Siebel CRM server instance. The screen contains the following fields:
Table 4–2 Integration Server Details Screen Fields
Field Description
Admin Host Name This is where the admin server resides. This can be a remote server or the same computer where the AIA Pre-Built Integrations Installer is launched. Example: server1.company.com.
The Admin Host Name is _________________________________
Admin Port This is the port number on which Weblogic Admin server is started. To find this value contact WebLogic administrator. Example: 7001.
The Admin Port is _____________________________________
Domain Name This is WebLogic server domain corresponding to the Admin Server. Example: domain1
The Domain Name is _____________________________________
Admin User This value is the WebLogic admin user name. To find this value contact your WebLogic administrator.
The Admin User is __________________________________
Admin Password This value is the WebLogic admin password. To find this value contact your WebLogic administrator.
The Admin Password is _____________________________________
Managed Server After you enter the Admin Host name, Admin Port, Domain Name, Admin user name and Admin Password, this field gets populated with managed servers for the domain. Select the manager server from the list. If you are deploying the integration to a SOA cluster, you should select the cluster name in this field.
The Managed Server is _______________________________
Managed Port This field gets updated automatically after you select the managed server. If you have configured a SOA Cluster the SOA Cluster port appears in the list.
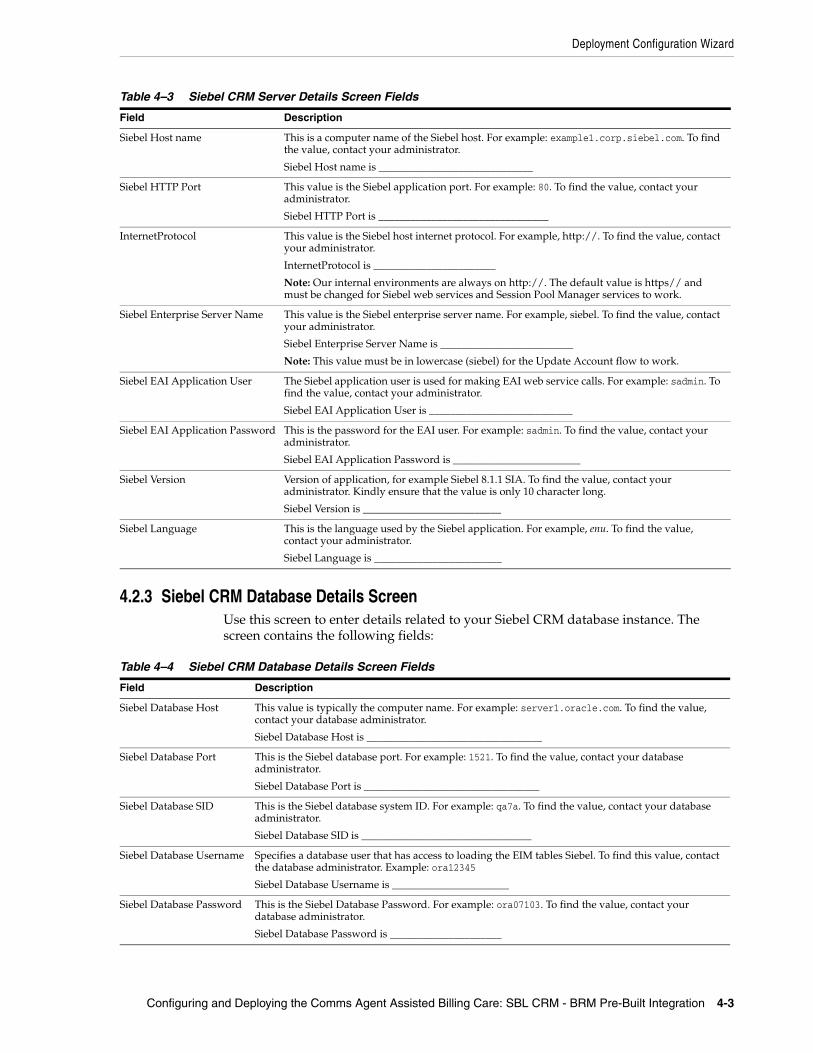
Deployment Configuration Wizard
Configuring and Deploying the Comms Agent Assisted Billing Care: SBL CRM - BRM Pre-Built Integration 4-3
4.2.3 Siebel CRM Database Details ScreenUse this screen to enter details related to your Siebel CRM database instance. The screen contains the following fields:
Table 4–3 Siebel CRM Server Details Screen Fields
Field Description
Siebel Host name This is a computer name of the Siebel host. For example: example1.corp.siebel.com. To find the value, contact your administrator.
Siebel Host name is _____________________________
Siebel HTTP Port This value is the Siebel application port. For example: 80. To find the value, contact your administrator.
Siebel HTTP Port is ________________________________
InternetProtocol This value is the Siebel host internet protocol. For example, http://. To find the value, contact your administrator.
InternetProtocol is _______________________
Note: Our internal environments are always on http://. The default value is https// and must be changed for Siebel web services and Session Pool Manager services to work.
Siebel Enterprise Server Name This value is the Siebel enterprise server name. For example, siebel. To find the value, contact your administrator.
Siebel Enterprise Server Name is _________________________
Note: This value must be in lowercase (siebel) for the Update Account flow to work.
Siebel EAI Application User The Siebel application user is used for making EAI web service calls. For example: sadmin. To find the value, contact your administrator.
Siebel EAI Application User is ___________________________
Siebel EAI Application Password This is the password for the EAI user. For example: sadmin. To find the value, contact your administrator.
Siebel EAI Application Password is ________________________
Siebel Version Version of application, for example Siebel 8.1.1 SIA. To find the value, contact your administrator. Kindly ensure that the value is only 10 character long.
Siebel Version is __________________________
Siebel Language This is the language used by the Siebel application. For example, enu. To find the value, contact your administrator.
Siebel Language is ________________________
Table 4–4 Siebel CRM Database Details Screen Fields
Field Description
Siebel Database Host This value is typically the computer name. For example: server1.oracle.com. To find the value, contact your database administrator.
Siebel Database Host is _________________________________
Siebel Database Port This is the Siebel database port. For example: 1521. To find the value, contact your database administrator.
Siebel Database Port is _________________________________
Siebel Database SID This is the Siebel database system ID. For example: qa7a. To find the value, contact your database administrator.
Siebel Database SID is ________________________________
Siebel Database Username Specifies a database user that has access to loading the EIM tables Siebel. To find this value, contact the database administrator. Example: ora12345
Siebel Database Username is ______________________
Siebel Database Password This is the Siebel Database Password. For example: ora07103. To find the value, contact your database administrator.
Siebel Database Password is _____________________

Deployment Configuration Wizard
4-4 Oracle Application Integration Architecture Installation and Upgrade Guide for Pre-Built Integrations
4.2.4 Oracle Communications BRM ScreenUse this screen to enter details related to your Oracle Communications BRM instance. The screen contains the following fields:
4.2.5 Oracle Data Integrator Access Information Details ScreensUse these screens to enter details to access Oracle Data Integrator. These screens contain the following fields:
Table 4–5 Oracle Communications BRM Details Screen
Field Description
Primary CM Host Name This is the host name of the primary Connection Manager (CM) of the BRM server. For example: example1.portal.com To find this value, contact your Oracle AQ system administrator.
Primary CM Host Name is ______________________________
Primary CM Port Number
This is the port number of primary Connection Manager (CM) of the BRM server. For example: 12600. To find this value contact your Oracle AQ database administrator System Administrator
Primary CM Port Number is ______________________________
Database Host This is the database host name of the Oracle AQ for which the BRM DM_AQ is configured. For example: example2.portal.com. To find this value, contact your Oracle AQ database administrator.
Database Host is _______________________
Database Port This is the database port number of the Oracle AQ. For example: 1521. To find this value, contact your Oracle AQ database administrator.
Database Port is _________________________
Oracle AQ Database SID This is the database instance of the Oracle AQ. For example: orcl. To find this value, contact your Oracle AQ database administrator.
Oracle AQ Database SID is _______________________________
Oracle AQ Username This is the database user name of the Oracle AQ. For example, PIN7820. To find this value, contact your Oracle AQ administrator.
Oracle AQ Username is _________________________
Note: This value must be in uppercase (PIN7820) for the OOTB PLM flow to work.
Oracle AQ Password This is the database password of the Oracle AQ. To find this value, contact your Oracle AQ administrator.
Oracle AQ Password is ___________________________
AQ Queue Name This is the queue name configured for the BRM DM_AQ. For example: AqportalUser. To find this value, contact your Oracle AQ database administrator.
AQ Queue Name is _________________________________
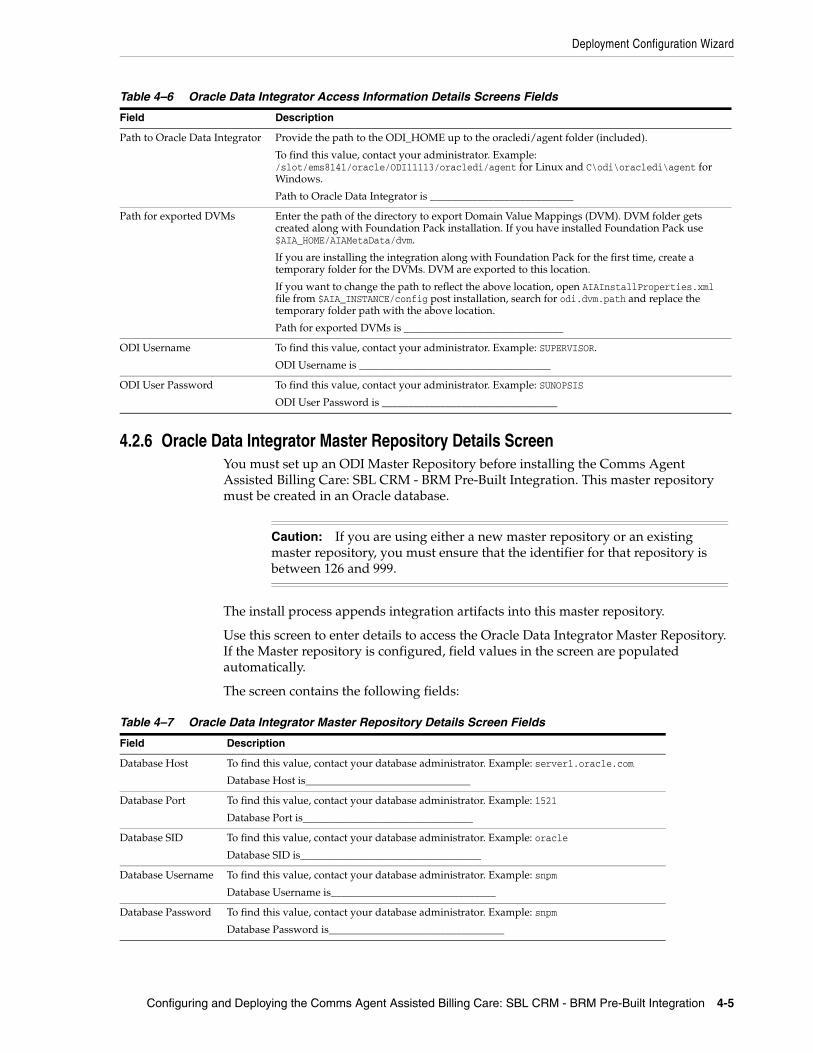
Deployment Configuration Wizard
Configuring and Deploying the Comms Agent Assisted Billing Care: SBL CRM - BRM Pre-Built Integration 4-5
4.2.6 Oracle Data Integrator Master Repository Details ScreenYou must set up an ODI Master Repository before installing the Comms Agent Assisted Billing Care: SBL CRM - BRM Pre-Built Integration. This master repository must be created in an Oracle database.
The install process appends integration artifacts into this master repository.
Use this screen to enter details to access the Oracle Data Integrator Master Repository. If the Master repository is configured, field values in the screen are populated automatically.
The screen contains the following fields:
Table 4–6 Oracle Data Integrator Access Information Details Screens Fields
Field Description
Path to Oracle Data Integrator Provide the path to the ODI_HOME up to the oracledi/agent folder (included).
To find this value, contact your administrator. Example: /slot/ems8141/oracle/ODI11113/oracledi/agent for Linux and C\odi\oracledi\agent for Windows.
Path to Oracle Data Integrator is ___________________________
Path for exported DVMs Enter the path of the directory to export Domain Value Mappings (DVM). DVM folder gets created along with Foundation Pack installation. If you have installed Foundation Pack use $AIA_HOME/AIAMetaData/dvm.
If you are installing the integration along with Foundation Pack for the first time, create a temporary folder for the DVMs. DVM are exported to this location.
If you want to change the path to reflect the above location, open AIAInstallProperties.xml file from $AIA_INSTANCE/config post installation, search for odi.dvm.path and replace the temporary folder path with the above location.
Path for exported DVMs is ______________________________
ODI Username To find this value, contact your administrator. Example: SUPERVISOR.
ODI Username is ____________________________________
ODI User Password To find this value, contact your administrator. Example: SUNOPSIS
ODI User Password is _________________________________
Caution: If you are using either a new master repository or an existing master repository, you must ensure that the identifier for that repository is between 126 and 999.
Table 4–7 Oracle Data Integrator Master Repository Details Screen Fields
Field Description
Database Host To find this value, contact your database administrator. Example: server1.oracle.com
Database Host is_______________________________
Database Port To find this value, contact your database administrator. Example: 1521
Database Port is________________________________
Database SID To find this value, contact your database administrator. Example: oracle
Database SID is__________________________________
Database Username To find this value, contact your database administrator. Example: snpm
Database Username is_______________________________
Database Password To find this value, contact your database administrator. Example: snpm
Database Password is_________________________________
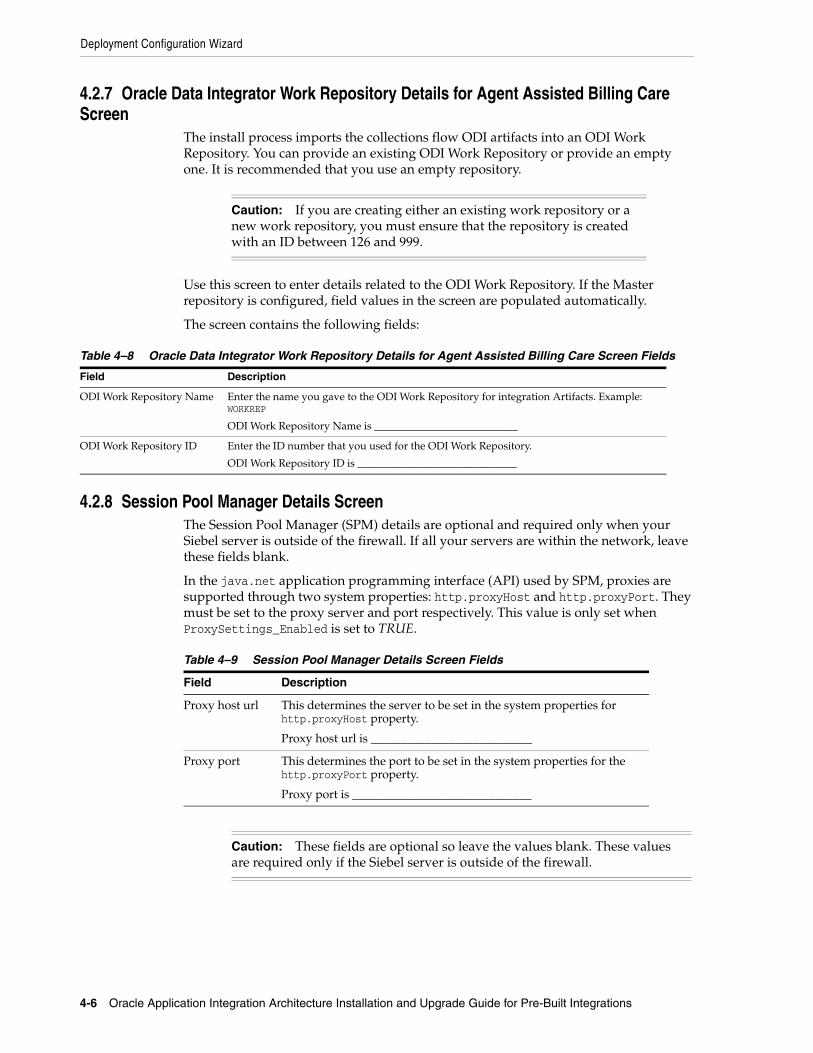
Deployment Configuration Wizard
4-6 Oracle Application Integration Architecture Installation and Upgrade Guide for Pre-Built Integrations
4.2.7 Oracle Data Integrator Work Repository Details for Agent Assisted Billing Care Screen
The install process imports the collections flow ODI artifacts into an ODI Work Repository. You can provide an existing ODI Work Repository or provide an empty one. It is recommended that you use an empty repository.
Use this screen to enter details related to the ODI Work Repository. If the Master repository is configured, field values in the screen are populated automatically.
The screen contains the following fields:
4.2.8 Session Pool Manager Details ScreenThe Session Pool Manager (SPM) details are optional and required only when your Siebel server is outside of the firewall. If all your servers are within the network, leave these fields blank.
In the java.net application programming interface (API) used by SPM, proxies are supported through two system properties: http.proxyHost and http.proxyPort. They must be set to the proxy server and port respectively. This value is only set when ProxySettings_Enabled is set to TRUE.
Caution: If you are creating either an existing work repository or a new work repository, you must ensure that the repository is created with an ID between 126 and 999.
Table 4–8 Oracle Data Integrator Work Repository Details for Agent Assisted Billing Care Screen Fields
Field Description
ODI Work Repository Name Enter the name you gave to the ODI Work Repository for integration Artifacts. Example: WORKREP
ODI Work Repository Name is ___________________________
ODI Work Repository ID Enter the ID number that you used for the ODI Work Repository.
ODI Work Repository ID is ______________________________
Table 4–9 Session Pool Manager Details Screen Fields
Field Description
Proxy host url This determines the server to be set in the system properties for http.proxyHost property.
Proxy host url is ___________________________
Proxy port This determines the port to be set in the system properties for the http.proxyPort property.
Proxy port is ______________________________
Caution: These fields are optional so leave the values blank. These values are required only if the Siebel server is outside of the firewall.
Configuring and Deploying the Comms Agent Assisted Billing Care: SBL CRM - BRM Pre-Built Integration
Configuring and Deploying the Comms Agent Assisted Billing Care: SBL CRM - BRM Pre-Built Integration 4-7
4.3 Configuring and Deploying the Comms Agent Assisted Billing Care: SBL CRM - BRM Pre-Built Integration
This section discusses the integration configuration and deployment process. There are two steps:
1. Configure your integration using the DCW.
2. Deploy the integration to the Fusion Middleware server.
4.3.1 Configuring the Comms Agent Assisted Billing Care: SBL CRM - BRM Pre-Built Integration
The screens that appear prompt you to enter the data that is required for successful configuration of the Comms Agent Assisted Billing Care: SBL CRM - BRM Pre-Built Integration. Keep the completed worksheets of the Comms Agent Assisted Billing Care: SBL CRM - BRM Pre-Built Integration screens ready before you launch the DCW.
To configure the Comms Agent Assisted Billing Care: SBL CRM - BRM Pre-Built Integration:
1. Navigate to /slot/emsxxxx/oracle/Middleware/user_projects/domains/soa_domain/bin/ and open setDomainEnv.sh for Linux based systems and setDomainEnv.bat for Microsoft Windows.
2. Replace WLS_JDBC_REMOTE_ENABLED="-Dweblogic.jdbc.remoteEnabled=false" with WLS_JDBC_REMOTE_ENABLED="-Dweblogic.jdbc.remoteEnabled=true".
3. Restart the server.
4. Navigate to <AIA_Instance>/bin and run the command source aiaenv.sh for Linux based systems and aiaenv.bat for Microsoft Windows to configure installation environment.
5. Navigate to <AIA_HOME>/bin and run the command ./aiaconfig.sh for Linux based systems and aiaconfig.bat for Microsoft Windows.
This launches the AIA DCW.
6. Click Next.
7. Expand Communications Pre-built Integrations and select Comms Agent Assisted Billing Care: SBL CRM - BRM.
8. Click Next.
4.3.1.1 Specify Integration Server Details
To specify integration server details:1. Enter information related to your integration server in the Integration Server
Details screen.
2. Click Next.
Note: If you are harvesting content to Oracle Enterprise Repository (OER), perform the first three steps. Else start from step 4.
Configuring and Deploying the Comms Agent Assisted Billing Care: SBL CRM - BRM Pre-Built Integration
4-8 Oracle Application Integration Architecture Installation and Upgrade Guide for Pre-Built Integrations
4.3.1.2 Specify Siebel CRM Server Details
To specify Siebel CRM Server details:1. Enter information about your Siebel CRM application in the Application Details -
Siebel CRM screen.
2. Click Next.
4.3.1.3 Specify Siebel CRM Database Details
To specify Siebel CRM Database details:1. Enter information about your Siebel CRM database in the Siebel CRM Database
Details screen.
2. Click Next.
4.3.1.4 Specify Oracle Communications BRM Details
To specify Oracle Communications BRM details:1. Enter Oracle Communications BRM information in the Oracle Communications
BRM screen.
2. Click Next.
4.3.1.5 Specify Oracle Data Integrator Access Details
To specify Oracle Data Integrator Access details:1. Enter information about your Oracle Data Integrator Access installation in the
Oracle Data Integrator Access Information screens.
Oracle Data Integration Access Information is captured in three screens. Enter the following information in the screens:
2. Specify the path to Oracle Data Integrator.
3. Click Next.
4. Specify the path for exported DVMs.
5. Click Next.
6. Enter ODI User name and ODI User Password.
7. Click Next.
4.3.1.6 Specify Oracle Data Integrator Master Repository Details
To specify Oracle Data Integrator Master Repository details:1. Enter information about your Oracle Data Integrator Master Repository
installation in the Oracle Data Integrator Master Repository screen.
2. Click Next.
Configuring and Deploying the Comms Agent Assisted Billing Care: SBL CRM - BRM Pre-Built Integration
Configuring and Deploying the Comms Agent Assisted Billing Care: SBL CRM - BRM Pre-Built Integration 4-9
4.3.1.7 Specify Oracle Data Integrator Work Repository Details
To specify Oracle Data Integrator Work Repository Details:1. Enter information about your Oracle Data Integrator Work Repository installation
in the Oracle Data Integrator Work Repository Details for Agent Assisted Billing Care screen.
2. Click Next.
4.3.1.8 Complete Configuration
To complete configuration:1. Review the configuration information on the Configuration Summary screen.
2. Click Configure to accept this configuration and begin the installation.
The system displays progress of configuration in the Configuration Progress screen.
The system displays any warnings or errors as necessary. You can review the configuration log for additional details. The configuration log location is displayed in the Configuration Progress screen.
3. When configuration process finishes without errors, the DCW displays the Configuration Complete screen.
4. Click Finish to close the DCW.
4.3.2 Configuring using the Response File
To configure using the response file:1. Open the response file.
When you create a response file through OUI, passwords get stored as <SECURE>.
2. Replace the password fields with actual passwords in the response file.
3. Navigate to <AIA_Instance>/bin and run the command source aiaenv.sh for Linux based systems and aiaenv.bat for Microsoft Windows to configure the environment.
4. Navigate to <AIA_HOME>/bin and run the command ./aiaconfig.sh <Response File Location and Name> for Linux based systems and aiaconfig.bat <Response File Location and Name> for Microsoft Windows.
Note: If you want to make changes to the configuration, use the navigation pane on the left and select the screen you want to edit.
You can create a response file based on the input provided in the DCW and use it in future when you want to deploy the integration. You can configure using the steps described in Section 4.3.2, "Configuring using the Response File". Click Save Response File and save the response file with the name and location of your choice.
Configuring and Deploying the Comms Agent Assisted Billing Care: SBL CRM - BRM Pre-Built Integration
4-10 Oracle Application Integration Architecture Installation and Upgrade Guide for Pre-Built Integrations
4.3.3 Deploying Mandatory PatchesBefore deploying Comms Agent Assisted Billing Care: SBL CRM - BRM Pre-Built Integration, you must install the patch 16598272.
4.3.4 Deploying the Comms Agent Assisted Billing Care: SBL CRM - BRM Pre-Built Integration
To deploy the integration to Fusion Middleware server:1. Navigate to <AIA_Instance>/bin and run the command source aiaenv.sh for
Linux based systems and aiaenv.bat for Microsoft Windows to configure the environment.
2. Run the command for your platform.
3. Review the log file in the location specified in the command or at the default location <AIA_Instance>/logs/AABCDP_Deployments_YYYY-MM-DD_HH-MI-SS.log to verify successful deployment of the integration.
Oracle AIA ships a few artifacts in AIA Lifecycle Workbench which can be used in your integrations. These native artifacts created using FMW technologies such as BPEL and Mediator are natively supported by AIA Foundation Pack tools such as Project Lifecycle Workbench, Harvester, Deployment Generator and AID. These artifacts include SOA artifact types such as composites, DataSources, DVM, xRef, and so on. These can be modified or new natively supported artifacts can be added using AIA Lifecycle Workbench and a BOM.xml file can be generated.
Integrations, most often, also require deployment of artifact types that are beyond what is supported by the Project Lifecycle Workbench and AIA Harvester. For instance, you may want to deploy artifacts such as Java applications, Shell Scripts, ANT based build scripts which constitute part of integration landscape in addition to the artifacts that are delivered by AIA. AIA also supports deployment of these supplementary artifacts. However, you must modify and add new non native artifacts outside AIA Lifecycle Workbench.
For more information on deploying artifacts, see Oracle Fusion Middleware Developer's Guide for Oracle Application Integration Architecture Foundation Pack, "Generating Deployment Plans and Deploying Artifacts".
Note: In Windows 2008, 2008 R2 and Vista, run the command prompt as an administrator (elevated mode). If the command prompt is invoked in normal mode, the integrations are not displayed.
Table 4–10 Deployment Commands for the Comms Agent Assisted Billing Care Pre-Built Integration
Platform Deployment Command
Linux x86
Solaris SPARC (64-bit)
IBM AIX Based Systems (64-bit).
HP-UX 11i (64 bit)
$AIA_HOME/pips/Communications/AABC/DeploymentPlans/deployAABC.sh
Microsoft Windows (32-bit) %AIA_HOME%\pips\Communications\AABC\DeploymentPlans\deployAABC.bat
Performing Postdeployment Configurations
Configuring and Deploying the Comms Agent Assisted Billing Care: SBL CRM - BRM Pre-Built Integration 4-11
4.4 Performing Postdeployment ConfigurationsThis section discusses the postdeployment configurations for Comms Agent Assisted Billing Care: SBL CRM - BRM Pre-Built Integration.
4.4.1 Suppressing Auto-Retry and Preventing Multiple Error Notifications and Trouble Tickets
To suppress auto-retry and prevent multiple error notifications and trouble tickets:1. Set the GlobalTxMaxRetry property for outbound adapters:
a. Log in to the Oracle Enterprise Manager Fusion Middleware Control.
b. Expand the SOA folder, right-click soa_infra.
c. Select SOA Administration, Common Properties.
d. Click More SOA Infra Advanced Configuration Properties.
e. Search for the GlobalTxMaxRetry property and set the value as 0 (zero).
2. Set the GlobalInboundJcaRetryCount property for inbound adapters:
a. Log in to the Oracle Enterprise Manager Fusion Middleware Control.
b. Expand the SOA folder, right-click soa_infra.
c. Select Administration, System Mbean Browser.
d. Search for oracle.as.soainfra.config, expand <Server>, expand AdapterConfig.
e. Select Adapter.
f. Search for the GlobalInboundJcaRetryCount property and set the value as 0 (zero).
3. Change Audit Level from development to production for soa infrastructure:
a. Log in to the Oracle Enterprise Manager Fusion Middleware Control.
b. Expand the SOA folder, right-click soa_infra.
c. Select SOA Administration, Common Properties.
d. Choose Production from the Audit Level list.
e. Click Apply
4. Stop and Start the SOA and Admin Server so that your changes can take effect.
4.4.2 Deploying Mandatory PatchesAfter deploying Comms Agent Assisted Billing Care: SBL CRM - BRM Pre-Built Integration, you must deploy the following patches:
■ 11843588
■ 12755349

Verifying Deployment
4-12 Oracle Application Integration Architecture Installation and Upgrade Guide for Pre-Built Integrations
4.5 Verifying Deployment
To verify the Comms Agent Assisted Billing Care: SBL CRM - BRM Pre-Built Integration deployment:1. Open the log files from the following location and look for warnings and error
messages:
■ For Linux x86, Solaris SPARC (64-bit), HP-UX 11i (64 bit) and IBM AIX Based Systems (64-bit): Review the install log located at <AIA_HOME>/aia_instances/<instance name>/logs to verify whether the integration is successfully installed.
■ For Microsoft Windows (32-bit): Review the install log located at <AIA_HOME>\aia_instances\<instance name>\logs to verify whether the integration is successfully installed.
2. Confirm that the Comms Agent Assisted Billing Care: Siebel - BRM Pre-Built Integration services were installed.
a. Navigate to the Oracle Enterprise Manager Fusion Middleware Control (http://<server name>:<port number>/em/)
b. Log in with the server admin user name. For access details, contact the system administrator.
c. Expand Farm_soa_domain, SOA, soa-infra, Default and look for the following items:
■ AccountBalanceSiebelCommsReqABCS
■ AdjustmentSiebelCommsReqABCS
■ CommunicationsCustomerPartyEBSV2
■ CommunicationsCustomerPartyResponseEBSV2
■ Core2CommsCustomerPartyBridge
■ CreateAccountBalanceAdjustmentBRMCommsProvABCSImpl
■ CreateAccountBalanceAdjustmentListResponseBRMCommsJMSConsumer
■ CreateAccountBalanceAdjustmentListResponseBRMCommsJMSProducer
■ CreateAccountBalanceAdjustmentSiebelCommsJMSConsumer
■ CreateAccountBalanceAdjustmentSiebelCommsReqABCSImpl
■ CreateInvoicePaymentSiebelCommsReqABCSImpl
■ CreatePaymentSiebelCommsReqABCSImpl
■ CreateReceivedPaymentBRMCommsProvABCSImpl
■ CustomerPartyEBSV2
■ InvoiceSiebelCommsReqABCS
■ PaymentSiebelCommsReqABCS
■ QueryAccountBalanceAdjustmentBRMCommsProvABCSImpl
■ QueryAccountBalanceAdjustmentSiebelCommsReqABCSImpl
■ QueryBalanceDetailsSiebelCommsReqABCSImpl
■ QueryBalanceGroupListSiebelCommsReqABCSImpl
Verifying Deployment
Configuring and Deploying the Comms Agent Assisted Billing Care: SBL CRM - BRM Pre-Built Integration 4-13
■ QueryBalanceGroupServicesSiebelCommsReqABCSImpl
■ QueryBalanceSummarySiebelCommsReqABCSImpl
■ QueryCustomerPartyListBRMCommsProvABCSImpl
■ QueryInstalledProductListBRMCommsProvABCSImpl
■ QueryInvoiceBalanceDetailsSiebelCommsReqABCSImpl
■ QueryInvoiceEventDetailsSiebelCommsReqABCSImpl
■ QueryInvoiceListBRMCommsProvABCSImpl
■ QueryInvoiceListSiebelCommsReqABCSImpl
■ QueryInvoicePaymentSiebelCommsReqABCSImpl
■ QueryInvoiceSiebelCommsReqABCSImpl
■ QueryPaymentSiebelCommsReqABCSImpl
■ QueryReceivedPaymentListBRMCommsProvABCSImpl
■ QueryServiceUsageBRMCommsProvABCSImpl
■ QueryUnbilledBalanceDetailsSiebelCommsReqABCSImpl
■ QueryUnbilledEventDetailsSiebelCommsReqABCSImpl
■ QueryUnbilledUsageSiebelCommsReqABCSImpl
■ SearchInvoiceEventDetailsSiebelCommsReqABCSImpl
■ SearchPaymentSiebelCommsReqABCSImpl
■ SearchUnbilledEventDetailsSiebelCommsReqABCSImpl
■ SyncAccountSiebelAggregatorAdapter
■ SyncAccountSiebelReqABCSImpl
■ SyncAcctSiebelAggrEventConsumer
■ SyncAddressSiebelAggregatorAdapter
■ SyncBPSiebelAggregatorAdapter
■ SyncContactSiebelAggregatorAdapter
■ SyncCustomerPartyListBRM_01CommsJMSConsumer
■ SyncCustomerPartyListBRMCommsJMSProducer
■ SyncCustomerPartyListBRMCommsProvABCSImpl
■ SyncCustomerSiebelEventAggregator
■ TransformAppContextSiebelService
■ UnbilledUsageSiebelCommsReqABCS
■ UpdateAccountBalanceAdjustmentRespSiebelCommsProvABCSImpl
■ UpdateCreditAlertBRMCommsProvABCSImpl
■ UpdateCreditAlertSiebelCommsReqABCSImpl
3. Verify Collections installation.
a. Verify that CURRENCY_CODE.dvm, COLLECTION_STATUS.dvm, COLLECTION_ACTIONNAME.dvm, COLLECTION_PRIORITY.dvm and COLLECTION_SUBSTATUS.dvm are present in the DVM path. This is the
Verifying Deployment
4-14 Oracle Application Integration Architecture Installation and Upgrade Guide for Pre-Built Integrations
same path that is mentioned during installation (<AIA_Instance>/config/AIAInstallProperties.xml file).
b. Open <AIA_Instance>/logs/AABCDP_Deployments_YYYY-MM-DD_HH-MI-SS.log. The log contains several statements starting with "[exec] OracleDI: Starting Command: OdiImportObject -FILE_NAME=". None of these statements should be followed by error messages except the error messages mentioned below.
4.5.1 Error Messages During Comms Agent Assisted Billing Care: SBL CRM - BRM Pre-Built Integration Deployment
When deploying the Comms Agent Assisted Billing Care: SBL CRM - BRM Pre-Built Integration, you can encounter the following errors:
■ Failed to execute: Create user xxxxx identified by yyyyy
■ Unique Constraint Violation
4.5.1.1 Failed to execute: Create user xxxxx identified by yyyyyAIA Pre-Built Integrations Installer displays this error message in the log file if the install script attempts to create a database user name for an existing database user name. You can ignore this message and continue with the install process.
The AIA Pre-Built Integrations Installer displays the following message when it finds an identical database user name:
Example 4–1 Identical Database User Name Message
ODIInstall_CreateDBSchemaWorkRep:[echo] ~~~~~~~~~~~~~~~~~~~~~~~~~~~~~~~~~~~~~~~~~~~~~~~~~~~[echo] Creating ODI Work Repository DB User: xxxxx[sql] Executing commands[sql] Failed to execute: create user xxxxx identified by yyyyy[sql] java.sql.SQLException: ORA-01920: user name 'xxxxx' conflicts with another user or role name[sql] 1 of 2 SQL statements executed successfully[echo] Done creating DB User for ODI Work Repository: xxxxx[echo] ~~~~~~~~~~~~~~~~~~~~~~~~~~~~~~~~~~~~~~~~~~~~~~~~~~~
4.5.1.2 Unique Constraint ViolationAIA Pre-Built Integrations Installer displays this error message in the log file if the ODI data source xxxxx exists in the ODI master repository. The ODI data source is defined in Topology in the Physical Architecture tab. This error occurs when the Comms Agent Assisted Billing Care: SBL CRM - BRM Pre-Built Integration is reinstalled.
The AIA Pre-Built Integrations Installer displays the following message when it finds an identical ODI data source:
Example 4–2 Identical ODI Data Source Message
[echo] - Importing CONN_xxxxx.xml[exec] OracleDI: Starting Command: OdiImportObject -FILE_NAME=<AIA_
Note: xxxxx refers to the database user name provided for ODI Work Repository and yyyyy is the password.
Verifying Deployment
Configuring and Deploying the Comms Agent Assisted Billing Care: SBL CRM - BRM Pre-Built Integration 4-15
HOME>/PIPS/Industry/Communications/DIS/Collections/src/master/CONN_xxxxx.xml -IMPORT_MODE=SYNONYM_INSERT_UPDATE ...[exec] java.sql.SQLException: ORA-00001: unique constraint (SNPM.PK_MTXT) violated
This error does not stop the install process. The process imports the remaining ODI integration artifacts into the ODI; however, it is important to verify the accuracy of the connections for these ODI data sources. To resolve this issue, verify that the connections and associated logical schemas in the ODI topology are accurate.
For integration implementation, see Oracle Application Integration Architecture Siebel CRM Integration Pack for Oracle Communications Billing and Revenue Management: Agent Assisted Billing Care Implementation Guide.
Also see Oracle Application Integration Architecture Oracle Communication Order to Cash Integration Pack Implementation Guide for Siebel CRM, Oracle Order and Service Management, and Oracle Billing and Revenue Management for information related to customer management.
4.5.2 Validating Security PoliciesAll SOA composites are protected by Global Policies provided by Foundation Pack as defined in the Security section of the Developer Guide. Additionally individual services for this integration have locally attached security policies.
To validate locally attached security policies:1. Log in to Oracle Enterprise Manager Fusion Middleware Control
2. Expand WebLogic Domain.
3. Select soa_domain.
4. Right-click soa_domain.
5. Select Web Services, Policies.
6. Verify Service Policy attachment.
a. Find no_authentication_service_policy in the list of policies.
b. Click the number in Attachment Count column.
This opens Usage Analysis screen.
c. Change the Subject Type list box to SOA Service.
d. Validate that all the composites are listed with local attachment to this service policy.
7. Verify Client Policy attachment
a. Navigate back to Web Services Policies screen.
b. Navigate to Applies To LOV, select Service Clients and hit enter. Find no_authentication_client_policy.
c. Click the number in Attachment Count column.
This opens Usage Analysis screen.
d. Change the Subject Type list box to SOA Reference.
e. Validate that all the composites are listed with local attachment to this client policy and attached to the correct references.
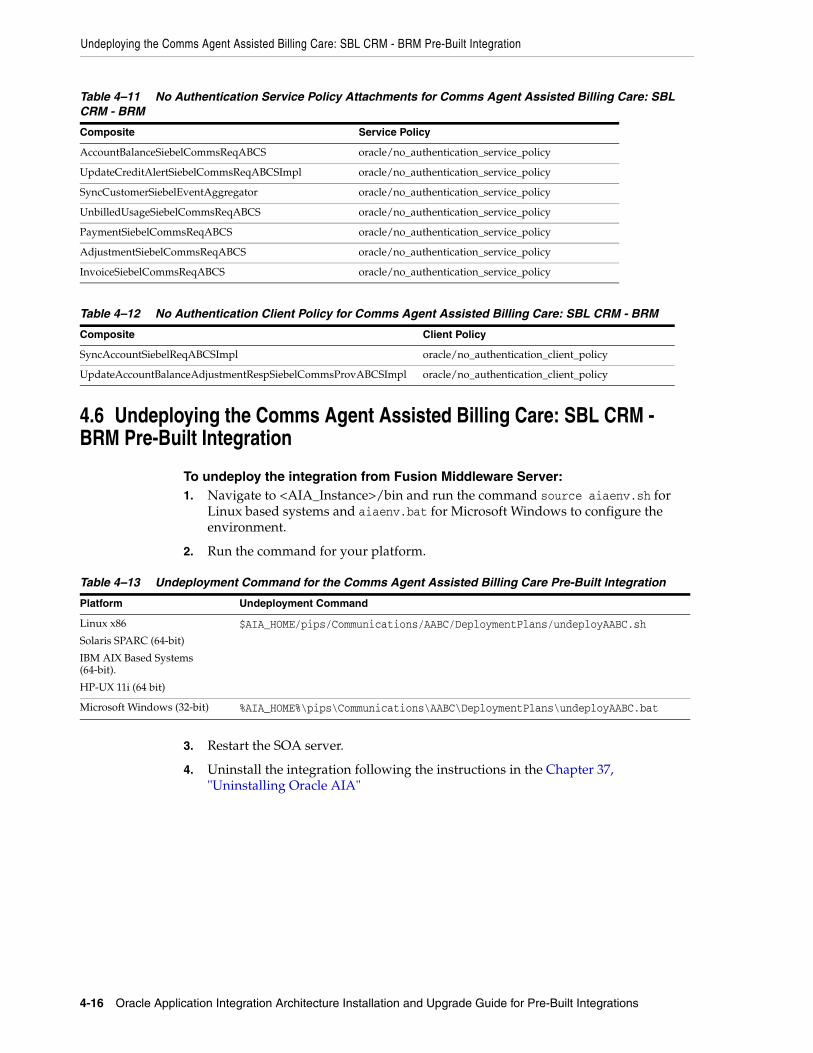
Undeploying the Comms Agent Assisted Billing Care: SBL CRM - BRM Pre-Built Integration
4-16 Oracle Application Integration Architecture Installation and Upgrade Guide for Pre-Built Integrations
4.6 Undeploying the Comms Agent Assisted Billing Care: SBL CRM - BRM Pre-Built Integration
To undeploy the integration from Fusion Middleware Server:1. Navigate to <AIA_Instance>/bin and run the command source aiaenv.sh for
Linux based systems and aiaenv.bat for Microsoft Windows to configure the environment.
2. Run the command for your platform.
3. Restart the SOA server.
4. Uninstall the integration following the instructions in the Chapter 37, "Uninstalling Oracle AIA"
Table 4–11 No Authentication Service Policy Attachments for Comms Agent Assisted Billing Care: SBL CRM - BRM
Composite Service Policy
AccountBalanceSiebelCommsReqABCS oracle/no_authentication_service_policy
UpdateCreditAlertSiebelCommsReqABCSImpl oracle/no_authentication_service_policy
SyncCustomerSiebelEventAggregator oracle/no_authentication_service_policy
UnbilledUsageSiebelCommsReqABCS oracle/no_authentication_service_policy
PaymentSiebelCommsReqABCS oracle/no_authentication_service_policy
AdjustmentSiebelCommsReqABCS oracle/no_authentication_service_policy
InvoiceSiebelCommsReqABCS oracle/no_authentication_service_policy
Table 4–12 No Authentication Client Policy for Comms Agent Assisted Billing Care: SBL CRM - BRM
Composite Client Policy
SyncAccountSiebelReqABCSImpl oracle/no_authentication_client_policy
UpdateAccountBalanceAdjustmentRespSiebelCommsProvABCSImpl oracle/no_authentication_client_policy
Table 4–13 Undeployment Command for the Comms Agent Assisted Billing Care Pre-Built Integration
Platform Undeployment Command
Linux x86
Solaris SPARC (64-bit)
IBM AIX Based Systems (64-bit).
HP-UX 11i (64 bit)
$AIA_HOME/pips/Communications/AABC/DeploymentPlans/undeployAABC.sh
Microsoft Windows (32-bit) %AIA_HOME%\pips\Communications\AABC\DeploymentPlans\undeployAABC.bat
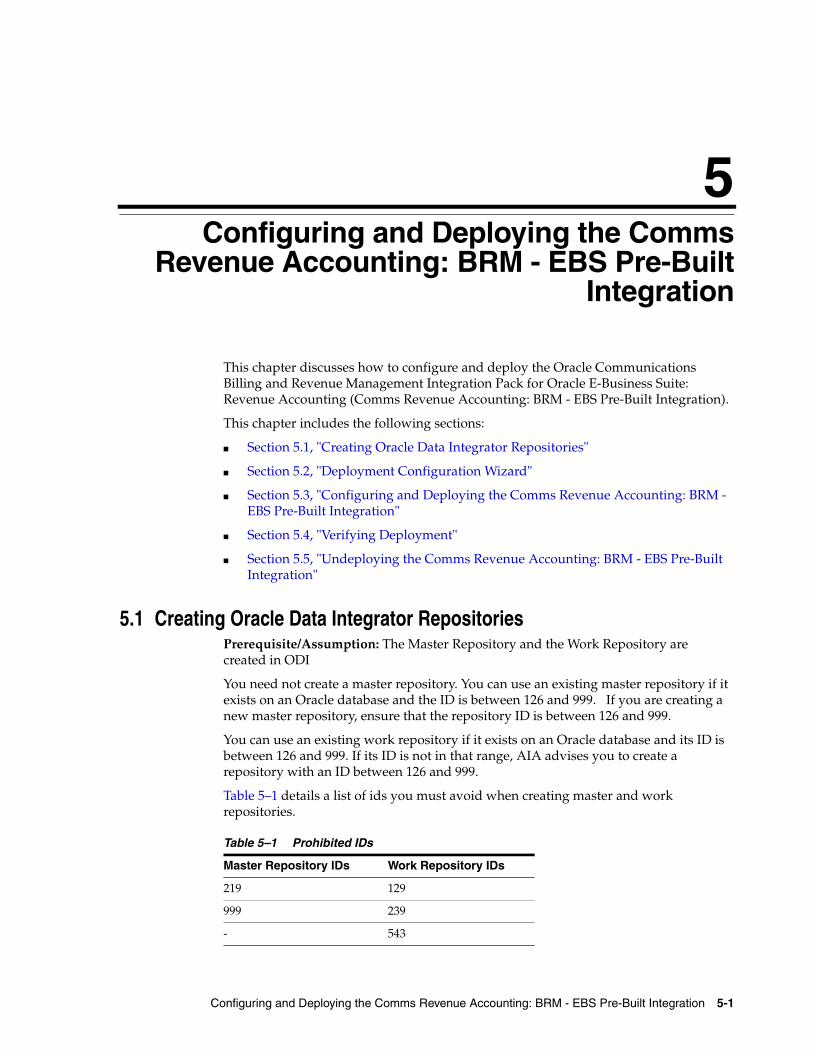
5
Configuring and Deploying the Comms Revenue Accounting: BRM - EBS Pre-Built Integration 5-1
5Configuring and Deploying the CommsRevenue Accounting: BRM - EBS Pre-Built
Integration
This chapter discusses how to configure and deploy the Oracle Communications Billing and Revenue Management Integration Pack for Oracle E-Business Suite: Revenue Accounting (Comms Revenue Accounting: BRM - EBS Pre-Built Integration).
This chapter includes the following sections:
■ Section 5.1, "Creating Oracle Data Integrator Repositories"
■ Section 5.2, "Deployment Configuration Wizard"
■ Section 5.3, "Configuring and Deploying the Comms Revenue Accounting: BRM - EBS Pre-Built Integration"
■ Section 5.4, "Verifying Deployment"
■ Section 5.5, "Undeploying the Comms Revenue Accounting: BRM - EBS Pre-Built Integration"
5.1 Creating Oracle Data Integrator RepositoriesPrerequisite/Assumption: The Master Repository and the Work Repository are created in ODI
You need not create a master repository. You can use an existing master repository if it exists on an Oracle database and the ID is between 126 and 999. If you are creating a new master repository, ensure that the repository ID is between 126 and 999.
You can use an existing work repository if it exists on an Oracle database and its ID is between 126 and 999. If its ID is not in that range, AIA advises you to create a repository with an ID between 126 and 999.
Table 5–1 details a list of ids you must avoid when creating master and work repositories.
Table 5–1 Prohibited IDs
Master Repository IDs Work Repository IDs
219 129
999 239
- 543
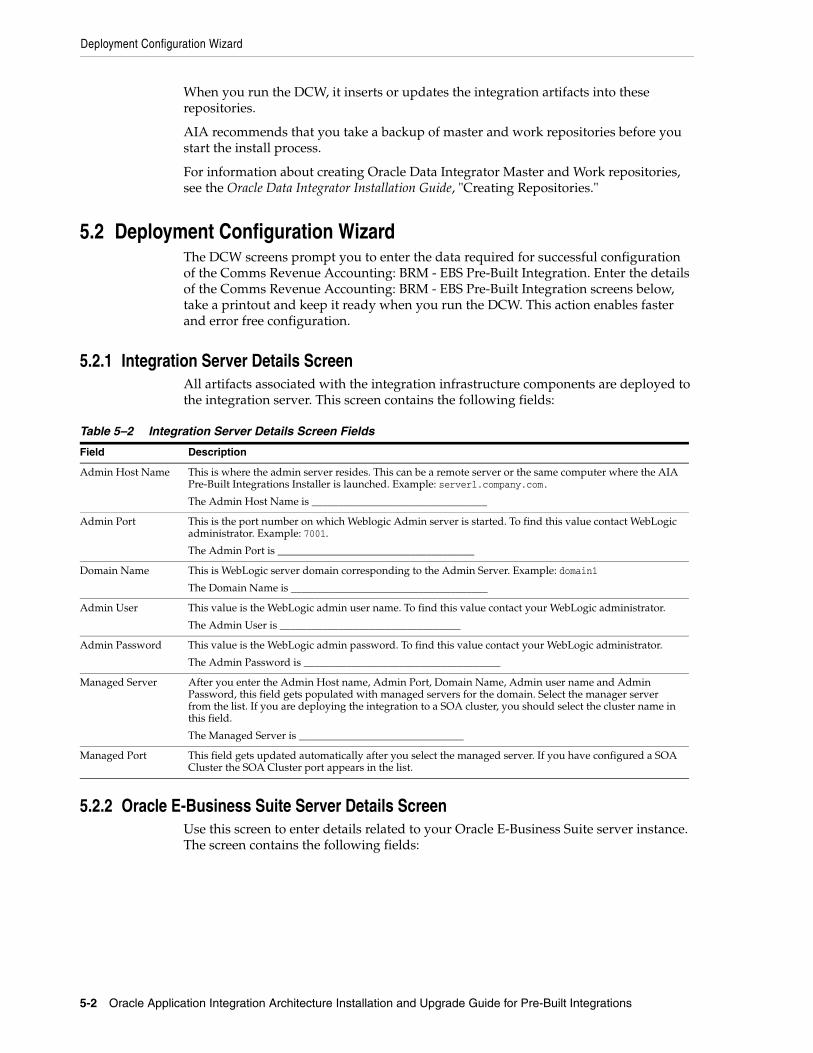
Deployment Configuration Wizard
5-2 Oracle Application Integration Architecture Installation and Upgrade Guide for Pre-Built Integrations
When you run the DCW, it inserts or updates the integration artifacts into these repositories.
AIA recommends that you take a backup of master and work repositories before you start the install process.
For information about creating Oracle Data Integrator Master and Work repositories, see the Oracle Data Integrator Installation Guide, "Creating Repositories."
5.2 Deployment Configuration WizardThe DCW screens prompt you to enter the data required for successful configuration of the Comms Revenue Accounting: BRM - EBS Pre-Built Integration. Enter the details of the Comms Revenue Accounting: BRM - EBS Pre-Built Integration screens below, take a printout and keep it ready when you run the DCW. This action enables faster and error free configuration.
5.2.1 Integration Server Details ScreenAll artifacts associated with the integration infrastructure components are deployed to the integration server. This screen contains the following fields:
5.2.2 Oracle E-Business Suite Server Details ScreenUse this screen to enter details related to your Oracle E-Business Suite server instance. The screen contains the following fields:
Table 5–2 Integration Server Details Screen Fields
Field Description
Admin Host Name This is where the admin server resides. This can be a remote server or the same computer where the AIA Pre-Built Integrations Installer is launched. Example: server1.company.com.
The Admin Host Name is _________________________________
Admin Port This is the port number on which Weblogic Admin server is started. To find this value contact WebLogic administrator. Example: 7001.
The Admin Port is _____________________________________
Domain Name This is WebLogic server domain corresponding to the Admin Server. Example: domain1
The Domain Name is _____________________________________
Admin User This value is the WebLogic admin user name. To find this value contact your WebLogic administrator.
The Admin User is __________________________________
Admin Password This value is the WebLogic admin password. To find this value contact your WebLogic administrator.
The Admin Password is _____________________________________
Managed Server After you enter the Admin Host name, Admin Port, Domain Name, Admin user name and Admin Password, this field gets populated with managed servers for the domain. Select the manager server from the list. If you are deploying the integration to a SOA cluster, you should select the cluster name in this field.
The Managed Server is _______________________________
Managed Port This field gets updated automatically after you select the managed server. If you have configured a SOA Cluster the SOA Cluster port appears in the list.
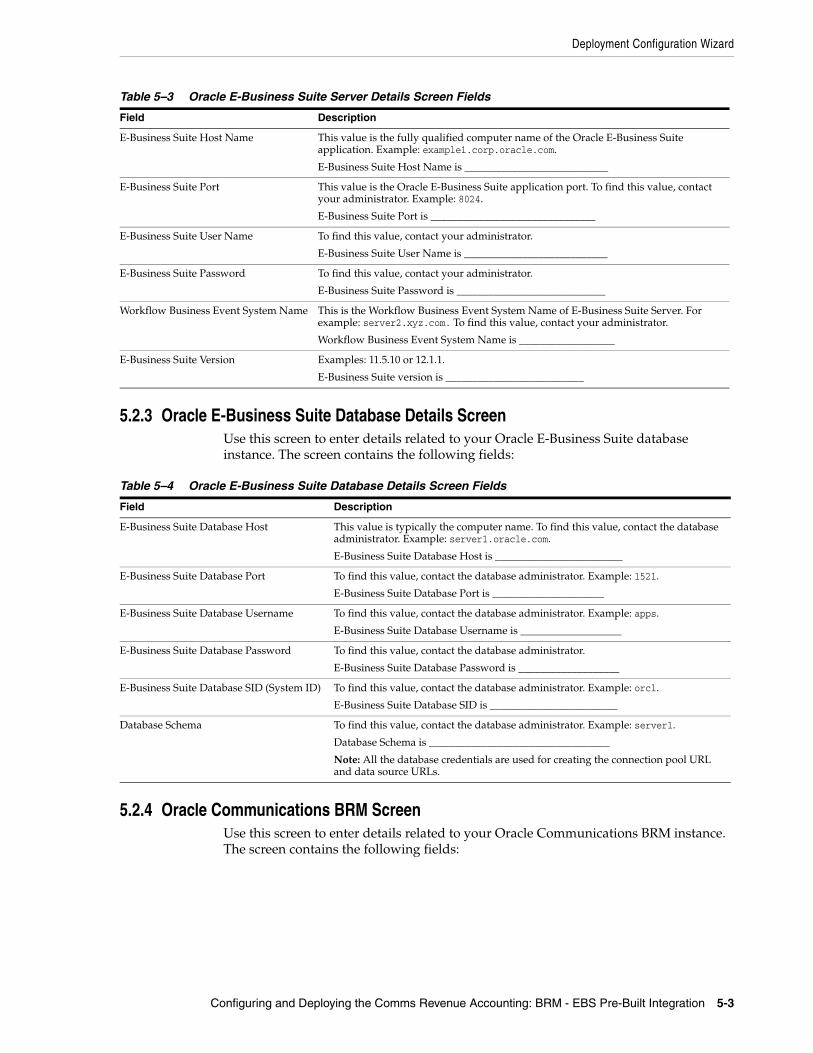
Deployment Configuration Wizard
Configuring and Deploying the Comms Revenue Accounting: BRM - EBS Pre-Built Integration 5-3
5.2.3 Oracle E-Business Suite Database Details ScreenUse this screen to enter details related to your Oracle E-Business Suite database instance. The screen contains the following fields:
5.2.4 Oracle Communications BRM ScreenUse this screen to enter details related to your Oracle Communications BRM instance. The screen contains the following fields:
Table 5–3 Oracle E-Business Suite Server Details Screen Fields
Field Description
E-Business Suite Host Name This value is the fully qualified computer name of the Oracle E-Business Suite application. Example: example1.corp.oracle.com.
E-Business Suite Host Name is ___________________________
E-Business Suite Port This value is the Oracle E-Business Suite application port. To find this value, contact your administrator. Example: 8024.
E-Business Suite Port is _______________________________
E-Business Suite User Name To find this value, contact your administrator.
E-Business Suite User Name is ___________________________
E-Business Suite Password To find this value, contact your administrator.
E-Business Suite Password is ____________________________
Workflow Business Event System Name This is the Workflow Business Event System Name of E-Business Suite Server. For example: server2.xyz.com. To find this value, contact your administrator.
Workflow Business Event System Name is __________________
E-Business Suite Version Examples: 11.5.10 or 12.1.1.
E-Business Suite version is __________________________
Table 5–4 Oracle E-Business Suite Database Details Screen Fields
Field Description
E-Business Suite Database Host This value is typically the computer name. To find this value, contact the database administrator. Example: server1.oracle.com.
E-Business Suite Database Host is ________________________
E-Business Suite Database Port To find this value, contact the database administrator. Example: 1521.
E-Business Suite Database Port is _____________________
E-Business Suite Database Username To find this value, contact the database administrator. Example: apps.
E-Business Suite Database Username is ___________________
E-Business Suite Database Password To find this value, contact the database administrator.
E-Business Suite Database Password is ___________________
E-Business Suite Database SID (System ID) To find this value, contact the database administrator. Example: orcl.
E-Business Suite Database SID is ________________________
Database Schema To find this value, contact the database administrator. Example: server1.
Database Schema is __________________________________
Note: All the database credentials are used for creating the connection pool URL and data source URLs.
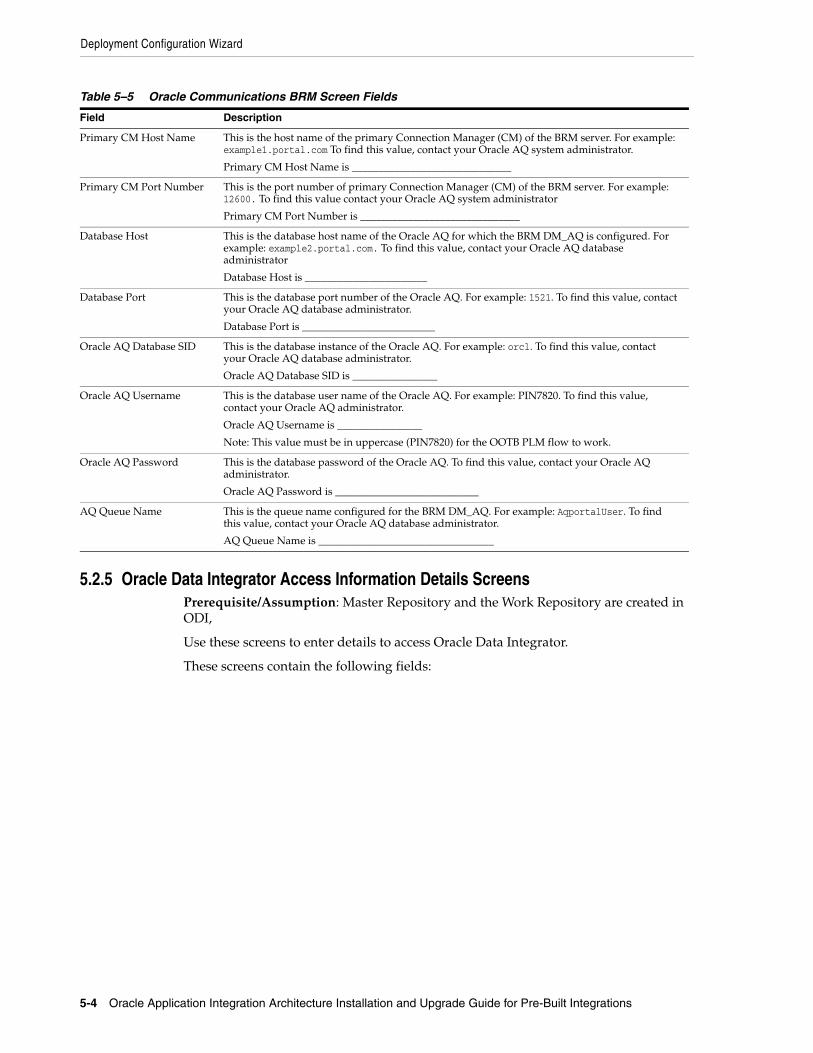
Deployment Configuration Wizard
5-4 Oracle Application Integration Architecture Installation and Upgrade Guide for Pre-Built Integrations
5.2.5 Oracle Data Integrator Access Information Details ScreensPrerequisite/Assumption: Master Repository and the Work Repository are created in ODI,
Use these screens to enter details to access Oracle Data Integrator.
These screens contain the following fields:
Table 5–5 Oracle Communications BRM Screen Fields
Field Description
Primary CM Host Name This is the host name of the primary Connection Manager (CM) of the BRM server. For example: example1.portal.com To find this value, contact your Oracle AQ system administrator.
Primary CM Host Name is ______________________________
Primary CM Port Number This is the port number of primary Connection Manager (CM) of the BRM server. For example: 12600. To find this value contact your Oracle AQ system administrator
Primary CM Port Number is ______________________________
Database Host This is the database host name of the Oracle AQ for which the BRM DM_AQ is configured. For example: example2.portal.com. To find this value, contact your Oracle AQ database administrator
Database Host is _______________________
Database Port This is the database port number of the Oracle AQ. For example: 1521. To find this value, contact your Oracle AQ database administrator.
Database Port is _________________________
Oracle AQ Database SID This is the database instance of the Oracle AQ. For example: orcl. To find this value, contact your Oracle AQ database administrator.
Oracle AQ Database SID is ________________
Oracle AQ Username This is the database user name of the Oracle AQ. For example: PIN7820. To find this value, contact your Oracle AQ administrator.
Oracle AQ Username is ________________
Note: This value must be in uppercase (PIN7820) for the OOTB PLM flow to work.
Oracle AQ Password This is the database password of the Oracle AQ. To find this value, contact your Oracle AQ administrator.
Oracle AQ Password is ___________________________
AQ Queue Name This is the queue name configured for the BRM DM_AQ. For example: AqportalUser. To find this value, contact your Oracle AQ database administrator.
AQ Queue Name is _________________________________
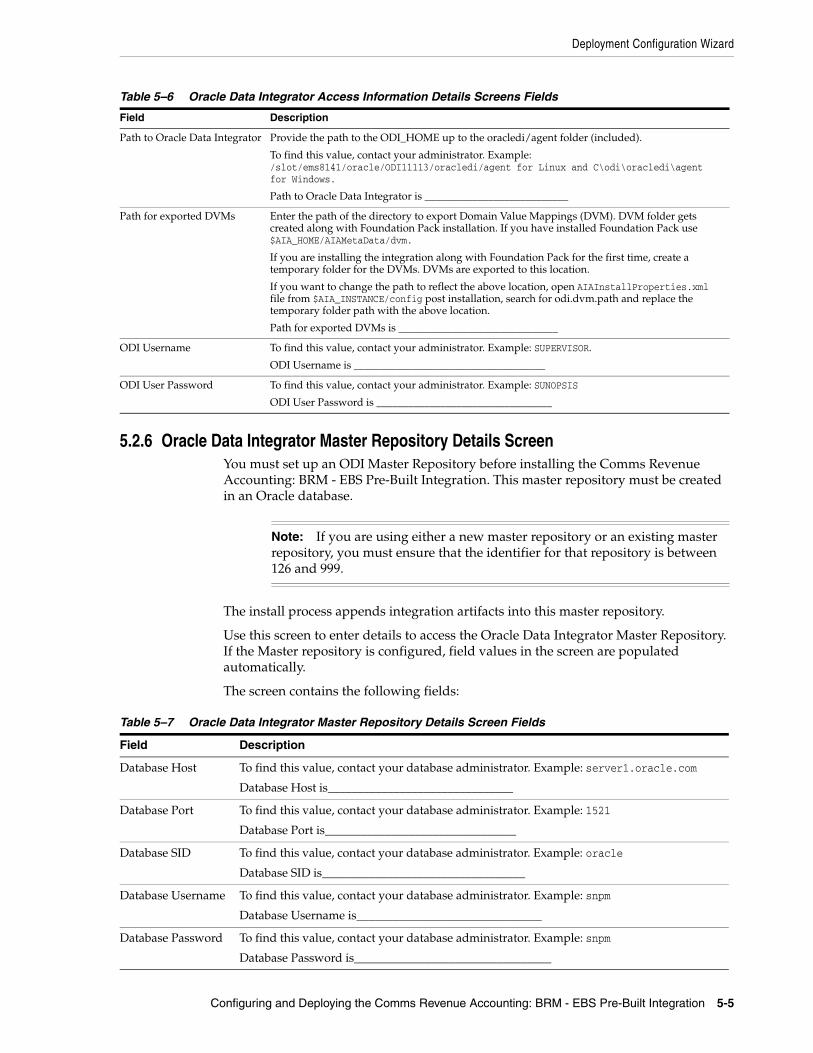
Deployment Configuration Wizard
Configuring and Deploying the Comms Revenue Accounting: BRM - EBS Pre-Built Integration 5-5
5.2.6 Oracle Data Integrator Master Repository Details ScreenYou must set up an ODI Master Repository before installing the Comms Revenue Accounting: BRM - EBS Pre-Built Integration. This master repository must be created in an Oracle database.
The install process appends integration artifacts into this master repository.
Use this screen to enter details to access the Oracle Data Integrator Master Repository. If the Master repository is configured, field values in the screen are populated automatically.
The screen contains the following fields:
Table 5–6 Oracle Data Integrator Access Information Details Screens Fields
Field Description
Path to Oracle Data Integrator Provide the path to the ODI_HOME up to the oracledi/agent folder (included).
To find this value, contact your administrator. Example: /slot/ems8141/oracle/ODI11113/oracledi/agent for Linux and C\odi\oracledi\agent for Windows.
Path to Oracle Data Integrator is ___________________________
Path for exported DVMs Enter the path of the directory to export Domain Value Mappings (DVM). DVM folder gets created along with Foundation Pack installation. If you have installed Foundation Pack use $AIA_HOME/AIAMetaData/dvm.
If you are installing the integration along with Foundation Pack for the first time, create a temporary folder for the DVMs. DVMs are exported to this location.
If you want to change the path to reflect the above location, open AIAInstallProperties.xml file from $AIA_INSTANCE/config post installation, search for odi.dvm.path and replace the temporary folder path with the above location.
Path for exported DVMs is ______________________________
ODI Username To find this value, contact your administrator. Example: SUPERVISOR.
ODI Username is ____________________________________
ODI User Password To find this value, contact your administrator. Example: SUNOPSIS
ODI User Password is _________________________________
Note: If you are using either a new master repository or an existing master repository, you must ensure that the identifier for that repository is between 126 and 999.
Table 5–7 Oracle Data Integrator Master Repository Details Screen Fields
Field Description
Database Host To find this value, contact your database administrator. Example: server1.oracle.com
Database Host is_______________________________
Database Port To find this value, contact your database administrator. Example: 1521
Database Port is________________________________
Database SID To find this value, contact your database administrator. Example: oracle
Database SID is__________________________________
Database Username To find this value, contact your database administrator. Example: snpm
Database Username is_______________________________
Database Password To find this value, contact your database administrator. Example: snpm
Database Password is_________________________________
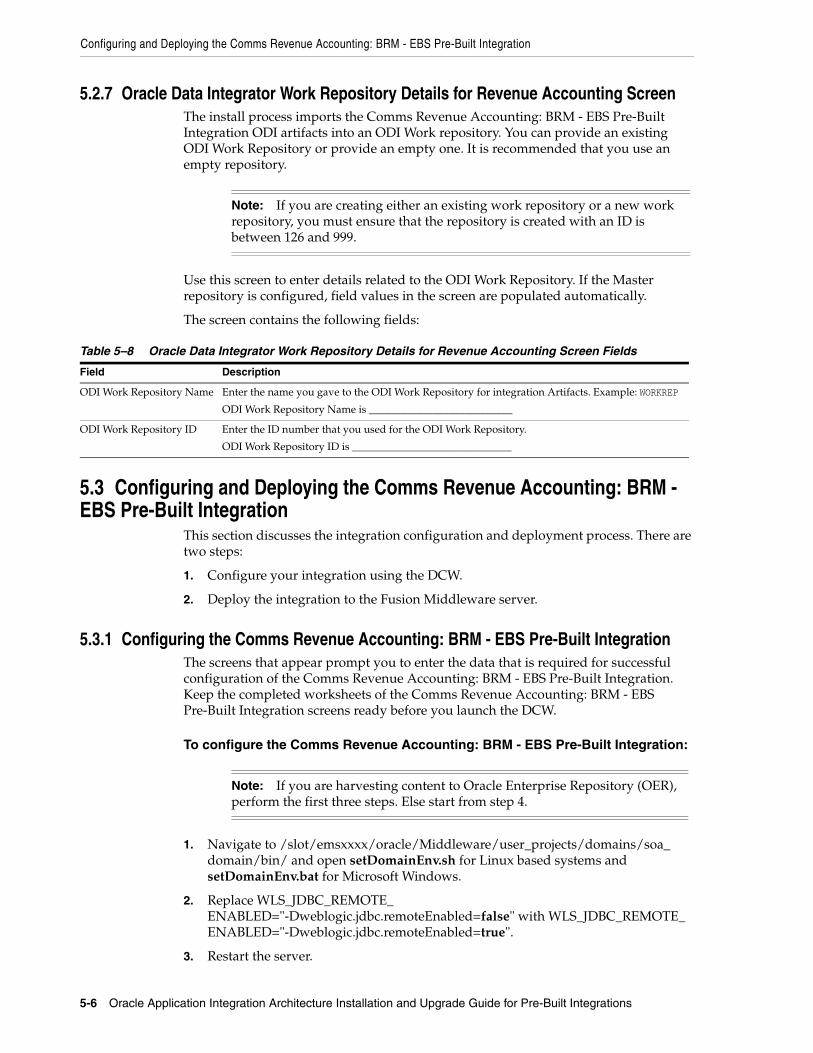
Configuring and Deploying the Comms Revenue Accounting: BRM - EBS Pre-Built Integration
5-6 Oracle Application Integration Architecture Installation and Upgrade Guide for Pre-Built Integrations
5.2.7 Oracle Data Integrator Work Repository Details for Revenue Accounting ScreenThe install process imports the Comms Revenue Accounting: BRM - EBS Pre-Built Integration ODI artifacts into an ODI Work repository. You can provide an existing ODI Work Repository or provide an empty one. It is recommended that you use an empty repository.
Use this screen to enter details related to the ODI Work Repository. If the Master repository is configured, field values in the screen are populated automatically.
The screen contains the following fields:
5.3 Configuring and Deploying the Comms Revenue Accounting: BRM - EBS Pre-Built Integration
This section discusses the integration configuration and deployment process. There are two steps:
1. Configure your integration using the DCW.
2. Deploy the integration to the Fusion Middleware server.
5.3.1 Configuring the Comms Revenue Accounting: BRM - EBS Pre-Built IntegrationThe screens that appear prompt you to enter the data that is required for successful configuration of the Comms Revenue Accounting: BRM - EBS Pre-Built Integration. Keep the completed worksheets of the Comms Revenue Accounting: BRM - EBS Pre-Built Integration screens ready before you launch the DCW.
To configure the Comms Revenue Accounting: BRM - EBS Pre-Built Integration:
1. Navigate to /slot/emsxxxx/oracle/Middleware/user_projects/domains/soa_domain/bin/ and open setDomainEnv.sh for Linux based systems and setDomainEnv.bat for Microsoft Windows.
2. Replace WLS_JDBC_REMOTE_ENABLED="-Dweblogic.jdbc.remoteEnabled=false" with WLS_JDBC_REMOTE_ENABLED="-Dweblogic.jdbc.remoteEnabled=true".
3. Restart the server.
Note: If you are creating either an existing work repository or a new work repository, you must ensure that the repository is created with an ID is between 126 and 999.
Table 5–8 Oracle Data Integrator Work Repository Details for Revenue Accounting Screen Fields
Field Description
ODI Work Repository Name Enter the name you gave to the ODI Work Repository for integration Artifacts. Example: WORKREP
ODI Work Repository Name is ___________________________
ODI Work Repository ID Enter the ID number that you used for the ODI Work Repository.
ODI Work Repository ID is ______________________________
Note: If you are harvesting content to Oracle Enterprise Repository (OER), perform the first three steps. Else start from step 4.
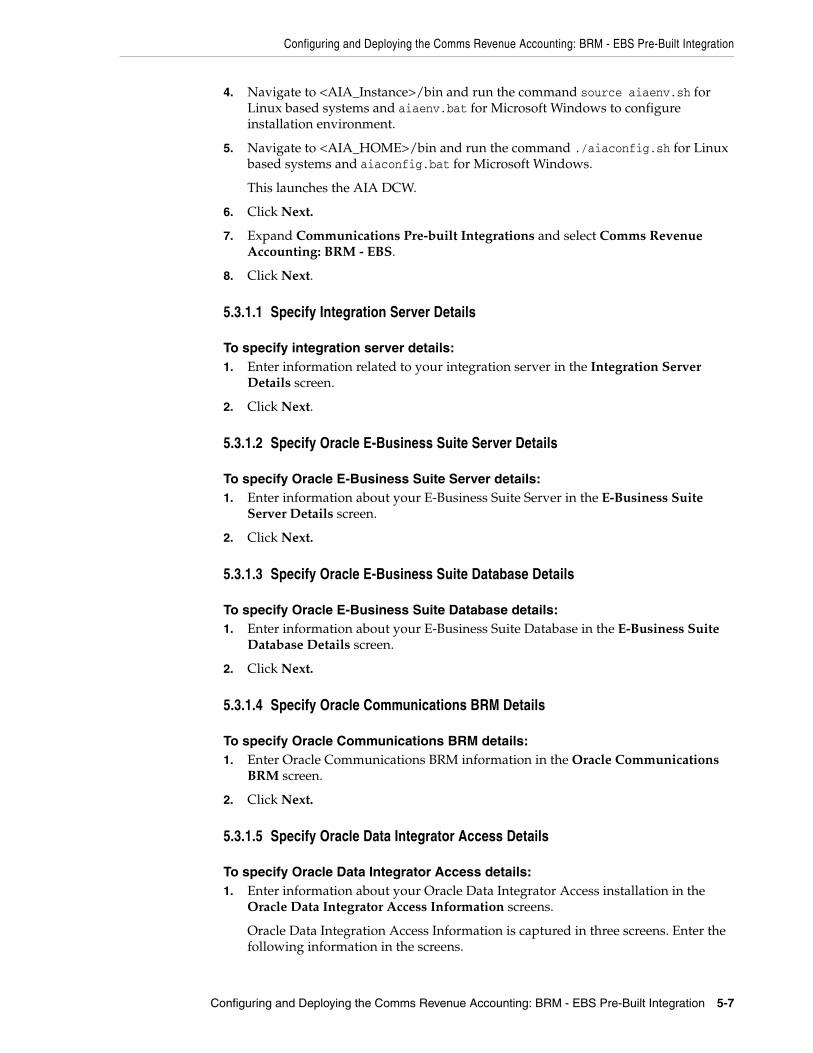
Configuring and Deploying the Comms Revenue Accounting: BRM - EBS Pre-Built Integration
Configuring and Deploying the Comms Revenue Accounting: BRM - EBS Pre-Built Integration 5-7
4. Navigate to <AIA_Instance>/bin and run the command source aiaenv.sh for Linux based systems and aiaenv.bat for Microsoft Windows to configure installation environment.
5. Navigate to <AIA_HOME>/bin and run the command ./aiaconfig.sh for Linux based systems and aiaconfig.bat for Microsoft Windows.
This launches the AIA DCW.
6. Click Next.
7. Expand Communications Pre-built Integrations and select Comms Revenue Accounting: BRM - EBS.
8. Click Next.
5.3.1.1 Specify Integration Server Details
To specify integration server details:1. Enter information related to your integration server in the Integration Server
Details screen.
2. Click Next.
5.3.1.2 Specify Oracle E-Business Suite Server Details
To specify Oracle E-Business Suite Server details:1. Enter information about your E-Business Suite Server in the E-Business Suite
Server Details screen.
2. Click Next.
5.3.1.3 Specify Oracle E-Business Suite Database Details
To specify Oracle E-Business Suite Database details:1. Enter information about your E-Business Suite Database in the E-Business Suite
Database Details screen.
2. Click Next.
5.3.1.4 Specify Oracle Communications BRM Details
To specify Oracle Communications BRM details:1. Enter Oracle Communications BRM information in the Oracle Communications
BRM screen.
2. Click Next.
5.3.1.5 Specify Oracle Data Integrator Access Details
To specify Oracle Data Integrator Access details:1. Enter information about your Oracle Data Integrator Access installation in the
Oracle Data Integrator Access Information screens.
Oracle Data Integration Access Information is captured in three screens. Enter the following information in the screens.

Configuring and Deploying the Comms Revenue Accounting: BRM - EBS Pre-Built Integration
5-8 Oracle Application Integration Architecture Installation and Upgrade Guide for Pre-Built Integrations
2. Specify path to Oracle Data Integrator.
3. Click Next.
4. Specify the path for exported DVMs.
5. Click Next.
6. Enter ODI User name and ODI User Password.
7. Click Next.
5.3.1.6 Specify Oracle Data Integrator Master Repository Details
To specify Oracle Data Integrator Master Repository details:1. Enter information about your Oracle Data Integrator Master Repository
installation in the Oracle Data Integrator Master Repository screen.
2. Click Next.
5.3.1.7 Specify Oracle Data Integrator Work Repository Details
To specify Oracle Data Integrator Work Repository details:1. Enter information about your Oracle Data Integrator Work Repository installation
in the Oracle Data Integrator Work Repository Details for Revenue Accounting screen.
2. Click Next.
5.3.1.8 Complete Configuration
To complete configuration:1. Review the configuration information on the Configuration Summary screen.
2. Click Configure to accept this configuration and begin the installation.
The system displays progress of configuration in the Configuration Progress screen.
The system displays any warnings or errors as necessary. You can review the configuration log for additional details. The configuration log location is displayed in Configuration Progress screen.
3. When configuration process finishes without errors, the AIA DCW displays the Configuration Complete screen.
4. Click Finish to close the DCW.
Note: If you want to make changes to the configuration, use the navigation pane on the left and select the screen you want to edit.
You can create a response file based on the input provided in the DCW and use it in future when you want to deploy the integration. You can configure using the steps described in Section 5.3.2, "Configuring using the Response File". Click Save Response File and save the response file with the name and location of your choice.
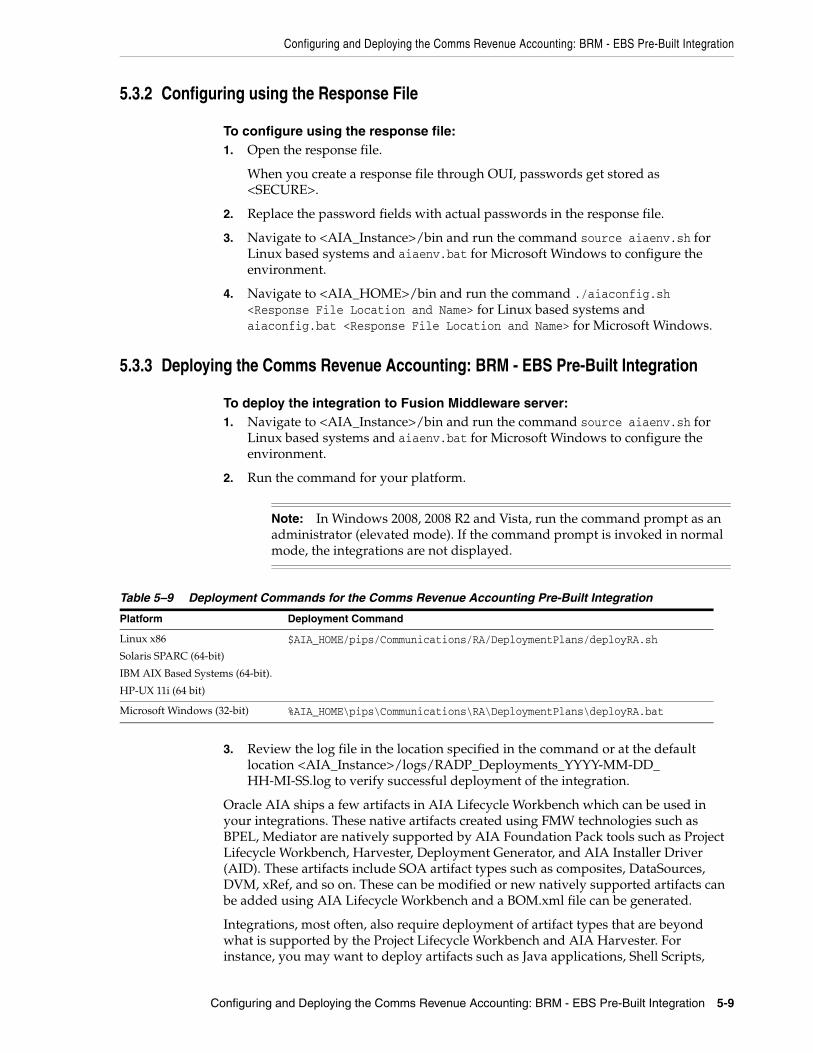
Configuring and Deploying the Comms Revenue Accounting: BRM - EBS Pre-Built Integration
Configuring and Deploying the Comms Revenue Accounting: BRM - EBS Pre-Built Integration 5-9
5.3.2 Configuring using the Response File
To configure using the response file:1. Open the response file.
When you create a response file through OUI, passwords get stored as <SECURE>.
2. Replace the password fields with actual passwords in the response file.
3. Navigate to <AIA_Instance>/bin and run the command source aiaenv.sh for Linux based systems and aiaenv.bat for Microsoft Windows to configure the environment.
4. Navigate to <AIA_HOME>/bin and run the command ./aiaconfig.sh <Response File Location and Name> for Linux based systems and aiaconfig.bat <Response File Location and Name> for Microsoft Windows.
5.3.3 Deploying the Comms Revenue Accounting: BRM - EBS Pre-Built Integration
To deploy the integration to Fusion Middleware server:1. Navigate to <AIA_Instance>/bin and run the command source aiaenv.sh for
Linux based systems and aiaenv.bat for Microsoft Windows to configure the environment.
2. Run the command for your platform.
3. Review the log file in the location specified in the command or at the default location <AIA_Instance>/logs/RADP_Deployments_YYYY-MM-DD_HH-MI-SS.log to verify successful deployment of the integration.
Oracle AIA ships a few artifacts in AIA Lifecycle Workbench which can be used in your integrations. These native artifacts created using FMW technologies such as BPEL, Mediator are natively supported by AIA Foundation Pack tools such as Project Lifecycle Workbench, Harvester, Deployment Generator, and AIA Installer Driver (AID). These artifacts include SOA artifact types such as composites, DataSources, DVM, xRef, and so on. These can be modified or new natively supported artifacts can be added using AIA Lifecycle Workbench and a BOM.xml file can be generated.
Integrations, most often, also require deployment of artifact types that are beyond what is supported by the Project Lifecycle Workbench and AIA Harvester. For instance, you may want to deploy artifacts such as Java applications, Shell Scripts,
Note: In Windows 2008, 2008 R2 and Vista, run the command prompt as an administrator (elevated mode). If the command prompt is invoked in normal mode, the integrations are not displayed.
Table 5–9 Deployment Commands for the Comms Revenue Accounting Pre-Built Integration
Platform Deployment Command
Linux x86
Solaris SPARC (64-bit)
IBM AIX Based Systems (64-bit).
HP-UX 11i (64 bit)
$AIA_HOME/pips/Communications/RA/DeploymentPlans/deployRA.sh
Microsoft Windows (32-bit) %AIA_HOME\pips\Communications\RA\DeploymentPlans\deployRA.bat
Verifying Deployment
5-10 Oracle Application Integration Architecture Installation and Upgrade Guide for Pre-Built Integrations
ANT based build scripts which constitute part of integration landscape in addition to the artifacts that are delivered by AIA. AIA also supports deployment of these supplementary artifacts. However, you must modify and add new non native artifacts outside AIA Lifecycle Workbench.
For more information on deploying artifacts, see Oracle Fusion Middleware Developer's Guide for Oracle Application Integration Architecture Foundation Pack "Generating Deployment Plans and Deploying Artifacts".
5.4 Verifying Deployment
To verify the Comms Revenue Accounting: BRM - EBS Pre-Built Integration deployment:1. Open the log files from the following location and look for warnings and error
messages:
■ For Linux x86, Solaris SPARC (64-bit), HP-UX 11i (64 bit) and IBM AIX Based Systems (64-bit): Review the install log located at <AIA_HOME>/aia_instances/<instance name>/logs to verify whether the integration is successfully installed.
■ For Microsoft Windows (32-bit): Review the install log located at <AIA_HOME>\aia_instances\<instance name>\logs to verify whether the integration is successfully installed.
2. Navigate to <AIAHome>/DISHome and verify whether the following folders have been created:
■ RevenueManagementHome
■ RevenueManagementHome/input
■ RevenueManagementHome/input/schema
■ RevenueManagementHome/success
■ RevenueManagementHome/failure
3. Verify whether CurrencyCodeMapping.xml is present in the DVM path. This is the same path that is mentioned during installation. You can find this path in deploy.properties file under the property 'odi.dvm.path.
4. Check <AIAHome>/DISHome/RevenueManagementHome/input/schema and find brm_gl_data.xsd.
5. Open <AIA_Instance>/logs/RADP_Deployments_YYYY-MM-DD_HH-MI-SS.log. The log contains several statements starting with "[exec] OracleDI: Starting Command: OdiImportObject -FILE_NAME=". None of these statements should be followed by error messages except the error messages mentioned in Section 5.4.1, "Error Messages During Comms Revenue Accounting: BRM - EBS Pre-Built Integration Deployment".
5.4.1 Error Messages During Comms Revenue Accounting: BRM - EBS Pre-Built Integration Deployment
When deploying the Comms Revenue Accounting: BRM - EBS Pre-Built Integration, you can encounter the following errors:
■ Failed to execute: Create user xxxxx identified by yyyyy
■ Unique Constraint Violation
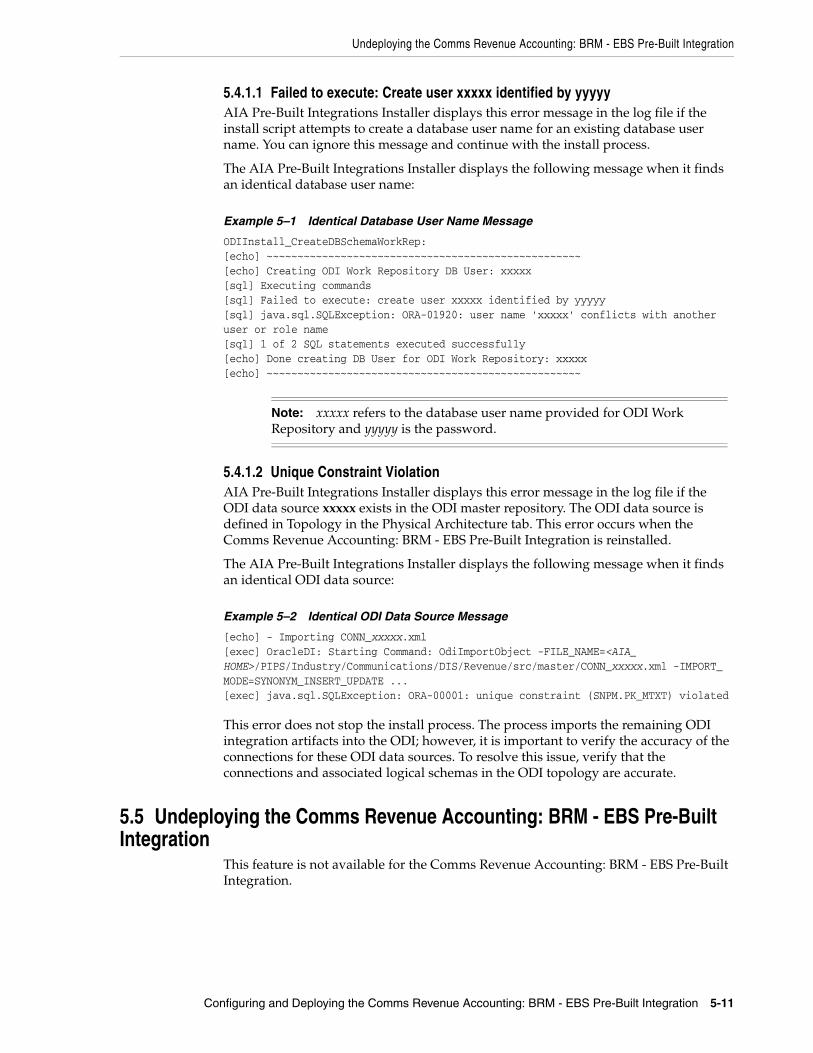
Undeploying the Comms Revenue Accounting: BRM - EBS Pre-Built Integration
Configuring and Deploying the Comms Revenue Accounting: BRM - EBS Pre-Built Integration 5-11
5.4.1.1 Failed to execute: Create user xxxxx identified by yyyyyAIA Pre-Built Integrations Installer displays this error message in the log file if the install script attempts to create a database user name for an existing database user name. You can ignore this message and continue with the install process.
The AIA Pre-Built Integrations Installer displays the following message when it finds an identical database user name:
Example 5–1 Identical Database User Name Message
ODIInstall_CreateDBSchemaWorkRep:[echo] ~~~~~~~~~~~~~~~~~~~~~~~~~~~~~~~~~~~~~~~~~~~~~~~~~~~[echo] Creating ODI Work Repository DB User: xxxxx[sql] Executing commands[sql] Failed to execute: create user xxxxx identified by yyyyy[sql] java.sql.SQLException: ORA-01920: user name 'xxxxx' conflicts with another user or role name[sql] 1 of 2 SQL statements executed successfully[echo] Done creating DB User for ODI Work Repository: xxxxx[echo] ~~~~~~~~~~~~~~~~~~~~~~~~~~~~~~~~~~~~~~~~~~~~~~~~~~~
5.4.1.2 Unique Constraint ViolationAIA Pre-Built Integrations Installer displays this error message in the log file if the ODI data source xxxxx exists in the ODI master repository. The ODI data source is defined in Topology in the Physical Architecture tab. This error occurs when the Comms Revenue Accounting: BRM - EBS Pre-Built Integration is reinstalled.
The AIA Pre-Built Integrations Installer displays the following message when it finds an identical ODI data source:
Example 5–2 Identical ODI Data Source Message
[echo] - Importing CONN_xxxxx.xml[exec] OracleDI: Starting Command: OdiImportObject -FILE_NAME=<AIA_HOME>/PIPS/Industry/Communications/DIS/Revenue/src/master/CONN_xxxxx.xml -IMPORT_MODE=SYNONYM_INSERT_UPDATE ...[exec] java.sql.SQLException: ORA-00001: unique constraint (SNPM.PK_MTXT) violated
This error does not stop the install process. The process imports the remaining ODI integration artifacts into the ODI; however, it is important to verify the accuracy of the connections for these ODI data sources. To resolve this issue, verify that the connections and associated logical schemas in the ODI topology are accurate.
5.5 Undeploying the Comms Revenue Accounting: BRM - EBS Pre-Built Integration
This feature is not available for the Comms Revenue Accounting: BRM - EBS Pre-Built Integration.
Note: xxxxx refers to the database user name provided for ODI Work Repository and yyyyy is the password.
Undeploying the Comms Revenue Accounting: BRM - EBS Pre-Built Integration
5-12 Oracle Application Integration Architecture Installation and Upgrade Guide for Pre-Built Integrations
6
Configuring and Deploying the Comms Order to Cash: SBL CRM, OSM, and BRM Pre-Built Integration 6-1
6Configuring and Deploying the CommsOrder to Cash: SBL CRM, OSM, and BRM
Pre-Built Integration
This chapter discusses how to configure and deploy the Oracle Communications Order to Cash Integration Pack for Siebel Customer Relationship Management, Oracle Communications Order and Service Management, and Oracle Communications Billing and Revenue Management (Comms Order to Cash: SBL CRM, OSM, and BRM Pre-Built Integration).
This chapter includes the following sections:
■ Section 6.1, "Deployment Configuration Wizard"
■ Section 6.2, "Performing Predeployment Configurations"
■ Section 6.3, "Configuring and Deploying the Comms Order to Cash: SBL CRM, OSM, and BRM Pre-Built Integration"
■ Section 6.4, "Performing Postdeployment Configurations"
■ Section 6.5, "Verifying Deployment"
■ Section 6.6, "Undeploying the Comms Order to Cash: SBL CRM, OSM, and BRM Pre-Built Integration"
6.1 Deployment Configuration WizardThe DCW screens prompt you to enter the data required for successful configuration of the Comms Order to Cash: SBL CRM, OSM, and BRM Pre-Built Integration. Enter the details of the Comms Order to Cash: SBL CRM, OSM, and BRM Pre-Built Integration screens below, take a printout and keep it ready when you run the DCW. This action enables faster and error free configuration.
6.1.1 Integration Server Details ScreenAll artifacts associated with the integration infrastructure components are deployed to the integration server. This screen contains the following fields:

Deployment Configuration Wizard
6-2 Oracle Application Integration Architecture Installation and Upgrade Guide for Pre-Built Integrations
6.1.2 Siebel CRM Server Details ScreenUse this screen to enter details related to your Siebel CRM server instance. The screen contains the following fields:
Table 6–1 Integration Server Details Screen Fields
Field Description
Admin Host Name
This is where the admin server resides. This can be a remote server or the same computer where the AIA Pre-Built Integrations Installer is launched. Example: server1.company.com.
The Admin Host Name is _________________________________
Admin Port This is the port number on which Weblogic Admin server is started. To find this value contact WebLogic administrator. Example: 7001.
The Admin Port is _____________________________________
Domain Name This is WebLogic server domain corresponding to the Admin Server. Example: domain1
The Domain Name is _____________________________________
Admin User This value is the WebLogic admin user name. To find this value contact your WebLogic administrator.
The Admin User is __________________________________
Admin Password This value is the WebLogic admin password. To find this value contact your WebLogic administrator.
The Admin Password is _____________________________________
Managed Server After you enter the Admin Host name, Admin Port, Domain Name, Admin user name and Admin Password, this field gets populated with managed servers for the domain. Select the manager server from the list. If you are deploying the integration to a SOA cluster, you should select the cluster name in this field.
The Managed Server is _______________________________
Managed Port This field gets updated automatically after you select the managed server. If you have configured a SOA Cluster the SOA Cluster port appears in the list.
Table 6–2 Siebel CRM Server Details Screen Fields
Field Description
Siebel Host name This is a computer name of the Siebel host. For example: example1.corp.siebel.com. To find the value, contact your administrator.
Siebel Host name is _____________________________
Siebel HTTP Port This value is the Siebel application port. For example: 80. To find the value, contact your administrator.
Siebel HTTP Port is ________________________________
InternetProtocol This value is the Siebel host internet protocol. For example, http://. To find the value, contact your administrator.
InternetProtocol is _______________________
Note: Our internal environments are always on http://. The default value is https// and must be changed for Siebel web services and Session Pool Manager services to work.
Siebel Enterprise Server Name This value is the Siebel enterprise server name. For example, siebel. To find the value, contact your administrator.
Siebel Enterprise Server Name is _________________________
Note: This value must be in lowercase (siebel) for the Update Account flow to work.
Siebel EAI Application User The Siebel application user is used for making EAI web service calls. For example: sadmin. To find the value, contact your administrator.
Siebel EAI Application User is ___________________________
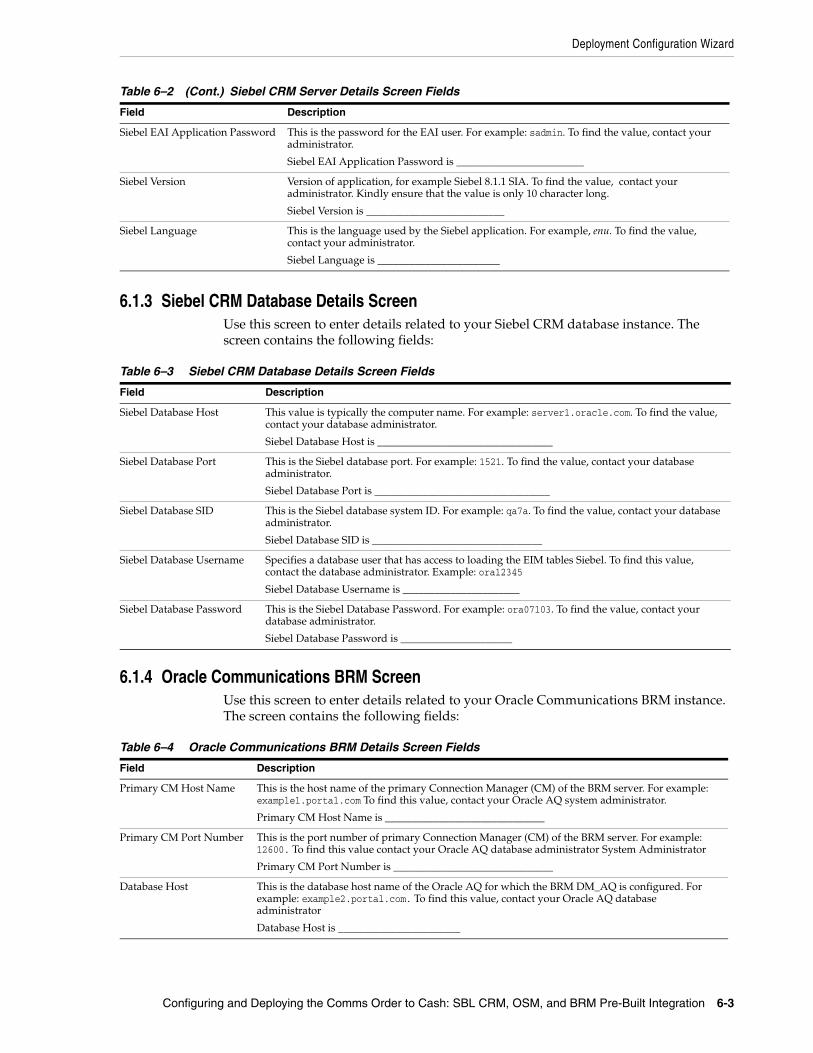
Deployment Configuration Wizard
Configuring and Deploying the Comms Order to Cash: SBL CRM, OSM, and BRM Pre-Built Integration 6-3
6.1.3 Siebel CRM Database Details ScreenUse this screen to enter details related to your Siebel CRM database instance. The screen contains the following fields:
6.1.4 Oracle Communications BRM ScreenUse this screen to enter details related to your Oracle Communications BRM instance. The screen contains the following fields:
Siebel EAI Application Password This is the password for the EAI user. For example: sadmin. To find the value, contact your administrator.
Siebel EAI Application Password is ________________________
Siebel Version Version of application, for example Siebel 8.1.1 SIA. To find the value, contact your administrator. Kindly ensure that the value is only 10 character long.
Siebel Version is __________________________
Siebel Language This is the language used by the Siebel application. For example, enu. To find the value, contact your administrator.
Siebel Language is _______________________
Table 6–3 Siebel CRM Database Details Screen Fields
Field Description
Siebel Database Host This value is typically the computer name. For example: server1.oracle.com. To find the value, contact your database administrator.
Siebel Database Host is _________________________________
Siebel Database Port This is the Siebel database port. For example: 1521. To find the value, contact your database administrator.
Siebel Database Port is _________________________________
Siebel Database SID This is the Siebel database system ID. For example: qa7a. To find the value, contact your database administrator.
Siebel Database SID is ________________________________
Siebel Database Username Specifies a database user that has access to loading the EIM tables Siebel. To find this value, contact the database administrator. Example: ora12345
Siebel Database Username is ______________________
Siebel Database Password This is the Siebel Database Password. For example: ora07103. To find the value, contact your database administrator.
Siebel Database Password is _____________________
Table 6–4 Oracle Communications BRM Details Screen Fields
Field Description
Primary CM Host Name This is the host name of the primary Connection Manager (CM) of the BRM server. For example: example1.portal.com To find this value, contact your Oracle AQ system administrator.
Primary CM Host Name is ______________________________
Primary CM Port Number This is the port number of primary Connection Manager (CM) of the BRM server. For example: 12600. To find this value contact your Oracle AQ database administrator System Administrator
Primary CM Port Number is ______________________________
Database Host This is the database host name of the Oracle AQ for which the BRM DM_AQ is configured. For example: example2.portal.com. To find this value, contact your Oracle AQ database administrator
Database Host is _______________________
Table 6–2 (Cont.) Siebel CRM Server Details Screen Fields
Field Description
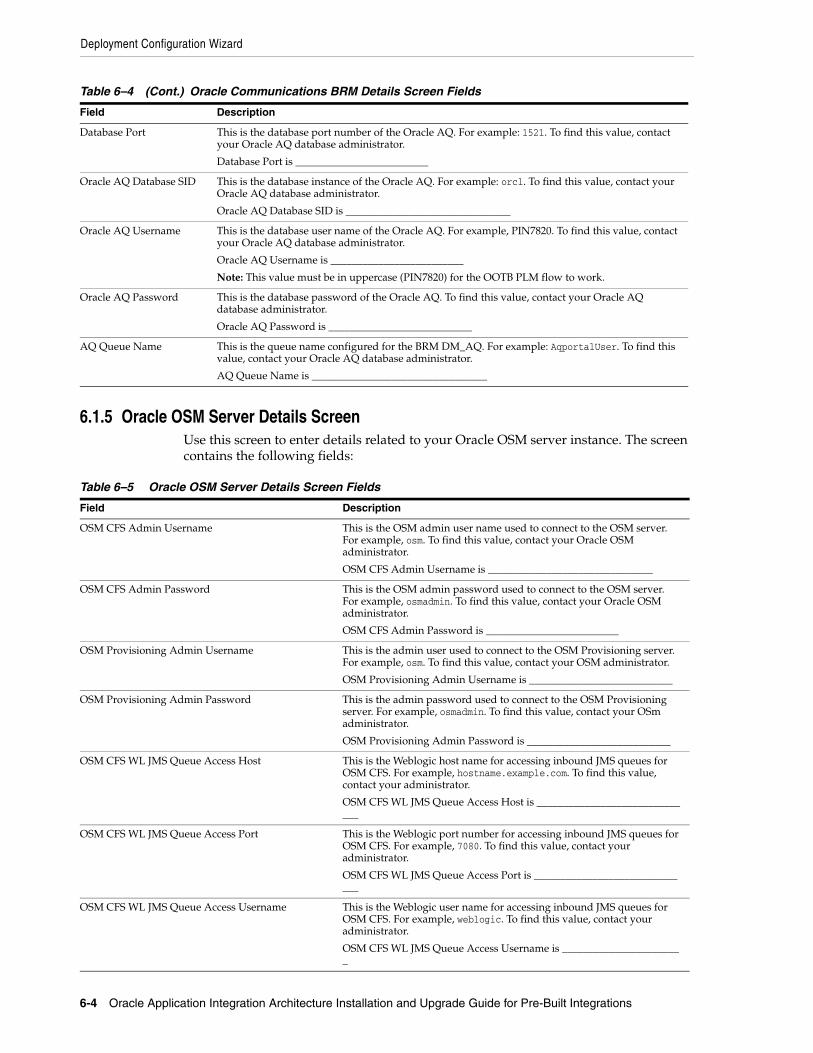
Deployment Configuration Wizard
6-4 Oracle Application Integration Architecture Installation and Upgrade Guide for Pre-Built Integrations
6.1.5 Oracle OSM Server Details Screen Use this screen to enter details related to your Oracle OSM server instance. The screen contains the following fields:
Database Port This is the database port number of the Oracle AQ. For example: 1521. To find this value, contact your Oracle AQ database administrator.
Database Port is _________________________
Oracle AQ Database SID This is the database instance of the Oracle AQ. For example: orcl. To find this value, contact your Oracle AQ database administrator.
Oracle AQ Database SID is _______________________________
Oracle AQ Username This is the database user name of the Oracle AQ. For example, PIN7820. To find this value, contact your Oracle AQ database administrator.
Oracle AQ Username is _________________________
Note: This value must be in uppercase (PIN7820) for the OOTB PLM flow to work.
Oracle AQ Password This is the database password of the Oracle AQ. To find this value, contact your Oracle AQ database administrator.
Oracle AQ Password is ___________________________
AQ Queue Name This is the queue name configured for the BRM DM_AQ. For example: AqportalUser. To find this value, contact your Oracle AQ database administrator.
AQ Queue Name is _________________________________
Table 6–5 Oracle OSM Server Details Screen Fields
Field Description
OSM CFS Admin Username This is the OSM admin user name used to connect to the OSM server. For example, osm. To find this value, contact your Oracle OSM administrator.
OSM CFS Admin Username is _______________________________
OSM CFS Admin Password This is the OSM admin password used to connect to the OSM server. For example, osmadmin. To find this value, contact your Oracle OSM administrator.
OSM CFS Admin Password is _________________________
OSM Provisioning Admin Username This is the admin user used to connect to the OSM Provisioning server. For example, osm. To find this value, contact your OSM administrator.
OSM Provisioning Admin Username is ___________________________
OSM Provisioning Admin Password This is the admin password used to connect to the OSM Provisioning server. For example, osmadmin. To find this value, contact your OSm administrator.
OSM Provisioning Admin Password is ___________________________
OSM CFS WL JMS Queue Access Host This is the Weblogic host name for accessing inbound JMS queues for OSM CFS. For example, hostname.example.com. To find this value, contact your administrator.
OSM CFS WL JMS Queue Access Host is ______________________________
OSM CFS WL JMS Queue Access Port This is the Weblogic port number for accessing inbound JMS queues for OSM CFS. For example, 7080. To find this value, contact your administrator.
OSM CFS WL JMS Queue Access Port is ______________________________
OSM CFS WL JMS Queue Access Username This is the Weblogic user name for accessing inbound JMS queues for OSM CFS. For example, weblogic. To find this value, contact your administrator.
OSM CFS WL JMS Queue Access Username is _______________________
Table 6–4 (Cont.) Oracle Communications BRM Details Screen Fields
Field Description
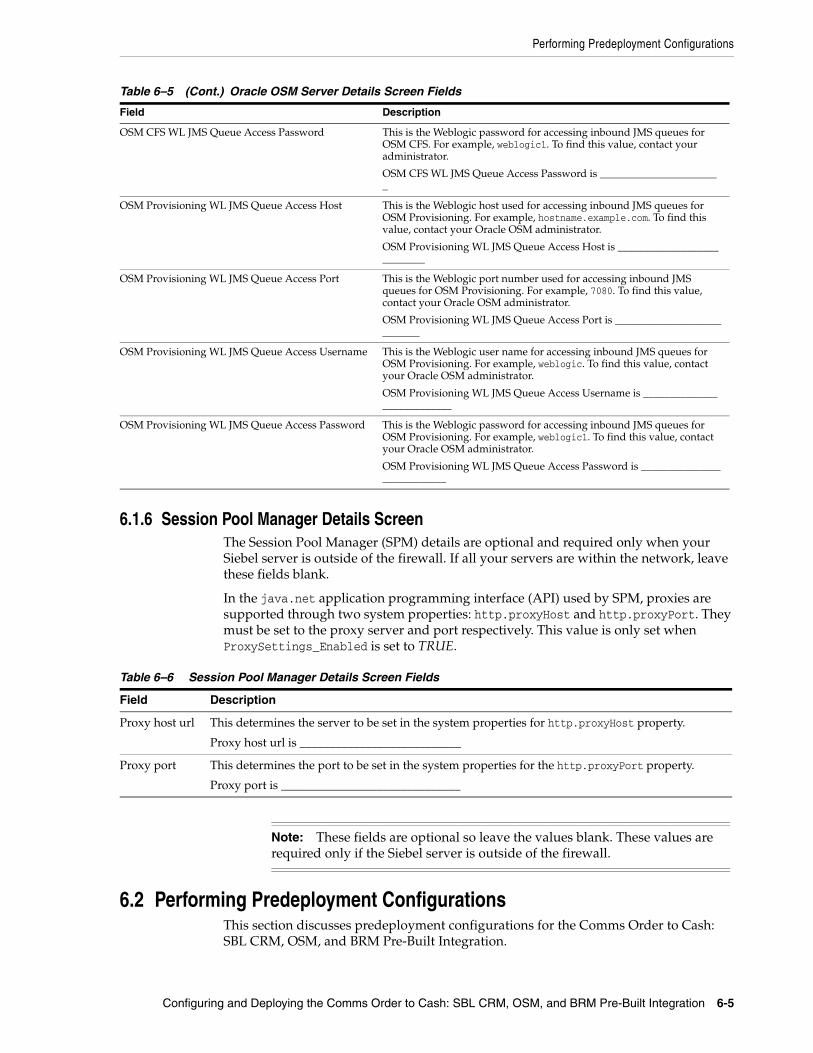
Performing Predeployment Configurations
Configuring and Deploying the Comms Order to Cash: SBL CRM, OSM, and BRM Pre-Built Integration 6-5
6.1.6 Session Pool Manager Details ScreenThe Session Pool Manager (SPM) details are optional and required only when your Siebel server is outside of the firewall. If all your servers are within the network, leave these fields blank.
In the java.net application programming interface (API) used by SPM, proxies are supported through two system properties: http.proxyHost and http.proxyPort. They must be set to the proxy server and port respectively. This value is only set when ProxySettings_Enabled is set to TRUE.
6.2 Performing Predeployment ConfigurationsThis section discusses predeployment configurations for the Comms Order to Cash: SBL CRM, OSM, and BRM Pre-Built Integration.
OSM CFS WL JMS Queue Access Password This is the Weblogic password for accessing inbound JMS queues for OSM CFS. For example, weblogic1. To find this value, contact your administrator.
OSM CFS WL JMS Queue Access Password is _______________________
OSM Provisioning WL JMS Queue Access Host This is the Weblogic host used for accessing inbound JMS queues for OSM Provisioning. For example, hostname.example.com. To find this value, contact your Oracle OSM administrator.
OSM Provisioning WL JMS Queue Access Host is ___________________________
OSM Provisioning WL JMS Queue Access Port This is the Weblogic port number used for accessing inbound JMS queues for OSM Provisioning. For example, 7080. To find this value, contact your Oracle OSM administrator.
OSM Provisioning WL JMS Queue Access Port is ___________________________
OSM Provisioning WL JMS Queue Access Username This is the Weblogic user name for accessing inbound JMS queues for OSM Provisioning. For example, weblogic. To find this value, contact your Oracle OSM administrator.
OSM Provisioning WL JMS Queue Access Username is ___________________________
OSM Provisioning WL JMS Queue Access Password This is the Weblogic password for accessing inbound JMS queues for OSM Provisioning. For example, weblogic1. To find this value, contact your Oracle OSM administrator.
OSM Provisioning WL JMS Queue Access Password is ___________________________
Table 6–6 Session Pool Manager Details Screen Fields
Field Description
Proxy host url This determines the server to be set in the system properties for http.proxyHost property.
Proxy host url is ___________________________
Proxy port This determines the port to be set in the system properties for the http.proxyPort property.
Proxy port is ______________________________
Note: These fields are optional so leave the values blank. These values are required only if the Siebel server is outside of the firewall.
Table 6–5 (Cont.) Oracle OSM Server Details Screen Fields
Field Description
Configuring and Deploying the Comms Order to Cash: SBL CRM, OSM, and BRM Pre-Built Integration
6-6 Oracle Application Integration Architecture Installation and Upgrade Guide for Pre-Built Integrations
6.2.1 Configuring the Timeout ValuesThis section describes how to modify the JTA Transaction Value and the SyncMaxWaitTime values.
To modify JTA Transaction Value:1. Log in to the WebLogic Server console.
2. Navigate to Services, JTA.
3. Change the value of the property Timeout Seconds to 3600.
4. Click Save and activate the changes.
To modify SyncMaxWaitTime values:1. Log in to the Oracle Enterprise Manager Fusion Middleware Control.
2. Expand the SOA folder and right-click soa-infra.
3. Select SOA Administration, BPEL Properties.
4. Click the More BPEL Configuration Properties link.
5. Change the value of syncMaxWaitTime to 120.
6. Click Apply.
6.3 Configuring and Deploying the Comms Order to Cash: SBL CRM, OSM, and BRM Pre-Built Integration
This section discusses the integration configuration and deployment process. There are two steps:
1. Configure your integration using the DCW.
2. Deploy the integration to the Fusion Middleware server.
6.3.1 Configuring the Comms Order to Cash: SBL CRM, OSM, and BRM Pre-Built Integration
The screens that appear prompt you to enter the data that is required for successful configuration of the Comms Order to Cash: SBL CRM, OSM, and BRM Pre-Built Integration. Keep the completed worksheets of the Comms Order to Cash: SBL CRM, OSM, and BRM Pre-Built Integration screens ready before you launch the DCW.
To configure the Comms Order to Cash: SBL CRM, OSM, and BRM Pre-Built Integration:
1. Navigate to /slot/emsxxxx/oracle/Middleware/user_projects/domains/soa_domain/bin/ and open setDomainEnv.sh for Linux based systems and setDomainEnv.bat for Microsoft Windows.
2. Replace WLS_JDBC_REMOTE_ENABLED="-Dweblogic.jdbc.remoteEnabled=false" with WLS_JDBC_REMOTE_ENABLED="-Dweblogic.jdbc.remoteEnabled=true".
Note: If you are harvesting content to Oracle Enterprise Repository (OER), perform the first three steps. Else start from step 4.
Configuring and Deploying the Comms Order to Cash: SBL CRM, OSM, and BRM Pre-Built Integration
Configuring and Deploying the Comms Order to Cash: SBL CRM, OSM, and BRM Pre-Built Integration 6-7
3. Restart the server.
4. Navigate to <AIA_Instance>/bin and run the command source aiaenv.sh for Linux based systems and aiaenv.bat for Microsoft Windows to configure installation environment.
5. Navigate to <AIA_HOME>/bin and run the command ./aiaconfig.sh for Linux based systems and aiaconfig.bat for Microsoft Windows.
This launches the AIA DCW.
6. Click Next.
7. Expand Communications Pre-built Integrations and select Comms Order to Cash: SBL CRM, OSM, and BRM.
8. Click Next.
6.3.1.1 Specify Integration Server Details
To specify Integration Server details:1. Enter information related to your integration server in the Integration Server
Details screen.
2. Click Next.
6.3.1.2 Specify Siebel CRM Server Details
To specify Siebel CRM server details:1. Enter information about your Siebel CRM application in the Application Details -
Siebel CRM screen.
2. Click Next.
6.3.1.3 Specify Siebel CRM Database Details
To specify Siebel CRM database details:1. Enter information about your Siebel CRM database in the Siebel CRM Database
Details screen.
2. Click Next.
6.3.1.4 Specify Oracle Communications BRM Details
To specify Oracle Communications BRM details:1. Enter Oracle Communications BRM information in the Oracle Communications
BRM screen.
2. Click Next.
6.3.1.5 Specify Oracle OSM Server Details
To specify Oracle OSM server details:1. Enter Oracle OSM server information in the Oracle OSM Server Details screen.
2. Click Next.
Configuring and Deploying the Comms Order to Cash: SBL CRM, OSM, and BRM Pre-Built Integration
6-8 Oracle Application Integration Architecture Installation and Upgrade Guide for Pre-Built Integrations
6.3.1.6 Complete Configuration
To complete configuration:1. Review the configuration information on the Configuration Summary screen.
2. Click Configure to accept this configuration and begin the installation.
The system displays progress of configuration in the Configuration Progress screen.
The system displays any warnings or errors as necessary. You can review the configuration log for additional details. The configuration log location is displayed in Configuration Progress screen.
3. When configuration process finishes without errors, the AIA DCW displays the Configuration Complete screen.
4. Click Finish to close the DCW.
6.3.2 Configuring Using the Response File
To configure using the response file:1. Open the response file.
When you create a response file through OUI, passwords get stored as <SECURE>.
2. Replace the password fields with actual passwords in the response file.
3. Navigate to <AIA_Instance>/bin and run the command source aiaenv.sh for Linux based systems and aiaenv.bat for Microsoft Windows to configure the environment.
4. Navigate to <AIA_HOME>/bin and run the command ./aiaconfig.sh <Response File Location and Name> for Linux based systems and aiaconfig.bat <Response File Location and Name> for Microsoft Windows.
6.3.3 Deploying Mandatory PatchesBefore deploying Comms Order to Cash: SBL CRM, OSM, and BRM Pre-Built Integration, you must install patch 16600070.
Note: If you want to make changes to the configuration, use the navigation pane on the left and select the screen you want to edit.
You can create a response file based on the input provided in the DCW and use it in future when you want to deploy the integration. You can configure using the steps described in Section 6.3.2, "Configuring Using the Response File". Click Save Response File and save the response file with the name and location of your choice.
Performing Postdeployment Configurations
Configuring and Deploying the Comms Order to Cash: SBL CRM, OSM, and BRM Pre-Built Integration 6-9
6.3.4 Deploying the Comms Order to Cash: SBL CRM, OSM, and BRM Pre-Built Integration
To deploy the integration to Fusion Middleware server:1. Navigate to <AIA_Instance>/bin and run the command source aiaenv.sh for
Linux based systems and aiaenv.bat for Microsoft Windows to configure the environment.
2. Run the command for your platform.
3. Review the log file in the location specified in the command or at the default location <AIA_Instance>/logs/O2CDP_Deployments_YYYY-MM-DD_HH-MI-SS.log to verify successful deployment of the integration.
Oracle AIA ships a few artifacts in AIA Lifecycle Workbench which can be used in your integrations. These native artifacts created using FMW technologies such as BPEL, Mediator are natively supported by AIA Foundation Pack tools such as Project Lifecycle Workbench, Harvester, Deployment Generator, and AIA Installer Driver (AID). These artifacts include SOA artifact types such as composites, DataSources, DVM, xRef, and so on. These can be modified or new natively supported artifacts can be added using AIA Lifecycle Workbench and a BOM.xml file can be generated.
Integrations, most often, also require deployment of artifact types that are beyond what is supported by the Project Lifecycle Workbench and AIA Harvester. For instance, you may want to deploy artifacts such as Java applications, Shell Scripts, ANT based build scripts which constitute part of integration landscape in addition to the artifacts that are delivered by AIA. AIA also supports deployment of these supplementary artifacts. However, you must modify and add new non native artifacts outside AIA Lifecycle Workbench.
For more information on deploying artifacts, see Oracle Fusion Middleware Developer's Guide for Oracle Application Integration Architecture Foundation Pack, "Generating Deployment Plans and Deploying Artifacts".
6.4 Performing Postdeployment ConfigurationsThis section discusses post deployment configuration for Comms Order to Cash: SBL CRM, OSM, and BRM Pre-Built Integration. This section includes:
Note: In Windows 2008, 2008 R2 and Vista, run the command prompt as an administrator (elevated mode). If the command prompt is invoked in normal mode, the integrations are not displayed.
Table 6–7 Deployment Commands for the Comms Order to Cash for Siebel CRM, OSM and BRM
Platform Deployment Command
Linux x86
Solaris SPARC (64-bit)
IBM AIX Based Systems (64-bit).
HP-UX 11i (64 bit)
$AIA_HOME/pips/Communications/O2C/DeploymentPlans/deployO2C.sh
Microsoft Windows (32-bit) %AIA_HOME%\pips\Communications\O2C\DeploymentPlans\deployO2C.bat
Performing Postdeployment Configurations
6-10 Oracle Application Integration Architecture Installation and Upgrade Guide for Pre-Built Integrations
■ Section 6.4.1, "Adding Singleton property to ProcessFulfillmentOrderBillingAccountListOSMCFSCommsJMSConsumer Service"
■ Section 6.4.2, "Suppressing Auto-Retry and Preventing Multiple Error Notifications and Trouble Tickets"
■ Section 6.4.3, "Supporting Message Priority"
■ Section 6.4.4, "Updating Internal ID for the BRM Instance BRM_01"
■ Section 6.4.5, "Adding Security Policy to the QueryProductClassAndAttributesSCECommsReqABCSImpl Service"
■ Section 6.4.6, "Setting up the AIA FMW Server"
■ Section 6.4.7, "Deploying Mandatory Patches"
6.4.1 Adding Singleton property to ProcessFulfillmentOrderBillingAccountListOSMCFSCommsJMSConsumer Service
1. Log in to the Oracle Enterprise Manager console of the Oracle AIA cluster.
2. Navigate to the SOA composite: ProcessFulfillmentOrderBillingAccountListOSMCFSCommsJMSConsumer
■ In the left-side navigation tree, expand SOA > soa-infra (soa_server1) in the navigator.
■ Expand the partition: default.
3. Select the SOA Composite : ProcessFulfillmentOrderBillingAccountListOSMCFSCommsJMSConsumer
4. From the SOA Composite menu, select Services/Reference Properties.
5. Select Consume_PFOBAL service. Click Properties tab. Click Add to add a new property.
6. Click Search and select Singleton from the Property Names pop-up window. In the Value column, enter true.
7. Click Apply.
6.4.2 Suppressing Auto-Retry and Preventing Multiple Error Notifications and Trouble Tickets
To suppress auto-retry and prevent multiple error notifications and trouble tickets:1. Set the GlobalTxMaxRetry property for outbound adapters:
a. Log in to the Oracle Enterprise Manager Fusion Middleware Control.
b. Expand the SOA folder, right-click soa_infra.
c. Select SOA Administration, Common Properties.
d. Click More SOA Infra Advanced Configuration Properties.
e. Search for the GlobalTxMaxRetry property and set the value as 0 (zero).
2. Set the GlobalInboundJcaRetryCount property for inbound adapters:
a. Log in to the Oracle Enterprise Manager Fusion Middleware Control.
Performing Postdeployment Configurations
Configuring and Deploying the Comms Order to Cash: SBL CRM, OSM, and BRM Pre-Built Integration 6-11
b. Expand the SOA folder, right-click soa_infra.
c. Select Administration, System Mbean Browser.
d. Expand oracle.as.soainfra.config, <Server>, AdapterConfig.
e. Select Adapter.
f. Search for the GlobalInboundJcaRetryCount property and set the value as 0 (zero).
3. Change Audit Level from Development to Production for soa infrastructure:
a. Log in to the Oracle Enterprise Manager Fusion Middleware Control.
b. Expand the SOA folder, right-click soa_infra.
c. Select SOA Administration, Common Properties.
d. Choose Production from the Audit Level list.
e. Click Apply.
4. Stop and Start the SOA and Admin Server so that your changes can take effect.
6.4.3 Supporting Message PriorityAs part of supporting message priority, follow the below steps to configure the queues (AIA_CRTBO_OUT_JMSQ, AIA_CRTCUST_OUT_JMS, AIA_CRTFO_OUT_JMSQ, AIA_FOPROV_OUT_JMSQ) so that the message is prioritized based on JMSPriority.
1. Creating Destination Sort Key based on JMSPriority
a. Log in to <httphost>:<httpport>/console.
b. Navigate to Services, Messaging, JMS Modules.
c. Click AIAJMSModule.
d. Click New and select Destination Sort Key option.
e. Click Next.
f. Give a name AIA_SALESORDERJMSPRIORITY_KEY, click OK. The key is created.
g. Click AIA_SALESORDERJMSPRIORITY_KEY link and choose JMSPriority from the Sort Key list.
h. Select Key Type as Int.
i. Select Direction as Descending.
j. Click Save.
2. Attaching Destination Sort Key to JMS Queues
a. Click AIAJMSModule.
b. Click AIA_CRTBO_OUT_JMSQ.
c. In Destination Keys section, newly created Key is displayed. Select and choose the key.
d. Click Save.
3. Repeat steps 2a to 2d for the following queues:
■ AIA_CRTCUST_OUT_JMSQ
Performing Postdeployment Configurations
6-12 Oracle Application Integration Architecture Installation and Upgrade Guide for Pre-Built Integrations
■ AIA_CRTFO_OUT_JMSQ
■ AIA_FOPROV_OUT_JMSQ
6.4.4 Updating Internal ID for the BRM Instance BRM_01To update the internal ID for the BRM instance BRM_01 in the AIA Application Registry in the AIA application perform the following steps:
1. Find the BRM instance ID that is specified in BRM Payload Configuration file:
a. Go to the file system where your BRM portal is installed.
b. Navigate to folder ../portal/7.4/sys/eai_js.
c. Find the payload configuration file payloadconfig_crm_sync.xml.
d. Open the file. The instance Id is specified as shown in Example 6–1.
Example 6–1 Instance ID Specified in the BRM Payload Configuration File
<ProductInfoChange Source="EVENT" Tag="ProductInfoChange" StartEvent="/event/notification/price/products/modify"> <Attribute Tag="InstanceId" Value="Portal"/> <Attribute Tag="xmlns" Value="http://www.portal.com/schemas/CRMSync"/> <Attribute Tag="xmlns:xsi" Value="http://www.w3.org/2001/XMLSchema-instance"/> <Attribute Tag="xsi:schemaLocation" Value="http://www.portal.com/schemas/CRMSync/ProductInfoChange.xsd"/> <Field PinFld="PIN_FLD_ACCOUNT_OBJ" Tag="AccountObj"/> <SubElement Name="ProductInfo" OnEvent="/event/notification/price/products/modify" /></ProductInfoChange>
If it is Portal, this value appears as brmproductabo:InstanceId in the Product Event message from BRM. See Example 6–2.
Example 6–2 BRM Instance ID Specified in the Message Payload
<SyncProductReqMsg><part xmlns:xsi="http://www.w3.org/2001/XMLSchema-instance"name="SyncProduct"><brmproductabo:ProductInfoChangexmlns:brmproductabo="http://www.portal.com/schemas/CRMSync"brmproductabo:InstanceId="Portal">
2. Update the Internal ID column to the Instance ID from BRM to the value above. For example: Portal.
3. In AIA Application, go to AIA Application Registry, Setup, System and find the entry for System Code "BRM_01".
4. Change that value to the InstanceId from the BRM Payload Configuration file. For example: Portal.
6.4.5 Adding Security Policy to the QueryProductClassAndAttributesSCECommsReqABCSImpl Service
Add the following security policy to have the Product Class SCE flow working from the OSM Design Studio.
Performing Postdeployment Configurations
Configuring and Deploying the Comms Order to Cash: SBL CRM, OSM, and BRM Pre-Built Integration 6-13
To add the security policy:1. Log in to the Oracle Enterprise Manager Fusion Middleware Control
(http://<host>:<port>/em).
2. Select the service QueryProductClassAndAttributesSCECommsReqABCSImpl.
3. Scroll down to the Services and References section and select the QueryProductClassAndAttributesSCECommsReqABCSImpl link.
4. Go to the Policies tab.
5. Go to the Directly Attached Policies section and click Attach/Detach.
6. Select oracle/no_authentication_service_policy and click Attach.
7. Click OK.
8. Verify that oracle/no_authentication_service_policy is attached.
6.4.6 Setting up the AIA FMW Server
Perform the following steps to enable tunneling:
1. Configure http proxy host
a. Modify mod_wl_ohs.conf
For example, $MW_HOME/Oracle_WT1/instances/instance1/config/OHS/ohs1/mod_wl_ohs.conf
b. Add the following location:
<Location / bea_wls_internal >
SetHandler weblogic-handler
WebLogicCluster adc1140309.example.com:8001,adc2101063.example.com:8011
WLLogFile /tmp/web_log.log
</Location>
c. Restart using ./opmnctl stopall, ./opmnctl startall
2. Configure WebLogic Server
a. Log in to the WebLogic Server Console.
b. Click Admin and each manager server.
c. Click Protocols, HTTP, Enable Tunneling.
d. Save the configuration.
e. Restart Admin and managed servers.
3. Configure OSM SAF Remote Context if OSM Fulfillment system is clustered
a. Navigate to console <host>:<port>/console.
Note: This step is only required if you are using OSM 7.0.2 version.
Note: This step is required if cluster is the deployment topology.
Verifying Deployment
6-14 Oracle Application Integration Architecture Installation and Upgrade Guide for Pre-Built Integrations
b. Navigate to Home, JMS Modules, AIAJMSModule, OSM (SAF Remote Context).
c. Select Lock and Edit: update the URL to include all the OSM clustered nodes.
For example, t3://coqalv0045.example.com:7070,coqalv0046.example.com:8070.
d. Save and Release the configuration.
4. Configure SOM SAF Remote Context if OSM Provisioning system is clustered
a. Navigate to console <host>:<port>/console.
b. Navigate to Home, JMS Modules, AIAJMSModule, SOM (SAF Remote Context).
c. Select Lock and Edit: update the URL to include all the OSM clustered nodes.
For example, t3://coqalv0045.example.com:7070,coqalv0046.example.com:8070.
d. Save and Release the configuration.
6.4.7 Deploying Mandatory PatchesAfter deploying Comms Order to Cash: SBL CRM, OSM, and BRM Pre-Built Integration, you must deploy the following patches:
■ 11843588
■ 12755349
6.5 Verifying Deployment
To verify the Comms Order to Cash: SBL CRM, OSM, and BRM Pre-Built Integration Deployment:1. Open the log files from the following location and look for warnings and error
messages:
■ For Linux x86, Solaris SPARC (64-bit), HP-UX 11i (64 bit) and IBM AIX Based Systems (64-bit): Review the install log located at <AIA_HOME>/aia_instances/<instance name>/logs to verify whether the integration is successfully installed.
2. Confirm that the Comms Order to Cash: SBL CRM, OSM, and BRM Pre-Built Integration components are successfully installed.
a. Navigate to the Oracle Enterprise Manager Fusion Middleware Control: (http://<server name>:<port number>/em/).
b. Log in with the server admin user name. For access details, contact the system administrator.
c. Expand Farm_soa_domain, SOA, soa-infra, Default and look for the following items:
■ AIACOMOrderFalloutNotificationJMSConsumer
■ AIAOrderFalloutJMSBridgeService
■ Comms2CoreCustomerPartybridge
■ CommsProcessBillingAccountListEBF
Verifying Deployment
Configuring and Deploying the Comms Order to Cash: SBL CRM, OSM, and BRM Pre-Built Integration 6-15
■ CommsProcessFulfillmentOrderBillingAccountListEBF
■ CommunicationsCustomerPartyEBSV2
■ CommunicationsCustomerPartyEBSV2Resequencer
■ CommunicationsCustomerPartyResponseEBSV2
■ Core2CommsCustomerPartyBridge
■ CreateFaultNotificationLFCommsJMSConsumer
■ CreateOrderFalloutNotificationOSMCFSCommsJMSConsumer
■ CreateOrderFalloutNotificationOSMCFSCommsJMSProducer
■ CreateOrderFalloutNotificationOSMCFSCommsProvImpl
■ CreateTroubleTicketAIACommsReqImpl
■ CreateTroubleTicketOSMCFSCommsJMSConsumer
■ CreateTroubleTicketRespOSMCFSCommsJMSProducer
■ CreateTroubleTicketSiebelCommsProvABCSImpl
■ CustomerPartyEBSV2
■ ProcessFOBillingAccountListRespOSMCFSCommsJMSProducer
■ ProcessFulfillmentOrderBillingAccountListOSMCFSCommsJMSConsumer
■ ProcessFulfillmentOrderBillingBRMCommsAddSubProcess
■ ProcessFulfillmentOrderBillingBRMCommsDeleteSubProcess
■ ProcessFulfillmentOrderBillingBRMCommsMoveAddSubProcess
■ ProcessFulfillmentOrderBillingBRMCommsProvABCSImpl
■ ProcessFulfillmentOrderBillingBRMCommsSuspendResumeSubProcess
■ ProcessFulfillmentOrderBillingBRMCommsUpdateSubProcess
■ ProcessFulfillmentOrderBillingOSMCFSCommsJMSConsumer
■ ProcessFulfillmentOrderBillingResponseOSMCFSCommsJMSProducer
■ ProcessFulfillmentOrderUpdateOSMCFSCommsJMSProducer
■ ProcessFulfillmentOrderUpdateOSMPROVCommsJMSConsumer
■ ProcessInstalledProductSpecialRatingSetListBRMCommsProvABCSImpl
■ ProcessInstalledProductSpecialRatingSetListSiebelCommsJMSConsumer
■ ProcessInstalledProductSpecialRatingSetListSiebelCommsReqABCSImpl
■ ProcessProvisioningOrderOSMCFSCommsJMSConsumer
■ ProcessProvisioningOrderOSMPROVCommsJMSProducer
■ ProcessSalesOrderFulfillmentOSMCFSCommsJMSProducer
■ ProcessSalesOrderFulfillmentSiebelCommsJMSConsumer
■ ProcessSalesOrderFulfillmentSiebelCommsReqABCSImpl
■ ProductOptimizedSyncPriceListListSiebelCommsProvABCSImpl
■ QueryClassificationListSiebelCommsProvABCSImpl
■ QueryCustomerPartyListSiebelProvABCSImplV2

Verifying Deployment
6-16 Oracle Application Integration Architecture Installation and Upgrade Guide for Pre-Built Integrations
■ QueryProductClassAndAttributesSCECommsReqABCSImpl
■ QuerySpecificationListSiebelCommsProvABCSImpl
■ QuerySpecificationValueSetListSiebelCommsProvABCSImpl
■ SyncAccountSiebelAggregatorAdapter
■ SyncAccountSiebelReqABCSImpl
■ SyncAcctSiebelAggrEventConsumer
■ SyncAddressSiebelAggregatorAdapter
■ SyncBPSiebelAggregatorAdapter
■ SyncContactSiebelAggregatorAdapter
■ SyncCustomerPartyListBRM_01CommsJMSConsumer
■ SyncCustomerPartyListBRMCommsJMSProducer
■ SyncCustomerPartyListBRMCommsProvABCSImpl
■ SyncCustomerSiebelEventAggregator
■ SyncDiscountBRMCommsReqABCSImpl
■ SyncDiscountInfoChangeBRMAQ
■ SyncItemCompositionListSiebelCommsProvABCSImpl
■ SyncProductBRMCommsReqABCSImpl
■ SyncProductInfoChangeBRMAQ
■ TransformAppContextSiebelService
■ UpdateSalesOrderOSMCFSCommsJMSConsumer
■ UpdateSalesOrderSiebelCommsProvABCSImpl
■ UpdateTroubleTicketOSMCFSCommsJMSConsumer
■ UpdateTroubleTicketSiebelCommsProvABCSImpl
6.5.1 Validating Security PoliciesAll SOA composites are protected by Global Policies provided by Foundation Pack as defined in the Security section of the Developer Guide. Additionally individual services for this integration have locally attached security policies.
To validate locally attached security policies:1. Log in to Oracle Enterprise Manager Fusion Middleware Control
2. Expand WebLogic Domain.
3. Select soa_domain.
4. Right-click soa_domain.
5. Select Web Services, Policies.
6. Verify Service Policy attachment.
a. Find no_authentication_service_policy in the list of policies.
b. Click the number in Attachment Count column.
This opens Usage Analysis screen.
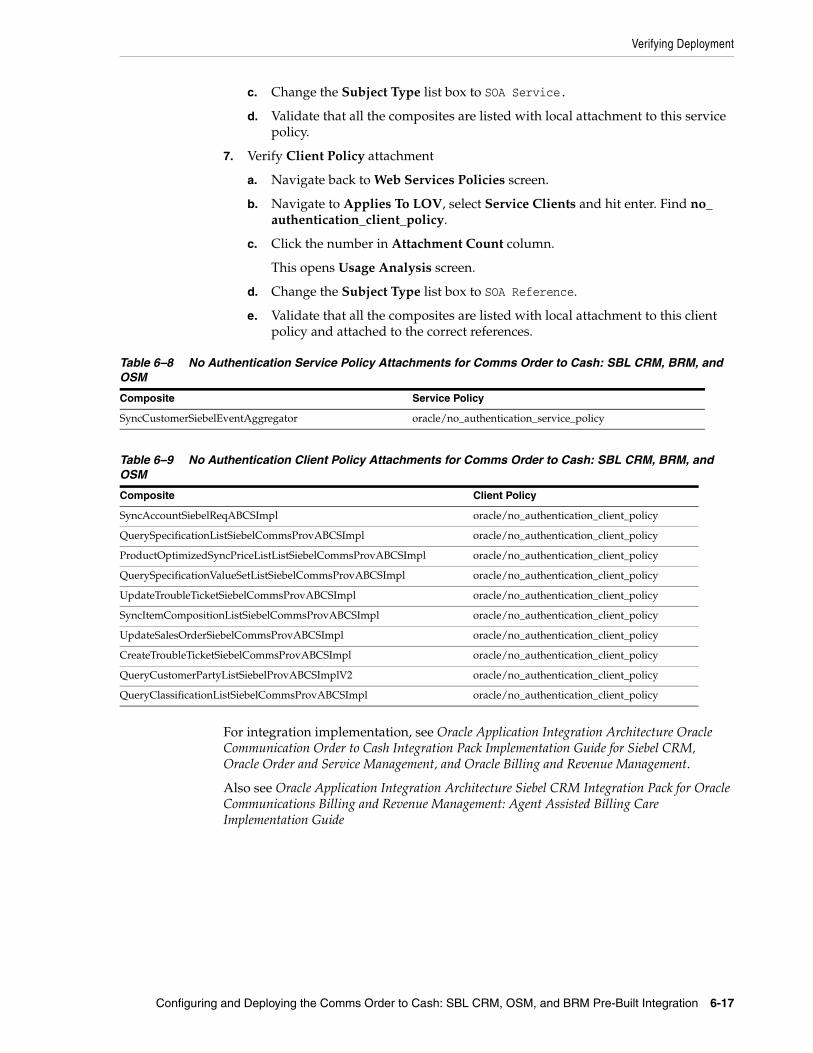
Verifying Deployment
Configuring and Deploying the Comms Order to Cash: SBL CRM, OSM, and BRM Pre-Built Integration 6-17
c. Change the Subject Type list box to SOA Service.
d. Validate that all the composites are listed with local attachment to this service policy.
7. Verify Client Policy attachment
a. Navigate back to Web Services Policies screen.
b. Navigate to Applies To LOV, select Service Clients and hit enter. Find no_authentication_client_policy.
c. Click the number in Attachment Count column.
This opens Usage Analysis screen.
d. Change the Subject Type list box to SOA Reference.
e. Validate that all the composites are listed with local attachment to this client policy and attached to the correct references.
For integration implementation, see Oracle Application Integration Architecture Oracle Communication Order to Cash Integration Pack Implementation Guide for Siebel CRM, Oracle Order and Service Management, and Oracle Billing and Revenue Management.
Also see Oracle Application Integration Architecture Siebel CRM Integration Pack for Oracle Communications Billing and Revenue Management: Agent Assisted Billing Care Implementation Guide
Table 6–8 No Authentication Service Policy Attachments for Comms Order to Cash: SBL CRM, BRM, and OSM
Composite Service Policy
SyncCustomerSiebelEventAggregator oracle/no_authentication_service_policy
Table 6–9 No Authentication Client Policy Attachments for Comms Order to Cash: SBL CRM, BRM, and OSM
Composite Client Policy
SyncAccountSiebelReqABCSImpl oracle/no_authentication_client_policy
QuerySpecificationListSiebelCommsProvABCSImpl oracle/no_authentication_client_policy
ProductOptimizedSyncPriceListListSiebelCommsProvABCSImpl oracle/no_authentication_client_policy
QuerySpecificationValueSetListSiebelCommsProvABCSImpl oracle/no_authentication_client_policy
UpdateTroubleTicketSiebelCommsProvABCSImpl oracle/no_authentication_client_policy
SyncItemCompositionListSiebelCommsProvABCSImpl oracle/no_authentication_client_policy
UpdateSalesOrderSiebelCommsProvABCSImpl oracle/no_authentication_client_policy
CreateTroubleTicketSiebelCommsProvABCSImpl oracle/no_authentication_client_policy
QueryCustomerPartyListSiebelProvABCSImplV2 oracle/no_authentication_client_policy
QueryClassificationListSiebelCommsProvABCSImpl oracle/no_authentication_client_policy
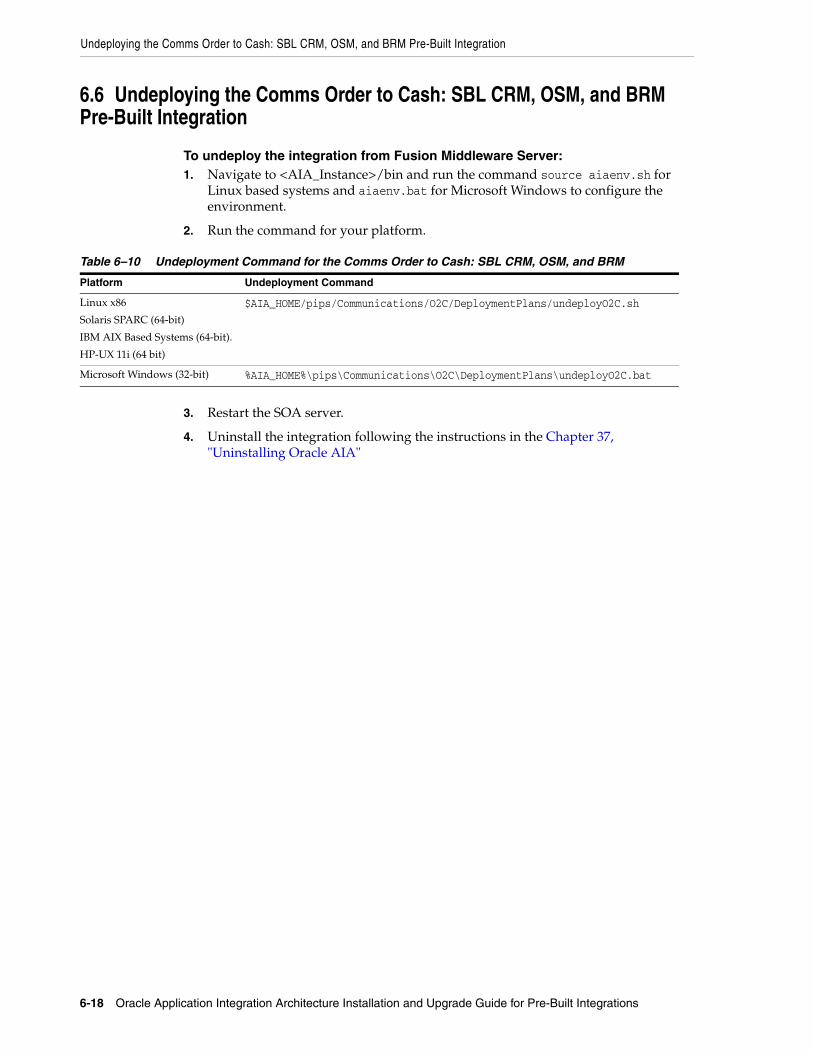
Undeploying the Comms Order to Cash: SBL CRM, OSM, and BRM Pre-Built Integration
6-18 Oracle Application Integration Architecture Installation and Upgrade Guide for Pre-Built Integrations
6.6 Undeploying the Comms Order to Cash: SBL CRM, OSM, and BRM Pre-Built Integration
To undeploy the integration from Fusion Middleware Server:1. Navigate to <AIA_Instance>/bin and run the command source aiaenv.sh for
Linux based systems and aiaenv.bat for Microsoft Windows to configure the environment.
2. Run the command for your platform.
3. Restart the SOA server.
4. Uninstall the integration following the instructions in the Chapter 37, "Uninstalling Oracle AIA"
Table 6–10 Undeployment Command for the Comms Order to Cash: SBL CRM, OSM, and BRM
Platform Undeployment Command
Linux x86
Solaris SPARC (64-bit)
IBM AIX Based Systems (64-bit).
HP-UX 11i (64 bit)
$AIA_HOME/pips/Communications/O2C/DeploymentPlans/undeployO2C.sh
Microsoft Windows (32-bit) %AIA_HOME%\pips\Communications\O2C\DeploymentPlans\undeployO2C.bat
7
Configuring and Deploying the Comms Order to Cash: SBL CRM and BRM Pre-Built Integration 7-1
7Configuring and Deploying the CommsOrder to Cash: SBL CRM and BRM Pre-Built
Integration
This chapter discusses how to configure and deploy the Oracle Communications Order to Cash Integration Pack for Siebel Customer Relationship Management and Oracle Communications Billing and Revenue Management (Comms Order to Cash: SBL CRM and BRM Pre-Built Integration).
This option assumes integration with a Central Order Management system, other than Oracle OSM. On deployment, this option deploys Test Orchestration Process (TOP) to take order fulfillment requests from Siebel and hand them off to Oracle BRM. However, this process is for simple sanity testing of the order flow between Siebel CRM and Oracle BRM. You must replace this process with your Order Management system following the steps detailed in Section 7.7, "Replacing Test Order Orchestration with your Order Management System".
This chapter includes the following sections:
■ Section 7.1, "Deployment Configuration Wizard"
■ Section 7.2, "Performing Predeployment Configurations"
■ Section 7.3, "Configuring and Deploying the Comms Order to Cash: SBL CRM and BRM Pre-Built Integration"
■ Section 7.4, "Performing Postdeployment Configurations"
■ Section 7.5, "Verifying Deployment"
■ Section 7.6, "Undeploying the Comms Order to Cash: SBL CRM and BRM Pre-Built Integration"
■ Section 7.7, "Replacing Test Order Orchestration with your Order Management System"
7.1 Deployment Configuration WizardThe DCW screens prompt you to enter the data required for successful configuration of the Comms Order to Cash: SBL CRM and BRM Pre-Built Integration. Enter the details of the Comms Order to Cash: SBL CRM and BRM Pre-Built Integration screens below, take a printout and keep it ready when you run the DCW. This action enables faster and error free configuration.
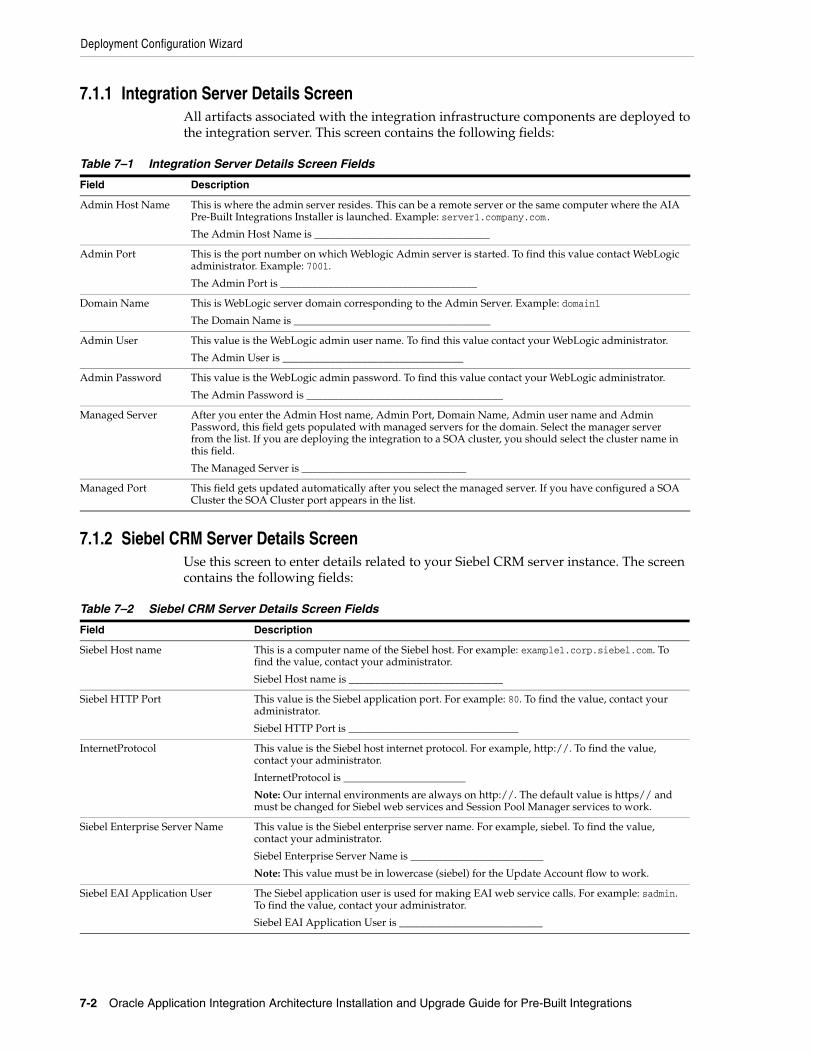
Deployment Configuration Wizard
7-2 Oracle Application Integration Architecture Installation and Upgrade Guide for Pre-Built Integrations
7.1.1 Integration Server Details ScreenAll artifacts associated with the integration infrastructure components are deployed to the integration server. This screen contains the following fields:
7.1.2 Siebel CRM Server Details ScreenUse this screen to enter details related to your Siebel CRM server instance. The screen contains the following fields:
Table 7–1 Integration Server Details Screen Fields
Field Description
Admin Host Name This is where the admin server resides. This can be a remote server or the same computer where the AIA Pre-Built Integrations Installer is launched. Example: server1.company.com.
The Admin Host Name is _________________________________
Admin Port This is the port number on which Weblogic Admin server is started. To find this value contact WebLogic administrator. Example: 7001.
The Admin Port is _____________________________________
Domain Name This is WebLogic server domain corresponding to the Admin Server. Example: domain1
The Domain Name is _____________________________________
Admin User This value is the WebLogic admin user name. To find this value contact your WebLogic administrator.
The Admin User is __________________________________
Admin Password This value is the WebLogic admin password. To find this value contact your WebLogic administrator.
The Admin Password is _____________________________________
Managed Server After you enter the Admin Host name, Admin Port, Domain Name, Admin user name and Admin Password, this field gets populated with managed servers for the domain. Select the manager server from the list. If you are deploying the integration to a SOA cluster, you should select the cluster name in this field.
The Managed Server is _______________________________
Managed Port This field gets updated automatically after you select the managed server. If you have configured a SOA Cluster the SOA Cluster port appears in the list.
Table 7–2 Siebel CRM Server Details Screen Fields
Field Description
Siebel Host name This is a computer name of the Siebel host. For example: example1.corp.siebel.com. To find the value, contact your administrator.
Siebel Host name is _____________________________
Siebel HTTP Port This value is the Siebel application port. For example: 80. To find the value, contact your administrator.
Siebel HTTP Port is ________________________________
InternetProtocol This value is the Siebel host internet protocol. For example, http://. To find the value, contact your administrator.
InternetProtocol is _______________________
Note: Our internal environments are always on http://. The default value is https// and must be changed for Siebel web services and Session Pool Manager services to work.
Siebel Enterprise Server Name This value is the Siebel enterprise server name. For example, siebel. To find the value, contact your administrator.
Siebel Enterprise Server Name is _________________________
Note: This value must be in lowercase (siebel) for the Update Account flow to work.
Siebel EAI Application User The Siebel application user is used for making EAI web service calls. For example: sadmin. To find the value, contact your administrator.
Siebel EAI Application User is ___________________________
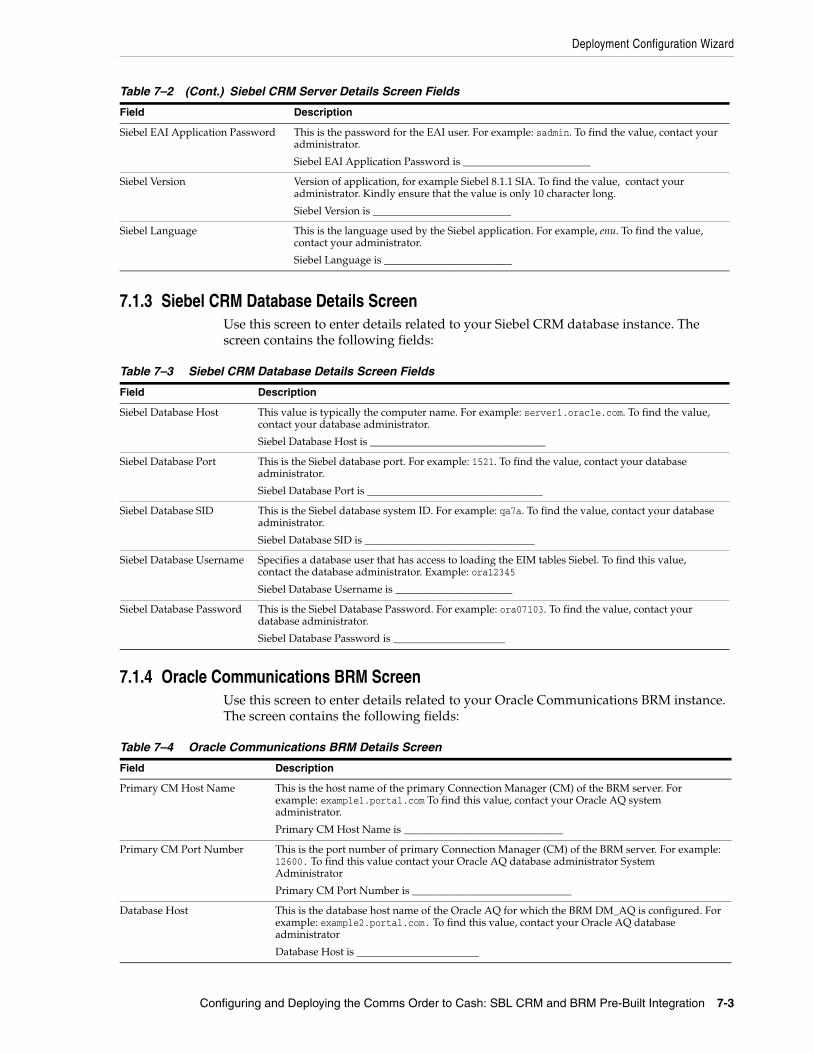
Deployment Configuration Wizard
Configuring and Deploying the Comms Order to Cash: SBL CRM and BRM Pre-Built Integration 7-3
7.1.3 Siebel CRM Database Details ScreenUse this screen to enter details related to your Siebel CRM database instance. The screen contains the following fields:
7.1.4 Oracle Communications BRM ScreenUse this screen to enter details related to your Oracle Communications BRM instance. The screen contains the following fields:
Siebel EAI Application Password This is the password for the EAI user. For example: sadmin. To find the value, contact your administrator.
Siebel EAI Application Password is ________________________
Siebel Version Version of application, for example Siebel 8.1.1 SIA. To find the value, contact your administrator. Kindly ensure that the value is only 10 character long.
Siebel Version is __________________________
Siebel Language This is the language used by the Siebel application. For example, enu. To find the value, contact your administrator.
Siebel Language is ________________________
Table 7–3 Siebel CRM Database Details Screen Fields
Field Description
Siebel Database Host This value is typically the computer name. For example: server1.oracle.com. To find the value, contact your database administrator.
Siebel Database Host is _________________________________
Siebel Database Port This is the Siebel database port. For example: 1521. To find the value, contact your database administrator.
Siebel Database Port is _________________________________
Siebel Database SID This is the Siebel database system ID. For example: qa7a. To find the value, contact your database administrator.
Siebel Database SID is ________________________________
Siebel Database Username Specifies a database user that has access to loading the EIM tables Siebel. To find this value, contact the database administrator. Example: ora12345
Siebel Database Username is ______________________
Siebel Database Password This is the Siebel Database Password. For example: ora07103. To find the value, contact your database administrator.
Siebel Database Password is _____________________
Table 7–4 Oracle Communications BRM Details Screen
Field Description
Primary CM Host Name This is the host name of the primary Connection Manager (CM) of the BRM server. For example: example1.portal.com To find this value, contact your Oracle AQ system administrator.
Primary CM Host Name is ______________________________
Primary CM Port Number This is the port number of primary Connection Manager (CM) of the BRM server. For example: 12600. To find this value contact your Oracle AQ database administrator System Administrator
Primary CM Port Number is ______________________________
Database Host This is the database host name of the Oracle AQ for which the BRM DM_AQ is configured. For example: example2.portal.com. To find this value, contact your Oracle AQ database administrator
Database Host is _______________________
Table 7–2 (Cont.) Siebel CRM Server Details Screen Fields
Field Description
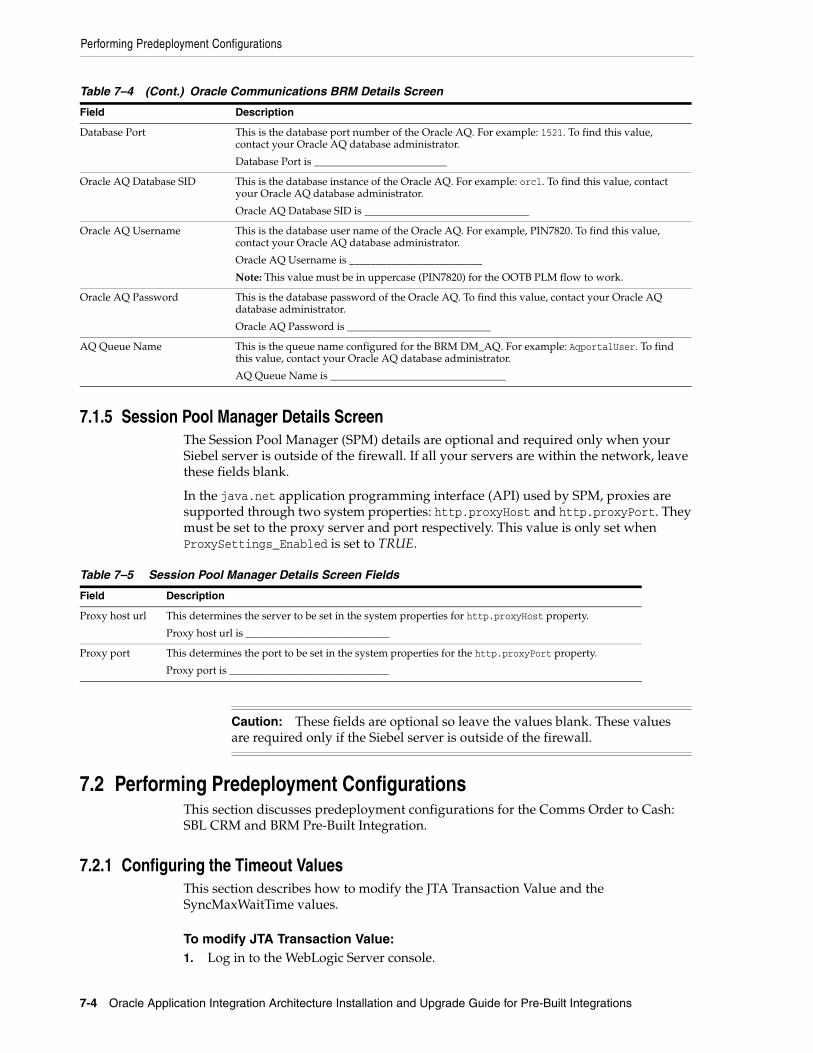
Performing Predeployment Configurations
7-4 Oracle Application Integration Architecture Installation and Upgrade Guide for Pre-Built Integrations
7.1.5 Session Pool Manager Details ScreenThe Session Pool Manager (SPM) details are optional and required only when your Siebel server is outside of the firewall. If all your servers are within the network, leave these fields blank.
In the java.net application programming interface (API) used by SPM, proxies are supported through two system properties: http.proxyHost and http.proxyPort. They must be set to the proxy server and port respectively. This value is only set when ProxySettings_Enabled is set to TRUE.
7.2 Performing Predeployment ConfigurationsThis section discusses predeployment configurations for the Comms Order to Cash: SBL CRM and BRM Pre-Built Integration.
7.2.1 Configuring the Timeout ValuesThis section describes how to modify the JTA Transaction Value and the SyncMaxWaitTime values.
To modify JTA Transaction Value:1. Log in to the WebLogic Server console.
Database Port This is the database port number of the Oracle AQ. For example: 1521. To find this value, contact your Oracle AQ database administrator.
Database Port is _________________________
Oracle AQ Database SID This is the database instance of the Oracle AQ. For example: orcl. To find this value, contact your Oracle AQ database administrator.
Oracle AQ Database SID is _______________________________
Oracle AQ Username This is the database user name of the Oracle AQ. For example, PIN7820. To find this value, contact your Oracle AQ database administrator.
Oracle AQ Username is _________________________
Note: This value must be in uppercase (PIN7820) for the OOTB PLM flow to work.
Oracle AQ Password This is the database password of the Oracle AQ. To find this value, contact your Oracle AQ database administrator.
Oracle AQ Password is ___________________________
AQ Queue Name This is the queue name configured for the BRM DM_AQ. For example: AqportalUser. To find this value, contact your Oracle AQ database administrator.
AQ Queue Name is _________________________________
Table 7–5 Session Pool Manager Details Screen Fields
Field Description
Proxy host url This determines the server to be set in the system properties for http.proxyHost property.
Proxy host url is ___________________________
Proxy port This determines the port to be set in the system properties for the http.proxyPort property.
Proxy port is ______________________________
Caution: These fields are optional so leave the values blank. These values are required only if the Siebel server is outside of the firewall.
Table 7–4 (Cont.) Oracle Communications BRM Details Screen
Field Description
Configuring and Deploying the Comms Order to Cash: SBL CRM and BRM Pre-Built Integration
Configuring and Deploying the Comms Order to Cash: SBL CRM and BRM Pre-Built Integration 7-5
2. Navigate to Services, JTA.
3. Change the value of the property Timeout Seconds to 3600.
4. Click Save and activate the changes.
To modify SyncMaxWaitTime values:1. Log in to the Oracle Enterprise Manager Fusion Middleware Control.
2. Expand the SOA folder and right-click soa-infra.
3. Select SOA Administration, BPEL Properties.
4. Click the More BPEL Configuration Properties link.
5. Change the value of SyncMaxWaitTime to 120.
6. Click Apply.
7.3 Configuring and Deploying the Comms Order to Cash: SBL CRM and BRM Pre-Built Integration
This section discusses the integration configuration and deployment process. There are two steps:
1. Configure your integration using the DCW.
2. Deploy the integration to the Fusion Middleware server.
7.3.1 Configuring the Comms Order to Cash: SBL CRM and BRM Pre-Built IntegrationThe screens that appear prompt you to enter the data that is required for successful configuration of the Comms Order to Cash: SBL CRM and BRM Pre-Built Integration. Keep the completed worksheets of the Comms Order to Cash: SBL CRM and BRM Pre-Built Integration screens ready before you launch the DCW.
To configure the Comms Order to Cash: SBL CRM and BRM Pre-Built Integration:
1. Navigate to ../Middleware/user_projects/domains/<domain_name>/bin and open setDomainEnv.sh for Linux based systems and setDomainEnv.bat for Microsoft Windows.
2. Replace WLS_JDBC_REMOTE_ENABLED="-Dweblogic.jdbc.remoteEnabled=false" with WLS_JDBC_REMOTE_ENABLED="-Dweblogic.jdbc.remoteEnabled=true".
3. Restart the server.
4. Navigate to <AIA_Instance>/bin and run the command source aiaenv.sh for Linux based systems and aiaenv.bat for Microsoft Windows to configure installation environment.
5. Navigate to <AIA_HOME>/bin and run the command ./aiaconfig.sh for Linux based systems and aiaconfig.bat for Microsoft Windows.
This launches the AIA DCW.
Note: If you are harvesting content to Oracle Enterprise Repository (OER), perform the first three steps. Else start from step 4.
Configuring and Deploying the Comms Order to Cash: SBL CRM and BRM Pre-Built Integration
7-6 Oracle Application Integration Architecture Installation and Upgrade Guide for Pre-Built Integrations
6. Click Next.
7. Expand Communications Pre-built Integrations and select Comms Order to Cash: Siebel CRM and BRM.
8. Click Next.
7.3.1.1 Specify Integration Server Details
To specify integration server details:1. Enter information related to your integration server in the Integration Server
Details screen.
2. Click Next.
7.3.1.2 Specify Siebel CRM Server Details
To specify Siebel CRM server details:1. Enter information about your Siebel CRM application in the Application Details -
Siebel CRM screen.
2. Click Next.
7.3.1.3 Specify Siebel CRM Database Details
To specify Siebel CRM database details:1. Enter information about your Siebel CRM database in the Siebel CRM Database
Details screen.
2. Click Next.
7.3.1.4 Specify Oracle Communications BRM Details
To specify Oracle Communications BRM details:1. Enter Oracle Communications BRM information in the Oracle Communications
BRM screen.
2. Click Next.
7.3.1.5 Complete Configuration
To complete configuration:1. Review the configuration information on the Configuration Summary screen.
2. Click Configure to accept this configuration and begin the installation.
Note: If you want to make changes to the configuration, use the navigation pane on the left and select the screen you want to edit.
You can create a response file based on the input provided in the DCW and use it in future when you want to deploy the integration. You can configure using the steps described in Section 7.3.2, "Configuring using the Response File". Click Save Response File and save the response file with the name and location of your choice.

Configuring and Deploying the Comms Order to Cash: SBL CRM and BRM Pre-Built Integration
Configuring and Deploying the Comms Order to Cash: SBL CRM and BRM Pre-Built Integration 7-7
The system displays progress of configuration in the Configuration Progress screen.
The system displays any warnings or errors as necessary. You can review the configuration log for additional details. The configuration log location is displayed in Configuration Progress screen.
3. When configuration process finishes without errors, the AIA DCW displays the Configuration Complete screen.
4. Click Finish to close the DCW.
7.3.2 Configuring using the Response File
To configure using the response file:1. Open the response file.
When you create a response file through OUI, passwords get stored as <SECURE>.
2. Replace the password fields with actual passwords in the response file.
3. Navigate to <AIA_Instance>/bin and run the command source aiaenv.sh for Linux based systems and aiaenv.bat for Microsoft Windows to configure the environment.
4. Navigate to <AIA_HOME>/bin and run the command ./aiaconfig.sh <Response File Location and Name> for Linux based systems and aiaconfig.bat <Response File Location and Name> for Microsoft Windows.
7.3.3 Deploying Mandatory PatchesBefore deploying Comms Order to Cash: SBL CRM and BRM Pre-Built Integration, you must install the patch 16604368.
7.3.4 Deploying the Comms Order to Cash: SBL CRM and BRM Pre-Built Integration
To deploy the integration to Fusion Middleware server:1. Navigate to <AIA_Instance>/bin and run the command source aiaenv.sh for
Linux based systems and aiaenv.bat for Microsoft Windows to configure the environment.
2. Run the command for your platform.
Note: In Windows 2008, 2008 R2 and Vista, run the command prompt as an administrator (elevated mode). If the command prompt is invoked in normal mode, the integrations are not displayed.
Performing Postdeployment Configurations
7-8 Oracle Application Integration Architecture Installation and Upgrade Guide for Pre-Built Integrations
3. Review the log file in the location specified in the command or at the default location <AIA_Instance>/logs/O2BDP_Deployments_YYYY-MM-DD_HH-MI-SS.log to verify successful deployment of the integration.
Oracle AIA ships a few artifacts in AIA Lifecycle Workbench which can be used in your integrations. These native artifacts created using FMW technologies such as BPEL, Mediator are natively supported by AIA Foundation Pack tools such as Project Lifecycle Workbench, Harvester, Deployment Generator, and AIA Installer Driver (AID). These artifacts include SOA artifact types such as composites, DataSources, DVM, xRef, and so on. These can be modified or new natively supported artifacts can be added using AIA Lifecycle Workbench and a BOM.xml file can be generated.
Integrations, most often, also require deployment of artifact types that are beyond what is supported by the Project Lifecycle Workbench and AIA Harvester. For instance, you may want to deploy artifacts such as Java applications, Shell Scripts, ANT based build scripts which constitute part of integration landscape in addition to the artifacts that are delivered by AIA. AIA also supports deployment of these supplementary artifacts. However, you must modify and add new non native artifacts outside AIA Lifecycle Workbench.
For more information on deploying artifacts, see Oracle Fusion Middleware Developer's Guide for Oracle Application Integration Architecture Foundation Pack, "Generating Deployment Plans and Deploying Artifacts".
7.4 Performing Postdeployment ConfigurationsThis section discusses post deployment configuration for Comms Order to Cash: SBL CRM and BRM Pre-Built Integration. This section includes:
■ Section 7.4.1, "Suppressing Auto-Retry and Preventing Multiple Error Notifications and Trouble Tickets"
■ Section 7.4.2, "Supporting Message Priority"
■ Section 7.4.3, "Updating Internal ID for the BRM Instance BRM_01"
■ Section 7.4.4, "Setting up the AIA FMW Server"
■ Section 7.4.5, "Deploying Mandatory Patches"
7.4.1 Suppressing Auto-Retry and Preventing Multiple Error Notifications and Trouble Tickets
To suppress auto-retry and prevent multiple error notifications and trouble tickets:1. Set the GlobalTxMaxRetry property for outbound adapters:
a. Log in to the Oracle Enterprise Manager Fusion Middleware Control.
Table 7–6 Deployment Commands for the Comms Order to Cash: SBL CRM and BRM Pre-Built Integration
Platform Deployment Command
Linux x86
Solaris SPARC (64-bit)
IBM AIX Based Systems (64-bit).
HP-UX 11i (64 bit)
$AIA_HOME/pips/Communications/O2B/DeploymentPlans/deployO2B.sh
Microsoft Windows (32-bit) %AIA_HOME%\pips\Communications\O2B\DeploymentPlans\deployO2B.bat

Performing Postdeployment Configurations
Configuring and Deploying the Comms Order to Cash: SBL CRM and BRM Pre-Built Integration 7-9
b. Expand the SOA folder, right-click soa_infra.
c. Select SOA Administration, Common Properties.
d. Click More SOA Infra Advanced Configuration Properties.
e. Search for the GlobalTxMaxRetry property and set the value as 0 (zero).
2. Set the GlobalInboundJcaRetryCount property for inbound adapters:
a. Log in to the Oracle Enterprise Manager Fusion Middleware Control.
b. Expand the SOA folder, right-click soa_infra.
c. Select Administration, System Mbean Browser.
d. Search for oracle.as.soainfra.config, expand <Server>, expand AdapterConfig.
e. Select Adapter.
f. Search for the GlobalInboundJcaRetryCount property and set the value as 0 (zero).
3. Change Audit Level from Development to Production for soa infrastructure:
a. Log in to the Oracle Enterprise Manager Fusion Middleware Control.
b. Expand the SOA folder, right-click soa_infra.
c. Select SOA Administration, Common Properties.
d. Choose Production from the Audit Level list.
e. Click Apply.
4. Stop and Start the SOA and Admin Server so that your changes can take effect.
7.4.2 Supporting Message PriorityAs part of supporting message priority, follow the below steps to configure the queues (AIA_CRTBO_OUT_JMSQ, AIA_CRTCUST_OUT_JMS) so that the message is prioritized based on JMSPriority.
1. Creating Destination Sort Key based on JMSPriority:
a. Log in to http://<host name>:<port number>/console.
b. Navigate to Services, Messaging, JMS Modules.
c. Click AIAJMSModule.
d. Click New and select Destination Sort Key option.
e. Give a name AIA_SALESORDERJMSPRIORITY_KEY, click OK. The key is created.
f. Click AIA_SALESORDERJMSPRIORITY_KEY link and choose JMSPriority from the Sort Key drop down list.
g. Select Key Type as Int.
h. Select Direction as Descending.
i. Click Save.
2. Attaching Destination Sort Key to JMS Queues:
a. Click AIAJMSModule.
Performing Postdeployment Configurations
7-10 Oracle Application Integration Architecture Installation and Upgrade Guide for Pre-Built Integrations
b. Click AIA_CRTBO_OUT_JMSQ.
c. In The Destination Keys section, newly created Key is displayed. Select and choose the key.
d. Click Save.
3. Repeat steps 2a to 2d for queue AIA_CRTCUST_OUT_JMSQ.
7.4.3 Updating Internal ID for the BRM Instance BRM_01To update the internal ID for the BRM instance BRM_01 in the AIA Application Registry in the AIA application perform the following steps:
1. Find the BRM instance ID that is specified in BRM Payload Configuration file:
a. Go to the file system where your BRM portal is installed.
b. Navigate to folder ../portal/7.4/sys/eai_js.
c. Find the payload configuration file payloadconfig_crm_sync.xml.
d. Open the file. The instance Id is specified as shown in Example 7–1.
Example 7–1 Instance ID Specified in the BRM Payload Configuration File
<ProductInfoChange Source="EVENT" Tag="ProductInfoChange" StartEvent="/event/notification/price/products/modify"> <Attribute Tag="InstanceId" Value="Portal"/> <Attribute Tag="xmlns" Value="http://www.portal.com/schemas/CRMSync"/> <Attribute Tag="xmlns:xsi" Value="http://www.w3.org/2001/XMLSchema-instance"/> <Attribute Tag="xsi:schemaLocation" Value="http://www.portal.com/schemas/CRMSync/ProductInfoChange.xsd"/> <Field PinFld="PIN_FLD_ACCOUNT_OBJ" Tag="AccountObj"/> <SubElement Name="ProductInfo" OnEvent="/event/notification/price/products/modify" /></ProductInfoChange>
If it is Portal, this value appears as brmproductabo:InstanceId in the Product Event message from BRM. See Example 7–2.
Example 7–2 BRM Instance ID Specified in the Message Payload
<SyncProductReqMsg><part xmlns:xsi="http://www.w3.org/2001/XMLSchema-instance"name="SyncProduct"><brmproductabo:ProductInfoChangexmlns:brmproductabo="http://www.portal.com/schemas/CRMSync"brmproductabo:InstanceId="Portal">
2. Update the Internal ID column to the Instance ID from BRM to the value above. For example: Portal.
3. In AIA Application, go to AIA Application Registry, Setup, System and find the entry for System Code "BRM_01".
4. Change that value to the InstanceId from the BRM Payload Configuration file. For example: Portal.
Verifying Deployment
Configuring and Deploying the Comms Order to Cash: SBL CRM and BRM Pre-Built Integration 7-11
7.4.4 Setting up the AIA FMW Server
Perform the following steps to enable tunneling:
1. Configure http proxy host
a. Modify mod_wl_ohs.conf
For example, scratch/userid/Oracle/Middleware/Oracle_WT1/instances/instance1/config/OHS/ohs1/mod_wl_ohs.conf
b. Add the following location:
<Location / bea_wls_internal >
SetHandler weblogic-handler
WebLogicCluster adc1140309.example.com:8001,adc2101063.example.com:8011
WLLogFile /tmp/web_log.log
</Location>
c. Restart using ./opmnctl stopall, ./opmnctl startall
2. Configure WebLogic Server
a. Log in to WebLogic Server console.
b. Click Admin and each manager server.
c. Click Protocols, HTTP, Enable Tunneling.
d. Save the configuration.
e. Restart Admin and managed servers.
7.4.5 Deploying Mandatory PatchesAfter deploying Comms Order to Cash: SBL CRM and BRM Pre-Built Integration, you must deploy the following patches:
■ 11843588
■ 12755349
7.5 Verifying Deployment
To verify the Comms Order to Cash: SBL CRM and BRM Pre-Built Integration deployment:1. Open the log files from the following location and look for warnings and error
messages:
■ For Linux x86, Solaris SPARC (64-bit), HP-UX 11i (64 bit) and IBM AIX Based Systems (64-bit): Review the install log located at <AIA_HOME>/aia_instances/<instance name>/logs to verify whether the integration is successfully installed.
Note: This step is required if cluster is the deployment topology.
Verifying Deployment
7-12 Oracle Application Integration Architecture Installation and Upgrade Guide for Pre-Built Integrations
2. Confirm that the Comms Order to Cash: SBL CRM and BRM Pre-Built Integration components were successfully installed.
a. Navigate to the Oracle Enterprise Manager Fusion Middleware Control: (http://<server name>:<port number>/em/).
b. Log in with the server admin user name. For access details, contact the system administrator.
c. Expand Farm_soa_domain, SOA, soa-infra, Default and look for the following items:
■ AIACOMOrderFalloutNotificationJMSConsumer
■ AIAOrderFalloutJMSBridgeService
■ BillingResponseConsumer
■ Comms2CoreCustomerPartybridge
■ CommsProcessBillingAccountListEBF
■ CommsProcessFulfillmentOrderBillingAccountListEBF
■ CommunicationsCustomerPartyEBSV2
■ CommunicationsCustomerPartyEBSV2Requencer
■ CommunicationsCustomerPartyResponseEBSV2
■ Core2CommsCustomerPartyBridge
■ CreateTroubleTicketAIACommsReqImpl
■ CreateTroubleTicketSiebelCommsProvABCSImpl
■ CustomerPartyEBSV2
■ CustomerResponseConsumer
■ OrderOrchestrationConsumer
■ ProcessFOBillingAccountListRespOSMCFSCommsJMSProducer
■ ProcessFufillmentOrderBillingAccountListOSMCFSCommsJMSConsumer
■ ProcessFulfillmentOrderBillingBRMCommsAddSubProcess
■ ProcessFulfillmentOrderBillingBRMCommsDeleteSubProcess
■ ProcessFulfillmentOrderBillingBRMCommsMoveAddSubProcess
■ ProcessFulfillmentOrderBillingBRMCommsProvABCSImpl
■ ProcessFulfillmentOrderBillingBRMCommsSuspendResumeSubProcess
■ ProcessFulfillmentOrderBillingBRMCommsUpdateSubProcess
■ ProcessFulfillmentOrderBillingOSMCFSCommsJMSConsumer
■ ProcessFulfillmentOrderBillingResponseOSMCFSCommsJMSProducer
■ ProcessInstalledProductSpecialRatingSetListBRMCommsProvABCSImpl
■ ProcessInstalledProductSpecialRatingSetListSiebelCommsJMSConsumer
■ ProcessInstalledProductSpecialRatingSetListSiebelCommsReqABCSImpl
■ ProcessSalesOrderFulfillmentOSMCFSCommsJMSProducer
■ ProcessSalesOrderFulfillmentSiebelCommsJMSConsumer
Verifying Deployment
Configuring and Deploying the Comms Order to Cash: SBL CRM and BRM Pre-Built Integration 7-13
■ ProcessSalesOrderFulfillmentSiebelCommsReqABCSImpl
■ ProductOptimizedSyncPriceListListSiebelCommsProvABCSImpl
■ QueryClassificationListSiebelCommsProvABCSImpl
■ QueryCustomerPartyListSiebelProvABCSImplV2
■ QuerySpecificationListSiebelCommsProvABCSImpl
■ QuerySpecificationValueSetListSiebelCommsProvABCSImpl
■ SyncAccountSiebelAggregatorAdapter
■ SyncAccountSiebelReqABCSImpl
■ SyncAcctSiebelAggrEventConsumer
■ SyncAddressSiebelAggregatorAdapter
■ SyncBPSiebelAggregatorAdapter
■ SyncContactSiebelAggregatorAdapter
■ SyncCustomerPartyListBRM_01CommsJMSConsumer
■ SyncCustomerPartyListBRMCommsJMSProducer
■ SyncCustomerPartyListBRMCommsProvABCSImpl
■ SyncCustomerSiebelEventAggregator
■ SyncDiscountBRMCommsReqABCSImpl
■ SyncDiscountInfoChangeBRMAQ
■ SyncItemCompositionListSiebelCommsProvABCSImpl
■ SyncProductBRMCommsReqABCSImpl
■ SyncProductInfoChangeBRMAQ
■ TestOrderOrchestrationEBF
■ TransformAppContextSiebelService
■ UpdateSalesOrderOSMCFSCommsJMSConsumer
■ UpdateSalesOrderSiebelCommsProvABCSImpl
■ UpdateTroubleTicketSiebelCommsProvABCSImpl
7.5.1 Validating Security PoliciesAll SOA composites are protected by Global Policies provided by Foundation Pack as defined in the Security section of the Developer Guide. Additionally individual services for this integration have locally attached security policies.
To validate locally attached security policies:1. Log in to Oracle Enterprise Manager Fusion Middleware Control
2. Expand WebLogic Domain.
3. Select soa_domain.
4. Right-click soa_domain.
5. Select Web Services, Policies.
6. Verify Service Policy attachment.
Verifying Deployment
7-14 Oracle Application Integration Architecture Installation and Upgrade Guide for Pre-Built Integrations
a. Find no_authentication_service_policy in the list of policies.
b. Click the number in Attachment Count column.
This opens Usage Analysis screen.
c. Change the Subject Type list box to SOA Service.
d. Validate that all the composites are listed with local attachment to this service policy.
7. Verify Client Policy attachment
a. Navigate back to Web Services Policies screen.
b. Navigate to Applies To LOV, select Service Clients and hit enter. Find no_authentication_client_policy.
c. Click the number in Attachment Count column.
This opens Usage Analysis screen.
d. Change the Subject Type list box to SOA Reference.
e. Validate that all the composites are listed with local attachment to this client policy and attached to the correct references.
For integration implementation, see Oracle Application Integration Architecture Oracle Communication Order to Cash Integration Pack Implementation Guide for Siebel CRM, Oracle Order and Service Management, and Oracle Billing and Revenue Management.
Also see Oracle Application Integration Architecture Siebel CRM Integration Pack for Oracle Communications Billing and Revenue Management: Agent Assisted Billing Care Implementation Guide.
Table 7–7 No Authentication Service Policy Attachments for Comms Order to Cash: SBL and BRM
Composite Service Policy
SyncCustomerSiebelEventAggregator oracle/no_authentication_service_policy
Table 7–8 No Authentication Client Policy Attachments for Comms Order to Cash: SBL and BRM
Composite Service Policy
SyncAccountSiebelReqABCSImpl oracle/no_authentication_client_policy
QuerySpecificationListSiebelCommsProvABCSImpl oracle/no_authentication_client_policy
ProductOptimizedSyncPriceListListSiebelCommsProvABCSImpl oracle/no_authentication_client_policy
QuerySpecificationValueSetListSiebelCommsProvABCSImpl oracle/no_authentication_client_policy
UpdateTroubleTicketSiebelCommsProvABCSImpl oracle/no_authentication_client_policy
SyncItemCompositionListSiebelCommsProvABCSImpl oracle/no_authentication_client_policy
UpdateSalesOrderSiebelCommsProvABCSImpl oracle/no_authentication_client_policy
CreateTroubleTicketSiebelCommsProvABCSImpl oracle/no_authentication_client_policy
QueryCustomerPartyListSiebelProvABCSImplV2 oracle/no_authentication_client_policy
QueryClassificationListSiebelCommsProvABCSImpl oracle/no_authentication_client_policy
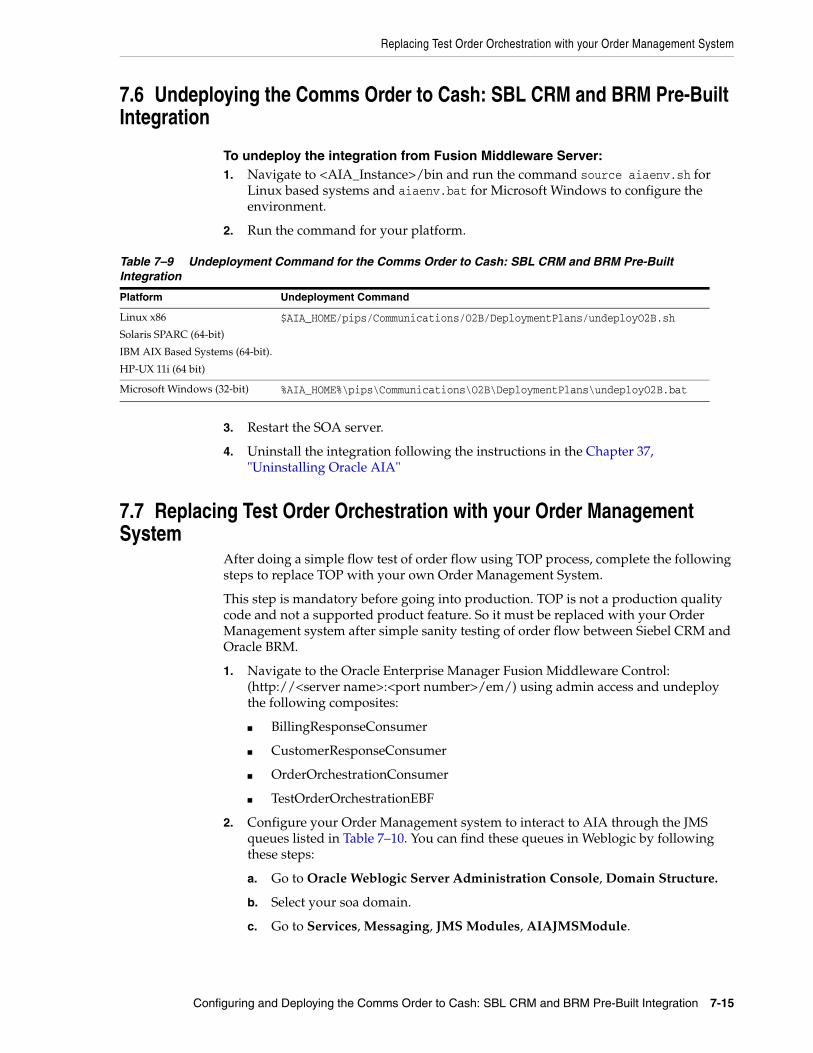
Replacing Test Order Orchestration with your Order Management System
Configuring and Deploying the Comms Order to Cash: SBL CRM and BRM Pre-Built Integration 7-15
7.6 Undeploying the Comms Order to Cash: SBL CRM and BRM Pre-Built Integration
To undeploy the integration from Fusion Middleware Server:1. Navigate to <AIA_Instance>/bin and run the command source aiaenv.sh for
Linux based systems and aiaenv.bat for Microsoft Windows to configure the environment.
2. Run the command for your platform.
3. Restart the SOA server.
4. Uninstall the integration following the instructions in the Chapter 37, "Uninstalling Oracle AIA"
7.7 Replacing Test Order Orchestration with your Order Management System
After doing a simple flow test of order flow using TOP process, complete the following steps to replace TOP with your own Order Management System.
This step is mandatory before going into production. TOP is not a production quality code and not a supported product feature. So it must be replaced with your Order Management system after simple sanity testing of order flow between Siebel CRM and Oracle BRM.
1. Navigate to the Oracle Enterprise Manager Fusion Middleware Control: (http://<server name>:<port number>/em/) using admin access and undeploy the following composites:
■ BillingResponseConsumer
■ CustomerResponseConsumer
■ OrderOrchestrationConsumer
■ TestOrderOrchestrationEBF
2. Configure your Order Management system to interact to AIA through the JMS queues listed in Table 7–10. You can find these queues in Weblogic by following these steps:
a. Go to Oracle Weblogic Server Administration Console, Domain Structure.
b. Select your soa domain.
c. Go to Services, Messaging, JMS Modules, AIAJMSModule.
Table 7–9 Undeployment Command for the Comms Order to Cash: SBL CRM and BRM Pre-Built Integration
Platform Undeployment Command
Linux x86
Solaris SPARC (64-bit)
IBM AIX Based Systems (64-bit).
HP-UX 11i (64 bit)
$AIA_HOME/pips/Communications/O2B/DeploymentPlans/undeployO2B.sh
Microsoft Windows (32-bit) %AIA_HOME%\pips\Communications\O2B\DeploymentPlans\undeployO2B.bat
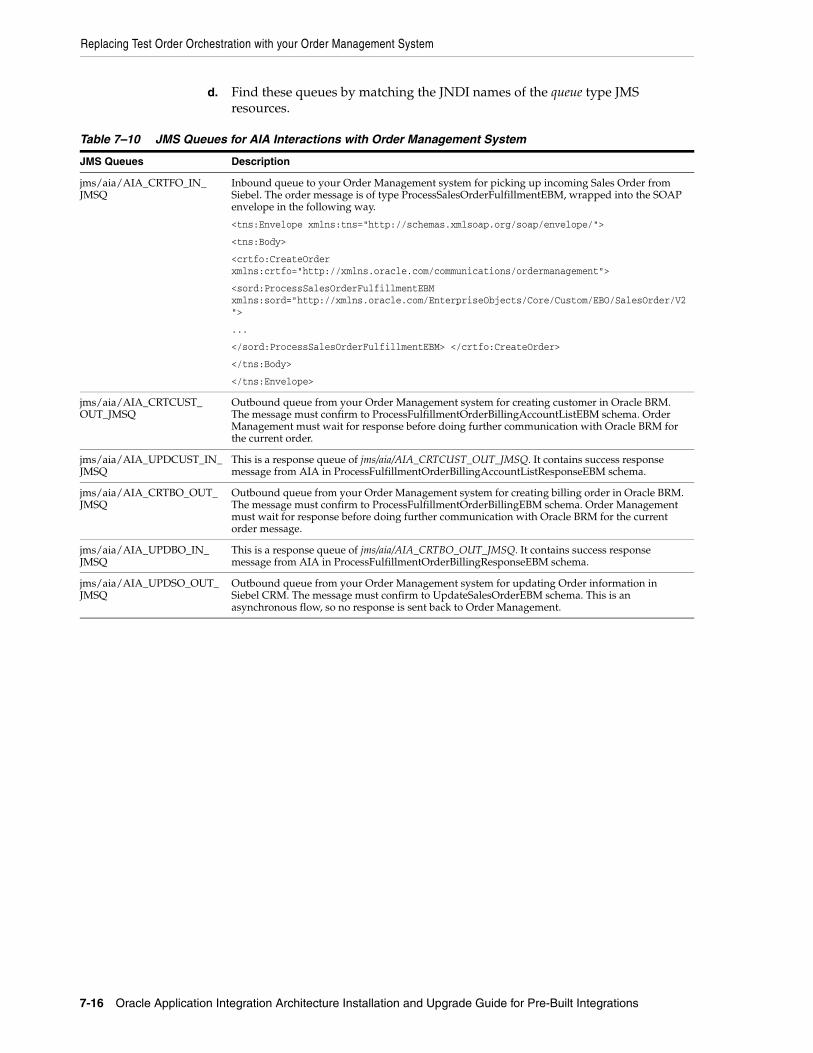
Replacing Test Order Orchestration with your Order Management System
7-16 Oracle Application Integration Architecture Installation and Upgrade Guide for Pre-Built Integrations
d. Find these queues by matching the JNDI names of the queue type JMS resources.
Table 7–10 JMS Queues for AIA Interactions with Order Management System
JMS Queues Description
jms/aia/AIA_CRTFO_IN_JMSQ
Inbound queue to your Order Management system for picking up incoming Sales Order from Siebel. The order message is of type ProcessSalesOrderFulfillmentEBM, wrapped into the SOAP envelope in the following way.
<tns:Envelope xmlns:tns="http://schemas.xmlsoap.org/soap/envelope/">
<tns:Body>
<crtfo:CreateOrder xmlns:crtfo="http://xmlns.oracle.com/communications/ordermanagement">
<sord:ProcessSalesOrderFulfillmentEBM xmlns:sord="http://xmlns.oracle.com/EnterpriseObjects/Core/Custom/EBO/SalesOrder/V2">
...
</sord:ProcessSalesOrderFulfillmentEBM> </crtfo:CreateOrder>
</tns:Body>
</tns:Envelope>
jms/aia/AIA_CRTCUST_OUT_JMSQ
Outbound queue from your Order Management system for creating customer in Oracle BRM. The message must confirm to ProcessFulfillmentOrderBillingAccountListEBM schema. Order Management must wait for response before doing further communication with Oracle BRM for the current order.
jms/aia/AIA_UPDCUST_IN_JMSQ
This is a response queue of jms/aia/AIA_CRTCUST_OUT_JMSQ. It contains success response message from AIA in ProcessFulfillmentOrderBillingAccountListResponseEBM schema.
jms/aia/AIA_CRTBO_OUT_JMSQ
Outbound queue from your Order Management system for creating billing order in Oracle BRM. The message must confirm to ProcessFulfillmentOrderBillingEBM schema. Order Management must wait for response before doing further communication with Oracle BRM for the current order message.
jms/aia/AIA_UPDBO_IN_JMSQ
This is a response queue of jms/aia/AIA_CRTBO_OUT_JMSQ. It contains success response message from AIA in ProcessFulfillmentOrderBillingResponseEBM schema.
jms/aia/AIA_UPDSO_OUT_JMSQ
Outbound queue from your Order Management system for updating Order information in Siebel CRM. The message must confirm to UpdateSalesOrderEBM schema. This is an asynchronous flow, so no response is sent back to Order Management.
8
Configuring and Deploying the Comms Order to Cash: SBL CRM and OSM Pre-Built Integration 8-1
8Configuring and Deploying the CommsOrder to Cash: SBL CRM and OSM Pre-Built
Integration
This chapter discusses how to configure and deploy the Oracle Communications Order to Cash Integration Pack for Siebel Customer Relationship Management and Oracle Communications Order and Service Management (Comms Order to Cash: SBL CRM and OSM Pre-Built Integration).
This chapter includes the following sections:
■ Section 8.1, "Deployment Configuration Wizard"
■ Section 8.2, "Configuring and Deploying the Comms Order to Cash: SBL CRM and OSM Pre-Built Integration"
■ Section 8.3, "Performing Postdeployment Configurations"
■ Section 8.4, "Verifying Deployment"
■ Section 8.5, "Undeploying the Comms Order to Cash: SBL CRM and OSM Pre-Built Integration"
8.1 Deployment Configuration WizardThe DCW screens prompt you to enter the data required for successful configuration of the Comms Order to Cash: SBL CRM and OSM Pre-Built Integration. Enter the details of the Comms Order to Cash: SBL CRM and OSM Pre-Built Integration screens below, take a printout and keep it ready when you run the DCW. This action enables faster and error free configuration.
8.1.1 Integration Server Details ScreenAll artifacts associated with the integration infrastructure components are deployed to the integration server. This screen contains the following fields:
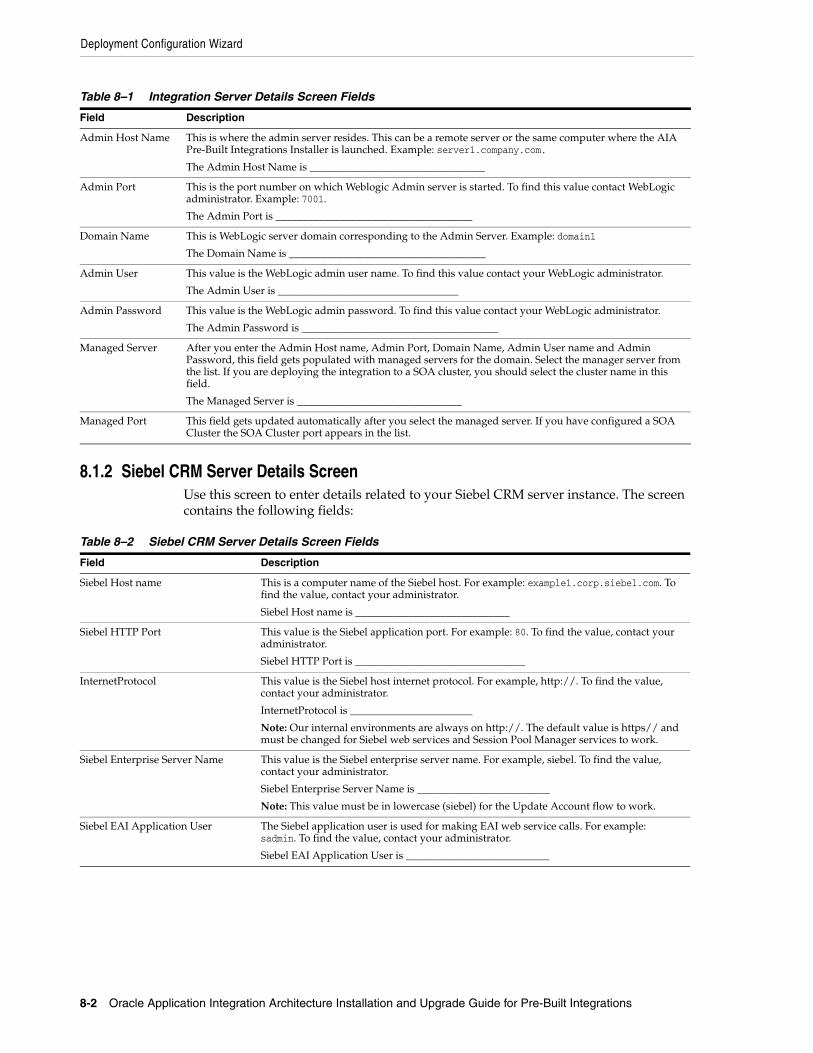
Deployment Configuration Wizard
8-2 Oracle Application Integration Architecture Installation and Upgrade Guide for Pre-Built Integrations
8.1.2 Siebel CRM Server Details ScreenUse this screen to enter details related to your Siebel CRM server instance. The screen contains the following fields:
Table 8–1 Integration Server Details Screen Fields
Field Description
Admin Host Name This is where the admin server resides. This can be a remote server or the same computer where the AIA Pre-Built Integrations Installer is launched. Example: server1.company.com.
The Admin Host Name is _________________________________
Admin Port This is the port number on which Weblogic Admin server is started. To find this value contact WebLogic administrator. Example: 7001.
The Admin Port is _____________________________________
Domain Name This is WebLogic server domain corresponding to the Admin Server. Example: domain1
The Domain Name is _____________________________________
Admin User This value is the WebLogic admin user name. To find this value contact your WebLogic administrator.
The Admin User is __________________________________
Admin Password This value is the WebLogic admin password. To find this value contact your WebLogic administrator.
The Admin Password is _____________________________________
Managed Server After you enter the Admin Host name, Admin Port, Domain Name, Admin User name and Admin Password, this field gets populated with managed servers for the domain. Select the manager server from the list. If you are deploying the integration to a SOA cluster, you should select the cluster name in this field.
The Managed Server is _______________________________
Managed Port This field gets updated automatically after you select the managed server. If you have configured a SOA Cluster the SOA Cluster port appears in the list.
Table 8–2 Siebel CRM Server Details Screen Fields
Field Description
Siebel Host name This is a computer name of the Siebel host. For example: example1.corp.siebel.com. To find the value, contact your administrator.
Siebel Host name is _____________________________
Siebel HTTP Port This value is the Siebel application port. For example: 80. To find the value, contact your administrator.
Siebel HTTP Port is ________________________________
InternetProtocol This value is the Siebel host internet protocol. For example, http://. To find the value, contact your administrator.
InternetProtocol is _______________________
Note: Our internal environments are always on http://. The default value is https// and must be changed for Siebel web services and Session Pool Manager services to work.
Siebel Enterprise Server Name This value is the Siebel enterprise server name. For example, siebel. To find the value, contact your administrator.
Siebel Enterprise Server Name is _________________________
Note: This value must be in lowercase (siebel) for the Update Account flow to work.
Siebel EAI Application User The Siebel application user is used for making EAI web service calls. For example: sadmin. To find the value, contact your administrator.
Siebel EAI Application User is ___________________________
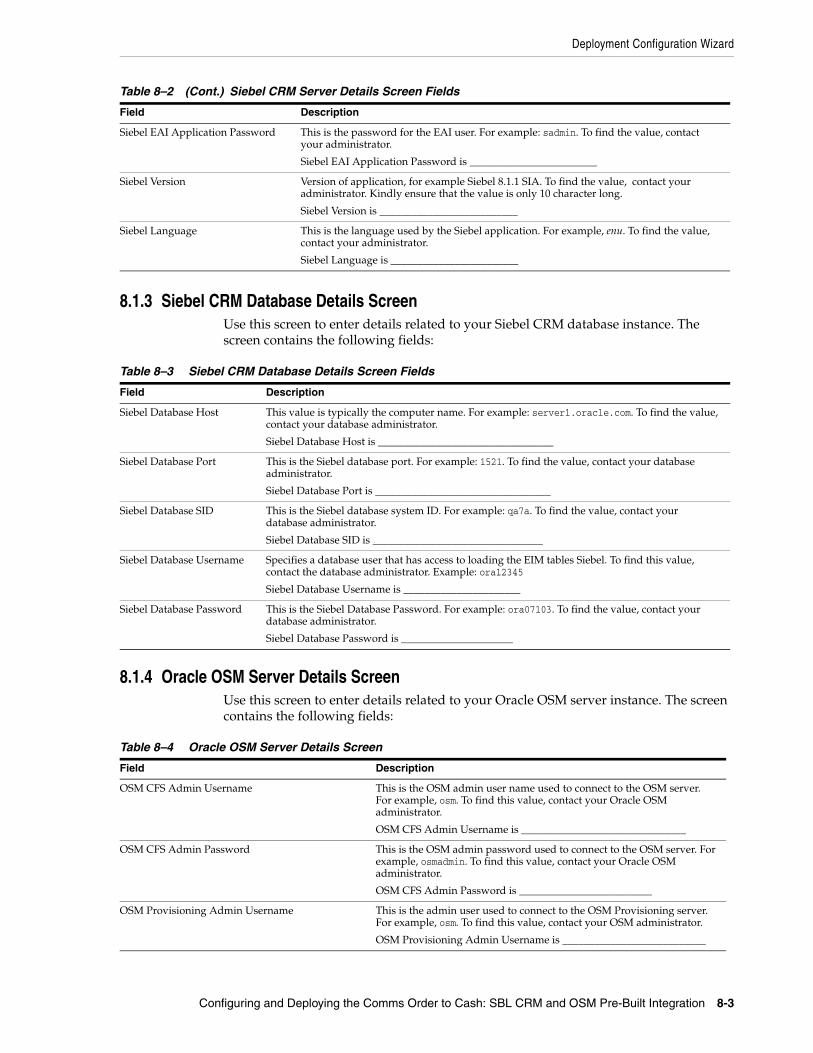
Deployment Configuration Wizard
Configuring and Deploying the Comms Order to Cash: SBL CRM and OSM Pre-Built Integration 8-3
8.1.3 Siebel CRM Database Details ScreenUse this screen to enter details related to your Siebel CRM database instance. The screen contains the following fields:
8.1.4 Oracle OSM Server Details ScreenUse this screen to enter details related to your Oracle OSM server instance. The screen contains the following fields:
Siebel EAI Application Password This is the password for the EAI user. For example: sadmin. To find the value, contact your administrator.
Siebel EAI Application Password is ________________________
Siebel Version Version of application, for example Siebel 8.1.1 SIA. To find the value, contact your administrator. Kindly ensure that the value is only 10 character long.
Siebel Version is __________________________
Siebel Language This is the language used by the Siebel application. For example, enu. To find the value, contact your administrator.
Siebel Language is ________________________
Table 8–3 Siebel CRM Database Details Screen Fields
Field Description
Siebel Database Host This value is typically the computer name. For example: server1.oracle.com. To find the value, contact your database administrator.
Siebel Database Host is _________________________________
Siebel Database Port This is the Siebel database port. For example: 1521. To find the value, contact your database administrator.
Siebel Database Port is _________________________________
Siebel Database SID This is the Siebel database system ID. For example: qa7a. To find the value, contact your database administrator.
Siebel Database SID is ________________________________
Siebel Database Username Specifies a database user that has access to loading the EIM tables Siebel. To find this value, contact the database administrator. Example: ora12345
Siebel Database Username is ______________________
Siebel Database Password This is the Siebel Database Password. For example: ora07103. To find the value, contact your database administrator.
Siebel Database Password is _____________________
Table 8–4 Oracle OSM Server Details Screen
Field Description
OSM CFS Admin Username This is the OSM admin user name used to connect to the OSM server. For example, osm. To find this value, contact your Oracle OSM administrator.
OSM CFS Admin Username is _______________________________
OSM CFS Admin Password This is the OSM admin password used to connect to the OSM server. For example, osmadmin. To find this value, contact your Oracle OSM administrator.
OSM CFS Admin Password is _________________________
OSM Provisioning Admin Username This is the admin user used to connect to the OSM Provisioning server. For example, osm. To find this value, contact your OSM administrator.
OSM Provisioning Admin Username is ___________________________
Table 8–2 (Cont.) Siebel CRM Server Details Screen Fields
Field Description
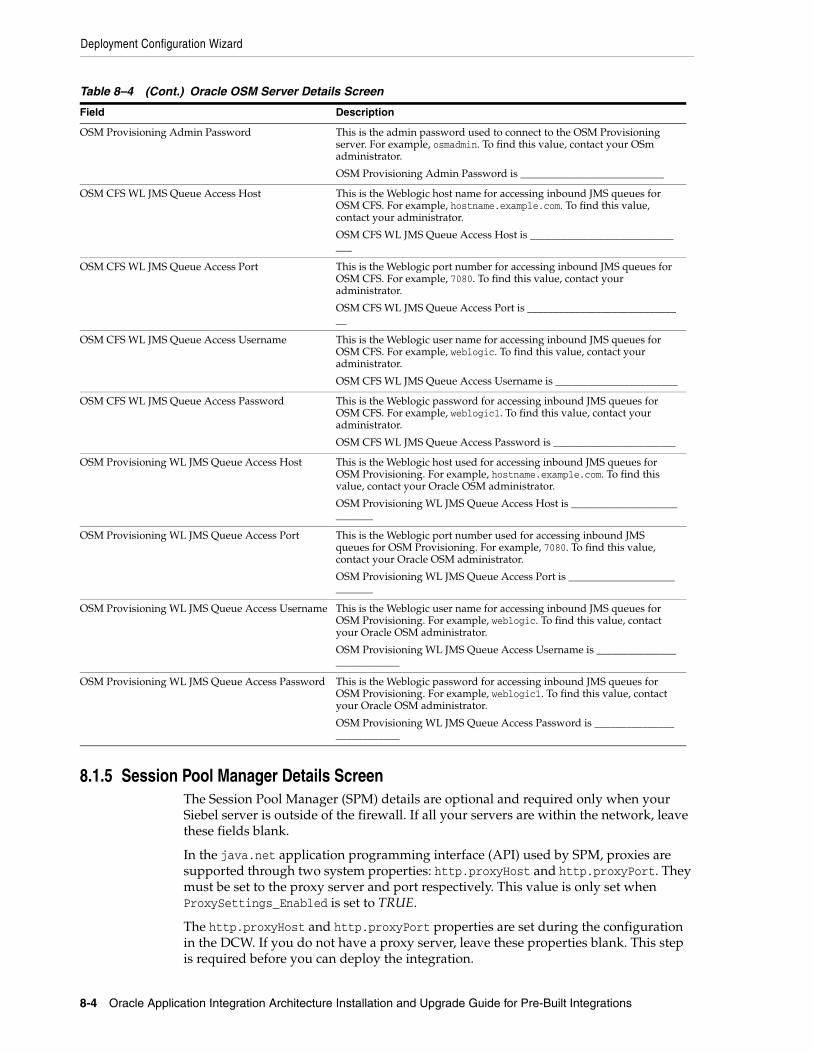
Deployment Configuration Wizard
8-4 Oracle Application Integration Architecture Installation and Upgrade Guide for Pre-Built Integrations
8.1.5 Session Pool Manager Details ScreenThe Session Pool Manager (SPM) details are optional and required only when your Siebel server is outside of the firewall. If all your servers are within the network, leave these fields blank.
In the java.net application programming interface (API) used by SPM, proxies are supported through two system properties: http.proxyHost and http.proxyPort. They must be set to the proxy server and port respectively. This value is only set when ProxySettings_Enabled is set to TRUE.
The http.proxyHost and http.proxyPort properties are set during the configuration in the DCW. If you do not have a proxy server, leave these properties blank. This step is required before you can deploy the integration.
OSM Provisioning Admin Password This is the admin password used to connect to the OSM Provisioning server. For example, osmadmin. To find this value, contact your OSm administrator.
OSM Provisioning Admin Password is ___________________________
OSM CFS WL JMS Queue Access Host This is the Weblogic host name for accessing inbound JMS queues for OSM CFS. For example, hostname.example.com. To find this value, contact your administrator.
OSM CFS WL JMS Queue Access Host is ______________________________
OSM CFS WL JMS Queue Access Port This is the Weblogic port number for accessing inbound JMS queues for OSM CFS. For example, 7080. To find this value, contact your administrator.
OSM CFS WL JMS Queue Access Port is ______________________________
OSM CFS WL JMS Queue Access Username This is the Weblogic user name for accessing inbound JMS queues for OSM CFS. For example, weblogic. To find this value, contact your administrator.
OSM CFS WL JMS Queue Access Username is _______________________
OSM CFS WL JMS Queue Access Password This is the Weblogic password for accessing inbound JMS queues for OSM CFS. For example, weblogic1. To find this value, contact your administrator.
OSM CFS WL JMS Queue Access Password is _______________________
OSM Provisioning WL JMS Queue Access Host This is the Weblogic host used for accessing inbound JMS queues for OSM Provisioning. For example, hostname.example.com. To find this value, contact your Oracle OSM administrator.
OSM Provisioning WL JMS Queue Access Host is ___________________________
OSM Provisioning WL JMS Queue Access Port This is the Weblogic port number used for accessing inbound JMS queues for OSM Provisioning. For example, 7080. To find this value, contact your Oracle OSM administrator.
OSM Provisioning WL JMS Queue Access Port is ___________________________
OSM Provisioning WL JMS Queue Access Username This is the Weblogic user name for accessing inbound JMS queues for OSM Provisioning. For example, weblogic. To find this value, contact your Oracle OSM administrator.
OSM Provisioning WL JMS Queue Access Username is ___________________________
OSM Provisioning WL JMS Queue Access Password This is the Weblogic password for accessing inbound JMS queues for OSM Provisioning. For example, weblogic1. To find this value, contact your Oracle OSM administrator.
OSM Provisioning WL JMS Queue Access Password is ___________________________
Table 8–4 (Cont.) Oracle OSM Server Details Screen
Field Description
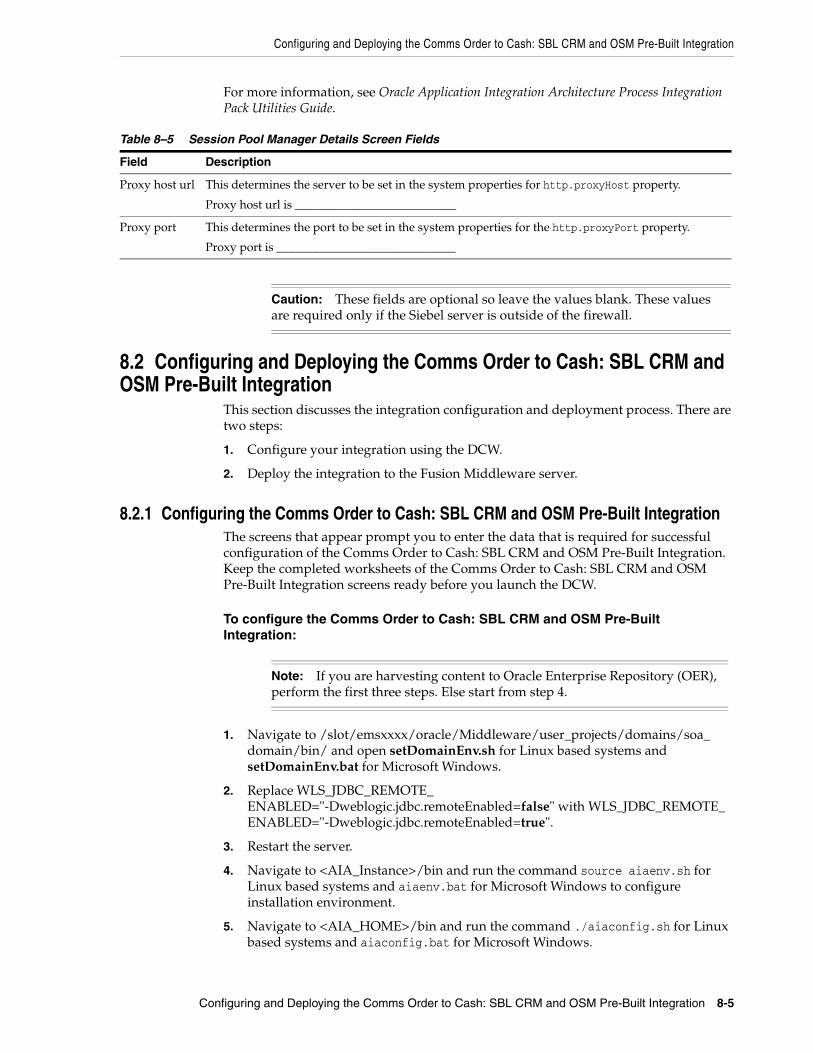
Configuring and Deploying the Comms Order to Cash: SBL CRM and OSM Pre-Built Integration
Configuring and Deploying the Comms Order to Cash: SBL CRM and OSM Pre-Built Integration 8-5
For more information, see Oracle Application Integration Architecture Process Integration Pack Utilities Guide.
8.2 Configuring and Deploying the Comms Order to Cash: SBL CRM and OSM Pre-Built Integration
This section discusses the integration configuration and deployment process. There are two steps:
1. Configure your integration using the DCW.
2. Deploy the integration to the Fusion Middleware server.
8.2.1 Configuring the Comms Order to Cash: SBL CRM and OSM Pre-Built IntegrationThe screens that appear prompt you to enter the data that is required for successful configuration of the Comms Order to Cash: SBL CRM and OSM Pre-Built Integration. Keep the completed worksheets of the Comms Order to Cash: SBL CRM and OSM Pre-Built Integration screens ready before you launch the DCW.
To configure the Comms Order to Cash: SBL CRM and OSM Pre-Built Integration:
1. Navigate to /slot/emsxxxx/oracle/Middleware/user_projects/domains/soa_domain/bin/ and open setDomainEnv.sh for Linux based systems and setDomainEnv.bat for Microsoft Windows.
2. Replace WLS_JDBC_REMOTE_ENABLED="-Dweblogic.jdbc.remoteEnabled=false" with WLS_JDBC_REMOTE_ENABLED="-Dweblogic.jdbc.remoteEnabled=true".
3. Restart the server.
4. Navigate to <AIA_Instance>/bin and run the command source aiaenv.sh for Linux based systems and aiaenv.bat for Microsoft Windows to configure installation environment.
5. Navigate to <AIA_HOME>/bin and run the command ./aiaconfig.sh for Linux based systems and aiaconfig.bat for Microsoft Windows.
Table 8–5 Session Pool Manager Details Screen Fields
Field Description
Proxy host url This determines the server to be set in the system properties for http.proxyHost property.
Proxy host url is ___________________________
Proxy port This determines the port to be set in the system properties for the http.proxyPort property.
Proxy port is ______________________________
Caution: These fields are optional so leave the values blank. These values are required only if the Siebel server is outside of the firewall.
Note: If you are harvesting content to Oracle Enterprise Repository (OER), perform the first three steps. Else start from step 4.
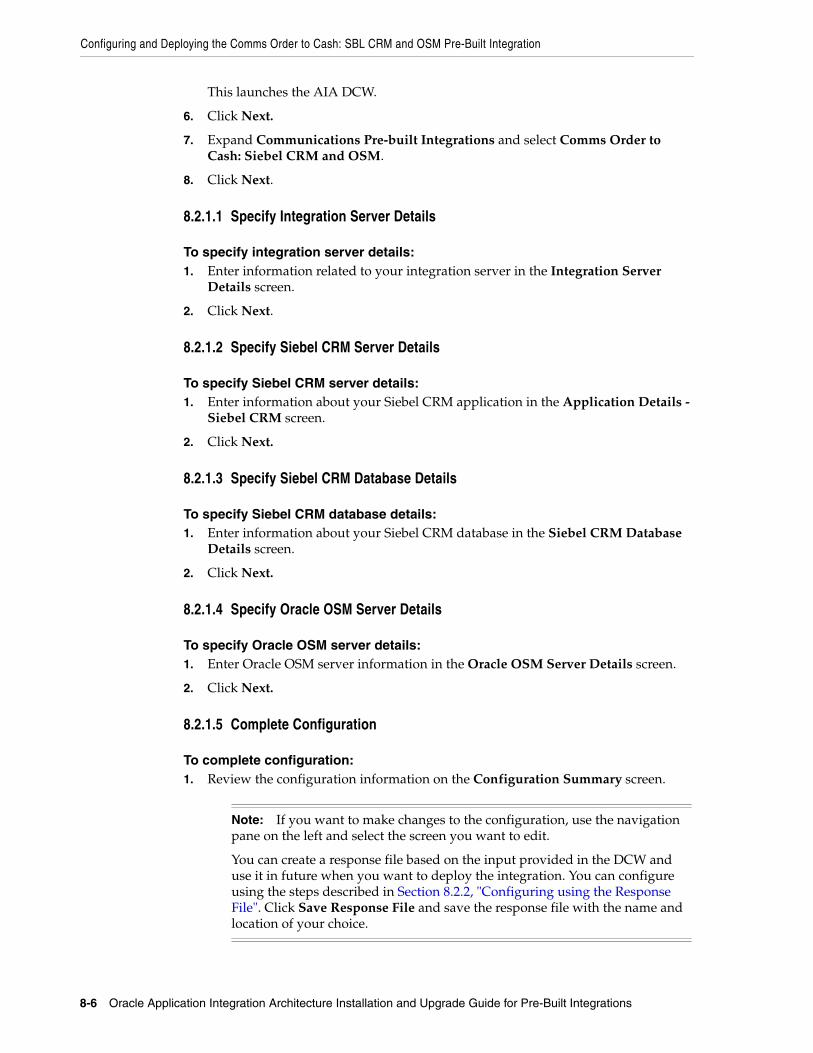
Configuring and Deploying the Comms Order to Cash: SBL CRM and OSM Pre-Built Integration
8-6 Oracle Application Integration Architecture Installation and Upgrade Guide for Pre-Built Integrations
This launches the AIA DCW.
6. Click Next.
7. Expand Communications Pre-built Integrations and select Comms Order to Cash: Siebel CRM and OSM.
8. Click Next.
8.2.1.1 Specify Integration Server Details
To specify integration server details:1. Enter information related to your integration server in the Integration Server
Details screen.
2. Click Next.
8.2.1.2 Specify Siebel CRM Server Details
To specify Siebel CRM server details:1. Enter information about your Siebel CRM application in the Application Details -
Siebel CRM screen.
2. Click Next.
8.2.1.3 Specify Siebel CRM Database Details
To specify Siebel CRM database details:1. Enter information about your Siebel CRM database in the Siebel CRM Database
Details screen.
2. Click Next.
8.2.1.4 Specify Oracle OSM Server Details
To specify Oracle OSM server details:1. Enter Oracle OSM server information in the Oracle OSM Server Details screen.
2. Click Next.
8.2.1.5 Complete Configuration
To complete configuration:1. Review the configuration information on the Configuration Summary screen.
Note: If you want to make changes to the configuration, use the navigation pane on the left and select the screen you want to edit.
You can create a response file based on the input provided in the DCW and use it in future when you want to deploy the integration. You can configure using the steps described in Section 8.2.2, "Configuring using the Response File". Click Save Response File and save the response file with the name and location of your choice.
Configuring and Deploying the Comms Order to Cash: SBL CRM and OSM Pre-Built Integration
Configuring and Deploying the Comms Order to Cash: SBL CRM and OSM Pre-Built Integration 8-7
2. Click Configure to accept this configuration and begin the installation.
The system displays progress of configuration in the Configuration Progress screen.
The system displays any necessary warnings or errors. You can review the configuration log for additional details. The configuration log location is displayed in Configuration Progress screen.
3. When configuration process finishes without errors, the AIA DCW displays the Configuration Complete screen.
4. Click Finish to close the DCW.
8.2.2 Configuring using the Response File
To configure using the response file:1. Open the response file.
When you create a response file through OUI, passwords get stored as <SECURE>.
2. Replace the password fields with actual passwords in the response file.
3. Navigate to <AIA_Instance>/bin and run the command source aiaenv.sh for Linux based systems and aiaenv.bat for Microsoft Windows to configure the environment.
4. Navigate to <AIA_HOME>/bin and run the command ./aiaconfig.sh <Response File Location and Name> for Linux based systems and aiaconfig.bat <Response File Location and Name> for Microsoft Windows.
8.2.3 Deploying Mandatory PatchesBefore deploying Comms Order to Cash: SBL CRM and OSM Pre-Built Integration, you must install the patch 16604969.
8.2.4 Deploying the Comms Order to Cash: SBL CRM and OSM Pre-Built Integration
To deploy the integration to Fusion Middleware server:1. Navigate to <AIA_Instance>/bin and run the command source aiaenv.sh for
Linux based systems and aiaenv.bat for Microsoft Windows to configure the environment.
2. Run the command for your platform.
Note: In Windows 2008, 2008 R2 and Vista, run the command prompt as an administrator (elevated mode). If the command prompt is invoked in normal mode, the integrations are not displayed.
Performing Postdeployment Configurations
8-8 Oracle Application Integration Architecture Installation and Upgrade Guide for Pre-Built Integrations
3. Review the log file in the location specified in the command or at the default location <AIA_Instance>/logs/O2ADP_Deployments_YYYY-MM-DD_HH-MI-SS.log to verify successful deployment of the integration.
Oracle AIA ships a few artifacts in AIA Lifecycle Workbench which can be used in your integrations. These native artifacts created using FMW technologies such as BPEL, Mediator are natively supported by AIA Foundation Pack tools such as Project Lifecycle Workbench, Harvester, Deployment Generator, and AIA Installer Driver (AID). These artifacts include SOA artifact types such as composites, DataSources, DVM, xRef, and so on. These can be modified or new natively supported artifacts can be added using AIA Lifecycle Workbench and a BOM.xml file can be generated.
Integrations, most often, also require deployment of artifact types that are beyond what is supported by the Project Lifecycle Workbench and AIA Harvester. For instance, you may want to deploy artifacts such as Java applications, Shell Scripts, ANT based build scripts which constitute part of integration landscape in addition to the artifacts that are delivered by AIA. AIA also supports deployment of these supplementary artifacts. However, you must modify and add new non native artifacts outside AIA Lifecycle Workbench.
For more information on deploying artifacts, see Oracle Fusion Middleware Developer's Guide for Oracle Application Integration Architecture Foundation Pack, "Generating Deployment Plans and Deploying Artifacts".
8.3 Performing Postdeployment ConfigurationsThis section discusses post deployment configuration for Comms Order to Cash: SBL CRM and OSM Pre-Built Integration. This section includes:
■ Section 8.3.1, "Suppressing Auto-Retry and Preventing Multiple Error Notifications and Trouble Tickets"
■ Section 8.3.2, "Supporting Message Priority"
■ Section 8.3.3, "Adding Security Policy to the QueryProductClassAndAttributesSCECommsReqABCSImpl Service"
■ Section 8.3.4, "Setting up the AIA FMW Server"
■ Section 8.3.5, "Deploying Mandatory Patches"
8.3.1 Suppressing Auto-Retry and Preventing Multiple Error Notifications and Trouble Tickets
This step is necessary to ensure that an transaction does not get auto tried using Database or SOA's inbuilt auto retry mechanism. Relying on Database or SOA's inbuild retry would cause undesirable effect on AIA flows and end to end transactionlity.
Table 8–6 Deployment Commands for the Comms Order to Cash: SBL CRM and OSM Pre-Built Integration
Platform Deployment Command
Linux x86
Solaris SPARC (64-bit)
IBM AIX Based Systems (64-bit).
HP-UX 11i (64 bit)
$AIA_HOME/pips/Communications/O2A/DeploymentPlans/deployO2A.sh
Microsoft Windows (32-bit) %AIA_HOME%\pips\Communications\O2A\DeploymentPlans\deployO2A.bat
Performing Postdeployment Configurations
Configuring and Deploying the Comms Order to Cash: SBL CRM and OSM Pre-Built Integration 8-9
To suppress auto-retry and prevent multiple error notifications and trouble tickets:1. Set the GlobalTxMaxRetry property for outbound adapters:
a. Log in to the Oracle Enterprise Manager Fusion Middleware Control.
b. Expand the SOA folder, right-click soa_infra.
c. Select SOA Administration, Common Properties.
d. Click More SOA Infra Advanced Configuration Properties.
e. Search for the GlobalTxMaxRetry property and set the value as 0 (zero).
2. Set the GlobalInboundJcaRetryCount property for inbound adapters:
a. Log in to the Oracle Enterprise Manager Fusion Middleware Control.
b. Expand the SOA folder, right-click soa_infra.
c. Select Administration, System Mbean Browser.
d. Search for oracle.as.soainfra.config, expand <Server>, expand AdapterConfig.
e. Select Adapter.
f. Search for the GlobalInboundJcaRetryCount property and set the value as 0 (zero).
3. Change Audit Level from Development to Production for soa infrastructure:
a. Log in to the Oracle Enterprise Manager Fusion Middleware Control.
b. Expand the SOA folder, right-click soa_infra.
c. Select SOA Administration, Common Properties.
d. Choose Production from the Audit Level list.
e. Click Apply.
4. Stop and Start the SOA and Admin Server so that your changes can take effect.
8.3.2 Supporting Message PriorityAs part of supporting message priority, follow the below steps to configure the queues (AIA_CRTBO_OUT_JMSQ, AIA_CRTCUST_OUT_JMS, AIA_CRTFO_OUT_JMSQ, AIA_FOPROV_OUT_JMSQ) so that the message is prioritized based on JMSPriority.
1. Creating Destination Sort Key based on JMSPriority
a. Log in to <httphost>:<httpport>/console
b. Navigate to Services, Messaging, JMS Modules
c. Click AIAJMSModule
d. Click New and select Destination Sort Key option
e. Give a name AIA_SALESORDERJMSPRIORITY_KEY, click OK. The key is created
f. Click AIA_SALESORDERJMSPRIORITY_KEY link and choose JMSPriority from the Sort Key drop down list
g. Select Key Type as Int
h. Select Direction as Descending
Performing Postdeployment Configurations
8-10 Oracle Application Integration Architecture Installation and Upgrade Guide for Pre-Built Integrations
i. Click Save
2. Attaching Destination Sort Key to JMS Queues
a. Click AIAJMSModule
b. Click AIA_CRTBO_OUT_JMSQ
c. In The Destination Keys section, newly created Key is displayed. Select and choose the key
d. Click Save
3. Repeat steps 2a to 2d for the following queues:
■ AIA_CRTCUST_OUT_JMSQ
■ AIA_CRTFO_OUT_JMSQ
■ AIA_FOPROV_OUT_JMSQ
8.3.3 Adding Security Policy to the QueryProductClassAndAttributesSCECommsReqABCSImpl Service
Add the following security policy to have the Product Class SCE flow working from the OSM Design Studio.
To add the security policy:1. Log in to the Oracle Enterprise Manager Fusion Middleware Control
(http://<host>:<port>/em).
2. Select the service QueryProductClassAndAttributesSCECommsReqABCSImpl.
3. Scroll down to the Services and References section and select the QueryProductClassAndAttributesSCECommsReqABCSImpl link.
4. Go to the Policies tab.
5. Go to the Directly Attached Policies section and click Attach/Detach.
6. Select oracle/no_authentication_service_policy and click Attach.
7. Click OK.
8. Verify that oracle/no_authentication_service_policy is attached.
8.3.4 Setting up the AIA FMW Server
Perform the following steps to enable tunneling:
1. Configure http proxy host
a. Modify mod_wl_ohs.conf
For example, scratch/userid/Oracle/Middleware/Oracle_WT1/instances/instance1/config/OHS/ohs1/mod_wl_ohs.conf
b. Add the following location:
Caution: This step is only required if you are using OSM 7.0.2 version.
Note: This step is required if cluster is the deployment topology.
Performing Postdeployment Configurations
Configuring and Deploying the Comms Order to Cash: SBL CRM and OSM Pre-Built Integration 8-11
<Location / bea_wls_internal >
SetHandler weblogic-handler
<Node1Servername: Portno>,<Node2Servername: Portno>
WLLogFile /tmp/web_log.log
</Location>
c. Restart using ./opmnctl stopall, ./opmnctl startall
2. Configure WebLogic Server
a. Log in to WebLogic Server console.
b. Click Admin and each manager server.
c. Click Protocols, HTTP, Enable Tunneling.
d. Save the configuration.
e. Restart Admin and managed servers.
3. Configure OSM SAF Remote Context if OSM Fulfillment system is clustered
a. Navigate to console <host>:<port>/console.
b. Navigate to Home, JMS Modules, AIAJMSModule, OSM (SAF Remote Context).
c. Select Lock and Edit: update the URL to include all the OSM clustered nodes.
For example, t3://coqalv0045.example.com:7070,coqalv0046.example.com:8070.
d. Save and Release the configuration.
4. Configure SOM SAF Remote Context if OSM Provisioning system is clustered
a. Navigate to console <host>:<port>/console.
b. Navigate to Home, JMS Modules, AIAJMSModule, SOM (SAF Remote Context).
c. Select Lock and Edit: update the URL to include all the OSM clustered nodes.
For example, t3://coqalv0045.example.com:7070,coqalv0046.example.com:8070.
d. Save and Release the configuration.
8.3.5 Deploying Mandatory PatchesAfter deploying Comms Order to Cash: SBL CRM and OSM Pre-Built Integration, you must deploy the following patches:
■ 11843588
■ 12755349

Verifying Deployment
8-12 Oracle Application Integration Architecture Installation and Upgrade Guide for Pre-Built Integrations
8.4 Verifying Deployment
To verify the Comms Order to Cash: SBL CRM and OSM Pre-Built Integration deployment:1. Open the log files from the following location and look for warnings and error
messages:
■ For Linux x86, Solaris SPARC (64-bit), HP-UX 11i (64 bit) and IBM AIX Based Systems (64-bit): Review the install log located at <AIA_HOME>/aia_instances/<instance name>/logs to verify whether the integration is successfully installed.
2. Confirm that the Comms Order to Cash: SBL CRM and OSM Pre-Built Integration components were successfully deployed.
a. Navigate to the Oracle Enterprise Manager Fusion Middleware Control: (http://<server name>:<port number>/em/).
b. Log in with the server admin user name. For access details, contact the system administrator.
c. Expand Farm_soa_domain, SOA, soa-infra, Default and look for items listed below.
■ AIAOrderFalloutJMSBridgeService
■ CreateFaultNotificationLFCommsJMSConsumer
■ CreateOrderFalloutNotificationOSMCFSCommsJMSConsumer
■ CreateOrderFalloutNotificationOSMCFSCommsJMSProducer
■ CreateOrderFalloutNotificationOSMCFSCommsProvImpl
■ CreateTroubleTicketOSMCFSCommsJMSConsumer
■ CreateTroubleTicketRespOSMCFSCommsJMSProducer
■ CreateTroubleTicketSiebelCommsProvABCSImpl
■ CustomerPartyEBSV2
■ ProcessFOBillingAccountListRespOSMCFSCommsJMSProducer
■ ProcessFulfillmentOrderBillingAccountListOSMCFSCommsJMSConsumer
■ ProcessFulfillmentOrderBillingOSMCFSCommsJMSConsumer
■ ProcessFulfillmentOrderBillingResponseOSMCFSCommsJMSProducer
■ ProcessFulfillmentOrderUpdateOSMCFSCommsJMSProducer
■ ProcessFulfillmentOrderUpdateOSMPROVCommsJMSConsumer
■ ProcessProvisioningOrderOSMCFSCommsJMSConsumer
■ ProcessProvisioningOrderOSMPROVCommsJMSProducer
■ ProcessSalesOrderFulfillmentOSMCFSCommsJMSProducer
■ ProcessSalesOrderFulfillmentSiebelCommsJMSConsumer
■ ProcessSalesOrderFulfillmentSiebelCommsReqABCSImpl
■ ProductOptimizedSyncPriceListListSiebelCommsProvABCSImpl
■ QueryClassificationListSiebelCommsProvABCSImpl
Verifying Deployment
Configuring and Deploying the Comms Order to Cash: SBL CRM and OSM Pre-Built Integration 8-13
■ QueryCustomerPartyListSiebelProcCommsABCSImplV2
■ QueryProductClassAndAttributesSCECommsReqABCSImpl
■ QuerySpecificationListSiebelCommsProvABCSImpl
■ QuerySpecificationValueSetListSiebelCommsProvABCSImpl
■ SyncAccountSiebelAggregatorAdapter
■ SyncAccountSiebelReqABCSImpl
■ SyncAcctSiebelAggrEventConsumer
■ SyncAddressSiebelAggregatorAdapter
■ SyncBPSiebelAggregatorAdapter
■ SyncContactSiebelAggregatorAdapter
■ SyncCustomerSiebelEventAggregator
■ SyncItemCompositionListSiebelCommsProvABCSImpl
■ TransformAppContextSiebelService
■ UpdateSalsOrderOSMCFSCommsJMSConsumer
■ UpdateSalesOrderSiebelCommsProvABCSImpl
■ UpdateTroubleTicketOSMCFSCommsJMSConsumer
■ UpdateTroubleTicketSiebelCommsProvABCSImpl
8.4.1 Validating Security PoliciesAll SOA composites are protected by Global Policies provided by Foundation Pack as defined in the Security section of the Developer Guide. Additionally individual services for this integration have locally attached security policies.
To validate locally attached security policies:1. Log in to Oracle Enterprise Manager Fusion Middleware Control.
2. Expand WebLogic Domain.
3. Select soa_domain.
4. Right-click soa_domain.
5. Select Web Services, Policies.
6. Verify Service Policy attachment.
a. Find no_authentication_service_policy in the list of policies.
b. Click the number in Attachment Count column.
This opens Usage Analysis screen.
c. Change the Subject Type list box to SOA Service (1).
d. Validate that all the composites are listed with local attachment to this service policy.
7. Verify Client Policy attachment
a. Navigate back to Web Services Policies screen.
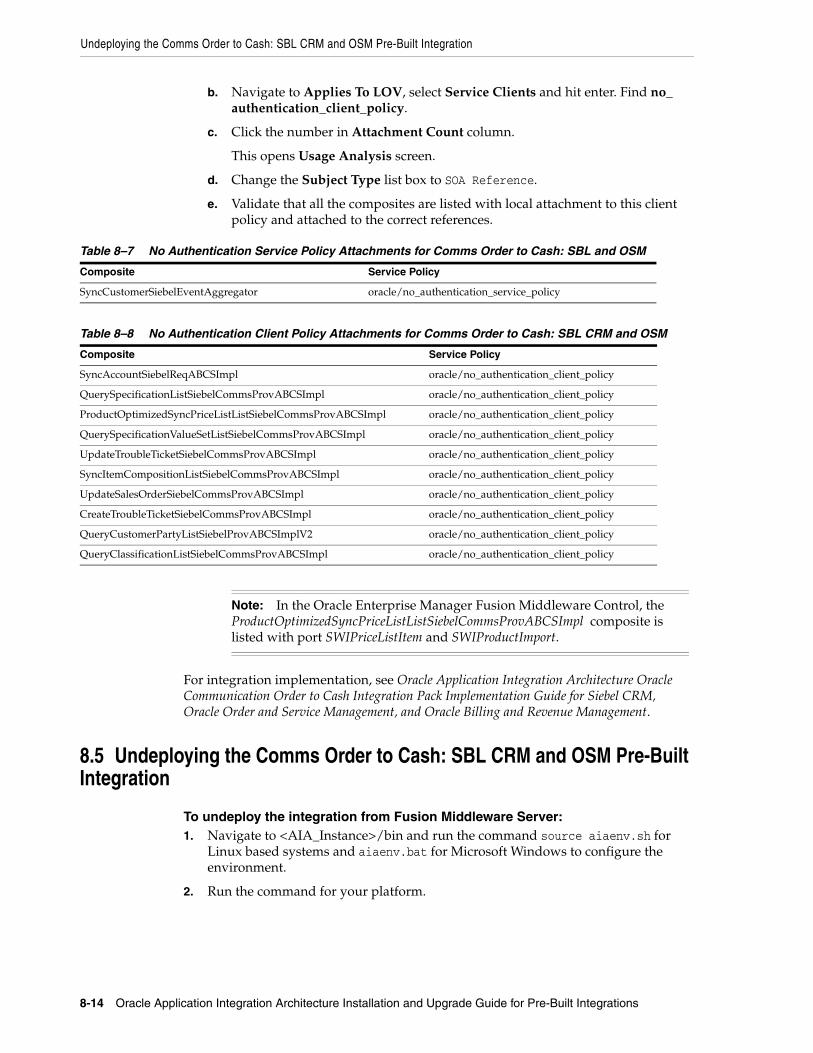
Undeploying the Comms Order to Cash: SBL CRM and OSM Pre-Built Integration
8-14 Oracle Application Integration Architecture Installation and Upgrade Guide for Pre-Built Integrations
b. Navigate to Applies To LOV, select Service Clients and hit enter. Find no_authentication_client_policy.
c. Click the number in Attachment Count column.
This opens Usage Analysis screen.
d. Change the Subject Type list box to SOA Reference.
e. Validate that all the composites are listed with local attachment to this client policy and attached to the correct references.
For integration implementation, see Oracle Application Integration Architecture Oracle Communication Order to Cash Integration Pack Implementation Guide for Siebel CRM, Oracle Order and Service Management, and Oracle Billing and Revenue Management.
8.5 Undeploying the Comms Order to Cash: SBL CRM and OSM Pre-Built Integration
To undeploy the integration from Fusion Middleware Server:1. Navigate to <AIA_Instance>/bin and run the command source aiaenv.sh for
Linux based systems and aiaenv.bat for Microsoft Windows to configure the environment.
2. Run the command for your platform.
Table 8–7 No Authentication Service Policy Attachments for Comms Order to Cash: SBL and OSM
Composite Service Policy
SyncCustomerSiebelEventAggregator oracle/no_authentication_service_policy
Table 8–8 No Authentication Client Policy Attachments for Comms Order to Cash: SBL CRM and OSM
Composite Service Policy
SyncAccountSiebelReqABCSImpl oracle/no_authentication_client_policy
QuerySpecificationListSiebelCommsProvABCSImpl oracle/no_authentication_client_policy
ProductOptimizedSyncPriceListListSiebelCommsProvABCSImpl oracle/no_authentication_client_policy
QuerySpecificationValueSetListSiebelCommsProvABCSImpl oracle/no_authentication_client_policy
UpdateTroubleTicketSiebelCommsProvABCSImpl oracle/no_authentication_client_policy
SyncItemCompositionListSiebelCommsProvABCSImpl oracle/no_authentication_client_policy
UpdateSalesOrderSiebelCommsProvABCSImpl oracle/no_authentication_client_policy
CreateTroubleTicketSiebelCommsProvABCSImpl oracle/no_authentication_client_policy
QueryCustomerPartyListSiebelProvABCSImplV2 oracle/no_authentication_client_policy
QueryClassificationListSiebelCommsProvABCSImpl oracle/no_authentication_client_policy
Note: In the Oracle Enterprise Manager Fusion Middleware Control, the ProductOptimizedSyncPriceListListSiebelCommsProvABCSImpl composite is listed with port SWIPriceListItem and SWIProductImport.
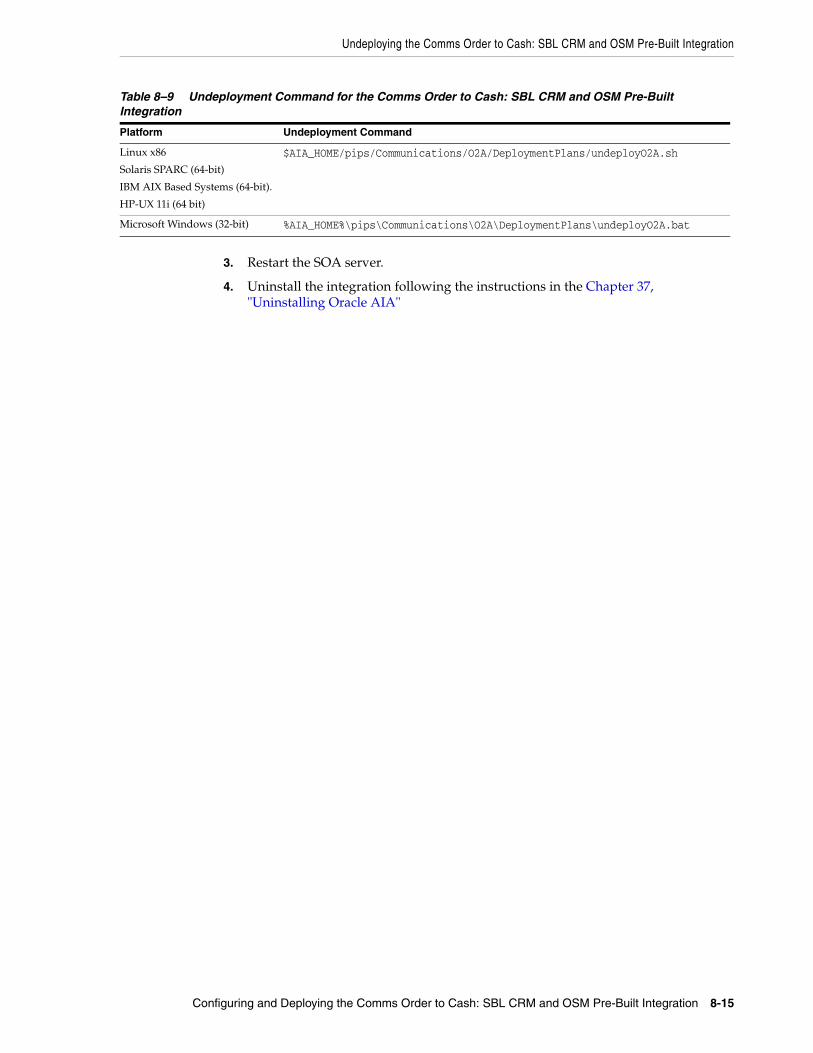
Undeploying the Comms Order to Cash: SBL CRM and OSM Pre-Built Integration
Configuring and Deploying the Comms Order to Cash: SBL CRM and OSM Pre-Built Integration 8-15
3. Restart the SOA server.
4. Uninstall the integration following the instructions in the Chapter 37, "Uninstalling Oracle AIA"
Table 8–9 Undeployment Command for the Comms Order to Cash: SBL CRM and OSM Pre-Built Integration
Platform Undeployment Command
Linux x86
Solaris SPARC (64-bit)
IBM AIX Based Systems (64-bit).
HP-UX 11i (64 bit)
$AIA_HOME/pips/Communications/O2A/DeploymentPlans/undeployO2A.sh
Microsoft Windows (32-bit) %AIA_HOME%\pips\Communications\O2A\DeploymentPlans\undeployO2A.bat

Undeploying the Comms Order to Cash: SBL CRM and OSM Pre-Built Integration
8-16 Oracle Application Integration Architecture Installation and Upgrade Guide for Pre-Built Integrations
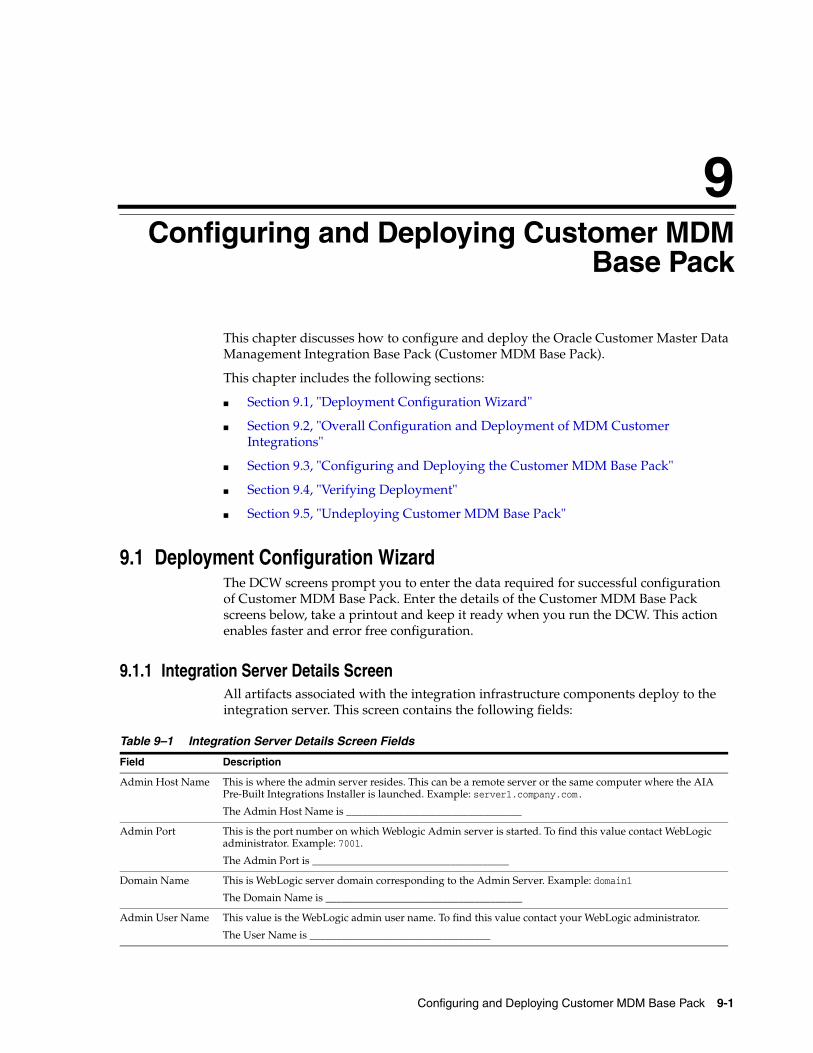
9
Configuring and Deploying Customer MDM Base Pack 9-1
9Configuring and Deploying Customer MDMBase Pack
This chapter discusses how to configure and deploy the Oracle Customer Master Data Management Integration Base Pack (Customer MDM Base Pack).
This chapter includes the following sections:
■ Section 9.1, "Deployment Configuration Wizard"
■ Section 9.2, "Overall Configuration and Deployment of MDM Customer Integrations"
■ Section 9.3, "Configuring and Deploying the Customer MDM Base Pack"
■ Section 9.4, "Verifying Deployment"
■ Section 9.5, "Undeploying Customer MDM Base Pack"
9.1 Deployment Configuration WizardThe DCW screens prompt you to enter the data required for successful configuration of Customer MDM Base Pack. Enter the details of the Customer MDM Base Pack screens below, take a printout and keep it ready when you run the DCW. This action enables faster and error free configuration.
9.1.1 Integration Server Details ScreenAll artifacts associated with the integration infrastructure components deploy to the integration server. This screen contains the following fields:
Table 9–1 Integration Server Details Screen Fields
Field Description
Admin Host Name This is where the admin server resides. This can be a remote server or the same computer where the AIA Pre-Built Integrations Installer is launched. Example: server1.company.com.
The Admin Host Name is _________________________________
Admin Port This is the port number on which Weblogic Admin server is started. To find this value contact WebLogic administrator. Example: 7001.
The Admin Port is _____________________________________
Domain Name This is WebLogic server domain corresponding to the Admin Server. Example: domain1
The Domain Name is _____________________________________
Admin User Name This value is the WebLogic admin user name. To find this value contact your WebLogic administrator.
The User Name is __________________________________
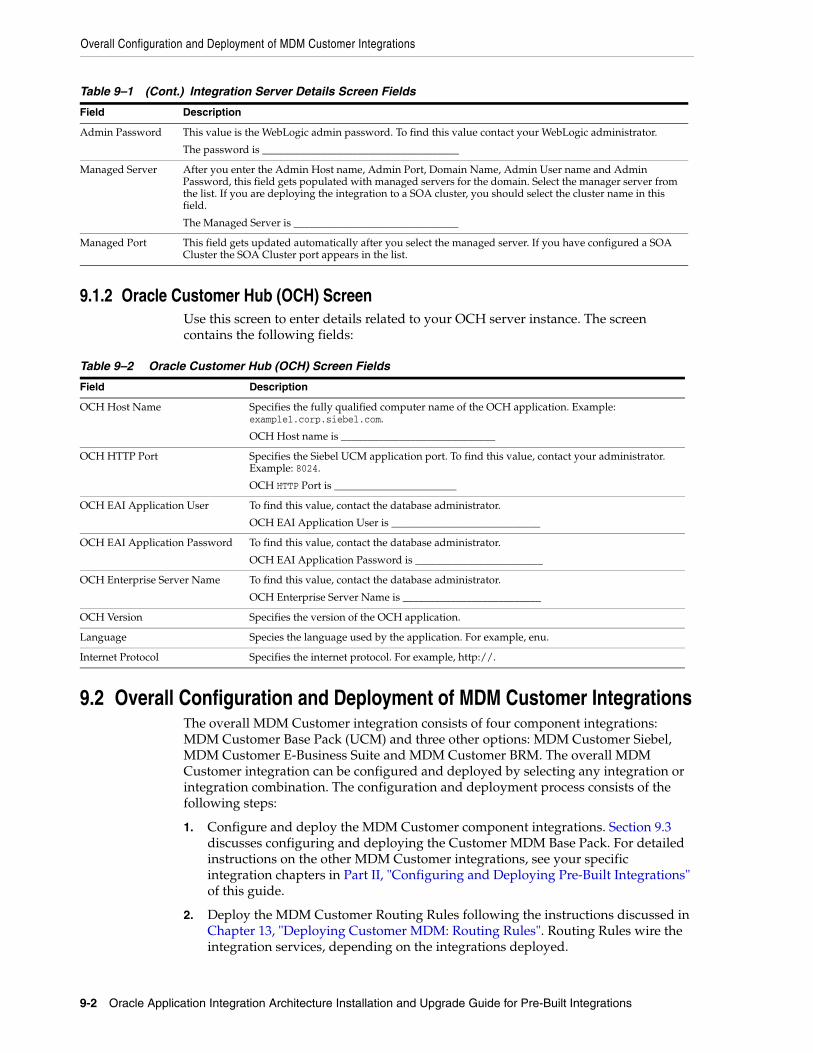
Overall Configuration and Deployment of MDM Customer Integrations
9-2 Oracle Application Integration Architecture Installation and Upgrade Guide for Pre-Built Integrations
9.1.2 Oracle Customer Hub (OCH) ScreenUse this screen to enter details related to your OCH server instance. The screen contains the following fields:
9.2 Overall Configuration and Deployment of MDM Customer IntegrationsThe overall MDM Customer integration consists of four component integrations: MDM Customer Base Pack (UCM) and three other options: MDM Customer Siebel, MDM Customer E-Business Suite and MDM Customer BRM. The overall MDM Customer integration can be configured and deployed by selecting any integration or integration combination. The configuration and deployment process consists of the following steps:
1. Configure and deploy the MDM Customer component integrations. Section 9.3 discusses configuring and deploying the Customer MDM Base Pack. For detailed instructions on the other MDM Customer integrations, see your specific integration chapters in Part II, "Configuring and Deploying Pre-Built Integrations" of this guide.
2. Deploy the MDM Customer Routing Rules following the instructions discussed in Chapter 13, "Deploying Customer MDM: Routing Rules". Routing Rules wire the integration services, depending on the integrations deployed.
Admin Password This value is the WebLogic admin password. To find this value contact your WebLogic administrator.
The password is _____________________________________
Managed Server After you enter the Admin Host name, Admin Port, Domain Name, Admin User name and Admin Password, this field gets populated with managed servers for the domain. Select the manager server from the list. If you are deploying the integration to a SOA cluster, you should select the cluster name in this field.
The Managed Server is _______________________________
Managed Port This field gets updated automatically after you select the managed server. If you have configured a SOA Cluster the SOA Cluster port appears in the list.
Table 9–2 Oracle Customer Hub (OCH) Screen Fields
Field Description
OCH Host Name Specifies the fully qualified computer name of the OCH application. Example: example1.corp.siebel.com.
OCH Host name is _____________________________
OCH HTTP Port Specifies the Siebel UCM application port. To find this value, contact your administrator. Example: 8024.
OCH HTTP Port is _______________________
OCH EAI Application User To find this value, contact the database administrator.
OCH EAI Application User is ____________________________
OCH EAI Application Password To find this value, contact the database administrator.
OCH EAI Application Password is ________________________
OCH Enterprise Server Name To find this value, contact the database administrator.
OCH Enterprise Server Name is __________________________
OCH Version Specifies the version of the OCH application.
Language Species the language used by the application. For example, enu.
Internet Protocol Specifies the internet protocol. For example, http://.
Table 9–1 (Cont.) Integration Server Details Screen Fields
Field Description
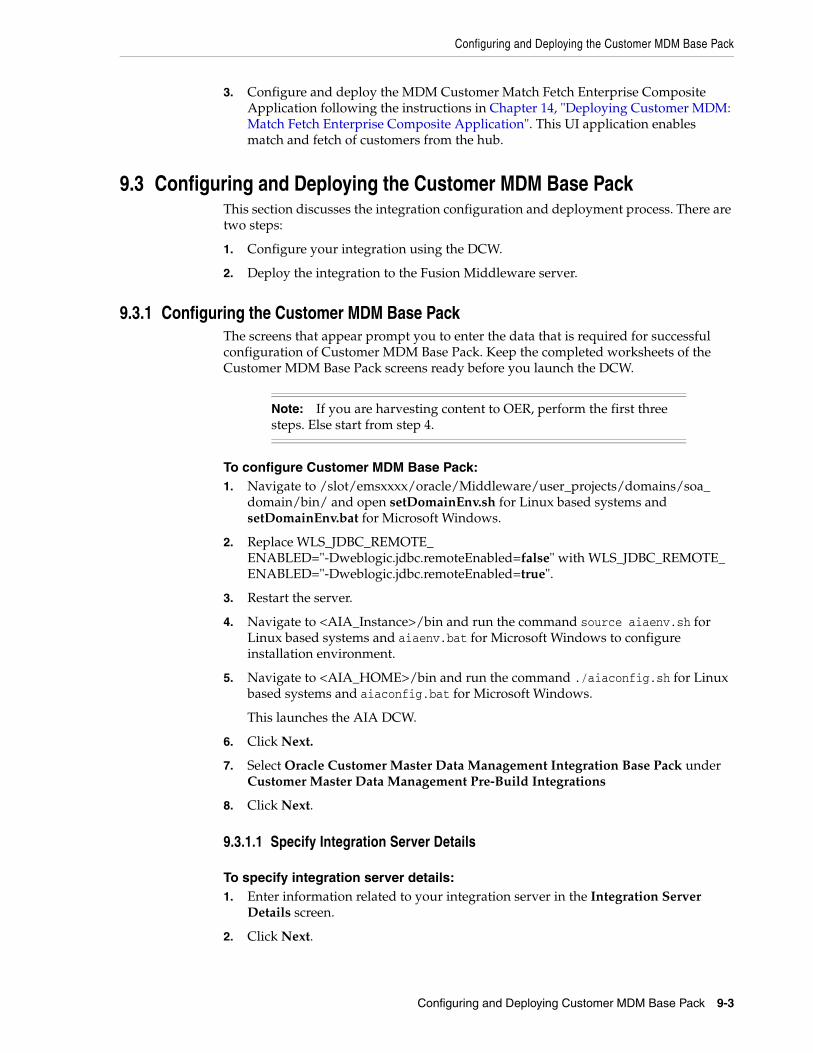
Configuring and Deploying the Customer MDM Base Pack
Configuring and Deploying Customer MDM Base Pack 9-3
3. Configure and deploy the MDM Customer Match Fetch Enterprise Composite Application following the instructions in Chapter 14, "Deploying Customer MDM: Match Fetch Enterprise Composite Application". This UI application enables match and fetch of customers from the hub.
9.3 Configuring and Deploying the Customer MDM Base PackThis section discusses the integration configuration and deployment process. There are two steps:
1. Configure your integration using the DCW.
2. Deploy the integration to the Fusion Middleware server.
9.3.1 Configuring the Customer MDM Base PackThe screens that appear prompt you to enter the data that is required for successful configuration of Customer MDM Base Pack. Keep the completed worksheets of the Customer MDM Base Pack screens ready before you launch the DCW.
To configure Customer MDM Base Pack:1. Navigate to /slot/emsxxxx/oracle/Middleware/user_projects/domains/soa_
domain/bin/ and open setDomainEnv.sh for Linux based systems and setDomainEnv.bat for Microsoft Windows.
2. Replace WLS_JDBC_REMOTE_ENABLED="-Dweblogic.jdbc.remoteEnabled=false" with WLS_JDBC_REMOTE_ENABLED="-Dweblogic.jdbc.remoteEnabled=true".
3. Restart the server.
4. Navigate to <AIA_Instance>/bin and run the command source aiaenv.sh for Linux based systems and aiaenv.bat for Microsoft Windows to configure installation environment.
5. Navigate to <AIA_HOME>/bin and run the command ./aiaconfig.sh for Linux based systems and aiaconfig.bat for Microsoft Windows.
This launches the AIA DCW.
6. Click Next.
7. Select Oracle Customer Master Data Management Integration Base Pack under Customer Master Data Management Pre-Build Integrations
8. Click Next.
9.3.1.1 Specify Integration Server Details
To specify integration server details:1. Enter information related to your integration server in the Integration Server
Details screen.
2. Click Next.
Note: If you are harvesting content to OER, perform the first three steps. Else start from step 4.

Configuring and Deploying the Customer MDM Base Pack
9-4 Oracle Application Integration Architecture Installation and Upgrade Guide for Pre-Built Integrations
9.3.1.2 Specify Oracle Customer Hub Server Details
To specify Oracle Customer Hub Server details:1. Enter information about your Oracle Customer Hub Server in the Application
Details - Oracle Customer Hub screen.
2. Click Next.
9.3.1.3 Complete Configuration
To complete configuration:1. Review the configuration information on the Configuration Summary screen.
2. Click Configure to accept this configuration and begin the installation.
The system displays progress of configuration in the Configuration Progress screen.
The system displays any warnings or errors as necessary. You can review the configuration log for additional details. The configuration log location is displayed in Configuration Progress screen.
3. When the configuration process finishes without errors, click Next.
4. When the AIA DCW displays the Configuration Complete screen, click Finish to close the DCW.
9.3.2 Configuring using the Response File
To configure using the response file:1. Open the response file.
When you create a response file through OUI, passwords get stored as <SECURE>.
2. Replace the password fields with actual passwords in the response file.
3. Navigate to <AIA_Instance>/bin and run the command source aiaenv.sh for Linux based systems and aiaenv.bat for Microsoft Windows to configure the environment.
4. Navigate to <AIA_HOME>/bin and run the command ./aiaconfig.sh <Response File Location and Name> for Linux based systems and aiaconfig.bat <Response File Location and Name> for Microsoft Windows.
Note: If you want to make changes to the configuration, use the navigation pane on the left and select the screen you want to edit.
You can create a response file based on the input provided in the DCW and use it in future when you want to deploy the integration. You can configure using the steps described in Section 9.3.2, "Configuring using the Response File". Click Save Response File and save the response file with the name and location of your choice.
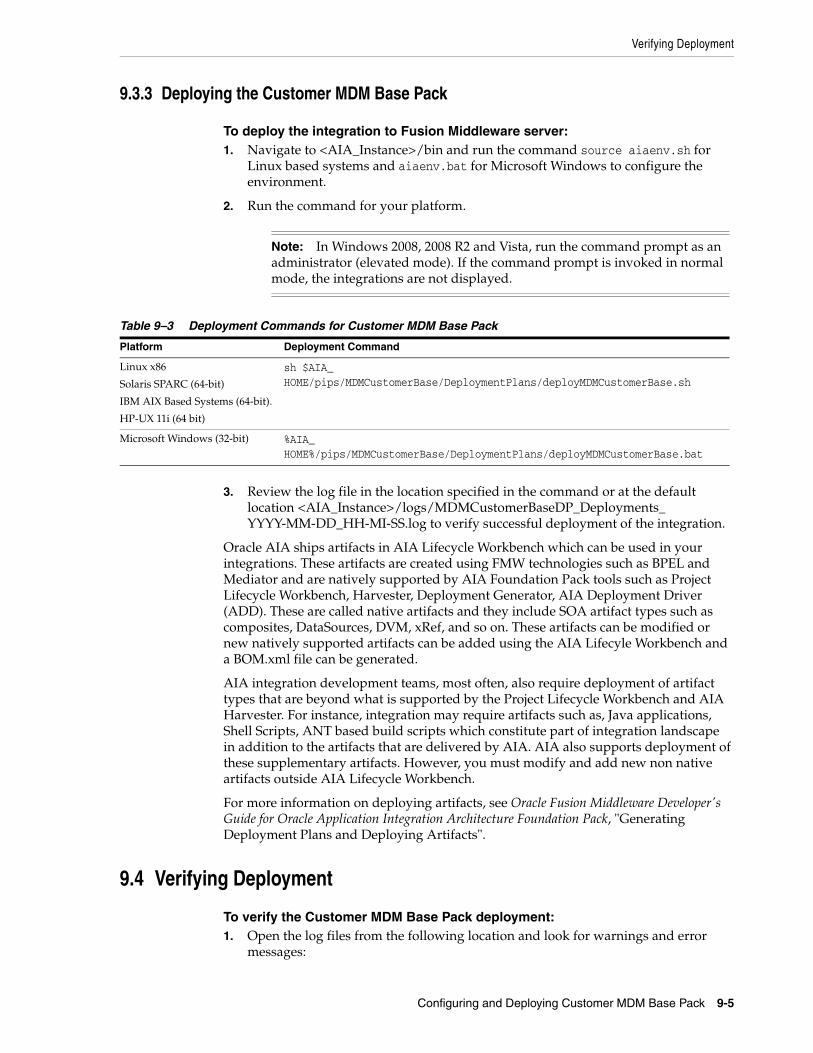
Verifying Deployment
Configuring and Deploying Customer MDM Base Pack 9-5
9.3.3 Deploying the Customer MDM Base Pack
To deploy the integration to Fusion Middleware server:1. Navigate to <AIA_Instance>/bin and run the command source aiaenv.sh for
Linux based systems and aiaenv.bat for Microsoft Windows to configure the environment.
2. Run the command for your platform.
3. Review the log file in the location specified in the command or at the default location <AIA_Instance>/logs/MDMCustomerBaseDP_Deployments_YYYY-MM-DD_HH-MI-SS.log to verify successful deployment of the integration.
Oracle AIA ships artifacts in AIA Lifecycle Workbench which can be used in your integrations. These artifacts are created using FMW technologies such as BPEL and Mediator and are natively supported by AIA Foundation Pack tools such as Project Lifecycle Workbench, Harvester, Deployment Generator, AIA Deployment Driver (ADD). These are called native artifacts and they include SOA artifact types such as composites, DataSources, DVM, xRef, and so on. These artifacts can be modified or new natively supported artifacts can be added using the AIA Lifecyle Workbench and a BOM.xml file can be generated.
AIA integration development teams, most often, also require deployment of artifact types that are beyond what is supported by the Project Lifecycle Workbench and AIA Harvester. For instance, integration may require artifacts such as, Java applications, Shell Scripts, ANT based build scripts which constitute part of integration landscape in addition to the artifacts that are delivered by AIA. AIA also supports deployment of these supplementary artifacts. However, you must modify and add new non native artifacts outside AIA Lifecycle Workbench.
For more information on deploying artifacts, see Oracle Fusion Middleware Developer's Guide for Oracle Application Integration Architecture Foundation Pack, "Generating Deployment Plans and Deploying Artifacts".
9.4 Verifying Deployment
To verify the Customer MDM Base Pack deployment:1. Open the log files from the following location and look for warnings and error
messages:
Note: In Windows 2008, 2008 R2 and Vista, run the command prompt as an administrator (elevated mode). If the command prompt is invoked in normal mode, the integrations are not displayed.
Table 9–3 Deployment Commands for Customer MDM Base Pack
Platform Deployment Command
Linux x86
Solaris SPARC (64-bit)
IBM AIX Based Systems (64-bit).
HP-UX 11i (64 bit)
sh $AIA_HOME/pips/MDMCustomerBase/DeploymentPlans/deployMDMCustomerBase.sh
Microsoft Windows (32-bit) %AIA_HOME%/pips/MDMCustomerBase/DeploymentPlans/deployMDMCustomerBase.bat
Verifying Deployment
9-6 Oracle Application Integration Architecture Installation and Upgrade Guide for Pre-Built Integrations
■ For Linux x86, Solaris SPARC (64-bit), HP-UX 11i (64 bit) and IBM AIX Based Systems (64-bit): Review the install log located at <AIA_HOME>/aia_instances/<instance name>/logs to verify whether the integration is successfully installed.
■ For Microsoft Windows (32-bit): Review the install log located at <AIA_HOME>\aia_instances\<instance name>\logs to verify whether the integration is successfully installed.
2. Confirm that Customer MDM Base Pack services were installed.
a. Navigate to the Oracle Enterprise Manager Fusion Middleware Control: (http://<server name>:<port number>/em/).
b. Log in with the server admin user name. For access details, contact the system administrator.
c. Expand Farm_soa_domain, SOA, soa-infra, Default and look for the following items:
■ FetchCustomerPartyEBF
■ ProcessPersonUCMReqABCSImpl
■ QueryCustomerPartyListUCMProvABCSImpl
■ QueryCustomerPartyUCMProvABCSImpl
■ SyncCustomerPartyListResponseUCMProvABCSImpl
■ SyncCustomerPartyListUCMProvABCSImpl
■ SyncOrganizationUCMJMSConsumer
■ SyncOrganizationUCMJMSProducer
■ SyncOrganizationUCMReqABCSImpl
■ SyncPersonUCMJMSConsumer
■ SyncPersonUCMJMSProducer
■ SyncPersonUCMReqABCSImpl
■ TransformAppContextUCMService
9.4.1 Validating Security PoliciesAll SOA composites are protected by Global Policies provided by Foundation Pack as defined in the Security section of the Developer Guide. Additionally individual services for this integration have locally attached security policies.
To validate locally attached security policies:1. Log in to Oracle Enterprise Manager Fusion Middleware Control
2. Navigate to WebLogic Domain, soa_domain, Web Services, Policies.
3. Verify Service Policy attachment.
a. Find the service policy in the list of policies.
b. Click the number in Attachment Count column.
This opens Usage Analysis screen.
c. Change the Subject Type list box to SOA Service.
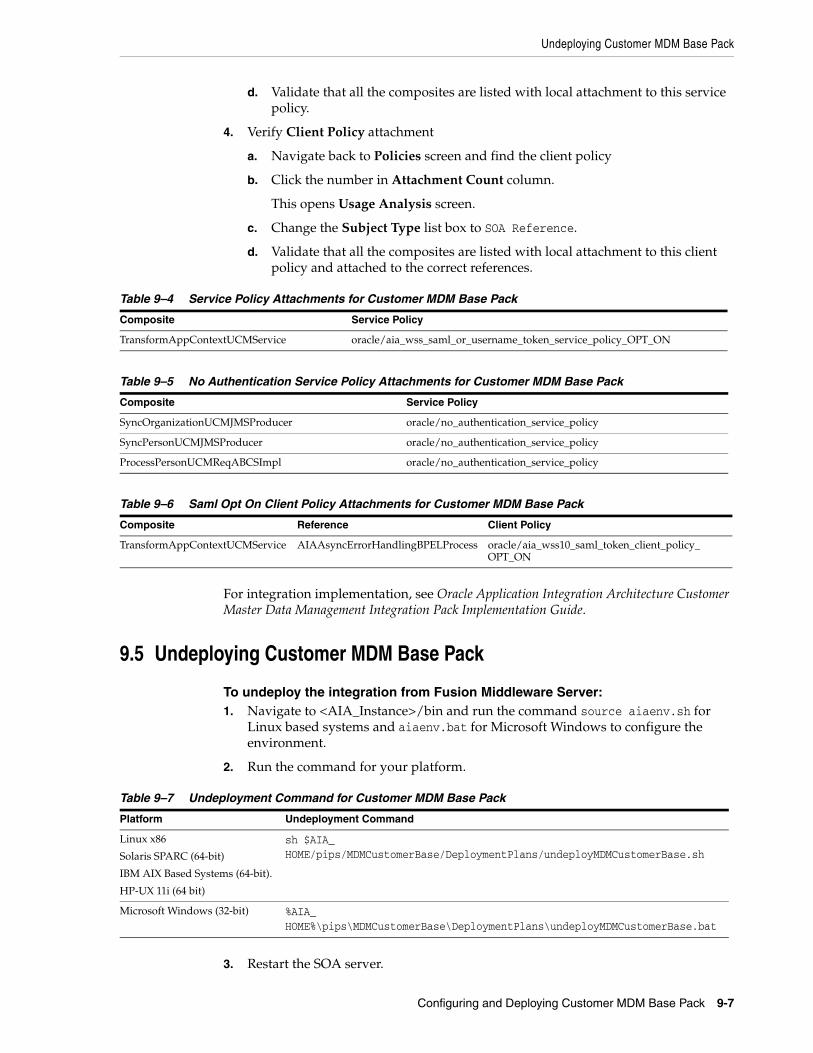
Undeploying Customer MDM Base Pack
Configuring and Deploying Customer MDM Base Pack 9-7
d. Validate that all the composites are listed with local attachment to this service policy.
4. Verify Client Policy attachment
a. Navigate back to Policies screen and find the client policy
b. Click the number in Attachment Count column.
This opens Usage Analysis screen.
c. Change the Subject Type list box to SOA Reference.
d. Validate that all the composites are listed with local attachment to this client policy and attached to the correct references.
For integration implementation, see Oracle Application Integration Architecture Customer Master Data Management Integration Pack Implementation Guide.
9.5 Undeploying Customer MDM Base Pack
To undeploy the integration from Fusion Middleware Server:1. Navigate to <AIA_Instance>/bin and run the command source aiaenv.sh for
Linux based systems and aiaenv.bat for Microsoft Windows to configure the environment.
2. Run the command for your platform.
3. Restart the SOA server.
Table 9–4 Service Policy Attachments for Customer MDM Base Pack
Composite Service Policy
TransformAppContextUCMService oracle/aia_wss_saml_or_username_token_service_policy_OPT_ON
Table 9–5 No Authentication Service Policy Attachments for Customer MDM Base Pack
Composite Service Policy
SyncOrganizationUCMJMSProducer oracle/no_authentication_service_policy
SyncPersonUCMJMSProducer oracle/no_authentication_service_policy
ProcessPersonUCMReqABCSImpl oracle/no_authentication_service_policy
Table 9–6 Saml Opt On Client Policy Attachments for Customer MDM Base Pack
Composite Reference Client Policy
TransformAppContextUCMService AIAAsyncErrorHandlingBPELProcess oracle/aia_wss10_saml_token_client_policy_OPT_ON
Table 9–7 Undeployment Command for Customer MDM Base Pack
Platform Undeployment Command
Linux x86
Solaris SPARC (64-bit)
IBM AIX Based Systems (64-bit).
HP-UX 11i (64 bit)
sh $AIA_HOME/pips/MDMCustomerBase/DeploymentPlans/undeployMDMCustomerBase.sh
Microsoft Windows (32-bit) %AIA_HOME%\pips\MDMCustomerBase\DeploymentPlans\undeployMDMCustomerBase.bat
Undeploying Customer MDM Base Pack
9-8 Oracle Application Integration Architecture Installation and Upgrade Guide for Pre-Built Integrations
4. Uninstall the integration following the instructions in Chapter 37, "Uninstalling Oracle AIA".

10
Configuring and Deploying Customer MDM: Siebel CRM 10-1
10Configuring and Deploying Customer MDM:Siebel CRM
This chapter discusses how to configure and deploy Oracle Customer Master Data Management Integration Option for Siebel CRM (Customer MDM: Siebel CRM).
This chapter includes the following sections:
■ Section 10.1, "Deployment Configuration Wizard"
■ Section 10.2, "Session Pool Manager Details Screen"
■ Section 10.3, "Overall Configuration and Deployment of MDM Customer Integrations"
■ Section 10.4, "Configuring and Deploying Customer MDM: Siebel CRM"
■ Section 10.5, "Postdeployment Configuration"
■ Section 10.6, "Verifying Deployment"
■ Section 10.7, "Undeploying Customer MDM: Siebel CRM"
10.1 Deployment Configuration WizardThe DCW screens prompt you to enter the data required for successful configuration of Customer MDM: Siebel CRM. Enter the details of Customer MDM: Siebel CRM screens below, take a printout and keep it ready when you run the DCW. This action enables faster and error free configuration.
10.1.1 Integration Server Details ScreenAll artifacts associated with the integration infrastructure components deploy to the integration server. This screen contains the following fields:
Table 10–1 Integration Server Details Screen Fields
Field Description
Admin Host Name This is where the admin server resides. This can be a remote server or the same computer where the AIA Pre-Built Integrations Installer is launched. Example: server1.company.com.
The Admin Host Name is _________________________________
Admin Port This is the port number on which Weblogic Admin server is started. To find this value contact WebLogic administrator. Example: 7001.
The Admin Port is _____________________________________
Domain Name This is WebLogic server domain corresponding to the Admin Server. Example: domain1
The Domain Name is _____________________________________
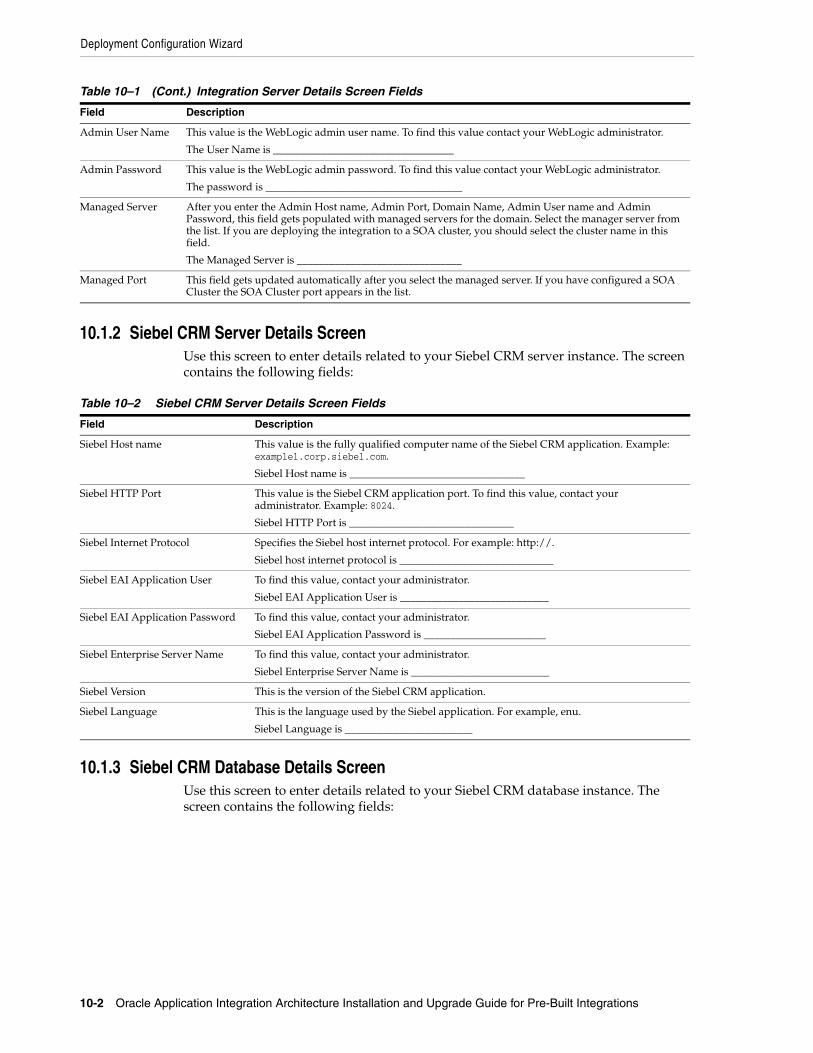
Deployment Configuration Wizard
10-2 Oracle Application Integration Architecture Installation and Upgrade Guide for Pre-Built Integrations
10.1.2 Siebel CRM Server Details ScreenUse this screen to enter details related to your Siebel CRM server instance. The screen contains the following fields:
10.1.3 Siebel CRM Database Details ScreenUse this screen to enter details related to your Siebel CRM database instance. The screen contains the following fields:
Admin User Name This value is the WebLogic admin user name. To find this value contact your WebLogic administrator.
The User Name is __________________________________
Admin Password This value is the WebLogic admin password. To find this value contact your WebLogic administrator.
The password is _____________________________________
Managed Server After you enter the Admin Host name, Admin Port, Domain Name, Admin User name and Admin Password, this field gets populated with managed servers for the domain. Select the manager server from the list. If you are deploying the integration to a SOA cluster, you should select the cluster name in this field.
The Managed Server is _______________________________
Managed Port This field gets updated automatically after you select the managed server. If you have configured a SOA Cluster the SOA Cluster port appears in the list.
Table 10–2 Siebel CRM Server Details Screen Fields
Field Description
Siebel Host name This value is the fully qualified computer name of the Siebel CRM application. Example: example1.corp.siebel.com.
Siebel Host name is _________________________________
Siebel HTTP Port This value is the Siebel CRM application port. To find this value, contact your administrator. Example: 8024.
Siebel HTTP Port is _______________________________
Siebel Internet Protocol Specifies the Siebel host internet protocol. For example: http://.
Siebel host internet protocol is _____________________________
Siebel EAI Application User To find this value, contact your administrator.
Siebel EAI Application User is ____________________________
Siebel EAI Application Password To find this value, contact your administrator.
Siebel EAI Application Password is _______________________
Siebel Enterprise Server Name To find this value, contact your administrator.
Siebel Enterprise Server Name is __________________________
Siebel Version This is the version of the Siebel CRM application.
Siebel Language This is the language used by the Siebel application. For example, enu.
Siebel Language is ________________________
Table 10–1 (Cont.) Integration Server Details Screen Fields
Field Description
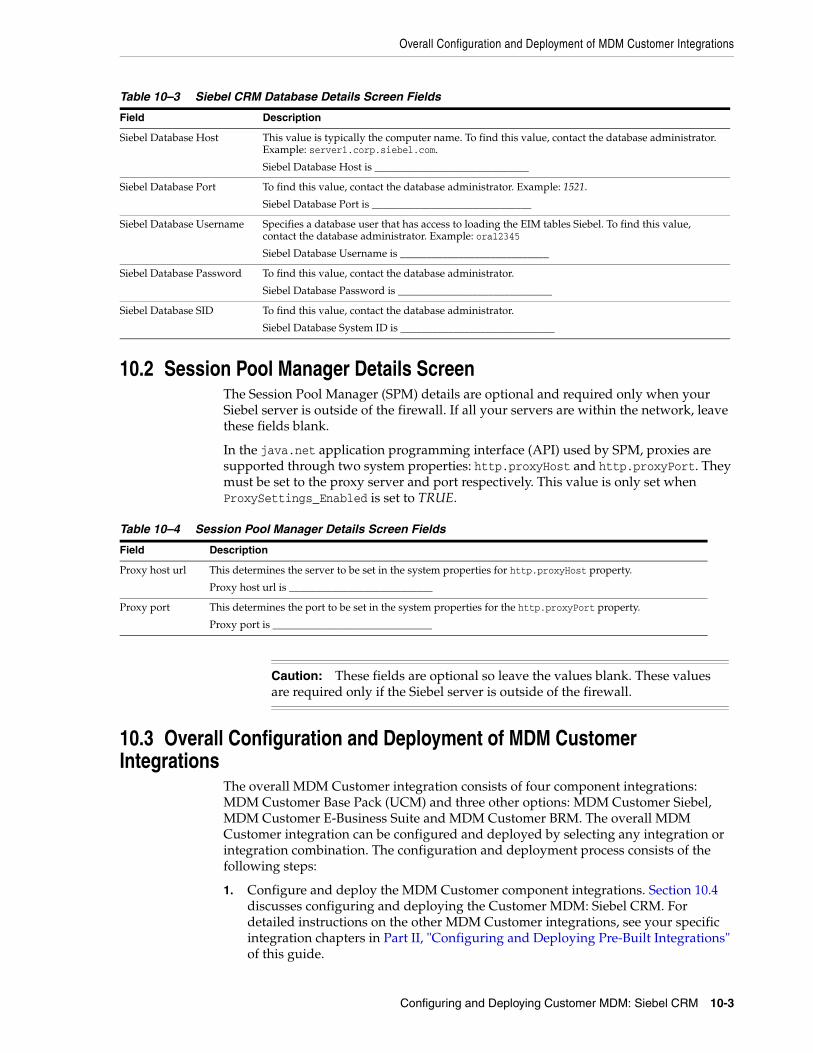
Overall Configuration and Deployment of MDM Customer Integrations
Configuring and Deploying Customer MDM: Siebel CRM 10-3
10.2 Session Pool Manager Details ScreenThe Session Pool Manager (SPM) details are optional and required only when your Siebel server is outside of the firewall. If all your servers are within the network, leave these fields blank.
In the java.net application programming interface (API) used by SPM, proxies are supported through two system properties: http.proxyHost and http.proxyPort. They must be set to the proxy server and port respectively. This value is only set when ProxySettings_Enabled is set to TRUE.
10.3 Overall Configuration and Deployment of MDM Customer Integrations
The overall MDM Customer integration consists of four component integrations: MDM Customer Base Pack (UCM) and three other options: MDM Customer Siebel, MDM Customer E-Business Suite and MDM Customer BRM. The overall MDM Customer integration can be configured and deployed by selecting any integration or integration combination. The configuration and deployment process consists of the following steps:
1. Configure and deploy the MDM Customer component integrations. Section 10.4 discusses configuring and deploying the Customer MDM: Siebel CRM. For detailed instructions on the other MDM Customer integrations, see your specific integration chapters in Part II, "Configuring and Deploying Pre-Built Integrations" of this guide.
Table 10–3 Siebel CRM Database Details Screen Fields
Field Description
Siebel Database Host This value is typically the computer name. To find this value, contact the database administrator. Example: server1.corp.siebel.com.
Siebel Database Host is _____________________________
Siebel Database Port To find this value, contact the database administrator. Example: 1521.
Siebel Database Port is ______________________________
Siebel Database Username Specifies a database user that has access to loading the EIM tables Siebel. To find this value, contact the database administrator. Example: ora12345
Siebel Database Username is ____________________________
Siebel Database Password To find this value, contact the database administrator.
Siebel Database Password is _____________________________
Siebel Database SID To find this value, contact the database administrator.
Siebel Database System ID is _____________________________
Table 10–4 Session Pool Manager Details Screen Fields
Field Description
Proxy host url This determines the server to be set in the system properties for http.proxyHost property.
Proxy host url is ___________________________
Proxy port This determines the port to be set in the system properties for the http.proxyPort property.
Proxy port is ______________________________
Caution: These fields are optional so leave the values blank. These values are required only if the Siebel server is outside of the firewall.
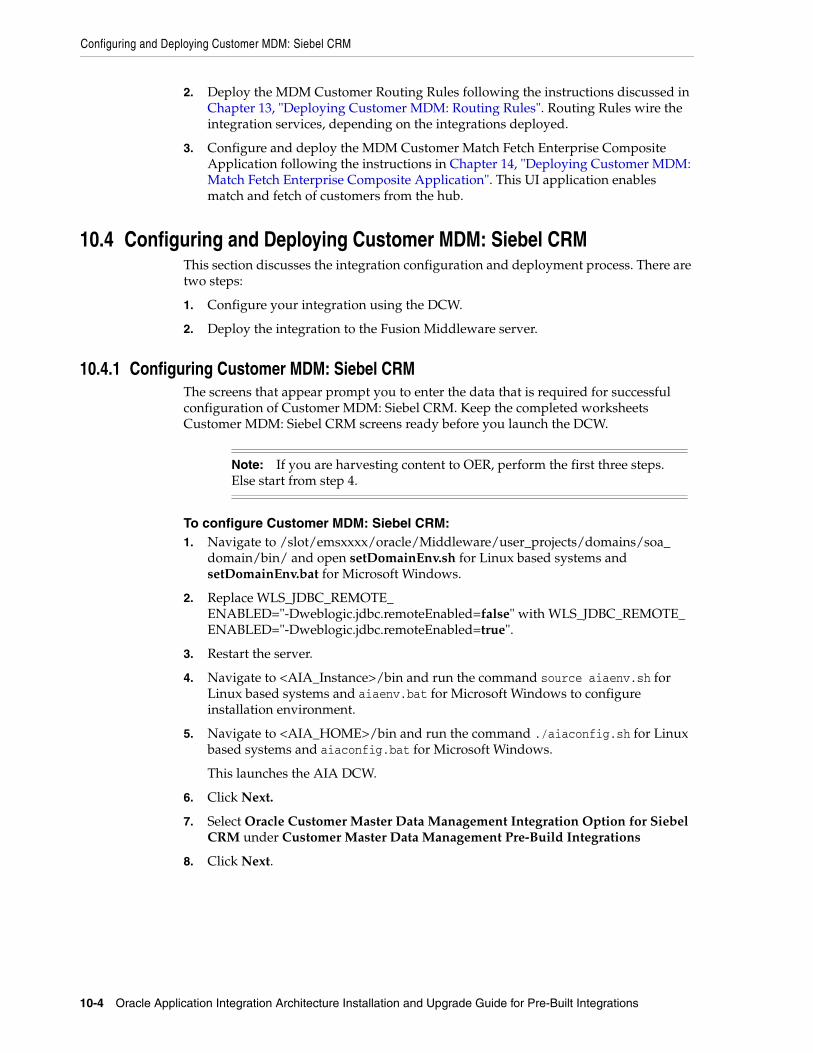
Configuring and Deploying Customer MDM: Siebel CRM
10-4 Oracle Application Integration Architecture Installation and Upgrade Guide for Pre-Built Integrations
2. Deploy the MDM Customer Routing Rules following the instructions discussed in Chapter 13, "Deploying Customer MDM: Routing Rules". Routing Rules wire the integration services, depending on the integrations deployed.
3. Configure and deploy the MDM Customer Match Fetch Enterprise Composite Application following the instructions in Chapter 14, "Deploying Customer MDM: Match Fetch Enterprise Composite Application". This UI application enables match and fetch of customers from the hub.
10.4 Configuring and Deploying Customer MDM: Siebel CRMThis section discusses the integration configuration and deployment process. There are two steps:
1. Configure your integration using the DCW.
2. Deploy the integration to the Fusion Middleware server.
10.4.1 Configuring Customer MDM: Siebel CRMThe screens that appear prompt you to enter the data that is required for successful configuration of Customer MDM: Siebel CRM. Keep the completed worksheets Customer MDM: Siebel CRM screens ready before you launch the DCW.
To configure Customer MDM: Siebel CRM:1. Navigate to /slot/emsxxxx/oracle/Middleware/user_projects/domains/soa_
domain/bin/ and open setDomainEnv.sh for Linux based systems and setDomainEnv.bat for Microsoft Windows.
2. Replace WLS_JDBC_REMOTE_ENABLED="-Dweblogic.jdbc.remoteEnabled=false" with WLS_JDBC_REMOTE_ENABLED="-Dweblogic.jdbc.remoteEnabled=true".
3. Restart the server.
4. Navigate to <AIA_Instance>/bin and run the command source aiaenv.sh for Linux based systems and aiaenv.bat for Microsoft Windows to configure installation environment.
5. Navigate to <AIA_HOME>/bin and run the command ./aiaconfig.sh for Linux based systems and aiaconfig.bat for Microsoft Windows.
This launches the AIA DCW.
6. Click Next.
7. Select Oracle Customer Master Data Management Integration Option for Siebel CRM under Customer Master Data Management Pre-Build Integrations
8. Click Next.
Note: If you are harvesting content to OER, perform the first three steps. Else start from step 4.

Configuring and Deploying Customer MDM: Siebel CRM
Configuring and Deploying Customer MDM: Siebel CRM 10-5
10.4.1.1 Specify Integration Server Details
To specify integration Server details:1. Enter information related to your integration server in the Integration Server
Details screen.
2. Click Next.
10.4.1.2 Specify Siebel CRM Server Details
To specify Siebel CRM Server details:1. Enter information about your Siebel CRM Server in the Application Details -
Siebel CRM screen.
2. Click Next.
10.4.1.3 Specify Siebel CRM Database Details
To specify Siebel CRM Database details:1. Enter information about your Siebel CRM Database the Siebel CRM Database
Details screen.
2. Click Next.
10.4.1.4 Specify Session Pool Manager Details
To specify Session Pool Manager details:1. Enter information related to your Session Pool Manager installation in the Session
Pool Manager Details screen.
2. Click Next.
10.4.1.5 Complete Configuration
To complete configuration:1. Review the configuration information on the Configuration Summary screen.
2. Click Configure to accept this configuration and begin the installation.
The system displays progress of configuration in the Configuration Progress screen.
The system displays any warnings or errors as necessary. You can review the configuration log for additional details. The configuration log location is displayed in Configuration Progress screen.
Note: If you want to make changes to the configuration, use the navigation pane on the left and select the screen you want to edit.
You can create a response file based on the input provided in the DCW and use it in future when you want to deploy the integration. You can configure using the steps described in Section 10.4.2, "Configuring using the Response File". Click Save Response File and save the response file with the name and location of your choice.
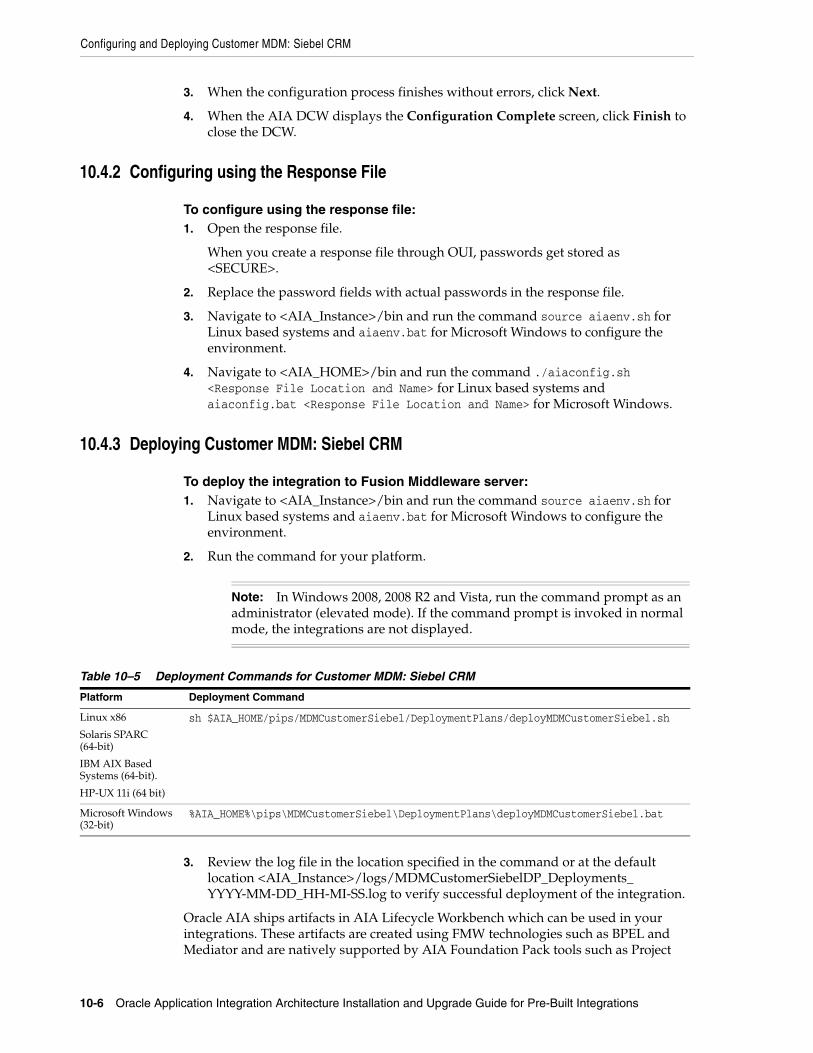
Configuring and Deploying Customer MDM: Siebel CRM
10-6 Oracle Application Integration Architecture Installation and Upgrade Guide for Pre-Built Integrations
3. When the configuration process finishes without errors, click Next.
4. When the AIA DCW displays the Configuration Complete screen, click Finish to close the DCW.
10.4.2 Configuring using the Response File
To configure using the response file:1. Open the response file.
When you create a response file through OUI, passwords get stored as <SECURE>.
2. Replace the password fields with actual passwords in the response file.
3. Navigate to <AIA_Instance>/bin and run the command source aiaenv.sh for Linux based systems and aiaenv.bat for Microsoft Windows to configure the environment.
4. Navigate to <AIA_HOME>/bin and run the command ./aiaconfig.sh <Response File Location and Name> for Linux based systems and aiaconfig.bat <Response File Location and Name> for Microsoft Windows.
10.4.3 Deploying Customer MDM: Siebel CRM
To deploy the integration to Fusion Middleware server:1. Navigate to <AIA_Instance>/bin and run the command source aiaenv.sh for
Linux based systems and aiaenv.bat for Microsoft Windows to configure the environment.
2. Run the command for your platform.
3. Review the log file in the location specified in the command or at the default location <AIA_Instance>/logs/MDMCustomerSiebelDP_Deployments_YYYY-MM-DD_HH-MI-SS.log to verify successful deployment of the integration.
Oracle AIA ships artifacts in AIA Lifecycle Workbench which can be used in your integrations. These artifacts are created using FMW technologies such as BPEL and Mediator and are natively supported by AIA Foundation Pack tools such as Project
Note: In Windows 2008, 2008 R2 and Vista, run the command prompt as an administrator (elevated mode). If the command prompt is invoked in normal mode, the integrations are not displayed.
Table 10–5 Deployment Commands for Customer MDM: Siebel CRM
Platform Deployment Command
Linux x86
Solaris SPARC (64-bit)
IBM AIX Based Systems (64-bit).
HP-UX 11i (64 bit)
sh $AIA_HOME/pips/MDMCustomerSiebel/DeploymentPlans/deployMDMCustomerSiebel.sh
Microsoft Windows (32-bit)
%AIA_HOME%\pips\MDMCustomerSiebel\DeploymentPlans\deployMDMCustomerSiebel.bat
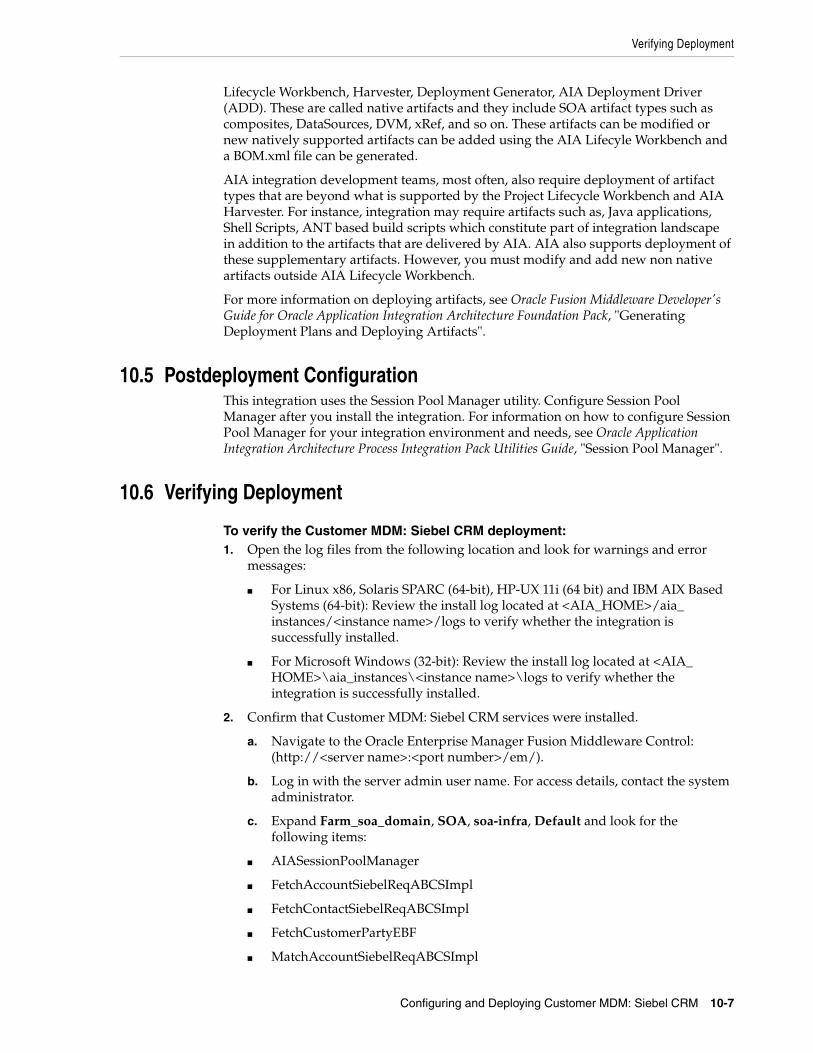
Verifying Deployment
Configuring and Deploying Customer MDM: Siebel CRM 10-7
Lifecycle Workbench, Harvester, Deployment Generator, AIA Deployment Driver (ADD). These are called native artifacts and they include SOA artifact types such as composites, DataSources, DVM, xRef, and so on. These artifacts can be modified or new natively supported artifacts can be added using the AIA Lifecyle Workbench and a BOM.xml file can be generated.
AIA integration development teams, most often, also require deployment of artifact types that are beyond what is supported by the Project Lifecycle Workbench and AIA Harvester. For instance, integration may require artifacts such as, Java applications, Shell Scripts, ANT based build scripts which constitute part of integration landscape in addition to the artifacts that are delivered by AIA. AIA also supports deployment of these supplementary artifacts. However, you must modify and add new non native artifacts outside AIA Lifecycle Workbench.
For more information on deploying artifacts, see Oracle Fusion Middleware Developer's Guide for Oracle Application Integration Architecture Foundation Pack, "Generating Deployment Plans and Deploying Artifacts".
10.5 Postdeployment ConfigurationThis integration uses the Session Pool Manager utility. Configure Session Pool Manager after you install the integration. For information on how to configure Session Pool Manager for your integration environment and needs, see Oracle Application Integration Architecture Process Integration Pack Utilities Guide, "Session Pool Manager".
10.6 Verifying Deployment
To verify the Customer MDM: Siebel CRM deployment:1. Open the log files from the following location and look for warnings and error
messages:
■ For Linux x86, Solaris SPARC (64-bit), HP-UX 11i (64 bit) and IBM AIX Based Systems (64-bit): Review the install log located at <AIA_HOME>/aia_instances/<instance name>/logs to verify whether the integration is successfully installed.
■ For Microsoft Windows (32-bit): Review the install log located at <AIA_HOME>\aia_instances\<instance name>\logs to verify whether the integration is successfully installed.
2. Confirm that Customer MDM: Siebel CRM services were installed.
a. Navigate to the Oracle Enterprise Manager Fusion Middleware Control: (http://<server name>:<port number>/em/).
b. Log in with the server admin user name. For access details, contact the system administrator.
c. Expand Farm_soa_domain, SOA, soa-infra, Default and look for the following items:
■ AIASessionPoolManager
■ FetchAccountSiebelReqABCSImpl
■ FetchContactSiebelReqABCSImpl
■ FetchCustomerPartyEBF
■ MatchAccountSiebelReqABCSImpl
Verifying Deployment
10-8 Oracle Application Integration Architecture Installation and Upgrade Guide for Pre-Built Integrations
■ MatchContactSiebelReqABCSImpl
■ SyncAccountSiebelAggregatorAdapter
■ SyncAccountSiebelReqABCSImpl
■ SyncAcctSiebelAggrEventConsumer
■ SyncAddressSiebelAggregatorAdapter
■ SyncBPSiebelAggregatorAdapter
■ SyncContactSiebelAggregatorAdapter
■ SyncContactSiebelReqABCSImpl
■ SyncContSiebelAggrEventConsumer
■ SyncCustomerPartyListResponseSiebelProvABCSImpl
■ SyncCustomerPartyListSiebelProvABCSImpl
■ TransformAppContextSiebelService
For more information about the DVMs to be verified, see Oracle Application Integration Architecture Customer Master Data Management Integration Pack Implementation Guide.
3. Verify whether Session Pool Manager is successfully installed and ensure that the Siebel server is active.
a. Log in to the Oracle Enterprise Manager Fusion Middleware Control: (http://<server name>:<port number>/em/).
b. Expand Farm_soa_domain, SOA, soa-infra (soa_server1), Default and click AIASessionPoolManager on the left panel.
c. Click Test.
d. Enter Operation = Start.
e. Under the collapsible section titled Security, select WSS Username Token and enter the WLS admin user name and password.
f. Under Input Arguments, Enter HostId = SEBL_01.
g. Click Test Web Service.
You should see a successful initialization response message. For more information and troubleshooting steps, see Oracle Application Integration Architecture Process Integration Pack Utilities Guide, "Session Pool Manager".
10.6.1 Validating Security PoliciesAll SOA composites are protected by Global Policies provided by Foundation Pack as defined in the Security section of the Developer Guide. Additionally individual services for this integration have locally attached security policies.
To validate locally attached security policies:1. Log in to Oracle Enterprise Manager Fusion Middleware Control
2. Navigate to WebLogic Domain, soa_domain, Web Services, Policies.
3. Verify Service Policy attachment.
a. Find the service policy in the list of policies.

Verifying Deployment
Configuring and Deploying Customer MDM: Siebel CRM 10-9
b. Click the number in Attachment Count column.
This opens Usage Analysis screen.
c. Change the Subject Type list box to SOA Service.
d. Validate that all the composites are listed with local attachment to this service policy.
4. Verify Client Policy attachment
a. Navigate back to Policies screen and find the client policy
b. Click the number in Attachment Count column.
This opens Usage Analysis screen.
c. Change the Subject Type list box to SOA Reference.
d. Validate that all the composites are listed with local attachment to this client policy and attached to the correct references.
For integration implementation, see Oracle Application Integration Architecture Customer Master Data Management Integration Pack Implementation Guide.
Table 10–6 Service Policy Attachments for Customer MDM Siebel CRM
Composite Service Policy
TransformAppContextSiebelService oracle/aia_wss_saml_or_username_token_service_policy_OPT_ON
AIASessionPoolManager oracle/aia_wss_saml_or_username_token_service_policy_OPT_ON
Table 10–7 No Authentication Service Policy Attachments for Customer MDM Siebel CRM
Composite Service Policy
SyncCustomerSiebelEventAggregator oracle/no_authentication_service_policy
MatchAccountSiebelReqABCSImpl oracle/no_authentication_service_policy
MatchContactSiebelReqABCSImpl oracle/no_authentication_service_policy
FetchAccountSiebelReqABCSImpl oracle/no_authentication_service_policy
FetchContactSiebelReqABCSImpl oracle/no_authentication_service_policy
Table 10–8 Saml Opt On Client Policy Attachments for Customer MDM Siebel CRM
Composite Reference Client Policy
SyncCustomerSiebelEventAggregator SyncContactSiebelAggregatorAdapter oracle/aia_wss10_saml_token_client_policy_OPT_ON
SyncCustomerSiebelEventAggregator SyncAccountSiebelAggregatorAdapter oracle/aia_wss10_saml_token_client_policy_OPT_ON
SyncCustomerSiebelEventAggregator SyncAddressSiebelAggregatorAdapter oracle/aia_wss10_saml_token_client_policy_OPT_ON
SyncCustomerSiebelEventAggregator SyncBPSiebelAggregatorAdapter oracle/aia_wss10_saml_token_client_policy_OPT_ON
SyncCustomerSiebelEventAggregator AIAAsyncErrorHandlingBPELProcess oracle/aia_wss10_saml_token_client_policy_OPT_ON
TransformAppContextSiebelService AIAAsyncErrorHandlingBPELProcess oracle/aia_wss10_saml_token_client_policy_OPT_ON
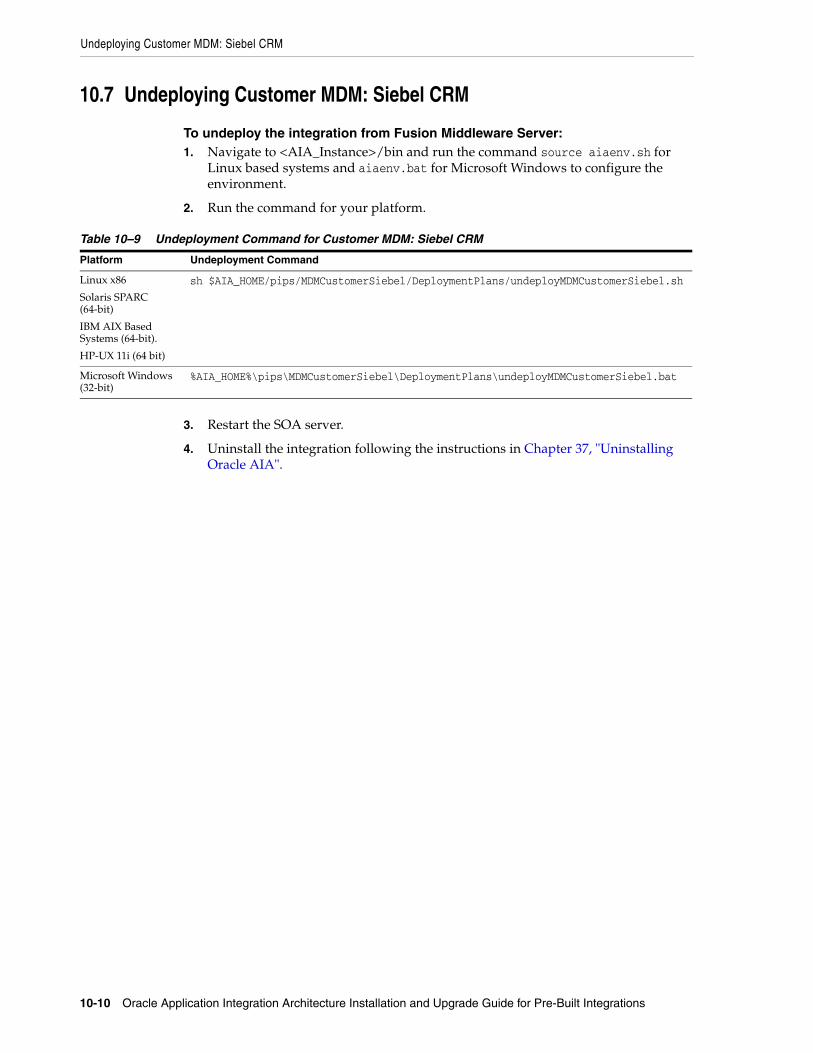
Undeploying Customer MDM: Siebel CRM
10-10 Oracle Application Integration Architecture Installation and Upgrade Guide for Pre-Built Integrations
10.7 Undeploying Customer MDM: Siebel CRM
To undeploy the integration from Fusion Middleware Server:1. Navigate to <AIA_Instance>/bin and run the command source aiaenv.sh for
Linux based systems and aiaenv.bat for Microsoft Windows to configure the environment.
2. Run the command for your platform.
3. Restart the SOA server.
4. Uninstall the integration following the instructions in Chapter 37, "Uninstalling Oracle AIA".
Table 10–9 Undeployment Command for Customer MDM: Siebel CRM
Platform Undeployment Command
Linux x86
Solaris SPARC (64-bit)
IBM AIX Based Systems (64-bit).
HP-UX 11i (64 bit)
sh $AIA_HOME/pips/MDMCustomerSiebel/DeploymentPlans/undeployMDMCustomerSiebel.sh
Microsoft Windows (32-bit)
%AIA_HOME%\pips\MDMCustomerSiebel\DeploymentPlans\undeployMDMCustomerSiebel.bat
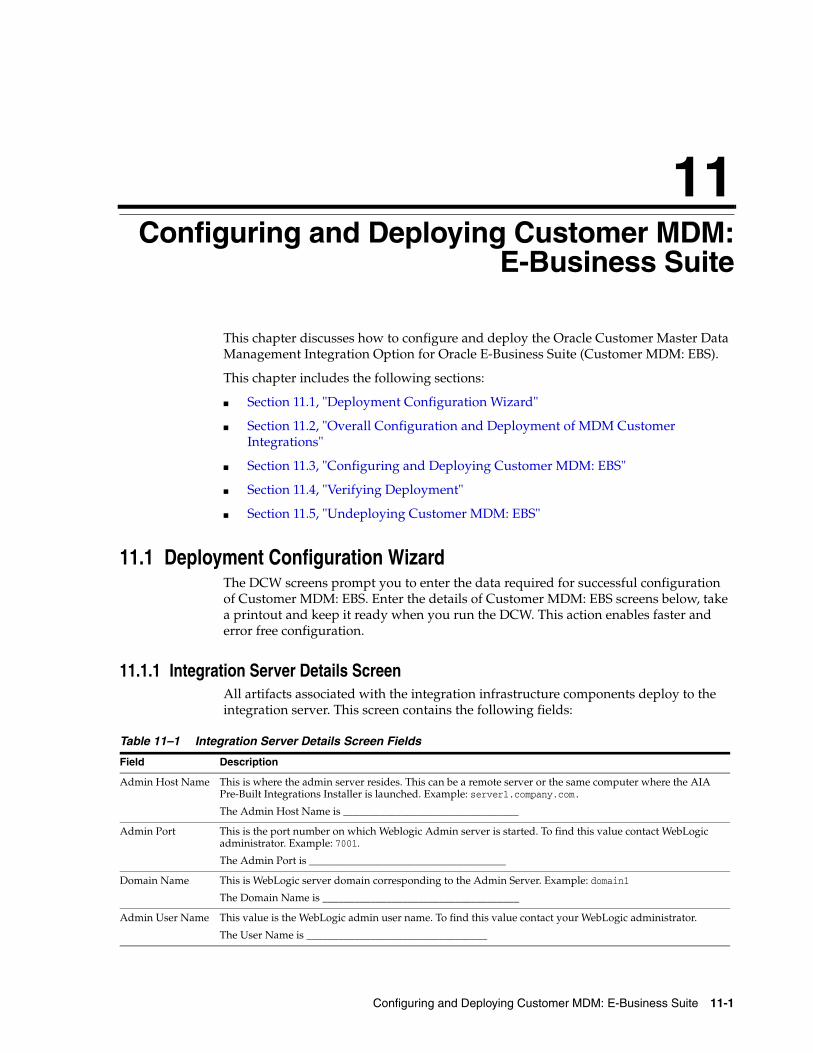
11
Configuring and Deploying Customer MDM: E-Business Suite 11-1
11Configuring and Deploying Customer MDM:E-Business Suite
This chapter discusses how to configure and deploy the Oracle Customer Master Data Management Integration Option for Oracle E-Business Suite (Customer MDM: EBS).
This chapter includes the following sections:
■ Section 11.1, "Deployment Configuration Wizard"
■ Section 11.2, "Overall Configuration and Deployment of MDM Customer Integrations"
■ Section 11.3, "Configuring and Deploying Customer MDM: EBS"
■ Section 11.4, "Verifying Deployment"
■ Section 11.5, "Undeploying Customer MDM: EBS"
11.1 Deployment Configuration WizardThe DCW screens prompt you to enter the data required for successful configuration of Customer MDM: EBS. Enter the details of Customer MDM: EBS screens below, take a printout and keep it ready when you run the DCW. This action enables faster and error free configuration.
11.1.1 Integration Server Details ScreenAll artifacts associated with the integration infrastructure components deploy to the integration server. This screen contains the following fields:
Table 11–1 Integration Server Details Screen Fields
Field Description
Admin Host Name This is where the admin server resides. This can be a remote server or the same computer where the AIA Pre-Built Integrations Installer is launched. Example: server1.company.com.
The Admin Host Name is _________________________________
Admin Port This is the port number on which Weblogic Admin server is started. To find this value contact WebLogic administrator. Example: 7001.
The Admin Port is _____________________________________
Domain Name This is WebLogic server domain corresponding to the Admin Server. Example: domain1
The Domain Name is _____________________________________
Admin User Name This value is the WebLogic admin user name. To find this value contact your WebLogic administrator.
The User Name is __________________________________
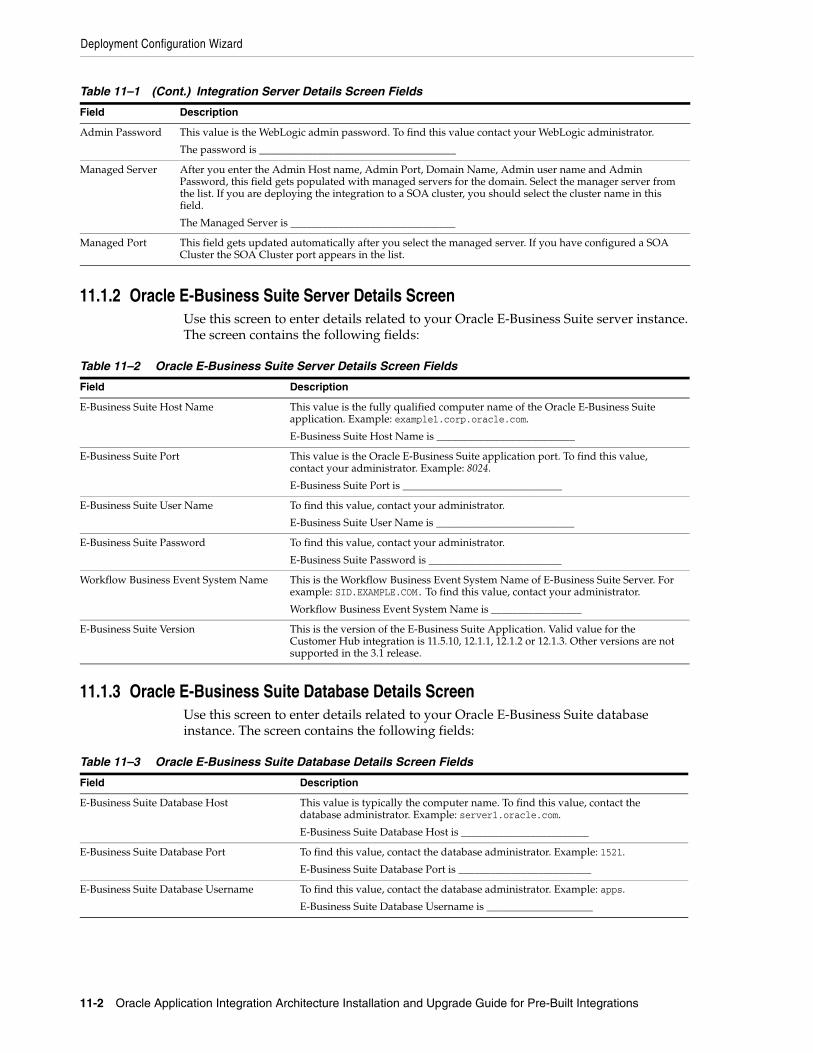
Deployment Configuration Wizard
11-2 Oracle Application Integration Architecture Installation and Upgrade Guide for Pre-Built Integrations
11.1.2 Oracle E-Business Suite Server Details ScreenUse this screen to enter details related to your Oracle E-Business Suite server instance. The screen contains the following fields:
11.1.3 Oracle E-Business Suite Database Details ScreenUse this screen to enter details related to your Oracle E-Business Suite database instance. The screen contains the following fields:
Admin Password This value is the WebLogic admin password. To find this value contact your WebLogic administrator.
The password is _____________________________________
Managed Server After you enter the Admin Host name, Admin Port, Domain Name, Admin user name and Admin Password, this field gets populated with managed servers for the domain. Select the manager server from the list. If you are deploying the integration to a SOA cluster, you should select the cluster name in this field.
The Managed Server is _______________________________
Managed Port This field gets updated automatically after you select the managed server. If you have configured a SOA Cluster the SOA Cluster port appears in the list.
Table 11–2 Oracle E-Business Suite Server Details Screen Fields
Field Description
E-Business Suite Host Name This value is the fully qualified computer name of the Oracle E-Business Suite application. Example: example1.corp.oracle.com.
E-Business Suite Host Name is __________________________
E-Business Suite Port This value is the Oracle E-Business Suite application port. To find this value, contact your administrator. Example: 8024.
E-Business Suite Port is ______________________________
E-Business Suite User Name To find this value, contact your administrator.
E-Business Suite User Name is __________________________
E-Business Suite Password To find this value, contact your administrator.
E-Business Suite Password is _________________________
Workflow Business Event System Name This is the Workflow Business Event System Name of E-Business Suite Server. For example: SID.EXAMPLE.COM. To find this value, contact your administrator.
Workflow Business Event System Name is _________________
E-Business Suite Version This is the version of the E-Business Suite Application. Valid value for the Customer Hub integration is 11.5.10, 12.1.1, 12.1.2 or 12.1.3. Other versions are not supported in the 3.1 release.
Table 11–3 Oracle E-Business Suite Database Details Screen Fields
Field Description
E-Business Suite Database Host This value is typically the computer name. To find this value, contact the database administrator. Example: server1.oracle.com.
E-Business Suite Database Host is ________________________
E-Business Suite Database Port To find this value, contact the database administrator. Example: 1521.
E-Business Suite Database Port is _________________________
E-Business Suite Database Username To find this value, contact the database administrator. Example: apps.
E-Business Suite Database Username is ____________________
Table 11–1 (Cont.) Integration Server Details Screen Fields
Field Description
Configuring and Deploying Customer MDM: EBS
Configuring and Deploying Customer MDM: E-Business Suite 11-3
11.2 Overall Configuration and Deployment of MDM Customer Integrations
The overall MDM Customer integration consists of four component integrations: MDM Customer Base Pack (UCM) and three other options: MDM Customer Siebel, MDM Customer E-Business Suite and MDM Customer BRM. The overall MDM Customer integration can be configured and deployed by selecting any integration or integration combination. The configuration and deployment process consists of the following steps:
1. Configure and deploy the MDM Customer component integrations. Section 11.3 discusses configuring and deploying the Customer MDM: EBS. For detailed instructions on the other MDM Customer integrations, see your specific integration chapters in Part II, "Configuring and Deploying Pre-Built Integrations" of this guide.
2. Deploy the MDM Customer Routing Rules following the instructions discussed in Chapter 13, "Deploying Customer MDM: Routing Rules". Routing Rules wire the integration services, depending on the integrations deployed.
3. Configure and deploy the MDM Customer Match Fetch Enterprise Composite Application following the instructions in Chapter 14, "Deploying Customer MDM: Match Fetch Enterprise Composite Application". This UI application enables match and fetch of customers from the hub.
11.3 Configuring and Deploying Customer MDM: EBSThis section discusses the integration configuration and deployment process. There are two steps:
1. Configure your integration using the DCW.
2. Deploy the integration to the Fusion Middleware server.
11.3.1 Configure Customer MDM: EBSThe section discusses the configuration process. The screens that appear prompt you to enter the data that is required for successful configuration of Customer MDM: EBS. Keep the completed worksheets Customer MDM: EBS screens ready before you launch the DCW.
E-Business Suite Database Password To find this value, contact the database administrator.
E-Business Suite Database Password is ____________________
E-Business Suite Database SID (System ID) To find this value, contact the database administrator. Example: orcl.
E-Business Suite Database SID is _________________________
Database Schema To find this value, contact the database administrator. Example: server1. This field is optional for this integration.
Database Schema is __________________________________
Note: All the database credentials are used for creating the connection pool URL and data source URLs.
Note: If you are harvesting content to OER, perform the first three steps. Else start from step 4.
Table 11–3 (Cont.) Oracle E-Business Suite Database Details Screen Fields
Field Description
Configuring and Deploying Customer MDM: EBS
11-4 Oracle Application Integration Architecture Installation and Upgrade Guide for Pre-Built Integrations
To configure Customer MDM: EBS:1. Navigate to /slot/emsxxxx/oracle/Middleware/user_projects/domains/soa_
domain/bin/ and open setDomainEnv.sh for Linux based systems and setDomainEnv.bat for Microsoft Windows.
2. Replace WLS_JDBC_REMOTE_ENABLED="-Dweblogic.jdbc.remoteEnabled=false" with WLS_JDBC_REMOTE_ENABLED="-Dweblogic.jdbc.remoteEnabled=true".
3. Restart the server.
4. Navigate to <AIA_Instance>/bin and run the command source aiaenv.sh for Linux based systems and aiaenv.bat for Microsoft Windows to configure installation environment.
5. Navigate to <AIA_HOME>/bin and run the command ./aiaconfig.sh for Linux based systems and aiaconfig.bat for Microsoft Windows.
This launches the AIA DCW.
6. Click Next.
7. Select Oracle Customer Master Data Management Integration Option for Oracle E-Business Suite under Customer Master Data Management Pre-Build Integrations
8. Click Next.
11.3.1.1 Specify Integration Server Details
To specify integration server details:1. Enter information related to your integration server in the Integration Server
Details screen.
2. Click Next.
11.3.1.2 Specify Oracle E-Business Suite Server Details
To specify Oracle E-Business Suite Server details:1. Enter information about your E-Business Suite Server in the E-Business Suite
Server Details screen.
2. Click Next.
11.3.1.3 Specify Oracle E-Business Suite Database Details
To specify Oracle E-Business Suite Database details:1. Enter information about your Oracle E-Business Suite Database in the E-Business
Suite Database Details screen.
2. Click Next.
11.3.1.4 Complete Configuration
To complete configuration:1. Review the configuration information on the Configuration Summary screen.

Configuring and Deploying Customer MDM: EBS
Configuring and Deploying Customer MDM: E-Business Suite 11-5
2. Click Configure to accept this configuration and begin the installation.
The system displays progress of configuration in the Configuration Progress screen.
The system displays any warnings or errors as necessary. You can review the configuration log for additional details. The configuration log location is displayed in Configuration Progress screen.
3. When the configuration process finishes without errors, click Next.
4. When the AIA DCW displays the Configuration Complete screen, click Finish to close the DCW.
11.3.2 Configuring using the Response File
To configure using the response file:1. Open the response file.
When you create a response file through OUI, passwords get stored as <SECURE>.
2. Replace the password fields with actual passwords in the response file.
3. Navigate to <AIA_Instance>/bin and run the command source aiaenv.sh for Linux based systems and aiaenv.bat for Microsoft Windows to configure the environment.
4. Navigate to <AIA_HOME>/bin and run the command ./aiaconfig.sh <Response File Location and Name> for Linux based systems and aiaconfig.bat <Response File Location and Name> for Microsoft Windows.
11.3.3 Deploying Customer MDM: EBS
To deploy the integration to Fusion Middleware server:1. Navigate to <AIA_Instance>/bin and run the command source aiaenv.sh for
Linux based systems and aiaenv.bat for Microsoft Windows to configure the environment.
2. Run the command for your platform.
Note: If you want to make changes to the configuration, use the navigation pane on the left and select the screen you want to edit.
You can create a response file based on the input provided in the DCW and use it in future when you want to deploy the integration. You can configure using the steps described in Section 11.3.2, "Configuring using the Response File". Click Save Response File and save the response file with the name and location of your choice.
Note: In Windows 2008, 2008 R2 and Vista, run the command prompt as an administrator (elevated mode). If the command prompt is invoked in normal mode, the integrations are not displayed.

Verifying Deployment
11-6 Oracle Application Integration Architecture Installation and Upgrade Guide for Pre-Built Integrations
3. Review the log file in the location specified in the command or at the default location <AIA_Instance>/logs/MDMCustomerEbizDP_Deployments_YYYY-MM-DD_HH-MI-SS.log to verify successful deployment of the integration.
Oracle AIA ships artifacts in AIA Lifecycle Workbench which can be used in your integrations. These artifacts are created using FMW technologies such as BPEL and Mediator and are natively supported by AIA Foundation Pack tools such as Project Lifecycle Workbench, Harvester, Deployment Generator, AIA Deployment Driver (ADD). These are called native artifacts and they include SOA artifact types such as composites, DataSources, DVM, xRef, and so on. These artifacts can be modified or new natively supported artifacts can be added using the AIA Lifecyle Workbench and a BOM.xml file can be generated.
AIA integration development teams, most often, also require deployment of artifact types that are beyond what is supported by the Project Lifecycle Workbench and AIA Harvester. For instance, integration may require artifacts such as, Java applications, Shell Scripts, ANT based build scripts which constitute part of integration landscape in addition to the artifacts that are delivered by AIA. AIA also supports deployment of these supplementary artifacts. However, you must modify and add new non native artifacts outside AIA Lifecycle Workbench.
For more information on deploying artifacts, see Oracle Fusion Middleware Developer's Guide for Oracle Application Integration Architecture Foundation Pack, "Generating Deployment Plans and Deploying Artifacts".
11.4 Verifying Deployment
To verify the Customer MDM: EBS deployment:1. Open the log files from the following location and look for warnings and error
messages:
■ For Linux x86, Solaris SPARC (64-bit), HP-UX 11i (64 bit) and IBM AIX Based Systems (64-bit): Review the install log located at <AIA_HOME>/aia_instances/<instance name>/logs to verify whether the integration is successfully installed.
■ For Microsoft Windows (32-bit): Review the install log located at <AIA_HOME>\aia_instances\<instance name>\logs to verify whether the integration is successfully installed.
2. Confirm that the Customer MDM: EBS processes were installed.
a. Navigate to the Oracle Enterprise Manager Fusion Middleware Control: (http://<server name>:<port number>/em/).
b. Log in with the server admin user name. For access details, contact the system administrator.
Table 11–4 Deployment Commands for Customer MDM: EBS
Platform Deployment Command
Linux x86
Solaris SPARC (64-bit)
IBM AIX Based Systems (64-bit).
HP-UX 11i (64 bit)
sh $AIA_HOME/pips/MDMCustomerEbiz/DeploymentPlans/deployMDMCustomerEbiz.sh
Microsoft Windows (32-bit) %AIA_HOME%\pips\MDMCustomerEbiz\DeploymentPlans\deployMDMCustomerEbiz.bat
Verifying Deployment
Configuring and Deploying Customer MDM: E-Business Suite 11-7
c. Expand Farm_soa_domain, SOA, soa-infra, Default and look for the following items:
■ QueryCustomerPartyListEbizCreateAdapter
■ QueryCustomerPartyListEbizUpdateAdapter
■ QueryPersonAccountEbizCreateAdapter
■ QueryPersonAccountEbizUpdateAdapter
■ QueryResponsibilityEbizAdapter
■ SyncCustomerPartyListEbizAdapter
■ SyncCustomerPartyListEbizEventConsumer
■ SyncCustomerPartyListEbizProvABCSImpl
■ SyncCustomerPartyListEbizReqABCSImpl
■ SyncCustomerPartyListPersonEbizAdapter
■ SyncCustomerPartyListResponseEbizProvABCSImpl
■ SyncPersonAccountEbizEventConsumer
■ SyncPersonAccountEbizReqABCSImpl
■ TransformAppContextEbizService
For more information about the DVMs to be verified, see the Oracle Application Integration Architecture Customer Master Data Management Integration Pack Implementation Guide.
11.4.1 Validating Security PoliciesAll SOA composites are protected by Global Policies provided by Foundation Pack as defined in the Security section of the Developer Guide. Additionally individual services for this integration have locally attached security policies.
To validate locally attached security policies:1. Log in to Oracle Enterprise Manager Fusion Middleware Control
2. Navigate to WebLogic Domain, soa_domain, Web Services, Policies.
3. Verify Service Policy attachment.
a. Find the service policy in the list of policies.
b. Click the number in Attachment Count column.
This opens Usage Analysis screen.
c. Change the Subject Type list box to SOA Service.
d. Validate that all the composites are listed with local attachment to this service policy.
4. Verify Client Policy attachment
a. Navigate back to Policies screen and find the client policy
b. Click the number in Attachment Count column.
This opens Usage Analysis screen.
c. Change the Subject Type list box to SOA Reference.
Undeploying Customer MDM: EBS
11-8 Oracle Application Integration Architecture Installation and Upgrade Guide for Pre-Built Integrations
d. Validate that all the composites are listed with local attachment to this client policy and attached to the correct references.
For integration implementation, see Oracle Application Integration Architecture Customer Master Data Management Integration Pack Implementation Guide.
11.5 Undeploying Customer MDM: EBS
To undeploy the integration from Fusion Middleware Server:1. Navigate to <AIA_Instance>/bin and run the command source aiaenv.sh for
Linux based systems and aiaenv.bat for Microsoft Windows to configure the environment.
2. Run the command for your platform.
3. Restart the SOA server.
4. Uninstall the integration following the instructions in Chapter 37, "Uninstalling Oracle AIA".
Table 11–5 Service Policy Attachments for Customer MDM: EBS
Composite Service Policy
TransformAppContextEbizService oracle/aia_wss_saml_or_username_token_service_policy_OPT_ON
Table 11–6 Saml Opt On Client Policy Attachments for Customer MDM EBS Pack
Composite Reference Client Policy
TransformAppContextEbizService AIAAsyncErrorHandlingBPELProcess oracle/aia_wss10_saml_token_client_policy_OPT_ON
Table 11–7 Undeployment Command for Customer MDM: EBS
Platform Undeployment Command
Linux x86
Solaris SPARC (64-bit)
IBM AIX Based Systems (64-bit).
HP-UX 11i (64 bit)
sh $AIA_HOME/pips/MDMCustomerEbiz/DeploymentPlans/undeployMDMCustomerEbiz.sh
Microsoft Windows (32-bit)
%AIA_HOME%\pips\MDMCustomerEbiz\DeploymentPlans\undeployMDMCustomerEbiz.bat
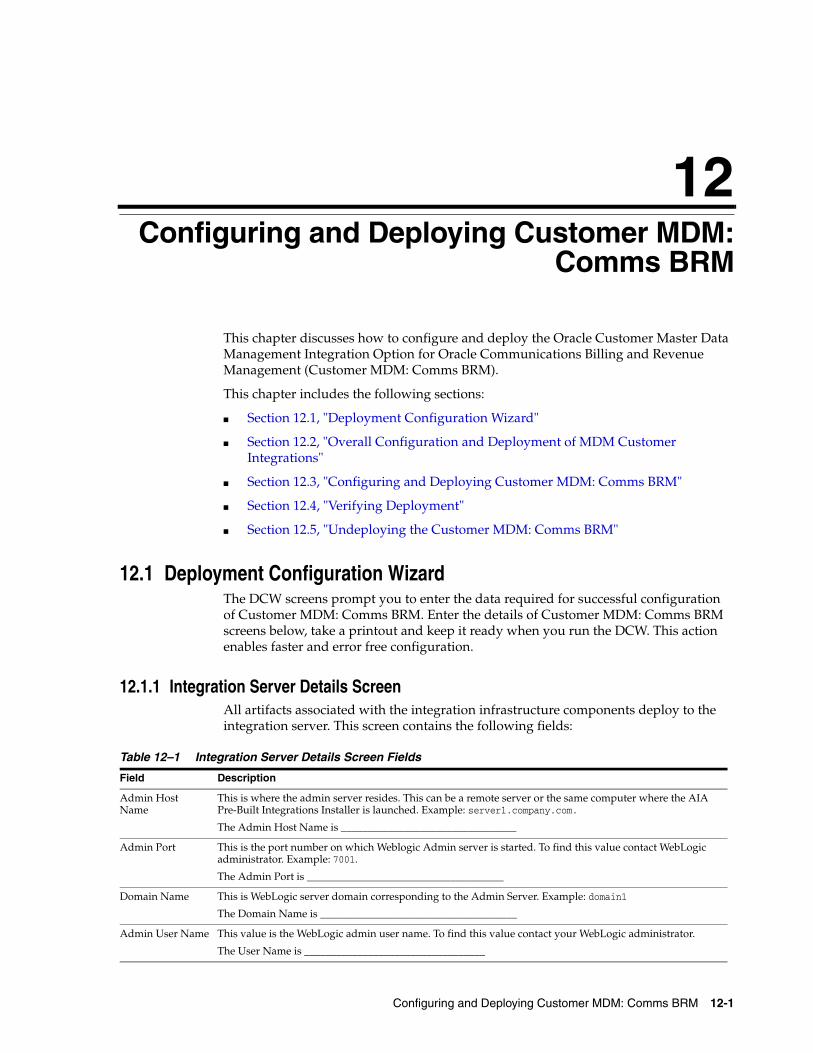
12
Configuring and Deploying Customer MDM: Comms BRM 12-1
12Configuring and Deploying Customer MDM:Comms BRM
This chapter discusses how to configure and deploy the Oracle Customer Master Data Management Integration Option for Oracle Communications Billing and Revenue Management (Customer MDM: Comms BRM).
This chapter includes the following sections:
■ Section 12.1, "Deployment Configuration Wizard"
■ Section 12.2, "Overall Configuration and Deployment of MDM Customer Integrations"
■ Section 12.3, "Configuring and Deploying Customer MDM: Comms BRM"
■ Section 12.4, "Verifying Deployment"
■ Section 12.5, "Undeploying the Customer MDM: Comms BRM"
12.1 Deployment Configuration WizardThe DCW screens prompt you to enter the data required for successful configuration of Customer MDM: Comms BRM. Enter the details of Customer MDM: Comms BRM screens below, take a printout and keep it ready when you run the DCW. This action enables faster and error free configuration.
12.1.1 Integration Server Details ScreenAll artifacts associated with the integration infrastructure components deploy to the integration server. This screen contains the following fields:
Table 12–1 Integration Server Details Screen Fields
Field Description
Admin Host Name
This is where the admin server resides. This can be a remote server or the same computer where the AIA Pre-Built Integrations Installer is launched. Example: server1.company.com.
The Admin Host Name is _________________________________
Admin Port This is the port number on which Weblogic Admin server is started. To find this value contact WebLogic administrator. Example: 7001.
The Admin Port is _____________________________________
Domain Name This is WebLogic server domain corresponding to the Admin Server. Example: domain1
The Domain Name is _____________________________________
Admin User Name This value is the WebLogic admin user name. To find this value contact your WebLogic administrator.
The User Name is __________________________________
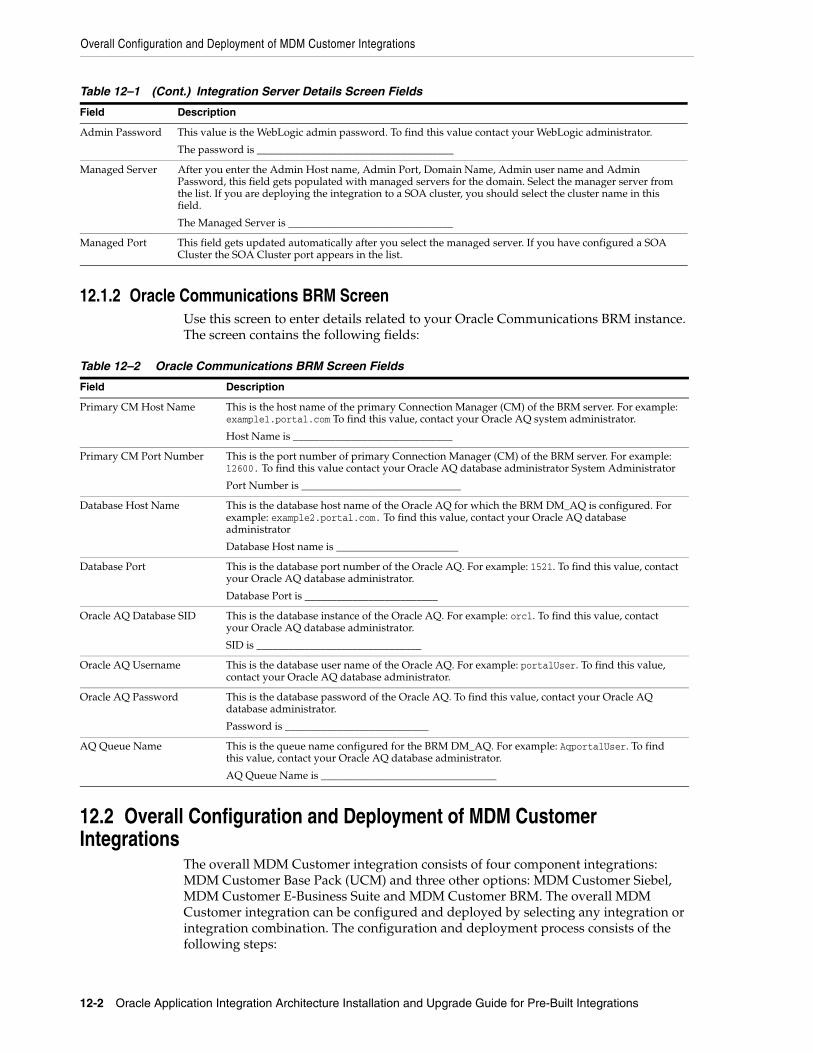
Overall Configuration and Deployment of MDM Customer Integrations
12-2 Oracle Application Integration Architecture Installation and Upgrade Guide for Pre-Built Integrations
12.1.2 Oracle Communications BRM ScreenUse this screen to enter details related to your Oracle Communications BRM instance. The screen contains the following fields:
12.2 Overall Configuration and Deployment of MDM Customer Integrations
The overall MDM Customer integration consists of four component integrations: MDM Customer Base Pack (UCM) and three other options: MDM Customer Siebel, MDM Customer E-Business Suite and MDM Customer BRM. The overall MDM Customer integration can be configured and deployed by selecting any integration or integration combination. The configuration and deployment process consists of the following steps:
Admin Password This value is the WebLogic admin password. To find this value contact your WebLogic administrator.
The password is _____________________________________
Managed Server After you enter the Admin Host name, Admin Port, Domain Name, Admin user name and Admin Password, this field gets populated with managed servers for the domain. Select the manager server from the list. If you are deploying the integration to a SOA cluster, you should select the cluster name in this field.
The Managed Server is _______________________________
Managed Port This field gets updated automatically after you select the managed server. If you have configured a SOA Cluster the SOA Cluster port appears in the list.
Table 12–2 Oracle Communications BRM Screen Fields
Field Description
Primary CM Host Name This is the host name of the primary Connection Manager (CM) of the BRM server. For example: example1.portal.com To find this value, contact your Oracle AQ system administrator.
Host Name is ______________________________
Primary CM Port Number This is the port number of primary Connection Manager (CM) of the BRM server. For example: 12600. To find this value contact your Oracle AQ database administrator System Administrator
Port Number is ______________________________
Database Host Name This is the database host name of the Oracle AQ for which the BRM DM_AQ is configured. For example: example2.portal.com. To find this value, contact your Oracle AQ database administrator
Database Host name is _______________________
Database Port This is the database port number of the Oracle AQ. For example: 1521. To find this value, contact your Oracle AQ database administrator.
Database Port is _________________________
Oracle AQ Database SID This is the database instance of the Oracle AQ. For example: orcl. To find this value, contact your Oracle AQ database administrator.
SID is _______________________________
Oracle AQ Username This is the database user name of the Oracle AQ. For example: portalUser. To find this value, contact your Oracle AQ database administrator.
Oracle AQ Password This is the database password of the Oracle AQ. To find this value, contact your Oracle AQ database administrator.
Password is ___________________________
AQ Queue Name This is the queue name configured for the BRM DM_AQ. For example: AqportalUser. To find this value, contact your Oracle AQ database administrator.
AQ Queue Name is _________________________________
Table 12–1 (Cont.) Integration Server Details Screen Fields
Field Description
Configuring and Deploying Customer MDM: Comms BRM
Configuring and Deploying Customer MDM: Comms BRM 12-3
1. Configure and deploy the MDM Customer component integrations. Section 12.3 discusses configuring and deploying the Customer MDM: Comms BRM. For detailed instructions on the other MDM Customer integrations, see your specific integration chapters in Part II, "Configuring and Deploying Pre-Built Integrations" of this guide.
2. Deploy the MDM Customer Routing Rules following the instructions discussed in Chapter 13, "Deploying Customer MDM: Routing Rules". Routing Rules wire the integration services, depending on the integrations deployed.
3. Configure and deploy the MDM Customer Match Fetch Enterprise Composite Application following the instructions in Chapter 14, "Deploying Customer MDM: Match Fetch Enterprise Composite Application". This UI application enables match and fetch of customers from the hub.
12.3 Configuring and Deploying Customer MDM: Comms BRMThis section discusses the integration configuration and deployment process. There are two steps:
1. Configure your integration using the DCW.
2. Deploy the integration to the Fusion Middleware server.
12.3.1 Configure Customer MDM: Comms BRMThe section discusses the configuration process. The screens that appear prompt you to enter the data that is required for successful configuration of Customer MDM: Comms BRM. Keep the completed worksheets Customer MDM: Comms BRM screens ready before you launch the DCW.
To configure Customer MDM: Comms BRM:1. Navigate to /slot/emsxxxx/oracle/Middleware/user_projects/domains/soa_
domain/bin/ and open setDomainEnv.sh for Linux based systems and setDomainEnv.bat for Microsoft Windows
2. Replace WLS_JDBC_REMOTE_ENABLED="-Dweblogic.jdbc.remoteEnabled=false" with WLS_JDBC_REMOTE_ENABLED="-Dweblogic.jdbc.remoteEnabled=true"
3. Restart the server
4. Navigate to <AIA_Instance>/bin and run the command source aiaenv.sh for Linux based systems and aiaenv.bat for Microsoft Windows to configure installation environment
5. Navigate to <AIA_HOME>/bin and run the command ./aiaconfig.sh for Linux based systems and aiaconfig.bat for Microsoft Windows
This launches the AIA DCW.
6. Click Next
7. Select Oracle Customer Master Data Management Integration Option for BRM under Customer Master Data Management Pre-Build Integrations
Note: If you are harvesting content to OER, perform the first three steps. Else start from step 4.
Configuring and Deploying Customer MDM: Comms BRM
12-4 Oracle Application Integration Architecture Installation and Upgrade Guide for Pre-Built Integrations
8. Click Next
12.3.1.1 Specify Integration Server Details
To specify integration server details:1. Enter information related to your integration server in the Integration Server
Details screen.
2. Click Next.
12.3.1.2 Specify Oracle Communications BRM Details
To specify Oracle Communications BRM details:1. Enter Oracle Communications BRM information in the Oracle Communications
BRM screen.
2. Click Next.
12.3.1.3 Complete Configuration
To complete configuration:1. Review the configuration information on the Configuration Summary screen.
2. Click Configure to accept this configuration and begin the installation.
The system displays progress of configuration in the Configuration Progress screen.
The system displays any warnings or errors as necessary. You can review the configuration log for additional details. The configuration log location is displayed in Configuration Progress screen.
3. When the configuration process finishes without errors, click Next.
4. When the AIA DCW displays the Configuration Complete screen, click Finish to close the DCW.
12.3.2 Configuring using the Response File
To configure using the response file:1. Open the response file.
When you create a response file through OUI, passwords get stored as <SECURE>.
2. Replace the password fields with actual passwords in the response file.
Note: If you want to make changes to the configuration, use the navigation pane on the left and select the screen you want to edit.
You can create a response file based on the input provided in the DCW and use it in future when you want to deploy the integration. You can configure using the steps described in Section 12.3.2, "Configuring using the Response File". Click Save Response File and save the response file with the name and location of your choice.
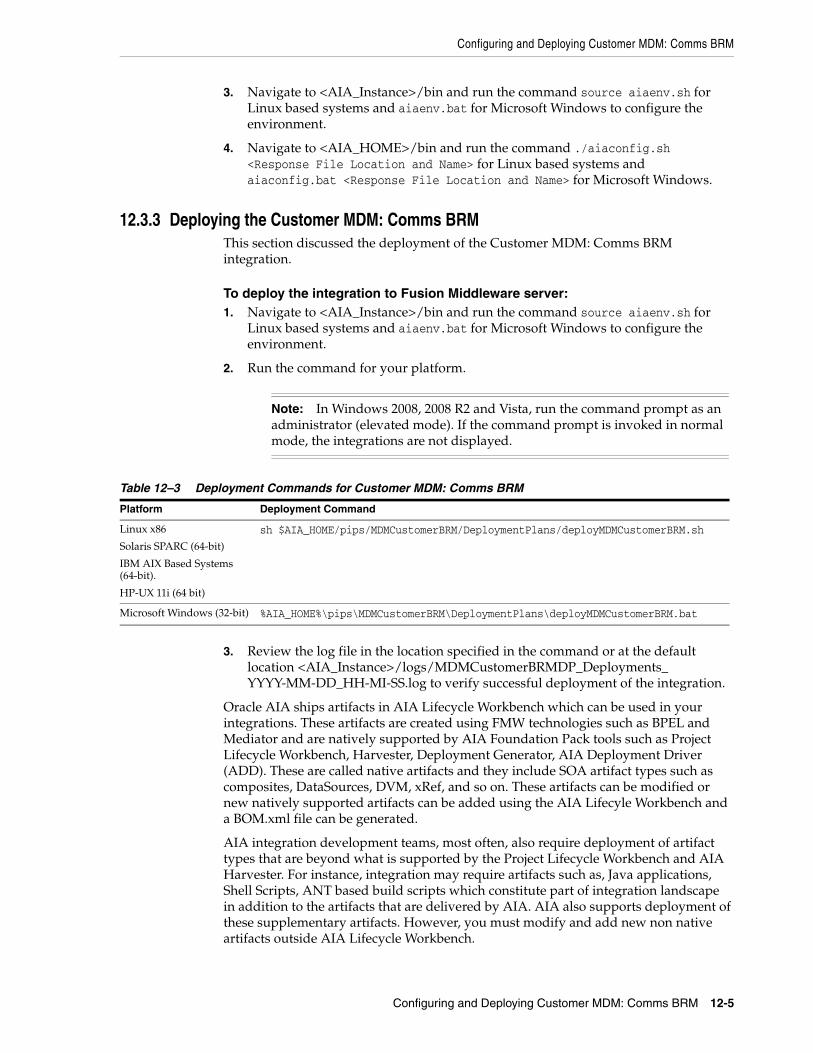
Configuring and Deploying Customer MDM: Comms BRM
Configuring and Deploying Customer MDM: Comms BRM 12-5
3. Navigate to <AIA_Instance>/bin and run the command source aiaenv.sh for Linux based systems and aiaenv.bat for Microsoft Windows to configure the environment.
4. Navigate to <AIA_HOME>/bin and run the command ./aiaconfig.sh <Response File Location and Name> for Linux based systems and aiaconfig.bat <Response File Location and Name> for Microsoft Windows.
12.3.3 Deploying the Customer MDM: Comms BRMThis section discussed the deployment of the Customer MDM: Comms BRM integration.
To deploy the integration to Fusion Middleware server:1. Navigate to <AIA_Instance>/bin and run the command source aiaenv.sh for
Linux based systems and aiaenv.bat for Microsoft Windows to configure the environment.
2. Run the command for your platform.
3. Review the log file in the location specified in the command or at the default location <AIA_Instance>/logs/MDMCustomerBRMDP_Deployments_YYYY-MM-DD_HH-MI-SS.log to verify successful deployment of the integration.
Oracle AIA ships artifacts in AIA Lifecycle Workbench which can be used in your integrations. These artifacts are created using FMW technologies such as BPEL and Mediator and are natively supported by AIA Foundation Pack tools such as Project Lifecycle Workbench, Harvester, Deployment Generator, AIA Deployment Driver (ADD). These are called native artifacts and they include SOA artifact types such as composites, DataSources, DVM, xRef, and so on. These artifacts can be modified or new natively supported artifacts can be added using the AIA Lifecyle Workbench and a BOM.xml file can be generated.
AIA integration development teams, most often, also require deployment of artifact types that are beyond what is supported by the Project Lifecycle Workbench and AIA Harvester. For instance, integration may require artifacts such as, Java applications, Shell Scripts, ANT based build scripts which constitute part of integration landscape in addition to the artifacts that are delivered by AIA. AIA also supports deployment of these supplementary artifacts. However, you must modify and add new non native artifacts outside AIA Lifecycle Workbench.
Note: In Windows 2008, 2008 R2 and Vista, run the command prompt as an administrator (elevated mode). If the command prompt is invoked in normal mode, the integrations are not displayed.
Table 12–3 Deployment Commands for Customer MDM: Comms BRM
Platform Deployment Command
Linux x86
Solaris SPARC (64-bit)
IBM AIX Based Systems (64-bit).
HP-UX 11i (64 bit)
sh $AIA_HOME/pips/MDMCustomerBRM/DeploymentPlans/deployMDMCustomerBRM.sh
Microsoft Windows (32-bit) %AIA_HOME%\pips\MDMCustomerBRM\DeploymentPlans\deployMDMCustomerBRM.bat
Verifying Deployment
12-6 Oracle Application Integration Architecture Installation and Upgrade Guide for Pre-Built Integrations
For more information on deploying artifacts, see Oracle Fusion Middleware Developer's Guide for Oracle Application Integration Architecture Foundation Pack, "Generating Deployment Plans and Deploying Artifacts".
12.4 Verifying Deployment
To verify the Customer MDM: Comms BRM deployment:1. Open the log files from the following location and look for warnings and error
messages:
■ For Linux x86, Solaris SPARC (64-bit), HP-UX 11i (64 bit) and IBM AIX Based Systems (64-bit): Review the install log located at <AIA_HOME>/aia_instances/<instance name>/logs to verify whether the integration is successfully installed.
■ For Microsoft Windows (32-bit): Review the install log located at <AIA_HOME>\aia_instances\<instance name>\logs to verify whether the integration is successfully installed.
2. Confirm that the Customer MDM: Comms BRM services were installed.
a. Navigate to the Oracle Enterprise Manager Fusion Middleware Control (http://<server name>:<port number>/em/).
b. Log in with the server admin user name. For access details, contact the system administrator.
c. Expand Farm_soa_domain, SOA, soa-infra, Default and look for the following items:
■ CommunicationsCustomerPartyEBSV2
■ CommunicationsCustomerPartyResponseEBSV2
■ Core2CommsCustomerPartyBridge
■ SyncCustomerPartyListBRM_01CommsJMSConsumer
■ SyncCustomerPartyListBRMCommsJMSProducer
■ SyncCustomerPartyListBRMCommsProvABCSImpl
For more information about the DVMs to be verified, see the Oracle Application Integration Architecture Customer Master Data Management Integration Pack Implementation Guide.
12.5 Undeploying the Customer MDM: Comms BRM
To undeploy the integration from Fusion Middleware Server:1. Navigate to <AIA_Instance>/bin and run the command source aiaenv.sh for
Linux based systems and aiaenv.bat for Microsoft Windows to configure the environment.
2. Run the command for your platform.
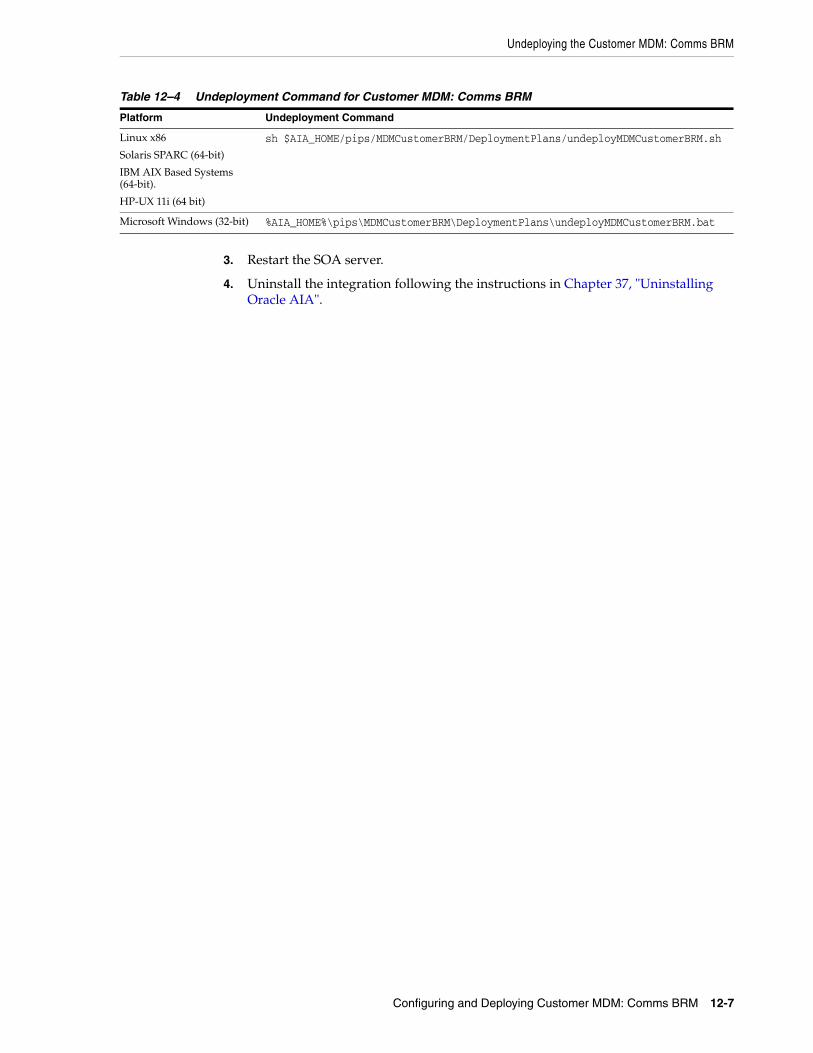
Undeploying the Customer MDM: Comms BRM
Configuring and Deploying Customer MDM: Comms BRM 12-7
3. Restart the SOA server.
4. Uninstall the integration following the instructions in Chapter 37, "Uninstalling Oracle AIA".
Table 12–4 Undeployment Command for Customer MDM: Comms BRM
Platform Undeployment Command
Linux x86
Solaris SPARC (64-bit)
IBM AIX Based Systems (64-bit).
HP-UX 11i (64 bit)
sh $AIA_HOME/pips/MDMCustomerBRM/DeploymentPlans/undeployMDMCustomerBRM.sh
Microsoft Windows (32-bit) %AIA_HOME%\pips\MDMCustomerBRM\DeploymentPlans\undeployMDMCustomerBRM.bat

Undeploying the Customer MDM: Comms BRM
12-8 Oracle Application Integration Architecture Installation and Upgrade Guide for Pre-Built Integrations
13
Deploying Customer MDM: Routing Rules 13-1
13Deploying Customer MDM: Routing Rules
This chapter discusses how to deploy Oracle Customer Master Data Management: Routing Rules (Customer MDM: Routing Rules).
This chapter includes the following sections:
■ Section 13.1, "Overall Configuration and Deployment of MDM Customer Integrations"
■ Section 13.2, "Deploying Customer MDM: Routing Rules"
■ Section 13.3, "Verifying Deployment"
■ Section 13.4, "Undeploying Customer MDM: Routing Rules"
13.1 Overall Configuration and Deployment of MDM Customer Integrations
The overall MDM Customer integration consists of four component integrations: MDM Customer Base Pack (UCM) and three other options: MDM Customer Siebel, MDM Customer E-Business Suite and MDM Customer BRM. The overall MDM Customer integration can be configured and deployed by selecting any integration or integration combination. The configuration and deployment process consists of the following steps:
1. Configure and deploy the MDM Customer component integrations. For detailed instructions on the MDM Customer integrations, see your specific integration chapters in Part II, "Configuring and Deploying Pre-Built Integrations" of this guide.
2. Deploy the MDM Customer Routing Rules following the instructions discussed in Section 13.2, "Deploying Customer MDM: Routing Rules". Routing Rules wire the integration services, depending on the integrations deployed.
3. Configure and deploy the MDM Customer Match Fetch Enterprise Composite Application following the instructions in Chapter 14, "Deploying Customer MDM: Match Fetch Enterprise Composite Application". This UI application enables match and fetch of customers from the hub.
13.2 Deploying Customer MDM: Routing Rules
To deploy the routing rules to Fusion Middleware server:1. Navigate to <AIA_Instance>/bin and run the command source aiaenv.sh for
Linux based systems and aiaenv.bat for Microsoft Windows to configure the environment.
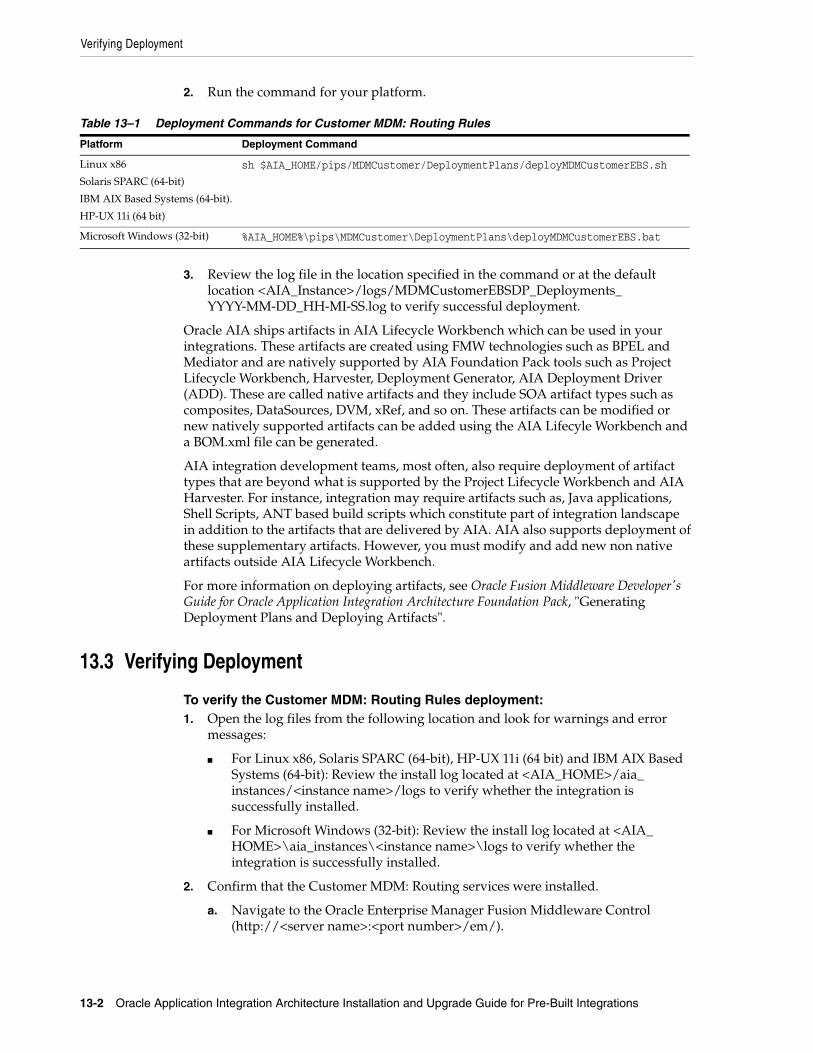
Verifying Deployment
13-2 Oracle Application Integration Architecture Installation and Upgrade Guide for Pre-Built Integrations
2. Run the command for your platform.
3. Review the log file in the location specified in the command or at the default location <AIA_Instance>/logs/MDMCustomerEBSDP_Deployments_YYYY-MM-DD_HH-MI-SS.log to verify successful deployment.
Oracle AIA ships artifacts in AIA Lifecycle Workbench which can be used in your integrations. These artifacts are created using FMW technologies such as BPEL and Mediator and are natively supported by AIA Foundation Pack tools such as Project Lifecycle Workbench, Harvester, Deployment Generator, AIA Deployment Driver (ADD). These are called native artifacts and they include SOA artifact types such as composites, DataSources, DVM, xRef, and so on. These artifacts can be modified or new natively supported artifacts can be added using the AIA Lifecyle Workbench and a BOM.xml file can be generated.
AIA integration development teams, most often, also require deployment of artifact types that are beyond what is supported by the Project Lifecycle Workbench and AIA Harvester. For instance, integration may require artifacts such as, Java applications, Shell Scripts, ANT based build scripts which constitute part of integration landscape in addition to the artifacts that are delivered by AIA. AIA also supports deployment of these supplementary artifacts. However, you must modify and add new non native artifacts outside AIA Lifecycle Workbench.
For more information on deploying artifacts, see Oracle Fusion Middleware Developer's Guide for Oracle Application Integration Architecture Foundation Pack, "Generating Deployment Plans and Deploying Artifacts".
13.3 Verifying Deployment
To verify the Customer MDM: Routing Rules deployment:1. Open the log files from the following location and look for warnings and error
messages:
■ For Linux x86, Solaris SPARC (64-bit), HP-UX 11i (64 bit) and IBM AIX Based Systems (64-bit): Review the install log located at <AIA_HOME>/aia_instances/<instance name>/logs to verify whether the integration is successfully installed.
■ For Microsoft Windows (32-bit): Review the install log located at <AIA_HOME>\aia_instances\<instance name>\logs to verify whether the integration is successfully installed.
2. Confirm that the Customer MDM: Routing services were installed.
a. Navigate to the Oracle Enterprise Manager Fusion Middleware Control (http://<server name>:<port number>/em/).
Table 13–1 Deployment Commands for Customer MDM: Routing Rules
Platform Deployment Command
Linux x86
Solaris SPARC (64-bit)
IBM AIX Based Systems (64-bit).
HP-UX 11i (64 bit)
sh $AIA_HOME/pips/MDMCustomer/DeploymentPlans/deployMDMCustomerEBS.sh
Microsoft Windows (32-bit) %AIA_HOME%\pips\MDMCustomer\DeploymentPlans\deployMDMCustomerEBS.bat
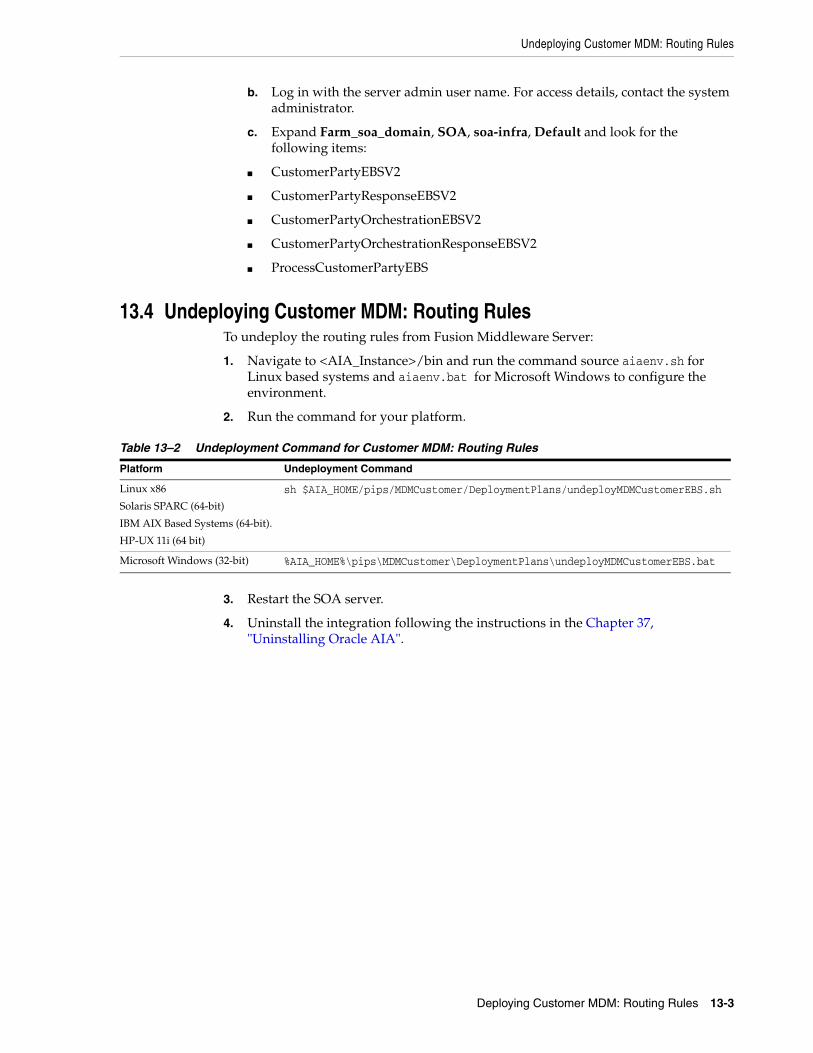
Undeploying Customer MDM: Routing Rules
Deploying Customer MDM: Routing Rules 13-3
b. Log in with the server admin user name. For access details, contact the system administrator.
c. Expand Farm_soa_domain, SOA, soa-infra, Default and look for the following items:
■ CustomerPartyEBSV2
■ CustomerPartyResponseEBSV2
■ CustomerPartyOrchestrationEBSV2
■ CustomerPartyOrchestrationResponseEBSV2
■ ProcessCustomerPartyEBS
13.4 Undeploying Customer MDM: Routing RulesTo undeploy the routing rules from Fusion Middleware Server:
1. Navigate to <AIA_Instance>/bin and run the command source aiaenv.sh for Linux based systems and aiaenv.bat for Microsoft Windows to configure the environment.
2. Run the command for your platform.
3. Restart the SOA server.
4. Uninstall the integration following the instructions in the Chapter 37, "Uninstalling Oracle AIA".
Table 13–2 Undeployment Command for Customer MDM: Routing Rules
Platform Undeployment Command
Linux x86
Solaris SPARC (64-bit)
IBM AIX Based Systems (64-bit).
HP-UX 11i (64 bit)
sh $AIA_HOME/pips/MDMCustomer/DeploymentPlans/undeployMDMCustomerEBS.sh
Microsoft Windows (32-bit) %AIA_HOME%\pips\MDMCustomer\DeploymentPlans\undeployMDMCustomerEBS.bat
Undeploying Customer MDM: Routing Rules
13-4 Oracle Application Integration Architecture Installation and Upgrade Guide for Pre-Built Integrations
14
Deploying Customer MDM: Match Fetch Enterprise Composite Application 14-1
14Deploying Customer MDM: Match FetchEnterprise Composite Application
This chapter discusses how to configure and deploy Oracle Customer Data Management: Match Fetch Enterprise Composite Application (Customer MDM: Match Fetch Enterprise Composite Application).
This chapter includes the following sections:
■ Section 14.1, "Overall Configuration and Deployment of MDM Customer Integrations"
■ Section 14.2, "Deploying Customer MDM: Match Fetch Enterprise Composite Application"
■ Section 14.3, "Verifying Deployment"
■ Section 14.4, "Undeploying Customer MDM: Match Fetch Enterprise Composite Application"
14.1 Overall Configuration and Deployment of MDM Customer Integrations
The overall MDM Customer integration consists of four component integrations: MDM Customer Base Pack (UCM) and three other options: MDM Customer Siebel, MDM Customer E-Business Suite and MDM Customer BRM. The overall MDM Customer integration can be configured and deployed by selecting any integration or integration combination. The configuration and deployment process consists of the following steps:
1. Configure and deploy the MDM Customer component integrations. For detailed instructions on the MDM Customer integrations, see your specific integration chapters in Part II, "Configuring and Deploying Pre-Built Integrations" of this guide.
2. Deploy the MDM Customer Routing Rules following the instructions discussed in Chapter 13, "Deploying Customer MDM: Routing Rules". Routing Rules wire the integration services, depending on the integrations deployed.
3. Deploy the MDM Customer Match Fetch Enterprise Composite Application following the instructions in Section 14.2, "Deploying Customer MDM: Match Fetch Enterprise Composite Application". This UI application enables match and fetch of customers from the hub.
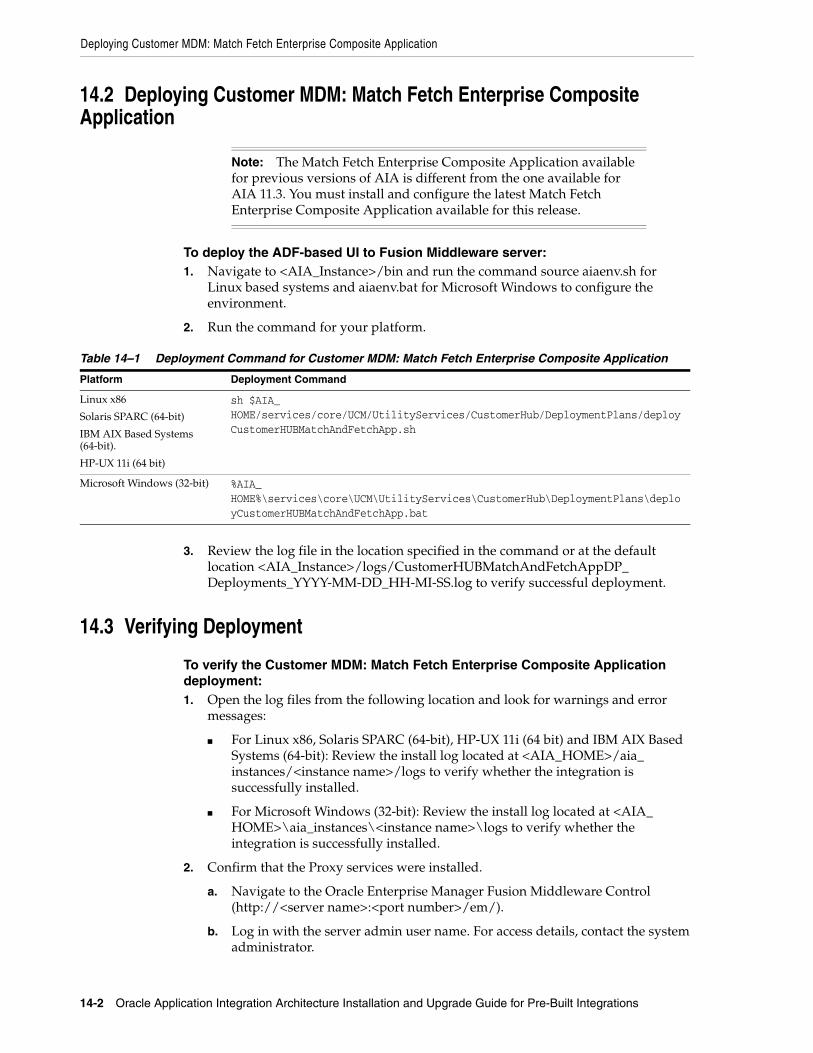
Deploying Customer MDM: Match Fetch Enterprise Composite Application
14-2 Oracle Application Integration Architecture Installation and Upgrade Guide for Pre-Built Integrations
14.2 Deploying Customer MDM: Match Fetch Enterprise Composite Application
To deploy the ADF-based UI to Fusion Middleware server:1. Navigate to <AIA_Instance>/bin and run the command source aiaenv.sh for
Linux based systems and aiaenv.bat for Microsoft Windows to configure the environment.
2. Run the command for your platform.
3. Review the log file in the location specified in the command or at the default location <AIA_Instance>/logs/CustomerHUBMatchAndFetchAppDP_Deployments_YYYY-MM-DD_HH-MI-SS.log to verify successful deployment.
14.3 Verifying Deployment
To verify the Customer MDM: Match Fetch Enterprise Composite Application deployment:1. Open the log files from the following location and look for warnings and error
messages:
■ For Linux x86, Solaris SPARC (64-bit), HP-UX 11i (64 bit) and IBM AIX Based Systems (64-bit): Review the install log located at <AIA_HOME>/aia_ instances/<instance name>/logs to verify whether the integration is successfully installed.
■ For Microsoft Windows (32-bit): Review the install log located at <AIA_ HOME>\aia_instances\<instance name>\logs to verify whether the integration is successfully installed.
2. Confirm that the Proxy services were installed.
a. Navigate to the Oracle Enterprise Manager Fusion Middleware Control (http://<server name>:<port number>/em/).
b. Log in with the server admin user name. For access details, contact the system administrator.
Note: The Match Fetch Enterprise Composite Application available for previous versions of AIA is different from the one available for AIA 11.3. You must install and configure the latest Match Fetch Enterprise Composite Application available for this release.
Table 14–1 Deployment Command for Customer MDM: Match Fetch Enterprise Composite Application
Platform Deployment Command
Linux x86
Solaris SPARC (64-bit)
IBM AIX Based Systems (64-bit).
HP-UX 11i (64 bit)
sh $AIA_HOME/services/core/UCM/UtilityServices/CustomerHub/DeploymentPlans/deployCustomerHUBMatchAndFetchApp.sh
Microsoft Windows (32-bit) %AIA_HOME%\services\core\UCM\UtilityServices\CustomerHub\DeploymentPlans\deployCustomerHUBMatchAndFetchApp.bat
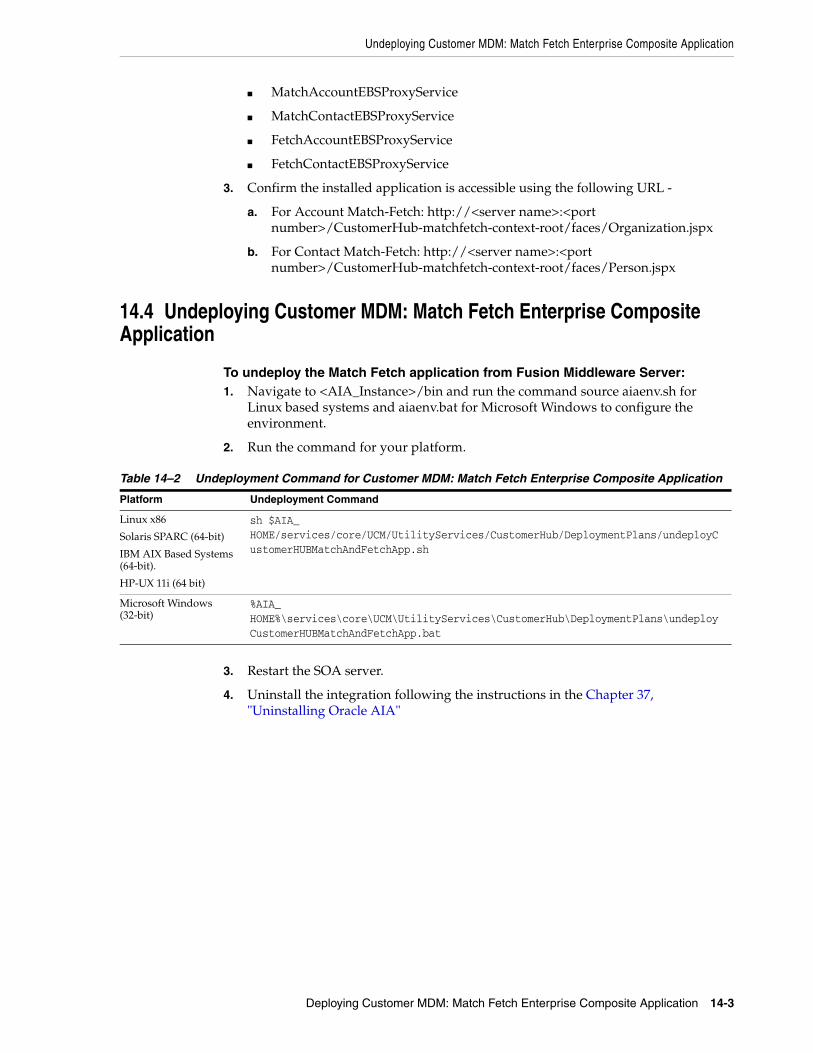
Undeploying Customer MDM: Match Fetch Enterprise Composite Application
Deploying Customer MDM: Match Fetch Enterprise Composite Application 14-3
■ MatchAccountEBSProxyService
■ MatchContactEBSProxyService
■ FetchAccountEBSProxyService
■ FetchContactEBSProxyService
3. Confirm the installed application is accessible using the following URL -
a. For Account Match-Fetch: http://<server name>:<port number>/CustomerHub-matchfetch-context-root/faces/Organization.jspx
b. For Contact Match-Fetch: http://<server name>:<port number>/CustomerHub-matchfetch-context-root/faces/Person.jspx
14.4 Undeploying Customer MDM: Match Fetch Enterprise Composite Application
To undeploy the Match Fetch application from Fusion Middleware Server:1. Navigate to <AIA_Instance>/bin and run the command source aiaenv.sh for
Linux based systems and aiaenv.bat for Microsoft Windows to configure the environment.
2. Run the command for your platform.
3. Restart the SOA server.
4. Uninstall the integration following the instructions in the Chapter 37, "Uninstalling Oracle AIA"
Table 14–2 Undeployment Command for Customer MDM: Match Fetch Enterprise Composite Application
Platform Undeployment Command
Linux x86
Solaris SPARC (64-bit)
IBM AIX Based Systems (64-bit).
HP-UX 11i (64 bit)
sh $AIA_HOME/services/core/UCM/UtilityServices/CustomerHub/DeploymentPlans/undeployCustomerHUBMatchAndFetchApp.sh
Microsoft Windows (32-bit)
%AIA_HOME%\services\core\UCM\UtilityServices\CustomerHub\DeploymentPlans\undeployCustomerHUBMatchAndFetchApp.bat

Undeploying Customer MDM: Match Fetch Enterprise Composite Application
14-4 Oracle Application Integration Architecture Installation and Upgrade Guide for Pre-Built Integrations
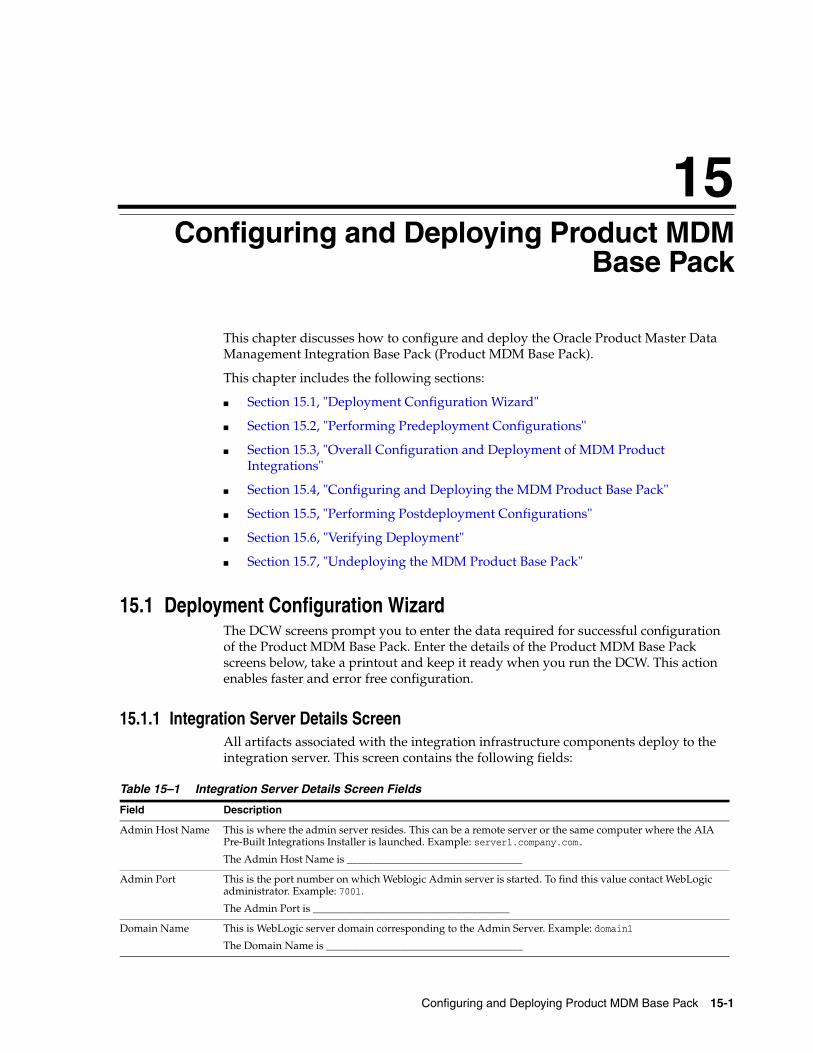
15
Configuring and Deploying Product MDM Base Pack 15-1
15Configuring and Deploying Product MDMBase Pack
This chapter discusses how to configure and deploy the Oracle Product Master Data Management Integration Base Pack (Product MDM Base Pack).
This chapter includes the following sections:
■ Section 15.1, "Deployment Configuration Wizard"
■ Section 15.2, "Performing Predeployment Configurations"
■ Section 15.3, "Overall Configuration and Deployment of MDM Product Integrations"
■ Section 15.4, "Configuring and Deploying the MDM Product Base Pack"
■ Section 15.5, "Performing Postdeployment Configurations"
■ Section 15.6, "Verifying Deployment"
■ Section 15.7, "Undeploying the MDM Product Base Pack"
15.1 Deployment Configuration WizardThe DCW screens prompt you to enter the data required for successful configuration of the Product MDM Base Pack. Enter the details of the Product MDM Base Pack screens below, take a printout and keep it ready when you run the DCW. This action enables faster and error free configuration.
15.1.1 Integration Server Details ScreenAll artifacts associated with the integration infrastructure components deploy to the integration server. This screen contains the following fields:
Table 15–1 Integration Server Details Screen Fields
Field Description
Admin Host Name This is where the admin server resides. This can be a remote server or the same computer where the AIA Pre-Built Integrations Installer is launched. Example: server1.company.com.
The Admin Host Name is _________________________________
Admin Port This is the port number on which Weblogic Admin server is started. To find this value contact WebLogic administrator. Example: 7001.
The Admin Port is _____________________________________
Domain Name This is WebLogic server domain corresponding to the Admin Server. Example: domain1
The Domain Name is _____________________________________
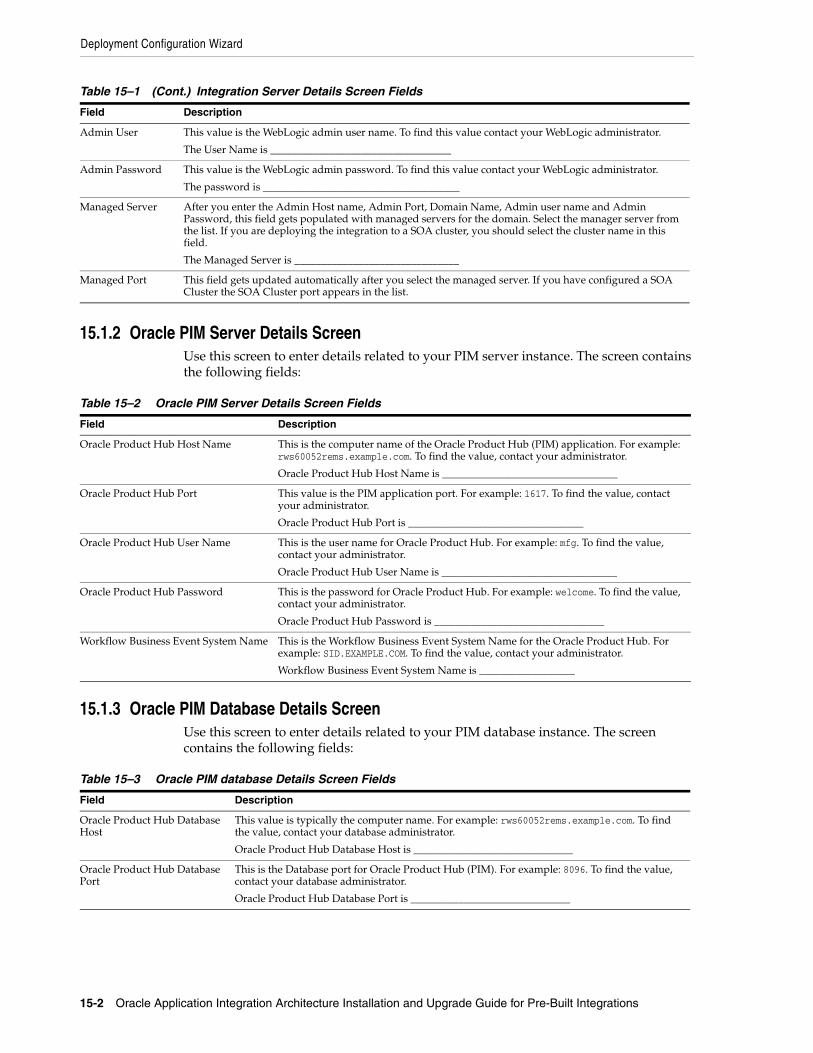
Deployment Configuration Wizard
15-2 Oracle Application Integration Architecture Installation and Upgrade Guide for Pre-Built Integrations
15.1.2 Oracle PIM Server Details ScreenUse this screen to enter details related to your PIM server instance. The screen contains the following fields:
15.1.3 Oracle PIM Database Details ScreenUse this screen to enter details related to your PIM database instance. The screen contains the following fields:
Admin User This value is the WebLogic admin user name. To find this value contact your WebLogic administrator.
The User Name is __________________________________
Admin Password This value is the WebLogic admin password. To find this value contact your WebLogic administrator.
The password is _____________________________________
Managed Server After you enter the Admin Host name, Admin Port, Domain Name, Admin user name and Admin Password, this field gets populated with managed servers for the domain. Select the manager server from the list. If you are deploying the integration to a SOA cluster, you should select the cluster name in this field.
The Managed Server is _______________________________
Managed Port This field gets updated automatically after you select the managed server. If you have configured a SOA Cluster the SOA Cluster port appears in the list.
Table 15–2 Oracle PIM Server Details Screen Fields
Field Description
Oracle Product Hub Host Name This is the computer name of the Oracle Product Hub (PIM) application. For example: rws60052rems.example.com. To find the value, contact your administrator.
Oracle Product Hub Host Name is _________________________________
Oracle Product Hub Port This value is the PIM application port. For example: 1617. To find the value, contact your administrator.
Oracle Product Hub Port is _________________________________
Oracle Product Hub User Name This is the user name for Oracle Product Hub. For example: mfg. To find the value, contact your administrator.
Oracle Product Hub User Name is _________________________________
Oracle Product Hub Password This is the password for Oracle Product Hub. For example: welcome. To find the value, contact your administrator.
Oracle Product Hub Password is ________________________________
Workflow Business Event System Name This is the Workflow Business Event System Name for the Oracle Product Hub. For example: SID.EXAMPLE.COM. To find the value, contact your administrator.
Workflow Business Event System Name is __________________
Table 15–3 Oracle PIM database Details Screen Fields
Field Description
Oracle Product Hub Database Host
This value is typically the computer name. For example: rws60052rems.example.com. To find the value, contact your database administrator.
Oracle Product Hub Database Host is ______________________________
Oracle Product Hub Database Port
This is the Database port for Oracle Product Hub (PIM). For example: 8096. To find the value, contact your database administrator.
Oracle Product Hub Database Port is ______________________________
Table 15–1 (Cont.) Integration Server Details Screen Fields
Field Description
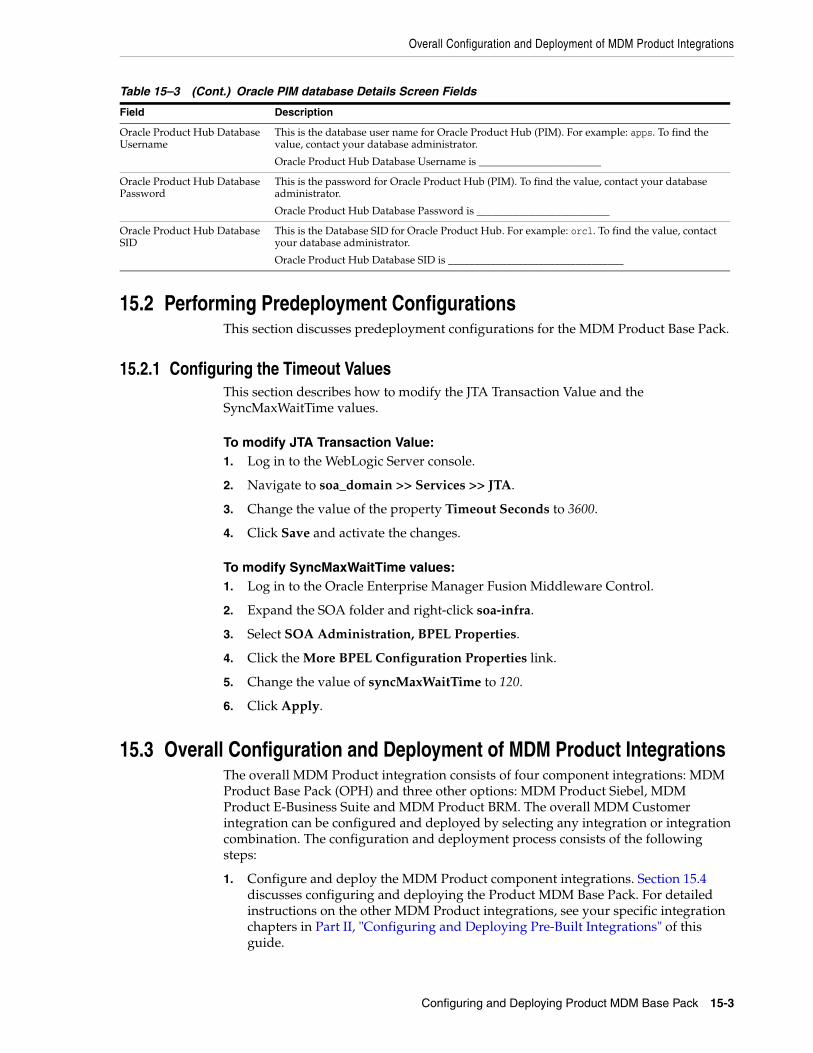
Overall Configuration and Deployment of MDM Product Integrations
Configuring and Deploying Product MDM Base Pack 15-3
15.2 Performing Predeployment ConfigurationsThis section discusses predeployment configurations for the MDM Product Base Pack.
15.2.1 Configuring the Timeout ValuesThis section describes how to modify the JTA Transaction Value and the SyncMaxWaitTime values.
To modify JTA Transaction Value:1. Log in to the WebLogic Server console.
2. Navigate to soa_domain >> Services >> JTA.
3. Change the value of the property Timeout Seconds to 3600.
4. Click Save and activate the changes.
To modify SyncMaxWaitTime values:1. Log in to the Oracle Enterprise Manager Fusion Middleware Control.
2. Expand the SOA folder and right-click soa-infra.
3. Select SOA Administration, BPEL Properties.
4. Click the More BPEL Configuration Properties link.
5. Change the value of syncMaxWaitTime to 120.
6. Click Apply.
15.3 Overall Configuration and Deployment of MDM Product IntegrationsThe overall MDM Product integration consists of four component integrations: MDM Product Base Pack (OPH) and three other options: MDM Product Siebel, MDM Product E-Business Suite and MDM Product BRM. The overall MDM Customer integration can be configured and deployed by selecting any integration or integration combination. The configuration and deployment process consists of the following steps:
1. Configure and deploy the MDM Product component integrations. Section 15.4 discusses configuring and deploying the Product MDM Base Pack. For detailed instructions on the other MDM Product integrations, see your specific integration chapters in Part II, "Configuring and Deploying Pre-Built Integrations" of this guide.
Oracle Product Hub Database Username
This is the database user name for Oracle Product Hub (PIM). For example: apps. To find the value, contact your database administrator.
Oracle Product Hub Database Username is _______________________
Oracle Product Hub Database Password
This is the password for Oracle Product Hub (PIM). To find the value, contact your database administrator.
Oracle Product Hub Database Password is _________________________
Oracle Product Hub Database SID
This is the Database SID for Oracle Product Hub. For example: orcl. To find the value, contact your database administrator.
Oracle Product Hub Database SID is _________________________________
Table 15–3 (Cont.) Oracle PIM database Details Screen Fields
Field Description
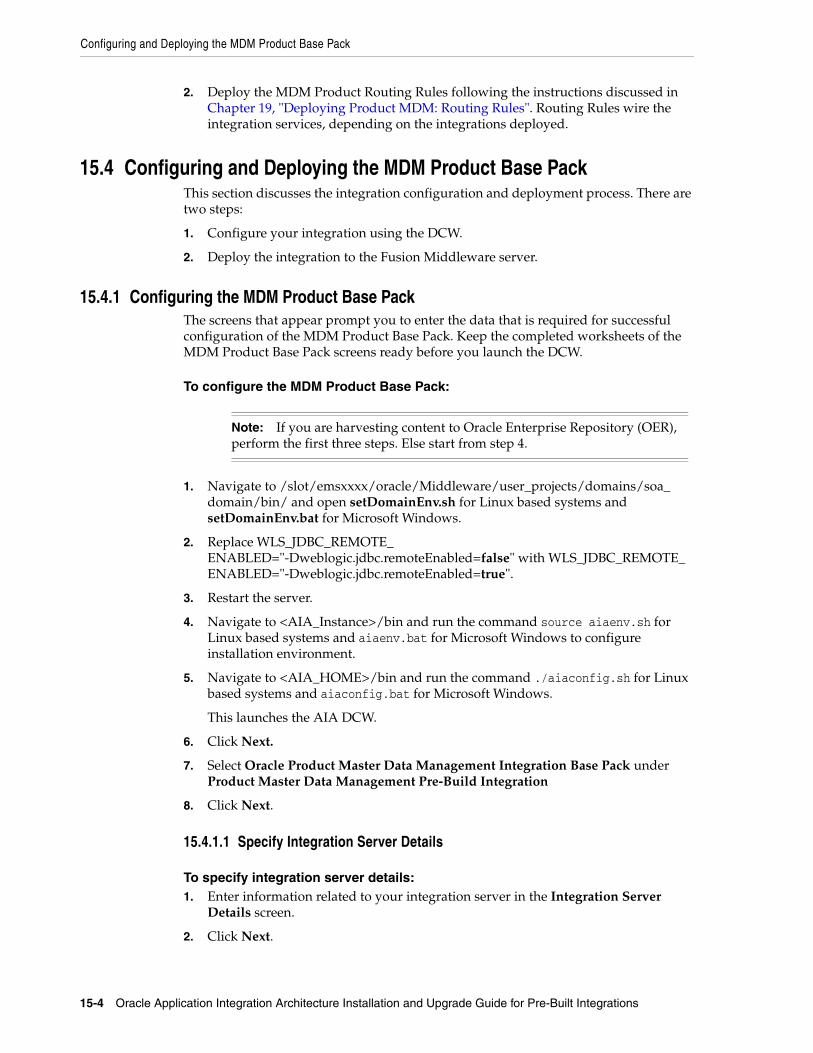
Configuring and Deploying the MDM Product Base Pack
15-4 Oracle Application Integration Architecture Installation and Upgrade Guide for Pre-Built Integrations
2. Deploy the MDM Product Routing Rules following the instructions discussed in Chapter 19, "Deploying Product MDM: Routing Rules". Routing Rules wire the integration services, depending on the integrations deployed.
15.4 Configuring and Deploying the MDM Product Base PackThis section discusses the integration configuration and deployment process. There are two steps:
1. Configure your integration using the DCW.
2. Deploy the integration to the Fusion Middleware server.
15.4.1 Configuring the MDM Product Base PackThe screens that appear prompt you to enter the data that is required for successful configuration of the MDM Product Base Pack. Keep the completed worksheets of the MDM Product Base Pack screens ready before you launch the DCW.
To configure the MDM Product Base Pack:
1. Navigate to /slot/emsxxxx/oracle/Middleware/user_projects/domains/soa_domain/bin/ and open setDomainEnv.sh for Linux based systems and setDomainEnv.bat for Microsoft Windows.
2. Replace WLS_JDBC_REMOTE_ENABLED="-Dweblogic.jdbc.remoteEnabled=false" with WLS_JDBC_REMOTE_ENABLED="-Dweblogic.jdbc.remoteEnabled=true".
3. Restart the server.
4. Navigate to <AIA_Instance>/bin and run the command source aiaenv.sh for Linux based systems and aiaenv.bat for Microsoft Windows to configure installation environment.
5. Navigate to <AIA_HOME>/bin and run the command ./aiaconfig.sh for Linux based systems and aiaconfig.bat for Microsoft Windows.
This launches the AIA DCW.
6. Click Next.
7. Select Oracle Product Master Data Management Integration Base Pack under Product Master Data Management Pre-Build Integration
8. Click Next.
15.4.1.1 Specify Integration Server Details
To specify integration server details:1. Enter information related to your integration server in the Integration Server
Details screen.
2. Click Next.
Note: If you are harvesting content to Oracle Enterprise Repository (OER), perform the first three steps. Else start from step 4.
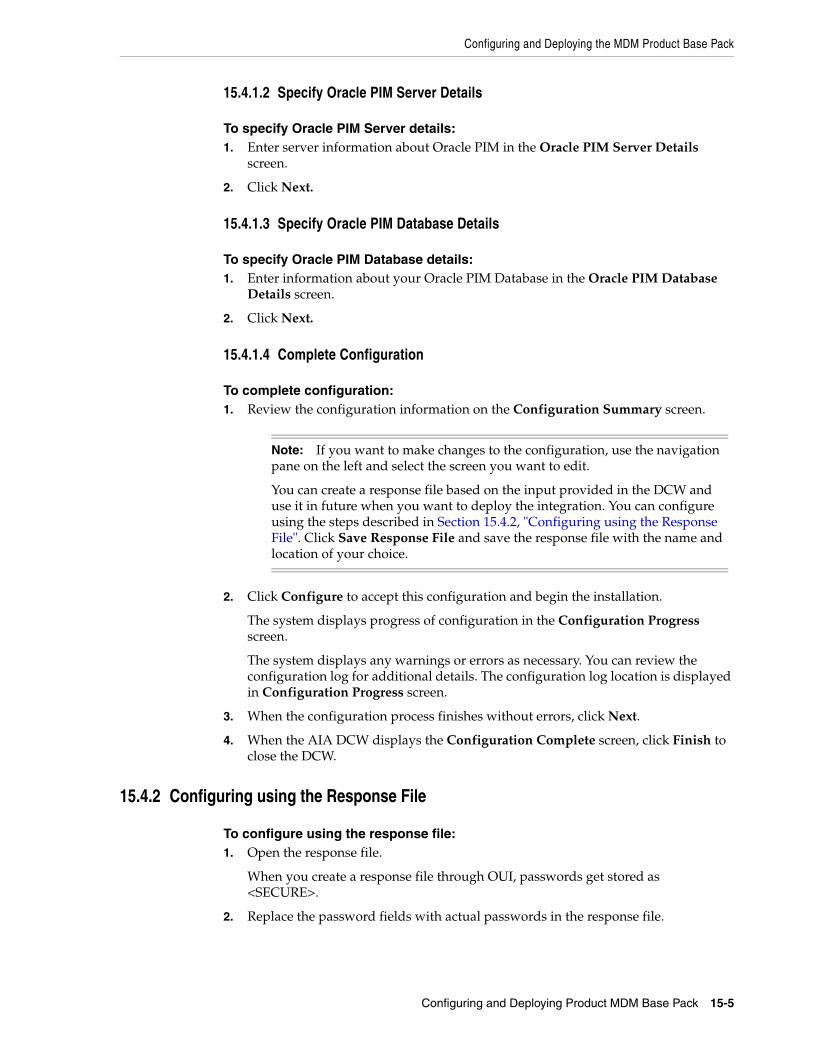
Configuring and Deploying the MDM Product Base Pack
Configuring and Deploying Product MDM Base Pack 15-5
15.4.1.2 Specify Oracle PIM Server Details
To specify Oracle PIM Server details:1. Enter server information about Oracle PIM in the Oracle PIM Server Details
screen.
2. Click Next.
15.4.1.3 Specify Oracle PIM Database Details
To specify Oracle PIM Database details:1. Enter information about your Oracle PIM Database in the Oracle PIM Database
Details screen.
2. Click Next.
15.4.1.4 Complete Configuration
To complete configuration:1. Review the configuration information on the Configuration Summary screen.
2. Click Configure to accept this configuration and begin the installation.
The system displays progress of configuration in the Configuration Progress screen.
The system displays any warnings or errors as necessary. You can review the configuration log for additional details. The configuration log location is displayed in Configuration Progress screen.
3. When the configuration process finishes without errors, click Next.
4. When the AIA DCW displays the Configuration Complete screen, click Finish to close the DCW.
15.4.2 Configuring using the Response File
To configure using the response file:1. Open the response file.
When you create a response file through OUI, passwords get stored as <SECURE>.
2. Replace the password fields with actual passwords in the response file.
Note: If you want to make changes to the configuration, use the navigation pane on the left and select the screen you want to edit.
You can create a response file based on the input provided in the DCW and use it in future when you want to deploy the integration. You can configure using the steps described in Section 15.4.2, "Configuring using the Response File". Click Save Response File and save the response file with the name and location of your choice.
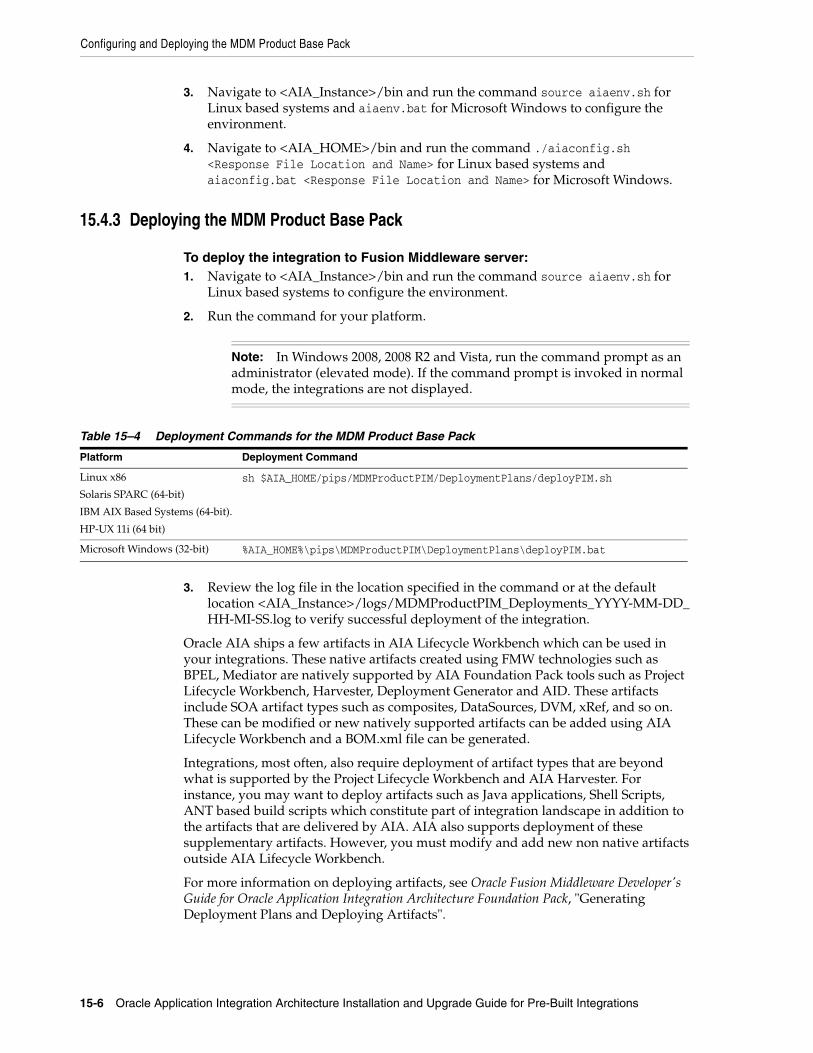
Configuring and Deploying the MDM Product Base Pack
15-6 Oracle Application Integration Architecture Installation and Upgrade Guide for Pre-Built Integrations
3. Navigate to <AIA_Instance>/bin and run the command source aiaenv.sh for Linux based systems and aiaenv.bat for Microsoft Windows to configure the environment.
4. Navigate to <AIA_HOME>/bin and run the command ./aiaconfig.sh <Response File Location and Name> for Linux based systems and aiaconfig.bat <Response File Location and Name> for Microsoft Windows.
15.4.3 Deploying the MDM Product Base Pack
To deploy the integration to Fusion Middleware server:1. Navigate to <AIA_Instance>/bin and run the command source aiaenv.sh for
Linux based systems to configure the environment.
2. Run the command for your platform.
3. Review the log file in the location specified in the command or at the default location <AIA_Instance>/logs/MDMProductPIM_Deployments_YYYY-MM-DD_HH-MI-SS.log to verify successful deployment of the integration.
Oracle AIA ships a few artifacts in AIA Lifecycle Workbench which can be used in your integrations. These native artifacts created using FMW technologies such as BPEL, Mediator are natively supported by AIA Foundation Pack tools such as Project Lifecycle Workbench, Harvester, Deployment Generator and AID. These artifacts include SOA artifact types such as composites, DataSources, DVM, xRef, and so on. These can be modified or new natively supported artifacts can be added using AIA Lifecycle Workbench and a BOM.xml file can be generated.
Integrations, most often, also require deployment of artifact types that are beyond what is supported by the Project Lifecycle Workbench and AIA Harvester. For instance, you may want to deploy artifacts such as Java applications, Shell Scripts, ANT based build scripts which constitute part of integration landscape in addition to the artifacts that are delivered by AIA. AIA also supports deployment of these supplementary artifacts. However, you must modify and add new non native artifacts outside AIA Lifecycle Workbench.
For more information on deploying artifacts, see Oracle Fusion Middleware Developer's Guide for Oracle Application Integration Architecture Foundation Pack, "Generating Deployment Plans and Deploying Artifacts".
Note: In Windows 2008, 2008 R2 and Vista, run the command prompt as an administrator (elevated mode). If the command prompt is invoked in normal mode, the integrations are not displayed.
Table 15–4 Deployment Commands for the MDM Product Base Pack
Platform Deployment Command
Linux x86
Solaris SPARC (64-bit)
IBM AIX Based Systems (64-bit).
HP-UX 11i (64 bit)
sh $AIA_HOME/pips/MDMProductPIM/DeploymentPlans/deployPIM.sh
Microsoft Windows (32-bit) %AIA_HOME%\pips\MDMProductPIM\DeploymentPlans\deployPIM.bat
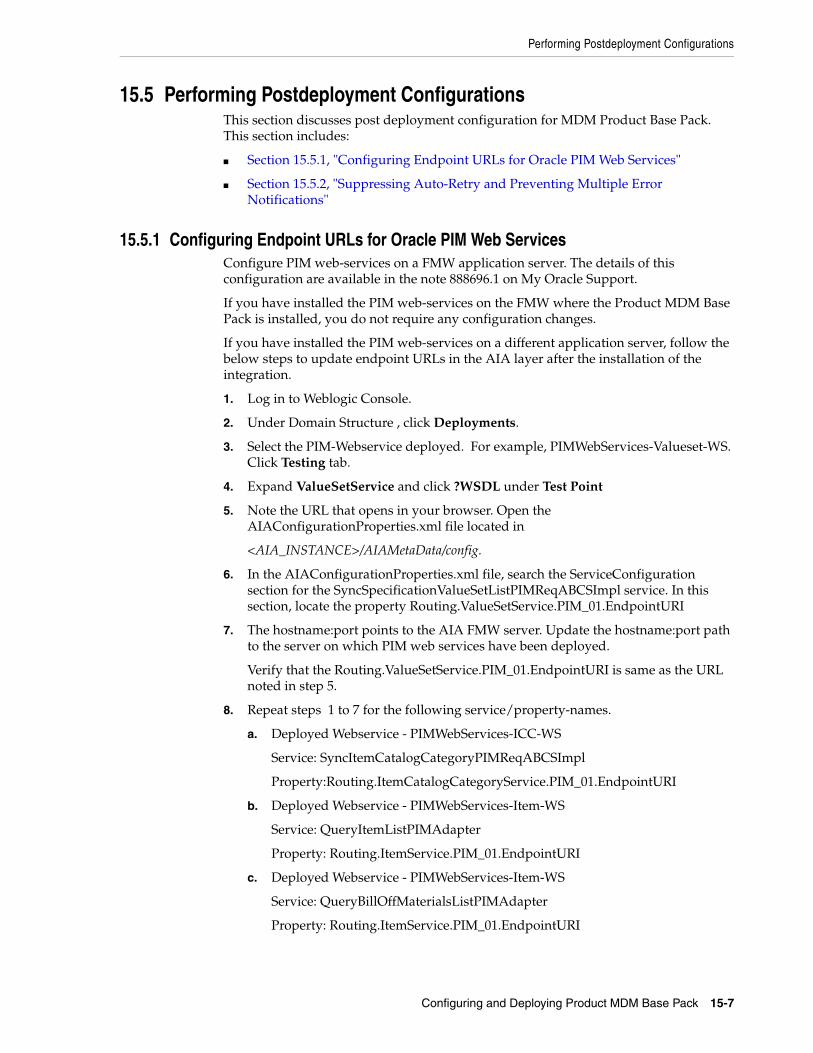
Performing Postdeployment Configurations
Configuring and Deploying Product MDM Base Pack 15-7
15.5 Performing Postdeployment ConfigurationsThis section discusses post deployment configuration for MDM Product Base Pack. This section includes:
■ Section 15.5.1, "Configuring Endpoint URLs for Oracle PIM Web Services"
■ Section 15.5.2, "Suppressing Auto-Retry and Preventing Multiple Error Notifications"
15.5.1 Configuring Endpoint URLs for Oracle PIM Web ServicesConfigure PIM web-services on a FMW application server. The details of this configuration are available in the note 888696.1 on My Oracle Support.
If you have installed the PIM web-services on the FMW where the Product MDM Base Pack is installed, you do not require any configuration changes.
If you have installed the PIM web-services on a different application server, follow the below steps to update endpoint URLs in the AIA layer after the installation of the integration.
1. Log in to Weblogic Console.
2. Under Domain Structure , click Deployments.
3. Select the PIM-Webservice deployed. For example, PIMWebServices-Valueset-WS. Click Testing tab.
4. Expand ValueSetService and click ?WSDL under Test Point
5. Note the URL that opens in your browser. Open the AIAConfigurationProperties.xml file located in
<AIA_INSTANCE>/AIAMetaData/config.
6. In the AIAConfigurationProperties.xml file, search the ServiceConfiguration section for the SyncSpecificationValueSetListPIMReqABCSImpl service. In this section, locate the property Routing.ValueSetService.PIM_01.EndpointURI
7. The hostname:port points to the AIA FMW server. Update the hostname:port path to the server on which PIM web services have been deployed.
Verify that the Routing.ValueSetService.PIM_01.EndpointURI is same as the URL noted in step 5.
8. Repeat steps 1 to 7 for the following service/property-names.
a. Deployed Webservice - PIMWebServices-ICC-WS
Service: SyncItemCatalogCategoryPIMReqABCSImpl
Property:Routing.ItemCatalogCategoryService.PIM_01.EndpointURI
b. Deployed Webservice - PIMWebServices-Item-WS
Service: QueryItemListPIMAdapter
Property: Routing.ItemService.PIM_01.EndpointURI
c. Deployed Webservice - PIMWebServices-Item-WS
Service: QueryBillOffMaterialsListPIMAdapter
Property: Routing.ItemService.PIM_01.EndpointURI
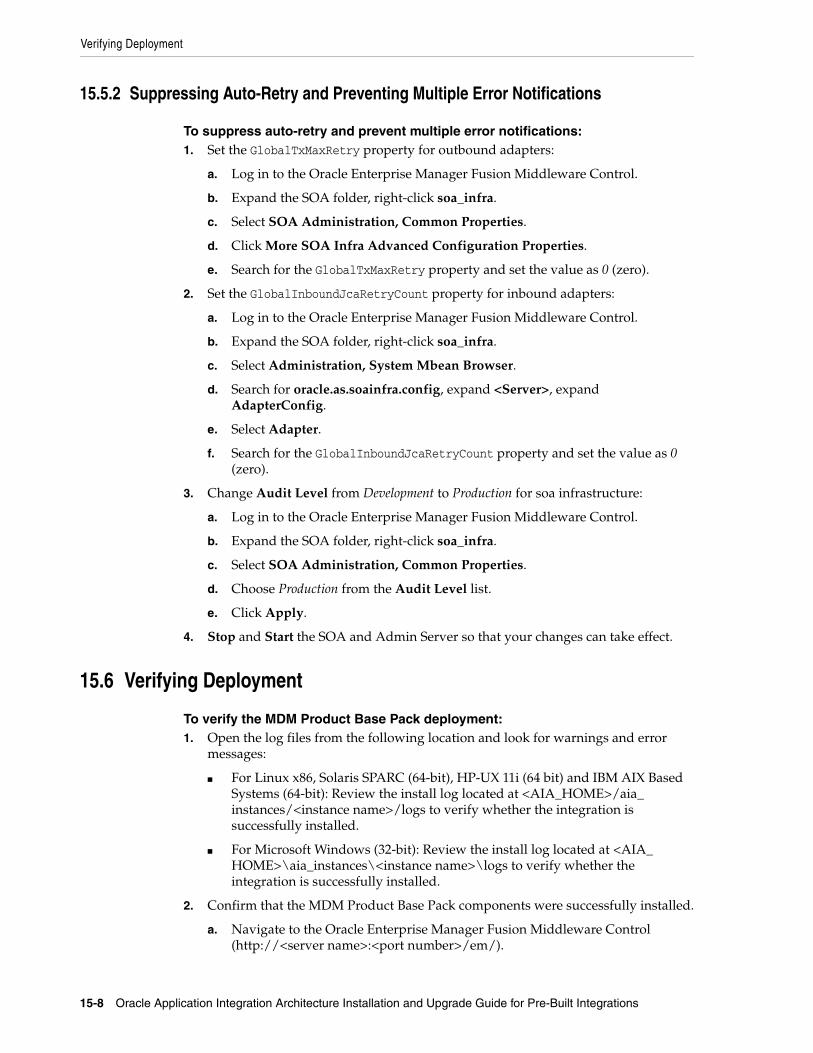
Verifying Deployment
15-8 Oracle Application Integration Architecture Installation and Upgrade Guide for Pre-Built Integrations
15.5.2 Suppressing Auto-Retry and Preventing Multiple Error Notifications
To suppress auto-retry and prevent multiple error notifications:1. Set the GlobalTxMaxRetry property for outbound adapters:
a. Log in to the Oracle Enterprise Manager Fusion Middleware Control.
b. Expand the SOA folder, right-click soa_infra.
c. Select SOA Administration, Common Properties.
d. Click More SOA Infra Advanced Configuration Properties.
e. Search for the GlobalTxMaxRetry property and set the value as 0 (zero).
2. Set the GlobalInboundJcaRetryCount property for inbound adapters:
a. Log in to the Oracle Enterprise Manager Fusion Middleware Control.
b. Expand the SOA folder, right-click soa_infra.
c. Select Administration, System Mbean Browser.
d. Search for oracle.as.soainfra.config, expand <Server>, expand AdapterConfig.
e. Select Adapter.
f. Search for the GlobalInboundJcaRetryCount property and set the value as 0 (zero).
3. Change Audit Level from Development to Production for soa infrastructure:
a. Log in to the Oracle Enterprise Manager Fusion Middleware Control.
b. Expand the SOA folder, right-click soa_infra.
c. Select SOA Administration, Common Properties.
d. Choose Production from the Audit Level list.
e. Click Apply.
4. Stop and Start the SOA and Admin Server so that your changes can take effect.
15.6 Verifying Deployment
To verify the MDM Product Base Pack deployment:1. Open the log files from the following location and look for warnings and error
messages:
■ For Linux x86, Solaris SPARC (64-bit), HP-UX 11i (64 bit) and IBM AIX Based Systems (64-bit): Review the install log located at <AIA_HOME>/aia_instances/<instance name>/logs to verify whether the integration is successfully installed.
■ For Microsoft Windows (32-bit): Review the install log located at <AIA_HOME>\aia_instances\<instance name>\logs to verify whether the integration is successfully installed.
2. Confirm that the MDM Product Base Pack components were successfully installed.
a. Navigate to the Oracle Enterprise Manager Fusion Middleware Control (http://<server name>:<port number>/em/).
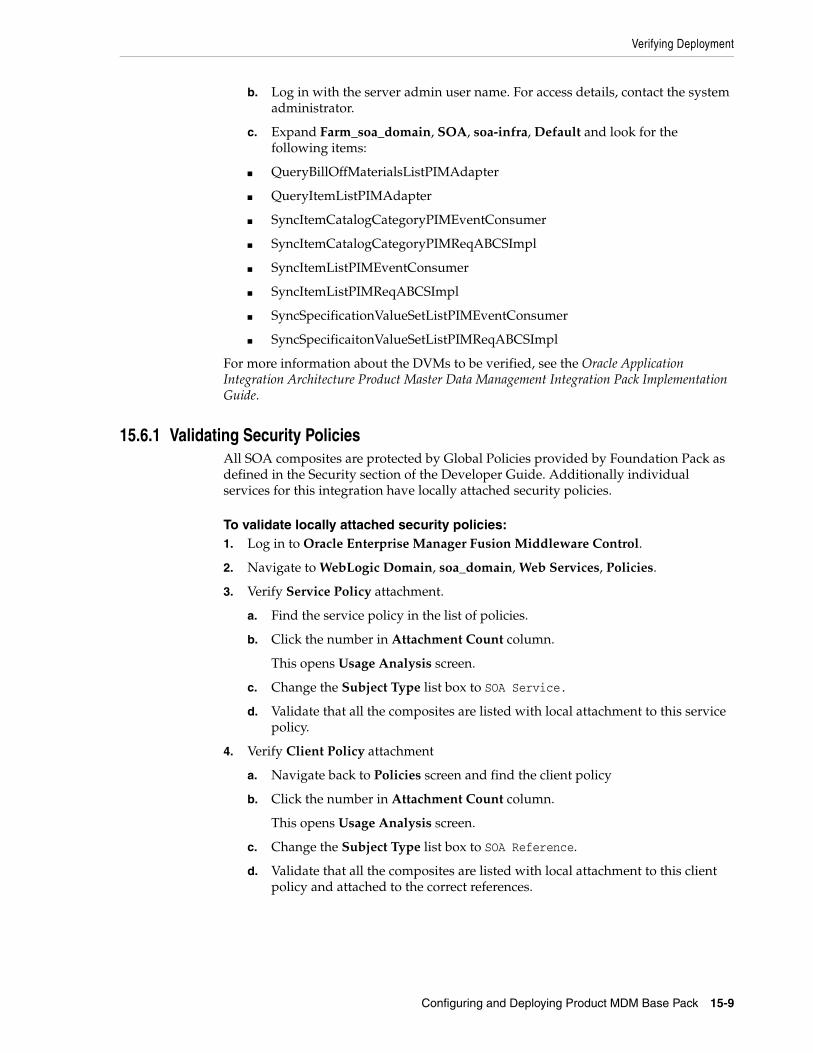
Verifying Deployment
Configuring and Deploying Product MDM Base Pack 15-9
b. Log in with the server admin user name. For access details, contact the system administrator.
c. Expand Farm_soa_domain, SOA, soa-infra, Default and look for the following items:
■ QueryBillOffMaterialsListPIMAdapter
■ QueryItemListPIMAdapter
■ SyncItemCatalogCategoryPIMEventConsumer
■ SyncItemCatalogCategoryPIMReqABCSImpl
■ SyncItemListPIMEventConsumer
■ SyncItemListPIMReqABCSImpl
■ SyncSpecificationValueSetListPIMEventConsumer
■ SyncSpecificaitonValueSetListPIMReqABCSImpl
For more information about the DVMs to be verified, see the Oracle Application Integration Architecture Product Master Data Management Integration Pack Implementation Guide.
15.6.1 Validating Security PoliciesAll SOA composites are protected by Global Policies provided by Foundation Pack as defined in the Security section of the Developer Guide. Additionally individual services for this integration have locally attached security policies.
To validate locally attached security policies:1. Log in to Oracle Enterprise Manager Fusion Middleware Control.
2. Navigate to WebLogic Domain, soa_domain, Web Services, Policies.
3. Verify Service Policy attachment.
a. Find the service policy in the list of policies.
b. Click the number in Attachment Count column.
This opens Usage Analysis screen.
c. Change the Subject Type list box to SOA Service.
d. Validate that all the composites are listed with local attachment to this service policy.
4. Verify Client Policy attachment
a. Navigate back to Policies screen and find the client policy
b. Click the number in Attachment Count column.
This opens Usage Analysis screen.
c. Change the Subject Type list box to SOA Reference.
d. Validate that all the composites are listed with local attachment to this client policy and attached to the correct references.

Undeploying the MDM Product Base Pack
15-10 Oracle Application Integration Architecture Installation and Upgrade Guide for Pre-Built Integrations
For integration implementation, see Oracle Application Integration Architecture Product Master Data Management Integration Pack Implementation Guide.
15.6.2 Validating User Credentials for PublicationService
To validate user credentials for PublicationService, perform these steps: 1. Login to EM console: http://<hostname>:<port>/em
2. Expand Farm_soa_domain, SOA, soa-infra, Default and look for the requestor. For example, SyncItemCatalogCategoryPIMReqABCSImpl.
3. In the Dashboard tab, scroll down to Services and References.
4. Select PublicationService, and then navigate to Policies tab.
5. Under Directly Attached Policies, select oracle/wss_username_token_client_policy.
6. Under Security Configuration Details, note the current value of csf-key. For example, PIMServicesKey.
7. Navigate to Farm_soa_domainWebLogic Domain, right-click soa_domain, select Security--> Credentials and expand <xxx>.wsm.security.
8. Select and edit the csf-key. Update the key with appropriate username/password.
9. Click OK to save it.
10. Restart the soa_domain and re-test the flow.
15.7 Undeploying the MDM Product Base Pack
To undeploy the integration from Fusion Middleware Server:1. Navigate to <AIA_Instance>/bin and run the command source aiaenv.sh for
Linux based systems and aiaenv.bat for Microsoft Windows to configure the environment.
2. Run the command for your platform.
Table 15–5 Saml Opt On Client Policy Attachments for MDM Product Base Pack
Composite Reference Client Policy
SyncItemListPIMReqABCSImpl PublicationService oracle/wss_username_token_client_policy
SyncItemListPIMReqABCSImpl GetListofTargetSystems oracle/wss_username_token_client_policy
SyncItemCatalogCategoryPIMReqABCSImpl ItemCatalogService oracle/wss_username_token_client_policy
SyncItemCatalogCategoryPIMReqABCSImpl PublicationService oracle/wss_username_token_client_policy
Note: The user credentials must match the PH4C development manager responsibility credentials.
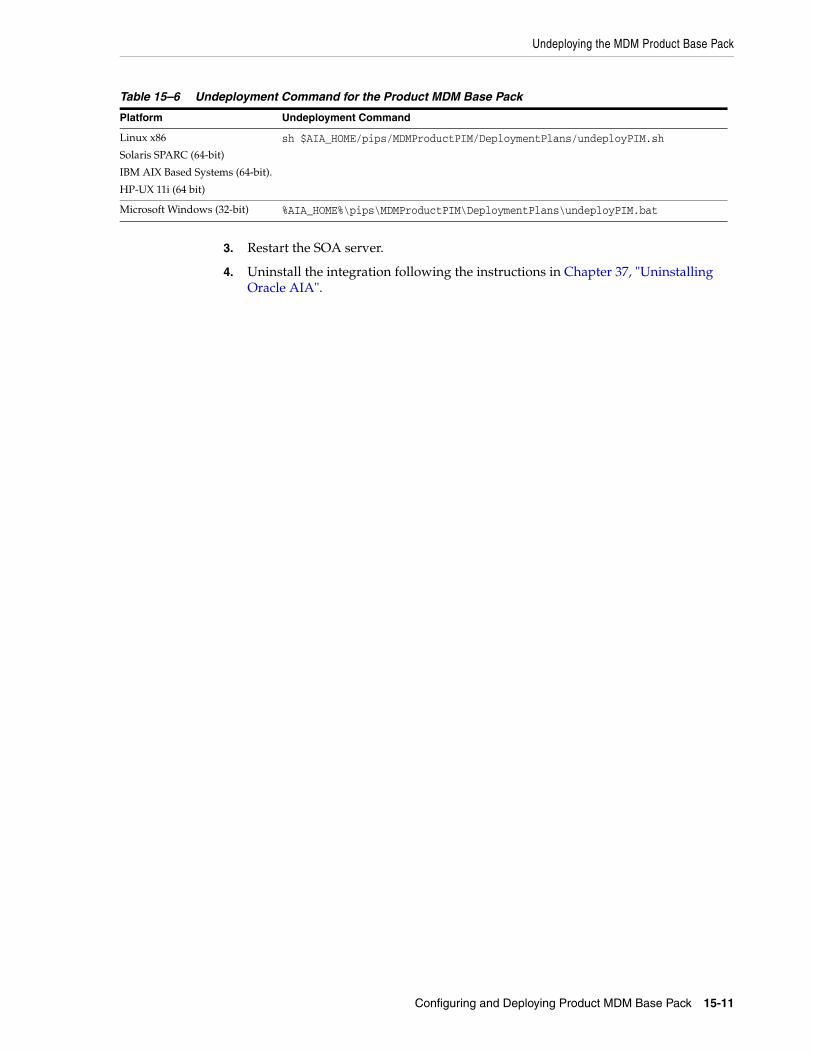
Undeploying the MDM Product Base Pack
Configuring and Deploying Product MDM Base Pack 15-11
3. Restart the SOA server.
4. Uninstall the integration following the instructions in Chapter 37, "Uninstalling Oracle AIA".
Table 15–6 Undeployment Command for the Product MDM Base Pack
Platform Undeployment Command
Linux x86
Solaris SPARC (64-bit)
IBM AIX Based Systems (64-bit).
HP-UX 11i (64 bit)
sh $AIA_HOME/pips/MDMProductPIM/DeploymentPlans/undeployPIM.sh
Microsoft Windows (32-bit) %AIA_HOME%\pips\MDMProductPIM\DeploymentPlans\undeployPIM.bat

Undeploying the MDM Product Base Pack
15-12 Oracle Application Integration Architecture Installation and Upgrade Guide for Pre-Built Integrations
16
Configuring and Deploying Product MDM: Siebel CRM 16-1
16Configuring and Deploying Product MDM:Siebel CRM
This chapter discusses how to configure and deploy Oracle Product Master Data Management Integration Option for Siebel CRM (Product MDM: Siebel CRM).
This chapter includes the following sections:
■ Section 16.1, "Deployment Configuration Wizard"
■ Section 16.2, "Session Pool Manager Details Screen"
■ Section 16.3, "Overall Configuration and Deployment of MDM Product Integrations"
■ Section 16.4, "Configuring and Deploying Product MDM: Siebel CRM"
■ Section 16.5, "Postdeployment Configuration"
■ Section 16.6, "Verifying Deployment"
■ Section 16.7, "Undeploying Product MDM: Siebel CRM"
16.1 Deployment Configuration WizardThe DCW screens prompt you to enter the data required for successful configuration of Product MDM: Siebel CRM. Enter the details of Product MDM: Siebel CRM screens below, take a printout and keep it ready when you run the DCW. This action enables faster and error free configuration.
16.1.1 Integration Server Details ScreenAll artifacts associated with the integration infrastructure components deploy to the integration server. This screen contains the following fields:
Table 16–1 Integration Server Details Screen Fields
Field Description
Admin Host Name This is where the admin server resides. This can be a remote server or the same computer where the AIA Pre-Built Integrations Installer is launched. Example: server1.company.com.
The Admin Host Name is _________________________________
Admin Port This is the port number on which Weblogic Admin server is started. To find this value contact WebLogic administrator. Example: 7001.
The Admin Port is _____________________________________
Domain Name This is WebLogic server domain corresponding to the Admin Server. Example: domain1
The Domain Name is _____________________________________
Deployment Configuration Wizard
16-2 Oracle Application Integration Architecture Installation and Upgrade Guide for Pre-Built Integrations
16.1.2 Siebel CRM Server Details ScreenUse this screen to enter details related to your Siebel CRM server instance. The screen contains the following fields:
16.1.3 Siebel CRM Database Details ScreenUse this screen to enter details related to your Siebel CRM database instance. The screen contains the following fields:
Admin User This value is the WebLogic admin user name. To find this value contact your WebLogic administrator.
The Admin User is __________________________________
Admin Password This value is the WebLogic admin password. To find this value contact your WebLogic administrator.
The Admin Password is _____________________________________
Managed Server After you enter the Admin Host name, Admin Port, Domain Name, Admin user name and Admin Password, this field gets populated with managed servers for the domain. Select the manager server from the list. If you are deploying the integration to a SOA cluster, you should select the cluster name in this field.
The Managed Server is _______________________________
Managed Port This field gets updated automatically after you select the managed server. If you have configured a SOA Cluster the SOA Cluster port appears in the list.
Table 16–2 Siebel CRM Server Details Screen Fields
Field Description
Siebel HTTP Host name This is a computer name of the Siebel host. For example: sdcp1953i054.corp.siebel.com. To find the value, contact your administrator.
Siebel HTTP Host name is _____________________________
Siebel HTTP Port This value is the Siebel application port. For example: 80. To find the value, contact your administrator.
Siebel HTTP Port is ________________________________
Siebel Internet Protocol Specifies the Siebel host internet protocol. For example: http://.
Siebel host internet protocol is _____________________________
Siebel EAI Application User The Siebel application user is used for making EAI web service calls. For example: sadmin. To find the value, contact your administrator.
Siebel EAI Application User is ___________________________
Siebel EAI Application Password This is the password for the EAI user. For example: sadmin. To find the value, contact your administrator.
Siebel EAI Application Password is ________________________
Siebel Enterprise Server Name This is the Siebel server name. For example: siebel. To find the value, contact your administrator.
Siebel Enterprise Server Name is __________________________
Siebel Version This is the version of the Siebel CRM application.
Siebel Language This is the language used by the Siebel application. For example, enu.
Siebel Language is ________________________
Table 16–1 (Cont.) Integration Server Details Screen Fields
Field Description
Overall Configuration and Deployment of MDM Product Integrations
Configuring and Deploying Product MDM: Siebel CRM 16-3
16.2 Session Pool Manager Details ScreenThe Session Pool Manager (SPM) details are optional and required only when your Siebel server is outside of the firewall. If all your servers are within the network, leave these fields blank.
In the java.net application programming interface (API) used by SPM, proxies are supported through two system properties: http.proxyHost and http.proxyPort. They must be set to the proxy server and port respectively. This value is only set when ProxySettings_Enabled is set to TRUE.
16.3 Overall Configuration and Deployment of MDM Product IntegrationsThe overall MDM Product integration consists of four component integrations: MDM Product Base Pack (OPH) and three other options: MDM Product Siebel, MDM Product E-Business Suite and MDM Product BRM. The overall MDM Customer integration can be configured and deployed by selecting any integration or integration combination. The configuration and deployment process consists of the following steps:
1. Configure and deploy the MDM Product component integrations. Section 16.4 discusses configuring and deploying the Product MDM: Siebel CRM. For detailed instructions on the other MDM Product integrations, see your specific integration
Table 16–3 Siebel CRM Database Details Screen Fields
Field Description
Siebel Database Host This value is typically the computer name. For example: server1.oracle.com. To find the value, contact your database administrator.
Siebel Database Host is _________________________________
Siebel Database Port This is the Siebel database port. For example: 1521. To find the value, contact your database administrator.
Siebel Database Port is _________________________________
Siebel Database Username Specifies a database user that has access to loading the EIM tables Siebel. To find this value, contact the database administrator. Example: ora12345
Siebel Database Username is ______________________
Siebel Database Password This is the Siebel Database Password. For example: ora07103. To find the value, contact your database administrator.
Siebel Database Password is _____________________
Siebel Database SID This is the Siebel database system ID. For example: qa7a. To find the value, contact your database administrator.
Siebel Database SID is ________________________________
Table 16–4 Session Pool Manager Details Screen Fields
Field Description
Proxy host url This determines the server to be set in the system properties for http.proxyHost property.
Proxy host url is ___________________________
Proxy port This determines the port to be set in the system properties for the http.proxyPort property.
Proxy port is ______________________________
Caution: These fields are optional so leave the values blank. These values are required only if the Siebel server is outside of the firewall.
Configuring and Deploying Product MDM: Siebel CRM
16-4 Oracle Application Integration Architecture Installation and Upgrade Guide for Pre-Built Integrations
chapters in Part II, "Configuring and Deploying Pre-Built Integrations" of this guide.
2. Deploy the MDM Product Routing Rules following the instructions discussed in Chapter 19, "Deploying Product MDM: Routing Rules". Routing Rules wire the integration services, depending on the integrations deployed.
16.4 Configuring and Deploying Product MDM: Siebel CRMThis section discusses the integration configuration and deployment process. There are two steps:
1. Configure your integration using the DCW.
2. Deploy the integration to the Fusion Middleware server.
16.4.1 Configure Product MDM: Siebel CRMThe screens that appear prompt you to enter the data that is required for successful configuration of Product MDM: Siebel CRM. Keep the completed worksheets of Product MDM: Siebel CRM screens ready before you launch the DCW.
To configure Product MDM: Siebel CRM:1. Navigate to /slot/emsxxxx/oracle/Middleware/user_projects/domains/soa_
domain/bin/ and open setDomainEnv.sh for Linux based systems and setDomainEnv.bat for Microsoft Windows
2. Replace WLS_JDBC_REMOTE_ENABLED="-Dweblogic.jdbc.remoteEnabled=false" with WLS_JDBC_REMOTE_ENABLED="-Dweblogic.jdbc.remoteEnabled=true"
3. Restart the server
4. Navigate to <AIA_Instance>/bin and run the command source aiaenv.sh for Linux based systems and aiaenv.bat for Microsoft Windows to configure installation environment
5. Navigate to <AIA_HOME>/bin and run the command ./aiaconfig.sh for Linux based systems and aiaconfig.bat for Microsoft Windows
This launches the AIA DCW.
6. Click Next
7. Select Oracle Product Master Data Management Integration Option for Siebel CRM under Product Master Data Management Pre-Build Integration
8. Click Next
16.4.1.1 Specify Integration Server Details
To specify integration server details:1. Enter information related to your integration server in the Integration Server
Details screen.
2. Click Next.
Note: If you are harvesting content to OER, perform the first three steps. Else start from step 4.
Configuring and Deploying Product MDM: Siebel CRM
Configuring and Deploying Product MDM: Siebel CRM 16-5
16.4.1.2 Specify Siebel CRM Server Details
To specify Siebel CRM Server details:1. Enter information about your Siebel CRM application in the Application Details -
Siebel CRM screen.
2. Click Next.
16.4.1.3 Specify Siebel CRM Database Details
To specify Siebel CRM Database details:1. Enter information about your Siebel CRM database in the Siebel CRM Database
Details screen.
2. Click Next.
16.4.1.4 Specify Session Pool Manager Details
To specify Session Pool Manager details:1. Enter information related to your Session Pool Manager installation in the Session
Pool Manager Details screen.
2. Click Next.
16.4.1.5 Complete Configuration
To complete configuration:1. Review the configuration information on the Configuration Summary screen.
2. Click Configure to accept this configuration and begin the installation.
The system displays progress of configuration in the Configuration Progress screen.
The system displays any warnings or errors as necessary. You can review the configuration log for additional details. The configuration log location is displayed in Configuration Progress screen.
3. When the configuration process finishes without errors, click Next.
4. When the AIA DCW displays the Configuration Complete screen, click Finish to close the DCW.
Note: If you want to make changes to the configuration, use the navigation pane on the left and select the screen you want to edit.
You can create a response file based on the input provided in the DCW and use it in future when you want to deploy the integration. You can configure using the steps described in Section 16.4.2, "Configuring using the Response File". Click Save Response File and save the response file with the name and location of your choice.
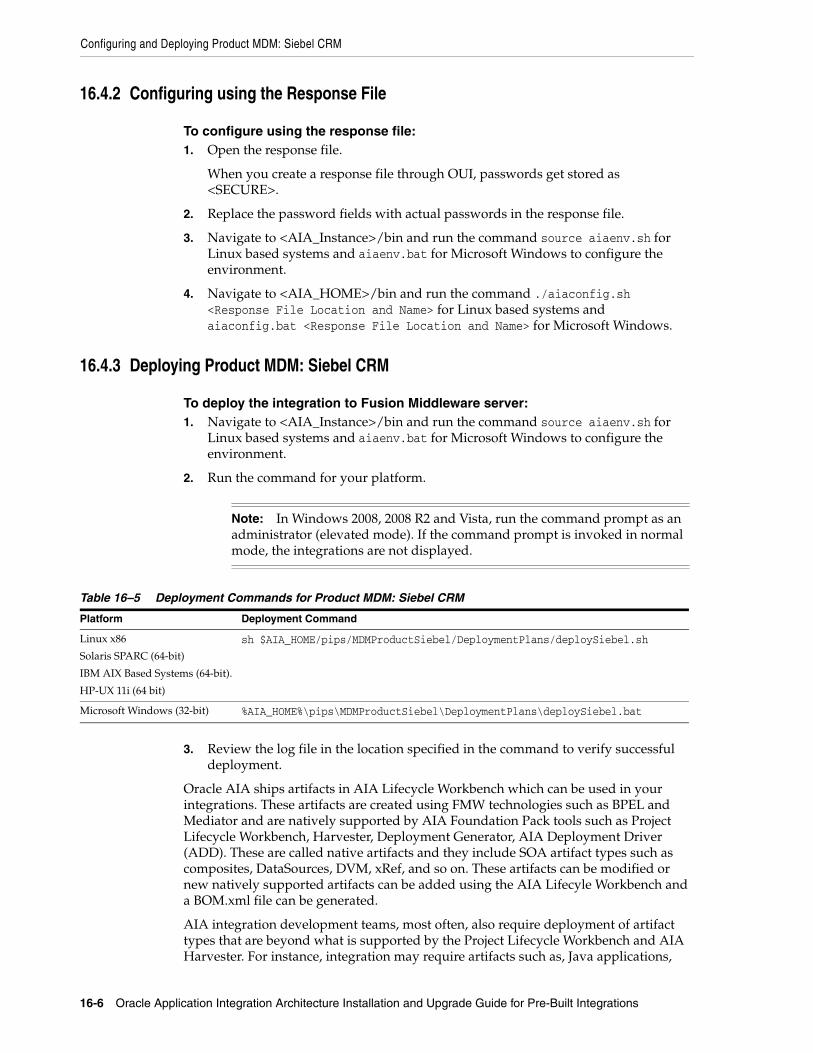
Configuring and Deploying Product MDM: Siebel CRM
16-6 Oracle Application Integration Architecture Installation and Upgrade Guide for Pre-Built Integrations
16.4.2 Configuring using the Response File
To configure using the response file:1. Open the response file.
When you create a response file through OUI, passwords get stored as <SECURE>.
2. Replace the password fields with actual passwords in the response file.
3. Navigate to <AIA_Instance>/bin and run the command source aiaenv.sh for Linux based systems and aiaenv.bat for Microsoft Windows to configure the environment.
4. Navigate to <AIA_HOME>/bin and run the command ./aiaconfig.sh <Response File Location and Name> for Linux based systems and aiaconfig.bat <Response File Location and Name> for Microsoft Windows.
16.4.3 Deploying Product MDM: Siebel CRM
To deploy the integration to Fusion Middleware server:1. Navigate to <AIA_Instance>/bin and run the command source aiaenv.sh for
Linux based systems and aiaenv.bat for Microsoft Windows to configure the environment.
2. Run the command for your platform.
3. Review the log file in the location specified in the command to verify successful deployment.
Oracle AIA ships artifacts in AIA Lifecycle Workbench which can be used in your integrations. These artifacts are created using FMW technologies such as BPEL and Mediator and are natively supported by AIA Foundation Pack tools such as Project Lifecycle Workbench, Harvester, Deployment Generator, AIA Deployment Driver (ADD). These are called native artifacts and they include SOA artifact types such as composites, DataSources, DVM, xRef, and so on. These artifacts can be modified or new natively supported artifacts can be added using the AIA Lifecyle Workbench and a BOM.xml file can be generated.
AIA integration development teams, most often, also require deployment of artifact types that are beyond what is supported by the Project Lifecycle Workbench and AIA Harvester. For instance, integration may require artifacts such as, Java applications,
Note: In Windows 2008, 2008 R2 and Vista, run the command prompt as an administrator (elevated mode). If the command prompt is invoked in normal mode, the integrations are not displayed.
Table 16–5 Deployment Commands for Product MDM: Siebel CRM
Platform Deployment Command
Linux x86
Solaris SPARC (64-bit)
IBM AIX Based Systems (64-bit).
HP-UX 11i (64 bit)
sh $AIA_HOME/pips/MDMProductSiebel/DeploymentPlans/deploySiebel.sh
Microsoft Windows (32-bit) %AIA_HOME%\pips\MDMProductSiebel\DeploymentPlans\deploySiebel.bat

Postdeployment Configuration
Configuring and Deploying Product MDM: Siebel CRM 16-7
Shell Scripts, ANT based build scripts which constitute part of integration landscape in addition to the artifacts that are delivered by AIA. AIA also supports deployment of these supplementary artifacts. However, you must modify and add new non native artifacts outside AIA Lifecycle Workbench.
For more information on deploying artifacts, see Oracle Fusion Middleware Developer's Guide for Oracle Application Integration Architecture Foundation Pack, "Generating Deployment Plans and Deploying Artifacts".
16.5 Postdeployment ConfigurationThis section includes the postdeployment configurations required for the Product MDM: Siebel CRM.
16.5.1 Configuring Session Pool ManagerThis integration uses the Session Pool Manager utility. Configure Session Pool Manager after you install the integration. For information on how to configure Session Pool Manager for your integration environment and needs, see Oracle Application Integration Architecture Process Integration Pack Utilities Guide, "Session Pool Manager".
16.5.2 Updating Product.Source.PIP Property Value
To update the Product.Source.PIP property value:1. Edit the AIAConfigurationProperties.xml file located in <AIA_
INSTANCE>/AIAMetaData/config.
2. Locate the Product.Source.PIP property and change the value as follows:
From: <Property name="Product.Source.PIP">O2C</Property>
To: <Property name="Product.Source.PIP">MDM</Property>
16.5.3 Updating Integration Services In item sync with pricelists scenario, SyncItemListPIMReqABCS service waits for a response. The response from the ProductOptimizedSyncPriceListListSiebelCommsProvABCSImpl service is sent to the requester through CommunicationsPriceListResponseEBSV2. Therefore, after you deploy the Siebel CRM services, you must update the following integration services:
■ ProductOptimizedSyncPriceListListSiebelCommsProvABCSImpl
■ SyncItemCompositionListSiebelCommsProvABCSImpl
To update the ProductOptimizedSyncPriceListListSiebelCommsProvABCSImpl service:
1. Edit the AIAConfigurationProperties.xml file that is located in <AIA_INSTANCE>/AIAMetaData/config.
2. Ensure that the following properties are listed in the AIAConfigurationProperties.xml file:
■ <Property name="EBSOverride.CommunicationsPriceListResponseEBS.SyncPriceListListResponse.Address">http://HOST_NAME:PORT_NAME/soa-infra/services/default/CommunicationsPriceListResponseEBSV2/CommunicationsPriceListResponseEBSV2_ep</Property>

Verifying Deployment
16-8 Oracle Application Integration Architecture Installation and Upgrade Guide for Pre-Built Integrations
■ <Property name="EBSOverride.CommunicationsPriceListResponseEBS.SyncPriceListListResponse.PortType">{http://xmlns.oracle.com/EnterpriseServices/Core/PriceList/V2}CommunicationsPriceListResponse</Property>
■ <Property name="EBSOverride.CommunicationsPriceListResponseEBS.SyncPriceListListResponse.ServiceName">{http://xmlns.oracle.com/EnterpriseServices/Core/PriceList/V2}CommunicationsPriceListResponse</Property>
To update the SyncItemCompositionListSiebelCommsProvABCSImpl service:
1. Edit the AIAConfigurationProperties.xml file that is located in <AIA_INSTANCE>/AIAMetaData/config.
2. Ensure that the following properties are listed in the AIAConfigurationProperties.xml file:
■ <Property name="EBSOverride.CommunicationsItemCompositionResponseEBSV1.SyncItemCompositionListResponse.Address">http://HOST_NAME:PORT_NAME/soa-infra/services/default/ProductOptimizedSyncPriceListListSiebelCommsProvABCSImpl/ProductOptimizedSyncPriceListListSiebelCommsProvABCSImpl</Property>
■ <Property name="EBSOverride.CommunicationsItemCompositionResponseEBSV1.SyncItemCompositionListResponse.PortType">{http://xmlns.oracle.com/ABCSImpl/Siebel/Industry/Comms/ProductOptimizedSyncPriceListListSiebelCommsProvABCSImpl/V1}ProductOptimizedSyncPriceListListSiebelCommsProvABCSImpl</Property>
■ <Property name="EBSOverride.CommunicationsItemCompositionResponseEBSV1.SyncItemCompositionListResponse.ServiceName">{http://xmlns.oracle.com/ABCSImpl/Siebel/Industry/Comms/ProductOptimizedSyncPriceListListSiebelCommsProvABCSImpl/V1}ProductOptimizedSyncPriceListListSiebelCommsProvABCSImpl</Property>
16.6 Verifying Deployment
To verify the Product MDM: Siebel CRM deployment:1. Open the log files from the following location and look for warnings and error
messages:
■ For Linux x86, Solaris SPARC (64-bit), HP-UX 11i (64 bit) and IBM AIX Based Systems (64-bit): Review the install log located at <AIA_HOME>/aia_instances/<instance name>/logs to verify whether the integration is successfully installed.
■ For Microsoft Windows (32-bit): Review the install log located at <AIA_HOME>\aia_instances\<instance name>\logs to verify whether the integration is successfully installed.
2. Confirm that the Product MDM: Siebel CRM services were installed.
a. Navigate to the Oracle Enterprise Manager Fusion Middleware Control: (http://<server name>:<port number>/em/).
Verifying Deployment
Configuring and Deploying Product MDM: Siebel CRM 16-9
b. Log in with the server admin user name. For access details, contact the system administrator.
c. Expand Farm_soa_domain, SOA, soa-infra, Default and look for the following items:
■ ProductOptimizedSyncPriceListListSiebelCommsProvABCSImpl
■ SyncBillOfMaterialsListSiebelProvABCSImpl
■ SyncClassificationSchemeListSiebelProvABCSImpl
■ SyncItemCompositionListSiebelCommsProvABCSImpl
■ SyncProductSiebelProvABCSImpl
■ SyncSpecificationValueSetListSiebelProvABCSImpl
For more information about the DVMs to be verified, see the Oracle Application Integration Architecture Product Master Data Management Integration Pack Implementation Guide.
3. Verify whether Session Pool Manager is successfully installed and ensure that the Siebel server is active.
a. Log in to the Oracle Enterprise Manager Fusion Middleware Control: (http://<server name>:<port number>/em/).
b. Expand Farm_soa_domain, SOA, soa-infra (soa_server1), Default and click AIASessionPoolManager on the left panel.
c. Click Test.
d. Enter Operation = Start.
e. Under the collapsible section titled Security, select WSS Username Token and enter the WLS admin user name and password.
f. Enter Input Argumemt Host Id = SEBL_01.
g. Click Test Web Service.
You should see a successful initialization response message. For more information and troubleshooting steps, see Oracle Application Integration Architecture Process Integration Pack Utilities Guide, "Session Pool Manager".
16.6.1 Validating Security PoliciesAll SOA composites are protected by Global Policies provided by Foundation Pack as defined in the Security section of the Developer Guide. Additionally individual services for this integration have locally attached security policies.
To validate locally attached security policies:1. Log in to Oracle Enterprise Manager Fusion Middleware Control
2. Navigate to WebLogic Domain, soa_domain, Web Services, Policies.
3. Verify Service Policy attachment.
a. Find the service policy in the list of policies.
b. Click the number in Attachment Count column.
This opens Usage Analysis screen.
c. Change the Subject Type list box to SOA Service.
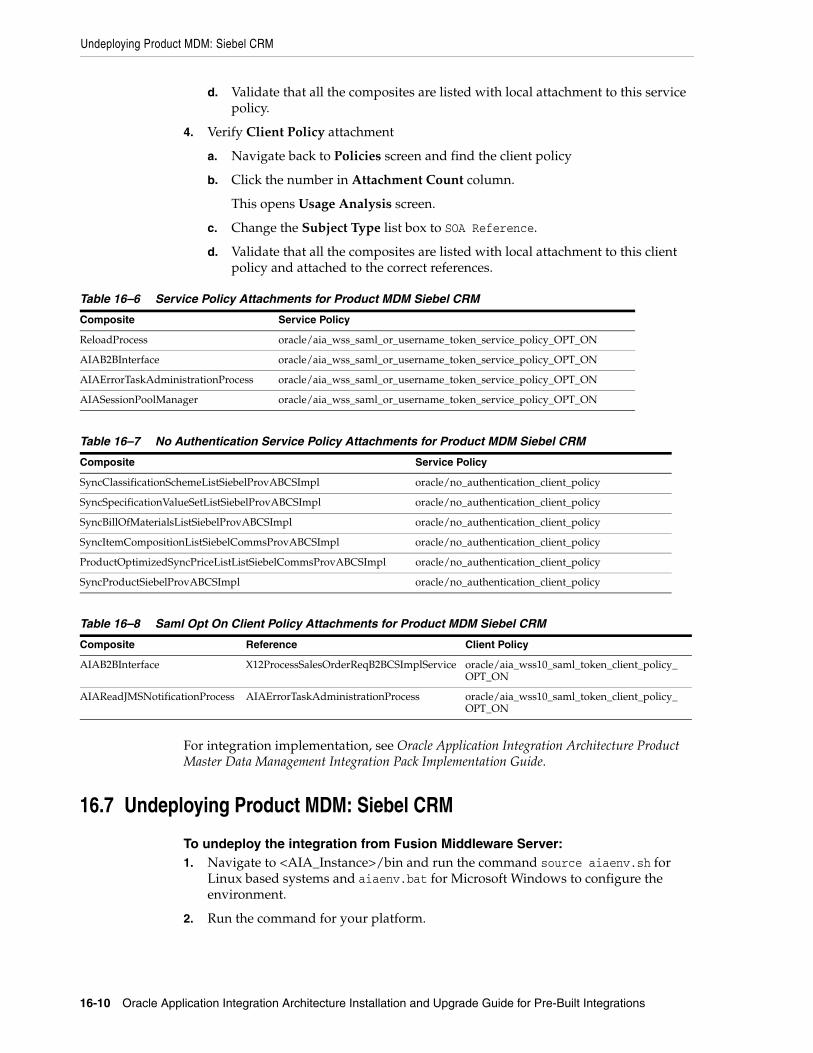
Undeploying Product MDM: Siebel CRM
16-10 Oracle Application Integration Architecture Installation and Upgrade Guide for Pre-Built Integrations
d. Validate that all the composites are listed with local attachment to this service policy.
4. Verify Client Policy attachment
a. Navigate back to Policies screen and find the client policy
b. Click the number in Attachment Count column.
This opens Usage Analysis screen.
c. Change the Subject Type list box to SOA Reference.
d. Validate that all the composites are listed with local attachment to this client policy and attached to the correct references.
For integration implementation, see Oracle Application Integration Architecture Product Master Data Management Integration Pack Implementation Guide.
16.7 Undeploying Product MDM: Siebel CRM
To undeploy the integration from Fusion Middleware Server:1. Navigate to <AIA_Instance>/bin and run the command source aiaenv.sh for
Linux based systems and aiaenv.bat for Microsoft Windows to configure the environment.
2. Run the command for your platform.
Table 16–6 Service Policy Attachments for Product MDM Siebel CRM
Composite Service Policy
ReloadProcess oracle/aia_wss_saml_or_username_token_service_policy_OPT_ON
AIAB2BInterface oracle/aia_wss_saml_or_username_token_service_policy_OPT_ON
AIAErrorTaskAdministrationProcess oracle/aia_wss_saml_or_username_token_service_policy_OPT_ON
AIASessionPoolManager oracle/aia_wss_saml_or_username_token_service_policy_OPT_ON
Table 16–7 No Authentication Service Policy Attachments for Product MDM Siebel CRM
Composite Service Policy
SyncClassificationSchemeListSiebelProvABCSImpl oracle/no_authentication_client_policy
SyncSpecificationValueSetListSiebelProvABCSImpl oracle/no_authentication_client_policy
SyncBillOfMaterialsListSiebelProvABCSImpl oracle/no_authentication_client_policy
SyncItemCompositionListSiebelCommsProvABCSImpl oracle/no_authentication_client_policy
ProductOptimizedSyncPriceListListSiebelCommsProvABCSImpl oracle/no_authentication_client_policy
SyncProductSiebelProvABCSImpl oracle/no_authentication_client_policy
Table 16–8 Saml Opt On Client Policy Attachments for Product MDM Siebel CRM
Composite Reference Client Policy
AIAB2BInterface X12ProcessSalesOrderReqB2BCSImplService oracle/aia_wss10_saml_token_client_policy_OPT_ON
AIAReadJMSNotificationProcess AIAErrorTaskAdministrationProcess oracle/aia_wss10_saml_token_client_policy_OPT_ON
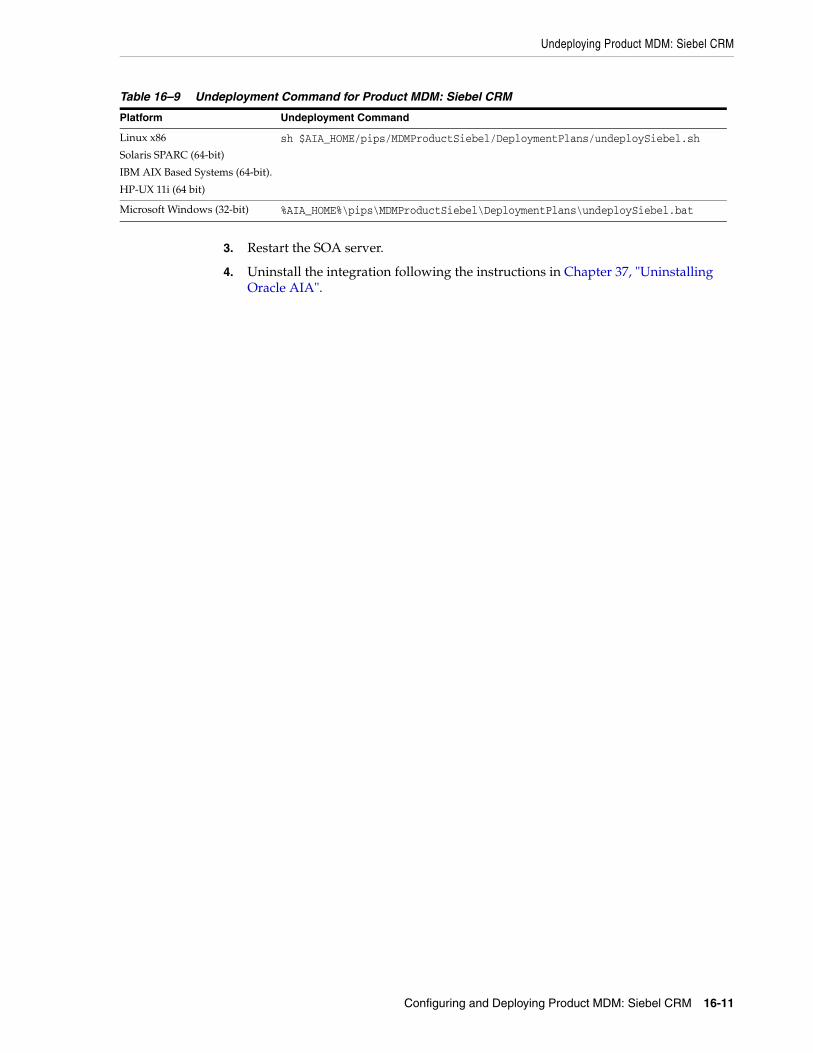
Undeploying Product MDM: Siebel CRM
Configuring and Deploying Product MDM: Siebel CRM 16-11
3. Restart the SOA server.
4. Uninstall the integration following the instructions in Chapter 37, "Uninstalling Oracle AIA".
Table 16–9 Undeployment Command for Product MDM: Siebel CRM
Platform Undeployment Command
Linux x86
Solaris SPARC (64-bit)
IBM AIX Based Systems (64-bit).
HP-UX 11i (64 bit)
sh $AIA_HOME/pips/MDMProductSiebel/DeploymentPlans/undeploySiebel.sh
Microsoft Windows (32-bit) %AIA_HOME%\pips\MDMProductSiebel\DeploymentPlans\undeploySiebel.bat

Undeploying Product MDM: Siebel CRM
16-12 Oracle Application Integration Architecture Installation and Upgrade Guide for Pre-Built Integrations
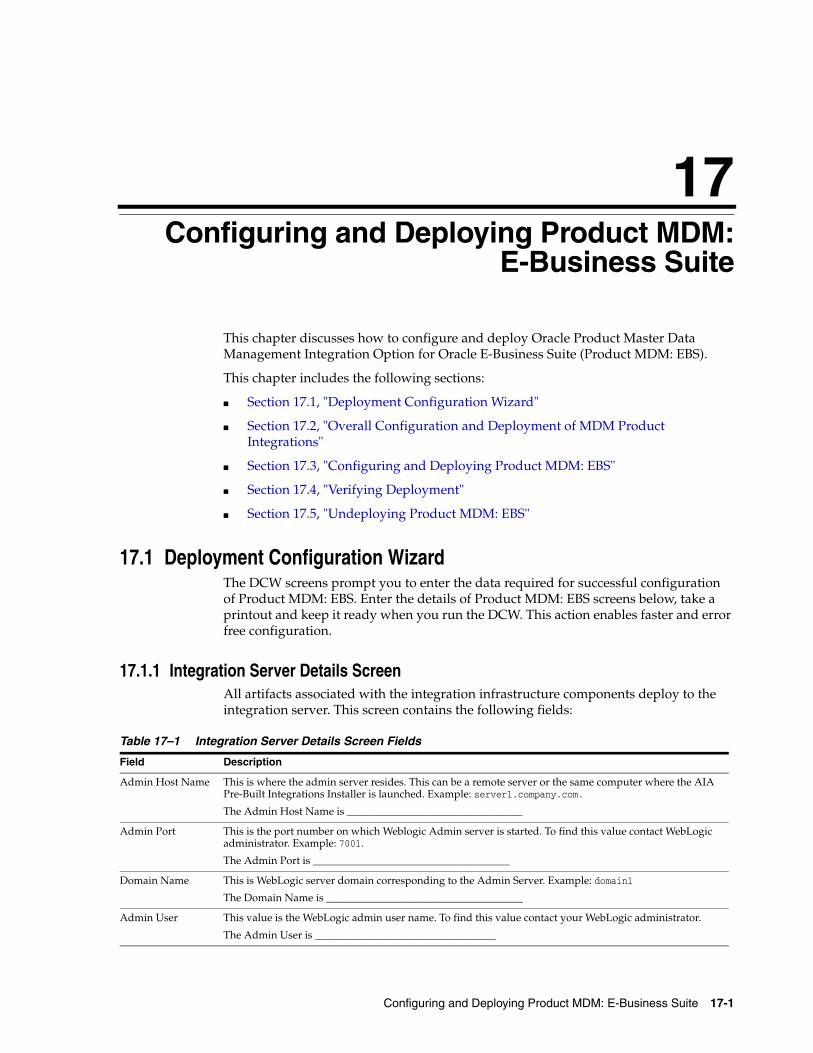
17
Configuring and Deploying Product MDM: E-Business Suite 17-1
17Configuring and Deploying Product MDM:E-Business Suite
This chapter discusses how to configure and deploy Oracle Product Master Data Management Integration Option for Oracle E-Business Suite (Product MDM: EBS).
This chapter includes the following sections:
■ Section 17.1, "Deployment Configuration Wizard"
■ Section 17.2, "Overall Configuration and Deployment of MDM Product Integrations"
■ Section 17.3, "Configuring and Deploying Product MDM: EBS"
■ Section 17.4, "Verifying Deployment"
■ Section 17.5, "Undeploying Product MDM: EBS"
17.1 Deployment Configuration WizardThe DCW screens prompt you to enter the data required for successful configuration of Product MDM: EBS. Enter the details of Product MDM: EBS screens below, take a printout and keep it ready when you run the DCW. This action enables faster and error free configuration.
17.1.1 Integration Server Details ScreenAll artifacts associated with the integration infrastructure components deploy to the integration server. This screen contains the following fields:
Table 17–1 Integration Server Details Screen Fields
Field Description
Admin Host Name This is where the admin server resides. This can be a remote server or the same computer where the AIA Pre-Built Integrations Installer is launched. Example: server1.company.com.
The Admin Host Name is _________________________________
Admin Port This is the port number on which Weblogic Admin server is started. To find this value contact WebLogic administrator. Example: 7001.
The Admin Port is _____________________________________
Domain Name This is WebLogic server domain corresponding to the Admin Server. Example: domain1
The Domain Name is _____________________________________
Admin User This value is the WebLogic admin user name. To find this value contact your WebLogic administrator.
The Admin User is __________________________________
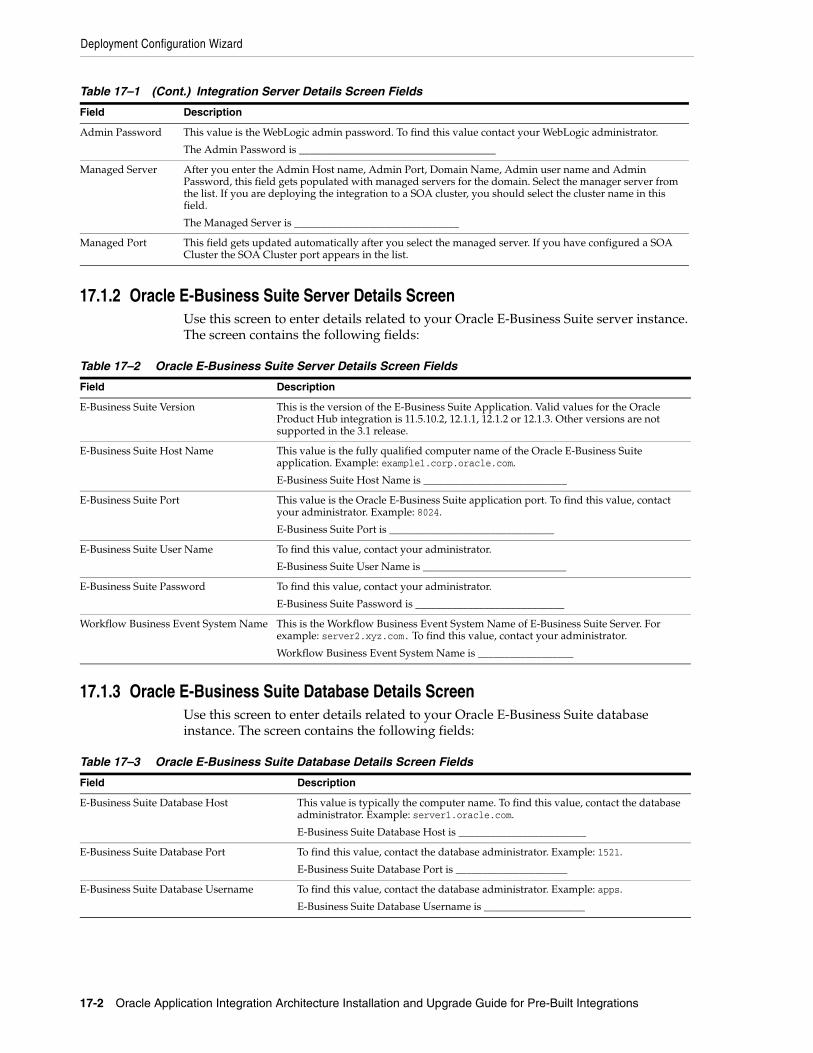
Deployment Configuration Wizard
17-2 Oracle Application Integration Architecture Installation and Upgrade Guide for Pre-Built Integrations
17.1.2 Oracle E-Business Suite Server Details ScreenUse this screen to enter details related to your Oracle E-Business Suite server instance. The screen contains the following fields:
17.1.3 Oracle E-Business Suite Database Details ScreenUse this screen to enter details related to your Oracle E-Business Suite database instance. The screen contains the following fields:
Admin Password This value is the WebLogic admin password. To find this value contact your WebLogic administrator.
The Admin Password is _____________________________________
Managed Server After you enter the Admin Host name, Admin Port, Domain Name, Admin user name and Admin Password, this field gets populated with managed servers for the domain. Select the manager server from the list. If you are deploying the integration to a SOA cluster, you should select the cluster name in this field.
The Managed Server is _______________________________
Managed Port This field gets updated automatically after you select the managed server. If you have configured a SOA Cluster the SOA Cluster port appears in the list.
Table 17–2 Oracle E-Business Suite Server Details Screen Fields
Field Description
E-Business Suite Version This is the version of the E-Business Suite Application. Valid values for the Oracle Product Hub integration is 11.5.10.2, 12.1.1, 12.1.2 or 12.1.3. Other versions are not supported in the 3.1 release.
E-Business Suite Host Name This value is the fully qualified computer name of the Oracle E-Business Suite application. Example: example1.corp.oracle.com.
E-Business Suite Host Name is ___________________________
E-Business Suite Port This value is the Oracle E-Business Suite application port. To find this value, contact your administrator. Example: 8024.
E-Business Suite Port is _______________________________
E-Business Suite User Name To find this value, contact your administrator.
E-Business Suite User Name is ___________________________
E-Business Suite Password To find this value, contact your administrator.
E-Business Suite Password is ____________________________
Workflow Business Event System Name This is the Workflow Business Event System Name of E-Business Suite Server. For example: server2.xyz.com. To find this value, contact your administrator.
Workflow Business Event System Name is __________________
Table 17–3 Oracle E-Business Suite Database Details Screen Fields
Field Description
E-Business Suite Database Host This value is typically the computer name. To find this value, contact the database administrator. Example: server1.oracle.com.
E-Business Suite Database Host is ________________________
E-Business Suite Database Port To find this value, contact the database administrator. Example: 1521.
E-Business Suite Database Port is _____________________
E-Business Suite Database Username To find this value, contact the database administrator. Example: apps.
E-Business Suite Database Username is ___________________
Table 17–1 (Cont.) Integration Server Details Screen Fields
Field Description
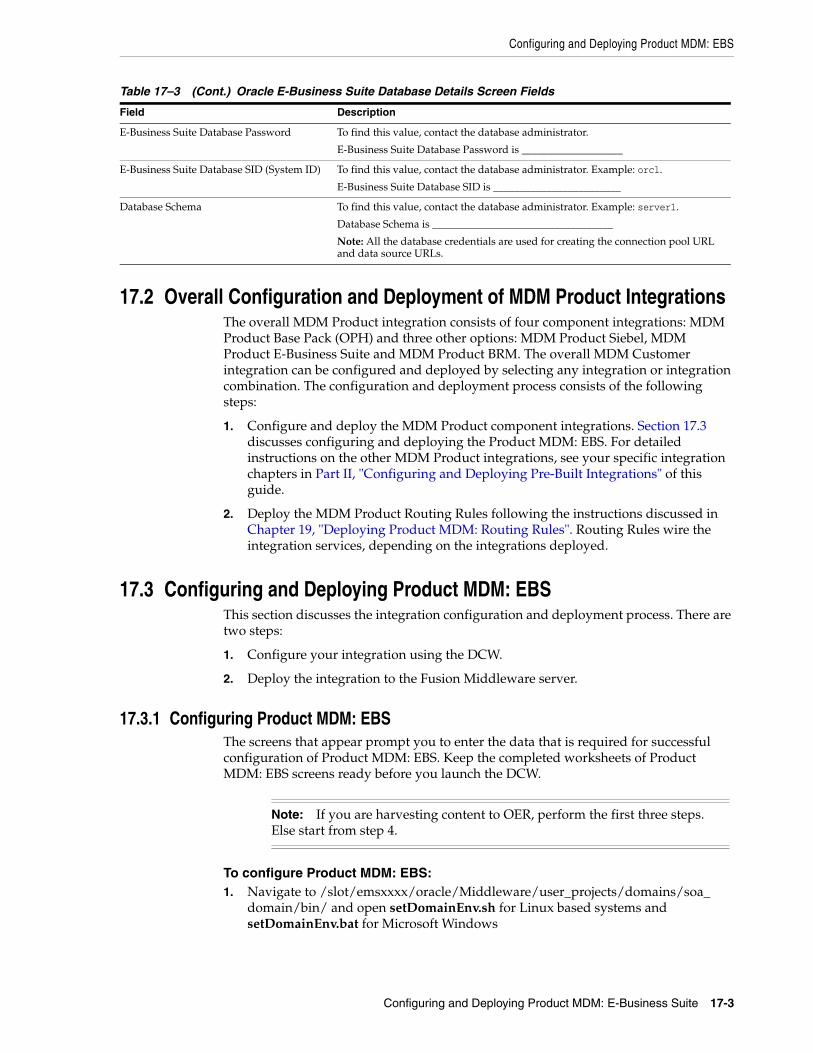
Configuring and Deploying Product MDM: EBS
Configuring and Deploying Product MDM: E-Business Suite 17-3
17.2 Overall Configuration and Deployment of MDM Product IntegrationsThe overall MDM Product integration consists of four component integrations: MDM Product Base Pack (OPH) and three other options: MDM Product Siebel, MDM Product E-Business Suite and MDM Product BRM. The overall MDM Customer integration can be configured and deployed by selecting any integration or integration combination. The configuration and deployment process consists of the following steps:
1. Configure and deploy the MDM Product component integrations. Section 17.3 discusses configuring and deploying the Product MDM: EBS. For detailed instructions on the other MDM Product integrations, see your specific integration chapters in Part II, "Configuring and Deploying Pre-Built Integrations" of this guide.
2. Deploy the MDM Product Routing Rules following the instructions discussed in Chapter 19, "Deploying Product MDM: Routing Rules". Routing Rules wire the integration services, depending on the integrations deployed.
17.3 Configuring and Deploying Product MDM: EBSThis section discusses the integration configuration and deployment process. There are two steps:
1. Configure your integration using the DCW.
2. Deploy the integration to the Fusion Middleware server.
17.3.1 Configuring Product MDM: EBSThe screens that appear prompt you to enter the data that is required for successful configuration of Product MDM: EBS. Keep the completed worksheets of Product MDM: EBS screens ready before you launch the DCW.
To configure Product MDM: EBS:1. Navigate to /slot/emsxxxx/oracle/Middleware/user_projects/domains/soa_
domain/bin/ and open setDomainEnv.sh for Linux based systems and setDomainEnv.bat for Microsoft Windows
E-Business Suite Database Password To find this value, contact the database administrator.
E-Business Suite Database Password is ___________________
E-Business Suite Database SID (System ID) To find this value, contact the database administrator. Example: orcl.
E-Business Suite Database SID is ________________________
Database Schema To find this value, contact the database administrator. Example: server1.
Database Schema is __________________________________
Note: All the database credentials are used for creating the connection pool URL and data source URLs.
Note: If you are harvesting content to OER, perform the first three steps. Else start from step 4.
Table 17–3 (Cont.) Oracle E-Business Suite Database Details Screen Fields
Field Description
Configuring and Deploying Product MDM: EBS
17-4 Oracle Application Integration Architecture Installation and Upgrade Guide for Pre-Built Integrations
2. Replace WLS_JDBC_REMOTE_ENABLED="-Dweblogic.jdbc.remoteEnabled=false" with WLS_JDBC_REMOTE_ENABLED="-Dweblogic.jdbc.remoteEnabled=true"
3. Restart the server
4. Navigate to <AIA_Instance>/bin and run the command source aiaenv.sh for Linux based systems and aiaenv.bat for Microsoft Windows to configure installation environment
5. Navigate to <AIA_HOME>/bin and run the command ./aiaconfig.sh for Linux based systems and aiaconfig.bat for Microsoft Windows
This launches the AIA DCW.
6. Click Next
7. Select Oracle Product Master Data Management Integration Option for Oracle E-Business Suite under Product Master Data Management Pre-Build Integration
8. Click Next
17.3.1.1 Specify Integration Server Details
To specify integration server details:1. Enter information related to your integration server in the Integration Server
Details screen.
2. Click Next.
17.3.1.2 Specify Oracle E-Business Suite Server Details
To specify Oracle E-Business Suite Server details:1. Enter information about your Oracle E-Business Suite Server in the E-Business
Suite Server Details screen.
2. Click Next.
17.3.1.3 Specify Oracle E-Business Suite Database Details
To specify Oracle E-Business Suite Database details:1. Enter information about your Oracle E-Business Suite Database in the E-Business
Suite Database Details screen.
2. Click Next.
17.3.1.4 Complete Configuration
To complete configuration:1. Review the configuration information on the Configuration Summary screen.
Configuring and Deploying Product MDM: EBS
Configuring and Deploying Product MDM: E-Business Suite 17-5
2. Click Configure to accept this configuration and begin the installation.
The system displays progress of configuration in the Configuration Progress screen.
The system displays any warnings or errors as necessary. You can review the configuration log for additional details. The configuration log location is displayed in Configuration Progress screen.
3. When the configuration process finishes without errors, click Next.
4. When the AIA DCW displays the Configuration Complete screen, click Finish to close the DCW.
17.3.2 Configuring using the Response File
To configure using the response file:1. Open the response file.
When you create a response file through OUI, passwords get stored as <SECURE>.
2. Replace the password fields with actual passwords in the response file.
3. Navigate to <AIA_Instance>/bin and run the command source aiaenv.sh for Linux based systems and aiaenv.bat for Microsoft Windows to configure the environment.
4. Navigate to <AIA_HOME>/bin and run the command ./aiaconfig.sh <Response File Location and Name> for Linux based systems and aiaconfig.bat <Response File Location and Name> for Microsoft Windows.
17.3.3 Deploying Product MDM: EBS
To deploy the integration to Fusion Middleware server:1. Navigate to <AIA_Instance>/bin and run the command source aiaenv.sh for
Linux based systems and aiaenv.bat for Microsoft Windows to configure the environment.
2. Run the command for your platform.
Note: If you want to make changes to the configuration, use the navigation pane on the left and select the screen you want to edit.
You can create a response file based on the input provided in the DCW and use it in future when you want to deploy the integration. You can configure using the steps described in Section 17.3.2, "Configuring using the Response File". Click Save Response File and save the response file with the name and location of your choice.
Note: In Windows 2008, 2008 R2 and Vista, run the command prompt as an administrator (elevated mode). If the command prompt is invoked in normal mode, the integrations are not displayed.

Verifying Deployment
17-6 Oracle Application Integration Architecture Installation and Upgrade Guide for Pre-Built Integrations
3. Review the log file in the location specified in the command or at the default location <AIA_Instance>/logs/MDMProductEbiz_Deployments_YYYY-MM-DD_HH-MI-SS.log to verify successful deployment of the integration.
Oracle AIA ships artifacts in AIA Lifecycle Workbench which can be used in your integrations. These artifacts are created using FMW technologies such as BPEL and Mediator and are natively supported by AIA Foundation Pack tools such as Project Lifecycle Workbench, Harvester, Deployment Generator, AIA Deployment Driver (ADD). These are called native artifacts and they include SOA artifact types such as composites, DataSources, DVM, xRef, and so on. These artifacts can be modified or new natively supported artifacts can be added using the AIA Lifecyle Workbench and a BOM.xml file can be generated.
AIA integration development teams, most often, also require deployment of artifact types that are beyond what is supported by the Project Lifecycle Workbench and AIA Harvester. For instance, integration may require artifacts such as, Java applications, Shell Scripts, ANT based build scripts which constitute part of integration landscape in addition to the artifacts that are delivered by AIA. AIA also supports deployment of these supplementary artifacts. However, you must modify and add new non native artifacts outside AIA Lifecycle Workbench.
For more information on deploying artifacts, see Oracle Fusion Middleware Developer's Guide for Oracle Application Integration Architecture Foundation Pack, "Generating Deployment Plans and Deploying Artifacts".
17.4 Verifying Deployment
To verify the Product MDM: EBS deployment:1. Open the log files from the following location and look for warnings and error
messages:
■ For Linux x86, Solaris SPARC (64-bit), HP-UX 11i (64 bit) and IBM AIX Based Systems (64-bit): Review the install log located at <AIA_HOME>/aia_instances/<instance name>/logs to verify whether the integration is successfully installed.
■ For Microsoft Windows (32-bit): Review the install log located at <AIA_HOME>\aia_instances\<instance name>\logs to verify whether the integration is successfully installed.
2. Confirm that the Product MDM: EBS services were installed.
a. Navigate to the Oracle Enterprise Manager Fusion Middleware Control: (http://<server name>:<port number>/em/).
b. Log in with the server admin user name. For access details, contact the system administrator.
Table 17–4 Deployment Commands for Product MDM: EBS
Platform Deployment Command
Linux x86
Solaris SPARC (64-bit)
IBM AIX Based Systems (64-bit).
HP-UX 11i (64 bit)
sh $AIA_HOME/pips/MDMProductEbiz/DeploymentPlans/deployEbiz.sh
Microsoft Windows (32-bit) %AIA_HOME%\pips\MDMProductEbiz\DeploymentPlans\deployEbiz.bat
Verifying Deployment
Configuring and Deploying Product MDM: E-Business Suite 17-7
c. Expand Farm_soa_domain, SOA, soa-infra, Default and look for the following items:
■ QueryResponsibilityEbizAdapter
■ SyncBillOfMaterialsListEbizAdapter
■ SyncBillOfMaterialsListEbizProvABCSImpl
■ SyncItemListEbizAdapter
■ SyncItemListEbizProvABCSImpl
■ TransformAppContextEbizService
For more information about the DVMs to be verified, see the Oracle Application Integration Architecture Product Master Data Management Integration Pack Implementation Guide.
17.4.1 Validating Security PoliciesAll SOA composites are protected by Global Policies provided by Foundation Pack as defined in the Security section of the Developer Guide. Additionally individual services for this integration have locally attached security policies.
To validate locally attached security policies:1. Log in to Oracle Enterprise Manager Fusion Middleware Control.
2. Navigate to WebLogic Domain, soa_domain, Web Services, Policies.
3. Verify Service Policy attachment.
a. Find the service policy in the list of policies.
b. Click the number in Attachment Count column.
This opens Usage Analysis screen.
c. Change the Subject Type list box to SOA Service.
d. Validate that all the composites are listed with local attachment to this service policy.
4. Verify Client Policy attachment
a. Navigate back to Policies screen and find the client policy
b. Click the number in Attachment Count column.
This opens Usage Analysis screen.
c. Change the Subject Type list box to SOA Reference.
d. Validate that all the composites are listed with local attachment to this client policy and attached to the correct references.
Table 17–5 Saml Opt On Client Policy Attachments for Product MDM EBS
Composite Reference Client Policy
TransformAppContextEbizService QueryRespEbizAdapter oracle/aia_wss10_saml_token_client_policy_OPT_ON
TransformAppContextEbizService AIAAsyncErrorHandlingBPELProcess oracle/aia_wss10_saml_token_client_policy_OPT_ON
Undeploying Product MDM: EBS
17-8 Oracle Application Integration Architecture Installation and Upgrade Guide for Pre-Built Integrations
For integration implementation, see the Oracle Application Integration Architecture Product Master Data Management Integration Pack Implementation Guide
17.5 Undeploying Product MDM: EBS
To undeploy the integration from Fusion Middleware Server:1. Navigate to <AIA_Instance>/bin and run the command source aiaenv.sh for
Linux based systems and aiaenv.bat for Microsoft Windows to configure the environment.
2. Run the command for your platform.
3. Restart the SOA server.
4. Uninstall the integration following the instructions in Chapter 37, "Uninstalling Oracle AIA".
Table 17–6 Undeployment Command for Product MDM: EBS
Platform Undeployment Command
Linux x86
Solaris SPARC (64-bit)
IBM AIX Based Systems (64-bit).
HP-UX 11i (64 bit)
sh $AIA_HOME/pips/MDMProductEbiz/DeploymentPlans/undeployEbiz.sh
Microsoft Windows (32-bit) %AIA_HOME%\pips\MDMProductEbiz\DeploymentPlans\undeployEbiz.bat
18
Configuring and Deploying Product MDM: Comms BRM 18-1
18Configuring and Deploying Product MDM:Comms BRM
This chapter discusses how to configure and deploy the Oracle Product Master Data Management Integration Option for Oracle Communications Billing and Revenue Management (Product MDM: Comms BRM).
This chapter includes the following sections:
■ Section 18.1, "Deployment Configuration Wizard"
■ Section 18.2, "Overall Configuration and Deployment of MDM Product Integrations"
■ Section 18.3, "Configuring and Deploying Product MDM: Comms BRM"
■ Section 18.4, "Verifying Deployment"
■ Section 18.5, "Undeploying the Product MDM: Comms BRM"
18.1 Deployment Configuration WizardThe DCW screens prompt you to enter the data required for successful configuration of the Product MDM: Comms BRM. Enter the details of the Product MDM: Comms BRM screens below, take a printout and keep it ready when you run the DCW. This action enables faster and error free configuration.
18.1.1 Integration Server Details ScreenAll artifacts associated with the integration infrastructure components deploy to the integration server. This screen contains the following fields:
Table 18–1 Integration Server Details Screen Fields
Field Description
Admin Host Name This is where the admin server resides. This can be a remote server or the same computer where the AIA Pre-Built Integrations Installer is launched. Example: server1.company.com.
The Admin Host Name is _________________________________
Admin Port This is the port number on which Weblogic Admin server is started. To find this value contact WebLogic administrator. Example: 7001.
The Admin Port is _____________________________________
Domain Name This is WebLogic server domain corresponding to the Admin Server. Example: domain1
The Domain Name is _____________________________________
Admin User This value is the WebLogic admin user name. To find this value contact your WebLogic administrator.
The Admin User is __________________________________
Overall Configuration and Deployment of MDM Product Integrations
18-2 Oracle Application Integration Architecture Installation and Upgrade Guide for Pre-Built Integrations
18.1.2 Oracle Communications BRM ScreenUse this screen to enter details related to your Oracle Communications BRM instance. The screen contains the following fields:
18.2 Overall Configuration and Deployment of MDM Product IntegrationsThe overall MDM Product integration consists of four component integrations: MDM Product Base Pack (OPH) and three other options: MDM Product Siebel, MDM Product E-Business Suite and MDM Product BRM. The overall MDM Customer integration can be configured and deployed by selecting any integration or integration combination. The configuration and deployment process consists of the following steps:
Admin Password This value is the WebLogic admin password. To find this value contact your WebLogic administrator.
The Admin Password is _____________________________________
Managed Server After you enter the Admin Host name, Admin Port, Domain Name, Admin user name and Admin Password, this field gets populated with managed servers for the domain. Select the manager server from the list. If you are deploying the integration to a SOA cluster, you should select the cluster name in this field.
The Managed Server is _______________________________
Managed Port This field gets updated automatically after you select the managed server. If you have configured a SOA Cluster the SOA Cluster port appears in the list.
Table 18–2 Oracle Communications BRM Details Screen
Field Description
Primary CM Host Name This is the host name of the primary Connection Manager (CM) of the BRM server. For example: example1.portal.com To find this value, contact your Oracle AQ system administrator.
Primary CM Host Name is ______________________________
Primary CM Port Number This is the port number of primary Connection Manager (CM) of the BRM server. For example: 12600. To find this value contact your Oracle AQ database administrator System Administrator
Primary CM Port Number is ______________________________
Database Host This is the database host name of the Oracle AQ for which the BRM DM_AQ is configured. For example: example2.portal.com. To find this value, contact your Oracle AQ database administrator
Database Host is _______________________
Database Port This is the database port number of the Oracle AQ. For example: 1521. To find this value, contact your Oracle AQ database administrator.
Database Port is _________________________
Oracle AQ Database SID This is the database instance of the Oracle AQ. For example: orcl. To find this value, contact your Oracle AQ database administrator.
Oracle AQ Database SID is _______________________________
Oracle AQ Username This is the database user name of the Oracle AQ. For example, PIN7820. To find this value, contact your Oracle AQ administrator.
Oracle AQ Username is _________________________
Note: This value must be in uppercase (PIN7820) for the OOTB PLM flow to work.
Oracle AQ Password This is the database password of the Oracle AQ. To find this value, contact your Oracle AQ administrator.
Oracle AQ Password is ___________________________
AQ Queue Name This is the queue name configured for the BRM DM_AQ. For example: AqportalUser. To find this value, contact your Oracle AQ database administrator.
AQ Queue Name is _________________________________
Table 18–1 (Cont.) Integration Server Details Screen Fields
Field Description
Configuring and Deploying Product MDM: Comms BRM
Configuring and Deploying Product MDM: Comms BRM 18-3
1. Configure and deploy the MDM Product component integrations. Section 18.3 discusses configuring and deploying the Product MDM: Comms BRM. For detailed instructions on the other MDM Product integrations, see your specific integration chapters in Part II, "Configuring and Deploying Pre-Built Integrations" of this guide.
2. Deploy the MDM Product Routing Rules following the instructions discussed in Chapter 19, "Deploying Product MDM: Routing Rules". Routing Rules wire the integration services, depending on the integrations deployed.
18.3 Configuring and Deploying Product MDM: Comms BRMThis section discusses the integration configuration and deployment process. There are two steps:
1. Configure your integration using the DCW.
2. Deploy the integration to the Fusion Middleware server.
18.3.1 Configuring Product MDM: Comms BRMThe screens that appear prompt you to enter the data that is required for successful configuration of the Product MDM: Comms BRM option. Keep the completed worksheets of the Product MDM: Comms BRM option screens ready before you launch the DCW.
To configure the Product MDM: Comms BRM:
1. Navigate to /slot/emsxxxx/oracle/Middleware/user_projects/domains/soa_domain/bin/ and open setDomainEnv.sh for Linux based systems and setDomainEnv.bat for Microsoft Windows.
2. Replace WLS_JDBC_REMOTE_ENABLED="-Dweblogic.jdbc.remoteEnabled=false" with WLS_JDBC_REMOTE_ENABLED="-Dweblogic.jdbc.remoteEnabled=true".
3. Restart the server.
4. Navigate to <AIA_Instance>/bin and run the command source aiaenv.sh for Linux based systems and aiaenv.bat for Microsoft Windows to configure installation environment.
5. Navigate to <AIA_HOME>/bin and run the command ./aiaconfig.sh for Linux based systems and aiaconfig.bat for Microsoft Windows.
This launches the AIA DCW.
6. Click Next.
7. Select Oracle Product Master Data Management Integration Option for BRM under Product Master Data Management Pre-Build Integration
8. Click Next.
Note: If you are harvesting content to Oracle Enterprise Repository (OER), perform the first three steps. Else start from step 4.
Configuring and Deploying Product MDM: Comms BRM
18-4 Oracle Application Integration Architecture Installation and Upgrade Guide for Pre-Built Integrations
18.3.1.1 Specify Integration Server Details
To specify integration server details:1. Enter information related to your integration server in the Integration Server
Details screen.
2. Click Next.
18.3.1.2 Specify Oracle Communications BRM Details
To specify Oracle Communications BRM details:1. Enter Oracle Communications BRM information in the Oracle Communications
BRM screen.
2. Click Next.
18.3.1.3 Complete Configuration
To complete configuration:1. Review the configuration information on the Configuration Summary screen.
2. Click Configure to accept this configuration and begin the installation.
The system displays progress of configuration in the Configuration Progress screen.
The system displays any warnings or errors as necessary. You can review the configuration log for additional details. The configuration log location is displayed in Configuration Progress screen.
3. When the configuration process finishes without errors, click Next.
4. When the AIA DCW displays the Configuration Complete screen, click Finish to close the DCW.
18.3.2 Configuring using the Response File
To configure using the response file:1. Open the response file.
When you create a response file through OUI, passwords get stored as <SECURE>.
2. Replace the password fields with actual passwords in the response file.
Note: If you want to make changes to the configuration, use the navigation pane on the left and select the screen you want to edit.
You can create a response file based on the input provided in the DCW and use it in future when you want to deploy the integration. You can configure using the steps described in Section 18.3.2, "Configuring using the Response File". Click Save Response File and save the response file with the name and location of your choice.
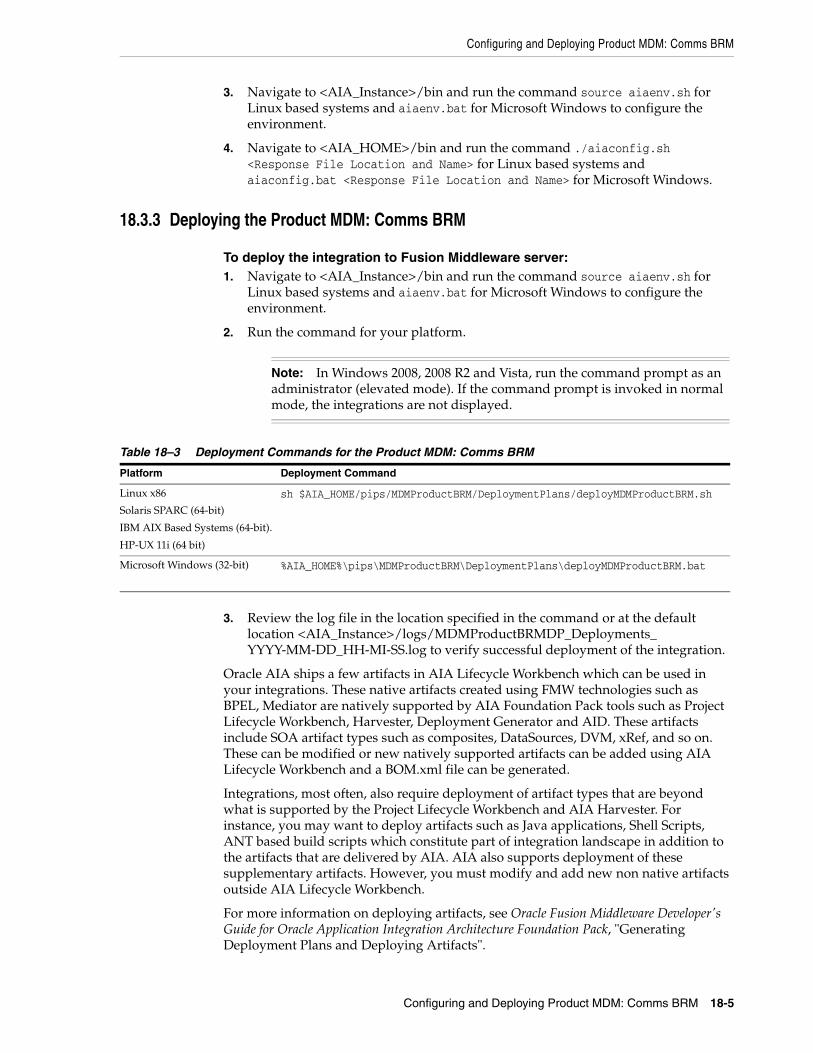
Configuring and Deploying Product MDM: Comms BRM
Configuring and Deploying Product MDM: Comms BRM 18-5
3. Navigate to <AIA_Instance>/bin and run the command source aiaenv.sh for Linux based systems and aiaenv.bat for Microsoft Windows to configure the environment.
4. Navigate to <AIA_HOME>/bin and run the command ./aiaconfig.sh <Response File Location and Name> for Linux based systems and aiaconfig.bat <Response File Location and Name> for Microsoft Windows.
18.3.3 Deploying the Product MDM: Comms BRM
To deploy the integration to Fusion Middleware server:1. Navigate to <AIA_Instance>/bin and run the command source aiaenv.sh for
Linux based systems and aiaenv.bat for Microsoft Windows to configure the environment.
2. Run the command for your platform.
3. Review the log file in the location specified in the command or at the default location <AIA_Instance>/logs/MDMProductBRMDP_Deployments_YYYY-MM-DD_HH-MI-SS.log to verify successful deployment of the integration.
Oracle AIA ships a few artifacts in AIA Lifecycle Workbench which can be used in your integrations. These native artifacts created using FMW technologies such as BPEL, Mediator are natively supported by AIA Foundation Pack tools such as Project Lifecycle Workbench, Harvester, Deployment Generator and AID. These artifacts include SOA artifact types such as composites, DataSources, DVM, xRef, and so on. These can be modified or new natively supported artifacts can be added using AIA Lifecycle Workbench and a BOM.xml file can be generated.
Integrations, most often, also require deployment of artifact types that are beyond what is supported by the Project Lifecycle Workbench and AIA Harvester. For instance, you may want to deploy artifacts such as Java applications, Shell Scripts, ANT based build scripts which constitute part of integration landscape in addition to the artifacts that are delivered by AIA. AIA also supports deployment of these supplementary artifacts. However, you must modify and add new non native artifacts outside AIA Lifecycle Workbench.
For more information on deploying artifacts, see Oracle Fusion Middleware Developer's Guide for Oracle Application Integration Architecture Foundation Pack, "Generating Deployment Plans and Deploying Artifacts".
Note: In Windows 2008, 2008 R2 and Vista, run the command prompt as an administrator (elevated mode). If the command prompt is invoked in normal mode, the integrations are not displayed.
Table 18–3 Deployment Commands for the Product MDM: Comms BRM
Platform Deployment Command
Linux x86
Solaris SPARC (64-bit)
IBM AIX Based Systems (64-bit).
HP-UX 11i (64 bit)
sh $AIA_HOME/pips/MDMProductBRM/DeploymentPlans/deployMDMProductBRM.sh
Microsoft Windows (32-bit) %AIA_HOME%\pips\MDMProductBRM\DeploymentPlans\deployMDMProductBRM.bat
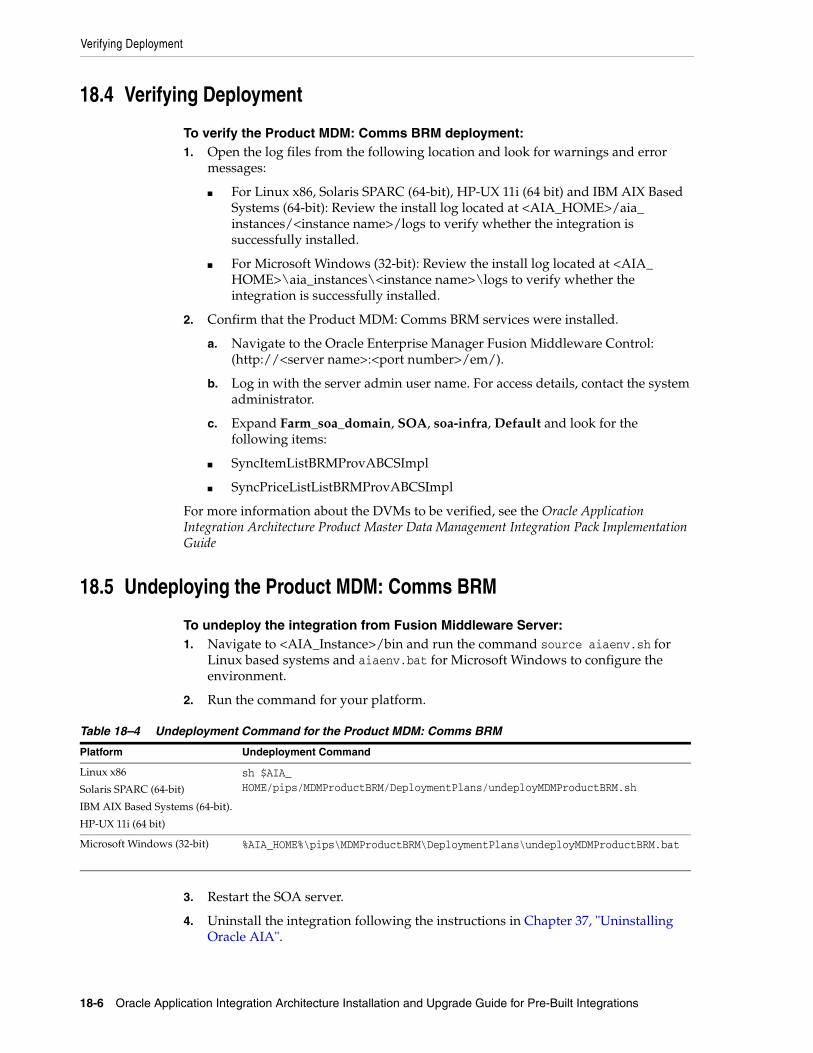
Verifying Deployment
18-6 Oracle Application Integration Architecture Installation and Upgrade Guide for Pre-Built Integrations
18.4 Verifying Deployment
To verify the Product MDM: Comms BRM deployment:1. Open the log files from the following location and look for warnings and error
messages:
■ For Linux x86, Solaris SPARC (64-bit), HP-UX 11i (64 bit) and IBM AIX Based Systems (64-bit): Review the install log located at <AIA_HOME>/aia_instances/<instance name>/logs to verify whether the integration is successfully installed.
■ For Microsoft Windows (32-bit): Review the install log located at <AIA_HOME>\aia_instances\<instance name>\logs to verify whether the integration is successfully installed.
2. Confirm that the Product MDM: Comms BRM services were installed.
a. Navigate to the Oracle Enterprise Manager Fusion Middleware Control: (http://<server name>:<port number>/em/).
b. Log in with the server admin user name. For access details, contact the system administrator.
c. Expand Farm_soa_domain, SOA, soa-infra, Default and look for the following items:
■ SyncItemListBRMProvABCSImpl
■ SyncPriceListListBRMProvABCSImpl
For more information about the DVMs to be verified, see the Oracle Application Integration Architecture Product Master Data Management Integration Pack Implementation Guide
18.5 Undeploying the Product MDM: Comms BRM
To undeploy the integration from Fusion Middleware Server:1. Navigate to <AIA_Instance>/bin and run the command source aiaenv.sh for
Linux based systems and aiaenv.bat for Microsoft Windows to configure the environment.
2. Run the command for your platform.
3. Restart the SOA server.
4. Uninstall the integration following the instructions in Chapter 37, "Uninstalling Oracle AIA".
Table 18–4 Undeployment Command for the Product MDM: Comms BRM
Platform Undeployment Command
Linux x86
Solaris SPARC (64-bit)
IBM AIX Based Systems (64-bit).
HP-UX 11i (64 bit)
sh $AIA_HOME/pips/MDMProductBRM/DeploymentPlans/undeployMDMProductBRM.sh
Microsoft Windows (32-bit) %AIA_HOME%\pips\MDMProductBRM\DeploymentPlans\undeployMDMProductBRM.bat
19
Deploying Product MDM: Routing Rules 19-1
19Deploying Product MDM: Routing Rules
This chapter discusses how to configure and deploy Oracle Product Master Data Management: Routing Rules (Product MDM: Routing Rules).
This chapter includes the following sections:
■ Section 19.1, "Overall Configuration and Deployment of MDM Product Integrations"
■ Section 19.2, "Deploying Product MDM: Routing Rules"
■ Section 19.3, "Verifying Deployment"
■ Section 19.4, "Undeploying Product MDM: Routing Rules"
19.1 Overall Configuration and Deployment of MDM Product IntegrationsThe overall MDM Product integration consists of four component integrations: MDM Product Base Pack (OPH) and three other options: MDM Product Siebel, MDM Product E-Business Suite and MDM Product BRM. The overall MDM Customer integration can be configured and deployed by selecting any integration or integration combination. The configuration and deployment process consists of the following steps:
1. Configure and deploy the MDM Product component integrations. For detailed instructions on the MDM Product integrations, see your specific integration chapters in Part II, "Configuring and Deploying Pre-Built Integrations" of this guide.
2. Deploy the MDM Product Routing Rules following the instructions discussed in Section 19.2, "Deploying Product MDM: Routing Rules". Routing Rules wire the integration services, depending on the integrations deployed.
19.2 Deploying Product MDM: Routing RulesTo deploy the routing rules to Fusion Middleware server:
1. Navigate to <AIA_Instance>/bin and run the command source aiaenv.sh for Linux based systems and aiaenv.bat for Microsoft Windows to configure the environment.
2. Run the command for your platform.
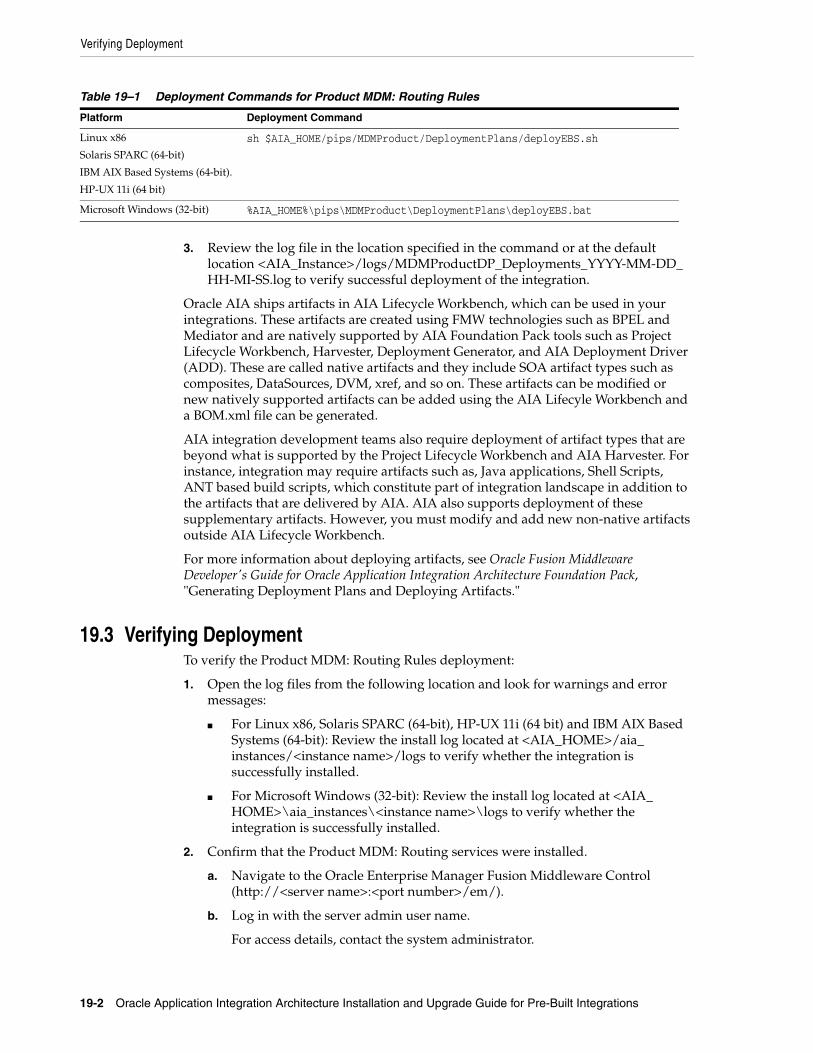
Verifying Deployment
19-2 Oracle Application Integration Architecture Installation and Upgrade Guide for Pre-Built Integrations
3. Review the log file in the location specified in the command or at the default location <AIA_Instance>/logs/MDMProductDP_Deployments_YYYY-MM-DD_HH-MI-SS.log to verify successful deployment of the integration.
Oracle AIA ships artifacts in AIA Lifecycle Workbench, which can be used in your integrations. These artifacts are created using FMW technologies such as BPEL and Mediator and are natively supported by AIA Foundation Pack tools such as Project Lifecycle Workbench, Harvester, Deployment Generator, and AIA Deployment Driver (ADD). These are called native artifacts and they include SOA artifact types such as composites, DataSources, DVM, xref, and so on. These artifacts can be modified or new natively supported artifacts can be added using the AIA Lifecyle Workbench and a BOM.xml file can be generated.
AIA integration development teams also require deployment of artifact types that are beyond what is supported by the Project Lifecycle Workbench and AIA Harvester. For instance, integration may require artifacts such as, Java applications, Shell Scripts, ANT based build scripts, which constitute part of integration landscape in addition to the artifacts that are delivered by AIA. AIA also supports deployment of these supplementary artifacts. However, you must modify and add new non-native artifacts outside AIA Lifecycle Workbench.
For more information about deploying artifacts, see Oracle Fusion Middleware Developer's Guide for Oracle Application Integration Architecture Foundation Pack, "Generating Deployment Plans and Deploying Artifacts."
19.3 Verifying DeploymentTo verify the Product MDM: Routing Rules deployment:
1. Open the log files from the following location and look for warnings and error messages:
■ For Linux x86, Solaris SPARC (64-bit), HP-UX 11i (64 bit) and IBM AIX Based Systems (64-bit): Review the install log located at <AIA_HOME>/aia_instances/<instance name>/logs to verify whether the integration is successfully installed.
■ For Microsoft Windows (32-bit): Review the install log located at <AIA_HOME>\aia_instances\<instance name>\logs to verify whether the integration is successfully installed.
2. Confirm that the Product MDM: Routing services were installed.
a. Navigate to the Oracle Enterprise Manager Fusion Middleware Control (http://<server name>:<port number>/em/).
b. Log in with the server admin user name.
For access details, contact the system administrator.
Table 19–1 Deployment Commands for Product MDM: Routing Rules
Platform Deployment Command
Linux x86
Solaris SPARC (64-bit)
IBM AIX Based Systems (64-bit).
HP-UX 11i (64 bit)
sh $AIA_HOME/pips/MDMProduct/DeploymentPlans/deployEBS.sh
Microsoft Windows (32-bit) %AIA_HOME%\pips\MDMProduct\DeploymentPlans\deployEBS.bat

Undeploying Product MDM: Routing Rules
Deploying Product MDM: Routing Rules 19-3
c. Expand Farm_soa_domain, SOA, soa-infra, Default and look for the following items:
■ SpecificationValueSetEBS
■ SpecificationValueSetResponseEBS
■ ClassificationSchemeEBS
■ ClassificationSchemeResponseEBS
■ ItemEBSV2
■ ItemResponseEBSV2
■ PriceListResponseEBSV2
■ CommunicationsPriceListEBSV2
■ CommunicationsPriceListResponseEBSV2
■ PriceListEBSV2
■ CommunicationsItemCompositionEBSV1
■ CommunicationsItemCompositionResponseEBSV1
■ BillOfMaterialsEBS
■ BillOfMaterialsResponseEBS
■ Comms2CorePriceListBridgeService
■ Core2CommsPriceListBridgeService
19.4 Undeploying Product MDM: Routing RulesTo undeploy the routing rules from Fusion Middleware Server:
1. Navigate to <AIA_Instance>/bin and run the command source aiaenv.sh for Linux based systems and aiaenv.bat for Microsoft Windows to configure the environment.
2. Run the command for your platform.
3. Restart the SOA server.
4. Uninstall the integration following the instructions in the Chapter 37, "Uninstalling Oracle AIA".
Table 19–2 Undeployment Command for Customer MDM: Routing Rules
Platform Undeployment Command
Linux x86
Solaris SPARC (64-bit)
IBM AIX Based Systems (64-bit).
HP-UX 11i (64 bit)
sh $AIA_HOME/pips/MDMProduct/DeploymentPlans/undeployEBS.sh
Microsoft Windows (32-bit) %AIA_HOME%\pips\MDMProduct\DeploymentPlans\undeployEBS.bat

Undeploying Product MDM: Routing Rules
19-4 Oracle Application Integration Architecture Installation and Upgrade Guide for Pre-Built Integrations
20
Configuring and Deploying Design to Release: Agile - EBS 20-1
20 Configuring and Deploying Design toRelease: Agile - EBS
This chapter discusses how to configure and deploy the Agile Product Lifecycle Management Integration Pack for Oracle E-Business Suite: Design to Release (Design to Release: Agile - EBS Pre-Built Integration).
This chapter includes the following sections
■ Section 20.1, "Deployment Configuration Wizard"
■ Section 20.2, "Performing Predeployment Configurations"
■ Section 20.3, "Configuring and Deploying Design to Release: Agile - EBS Pre-Built Integration"
■ Section 20.4, "Performing Postdeployment Configurations"
■ Section 20.5, "Verifying Deployment"
■ Section 20.6, "Undeploying the Design to Release: Agile - EBS Pre-Built Integration"
20.1 Deployment Configuration WizardThe DCW screens prompt you to enter the data required for successful configuration of the Design to Release: Agile - EBS Pre-Built Integration. Enter the details of the Design to Release: Agile - EBS Pre-Built Integration screens below, take a printout and keep it ready when you run the DCW. This action enables faster and error free configuration.
20.1.1 Integration Server Details ScreenAll artifacts associated with the integration infrastructure components deploy to the integration server. This screen contains the following fields:

Deployment Configuration Wizard
20-2 Oracle Application Integration Architecture Installation and Upgrade Guide for Pre-Built Integrations
20.1.2 Agile PLM Details ScreenUse this screen to enter details related to your Agile PLM instance. The screen contains the following fields:
20.1.3 Oracle E-Business Suite Server Details ScreenUse this screen to enter details related to your Oracle E-Business Suite server instance. The screen contains the following fields:
Table 20–1 Integration Server Details Screen Fields
Field Description
Admin Host Name Specifies where the admin server resides. This can be a remote server or the same system where the AIA Pre-Built Integrations Installer is launched. Example: server1.company.com.
The Admin Host Name is _________________________________
Admin Port This is the port number on which the Weblogic Admin server is started. To find this value contact the WebLogic administrator. Example: 7001.
The Admin Port is _____________________________________
Domain Name This is WebLogic server domain corresponding to the Admin Server. Example: domain1
The Domain Name is _______________________________
Admin User This value is the WebLogic admin user name. To find this value contact your WebLogic administrator.
The Admin User is __________________________________
Admin Password This value is the WebLogic admin password. To find this value contact your WebLogic administrator.
The password is _____________________________________
Managed Server After you enter the Admin Host Name, Admin Port and Admin User, this field populates with managed servers for the domain. Select the managed server from the list. If you are deploying the integration to a SOA cluster, you should select the cluster name in this field.
The Managed Server is _______________________________
Managed Port This field is automatically updated after you select the managed server. If you have configured a SOA Cluster, the SOA Cluster port appears in the list.
Table 20–2 Agile PLM Details Screen fields
Field Description
Agile PLM Host Specifies the system name. Example: example1.corp.oracle.com.
Agile PLM Host is ________________________________
Agile PLM Port This is the http port. This value depends on the web server port and operating system of your Agile PLM instance. To find this value, contact your Agile PLM administrator. Example: 80.
Agile PLM Port is ________________________________
Agile PLM Virtual Path This value is the same virtual path entered during the Agile PLM installation. Example: Agile.
Agile PLM Virtual Path is _________________________
Agile PLM Integration Username This is the Agile PLM admin access user name. Example: admin.
Agile PLM Integration Username is ________________
Agile PLM Integration User Password To find this value, contact your Agile PLM administrator.
Agile PLM Integration User Password is ____________
Agile Version This is a drop down list of Agile PLM Application Versions.
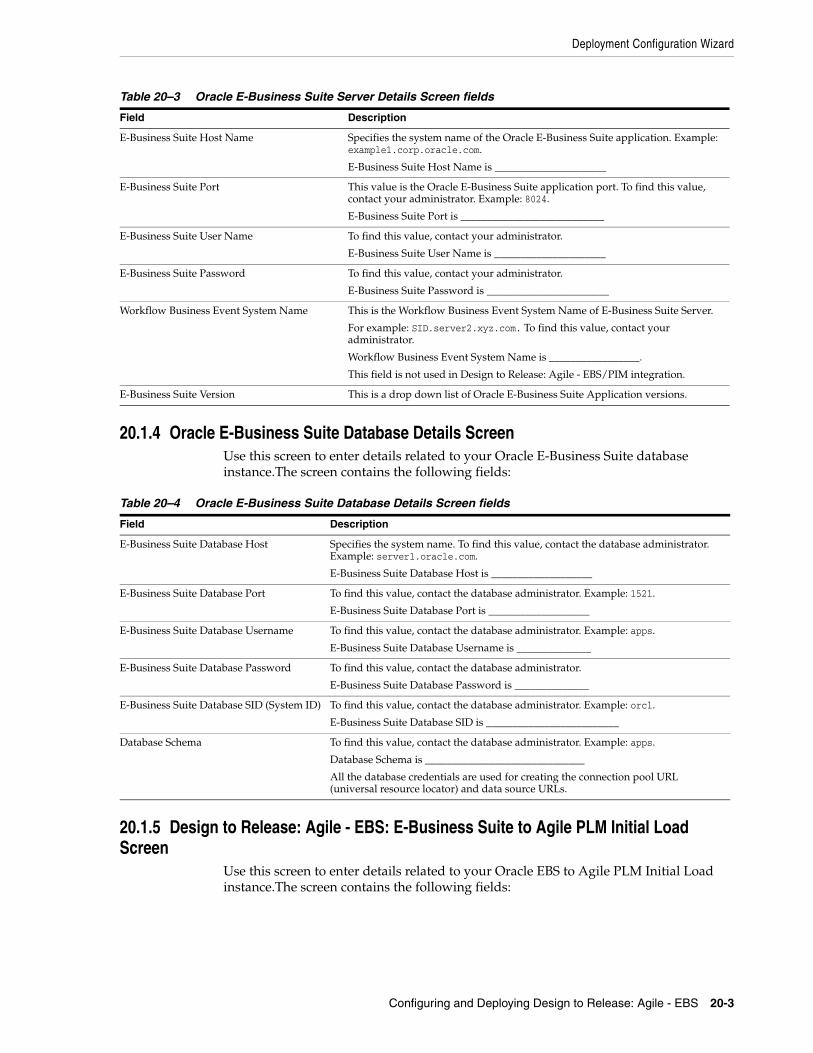
Deployment Configuration Wizard
Configuring and Deploying Design to Release: Agile - EBS 20-3
20.1.4 Oracle E-Business Suite Database Details ScreenUse this screen to enter details related to your Oracle E-Business Suite database instance.The screen contains the following fields:
20.1.5 Design to Release: Agile - EBS: E-Business Suite to Agile PLM Initial Load Screen
Use this screen to enter details related to your Oracle EBS to Agile PLM Initial Load instance.The screen contains the following fields:
Table 20–3 Oracle E-Business Suite Server Details Screen fields
Field Description
E-Business Suite Host Name Specifies the system name of the Oracle E-Business Suite application. Example: example1.corp.oracle.com.
E-Business Suite Host Name is _____________________
E-Business Suite Port This value is the Oracle E-Business Suite application port. To find this value, contact your administrator. Example: 8024.
E-Business Suite Port is ___________________________
E-Business Suite User Name To find this value, contact your administrator.
E-Business Suite User Name is _____________________
E-Business Suite Password To find this value, contact your administrator.
E-Business Suite Password is _______________________
Workflow Business Event System Name This is the Workflow Business Event System Name of E-Business Suite Server.
For example: SID.server2.xyz.com. To find this value, contact your administrator.
Workflow Business Event System Name is _________________.
This field is not used in Design to Release: Agile - EBS/PIM integration.
E-Business Suite Version This is a drop down list of Oracle E-Business Suite Application versions.
Table 20–4 Oracle E-Business Suite Database Details Screen fields
Field Description
E-Business Suite Database Host Specifies the system name. To find this value, contact the database administrator. Example: server1.oracle.com.
E-Business Suite Database Host is ___________________
E-Business Suite Database Port To find this value, contact the database administrator. Example: 1521.
E-Business Suite Database Port is ___________________
E-Business Suite Database Username To find this value, contact the database administrator. Example: apps.
E-Business Suite Database Username is ______________
E-Business Suite Database Password To find this value, contact the database administrator.
E-Business Suite Database Password is ______________
E-Business Suite Database SID (System ID) To find this value, contact the database administrator. Example: orcl.
E-Business Suite Database SID is _________________________
Database Schema To find this value, contact the database administrator. Example: apps.
Database Schema is ______________________________
All the database credentials are used for creating the connection pool URL (universal resource locator) and data source URLs.
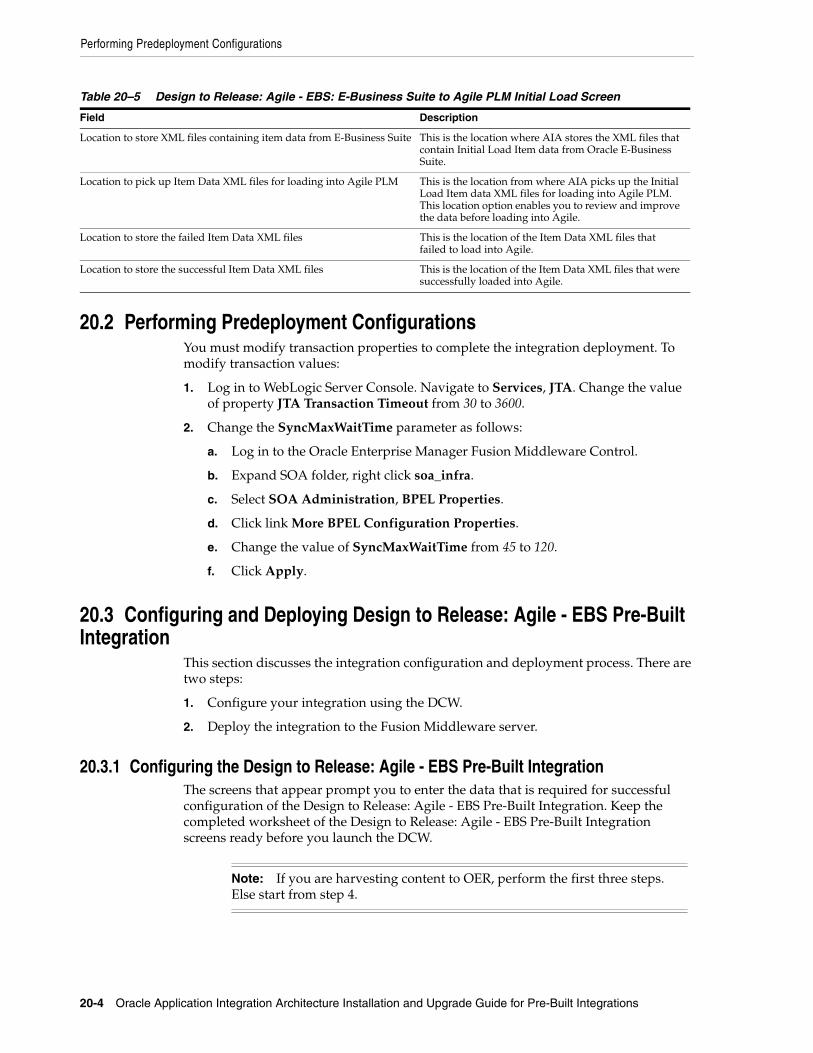
Performing Predeployment Configurations
20-4 Oracle Application Integration Architecture Installation and Upgrade Guide for Pre-Built Integrations
20.2 Performing Predeployment ConfigurationsYou must modify transaction properties to complete the integration deployment. To modify transaction values:
1. Log in to WebLogic Server Console. Navigate to Services, JTA. Change the value of property JTA Transaction Timeout from 30 to 3600.
2. Change the SyncMaxWaitTime parameter as follows:
a. Log in to the Oracle Enterprise Manager Fusion Middleware Control.
b. Expand SOA folder, right click soa_infra.
c. Select SOA Administration, BPEL Properties.
d. Click link More BPEL Configuration Properties.
e. Change the value of SyncMaxWaitTime from 45 to 120.
f. Click Apply.
20.3 Configuring and Deploying Design to Release: Agile - EBS Pre-Built Integration
This section discusses the integration configuration and deployment process. There are two steps:
1. Configure your integration using the DCW.
2. Deploy the integration to the Fusion Middleware server.
20.3.1 Configuring the Design to Release: Agile - EBS Pre-Built IntegrationThe screens that appear prompt you to enter the data that is required for successful configuration of the Design to Release: Agile - EBS Pre-Built Integration. Keep the completed worksheet of the Design to Release: Agile - EBS Pre-Built Integration screens ready before you launch the DCW.
Table 20–5 Design to Release: Agile - EBS: E-Business Suite to Agile PLM Initial Load Screen
Field Description
Location to store XML files containing item data from E-Business Suite This is the location where AIA stores the XML files that contain Initial Load Item data from Oracle E-Business Suite.
Location to pick up Item Data XML files for loading into Agile PLM This is the location from where AIA picks up the Initial Load Item data XML files for loading into Agile PLM. This location option enables you to review and improve the data before loading into Agile.
Location to store the failed Item Data XML files This is the location of the Item Data XML files that failed to load into Agile.
Location to store the successful Item Data XML files This is the location of the Item Data XML files that were successfully loaded into Agile.
Note: If you are harvesting content to OER, perform the first three steps. Else start from step 4.
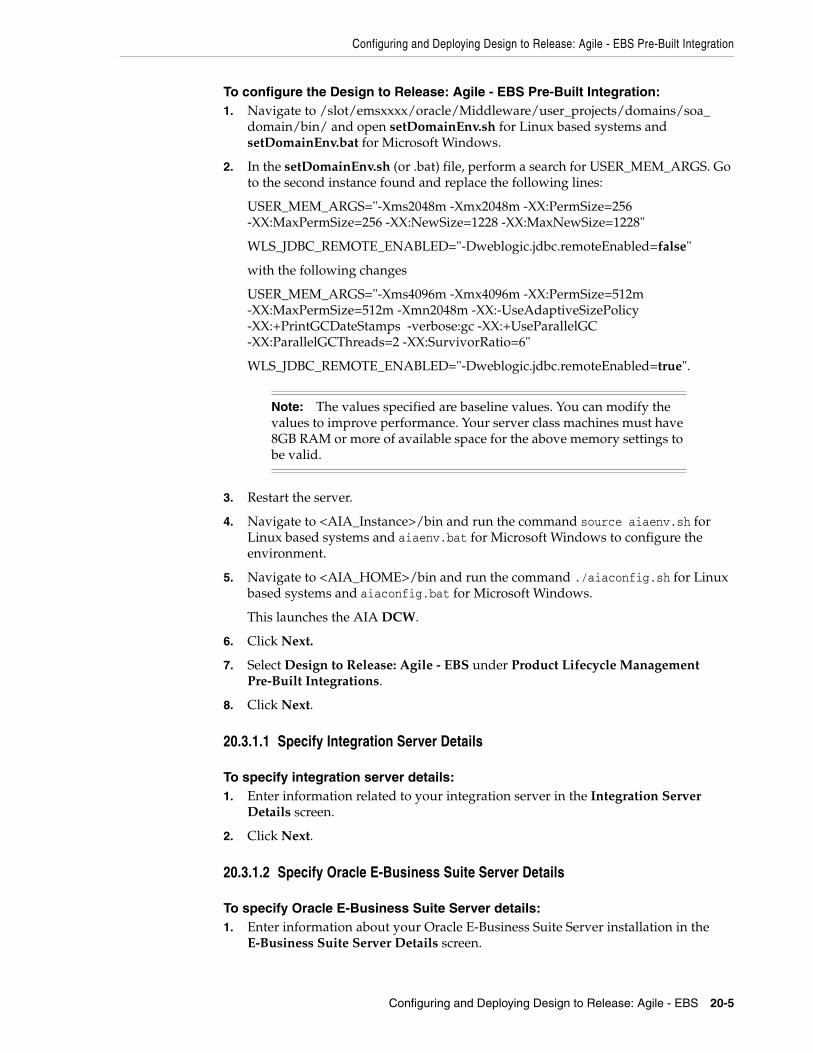
Configuring and Deploying Design to Release: Agile - EBS Pre-Built Integration
Configuring and Deploying Design to Release: Agile - EBS 20-5
To configure the Design to Release: Agile - EBS Pre-Built Integration:1. Navigate to /slot/emsxxxx/oracle/Middleware/user_projects/domains/soa_
domain/bin/ and open setDomainEnv.sh for Linux based systems and setDomainEnv.bat for Microsoft Windows.
2. In the setDomainEnv.sh (or .bat) file, perform a search for USER_MEM_ARGS. Go to the second instance found and replace the following lines:
USER_MEM_ARGS="-Xms2048m -Xmx2048m -XX:PermSize=256 -XX:MaxPermSize=256 -XX:NewSize=1228 -XX:MaxNewSize=1228"
WLS_JDBC_REMOTE_ENABLED="-Dweblogic.jdbc.remoteEnabled=false"
with the following changes
USER_MEM_ARGS="-Xms4096m -Xmx4096m -XX:PermSize=512m -XX:MaxPermSize=512m -Xmn2048m -XX:-UseAdaptiveSizePolicy -XX:+PrintGCDateStamps -verbose:gc -XX:+UseParallelGC -XX:ParallelGCThreads=2 -XX:SurvivorRatio=6"
WLS_JDBC_REMOTE_ENABLED="-Dweblogic.jdbc.remoteEnabled=true".
3. Restart the server.
4. Navigate to <AIA_Instance>/bin and run the command source aiaenv.sh for Linux based systems and aiaenv.bat for Microsoft Windows to configure the environment.
5. Navigate to <AIA_HOME>/bin and run the command ./aiaconfig.sh for Linux based systems and aiaconfig.bat for Microsoft Windows.
This launches the AIA DCW.
6. Click Next.
7. Select Design to Release: Agile - EBS under Product Lifecycle Management Pre-Built Integrations.
8. Click Next.
20.3.1.1 Specify Integration Server Details
To specify integration server details:1. Enter information related to your integration server in the Integration Server
Details screen.
2. Click Next.
20.3.1.2 Specify Oracle E-Business Suite Server Details
To specify Oracle E-Business Suite Server details:1. Enter information about your Oracle E-Business Suite Server installation in the
E-Business Suite Server Details screen.
Note: The values specified are baseline values. You can modify the values to improve performance. Your server class machines must have 8GB RAM or more of available space for the above memory settings to be valid.
Configuring and Deploying Design to Release: Agile - EBS Pre-Built Integration
20-6 Oracle Application Integration Architecture Installation and Upgrade Guide for Pre-Built Integrations
2. Click Next.
20.3.1.3 Specify Oracle E-Business Suite Database Details
To specify Oracle E-Business Suite Database details:1. Enter information about your Oracle E-Business Suite Database installation in the
E-Business Suite Database Details screen.
2. Click Next.
20.3.1.4 Specify Agile PLM Application Details
To specify Agile PLM details:1. Enter information about your Agile PLM installation in the Agile PLM Details
screen.
2. Click Next.
20.3.1.5 Specify Design to Release: Agile - EBS: E-Business Suite to Agile PLM Initial Load Details
To specify Design to Release: Agile - EBS: E-Business Suite to Agile PLM Initial Load details:1. Enter information about your Oracle EBS to Agile PLM initial load installation in
the Design to Release: Agile - EBS: E-Business Suite to Agile PLM Initial Load screen.
2. Click Next.
20.3.1.6 Complete Configuration
To complete configuration:1. Review the configuration information on the Configuration Summary screen.
2. Click Configure to accept the configuration.
The system displays progress of the configuration in the Configuration Progress screen.
The system displays any warnings or errors as necessary. You can review the configuration log for additional details. The configuration log location is displayed in Configuration Progress screen.
3. When the configuration process completes without errors, the AIA DCW displays the Configuration Complete screen.
Note: If you want to make changes to the configuration, use the navigation pane on the left and select the screen you want to edit. You can create a response file based on the input provided in the DCW and use it in future when you want to deploy the integration. You can configure using the steps described in Section 20.3.2, "Configuring using the Response File". Click Save Response File and save the response file with the name and location of your choice.
Configuring and Deploying Design to Release: Agile - EBS Pre-Built Integration
Configuring and Deploying Design to Release: Agile - EBS 20-7
4. Click Finish to close the DCW.
20.3.2 Configuring using the Response File
To configure using the response file:1. Open the response file.
When you create a response file through OUI, passwords get stored as <SECURE>.
2. Replace the password fields with actual passwords in the response file.
3. Navigate to <AIA_Instance>/bin and run the command source aiaenv.sh for Linux based systems and aiaenv.bat for Microsoft Windows to configure the environment.
4. Navigate to <AIA_HOME>/bin and run the command./aiaconfig.sh <Response File Location and Name> for Linux based systems and aiaconfig.bat <Response File Location and Name> for Microsoft Windows.
20.3.3 Deploying the Design to Release: Agile - EBS Pre-Built Integration
To deploy the integration to Fusion Middleware server:1. Navigate to <AIA_Instance>/bin and run the command source aiaenv.sh for
Linux based systems and aiaenv.bat for Microsoft Windows to configure the environment.
2. Run the command for your platform.
3. Review the log file in the location specified in the command to verify successful deployment.
Oracle AIA ships artifacts in AIA Lifecycle Workbench which can be used in your integrations. These artifacts are created using FMW technologies such as BPEL and Mediator and are natively supported by AIA Foundation Pack tools such as Project Lifecycle Workbench, Harvester, Deployment Generator, AIA Deployment Driver (ADD). These are called native artifacts and they include SOA artifact types such as composites, DataSources, DVM, xRef, and so on. These artifacts can be modified or new natively supported artifacts can be added using the AIA Lifecyle Workbench and a BOM.xml file can be generated.
Table 20–6 Deployment Command for the Design to Release: Agile - EBS Pre-Built Integration
Platform Deployment Command
Linux
Solaris SPARC
HP-UX
IBM AIX Based Systems
sh $AIA_HOME/pips/AgileToEbiz/DeploymentPlans/AgileToEbizDP.sh
Microsoft Windows %AIA_HOME%\pips\AgileToEbiz\DeploymentPlans\AgileToEbizDP.bat
Note: In Windows 2008, 2008 R2 and Vista, run the command prompt as an administrator (elevated mode). If the command prompt is invoked in normal mode, the integrations are not displayed.
Performing Postdeployment Configurations
20-8 Oracle Application Integration Architecture Installation and Upgrade Guide for Pre-Built Integrations
AIA integration development teams, most often, also require deployment of artifact types that are beyond what is supported by the Project Lifecycle Workbench and AIA Harvester. For instance, integration may require artifacts such as, Java applications, Shell Scripts, ANT based build scripts which constitute part of integration landscape in addition to the artifacts that are delivered by AIA. AIA also supports deployment of these supplementary artifacts. However, you must modify and add new non native artifacts outside AIA Lifecycle Workbench.
For more information on deploying artifacts, see Oracle Fusion Middleware Developer's Guide for Oracle Application Integration Architecture Foundation Pack, "Generating Deployment Plans and Deploying Artifacts".
20.4 Performing Postdeployment ConfigurationsThis sections describes the postdeployment tasks you must perform after configuring the Design to Release: Agile - EBS Pre-Built Integration. This section includes the following topics:
■ Section 20.4.1, "Cluster Installation"
■ Section 20.4.2, "Enabling Security"
■ Section 20.4.3, "Configuring Initial Load"
■ Section 20.4.4, "Enabling the NPR & SYNC Flows"
20.4.1 Cluster InstallationTo install the Design to Release: Agile - EBS PIP in a cluster, follow these steps:
1. Open the <WebTier_HOME>/instances/<instances_name>/config/OHS/ohs1/mod_wl_ohs.conf file.
2. Add the following code:
Example 20–1 Queue
<Location /queue> SetHandler weblogic-handler WebLogicCluster <<PrimaryHost>>:<PrimaryHost Port>>,<<SecondaryHost>>:<SecondaryHost Port>> WLLogFile /tmp/web_log.log </Location>
Example 20–2 EBIBOMConfigurator
<Location /EBIBOMConfigurator/ebibomconfigreturnservlet > SetHandler weblogic-handler WebLogicCluster <<PrimaryHost>>:<PrimaryHostPort>>,<<SecondaryHost>>:<SecondaryHost Port>> WLLogFile /tmp/web_log.log </Location>
20.4.2 Enabling SecurityAfter configuration of the EBS is complete, you must enable security in the three concurrent programs of the Design to Release: Agile - EBS Pre-Built Integration. To complete this task, perform the following steps:
1. Set EBS Integration: SOA SERVER USER system profile to Weblogic user.
Performing Postdeployment Configurations
Configuring and Deploying Design to Release: Agile - EBS 20-9
2. Set the SOA Password using the SQL script: inveipwd.sql.
The file is located in EBS APPLICATION_TOP in the following folder: APPL_TOP/inv/12.0.0/patch/115/sql/inveipwd.sql.
You are prompted to enter the password for the SOA user to be encoded and stored. (This is used by Business Event to invoke RequestorABCS.) The password is stored in FND_VAULT under the module EBI and Vault Key INV_EBI_SOA_PASSWORD.
20.4.3 Configuring Initial LoadTo configure the Agile Initial Load for the Design to Release: Agile - EBS Pre-Built Integration, perform the following steps:
1. Apply patch 8313714:R12.EGO.C for EBS R12.1.1 or EBS R12.1.2 and patch 8263652 for EBS 11i
2. Login to the EBS database
3. Locate and open the EGO_EBI_ITEM_LOAD package
4. Perform the following changes:
a. In the GENERATE_EVENTS procedure, replace the following query:
INSERT INTO EGO_EBI_ITEM_LOAD_LOG (INVENTORY_ITEM_ID,ORGANIZATION_ID, EVENT_ID)SELECT INVENTORY_ITEM_ID, ORGANIZATION_ID, NULLFROM MTL_SYSTEM_ITEMS_BWHERE ORGANIZATION_ID = p_organization_idAND bom_item_type in (1, 2, 4)AND customer_order_flag = 'Y'AND customer_order_enabled_flag = 'Y';
With the following query:
INSERT INTO EGO_EBI_ITEM_LOAD_LOG (INVENTORY_ITEM_ID,ORGANIZATION_ID, EVENT_ID)SELECT INVENTORY_ITEM_ID, ORGANIZATION_ID, NULLFROM MTL_SYSTEM_ITEMS_BWHERE ORGANIZATION_ID = p_organization_id;
b. In the REGENERATE_FAILED_EVENT procedure, replace the following query:
DELETE FROM EGO_EBI_ITEM_LOAD_LOGWHERE ORGANIZATION_ID = p_organization_id ANDEVENT_ID = p_event_id ANDINVENTORY_ITEM_ID NOT IN(SELECT INVENTORY_ITEM_IDFROM MTL_SYSTEM_ITEMS_BWHERE ORGANIZATION_ID = p_organization_idAND bom_item_type in (1, 2, 4)AND customer_order_flag = 'Y'AND customer_order_enabled_flag = 'Y');
With the following query:
Note: These steps are required to use the Initial Load for the Design to Release: Agile - EBS Pre-Built Integration.
Verifying Deployment
20-10 Oracle Application Integration Architecture Installation and Upgrade Guide for Pre-Built Integrations
DELETE FROM EGO_EBI_ITEM_LOAD_LOGWHERE ORGANIZATION_ID = p_organization_id ANDEVENT_ID = p_event_id ANDINVENTORY_ITEM_ID NOT IN(SELECT INVENTORY_ITEM_IDFROM MTL_SYSTEM_ITEMS_BWHERE ORGANIZATION_ID = p_organization_id);
5. Recompile the EGO_EBI_ITEM_LOAD package
20.4.4 Enabling the NPR & SYNC FlowsTo enable the NPR & SYNC flows in the Design to Release: Agile - EBS Pre-Built Integration, you must update the config.properties file located in NPRpx.jar:
1. In the Agile server, navigate to <AgileHome>/integration/sdk/extensions.
2. Unzip NPRpx.jar.
3. Open config.properties file.
4. Update Host and Port values for the following variables:
a. WS_LOCATION_CRETEITEMFLOW=http://<<FMWHost>>:<<ManagedPort>>/soa-infra/services/default/SyncItemListAgileReqABCS/client
b. WS_LOCATION_SYNCITEMFLOW=http://<<FMWHost>>:<<ManagedPort>>/soa-infra/services/default/SyncItemListAgileReqABCS/client
5. Check that the value for NPR_PX_TIMEOUT is 90000000. This is the recommended value.
6. Update the SOA_LOGIN_USERNAME and SOA_LOGIN_PASSWORD values with your username and password.
The password must be encrypted. To encrypt the password:
a. In the Agile Server, navigate to <AgileHome>/agileDomain/bin
b. Run the encryption script "./encryptpwd.sh <PasswordToBeEncrypted>".
7. Save your changes and rezip NPRpx.jar.
8. Restart the Agile Server.
20.5 Verifying Deployment
To verify the Design to Release: Agile - EBS Pre-Built Integration deployment:1. Open the log files from the following location and look for warnings and error
messages:
■ For Linux, Solaris SPARC, HP-UX and IBM AIX Based Systems: Review the install log located at <AIA_HOME>/aia_instances/<instance name>/logs to verify that the integration is successfully installed.
Note: Before performing any changes, back up the NPRpx.jar file.
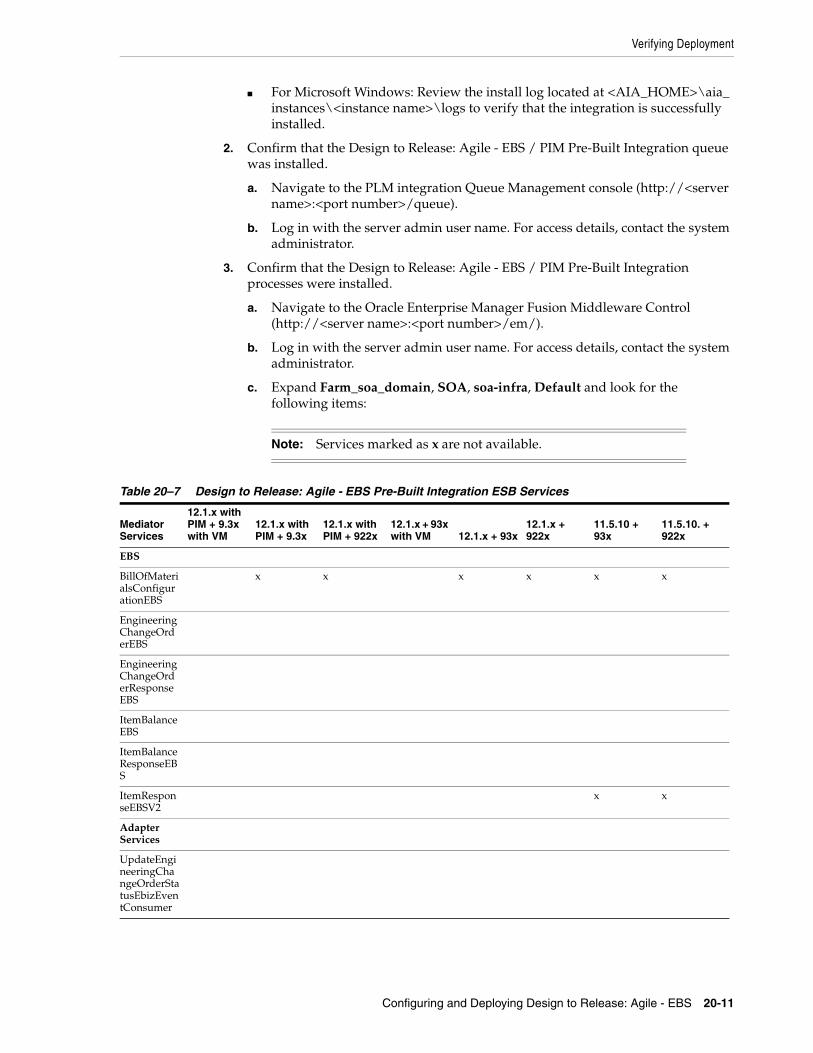
Verifying Deployment
Configuring and Deploying Design to Release: Agile - EBS 20-11
■ For Microsoft Windows: Review the install log located at <AIA_HOME>\aia_instances\<instance name>\logs to verify that the integration is successfully installed.
2. Confirm that the Design to Release: Agile - EBS / PIM Pre-Built Integration queue was installed.
a. Navigate to the PLM integration Queue Management console (http://<server name>:<port number>/queue).
b. Log in with the server admin user name. For access details, contact the system administrator.
3. Confirm that the Design to Release: Agile - EBS / PIM Pre-Built Integration processes were installed.
a. Navigate to the Oracle Enterprise Manager Fusion Middleware Control (http://<server name>:<port number>/em/).
b. Log in with the server admin user name. For access details, contact the system administrator.
c. Expand Farm_soa_domain, SOA, soa-infra, Default and look for the following items:
Note: Services marked as x are not available.
Table 20–7 Design to Release: Agile - EBS Pre-Built Integration ESB Services
Mediator Services
12.1.x with PIM + 9.3x with VM
12.1.x with PIM + 9.3x
12.1.x with PIM + 922x
12.1.x + 93x with VM 12.1.x + 93x
12.1.x + 922x
11.5.10 + 93x
11.5.10. + 922x
EBS
BillOfMaterialsConfigurationEBS
x x x x x x
EngineeringChangeOrderEBS
EngineeringChangeOrderResponseEBS
ItemBalanceEBS
ItemBalanceResponseEBS
ItemResponseEBSV2
x x
Adapter Services
UpdateEngineeringChangeOrderStatusEbizEventConsumer
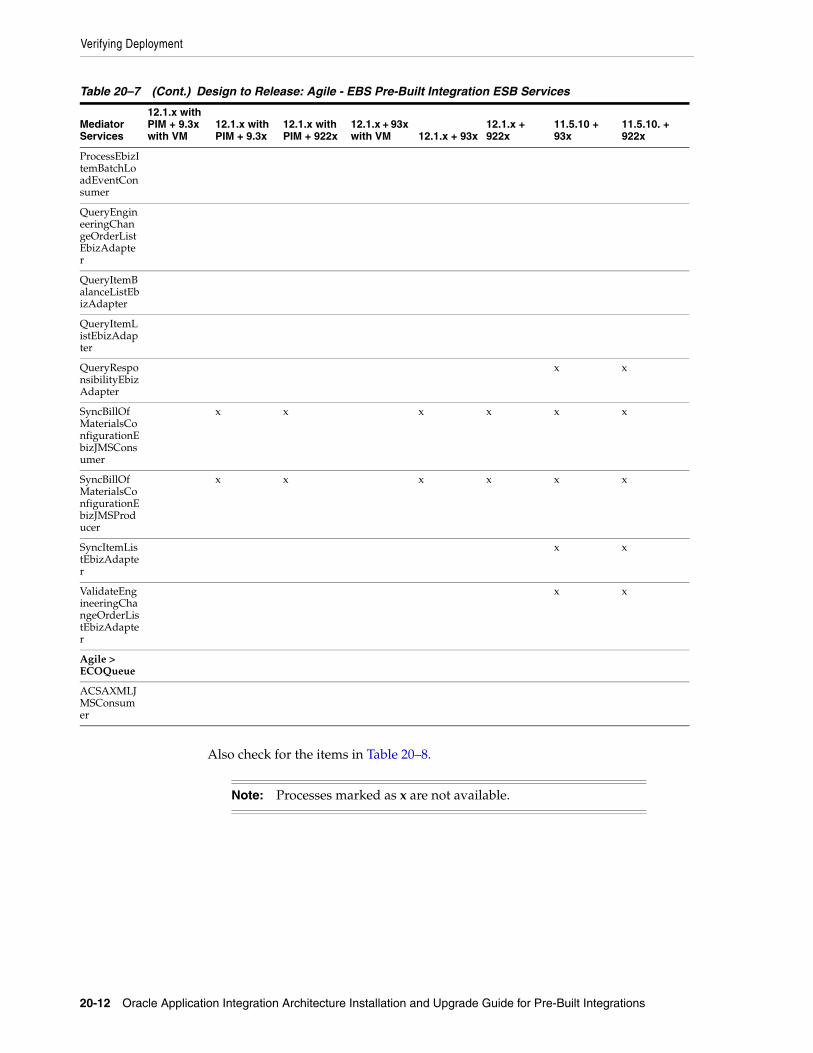
Verifying Deployment
20-12 Oracle Application Integration Architecture Installation and Upgrade Guide for Pre-Built Integrations
Also check for the items in Table 20–8.
ProcessEbizItemBatchLoadEventConsumer
QueryEngineeringChangeOrderListEbizAdapter
QueryItemBalanceListEbizAdapter
QueryItemListEbizAdapter
QueryResponsibilityEbizAdapter
x x
SyncBillOfMaterialsConfigurationEbizJMSConsumer
x x x x x x
SyncBillOfMaterialsConfigurationEbizJMSProducer
x x x x x x
SyncItemListEbizAdapter
x x
ValidateEngineeringChangeOrderListEbizAdapter
x x
Agile > ECOQueue
ACSAXMLJMSConsumer
Note: Processes marked as x are not available.
Table 20–7 (Cont.) Design to Release: Agile - EBS Pre-Built Integration ESB Services
Mediator Services
12.1.x with PIM + 9.3x with VM
12.1.x with PIM + 9.3x
12.1.x with PIM + 922x
12.1.x + 93x with VM 12.1.x + 93x
12.1.x + 922x
11.5.10 + 93x
11.5.10. + 922x
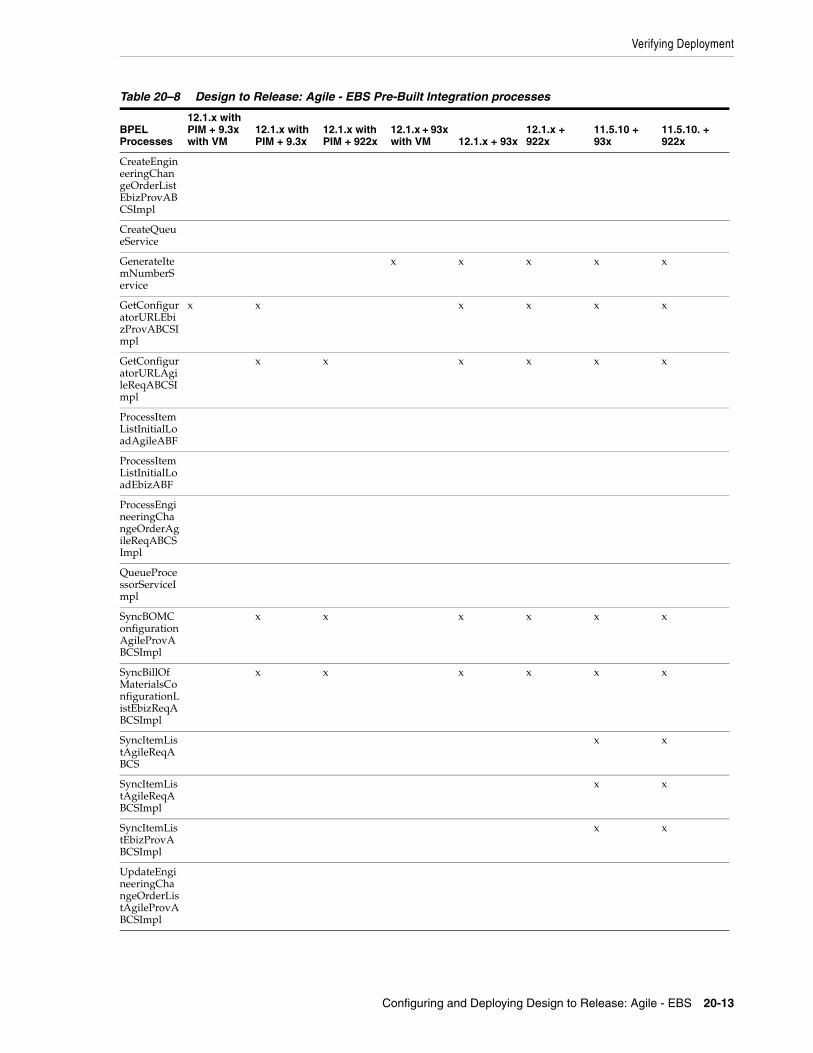
Verifying Deployment
Configuring and Deploying Design to Release: Agile - EBS 20-13
Table 20–8 Design to Release: Agile - EBS Pre-Built Integration processes
BPEL Processes
12.1.x with PIM + 9.3x with VM
12.1.x with PIM + 9.3x
12.1.x with PIM + 922x
12.1.x + 93x with VM 12.1.x + 93x
12.1.x + 922x
11.5.10 + 93x
11.5.10. + 922x
CreateEngineeringChangeOrderListEbizProvABCSImpl
CreateQueueService
GenerateItemNumberService
x x x x x
GetConfiguratorURLEbizProvABCSImpl
x x x x x x
GetConfiguratorURLAgileReqABCSImpl
x x x x x x
ProcessItemListInitialLoadAgileABF
ProcessItemListInitialLoadEbizABF
ProcessEngineeringChangeOrderAgileReqABCSImpl
QueueProcessorServiceImpl
SyncBOMConfigurationAgileProvABCSImpl
x x x x x x
SyncBillOfMaterialsConfigurationListEbizReqABCSImpl
x x x x x x
SyncItemListAgileReqABCS
x x
SyncItemListAgileReqABCSImpl
x x
SyncItemListEbizProvABCSImpl
x x
UpdateEngineeringChangeOrderListAgileProvABCSImpl
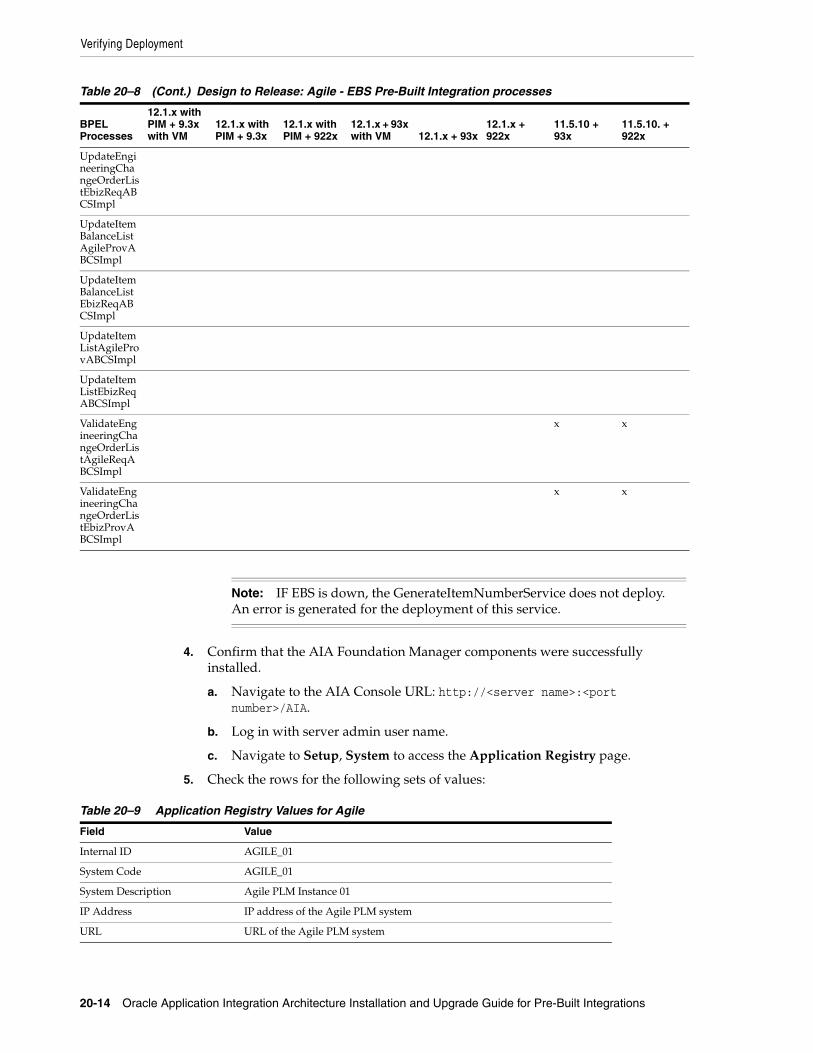
Verifying Deployment
20-14 Oracle Application Integration Architecture Installation and Upgrade Guide for Pre-Built Integrations
4. Confirm that the AIA Foundation Manager components were successfully installed.
a. Navigate to the AIA Console URL: http://<server name>:<port number>/AIA.
b. Log in with server admin user name.
c. Navigate to Setup, System to access the Application Registry page.
5. Check the rows for the following sets of values:
UpdateEngineeringChangeOrderListEbizReqABCSImpl
UpdateItemBalanceListAgileProvABCSImpl
UpdateItemBalanceListEbizReqABCSImpl
UpdateItemListAgileProvABCSImpl
UpdateItemListEbizReqABCSImpl
ValidateEngineeringChangeOrderListAgileReqABCSImpl
x x
ValidateEngineeringChangeOrderListEbizProvABCSImpl
x x
Note: IF EBS is down, the GenerateItemNumberService does not deploy. An error is generated for the deployment of this service.
Table 20–9 Application Registry Values for Agile
Field Value
Internal ID AGILE_01
System Code AGILE_01
System Description Agile PLM Instance 01
IP Address IP address of the Agile PLM system
URL URL of the Agile PLM system
Table 20–8 (Cont.) Design to Release: Agile - EBS Pre-Built Integration processes
BPEL Processes
12.1.x with PIM + 9.3x with VM
12.1.x with PIM + 9.3x
12.1.x with PIM + 922x
12.1.x + 93x with VM 12.1.x + 93x
12.1.x + 922x
11.5.10 + 93x
11.5.10. + 922x
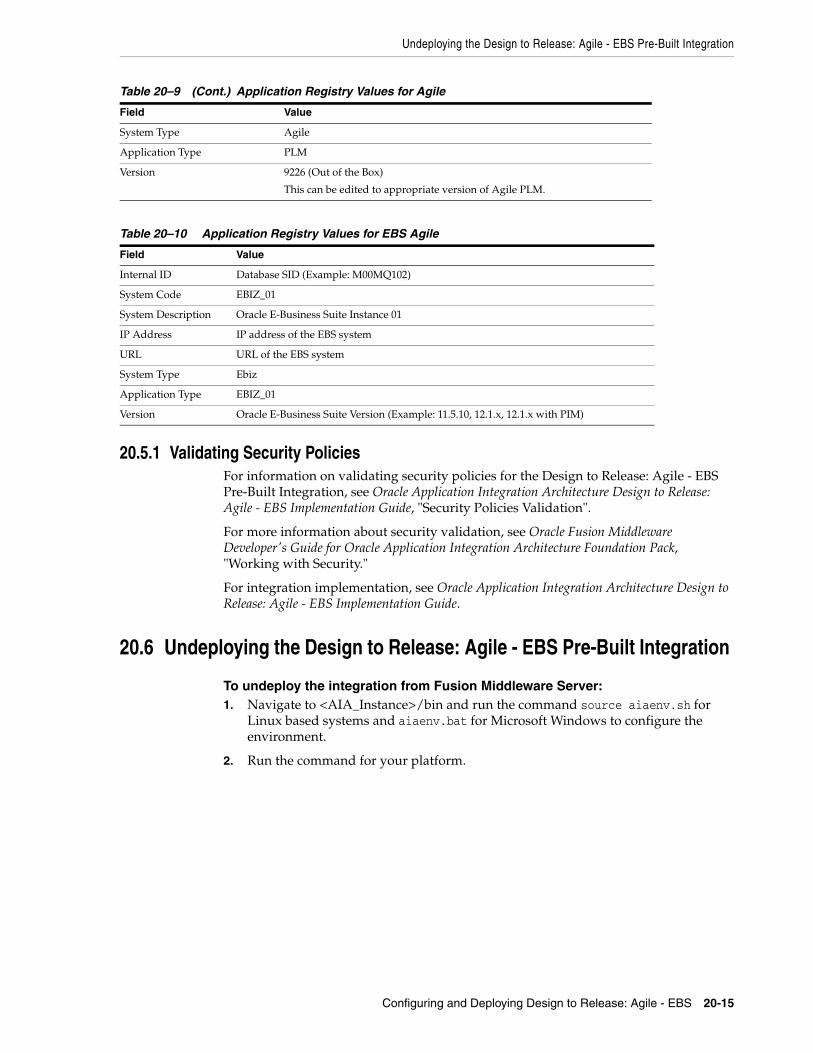
Undeploying the Design to Release: Agile - EBS Pre-Built Integration
Configuring and Deploying Design to Release: Agile - EBS 20-15
20.5.1 Validating Security PoliciesFor information on validating security policies for the Design to Release: Agile - EBS Pre-Built Integration, see Oracle Application Integration Architecture Design to Release: Agile - EBS Implementation Guide, "Security Policies Validation".
For more information about security validation, see Oracle Fusion Middleware Developer's Guide for Oracle Application Integration Architecture Foundation Pack, "Working with Security."
For integration implementation, see Oracle Application Integration Architecture Design to Release: Agile - EBS Implementation Guide.
20.6 Undeploying the Design to Release: Agile - EBS Pre-Built Integration
To undeploy the integration from Fusion Middleware Server:1. Navigate to <AIA_Instance>/bin and run the command source aiaenv.sh for
Linux based systems and aiaenv.bat for Microsoft Windows to configure the environment.
2. Run the command for your platform.
System Type Agile
Application Type PLM
Version 9226 (Out of the Box)
This can be edited to appropriate version of Agile PLM.
Table 20–10 Application Registry Values for EBS Agile
Field Value
Internal ID Database SID (Example: M00MQ102)
System Code EBIZ_01
System Description Oracle E-Business Suite Instance 01
IP Address IP address of the EBS system
URL URL of the EBS system
System Type Ebiz
Application Type EBIZ_01
Version Oracle E-Business Suite Version (Example: 11.5.10, 12.1.x, 12.1.x with PIM)
Table 20–9 (Cont.) Application Registry Values for Agile
Field Value

Undeploying the Design to Release: Agile - EBS Pre-Built Integration
20-16 Oracle Application Integration Architecture Installation and Upgrade Guide for Pre-Built Integrations
3. Restart the SOA server.
4. Uninstall the integration following the instructions in Chapter 37, "Uninstalling Oracle AIA".
Table 20–11 Un-deployment Command for the Design to Release: Agile - EBS Pre-Built Integration
Platform Un-deployment Command
Linux
Solaris SPARC
HP-UX
IBM AIX Based Systems
ant Uninstall -f <AIA_HOME>/Infrastructure/Install/AID/AIAInstallDriver.xml-DPropertiesFile=<AIA_HOME>/aia_instances/<AIA_Instance_name>/config/AIAInstallProperties.xml -DDeploymentPlan=<AIA_HOME>/pips/AgileToEbiz/DeploymentPlans/AgileToEbizDPUndeployDP.xml -DDeploymentPolicyFile=<AIA_HOME>/pips/AgileToEbiz/DeploymentPlans/AgileToEbizConditionalPolicyUndeploy.xml -DSupplementaryDeploymentPlan=<AIA_HOME>/pips/AgileToEbiz/DeploymentPlans/AgileToEbizSupplementaryUndeployDP.xml -l <AIA_HOME>/pips/AgileToEbiz/DeploymentPlans/AgileToEbizUndeployDP.log
Microsoft Windows ant Uninstall -f <AIA_HOME>\Infrastructure\Install\AID\AIAInstallDriver.xml -DPropertiesFile=<AIA_HOME>\aia_instances\<AIA_Instance_name>\config\AIAInstallProperties.xml -DDeploymentPlan=<AIA_HOME>\pips\AgileToEbiz\DeploymentPlans\AgileToEbizDPUndeployDP.xml -DDeploymentPolicyFile=<AIA_HOME>\pips\AgileToEbiz\DeploymentPlans\AgileToEbizConditionalPolicyUndeploy.xml -DSupplementaryDeploymentPlan=<AIA_HOME>\pips\AgileToEbiz\DeploymentPlans\AgileToEbizSupplementaryUndeployDP.xml -l <AIA_HOME>\pips\AgileToEbiz\DeploymentPlans\AgileToEbizUndeployDP.log
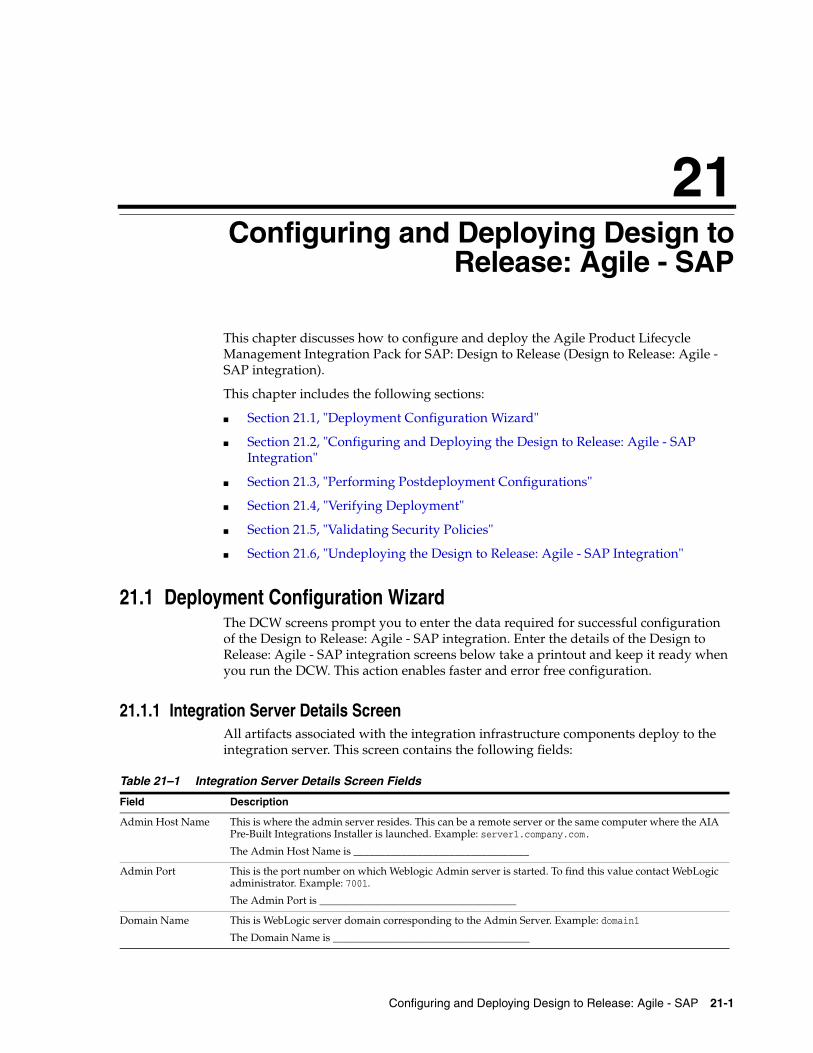
21
Configuring and Deploying Design to Release: Agile - SAP 21-1
21Configuring and Deploying Design toRelease: Agile - SAP
This chapter discusses how to configure and deploy the Agile Product Lifecycle Management Integration Pack for SAP: Design to Release (Design to Release: Agile - SAP integration).
This chapter includes the following sections:
■ Section 21.1, "Deployment Configuration Wizard"
■ Section 21.2, "Configuring and Deploying the Design to Release: Agile - SAP Integration"
■ Section 21.3, "Performing Postdeployment Configurations"
■ Section 21.4, "Verifying Deployment"
■ Section 21.5, "Validating Security Policies"
■ Section 21.6, "Undeploying the Design to Release: Agile - SAP Integration"
21.1 Deployment Configuration WizardThe DCW screens prompt you to enter the data required for successful configuration of the Design to Release: Agile - SAP integration. Enter the details of the Design to Release: Agile - SAP integration screens below take a printout and keep it ready when you run the DCW. This action enables faster and error free configuration.
21.1.1 Integration Server Details ScreenAll artifacts associated with the integration infrastructure components deploy to the integration server. This screen contains the following fields:
Table 21–1 Integration Server Details Screen Fields
Field Description
Admin Host Name This is where the admin server resides. This can be a remote server or the same computer where the AIA Pre-Built Integrations Installer is launched. Example: server1.company.com.
The Admin Host Name is _________________________________
Admin Port This is the port number on which Weblogic Admin server is started. To find this value contact WebLogic administrator. Example: 7001.
The Admin Port is _____________________________________
Domain Name This is WebLogic server domain corresponding to the Admin Server. Example: domain1
The Domain Name is _____________________________________
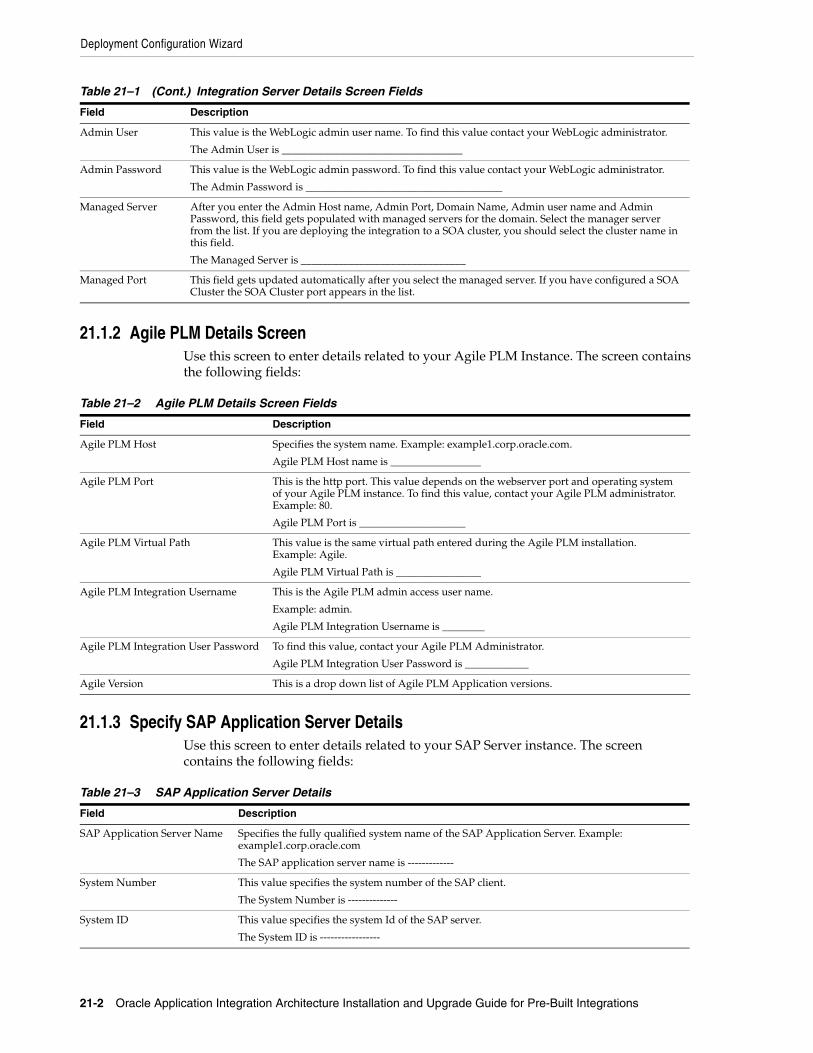
Deployment Configuration Wizard
21-2 Oracle Application Integration Architecture Installation and Upgrade Guide for Pre-Built Integrations
21.1.2 Agile PLM Details ScreenUse this screen to enter details related to your Agile PLM Instance. The screen contains the following fields:
21.1.3 Specify SAP Application Server DetailsUse this screen to enter details related to your SAP Server instance. The screen contains the following fields:
Admin User This value is the WebLogic admin user name. To find this value contact your WebLogic administrator.
The Admin User is __________________________________
Admin Password This value is the WebLogic admin password. To find this value contact your WebLogic administrator.
The Admin Password is _____________________________________
Managed Server After you enter the Admin Host name, Admin Port, Domain Name, Admin user name and Admin Password, this field gets populated with managed servers for the domain. Select the manager server from the list. If you are deploying the integration to a SOA cluster, you should select the cluster name in this field.
The Managed Server is _______________________________
Managed Port This field gets updated automatically after you select the managed server. If you have configured a SOA Cluster the SOA Cluster port appears in the list.
Table 21–2 Agile PLM Details Screen Fields
Field Description
Agile PLM Host Specifies the system name. Example: example1.corp.oracle.com.
Agile PLM Host name is _________________
Agile PLM Port This is the http port. This value depends on the webserver port and operating system of your Agile PLM instance. To find this value, contact your Agile PLM administrator. Example: 80.
Agile PLM Port is ____________________
Agile PLM Virtual Path This value is the same virtual path entered during the Agile PLM installation. Example: Agile.
Agile PLM Virtual Path is ________________
Agile PLM Integration Username This is the Agile PLM admin access user name.
Example: admin.
Agile PLM Integration Username is ________
Agile PLM Integration User Password To find this value, contact your Agile PLM Administrator.
Agile PLM Integration User Password is ____________
Agile Version This is a drop down list of Agile PLM Application versions.
Table 21–3 SAP Application Server Details
Field Description
SAP Application Server Name Specifies the fully qualified system name of the SAP Application Server. Example: example1.corp.oracle.com
The SAP application server name is -------------
System Number This value specifies the system number of the SAP client.
The System Number is --------------
System ID This value specifies the system Id of the SAP server.
The System ID is -----------------
Table 21–1 (Cont.) Integration Server Details Screen Fields
Field Description
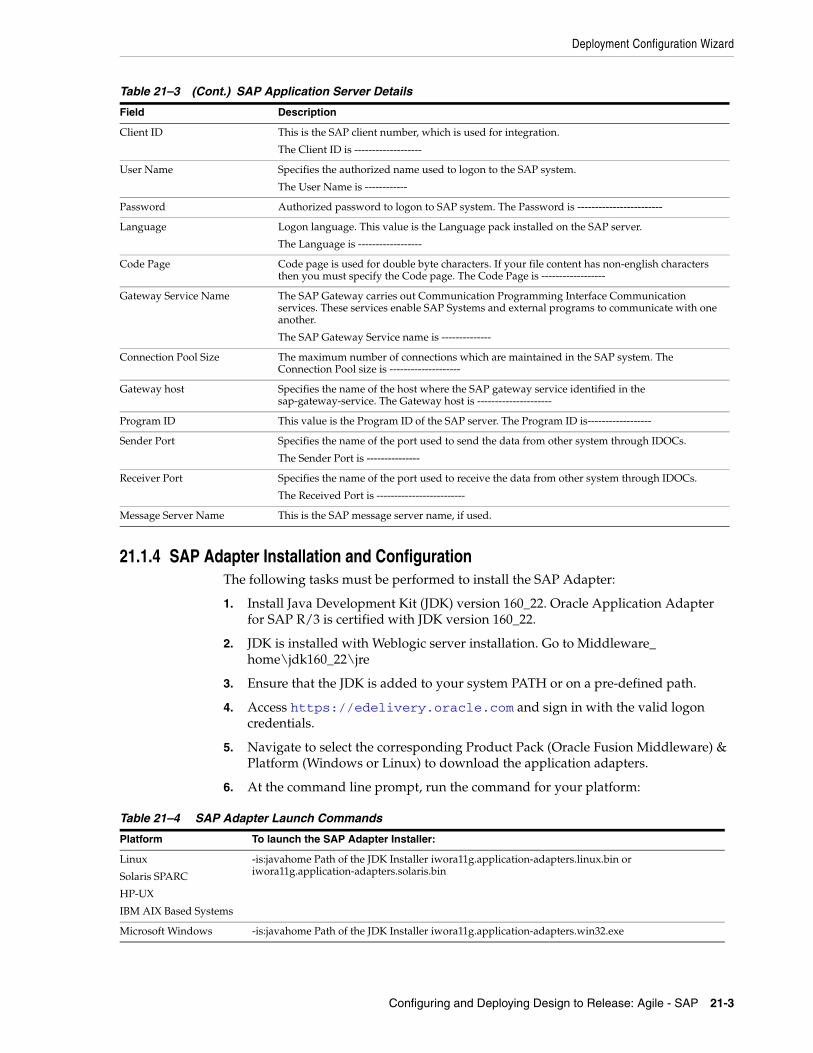
Deployment Configuration Wizard
Configuring and Deploying Design to Release: Agile - SAP 21-3
21.1.4 SAP Adapter Installation and ConfigurationThe following tasks must be performed to install the SAP Adapter:
1. Install Java Development Kit (JDK) version 160_22. Oracle Application Adapter for SAP R/3 is certified with JDK version 160_22.
2. JDK is installed with Weblogic server installation. Go to Middleware_home\jdk160_22\jre
3. Ensure that the JDK is added to your system PATH or on a pre-defined path.
4. Access https://edelivery.oracle.com and sign in with the valid logon credentials.
5. Navigate to select the corresponding Product Pack (Oracle Fusion Middleware) & Platform (Windows or Linux) to download the application adapters.
6. At the command line prompt, run the command for your platform:
Client ID This is the SAP client number, which is used for integration.
The Client ID is -------------------
User Name Specifies the authorized name used to logon to the SAP system.
The User Name is ------------
Password Authorized password to logon to SAP system. The Password is ------------------------
Language Logon language. This value is the Language pack installed on the SAP server.
The Language is ------------------
Code Page Code page is used for double byte characters. If your file content has non-english characters then you must specify the Code page. The Code Page is ------------------
Gateway Service Name The SAP Gateway carries out Communication Programming Interface Communication services. These services enable SAP Systems and external programs to communicate with one another.
The SAP Gateway Service name is --------------
Connection Pool Size The maximum number of connections which are maintained in the SAP system. The Connection Pool size is --------------------
Gateway host Specifies the name of the host where the SAP gateway service identified in the sap-gateway-service. The Gateway host is ---------------------
Program ID This value is the Program ID of the SAP server. The Program ID is------------------
Sender Port Specifies the name of the port used to send the data from other system through IDOCs.
The Sender Port is ---------------
Receiver Port Specifies the name of the port used to receive the data from other system through IDOCs.
The Received Port is -------------------------
Message Server Name This is the SAP message server name, if used.
Table 21–4 SAP Adapter Launch Commands
Platform To launch the SAP Adapter Installer:
Linux
Solaris SPARC
HP-UX
IBM AIX Based Systems
-is:javahome Path of the JDK Installer iwora11g.application-adapters.linux.bin or iwora11g.application-adapters.solaris.bin
Microsoft Windows -is:javahome Path of the JDK Installer iwora11g.application-adapters.win32.exe
Table 21–3 (Cont.) SAP Application Server Details
Field Description
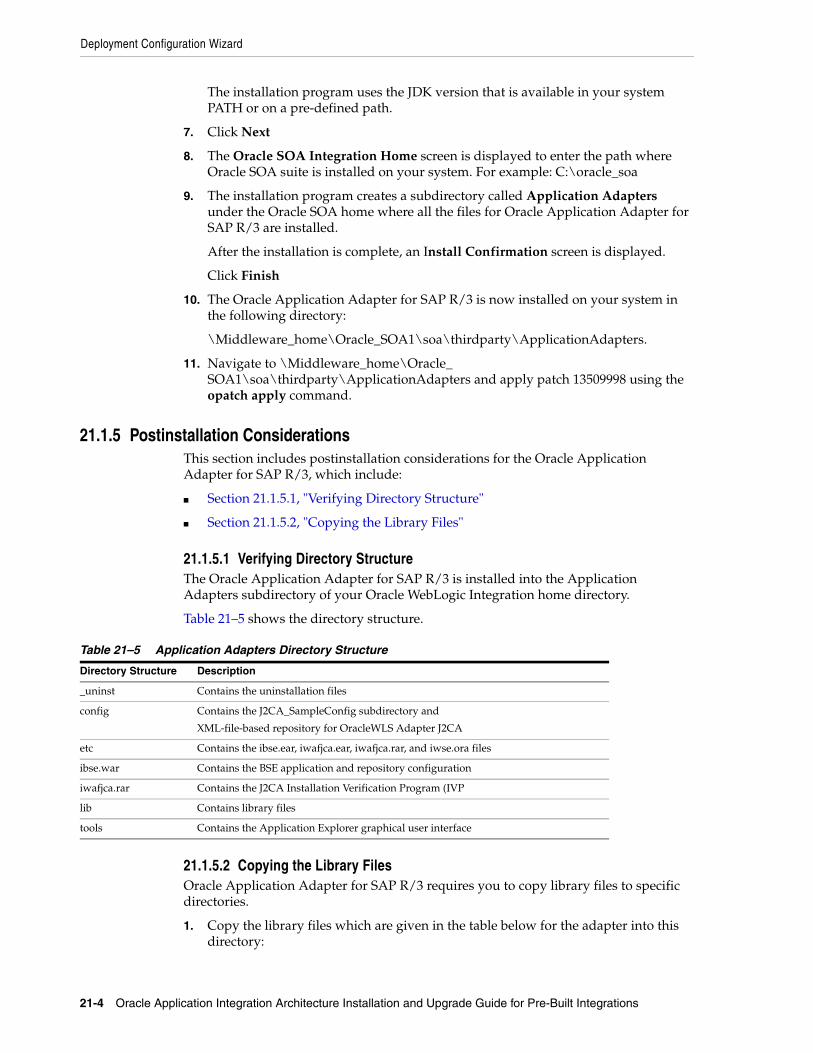
Deployment Configuration Wizard
21-4 Oracle Application Integration Architecture Installation and Upgrade Guide for Pre-Built Integrations
The installation program uses the JDK version that is available in your system PATH or on a pre-defined path.
7. Click Next
8. The Oracle SOA Integration Home screen is displayed to enter the path where Oracle SOA suite is installed on your system. For example: C:\oracle_soa
9. The installation program creates a subdirectory called Application Adapters under the Oracle SOA home where all the files for Oracle Application Adapter for SAP R/3 are installed.
After the installation is complete, an Install Confirmation screen is displayed.
Click Finish
10. The Oracle Application Adapter for SAP R/3 is now installed on your system in the following directory:
\Middleware_home\Oracle_SOA1\soa\thirdparty\ApplicationAdapters.
11. Navigate to \Middleware_home\Oracle_SOA1\soa\thirdparty\ApplicationAdapters and apply patch 13509998 using the opatch apply command.
21.1.5 Postinstallation ConsiderationsThis section includes postinstallation considerations for the Oracle Application Adapter for SAP R/3, which include:
■ Section 21.1.5.1, "Verifying Directory Structure"
■ Section 21.1.5.2, "Copying the Library Files"
21.1.5.1 Verifying Directory StructureThe Oracle Application Adapter for SAP R/3 is installed into the Application Adapters subdirectory of your Oracle WebLogic Integration home directory.
Table 21–5 shows the directory structure.
21.1.5.2 Copying the Library FilesOracle Application Adapter for SAP R/3 requires you to copy library files to specific directories.
1. Copy the library files which are given in the table below for the adapter into this directory:
Table 21–5 Application Adapters Directory Structure
Directory Structure Description
_uninst Contains the uninstallation files
config Contains the J2CA_SampleConfig subdirectory and
XML-file-based repository for OracleWLS Adapter J2CA
etc Contains the ibse.ear, iwafjca.ear, iwafjca.rar, and iwse.ora files
ibse.war Contains the BSE application and repository configuration
iwafjca.rar Contains the J2CA Installation Verification Program (IVP
lib Contains library files
tools Contains the Application Explorer graphical user interface
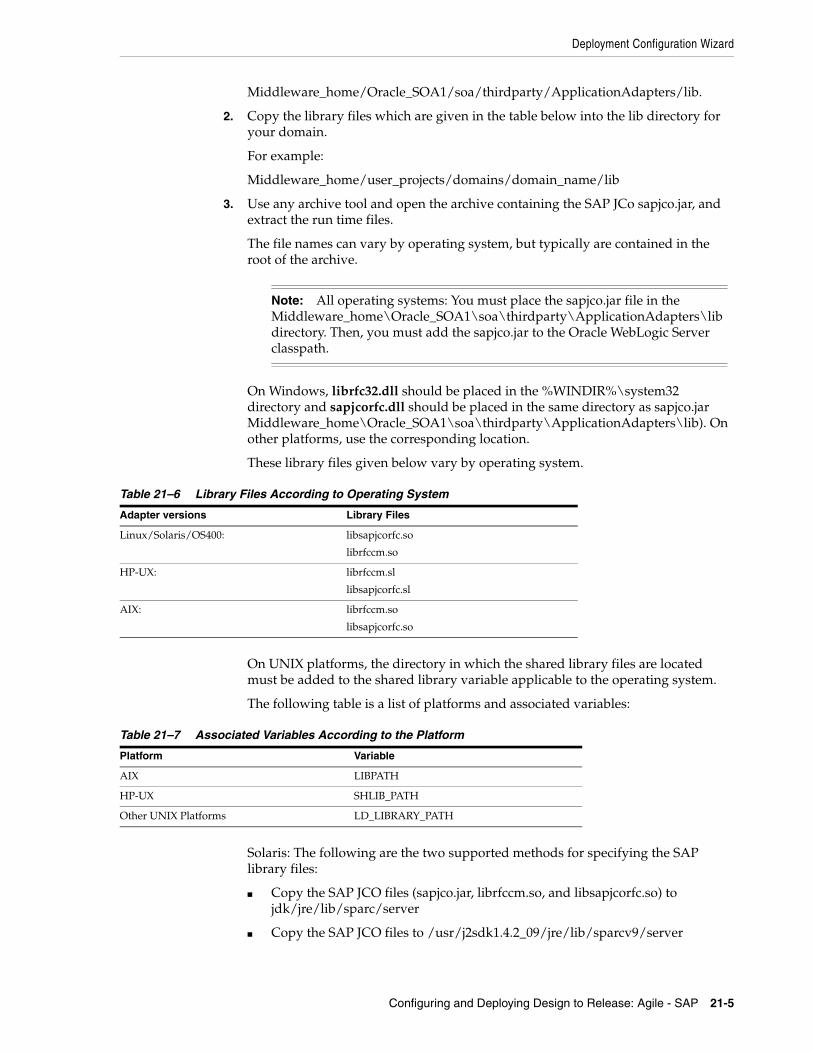
Deployment Configuration Wizard
Configuring and Deploying Design to Release: Agile - SAP 21-5
Middleware_home/Oracle_SOA1/soa/thirdparty/ApplicationAdapters/lib.
2. Copy the library files which are given in the table below into the lib directory for your domain.
For example:
Middleware_home/user_projects/domains/domain_name/lib
3. Use any archive tool and open the archive containing the SAP JCo sapjco.jar, and extract the run time files.
The file names can vary by operating system, but typically are contained in the root of the archive.
On Windows, librfc32.dll should be placed in the %WINDIR%\system32 directory and sapjcorfc.dll should be placed in the same directory as sapjco.jar Middleware_home\Oracle_SOA1\soa\thirdparty\ApplicationAdapters\lib). On other platforms, use the corresponding location.
These library files given below vary by operating system.
On UNIX platforms, the directory in which the shared library files are located must be added to the shared library variable applicable to the operating system.
The following table is a list of platforms and associated variables:
Solaris: The following are the two supported methods for specifying the SAP library files:
■ Copy the SAP JCO files (sapjco.jar, librfccm.so, and libsapjcorfc.so) to jdk/jre/lib/sparc/server
■ Copy the SAP JCO files to /usr/j2sdk1.4.2_09/jre/lib/sparcv9/server
Note: All operating systems: You must place the sapjco.jar file in the Middleware_home\Oracle_SOA1\soa\thirdparty\ApplicationAdapters\lib directory. Then, you must add the sapjco.jar to the Oracle WebLogic Server classpath.
Table 21–6 Library Files According to Operating System
Adapter versions Library Files
Linux/Solaris/OS400: libsapjcorfc.so
librfccm.so
HP-UX: librfccm.sl
libsapjcorfc.sl
AIX: librfccm.so
libsapjcorfc.so
Table 21–7 Associated Variables According to the Platform
Platform Variable
AIX LIBPATH
HP-UX SHLIB_PATH
Other UNIX Platforms LD_LIBRARY_PATH
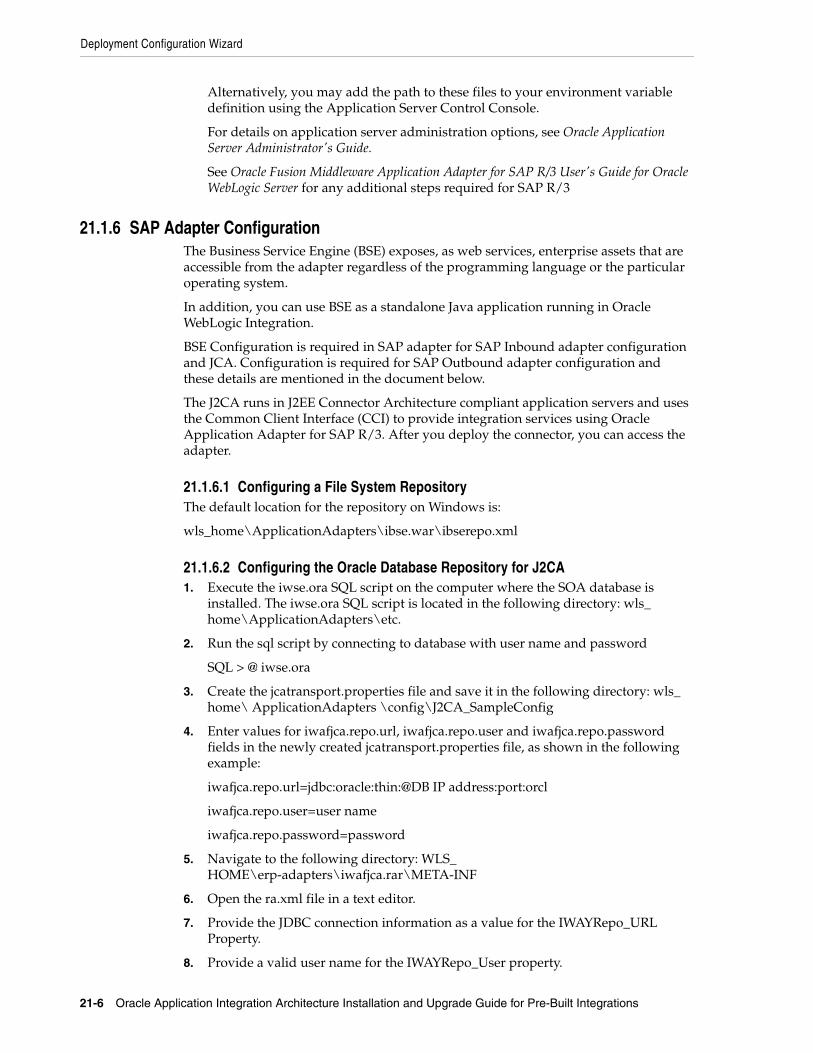
Deployment Configuration Wizard
21-6 Oracle Application Integration Architecture Installation and Upgrade Guide for Pre-Built Integrations
Alternatively, you may add the path to these files to your environment variable definition using the Application Server Control Console.
For details on application server administration options, see Oracle Application Server Administrator's Guide.
See Oracle Fusion Middleware Application Adapter for SAP R/3 User's Guide for Oracle WebLogic Server for any additional steps required for SAP R/3
21.1.6 SAP Adapter ConfigurationThe Business Service Engine (BSE) exposes, as web services, enterprise assets that are accessible from the adapter regardless of the programming language or the particular operating system.
In addition, you can use BSE as a standalone Java application running in Oracle WebLogic Integration.
BSE Configuration is required in SAP adapter for SAP Inbound adapter configuration and JCA. Configuration is required for SAP Outbound adapter configuration and these details are mentioned in the document below.
The J2CA runs in J2EE Connector Architecture compliant application servers and uses the Common Client Interface (CCI) to provide integration services using Oracle Application Adapter for SAP R/3. After you deploy the connector, you can access the adapter.
21.1.6.1 Configuring a File System RepositoryThe default location for the repository on Windows is:
wls_home\ApplicationAdapters\ibse.war\ibserepo.xml
21.1.6.2 Configuring the Oracle Database Repository for J2CA1. Execute the iwse.ora SQL script on the computer where the SOA database is
installed. The iwse.ora SQL script is located in the following directory: wls_home\ApplicationAdapters\etc.
2. Run the sql script by connecting to database with user name and password
SQL > @ iwse.ora
3. Create the jcatransport.properties file and save it in the following directory: wls_home\ ApplicationAdapters \config\J2CA_SampleConfig
4. Enter values for iwafjca.repo.url, iwafjca.repo.user and iwafjca.repo.password fields in the newly created jcatransport.properties file, as shown in the following example:
iwafjca.repo.url=jdbc:oracle:thin:@DB IP address:port:orcl
iwafjca.repo.user=user name
iwafjca.repo.password=password
5. Navigate to the following directory: WLS_HOME\erp-adapters\iwafjca.rar\META-INF
6. Open the ra.xml file in a text editor.
7. Provide the JDBC connection information as a value for the IWAYRepo_URL Property.
8. Provide a valid user name for the IWAYRepo_User property.

Deployment Configuration Wizard
Configuring and Deploying Design to Release: Agile - SAP 21-7
9. Provide a valid password for the IWAYRepo_Password property.
10. Save your changes to the ra.xml file.
11. Execute the iwse.ora SQL script on the computer where the database is installed.
21.1.6.3 Configuring the Oracle Database Repository for BSE1. Execute the iwse.ora SQL script on the computer where the database is installed.
The iwse.ora SQL script is located in the following directory:
wls_home\ ApplicationAdapters\etc
SQL>@ iwse.ora
2. Display the BSE configuration page in a browser:
http://host name: port/ibse/IBSEConfig where host name is the system where BSE is installed and port is the port number on which BSE is listening.
3. Configure the system settings. The following table lists the parameters with descriptions of the information to provide.
4. Configure the repository settings.
BSE requires a repository to store transactions and metadata required for the delivery of web services.
Note: The jcatransport.properties file is required
Table 21–8 Parameters to Configure the System Settings
Parameter Description
Language Specify the required language
Adapter Lib
Directory Enter the full path to the directory where the adapter jar files reside. Encoding Only UTF-8 is supported.
Debug Level Specify the debug level from the following options:
None
Fatal
Error
Warning
Info
Debug
Table 21–9 Parameters to Configure the Repository Settings
Parameter Description
Repository Select either Oracle or File (Do not use for BSE in production environments.)
Repository URL Enter the JDBC URL to use when opening a connection to the database. For example, the following repository URL format is used when connecting to Oracle: jdbc:oracle:thin:@host name:port;SID
Repository Driver Provide the driver class to use when opening a connection to the database (optional). For example, the following repository driver format is used when connecting to Oracle: oracle.jdbc.driver.OracleDriver
Repository User Enter a valid password that is associated with the user ID.
Repository Password Enter a valid password that is associated with the user ID.
Repository Pooling If selected, repository pooling is used. This option is disabled by default.
Deployment Configuration Wizard
21-8 Oracle Application Integration Architecture Installation and Upgrade Guide for Pre-Built Integrations
5. Click Save
21.1.6.4 Configuring an HTTP Repository1. Start Application Explorer.
2. Right-click the Configurations node in the left pane and select New. The New Configuration dialog box opens.
3. Type a name for the configuration and click OK.
4. Select JCA from the Service Provider list box and enter an HTTP target value in the Home field.
5. Use the following format for the HTTP target value:
http://host name: port/iwafjca/JCAServlet
For example: http://iwserv14:7777/iwafjca/JCAServlet
6. Click OK.
7. The new HTTP repository connection is added to the Configurations node.
8. Once you connect to the remote server, you can create new Adapter targets, generate WSDL documents, and store them in the remote server.
21.1.6.5 Application ExplorerOracle Adapter Application Explorer (Application Explorer), a GUI tool which uses SAP R/3 object repository metadata to build XML schemas and web services to handle adapter requests or event data.
21.1.6.6 Starting Application ExplorerOn Windows, execute the ae.bat file, which is found under wls_home\ApplicationAdapters\tools\iwae\bin, where wls_home is the directory where Oracle WebLogic Server is installed.
On UNIX, load the iwae.sh script file, which is found under wls_home/ ApplicationAdapters /tools/iwae/bin, where wls_home is the directory where Oracle WebLogic Server is installed.
21.1.6.7 Creating a Configuration for J2CA Connector Application Using Application ExplorerTo create a configuration for Oracle Adapter J2EE Connector Architecture (J2CA) using Application Explorer, you must first define a new configuration.
This is a prerequisite for deploying J2CA as a web application in Oracle WebLogic Integration.
21.1.6.8 Defining a New Configuration for J2CATo define a new configuration for J2CA:
1. Start Application Explorer.
For more information, see Section 21.1.6.6, "Starting Application Explorer".
2. Right-click Configurations and select New. The New Configuration dialog box is displayed.
Deployment Configuration Wizard
Configuring and Deploying Design to Release: Agile - SAP 21-9
3. Enter a name for the new configuration, for example, J2CA_SampleConfig, and click OK. The name of the J2CA configuration that is specified here is used during the J2CA deployment process.
4. From the Service Provider list, select JCA.
5. In the Home field, enter a path to your J2CA configuration directory where the repository, schemas, and other information is stored, for example: c:\ Middleware_home\Oracle_SOA1\soa\thirdparty\ApplicationAdapters
6. Click OK.
A node representing the new configuration appears beneath the root configurations node. For example: Configurations: J2CA_SampleConfig
21.1.6.9 Configuring Settings for the J2CA Connector Application1. Locate the ra.xml file, which is located in the following directory: wls_
home\erp-adapters\iwafjca.rar\META-INF\ra.xml
2. Open the ra.xml file in an editor.
3. Enter a value for the IWayHome property.
This is the folder where the adapter is installed. For example:
<Config-property>
<config-property-name>IWayHome</config-property-name>
<config-property-type>java.lang.String</config-property-type>
<config-property-value>c:\ Middleware_home\Oracle_SOA1\soa\thirdparty\ApplicationAdapters\</config-property-value>
</config-property>
4. Enter a value for the IWayConfig property.
This is the value that you specified when you created a new J2CA configuration using Application Explorer. For example:
<config-property>
<config-property-name>IWayConfig</config-property-name>
<config-property-type>java.lang.String</config-property-type>
<config-property-value>J2CA_SampleConfig</config-property-value>
</config-property>
5. Enter a value for the Loglevel property.
This property can be set to DEBUG, INFO, or ERROR. For example:
<config-property>
<config-property-name>LogLevel</config-property-name>
6. Save the ra.xml file and exit the editor.
21.1.6.10 Deploying the J2CA Connector Application Using the Oracle WebLogic Server Administration ConsoleTo deploy the J2CA Connector Application:
Deployment Configuration Wizard
21-10 Oracle Application Integration Architecture Installation and Upgrade Guide for Pre-Built Integrations
1. Start the Oracle WebLogic Server for the Oracle WebLogic Server domain that you have configured.
Open the Oracle WebLogic Server Administration Console in a web browser by entering the following URL: http://hostname:port/console where host name is the name of the computer where Oracle WebLogic Server is running and port is the port for the domain you are using. The port for the default domain is 7001
2. Logon to admin console by giving user name and password. In the Domain Structure section in the left pane, click Deployments. The Deployments page is displayed.
3. Click Install and the Install Application Assistant page is displayed
4. Browse to the following directory:
C:\Middleware_home\Oracle_SOA1\soa\thirdparty\Application-Adapters\iwafjca.rar.
Select Radio, next to iwafjca.rar and click Next.The Choose Targeting Style page is displayed.
5. Leave the default Install this deployment as an application selected and click Next.
6. The Optional Settings page is displayed.
7. Click Next leaving the default values.
8. The Summary page is displayed.
9. Click Finish. The Settings page for the J2CA (iwafjca) Connector Application opens.
10. Click Save. The following messages are displayed, which indicate a successful deployment.
11. In the Domain Structure section in the left pane, click Deployments.
12. Navigate through the table that lists all the deployed applications until you find the J2CA (iwafjca) Connector Application.
13. Select the check box next to iwafjca.
14. Click the Start submenu (down arrow) and select servicing all requests.
15. The Start Application Assistant is displayed.
16. Click Yes to start the selected deployment.
17. From the list of deployed applications, select iwafjca.
18. Click the Testing tab.
19. The Outbound Connection Pools and Connections Testing page is displayed.
20. Select the check box next to eis/OracleJCAAdapter/DefaultConnection and click Test.
21. The Test Result column indicates Passed.
21.1.6.11 Deploying the J2CA Installation Verification Program (IVP) Using the Oracle WebLogic Server Administration Console1. Start the Oracle WebLogic Server for the Oracle WebLogic Server domain that you
have configured.
Deployment Configuration Wizard
Configuring and Deploying Design to Release: Agile - SAP 21-11
Open the Oracle WebLogic Server Administration Console in a web browser by entering the following URL: http://hostname:port/console where hostname is the name of the computer where Oracle WebLogic Server is running and port is the port for the domain you are using. The port for the default domain is 7001
2. Logon to admin console by giving user name and password. In the Domain Structure section in the left pane, click Deployments. The Deployments page is displayed.
3. Click Install and the Install Application Assistant page is displayed
4. Browse to the following directory:
C:\ Middleware_home\Oracle_SOA\soa\thirdparty\Application-Adapters\iwafjca.rar.
Click Next. The Choose Targeting Style page is displayed.
5. Leave the default Install this deployment as an application selected and click Next.
6. The Optional Settings page is displayed. In the Name field, enter: Iwafjcatest.
7. The Summary page is displayed.
8. Click Finish. The Settings page for the J2CA (iwafjca) Installation Verification Program (IVP) opens.
9. Click Save. The following messages are displayed, which indicate a successful deployment.
10. In the Domain Structure section in the left pane, click Deployments.
11. Navigate through the table that lists all the deployed applications until you find the J2CA (iwafjcatest) Installation Verification Program (IVP).
12. Select the check box next to iwafjcatest.
13. Click the Start submenu (down arrow) and select servicing all requests.
14. The Start Application Assistant is displayed.
15. Click Yes to start the selected deployment.
16. From the list of deployed applications, select iwafjcatest.
17. Click the Testing tab.
18. The Deployment Tests page is displayed. Click the links given in that page to verify the installation.
21.1.6.12 Connecting to a J2CA Configuration Using Application ExplorerTo connect to a new J2CA configuration:
1. Right-click the configuration to which you want to connect, for example, J2CA_SampleConfig.
2. Select Connect. Nodes appear for Adapters and Events. You can configure events using a J2CA configuration only.
3. Use the Adapters folder to create inbound interactions with Oracle Application Adapter for SAP R/3. For example, you can use the SAP node in the Adapters folder to configure a service that updates SAP R/3.
4. Use the Events folder to configure listeners that listen for events in SAP R/3.
5. You can now define new targets to Oracle Application Adapter for SAP R/3.
Deployment Configuration Wizard
21-12 Oracle Application Integration Architecture Installation and Upgrade Guide for Pre-Built Integrations
21.1.6.13 Creating a Configuration for Business Services Engine Using Application ExplorerDefining a new configuration for BSE
1. Start Application Explorer. For more information, see Section 21.1.6.6, "Starting Application Explorer".
2. Right-click Configurations and select New.
3. The New Configuration dialog box is displayed.
4. Enter a name for the new configuration, for example, BSE_SampleConfig, and click OK. The name of the BSE configuration that is specified here is used during the BSE deployment process.
5. From the Service Provider list, select iBSE.
6. In the iBSE URL field, accept the default URL or replace it with a different URL with the following format: http://host name:port/ibse/IBSEServlet where host name is the system on which Oracle WebLogic Integration resides and port is the HTTP port number where Oracle WebLogic Integration is listening.
7. Click OK. A node representing the new configuration appears beneath the root Configurations node.
21.1.6.14 Configuring and Deploying Business Services EngineConfiguring settings for BSE:
1. Locate the web.xml file, which is located in the following directory:
wls_home\erp-adapters\ibse.war\WEB-INF\web.xml
2. Open the web.xml file in an editor.
3. Enter a value for the ibseroot parameter.
This is the folder where the BSE files are stored in subdirectories for each adapter.
For example:
<context-param>
<param-name>ibseroot</param-name>
<param-value>C:\ Middleware_home\Oracle_SOA1\soa\thirdparty\Application-Adapters\ibse.war</param-value>
<description>ibse root directory</description>
</context-param>
4. Enter a value for the iway.home parameter.
5. This is the folder where the adapter is installed.
For example:
<context-param>
<param-name>iway.home</param-name>
<param-value> C:\ Middleware_home\Oracle_SOA1\soa\thirdparty\Application-adapters /param-value>
<description>license file location</description>
</context-param>
Deployment Configuration Wizard
Configuring and Deploying Design to Release: Agile - SAP 21-13
6. Enter a value for the iway.config parameter.
This is the value that you specified when you created a new BSE configuration using Application Explorer.
For example:
<context-param>
<param-name>iway.config</param-name><param-value>BSE_SampleConfig</param-value>
<description>Base Configuration</description>
</context-param>
7. Save the web.xml file and exit the editor.
8. From the same directory, open the ibseconfig.xml file in an editor.
9. Enter a value for the afroot parameter, which is the path to the adapter lib directory.
For example:
<param name="afroot" type="string" required="false" value="c:\wls_home\erp-adapters\lib"/>
10. Save the ibseconfig.xml file and exit the editor.
21.1.6.15 Deploying Oracle WLS Adapter Business Services Engine (BSE) Using the Oracle WebLogic Server Administration Console1. Start the Oracle WebLogic Server for the Oracle WebLogic Server domain that you
have configured.
Open the Oracle WebLogic Server Administration Console in a web browser by enter the following URL: http://hostname:port/console where hostname is the name of the computer where Oracle WebLogic Server is running and port is the port for the domain you are using. The port for the default domain is 7001
2. Logon to admin console by giving user name and password.
3. In the Domain Structure section in the left pane, click Deployments. The Deployments page is displayed.
4. Click Install and the Install Application Assistant page is displayed
5. Browse to the following directory:
C:\ Middleware_home\Oracle_SOA1\soa\thirdparty\Application-adapters \ibse.war.
Select Radio, next to ibse.war and click Next.The Choose Targeting Style page is displayed.
6. Leave the default Install this deployment as an application selected and click Next.
7. The Optional Settings page is displayed. Click Next again leaving the default values. The Summary page is displayed.
8. Click Finish. The Settings page for the BSE (ibse) Connector Application opens.
9. Click Save. The following messages are displayed, which indicate a successful deployment.
10. In the Domain Structure section in the left pane, click Deployments.
Deployment Configuration Wizard
21-14 Oracle Application Integration Architecture Installation and Upgrade Guide for Pre-Built Integrations
11. Navigate through the table that lists all the deployed applications until you find the BSE (ibse) Application.
12. Select the check box next to ibse.
13. Click the Start submenu (down arrow) and select servicing all requests.
14. The Start Application Assistant is displayed.
15. Click Yes to start the selected deployment.
16. From the list of deployed applications, select ibse.
17. Click the Testing tab.
18. Click the following link: http://soahostname:soaport/ibse.
21.1.6.16 Connecting to a BSE Configuration Using Application Explorer1. Right-click the configuration to which you want to connect, for example, BSE_
SampleConfig. Select Connect.
2. Nodes appear for Adapters, Events, and Business Services (also known as Web services).
3. The Business Services node is only available for BSE configurations.
4. Events are not applicable when using a BSE configuration. You can configure events using a J2CA configuration only.
5. As a result, you can disregard the Events node that appears for a BSE configuration.
6. The following is an example of a BSE configuration named BSE_SampleConfig:
21.1.6.17 SAP Inbound Adapter ConfigurationAs part of SAP Inbound adapter configuration, BAPI wsdls should be generated by following the below steps
1. Start an Application Explorer.
2. Click Adapters in the BSE_SampleConfig, MySAP, Create new target.
3. Create InboundConnection.
4. Go to Remote Function Modules.
5. Click Find, Search for each service.
6. Right-click Create Web Service, enter Service Name and Description.
7. Click OK
The following BAPI wsdls are generated:
■ BAPI_MATERIAL_GET_ALL
■ BAPI_MATERIAL_GETALL
■ BAPI_STDMATERIAL_GETINTNUMBER
■ BAPI_MATERIAL_GET_DETAIL
■ CCAP_ECN_MAINTAIN
■ CCAP_REV_LEVEL_MAINTAIN
■ BAPI_MATERIAL_SAVEDATA
Configuring and Deploying the Design to Release: Agile - SAP Integration
Configuring and Deploying Design to Release: Agile - SAP 21-15
■ CSAP_MAT_BOM_CREATE
■ CSAP_MAT_BOM_MAINTAIN
■ CSAP_MAT_BOM_ALLOC_CREATE
■ CSAP_MAT_BOM_READ
■ BAPI_MAT_BOM_EXISTENCE_CHECK
21.1.6.18 SAP Outbound Adapter Configuration1. Create a new connection for Outbound, go to Events, MySAP, Channels (without
creating Channel first, you cannot proceed).
2. Enter Channel name: MATMAS
3. Navigate to ALE (IDOCS), right click, search for MATMAS01, right-click MATMAS and select Create Inbound JCA Service (Event).
This create three files under the following path:
Middleware_home/Oracle_SOA1/soa/thirdparty/ApplicationAdapters/wsdls
■ MATMAS01_receive.jca
■ MATMAS01_receive.wsdl
■ MATMAS01_receive_request.xsd
21.2 Configuring and Deploying the Design to Release: Agile - SAP Integration
This section discusses the Integration configuration and deployment process. There are two steps:
1. Configure your integration using the DCW.
2. Deploy the integration to the Fusion Middleware server.
21.2.1 Configuring the Design to Release: Agile - SAP IntegrationThe screens that appear in the DCW prompt you to enter the data that is required for successful configuration of the Design to Release: Agile SAP integration. Keep the completed worksheets the Design to Release: Agile - SAP integration screens ready before you launch the DCW.
To configure the Design to Release: Agile - SAP Integration
1. Navigate to /slot/emsxxxx/oracle/Middleware/user_projects/domains/soa_domain/bin/ and open setDomainEnv.sh for Linux based systems and setDomainEnv.bat for Microsoft Windows.
2. Replace
WLS_JDBC_REMOTE_ENABLED="-Dweblogic.jdbc.remoteEnabled=false"
with
Note: If you are harvesting content to OER, perform the first three steps. Else start from step 4.

Configuring and Deploying the Design to Release: Agile - SAP Integration
21-16 Oracle Application Integration Architecture Installation and Upgrade Guide for Pre-Built Integrations
WLS_JDBC_REMOTE_ ENABLED="-Dweblogic.jdbc.remoteEnabled=true".
3. Restart the server.
4. Navigate to <AIA_Instance>/bin and run the command source aiaenv.sh for Linux based systems and aiaenv.bat for Microsoft Windows to configure the environment.
5. Navigate to <AIA_HOME>/bin and run the command ./aiaconfig.sh for Linux based systems and aiaconfig.bat for Microsoft Windows.
This launches the AIA DCW.
1. Click Next.
2. Select the Design to Release: Agile - SAP integration
3. Click Next.
21.2.1.1 Specify Integration Server DetailsTo specify Integration Server details:
1. Enter information related to your integration server in the integration Server Details screen.
2. Click Next.
21.2.1.2 Specify Agile PLM DetailsTo specify Agile PLM application details:
1. Enter information about your Agile PLM installation in the Agile PLM Application Details screen.
2. Click Next.
21.2.1.3 Specify SAP Server DetailsTo specify SAP Server details:
1. Enter information about your SAP Server in the SAP server details screen.
2. Click Next.
21.2.1.4 Complete ConfigurationTo complete configuration:
1. Review the configuration information on the Configuration Summary screen.
2. Click Configure to accept the configuration.
The system displays progress of the configuration in the Configuration Progress screen.
Note: If you want to make changes to the configuration, use the navigation pane on the left and select the screen you want to edit. You can create a response file based on the input provided in the DCW and use it in future when you want to deploy the integration. You can configure using the steps described in Section 21.2.2, "Configuring using the Response File". Click Save Response File and save the response file with the name and location of your choice.
Configuring and Deploying the Design to Release: Agile - SAP Integration
Configuring and Deploying Design to Release: Agile - SAP 21-17
The system displays any warnings or errors as necessary. You can review the configuration log for additional details. The configuration log location is displayed in Configuration Progress screen.
3. When the configuration process completes without errors, the AIA DCW displays the Configuration Complete screen.
4. Click Finish to close the DCW.
21.2.2 Configuring using the Response FileTo configure using the response file:
1. Open the response file.
When you create a response file through OUI, passwords get stored as <SECURE>.
2. Replace the password fields with actual passwords in the response file.
3. Navigate to <AIA_Instance>/bin and run the command source aiaenv.sh for Linux based systems and aiaenv.bat for Microsoft Windows to configure the environment.
4. Navigate to <AIA_HOME>/bin and run the command ./aiaconfig.sh <Response File Location and Name> for Linux based systems and aiaconfig.bat <Response File Location and Name> for Microsoft Windows.
21.2.3 Deploying the Design to Release: Agile - SAP IntegrationTo deploy the Integration to Fusion Middleware server:
1. Navigate to <AIA_Instance>/bin and run the command source aiaenv.sh for Linux based systems and aiaenv.bat for Microsoft Windows to configure the environment.
2. Run the command for your platform.
Note: When you copy and paste the command in the command line, ensure that there is space between .xml and -. Ensure that there is space between these two when you run undeployment command too.
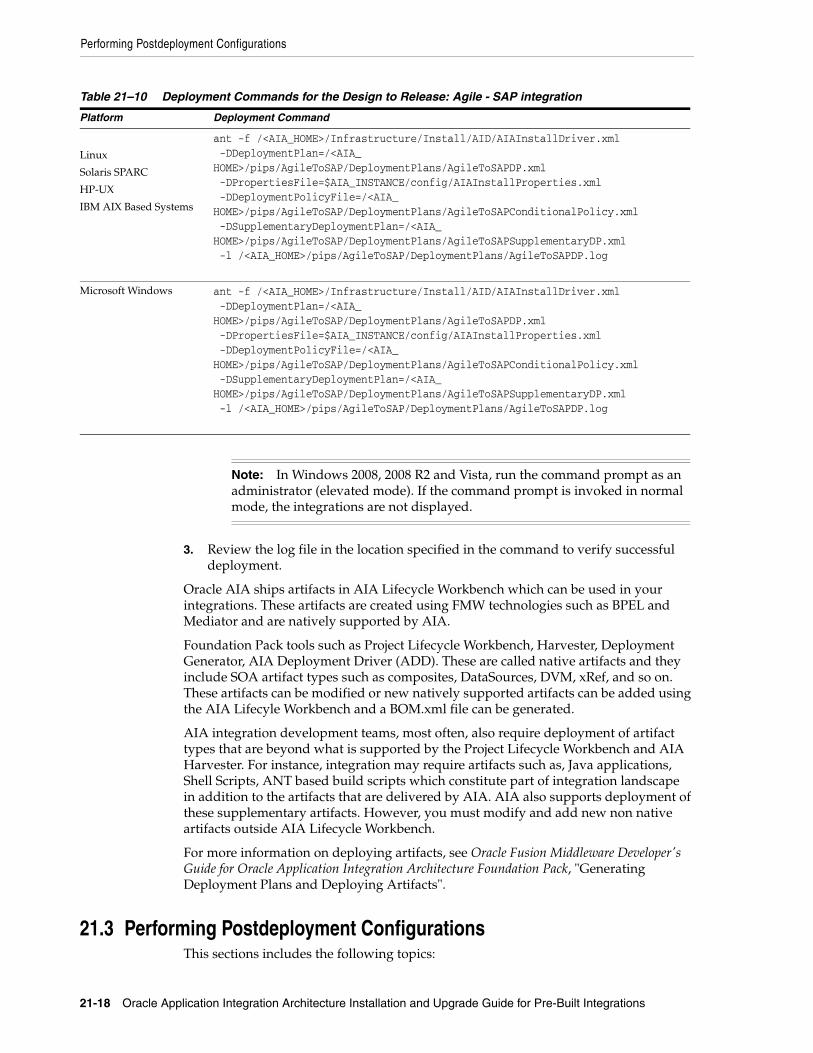
Performing Postdeployment Configurations
21-18 Oracle Application Integration Architecture Installation and Upgrade Guide for Pre-Built Integrations
3. Review the log file in the location specified in the command to verify successful deployment.
Oracle AIA ships artifacts in AIA Lifecycle Workbench which can be used in your integrations. These artifacts are created using FMW technologies such as BPEL and Mediator and are natively supported by AIA.
Foundation Pack tools such as Project Lifecycle Workbench, Harvester, Deployment Generator, AIA Deployment Driver (ADD). These are called native artifacts and they include SOA artifact types such as composites, DataSources, DVM, xRef, and so on. These artifacts can be modified or new natively supported artifacts can be added using the AIA Lifecyle Workbench and a BOM.xml file can be generated.
AIA integration development teams, most often, also require deployment of artifact types that are beyond what is supported by the Project Lifecycle Workbench and AIA Harvester. For instance, integration may require artifacts such as, Java applications, Shell Scripts, ANT based build scripts which constitute part of integration landscape in addition to the artifacts that are delivered by AIA. AIA also supports deployment of these supplementary artifacts. However, you must modify and add new non native artifacts outside AIA Lifecycle Workbench.
For more information on deploying artifacts, see Oracle Fusion Middleware Developer's Guide for Oracle Application Integration Architecture Foundation Pack, "Generating Deployment Plans and Deploying Artifacts".
21.3 Performing Postdeployment ConfigurationsThis sections includes the following topics:
Table 21–10 Deployment Commands for the Design to Release: Agile - SAP integration
Platform Deployment Command
Linux
Solaris SPARC
HP-UX
IBM AIX Based Systems
ant -f /<AIA_HOME>/Infrastructure/Install/AID/AIAInstallDriver.xml -DDeploymentPlan=/<AIA_HOME>/pips/AgileToSAP/DeploymentPlans/AgileToSAPDP.xml -DPropertiesFile=$AIA_INSTANCE/config/AIAInstallProperties.xml -DDeploymentPolicyFile=/<AIA_HOME>/pips/AgileToSAP/DeploymentPlans/AgileToSAPConditionalPolicy.xml -DSupplementaryDeploymentPlan=/<AIA_HOME>/pips/AgileToSAP/DeploymentPlans/AgileToSAPSupplementaryDP.xml -l /<AIA_HOME>/pips/AgileToSAP/DeploymentPlans/AgileToSAPDP.log
Microsoft Windows ant -f /<AIA_HOME>/Infrastructure/Install/AID/AIAInstallDriver.xml -DDeploymentPlan=/<AIA_HOME>/pips/AgileToSAP/DeploymentPlans/AgileToSAPDP.xml -DPropertiesFile=$AIA_INSTANCE/config/AIAInstallProperties.xml -DDeploymentPolicyFile=/<AIA_HOME>/pips/AgileToSAP/DeploymentPlans/AgileToSAPConditionalPolicy.xml -DSupplementaryDeploymentPlan=/<AIA_HOME>/pips/AgileToSAP/DeploymentPlans/AgileToSAPSupplementaryDP.xml -l /<AIA_HOME>/pips/AgileToSAP/DeploymentPlans/AgileToSAPDP.log
Note: In Windows 2008, 2008 R2 and Vista, run the command prompt as an administrator (elevated mode). If the command prompt is invoked in normal mode, the integrations are not displayed.
Performing Postdeployment Configurations
Configuring and Deploying Design to Release: Agile - SAP 21-19
■ Section 21.3.1, "Configuring the Agile PLM Credentials"
■ Section 21.3.2, "Enabling the NPR & SYNC Flows"
21.3.1 Configuring the Agile PLM CredentialsAgile PLM applies HTTP basic authentication to handle AIA Indication result messages by an Agile PLM host account. You must add the Agile PLM credentials to Fusion Middleware for the HTTP basic authentication connection.
To configure credential:
1. Log in to Oracle Enterprise Manager Fusion Middleware Control.
2. Navigate to WebLogic Domain, soa_domain, Securities, Credentials.
3. Check whether the Map with name oracle.wsm.security exists in Credentials.
If it does not exist, create a Map with name oracle.wsm.security and Keys with the names AgileWebservicesKey and AIABasicCredentials.
In AgileWebservicesKey enter the agile admin user name and password and click ok t save the key.
In AIABasicCredentials enter the user name and password for Weblogic, and then click ok to save the key.
21.3.2 Enabling the NPR & SYNC FlowsTo enable the NPR & SYNC flows in the Design to Release: Agile - SAP Pre-Built Integration, you must update the config.properties file located in NPRpx.jar:
1. In the Agile server, navigate to <AgileHome>/integration/sdk/extensions.
2. Unzip NPRpx.jar.
3. Open config.properties file.
4. Update Host and Port values for the following variables:
a. WS_LOCATION_CRETEITEMFLOW=http://<<FMWHost>>:<<ManagedPort>>/soa-infra/services/default/CreateItemAgileReqABCS/NPRpx
b. WS_LOCATION_SYNCITEMFLOW=http://<<FMWHost>>:<<ManagedPort>>/soa-infra/services/default/CreateItemAgileReqABCS/NPRpx
5. Check that the value for NPR_PX_TIMEOUT is 90000000. This is the recommended value.
6. Update the SOA_LOGIN_USERNAME and SOA_LOGIN_PASSWORD values with your username and password.
The password must be encrypted. To encrypt the password:
a. In the Agile Server, navigate to <AgileHome>/agileDomain/bin
b. Run the encryption script "./encryptpwd.sh <PasswordToBeEncrypted>".
7. Save your changes and rezip NPRpx.jar.
Note: Before performing any changes, back up the NPRpx.jar file.
Verifying Deployment
21-20 Oracle Application Integration Architecture Installation and Upgrade Guide for Pre-Built Integrations
8. Restart the Agile server.
21.4 Verifying DeploymentTo verify the Design to Release: Agile - SAP integration deployment:
1. Open the log files from the following location and look for warnings and error messages:
■ For Linux, Solaris SPARC, HP-UX and IBM AIX Based Systems: Review the install log located at <AIA_HOME>/aia_instances/<instance name>/logs to verify that the integration is successfully installed.
■ For Microsoft Windows: Review the install log located at <AIA_HOME>\aia_ instances\<instance name>\logs to verify that the integration is successfully installed.
2. Confirm that the Design to Release: Agile - SAP integration services were installed.
1. Navigate to the Oracle Enterprise Manager Fusion Middleware Control (http://<server name>:<port number>/em/).
2. Log in with the server admin user name. For access details, contact the system administrator.
3. Expand Farm_soa_domain, SOA, soa-infra, Default
4. Verify that the following services are installed in the Weblogic Oracle Enterprise Manager Fusion Middleware Control after the successful integration installation.
Design to Release Agile - SAP integration services
Agile Services
Adapter Services
■ ACSAXMLJMSConsumer
■ ChangeStatusDBAdapter
RequesterABCS
■ CreateItemAgileReqABCS
■ CreateItemAgileReqABCSImpl
■ ProcessEngineeringChangeOrderAgileReqABCSImpl
ProviderABCS
■ UpdateItemListAgileProvABCSImpl
Utility Services
■ CreateQueueControlService
■ CreateQueueService
■ QueueProcessorService
■ QueueProcessorServiceImpl
SAP Services
Adapter Services
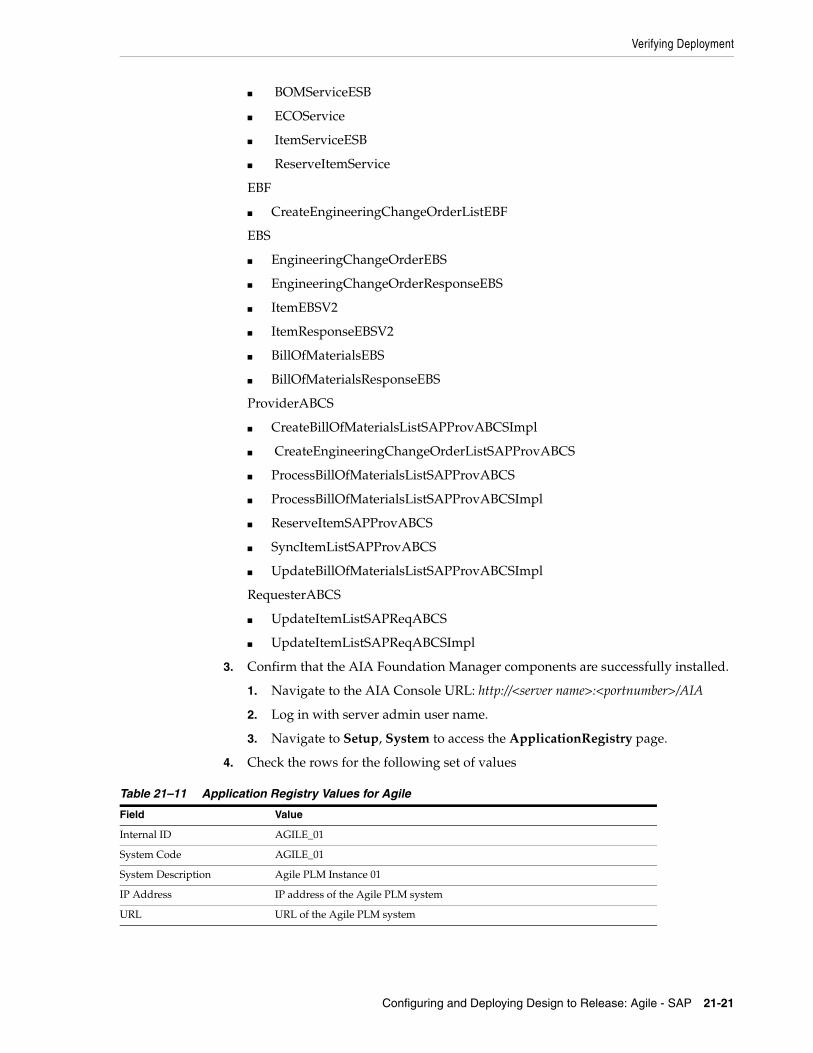
Verifying Deployment
Configuring and Deploying Design to Release: Agile - SAP 21-21
■ BOMServiceESB
■ ECOService
■ ItemServiceESB
■ ReserveItemService
EBF
■ CreateEngineeringChangeOrderListEBF
EBS
■ EngineeringChangeOrderEBS
■ EngineeringChangeOrderResponseEBS
■ ItemEBSV2
■ ItemResponseEBSV2
■ BillOfMaterialsEBS
■ BillOfMaterialsResponseEBS
ProviderABCS
■ CreateBillOfMaterialsListSAPProvABCSImpl
■ CreateEngineeringChangeOrderListSAPProvABCS
■ ProcessBillOfMaterialsListSAPProvABCS
■ ProcessBillOfMaterialsListSAPProvABCSImpl
■ ReserveItemSAPProvABCS
■ SyncItemListSAPProvABCS
■ UpdateBillOfMaterialsListSAPProvABCSImpl
RequesterABCS
■ UpdateItemListSAPReqABCS
■ UpdateItemListSAPReqABCSImpl
3. Confirm that the AIA Foundation Manager components are successfully installed.
1. Navigate to the AIA Console URL: http://<server name>:<portnumber>/AIA
2. Log in with server admin user name.
3. Navigate to Setup, System to access the ApplicationRegistry page.
4. Check the rows for the following set of values
Table 21–11 Application Registry Values for Agile
Field Value
Internal ID AGILE_01
System Code AGILE_01
System Description Agile PLM Instance 01
IP Address IP address of the Agile PLM system
URL URL of the Agile PLM system
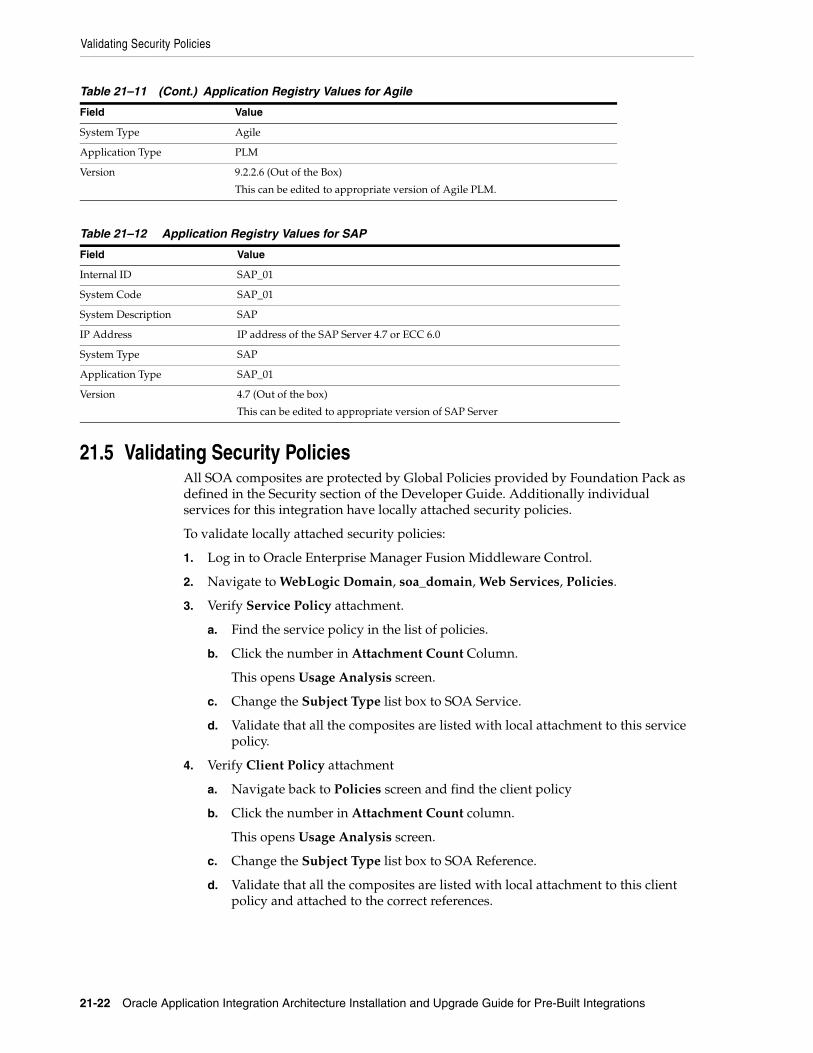
Validating Security Policies
21-22 Oracle Application Integration Architecture Installation and Upgrade Guide for Pre-Built Integrations
21.5 Validating Security PoliciesAll SOA composites are protected by Global Policies provided by Foundation Pack as defined in the Security section of the Developer Guide. Additionally individual services for this integration have locally attached security policies.
To validate locally attached security policies:
1. Log in to Oracle Enterprise Manager Fusion Middleware Control.
2. Navigate to WebLogic Domain, soa_domain, Web Services, Policies.
3. Verify Service Policy attachment.
a. Find the service policy in the list of policies.
b. Click the number in Attachment Count Column.
This opens Usage Analysis screen.
c. Change the Subject Type list box to SOA Service.
d. Validate that all the composites are listed with local attachment to this service policy.
4. Verify Client Policy attachment
a. Navigate back to Policies screen and find the client policy
b. Click the number in Attachment Count column.
This opens Usage Analysis screen.
c. Change the Subject Type list box to SOA Reference.
d. Validate that all the composites are listed with local attachment to this client policy and attached to the correct references.
System Type Agile
Application Type PLM
Version 9.2.2.6 (Out of the Box)
This can be edited to appropriate version of Agile PLM.
Table 21–12 Application Registry Values for SAP
Field Value
Internal ID SAP_01
System Code SAP_01
System Description SAP
IP Address IP address of the SAP Server 4.7 or ECC 6.0
System Type SAP
Application Type SAP_01
Version 4.7 (Out of the box)
This can be edited to appropriate version of SAP Server
Table 21–11 (Cont.) Application Registry Values for Agile
Field Value
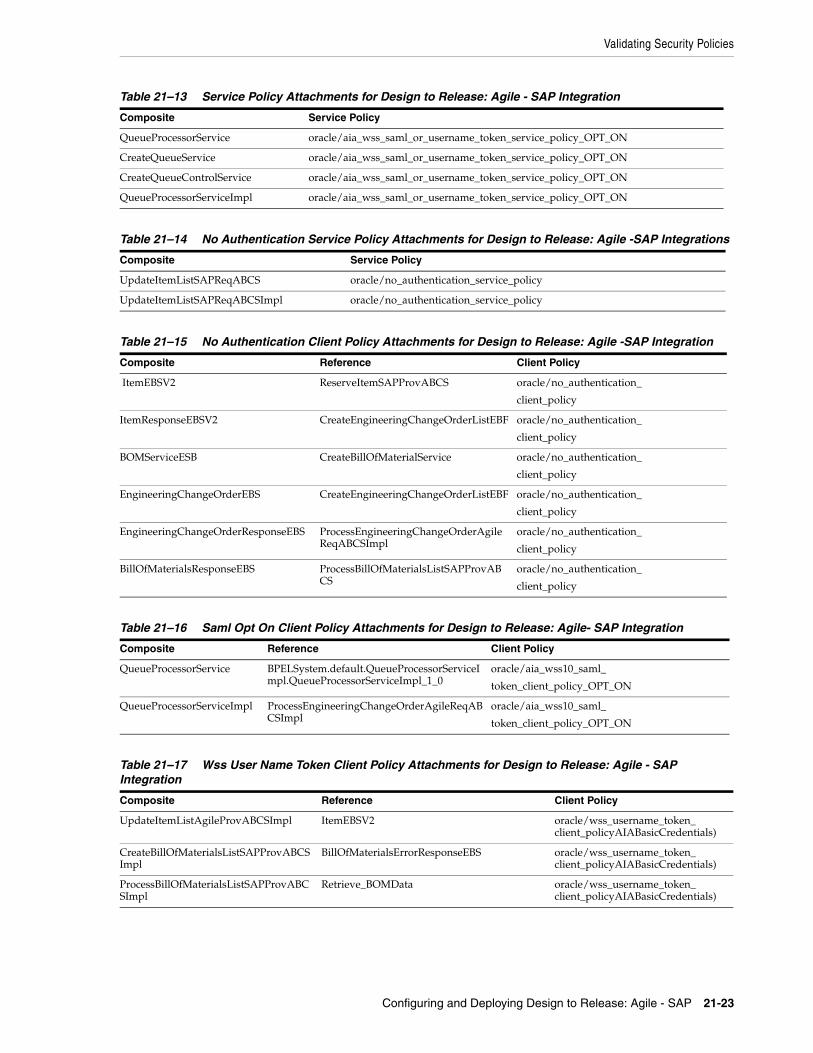
Validating Security Policies
Configuring and Deploying Design to Release: Agile - SAP 21-23
Table 21–13 Service Policy Attachments for Design to Release: Agile - SAP Integration
Composite Service Policy
QueueProcessorService oracle/aia_wss_saml_or_username_token_service_policy_OPT_ON
CreateQueueService oracle/aia_wss_saml_or_username_token_service_policy_OPT_ON
CreateQueueControlService oracle/aia_wss_saml_or_username_token_service_policy_OPT_ON
QueueProcessorServiceImpl oracle/aia_wss_saml_or_username_token_service_policy_OPT_ON
Table 21–14 No Authentication Service Policy Attachments for Design to Release: Agile -SAP Integrations
Composite Service Policy
UpdateItemListSAPReqABCS oracle/no_authentication_service_policy
UpdateItemListSAPReqABCSImpl oracle/no_authentication_service_policy
Table 21–15 No Authentication Client Policy Attachments for Design to Release: Agile -SAP Integration
Composite Reference Client Policy
ItemEBSV2 ReserveItemSAPProvABCS oracle/no_authentication_
client_policy
ItemResponseEBSV2 CreateEngineeringChangeOrderListEBF oracle/no_authentication_
client_policy
BOMServiceESB CreateBillOfMaterialService oracle/no_authentication_
client_policy
EngineeringChangeOrderEBS CreateEngineeringChangeOrderListEBF oracle/no_authentication_
client_policy
EngineeringChangeOrderResponseEBS ProcessEngineeringChangeOrderAgileReqABCSImpl
oracle/no_authentication_
client_policy
BillOfMaterialsResponseEBS ProcessBillOfMaterialsListSAPProvABCS
oracle/no_authentication_
client_policy
Table 21–16 Saml Opt On Client Policy Attachments for Design to Release: Agile- SAP Integration
Composite Reference Client Policy
QueueProcessorService BPELSystem.default.QueueProcessorServiceImpl.QueueProcessorServiceImpl_1_0
oracle/aia_wss10_saml_
token_client_policy_OPT_ON
QueueProcessorServiceImpl ProcessEngineeringChangeOrderAgileReqABCSImpl
oracle/aia_wss10_saml_
token_client_policy_OPT_ON
Table 21–17 Wss User Name Token Client Policy Attachments for Design to Release: Agile - SAP Integration
Composite Reference Client Policy
UpdateItemListAgileProvABCSImpl ItemEBSV2 oracle/wss_username_token_client_policyAIABasicCredentials)
CreateBillOfMaterialsListSAPProvABCSImpl
BillOfMaterialsErrorResponseEBS oracle/wss_username_token_client_policyAIABasicCredentials)
ProcessBillOfMaterialsListSAPProvABCSImpl
Retrieve_BOMData oracle/wss_username_token_client_policyAIABasicCredentials)
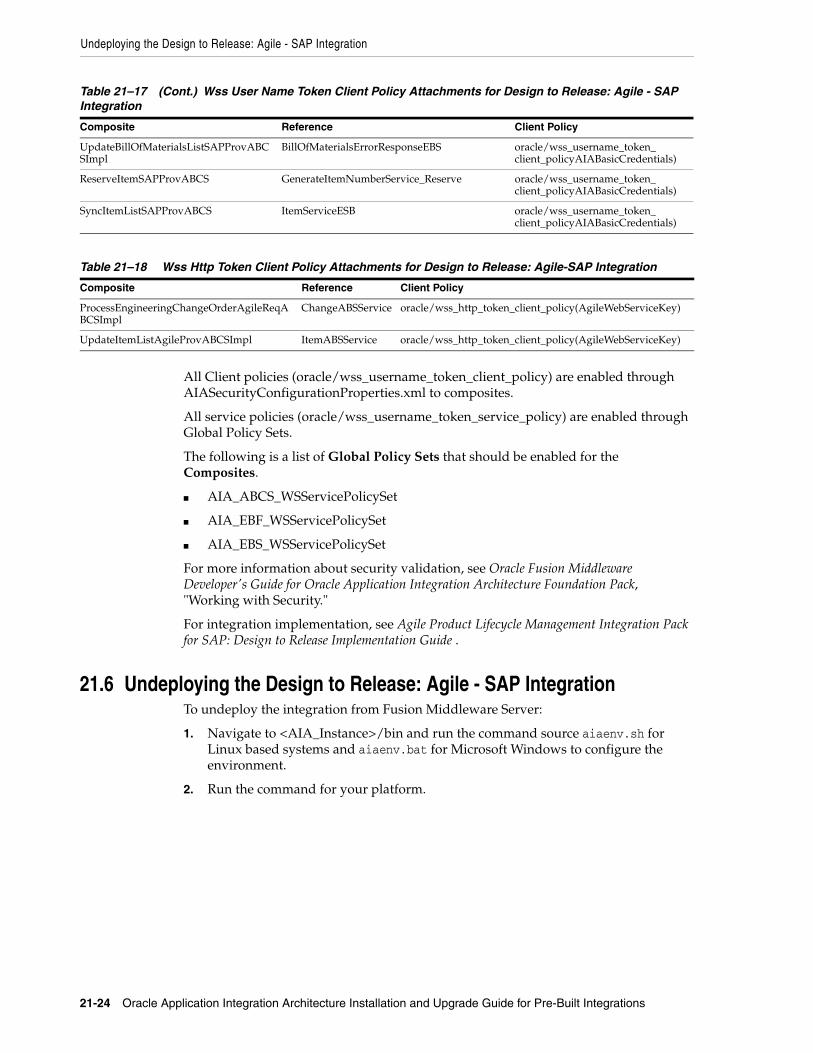
Undeploying the Design to Release: Agile - SAP Integration
21-24 Oracle Application Integration Architecture Installation and Upgrade Guide for Pre-Built Integrations
All Client policies (oracle/wss_username_token_client_policy) are enabled through AIASecurityConfigurationProperties.xml to composites.
All service policies (oracle/wss_username_token_service_policy) are enabled through Global Policy Sets.
The following is a list of Global Policy Sets that should be enabled for the Composites.
■ AIA_ABCS_WSServicePolicySet
■ AIA_EBF_WSServicePolicySet
■ AIA_EBS_WSServicePolicySet
For more information about security validation, see Oracle Fusion Middleware Developer's Guide for Oracle Application Integration Architecture Foundation Pack, "Working with Security."
For integration implementation, see Agile Product Lifecycle Management Integration Pack for SAP: Design to Release Implementation Guide .
21.6 Undeploying the Design to Release: Agile - SAP IntegrationTo undeploy the integration from Fusion Middleware Server:
1. Navigate to <AIA_Instance>/bin and run the command source aiaenv.sh for Linux based systems and aiaenv.bat for Microsoft Windows to configure the environment.
2. Run the command for your platform.
UpdateBillOfMaterialsListSAPProvABCSImpl
BillOfMaterialsErrorResponseEBS oracle/wss_username_token_client_policyAIABasicCredentials)
ReserveItemSAPProvABCS GenerateItemNumberService_Reserve oracle/wss_username_token_client_policyAIABasicCredentials)
SyncItemListSAPProvABCS ItemServiceESB oracle/wss_username_token_client_policyAIABasicCredentials)
Table 21–18 Wss Http Token Client Policy Attachments for Design to Release: Agile-SAP Integration
Composite Reference Client Policy
ProcessEngineeringChangeOrderAgileReqABCSImpl
ChangeABSService oracle/wss_http_token_client_policy(AgileWebServiceKey)
UpdateItemListAgileProvABCSImpl ItemABSService oracle/wss_http_token_client_policy(AgileWebServiceKey)
Table 21–17 (Cont.) Wss User Name Token Client Policy Attachments for Design to Release: Agile - SAP Integration
Composite Reference Client Policy
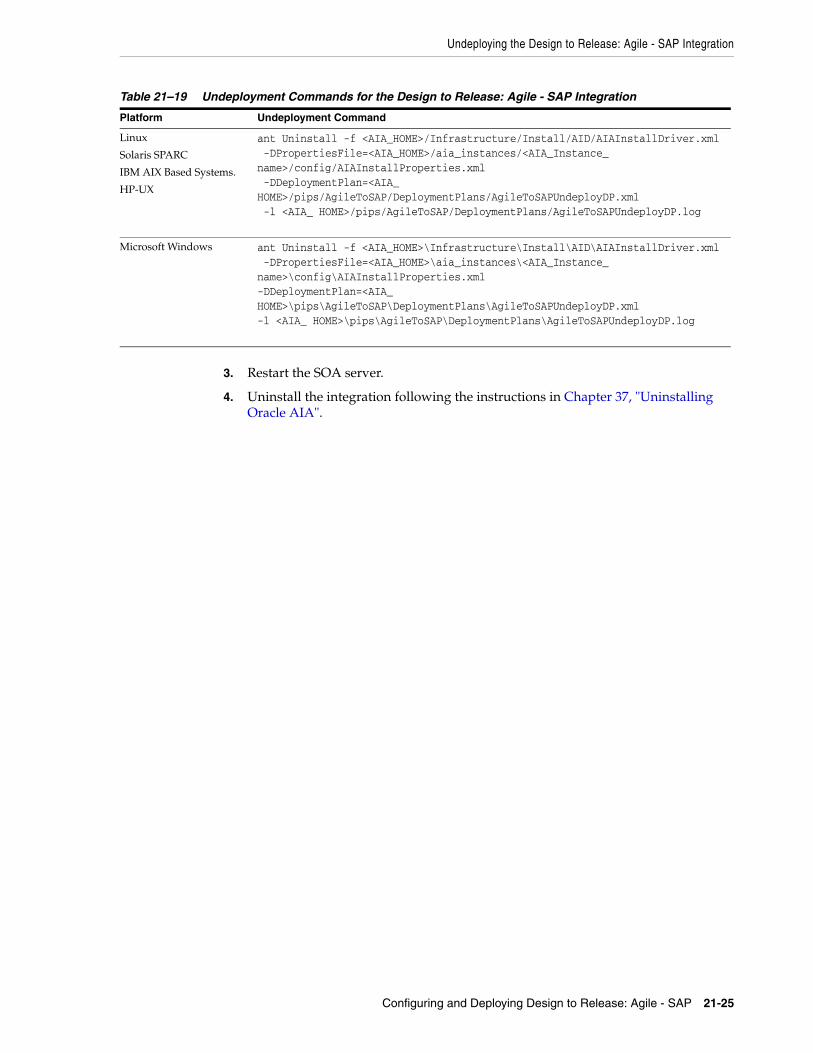
Undeploying the Design to Release: Agile - SAP Integration
Configuring and Deploying Design to Release: Agile - SAP 21-25
3. Restart the SOA server.
4. Uninstall the integration following the instructions in Chapter 37, "Uninstalling Oracle AIA".
Table 21–19 Undeployment Commands for the Design to Release: Agile - SAP Integration
Platform Undeployment Command
Linux
Solaris SPARC
IBM AIX Based Systems.
HP-UX
ant Uninstall -f <AIA_HOME>/Infrastructure/Install/AID/AIAInstallDriver.xml -DPropertiesFile=<AIA_HOME>/aia_instances/<AIA_Instance_name>/config/AIAInstallProperties.xml -DDeploymentPlan=<AIA_ HOME>/pips/AgileToSAP/DeploymentPlans/AgileToSAPUndeployDP.xml -l <AIA_ HOME>/pips/AgileToSAP/DeploymentPlans/AgileToSAPUndeployDP.log
Microsoft Windows ant Uninstall -f <AIA_HOME>\Infrastructure\Install\AID\AIAInstallDriver.xml -DPropertiesFile=<AIA_HOME>\aia_instances\<AIA_Instance_name>\config\AIAInstallProperties.xml -DDeploymentPlan=<AIA_ HOME>\pips\AgileToSAP\DeploymentPlans\AgileToSAPUndeployDP.xml -l <AIA_ HOME>\pips\AgileToSAP\DeploymentPlans\AgileToSAPUndeployDP.log

Undeploying the Design to Release: Agile - SAP Integration
21-26 Oracle Application Integration Architecture Installation and Upgrade Guide for Pre-Built Integrations

22
Configuring and Deploying the Oracle Process Integration Pack for Oracle Utilities Field Work 22-1
22Configuring and Deploying the OracleProcess Integration Pack for Oracle Utilities
Field Work
This chapter discusses how to configure and deploy the Oracle Process Integration Pack for Oracle Utilities Field Work.
This chapter includes the following sections:
■ Section 22.1, "Deployment Configuration Wizard"
■ Section 22.2, "Configuring and Deploying the Oracle Process Integration Pack for Oracle Utilities Field Work"
■ Section 22.3, "Verifying Deployment"
■ Section 22.4, "Undeploying the Oracle Process Integration Pack for Oracle Utilities Field Work"
22.1 Deployment Configuration WizardThe DCW screens prompt you to enter the data required for successful configuration of the Oracle Process Integration Pack for Oracle Utilities Field Work. Enter the details of the Oracle Process Integration Pack for Oracle Utilities Field Work screens below, take a printout and keep it ready when you run the DCW. This action enables faster and error free configuration.
22.1.1 Integration Server Details ScreenAll artifacts associated with the integration infrastructure components deploy to the integration server. This screen contains the following fields:
Table 22–1 Integration Server Details Screen Fields
Field Description
Admin Host Name Specifies where the admin server resides. This can be a remote server or the same system where the AIA Pre-Built Integrations Installer is launched. Example: server1.company.com.
The Admin Host Name is _________________________________
Admin Port This is the port number on which the Weblogic Admin server is started. To find this value contact the WebLogic administrator. Example: 7001.
The Admin Port is _____________________________________
Domain Name This is WebLogic server domain corresponding to the Admin Server. Example: domain1
The Domain Name is _______________________________
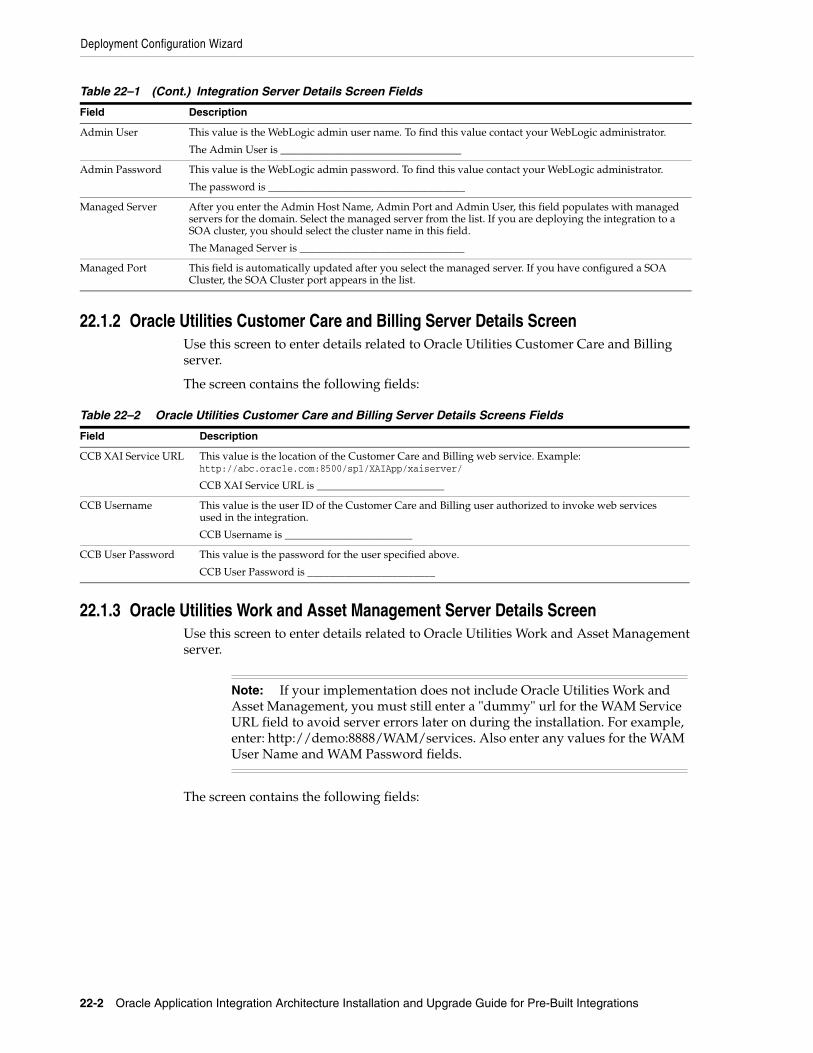
Deployment Configuration Wizard
22-2 Oracle Application Integration Architecture Installation and Upgrade Guide for Pre-Built Integrations
22.1.2 Oracle Utilities Customer Care and Billing Server Details ScreenUse this screen to enter details related to Oracle Utilities Customer Care and Billing server.
The screen contains the following fields:
22.1.3 Oracle Utilities Work and Asset Management Server Details ScreenUse this screen to enter details related to Oracle Utilities Work and Asset Management server.
The screen contains the following fields:
Admin User This value is the WebLogic admin user name. To find this value contact your WebLogic administrator.
The Admin User is __________________________________
Admin Password This value is the WebLogic admin password. To find this value contact your WebLogic administrator.
The password is _____________________________________
Managed Server After you enter the Admin Host Name, Admin Port and Admin User, this field populates with managed servers for the domain. Select the managed server from the list. If you are deploying the integration to a SOA cluster, you should select the cluster name in this field.
The Managed Server is _______________________________
Managed Port This field is automatically updated after you select the managed server. If you have configured a SOA Cluster, the SOA Cluster port appears in the list.
Table 22–2 Oracle Utilities Customer Care and Billing Server Details Screens Fields
Field Description
CCB XAI Service URL This value is the location of the Customer Care and Billing web service. Example: http://abc.oracle.com:8500/spl/XAIApp/xaiserver/
CCB XAI Service URL is ________________________
CCB Username This value is the user ID of the Customer Care and Billing user authorized to invoke web services used in the integration.
CCB Username is ________________________
CCB User Password This value is the password for the user specified above.
CCB User Password is ________________________
Note: If your implementation does not include Oracle Utilities Work and Asset Management, you must still enter a "dummy" url for the WAM Service URL field to avoid server errors later on during the installation. For example, enter: http://demo:8888/WAM/services. Also enter any values for the WAM User Name and WAM Password fields.
Table 22–1 (Cont.) Integration Server Details Screen Fields
Field Description
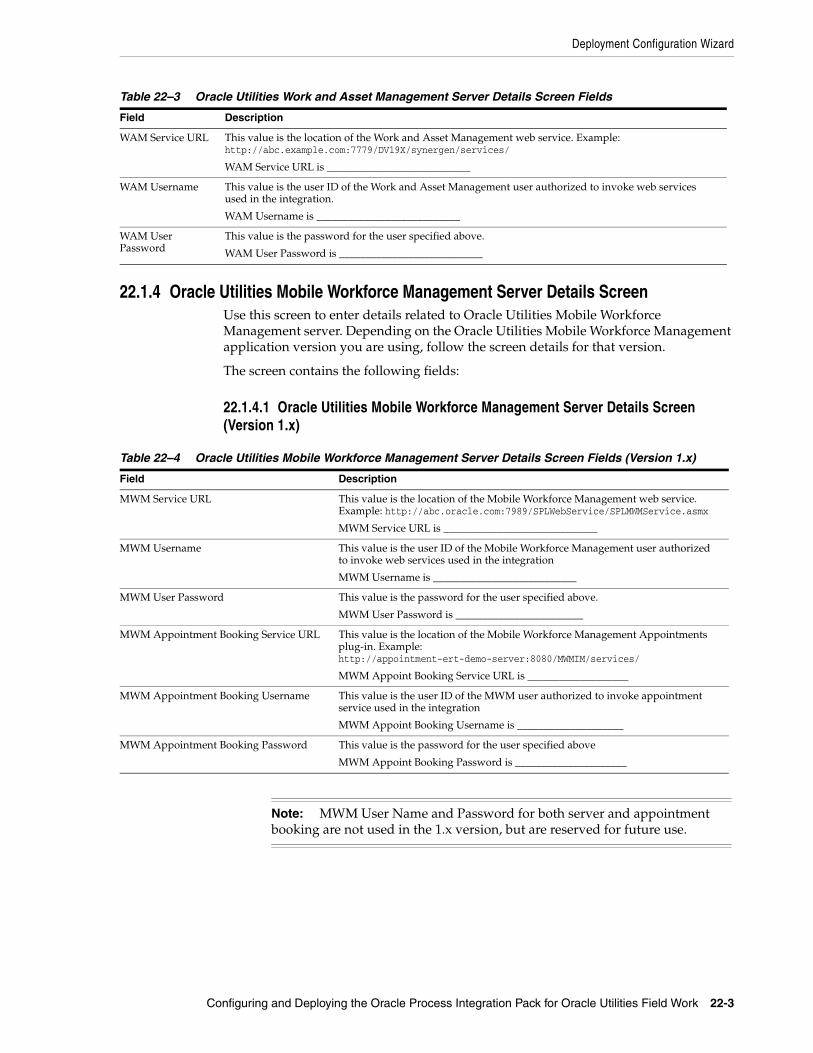
Deployment Configuration Wizard
Configuring and Deploying the Oracle Process Integration Pack for Oracle Utilities Field Work 22-3
22.1.4 Oracle Utilities Mobile Workforce Management Server Details ScreenUse this screen to enter details related to Oracle Utilities Mobile Workforce Management server. Depending on the Oracle Utilities Mobile Workforce Management application version you are using, follow the screen details for that version.
The screen contains the following fields:
22.1.4.1 Oracle Utilities Mobile Workforce Management Server Details Screen (Version 1.x)
Table 22–3 Oracle Utilities Work and Asset Management Server Details Screen Fields
Field Description
WAM Service URL This value is the location of the Work and Asset Management web service. Example: http://abc.example.com:7779/DV19X/synergen/services/
WAM Service URL is ___________________________
WAM Username This value is the user ID of the Work and Asset Management user authorized to invoke web services used in the integration.
WAM Username is ___________________________
WAM User Password
This value is the password for the user specified above.
WAM User Password is ___________________________
Table 22–4 Oracle Utilities Mobile Workforce Management Server Details Screen Fields (Version 1.x)
Field Description
MWM Service URL This value is the location of the Mobile Workforce Management web service. Example: http://abc.oracle.com:7989/SPLWebService/SPLMWMService.asmx
MWM Service URL is _____________________________
MWM Username This value is the user ID of the Mobile Workforce Management user authorized to invoke web services used in the integration
MWM Username is ___________________________
MWM User Password This value is the password for the user specified above.
MWM User Password is ________________________
MWM Appointment Booking Service URL This value is the location of the Mobile Workforce Management Appointments plug-in. Example: http://appointment-ert-demo-server:8080/MWMIM/services/
MWM Appoint Booking Service URL is ___________________
MWM Appointment Booking Username This value is the user ID of the MWM user authorized to invoke appointment service used in the integration
MWM Appoint Booking Username is ____________________
MWM Appointment Booking Password This value is the password for the user specified above
MWM Appoint Booking Password is _____________________
Note: MWM User Name and Password for both server and appointment booking are not used in the 1.x version, but are reserved for future use.

Configuring and Deploying the Oracle Process Integration Pack for Oracle Utilities Field Work
22-4 Oracle Application Integration Architecture Installation and Upgrade Guide for Pre-Built Integrations
22.1.4.2 Oracle Utilities Mobile Workforce Management Server Details Screen (Version 2.x)
22.2 Configuring and Deploying the Oracle Process Integration Pack for Oracle Utilities Field Work
This section discusses the integration configuration and deployment process. There are two steps:
1. Configure your integration using the deployment DCW.
2. Deploy the integration to the Fusion Middleware server.
22.2.1 Configuring the Oracle Process Integration Pack for Oracle Utilities Field WorkThe screens that appear prompt you to enter the data that is required for successful configuration of the Oracle Process Integration Pack for Oracle Utilities Field Work. Keep the completed worksheets of the Oracle Process Integration Pack for Oracle Utilities Field Work screens ready before you launch the DCW.
To configure the Oracle Process Integration Pack for Oracle Utilities Field Work:1. Navigate to /slot/emsxxxx/oracle/Middleware/user_projects/domains/soa_
domain/bin/ and open setDomainEnv.sh for Linux based systems and setDomainEnv.bat for Microsoft Windows.
2. Replace WLS_JDBC_REMOTE_ENABLED="-Dweblogic.jdbc.remoteEnabled=false" with WLS_JDBC_REMOTE_ENABLED="-Dweblogic.jdbc.remoteEnabled=true".
3. Restart the server.
Table 22–5 Oracle Utilities Mobile Workforce Management Server Details Screen Fields (Version 2.x)
Field Description
MWM Service URL This value is the location of the Mobile Workforce Management web service. Example: http://abc.oracle.com:8300/ouaf/XAIApp/xaiserver/
MWM Service URL is _____________________________
MWM Username This value is the user ID of the Mobile Workforce Management user authorized to invoke web services used in the integration
MWM Username is ___________________________
MWM User Password This value is the password for the user specified above.
MWM User Password is ________________________
MWM Appointment Booking Service URL Leave option blank.
MWM Appointment Booking Username Leave option blank.
MWM Appointment Booking Password Leave option blank.
Note: MWM Appointment Booking URL, MWM Appointment Booking User Name and MWM Appointment Booking Password are not valid in 2.x version. Leave these blank.
Note: If you are harvesting content to OER, perform the first three steps. Else start from step 4.
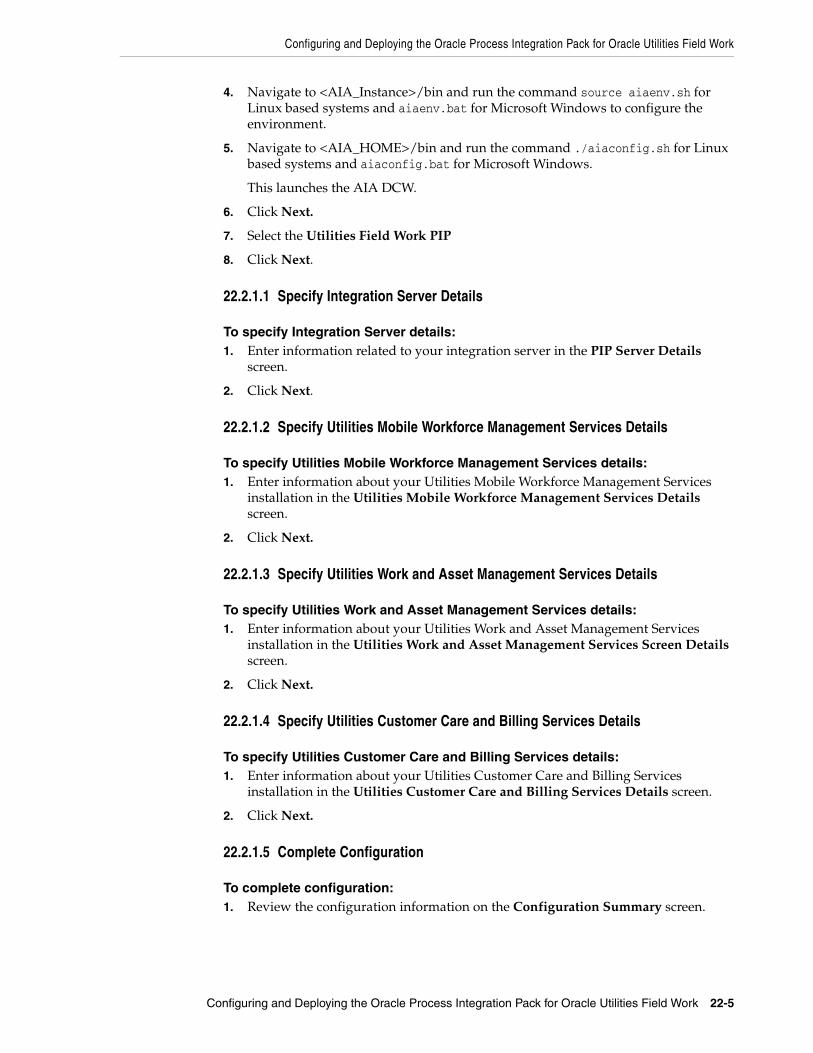
Configuring and Deploying the Oracle Process Integration Pack for Oracle Utilities Field Work
Configuring and Deploying the Oracle Process Integration Pack for Oracle Utilities Field Work 22-5
4. Navigate to <AIA_Instance>/bin and run the command source aiaenv.sh for Linux based systems and aiaenv.bat for Microsoft Windows to configure the environment.
5. Navigate to <AIA_HOME>/bin and run the command ./aiaconfig.sh for Linux based systems and aiaconfig.bat for Microsoft Windows.
This launches the AIA DCW.
6. Click Next.
7. Select the Utilities Field Work PIP
8. Click Next.
22.2.1.1 Specify Integration Server Details
To specify Integration Server details:1. Enter information related to your integration server in the PIP Server Details
screen.
2. Click Next.
22.2.1.2 Specify Utilities Mobile Workforce Management Services Details
To specify Utilities Mobile Workforce Management Services details:1. Enter information about your Utilities Mobile Workforce Management Services
installation in the Utilities Mobile Workforce Management Services Details screen.
2. Click Next.
22.2.1.3 Specify Utilities Work and Asset Management Services Details
To specify Utilities Work and Asset Management Services details:1. Enter information about your Utilities Work and Asset Management Services
installation in the Utilities Work and Asset Management Services Screen Details screen.
2. Click Next.
22.2.1.4 Specify Utilities Customer Care and Billing Services Details
To specify Utilities Customer Care and Billing Services details:1. Enter information about your Utilities Customer Care and Billing Services
installation in the Utilities Customer Care and Billing Services Details screen.
2. Click Next.
22.2.1.5 Complete Configuration
To complete configuration:1. Review the configuration information on the Configuration Summary screen.

Configuring and Deploying the Oracle Process Integration Pack for Oracle Utilities Field Work
22-6 Oracle Application Integration Architecture Installation and Upgrade Guide for Pre-Built Integrations
2. Click Configure to accept the configuration.
The system displays progress of the configuration in the Configuration Progress screen.
The system displays any warnings or errors as necessary. You can review the configuration log for additional details. The configuration log location is displayed in Configuration Progress screen.
3. When the configuration process completes without errors, the AIA DCW displays the Configuration Complete screen.
4. Click Finish to close the DCW.
22.2.2 Configuring using the Response File
To configure using the response file:1. Open the response file.
When you create a response file through OUI, passwords get stored as <SECURE>.
2. Replace the password fields with actual passwords in the response file.
3. Navigate to <AIA_Instance>/bin and run the command source aiaenv.sh for Linux based systems and aiaenv.bat for Microsoft Windows to configure the environment.
4. Navigate to <AIA_HOME>/bin and run the command ./aiaconfig.sh <Response File Location and Name> for Linux based systems and aiaconfig.bat <Response File Location and Name> for Microsoft Windows.
22.2.3 Deploying the Oracle Process Integration Pack for Oracle Utilities Field Work
To deploy the integration to Fusion Middleware server:1. Navigate to <AIA_Instance>/bin and run the command source aiaenv.sh for
Linux based systems and aiaenv.bat for Microsoft Windows to configure the environment.
2. Run the command for your platform.
Note: If you want to make changes to the configuration, use the navigation pane on the left and select the screen you want to edit.
You can create a response file based on the input provided in the DCW and use it in future when you want to deploy the integration. You can configure using the steps described in Section 22.2.2, "Configuring using the Response File". Click Save Response File and save the response file with the name and location of your choice.
Note: When you copy and paste the command in the command line, ensure that there is space between .xml and -. Ensure that there is space between these two when you run undeployment command too.
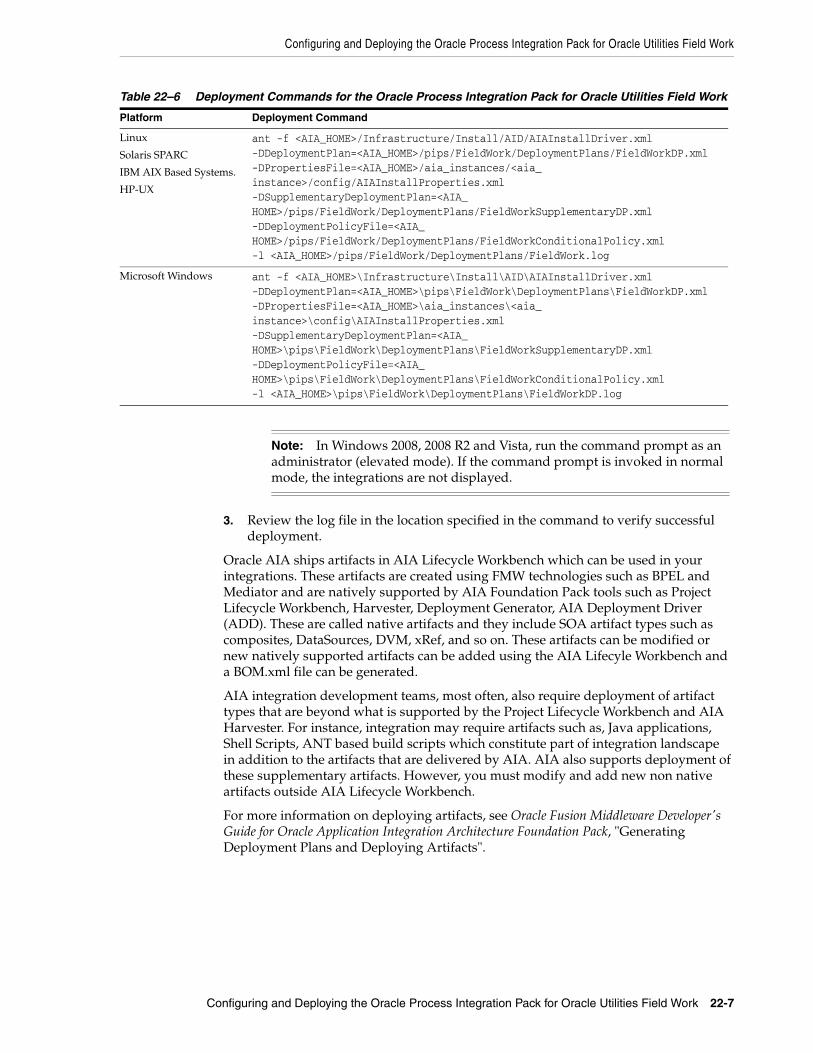
Configuring and Deploying the Oracle Process Integration Pack for Oracle Utilities Field Work
Configuring and Deploying the Oracle Process Integration Pack for Oracle Utilities Field Work 22-7
3. Review the log file in the location specified in the command to verify successful deployment.
Oracle AIA ships artifacts in AIA Lifecycle Workbench which can be used in your integrations. These artifacts are created using FMW technologies such as BPEL and Mediator and are natively supported by AIA Foundation Pack tools such as Project Lifecycle Workbench, Harvester, Deployment Generator, AIA Deployment Driver (ADD). These are called native artifacts and they include SOA artifact types such as composites, DataSources, DVM, xRef, and so on. These artifacts can be modified or new natively supported artifacts can be added using the AIA Lifecyle Workbench and a BOM.xml file can be generated.
AIA integration development teams, most often, also require deployment of artifact types that are beyond what is supported by the Project Lifecycle Workbench and AIA Harvester. For instance, integration may require artifacts such as, Java applications, Shell Scripts, ANT based build scripts which constitute part of integration landscape in addition to the artifacts that are delivered by AIA. AIA also supports deployment of these supplementary artifacts. However, you must modify and add new non native artifacts outside AIA Lifecycle Workbench.
For more information on deploying artifacts, see Oracle Fusion Middleware Developer's Guide for Oracle Application Integration Architecture Foundation Pack, "Generating Deployment Plans and Deploying Artifacts".
Table 22–6 Deployment Commands for the Oracle Process Integration Pack for Oracle Utilities Field Work
Platform Deployment Command
Linux
Solaris SPARC
IBM AIX Based Systems.
HP-UX
ant -f <AIA_HOME>/Infrastructure/Install/AID/AIAInstallDriver.xml -DDeploymentPlan=<AIA_HOME>/pips/FieldWork/DeploymentPlans/FieldWorkDP.xml -DPropertiesFile=<AIA_HOME>/aia_instances/<aia_instance>/config/AIAInstallProperties.xml -DSupplementaryDeploymentPlan=<AIA_HOME>/pips/FieldWork/DeploymentPlans/FieldWorkSupplementaryDP.xml -DDeploymentPolicyFile=<AIA_HOME>/pips/FieldWork/DeploymentPlans/FieldWorkConditionalPolicy.xml -l <AIA_HOME>/pips/FieldWork/DeploymentPlans/FieldWork.log
Microsoft Windows ant -f <AIA_HOME>\Infrastructure\Install\AID\AIAInstallDriver.xml -DDeploymentPlan=<AIA_HOME>\pips\FieldWork\DeploymentPlans\FieldWorkDP.xml -DPropertiesFile=<AIA_HOME>\aia_instances\<aia_instance>\config\AIAInstallProperties.xml -DSupplementaryDeploymentPlan=<AIA_HOME>\pips\FieldWork\DeploymentPlans\FieldWorkSupplementaryDP.xml -DDeploymentPolicyFile=<AIA_HOME>\pips\FieldWork\DeploymentPlans\FieldWorkConditionalPolicy.xml -l <AIA_HOME>\pips\FieldWork\DeploymentPlans\FieldWorkDP.log
Note: In Windows 2008, 2008 R2 and Vista, run the command prompt as an administrator (elevated mode). If the command prompt is invoked in normal mode, the integrations are not displayed.
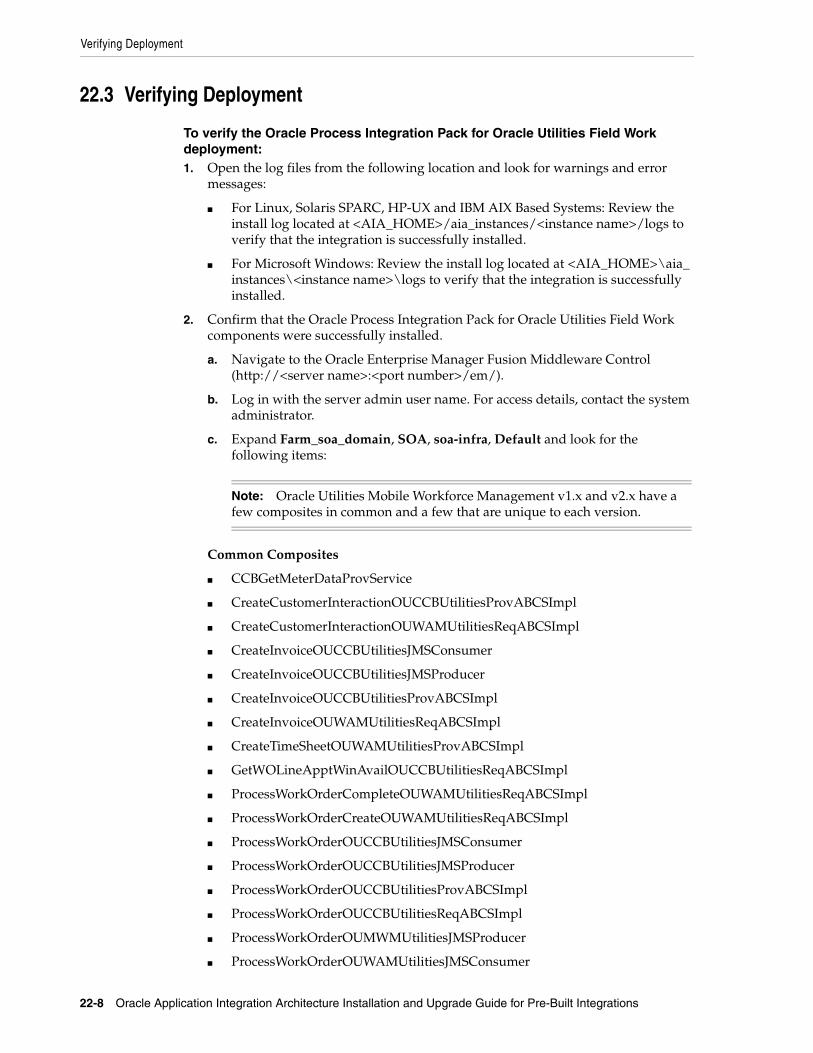
Verifying Deployment
22-8 Oracle Application Integration Architecture Installation and Upgrade Guide for Pre-Built Integrations
22.3 Verifying Deployment
To verify the Oracle Process Integration Pack for Oracle Utilities Field Work deployment: 1. Open the log files from the following location and look for warnings and error
messages:
■ For Linux, Solaris SPARC, HP-UX and IBM AIX Based Systems: Review the install log located at <AIA_HOME>/aia_instances/<instance name>/logs to verify that the integration is successfully installed.
■ For Microsoft Windows: Review the install log located at <AIA_HOME>\aia_instances\<instance name>\logs to verify that the integration is successfully installed.
2. Confirm that the Oracle Process Integration Pack for Oracle Utilities Field Work components were successfully installed.
a. Navigate to the Oracle Enterprise Manager Fusion Middleware Control (http://<server name>:<port number>/em/).
b. Log in with the server admin user name. For access details, contact the system administrator.
c. Expand Farm_soa_domain, SOA, soa-infra, Default and look for the following items:
Common Composites
■ CCBGetMeterDataProvService
■ CreateCustomerInteractionOUCCBUtilitiesProvABCSImpl
■ CreateCustomerInteractionOUWAMUtilitiesReqABCSImpl
■ CreateInvoiceOUCCBUtilitiesJMSConsumer
■ CreateInvoiceOUCCBUtilitiesJMSProducer
■ CreateInvoiceOUCCBUtilitiesProvABCSImpl
■ CreateInvoiceOUWAMUtilitiesReqABCSImpl
■ CreateTimeSheetOUWAMUtilitiesProvABCSImpl
■ GetWOLineApptWinAvailOUCCBUtilitiesReqABCSImpl
■ ProcessWorkOrderCompleteOUWAMUtilitiesReqABCSImpl
■ ProcessWorkOrderCreateOUWAMUtilitiesReqABCSImpl
■ ProcessWorkOrderOUCCBUtilitiesJMSConsumer
■ ProcessWorkOrderOUCCBUtilitiesJMSProducer
■ ProcessWorkOrderOUCCBUtilitiesProvABCSImpl
■ ProcessWorkOrderOUCCBUtilitiesReqABCSImpl
■ ProcessWorkOrderOUMWMUtilitiesJMSProducer
■ ProcessWorkOrderOUWAMUtilitiesJMSConsumer
Note: Oracle Utilities Mobile Workforce Management v1.x and v2.x have a few composites in common and a few that are unique to each version.
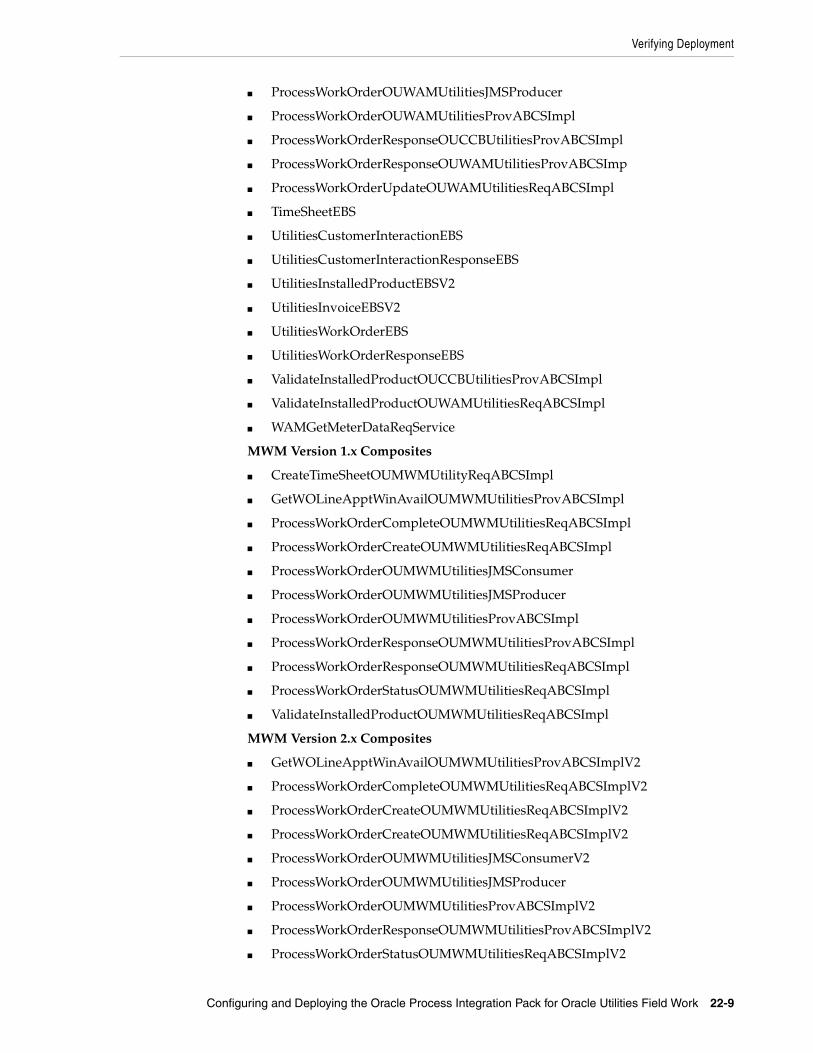
Verifying Deployment
Configuring and Deploying the Oracle Process Integration Pack for Oracle Utilities Field Work 22-9
■ ProcessWorkOrderOUWAMUtilitiesJMSProducer
■ ProcessWorkOrderOUWAMUtilitiesProvABCSImpl
■ ProcessWorkOrderResponseOUCCBUtilitiesProvABCSImpl
■ ProcessWorkOrderResponseOUWAMUtilitiesProvABCSImp
■ ProcessWorkOrderUpdateOUWAMUtilitiesReqABCSImpl
■ TimeSheetEBS
■ UtilitiesCustomerInteractionEBS
■ UtilitiesCustomerInteractionResponseEBS
■ UtilitiesInstalledProductEBSV2
■ UtilitiesInvoiceEBSV2
■ UtilitiesWorkOrderEBS
■ UtilitiesWorkOrderResponseEBS
■ ValidateInstalledProductOUCCBUtilitiesProvABCSImpl
■ ValidateInstalledProductOUWAMUtilitiesReqABCSImpl
■ WAMGetMeterDataReqService
MWM Version 1.x Composites
■ CreateTimeSheetOUMWMUtilityReqABCSImpl
■ GetWOLineApptWinAvailOUMWMUtilitiesProvABCSImpl
■ ProcessWorkOrderCompleteOUMWMUtilitiesReqABCSImpl
■ ProcessWorkOrderCreateOUMWMUtilitiesReqABCSImpl
■ ProcessWorkOrderOUMWMUtilitiesJMSConsumer
■ ProcessWorkOrderOUMWMUtilitiesJMSProducer
■ ProcessWorkOrderOUMWMUtilitiesProvABCSImpl
■ ProcessWorkOrderResponseOUMWMUtilitiesProvABCSImpl
■ ProcessWorkOrderResponseOUMWMUtilitiesReqABCSImpl
■ ProcessWorkOrderStatusOUMWMUtilitiesReqABCSImpl
■ ValidateInstalledProductOUMWMUtilitiesReqABCSImpl
MWM Version 2.x Composites
■ GetWOLineApptWinAvailOUMWMUtilitiesProvABCSImplV2
■ ProcessWorkOrderCompleteOUMWMUtilitiesReqABCSImplV2
■ ProcessWorkOrderCreateOUMWMUtilitiesReqABCSImplV2
■ ProcessWorkOrderCreateOUMWMUtilitiesReqABCSImplV2
■ ProcessWorkOrderOUMWMUtilitiesJMSConsumerV2
■ ProcessWorkOrderOUMWMUtilitiesJMSProducer
■ ProcessWorkOrderOUMWMUtilitiesProvABCSImplV2
■ ProcessWorkOrderResponseOUMWMUtilitiesProvABCSImplV2
■ ProcessWorkOrderStatusOUMWMUtilitiesReqABCSImplV2
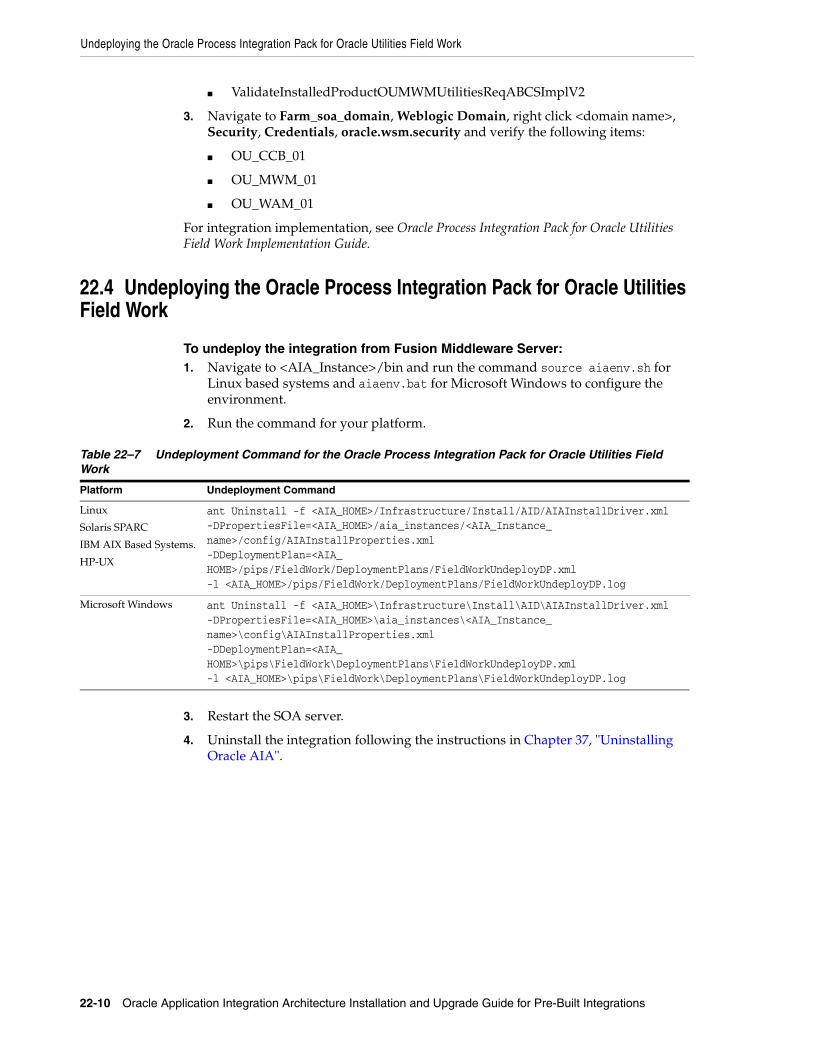
Undeploying the Oracle Process Integration Pack for Oracle Utilities Field Work
22-10 Oracle Application Integration Architecture Installation and Upgrade Guide for Pre-Built Integrations
■ ValidateInstalledProductOUMWMUtilitiesReqABCSImplV2
3. Navigate to Farm_soa_domain, Weblogic Domain, right click <domain name>, Security, Credentials, oracle.wsm.security and verify the following items:
■ OU_CCB_01
■ OU_MWM_01
■ OU_WAM_01
For integration implementation, see Oracle Process Integration Pack for Oracle Utilities Field Work Implementation Guide.
22.4 Undeploying the Oracle Process Integration Pack for Oracle Utilities Field Work
To undeploy the integration from Fusion Middleware Server:1. Navigate to <AIA_Instance>/bin and run the command source aiaenv.sh for
Linux based systems and aiaenv.bat for Microsoft Windows to configure the environment.
2. Run the command for your platform.
3. Restart the SOA server.
4. Uninstall the integration following the instructions in Chapter 37, "Uninstalling Oracle AIA".
Table 22–7 Undeployment Command for the Oracle Process Integration Pack for Oracle Utilities Field Work
Platform Undeployment Command
Linux
Solaris SPARC
IBM AIX Based Systems.
HP-UX
ant Uninstall -f <AIA_HOME>/Infrastructure/Install/AID/AIAInstallDriver.xml -DPropertiesFile=<AIA_HOME>/aia_instances/<AIA_Instance_name>/config/AIAInstallProperties.xml -DDeploymentPlan=<AIA_HOME>/pips/FieldWork/DeploymentPlans/FieldWorkUndeployDP.xml -l <AIA_HOME>/pips/FieldWork/DeploymentPlans/FieldWorkUndeployDP.log
Microsoft Windows ant Uninstall -f <AIA_HOME>\Infrastructure\Install\AID\AIAInstallDriver.xml -DPropertiesFile=<AIA_HOME>\aia_instances\<AIA_Instance_name>\config\AIAInstallProperties.xml -DDeploymentPlan=<AIA_HOME>\pips\FieldWork\DeploymentPlans\FieldWorkUndeployDP.xml -l <AIA_HOME>\pips\FieldWork\DeploymentPlans\FieldWorkUndeployDP.log

23
Configuring and Deploying Customer Data Synchronization for Oracle Utilities CCB and Siebel Energy 23-1
23Configuring and Deploying Customer DataSynchronization for Oracle Utilities CCB and
Siebel Energy
This chapter discusses how to configure and deploy the Oracle Customer Data Synchronization Integration Pack for Oracle Utilities Customer Care and Billing and Siebel Energy (Customer Data Synchronization for Oracle Utilities CCB and Siebel Energy) integration.
This chapter includes the following sections:.
■ Section 23.1, "Deployment Configuration Wizard"
■ Section 23.2, "Configuring and Deploying Customer Data Synchronization for Oracle Utilities CCB and Siebel Energy Integration"
■ Section 23.3, "Verifying Deployment"
■ Section 23.4, "Undeploying the Customer Data Synchronization for Oracle Utilities CCB and Siebel Energy Integration"
23.1 Deployment Configuration WizardThe DCW screens prompt you to enter the data required for successful configuration of the Customer Data Synchronization for Oracle Utilities CCB and Siebel Energy integration. Enter the details of the Customer Data Synchronization for Oracle Utilities CCB and Siebel Energy integration screens below, take a printout and keep it ready when you run the DCW. This action enables faster and error free configuration.
23.1.1 Integration Server Details ScreenAll artifacts associated with the integration infrastructure components deploy to the integration server. This screen contains the following fields:
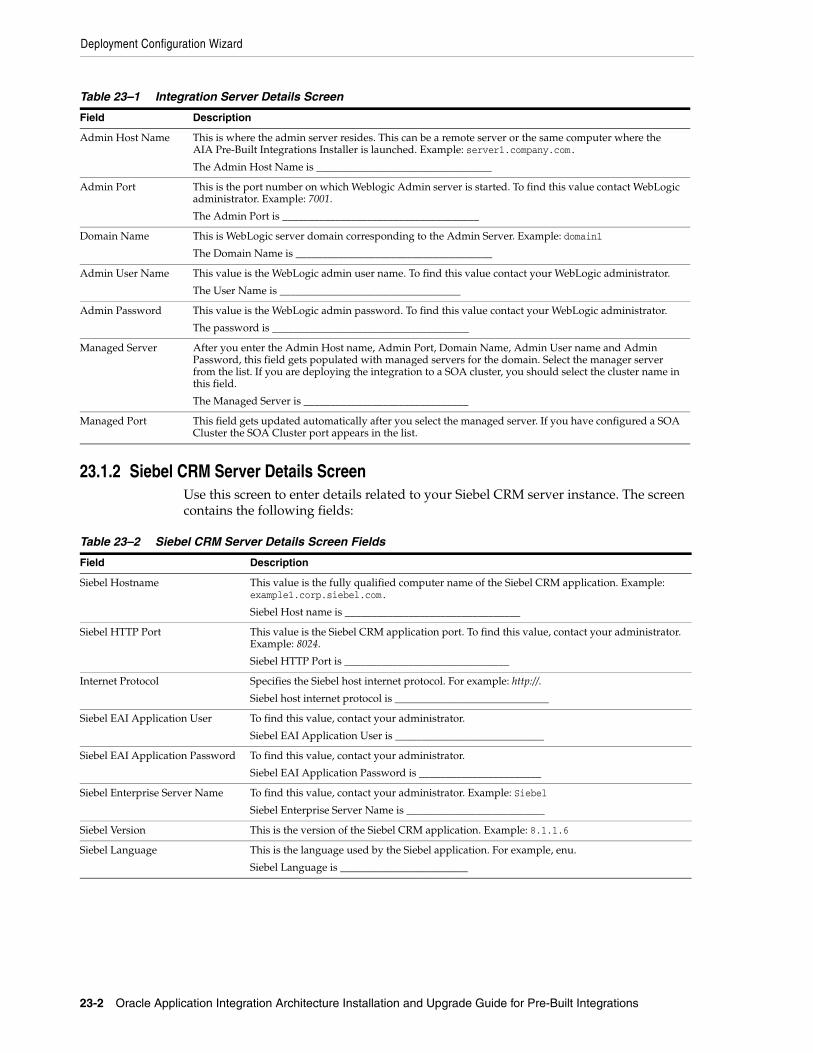
Deployment Configuration Wizard
23-2 Oracle Application Integration Architecture Installation and Upgrade Guide for Pre-Built Integrations
23.1.2 Siebel CRM Server Details ScreenUse this screen to enter details related to your Siebel CRM server instance. The screen contains the following fields:
Table 23–1 Integration Server Details Screen
Field Description
Admin Host Name This is where the admin server resides. This can be a remote server or the same computer where the AIA Pre-Built Integrations Installer is launched. Example: server1.company.com.
The Admin Host Name is _________________________________
Admin Port This is the port number on which Weblogic Admin server is started. To find this value contact WebLogic administrator. Example: 7001.
The Admin Port is _____________________________________
Domain Name This is WebLogic server domain corresponding to the Admin Server. Example: domain1
The Domain Name is _____________________________________
Admin User Name This value is the WebLogic admin user name. To find this value contact your WebLogic administrator.
The User Name is __________________________________
Admin Password This value is the WebLogic admin password. To find this value contact your WebLogic administrator.
The password is _____________________________________
Managed Server After you enter the Admin Host name, Admin Port, Domain Name, Admin User name and Admin Password, this field gets populated with managed servers for the domain. Select the manager server from the list. If you are deploying the integration to a SOA cluster, you should select the cluster name in this field.
The Managed Server is _______________________________
Managed Port This field gets updated automatically after you select the managed server. If you have configured a SOA Cluster the SOA Cluster port appears in the list.
Table 23–2 Siebel CRM Server Details Screen Fields
Field Description
Siebel Hostname This value is the fully qualified computer name of the Siebel CRM application. Example: example1.corp.siebel.com.
Siebel Host name is _________________________________
Siebel HTTP Port This value is the Siebel CRM application port. To find this value, contact your administrator. Example: 8024.
Siebel HTTP Port is _______________________________
Internet Protocol Specifies the Siebel host internet protocol. For example: http://.
Siebel host internet protocol is _____________________________
Siebel EAI Application User To find this value, contact your administrator.
Siebel EAI Application User is ____________________________
Siebel EAI Application Password To find this value, contact your administrator.
Siebel EAI Application Password is _______________________
Siebel Enterprise Server Name To find this value, contact your administrator. Example: Siebel
Siebel Enterprise Server Name is __________________________
Siebel Version This is the version of the Siebel CRM application. Example: 8.1.1.6
Siebel Language This is the language used by the Siebel application. For example, enu.
Siebel Language is ________________________
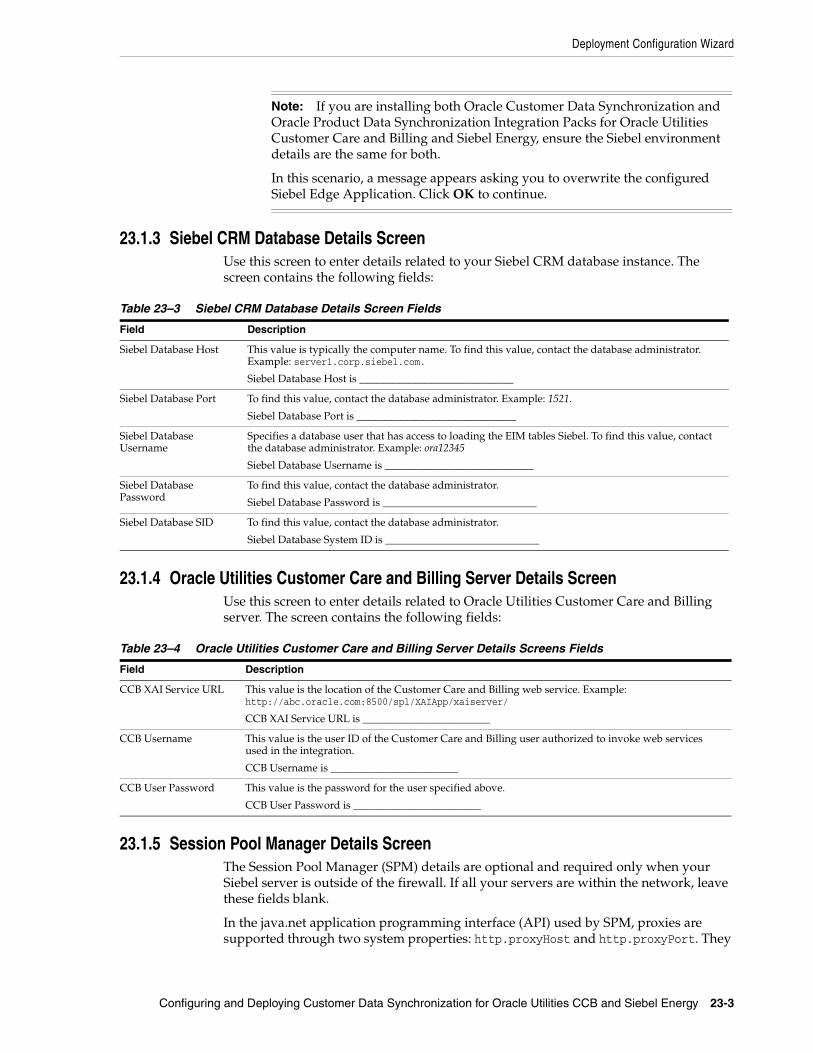
Deployment Configuration Wizard
Configuring and Deploying Customer Data Synchronization for Oracle Utilities CCB and Siebel Energy 23-3
23.1.3 Siebel CRM Database Details ScreenUse this screen to enter details related to your Siebel CRM database instance. The screen contains the following fields:
23.1.4 Oracle Utilities Customer Care and Billing Server Details ScreenUse this screen to enter details related to Oracle Utilities Customer Care and Billing server. The screen contains the following fields:
23.1.5 Session Pool Manager Details ScreenThe Session Pool Manager (SPM) details are optional and required only when your Siebel server is outside of the firewall. If all your servers are within the network, leave these fields blank.
In the java.net application programming interface (API) used by SPM, proxies are supported through two system properties: http.proxyHost and http.proxyPort. They
Note: If you are installing both Oracle Customer Data Synchronization and Oracle Product Data Synchronization Integration Packs for Oracle Utilities Customer Care and Billing and Siebel Energy, ensure the Siebel environment details are the same for both.
In this scenario, a message appears asking you to overwrite the configured Siebel Edge Application. Click OK to continue.
Table 23–3 Siebel CRM Database Details Screen Fields
Field Description
Siebel Database Host This value is typically the computer name. To find this value, contact the database administrator. Example: server1.corp.siebel.com.
Siebel Database Host is _____________________________
Siebel Database Port To find this value, contact the database administrator. Example: 1521.
Siebel Database Port is ______________________________
Siebel Database Username
Specifies a database user that has access to loading the EIM tables Siebel. To find this value, contact the database administrator. Example: ora12345
Siebel Database Username is ____________________________
Siebel Database Password
To find this value, contact the database administrator.
Siebel Database Password is _____________________________
Siebel Database SID To find this value, contact the database administrator.
Siebel Database System ID is _____________________________
Table 23–4 Oracle Utilities Customer Care and Billing Server Details Screens Fields
Field Description
CCB XAI Service URL This value is the location of the Customer Care and Billing web service. Example: http://abc.oracle.com:8500/spl/XAIApp/xaiserver/
CCB XAI Service URL is ________________________
CCB Username This value is the user ID of the Customer Care and Billing user authorized to invoke web services used in the integration.
CCB Username is ________________________
CCB User Password This value is the password for the user specified above.
CCB User Password is ________________________
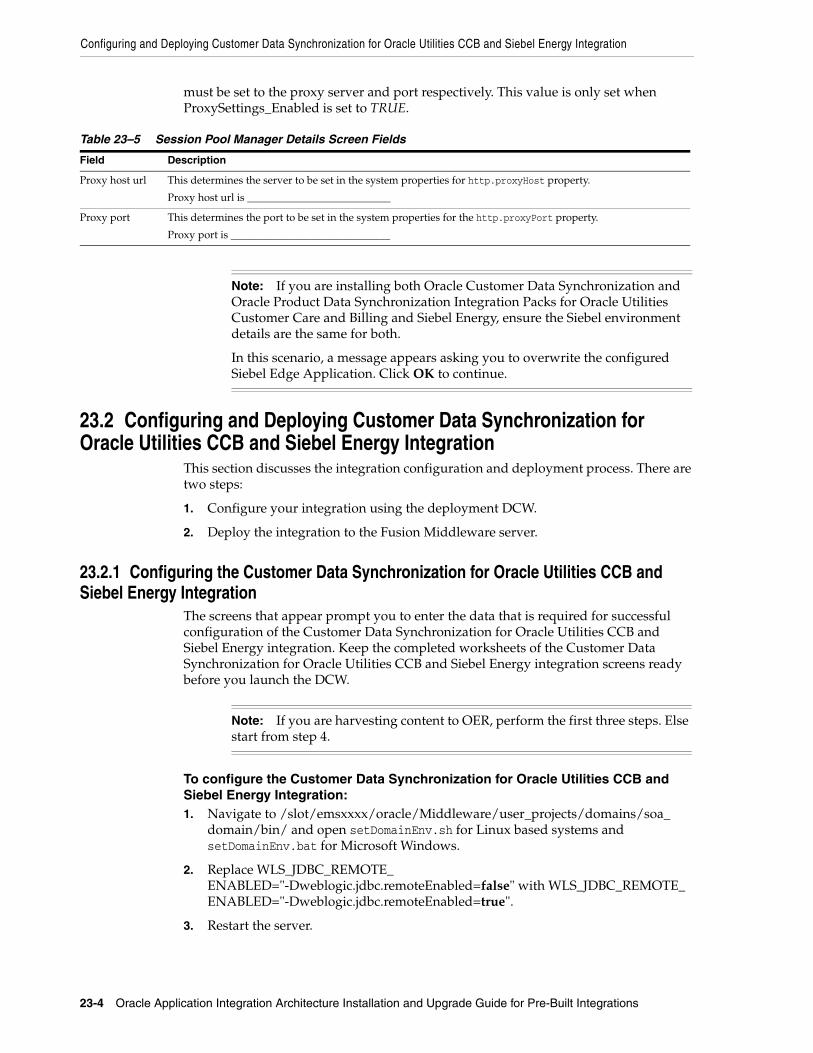
Configuring and Deploying Customer Data Synchronization for Oracle Utilities CCB and Siebel Energy Integration
23-4 Oracle Application Integration Architecture Installation and Upgrade Guide for Pre-Built Integrations
must be set to the proxy server and port respectively. This value is only set when ProxySettings_Enabled is set to TRUE.
23.2 Configuring and Deploying Customer Data Synchronization for Oracle Utilities CCB and Siebel Energy Integration
This section discusses the integration configuration and deployment process. There are two steps:
1. Configure your integration using the deployment DCW.
2. Deploy the integration to the Fusion Middleware server.
23.2.1 Configuring the Customer Data Synchronization for Oracle Utilities CCB and Siebel Energy Integration
The screens that appear prompt you to enter the data that is required for successful configuration of the Customer Data Synchronization for Oracle Utilities CCB and Siebel Energy integration. Keep the completed worksheets of the Customer Data Synchronization for Oracle Utilities CCB and Siebel Energy integration screens ready before you launch the DCW.
To configure the Customer Data Synchronization for Oracle Utilities CCB and Siebel Energy Integration:1. Navigate to /slot/emsxxxx/oracle/Middleware/user_projects/domains/soa_
domain/bin/ and open setDomainEnv.sh for Linux based systems and setDomainEnv.bat for Microsoft Windows.
2. Replace WLS_JDBC_REMOTE_ENABLED="-Dweblogic.jdbc.remoteEnabled=false" with WLS_JDBC_REMOTE_ENABLED="-Dweblogic.jdbc.remoteEnabled=true".
3. Restart the server.
Table 23–5 Session Pool Manager Details Screen Fields
Field Description
Proxy host url This determines the server to be set in the system properties for http.proxyHost property.
Proxy host url is ___________________________
Proxy port This determines the port to be set in the system properties for the http.proxyPort property.
Proxy port is ______________________________
Note: If you are installing both Oracle Customer Data Synchronization and Oracle Product Data Synchronization Integration Packs for Oracle Utilities Customer Care and Billing and Siebel Energy, ensure the Siebel environment details are the same for both.
In this scenario, a message appears asking you to overwrite the configured Siebel Edge Application. Click OK to continue.
Note: If you are harvesting content to OER, perform the first three steps. Else start from step 4.
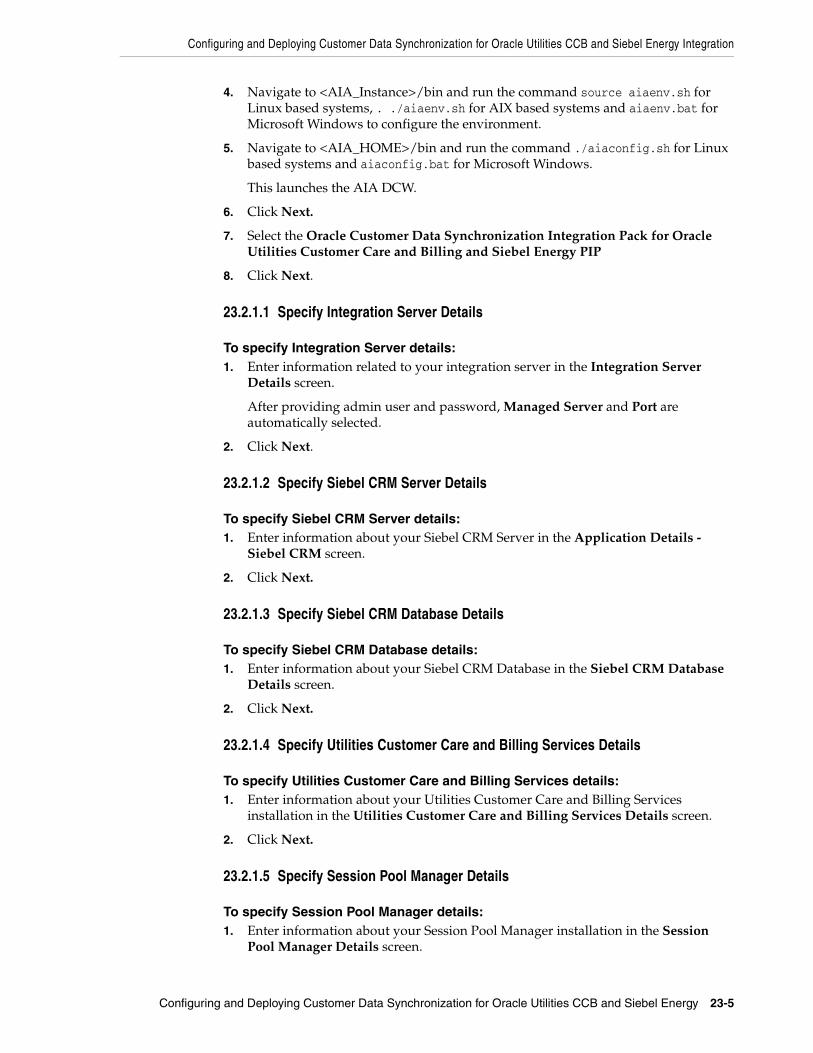
Configuring and Deploying Customer Data Synchronization for Oracle Utilities CCB and Siebel Energy Integration
Configuring and Deploying Customer Data Synchronization for Oracle Utilities CCB and Siebel Energy 23-5
4. Navigate to <AIA_Instance>/bin and run the command source aiaenv.sh for Linux based systems, . ./aiaenv.sh for AIX based systems and aiaenv.bat for Microsoft Windows to configure the environment.
5. Navigate to <AIA_HOME>/bin and run the command ./aiaconfig.sh for Linux based systems and aiaconfig.bat for Microsoft Windows.
This launches the AIA DCW.
6. Click Next.
7. Select the Oracle Customer Data Synchronization Integration Pack for Oracle Utilities Customer Care and Billing and Siebel Energy PIP
8. Click Next.
23.2.1.1 Specify Integration Server Details
To specify Integration Server details:1. Enter information related to your integration server in the Integration Server
Details screen.
After providing admin user and password, Managed Server and Port are automatically selected.
2. Click Next.
23.2.1.2 Specify Siebel CRM Server Details
To specify Siebel CRM Server details:1. Enter information about your Siebel CRM Server in the Application Details -
Siebel CRM screen.
2. Click Next.
23.2.1.3 Specify Siebel CRM Database Details
To specify Siebel CRM Database details:1. Enter information about your Siebel CRM Database in the Siebel CRM Database
Details screen.
2. Click Next.
23.2.1.4 Specify Utilities Customer Care and Billing Services Details
To specify Utilities Customer Care and Billing Services details:1. Enter information about your Utilities Customer Care and Billing Services
installation in the Utilities Customer Care and Billing Services Details screen.
2. Click Next.
23.2.1.5 Specify Session Pool Manager Details
To specify Session Pool Manager details:1. Enter information about your Session Pool Manager installation in the Session
Pool Manager Details screen.
Configuring and Deploying Customer Data Synchronization for Oracle Utilities CCB and Siebel Energy Integration
23-6 Oracle Application Integration Architecture Installation and Upgrade Guide for Pre-Built Integrations
2. Click Next.
23.2.1.6 Complete Configuration
To complete configuration:1. Review the configuration information on the Configuration Summary screen.
2. Click Configure to accept the configuration.
The system displays progress of the configuration in the Configuration Progress screen.
The system displays any warnings or errors as necessary. You can review the configuration log for additional details. The configuration log location is displayed in Configuration Progress screen.
3. When the configuration process completes without errors, the AIA DCW displays the Configuration Complete screen.
4. Click Finish to close the DCW.
23.2.2 Configuring using the Response File
To configure using the response file:1. Open the response file.
When you create a response file through OUI, passwords get stored as <SECURE>.
2. Replace the password fields with actual passwords in the response file.
3. Navigate to <AIA_Instance>/bin and run the command source aiaenv.sh for Linux based systems, . ./aiaenv.sh for AIX based systems and aiaenv.bat for Microsoft Windows to configure the environment.
4. Navigate to <AIA_HOME>/bin and run the command ./aiaconfig.sh <Response File Location and Name> for Linux based systems and aiaconfig.bat <Response File Location and Name> for Microsoft Windows.
Note: If you want to make changes to the configuration, use the navigation pane on the left and select the screen you want to edit.
You can create a response file based on the input provided in the DCW and use it in future when you want to deploy the integration. You can configure using the steps described in Section 23.2.2, "Configuring using the Response File". Click Save Response File and save the response file with the name and location of your choice.
Note: If you encounter any issues running aiaconfig.sh on AIX, see the KIWA report of this integration for further details.
Configuring and Deploying Customer Data Synchronization for Oracle Utilities CCB and Siebel Energy Integration
Configuring and Deploying Customer Data Synchronization for Oracle Utilities CCB and Siebel Energy 23-7
23.2.3 Deploying the Customer Data Synchronization for Oracle Utilities CCB and Siebel Energy Integration
To deploy the integration to Fusion Middleware server:1. Navigate to <AIA_Instance>/bin and run the command source aiaenv.sh for
Linux based systems, . ./aiaenv.sh for AIX based systems and aiaenv.bat for Microsoft Windows to configure the environment.
2. Run the command for your platform.
Note: When you copy and paste the command in the command line, ensure that there is space between .xml and -. Ensure that there is space between these two when you run undeployment command too.
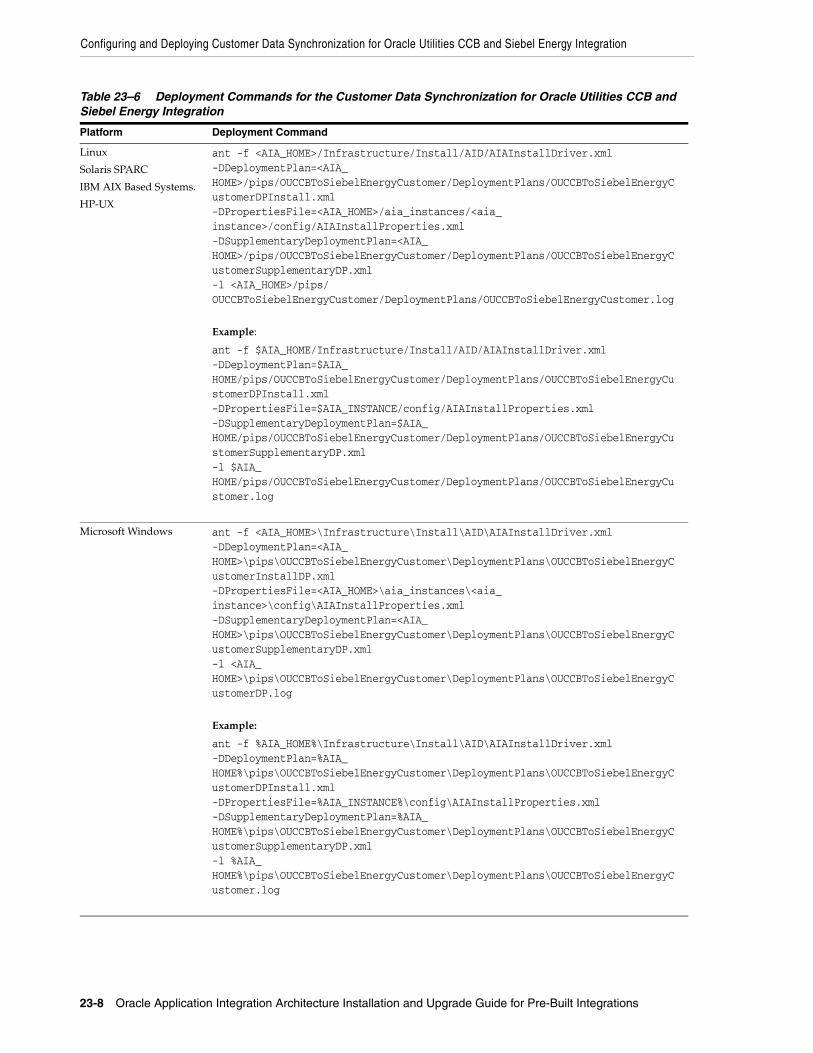
Configuring and Deploying Customer Data Synchronization for Oracle Utilities CCB and Siebel Energy Integration
23-8 Oracle Application Integration Architecture Installation and Upgrade Guide for Pre-Built Integrations
Table 23–6 Deployment Commands for the Customer Data Synchronization for Oracle Utilities CCB and Siebel Energy Integration
Platform Deployment Command
Linux
Solaris SPARC
IBM AIX Based Systems.
HP-UX
ant -f <AIA_HOME>/Infrastructure/Install/AID/AIAInstallDriver.xml -DDeploymentPlan=<AIA_HOME>/pips/OUCCBToSiebelEnergyCustomer/DeploymentPlans/OUCCBToSiebelEnergyCustomerDPInstall.xml -DPropertiesFile=<AIA_HOME>/aia_instances/<aia_instance>/config/AIAInstallProperties.xml -DSupplementaryDeploymentPlan=<AIA_HOME>/pips/OUCCBToSiebelEnergyCustomer/DeploymentPlans/OUCCBToSiebelEnergyCustomerSupplementaryDP.xml -l <AIA_HOME>/pips/ OUCCBToSiebelEnergyCustomer/DeploymentPlans/OUCCBToSiebelEnergyCustomer.log
Example:
ant -f $AIA_HOME/Infrastructure/Install/AID/AIAInstallDriver.xml-DDeploymentPlan=$AIA_HOME/pips/OUCCBToSiebelEnergyCustomer/DeploymentPlans/OUCCBToSiebelEnergyCustomerDPInstall.xml-DPropertiesFile=$AIA_INSTANCE/config/AIAInstallProperties.xml-DSupplementaryDeploymentPlan=$AIA_HOME/pips/OUCCBToSiebelEnergyCustomer/DeploymentPlans/OUCCBToSiebelEnergyCustomerSupplementaryDP.xml-l $AIA_HOME/pips/OUCCBToSiebelEnergyCustomer/DeploymentPlans/OUCCBToSiebelEnergyCustomer.log
Microsoft Windows ant -f <AIA_HOME>\Infrastructure\Install\AID\AIAInstallDriver.xml -DDeploymentPlan=<AIA_HOME>\pips\OUCCBToSiebelEnergyCustomer\DeploymentPlans\OUCCBToSiebelEnergyCustomerInstallDP.xml -DPropertiesFile=<AIA_HOME>\aia_instances\<aia_instance>\config\AIAInstallProperties.xml -DSupplementaryDeploymentPlan=<AIA_HOME>\pips\OUCCBToSiebelEnergyCustomer\DeploymentPlans\OUCCBToSiebelEnergyCustomerSupplementaryDP.xml -l <AIA_HOME>\pips\OUCCBToSiebelEnergyCustomer\DeploymentPlans\OUCCBToSiebelEnergyCustomerDP.log
Example:
ant -f %AIA_HOME%\Infrastructure\Install\AID\AIAInstallDriver.xml -DDeploymentPlan=%AIA_HOME%\pips\OUCCBToSiebelEnergyCustomer\DeploymentPlans\OUCCBToSiebelEnergyCustomerDPInstall.xml -DPropertiesFile=%AIA_INSTANCE%\config\AIAInstallProperties.xml -DSupplementaryDeploymentPlan=%AIA_HOME%\pips\OUCCBToSiebelEnergyCustomer\DeploymentPlans\OUCCBToSiebelEnergyCustomerSupplementaryDP.xml -l %AIA_HOME%\pips\OUCCBToSiebelEnergyCustomer\DeploymentPlans\OUCCBToSiebelEnergyCustomer.log

Verifying Deployment
Configuring and Deploying Customer Data Synchronization for Oracle Utilities CCB and Siebel Energy 23-9
3. Review the log file in the location specified in the command to verify successful deployment.
Oracle AIA ships artifacts in AIA Lifecycle Workbench which can be used in your integrations. These artifacts are created using FMW technologies such as BPEL and Mediator and are natively supported by AIA Foundation Pack tools such as Project Lifecycle Workbench, Harvester, Deployment Generator, AIA Deployment Driver (ADD). These are called native artifacts and they include SOA artifact types such as composites, DataSources, DVM, xRef, and so on. These artifacts can be modified or new natively supported artifacts can be added using the AIA Lifecyle Workbench and a BOM.xml file can be generated.
AIA integration development teams, most often, also require deployment of artifact types that are beyond what is supported by the Project Lifecycle Workbench and AIA Harvester. For instance, integration may require artifacts such as, Java applications, Shell Scripts, ANT based build scripts which constitute part of integration landscape in addition to the artifacts that are delivered by AIA. AIA also supports deployment of these supplementary artifacts. However, you must modify and add new non native artifacts outside AIA Lifecycle Workbench.
For more information on deploying artifacts, see Oracle Fusion Middleware Developer's Guide for Oracle Application Integration Architecture Foundation Pack, "Generating Deployment Plans and Deploying Artifacts".
23.3 Verifying Deployment
To verify the Customer Data Synchronization for Oracle Utilities CCB and Siebel Energy Integration deployment: 1. Open the log files from the following location and look for warnings and error
messages:
■ For Linux, Solaris SPARC, HP-UX and IBM AIX Based Systems: Review the install log located at <AIA_HOME>/aia_instances/<instance name>/logs to verify that the integration is successfully installed.
■ For Microsoft Windows: Review the install log located at <AIA_HOME>\aia_instances\<instance name>\logs to verify that the integration is successfully installed.
2. Confirm that the Customer Data Synchronization for Oracle Utilities CCB and Siebel Energy Integration components were successfully installed.
a. Navigate to the Oracle Enterprise Manager Fusion Middleware Control (http://<server name>:<port number>/em/).
b. Log in with the server admin user name. For access details, contact the system administrator.
c. Expand Farm_soa_domain, SOA, soa-infra, Default and look for the following items:
■ ProcessSalesOrderBillingAccountListSiebelUtilitiesConsumer
■ ProcessSalesOrderBillingAccountListSiebelUtilitiesProducer
Note: In Windows 2008, 2008 R2 and Vista, run the command prompt as an administrator (elevated mode). If the command prompt is invoked in normal mode, the integrations are not displayed.
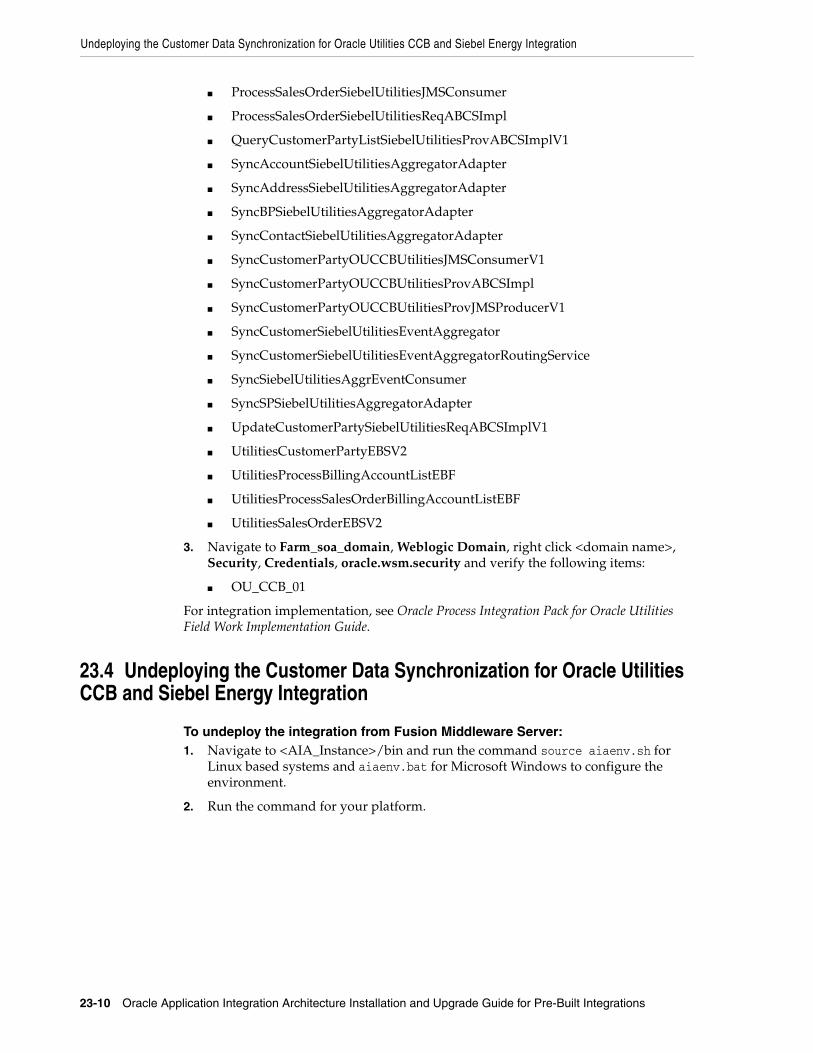
Undeploying the Customer Data Synchronization for Oracle Utilities CCB and Siebel Energy Integration
23-10 Oracle Application Integration Architecture Installation and Upgrade Guide for Pre-Built Integrations
■ ProcessSalesOrderSiebelUtilitiesJMSConsumer
■ ProcessSalesOrderSiebelUtilitiesReqABCSImpl
■ QueryCustomerPartyListSiebelUtilitiesProvABCSImplV1
■ SyncAccountSiebelUtilitiesAggregatorAdapter
■ SyncAddressSiebelUtilitiesAggregatorAdapter
■ SyncBPSiebelUtilitiesAggregatorAdapter
■ SyncContactSiebelUtilitiesAggregatorAdapter
■ SyncCustomerPartyOUCCBUtilitiesJMSConsumerV1
■ SyncCustomerPartyOUCCBUtilitiesProvABCSImpl
■ SyncCustomerPartyOUCCBUtilitiesProvJMSProducerV1
■ SyncCustomerSiebelUtilitiesEventAggregator
■ SyncCustomerSiebelUtilitiesEventAggregatorRoutingService
■ SyncSiebelUtilitiesAggrEventConsumer
■ SyncSPSiebelUtilitiesAggregatorAdapter
■ UpdateCustomerPartySiebelUtilitiesReqABCSImplV1
■ UtilitiesCustomerPartyEBSV2
■ UtilitiesProcessBillingAccountListEBF
■ UtilitiesProcessSalesOrderBillingAccountListEBF
■ UtilitiesSalesOrderEBSV2
3. Navigate to Farm_soa_domain, Weblogic Domain, right click <domain name>, Security, Credentials, oracle.wsm.security and verify the following items:
■ OU_CCB_01
For integration implementation, see Oracle Process Integration Pack for Oracle Utilities Field Work Implementation Guide.
23.4 Undeploying the Customer Data Synchronization for Oracle Utilities CCB and Siebel Energy Integration
To undeploy the integration from Fusion Middleware Server:1. Navigate to <AIA_Instance>/bin and run the command source aiaenv.sh for
Linux based systems and aiaenv.bat for Microsoft Windows to configure the environment.
2. Run the command for your platform.
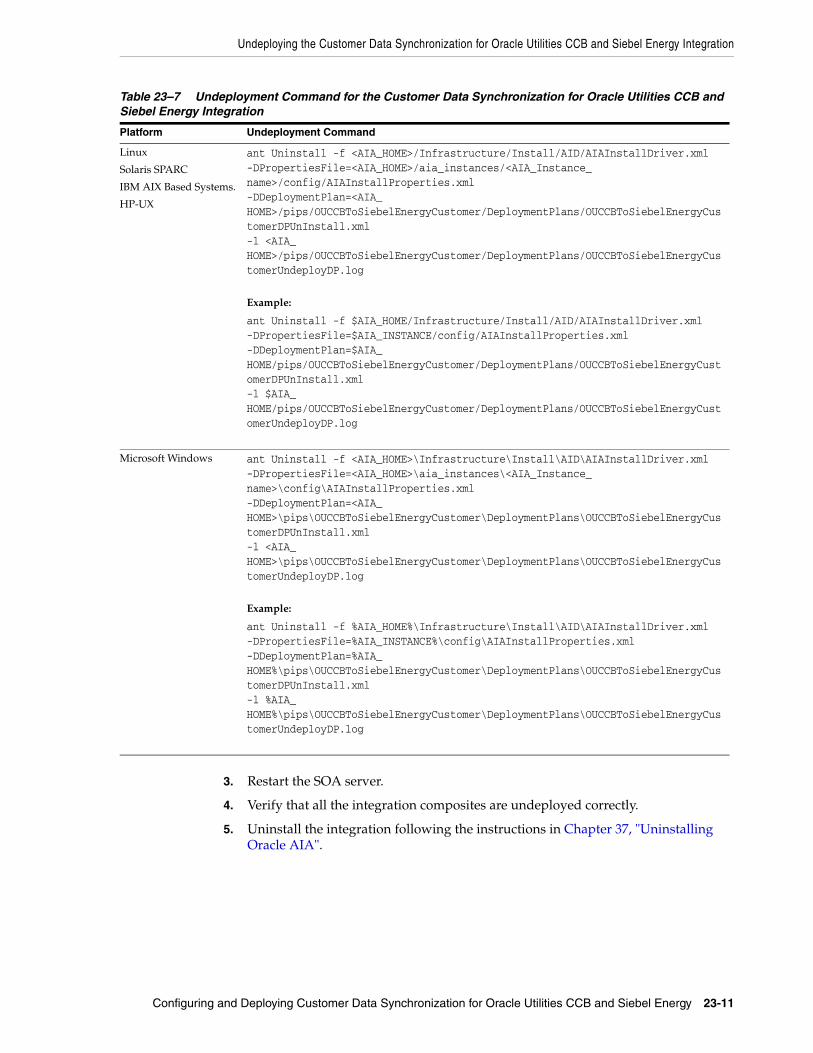
Undeploying the Customer Data Synchronization for Oracle Utilities CCB and Siebel Energy Integration
Configuring and Deploying Customer Data Synchronization for Oracle Utilities CCB and Siebel Energy 23-11
3. Restart the SOA server.
4. Verify that all the integration composites are undeployed correctly.
5. Uninstall the integration following the instructions in Chapter 37, "Uninstalling Oracle AIA".
Table 23–7 Undeployment Command for the Customer Data Synchronization for Oracle Utilities CCB and Siebel Energy Integration
Platform Undeployment Command
Linux
Solaris SPARC
IBM AIX Based Systems.
HP-UX
ant Uninstall -f <AIA_HOME>/Infrastructure/Install/AID/AIAInstallDriver.xml -DPropertiesFile=<AIA_HOME>/aia_instances/<AIA_Instance_name>/config/AIAInstallProperties.xml -DDeploymentPlan=<AIA_HOME>/pips/OUCCBToSiebelEnergyCustomer/DeploymentPlans/OUCCBToSiebelEnergyCustomerDPUnInstall.xml -l <AIA_HOME>/pips/OUCCBToSiebelEnergyCustomer/DeploymentPlans/OUCCBToSiebelEnergyCustomerUndeployDP.log
Example:
ant Uninstall -f $AIA_HOME/Infrastructure/Install/AID/AIAInstallDriver.xml-DPropertiesFile=$AIA_INSTANCE/config/AIAInstallProperties.xml-DDeploymentPlan=$AIA_HOME/pips/OUCCBToSiebelEnergyCustomer/DeploymentPlans/OUCCBToSiebelEnergyCustomerDPUnInstall.xml-l $AIA_HOME/pips/OUCCBToSiebelEnergyCustomer/DeploymentPlans/OUCCBToSiebelEnergyCustomerUndeployDP.log
Microsoft Windows ant Uninstall -f <AIA_HOME>\Infrastructure\Install\AID\AIAInstallDriver.xml -DPropertiesFile=<AIA_HOME>\aia_instances\<AIA_Instance_name>\config\AIAInstallProperties.xml -DDeploymentPlan=<AIA_HOME>\pips\OUCCBToSiebelEnergyCustomer\DeploymentPlans\OUCCBToSiebelEnergyCustomerDPUnInstall.xml -l <AIA_HOME>\pips\OUCCBToSiebelEnergyCustomer\DeploymentPlans\OUCCBToSiebelEnergyCustomerUndeployDP.log
Example:
ant Uninstall -f %AIA_HOME%\Infrastructure\Install\AID\AIAInstallDriver.xml-DPropertiesFile=%AIA_INSTANCE%\config\AIAInstallProperties.xml-DDeploymentPlan=%AIA_HOME%\pips\OUCCBToSiebelEnergyCustomer\DeploymentPlans\OUCCBToSiebelEnergyCustomerDPUnInstall.xml-l %AIA_HOME%\pips\OUCCBToSiebelEnergyCustomer\DeploymentPlans\OUCCBToSiebelEnergyCustomerUndeployDP.log

Undeploying the Customer Data Synchronization for Oracle Utilities CCB and Siebel Energy Integration
23-12 Oracle Application Integration Architecture Installation and Upgrade Guide for Pre-Built Integrations
24
Configuring and Deploying Product Data Synchronization for Oracle Utilities CCB and Siebel Energy 24-1
24Configuring and Deploying Product DataSynchronization for Oracle Utilities CCB and
Siebel Energy
This chapter discusses how to configure and deploy the Oracle Product Data Synchronization Integration Pack for Oracle Utilities Customer Care and Billing and Siebel Energy (Product Data Synchronization for Oracle Utilities CCB and Siebel Energy) integration.
This chapter includes the following sections:
■ Section 24.1, "Deployment Configuration Wizard"
■ Section 24.2, "Configuring and Deploying Product Data Synchronization for Oracle Utilities CCB and Siebel Energy Integration"
■ Section 24.3, "Verifying Deployment"
■ Section 24.4, "Undeploying the Product Data Synchronization for Oracle Utilities CCB and Siebel Energy Integration"
24.1 Deployment Configuration WizardThe DCW screens prompt you to enter the data required for successful configuration of the Product Data Synchronization for Oracle Utilities CCB and Siebel Energy Integration. Enter the details of the Product Data Synchronization for Oracle Utilities CCB and Siebel Energy Integration screens below, take a printout and keep it ready when you run the DCW. This action enables faster and error free configuration.
24.1.1 Integration Server Details ScreenAll artifacts associated with the integration infrastructure components deploy to the integration server. This screen contains the following fields:
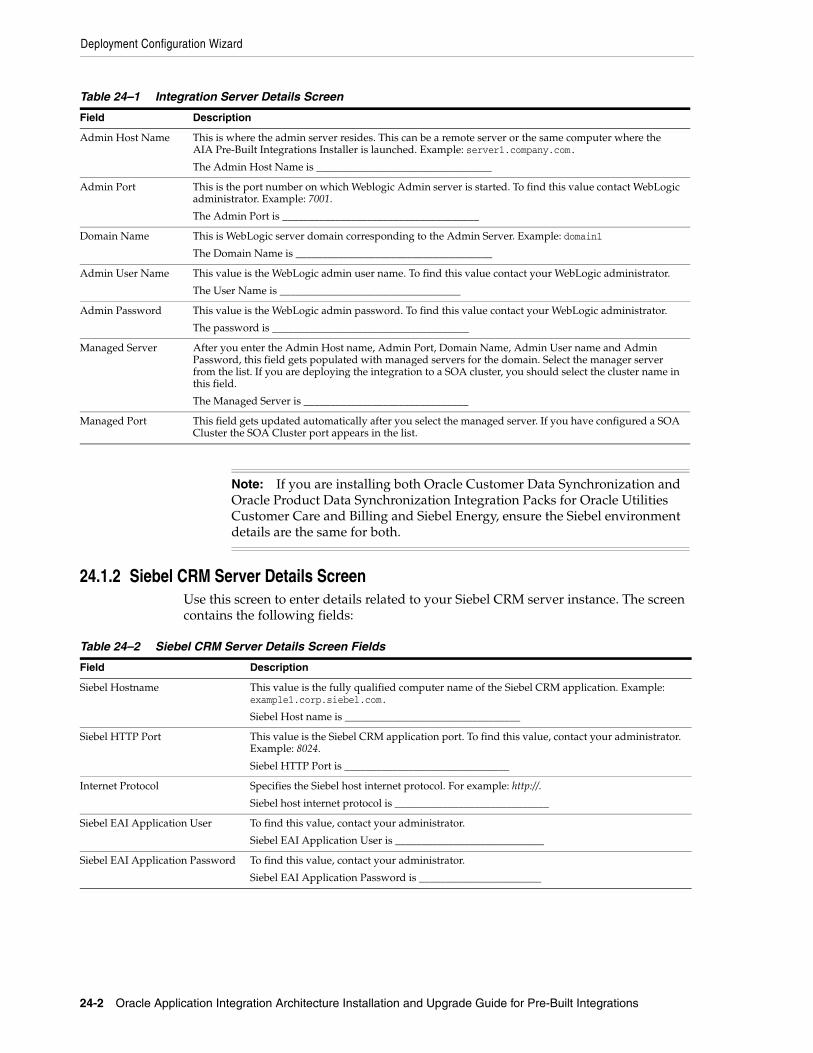
Deployment Configuration Wizard
24-2 Oracle Application Integration Architecture Installation and Upgrade Guide for Pre-Built Integrations
24.1.2 Siebel CRM Server Details ScreenUse this screen to enter details related to your Siebel CRM server instance. The screen contains the following fields:
Table 24–1 Integration Server Details Screen
Field Description
Admin Host Name This is where the admin server resides. This can be a remote server or the same computer where the AIA Pre-Built Integrations Installer is launched. Example: server1.company.com.
The Admin Host Name is _________________________________
Admin Port This is the port number on which Weblogic Admin server is started. To find this value contact WebLogic administrator. Example: 7001.
The Admin Port is _____________________________________
Domain Name This is WebLogic server domain corresponding to the Admin Server. Example: domain1
The Domain Name is _____________________________________
Admin User Name This value is the WebLogic admin user name. To find this value contact your WebLogic administrator.
The User Name is __________________________________
Admin Password This value is the WebLogic admin password. To find this value contact your WebLogic administrator.
The password is _____________________________________
Managed Server After you enter the Admin Host name, Admin Port, Domain Name, Admin User name and Admin Password, this field gets populated with managed servers for the domain. Select the manager server from the list. If you are deploying the integration to a SOA cluster, you should select the cluster name in this field.
The Managed Server is _______________________________
Managed Port This field gets updated automatically after you select the managed server. If you have configured a SOA Cluster the SOA Cluster port appears in the list.
Note: If you are installing both Oracle Customer Data Synchronization and Oracle Product Data Synchronization Integration Packs for Oracle Utilities Customer Care and Billing and Siebel Energy, ensure the Siebel environment details are the same for both.
Table 24–2 Siebel CRM Server Details Screen Fields
Field Description
Siebel Hostname This value is the fully qualified computer name of the Siebel CRM application. Example: example1.corp.siebel.com.
Siebel Host name is _________________________________
Siebel HTTP Port This value is the Siebel CRM application port. To find this value, contact your administrator. Example: 8024.
Siebel HTTP Port is _______________________________
Internet Protocol Specifies the Siebel host internet protocol. For example: http://.
Siebel host internet protocol is _____________________________
Siebel EAI Application User To find this value, contact your administrator.
Siebel EAI Application User is ____________________________
Siebel EAI Application Password To find this value, contact your administrator.
Siebel EAI Application Password is _______________________
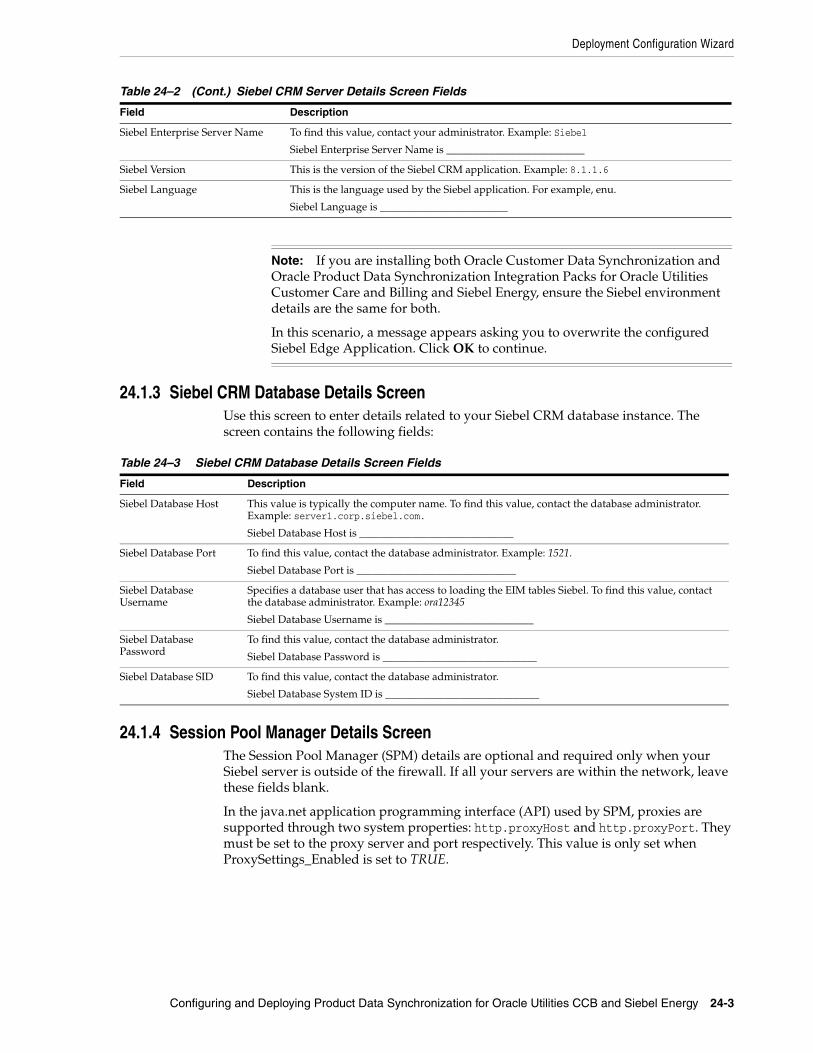
Deployment Configuration Wizard
Configuring and Deploying Product Data Synchronization for Oracle Utilities CCB and Siebel Energy 24-3
24.1.3 Siebel CRM Database Details ScreenUse this screen to enter details related to your Siebel CRM database instance. The screen contains the following fields:
24.1.4 Session Pool Manager Details ScreenThe Session Pool Manager (SPM) details are optional and required only when your Siebel server is outside of the firewall. If all your servers are within the network, leave these fields blank.
In the java.net application programming interface (API) used by SPM, proxies are supported through two system properties: http.proxyHost and http.proxyPort. They must be set to the proxy server and port respectively. This value is only set when ProxySettings_Enabled is set to TRUE.
Siebel Enterprise Server Name To find this value, contact your administrator. Example: Siebel
Siebel Enterprise Server Name is __________________________
Siebel Version This is the version of the Siebel CRM application. Example: 8.1.1.6
Siebel Language This is the language used by the Siebel application. For example, enu.
Siebel Language is ________________________
Note: If you are installing both Oracle Customer Data Synchronization and Oracle Product Data Synchronization Integration Packs for Oracle Utilities Customer Care and Billing and Siebel Energy, ensure the Siebel environment details are the same for both.
In this scenario, a message appears asking you to overwrite the configured Siebel Edge Application. Click OK to continue.
Table 24–3 Siebel CRM Database Details Screen Fields
Field Description
Siebel Database Host This value is typically the computer name. To find this value, contact the database administrator. Example: server1.corp.siebel.com.
Siebel Database Host is _____________________________
Siebel Database Port To find this value, contact the database administrator. Example: 1521.
Siebel Database Port is ______________________________
Siebel Database Username
Specifies a database user that has access to loading the EIM tables Siebel. To find this value, contact the database administrator. Example: ora12345
Siebel Database Username is ____________________________
Siebel Database Password
To find this value, contact the database administrator.
Siebel Database Password is _____________________________
Siebel Database SID To find this value, contact the database administrator.
Siebel Database System ID is _____________________________
Table 24–2 (Cont.) Siebel CRM Server Details Screen Fields
Field Description
Configuring and Deploying Product Data Synchronization for Oracle Utilities CCB and Siebel Energy Integration
24-4 Oracle Application Integration Architecture Installation and Upgrade Guide for Pre-Built Integrations
24.2 Configuring and Deploying Product Data Synchronization for Oracle Utilities CCB and Siebel Energy Integration
This section discusses the integration configuration and deployment process. There are two steps:
1. Configure your integration using the deployment DCW.
2. Deploy the integration to the Fusion Middleware server.
24.2.1 Configuring the Product Data Synchronization for Oracle Utilities CCB and Siebel Energy Integration
The screens that appear prompt you to enter the data that is required for successful configuration of the Product Data Synchronization for Oracle Utilities CCB and Siebel Energy Integration. Keep the completed worksheets of the Product Data Synchronization for Oracle Utilities CCB and Siebel Energy Integration screens ready before you launch the DCW.
To configure the Product Data Synchronization for Oracle Utilities CCB and Siebel Energy Integration:1. Navigate to /slot/emsxxxx/oracle/Middleware/user_projects/domains/soa_
domain/bin/ and open setDomainEnv.sh for Linux based systems and setDomainEnv.bat for Microsoft Windows.
2. Replace WLS_JDBC_REMOTE_ENABLED="-Dweblogic.jdbc.remoteEnabled=false" with WLS_JDBC_REMOTE_ENABLED="-Dweblogic.jdbc.remoteEnabled=true".
3. Restart the server.
4. Navigate to <AIA_Instance>/bin and run the command source aiaenv.sh for Linux based systems and aiaenv.bat for Microsoft Windows to configure the environment.
Table 24–4 Session Pool Manager Details Screen Fields
Field Description
Proxy host url This determines the server to be set in the system properties for http.proxyHost property.
Proxy host url is ___________________________
Proxy port This determines the port to be set in the system properties for the http.proxyPort property.
Proxy port is ______________________________
Note: If you are installing both Oracle Customer Data Synchronization and Oracle Product Data Synchronization Integration Packs for Oracle Utilities Customer Care and Billing and Siebel Energy, ensure the Siebel environment details are the same for both.
In this scenario, a message appears asking you to overwrite the configured Siebel Edge Application. Click OK to continue.
Note: If you are harvesting content to OER, perform the first three steps. Else start from step 4.
Configuring and Deploying Product Data Synchronization for Oracle Utilities CCB and Siebel Energy Integration
Configuring and Deploying Product Data Synchronization for Oracle Utilities CCB and Siebel Energy 24-5
5. Navigate to <AIA_HOME>/bin and run the command ./aiaconfig.sh for Linux based systems and aiaconfig.bat for Microsoft Windows.
This launches the AIA DCW.
6. Click Next.
7. Select the Oracle Product Data Synchronization Integration Pack for Oracle Utilities Customer Care and Billing and Siebel Energy PIP
8. Click Next.
24.2.1.1 Specify Integration Server Details
To specify Integration Server details:1. Enter information related to your integration server in the Integration Server
Details screen.
After providing admin user and password, Managed Server and Port are automatically selected.
2. Click Next.
24.2.1.2 Specify Siebel CRM Server Details
To specify Siebel CRM Server details:1. Enter information about your Siebel CRM Server in the Application Details -
Siebel CRM screen.
2. Click Next.
24.2.1.3 Specify Siebel CRM Database Details
To specify Siebel CRM Database details:1. Enter information about your Siebel CRM Database in the Siebel CRM Database
Details screen.
2. Click Next.
24.2.1.4 Specify Session Pool Manager Details
To specify Session Pool Manager details:1. Enter information about your Session Pool Manager installation in the Session
Pool Manager Details screen.
2. Click Next.
24.2.1.5 Complete Configuration
To complete configuration:1. Review the configuration information on the Configuration Summary screen.
Configuring and Deploying Product Data Synchronization for Oracle Utilities CCB and Siebel Energy Integration
24-6 Oracle Application Integration Architecture Installation and Upgrade Guide for Pre-Built Integrations
2. Click Configure to accept the configuration.
The system displays progress of the configuration in the Configuration Progress screen.
The system displays any warnings or errors as necessary. You can review the configuration log for additional details. The configuration log location is displayed in Configuration Progress screen.
3. When the configuration process completes without errors, the AIA DCW displays the Configuration Complete screen.
4. Click Finish to close the DCW.
24.2.2 Configuring using the Response File
To configure using the response file:1. Open the response file.
When you create a response file through OUI, passwords get stored as <SECURE>.
2. Replace the password fields with actual passwords in the response file.
3. Navigate to <AIA_Instance>/bin and run the command source aiaenv.sh for Linux based systems, . ./aiaenv.sh for AIX based systems and aiaenv.bat for Microsoft Windows to configure the environment.
4. Navigate to <AIA_HOME>/bin and run the command ./aiaconfig.sh <Response File Location and Name> for Linux based systems and aiaconfig.bat <Response File Location and Name> for Microsoft Windows.
24.2.3 Deploying the Product Data Synchronization for Oracle Utilities CCB and Siebel Energy Integration
To deploy the integration to Fusion Middleware server:1. Navigate to <AIA_Instance>/bin and run the command source aiaenv.sh for
Linux based systems, . ./aiaenv.sh for AIX based systems and aiaenv.bat for Microsoft Windows to configure the environment.
2. Run the command for your platform.
Note: If you want to make changes to the configuration, use the navigation pane on the left and select the screen you want to edit.
You can create a response file based on the input provided in the DCW and use it in future when you want to deploy the integration. You can configure using the steps described in Section 24.2.2, "Configuring using the Response File". Click Save Response File and save the response file with the name and location of your choice.
Note: If you encounter any issues running aiaconfig.sh on AIX, see the KIWA report of this integration for further details.
Configuring and Deploying Product Data Synchronization for Oracle Utilities CCB and Siebel Energy Integration
Configuring and Deploying Product Data Synchronization for Oracle Utilities CCB and Siebel Energy 24-7
Note: When you copy and paste the command in the command line, ensure that there is space between .xml and -. Ensure that there is space between these two when you run undeployment command too.
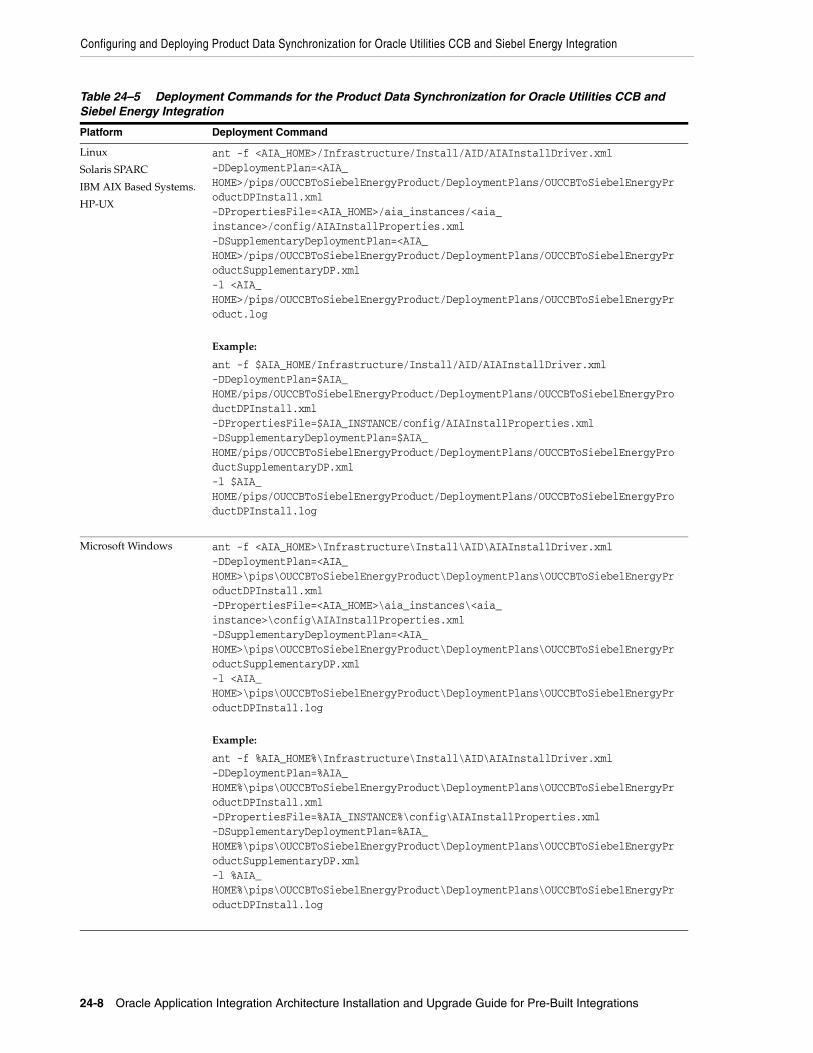
Configuring and Deploying Product Data Synchronization for Oracle Utilities CCB and Siebel Energy Integration
24-8 Oracle Application Integration Architecture Installation and Upgrade Guide for Pre-Built Integrations
Table 24–5 Deployment Commands for the Product Data Synchronization for Oracle Utilities CCB and Siebel Energy Integration
Platform Deployment Command
Linux
Solaris SPARC
IBM AIX Based Systems.
HP-UX
ant -f <AIA_HOME>/Infrastructure/Install/AID/AIAInstallDriver.xml -DDeploymentPlan=<AIA_HOME>/pips/OUCCBToSiebelEnergyProduct/DeploymentPlans/OUCCBToSiebelEnergyProductDPInstall.xml -DPropertiesFile=<AIA_HOME>/aia_instances/<aia_instance>/config/AIAInstallProperties.xml -DSupplementaryDeploymentPlan=<AIA_HOME>/pips/OUCCBToSiebelEnergyProduct/DeploymentPlans/OUCCBToSiebelEnergyProductSupplementaryDP.xml -l <AIA_HOME>/pips/OUCCBToSiebelEnergyProduct/DeploymentPlans/OUCCBToSiebelEnergyProduct.log
Example:
ant -f $AIA_HOME/Infrastructure/Install/AID/AIAInstallDriver.xml -DDeploymentPlan=$AIA_HOME/pips/OUCCBToSiebelEnergyProduct/DeploymentPlans/OUCCBToSiebelEnergyProductDPInstall.xml -DPropertiesFile=$AIA_INSTANCE/config/AIAInstallProperties.xml -DSupplementaryDeploymentPlan=$AIA_HOME/pips/OUCCBToSiebelEnergyProduct/DeploymentPlans/OUCCBToSiebelEnergyProductSupplementaryDP.xml -l $AIA_HOME/pips/OUCCBToSiebelEnergyProduct/DeploymentPlans/OUCCBToSiebelEnergyProductDPInstall.log
Microsoft Windows ant -f <AIA_HOME>\Infrastructure\Install\AID\AIAInstallDriver.xml -DDeploymentPlan=<AIA_HOME>\pips\OUCCBToSiebelEnergyProduct\DeploymentPlans\OUCCBToSiebelEnergyProductDPInstall.xml -DPropertiesFile=<AIA_HOME>\aia_instances\<aia_instance>\config\AIAInstallProperties.xml -DSupplementaryDeploymentPlan=<AIA_HOME>\pips\OUCCBToSiebelEnergyProduct\DeploymentPlans\OUCCBToSiebelEnergyProductSupplementaryDP.xml -l <AIA_HOME>\pips\OUCCBToSiebelEnergyProduct\DeploymentPlans\OUCCBToSiebelEnergyProductDPInstall.log
Example:
ant -f %AIA_HOME%\Infrastructure\Install\AID\AIAInstallDriver.xml -DDeploymentPlan=%AIA_HOME%\pips\OUCCBToSiebelEnergyProduct\DeploymentPlans\OUCCBToSiebelEnergyProductDPInstall.xml -DPropertiesFile=%AIA_INSTANCE%\config\AIAInstallProperties.xml -DSupplementaryDeploymentPlan=%AIA_HOME%\pips\OUCCBToSiebelEnergyProduct\DeploymentPlans\OUCCBToSiebelEnergyProductSupplementaryDP.xml -l %AIA_HOME%\pips\OUCCBToSiebelEnergyProduct\DeploymentPlans\OUCCBToSiebelEnergyProductDPInstall.log

Verifying Deployment
Configuring and Deploying Product Data Synchronization for Oracle Utilities CCB and Siebel Energy 24-9
3. Review the log file in the location specified in the command to verify successful deployment.
Oracle AIA ships artifacts in AIA Lifecycle Workbench which can be used in your integrations. These artifacts are created using FMW technologies such as BPEL and Mediator and are natively supported by AIA Foundation Pack tools such as Project Lifecycle Workbench, Harvester, Deployment Generator, AIA Deployment Driver (ADD). These are called native artifacts and they include SOA artifact types such as composites, DataSources, DVM, xRef, and so on. These artifacts can be modified or new natively supported artifacts can be added using the AIA Lifecyle Workbench and a BOM.xml file can be generated.
AIA integration development teams, most often, also require deployment of artifact types that are beyond what is supported by the Project Lifecycle Workbench and AIA Harvester. For instance, integration may require artifacts such as, Java applications, Shell Scripts, ANT based build scripts which constitute part of integration landscape in addition to the artifacts that are delivered by AIA. AIA also supports deployment of these supplementary artifacts. However, you must modify and add new non native artifacts outside AIA Lifecycle Workbench.
For more information on deploying artifacts, see Oracle Fusion Middleware Developer's Guide for Oracle Application Integration Architecture Foundation Pack, "Generating Deployment Plans and Deploying Artifacts".
24.3 Verifying Deployment
To verify the Product Data Synchronization for Oracle Utilities CCB and Siebel Energy Integration deployment: 1. Open the log files from the following location and look for warnings and error
messages:
■ For Linux, Solaris SPARC, HP-UX and IBM AIX Based Systems: Review the install log located at <AIA_HOME>/aia_instances/<instance name>/logs to verify that the integration is successfully installed.
■ For Microsoft Windows: Review the install log located at <AIA_HOME>\aia_instances\<instance name>\logs to verify that the integration is successfully installed.
2. Confirm that the Product Data Synchronization for Oracle Utilities CCB and Siebel Energy Integration components were successfully installed.
a. Navigate to the Oracle Enterprise Manager Fusion Middleware Control (http://<server name>:<port number>/em/).
b. Log in with the server admin user name. For access details, contact the system administrator.
c. Expand Farm_soa_domain, SOA, soa-infra, Default and look for the following items:
■ SyncItemCompositionOUCCBUtilitiesReqABCSImpl
■ SyncItemCompositionSiebelUtilitiesProvABCSImpl
Note: In Windows 2008, 2008 R2 and Vista, run the command prompt as an administrator (elevated mode). If the command prompt is invoked in normal mode, the integrations are not displayed.
Undeploying the Product Data Synchronization for Oracle Utilities CCB and Siebel Energy Integration
24-10 Oracle Application Integration Architecture Installation and Upgrade Guide for Pre-Built Integrations
■ SyncItemCompositionResponseOUCCBUtilitiesProvABCSImpl
■ UtilitiesItemCompositionEBS
■ UtilitiesItemCompositionResponseEBS
■ SyncProductListOUCCBUtilitiesJMSConsumerV1
■ SyncProductListResponseOUCCBUtilitiesJMSProducerV1
For integration implementation, see Oracle Product Data Synchronization Integration Pack for Oracle Utilities Customer Care and Billing and Siebel Energy Implementation Guide.
24.4 Undeploying the Product Data Synchronization for Oracle Utilities CCB and Siebel Energy Integration
To undeploy the integration from Fusion Middleware Server:1. Navigate to <AIA_Instance>/bin and run the command source aiaenv.sh for
Linux based systems, . ./aiaenv.sh for AIX based systems and aiaenv.bat for Microsoft Windows to configure the environment.
2. Run the command for your platform.
Note: The Queue needed by Oracle Utilities Customer Care and Billing to publish Products into and the queue needed to read response message from Siebel Energy into Oracle Utilities Customer Care and Billing resides on the Integration Server.
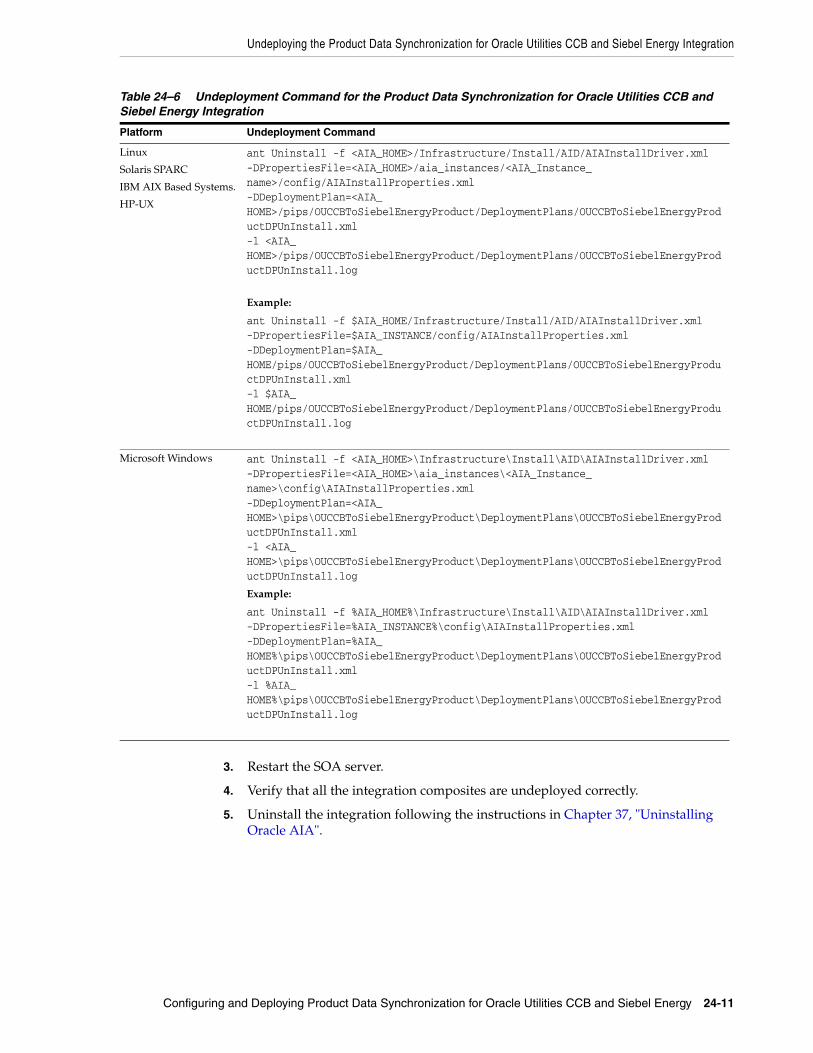
Undeploying the Product Data Synchronization for Oracle Utilities CCB and Siebel Energy Integration
Configuring and Deploying Product Data Synchronization for Oracle Utilities CCB and Siebel Energy 24-11
3. Restart the SOA server.
4. Verify that all the integration composites are undeployed correctly.
5. Uninstall the integration following the instructions in Chapter 37, "Uninstalling Oracle AIA".
Table 24–6 Undeployment Command for the Product Data Synchronization for Oracle Utilities CCB and Siebel Energy Integration
Platform Undeployment Command
Linux
Solaris SPARC
IBM AIX Based Systems.
HP-UX
ant Uninstall -f <AIA_HOME>/Infrastructure/Install/AID/AIAInstallDriver.xml -DPropertiesFile=<AIA_HOME>/aia_instances/<AIA_Instance_name>/config/AIAInstallProperties.xml -DDeploymentPlan=<AIA_HOME>/pips/OUCCBToSiebelEnergyProduct/DeploymentPlans/OUCCBToSiebelEnergyProductDPUnInstall.xml -l <AIA_HOME>/pips/OUCCBToSiebelEnergyProduct/DeploymentPlans/OUCCBToSiebelEnergyProductDPUnInstall.log
Example:
ant Uninstall -f $AIA_HOME/Infrastructure/Install/AID/AIAInstallDriver.xml-DPropertiesFile=$AIA_INSTANCE/config/AIAInstallProperties.xml-DDeploymentPlan=$AIA_HOME/pips/OUCCBToSiebelEnergyProduct/DeploymentPlans/OUCCBToSiebelEnergyProductDPUnInstall.xml-l $AIA_HOME/pips/OUCCBToSiebelEnergyProduct/DeploymentPlans/OUCCBToSiebelEnergyProductDPUnInstall.log
Microsoft Windows ant Uninstall -f <AIA_HOME>\Infrastructure\Install\AID\AIAInstallDriver.xml -DPropertiesFile=<AIA_HOME>\aia_instances\<AIA_Instance_name>\config\AIAInstallProperties.xml -DDeploymentPlan=<AIA_HOME>\pips\OUCCBToSiebelEnergyProduct\DeploymentPlans\OUCCBToSiebelEnergyProductDPUnInstall.xml -l <AIA_HOME>\pips\OUCCBToSiebelEnergyProduct\DeploymentPlans\OUCCBToSiebelEnergyProductDPUnInstall.log
Example:
ant Uninstall -f %AIA_HOME%\Infrastructure\Install\AID\AIAInstallDriver.xml-DPropertiesFile=%AIA_INSTANCE%\config\AIAInstallProperties.xml-DDeploymentPlan=%AIA_HOME%\pips\OUCCBToSiebelEnergyProduct\DeploymentPlans\OUCCBToSiebelEnergyProductDPUnInstall.xml-l %AIA_HOME%\pips\OUCCBToSiebelEnergyProduct\DeploymentPlans\OUCCBToSiebelEnergyProductDPUnInstall.log

Undeploying the Product Data Synchronization for Oracle Utilities CCB and Siebel Energy Integration
24-12 Oracle Application Integration Architecture Installation and Upgrade Guide for Pre-Built Integrations
Part IIIPart III Configuring and Deploying AIA RV
3.1.1 PIPs and DIs
This part provides a general introduction to the Oracle AIA RV 3.1.1 PIPs and DIs. It also provides the steps involved in the configuration and deployment of the PIPs and DIs.
This part contains the following chapters:
■ Chapter 25, "Configuring and Deploying the Design to Release: Agile PLM for Process - OPM PIP"
■ Chapter 26, "Configuring and Deploying the Order to Cash for Siebel CRM - EBS PIP"
■ Chapter 27, "Configuring and Deploying Siebel CRM to OIC Integration"
■ Chapter 28, "Configuring and Deploying the Lead to Order: CRM OD - EBS PIP"
■ Chapter 29, "Configuring and Deploying the Financials Ops Control: Oracle Retail - PSFT PIP"
■ Chapter 30, "Configuring and Deploying the LSP Financial Mgmt: OTM - EBS PIP"
■ Chapter 31, "Configuring and Deploying the LSP Order Mgmt: OTM - EBS - Siebel CRM PIP"
■ Chapter 32, "Configuring and Deploying the LSP Driver Mgmt: OTM - EBS PIP"
■ Chapter 33, "Configuring and Deploying Value Chain Planning Base Pack Integration"
■ Chapter 34, "Configuring and Deploying the Project Portfolio Mgmt: Primavera P6 - JDE E1 PIP"
■ Chapter 35, "Configuring and Deploying the Serialization and Tracking: OPSM - EBS integration"

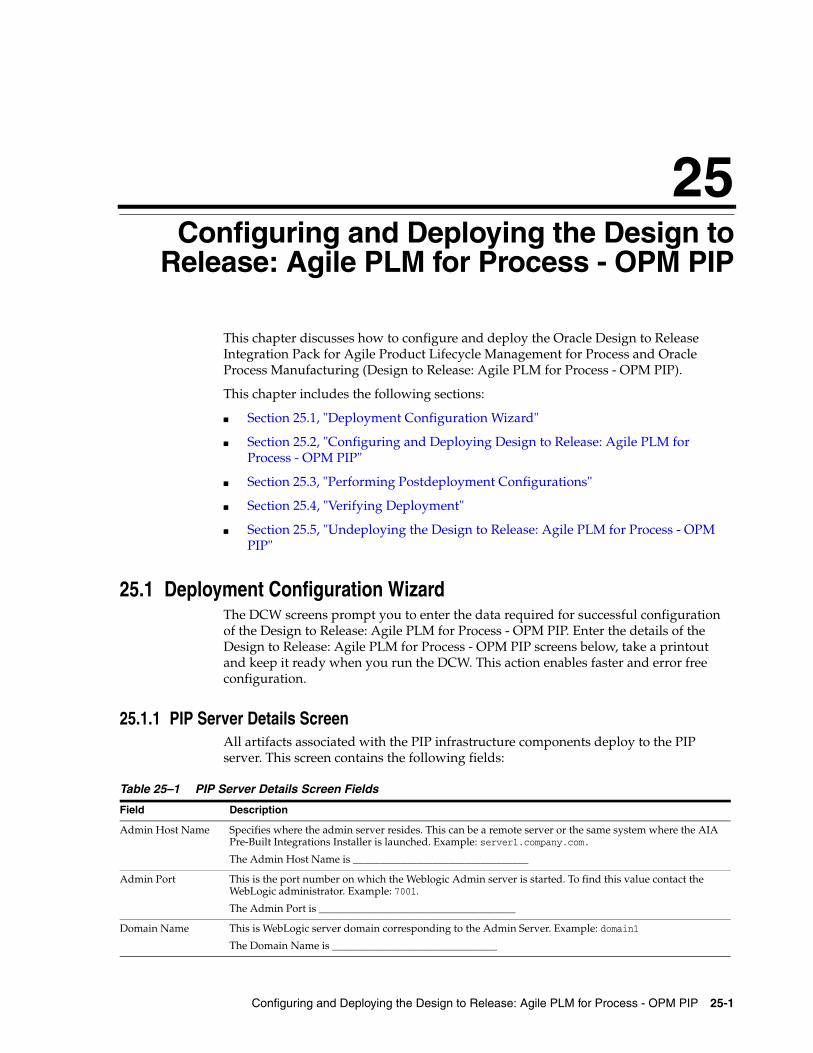
25
Configuring and Deploying the Design to Release: Agile PLM for Process - OPM PIP 25-1
25Configuring and Deploying the Design toRelease: Agile PLM for Process - OPM PIP
This chapter discusses how to configure and deploy the Oracle Design to Release Integration Pack for Agile Product Lifecycle Management for Process and Oracle Process Manufacturing (Design to Release: Agile PLM for Process - OPM PIP).
This chapter includes the following sections:
■ Section 25.1, "Deployment Configuration Wizard"
■ Section 25.2, "Configuring and Deploying Design to Release: Agile PLM for Process - OPM PIP"
■ Section 25.3, "Performing Postdeployment Configurations"
■ Section 25.4, "Verifying Deployment"
■ Section 25.5, "Undeploying the Design to Release: Agile PLM for Process - OPM PIP"
25.1 Deployment Configuration WizardThe DCW screens prompt you to enter the data required for successful configuration of the Design to Release: Agile PLM for Process - OPM PIP. Enter the details of the Design to Release: Agile PLM for Process - OPM PIP screens below, take a printout and keep it ready when you run the DCW. This action enables faster and error free configuration.
25.1.1 PIP Server Details ScreenAll artifacts associated with the PIP infrastructure components deploy to the PIP server. This screen contains the following fields:
Table 25–1 PIP Server Details Screen Fields
Field Description
Admin Host Name Specifies where the admin server resides. This can be a remote server or the same system where the AIA Pre-Built Integrations Installer is launched. Example: server1.company.com.
The Admin Host Name is _________________________________
Admin Port This is the port number on which the Weblogic Admin server is started. To find this value contact the WebLogic administrator. Example: 7001.
The Admin Port is _____________________________________
Domain Name This is WebLogic server domain corresponding to the Admin Server. Example: domain1
The Domain Name is _______________________________
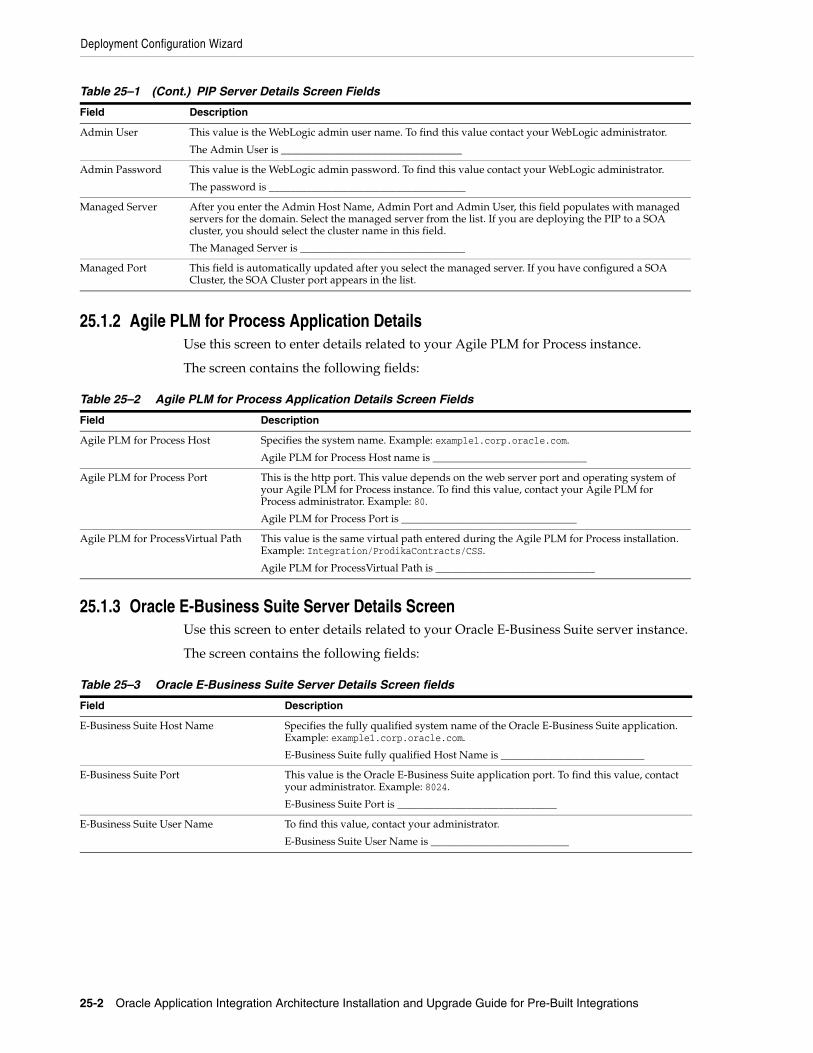
Deployment Configuration Wizard
25-2 Oracle Application Integration Architecture Installation and Upgrade Guide for Pre-Built Integrations
25.1.2 Agile PLM for Process Application DetailsUse this screen to enter details related to your Agile PLM for Process instance.
The screen contains the following fields:
25.1.3 Oracle E-Business Suite Server Details ScreenUse this screen to enter details related to your Oracle E-Business Suite server instance.
The screen contains the following fields:
Admin User This value is the WebLogic admin user name. To find this value contact your WebLogic administrator.
The Admin User is __________________________________
Admin Password This value is the WebLogic admin password. To find this value contact your WebLogic administrator.
The password is _____________________________________
Managed Server After you enter the Admin Host Name, Admin Port and Admin User, this field populates with managed servers for the domain. Select the managed server from the list. If you are deploying the PIP to a SOA cluster, you should select the cluster name in this field.
The Managed Server is _______________________________
Managed Port This field is automatically updated after you select the managed server. If you have configured a SOA Cluster, the SOA Cluster port appears in the list.
Table 25–2 Agile PLM for Process Application Details Screen Fields
Field Description
Agile PLM for Process Host Specifies the system name. Example: example1.corp.oracle.com.
Agile PLM for Process Host name is _____________________________
Agile PLM for Process Port This is the http port. This value depends on the web server port and operating system of your Agile PLM for Process instance. To find this value, contact your Agile PLM for Process administrator. Example: 80.
Agile PLM for Process Port is _________________________________
Agile PLM for ProcessVirtual Path This value is the same virtual path entered during the Agile PLM for Process installation. Example: Integration/ProdikaContracts/CSS.
Agile PLM for ProcessVirtual Path is ______________________________
Table 25–3 Oracle E-Business Suite Server Details Screen fields
Field Description
E-Business Suite Host Name Specifies the fully qualified system name of the Oracle E-Business Suite application. Example: example1.corp.oracle.com.
E-Business Suite fully qualified Host Name is ___________________________
E-Business Suite Port This value is the Oracle E-Business Suite application port. To find this value, contact your administrator. Example: 8024.
E-Business Suite Port is ______________________________
E-Business Suite User Name To find this value, contact your administrator.
E-Business Suite User Name is __________________________
Table 25–1 (Cont.) PIP Server Details Screen Fields
Field Description
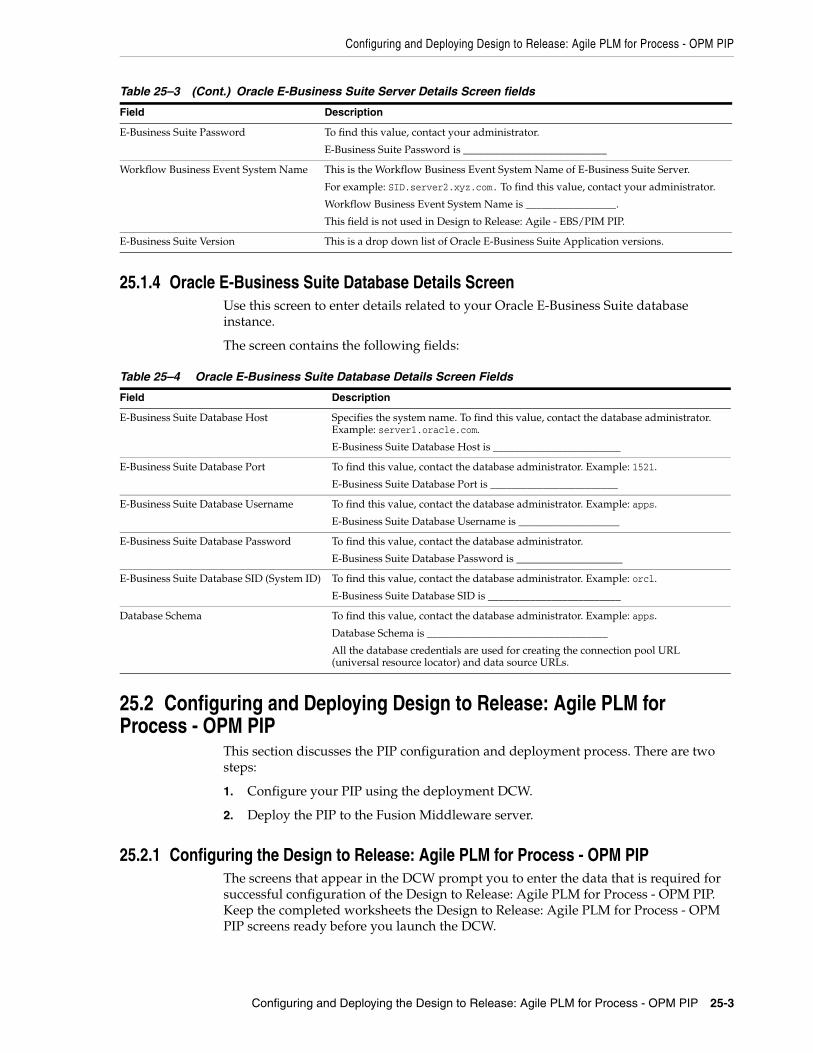
Configuring and Deploying Design to Release: Agile PLM for Process - OPM PIP
Configuring and Deploying the Design to Release: Agile PLM for Process - OPM PIP 25-3
25.1.4 Oracle E-Business Suite Database Details ScreenUse this screen to enter details related to your Oracle E-Business Suite database instance.
The screen contains the following fields:
25.2 Configuring and Deploying Design to Release: Agile PLM for Process - OPM PIP
This section discusses the PIP configuration and deployment process. There are two steps:
1. Configure your PIP using the deployment DCW.
2. Deploy the PIP to the Fusion Middleware server.
25.2.1 Configuring the Design to Release: Agile PLM for Process - OPM PIPThe screens that appear in the DCW prompt you to enter the data that is required for successful configuration of the Design to Release: Agile PLM for Process - OPM PIP. Keep the completed worksheets the Design to Release: Agile PLM for Process - OPM PIP screens ready before you launch the DCW.
E-Business Suite Password To find this value, contact your administrator.
E-Business Suite Password is ___________________________
Workflow Business Event System Name This is the Workflow Business Event System Name of E-Business Suite Server.
For example: SID.server2.xyz.com. To find this value, contact your administrator.
Workflow Business Event System Name is _________________.
This field is not used in Design to Release: Agile - EBS/PIM PIP.
E-Business Suite Version This is a drop down list of Oracle E-Business Suite Application versions.
Table 25–4 Oracle E-Business Suite Database Details Screen Fields
Field Description
E-Business Suite Database Host Specifies the system name. To find this value, contact the database administrator. Example: server1.oracle.com.
E-Business Suite Database Host is ________________________
E-Business Suite Database Port To find this value, contact the database administrator. Example: 1521.
E-Business Suite Database Port is ________________________
E-Business Suite Database Username To find this value, contact the database administrator. Example: apps.
E-Business Suite Database Username is ___________________
E-Business Suite Database Password To find this value, contact the database administrator.
E-Business Suite Database Password is ____________________
E-Business Suite Database SID (System ID) To find this value, contact the database administrator. Example: orcl.
E-Business Suite Database SID is _________________________
Database Schema To find this value, contact the database administrator. Example: apps.
Database Schema is __________________________________
All the database credentials are used for creating the connection pool URL (universal resource locator) and data source URLs.
Table 25–3 (Cont.) Oracle E-Business Suite Server Details Screen fields
Field Description
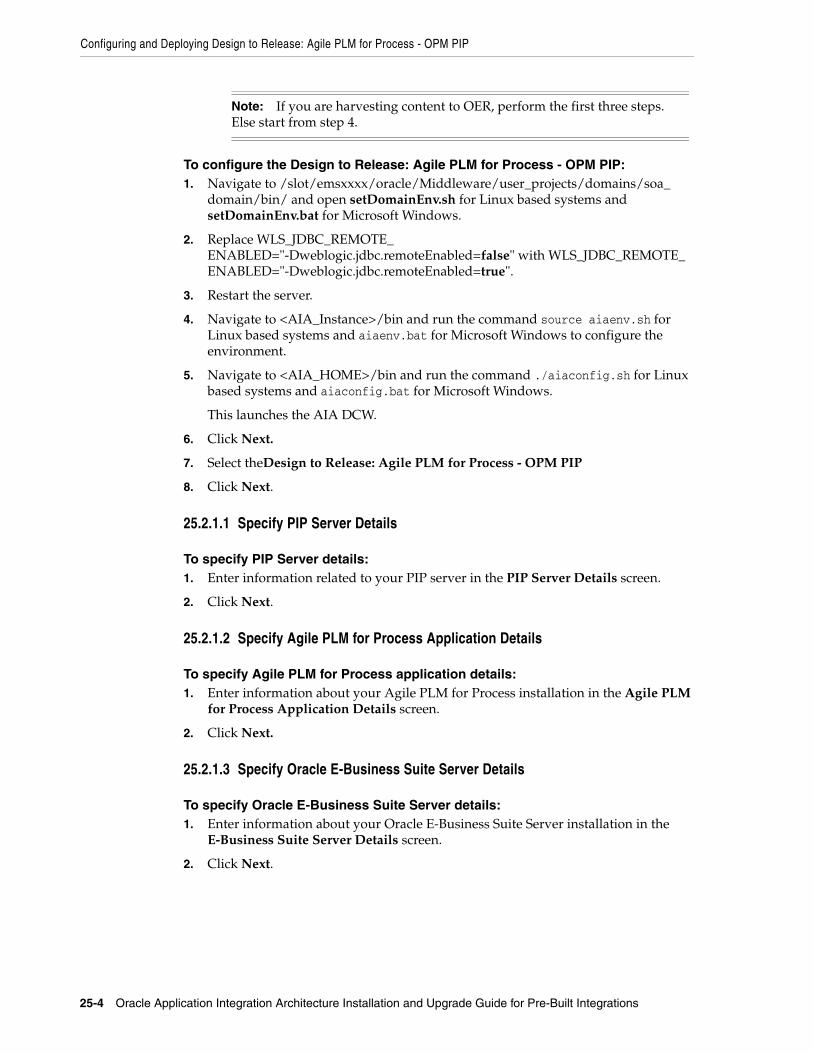
Configuring and Deploying Design to Release: Agile PLM for Process - OPM PIP
25-4 Oracle Application Integration Architecture Installation and Upgrade Guide for Pre-Built Integrations
To configure the Design to Release: Agile PLM for Process - OPM PIP:1. Navigate to /slot/emsxxxx/oracle/Middleware/user_projects/domains/soa_
domain/bin/ and open setDomainEnv.sh for Linux based systems and setDomainEnv.bat for Microsoft Windows.
2. Replace WLS_JDBC_REMOTE_ENABLED="-Dweblogic.jdbc.remoteEnabled=false" with WLS_JDBC_REMOTE_ENABLED="-Dweblogic.jdbc.remoteEnabled=true".
3. Restart the server.
4. Navigate to <AIA_Instance>/bin and run the command source aiaenv.sh for Linux based systems and aiaenv.bat for Microsoft Windows to configure the environment.
5. Navigate to <AIA_HOME>/bin and run the command ./aiaconfig.sh for Linux based systems and aiaconfig.bat for Microsoft Windows.
This launches the AIA DCW.
6. Click Next.
7. Select theDesign to Release: Agile PLM for Process - OPM PIP
8. Click Next.
25.2.1.1 Specify PIP Server Details
To specify PIP Server details:1. Enter information related to your PIP server in the PIP Server Details screen.
2. Click Next.
25.2.1.2 Specify Agile PLM for Process Application Details
To specify Agile PLM for Process application details:1. Enter information about your Agile PLM for Process installation in the Agile PLM
for Process Application Details screen.
2. Click Next.
25.2.1.3 Specify Oracle E-Business Suite Server Details
To specify Oracle E-Business Suite Server details:1. Enter information about your Oracle E-Business Suite Server installation in the
E-Business Suite Server Details screen.
2. Click Next.
Note: If you are harvesting content to OER, perform the first three steps. Else start from step 4.
Configuring and Deploying Design to Release: Agile PLM for Process - OPM PIP
Configuring and Deploying the Design to Release: Agile PLM for Process - OPM PIP 25-5
25.2.1.4 Oracle E-Business Suite Database Details Screen
To specify Oracle E-Business Suite Database details:1. Enter information about your Oracle E-Business Suite Database installation in the
E-Business Suite Database Details screen.
2. Click Next.
25.2.1.5 Complete Configuration
To complete configuration:1. Review the configuration information on the Configuration Summary screen.
2. Click Configure to accept the configuration.
The system displays progress of the configuration in the Configuration Progress screen.
The system displays any warnings or errors as necessary. You can review the configuration log for additional details. The configuration log location is displayed in Configuration Progress screen.
3. When the configuration process completes without errors, the AIA DCW displays the Configuration Complete screen.
4. Click Finish to close the DCW.
25.2.2 Configuring using the Response File
To configure using the response file:1. Open the response file.
When you create a response file through OUI, passwords get stored as <SECURE>.
2. Replace the password fields with actual passwords in the response file.
3. Navigate to <AIA_Instance>/bin and run the command source aiaenv.sh for Linux based systems and aiaenv.bat for Microsoft Windows to configure the environment.
4. Navigate to <AIA_HOME>/bin and run the command ./aiaconfig.sh <Response File Location and Name> for Linux based systems and aiaconfig.bat <Response File Location and Name> for Microsoft Windows.
Note: If you want to make changes to the configuration, use the navigation pane on the left and select the screen you want to edit.
You can create a response file based on the input provided in the DCW and use it in future when you want to deploy the PIP. You can configure using the steps described in Section 25.2.2, "Configuring using the Response File". Click Save Response File and save the response file with the name and location of your choice.
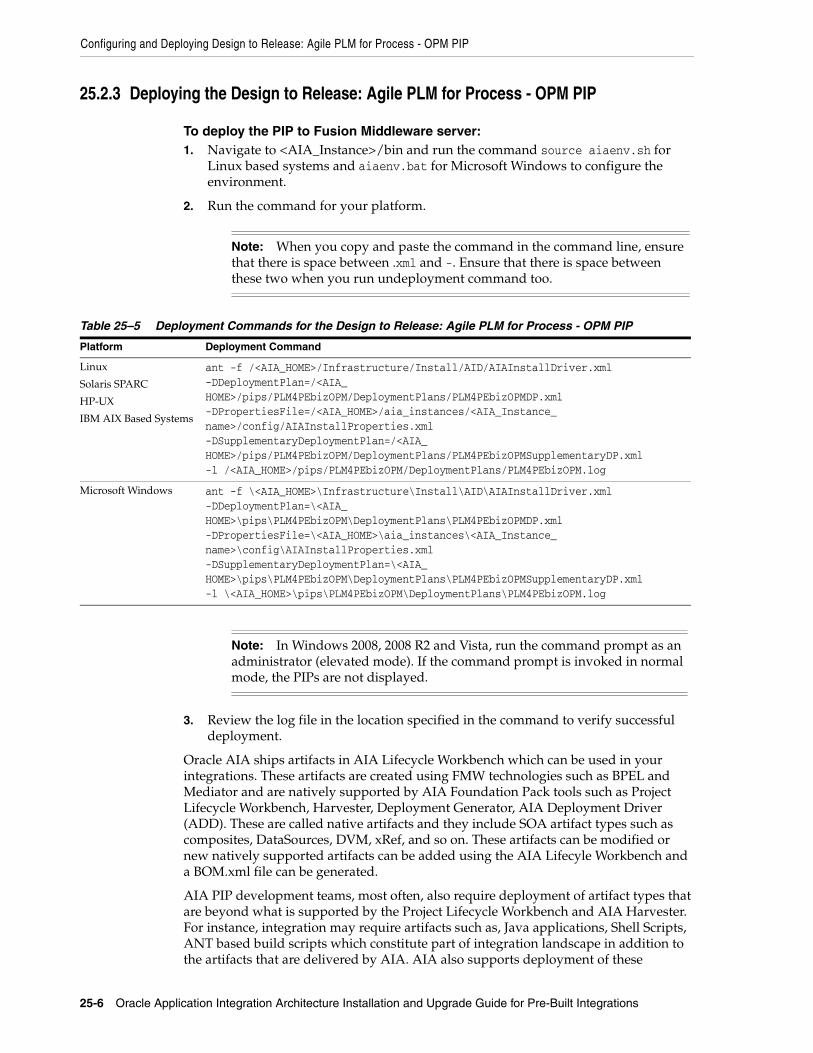
Configuring and Deploying Design to Release: Agile PLM for Process - OPM PIP
25-6 Oracle Application Integration Architecture Installation and Upgrade Guide for Pre-Built Integrations
25.2.3 Deploying the Design to Release: Agile PLM for Process - OPM PIP
To deploy the PIP to Fusion Middleware server:1. Navigate to <AIA_Instance>/bin and run the command source aiaenv.sh for
Linux based systems and aiaenv.bat for Microsoft Windows to configure the environment.
2. Run the command for your platform.
3. Review the log file in the location specified in the command to verify successful deployment.
Oracle AIA ships artifacts in AIA Lifecycle Workbench which can be used in your integrations. These artifacts are created using FMW technologies such as BPEL and Mediator and are natively supported by AIA Foundation Pack tools such as Project Lifecycle Workbench, Harvester, Deployment Generator, AIA Deployment Driver (ADD). These are called native artifacts and they include SOA artifact types such as composites, DataSources, DVM, xRef, and so on. These artifacts can be modified or new natively supported artifacts can be added using the AIA Lifecyle Workbench and a BOM.xml file can be generated.
AIA PIP development teams, most often, also require deployment of artifact types that are beyond what is supported by the Project Lifecycle Workbench and AIA Harvester. For instance, integration may require artifacts such as, Java applications, Shell Scripts, ANT based build scripts which constitute part of integration landscape in addition to the artifacts that are delivered by AIA. AIA also supports deployment of these
Note: When you copy and paste the command in the command line, ensure that there is space between .xml and -. Ensure that there is space between these two when you run undeployment command too.
Table 25–5 Deployment Commands for the Design to Release: Agile PLM for Process - OPM PIP
Platform Deployment Command
Linux
Solaris SPARC
HP-UX
IBM AIX Based Systems
ant -f /<AIA_HOME>/Infrastructure/Install/AID/AIAInstallDriver.xml -DDeploymentPlan=/<AIA_HOME>/pips/PLM4PEbizOPM/DeploymentPlans/PLM4PEbizOPMDP.xml -DPropertiesFile=/<AIA_HOME>/aia_instances/<AIA_Instance_name>/config/AIAInstallProperties.xml -DSupplementaryDeploymentPlan=/<AIA_HOME>/pips/PLM4PEbizOPM/DeploymentPlans/PLM4PEbizOPMSupplementaryDP.xml -l /<AIA_HOME>/pips/PLM4PEbizOPM/DeploymentPlans/PLM4PEbizOPM.log
Microsoft Windows ant -f \<AIA_HOME>\Infrastructure\Install\AID\AIAInstallDriver.xml -DDeploymentPlan=\<AIA_HOME>\pips\PLM4PEbizOPM\DeploymentPlans\PLM4PEbizOPMDP.xml -DPropertiesFile=\<AIA_HOME>\aia_instances\<AIA_Instance_name>\config\AIAInstallProperties.xml -DSupplementaryDeploymentPlan=\<AIA_HOME>\pips\PLM4PEbizOPM\DeploymentPlans\PLM4PEbizOPMSupplementaryDP.xml -l \<AIA_HOME>\pips\PLM4PEbizOPM\DeploymentPlans\PLM4PEbizOPM.log
Note: In Windows 2008, 2008 R2 and Vista, run the command prompt as an administrator (elevated mode). If the command prompt is invoked in normal mode, the PIPs are not displayed.
Verifying Deployment
Configuring and Deploying the Design to Release: Agile PLM for Process - OPM PIP 25-7
supplementary artifacts. However, you must modify and add new non native artifacts outside AIA Lifecycle Workbench.
For more information on deploying artifacts, see Oracle Fusion Middleware Developer's Guide for Oracle Application Integration Architecture Foundation Pack, "Generating Deployment Plans and Deploying Artifacts".
25.3 Performing Postdeployment ConfigurationsAgile PLM for Process applies HTTP basic authentication to handle AIA syndication result messages by an Agile PLM for Process host account. You must add the Agile PLM for Process credential to Fusion Middleware for the HTTP basic authentication connection.
To configure credential:1. Log in to the Oracle Enterprise Manager Fusion Middleware Control.
2. Navigate to WebLogic Domain, soa_domain, Securities, Credentials.
3. Check whether the Map with name oracle.wsm.security exists in Credentials.
If it does not exist, create a Map with name oracle.wsm.security.
4. Create a key in oracle.wsm.security map with name PLM4P_CSSServices_BasicHttpBinding_ICSSServices. Select the type as password and enter the Agile PLM for Process host user name and password.
5. Click OK.
25.4 Verifying Deployment
To verify the Design to Release: Agile PLM for Process - OPM PIP deployment:1. Open the log files from the following location and look for warnings and error
messages:
■ For Linux, Solaris SPARC, HP-UX and IBM AIX Based Systems: Review the install log located at <AIA_HOME>/aia_instances/<instance name>/logs to verify that the PIP is successfully installed.
■ For Microsoft Windows: Review the install log located at <AIA_HOME>\aia_instances\<instance name>\logs to verify that the PIP is successfully installed.
2. Confirm that the Design to Release: Agile PLM for Process - OPM PIP services were installed.
a. Navigate to the Oracle Enterprise Manager Fusion Middleware Control (http://<server name>:<port number>/em/).
b. Log in with the server admin user name. For access details, contact the system administrator.
c. Expand Farm_soa_domain, SOA, soa-infra, Default and look for the following items:
■ ItemEBSV2
■ ItemResponseEBSV2
■ ProductionRecipeEBS
Verifying Deployment
25-8 Oracle Application Integration Architecture Installation and Upgrade Guide for Pre-Built Integrations
■ ProductionRecipeResponseEBS
■ QueryResponsibilityEbizAdapter
■ SyncItemListEbizAdapter
■ SyncItemListEbizProvABCSImpl
■ SyncProductionRecipeListEbizProvABCSImpl
■ SyncRecipeListEbizAdapter
■ SyncSpecPLM4PAdapter
■ SyncSpecPLM4PReqABCSImpl
■ TransformAppContextEbizService
25.4.1 Validating Security PoliciesAll SOA composites are protected by Global Policies provided by Foundation Pack as defined in the Security section of the Developer Guide. Additionally individual services for this PIP have locally attached security policies.
To validate locally attached security policies:1. Log in to the Oracle Enterprise Manager Fusion Middleware Control.
2. Navigate to WebLogic Domain, soa_domain, Web Services, Policies.
3. Verify Service Policy attachment.
a. Find the service policy in the list of policies.
b. Click the number in Attachment Count column.
This opens Usage Analysis screen.
c. Change the Subject Type list box to SOA Service.
d. Validate that all the composites are listed with local attachment to this service policy.
4. Verify Client Policy attachment
a. Navigate back to Policies screen and find the client policy
b. Click the number in Attachment Count column.
This opens Usage Analysis screen.
c. Change the Subject Type list box to SOA Reference.
d. Validate that all the composites are listed with local attachment to this client policy and attached to the correct references.
Table 25–6 Service Policy Attachments for Design to Release: Agile PLM for Process – EBS OPM PIP
Composite Service Policy
SyncSpecPLM4PAdapter oracle/wss_http_token_service_policy
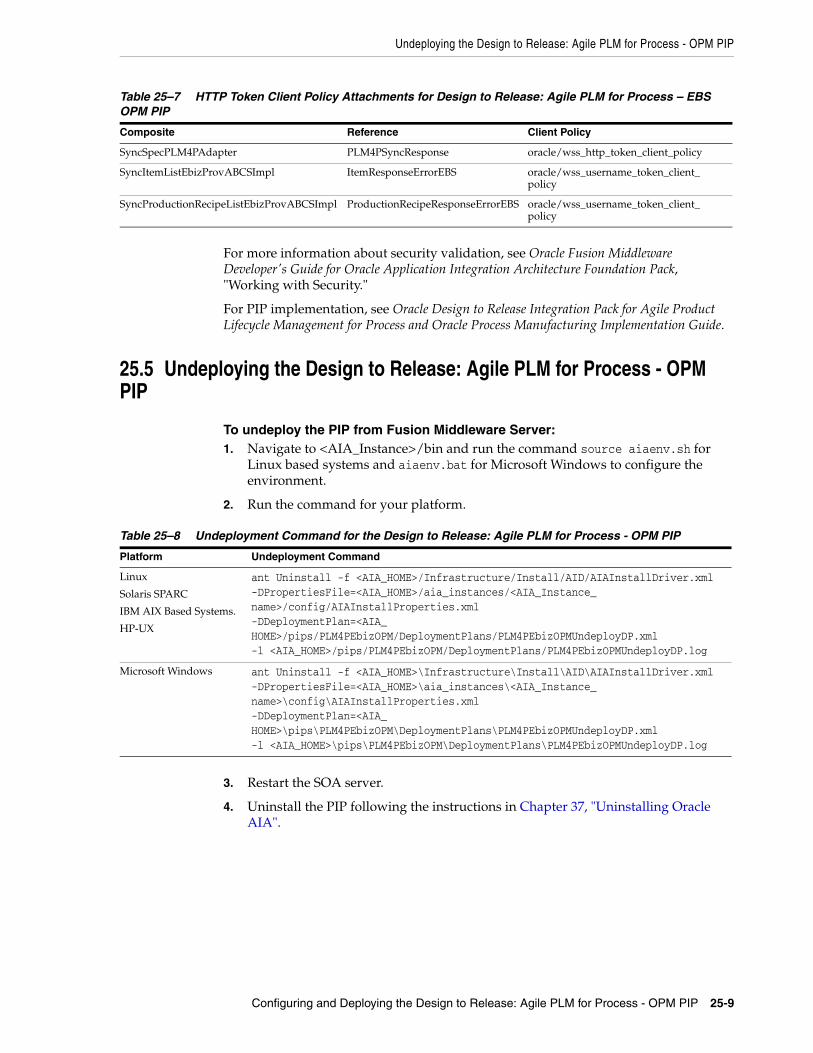
Undeploying the Design to Release: Agile PLM for Process - OPM PIP
Configuring and Deploying the Design to Release: Agile PLM for Process - OPM PIP 25-9
For more information about security validation, see Oracle Fusion Middleware Developer's Guide for Oracle Application Integration Architecture Foundation Pack, "Working with Security."
For PIP implementation, see Oracle Design to Release Integration Pack for Agile Product Lifecycle Management for Process and Oracle Process Manufacturing Implementation Guide.
25.5 Undeploying the Design to Release: Agile PLM for Process - OPM PIP
To undeploy the PIP from Fusion Middleware Server:1. Navigate to <AIA_Instance>/bin and run the command source aiaenv.sh for
Linux based systems and aiaenv.bat for Microsoft Windows to configure the environment.
2. Run the command for your platform.
3. Restart the SOA server.
4. Uninstall the PIP following the instructions in Chapter 37, "Uninstalling Oracle AIA".
Table 25–7 HTTP Token Client Policy Attachments for Design to Release: Agile PLM for Process – EBS OPM PIP
Composite Reference Client Policy
SyncSpecPLM4PAdapter PLM4PSyncResponse oracle/wss_http_token_client_policy
SyncItemListEbizProvABCSImpl ItemResponseErrorEBS oracle/wss_username_token_client_policy
SyncProductionRecipeListEbizProvABCSImpl ProductionRecipeResponseErrorEBS oracle/wss_username_token_client_policy
Table 25–8 Undeployment Command for the Design to Release: Agile PLM for Process - OPM PIP
Platform Undeployment Command
Linux
Solaris SPARC
IBM AIX Based Systems.
HP-UX
ant Uninstall -f <AIA_HOME>/Infrastructure/Install/AID/AIAInstallDriver.xml -DPropertiesFile=<AIA_HOME>/aia_instances/<AIA_Instance_name>/config/AIAInstallProperties.xml -DDeploymentPlan=<AIA_HOME>/pips/PLM4PEbizOPM/DeploymentPlans/PLM4PEbizOPMUndeployDP.xml -l <AIA_HOME>/pips/PLM4PEbizOPM/DeploymentPlans/PLM4PEbizOPMUndeployDP.log
Microsoft Windows ant Uninstall -f <AIA_HOME>\Infrastructure\Install\AID\AIAInstallDriver.xml -DPropertiesFile=<AIA_HOME>\aia_instances\<AIA_Instance_name>\config\AIAInstallProperties.xml -DDeploymentPlan=<AIA_HOME>\pips\PLM4PEbizOPM\DeploymentPlans\PLM4PEbizOPMUndeployDP.xml -l <AIA_HOME>\pips\PLM4PEbizOPM\DeploymentPlans\PLM4PEbizOPMUndeployDP.log

Undeploying the Design to Release: Agile PLM for Process - OPM PIP
25-10 Oracle Application Integration Architecture Installation and Upgrade Guide for Pre-Built Integrations
26
Configuring and Deploying the Order to Cash for Siebel CRM - EBS PIP 26-1
26Configuring and Deploying the Order toCash for Siebel CRM - EBS PIP
This chapter discusses how to configure and deploy the Siebel CRM Integration Pack for Oracle Order Management: Order to Cash (Order to Cash: Siebel CRM - EBS PIP).
This chapter includes the following sections:
■ Section 26.1, "Configuring Oracle Data Integrator (Optional)"
■ Section 26.2, "Deployment Configuration Wizard"
■ Section 26.3, "Configuring and Deploying the Order to Cash: Siebel CRM - EBS"
■ Section 26.4, "Performing Postdeployment Configurations"
■ Section 26.5, "Verifying Deployment"
■ Section 26.6, "Undeploying the Order to Cash: Siebel CRM - EBS PIP"
26.1 Configuring Oracle Data Integrator (Optional)To run AIA Pre-Built Integrations Installer you must have Oracle Data Integrator (ODI) access with Supervisor privileges.
ODI is used by the O2C PIP for the initial load flows. You can skip this section if you do not plan to run the initial load flows. If you intend to run the ODI based initial loads, review the details in this section and perform tasks accordingly.
For installation purposes, the ODI software must reside at the same server where Foundation Pack is installed. Once the PIP installation is complete, the ODI software can be installed onto another server (if desired) connecting to the master and work repositories used during the PIP installation.
26.1.1 Creating Oracle Data Integrator RepositoriesYou can use an existing master repository if it exists on an Oracle database and its ID is not 0. If the ID is 0, AIA advises you to create a another master repository.
You can use an existing work repository if it exists on an Oracle database and its ID is not 778. If the ID is 778, AIA advises you to create a another repository and not to use 778 as the Work Repository ID.
Table 26–1 details a list of ids you must avoid when creating master and work repositories.
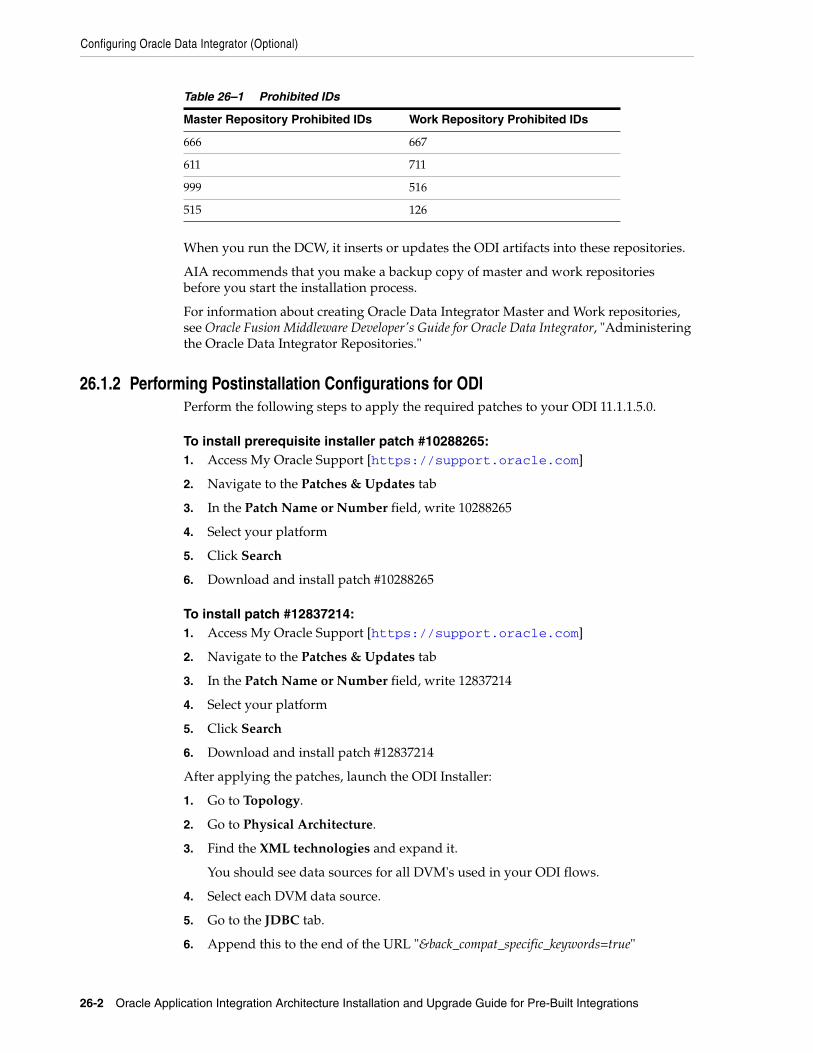
Configuring Oracle Data Integrator (Optional)
26-2 Oracle Application Integration Architecture Installation and Upgrade Guide for Pre-Built Integrations
When you run the DCW, it inserts or updates the ODI artifacts into these repositories.
AIA recommends that you make a backup copy of master and work repositories before you start the installation process.
For information about creating Oracle Data Integrator Master and Work repositories, see Oracle Fusion Middleware Developer's Guide for Oracle Data Integrator, "Administering the Oracle Data Integrator Repositories."
26.1.2 Performing Postinstallation Configurations for ODIPerform the following steps to apply the required patches to your ODI 11.1.1.5.0.
To install prerequisite installer patch #10288265:1. Access My Oracle Support [https://support.oracle.com]
2. Navigate to the Patches & Updates tab
3. In the Patch Name or Number field, write 10288265
4. Select your platform
5. Click Search
6. Download and install patch #10288265
To install patch #12837214:1. Access My Oracle Support [https://support.oracle.com]
2. Navigate to the Patches & Updates tab
3. In the Patch Name or Number field, write 12837214
4. Select your platform
5. Click Search
6. Download and install patch #12837214
After applying the patches, launch the ODI Installer:
1. Go to Topology.
2. Go to Physical Architecture.
3. Find the XML technologies and expand it.
You should see data sources for all DVM's used in your ODI flows.
4. Select each DVM data source.
5. Go to the JDBC tab.
6. Append this to the end of the URL "&back_compat_specific_keywords=true"
Table 26–1 Prohibited IDs
Master Repository Prohibited IDs Work Repository Prohibited IDs
666 667
611 711
999 516
515 126
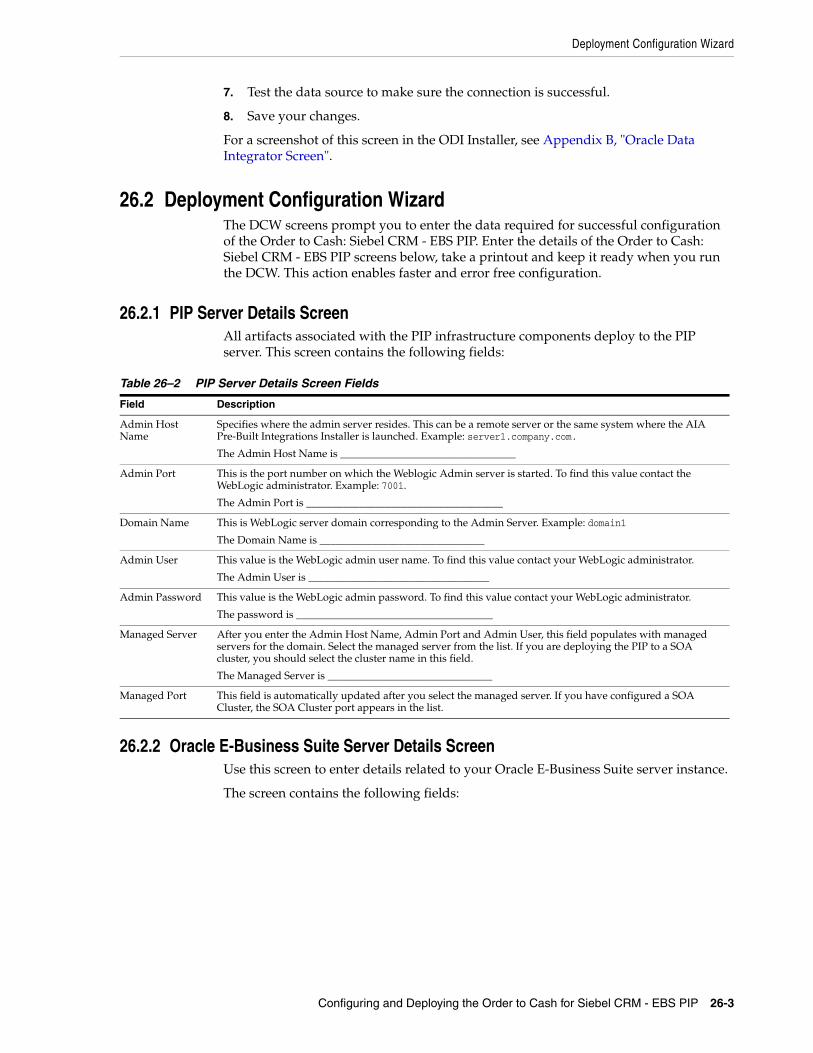
Deployment Configuration Wizard
Configuring and Deploying the Order to Cash for Siebel CRM - EBS PIP 26-3
7. Test the data source to make sure the connection is successful.
8. Save your changes.
For a screenshot of this screen in the ODI Installer, see Appendix B, "Oracle Data Integrator Screen".
26.2 Deployment Configuration WizardThe DCW screens prompt you to enter the data required for successful configuration of the Order to Cash: Siebel CRM - EBS PIP. Enter the details of the Order to Cash: Siebel CRM - EBS PIP screens below, take a printout and keep it ready when you run the DCW. This action enables faster and error free configuration.
26.2.1 PIP Server Details ScreenAll artifacts associated with the PIP infrastructure components deploy to the PIP server. This screen contains the following fields:
26.2.2 Oracle E-Business Suite Server Details ScreenUse this screen to enter details related to your Oracle E-Business Suite server instance.
The screen contains the following fields:
Table 26–2 PIP Server Details Screen Fields
Field Description
Admin Host Name
Specifies where the admin server resides. This can be a remote server or the same system where the AIA Pre-Built Integrations Installer is launched. Example: server1.company.com.
The Admin Host Name is _________________________________
Admin Port This is the port number on which the Weblogic Admin server is started. To find this value contact the WebLogic administrator. Example: 7001.
The Admin Port is _____________________________________
Domain Name This is WebLogic server domain corresponding to the Admin Server. Example: domain1
The Domain Name is _______________________________
Admin User This value is the WebLogic admin user name. To find this value contact your WebLogic administrator.
The Admin User is __________________________________
Admin Password This value is the WebLogic admin password. To find this value contact your WebLogic administrator.
The password is _____________________________________
Managed Server After you enter the Admin Host Name, Admin Port and Admin User, this field populates with managed servers for the domain. Select the managed server from the list. If you are deploying the PIP to a SOA cluster, you should select the cluster name in this field.
The Managed Server is _______________________________
Managed Port This field is automatically updated after you select the managed server. If you have configured a SOA Cluster, the SOA Cluster port appears in the list.
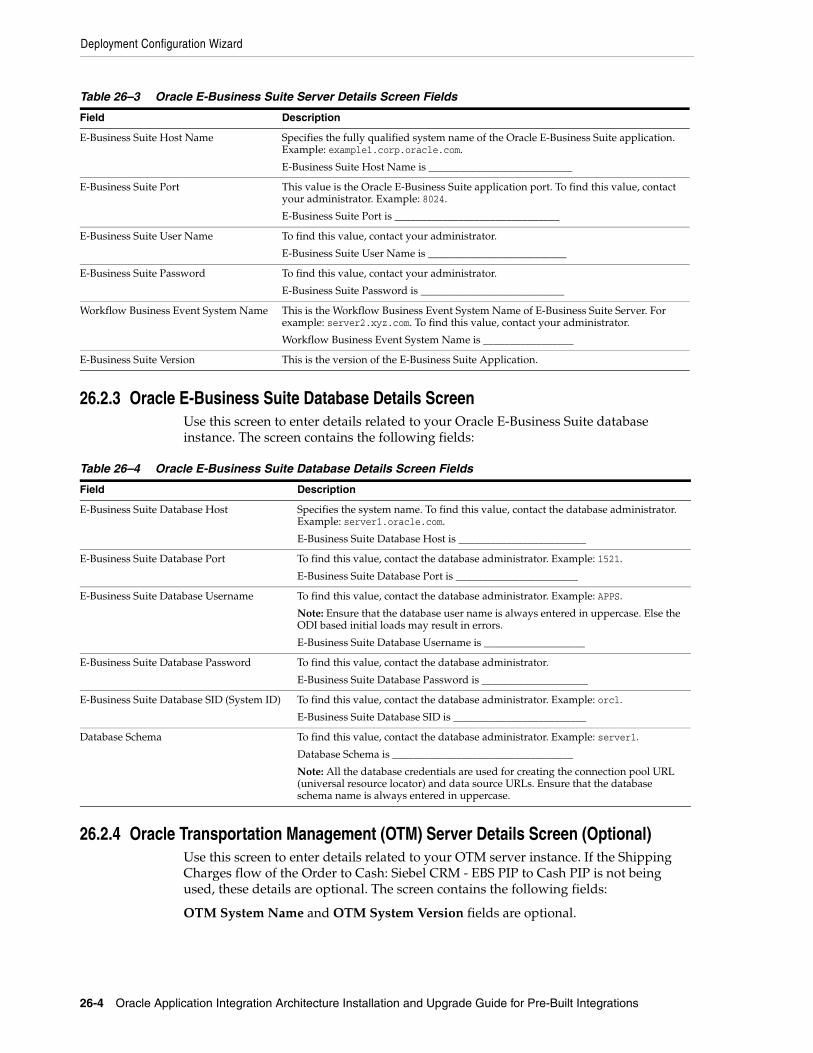
Deployment Configuration Wizard
26-4 Oracle Application Integration Architecture Installation and Upgrade Guide for Pre-Built Integrations
26.2.3 Oracle E-Business Suite Database Details ScreenUse this screen to enter details related to your Oracle E-Business Suite database instance. The screen contains the following fields:
26.2.4 Oracle Transportation Management (OTM) Server Details Screen (Optional)Use this screen to enter details related to your OTM server instance. If the Shipping Charges flow of the Order to Cash: Siebel CRM - EBS PIP to Cash PIP is not being used, these details are optional. The screen contains the following fields:
OTM System Name and OTM System Version fields are optional.
Table 26–3 Oracle E-Business Suite Server Details Screen Fields
Field Description
E-Business Suite Host Name Specifies the fully qualified system name of the Oracle E-Business Suite application. Example: example1.corp.oracle.com.
E-Business Suite Host Name is ___________________________
E-Business Suite Port This value is the Oracle E-Business Suite application port. To find this value, contact your administrator. Example: 8024.
E-Business Suite Port is _______________________________
E-Business Suite User Name To find this value, contact your administrator.
E-Business Suite User Name is __________________________
E-Business Suite Password To find this value, contact your administrator.
E-Business Suite Password is ___________________________
Workflow Business Event System Name This is the Workflow Business Event System Name of E-Business Suite Server. For example: server2.xyz.com. To find this value, contact your administrator.
Workflow Business Event System Name is _________________
E-Business Suite Version This is the version of the E-Business Suite Application.
Table 26–4 Oracle E-Business Suite Database Details Screen Fields
Field Description
E-Business Suite Database Host Specifies the system name. To find this value, contact the database administrator. Example: server1.oracle.com.
E-Business Suite Database Host is ________________________
E-Business Suite Database Port To find this value, contact the database administrator. Example: 1521.
E-Business Suite Database Port is _______________________
E-Business Suite Database Username To find this value, contact the database administrator. Example: APPS.
Note: Ensure that the database user name is always entered in uppercase. Else the ODI based initial loads may result in errors.
E-Business Suite Database Username is ___________________
E-Business Suite Database Password To find this value, contact the database administrator.
E-Business Suite Database Password is ____________________
E-Business Suite Database SID (System ID) To find this value, contact the database administrator. Example: orcl.
E-Business Suite Database SID is _________________________
Database Schema To find this value, contact the database administrator. Example: server1.
Database Schema is __________________________________
Note: All the database credentials are used for creating the connection pool URL (universal resource locator) and data source URLs. Ensure that the database schema name is always entered in uppercase.
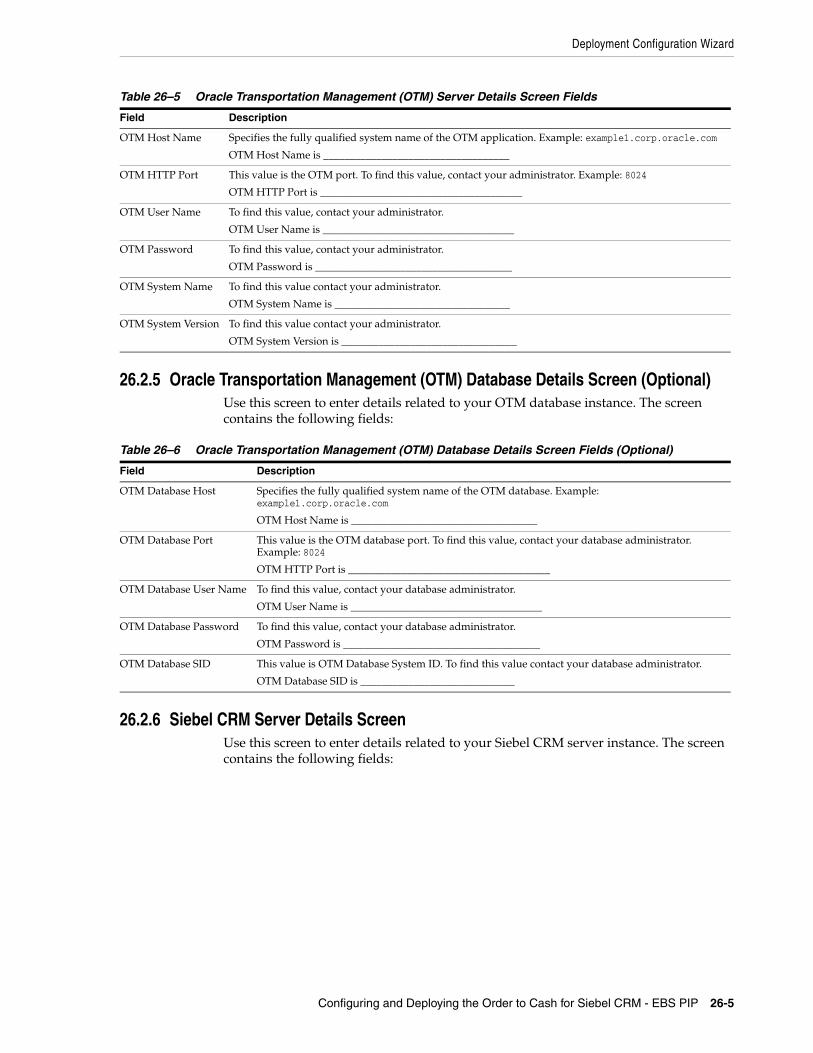
Deployment Configuration Wizard
Configuring and Deploying the Order to Cash for Siebel CRM - EBS PIP 26-5
26.2.5 Oracle Transportation Management (OTM) Database Details Screen (Optional)Use this screen to enter details related to your OTM database instance. The screen contains the following fields:
26.2.6 Siebel CRM Server Details ScreenUse this screen to enter details related to your Siebel CRM server instance. The screen contains the following fields:
Table 26–5 Oracle Transportation Management (OTM) Server Details Screen Fields
Field Description
OTM Host Name Specifies the fully qualified system name of the OTM application. Example: example1.corp.oracle.com
OTM Host Name is ___________________________________
OTM HTTP Port This value is the OTM port. To find this value, contact your administrator. Example: 8024
OTM HTTP Port is ______________________________________
OTM User Name To find this value, contact your administrator.
OTM User Name is ____________________________________
OTM Password To find this value, contact your administrator.
OTM Password is _____________________________________
OTM System Name To find this value contact your administrator.
OTM System Name is _________________________________
OTM System Version To find this value contact your administrator.
OTM System Version is _________________________________
Table 26–6 Oracle Transportation Management (OTM) Database Details Screen Fields (Optional)
Field Description
OTM Database Host Specifies the fully qualified system name of the OTM database. Example: example1.corp.oracle.com
OTM Host Name is ___________________________________
OTM Database Port This value is the OTM database port. To find this value, contact your database administrator. Example: 8024
OTM HTTP Port is ______________________________________
OTM Database User Name To find this value, contact your database administrator.
OTM User Name is ____________________________________
OTM Database Password To find this value, contact your database administrator.
OTM Password is _____________________________________
OTM Database SID This value is OTM Database System ID. To find this value contact your database administrator.
OTM Database SID is _____________________________
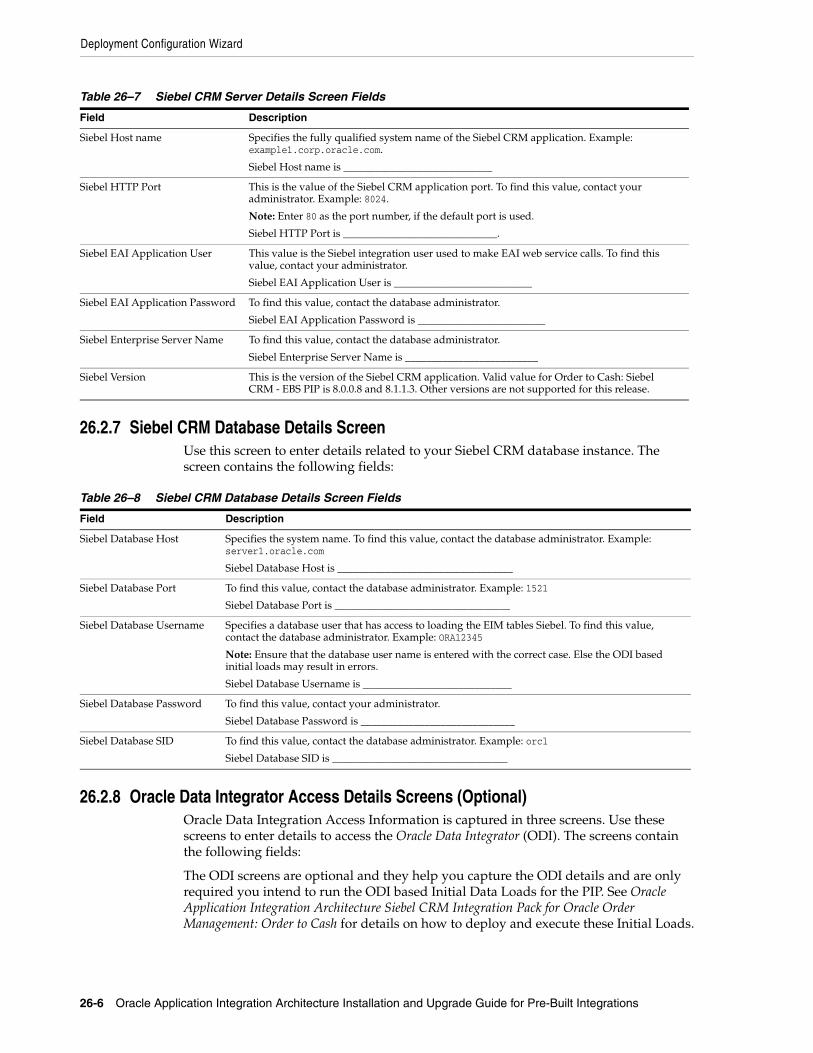
Deployment Configuration Wizard
26-6 Oracle Application Integration Architecture Installation and Upgrade Guide for Pre-Built Integrations
26.2.7 Siebel CRM Database Details ScreenUse this screen to enter details related to your Siebel CRM database instance. The screen contains the following fields:
26.2.8 Oracle Data Integrator Access Details Screens (Optional)Oracle Data Integration Access Information is captured in three screens. Use these screens to enter details to access the Oracle Data Integrator (ODI). The screens contain the following fields:
The ODI screens are optional and they help you capture the ODI details and are only required you intend to run the ODI based Initial Data Loads for the PIP. See Oracle Application Integration Architecture Siebel CRM Integration Pack for Oracle Order Management: Order to Cash for details on how to deploy and execute these Initial Loads.
Table 26–7 Siebel CRM Server Details Screen Fields
Field Description
Siebel Host name Specifies the fully qualified system name of the Siebel CRM application. Example: example1.corp.oracle.com.
Siebel Host name is ____________________________
Siebel HTTP Port This is the value of the Siebel CRM application port. To find this value, contact your administrator. Example: 8024.
Note: Enter 80 as the port number, if the default port is used.
Siebel HTTP Port is _____________________________.
Siebel EAI Application User This value is the Siebel integration user used to make EAI web service calls. To find this value, contact your administrator.
Siebel EAI Application User is __________________________
Siebel EAI Application Password To find this value, contact the database administrator.
Siebel EAI Application Password is ________________________
Siebel Enterprise Server Name To find this value, contact the database administrator.
Siebel Enterprise Server Name is _________________________
Siebel Version This is the version of the Siebel CRM application. Valid value for Order to Cash: Siebel CRM - EBS PIP is 8.0.0.8 and 8.1.1.3. Other versions are not supported for this release.
Table 26–8 Siebel CRM Database Details Screen Fields
Field Description
Siebel Database Host Specifies the system name. To find this value, contact the database administrator. Example: server1.oracle.com
Siebel Database Host is _________________________________
Siebel Database Port To find this value, contact the database administrator. Example: 1521
Siebel Database Port is _________________________________
Siebel Database Username Specifies a database user that has access to loading the EIM tables Siebel. To find this value, contact the database administrator. Example: ORA12345
Note: Ensure that the database user name is entered with the correct case. Else the ODI based initial loads may result in errors.
Siebel Database Username is ____________________________
Siebel Database Password To find this value, contact your administrator.
Siebel Database Password is _____________________________
Siebel Database SID To find this value, contact the database administrator. Example: orcl
Siebel Database SID is _________________________________
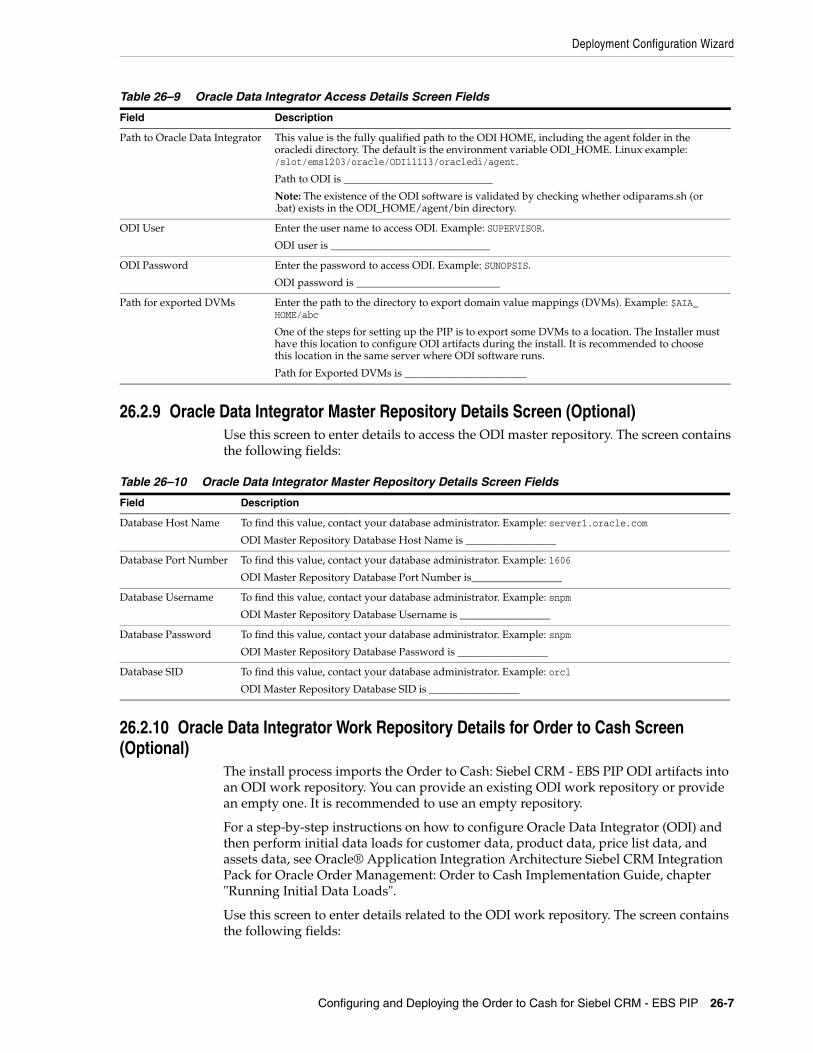
Deployment Configuration Wizard
Configuring and Deploying the Order to Cash for Siebel CRM - EBS PIP 26-7
26.2.9 Oracle Data Integrator Master Repository Details Screen (Optional)Use this screen to enter details to access the ODI master repository. The screen contains the following fields:
26.2.10 Oracle Data Integrator Work Repository Details for Order to Cash Screen (Optional)
The install process imports the Order to Cash: Siebel CRM - EBS PIP ODI artifacts into an ODI work repository. You can provide an existing ODI work repository or provide an empty one. It is recommended to use an empty repository.
For a step-by-step instructions on how to configure Oracle Data Integrator (ODI) and then perform initial data loads for customer data, product data, price list data, and assets data, see Oracle® Application Integration Architecture Siebel CRM Integration Pack for Oracle Order Management: Order to Cash Implementation Guide, chapter "Running Initial Data Loads".
Use this screen to enter details related to the ODI work repository. The screen contains the following fields:
Table 26–9 Oracle Data Integrator Access Details Screen Fields
Field Description
Path to Oracle Data Integrator This value is the fully qualified path to the ODI HOME, including the agent folder in the oracledi directory. The default is the environment variable ODI_HOME. Linux example: /slot/ems1203/oracle/ODI11113/oracledi/agent.
Path to ODI is ____________________________
Note: The existence of the ODI software is validated by checking whether odiparams.sh (or .bat) exists in the ODI_HOME/agent/bin directory.
ODI User Enter the user name to access ODI. Example: SUPERVISOR.
ODI user is ______________________________
ODI Password Enter the password to access ODI. Example: SUNOPSIS.
ODI password is ___________________________
Path for exported DVMs Enter the path to the directory to export domain value mappings (DVMs). Example: $AIA_HOME/abc
One of the steps for setting up the PIP is to export some DVMs to a location. The Installer must have this location to configure ODI artifacts during the install. It is recommended to choose this location in the same server where ODI software runs.
Path for Exported DVMs is _______________________
Table 26–10 Oracle Data Integrator Master Repository Details Screen Fields
Field Description
Database Host Name To find this value, contact your database administrator. Example: server1.oracle.com
ODI Master Repository Database Host Name is _________________
Database Port Number To find this value, contact your database administrator. Example: 1606
ODI Master Repository Database Port Number is_________________
Database Username To find this value, contact your database administrator. Example: snpm
ODI Master Repository Database Username is _________________
Database Password To find this value, contact your database administrator. Example: snpm
ODI Master Repository Database Password is _________________
Database SID To find this value, contact your database administrator. Example: orcl
ODI Master Repository Database SID is _________________
Configuring and Deploying the Order to Cash: Siebel CRM - EBS
26-8 Oracle Application Integration Architecture Installation and Upgrade Guide for Pre-Built Integrations
26.2.11 Session Pool Manager Screen (Optional)This PIP uses the Session Pool Manager utility to interact with Siebel web services. If the AIA server must invoke Siebel web services through a proxy server, fill in the values in this screen. If no proxy server is involved, these values can be left blank.
Use this screen to enter details related to your Session Pool Manager.
The screen contains the following fields:
For information about Session Pool Manager, see Oracle Application Integration Architecture Process Integration Pack Utilities Guide, "Session Pool Manager".
26.3 Configuring and Deploying the Order to Cash: Siebel CRM - EBSThis section discusses the PIP configuration and deployment process. There are two steps:
1. Configure your PIP using the deployment DCW.
2. Deploy the PIP to the Fusion Middleware server.
26.3.1 Configuring the Order to Cash: Siebel CRM - EBS PIPThe screens that appear prompt you to enter the data that is required for successful configuration of the Order to Cash: Siebel CRM - EBS PIP. Keep the completed worksheets of the Order to Cash: Siebel CRM - EBS PIP screens ready before you launch the DCW.
By default OTM is not defined as a participating application for the Order to Cash: Siebel CRM - EBS PIP in the DCW. If you intend to use the Shipping Charges flow of the Order to Cash: Siebel CRM - EBS PIP, define OTM as participating application.
Define OTM as a participating application for DCW (Optional)To define OTM as participating application:
1. Open <AIA_HOME>/pips/PIPManifest.xml.
Table 26–11 Oracle Data Integrator Work Repository Details for Order to Cash: Siebel CRM - EBS PIP Screen Fields
Field Description
ODI Work Repository Name Enter the name you gave to the ODI work repository for Order to Cash: Siebel CRM - EBS PIP artifacts. Example: OrderToCash
ODI Work Repository Name is: _________________________
ODI Work Repository ID Enter the ID number that you used for the ODI work repository. It should be between 1 and 899. Example: 42
Do not use 900. Also do not use the ID used for other work repositories.
ODI Work Repository ID is: ______________
Table 26–12 Session Pool Manager Screen Fields
Field Description
Proxy Host URL Specify the proxy host location. Example: www-proxy.your.company.com
Proxy Host URL is _________________________________
Proxy Port Specify the proxy port. Example: 80
Proxy Port is _________________________________
Configuring and Deploying the Order to Cash: Siebel CRM - EBS
Configuring and Deploying the Order to Cash for Siebel CRM - EBS PIP 26-9
2. Find the PIP OrderToCash, and in the participating application section for this PIP, uncomment the entry for OTM.
To configure the Order to Cash: Siebel CRM - EBS PIP:1. Navigate to /slot/emsxxxx/oracle/Middleware/user_projects/domains/soa_
domain/bin/ and open setDomainEnv.sh for Linux based systems and setDomainEnv.bat for Microsoft Windows.
2. Replace WLS_JDBC_REMOTE_ENABLED="-Dweblogic.jdbc.remoteEnabled=false" with WLS_JDBC_REMOTE_ENABLED="-Dweblogic.jdbc.remoteEnabled=true".
3. Restart the server.
4. Navigate to <AIA_Instance>/bin and run the command source aiaenv.sh for Linux based systems and aiaenv.bat for Microsoft Windows to configure installation environment.
5. Navigate to <AIA_HOME>/bin and run the command ./aiaconfig.sh for Linux based systems and aiaconfig.bat for Microsoft Windows.
This launches the AIA DCW.
6. Click Next.
7. Select the Order to Cash: Siebel CRM - EBS PIP.
8. If you intend to configure the ODI details for Order to Cash Initial Loads, also select the Order to Cash: Siebel CRM - EBS Initial Loads PIP.
9. Click Next.
26.3.1.1 Specify PIP Server Details
To specify PIP Server details:1. Enter information related to your PIP server in the PIP Server Details screen.
2. Click Next.
26.3.1.2 Specify Oracle E-Business Suite Server Details
To specify Oracle E-Business Suite server details:1. Enter your Oracle E-Business Suite Server information in the E-Business Suite
Server Details screen.
2. Click Next.
26.3.1.3 Specify Oracle E-Business Suite Database Details
To specify Oracle E-Business Suite database details:1. Enter your Oracle E-Business Suite Database connection information in the
E-Business Suite Database Details screen.
2. Click Next.
Note: If you are harvesting content to OER, perform the first three steps. Else start from step 4.
Configuring and Deploying the Order to Cash: Siebel CRM - EBS
26-10 Oracle Application Integration Architecture Installation and Upgrade Guide for Pre-Built Integrations
26.3.1.4 Specify Oracle Transportation Management Server Details (Optional)
To specify details of the Oracle Transportation Management (OTM) Server:1. Enter your OTM Server information in the Oracle Transportation Management
(OTM) Server Details screen.
2. Click Next.
26.3.1.5 Oracle Transportation Management (OTM) Database Details Screen (Optional)
To specify details of the Oracle Transportation Management (OTM) Database:1. Enter your OTM Server information in the Oracle Transportation Management
(OTM) Database Details screen.
2. Click Next.
26.3.1.6 Specify Siebel CRM Server Details
To specify Siebel CRM server details:1. Enter your Siebel CRM connection information in the Application Details - Siebel
CRM screen
2. Click Next.
26.3.1.7 Specify Siebel CRM Database Details
To specify Siebel CRM database details:1. Enter your Siebel CRM Database connection information in the Siebel CRM
Database Details screen.
2. Click Next.
26.3.1.8 Specify Oracle Data Integrator Access Details (Optional)
To specify Oracle Data Integrator access details:1. Enter information about your ODI access installation in the Oracle Data Integrator
Access Information screens.
ODI access information is captured in three screens. Enter the following information in the screens.
2. Specify the ODI Home.
3. Click Next.
4. Enter ODI User and ODI Password.
Note: The OTN screens appear only if you have uncommented OTN as participating application in PIPManifest.xml.
Note: The ODI screens appear if you have selected the Order to Cash: Siebel CRM - EBS Initial Loads PIP.
Configuring and Deploying the Order to Cash: Siebel CRM - EBS
Configuring and Deploying the Order to Cash for Siebel CRM - EBS PIP 26-11
5. Click Next.
6. Specify the Path for exported DVMs.
7. Click Next.
26.3.1.9 Specify Oracle Data Integrator Master Repository Details (Optional)
To specify Oracle Data Integrator master repository details:1. Enter information about your ODI master repository installation in the Oracle
Data Integrator Master Repository screen.
2. Click Next.
26.3.1.10 Specify Oracle Data Integrator Work Repository Details for Order to Cash (Optional)
To specify Oracle Data Integrator Work Repository Details for Order to Cash:1. Enter information about your ODI work repository installation in the Oracle Data
Integrator Work Repository Details for Order to Cash screen.
2. Click Next.
26.3.1.11 Specify Session Pool Manager Details
To specify Session Pool Manager details:1. Enter information related to your Session Pool Manager installation in the Session
Pool Manager Details screen.
2. Click Next.
26.3.1.12 Complete Configuration
To complete configuration:1. Review the configuration information on the Configuration Summary screen.
2. Click Configure to accept the configuration.
The system displays progress of configuration in the Configuration Progress screen.
The system displays any warnings or errors as necessary. You can review the configuration log for additional details. The configuration log location is displayed in Configuration Progress screen.
Note: If you want to make changes to the configuration, use the navigation pane on the left and select the screen you want to edit.
You can create a response file based on the input provided in the DCW and use it in future when you want to deploy the PIP. You can configure using the steps described in Section 26.3.2, "Configuring using the Response File". Click Save Response File and save the response file with the name and location of your choice.
Configuring and Deploying the Order to Cash: Siebel CRM - EBS
26-12 Oracle Application Integration Architecture Installation and Upgrade Guide for Pre-Built Integrations
3. When configuration process finishes without errors, the AIA DCW displays the Configuration Complete screen.
4. Click Finish to close the DCW.
26.3.2 Configuring using the Response File
To configure using the response file:1. Open the response file.
When you create a response file through OUI, passwords get stored as <SECURE>.
2. Replace the password fields with actual passwords in the response file.
3. Navigate to <AIA_Instance>/bin and run the command source aiaenv.sh for Linux based systems and aiaenv.bat for Microsoft Windows to configure the environment.
4. Navigate to <AIA_HOME>/bin and run the command ./aiaconfig.sh <Response File Location and Name> for Linux based systems and aiaconfig.bat <Response File Location and Name> for Microsoft Windows.
26.3.3 Deploying the Order to Cash: Siebel CRM - EBS
To deploy the PIP to Fusion Middleware server, run the command specific to your platform:1. Navigate to <AIA_Instance>/bin and run the command source aiaenv.sh for
Linux based systems and aiaenv.bat for Microsoft Windows to configure the environment.
2. Run the command for your platform.
Note: When you copy and paste the command in the command line, ensure that there is space between .xml and -. Ensure that there is space between these two when you run undeployment command too.

Performing Postdeployment Configurations
Configuring and Deploying the Order to Cash for Siebel CRM - EBS PIP 26-13
3. Review the log file in the location specified in the command to verify successful deployment.
Oracle AIA ships artifacts in AIA Lifecycle Workbench which can be used in your integrations. These artifacts are created using FMW technologies such as BPEL and Mediator and are natively supported by AIA Foundation Pack tools such as Project Lifecycle Workbench, Harvester, Deployment Generator, AIA Deployment Driver (ADD). These are called native artifacts and they include SOA artifact types such as composites, DataSources, DVM, xRef, and so on. These artifacts can be modified or new natively supported artifacts can be added using the AIA Lifecyle Workbench and a BOM.xml file can be generated.
AIA PIP development teams, most often, also require deployment of artifact types that are beyond what is supported by the Project Lifecycle Workbench and AIA Harvester. For instance, integration may require artifacts such as, Java applications, Shell Scripts, ANT based build scripts which constitute part of integration landscape in addition to the artifacts that are delivered by AIA. AIA also supports deployment of these supplementary artifacts. However, you must modify and add new non native artifacts outside AIA Lifecycle Workbench.
For more information on deploying artifacts, see Oracle Fusion Middleware Developer's Guide for Oracle Application Integration Architecture Foundation Pack, "Generating Deployment Plans and Deploying Artifacts".
26.4 Performing Postdeployment ConfigurationsPerform the following tasks as part of postdeployment configurations for the Order to Cash: Siebel CRM - EBS PIP.
Table 26–13 Deployment Commands for the Order to Cash: Siebel CRM - EBS PIP
Platform Deployment Command
Linux
Solaris SPARC
IBM AIX Based Systems
HP-UX
ant -f <AIA_HOME>/Infrastructure/Install/AID/AIAInstallDriver.xml -DDeploymentPlan=<AIA_HOME>/pips/OrderToCash/DeploymentPlans/OrderToCashDP.xml -DPropertiesFile=<AIA_HOME>/aia_instances/<aia_instance>/config/AIAInstallProperties.xml -DSupplementaryDeploymentPlan=<AIA_HOME>/pips/OrderToCash/DeploymentPlans/OrderToCashSupplementaryDP.xml -DDeploymentPolicyFile=<AIA_HOME>/pips/OrderToCash/DeploymentPlans/OrderToCashConditionalPolicy.xml -l <AIA_HOME>/pips/OrderToCash/DeploymentPlans/OrderToCash.log
Microsoft Windows ant -f <AIA_HOME>\Infrastructure\Install\AID\AIAInstallDriver.xml -DDeploymentPlan=<AIA_HOME>\pips\OrderToCash\DeploymentPlans\OrderToCashDP.xml -DPropertiesFile=<AIA_HOME>\aia_instances\<aia_instance>\config\AIAInstallProperties.xml -DSupplementaryDeploymentPlan=<AIA_HOME>\pips\OrderToCash\DeploymentPlans\OrderToCashSupplementaryDP.xml -DDeploymentPolicyFile=<AIA_HOME>\pips\OrderToCash\DeploymentPlans\OrderToCashConditionalPolicy.xml -l <AIA_HOME>\pips\OrderToCash\DeploymentPlans\OrderToCashDP.log
Note: In Windows 2008, 2008 R2 and Vista, run the command prompt as an administrator (elevated mode). If the command prompt is invoked in normal mode, the PIPs are not displayed.
Verifying Deployment
26-14 Oracle Application Integration Architecture Installation and Upgrade Guide for Pre-Built Integrations
26.4.1 Setting up Order to Cash PIPAs part of this PIP implementation, review and perform a few application and PIP related configurations as described in Oracle Application Integration Architecture Siebel CRM Integration Pack for Oracle Order Management: Order to Cash, "Implementing the Order to Cash: Siebel CRM – EBS Process Integration Pack".
26.4.2 Configuring Session Pool ManagerThis PIP uses the Session Pool Manager utility. Configure Session Pool Manager after you install the PIP. For information on how to configure Session Pool Manager for your integration environment and needs, see Oracle Application Integration Architecture Process Integration Pack Utilities Guide, "Session Pool Manager".
26.5 Verifying Deployment
To verify the Order to Cash: Siebel CRM - EBS PIP deployment:1. Open the log files from the following location and look for warnings and error
messages:
■ For Linux x86, Solaris SPARC (64-bit), HP-UX 11i (64 bit) and IBM AIX Based Systems (64-bit): Review the install log located at <AIA_HOME>/aia_instances/<instance name>/logs to verify whether the PIP is successfully installed.
■ For Microsoft Windows (32-bit): Review the install log located at <AIA_HOME>\aia_instances\<instance name>\logs to verify whether the PIP is successfully installed.
2. Confirm that the Order to Cash: Siebel CRM - EBS PIP services were installed.
a. Navigate to the Oracle Enterprise Manager Fusion Middleware Control (http://<server name>:<port number>/em/).
b. Log in with the server admin user name. For access details, contact the system administrator.
c. Expand Farm_soa_domain, SOA, soa-infra, Default and look for the following items:
■ AIASessionPoolManager
■ BulkLoadProductEbizReqABCSImpl
■ CalculateShippingChargeSalesOrderSiebelReqABCSImpl
■ CheckATPSalesOrderSiebelReqABCSImpl
■ ConfiguratorCopyConfigEbizAdapter
■ ConfiguratorUserLangSiebelAdapter
■ CreateAssetSiebelProvABCSImpl
■ CreateItemEbizEventConsumer
■ CreateItemInstanceEbizEventConsumer
■ CreateItemInstanceEbizReqABCSImpl
■ CreateProductEbizReqABCSImpl
■ CreateSalesOrderEbizProvABCSImpl
Verifying Deployment
Configuring and Deploying the Order to Cash for Siebel CRM - EBS PIP 26-15
■ CreditCheckSalesOrderSiebelReqABCSImpl
■ CustomerPartyEBSV2
■ CustomerPartyOrchestrationEBSV2
■ CustomerPartyOrchestrationResponseEBSV2
■ CustomerPartyResponseEBSV2
■ ExplodeItemCompositionEbizAdapter
■ FetchATPScheduleSequenceEbizAdapter
■ GetItemValidationOrganizationEbizAdapter
■ GetItemValidationOrganizationOUEbizAdapter
■ GetOperatingUnitIVOrgEbizAdapter
■ GetSalesOrderEbizAdapter
■ GetSalesOrderLineShippingDetailsEbizAdapter
■ InstalledProductEBSV2
■ InterfaceCustomerToFulfillmentEBF
■ InterfaceSalesOrderToCustomerEBFV2
■ InterfaceSalesOrderToFulfillmentEBF
■ InterfaceSyncProductStructureEBF
■ ItemCompositionEBS
■ ItemCompositionOrchestrationEBS
■ ItemCompositionResponseEBS
■ ItemEBSV2
■ MergeAccountEbizEventConsumer
■ MergeAccountEbizReqABCSImpl
■ MergePartyEbizEventConsumer
■ MergePartyEbizReqABCSImpl
■ PaymentAuthorizationSalesOrderSiebelReqABCSImpl
■ ProcessCreditChargeAuthorizationEbizAdapter
■ ProcessCreditChargeAuthorizationEbizProvABCSImpl
■ ProcessCreditEligibilityEbizAdapter
■ ProcessCreditEligibilityEbizProvABCSImpl
■ ProcessQuoteSiebelJMSConsumer (applicable only for Siebel 8.0.x)
■ ProcessQuoteSiebelJMSProducer (applicable only for Siebel 8.0.x)
■ ProcessQuoteSiebelReqABCSImpl
■ ProcessQuoteSoapMsgSiebelJMSConsumer (applicable only for Siebel 8.1.x)
■ ProcessSalesOrderATPCheckEbizAdapter
■ ProcessSalesOrderATPCheckEbizProvABCSImpl
■ ProcessSalesOrderEbizAdapter
Verifying Deployment
26-16 Oracle Application Integration Architecture Installation and Upgrade Guide for Pre-Built Integrations
■ ProcessSalesOrderShippingChargeLogisticsProvABCSImpl
■ ProcessSalesOrderSiebelJMSConsumerV2 (applicable only for Siebel 8.0.x)
■ ProcessSalesOrderSiebelJMSProducerV2 (applicable only for Siebel 8.0.x)
■ ProcessSalesOrderSiebelReqABCSImplV2
■ ProcessSalesOrderSoapMsgSiebelJMSConsumer (applicable only for Siebel 8.1.x)
■ QueryCustomerPartyEbizAdapter
■ QueryCustomerPartyListEbizCreateAdapter
■ QueryCustomerPartyListEbizUpdateAdapter
■ QueryCustomerPartyListSiebelProvABCSImplV2
■ QueryItemCompositionEbizAdapter
■ QueryItemCompositionListEbizProvABCSImpl
■ QueryItemInstanceEbizAdapter (applicable only for E-Business Suite 11.x)
■ QueryItemInstanceEbizR12VersionAdapter (applicable only for E-Business Suite 12.x)
■ QueryMergeAccountEbizAdapter
■ QueryMergeOrgCustEbizAdapter
■ QueryPartyMergeEbizAdapter
■ QueryRelatedOrgCustEbizAdapter
■ QueryResponsibilityEbizAdapter
■ QuerySimpleItemAdapter
■ QuerySimpleItemBulkLoadAdapter
■ QuerySimpleItemUpdateAdapter
■ QueryStructureItemCompositionEbizAdapter
■ ReceivedPaymentEBS
■ RequestProductStructureSiebelJMSConsumer
■ RequestProductStructureSiebelJMSProducer
■ RequestProductStructureSiebelReqABCSImpl
■ SalesOrderEBSV2
■ SalesOrderOrchestrationEBSV2
■ SalesOrderOrchestrationResponseEBSV2
■ SalesOrderResponseEBSV2
■ SyncAccountSiebelAggregatorAdapter
■ SyncAccountSiebelReqABCSImpl
■ SyncAcctSiebelAggrEventConsumer
■ SyncAddressSiebelAggregatorAdapter
■ SyncBPSiebelAggregatorAdapter
■ SyncContactSiebelAggregatorAdapter
Verifying Deployment
Configuring and Deploying the Order to Cash for Siebel CRM - EBS PIP 26-17
■ SyncContactSiebelReqABCSImpl
■ SyncContSiebelAggrEventConsumer
■ SyncCustomerPartyListEbizAdapter
■ SyncCustomerPartyListEbizEventConsumer
■ SyncCustomerPartyListEbizProvABCSImpl
■ SyncCustomerPartyListEbizReqABCSImpl
■ SyncCustomerPartyListPersonEbizAdapter
■ SyncCustomerPartyListSiebelProvABCSImpl
■ SyncCustomerSiebelEventAggregator
■ SyncItemCompositionListSiebelProvABCSImpl
■ SyncProductSiebelProvABCSImpl
■ SyncSalesOrderEbizProvABCSImpl
■ TransformAppContextEbizService
■ TransformAppContextLogisticsService
■ TransformAppContextSiebelService
■ UpdateAssetSiebelProvABCSImpl
■ UpdateItemEbizEventConsumer
■ UpdateItemInstanceEbizEventConsumer
■ UpdateItemInstanceEbizReqABCSImpl
■ UpdateProductEbizReqABCSImpl
■ UpdateSalesOrderEbizEventConsumer
■ UpdateSalesOrderEbizReqABCSImpl
■ UpdateSalesOrderSiebelProvABCSImpl
3. Verify whether Session Pool Manager is successfully installed and ensure that the Siebel server is active.
a. Log in to the Oracle Enterprise Manager Fusion Middleware Control (http://<server name>:<port number>/em/).
b. Expand Farm_soa_domain, SOA, soa-infra (soa_server1), Default and click AIASessionPoolManager on the left panel.
c. Click Test.
d. Enter Operation = Start.
e. Under the collapsible section titled Security, select WSS Username Token and enter the WLS admin user name and password.
f. Enter Input Argumemt Host Id = SEBL_01.
g. Click Test Web Service.
You should see a successful initialization response message. For more information and troubleshooting steps, see Oracle Application Integration Architecture Process Integration Pack Utilities Guide, "Session Pool Manager".

Verifying Deployment
26-18 Oracle Application Integration Architecture Installation and Upgrade Guide for Pre-Built Integrations
26.5.1 Validating Security PoliciesAll SOA composites are protected by Global Policies provided by Foundation Pack as defined in the Security section of the Developer Guide. Additionally individual services for this PIP have locally attached security policies.
To validate locally attached security policies:1. Log in to Oracle Enterprise Manager Fusion Middleware Control.
2. Navigate to WebLogic Domain, soa_domain, Web Services, Policies.
3. Verify Service Policy attachment.
a. Select Security from the Category list and Service Clients from the Applies To list, and click Search/Arrow.
b. Find the service policy in the list of policies.
c. Click the number in Attachment Count column.
This opens Usage Analysis screen.
d. Change the Subject Type list box to SOA Service.
e. Validate that all the composites are listed with local attachment to this service policy.
4. Verify Client Policy attachment
a. Navigate back to Policies screen.
b. Select Security from the Category list and Service Endpoints from the Applies To list, and click Search/Arrow to refresh the list of policies.
c. Find the client policy in the list of policies
d. Click the number in Attachment Count column.
This opens Usage Analysis screen.
e. Change the Subject Type list box to SOA Reference.
f. Validate that all the composites are listed with local attachment to this client policy and attached to the correct references.
Table 26–14 Service Policy Attachments for Order to Cash: Siebel CRM - EBS PIP
Composite Service Policy
AIASessionPoolManager oracle/aia_wss_saml_or_username_token_service_policy_OPT_ON
TransformAppContextSiebelService oracle/aia_wss_saml_or_username_token_service_policy_OPT_ON
TransformAppContextEbizService oracle/aia_wss_saml_or_username_token_service_policy_OPT_ON
TransformAppContextLogisticsService oracle/aia_wss_saml_or_username_token_service_policy_OPT_ON
Table 26–15 No Authentication Service Policy Attachments for Order to Cash: Siebel CRM - EBS PIP
Composite Service Policy
RequestProductStructureSiebelJMSProducer oracle/no_authentication_service_policy
ConfiguratorUserLangSiebelAdapter oracle/no_authentication_service_policy
PaymentAuthorizationSalesOrderSiebelReqABCSImpl oracle/no_authentication_service_policy
CreditCheckSalesOrderSiebelReqABCSImpl oracle/no_authentication_service_policy
CalculateShippingChargeSalesOrderSiebelReqABCSImpl oracle/no_authentication_service_policy
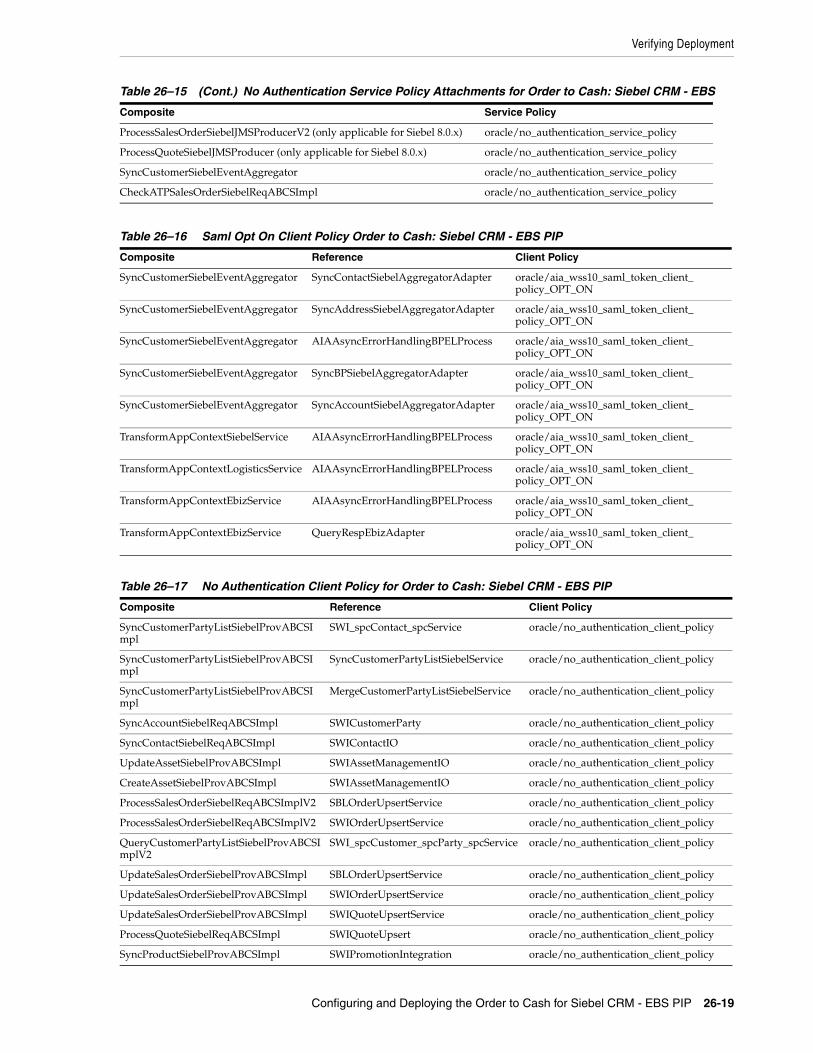
Verifying Deployment
Configuring and Deploying the Order to Cash for Siebel CRM - EBS PIP 26-19
ProcessSalesOrderSiebelJMSProducerV2 (only applicable for Siebel 8.0.x) oracle/no_authentication_service_policy
ProcessQuoteSiebelJMSProducer (only applicable for Siebel 8.0.x) oracle/no_authentication_service_policy
SyncCustomerSiebelEventAggregator oracle/no_authentication_service_policy
CheckATPSalesOrderSiebelReqABCSImpl oracle/no_authentication_service_policy
Table 26–16 Saml Opt On Client Policy Order to Cash: Siebel CRM - EBS PIP
Composite Reference Client Policy
SyncCustomerSiebelEventAggregator SyncContactSiebelAggregatorAdapter oracle/aia_wss10_saml_token_client_policy_OPT_ON
SyncCustomerSiebelEventAggregator SyncAddressSiebelAggregatorAdapter oracle/aia_wss10_saml_token_client_policy_OPT_ON
SyncCustomerSiebelEventAggregator AIAAsyncErrorHandlingBPELProcess oracle/aia_wss10_saml_token_client_policy_OPT_ON
SyncCustomerSiebelEventAggregator SyncBPSiebelAggregatorAdapter oracle/aia_wss10_saml_token_client_policy_OPT_ON
SyncCustomerSiebelEventAggregator SyncAccountSiebelAggregatorAdapter oracle/aia_wss10_saml_token_client_policy_OPT_ON
TransformAppContextSiebelService AIAAsyncErrorHandlingBPELProcess oracle/aia_wss10_saml_token_client_policy_OPT_ON
TransformAppContextLogisticsService AIAAsyncErrorHandlingBPELProcess oracle/aia_wss10_saml_token_client_policy_OPT_ON
TransformAppContextEbizService AIAAsyncErrorHandlingBPELProcess oracle/aia_wss10_saml_token_client_policy_OPT_ON
TransformAppContextEbizService QueryRespEbizAdapter oracle/aia_wss10_saml_token_client_policy_OPT_ON
Table 26–17 No Authentication Client Policy for Order to Cash: Siebel CRM - EBS PIP
Composite Reference Client Policy
SyncCustomerPartyListSiebelProvABCSImpl
SWI_spcContact_spcService oracle/no_authentication_client_policy
SyncCustomerPartyListSiebelProvABCSImpl
SyncCustomerPartyListSiebelService oracle/no_authentication_client_policy
SyncCustomerPartyListSiebelProvABCSImpl
MergeCustomerPartyListSiebelService oracle/no_authentication_client_policy
SyncAccountSiebelReqABCSImpl SWICustomerParty oracle/no_authentication_client_policy
SyncContactSiebelReqABCSImpl SWIContactIO oracle/no_authentication_client_policy
UpdateAssetSiebelProvABCSImpl SWIAssetManagementIO oracle/no_authentication_client_policy
CreateAssetSiebelProvABCSImpl SWIAssetManagementIO oracle/no_authentication_client_policy
ProcessSalesOrderSiebelReqABCSImplV2 SBLOrderUpsertService oracle/no_authentication_client_policy
ProcessSalesOrderSiebelReqABCSImplV2 SWIOrderUpsertService oracle/no_authentication_client_policy
QueryCustomerPartyListSiebelProvABCSImplV2
SWI_spcCustomer_spcParty_spcService oracle/no_authentication_client_policy
UpdateSalesOrderSiebelProvABCSImpl SBLOrderUpsertService oracle/no_authentication_client_policy
UpdateSalesOrderSiebelProvABCSImpl SWIOrderUpsertService oracle/no_authentication_client_policy
UpdateSalesOrderSiebelProvABCSImpl SWIQuoteUpsertService oracle/no_authentication_client_policy
ProcessQuoteSiebelReqABCSImpl SWIQuoteUpsert oracle/no_authentication_client_policy
SyncProductSiebelProvABCSImpl SWIPromotionIntegration oracle/no_authentication_client_policy
Table 26–15 (Cont.) No Authentication Service Policy Attachments for Order to Cash: Siebel CRM - EBS
Composite Service Policy
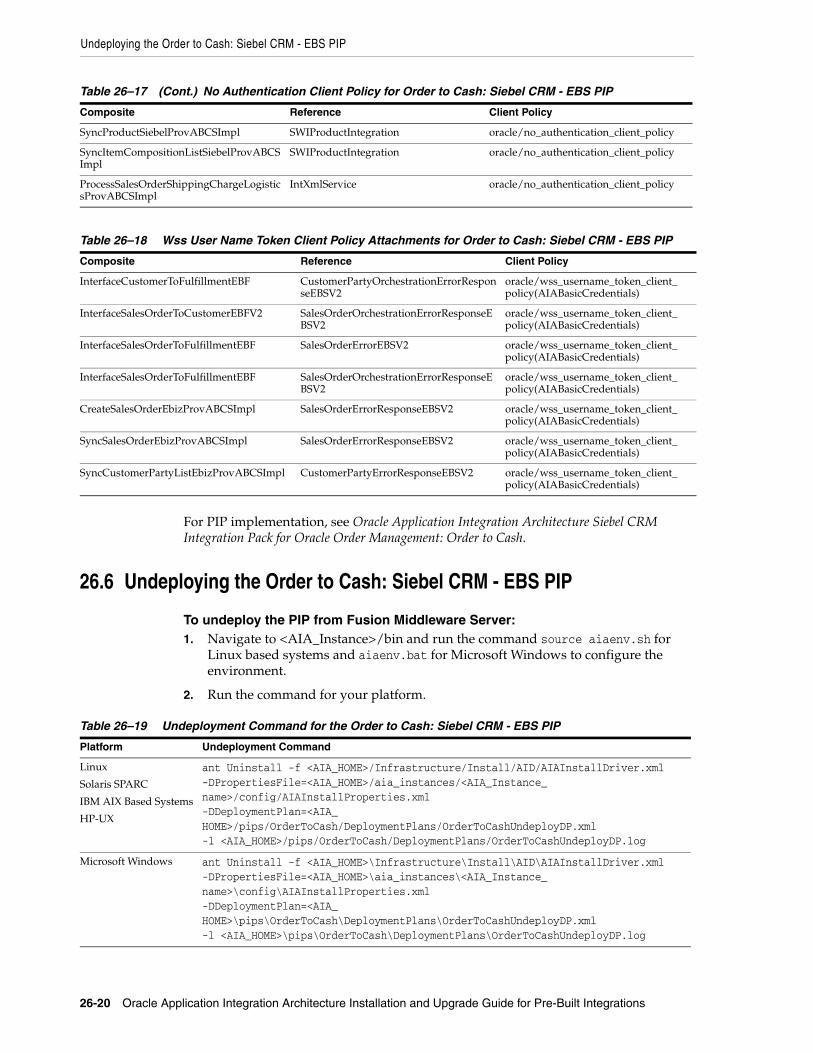
Undeploying the Order to Cash: Siebel CRM - EBS PIP
26-20 Oracle Application Integration Architecture Installation and Upgrade Guide for Pre-Built Integrations
For PIP implementation, see Oracle Application Integration Architecture Siebel CRM Integration Pack for Oracle Order Management: Order to Cash.
26.6 Undeploying the Order to Cash: Siebel CRM - EBS PIP
To undeploy the PIP from Fusion Middleware Server:1. Navigate to <AIA_Instance>/bin and run the command source aiaenv.sh for
Linux based systems and aiaenv.bat for Microsoft Windows to configure the environment.
2. Run the command for your platform.
SyncProductSiebelProvABCSImpl SWIProductIntegration oracle/no_authentication_client_policy
SyncItemCompositionListSiebelProvABCSImpl
SWIProductIntegration oracle/no_authentication_client_policy
ProcessSalesOrderShippingChargeLogisticsProvABCSImpl
IntXmlService oracle/no_authentication_client_policy
Table 26–18 Wss User Name Token Client Policy Attachments for Order to Cash: Siebel CRM - EBS PIP
Composite Reference Client Policy
InterfaceCustomerToFulfillmentEBF CustomerPartyOrchestrationErrorResponseEBSV2
oracle/wss_username_token_client_policy(AIABasicCredentials)
InterfaceSalesOrderToCustomerEBFV2 SalesOrderOrchestrationErrorResponseEBSV2
oracle/wss_username_token_client_policy(AIABasicCredentials)
InterfaceSalesOrderToFulfillmentEBF SalesOrderErrorEBSV2 oracle/wss_username_token_client_policy(AIABasicCredentials)
InterfaceSalesOrderToFulfillmentEBF SalesOrderOrchestrationErrorResponseEBSV2
oracle/wss_username_token_client_policy(AIABasicCredentials)
CreateSalesOrderEbizProvABCSImpl SalesOrderErrorResponseEBSV2 oracle/wss_username_token_client_policy(AIABasicCredentials)
SyncSalesOrderEbizProvABCSImpl SalesOrderErrorResponseEBSV2 oracle/wss_username_token_client_policy(AIABasicCredentials)
SyncCustomerPartyListEbizProvABCSImpl CustomerPartyErrorResponseEBSV2 oracle/wss_username_token_client_policy(AIABasicCredentials)
Table 26–19 Undeployment Command for the Order to Cash: Siebel CRM - EBS PIP
Platform Undeployment Command
Linux
Solaris SPARC
IBM AIX Based Systems
HP-UX
ant Uninstall -f <AIA_HOME>/Infrastructure/Install/AID/AIAInstallDriver.xml -DPropertiesFile=<AIA_HOME>/aia_instances/<AIA_Instance_name>/config/AIAInstallProperties.xml -DDeploymentPlan=<AIA_HOME>/pips/OrderToCash/DeploymentPlans/OrderToCashUndeployDP.xml -l <AIA_HOME>/pips/OrderToCash/DeploymentPlans/OrderToCashUndeployDP.log
Microsoft Windows ant Uninstall -f <AIA_HOME>\Infrastructure\Install\AID\AIAInstallDriver.xml -DPropertiesFile=<AIA_HOME>\aia_instances\<AIA_Instance_name>\config\AIAInstallProperties.xml -DDeploymentPlan=<AIA_HOME>\pips\OrderToCash\DeploymentPlans\OrderToCashUndeployDP.xml -l <AIA_HOME>\pips\OrderToCash\DeploymentPlans\OrderToCashUndeployDP.log
Table 26–17 (Cont.) No Authentication Client Policy for Order to Cash: Siebel CRM - EBS PIP
Composite Reference Client Policy
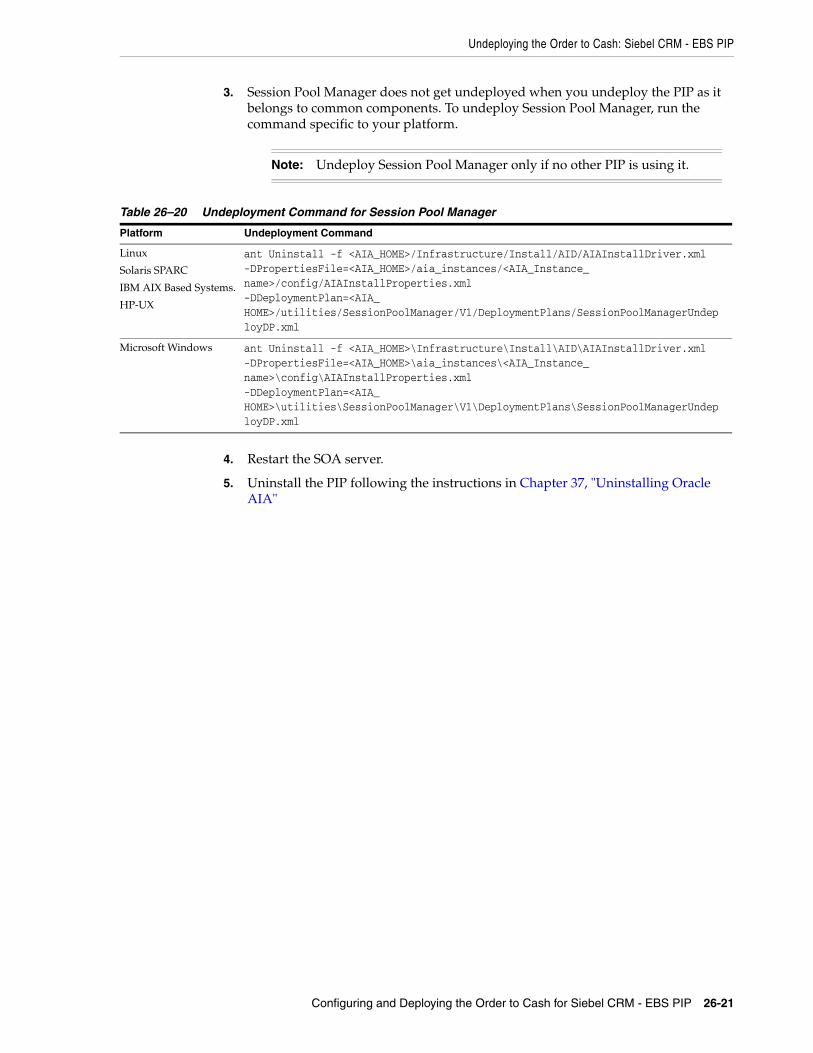
Undeploying the Order to Cash: Siebel CRM - EBS PIP
Configuring and Deploying the Order to Cash for Siebel CRM - EBS PIP 26-21
3. Session Pool Manager does not get undeployed when you undeploy the PIP as it belongs to common components. To undeploy Session Pool Manager, run the command specific to your platform.
4. Restart the SOA server.
5. Uninstall the PIP following the instructions in Chapter 37, "Uninstalling Oracle AIA"
Note: Undeploy Session Pool Manager only if no other PIP is using it.
Table 26–20 Undeployment Command for Session Pool Manager
Platform Undeployment Command
Linux
Solaris SPARC
IBM AIX Based Systems.
HP-UX
ant Uninstall -f <AIA_HOME>/Infrastructure/Install/AID/AIAInstallDriver.xml -DPropertiesFile=<AIA_HOME>/aia_instances/<AIA_Instance_name>/config/AIAInstallProperties.xml -DDeploymentPlan=<AIA_HOME>/utilities/SessionPoolManager/V1/DeploymentPlans/SessionPoolManagerUndeployDP.xml
Microsoft Windows ant Uninstall -f <AIA_HOME>\Infrastructure\Install\AID\AIAInstallDriver.xml -DPropertiesFile=<AIA_HOME>\aia_instances\<AIA_Instance_name>\config\AIAInstallProperties.xml -DDeploymentPlan=<AIA_HOME>\utilities\SessionPoolManager\V1\DeploymentPlans\SessionPoolManagerUndeployDP.xml

Undeploying the Order to Cash: Siebel CRM - EBS PIP
26-22 Oracle Application Integration Architecture Installation and Upgrade Guide for Pre-Built Integrations
27
Configuring and Deploying Siebel CRM to OIC Integration 27-1
27Configuring and Deploying Siebel CRM toOIC Integration
This chapter discusses how to configure and deploy Siebel CRM Integration to Oracle Incentive Compensation (Siebel CRM to OIC).
This chapter includes the following sections:
■ Section 27.1, "Configuring Oracle Data Integrator"
■ Section 27.2, "Deployment Configuration Wizard"
■ Section 27.3, "Configuring and Deploying Siebel CRM to OIC"
■ Section 27.4, "Performing Postdeployment Configurations"
■ Section 27.5, "Verifying Deployment"
■ Section 27.6, "Undeploying the Siebel CRM to OIC Integration"
27.1 Configuring Oracle Data IntegratorTo run AIA Pre-Built Integrations Installer you must have Oracle Data Integrator (ODI) access with Supervisor privileges.
For installation purposes, the ODI software must reside at the same server where Foundation Pack is installed. Once the PIP installation is complete, the ODI software can be installed onto another server (if desired) connecting to the master and work repositories used during the PIP installation.
27.1.1 Creating Oracle Data Integrator RepositoriesYou can use an existing master repository if it exists on an Oracle database and its ID is not 0. If the ID is 0, AIA advises you to create another master repository.
You can use an existing work repository if it exists on an Oracle database and its ID is not 1 or 778. If the ID is 1 or 778, AIA advises you to create another repository and not to use 1 or 778 as the Work Repository ID.
When you run the DCW, it inserts or updates the ODI artifacts into these repositories.
AIA recommends that you make a backup copy of master and work repositories before you start the installation process.
For information about creating Oracle Data Integrator master and work repositories, see Oracle Fusion Middleware Developer's Guide for Oracle Data Integrator, "Administering the Oracle Data Integrator Repositories."
Deployment Configuration Wizard
27-2 Oracle Application Integration Architecture Installation and Upgrade Guide for Pre-Built Integrations
27.1.2 Performing Postinstallation Configurations for ODIPerform the following steps to apply the required patches to your ODI 11.1.1.5.0.
To install prerequisite installer patch #10288265:1. Access My Oracle Support [https://support.oracle.com]
2. Navigate to the Patches & Updates tab
3. In the Patch Name or Number field, write 10288265
4. Select your platform
5. Click Search
6. Download and install patch #10288265
To install patch #12837214:1. Access My Oracle Support [https://support.oracle.com]
2. Navigate to the Patches & Updates tab
3. In the Patch Name or Number field, write 12837214
4. Select your platform
5. Click Search
6. Download and install patch #12837214
After applying the patches, launch the ODI Installer:
1. Go to Topology.
2. Go to Physical Architecture.
3. Find the XML technologies and expand it.
You should see data sources for all DVM's used in your ODI flows.
4. Select each DVM data source.
5. Go to the JDBC tab.
6. Append this to the end of the URL "&back_compat_specific_keywords=true"
7. Test the data source to make sure the connection is successful.
8. Save your changes.
For a screenshot of this screen in ODI Installer, see Appendix B, "Oracle Data Integrator Screen".
27.2 Deployment Configuration WizardThe DCW screens prompt you to enter the data required for successful configuration of Siebel CRM to OIC integration. Enter the details of the Siebel CRM to OIC screens below, take a printout and keep it ready when you run the DCW. This action enables faster and error free configuration.
27.2.1 PIP Server Details ScreenAll artifacts associated with the PIP infrastructure components deploy to the PIP server. This screen contains the following fields:
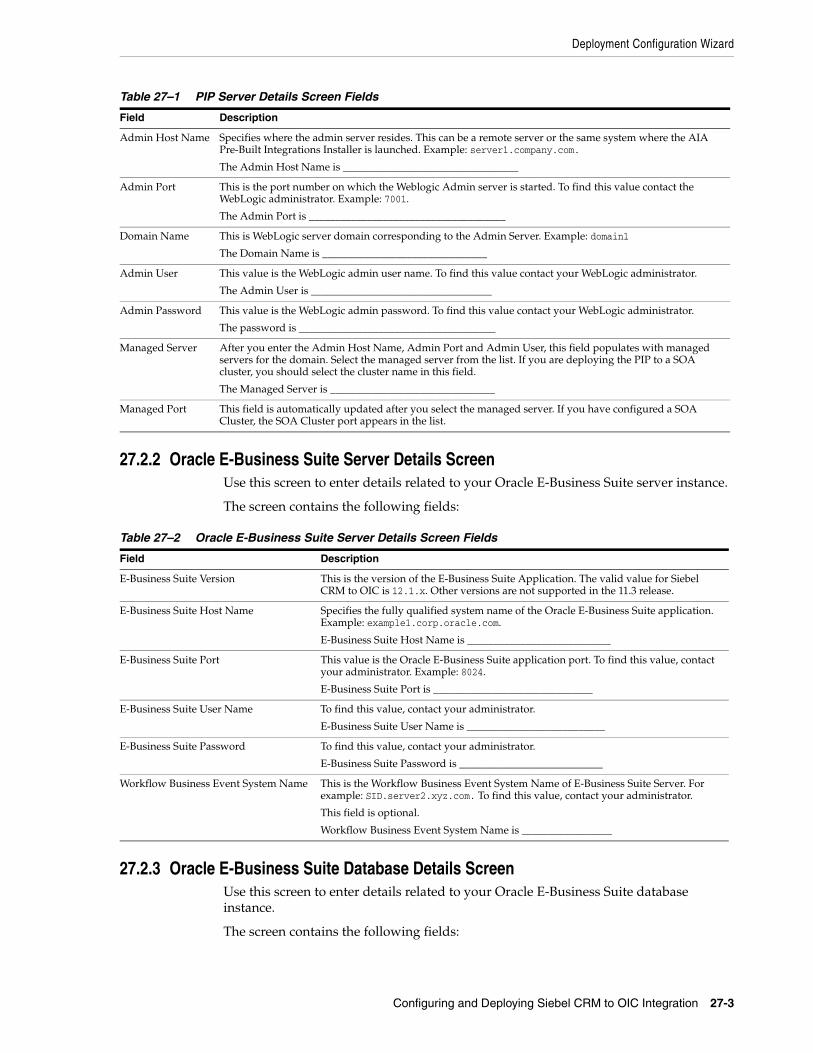
Deployment Configuration Wizard
Configuring and Deploying Siebel CRM to OIC Integration 27-3
27.2.2 Oracle E-Business Suite Server Details ScreenUse this screen to enter details related to your Oracle E-Business Suite server instance.
The screen contains the following fields:
27.2.3 Oracle E-Business Suite Database Details ScreenUse this screen to enter details related to your Oracle E-Business Suite database instance.
The screen contains the following fields:
Table 27–1 PIP Server Details Screen Fields
Field Description
Admin Host Name Specifies where the admin server resides. This can be a remote server or the same system where the AIA Pre-Built Integrations Installer is launched. Example: server1.company.com.
The Admin Host Name is _________________________________
Admin Port This is the port number on which the Weblogic Admin server is started. To find this value contact the WebLogic administrator. Example: 7001.
The Admin Port is _____________________________________
Domain Name This is WebLogic server domain corresponding to the Admin Server. Example: domain1
The Domain Name is _______________________________
Admin User This value is the WebLogic admin user name. To find this value contact your WebLogic administrator.
The Admin User is __________________________________
Admin Password This value is the WebLogic admin password. To find this value contact your WebLogic administrator.
The password is _____________________________________
Managed Server After you enter the Admin Host Name, Admin Port and Admin User, this field populates with managed servers for the domain. Select the managed server from the list. If you are deploying the PIP to a SOA cluster, you should select the cluster name in this field.
The Managed Server is _______________________________
Managed Port This field is automatically updated after you select the managed server. If you have configured a SOA Cluster, the SOA Cluster port appears in the list.
Table 27–2 Oracle E-Business Suite Server Details Screen Fields
Field Description
E-Business Suite Version This is the version of the E-Business Suite Application. The valid value for Siebel CRM to OIC is 12.1.x. Other versions are not supported in the 11.3 release.
E-Business Suite Host Name Specifies the fully qualified system name of the Oracle E-Business Suite application. Example: example1.corp.oracle.com.
E-Business Suite Host Name is ___________________________
E-Business Suite Port This value is the Oracle E-Business Suite application port. To find this value, contact your administrator. Example: 8024.
E-Business Suite Port is ______________________________
E-Business Suite User Name To find this value, contact your administrator.
E-Business Suite User Name is __________________________
E-Business Suite Password To find this value, contact your administrator.
E-Business Suite Password is ___________________________
Workflow Business Event System Name This is the Workflow Business Event System Name of E-Business Suite Server. For example: SID.server2.xyz.com. To find this value, contact your administrator.
This field is optional.
Workflow Business Event System Name is _________________
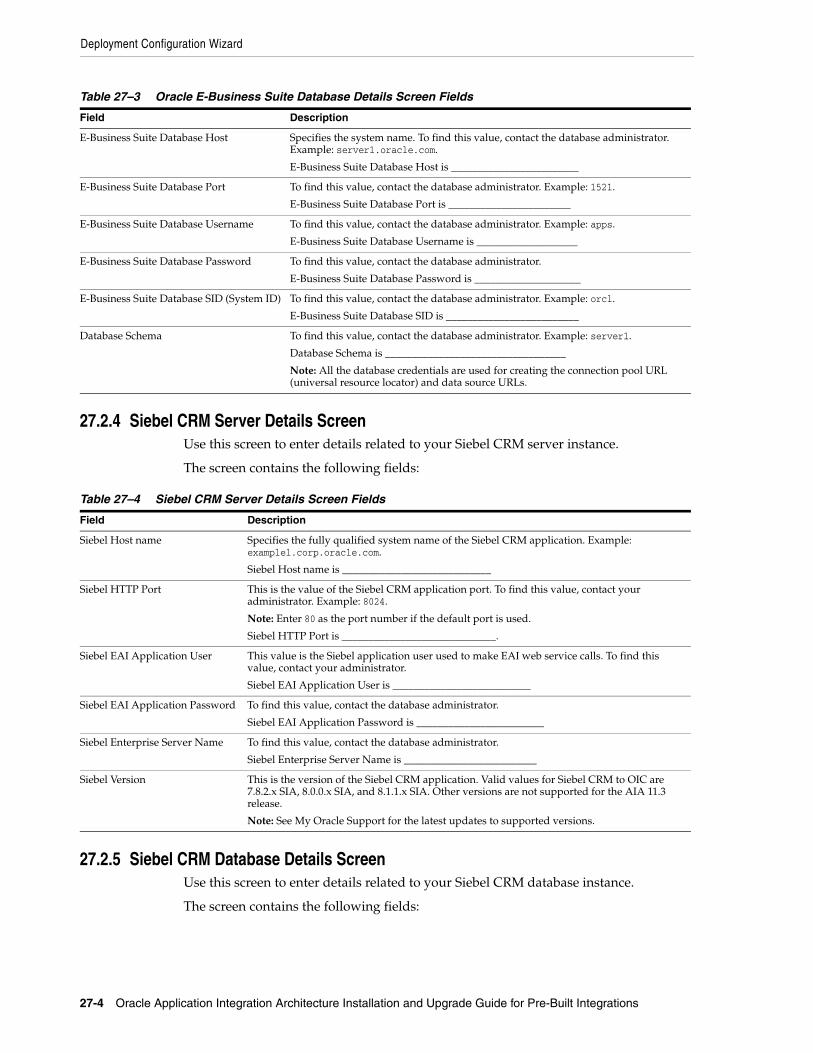
Deployment Configuration Wizard
27-4 Oracle Application Integration Architecture Installation and Upgrade Guide for Pre-Built Integrations
27.2.4 Siebel CRM Server Details ScreenUse this screen to enter details related to your Siebel CRM server instance.
The screen contains the following fields:
27.2.5 Siebel CRM Database Details ScreenUse this screen to enter details related to your Siebel CRM database instance.
The screen contains the following fields:
Table 27–3 Oracle E-Business Suite Database Details Screen Fields
Field Description
E-Business Suite Database Host Specifies the system name. To find this value, contact the database administrator. Example: server1.oracle.com.
E-Business Suite Database Host is ________________________
E-Business Suite Database Port To find this value, contact the database administrator. Example: 1521.
E-Business Suite Database Port is _______________________
E-Business Suite Database Username To find this value, contact the database administrator. Example: apps.
E-Business Suite Database Username is ___________________
E-Business Suite Database Password To find this value, contact the database administrator.
E-Business Suite Database Password is ____________________
E-Business Suite Database SID (System ID) To find this value, contact the database administrator. Example: orcl.
E-Business Suite Database SID is _________________________
Database Schema To find this value, contact the database administrator. Example: server1.
Database Schema is __________________________________
Note: All the database credentials are used for creating the connection pool URL (universal resource locator) and data source URLs.
Table 27–4 Siebel CRM Server Details Screen Fields
Field Description
Siebel Host name Specifies the fully qualified system name of the Siebel CRM application. Example: example1.corp.oracle.com.
Siebel Host name is ____________________________
Siebel HTTP Port This is the value of the Siebel CRM application port. To find this value, contact your administrator. Example: 8024.
Note: Enter 80 as the port number if the default port is used.
Siebel HTTP Port is _____________________________.
Siebel EAI Application User This value is the Siebel application user used to make EAI web service calls. To find this value, contact your administrator.
Siebel EAI Application User is __________________________
Siebel EAI Application Password To find this value, contact the database administrator.
Siebel EAI Application Password is ________________________
Siebel Enterprise Server Name To find this value, contact the database administrator.
Siebel Enterprise Server Name is _________________________
Siebel Version This is the version of the Siebel CRM application. Valid values for Siebel CRM to OIC are 7.8.2.x SIA, 8.0.0.x SIA, and 8.1.1.x SIA. Other versions are not supported for the AIA 11.3 release.
Note: See My Oracle Support for the latest updates to supported versions.
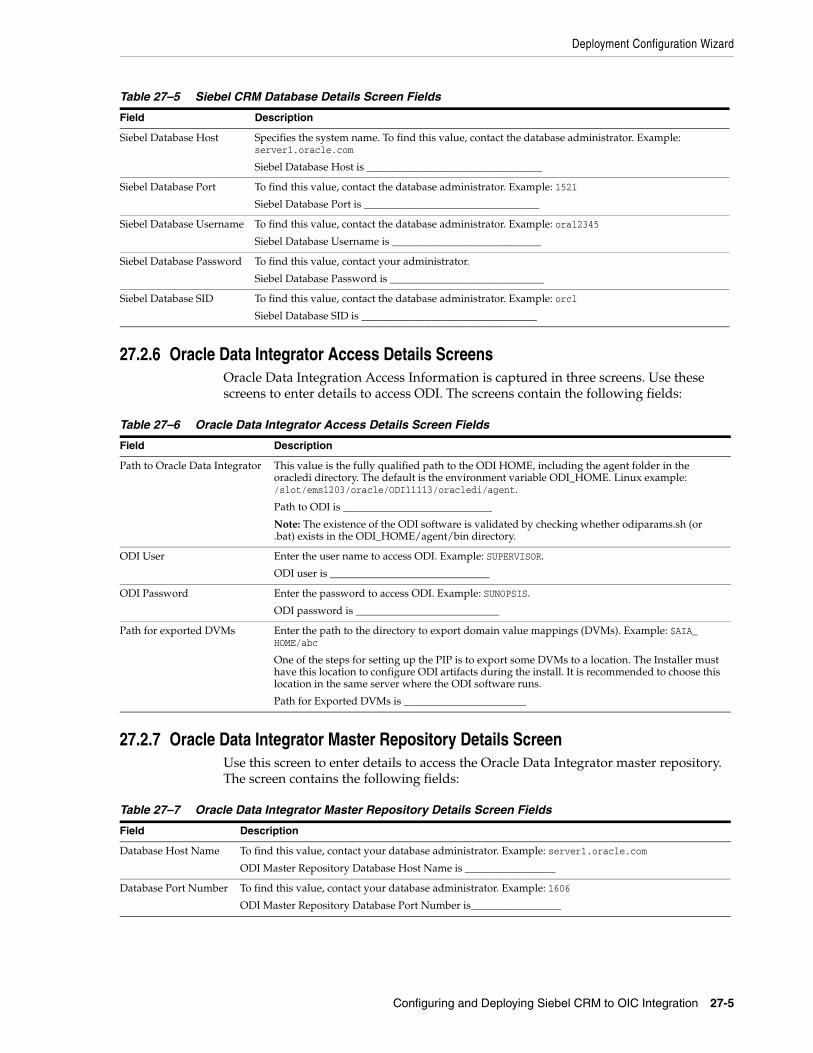
Deployment Configuration Wizard
Configuring and Deploying Siebel CRM to OIC Integration 27-5
27.2.6 Oracle Data Integrator Access Details ScreensOracle Data Integration Access Information is captured in three screens. Use these screens to enter details to access ODI. The screens contain the following fields:
27.2.7 Oracle Data Integrator Master Repository Details ScreenUse this screen to enter details to access the Oracle Data Integrator master repository. The screen contains the following fields:
Table 27–5 Siebel CRM Database Details Screen Fields
Field Description
Siebel Database Host Specifies the system name. To find this value, contact the database administrator. Example: server1.oracle.com
Siebel Database Host is _________________________________
Siebel Database Port To find this value, contact the database administrator. Example: 1521
Siebel Database Port is _________________________________
Siebel Database Username To find this value, contact the database administrator. Example: ora12345
Siebel Database Username is ____________________________
Siebel Database Password To find this value, contact your administrator.
Siebel Database Password is _____________________________
Siebel Database SID To find this value, contact the database administrator. Example: orcl
Siebel Database SID is _________________________________
Table 27–6 Oracle Data Integrator Access Details Screen Fields
Field Description
Path to Oracle Data Integrator This value is the fully qualified path to the ODI HOME, including the agent folder in the oracledi directory. The default is the environment variable ODI_HOME. Linux example: /slot/ems1203/oracle/ODI11113/oracledi/agent.
Path to ODI is ____________________________
Note: The existence of the ODI software is validated by checking whether odiparams.sh (or .bat) exists in the ODI_HOME/agent/bin directory.
ODI User Enter the user name to access ODI. Example: SUPERVISOR.
ODI user is ______________________________
ODI Password Enter the password to access ODI. Example: SUNOPSIS.
ODI password is ___________________________
Path for exported DVMs Enter the path to the directory to export domain value mappings (DVMs). Example: $AIA_HOME/abc
One of the steps for setting up the PIP is to export some DVMs to a location. The Installer must have this location to configure ODI artifacts during the install. It is recommended to choose this location in the same server where the ODI software runs.
Path for Exported DVMs is _______________________
Table 27–7 Oracle Data Integrator Master Repository Details Screen Fields
Field Description
Database Host Name To find this value, contact your database administrator. Example: server1.oracle.com
ODI Master Repository Database Host Name is _________________
Database Port Number To find this value, contact your database administrator. Example: 1606
ODI Master Repository Database Port Number is_________________
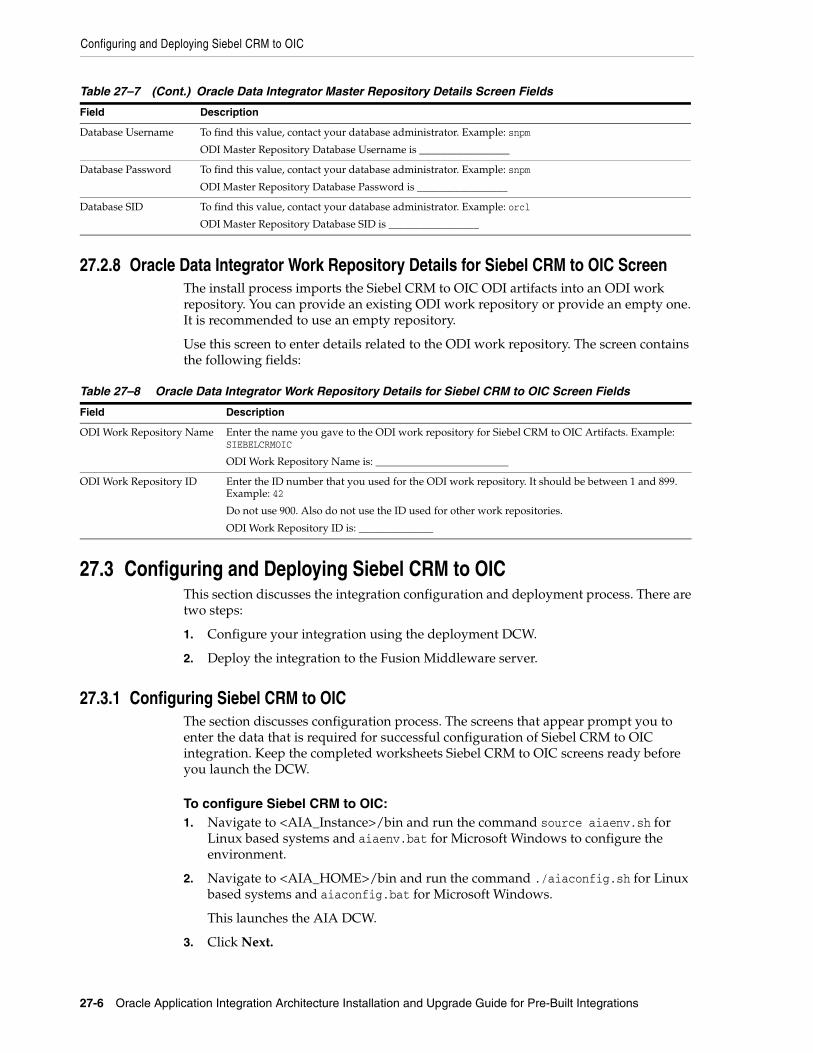
Configuring and Deploying Siebel CRM to OIC
27-6 Oracle Application Integration Architecture Installation and Upgrade Guide for Pre-Built Integrations
27.2.8 Oracle Data Integrator Work Repository Details for Siebel CRM to OIC ScreenThe install process imports the Siebel CRM to OIC ODI artifacts into an ODI work repository. You can provide an existing ODI work repository or provide an empty one. It is recommended to use an empty repository.
Use this screen to enter details related to the ODI work repository. The screen contains the following fields:
27.3 Configuring and Deploying Siebel CRM to OICThis section discusses the integration configuration and deployment process. There are two steps:
1. Configure your integration using the deployment DCW.
2. Deploy the integration to the Fusion Middleware server.
27.3.1 Configuring Siebel CRM to OICThe section discusses configuration process. The screens that appear prompt you to enter the data that is required for successful configuration of Siebel CRM to OIC integration. Keep the completed worksheets Siebel CRM to OIC screens ready before you launch the DCW.
To configure Siebel CRM to OIC:1. Navigate to <AIA_Instance>/bin and run the command source aiaenv.sh for
Linux based systems and aiaenv.bat for Microsoft Windows to configure the environment.
2. Navigate to <AIA_HOME>/bin and run the command ./aiaconfig.sh for Linux based systems and aiaconfig.bat for Microsoft Windows.
This launches the AIA DCW.
3. Click Next.
Database Username To find this value, contact your database administrator. Example: snpm
ODI Master Repository Database Username is _________________
Database Password To find this value, contact your database administrator. Example: snpm
ODI Master Repository Database Password is _________________
Database SID To find this value, contact your database administrator. Example: orcl
ODI Master Repository Database SID is _________________
Table 27–8 Oracle Data Integrator Work Repository Details for Siebel CRM to OIC Screen Fields
Field Description
ODI Work Repository Name Enter the name you gave to the ODI work repository for Siebel CRM to OIC Artifacts. Example: SIEBELCRMOIC
ODI Work Repository Name is: _________________________
ODI Work Repository ID Enter the ID number that you used for the ODI work repository. It should be between 1 and 899. Example: 42
Do not use 900. Also do not use the ID used for other work repositories.
ODI Work Repository ID is: ______________
Table 27–7 (Cont.) Oracle Data Integrator Master Repository Details Screen Fields
Field Description
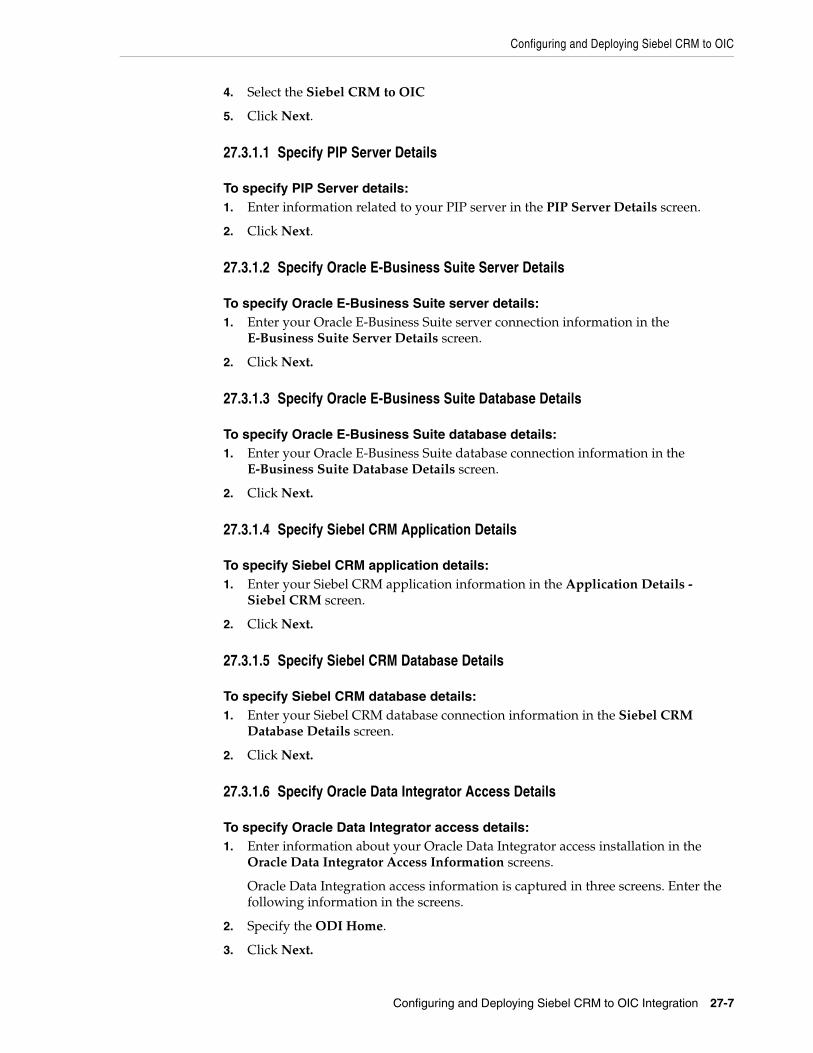
Configuring and Deploying Siebel CRM to OIC
Configuring and Deploying Siebel CRM to OIC Integration 27-7
4. Select the Siebel CRM to OIC
5. Click Next.
27.3.1.1 Specify PIP Server Details
To specify PIP Server details:1. Enter information related to your PIP server in the PIP Server Details screen.
2. Click Next.
27.3.1.2 Specify Oracle E-Business Suite Server Details
To specify Oracle E-Business Suite server details:1. Enter your Oracle E-Business Suite server connection information in the
E-Business Suite Server Details screen.
2. Click Next.
27.3.1.3 Specify Oracle E-Business Suite Database Details
To specify Oracle E-Business Suite database details:1. Enter your Oracle E-Business Suite database connection information in the
E-Business Suite Database Details screen.
2. Click Next.
27.3.1.4 Specify Siebel CRM Application Details
To specify Siebel CRM application details:1. Enter your Siebel CRM application information in the Application Details -
Siebel CRM screen.
2. Click Next.
27.3.1.5 Specify Siebel CRM Database Details
To specify Siebel CRM database details:1. Enter your Siebel CRM database connection information in the Siebel CRM
Database Details screen.
2. Click Next.
27.3.1.6 Specify Oracle Data Integrator Access Details
To specify Oracle Data Integrator access details:1. Enter information about your Oracle Data Integrator access installation in the
Oracle Data Integrator Access Information screens.
Oracle Data Integration access information is captured in three screens. Enter the following information in the screens.
2. Specify the ODI Home.
3. Click Next.
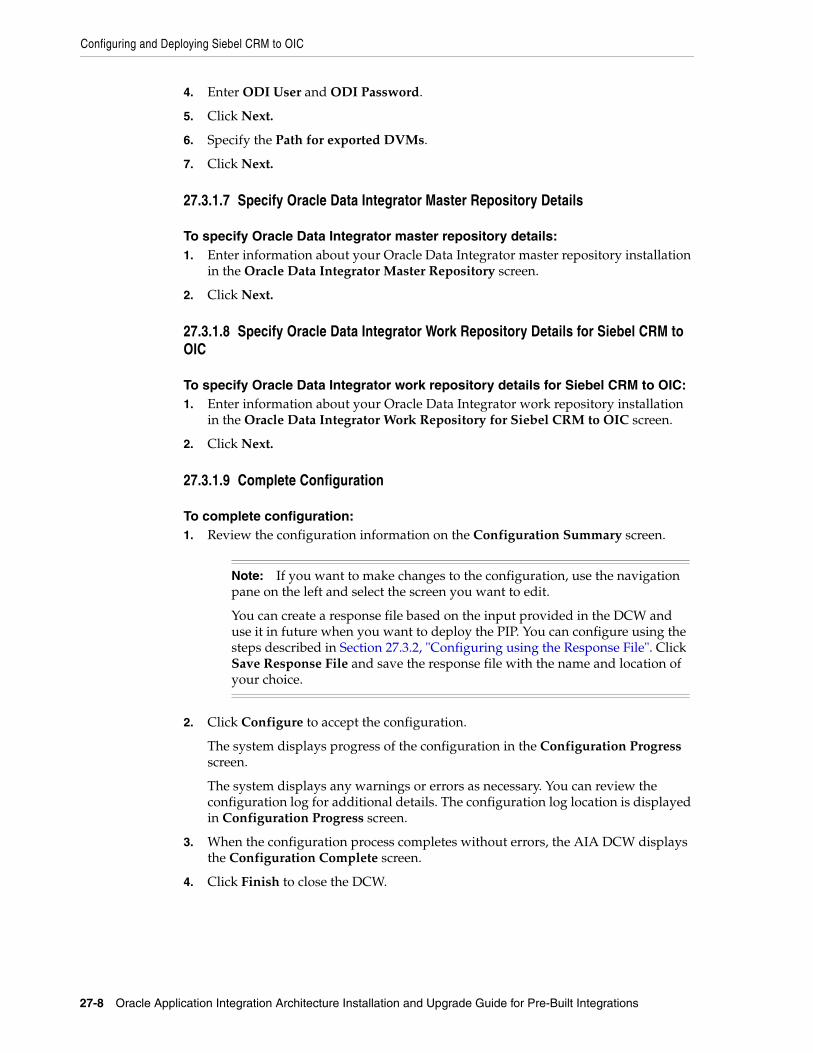
Configuring and Deploying Siebel CRM to OIC
27-8 Oracle Application Integration Architecture Installation and Upgrade Guide for Pre-Built Integrations
4. Enter ODI User and ODI Password.
5. Click Next.
6. Specify the Path for exported DVMs.
7. Click Next.
27.3.1.7 Specify Oracle Data Integrator Master Repository Details
To specify Oracle Data Integrator master repository details:1. Enter information about your Oracle Data Integrator master repository installation
in the Oracle Data Integrator Master Repository screen.
2. Click Next.
27.3.1.8 Specify Oracle Data Integrator Work Repository Details for Siebel CRM to OIC
To specify Oracle Data Integrator work repository details for Siebel CRM to OIC:1. Enter information about your Oracle Data Integrator work repository installation
in the Oracle Data Integrator Work Repository for Siebel CRM to OIC screen.
2. Click Next.
27.3.1.9 Complete Configuration
To complete configuration:1. Review the configuration information on the Configuration Summary screen.
2. Click Configure to accept the configuration.
The system displays progress of the configuration in the Configuration Progress screen.
The system displays any warnings or errors as necessary. You can review the configuration log for additional details. The configuration log location is displayed in Configuration Progress screen.
3. When the configuration process completes without errors, the AIA DCW displays the Configuration Complete screen.
4. Click Finish to close the DCW.
Note: If you want to make changes to the configuration, use the navigation pane on the left and select the screen you want to edit.
You can create a response file based on the input provided in the DCW and use it in future when you want to deploy the PIP. You can configure using the steps described in Section 27.3.2, "Configuring using the Response File". Click Save Response File and save the response file with the name and location of your choice.
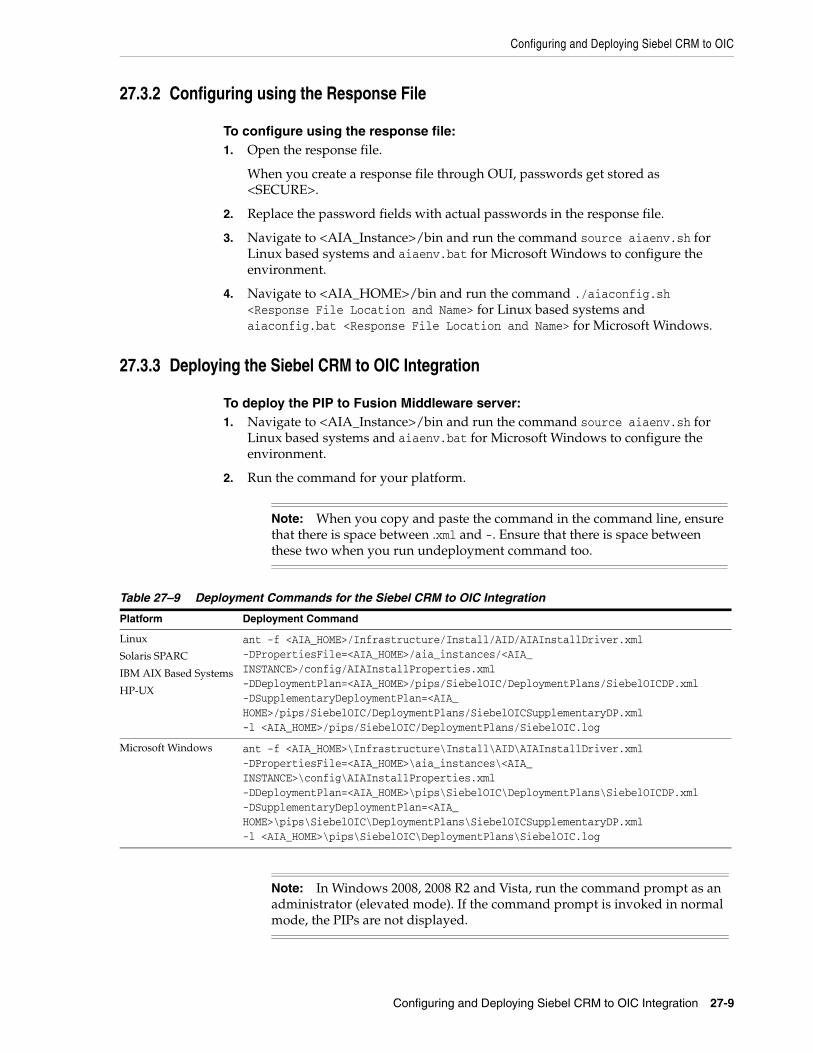
Configuring and Deploying Siebel CRM to OIC
Configuring and Deploying Siebel CRM to OIC Integration 27-9
27.3.2 Configuring using the Response File
To configure using the response file:1. Open the response file.
When you create a response file through OUI, passwords get stored as <SECURE>.
2. Replace the password fields with actual passwords in the response file.
3. Navigate to <AIA_Instance>/bin and run the command source aiaenv.sh for Linux based systems and aiaenv.bat for Microsoft Windows to configure the environment.
4. Navigate to <AIA_HOME>/bin and run the command ./aiaconfig.sh <Response File Location and Name> for Linux based systems and aiaconfig.bat <Response File Location and Name> for Microsoft Windows.
27.3.3 Deploying the Siebel CRM to OIC Integration
To deploy the PIP to Fusion Middleware server:1. Navigate to <AIA_Instance>/bin and run the command source aiaenv.sh for
Linux based systems and aiaenv.bat for Microsoft Windows to configure the environment.
2. Run the command for your platform.
Note: When you copy and paste the command in the command line, ensure that there is space between .xml and -. Ensure that there is space between these two when you run undeployment command too.
Table 27–9 Deployment Commands for the Siebel CRM to OIC Integration
Platform Deployment Command
Linux
Solaris SPARC
IBM AIX Based Systems
HP-UX
ant -f <AIA_HOME>/Infrastructure/Install/AID/AIAInstallDriver.xml -DPropertiesFile=<AIA_HOME>/aia_instances/<AIA_INSTANCE>/config/AIAInstallProperties.xml -DDeploymentPlan=<AIA_HOME>/pips/SiebelOIC/DeploymentPlans/SiebelOICDP.xml -DSupplementaryDeploymentPlan=<AIA_HOME>/pips/SiebelOIC/DeploymentPlans/SiebelOICSupplementaryDP.xml -l <AIA_HOME>/pips/SiebelOIC/DeploymentPlans/SiebelOIC.log
Microsoft Windows ant -f <AIA_HOME>\Infrastructure\Install\AID\AIAInstallDriver.xml -DPropertiesFile=<AIA_HOME>\aia_instances\<AIA_INSTANCE>\config\AIAInstallProperties.xml -DDeploymentPlan=<AIA_HOME>\pips\SiebelOIC\DeploymentPlans\SiebelOICDP.xml -DSupplementaryDeploymentPlan=<AIA_HOME>\pips\SiebelOIC\DeploymentPlans\SiebelOICSupplementaryDP.xml -l <AIA_HOME>\pips\SiebelOIC\DeploymentPlans\SiebelOIC.log
Note: In Windows 2008, 2008 R2 and Vista, run the command prompt as an administrator (elevated mode). If the command prompt is invoked in normal mode, the PIPs are not displayed.
Performing Postdeployment Configurations
27-10 Oracle Application Integration Architecture Installation and Upgrade Guide for Pre-Built Integrations
3. Review the log file in the location specified in the command to verify successful deployment.
Oracle AIA ships artifacts in AIA Lifecycle Workbench which can be used in your integrations. These artifacts are created using FMW technologies such as BPEL and Mediator and are natively supported by AIA Foundation Pack tools such as Project Lifecycle Workbench, Harvester, Deployment Generator, AIA Deployment Driver (ADD). These are called native artifacts and they include SOA artifact types such as composites, DataSources, DVM, xRef, and so on. These artifacts can be modified or new natively supported artifacts can be added using the AIA Lifecyle Workbench and a BOM.xml file can be generated.
AIA PIP development teams, most often, also require deployment of artifact types that are beyond what is supported by the Project Lifecycle Workbench and AIA Harvester. For instance, integration may require artifacts such as, Java applications, Shell Scripts, ANT based build scripts which constitute part of integration landscape in addition to the artifacts that are delivered by AIA. AIA also supports deployment of these supplementary artifacts. However, you must modify and add new non native artifacts outside AIA Lifecycle Workbench.
For more information on deploying artifacts, see Oracle Fusion Middleware Developer's Guide for Oracle Application Integration Architecture Foundation Pack, "Generating Deployment Plans and Deploying Artifacts".
27.4 Performing Postdeployment ConfigurationsThis section discusses the postdeployment configurations for Siebel CRM to OIC Integration. This section includes the following:
■ Section 27.4.1, "Associating the Oracle Data Integrator Console with the Work Repository"
■ Section 27.4.2, "Populating the COMPENSATION_ORGANIZATION_ID Cross-Reference Manually"
■ Section 27.4.3, "Creating Siebel Views"
27.4.1 Associating the Oracle Data Integrator Console with the Work RepositoryThe Oracle Data Integrator Console must be associated with the work repository that is created for the Siebel CRM to OIC integration.
For information on associating the Oracle Data Integrator Console with the work repository, see Oracle Fusion Middleware Developer's Guide for Oracle Data Integrator, "Creating a Repository Connection" in "Performing Administrative Operations."
27.4.2 Populating the COMPENSATION_ORGANIZATION_ID Cross-Reference ManuallyThe COMPENSATION_ORGANIZATION_ID cross-reference table dynamically maps values between Siebel CRM and Oracle Incentive Compensation.
An example of the COMPENSATION_ORGANIZATION_ID cross-reference table is shown here:
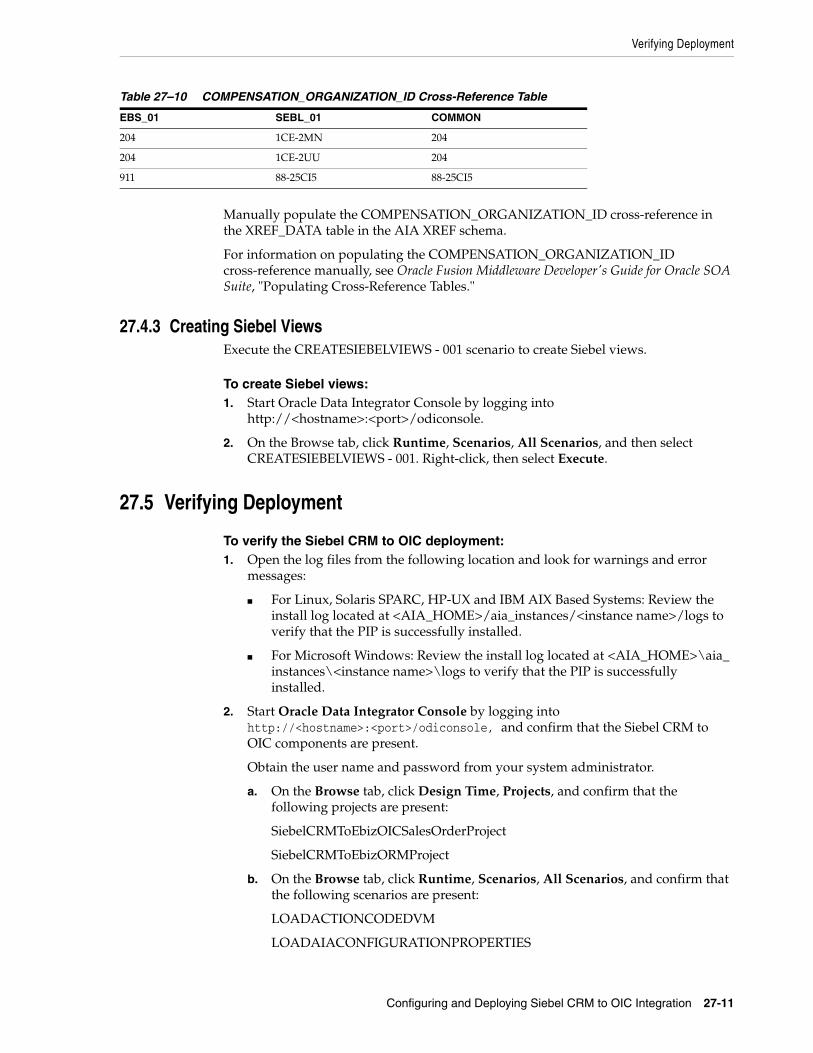
Verifying Deployment
Configuring and Deploying Siebel CRM to OIC Integration 27-11
Manually populate the COMPENSATION_ORGANIZATION_ID cross-reference in the XREF_DATA table in the AIA XREF schema.
For information on populating the COMPENSATION_ORGANIZATION_ID cross-reference manually, see Oracle Fusion Middleware Developer's Guide for Oracle SOA Suite, "Populating Cross-Reference Tables."
27.4.3 Creating Siebel ViewsExecute the CREATESIEBELVIEWS - 001 scenario to create Siebel views.
To create Siebel views:1. Start Oracle Data Integrator Console by logging into
http://<hostname>:<port>/odiconsole.
2. On the Browse tab, click Runtime, Scenarios, All Scenarios, and then select CREATESIEBELVIEWS - 001. Right-click, then select Execute.
27.5 Verifying Deployment
To verify the Siebel CRM to OIC deployment:1. Open the log files from the following location and look for warnings and error
messages:
■ For Linux, Solaris SPARC, HP-UX and IBM AIX Based Systems: Review the install log located at <AIA_HOME>/aia_instances/<instance name>/logs to verify that the PIP is successfully installed.
■ For Microsoft Windows: Review the install log located at <AIA_HOME>\aia_instances\<instance name>\logs to verify that the PIP is successfully installed.
2. Start Oracle Data Integrator Console by logging into http://<hostname>:<port>/odiconsole, and confirm that the Siebel CRM to OIC components are present.
Obtain the user name and password from your system administrator.
a. On the Browse tab, click Design Time, Projects, and confirm that the following projects are present:
SiebelCRMToEbizOICSalesOrderProject
SiebelCRMToEbizORMProject
b. On the Browse tab, click Runtime, Scenarios, All Scenarios, and confirm that the following scenarios are present:
LOADACTIONCODEDVM
LOADAIACONFIGURATIONPROPERTIES
Table 27–10 COMPENSATION_ORGANIZATION_ID Cross-Reference Table
EBS_01 SEBL_01 COMMON
204 1CE-2MN 204
204 1CE-2UU 204
911 88-25CI5 88-25CI5
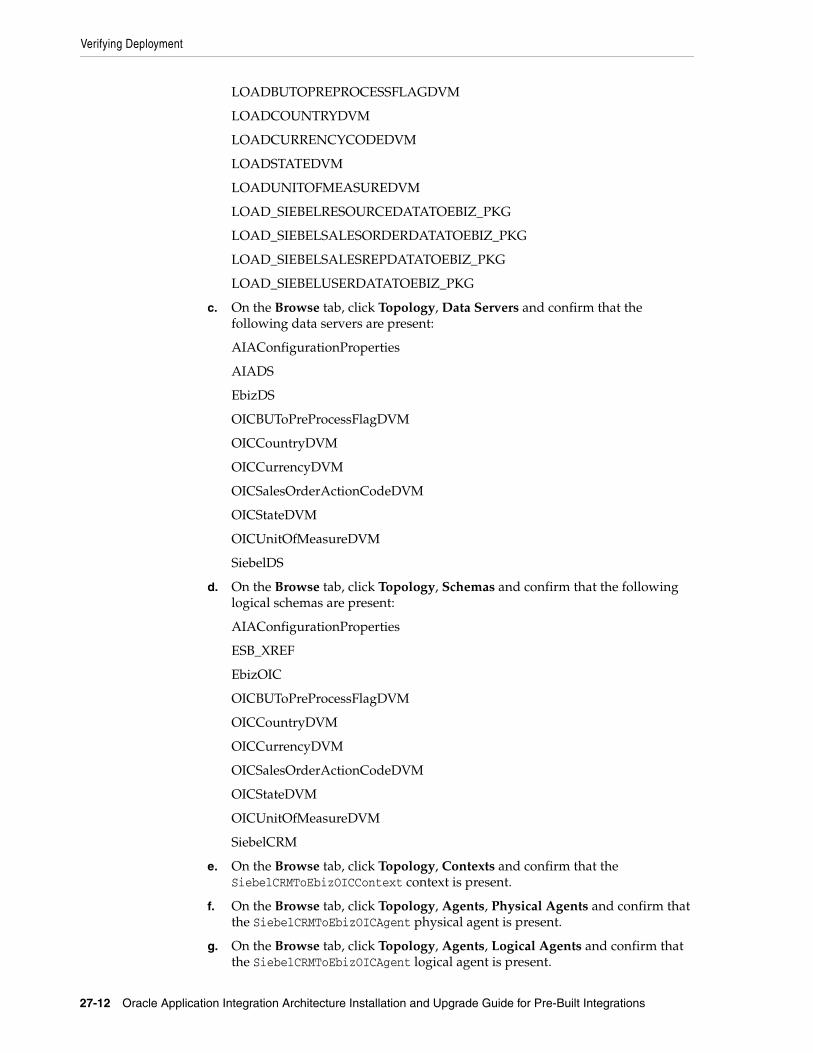
Verifying Deployment
27-12 Oracle Application Integration Architecture Installation and Upgrade Guide for Pre-Built Integrations
LOADBUTOPREPROCESSFLAGDVM
LOADCOUNTRYDVM
LOADCURRENCYCODEDVM
LOADSTATEDVM
LOADUNITOFMEASUREDVM
LOAD_SIEBELRESOURCEDATATOEBIZ_PKG
LOAD_SIEBELSALESORDERDATATOEBIZ_PKG
LOAD_SIEBELSALESREPDATATOEBIZ_PKG
LOAD_SIEBELUSERDATATOEBIZ_PKG
c. On the Browse tab, click Topology, Data Servers and confirm that the following data servers are present:
AIAConfigurationProperties
AIADS
EbizDS
OICBUToPreProcessFlagDVM
OICCountryDVM
OICCurrencyDVM
OICSalesOrderActionCodeDVM
OICStateDVM
OICUnitOfMeasureDVM
SiebelDS
d. On the Browse tab, click Topology, Schemas and confirm that the following logical schemas are present:
AIAConfigurationProperties
ESB_XREF
EbizOIC
OICBUToPreProcessFlagDVM
OICCountryDVM
OICCurrencyDVM
OICSalesOrderActionCodeDVM
OICStateDVM
OICUnitOfMeasureDVM
SiebelCRM
e. On the Browse tab, click Topology, Contexts and confirm that the SiebelCRMToEbizOICContext context is present.
f. On the Browse tab, click Topology, Agents, Physical Agents and confirm that the SiebelCRMToEbizOICAgent physical agent is present.
g. On the Browse tab, click Topology, Agents, Logical Agents and confirm that the SiebelCRMToEbizOICAgent logical agent is present.
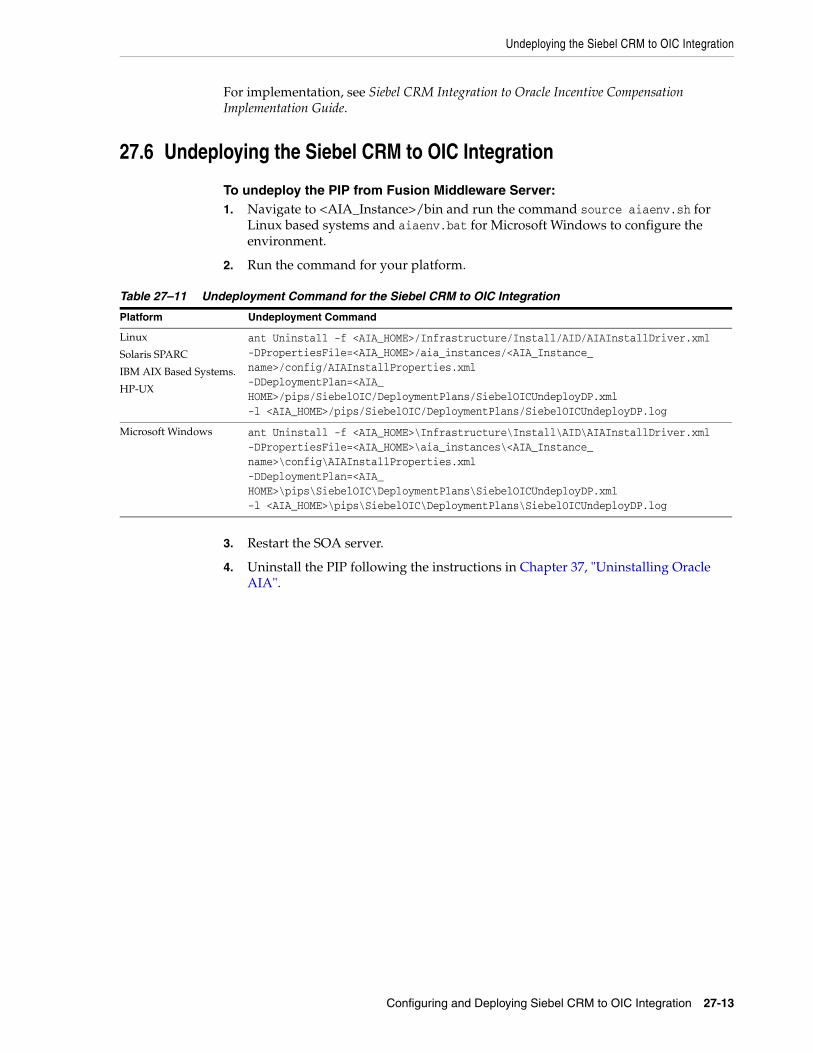
Undeploying the Siebel CRM to OIC Integration
Configuring and Deploying Siebel CRM to OIC Integration 27-13
For implementation, see Siebel CRM Integration to Oracle Incentive Compensation Implementation Guide.
27.6 Undeploying the Siebel CRM to OIC Integration
To undeploy the PIP from Fusion Middleware Server:1. Navigate to <AIA_Instance>/bin and run the command source aiaenv.sh for
Linux based systems and aiaenv.bat for Microsoft Windows to configure the environment.
2. Run the command for your platform.
3. Restart the SOA server.
4. Uninstall the PIP following the instructions in Chapter 37, "Uninstalling Oracle AIA".
Table 27–11 Undeployment Command for the Siebel CRM to OIC Integration
Platform Undeployment Command
Linux
Solaris SPARC
IBM AIX Based Systems.
HP-UX
ant Uninstall -f <AIA_HOME>/Infrastructure/Install/AID/AIAInstallDriver.xml -DPropertiesFile=<AIA_HOME>/aia_instances/<AIA_Instance_name>/config/AIAInstallProperties.xml -DDeploymentPlan=<AIA_HOME>/pips/SiebelOIC/DeploymentPlans/SiebelOICUndeployDP.xml -l <AIA_HOME>/pips/SiebelOIC/DeploymentPlans/SiebelOICUndeployDP.log
Microsoft Windows ant Uninstall -f <AIA_HOME>\Infrastructure\Install\AID\AIAInstallDriver.xml -DPropertiesFile=<AIA_HOME>\aia_instances\<AIA_Instance_name>\config\AIAInstallProperties.xml -DDeploymentPlan=<AIA_HOME>\pips\SiebelOIC\DeploymentPlans\SiebelOICUndeployDP.xml -l <AIA_HOME>\pips\SiebelOIC\DeploymentPlans\SiebelOICUndeployDP.log

Undeploying the Siebel CRM to OIC Integration
27-14 Oracle Application Integration Architecture Installation and Upgrade Guide for Pre-Built Integrations
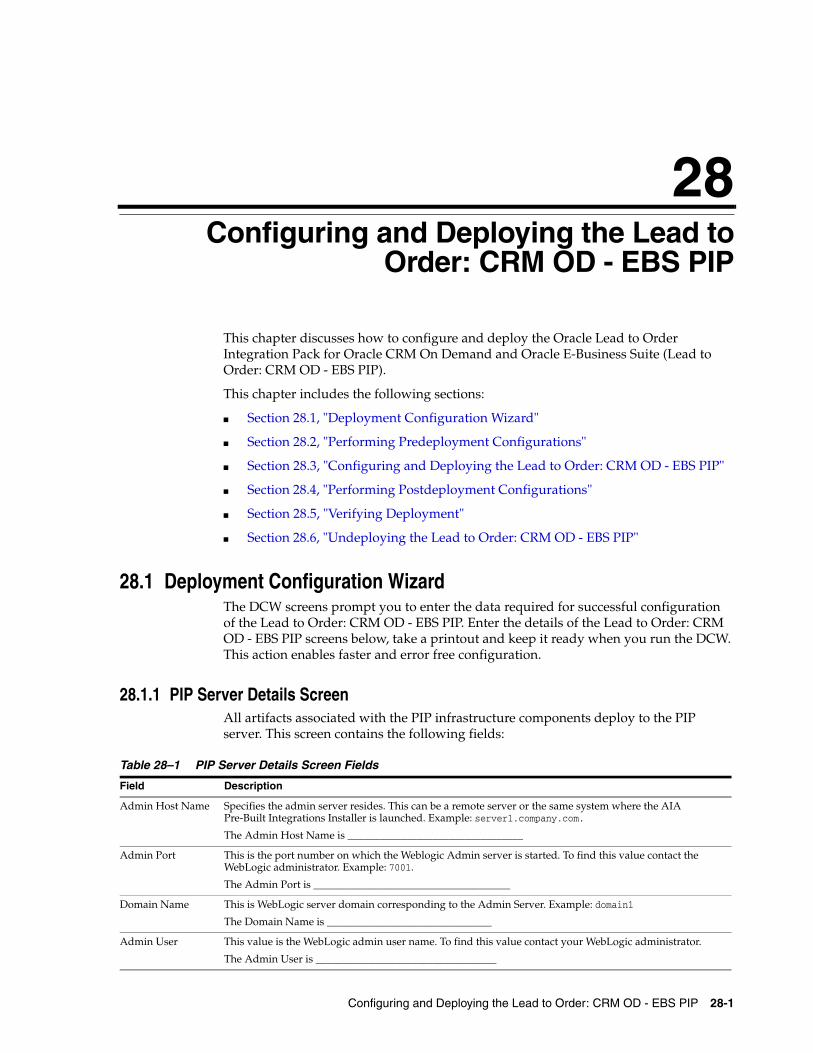
28
Configuring and Deploying the Lead to Order: CRM OD - EBS PIP 28-1
28Configuring and Deploying the Lead toOrder: CRM OD - EBS PIP
This chapter discusses how to configure and deploy the Oracle Lead to Order Integration Pack for Oracle CRM On Demand and Oracle E-Business Suite (Lead to Order: CRM OD - EBS PIP).
This chapter includes the following sections:
■ Section 28.1, "Deployment Configuration Wizard"
■ Section 28.2, "Performing Predeployment Configurations"
■ Section 28.3, "Configuring and Deploying the Lead to Order: CRM OD - EBS PIP"
■ Section 28.4, "Performing Postdeployment Configurations"
■ Section 28.5, "Verifying Deployment"
■ Section 28.6, "Undeploying the Lead to Order: CRM OD - EBS PIP"
28.1 Deployment Configuration WizardThe DCW screens prompt you to enter the data required for successful configuration of the Lead to Order: CRM OD - EBS PIP. Enter the details of the Lead to Order: CRM OD - EBS PIP screens below, take a printout and keep it ready when you run the DCW. This action enables faster and error free configuration.
28.1.1 PIP Server Details ScreenAll artifacts associated with the PIP infrastructure components deploy to the PIP server. This screen contains the following fields:
Table 28–1 PIP Server Details Screen Fields
Field Description
Admin Host Name Specifies the admin server resides. This can be a remote server or the same system where the AIA Pre-Built Integrations Installer is launched. Example: server1.company.com.
The Admin Host Name is _________________________________
Admin Port This is the port number on which the Weblogic Admin server is started. To find this value contact the WebLogic administrator. Example: 7001.
The Admin Port is _____________________________________
Domain Name This is WebLogic server domain corresponding to the Admin Server. Example: domain1
The Domain Name is _______________________________
Admin User This value is the WebLogic admin user name. To find this value contact your WebLogic administrator.
The Admin User is __________________________________
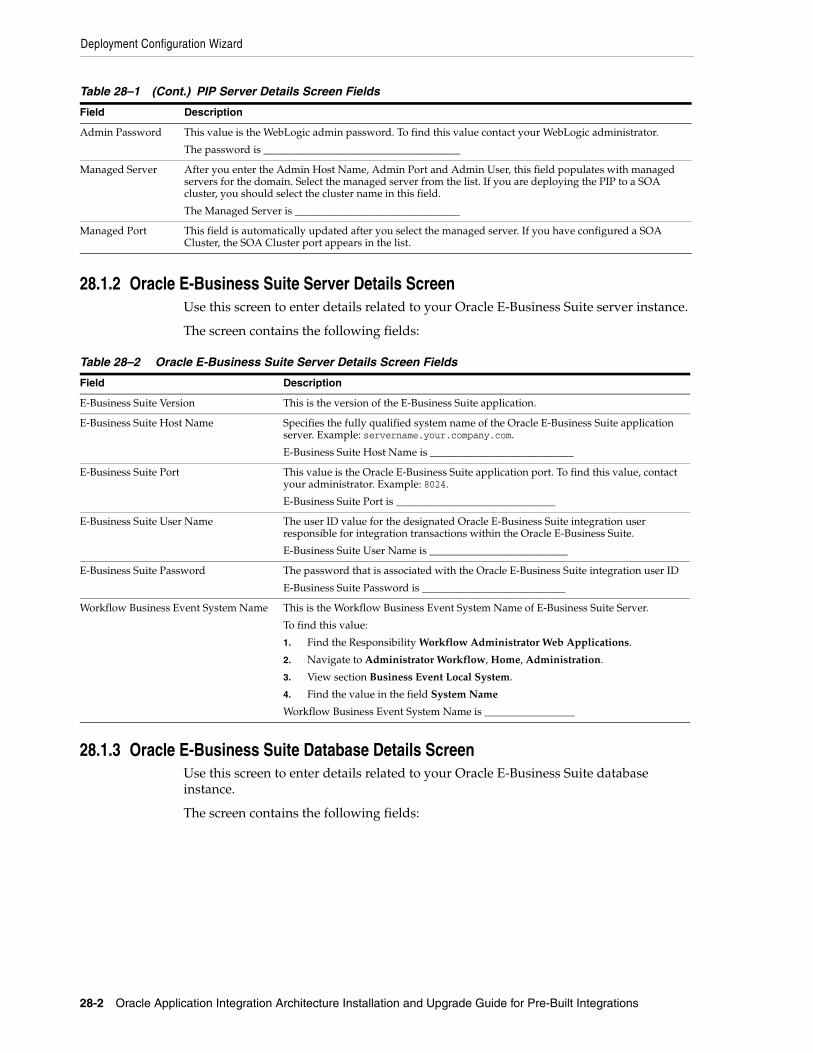
Deployment Configuration Wizard
28-2 Oracle Application Integration Architecture Installation and Upgrade Guide for Pre-Built Integrations
28.1.2 Oracle E-Business Suite Server Details ScreenUse this screen to enter details related to your Oracle E-Business Suite server instance.
The screen contains the following fields:
28.1.3 Oracle E-Business Suite Database Details ScreenUse this screen to enter details related to your Oracle E-Business Suite database instance.
The screen contains the following fields:
Admin Password This value is the WebLogic admin password. To find this value contact your WebLogic administrator.
The password is _____________________________________
Managed Server After you enter the Admin Host Name, Admin Port and Admin User, this field populates with managed servers for the domain. Select the managed server from the list. If you are deploying the PIP to a SOA cluster, you should select the cluster name in this field.
The Managed Server is _______________________________
Managed Port This field is automatically updated after you select the managed server. If you have configured a SOA Cluster, the SOA Cluster port appears in the list.
Table 28–2 Oracle E-Business Suite Server Details Screen Fields
Field Description
E-Business Suite Version This is the version of the E-Business Suite application.
E-Business Suite Host Name Specifies the fully qualified system name of the Oracle E-Business Suite application server. Example: servername.your.company.com.
E-Business Suite Host Name is ___________________________
E-Business Suite Port This value is the Oracle E-Business Suite application port. To find this value, contact your administrator. Example: 8024.
E-Business Suite Port is ______________________________
E-Business Suite User Name The user ID value for the designated Oracle E-Business Suite integration user responsible for integration transactions within the Oracle E-Business Suite.
E-Business Suite User Name is __________________________
E-Business Suite Password The password that is associated with the Oracle E-Business Suite integration user ID
E-Business Suite Password is ___________________________
Workflow Business Event System Name This is the Workflow Business Event System Name of E-Business Suite Server.
To find this value:
1. Find the Responsibility Workflow Administrator Web Applications.
2. Navigate to Administrator Workflow, Home, Administration.
3. View section Business Event Local System.
4. Find the value in the field System Name
Workflow Business Event System Name is _________________
Table 28–1 (Cont.) PIP Server Details Screen Fields
Field Description
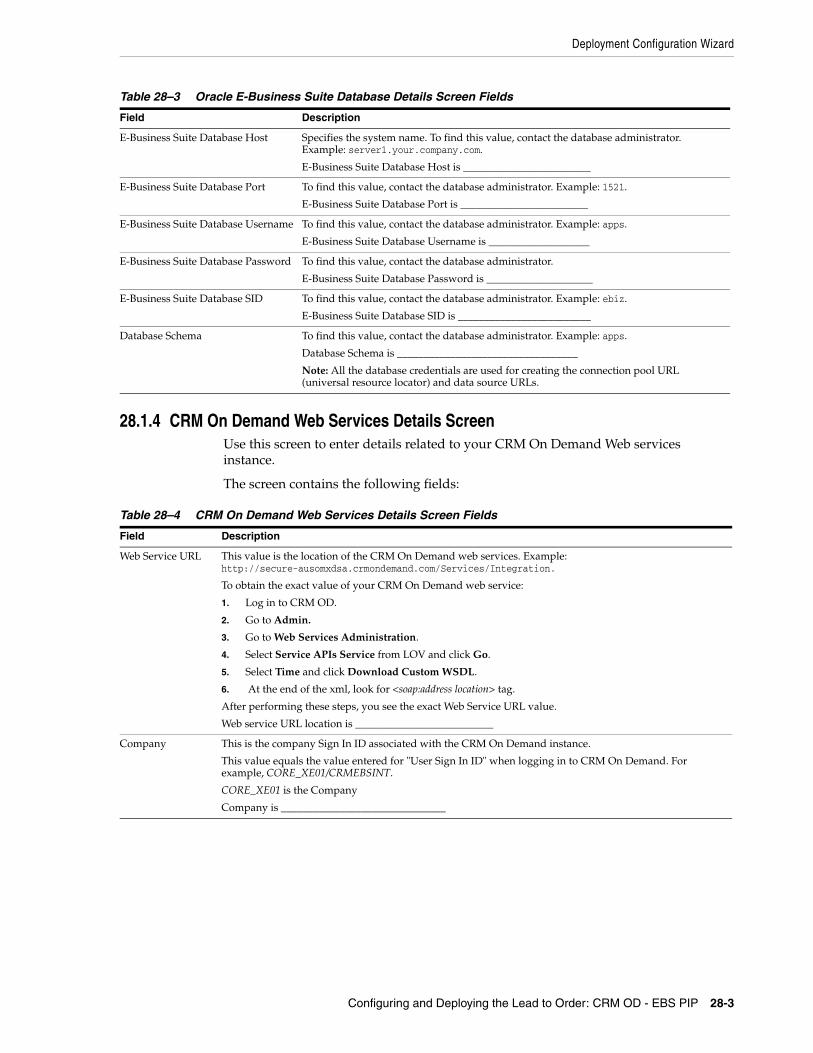
Deployment Configuration Wizard
Configuring and Deploying the Lead to Order: CRM OD - EBS PIP 28-3
28.1.4 CRM On Demand Web Services Details ScreenUse this screen to enter details related to your CRM On Demand Web services instance.
The screen contains the following fields:
Table 28–3 Oracle E-Business Suite Database Details Screen Fields
Field Description
E-Business Suite Database Host Specifies the system name. To find this value, contact the database administrator. Example: server1.your.company.com.
E-Business Suite Database Host is ________________________
E-Business Suite Database Port To find this value, contact the database administrator. Example: 1521.
E-Business Suite Database Port is ________________________
E-Business Suite Database Username To find this value, contact the database administrator. Example: apps.
E-Business Suite Database Username is ___________________
E-Business Suite Database Password To find this value, contact the database administrator.
E-Business Suite Database Password is ____________________
E-Business Suite Database SID To find this value, contact the database administrator. Example: ebiz.
E-Business Suite Database SID is _________________________
Database Schema To find this value, contact the database administrator. Example: apps.
Database Schema is __________________________________
Note: All the database credentials are used for creating the connection pool URL (universal resource locator) and data source URLs.
Table 28–4 CRM On Demand Web Services Details Screen Fields
Field Description
Web Service URL This value is the location of the CRM On Demand web services. Example: http://secure-ausomxdsa.crmondemand.com/Services/Integration.
To obtain the exact value of your CRM On Demand web service:
1. Log in to CRM OD.
2. Go to Admin.
3. Go to Web Services Administration.
4. Select Service APIs Service from LOV and click Go.
5. Select Time and click Download Custom WSDL.
6. At the end of the xml, look for <soap:address location> tag.
After performing these steps, you see the exact Web Service URL value.
Web service URL location is __________________________
Company This is the company Sign In ID associated with the CRM On Demand instance.
This value equals the value entered for "User Sign In ID" when logging in to CRM On Demand. For example, CORE_XE01/CRMEBSINT.
CORE_XE01 is the Company
Company is _______________________________
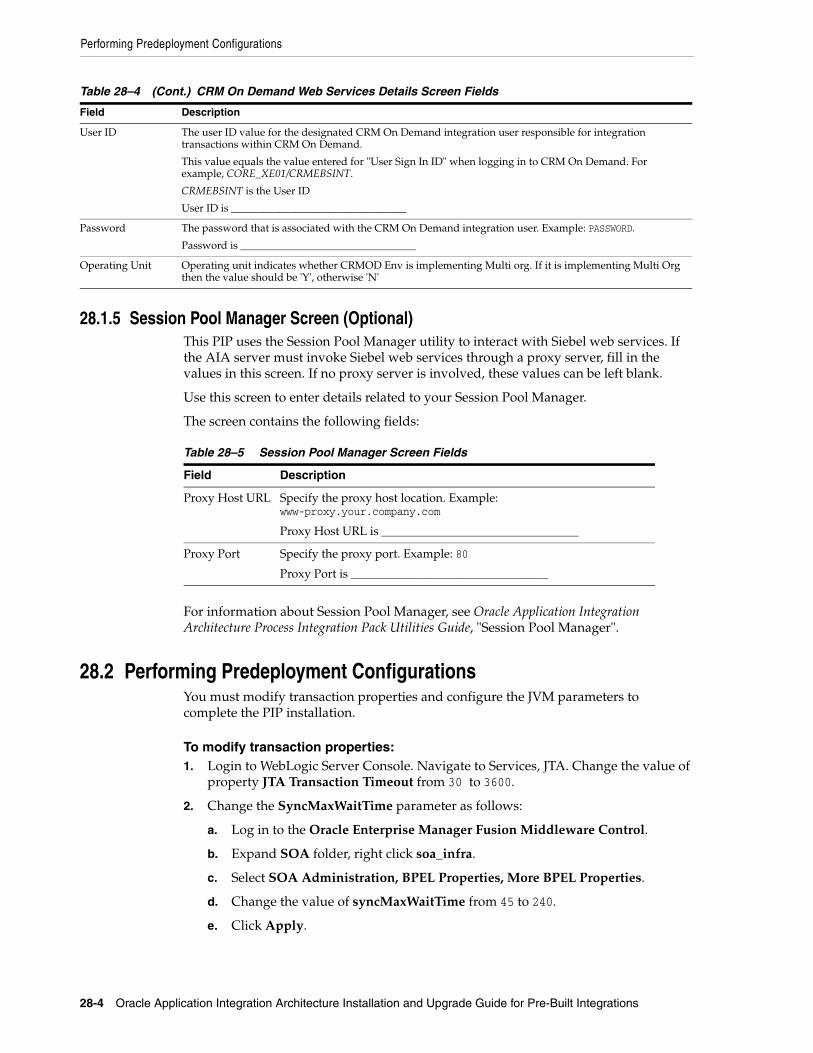
Performing Predeployment Configurations
28-4 Oracle Application Integration Architecture Installation and Upgrade Guide for Pre-Built Integrations
28.1.5 Session Pool Manager Screen (Optional)This PIP uses the Session Pool Manager utility to interact with Siebel web services. If the AIA server must invoke Siebel web services through a proxy server, fill in the values in this screen. If no proxy server is involved, these values can be left blank.
Use this screen to enter details related to your Session Pool Manager.
The screen contains the following fields:
For information about Session Pool Manager, see Oracle Application Integration Architecture Process Integration Pack Utilities Guide, "Session Pool Manager".
28.2 Performing Predeployment ConfigurationsYou must modify transaction properties and configure the JVM parameters to complete the PIP installation.
To modify transaction properties:1. Login to WebLogic Server Console. Navigate to Services, JTA. Change the value of
property JTA Transaction Timeout from 30 to 3600.
2. Change the SyncMaxWaitTime parameter as follows:
a. Log in to the Oracle Enterprise Manager Fusion Middleware Control.
b. Expand SOA folder, right click soa_infra.
c. Select SOA Administration, BPEL Properties, More BPEL Properties.
d. Change the value of syncMaxWaitTime from 45 to 240.
e. Click Apply.
User ID The user ID value for the designated CRM On Demand integration user responsible for integration transactions within CRM On Demand.
This value equals the value entered for "User Sign In ID" when logging in to CRM On Demand. For example, CORE_XE01/CRMEBSINT.
CRMEBSINT is the User ID
User ID is _________________________________
Password The password that is associated with the CRM On Demand integration user. Example: PASSWORD.
Password is _________________________________
Operating Unit Operating unit indicates whether CRMOD Env is implementing Multi org. If it is implementing Multi Org then the value should be 'Y', otherwise 'N'
Table 28–5 Session Pool Manager Screen Fields
Field Description
Proxy Host URL Specify the proxy host location. Example: www-proxy.your.company.com
Proxy Host URL is _________________________________
Proxy Port Specify the proxy port. Example: 80
Proxy Port is _________________________________
Table 28–4 (Cont.) CRM On Demand Web Services Details Screen Fields
Field Description
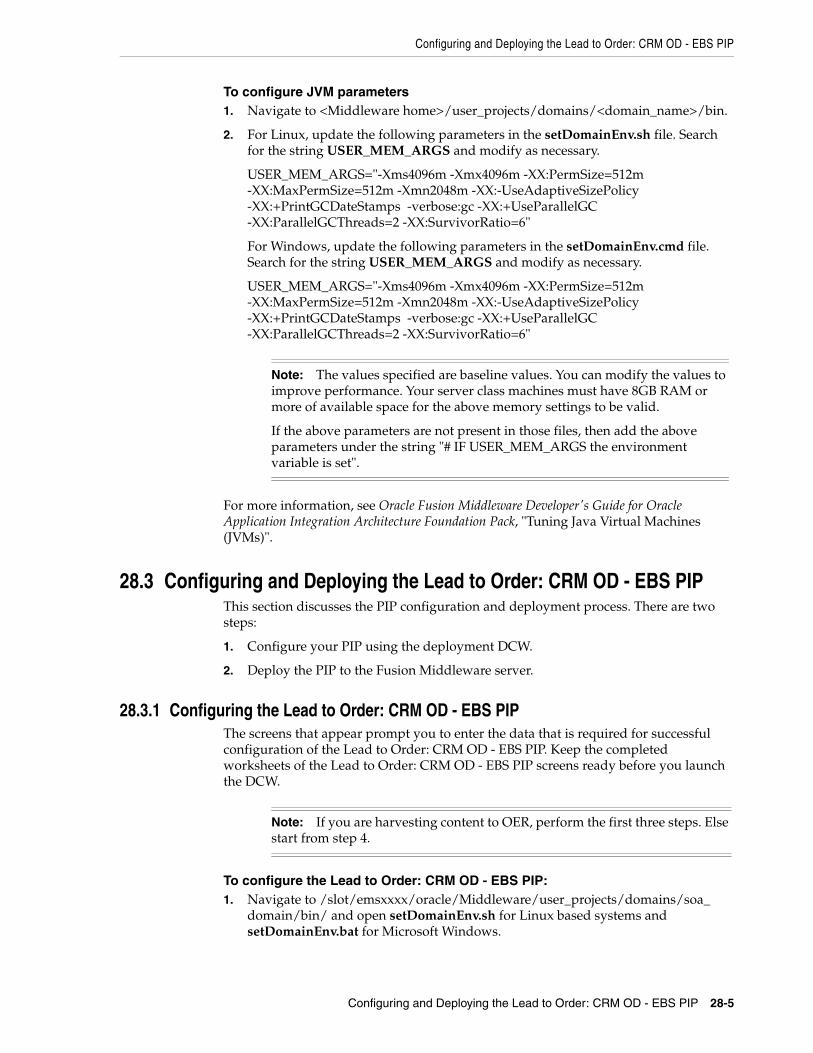
Configuring and Deploying the Lead to Order: CRM OD - EBS PIP
Configuring and Deploying the Lead to Order: CRM OD - EBS PIP 28-5
To configure JVM parameters1. Navigate to <Middleware home>/user_projects/domains/<domain_name>/bin.
2. For Linux, update the following parameters in the setDomainEnv.sh file. Search for the string USER_MEM_ARGS and modify as necessary.
USER_MEM_ARGS="-Xms4096m -Xmx4096m -XX:PermSize=512m -XX:MaxPermSize=512m -Xmn2048m -XX:-UseAdaptiveSizePolicy -XX:+PrintGCDateStamps -verbose:gc -XX:+UseParallelGC -XX:ParallelGCThreads=2 -XX:SurvivorRatio=6"
For Windows, update the following parameters in the setDomainEnv.cmd file. Search for the string USER_MEM_ARGS and modify as necessary.
USER_MEM_ARGS="-Xms4096m -Xmx4096m -XX:PermSize=512m -XX:MaxPermSize=512m -Xmn2048m -XX:-UseAdaptiveSizePolicy -XX:+PrintGCDateStamps -verbose:gc -XX:+UseParallelGC -XX:ParallelGCThreads=2 -XX:SurvivorRatio=6"
For more information, see Oracle Fusion Middleware Developer's Guide for Oracle Application Integration Architecture Foundation Pack, "Tuning Java Virtual Machines (JVMs)".
28.3 Configuring and Deploying the Lead to Order: CRM OD - EBS PIPThis section discusses the PIP configuration and deployment process. There are two steps:
1. Configure your PIP using the deployment DCW.
2. Deploy the PIP to the Fusion Middleware server.
28.3.1 Configuring the Lead to Order: CRM OD - EBS PIPThe screens that appear prompt you to enter the data that is required for successful configuration of the Lead to Order: CRM OD - EBS PIP. Keep the completed worksheets of the Lead to Order: CRM OD - EBS PIP screens ready before you launch the DCW.
To configure the Lead to Order: CRM OD - EBS PIP:1. Navigate to /slot/emsxxxx/oracle/Middleware/user_projects/domains/soa_
domain/bin/ and open setDomainEnv.sh for Linux based systems and setDomainEnv.bat for Microsoft Windows.
Note: The values specified are baseline values. You can modify the values to improve performance. Your server class machines must have 8GB RAM or more of available space for the above memory settings to be valid.
If the above parameters are not present in those files, then add the above parameters under the string "# IF USER_MEM_ARGS the environment variable is set".
Note: If you are harvesting content to OER, perform the first three steps. Else start from step 4.

Configuring and Deploying the Lead to Order: CRM OD - EBS PIP
28-6 Oracle Application Integration Architecture Installation and Upgrade Guide for Pre-Built Integrations
2. Replace WLS_JDBC_REMOTE_ENABLED="-Dweblogic.jdbc.remoteEnabled=false" with WLS_JDBC_REMOTE_ENABLED="-Dweblogic.jdbc.remoteEnabled=true".
3. Restart the server.
4. Navigate to <AIA_Instance>/bin and run the command source aiaenv.sh for Linux based systems and aiaenv.bat for Microsoft Windows to configure the environment.
5. Navigate to <AIA_HOME>/bin and run the command ./aiaconfig.sh for Linux based systems and aiaconfig.bat for Microsoft Windows.
This launches the AIA DCW.
6. Click Next.
7. Select the Lead to Order: CRM OD - EBS PIP
8. Click Next.
28.3.1.1 Specify PIP Server Details
To specify PIP Server details:1. Enter information related to your PIP server in the PIP Server Details screen.
2. Click Next.
28.3.1.2 Specify Oracle E-Business Suite Server Details
To specify Oracle E-Business Suite Server details:1. Enter information about your Oracle E-Business Suite Server installation in the
E-Business Suite Server Details screen.
2. Click Next.
28.3.1.3 Specify Oracle E-Business Suite Database Details
To specify Oracle E-Business Suite Database details:1. Enter information about your Oracle E-Business Suite Database installation in the
E-Business Suite Database Details screen.
2. Click Next.
28.3.1.4 Specify CRM On Demand Web Services Details
To specify CRM On Demand Web Services details:1. Enter information about your CRM On Demand Web Services installation in the
CRM On Demand Web Services Information screen.
2. Click Next.
28.3.1.5 Specify Session Pool Manager Details
To specify Session Pool Manager details:1. Enter information related to your Session Pool Manager installation in the Session
Pool Manager Details screen.
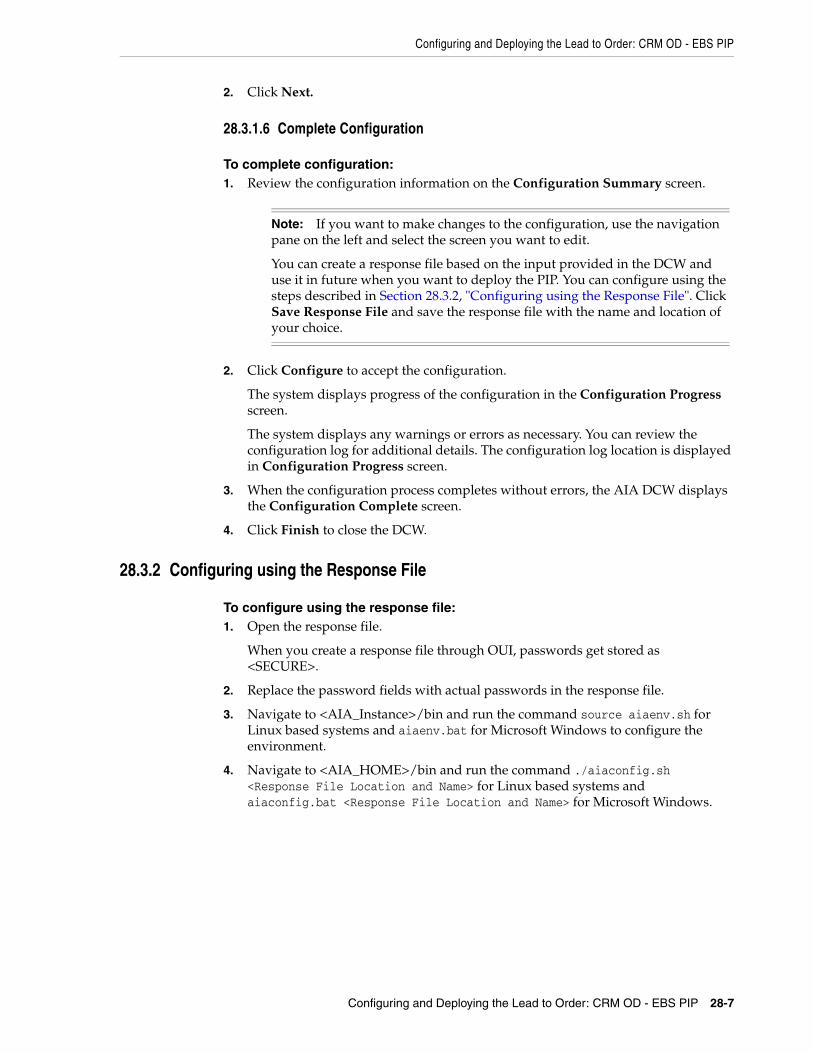
Configuring and Deploying the Lead to Order: CRM OD - EBS PIP
Configuring and Deploying the Lead to Order: CRM OD - EBS PIP 28-7
2. Click Next.
28.3.1.6 Complete Configuration
To complete configuration:1. Review the configuration information on the Configuration Summary screen.
2. Click Configure to accept the configuration.
The system displays progress of the configuration in the Configuration Progress screen.
The system displays any warnings or errors as necessary. You can review the configuration log for additional details. The configuration log location is displayed in Configuration Progress screen.
3. When the configuration process completes without errors, the AIA DCW displays the Configuration Complete screen.
4. Click Finish to close the DCW.
28.3.2 Configuring using the Response File
To configure using the response file:1. Open the response file.
When you create a response file through OUI, passwords get stored as <SECURE>.
2. Replace the password fields with actual passwords in the response file.
3. Navigate to <AIA_Instance>/bin and run the command source aiaenv.sh for Linux based systems and aiaenv.bat for Microsoft Windows to configure the environment.
4. Navigate to <AIA_HOME>/bin and run the command ./aiaconfig.sh <Response File Location and Name> for Linux based systems and aiaconfig.bat <Response File Location and Name> for Microsoft Windows.
Note: If you want to make changes to the configuration, use the navigation pane on the left and select the screen you want to edit.
You can create a response file based on the input provided in the DCW and use it in future when you want to deploy the PIP. You can configure using the steps described in Section 28.3.2, "Configuring using the Response File". Click Save Response File and save the response file with the name and location of your choice.
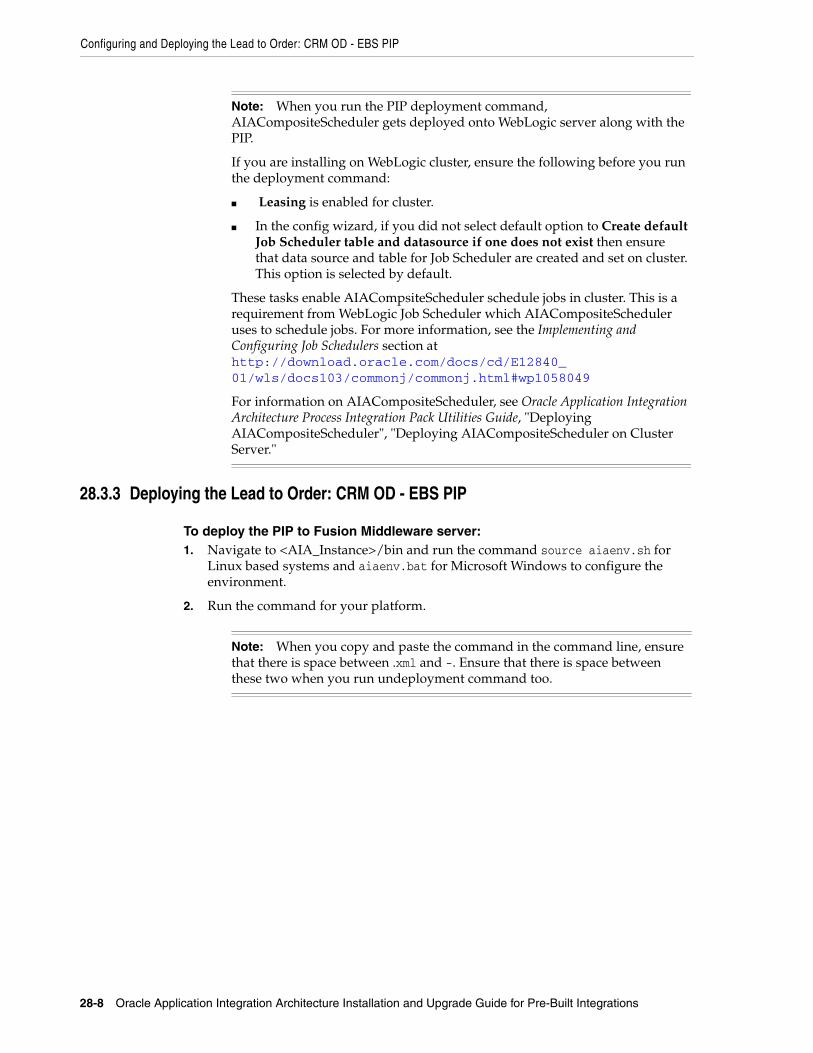
Configuring and Deploying the Lead to Order: CRM OD - EBS PIP
28-8 Oracle Application Integration Architecture Installation and Upgrade Guide for Pre-Built Integrations
28.3.3 Deploying the Lead to Order: CRM OD - EBS PIP
To deploy the PIP to Fusion Middleware server:1. Navigate to <AIA_Instance>/bin and run the command source aiaenv.sh for
Linux based systems and aiaenv.bat for Microsoft Windows to configure the environment.
2. Run the command for your platform.
Note: When you run the PIP deployment command, AIACompositeScheduler gets deployed onto WebLogic server along with the PIP.
If you are installing on WebLogic cluster, ensure the following before you run the deployment command:
■ Leasing is enabled for cluster.
■ In the config wizard, if you did not select default option to Create default Job Scheduler table and datasource if one does not exist then ensure that data source and table for Job Scheduler are created and set on cluster. This option is selected by default.
These tasks enable AIACompsiteScheduler schedule jobs in cluster. This is a requirement from WebLogic Job Scheduler which AIACompositeScheduler uses to schedule jobs. For more information, see the Implementing and Configuring Job Schedulers section at http://download.oracle.com/docs/cd/E12840_01/wls/docs103/commonj/commonj.html#wp1058049
For information on AIACompositeScheduler, see Oracle Application Integration Architecture Process Integration Pack Utilities Guide, "Deploying AIACompositeScheduler", "Deploying AIACompositeScheduler on Cluster Server."
Note: When you copy and paste the command in the command line, ensure that there is space between .xml and -. Ensure that there is space between these two when you run undeployment command too.
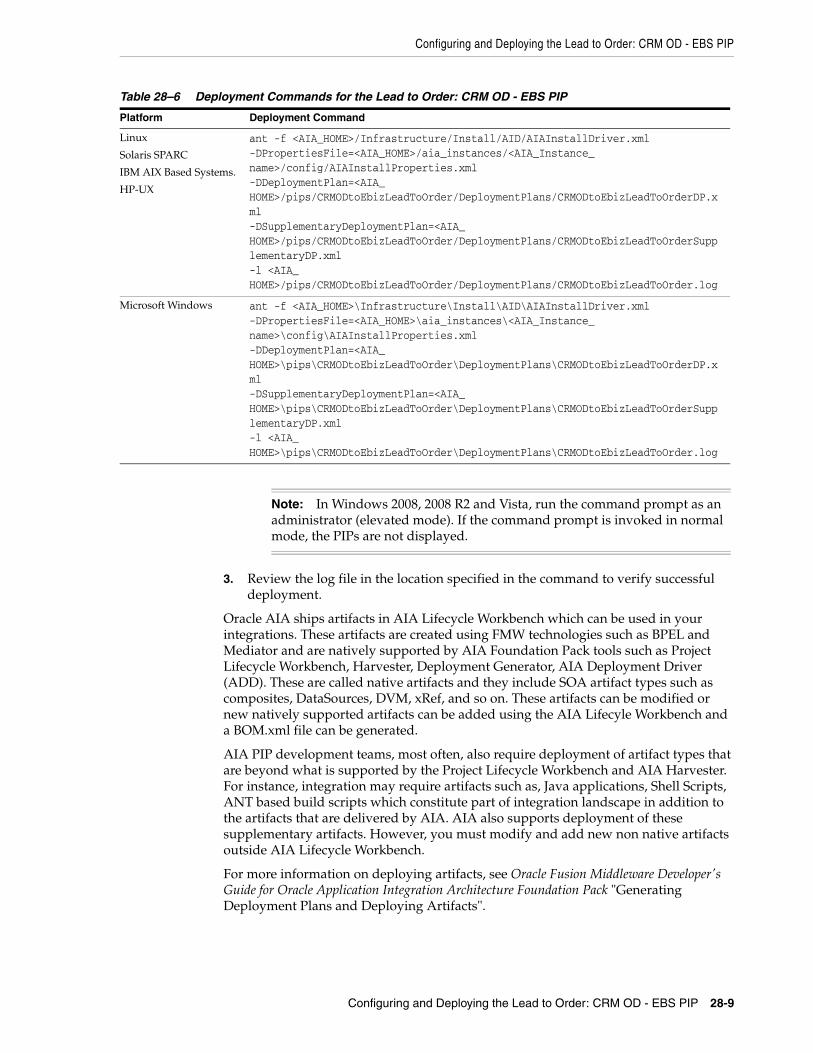
Configuring and Deploying the Lead to Order: CRM OD - EBS PIP
Configuring and Deploying the Lead to Order: CRM OD - EBS PIP 28-9
3. Review the log file in the location specified in the command to verify successful deployment.
Oracle AIA ships artifacts in AIA Lifecycle Workbench which can be used in your integrations. These artifacts are created using FMW technologies such as BPEL and Mediator and are natively supported by AIA Foundation Pack tools such as Project Lifecycle Workbench, Harvester, Deployment Generator, AIA Deployment Driver (ADD). These are called native artifacts and they include SOA artifact types such as composites, DataSources, DVM, xRef, and so on. These artifacts can be modified or new natively supported artifacts can be added using the AIA Lifecyle Workbench and a BOM.xml file can be generated.
AIA PIP development teams, most often, also require deployment of artifact types that are beyond what is supported by the Project Lifecycle Workbench and AIA Harvester. For instance, integration may require artifacts such as, Java applications, Shell Scripts, ANT based build scripts which constitute part of integration landscape in addition to the artifacts that are delivered by AIA. AIA also supports deployment of these supplementary artifacts. However, you must modify and add new non native artifacts outside AIA Lifecycle Workbench.
For more information on deploying artifacts, see Oracle Fusion Middleware Developer's Guide for Oracle Application Integration Architecture Foundation Pack "Generating Deployment Plans and Deploying Artifacts".
Table 28–6 Deployment Commands for the Lead to Order: CRM OD - EBS PIP
Platform Deployment Command
Linux
Solaris SPARC
IBM AIX Based Systems.
HP-UX
ant -f <AIA_HOME>/Infrastructure/Install/AID/AIAInstallDriver.xml -DPropertiesFile=<AIA_HOME>/aia_instances/<AIA_Instance_name>/config/AIAInstallProperties.xml -DDeploymentPlan=<AIA_HOME>/pips/CRMODtoEbizLeadToOrder/DeploymentPlans/CRMODtoEbizLeadToOrderDP.xml -DSupplementaryDeploymentPlan=<AIA_HOME>/pips/CRMODtoEbizLeadToOrder/DeploymentPlans/CRMODtoEbizLeadToOrderSupplementaryDP.xml -l <AIA_HOME>/pips/CRMODtoEbizLeadToOrder/DeploymentPlans/CRMODtoEbizLeadToOrder.log
Microsoft Windows ant -f <AIA_HOME>\Infrastructure\Install\AID\AIAInstallDriver.xml -DPropertiesFile=<AIA_HOME>\aia_instances\<AIA_Instance_name>\config\AIAInstallProperties.xml -DDeploymentPlan=<AIA_HOME>\pips\CRMODtoEbizLeadToOrder\DeploymentPlans\CRMODtoEbizLeadToOrderDP.xml -DSupplementaryDeploymentPlan=<AIA_HOME>\pips\CRMODtoEbizLeadToOrder\DeploymentPlans\CRMODtoEbizLeadToOrderSupplementaryDP.xml -l <AIA_HOME>\pips\CRMODtoEbizLeadToOrder\DeploymentPlans\CRMODtoEbizLeadToOrder.log
Note: In Windows 2008, 2008 R2 and Vista, run the command prompt as an administrator (elevated mode). If the command prompt is invoked in normal mode, the PIPs are not displayed.
Performing Postdeployment Configurations
28-10 Oracle Application Integration Architecture Installation and Upgrade Guide for Pre-Built Integrations
28.4 Performing Postdeployment ConfigurationsThis section discusses the postdeployment configuration for the Lead to Order: CRM OD - EBS PIP. This section contains the following:
■ Section 28.4.1, "Populating the inventory_location_id cross-reference Table"
■ Section 28.4.2, "Defining the Application Context for E-Business Suite Service Calls"
■ Section 28.4.3, "Updating the Oracle E-Business Suite Database"
■ Section 28.4.4, "Updating the AIA Configuration Properties"
■ Section 28.4.5, "Configuring Session Pool Manager"
28.4.1 Populating the inventory_location_id cross-reference TableYou must create a cross-reference in the inventory_location_id cross-reference (XREF) table for each operating unit in Oracle E-Business Suite for which data is to be synchronized to CRM On Demand. To create a cross-reference in the inventory_location_id XREF table you must perform the following tasks:
1. Identify inventory location details for each operating unit.
2. Create a cross-reference for the inventory location ID of the operating unit.
3. Validate the cross-reference.
To identify inventory location details in Oracle EBS:1. Log in to Oracle E-Business Suite.
2. Select the Order Management responsibilities for the relevant operating unit.
3. Perform the following steps for each of the relevant Order Management responsibilities:
a. Select Setup: System Parameter, Values from menu option.
b. Note the name of the organization associated with the Item Validation Organization parameter, for example, DivisionA Operations.
4. To obtain the full name of the operating unit:
a. Log in to the Oracle E-Business Suite database (apps/apps).
b. Identify the operating unit for which data is to be synchronized to CRM On Demand.
c. Log in to Oracle Applications and identify the full name of the operating unit, for example, DivisionA Operations (204).
5. Obtain the organization_id of the operating unit by issuing the following query:
select organization_id from hr_operating_units where name = 'DivisionA Operations'
Where DivisionA Operations is the name of the organization associated with the Item Validation Organization parameter that you identified in step 3.
To create cross-references in the inventory_location_id XREF Table:
Note: SOA Domain must be running to perform these steps.
Performing Postdeployment Configurations
Configuring and Deploying the Lead to Order: CRM OD - EBS PIP 28-11
1. Log in to the WebLogic Server EM Console.
2. Navigate to SOA, soa-infra, default.
3. Click the UtilityXREF composite.
4. Click Test.
5. Expand Security and select WSS Username Token. Use Weblogic username/password.
6. Enter the following values:
Example 28–1 Cross-References in the inventory_location_id XREF Table
<XREFTableName>oramds:/apps/AIAMetaData/xref/INVENTORY_LOCATION_ID.xref</XREFTableName><ReferenceColName>EBIZ_01</ReferenceColName><ReferenceVal>organization_ID</ReferenceVal><ColumnName>COMMON</ColumnName><ColumnValue>12345</ColumnValue>
In Example 28–1:
■ organization_id in the <ReferenceVal> record is the organization ID of the operating unit which you identified in the previous procedure.
■ 12345 in the <ColumnValue> record is a numeric string with a maximum length of 32 characters.
The <ColumnValue> you specify must be unique in the inventory_location_id XREF table. If you must create inventory_location_id records for multiple operating units, increment the value you specify for the <ColumnValue> record for each subsequent record.
7. Click Test Web Service.
8. Restart the SOA server.
To validate the cross-references you created:1. Log in to the AIA XREF database.
2. Using the following query, search the XREF_DATA table to confirm that every organization and every inventory location used in the XML files has three records, <ReferenceVal>, <ColumnName>, and ColumnValue>.
Example 28–2 Cross-Reference Validation Query
select value||'::'||Xref_column_name from xref_Data whererow_number in (select row_number from xref_data wherexref_table_name = 'oramds:/apps/AIAMetaData/xref/INVENTORY_LOCATION_ID.xref'and value in ('organization_id'))
In Example 28–2, organization_id is the organization ID of the operating unit for which you created the cross-reference.
28.4.2 Defining the Application Context for E-Business Suite Service CallsThe application context for E-Business Suite service or API calls comprises the following components:
■ Operating unit
Performing Postdeployment Configurations
28-12 Oracle Application Integration Architecture Installation and Upgrade Guide for Pre-Built Integrations
■ User name
■ Responsibility
You must define the application context in process flows where E-Business Suite API or service calls are made. This involves the following steps:
1. Map operating units to the corresponding entities in other applications.
If the source application's organization context is available in a flow and if it is mapped in the ORGANIZATION_ID cross-reference table, the operating unit is obtained by looking up the ORGANIZATION_ID cross-reference table.
If the organization context is not mapped or cannot be looked up, the default operating unit is used as the organization context value.
The default operating unit is set in the TransformAppContextEbizService.DefaultOperatingUnit property; the service name is TransformAppcontextEbizService.
2. If required, you can define cross-reference mappings for users between applications in the USER_NAME cross-reference table.
If the source application's user context is available in a flow and is mapped in the USER_NAME cross-reference table, the user name for E-Business Suite can be derived from the USER_NAME cross-reference table.
If the user context is not mapped or cannot be looked up, then a default user name is used. The default user is defined in the TransformAppContextEbizService.DefaultUser property; the service name is TransformAppcontextEbizService.
3. Responsibilities must be mapped to the E-Business Suite User+Operating Unit combined field.
You must specify a valid responsibility that is assigned privileges to operate in the operating unit, and the responsibility must be assigned to the specified user.
Map responsibilities in the ORACLE_RESPONSIBILITY domain value map.
■ In the EBIZ_USER_OU column, enter the user name and organization ID in a format like USER_NAME:ORGANIZATION_ID. The following is an example entry:
EBIZ_USER_OU - OPERATIONS:204
■ In the EBIZ_RESP column, enter the Responsibility to be used for the user and organization specified. The following is an example entry:
EBIZ_RESP - Order Management Super User, Vision Operations (USA)
The default responsibility is set in the TransformAppContextEbizService.DefaultResponsibility property; the service name is TransformAppcontextEbizService.
28.4.3 Updating the Oracle E-Business Suite DatabaseIn the Oracle E-Business Suite database, run the following command:
Example 28–3 Oracle E-Business Suite Database Update Command
/BEGINDBMS_AQADM.ALTER_QUEUE(
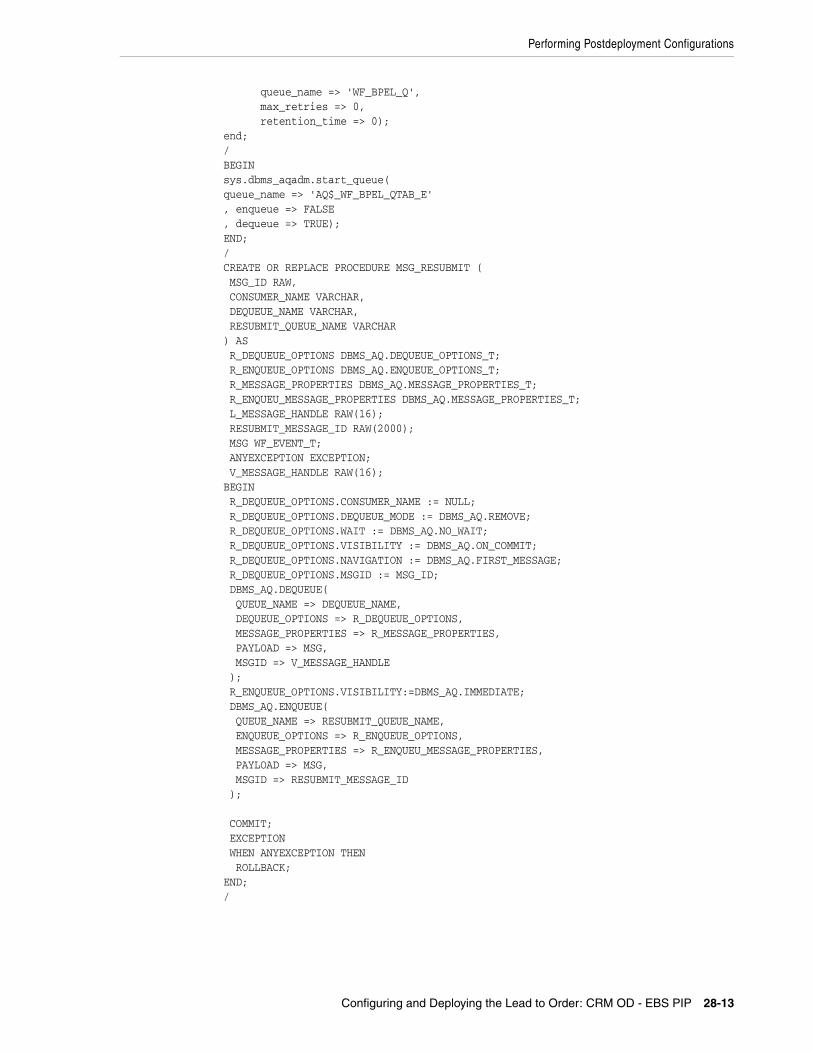
Performing Postdeployment Configurations
Configuring and Deploying the Lead to Order: CRM OD - EBS PIP 28-13
queue_name => 'WF_BPEL_Q', max_retries => 0, retention_time => 0); end;/BEGINsys.dbms_aqadm.start_queue(queue_name => 'AQ$_WF_BPEL_QTAB_E', enqueue => FALSE, dequeue => TRUE);END;/CREATE OR REPLACE PROCEDURE MSG_RESUBMIT ( MSG_ID RAW, CONSUMER_NAME VARCHAR, DEQUEUE_NAME VARCHAR, RESUBMIT_QUEUE_NAME VARCHAR) AS R_DEQUEUE_OPTIONS DBMS_AQ.DEQUEUE_OPTIONS_T; R_ENQUEUE_OPTIONS DBMS_AQ.ENQUEUE_OPTIONS_T; R_MESSAGE_PROPERTIES DBMS_AQ.MESSAGE_PROPERTIES_T; R_ENQUEU_MESSAGE_PROPERTIES DBMS_AQ.MESSAGE_PROPERTIES_T; L_MESSAGE_HANDLE RAW(16); RESUBMIT_MESSAGE_ID RAW(2000); MSG WF_EVENT_T; ANYEXCEPTION EXCEPTION; V_MESSAGE_HANDLE RAW(16);BEGIN R_DEQUEUE_OPTIONS.CONSUMER_NAME := NULL; R_DEQUEUE_OPTIONS.DEQUEUE_MODE := DBMS_AQ.REMOVE; R_DEQUEUE_OPTIONS.WAIT := DBMS_AQ.NO_WAIT; R_DEQUEUE_OPTIONS.VISIBILITY := DBMS_AQ.ON_COMMIT; R_DEQUEUE_OPTIONS.NAVIGATION := DBMS_AQ.FIRST_MESSAGE; R_DEQUEUE_OPTIONS.MSGID := MSG_ID; DBMS_AQ.DEQUEUE( QUEUE_NAME => DEQUEUE_NAME, DEQUEUE_OPTIONS => R_DEQUEUE_OPTIONS, MESSAGE_PROPERTIES => R_MESSAGE_PROPERTIES, PAYLOAD => MSG, MSGID => V_MESSAGE_HANDLE ); R_ENQUEUE_OPTIONS.VISIBILITY:=DBMS_AQ.IMMEDIATE; DBMS_AQ.ENQUEUE( QUEUE_NAME => RESUBMIT_QUEUE_NAME, ENQUEUE_OPTIONS => R_ENQUEUE_OPTIONS, MESSAGE_PROPERTIES => R_ENQUEU_MESSAGE_PROPERTIES, PAYLOAD => MSG, MSGID => RESUBMIT_MESSAGE_ID ); COMMIT; EXCEPTION WHEN ANYEXCEPTION THEN ROLLBACK;END;/

Verifying Deployment
28-14 Oracle Application Integration Architecture Installation and Upgrade Guide for Pre-Built Integrations
28.4.4 Updating the AIA Configuration Properties
To update the AIAConfigurationProperties:1. Open the following file in a text editor:
<AIA_HOME>/aia_instances/<instance_name>/AIAMetaData/config/AIAConfigurationProperties.xml
<instance_name> is the value entered while configuring the PIP.
2. Locate the service configuration section for the CreateSalesQuoteEbizProvABCSImpl service.
3. Ensure the value of Routing.CreateSalesQuoteEbizAdapter.EBIZ_01.EndpointURL is set as follows:
■ http://${fp.server.soaserverhostname}:${fp.server.soaserverport}/soa-infra/services/default/CreateSalesQuoteEbizAdapter/CreateSalesQuoteEbizAdapter_ep if you are using Oracle E-Business Suite 11i
■ http://${fp.server.soaserverhostname}:${fp.server.soaserverport}/soa-infra/services/default/CreateSalesQuoteEbizR12VersionAdapter/CreateSalesQuoteEbizR12VersionAdapter_ep if you are using Oracle E-Business Suite R12.1.1 or R12.1.2
28.4.5 Configuring Session Pool ManagerThis PIP uses the Session Pool Manager utility. Configure Session Pool Manager after you install the PIP. For information on how to configure Session Pool Manager for your integration environment and needs, see Oracle Application Integration Architecture Process Integration Pack Utilities Guide , "Session Pool Manager".
For more information on Session Pool Manager configurations, see MOS ID 1314624.1. This document provides a solution for the Cipher not initialized error.
28.5 Verifying Deployment
To verify the Lead to Order: CRM OD - EBS PIP deployment:1. Open the log files from the following location and look for warnings and error
messages:
■ For Linux, Solaris SPARC, HP-UX and IBM AIX Based Systems: Review the install log located at <AIA_HOME>/aia_instances/<instance name>/logs to verify that the PIP is successfully installed.
■ For Microsoft Windows: Review the install log located at <AIA_HOME>\aia_instances\<instance name>\logs to verify that the PIP is successfully installed.
2. Verify that AIACompositeScheduler is deployed.
a. Log into Weblogic Server console.
b. Navigate to your_domain, Deployments and check whether you can see AIACompositeScheduler.
3. Verify whether Session Pool Manager is successfully installed and ensure that the CRMOnDemand server is active.
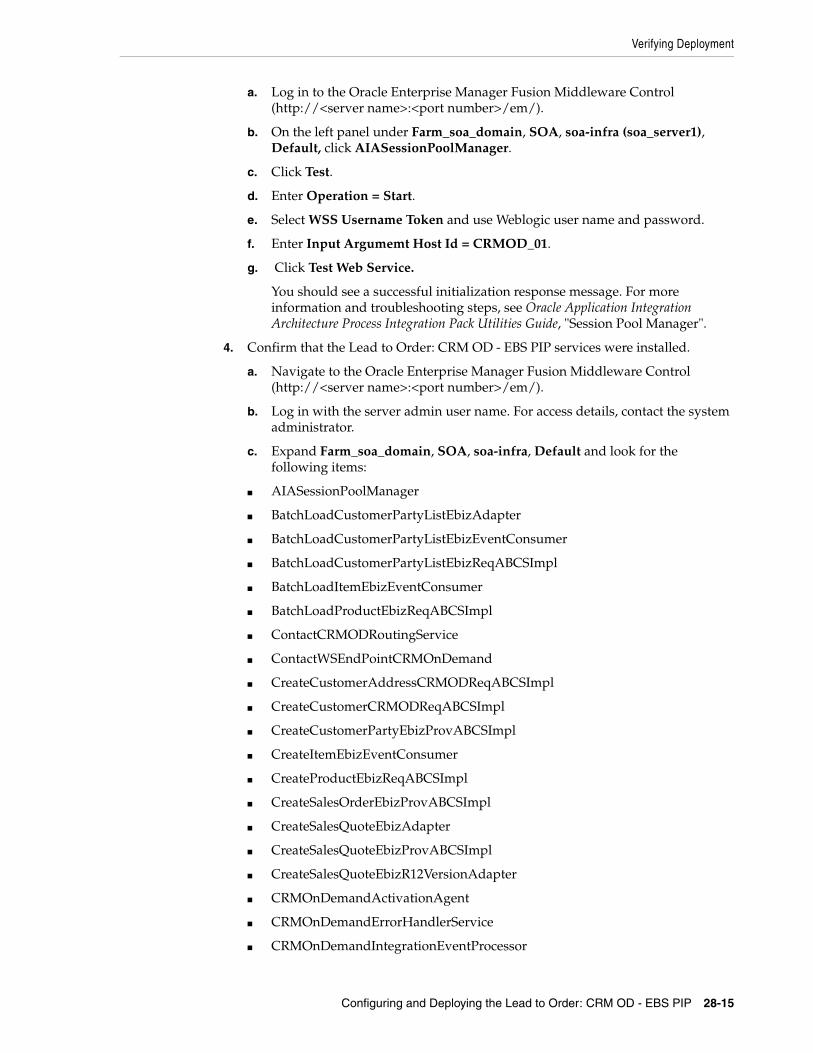
Verifying Deployment
Configuring and Deploying the Lead to Order: CRM OD - EBS PIP 28-15
a. Log in to the Oracle Enterprise Manager Fusion Middleware Control (http://<server name>:<port number>/em/).
b. On the left panel under Farm_soa_domain, SOA, soa-infra (soa_server1), Default, click AIASessionPoolManager.
c. Click Test.
d. Enter Operation = Start.
e. Select WSS Username Token and use Weblogic user name and password.
f. Enter Input Argumemt Host Id = CRMOD_01.
g. Click Test Web Service.
You should see a successful initialization response message. For more information and troubleshooting steps, see Oracle Application Integration Architecture Process Integration Pack Utilities Guide, "Session Pool Manager".
4. Confirm that the Lead to Order: CRM OD - EBS PIP services were installed.
a. Navigate to the Oracle Enterprise Manager Fusion Middleware Control (http://<server name>:<port number>/em/).
b. Log in with the server admin user name. For access details, contact the system administrator.
c. Expand Farm_soa_domain, SOA, soa-infra, Default and look for the following items:
■ AIASessionPoolManager
■ BatchLoadCustomerPartyListEbizAdapter
■ BatchLoadCustomerPartyListEbizEventConsumer
■ BatchLoadCustomerPartyListEbizReqABCSImpl
■ BatchLoadItemEbizEventConsumer
■ BatchLoadProductEbizReqABCSImpl
■ ContactCRMODRoutingService
■ ContactWSEndPointCRMOnDemand
■ CreateCustomerAddressCRMODReqABCSImpl
■ CreateCustomerCRMODReqABCSImpl
■ CreateCustomerPartyEbizProvABCSImpl
■ CreateItemEbizEventConsumer
■ CreateProductEbizReqABCSImpl
■ CreateSalesOrderEbizProvABCSImpl
■ CreateSalesQuoteEbizAdapter
■ CreateSalesQuoteEbizProvABCSImpl
■ CreateSalesQuoteEbizR12VersionAdapter
■ CRMOnDemandActivationAgent
■ CRMOnDemandErrorHandlerService
■ CRMOnDemandIntegrationEventProcessor
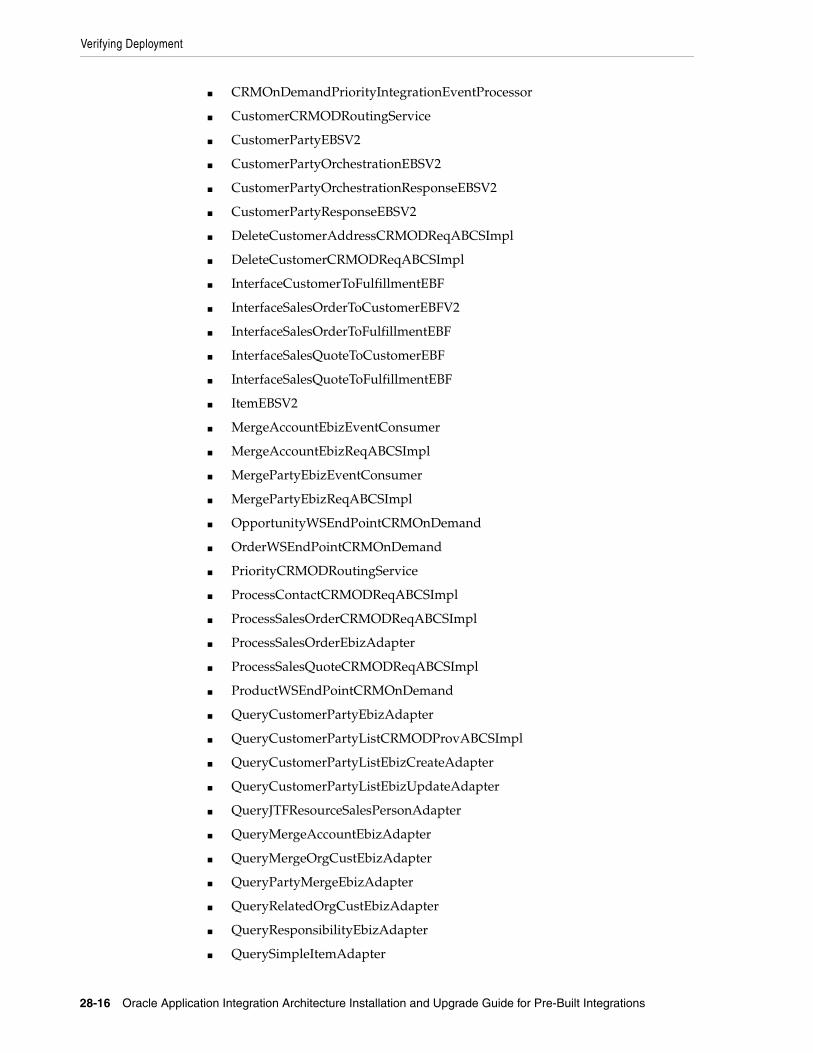
Verifying Deployment
28-16 Oracle Application Integration Architecture Installation and Upgrade Guide for Pre-Built Integrations
■ CRMOnDemandPriorityIntegrationEventProcessor
■ CustomerCRMODRoutingService
■ CustomerPartyEBSV2
■ CustomerPartyOrchestrationEBSV2
■ CustomerPartyOrchestrationResponseEBSV2
■ CustomerPartyResponseEBSV2
■ DeleteCustomerAddressCRMODReqABCSImpl
■ DeleteCustomerCRMODReqABCSImpl
■ InterfaceCustomerToFulfillmentEBF
■ InterfaceSalesOrderToCustomerEBFV2
■ InterfaceSalesOrderToFulfillmentEBF
■ InterfaceSalesQuoteToCustomerEBF
■ InterfaceSalesQuoteToFulfillmentEBF
■ ItemEBSV2
■ MergeAccountEbizEventConsumer
■ MergeAccountEbizReqABCSImpl
■ MergePartyEbizEventConsumer
■ MergePartyEbizReqABCSImpl
■ OpportunityWSEndPointCRMOnDemand
■ OrderWSEndPointCRMOnDemand
■ PriorityCRMODRoutingService
■ ProcessContactCRMODReqABCSImpl
■ ProcessSalesOrderCRMODReqABCSImpl
■ ProcessSalesOrderEbizAdapter
■ ProcessSalesQuoteCRMODReqABCSImpl
■ ProductWSEndPointCRMOnDemand
■ QueryCustomerPartyEbizAdapter
■ QueryCustomerPartyListCRMODProvABCSImpl
■ QueryCustomerPartyListEbizCreateAdapter
■ QueryCustomerPartyListEbizUpdateAdapter
■ QueryJTFResourceSalesPersonAdapter
■ QueryMergeAccountEbizAdapter
■ QueryMergeOrgCustEbizAdapter
■ QueryPartyMergeEbizAdapter
■ QueryRelatedOrgCustEbizAdapter
■ QueryResponsibilityEbizAdapter
■ QuerySimpleItemAdapter
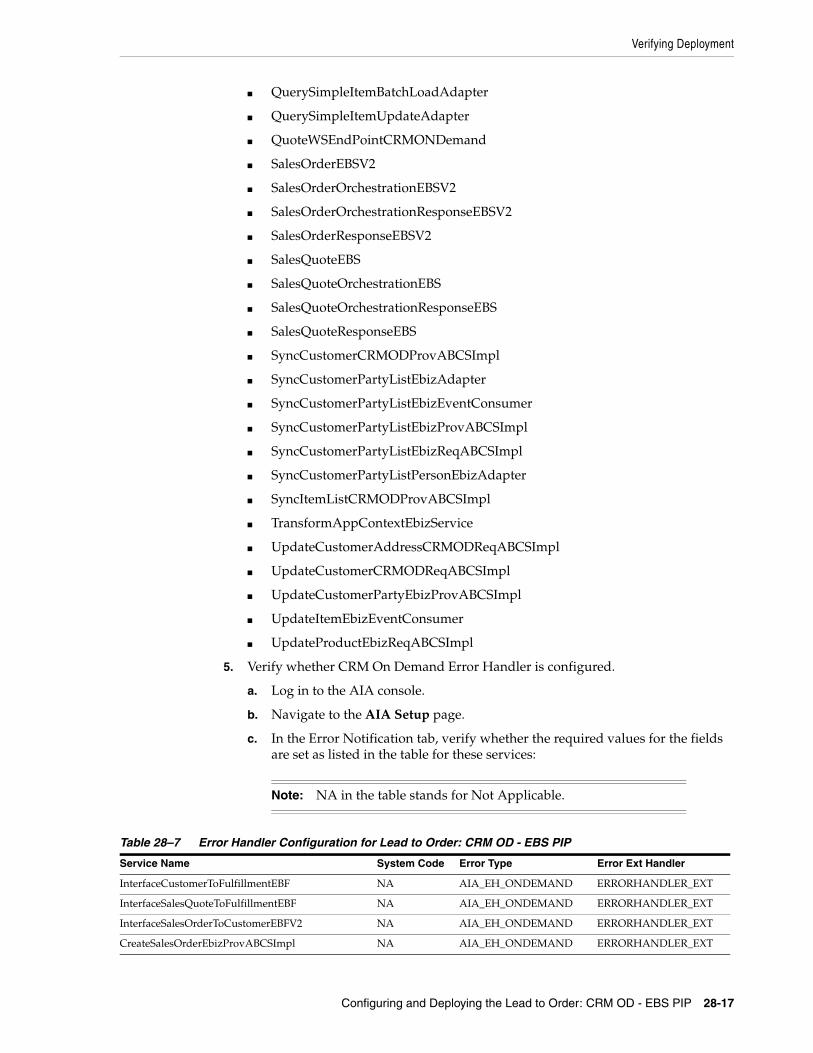
Verifying Deployment
Configuring and Deploying the Lead to Order: CRM OD - EBS PIP 28-17
■ QuerySimpleItemBatchLoadAdapter
■ QuerySimpleItemUpdateAdapter
■ QuoteWSEndPointCRMONDemand
■ SalesOrderEBSV2
■ SalesOrderOrchestrationEBSV2
■ SalesOrderOrchestrationResponseEBSV2
■ SalesOrderResponseEBSV2
■ SalesQuoteEBS
■ SalesQuoteOrchestrationEBS
■ SalesQuoteOrchestrationResponseEBS
■ SalesQuoteResponseEBS
■ SyncCustomerCRMODProvABCSImpl
■ SyncCustomerPartyListEbizAdapter
■ SyncCustomerPartyListEbizEventConsumer
■ SyncCustomerPartyListEbizProvABCSImpl
■ SyncCustomerPartyListEbizReqABCSImpl
■ SyncCustomerPartyListPersonEbizAdapter
■ SyncItemListCRMODProvABCSImpl
■ TransformAppContextEbizService
■ UpdateCustomerAddressCRMODReqABCSImpl
■ UpdateCustomerCRMODReqABCSImpl
■ UpdateCustomerPartyEbizProvABCSImpl
■ UpdateItemEbizEventConsumer
■ UpdateProductEbizReqABCSImpl
5. Verify whether CRM On Demand Error Handler is configured.
a. Log in to the AIA console.
b. Navigate to the AIA Setup page.
c. In the Error Notification tab, verify whether the required values for the fields are set as listed in the table for these services:
Note: NA in the table stands for Not Applicable.
Table 28–7 Error Handler Configuration for Lead to Order: CRM OD - EBS PIP
Service Name System Code Error Type Error Ext Handler
InterfaceCustomerToFulfillmentEBF NA AIA_EH_ONDEMAND ERRORHANDLER_EXT
InterfaceSalesQuoteToFulfillmentEBF NA AIA_EH_ONDEMAND ERRORHANDLER_EXT
InterfaceSalesOrderToCustomerEBFV2 NA AIA_EH_ONDEMAND ERRORHANDLER_EXT
CreateSalesOrderEbizProvABCSImpl NA AIA_EH_ONDEMAND ERRORHANDLER_EXT
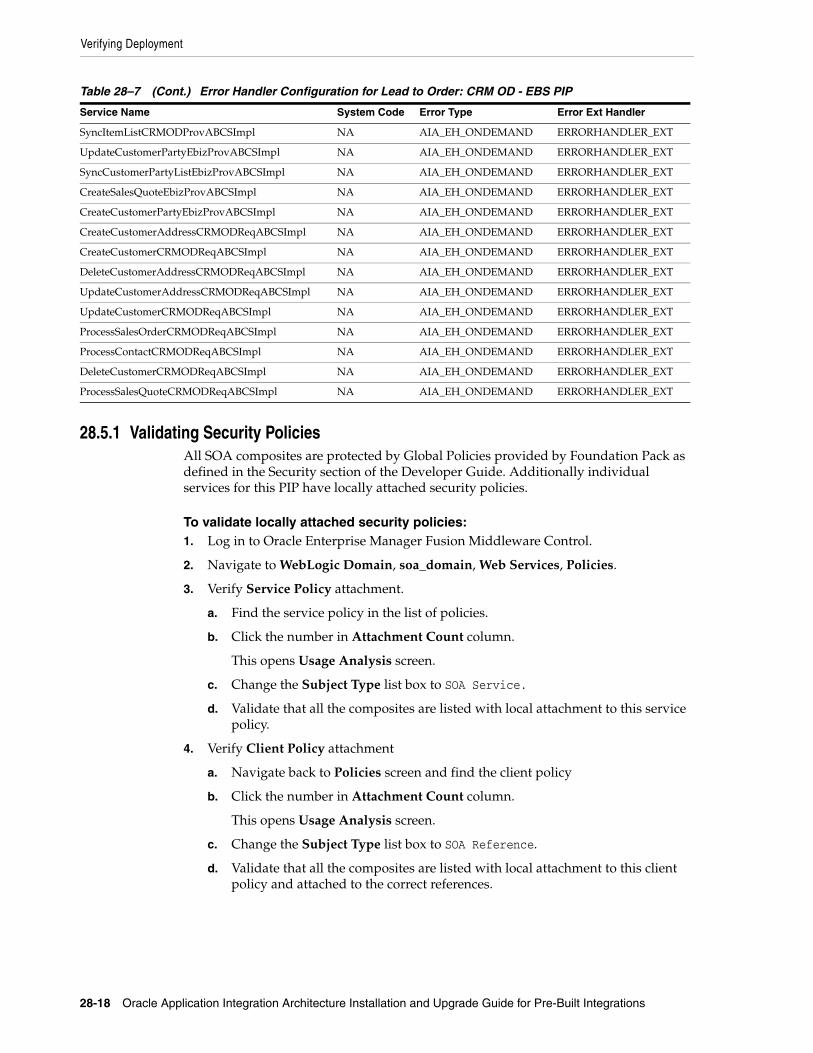
Verifying Deployment
28-18 Oracle Application Integration Architecture Installation and Upgrade Guide for Pre-Built Integrations
28.5.1 Validating Security PoliciesAll SOA composites are protected by Global Policies provided by Foundation Pack as defined in the Security section of the Developer Guide. Additionally individual services for this PIP have locally attached security policies.
To validate locally attached security policies:1. Log in to Oracle Enterprise Manager Fusion Middleware Control.
2. Navigate to WebLogic Domain, soa_domain, Web Services, Policies.
3. Verify Service Policy attachment.
a. Find the service policy in the list of policies.
b. Click the number in Attachment Count column.
This opens Usage Analysis screen.
c. Change the Subject Type list box to SOA Service.
d. Validate that all the composites are listed with local attachment to this service policy.
4. Verify Client Policy attachment
a. Navigate back to Policies screen and find the client policy
b. Click the number in Attachment Count column.
This opens Usage Analysis screen.
c. Change the Subject Type list box to SOA Reference.
d. Validate that all the composites are listed with local attachment to this client policy and attached to the correct references.
SyncItemListCRMODProvABCSImpl NA AIA_EH_ONDEMAND ERRORHANDLER_EXT
UpdateCustomerPartyEbizProvABCSImpl NA AIA_EH_ONDEMAND ERRORHANDLER_EXT
SyncCustomerPartyListEbizProvABCSImpl NA AIA_EH_ONDEMAND ERRORHANDLER_EXT
CreateSalesQuoteEbizProvABCSImpl NA AIA_EH_ONDEMAND ERRORHANDLER_EXT
CreateCustomerPartyEbizProvABCSImpl NA AIA_EH_ONDEMAND ERRORHANDLER_EXT
CreateCustomerAddressCRMODReqABCSImpl NA AIA_EH_ONDEMAND ERRORHANDLER_EXT
CreateCustomerCRMODReqABCSImpl NA AIA_EH_ONDEMAND ERRORHANDLER_EXT
DeleteCustomerAddressCRMODReqABCSImpl NA AIA_EH_ONDEMAND ERRORHANDLER_EXT
UpdateCustomerAddressCRMODReqABCSImpl NA AIA_EH_ONDEMAND ERRORHANDLER_EXT
UpdateCustomerCRMODReqABCSImpl NA AIA_EH_ONDEMAND ERRORHANDLER_EXT
ProcessSalesOrderCRMODReqABCSImpl NA AIA_EH_ONDEMAND ERRORHANDLER_EXT
ProcessContactCRMODReqABCSImpl NA AIA_EH_ONDEMAND ERRORHANDLER_EXT
DeleteCustomerCRMODReqABCSImpl NA AIA_EH_ONDEMAND ERRORHANDLER_EXT
ProcessSalesQuoteCRMODReqABCSImpl NA AIA_EH_ONDEMAND ERRORHANDLER_EXT
Table 28–7 (Cont.) Error Handler Configuration for Lead to Order: CRM OD - EBS PIP
Service Name System Code Error Type Error Ext Handler
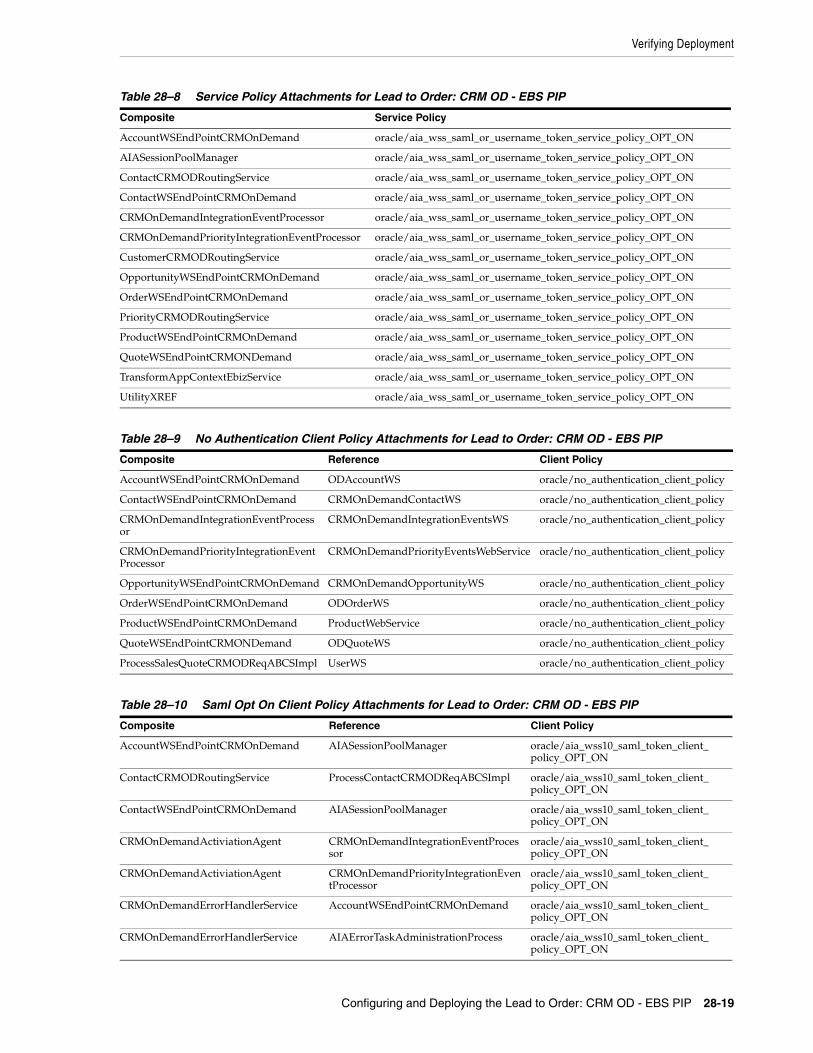
Verifying Deployment
Configuring and Deploying the Lead to Order: CRM OD - EBS PIP 28-19
Table 28–8 Service Policy Attachments for Lead to Order: CRM OD - EBS PIP
Composite Service Policy
AccountWSEndPointCRMOnDemand oracle/aia_wss_saml_or_username_token_service_policy_OPT_ON
AIASessionPoolManager oracle/aia_wss_saml_or_username_token_service_policy_OPT_ON
ContactCRMODRoutingService oracle/aia_wss_saml_or_username_token_service_policy_OPT_ON
ContactWSEndPointCRMOnDemand oracle/aia_wss_saml_or_username_token_service_policy_OPT_ON
CRMOnDemandIntegrationEventProcessor oracle/aia_wss_saml_or_username_token_service_policy_OPT_ON
CRMOnDemandPriorityIntegrationEventProcessor oracle/aia_wss_saml_or_username_token_service_policy_OPT_ON
CustomerCRMODRoutingService oracle/aia_wss_saml_or_username_token_service_policy_OPT_ON
OpportunityWSEndPointCRMOnDemand oracle/aia_wss_saml_or_username_token_service_policy_OPT_ON
OrderWSEndPointCRMOnDemand oracle/aia_wss_saml_or_username_token_service_policy_OPT_ON
PriorityCRMODRoutingService oracle/aia_wss_saml_or_username_token_service_policy_OPT_ON
ProductWSEndPointCRMOnDemand oracle/aia_wss_saml_or_username_token_service_policy_OPT_ON
QuoteWSEndPointCRMONDemand oracle/aia_wss_saml_or_username_token_service_policy_OPT_ON
TransformAppContextEbizService oracle/aia_wss_saml_or_username_token_service_policy_OPT_ON
UtilityXREF oracle/aia_wss_saml_or_username_token_service_policy_OPT_ON
Table 28–9 No Authentication Client Policy Attachments for Lead to Order: CRM OD - EBS PIP
Composite Reference Client Policy
AccountWSEndPointCRMOnDemand ODAccountWS oracle/no_authentication_client_policy
ContactWSEndPointCRMOnDemand CRMOnDemandContactWS oracle/no_authentication_client_policy
CRMOnDemandIntegrationEventProcessor
CRMOnDemandIntegrationEventsWS oracle/no_authentication_client_policy
CRMOnDemandPriorityIntegrationEventProcessor
CRMOnDemandPriorityEventsWebService oracle/no_authentication_client_policy
OpportunityWSEndPointCRMOnDemand CRMOnDemandOpportunityWS oracle/no_authentication_client_policy
OrderWSEndPointCRMOnDemand ODOrderWS oracle/no_authentication_client_policy
ProductWSEndPointCRMOnDemand ProductWebService oracle/no_authentication_client_policy
QuoteWSEndPointCRMONDemand ODQuoteWS oracle/no_authentication_client_policy
ProcessSalesQuoteCRMODReqABCSImpl UserWS oracle/no_authentication_client_policy
Table 28–10 Saml Opt On Client Policy Attachments for Lead to Order: CRM OD - EBS PIP
Composite Reference Client Policy
AccountWSEndPointCRMOnDemand AIASessionPoolManager oracle/aia_wss10_saml_token_client_policy_OPT_ON
ContactCRMODRoutingService ProcessContactCRMODReqABCSImpl oracle/aia_wss10_saml_token_client_policy_OPT_ON
ContactWSEndPointCRMOnDemand AIASessionPoolManager oracle/aia_wss10_saml_token_client_policy_OPT_ON
CRMOnDemandActiviationAgent CRMOnDemandIntegrationEventProcessor
oracle/aia_wss10_saml_token_client_policy_OPT_ON
CRMOnDemandActiviationAgent CRMOnDemandPriorityIntegrationEventProcessor
oracle/aia_wss10_saml_token_client_policy_OPT_ON
CRMOnDemandErrorHandlerService AccountWSEndPointCRMOnDemand oracle/aia_wss10_saml_token_client_policy_OPT_ON
CRMOnDemandErrorHandlerService AIAErrorTaskAdministrationProcess oracle/aia_wss10_saml_token_client_policy_OPT_ON
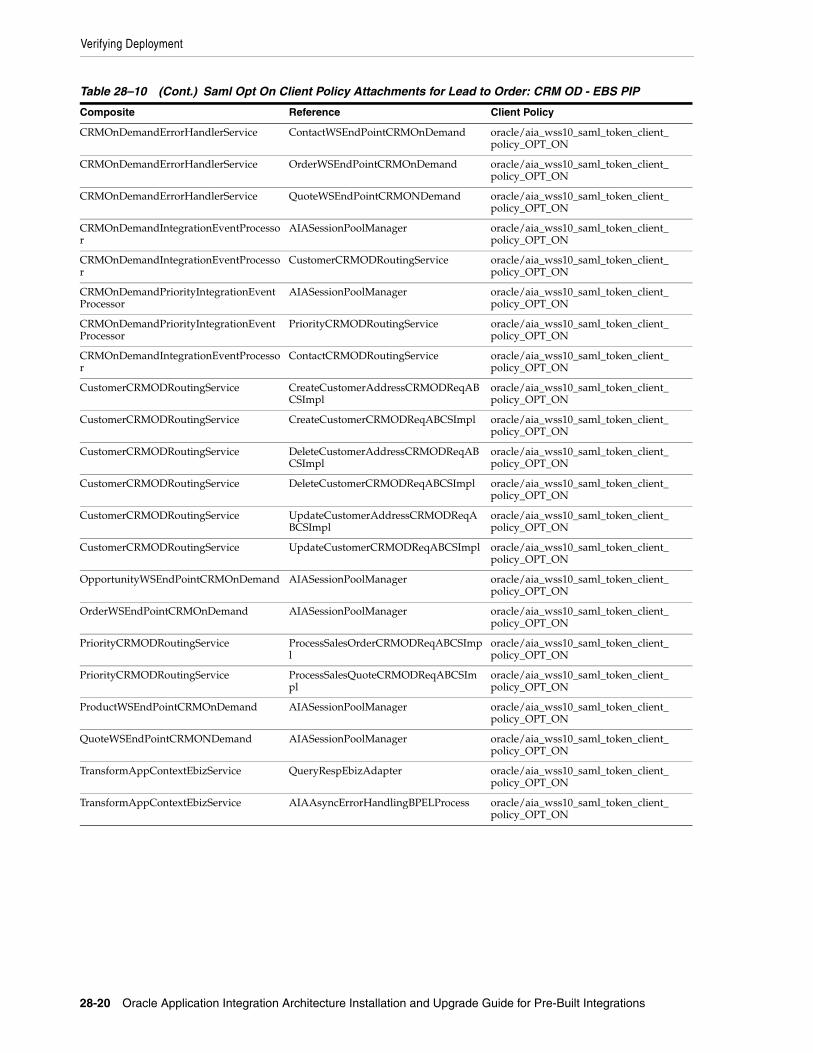
Verifying Deployment
28-20 Oracle Application Integration Architecture Installation and Upgrade Guide for Pre-Built Integrations
CRMOnDemandErrorHandlerService ContactWSEndPointCRMOnDemand oracle/aia_wss10_saml_token_client_policy_OPT_ON
CRMOnDemandErrorHandlerService OrderWSEndPointCRMOnDemand oracle/aia_wss10_saml_token_client_policy_OPT_ON
CRMOnDemandErrorHandlerService QuoteWSEndPointCRMONDemand oracle/aia_wss10_saml_token_client_policy_OPT_ON
CRMOnDemandIntegrationEventProcessor
AIASessionPoolManager oracle/aia_wss10_saml_token_client_policy_OPT_ON
CRMOnDemandIntegrationEventProcessor
CustomerCRMODRoutingService oracle/aia_wss10_saml_token_client_policy_OPT_ON
CRMOnDemandPriorityIntegrationEventProcessor
AIASessionPoolManager oracle/aia_wss10_saml_token_client_policy_OPT_ON
CRMOnDemandPriorityIntegrationEventProcessor
PriorityCRMODRoutingService oracle/aia_wss10_saml_token_client_policy_OPT_ON
CRMOnDemandIntegrationEventProcessor
ContactCRMODRoutingService oracle/aia_wss10_saml_token_client_policy_OPT_ON
CustomerCRMODRoutingService CreateCustomerAddressCRMODReqABCSImpl
oracle/aia_wss10_saml_token_client_policy_OPT_ON
CustomerCRMODRoutingService CreateCustomerCRMODReqABCSImpl oracle/aia_wss10_saml_token_client_policy_OPT_ON
CustomerCRMODRoutingService DeleteCustomerAddressCRMODReqABCSImpl
oracle/aia_wss10_saml_token_client_policy_OPT_ON
CustomerCRMODRoutingService DeleteCustomerCRMODReqABCSImpl oracle/aia_wss10_saml_token_client_policy_OPT_ON
CustomerCRMODRoutingService UpdateCustomerAddressCRMODReqABCSImpl
oracle/aia_wss10_saml_token_client_policy_OPT_ON
CustomerCRMODRoutingService UpdateCustomerCRMODReqABCSImpl oracle/aia_wss10_saml_token_client_policy_OPT_ON
OpportunityWSEndPointCRMOnDemand AIASessionPoolManager oracle/aia_wss10_saml_token_client_policy_OPT_ON
OrderWSEndPointCRMOnDemand AIASessionPoolManager oracle/aia_wss10_saml_token_client_policy_OPT_ON
PriorityCRMODRoutingService ProcessSalesOrderCRMODReqABCSImpl
oracle/aia_wss10_saml_token_client_policy_OPT_ON
PriorityCRMODRoutingService ProcessSalesQuoteCRMODReqABCSImpl
oracle/aia_wss10_saml_token_client_policy_OPT_ON
ProductWSEndPointCRMOnDemand AIASessionPoolManager oracle/aia_wss10_saml_token_client_policy_OPT_ON
QuoteWSEndPointCRMONDemand AIASessionPoolManager oracle/aia_wss10_saml_token_client_policy_OPT_ON
TransformAppContextEbizService QueryRespEbizAdapter oracle/aia_wss10_saml_token_client_policy_OPT_ON
TransformAppContextEbizService AIAAsyncErrorHandlingBPELProcess oracle/aia_wss10_saml_token_client_policy_OPT_ON
Table 28–10 (Cont.) Saml Opt On Client Policy Attachments for Lead to Order: CRM OD - EBS PIP
Composite Reference Client Policy
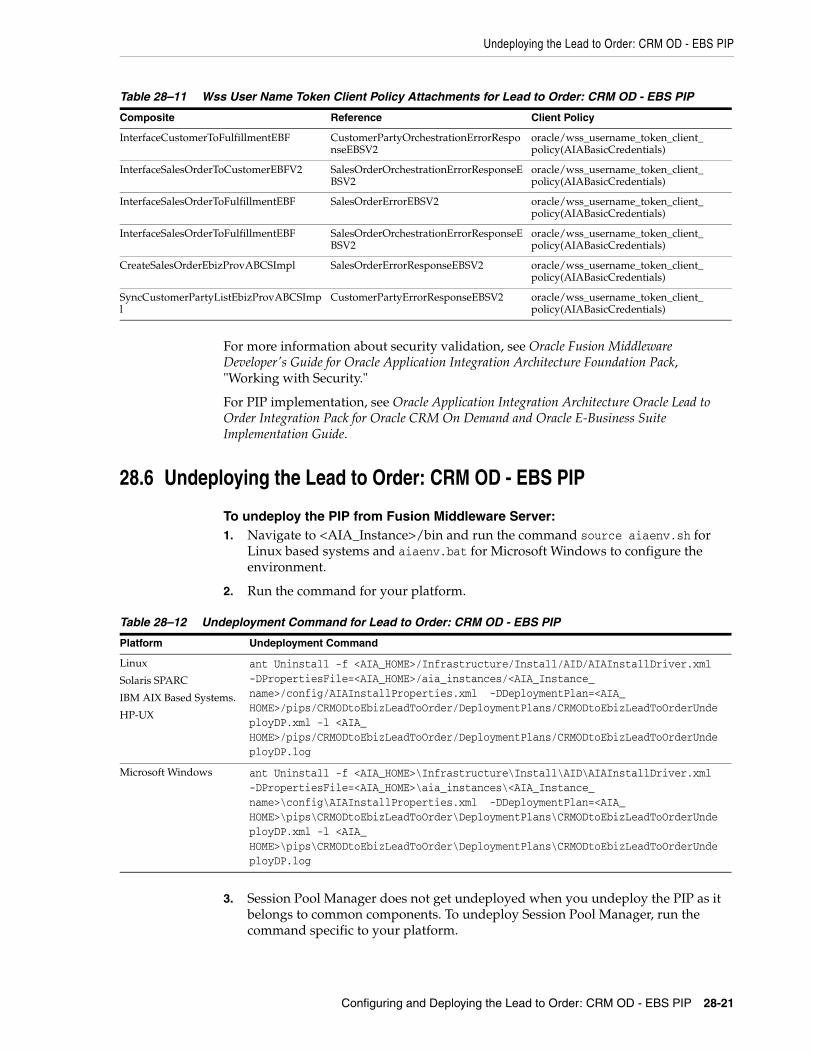
Undeploying the Lead to Order: CRM OD - EBS PIP
Configuring and Deploying the Lead to Order: CRM OD - EBS PIP 28-21
For more information about security validation, see Oracle Fusion Middleware Developer's Guide for Oracle Application Integration Architecture Foundation Pack, "Working with Security."
For PIP implementation, see Oracle Application Integration Architecture Oracle Lead to Order Integration Pack for Oracle CRM On Demand and Oracle E-Business Suite Implementation Guide.
28.6 Undeploying the Lead to Order: CRM OD - EBS PIP
To undeploy the PIP from Fusion Middleware Server:1. Navigate to <AIA_Instance>/bin and run the command source aiaenv.sh for
Linux based systems and aiaenv.bat for Microsoft Windows to configure the environment.
2. Run the command for your platform.
3. Session Pool Manager does not get undeployed when you undeploy the PIP as it belongs to common components. To undeploy Session Pool Manager, run the command specific to your platform.
Table 28–11 Wss User Name Token Client Policy Attachments for Lead to Order: CRM OD - EBS PIP
Composite Reference Client Policy
InterfaceCustomerToFulfillmentEBF CustomerPartyOrchestrationErrorResponseEBSV2
oracle/wss_username_token_client_policy(AIABasicCredentials)
InterfaceSalesOrderToCustomerEBFV2 SalesOrderOrchestrationErrorResponseEBSV2
oracle/wss_username_token_client_policy(AIABasicCredentials)
InterfaceSalesOrderToFulfillmentEBF SalesOrderErrorEBSV2 oracle/wss_username_token_client_policy(AIABasicCredentials)
InterfaceSalesOrderToFulfillmentEBF SalesOrderOrchestrationErrorResponseEBSV2
oracle/wss_username_token_client_policy(AIABasicCredentials)
CreateSalesOrderEbizProvABCSImpl SalesOrderErrorResponseEBSV2 oracle/wss_username_token_client_policy(AIABasicCredentials)
SyncCustomerPartyListEbizProvABCSImpl
CustomerPartyErrorResponseEBSV2 oracle/wss_username_token_client_policy(AIABasicCredentials)
Table 28–12 Undeployment Command for Lead to Order: CRM OD - EBS PIP
Platform Undeployment Command
Linux
Solaris SPARC
IBM AIX Based Systems.
HP-UX
ant Uninstall -f <AIA_HOME>/Infrastructure/Install/AID/AIAInstallDriver.xml -DPropertiesFile=<AIA_HOME>/aia_instances/<AIA_Instance_name>/config/AIAInstallProperties.xml -DDeploymentPlan=<AIA_HOME>/pips/CRMODtoEbizLeadToOrder/DeploymentPlans/CRMODtoEbizLeadToOrderUndeployDP.xml -l <AIA_HOME>/pips/CRMODtoEbizLeadToOrder/DeploymentPlans/CRMODtoEbizLeadToOrderUndeployDP.log
Microsoft Windows ant Uninstall -f <AIA_HOME>\Infrastructure\Install\AID\AIAInstallDriver.xml -DPropertiesFile=<AIA_HOME>\aia_instances\<AIA_Instance_name>\config\AIAInstallProperties.xml -DDeploymentPlan=<AIA_HOME>\pips\CRMODtoEbizLeadToOrder\DeploymentPlans\CRMODtoEbizLeadToOrderUndeployDP.xml -l <AIA_HOME>\pips\CRMODtoEbizLeadToOrder\DeploymentPlans\CRMODtoEbizLeadToOrderUndeployDP.log
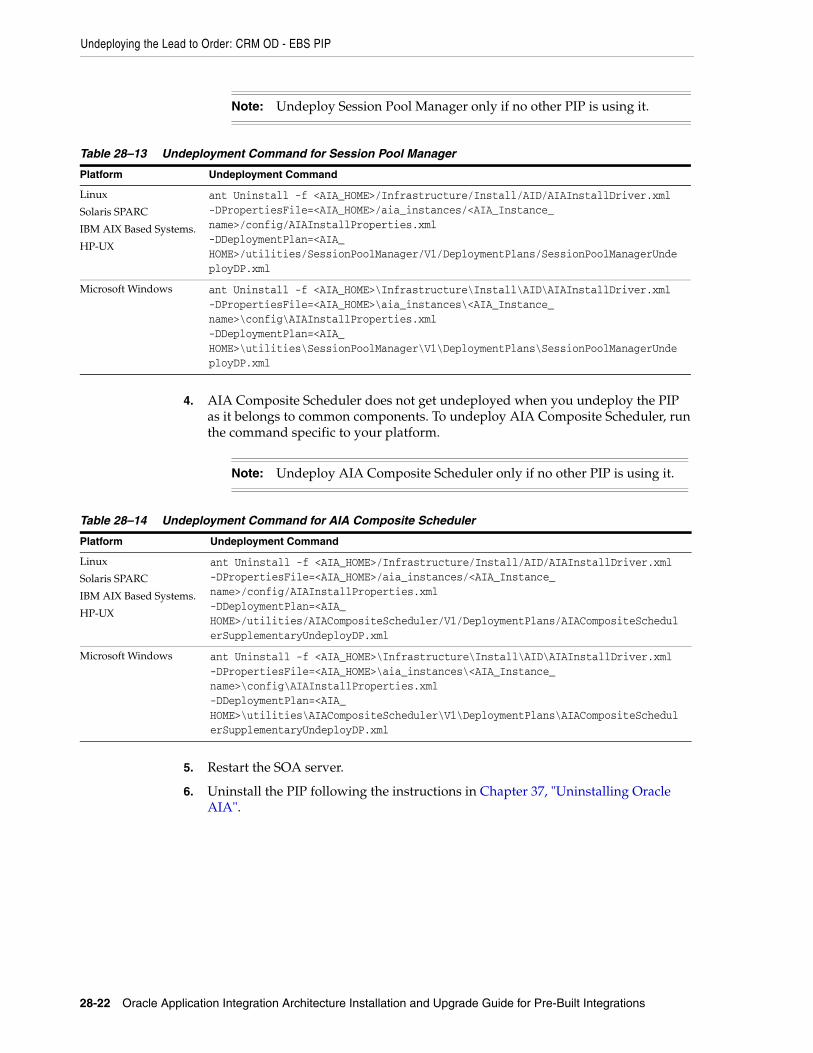
Undeploying the Lead to Order: CRM OD - EBS PIP
28-22 Oracle Application Integration Architecture Installation and Upgrade Guide for Pre-Built Integrations
4. AIA Composite Scheduler does not get undeployed when you undeploy the PIP as it belongs to common components. To undeploy AIA Composite Scheduler, run the command specific to your platform.
5. Restart the SOA server.
6. Uninstall the PIP following the instructions in Chapter 37, "Uninstalling Oracle AIA".
Note: Undeploy Session Pool Manager only if no other PIP is using it.
Table 28–13 Undeployment Command for Session Pool Manager
Platform Undeployment Command
Linux
Solaris SPARC
IBM AIX Based Systems.
HP-UX
ant Uninstall -f <AIA_HOME>/Infrastructure/Install/AID/AIAInstallDriver.xml -DPropertiesFile=<AIA_HOME>/aia_instances/<AIA_Instance_name>/config/AIAInstallProperties.xml -DDeploymentPlan=<AIA_HOME>/utilities/SessionPoolManager/V1/DeploymentPlans/SessionPoolManagerUndeployDP.xml
Microsoft Windows ant Uninstall -f <AIA_HOME>\Infrastructure\Install\AID\AIAInstallDriver.xml -DPropertiesFile=<AIA_HOME>\aia_instances\<AIA_Instance_name>\config\AIAInstallProperties.xml -DDeploymentPlan=<AIA_HOME>\utilities\SessionPoolManager\V1\DeploymentPlans\SessionPoolManagerUndeployDP.xml
Note: Undeploy AIA Composite Scheduler only if no other PIP is using it.
Table 28–14 Undeployment Command for AIA Composite Scheduler
Platform Undeployment Command
Linux
Solaris SPARC
IBM AIX Based Systems.
HP-UX
ant Uninstall -f <AIA_HOME>/Infrastructure/Install/AID/AIAInstallDriver.xml -DPropertiesFile=<AIA_HOME>/aia_instances/<AIA_Instance_name>/config/AIAInstallProperties.xml -DDeploymentPlan=<AIA_HOME>/utilities/AIACompositeScheduler/V1/DeploymentPlans/AIACompositeSchedulerSupplementaryUndeployDP.xml
Microsoft Windows ant Uninstall -f <AIA_HOME>\Infrastructure\Install\AID\AIAInstallDriver.xml -DPropertiesFile=<AIA_HOME>\aia_instances\<AIA_Instance_name>\config\AIAInstallProperties.xml -DDeploymentPlan=<AIA_HOME>\utilities\AIACompositeScheduler\V1\DeploymentPlans\AIACompositeSchedulerSupplementaryUndeployDP.xml
29
Configuring and Deploying the Financials Ops Control: Oracle Retail - PSFT PIP 29-1
29Configuring and Deploying the FinancialsOps Control: Oracle Retail - PSFT PIP
This chapter discusses how to configure and deploy the Oracle Financial Operations Control Integration Pack for Oracle Retail Merchandise Operations Management and PeopleSoft Enterprise Financials (Financials Ops Control: Oracle Retail - PSFT PIP).
This chapter includes the following sections:
■ Section 29.1, "Configuring Oracle Data Integrator"
■ Section 29.2, "Deployment Configuration Wizard"
■ Section 29.3, "Configuring and Deploying the Financials Ops Control: Oracle Retail - PSFT PIP"
■ Section 29.4, "Performing Postdeployment Configurations"
■ Section 29.5, "Verifying Deployment"
■ Section 29.6, "Undeploying the Financials Ops Control: Oracle Retail - PeopleSoft PIP"
29.1 Configuring Oracle Data IntegratorTo run AIA Pre-Built Integrations Installer you must have ODI access with Supervisor privileges.
For install purposes, the ODI software must reside at the same server where Foundation Pack is installed. Once the PIP installation is complete, the ODI Software can be installed into another server (if desired) connecting to the master and work repositories provided during the PIP installation.
If you decide to have ODI software running on a different server than Foundation Pack, after installing the PIP, you should copy the <aia_home>/config/AIAConfigurationProperties.xml file into that server, then modify the JDBC URL information for the AIA Configuration Properties DS Data Server in ODI to point to the new location of the AIAConfigurationProperties.xml
AIA Configuration Properties DS is located in the Physical Architecture tab in ODI topology. The JDBC URL is located under the JDBC tab.
For example, after installing you copied the file into Z:/Oracle/PIP/. Consider the following JDBC URL:
jdbc:snps:xml?f=D:/Oracle/FPAIAHOME/config/AIAConfigurationProperties.xml&s=AIACONFIGSCHEMA
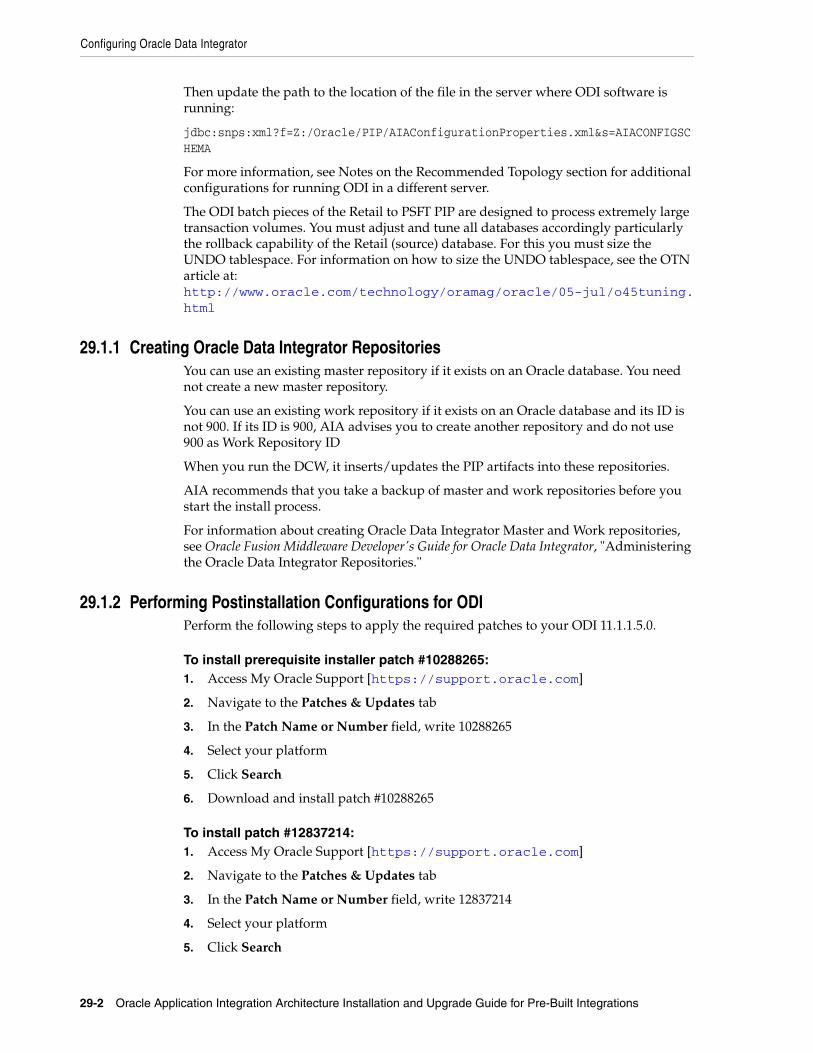
Configuring Oracle Data Integrator
29-2 Oracle Application Integration Architecture Installation and Upgrade Guide for Pre-Built Integrations
Then update the path to the location of the file in the server where ODI software is running:
jdbc:snps:xml?f=Z:/Oracle/PIP/AIAConfigurationProperties.xml&s=AIACONFIGSCHEMA
For more information, see Notes on the Recommended Topology section for additional configurations for running ODI in a different server.
The ODI batch pieces of the Retail to PSFT PIP are designed to process extremely large transaction volumes. You must adjust and tune all databases accordingly particularly the rollback capability of the Retail (source) database. For this you must size the UNDO tablespace. For information on how to size the UNDO tablespace, see the OTN article at: http://www.oracle.com/technology/oramag/oracle/05-jul/o45tuning.html
29.1.1 Creating Oracle Data Integrator RepositoriesYou can use an existing master repository if it exists on an Oracle database. You need not create a new master repository.
You can use an existing work repository if it exists on an Oracle database and its ID is not 900. If its ID is 900, AIA advises you to create another repository and do not use 900 as Work Repository ID
When you run the DCW, it inserts/updates the PIP artifacts into these repositories.
AIA recommends that you take a backup of master and work repositories before you start the install process.
For information about creating Oracle Data Integrator Master and Work repositories, see Oracle Fusion Middleware Developer's Guide for Oracle Data Integrator, "Administering the Oracle Data Integrator Repositories."
29.1.2 Performing Postinstallation Configurations for ODIPerform the following steps to apply the required patches to your ODI 11.1.1.5.0.
To install prerequisite installer patch #10288265:1. Access My Oracle Support [https://support.oracle.com]
2. Navigate to the Patches & Updates tab
3. In the Patch Name or Number field, write 10288265
4. Select your platform
5. Click Search
6. Download and install patch #10288265
To install patch #12837214:1. Access My Oracle Support [https://support.oracle.com]
2. Navigate to the Patches & Updates tab
3. In the Patch Name or Number field, write 12837214
4. Select your platform
5. Click Search
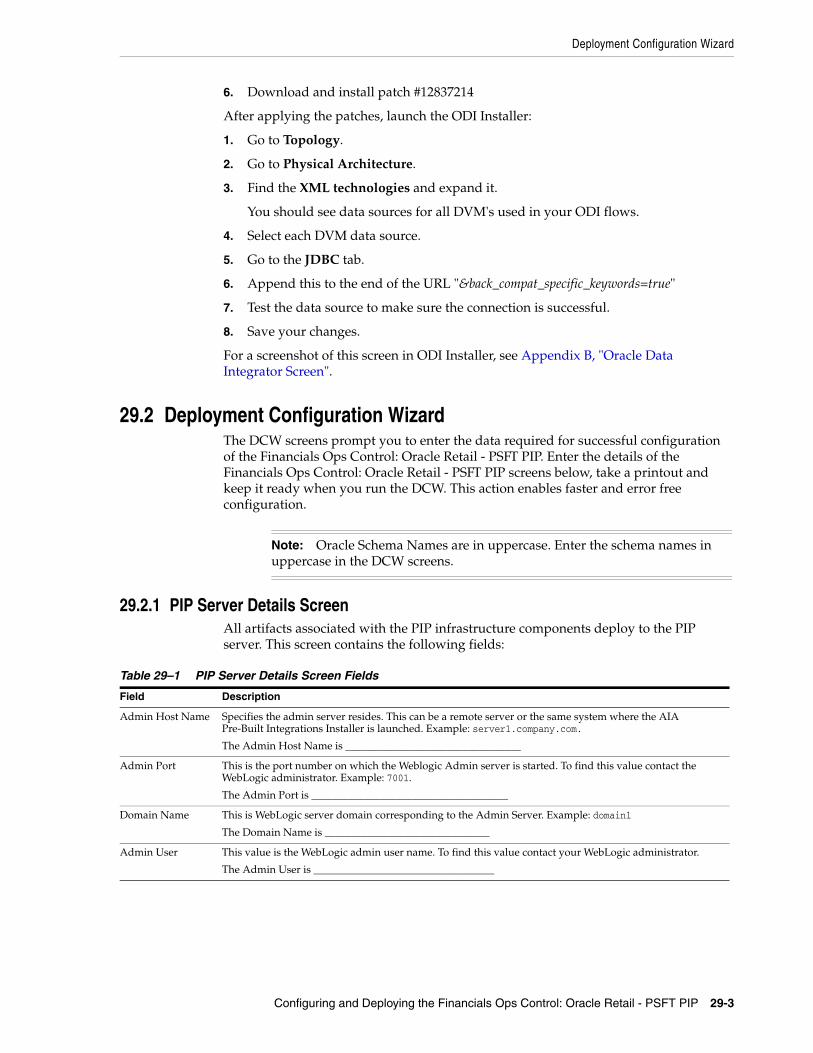
Deployment Configuration Wizard
Configuring and Deploying the Financials Ops Control: Oracle Retail - PSFT PIP 29-3
6. Download and install patch #12837214
After applying the patches, launch the ODI Installer:
1. Go to Topology.
2. Go to Physical Architecture.
3. Find the XML technologies and expand it.
You should see data sources for all DVM's used in your ODI flows.
4. Select each DVM data source.
5. Go to the JDBC tab.
6. Append this to the end of the URL "&back_compat_specific_keywords=true"
7. Test the data source to make sure the connection is successful.
8. Save your changes.
For a screenshot of this screen in ODI Installer, see Appendix B, "Oracle Data Integrator Screen".
29.2 Deployment Configuration WizardThe DCW screens prompt you to enter the data required for successful configuration of the Financials Ops Control: Oracle Retail - PSFT PIP. Enter the details of the Financials Ops Control: Oracle Retail - PSFT PIP screens below, take a printout and keep it ready when you run the DCW. This action enables faster and error free configuration.
29.2.1 PIP Server Details ScreenAll artifacts associated with the PIP infrastructure components deploy to the PIP server. This screen contains the following fields:
Note: Oracle Schema Names are in uppercase. Enter the schema names in uppercase in the DCW screens.
Table 29–1 PIP Server Details Screen Fields
Field Description
Admin Host Name Specifies the admin server resides. This can be a remote server or the same system where the AIA Pre-Built Integrations Installer is launched. Example: server1.company.com.
The Admin Host Name is _________________________________
Admin Port This is the port number on which the Weblogic Admin server is started. To find this value contact the WebLogic administrator. Example: 7001.
The Admin Port is _____________________________________
Domain Name This is WebLogic server domain corresponding to the Admin Server. Example: domain1
The Domain Name is _______________________________
Admin User This value is the WebLogic admin user name. To find this value contact your WebLogic administrator.
The Admin User is __________________________________
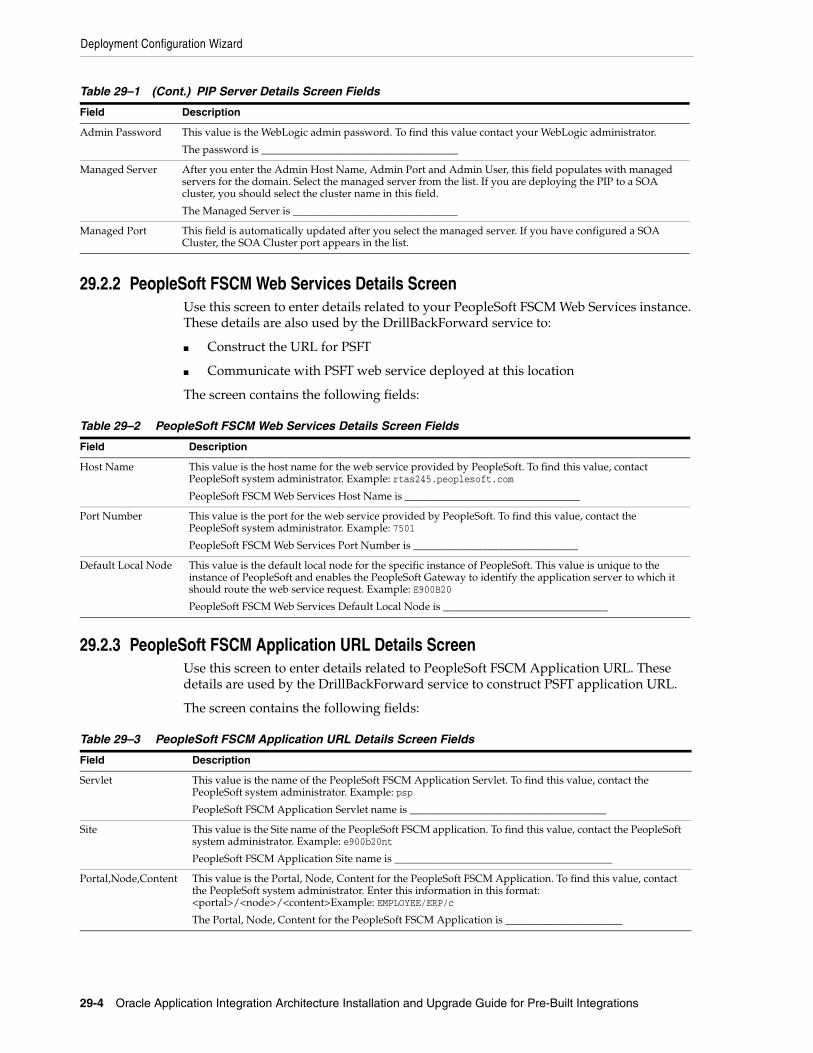
Deployment Configuration Wizard
29-4 Oracle Application Integration Architecture Installation and Upgrade Guide for Pre-Built Integrations
29.2.2 PeopleSoft FSCM Web Services Details ScreenUse this screen to enter details related to your PeopleSoft FSCM Web Services instance. These details are also used by the DrillBackForward service to:
■ Construct the URL for PSFT
■ Communicate with PSFT web service deployed at this location
The screen contains the following fields:
29.2.3 PeopleSoft FSCM Application URL Details ScreenUse this screen to enter details related to PeopleSoft FSCM Application URL. These details are used by the DrillBackForward service to construct PSFT application URL.
The screen contains the following fields:
Admin Password This value is the WebLogic admin password. To find this value contact your WebLogic administrator.
The password is _____________________________________
Managed Server After you enter the Admin Host Name, Admin Port and Admin User, this field populates with managed servers for the domain. Select the managed server from the list. If you are deploying the PIP to a SOA cluster, you should select the cluster name in this field.
The Managed Server is _______________________________
Managed Port This field is automatically updated after you select the managed server. If you have configured a SOA Cluster, the SOA Cluster port appears in the list.
Table 29–2 PeopleSoft FSCM Web Services Details Screen Fields
Field Description
Host Name This value is the host name for the web service provided by PeopleSoft. To find this value, contact PeopleSoft system administrator. Example: rtas245.peoplesoft.com
PeopleSoft FSCM Web Services Host Name is _________________________________
Port Number This value is the port for the web service provided by PeopleSoft. To find this value, contact the PeopleSoft system administrator. Example: 7501
PeopleSoft FSCM Web Services Port Number is _______________________________
Default Local Node This value is the default local node for the specific instance of PeopleSoft. This value is unique to the instance of PeopleSoft and enables the PeopleSoft Gateway to identify the application server to which it should route the web service request. Example: E900B20
PeopleSoft FSCM Web Services Default Local Node is _______________________________
Table 29–3 PeopleSoft FSCM Application URL Details Screen Fields
Field Description
Servlet This value is the name of the PeopleSoft FSCM Application Servlet. To find this value, contact the PeopleSoft system administrator. Example: psp
PeopleSoft FSCM Application Servlet name is _____________________________________
Site This value is the Site name of the PeopleSoft FSCM application. To find this value, contact the PeopleSoft system administrator. Example: e900b20nt
PeopleSoft FSCM Application Site name is _________________________________________
Portal,Node,Content This value is the Portal, Node, Content for the PeopleSoft FSCM Application. To find this value, contact the PeopleSoft system administrator. Enter this information in this format: <portal>/<node>/<content>Example: EMPLOYEE/ERP/c
The Portal, Node, Content for the PeopleSoft FSCM Application is ______________________
Table 29–1 (Cont.) PIP Server Details Screen Fields
Field Description
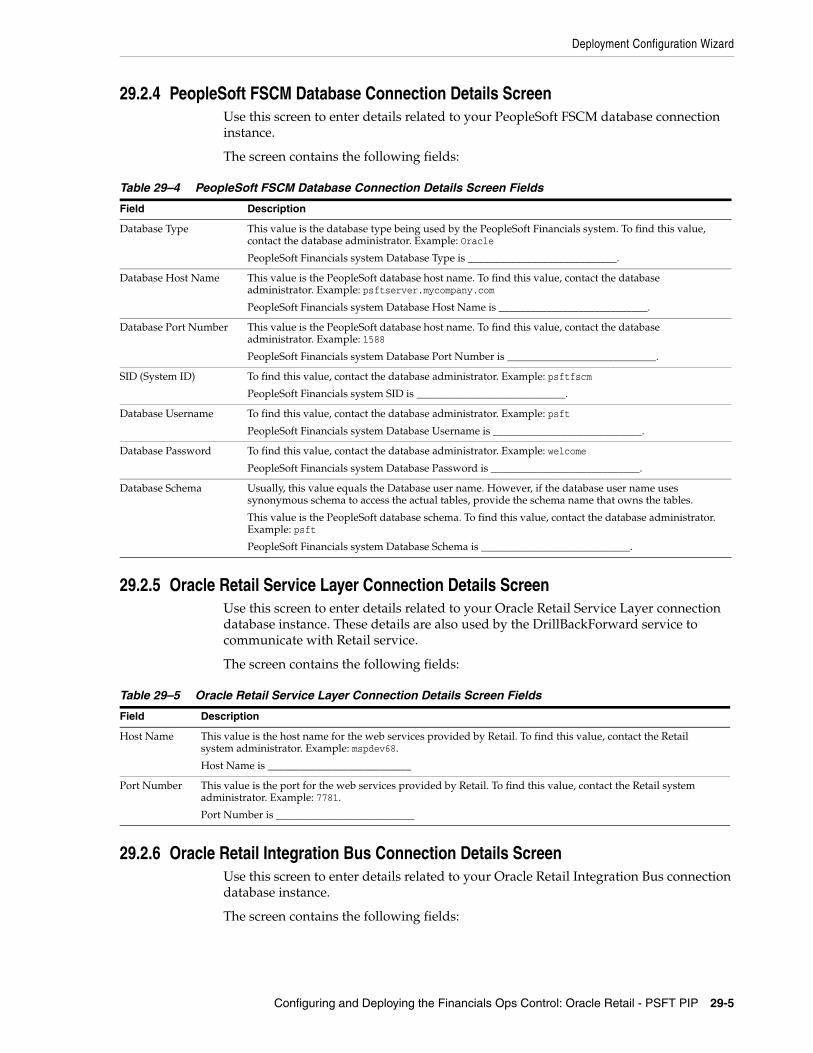
Deployment Configuration Wizard
Configuring and Deploying the Financials Ops Control: Oracle Retail - PSFT PIP 29-5
29.2.4 PeopleSoft FSCM Database Connection Details ScreenUse this screen to enter details related to your PeopleSoft FSCM database connection instance.
The screen contains the following fields:
29.2.5 Oracle Retail Service Layer Connection Details ScreenUse this screen to enter details related to your Oracle Retail Service Layer connection database instance. These details are also used by the DrillBackForward service to communicate with Retail service.
The screen contains the following fields:
29.2.6 Oracle Retail Integration Bus Connection Details ScreenUse this screen to enter details related to your Oracle Retail Integration Bus connection database instance.
The screen contains the following fields:
Table 29–4 PeopleSoft FSCM Database Connection Details Screen Fields
Field Description
Database Type This value is the database type being used by the PeopleSoft Financials system. To find this value, contact the database administrator. Example: Oracle
PeopleSoft Financials system Database Type is ____________________________.
Database Host Name This value is the PeopleSoft database host name. To find this value, contact the database administrator. Example: psftserver.mycompany.com
PeopleSoft Financials system Database Host Name is ____________________________.
Database Port Number This value is the PeopleSoft database host name. To find this value, contact the database administrator. Example: 1588
PeopleSoft Financials system Database Port Number is ____________________________.
SID (System ID) To find this value, contact the database administrator. Example: psftfscm
PeopleSoft Financials system SID is ____________________________.
Database Username To find this value, contact the database administrator. Example: psft
PeopleSoft Financials system Database Username is ____________________________.
Database Password To find this value, contact the database administrator. Example: welcome
PeopleSoft Financials system Database Password is ____________________________.
Database Schema Usually, this value equals the Database user name. However, if the database user name uses synonymous schema to access the actual tables, provide the schema name that owns the tables.
This value is the PeopleSoft database schema. To find this value, contact the database administrator. Example: psft
PeopleSoft Financials system Database Schema is ____________________________.
Table 29–5 Oracle Retail Service Layer Connection Details Screen Fields
Field Description
Host Name This value is the host name for the web services provided by Retail. To find this value, contact the Retail system administrator. Example: mspdev68.
Host Name is ___________________________
Port Number This value is the port for the web services provided by Retail. To find this value, contact the Retail system administrator. Example: 7781.
Port Number is __________________________
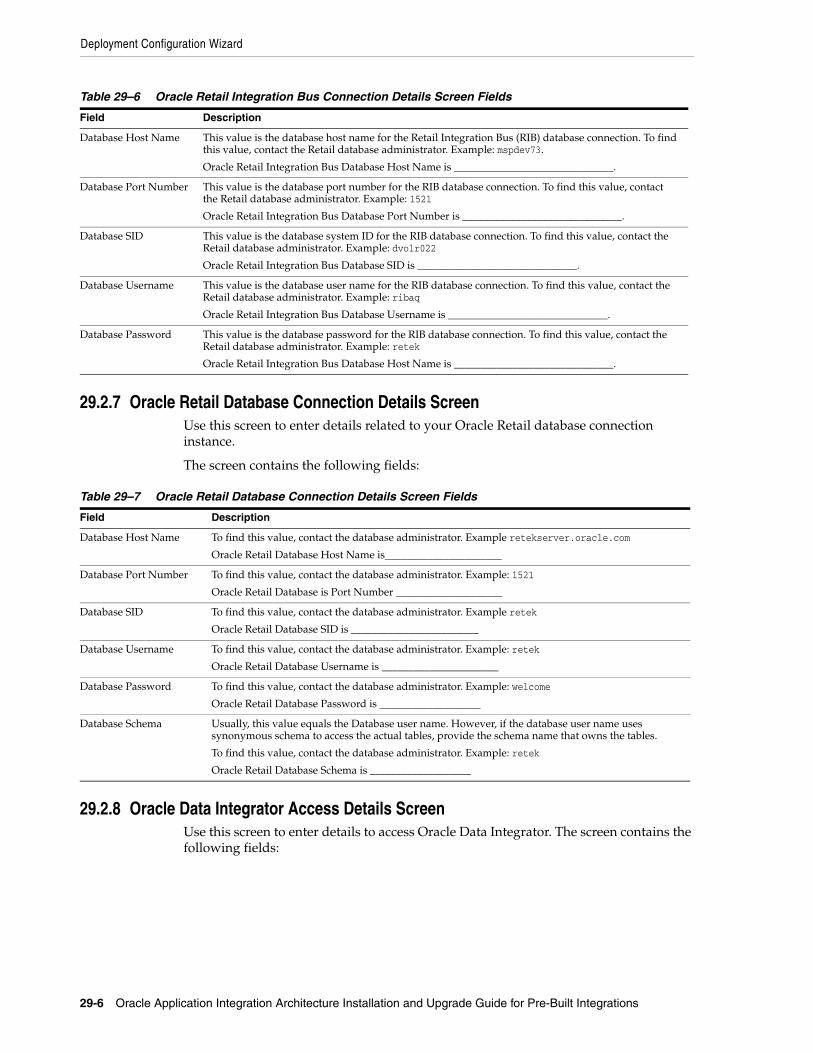
Deployment Configuration Wizard
29-6 Oracle Application Integration Architecture Installation and Upgrade Guide for Pre-Built Integrations
29.2.7 Oracle Retail Database Connection Details ScreenUse this screen to enter details related to your Oracle Retail database connection instance.
The screen contains the following fields:
29.2.8 Oracle Data Integrator Access Details ScreenUse this screen to enter details to access Oracle Data Integrator. The screen contains the following fields:
Table 29–6 Oracle Retail Integration Bus Connection Details Screen Fields
Field Description
Database Host Name This value is the database host name for the Retail Integration Bus (RIB) database connection. To find this value, contact the Retail database administrator. Example: mspdev73.
Oracle Retail Integration Bus Database Host Name is ______________________________.
Database Port Number This value is the database port number for the RIB database connection. To find this value, contact the Retail database administrator. Example: 1521
Oracle Retail Integration Bus Database Port Number is ______________________________.
Database SID This value is the database system ID for the RIB database connection. To find this value, contact the Retail database administrator. Example: dvolr022
Oracle Retail Integration Bus Database SID is ______________________________.
Database Username This value is the database user name for the RIB database connection. To find this value, contact the Retail database administrator. Example: ribaq
Oracle Retail Integration Bus Database Username is ______________________________.
Database Password This value is the database password for the RIB database connection. To find this value, contact the Retail database administrator. Example: retek
Oracle Retail Integration Bus Database Host Name is ______________________________.
Table 29–7 Oracle Retail Database Connection Details Screen Fields
Field Description
Database Host Name To find this value, contact the database administrator. Example retekserver.oracle.com
Oracle Retail Database Host Name is______________________
Database Port Number To find this value, contact the database administrator. Example: 1521
Oracle Retail Database is Port Number ____________________
Database SID To find this value, contact the database administrator. Example retek
Oracle Retail Database SID is ________________________
Database Username To find this value, contact the database administrator. Example: retek
Oracle Retail Database Username is ______________________
Database Password To find this value, contact the database administrator. Example: welcome
Oracle Retail Database Password is ___________________
Database Schema Usually, this value equals the Database user name. However, if the database user name uses synonymous schema to access the actual tables, provide the schema name that owns the tables.
To find this value, contact the database administrator. Example: retek
Oracle Retail Database Schema is ___________________
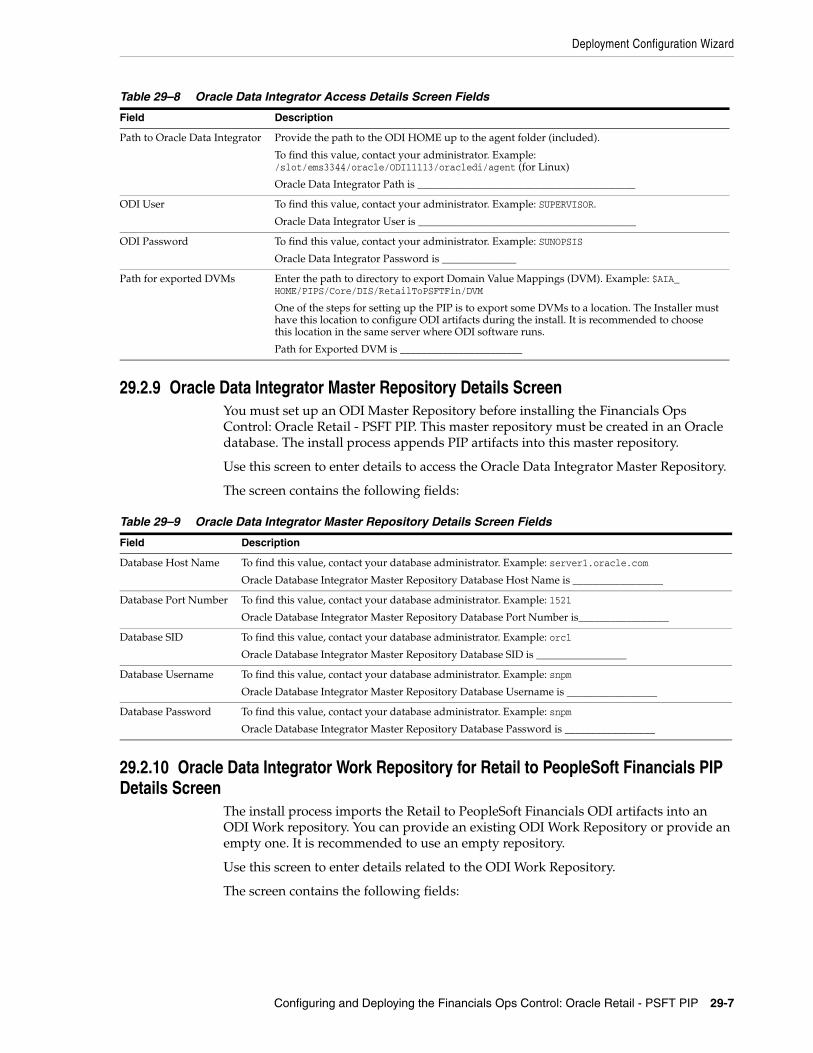
Deployment Configuration Wizard
Configuring and Deploying the Financials Ops Control: Oracle Retail - PSFT PIP 29-7
29.2.9 Oracle Data Integrator Master Repository Details ScreenYou must set up an ODI Master Repository before installing the Financials Ops Control: Oracle Retail - PSFT PIP. This master repository must be created in an Oracle database. The install process appends PIP artifacts into this master repository.
Use this screen to enter details to access the Oracle Data Integrator Master Repository.
The screen contains the following fields:
29.2.10 Oracle Data Integrator Work Repository for Retail to PeopleSoft Financials PIP Details Screen
The install process imports the Retail to PeopleSoft Financials ODI artifacts into an ODI Work repository. You can provide an existing ODI Work Repository or provide an empty one. It is recommended to use an empty repository.
Use this screen to enter details related to the ODI Work Repository.
The screen contains the following fields:
Table 29–8 Oracle Data Integrator Access Details Screen Fields
Field Description
Path to Oracle Data Integrator Provide the path to the ODI HOME up to the agent folder (included).
To find this value, contact your administrator. Example: /slot/ems3344/oracle/ODI11113/oracledi/agent (for Linux)
Oracle Data Integrator Path is _________________________________________
ODI User To find this value, contact your administrator. Example: SUPERVISOR.
Oracle Data Integrator User is _________________________________________
ODI Password To find this value, contact your administrator. Example: SUNOPSIS
Oracle Data Integrator Password is ______________
Path for exported DVMs Enter the path to directory to export Domain Value Mappings (DVM). Example: $AIA_HOME/PIPS/Core/DIS/RetailToPSFTFin/DVM
One of the steps for setting up the PIP is to export some DVMs to a location. The Installer must have this location to configure ODI artifacts during the install. It is recommended to choose this location in the same server where ODI software runs.
Path for Exported DVM is _______________________
Table 29–9 Oracle Data Integrator Master Repository Details Screen Fields
Field Description
Database Host Name To find this value, contact your database administrator. Example: server1.oracle.com
Oracle Database Integrator Master Repository Database Host Name is _________________
Database Port Number To find this value, contact your database administrator. Example: 1521
Oracle Database Integrator Master Repository Database Port Number is_________________
Database SID To find this value, contact your database administrator. Example: orcl
Oracle Database Integrator Master Repository Database SID is _________________
Database Username To find this value, contact your database administrator. Example: snpm
Oracle Database Integrator Master Repository Database Username is _________________
Database Password To find this value, contact your database administrator. Example: snpm
Oracle Database Integrator Master Repository Database Password is _________________
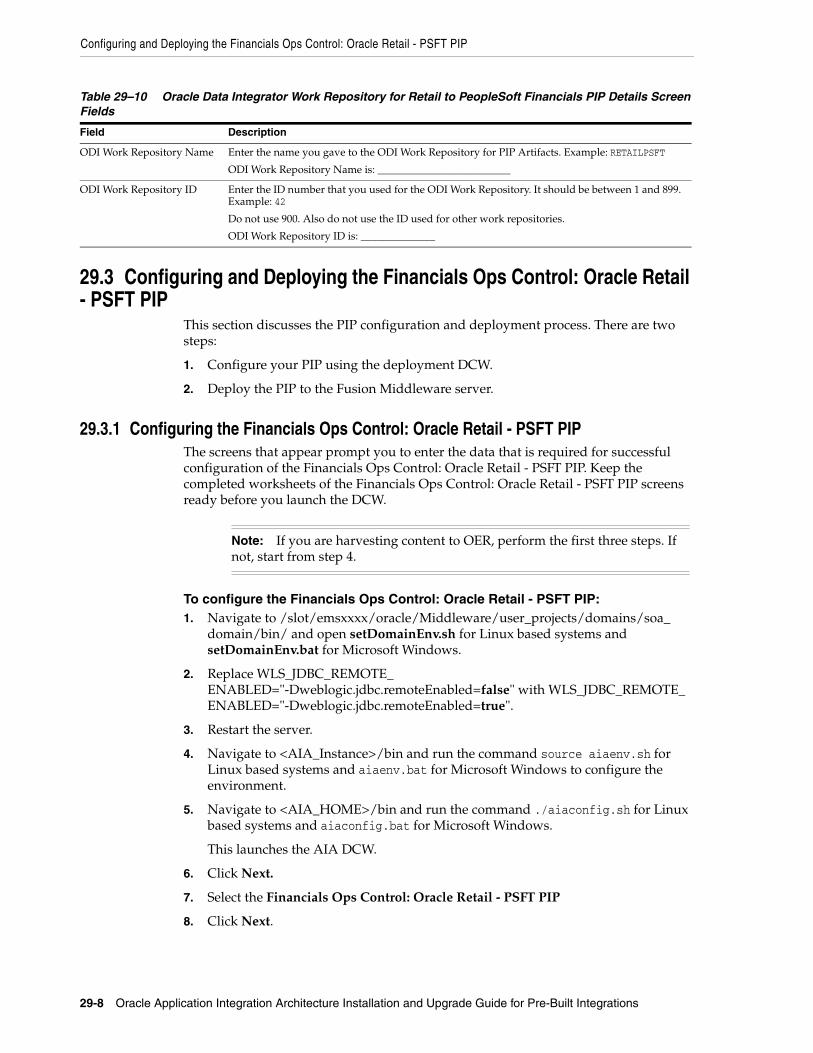
Configuring and Deploying the Financials Ops Control: Oracle Retail - PSFT PIP
29-8 Oracle Application Integration Architecture Installation and Upgrade Guide for Pre-Built Integrations
29.3 Configuring and Deploying the Financials Ops Control: Oracle Retail - PSFT PIP
This section discusses the PIP configuration and deployment process. There are two steps:
1. Configure your PIP using the deployment DCW.
2. Deploy the PIP to the Fusion Middleware server.
29.3.1 Configuring the Financials Ops Control: Oracle Retail - PSFT PIPThe screens that appear prompt you to enter the data that is required for successful configuration of the Financials Ops Control: Oracle Retail - PSFT PIP. Keep the completed worksheets of the Financials Ops Control: Oracle Retail - PSFT PIP screens ready before you launch the DCW.
To configure the Financials Ops Control: Oracle Retail - PSFT PIP:1. Navigate to /slot/emsxxxx/oracle/Middleware/user_projects/domains/soa_
domain/bin/ and open setDomainEnv.sh for Linux based systems and setDomainEnv.bat for Microsoft Windows.
2. Replace WLS_JDBC_REMOTE_ENABLED="-Dweblogic.jdbc.remoteEnabled=false" with WLS_JDBC_REMOTE_ENABLED="-Dweblogic.jdbc.remoteEnabled=true".
3. Restart the server.
4. Navigate to <AIA_Instance>/bin and run the command source aiaenv.sh for Linux based systems and aiaenv.bat for Microsoft Windows to configure the environment.
5. Navigate to <AIA_HOME>/bin and run the command ./aiaconfig.sh for Linux based systems and aiaconfig.bat for Microsoft Windows.
This launches the AIA DCW.
6. Click Next.
7. Select the Financials Ops Control: Oracle Retail - PSFT PIP
8. Click Next.
Table 29–10 Oracle Data Integrator Work Repository for Retail to PeopleSoft Financials PIP Details Screen Fields
Field Description
ODI Work Repository Name Enter the name you gave to the ODI Work Repository for PIP Artifacts. Example: RETAILPSFT
ODI Work Repository Name is: _________________________
ODI Work Repository ID Enter the ID number that you used for the ODI Work Repository. It should be between 1 and 899. Example: 42
Do not use 900. Also do not use the ID used for other work repositories.
ODI Work Repository ID is: ______________
Note: If you are harvesting content to OER, perform the first three steps. If not, start from step 4.

Configuring and Deploying the Financials Ops Control: Oracle Retail - PSFT PIP
Configuring and Deploying the Financials Ops Control: Oracle Retail - PSFT PIP 29-9
29.3.1.1 Specify PIP Server Details
To specify PIP Server details:1. Enter information related to your PIP server in the PIP Server Details screen.
2. Click Next.
29.3.1.2 Specify PeopleSoft FSCM Web Services Details
To specify PeopleSoft FSCM Web Services details:1. Enter information about your PeopleSoft FSCM Web Services installation in the
PeopleSoft FSCM Web Services Information screen.
2. Click Next.
29.3.1.3 Specify PeopleSoft FSCM Application URL Details
To specify PeopleSoft FSCM Application URL details:1. Enter information about your PeopleSoft FSCM Web Application URL in the
PeopleSoft FSCM Application URL screen.
2. Click Next.
29.3.1.4 Specify PeopleSoft FSCM Database Connection Details
To specify PeopleSoft FSCM Database Connection details:1. Enter information about your PeopleSoft FSCM Database Connection installation
in the PeopleSoft FSCM Database Connection Information screen.
2. Click Next.
29.3.1.5 Specify Oracle Retail Service Layer Connection Details
To specify Oracle Retail Service Layer Connection details:1. Enter information about your Oracle Retail Service Layer Connection installation
in the Oracle Retail Service Layer Connection Information screen.
2. Click Next.
29.3.1.6 Specify Oracle Retail Integration Bus Connection Details
To specify Oracle Retail Integration Bus Connection details:1. Enter information about your Oracle Retail Integration Bus Connection installation
in the Oracle Retail Integration Bus Connection Information screen.
2. Click Next.
29.3.1.7 Specify Oracle Retail Database Connection Details
To specify Oracle Retail Database Connection details:1. Enter information about your Oracle Retail Database Connection installation in the
Oracle Retail Database Connection Information screen.
2. Click Next.
Configuring and Deploying the Financials Ops Control: Oracle Retail - PSFT PIP
29-10 Oracle Application Integration Architecture Installation and Upgrade Guide for Pre-Built Integrations
29.3.1.8 Specify Oracle Data Integrator Access Details
To specify Oracle Data Integrator Access details:1. Enter information about your Oracle Data Integrator Access installation in the
Oracle Data Integrator Access Information screens.
Oracle Data Integration Access Information is captured in three screens. Enter the following information in the screens.
2. Specify ODI Home.
3. Click Next.
4. Enter ODI User and ODI Password.
5. Click Next.
6. Specify the Path for exported DVMs.
7. Click Next.
29.3.1.9 Specify Oracle Data Integrator Master Repository Details
To specify Oracle Data Integrator Master Repository details:1. Enter information about your Oracle Data Integrator Master Repository
installation in the Oracle Data Integrator Master Repository screen.
2. Click Next.
29.3.1.10 Specify Oracle Data Integrator Work Repository Details
To specify Oracle Data Integrator Work Repository details:1. Enter information about your Oracle Data Integrator Work Repository installation
in the Oracle Data Integrator Work Repository for Retails to PeopleSoft Financials screen.
2. Click Next.
29.3.1.11 Complete Configuration
To complete configuration:1. Review the configuration information on the Configuration Summary screen.
2. Click Configure to accept the configuration.
The system displays progress of the configuration in the Configuration Progress screen.
Note: If you want to make changes to the configuration, use the navigation pane on the left and select the screen you want to edit.
You can create a response file based on the input provided in the DCW and use it in future when you want to deploy the PIP. You can configure using the steps described in Section 29.3.2, "Configuring using the Response File". Click Save Response File and save the response file with the name and location of your choice.
Configuring and Deploying the Financials Ops Control: Oracle Retail - PSFT PIP
Configuring and Deploying the Financials Ops Control: Oracle Retail - PSFT PIP 29-11
The system displays any warnings or errors as necessary. You can review the configuration log for additional details. The configuration log location is displayed in Configuration Progress screen.
3. When the configuration process completes without errors, the AIA DCW displays the Configuration Complete screen.
4. Click Finish to close the DCW.
29.3.2 Configuring using the Response File
To configure using the response file:1. Open the response file.
When you create a response file through OUI, passwords get stored as <SECURE>.
2. Replace the password fields with actual passwords in the response file.
3. Navigate to <AIA_Instance>/bin and run the command source aiaenv.sh for Linux based systems and aiaenv.bat for Microsoft Windows to configure the environment.
4. Navigate to <AIA_HOME>/bin and run the command ./aiaconfig.sh <Response File Location and Name> for Linux based systems and aiaconfig.bat <Response File Location and Name> for Microsoft Windows.
29.3.3 Deploying the Financials Ops Control: Oracle Retail - PSFT PIP
To deploy the PIP to Fusion Middleware server:1. Navigate to <AIA_Instance>/bin and run the command source aiaenv.sh for
Linux based systems and aiaenv.bat for Microsoft Windows to configure the environment.
2. Run the command for your platform
Note: When you copy and paste the command in the command line, ensure that there is space between .xml and -. Ensure that there is space between these two when you run undeployment command too.
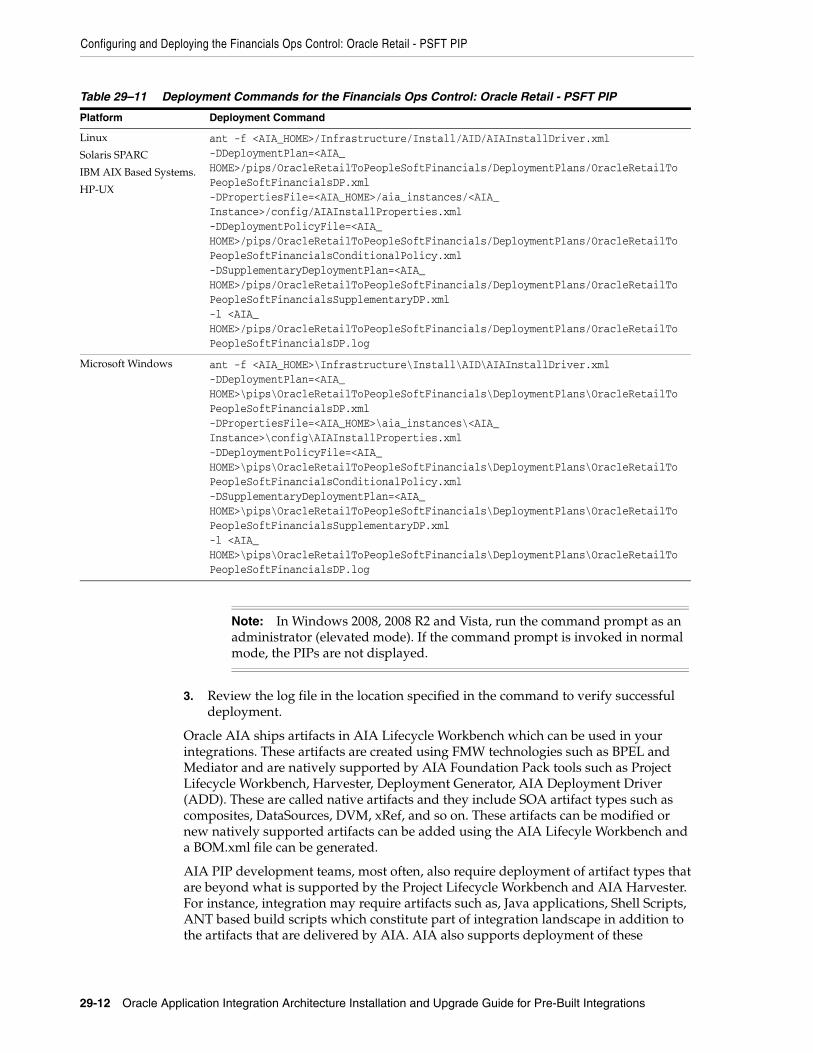
Configuring and Deploying the Financials Ops Control: Oracle Retail - PSFT PIP
29-12 Oracle Application Integration Architecture Installation and Upgrade Guide for Pre-Built Integrations
3. Review the log file in the location specified in the command to verify successful deployment.
Oracle AIA ships artifacts in AIA Lifecycle Workbench which can be used in your integrations. These artifacts are created using FMW technologies such as BPEL and Mediator and are natively supported by AIA Foundation Pack tools such as Project Lifecycle Workbench, Harvester, Deployment Generator, AIA Deployment Driver (ADD). These are called native artifacts and they include SOA artifact types such as composites, DataSources, DVM, xRef, and so on. These artifacts can be modified or new natively supported artifacts can be added using the AIA Lifecyle Workbench and a BOM.xml file can be generated.
AIA PIP development teams, most often, also require deployment of artifact types that are beyond what is supported by the Project Lifecycle Workbench and AIA Harvester. For instance, integration may require artifacts such as, Java applications, Shell Scripts, ANT based build scripts which constitute part of integration landscape in addition to the artifacts that are delivered by AIA. AIA also supports deployment of these
Table 29–11 Deployment Commands for the Financials Ops Control: Oracle Retail - PSFT PIP
Platform Deployment Command
Linux
Solaris SPARC
IBM AIX Based Systems.
HP-UX
ant -f <AIA_HOME>/Infrastructure/Install/AID/AIAInstallDriver.xml -DDeploymentPlan=<AIA_HOME>/pips/OracleRetailToPeopleSoftFinancials/DeploymentPlans/OracleRetailToPeopleSoftFinancialsDP.xml -DPropertiesFile=<AIA_HOME>/aia_instances/<AIA_Instance>/config/AIAInstallProperties.xml -DDeploymentPolicyFile=<AIA_HOME>/pips/OracleRetailToPeopleSoftFinancials/DeploymentPlans/OracleRetailToPeopleSoftFinancialsConditionalPolicy.xml -DSupplementaryDeploymentPlan=<AIA_HOME>/pips/OracleRetailToPeopleSoftFinancials/DeploymentPlans/OracleRetailToPeopleSoftFinancialsSupplementaryDP.xml -l <AIA_HOME>/pips/OracleRetailToPeopleSoftFinancials/DeploymentPlans/OracleRetailToPeopleSoftFinancialsDP.log
Microsoft Windows ant -f <AIA_HOME>\Infrastructure\Install\AID\AIAInstallDriver.xml -DDeploymentPlan=<AIA_HOME>\pips\OracleRetailToPeopleSoftFinancials\DeploymentPlans\OracleRetailToPeopleSoftFinancialsDP.xml -DPropertiesFile=<AIA_HOME>\aia_instances\<AIA_Instance>\config\AIAInstallProperties.xml -DDeploymentPolicyFile=<AIA_HOME>\pips\OracleRetailToPeopleSoftFinancials\DeploymentPlans\OracleRetailToPeopleSoftFinancialsConditionalPolicy.xml -DSupplementaryDeploymentPlan=<AIA_HOME>\pips\OracleRetailToPeopleSoftFinancials\DeploymentPlans\OracleRetailToPeopleSoftFinancialsSupplementaryDP.xml -l <AIA_HOME>\pips\OracleRetailToPeopleSoftFinancials\DeploymentPlans\OracleRetailToPeopleSoftFinancialsDP.log
Note: In Windows 2008, 2008 R2 and Vista, run the command prompt as an administrator (elevated mode). If the command prompt is invoked in normal mode, the PIPs are not displayed.
Performing Postdeployment Configurations
Configuring and Deploying the Financials Ops Control: Oracle Retail - PSFT PIP 29-13
supplementary artifacts. However, you must modify and add new non native artifacts outside AIA Lifecycle Workbench.
For more information on deploying artifacts, see Oracle Fusion Middleware Developer's Guide for Oracle Application Integration Architecture Foundation Pack, "Generating Deployment Plans and Deploying Artifacts".
29.4 Performing Postdeployment ConfigurationsThis section discusses the following postdeployment configurations for the Financials Ops Control: Oracle Retail - PSFT PIP:
■ Section 29.4.1, "Configuring Retail to PeopleSoft Accounting Entries Integration"
■ Section 29.4.2, "Configuring Retail to PeopleSoft Invoice/Voucher Integration"
■ Section 29.4.3, "Configuring Web Services for Financials Ops Control: Oracle Retail - PSFT PIP (Optional)"
■ Section 29.4.4, "Creating Sequence Rights to PeopleSoft Database User (Required)"
■ Section 29.4.5, "Verifying the Database Connection (Optional)"
■ Section 29.4.6, "Setting Up and Exporting Domain Value Mappings (Required)"
■ Section 29.4.7, "Setting Up ORGANIZATION_ID XREF (Required)"
29.4.1 Configuring Retail to PeopleSoft Accounting Entries IntegrationThe Retail to PeopleSoft_AccountingEntry ODI Integration can be configured to send emails to an individual when a successful transaction occurs.
To send emails to individuals on successful transaction:1. Edit the AIAConfigurationProperties.xml file located in AIA_HOME/config.
2. Set the polling interval.
<Property name="PollingInterval">300000</Property>
The ODI process has a polling interval, which is the time period (in milliseconds) the process waits before polling tables for new data. This polling interval can be changed as required.
3. Modify the property name:
Example 29–1 Property Name Modification
<Property name="FromMailAddress">[email protected]</Property><Property name="ToMailAddress">[email protected]</Property><Property name="MailServerName">mail.company.com</Property>
4. Enter the email ID of the recipient in the ToMailAddress section to specify the person to receive the email messages.
5. Enter the email ID of the sender in the FromMailAddress section.
This value is required by the email process to send the email. Oracle AIA recommends that FromMailAddress and ToMailAddress to prevent the recipient from receiving two emails for the same successful process.
6. Enter the name of the mail server in the MailServerName section to specify the mail server.
Performing Postdeployment Configurations
29-14 Oracle Application Integration Architecture Installation and Upgrade Guide for Pre-Built Integrations
After you modify the AIAConfigurationProperties.xml file, update the MDS with the information.
To update SOA-MDS, apps/AIAMetaData:1. Browse to the folder at $AIA_HOME/aia_instances/$INSTANCE_NAME/bin.
2. Execute source aiaenv.sh and source the file aiaenv.sh.
3. Browse to the folder at $AIA_HOME/aia_instances/$INSTANCE_NAME/config and open UpdateMetaDataDP.xml.
4. Update the file UpdateMetaDataDP.xml. To add resource groups to the MDS insert the include tags.
■ To upload all the files under "AIAMetaData", add <include name ="AIAMetadata/**"/>
■ To upload the files copied to AIAComponents/ApplicationObjectLibrary/SEBL/schemas folder, add <include name ="AIAComponents/ApplicationObjectLibrary/SEBL/schemas/**"/>
5. Browse to AIA_HOME/Infrastructure/Install/scripts.
6. Execute ant -f UpdateMetaData.xml to update MDS.
29.4.2 Configuring Retail to PeopleSoft Invoice/Voucher IntegrationThe Retail to PeopleSoft Invoice ODI Integration can be configured to send emails to an individual when a successful transaction occurs.
To send emails to individuals on successful transaction:1. Edit the AIAConfigurationProperties.xml file located in AIA_HOME/config.
2. Set the polling interval.
<Property name="PollingInterval">300000</Property>
The ODI process has a polling interval, which is the time period (in milliseconds) the process waits before polling tables for new data. This polling interval can be changed as required.
3. Modify the property name:
Example 29–2 Property Name Modification
<Property name="FromMailAddress">[email protected]</Property><Property name="ToMailAddress">[email protected]</Property><Property name="MailServerName">mail.company.com</Property>
4. Enter the email ID of the recipient in the ToMailAddress section to specify the person to receive the email messages.
5. Enter the email ID of the sender in the FromMailAddress section.
Note: In the include tag, the folder path must be relative to the folder AIAMetaData.
Performing Postdeployment Configurations
Configuring and Deploying the Financials Ops Control: Oracle Retail - PSFT PIP 29-15
This value is required by the email process to send the email. Oracle AIA recommends that FromMailAddress and ToMailAddress to prevent the recipient from receiving two emails for the same successful process.\
6. Enter the name of the mail server in the MailServerName section to specify the mail server.
29.4.3 Configuring Web Services for Financials Ops Control: Oracle Retail - PSFT PIP (Optional)
In addition to the above modules, you can perform postdeployment configuration for the following services:
■ CreatePaymentTermPeopleSoftReqABCSImpl
■ CreatePaymentTermRetailProvProvABCSImpl
■ CreateSupplierPartyListPeopleSoftReqABCSImpl
■ CreateSupplierPartyRetailProvProvABCSImpl
■ DrillBackForward
■ ProcessGLAccountValidationPeopleSoftProvABCSImpl
■ ProcessGLAccountValidationRetailReqABCSImpl
■ SyncCurrencyExchangeListPeopleSoftReqABCSImpl
■ SyncCurrencyExchangeListRetailProvProvABCSImpl
■ SyncPaymentTermListPeopleSoftReqABCSImpl
■ SyncSupplierPartyListPeopleSoftReqABCSImpl
■ SyncSupplierPartyListRetailProvProvABCSImpl
■ UpdatePaymentTermPeopleSoftReqABCSImpl
■ UpdatePaymentTermRetailProvProvABCSImpl
■ UpdateSupplierPartyListPeopleSoftReqABCSImpl
■ UpdateSupplierPartyRetailProvProvABCSImpl
For more information on how to configure these services, see the Oracle Application Integration Architecture Oracle Financial Operations Control Integration Pack Implementation Guide for Oracle Retail Merchandise Operations Management and PeopleSoft Enterprise Financials.
29.4.4 Creating Sequence Rights to PeopleSoft Database User (Required)The ODI processes create a database sequence in PeopleSoft database. Ensure that the database user for the PeopleSoft database has appropriate rights to create sequences.
29.4.5 Verifying the Database Connection (Optional)
To verify the database connection:1. Open ODI Topology Manager.
2. Expand Oracle in Physical Architecture tab.
3. Select AIA SCHEMA DS.
Performing Postdeployment Configurations
29-16 Oracle Application Integration Architecture Installation and Upgrade Guide for Pre-Built Integrations
4. Right click and select Edit to open AIA SCHEMA DS.
5. Click Test.
This opens Test Connection window.
6. Click Test.
If successful connection message does not appear, verify the connection information in the Definitions and JDBC tabs.
7. Repeat steps 1 to 6 for the following data sources:
■ ORACLE RETAIL DS
■ PEOPLESOFT DS
29.4.6 Setting Up and Exporting Domain Value Mappings (Required)You must set up and export Domain Value Maps (DVM) to complete the install process.
To set up and export DVMs:1. Set up all DVMs for the PIP.
2. Export the following DVMs:
■ BUSINESS_UNIT
■ CURRENCY_CODE
■ CHARTOFACCOUNTS_GLELEMENT
3. During installation, AIA Pre-Built Integrations Installer prompts you to specify a folder in your local file system to store the exported DVMs files. Export the following DVMs to that folder:
■ BUSINESS_UNIT
■ CURRENCY_CODE DVMs
4. And export the CHARTOFACCOUNTS_GLELEMENT DVM to the <AIA_HOME>/services/core/BulkDataProcess/OracleRetailToPeopleSoft/Financials/CreateRetailViewSQL folder. When exporting this dvm, change the name to CHARTOFACCOUNTS_GLELEMENT.xml, instead of CHARTOFACCOUNTS_GLELEMENT.dvm.
For more information on how to set up DVMs, see Oracle Application Integration Architecture Oracle Financial Operations Control Integration Pack Implementation Guide for Oracle Retail Merchandise Operations Management and PeopleSoft Enterprise Financials, "Describing Domain Value Maps", Implementing Oracle Retail to PeopleSoft Financials Process Integration Pack.
29.4.7 Setting Up ORGANIZATION_ID XREF (Required)For information about how to set up the ORGANIZATION_ID XREF, see Oracle Application Integration Architecture Oracle Financial Operations Control Integration Pack Implementation Guide for Oracle Retail Merchandise Operations Management and PeopleSoft Enterprise Financials, "Implementing Oracle Retail Merchandising Integration Pack for
Note: If PeopleSoft is under IBM DB2, the data source is under IBM DB2 UDB technology.
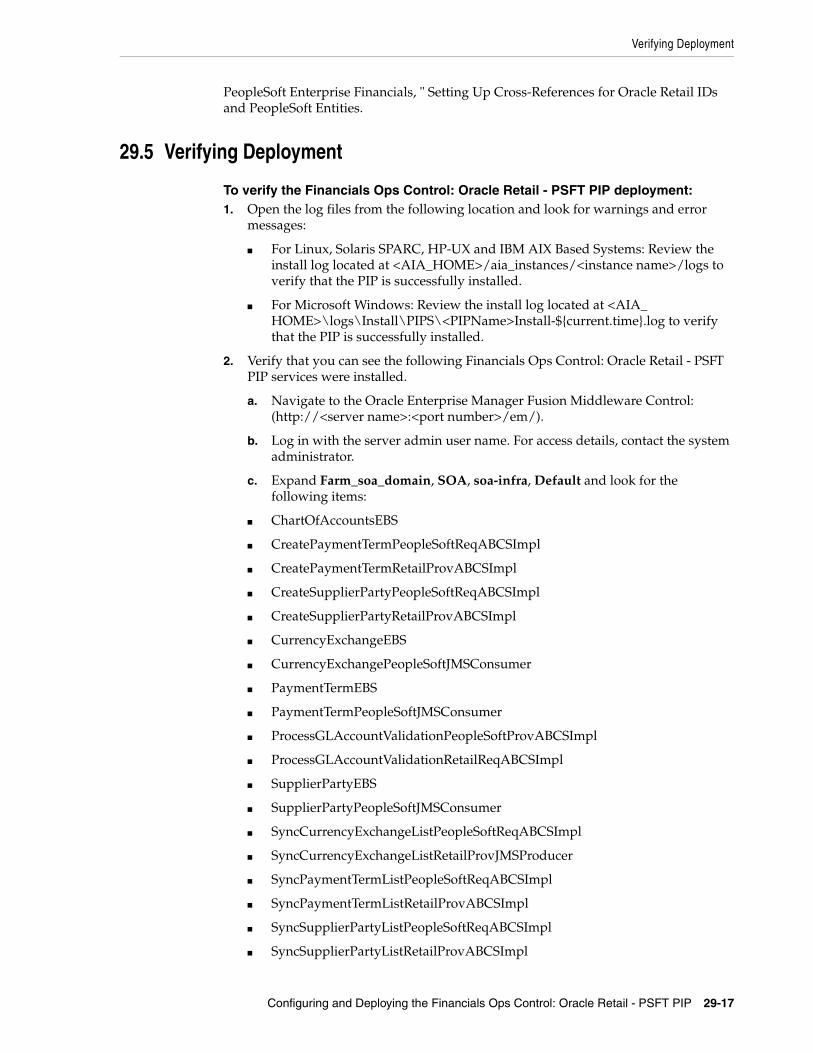
Verifying Deployment
Configuring and Deploying the Financials Ops Control: Oracle Retail - PSFT PIP 29-17
PeopleSoft Enterprise Financials, " Setting Up Cross-References for Oracle Retail IDs and PeopleSoft Entities.
29.5 Verifying Deployment
To verify the Financials Ops Control: Oracle Retail - PSFT PIP deployment:1. Open the log files from the following location and look for warnings and error
messages:
■ For Linux, Solaris SPARC, HP-UX and IBM AIX Based Systems: Review the install log located at <AIA_HOME>/aia_instances/<instance name>/logs to verify that the PIP is successfully installed.
■ For Microsoft Windows: Review the install log located at <AIA_HOME>\logs\Install\PIPS\<PIPName>Install-${current.time}.log to verify that the PIP is successfully installed.
2. Verify that you can see the following Financials Ops Control: Oracle Retail - PSFT PIP services were installed.
a. Navigate to the Oracle Enterprise Manager Fusion Middleware Control: (http://<server name>:<port number>/em/).
b. Log in with the server admin user name. For access details, contact the system administrator.
c. Expand Farm_soa_domain, SOA, soa-infra, Default and look for the following items:
■ ChartOfAccountsEBS
■ CreatePaymentTermPeopleSoftReqABCSImpl
■ CreatePaymentTermRetailProvABCSImpl
■ CreateSupplierPartyPeopleSoftReqABCSImpl
■ CreateSupplierPartyRetailProvABCSImpl
■ CurrencyExchangeEBS
■ CurrencyExchangePeopleSoftJMSConsumer
■ PaymentTermEBS
■ PaymentTermPeopleSoftJMSConsumer
■ ProcessGLAccountValidationPeopleSoftProvABCSImpl
■ ProcessGLAccountValidationRetailReqABCSImpl
■ SupplierPartyEBS
■ SupplierPartyPeopleSoftJMSConsumer
■ SyncCurrencyExchangeListPeopleSoftReqABCSImpl
■ SyncCurrencyExchangeListRetailProvJMSProducer
■ SyncPaymentTermListPeopleSoftReqABCSImpl
■ SyncPaymentTermListRetailProvABCSImpl
■ SyncSupplierPartyListPeopleSoftReqABCSImpl
■ SyncSupplierPartyListRetailProvABCSImpl
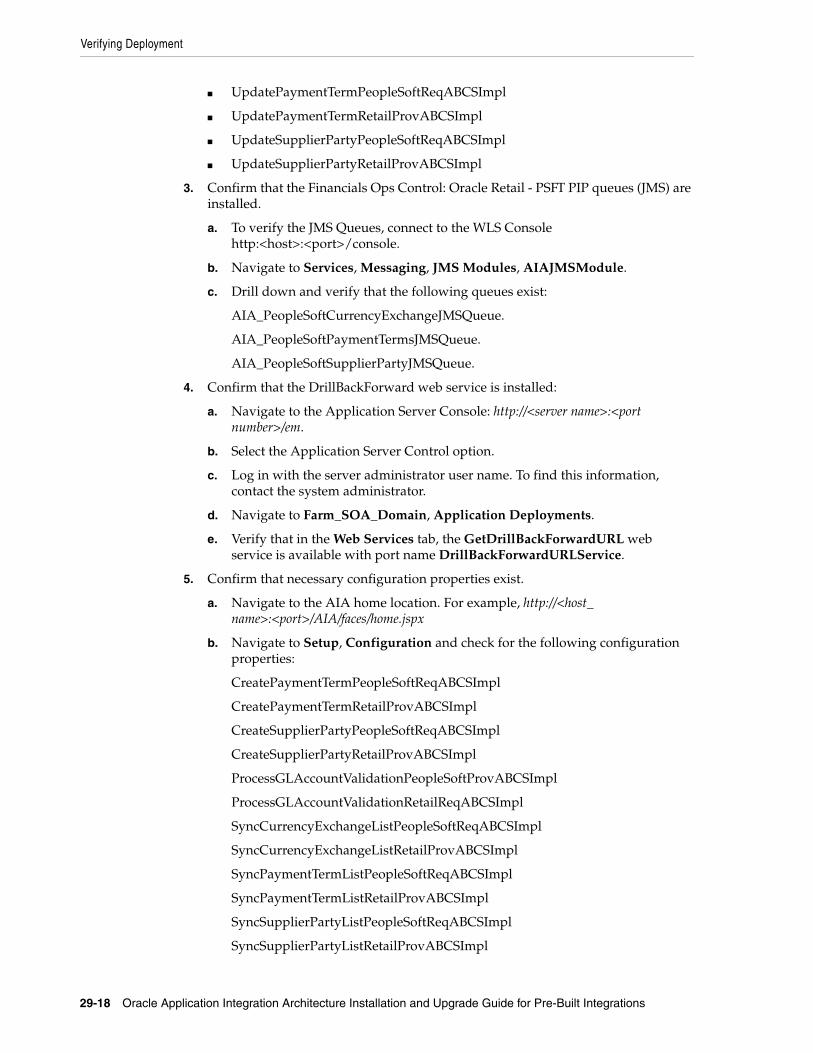
Verifying Deployment
29-18 Oracle Application Integration Architecture Installation and Upgrade Guide for Pre-Built Integrations
■ UpdatePaymentTermPeopleSoftReqABCSImpl
■ UpdatePaymentTermRetailProvABCSImpl
■ UpdateSupplierPartyPeopleSoftReqABCSImpl
■ UpdateSupplierPartyRetailProvABCSImpl
3. Confirm that the Financials Ops Control: Oracle Retail - PSFT PIP queues (JMS) are installed.
a. To verify the JMS Queues, connect to the WLS Console http:<host>:<port>/console.
b. Navigate to Services, Messaging, JMS Modules, AIAJMSModule.
c. Drill down and verify that the following queues exist:
AIA_PeopleSoftCurrencyExchangeJMSQueue.
AIA_PeopleSoftPaymentTermsJMSQueue.
AIA_PeopleSoftSupplierPartyJMSQueue.
4. Confirm that the DrillBackForward web service is installed:
a. Navigate to the Application Server Console: http://<server name>:<port number>/em.
b. Select the Application Server Control option.
c. Log in with the server administrator user name. To find this information, contact the system administrator.
d. Navigate to Farm_SOA_Domain, Application Deployments.
e. Verify that in the Web Services tab, the GetDrillBackForwardURL web service is available with port name DrillBackForwardURLService.
5. Confirm that necessary configuration properties exist.
a. Navigate to the AIA home location. For example, http://<host_name>:<port>/AIA/faces/home.jspx
b. Navigate to Setup, Configuration and check for the following configuration properties:
CreatePaymentTermPeopleSoftReqABCSImpl
CreatePaymentTermRetailProvABCSImpl
CreateSupplierPartyPeopleSoftReqABCSImpl
CreateSupplierPartyRetailProvABCSImpl
ProcessGLAccountValidationPeopleSoftProvABCSImpl
ProcessGLAccountValidationRetailReqABCSImpl
SyncCurrencyExchangeListPeopleSoftReqABCSImpl
SyncCurrencyExchangeListRetailProvABCSImpl
SyncPaymentTermListPeopleSoftReqABCSImpl
SyncPaymentTermListRetailProvABCSImpl
SyncSupplierPartyListPeopleSoftReqABCSImpl
SyncSupplierPartyListRetailProvABCSImpl
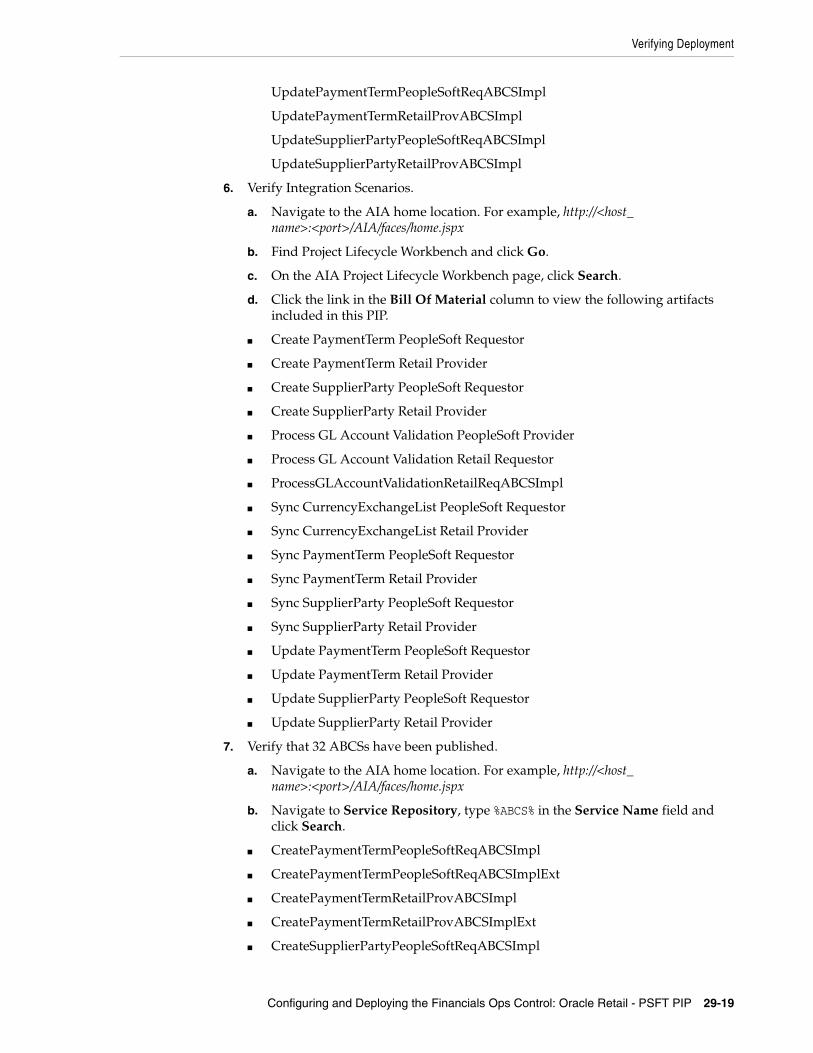
Verifying Deployment
Configuring and Deploying the Financials Ops Control: Oracle Retail - PSFT PIP 29-19
UpdatePaymentTermPeopleSoftReqABCSImpl
UpdatePaymentTermRetailProvABCSImpl
UpdateSupplierPartyPeopleSoftReqABCSImpl
UpdateSupplierPartyRetailProvABCSImpl
6. Verify Integration Scenarios.
a. Navigate to the AIA home location. For example, http://<host_name>:<port>/AIA/faces/home.jspx
b. Find Project Lifecycle Workbench and click Go.
c. On the AIA Project Lifecycle Workbench page, click Search.
d. Click the link in the Bill Of Material column to view the following artifacts included in this PIP.
■ Create PaymentTerm PeopleSoft Requestor
■ Create PaymentTerm Retail Provider
■ Create SupplierParty PeopleSoft Requestor
■ Create SupplierParty Retail Provider
■ Process GL Account Validation PeopleSoft Provider
■ Process GL Account Validation Retail Requestor
■ ProcessGLAccountValidationRetailReqABCSImpl
■ Sync CurrencyExchangeList PeopleSoft Requestor
■ Sync CurrencyExchangeList Retail Provider
■ Sync PaymentTerm PeopleSoft Requestor
■ Sync PaymentTerm Retail Provider
■ Sync SupplierParty PeopleSoft Requestor
■ Sync SupplierParty Retail Provider
■ Update PaymentTerm PeopleSoft Requestor
■ Update PaymentTerm Retail Provider
■ Update SupplierParty PeopleSoft Requestor
■ Update SupplierParty Retail Provider
7. Verify that 32 ABCSs have been published.
a. Navigate to the AIA home location. For example, http://<host_name>:<port>/AIA/faces/home.jspx
b. Navigate to Service Repository, type %ABCS% in the Service Name field and click Search.
■ CreatePaymentTermPeopleSoftReqABCSImpl
■ CreatePaymentTermPeopleSoftReqABCSImplExt
■ CreatePaymentTermRetailProvABCSImpl
■ CreatePaymentTermRetailProvABCSImplExt
■ CreateSupplierPartyPeopleSoftReqABCSImpl

Verifying Deployment
29-20 Oracle Application Integration Architecture Installation and Upgrade Guide for Pre-Built Integrations
■ CreateSupplierPartyPeopleSoftReqABCSImplExt
■ CreateSupplierPartyRetailProvABCSImpl
■ CreateSupplierPartyRetailProvABCSImplExt
■ ProcessGLAccountValidationPeopleSoftProvABCSImpl
■ ProcessGLAccountValidationPeopleSoftProvABCSImplExt
■ ProcessGLAccountValidationRetailReqABCSImpl
■ ProcessGLAccountValidationRetailReqABCSImplExt
■ SyncCurrencyExchangeListPeopleSoftReqABCSImpl
■ SyncCurrencyExchangeListPeopleSoftReqABCSImplExt
■ SyncCurrencyExchangeListRetailProvABCSImpl
■ SyncCurrencyExchangeListRetailProvABCSImplExt
■ SyncPaymentTermListPeopleSoftReqABCSImpl
■ SyncPaymentTermListPeopleSoftReqABCSImplExt
■ SyncPaymentTermListRetailProvABCSImpl
■ SyncPaymentTermListRetailProvABCSImplExt
■ SyncSupplierPartyListPeopleSoftReqABCSImpl
■ SyncSupplierPartyListPeopleSoftReqABCSImplExt
■ SyncSupplierPartyListRetailProvABCSImpl
■ SyncSupplierPartyListRetailProvABCSImplExt
■ UpdatePaymentTermPeopleSoftReqABCSImpl
■ UpdatePaymentTermPeopleSoftReqABCSImplExt
■ UpdatePaymentTermRetailProvABCSImpl
■ UpdatePaymentTermRetailProvABCSImplExt
■ UpdateSupplierPartyPeopleSoftReqABCSImpl
■ UpdateSupplierPartyPeopleSoftReqABCSImplExt
■ UpdateSupplierPartyRetailProvABCSImpl
■ UpdateSupplierPartyRetailProvABCSImplExt
29.5.1 Validating Security PoliciesAll SOA composites are protected by Global Policies provided by Foundation Pack as defined in the Security section of the Developer Guide. Additionally individual services for this PIP have locally attached security policies.
To validate locally attached security policies:1. Log in to Oracle Enterprise Manager Fusion Middleware Control.
2. Navigate to WebLogic Domain, soa_domain, Web Services, Policies.
3. Verify Service Policy attachment.
a. Find the service policy in the list of policies.
b. Click the number in Attachment Count column.

Verifying Deployment
Configuring and Deploying the Financials Ops Control: Oracle Retail - PSFT PIP 29-21
This opens Usage Analysis screen.
c. Change the Subject Type list box to SOA Service.
d. Validate that all the composites are listed with local attachment to this service policy.
4. Verify Client Policy attachment
a. Navigate back to Policies screen and find the client policy
b. Click the number in Attachment Count column.
This opens Usage Analysis screen.
c. Change the Subject Type list box to SOA Reference.
d. Validate that all the composites are listed with local attachment to this client policy and attached to the correct references.
For more information about security validation, see Oracle Fusion Middleware Developer's Guide for Oracle Application Integration Architecture Foundation Pack "Working with Security."
29.5.2 ODI Topology1. Verify the following connections are accurate in the Physical Architecture tab.
a. Launch ODI Topology Manager and navigate to Physical Architecture tab.
b. Expand XML node and double click AIA Configuration PropertiesDS.
c. Click JDBC tab and check for the connection <AIAHome>/aia_instances/<AIAInstance Name>/AIAMetaData/config/AIAConfigurationProperties.xml
d. Similarly find the following data servers based on the technology and artifact name. The first row in the table is used as an example.
Table 29–12 Service Policy Attachments for Financials Ops Control: Oracle Retail - PSFT PIP
Composite Service Policy
ProcessGLAccountValidationRetailReqABCSImpl oracle/no_authentication_service_policy
Table 29–13 No Authentication Client Policy Attachments for Financials Ops Control: Oracle Retail - PSFT PIP
Composite Reference Client Policy
ProcessGLAccountValidationPeopleSoftProvABCSImpl GL_CHARTFIELD oracle/no_authentication_client_policy
CreatePaymentTermRetailProvABCSImpl PayTermService oracle/no_authentication_client_policy
UpdatePaymentTermRetailProvABCSImpl PayTermService oracle/no_authentication_client_policy
SyncPaymentTermListRetailProvABCSImpl PayTermService oracle/no_authentication_client_policy
CreateSupplierPartyRetailProvABCSImpl SupplierService oracle/no_authentication_client_policy
UpdateSupplierPartyRetailProvABCSImpl SupplierService oracle/no_authentication_client_policy
SyncSupplierPartyListRetailProvABCSImpl SupplierService oracle/no_authentication_client_policy
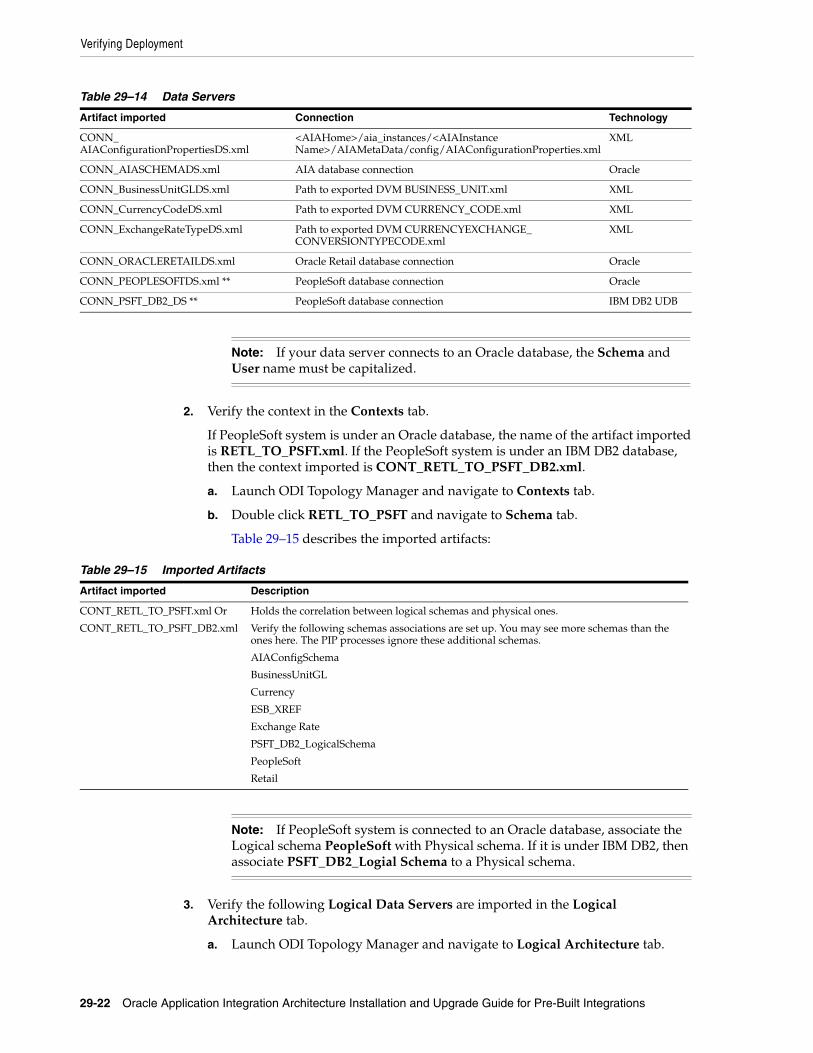
Verifying Deployment
29-22 Oracle Application Integration Architecture Installation and Upgrade Guide for Pre-Built Integrations
2. Verify the context in the Contexts tab.
If PeopleSoft system is under an Oracle database, the name of the artifact imported is RETL_TO_PSFT.xml. If the PeopleSoft system is under an IBM DB2 database, then the context imported is CONT_RETL_TO_PSFT_DB2.xml.
a. Launch ODI Topology Manager and navigate to Contexts tab.
b. Double click RETL_TO_PSFT and navigate to Schema tab.
Table 29–15 describes the imported artifacts:
3. Verify the following Logical Data Servers are imported in the Logical Architecture tab.
a. Launch ODI Topology Manager and navigate to Logical Architecture tab.
Table 29–14 Data Servers
Artifact imported Connection Technology
CONN_AIAConfigurationPropertiesDS.xml
<AIAHome>/aia_instances/<AIAInstance Name>/AIAMetaData/config/AIAConfigurationProperties.xml
XML
CONN_AIASCHEMADS.xml AIA database connection Oracle
CONN_BusinessUnitGLDS.xml Path to exported DVM BUSINESS_UNIT.xml XML
CONN_CurrencyCodeDS.xml Path to exported DVM CURRENCY_CODE.xml XML
CONN_ExchangeRateTypeDS.xml Path to exported DVM CURRENCYEXCHANGE_CONVERSIONTYPECODE.xml
XML
CONN_ORACLERETAILDS.xml Oracle Retail database connection Oracle
CONN_PEOPLESOFTDS.xml ** PeopleSoft database connection Oracle
CONN_PSFT_DB2_DS ** PeopleSoft database connection IBM DB2 UDB
Note: If your data server connects to an Oracle database, the Schema and User name must be capitalized.
Table 29–15 Imported Artifacts
Artifact imported Description
CONT_RETL_TO_PSFT.xml Or
CONT_RETL_TO_PSFT_DB2.xml
Holds the correlation between logical schemas and physical ones.
Verify the following schemas associations are set up. You may see more schemas than the ones here. The PIP processes ignore these additional schemas.
AIAConfigSchema
BusinessUnitGL
Currency
ESB_XREF
Exchange Rate
PSFT_DB2_LogicalSchema
PeopleSoft
Retail
Note: If PeopleSoft system is connected to an Oracle database, associate the Logical schema PeopleSoft with Physical schema. If it is under IBM DB2, then associate PSFT_DB2_Logial Schema to a Physical schema.
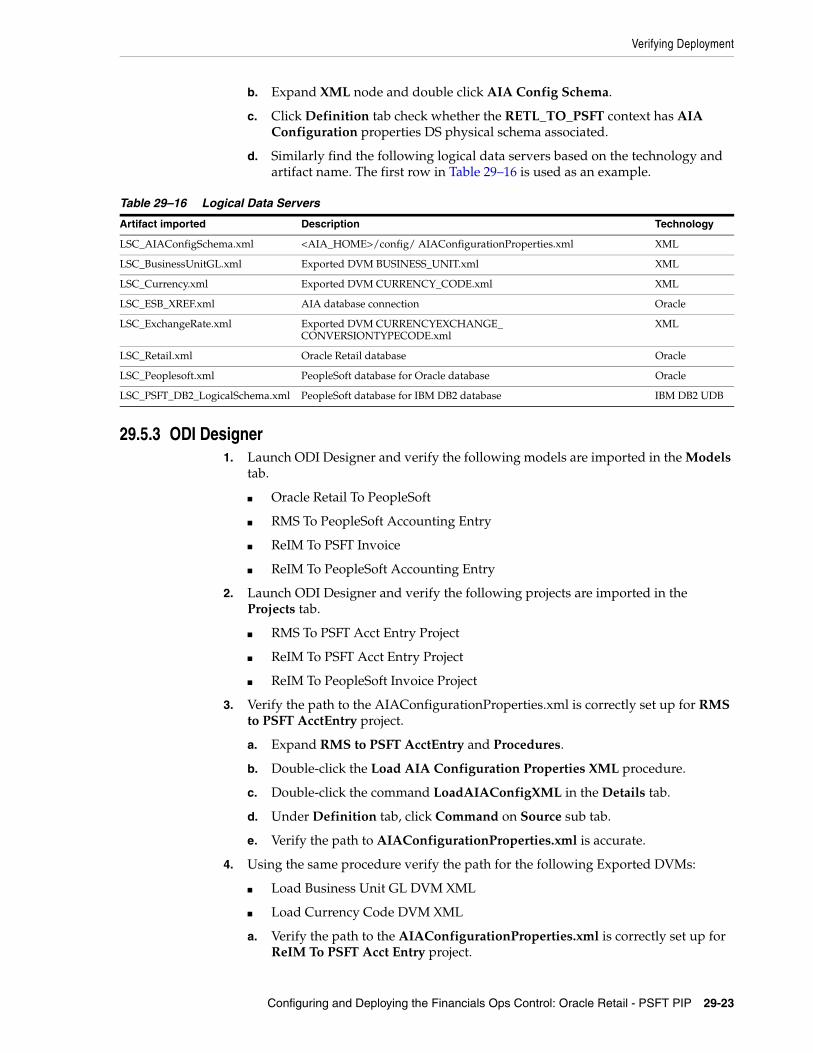
Verifying Deployment
Configuring and Deploying the Financials Ops Control: Oracle Retail - PSFT PIP 29-23
b. Expand XML node and double click AIA Config Schema.
c. Click Definition tab check whether the RETL_TO_PSFT context has AIA Configuration properties DS physical schema associated.
d. Similarly find the following logical data servers based on the technology and artifact name. The first row in Table 29–16 is used as an example.
29.5.3 ODI Designer1. Launch ODI Designer and verify the following models are imported in the Models
tab.
■ Oracle Retail To PeopleSoft
■ RMS To PeopleSoft Accounting Entry
■ ReIM To PSFT Invoice
■ ReIM To PeopleSoft Accounting Entry
2. Launch ODI Designer and verify the following projects are imported in the Projects tab.
■ RMS To PSFT Acct Entry Project
■ ReIM To PSFT Acct Entry Project
■ ReIM To PeopleSoft Invoice Project
3. Verify the path to the AIAConfigurationProperties.xml is correctly set up for RMS to PSFT AcctEntry project.
a. Expand RMS to PSFT AcctEntry and Procedures.
b. Double-click the Load AIA Configuration Properties XML procedure.
c. Double-click the command LoadAIAConfigXML in the Details tab.
d. Under Definition tab, click Command on Source sub tab.
e. Verify the path to AIAConfigurationProperties.xml is accurate.
4. Using the same procedure verify the path for the following Exported DVMs:
■ Load Business Unit GL DVM XML
■ Load Currency Code DVM XML
a. Verify the path to the AIAConfigurationProperties.xml is correctly set up for ReIM To PSFT Acct Entry project.
Table 29–16 Logical Data Servers
Artifact imported Description Technology
LSC_AIAConfigSchema.xml <AIA_HOME>/config/ AIAConfigurationProperties.xml XML
LSC_BusinessUnitGL.xml Exported DVM BUSINESS_UNIT.xml XML
LSC_Currency.xml Exported DVM CURRENCY_CODE.xml XML
LSC_ESB_XREF.xml AIA database connection Oracle
LSC_ExchangeRate.xml Exported DVM CURRENCYEXCHANGE_CONVERSIONTYPECODE.xml
XML
LSC_Retail.xml Oracle Retail database Oracle
LSC_Peoplesoft.xml PeopleSoft database for Oracle database Oracle
LSC_PSFT_DB2_LogicalSchema.xml PeopleSoft database for IBM DB2 database IBM DB2 UDB
Verifying Deployment
29-24 Oracle Application Integration Architecture Installation and Upgrade Guide for Pre-Built Integrations
b. Verify the path to the Exported DVMs:
Load Business Unit GL DVM XML
Load Currency Code DVM XML
c. Verify the path to the AIAConfigurationProperties.xml is correctly set up for ReIM To PeopleSoft Invoice project
d. Verify the path to the Exported DVMs:
Load Business Unit GL DVM XML
Load Currency Code DVM XML
5. Verify the WSDL URL for ErrorNotification step name is accurate for AIAAsyncErrorHandlingBPELProcess in the Load RMS To PSFT Acct Entry Package:
a. Launch ODI Designer.
b. Go to Projects tab.
c. Double click Load RMS To PSFT Acct Entry Package.
d. Select the Diagram tab.
e. Click the Error Notification icon.
f. In the Properties frame under General tab verify the WSDL URL user and password are accurate
g. Verify the WSDL URL for ErrorNotification step name is accurate for AIAAsyncErrorHandlingBPELProcess in the Load ReIM to PSFT AcctEntry PKG
h. Verify the WSDL URL for OdiInvokeWebService 5-step name is accurate for AIAAsyncErrorHandlingBPELProcess in the Load RETL Invoices To PSFT Pkg.
29.5.4 Error Messages During Financials Ops Control: Oracle Retail - PSFT PIP Deployment
When deploying the Financials Ops Control: Oracle Retail - PSFT PIP, you might encounter the following errors:
■ Failed to execute: Create user xxxxx identified by yyyyy
■ Unique Constraint Violation
29.5.4.1 Failed to execute: Create user xxxxx identified by yyyyyAIA Pre-Built Integrations Installer displays this error message in the log file if the install script attempts to create a database user name for an existing database user name. You can ignore this message and continue with the install process.
The AIA Pre-Built Integrations Installer displays the following message when it finds an identical database user name:
Example 29–3 Identical Database User Name Message
ODIInstall_CreateDBSchemaWorkRep:[echo] ~~~~~~~~~~~~~~~~~~~~~~~~~~~~~~~~~~~~~~~~~~~~~~~~~~~[echo] Creating ODI Work Repository DB User: xxxxx[sql] Executing commands
Undeploying the Financials Ops Control: Oracle Retail - PeopleSoft PIP
Configuring and Deploying the Financials Ops Control: Oracle Retail - PSFT PIP 29-25
[sql] Failed to execute: create user xxxxx identified by yyyyy[sql] java.sql.SQLException: ORA-01920: user name 'xxxxx' conflicts with another user or role name[sql] 1 of 2 SQL statements executed successfully[echo] Done creating DB User for ODI Work Repository: xxxxx[echo] ~~~~~~~~~~~~~~~~~~~~~~~~~~~~~~~~~~~~~~~~~~~~~~~~~~~
29.5.4.2 Unique Constraint ViolationAIA Pre-Built Integrations Installer displays this error message in the log file if the ODI data source xxxxx exists in the ODI master repository. The ODI data source is defined in Topology in the Physical Architecture tab. This error occurs when the Financials Ops Control: Oracle Retail - PSFT PIP is reinstalled.
The AIA Pre-Built Integrations Installer displays the following message when it finds an identical ODI data source:
Example 29–4 Identical ODI Data Source Message
[echo] - Importing CONN_xxxxx.xml[exec] OracleDI: Starting Command : OdiImportObject -FILE_NAME=<AIA_HOME>/PIPS/Core/DIS/RetailToPSFTFin/ODI Master Repository/CONN_xxxxx.xml -IMPORT_MODE=SYNONYM_INSERT_UPDATE ...[exec] java.sql.SQLException: ORA-00001: unique constraint (SNPM.PK_MTXT) violatedThis error does not stop the install process. The process imports the remaining ODI PIP artifacts into the ODI; however, it is important to verify the accuracy of the connections for these ODI data sources. To resolve this issue, verify that the connections and associated logical schemas in the ODI topology are accurate.
For PIP implementation, see Oracle Application Integration Architecture Oracle Financial Operations Control Integration Pack Implementation Guide for Oracle Retail Merchandise Operations Management and PeopleSoft Enterprise Financials.
29.6 Undeploying the Financials Ops Control: Oracle Retail - PeopleSoft PIP
To undeploy the PIP from Fusion Middleware Server:1. Navigate to <AIA_Instance>/bin and run the command source aiaenv.sh for
Linux based systems and aiaenv.bat for Microsoft Windows to configure the environment.
2. Run the command for your platform.
Note: xxxxx refers to the database user name provided for ODI Work Repository and yyyyy is the password.
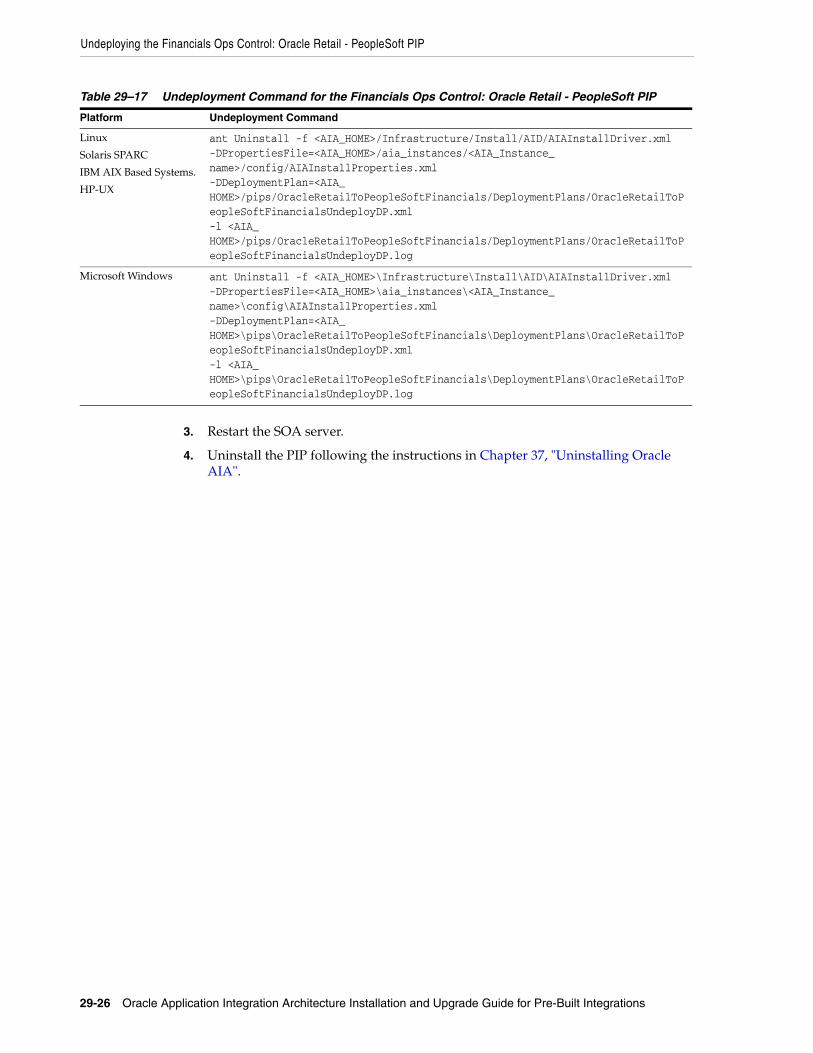
Undeploying the Financials Ops Control: Oracle Retail - PeopleSoft PIP
29-26 Oracle Application Integration Architecture Installation and Upgrade Guide for Pre-Built Integrations
3. Restart the SOA server.
4. Uninstall the PIP following the instructions in Chapter 37, "Uninstalling Oracle AIA".
Table 29–17 Undeployment Command for the Financials Ops Control: Oracle Retail - PeopleSoft PIP
Platform Undeployment Command
Linux
Solaris SPARC
IBM AIX Based Systems.
HP-UX
ant Uninstall -f <AIA_HOME>/Infrastructure/Install/AID/AIAInstallDriver.xml -DPropertiesFile=<AIA_HOME>/aia_instances/<AIA_Instance_name>/config/AIAInstallProperties.xml -DDeploymentPlan=<AIA_HOME>/pips/OracleRetailToPeopleSoftFinancials/DeploymentPlans/OracleRetailToPeopleSoftFinancialsUndeployDP.xml -l <AIA_HOME>/pips/OracleRetailToPeopleSoftFinancials/DeploymentPlans/OracleRetailToPeopleSoftFinancialsUndeployDP.log
Microsoft Windows ant Uninstall -f <AIA_HOME>\Infrastructure\Install\AID\AIAInstallDriver.xml -DPropertiesFile=<AIA_HOME>\aia_instances\<AIA_Instance_name>\config\AIAInstallProperties.xml -DDeploymentPlan=<AIA_HOME>\pips\OracleRetailToPeopleSoftFinancials\DeploymentPlans\OracleRetailToPeopleSoftFinancialsUndeployDP.xml -l <AIA_HOME>\pips\OracleRetailToPeopleSoftFinancials\DeploymentPlans\OracleRetailToPeopleSoftFinancialsUndeployDP.log
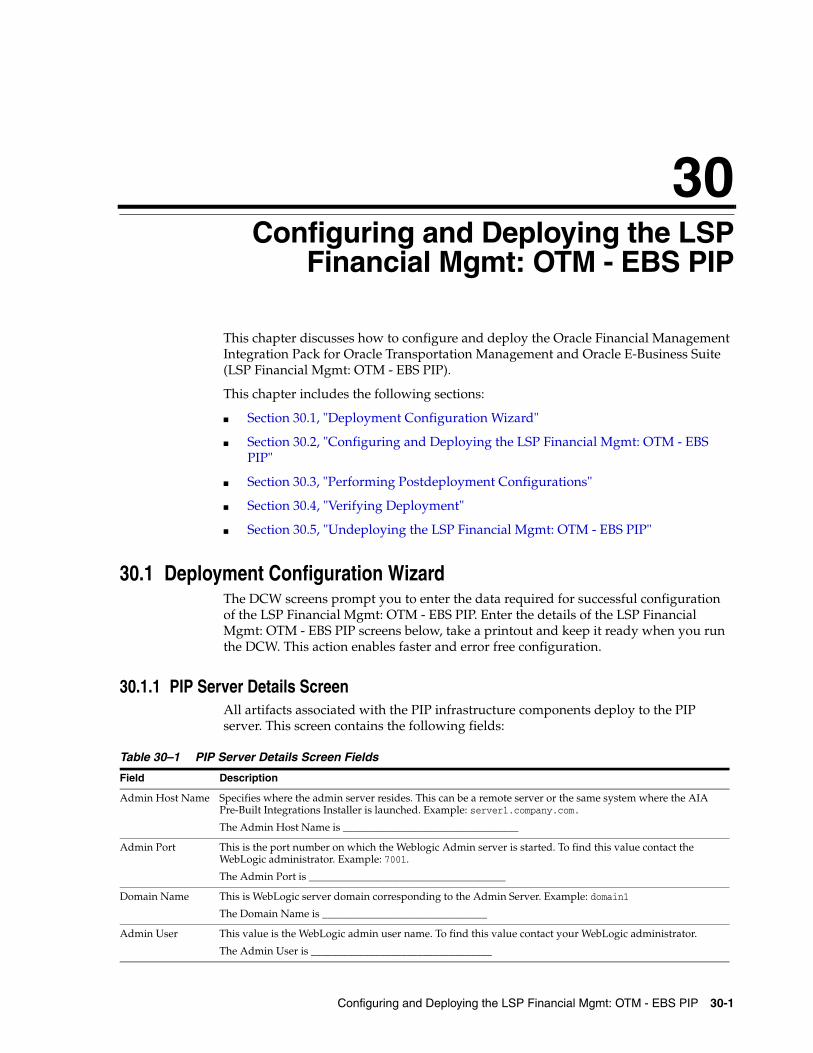
30
Configuring and Deploying the LSP Financial Mgmt: OTM - EBS PIP 30-1
30Configuring and Deploying the LSPFinancial Mgmt: OTM - EBS PIP
This chapter discusses how to configure and deploy the Oracle Financial Management Integration Pack for Oracle Transportation Management and Oracle E-Business Suite (LSP Financial Mgmt: OTM - EBS PIP).
This chapter includes the following sections:
■ Section 30.1, "Deployment Configuration Wizard"
■ Section 30.2, "Configuring and Deploying the LSP Financial Mgmt: OTM - EBS PIP"
■ Section 30.3, "Performing Postdeployment Configurations"
■ Section 30.4, "Verifying Deployment"
■ Section 30.5, "Undeploying the LSP Financial Mgmt: OTM - EBS PIP"
30.1 Deployment Configuration WizardThe DCW screens prompt you to enter the data required for successful configuration of the LSP Financial Mgmt: OTM - EBS PIP. Enter the details of the LSP Financial Mgmt: OTM - EBS PIP screens below, take a printout and keep it ready when you run the DCW. This action enables faster and error free configuration.
30.1.1 PIP Server Details ScreenAll artifacts associated with the PIP infrastructure components deploy to the PIP server. This screen contains the following fields:
Table 30–1 PIP Server Details Screen Fields
Field Description
Admin Host Name Specifies where the admin server resides. This can be a remote server or the same system where the AIA Pre-Built Integrations Installer is launched. Example: server1.company.com.
The Admin Host Name is _________________________________
Admin Port This is the port number on which the Weblogic Admin server is started. To find this value contact the WebLogic administrator. Example: 7001.
The Admin Port is _____________________________________
Domain Name This is WebLogic server domain corresponding to the Admin Server. Example: domain1
The Domain Name is _______________________________
Admin User This value is the WebLogic admin user name. To find this value contact your WebLogic administrator.
The Admin User is __________________________________

Deployment Configuration Wizard
30-2 Oracle Application Integration Architecture Installation and Upgrade Guide for Pre-Built Integrations
30.1.2 Oracle E-Business Suite Server Details ScreenUse this screen to enter details related to your Oracle E-Business Suite server instance.
The screen contains the following fields:
30.1.3 Oracle E-Business Suite Database Details ScreenUse this screen to enter details related to your Oracle E-Business Suite database instance.
The screen contains the following fields:
Admin Password This value is the WebLogic admin password. To find this value contact your WebLogic administrator.
The password is _____________________________________
Managed Server After you enter the Admin Host Name, Admin Port and Admin User, this field populates with managed servers for the domain. Select the managed server from the list. If you are deploying the PIP to a SOA cluster, you should select the cluster name in this field.
The Managed Server is _______________________________
Managed Port This field is automatically updated after you select the managed server. If you have configured a SOA Cluster, the SOA Cluster port appears in the list.
Table 30–2 Oracle E-Business Suite Server Details Screen Fields
Field Description
E-Business Suite Host Name Specifies the fully qualified system name of the Oracle E-Business Suite application. Example: example1.corp.oracle.com.
E-Business Suite Host Name is ___________________________
E-Business Suite Port This value is the Oracle E-Business Suite application port. To find this value, contact your administrator. Example: 8024.
E-Business Suite Port is _______________________________
E-Business Suite User Name To find this value, contact your administrator.
E-Business Suite User Name is ___________________________
E-Business Suite Password To find this value, contact your administrator.
E-Business Suite Password is ____________________________
Workflow Business Event System Name This is the Workflow Business Event System Name of E-Business Suite Server. For example: server2.xyz.com. To find this value, contact your administrator.
Workflow Business Event System Name is __________________
E-Business suite version This is the version of the E-Business Suite Application.
Table 30–3 Oracle E-Business Suite Database Details Screen Fields
Field Description
E-Business Suite Database Host Specifies the system name. To find this value, contact the database administrator. Example: server1.oracle.com.
E-Business Suite Database Host is ________________________
E-Business Suite Database Port To find this value, contact the database administrator. Example: 1521.
E-Business Suite Database Port is _____________________
E-Business Suite Database Username To find this value, contact the database administrator. Example: apps.
E-Business Suite Database Username is ___________________
Table 30–1 (Cont.) PIP Server Details Screen Fields
Field Description
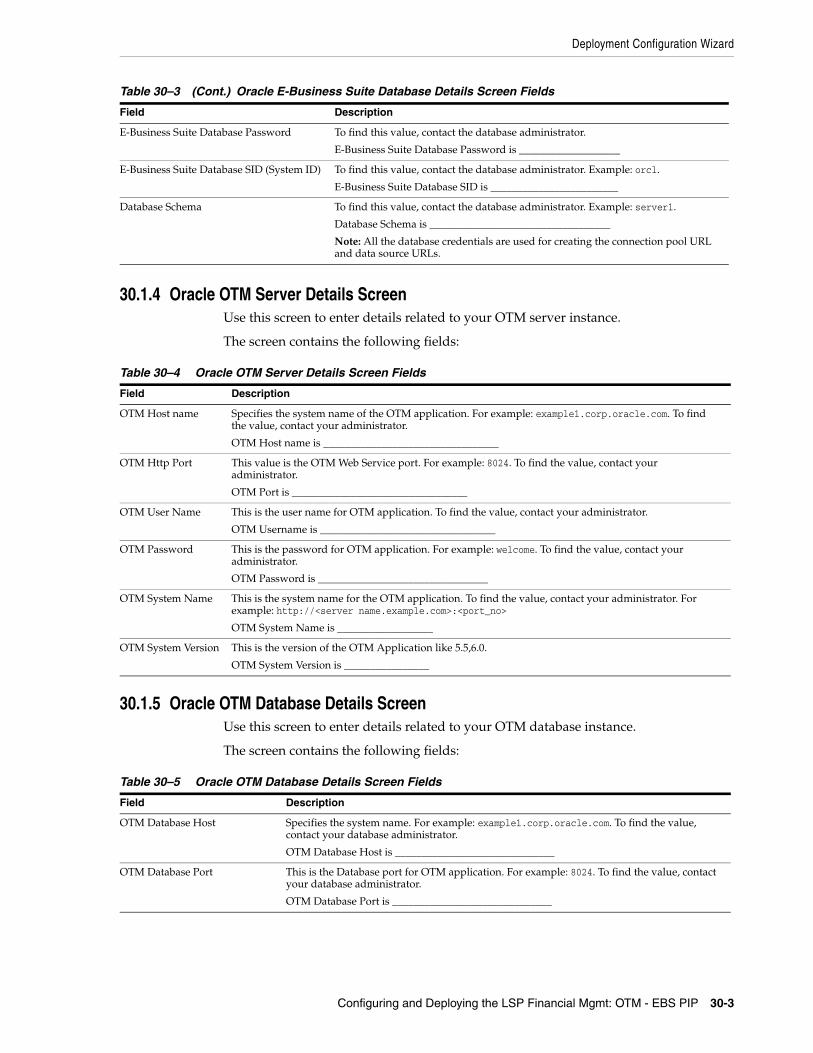
Deployment Configuration Wizard
Configuring and Deploying the LSP Financial Mgmt: OTM - EBS PIP 30-3
30.1.4 Oracle OTM Server Details ScreenUse this screen to enter details related to your OTM server instance.
The screen contains the following fields:
30.1.5 Oracle OTM Database Details ScreenUse this screen to enter details related to your OTM database instance.
The screen contains the following fields:
E-Business Suite Database Password To find this value, contact the database administrator.
E-Business Suite Database Password is ___________________
E-Business Suite Database SID (System ID) To find this value, contact the database administrator. Example: orcl.
E-Business Suite Database SID is ________________________
Database Schema To find this value, contact the database administrator. Example: server1.
Database Schema is __________________________________
Note: All the database credentials are used for creating the connection pool URL and data source URLs.
Table 30–4 Oracle OTM Server Details Screen Fields
Field Description
OTM Host name Specifies the system name of the OTM application. For example: example1.corp.oracle.com. To find the value, contact your administrator.
OTM Host name is _________________________________
OTM Http Port This value is the OTM Web Service port. For example: 8024. To find the value, contact your administrator.
OTM Port is _________________________________
OTM User Name This is the user name for OTM application. To find the value, contact your administrator.
OTM Username is _________________________________
OTM Password This is the password for OTM application. For example: welcome. To find the value, contact your administrator.
OTM Password is ________________________________
OTM System Name This is the system name for the OTM application. To find the value, contact your administrator. For example: http://<server name.example.com>:<port_no>
OTM System Name is __________________
OTM System Version This is the version of the OTM Application like 5.5,6.0.
OTM System Version is ________________
Table 30–5 Oracle OTM Database Details Screen Fields
Field Description
OTM Database Host Specifies the system name. For example: example1.corp.oracle.com. To find the value, contact your database administrator.
OTM Database Host is ______________________________
OTM Database Port This is the Database port for OTM application. For example: 8024. To find the value, contact your database administrator.
OTM Database Port is ______________________________
Table 30–3 (Cont.) Oracle E-Business Suite Database Details Screen Fields
Field Description
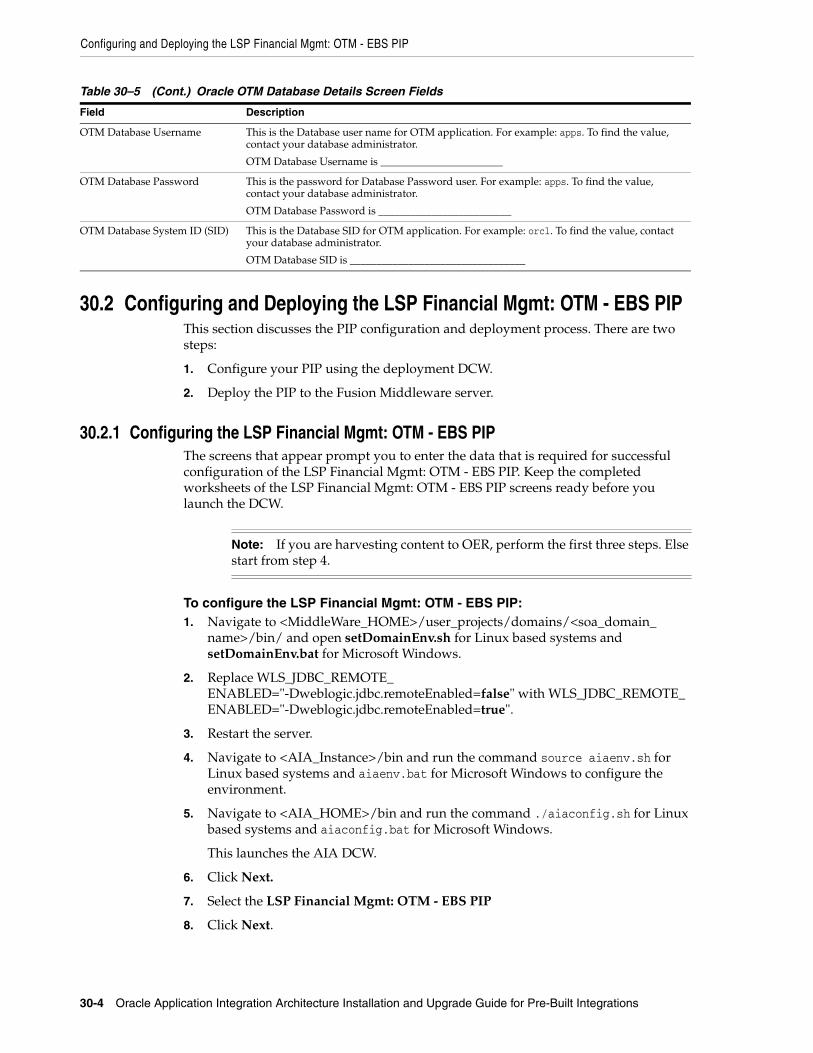
Configuring and Deploying the LSP Financial Mgmt: OTM - EBS PIP
30-4 Oracle Application Integration Architecture Installation and Upgrade Guide for Pre-Built Integrations
30.2 Configuring and Deploying the LSP Financial Mgmt: OTM - EBS PIPThis section discusses the PIP configuration and deployment process. There are two steps:
1. Configure your PIP using the deployment DCW.
2. Deploy the PIP to the Fusion Middleware server.
30.2.1 Configuring the LSP Financial Mgmt: OTM - EBS PIPThe screens that appear prompt you to enter the data that is required for successful configuration of the LSP Financial Mgmt: OTM - EBS PIP. Keep the completed worksheets of the LSP Financial Mgmt: OTM - EBS PIP screens ready before you launch the DCW.
To configure the LSP Financial Mgmt: OTM - EBS PIP:1. Navigate to <MiddleWare_HOME>/user_projects/domains/<soa_domain_
name>/bin/ and open setDomainEnv.sh for Linux based systems and setDomainEnv.bat for Microsoft Windows.
2. Replace WLS_JDBC_REMOTE_ENABLED="-Dweblogic.jdbc.remoteEnabled=false" with WLS_JDBC_REMOTE_ENABLED="-Dweblogic.jdbc.remoteEnabled=true".
3. Restart the server.
4. Navigate to <AIA_Instance>/bin and run the command source aiaenv.sh for Linux based systems and aiaenv.bat for Microsoft Windows to configure the environment.
5. Navigate to <AIA_HOME>/bin and run the command ./aiaconfig.sh for Linux based systems and aiaconfig.bat for Microsoft Windows.
This launches the AIA DCW.
6. Click Next.
7. Select the LSP Financial Mgmt: OTM - EBS PIP
8. Click Next.
OTM Database Username This is the Database user name for OTM application. For example: apps. To find the value, contact your database administrator.
OTM Database Username is _______________________
OTM Database Password This is the password for Database Password user. For example: apps. To find the value, contact your database administrator.
OTM Database Password is _________________________
OTM Database System ID (SID) This is the Database SID for OTM application. For example: orcl. To find the value, contact your database administrator.
OTM Database SID is _________________________________
Note: If you are harvesting content to OER, perform the first three steps. Else start from step 4.
Table 30–5 (Cont.) Oracle OTM Database Details Screen Fields
Field Description
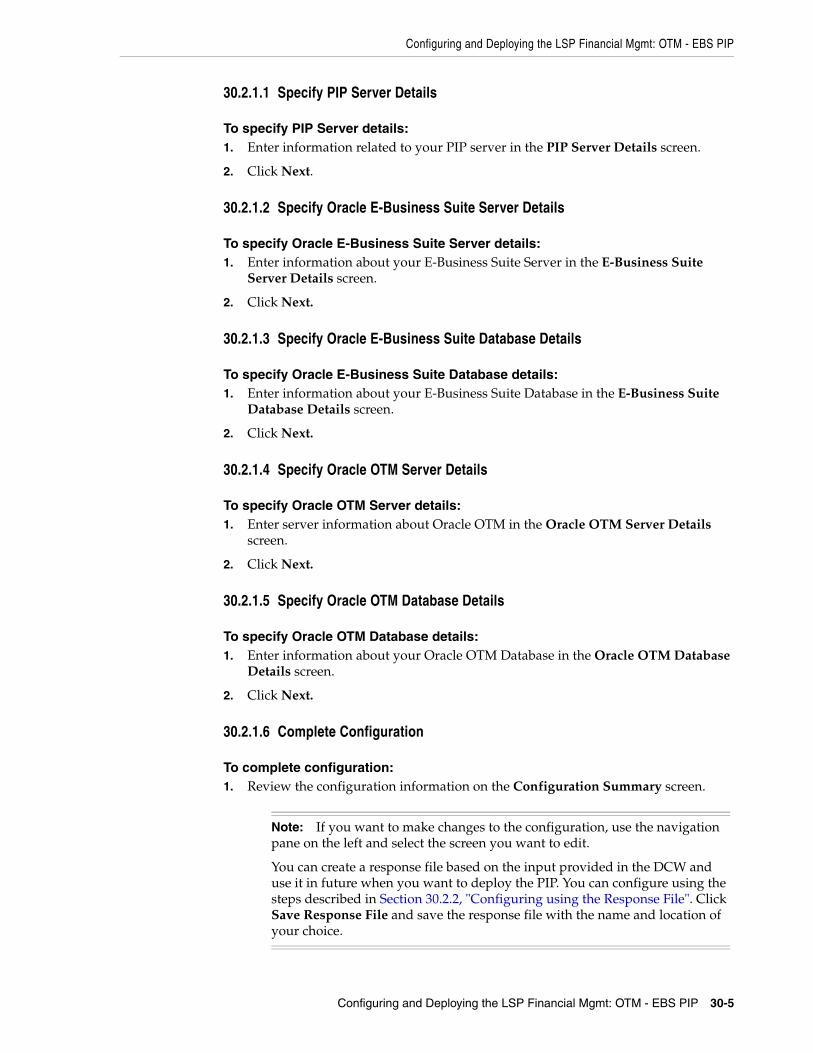
Configuring and Deploying the LSP Financial Mgmt: OTM - EBS PIP
Configuring and Deploying the LSP Financial Mgmt: OTM - EBS PIP 30-5
30.2.1.1 Specify PIP Server Details
To specify PIP Server details:1. Enter information related to your PIP server in the PIP Server Details screen.
2. Click Next.
30.2.1.2 Specify Oracle E-Business Suite Server Details
To specify Oracle E-Business Suite Server details:1. Enter information about your E-Business Suite Server in the E-Business Suite
Server Details screen.
2. Click Next.
30.2.1.3 Specify Oracle E-Business Suite Database Details
To specify Oracle E-Business Suite Database details:1. Enter information about your E-Business Suite Database in the E-Business Suite
Database Details screen.
2. Click Next.
30.2.1.4 Specify Oracle OTM Server Details
To specify Oracle OTM Server details:1. Enter server information about Oracle OTM in the Oracle OTM Server Details
screen.
2. Click Next.
30.2.1.5 Specify Oracle OTM Database Details
To specify Oracle OTM Database details:1. Enter information about your Oracle OTM Database in the Oracle OTM Database
Details screen.
2. Click Next.
30.2.1.6 Complete Configuration
To complete configuration:1. Review the configuration information on the Configuration Summary screen.
Note: If you want to make changes to the configuration, use the navigation pane on the left and select the screen you want to edit.
You can create a response file based on the input provided in the DCW and use it in future when you want to deploy the PIP. You can configure using the steps described in Section 30.2.2, "Configuring using the Response File". Click Save Response File and save the response file with the name and location of your choice.
Configuring and Deploying the LSP Financial Mgmt: OTM - EBS PIP
30-6 Oracle Application Integration Architecture Installation and Upgrade Guide for Pre-Built Integrations
2. Click Configure to accept the configuration.
The system displays progress of the configuration in the Configuration Progress screen.
The system displays any warnings or errors as necessary. You can review the configuration log for additional details. The configuration log location is displayed in Configuration Progress screen.
3. When the configuration process completes without errors, the AIA DCW displays the Configuration Complete screen.
4. Click Finish to close the DCW.
30.2.2 Configuring using the Response File
To configure using the response file:1. Open the response file.
When you create a response file through OUI, passwords get stored as <SECURE>.
2. Replace the password fields with actual passwords in the response file.
3. Navigate to <AIA_Instance>/bin and run the command source aiaenv.sh for Linux based systems and aiaenv.bat for Microsoft Windows to configure the environment.
4. Navigate to <AIA_HOME>/bin and run the command ./aiaconfig.sh <Response File Location and Name> for Linux based systems and aiaconfig.bat <Response File Location and Name> for Microsoft Windows.
30.2.3 Deploying the LSP Financial Mgmt: OTM - EBS PIP
To deploy the PIP to Fusion Middleware server:1. Navigate to <AIA_Instance>/bin and run the command source aiaenv.sh for
Linux based systems and aiaenv.bat for Microsoft Windows to configure the environment.
2. Run the command for your platform.
Note: When you copy and paste the command in the command line, ensure that there is space between .xml and -. Ensure that there is space between these two when you run undeployment command too.
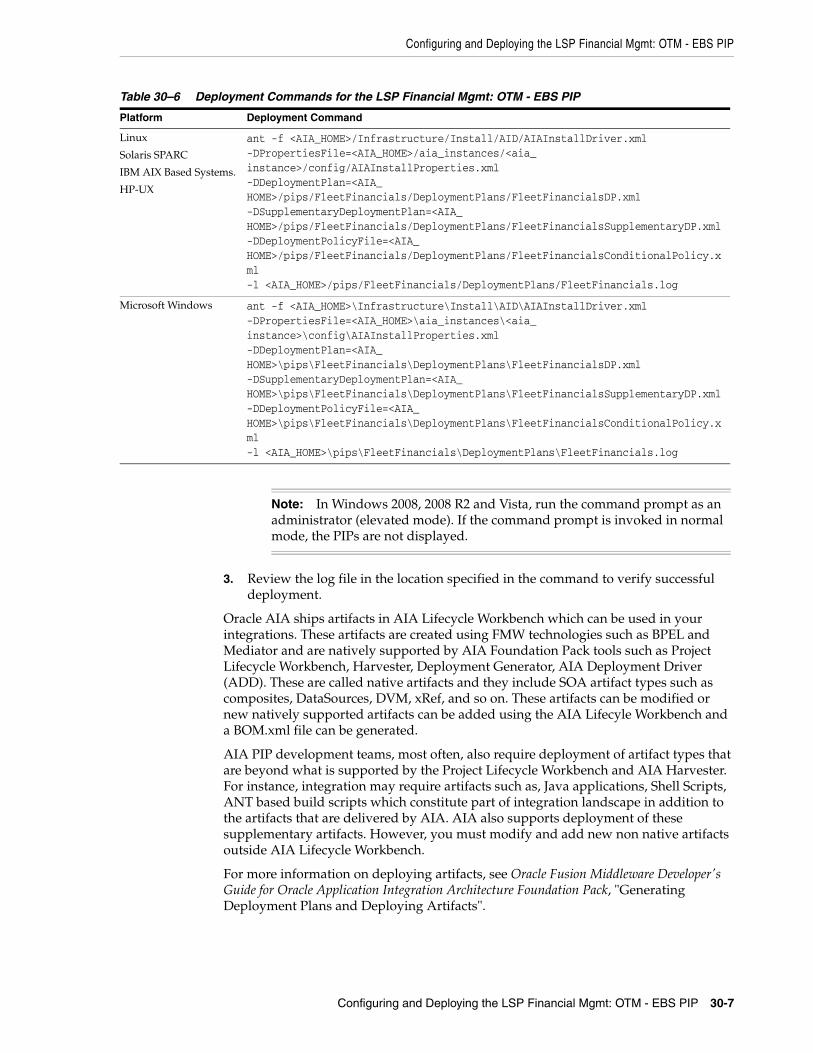
Configuring and Deploying the LSP Financial Mgmt: OTM - EBS PIP
Configuring and Deploying the LSP Financial Mgmt: OTM - EBS PIP 30-7
3. Review the log file in the location specified in the command to verify successful deployment.
Oracle AIA ships artifacts in AIA Lifecycle Workbench which can be used in your integrations. These artifacts are created using FMW technologies such as BPEL and Mediator and are natively supported by AIA Foundation Pack tools such as Project Lifecycle Workbench, Harvester, Deployment Generator, AIA Deployment Driver (ADD). These are called native artifacts and they include SOA artifact types such as composites, DataSources, DVM, xRef, and so on. These artifacts can be modified or new natively supported artifacts can be added using the AIA Lifecyle Workbench and a BOM.xml file can be generated.
AIA PIP development teams, most often, also require deployment of artifact types that are beyond what is supported by the Project Lifecycle Workbench and AIA Harvester. For instance, integration may require artifacts such as, Java applications, Shell Scripts, ANT based build scripts which constitute part of integration landscape in addition to the artifacts that are delivered by AIA. AIA also supports deployment of these supplementary artifacts. However, you must modify and add new non native artifacts outside AIA Lifecycle Workbench.
For more information on deploying artifacts, see Oracle Fusion Middleware Developer's Guide for Oracle Application Integration Architecture Foundation Pack, "Generating Deployment Plans and Deploying Artifacts".
Table 30–6 Deployment Commands for the LSP Financial Mgmt: OTM - EBS PIP
Platform Deployment Command
Linux
Solaris SPARC
IBM AIX Based Systems.
HP-UX
ant -f <AIA_HOME>/Infrastructure/Install/AID/AIAInstallDriver.xml -DPropertiesFile=<AIA_HOME>/aia_instances/<aia_instance>/config/AIAInstallProperties.xml -DDeploymentPlan=<AIA_HOME>/pips/FleetFinancials/DeploymentPlans/FleetFinancialsDP.xml -DSupplementaryDeploymentPlan=<AIA_HOME>/pips/FleetFinancials/DeploymentPlans/FleetFinancialsSupplementaryDP.xml -DDeploymentPolicyFile=<AIA_HOME>/pips/FleetFinancials/DeploymentPlans/FleetFinancialsConditionalPolicy.xml -l <AIA_HOME>/pips/FleetFinancials/DeploymentPlans/FleetFinancials.log
Microsoft Windows ant -f <AIA_HOME>\Infrastructure\Install\AID\AIAInstallDriver.xml -DPropertiesFile=<AIA_HOME>\aia_instances\<aia_instance>\config\AIAInstallProperties.xml -DDeploymentPlan=<AIA_HOME>\pips\FleetFinancials\DeploymentPlans\FleetFinancialsDP.xml -DSupplementaryDeploymentPlan=<AIA_HOME>\pips\FleetFinancials\DeploymentPlans\FleetFinancialsSupplementaryDP.xml -DDeploymentPolicyFile=<AIA_HOME>\pips\FleetFinancials\DeploymentPlans\FleetFinancialsConditionalPolicy.xml -l <AIA_HOME>\pips\FleetFinancials\DeploymentPlans\FleetFinancials.log
Note: In Windows 2008, 2008 R2 and Vista, run the command prompt as an administrator (elevated mode). If the command prompt is invoked in normal mode, the PIPs are not displayed.
Performing Postdeployment Configurations
30-8 Oracle Application Integration Architecture Installation and Upgrade Guide for Pre-Built Integrations
30.3 Performing Postdeployment ConfigurationsYou can edit existing csf-key or create new csf-key and configure flows to use the modified/new csf-key.
To edit existing csf-key or create new csf-key:1. Log in to Oracle Enterprise Manager Fusion Middleware Control (http://<server_
host>:<server_port>/em).
2. Right click WebLogic Domain and navigate to <your_domain>, Security, and select Credentials.
3. Expand oracle.wsm.security and click OTM_DOMAIN.
4. Edit existing csf-key credentials or create new csf-key with new credentials.
To configure flows to use new csf-key:1. Log in to Oracle Enterprise Manager Fusion Middleware Control (http://<server_
host>:<server_port>/em).
2. Click the process name which is invoking OTM Webservice based on the flow.
3. Click the corresponding Reference under the Services and References section. (use the security exceptions table in the Section 30.4.1, "Validating Security Policies" section to find the References)
4. Click the Policies and select oracle/wss_http_token_client_policy.
5. Update the csf-key value under Security Configuration Details tab and save the changes.
30.4 Verifying Deployment
To verify the LSP Financial Mgmt: OTM - EBS PIP deployment:1. Open the log files from the following location and look for warnings and error
messages:
■ For Linux, Solaris SPARC, HP-UX and IBM AIX Based Systems: Review the install log located at <AIA_HOME>/aia_instances/<instance name>/logs to verify that the PIP is successfully installed.
■ For Microsoft Windows: Review the install log located at <AIA_HOME>\aia_instances\<instance name>\logs to verify that the PIP is successfully installed.
2. Confirm that JMS Queues are created:
a. Navigate to the WLS Console (http:// name>:<port number>/console/).
b. Log in with the server admin user name. For access details, contact the system administrator
c. Navigate to Services, Messaging, JMS Modules, AIAJMSModule for the following Queue Names
■ AIA_EbizSupplierPartyJMSQueue
■ AIA_EbizCurrencyExchangeJMSQueue
3. Confirm that the LSP Financial Mgmt: OTM - EBS PIP services were installed.
Verifying Deployment
Configuring and Deploying the LSP Financial Mgmt: OTM - EBS PIP 30-9
a. Navigate to the Oracle Enterprise Manager Fusion Middleware Control (http://<server name>:<port number>/em/).
b. Log in with the server admin user name. For access details, contact the system administrator.
c. Expand Farm_soa_domain, SOA, soa-infra, Default and look for the following items:
■ AccountingEntryEBS
■ AccountingEntryResponseEBS
■ CreateAccountingEntryListEbizDBAdapter
■ CreateAccountingEntryListEbizProvABCSImpl
■ CreateAccountingEntryListLogisticsAQConsumer
■ CreateAccountingEntryListLogisticsReqABCSImpl
■ CreateInvoiceListEbizAppsAdapter
■ CreateInvoiceListEbizProvABCSImpl
■ CreateInvoiceListLogisticsAQConsumer
■ CreateInvoiceListLogisticsReqABCSImpl
■ CreatePayableInvoiceListEbizDBAdapter
■ CreatePayableInvoiceListEbizProvABCSImpl
■ CreatePayableInvoiceListLogisticsAQConsumer
■ CreatePayableInvoiceListLogisticsReqABCSImpl
■ CurrencyExchangeEBS
■ CurrencyExchangeListEbizJMSConsumer
■ CurrencyExchangeListEbizJMSProducer
■ CurrencyExchangeResponseEBS
■ CustomerPartyEBSV2
■ CustomerPartyResponseEBSV2
■ InitialLoadSupplierPartyListEbizAdapter
■ InvoiceEBS
■ InvoiceResponseEBS
■ MergeAccountEbizEventConsumer
■ MergeAccountEbizReqABCSImpl
■ MergeCustomerPartyListLogisticsProvABCSImpl
■ MergePartyEbizEventConsumer
■ MergePartyEbizReqABCSImpl
■ PayableInvoiceEBS
■ PayableInvoiceResponseEBS
■ QueryCustomerPartyEbizAdapter
■ QueryCustomerPartyListEbizCreateAdapter
Verifying Deployment
30-10 Oracle Application Integration Architecture Installation and Upgrade Guide for Pre-Built Integrations
■ QueryCustomerPartyListEbizUpdateAdapter
■ QueryMergeAccountEbizAdapter
■ QueryMergeOrgCustEbizAdapter
■ QueryPartyMergeEbizAdapter
■ SupplierPartyEBS
■ SupplierPartyListEbizJMSConsumer
■ SupplierPartyListEbizJMSProducer
■ SupplierPartyResponseEBS
■ SyncCurrencyExchangeListEbizAdapter
■ SyncCurrencyExchangeListEbizReqABCSImpl
■ SyncCurrencyExchangeListLogisticsProvABCSImpl
■ SyncCustomerPartyListEbizEventConsumer
■ SyncCustomerPartyListEbizReqABCSImpl
■ SyncCustomerPartyListLogisticsProvABCSImpl
■ SyncSupplierPartyListEbizAdapter
■ SyncSupplierPartyListEbizReqABCSImpl
■ SyncSupplierPartyListLogisticsProvABCSImpl
■ TransformAppContextEbizService
■ UpdateAccountingEntryListEbizXref
■ UpdateInvoiceListEbizXref
■ UpdatePayableInvoiceListEbizXref
4. LSP Financial Mgmt: OTM - EBS PIP and LSP Order Mgmt: OTM - EBS - Siebel CRM PIP use the same CustomerPartyEBSV2.
When you install the Fleet PIPs, if LSP Financial Mgmt: OTM - EBS PIP is installed after LSP Order Mgmt: OTM - EBS - Siebel CRM PIP, routing rules pertaining to Customer flow of LSP Financial Mgmt: OTM - EBS PIP do not appear on the Oracle Enterprise Manager Fusion Middleware Control for CustomerPartyEBSV2. In this case, routing rules pertaining to the SyncCustomerPartyListLogisticsProvABCSImpl and MergeCustomerPartyListLogisticsProvABCSImpl of Customer flow of LSP Financial Mgmt: OTM - EBS PIP have to be added manually to the CustomerPartyEBSV2.
5. LSP Driver Mgmt: OTM - EBS PIP and LSP Financial Mgmt: OTM - EBS PIP use same PayableInvoiceEBS.
When you install Fleet PIPs, if LSP Financial Mgmt: OTM - EBS PIP is installed after LSP Driver Mgmt: OTM - EBS PIP, routing rules pertaining to Payable Invoice flow of LSP Financial Mgmt: OTM - EBS PIP do not appear in Oracle Enterprise Manager Fusion Middleware Control for PayableInvoiceEBS. In this case, routing rules pertaining to CreatePayableInvoiceListEbizProvABCSImpl of PayableInvoice flow of LSP Financial Mgmt: OTM - EBS PIP have to be added manually to PayableInvoiceEBS and deployed on server.
For more information on manual deployment of routing rules, see Oracle Fusion Middleware Developer's Guide for Oracle Application Integration Architecture Foundation Pack "Creating Routing Rules".
Verifying Deployment
Configuring and Deploying the LSP Financial Mgmt: OTM - EBS PIP 30-11
30.4.1 Validating Security PoliciesAll SOA composites are protected by Global Policies provided by Foundation Pack as defined in the Security section of the Developer Guide. Additionally individual services for this PIP have locally attached security policies.
To validate locally attached security policies:1. Log in to Oracle Enterprise Manager Fusion Middleware Control.
2. Navigate to WebLogic Domain, soa_domain, Web Services, Policies.
3. Verify Service Policy attachment.
a. Find the service policy in the list of policies.
b. Click the number in Attachment Count column.
This opens Usage Analysis screen.
c. Change the Subject Type list box to SOA Service.
d. Validate that all the composites are listed with local attachment to this service policy.
4. Verify Client Policy attachment
a. Navigate back to Policies screen and find the client policy
b. Click the number in Attachment Count column.
This opens Usage Analysis screen.
c. Change the Subject Type list box to SOA Reference.
d. Validate that all the composites are listed with local attachment to this client policy and attached to the correct references.
Note: The default csf-key for all the flows is OTM_DOMAIN. This is created in server automatically as a part of PIP installation.
Table 30–7 Service Policy Attachments for LSP Financial Mgmt: OTM - EBS PIP
Composite Service Service Policy
MergeCustomerPartyListLogisticsProvABCSImpl TransmissionReport oracle/wss_http_token_service_policy
SyncCurrencyExchangeListLogisticsProvABCSImpl TransmissionReport oracle/wss_http_token_service_policy
SyncCustomerPartyListLogisticsProvABCSImpl TransmissionReport oracle/wss_http_token_service_policy
SyncSupplierPartyListLogisticsProvABCSImpl TransmissionReport oracle/wss_http_token_service_policy
Table 30–8 Wss Http Token Client Policy Attachments for LSP Financial Mgmt: OTM - EBS PIP
Composite Reference Client Policy
MergeCustomerPartyListLogisticsProvABCSImpl LogisticsWebService oracle/wss_http_token_client_policy
SyncCurrencyExchangeListLogisticsProvABCSImpl LogisticsWebService oracle/wss_http_token_client_policy
SyncCustomerPartyListLogisticsProvABCSImpl LogisticsWebService oracle/wss_http_token_client_policy
SyncSupplierPartyListLogisticsProvABCSImpl SyncSupplierPartyListLogisticsProvABCSImplService
oracle/wss_http_token_client_policy
Undeploying the LSP Financial Mgmt: OTM - EBS PIP
30-12 Oracle Application Integration Architecture Installation and Upgrade Guide for Pre-Built Integrations
For more information about security validation, see Oracle Fusion Middleware Developer's Guide for Oracle Application Integration Architecture Foundation Pack, "Working with Security."
For PIP implementation, see Oracle Application Integration Architecture Oracle Financial Management Integration Pack for Oracle Transportation Management and Oracle E-Business Suite Implementation Guide.
30.5 Undeploying the LSP Financial Mgmt: OTM - EBS PIP
To undeploy the PIP from Fusion Middleware Server:1. Navigate to <AIA_Instance>/bin and run the command source aiaenv.sh for
Linux based systems and aiaenv.bat for Microsoft Windows to configure the environment.
2. Run the command for your platform.
3. Restart the SOA server.
4. Uninstall the PIP following the instructions in Chapter 37, "Uninstalling Oracle AIA".
Table 30–9 Undeployment Command for the LSP Financial Mgmt: OTM - EBS PIP
Platform Undeployment Command
Linux
Solaris SPARC
IBM AIX Based Systems.
HP-UX
ant Uninstall -f <AIA_HOME>/Infrastructure/Install/AID/AIAInstallDriver.xml -DPropertiesFile=<AIA_HOME>/aia_instances/<aia_instance>/config/AIAInstallProperties.xml -DDeploymentPlan=<AIA_HOME>/pips/FleetFinancials/DeploymentPlans/FleetFinancialsUndeployDP.xml -l <AIA_HOME>/pips/FleetFinancials/DeploymentPlans/FleetFinancialsUndeployDP.log
Microsoft Windows ant Uninstall -f <AIA_HOME>\Infrastructure\Install\AID\AIAInstallDriver.xml -DPropertiesFile=<AIA_HOME>\aia_instances\<aia_instance>\config\AIAInstallProperties.xml -DDeploymentPlan=<AIA_HOME>\pips\FleetFinancials\DeploymentPlans\FleetFinancialsUndeployDP.xml -l <AIA_HOME>\pips\FleetFinancials\DeploymentPlans\FleetFinancialsUndeployDP.log
31
Configuring and Deploying the LSP Order Mgmt: OTM - EBS - Siebel CRM PIP 31-1
31Configuring and Deploying the LSP OrderMgmt: OTM - EBS - Siebel CRM PIP
This chapter discusses how to configure and deploy the Oracle Order Management Integration Pack for Oracle Transportation Management, Oracle E-Business Suite, and Siebel CRM (LSP Order Mgmt: OTM - EBS - Siebel CRM PIP).
This chapter includes the following sections:
■ Section 31.1, "Deployment Configuration Wizard"
■ Section 31.2, "Configuring and Deploying the LSP Order Mgmt: OTM - EBS - Siebel CRM PIP"
■ Section 31.3, "Performing Postdeployment Configurations"
■ Section 31.4, "Verifying Deployment"
■ Section 31.5, "Undeploying the LSP Order Mgmt: OTM - EBS - Siebel CRM PIP"
31.1 Deployment Configuration WizardThe DCW screens prompt you to enter the data required for successful configuration of the LSP Order Mgmt: OTM - EBS - Siebel CRM PIP. Enter the details of the LSP Order Mgmt: OTM - EBS - Siebel CRM PIP screens below, take a printout and keep it ready when you run the DCW. This action enables faster and error free configuration.
31.1.1 PIP Server Details ScreenAll artifacts associated with the PIP infrastructure components deploy to the PIP server. This screen contains the following fields:
Table 31–1 PIP Server Details Screen Fields
Field Description
Admin Host Name Specifies where the admin server resides. This can be a remote server or the same system where the AIA Pre-Built Integrations Installer is launched. Example: server1.company.com.
The Admin Host Name is _________________________________
Admin Port This is the port number on which the Weblogic Admin server is started. To find this value contact the WebLogic administrator. Example: 7001.
The Admin Port is _____________________________________
Domain Name This is WebLogic server domain corresponding to the Admin Server. Example: domain1
The Domain Name is _______________________________
Admin User This value is the WebLogic admin user name. To find this value contact your WebLogic administrator.
The Admin User is __________________________________
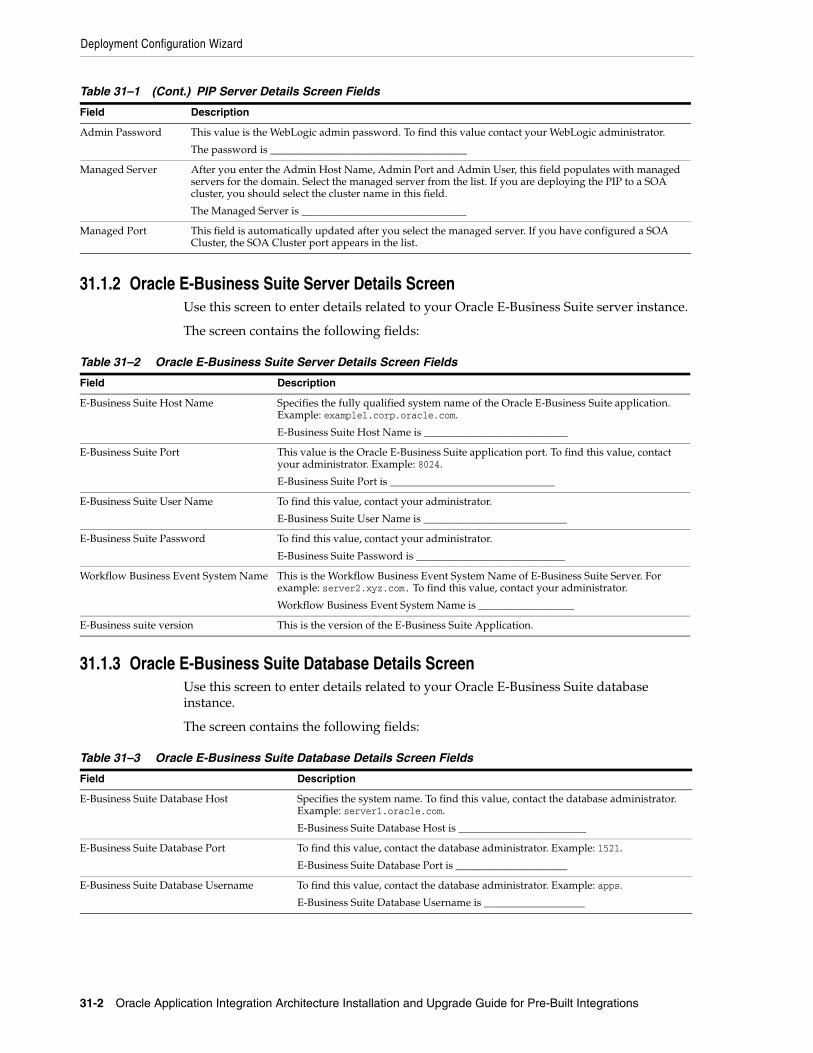
Deployment Configuration Wizard
31-2 Oracle Application Integration Architecture Installation and Upgrade Guide for Pre-Built Integrations
31.1.2 Oracle E-Business Suite Server Details ScreenUse this screen to enter details related to your Oracle E-Business Suite server instance.
The screen contains the following fields:
31.1.3 Oracle E-Business Suite Database Details ScreenUse this screen to enter details related to your Oracle E-Business Suite database instance.
The screen contains the following fields:
Admin Password This value is the WebLogic admin password. To find this value contact your WebLogic administrator.
The password is _____________________________________
Managed Server After you enter the Admin Host Name, Admin Port and Admin User, this field populates with managed servers for the domain. Select the managed server from the list. If you are deploying the PIP to a SOA cluster, you should select the cluster name in this field.
The Managed Server is _______________________________
Managed Port This field is automatically updated after you select the managed server. If you have configured a SOA Cluster, the SOA Cluster port appears in the list.
Table 31–2 Oracle E-Business Suite Server Details Screen Fields
Field Description
E-Business Suite Host Name Specifies the fully qualified system name of the Oracle E-Business Suite application. Example: example1.corp.oracle.com.
E-Business Suite Host Name is ___________________________
E-Business Suite Port This value is the Oracle E-Business Suite application port. To find this value, contact your administrator. Example: 8024.
E-Business Suite Port is _______________________________
E-Business Suite User Name To find this value, contact your administrator.
E-Business Suite User Name is ___________________________
E-Business Suite Password To find this value, contact your administrator.
E-Business Suite Password is ____________________________
Workflow Business Event System Name This is the Workflow Business Event System Name of E-Business Suite Server. For example: server2.xyz.com. To find this value, contact your administrator.
Workflow Business Event System Name is __________________
E-Business suite version This is the version of the E-Business Suite Application.
Table 31–3 Oracle E-Business Suite Database Details Screen Fields
Field Description
E-Business Suite Database Host Specifies the system name. To find this value, contact the database administrator. Example: server1.oracle.com.
E-Business Suite Database Host is ________________________
E-Business Suite Database Port To find this value, contact the database administrator. Example: 1521.
E-Business Suite Database Port is _____________________
E-Business Suite Database Username To find this value, contact the database administrator. Example: apps.
E-Business Suite Database Username is ___________________
Table 31–1 (Cont.) PIP Server Details Screen Fields
Field Description
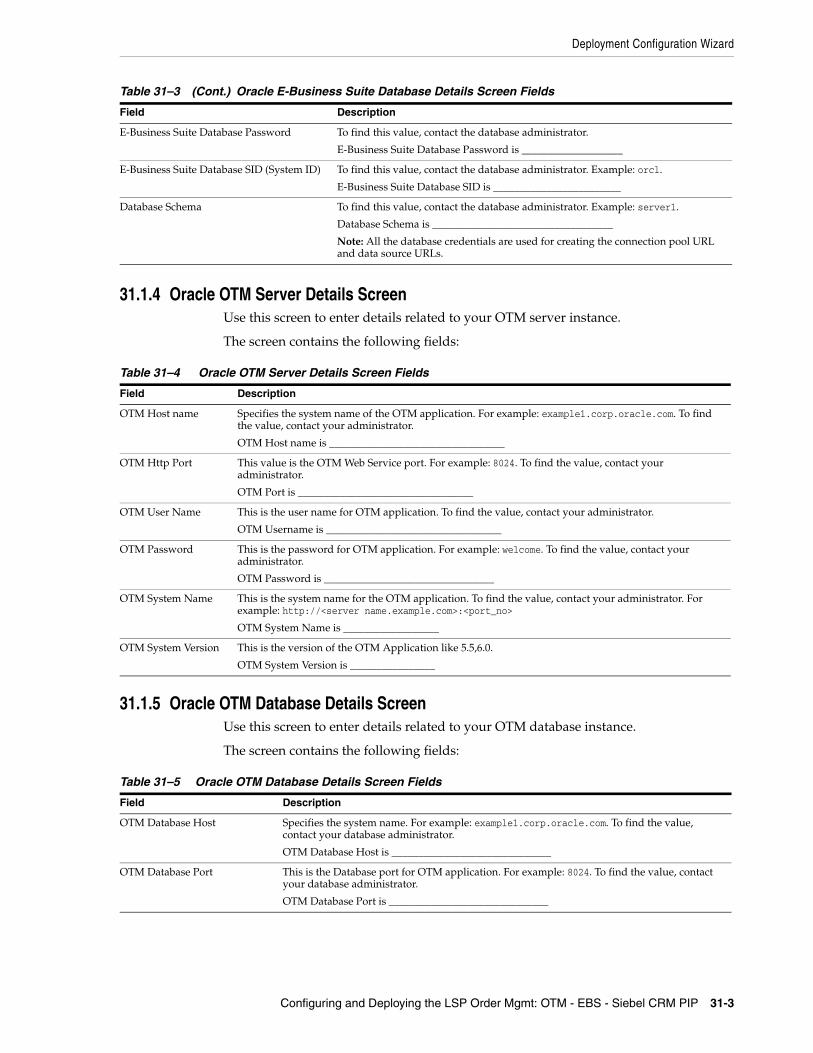
Deployment Configuration Wizard
Configuring and Deploying the LSP Order Mgmt: OTM - EBS - Siebel CRM PIP 31-3
31.1.4 Oracle OTM Server Details ScreenUse this screen to enter details related to your OTM server instance.
The screen contains the following fields:
31.1.5 Oracle OTM Database Details ScreenUse this screen to enter details related to your OTM database instance.
The screen contains the following fields:
E-Business Suite Database Password To find this value, contact the database administrator.
E-Business Suite Database Password is ___________________
E-Business Suite Database SID (System ID) To find this value, contact the database administrator. Example: orcl.
E-Business Suite Database SID is ________________________
Database Schema To find this value, contact the database administrator. Example: server1.
Database Schema is __________________________________
Note: All the database credentials are used for creating the connection pool URL and data source URLs.
Table 31–4 Oracle OTM Server Details Screen Fields
Field Description
OTM Host name Specifies the system name of the OTM application. For example: example1.corp.oracle.com. To find the value, contact your administrator.
OTM Host name is _________________________________
OTM Http Port This value is the OTM Web Service port. For example: 8024. To find the value, contact your administrator.
OTM Port is _________________________________
OTM User Name This is the user name for OTM application. To find the value, contact your administrator.
OTM Username is _________________________________
OTM Password This is the password for OTM application. For example: welcome. To find the value, contact your administrator.
OTM Password is ________________________________
OTM System Name This is the system name for the OTM application. To find the value, contact your administrator. For example: http://<server name.example.com>:<port_no>
OTM System Name is __________________
OTM System Version This is the version of the OTM Application like 5.5,6.0.
OTM System Version is ________________
Table 31–5 Oracle OTM Database Details Screen Fields
Field Description
OTM Database Host Specifies the system name. For example: example1.corp.oracle.com. To find the value, contact your database administrator.
OTM Database Host is ______________________________
OTM Database Port This is the Database port for OTM application. For example: 8024. To find the value, contact your database administrator.
OTM Database Port is ______________________________
Table 31–3 (Cont.) Oracle E-Business Suite Database Details Screen Fields
Field Description
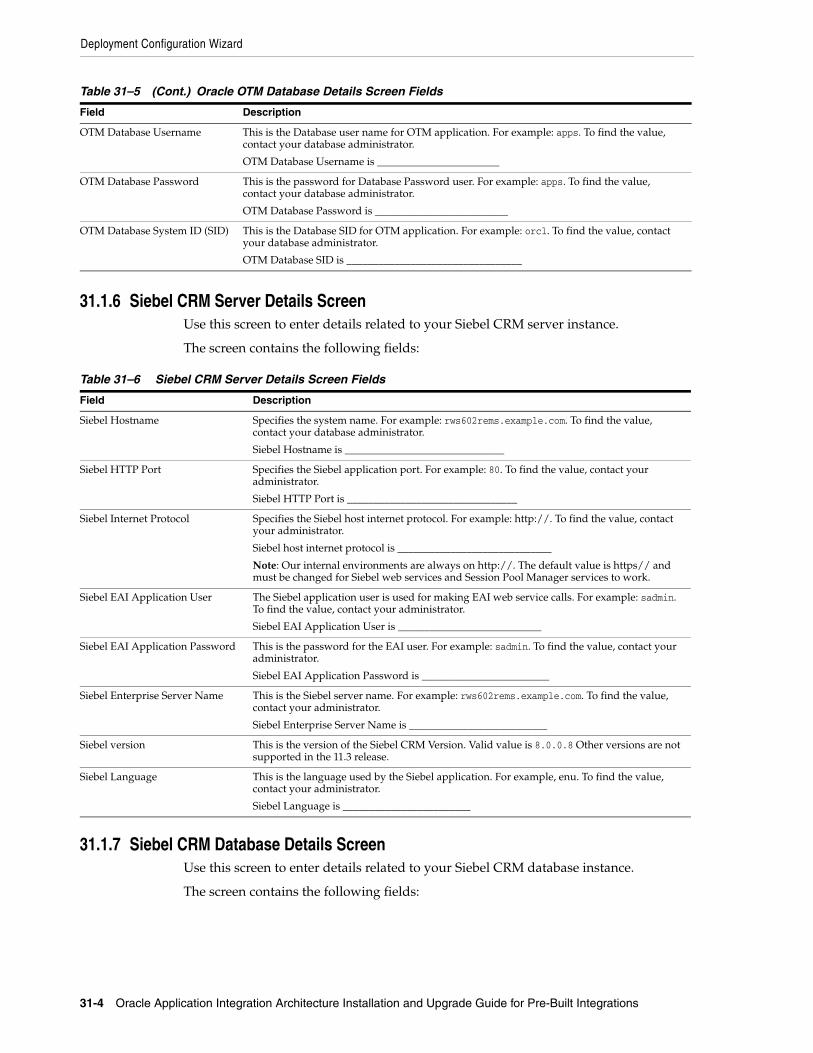
Deployment Configuration Wizard
31-4 Oracle Application Integration Architecture Installation and Upgrade Guide for Pre-Built Integrations
31.1.6 Siebel CRM Server Details ScreenUse this screen to enter details related to your Siebel CRM server instance.
The screen contains the following fields:
31.1.7 Siebel CRM Database Details ScreenUse this screen to enter details related to your Siebel CRM database instance.
The screen contains the following fields:
OTM Database Username This is the Database user name for OTM application. For example: apps. To find the value, contact your database administrator.
OTM Database Username is _______________________
OTM Database Password This is the password for Database Password user. For example: apps. To find the value, contact your database administrator.
OTM Database Password is _________________________
OTM Database System ID (SID) This is the Database SID for OTM application. For example: orcl. To find the value, contact your database administrator.
OTM Database SID is _________________________________
Table 31–6 Siebel CRM Server Details Screen Fields
Field Description
Siebel Hostname Specifies the system name. For example: rws602rems.example.com. To find the value, contact your database administrator.
Siebel Hostname is ______________________________
Siebel HTTP Port Specifies the Siebel application port. For example: 80. To find the value, contact your administrator.
Siebel HTTP Port is ________________________________
Siebel Internet Protocol Specifies the Siebel host internet protocol. For example: http://. To find the value, contact your administrator.
Siebel host internet protocol is _____________________________
Note: Our internal environments are always on http://. The default value is https// and must be changed for Siebel web services and Session Pool Manager services to work.
Siebel EAI Application User The Siebel application user is used for making EAI web service calls. For example: sadmin. To find the value, contact your administrator.
Siebel EAI Application User is ___________________________
Siebel EAI Application Password This is the password for the EAI user. For example: sadmin. To find the value, contact your administrator.
Siebel EAI Application Password is ________________________
Siebel Enterprise Server Name This is the Siebel server name. For example: rws602rems.example.com. To find the value, contact your administrator.
Siebel Enterprise Server Name is __________________________
Siebel version This is the version of the Siebel CRM Version. Valid value is 8.0.0.8 Other versions are not supported in the 11.3 release.
Siebel Language This is the language used by the Siebel application. For example, enu. To find the value, contact your administrator.
Siebel Language is ________________________
Table 31–5 (Cont.) Oracle OTM Database Details Screen Fields
Field Description
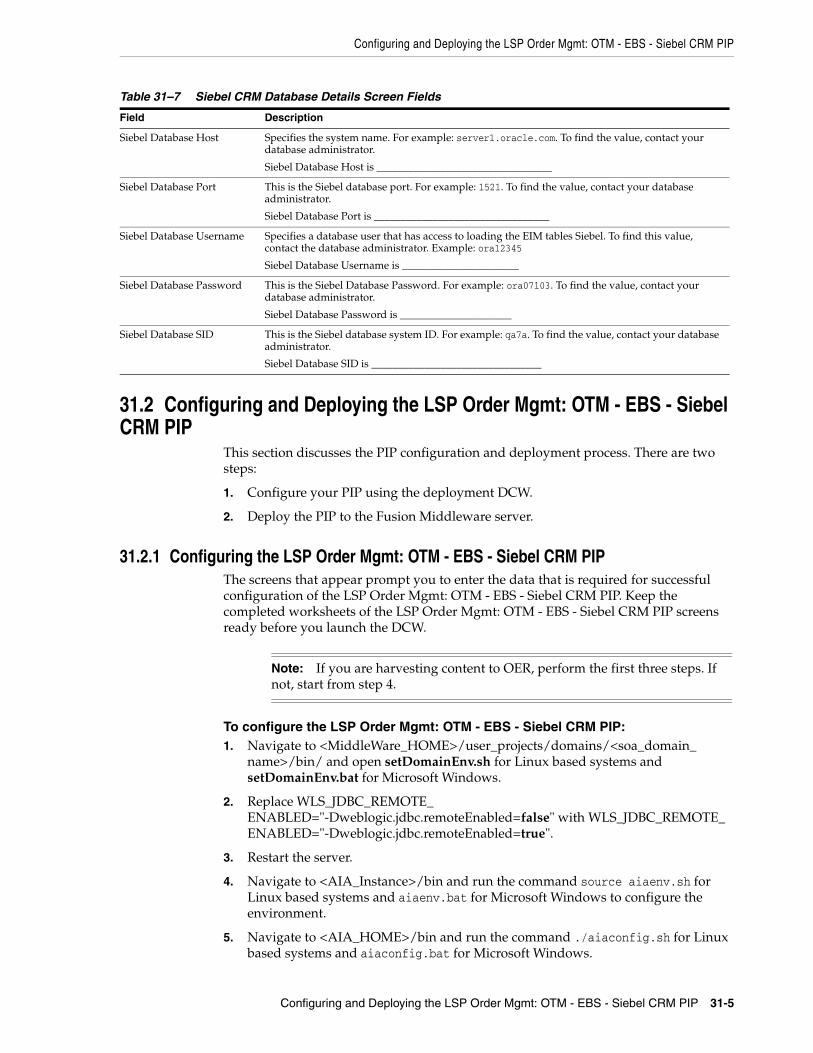
Configuring and Deploying the LSP Order Mgmt: OTM - EBS - Siebel CRM PIP
Configuring and Deploying the LSP Order Mgmt: OTM - EBS - Siebel CRM PIP 31-5
31.2 Configuring and Deploying the LSP Order Mgmt: OTM - EBS - Siebel CRM PIP
This section discusses the PIP configuration and deployment process. There are two steps:
1. Configure your PIP using the deployment DCW.
2. Deploy the PIP to the Fusion Middleware server.
31.2.1 Configuring the LSP Order Mgmt: OTM - EBS - Siebel CRM PIPThe screens that appear prompt you to enter the data that is required for successful configuration of the LSP Order Mgmt: OTM - EBS - Siebel CRM PIP. Keep the completed worksheets of the LSP Order Mgmt: OTM - EBS - Siebel CRM PIP screens ready before you launch the DCW.
To configure the LSP Order Mgmt: OTM - EBS - Siebel CRM PIP:1. Navigate to <MiddleWare_HOME>/user_projects/domains/<soa_domain_
name>/bin/ and open setDomainEnv.sh for Linux based systems and setDomainEnv.bat for Microsoft Windows.
2. Replace WLS_JDBC_REMOTE_ENABLED="-Dweblogic.jdbc.remoteEnabled=false" with WLS_JDBC_REMOTE_ENABLED="-Dweblogic.jdbc.remoteEnabled=true".
3. Restart the server.
4. Navigate to <AIA_Instance>/bin and run the command source aiaenv.sh for Linux based systems and aiaenv.bat for Microsoft Windows to configure the environment.
5. Navigate to <AIA_HOME>/bin and run the command ./aiaconfig.sh for Linux based systems and aiaconfig.bat for Microsoft Windows.
Table 31–7 Siebel CRM Database Details Screen Fields
Field Description
Siebel Database Host Specifies the system name. For example: server1.oracle.com. To find the value, contact your database administrator.
Siebel Database Host is _________________________________
Siebel Database Port This is the Siebel database port. For example: 1521. To find the value, contact your database administrator.
Siebel Database Port is _________________________________
Siebel Database Username Specifies a database user that has access to loading the EIM tables Siebel. To find this value, contact the database administrator. Example: ora12345
Siebel Database Username is ______________________
Siebel Database Password This is the Siebel Database Password. For example: ora07103. To find the value, contact your database administrator.
Siebel Database Password is _____________________
Siebel Database SID This is the Siebel database system ID. For example: qa7a. To find the value, contact your database administrator.
Siebel Database SID is ________________________________
Note: If you are harvesting content to OER, perform the first three steps. If not, start from step 4.

Configuring and Deploying the LSP Order Mgmt: OTM - EBS - Siebel CRM PIP
31-6 Oracle Application Integration Architecture Installation and Upgrade Guide for Pre-Built Integrations
This launches the AIA DCW.
6. Click Next.
7. Select the LSP Order Mgmt: OTM - EBS - Siebel CRM PIP
8. Click Next.
31.2.1.1 Specify PIP Server Details
To specify PIP Server details:1. Enter information related to your PIP server in the PIP Server Details screen.
2. Click Next.
31.2.1.2 Specify Oracle E-Business Suite Server Details
To specify Oracle E-Business Suite Server details:1. Enter information about your E-Business Suite Server in the E-Business Suite
Server Details screen.
2. Click Next.
31.2.1.3 Specify Oracle E-Business Suite Database Details
To specify Oracle E-Business Suite Database details:1. Enter information about your E-Business Suite Database in the E-Business Suite
Database Details screen.
2. Click Next.
31.2.1.4 Specify Oracle OTM Server Details
To specify Oracle OTM Server details:1. Enter server information about Oracle OTM in the Oracle OTM Server Details
screen.
2. Click Next.
31.2.1.5 Specify Oracle OTM Database Details
To specify Oracle OTM Database details:1. Enter information about your Oracle OTM Database in the Oracle OTM Database
Details screen.
2. Click Next.
31.2.1.6 Specify Siebel CRM Server Details
To specify Siebel CRM Server details:1. Enter information about your Siebel CRM application in the Application Details -
Siebel CRM screen.
2. Click Next.
Configuring and Deploying the LSP Order Mgmt: OTM - EBS - Siebel CRM PIP
Configuring and Deploying the LSP Order Mgmt: OTM - EBS - Siebel CRM PIP 31-7
31.2.1.7 Specify Siebel CRM Database Details
To specify Siebel CRM Database details:1. Enter information about your Siebel CRM database in the Siebel CRM Database
Details screen.
2. Click Next.
31.2.1.8 Complete Configuration
To complete configuration:1. Review the configuration information on the Configuration Summary screen.
2. Click Configure to accept the configuration.
The system displays progress of the configuration in the Configuration Progress screen.
The system displays any warnings or errors as necessary. You can review the configuration log for additional details. The configuration log location is displayed in Configuration Progress screen.
3. When the configuration process completes without errors, the AIA DCW displays the Configuration Complete screen.
4. Click Finish to close the DCW.
31.2.2 Configuring using the Response File
To configure using the response file:1. Open the response file.
When you create a response file through OUI, passwords get stored as <SECURE>.
2. Replace the password fields with actual passwords in the response file.
3. Navigate to <AIA_Instance>/bin and run the command source aiaenv.sh for Linux based systems and aiaenv.bat for Microsoft Windows to configure the environment.
4. Navigate to <AIA_HOME>/bin and run the command ./aiaconfig.sh <Response File Location and Name> for Linux based systems and aiaconfig.bat <Response File Location and Name> for Microsoft Windows.
Note: If you want to make changes to the configuration, use the navigation pane on the left and select the screen you want to edit.
You can create a response file based on the input provided in the DCW and use it in future when you want to deploy the PIP. You can configure using the steps described in Section 31.2.2, "Configuring using the Response File". Click Save Response File and save the response file with the name and location of your choice.
Configuring and Deploying the LSP Order Mgmt: OTM - EBS - Siebel CRM PIP
31-8 Oracle Application Integration Architecture Installation and Upgrade Guide for Pre-Built Integrations
31.2.3 Deploying the LSP Order Mgmt: OTM - EBS - Siebel CRM PIP
To deploy the PIP to Fusion Middleware server:1. Navigate to <AIA_Instance>/bin and run the command source aiaenv.sh for
Linux based systems and aiaenv.bat for Microsoft Windows to configure the environment.
2. Run the command for your platform.
3. Review the log file in the location specified in the command to verify successful deployment.
Oracle AIA ships artifacts in AIA Lifecycle Workbench which can be used in your integrations. These artifacts are created using FMW technologies such as BPEL and Mediator and are natively supported by AIA Foundation Pack tools such as Project Lifecycle Workbench, Harvester, Deployment Generator, AIA Deployment Driver
Note: When you copy and paste the command in the command line, ensure that there is space between .xml and -. Ensure that there is space between these two when you run undeployment command too.
Table 31–8 Deployment Commands for the LSP Order Mgmt: OTM - EBS - Siebel CRM PIP
Platform Deployment Command
Linux
Solaris SPARC
IBM AIX Based Systems.
HP-UX
ant -f <AIA_HOME>/Infrastructure/Install/AID/AIAInstallDriver.xml -DPropertiesFile=<AIA_HOME>/aia_instances/<aia_instance>/config/AIAInstallProperties.xml -DDeploymentPlan=<AIA_HOME>/pips/FleetOrderManagement/DeploymentPlans/FleetOrderManagementDP.xml -DSupplementaryDeploymentPlan=<AIA_HOME>/pips/FleetOrderManagement/DeploymentPlans/FleetOrderManagementSupplementaryDP.xml -DDeploymentPolicyFile=<AIA_HOME>/pips/FleetOrderManagement/DeploymentPlans/FleetOrderManagementConditionalPolicy.xml -l <AIA_HOME>/pips/FleetOrderManagement/DeploymentPlans/FleetOrderManagement.log
Microsoft Windows ant -f <AIA_HOME>\Infrastructure\Install\AID\AIAInstallDriver.xml -DPropertiesFile=<AIA_HOME>\aia_instances\<aia_instance>\config\AIAInstallProperties.xml -DDeploymentPlan=<AIA_HOME>\pips\FleetOrderManagement\DeploymentPlans\FleetOrderManagementDP.xml -DSupplementaryDeploymentPlan=<AIA_HOME>\pips\FleetOrderManagement\DeploymentPlans\FleetOrderManagementSupplementaryDP.xml -DDeploymentPolicyFile=<AIA_HOME>\pips\FleetOrderManagement\DeploymentPlans\FleetOrderManagementConditionalPolicy.xml -l <AIA_HOME>\pips\FleetOrderManagement\DeploymentPlans\FleetOrderManagement.log
Note: In Windows 2008, 2008 R2 and Vista, run the command prompt as an administrator (elevated mode). If the command prompt is invoked in normal mode, the PIPs are not displayed.

Verifying Deployment
Configuring and Deploying the LSP Order Mgmt: OTM - EBS - Siebel CRM PIP 31-9
(ADD). These are called native artifacts and they include SOA artifact types such as composites, DataSources, DVM, xRef, and so on. These artifacts can be modified or new natively supported artifacts can be added using the AIA Lifecyle Workbench and a BOM.xml file can be generated.
AIA PIP development teams, most often, also require deployment of artifact types that are beyond what is supported by the Project Lifecycle Workbench and AIA Harvester. For instance, integration may require artifacts such as, Java applications, Shell Scripts, ANT based build scripts which constitute part of integration landscape in addition to the artifacts that are delivered by AIA. AIA also supports deployment of these supplementary artifacts. However, you must modify and add new non native artifacts outside AIA Lifecycle Workbench.
For more information on deploying artifacts, see Oracle Fusion Middleware Developer's Guide for Oracle Application Integration Architecture Foundation Pack, "Generating Deployment Plans and Deploying Artifacts".
31.3 Performing Postdeployment ConfigurationsYou can edit existing csf-key or create new csf-key and configure flows to use the modified/new csf-key.
To edit existing csf-key or create new csf-key:1. Log in to Oracle Enterprise Manager Fusion Middleware Control (http://<server_
host>:<server_port>/em).
2. Right click WebLogic Domain and navigate to <your_domain>, Security, and select Credentials.
3. Expand oracle.wsm.security and click OTM_DOMAIN.
4. Edit existing csf-key credentials or create new csf-key with new credentials.
To configure flows to use new csf-key:1. Log in to Oracle Enterprise Manager Fusion Middleware Control (http://<server_
host>:<server_port>/em).
2. Click the process name which is invoking OTM Webservice based on the flow.
3. Click the corresponding Reference under the Services and References section. (use the security exceptions table in the Section 31.4.1, "Validating Security Policies" section to find the References).
4. Click the Policies and select oracle/wss_http_token_client_policy.
5. Update the csf-key value under Security Configuration Details tab and save the changes.
31.4 Verifying Deployment
To verify the LSP Order Mgmt: OTM - EBS - Siebel CRM PIP deployment:1. Open the log files from the following location and look for warnings and error
messages:
■ For Linux, Solaris SPARC, HP-UX and IBM AIX Based Systems: Review the install log located at <AIA_HOME>/aia_instances/<instance name>/logs to verify that the PIP is successfully installed.
Verifying Deployment
31-10 Oracle Application Integration Architecture Installation and Upgrade Guide for Pre-Built Integrations
■ For Microsoft Windows: Review the install log located at <AIA_HOME>\aia_instances\<instance name>\logs to verify that the PIP is successfully installed.
2. Confirm that JMS Queues are created:
a. Log in to the WLS Console: http:// name>:<port number>/console/
b. Log in with the server admin user name. For access details, contact the system administrator
c. Navigate to Services, Messaging, JMS Modules, AIAJMSModule and verify that the following queue names exist.
■ AIA_SiebelItemJMSQueueV1
■ AIA_SiebelTransportationSalesOrderJMSQueue
■ AIA_SiebelTransportStopJMSQ
■ AIA_CustomerPartyJMSTV1
3. Confirm that the LSP Order Mgmt: OTM - EBS - Siebel CRM PIP services were installed.
a. Log in to the Oracle Enterprise Manager Fusion Middleware Control (http://<server name>:<port number>/em/).
b. Log in with the server admin user name. For access details, contact the system administrator.
c. Expand Farm_soa_domain, SOA, soa-infra, Default and look for the following items:
■ CustomerPartyEBSV2
■ CustomerPartyResponseEBSV2
■ ItemEBSV2
■ ItemResponseEBSV2
■ QueryResponsibilityEbizAdapter
■ QueryTransportationSalesOrderItineraryListLogisticsProvABCSImpl
■ QueryTransportationSalesOrderItineraryListSiebelReqABCSImpl
■ SyncAccountSiebelAggregatorAdapter
■ SyncAccountSiebelReqABCSImpl
■ SyncAcctSiebelAggrEventConsumer
■ SyncAddressSiebelAggregatorAdapter
■ SyncBPSiebelAggregatorAdapter
■ SyncContactSiebelAggregatorAdapter
■ SyncCustomerPartyEbizJMSConsumerV1
■ SyncCustomerPartyJMSProducerV1
■ SyncCustomerPartyListEbizProvABCSImpl
■ SyncCustomerPartyListLogisticsProvABCSImpl
■ SyncCustomerPartyListPersonEbizAdapter
■ SyncCustomerPartyLogisticsJMSConsumerV1

Verifying Deployment
Configuring and Deploying the LSP Order Mgmt: OTM - EBS - Siebel CRM PIP 31-11
■ SyncCustomerSiebelEventAggregator
■ SyncItemListLogisticsProvABCSImpl
■ SyncItemListSiebelReqABCSImpl
■ SyncItemSiebelConsumer
■ SyncTransportationSalesOrderListLogisticsProvABCSImpl
■ SyncTransportationSalesOrderListSiebelReqABCSImpl
■ SyncTransportationStopAddressSiebelAggregatorAdapterConsumer
■ SyncTransportationStopAggregatorRoutingService
■ SyncTransportationStopContactSiebelAggregatorAdapterConsumer
■ SyncTransportationStopListLogisticsProvABCSImpl
■ SyncTransportationStopListSiebelReqABCSImpl
■ SyncTransportationStopSiebelJMSConsumer
■ TransformAppContextEbizService
■ TransformAppContextSiebelService
■ TransportationSalesOrderEBS
■ TransportationSalesOrderListSiebelJMSConsumer
■ TransportationSalesOrderResponseEBS
■ TransportationStopEBS
■ TransportationStopResponseEBS
■ UpdatePlannedShipmentLogisticsAQConsumer
■ UpdateTransportationSalesOrderListLogisticsReqABCSImpl
■ UpdateTransportationSalesOrderListSiebelProvABCSImpl
4. LSP Order Mgmt: OTM - EBS - Siebel CRM PIP and LSP Financial Mgmt: OTM - EBS PIP use the same CustomerPartyEBSV2.
When you install the Fleet PIPs, if LSP Order Mgmt: OTM - EBS - Siebel CRM PIP is installed after LSP Financial Mgmt: OTM - EBS PIP, routing rules pertaining to Customer flow of LSP Order Mgmt: OTM - EBS - Siebel CRM PIP do not appear on the Oracle Enterprise Manager Fusion Middleware Control for CustomerPartyEBSV2. In this case, routing rules pertaining to the SyncCustomerPartyListLogisticsJMSProducerV1 of Customer flow of LSP Order Mgmt: OTM - EBS - Siebel CRM PIP have to be added manually to the CustomerPartyEBSV2
For more information on manual deployment of routing rules, see Oracle Fusion Middleware Developer's Guide for Oracle Application Integration Architecture Foundation Pack, "Creating Routing Rules".
31.4.1 Validating Security PoliciesAll SOA composites are protected by Global Policies provided by Foundation Pack as defined in the Security section of the Developer Guide. Additionally individual services for this PIP have locally attached security policies.
Verifying Deployment
31-12 Oracle Application Integration Architecture Installation and Upgrade Guide for Pre-Built Integrations
To validate locally attached security policies:1. Log in to Oracle Enterprise Manager Fusion Middleware Control.
2. Navigate to WebLogic Domain, soa_domain, Web Services, Policies.
3. Verify Service Policy attachment.
a. Find the service policy in the list of policies.
b. Click the number in Attachment Count column.
This opens Usage Analysis screen.
c. Change the Subject Type list box to SOA Service.
d. Validate that all the composites are listed with local attachment to this service policy.
4. Verify Client Policy attachment
a. Navigate back to Policies screen and find the client policy
b. Click the number in Attachment Count column.
This opens Usage Analysis screen.
c. Change the Subject Type list box to SOA Reference.
d. Validate that all the composites are listed with local attachment to this client policy and attached to the correct references.
Table 31–9 Wss Http Token Service Policy Attachments for LSP Order Mgmt: OTM - EBS - Siebel CRM PIP
Composite Service Service Policy
SyncItemListLogisticsProvABCSImpl TransmissionReport oracle/wss_http_token_service_policy
SyncTransportationSalesOrderListLogisticsProvABCSImpl TransmissionReport oracle/wss_http_token_service_policy
SyncTransportationStopListLogisticsProvABCSImpl TransmissionReport oracle/wss_http_token_service_policy
SyncCustomerPartyListLogisticsProvABCSImpl TransmissionReport oracle/wss_http_token_service_policy
Table 31–10 No Authentication Service Policy Attachments for LSP Order Mgmt: OTM - EBS - Siebel CRM PIP
Composite Service Service Policy
QueryTransportationSalesOrderItineraryListSiebelReqABCSImpl
QueryTransportationSalesOrderItineraryListSiebelReqABCSImpl
oracle/no_authentication_service_policy
SyncCustomerSiebelEventAggregator Client oracle/no_authentication_service_policy
Table 31–11 Wss Http Token Client Policy Attachments for LSP Order Mgmt: OTM - EBS - Siebel CRM PIP
Composite Reference Client Policy
QueryTransportationSalesOrderItineraryListLogisticsProvABCSImpl
LogisticsWebService oracle/wss_http_token_client_policy
SyncItemListLogisticsProvABCSImpl LogisticsWebService oracle/wss_http_token_client_policy
SyncTransportationSalesOrderListLogisticsProvABCSImpl
SyncTransportationSalesOrderListLogisticsProvABCSImplService
oracle/wss_http_token_client_policy
SyncTransportationStopListLogisticsProvABCSImpl
LogisticsWebService oracle/wss_http_token_client_policy
SyncCustomerPartyListLogisticsProvABCSImpl
LogisticsWebService oracle/wss_http_token_client_policy
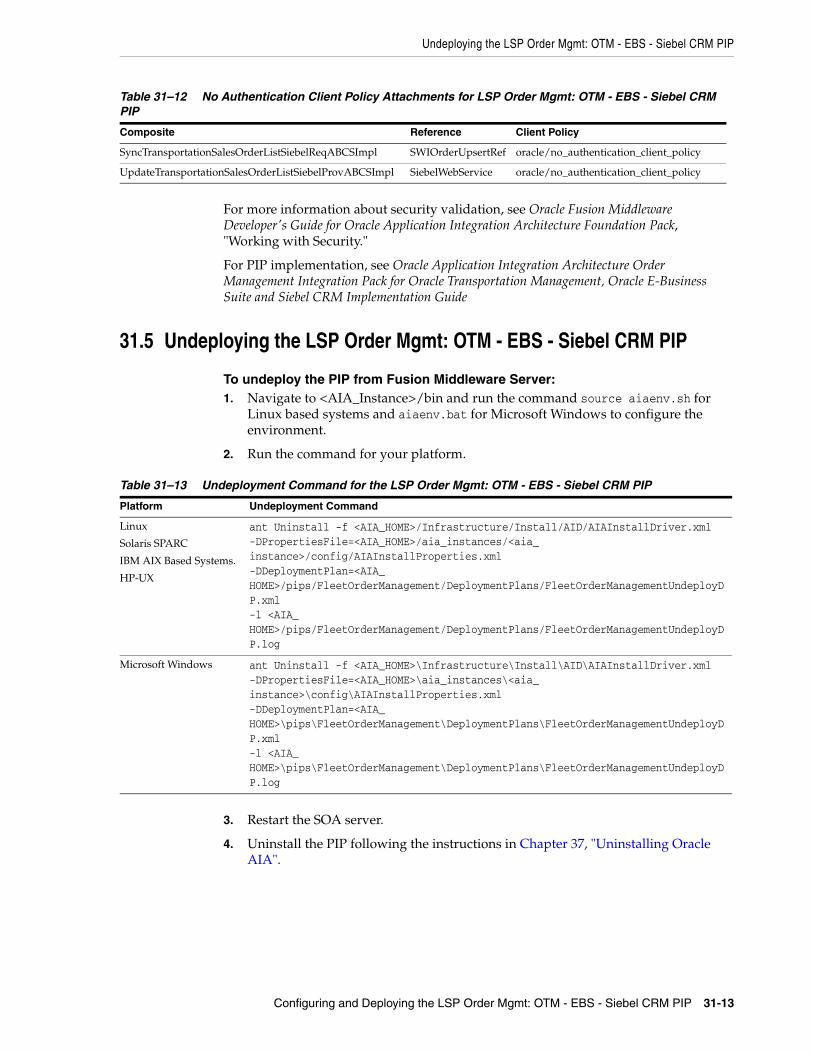
Undeploying the LSP Order Mgmt: OTM - EBS - Siebel CRM PIP
Configuring and Deploying the LSP Order Mgmt: OTM - EBS - Siebel CRM PIP 31-13
For more information about security validation, see Oracle Fusion Middleware Developer's Guide for Oracle Application Integration Architecture Foundation Pack, "Working with Security."
For PIP implementation, see Oracle Application Integration Architecture Order Management Integration Pack for Oracle Transportation Management, Oracle E-Business Suite and Siebel CRM Implementation Guide
31.5 Undeploying the LSP Order Mgmt: OTM - EBS - Siebel CRM PIP
To undeploy the PIP from Fusion Middleware Server:1. Navigate to <AIA_Instance>/bin and run the command source aiaenv.sh for
Linux based systems and aiaenv.bat for Microsoft Windows to configure the environment.
2. Run the command for your platform.
3. Restart the SOA server.
4. Uninstall the PIP following the instructions in Chapter 37, "Uninstalling Oracle AIA".
Table 31–12 No Authentication Client Policy Attachments for LSP Order Mgmt: OTM - EBS - Siebel CRM PIP
Composite Reference Client Policy
SyncTransportationSalesOrderListSiebelReqABCSImpl SWIOrderUpsertRef oracle/no_authentication_client_policy
UpdateTransportationSalesOrderListSiebelProvABCSImpl SiebelWebService oracle/no_authentication_client_policy
Table 31–13 Undeployment Command for the LSP Order Mgmt: OTM - EBS - Siebel CRM PIP
Platform Undeployment Command
Linux
Solaris SPARC
IBM AIX Based Systems.
HP-UX
ant Uninstall -f <AIA_HOME>/Infrastructure/Install/AID/AIAInstallDriver.xml -DPropertiesFile=<AIA_HOME>/aia_instances/<aia_instance>/config/AIAInstallProperties.xml -DDeploymentPlan=<AIA_HOME>/pips/FleetOrderManagement/DeploymentPlans/FleetOrderManagementUndeployDP.xml -l <AIA_HOME>/pips/FleetOrderManagement/DeploymentPlans/FleetOrderManagementUndeployDP.log
Microsoft Windows ant Uninstall -f <AIA_HOME>\Infrastructure\Install\AID\AIAInstallDriver.xml -DPropertiesFile=<AIA_HOME>\aia_instances\<aia_instance>\config\AIAInstallProperties.xml -DDeploymentPlan=<AIA_HOME>\pips\FleetOrderManagement\DeploymentPlans\FleetOrderManagementUndeployDP.xml -l <AIA_HOME>\pips\FleetOrderManagement\DeploymentPlans\FleetOrderManagementUndeployDP.log

Undeploying the LSP Order Mgmt: OTM - EBS - Siebel CRM PIP
31-14 Oracle Application Integration Architecture Installation and Upgrade Guide for Pre-Built Integrations
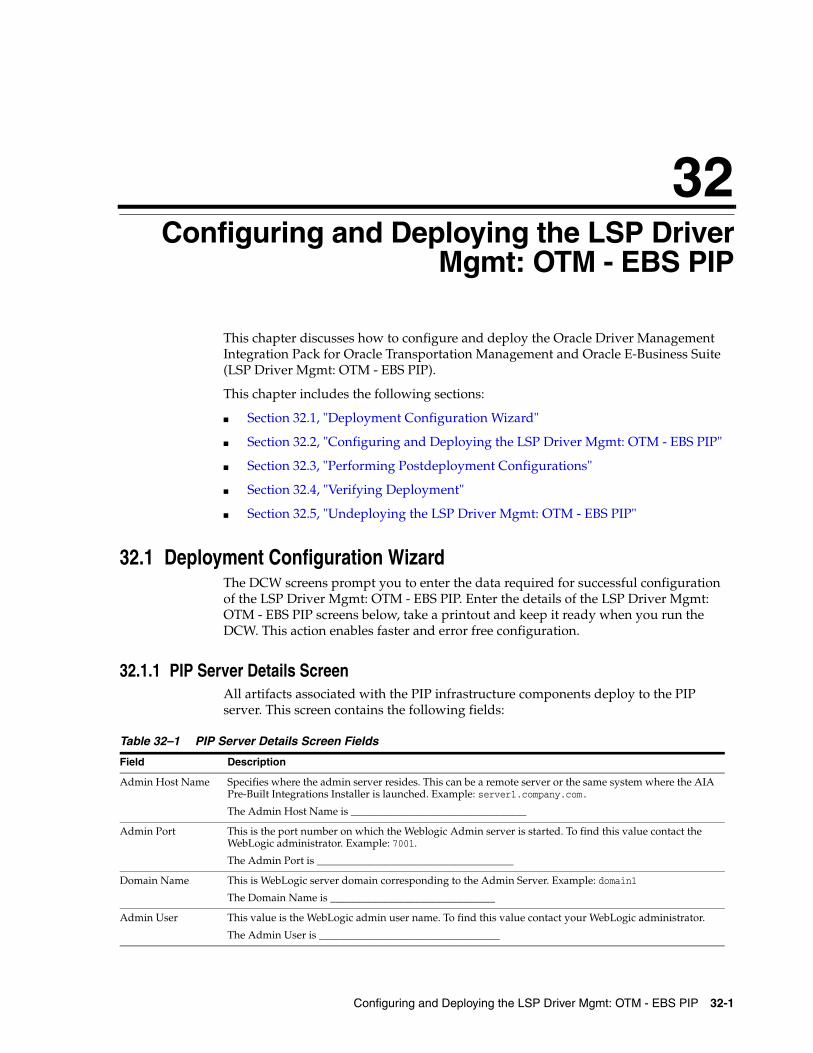
32
Configuring and Deploying the LSP Driver Mgmt: OTM - EBS PIP 32-1
32Configuring and Deploying the LSP DriverMgmt: OTM - EBS PIP
This chapter discusses how to configure and deploy the Oracle Driver Management Integration Pack for Oracle Transportation Management and Oracle E-Business Suite (LSP Driver Mgmt: OTM - EBS PIP).
This chapter includes the following sections:
■ Section 32.1, "Deployment Configuration Wizard"
■ Section 32.2, "Configuring and Deploying the LSP Driver Mgmt: OTM - EBS PIP"
■ Section 32.3, "Performing Postdeployment Configurations"
■ Section 32.4, "Verifying Deployment"
■ Section 32.5, "Undeploying the LSP Driver Mgmt: OTM - EBS PIP"
32.1 Deployment Configuration WizardThe DCW screens prompt you to enter the data required for successful configuration of the LSP Driver Mgmt: OTM - EBS PIP. Enter the details of the LSP Driver Mgmt: OTM - EBS PIP screens below, take a printout and keep it ready when you run the DCW. This action enables faster and error free configuration.
32.1.1 PIP Server Details ScreenAll artifacts associated with the PIP infrastructure components deploy to the PIP server. This screen contains the following fields:
Table 32–1 PIP Server Details Screen Fields
Field Description
Admin Host Name Specifies where the admin server resides. This can be a remote server or the same system where the AIA Pre-Built Integrations Installer is launched. Example: server1.company.com.
The Admin Host Name is _________________________________
Admin Port This is the port number on which the Weblogic Admin server is started. To find this value contact the WebLogic administrator. Example: 7001.
The Admin Port is _____________________________________
Domain Name This is WebLogic server domain corresponding to the Admin Server. Example: domain1
The Domain Name is _______________________________
Admin User This value is the WebLogic admin user name. To find this value contact your WebLogic administrator.
The Admin User is __________________________________
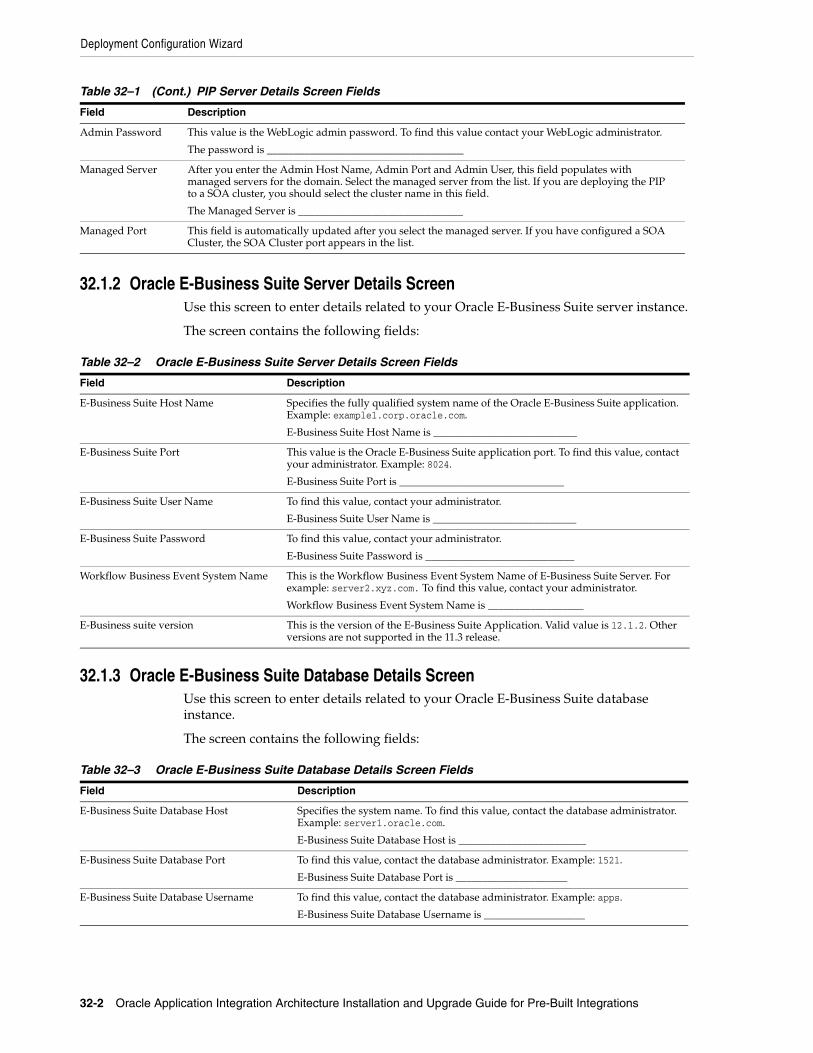
Deployment Configuration Wizard
32-2 Oracle Application Integration Architecture Installation and Upgrade Guide for Pre-Built Integrations
32.1.2 Oracle E-Business Suite Server Details ScreenUse this screen to enter details related to your Oracle E-Business Suite server instance.
The screen contains the following fields:
32.1.3 Oracle E-Business Suite Database Details ScreenUse this screen to enter details related to your Oracle E-Business Suite database instance.
The screen contains the following fields:
Admin Password This value is the WebLogic admin password. To find this value contact your WebLogic administrator.
The password is _____________________________________
Managed Server After you enter the Admin Host Name, Admin Port and Admin User, this field populates with managed servers for the domain. Select the managed server from the list. If you are deploying the PIP to a SOA cluster, you should select the cluster name in this field.
The Managed Server is _______________________________
Managed Port This field is automatically updated after you select the managed server. If you have configured a SOA Cluster, the SOA Cluster port appears in the list.
Table 32–2 Oracle E-Business Suite Server Details Screen Fields
Field Description
E-Business Suite Host Name Specifies the fully qualified system name of the Oracle E-Business Suite application. Example: example1.corp.oracle.com.
E-Business Suite Host Name is ___________________________
E-Business Suite Port This value is the Oracle E-Business Suite application port. To find this value, contact your administrator. Example: 8024.
E-Business Suite Port is _______________________________
E-Business Suite User Name To find this value, contact your administrator.
E-Business Suite User Name is ___________________________
E-Business Suite Password To find this value, contact your administrator.
E-Business Suite Password is ____________________________
Workflow Business Event System Name This is the Workflow Business Event System Name of E-Business Suite Server. For example: server2.xyz.com. To find this value, contact your administrator.
Workflow Business Event System Name is __________________
E-Business suite version This is the version of the E-Business Suite Application. Valid value is 12.1.2. Other versions are not supported in the 11.3 release.
Table 32–3 Oracle E-Business Suite Database Details Screen Fields
Field Description
E-Business Suite Database Host Specifies the system name. To find this value, contact the database administrator. Example: server1.oracle.com.
E-Business Suite Database Host is ________________________
E-Business Suite Database Port To find this value, contact the database administrator. Example: 1521.
E-Business Suite Database Port is _____________________
E-Business Suite Database Username To find this value, contact the database administrator. Example: apps.
E-Business Suite Database Username is ___________________
Table 32–1 (Cont.) PIP Server Details Screen Fields
Field Description
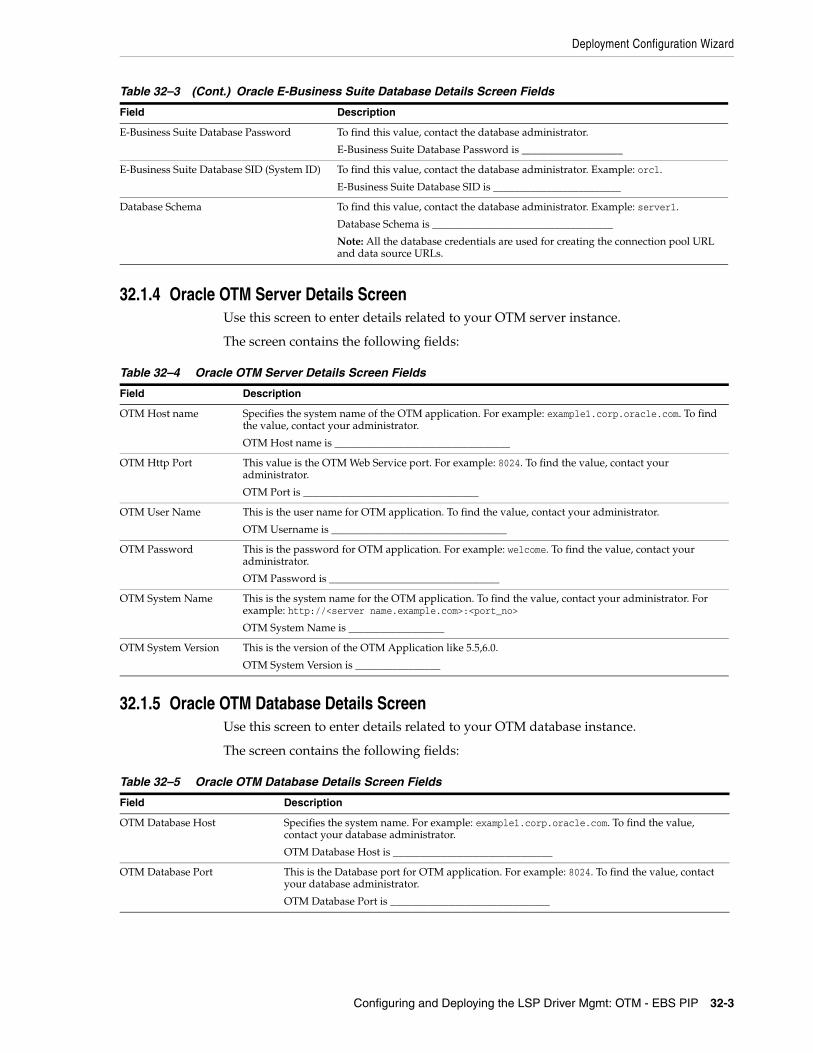
Deployment Configuration Wizard
Configuring and Deploying the LSP Driver Mgmt: OTM - EBS PIP 32-3
32.1.4 Oracle OTM Server Details ScreenUse this screen to enter details related to your OTM server instance.
The screen contains the following fields:
32.1.5 Oracle OTM Database Details ScreenUse this screen to enter details related to your OTM database instance.
The screen contains the following fields:
E-Business Suite Database Password To find this value, contact the database administrator.
E-Business Suite Database Password is ___________________
E-Business Suite Database SID (System ID) To find this value, contact the database administrator. Example: orcl.
E-Business Suite Database SID is ________________________
Database Schema To find this value, contact the database administrator. Example: server1.
Database Schema is __________________________________
Note: All the database credentials are used for creating the connection pool URL and data source URLs.
Table 32–4 Oracle OTM Server Details Screen Fields
Field Description
OTM Host name Specifies the system name of the OTM application. For example: example1.corp.oracle.com. To find the value, contact your administrator.
OTM Host name is _________________________________
OTM Http Port This value is the OTM Web Service port. For example: 8024. To find the value, contact your administrator.
OTM Port is _________________________________
OTM User Name This is the user name for OTM application. To find the value, contact your administrator.
OTM Username is _________________________________
OTM Password This is the password for OTM application. For example: welcome. To find the value, contact your administrator.
OTM Password is ________________________________
OTM System Name This is the system name for the OTM application. To find the value, contact your administrator. For example: http://<server name.example.com>:<port_no>
OTM System Name is __________________
OTM System Version This is the version of the OTM Application like 5.5,6.0.
OTM System Version is ________________
Table 32–5 Oracle OTM Database Details Screen Fields
Field Description
OTM Database Host Specifies the system name. For example: example1.corp.oracle.com. To find the value, contact your database administrator.
OTM Database Host is ______________________________
OTM Database Port This is the Database port for OTM application. For example: 8024. To find the value, contact your database administrator.
OTM Database Port is ______________________________
Table 32–3 (Cont.) Oracle E-Business Suite Database Details Screen Fields
Field Description
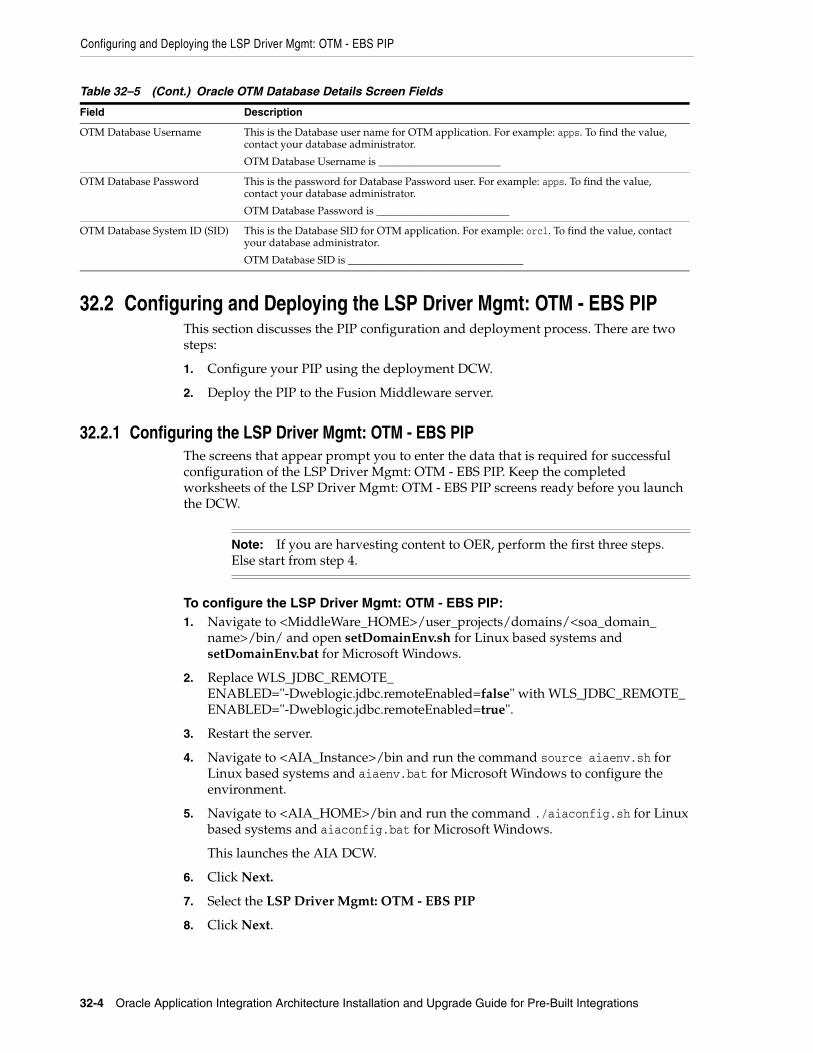
Configuring and Deploying the LSP Driver Mgmt: OTM - EBS PIP
32-4 Oracle Application Integration Architecture Installation and Upgrade Guide for Pre-Built Integrations
32.2 Configuring and Deploying the LSP Driver Mgmt: OTM - EBS PIPThis section discusses the PIP configuration and deployment process. There are two steps:
1. Configure your PIP using the deployment DCW.
2. Deploy the PIP to the Fusion Middleware server.
32.2.1 Configuring the LSP Driver Mgmt: OTM - EBS PIPThe screens that appear prompt you to enter the data that is required for successful configuration of the LSP Driver Mgmt: OTM - EBS PIP. Keep the completed worksheets of the LSP Driver Mgmt: OTM - EBS PIP screens ready before you launch the DCW.
To configure the LSP Driver Mgmt: OTM - EBS PIP:1. Navigate to <MiddleWare_HOME>/user_projects/domains/<soa_domain_
name>/bin/ and open setDomainEnv.sh for Linux based systems and setDomainEnv.bat for Microsoft Windows.
2. Replace WLS_JDBC_REMOTE_ENABLED="-Dweblogic.jdbc.remoteEnabled=false" with WLS_JDBC_REMOTE_ENABLED="-Dweblogic.jdbc.remoteEnabled=true".
3. Restart the server.
4. Navigate to <AIA_Instance>/bin and run the command source aiaenv.sh for Linux based systems and aiaenv.bat for Microsoft Windows to configure the environment.
5. Navigate to <AIA_HOME>/bin and run the command ./aiaconfig.sh for Linux based systems and aiaconfig.bat for Microsoft Windows.
This launches the AIA DCW.
6. Click Next.
7. Select the LSP Driver Mgmt: OTM - EBS PIP
8. Click Next.
OTM Database Username This is the Database user name for OTM application. For example: apps. To find the value, contact your database administrator.
OTM Database Username is _______________________
OTM Database Password This is the password for Database Password user. For example: apps. To find the value, contact your database administrator.
OTM Database Password is _________________________
OTM Database System ID (SID) This is the Database SID for OTM application. For example: orcl. To find the value, contact your database administrator.
OTM Database SID is _________________________________
Note: If you are harvesting content to OER, perform the first three steps. Else start from step 4.
Table 32–5 (Cont.) Oracle OTM Database Details Screen Fields
Field Description

Configuring and Deploying the LSP Driver Mgmt: OTM - EBS PIP
Configuring and Deploying the LSP Driver Mgmt: OTM - EBS PIP 32-5
32.2.1.1 Specify PIP Server Details
To specify PIP Server details:1. Enter information related to your PIP server in the PIP Server Details screen.
2. Click Next.
32.2.1.2 Specify Oracle E-Business Suite Server Details
To specify Oracle E-Business Suite Server details:1. Enter information about your E-Business Suite Server in the E-Business Suite
Server Details screen.
2. Click Next.
32.2.1.3 Specify Oracle E-Business Suite Database Details
To specify Oracle E-Business Suite Database details:1. Enter information about your E-Business Suite Database in the E-Business Suite
Database Details screen.
2. Click Next.
32.2.1.4 Specify Oracle OTM Server Details
To specify Oracle OTM Server details:1. Enter server information about Oracle OTM in the Oracle OTM Server Details
screen.
2. Click Next.
32.2.1.5 Specify Oracle OTM Database Details
To specify Oracle OTM Database details:1. Enter information about your Oracle OTM Database in the Oracle OTM Database
Details screen.
2. Click Next.
32.2.1.6 Complete Configuration
To complete configuration:1. Review the configuration information on the Configuration Summary screen.
Note: If you want to make changes to the configuration, use the navigation pane on the left and select the screen you want to edit.
You can create a response file based on the input provided in the DCW and use it in future when you want to deploy the PIP. You can configure using the steps described in Section 32.2.2, "Configuring using the Response File". Click Save Response File and save the response file with the name and location of your choice.
Configuring and Deploying the LSP Driver Mgmt: OTM - EBS PIP
32-6 Oracle Application Integration Architecture Installation and Upgrade Guide for Pre-Built Integrations
2. Click Configure to accept the configuration.
The system displays progress of the configuration in the Configuration Progress screen.
The system displays any warnings or errors as necessary. You can review the configuration log for additional details. The configuration log location is displayed in Configuration Progress screen.
3. When the configuration process completes without errors, the AIA DCW displays the Configuration Complete screen.
4. Click Finish to close the DCW.
32.2.2 Configuring using the Response File
To configure using the response file:1. Open the response file.
When you create a response file through OUI, passwords get stored as <SECURE>.
2. Replace the password fields with actual passwords in the response file.
3. Navigate to <AIA_Instance>/bin and run the command source aiaenv.sh for Linux based systems and aiaenv.bat for Microsoft Windows to configure the environment.
4. Navigate to <AIA_HOME>/bin and run the command ./aiaconfig.sh <Response File Location and Name> for Linux based systems and aiaconfig.bat <Response File Location and Name> for Microsoft Windows.
32.2.3 Deploying the LSP Driver Mgmt: OTM - EBS PIP
To deploy the PIP to Fusion Middleware server:1. Navigate to <AIA_Instance>/bin and run the command source aiaenv.sh for
Linux based systems and aiaenv.bat for Microsoft Windows to configure the environment.
2. Run the command for your platform.
Note: When you copy and paste the command in the command line, ensure that there is space between .xml and -. Ensure that there is space between these two when you run undeployment command too.
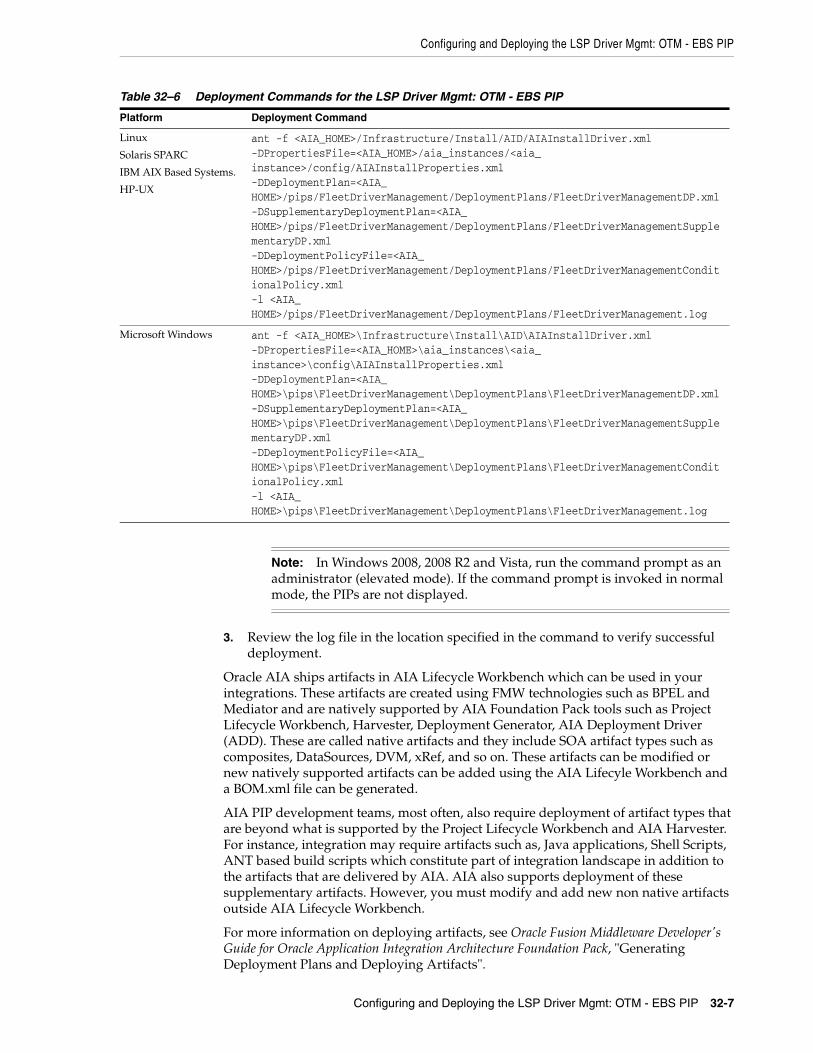
Configuring and Deploying the LSP Driver Mgmt: OTM - EBS PIP
Configuring and Deploying the LSP Driver Mgmt: OTM - EBS PIP 32-7
3. Review the log file in the location specified in the command to verify successful deployment.
Oracle AIA ships artifacts in AIA Lifecycle Workbench which can be used in your integrations. These artifacts are created using FMW technologies such as BPEL and Mediator and are natively supported by AIA Foundation Pack tools such as Project Lifecycle Workbench, Harvester, Deployment Generator, AIA Deployment Driver (ADD). These are called native artifacts and they include SOA artifact types such as composites, DataSources, DVM, xRef, and so on. These artifacts can be modified or new natively supported artifacts can be added using the AIA Lifecyle Workbench and a BOM.xml file can be generated.
AIA PIP development teams, most often, also require deployment of artifact types that are beyond what is supported by the Project Lifecycle Workbench and AIA Harvester. For instance, integration may require artifacts such as, Java applications, Shell Scripts, ANT based build scripts which constitute part of integration landscape in addition to the artifacts that are delivered by AIA. AIA also supports deployment of these supplementary artifacts. However, you must modify and add new non native artifacts outside AIA Lifecycle Workbench.
For more information on deploying artifacts, see Oracle Fusion Middleware Developer's Guide for Oracle Application Integration Architecture Foundation Pack, "Generating Deployment Plans and Deploying Artifacts".
Table 32–6 Deployment Commands for the LSP Driver Mgmt: OTM - EBS PIP
Platform Deployment Command
Linux
Solaris SPARC
IBM AIX Based Systems.
HP-UX
ant -f <AIA_HOME>/Infrastructure/Install/AID/AIAInstallDriver.xml -DPropertiesFile=<AIA_HOME>/aia_instances/<aia_instance>/config/AIAInstallProperties.xml -DDeploymentPlan=<AIA_HOME>/pips/FleetDriverManagement/DeploymentPlans/FleetDriverManagementDP.xml -DSupplementaryDeploymentPlan=<AIA_HOME>/pips/FleetDriverManagement/DeploymentPlans/FleetDriverManagementSupplementaryDP.xml -DDeploymentPolicyFile=<AIA_HOME>/pips/FleetDriverManagement/DeploymentPlans/FleetDriverManagementConditionalPolicy.xml -l <AIA_HOME>/pips/FleetDriverManagement/DeploymentPlans/FleetDriverManagement.log
Microsoft Windows ant -f <AIA_HOME>\Infrastructure\Install\AID\AIAInstallDriver.xml -DPropertiesFile=<AIA_HOME>\aia_instances\<aia_instance>\config\AIAInstallProperties.xml -DDeploymentPlan=<AIA_HOME>\pips\FleetDriverManagement\DeploymentPlans\FleetDriverManagementDP.xml -DSupplementaryDeploymentPlan=<AIA_HOME>\pips\FleetDriverManagement\DeploymentPlans\FleetDriverManagementSupplementaryDP.xml -DDeploymentPolicyFile=<AIA_HOME>\pips\FleetDriverManagement\DeploymentPlans\FleetDriverManagementConditionalPolicy.xml -l <AIA_HOME>\pips\FleetDriverManagement\DeploymentPlans\FleetDriverManagement.log
Note: In Windows 2008, 2008 R2 and Vista, run the command prompt as an administrator (elevated mode). If the command prompt is invoked in normal mode, the PIPs are not displayed.
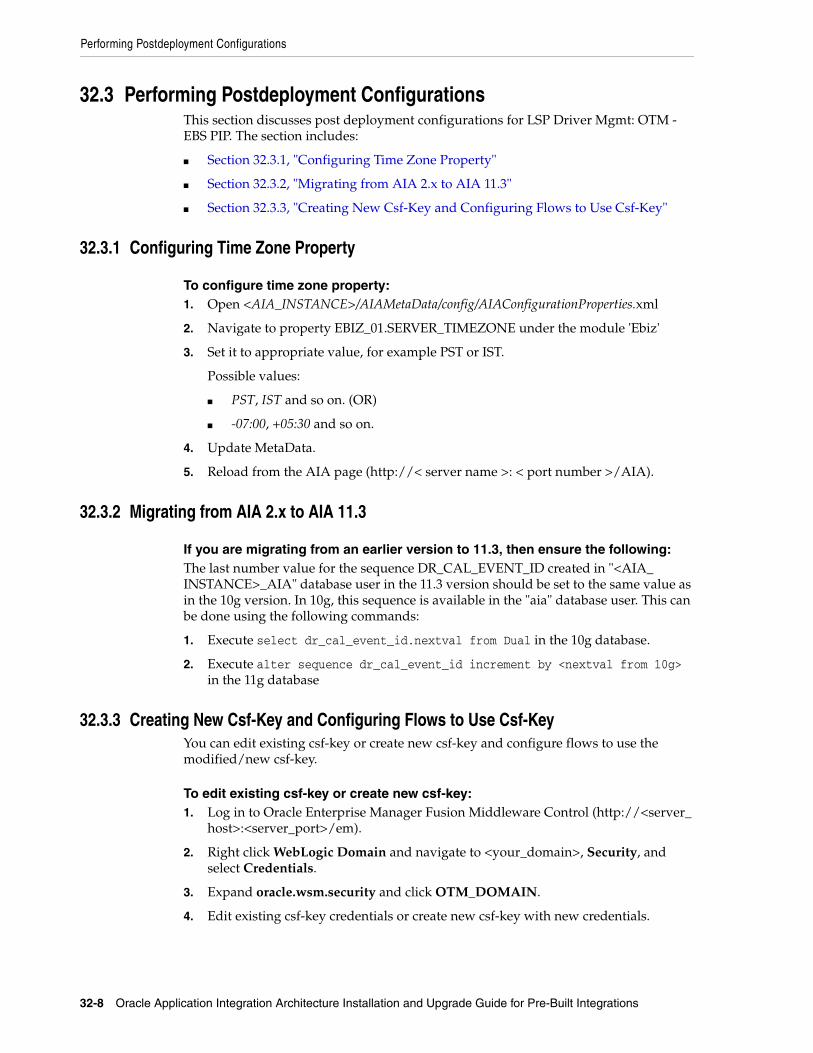
Performing Postdeployment Configurations
32-8 Oracle Application Integration Architecture Installation and Upgrade Guide for Pre-Built Integrations
32.3 Performing Postdeployment ConfigurationsThis section discusses post deployment configurations for LSP Driver Mgmt: OTM - EBS PIP. The section includes:
■ Section 32.3.1, "Configuring Time Zone Property"
■ Section 32.3.2, "Migrating from AIA 2.x to AIA 11.3"
■ Section 32.3.3, "Creating New Csf-Key and Configuring Flows to Use Csf-Key"
32.3.1 Configuring Time Zone Property
To configure time zone property:1. Open <AIA_INSTANCE>/AIAMetaData/config/AIAConfigurationProperties.xml
2. Navigate to property EBIZ_01.SERVER_TIMEZONE under the module 'Ebiz'
3. Set it to appropriate value, for example PST or IST.
Possible values:
■ PST, IST and so on. (OR)
■ -07:00, +05:30 and so on.
4. Update MetaData.
5. Reload from the AIA page (http://< server name >: < port number >/AIA).
32.3.2 Migrating from AIA 2.x to AIA 11.3
If you are migrating from an earlier version to 11.3, then ensure the following:The last number value for the sequence DR_CAL_EVENT_ID created in "<AIA_INSTANCE>_AIA" database user in the 11.3 version should be set to the same value as in the 10g version. In 10g, this sequence is available in the "aia" database user. This can be done using the following commands:
1. Execute select dr_cal_event_id.nextval from Dual in the 10g database.
2. Execute alter sequence dr_cal_event_id increment by <nextval from 10g> in the 11g database
32.3.3 Creating New Csf-Key and Configuring Flows to Use Csf-KeyYou can edit existing csf-key or create new csf-key and configure flows to use the modified/new csf-key.
To edit existing csf-key or create new csf-key:1. Log in to Oracle Enterprise Manager Fusion Middleware Control (http://<server_
host>:<server_port>/em).
2. Right click WebLogic Domain and navigate to <your_domain>, Security, and select Credentials.
3. Expand oracle.wsm.security and click OTM_DOMAIN.
4. Edit existing csf-key credentials or create new csf-key with new credentials.
Verifying Deployment
Configuring and Deploying the LSP Driver Mgmt: OTM - EBS PIP 32-9
To configure flows to use new csf-key:1. Log in to Oracle Enterprise Manager Fusion Middleware Control (http://<server_
host>:<server_port>/em).
2. Click the process name which is invoking OTM Webservice based on the flow.
3. Click the corresponding Reference under Services and References section. (use the security exceptions table in the Section 32.4.1, "Validating Security Policies" section to find the References)
4. Click the Policies and select oracle/wss_http_token_client_policy.
5. Update the csf-key value under Security Configuration Details tab and save the changes.
32.4 Verifying Deployment
To verify the LSP Driver Mgmt: OTM - EBS PIP deployment:1. Open the log files from the following location and look for warnings and error
messages:
■ For Linux, Solaris SPARC, HP-UX and IBM AIX Based Systems: Review the install log located at <AIA_HOME>/aia_instances/<instance name>/logs to verify that the PIP is successfully installed.
■ For Microsoft Windows: Review the install log located at <AIA_HOME>\aia_instances\<instance name>\logs to verify that the PIP is successfully installed.
2. Confirm that JMS Queues are created:
a. Log in to the WLS Console: http:// name>:<port number>/console/
b. Log in with the server admin user name. For access details, contact the system administrator
c. Navigate to Services, Messaging, JMS Modules, AIAJMSModule and verify that the following queue names exist.
■ AIA_EbizTrainingCalendarJMSQueue
■ AIA_EbizAbsenceCalendarJMSQueue
■ AIA_EbizWorkerJMSQueue
■ AIA_EbizLocationJMSQueue
3. Confirm that the LSP Driver Mgmt: OTM - EBS PIP services were installed.
a. Navigate to the Oracle Enterprise Manager Fusion Middleware Control (http://<server name>:<port number>/em/).
b. Log in with the server admin user name. For access details, contact the system administrator.
c. Expand Farm_soa_domain, SOA, soa-infra, Default and look for the following items:
■ CalculateDriverIncentiveCompensationListEbizAdapter
■ CalculateDriverIncentiveCompensationListEbizProvABCSImpl
■ CalculateDriverIncentiveCompensationListLogisticsAQConsumer
■ CalculateDriverIncentiveCompensationListLogisticsReqABCSImpl
Verifying Deployment
32-10 Oracle Application Integration Architecture Installation and Upgrade Guide for Pre-Built Integrations
■ CreateAbsenceAttendanceEbizAdapter
■ CreateDelegateBookingEbizAdapter
■ CreateLocationListEbizAdapter
■ DeleteAbsenceAttendanceEbizAdapter
■ DeleteDelegateBookingEbizAdapter
■ LocationEBS
■ LocationResponseEBS
■ PayableInvoiceEBS
■ PayableInvoiceResponseEBS
■ ResourceCalendarEntryEBS
■ ResourceCalendarEntryResponseEBS
■ SyncAbsenceCalendarListEbizJMSConsumer
■ SyncAbsenceCalendarListEbizJMSProducer
■ SyncAbsenceCalendarListEbizReqABCSImpl
■ SyncAbsenceCalendarListInitialLoadDBAdapter
■ SyncAbsenceCalendarListProcess
■ SyncLocationListEbizGetABM
■ SyncLocationListEbizJMSConsumer
■ SyncLocationListEbizJMSProducer
■ SyncLocationListEbizReqABCSImpl
■ SyncLocationListInitialLoadDBAdapter
■ SyncLocationListLogisticsProvABCSImpl
■ SyncResourceCalendarEntryListLogisticsProvABCSImpl
■ SyncTrainingCalendarListEbizJMSConsumer
■ SyncTrainingCalendarListEbizJMSProducer
■ SyncTrainingCalendarListEbizReqABCSImpl
■ SyncTrainingCalendarListInitialLoadDBAdapter
■ SyncTrainingCalendarListProcess
■ SyncWorkerListBPELAggregator
■ SyncWorkerListEbizAggrEventConsumer
■ SyncWorkerListEbizEventAggregator
■ SyncWorkerListEbizGroupEventAdapter
■ SyncWorkerListEbizInitialLoad
■ SyncWorkerListEbizJMSConsumer
■ SyncWorkerListEbizJMSProducer
■ SyncWorkerListEbizReqABCSImpl
■ SyncWorkerListLogisticsProvABCSImpl
Verifying Deployment
Configuring and Deploying the LSP Driver Mgmt: OTM - EBS PIP 32-11
■ UpdateAbsenceAttendanceEbizAdapter
■ UpdateClassScheduleEbizAdapter
■ UpdateDelegateBookingEbizAdapter
■ UpdateLocationEbizAdapter
■ UpdateLocationListEbizAdapter
■ UpdateTrainingCenterandLocationEbizAdapter
■ WorkerEBS
■ WorkerResponseEBS
4. LSP Financial Mgmt: OTM - EBS PIP and LSP Driver Mgmt: OTM - EBS PIP use same PayableInvoiceEBS and PayableInvoiceResponseEBS.
When you install Fleet PIPs, if LSP Driver Mgmt: OTM - EBS PIP is installed after LSP Financial Mgmt: OTM - EBS PIP, routing rules pertaining to WorkInvoice flow of LSP Driver Mgmt: OTM - EBS PIP do not appear in Oracle Enterprise Manager Fusion Middleware Control for PayableInvoiceEBS and PayableInvoiceResponseEBS. In this case, routing rules pertaining to CalculateDriverIncentiveCompensationListEbizProvABCSImpl of WorkInvoice flow of LSP Driver Mgmt: OTM - EBS PIP have to be added manually to PayableInvoiceEBS and routing rules pertaining to CalculateDriverIncentiveCompensationListLogisticsReqABCSImpl of WorkInvoice flow of LSP Driver Mgmt: OTM - EBS PIP have to be added manually to PayableInvoiceResponseEBS and deployed on server.
For more information on manual deployment of routing rules, see Oracle Fusion Middleware Developer's Guide for Oracle Application Integration Architecture Foundation Pack, "Creating Routing Rules".
32.4.1 Validating Security PoliciesAll SOA composites are protected by Global Policies provided by Foundation Pack as defined in the Security section of the Developer Guide. Additionally individual services for this PIP have locally attached security policies.
To validate locally attached security policies:1. Log in to Oracle Enterprise Manager Fusion Middleware Control.
2. Navigate to WebLogic Domain, soa_domain, Web Services, Policies.
3. Verify Service Policy attachment.
a. Find the service policy in the list of policies.
b. Click the number in Attachment Count column.
This opens Usage Analysis screen.
c. Change the Subject Type list box to SOA Service.
d. Validate that all the composites are listed with local attachment to this service policy.
4. Verify Client Policy attachment
a. Navigate back to Policies screen and find the client policy
b. Click the number in Attachment Count column.
Undeploying the LSP Driver Mgmt: OTM - EBS PIP
32-12 Oracle Application Integration Architecture Installation and Upgrade Guide for Pre-Built Integrations
This opens Usage Analysis screen.
c. Change the Subject Type list box to SOA Reference.
d. Validate that all the composites are listed with local attachment to this client policy and attached to the correct references.
For more information about security validation, see Oracle Fusion Middleware Developer's Guide for Oracle Application Integration Architecture Foundation Pack, "Working with Security."
For PIP implementation, see Oracle Application Integration Architecture Oracle Driver Management Integration Pack for Oracle Transportation Management and Oracle E-Business Suite Implementation Guide.
32.5 Undeploying the LSP Driver Mgmt: OTM - EBS PIP
To undeploy the PIP from Fusion Middleware Server:1. Navigate to <AIA_Instance>/bin and run the command source aiaenv.sh for
Linux based systems and aiaenv.bat for Microsoft Windows to configure the environment.
2. Run the command for your platform.
Note: The default csf-key for all the flows is OTM_DOMAIN. This is created in server automatically as a part of PIP installation.
Table 32–7 Service Policy Attachments for LSP Driver Mgmt: OTM - EBS PIP
Composite Service Service Policy
SyncLocationListLogisticsProvABCSImpl TransmissionReport oracle/wss_http_token_service_policy
SyncResourceCalendarEntryListLogisticsProvABCSImpl TransmissionReport oracle/wss_http_token_service_policy
SyncWorkerListLogisticsProvABCSImpl TransmissionReport oracle/wss_http_token_service_policy
Table 32–8 Wss Http Token Client Policy Attachments for LSP Driver Mgmt: OTM - EBS PIP
Composite Reference Client Policy
CalculateDriverIncentiveCompensationListLogisticsReqABCSImpl LogisticsWebService oracle/wss_http_token_client_policy
SyncLocationListLogisticsProvABCSImpl LogisticsWebService oracle/wss_http_token_client_policy
SyncResourceCalendarEntryListLogisticsProvABCSImpl LogisticsWebService oracle/wss_http_token_client_policy
SyncWorkerListLogisticsProvABCSImpl LogisticsWebService oracle/wss_http_token_client_policy
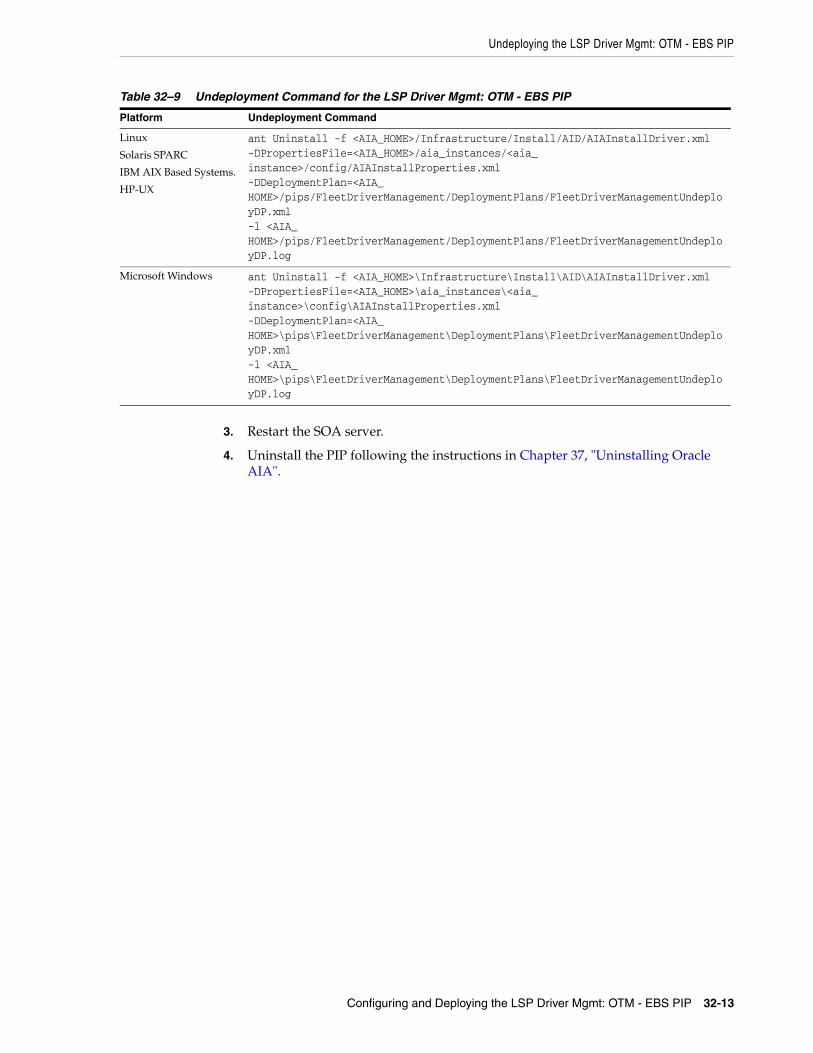
Undeploying the LSP Driver Mgmt: OTM - EBS PIP
Configuring and Deploying the LSP Driver Mgmt: OTM - EBS PIP 32-13
3. Restart the SOA server.
4. Uninstall the PIP following the instructions in Chapter 37, "Uninstalling Oracle AIA".
Table 32–9 Undeployment Command for the LSP Driver Mgmt: OTM - EBS PIP
Platform Undeployment Command
Linux
Solaris SPARC
IBM AIX Based Systems.
HP-UX
ant Uninstall -f <AIA_HOME>/Infrastructure/Install/AID/AIAInstallDriver.xml -DPropertiesFile=<AIA_HOME>/aia_instances/<aia_instance>/config/AIAInstallProperties.xml -DDeploymentPlan=<AIA_HOME>/pips/FleetDriverManagement/DeploymentPlans/FleetDriverManagementUndeployDP.xml -l <AIA_HOME>/pips/FleetDriverManagement/DeploymentPlans/FleetDriverManagementUndeployDP.log
Microsoft Windows ant Uninstall -f <AIA_HOME>\Infrastructure\Install\AID\AIAInstallDriver.xml -DPropertiesFile=<AIA_HOME>\aia_instances\<aia_instance>\config\AIAInstallProperties.xml -DDeploymentPlan=<AIA_HOME>\pips\FleetDriverManagement\DeploymentPlans\FleetDriverManagementUndeployDP.xml -l <AIA_HOME>\pips\FleetDriverManagement\DeploymentPlans\FleetDriverManagementUndeployDP.log

Undeploying the LSP Driver Mgmt: OTM - EBS PIP
32-14 Oracle Application Integration Architecture Installation and Upgrade Guide for Pre-Built Integrations
33
Configuring and Deploying Value Chain Planning Base Pack Integration 33-1
33Configuring and Deploying Value ChainPlanning Base Pack Integration
This chapter discusses how to configure and deploy the Oracle Value Chain Planning Integration Base Pack (VCP Base Pack integration).
This chapter includes the following sections:
■ Section 33.1, "Configuring Oracle Data Integrator"
■ Section 33.2, "Deployment Configuration Wizard"
■ Section 33.3, "Configuring and Deploying VCP Base Pack Integration"
■ Section 33.4, "Performing Postdeployment Configurations"
■ Section 33.5, "Verifying Deployment"
■ Section 33.6, "Undeploying VCP Base Pack Integration"
33.1 Configuring Oracle Data IntegratorTo run AIA Pre-Built Integrations Installer you must have Oracle Data Integrator (ODI) access with Supervisor privileges.
For installation purposes, the ODI software must reside at the same server where Foundation Pack is installed. Once the PIP installation is complete, the ODI software can be installed onto another server (if desired) connecting to the master and work repositories used during the PIP installation.
33.1.1 Creating Oracle Data Integrator RepositoriesYou can use an existing master repository if it exists on an Oracle database and its ID is not 0. If the ID is 0, AIA advises you to create another master repository.
You can use an existing work repository if it exists on an Oracle database and its ID is not 1 or 778. If the ID is 1 or 778, AIA advises you to create another repository and not to use 1 or 778 as the Work Repository ID.
When you run the DCW, it inserts or updates the ODI artifacts into these repositories.
AIA recommends that you make a backup copy of master and work repositories before you start the installation process.
Note for PeopleSoft Users: This information also covers the integration between PeopleSoft and Demantra. Unless specifically mentioned, references to JD Edwards or JDE should be interpreted as also referring to PeopleSoft.
Deployment Configuration Wizard
33-2 Oracle Application Integration Architecture Installation and Upgrade Guide for Pre-Built Integrations
For information about creating Oracle Data Integrator master and work repositories, see Oracle Fusion Middleware Developer's Guide for Oracle Data Integrator, "Administering the Oracle Data Integrator Repositories."
33.1.2 Performing Postinstallation Configurations for ODIPerform the following steps to apply the required patches to your ODI 11.1.1.5.0.
To install prerequisite installer patch #10288265:1. Access My Oracle Support [https://support.oracle.com]
2. Navigate to the Patches & Updates tab
3. In the Patch Name or Number field, write 10288265
4. Select your platform
5. Click Search
6. Download and install patch #10288265
To install patch #12837214:1. Access My Oracle Support [https://support.oracle.com]
2. Navigate to the Patches & Updates tab
3. In the Patch Name or Number field, write 12837214
4. Select your platform
5. Click Search
6. Download and install patch #12837214
After applying the patches, launch the ODI Installer:
1. Go to Topology.
2. Go to Physical Architecture.
3. Find the XML technologies and expand it.
You should see data sources for all DVM's used in your ODI flows.
4. Select each DVM data source.
5. Go to the JDBC tab.
6. Append this to the end of the URL "&back_compat_specific_keywords=true"
7. Test the data source to make sure the connection is successful.
8. Save your changes.
For a screenshot of this screen in ODI Installer, see Appendix B, "Oracle Data Integrator Screen".
33.2 Deployment Configuration WizardThe DCW screens prompt you to enter the data required for successful configuration of VCP Base Pack Integration. Enter the details of VCP Base Pack Integration screens below, take a printout and keep it ready when you run the DCW. This action enables faster and error free configuration.
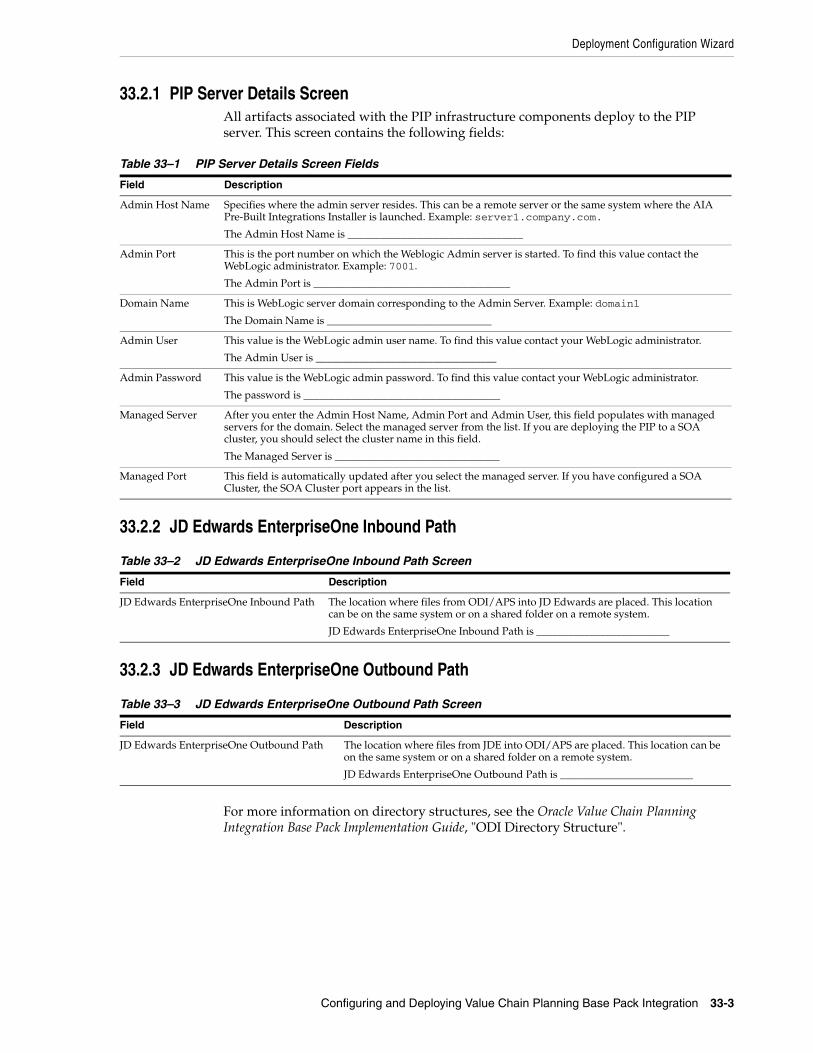
Deployment Configuration Wizard
Configuring and Deploying Value Chain Planning Base Pack Integration 33-3
33.2.1 PIP Server Details ScreenAll artifacts associated with the PIP infrastructure components deploy to the PIP server. This screen contains the following fields:
33.2.2 JD Edwards EnterpriseOne Inbound Path
33.2.3 JD Edwards EnterpriseOne Outbound Path
For more information on directory structures, see the Oracle Value Chain Planning Integration Base Pack Implementation Guide, "ODI Directory Structure".
Table 33–1 PIP Server Details Screen Fields
Field Description
Admin Host Name Specifies where the admin server resides. This can be a remote server or the same system where the AIA Pre-Built Integrations Installer is launched. Example: server1.company.com.
The Admin Host Name is _________________________________
Admin Port This is the port number on which the Weblogic Admin server is started. To find this value contact the WebLogic administrator. Example: 7001.
The Admin Port is _____________________________________
Domain Name This is WebLogic server domain corresponding to the Admin Server. Example: domain1
The Domain Name is _______________________________
Admin User This value is the WebLogic admin user name. To find this value contact your WebLogic administrator.
The Admin User is __________________________________
Admin Password This value is the WebLogic admin password. To find this value contact your WebLogic administrator.
The password is _____________________________________
Managed Server After you enter the Admin Host Name, Admin Port and Admin User, this field populates with managed servers for the domain. Select the managed server from the list. If you are deploying the PIP to a SOA cluster, you should select the cluster name in this field.
The Managed Server is _______________________________
Managed Port This field is automatically updated after you select the managed server. If you have configured a SOA Cluster, the SOA Cluster port appears in the list.
Table 33–2 JD Edwards EnterpriseOne Inbound Path Screen
Field Description
JD Edwards EnterpriseOne Inbound Path The location where files from ODI/APS into JD Edwards are placed. This location can be on the same system or on a shared folder on a remote system.
JD Edwards EnterpriseOne Inbound Path is _________________________
Table 33–3 JD Edwards EnterpriseOne Outbound Path Screen
Field Description
JD Edwards EnterpriseOne Outbound Path The location where files from JDE into ODI/APS are placed. This location can be on the same system or on a shared folder on a remote system.
JD Edwards EnterpriseOne Outbound Path is _________________________
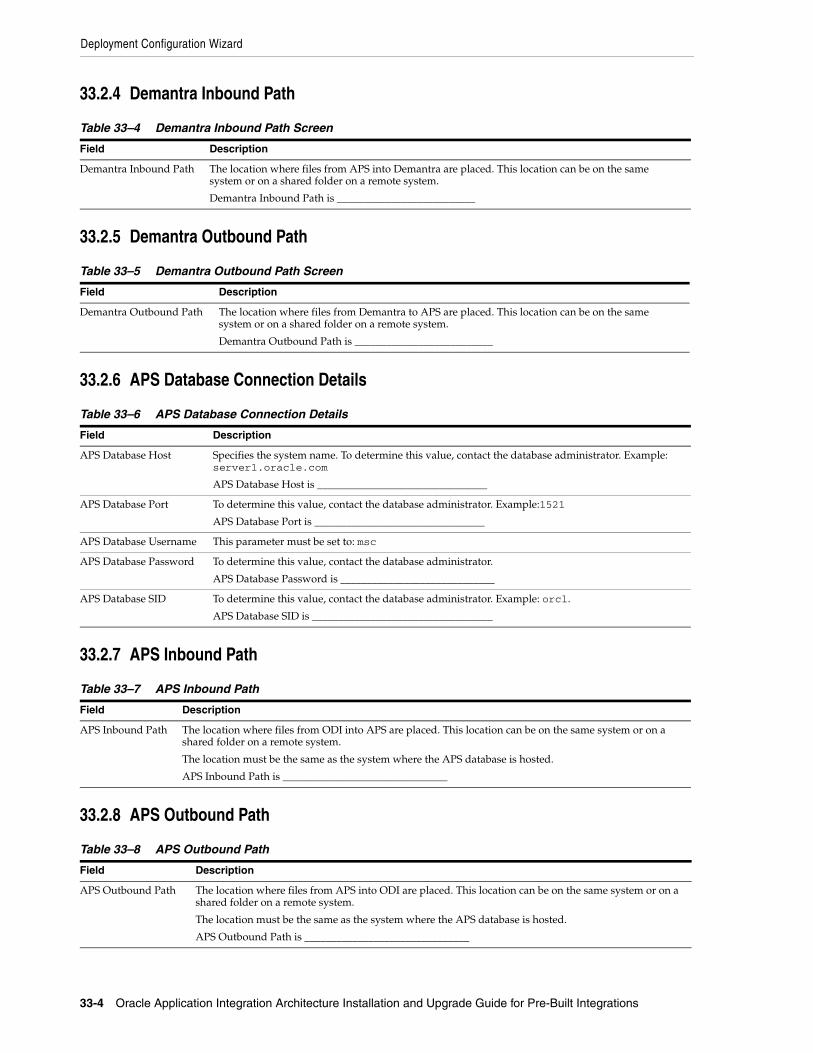
Deployment Configuration Wizard
33-4 Oracle Application Integration Architecture Installation and Upgrade Guide for Pre-Built Integrations
33.2.4 Demantra Inbound Path
33.2.5 Demantra Outbound Path
33.2.6 APS Database Connection Details
33.2.7 APS Inbound Path
33.2.8 APS Outbound Path
Table 33–4 Demantra Inbound Path Screen
Field Description
Demantra Inbound Path The location where files from APS into Demantra are placed. This location can be on the same system or on a shared folder on a remote system.
Demantra Inbound Path is __________________________
Table 33–5 Demantra Outbound Path Screen
Field Description
Demantra Outbound Path The location where files from Demantra to APS are placed. This location can be on the same system or on a shared folder on a remote system.
Demantra Outbound Path is __________________________
Table 33–6 APS Database Connection Details
Field Description
APS Database Host Specifies the system name. To determine this value, contact the database administrator. Example: server1.oracle.com
APS Database Host is ________________________________
APS Database Port To determine this value, contact the database administrator. Example:1521
APS Database Port is ________________________________
APS Database Username This parameter must be set to: msc
APS Database Password To determine this value, contact the database administrator.
APS Database Password is _____________________________
APS Database SID To determine this value, contact the database administrator. Example: orcl.
APS Database SID is __________________________________
Table 33–7 APS Inbound Path
Field Description
APS Inbound Path The location where files from ODI into APS are placed. This location can be on the same system or on a shared folder on a remote system.
The location must be the same as the system where the APS database is hosted.
APS Inbound Path is _______________________________
Table 33–8 APS Outbound Path
Field Description
APS Outbound Path The location where files from APS into ODI are placed. This location can be on the same system or on a shared folder on a remote system.
The location must be the same as the system where the APS database is hosted.
APS Outbound Path is _______________________________
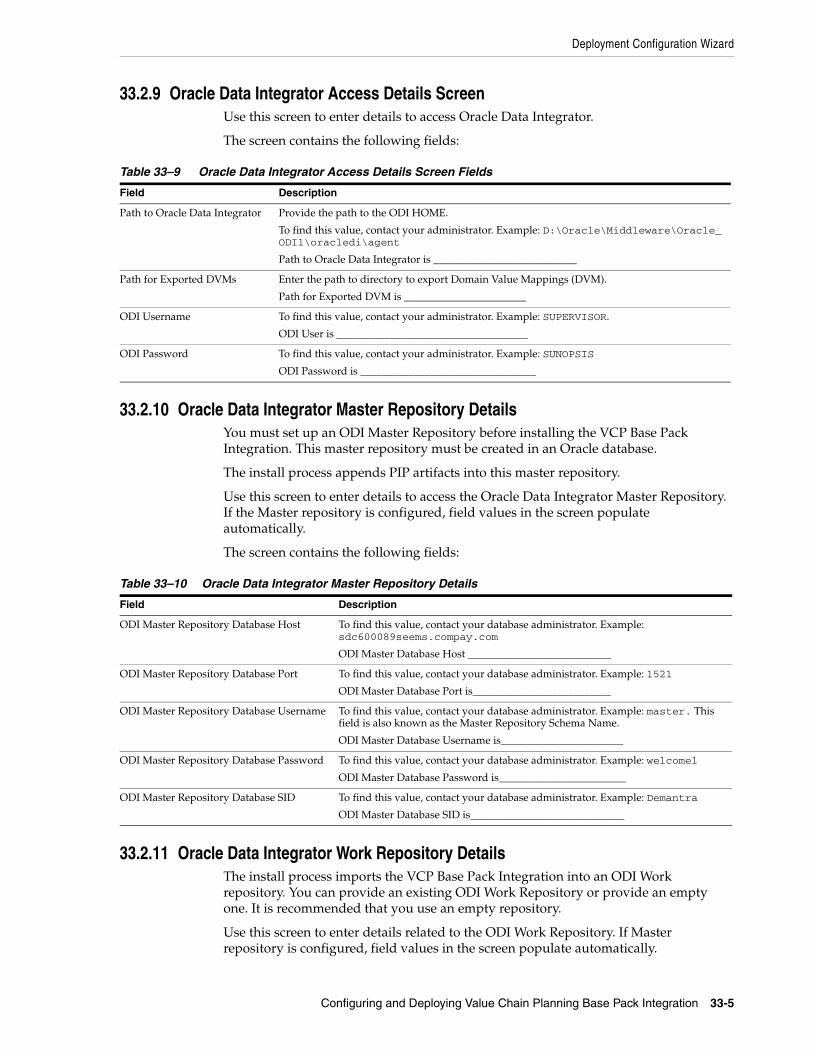
Deployment Configuration Wizard
Configuring and Deploying Value Chain Planning Base Pack Integration 33-5
33.2.9 Oracle Data Integrator Access Details ScreenUse this screen to enter details to access Oracle Data Integrator.
The screen contains the following fields:
33.2.10 Oracle Data Integrator Master Repository DetailsYou must set up an ODI Master Repository before installing the VCP Base Pack Integration. This master repository must be created in an Oracle database.
The install process appends PIP artifacts into this master repository.
Use this screen to enter details to access the Oracle Data Integrator Master Repository. If the Master repository is configured, field values in the screen populate automatically.
The screen contains the following fields:
33.2.11 Oracle Data Integrator Work Repository DetailsThe install process imports the VCP Base Pack Integration into an ODI Work repository. You can provide an existing ODI Work Repository or provide an empty one. It is recommended that you use an empty repository.
Use this screen to enter details related to the ODI Work Repository. If Master repository is configured, field values in the screen populate automatically.
Table 33–9 Oracle Data Integrator Access Details Screen Fields
Field Description
Path to Oracle Data Integrator Provide the path to the ODI HOME.
To find this value, contact your administrator. Example: D:\Oracle\Middleware\Oracle_ODI1\oracledi\agent
Path to Oracle Data Integrator is ___________________________
Path for Exported DVMs Enter the path to directory to export Domain Value Mappings (DVM).
Path for Exported DVM is _______________________
ODI Username To find this value, contact your administrator. Example: SUPERVISOR.
ODI User is ____________________________________
ODI Password To find this value, contact your administrator. Example: SUNOPSIS
ODI Password is _________________________________
Table 33–10 Oracle Data Integrator Master Repository Details
Field Description
ODI Master Repository Database Host To find this value, contact your database administrator. Example: sdc600089seems.compay.com
ODI Master Database Host ___________________________
ODI Master Repository Database Port To find this value, contact your database administrator. Example: 1521
ODI Master Database Port is__________________________
ODI Master Repository Database Username To find this value, contact your database administrator. Example: master. This field is also known as the Master Repository Schema Name.
ODI Master Database Username is_______________________
ODI Master Repository Database Password To find this value, contact your database administrator. Example: welcome1
ODI Master Database Password is________________________
ODI Master Repository Database SID To find this value, contact your database administrator. Example: Demantra
ODI Master Database SID is_____________________________
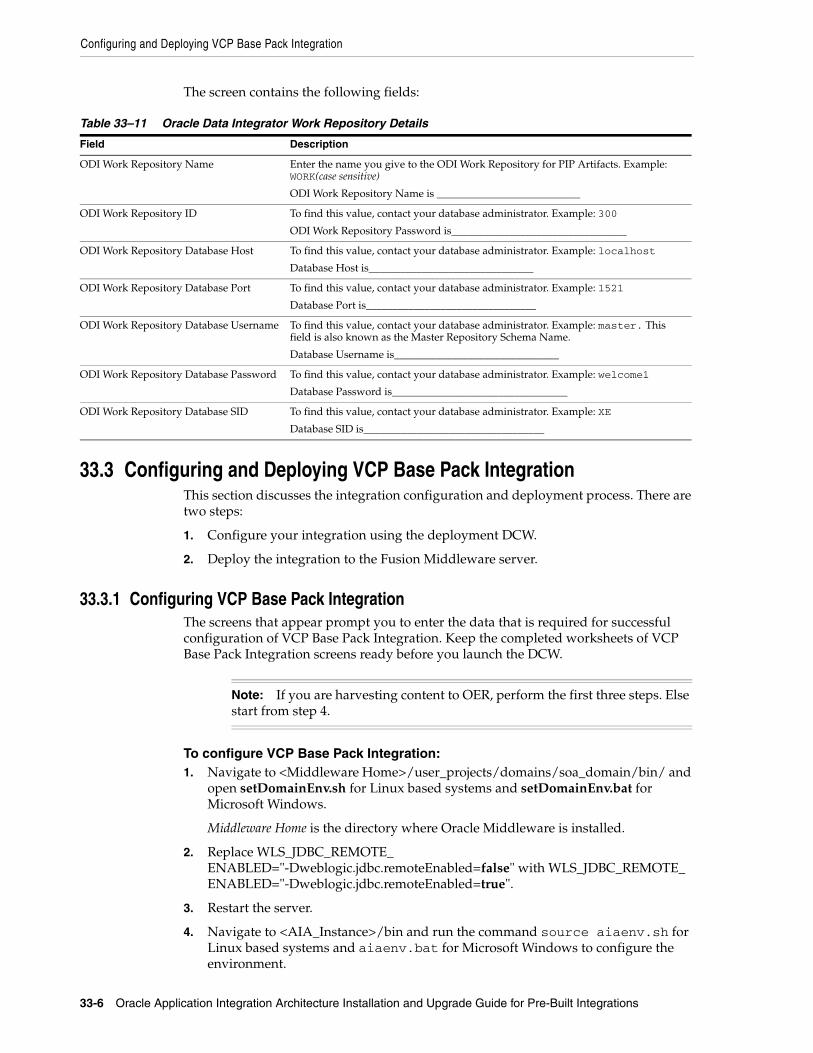
Configuring and Deploying VCP Base Pack Integration
33-6 Oracle Application Integration Architecture Installation and Upgrade Guide for Pre-Built Integrations
The screen contains the following fields:
33.3 Configuring and Deploying VCP Base Pack IntegrationThis section discusses the integration configuration and deployment process. There are two steps:
1. Configure your integration using the deployment DCW.
2. Deploy the integration to the Fusion Middleware server.
33.3.1 Configuring VCP Base Pack IntegrationThe screens that appear prompt you to enter the data that is required for successful configuration of VCP Base Pack Integration. Keep the completed worksheets of VCP Base Pack Integration screens ready before you launch the DCW.
To configure VCP Base Pack Integration:1. Navigate to <Middleware Home>/user_projects/domains/soa_domain/bin/ and
open setDomainEnv.sh for Linux based systems and setDomainEnv.bat for Microsoft Windows.
Middleware Home is the directory where Oracle Middleware is installed.
2. Replace WLS_JDBC_REMOTE_ENABLED="-Dweblogic.jdbc.remoteEnabled=false" with WLS_JDBC_REMOTE_ENABLED="-Dweblogic.jdbc.remoteEnabled=true".
3. Restart the server.
4. Navigate to <AIA_Instance>/bin and run the command source aiaenv.sh for Linux based systems and aiaenv.bat for Microsoft Windows to configure the environment.
Table 33–11 Oracle Data Integrator Work Repository Details
Field Description
ODI Work Repository Name Enter the name you give to the ODI Work Repository for PIP Artifacts. Example: WORK(case sensitive)
ODI Work Repository Name is ___________________________
ODI Work Repository ID To find this value, contact your database administrator. Example: 300
ODI Work Repository Password is_________________________________
ODI Work Repository Database Host To find this value, contact your database administrator. Example: localhost
Database Host is_______________________________
ODI Work Repository Database Port To find this value, contact your database administrator. Example: 1521
Database Port is________________________________
ODI Work Repository Database Username To find this value, contact your database administrator. Example: master. This field is also known as the Master Repository Schema Name.
Database Username is_______________________________
ODI Work Repository Database Password To find this value, contact your database administrator. Example: welcome1
Database Password is_________________________________
ODI Work Repository Database SID To find this value, contact your database administrator. Example: XE
Database SID is__________________________________
Note: If you are harvesting content to OER, perform the first three steps. Else start from step 4.
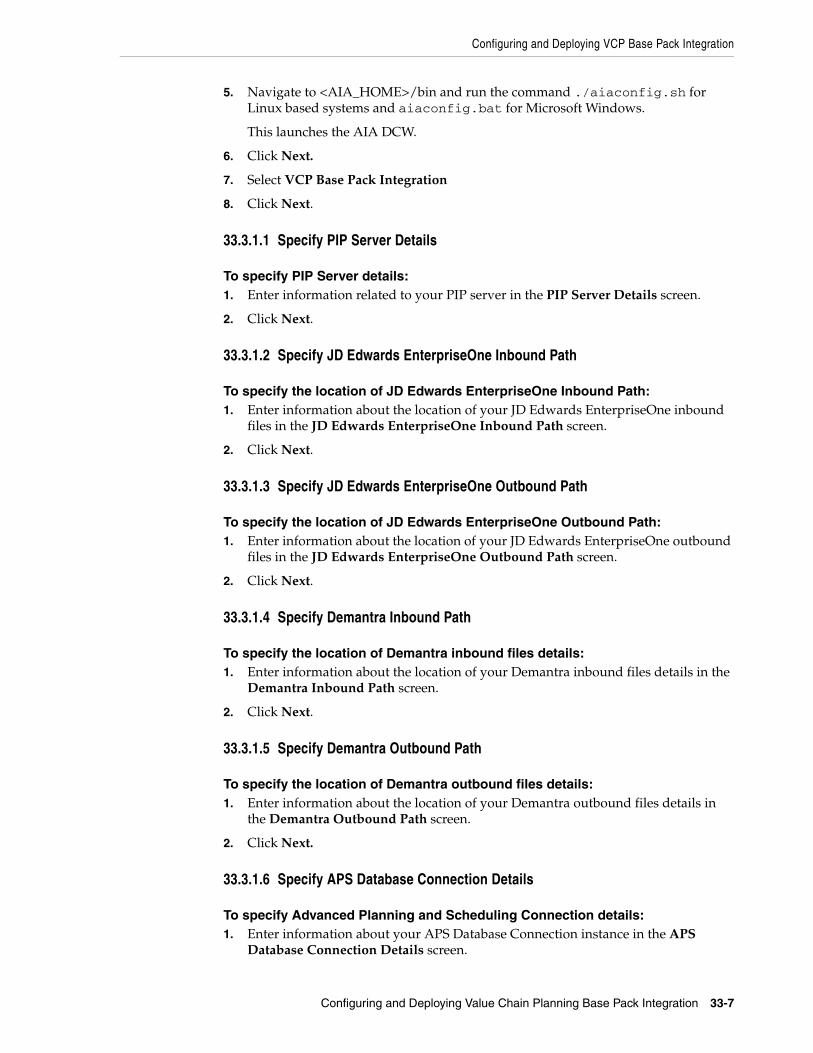
Configuring and Deploying VCP Base Pack Integration
Configuring and Deploying Value Chain Planning Base Pack Integration 33-7
5. Navigate to <AIA_HOME>/bin and run the command ./aiaconfig.sh for Linux based systems and aiaconfig.bat for Microsoft Windows.
This launches the AIA DCW.
6. Click Next.
7. Select VCP Base Pack Integration
8. Click Next.
33.3.1.1 Specify PIP Server Details
To specify PIP Server details:1. Enter information related to your PIP server in the PIP Server Details screen.
2. Click Next.
33.3.1.2 Specify JD Edwards EnterpriseOne Inbound Path
To specify the location of JD Edwards EnterpriseOne Inbound Path:1. Enter information about the location of your JD Edwards EnterpriseOne inbound
files in the JD Edwards EnterpriseOne Inbound Path screen.
2. Click Next.
33.3.1.3 Specify JD Edwards EnterpriseOne Outbound Path
To specify the location of JD Edwards EnterpriseOne Outbound Path:1. Enter information about the location of your JD Edwards EnterpriseOne outbound
files in the JD Edwards EnterpriseOne Outbound Path screen.
2. Click Next.
33.3.1.4 Specify Demantra Inbound Path
To specify the location of Demantra inbound files details:1. Enter information about the location of your Demantra inbound files details in the
Demantra Inbound Path screen.
2. Click Next.
33.3.1.5 Specify Demantra Outbound Path
To specify the location of Demantra outbound files details:1. Enter information about the location of your Demantra outbound files details in
the Demantra Outbound Path screen.
2. Click Next.
33.3.1.6 Specify APS Database Connection Details
To specify Advanced Planning and Scheduling Connection details:1. Enter information about your APS Database Connection instance in the APS
Database Connection Details screen.
Configuring and Deploying VCP Base Pack Integration
33-8 Oracle Application Integration Architecture Installation and Upgrade Guide for Pre-Built Integrations
2. Click Next.
33.3.1.7 Specify APS Inbound Path
To specify APS inbound files location:1. Enter information about your APS inbound files location in the APS Inbound
Path Screen.
2. Click Next.
33.3.1.8 Specify APS Outbound Path
To specify APS outbound files location:1. Enter information about your APS outbound files location in the APS Outbound
Path Screen.
2. Click Next.
33.3.1.9 Specify Oracle Data Integrator Access Details
To specify Oracle Data Integrator Access details:1. Enter information about your Oracle Data Integrator Access installation in the
Oracle Data Integrator Access Information screens.
Oracle Data Integration Access Information is captured in two screens. Enter the following information in the screens.
2. Specify ODI Home.
3. Click Next.
4. Enter ODI User and ODI Password.
5. Specify the Path to JDK.
6. Click Next.
33.3.1.10 Oracle Data Integrator Path for Exported DVMs DetailsThe path for Exported DVMs is not applicable for Oracle Value Chain Planning Integration Pack for JD Edwards EnterpriseOne.
33.3.1.11 Specify Oracle Data Integrator Master Repository Details
To specify Oracle Data Integrator Master Repository details:1. Enter information about your Oracle Data Integrator Master Repository
installation in the Oracle Data Integrator Master Repository screen.
2. Click Next.
33.3.1.12 Specify Oracle Data Integrator Work Repository Details
To specify Oracle Data Integrator Work Repository details:1. Enter information about your Oracle Data Integrator Work Repository installation
in the Oracle Data Integrator Work Repository screen.
2. Click Next.
Configuring and Deploying VCP Base Pack Integration
Configuring and Deploying Value Chain Planning Base Pack Integration 33-9
33.3.1.13 Complete Configuration
To complete configuration:1. Review the configuration information on the Configuration Summary screen.
2. Click Configure to accept the configuration.
The system displays progress of the configuration in the Configuration Progress screen.
The system displays any warnings or errors as necessary. You can review the configuration log for additional details. The configuration log location is displayed in Configuration Progress screen.
3. When the configuration process completes without errors, the AIA DCW displays the Configuration Complete screen.
4. Click Finish to close the DCW.
33.3.2 Configuring using the Response File
To configure using the response file:1. Open the response file.
When you create a response file through OUI, passwords get stored as <SECURE>.
2. Replace the password fields with actual passwords in the response file.
3. Navigate to <AIA_Instance>/bin and run the command source aiaenv.sh for Linux based systems and aiaenv.bat for Microsoft Windows to configure the environment.
4. Navigate to <AIA_HOME>/bin and run the command ./aiaconfig.sh <Response File Location and Name> for Linux based systems and aiaconfig.bat <Response File Location and Name> for Microsoft Windows.
33.3.3 Deploying the VCP Base Pack Integration
To deploy the PIP to Fusion Middleware server:1. Navigate to <AIA_Instance>/bin and run the command source aiaenv.sh for
Linux based systems and aiaenv.bat for Microsoft Windows to configure the environment.
2. Run the command for your platform.
Note: If you want to make changes to the configuration, use the navigation pane on the left and select the screen you want to edit.
You can create a response file based on the input provided in the DCW and use it in future when you want to deploy the PIP. You can configure using the steps described in Section 33.3.2, "Configuring using the Response File". Click Save Response File and save the response file with the name and location of your choice.
Performing Postdeployment Configurations
33-10 Oracle Application Integration Architecture Installation and Upgrade Guide for Pre-Built Integrations
3. Review the log file in the location specified in the command to verify successful deployment.
Oracle AIA ships artifacts in AIA Lifecycle Workbench which can be used in your integrations. These artifacts are created using FMW technologies such as BPEL and Mediator and are natively supported by AIA Foundation Pack tools such as Project Lifecycle Workbench, Harvester, Deployment Generator, AIA Deployment Driver (ADD). These are called native artifacts and they include SOA artifact types such as composites, DataSources, DVM, xRef, and so on. These artifacts can be modified or new natively supported artifacts can be added using the AIA Lifecyle Workbench and a BOM.xml file can be generated.
AIA PIP development teams, most often, also require deployment of artifact types that are beyond what is supported by the Project Lifecycle Workbench and AIA Harvester. For instance, integration may require artifacts such as, Java applications, Shell Scripts, ANT based build scripts which constitute part of integration landscape in addition to the artifacts that are delivered by AIA. AIA also supports deployment of these supplementary artifacts. However, you must modify and add new non native artifacts outside AIA Lifecycle Workbench.
For more information on deploying artifacts, see Oracle Fusion Middleware Developer's Guide for Oracle Application Integration Architecture Foundation Pack "Generating Deployment Plans and Deploying Artifacts".
33.4 Performing Postdeployment ConfigurationsThis section discusses postdeployment configurations for the VCP Base Pack Integration. This section includes:
■ Section 33.4.1, "Configuring Environment Variables"
■ Section 33.4.2, "Verifying Directory Structure"
Note: When you copy and paste the command in the command line, ensure that there is space between .xml and -. Ensure that there is space between these two when you run undeployment command too.
Table 33–12 Deployment Commands for the VCP Base Pack Integration
Platform Deployment Command
Linux
Solaris SPARC
IBM AIX Based Systems.
HP-UX
ant -f <AIA_HOME>/Infrastructure/Install/AID/AIAInstallDriver.xml -DDeploymentPlan=<AIA_HOME>/pips/VCPJDE/DeploymentPlans/VCPJDEDP.xml -DPropertiesFile=<AIA_HOME>/aia_instances/<aia_instance>/config/AIAInstallProperties.xml -l <AIA_HOME>/pips/VCPJDE/DeploymentPlans/VCPJDE.log
Microsoft Windows ant -f <AIA_HOME>\Infrastructure\Install\AID\AIAInstallDriver.xml -DDeploymentPlan=<AIA_HOME>\pips\VCPJDE\DeploymentPlans\VCPJDEDP.xml -DPropertiesFile=<AIA_HOME>\aia_instances\<aia_instance>\config\AIAInstallProperties.xml -l <AIA_HOME>\pips\VCPJDE\DeploymentPlans\VCPJDE.log
Note: In Windows 2008, 2008 R2 and Vista, run the command prompt as an administrator (elevated mode). If the command prompt is invoked in normal mode, the PIPs are not displayed.
Performing Postdeployment Configurations
Configuring and Deploying Value Chain Planning Base Pack Integration 33-11
■ Section 33.4.3, "Launching the VCP Base Pack Integration Agent"
■ Section 33.4.4, "Enabling AIA Error Handling (Optional)"
■ Section 33.4.5, "Updating the DTD files"
■ Section 33.4.6, "Applying Patch for Compatibility with ODI 11.1.1.5.0"
33.4.1 Configuring Environment VariablesConfigure the following environment variable:
For more information, see the Oracle Value Chain Planning Integration Base Pack Implementation Guide, "Configuring ODI Variables".
33.4.2 Verifying Directory StructureBefore using VCP Base Pack Integration, a system administrator must verify if the directories exist according to the directory structure.
For more information, see the Oracle Value Chain Planning Integration Base Pack Implementation Guide, "Setting Up VCP Base Pack Integration".
33.4.3 Launching the VCP Base Pack Integration AgentBefore running a scenario from ODI or a collection from APS, ensure that the VCP Base Pack Java EE agent is running. The name of this agent is OracleDIAgent.
To ensure that OracleDIAgent is running properly:1. Log in to the ODI Topology Manager.
2. Create a new agent called OracleDIAgent.
3. In the Host field, enter the name of the host where the Java EE agent deploys.
This is the same host where the Weblogic server runs.
4. In the Port field, enter the port number of the Admin server in Weblogic server.
5. Install and configure the Java EE agent.
For more information on installing and deploying the Java EE agent, see Oracle Fusion Middleware Installation Guide for Oracle Data Integrator, "Installing Oracle Data Integrator". Follow the installation instructions for Java EE.
6. Return to the OracleDIAgent screen in the Topology Manager and click Test.
33.4.4 Enabling AIA Error Handling (Optional)The procedure for logging these error messages is provided in each package of the PIP with a six step process grouped in each package. These steps are:
1. PVV_ERR_MSG: This step stores the error message.
Table 33–13 Environment Variable Configuration
Environment Variable Description
ODI_BIN_DIR The location of the ODI program. The recommended location is as follows:
<ODIHOME>/bin
VCPJDE_PIP_HOME The location of the PIP program. The recommended location is as follows:
<PIP_HOME>/VCPJDE
Performing Postdeployment Configurations
33-12 Oracle Application Integration Architecture Installation and Upgrade Guide for Pre-Built Integrations
2. PVV_ERR_STEP: This step stores the step name where scenario has failed.
3. PVV_ERROR_FLOW_INSTANCE_ID: This step stores the flow name where scenario has failed.
4. PVV_ERROR_SOURCE_ID: This step stores the source from where data is coming.
5. ODI Invoke Web Service: This step invokes the web service. All credential like WSDL url, user name, password and so on are to be provided here.
6. Failure: This step is to purposefully fail the Scenario (APS depends on the actual failure and success of Scenario to show if a request is successful or errored out).
To enable AIA error handling:1. Open the package.
2. Go to diagram tab and select ko step from toolbar.
3. Connect InsertScenName Step to PVV_ERR_MSG using the ko step.
Only exception to this step is in Synchronize_XML package where ko step is to be inserted between Synchronize_Xml and OdiInvokeWebService1.
4. Select the step OdiInvokeWebService1 and view the properties.
5. Change WSDL URL, HTTP User, and HTTP Password values.
6. Repeat steps 1 through 5 in each of the package.
7. Regenerate all the scenarios.
After completing these steps, the AIA error logging can be viewed using BPEL-Console.
33.4.5 Updating the DTD filesDTD files are located at <AIA_HOME>\services\core\BulkDataProcess\VCPJDE\VCP\ODI\Oracle\V1\DTD
1. Copy Base.dtd, BeginningInventory.dtd, Customer.dtd, Distribution.dtd, Manufacturing.dtd, PurchaseOrders.dtd, SalesOrders.dtd, Supplier.dtd, TimeSeries.dtd, TransferOrders.dtd and WorkOrders.dtd to the directory where the XML files from JDE E1 or PeopleSoft are placed; the JDE E1 Output directory.
2. Copy DeploymentPlan.dtd, DetailedProductionPlan.dtd, MasterProductionPlan.dtd, PurchasePlan.dtd to the APS Output Directory.
You must copy and populate the spreadsheet contained in the self extracting file E1VCPUDD.exe. E1VCPUDD.exe resides in <PIP install directory>/html/supplychain/US/.
It is a self-extracting file that extracts the zip file containing the Excel template for user-defined parameters. The spreadsheet in this file should be copied into the JDE E1 Output directory. Once the data is populated in the spreadsheet, run the Export to File macro to export the spreadsheet data.
Note: You can check the Physical Topology under Files and XML to see the directory names where the DTDs should be available.

Verifying Deployment
Configuring and Deploying Value Chain Planning Base Pack Integration 33-13
33.4.6 Applying Patch for Compatibility with ODI 11.1.1.5.0To achieve compatibility between the VCP Base Pack Integration and ODI 11.1.1.5.0, you must apply patch 12839129 in the ODI work repository.
To apply patch 12839129:1. Search for patch 12839129 on My Oracle Support
[https://support.oracle.com/]
2. Download and extract the patch to a folder.
3. Follow the instructions on the Readme.txt file to apply the patch in the ODI work repository.
33.5 Verifying Deployment
To verify the VCP Base Pack Integration deployment:1. Open the log files from the following location and look for warnings and error
messages:
■ For Linux, Solaris SPARC, HP-UX and IBM AIX Based Systems: Review the install log located at <AIA_HOME>/aia_instances/<instance name>/logs to verify that the PIP is successfully installed.
■ For Microsoft Windows: Review the install log located at <AIA_HOME>\aia_instances\<instance name>\logs to verify that the PIP is successfully installed.
2. Confirm that the VCP Base Pack Integration artifacts are installed:
a. Open the ODI Designer Console.
b. Verify that you can see the E1APSProject project.
c. Verify that you can see the following models in the model tab:
APSToE1ModelFolder
DemantraToE1ModelFolder
E1ToAPSModelFolder
E1ToDemantraModelFolder
d. Open the ODI Topology Manager console.
e. Verify that you can see the following Physical Architecture:
File
APSFlatFileInDS
DemantraFlatFileOutDS
DemantraFlatFileInDS
E1FlatFileInDS
E1FlatFileOutDS
FILE_GENERIC
LogFileDS
Datatypes
Verifying Deployment
33-14 Oracle Application Integration Architecture Installation and Upgrade Guide for Pre-Built Integrations
Actions
Oracle
ASCPDS
WorkRepoDS
Datatypes
Actions
XML
E1BaseDS
E1BeginningInventoryDS
E1CustomerDS
E1DeploymentPlanDS
E1DetailedProductionPlanDS
E1DistributionDS
E1ManufacturingDS
E1MasterProductionPlanDS
E1PurchaseOrdersDS
E1PurchasePlanDS
E1SalesOrderDS
E1SupplierDS
E1TimeSeriesDS
E1TransferOrderDS
E1WorkOrdersDS
XML_GEO_DIM
Datatypes
Actions
f. Verify that you can see the following Logical Architecture:
File
APSFLATFILEIN
DEMANTRAFLATFILEIN
DEMANTRAFLATFILEOUT
E1FLATFILEIN
Caution: If you are reinstalling, do not delete the FILE_GENERIC connection. This is a default ODI connection.
Caution: If you are reinstalling, do not delete the XML_GEO_DIM connection. This is a default ODI connection.
Verifying Deployment
Configuring and Deploying Value Chain Planning Base Pack Integration 33-15
E1FLATFILEOUT
FILE_DEMO_SRC
LOGFILE
Datatypes
Actions
Oracle
ASCP
WORKREPO
Datatypes
Actions
Xml
E1BASE
E1BEGINVENTORY
E1CUSTOMER
E1DEPLOYMENTPLAN
E1DETAILEDPRODPLAN
E1DISTRIBUTION
E1MANUFACTURING
E1MASTERPRODPLAN
E1PURCHASEORDERS
E1PURCHASEPLAN
E1SALESORDERS
E1SUPPLIER
E1TIMESERIES
E1TRANSFERORDERS
E1WORKORDERS
XML_DEMO_GEO
Datatypes
Actions
Caution: If you are reinstalling, do not delete the FILE_DEMO_SRC logical connection. This is a default ODI connection.
Caution: If you are reinstalling, do not delete the XML_DEMO_GEO logical connection. This is a default ODI connection.
Undeploying VCP Base Pack Integration
33-16 Oracle Application Integration Architecture Installation and Upgrade Guide for Pre-Built Integrations
33.5.1 Validating Security PoliciesAll SOA composites are protected by Global Policies provided by Foundation Pack as defined in the Security section of the Developer Guide. Additionally individual services for this PIP have locally attached security policies.
To validate locally attached security policies:1. Log in to Oracle Enterprise Manager Fusion Middleware Control.
2. Navigate to WebLogic Domain, soa_domain, Web Services, Policies.
3. Verify Service Policy attachment.
a. Find the service policy in the list of policies.
b. Click the number in Attachment Count column.
This opens Usage Analysis screen.
c. Change the Subject Type list box to SOA Service.
d. Validate that all the composites are listed with local attachment to this service policy.
4. Verify Client Policy attachment
a. Navigate back to Policies screen and find the client policy
b. Click the number in Attachment Count column.
This opens Usage Analysis screen.
c. Change the Subject Type list box to SOA Reference.
d. Validate that all the composites are listed with local attachment to this client policy and attached to the correct references.
For more information about security validation, see Oracle Fusion Middleware Developer's Guide for Oracle Application Integration Architecture Foundation Pack, "Working with Security."
For PIP Implementation, see Oracle Value Chain Planning Integration Base Pack Implementation Guide.
33.6 Undeploying VCP Base Pack Integration
To undeploy the PIP from Fusion Middleware Server:1. Navigate to <AIA_Instance>/bin and run the command source aiaenv.sh for
Linux based systems and aiaenv.bat for Microsoft Windows to configure the environment.
Table 33–14 Service Policy Attachments for VCP Base Pack Integration
Composite Service Policy
AIAAsyncErrorHandlingBPELProcess aia_wss_saml_or_username_or_http_token_service_policy_OPT_ON
Table 33–15 No Authentication Client Policy Attachments for VCP Base Pack Integration
Composite Reference Client Policy
AIAAsyncErrorHandlingBPELProcess OdiInvokeWebService 1 oracle/no_authentication_client_policy
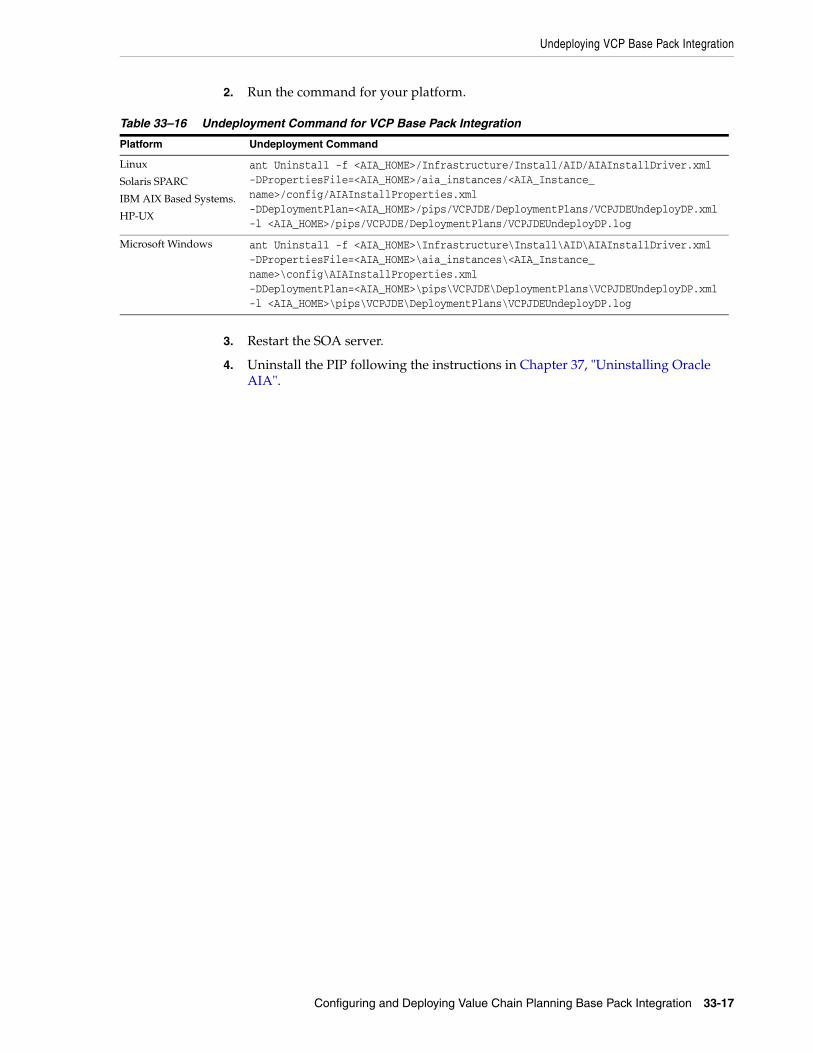
Undeploying VCP Base Pack Integration
Configuring and Deploying Value Chain Planning Base Pack Integration 33-17
2. Run the command for your platform.
3. Restart the SOA server.
4. Uninstall the PIP following the instructions in Chapter 37, "Uninstalling Oracle AIA".
Table 33–16 Undeployment Command for VCP Base Pack Integration
Platform Undeployment Command
Linux
Solaris SPARC
IBM AIX Based Systems.
HP-UX
ant Uninstall -f <AIA_HOME>/Infrastructure/Install/AID/AIAInstallDriver.xml -DPropertiesFile=<AIA_HOME>/aia_instances/<AIA_Instance_name>/config/AIAInstallProperties.xml -DDeploymentPlan=<AIA_HOME>/pips/VCPJDE/DeploymentPlans/VCPJDEUndeployDP.xml -l <AIA_HOME>/pips/VCPJDE/DeploymentPlans/VCPJDEUndeployDP.log
Microsoft Windows ant Uninstall -f <AIA_HOME>\Infrastructure\Install\AID\AIAInstallDriver.xml -DPropertiesFile=<AIA_HOME>\aia_instances\<AIA_Instance_name>\config\AIAInstallProperties.xml -DDeploymentPlan=<AIA_HOME>\pips\VCPJDE\DeploymentPlans\VCPJDEUndeployDP.xml -l <AIA_HOME>\pips\VCPJDE\DeploymentPlans\VCPJDEUndeployDP.log

Undeploying VCP Base Pack Integration
33-18 Oracle Application Integration Architecture Installation and Upgrade Guide for Pre-Built Integrations
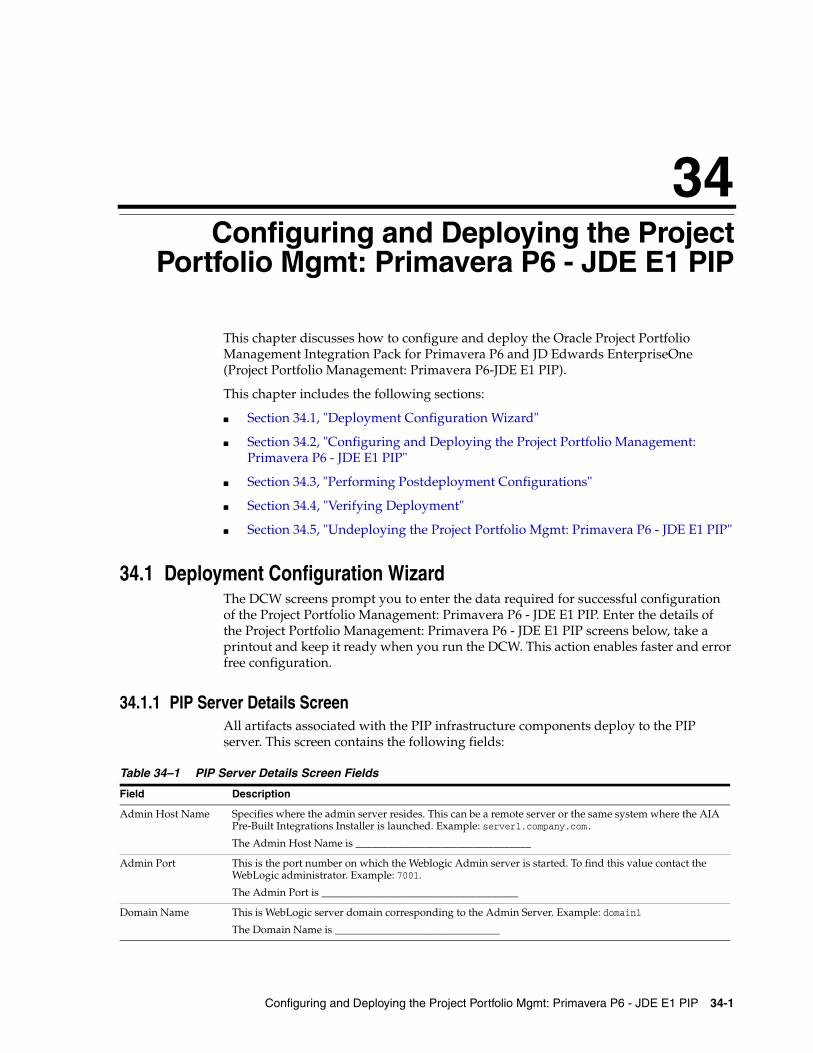
34
Configuring and Deploying the Project Portfolio Mgmt: Primavera P6 - JDE E1 PIP 34-1
34Configuring and Deploying the ProjectPortfolio Mgmt: Primavera P6 - JDE E1 PIP
This chapter discusses how to configure and deploy the Oracle Project Portfolio Management Integration Pack for Primavera P6 and JD Edwards EnterpriseOne (Project Portfolio Management: Primavera P6-JDE E1 PIP).
This chapter includes the following sections:
■ Section 34.1, "Deployment Configuration Wizard"
■ Section 34.2, "Configuring and Deploying the Project Portfolio Management: Primavera P6 - JDE E1 PIP"
■ Section 34.3, "Performing Postdeployment Configurations"
■ Section 34.4, "Verifying Deployment"
■ Section 34.5, "Undeploying the Project Portfolio Mgmt: Primavera P6 - JDE E1 PIP"
34.1 Deployment Configuration WizardThe DCW screens prompt you to enter the data required for successful configuration of the Project Portfolio Management: Primavera P6 - JDE E1 PIP. Enter the details of the Project Portfolio Management: Primavera P6 - JDE E1 PIP screens below, take a printout and keep it ready when you run the DCW. This action enables faster and error free configuration.
34.1.1 PIP Server Details ScreenAll artifacts associated with the PIP infrastructure components deploy to the PIP server. This screen contains the following fields:
Table 34–1 PIP Server Details Screen Fields
Field Description
Admin Host Name Specifies where the admin server resides. This can be a remote server or the same system where the AIA Pre-Built Integrations Installer is launched. Example: server1.company.com.
The Admin Host Name is _________________________________
Admin Port This is the port number on which the Weblogic Admin server is started. To find this value contact the WebLogic administrator. Example: 7001.
The Admin Port is _____________________________________
Domain Name This is WebLogic server domain corresponding to the Admin Server. Example: domain1
The Domain Name is _______________________________

Deployment Configuration Wizard
34-2 Oracle Application Integration Architecture Installation and Upgrade Guide for Pre-Built Integrations
34.1.2 JD Edwards EnterpriseOne Business Services ScreenUse this screen to enter details related to your JD Edwards EnterpriseOne business services.
The screen contains the following fields:
34.1.3 Primavera P6 Server Details
Admin User This value is the WebLogic admin user name. To find this value contact your WebLogic administrator.
The Admin User is __________________________________
Admin Password This value is the WebLogic admin password. To find this value contact your WebLogic administrator.
The password is _____________________________________
Managed Server After you enter the Admin Host Name, Admin Port and Admin User, this field populates with managed servers for the domain. Select the managed server from the list. If you are deploying the PIP to a SOA cluster, you should select the cluster name in this field.
The Managed Server is _______________________________
Managed Port This field is automatically updated after you select the managed server. If you have configured a SOA Cluster, the SOA Cluster port appears in the list.
Table 34–2 JD Edwards EnterpriseOne Business Services Screen Fields
Field Description
Web Services Platform This value is the web services platform that is used by EnterpriseOne. Valid platforms include Oracle WebLogic Server (WLS) and WebSphere Application Server (WAS). This value can be WLS or WAS. Select the appropriate platform from the menu.
Example: WLS
Web Services Platform is ____________________________
Web Service Server URL This value is the location of the EnterpriseOne business service server. This value should contain the entire path, including the trailing slash, but not contain the name of the particular web service.
Example: http://dnvmsvr20.mlab.jdedwards.com:9988/PY900/
Web Service URL is _________________________________
Environment This is the environment that the integration proxy user accesses during sign on. To find this value, contact your administrator.
Example: PY900CLM
Environment is _________________________________
Table 34–3 Primavera P6 Server Details Screen Fields
Field Description
P6 Webservice host url This value is the url of the P6 Webservice host, and must contain either http:// or https:// as part of the url."
Example: http://example1.p6webservice.com
P6 Webservice host url is ____________________________
P6 Webservice port This value is the P6 Webservice port number. To find this value, contact your administrator.
Example: 1521
P6 Webservice port is ______________________
Table 34–1 (Cont.) PIP Server Details Screen Fields
Field Description
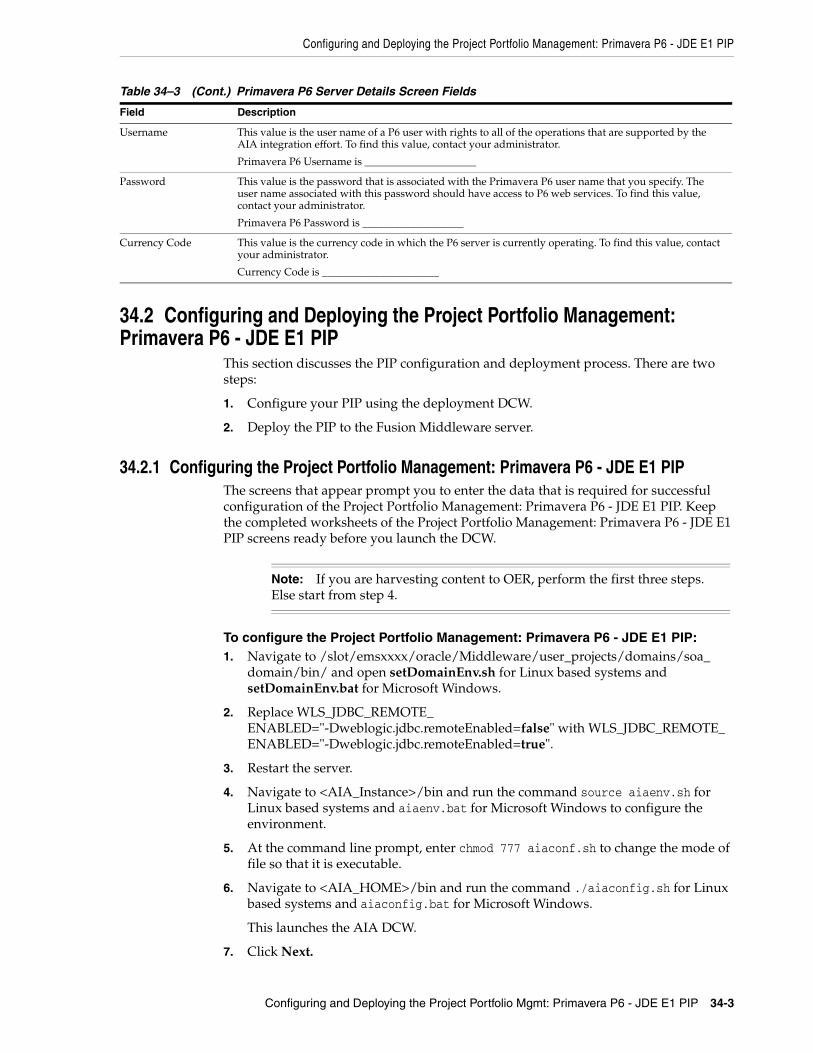
Configuring and Deploying the Project Portfolio Management: Primavera P6 - JDE E1 PIP
Configuring and Deploying the Project Portfolio Mgmt: Primavera P6 - JDE E1 PIP 34-3
34.2 Configuring and Deploying the Project Portfolio Management: Primavera P6 - JDE E1 PIP
This section discusses the PIP configuration and deployment process. There are two steps:
1. Configure your PIP using the deployment DCW.
2. Deploy the PIP to the Fusion Middleware server.
34.2.1 Configuring the Project Portfolio Management: Primavera P6 - JDE E1 PIPThe screens that appear prompt you to enter the data that is required for successful configuration of the Project Portfolio Management: Primavera P6 - JDE E1 PIP. Keep the completed worksheets of the Project Portfolio Management: Primavera P6 - JDE E1 PIP screens ready before you launch the DCW.
To configure the Project Portfolio Management: Primavera P6 - JDE E1 PIP:1. Navigate to /slot/emsxxxx/oracle/Middleware/user_projects/domains/soa_
domain/bin/ and open setDomainEnv.sh for Linux based systems and setDomainEnv.bat for Microsoft Windows.
2. Replace WLS_JDBC_REMOTE_ENABLED="-Dweblogic.jdbc.remoteEnabled=false" with WLS_JDBC_REMOTE_ENABLED="-Dweblogic.jdbc.remoteEnabled=true".
3. Restart the server.
4. Navigate to <AIA_Instance>/bin and run the command source aiaenv.sh for Linux based systems and aiaenv.bat for Microsoft Windows to configure the environment.
5. At the command line prompt, enter chmod 777 aiaconf.sh to change the mode of file so that it is executable.
6. Navigate to <AIA_HOME>/bin and run the command ./aiaconfig.sh for Linux based systems and aiaconfig.bat for Microsoft Windows.
This launches the AIA DCW.
7. Click Next.
Username This value is the user name of a P6 user with rights to all of the operations that are supported by the AIA integration effort. To find this value, contact your administrator.
Primavera P6 Username is _____________________
Password This value is the password that is associated with the Primavera P6 user name that you specify. The user name associated with this password should have access to P6 web services. To find this value, contact your administrator.
Primavera P6 Password is ___________________
Currency Code This value is the currency code in which the P6 server is currently operating. To find this value, contact your administrator.
Currency Code is ______________________
Note: If you are harvesting content to OER, perform the first three steps. Else start from step 4.
Table 34–3 (Cont.) Primavera P6 Server Details Screen Fields
Field Description
Configuring and Deploying the Project Portfolio Management: Primavera P6 - JDE E1 PIP
34-4 Oracle Application Integration Architecture Installation and Upgrade Guide for Pre-Built Integrations
8. Select the Project Portfolio Management: Primavera P6 - JDE E1 PIP
9. Click Next.
34.2.1.1 Specify PIP Server Details
To specify PIP Server details:1. Enter information related to your PIP server in the PIP Server Details screen.
2. Click Next.
34.2.1.2 Specify JD Edwards EnterpriseOne Business Services Details
To specify JD Edwards EnterpriseOne Business Services Information details:1. Enter information about your JD Edwards EnterpriseOne installation on the
EnterpriseOne Business Services Information screen.
2. Click Next.
34.2.1.3 Specify the Primavera P6 Server Details
To specify Primavera P6 server details:1. Enter information about your Primavera P6 installation in the Primavera P6
Server Details screen.
2. Click Next.
34.2.1.4 Complete Configuration
To complete configuration:1. Review the configuration information on the Configuration Summary screen.
2. Click Configure to accept the configuration.
The system displays progress of the configuration in the Configuration Progress screen.
The system displays any warnings or errors as necessary. You can review the configuration log for additional details. The configuration log location is displayed in Configuration Progress screen.
3. When the configuration process completes without errors, the AIA DCW displays the Configuration Complete screen.
4. Click Finish to close the DCW.
Note: If you want to make changes to the configuration, use the navigation pane on the left and select the screen you want to edit.
You can create a response file based on the input provided in the DCW and use it in future when you want to deploy the PIP. You can configure using the steps described in Section 34.2.2, "Configuring using the Response File". Click Save Response File and save the response file with the name and location of your choice.
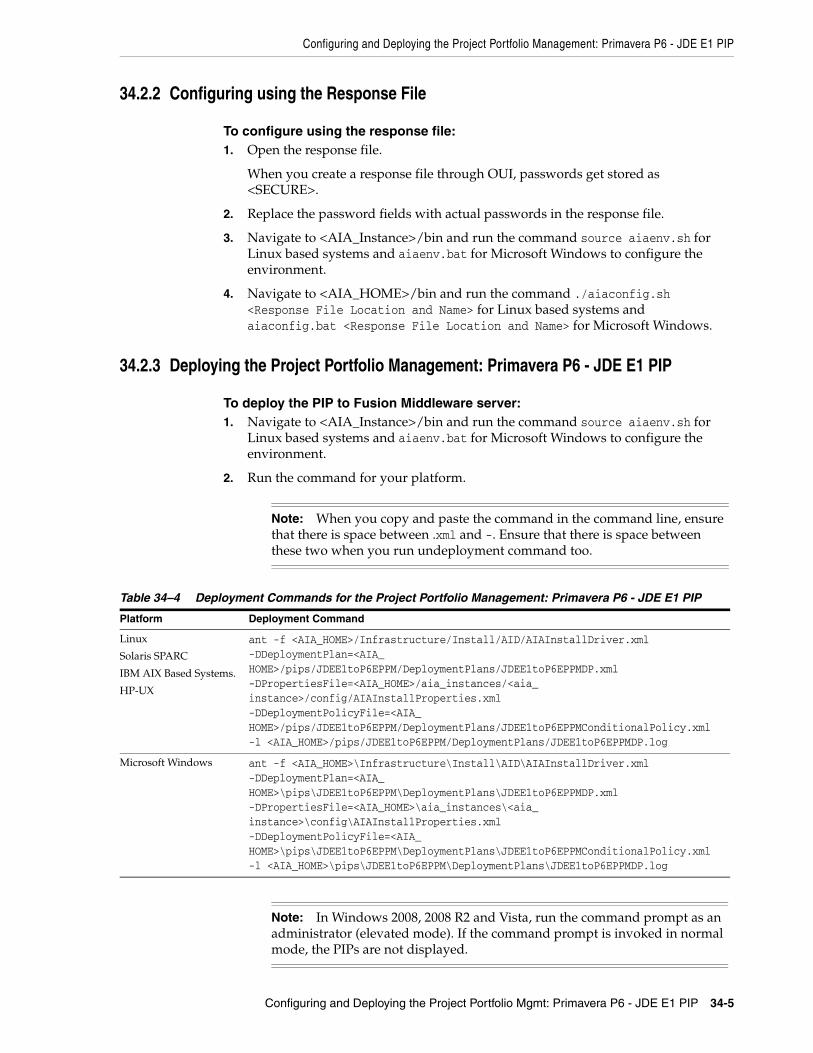
Configuring and Deploying the Project Portfolio Management: Primavera P6 - JDE E1 PIP
Configuring and Deploying the Project Portfolio Mgmt: Primavera P6 - JDE E1 PIP 34-5
34.2.2 Configuring using the Response File
To configure using the response file:1. Open the response file.
When you create a response file through OUI, passwords get stored as <SECURE>.
2. Replace the password fields with actual passwords in the response file.
3. Navigate to <AIA_Instance>/bin and run the command source aiaenv.sh for Linux based systems and aiaenv.bat for Microsoft Windows to configure the environment.
4. Navigate to <AIA_HOME>/bin and run the command ./aiaconfig.sh <Response File Location and Name> for Linux based systems and aiaconfig.bat <Response File Location and Name> for Microsoft Windows.
34.2.3 Deploying the Project Portfolio Management: Primavera P6 - JDE E1 PIP
To deploy the PIP to Fusion Middleware server:1. Navigate to <AIA_Instance>/bin and run the command source aiaenv.sh for
Linux based systems and aiaenv.bat for Microsoft Windows to configure the environment.
2. Run the command for your platform.
Note: When you copy and paste the command in the command line, ensure that there is space between .xml and -. Ensure that there is space between these two when you run undeployment command too.
Table 34–4 Deployment Commands for the Project Portfolio Management: Primavera P6 - JDE E1 PIP
Platform Deployment Command
Linux
Solaris SPARC
IBM AIX Based Systems.
HP-UX
ant -f <AIA_HOME>/Infrastructure/Install/AID/AIAInstallDriver.xml -DDeploymentPlan=<AIA_HOME>/pips/JDEE1toP6EPPM/DeploymentPlans/JDEE1toP6EPPMDP.xml -DPropertiesFile=<AIA_HOME>/aia_instances/<aia_instance>/config/AIAInstallProperties.xml -DDeploymentPolicyFile=<AIA_HOME>/pips/JDEE1toP6EPPM/DeploymentPlans/JDEE1toP6EPPMConditionalPolicy.xml -l <AIA_HOME>/pips/JDEE1toP6EPPM/DeploymentPlans/JDEE1toP6EPPMDP.log
Microsoft Windows ant -f <AIA_HOME>\Infrastructure\Install\AID\AIAInstallDriver.xml -DDeploymentPlan=<AIA_HOME>\pips\JDEE1toP6EPPM\DeploymentPlans\JDEE1toP6EPPMDP.xml -DPropertiesFile=<AIA_HOME>\aia_instances\<aia_instance>\config\AIAInstallProperties.xml -DDeploymentPolicyFile=<AIA_HOME>\pips\JDEE1toP6EPPM\DeploymentPlans\JDEE1toP6EPPMConditionalPolicy.xml -l <AIA_HOME>\pips\JDEE1toP6EPPM\DeploymentPlans\JDEE1toP6EPPMDP.log
Note: In Windows 2008, 2008 R2 and Vista, run the command prompt as an administrator (elevated mode). If the command prompt is invoked in normal mode, the PIPs are not displayed.
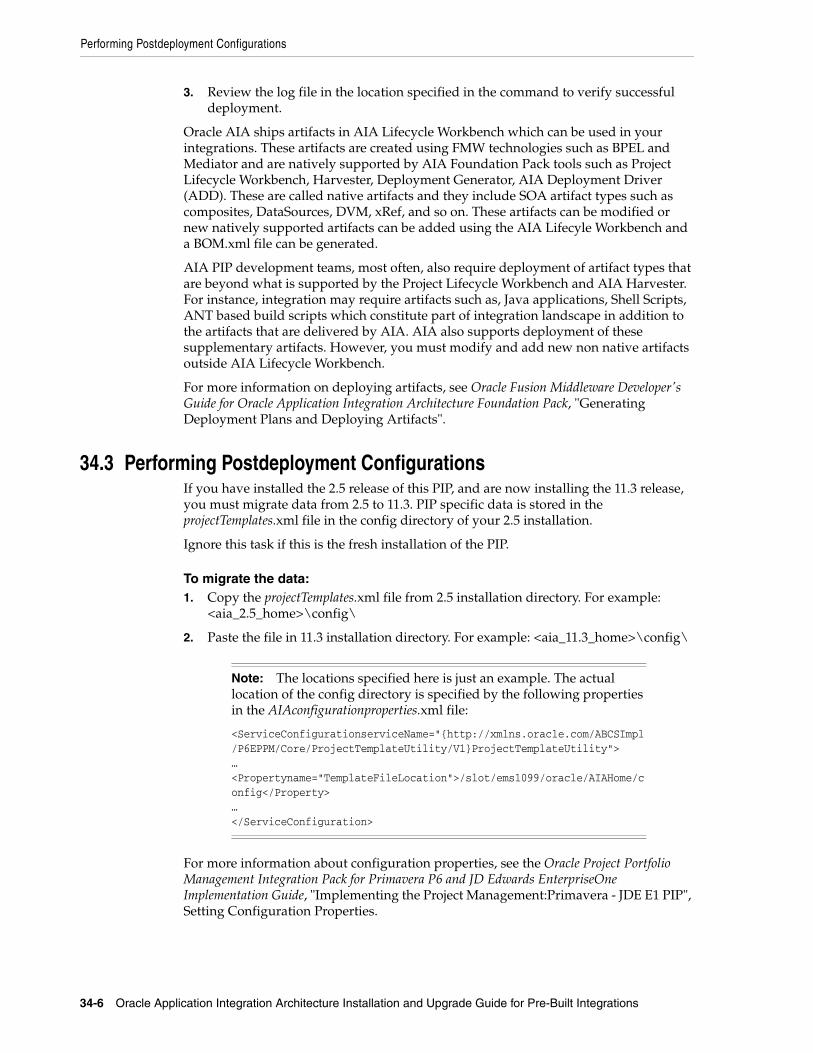
Performing Postdeployment Configurations
34-6 Oracle Application Integration Architecture Installation and Upgrade Guide for Pre-Built Integrations
3. Review the log file in the location specified in the command to verify successful deployment.
Oracle AIA ships artifacts in AIA Lifecycle Workbench which can be used in your integrations. These artifacts are created using FMW technologies such as BPEL and Mediator and are natively supported by AIA Foundation Pack tools such as Project Lifecycle Workbench, Harvester, Deployment Generator, AIA Deployment Driver (ADD). These are called native artifacts and they include SOA artifact types such as composites, DataSources, DVM, xRef, and so on. These artifacts can be modified or new natively supported artifacts can be added using the AIA Lifecyle Workbench and a BOM.xml file can be generated.
AIA PIP development teams, most often, also require deployment of artifact types that are beyond what is supported by the Project Lifecycle Workbench and AIA Harvester. For instance, integration may require artifacts such as, Java applications, Shell Scripts, ANT based build scripts which constitute part of integration landscape in addition to the artifacts that are delivered by AIA. AIA also supports deployment of these supplementary artifacts. However, you must modify and add new non native artifacts outside AIA Lifecycle Workbench.
For more information on deploying artifacts, see Oracle Fusion Middleware Developer's Guide for Oracle Application Integration Architecture Foundation Pack, "Generating Deployment Plans and Deploying Artifacts".
34.3 Performing Postdeployment ConfigurationsIf you have installed the 2.5 release of this PIP, and are now installing the 11.3 release, you must migrate data from 2.5 to 11.3. PIP specific data is stored in the projectTemplates.xml file in the config directory of your 2.5 installation.
Ignore this task if this is the fresh installation of the PIP.
To migrate the data: 1. Copy the projectTemplates.xml file from 2.5 installation directory. For example:
<aia_2.5_home>\config\
2. Paste the file in 11.3 installation directory. For example: <aia_11.3_home>\config\
For more information about configuration properties, see the Oracle Project Portfolio Management Integration Pack for Primavera P6 and JD Edwards EnterpriseOne Implementation Guide, "Implementing the Project Management:Primavera - JDE E1 PIP", Setting Configuration Properties.
Note: The locations specified here is just an example. The actual location of the config directory is specified by the following properties in the AIAconfigurationproperties.xml file:
<ServiceConfigurationserviceName="{http://xmlns.oracle.com/ABCSImpl/P6EPPM/Core/ProjectTemplateUtility/V1}ProjectTemplateUtility">…<Propertyname="TemplateFileLocation">/slot/ems1099/oracle/AIAHome/config</Property>…</ServiceConfiguration>
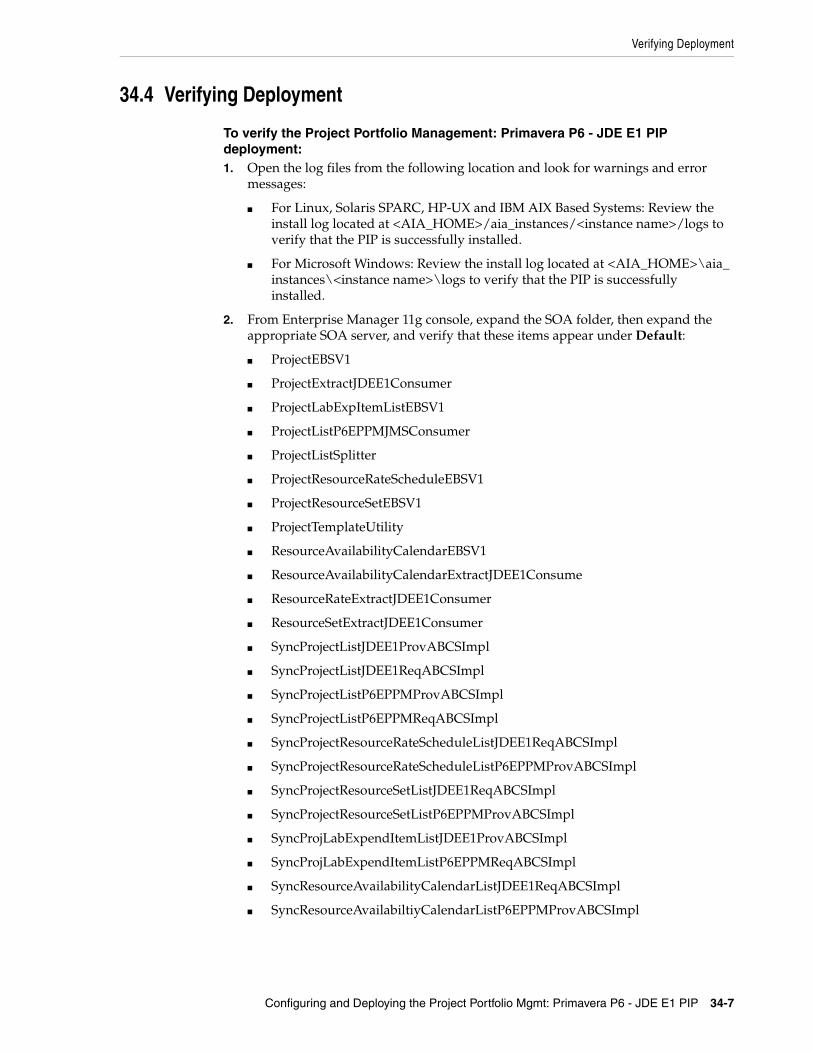
Verifying Deployment
Configuring and Deploying the Project Portfolio Mgmt: Primavera P6 - JDE E1 PIP 34-7
34.4 Verifying Deployment
To verify the Project Portfolio Management: Primavera P6 - JDE E1 PIP deployment:1. Open the log files from the following location and look for warnings and error
messages:
■ For Linux, Solaris SPARC, HP-UX and IBM AIX Based Systems: Review the install log located at <AIA_HOME>/aia_instances/<instance name>/logs to verify that the PIP is successfully installed.
■ For Microsoft Windows: Review the install log located at <AIA_HOME>\aia_instances\<instance name>\logs to verify that the PIP is successfully installed.
2. From Enterprise Manager 11g console, expand the SOA folder, then expand the appropriate SOA server, and verify that these items appear under Default:
■ ProjectEBSV1
■ ProjectExtractJDEE1Consumer
■ ProjectLabExpItemListEBSV1
■ ProjectListP6EPPMJMSConsumer
■ ProjectListSplitter
■ ProjectResourceRateScheduleEBSV1
■ ProjectResourceSetEBSV1
■ ProjectTemplateUtility
■ ResourceAvailabilityCalendarEBSV1
■ ResourceAvailabilityCalendarExtractJDEE1Consume
■ ResourceRateExtractJDEE1Consumer
■ ResourceSetExtractJDEE1Consumer
■ SyncProjectListJDEE1ProvABCSImpl
■ SyncProjectListJDEE1ReqABCSImpl
■ SyncProjectListP6EPPMProvABCSImpl
■ SyncProjectListP6EPPMReqABCSImpl
■ SyncProjectResourceRateScheduleListJDEE1ReqABCSImpl
■ SyncProjectResourceRateScheduleListP6EPPMProvABCSImpl
■ SyncProjectResourceSetListJDEE1ReqABCSImpl
■ SyncProjectResourceSetListP6EPPMProvABCSImpl
■ SyncProjLabExpendItemListJDEE1ProvABCSImpl
■ SyncProjLabExpendItemListP6EPPMReqABCSImpl
■ SyncResourceAvailabilityCalendarListJDEE1ReqABCSImpl
■ SyncResourceAvailabiltiyCalendarListP6EPPMProvABCSImpl
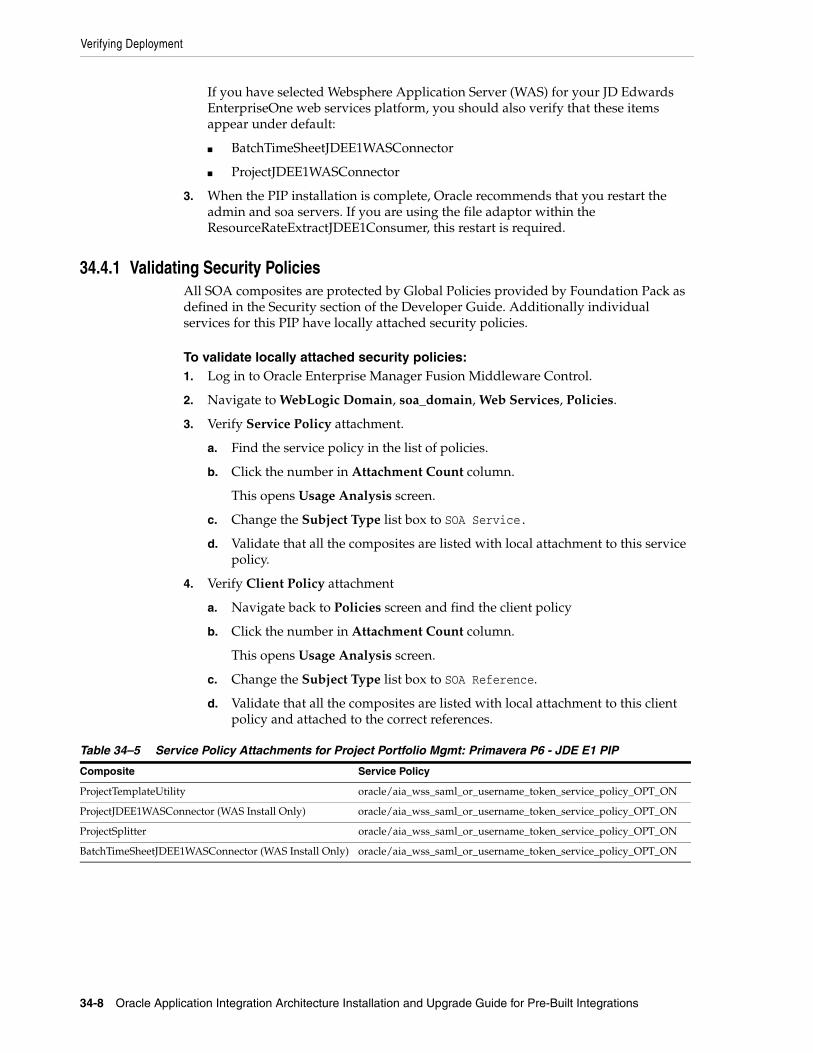
Verifying Deployment
34-8 Oracle Application Integration Architecture Installation and Upgrade Guide for Pre-Built Integrations
If you have selected Websphere Application Server (WAS) for your JD Edwards EnterpriseOne web services platform, you should also verify that these items appear under default:
■ BatchTimeSheetJDEE1WASConnector
■ ProjectJDEE1WASConnector
3. When the PIP installation is complete, Oracle recommends that you restart the admin and soa servers. If you are using the file adaptor within the ResourceRateExtractJDEE1Consumer, this restart is required.
34.4.1 Validating Security PoliciesAll SOA composites are protected by Global Policies provided by Foundation Pack as defined in the Security section of the Developer Guide. Additionally individual services for this PIP have locally attached security policies.
To validate locally attached security policies:1. Log in to Oracle Enterprise Manager Fusion Middleware Control.
2. Navigate to WebLogic Domain, soa_domain, Web Services, Policies.
3. Verify Service Policy attachment.
a. Find the service policy in the list of policies.
b. Click the number in Attachment Count column.
This opens Usage Analysis screen.
c. Change the Subject Type list box to SOA Service.
d. Validate that all the composites are listed with local attachment to this service policy.
4. Verify Client Policy attachment
a. Navigate back to Policies screen and find the client policy
b. Click the number in Attachment Count column.
This opens Usage Analysis screen.
c. Change the Subject Type list box to SOA Reference.
d. Validate that all the composites are listed with local attachment to this client policy and attached to the correct references.
Table 34–5 Service Policy Attachments for Project Portfolio Mgmt: Primavera P6 - JDE E1 PIP
Composite Service Policy
ProjectTemplateUtility oracle/aia_wss_saml_or_username_token_service_policy_OPT_ON
ProjectJDEE1WASConnector (WAS Install Only) oracle/aia_wss_saml_or_username_token_service_policy_OPT_ON
ProjectSplitter oracle/aia_wss_saml_or_username_token_service_policy_OPT_ON
BatchTimeSheetJDEE1WASConnector (WAS Install Only) oracle/aia_wss_saml_or_username_token_service_policy_OPT_ON
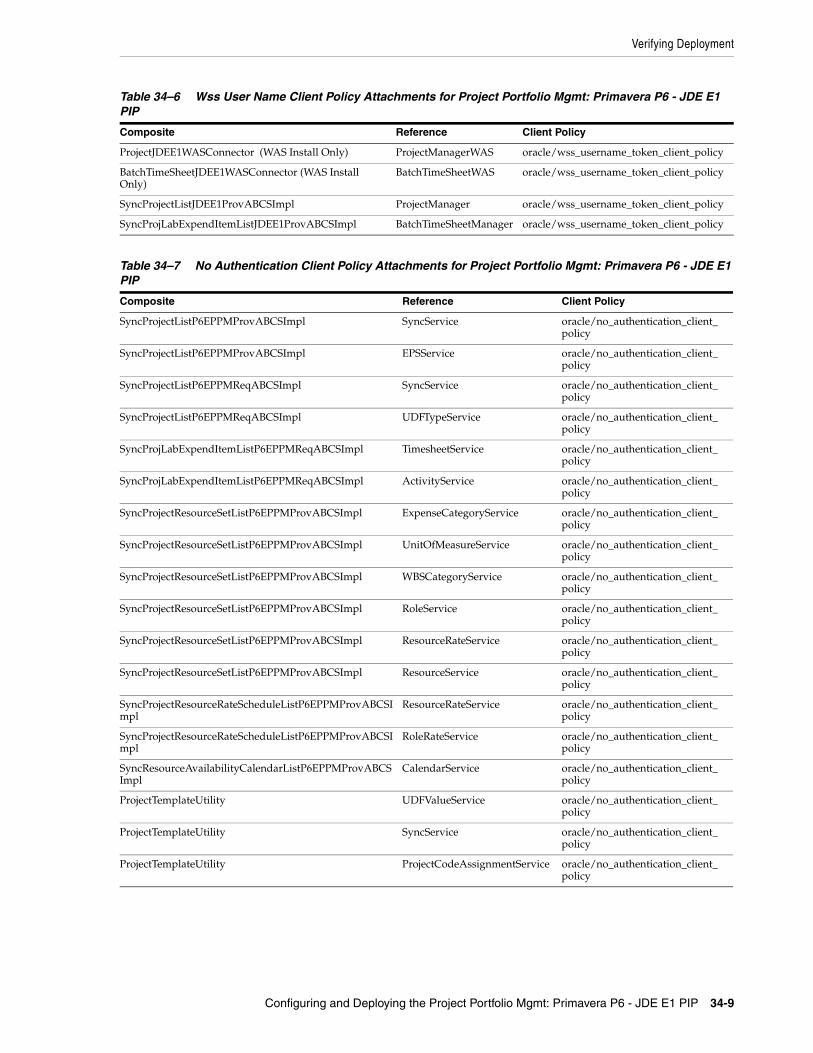
Verifying Deployment
Configuring and Deploying the Project Portfolio Mgmt: Primavera P6 - JDE E1 PIP 34-9
Table 34–6 Wss User Name Client Policy Attachments for Project Portfolio Mgmt: Primavera P6 - JDE E1 PIP
Composite Reference Client Policy
ProjectJDEE1WASConnector (WAS Install Only) ProjectManagerWAS oracle/wss_username_token_client_policy
BatchTimeSheetJDEE1WASConnector (WAS Install Only)
BatchTimeSheetWAS oracle/wss_username_token_client_policy
SyncProjectListJDEE1ProvABCSImpl ProjectManager oracle/wss_username_token_client_policy
SyncProjLabExpendItemListJDEE1ProvABCSImpl BatchTimeSheetManager oracle/wss_username_token_client_policy
Table 34–7 No Authentication Client Policy Attachments for Project Portfolio Mgmt: Primavera P6 - JDE E1 PIP
Composite Reference Client Policy
SyncProjectListP6EPPMProvABCSImpl SyncService oracle/no_authentication_client_policy
SyncProjectListP6EPPMProvABCSImpl EPSService oracle/no_authentication_client_policy
SyncProjectListP6EPPMReqABCSImpl SyncService oracle/no_authentication_client_policy
SyncProjectListP6EPPMReqABCSImpl UDFTypeService oracle/no_authentication_client_policy
SyncProjLabExpendItemListP6EPPMReqABCSImpl TimesheetService oracle/no_authentication_client_policy
SyncProjLabExpendItemListP6EPPMReqABCSImpl ActivityService oracle/no_authentication_client_policy
SyncProjectResourceSetListP6EPPMProvABCSImpl ExpenseCategoryService oracle/no_authentication_client_policy
SyncProjectResourceSetListP6EPPMProvABCSImpl UnitOfMeasureService oracle/no_authentication_client_policy
SyncProjectResourceSetListP6EPPMProvABCSImpl WBSCategoryService oracle/no_authentication_client_policy
SyncProjectResourceSetListP6EPPMProvABCSImpl RoleService oracle/no_authentication_client_policy
SyncProjectResourceSetListP6EPPMProvABCSImpl ResourceRateService oracle/no_authentication_client_policy
SyncProjectResourceSetListP6EPPMProvABCSImpl ResourceService oracle/no_authentication_client_policy
SyncProjectResourceRateScheduleListP6EPPMProvABCSImpl
ResourceRateService oracle/no_authentication_client_policy
SyncProjectResourceRateScheduleListP6EPPMProvABCSImpl
RoleRateService oracle/no_authentication_client_policy
SyncResourceAvailabilityCalendarListP6EPPMProvABCSImpl
CalendarService oracle/no_authentication_client_policy
ProjectTemplateUtility UDFValueService oracle/no_authentication_client_policy
ProjectTemplateUtility SyncService oracle/no_authentication_client_policy
ProjectTemplateUtility ProjectCodeAssignmentService oracle/no_authentication_client_policy
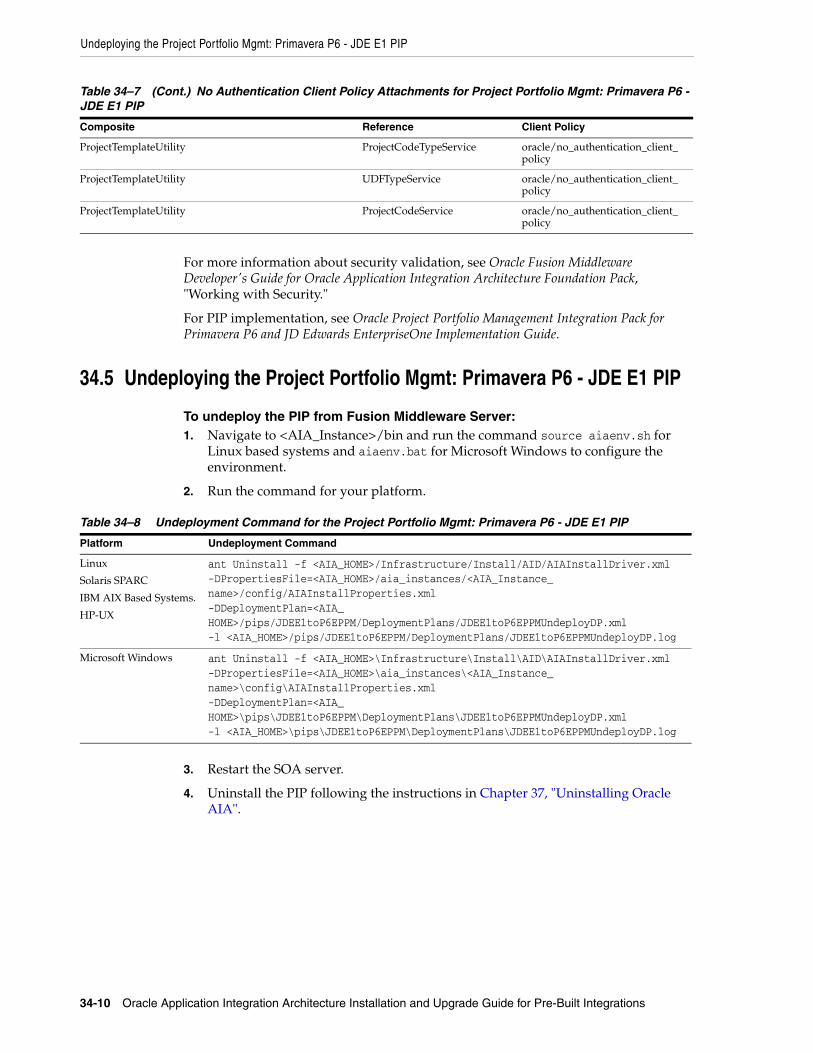
Undeploying the Project Portfolio Mgmt: Primavera P6 - JDE E1 PIP
34-10 Oracle Application Integration Architecture Installation and Upgrade Guide for Pre-Built Integrations
For more information about security validation, see Oracle Fusion Middleware Developer's Guide for Oracle Application Integration Architecture Foundation Pack, "Working with Security."
For PIP implementation, see Oracle Project Portfolio Management Integration Pack for Primavera P6 and JD Edwards EnterpriseOne Implementation Guide.
34.5 Undeploying the Project Portfolio Mgmt: Primavera P6 - JDE E1 PIP
To undeploy the PIP from Fusion Middleware Server:1. Navigate to <AIA_Instance>/bin and run the command source aiaenv.sh for
Linux based systems and aiaenv.bat for Microsoft Windows to configure the environment.
2. Run the command for your platform.
3. Restart the SOA server.
4. Uninstall the PIP following the instructions in Chapter 37, "Uninstalling Oracle AIA".
ProjectTemplateUtility ProjectCodeTypeService oracle/no_authentication_client_policy
ProjectTemplateUtility UDFTypeService oracle/no_authentication_client_policy
ProjectTemplateUtility ProjectCodeService oracle/no_authentication_client_policy
Table 34–8 Undeployment Command for the Project Portfolio Mgmt: Primavera P6 - JDE E1 PIP
Platform Undeployment Command
Linux
Solaris SPARC
IBM AIX Based Systems.
HP-UX
ant Uninstall -f <AIA_HOME>/Infrastructure/Install/AID/AIAInstallDriver.xml -DPropertiesFile=<AIA_HOME>/aia_instances/<AIA_Instance_name>/config/AIAInstallProperties.xml -DDeploymentPlan=<AIA_HOME>/pips/JDEE1toP6EPPM/DeploymentPlans/JDEE1toP6EPPMUndeployDP.xml -l <AIA_HOME>/pips/JDEE1toP6EPPM/DeploymentPlans/JDEE1toP6EPPMUndeployDP.log
Microsoft Windows ant Uninstall -f <AIA_HOME>\Infrastructure\Install\AID\AIAInstallDriver.xml -DPropertiesFile=<AIA_HOME>\aia_instances\<AIA_Instance_name>\config\AIAInstallProperties.xml -DDeploymentPlan=<AIA_HOME>\pips\JDEE1toP6EPPM\DeploymentPlans\JDEE1toP6EPPMUndeployDP.xml -l <AIA_HOME>\pips\JDEE1toP6EPPM\DeploymentPlans\JDEE1toP6EPPMUndeployDP.log
Table 34–7 (Cont.) No Authentication Client Policy Attachments for Project Portfolio Mgmt: Primavera P6 - JDE E1 PIP
Composite Reference Client Policy
35
Configuring and Deploying the Serialization and Tracking: OPSM - EBS integration 35-1
35Configuring and Deploying the Serializationand Tracking: OPSM - EBS integration
This chapter discusses how to configure and deploy Oracle Serialization and Tracking Integration Pack for Oracle Pedigree and Serialization Manager and Oracle E-Business Suite (Serialization and Tracking: OPSM - EBS).
This chapter includes the following sections:
■ Section 35.1, "Configuring Oracle Data Integrator"
■ Section 35.1.1, "Creating Oracle Data Integrator Repositories"
■ Section 35.2, "Deployment Configuration Wizard"
■ Section 35.3, "Configuring and Deploying the Serialization and Tracking: OPSM - EBS"
■ Section 35.4, "Performing Postdeployment Configurations"
■ Section 35.5, "Verifying Deployment"
■ Section 35.6, "Undeploying Serialization and Tracking: OPSM - EBS"
35.1 Configuring Oracle Data IntegratorTo run AIA Pre-Built Integrations Installer you must have ODI access with Supervisor privileges.
For install purposes, the ODI software must reside on the same server where Foundation Pack is installed. After the Serialization and Tracking: OPSM - EBS installation is complete, the ODI software can be installed on another server (if desired) connecting to the master and work repositories used during the Serialization and Tracking: OPSM - EBS installation.
35.1.1 Creating Oracle Data Integrator RepositoriesYou can use an existing master repository if it exists on an Oracle database and its ID is not 200. If its ID is 200, AIA advises that you create a new master repository.
You can use an existing work repository if it exists on an Oracle database and its ID is not 900. If its ID is 900, AIA advises that you create a new master repository.
When you run the DCW, it inserts or updates the integration artifacts into these repositories.
AIA recommends that you take a backup of the master and work repositories before you start the install process.
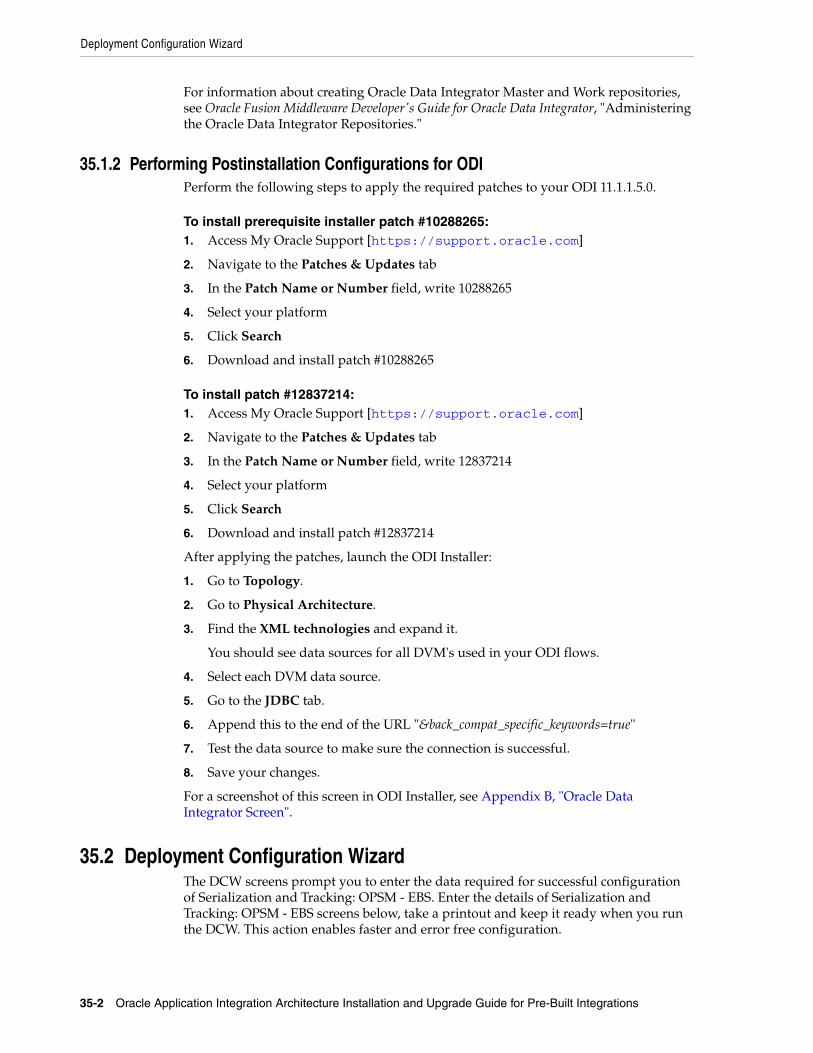
Deployment Configuration Wizard
35-2 Oracle Application Integration Architecture Installation and Upgrade Guide for Pre-Built Integrations
For information about creating Oracle Data Integrator Master and Work repositories, see Oracle Fusion Middleware Developer's Guide for Oracle Data Integrator, "Administering the Oracle Data Integrator Repositories."
35.1.2 Performing Postinstallation Configurations for ODIPerform the following steps to apply the required patches to your ODI 11.1.1.5.0.
To install prerequisite installer patch #10288265:1. Access My Oracle Support [https://support.oracle.com]
2. Navigate to the Patches & Updates tab
3. In the Patch Name or Number field, write 10288265
4. Select your platform
5. Click Search
6. Download and install patch #10288265
To install patch #12837214:1. Access My Oracle Support [https://support.oracle.com]
2. Navigate to the Patches & Updates tab
3. In the Patch Name or Number field, write 12837214
4. Select your platform
5. Click Search
6. Download and install patch #12837214
After applying the patches, launch the ODI Installer:
1. Go to Topology.
2. Go to Physical Architecture.
3. Find the XML technologies and expand it.
You should see data sources for all DVM's used in your ODI flows.
4. Select each DVM data source.
5. Go to the JDBC tab.
6. Append this to the end of the URL "&back_compat_specific_keywords=true"
7. Test the data source to make sure the connection is successful.
8. Save your changes.
For a screenshot of this screen in ODI Installer, see Appendix B, "Oracle Data Integrator Screen".
35.2 Deployment Configuration WizardThe DCW screens prompt you to enter the data required for successful configuration of Serialization and Tracking: OPSM - EBS. Enter the details of Serialization and Tracking: OPSM - EBS screens below, take a printout and keep it ready when you run the DCW. This action enables faster and error free configuration.
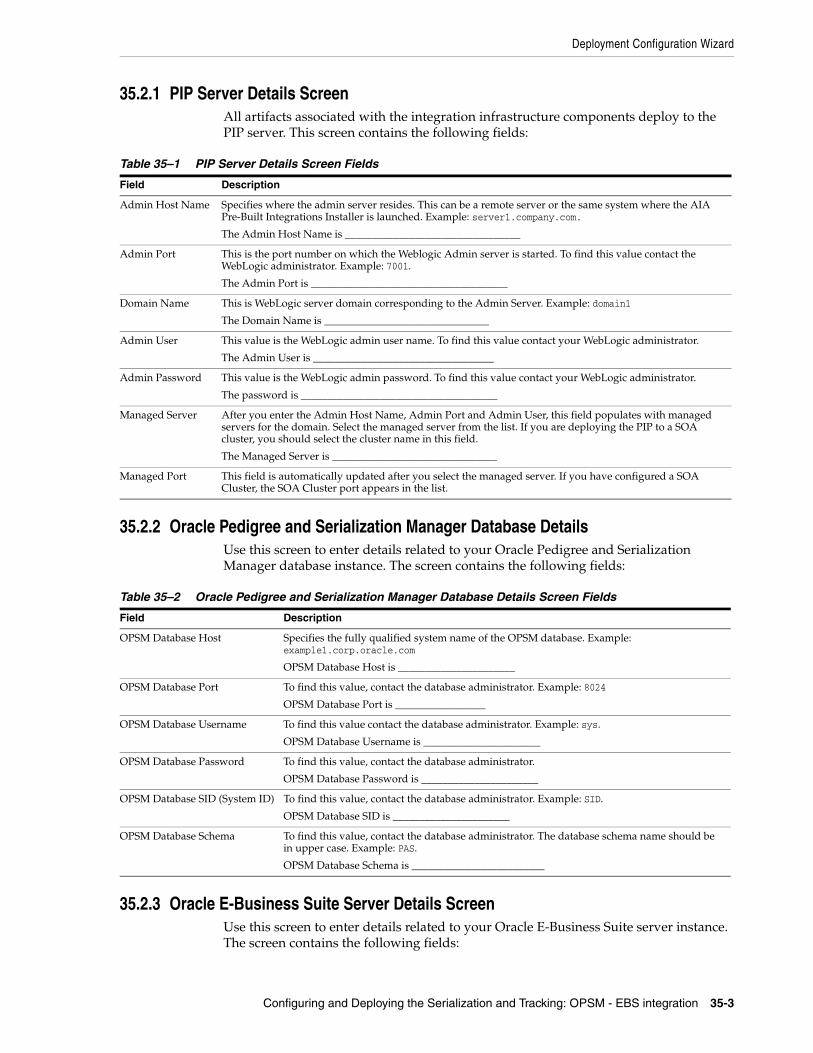
Deployment Configuration Wizard
Configuring and Deploying the Serialization and Tracking: OPSM - EBS integration 35-3
35.2.1 PIP Server Details ScreenAll artifacts associated with the integration infrastructure components deploy to the PIP server. This screen contains the following fields:
35.2.2 Oracle Pedigree and Serialization Manager Database DetailsUse this screen to enter details related to your Oracle Pedigree and Serialization Manager database instance. The screen contains the following fields:
35.2.3 Oracle E-Business Suite Server Details ScreenUse this screen to enter details related to your Oracle E-Business Suite server instance. The screen contains the following fields:
Table 35–1 PIP Server Details Screen Fields
Field Description
Admin Host Name Specifies where the admin server resides. This can be a remote server or the same system where the AIA Pre-Built Integrations Installer is launched. Example: server1.company.com.
The Admin Host Name is _________________________________
Admin Port This is the port number on which the Weblogic Admin server is started. To find this value contact the WebLogic administrator. Example: 7001.
The Admin Port is _____________________________________
Domain Name This is WebLogic server domain corresponding to the Admin Server. Example: domain1
The Domain Name is _______________________________
Admin User This value is the WebLogic admin user name. To find this value contact your WebLogic administrator.
The Admin User is __________________________________
Admin Password This value is the WebLogic admin password. To find this value contact your WebLogic administrator.
The password is _____________________________________
Managed Server After you enter the Admin Host Name, Admin Port and Admin User, this field populates with managed servers for the domain. Select the managed server from the list. If you are deploying the PIP to a SOA cluster, you should select the cluster name in this field.
The Managed Server is _______________________________
Managed Port This field is automatically updated after you select the managed server. If you have configured a SOA Cluster, the SOA Cluster port appears in the list.
Table 35–2 Oracle Pedigree and Serialization Manager Database Details Screen Fields
Field Description
OPSM Database Host Specifies the fully qualified system name of the OPSM database. Example: example1.corp.oracle.com
OPSM Database Host is ______________________
OPSM Database Port To find this value, contact the database administrator. Example: 8024
OPSM Database Port is _________________
OPSM Database Username To find this value contact the database administrator. Example: sys.
OPSM Database Username is ______________________
OPSM Database Password To find this value, contact the database administrator.
OPSM Database Password is ______________________
OPSM Database SID (System ID) To find this value, contact the database administrator. Example: SID.
OPSM Database SID is ______________________
OPSM Database Schema To find this value, contact the database administrator. The database schema name should be in upper case. Example: PAS.
OPSM Database Schema is _________________________
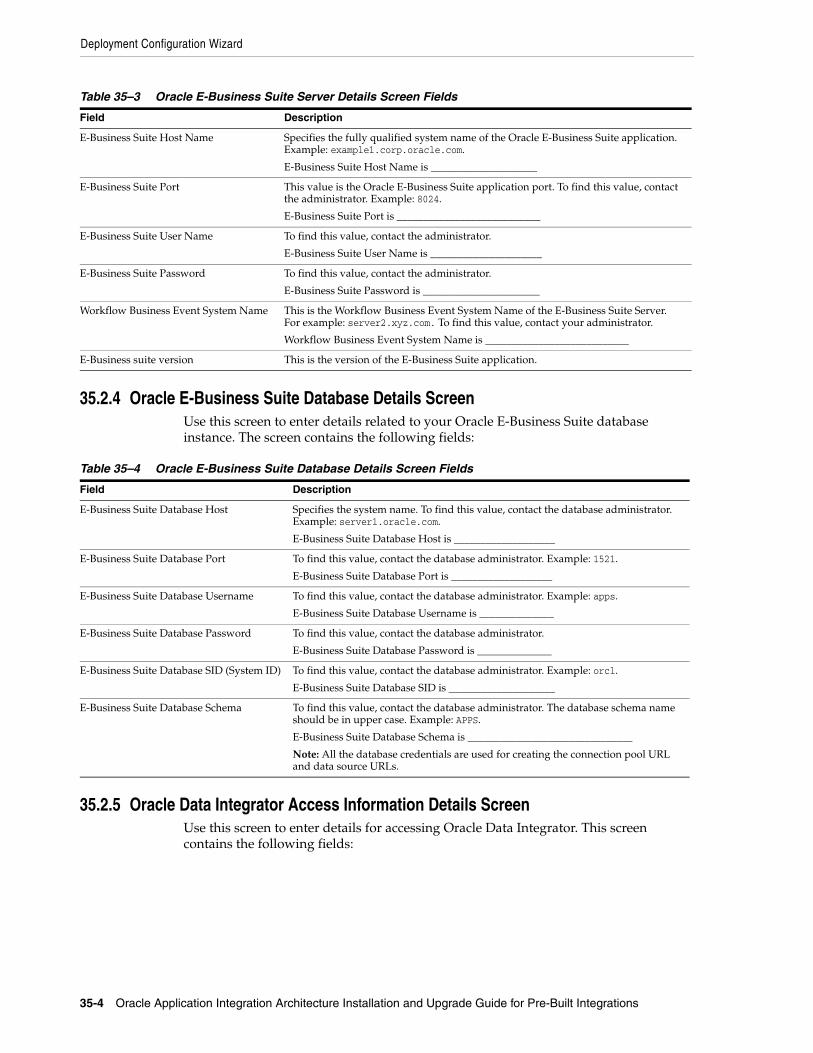
Deployment Configuration Wizard
35-4 Oracle Application Integration Architecture Installation and Upgrade Guide for Pre-Built Integrations
35.2.4 Oracle E-Business Suite Database Details ScreenUse this screen to enter details related to your Oracle E-Business Suite database instance. The screen contains the following fields:
35.2.5 Oracle Data Integrator Access Information Details ScreenUse this screen to enter details for accessing Oracle Data Integrator. This screen contains the following fields:
Table 35–3 Oracle E-Business Suite Server Details Screen Fields
Field Description
E-Business Suite Host Name Specifies the fully qualified system name of the Oracle E-Business Suite application. Example: example1.corp.oracle.com.
E-Business Suite Host Name is ____________________
E-Business Suite Port This value is the Oracle E-Business Suite application port. To find this value, contact the administrator. Example: 8024.
E-Business Suite Port is ___________________________
E-Business Suite User Name To find this value, contact the administrator.
E-Business Suite User Name is _____________________
E-Business Suite Password To find this value, contact the administrator.
E-Business Suite Password is ______________________
Workflow Business Event System Name This is the Workflow Business Event System Name of the E-Business Suite Server. For example: server2.xyz.com. To find this value, contact your administrator.
Workflow Business Event System Name is ___________________________
E-Business suite version This is the version of the E-Business Suite application.
Table 35–4 Oracle E-Business Suite Database Details Screen Fields
Field Description
E-Business Suite Database Host Specifies the system name. To find this value, contact the database administrator. Example: server1.oracle.com.
E-Business Suite Database Host is ___________________
E-Business Suite Database Port To find this value, contact the database administrator. Example: 1521.
E-Business Suite Database Port is ___________________
E-Business Suite Database Username To find this value, contact the database administrator. Example: apps.
E-Business Suite Database Username is ______________
E-Business Suite Database Password To find this value, contact the database administrator.
E-Business Suite Database Password is ______________
E-Business Suite Database SID (System ID) To find this value, contact the database administrator. Example: orcl.
E-Business Suite Database SID is ____________________
E-Business Suite Database Schema To find this value, contact the database administrator. The database schema name should be in upper case. Example: APPS.
E-Business Suite Database Schema is _______________________________
Note: All the database credentials are used for creating the connection pool URL and data source URLs.
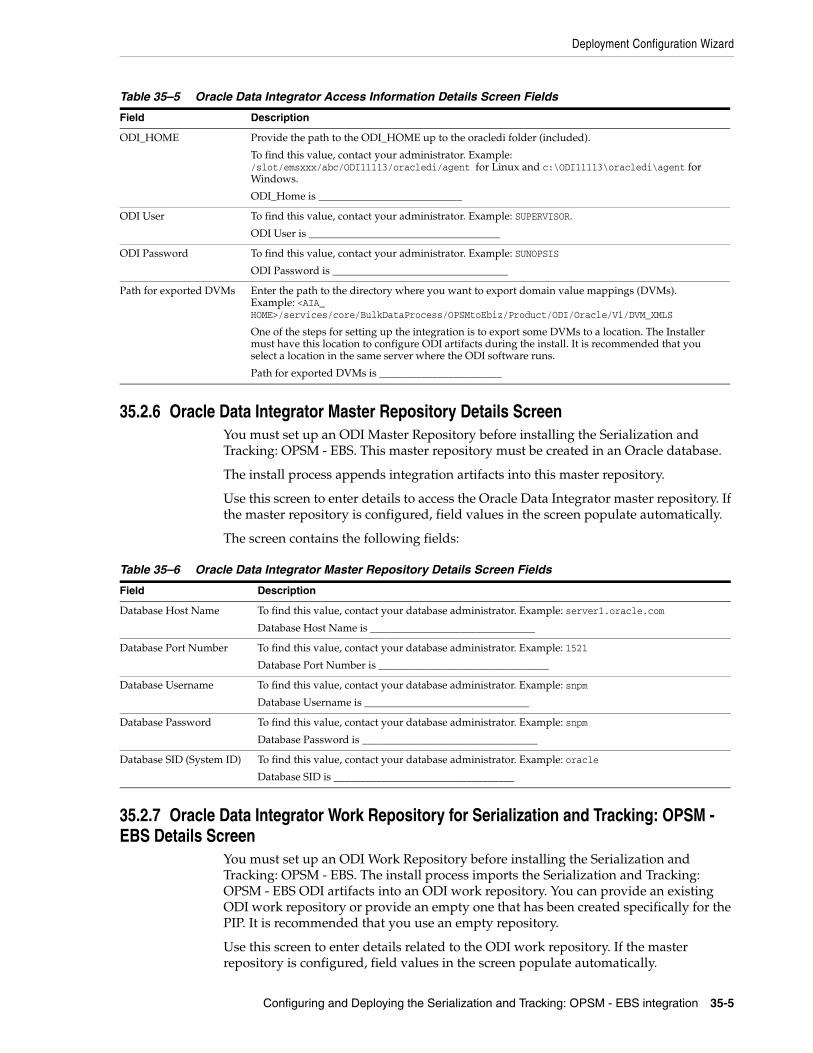
Deployment Configuration Wizard
Configuring and Deploying the Serialization and Tracking: OPSM - EBS integration 35-5
35.2.6 Oracle Data Integrator Master Repository Details ScreenYou must set up an ODI Master Repository before installing the Serialization and Tracking: OPSM - EBS. This master repository must be created in an Oracle database.
The install process appends integration artifacts into this master repository.
Use this screen to enter details to access the Oracle Data Integrator master repository. If the master repository is configured, field values in the screen populate automatically.
The screen contains the following fields:
35.2.7 Oracle Data Integrator Work Repository for Serialization and Tracking: OPSM - EBS Details Screen
You must set up an ODI Work Repository before installing the Serialization and Tracking: OPSM - EBS. The install process imports the Serialization and Tracking: OPSM - EBS ODI artifacts into an ODI work repository. You can provide an existing ODI work repository or provide an empty one that has been created specifically for the PIP. It is recommended that you use an empty repository.
Use this screen to enter details related to the ODI work repository. If the master repository is configured, field values in the screen populate automatically.
Table 35–5 Oracle Data Integrator Access Information Details Screen Fields
Field Description
ODI_HOME Provide the path to the ODI_HOME up to the oracledi folder (included).
To find this value, contact your administrator. Example: /slot/emsxxx/abc/ODI11113/oracledi/agent for Linux and c:\ODI11113\oracledi\agent for Windows.
ODI_Home is ___________________________
ODI User To find this value, contact your administrator. Example: SUPERVISOR.
ODI User is ____________________________________
ODI Password To find this value, contact your administrator. Example: SUNOPSIS
ODI Password is _________________________________
Path for exported DVMs Enter the path to the directory where you want to export domain value mappings (DVMs). Example: <AIA_HOME>/services/core/BulkDataProcess/OPSMtoEbiz/Product/ODI/Oracle/V1/DVM_XMLS
One of the steps for setting up the integration is to export some DVMs to a location. The Installer must have this location to configure ODI artifacts during the install. It is recommended that you select a location in the same server where the ODI software runs.
Path for exported DVMs is _______________________
Table 35–6 Oracle Data Integrator Master Repository Details Screen Fields
Field Description
Database Host Name To find this value, contact your database administrator. Example: server1.oracle.com
Database Host Name is _______________________________
Database Port Number To find this value, contact your database administrator. Example: 1521
Database Port Number is ________________________________
Database Username To find this value, contact your database administrator. Example: snpm
Database Username is _______________________________
Database Password To find this value, contact your database administrator. Example: snpm
Database Password is _________________________________
Database SID (System ID) To find this value, contact your database administrator. Example: oracle
Database SID is __________________________________
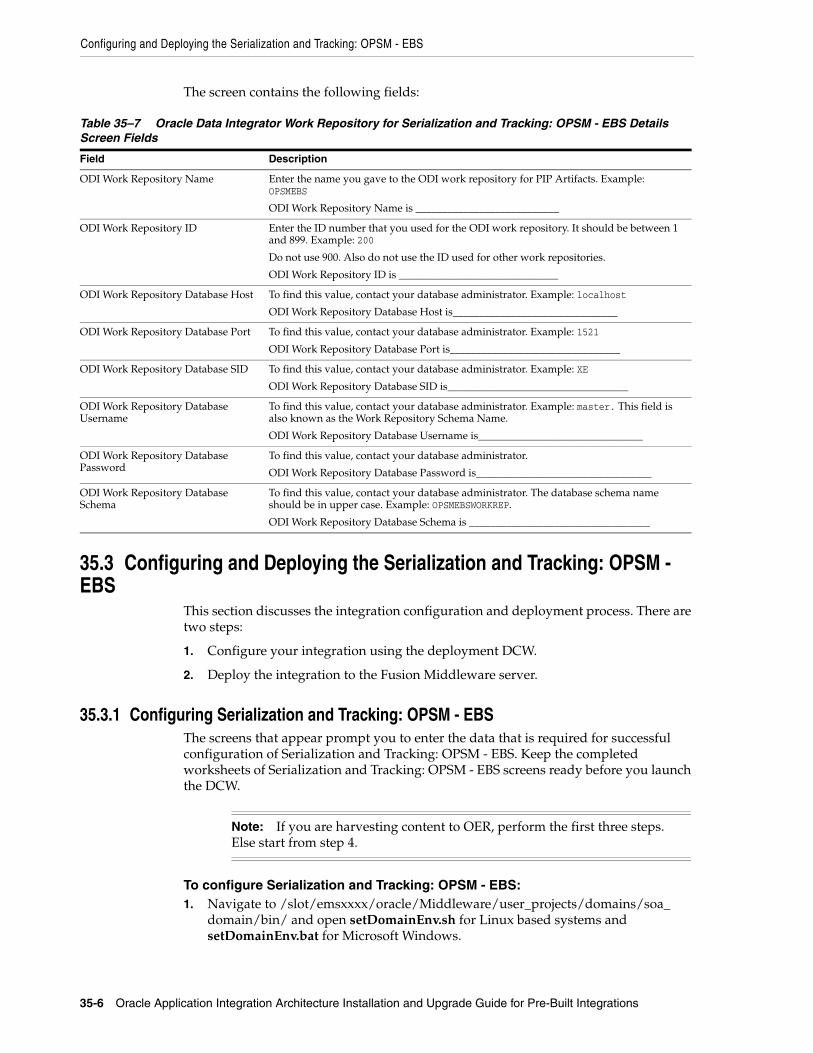
Configuring and Deploying the Serialization and Tracking: OPSM - EBS
35-6 Oracle Application Integration Architecture Installation and Upgrade Guide for Pre-Built Integrations
The screen contains the following fields:
35.3 Configuring and Deploying the Serialization and Tracking: OPSM - EBS
This section discusses the integration configuration and deployment process. There are two steps:
1. Configure your integration using the deployment DCW.
2. Deploy the integration to the Fusion Middleware server.
35.3.1 Configuring Serialization and Tracking: OPSM - EBS The screens that appear prompt you to enter the data that is required for successful configuration of Serialization and Tracking: OPSM - EBS. Keep the completed worksheets of Serialization and Tracking: OPSM - EBS screens ready before you launch the DCW.
To configure Serialization and Tracking: OPSM - EBS:1. Navigate to /slot/emsxxxx/oracle/Middleware/user_projects/domains/soa_
domain/bin/ and open setDomainEnv.sh for Linux based systems and setDomainEnv.bat for Microsoft Windows.
Table 35–7 Oracle Data Integrator Work Repository for Serialization and Tracking: OPSM - EBS Details Screen Fields
Field Description
ODI Work Repository Name Enter the name you gave to the ODI work repository for PIP Artifacts. Example: OPSMEBS
ODI Work Repository Name is ___________________________
ODI Work Repository ID Enter the ID number that you used for the ODI work repository. It should be between 1 and 899. Example: 200
Do not use 900. Also do not use the ID used for other work repositories.
ODI Work Repository ID is ______________________________
ODI Work Repository Database Host To find this value, contact your database administrator. Example: localhost
ODI Work Repository Database Host is_______________________________
ODI Work Repository Database Port To find this value, contact your database administrator. Example: 1521
ODI Work Repository Database Port is________________________________
ODI Work Repository Database SID To find this value, contact your database administrator. Example: XE
ODI Work Repository Database SID is__________________________________
ODI Work Repository Database Username
To find this value, contact your database administrator. Example: master. This field is also known as the Work Repository Schema Name.
ODI Work Repository Database Username is_______________________________
ODI Work Repository Database Password
To find this value, contact your database administrator.
ODI Work Repository Database Password is_________________________________
ODI Work Repository Database Schema
To find this value, contact your database administrator. The database schema name should be in upper case. Example: OPSMEBSWORKREP.
ODI Work Repository Database Schema is __________________________________
Note: If you are harvesting content to OER, perform the first three steps. Else start from step 4.
Configuring and Deploying the Serialization and Tracking: OPSM - EBS
Configuring and Deploying the Serialization and Tracking: OPSM - EBS integration 35-7
2. Replace WLS_JDBC_REMOTE_ENABLED="-Dweblogic.jdbc.remoteEnabled=false" with WLS_JDBC_REMOTE_ENABLED="-Dweblogic.jdbc.remoteEnabled=true".
3. Restart the server.
4. Navigate to <AIA_Instance>/bin and run the command source aiaenv.sh for Linux based systems and aiaenv.bat for Microsoft Windows to configure the environment.
5. Navigate to <AIA_HOME>/bin and run the command ./aiaconfig.sh for Linux based systems and aiaconfig.bat for Microsoft Windows.
This launches the AIA DCW.
6. Click Next.
7. Select Serialization and Tracking: OPSM - EBS.
8. Click Next.
35.3.1.1 Specify PIP Server Details
To specify PIP Server details:1. Enter information related to your PIP server in the PIP Server Details screen.
2. Click Next.
35.3.1.2 Specify Oracle Pedigree and Serialization Manager Database Details
To specify Oracle Pedigree and Serialization Manager Database details:1. Enter information about your Oracle Pedigree and Serialization Manager Database
instance in the Oracle Pedigree and Serialization Manager Database Details screen.
2. Click Next.
35.3.1.3 Specify Oracle E-Business Suite Server Details
To specify Oracle E-Business Suite Server details:1. Enter information about your Oracle E-Business Suite Server in the E-Business
Suite Server Details screen.
2. Click Next.
35.3.1.4 Specify Oracle E-Business Suite Database Details
To specify Oracle E-Business Suite Database details:1. Enter information about your Oracle E-Business Suite Database in the E-Business
Suite Database Details screen.
2. Click Next.
Configuring and Deploying the Serialization and Tracking: OPSM - EBS
35-8 Oracle Application Integration Architecture Installation and Upgrade Guide for Pre-Built Integrations
35.3.1.5 Specify Oracle Data Integrator Access Details
To specify Oracle Data Integrator Access details:1. Enter information about your Oracle Data Integrator Access installation in the
Oracle Data Integrator Access Information screens.
Oracle Data Integration Access Information is captured in three screens. Enter the following information in the screens.
2. Specify ODI Home.
3. Click Next.
4. Enter ODI User and ODI Password.
5. Click Next.
35.3.1.6 Specify Oracle Data Integrator Master Repository Details
To specify Oracle Data Integrator Master Repository details:1. Enter information about your Oracle Data Integrator Master Repository
installation in the Oracle Data Integrator Master Repository screen.
2. Click Next.
35.3.1.7 Specify Oracle Data Integrator Work Repository for Serialization and Tracking: OPSM - EBS Details
To specify Oracle Data Integrator Work Repository for Serialization and Tracking: OPSM - EBS details:1. Enter information about your Oracle Data Integrator Work Repository for
Serialization and Tracking: OPSM - EBS installation in the Oracle Data Integrator Work Repository for Serialization and Tracking: OPSM - EBS screen.
2. Click Next.
35.3.1.8 Complete Configuration
To complete configuration:1. Review the configuration information on the Configuration Summary screen.
2. Click Configure to accept the configuration.
The system displays progress of the configuration in the Configuration Progress screen.
Note: If you want to make changes to the configuration, use the navigation pane on the left and select the screen you want to edit.
You can create a response file based on the input provided in the DCW and use it in future when you want to deploy the PIP. You can configure using the steps described in Section 35.3.2, "Configuring using the Response File". Click Save Response File and save the response file with the name and location of your choice.
Configuring and Deploying the Serialization and Tracking: OPSM - EBS
Configuring and Deploying the Serialization and Tracking: OPSM - EBS integration 35-9
The system displays any warnings or errors as necessary. You can review the configuration log for additional details. The configuration log location is displayed in Configuration Progress screen.
3. When the configuration process completes without errors, the AIA DCW displays the Configuration Complete screen.
4. Click Finish to close the DCW.
35.3.2 Configuring using the Response File
To configure using the response file:1. Open the response file.
When you create a response file through OUI, passwords get stored as <SECURE>.
2. Replace the password fields with actual passwords in the response file.
3. Navigate to <AIA_Instance>/bin and run the command source aiaenv.sh for Linux based systems and aiaenv.bat for Microsoft Windows to configure the environment.
4. Navigate to <AIA_HOME>/bin and run the command ./aiaconfig.sh <Response File Location and Name> for Linux based systems and aiaconfig.bat <Response File Location and Name> for Microsoft Windows.
35.3.3 Deploying Serialization and Tracking: OPSM - EBS
To deploy the integration to Fusion Middleware server:1. Navigate to <AIA_Instance>/bin and run the command source aiaenv.sh for
Linux based systems and aiaenv.bat for Microsoft Windows to configure the environment.
2. Run the command for your platform.
Note: When you copy and paste the command in the command line, ensure that there is space between .xml and -. Ensure that there is space between these two when you run undeployment command too.
Table 35–8 Deployment Commands for the Serialization and Tracking: OPSM - EBS
Platform Deployment Command
Linux
Solaris SPARC
IBM AIX Based Systems.
HP-UX
ant -f <AIA_HOME>/Infrastructure/Install/AID/AIAInstallDriver.xml -DDeploymentPlan=<AIA_HOME>/pips/OPSMtoEbiz/DeploymentPlans/OPSMtoEbizDP.xml -DPropertiesFile=<AIA_HOME>/aia_instances/<aia_instance>/config/AIAInstallProperties.xml -l <AIA_HOME>/pips/OPSMtoEbiz/DeploymentPlans/OPSMtoEbiz.log
Microsoft Windows ant -f <AIA_HOME>\Infrastructure\Install\AID\AIAInstallDriver.xml -DDeploymentPlan=<AIA_HOME>\pips\OPSMtoEbiz\DeploymentPlans\OPSMtoEbizDP.xml -DPropertiesFile=<AIA_HOME>\aia_instances\<aia_instance>\config\AIAInstallProperties.xml -l <AIA_HOME>\pips\OPSMtoEbiz\DeploymentPlans\OPSMtoEbizDP.log
Performing Postdeployment Configurations
35-10 Oracle Application Integration Architecture Installation and Upgrade Guide for Pre-Built Integrations
3. Review the log file in the location specified in the command to verify successful deployment.
Oracle AIA ships artifacts in AIA Lifecycle Workbench which can be used in your integrations. These artifacts are created using FMW technologies such as, BPEL and Mediator and are natively supported by AIA Foundation Pack tools such as, Project Lifecycle Workbench, Harvester, Deployment Generator, AIA Deployment Driver (ADD). These are called native artifacts and they include SOA artifact types such as, composites, DataSources, DVM, xRef, and so on. These artifacts can be modified or new natively supported artifacts can be added using the AIA Lifecyle Workbench and a BOM.xml file can be generated.
AIA PIP development teams, most often, also require deployment of artifact types that are beyond what is supported by the Project Lifecycle Workbench and AIA Harvester. For instance, integration may require artifacts such as, Java applications, Shell Scripts, ANT based build scripts which constitute part of integration landscape in addition to the artifacts that are delivered by AIA. AIA also supports deployment of these supplementary artifacts. However, you must modify and add new non native artifacts outside AIA Lifecycle Workbench.
For more information on deploying artifacts, see Oracle Fusion Middleware Developer's Guide for Oracle Application Integration Architecture Foundation Pack, "Generating Deployment Plans and Deploying Artifacts".
35.4 Performing Postdeployment ConfigurationsThis section discusses postdeployment configurations for the Serialization and Tracking: OPSM - EBS integration. The section includes:
■ Section 35.4.1, "Configuring Environment Variables"
■ Section 35.4.2, "Launching the Serialization and Tracking: OPSM - EBS Agent"
■ Section 35.4.3, "Stopping the Serialization and Tracking: OPSM - EBS Agent"
■ Section 35.4.4, "Configuring ODI Variables"
■ Section 35.4.5, "Configuring Web Services for Serialization and Tracking: OPSM - EBS (Optional)"
■ Section 35.4.6, "Verifying the Database Connection (Optional)"
■ Section 35.4.7, "Configuring the Remote OPSM JMS Queue in Serialization and Tracking: OPSM - EBS (Required)"
■ Section 35.4.8, "Configuring Cross Domain Security in Serialization and Tracking: OPSM – EBS (Required)"
■ Section 35.4.9, "Maintaining Serialization and Tracking: OPSM - EBS"
■ Section 35.4.10, "Adding File permissions"
35.4.1 Configuring Environment VariablesConfigure the following environment variables:
Note: In Windows 2008, 2008 R2 and Vista, run the command prompt as an administrator (elevated mode). If the command prompt is invoked in normal mode, the PIPs are not displayed.
Performing Postdeployment Configurations
Configuring and Deploying the Serialization and Tracking: OPSM - EBS integration 35-11
35.4.2 Launching the Serialization and Tracking: OPSM - EBS AgentThe Serialization and Tracking: OPSM - EBS agent should be up and running before you execute any scenario from ODI or OPSM.
To start the Serialization and Tracking: OPSM - EBS agent, navigate to <AIA_HOME>/services/core/BulkDataProcess/OPSMtoEbiz/Product/ODI/Oracle/V1/Agent_Files directory and run the start_odi_agent.bat file (or start_odi_agent.sh in Linux) command.
The agent is launched as a listener.
35.4.3 Stopping the Serialization and Tracking: OPSM - EBS AgentWhen you are not using integration, you can stop the Serialization and Tracking: OPSM - EBS agent.
To stop the Serialization and Tracking: OPSM - EBS agent, navigate to <AIA_HOME>/services/core/BulkDataProcess/OPSMtoEbiz/Product/ODI/Oracle/V1/Agent_Files directory and run the stop_odi_agent.bat file (or stop_odi_agent.sh in Linux).
35.4.4 Configuring ODI VariablesA number of variables must be configured in ODI to support the Serialization and Tracking: OPSM - EBS. Many variables are configured when you install the integration. Configure the following variables using the ODI Designer. After the variables are defined in the ODI Designer, run the Regenerate All Scenarios package to reconfigure the main integration packages.
All the ODI scenarios must be regenerated if any variable value is changed. To regenerate the ODI scenarios:
1. Open ODI Operator.
2. Expand the Scenarios tab.
3. Right click the scenario you want to regenerate.
4. Click Regenerate option.
Table 35–9 Environment Variables to be Configured for the Serialization and Tracking: OPSM - EBS
Environment Variable Description
ODI_BIN_DIR The location of the ODI program. Recommended: <ODIHOME>/oracledi/agent/bin
Note: Ensure that the executable permission is enabled on all the shell scripts.
Table 35–10 ODI Variables to be Configured for the Serialization and Tracking: OPSM - EBS
ODI Variable Description
PVV_FROM_EMAIL_ADDRESS Email address for notification result queries.
PVV_TO_EMAIL_ADDRESS Email addresses of individuals to be notified of integration results. Separate multiple email addresses with a comma.
PVV_PIP_HOME Home directory of the PIP. Default value is <AIA_HOME>/services/core/BulkDataProcess/OPSMtoEbiz/Product/ODI/Oracle/V1
PVV_MAIL_SERVER Mail server to which email is to be forwarded for notification.
Performing Postdeployment Configurations
35-12 Oracle Application Integration Architecture Installation and Upgrade Guide for Pre-Built Integrations
5. Click OK twice.
35.4.5 Configuring Web Services for Serialization and Tracking: OPSM - EBS (Optional)Configure the following services:
■ CreateShipmentReceiptListEbizJMSProducer
■ CreateShipmentReceiptListEbizJMSConsumer
■ CreateShipmentReceiptListEbizReqABCSImpl
■ ShipmentReceiptEBS
■ CreateShipmentReceiptListPASProvABCSImpl
■ CreateShipmentReceiptListPASJMSProducer
■ CreateAdvanceShipmentNoticeListEbizJMSProducer
■ CreateAdvanceShipmentNoticeListEbizJMSConsumer
■ CreateAdvanceShipmentNoticeListEbizReqABCSImpl
■ AdvanceShipmentNoticeEBS
■ CreateAdvanceShipmentNoticeListPASProvABCSImpl
■ CreateAdvanceShipmentNoticeListPASJMSProducer
■ SyncItemLotListEbizJMSProducer
■ SyncItemLotListEbizJMSConsumer
■ SyncItemLotListEbizReqABCSImpl
■ ItemLotEBS
■ SyncItemLotListPASProvABCSImpl
■ SyncItemLotListPASJMSProducer
To configure the above Web Services, see Oracle Serialization and Tracking Integration Pack for Oracle Pedigree and Serialization Manager and Oracle E-Business Suite Implementation Guide.
35.4.6 Verifying the Database Connection (Optional)
To verify the database connection:1. Open ODI Topology Manager.
2. Navigate to Technologies, Oracle in the Physical Architecture tab and expand the Oracle node.
3. Select PASDS.
4. Right click and select Open.
5. Click Test Connection.
The Test Connection window appears.
6. Click Test.
If successful connection message does not appear, verify the connection information in the Definitions and JDBC tabs.
7. Repeat steps 1 - 6 for the following data sources:
Performing Postdeployment Configurations
Configuring and Deploying the Serialization and Tracking: OPSM - EBS integration 35-13
■ OracleEbizDS
■ WorkRepDS
35.4.7 Configuring the Remote OPSM JMS Queue in Serialization and Tracking: OPSM - EBS (Required)
To configure the Remote OPSM JMS Queue in Serialization and Tracking: OPSM - EBS:1. Navigate to Administration Console (http://<server name>:<port
number>/console).
2. Log in with the server admin user name. For access details, contact the system administrator.
3. Navigate to Domain Structure, soa_domain, Deployments.
4. Click AIA_JmsAdapter_Config in the Deployments table.
5. Select Configuration Tab.
6. Select Outbound Connection Pools tab.
7. Click eis/wlsjms/AIAPASCF instance in the Outbound Connection Pool Configuration Table.
8. Update the following properties and leave the rest of the properties with their default values:
9. Click Save.
10. Navigate back to soa_domain, Deployments.
11. Select AIA_JmsAdapter_Config and click Update.
12. Select the option Update this application in place with new deployments plan changes…….
13. Click Finish.
35.4.8 Configuring Cross Domain Security in Serialization and Tracking: OPSM – EBS (Required)
Cross Domain Security establishes trust between two WebLogic Server domain pairs by using a credential mapper to configure communication between these WebLogic Server domains.
To configure Cross Domain Security between the OPSM Weblogic Server domain and the PIP WebLogic Server domain:1. Enable Cross Domain Security.
a. Open Administration Console: http://<server name>:<port number>/console.
Table 35–11 Properties to be Updated for Configuring the Remote OPSM JMS Queue
Property Name Property Type Property Value
ConnectionFactoryLocation Java.lang.String oracle/apps/jms/pas/OPSMCF
FactoryProperties Java.lang.String java.naming.factory.initial=weblogic.jndi.WLInitialContextFactory;java.naming.provider.url=t3://<OPSM server host >:<SOA port number>
Performing Postdeployment Configurations
35-14 Oracle Application Integration Architecture Installation and Upgrade Guide for Pre-Built Integrations
b. Log in with the server admin user name. For access details, contact the system administrator.
c. Navigate to Domain Structure, soa_domain.
d. Open the Security: General tab in the console.
e. Check Cross Domain Security Enabled.
f. Click Save.
Repeat steps a to f for the OPSM WebLogic Server domain.
2. Configure a Cross Domain User.
Cross-domain security in WebLogic Server uses a global security role named CrossDomainConnector with resource type remote and a group named CrossDomainConnectors, which is assigned the CrossDomainConnector role. Invocation requests from remote domains are expected to be from users with the CrossDomainConnector role. By default, the CrossDomainConnectors has no users as members. You must create one or more users and add them to the group CrossDomainConnectors. Typically, such a user is a virtual system user and preferably should have no privileges other than those granted by the CrossDomainConnector security role.
a. Open Administration Console: http://<server name>:<port number>/console.
b. Log in with the server admin user name. For access details, contact the system administrator.
c. Navigate to Domain Structure, soa_domain, Security Realms.
d. Click the name of your security realm (default is myrealm).
e. Open the Users and Groups tab in the console.
f. Click New to create a user.
g. Enter the Name, Description, and Password for the new user and click OK.
h. On the Users and Groups: Users tab, click the name of the user you just created.
i. Open the Groups tab.
j. Find the CrossDomainConnectors group in the list of available parent groups on the left and click the shuttle button to move that group into the chosen group list on the right.
k. Click Save.
Repeat these steps for the OPSM WebLogic Server domain to create a cross domain user in that domain.
3. Configure a Credential Mapping for Cross Domain Security.
In each WebLogic Server domain, you must specify a credential to be used by each user on each remote domain to be trusted. Do this by configuring credential mappings for each domain in the connection.
a. Open Administration Console: http://<server name>:<port number>/console.
b. Log in with the server admin user name. For access details, contact the system administrator.
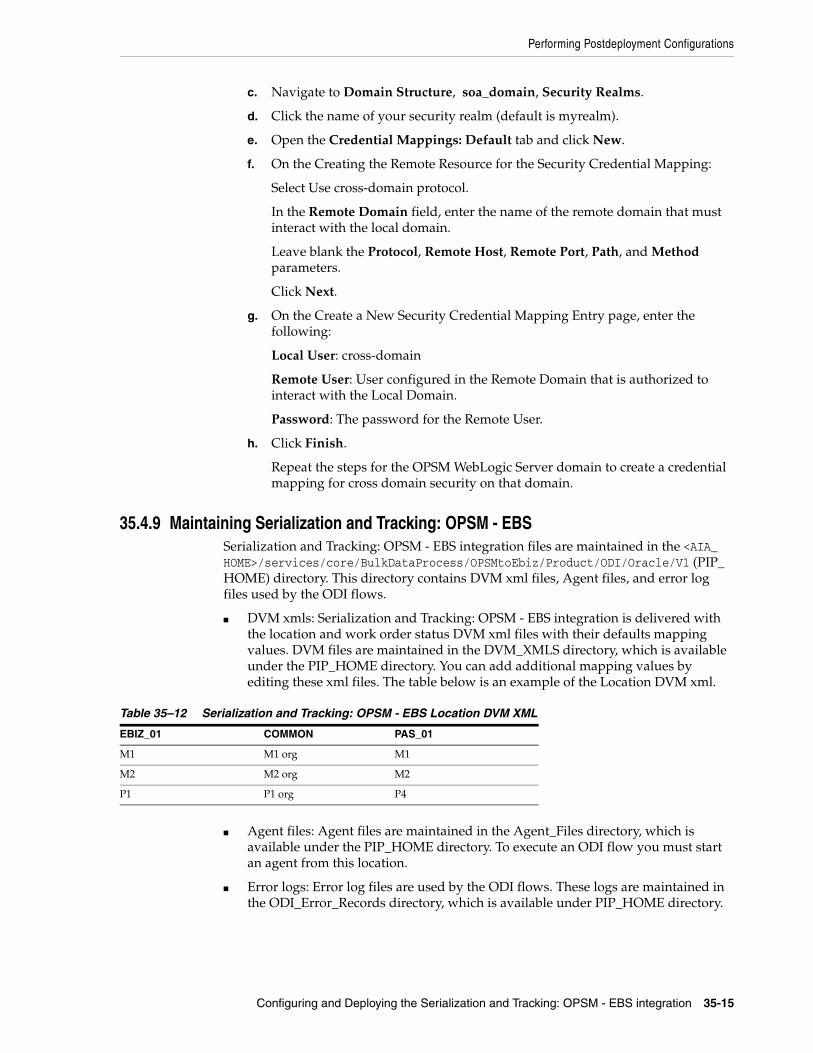
Performing Postdeployment Configurations
Configuring and Deploying the Serialization and Tracking: OPSM - EBS integration 35-15
c. Navigate to Domain Structure, soa_domain, Security Realms.
d. Click the name of your security realm (default is myrealm).
e. Open the Credential Mappings: Default tab and click New.
f. On the Creating the Remote Resource for the Security Credential Mapping:
Select Use cross-domain protocol.
In the Remote Domain field, enter the name of the remote domain that must interact with the local domain.
Leave blank the Protocol, Remote Host, Remote Port, Path, and Method parameters.
Click Next.
g. On the Create a New Security Credential Mapping Entry page, enter the following:
Local User: cross-domain
Remote User: User configured in the Remote Domain that is authorized to interact with the Local Domain.
Password: The password for the Remote User.
h. Click Finish.
Repeat the steps for the OPSM WebLogic Server domain to create a credential mapping for cross domain security on that domain.
35.4.9 Maintaining Serialization and Tracking: OPSM - EBSSerialization and Tracking: OPSM - EBS integration files are maintained in the <AIA_HOME>/services/core/BulkDataProcess/OPSMtoEbiz/Product/ODI/Oracle/V1 (PIP_HOME) directory. This directory contains DVM xml files, Agent files, and error log files used by the ODI flows.
■ DVM xmls: Serialization and Tracking: OPSM - EBS integration is delivered with the location and work order status DVM xml files with their defaults mapping values. DVM files are maintained in the DVM_XMLS directory, which is available under the PIP_HOME directory. You can add additional mapping values by editing these xml files. The table below is an example of the Location DVM xml.
■ Agent files: Agent files are maintained in the Agent_Files directory, which is available under the PIP_HOME directory. To execute an ODI flow you must start an agent from this location.
■ Error logs: Error log files are used by the ODI flows. These logs are maintained in the ODI_Error_Records directory, which is available under PIP_HOME directory.
Table 35–12 Serialization and Tracking: OPSM - EBS Location DVM XML
EBIZ_01 COMMON PAS_01
M1 M1 org M1
M2 M2 org M2
P1 P1 org P4
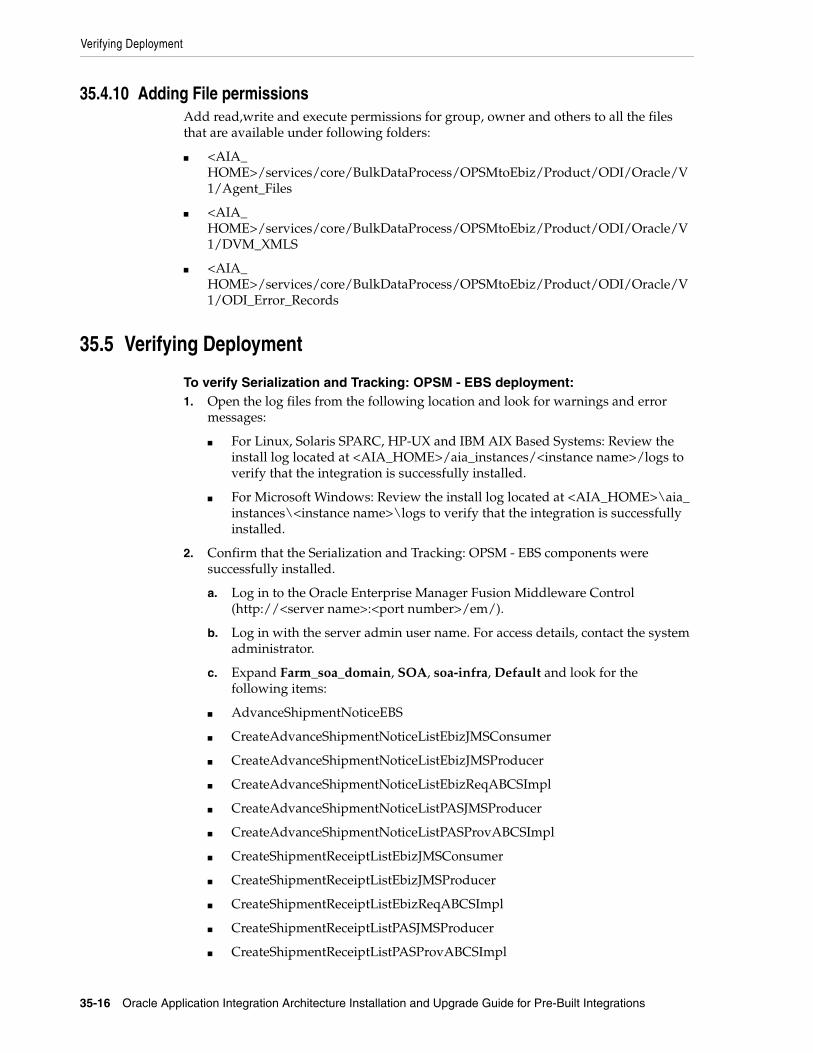
Verifying Deployment
35-16 Oracle Application Integration Architecture Installation and Upgrade Guide for Pre-Built Integrations
35.4.10 Adding File permissionsAdd read,write and execute permissions for group, owner and others to all the files that are available under following folders:
■ <AIA_HOME>/services/core/BulkDataProcess/OPSMtoEbiz/Product/ODI/Oracle/V1/Agent_Files
■ <AIA_HOME>/services/core/BulkDataProcess/OPSMtoEbiz/Product/ODI/Oracle/V1/DVM_XMLS
■ <AIA_HOME>/services/core/BulkDataProcess/OPSMtoEbiz/Product/ODI/Oracle/V1/ODI_Error_Records
35.5 Verifying Deployment
To verify Serialization and Tracking: OPSM - EBS deployment:1. Open the log files from the following location and look for warnings and error
messages:
■ For Linux, Solaris SPARC, HP-UX and IBM AIX Based Systems: Review the install log located at <AIA_HOME>/aia_instances/<instance name>/logs to verify that the integration is successfully installed.
■ For Microsoft Windows: Review the install log located at <AIA_HOME>\aia_instances\<instance name>\logs to verify that the integration is successfully installed.
2. Confirm that the Serialization and Tracking: OPSM - EBS components were successfully installed.
a. Log in to the Oracle Enterprise Manager Fusion Middleware Control (http://<server name>:<port number>/em/).
b. Log in with the server admin user name. For access details, contact the system administrator.
c. Expand Farm_soa_domain, SOA, soa-infra, Default and look for the following items:
■ AdvanceShipmentNoticeEBS
■ CreateAdvanceShipmentNoticeListEbizJMSConsumer
■ CreateAdvanceShipmentNoticeListEbizJMSProducer
■ CreateAdvanceShipmentNoticeListEbizReqABCSImpl
■ CreateAdvanceShipmentNoticeListPASJMSProducer
■ CreateAdvanceShipmentNoticeListPASProvABCSImpl
■ CreateShipmentReceiptListEbizJMSConsumer
■ CreateShipmentReceiptListEbizJMSProducer
■ CreateShipmentReceiptListEbizReqABCSImpl
■ CreateShipmentReceiptListPASJMSProducer
■ CreateShipmentReceiptListPASProvABCSImpl
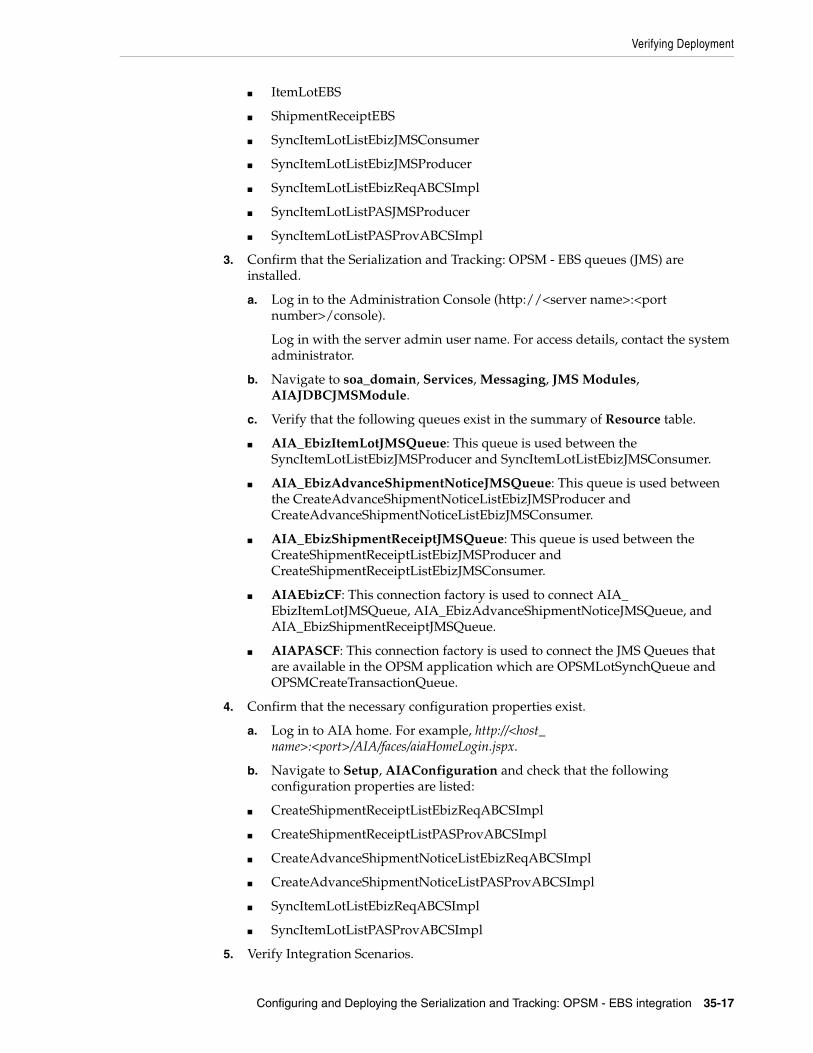
Verifying Deployment
Configuring and Deploying the Serialization and Tracking: OPSM - EBS integration 35-17
■ ItemLotEBS
■ ShipmentReceiptEBS
■ SyncItemLotListEbizJMSConsumer
■ SyncItemLotListEbizJMSProducer
■ SyncItemLotListEbizReqABCSImpl
■ SyncItemLotListPASJMSProducer
■ SyncItemLotListPASProvABCSImpl
3. Confirm that the Serialization and Tracking: OPSM - EBS queues (JMS) are installed.
a. Log in to the Administration Console (http://<server name>:<port number>/console).
Log in with the server admin user name. For access details, contact the system administrator.
b. Navigate to soa_domain, Services, Messaging, JMS Modules, AIAJDBCJMSModule.
c. Verify that the following queues exist in the summary of Resource table.
■ AIA_EbizItemLotJMSQueue: This queue is used between the SyncItemLotListEbizJMSProducer and SyncItemLotListEbizJMSConsumer.
■ AIA_EbizAdvanceShipmentNoticeJMSQueue: This queue is used between the CreateAdvanceShipmentNoticeListEbizJMSProducer and CreateAdvanceShipmentNoticeListEbizJMSConsumer.
■ AIA_EbizShipmentReceiptJMSQueue: This queue is used between the CreateShipmentReceiptListEbizJMSProducer and CreateShipmentReceiptListEbizJMSConsumer.
■ AIAEbizCF: This connection factory is used to connect AIA_EbizItemLotJMSQueue, AIA_EbizAdvanceShipmentNoticeJMSQueue, and AIA_EbizShipmentReceiptJMSQueue.
■ AIAPASCF: This connection factory is used to connect the JMS Queues that are available in the OPSM application which are OPSMLotSynchQueue and OPSMCreateTransactionQueue.
4. Confirm that the necessary configuration properties exist.
a. Log in to AIA home. For example, http://<host_name>:<port>/AIA/faces/aiaHomeLogin.jspx.
b. Navigate to Setup, AIAConfiguration and check that the following configuration properties are listed:
■ CreateShipmentReceiptListEbizReqABCSImpl
■ CreateShipmentReceiptListPASProvABCSImpl
■ CreateAdvanceShipmentNoticeListEbizReqABCSImpl
■ CreateAdvanceShipmentNoticeListPASProvABCSImpl
■ SyncItemLotListEbizReqABCSImpl
■ SyncItemLotListPASProvABCSImpl
5. Verify Integration Scenarios.
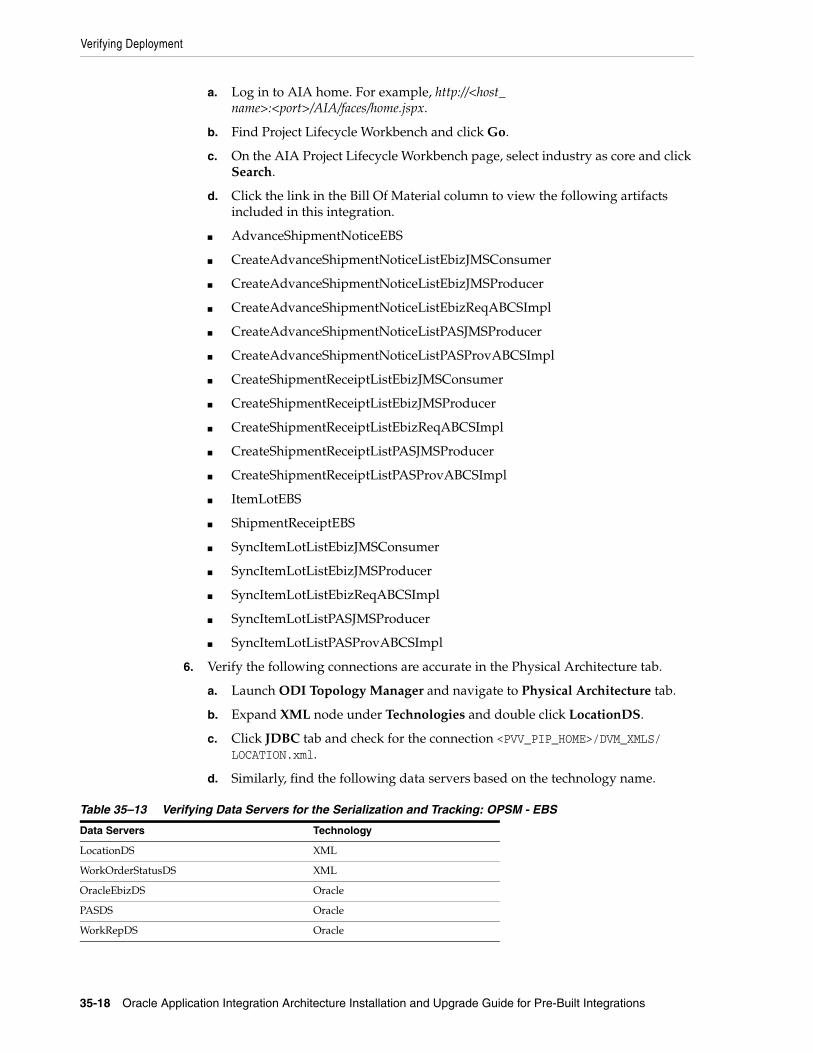
Verifying Deployment
35-18 Oracle Application Integration Architecture Installation and Upgrade Guide for Pre-Built Integrations
a. Log in to AIA home. For example, http://<host_name>:<port>/AIA/faces/home.jspx.
b. Find Project Lifecycle Workbench and click Go.
c. On the AIA Project Lifecycle Workbench page, select industry as core and click Search.
d. Click the link in the Bill Of Material column to view the following artifacts included in this integration.
■ AdvanceShipmentNoticeEBS
■ CreateAdvanceShipmentNoticeListEbizJMSConsumer
■ CreateAdvanceShipmentNoticeListEbizJMSProducer
■ CreateAdvanceShipmentNoticeListEbizReqABCSImpl
■ CreateAdvanceShipmentNoticeListPASJMSProducer
■ CreateAdvanceShipmentNoticeListPASProvABCSImpl
■ CreateShipmentReceiptListEbizJMSConsumer
■ CreateShipmentReceiptListEbizJMSProducer
■ CreateShipmentReceiptListEbizReqABCSImpl
■ CreateShipmentReceiptListPASJMSProducer
■ CreateShipmentReceiptListPASProvABCSImpl
■ ItemLotEBS
■ ShipmentReceiptEBS
■ SyncItemLotListEbizJMSConsumer
■ SyncItemLotListEbizJMSProducer
■ SyncItemLotListEbizReqABCSImpl
■ SyncItemLotListPASJMSProducer
■ SyncItemLotListPASProvABCSImpl
6. Verify the following connections are accurate in the Physical Architecture tab.
a. Launch ODI Topology Manager and navigate to Physical Architecture tab.
b. Expand XML node under Technologies and double click LocationDS.
c. Click JDBC tab and check for the connection <PVV_PIP_HOME>/DVM_XMLS/ LOCATION.xml.
d. Similarly, find the following data servers based on the technology name.
Table 35–13 Verifying Data Servers for the Serialization and Tracking: OPSM - EBS
Data Servers Technology
LocationDS XML
WorkOrderStatusDS XML
OracleEbizDS Oracle
PASDS Oracle
WorkRepDS Oracle
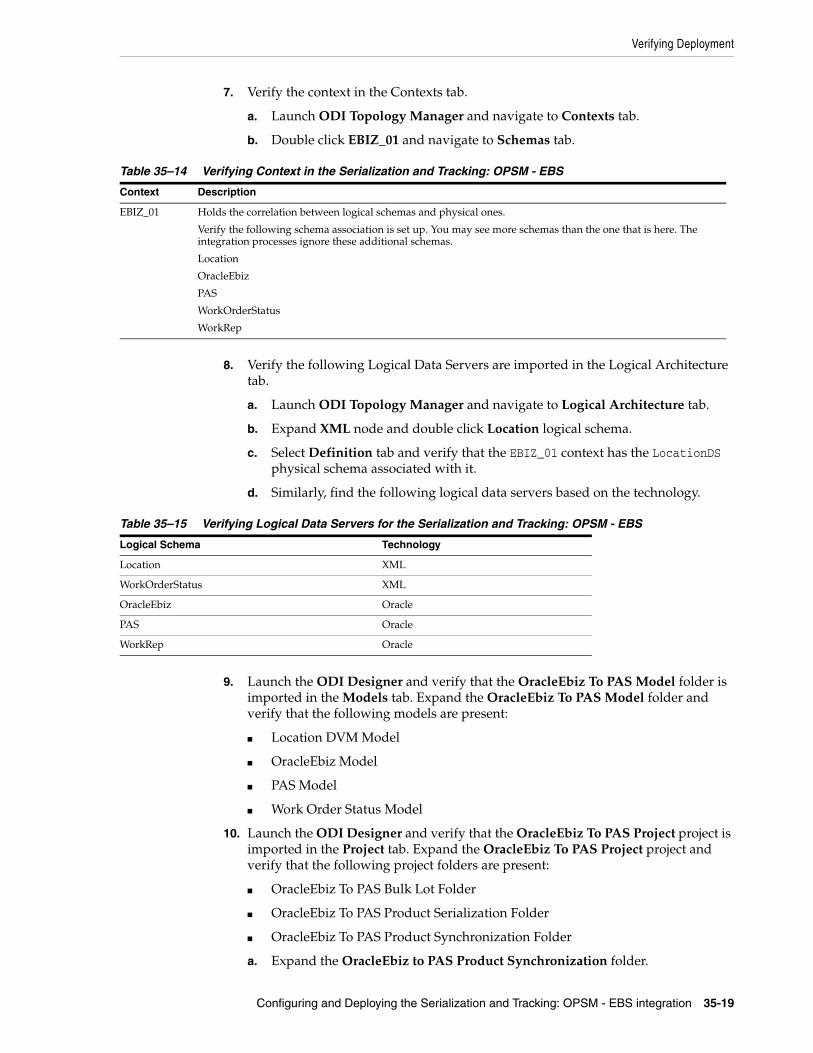
Verifying Deployment
Configuring and Deploying the Serialization and Tracking: OPSM - EBS integration 35-19
7. Verify the context in the Contexts tab.
a. Launch ODI Topology Manager and navigate to Contexts tab.
b. Double click EBIZ_01 and navigate to Schemas tab.
8. Verify the following Logical Data Servers are imported in the Logical Architecture tab.
a. Launch ODI Topology Manager and navigate to Logical Architecture tab.
b. Expand XML node and double click Location logical schema.
c. Select Definition tab and verify that the EBIZ_01 context has the LocationDS physical schema associated with it.
d. Similarly, find the following logical data servers based on the technology.
9. Launch the ODI Designer and verify that the OracleEbiz To PAS Model folder is imported in the Models tab. Expand the OracleEbiz To PAS Model folder and verify that the following models are present:
■ Location DVM Model
■ OracleEbiz Model
■ PAS Model
■ Work Order Status Model
10. Launch the ODI Designer and verify that the OracleEbiz To PAS Project project is imported in the Project tab. Expand the OracleEbiz To PAS Project project and verify that the following project folders are present:
■ OracleEbiz To PAS Bulk Lot Folder
■ OracleEbiz To PAS Product Serialization Folder
■ OracleEbiz To PAS Product Synchronization Folder
a. Expand the OracleEbiz to PAS Product Synchronization folder.
Table 35–14 Verifying Context in the Serialization and Tracking: OPSM - EBS
Context Description
EBIZ_01 Holds the correlation between logical schemas and physical ones.
Verify the following schema association is set up. You may see more schemas than the one that is here. The integration processes ignore these additional schemas.
Location
OracleEbiz
PAS
WorkOrderStatus
WorkRep
Table 35–15 Verifying Logical Data Servers for the Serialization and Tracking: OPSM - EBS
Logical Schema Technology
Location XML
WorkOrderStatus XML
OracleEbiz Oracle
PAS Oracle
WorkRep Oracle
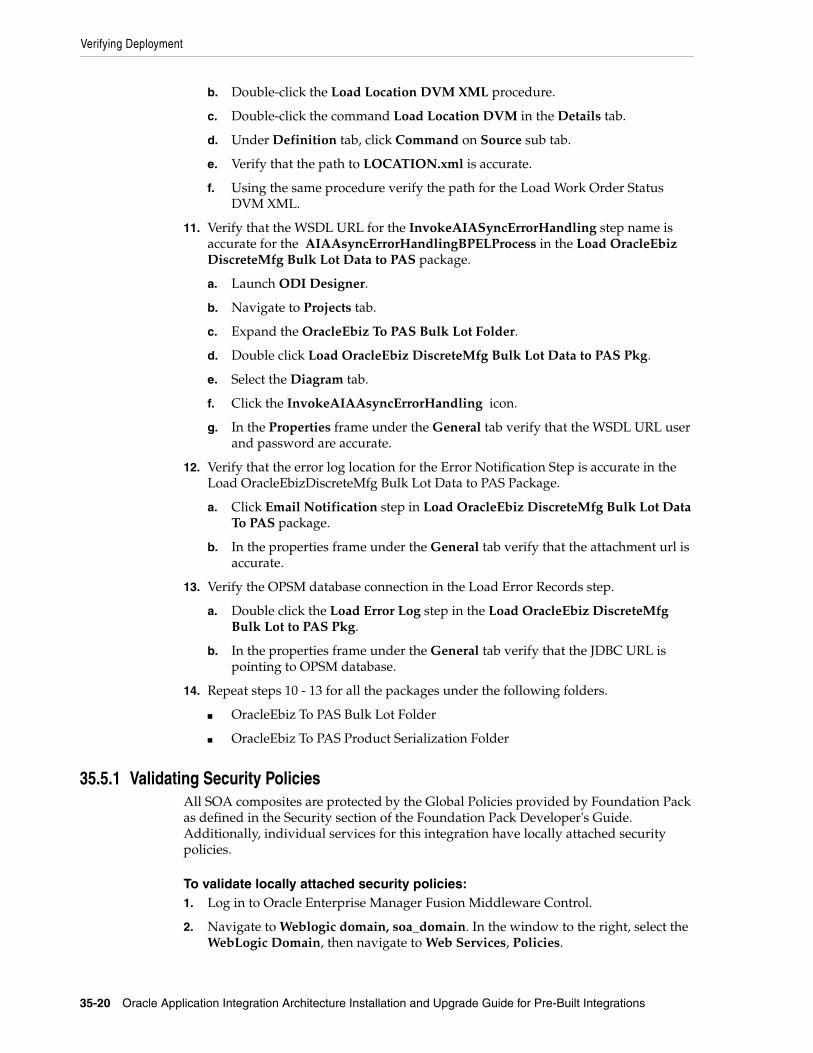
Verifying Deployment
35-20 Oracle Application Integration Architecture Installation and Upgrade Guide for Pre-Built Integrations
b. Double-click the Load Location DVM XML procedure.
c. Double-click the command Load Location DVM in the Details tab.
d. Under Definition tab, click Command on Source sub tab.
e. Verify that the path to LOCATION.xml is accurate.
f. Using the same procedure verify the path for the Load Work Order Status DVM XML.
11. Verify that the WSDL URL for the InvokeAIASyncErrorHandling step name is accurate for the AIAAsyncErrorHandlingBPELProcess in the Load OracleEbiz DiscreteMfg Bulk Lot Data to PAS package.
a. Launch ODI Designer.
b. Navigate to Projects tab.
c. Expand the OracleEbiz To PAS Bulk Lot Folder.
d. Double click Load OracleEbiz DiscreteMfg Bulk Lot Data to PAS Pkg.
e. Select the Diagram tab.
f. Click the InvokeAIAAsyncErrorHandling icon.
g. In the Properties frame under the General tab verify that the WSDL URL user and password are accurate.
12. Verify that the error log location for the Error Notification Step is accurate in the Load OracleEbizDiscreteMfg Bulk Lot Data to PAS Package.
a. Click Email Notification step in Load OracleEbiz DiscreteMfg Bulk Lot Data To PAS package.
b. In the properties frame under the General tab verify that the attachment url is accurate.
13. Verify the OPSM database connection in the Load Error Records step.
a. Double click the Load Error Log step in the Load OracleEbiz DiscreteMfg Bulk Lot to PAS Pkg.
b. In the properties frame under the General tab verify that the JDBC URL is pointing to OPSM database.
14. Repeat steps 10 - 13 for all the packages under the following folders.
■ OracleEbiz To PAS Bulk Lot Folder
■ OracleEbiz To PAS Product Serialization Folder
35.5.1 Validating Security PoliciesAll SOA composites are protected by the Global Policies provided by Foundation Pack as defined in the Security section of the Foundation Pack Developer's Guide. Additionally, individual services for this integration have locally attached security policies.
To validate locally attached security policies:1. Log in to Oracle Enterprise Manager Fusion Middleware Control.
2. Navigate to Weblogic domain, soa_domain. In the window to the right, select the WebLogic Domain, then navigate to Web Services, Policies.
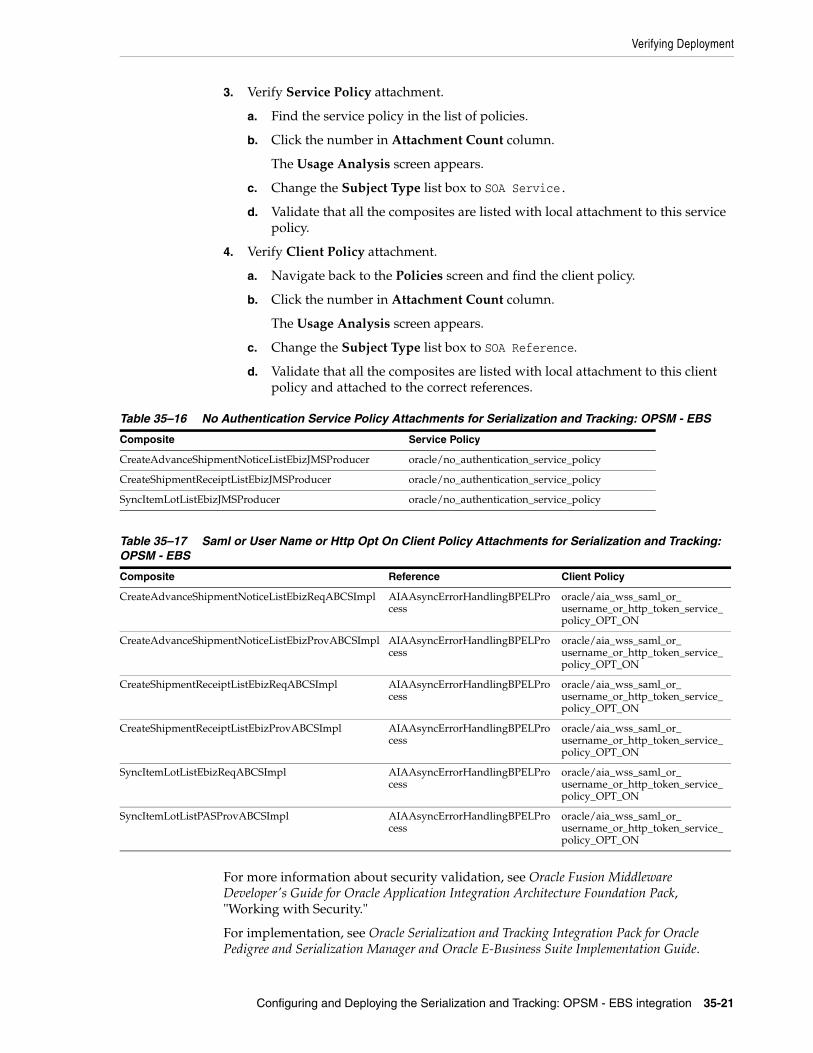
Verifying Deployment
Configuring and Deploying the Serialization and Tracking: OPSM - EBS integration 35-21
3. Verify Service Policy attachment.
a. Find the service policy in the list of policies.
b. Click the number in Attachment Count column.
The Usage Analysis screen appears.
c. Change the Subject Type list box to SOA Service.
d. Validate that all the composites are listed with local attachment to this service policy.
4. Verify Client Policy attachment.
a. Navigate back to the Policies screen and find the client policy.
b. Click the number in Attachment Count column.
The Usage Analysis screen appears.
c. Change the Subject Type list box to SOA Reference.
d. Validate that all the composites are listed with local attachment to this client policy and attached to the correct references.
For more information about security validation, see Oracle Fusion Middleware Developer's Guide for Oracle Application Integration Architecture Foundation Pack, "Working with Security."
For implementation, see Oracle Serialization and Tracking Integration Pack for Oracle Pedigree and Serialization Manager and Oracle E-Business Suite Implementation Guide.
Table 35–16 No Authentication Service Policy Attachments for Serialization and Tracking: OPSM - EBS
Composite Service Policy
CreateAdvanceShipmentNoticeListEbizJMSProducer oracle/no_authentication_service_policy
CreateShipmentReceiptListEbizJMSProducer oracle/no_authentication_service_policy
SyncItemLotListEbizJMSProducer oracle/no_authentication_service_policy
Table 35–17 Saml or User Name or Http Opt On Client Policy Attachments for Serialization and Tracking: OPSM - EBS
Composite Reference Client Policy
CreateAdvanceShipmentNoticeListEbizReqABCSImpl AIAAsyncErrorHandlingBPELProcess
oracle/aia_wss_saml_or_username_or_http_token_service_policy_OPT_ON
CreateAdvanceShipmentNoticeListEbizProvABCSImpl AIAAsyncErrorHandlingBPELProcess
oracle/aia_wss_saml_or_username_or_http_token_service_policy_OPT_ON
CreateShipmentReceiptListEbizReqABCSImpl AIAAsyncErrorHandlingBPELProcess
oracle/aia_wss_saml_or_username_or_http_token_service_policy_OPT_ON
CreateShipmentReceiptListEbizProvABCSImpl AIAAsyncErrorHandlingBPELProcess
oracle/aia_wss_saml_or_username_or_http_token_service_policy_OPT_ON
SyncItemLotListEbizReqABCSImpl AIAAsyncErrorHandlingBPELProcess
oracle/aia_wss_saml_or_username_or_http_token_service_policy_OPT_ON
SyncItemLotListPASProvABCSImpl AIAAsyncErrorHandlingBPELProcess
oracle/aia_wss_saml_or_username_or_http_token_service_policy_OPT_ON
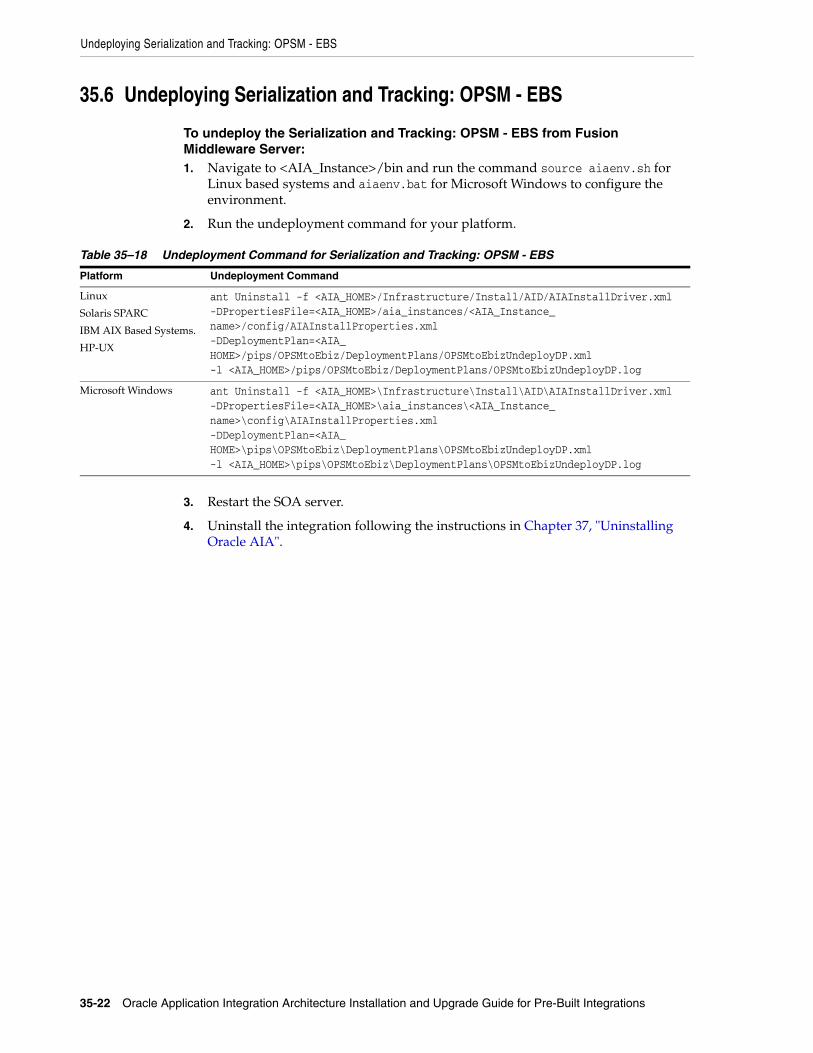
Undeploying Serialization and Tracking: OPSM - EBS
35-22 Oracle Application Integration Architecture Installation and Upgrade Guide for Pre-Built Integrations
35.6 Undeploying Serialization and Tracking: OPSM - EBS
To undeploy the Serialization and Tracking: OPSM - EBS from Fusion Middleware Server:1. Navigate to <AIA_Instance>/bin and run the command source aiaenv.sh for
Linux based systems and aiaenv.bat for Microsoft Windows to configure the environment.
2. Run the undeployment command for your platform.
3. Restart the SOA server.
4. Uninstall the integration following the instructions in Chapter 37, "Uninstalling Oracle AIA".
Table 35–18 Undeployment Command for Serialization and Tracking: OPSM - EBS
Platform Undeployment Command
Linux
Solaris SPARC
IBM AIX Based Systems.
HP-UX
ant Uninstall -f <AIA_HOME>/Infrastructure/Install/AID/AIAInstallDriver.xml -DPropertiesFile=<AIA_HOME>/aia_instances/<AIA_Instance_name>/config/AIAInstallProperties.xml -DDeploymentPlan=<AIA_HOME>/pips/OPSMtoEbiz/DeploymentPlans/OPSMtoEbizUndeployDP.xml -l <AIA_HOME>/pips/OPSMtoEbiz/DeploymentPlans/OPSMtoEbizUndeployDP.log
Microsoft Windows ant Uninstall -f <AIA_HOME>\Infrastructure\Install\AID\AIAInstallDriver.xml -DPropertiesFile=<AIA_HOME>\aia_instances\<AIA_Instance_name>\config\AIAInstallProperties.xml -DDeploymentPlan=<AIA_HOME>\pips\OPSMtoEbiz\DeploymentPlans\OPSMtoEbizUndeployDP.xml -l <AIA_HOME>\pips\OPSMtoEbiz\DeploymentPlans\OPSMtoEbizUndeployDP.log

Part IVPart IV Upgrading Pre-Built Integrations
This part provides a general introduction to and the steps involved in upgrading Pre-Built Integrations.
This part contains the following chapter:
■ Chapter 36, "Upgrading Pre-Built Integrations"

36
Upgrading Pre-Built Integrations 36-1
36Upgrading Pre-Built Integrations
This chapter provides an overview of the Application Integration Architecture (AIA) upgrade process for the Pre-Built Integrations included in this release.
This chapter includes the following sections:
■ Section 36.1, "Understanding AIA Upgrade"
■ Section 36.2, "Upgrading Pre-Built Integrations"
■ Section 36.3, "Upgrading AIA 11.2 Integrations"
■ Section 36.4, "Upgrading AIA 3.1 PIPs and DIs"
■ Section 36.5, "Performing Postupgrade Tasks for Pre-Built Integrations"
■ Section 36.6, "Performing Postupgrade Tasks for AIA"
36.1 Understanding AIA UpgradeThe AIA upgrade process consists of three phases:
1. Upgrade newer AIA Release: the file-system (under $AIA_HOME) is updated with the latest content.
2. Redeploy previously deployed PIPs or DIs: update the server to the latest content by redeploying new PIPs or DIs from the new release.
3. Merge customizations and extensions: if you have customized services, you must merge the customizations.
Note: If you have AIA 2.4 or 2.5 installed, you cannot migrate or upgrade to AIA 11.1. You must install AIA 11.3 following the steps included in Chapter 3, "Installing Pre-Built Integrations"
To migrate customizations made to OOTB 2.4 or 2.5 artifacts, see the Oracle Fusion Middleware Developer's Guide for Oracle Application Integration Architecture Foundation Pack
To migrate the 2.4 or 2.5 xref data to AIA 11.3, you must use the SOA xref utility. For more information, see the Oracle Fusion Middleware Developer's Guide for Oracle SOA Suite.
If you have modified or created custom services, custom DVMs and Xrefs, you must migrate these to AIA 11.3. For more information on migrating custom services, custom DVMs and Xrefs from AIA 2.4 or 2.5 to AIA 11.3, see the Oracle Fusion Middleware Developer's Guide for Oracle Application Integration Architecture Foundation Pack

Upgrading Pre-Built Integrations
36-2 Oracle Application Integration Architecture Installation and Upgrade Guide for Pre-Built Integrations
After these three tasks are completed, you can configure and deploy new PIPs or DIs from the new release.
36.1.1 Upgrading the AIA ReleaseYou must run the AIA Pre-Built Integrations Installer and point to the existing $AIA_HOME where the previous AIA version is installed. The AIA Pre-Built Integrations Installer:
1. Warns you when there is a previous release of AIA Pre-Built Integrations installed in $AIA_HOME.
2. Updates the PIP and DI content in $AIA_HOME with the latest version, after you back up AIA_HOME.
36.1.2 Redeploying previously deployed PIPs and DIsAfter upgrading the release and merging your customizations, the previously deployed PIPs and DIs may be redeployed. FOR OOTB PIPs or DIs that require redeployment, see Section 36.2, "Upgrading Pre-Built Integrations", Section 36.3, "Upgrading AIA 11.2 Integrations" and Section 36.4, "Upgrading AIA 3.1 PIPs and DIs". The required upgrade scripts are included by the PIPs or DIs in this release.
For custom PIPs or DIs, you must identify the artifacts that require redeployment by rerunning the deployment plan of the specific PIP or DI or by redeploying the specific artifacts using a custom deployment plan.
36.1.3 Merging Customizations and ExtensionsThis applies if you have customized or extended the OOTB services or the PIPs or DIs. You must review the changes in this release and restore your customization and extensions after upgrading.
36.2 Upgrading Pre-Built IntegrationsThis section lists the tasks that you must perform to upgrade pre-built integrations.
36.2.1 AIA Upgrade RequirementsAIA Pre-Built Integrations Installer upgrades your 11.1 version PIPs and DIs to RV 11.3.
To upgrade from Foundation Pack 11.1.1.5.0 to version 11.1.1.6.0, RUP patch 14253266 or later, you must manually run the upgrade scripts found in the Oracle Fusion Middleware Installation and Upgrade Guide for Oracle Application Integration Architecture
Note: Before upgrading Pre-Built Integrations 11.1 or AIA RV 3.1.1 PIPs or DIs, you must upgrade Foundation Pack to version 11.1.1.6.0, RUP patch 14253266 or later. For more information and instructions, see the Oracle Fusion Middleware Installation and Upgrade Guide for Oracle Application Integration Architecture Foundation Pack. If you are using an AIA Foundation Pack release that is earlier than 11.1.1.5.0, first upgrade to release 11.1.1.5.0 using the respective upgrade guides and then upgrade to version 11.1.1.6.0, RUP patch 14253266 or later.
.
Upgrading Pre-Built Integrations
Upgrading Pre-Built Integrations 36-3
Foundation Pack. To upgrade individual PIPs or DIs, you must manually run the upgrade scripts after you upgrade Foundation Pack.
AIA Pre-Built Integrations Installer does not republish AIA content to the service registry when you upgrade from Foundation Pack 11.1.1.5.0 to 11.1.1.6.0. To upgrade the registry with AIA 11.1.1.6.0 content, you must manually republish.
AIA Foundation Pack 11.1.1.6.0 contains bug fixes in Core Infrastructure areas (CAVS, BSR, and so on). When you upgrade from 11.1.1.5.0 to 11.1.1.6.0, RUP patch 14253266 or later, these applications get redeployed. However, the upgrade does not have any impact because your data is preserved and all fixes are backward compatible.
36.2.1.1 Software and Hardware RequirementsThe system requirements for the upgrade (CPU/memory/disk space) are the same as those discussed under Hardware Requirements.
For more details on the software requirements for your specific PIPs or DIs, see Chapter 2, "Software Requirements".
36.2.2 Performing Preupgrade Tasks for Pre-Built IntegrationsBefore running the AIA Pre-Built Integrations Installer, you must:
1. Navigate a command prompt to the <AIA_HOME> parent directory: For example: "cd $AIA_HOME/..." (Go to the <AIA_HOME> directory and move up one directory higher).
2. Change the file permissions for the <AIA_HOME> directory and all subdirectories recursively to Read/Write/Execute for User/Group/Other owners. For example: chmod -R 777 <AIA_HOME>.
3. Back up your existing AIA_HOME before you start the 11.3 AIA Pre-Built Integrations Installer.
Back up extended solution artifactsFollowing the AIA extensibility model, as documented in the extensibility sections of the Oracle Application Integration Architecture - Foundation Pack: Concepts and Technologies Guide and the Oracle Application Integration Architecture - Foundation Pack: Integration Developer's Guide, you created or updated one or more of the following artifacts:
■ Custom EBOs:
These are AIA schema extensions performed on EBOs. Though the AIA Foundation Pack Installer automatically preserves these schema extensions, it is advisable to back up the custom directory. For example, all custom xsd files for core EBOs are accessed as http://hostname:port/AIAComponents/EnterpriseObjectLibrary/Core/Custom/EBO/
Note: The upgrade of individual components is not supported in this release.
Note: These steps must be performed to upgrade every PIP or DI in Section 36.3, "Upgrading AIA 11.2 Integrations" and Section 36.4, "Upgrading AIA 3.1 PIPs and DIs".
Upgrading Pre-Built Integrations
36-4 Oracle Application Integration Architecture Installation and Upgrade Guide for Pre-Built Integrations
If you are using the oracle application server, you can access this folder from SOA_HOME/Apache/Apache/htdocs/AIAComponents/EnterpriseObjectLibrary/Core/Custom/EBO/
■ Custom XSLTs:
These are the extensions performed on the AIA Transformation style sheet. Foundation Pack does not contain any Extensible Stylesheet Language Transformations (XSLTs) for its components and utilities. Because the process content is delivered only in PIPs or DIs, you must manually back up the XSLTs if you have developed any for the custom integrations, and reapply them as a postupgrade step.
■ Custom EBS WSDL:
If you have customized any EBS WSDL that is delivered or shipped with AIA Foundation Pack, you must back it up and restore it manually as a postupgrade step
36.2.2.1 Performing Preupgrade Tasks for Design to Release: Agile - EBS 11.1 Before you upgrade the Design to Release: Agile - EBS pre-built integrations from PIP version 11.1 to 11.2, you must apply the patch 13944235 (or later) on Design to Release: Agile - EBS PIP 11.1 if not applied.
36.2.2.2 Performing Preupgrade tasks for the Design to Release: Agile - EBS 3.1Before you upgrade the Design to Release: Agile - EBS pre-built integrations from PIP version 3.1 to 11.2, you must apply the patch 12543953 (or later) on Design to Release: Agile - EBS PIP 3.1 if not applied.
36.2.3 Performing Upgrade Process for Pre-Built IntegrationsLaunching the AIA Pre-Built Integrations Installer
■ To launch AIA Pre-Built Integrations Installer:
1. Navigate to aiapip/Disk1.
2. Follow the launch instructions for your platform.
3. Click Next.
36.2.4 Choosing the Existing Home Directory■ To choose the home directory where the existing version of Pre-Built Integrations
is installed:
1. Specify the home directory of your existing AIA implementation.
Table 36–1 Launch Instructions for AIA Pre-Built Integrations Installer
Platform To launch the AIA Pre-Built Integrations Installer
Linux x86
Solaris SPARC (64-bit)
IBM AIX Based Systems (64-bit)
HP-UX 11i (64 bit)
At the command line prompt, enter:
./runInstaller -invPtrLoc <AIA_HOME>/oraInst.loc -jreLoc <location of the jre specific to your operating system. This directory should have /bin/java>
Microsoft Windows (32-bit) Double-click setup.exe
Upgrading AIA 11.2 Integrations
Upgrading Pre-Built Integrations 36-5
2. Click Next.
36.2.5 Running the Directory Selection and Upgrade Process■ To run the directory selection and upgrade process:
1. On the Summary screen, review the summary of upgrade information.
The summary screen provides information about the existing AIA Pre-Built Integrations installation.
2. Click Install. This upgrades the Pre-Built Integrations version.
PIP- and DI-related files get copied to the specified location. You must manually execute the PIP or DI upgrade scripts to complete the upgrade.
36.3 Upgrading AIA 11.2 Integrations
This section discusses the upgrade process for AIA 11.2 integrations. The integrations included in this section are upgraded from AIA version 11.2 to 11.3.
36.3.1 Upgrading Design to Release: Agile - EBSUpgrade the Design to Release: Agile - EBS pre-built integrations by following
the tasks discussed below:
36.3.1.1 Running Upgrade Scripts for Design to Release: Agile - EBS1. Navigate to <AIA_Instance>/bin and run the command source aiaenv.sh for
Linux based systems and aiaenv.bat for Microsoft Windows to configure the environment.
2. Configure the PIP by following the steps listed in Section 20.3.1, "Configuring the Design to Release: Agile - EBS Pre-Built Integration".
3. Apply the patch 15847182.
4. Navigate to <AIAHOME>/pips/AgileToEbiz/upgrade/11.2 and run the deployment commands for your platform.
Note: Provide the directory where Foundation Pack 11.1.1.5.0 was installed. The path should be available in the list. When you select the current home directory, AIA Pre-Built Integrations Installer disables the rest of the options in the screen and displays the information related to AIA (product name and version number) that is in the directory.
Note: The integrations that are not listed in this section do not require updates because the contents have not changed.
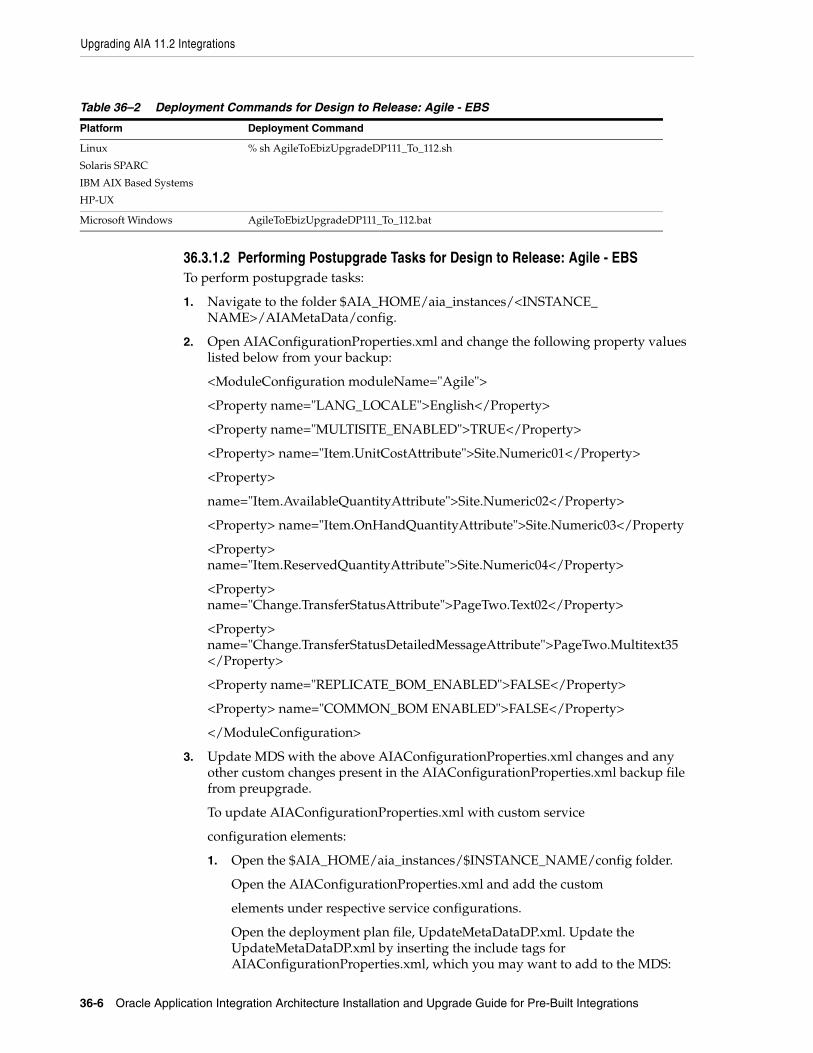
Upgrading AIA 11.2 Integrations
36-6 Oracle Application Integration Architecture Installation and Upgrade Guide for Pre-Built Integrations
36.3.1.2 Performing Postupgrade Tasks for Design to Release: Agile - EBSTo perform postupgrade tasks:
1. Navigate to the folder $AIA_HOME/aia_instances/<INSTANCE_NAME>/AIAMetaData/config.
2. Open AIAConfigurationProperties.xml and change the following property values listed below from your backup:
<ModuleConfiguration moduleName="Agile">
<Property name="LANG_LOCALE">English</Property>
<Property name="MULTISITE_ENABLED">TRUE</Property>
<Property> name="Item.UnitCostAttribute">Site.Numeric01</Property>
<Property>
name="Item.AvailableQuantityAttribute">Site.Numeric02</Property>
<Property> name="Item.OnHandQuantityAttribute">Site.Numeric03</Property
<Property> name="Item.ReservedQuantityAttribute">Site.Numeric04</Property>
<Property> name="Change.TransferStatusAttribute">PageTwo.Text02</Property>
<Property> name="Change.TransferStatusDetailedMessageAttribute">PageTwo.Multitext35 </Property>
<Property name="REPLICATE_BOM_ENABLED">FALSE</Property>
<Property> name="COMMON_BOM ENABLED">FALSE</Property>
</ModuleConfiguration>
3. Update MDS with the above AIAConfigurationProperties.xml changes and any other custom changes present in the AIAConfigurationProperties.xml backup file from preupgrade.
To update AIAConfigurationProperties.xml with custom service
configuration elements:
1. Open the $AIA_HOME/aia_instances/$INSTANCE_NAME/config folder.
Open the AIAConfigurationProperties.xml and add the custom
elements under respective service configurations.
Open the deployment plan file, UpdateMetaDataDP.xml. Update the UpdateMetaDataDP.xml by inserting the include tags for AIAConfigurationProperties.xml, which you may want to add to the MDS:
Table 36–2 Deployment Commands for Design to Release: Agile - EBS
Platform Deployment Command
Linux
Solaris SPARC
IBM AIX Based Systems
HP-UX
% sh AgileToEbizUpgradeDP111_To_112.sh
Microsoft Windows AgileToEbizUpgradeDP111_To_112.bat
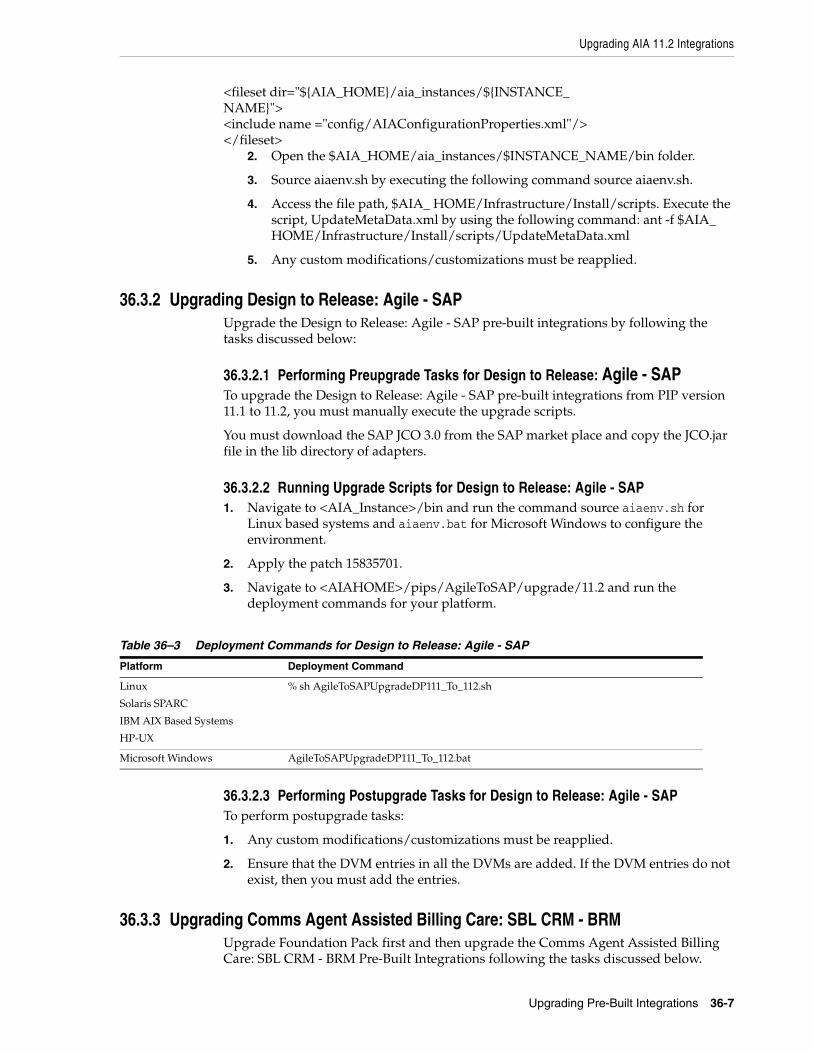
Upgrading AIA 11.2 Integrations
Upgrading Pre-Built Integrations 36-7
<fileset dir="${AIA_HOME}/aia_instances/${INSTANCE_NAME}"><include name ="config/AIAConfigurationProperties.xml"/></fileset>
2. Open the $AIA_HOME/aia_instances/$INSTANCE_NAME/bin folder.
3. Source aiaenv.sh by executing the following command source aiaenv.sh.
4. Access the file path, $AIA_ HOME/Infrastructure/Install/scripts. Execute the script, UpdateMetaData.xml by using the following command: ant -f $AIA_ HOME/Infrastructure/Install/scripts/UpdateMetaData.xml
5. Any custom modifications/customizations must be reapplied.
36.3.2 Upgrading Design to Release: Agile - SAPUpgrade the Design to Release: Agile - SAP pre-built integrations by following the tasks discussed below:
36.3.2.1 Performing Preupgrade Tasks for Design to Release: Agile - SAP To upgrade the Design to Release: Agile - SAP pre-built integrations from PIP version 11.1 to 11.2, you must manually execute the upgrade scripts.
You must download the SAP JCO 3.0 from the SAP market place and copy the JCO.jar file in the lib directory of adapters.
36.3.2.2 Running Upgrade Scripts for Design to Release: Agile - SAP1. Navigate to <AIA_Instance>/bin and run the command source aiaenv.sh for
Linux based systems and aiaenv.bat for Microsoft Windows to configure the environment.
2. Apply the patch 15835701.
3. Navigate to <AIAHOME>/pips/AgileToSAP/upgrade/11.2 and run the deployment commands for your platform.
36.3.2.3 Performing Postupgrade Tasks for Design to Release: Agile - SAPTo perform postupgrade tasks:
1. Any custom modifications/customizations must be reapplied.
2. Ensure that the DVM entries in all the DVMs are added. If the DVM entries do not exist, then you must add the entries.
36.3.3 Upgrading Comms Agent Assisted Billing Care: SBL CRM - BRMUpgrade Foundation Pack first and then upgrade the Comms Agent Assisted Billing Care: SBL CRM - BRM Pre-Built Integrations following the tasks discussed below.
Table 36–3 Deployment Commands for Design to Release: Agile - SAP
Platform Deployment Command
Linux
Solaris SPARC
IBM AIX Based Systems
HP-UX
% sh AgileToSAPUpgradeDP111_To_112.sh
Microsoft Windows AgileToSAPUpgradeDP111_To_112.bat
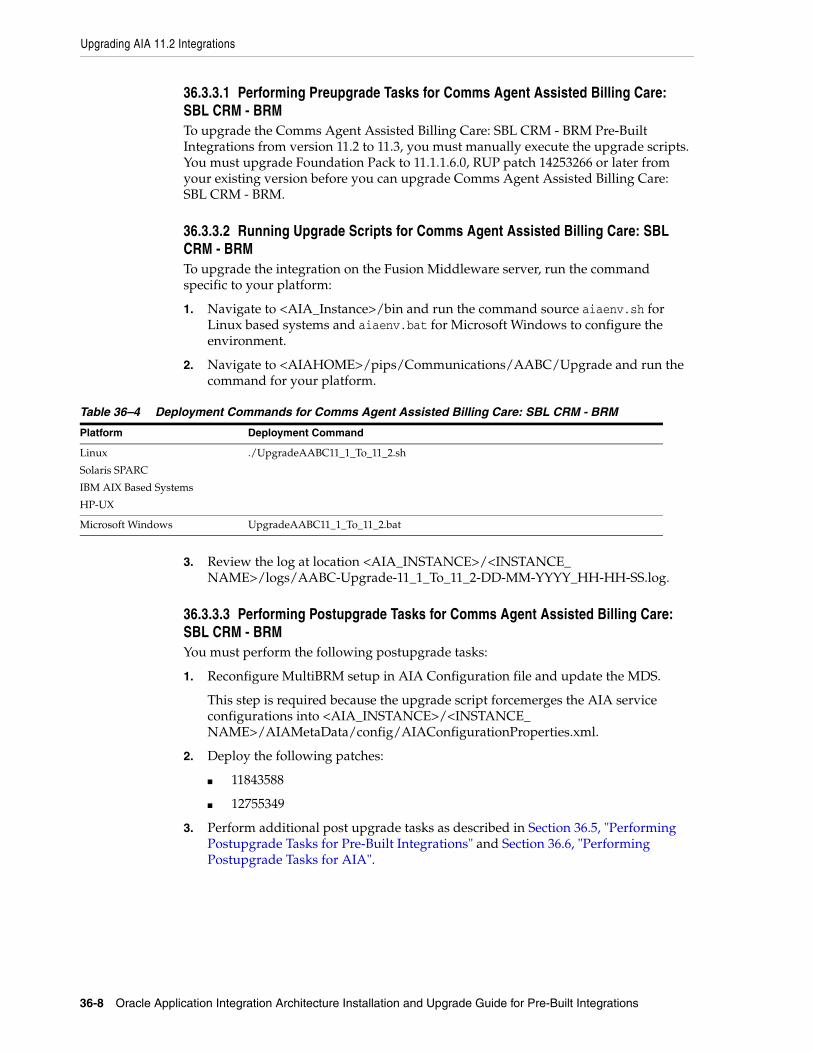
Upgrading AIA 11.2 Integrations
36-8 Oracle Application Integration Architecture Installation and Upgrade Guide for Pre-Built Integrations
36.3.3.1 Performing Preupgrade Tasks for Comms Agent Assisted Billing Care: SBL CRM - BRMTo upgrade the Comms Agent Assisted Billing Care: SBL CRM - BRM Pre-Built Integrations from version 11.2 to 11.3, you must manually execute the upgrade scripts. You must upgrade Foundation Pack to 11.1.1.6.0, RUP patch 14253266 or later from your existing version before you can upgrade Comms Agent Assisted Billing Care: SBL CRM - BRM.
36.3.3.2 Running Upgrade Scripts for Comms Agent Assisted Billing Care: SBL CRM - BRMTo upgrade the integration on the Fusion Middleware server, run the command specific to your platform:
1. Navigate to <AIA_Instance>/bin and run the command source aiaenv.sh for Linux based systems and aiaenv.bat for Microsoft Windows to configure the environment.
2. Navigate to <AIAHOME>/pips/Communications/AABC/Upgrade and run the command for your platform.
3. Review the log at location <AIA_INSTANCE>/<INSTANCE_NAME>/logs/AABC-Upgrade-11_1_To_11_2-DD-MM-YYYY_HH-HH-SS.log.
36.3.3.3 Performing Postupgrade Tasks for Comms Agent Assisted Billing Care: SBL CRM - BRMYou must perform the following postupgrade tasks:
1. Reconfigure MultiBRM setup in AIA Configuration file and update the MDS.
This step is required because the upgrade script forcemerges the AIA service configurations into <AIA_INSTANCE>/<INSTANCE_NAME>/AIAMetaData/config/AIAConfigurationProperties.xml.
2. Deploy the following patches:
■ 11843588
■ 12755349
3. Perform additional post upgrade tasks as described in Section 36.5, "Performing Postupgrade Tasks for Pre-Built Integrations" and Section 36.6, "Performing Postupgrade Tasks for AIA".
Table 36–4 Deployment Commands for Comms Agent Assisted Billing Care: SBL CRM - BRM
Platform Deployment Command
Linux
Solaris SPARC
IBM AIX Based Systems
HP-UX
./UpgradeAABC11_1_To_11_2.sh
Microsoft Windows UpgradeAABC11_1_To_11_2.bat

Upgrading AIA 11.2 Integrations
Upgrading Pre-Built Integrations 36-9
36.3.4 Upgrading Comms Order to Cash: SBL CRM, OSM and BRMUpgrade Foundation Pack first and then upgrade the Comms Order to Cash: SBL CRM, OSM and BRM Pre-Built Integrations following the tasks discussed below.
36.3.4.1 Performing Preupgrade Tasks for Comms Order to Cash: SBL CRM, OSM and BRMTo upgrade the Comms Order to Cash: SBL CRM, OSM and BRM Pre-Built Integrations from version 11.2 to 11.3, you must manually execute the upgrade scripts. You must upgrade Foundation Pack to 11.1.1.6.0, RUP patch 14253266 or later from your existing version before you can upgrade Comms Order to Cash: SBL CRM, OSM and BRM.
36.3.4.2 Running Upgrade Scripts for Comms Order to Cash: SBL CRM, OSM and BRMTo upgrade the integration on the Fusion Middleware server, run the command specific to your platform:
1. Navigate to <AIA_Instance>/bin and run the command source aiaenv.sh for Linux based systems and aiaenv.bat for Microsoft Windows to configure the environment.
2. Navigate to <AIAHOME>/pips/Communications/O2C/Upgrade and run the command for your platform.
3. Review the log at location <AIA_INSTANCE>/<INSTANCE_NAME>/logs/O2C-Upgrade-11_1_To_11_2-DD-MM-YYYY_HH-HH-SS.log.
36.3.4.3 Performing Postupgrade Tasks for Comms Order to Cash: SBL CRM, OSM and BRMYou must perform the following postupgrade tasks:
1. Reconfigure MultiBRM setup in AIA Configuration file and update the MDS.
This step is required because the upgrade script forcemerges the AIA service configurations into <AIA_INSTANCE>/<INSTANCE_NAME>/AIAMetaData/config/AIAConfigurationProperties.xml.
Note: If you are using the Collections feature of Comms Agent Assisted Billing Care: SBL CRM - BRM PIP, then you must regrenerate the scenario. For more information about how to regenerate a scenario, see chapter 13.3 Regenerating a Scenario in the Oracle® Fusion Middleware Developer's Guide for Oracle Data Integrator 11g Release 1 (11.1.1).
Table 36–5 Deployment Commands for Comms Order to Cash: SBL CRM, OSM and BRM
Platform Deployment Command
Linux
Solaris SPARC
IBM AIX Based Systems
HP-UX
./UpgradeO2C11_1_To_11_2.sh
Microsoft Windows UpgradeO2C11_1_To_11_2.bat
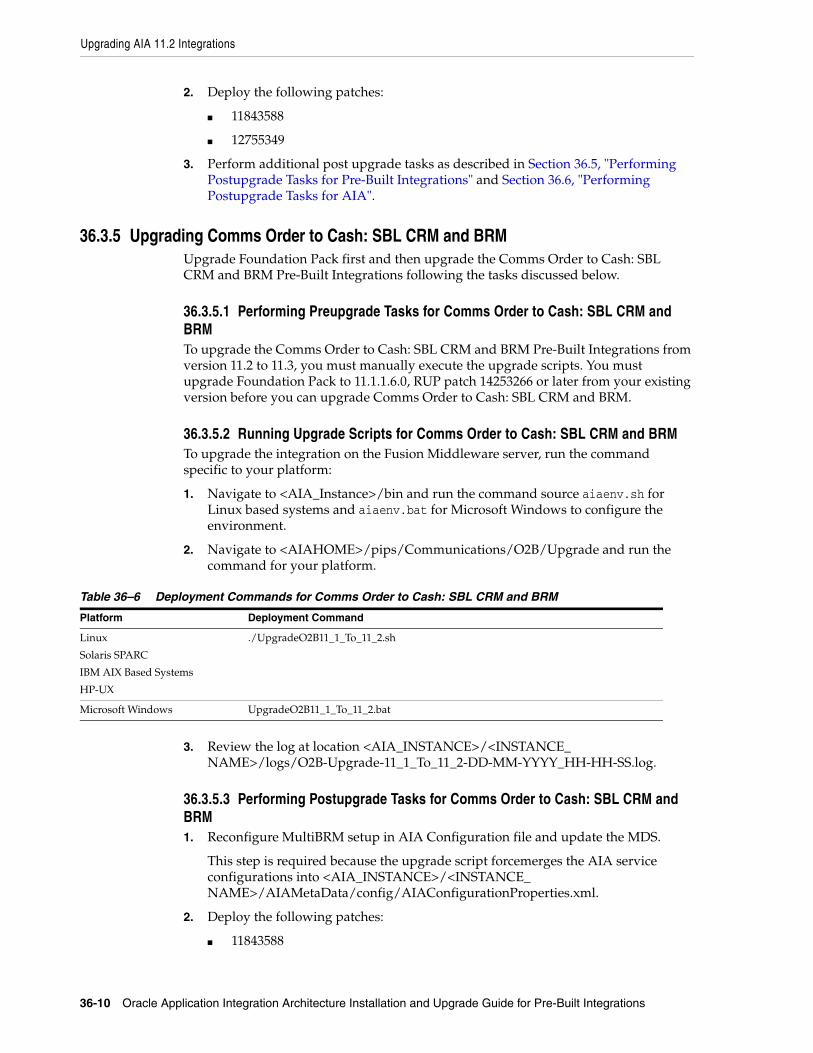
Upgrading AIA 11.2 Integrations
36-10 Oracle Application Integration Architecture Installation and Upgrade Guide for Pre-Built Integrations
2. Deploy the following patches:
■ 11843588
■ 12755349
3. Perform additional post upgrade tasks as described in Section 36.5, "Performing Postupgrade Tasks for Pre-Built Integrations" and Section 36.6, "Performing Postupgrade Tasks for AIA".
36.3.5 Upgrading Comms Order to Cash: SBL CRM and BRMUpgrade Foundation Pack first and then upgrade the Comms Order to Cash: SBL CRM and BRM Pre-Built Integrations following the tasks discussed below.
36.3.5.1 Performing Preupgrade Tasks for Comms Order to Cash: SBL CRM and BRMTo upgrade the Comms Order to Cash: SBL CRM and BRM Pre-Built Integrations from version 11.2 to 11.3, you must manually execute the upgrade scripts. You must upgrade Foundation Pack to 11.1.1.6.0, RUP patch 14253266 or later from your existing version before you can upgrade Comms Order to Cash: SBL CRM and BRM.
36.3.5.2 Running Upgrade Scripts for Comms Order to Cash: SBL CRM and BRMTo upgrade the integration on the Fusion Middleware server, run the command specific to your platform:
1. Navigate to <AIA_Instance>/bin and run the command source aiaenv.sh for Linux based systems and aiaenv.bat for Microsoft Windows to configure the environment.
2. Navigate to <AIAHOME>/pips/Communications/O2B/Upgrade and run the command for your platform.
3. Review the log at location <AIA_INSTANCE>/<INSTANCE_NAME>/logs/O2B-Upgrade-11_1_To_11_2-DD-MM-YYYY_HH-HH-SS.log.
36.3.5.3 Performing Postupgrade Tasks for Comms Order to Cash: SBL CRM and BRM1. Reconfigure MultiBRM setup in AIA Configuration file and update the MDS.
This step is required because the upgrade script forcemerges the AIA service configurations into <AIA_INSTANCE>/<INSTANCE_NAME>/AIAMetaData/config/AIAConfigurationProperties.xml.
2. Deploy the following patches:
■ 11843588
Table 36–6 Deployment Commands for Comms Order to Cash: SBL CRM and BRM
Platform Deployment Command
Linux
Solaris SPARC
IBM AIX Based Systems
HP-UX
./UpgradeO2B11_1_To_11_2.sh
Microsoft Windows UpgradeO2B11_1_To_11_2.bat
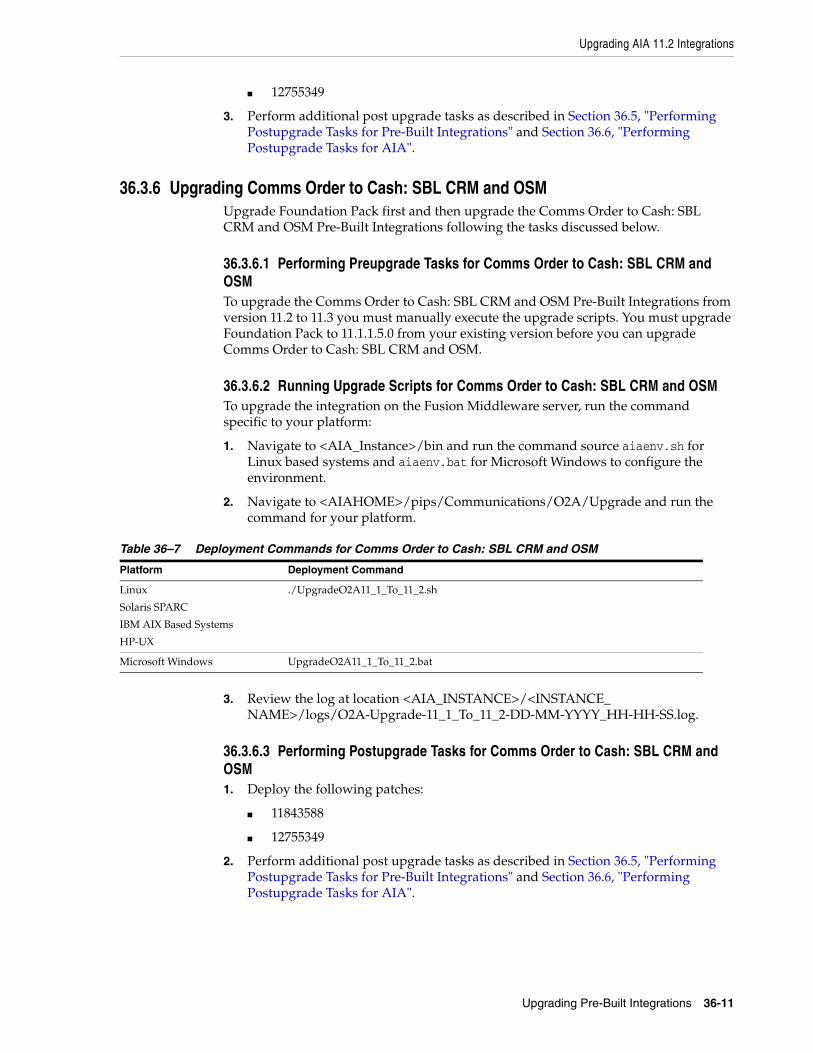
Upgrading AIA 11.2 Integrations
Upgrading Pre-Built Integrations 36-11
■ 12755349
3. Perform additional post upgrade tasks as described in Section 36.5, "Performing Postupgrade Tasks for Pre-Built Integrations" and Section 36.6, "Performing Postupgrade Tasks for AIA".
36.3.6 Upgrading Comms Order to Cash: SBL CRM and OSMUpgrade Foundation Pack first and then upgrade the Comms Order to Cash: SBL CRM and OSM Pre-Built Integrations following the tasks discussed below.
36.3.6.1 Performing Preupgrade Tasks for Comms Order to Cash: SBL CRM and OSMTo upgrade the Comms Order to Cash: SBL CRM and OSM Pre-Built Integrations from version 11.2 to 11.3 you must manually execute the upgrade scripts. You must upgrade Foundation Pack to 11.1.1.5.0 from your existing version before you can upgrade Comms Order to Cash: SBL CRM and OSM.
36.3.6.2 Running Upgrade Scripts for Comms Order to Cash: SBL CRM and OSMTo upgrade the integration on the Fusion Middleware server, run the command specific to your platform:
1. Navigate to <AIA_Instance>/bin and run the command source aiaenv.sh for Linux based systems and aiaenv.bat for Microsoft Windows to configure the environment.
2. Navigate to <AIAHOME>/pips/Communications/O2A/Upgrade and run the command for your platform.
3. Review the log at location <AIA_INSTANCE>/<INSTANCE_NAME>/logs/O2A-Upgrade-11_1_To_11_2-DD-MM-YYYY_HH-HH-SS.log.
36.3.6.3 Performing Postupgrade Tasks for Comms Order to Cash: SBL CRM and OSM1. Deploy the following patches:
■ 11843588
■ 12755349
2. Perform additional post upgrade tasks as described in Section 36.5, "Performing Postupgrade Tasks for Pre-Built Integrations" and Section 36.6, "Performing Postupgrade Tasks for AIA".
Table 36–7 Deployment Commands for Comms Order to Cash: SBL CRM and OSM
Platform Deployment Command
Linux
Solaris SPARC
IBM AIX Based Systems
HP-UX
./UpgradeO2A11_1_To_11_2.sh
Microsoft Windows UpgradeO2A11_1_To_11_2.bat
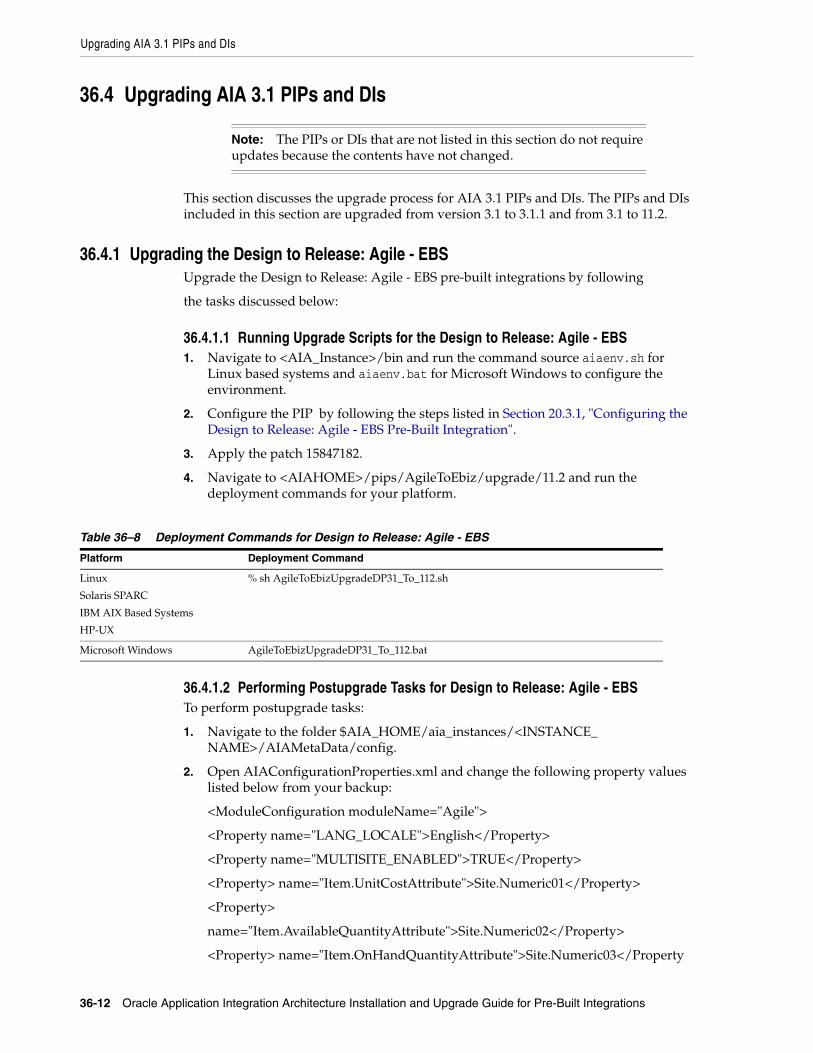
Upgrading AIA 3.1 PIPs and DIs
36-12 Oracle Application Integration Architecture Installation and Upgrade Guide for Pre-Built Integrations
36.4 Upgrading AIA 3.1 PIPs and DIs
This section discusses the upgrade process for AIA 3.1 PIPs and DIs. The PIPs and DIs included in this section are upgraded from version 3.1 to 3.1.1 and from 3.1 to 11.2.
36.4.1 Upgrading the Design to Release: Agile - EBSUpgrade the Design to Release: Agile - EBS pre-built integrations by following
the tasks discussed below:
36.4.1.1 Running Upgrade Scripts for the Design to Release: Agile - EBS1. Navigate to <AIA_Instance>/bin and run the command source aiaenv.sh for
Linux based systems and aiaenv.bat for Microsoft Windows to configure the environment.
2. Configure the PIP by following the steps listed in Section 20.3.1, "Configuring the Design to Release: Agile - EBS Pre-Built Integration".
3. Apply the patch 15847182.
4. Navigate to <AIAHOME>/pips/AgileToEbiz/upgrade/11.2 and run the deployment commands for your platform.
36.4.1.2 Performing Postupgrade Tasks for Design to Release: Agile - EBSTo perform postupgrade tasks:
1. Navigate to the folder $AIA_HOME/aia_instances/<INSTANCE_NAME>/AIAMetaData/config.
2. Open AIAConfigurationProperties.xml and change the following property values listed below from your backup:
<ModuleConfiguration moduleName="Agile">
<Property name="LANG_LOCALE">English</Property>
<Property name="MULTISITE_ENABLED">TRUE</Property>
<Property> name="Item.UnitCostAttribute">Site.Numeric01</Property>
<Property>
name="Item.AvailableQuantityAttribute">Site.Numeric02</Property>
<Property> name="Item.OnHandQuantityAttribute">Site.Numeric03</Property
Note: The PIPs or DIs that are not listed in this section do not require updates because the contents have not changed.
Table 36–8 Deployment Commands for Design to Release: Agile - EBS
Platform Deployment Command
Linux
Solaris SPARC
IBM AIX Based Systems
HP-UX
% sh AgileToEbizUpgradeDP31_To_112.sh
Microsoft Windows AgileToEbizUpgradeDP31_To_112.bat
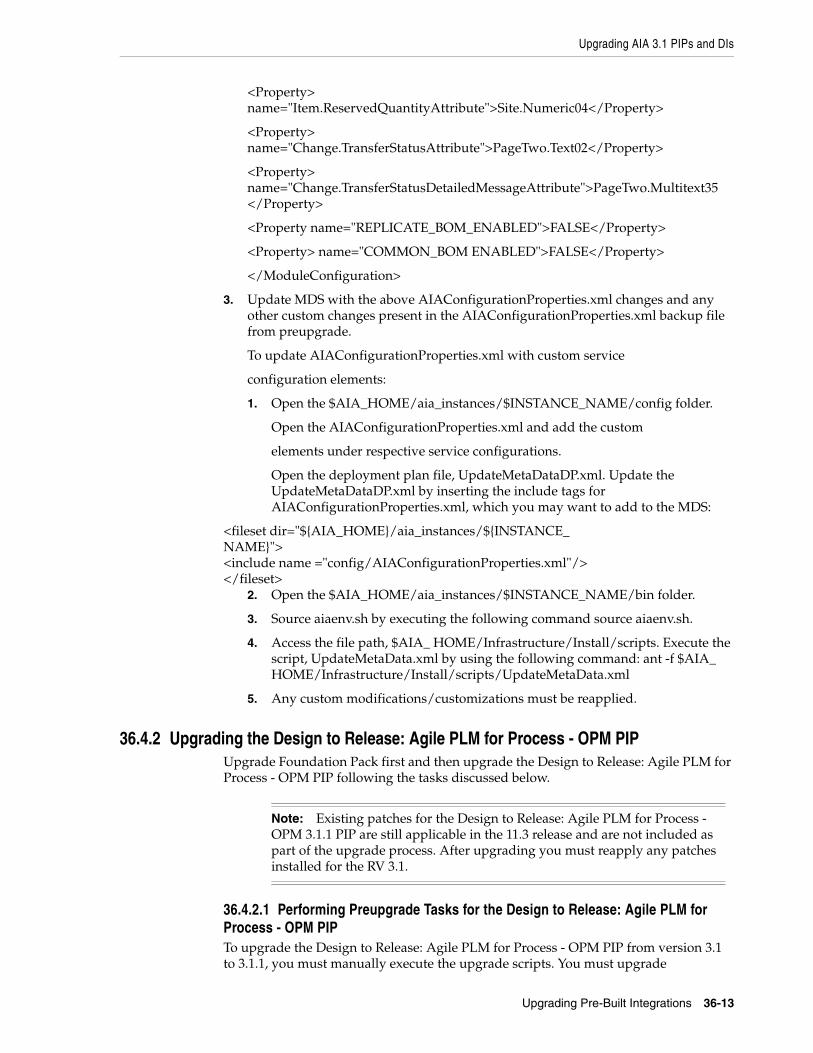
Upgrading AIA 3.1 PIPs and DIs
Upgrading Pre-Built Integrations 36-13
<Property> name="Item.ReservedQuantityAttribute">Site.Numeric04</Property>
<Property> name="Change.TransferStatusAttribute">PageTwo.Text02</Property>
<Property> name="Change.TransferStatusDetailedMessageAttribute">PageTwo.Multitext35 </Property>
<Property name="REPLICATE_BOM_ENABLED">FALSE</Property>
<Property> name="COMMON_BOM ENABLED">FALSE</Property>
</ModuleConfiguration>
3. Update MDS with the above AIAConfigurationProperties.xml changes and any other custom changes present in the AIAConfigurationProperties.xml backup file from preupgrade.
To update AIAConfigurationProperties.xml with custom service
configuration elements:
1. Open the $AIA_HOME/aia_instances/$INSTANCE_NAME/config folder.
Open the AIAConfigurationProperties.xml and add the custom
elements under respective service configurations.
Open the deployment plan file, UpdateMetaDataDP.xml. Update the UpdateMetaDataDP.xml by inserting the include tags for AIAConfigurationProperties.xml, which you may want to add to the MDS:
<fileset dir="${AIA_HOME}/aia_instances/${INSTANCE_NAME}"><include name ="config/AIAConfigurationProperties.xml"/></fileset>
2. Open the $AIA_HOME/aia_instances/$INSTANCE_NAME/bin folder.
3. Source aiaenv.sh by executing the following command source aiaenv.sh.
4. Access the file path, $AIA_ HOME/Infrastructure/Install/scripts. Execute the script, UpdateMetaData.xml by using the following command: ant -f $AIA_ HOME/Infrastructure/Install/scripts/UpdateMetaData.xml
5. Any custom modifications/customizations must be reapplied.
36.4.2 Upgrading the Design to Release: Agile PLM for Process - OPM PIPUpgrade Foundation Pack first and then upgrade the Design to Release: Agile PLM for Process - OPM PIP following the tasks discussed below.
36.4.2.1 Performing Preupgrade Tasks for the Design to Release: Agile PLM for Process - OPM PIPTo upgrade the Design to Release: Agile PLM for Process - OPM PIP from version 3.1 to 3.1.1, you must manually execute the upgrade scripts. You must upgrade
Note: Existing patches for the Design to Release: Agile PLM for Process - OPM 3.1.1 PIP are still applicable in the 11.3 release and are not included as part of the upgrade process. After upgrading you must reapply any patches installed for the RV 3.1.
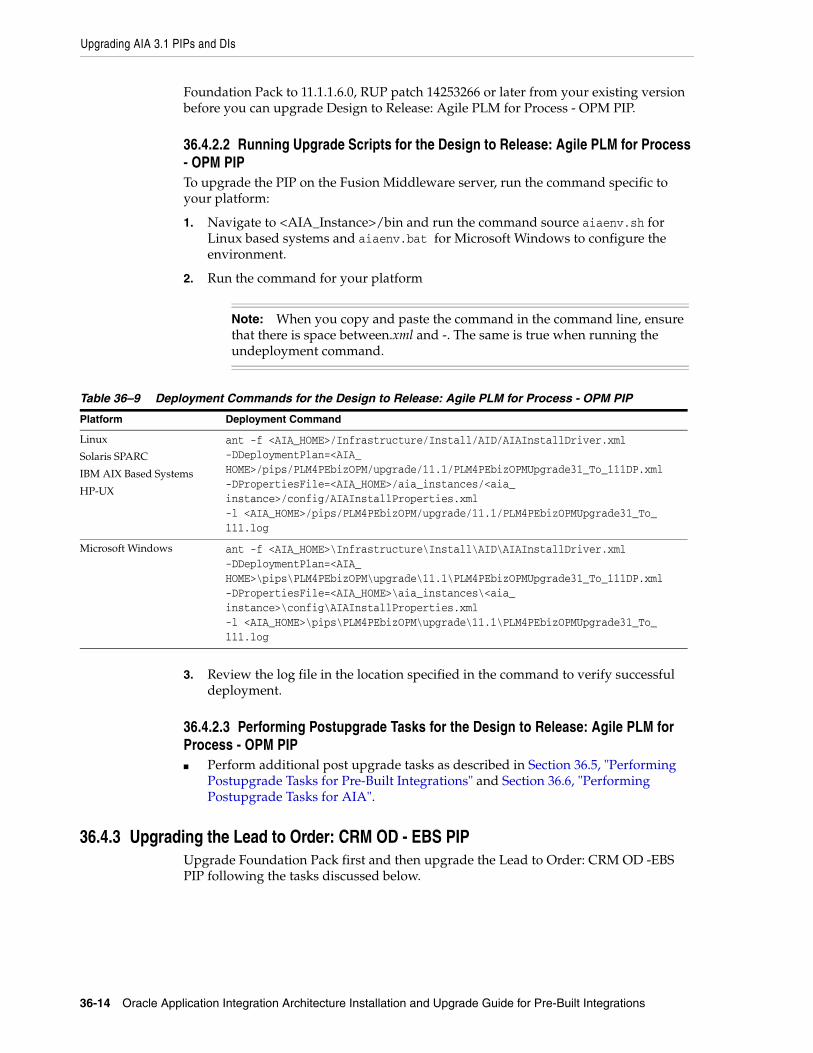
Upgrading AIA 3.1 PIPs and DIs
36-14 Oracle Application Integration Architecture Installation and Upgrade Guide for Pre-Built Integrations
Foundation Pack to 11.1.1.6.0, RUP patch 14253266 or later from your existing version before you can upgrade Design to Release: Agile PLM for Process - OPM PIP.
36.4.2.2 Running Upgrade Scripts for the Design to Release: Agile PLM for Process - OPM PIPTo upgrade the PIP on the Fusion Middleware server, run the command specific to your platform:
1. Navigate to <AIA_Instance>/bin and run the command source aiaenv.sh for Linux based systems and aiaenv.bat for Microsoft Windows to configure the environment.
2. Run the command for your platform
3. Review the log file in the location specified in the command to verify successful deployment.
36.4.2.3 Performing Postupgrade Tasks for the Design to Release: Agile PLM for Process - OPM PIP■ Perform additional post upgrade tasks as described in Section 36.5, "Performing
Postupgrade Tasks for Pre-Built Integrations" and Section 36.6, "Performing Postupgrade Tasks for AIA".
36.4.3 Upgrading the Lead to Order: CRM OD - EBS PIPUpgrade Foundation Pack first and then upgrade the Lead to Order: CRM OD -EBS PIP following the tasks discussed below.
Note: When you copy and paste the command in the command line, ensure that there is space between.xml and -. The same is true when running the undeployment command.
Table 36–9 Deployment Commands for the Design to Release: Agile PLM for Process - OPM PIP
Platform Deployment Command
Linux
Solaris SPARC
IBM AIX Based Systems
HP-UX
ant -f <AIA_HOME>/Infrastructure/Install/AID/AIAInstallDriver.xml -DDeploymentPlan=<AIA_HOME>/pips/PLM4PEbizOPM/upgrade/11.1/PLM4PEbizOPMUpgrade31_To_111DP.xml -DPropertiesFile=<AIA_HOME>/aia_instances/<aia_instance>/config/AIAInstallProperties.xml -l <AIA_HOME>/pips/PLM4PEbizOPM/upgrade/11.1/PLM4PEbizOPMUpgrade31_To_111.log
Microsoft Windows ant -f <AIA_HOME>\Infrastructure\Install\AID\AIAInstallDriver.xml -DDeploymentPlan=<AIA_HOME>\pips\PLM4PEbizOPM\upgrade\11.1\PLM4PEbizOPMUpgrade31_To_111DP.xml -DPropertiesFile=<AIA_HOME>\aia_instances\<aia_instance>\config\AIAInstallProperties.xml -l <AIA_HOME>\pips\PLM4PEbizOPM\upgrade\11.1\PLM4PEbizOPMUpgrade31_To_111.log
Upgrading AIA 3.1 PIPs and DIs
Upgrading Pre-Built Integrations 36-15
36.4.3.1 Performing Preupgrade Tasks for the Lead to Order: CRMOD - EBS PIPTo upgrade Lead to Order: CRM OD - EBS PIP from version 3.1 to 3.1.1, you must manually execute the upgrade scripts. You must upgrade Foundation Pack to 11.1.1.6.0, RUP patch 14253266 or later from your existing version before you can upgrade Lead to Order: CRM OD - EBS PIP.
36.4.3.2 Running Upgrade Scripts for the Lead to Order: CRM OD - EBS PIPTo upgrade the PIP on the Fusion Middleware server, run the command specific to your platform:
1. Navigate to <AIA_Instance>/bin and run the command source aiaenv.sh for Linux based systems and aiaenv.bat for Microsoft Windows to configure the environment.
2. Navigate to <AIA_HOME>pips/CRMODtoEbizLeadToOrder/upgrade/11.1 and run the command for your platform.
3. Review the log file in the location specified in the command to verify successful deployment.
36.4.3.3 Performing Postupgrade Tasks for the Lead to Order: CRM OD - EBS PIPPerform additional post upgrade tasks as described in Section 36.5, "Performing Postupgrade Tasks for Pre-Built Integrations" and Section 36.6, "Performing Postupgrade Tasks for AIA".
36.4.4 Upgrading the Order to Cash: Siebel CRM - EBS PIPUpgrade Foundation Pack first and then upgrade the Order to Cash: Siebel CRM - EBS PIP following the tasks discussed below.
Note: Existing patches for the Lead to Order: CRM OD -EBS 3.1.1 PIP are still applicable in the 11.3 release and are not included as part of the upgrade process. After upgrading you must reapply any patches installed for the RV 3.1.
Table 36–10 Deployment Commands for the Lead to Order: CRM OD - EBS PIP
Platform Deployment Command
Linux
Solaris SPARC
IBM AIX Based Systems
HP-UX
./CRMODtoEbizLeadToOrderUpgradeDP31_TO_111.sh
Microsoft Windows CRMODtoEbizLeadToOrderUpgradeDP31_TO_111.bat
Note: Existing patches for the Order to Cash: Siebel CRM - EBS 3.1.1 PIP are still applicable in the 11.3 release and are not included as part of the upgrade process. After upgrading you must reapply any patches installed for the RV 3.1.
Upgrading AIA 3.1 PIPs and DIs
36-16 Oracle Application Integration Architecture Installation and Upgrade Guide for Pre-Built Integrations
36.4.4.1 Performing Preupgrade Tasks for the Order to Cash: Siebel CRM - EBS PIPTo upgrade the Order to Cash: Siebel CRM - EBS PIP from version 3.1 to 3.1.1, you must manually execute the upgrade scripts. You must upgrade Foundation Pack to 11.1.1.6.0, RUP patch 14253266 or later from your existing version before you can upgrade Order to Cash: Siebel CRM - EBS PIP.
36.4.4.2 Running Upgrade Scripts for the Order to Cash: Siebel CRM - EBS PIPTo upgrade the PIP on the Fusion Middleware server, run the command specific to your platform:
1. Navigate to <AIA_Instance>/bin and run the command source aiaenv.sh for Linux based systems and aiaenv.bat for Microsoft Windows to configure the environment.
2. Run the command for your platform:
3. Review the log file in the location specified in the command to verify successful deployment.
36.4.4.3 Performing Postupgrade Tasks for the Order to Cash: Siebel CRM - EBS PIPPerform additional post upgrade tasks as described in Section 36.5, "Performing Postupgrade Tasks for Pre-Built Integrations" and Section 36.6, "Performing Postupgrade Tasks for AIA".
36.4.5 Upgrading the LSP Order Mgmt: OTM - EBS - Siebel CRM PIPUpgrade Foundation Pack first and then upgrade the LSP Order Mgmt: OTM - EBS - Siebel CRM PIP following the tasks discussed below.
The steps to upgrade the LSP Order Mgmt: OTM - EBS - Siebel CRM PIP from version 3.1 to version 3.1.1 are the same if upgrading from the AIA 3.1 release to the AIA 11.3 release or the AIA 11.2 release to the AIA 11.3 release.
Note: When you copy and paste the command in the command line, ensure that there is space between.xml and -. Ensure that there is space between these two when you run undeployment command too.
Table 36–11 Deployment Commands for the Order to Cash: Siebel CRM - EBS PIP
Platform Deployment Command
Linux
Solaris SPARC
IBM AIX Based Systems
HP-UX
ant -f <AIA_HOME>/Infrastructure/Install/AID/AIAInstallDriver.xml -DDeploymentPlan=<AIA_HOME>/pips/OrderToCash/upgrade/11.1/OrderToCashUpgrade31_To_111DP.xml -DPropertiesFile=<AIA_HOME>/aia_instances/<aia_instance>/config/AIAInstallProperties.xml -l <AIA_HOME>/pips/OrderToCash/upgrade/11.1/OrderToCashUpgrade31_To_111.log
Microsoft Windows ant -f <AIA_HOME>\Infrastructure\Install\AID\AIAInstallDriver.xml -DDeploymentPlan=<AIA_HOME>\pips\OrderToCash\upgrade\11.1\OrderToCashUpgrade31_To_111DP.xml -DPropertiesFile=<AIA_HOME>\aia_instances\<aia_instance>\config\AIAInstallProperties.xml -l <AIA_HOME>\pips\OrderToCash\upgrade\11.1\OrderToCashUpgrade31_To_111.log
Performing Postupgrade Tasks for Pre-Built Integrations
Upgrading Pre-Built Integrations 36-17
36.4.5.1 Performing Preupgrade Tasks for the LSP Order Mgmt: OTM - EBS - Siebel CRM PIPTo upgrade the LSP Order Mgmt: OTM - EBS - Siebel CRM PIP from version 3.1 to version 3.1.1, you must manually execute the upgrade scripts. You must upgrade Foundation Pack to 11.1.1.6.0, RUP patch 14253266 or later from your existing version before you can upgrade the Order to Cash: Siebel CRM - EBS PIP.
36.4.5.2 Running Upgrade Scripts for the LSP Order Mgmt: OTM - EBS - Siebel CRM PIPTo upgrade the LSP Order Mgmt: OTM - EBS - Siebel CRM PIP on the Fusion Middleware server, run the command specific to your platform:
1. Navigate to <AIA_Instance>/bin and run the command source aiaenv.sh for Linux based systems and aiaenv.bat for Microsoft Windows to configure the environment.
2. Navigate to $AIA_HOME/pips/FleetOrderManagement/upgrade and run the command from your platform.
3. Review the log file in the location specified in the command to verify successful deployment.
36.4.5.3 Performing Postupgrade Tasks for the LSP Order Mgmt: OTM - EBS - Siebel CRM PIPPerform additional postupgrade tasks as described in Section 36.5, "Performing Postupgrade Tasks for Pre-Built Integrations" and Section 36.6, "Performing Postupgrade Tasks for AIA".
36.5 Performing Postupgrade Tasks for Pre-Built IntegrationsYou must perform the following key tasks after you successfully upgrade to pre-built integrations 11.3:
Note: Existing patches for the LSP Order Mgmt: OTM - EBS - Siebel CRM 3.1.1 PIP are still applicable in the 11.3 release and are not included as part of the upgrade process. After upgrading you must reapply any patches installed for the RV 3.1.
Note: If you have not installed the 11.3 AIA release, run the AIA 11.3 installer on your existing AIAHOME to get the latest version of the files.
Table 36–12 Deployment Commands for the LSP Order Mgmt: OTM - EBS - Siebel CRM PIP
Platform Deployment Command
Linux
Solaris SPARC
IBM AIX Based Systems
HP-UX
./UpgradeFleetOrderManagement.sh
Microsoft Windows UpgradeFleetOrderManagement.bat
Performing Postupgrade Tasks for AIA
36-18 Oracle Application Integration Architecture Installation and Upgrade Guide for Pre-Built Integrations
■ Deploy any custom processes that were developed.
If you plan to use any of the enhanced or new features in pre-built integrations 11.1, including the EBO changes, you must update these custom processes before re-deployment.
■ Merge extensions.
Any xsl extensions and wsdl customizations maintained in AIA HOME / SOA HOME must be merged with the preupgrade back up changes after comparison.
■ Restore customizations.
Any custom code developed and maintained in AIA HOME / SOA HOME must be restored.
■ Upgrading ABCS Service Generator input.xml
The input.xml files created in previous versions of the pre-built integrations do not directly work with 11.1.1.6.0 version of ABCS Service Generator. You must move GenerateReferenceWSDLFileIndicator element from GenerateOutputFiles section to each TargetService where you must reference the WSDL. This flag must be added to each of the targetservice sections.
Log in to the AIA Console to verify that the following components are working:
■ OER (optional):
Ensure that the services and objects can be searched for and viewed. If you had any integration scenarios published, check whether they are accessed as well.
■ CAVS:
Check that the existing Test and Simulator definitions defined can still be viewed and are functional.
■ Error Handling and Setup:
Verify that the existing setup data (Setup Tab Page) is unchanged and two new columns (ERROR_TYPE, ERROR_EXT_HANDLER) are added to the Error Notifications table.
■ Perform additional post upgrade tasks as described in Section 36.6, "Performing Postupgrade Tasks for AIA".
36.6 Performing Postupgrade Tasks for AIAEvaluate the upgrade log file for any exceptions or warnings:
■ For pre-built integrations, the upgrade DP log is created on the name of the integration. For example, if you are upgrading the CRMOD to Ebiz Lead to Order PIP, the name of the log file is AIA_HOME/pips/CRMODtoEbizLeadToOrder/upgrade/11.1/CRMODtoEbizLeadToOrderUpgradeDP31_TO_111.log.
The following warning message describes the EOL content:
runCustomExtTracer:
[java] java.io.UTFDataFormatException: Invalid byte 1 of 1-byte UTF-8 sequence.
■ For objects that were identified to have been extended, the AIA Pre-Built Integrations Installer logs the list of EBOs that it found extended by you. These are reported in the following way:
Performing Postupgrade Tasks for AIA
Upgrading Pre-Built Integrations 36-19
[java] /slot/ems1846/oracle/FP_Upgrade_9June_1/patchset/AIAComponents/EnterpriseObjectLibrary/Core/Custom/EBO/InstalledProduct/V2/CustomInstalledProductEBO.xsd
[java] :[Element: <xsd:sequence [Namespace: http://www.w3.org/2001/XMLSchema]/>]element updated
■ Every major task performed by the AIA Pre-Built Integrations Installer is audited in the file. Here are some sample audit comments:
undeployAIAUI:
[echo] - Undeploying the Ear AIAApplication.ear
[java] 08/08/09 16:12:33 Notification ==>Application UnDeployer for AIAApplication STARTS.
DeployAIAUI:
[echo] - Deploying the Ear AIAApplication.ear
[oracle:deploy] Deploying application AIAApplication.
[oracle:deploy] Application deployer for AIAApplication COMPLETES.
[echo] - Deployment of AIAApplication.ear completed
From the backups that you performed, compare the following files and manually merge the configuration settings, as required:
You should consider restoring files from the backups of the <aia_instance>/AIAMetaData/config folder.
For more information about how to perform implementation-related configurations, see Oracle Fusion Middleware Developer's Guide for Oracle Application Integration Architecture Foundation Pack.

Performing Postupgrade Tasks for AIA
36-20 Oracle Application Integration Architecture Installation and Upgrade Guide for Pre-Built Integrations
Part VPart V Uninstalling Oracle AIA
This part provides a general introduction to and the steps involved in uninstalling Oracle AIA.
This part contains the following chapter:
■ Chapter 37, "Uninstalling Oracle AIA"

37
Uninstalling Oracle AIA 37-1
37Uninstalling Oracle AIA
This chapter discusses how to uninstall the Process Integration Packs (PIP) and Direct Integrations (DI) included in pre-built integrations and Foundation Pack.
This chapter includes the following sections:
■ Section 37.1, "Uninstalling Pre-Built Integrations and Foundation Pack"
Section 37.2, "Uninstalling PIP or DIs"
■ Section 37.3, "Cleaning the Environment"
■ Section 37.4, "Verifying Uninstall Processes"
37.1 Uninstalling Pre-Built Integrations and Foundation PackThe AIA Uninstaller removes the pre-built integrations and Foundation Pack installed on your system. To perform the uninstall of all applications in AIA_HOME using the undeployment plan:
1. Manually back up your customizations.
2. Undeploy all the PIPs and DIs that belong to the pre-built integrations by launching the respective undeployment plan for your PIP or DI.
3. Launch the pre-built integrations OUI wizard. This is located at: AIA_HOME/oui/bin. You must type ./runInstaller -deinstall.
On the Deinstall AIA Home screen, make sure the AIA_Home shown is correct and select DEINSTALL.
4. Exit the Uninstaller.
37.2 Uninstalling PIP or DIsA PIP or DI can never be uninstalled individually. Individual PIPs or DIs can only be undeployed by running its respective undeployment plan.
For more information, see the undeployment section of your respective PIP or DI in Part II, "Configuring and Deploying Pre-Built Integrations" or Part III, "Configuring and Deploying AIA RV 3.1.1 PIPs and DIs" of this guide.
When you run the Uninstall, it removes all individual integrations and Foundation Pack installed in AIA_HOME.
Note: Before uninstalling, consider the impact on any customizations you have made.
Cleaning the Environment
37-2 Oracle Application Integration Architecture Installation and Upgrade Guide for Pre-Built Integrations
37.3 Cleaning the Environment
To clean the environment:1. Navigate to WebLogic console and click Deployments in the left navigation bar.
2. Select all AIA related deployments if they exist (ideally they get removed during uninstallation) and click Delete.
3. Repeat the above step for Datasources, JMS modules and JMS resources if they exist.
4. Navigate to Security Realms, select your realm (myrealm).
5. Click the Users and Groups tab and remove AIA users and AIA groups.
6. Shutdown the SOA managed server and then shutdown the Admin server.
7. Start the Admin server.
8. Open the console, and verify whether you have any changes to activate in the Activation center. If there are any, activate them. If they do not get activated undo all changes.
9. Open the folder Middleware/domains/<your_domain> and remove the file edit.lok.
10. Open the folder Middleware/domains/<your_domain>/pending, and remove all files.
11. Restart the SOA Server.
Attempt a fresh installation. Ensure that you have completed all preinstallation steps before attempting the installation
37.4 Verifying Uninstall ProcessesIf you chose to uninstall the AIA Home directory and its installed processes, navigate to the AIA Home directory and delete any residual files. You may have added additional files to the home directory that the AIA Pre-Built Integrations Installer did not automatically remove.
Also identify associated Oracle Enterprise Manager Fusion Middleware Control and SOA Composer services and confirm that these services are no longer shown in the Oracle Enterprise Manager Fusion Middleware Control and SOA Composer.
For more information about which services are associated with which delivered components, see the Oracle Application Integration Architecture - Foundation Pack: Core Infrastructure Components Guide.
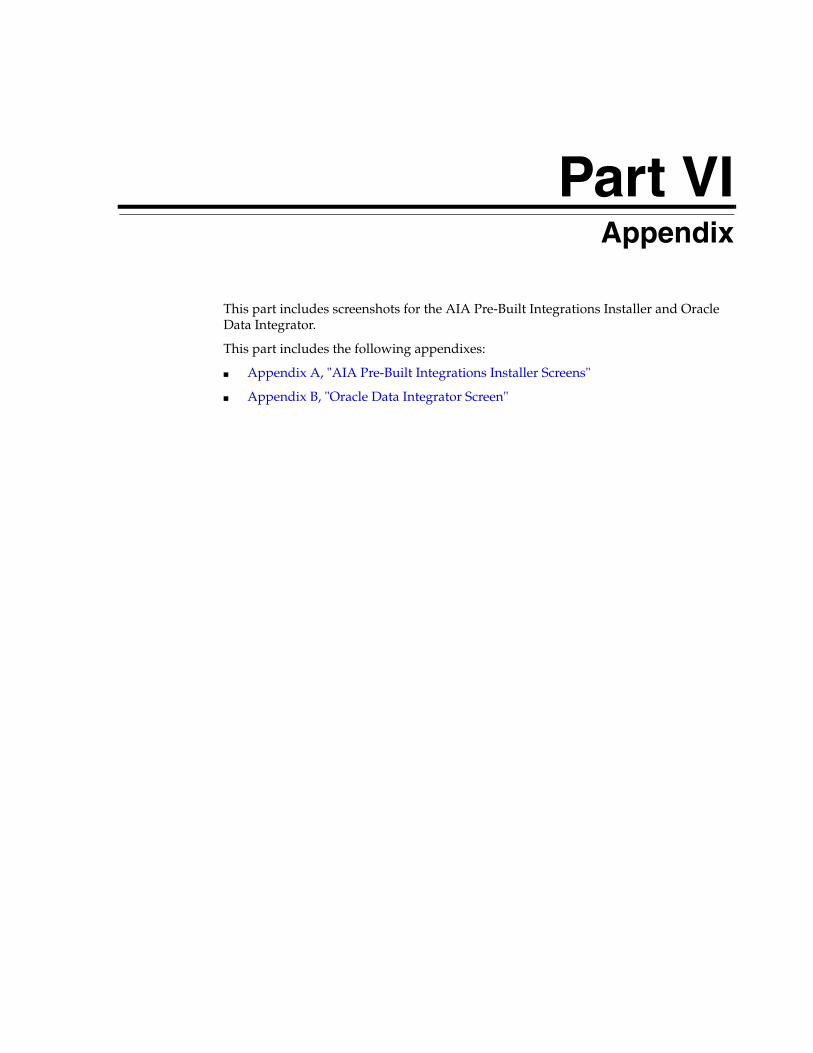
Part VIPart VI Appendix
This part includes screenshots for the AIA Pre-Built Integrations Installer and Oracle Data Integrator.
This part includes the following appendixes:
■ Appendix A, "AIA Pre-Built Integrations Installer Screens"
■ Appendix B, "Oracle Data Integrator Screen"


A
AIA Pre-Built Integrations Installer Screens A-1
AAIA Pre-Built Integrations Installer Screens
This appendix includes the screenshots of the Application Integration Architecture (AIA) Pre-Built Integrations Installer screens you see when installing AIA Pre-Built Integrations 11.3. The steps for installation are described in Chapter 3, "Installing Pre-Built Integrations".
Figure A–1 Welcome Screen of the AIA Pre-Built Integrations Installer
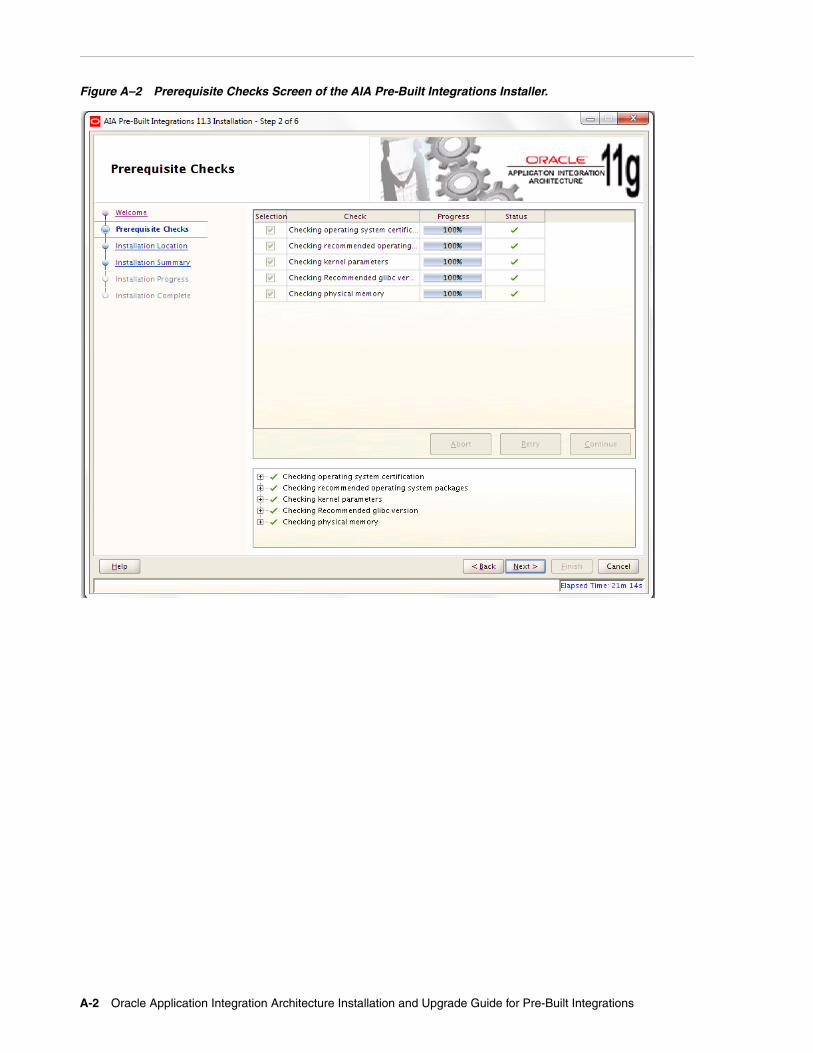
A-2 Oracle Application Integration Architecture Installation and Upgrade Guide for Pre-Built Integrations
Figure A–2 Prerequisite Checks Screen of the AIA Pre-Built Integrations Installer.

AIA Pre-Built Integrations Installer Screens A-3
Figure A–3 Installation Location Screen of the AIA Pre-Built Integrations Installer.
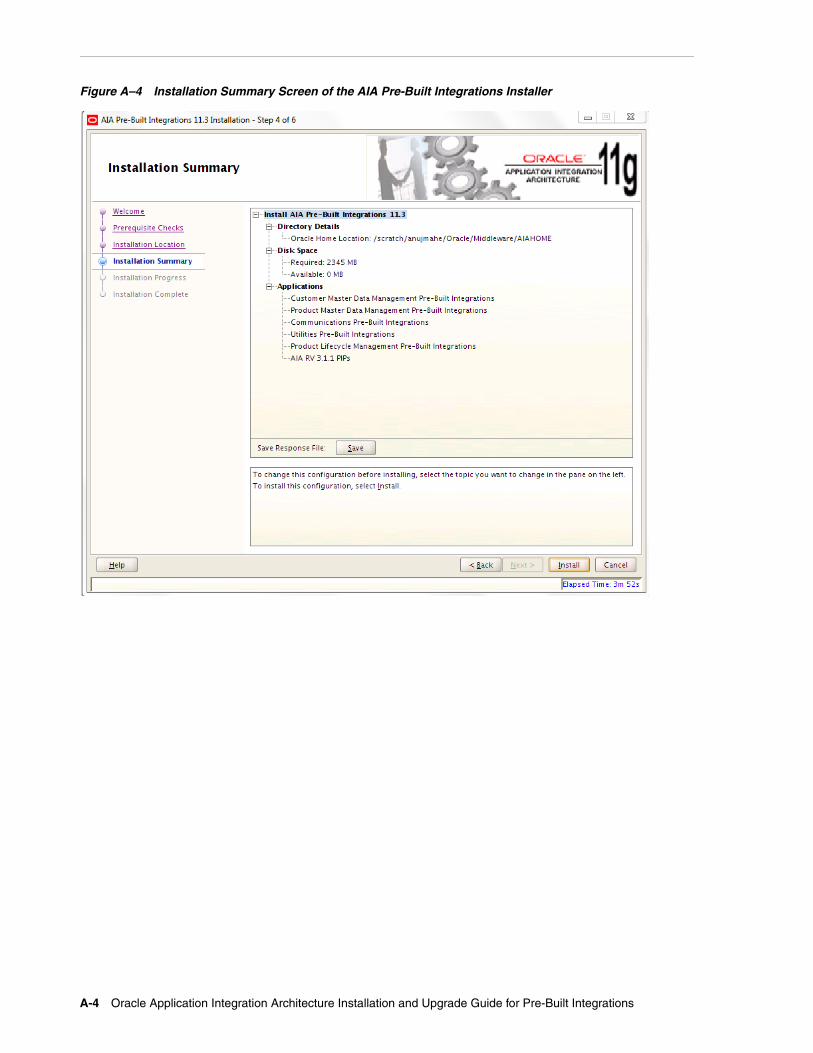
A-4 Oracle Application Integration Architecture Installation and Upgrade Guide for Pre-Built Integrations
Figure A–4 Installation Summary Screen of the AIA Pre-Built Integrations Installer
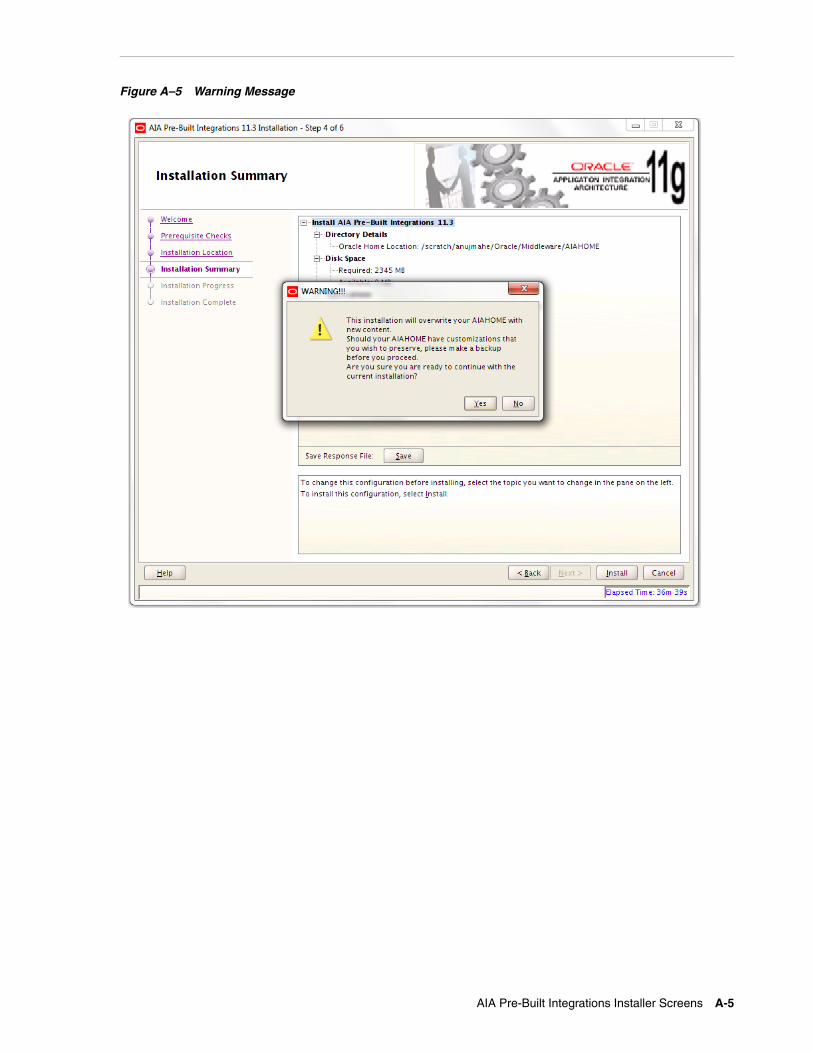
AIA Pre-Built Integrations Installer Screens A-5
Figure A–5 Warning Message
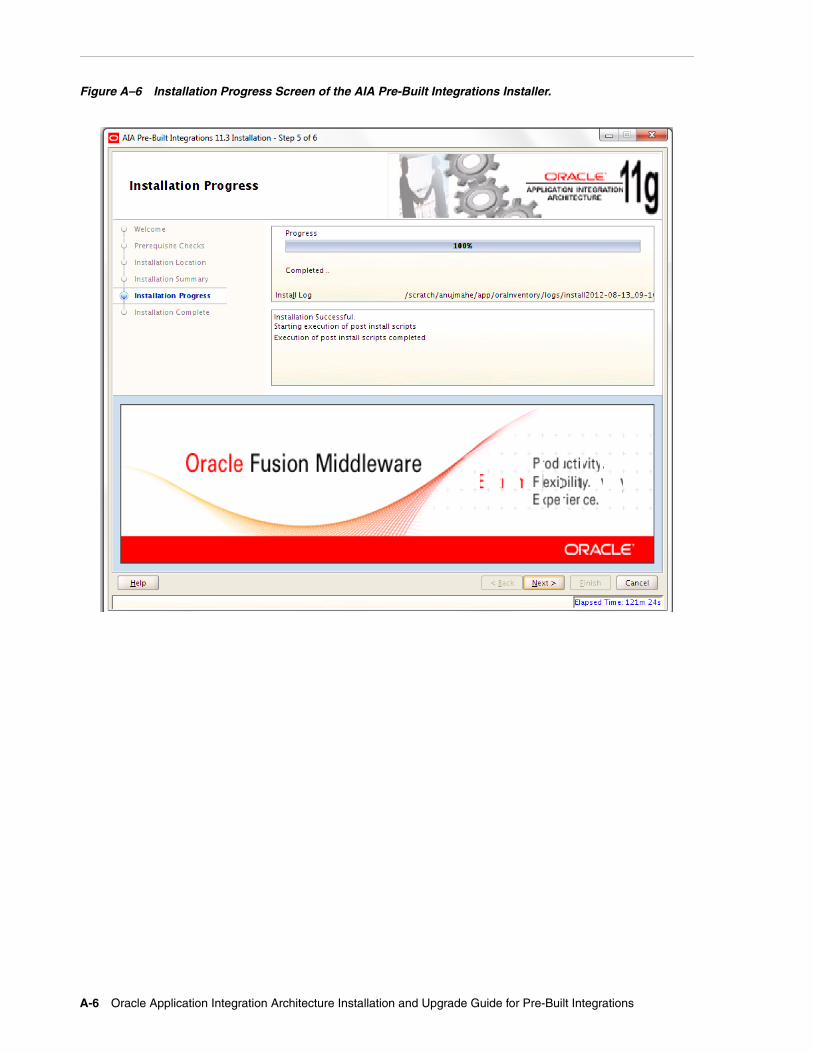
A-6 Oracle Application Integration Architecture Installation and Upgrade Guide for Pre-Built Integrations
Figure A–6 Installation Progress Screen of the AIA Pre-Built Integrations Installer.
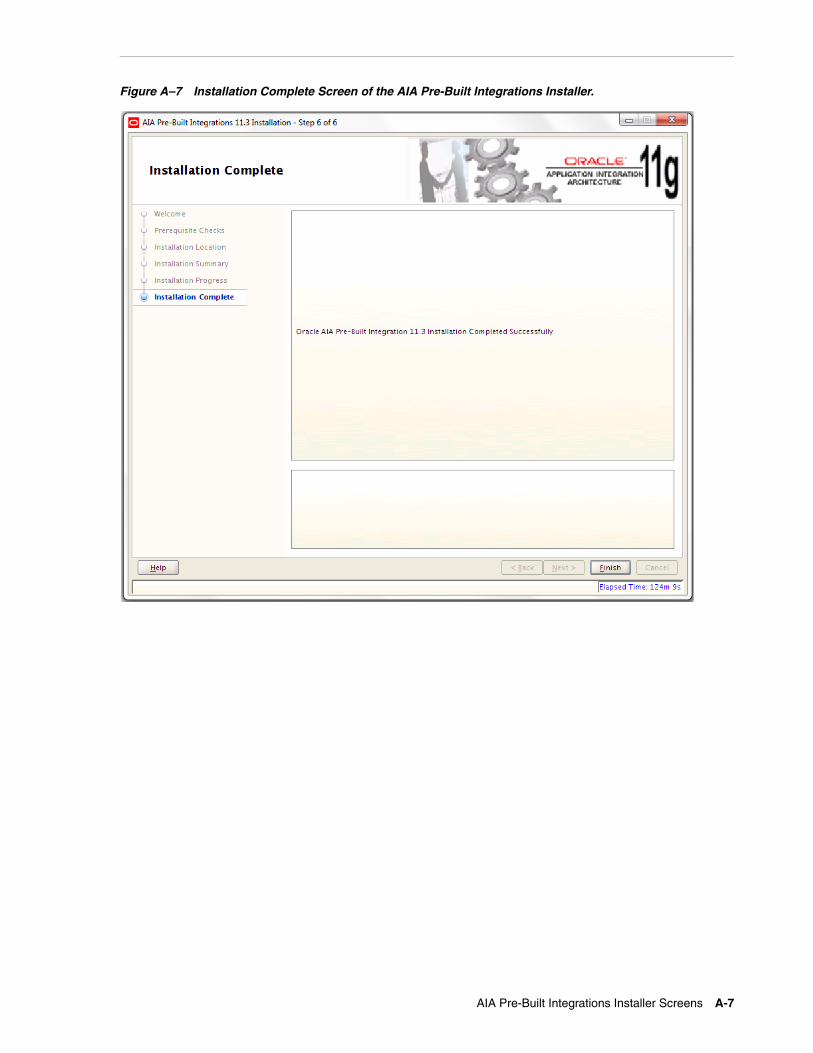
AIA Pre-Built Integrations Installer Screens A-7
Figure A–7 Installation Complete Screen of the AIA Pre-Built Integrations Installer.

A-8 Oracle Application Integration Architecture Installation and Upgrade Guide for Pre-Built Integrations
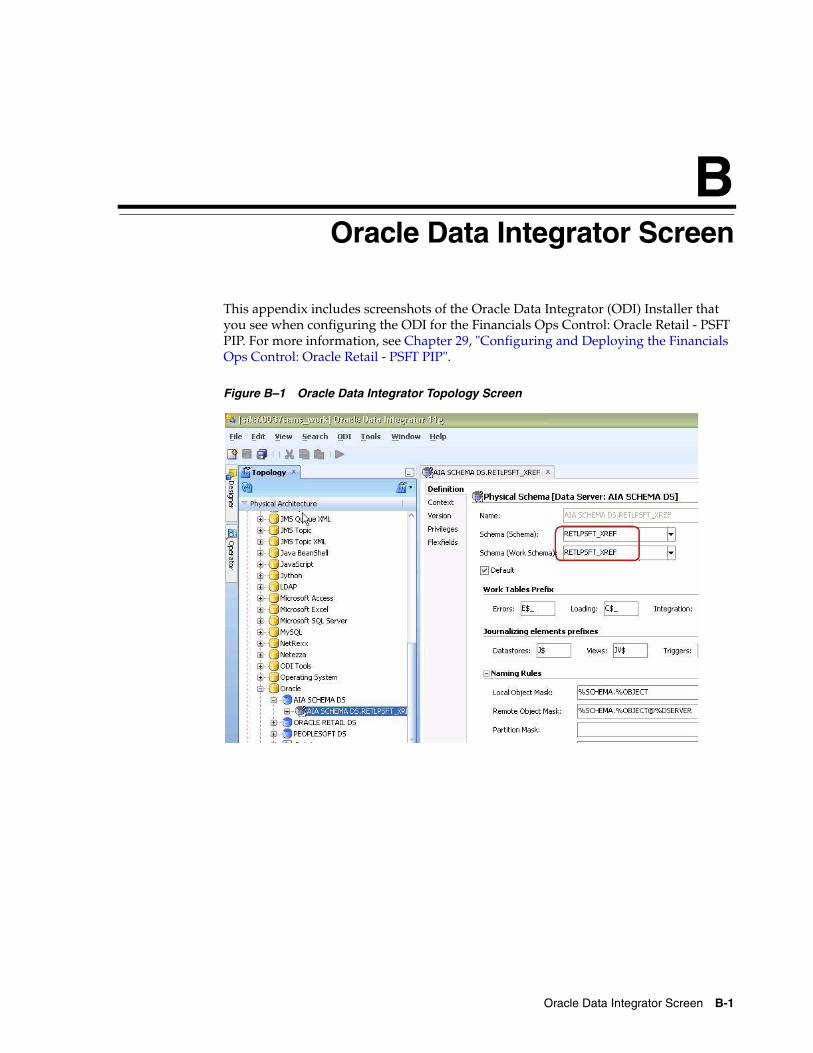
B
Oracle Data Integrator Screen B-1
BOracle Data Integrator Screen
This appendix includes screenshots of the Oracle Data Integrator (ODI) Installer that you see when configuring the ODI for the Financials Ops Control: Oracle Retail - PSFT PIP. For more information, see Chapter 29, "Configuring and Deploying the Financials Ops Control: Oracle Retail - PSFT PIP".
Figure B–1 Oracle Data Integrator Topology Screen
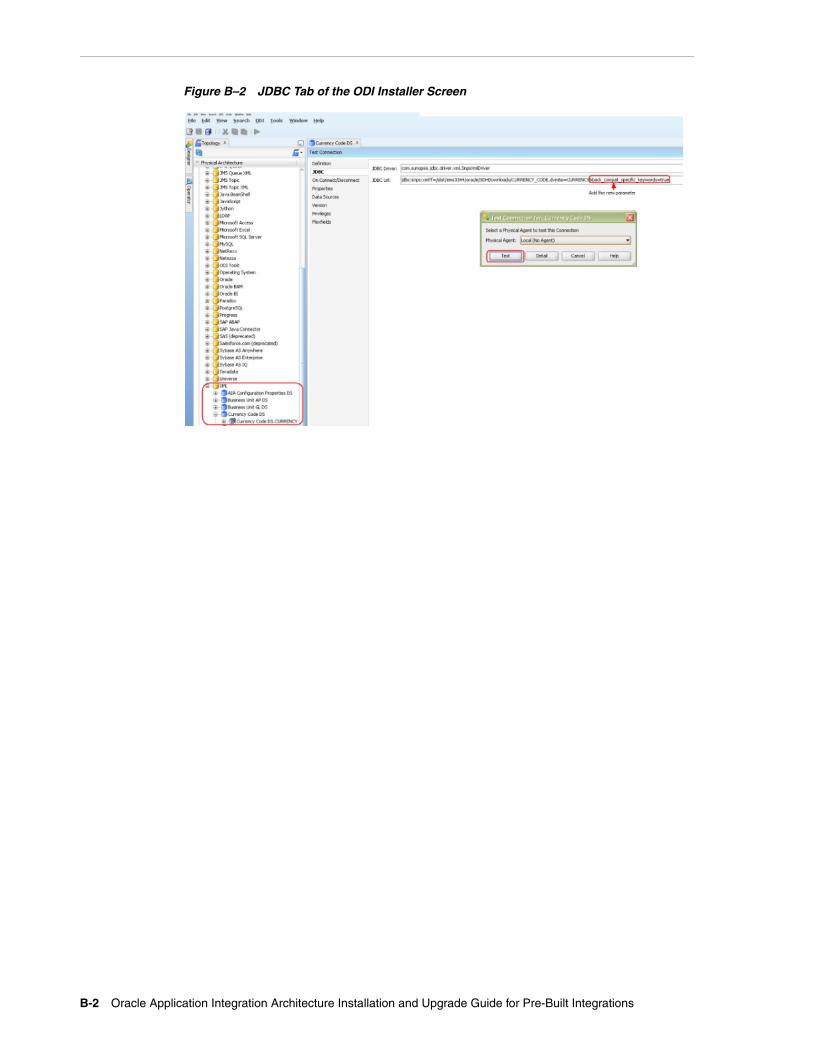
B-2 Oracle Application Integration Architecture Installation and Upgrade Guide for Pre-Built Integrations
Figure B–2 JDBC Tab of the ODI Installer Screen


![[1]Oracle® Application Integration Architecture Agile Product … · [1]Oracle® Application Integration Architecture Agile Product Lifecycle Management for Oracle EBS: Design to](https://img.pdfslide.us/doc/110x75/5f87f83b9297c13f6c3a62fd/1oracle-application-integration-architecture-agile-product-1oracle-application.jpg)