Embed Size (px)
Citation preview

8/8/2019 Oracle 11g RAC Guide
http://slidepdf.com/reader/full/oracle-11g-rac-guide 1/208
Oracle® Database 2 Day + Real Application Clusters Guide 11g Release 2 (11.2)
E10743-02
September 2009

8/8/2019 Oracle 11g RAC Guide
http://slidepdf.com/reader/full/oracle-11g-rac-guide 2/208
Oracle Database 2 Day + Real Application Clusters Guide 11 g Release 2 (11.2)
E10743-02
Copyright © 2006, 2009, Oracle and/or its affiliates. All rights reserved.
Primary Author: Janet Stern
Contributing Author: Mark Bauer, Vivian Schupmann, Douglas Williams
Contributor: David Austin, Eric Belden, Jonathan Creighton, Sudip Datta, Prabhaker Gongloor, WilliamHodak, Sushil Kumar, Rich Long, Barb Lundhild, Venkat Maddali, Gaurav Manglik, Markus Michalewicz,Mughees Minhas, Joe Paradise, Hanlin Qian, Laurent Schneider, Uri Shaft, Jacqueline Sideri, MarkTownsend, Mike Zampiceni
This software and related documentation are provided under a license agreement containing restrictions onuse and disclosure and are protected by intellectual property laws. Except as expressly permitted in yourlicense agreement or allowed by law, you may not use, copy, reproduce, translate, broadcast, modify, license,transmit, distribute, exhibit, perform, publish, or display any part, in any form, or by any means. Reverseengineering, disassembly, or decompilation of this software, unless required by law for interoperability, isprohibited.
The information contained herein is subject to change without notice and is not warranted to be error-free. Ifyou find any errors, please report them to us in writing.
If this software or related documentation is delivered to the U.S. Government or anyone licensing it on behalf of the U.S. Government, the following notice is applicable:
U.S. GOVERNMENT RIGHTS Programs, software, databases, and related documentation and technical datadelivered to U.S. Government customers are "commercial computer software" or "commercial technical data"pursuant to the applicable Federal Acquisition Regulation and agency-specific supplemental regulations. Assuch, the use, duplication, disclosure, modification, and adaptation shall be subject to the restrictions andlicense terms set forth in the applicable Government contract, and, to the extent applicable by the terms ofthe Government contract, the additional rights set forth in FAR 52.227-19, Commercial Computer SoftwareLicense (December 2007). Oracle USA, Inc., 500 Oracle Parkway, Redwood City, CA 94065.
This software is developed for general use in a variety of information management applications. It is notdeveloped or intended for use in any inherently dangerous applications, including applications which maycreate a risk of personal injury. If you use this software in dangerous applications, then you shall beresponsible to take all appropriate fail-safe, backup, redundancy, and other measures to ensure the safe useof this software. Oracle Corporation and its affiliates disclaim any liability for any damages caused by use ofthis software in dangerous applications.
Oracle is a registered trademark of Oracle Corporation and/or its affiliates. Other names may be trademarksof their respective owners.
This software and documentation may provide access to or information on content, products, and servicesfrom third parties. Oracle Corporation and its affiliates are not responsible for and expressly disclaim allwarranties of any kind with respect to third-party content, products, and services. Oracle Corporation andits affiliates will not be responsible for any loss, costs, or damages incurred due to your access to or use ofthird-party content, products, or services.

8/8/2019 Oracle 11g RAC Guide
http://slidepdf.com/reader/full/oracle-11g-rac-guide 3/208
iii
Contents
Preface .................................................................................................................................................................xi
Audience....................................................................................................................................................... xiDocumentation Accessibility..................................................................................................................... xiRelated Documents ............... .............. ................ .............. ............... .............. ............... .............. ............... xiiConventions .............. ............... .............. ............... .............. ................ .............. ................ ............... ...........xii
1 Introduction to Oracle Database 2 Day + Real Application Clusters GuideAbout This Guide ..................................................................................................................................... 1-1
What This Guide Is Not..................................................................................................................... 1-1Related Materials................................................................................................................................1-1Overview of Oracle Real Application Clusters Documentation .............. .............. ............... ...... 1-2
Useful Oracle RAC Guides........................................................................................................ 1-2About Oracle Grid Infrastructure and Oracle RAC ........................................................................... 1-2About Oracle Automatic Storage Management ................................................................................. 1-3About Oracle Real Application Clusters ............................................................................................. 1-4
About Installing Oracle RAC on Different Operating Systems................................................... 1-5
Tools for Installing, Configuring, and Managing Oracle RAC ....................................................... 1-5
2 Preparing Your ClusterVerifying System Requirements ........................................................................................................... 2-1
About Hardware Requirements....................................................................................................... 2-1About Network Hardware Requirements...................................................................................... 2-3About IP Address Requirements ............. ................ ............. ................ .............. ............... .............. 2-4Verifying Operating System and Software Requirements........................................................... 2-5
Preparing the Server ................................................................................................................................ 2-6About Operating System Users and Groups.................................................................................. 2-7
Required Operating System Users and Groups .............. ............... .............. ................ .......... 2-7Optional Operating System Users and Groups...................................................................... 2-8Configuring Operating System Users and Groups....................................................................... 2-8Configuring Secure Shell................................................................................................................ 2-10About Configuring the Software Owner’s Shell Environment ............. ............... .............. ...... 2-10
Configuring the Network .................................................................................................................... 2-11Verifying the Network Configuration ............. ................ ............... ................ ............... .............. 2-14
Preparing the Operating System and Software ............................................................................... 2-15About Setting the Time on Both Nodes ............. ............... ............... ............... ............... .............. 2-15

8/8/2019 Oracle 11g RAC Guide
http://slidepdf.com/reader/full/oracle-11g-rac-guide 4/208
iv
About Configuring Kernel Parameters........................................................................................ 2-16About Performing Platform-Specific Configuration Tasks....................................................... 2-16
Configuring Installation Directories and Shared Storage ........................................................... 2-17Locating the Oracle Inventory Directory..................................................................................... 2-17Creating the Oracle Grid Infrastructure Home Directory......................................................... 2-18Creating the Oracle Base Directory ............. ................ .............. ............... ............... ............... ...... 2-19
Example: Creating an Oracle Base Directory....................................................................... 2-19About the Oracle Home Directory................................................................................................ 2-20About Shared Storage..................................................................................................................... 2-20Configuring Files on an NAS Device for Use with Oracle ASM.............................................. 2-21Using ASMLib to Mark the Shared Disks as Candidate Disks .............. ............... ................ ... 2-22
Installing ASMLib.................................................................................................................... 2-23Configuring ASMLib............................................................................................................... 2-23Using ASMLib to Create ASM Disks ................ .............. .............. ............... .............. ........... 2-24
Configuring Disk Device Persistence........................................................................................... 2-25
3 Installing Oracle Grid Infrastructure and Oracle Real Application ClustersPreparing the Oracle Media Installation File ..................................................................................... 3-1Installing the Oracle Grid Infrastructure ............................................................................................ 3-2
Configuring the Operating System Environment ................ .............. ............... ................ ............ 3-2About CVU Fixup Scripts .............. ............... ............... ............... ............... .............. ................. ........ 3-3Using Oracle Universal Installer to Install the Oracle Grid Infrastructure ............... ................ 3-3Completing the Oracle Clusterware Configuration...................................................................... 3-8
Installing the Oracle Database Software and Creating a Cluster Database ................................ 3-9Configuring the Operating System Environment ................ .............. ............... ................ ............ 3-9Creating Additional ASM Disk Groups....................................................................................... 3-10Using Oracle Universal Installer to Install Oracle RAC............. ................ .............. ............... .. 3-10
Verifying Your Oracle RAC Database Installation..................................................................... 3-14Performing Postinstallation Tasks ..................................................................................................... 3-16About Verifying the Oracle Clusterware Installation................................................................ 3-16Backing Up Installation Files......................................................................................................... 3-16
About Backing Up the root.sh Script ................ ............... ............... ............... ............... ........ 3-17About Backing Up the emkey.ora File.................................................................................. 3-17
Verifying Oracle Enterprise Manager Operations ............... ............... .............. ............... .......... 3-17About Downloading and Installing RDBMS Patches................................................................ 3-18About Configuring User Accounts............................................................................................... 3-18
About Converting an Oracle Database to an Oracle RAC Database ........................................... 3-19About Preparing for Database Conversion .............. ................ ............... ............... ............... ...... 3-19
Overview of the Database Conversion Process Using Grid Control....................................... 3-20Overview of the Database Conversion Process Using rconfig ............................................. 3-20
4 Administering Database Instances and Cluster DatabasesAbout Oracle Real Application Clusters Database Management .................................................. 4-1About Oracle RAC Management Using Enterprise Manager ......................................................... 4-2Starting and Stopping Oracle RAC Databases and Database Instances ....................................... 4-3About Oracle Real Application Clusters Initialization Parameters ............................................... 4-4
About Configuring Initialization Parameters for an Oracle RAC Database .............. .............. 4-4

8/8/2019 Oracle 11g RAC Guide
http://slidepdf.com/reader/full/oracle-11g-rac-guide 5/208
v
Parameters that Must Have Identical Settings on All Instances ............. .............. .............. . 4-5Parameters that Must Have Unique Settings on All Instances ............... ............... .............. 4-5Parameters that Should Have Identical Settings on All Instances....................................... 4-6About Modifying the SERVICE_NAMES Parameter for Oracle RAC................................ 4-7
About the Server Parameter File for Oracle Real Application Clusters..................................... 4-7Editing Initialization Parameter Settings for an Oracle RAC Database..................................... 4-8
Modifying the Initialization Parameter for Oracle RAC Using the Current Tab .............. 4-8Modifying the Initialization Parameter for Oracle RAC Using the SPFile Tab............... .. 4-9Example: Modifying the OPEN_CURSORS Parameter ............... ................ ............... ...... 4-11
About Administering Storage in Oracle RAC ................................................................................. 4-11About Automatic Undo Management in Oracle RAC............................................................... 4-12Oracle Automatic Storage Management in Oracle RAC........................................................... 4-12
About Oracle ASM Components in Oracle RAC ............. ................ ............... ................ .... 4-12About Disk Group Configurations for Oracle ASM in Oracle RAC .............. .............. .... 4-13About Standalone Oracle ASM Disk Group Management................................................ 4-13About Oracle ASM Instance and Disk Group Management............... ................ .............. 4-13
Administering Redo Logs in Oracle RAC .............. ............... ............... .............. ................ ......... 4-14
About Redo Log Groups and Redo Threads in Oracle RAC Databases.......................... 4-14About Accessing Redo Log Files for an Oracle RAC Database ............... ................ ......... 4-15Using Enterprise Manager to View and Create Online Redo Log Files .............. ............ 4-15
5 Administering Oracle Clusterware ComponentsAbout Oracle Clusterware ...................................................................................................................... 5-1Adding and Removing Voting Disks ................................................................................................... 5-2Backing Up and Recovering Voting Disks .......................................................................................... 5-2
About Backing Up and Recovering Voting Disks......................................................................... 5-2Backing Up Voting Disks.................................................................................................................. 5-3
Recovering Voting Disks................................................................................................................... 5-3Backing Up and Recovering the Oracle Cluster Registry ................................................................ 5-3Viewing Available OCR Backups .............. ............... ................ .............. ............... .............. ............ 5-3Manually Backing Up the OCR........................................................................................................ 5-4Recovering the OCR ..........................................................................................................................5-4
Checking the Status of the OCR................................................................................................ 5-4Restoring the OCR from Automatically Generated OCR Backups ................. ................ .... 5-5
Maintaining the Oracle Local Registry .............. ............... .............. ................ ............... .............. ... 5-5Changing the Oracle Cluster Registry Configuration ...................................................................... 5-6
Adding an OCR Location.................................................................................................................. 5-7Replacing an OCR..............................................................................................................................5-7
Removing an OCR .............. ............... .............. ............... ............... ............... .............. ............... ........5-8Repairing an OCR Configuration on a Local Node ............... ............... ................ .............. .......... 5-8
Troubleshooting the Oracle Cluster Registry ..................................................................................... 5-9About the OCRCHECK Utility ............. .............. ............... .............. ............... ............... ................ .. 5-9Common Oracle Cluster Registry Problems and Solutions......................................................... 5-9
6 Administering Backup and RecoveryOverview of Oracle RAC Database Backup and Recovery .............................................................. 6-1
8/8/2019 Oracle 11g RAC Guide
http://slidepdf.com/reader/full/oracle-11g-rac-guide 6/208
vi
About the Fast Recovery Area in Oracle RAC .................................................................................... 6-2Archiving the Oracle Real Application Clusters Database Redo Logs ......................................... 6-3
About Archived Redo Log Files for an Oracle RAC Database.................................................... 6-3About Parallelism and Backups Across Multiple RMAN Channels .............. .............. .............. 6-4Configuring Archiving for Your Oracle RAC Database............................................................... 6-4
About Preparing for Backup and Recovery Operations ................................................................... 6-6
About Credentials for Performing Backup and Recovery ............... ............... ............... ............. 6-6About Configuring Backup Settings ............. ............... ................ ............... .............. ................ ...... 6-6
Performing Backups of Your Oracle Real Application Clusters Database ................................... 6-7Backing Up Archived Redo Log Files ............. ............... ............... .............. ................ .............. ...... 6-7
Recovering Your Oracle Real Application Clusters Database ......................................................... 6-8About Preparing to Restore and Recover Your Oracle RAC Database...................................... 6-8
About Configuring Access to the Archive Log .............. ................ ............... ................ ......... 6-9About Putting the Oracle RAC Database Instances into the Correct State ............... ......... 6-9
About Restoring Archived Redo Log File Files .............. ............... ............... ................ .............. ... 6-9About Performing Recovery Using Parallelism .............. .............. ............... ................ .............. 6-10Recovering the Oracle RAC Database Using Enterprise Manager.......................................... 6-10
Recovering the Parameter File from an Automatic File Backup.............................................. 6-11About Managing Your Database Backup Files ................................................................................ 6-11Displaying Backup Reports for Your Oracle Real Application Clusters Database .................. 6-12
7 Managing Database Workload Using ServicesAbout Workload Management .............................................................................................................. 7-1
About Oracle Services ............. ............... ............... .............. ............... ............... ............... ............... .. 7-1About Service Failover............................................................................................................... 7-3About Automatic Starting of Services...................................................................................... 7-3
About the Database Resource Manager.......................................................................................... 7-4
About Oracle RAC High Availability Framework........................................................................ 7-5About Fast Application Notification (FAN)................................................................................... 7-5About FAN Callouts................................................................................................................... 7-6
About the Load Balancing Advisory............................................................................................... 7-6About Connection Load Balancing.................................................................................................. 7-7
Client-Side Load Balancing .............. ............... ............... .............. ................ .............. ............... 7-8Server-Side Load Balancing....................................................................................................... 7-9
About Runtime Connection Load Balancing ................ ............... ................ ............... .............. ..... 7-9Creating Services ................................................................................................................................... 7-11
Verifying Oracle Net Supports Newly Created Services ............. .............. ............... .............. .. 7-14Administering Services ........................................................................................................................ 7-15
About Service Administration Using Enterprise Manager....................................................... 7-15Using the Cluster Managed Database Services Page................................................................. 7-15
Configuring Clients for High Availability ....................................................................................... 7-16Configuring JDBC Clients.............................................................................................................. 7-17
Configuring JDBC Clients for Fast Connection Failover .............. .............. ............... ........ 7-17Configuring JDBC Clients for Connection Failure Notification ................ .............. ......... 7-19
Configuring OCI Clients .............. ............... ............... .............. ............... .............. ................ ......... 7-19Configuring ODP.NET Clients...................................................................................................... 7-21
8/8/2019 Oracle 11g RAC Guide
http://slidepdf.com/reader/full/oracle-11g-rac-guide 7/208
vii
8 Monitoring Performance and TroubleshootingMonitoring Oracle RAC Database and Cluster Performance .......................................................... 8-1
About Automatic Database Diagnostic Monitor and Oracle RAC Performance .............. ....... 8-2Viewing ADDM for Oracle RAC Findings..................................................................................... 8-4Using the Cluster Database Performance Page ............. ............... ............... .............. ............... ..... 8-6
Viewing the Chart for Cluster Host Load Average ................ ............... ................ ............... 8-7Viewing the Chart for Global Cache Block Access Latency .............. ................ ............... ... 8-7Viewing the Chart for Average Active Sessions ............... .............. ............... ................ ....... 8-9Viewing the Database Throughput Chart............................................................................ 8-10Viewing the Services Chart .................................................................................................... 8-11Viewing the Active Sessions by Instance Chart ............... ................ ............... ................ .... 8-12
Viewing Other Performance Related Charts .................................................................................... 8-13Accessing the Cluster Cache Coherency Page............................................................................ 8-14Accessing the Top Consumers Page............................................................................................. 8-15Accessing the Top Sessions Page ............... ............... .............. ................ ............... ............... ........ 8-16Accessing the Top Activity Page................................................................................................... 8-17Accessing the Instance Activity Page........................................................................................... 8-17Accessing the Top Segments Page................................................................................................ 8-18Accessing the Database Locks Page .............. .............. ................ ............... .............. ................ .... 8-19
Viewing the Cluster Database Topology .......................................................................................... 8-19Monitoring Oracle Clusterware .......................................................................................................... 8-21
Accessing the Oracle Clusterware Information.......................................................................... 8-21Reviewing the Oracle Clusterware Home Page ................ ............... ................ .............. ............ 8-22Viewing the Cluster Performance Page .............. ............... ............... .............. ............... .............. 8-24Viewing the Cluster Targets Page .............. .............. ................ .............. ............... ............... ........ 8-26Viewing the Cluster Administration Page ................ ............... .............. ................ .............. ....... 8-26About the Cluster Interconnects Page.......................................................................................... 8-27
Viewing the Cluster Topology Page............................................................................................. 8-28Troubleshooting Configuration Problems in Oracle RAC Environments ................................. 8-29Using CRSCTL to Diagnose Cluster Issues................................................................................. 8-29
About the Oracle Clusterware Alert Log ............... ................ .............. ............... .............. ... 8-30About the Oracle Clusterware Component Log Files .............. ............... ............... ............ 8-30Checking the Status of the Oracle Clusterware Installation.............................................. 8-31Running the Oracle Clusterware Diagnostics Collection Script .............. ............... .......... 8-31Enabling Debugging of Oracle Clusterware Components .............. ............... ............... .... 8-32Enabling Debugging for an Oracle Clusterware Resource................................................ 8-32Enabling and Disabling Oracle Clusterware Daemons...................................................... 8-33
Using the Cluster Verification Utility to Diagnose Problems................................................... 8-33
Verifying the Existence of Node Applications .............. ................ ............. ............... .......... 8-33Verifying the Integrity of Oracle Clusterware Components ................ ............... .............. 8-34Verifying the Integrity of the Oracle Cluster Registry ............. .............. ................ ............ 8-34Verifying the Integrity of Your Entire Cluster..................................................................... 8-35Checking the Settings for the Interconnect .............. ............... ............... ............... ............... 8-35Enabling Tracing ............. ............... .............. ............... ............... .............. ............... ................ . 8-36
Viewing Oracle RAC Database Alerts ............. ............... ............... ............... .............. ................ . 8-36Viewing Oracle RAC Database Alert Log Messages .............. ............... ............... ............... ...... 8-37
Monitoring and Tuning Oracle RAC: Oracle By Example Series ................................................ 8-38

8/8/2019 Oracle 11g RAC Guide
http://slidepdf.com/reader/full/oracle-11g-rac-guide 8/208
viii
9 Adding and Deleting Nodes and InstancesPreparing the New Node ........................................................................................................................ 9-1
Verifying the New Node Meets the Prerequisites for Installation.............................................. 9-2Extending the Oracle Grid Infrastructure Home to the New Node ............................................... 9-2Extending the Oracle RAC Home Directory ....................................................................................... 9-3Adding the New Node to the Cluster using Enterprise Manager .................................................. 9-4Creating an Instance on the New Node ............................................................................................... 9-4
Adding a New Instance for a Policy-Managed Database ............. .............. ............... ............... ... 9-4Adding a New Instance for an Administrator-Managed Database............................................ 9-5
Deleting an Instance From the Cluster Database ............................................................................... 9-6Deleting an Instance From a Policy-Managed Database.............................................................. 9-6Deleting an Instance From an Administrator-Managed Database .............. ............... .............. .. 9-7
Removing a Node From the Cluster ..................................................................................................... 9-8
10 Managing Oracle Software and Applying PatchesConfiguring the Enterprise Manager Patch Interface .................................................................... 10-1
Configure the Software Library ............. ................ ............... .............. ................ ............. ............. 10-2About My Oracle Support Credentials ............... .............. ............... ............... ............... .............. 10-2Start the Provisioning Daemon .............. ................ .............. ............... ................ .............. ............ 10-3
Obtaining Patches ................................................................................................................................. 10-3Uploading Patches to the Software Library ..................................................................................... 10-4Using DB Control to Apply Patches to a Cluster Database .......................................................... 10-5
Patching an Oracle RAC Database Using the Rolling Upgrade Method................................ 10-6Applying Patches to Oracle Clusterware Using DB Control ........................................................ 10-8Applying Patch Sets .............................................................................................................................. 10-9Applying Patches Using OPatch and the Minimum Downtime Method ................................ 10-10
Preparing to Use OPatch.............................................................................................................. 10-10
Checking the ORACLE_HOME Environment Variable ............... ............... ............... ..... 10-10Performing a Backup Prior to Patching Software ............... .............. .............. ............... ... 10-11Staging the Patch on Each Node.......................................................................................... 10-11Updating the PATH Environment Variable ............... ............... ................ ............... ......... 10-11Configuring SSH User Equivalency.................................................................................... 10-12
Minimum Downtime Patching ............. ............... ............... .............. ................ .............. ............ 10-13Troubleshooting Patch Deployment ................................................................................................ 10-15
Updating the Node List for OPatch............................................................................................ 10-15About OPatch Log and Trace Files............................................................................................. 10-15Resolving the "Not a valid patch area" Error................ ............... ............... ............... ............... 10-16Resolving the "Unable to remove a partially installed interim patch" Error........................ 10-17
Upgrading the Oracle Software ........................................................................................................ 10-17
Index

8/8/2019 Oracle 11g RAC Guide
http://slidepdf.com/reader/full/oracle-11g-rac-guide 9/208
ix

8/8/2019 Oracle 11g RAC Guide
http://slidepdf.com/reader/full/oracle-11g-rac-guide 10/208
x
List of Tables
2–1 Manual Network Configuration Example .............. ............... .............. ............... .............. .. 2-125–1 Common OCR Problems and Solutions ............. ............... .............. ................ .............. ......... 5-98–1 Cluster Cache Coherency Charts.......................................................................................... 8-1410–1 Patching Oracle Home Directories....................................................................................... 10-5

8/8/2019 Oracle 11g RAC Guide
http://slidepdf.com/reader/full/oracle-11g-rac-guide 11/208
xi
Preface
Oracle Database 2 Day + Real Application Clusters Guide describes how to install,configure, and administer Oracle Clusterware, Oracle Automatic Storage Management(Oracle ASM), and Oracle Real Application Clusters (Oracle RAC) on a two-nodesystem using the Oracle Enterprise Linux system.
This guide covers topics that a reasonably knowledgeable Oracle databaseadministrator (DBA) would need to know when moving from managing asingle-instance Oracle Database environment to managing an Oracle RACenvironment.
Audience Oracle Database 2 Day + Real Application Clusters Guide is an Oracle RAC databaseadministration guide for DBAs who want to install and use Oracle RAC. This guideassumes you have already read Oracle Database 2 Day DBA. This guide is intended forDBAs who:■ Want basic DBA skills for managing an Oracle RAC environment■ Manage Oracle databases for small- to medium-sized businesses
To use this guide, you should be familiar with the administrative procedures describedin Oracle Database 2 Day DBA.
Documentation Accessibility Our goal is to make Oracle products, services, and supporting documentationaccessible to all users, including users that are disabled. To that end, ourdocumentation includes features that make information available to users of assistivetechnology. This documentation is available in HTML format, and contains markup tofacilitate access by the disabled community. Accessibility standards will continue to
Note: For Linux operating systems other then Oracle EnterpriseLinux, see Oracle Real Application Clusters Installation Guide for Linuxand UNIX . For other operating systems, see the platform-specificOracle RAC installation guide.
Note: Some DBAs may be interested in moving the data from theirsingle-instance Oracle Database to their Oracle RAC database. Thisguide also explains the procedures for doing this.

8/8/2019 Oracle 11g RAC Guide
http://slidepdf.com/reader/full/oracle-11g-rac-guide 12/208
xii
evolve over time, and Oracle is actively engaged with other market-leadingtechnology vendors to address technical obstacles so that our documentation can beaccessible to all of our customers. For more information, visit the Oracle AccessibilityProgram Web site at http://www.oracle.com/accessibility/ .
Accessibility of Code Examples in DocumentationScreen readers may not always correctly read the code examples in this document. Theconventions for writing code require that closing braces should appear on anotherwise empty line; however, some screen readers may not always read a line of textthat consists solely of a bracket or brace.
Accessibility of Links to External Web Sites in DocumentationThis documentation may contain links to Web sites of other companies ororganizations that Oracle does not own or control. Oracle neither evaluates nor makesany representations regarding the accessibility of these Web sites.
Deaf/Hard of Hearing Access to Oracle Support ServicesTo reach Oracle Support Services, use a telecommunications relay service (TRS) to callOracle Support at 1.800.223.1711. An Oracle Support Services engineer will handletechnical issues and provide customer support according to the Oracle service requestprocess. Information about TRS is available athttp://www.fcc.gov/cgb/consumerfacts/trs.html , and a list of phonenumbers is available at http://www.fcc.gov/cgb/dro/trsphonebk.html .
Related Documents For more information, see the following in the Oracle Database documentation set:■ Oracle Real Application Clusters Installation Guide for Linux and UNIX■ Oracle Grid Infrastructure Installation Guide for Linux■
Oracle Real Application Clusters Administration and Deployment Guide■ Oracle Database 2 Day DBA■ Oracle Database Storage Administrator's Guide
Conventions The following text conventions are used in this guide:
Convention Meaning
boldface Boldface type indicates graphical user interface elements associatedwith an action, or terms defined in text or the glossary.
italic Italic type indicates book titles, emphasis, or placeholder variables forwhich you supply particular values.
monospace Monospace type indicates commands within a paragraph, URLs, codein examples, text that appears on the screen, or text that you enter.

8/8/2019 Oracle 11g RAC Guide
http://slidepdf.com/reader/full/oracle-11g-rac-guide 13/208
1
Introduction to Oracle Database 2 Day + Real Application Clusters Guide 1-1
1 Introduction to Oracle Database 2 Day +Real Application Clusters Guide
This chapter provides an overview of Oracle Real Application Clusters (Oracle RAC)environments. This chapter includes the following sections:■ About This Guide■
About Oracle Grid Infrastructure and Oracle RAC■ About Oracle Automatic Storage Management■ Tools for Installing, Configuring, and Managing Oracle RAC
About This Guide This is a task-oriented guide for Oracle Real Application Clusters (Oracle RAC)database administration. This guide shows you how to configure and manage theenvironment for Oracle Clusterware and Oracle RAC. This guide also explains how tocreate an Oracle RAC database and how to perform routine Oracle RAC databaseadministrative tasks.
The goal of this guide is to help you understand the basic steps required to install andmaintain an Oracle RAC environment, including how to perform basictroubleshooting, performance monitoring, and backup and recovery activities. Thisguide is based on Oracle Enterprise Linux, but you do not need to be a Linux expert touse this guide.
What This Guide Is Not This guide is not a comprehensive description of Oracle RAC. It describes conceptsonly when necessary for completing a particular task.
Related Materials This guide is part of a comprehensive set of learning materials for administeringOracle Databases, which includes a 2 Day DBA Oracle By Example (OBE) series(available on the Web) and Oracle University instructor-led classes.
See Also:
■ Oracle Database Concepts ■ Oracle Database Administrator's Guide

8/8/2019 Oracle 11g RAC Guide
http://slidepdf.com/reader/full/oracle-11g-rac-guide 14/208
About Oracle Grid Infrastructure and Oracle RAC
1-2 Oracle Database 2 Day + Real Application Clusters Guide
Overview of Oracle Real Application Clusters Documentation This guide describes how to install, configure, and manage Oracle RAC, OracleClusterware and Oracle Automatic Storage Management (Oracle ASM). It providesexamples for how you could deploy Oracle RAC on a two-node cluster, using theOracle Enterprise Linux operating system. Oracle Enterprise Linux is fully compatible— both source and binary — with Red Hat Enterprise Linux. It includes the identical
set of packages at the same version levels with the same source code as the Red Hatdistribution.
This guide is for DBAs who have experience with single-instance Oracle environmentsand have read Oracle Database 2 Day DBA.
Useful Oracle RAC Guides The following is a list of other useful Oracle RAC or related documentation:■ Oracle Real Application Clusters Administration and Deployment Guide■ Oracle Clusterware Administration and Deployment Guide■ Oracle Real Application Clusters Installation Guide for Linux and UNIX (or other
operating system)■ Oracle Grid Infrastructure Installation Guide for Linux (or other operating system)
About Oracle Grid Infrastructure and Oracle RAC Starting with Oracle Database 11 g Release 2, Oracle Clusterware and Oracle ASM areinstalled into a single home directory, which is called the Grid home. Oracle gridinfrastructure refers to the installation of the combined products. Oracle Clusterwareand Oracle ASM are still individual products, and are referred to by those names.
Oracle Clusterware enables servers, referred to as hosts or nodes , to operate togetheras if they are one server, commonly referred to as a cluster . Although the servers arestandalone servers, each server has additional processes that communicate with otherservers. In this way the separate servers appear as if they are one server to applicationsand end users. Oracle Clusterware provides the infrastructure necessary to run OracleRAC. The combined processing power of the multiple servers provides greateravailability, throughput, and scalability than is available from a single server.
The nodes in a cluster can be organized into a server pool for better resourcemanagement. Each server pool has the following properties:■ The minimum number of nodes that should be in the server pool■ The maximum number of nodes that can be in the server pool■ The relative importance of this server pool to other server pools
Upon installation of Oracle grid infrastructure, a default server pool, called the Freepool , is created automatically. All servers in a new installation are assigned to the Freeserver pool, initially. If you create a new server pool, the servers move from the Freepool to the new server pool automatically.
When you create an Oracle RAC database that is a policy-managed database , youspecify the number of servers that are needed for the database, and a server pool is
Note: Additional information for this release may be available in theOracle Database 11 g release 2 (11.2) README or Release Notes. Youcan locate these documents on your Oracle product installation media.

8/8/2019 Oracle 11g RAC Guide
http://slidepdf.com/reader/full/oracle-11g-rac-guide 15/208
About Oracle Automatic Storage Management
Introduction to Oracle Database 2 Day + Real Application Clusters Guide 1-3
automatically created for the database. Oracle Clusterware populates the server poolwith the servers it has available. If you do not use server pools, then you can create anadministrator-managed database . For the purposes of this guide, we will use anadministrator-managed Oracle RAC database.
About Oracle Automatic Storage Management With Oracle Real Application Clusters (Oracle RAC), each instance must have accessto the data files and recovery files for the Oracle RAC database. Using OracleAutomatic Storage Management (Oracle ASM) is an easy way to satisfy thisrequirement.
Oracle ASM is an integrated, high-performance volume manager and file system. WithOracle Database 11 g Release 2, Oracle ASM adds support for storing the Oracle
Clusterware OCR and voting disk files, as well as a general purpose cluster file systemcalled Oracle Automatic Storage Management Cluster File System (Oracle ACFS).Oracle ASM is based on the principle that the database should manage storage insteadof requiring an administrator to do it. Oracle ASM eliminates the need for you todirectly manage potentially thousands of Oracle database files.
Oracle ASM groups the disks in your storage system into one or more disk groups.You manage a small set of disk groups and Oracle ASM automates the placement ofthe database files within those disk groups. Oracle Cluster Registry (OCR) and votingdisks can also be placed on Oracle ASM diskgroups.
Oracle ASM provides the following benefits:■ Striping —Oracle ASM spreads data evenly across all disks in a disk group to
optimize performance and utilization. This even distribution of database fileseliminates the need for regular monitoring and I/O performance tuning.■ Mirroring —Oracle ASM can increase data availability by optionally mirroring any
file. Oracle ASM mirrors at the file level, unlike operating system mirroring, whichmirrors at the disk level. Mirroring means keeping redundant copies, or mirroredcopies, of each extent of the file, to help avoid data loss caused by disk failures.The mirrored copy of each file extent is always kept on a different disk from theoriginal copy. If a disk fails, Oracle ASM can continue to access affected files byaccessing mirrored copies on the surviving disks in the disk group.
■ Online storage reconfiguration and dynamic rebalancing —Oracle ASM permitsyou to add or remove disks from your disk storage system while the database isoperating. When you add a disk to a disk group, Oracle ASM automatically
redistributes the data so that it is evenly spread across all disks in the disk group,including the new disk. The process of redistributing data so that it is also spreadacross the newly added disks is known as rebalancing . It is done in the background and with minimal impact to database performance.
■ Managed file creation and deletion —Oracle ASM further reduces administrationtasks by enabling files stored in Oracle ASM disk groups to be managed by OracleDatabase. Oracle ASM automatically assigns file names when files are created, andautomatically deletes files when they are no longer needed by the database.
See Also:
■ Oracle Real Application Clusters Administration and DeploymentGuide
■ Oracle Clusterware Administration and Deployment Guide

8/8/2019 Oracle 11g RAC Guide
http://slidepdf.com/reader/full/oracle-11g-rac-guide 16/208
About Oracle Real Application Clusters
1-4 Oracle Database 2 Day + Real Application Clusters Guide
Oracle Automatic Storage Management Cluster File System (Oracle ACFS) is a newmulti-platform, scalable file system, and storage management technology that extendsOracle ASM functionality to support customer files maintained outside of the OracleDatabase. Files supported by Oracle ACFS include database and applicationexecutables, trace files, alert logs, application reports, BFILEs, and configuration files.Oracle ACFS leverages Oracle ASM functionality to provide dynamic file systemresizing, striping, and mirroring.
Oracle ASM is implemented as a special kind of Oracle instance, with its own SystemGlobal Area and background processes. The Oracle ASM instance is tightly integratedwith Oracle Clusterware and Oracle Database. Every server running one or moredatabase instances that use Oracle ASM for storage has an Oracle ASM instance. In anOracle RAC environment, there is one Oracle ASM instance for each node, and theOracle ASM instances communicate with each other on a peer-to-peer basis. Only oneOracle ASM instance is supported on a node, but you can have multiple databaseinstances that use Oracle ASM residing on the same node.
Oracle recommends that you use Oracle ASM for your Oracle Clusterware files andOracle RAC datafiles, instead of raw devices or the operating system file system.Oracle databases can use both Oracle ASM files and non-Oracle ASM files. You canalso create an ACFS to store your database Oracle Home and any other external(non-database) files in the cluster.
About Oracle Real Application Clusters Oracle RAC extends Oracle Database so that you can store, update, and efficientlyretrieve data using multiple database instances on different servers at the same time.Oracle RAC provides the software that manages multiple servers as and instances as a
single group. The data files that make up the database must reside on shared storagethat is accessible from all servers that are part of the cluster. Each server in the clusterruns the Oracle RAC software.
An Oracle Database database has a one-to-one relationship between data files and theinstance. An Oracle RAC database, however, has a one-to-many relationship betweendata files and instances. In an Oracle RAC database, multiple instances access a singleset of database files.
Each database instance in an Oracle RAC database uses its own memory structuresand background processes. Oracle RAC uses Cache Fusion to synchronize the datastored in the buffer cache of each database instance. Cache Fusion moves current data blocks (which reside in memory) between database instances, rather than having onedatabase instance write the data blocks to disk and requiring another database
instance to reread the data blocks from disk. When a data block located in the buffercache of one instance is required by another instance, Cache Fusion transfers the data block directly between the instances using the interconnect, enabling the Oracle RACdatabase to access and modify data as if the data resided in a single buffer cache.
Oracle RAC is also a key component for implementing the Oracle enterprise gridcomputing architecture. Having multiple database instances accessing a single set ofdata files prevents the server from being a single point of failure. Any packaged orcustom application that scales on an Oracle Database will scale well on Oracle RACwithout requiring changes to the application code.
See Also:
■ Oracle Database 2 Day DBA■ Oracle Database Storage Administrator's Guide

8/8/2019 Oracle 11g RAC Guide
http://slidepdf.com/reader/full/oracle-11g-rac-guide 17/208
Tools for Installing, Configuring, and Managing Oracle RAC
Introduction to Oracle Database 2 Day + Real Application Clusters Guide 1-5
You will learn more about the operation of the Oracle RAC database in a cluster, howto build the cluster, and the structure of an Oracle RAC database in other sections ofthis guide.
About Installing Oracle RAC on Different Operating Systems If you plan to install and configure Oracle RAC on an operating system other thanOracle Enterprise Linux, you can still use this guide to obtain a general understandingabout how to deploy Oracle RAC. You can also use this guide for deploying OracleRAC on clusters with more than two nodes. For all environments that do not matchthe environment that this guide describes, modify the examples accordingly.
When installing Oracle RAC on a different platform or different operating systemversion than Oracle Enterprise Linux or Red Hat Enterprise Linux, refer to theinstallation and configuration guides for that platform. For example, if you areinstalling Oracle RAC on the Solaris operating system, then you would use thefollowing guides:■ Oracle Grid Infrastructure Installation Guide for Solaris Operating System■ Oracle Real Application Clusters Installation Guide for Solaris Operating System
Oracle Clusterware and Oracle RAC do not support heterogeneous platforms in thesame cluster. For example, you cannot have one node in the cluster running OracleEnterprise Linux and another node in the same cluster running Solaris UNIX. Allnodes must run the same operating system, that is, they must be binary compatible.Oracle RAC does not support machines having different chip architectures in the samecluster. However, you can have machines of different speeds and sizes in the samecluster.
Tools for Installing, Configuring, and Managing Oracle RAC The following is a description of the tools used for installing, configuring, andmanaging the Oracle Clusterware, Oracle Automatic Storage Management (OracleASM), and Oracle Real Application Clusters (Oracle RAC):■ Oracle Universal Installer (OUI)—OUI installs the Oracle grid infrastructure
software (which consists of Oracle Clusterware and Oracle ASM) and the OracleDatabase software with Oracle RAC. After you configure the nodes that you wantto use in your cluster, OUI installs the Oracle software on the specified nodesusing a network connection.
■ Cluster Verification Utility (CVU)— CVU is a command-line tool that you can useto verify a range of cluster and Oracle RAC components such as shared storagedevices, networking configurations, system requirements, and Oracle Clusterware,as well as operating system groups and users. You can use CVU for preinstallationas well as postinstallation checks of your cluster environment. CVU is especiallyuseful during preinstallation and during installation of Oracle Clusterware and
See Also:
■ Oracle Real Application Clusters Administration and DeploymentGuide
■ Oracle Clusterware Administration and Deployment Guide
See Also:
■ Oracle Real Application Clusters Administration and DeploymentGuide

8/8/2019 Oracle 11g RAC Guide
http://slidepdf.com/reader/full/oracle-11g-rac-guide 18/208
Tools for Installing, Configuring, and Managing Oracle RAC
1-6 Oracle Database 2 Day + Real Application Clusters Guide
Oracle RAC components. OUI runs CVU after the Oracle Clusterware installationto verify your environment.
■ Oracle Enterprise Manager—Oracle Enterprise Manager has both the DatabaseControl and Grid Control graphical user interfaces (GUIs) for managing single-instance and Oracle RAC environments.
■ SQL*Plus—To issue SQL and PL/SQL statements to Oracle Database, you can useSQL*Plus. This tool provides a command-line interface that enables you toperform database management operations for a database, and also to query, insert,update, or delete data directly in the database.
■ Server Control (SRVCTL)—SRVCTL is a command-line interface that you can useto manage the resources defined in the Oracle Cluster Registry (OCR). Theseresources include the node applications, called nodeapps , that make up OracleClusterware, which includes the Oracle Notification Service (ONS), the GlobalServices Daemon (GSD), and the Virtual IP (VIP). Other resources that can bemanaged by SRVCTL include databases, instances, listeners, services, andapplications. Using SRVCTL you can start and stop nodeapps, databases,instances, listeners, and services, delete or move instances and services, addservices, and manage configuration information.
■ Cluster Ready Services Control (CRSCTL)—CRSCTL is a command-line tool thatyou can use to manage Oracle Clusterware daemons. These daemons includeCluster Synchronization Services (CSS), Cluster-Ready Services (CRS), and EventManager (EVM). You can use CRSCTL to start and stop Oracle Clusterware and todetermine the current status of your Oracle Clusterware installation.
■ Database Configuration Assistant (DBCA)—DBCA is a utility that is used to createand configure Oracle Databases. DBCA can be launched by OUI, depending uponthe type of install that you select. You can also launch DBCA as a standalone toolat any time after Oracle Database installation. You can run DBCA in interactivemode or noninteractive/silent mode. Interactive mode provides a graphicalinterface and guided workflow for creating and configuring a database. DBCA isthe preferred way to create a database, because it is a more automated approach,and your database is ready to use when DBCA completes.
■ Oracle Automatic Storage Management Configuration Assistant(ASMCA)—ASMCA is a utility that supports installing and configuring OracleASM instances, disk groups, volumes, and Oracle Automatic Storage ManagementCluster File System (Oracle ACFS). ASMCA provides both a GUI and a non-GUIinterface.
■ Oracle Automatic Storage Management Command Line utility(ASMCMD)—ASMCMD is a command-line utility that you can use to manageOracle ASM instances, Oracle ASM disk groups, file access control for disk groups,files and directories within Oracle ASM disk groups, templates for disk groups,and Oracle ASM volumes.
■ Listener Control (LSNRCTL)—The Listener Control utility is a command-lineinterface that you use to administer listeners.You can use its commands to perform basic management functions on one or more listeners. Additionally, you can viewand change parameter settings for the listener.
If you have installed Oracle grid infrastructure for Oracle Database 11 g release 2 (11.2),when using utilities to manage your cluster, databases, database instances, OracleASM, and listeners, use the appropriate binary that is in the home directory of theobject or component you are managing and set your ORACLE_HOMEenvironmentvariable to point to this directory. For example:

8/8/2019 Oracle 11g RAC Guide
http://slidepdf.com/reader/full/oracle-11g-rac-guide 19/208
Tools for Installing, Configuring, and Managing Oracle RAC
Introduction to Oracle Database 2 Day + Real Application Clusters Guide 1-7
■ If you use ASMCMD, srvctl , sqlplus , or lnsrctl to manage Oracle ASM orits listener, then use the binaries located in the Grid home, not the binaries locatedin the Oracle Database home, and set ORACLE_HOMEenvironment variable to thelocation of the Grid home.
■ If you use srvctl , sqlplus , or lnsrctl to manage a database instance or itslistener, then use the binaries located in the Oracle home where the database
instance or listener is running, and set the ORACLE_HOMEenvironment variable tothe location of that Oracle home
See Also:
■ Oracle Real Application Clusters Administration and DeploymentGuide

8/8/2019 Oracle 11g RAC Guide
http://slidepdf.com/reader/full/oracle-11g-rac-guide 20/208
Tools for Installing, Configuring, and Managing Oracle RAC
1-8 Oracle Database 2 Day + Real Application Clusters Guide

8/8/2019 Oracle 11g RAC Guide
http://slidepdf.com/reader/full/oracle-11g-rac-guide 21/208
2
Preparing Your Cluster 2-1
2 Preparing Your Cluster
This chapter contains the information that your system administrator and networkadministrator need to help you, as the DBA, configure the two nodes in your cluster.This chapter assumes a basic understanding of the Linux operating system. In somecases, you may need to refer to details in Oracle Real Application Clusters InstallationGuide for Linux and UNIX. In addition, you must have root or sudo privileges toperform certain tasks in this chapter.
This chapter includes the following sections:■ Verifying System Requirements■ Preparing the Server■ Configuring the Network■ Preparing the Operating System and Software■ Configuring Installation Directories and Shared Storage
Verifying System Requirements
Before you begin your installation, you should check to make sure that your systemmeets the requirements for Oracle Real Application Clusters (Oracle RAC). Therequirements can be grouped into the following three categories:■ About Hardware Requirements■ About Network Hardware Requirements■ About IP Address Requirements■ Verifying Operating System and Software Requirements
About Hardware Requirements Each node that you want to make part of your Oracle Clusterware, or Oracle
Clusterware and Oracle RAC installation, must satisfy the minimum hardwarerequirements of the software. These hardware requirements can be categorized asfollows:■ Physical memory (at least 1.5 gigabyte (GB) of RAM)■ An amount of swap space equal the amount of RAM■ Temporary space (at least 1 GB) available in /tmp
■ A processor type (CPU) that is certified with the version of the Oracle software being installed
8/8/2019 Oracle 11g RAC Guide
http://slidepdf.com/reader/full/oracle-11g-rac-guide 22/208
Verifying System Requirements
2-2 Oracle Database 2 Day + Real Application Clusters Guide
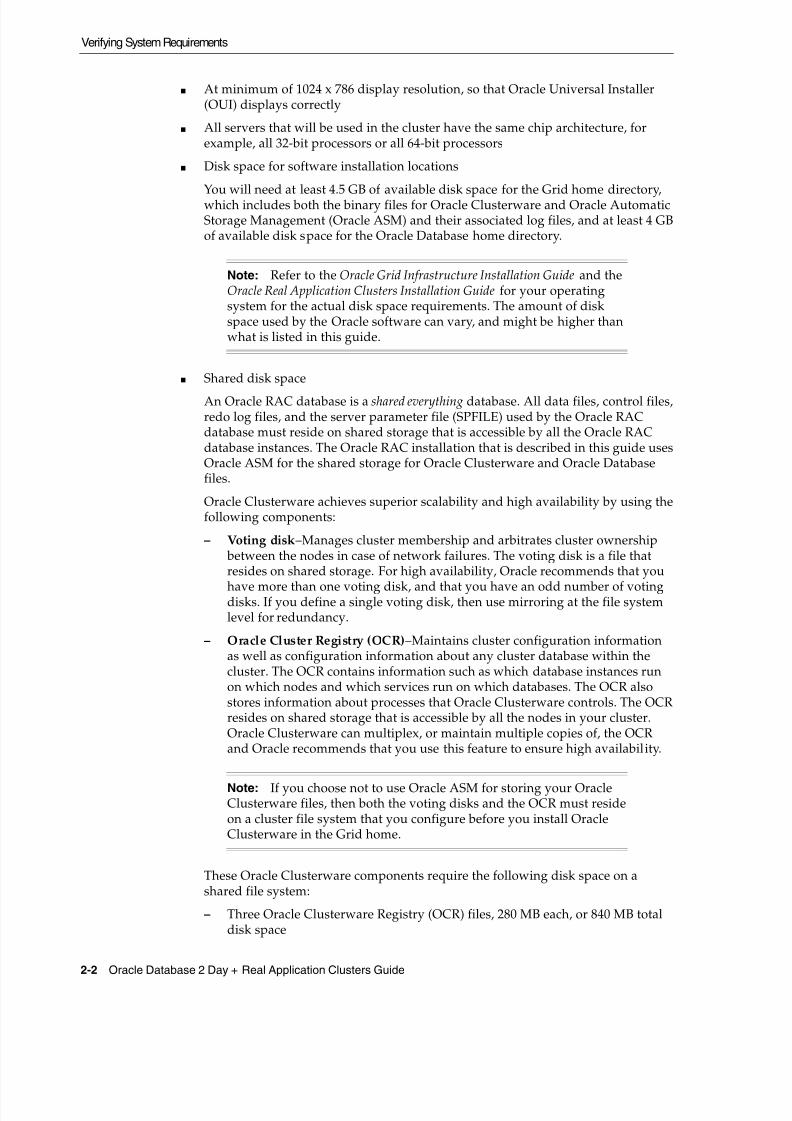
■ At minimum of 1024 x 786 display resolution, so that Oracle Universal Installer(OUI) displays correctly
■ All servers that will be used in the cluster have the same chip architecture, forexample, all 32-bit processors or all 64-bit processors
■ Disk space for software installation locations
You will need at least 4.5 GB of available disk space for the Grid home directory,which includes both the binary files for Oracle Clusterware and Oracle AutomaticStorage Management (Oracle ASM) and their associated log files, and at least 4 GBof available disk space for the Oracle Database home directory.
■ Shared disk space
An Oracle RAC database is a shared everything database. All data files, control files,redo log files, and the server parameter file (SPFILE) used by the Oracle RACdatabase must reside on shared storage that is accessible by all the Oracle RACdatabase instances. The Oracle RAC installation that is described in this guide usesOracle ASM for the shared storage for Oracle Clusterware and Oracle Databasefiles.
Oracle Clusterware achieves superior scalability and high availability by using thefollowing components:
– Voting disk –Manages cluster membership and arbitrates cluster ownership between the nodes in case of network failures. The voting disk is a file thatresides on shared storage. For high availability, Oracle recommends that you
have more than one voting disk, and that you have an odd number of votingdisks. If you define a single voting disk, then use mirroring at the file systemlevel for redundancy.
– Oracle Cluster Registry (OCR) –Maintains cluster configuration informationas well as configuration information about any cluster database within thecluster. The OCR contains information such as which database instances runon which nodes and which services run on which databases. The OCR alsostores information about processes that Oracle Clusterware controls. The OCRresides on shared storage that is accessible by all the nodes in your cluster.Oracle Clusterware can multiplex, or maintain multiple copies of, the OCRand Oracle recommends that you use this feature to ensure high availability.
These Oracle Clusterware components require the following disk space on ashared file system:
– Three Oracle Clusterware Registry (OCR) files, 280 MB each, or 840 MB totaldisk space
Note: Refer to the Oracle Grid Infrastructure Installation Guide and theOracle Real Application Clusters Installation Guide for your operatingsystem for the actual disk space requirements. The amount of diskspace used by the Oracle software can vary, and might be higher thanwhat is listed in this guide.
Note: If you choose not to use Oracle ASM for storing your OracleClusterware files, then both the voting disks and the OCR must resideon a cluster file system that you configure before you install OracleClusterware in the Grid home.

8/8/2019 Oracle 11g RAC Guide
http://slidepdf.com/reader/full/oracle-11g-rac-guide 23/208
Verifying System Requirements
Preparing Your Cluster 2-3
– Three voting disk files, 280 MB each, or 840 MB total disk space
If you are not using Oracle ASM for storing Oracle Clusterware files, then for bestperformance and protection, you should use multiple disks, each using a differentdisk controller for voting disk file placement. Ensure that each voting disk isconfigured so that it does not have share any hardware device or have a singlepoint of failure.
About Network Hardware Requirements An Oracle RAC cluster comprises two or more nodes that are linked by a privateinterconnect. The interconnect serves as the communication path between nodes in thecluster. Each cluster database instance uses the interconnect for messaging tosynchronize the use of shared resources by each instance. Oracle RAC also uses theinterconnect to transmit data blocks that are shared between the instances.
Oracle Clusterware requires that you connect the nodes in the cluster to a privatenetwork by way of a private interconnect. The private interconnect is a separatenetwork that you configure between cluster nodes. The interconnect used by OracleRAC is the same interconnect that Oracle Clusterware uses. This interconnect should
be a private interconnect, meaning it is not accessible to nodes that are not members ofthe cluster.
When you configure the network for Oracle RAC and Oracle Clusterware, each nodein the cluster must meet the following requirements:■ Each node has at least two network interface cards (NIC), or network adapters .
One adapter is for the public network interface and the other adapter is for theprivate network interface (the interconnect). Install additional network adapterson a node if that node meets either of the following conditions:
– Does not have at least two network adapters
– Has two network interface cards but is using network attached storage (NAS).You should have a separate network adapter for NAS.
Note: When you install Oracle software, Oracle Universal Installer(OUI) automatically performs hardware prerequisite checks andnotifies you if they are not met.
See Also:
■ Your platform-specific Oracle Clusterware installation guide■ "About Performing Platform-Specific Configuration Tasks"■ "Preparing the Server"■ "Configuring Installation Directories and Shared Storage"
Note: For the most current information about supported networkprotocols and hardware for Oracle RAC installations, refer to theCertify pages on My Oracle Support (formerly Oracle MetaLink),which is located at
https://metalink.oracle.com

8/8/2019 Oracle 11g RAC Guide
http://slidepdf.com/reader/full/oracle-11g-rac-guide 24/208
Verifying System Requirements
2-4 Oracle Database 2 Day + Real Application Clusters Guide
■ Public interface names must be the same for all nodes. If the public interface onone node uses the network adapter eth0 , then you must configure eth0 as thepublic interface on all nodes.
■ You should configure the same private interface names for all nodes as well. Ifeth1 is the private interface name for the first node, then eth1 should be theprivate interface name for your second node.
■ The network adapter for the public interface must support TCP/IP.■ The network adapter for the private interface must support the user datagram
protocol (UDP) using high-speed network adapters and a network switch thatsupports TCP/IP (Gigabit Ethernet or better).
■ For the private network, the end points of all designated interconnect interfacesmust be completely reachable on the network. Every node in the cluster should beable to connect to every private network interface in the cluster.
■ The host name of each node must conform to the RFC 952 standard, which permitsalphanumeric characters. Host names using underscores ("_") are not allowed.
About IP Address Requirements When performing an advanced installation of the Oracle grid infrastructure software,you can chose to use Grid Naming Service (GNS) and Dynamic Host ConfigurationProtocol (DHCP) for virtual IPs (VIPs). Grid Naming Service is a new feature inOracle Database 11g release 2 that uses multicast Domain Name Server (mDNS) toenable the cluster to assign host names and IP addresses dynamically as nodes areadded and removed from the cluster, without requiring additional network addressconfiguration in the domain name server (DNS). For more information about GNS,refer to Oracle Grid Infrastructure Installation Guide for Linux .
This guide documents how to perform a typical installation, which does not use GNS.You must configure the following addresses manually in your corporate DNS:■ A public IP address for each node■ A virtual IP address for each node■
Three single client access name (SCAN) addresses for the cluster
During installation a SCAN for the cluster is configured, which is a domain name thatresolves to all the SCAN addresses allocated for the cluster. The IP addresses used forthe SCAN addresses must be on the same subnet as the VIP addresses. The SCAN
Note: You must use a switch for the interconnect. Oraclerecommends that you use a dedicated network switch. Token-rings orcrossover cables are not supported for the interconnect.
See Also:
■ "Configuring the Network"■ "Verifying System Requirements"
Note: Oracle Clusterware uses interfaces marked as private as thecluster interconnects.

8/8/2019 Oracle 11g RAC Guide
http://slidepdf.com/reader/full/oracle-11g-rac-guide 25/208
Verifying System Requirements
Preparing Your Cluster 2-5
must be unique within your network. The SCAN addresses should not respond toping commands before installation.
During installation of the Oracle grid infrastructure, a listener is created for each ofthe SCAN addresses. Clients that access the Oracle RAC database should use theSCAN or SCAN address, not the VIP name or address. If an application uses a SCANto connect to the cluster database, the network configuration files on the client
computer do not need to be modified when nodes are added to or removed from thecluster. The SCAN and its associated IP addresses provide a stable name for clients touse for connections, independent of the nodes that make up the cluster. Clients canconnect to the cluster database using the easy connect naming method and the SCAN.
Verifying Operating System and Software Requirements Refer to the Oracle Grid Infrastructure Installation Guide and the Oracle Real ApplicationClusters Installation Guide for your platform for information about exact requirements.These requirements can include any of the following:■ The operating system version■ The kernel version of the operating system■ Modifying the values for kernel parameters■ Installed packages, patches, or patch sets
■ Installed compilers and drivers■ Web browser type and version■ Additional application software requirements
If you are currently running an operating system version that is not supported byOracle Database 11 g release 2 (11.2), then you must first upgrade your operatingsystem before installing Oracle Real Application Clusters 11 g.
If you are using Oracle Enterprise Linux as your operating system, then you can usethe Oracle Validated RPM system configuration script to configure your system.
To determine if the operating system requirements for Oracle Enterprise Linuxhave been met:1. To determine which distribution and version of Linux is installed, run the
following command at the operating system prompt as the root user:
# cat /proc/version
2. To determine which chip architecture each server is using and which version of thesoftware you should install, run the following command at the operating systemprompt as the root user:
# uname -m
See Also: Oracle Database Net Services Administrator's Guide forinformation about the easy connect naming method
See Also:
■ "Configuring the Network"■ "Verifying System Requirements"

8/8/2019 Oracle 11g RAC Guide
http://slidepdf.com/reader/full/oracle-11g-rac-guide 26/208
Preparing the Server
2-6 Oracle Database 2 Day + Real Application Clusters Guide
This command displays the processor type. For a 64-bit architecture, the outputwould be "x86_64".
3. To determine if the required errata level is installed, use the following procedureas the root user:
# uname -r2.6.9-55.0.0.0.2.ELsmp
Like most software, the Linux kernel is updated to fix bugs in the operatingsystem. These kernel updates are referred to as erratum kernels or errata levels .
The output in the previous example shows that the kernel version is 2.6.9, and theerrata level (EL) is 55.0.0.0.2.ELsmp. Review the required errata level for yourdistribution. If the errata level is below the required minimum errata level, theninstall the latest kernel update for your operating system. The kernel updates areavailable from your operating system vendor.
4. To ensure there are no operating system issues affecting installation, make sureyou have installed all the operating system patch updates and packages that arelisted in Oracle Clusterware and Oracle Real Application Clusters Installation Guide foryour platform. If you are using Oracle Enterprise Linux, you can determine if therequired packages, or programs that perform specific functions or calculations, areinstalled by using the following command as the root user:
# rpm -q package_name
The variable package_name is the name of the package you are verifying, such assetarch . If a package is not installed, then install it from your Linux distributionmedia or download the required package version from your Linux vendor's Website.
You can also use either up2date or YUM (Yellow dog Updater Modified) toinstall packages and their dependencies on some Linux systems. YUM usesrepositories to automatically locate and obtain the correct RPM packages for yoursystem.
Preparing the Server After you have verified that your system meets the basic requirements for installingOracle RAC, the next step is to configure the server in preparation for installation.
In this section, you will perform the following tasks:■ About Operating System Users and Groups■ Configuring Secure Shell■ About Configuring the Software Owner’s Shell Environment
See Also:
■ "About Installing Oracle RAC on Different Operating Systems"■ "Preparing the Server"■ "Preparing the Operating System and Software"■ "About Configuring the Software Owner’s Shell Environment"■ "About Performing Platform-Specific Configuration Tasks"■ Oracle Clusterware and Oracle Real Application Clusters Installation
and Configuration Guide for your platform

8/8/2019 Oracle 11g RAC Guide
http://slidepdf.com/reader/full/oracle-11g-rac-guide 27/208
8/8/2019 Oracle 11g RAC Guide
http://slidepdf.com/reader/full/oracle-11g-rac-guide 28/208
Preparing the Server
2-8 Oracle Database 2 Day + Real Application Clusters Guide
If you use one installation owner for both Oracle grid infrastructure and Oracle RAC,then when you want to perform administration tasks, you need to change the value forORACLE_HOMEenvironment variable to match the instance you want to administer(Oracle ASM, in the Grid home, or a database instance in the Oracle home). To changethe ORACLE_HOMEenvironment variable, use a command syntax similar to thefollowing example, where /u01/app/grid is the Oracle grid infrastructure home:
ORACLE_HOME=/u01/app/grid; export ORACLE_HOME
If you try to administer an instance using sqlplus , lsnrctl , or asmcmd commandswhile ORACLE_HOMEis set to a different binary path, then you will encounter errors.The Oracle home path does not affect srvctl commands.
Optional Operating System Users and Groups You can create additional users and groups to divide administrative access privilegesto the Oracle grid infrastructure installation from other administrative users andgroups associated with other Oracle installations. Separating administrative access isimplemented by specifying membership in different operating system groups, andseparating installation privileges is implemented by using different installation ownersfor each Oracle installation.
The optional users and groups you can create are:■ The OSASM group (for example, asm ) for Oracle Automatic Storage Management
(Oracle ASM) authentication. If this option is not chosen, then dba is the defaultOSASM group.
■ The OSDBA group for ASM (typically asmdba ). Members of the OSDBA group forASM are granted read and write access to files managed by Oracle ASM. TheOracle database software owner (typically oracle ) must be a member of thisgroup, and all users with OSDBA membership on databases that you want to haveaccess to the files managed by Oracle ASM should be members of the OSDBAgroup for ASM
■ The OSOPER group for Oracle Database (typically, oper ). Create this group if youwant a certain operating system users to have a limited set of databaseadministrative privileges (the SYSOPERprivilege). Members of the OSDBA groupautomatically have all privileges granted by the SYSOPERprivilege.
By using different operating system groups for authenticating administrative access toeach Oracle Database installation, members of the different groups have SYSDBA privileges for only one database, rather than for all the databases on the system. Also,
if you configure a separate operating system group for Oracle ASM authentication,then you can have users that have SYSASMaccess to the Oracle ASM instances but donot have SYSDBAaccess to the database instances.
Configuring Operating System Users and Groups In this guide, a single software owner will be used for all installations, named oracle .The oracle user will belong to the oinstall and dba operating system groups.
Note: Each Oracle software owner must be a member of the samecentral inventory group. You cannot have more than one centralinventory group on a server.

8/8/2019 Oracle 11g RAC Guide
http://slidepdf.com/reader/full/oracle-11g-rac-guide 29/208
Preparing the Server
Preparing Your Cluster 2-9
To create one software owner with all operating system-authenticatedadministration privileges:1. Determine the groups that already exist on your server by listing the contents of
the /etc/group file.
cat /etc/group
2.If this is the first time Oracle software has been installed on your server, and theOracle Inventory group does not exist, then create the Oracle Inventory group(oinstall ) with a group ID that is currently not in use on all the nodes in yourcluster. Enter a command as the root user that is similar to the following:
# /usr/sbin/groupadd -g 1000 oinstall
3. Create an OSDBA ( dba ) group with a group ID that is currently not in use on allthe nodes in your cluster by entering a command as the root user that is similarto the following:
# /usr/sbin/groupadd -g 1001 dba
4. If the user that owns the Oracle software ( oracle ) does not exist on your server,you must create the user. Select a user ID (UID) that is currently not in use on allthe nodes in your cluster. To determine which users have already been created onyour server, list the contents of the /etc/passwd file using the command:
cat /etc/passwd
The following command shows how to create the oracle user and the user'shome directory ( /home/oracle ) with the default group as oinstall and thesecondary group as dba , using a UID of 1100:
# useradd -u 1100 –g oinstall -G dba -d /home/oracle -r oracle
5. Set the password for the oracle account using the following command. Replace password with your own password.
passwd oracle
Changing password for user oracle.New UNIX password: password retype new UNIX password: password passwd: all authentication tokens updated successfully.
6. Repeat Step 1 through Step 5 on each node in your cluster.
7. Verify that the attributes of the user oracle are identical on each node of yourcluster:
id oracle
The command output should be similar to the following:
uid=1100(oracle) gid=1000(oinstall) groups=1000(oinstall),1001(dba)
See Also:
■ "Configuring Installation Directories and Shared Storage"■ "About Oracle Automatic Storage Management"

8/8/2019 Oracle 11g RAC Guide
http://slidepdf.com/reader/full/oracle-11g-rac-guide 30/208
Preparing the Server
2-10 Oracle Database 2 Day + Real Application Clusters Guide
Configuring Secure ShellTo install Oracle software, Secure Shell (SSH) connectivity must be set up between allcluster member nodes. OUI uses the ssh and scp commands during installation torun remote commands on and copy files to the other cluster nodes. You mustconfigure SSH so that these commands do not prompt for a password. SSH is alsoused by the configuration assistants, Enterprise Manager, and when adding nodes to
the cluster.You can configure SSH from the Oracle Universal Installer (OUI) interface duringinstallation for the user account running the installation. The automatic configurationcreates passwordless SSH connectivity between all cluster member nodes.
To enable the script to run, you must remove stty commands from the profiles of anyOracle software installation owners, and remove other security measures that aretriggered during a login, and that generate messages to the terminal. These messages,mail checks, and other displays prevent Oracle software installation owners fromusing the SSH configuration script that is built into the Oracle Universal Installer. Ifthey are not disabled, then SSH must be configured manually before an installationcan be run.
On Linux systems, to enable Oracle Universal Installer to use the ssh and scp commands without being prompted for a pass phrase, you must have userequivalency in the cluster. User equivalency exists in a cluster when the followingoccurs on all nodes in the cluster:■ A given user has the same user name, user ID (UID), and password.■ A given user belongs to the same groups.■ A given group has the same group ID (GID).
For information on configuring user equivalency, see "Configuring Operating SystemUsers and Groups" on page 2-8 .
About Configuring the Software Owner’s Shell Environment On Oracle Enterprise Linux, you run Oracle Universal Installer (OUI) from theoracle account. Oracle Universal Installer obtains information from the environmentvariables configured for the oracle user. Prior to running OUI, you must make thefollowing changes to the Oracle grid infrastructure software owner's shell startup file:■ Set the default file mode creation mask ( umask ) of the installation user ( oracle )
to 022 in the shell startup file. Setting the mask to 022 ensures that the userperforming the software installation creates files with 644 permissions.
■ Set ulimit settings for file descriptors ( nofile ) and processes ( nproc ) for the
installation user (oracle
)■ Set the software owner's environment variable DISPLAY environment variables in
preparation for the Oracle grid infrastructure installation■ Remove any lines in the file that set values for ORACLE_SID, ORACLE_HOME, or
ORACLE_BASEenvironment variables.
After you have saved your changes, run the shell startup script to configure theenvironment.
Also, if the /tmp directory has less than 1 GB of available disk space, but you haveidentified a different, non-shared file system that has at least 1 GB of available space,
See Also: Oracle Grid Infrastructure Installation Guide for Linux for
more information about manually configuring SSH

8/8/2019 Oracle 11g RAC Guide
http://slidepdf.com/reader/full/oracle-11g-rac-guide 31/208
Configuring the Network
Preparing Your Cluster 2-11
you can set the TEMPand TMPDIRenvironment variables to specify the alternatetemporary directory on this file system.
To review your current environment settings, use the env | more command as theoracle user.
Refer to the Oracle Clusterware Installation Guide for your platform for more informationon how to configure the Oracle software owner environment prior to installation.
Configuring the Network Oracle Database 11 g release 2 (11.2) clients connect to the database using a single clientaccess name (SCAN). The SCAN and its associated IP addresses provide a stable namefor clients to use for connections, independent of the nodes that make up the cluster. ASCAN works by being able to resolve to multiple IP addresses referencing multiplelisteners in the cluster that handle public client connections. These listeners, called
SCAN listeners, are created during installation.
To configure the network in preparation for installing Oracle grid infrastructure:1. Determine your cluster name. The cluster name should satisfy the following
conditions:■ The cluster name is globally unique throughout your host domain.■ The cluster name is at least 1 character long and less than 15 characters long.■ The cluster name must consist of the same character set used for host names:
single-byte alphanumeric characters (a to z, A to Z, and 0 to 9) and hyphens(-).
■ If you use third-party vendor clusterware, then Oracle recommends that youuse the vendor cluster name.
2. Determine the public host name and virtual host name for each node in the cluster.■ For the public host name, use the primary host name of each node. In other
words, use the name displayed by the hostname command. This host namecan be either the permanent or the virtual host name, for example: racnode1 .
■ Determine a virtual host name for each node. A virtual host name is a publicnode name that is used to reroute client requests sent to the node if the node is
Note: Remove any stty commands from such files before you startthe installation. On Linux systems, if there are hidden files (such aslogon or profile scripts) that contain stty commands, when thesefiles are loaded by the remote shell during installation, OUI indicatesan error and stops the installation.
See Also:
■ "About Operating System Users and Groups"■ "Preparing the Operating System and Software"■ "Configuring Installation Directories and Shared Storage"■ "About Setting the Time on Both Nodes"■ "About Performing Platform-Specific Configuration Tasks"

8/8/2019 Oracle 11g RAC Guide
http://slidepdf.com/reader/full/oracle-11g-rac-guide 32/208
Configuring the Network
2-12 Oracle Database 2 Day + Real Application Clusters Guide
down. Oracle recommends that you provide a name in the format <publichostname> -vip , for example: racnode1-vip .
3. Identify the interface names and associated IP addresses for all network adapters by executing the following command on each node:
# /sbin/ifconfig
From the output, identify the interface name (such as eth0 ) and IP address foreach network adapter that you want to specify as a public network interface.
If your operating system supports it, you can also use the following command tostart a graphical interface that you can use to configure the network adapters and/etc/hosts file:
/usr/bin/system-config-network &
4. On each node in the cluster, assign a public IP address with an associated networkname to one network adapter. The public name for each node should be registeredwith your domain name system (DNS). IP addresses on the subnet you identify asprivate are assigned as private IP addresses for cluster member nodes. You do notneed to configure these addresses manually in the /etc/hosts file.
You can test whether or not an interconnect interface is reachable using a ping command.
5. On each node in the cluster, configure a third IP address that will serve as a virtualIP address. Use an IP address that meets the following requirements:■ The virtual IP address and the network name must not be currently in use.■ The virtual IP address must be on the same subnet as your public IP address.
The virtual host name for each node should be registered with your DNS.
6. Define a SCAN that resolves to three IP addresses in your DNS.
7. When you complete the network configuration, the IP address and networkinterface configuration should be similar to what is shown in Table 2–1 (your nodenames and IP addresses might be different):
Note: When you install Oracle Clusterware and Oracle RAC, youwill be asked to provide this network information.
Table 2–1 Manual Network Configuration Example
IdentityHomeNode Host Node Given Name Type Address
AddressAssigned By
ResolvedBy
Node 1
Public
Node 1 racnode1 racnode1 1 Public 192.0.2.101 Fixed DNS
Node 1VIP
Node 1 Selected byOracleClusterware
racnode1-vip Virtual 192.0.2.104 Fixed DNS, hostsfile
Node 1Private
Node 1 racnode1 racnode1-priv Private 192.168.0.1 Fixed DNS, hostsfile, or none
Node 2Public
Node 2 racnode2 racnode2 1 Public 192.0.2.102 Fixed DNS

8/8/2019 Oracle 11g RAC Guide
http://slidepdf.com/reader/full/oracle-11g-rac-guide 33/208
Configuring the Network
Preparing Your Cluster 2-13
Even if you are using a DNS, Oracle recommends that you add lines to the/etc/hosts file on each node, specifying the public IP addresses. Configure the/etc/hosts file so that it is similar to the following example:
#eth0 - PUBLIC192.0.2.100 racnode1.example.com racnode1192.0.2.101 racnode2.example.com racnode2
The fully qualified SCAN for the cluster defaults to cluster_name -scan. GNS_subdomain_name , for example docrac-scan.example.com . The short SCANfor the cluster is docrac-scan . You can use any name for the SCAN, as long as itis unique within your network and conforms to the RFC 952 standard.
8. If you configured the IP addresses in a DNS server, then, as the root user, changethe hosts search order in /etc/nsswitch.conf on all nodes as shown here:
Old:
hosts: files nis dns
New:
hosts: dns files nis
9. After modifying the nsswitch.conf file, restart the nscd daemon on each nodeusing the following command:
# /sbin/service nscd restart
Node 2VIP
Node 2 Selected byOracleClusterware
racnode2-vip Virtual 192.0.2.105 Fixed DNS, hostsfile
Node 2Private Node 2 racnode2 racnode2-priv Private 192.168.0.2 Fixed DNS, hostsfile, or none
SCANVIP 1
none Selected byOracleClusterware
docrac-scan virtual 192.0.2.201 Fixed DNS
SCANVIP 2
none Selected byOracleClusterware
docrac-scan virtual 192.0.2.202 Fixed DNS
SCANVIP 3
none Selected byOracleClusterware
docrac-scan virtual 192.0.2.203 Fixed DNS
1 Node hostnames may resolve to multiple addresses.
Note: Make a note of the addresses you configured in the/etc/hosts file or registered with DNS. When you install Oraclegrid infrastructure and Oracle RAC, you will be prompted for the
public, virtual IP, and SCAN addresses.Oracle strongly recommends that you do not configure SCAN VIPaddresses in the hosts file. Use DNS resolution for SCAN VIPs.
Table 2–1 (Cont.) Manual Network Configuration Example
IdentityHomeNode Host Node Given Name Type Address
AddressAssigned By
ResolvedBy

8/8/2019 Oracle 11g RAC Guide
http://slidepdf.com/reader/full/oracle-11g-rac-guide 34/208
Configuring the Network
2-14 Oracle Database 2 Day + Real Application Clusters Guide
After you have completed the installation process, configure clients to use the SCANto access the cluster. Using the previous example, the clients would use docrac-scan to connect to the cluster.
Verifying the Network Configuration After you have configured the network, perform verification tests to make sure it isconfigured properly. If there are problems with the network connection between nodesin the cluster, the Oracle Clusterware installation will fail.
To verify the network configuration on a two-node cluster that is running OracleEnterprise Linux:1. As the root user, verify the configuration of the public and private networks.
Verify that the interfaces are configured on the same network (either private orpublic) on all nodes in your cluster.
In this example, eth0 is used for the public network and eth1 is used for theprivate network on each node.
# /sbin/ifconfig eth0 Link encap:Ethernet HWaddr 00:0E:0C:08:67:A9
inet addr: 192.0.2.100 Bcast:192.0.2.255 Mask:255.255.240.0UP BROADCAST RUNNING MULTICAST MTU:1500 Metric:1RX packets:270332689 errors:0 dropped:0 overruns:0 frame:0TX packets:112346591 errors:2 dropped:0 overruns:0 carrier:2collisions:202 txqueuelen:1000RX bytes:622032739 (593.2 MB) TX bytes:2846589958 (2714.7 MB)Base address:0x2840 Memory:fe7e0000-fe800000
eth1 Link encap:Ethernet HWaddr 00:04:23:A6:CD:59inet addr: 10.10.10.11 Bcast: 10.10.10.255 Mask:255.255.240.0UP BROADCAST RUNNING MULTICAST MTU:1500 Metric:1RX packets:21567028 errors:0 dropped:0 overruns:0 frame:0TX packets:15259945 errors:0 dropped:0 overruns:0 carrier:0collisions:0 txqueuelen:1000RX bytes:4091201649 (3901.6 MB) TX bytes:377502797 (360.0 MB)Base address:0x2800 Memory:fe880000-fe8a0000
lo Link encap:Local Loopbackinet addr:127.0.0.1 Mask:255.0.0.0UP LOOPBACK RUNNING MTU:16436 Metric:1RX packets:52012956 errors:0 dropped:0 overruns:0 frame:0
TX packets:52012956 errors:0 dropped:0 overruns:0 carrier:0collisions:0 txqueuelen:0RX bytes:905082901 (863.1 MB) TX bytes:905082901 (863.1 MB)
2. As the root user, verify the network configuration by using the ping commandto test the connection from each node in your cluster to all the other nodes. Forexample, as the root user, you might run the following commands on each node:
# ping -c 3 racnode1.example.com# ping -c 3 racnode1
See Also:
■ "About Network Hardware Requirements"
■ Your platform-specific Oracle Clusterware installation guide

8/8/2019 Oracle 11g RAC Guide
http://slidepdf.com/reader/full/oracle-11g-rac-guide 35/208
Preparing the Operating System and Software
Preparing Your Cluster 2-15
# ping -c 3 racnode2.example.com# ping -c 3 racnode2
You should not get a response from the nodes using the ping command for thevirtual IPs ( racnode1-vip , racnode2-vip ) or the SCAN IPs until after OracleClusterware is installed and running. If the ping commands for the publicaddresses fail, resolve the issue before you proceed.
3. Ensure that you can access the default gateway with a ping command. To identifythe default gateway, use the route command, as described in the OracleEnterprise Linux Help utility.
Preparing the Operating System and Software When you install the Oracle software on your server, Oracle Universal Installer expectsthe operating system to have specific packages and software applications installed.
This section covers the following topics:■ About Setting the Time on Both Nodes■ About Configuring Kernel Parameters■ About Performing Platform-Specific Configuration Tasks
You must also ensure that you have a certified combination of the operating systemand the Oracle Database software by referring to My Oracle Support (formerlyOracle MetaLink) certification, which is located at the following Web site
https://metalink.oracle.com
You can find this by clicking Certify and then selecting 1.View Certifications byProduct .
About Setting the Time on Both Nodes Before starting the installation, ensure that the date and time settings on both nodesare set as closely as possible to the same date and time. A cluster time synchronizationmechanism ensures that the internal clocks of all the cluster members aresynchronized. For Oracle RAC on Linux, you can use either the Network TimeProtocol (NTP) or the Oracle Cluster Time Synchronization Service.
See Also:
■ "Checking the Settings for the Interconnect"■ "Configuring the Network"■ "About Network Hardware Requirements"
Note: Oracle Universal Installer verifies that your server andoperating system meet the listed requirements. Check therequirements before you start Oracle Universal Installer, to ensureyour server and operating system meet will meet the requirements.
See Also: ■ "Preparing the Server"■ "Verifying Operating System and Software Requirements"

8/8/2019 Oracle 11g RAC Guide
http://slidepdf.com/reader/full/oracle-11g-rac-guide 36/208
Preparing the Operating System and Software
2-16 Oracle Database 2 Day + Real Application Clusters Guide
NTP is a protocol designed to synchronize the clocks of servers connected by anetwork. When using NTP, each server on the network runs client software toperiodically make timing requests to one or more servers, referred to as reference NTPservers. The information returned by the timing request is used to adjust the server'sclock. All the nodes in your cluster should use the same reference NTP server.
If you do not configure NTP, Oracle will configure and use the Cluster Time
Synchronization Service (CTSS). CTSS can also be used to synchronize the internalclocks of all the members in the cluster. CTSS keeps the member nodes of the clustersynchronized. CTSS designates the first node in the cluster as the master and thensynchronizes all other nodes in the cluster to have the same time as the master node.CTSS does not use any external clock for synchronization.
About Configuring Kernel Parameters OUI checks the current settings for various kernel parameters to ensure they meet theminimum requirements for deploying Oracle RAC. For production database systems,Oracle recommends that you tune the settings to optimize the performance of yourparticular system.
About Performing Platform-Specific Configuration Tasks You may be required to perform special configuration steps that are specific to the
operating system on which you are installing Oracle RAC, or for the components usedwith your cluster. The following list provides examples of operating-specificinstallation tasks:■ Configure the use of Huge Pages on SUSE Linux, Red Hat Enterprise Linux, or
Oracle Enterprise Linux.■ Configure the hangcheck-timer module on SUSE Linux, Red Hat Enterprise Linux,
or Oracle Enterprise Linux.
Note: Using NTP or CTSS does not protect your system againsthuman error resulting from a change in the system time for a node.
See Also:
■ "Preparing the Server"■ "Preparing the Operating System and Software"■ Your platform-specific Oracle Clusterware installation guide
Note: If you find parameter settings or shell limit values on yoursystem that are greater than the values mentioned by OUI, then do notmodify the parameter setting.
See Also:
■ "Preparing the Server"■ "Preparing the Operating System and Software"■ Your platform-specific Oracle Clusterware installation guide

8/8/2019 Oracle 11g RAC Guide
http://slidepdf.com/reader/full/oracle-11g-rac-guide 37/208
Configuring Installation Directories and Shared Storage
Preparing Your Cluster 2-17
■ Set shell limits for the oracle user on Red Hat Linux or Oracle Enterprise Linuxsystems to increase the number of files and processes available to OracleClusterware and Oracle RAC.
■ Start the Telnet service on Microsoft Windows.■ Create X library symbolic links on HP-UX.■
Configure network tuning parameters on AIX Based Systems.
Configuring Installation Directories and Shared Storage Oracle RAC requires access to a shared file system for storing Oracle Clusterware files.
You must also determine where the Oracle software and database files will beinstalled.
This section describes the storage configuration tasks that you must complete beforeyou start Oracle Universal Installer. It includes information about the following topics:■ Locating the Oracle Inventory Directory■ Creating the Oracle Grid Infrastructure Home Directory■ Creating the Oracle Base Directory■ About the Oracle Home Directory■ About Shared Storage■
Configuring Files on an NAS Device for Use with Oracle ASM■ Using ASMLib to Mark the Shared Disks as Candidate Disks
Locating the Oracle Inventory Directory
The Oracle Inventory ( oraInventory ) directory is the central inventory record of allOracle software installations on a server. The oraInventory directory contains thefollowing:■ A registry of the Oracle home directories (Oracle grid infrastructure and Oracle
Database) on the system■ Installation logs and trace files from installations of Oracle software. These files are
also copied to the respective Oracle homes for future reference
The oraInventory directory is created by OUI during installation.By default, theOracle Inventory directory is not installed under the Oracle Base directory. This is
See Also:
■ "Preparing the Server"■ "Preparing the Operating System and Software"■ "About Installing Oracle RAC on Different Operating Systems"■ Your platform-specific Oracle Clusterware installation guide
See Also:
■ "Verifying System Requirements"■ "About Operating System Users and Groups"■ "About Hardware Requirements"■ Your platform-specific Oracle Clusterware installation guide

8/8/2019 Oracle 11g RAC Guide
http://slidepdf.com/reader/full/oracle-11g-rac-guide 38/208
Configuring Installation Directories and Shared Storage
2-18 Oracle Database 2 Day + Real Application Clusters Guide
because all Oracle software installations share a common Oracle Inventory, so there isonly one Oracle Inventory for all users, whereas each user that performs a softwareinstallation can use a separate Oracle base directory.
If you have an existing Oracle Inventory, then ensure that you use the same OracleInventory for all Oracle software installations, and ensure that all Oracle softwareusers you intend to use for installation have permissions to write to this directory.
To determine if you have an Oracle central inventory directory (oraInventory) onyour system:1. Run the following command to check for an existing Oracle Inventory directory:
# more /etc/oraInst.loc
2. If the oraInst.loc file exists, then the output from this command is similar tothe following:
inventory_loc=/u01/app/oraInventoryinst_group=oinstall
In the previous output example:■ The inventory_loc group shows the location of the Oracle Inventory.■ The inst_group parameter shows the name of the Oracle Inventory group
(in this example, oinstall ).
3. If the Oracle Inventory directory does not exist, the command returns an errormessage indicating that the file or directory does not exist.
If the Oracle Inventory directory does not exist, you do not need to create oneprior to installing the Oracle software.
Creating the Oracle Grid Infrastructure Home Directory During installation, you are prompted to provide a path to a home directory to store
Oracle grid infrastructure binaries. OUI installs Oracle Clusterware and Oracle ASMinto a directory referred to as Grid_home . Ensure that the directory path you providemeets the following requirements:■ It should be created in a path outside existing Oracle homes.■ It should not be located in a user home directory.■ It should be created either as a subdirectory in a path where all files can be owned
by root , or in a unique path.■ If you create the path before installation, then it should be owned by the
installation owner of Oracle grid infrastructure ( oracle or grid ), and set to 775permissions.
Before you start the installation, you must have sufficient disk space on a file systemfor the Oracle grid infrastructure directory. The file system that you use for the Gridhome directory must have at least 4.5 GB of available disk space.
The path to the Grid home directory must be the same on all nodes. As the root user,you should create a path compliant with Oracle Optimal Flexible Architecture (OFA)guidelines, so that OUI can select that directory during installation.
To create the Grid home directory:To create the Grid home directory as the root user, enter the following commands:
8/8/2019 Oracle 11g RAC Guide
http://slidepdf.com/reader/full/oracle-11g-rac-guide 39/208
Configuring Installation Directories and Shared Storage
Preparing Your Cluster 2-19
# mkdir -p /u01/grid# chown -R oracle:oinstall /u01/grid
Creating the Oracle Base Directory Oracle Universal Installer (OUI) creates the Oracle base directory for you in thelocation you specify. This directory is owned by the user performing the installation.The Oracle base directory ( ORACLE_BASE) helps to facilitate the organization of Oracleinstallations, and helps to ensure that installations of multiple databases maintain anOptimal Flexible Architecture (OFA) configuration. OFA guidelines recommend thatyou use a path similar to the following for the Oracle base directory:
/ mount_point /app/ user
In the preceding path example, the variable mount_point is the mount pointdirectory for the file system where you intend to install the Oracle software and user is the Oracle software owner (typically oracle ). For OUI to recognize the path as anOracle software path, it must be in the form u0[1-9]/app , for example, /u01/app .
The path to the Oracle base directory must be the same on all nodes. The permissionson the Oracle base directory should be at least 750.
Example: Creating an Oracle Base Directory Prior to installing any Oracle software, you must configure an Oracle base directory,which is used to determine the location of the Oracle Inventory directory, as well as forinstalling Oracle RAC.
Assume you have determined that the file system mounted as /u01 has sufficientroom for both the Oracle grid infrastructure software and the Oracle RAC software.You have decided to make the /u01/app/oracle/11gR2 directory the Oracle basedirectory. The oracle user will be used to install all the Oracle software.
To create the Oracle base directory:1. Log in as the root user.
2. Use the mkdir command to create the path to the Oracle base directory.
# mkdir -p /u01/app/oracle/11gR2
3. Change the ownership of the Oracle base path to the Oracle software owner,oracle .
# chown -R oracle:oinstall /u01/app/oracle/11gR2
4. Change the permissions on the Oracle base directory to 775.
# chmod -R 775 /u01/app/oracle/11gR2
Note: Ensure the Grid home directory is not a subdirectory of theOracle base directory. Installing Oracle Clusterware in an Oracle basedirectory will cause installation errors.
See Also:
■ "About Hardware Requirements"■ "About Shared Storage"

8/8/2019 Oracle 11g RAC Guide
http://slidepdf.com/reader/full/oracle-11g-rac-guide 40/208
Configuring Installation Directories and Shared Storage
2-20 Oracle Database 2 Day + Real Application Clusters Guide
About the Oracle Home Directory The Oracle home directory is the location in which the Oracle RAC software isinstalled. You can use a Oracle home directory created in the local file system, forexample, /u01/app/oracle/product/11.2.0/dbhome_1 . The same directorymust exist on every node in the cluster. You do not need to create these directoriesprior to installation. By default, the installer will suggest a subdirectory of the Oracle base directory for the Oracle home.
You can also use a shared Oracle home. The location of the shared Oracle home can beon network storage, or a supported cluster file system such as Oracle AutomaticStorage Management Cluster File System (Oracle ACFS). For more information aboutOracle ACFS, see Oracle Database Storage Administrator's Guide .
If you use the local file system for the Oracle home directory, and you want to install adifferent versions of Oracle RAC or Oracle Database on the same server, then youmust use a separate Oracle home directory for each software installation. Multipleversions of the same product or different products can run from different Oraclehomes concurrently. Products installed in one Oracle home do not conflict or interactwith products installed in another Oracle home.
Using different Oracle homes for your installed software allows you to performmaintenance operations on the Oracle software in one home without effecting thesoftware in another Oracle home. However, it also increases your softwaremaintenance costs, because each Oracle home must be upgraded or patchedseparately.
About Shared Storage Each node in a cluster requires external shared disks for storing the OracleClusterware (Oracle Cluster Registry and voting disk) files, and Oracle Database files.The supported types of shared storage depend upon the platform you are using, forexample:■ Automatic Storage Management (strongly recommended)■ A supported cluster file system, such as OCFS2 for Linux, OCFS for Microsoft
Windows, or General Parallel File System (GPFS) on IBM platforms■ Network file system (NFS), which is not supported on AIX Based Systems, Linux
on POWER, or on IBM zSeries Based Linux■ (Upgrades only) Shared disk partitions consisting of block devices or raw devices.
Block devices are disk partitions that are not mounted using the Linux file system.Oracle Clusterware and Oracle RAC write to these partitions directly.
For all installations, you must choose the storage option that you want to use forOracle Clusterware files and Oracle Database files.
See Also:
■ "About Hardware Requirements"■ "About Shared Storage"
Note: You cannot use OUI to install Oracle Clusterware files on blockor raw devices. You cannot put Oracle Clusterware binaries and fileson Oracle Automatic Storage Management Cluster File System (OracleACFS).

8/8/2019 Oracle 11g RAC Guide
http://slidepdf.com/reader/full/oracle-11g-rac-guide 41/208
Configuring Installation Directories and Shared Storage
Preparing Your Cluster 2-21
If you decide to use OCFS2 to store the Oracle Clusterware files, you must use theproper version of OCFS2 for your operating system version. OCFS2 works with OracleEnterprise Linux and Red Hat Linux kernel version 2.6
The examples in this guide use Oracle ASM to store the Oracle Clusterware and OracleDatabase files. The Oracle grid infrastructure and Oracle RAC software will beinstalled on disks local to each node, not on a shared file system.
Configuring Files on an NAS Device for Use with Oracle ASM To use an NFS file system, it must be on a certified NAS device. If you have a certifiednetwork attached storage (NAS) device, then you can create zero-padded files in anNFS mounted directory and use those files as disk devices in an Oracle ASM diskgroup.
To ensure high availability of Oracle Clusterware files on Oracle ASM, you need tohave at least 2 GB of disk space for Oracle Clusterware files in three separate failuregroups, with at least three physical disks. Each disk must have at least 1 GB of capacityto ensure that there is sufficient space to create Oracle Clusterware files.
Use the following guidelines when identifying appropriate disk devices:■ All of the devices in an Automatic Storage Management disk group should be the
same size and have the same performance characteristics.■ A disk group should not contain more than one partition on a single physical disk
device.■ Using logical volumes as a device in an Automatic Storage Management disk
group is not supported with Oracle RAC.■ The user account with which you perform the installation ( oracle ) must have
write permissions to create the files in the path that you specify.
To configure NAS device files for creating disk groups:1. Add and configure access to the disks to the NAS device. Make sure each cluster
node has been granted access to all the disks that will be used by Oracle gridinfrastructure software and Oracle Database software.
Refer to your NAS device documentation for more information about completingthis step.
2. On a cluster node, log in as the root user (or use sudo for the following steps).
Note: For the most up-to-date information about supported storageoptions for Oracle RAC installations, refer to the Certify pages on My
Oracle Support (formerly Oracle MetaLink) at:https://metalink.oracle.com
See Also:
■ Your platform-specific Oracle Clusterware installation guide ifyou are using a cluster file system or NFS
■ "Configuring Installation Directories and Shared Storage"■ "About Hardware Requirements"

8/8/2019 Oracle 11g RAC Guide
http://slidepdf.com/reader/full/oracle-11g-rac-guide 42/208
Configuring Installation Directories and Shared Storage
2-22 Oracle Database 2 Day + Real Application Clusters Guide
3. Configure access to the disks on the NAS devices. The process for completing thisstep can vary depending on the type of disks and the type of NAS service.
One example of the configuration process is shown here. The first step is to createa mount point directory on the local system:
# mkdir -p /mnt/oracleasm
4. To ensure that the NFS file system is mounted when the system restarts, add anentry for the file system in the mount file /etc/fstab .
For more information about editing the mount file for the operating system, referto the Linux man pages. For more information about recommended mountoptions, refer to Oracle Grid Infrastructure Installation Guide for Linux .
5. Enter a command similar to the following to mount the NFS file system on thelocal system, where host is the hostname or IP address of the file server, and
pathname is the location of the storage within NFS (for example, /public ):
# mount <host>:<pathname> /mnt/oracleasm
6. Choose a name for the disk group that you want to create, for example, nfsdg .
7. Create a directory for the files on the NFS file system, using the disk group nameas the directory name, for example:
# mkdir /mnt/oracleasm/nfsdg
8. Use commands similar to the following to create the required number ofzero-padded files in this directory:
# dd if=/dev/zero of=/mnt/oracleasm/nfsdg/disk1 bs=1024k count=1000
This example creates a 1 GB file named disk1 on the NFS file system. You mustcreate one, two, or three files respectively to create an external, normal, or highredundancy disk group.
9. Enter the following commands to change the owner, group, and permissions onthe directory and files that you created:
# chown -R oracle:dba /mnt/oracleasm# chmod -R 660 /mnt/oracleasm
10. When installing Oracle RAC, if you choose to create an Oracle ASM disk group,you will need to change the disk discovery path to specify a regular expressionthat matches the file names you created, for example,/mnt/oracleasm/nfsdg/* .
Using ASMLib to Mark the Shared Disks as Candidate Disks When you reboot the server, unless you have configured special files for devicepersistence, a disk that appeared as /dev/sdg before the system shutdown canappear as /dev/sdh after the system is restarted. If you use ASMLib to configure thedisks, then when you reboot the node:■ The disk device names do not change
See Also:
■ "About Shared Storage"
■ "About Hardware Requirements"

8/8/2019 Oracle 11g RAC Guide
http://slidepdf.com/reader/full/oracle-11g-rac-guide 43/208
Configuring Installation Directories and Shared Storage
Preparing Your Cluster 2-23
■ The ownership and group membership for these disk devices remains the same■ You can copy the disk configuration implemented by ASM to other nodes in the
cluster by running a simple command
The following sections describe how to configure and use ASMLib for your shareddisk devices:■
Installing ASMLib■ Configuring ASMLib■ Using ASMLib to Create ASM Disks
Installing ASMLib The ASMLib software is available from the Oracle Technology Network. Select the linkfor your platform on the ASMLib download page at:
http://www.oracle.com/technology/tech/linux/asmlib/index.html
You will see 4 to 6 packages for your Linux platform. The oracleasmlib packageprovides the actual ASM library. The oracleasm-support package provides theutilities used to get the ASM driver up and running. Both of these packages need to beinstalled.
The remaining packages provide the kernel driver for the ASM library. Each packageprovides the driver for a different kernel. You must install the appropriate package forthe kernel you are running. Use the uname -r command to determine the version ofthe kernel on your server. The oracleasm kernel driver package will have thatversion string in its name. For example, if you are running Red Hat Enterprise Linux 4AS, and the kernel you are using is the 2.6.9-55.0.12.ELsmp kernel, you would choosethe oracleasm-2.6.9-55.0.12.ELsmp-2.0.3-1.x86_64.rpm package.
To install the ASMLib software packages:1. Download the ASMLib packages to each node in your cluster.
2. Change to the directory where the package files were downloaded.3. As the root user, use the rpm command to install the packages. For example:
# rpm -Uvh oracleasm-support-2.1.3-1.el4.x86_64.rpm# rpm -Uvh oracleasmlib-2.0.4-1.el4.x86_64.rpm# rpm -Uvh oracleasm-2.6.9-55.0.12.ELsmp-2.0.3-1.x86_64.rpm
After you have completed these commands, ASMLib is installed on the system.
4. Repeat steps 2 and 3 on each node in your cluster.
Configuring ASMLib Now that the ASMLib software is installed, a few steps have to be taken by the system
administrator to make the ASM driver available. The ASM driver needs to be loaded,and the driver file system needs to be mounted. This is taken care of by theinitialization script, /usr/sbin/oracleasm .
To configure the ASMLib software after installation:1. As the root user, run the following command:
# /usr/sbin/oracleasm configure

8/8/2019 Oracle 11g RAC Guide
http://slidepdf.com/reader/full/oracle-11g-rac-guide 44/208
Configuring Installation Directories and Shared Storage
2-24 Oracle Database 2 Day + Real Application Clusters Guide
The script will prompt you for the default user and group to own the ASM driveraccess point. Specify the Oracle Database software owner ( oracle ) and theOSDBA group ( dba ).
The script will also prompt you to specify whether or not you want to start theASMLib driver when the node is started and whether or not you want to scan forpresence of any Oracle Automatic Storage Management disks when the node is
started. Answer yes for both of these questions.2. Repeat step 1 on each node in your cluster.
Using ASMLib to Create ASM Disks Every disk that is used in an ASM disk group must be accessible on each node. Afteryou make the physical disk available to each node, you can then mark the disk deviceas an ASM disk. The /usr/sbin/oracleasm script is again used for this task.
If the target disk device supports partitioning, for example, raw devices, then youmust first create a single partition that encompasses the entire disk. If the target diskdevice does not support partitioning, then you do not need to create a partition on thedisk.
To create ASM disks using ASMLib:1. As the root user, use oracleasm to create ASM disks using the following syntax:
# /usr/sbin/oracleasm createdisk disk_name device_partition_name
In this command, disk_name is the name you choose for the ASM disk. The nameyou choose must contain only ASCII capital letters, numbers, or underscores, andthe disk name must start with a letter, for example, DISK1 or VOL1, or RAC_FILE1. The name of the disk partition to mark as an ASM disk is the device_
partition_name . For example:
# /usr/sbin/oracleasm createdisk DISK1 /dev/sdb1
If you need to unmark a disk that was used in a createdisk command, you canuse the following syntax:
# /usr/sbin/oracleasm deletedisk disk_name
2. Repeat step 1 for each disk that will be used by Oracle ASM.
3. After you have created all the ASM disks for your cluster, use the listdisks command to verify their availability:
# /usr/sbin/oracleasm listdisksDISK1DISK2DISK3
4. On all the other nodes in the cluster, use the scandisks command to view thenewly created ASM disks. You do not need to create the ASM disks on each node,only on one node in the cluster.
# /usr/sbin/oracleasm scandisksScanning system for ASM disks [ OK ]
5. After scanning for ASM disks, display the available ASM disks on each node toverify their availability:
# /usr/sbin/oracleasm listdisks

8/8/2019 Oracle 11g RAC Guide
http://slidepdf.com/reader/full/oracle-11g-rac-guide 45/208
Configuring Installation Directories and Shared Storage
Preparing Your Cluster 2-25
DISK1DISK2DISK3
Configuring Disk Device Persistence By default, the Linux 2.6 kernel device file naming scheme udev dynamically createsdevice file names when the server is started, and assigns ownership of them to root .If udev applies default settings, then it changes device file names and owners forvoting disks or Oracle Cluster Registry partitions, corrupting them when the server isrestarted. For example, a voting disk on a device named /dev/sdd owned by the usergrid may be on a device named /dev/sdf owned by root after restarting the server.
If you use ASMLIB, then you do not need to ensure permissions and device pathpersistency in udev . If you do not use ASMLib, then you must create a custom rulesfile. When udev is started, it sequentially carries out rules (configuration directives)defined in rules files. These files are in the path /etc/udev/rules.d/ . Rules filesare read in lexical order. For example, rules in the file 10-wacom.rules are parsedand carried out before rules in the rules file 90-ib.rules .
Where rules files describe the same devices, on Asianux, Red Hat, and OracleEnterprise Linux, the last file read is the one that is applied. On SUSE 2.6 kernels, thefirst file read is the one that is applied.
To configure a rules file for disk devices, refer to Chapter 3 in Oracle Grid InfrastructureInstallation Guide for Linux .
Note: At this point, you should restart each node on which you will be installing the Oracle grid infrastructure software. After the nodehas restarted, view the configured shared storage on each node. Thishelps to ensure that the system configuration is complete and persistsacross node shutdowns.

8/8/2019 Oracle 11g RAC Guide
http://slidepdf.com/reader/full/oracle-11g-rac-guide 46/208
Configuring Installation Directories and Shared Storage
2-26 Oracle Database 2 Day + Real Application Clusters Guide

8/8/2019 Oracle 11g RAC Guide
http://slidepdf.com/reader/full/oracle-11g-rac-guide 47/208
3
Installing Oracle Grid Infrastructure and Oracle Real Application Clusters 3-1
3 Installing Oracle Grid Infrastructure andOracle Real Application Clusters
Before installing Oracle RAC, you must first install the Oracle grid infrastructuresoftware, which consists of Oracle Clusterware and Oracle Automatic StorageManagement (Oracle ASM), for 11 g release 2 (11.2).
This chapter explains how to install Oracle Real Application Clusters (Oracle RAC)using Oracle Universal Installer (OUI). Before installing Oracle RAC, you must firstinstall the Oracle grid infrastructure software, which consists of Oracle Clusterwareand Oracle Automatic Storage Management (Oracle ASM), for 11 g release 2 (11.2).After Oracle Clusterware and Oracle ASM are operational, you can use OUI to installthe Oracle Database software with the Oracle RAC components.
This chapter includes the following sections:■ Preparing the Oracle Media Installation File■ Installing the Oracle Grid Infrastructure■ Installing the Oracle Database Software and Creating a Cluster Database■ Performing Postinstallation Tasks■ About Converting an Oracle Database to an Oracle RAC Database
Preparing the Oracle Media Installation File Oracle Clusterware is installed as part of the Oracle grid infrastructure software. OUIinstalls Oracle Clusterware into a directory structure that is referred to as Grid_home .This home is separate from the home directories of other Oracle software productsinstalled on the same server. Because Oracle Clusterware works closely with theoperating system, system administrator access is required for some of the installationtasks. In addition, some of the Oracle Clusterware processes must run as the specialoperating system user, root . If you choose to install Oracle Automatic StorageManagement (Oracle ASM), it is also installed in the Grid home directory.
The Oracle RAC database software is installed from the same Oracle Database 11 g installation media. By default, the standard Oracle Database 11 g software installationprocess installs the Oracle RAC option when OUI recognizes that you are performingthe installation on a cluster. OUI installs Oracle RAC into a directory structure that isreferred to as Oracle_home . This home is separate from the home directories of otherOracle software products installed on the same server.
8/8/2019 Oracle 11g RAC Guide
http://slidepdf.com/reader/full/oracle-11g-rac-guide 48/208
Installing the Oracle Grid Infrastructure
3-2 Oracle Database 2 Day + Real Application Clusters Guide
To prepare the Oracle Media installation files:1. If you have the Oracle software on CDs or DVDs, insert the disc for Oracle grid
infrastructure into a disk drive on your computer. Make sure the disk drive has been mounted at the operating system level. You will need to change discs wheninstalling the Oracle Database software.
If you do not have installation disks, but are instead installing from ZIP files,
continue on to Step 2.2. If the installation software is in one or more ZIP files, create a staging directory on
one node, for example, racnode1 , to store the unzipped files, as shown here:
mkdir -p /stage/oracle/11.2.0
3. Copy the ZIP files to this staging directory. For example, if the files weredownloaded to a directory named /home/user1 , and the ZIP file is named11200_linux_db.zip , you would you use the following command to move theZIP file to the staging directory:
cd /home/user1cp 11200_linux_db.zip /stage/oracle/11.2.0
4. As the oracle user on the first node, unzip the Oracle media, as shown in thefollowing example:
cd /stage/oracle/11.2.0unzip 11200_linux_db.zip
Installing the Oracle Grid Infrastructure The following topics describe the process of installing the Oracle grid infrastructure,which consists of Oracle Clusterware and Oracle Automatic Storage Management(Oracle ASM):■ Configuring the Operating System Environment■ About CVU Fixup Scripts■ Using Oracle Universal Installer to Install the Oracle Grid Infrastructure■ Completing the Oracle Clusterware Configuration
Configuring the Operating System Environment
You run OUI from the oracle user account. Before you start OUI to install OracleGrid Infrastructure, you do not need to configure the environment of the oracle user.You can specify the directories to use for the central inventory and the Grid homeduring the installation process.
However, you can set the ORACLE_BASEenvironment variable to the directory inwhich you want the Oracle Inventory files located.For example, if you plan to makethe Oracle Database home directory /u01/app/oracle/product/11.2.0/dbhome_1 , you would set ORACLE_BASEto the directory /u01/app/oracle/ . Ifyou set the ORACLE_BASEdirectory prior to installation, then this becomes the defaultlocation for the central inventory displayed by OUI.
See Also:
■ "Configuring Installation Directories and Shared Storage"■ "About Operating System Users and Groups"

8/8/2019 Oracle 11g RAC Guide
http://slidepdf.com/reader/full/oracle-11g-rac-guide 49/208
Installing the Oracle Grid Infrastructure
Installing Oracle Grid Infrastructure and Oracle Real Application Clusters 3-3
You can also set the ORACLE_HOMEenvironment variable to the location chosen for theGrid home. If you set the ORACLE_HOMEdirectory prior to installation, then this becomes the default location for the Grid home displayed by OUI.
(Optional) To modify the user environment prior to installing Oracle gridinfrastructure on Oracle Enterprise Linux:1. As the oracle user, execute the following commands:
[oracle]$ unset ORACLE_HOME[oracle]$ unset ORACLE_SID[oracle]$ unset ORACLE_BASE[oracle]$ export ORACLE_BASE=/u01/app/oracle/[oracle]$ export ORACLE_HOME=/u01/grid
2. Verify the changes have been made by executing the following commands:
[oracle]$ echo $ORACLE_SID
[oracle]$ echo $ORACLE_HOME/u01/grid[oracle]$ echo $ORACLE_BASE
/u01/app/oracle/
About CVU Fixup Scripts During installation, for certain prerequisite check failures, you can click Fix & CheckAgain to generate a fixup script ( runfixup.sh ). You are then prompted by OUI torun the fixup script as the root user in a separate session. You must run the script on allthe nodes specified by OUI.
The Fixup script does the following:■ Checks and sets kernel parameters to values required for successful installation,
including:
– Shared memory parameters
– Open file descriptor and UDP send/receive parameters■ Sets permissions on the Oracle Inventory (central inventory) directory.
Modifying the contents of the generated fixup script is not recommended.
Using Oracle Universal Installer to Install the Oracle Grid Infrastructure As the Oracle grid infrastructure software owner ( oracle) user on the first node,install the Oracle grid infrastructure for your cluster. Note that OUI uses Secure Shell(SSH) to copy the binary files from this node to the other nodes during the installation.OUI has the ability to configure SSH for you during installation.
Note: Using fixup scripts will not ensure that all the requiredprerequisites for installing Oracle grid infrastructure and Oracle RACare satisfied. You must still verify that all the requirements listed inChapter 2, "Preparing Your Cluster" are met to ensure a successfulinstallation.

8/8/2019 Oracle 11g RAC Guide
http://slidepdf.com/reader/full/oracle-11g-rac-guide 50/208
Installing the Oracle Grid Infrastructure
3-4 Oracle Database 2 Day + Real Application Clusters Guide
To install the Oracle grid infrastructure software:1. Use the following command to start OUI, where staging_area is the location of
the staging area on disk, or the root level of the installation media:
cd / staging_area /clusterware/Disk1./runInstaller
After a few minutes, the Select Installation Option window appears.
2. Choose the Install and Configure Grid Infrastructure for a Cluster option, then
click Next .The Select Installation Type window appears.
3. Select Typical Installation , then click Next .
The Specify Cluster Configuration window appears.
4. In the SCAN Name field, enter a name for your cluster that is unique throughoutyour entire enterprise network. For example, you might choose a name that is based on the node names' common prefix. This guide will use the SCAN namedocrac .
In the Hostname column of the table of cluster nodes, you should see your localnode, for example racnode1.example.com . Click Add to add another node to
the cluster.The Add Cluster Node Information pop-up window appears.
5. Enter the second node's public name ( racnode2 ), and virtual IP name(racnode2-vip ), and then click OK .
You are returned to the Specify Cluster Configuration window.
6. You should now see both nodes listed in the table of cluster nodes. Make sure bothnodes are selected, then click the SSH Connectivity button at the bottom of thewindow.
The bottom panel of the window displays the SSH Connectivity information.
7. Enter the operating system username and password for the Oracle software owner
(oracle ). Select the option If you have already configured SSH connectivity between the nodes, then select the Reuse private and public keys existing in userhome option. Click Setup .
A message window appears, indicating that it might take several minutes toconfigure SSH connectivity between the nodes. After a short period of time,another message window appears indicating that passwordless SSH connectivityhas been established between the cluster nodes. Click OK to continue.
8. When returned to the Specify Cluster Configuration window, click Next tocontinue.
Note: If you are installing Oracle Clusterware on a server thatalready has a single-instance Oracle Database 11 g installation, thenstop the existing Oracle ASM instances, if any. After OracleClusterware is installed, start the Oracle ASM instances again. Whenyou restart the single-instance Oracle database and then the OracleASM instances, the Oracle ASM instances use the Cluster
Synchronization Services Daemon (CSSD) instead of the daemon forthe single-instance Oracle database.

8/8/2019 Oracle 11g RAC Guide
http://slidepdf.com/reader/full/oracle-11g-rac-guide 51/208
Installing the Oracle Grid Infrastructure
Installing Oracle Grid Infrastructure and Oracle Real Application Clusters 3-5
After several checks are performed, the Specify Install Locations window appears.
9. Perform the following actions on this page:■ For the Oracle base field, make sure it is set to the location you chose for your
Oracle Base directory, for example /u01/app/oracle/ . If not, click Browse .In the Choose Directory window, go up the path until you can select the /u01/app/oracle/ directory, then click Choose Directory .
■ For the Software Location field, make sure it is set to the location you chose foryour Grid home, for example /u01/grid . If not, click Browse . In the ChooseDirectory window, go up the path until you can select /u01/grid , then clickChoose Directory .
■ For the Cluster Registry Storage Type , choose Automatic StorageManagement.
■ Enter a password for a SYSASM user in the SYSASM Password and ConfirmPassword fields. This password will be used for managing Oracle ASM afterinstallation, so make note of it in a secure place.
■ For the OSASM group, use the drop-down list to choose the operating systemgroup for managing Oracle ASM, for example, dba .
After you have specified information for all the fields on this page, click Next .
The Create ASM Disk Group page appears.
10. In the Disk Group Name field, enter a name for the disk group, for exampleDATA. Choose the Redundancy level for this disk group, and then in the AddDisks section, choose the disks to add to this disk group.
In the Add Disks section you should see the disks that you configured using theASMLIB utility in Chapter 2.
When you have finished selecting the disks for this disk group, click Next .
If you have not installed Oracle software previously on this computer, then the
Create Inventory page appears.11. Change the path for the inventory directory, if required. If you are using the same
directory names as this book, then it should show a value of /u01/app/oraInventory . The oraInventory group name should show oinstall .
Click Next . The Perform Prerequisite Checks window appears.12. If any of the checks have a status of Failed and a value of Yes in the Fixable
column, select that check, for example OS Kernel Parameter:file-max, then clickthe Fix & Check Again button. This instructs the installer to create a shell script tofix the problem. You must run the specified script on the indicated nodes as theroot user to fix the problem. When you have finished running the script on eachnode, click OK.
Repeat until all the fixable checks have a status of Succeeded.
Note: The path displayed for the inventory directory should be theoraInventory subdirectory of the directory one level above theOracle base directory. For example, if you set the ORACLE_BASE environment variable to /u01/app/oracle/ before starting OUI,then the OraInventory path displayed is /u01/app/oraInventory .

8/8/2019 Oracle 11g RAC Guide
http://slidepdf.com/reader/full/oracle-11g-rac-guide 52/208
Installing the Oracle Grid Infrastructure
3-6 Oracle Database 2 Day + Real Application Clusters Guide
If there are other checks that failed, but are do not have a value of Yes in theFixable field, you will need to configure the node to meet these requirements inanother window. After you have made the necessary adjustments, return to theOUI window and click Check Again. Repeat as needed until all the checks have astatus of Succeeded. Click Next .
The Summary window appears.13. Review the contents of the Summary window and then click Finish .
OUI displays a progress indicator allowing you to monitor the installation process.
14. As part of the installation process, you will be required to run certain scripts as theroot user, as specified in the Execute Configuration Scripts window appears. Donot click OK until you have run the scripts.

8/8/2019 Oracle 11g RAC Guide
http://slidepdf.com/reader/full/oracle-11g-rac-guide 53/208
Installing the Oracle Grid Infrastructure
Installing Oracle Grid Infrastructure and Oracle Real Application Clusters 3-7
The Execute Configuration Scripts window shows configuration scripts, and thepath where the configuration scripts are located. Run the scripts on all nodes asdirected, in the order shown. For example, on Oracle Enterprise Linux youperform the following steps (note that for clarity, the examples show the currentuser, node and directory in the prompt):
a. As the oracle user on racnode1 , open a terminal window, and enter thefollowing commands:
[oracle@racnode1 oracle]$ cd /u01/app/oraInventory[oracle@racnode1 oraInventory]$ su
b. Enter the password for the root user, and then enter the following commandto run the first script on racnode1 :
[root@racnode1 oraInventory]# ./orainstRoot.sh
c. After the orainstRoot.sh script finishes on racnode1 , open anotherterminal window, and as the oracle user, enter the following commands:
[oracle@racnode1 oracle]$ ssh racnode2[oracle@racnode2 oracle]$ cd /u01/app/oraInventory[oracle@racnode2 oraInventory]$ su
d. Enter the password for the root user, and then enter the following commandto run the first script on racnode2 :
[root@racnode2 oraInventory]# ./orainstRoot.sh
e. After the orainstRoot.sh script finishes on racnode2 , go to the terminalwindow you opened in Step 15a. As the root user on racnode1 , enter thefollowing commands to run the second script, root.sh :
[root@racnode1 oraInventory]# cd /u01/grid[root@racnode1 grid]# ./root.sh
Press Enter at the prompt to accept the default value.

8/8/2019 Oracle 11g RAC Guide
http://slidepdf.com/reader/full/oracle-11g-rac-guide 54/208
Installing the Oracle Grid Infrastructure
3-8 Oracle Database 2 Day + Real Application Clusters Guide
f. After the root.sh script finishes on racnode1 , go to the terminal window
you opened in Step 15c. As the root user on racnode2 , enter the followingcommands:
[root@racnode2 oraInventory]# cd /u01/grid[root@racnode2 grid]# ./root.sh
Press Enter at the prompt to accept the default value.
After the root.sh script completes, return to the OUI window where the Installerprompted you to run the orainstRoot.sh and root.sh scripts. Click OK .
The software installation monitoring window reappears.
15. Continue monitoring the installation until the Finish window appears. Then clickClose to complete the installation process and exit the installer
Completing the Oracle Clusterware Configuration After you have installed Oracle Clusterware, verify that the node applications arerunning. Depending on which operating system you use, you may need to performsome postinstallation tasks to configure the Oracle Clusterware components properly.
To complete the Oracle Clusterware configuration on Oracle Enterprise Linux:1. As the oracle user on the first node, check the status of the Oracle Clusterware
targets by entering the following command:
/u01/grid/bin/crsctl check cluster -all
This command provides output showing if all the important cluster services, suchas gsd , ons , and vip, are running on the nodes of your cluster.
2. In the displayed output, you should see the Oracle Clusterware daemons are
online for each node in the cluster.******************************************************************racnode1:CRS-4537: Cluster Ready Services is onlineCRS-4529: Cluster Synchronization Services is onlineCRS-4533: Event Manager is online******************************************************************racnode2:CRS-4537: Cluster Ready Services is onlineCRS-4529: Cluster Synchronization Services is onlineCRS-4533: Event Manager is online
Note: Do not attempt to run the root.sh script on other nodes, or itmight fail. Wait until the script finishes running on the local node before starting it on a different node.
Caution: After installation is complete, do not remove manually orrun cron jobs that remove /tmp/.oracle or /var/tmp/.oracle directories or their files while Oracle software is running on the server.If you remove these files, then the Oracle software can encounterintermittent hangs. Oracle Clusterware installations will fail with theerror:
CRS-0184: Cannot communicate with the CRS daemon.

8/8/2019 Oracle 11g RAC Guide
http://slidepdf.com/reader/full/oracle-11g-rac-guide 55/208
Installing the Oracle Database Software and Creating a Cluster Database
Installing Oracle Grid Infrastructure and Oracle Real Application Clusters 3-9
******************************************************************
If you see that one or more Oracle Clusterware resources are offline, or aremissing, then the Oracle Clusterware software did not install properly.
Installing the Oracle Database Software and Creating a Cluster Database Now that the grid infrastructure software is functional, you can install the OracleDatabase software on the one node in your cluster. OUI copies the binary files fromthis node to all the other node in the cluster during the installation process.
The following topics describe the process of installing the Oracle Database softwareand creating a clustered database:■ Configuring the Operating System Environment■ Creating Additional ASM Disk Groups■ Using Oracle Universal Installer to Install Oracle RAC■ Verifying Your Oracle RAC Database Installation
Configuring the Operating System Environment You run OUI from the oracle user account. Before you start OUI you do not need toconfigure the environment of the oracle user.
However, you can set the ORACLE_BASEenvironment variable to the directory inwhich you want the Oracle Inventory files located.For example, if you plan to makethe Oracle Database home directory /u01/app/oracle/product/11.2.0/dbhome_1 , you would set ORACLE_BASEto the directory /u01/app/oracle/ . Ifyou set the ORACLE_BASEdirectory prior to installation, then this becomes the defaultlocation for the central inventory displayed by OUI.
You can also set the ORACLE_HOMEenvironment variable to the location chosen for theOracle Database home. If you set the ORACLE_HOMEdirectory prior to installation,then this becomes the default location for the Grid home displayed by OUI.
(Optional) To modify the user environment prior to installing Oracle Databasesoftware on Oracle Enterprise Linux:1. As the oracle user, execute the following commands:
[oracle]$ unset ORACLE_SID[oracle]$ export ORACLE_BASE=/u01/app/oracle/[oracle]$ export ORACLE_HOME=/u01/app/oracle/product/11.2.0/dbhome_1
2. Verify the changes have been made by executing the following commands:
[oracle]$ echo $ORACLE_SID
[oracle]$ echo $ORACLE_HOME/u01/app/oracle/product/11.2.0/dbhome_1[oracle]$ echo $ORACLE_BASE/u01/app/oracle/
3. Install the Oracle grid infrastructure software. See “Installing the Oracle GridInfrastructure” on page 2.

8/8/2019 Oracle 11g RAC Guide
http://slidepdf.com/reader/full/oracle-11g-rac-guide 56/208
Installing the Oracle Database Software and Creating a Cluster Database
3-10 Oracle Database 2 Day + Real Application Clusters Guide
Creating Additional ASM Disk Groups If you chose to store the Oracle Clusterware files on ASM during the Oracle gridinfrastructure installation, then a single disk group was created in ASM. You can usethis same disk group to store the data files for your Oracle database.
If you want to use a separate disk groups for your Oracle database files or for a FastRecovery Area, then you need to create additional ASM disk groups prior to installingOracle Database software.
To create an additional disk group using ASMCA:1. Prepare the disks or devices for use with ASM, as described in "Configuring
Installation Directories and Shared Storage" on page 2-17 .
2. Start the Automatic Storage Configuration Assistant (ASMCA) from the Gridhome:
/u01/grid/bin/asmca
The ASM Configuration Assistant starts, and displays the Disk Groups window.
3. Click the Create button at the bottom left-hand side of the window to create a newdisk group.The Create Disk Group window appears.
4. Provide the following information:■ In the Disk Group Name field, enter a name for the new disk group, for
example, FRA.■ Choose a Redundancy level, for example, Normal.■ Select the disks to include in the new disk group.
If you used ASMLIB to configure the disks for use with ASM, then theavailable disks are displayed if you have the Show Eligible option selected,and they have a Header Status of PROVISIONED.
After you have provided all the information, click OK . A progress window titledDiskGroup: Creation appears. After a few minutes, a message appears indicatingthe disk group was created successfully. Click OK to continue.
5. Repeat Step 3 and 4 to create additional disk groups, or click Exit , then select Yes to exit the utility.
Using Oracle Universal Installer to Install Oracle RAC After you have configured the operating system environment, you can use OracleUniversal Installer to install the Oracle Database software and create an Oracle RACdatabase.
To install Oracle Database software on your cluster and create a clustereddatabase:1. As the oracle user, use the following commands to start OUI, where
staging_area is the location of the staging area on disk, or the location of themounted installation disk:
cd / staging_area./runInstaller

8/8/2019 Oracle 11g RAC Guide
http://slidepdf.com/reader/full/oracle-11g-rac-guide 57/208
Installing the Oracle Database Software and Creating a Cluster Database
Installing Oracle Grid Infrastructure and Oracle Real Application Clusters 3-11
When you start Oracle Universal Installer, the Configure Security Updateswindow appears.
2. (Optional) Enter your email address and My Oracle Support password, then clickNext to continue.
If you want to receive notification by email of any newly discovered securityissues related to the software you are installing, then enter an email address in theEmail field. If you also want to receive the security updates through My OracleSupport, then use the same email address that is registered with My OracleSupport, select the I wish to receive security updates via My Oracle Support option, and enter your My Oracle Support login password in the My OracleSupport Password field.
If you provide an email address, then the Oracle Configuration Manager (OCM)tool with also be installed. This utility provides Oracle Support Services withconfiguration information about your system when creating service requests. Youcan disable the OCM tool after installation, but Oracle strongly discourages this.OCM does not access, collect, or store any personal information (except fortechnical support contact information), or any business data files residing in yoursoftware environment. See http://www.oracle.com/technology/
documentation/ocm.html for more information.After you click Next , the Select Installation Option window appears.
3. Select Create and configure a database , then click Next .
The System Class window appears.
4. Choose Server Class , then click Next .
If you choose the Desktop Class option, it installs a single-instance database, not aclustered database.
The Node Selection screen appears.
5. Select the Real Application Clusters database installation type.
Select the nodes on which you want to install Oracle Database software and createan Oracle RAC instance. All the available nodes in the cluster are selected bydefault.
Click the SSH Connectivity button at the bottom of the window. The bottompanel of the window displays the SSH Connectivity information.
6. Because you configured SSH connectivity between the nodes for the Oracle gridinfrastructure installation, select the Reuse private and public keys existing inuser home option . If you are using a network user with home directory on sharedstorage, then also select the "User home if shared by the selected nodes" option.Click Test .
A message window appears, indicating that passwordless SSH connectivity has
already been established between the cluster nodes. Click OK to continue.7. When returned to the Node Selection window, click Next to continue.
The Select Install Type window appears.
8. Choose the Typical install option, and click Next.
A typical installation requires minimal input. It installs the software andoptionally creates a general-purpose database. If you choose the Advancedinstallation type (not documented in this guide), you are prompted to providemore information about how the database should be configured. For example, you

8/8/2019 Oracle 11g RAC Guide
http://slidepdf.com/reader/full/oracle-11g-rac-guide 58/208
Installing the Oracle Database Software and Creating a Cluster Database
3-12 Oracle Database 2 Day + Real Application Clusters Guide
could set passwords for each user account individually, choose a differenttemplate for the starter database, choose a non-default language for the database,and so on.
The Typical Install Configuration window appears.
9. In this window, you must provide the following information:■
Oracle base location : The default value is /u01/app/oracle . If you did notset the ORACLE_BASEenvironment variable and the default location isdifferent from the directory location you have chose, then enter the directoryfor your Oracle base or click the Browse button to change the directory path.
■ Software location : If you did not set the ORACLE_HOMEenvironment variableprior to starting the installation, then enter the directory for your Oracle homeor click the Browse button to change the directory path.
■ Storage Type : In this drop-down list, choose Automatic Storage Management(ASM). If you do not want to use ASM, then choose File System. Because ASMwas installed with the Oracle grid infrastructure, Automatic StorageManagement is the default value.
■ Database file location : Choose the disk group to use for storing the databasefiles. You can use the same disk group that Oracle Clusterware uses. If you donot want to use the same disk group that is currently being used to store theOracle Clusterware files, then you must exit the installation and create a newdisk group using ASM utilities. Refer to "Creating Additional ASM DiskGroups" on page 3-10 for more information on creating a disk group.
If you chose the File System storage type, then enter the directory location ofthe shared storage where the database files will be created.
■ ASMSNMP Password : Enter the password for the ASMSNMP user. TheASMSNMP user is used primarily by EM to monitor ASM instances.
If you chose File System for the Storage Type, then this field is disabled.■
Database edition : From this drop-down list choose either Enterprise Editionor Standard Edition. The number in parentheses next to your choice indicatesthe amount of disk space required.
■ OSDBA Group : From this drop-down list select the operating system groupused for database administration, for example, dba .
■ Global database name : Enter the fully qualified global name for yourdatabase. The global database name is in the form ORACLE_SID .DB_DOMAIN ,for example, orcl.example.com .
■ Administrative password : Enter the password to be used for theadministrative account, such as SYS, SYSTEM, and DBSNMP.
■ Confirm Password : Enter the same password in this field.
After you have provided all the necessary information, click Next . The PerformPrerequisite Checks window appears.
10. After a short period of time, the Summary window appears. Review theinformation on this screen, then click Finish to continue.
If any of the information in the Summary window is incorrect, use the Back buttonto return to a previous window and correct it.
After you click Finish, OUI displays a progress indicator to show that theinstallation has begun. This step takes several minutes to complete.

8/8/2019 Oracle 11g RAC Guide
http://slidepdf.com/reader/full/oracle-11g-rac-guide 59/208
Installing the Oracle Database Software and Creating a Cluster Database
Installing Oracle Grid Infrastructure and Oracle Real Application Clusters 3-13
11. After the software is installed on each node, OUI starts the DatabaseConfiguration Assistant (DBCA). This utility creates the database using the globaldatabase name specified in Step 9. At the end of the database creation, you will seethe DBCA window with the database configuration information displayed,including the URL for the Database Control console.
There is also a Password Management button that you can click to unlock the
database user accounts, or change their default passwords.After making note of the information in this window, click OK .
OUI configures Oracle Configuration Management, if you provided theinformation in Step 2.
12. In the last step of the installation process, you are prompted to perform the task ofrunning the root.sh script on both nodes, as specified in the ExecuteConfiguration Scripts window. Do not click OK until you have run the scripts on both nodes.
Perform the following steps to run the root.sh script (note that for clarity, theexamples show the current user, node and directory in the prompt):
a. Open a terminal window. As the oracle user on the first node. Changedirectories to your Oracle home directory, and then switch to the root user byentering the following commands:
[oracle@racnode1 oracle]$ cd /u01/app/oracle/product/11.2.0/dbhome_1[oracle@racnode1 dbhome_1]$ su
b. Enter the password for the root user, and then run the script specified in theExecute Configuration scripts window:
[root@racnode1 dbhome_1]# ./root.sh
Note: Do not attempt to run the root.sh script on other nodes, or itmight fail. Wait until the script finishes running on the local node before starting it on a different node.

8/8/2019 Oracle 11g RAC Guide
http://slidepdf.com/reader/full/oracle-11g-rac-guide 60/208
Installing the Oracle Database Software and Creating a Cluster Database
3-14 Oracle Database 2 Day + Real Application Clusters Guide
c. As the root.sh script runs, it prompts you for the path to the local bin directory. The information displayed in the brackets is the information it hasobtained from your system configuration. It also writes the dbhome , oraenv ,and coraenv files in the /usr/local/bin directory. If these files alreadyexist, you are asked if you want to overwrite them. After responding toprompt, press the Enter key. To accept the default choice, press the Enter keywithout entering any text.
d. After the script has completed on the first node, the prompt appears. Entercommands similar to the following to run the script on the other nodes:
[root@racnode1 dhome_1]# exit[oracle@racnode1 dhome_1]$ ssh racnode2[oracle@racnode2 ~]$ cd /u01/app/oracle/product/11.2.0/dbhome_1[oracle@racnode2 dbhome_1]$ su
e. Enter the password for the root user, and then run the script specified in theExecute Configuration scripts window:
[root@racnode2 dbhome_1]# ./root.sh
f. After responding to each prompt, press the Enter key.
g. When the root.sh script completes, the following messages are displayed:
After you finish executing the script on all nodes, return to the Execute
Configuration scripts window and click OK .The Install Product window is displayed.
13. Click Next to complete the installation.
The Finish window is displayed, with the URL for Enterprise Manager DatabaseControl displayed.
14. Click Close to exit the installer.
Verifying Your Oracle RAC Database Installation At this point, you should verify that all the database services are up and running.
See Also:
■ "Configuring the Operating System Environment"■ "Verifying Your Oracle RAC Database Installation"■ "Performing Postinstallation Tasks"■ "About Downloading and Installing RDBMS Patches"■ Oracle Real Application Clusters Administration and Deployment
Guide for more information about configuring disk groups inOracle ASM

8/8/2019 Oracle 11g RAC Guide
http://slidepdf.com/reader/full/oracle-11g-rac-guide 61/208
Installing the Oracle Database Software and Creating a Cluster Database
Installing Oracle Grid Infrastructure and Oracle Real Application Clusters 3-15
To verify the Oracle RAC database services are running:1. Log in as the oracle user and go to the Grid_home /bin directory:
[oracle] $ cd /u01/grid/bin
2. Run the following command to view the status of the resources managed byOracle Clusterware that contain the string ’ora’:
[oracle] $ ./crsctl status resource -w "TYPE co ’ora’" -t
The output of the command should show that the Oracle Clusterware, OracleASM, and Oracle Database resources are available (online) for each host. Anexample of the output is:
------------------------------------------------------------------------------NAME TARGET STATE SERVER STATE_DETAILS------------------------------------------------------------------------------Local Resources------------------------------------------------------------------------------ora.DATA.dg
ONLINE ONLINE racnode1ONLINE ONLINE racnode2
ora.LISTENER.lsnrONLINE ONLINE racnode1ONLINE ONLINE racnode2
ora.asm
ONLINE ONLINE racnode1 StartedONLINE ONLINE racnode2 Started
ora.eonsONLINE ONLINE racnode1ONLINE ONLINE racnode2
ora.gsdOFFLINE OFFLINE racnode1OFFLINE OFFLINE racnode2
ora.net1.networkONLINE ONLINE racnode1ONLINE ONLINE racnode2
ora.onsONLINE ONLINE racnode1ONLINE ONLINE racnode2
ora.registry.acfsONLINE ONLINE racnode1ONLINE ONLINE racnode2
------------------------------------------------------------------------------Cluster Resources------------------------------------------------------------------------------ora.LISTENER_SCAN1.lsnr
1 ONLINE ONLINE racnode1ora.oc4j
1 OFFLINE OFFLINEora.orcl.db
1 ONLINE ONLINE racnode1 Open2 ONLINE ONLINE racnode2 Open
ora.racnode1.vip

8/8/2019 Oracle 11g RAC Guide
http://slidepdf.com/reader/full/oracle-11g-rac-guide 62/208
Performing Postinstallation Tasks
3-16 Oracle Database 2 Day + Real Application Clusters Guide
1 ONLINE ONLINE racnode1ora.racnode2.vip
1 ONLINE ONLINE racnode2ora.scan1.vip
1 ONLINE ONLINE racnode1
Performing Postinstallation Tasks After you have installed the Oracle Real Application Clusters (Oracle RAC) software,there are additional tasks that you can perform before your cluster database is readyfor use. These steps are recommended, but are not required.
This section contains the following topics:■ About Verifying the Oracle Clusterware Installation■ Backing Up Installation Files■ Verifying Oracle Enterprise Manager Operations■ About Downloading and Installing RDBMS Patches■ About Configuring User Accounts
About Verifying the Oracle Clusterware Installation After the Oracle Clusterware installation is complete, OUI automatically runs thecluvfy utility as a Configuration Assistant to verify that the Clusterware installationhas been completed successfully.
If the CVU reports problems with your configuration, correct these errors beforeproceeding.
Backing Up Installation Files Certain files used during installation are very important to the operation of theinstalled software. It is important to back up these files and keep them in a separatelocation from the installed software in case of hardware failure.■ About Backing Up the root.sh Script■ About Configuring User Accounts
Caution: After installation is complete, do not remove manually orrun cron jobs that remove /tmp/.oracle or /var/tmp/.oracle directories or their files while Oracle software is running on the server.If you remove these files, then the Oracle software can encounterintermittent hangs. Oracle Clusterware installations will fail with theerror:
CRS-0184: Cannot communicate with the CRS daemon.
See Also:
■ Oracle Clusterware Administration and Deployment Guide for moreinformation about using the CVU and resolving configurationproblems

8/8/2019 Oracle 11g RAC Guide
http://slidepdf.com/reader/full/oracle-11g-rac-guide 63/208
Performing Postinstallation Tasks
Installing Oracle Grid Infrastructure and Oracle Real Application Clusters 3-17
About Backing Up the root.sh Script Oracle recommends that you back up the root.sh script after you complete aninstallation. If you install other products in the same Oracle home directory, OUIupdates the contents of the existing root.sh script during the installation. If yourequire information contained in the original root.sh script, then you can recover itfrom the root.sh backup copy.
About Backing Up the emkey.ora File During the installation described in this guide, the Enterprise Manager DatabaseControl management repository is placed in secure mode. All Enterprise Manager datais encrypted using the encryption key stored in the file emkey.ora . If this file isdamaged or lost, and cannot be restored from a backup, you will no longer be able touse the existing Enterprise Manager repository.
The emkey.or a file is located in the Oracle_home /<node_name >_<Database_name >/ sysman / config directory. For example, on theracnode2 server, the encryption key file for the orcl.example.com databasewould be located at /u01/app/oracle/product/11.2.0/dbhome_1/racnode2_orcl/sysman/config/emkey.ora directory.
Verifying Oracle Enterprise Manager Operations When you create an Oracle RAC database and choose Database Control for yourdatabase management, the Enterprise Manager Database Control utility is installedand configured automatically.
To verify Oracle Enterprise Manager Database Control has been started in yournew Oracle RAC environment:1. Make sure the ORACLE_UNQNAMEenvironment variable is set to the unique name
of the database to which you want to connect, for example orcl . Also make surethe ORACLE_HOMEenvironment variable is set to the location of the installedOracle Database software.
$ export ORACLE_UNQNAME=orcl$ echo $ORACLE_HOME/u01/app/oracle/product/11.2.0/dbhome_1
$ echo $ORACLE_UNQNAMEorcl
2. Go to the Oracle_home/bin directory.
3. Run the following command as the oracle user:
./emctl status dbconsole
The Enterprise Manager Control (EMCTL) utility displays the current status of theDatabase Control console on the current node.Oracle Enterprise Manager 11g Database Control Release 11.2.0.1.0Copyright (c) 1996, 2009 Oracle Corporation. All rights reserved.https://racnode1.example.com:1158/em/console/aboutApplicationOracle Enterprise Manager 11g is running.------------------------------------------------------------------Logs are generated in directory /u01/app/oracle/product/11.2.0/dbhome_1/racnode1_orcl/sysman/log

8/8/2019 Oracle 11g RAC Guide
http://slidepdf.com/reader/full/oracle-11g-rac-guide 64/208
Performing Postinstallation Tasks
3-18 Oracle Database 2 Day + Real Application Clusters Guide
4. If the EMCTL utility reports that Database Control is not started, use the followingcommand to start it:
./emctl start dbconsole
Following a typical installation, Database Control serves console pages from thenode where database was created. The console also monitors agents on all nodesof the cluster. However, you can configure Enterprise Manager to have multipleDatabase Control consoles within a cluster using EMCA.
About Downloading and Installing RDBMS Patches Periodically, Oracle issues bug fixes for its software called patches . Patch sets are acollection of bug fixes that were produced up to the time of the patch set release. Patch
sets are fully tested product fixes. Application of a patch set affects the softwareresiding in your Oracle home.
Ensure that you are running the latest patch set of the installed software. You mightalso need to apply patches that are not included in a patch set. Information aboutdownloading and installing patches and patch sets is covered in Chapter 10,"Managing Oracle Software and Applying Patches" .
About Configuring User Accounts The oracle user operating system account is the account that you used to install theOracle software. You can use different operating system accounts for accessing and
managing your Oracle RAC database. You can modify the shell configuration file to setenvironment variables such as ORACLE_HOMEwhenever you log in as that operatingsystem user.
See Also:
■ Oracle Database 2 Day DBA ■ "Configuring the Enterprise Manager Patch Interface"■ "About Oracle RAC Management Using Enterprise Manager"
Note: If you want to install Oracle Database or Oracle RAC versions11.1.0.7, 11.1.0.6, or 10.2.0.4 after installing Oracle Clusterware 11 g release 2, then you must install the one-off patch required for thatrelease. Refer to the My Oracle Support Web site for the requiredpatch updates for your installation.
See Also:
■ "Configuring the Enterprise Manager Patch Interface"■ "Download and Install Patch Updates" in Chapter 5 of Oracle Grid
Infrastructure Installation Guide for Linux
8/8/2019 Oracle 11g RAC Guide
http://slidepdf.com/reader/full/oracle-11g-rac-guide 65/208
About Converting an Oracle Database to an Oracle RAC Database
Installing Oracle Grid Infrastructure and Oracle Real Application Clusters 3-19
About Converting an Oracle Database to an Oracle RAC Database You can use rconfig , or Oracle Enterprise Manager to assist you with the task ofconverting a single-instance database installation to an Oracle Real ApplicationClusters (Oracle RAC) database. rconfig is a command line utility. Oracle EnterpriseManager Grid Control database administration option, Convert to Cluster Database,provides a GUI conversion tool.
This section contains the following topics:■ About Preparing for Database Conversion■ Overview of the Database Conversion Process Using Grid Control■ Overview of the Database Conversion Process Using rconfig
About Preparing for Database Conversion Before you start the process of converting your database to a cluster database, yourdatabase environment must meet certain prerequisites:■ The existing database and the target Oracle RAC database must be on the same
release of Oracle Database 11 g and must be running on the same platform.■ The hardware and operating system software used to implement your Oracle RAC
database must be certified for use with the release of the Oracle RAC software youare installing.
■ You must configure shared storage for your Oracle RAC database.■ You must verify that any applications that will run against the Oracle RAC
database do not need any additional configuration before they can be usedsuccessfully with the cluster database. This applies to both Oracle applications anddatabase features, such as Oracle Streams, and applications and products that donot come from Oracle.
■ Backup procedures should be available before converting from a single-instance
Oracle Database to Oracle RAC.■ For archiving in Oracle RAC environments, the archive log file format requires a
thread number.■ The archived redo log files from all instances of an Oracle RAC database are
required for media recovery. Because of this, if you archive to a file and you do notuse a cluster file system, or some other means to provide shared file systems, thenyou require a method of accessing the archived redo log files from all nodes onwhich the cluster database has instances.
See Also:
■ "About Operating System Users and Groups"■ "Installing the Oracle Database Software and Creating a Cluster
Database"■ "Performing Postinstallation Tasks"■ Oracle Database Administrator's Reference for Linux and UNIX-Based
Operating Systems for more information about setting up optionaloperating system user accounts that can be used to manage thedatabase
8/8/2019 Oracle 11g RAC Guide
http://slidepdf.com/reader/full/oracle-11g-rac-guide 66/208
About Converting an Oracle Database to an Oracle RAC Database
3-20 Oracle Database 2 Day + Real Application Clusters Guide
Overview of the Database Conversion Process Using Grid ControlThe following list provides an outline of the process of converting a single-instancedatabase to an Oracle RAC database using Oracle Enterprise Manager Grid Control:■ Complete the prerequisite tasks for converting to an Oracle RAC database:
– Oracle Clusterware and Oracle Database software is installed on all targetnodes.
– Oracle Clusterware is started.
– The Oracle Database binary is enabled for Oracle RAC on all target nodes.
– Shared storage is configured and accessible from all nodes.
– User equivalency is configured for the operating system user performing theconversion.
– Enterprise Manager agents are configured and running on all nodes, and areconfigured with the cluster and host information.
– The database being converted has been backed up successfully.■ Access the Database Home page for the database you want to convert.■ Go to the Server subpage and select Convert to Cluster Database.■ Provide the necessary credentials.■ Select the host nodes that will contain instances of the new database.■ Provide listener and instance configuration information.■ Specify the location of the shared storage to be used for the data files.■ Submit the job.■ Complete the post-conversion tasks.
The resulting Oracle RAC database uses a server pool instead of a fixed configuration.
Overview of the Database Conversion Process Using rconfigThe following list provides an outline of the process of converting a single-instancedatabase to an Oracle RAC database using the rconfig utility:■ Complete the prerequisite tasks for converting to an Oracle RAC database.
– Oracle Clusterware and Oracle Database software is installed on all targetnodes.
– Oracle Clusterware is started.
– The Oracle Database binary is enabled for Oracle RAC on all target nodes.
Note: Before using individual Oracle Database 11 g databaseproducts or options, refer to the product documentation library, whichis available in the DOC directory on the 11 g release 2 (11.2) installationmedia, or on the OTN Web site at http://www.oracle.com/technology/documentation
See Also: Oracle Real Application Clusters Installation Guide for Linuxand UNIX , or for a different platform, for a complete description ofthis process

8/8/2019 Oracle 11g RAC Guide
http://slidepdf.com/reader/full/oracle-11g-rac-guide 67/208
About Converting an Oracle Database to an Oracle RAC Database
Installing Oracle Grid Infrastructure and Oracle Real Application Clusters 3-21
– Shared storage is configured and accessible from all nodes.
– User equivalency is configured for the operating system user performing theconversion.
– The database being converted has been backed up successfully.■ Using rconfig , you can convert a single-instance database to either an
administrator-managed cluster database or a policy-managed cluster database.Modify the parameters in either the ConvertToRAC_AdminManaged.xml orConvertToRAC_PolicyManaged.xml sample file, as appropriate for yourenvironment, then save the file to a new location. Both files are located in theOracle_home /assistants/rconfig/sampleXMLs directory.
■ Run the rconfig command, supplying the name of the modified XML file asinput.
■ Complete the post-conversion tasks.
You can also use the rconfig utility to convert single-instance Oracle ASM toclustered Oracle ASM.
See Also: Oracle Real Application Clusters Installation Guide for Linuxand UNIX , or for a different platform, for a complete description ofthis process

8/8/2019 Oracle 11g RAC Guide
http://slidepdf.com/reader/full/oracle-11g-rac-guide 68/208
About Converting an Oracle Database to an Oracle RAC Database
3-22 Oracle Database 2 Day + Real Application Clusters Guide

8/8/2019 Oracle 11g RAC Guide
http://slidepdf.com/reader/full/oracle-11g-rac-guide 69/208
4
Administering Database Instances and Cluster Databases 4-1
4Administering Database Instances andCluster Databases
Web-based Oracle Enterprise Manager Database Control and Grid Control interfaceslet you mange Oracle Real Application Clusters (Oracle RAC) databases. TheEnterprise Manager console is a central point of control for the Oracle environment.Use the Database Control console to initiate cluster database management tasks. Use
the Grid Control console to administer multiple Oracle RAC databases and clusternodes.
This chapter describes how to administer your Oracle RAC environment. It explainsthe startup and shutdown tasks for database components and how to administerparameters and parameter files in Oracle RAC. This chapter includes the followingsections:■ About Oracle Real Application Clusters Database Management■ About Oracle RAC Management Using Enterprise Manager■ Starting and Stopping Oracle RAC Databases and Database Instances■ About Oracle Real Application Clusters Initialization Parameters
■ About Administering Storage in Oracle RAC
About Oracle Real Application Clusters Database Management Oracle Real Application Clusters (Oracle RAC) is technology that links one or moreindividual computers so that they function as one system. Oracle RAC enables eachcomputer that is a member of a cluster, or node, to share access to the Oracle database.If one cluster node fails or is taken offline, then the other cluster nodes continueoperating and the entire Oracle RAC database remains available. This means that twoor more inexpensive computers can appear to applications as if they were a single,much more powerful and more expensive, computer.
To increase the performance of a two-node Oracle RAC database, you can add clusternodes. Each additional node can help speed up application processing, support moreusers or processes, or both. In addition, you can also add cluster nodes to increase theavailability and reliability of a two-node Oracle RAC database. The more nodes thatyour Oracle RAC environment has, the less the impact of the loss of any individualnode on the database.
Note: If you are using Oracle Database Standard Edition, yourcluster must adhere to the license restrictions. See Oracle DatabaseLicensing Information for specific details on these restrictions.

8/8/2019 Oracle 11g RAC Guide
http://slidepdf.com/reader/full/oracle-11g-rac-guide 70/208
About Oracle RAC Management Using Enterprise Manager
4-2 Oracle Database 2 Day + Real Application Clusters Guide
An Oracle RAC database requires three components: cluster nodes, shared storage,and Oracle Clusterware. Although you can choose how many nodes your clustershould have and what type of shared storage to use, this guide describes one specificconfiguration for a two-node cluster. This two-node configuration uses OracleAutomatic Storage Management (Oracle ASM) for storage management and RecoveryManager (RMAN) for the backup and recovery strategy.
Most administration tasks are the same for Oracle single-instance and Oracle RACdatabases. This guide provides additional instructions for some of the databaseadministration tasks specific to Oracle RAC, as well as some recommendations formanaging Oracle RAC databases.
About Oracle RAC Management Using Enterprise Manager The Web-based Oracle Enterprise Manager Database Control console and the Oracle
Enterprise Manager Grid Control console let you manage Oracle RAC databases.Enterprise Manager is a central point of control for the Oracle environment that youaccess by way of a graphical user interface (GUI). You can use Enterprise Manager tocreate and modify services, and to start and stop the cluster database instances and thecluster database. Use Enterprise Manager Database Control for cluster databasemanagement tasks. Use Enterprise Manager Grid Control to administer your entireOracle RAC environment, not just the Oracle RAC database.
When you log in to Enterprise Manager using a client browser, the Cluster DatabaseHome page appears. The Cluster Database Home page is similar to a single-instanceDatabase Home page. However, on the Cluster Database Home page, EnterpriseManager displays the system state and availability of the entire Oracle RACenvironment. This includes a summary about alert messages and job activity, as well
as the status of and links to all the database and Oracle Automatic StorageManagement (Oracle ASM) instances. By clicking the Cluster tab on this page you canview the Cluster Home page, to view the status of and alerts for the underlyingcluster.
See Also:
■ Oracle Database 2 Day DBA■ Chapter 9, "Adding and Deleting Nodes and Instances"
Note: You can use Database Control to manage all the instances in asingle Oracle RAC database, and, if your database uses Oracle ASMfor storage, all the Oracle ASM instances. If you have multiple OracleRAC databases using Oracle ASM for storage on the same clusternodes, then the same Oracle ASM instances will appear for everyOracle RAC instance because you can only have one Oracle ASMinstance per node.
See Also:
■ Oracle Database 2 Day DBA■ Oracle Real Application Clusters Administration and Deployment
Guide for more information about monitoring Oracle RACperformance

8/8/2019 Oracle 11g RAC Guide
http://slidepdf.com/reader/full/oracle-11g-rac-guide 71/208
Starting and Stopping Oracle RAC Databases and Database Instances
Administering Database Instances and Cluster Databases 4-3
Starting and Stopping Oracle RAC Databases and Database Instances Typically, you start up and shut down the cluster database from the EnterpriseManager Cluster Database Home page. By using this page for cluster database startupand shutdown operations, you ensure that all the instances that belong to the OracleRAC database are in a consistent state. This enables you to more easily manage anOracle RAC database.
You can also start and stop individual instances in an Oracle RAC database. However,starting and stopping one instance in an Oracle RAC database does not stop or startother instances. To completely stop an Oracle RAC database, you must shut down allof its instances.
To start and stop an entire Oracle RAC database, assuming you are using aserver parameter file (SPFILE):1. Go to the following URL and log in to Enterprise Manager:
http:// hostname:portnumber /em
For example, http://racnode1.example.com:1158/em .
2. On the Cluster Database Home page, in the General section, click Startup if thedatabase is down, or Shutdown if the database is started.
The Startup/Shutdown: Specify Credentials page appears.
3. Enter the host credentials for the cluster nodes. The host credentials are the username and password for a user who is a member of the OSDBAor OSOPER operating system group.
The Startup/Shutdown: Select Operation page appears.
4. Click Select All to select all the instances, or then click Shutdown to stop all thedatabase instances or Startup to start all the database instances.
The Startup/Shutdown: Confirmation page appears.
5. Click Yes .To start and stop individual instances, go to the Startup/Shutdown: Select Operationpage and select the database instances, then click Startup or Shutdown to perform thedesired operation on the selected database instances.
You can also start up and shut down instances using SQL*Plus or Server Control(SRVCTL).
Note: You can start up and shut down individual instances fromeach instance's home page. However, it is easier to perform instancestartup and shutdown operations directly from the Startup/Shutdown: Select Operation page.
See Also:
■ Oracle Real Application Clusters Administration and DeploymentGuide for more information about using command-line interfacesto start and stop Oracle RAC database instances

8/8/2019 Oracle 11g RAC Guide
http://slidepdf.com/reader/full/oracle-11g-rac-guide 72/208
About Oracle Real Application Clusters Initialization Parameters
4-4 Oracle Database 2 Day + Real Application Clusters Guide
About Oracle Real Application Clusters Initialization Parameters Managing initialization parameters for an Oracle RAC database is essentially the sameas managing them for a single-instance Oracle database. Note the followingdifferences for parameters in Oracle RAC databases:■ Parameters that are cluster-specific have the value Cluster Database in the
Category column.■ Parameters that are the same on each instance in the Oracle RAC database are
identified in the Instance column with an asterisk (*).■ Parameters that are set to different values on each instance of an Oracle RAC
database are listed by instance name.
The administration of initialization parameters in an Oracle RAC environment isslightly different from single-instance database parameter administration. Forexample, if you change a parameter setting that is marked by an asterisk, whichindicates that the parameter is a clusterwide database initialization parameter, thenyou change that parameter's setting for all the instances in your Oracle RAC database.If you change an initialization parameter prefixed with an instance name, or aninstance-specific initialization parameter, then the change affects only that instance; thechange does not affect the parameter's settings on other database instances.This section contains the following topics:■ About Configuring Initialization Parameters for an Oracle RAC Database■ Editing Initialization Parameter Settings for an Oracle RAC Database■ About the Server Parameter File for Oracle Real Application Clusters
About Configuring Initialization Parameters for an Oracle RAC Database A server parameter file (SPFILE) is a type of repository for initialization parametersthat is maintained on the server where the Oracle database server runs, or on sharedstorage for an Oracle RAC database. Initialization parameters stored in a serverparameter file are persistent, in that any changes made to the parameters while aninstance is running can persist across instance shutdown and startup.
An initialization parameter file is a text file that contains initialization parametersettings. In contrast to the SPFILE, this parameter file is not binary and does not needto be located on the database server. The text-based initialization parameter file can be
read by the database, but it is not written to by the database.By default, Oracle Database sets most parameters to a default value and this value isthe same across all instances. However, many initialization parameters can also havedifferent values on different instances as described in Oracle Database Reference.Otherparameters must be either unique or identical across instances, as described in thefollowing sections:■ Parameters that Must Have Identical Settings on All Instances■ Parameters that Must Have Unique Settings on All Instances
See Also:
■ Oracle Database 2 Day DBA■ Oracle Real Application Clusters Administration and Deployment
Guide for more information about initialization parameters in anOracle RAC environment

8/8/2019 Oracle 11g RAC Guide
http://slidepdf.com/reader/full/oracle-11g-rac-guide 73/208
About Oracle Real Application Clusters Initialization Parameters
Administering Database Instances and Cluster Databases 4-5
■ Parameters that Should Have Identical Settings on All Instances
Parameters that Must Have Identical Settings on All Instances Certain initialization parameters that are critical at database creation or that affectcertain database operations must have the same value for every instance in an OracleRAC database. Specify these parameter values in the SPFILE, or within the individual
PFILEs for each instance. The following list contains the parameters that must beidentical on every instance:■ CLUSTER_DATABASE
■ COMPATIBLE
■ CONTROL_FILES
■ DB_BLOCK_SIZE
■ DB_DOMAIN
■ DB_FILES
■ DB_NAME
■ DB_RECOVERY_FILE_DEST■ DB_RECOVERY_FILE_DEST_SIZE
■ DB_UNIQUE_NAME
■ DML_LOCKS(only if set to 0)■ INSTANCE_TYPE (RDBMS or ASM)■ PARALLEL_EXECUTION_MESSAGE_SIZE
■ REMOTE_LOGIN_PASSWORDFILE
■ RESULT_CACHE_MAX_SIZE(either enabled or disabled on all instances)■ UNDO_MANAGEMENT
Parameters that Must Have Unique Settings on All Instances For the following parameters, the parameter must be set on all instances to a value thatis unique to that instance:■ CLUSTER_INTERCONNECTS
■ INSTANCE_NUMBER
■ ROLLBACK_SEGMENTS(if the UNDO_MANAGEMENTinitialization parameter is notset to AUTO)
■ UNDO_TABLESPACE(if UNDO_MANAGEMENTis set to AUTO)
Oracle Database uses the INSTANCE_NUMBERparameter to distinguish amonginstances at startup. Oracle Database uses the INSTANCE_NAMEparameter to assignredo log groups to specific instances. To simplify administration, use the same numberfor both the INSTANCE_NAMEand INSTANCE_NUMBERparameters. With OracleDatabase 11.2 using Grid Plug and Play, the instance name parameter is no longerrequired. If you do not specify the instance name, then instance name defaults to db_unique_name _number .

8/8/2019 Oracle 11g RAC Guide
http://slidepdf.com/reader/full/oracle-11g-rac-guide 74/208
About Oracle Real Application Clusters Initialization Parameters
4-6 Oracle Database 2 Day + Real Application Clusters Guide
Parameters that Should Have Identical Settings on All Instances Oracle recommends that you set the values for the following parameters to the samevalue on all instances. Although you can have different settings for these parameterson different instances, setting each parameter to the same value on all instancessimplifies administration:■ ARCHIVE_LAG_TARGET
Different values for instances in your Oracle RAC database are likely to increaseoverhead because of additional automatic synchronization performed by thedatabase processing.
When using Oracle Streams with your Oracle RAC database, the value should begreater than zero.
■ CONTROL_MANAGEMENT_PACK_ACCESS
This parameter controls the use of the Diagnostics and Tuning Packs for OracleEnterprise Manager Database Control (Database Control). You should set thevalue for this parameter on all instance to reflect whether or not you havepurchased the Diagnostics and Tuning Manageability Packs for your Oracle RACdatabase.
■ DIAGNOSTIC_DEST
As of Oracle Database 11 g release 1 (11.1), the diagnostics for each databaseinstance are located in a dedicated directory, which can be specified through theDIAGNOSTIC_DEST initialization parameter. This parameter can be set on eachinstance. Oracle recommends that each instance in a cluster specify aDIAGNOSTIC_DESTdirectory location that is located on shared disk and that thesame value for DIAGNOSTIC_DESTbe specified for each instance.
■ LICENSE_MAX_USERS
This parameter determines a database-wide limit on the number of user accountsdefined in the database and it is useful to have the same value on all instances ofyour database so you can see the current value no matter which instance you areusing. Setting different values may generate additional warning messages duringinstance startup, or cause commands related to database user accountmanagement to fail on some instances.
If you have concurrent usage (session) licensing, then set the LICENSE_MAX_SESSIONS parameter instead. When using LICENSE_MAX_SESSIONS, set thevalue on each instance so that the sum of all the values is less than or equal to thetotal number of sessions licensed for the database. Do not set both LICENSE_MAX_SESSIONS and LICENSE_MAX_USERS.
■ LOG_ARCHIVE_FORMAT
If you do not use the same value for all your instances, then you complicate mediarecovery. The recovering instance expects the required archived redo log filenames to have the format defined by its own value of LOG_ARCHIVE_FORMAT,regardless of which instance created the archived redo log files.
Databases that support Oracle Data Guard, either to send or receive archived redolog files, must use the same value of LOG_ARCHIVE_FORMATfor all instances.
■ REDO_TRANSPORT_USER
This parameter specifies the name of the user whose password verifier is usedwhen a remote login password file is used for redo transport authentication. Thisparameter is used in Oracle Data Guard configurations.

8/8/2019 Oracle 11g RAC Guide
http://slidepdf.com/reader/full/oracle-11g-rac-guide 75/208
About Oracle Real Application Clusters Initialization Parameters
Administering Database Instances and Cluster Databases 4-7
■ SPFILE
The SPFILE resides in the $ORACLE_HOME/dbs directory; however, users canplace it any storage accessible to the local host as long as it is specified in aninitialization parameter file.
If this parameter does not identify the same file to all instances, then each instancemay act differently and unpredictably in failover, load-balancing, or standardoperations. Additionally, a change you make to the SPFILE using an ALTERSYSTEM SET or ALTER SYSTEM RESET command is saved only in the SPFILEused by the instance where you run the command. Your change will not bereflected in instances using different SPFILEs.
■ TRACE_ENABLED
When TRACE_ENABLEDis set to true, Oracle records information in specific fileswhen errors occur. Oracle Support Services uses this information for debuggingthe Oracle software. If you enable tracing on one instance, you should enable it onall instances to make sure that the diagnostic information is recorded in a trace file.
■ UNDO_RETENTION
By setting different values for UNDO_RETENTIONin each instance, you are likelyto reduce scalability and encounter unpredictable actions following a failover.Therefore, you should carefully consider whether or not you will accrue any benefits before you assign different values for this parameter to the instances inyour Oracle RAC database.
About Modifying the SERVICE_NAMES Parameter for Oracle RAC The SERVICE_NAMESinitialization parameter specifies one or more names by whichclients can connect to the instance. The instance registers its service names with thelistener. When a client requests a service, the listener determines which instances offerthe requested service and routes the client to the appropriate instance.
In an Oracle RAC database, you should not modify this parameter directly. Instead,
define services for your database and database instances using the Clustered ManagedDatabase Services page in Oracle Enterprise Manager. If you need to change a service,you can use either Enterprise Manager or SRVCTL. When you use either OracleEnterprise Manager or SRVCTL to create and start the service, the SERVICE_NAMES parameter is updated automatically once the service is active.
About the Server Parameter File for Oracle Real Application Clusters When you create the database, Oracle creates an SPFILE in the file location that youspecify. This location can be an Oracle ASM disk group or cluster file system file. In theenvironment described by this guide, the SPFILE is created on an Oracle ASM diskgroup.
All instances in the cluster database use the same SPFILE at startup. Oracle RAC usesa traditional parameter file only if an SPFILE does not exist or if you specify PFILE inyour STARTUP command. Oracle recommends that you use an SPFILE to simplifyadministration, maintain parameter setting consistency, and to guarantee parametersetting persistence across database shutdown and startup events. In addition, you canconfigure RMAN to back up your SPFILE.
See Also:
■ "About Oracle Services" on page 7-1

8/8/2019 Oracle 11g RAC Guide
http://slidepdf.com/reader/full/oracle-11g-rac-guide 76/208
About Oracle Real Application Clusters Initialization Parameters
4-8 Oracle Database 2 Day + Real Application Clusters Guide
Editing Initialization Parameter Settings for an Oracle RAC Database You can use Enterprise Manager to view and edit the initialization parameter settingsfor your Oracle RAC database.
To view or modify the initialization parameters using Enterprise Manager:1. On the Cluster Database Home page, while logged in as a SYSDBA user, click
Server .
The Server page appears.
2. Under the heading Database Configuration, select Initialization Parameters .
The Initialization Parameters page appears.
3. Select either the Current or SPFile subpage to modify the parameter settings.
See either:■ "Modifying the Initialization Parameter for Oracle RAC Using the Current
Tab"■ "Modifying the Initialization Parameter for Oracle RAC Using the SPFile Tab"
Modifying the Initialization Parameter for Oracle RAC Using the Current Tab The Current subpage of the Initialization Parameters contains a list of configurationparameters for that instance and database. You can set these parameters to particularvalues to initialize many of the memory and process settings of an Oracle instance.
When you modify initialization parameters using the Current tab, the changes areapplied only to the running instances, not the SPFILE, unless the "Apply changes incurrent running instance(s) mode to SPFile" option is selected.
The Instance column shows the instances for which the parameter has the value listedin the table. An asterisk (*) indicates that the parameter has the same value for allremaining instances of the cluster database. For example, if open_cursors = 250 for node1 and open_cursors = 300 for node2 , then the Instance column foropen_cursors = 250 displays an asterisk, but the Instance column for open_cursors = 300 contains "node2". This shorthand notation saves space when thecluster databases has many instances.
See Also:
■ Oracle Database 2 Day DBA■ Oracle Real Application Clusters Administration and Deployment
Guide for more information about using a server parameter file inan Oracle Real Application Clusters environment

8/8/2019 Oracle 11g RAC Guide
http://slidepdf.com/reader/full/oracle-11g-rac-guide 77/208
About Oracle Real Application Clusters Initialization Parameters
Administering Database Instances and Cluster Databases 4-9
You can filter the Initialization Parameters page to show only those parameters thatmeet the criteria of the filter you enter in the Filter by name field. Optionally, you canselect Show All to display on one page all parameters currently used by the runninginstance(s).
To modify parameter values using the Current tab:1. Select a parameter from the Select column and do one of the following:
■ Click Add to add the selected parameter to a different instance.
When the new row appears in the table, choose the instance name to which thenew setting applies, and enter the new value for the parameter in the Valuefield. Optionally, you can put text in the Comment field to indicate why theinstance has a different value from the other instances.
■ Click Reset to reset the value of the selected parameter. Note that using thisoption you can reset only those parameters that do not have an asterisk in theInstance column.
When you click Reset, the value of the selected parameter is reset to the value
of the remaining instances (that is, the row with the asterisk in the Instancecolumn) and the row that has the local instance name in the Instance field isremoved from the table.
For example, select the parameter OPEN_CURSORS, then click Add . In the newentry for OPEN_CURSORS, select an Instance (for example sales1 or RACDB2),change the Value field to 300.
2. After you make changes to one or more of the parameters, click Apply to acceptand implement the changes.
Modifying the Initialization Parameter for Oracle RAC Using the SPFile Tab You can also add or reset parameters using the SPFile tab. When you modify
initialization parameters using the SPFile tab, the changes are applied only to theSPFILE, not the currently running instances, unless the "Apply changes in SPFile modeto the current running instance(s)" option is selected.
Resetting parameters using the SPFile tab is different than resetting the sameparameters using the Current tab. You can either reset the parameter value for aninstance back to the default value for all instances, or you can delete the defaultparameter setting (unset the parameter) for all instances.

8/8/2019 Oracle 11g RAC Guide
http://slidepdf.com/reader/full/oracle-11g-rac-guide 78/208
About Oracle Real Application Clusters Initialization Parameters
4-10 Oracle Database 2 Day + Real Application Clusters Guide
■ If you reset a parameter with an asterisk in the Instance column, the entry will bedeleted from both the SPFILE and the table in Database Control. Only parameterswithout an asterisk (or instance-specific parameters) will remain.
■ If you reset the only entry for a nonasterick parameter, it will be deleted from boththe SPFILE and the table in Database Control, but the parameter will be replaced by a dummy parameter with an empty value field and an asterisk in the Instancecolumn; this enables you to specify a new value for the parameter, add newinstance-specific entries for the parameter, and so on.
Resetting a parameter that is set for only one instance results in the parameter beingunset for all instances.
To modify parameter values using the SPFile tab:1. Choose a parameter using the Select column.
For more information about each parameter, click the information icon in the Helpcolumn next to the parameter.
2. Click Add , then edit the entry to change the target instance or parameter value.You can optionally add a comment describing the reason for the change.
3. Click Apply to apply the changes to the SPFILE, or to the SPFile and the currentlyrunning instance if you selected the "Apply changes in SPFile mode to the currentrunning instance(s)" option.
4. On the SPFile subpage of the Initialization Parameters page, select a parameterfrom the Select column and do one of the following:■ Click Add to add the selected parameter to a different instance.
When the new row appears in the table, choose the instance name to which thenew setting applies, and then enter the new value for the parameter in theValue field. Optionally, you can put text in the Comment field describing thereason for the change.
■ Click Reset to reset the value of the selected parameter.
When you click Reset, one of the following actions is performed:
– If the entry you selected was for a specific instance, then the value of theselected parameter for that instance is reset to the value of the remaininginstances (indicated by an asterisk in the Instance column). The entry thathas the local instance name in the Instance field is deleted.
– If the entry you selected to reset was the default values for all instances(indicated by an asterisk in the Instance column), then the value of the
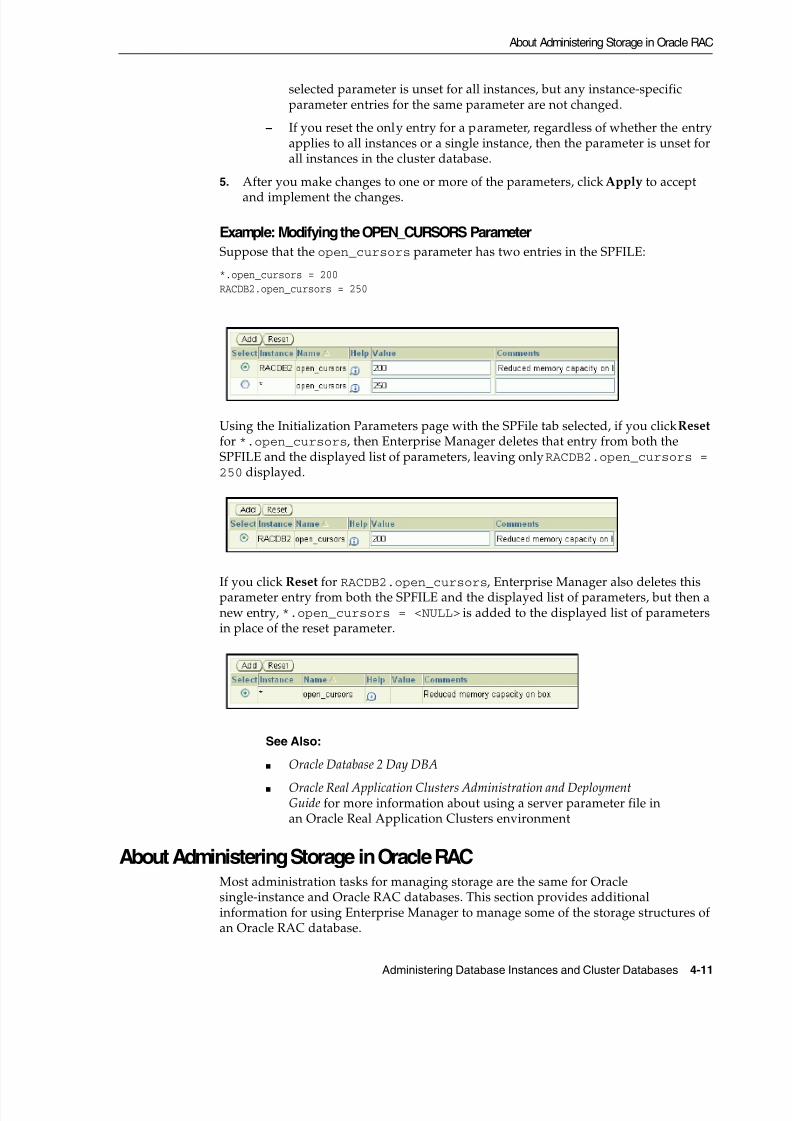
8/8/2019 Oracle 11g RAC Guide
http://slidepdf.com/reader/full/oracle-11g-rac-guide 79/208
About Administering Storage in Oracle RAC
Administering Database Instances and Cluster Databases 4-11
selected parameter is unset for all instances, but any instance-specificparameter entries for the same parameter are not changed.
– If you reset the only entry for a parameter, regardless of whether the entryapplies to all instances or a single instance, then the parameter is unset forall instances in the cluster database.
5. After you make changes to one or more of the parameters, click Apply to acceptand implement the changes.
Example: Modifying the OPEN_CURSORS Parameter Suppose that the open_cursors parameter has two entries in the SPFILE:
*.open_cursors = 200RACDB2.open_cursors = 250
Using the Initialization Parameters page with the SPFile tab selected, if you click Reset for *.open_cursors , then Enterprise Manager deletes that entry from both theSPFILE and the displayed list of parameters, leaving only RACDB2.open_cursors =250 displayed.
If you clickReset
forRACDB2.open_cursors
, Enterprise Manager also deletes thisparameter entry from both the SPFILE and the displayed list of parameters, but then anew entry, *.open_cursors = <NULL> is added to the displayed list of parametersin place of the reset parameter.
About Administering Storage in Oracle RAC Most administration tasks for managing storage are the same for Oraclesingle-instance and Oracle RAC databases. This section provides additionalinformation for using Enterprise Manager to manage some of the storage structures ofan Oracle RAC database.
See Also:
■ Oracle Database 2 Day DBA■ Oracle Real Application Clusters Administration and Deployment
Guide for more information about using a server parameter file inan Oracle Real Application Clusters environment

8/8/2019 Oracle 11g RAC Guide
http://slidepdf.com/reader/full/oracle-11g-rac-guide 80/208
About Administering Storage in Oracle RAC
4-12 Oracle Database 2 Day + Real Application Clusters Guide
This section describes the following topics:■ About Automatic Undo Management in Oracle RAC■ Oracle Automatic Storage Management in Oracle RAC■ Administering Redo Logs in Oracle RAC
About Automatic Undo Management in Oracle RAC Oracle RAC automatically manages undo segments within a specific undo tablespacethat is assigned to an instance. Only the instance assigned to the undo tablespace canmodify the contents of that tablespace. However, each instance can read the undo data blocks created by any instance. Also, when performing transaction recovery, anyinstance can update any undo tablespace, as long as that undo tablespace is notcurrently being used by another instance for undo generation or transaction recovery.
You assign undo tablespaces in your Oracle RAC database by specifying a differentvalue for the UNDO_TABLESPACEparameter for each instance in your SPFILE orindividual PFILEs. You cannot simultaneously use automatic undo management andmanual undo management in an Oracle RAC database. In other words, all instances ofan Oracle RAC database must operate in the same undo mode.
Oracle Automatic Storage Management in Oracle RAC Oracle Automatic Storage Management (Oracle ASM) automatically optimizes storageto maximize performance by managing the storage configuration across the disks thatOracle ASM manages. Oracle ASM does this by evenly distributing the storage loadacross all the available storage within your cluster database environment. Oracle ASMpartitions your total disk space requirements into uniformly sized units across all the
disks in a disk group. Oracle ASM can also automatically mirror data to prevent dataloss. Because of these features, Oracle ASM also significantly reduces youradministrative overhead.
As in single-instance Oracle databases, using Oracle ASM in Oracle RAC does notrequire I/O tuning. The following topics describe Oracle ASM and Oracle ASMadministration:■ About Oracle ASM Components in Oracle RAC■ About Disk Group Configurations for Oracle ASM in Oracle RAC■ About Standalone Oracle ASM Disk Group Management■ About Oracle ASM Instance and Disk Group Management
About Oracle ASM Components in Oracle RAC When you configure Oracle ASM after installing Oracle grid infrastructure, one OracleASM instance is created on each node in your Oracle RAC environment if one does notalready exist. Each Oracle ASM instance has either an SPFILE or PFILE type parameterfile. For the environment described in this guide, the Oracle ASM instances useSPFILEs.
See Also:
■ Oracle Database 2 Day DBA for more information about managingthe undo data for your database

8/8/2019 Oracle 11g RAC Guide
http://slidepdf.com/reader/full/oracle-11g-rac-guide 81/208
About Administering Storage in Oracle RAC
Administering Database Instances and Cluster Databases 4-13
About Disk Group Configurations for Oracle ASM in Oracle RAC
When you create a disk group for a cluster, or add new disks to an existing clustereddisk group, you must prepare only the underlying physical storage on shared disks.The shared disk requirement is the only substantial difference between using OracleASM in an Oracle RAC database compared to using it in a single-instance Oracledatabase. Oracle ASM automatically rebalances the storage load after you add ordelete a disk or disk group.
In a cluster, each Oracle ASM instance manages the metadata updates to the diskgroups for the node on which it is running. In addition, each Oracle ASM instancecoordinates disk group metadata with other nodes in the cluster. As in single-instanceOracle databases, you can use Enterprise Manager, Oracle ASM configuration assistant(ASMCA), ASMCMD, SQL*Plus, and SRVCTL to administer disk groups for OracleASM in an Oracle RAC environment.
About Standalone Oracle ASM Disk Group Management You can configure Oracle ASM during installation of Oracle grid infrastructure. If youchoose not to configure Oracle ASM during installation, then you need to manuallyconfigure Oracle ASM, or perform standalone Oracle ASM disk group management.
To manually configure Oracle ASM, you must first run ASMCA to create the OracleASM instances and create at least one diskgroup. Once Oracle ASM is running, thenyou can use DBCA to create an Oracle RAC database that uses Oracle ASM for storage.
You do not have to create a new database to modify Oracle ASM storage properties.
About Oracle ASM Instance and Disk Group Management You can perform administrative operations on Oracle ASM disk groups usingEnterprise Manager such as adding and deleting them. You can also monitor OracleASM disk group performance as well as control disk group availability at the instance
See Also:
■ Oracle Database 2 Day DBA■ "About Oracle Automatic Storage Management"
See Also:
■ Oracle Database 2 Day DBA■ Oracle Database Storage Administrator's Guide for information
about how to use SQL*Plus to administer Oracle ASM instances
Note: If you installed the OCR and Voting Disks on Oracle ASM aspart of your Oracle grid infrastructure install, the Oracle ASMinstances are created by OUI and you do not have to run ASMCA.Only if you did not specify Oracle ASM storage for the OCR andVoting disks during installation so do you have to use ASMCA.
See Also:
■ Oracle Database 2 Day DBA■ Oracle Database Storage Administrator's Guide for information
about how to use the Oracle Automatic Storage Managementcommand-line utility

8/8/2019 Oracle 11g RAC Guide
http://slidepdf.com/reader/full/oracle-11g-rac-guide 82/208
About Administering Storage in Oracle RAC
4-14 Oracle Database 2 Day + Real Application Clusters Guide
level. For example, some of the Oracle RAC-specific features for Oracle ASM that areprovided by Enterprise Manager are the following:■ When you add a disk group, the disk group definition includes a check box to
indicate whether or not the disk group is automatically mounted to all the clusterdatabase instances.
■ The default Disk Group Performance page displays instance-level performancedetails when you click a performance characteristic such as Write Response Time or I/O Throughput .
■ When you mount and dismount Oracle ASM disk groups, you can use a check boxto indicate which instances should mount or dismount a particular Oracle ASMDisk Group.
Administering Redo Logs in Oracle RAC Managing redo log files in Oracle RAC environments is similar to managing redo logfiles in single-instance Oracle Database environments. This section provides anoverview of some of the additional concepts and procedures for configuring redo logfiles in Oracle RAC environments.
About Redo Log Groups and Redo Threads in Oracle RAC Databases
Redo logs contain a record of changes that have been made to data files. In asingle-instance Oracle database, redo logs are stored in two or more redo log filegroups. Each of these groups contains a redo log file and possibly one or moremirrored copies of that file. In an Oracle RAC database, each instance requires its ownset of redo log groups, which is known as a redo thread . Mirrored copies of the redolog files provide your system with extra protection against data loss that is due tohardware failures or data corruption. If a redo log file is unreadable, then the OracleDatabase attempts to access its mirrored copy. The redo log file mirrors should belocated on different disk devices from the primary redo log files.
Each instance's redo thread must contain at least two redo log groups. Each redo loggroup should contain at least two members: a redo log and its mirrored copy. If youcreate your Oracle RAC database using DBCA, then your Oracle RAC databaseautomatically implements a configuration that meets the Oracle recommendations.
You should create redo log groups only if you are using administrator-manageddatabases. For policy-managed databases, if an instance starts up due to a change inserver pool cardinality, then Oracle Database automatically creates redo log files,enables a redo thread for the instance if there is not already a redo thread allocated tothat instance, and creates the undo tablespace if there is not already an undotablespace allocated to that instance. The database must be using Oracle ManagedFiles and Oracle ASM in this situation. See Oracle Real Application Clusters
Administration and Deployment Guide for more information.
See Also:
■ Oracle Database Storage Administrator's Guide ■ Oracle Database 2 Day DBA
See Also:
■ Oracle Database 2 Day DBA ■ Oracle Database Storage Administrator's Guide

8/8/2019 Oracle 11g RAC Guide
http://slidepdf.com/reader/full/oracle-11g-rac-guide 83/208
About Administering Storage in Oracle RAC
Administering Database Instances and Cluster Databases 4-15
In an Oracle RAC database, all the redo log files reside on shared storage. In addition,each instance must have access to the redo log files of all the other instances in thecluster. If your Oracle RAC database uses Oracle ASM, then Oracle ASM manages theshared storage for the redo log files and the access to those files.
About Accessing Redo Log Files for an Oracle RAC Database In an Oracle RAC database, each instance writes and archives the redo log groups inits redo thread in the same manner that single-instance Oracle databases do. However,in recovery mode, the instance performing the recovery is able to read and process allthe redo threads for the database, regardless of which instance generated the redothread. This enables a running instance to recover the work completed by one or morefailed instances.
In case of instance failure, a surviving instance can read the redo logs of the failedinstance. Users can continue to access and update the database without waiting for thefailed instance to be restarted. For example, assume that you have an Oracle RACdatabase with two instances, instance A and instance B. If instance A is down, theninstance B can read the redo log files for both instance A and B to ensure a successfulrecovery.
Using Enterprise Manager to View and Create Online Redo Log Files On the Redo Log Groups page, you can create additional redo log groups and addmembers to the redo log group. The Thread column identifies the instance, or redothread, to which a redo log file belongs.
To access the redo log file groups using Enterprise Manager:1. On the Cluster Database Home Page, select Server .
The Server page appears.
2. In the Storage section, select Redo Log Groups .
The Redo Log Groups page appears.
3. On this page you can perform the following tasks:■
View the status, number of members, thread, file size, status, and archivestatue of each redo log group■ Create or delete log groups■ Edit a redo log group to add or remove members■ Perform other redo log group management tasks, including clearing log files,
duplicating a log group, generating sizing advice, and forcing a log switch
Note: DBCA creates redo threads and undo tablespaces up to the
maximum instance parameter at the time of creation for betterperformance.
See Also:
■ Oracle Database 2 Day DBA ■ Oracle Database Storage Administrator's Guide

8/8/2019 Oracle 11g RAC Guide
http://slidepdf.com/reader/full/oracle-11g-rac-guide 84/208
About Administering Storage in Oracle RAC
4-16 Oracle Database 2 Day + Real Application Clusters Guide
See Also:
■ Oracle Real Application Clusters Administration and DeploymentGuide for additional information about redo threads in an OracleRAC environment
■ Oracle Database Storage Administrator's Guide ■ Oracle Database 2 Day DBA for more information about creating
online redo log files

8/8/2019 Oracle 11g RAC Guide
http://slidepdf.com/reader/full/oracle-11g-rac-guide 85/208
5
Administering Oracle Clusterware Components 5-1
5 Administering Oracle ClusterwareComponents
This chapter describes how to administer your Oracle Clusterware environment. Itdescribes how to administer the voting disks and the Oracle Cluster Registry (OCR) inthe following sections:■ About Oracle Clusterware■ Adding and Removing Voting Disks■ Backing Up and Recovering Voting Disks■ Backing Up and Recovering the Oracle Cluster Registry■ Changing the Oracle Cluster Registry Configuration■ Troubleshooting the Oracle Cluster Registry
About Oracle Clusterware Oracle Real Application Clusters (Oracle RAC) uses Oracle Clusterware as theinfrastructure that binds together multiple nodes that then operate as a single server.In an Oracle RAC environment, Oracle Clusterware monitors all Oracle components(such as instances and listeners). If a failure occurs, Oracle Clusterware automaticallyattempts to restart the failed component and also redirects operations to a survivingcomponent.
Oracle Clusterware includes a high availability framework for managing anyapplication that runs on your cluster. Oracle Clusterware manages applications toensure they start when the system starts. Oracle Clusterware also monitors theapplications to make sure that they are always available. For example, if an applicationprocess fails, then Oracle Clusterware attempts to restart the process based on scriptsthat you customize. If a node in the cluster fails, then you can program applicationprocesses that typically run on the failed node to restart on another node in the cluster.
Oracle Clusterware includes two important components: the voting disk and the OCR.The voting disk is a file that manages information about node membership. The OCRis a file that contains information about the cluster node list, instance-to-node mappinginformation, and information about Oracle Clusterware resource profiles for resourcesthat you have customized.
Each node in a cluster also has its own local OCR, called an Oracle Local Registry(OLR), that is created when Oracle Clusterware is installed. Multiple processes on eachnode have simultaneous read and write access to the OLR particular to the node onwhich they reside, whether or not Oracle Clusterware is fully functional. By default,OLR is located at Grid_home /cdata/ $HOSTNAME .olr

8/8/2019 Oracle 11g RAC Guide
http://slidepdf.com/reader/full/oracle-11g-rac-guide 86/208
Adding and Removing Voting Disks
5-2 Oracle Database 2 Day + Real Application Clusters Guide
The Oracle Clusterware installation process creates the voting disk and the OCR onshared storage. If you select the option for normal redundant copies during theinstallation process, then Oracle Clusterware automatically maintains redundantcopies of these files to prevent the files from becoming single points of failure. Thenormal redundancy feature also eliminates the need for third-party storageredundancy solutions. When you use normal redundancy, Oracle Clusterwareautomatically maintains two copies of the OCR file and three copies of the voting diskfile.
Adding and Removing Voting Disks You can dynamically add and remove voting disks after installing Oracle RAC. Do thisusing the following commands where path is the fully qualified path for theadditional voting disk.
To add or remove a voting disk:1. Run the following command as the root user to add a voting disk:
crsctl add css votedisk path
2. Run the following command as the root user to remove a voting disk:
crsctl delete css votedisk path
Backing Up and Recovering Voting Disks High availability configurations have redundant hardware and software that maintainoperations by avoiding single points of failure. When a component is down, OracleClusterware redirects its managed resources to one of the redundant components.However, if a disaster strikes, or a massive hardware failure occurs, having redundantcomponents might not be enough. To fully protect your system it is important to have backups of your critical files.
About Backing Up and Recovering Voting Disks The voting disk records node membership information. A node must be able to accessmore than half of the voting disks at any time. To avoid simultaneous loss of multiplevoting disks, each voting disk should be on a storage device that does not share anycomponents (controller, interconnect, and so on) with the storage devices used for theother voting disks.
For example, if you have five voting disks configured, then a node must be able toaccess at least three of the voting disks at any time. If a node cannot access theminimum required number of voting disks it is evicted, or removed, from the cluster.After the cause of the failure has been corrected and access to the voting disks has been restored, you can instruct Oracle Clusterware to recover the failed node andrestore it to the cluster.
Note: If your cluster is down, then you can use the -force option toadd a voting disk without interacting with active Oracle Clusterwaredaemons. However, you may corrupt your cluster configuration if youuse the -force option while a cluster node is active.

8/8/2019 Oracle 11g RAC Guide
http://slidepdf.com/reader/full/oracle-11g-rac-guide 87/208
Backing Up and Recovering the Oracle Cluster Registry
Administering Oracle Clusterware Components 5-3
If you lose all copies of the voting disk and do not have a backup, the only safe way tore-create the voting disk is to reinstall Oracle Clusterware. Having a backup of thevoting disk can drastically simplify the recovery of your system.
Backing Up Voting Disks The voting disk files are backed up automatically by Oracle Clusterware if the contentsof the files have changed in the following ways:■ Configuration parameters, for example misscount , have been added or modified■ After performing voting disk add or delete operations
Recovering Voting Disks If a voting disk is damaged, and no longer usable by Oracle Clusterware, you canrecreate the voting disk. The voting disk contents are restored from a backup when anew voting file is added; this occurs regardless of whether or not the voting disk file isstored in Oracle Automatic Storage Management (Oracle ASM). If you need to replacea corrupt, damaged, or missing voting disk, then use CRSCTL to first delete the votingdisk and then create a new voting disk in the same location.
Restoring a voting disk from a copy created with the operating system dd command isnot supported.
Backing Up and Recovering the Oracle Cluster Registry Oracle Clusterware automatically creates OCR backups every 4 hours. At any onetime, Oracle Clusterware always retains the latest 3 backup copies of the OCR that are4 hours old, 1 day old, and 1 week old.
You cannot customize the backup frequencies or the number of files that OracleClusterware retains. You can use any backup software to copy the automaticallygenerated backup files at least once daily to a different device from where the primary
OCR file resides.This section contains the following topics:■ Viewing Available OCR Backups■ Manually Backing Up the OCR■ Recovering the OCR■ Maintaining the Oracle Local Registry
Viewing Available OCR Backups Use the ocrconfig utility to view the backups generated automatically by Oracle
Clusterware.To find the most recent backup of the OCR:Run the following command on any node in the cluster:
ocrconfig -showbackup

8/8/2019 Oracle 11g RAC Guide
http://slidepdf.com/reader/full/oracle-11g-rac-guide 88/208
Backing Up and Recovering the Oracle Cluster Registry
5-4 Oracle Database 2 Day + Real Application Clusters Guide
Manually Backing Up the OCR Use the ocrconfig utility to force Oracle Clusterware to perform a backup of OCR atany time, rather than wait for the automatic backup that occurs at 4-hour intervals.This option is especially useful when you want to obtain a binary backup on demand,such as before you make changes to OCR.
To manually backup the contents of the OCR:1. Log in as the root user.
2. Use the following command to force Oracle Clusterware to perform an immediate backup of the OCR:
ocrconfig -manualbackup
The date and identifier of the recently generated OCR backup is displayed.
3. (Optional) If you need to change the location for the OCR backup files, use thefollowing command, where directory_name is the new location for the backups:
ocrconfig -backuploc directory_name
The default location for generating backups on Oracle Enterprise Linux systems isGrid_home /cdata/ cluster_name where cluster_name is the name of yourcluster and Grid_homeis the home directory of your Oracle grid infrastructuresoftware. Because the default backup is on a local file system, Oracle recommends thatyou include the backup file created with the ocrconfig command as part of youroperating system backup using standard operating system or third-party tools.
Recovering the OCR
There are two methods for recovering the OCR. The first method uses automaticallygenerated OCR file copies and the second method uses manually created OCR exportfiles.
This section contains the following topics:■ Checking the Status of the OCR■ Restoring the OCR from Automatically Generated OCR Backups
Checking the Status of the OCR In event of a failure, before you attempt to restore the OCR, ensure that the OCR isunavailable.
To check the status of the OCR:1. Run the following command:
ocrcheck
2. If this command does not display the message 'Device/File integritycheck succeeded' for at least one copy of the OCR, then all copies of the OCRhave failed. You must restore the OCR from a backup or OCR export.
3. If there is at least one copy of the OCR available, you can use that copy to restorethe other copies of the OCR.
Tip: You can use the ocrconfig -backuploc command to movethe location where the OCR backups are created

8/8/2019 Oracle 11g RAC Guide
http://slidepdf.com/reader/full/oracle-11g-rac-guide 89/208
Backing Up and Recovering the Oracle Cluster Registry
Administering Oracle Clusterware Components 5-5
Restoring the OCR from Automatically Generated OCR Backups When restoring the OCR from automatically generated backups, you first have todetermine which backup file you will use for the recovery.
To restore the OCR from an automatically generated backup on an OracleEnterprise Linux system:1. Log in as the root user.
2. Identify the available OCR backups using the ocrconfig command:
[root]# ocrconfig -showbackup3. Review the contents of the backup using the following ocrdump command, where
file_name is the name of the OCR backup file for which the contents should be
written out to the file ocr_dump_output_file:[root]# ocrdump ocr_dump_output_file -backupfile file_name
If you do not specify an output file name, then the OCR contents are written to afile named OCRDUMPFILEin the current directory.
4. As the root user, stop Oracle Clusterware on all the nodes in your Oracle RACcluster by executing the following command:
[root]# crsctl stop cluster -all
5. As the root user, restore the OCR by applying an OCR backup file that youidentified in Step 1 using the following command, where file_name is the nameof the OCR that you want to restore. Make sure that the OCR devices that youspecify in the OCR configuration exist, and that these OCR devices are valid before running this command.
[root]# ocrconfig -restore file_name
6. As the root user, restart Oracle Clusterware on all the nodes in your cluster byrunning the following command:
[root]# crsctl start cluster -all
7. Use the Cluster Verification Utility (CVU) to verify the OCR integrity. Exit theroot user account, and as the software owner of the Oracle grid infrastructure runthe following command, where the -n all argument retrieves a list of all thecluster nodes that are configured as part of your cluster:
cluvfy comp ocr -n all [-verbose]
Maintaining the Oracle Local Registry You maintain the Oracle Local Registry using the OCRCHECK, OCRDUMP, andOCRCONFIG utilities with the -local option.
See Also:
■ "About the OCRCHECK Utility"■ "Repairing an OCR Configuration on a Local Node"■ "Replacing an OCR"
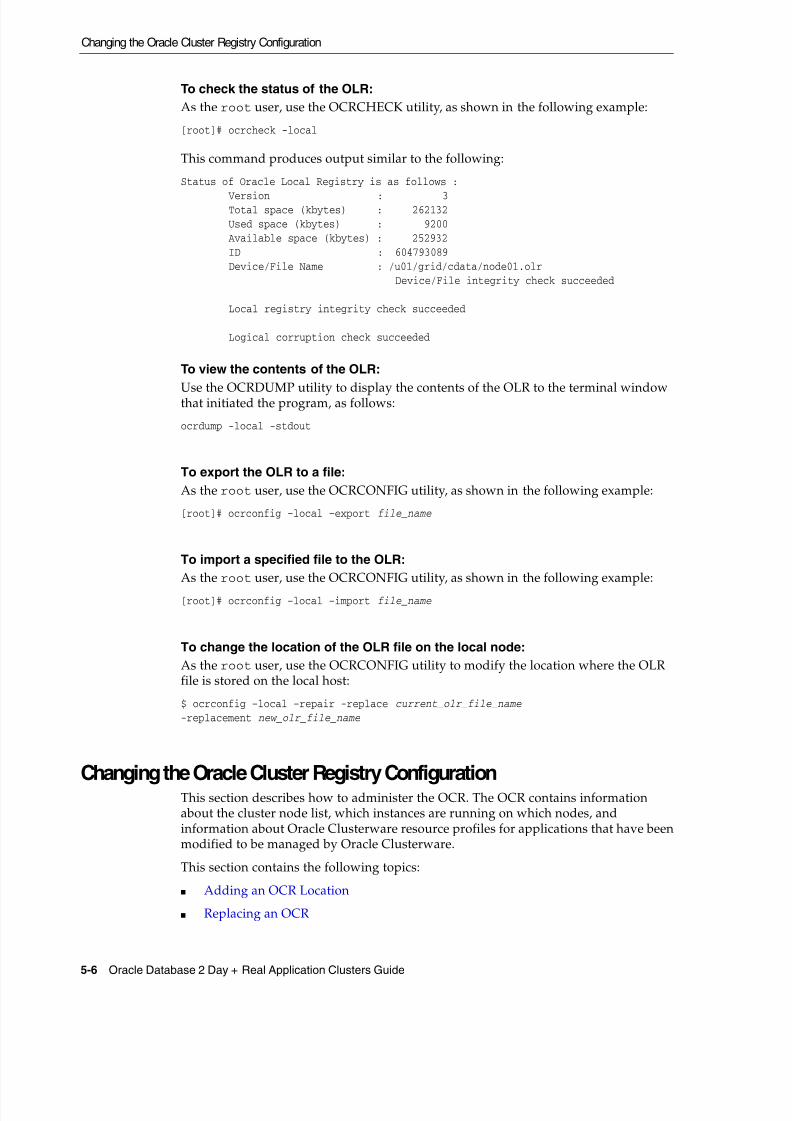
8/8/2019 Oracle 11g RAC Guide
http://slidepdf.com/reader/full/oracle-11g-rac-guide 90/208
Changing the Oracle Cluster Registry Configuration
5-6 Oracle Database 2 Day + Real Application Clusters Guide
To check the status of the OLR:As the root user, use the OCRCHECK utility, as shown in the following example:
[root]# ocrcheck -local
This command produces output similar to the following:
Status of Oracle Local Registry is as follows :
Version : 3Total space (kbytes) : 262132Used space (kbytes) : 9200Available space (kbytes) : 252932ID : 604793089Device/File Name : /u01/grid/cdata/node01.olr
Device/File integrity check succeeded
Local registry integrity check succeeded
Logical corruption check succeeded
To view the contents of the OLR:
Use the OCRDUMP utility to display the contents of the OLR to the terminal windowthat initiated the program, as follows:
ocrdump -local -stdout
To export the OLR to a file:As the root user, use the OCRCONFIG utility, as shown in the following example:
[root]# ocrconfig –local –export file_name
To import a specified file to the OLR:As the root user, use the OCRCONFIG utility, as shown in the following example:
[root]# ocrconfig –local –import file_name
To change the location of the OLR file on the local node:As the root user, use the OCRCONFIG utility to modify the location where the OLRfile is stored on the local host:
$ ocrconfig –local –repair -replace current_olr_file_name-replacement new_olr_file_name
Changing the Oracle Cluster Registry Configuration This section describes how to administer the OCR. The OCR contains informationabout the cluster node list, which instances are running on which nodes, andinformation about Oracle Clusterware resource profiles for applications that have beenmodified to be managed by Oracle Clusterware.
This section contains the following topics:■ Adding an OCR Location■ Replacing an OCR

8/8/2019 Oracle 11g RAC Guide
http://slidepdf.com/reader/full/oracle-11g-rac-guide 91/208
Changing the Oracle Cluster Registry Configuration
Administering Oracle Clusterware Components 5-7
■ Removing an OCR■ Repairing an OCR Configuration on a Local Node
Adding an OCR Location Oracle Clusterware supports up to 5 OCR copies. You can add an OCR location afteran upgrade or after completing the Oracle RAC installation. Additional OCR copiesprovide greater fault tolerance.
To add an OCR file:As the root user, enter the following command to add a new OCR file:
[root]# ocrconfig -add new_ocr_file_name
This command updates the OCR configuration on all the nodes on which OracleClusterware is running.
Replacing an OCR If you need to change the location of an existing OCR, or change the location of afailed OCR to the location of a working one, you can use the following procedure aslong as one OCR file remains online.
To change the location of an OCR or replace an OCR file:1. Use the OCRCHECK utility to verify that a copy of the OCR other than the one
you are going to replace is online, using the following command:ocrcheck
2. Use the following command to verify that Oracle Clusterware is running on thenode on which the you are going to perform the replace operation:
crsctl check cluster -all
3. As the root user, enter the following command to designate a new location forthe specified OCR file:[root]# ocrconfig -replace source_ocr_file -replacement destination_ocr_file
This command updates the OCR configuration on all the nodes on which OracleClusterware is running.
4. Use the OCRCHECK utility to verify that OCR replacement file is online:
ocrcheck
Note: The operations in this section affect the OCR for the entirecluster. However, the ocrconfig command cannot modify OCRconfiguration information for nodes that are shut down or for nodeson which Oracle Clusterware is not running. Avoid shutting downnodes while modifying the OCR using the ocrconfig command.
Note: The OCR that you are replacing can be either online or offline.
8/8/2019 Oracle 11g RAC Guide
http://slidepdf.com/reader/full/oracle-11g-rac-guide 92/208
Changing the Oracle Cluster Registry Configuration
5-8 Oracle Database 2 Day + Real Application Clusters Guide
Removing an OCR To remove an OCR file, at least one copy of the OCR must be online. You can removean OCR location to reduce OCR-related overhead or to stop mirroring your OCR because you moved the OCR to a redundant storage system, such as a redundantarray of independent disks (RAID).
To remove an OCR location from your Oracle RAC cluster:1. Use the OCRCHECK utility to ensure that at least one OCR other than the OCR
that you are removing is online.
ocrcheck
2. As the root user, run the following command on any node in the cluster toremove a specific OCR file:
[root]# ocrconfig -delete ocr_file_name
This command updates the OCR configuration on all the nodes on which OracleClusterware is running.
Repairing an OCR Configuration on a Local Node If one of the nodes in your cluster was not available when you modified the OCRconfiguration, then you might need to repair the OCR configuration on that node before it is restarted.
To repair an OCR configuration:
1. As the root user, run the one or more of the following commands on the node onwhich Oracle Clusterware is stopped, depending on the number and type ofchanges that were made to the OCR configuration:
[root]# ocrconfig –repair -add new_ocr_file_name
[root]# ocrconfig –repair -delete ocr_file_name
[root]# ocrconfig –repair -replace source_ocr_file -replacement dest_ocr_file
These commands update the OCR configuration only on the node from which yourun the command.
2. Restart Oracle Clusterware on the node you have just repaired.
3. As the root user, check the OCR configuration integrity of your cluster using thefollowing command:
[root]# ocrcheck
Note: Do not perform this OCR removal procedure unless there is atleast one active OCR online.
Note: You cannot perform these operations on a node on which theOracle Clusterware daemon is running.

8/8/2019 Oracle 11g RAC Guide
http://slidepdf.com/reader/full/oracle-11g-rac-guide 93/208
Troubleshooting the Oracle Cluster Registry
Administering Oracle Clusterware Components 5-9
Troubleshooting the Oracle Cluster Registry This section includes the following topics about troubleshooting the Oracle ClusterRegistry (OCR):■ About the OCRCHECK Utility■ Common Oracle Cluster Registry Problems and Solutions
About the OCRCHECK Utility The OCRCHECK utility displays the data block format version used by the OCR, theavailable space and used space in the OCR, the ID used for the OCR, and the locationsyou have configured for the OCR. The OCRCHECK utility calculates a checksum forall the data blocks in all the OCRs that you have configured to verify the integrity ofeach block. It also returns an individual status for each OCR file as well as a result forthe overall OCR integrity check. The following is a sample of the OCRCHECK output:
Status of Oracle Cluster Registry is as follows :Version : 3Total space (kbytes) : 262144Used space (kbytes) : 16256Available space (kbytes) : 245888ID : 570929253Device/File Name : +CRS_DATA
Device/File integrity check succeeded...
Decive/File not configured
Cluster registry integrity check succeeded
Logical corruption check succeeded
The OCRCHECK utility creates a log file in the following directory, where Grid_home is the location of the Oracle grid infrastructure installation, and hostname is the name
of the local node:Grid_home /log/ hostname /client
The log files have names of the form ocrcheck_ nnnnn .log , where nnnnn is theprocess ID of the operating session that issued the ocrcheck command.
Common Oracle Cluster Registry Problems and Solutions Table 5–1 describes common OCR problems and their corresponding solutions.
Table 5–1 Common OCR Problems and Solutions
Problem Solution
The OCR is not mirrored. Run the ocrconfig command with the -add option asdescribed in the section "Adding an OCR Location" on page 5-7 .
A copy of the OCR hasfailed and you must replaceit. Error messages are beingreported in EnterpriseManager or the OCR logfile.
Run the ocrconfig command with the -replace option asdescribed in the section "Replacing an OCR" on page 5-7 .

8/8/2019 Oracle 11g RAC Guide
http://slidepdf.com/reader/full/oracle-11g-rac-guide 94/208
Troubleshooting the Oracle Cluster Registry
5-10 Oracle Database 2 Day + Real Application Clusters Guide
The OCR configuration wasupdated incorrectly.
Run the ocrconfig command with the -repair option asdescribed in the section "Repairing an OCR Configuration on aLocal Node" on page 5-8 .
You are experiencing a
severe performance effectfrom updating multipleOCR files, or you want toremove an OCR file forother reasons.
Run the ocrconfig command with the -delete option as
described in the section "Removing an OCR" on page 5-8 .
See Also:
■ "About Verifying the Oracle Clusterware Installation"■ "Replacing an OCR"■ "Adding an OCR Location"■ "Repairing an OCR Configuration on a Local Node"
Table 5–1 (Cont.) Common OCR Problems and Solutions
Problem Solution
8/8/2019 Oracle 11g RAC Guide
http://slidepdf.com/reader/full/oracle-11g-rac-guide 95/208
6
Administering Backup and Recovery 6-1
6Administering Backup and Recovery
This chapter describes how to back up and recover an Oracle Real ApplicationClusters (Oracle RAC) database.
This chapter contains the following sections:■ Overview of Oracle RAC Database Backup and Recovery■ About the Fast Recovery Area in Oracle RAC■ Archiving the Oracle Real Application Clusters Database Redo Logs■ About Preparing for Backup and Recovery Operations■ Performing Backups of Your Oracle Real Application Clusters Database■ About Preparing to Restore and Recover Your Oracle RAC Database■ Recovering Your Oracle Real Application Clusters Database■ About Managing Your Database Backup Files■ Displaying Backup Reports for Your Oracle Real Application Clusters Database
Overview of Oracle RAC Database Backup and Recovery To protect your Oracle Real Application Clusters (Oracle RAC) database fromhardware failures or disasters, you need to have a physical copy of the database files.The files protected by the backup and recovery facilities built into Oracle EnterpriseManager include data files, control files, server parameter files (SPFILEs), andarchived redo log files. Using these files, your database can be reconstructed. The backup mechanisms that work at the physical level protect against damage at the filelevel, such as the accidental deletion of a data file or the failure of a disk drive.Database recovery involves restoring, or copying, the damaged files from backup andperforming media recovery on the restored files. Media recovery is the application ofredo logs or incremental backups to a restored data file in order to update it to thecurrent time or some other specified time.
The Oracle Database flashback features, such as Oracle Flashback Drop and OracleFlashback Table, provide a range of physical and logical data recovery tools asefficient, easy-to-use alternatives to physical and logical backup operations. The
See Also:
■ Oracle Database 2 Day DBA■ Oracle Database Backup and Recovery User's Guide for more
information about using the Recovery Manager utility

8/8/2019 Oracle 11g RAC Guide
http://slidepdf.com/reader/full/oracle-11g-rac-guide 96/208
About the Fast Recovery Area in Oracle RAC
6-2 Oracle Database 2 Day + Real Application Clusters Guide
flashback features enable you to reverse the effects of unwanted database changeswithout restoring data files from backup or performing media recovery.
The Enterprise Manager physical backup and recovery features are built on theRecovery Manager (RMAN) command-line client. Enterprise Manager makes availablemany of the RMAN features, and provides wizards and automatic strategies tosimplify and further automate RMAN-based backup and recovery.
The Enterprise Manager Guided Recovery capability provides a Recovery Wizard thatencapsulates the logic required for a wide range of file restoration and recoveryscenarios, including the following:■ Complete restoration and recovery of the database■ Point-in-time recovery of the database or selected tablespaces■
Flashback Database■ Other flashback features of Oracle Database for logical-level repair of unwanted
changes to database objects■ Media recovery at the block level for data files with corrupt blocks
If the database files are damaged or need recovery, Enterprise Manager can determinewhich parts of the database must be restored from a backup and recovered, includingearly detection of situations such as corrupted database files. Enterprise Managerguides you through the recovery process, prompting for needed information andperforming the required recovery actions.
About the Fast Recovery Area in Oracle RAC Using a fast recovery area minimizes the need to manually manage disk space for your backup-related files and balance the use of space among the different types of files.Oracle recommends that you enable a fast recovery area to simplify your backup
management.The larger the fast recovery area is, the more useful it becomes. Ideally, the fastrecovery area should be large enough to contain all the following files:■ A copy of all data files■ Incremental backups■ Online redo logs■ Archived redo log files that have not yet been backed up
Note: For the RMAN utility to work properly on Linux platforms,the $ORACLE_HOME/bin directory must appear in the PATH variable before the /usr/X11R6/bin directory.
See Also:
■
"Performing Backups of Your Oracle Real Application ClustersDatabase"■ "Recovering Your Oracle Real Application Clusters Database"■ "About Managing Your Database Backup Files"■ Oracle Database 2 Day DBA

8/8/2019 Oracle 11g RAC Guide
http://slidepdf.com/reader/full/oracle-11g-rac-guide 97/208
Archiving the Oracle Real Application Clusters Database Redo Logs
Administering Backup and Recovery 6-3
■ Control files and control file copies■ Autobackups of the control file and database initialization parameter file
The preferred configuration for Oracle RAC is to use Oracle Automatic StorageManagement (Oracle ASM) for a recovery area using a different disk group for yourrecovery set than for your data files. Alternatively, you can use a cluster file systemarchiving scheme.
The location and disk quota must be the same on all instances. To accomplish this,Oracle recommends that you place the fast recovery area on the shared Oracle ASMdisks. In addition, you must set the DB_RECOVERY_FILE_DESTand DB_RECOVERY_FILE_DEST_SIZE parameters to the same values on all instances.
To use the fast recovery feature, you must first configure the fast recovery area for eachinstance in your Oracle RAC cluster.
Archiving the Oracle Real Application Clusters Database Redo Logs To make your data highly available, it is important to configure the database so youcan recover your data in the event of a system failure. Redo logs contain a record of
changes that were made to datafiles. Redo logs are stored in redo log groups, and youmust have at least two redo log groups for your database.
After the redo log files in a group have filled up, the log writer process (LGWR)switches the writing of redo records to a new redo log group. Oracle Database canautomatically save the inactive group of redo log files to one or more offlinedestinations, known collectively as the archived redo log (also called the archive log).The process of turning redo log files into archived redo log files is called archiving .
When you archive your redo log, you write redo log files to another location prior totheir being overwritten. This location is called the archived redo log. These copies ofredo log files extend the amount of redo data that can be saved and used for recovery.Archiving can be either enabled or disabled for the database, but Oracle recommendsthat you enable archiving.
About Archived Redo Log Files for an Oracle RAC Database When you use Oracle Database Configuration Assistant (DBCA) to create your OracleReal Application Clusters (Oracle RAC) database, each instance is configured with atleast two redo log files that are stored in the shared storage area. If you have atwo-node Oracle RAC database, then at least 4 redo logs are created for the database,two for each instance.
If you use a cluster file system to store the archived redo log files for your Oracle RACdatabase, then the redo log files are shared file system files. If you use Oracle ASM tostore the archived redo log files for your Oracle RAC database, then each instanceautomatically has access to all the archived redo log files generated by the database. If
you use shared storage or raw devices to store the archived redo log files on eachnode, then you must configure the operating system to grant access to thosedirectories for each instance of the cluster database that needs access to them.
The primary consideration when configuring archiving is to ensure that all archivedredo logs can be read from every node during recovery, and if possible during backups. During recovery, as long as the archived log destinations are visible from thenode that performs the recovery, Oracle RAC can successfully recover the archivedredo log data. For creating backups of your Oracle RAC database, the strategy that youchoose depends on how you configure the archiving destinations for each node.

8/8/2019 Oracle 11g RAC Guide
http://slidepdf.com/reader/full/oracle-11g-rac-guide 98/208
Archiving the Oracle Real Application Clusters Database Redo Logs
6-4 Oracle Database 2 Day + Real Application Clusters Guide
Whether only one node or all nodes perform archived redo log backups, you need toensure that the archived redo logs for every instance are backed up.
To backup the archived redo logs from a single node, that node needs to have access tothe archived log files of the other instances. The archived redo log naming scheme thatyou use is important because when a node writes to a log with a specific filename onits file system, the file must be readable by any node that needs to access this archived
redo log. For example, if node1 archives a log to /oracle/arc_dest/log_1_100_23452345.arc , then node2 can back up this archived redo log only if it canread /oracle/arc_dest/log_1_100_23452345.arc on its own file system.
About Parallelism and Backups Across Multiple RMAN Channels Recovery Manager (RMAN) depends on server sessions, processes that run on thedatabase server, to perform backup and recovery tasks. Each server session in turncorresponds to an RMAN channel, representing one stream of data to or from a backup device. RMAN supports parallelism, which is the use of multiple channels andserver sessions to carry out the work of a single backup job or file restoration task.
Because the control file, SPFILE, and data files are accessible by any instance, the backup operation of these files is distributed across all the allocated channels. For backups of the archived redo log, the actions performed by RMAN depend on the typeof archiving scheme used by your Oracle RAC database.
If you use a local archiving scheme, then each instance writes the archived redo logfiles to a local directory. When multiple channels are allocated that have access to thearchived redo log, for each archived redo log file, RMAN determines which channelshave access to that archived redo log file. Then, RMAN groups together the archivedredo log files that can be accessed by a channel and schedules a backup job using that
channel.If each node in the cluster writes the archived redo log files to Oracle ASM, a clusteredfile system, or other type of shared storage, then each instance has access to all thearchived redo log files. In this case, the backup of the archived redo log is distributedacross all the allocated channels.
Configuring Archiving for Your Oracle RAC Database For Oracle RAC, each instance has its own thread of redo. The preferred configurationfor Oracle RAC is to configure the fast recovery area using an Oracle ASM disk groupthat is separate from the Oracle ASM disk group used for your data files. Alternatively,you can use a cluster file system archiving scheme.
See Also:
■ Oracle Database 2 Day DBA■ Oracle Database Storage Administrator's Guide
See Also:
■ "About Archived Redo Log Files for an Oracle RAC Database"■ "Performing Backups of Your Oracle Real Application Clusters
Database"■ Oracle Database 2 Day DBA for more information about RMAN
backups■ Oracle Database 2 Day DBA for more information about
configuring backup device settings

8/8/2019 Oracle 11g RAC Guide
http://slidepdf.com/reader/full/oracle-11g-rac-guide 99/208
Archiving the Oracle Real Application Clusters Database Redo Logs
Administering Backup and Recovery 6-5
To configure archiving for your Oracle RAC database:1. On the Database Home page of Enterprise Manager Database Control, while
logged in as a SYSDBA user, select Availability .
The Availability subpage appears.
2. In the Backup/Recovery section, under the heading Setup, select RecoverySettings .
The Recovery Settings page appears.
3. In the Media Recovery section, select the ARCHIVELOG mode option.
4. In the Log Archive Filename Format field, accept the default value, or enter thedesired format.
For clustered databases, the format for the archive log file name should contain the%t modifier, to indicate which redo log thread the archived redo log file belongsto. As a best practice, the format for the archive log file name should also includethe %s (log sequence number) and %r (resetlogs identifier) modifiers.
5. If the archive log destination is the same for all instances, then in the Archive LogDestination field, change the value to the location of the archive log destinationfor the cluster database.For example, you might set it to +DATAif using Oracle ASM, or to/u01/oradata/arch if you want local archiving on each node.
If you need to configure a different archive log destination for any instance, youmust go to the Initialization Parameters page and modify the LOG_ARCHIVE_DEST_1 parameter that corresponds to the instance for which you want toconfigure the archive log destination. The Instance column should display thename of the instance, for example sales1 . Change the Value field to contain thelocation of the archive log destination for that instance.
6. If you want to configure more than one archive log destination for the database, onthe Recovery Settings page, click Add Another Row under the Archive Log
Destination field.7. After you have finished configuring archiving, click Apply .
When prompted to restart the database, click Yes.
8. Enter the host and SYSDBA user credentials, then click Continue .
9. Wait a couple of minutes, then click Refresh .
If the database has been restarted, you are prompted to enter the login credentials.
See Also:
■ "About Archived Redo Log Files for an Oracle RAC Database"■ "About Configuring Initialization Parameters for an Oracle RAC
Database"■ "Editing Initialization Parameter Settings for an Oracle RAC
Database"■ Oracle Database 2 Day DBA■ Oracle Real Application Clusters Administration and Deployment
Guide for more information about configuring and managingarchived redo log files for an Oracle RAC database

8/8/2019 Oracle 11g RAC Guide
http://slidepdf.com/reader/full/oracle-11g-rac-guide 100/208
About Preparing for Backup and Recovery Operations
6-6 Oracle Database 2 Day + Real Application Clusters Guide
About Preparing for Backup and Recovery Operations Prior to taking backups of your Oracle Real Application Clusters (Oracle RAC)database using Enterprise Manager, you must configure access for the user performingthe backups, or credentials . You can also configure the default values for certain backup settings, so they do not need to be specified every time a backup is taken.
About Credentials for Performing Backup and Recovery When using Enterprise Manager, you must have the proper credentials to performsome of the configuration tasks for backup and recovery, to schedule backup jobs, andto perform recovery. The following credentials may be required:■ The Oracle database administrator user you use when you log in to Enterprise
Manager■ The host operating system user whose credentials you provide when performing
backup and recovery tasks
To perform or schedule RMAN tasks, you must either log in to Enterprise Manager asa user with SYSDBAprivileges, or provide host operating system credentials for a user
who is a member of the dba group. The host operating system user must also haveexecute permission for the RMAN command-line client.
For tasks requiring host operating system credentials, a Host Credentials form appearsat the bottom of the page used to perform the task. Enterprise Manager uses thecredentials when it invokes RMAN to perform jobs you requested or scheduled.
The Host Credentials form always includes an option labeled Save as PreferredCredential. If you select this option before performing your action, then the providedcredentials are stored persistently for the currently logged-in Oracle database user. Thepreferred credentials are reused by default whenever you log in as that user andperform operations requiring host credentials.
About Configuring Backup Settings Assuming you have a fast recovery area configured, you can configure a number ofsettings and policies that determine how backups are stored, which data is backed up,and how long backups are retained before being purged from the fast recovery area.You can also configure settings to optimize backup performance for your environment.
See Also:
■ "About Operating System Users and Groups"■ "About Configuring User Accounts"■ Oracle Database 2 Day DBA
See Also:
■ "Configuring Archiving for Your Oracle RAC Database"■ "Overview of Oracle RAC Database Backup and Recovery"■ Oracle Database 2 Day DBA for more information about
configuring backup policy settings■ Oracle Database 2 Day DBA for more information about
configuring backup settings

8/8/2019 Oracle 11g RAC Guide
http://slidepdf.com/reader/full/oracle-11g-rac-guide 101/208
Performing Backups of Your Oracle Real Application Clusters Database
Administering Backup and Recovery 6-7
Performing Backups of Your Oracle Real Application Clusters Database When you use Oracle ASM to manage database files, Oracle recommends that you useRMAN for creating backups. You must have both database ( SYSDBA) privileges andhost operating system ( OSDBA) credentials to perform backup and recoveryoperations.
If you log in to Enterprise Manager with SYSDBAprivileges, any operating systemuser who has execute permission for the RMAN command-line client can perform backups of an Oracle Real Application Clusters (Oracle RAC) database. However, ifyou log in as a database user without SYSDBAprivileges, then you must provide thename and password of an operating system user that is a member of the OSDBAgroup before you can perform the backup operation.
To back up an Oracle RAC database:1. On the Cluster Database Home page, select Availability .
The Cluster Database Availability page appears.
2. In the Backup/Recovery section, under the heading Manage, select ScheduleBackup .
3. Follow the backup procedures outlined in Chapter 9, "Performing Backup andRecovery" of Oracle Database 2 Day DBA or click Help on this page.vvv
Backing Up Archived Redo Log Files Whether only one node or all nodes perform archive log backups, ensure that allarchived redo log files for all nodes are backed up. If you use a local archiving scheme,then allocate multiple channels to provide RMAN access to all the archived redo logfiles.
You can configure RMAN to automatically delete the archived redo log files from diskafter they have been safely backed up. This feature helps to reduce the disk space used by your Oracle RAC database, and prevent an unnecessary outage that might occur ifyou run out of available disk space.
To configure RMAN to automatically delete the archived redo log file files fromdisk after they have been safely backed up, when creating or scheduling yourdatabase backups:1. On the Cluster Database Home page, select Availability .
The Cluster Database Availability page appears.
2. In the Backup/Recovery section, under the heading Manage, select ScheduleBackup .
3. Choose a backup type and click Schedule Customized Backup .
See Also:
■ "About Operating System Users and Groups"■ "About Credentials for Performing Backup and Recovery"■ Oracle Database 2 Day DBA for more information about
configuring your database for backup and recovery■ Oracle Database 2 Day DBA for more information about performing
and scheduling backups using Enterprise Manager Database
Control

8/8/2019 Oracle 11g RAC Guide
http://slidepdf.com/reader/full/oracle-11g-rac-guide 102/208
Recovering Your Oracle Real Application Clusters Database
6-8 Oracle Database 2 Day + Real Application Clusters Guide
4. While specifying the options for your backup, select Also back up all archivedlogs on disk if you are performing an online backup. There is no need to back uparchived redo log files when performing an offline backup because the database isin a consistent state at the time of backup and does not require media recovery ifyou restore.
5. Select Delete all archived logs from disk after they are successfully backed up if
you are using shared storage for your archived redo log files.
Recovering Your Oracle Real Application Clusters Database The Enterprise Manager Guided Recovery capability provides a Recovery Wizard thatencapsulates the logic required for a wide range of restore and recovery scenarios.Enterprise Manager can determine which parts of the database must be restored andrecovered, including early detection of situations such as corrupted database files.Enterprise Managers takes you through the recovery process, prompting forinformation and performing required file restoration and recovery actions.
This section discusses both instance recovery and media recovery. It contains thefollowing topics:■ About Preparing to Restore and Recover Your Oracle RAC Database■ About Restoring Archived Redo Log File Files■ About Performing Recovery Using Parallelism■ Recovering the Oracle RAC Database Using Enterprise Manager■ Recovering the Parameter File from an Automatic File Backup
About Preparing to Restore and Recover Your Oracle RAC Database The node that performs the recovery of an Oracle Real Application Clusters (OracleRAC) database must be able to restore all the required data files. That node must also be able to either read all the required archived redo log files on disk or be able torestore the archived redo log files from backup files.
This section discusses two tasks you must perform prior to recovering your database:■ About Configuring Access to the Archive Log■ About Putting the Oracle RAC Database Instances into the Correct State
Note: Do not select Delete all archived logs from disk after they aresuccessfully backed up if you are using a fast recovery area as youronly archive log destination. In this case, archived redo log files thathave been backed up are deleted automatically as space is needed forstorage of other files.
See Also:
■ "Performing Backups of Your Oracle Real Application ClustersDatabase"
■ "About Archived Redo Log Files for an Oracle RAC Database"■ Oracle Database 2 Day DBA

8/8/2019 Oracle 11g RAC Guide
http://slidepdf.com/reader/full/oracle-11g-rac-guide 103/208
Recovering Your Oracle Real Application Clusters Database
Administering Backup and Recovery 6-9
About Configuring Access to the Archive Log During recovery, as long as the archive log file destinations are visible from the nodethat performs the recovery, Oracle RAC can successfully access the archived redo logfiles during recovery.
If you do not use shared storage or a clustered file system to store the archived redolog files for your cluster database, then you need to make the archived redo log files
available to the node performing the recovery.
About Putting the Oracle RAC Database Instances into the Correct State Recovery of a failed instance in Oracle RAC is automatic. If an Oracle RAC databaseinstance fails, then a surviving database instance processes the online redo logsgenerated by the failed instance to ensure that the database contents are in a consistentstate. When recovery completes, Oracle Clusterware attempts to restart the failedinstance automatically.
Media recovery is a manual process that occurs while a database is closed. A mediafailure is the failure of a read or write operation of a disk file required to run thedatabase, due to a physical problem with the disk such as a head malfunction. Anydatabase file can be vulnerable to a media failure. If a media failure occurs, then youmust perform media recovery to restore and recover the damaged database files.Media recovery is always done by one instance in the cluster.
Before starting media recovery, the instance that will be performing the recoveryshould be started in MOUNTmode. The other instances should be started in NOMOUNT mode.
About Restoring Archived Redo Log File Files During a restore operation, RMAN automatically locates the most recent backups ofthe database that are available. A channel connected to a specific node attempts torestore files that were backed up only to that node. For example, assume that anarchived redo log file with the sequence number 1001 is backed up to a deviceattached to the node racnode1 , while the archived redo log file with sequencenumber 1002 is backed up to a device attached to the node racnode2 . If you allocatechannels that connect to nodes racnode1 and racnode2 for a restore operation, thenthe channel connected to racnode1 restores log sequence 1001, but not log sequence1002. The channel connected to racnode2 can restore log sequence 1002, but not logsequence 1001.
If you use Oracle ASM or a clustered file system for storing the archived redo log files,then any instance can restore the archived redo log files.
See Also:
■ "Starting and Stopping Oracle RAC Databases and DatabaseInstances"
■ "About Preparing to Restore and Recover Your Oracle RACDatabase"
■ Oracle Database 2 Day DBA

8/8/2019 Oracle 11g RAC Guide
http://slidepdf.com/reader/full/oracle-11g-rac-guide 104/208
Recovering Your Oracle Real Application Clusters Database
6-10 Oracle Database 2 Day + Real Application Clusters Guide
About Performing Recovery Using Parallelism Oracle RAC automatically selects the optimum degree of parallelism for instancefailure and media recovery.
When using Enterprise Manager and RMAN to perform the recovery, Oracle RACautomatically makes parallel the following three stages of recovery:■ Restoring Data files—When restoring data files, the number of channels you
allocate in the RMAN recovery script effectively sets the parallelism that RMANuses. For example, if you allocate five channels, you can have up to five parallelstreams restoring data files.
■ Applying Incremental Backups—Similarly, when you are applying incremental backups, the number of channels you allocate determines the potentialparallelism.
■ Applying Archived Redo Log Files—Using RMAN, the application of archivedredo log files is performed in parallel. Oracle RAC automatically selects theoptimum degree of parallelism based on available CPU resources.
Recovering the Oracle RAC Database Using Enterprise Manager When using Enterprise Manager and RMAN, the process of recovering and restoringan Oracle RAC database is essentially the same as for a single-instance Oracledatabases, except that you access RMAN from the Availability page at the clusterdatabase level, instead of at the instance level.
To use Enterprise Manager and RMAN to restore and recover an Oracle RACdatabase:1. On the Cluster Database Home Page, select Availability .
The Cluster Database Availability page appears.
2. In the Backup/Recovery section, under the heading Manage, select PerformRecovery .
The Perform Recovery page appears.
3. Follow the recovery procedures outlined in Chapter 9 of Oracle Database 2 DayDBA
See Also:
■ "About Archived Redo Log Files for an Oracle RAC Database"■ "Configuring Archiving for Your Oracle RAC Database"■ Oracle Database Backup and Recovery User's Guide for more
information about restoring archived redo log file files
See Also:
■ "Recovering Your Oracle Real Application Clusters Database"■ "Overview of Oracle RAC Database Backup and Recovery"■ Oracle Database 2 Day DBA for more information about
incremental backups of data files■ Oracle Database 2 Day DBA for more information about
configuring recovery settings

8/8/2019 Oracle 11g RAC Guide
http://slidepdf.com/reader/full/oracle-11g-rac-guide 105/208
About Managing Your Database Backup Files
Administering Backup and Recovery 6-11
Recovering the Parameter File from an Automatic File Backup You can use Enterprise Manager to recover a lost or damaged server parameter file(SPFILE).
To recover an SPFILE for an Oracle RAC database:1. Start the database in MOUNTmode.
2. On the Cluster Database Home page, select Availability .
The Cluster Database Availability page appears.
3. In the Backup/Recovery section, under the heading Manage, select PerformRecovery .
When the database is not open, the Perform Recovery link takes you to the SPFILErestore page.
4. Specify the location of the fast recovery area, if configured.
5. In the Backup Information section, select Use Other Backup Information and Usean Autobackup .
6. On the Perform Recovery: Restore SPFILE page, specify a different location for theSPFILE to be restored to.
7. When finished selecting your options, click Restore , then click Yes to confirm youwant to restore the SPFILE.
8. After the SPFILE is restored, you are prompted to login to the database again.
About Managing Your Database Backup Files Managing RMAN backup files, with or without Enterprise Manager, consists of twotasks:
1. Managing the backup files for your database that are stored on disk or tape
2. Managing the record of those backup files in the RMAN repository
Enterprise Manager simplifies both backup file management tasks. Some of the othertasks involved in managing backup files include the following:
See Also:
■ "About Preparing to Restore and Recover Your Oracle RACDatabase"
■ "About Credentials for Performing Backup and Recovery"■ Oracle Database 2 Day DBA for more information about performing
user-directed recovery
See Also:
■ "Starting and Stopping Oracle RAC Databases and DatabaseInstances"
■ "About the Server Parameter File for Oracle Real ApplicationClusters"
■ Oracle Database Backup and Recovery User's Guide for moreinformation about recovering a server parameter file

8/8/2019 Oracle 11g RAC Guide
http://slidepdf.com/reader/full/oracle-11g-rac-guide 106/208
Displaying Backup Reports for Your Oracle Real Application Clusters Database
6-12 Oracle Database 2 Day + Real Application Clusters Guide
■ Searching for backup files■ Validating the contents of backup sets or image copies■ Cross-checking a backup■ Deleting expired or obsolete backup files■ Marking backup files as available or unavailable
Displaying Backup Reports for Your Oracle Real Application Clusters Database
Backup reports contain summary and detailed information about past backup jobs run by RMAN, including backup jobs run through Enterprise Manager and the RMANcommand-line client.
To view backup reports:1. On the Cluster Database Home page, select Availability .
The Availability page appears.
2. In the Backup/Recovery section, under the heading Manage, select BackupReports .
The View Backup Report page appears, with a list of recent backup jobs.
3. In the Search section, specify any filter conditions and click Go to restrict the list to backups of interest.
You can use the Search section of the page to restrict the backups listed by the timeof the backup, the type of data backed up, and the status of the jobs (whether itsucceeded or failed, and whether or not warnings were generated during the job).
4. To view detailed information about any backup, click the backup job name in theBackup Name column.
The Backup Report page is displayed for the selected backup job. This pagecontains summary information about this backup job, such as how many files ofeach type were backed up, the total size of the data backed up, and the number,size, and type of backup files created.
The Backup Report page also contains a Search section that you can use to quicklyrun a search for another backup job or backup jobs from a specific date range. Theresulting report contains aggregate information for backup jobs matching thesearch criteria.
See Also:
■ Oracle Database 2 Day DBA for more information about thesetopics and details on how to perform these tasks
See Also:
■ "About Managing Your Database Backup Files"■ "Performing Backups of Your Oracle Real Application Clusters
Database"■ "Overview of Oracle RAC Database Backup and Recovery"■ Oracle Database 2 Day DBA

8/8/2019 Oracle 11g RAC Guide
http://slidepdf.com/reader/full/oracle-11g-rac-guide 107/208
7
Managing Database Workload Using Services 7-1
7 Managing Database Workload UsingServices
Using workload management, you can distribute the workload across databaseinstances to achieve optimal database and cluster performance for users andapplications. This chapter contains the following sections:■ About Workload Management■ Creating Services■ Administering Services■ Configuring Clients for High Availability
About Workload Management Applications using a clustered database generally want to load balance their workloadacross the cluster. Oracle Real Application Clusters (Oracle RAC) includes a highlyavailable (HA) application framework that provides the necessary service andintegration points between Oracle RAC and custom enterprise applications.
You can deploy Oracle RAC and single-instance Oracle database environments to useworkload management features in many different ways. Depending on the number ofnodes and your environment's complexity and objectives, your choices for the optimalworkload management and high availability configuration depend on a variety ofconsiderations, as described in this chapter.
To implement workload management for an Oracle RAC database, you can use anumber of different features. This section contains the following topics:■ About Oracle Services■ About the Database Resource Manager■ About Oracle RAC High Availability Framework■
About Fast Application Notification (FAN)■ About the Load Balancing Advisory■ About Connection Load Balancing■ About Runtime Connection Load Balancing
About Oracle Services Oracle Database 10 g introduced an automatic workload management facility, calledservices. A service represents the workload of applications with common attributes,

8/8/2019 Oracle 11g RAC Guide
http://slidepdf.com/reader/full/oracle-11g-rac-guide 108/208
About Workload Management
7-2 Oracle Database 2 Day + Real Application Clusters Guide
performance thresholds, and priorities. A single service can represent an application,multiple applications or a subset of a single application. A single service can beassociated with one or more instances of an Oracle RAC database, and a singleinstance can support multiple services. Services provide the following benefits:■ A single entity for managing applications that compete for the same resources■ Allow each workload to be managed as a single unit■ Hide the complexity of the cluster from the client
To manage workloads, you can define services that you assign to a particularapplication or to a subset of an application's operations. You can also use services tomanage the workload for different types of work. For example, online users can useone service while batch processing can use a different service and reporting can useyet another service type.
Traditionally an Oracle database provided a single service and all users connected tothe same service. A database will always have this default database service that is thedatabase name. This service cannot be modified and will always allow you to connectto the database.
When a user or application connects to a database, Oracle recommends that you use aservice for the connection. Oracle Database automatically creates one database servicewhen the database is created. For many installations, this may be all you need. Formore flexibility in the management of the workload using the database, OracleDatabase enables you to create multiple services and specify which database instancesoffer the services.
You can define services for both policy-managed and administrator-managed
databases.■ Policy-managed database : When you define services for a policy-managed
database, you assign the service to a server pool where the database is running.You can define the service as either uniform (running on all instances in the serverpool) or singleton (running on only one instance in the server pool).
■ Administrator-managed database : When you define a service for anadministrator-managed database, you define which instances normally supportthat service.These are known as the PREFERREDinstances. You can also defineother instances to support a service if the preferred instance fails. These are knownas AVAILABLE instances.
Services are integrated with the Database Resource Manager, which enables you to
restrict the resources that are used by a service within an instance. In addition, OracleScheduler jobs can run using a service, as opposed to using a specific instance.
Note: Do not use the default database service for applicationworkloads. Create at least one service as described in "CreatingServices".

8/8/2019 Oracle 11g RAC Guide
http://slidepdf.com/reader/full/oracle-11g-rac-guide 109/208
About Workload Management
Managing Database Workload Using Services 7-3
About Service Failover When you specify a preferred instance for a service, the service runs on that instanceduring normal operation. Oracle Clusterware attempts to ensure that the servicealways runs on all the preferred instances that have been configured for a service. Ifthe instance fails, the service is randomly relocated to another preferred instance orone of the available instances. You can also manually relocate the service to anavailable instance.
If a service fails over to an available instance, the service is not moved back to itspreferred instance automatically. However, you can automate the relocation of a
service to its preferred instance by using a callout. For more information aboutcallouts, see "About FAN Callouts" on page 7-6 . An example callout script forrelocating services back to their preferred instances is available in the Oracle RACSample Code section on Oracle Technology Network athttp://www.oracle.com/technology/sample_code/products/rac/
You do not have to specify available instances for a service. If you do not specifypreferred or available instances when you create a service, then by default, everyinstance in the Oracle RAC database is a preferred instance for that service. However,if you configure a preferred instance for a service, but do not specify at least oneavailable instance for the service, then the service does not relocate to another instanceif the preferred instance fails.
You can also specify an instance as Not Used. This setting means the service does notrun on the instance, even if the preferred instance for the service fails.
About Automatic Starting of Services When you define a service, you can also define the management policy for thatservice. You can choose either an automatic or manual management policy:■
automatic : The service always starts when the database starts.
See Also:
■ "Creating Services"■ "Administering Services"■ "About Workload Management"■ Oracle Database 2 Day DBA■ Oracle Database Administrator's Guide
See Also:
■ "About FAN Callouts"■ "Creating Services"■ "About Workload Management"
Note: When you use automatic services in anadministrator-managed database, during planned database startup,services may start on the first instances that become available ratherthan their preferred instances.

8/8/2019 Oracle 11g RAC Guide
http://slidepdf.com/reader/full/oracle-11g-rac-guide 110/208
About Workload Management
7-4 Oracle Database 2 Day + Real Application Clusters Guide
■ manual : Requires you to start the service manually after the database starts. Priorto Oracle Database 11 g release 2 (11.2), all services worked as though they weredefined with a manual management policy.
About the Database Resource Manager The Database Resource Manager is a database feature you can use to control thedatabase resources allocated to users, applications, and services. This approachensures that users, applications, and services receive their share of the availabledatabase resources. The Database Resource Manager enables an Oracle RAC databaserunning on one or more nodes to support multiple applications and mixed workloadswith optimal efficiency.
The Database Resource Manager provides the ability to prioritize work within anOracle database or your Oracle RAC environment. For example, high priority users,such as online workers, would get more resources to minimize response time, whilelower priority users, such as batch jobs or reports, would get fewer resources, andcould take longer to run. This allows for more granular control over resources.
Resources are allocated to users according to a resource plan specified by the databaseadministrator. The following terms are used in specifying a resource plan:■ A resource plan specifies how the resources are to be distributed among various
users (resource consumer groups).■ Resource consumer groups allow the administrator to group user sessions together
by resource requirements. Resource consumer groups are different from user roles;one database user can have different sessions assigned to different resourceconsumer groups.
■ Resource allocation methodsare the methods or policies used by the DatabaseResource Manager when allocating for a particular resource. Resource allocationmethods are used by resource consumer groups and resource plans. The databaseprovides the resource allocation methods that are available, but the DBAdetermines which method to use.
■ Resource plan directivesare a means of assigning consumer groups to particularplans and partitioning resources among consumer groups by specifyingparameters for each resource allocation method.
■ Subplans, which the DBA can create within a resource plan, allow furthersubdivision of resources among different users of an application.
■ Levelsprovide a mechanism to specify distribution of unused resources amongavailable users. Up to eight levels of resource allocation can be specified.
The Database Resource Manager enables you to map a resource consumer group to aservice so that users who connect using that service are members of the specifiedresource consumer group, and thus restricted to the resources available to thatresource consumer group.
To learn more about managing the Database Resource Manager using EnterpriseManager:
1. Access the Database Home page.
2. At the top of the page, click Server to display the Server page.
3. In the Resource Manager section, click Getting Started .

8/8/2019 Oracle 11g RAC Guide
http://slidepdf.com/reader/full/oracle-11g-rac-guide 111/208
About Workload Management
Managing Database Workload Using Services 7-5
About Oracle RAC High Availability Framework The Oracle RAC high availability framework enables Oracle RAC to maintain thedatabase, components, and applications in a running state at all times. If an instance,component, or application fails, it can be automatically restarted to keep OracleDatabase operating at full capacity
Oracle Database focuses on maintaining service availability. In Oracle RAC, Oracleservices are designed to be continuously available with workloads shared across oneor more instances. The Oracle RAC high availability framework maintains serviceavailability by storing the configuration information for each service in the OracleCluster Registry (OCR). Oracle Clusterware recovers and balances services acrossinstances based on the service definition.
About Fast Application Notification (FAN) One of the main requirements of a highly available application is for it to be quicklynotified when something happens to critical system components. This allows theapplication to execute event-handling programs. The timely execution of suchprograms minimizes the time it takes to react to cluster resource organizations and theimpact of cluster component failures by avoiding costly connection time-outs andapplication time-outs.
Fast Application Notification is a notification mechanism that Oracle RAC uses tonotify other processes about cluster configuration and service-level information,including status changes such as UP or DOWNevents. FAN UP and DOWNevents canapply to instances, services, and nodes. FAN also publishes Load Balancing Advisoryevents.
FAN enables the automated recovery of applications when cluster components fail.For cluster configuration changes, the Oracle RAC high availability frameworkpublishes a FAN event immediately when a change occurs regarding the state of theinstances in the cluster. Instead of waiting for the application to query the databaseand detect a problem, applications can receive FAN events and react immediately.
FAN UP and DOWNevents provide the following benefits:
■ For DOWNevents, the disruption to the application can be minimized becausesessions that are connected to the failed instance or node can be terminated.Incomplete transactions can be terminated and the application user notifiedimmediately. Application users who request connections are directed to instancesthat are started and are providing the requested service.
■ For UP events, when services and instances are started, new connections can becreated so that the application can immediately take advantage of the extraresources.
See Also:
■ "About Workload Management"■ Oracle Database Administrator's Guide for more information about
the Database Resource Manager
See Also:■ "About Oracle Clusterware"■ "About Workload Management"

8/8/2019 Oracle 11g RAC Guide
http://slidepdf.com/reader/full/oracle-11g-rac-guide 112/208
About Workload Management
7-6 Oracle Database 2 Day + Real Application Clusters Guide
Oracle Clusterware and Oracle RAC utilize Oracle Notification Service (ONS) topropagate FAN messages both within the Oracle RAC cluster and to client or mid-tiermachines. ONS is installed with Oracle RAC and the Oracle Clusterware resources tomanage the ONS daemon are created automatically during the installation process.ONS daemons run locally sending messages to and receiving messages from aconfigured list of nodes (where other ONS daemons are active).
About FAN Callouts FAN callouts are server-side executable files that Oracle RAC runs immediately whenhigh availability events occur. A callout is essentially a shell script or precompiledexecutable written in any programming language. Some examples of how you can useFAN callouts to automate the actions performed when events occur in a clusterconfiguration are as follows:■ Starting and stopping server-side applications■ Relocating low-priority services when high-priority services come online■ Sending text or numeric messages to pagers■ Executing shell scripts
The executable files for FAN callouts are stored in the Grid_home /racg/usrco subdirectory. If this subdirectory does not exist in your Grid home, then you mustcreate this directory with the same permissions and ownership as the Grid_home /racg/tmp subdirectory.
All executables in the Grid_home /racg/usrco subdirectory are executedimmediately, in an asynchronous fashion, when a FAN event received through theONS. A copy of the executable files used by FAN callouts should be available on everynode that runs Oracle Clusterware. Example callout scripts are available in the OracleRAC Sample Code section on Oracle Technology Network athttp://www.oracle.com/technology/sample_code/products/rac/
About the Load Balancing Advisory The Load Balancing Advisory provides information to applications or clients about thecurrent service levels that the Oracle RAC database instances are providing.Applications can take advantage of the load balancing Fast Application Notification
(FAN) events to direct work requests to the instance in the cluster that will provide the best performance based on the workload management directives that you havedefined for that service. Also, when an instance is restarted, Oracle RAC uses FANevents to notify the application’s connection pool so that the connection pool cancreate connections to the recently started instance and take advantage of the additionalresources that this instance provides
The load balancing advisory is integrated with the Automatic Workload Repository built into Oracle Database 11 g. The Automatic Workload Repository measuresresponse time and CPU consumption for each service.
See Also:
■ "About Connection Load Balancing"■ "About the Load Balancing Advisory"■ Oracle Real Application Clusters Administration and Deployment
Guide for more information about configuring Fast ApplicationNotification and FAN callouts
8/8/2019 Oracle 11g RAC Guide
http://slidepdf.com/reader/full/oracle-11g-rac-guide 113/208
About Workload Management
Managing Database Workload Using Services 7-7
The advice given by the Load Balancing Advisory takes into account the power of theserver as well as the current workload of the service on the server. Enabling the LoadBalancing Advisory helps improve the throughput of applications by not sendingwork to instances that are overworked, running slowly, not responding, or have failed.
Your application can take advantage of the Load Balancing Advisory without anyprogrammatic changes if you use an integrated Oracle client, one that has the Runtime
Connection Load Balancing feature. Due to the integration with FAN, Oracleintegrated clients are more aware of the current status of an Oracle RAC cluster. Thisprevents client connections from waiting or trying to connect to an instance that is nolonger available. The integrated clients for FAN events include Oracle Database 11 g JDBC, Oracle Database 11 g ODP.NET, and Oracle Database 11 g Oracle Call Interface(OCI).
You configure your Oracle RAC environment to use the Load Balancing Advisory bydefining service-level goals for each service used. This enables the Load BalancingAdvisory for that service and enables the publication of FAN load balancing events.There are two types of service-level goals for Runtime Connection Load Balancing:■ Service Time—The Load Balancing Advisory attempts to direct work requests to
instances according to their response time. Load Balancing Advisory data is based
on the elapsed time for work done by connections using the service, as well asavailable bandwidth to the service. This goal is best suited for workloads thatrequire varying lengths of time to complete, for example, an internet shoppingsystem.
■ Throughput—The Load Balancing Advisory measures the percentage of the totalresponse time that the CPU consumes for the service. This measures the efficiencyof an instance, rather than the response time. This goal is best suited for workloadswhere each work request completes in a similar amount of time, for example, atrading system.
If you do not select the Enable Load Balancing Advisory option, the service-level goalis set to None, which disables load balancing for that service.
About Connection Load Balancing Oracle Net is a software component that resides on the client and on the Oracledatabase server. It establishes and maintains the connection between the clientapplication and the server, and exchanges messages between them using industrystandard protocols. For the client application and a database to communicate, theclient application must specify location details for the database it wants to connect to,and the database must provide some sort of identification or address.
On the database server, the Oracle Net Listener, commonly known as the listener, is aprocess that listens for client connection requests. The configuration file for the listeneris the listener.ora .
See Also:■ "About Fast Application Notification (FAN)"■ "Configuring Clients for High Availability"■ "Administering Services"■ "About Workload Management"■ Oracle Real Application Clusters Administration and Deployment
Guide for more information about integrated Oracle clients
8/8/2019 Oracle 11g RAC Guide
http://slidepdf.com/reader/full/oracle-11g-rac-guide 114/208
About Workload Management
7-8 Oracle Database 2 Day + Real Application Clusters Guide
Oracle Database 11 g database clients use SCAN and the easy connect method toconnect to the database. SCAN can resolve to multiple IP addresses, reflecting multiplelisteners in the cluster handling public client connections. When using the easyconnect method, you do not have to configure any client network files. You simplyspecify a connect identifier with the following format:SCAN [: port ]/ service_name
SCAN represents the SCAN for your cluster. Specifying the TCP port identifier isoptional. The service_nameis the name of a database service.
You can also use Net Configuration Assistant (NETCA) to create a net service name , asimple name for the database service. The net service name resolves to the connectdescriptor , which is the network address of the database and the name of the databaseservice. The address portion of the connect descriptor is actually the protocol addressof the listener. The client uses a connect descriptor to specify the database or instanceto which the client wants to connect.
When a net service name is used, establishing a connection to a database instancetakes place by first mapping the net service name to the connect descriptor. Thismapped information is stored in one or more repositories of information that are
accessed using naming methods. The most commonly used naming method is LocalNaming, where the net service names and their connect descriptors are stored in alocalized configuration file named tnsnames.ora .
When the client connects to the cluster database using a service, you can use theOracle Net connection load balancing feature to spread user connections across all theinstances that are supporting that service. There are two types of load balancing thatyou can implement: client-side and server-side load balancing. In an Oracle RACdatabase, client connections should use both types of connection load balancing. Whenyou create an Oracle RAC database using Oracle Database Configuration Assistant(DBCA), DBCA configures and enables server-side load balancing by default.
Client-Side Load Balancing Client-side load balancing balances the connection requests across the listeners. Whenthe listener receives the connection request, the listener connects the user to aninstance that the listener knows provides the requested service.
Client-side load balancing is defined in your client connection definition by setting theparameter LOAD_BALANCE=yesin the tnsnames.ora file. When you set thisparameter to yes , the Oracle client randomly selects an address from the address list,and connects to that node's listener. This balances client connections across theavailable listeners in the cluster.
When you create an Oracle RAC database using DBCA, the assistant creates a sampleload balancing connection definition in the tnsnames.ora file.
Client-side load balancing includes connection failover. With connection failover, if anerror is returned from the chosen address, Oracle Net Services will try the next addressin the address list until either a successful connection is made or it has exhausted allthe addresses in the list.
See Also:
■ "Verifying Oracle Net Supports Newly Created Services"■ Oracle Database 2 Day DBA

8/8/2019 Oracle 11g RAC Guide
http://slidepdf.com/reader/full/oracle-11g-rac-guide 115/208
About Workload Management
Managing Database Workload Using Services 7-9
Server-Side Load Balancing With server-side load balancing, the listener directs a connection request to the bestinstance currently providing the service by using information from the Load BalancingAdvisory.
For each service, you can define the method that you want the listener to use for load balancing by setting the connection load balancing goal. You can use a goal of either
long or short for connection load balancing. These goals have the followingcharacteristics:■ Short—Connections are distributed across instances based on the amount of time
that the service is used. Use the Short connection load balancing goal forapplications that have connections of brief duration.
■ Long—Connections are distributed across instances based on the number ofsessions in each instance, for each instance that supports the service. Use the Longconnection load balancing goal for applications that have connections of longduration. This is typical for connection pools and SQL*Forms sessions. Long is thedefault connection load balancing goal.
Any services created by using DBCA use the Long connection load balancing goal by
default.
About Runtime Connection Load Balancing Runtime Connection Load Balancing is a feature of Oracle connection pools that candistribute client work requests across the instances in an Oracle RAC database based
on the Load Balancing Advisory information. The connection allocation is based onthe current performance level provided by the database instances as indicated by theLoad Balancing Advisory FAN events. This provides load balancing at the transactionlevel, instead of load balancing at the time of the initial database connection.
With Runtime Connection Load Balancing, applications use Load Balancing Advisoryinformation to provide better performance to users. OCI Session pools and ODP.NETconnection pools support Runtime Connection Load Balancing. For Java applications,Oracle recommends the Universal Connection Pool (UCP). The Universal ConnectionPool is integrated to take advantage of Load Balancing Advisory information. UCP,introduced in Oracle Database 11 g Patchset 1 (11.1.0.7), can be used against OracleDatabase 10 g or Oracle Database 11 g.
You must enable the client data source for Runtime Connection Load Balancing with a
service that has the following configuration:■ The Load Balancing Advisory is enabled and the service-level goal is set to either
Service Time or Throughput.■ The service connection load balancing goal is set to Short.
Figure 7–1, "Runtime Connection Load Balancing" illustrates Runtime ConnectionLoad Balancing. In this illustration, the Oracle RAC database has three instances.Suppose that the Load Balancing Advisory indicates that Instance1 and Instance3 havethe best performance, while Instance2 currently has less than optimal performance.
Note: If you did not use DBCA to create your database, or if you areusing listener ports other than the default of 1521, then you mustconfigure the LOCAL_LISTENERand REMOTE_LISTENERdatabaseinitialization parameters for your cluster database to point toSCAN:port .

8/8/2019 Oracle 11g RAC Guide
http://slidepdf.com/reader/full/oracle-11g-rac-guide 116/208
About Workload Management
7-10 Oracle Database 2 Day + Real Application Clusters Guide
When Runtime Connection Load Balancing is enabled on the implicit connectioncache, the following process occurs:
1. A client requests a connection from the connection pool.
2. Runtime Connection Load Balancing selects the connection that belongs to themost efficient (best) instance from the connection pool. In Figure 7–1 , there arethree possible nodes to which the connection can be routed. Instance1, which hasthe least amount of CPU workload, is currently being assigned about 60 percent ofthe incoming connections. Instance2, which is currently overloaded, is only beingassigned around 10 percent of the incoming connections. Instance3, which has ahigh workload, is being assigned around 30 percent of the incoming connections.The best instance to handle the connection request in this case would be Instance1.
3. The client receives the connection that would process the work request with the best response time.
Figure 7–1 Runtime Connection Load Balancing
Oracle Database 11 g introduces an additional flag in the load balancing advisory eventcalled affinity hint. The affinity hint is automatic when load balancing advisory isturned on through setting the goal on the service. This flag is for temporary affinitythat lasts for the duration of a web session. Web conversations often connect and
disconnect a number of times during the entire session. During each of these connects,it may access the same or similar data, for example, a shopping cart, Siebel, and so on.Affinity can improve buffer cache efficiency, which lowers cpu usage and transactionlatency. The Affinity Hint is a flag that indicates if Affinity is active or inactive for aparticular instance and service combination. Different instances offering the sameservice can have different settings for the Affinity Hint.
Applications using Oracle Database 11 g and UCP, can take advantage of this newaffinity feature. If the affinity flag is turned on in the Load Balancing Advisory event,then UCP will create an Affinity Context for the Web session such that when thatsession does a get connection from the pool, the pool will always try to give it a

8/8/2019 Oracle 11g RAC Guide
http://slidepdf.com/reader/full/oracle-11g-rac-guide 117/208
Creating Services
Managing Database Workload Using Services 7-11
connection to the instance it connected to the first time it acquired a session. Thechoice of instance for the first connection is based on the current load balancingadvisory information.
Creating Services To manage workloads, you can define services that you assign to a particularapplication or to a subset of an application's operations. You can also use services tomanage the workload for different types of work. You can create a service using OracleEnterprise Manager Database Control.
To create a service:1. On the Cluster Database Home page, click Availability .
The Availability page appears.
2. Click Cluster Managed Database Services in the Services section. Enter orconfirm the credentials for the Oracle RAC database and host operating systemand click Continue .
The Cluster Managed Database Services page appears.
3. Click Create Service .
The Create Service page appears.
4. Enter the name of your service in the Service Name field, for example, DEVUSERS.

8/8/2019 Oracle 11g RAC Guide
http://slidepdf.com/reader/full/oracle-11g-rac-guide 118/208
Creating Services
7-12 Oracle Database 2 Day + Real Application Clusters Guide
5. Select Start Service after creation if you want the service to be started after it iscreated. Select Update local naming parameter (tnsnames.ora) file if you want DBControl to add the new service to the local Oracle Net Services tnsnames.ora file.
6. (Policy-managed databases only) For the service type, select UNIFORM orSINGLETON.
7. (Administrator-managed databases only) For each instance choose whether that
instance is a Preferred instance or an Available instance. If you do not want theservice to run on an instance under any circumstances, then set the Service Policyfor that instance to Not Used.
8. In the Service Properties section, select Short for Connection Load Balancing Goalif you want to distribute the connection workload based on elapsed time insteadof the overall number of connections. Otherwise, choose Long .
9. Select Enable Load Balancing Advisory under the sub-heading NotificationProperties to enable the Load Balancing Advisory for this service, as shown in thefollowing screenshot. Choose a service-level goal of either Service Time orThroughput .

8/8/2019 Oracle 11g RAC Guide
http://slidepdf.com/reader/full/oracle-11g-rac-guide 119/208
Creating Services
Managing Database Workload Using Services 7-13
10. Select Enable Fast Application Notification under the heading NotificationProperties if this service is used by an Oracle Call Interface (OCI) or ODP.NETapplication, and you want to enable FAN.
11. In the Service Threshold Levels section, you can optionally set the service-levelthresholds by entering a value in milliseconds for Warning and Critical thresholdsfor the Elapsed Time and CPU Time metrics.
12. If you want to use a Resource Plan to control the resources used by this service,select the name of the consumer group from the Consumer Group Mapping list inthe Resource Management Properties section. For example, you might choose theLOW_GROUPconsumer group to give development users low priority to databaseresources.
13. If this service is used by a specific Oracle Scheduler job class, you can specify themapping by selecting the name from the Job Scheduler Mapping list in theResource Management Properties.
Note: You cannot change the consumer group name for a service onthe Edit Service page. This is because there may be several consumergroups associated with a given service. However, the Edit Servicepage contains a link to the Resource Consumer Group Mapping page,where you can modify the consumer group mapping for the service.

8/8/2019 Oracle 11g RAC Guide
http://slidepdf.com/reader/full/oracle-11g-rac-guide 120/208
Creating Services
7-14 Oracle Database 2 Day + Real Application Clusters Guide
14. Click OK to create the service.
Verifying Oracle Net Supports Newly Created Services By using GNS and configuring a SCAN for your cluster, you no longer have to modifythe network setup on each client. This section shows you how to verify that the newservice is recognized by Oracle Net and available to the database clients.
When using utilities to manage your cluster, databases, database instances, OracleAutomatic Storage Management (Oracle ASM), and listeners, use the appropriate binary that is in the home directory of the object or component you are managing andset your ORACLE_HOMEenvironment variable to point to this directory. For example,to use lsnrctl to manage a database instance or its listener, then use the binarieslocated in the Oracle home where the database instance or listener is running, and setthe ORACLE_HOMEenvironment variable to the location of that Oracle home.
To verify Oracle Net Services supports the newly created service:1. Determine if the listener on the local node recognizes the new service by using the
following command:
lsnrctl status LISTENER_SCAN1
You should see a list for the new service, similar to the following:
Services Summary...Service "DEVUSERS.example.com" has 2 instance(s).
Instance "sales1", status READY, has 1 handler(s) for this service...Instance "sales2", status READY, has 1 handler(s) for this service...
The displayed name for your newly created service, for exampleDEVUSERS.example.com , is the service name you use in your connectionstrings.
2. Test the Oracle Net Services configuration by attempting to connect to the OracleRAC database using SQL*Plus and the SCAN. The connect identifier for easyconnect naming has the following format:
"[//] SCAN [: port ]/ service_name "
SCAN is the SCAN for your cluster, which defaults to cluster_name.GNS_sub_domain. The service_nameis the name of the database service you want to use forconnecting to the database. You can optionally specify the TCP port number onwhich the Oracle SCAN listener listens for connections.
For example, you might use the following commands to connect to theDEVUSERS service for Oracle RAC database in the docrac cluster:
$ sqlplus /nologSQL> CONNECT system@"docrac/DEVUSERS.example.com"
See Also:
■ "About Workload Management"■ "About Connection Load Balancing"■ "About the Load Balancing Advisory"■ "About Fast Application Notification (FAN)"■ "Administering Services"■ Oracle Database Administrator's Guide
8/8/2019 Oracle 11g RAC Guide
http://slidepdf.com/reader/full/oracle-11g-rac-guide 121/208
Administering Services
Managing Database Workload Using Services 7-15
Enter password: password
After you enter the password, you should see a message indicating you aresuccessfully connected to the Oracle RAC database. If you get an error message,examine the connect identifier and verify the user name, password, and servicename were typed in correctly and all the information is correct for your OracleRAC environment.
Administering Services You can create and administer services using Enterprise Manager. You can also use theSRVCTL utility to perform most service management tasks.
The following sections describe how to manage services for your cluster database:■ About Service Administration Using Enterprise Manager■ Using the Cluster Managed Database Services Page
About Service Administration Using Enterprise Manager
The Cluster Managed Database Services page is the master page for beginning alltasks related to services. To access this page, go to the Cluster Database Maintenancepage, then click Cluster Managed Database Services in the Services section. You canuse this page and links from this page to do the following:■ View a list of services for the cluster.■ View the instances on which each service is currently running.■ View the status for each service.■ Create or edit a service.■ Start or stop a service.■ Enable or disable a service.■ Perform instance-level tasks for a service.■ Delete a service.
Using the Cluster Managed Database Services Page
When managing services using Enterprise Manager, you use the Cluster ManagedDatabase Services page.
On the Cluster Managed Database Services page you can perform the following tasks:■ View a list of services for the cluster, the instances on which each service is
currently running, the status of each service, the server pool associated with theservice, the responsiveness of the service, and any alerts or messages for thatservice.
■ Start or stop a service.
See Also:
■ "Administering Services"■ "About Oracle Services"■ "Creating Services"
8/8/2019 Oracle 11g RAC Guide
http://slidepdf.com/reader/full/oracle-11g-rac-guide 122/208
Configuring Clients for High Availability
7-16 Oracle Database 2 Day + Real Application Clusters Guide
■ Test the connection for a service, or display the Oracle Net TNS strings being used.■ Access the Create Service page.■ Edit, delete, enable, or disable a service.■ Access the Edit Server Pool page for the server pool associate with each service.
To access the Cluster Managed Database Services page:1. On the Cluster Database Home page, click the Availability tab.
2. On the Availability subpage, under the Services heading, click Cluster ManagedDatabase Services .
The Cluster and Database Login page appears.
3. Enter credentials for the database and for the cluster that hosts the Oracle RACdatabase, then click Continue .
The Cluster Managed Database Services page appears and displays the servicesthat are available on the cluster database instances.
Configuring Clients for High Availability There are two central elements to consider when automating failover for applicationclients. First, clients that are connected at the time of failure must be quickly andautomatically notified that a failure has occurred to avoid waiting for TCP/IP networktime-outs before attempting to connect to the new database instance (such time-outsrange anywhere from 8 minutes to 2 hours, depending on operating system). Oracle
RAC configurations utilize Fast Application Notification (FAN) to notify JDBC clients,OCI clients, and ODP.NET clients. FAN event notifications and callouts enableautomatic and fast redirection of clients in the event of a site failure.
The second central element of client failover, is the redirection of clients to the newinstance after a failure has occurred, which can be implemented using services. Whenyou create services in an Oracle RAC database, if an instance to which you haveassigned a service becomes unavailable, Oracle RAC relocates the service to anavailable instance in the database. Users will be able to access the service independentof the instance providing it because, using listener registration, all listeners in thecluster are aware of which instances are currently providing a service when aconnection request comes in.
In addition to FAN, the client can limit the time it waits for a response from the server before trying the next address in the connection list without waiting for the TCP/IPnetwork time out. To enable this, set the sqlnet.ora parametersqlnet.outbound_connection_timeout = x, where x represents the maximumamount of time, in seconds, for a client to establish an Oracle Net connection to thedatabase instance, for example 3 seconds.
sqlnet.outbound_connection_timeout = 3
See Also:
■ "About Service Administration Using Enterprise Manager"■ "About Oracle Services"■ "Creating Services"

8/8/2019 Oracle 11g RAC Guide
http://slidepdf.com/reader/full/oracle-11g-rac-guide 123/208
Configuring Clients for High Availability
Managing Database Workload Using Services 7-17
This section deals with configuration FAN for application clients, and contains the
following topics:■ Configuring JDBC Clients■ Configuring OCI Clients■ Configuring ODP.NET Clients
Configuring JDBC Clients An application that uses JDBC connections can use a connection pool, so an existingconnection can be used in the pool instead of making a new connection to the databaseevery time you need to access data. The Universal Connection Pool (UCP) is a Java-based connection pool that supports any type of connection (JDBC, LDAP, JCA),to any type of database (Oracle or non-Oracle) with any middle tier (Oracle ornon-Oracle). It also supports standalone deployments such as TopLink or BPEL. UCPincludes integration features of Oracle Database such as Oracle RAC, including FastConnection Failover, Runtime Connection Load Balancing, and Connection Affinityfor Oracle RAC instances.
Without Fast Connection Failover, if a node goes down and the application attempts toconnect to that instance, the connection request might hang for several minuteswaiting for the TCP time-out to be reached. If you chose not to use a connection pool
with the integrated FCF feature, your application can still be notified of RAC highavailability events by configuring the Connection Failure Notification feature.
This section explains how to configure Java Database Connectivity (JDBC) clients for:■ Configuring JDBC Clients for Fast Connection Failover■ Configuring JDBC Clients for Connection Failure Notification
Configuring JDBC Clients for Fast Connection Failover The Universal Connection Pool subscribes to the FAN Load Balancing eventsautomatically when you configure fast connection failover. Instead of randomlyassigning a free connection to a work request, the connection pool chooses the connectthat will give the best service according to the latest information it has received. If anode becomes hung, the connection pool gradually shifts connections from the hungnode to other nodes in the cluster.
Note: You should not configure the sqlnet.outbound_connection_timeout parameter on the server sqlnet.ora file, as this can impactOracle Clusterware operations.
See Also:
■ "About Fast Application Notification (FAN)"■ "About Oracle Services"
Note: Connection Failure Notification is redundant with FastConnection Failover as implemented by the UCP. You should notconfigure both within the same application.

8/8/2019 Oracle 11g RAC Guide
http://slidepdf.com/reader/full/oracle-11g-rac-guide 124/208
Configuring Clients for High Availability
7-18 Oracle Database 2 Day + Real Application Clusters Guide
To configure JDBC clients for Fast Connection Failover:1. Use the Cluster Managed Services page in Oracle Enterprise Manager Database
Control or Oracle Enterprise Manager Grid Control to create new services. See"Creating Services" on page 7-11 for more information about creating services.
2. Enable fast connection failover for JDBC clients by setting the UCP DataSourceproperty FastConnectionFailoverEnabled to TRUE. Also, Configure a remote
Oracle Notification Services (ONS) subscription on the JDBC client so that an ONSdaemon is not required on the client, as shown in the following example:
PoolDataSource pds = PoolDataSourceFactory.getPoolDataSource();Pds.setConnnectionPoolName(“FCFSampleUCP”);
pds.setONSConfiguration(“nodes=racnode1:4200,racnode2:4200”); pds.setFastConnectionFailoverEnabled(true);
pds.setConnectionFactoryClassName(“oracle.jdbc.pool.OracleDataSource”);
The remote ONS subscription must contain every host that the client applicationcan use for failover.
3. Set the oracle.net.ns.SQLnetDef.TCP_CONNTIMEOUT_STR property to anonzero value on the data source. When this property is set, if the JDBC clientattempts to connect to a host that is unavailable, the connection attempt is bounded to the time specified for oracle.net.ns.SQLnetDef.TCP_CONNTIMEOUT_STR. After the specified time has elapsed and a successfulconnection has not been made, the client attempts to connect to the next host in theaddress list. Setting this property to a value of 3 seconds is sufficient for mostinstallations.
4. Configure JDBC clients to use a connect descriptor that includes the SCAN and theservice name, and optionally the port that the SCAN listener listens on, forexample:
@//docrac.example.com:1521/orcl_JDBC
In the JDBC application, you would connect to the database using a connect string,such as the following one:
pds.setURL("jdbc:oracle:thin:@//docrac.example.com:1521/orcl_JDBC")
If you are using a JDBC driver, you must include the complete connect descriptorin the URL because the JDBC driver does not use Oracle Net.
5. Make sure that both ucp.jar and ons.jar are in the application CLASSPATH.
See Also: Oracle Universal Connection Pool for JDBC Developer's Guide for more information
Note: Do not configure Transparent Application Failover (TAF) withFast Connection Failover for JDBC clients as TAF processing willinterfere with FAN ONS processing.

8/8/2019 Oracle 11g RAC Guide
http://slidepdf.com/reader/full/oracle-11g-rac-guide 125/208
Configuring Clients for High Availability
Managing Database Workload Using Services 7-19
Configuring JDBC Clients for Connection Failure Notification JDBC Connection Failure Notification enables stand-alone Oracle JDBC connections torespond to node failures quicker. This feature enables a stand-alone connection tolisten for Oracle RAC node down events and respond to a node down event bymarking the connection closed, permitting user applications to begin recovery quicker.
It does not alter the behavior of the application, except that JDBC method calls willthrow exceptions more quickly after a node goes down.
To configure Connection Failure Notification, you use theConnectionFailureNotification connection property.
To configure JDBC clients for Connection Failure Notification:1. Set the Connection Failure Notification property either as a system property using
the -D option, or by including it in the connection properties argument whencreating a connection.
To set it as a system property, use a command similar to the following:
java -Doracle.jdbc.ConnectionFailureNotification=true
To set it within the connection properties argument, use code similar to thefollowing:
Properties props = new Properties();props.put("ConnectionFailureNotification", "true");Connection = DriverManager.getConnection(url, props);
2. Configure the transport mechanism by which the node down events are received.If ONS is the selected transport mechanism, then use the SetONSConfigurationproperty, as demonstrated in the following code, where racnode1 and racnode2 represent nodes in the cluster that have ONS running on them:
props.setONSConfiguration(“nodes=racnode1:4200,racnode2:4200”);
3. Make sure that ons.jar is in the application CLASSPATH.
Configuring OCI Clients The Oracle Call Interface (OCI) provides integration with FAN and Load BalancingAdvisory events. To take advantage of the Load Balancing Advisory, you need toenable the OCI Session pool. OCI clients can register to receive notifications aboutOracle RAC high availability events and respond when events occur. This improves
See Also:
■ "Creating Services"■ "About Fast Application Notification (FAN)"■ "Configuring Clients for High Availability"■ Oracle Database JDBC Developer's Guide for more information about
fast connection failover and configuring ONS■ Oracle Database 2 Day + Java Developer's Guide for information
about creating a method to authenticate users■ Oracle Real Application Clusters Administration and Deployment
Guide for information about configuring client failover

8/8/2019 Oracle 11g RAC Guide
http://slidepdf.com/reader/full/oracle-11g-rac-guide 126/208
Configuring Clients for High Availability
7-20 Oracle Database 2 Day + Real Application Clusters Guide
the connection failover response time in OCI and also removes terminated connectionsfrom connection and session pools. This feature works for all OCI client applications.
To configure OCI clients to receive FAN notifications:1. Use the Cluster Managed Services page in Oracle Enterprise Manager Database
Control or Oracle Enterprise Manager Grid Control to a create services for the OCIclients. See "Creating Services" on page 7-11 for more information about creatingservices.
You should configure the primary instance as preferred for that service. ForNotification Properties, choose "Enable Fast Application Notification for OCI andODP.NET Applications".
See "Administering Services" on page 7-15 for more information about modifyingservices using Enterprise Manager.
2. Enable FAN for OCI clients by initializing the environment with the OCI_EVENTS parameter, as in the following example:
OCIEnvCreate(...OCI_EVENTS...)
3. Link the OCI client applications with thread library libthread or libpthread .
4. In your application, you will need to check if an event has occurred, using codesimilar to the following example:
void evtcallback_fn(ha_ctx, eventhp)...printf("HA Event received.\n");
if (OCIHandleAlloc( (dvoid *)envhp, (dvoid **)&errhp, (ub4) OCI_HTYPE_ERROR,(size_t) 0, (dvoid **) 0))
return;if (retcode = OCIAttrGet(eventhp, OCT_HTYPE_EVENT, (dvoid *)&srvhp, (ub4 *)0,
OCI_ATTR_HA_SRVFIRST, errhp))checkerr (errhp, (sword)retcode;
else {
printf("found first server handle.\n");/*get associated instance name */if (retcode = OCIAttrGet(srvhp, OCI_HTYPE_SERVER, (dvoid *)&instname,
(ub4 *)&sizep, OCI_ATTR_INSTNAME, errhp))checkerr (errhp, (sword)retcode);
elseprintf("instance name is %s.\n", instname);
5. After a HA event is received, clients and applications can register a callback that isinvoked whenever a high availability event occurs, as shown in the followingexample:
/*Registering HA callback function */if (checkerr(errhp, OCIAttrSet(envhp, (ub4) OCI_HTYPE_ENV,
(dvoid *) evtcallback_fn , (ub4) 0, (ub4)OCI_ATTR_EVTCBK , errhp))){
printf("Failed to set register EVENT callback.\n");return EX_FAILURE;
}if (checkerr(errhp, OCIAttrSet(envhp, (ub4) OCI_HTYPE_ENV,
(dvoid *) evtctx , (ub4) 0,(ub4)OCI_ATTR_EVTCTX , errhp)))
{printf("Failed to set register EVENT callback context.\n");

8/8/2019 Oracle 11g RAC Guide
http://slidepdf.com/reader/full/oracle-11g-rac-guide 127/208
Configuring Clients for High Availability
Managing Database Workload Using Services 7-21
return EX_FAILURE;}
return EX_SUCCESS;
After registering an event callback and context, OCI will call the registeredfunction once for each high availability event.
Configuring ODP.NET Clients Oracle Data Provider for .NET (ODP.NET) connection pools subscribe to FANnotifications from Oracle RAC that indicate when nodes are down and when servicesare up or down. Based on these notifications, ODP.NET connection pools make idleconnections, connections that were previously connected to node that failed, availableagain. It also creates new connections to healthy nodes if possible.
ODP.NET provides Runtime Connection Load Balancing to provide enhanced load balancing of the application workload. Instead of randomly selecting an availableconnection from the connection pool, it will choose the connection that will providethe best service based on the current workload information.
The procedures for enabling ODP.NET are similar to the procedures for enabling JDBCin that you must set parameters in the connection string to enable FCF. This sectionexplains how to configure Oracle Data Provider for .NET (ODP.NET) clients forfailover using FAN events.
To configure ODP.Net clients to receive FAN notifications:1. Use the Cluster Managed Services page in Oracle Enterprise Manager Database
Control or Oracle Enterprise Manager Grid Control to a create services for theODP.NET clients. See "Creating Services" on page 7-11 for more information aboutcreating services.
For Notification Properties, choose "Enable Fast Application Notification for OCIand ODP.NET Applications". Set the Connection Load Balancing Goal to Long.
2. Enable Fast Connection Failover for ODP.NET connection pools by subscribing to
FAN high availability events. Do this by setting the ha events connection stringattribute to true either at connection time or in the data source definition. Notethat this only works if you are using connection pools (the pooling attribute totrue ).
You can also enable Runtime Connection Load Balancing by setting the loadbalancing connection string attribute to true .
Use code similar to the following, where username is the name of the database userthat the application uses to connect to the database, password is the password forthat database user, and the service name is odpserv :
See Also:■ "Creating Services"■ "About Fast Application Notification (FAN)"■ "Configuring Clients for High Availability"■ Oracle Call Interface Programmer's Guide for more information
about event notification and user-registered callbacks■ Oracle Real Application Clusters Administration and Deployment
Guide for more information about configuring fast applicationnotification for OCI clients.

8/8/2019 Oracle 11g RAC Guide
http://slidepdf.com/reader/full/oracle-11g-rac-guide 128/208
Configuring Clients for High Availability
7-22 Oracle Database 2 Day + Real Application Clusters Guide
// C#using System;using Oracle.DataAccess.Client;class HAEventEnablingSample{
static void Main(){
OracleConnection con = new OracleConnection();
// Open a connection using ConnectionString attributes// Also, enable "load balancing"con.ConnectionString =
"User Id= username ;Password= password ;" +"Data Source=//docrac.example.com/odpserv;" +"Min Pool Size=10;Connection Lifetime=120;Connection Timeout=60;" +"HA Events=true;Incr Pool Size=5;Decr Pool Size=2";
con.Open();// Carry out work against the database here.con.Close();// Dispose OracleConnection objectcon.Dispose();}
}
3. The HA events are published as messages in the SYS.SYS$SERVICE_METRICSqueue. You must grant dequeue permission on this queue to the database user thatthe application uses to connect to the database.
Use a command similar to the following, where username represents the databaseuser that the .NET application uses to connect to the database:
executedbms_aqadm.grant_queue_privilege('DEQUEUE','SYS.SYS$SERVICE_METRICS',username );
The username specified in this step is the same as the username used for the User Idargument in the previous step.
See Also:
■ "Creating Services"■ "About Fast Application Notification (FAN)"■ "Configuring Clients for High Availability"■ Oracle Data Provider for .NET Developer's Guide for more
information about event notification and user-registered callbacks■ Oracle Real Application Clusters Administration and Deployment
Guide for more information about configuring fast applicationnotification for ODP.NET clients.

8/8/2019 Oracle 11g RAC Guide
http://slidepdf.com/reader/full/oracle-11g-rac-guide 129/208
8
Monitoring Performance and Troubleshooting 8-1
8Monitoring Performance andTroubleshooting
Performance tuning for an Oracle Real Application Clusters (Oracle RAC) database isvery similar to performance tuning for a single-instance database. Many of the tuningtasks that you perform on single-instance Oracle databases can also improveperformance of your Oracle RAC database. This chapter focuses on the performance
tuning and monitoring tasks that are unique to Oracle RAC.This chapter includes the following sections:■ Monitoring Oracle RAC Database and Cluster Performance■ Viewing Other Performance Related Charts■ Viewing the Cluster Database Topology■ Monitoring Oracle Clusterware■ Troubleshooting Configuration Problems in Oracle RAC Environments■ Monitoring and Tuning Oracle RAC: Oracle By Example Series
Monitoring Oracle RAC Database and Cluster Performance Both Oracle Enterprise Manager Database Control and Oracle Enterprise ManagerGrid Control are cluster-aware and provide a central console to manage your clusterdatabase.
From the Cluster Database Home page, you can do all of the following:■ View the overall system status, such as the number of nodes in the cluster and
their current status. This high-level view capability means that you do not have to
See Also:
■ Oracle Database 2 Day DBA for more information about basicdatabase tuning
■ Oracle Database 2 Day + Performance Tuning Guide for moreinformation about general performance tuning
■ Oracle Real Application Clusters Administration and DeploymentGuide for more information about diagnosing problems forOracle Real Application Clusters components
■ Oracle Clusterware Administration and Deployment Guide formore information about diagnosing problems for OracleClusterware components

8/8/2019 Oracle 11g RAC Guide
http://slidepdf.com/reader/full/oracle-11g-rac-guide 130/208
Monitoring Oracle RAC Database and Cluster Performance
8-2 Oracle Database 2 Day + Real Application Clusters Guide
access each individual database instance for details if you just want to seeinclusive, aggregated information.
■ View alert messages aggregated across all the instances with lists for the source ofeach alert message. An alert message is an indicator that signifies that a particularmetric condition has been encountered. A metric is a unit of measurement used toreport the system's conditions.
■ Review issues that are affecting the entire cluster as well as those that are affectingindividual instances.
■ Monitor cluster cache coherency statistics to help you identify processing trendsand optimize performance for your Oracle RAC environment. Cache coherencystatistics measure how well the data in caches on multiple instances issynchronized. If the data caches are completely synchronized with each other, thenreading a memory location from the cache on any instance will return the mostrecent data written to that location from any cache on any instance.
■ Determine if any of the services for the cluster database are having availabilityproblems. A service is deem to be a problem service if it is not running on allpreferred instances, if it's response time thresholds are not met, and so on. Clickingon the link on the Cluster Database Home page will open the Cluster ManagedDatabase services page where the service can be managed.
■ Review any outstanding Clusterware interconnect alerts.
Also note the following points about monitoring Oracle RAC environments:■ Performance monitoring features, such as Automatic Workload Repository (AWR)
and Statspack, are Oracle RAC-aware.
■ You can use global dynamic performance views, or GV$ views, to view statisticsacross instances. These views are based on the single-instance V$ views.
This section contains the following topics:■ About Automatic Database Diagnostic Monitor and Oracle RAC Performance■ Viewing ADDM for Oracle RAC Findings■ Using the Cluster Database Performance Page
About Automatic Database Diagnostic Monitor and Oracle RAC Performance
The Automatic Database Diagnostic Monitor (ADDM) is a self-diagnostic engine builtinto the Oracle Database. ADDM examines and analyzes data captured in theAutomatic Workload Repository (AWR) to determine possible performance problemsin Oracle Database. ADDM then locates the root causes of the performance problems,provides recommendations for correcting them, and quantifies the expected benefits.ADDM analyzes the AWR data for performance problems at both the database and theinstance level.
An ADDM analysis is performed as each AWR snapshot is generated, which is everyhour by default. The results are saved in the database and can be viewed by usingEnterprise Manager. Any time you have a performance problem, you should first
Note: Instead of using Statspack, Oracle recommends that you usethe more sophisticated management and monitoring features of theOracle Database 11g Diagnostic and Tuning packs, which includeAWR

8/8/2019 Oracle 11g RAC Guide
http://slidepdf.com/reader/full/oracle-11g-rac-guide 131/208
Monitoring Oracle RAC Database and Cluster Performance
Monitoring Performance and Troubleshooting 8-3
review the results of the ADDM analysis. An ADDM analysis is performed from thetop down, first identifying symptoms, then refining the analysis to reach the rootcauses, and finally providing remedies for the problems.
For the cluster-wide analysis, Enterprise Manager reports two types of findings:■ Database findings: An issue that concerns a resource that is shared by all instances
in the cluster database, or an issue that affects multiple instances. An example of adatabase finding is I/O contention on the disk system used for shared storage.
■ Instance findings: An issue that concerns the hardware or software that isavailable for only one instance, or an issue that typically affects just a singleinstance. Examples of instance findings are high CPU load or sub-optimal memoryallocation.
ADDM reports only the findings that are significant, or findings that take up asignificant amount of instance or database time. Instance time is the amount of timespent using a resource due to a performance issue for a single instance and databasetime is the sum of time spent using a resource due to a performance issue for allinstances of the database, excluding any Automatic Storage Management (ASM)instances.
An instance finding can be reported as a database finding if it relates to a significantamount of database time. For example, if one instance spends 900 minutes using theCPU, and the sum of all time spent using the CPU for the cluster database is 1040minutes, then this finding would be reported as a database finding because it takes upa significant amount of database time.
A problem finding can be associated with a list of recommendations for reducing theimpact of the performance problem. Each recommendation has a benefit that is anestimate of the portion of database time that can be saved if the recommendation isimplemented. A list of recommendations can contain various alternatives for solvingthe same problem; you do not have to apply the recommendations.
Recommendations are composed of actions and rationales. You must apply all theactions of a recommendation to gain the estimated benefit of that recommendation.The rationales explain why the actions were recommended, and provide additionalinformation to implement the suggested recommendation.
See Also:
■ "Monitoring Oracle RAC Database and Cluster Performance"■ "About Workload Management"■ Oracle Database 2 Day + Performance Tuning Guide for more
information about configuring and using AWR and ADDM■ Oracle Database Performance Tuning Guide for more information
about Automatic Database Diagnostic Monitor

8/8/2019 Oracle 11g RAC Guide
http://slidepdf.com/reader/full/oracle-11g-rac-guide 132/208
Monitoring Oracle RAC Database and Cluster Performance
8-4 Oracle Database 2 Day + Real Application Clusters Guide
Viewing ADDM for Oracle RAC Findings By default, ADDM runs every hour to analyze snapshots taken by the AWR duringthat period. If the database finds performance problems, then it displays the results ofthe analysis under Diagnostic Summary on the Cluster Database Home page. TheADDM Findings link shows how many ADDM findings were found in the most recentADDM analysis.
ADDM for Oracle RAC can be accessed in Enterprise Manager by the followingmethods:■ On the Cluster Database Home Page, under Diagnostic Summary, click the
ADDM Findings Link .■ On the Cluster Database Performance, click the camera icons at the bottom of the
Active Sessions Graph.■ In the Related Links section on the Cluster Database Home page or the
Performance, click Advisor Central . On the Advisor Central page, select ADDM .Choose the option Run ADDM to analyze past performance and specify anappropriate time period, then click OK .
To view ADDM findings from the Cluster Database Home page:1. On the Cluster Database Home page, under Diagnostic Summary, if a nonzero
number is displayed next to ADDM Findings, then click this link.
You can also view the ADDM findings per instance by viewing the Instances tableon the Cluster Database Home page.
When you select the number of ADDM Findings, the Automatic DatabaseDiagnostic Monitor (ADDM) page for the cluster database appears.
2. Review the results of the ADDM run.

8/8/2019 Oracle 11g RAC Guide
http://slidepdf.com/reader/full/oracle-11g-rac-guide 133/208

8/8/2019 Oracle 11g RAC Guide
http://slidepdf.com/reader/full/oracle-11g-rac-guide 134/208
Monitoring Oracle RAC Database and Cluster Performance
8-6 Oracle Database 2 Day + Real Application Clusters Guide
7. View the available Recommendations for resolving the performance problem. Runthe SQL Tuning Advisor to tune the SQL statements that are causing theperformance findings.
Using the Cluster Database Performance Page The Cluster Database Performance page provides a quick glimpse of the performancestatistics for a database. Enterprise Manager accumulates data from each instance overspecified periods of time, called collection-based data. Enterprise Manager alsoprovides current data from each instance, known as real-time data.
Statistics are rolled up across all the instances in the cluster database. Using the linksnext to the charts, you can get more specific information and perform any of thefollowing tasks:■ Identify the causes of performance issues.■ Decide whether resources need to be added or redistributed.■ Tune your SQL plan and schema for better optimization.■ Resolve performance issues.
The following screenshot shows a partial view of the Cluster Database Performancepage. You access this page by clicking the Performance tab from the Cluster DatabaseHome page.
The charts on the Performance page are described in the following sections:■ Viewing the Chart for Cluster Host Load Average

8/8/2019 Oracle 11g RAC Guide
http://slidepdf.com/reader/full/oracle-11g-rac-guide 135/208
Monitoring Oracle RAC Database and Cluster Performance
Monitoring Performance and Troubleshooting 8-7
■ Viewing the Chart for Global Cache Block Access Latency■ Viewing the Chart for Average Active Sessions■ Viewing the Database Throughput Chart
Viewing the Chart for Cluster Host Load Average
The Cluster Host Load Average chart in the Cluster Database Performance page showspotential problems that are outside the database. The chart shows maximum, average,and minimum load values for available nodes in the cluster for the previous hour.
If the load average is higher than the average of the total number of CPUs across allthe hosts in the cluster, then too many processes are waiting for CPU resources. SQLstatements that are not tuned often cause high CPU usage. Compare the load averagevalues with the values displayed for CPU Used in the Average Active Sessions chart. Ifthe sessions value is low and the load average value is high, then this indicates thatsomething else on the host, other than your database, is consuming the CPU.
You can click any of the load value labels for the Cluster Host Load Average chart toview more detailed information about that load value. For example, if you click thelabel Average , the Hosts: Average Load page appears, displaying charts that depict the
average host load for up to four nodes in the cluster.You can select whether the data is displayed in a summary chart, combining the datafor each node in one display, or using tile charts, where the data for each node isdisplayed in its own chart. You can click Customize to change the number of tilecharts displayed in each row or the method of ordering the tile charts.
For more information about changing the data displayed on the Hosts: Average Loadpage, refer to the Enterprise Manager online Help.
Viewing the Chart for Global Cache Block Access Latency Each cluster database instance has its own buffer cache in its System Global Area(SGA). Using Cache Fusion, Oracle RAC environments logically combine each
instance's buffer cache to enable the database instances to process data as if the dataresided on a logically combined, single cache.
When a process attempts to access a data block, it first tries to locate a copy of the data block in the local buffer cache. If a copy of the data block is not found in the local buffer cache, a global cache operation is initiated. Before reading a data block fromdisk, the process attempts to find the data block in the buffer cache of another instance.If the data block is in the buffer cache of another instance, Cache Fusion transfers aversion of the data block to the local buffer cache, rather than having one databaseinstance write the data block to disk and requiring the other instance to reread the data block from disk. For example, after the orcl1 instance loads a data block into its buffer cache, the orcl2 instance can more quickly acquire the data block from theorcl1 instance by using Cache Fusion rather than by reading the data block fromdisk.
The Global Cache Block Access Latency chart shows data for two different types ofdata block requests: current and consistent-read (CR) blocks. When you update data inthe database, Oracle Database must locate the most recent version of the data blockthat contains the data, which is called the current block . If you perform a query, onlydata committed before the query began is visible to the query. Data blocks that werechanged after the start of the query are reconstructed from data in the undo segments,and the reconstructed data is made available to the query in the form of aconsistent-read block .

8/8/2019 Oracle 11g RAC Guide
http://slidepdf.com/reader/full/oracle-11g-rac-guide 136/208
Monitoring Oracle RAC Database and Cluster Performance
8-8 Oracle Database 2 Day + Real Application Clusters Guide
The Global Cache Block Access Latency chart on the Cluster Database Performancepage shows the latency for each type of data block request, that is the elapsed time ittakes to locate and transfer consistent-read and current blocks between the buffercaches.
You can click either metric for the Global Cache Block Access Latency chart to viewmore detailed information about that type of cached block. For example, if you click
the metric Average Current Block Receive Time , the Average Current Block ReceiveTime by Instance page appears, displaying a summary chart that depicts the averagecurrent block receive time for up to four nodes in the cluster. You can select whetherthe data is displayed in a summary chart or using tile charts. If you choose Summarychart, then, by default, the instances with the 4 highest receive times are displayed. Ifyou choose Tile charts, then the data for each node is displayed in its own chart. Youcan customize which nodes are displayed in either the Summary or Tile chart display.
Also, on the Average Current Block Receive Time By Instance page or the ClusterCache Coherency page, you can use the slider bar on the Active Session History chartto focus on a 5 minute window (time period) within the past 1 hour. This enables youto identify the top sessions, services, modules, actions, or SQL statements that wererunning during a period of high cache coherency activity.
At the top of the page, you can use the Metric list to change the metric displayed. Thechoices are:■ Average CR Block Receive Time■ Average Current Block Receive Time■ GC Current Blocks Received■ GC CR Blocks Received■ Physical Reads■ Global Cache Block Transfers
Each metric displays a monitoring page for that metric. On each metric monitoring
page you can view the data for that metric in either a summary chart or using tilecharts. You can also view the Maximum, Average, Minimum chart on the metricmonitoring page to view the maximum, average, and minimum values for the metricfor all active cluster database instances.

8/8/2019 Oracle 11g RAC Guide
http://slidepdf.com/reader/full/oracle-11g-rac-guide 137/208
Monitoring Oracle RAC Database and Cluster Performance
Monitoring Performance and Troubleshooting 8-9
If the Global Cache Block Access Latency chart shows high latencies (high elapsedtimes), this can be caused by any of the following:■ A high number of requests caused by SQL statements that are not tuned.■ A large number of processes in the queue waiting for the CPU, or scheduling
delays.■
Slow, busy, or faulty interconnects. In these cases, check your network connectionfor dropped packets, retransmittals, or cyclic redundancy check (CRC) errors.
Concurrent read and write activity on shared data in a cluster is a frequently occurringactivity. Depending on the service requirements, this activity does not usually causeperformance problems. However, when global cache requests cause a performanceproblem, optimizing SQL plans and the schema to improve the rate at which data blocks are located in the local buffer cache, and minimizing I/O is a successful strategyfor performance tuning. If the latency for consistent-read and current block requestsreaches 10 milliseconds, then your first step in resolving the problem should be to goto the Cluster Cache Coherency page for more detailed information.
Viewing the Chart for Average Active Sessions
The Average Active Sessions chart in the Cluster Database Performance page showspotential problems inside the database. Categories, called wait classes, show howmuch of the database is using a resource, such as CPU or disk I/O. Comparing CPUtime to wait time helps to determine how much of the response time is consumed withuseful work rather than waiting for resources that are potentially held by otherprocesses.
The chart displays the workload on the database or instance and identifiesperformance issues. At the cluster database level, this chart shows the aggregate waitclass statistics across all the instances. For a more detailed analysis, you can click theclipboard icon at the bottom of the chart to view the ADDM analysis for the databasefor that time period.
Compare the peaks on the Average Active Sessions chart with those on the DatabaseThroughput charts. If the Average Active Sessions chart displays a large number ofsessions waiting, indicating internal contention, but throughput is high, then thesituation may be acceptable. The database is probably also performing efficiently ifinternal contention is low but throughput is high. However, if internal contention ishigh and throughput is low, then consider tuning the database.
If you click the wait class legends beside the Average Active Sessions chart, you canview instance-level information stored in Active Sessions by Instance pages. You canuse the Wait Class action list on the Active Sessions by Instance page to view thedifferent wait classes. The Active Sessions by Instance pages show the service times forup to four instances. Using the Customize button you can select the instances that aredisplayed. You can view the data for the instances separately using tile charts, or youcan combine the data into a single summary chart.
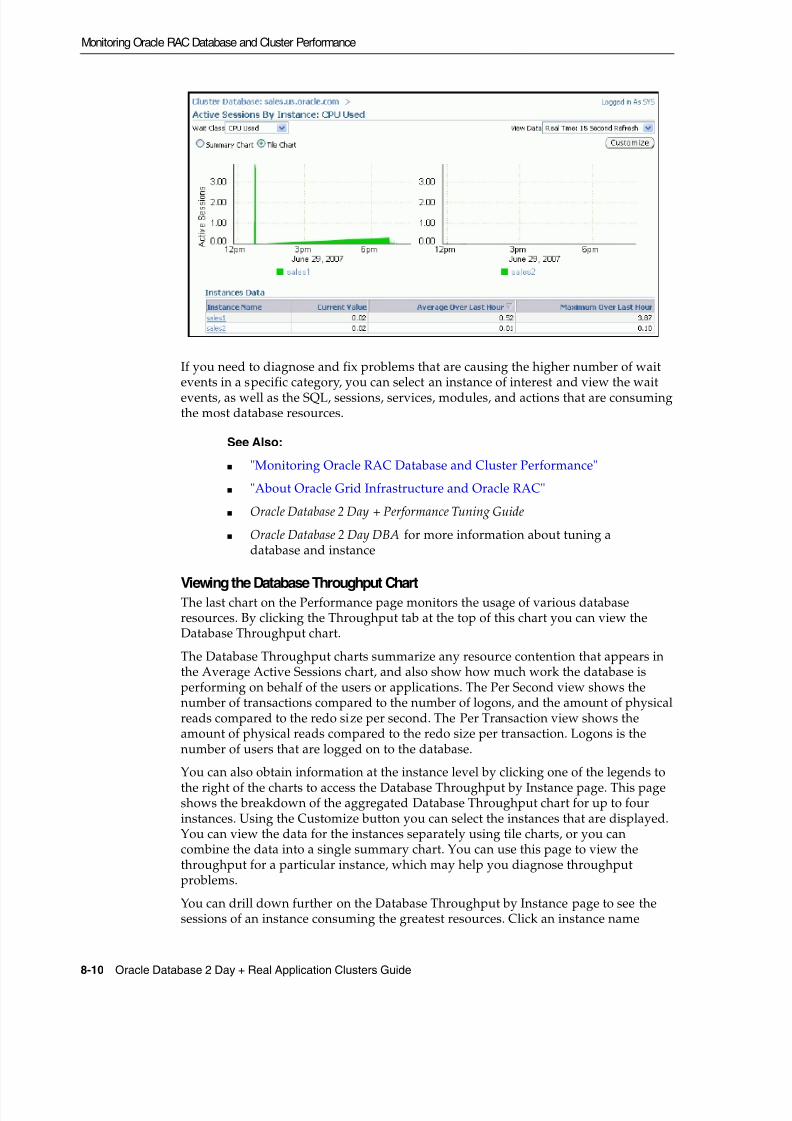
8/8/2019 Oracle 11g RAC Guide
http://slidepdf.com/reader/full/oracle-11g-rac-guide 138/208
Monitoring Oracle RAC Database and Cluster Performance
8-10 Oracle Database 2 Day + Real Application Clusters Guide
If you need to diagnose and fix problems that are causing the higher number of waitevents in a specific category, you can select an instance of interest and view the waitevents, as well as the SQL, sessions, services, modules, and actions that are consumingthe most database resources.
Viewing the Database Throughput Chart The last chart on the Performance page monitors the usage of various databaseresources. By clicking the Throughput tab at the top of this chart you can view theDatabase Throughput chart.
The Database Throughput charts summarize any resource contention that appears inthe Average Active Sessions chart, and also show how much work the database isperforming on behalf of the users or applications. The Per Second view shows thenumber of transactions compared to the number of logons, and the amount of physicalreads compared to the redo size per second. The Per Transaction view shows theamount of physical reads compared to the redo size per transaction. Logons is thenumber of users that are logged on to the database.
You can also obtain information at the instance level by clicking one of the legends tothe right of the charts to access the Database Throughput by Instance page. This pageshows the breakdown of the aggregated Database Throughput chart for up to fourinstances. Using the Customize button you can select the instances that are displayed.You can view the data for the instances separately using tile charts, or you cancombine the data into a single summary chart. You can use this page to view thethroughput for a particular instance, which may help you diagnose throughputproblems.
You can drill down further on the Database Throughput by Instance page to see thesessions of an instance consuming the greatest resources. Click an instance name
See Also:
■ "Monitoring Oracle RAC Database and Cluster Performance"■ "About Oracle Grid Infrastructure and Oracle RAC"■ Oracle Database 2 Day + Performance Tuning Guide■ Oracle Database 2 Day DBA for more information about tuning a
database and instance

8/8/2019 Oracle 11g RAC Guide
http://slidepdf.com/reader/full/oracle-11g-rac-guide 139/208
Monitoring Oracle RAC Database and Cluster Performance
Monitoring Performance and Troubleshooting 8-11
legend just under the chart to go to the Top Sessions subpage of the Top Consumerspage for that instance.
For more information about the information on this page, refer to the EnterpriseManager Help system.
Viewing the Services Chart The last chart on the Performance page monitors the usage of various databaseresources. By clicking the Services tab at the top of this chart you can view the Serviceschart.
The Services charts shows the top services being used by the active sessions. Onlyactive services are shown. You can select one of the service legends to the right of thechart to go to the Service subpage of the Top Consumers page. The Activity subtab isselected by default. On this page you can view real-time data showing the sessionloads by wait classes for the service.
See Also:
■ "Monitoring Oracle RAC Database and Cluster Performance"■ "About Oracle Grid Infrastructure and Oracle RAC"■ Oracle Database 2 Day + Performance Tuning Guide■ Oracle Database 2 Day DBA for more information about tuning a
database and instance
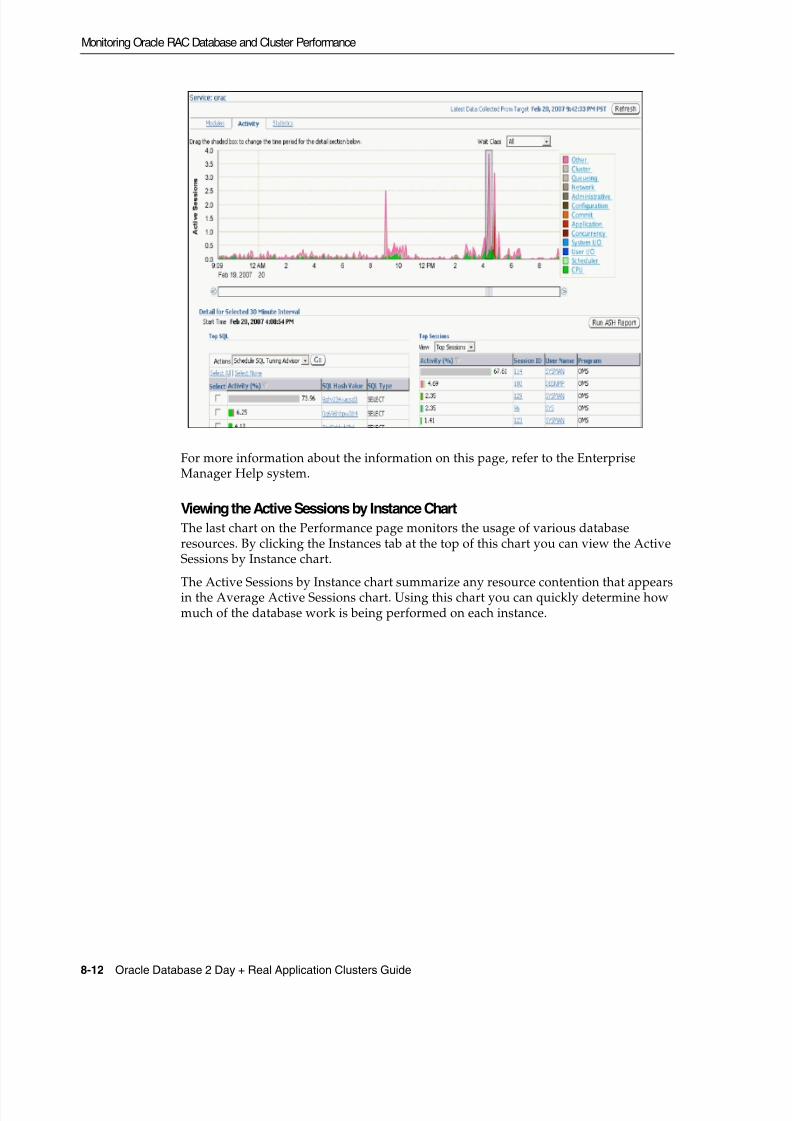
8/8/2019 Oracle 11g RAC Guide
http://slidepdf.com/reader/full/oracle-11g-rac-guide 140/208
Monitoring Oracle RAC Database and Cluster Performance
8-12 Oracle Database 2 Day + Real Application Clusters Guide
For more information about the information on this page, refer to the EnterpriseManager Help system.
Viewing the Active Sessions by Instance Chart The last chart on the Performance page monitors the usage of various databaseresources. By clicking the Instances tab at the top of this chart you can view the ActiveSessions by Instance chart.
The Active Sessions by Instance chart summarize any resource contention that appearsin the Average Active Sessions chart. Using this chart you can quickly determine howmuch of the database work is being performed on each instance.
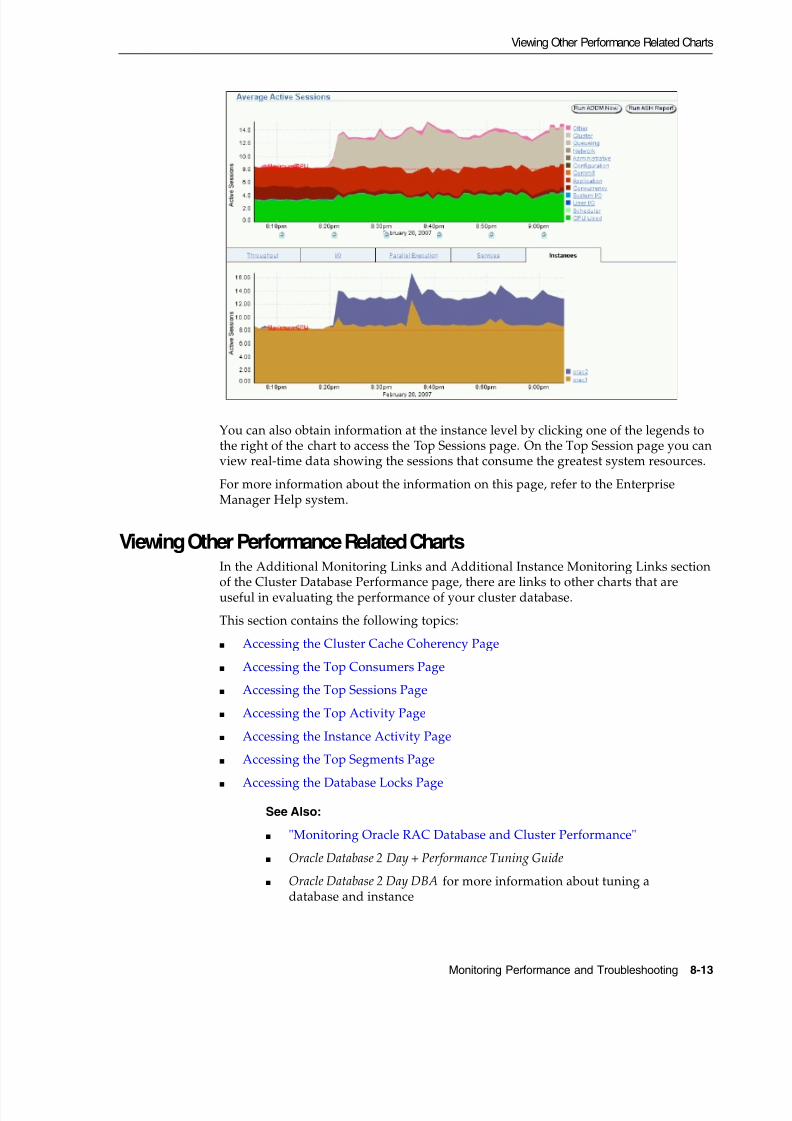
8/8/2019 Oracle 11g RAC Guide
http://slidepdf.com/reader/full/oracle-11g-rac-guide 141/208
Viewing Other Performance Related Charts
Monitoring Performance and Troubleshooting 8-13
You can also obtain information at the instance level by clicking one of the legends tothe right of the chart to access the Top Sessions page. On the Top Session page you canview real-time data showing the sessions that consume the greatest system resources.
For more information about the information on this page, refer to the EnterpriseManager Help system.
Viewing Other Performance Related Charts In the Additional Monitoring Links and Additional Instance Monitoring Links section
of the Cluster Database Performance page, there are links to other charts that areuseful in evaluating the performance of your cluster database.
This section contains the following topics:■ Accessing the Cluster Cache Coherency Page■ Accessing the Top Consumers Page■ Accessing the Top Sessions Page■ Accessing the Top Activity Page■ Accessing the Instance Activity Page■ Accessing the Top Segments Page
■ Accessing the Database Locks PageSee Also:
■ "Monitoring Oracle RAC Database and Cluster Performance"■ Oracle Database 2 Day + Performance Tuning Guide■ Oracle Database 2 Day DBA for more information about tuning a
database and instance

8/8/2019 Oracle 11g RAC Guide
http://slidepdf.com/reader/full/oracle-11g-rac-guide 142/208
Viewing Other Performance Related Charts
8-14 Oracle Database 2 Day + Real Application Clusters Guide
Accessing the Cluster Cache Coherency Page The Cluster Cache Coherency page contains summary charts for cache coherencymetrics for the cluster.
Table 8–1 provides a description of the Cluster Cache Coherency charts and the actionsto perform to access more comprehensive information for problem resolution.
To access the Cluster Cache Coherency page:1. On the Cluster Database Home page, select Performance.
The Performance subpage appears.2. Click Cluster Cache Coherency in the Additional Monitoring Links section at the
bottom of the page.
3. Alternatively, click either of the legends to the right of the Global Cache BlockAccess Latency chart.
The Cluster Cache Coherency page appears.
Table 8–1 Cluster Cache Coherency Charts
Name Description
Global Cache Block AccessLatency
Shows the total elapsed time, or latency, for a block request.Click one of the legends to the right of the chart to view theaverage time it takes to receive data blocks for each block type(current or CR) by instance.
On the Average Block Receive Time by Instance page, you canclick an instance legend under the chart to go to the BlockTransfer for Local Instance page, where you can identify which
block classes, such as undo blocks, data blocks, and so on, aresubject to intense global cache activity. This page displays the
block classes that are being transferred, and which instances aretransferring most of the blocks.
Cache transfer indicates how many current and CR blocks foreach block class were received from remote instances, includinghow many transfers incurred a delay (busy) or an unexpectedlonger delay (congested).
Global Cache Block TransferRate
Shows the total aggregated number of blocks received by allinstances in the cluster by way of an interconnect.
Click one of the legends to the right of the chart to go to theGlobal Cache Blocks Received by Instance page for that type of
block. From there, you can click an instance legend under thechart to go to the Segment Statistics by Instance page, where youcan see which segments are causing cache contention.
Global Cache BlockTransfers and Physical
Reads
Shows the percentage of logical read operations that retrieveddata from the buffer cache of other instances by way of Direct
Memory Access and from disk. It is essentially a profile of howmuch work is performed in the local buffer cache, rather thanthe portion of remote references and physical reads, which bothhave higher latencies.
Click one of the legends to the right of the chart to go to theGlobal Cache Block Transfers vs. Logical Reads by Instance andPhysical Reads vs. Logical Reads by Instance pages. From there,you can click an instance legend under the chart to go to theSegment Statistics by Instance page, where you can see whichsegments are causing cache contention.

8/8/2019 Oracle 11g RAC Guide
http://slidepdf.com/reader/full/oracle-11g-rac-guide 143/208
Viewing Other Performance Related Charts
Monitoring Performance and Troubleshooting 8-15
Accessing the Top Consumers Page The Top Consumers page provides access to several tabs that enable you to viewreal-time or collection-based data for the services, modules, actions, clients, andsessions that are consuming the most system resources.
To access the Top Consumers page:1. On the Cluster Database Home page, select Performance.
The Performance subpage appears.
2. Click Top Consumers in the Additional Monitoring Links section at the bottom ofthe page.
When accessed this way, the Top Consumers page initially displays the Overviewtab by default, which shows aggregated summary data for the highest resourceconsumers.

8/8/2019 Oracle 11g RAC Guide
http://slidepdf.com/reader/full/oracle-11g-rac-guide 144/208
Viewing Other Performance Related Charts
8-16 Oracle Database 2 Day + Real Application Clusters Guide
3. (Optional) Click the portion of a chart representing the consumer or click the linkunder the chart for that consumer to view instance-level information about thatconsumer.
The page that appears shows the running instances that are serving the consumer.
4. (Optional) Expand the names in the Action or Module column to show data forindividual instances.
Accessing the Top Sessions Page The Top Sessions page shows a real-time summary list of sessions based on aggregated
data. You can see which sessions have consumed the greatest amount of systemresources, referred to as the top sessions, and then decide whether or not you want tostop the sessions.
To access the Top Sessions page:1. On the Cluster Database Home page, select Performance.
The Performance subpage appears.
2. Click Top Consumers in the Additional Monitoring Links section at the bottom ofthe page.
See Also:
■ "Monitoring Oracle RAC Database and Cluster Performance"■ Oracle Database 2 Day + Performance Tuning Guide

8/8/2019 Oracle 11g RAC Guide
http://slidepdf.com/reader/full/oracle-11g-rac-guide 145/208
Viewing Other Performance Related Charts
Monitoring Performance and Troubleshooting 8-17
3. On the Top Consumers page, click the Top Sessions subtab.
Accessing the Top Activity Page The Top Activity page enables you to view the cluster database activity by waits,services and instances. Also, you can see the details for the Top SQL and Top Sessionsfor a specific 5 minute interval by moving the slider bar on the Top Activity chart.
In the Top SQL detail section, you can select problematic SQL statements and eitherschedule the SQL Tuning Advisor for those statements or create a SQL Tuning Set.
By default, the Top Sessions for the selected time period are shown. Using the Viewaction list in this section you can change the display to one of the following:■ Top Sessions■ Top Services■ Top Modules■ Top Actions■ Top Clients■ Top Files■ Top Objects■ Top PL/SQL■ Top Instances
To access the Top Activity page:
1. On the Cluster Database Home page, select Performance .The Performance subpage appears.
2. Click Top Activity in the Additional Monitoring Links section at the bottom of thepage.
The Top Activity page appears.
Accessing the Instance Activity Page The Instance Activity page enables you to view instance activity for several metricswithin general metric categories, such as cursors, transactions, sessions, logical I/O,physical I/O, and net I/O. You can view data for each second or transaction.
To access the Instance Activity page:1. On the Cluster Database Home page, select Performance .
The Performance subpage appears.
2. Click Instance Activity in the Additional Monitoring Links section at the bottomof the page.
See Also:
■ "Monitoring Oracle RAC Database and Cluster Performance"■ Oracle Database 2 Day + Performance Tuning Guide

8/8/2019 Oracle 11g RAC Guide
http://slidepdf.com/reader/full/oracle-11g-rac-guide 146/208
Viewing Other Performance Related Charts
8-18 Oracle Database 2 Day + Real Application Clusters Guide
3. (Optional) Click a metric legend under the chart if in Graphic mode, or click aname in the summary table if in Tabular mode to access top sessions statistics for aparticular metric.
4. (Optional) Use the Switch Database Instance list to change the instance for whichthe data is displayed in the chart.
Accessing the Top Segments Page Collecting and viewing statistics at the segment level is an effective method foridentifying frequently accessed tables or indexes in a database. The Top Segmentspage enables you to gather segment-level statistics to identify performance problemsassociated with individual segments. This page is particularly useful for Oracle RAC, because it also tracks the number of consistent-read and current blocks received by anobject. A high number of current blocks received plus a high number of buffer waitsmay indicate potential resource contention.
To access the Top Segments page:1. On the Cluster Database Home page, select Performance .
The Performance subpage appears.
2. Click Top Segments in the Additional Monitoring Links section at the bottom ofthe page.
You can view segments for all instances, or use a filter to see segments for aspecific instance.
See Also:
■ "Monitoring Oracle RAC Database and Cluster Performance"■ Oracle Database 2 Day + Performance Tuning Guide

8/8/2019 Oracle 11g RAC Guide
http://slidepdf.com/reader/full/oracle-11g-rac-guide 147/208
Viewing the Cluster Database Topology
Monitoring Performance and Troubleshooting 8-19
Accessing the Database Locks Page Use the Database Locks page to determine if multiple instances are holding locks forthe same object. The page shows user locks, all database locks, or locks that are blocking other users or applications. You can use this information to stop a session thatis unnecessarily locking an object.
To access the Database Locks page:1. On the Cluster Database Home page, select Performance .
The Performance subpage appears.
2. Click Database Locks in the Additional Monitoring Links section at the bottom ofthe page.
Viewing the Cluster Database Topology Using Database Control you can view a graphical representation of your clusterenvironment. Using the topology view you can quickly see the components that make
See Also:
■ "Monitoring Oracle RAC Database and Cluster Performance"
See Also:
■ "Monitoring Oracle RAC Database and Cluster Performance"■ Oracle Database Administrator's Guide

8/8/2019 Oracle 11g RAC Guide
http://slidepdf.com/reader/full/oracle-11g-rac-guide 148/208
Viewing the Cluster Database Topology
8-20 Oracle Database 2 Day + Real Application Clusters Guide
up your cluster database environment, such as database instances, listeners, ASMinstances, hosts, and interfaces.
After you click the topology chart to activate the controls, you can mouse over acomponent to see the status and configuration details for that component. If you selecta component in the topology chart, you can then right-click that component to view aset of menu actions specific for that component.
To view the topology for your cluster database environment:1. On the Cluster Database Home page, select Topology .
The Topology subpage appears.
2. (Optional) Move the mouse cursor over any component in the topology diagramto display information about that component in a popup box.
3. Select any component in the topology diagram to change the informationdisplayed in the Selection Details section.
4. (Optional) Click Legend at the bottom of the page, on the left-hand side, to displaythe Topology Legend page.
This page describes the icons used in Cluster Topology and Cluster DatabaseTopology.
5. (Optional) Right-click the currently selected component to view the menu actionsavailable for that component.

8/8/2019 Oracle 11g RAC Guide
http://slidepdf.com/reader/full/oracle-11g-rac-guide 149/208
Monitoring Oracle Clusterware
Monitoring Performance and Troubleshooting 8-21
Monitoring Oracle Clusterware You can use Enterprise Manager to monitor Oracle Clusterware. Some of themonitoring features available with Enterprise Manager include:■ Viewing the status of Oracle Clusterware on each node of the cluster■ Receiving notifications if there are any VIP relocations■ Monitoring the overall throughput across the private interconnect■ Receiving notifications if nodeapps go down or come up■ Viewing alerts if a database instance is using the public interface instead of the VIP■ Monitoring the Clusterware alert log for OCR or voting disk related issues, node
evictions, and other clusterware errors
With Oracle Database 11 g release 2 you can also monitor Oracle Clusterware resourcesand use cluster component health monitoring for individual components. To monitorresources you click on the Administration link from the Cluster home page. Tomonitor the health of individual cluster components you click the All Metrics link inthe Related Links section of the Cluster home page.
This section contains the following topics:■ Accessing the Oracle Clusterware Information■ Reviewing the Oracle Clusterware Home Page■ Viewing the Cluster Performance Page■ Viewing the Cluster Targets Page■ Viewing the Cluster Administration Page■ About the Cluster Interconnects Page■ Viewing the Cluster Topology Page
Accessing the Oracle Clusterware Information From the Cluster Database Home page, there a several ways to access OracleClusterware information.
To access Oracle Clusterware information:1. From the Cluster Database Home page, in the General section, click the link next
to Cluster to view the Cluster Home page.
Click the Database tab to return to the Cluster Database Home page.
2. Under Diagnostic Summary, click the number next to Interconnect Alerts to viewthe Interconnects subpage for the cluster.
Click the Database tab to return to the Cluster Database Home page.3. In the High Availability section, click the number next to Problem Services to
display the Cluster Home page.
Click the Database tab to return to the Cluster Database Home page.
4. Select Topology . Click one of the nodes in the graphical display to activate thecontrols. Click the Interface component. Right-click the Interface component, thenchoose View Details from the menu to display the Interconnects subpage for thecluster.
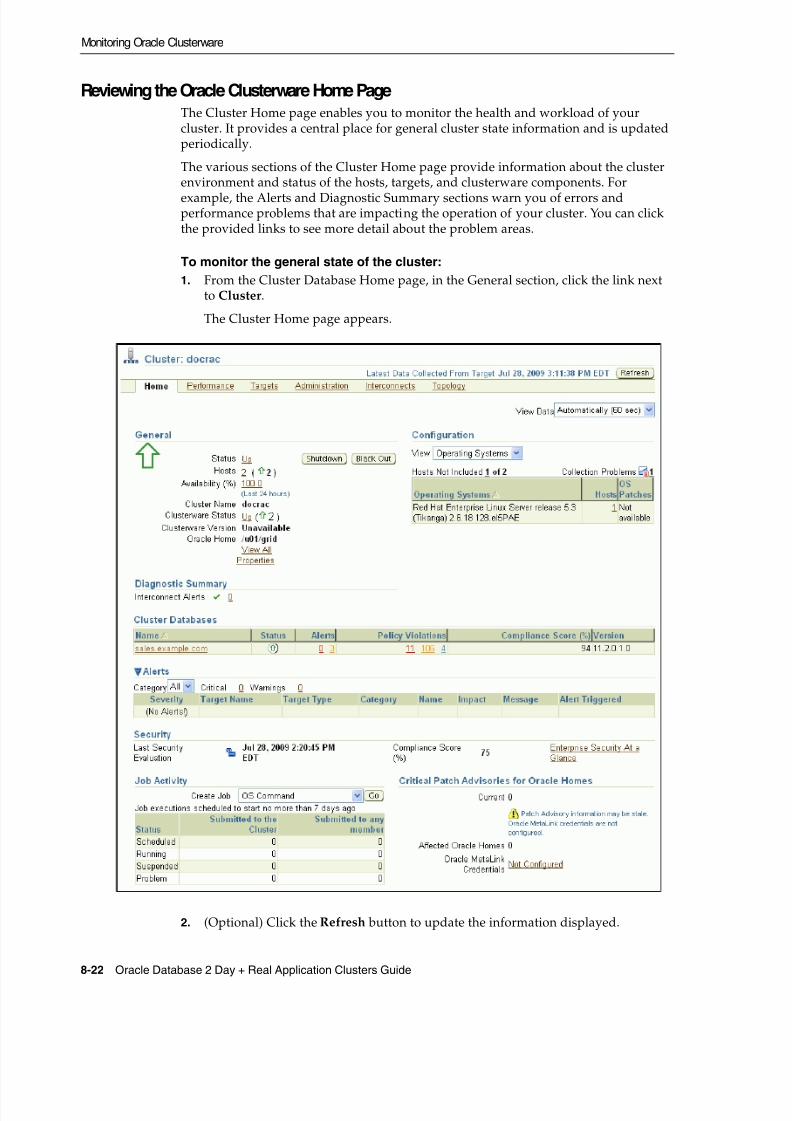
8/8/2019 Oracle 11g RAC Guide
http://slidepdf.com/reader/full/oracle-11g-rac-guide 150/208
Monitoring Oracle Clusterware
8-22 Oracle Database 2 Day + Real Application Clusters Guide
Reviewing the Oracle Clusterware Home Page The Cluster Home page enables you to monitor the health and workload of yourcluster. It provides a central place for general cluster state information and is updatedperiodically.
The various sections of the Cluster Home page provide information about the clusterenvironment and status of the hosts, targets, and clusterware components. Forexample, the Alerts and Diagnostic Summary sections warn you of errors andperformance problems that are impacting the operation of your cluster. You can clickthe provided links to see more detail about the problem areas.
To monitor the general state of the cluster:1. From the Cluster Database Home page, in the General section, click the link next
to Cluster .
The Cluster Home page appears.
2. (Optional) Click the Refresh button to update the information displayed.

8/8/2019 Oracle 11g RAC Guide
http://slidepdf.com/reader/full/oracle-11g-rac-guide 151/208
Monitoring Oracle Clusterware
Monitoring Performance and Troubleshooting 8-23
The date and time that data was last collected from the cluster is displayed to theleft of the Refresh button.
3. Get a quick view of the cluster in the General section, which includes thefollowing information:■ Status of the cluster, Up or Down
Click the Status link to drill down to cluster availability details.■ Number of hosts in the cluster■ Cluster name■ The status of Oracle Clusterware overall and by host■ Oracle Clusterware version■ Oracle Clusterware home directory.
4. In the Configuration section, use the View list to select which of the followinginformation is displayed for the available hosts in the cluster:■ Operating Systems (including Hosts and OS Patches)
■ Hardware (including hardware configuration and hosts)Click the links under Host or OS Patches for detailed information.
5. View the Diagnostic Summary section which contains the number of activeInterconnect alerts. Click the number of alerts to view the Interconnects subpage.
6. Investigate the Cluster Databases table to view the cluster databases associatedwith this cluster, their availability, any alerts or policy violations on thosedatabases, their security compliance score, and the database software version.
7. View the Alerts section, which includes the following items:■ Category list
Optionally choose a category from the list to view only alerts in that category■ Critical
This is the number of metrics that have crossed critical thresholds plus thenumber of other critical alerts, such as those caused by incidents (criticalerrors).
■ Warning
This is the number of metrics that have crossed warning thresholds■ Alerts table
The Alerts table provides information about any alerts that have been issuedalong with the severity rating of each. Click the alert message in the Messagecolumn for more information about the alert.
When an alert is triggered, the name of the metric for which the alert wastriggered is displayed in the Name column. The severity icon for the alert(Warning or Critical) is displayed, along with the time the alert was triggered,the value of the alert, and the time the metric's value was last checked.
8. View the date of the Last Security Evaluation and the Compliance score for thecluster in the Security section.
The compliance score is a value between 0 and 100 where 100 is a state of completecompliance to the security policies. The compliance score calculation for each

8/8/2019 Oracle 11g RAC Guide
http://slidepdf.com/reader/full/oracle-11g-rac-guide 152/208
Monitoring Oracle Clusterware
8-24 Oracle Database 2 Day + Real Application Clusters Guide
target and policy combination to a great extent is influenced by the severity of theviolation and importance of the policy, and to a lesser extent by the percentage ofviolating rows over the total number of rows tested.
9. Review the status of any jobs submitted to the cluster within the last 7 days in the Job Activity section.
10. Determine if there are patches to be applied to Oracle Clusterware by reviewingthe Critical Patch Advisories for Oracle Homes section.To view available patches, you must have first configured your My Oracle Support(formerly Oracle MetaLink) Credentials as discussed in "Configuring the EnterpriseManager Patch Interface" on page 10-1 .
11. View basic performance statistics for each host in the cluster in the Hosts table atthe bottom of the page.
Click any link in this table to view further details about that statistic.
12. Use the subtabs at the top of the page to view detailed information forPerformance, Targets, Interconnects, or Topology.
Viewing the Cluster Performance Page The Cluster Performance page displays utilization statistics, such as CPU, Memory,and Disk I/O, during the past hour for all hosts of a cluster, which is part of thegreater Enterprise Manager environment. With this information, you can determinewhether you need to add or redistribute resources.

8/8/2019 Oracle 11g RAC Guide
http://slidepdf.com/reader/full/oracle-11g-rac-guide 153/208
Monitoring Oracle Clusterware
Monitoring Performance and Troubleshooting 8-25
Using the charts on the Cluster Performance page, you can:■ View the CPU, Memory, and Disk I/O charts for the cluster across all hosts.■ View the CPU, Memory, and Disk I/O charts for each host individually by clicking
the host name in the legend to the right of the chart.
The Cluster Performance page also contains a Hosts table. The Hosts table displayssummary information for the hosts for the cluster, their availability, any alerts on thosehosts, CPU and memory utilization percentage, and total input/output per second.You can click a host name in the Hosts table to go to the performance page for thathost.
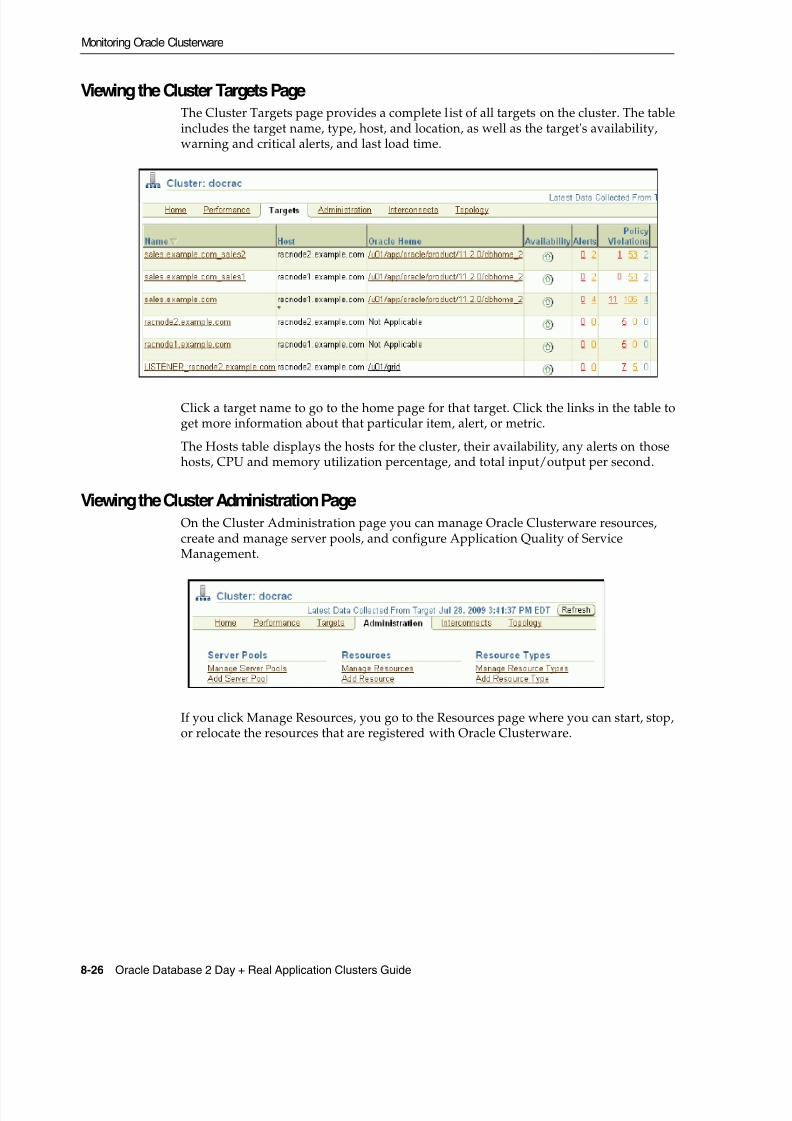
8/8/2019 Oracle 11g RAC Guide
http://slidepdf.com/reader/full/oracle-11g-rac-guide 154/208
Monitoring Oracle Clusterware
8-26 Oracle Database 2 Day + Real Application Clusters Guide
Viewing the Cluster Targets Page The Cluster Targets page provides a complete list of all targets on the cluster. The tableincludes the target name, type, host, and location, as well as the target's availability,warning and critical alerts, and last load time.
Click a target name to go to the home page for that target. Click the links in the table toget more information about that particular item, alert, or metric.
The Hosts table displays the hosts for the cluster, their availability, any alerts on thosehosts, CPU and memory utilization percentage, and total input/output per second.
Viewing the Cluster Administration Page On the Cluster Administration page you can manage Oracle Clusterware resources,create and manage server pools, and configure Application Quality of ServiceManagement.
If you click Manage Resources, you go to the Resources page where you can start, stop,or relocate the resources that are registered with Oracle Clusterware.

8/8/2019 Oracle 11g RAC Guide
http://slidepdf.com/reader/full/oracle-11g-rac-guide 155/208
Monitoring Oracle Clusterware
Monitoring Performance and Troubleshooting 8-27
About the Cluster Interconnects Page The Cluster Interconnects page is useful for monitoring the interconnect interfaces,determining configuration issues, and identifying transfer rate-related issues,including excess traffic. This page helps determine the load added by individualinstances and databases on the interconnect. Sometimes you can immediately identifyinterconnect delays that are due to applications outside Oracle.
You can use this page to perform the following tasks:■ View all interfaces that are configured across the cluster.■ View statistics for the interfaces, such as absolute transfer rates and errors.■ Determine the type of interfaces, such as private or public.■ Determine whether the instance is using a public or private network.■ Determine which database instance is currently using which interface.■ Determine how much the instance is contributing to the transfer rate on the
interface.
See Also:
■ "Viewing the Cluster Database Topology" on page 8-19■
Oracle Clusterware Administration and Deployment Guide
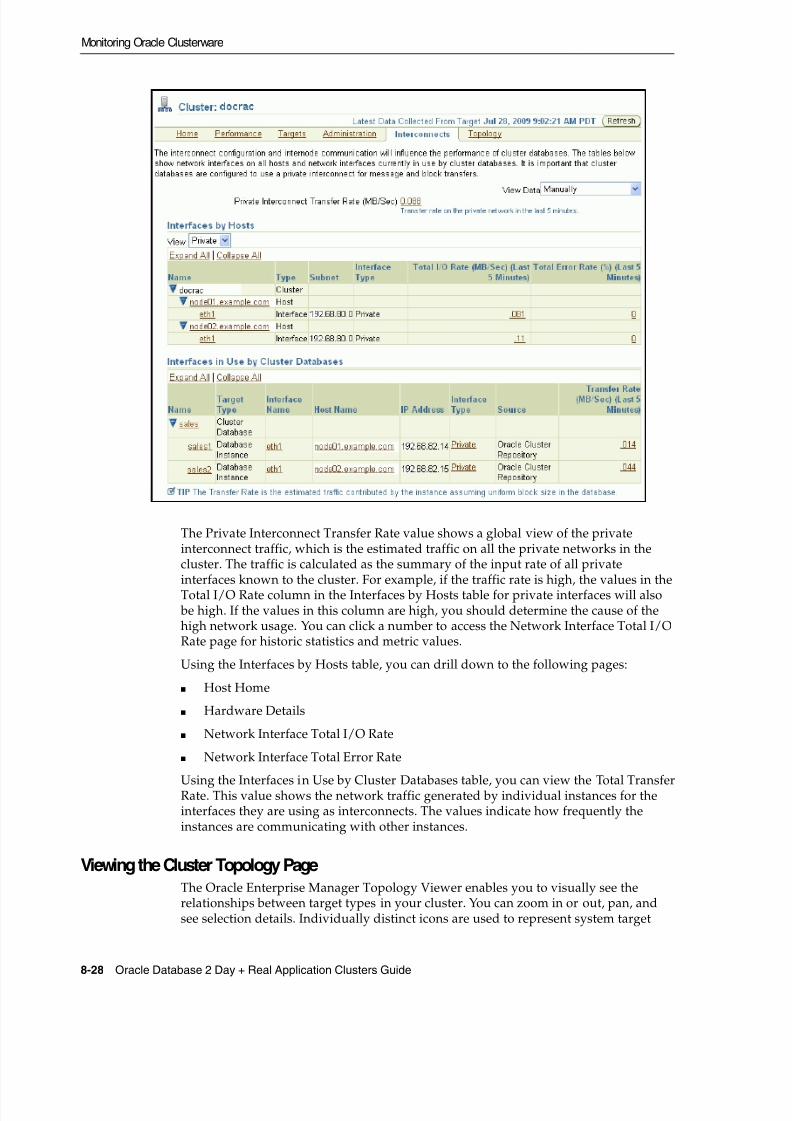
8/8/2019 Oracle 11g RAC Guide
http://slidepdf.com/reader/full/oracle-11g-rac-guide 156/208
Monitoring Oracle Clusterware
8-28 Oracle Database 2 Day + Real Application Clusters Guide
The Private Interconnect Transfer Rate value shows a global view of the privateinterconnect traffic, which is the estimated traffic on all the private networks in thecluster. The traffic is calculated as the summary of the input rate of all privateinterfaces known to the cluster. For example, if the traffic rate is high, the values in theTotal I/O Rate column in the Interfaces by Hosts table for private interfaces will also be high. If the values in this column are high, you should determine the cause of thehigh network usage. You can click a number to access the Network Interface Total I/ORate page for historic statistics and metric values.
Using the Interfaces by Hosts table, you can drill down to the following pages:■ Host Home■ Hardware Details■ Network Interface Total I/O Rate■ Network Interface Total Error Rate
Using the Interfaces in Use by Cluster Databases table, you can view the Total TransferRate. This value shows the network traffic generated by individual instances for theinterfaces they are using as interconnects. The values indicate how frequently theinstances are communicating with other instances.
Viewing the Cluster Topology Page The Oracle Enterprise Manager Topology Viewer enables you to visually see therelationships between target types in your cluster. You can zoom in or out, pan, andsee selection details. Individually distinct icons are used to represent system target

8/8/2019 Oracle 11g RAC Guide
http://slidepdf.com/reader/full/oracle-11g-rac-guide 157/208
Troubleshooting Configuration Problems in Oracle RAC Environments
Monitoring Performance and Troubleshooting 8-29
types, and standardized visual indicators, such as frames around selections, are usedacross all target types.
The Topology Viewer populates icons based on your system configuration. If a listeneris serving an instance, a line connects the listener icon and the instance icon. If a clusterdatabase is configured to use ASM, the relationship between the cluster ASM andcluster database appears in the topology.
If the Show Configuration Details option is unchecked, the topology shows themonitoring view of the environment, which includes general information such asalerts and overall status. If you select the Show Configuration Details option,additional details are shown in the Selection Details page, which are valid for anytopology view. For instance, the listener component would also show the machinename and port number.
You can click an icon and then the right mouse button to display a menu of availableactions. Several actions go to pages related to the target type where you can performmonitoring or tuning tasks.
Refer to the Enterprise Manager Online Help for more information about the contentsof this page.
Troubleshooting Configuration Problems in Oracle RAC Environments Problems can occur when attempting to complete the installation or database creationprocess manually instead of using the Oracle Database management tools. Otherproblems occur due to the database administrator or system administrator missingimportant operating system or cluster configuration steps prior to installation. BothOracle Clusterware and Oracle Database components have subcomponents that youcan troubleshoot. The Cluster Ready Services Control (CRSCTL) command check enables you to determine the status of several Oracle Clusterware components at onetime.
This section contains the following topics:■ Using CRSCTL to Diagnose Cluster Issues■ Using the Cluster Verification Utility to Diagnose Problems■ Viewing Oracle RAC Database Alerts■ Viewing Oracle RAC Database Alert Log Messages
Using CRSCTL to Diagnose Cluster Issues You can use CRSCTL commands as the root operating system user to diagnoseproblems with your Oracle Clusterware installation, or to enable dynamic debuggingfor Oracle Clusterware. This section contains the following topics:■ About the Oracle Clusterware Alert Log■ About the Oracle Clusterware Component Log Files■ Checking the Status of the Oracle Clusterware Installation
See Also: "Viewing the Cluster Database Topology" on page 8-19
See Also:
■ "Tools for Installing, Configuring, and Managing Oracle RAC"■ "About Verifying the Oracle Clusterware Installation"

8/8/2019 Oracle 11g RAC Guide
http://slidepdf.com/reader/full/oracle-11g-rac-guide 158/208
Troubleshooting Configuration Problems in Oracle RAC Environments
8-30 Oracle Database 2 Day + Real Application Clusters Guide
■ Running the Oracle Clusterware Diagnostics Collection Script■ Enabling Debugging of Oracle Clusterware Components■ Enabling Debugging for an Oracle Clusterware Resource■ Enabling and Disabling Oracle Clusterware Daemons
About the Oracle Clusterware Alert Log Oracle Clusterware posts alert messages when important events occur. For example,you might see alert messages from the Cluster Ready Services (CRS) daemon processwhen it starts, if it aborts, if the failover process fails, or if automatic restart of a CRSresource failed.
Enterprise Manager monitors the Clusterware log file and posts an alert on the Cluster
Home page if an error is detected. For example, if a voting disk is not available, aCRS-1604 error is raised, and a critical alert is posted on the Cluster Home page. Youcan customize the error detection and alert settings on the Metric and Policy Settingspage.
The Oracle Clusterware should be the first place to look for serious errors. It oftencontains references to other diagnostic logs that provide detailed information on aspecific component. The location of the Oracle Clusterware log file is CRS_home /log/ hostname /alert hostname .log , where CRS_home is the directory inwhich Oracle Clusterware was installed and hostname is the host name of the localnode.
About the Oracle Clusterware Component Log Files Oracle RAC uses a unified log directory structure to store all the Oracle Clusterwarecomponent log files. This consolidated structure simplifies diagnostic informationcollection and assists during data retrieval and problem analysis.
In each of the following log file locations, hostname is the name of the node, forexample, racnode2 and CRS_homeis the directory in which the Oracle Clusterwaresoftware was installed.
The log files for the CRS daemon, crsd , can be found in the following directory:
CRS_home /log/ hostname /crsd/
The log files for the CSS daemon, cssd , can be found in the following directory:CRS_home /log/ hostname /cssd/
The log files for the EVM daemon, evmd , can be found in the following directory:CRS_home /log/ hostname /evmd/
The log files for the Oracle Cluster Registry (OCR) can be found in the followingdirectory:
See Also:
■ "Tools for Installing, Configuring, and Managing Oracle RAC"■ "Troubleshooting Configuration Problems in Oracle RAC
Environments"
See Also:
■ Oracle Real Application Clusters Administration and DeploymentGuide
8/8/2019 Oracle 11g RAC Guide
http://slidepdf.com/reader/full/oracle-11g-rac-guide 159/208
Troubleshooting Configuration Problems in Oracle RAC Environments
Monitoring Performance and Troubleshooting 8-31
CRS_home /log/ hostname /client/
Each program that is part of the Oracle RAC high availability component has asubdirectory assigned exclusively for that program. The name of the subdirectory isthe same as the name of the program.
Checking the Status of the Oracle Clusterware Installation Use the CRSCTL check command to display the status of an Oracle Clusterwarecomponent or daemon.
To determine the condition of your clusterware installation:1. Log in to the operating system as the root user in a command window.
2. Use CRSCTL to check the status of Oracle Clusterware using the followingcommand:
# crsctl check crs
3. Check the status of an individual Oracle Clusterware daemon using the followingsyntax, where daemon is crsd , cssd , or evmd :
# crsctl check daemon
Running the Oracle Clusterware Diagnostics Collection Script The Oracle Clusterware Diagnostics Collection script collects diagnostic informationfor your Oracle Clusterware installation. The diagnostics provide additionalinformation so that Oracle Support Services can resolve problems. It displays thestatus of the Cluster Synchronization Services (CSS), Event Manager (EVM), and theCluster Ready Services (CRS) daemons.
To run the Oracle Clusterware Diagnostics Collection script:1. In a command window, log in to the operating system as the root user.
2. Run the diagcollection.pl script from the operating system prompt asfollows, where Grid_homeis the home directory of your Oracle grid infrastructureinstallation:
# Grid_home /bin/diagcollection.pl --collect
Note: If any of the Oracle Clusterware components generates a coredump file, it is located in a subdirectory of the log directory for thatcomponent.
See Also:
■ Oracle Real Application Clusters Administration and DeploymentGuide
See Also:■ Oracle Real Application Clusters Administration and Deployment
Guide

8/8/2019 Oracle 11g RAC Guide
http://slidepdf.com/reader/full/oracle-11g-rac-guide 160/208
Troubleshooting Configuration Problems in Oracle RAC Environments
8-32 Oracle Database 2 Day + Real Application Clusters Guide
Enabling Debugging of Oracle Clusterware Components You can enable debugging for the Oracle Cluster daemons, Event Manager (EVM), andtheir modules by running CRSCTL commands.
To enable debugging of Oracle Clusterware components:1. In a command window, log in to the operating system as the root user.
2. Use the following command to obtain the module names for a component, wherecomponent_name is crs , evm, css or the name of the component for which youwant to enable debugging:
# crsctl lsmodules component_name
For example, viewing the modules of the css component might return thefollowing results:
# crsctl lsmodules cssThe following are the CSS modules ::CSSDCOMMCRSCOMMNS
3. Use CRSCTL as follows, where component_name is the name of the OracleClusterware component for which you want to enable debugging, module is thename of module, and debugging_level is a number from 1 to 5:
# crsctl debug log component module : debugging_level
For example, to enable the lowest level of tracing for the CSSD module of the css component, you would use the following command:
# crsctl debug log css CSSD:1
Enabling Debugging for an Oracle Clusterware Resource You can use CRSCTL commands to enable debugging for resource managed by OracleClusterware.
To enable debugging of an Oracle Clusterware resource:
1. In a command window, log in to the operating system as the root user.2. Obtain a list of the resources available for debugging by running the following
command:
# crsctl check crs
3. Run the following command to enable debugging, where resource_name is thename of an Oracle Clusterware resource, such as ora.racnode1.vip , anddebugging_level is a number from 1 to 5:
# crsctl debug log res resource_name : debugging_level
See Also:
■ Oracle Real Application Clusters Administration and DeploymentGuide
See Also:
■ Oracle Real Application Clusters Administration and DeploymentGuide

8/8/2019 Oracle 11g RAC Guide
http://slidepdf.com/reader/full/oracle-11g-rac-guide 161/208
Troubleshooting Configuration Problems in Oracle RAC Environments
Monitoring Performance and Troubleshooting 8-33
Enabling and Disabling Oracle Clusterware Daemons When the Oracle Clusterware daemons are enabled, they start automatically when thenode is started. To prevent the daemons from doing this, you can disable them usingcrsctl commands.
To enable automatic startup for all Oracle Clusterware daemons:1. In a command window, log in to the operating system as the root user.
2. Run the following CRSCTL command:
# crsctl enable crs
To disable automatic startup for all Oracle Clusterware daemons:1. In a command window, log in to the operating system as the root user.
2. Run the following CRSCTL command:
# crsctl disable crs
Using the Cluster Verification Utility to Diagnose Problems
The Cluster Verification Utility (CVU) can assist you in diagnosing a wide variety ofconfiguration problems.
This section contains the following topics:■ Verifying the Existence of Node Applications■ Verifying the Integrity of Oracle Clusterware Components■ Verifying the Integrity of the Oracle Cluster Registry■ Verifying the Integrity of Your Entire Cluster■ Checking the Settings for the Interconnect■ Enabling Tracing
Verifying the Existence of Node Applications You use the CVU comp nodeapp command to verify the existence of nodeapplications, namely the virtual IP (VIP), Oracle Notification Services (ONS), andGlobal Service Daemon (GSD), on all the nodes.
To verify the existence of node applications:1. In a command window, log in to the operating system as the root user.
2. Use the comp nodeapp command of the CVU, using the following syntax:
See Also:
■ Oracle Real Application Clusters Administration and DeploymentGuide
See Also:
■ Oracle Real Application Clusters Administration and DeploymentGuide

8/8/2019 Oracle 11g RAC Guide
http://slidepdf.com/reader/full/oracle-11g-rac-guide 162/208
Troubleshooting Configuration Problems in Oracle RAC Environments
8-34 Oracle Database 2 Day + Real Application Clusters Guide
cluvfy comp nodeapp [ -n node_list ] [-verbose]
where node_list represents the nodes to check.
3. If the cluvfy command returns the value of UNKNOWNfor a particular node, theCVU cannot determine whether a check passed or failed. Determine if the failurewas caused by one of the following reasons:
■ The node is down.■ Executable files that the CVU requires are missing in the CRS_home /bin
directory or the Oracle_home /bin directory.■ The user account that ran the CVU does not have permissions to run common
operating system executable files on the node.■ The node is missing an operating system patch or required package.■ The kernel parameters on that node were not configured correctly and the
CVU cannot obtain the operating system resources required to perform itschecks.
Verifying the Integrity of Oracle Clusterware Components You use the CVU comp crs command to verify the existence of all the OracleClusterware components.
To verify the integrity of Oracle Clusterware components:1. In a command window, log in to the operating system as the root user.
2.Use the
comp crscommand of the CVU, using the following syntax:
cluvfy comp crs [ -n node_list ] [-verbose]
where node_list represents the nodes to check.
Verifying the Integrity of the Oracle Cluster Registry You use the CVU comp ocr command to verify the integrity of the OracleClusterware registry.
To verify the integrity of the Oracle Clusterware registry:1. In a command window, log in to the operating system as the root user.
2. Use the comp ocr command of the CVU, using the following syntax:
cluvfy comp ocr [ -n node_list ] [-verbose]
where node_list represents the nodes to check.
See Also:
■ "Troubleshooting Configuration Problems in Oracle RACEnvironments"
■ Oracle Clusterware Administration and Deployment Guide
See Also:
■ "Troubleshooting Configuration Problems in Oracle RACEnvironments"
■ Oracle Clusterware Administration and Deployment Guide

8/8/2019 Oracle 11g RAC Guide
http://slidepdf.com/reader/full/oracle-11g-rac-guide 163/208
Troubleshooting Configuration Problems in Oracle RAC Environments
Monitoring Performance and Troubleshooting 8-35
Verifying the Integrity of Your Entire Cluster You use the CVU comp clu command to check that all nodes in the cluster have thesame view of the cluster configuration.
To verify the integrity of your Oracle RAC cluster:1. In a command window, log in to the operating system as the root user.
2. Use the comp clu command of the CVU, using the following syntax:
cluvfy comp clu [-verbose]
Checking the Settings for the Interconnect Cache Fusion enhances the performance of Oracle RAC by utilizing a high-speedinterconnect to send data blocks to another instance's buffer cache. The high-speedinterconnect should be a private network with the highest bandwidth to maximizeperformance.
For network connectivity verification, the CVU discovers all the available networkinterfaces if you do not specify an interface on the CVU command line.
To check the settings for the interconnect:1. In a command window, log in to the operating system as the root user.
2. To verify the accessibility of the cluster nodes, specified by node_list , from thelocal node or from any other cluster node, specified by srcnode , use thecomponent verification command nodereach as follows:
cluvfy comp nodereach -n node_list [ -srcnode node ] [-verbose]
When you issue the nodecon command as shown in the previous example, itinstructs the CVU to perform the following tasks:■ Discover all the network interfaces that are available on the cluster nodes.■
Review the corresponding IP addresses and subnets for the interfaces.■ Obtain the list of interfaces that are suitable for use as VIPs and the list of
interfaces to private interconnects.■ Verify the connectivity among all the nodes through those interfaces.
When you run the nodecon command in verbose mode, it identifies the mappings between the interfaces, IP addresses, and subnets.
See Also:
■ "Troubleshooting Configuration Problems in Oracle RACEnvironments"
■ Oracle Clusterware Administration and Deployment Guide
See Also:
■ "Troubleshooting Configuration Problems in Oracle RACEnvironments"
■ Oracle Clusterware Administration and Deployment Guide

8/8/2019 Oracle 11g RAC Guide
http://slidepdf.com/reader/full/oracle-11g-rac-guide 164/208
Troubleshooting Configuration Problems in Oracle RAC Environments
8-36 Oracle Database 2 Day + Real Application Clusters Guide
3. To verify the connectivity among the nodes through specific network interfaces,use the comp nodecon command with the -i option and specify the interfaces to be checked with the interface_list argument:
cluvfy comp nodecon -n node_list -i interface_list [-verbose]
For example, you can verify the connectivity among the nodes racnode1 , racnode2 , and racnode3 , through the specific network interface eth0 byrunning the following command:
cluvfy comp nodecon -n racnode1, racnode2, racnode3 -i eth0 -verbose
Enabling Tracing The CVU does not generate trace files unless you enable tracing. The CVU trace filesare created in the CRS_home /cv/log directory. Oracle RAC automatically rotates thelog files, and the most recently created log file has the name cvutrace.log.0 . Youshould remove unwanted log files or archive them to reclaim disk space, if needed.
To enable tracing using CVU:1. In a command window, log in to the operating system as the root user.
2. Set the environment variable SRVM_TRACEto true .
# set SRVM_TRACE=true; export SRVM_TRACE
3. Run the command that you want to trace.
Viewing Oracle RAC Database Alerts Alert messages are displayed in Enterprise Manager. The Alerts table is similar to thatshown for single-instance databases, but in a cluster database, it includes columns forthe target name and target type. For example, if a user connected to the orcl1 instance exceeded their allotted login time, you would see an alert message with thefollowing values:■ Target name: orcl_orcl1■ Target type: Database instance■ Category: Response■ Name: User logon time■ Message: User logon time is 10250 milliseconds■ Alert triggered: Date and time when the alert condition occurred
See Also:
■ "Troubleshooting Configuration Problems in Oracle RACEnvironments"
■ Oracle Clusterware Administration and Deployment Guide
See Also:■ "Troubleshooting Configuration Problems in Oracle RAC
Environments"■ Oracle Clusterware Administration and Deployment Guide

8/8/2019 Oracle 11g RAC Guide
http://slidepdf.com/reader/full/oracle-11g-rac-guide 165/208
Troubleshooting Configuration Problems in Oracle RAC Environments
Monitoring Performance and Troubleshooting 8-37
To view the alert messages for an Oracle RAC database:1. On the Cluster Database Home page, scroll down to the section titled Alerts.
The section Related Alerts displays nondatabase alert messages, for example, alertmessages for Oracle Net.
2. View the alerts for your database and database instances.
The following screenshot shows an example of the Alerts display for a clustereddatabase named docrac .
Viewing Oracle RAC Database Alert Log Messages An alert log is created for each instance in a cluster database.
To view the alert log for an Oracle RAC database instance:1. On the Cluster Database Home page, scroll down to the Instances section.
2. Click the name of the instance for which you want to view the alert log.
The Cluster Database Instance Home page appears.
3. In the Diagnostic Summary section, click the link next to the heading Alert Log todisplay the alert log entries containing ORA- errors.
The Alert Log Errors page appears.
4. (Optional) Click Alert Log Contents in the Related Links section to view all theentries in the alert log.
On the View Alert Log Contents page, click Go to view the most recent entries, oryou can enter your own search criteria.
See Also:
■ "Monitoring Oracle RAC Database and Cluster Performance"■ "Troubleshooting Configuration Problems in Oracle RAC
Environments"■ Oracle Database 2 Day DBA■ Oracle Database 2 Day + Performance Tuning Guide
See Also:
■ Oracle Real Application Clusters Administration and DeploymentGuide

8/8/2019 Oracle 11g RAC Guide
http://slidepdf.com/reader/full/oracle-11g-rac-guide 166/208
Monitoring and Tuning Oracle RAC: Oracle By Example Series
8-38 Oracle Database 2 Day + Real Application Clusters Guide
Monitoring and Tuning Oracle RAC: Oracle By Example Series Oracle By Example (OBE) has a viewlet, or animated demo, on using ADDM for anOracle RAC database.
To view the Monitoring and Tuning OBE, in your browser, enter the following URL:
http://www.oracle.com/technology/obe/demos/admin/demos.html

8/8/2019 Oracle 11g RAC Guide
http://slidepdf.com/reader/full/oracle-11g-rac-guide 167/208
9
Adding and Deleting Nodes and Instances 9-1
9Adding and Deleting Nodes and Instances
This chapter describes how to add and remove nodes and instances in Oracle RealApplication Clusters (Oracle RAC) environments. You can use these methods whenconfiguring a new Oracle RAC cluster, or when scaling up an existing Oracle RACcluster.
This chapter includes the following sections:
■ Preparing the New Node■ Extending the Oracle Grid Infrastructure Home to the New Node■ Extending the Oracle RAC Home Directory■ Adding the New Node to the Cluster using Enterprise Manager■ Creating an Instance on the New Node■ Deleting an Instance From the Cluster Database■ Removing a Node From the Cluster
Preparing the New Node Before a node can be added to the cluster, you must perform the same preinstallationsteps on the new node as you did for all the existing nodes in the cluster. This includesthe following tasks:■ Checking hardware compatibility■ Configuring the operating system■ Configuring SSH connectivity between the new node and the other cluster
members■ Configuring access to shared storage■ Creating groups, users, and directories
Refer to Chapter 2, "Preparing Your Cluster" for details on these tasks.
Note: For this chapter, it is very important that you perform each
step in the order shown.
See Also:
■ Oracle Real Application Clusters Administration and DeploymentGuide for more information about adding and removing nodesfrom your cluster database

8/8/2019 Oracle 11g RAC Guide
http://slidepdf.com/reader/full/oracle-11g-rac-guide 168/208
Extending the Oracle Grid Infrastructure Home to the New Node
9-2 Oracle Database 2 Day + Real Application Clusters Guide
Verifying the New Node Meets the Prerequisites for Installation When adding a node to an existing cluster, the new node must match theconfiguration of the other nodes in the cluster. This means the new nodes must run thesame operating system and version of the operating system as the other nodes. Thenew machine must also use the same chip architecture (32-bit or 64-bit) as the othernodes. However, you can have machines of different speeds and sizes in the same
cluster.After you have configured the new nodes, you should use cluvfy to verify that allthe requirements for installation have been met. To verify the new node meets thehardware requirement, run the following command on an existing node (for example,either racnode1 or racnode2 ) from the Grid_home /bin directory:
cluvfy stage -pre crsinst -n racnode3 -verbose
Extending the Oracle Grid Infrastructure Home to the New Node Now that the new node has been configured to support Oracle Clusterware, you useOracle Universal Installer (OUI) to add a Grid home to the node being added to yourOracle RAC cluster.
This section assumes that you are adding a node named racnode3 and that you havealready successfully installed Oracle Clusterware on racnode1 in a nonshared home,where Grid_home represents the successfully installed Oracle Clusterware home.
To extend the Oracle grid infrastructure to include the new node:1. Verify the new node has been properly prepared for an Oracle Clusterware
installation by running the following CLUVFY command on the racnode1 node:cluvfy stage -pre nodeadd -n racnode3 -verbose
2. As the oracle user (owner of the Oracle Grid software installation) onracnode1 , go to Grid_home /oui/bin and run the addNode.sh script in silentmode:
cd /u01/grid/oui/bin./addNode.sh -silent "CLUSTER_NEW_NODES={racnode3}" "CLUSTER_NEW_VIRTUAL_HOSTNAMES={racnode3-vip}"
When running this command, the curly braces ( { } ) are not optional and must beincluded or the command will return an error.
You can alternatively use a response file instead of placing all the arguments in thecommand line. See Oracle Clusterware Administration and Deployment Guide formore information on using response files.
3. When the script finishes, run the root.sh script as the root user on the newnode, racnode3 , from the Oracle home directory on that node.
4. If you are not using Oracle Grid Naming Service (GNS), then you must add thename and address for racnode3 to DNS.
See Also:
■ "Preparing Your Cluster"■ "Configuring the Network"

8/8/2019 Oracle 11g RAC Guide
http://slidepdf.com/reader/full/oracle-11g-rac-guide 169/208
Extending the Oracle RAC Home Directory
Adding and Deleting Nodes and Instances 9-3
You should now have Oracle Clusterware running on the new node. To verify theinstallation of Oracle Clusterware on the new node, you can run the followingcommand on the newly configured node, racnode3 :
$ cd /u01/grid/bin$ ./cluvfy stage -post nodeadd -n racnode3 -verbose
Extending the Oracle RAC Home Directory Now that you have extended the Grid home to the new node, you must extend theOracle home on racnode1 to racnode3 . The following steps assume that you havealready completed the tasks described in the previous sections, "Preparing the NewNode" and "Extending the Oracle Grid Infrastructure Home to the New Node" , andthat racnode3 is a member node of the cluster to which racnode1 belongs.
The procedure for adding an Oracle home to the new node is very similar to theprocedure you just completed for extending the Grid home to the new node.
To extend the Oracle RAC installation to include the new node:1. Ensure that you have successfully installed the Oracle RAC software on at least
one node in your cluster environment. To use these procedures as shown, replaceOracle_home with the location of your installed Oracle home directory.
2. Go to the Oracle_home /oui/bin directory on racnode1 and run theaddNode.sh script in silent mode as shown in the following example:
$ cd /u01/app/oracle/product/11.2.0/oui/bin$ ./addode.sh -silent "CLUSTER_NEW_NODES={racnode3}"
3. When the script finishes, run the root.sh script as the root user on the newnode, racnode3 , from the Oracle home directory on that node.
For policy-managed databases with Oracle Managed Files (OMF) enabled, no
further actions are needed.For a policy-managed database, when you add a new node to the cluster, it isplaced in the Free pool by default. If you increase the cardinality of the databaseserver pool, then an Oracle RAC instance is added to the new node, racnode3 ,and it is moved to the database server pool. No further action is necessary.
4. Add shared storage for the undo tablespace and redo log files.
If OMF is not enabled for your database, then you must manually add an undotablespace and redo logs.
Note: Avoid changing host names after you complete the OracleClusterware installation, including adding or deleting domainqualifications. Nodes with changed host names must be deleted fromthe cluster and added back with the new name.
See Also:
■ "Completing the Oracle Clusterware Configuration"■ Oracle Real Application Clusters Administration and Deployment
Guide for more information about adding and removing nodesfrom your cluster database

8/8/2019 Oracle 11g RAC Guide
http://slidepdf.com/reader/full/oracle-11g-rac-guide 170/208
Adding the New Node to the Cluster using Enterprise Manager
9-4 Oracle Database 2 Day + Real Application Clusters Guide
5. If you have an administrator-managed database, then add a new instance on thenew node as described in "Creating an Instance on the New Node" on page 9-4 .
If you followed the installation instructions in this guide, then your clusterdatabase is an administrator-managed database and stores the database files onOracle Automatic Storage Management (Oracle ASM) with OMF enabled.
After completing these steps, you should have an installed Oracle home on the newnode.
Adding the New Node to the Cluster using Enterprise Manager If you followed the steps described in "Extending the Oracle RAC Home Directory" ,the cluster node is added to the cluster by the addNode.sh script. After the softwareis started on the new node, it is detected by Enterprise Manager. If an EM agent wasnot installed on the new node, then an alert is issued for that host, with the message"Incomplete configuration".
Creating an Instance on the New Node You can add an instance to the cluster using either the Instance Management option ofDatabase Configuration Assistant (DBCA) or using Enterprise Manager. Before usingeither of these options you must first configure the new node to be a part of the clusterand install the software on the new node as described in the previous sections.
There are two methods of adding an instance to the new node:■ Adding a New Instance for a Policy-Managed Database■ Adding a New Instance for an Administrator-Managed Database
Adding a New Instance for a Policy-Managed Database To add an instance to a policy-managed databases, you simply increase the cardinalityof the server pool for the database. The database instance and ASM instance on thenew node are created and configured automatically when a node is added to theserver pool.
See Also:
■ "Verifying Your Oracle RAC Database Installation"■ Oracle Real Application Clusters Administration and Deployment
Guide for more information about adding and removing nodesfrom your cluster database
See Also:
■ "Completing the Oracle Clusterware Configuration"■ Oracle Real Application Clusters Administration and Deployment
Guide for more information about adding and removing nodesfrom your cluster database
Note: The steps described in this section require a license for theEnterprise Manager Provisioning Management pack. Refer to the
Oracle Database Licensing Information for information about theavailability of these features on your system.

8/8/2019 Oracle 11g RAC Guide
http://slidepdf.com/reader/full/oracle-11g-rac-guide 171/208
Creating an Instance on the New Node
Adding and Deleting Nodes and Instances 9-5
To add an instance to a policy-managed database using Enterprise Manager:1. From the Cluster Database Home page, click Server .
2. Under the heading Change Database, click Add Instance .
The Add Instance: Cluster Credentials page appears.
3. Enter the credentials of the Oracle Clusterware software owner and the SYSASMuser, then click Next .
After the credentials have been validated, the Edit Server Pool page appears.
4. Modify the server pool settings then click Submit.
5. Click the Database tab to return to the Cluster Database Home page.
Review the number of instances available for your cluster database.
Adding a New Instance for an Administrator-Managed Database When adding an instance to an administrator-managed databases, you must specifythe name of the database instance and which node it should run on.
To add an instance to an administrator-managed database using EnterpriseManager:1. From the Cluster Database Home page, click Server .
2. Under the heading Change Database, click Add Instance .
The Add Instance: Cluster Credentials page appears.
3. Enter the credentials of the Oracle Clusterware software owner and for theSYSASM user, then click Next .
After the credentials have been validated, the Add Instance: Host page appears.
4. In the Name of the database instance to be added field, either use the defaultinstance name, or enter a different name for the database instance, such asracnode3 .
5. Select the node on which you want to create the new instance, then Next .
Note: This procedure assumes that the Oracle Database software isalready configured on the selected node and that there is no instancefor the cluster database currently running on the selected node.

8/8/2019 Oracle 11g RAC Guide
http://slidepdf.com/reader/full/oracle-11g-rac-guide 172/208
Deleting an Instance From the Cluster Database
9-6 Oracle Database 2 Day + Real Application Clusters Guide
After the selected host has been validated, the Add Instance: Review pageappears.
6. Review the information, then click Submit Job to proceed.
A confirmation page appears.
7. Click View Job to check on the status of the submitted job.
The Job Run detail page appears.
8. Click your browser’s Refresh button until the job shows a status of Succeeded orFailed.
If the job shows a status of Failed, you can click the name of the step that failed toview the reason for the failure.
9. Click the Database tab to return to the Cluster Database Home page.
The number of instances available in the cluster database is increased by one.
Deleting an Instance From the Cluster Database Sometimes, it might be necessary to remove a database instance from your clusterdatabase. For example, if you want to retire or repurpose a server, you would firstremove the database instance running on that server.
You can delete an instance from the cluster using either the Instance Managementoption of Database Configuration Assistant (DBCA) or using Enterprise Manager. Ifyou choose to use DBCA to delete an instance, start the DBCA utility from a node thatwill remain part of the cluster.
When you delete an instance from a clustered database, there are two methods:■ Deleting an Instance From a Policy-Managed Database■ Deleting an Instance From an Administrator-Managed Database
Deleting an Instance From a Policy-Managed Database To delete an instance from a policy-managed databases, you simply decrease thecardinality of the server pool for the database. The database instance and ASM
Note: The steps described in this section require a license for theEnterprise Manager Provisioning Management pack. Refer to theOracle Database Licensing Information for information about theavailability of these features on your system.

8/8/2019 Oracle 11g RAC Guide
http://slidepdf.com/reader/full/oracle-11g-rac-guide 173/208
Deleting an Instance From the Cluster Database
Adding and Deleting Nodes and Instances 9-7
instance on the deallocated node are removed from the cluster and the node is eitherreassigned to another server pool or placed in the Free pool.
To delete a policy-managed database instance using Enterprise Manager:1. Log in to Oracle Enterprise Manager Database Control (Database Control) as a
SYSDBA user.
2. From the Cluster Database Home page, click Server .3. On the Server subpage, under the heading Change Database, click Delete
Instance .
The Edit Server Pool page appears.
4. Enter the credentials for the Oracle Database software owner and the SYSASMuser, then click Next .The Delete Instance: Database Instance page appears
5. Modify the server pool settings then click Submit.
6. Click the Database tab to return to the Cluster Database Home page.
Review the number of instances available for your cluster database.
Deleting an Instance From an Administrator-Managed Database To remove an instance from an administrator-managed database, you must specify thename of the database instance to delete and which node the instance is running on.
To delete an administrator-managed database instance using EnterpriseManager:1. Log in to Oracle Enterprise Manager Database Control (Database Control) as a
SYSDBA user.
2. From the Cluster Database Home page, click Server .
3. On the Server subpage, under the heading Change Database, click DeleteInstance .
The Delete Instance: Cluster Credentials page appears.
4. Enter the credentials for the Oracle Database software owner and the SYSASMuser, then click Next .
The Delete Instance: Database Instance page appears
5. Select the instance you want to delete, then click Next .

8/8/2019 Oracle 11g RAC Guide
http://slidepdf.com/reader/full/oracle-11g-rac-guide 174/208
Removing a Node From the Cluster
9-8 Oracle Database 2 Day + Real Application Clusters Guide
After the host information has been validated, the Delete Instance: Review pageappears.
6. Review the information, and if correct, click Submit Job to continue. Otherwise,click Back and correct the information.
A Confirmation page appears.
7. Click View Job to view the status of the node deletion job.
A Job Run detail page appears.
8. Click your browser’s Refresh button until the job shows a status of Succeeded orFailed.
If the job shows a status of Failed, you can click the name of the step that failed toview the reason for the failure.
9. Click the Cluster tab to view to the Cluster Home page.
The number of hosts available in the cluster database is reduced by one.
Removing a Node From the Cluster Removing a node from the cluster can be as easy as simply shutting down the server.As long as the node was not pinned and does not host any Oracle databases prior toOracle Database 11 g release 2, the node is automatically removed from the cluster

8/8/2019 Oracle 11g RAC Guide
http://slidepdf.com/reader/full/oracle-11g-rac-guide 175/208
Removing a Node From the Cluster
Adding and Deleting Nodes and Instances 9-9
when it is shut down. If the node was pinned or hosts database instance from previousreleases, then explicit deletion is needed.
To repurpose this server, you can restart the node with a different profile in place, oryou can use other software to put a new software image on the server.
If you have licensed the Oracle Enterprise Manager RAC Provisioning pack, you canalso use the "Scale down Oracle Real Application Clusters" deployment procedure toremove a node from your cluster.
See Also:
■
"Completing the Oracle Clusterware Configuration"■ Oracle Real Application Clusters Administration and Deployment
Guide for more information about adding and removing nodesfrom your cluster database

8/8/2019 Oracle 11g RAC Guide
http://slidepdf.com/reader/full/oracle-11g-rac-guide 176/208
Removing a Node From the Cluster
9-10 Oracle Database 2 Day + Real Application Clusters Guide

8/8/2019 Oracle 11g RAC Guide
http://slidepdf.com/reader/full/oracle-11g-rac-guide 177/208
10
Managing Oracle Software and Applying Patches 10-1
10Managing Oracle Software and ApplyingPatches
Oracle issues product fixes for its software called patches. When you apply the patchto your Oracle software installation, it updates the executable files, libraries, and objectfiles in the software home directory. The patch application can also updateconfiguration files and Oracle-supplied SQL schemas. Patches are applied by using
OPatch, a utility supplied by Oracle, or Enterprise Manager.A group of patches form a patch set. When you apply a patch set, many different filesand utilities are modified. This results in a version change for your Oracle software, forexample, from Oracle Database 11.2.0.1.0 to Oracle Database 11.2.0.2.0. To apply apatch set, use Oracle Universal Installer (OUI).
This chapter describes how to manage Oracle software and apply patches in OracleReal Application Clusters (Oracle RAC) environments using Oracle EnterpriseManager and the OPatch utility.
This chapter includes the following sections:■ Configuring the Enterprise Manager Patch Interface■
Obtaining Patches■ Using DB Control to Apply Patches to a Cluster Database■ Applying Patches to Oracle Clusterware Using DB Control■ Applying Patch Sets■ Applying Patches Using OPatch and the Minimum Downtime Method■ Troubleshooting Patch Deployment■ Upgrading the Oracle Software
Configuring the Enterprise Manager Patch Interface Enterprise Manager Database Control enables you to find the latest patch release onthe My Oracle Support (formerly Oracle MetaLink) Web site, and to download it to your
See Also:
■ Oracle Universal Installer and OPatch User's Guide for Windows andUNIX for more information about using OPatch and applyingpatches to Oracle RAC
■ Oracle Database 2 Day DBA

8/8/2019 Oracle 11g RAC Guide
http://slidepdf.com/reader/full/oracle-11g-rac-guide 178/208
Configuring the Enterprise Manager Patch Interface
10-2 Oracle Database 2 Day + Real Application Clusters Guide
Oracle home. There are two topics related to configuring the Enterprise Manager Patchinterface:■ Configure the Software Library■ About My Oracle Support Credentials
Configure the Software Library The first step is configuring the software library. When configuring the SoftwareLibrary you specify the directory paths that the software library will use to store binary data, such as patches.
To configure the Software Library prior to using the Patch Interface of DatabaseControl:1. On the Database Home page in DB Control, click Software and Support .2. In the Deployment Procedure Manager section, click the Deployment and
Provisioning Software Library link.
The Provisioning page appears.
3. Click the link for the Administration page.
4. Scroll down to the Software Library Configuration section at the bottom of thepage. Click Add .
The Add Software Library Location page appears.
5. In the Software Library directory location field, enter the name of the directory
where the patches will be uploaded to the node, for example,/home/oracle
.Click OK .
6. When the utility completes, you have completed the Software Libraryconfiguration.
About My Oracle Support Credentials To download patches from My Oracle Support (formerly Oracle MetaLink) usingEnterprise Manager, you can give Enterprise Manager Database Control (DatabaseControl) your login credentials so that it can log in to My Oracle Support automaticallyand search for patch releases. You must set these credentials before you can run thePatch Advisor in Database Control.
After you have configured the My Oracle Support credentials, Enterprise Managerautomatically creates and schedules two jobs for your system:■ Refresh From Metalink■ OPatch Update (which requires the Software Library to be configured)
Refer to Oracle Database 2 Day DBA for instructions on setting your My Oracle Supportcredentials.
See Also:
■ "About Oracle RAC Management Using Enterprise Manager" onpage 4-2
■ Oracle Database 2 Day DBA
8/8/2019 Oracle 11g RAC Guide
http://slidepdf.com/reader/full/oracle-11g-rac-guide 179/208
Obtaining Patches
Managing Oracle Software and Applying Patches 10-3
Start the Provisioning Daemon The Procedure Manager allows you to view, edit, run, and monitor deploymentprocedures. Deployment procedures are best practices provided by Oracle for variousprovisioning tasks.
In order for the Deployment Procedure Manager to function properly, the ProvisioningDaemon job should be running. This job is used to monitor the status of runningdeployment procedures. You can start or stop a job and also view the status of the jobusing the pafctl utility. You can find this utility in the $ORACLE_HOME/bin directory. The syntax for this utility is as follows:
pafctl { start | stop | status } [ sysman_password ] [ interval ]
The keywords for this command indicate the following:■ start — Starts the Provisioning Daemon job. This takes the interval value from
the command line. If no interval is specified in the command line, you will have toenter a value, which is the interval (in minutes) with which to run the ProvisioningDaemon job.
■ stop — Stop the Provisioning Daemon job.■ status —Checks if the Provisioning Daemon job is running.■ sysman_password —You must specify the SYSMAN password to connect to the
repository. If not specified at the command line, you will be prompted to enter thevalue.
■ interval —This is an integer that specifies the interval (in minutes) for which to
run the Provisioning Daemon job. The default interval is 3 minutes. To specify avalue that is not the default value, you must use the start action. You will then be prompted for both the SYSMAN user password and the interval.
To start the Provisioning Daemon job, enter the following command at the operatingsystem prompt"
$ pafctl startEnter the repository user password:Enter interval [default 3]:
Obtaining Patches If you are directed by Oracle Support Services to apply a patch to your system, youcan get the patch from My Oracle Support. Search for the patch using the Patches &Updates interface using either the patch number, or search criteria.
Once you have located the patch, you can view the Readme file for the patch, andchoose to download the patch to your local system. If you download the patch file to acomputer that is not a node in the cluster, then you will need to transfer the file using a binary protocol to one of the cluster nodes.
See Also:
■ "Configuring the Enterprise Manager Patch Interface" onpage 10-1
■ Oracle Database 2 Day DBA

8/8/2019 Oracle 11g RAC Guide
http://slidepdf.com/reader/full/oracle-11g-rac-guide 180/208
Uploading Patches to the Software Library
10-4 Oracle Database 2 Day + Real Application Clusters Guide
Uploading Patches to the Software Library After you have downloaded a patch, you then need to upload the patch into theSoftware Library, or the patch cache.
To upload patches to the Software Library:1. On the Database Home page, click Software and Support .
2. On the Software and Support page, select View Patch Cache under the headingDatabase Software Patching.
3. On the Patch Cache page, click Upload Patch.
The Create Oracle Software Update Component page appears.
4. Click the Browse button, and then navigate to the directory where you saved thepatch file to disk. If you are accessing DB Control from a browser running on aclient computer, then the patch must be available on that client computer.
When you have located the patch file, click the file name to select the file, thenclick Open . This places the file name in the Patch File field.
5. In the Patch Attributes section of the Create Oracle Software Update Componentpage enter the following information about the patch you are uploading:■ Patch number■ The type of patch (individual or patch set)■ The date the patch was created■ The patch description■ The product family for the patch, (for example, Oracle Database)■ The product the patch applies to (for example, RDBMS Server)■ The release version of the product■
The platform your database runs on■ The language to use (for example, American English)■ (Optional) A description of the patch

8/8/2019 Oracle 11g RAC Guide
http://slidepdf.com/reader/full/oracle-11g-rac-guide 181/208
Using DB Control to Apply Patches to a Cluster Database
Managing Oracle Software and Applying Patches 10-5
You can find most of this information in the patch set README file.
6. When you have finished entering the information, check the option Add PatchFile to Patch Cache , then click Upload .
The Patch Cache page appears again, with a confirmation message.
7. The patch now appears in the Patch Cache.
Using DB Control to Apply Patches to a Cluster Database Patching in an Oracle RAC environment is slightly different compared to patching astandalone database instance. Before you install a patch, DB Control must stop all theapplications running from the software directory that is being patched. In an OracleRAC cluster, additional applications may need to be shutdown, depending uponwhich software is being patched.The following table Table 10–1 lists the applications tostop when patching Oracle software.
Because DB Control must be stopped when applying patches to the Oracle Databasehome, it creates background scripts to apply the patch during the time DB Control isdown. These scripts also restart the Oracle software, including DB Control after the
Table 10–1 Patching Oracle Home Directories
Oracle Home Directory Applications to Stop
Oracle RAC Database Oracle RAC database, Enterprise Manager Database Control,
listener, and any other applications that are running from theOracle RAC home directory
Oracle grid infrastructure Oracle RAC database, any standalone database instances thatuse the same ASM instance as the cluster database, ASM, allnode applications, Oracle Clusterware, and any otherapplications that are running from the Grid home directory

8/8/2019 Oracle 11g RAC Guide
http://slidepdf.com/reader/full/oracle-11g-rac-guide 182/208
Using DB Control to Apply Patches to a Cluster Database
10-6 Oracle Database 2 Day + Real Application Clusters Guide
patch has been applied. After it has been restarted, DB Control continues the patchingoperation.
You can use DB Control to patch Oracle RAC in the following ways:■ Patch Oracle RAC Database (All Nodes Upgrade)■ Patch Oracle RAC Database (Rolling Upgrade)
This section discusses only the Rolling Upgrade Method.
Patching an Oracle RAC Database Using the Rolling Upgrade Method In rolling patching , one node is shut down, the patch is applied to the node, and thenode is brought back up. This is performed node by node, separately, until all thenodes in the cluster are patched. This is the most efficient means of applying an
interim patch to an Oracle RAC, ASM, or Oracle Clusterware installation. By patchingnodes individually, there is zero downtime for the cluster database because at least oneinstance is available at all times on a different node.
While most patches can be applied in a rolling fashion, some patches cannot beapplied in this fashion. The READMEfile for the patch indicates whether or not you canapply the patch using the rolling patch method. If the patch cannot be applied usingthe rolling patch method, then you must use either "Minimum Downtime Patching" onpage 10-13 or the Patch Oracle RAC Database (All Nodes Upgrade) method to applythe patch.
To patch a non-shared Oracle home using the rolling patch method:1. On the Database Home page, click Software and Support .
2. On the Software and Support page, select Deployment Procedures .
The Deployment Procedure Manager page appears.
3. Select the option Patch Oracle RAC Database (Rolling Upgrade) then click theSchedule Deployment button.
The Select Patches page appears.
4. Under the heading RAC Updates, click the Add Patches button.
The Search and Select Patches page appears.
5. Select either the Search My Oracle Support option to check for patches online orthe Search Software Library option to search for patches manually added to the
Software Library, as described in "Uploading Patches to the Software Library" onpage 10-4 .
Enter parameters to limit the Search performed, if desired, then click Go .
6. Check the box next to the patches you want to install, then click Select .
See Also:
■ "Preparing to Use OPatch"■ Oracle Universal Installer and OPatch User's Guide for Windows and
UNIX

8/8/2019 Oracle 11g RAC Guide
http://slidepdf.com/reader/full/oracle-11g-rac-guide 183/208
Using DB Control to Apply Patches to a Cluster Database
Managing Oracle Software and Applying Patches 10-7
The Select Patches page appears again, with the selected patches displayed in theRAC Updates section.
7. After you have selected all the patches you want to install, click Next .
The Credentials and Schedule page appears.
8. Choose to either use the Preferred Credentials or to override the PreferredCredentials. If you choose to override the Preferred Credentials, then enter theusername and password of the operating system user that owns the Oracle Home being patched, for example, oracle . Check the option to save the username andpassword as Preferred Credentials.
In the Schedule section of the page, choose the option One Time (Later) and thenspecify the time when you want the patch to be applied to your system, or choosethe option One Time (Immediately) to have the patch applied right away.
After you have specified the schedule for the patch, click Next . The Review pageappears.
9. Review the information on this page regarding the updates that will be made toyour system. At the bottom of the page, under the heading Warning, read thewarning statement about not being able to access DB Control during the patchingoperation, then check the Select the check box to accept this warning andcontinue box.

8/8/2019 Oracle 11g RAC Guide
http://slidepdf.com/reader/full/oracle-11g-rac-guide 184/208
Applying Patches to Oracle Clusterware Using DB Control
10-8 Oracle Database 2 Day + Real Application Clusters Guide
After you have checked this box you can click Finish to submit the patchingoperation.
10. To view the progress of the patching operation, select Procedure CompletionStatus on the Deployment Procedure Manager page.
Applying Patches to Oracle Clusterware Using DB ControlTo patch the Oracle Grid home, all applications that depend on Oracle Clusterwarewill need to be stopped for the node being patched. In the case of a non-shared Oracle
Grid home, the patch is applied in a rolling method, so only a small part of the clusteris down at any given time. If you have a shared Oracle Grid home, then you can usethe out-of-place patching method to minimize the downtime required for patching.
If you want to patch the software for ASM, because it is installed in the same directoryas Oracle Clusterware, you must shut down Oracle Clusterware as well as Oracle ASMprior to patching.
This section describes the procedure for patching a non-shared Oracle Grid home. Thepatches are applied in-place, that is, to the existing software directories.
To patch Oracle Grid home using DB Control, perform the following steps:1. On the Database Home page, click Software and Support .
2. On the Software and Support page, select Deployment Procedures .The Deployment Procedure Manager page appears.
3. Select Patch Oracle Clusterware - Rolling .
A list of patches currently available in the Software library is displayed, or you canclick Add Patches to locate and download the patch from My Oracle Support(formerly Oracle MetaLink) at https://metalink.oracle.com .
4. On the Target Selector page, select all the nodes that need to be patched.
5. Enter the operating system credentials for the Oracle Grid home being patched.
6. (Optional) Specify a schedule for when you want the patching operation to occur.If you want the patch to be applied immediately, skip this step.
7. Review the information about the selections you have made. If you need to makechanges to the information, use the Back button.
8. DB Control starts the patching operation. It performs the following tasks:■ Downloads patches or patchsets from My Oracle Support and stages them on
the local file system■ For one of the nodes in the cluster, all databases and cluster database instances
are stopped, the ASM instance is stopped, and any other Oracle Clusterwaredependent resources are stopped. The rootcrs.pl script is run on that node
See Also:
■ "Using DB Control to Apply Patches to a Cluster Database" onpage 10-5
■ "Applying Patch Sets" on page 10-9■ "Troubleshooting Patch Deployment" on page 10-15■ Oracle Universal Installer and OPatch User's Guide for Windows and
UNIX

8/8/2019 Oracle 11g RAC Guide
http://slidepdf.com/reader/full/oracle-11g-rac-guide 185/208
Applying Patch Sets
Managing Oracle Software and Applying Patches 10-9
for every patch. The patches are then applied to the Oracle Grid home. Ifnecessary, the root.sh script is run for the Oracle Grid home, and thenOracle Clusterware is restarted, followed by all the dependent resources thatwere shut down at the start of the patching operation.
■ The previous step is repeated for each node in the cluster
Applying Patch Sets Patch sets are a mechanism for delivering fully tested and integrated product fixes. Allthe fixes in a patch set have been tested and are certified to work with each other.Because a patch set includes only low impact patches, it does not require you to certifyapplications or tools against the server.
For instructions on applying the latest patch set to your Oracle RAC database andOracle Clusterware installations on Oracle Enterprise Linux, search for "Oracle 11grelease 2(11.2) Support Status and Alerts" documentation on the My Oracle Support(formerly Oracle MetaLink) Web site.
This document provides a summary of the patch sets available for Oracle 11g Release2. Using this document, you can easily locate and view the Patch Set Notes for yourplatform. The Oracle Database Patch Set Notes document contains the followinginformation:■ System requirements and information about how to install or reinstall the patch
set■ A list of all bugs fixed to date that are specific to Oracle Database for specified
platform■ A list of known issues relating to Oracle Database for the specified platform
To locate the Patchset notes on My Oracle Support:1. Log in to My Oracle Support.
2. Select the Patches & Updates tab.3. Select Quick Links to the Latest Patchsets, Mini Packs, and Maintenance Packs .
4. Under the heading Latest Oracle Server/Tools Patchsets, select Oracle Database .
A list of operating systems appears.
5. Place your cursor over the entry that matches your operating system, or use thetriangular arrows to search for your operating system.
When you place the cursor over the entry for your operating system, for example,Linux x86, a list of database versions appears.
6. Select 11.2.0
The Advanced Search page appears.7. Scroll to the bottom of this page to see the list of available patchsets.
8. Select the number in the Patch column for the patchset you want to view ordownload.
The Patchset description and download page appears.
9. Click View Readme to see the patchset notes.
On this page you can also click Download to download the patch to yourcomputer.

8/8/2019 Oracle 11g RAC Guide
http://slidepdf.com/reader/full/oracle-11g-rac-guide 186/208
Applying Patches Using OPatch and the Minimum Downtime Method
10-10 Oracle Database 2 Day + Real Application Clusters Guide
10. If you choose to download the patch, then follow the directions in "UploadingPatches to the Software Library" and "Using DB Control to Apply Patches to aCluster Database" to apply the patch to your system.
Applying Patches Using OPatch and the Minimum Downtime Method If you want to use the Minimum Downtime patching method to apply a patch thatcannot be applied in a rolling fashion, then you must use OPatch.■ Preparing to Use OPatch■ Minimum Downtime Patching
Preparing to Use OPatch Before you apply the patch to your Oracle RAC database, your ASM installation, or toyour Oracle Clusterware installation, there are a few steps to perform:■ Checking the ORACLE_HOME Environment Variable■ Performing a Backup Prior to Patching Software■ Staging the Patch on Each Node■ Updating the PATH Environment Variable■ Configuring SSH User Equivalency
Checking the ORACLE_HOME Environment Variable OPatch verifies if the Oracle home is present. You must ensure that the ORACLE_HOME environment variable is set to the Oracle home of the product you are trying to patch.
Check the respective vendor documentation for the details to set the environmentvariable.
To check the current setting of the ORACLE_HOME variable on Linux:1. In a command window, log in to the operating system as the oracle user.
2. Use the echo command to display the current setting of the ORACLE_HOME environment variable.
echo $ORACLE_HOME
See Also:
■ "Preparing to Use OPatch"
■ "Using DB Control to Apply Patches to a Cluster Database"■ "Troubleshooting Patch Deployment"■ Oracle Universal Installer and OPatch User's Guide for Windows and
UNIX
See Also:
■ "Configuring the Enterprise Manager Patch Interface" onpage 10-1
■ Oracle Database 2 Day DBA
8/8/2019 Oracle 11g RAC Guide
http://slidepdf.com/reader/full/oracle-11g-rac-guide 187/208
Applying Patches Using OPatch and the Minimum Downtime Method
Managing Oracle Software and Applying Patches 10-11
Performing a Backup Prior to Patching Software It is highly recommended to back up the software directory you are patching beforeperforming any patch operation. This applies to Oracle RAC, ASM, or OracleClusterware software installation directories.
To back up the software installation:1. Back up the software installed in the specified Oracle home using:
a. An operating system utility, such as zip , cp -r , tar , or cpio , to back upthe software in the Oracle home directory that is being patched to disk.
b. The Oracle Secure Backup utility to back up the software in the Oracle home
directory that is being patched to tape.
Staging the Patch on Each Node If you use Enterprise Manager to download the patch, and you selected all the nodesin your cluster as targets for the patch, then the patch is automatically staged on those
nodes.If you manually downloaded the patch from My Oracle Support, then you must copythe patch to each node.
Updating the PATH Environment Variable The opatch binary file is located in the Oracle_home /OPatch directory. You caneither specify this path when executing OPatch, or you can update the PATH
environment variable to include the OPatch directory.
To update the PATH environment variable on Oracle Enterprise Linux systems:1. In a command window, log in to the operating system.
2. Use a shell command similar to the following to update the value of the PATHenvironment variable, where /u01/app/oracle/11gR2/db_1 is the location ofyour Oracle home directory:
$ export PATH=$PATH:/u01/app/oracle/11gR2/db_1/OPatch
See Also:
■ "Preparing to Use OPatch" on page 10-10■ "Configuring the Operating System Environment" on page 3-2■ Oracle Database 2 Day DBA for information about locating the
value for the database Oracle home directory.
See Also:
■ "Preparing to Use OPatch" on page 10-10■ "Configuring the Operating System Environment" on page 3-2■ Oracle Universal Installer and OPatch User's Guide for Windows and
UNIX
See Also:
■ "Preparing to Use OPatch" on page 10-10■ Oracle Database 2 Day DBA

8/8/2019 Oracle 11g RAC Guide
http://slidepdf.com/reader/full/oracle-11g-rac-guide 188/208
Applying Patches Using OPatch and the Minimum Downtime Method
10-12 Oracle Database 2 Day + Real Application Clusters Guide
You could also modify the shell profile script for the current user to have thisvariable configured every time you log in.
Configuring SSH User Equivalency Before you patch a system, make sure the user equivalency is working. Userequivalency exists when the operating system user on each node is considered to beidentical. For information on configuring user equivalency, see "ConfiguringOperating System Users and Groups" on page 2-8 .
To test SSH user equivalency:1. On the system where you want to run OPatch, log in as the oracle user.
2. Use the following command to test user equivalency:[oracle@racnode1] $ ssh racnode2 date
If the date is returned, then user equivalency between the source and destinationnode has been configured.
3. If you see output similar to the following, then SSH user equivalency is notenabled:
Enter passphrase for key ’/home/oracle/.ssh/id_rsa’:
Enable SSH user equivalency before continuing with the patching operation.
To enable SSH user equivalency:1. On the system where you want to run OPatch, open a command window and log
in as the oracle user.
2. Start the SSH agent and load the SSH keys into memory using the followingcommands:
$ /usr/bin/ssh-agent $SHELL$ /usr/bin/ssh-add
These commands start the ssh-agent on the local node, and load the RSA andDSA keys into the current session’s memory so that you are not prompted to usepass phrases when issuing SSH commands.
3. At the prompt, enter the pass phrase for each key that you generated whenconfiguring Secure Shell, for example:[oracle@racnode1 .ssh]$ exec /usr/bin/ssh-agent $SHELL[oracle@racnode1 .ssh]$ /usr/bin/ssh-addEnter passphrase for /home/oracle/.ssh/id_rsaIdentity added: /home/oracle/.ssh/id_rsa (/home/oracle/.ssh/id_rsa)Identity added: /home/oracle/.ssh/id_dsa (/home/oracle/.ssh/id_dsa)
4. To test if you have configured SSH correctly, run the following command. If youhave configured SSH correctly, then you will not be prompted for a password or apass phrase.
See Also:
■ "Preparing to Use OPatch" on page 10-10■ "Configuring the Operating System Environment" on page 3-2■ Oracle Universal Installer and OPatch User's Guide for Windows and
UNIX

8/8/2019 Oracle 11g RAC Guide
http://slidepdf.com/reader/full/oracle-11g-rac-guide 189/208
Applying Patches Using OPatch and the Minimum Downtime Method
Managing Oracle Software and Applying Patches 10-13
[oracle@racnode1] $ ssh racnode2 date
Minimum Downtime Patching In minimum downtime patching , one set of nodes is shut down and the patch isapplied to those nodes. After the first set of nodes has been patched, the second set ofnodes is shut down. The first set of nodes is then restarted and the patch is applied tothe second set of nodes. After the patch has been applied to the second set of nodes,
those nodes are restarted. This method leads to less downtime for Oracle RAC,compared to having all the nodes shut down at the same time.
When you use the minimum downtime patching method, the following actions occur:■ The local node is always patched first.■ The local node is used as a base to patch the other nodes.■ The user is prompted for the set of nodes to patch first from the remaining nodes.■ For each node in this first set, the user is asked to stop the instance and then the
patch is propagated to that node before continuing to the next node. When theinitial set of nodes has been patched, the user is asked to shut down the remainingnodes.
■ After the local node is patched, the patch is propagated to the last set of nodes andthe inventory is updated. The last instances are stopped on the remote nodes. Youcan then start up the patched nodes (the first set of nodes) before patching theremaining nodes.
To apply a patch to your cluster database using the minimum downtime method:1. Change to the directory where the unzipped patch is staged on disk, for example:
$ cd Oracle_home /EMStagedPatches/4519934/4519934
2. Stop all user applications that use the Oracle RAC home directory for the group ofnodes being patched. For example, to stop Enterprise Manager Database Controlon the local node, use the following command, where Oracle_home is the homedirectory for your Oracle RAC installation:$ Oracle_home /bin/emctl stop dbconsole
3. Shut down all Oracle RAC instances on the local node. To shut down an instancefor an Oracle RAC database, enter a command similar to the following example,where Grid_home is the home directory for your Oracle grid infrastructureinstallation, orcl is the name of the database, and orcl1 is the name of theinstance:
$ CRS_home /bin/srvctl stop instance -d orcl -i "orcl1"
Note: Do not close this command window until you have completedthe patch installation. If you must close the command window inwhich you enabled SSH user equivalency before the patch installationis complete, repeat Step 1 to Step 4 before starting the patchinstallation.
See Also:
■ "Preparing to Use OPatch" on page 10-10
8/8/2019 Oracle 11g RAC Guide
http://slidepdf.com/reader/full/oracle-11g-rac-guide 190/208
Applying Patches Using OPatch and the Minimum Downtime Method
10-14 Oracle Database 2 Day + Real Application Clusters Guide
4. Make sure the ORACLE_HOMEenvironment variable points to the softwaredirectory you want to patch, for example:
$ echo $ORACLE_HOME/u01/app/oracle/11gR2/db_1
5. Use the following command from within the patch directory:
$ opatch apply -minimize_downtime
If you run the OPatch command from the directory where the patch is staged ondisk, you do not need to specify the patch ID.
OPatch asks if you are ready to patch the local node. After you confirm that theOracle RAC instances on the local node have been shut down, OPatch applies thepatch to the Oracle home directory on the local node. You are then asked to selectthe next nodes to be patched.
6. After you shut down the Oracle RAC instances on the other nodes in the cluster,you can restart the Oracle RAC instance on the local node. Then, instruct OPatchthat you are ready to patch the remaining nodes.
7. After all the nodes have been patched, restart the Oracle RAC instances on theother nodes in the cluster. The following command shows how to start the orcl2 instance for the Oracle RAC database named orcl :
$ CRS_home /bin/srvctl start instance -d orcl -i "orcl1"
8. Verify that all the nodeapps were restarted on the nodes in the cluster.
$ crsctl check crs
If any of the node applications did not restart, use the SRVCTL utility to restartthem. For example, you can use commands similar the following to restart thelistener on the racnode1 node, where Grid_homeis the home directory of yourOracle grid infrastructure installation:
$ CRS_home /bin/srvctl start listener -n racnode1
9. Run any post-patch scripts that are mentioned in the patch instructions, forexample:
$ sqlplus /nologSQL> connect sys/ password @orcl1 AS SYSDBASQL> @Oracle_home /cpu/CPUOct2007/catcpu.sqlSQL> @Oracle_home /rdbms/admin/utlrp.sqlSQL> exit
See Also:
■ "Preparing to Use OPatch" on page 10-10■ "Using DB Control to Apply Patches to a Cluster Database" on
page 10-5■ "Applying Patch Sets" on page 10-9■ "Troubleshooting Patch Deployment" on page 10-15■ Oracle Universal Installer and OPatch User's Guide for Windows and
UNIX

8/8/2019 Oracle 11g RAC Guide
http://slidepdf.com/reader/full/oracle-11g-rac-guide 191/208
Troubleshooting Patch Deployment
Managing Oracle Software and Applying Patches 10-15
Troubleshooting Patch Deployment Applying patches to your Oracle RAC cluster can be complicated at times. This sectioncovers some of the most common topics regarding troubleshooting patch deployment:■ Updating the Node List for OPatch■ About OPatch Log and Trace Files■ Resolving the "Not a valid patch area" Error■ Resolving the "Unable to remove a partially installed interim patch" Error
If you have problems applying a patch to your Oracle RAC database, review thesesolutions to common problems. If the problem you encountered is not listed, reviewthe log and trace files.
Updating the Node List for OPatch If OPatch does not automatically detect Oracle RAC or its nodes, investigate thecontents of the inventory and ensure they are complete.
To update the node list for OPatch:If the list of nodes for your cluster is not complete, you can update it by using OracleUniversal Installer and the -updateNodeList flag, as demonstrated in the followingexample:
Oracle_home /oui/bin/runInstaller -updateNodeListORACLE_ HOME=/u01/app/oracle/11gR2/db_1CLUSTER_NODES=racnode1,racnode2,racnode3 -noClusterEnabled
About OPatch Log and Trace Files Logging and tracing is a common aid for debugging. OPatch maintains logs for allapply , rollback , and lsinventory operations. The log files are located in theOracle_home /cfgtoollogs/opatch directory. Each log file will be tagged withthe time stamp of the operation. Log files are named as opatch_mm-dd-yyyy_hh-mm-ss.log , where mm-dd-yyyy is the current date and hh-mm-ss is the currenttime. Each time you run OPatch, a new log file is created.
For example, if a log file is created on May 17, 2007 at 11:55 PM, then it will be namedas follows:
See Also:
■ Oracle Universal Installer and OPatch User's Guide for Windows andUNIX
■ "Preparing to Use OPatch"
■ "Using DB Control to Apply Patches to a Cluster Database"■ Oracle Database 2 Day DBA
See Also:
■ "Troubleshooting Patch Deployment"■ Oracle Universal Installer and OPatch User's Guide for Windows and
UNIX for more information about Oracle product patching usingOPatch
8/8/2019 Oracle 11g RAC Guide
http://slidepdf.com/reader/full/oracle-11g-rac-guide 192/208
Troubleshooting Patch Deployment
10-16 Oracle Database 2 Day + Real Application Clusters Guide
opatch_05-17-2007_23-55-00.log
OPatch also maintains an index of the commands processed by OPatch and the logfiles associated with it in the opatch_history.txt file located in the Oracle_home /cfgtoollogs/opatch directory. A sample of the opatch_history.txt fileis as follows:
Date & Time : Tue Apr 26 23:00:55 PDT 2007Oracle Home : /u01/app/oracle/11gR2/db_1/OPatch Ver. : 11.2.0.0.0Current Dir : /scratch/oui/OPatchCommand : lsinventoryLog File :/u01/app/oracle/11gR2/db_1/cfgtoollogs/opatch/opatch-2007_Apr_26_23-00-55-PDT_Tue.log
Resolving the "Not a valid patch area" Error You might get this error if the directory that the OPatch utility is using to do the patchdoes not match the template for what it is checking, or if the OPatch utility is run froman invalid directory.
The Patch_Shiphome directory should have the following structure:■ An etc directory that has the metadata files■ A files directory that has the patch files■ The etc/config/inventory.xml file and the actions.xml file under the
same directory
To resolve the "Not a valid patch area" error:■ Perform one of the following actions:
a. Remove the patch shiphome directory and re-create it with the properstructure (by extracting the files again).
b. Start the OPatch utility from the directory where the patch to be installed has been unzipped and staged on disk.
c. Use the following command when starting OPatch:
opatch apply / Patch_Shiphome
where Patch_Shiphome is the location where the patch has been staged ondisk.
See Also:
■ "Troubleshooting Patch Deployment"■ Oracle Universal Installer and OPatch User's Guide for Windows and
UNIX
See Also:
■ "Troubleshooting Patch Deployment"■ Oracle Universal Installer and OPatch User's Guide for Windows and
UNIX

8/8/2019 Oracle 11g RAC Guide
http://slidepdf.com/reader/full/oracle-11g-rac-guide 193/208
Upgrading the Oracle Software
Managing Oracle Software and Applying Patches 10-17
Resolving the "Unable to remove a partially installed interim patch" Error If the patching process is interrupted, you might get the error "Unable to remove apartially installed interim patch" when you try to install the patch a second time.
To resolve the partially installed patch error:1. Ensure that the environment variable ORACLE_HOMEis set to the Oracle home
directory you are attempting to patch.2. Go to the Oracle_home /.patch_storage/ patch-id _ timestamp directory
and run the restore.sh script (or restore.bat on Windows platforms) asfollows:Oracle_home /.patch_storage/ patch-id _timestamp /restore.sh
3. On Linux and UNIX systems, use the Oracle_home /.patch_storage/ patch-id _ timestamp /make.txt file (if available) to modify youroperating system environment, as follows:
/bin/sh make.txt
4. Attempt to apply the patch again.
Upgrading the Oracle Software Upgrading Oracle Clusterware and Oracle RAC is performed in a manner very similarto patching. You can perform rolling upgrades, or you can shut down the OracleDatabase and Oracle Clusterware software to perform the upgrade.
With Oracle Clusterware 11g release 2, you perform out-of-place upgrades. To performan out-of-place upgrade, you install the Oracle grid infrastructure into a new Gridhome. When performing the upgrade, you specify the location of the new Grid homeinstead of selecting the existing software location. When performing an out-of-placeupgrade, the old and new version of the software are present on the nodes at the sametime, each in a different home location, but only one version of the software is active atany given time.
See Also:
■ "Troubleshooting Patch Deployment"■ Oracle Universal Installer and OPatch User's Guide for Windows and
UNIX
See Also: Oracle Clusterware Installation Guide for more informationon performing software upgrades

8/8/2019 Oracle 11g RAC Guide
http://slidepdf.com/reader/full/oracle-11g-rac-guide 194/208
Upgrading the Oracle Software
10-18 Oracle Database 2 Day + Real Application Clusters Guide

8/8/2019 Oracle 11g RAC Guide
http://slidepdf.com/reader/full/oracle-11g-rac-guide 195/208
Glossary-1
Glossary
administrator-managed database
An administrator-managed database is a database created on nodes that are not part ofa server pool and are managed by the database or clusterware administrator.
all node patching
A method of applying patches to the nodes in a cluster. When using the all nodepatching method, all the nodes in the Real Application Clusters are initially broughtdown and the patch is applied on all the nodes. After the patch is applied to all nodes,then the nodes are brought back up.
Automatic Workload Repository (AWR)
A built-in repository that exists in every Oracle Database. At regular intervals, theOracle Database makes a snapshot of all of its vital statistics and workload informationand stores them in the AWR.
cache coherency
The synchronization of data in multiple caches so that reading a memory locationthrough any cache will return the most recent data written to that location through anyother cache. Sometimes called cache consistency.
Cache Fusion
A diskless cache coherency mechanism in Oracle Real Application Clusters thatprovides copies of blocks directly from a holding instance's memory cache to arequesting instance's memory cache.
cluster
Multiple interconnected computers or servers that appear as if they are one server toend users and applications.
cluster file system
A distributed file system that is a cluster of servers that collaborate to provide highperformance service to their clients. Cluster file system software deals withdistributing requests to storage cluster components.
cluster database
The generic term for a Oracle Real Application Clusters database.
CRSD - Oracle Clusterware Daemon
The primary Oracle Clusterware process.

8/8/2019 Oracle 11g RAC Guide
http://slidepdf.com/reader/full/oracle-11g-rac-guide 196/208
Cluster Synchronization Services (CSS)
Glossary-2
Cluster Synchronization Services (CSS)
An Oracle Clusterware component that discovers and tracks the membership state ofeach node by providing a common view of membership across the cluster. CSS alsomonitors process health, specifically the health of the database instance. The GlobalEnqueue Service Monitor (LMON), a background process that monitors the health ofthe cluster database environment and registers and de-registers from CSS. See also,OCSSD.
Cluster Verification Utility (CVU)
A tool that verifies a wide range of Oracle RAC-specific components such as sharedstorage devices, networking configurations, system requirements, Oracle Clusterware,groups, and users.
CRSD
A Linux or UNIX process that performs high availability recovery and managementoperations such as maintaining the OCR. Also manages application resources and runsas root user (or by a user in the admin group on Mac OS X-based systems) andrestarts automatically upon failure.
Distributed Transaction Processing (DTP)The paradigm of distributed transactions, including both XA-type externallycoordinated transactions, and distributed-SQL-type (database links in Oracle)internally coordinated transactions.
Enterprise Manager Configuration Assistant (EMCA)
A graphical user interface-based configuration assistant that you can use to configureEnterprise Manager features.
Dynamic Host Configuration Protocol (DHCP)
A network application protocol used by devices (DHCP clients) to obtainconfiguration information for operation in an Internet Protocol network. This protocol
reduces system administration workload, allowing devices to be added to the networkwith little or no manual intervention.
Event Manager (EVM)
The background process that publishes Oracle Clusterware events. EVM scans thedesignated callout directory and runs all scripts in that directory when an eventoccurs.
Event Manager Daemon (EVMD)
A Linux or UNIX event manager daemon that starts the racgevt process to managecallouts.
Fast Application Notification (FAN)
Applications can use FAN to enable rapid failure detection, balancing of connectionpools after failures, and re-balancing of connection pools when failed components arerepaired. The FAN notification process uses system events that Oracle publishes whencluster servers become unreachable or if network interfaces fail.
Fast Connection Failover
Fast Connection Failover provides high availability to FAN integrated clients, such asclients that use JDBC, OCI, or ODP.NET. If you configure the client to use fastconnection failover, then the client automatically subscribes to FAN events and can

8/8/2019 Oracle 11g RAC Guide
http://slidepdf.com/reader/full/oracle-11g-rac-guide 197/208
Global Enqueue Service Monitor (LMON)
Glossary-3
react to database UP and DOWNevents. In response, Oracle gives the client a connectionto an active instance that provides the requested database service.
Free pool
A default server pool used in policy-based cluster and capacity management of OracleClusterware resources. The free pool contains servers that are not assigned to anyserver pool.
General Parallel File System (GPFS)
General Parallel File System (GPFS) is a shared-disk IBM file system product thatprovides data access from all of the nodes in a homogenous or heterogeneous cluster.
forced disk write
In Oracle Real Application Clusters, a particular data block can only be modified byone instance at a time. If one instance modifies a data block that another instanceneeds, then whether a forced disk write is required depends on the type of requestsubmitted for the block.
Global Cache Service (GCS)
Process that implement Cache Fusion. It maintains the block mode for blocks in theglobal role. It is responsible for block transfers between instances. The Global CacheService employs various background processes such as the Global Cache ServiceProcesses (LMSn) and Global Enqueue Service Daemon (LMD).
Global Cache Service Processes (LMSn)
Processes that manage remote messages. Oracle RAC provides for up to 10 GlobalCache Service Processes.
Global Cache Service (GCS) resources
Global resources that coordinate access to data blocks in the buffer caches of multipleOracle RAC instances to provide cache coherency.
global database name
The full name of the database that uniquely identifies it from any other database. Theglobal database name is of the form database_name.database_domain—for example:TEST.US.EXAMPLE.COM
global dynamic performance views (GV$)
Dynamic performance views storing information about all open instances in a OracleReal Application Clusters cluster. (Not only the local instance.) In contrast, standarddynamic performance views (V$) only store information about the local instance.
Global Enqueue Service (GES)
A service that coordinates enqueues that are shared globally.
Global Enqueue Service Daemon (LMD)
The resource agent process that manages requests for resources to control access to blocks. The LMD process also handles deadlock detection and remote resourcerequests. Remote resource requests are requests originating from another instance.
Global Enqueue Service Monitor (LMON)
The background LMON process monitors the entire cluster to manage globalresources. LMON manages instance deaths and the associated recovery for any failed

8/8/2019 Oracle 11g RAC Guide
http://slidepdf.com/reader/full/oracle-11g-rac-guide 198/208

8/8/2019 Oracle 11g RAC Guide
http://slidepdf.com/reader/full/oracle-11g-rac-guide 199/208
node
Glossary-5
allocated to it for inserts and updates. This will ensure that it does not use spaceallocated for other instances.
interconnect
The private network communication link that is used to synchronize the memorycache of the nodes in the cluster.
Logical Volume Manager (LVM)A generic term that describes Linux or UNIX subsystems for online disk storagemanagement.
Inter-Process Communication (IPC)
A high-speed operating system-dependent transport component. The IPC transfersmessages between instances on different nodes. Also referred to as the interconnect.
Master Boot Record (MBR)
A program that executes when a computer starts. Typically, the MBR resides on thefirst sector of a local hard disk. The program begins the startup process by examiningthe partition table to determine which partition to use for starting the machine. TheMBR program then transfers control to the boot sector of the startup partition, whichcontinues the startup process.
minimum downtime patching
In minimum downtime patching, the nodes are divided into two sets. The first set isshut down and the patch is applied to it. The second set is then shut down. The firstset is brought up and then the patch is applied to the second set. After the patch isapplied to the second set, those nodes are also brought up, finishing the patchingoperation.
multicast Domain Name Server (mDNS)
A part of Zero Configuration Networking (Zeroconf), mDNS provides the ability to
address hosts using DNS-like names without the need of an existing, managed DNSserver.
Network Attached Storage (NAS)
Storage that is attached to a server by way of a network.
Network Interface Card (NIC)
A card that you insert into a computer to connect the computer to a network.
network switch
A hardware device that connects computers together within a network.
Network Time Protocol (NTP)
An Internet standard protocol, built on top of TCP/IP, that ensures the accuratesynchronization to the millisecond of the computer clock times in a network ofcomputers.
node
A node is a machine on which an instance resides.

8/8/2019 Oracle 11g RAC Guide
http://slidepdf.com/reader/full/oracle-11g-rac-guide 200/208
Oracle Cluster File System (OCFS)
Glossary-6
Oracle Cluster File System (OCFS)
The Oracle proprietary cluster file system software that is available for Linux andWindows platforms.
Oracle Cluster Registry (OCR)
The Oracle RAC configuration information repository that manages information about
the cluster node list and instance-to-node mapping information. The OCR alsomanages information about Oracle Clusterware resource profiles for customizedapplications.
Object Link Manager (OLM)
The Oracle interface that maps symbolic links to logical drives and displays them inthe OLM graphical user interface.
OCLSMON
A process that runs on nodes in Oracle RAC environments.OCLSOMON monitors CSShangs that result from load or scheduling issues. If OCLSOMON detects either ofthese, the process shuts down the affected node to prevent database corruption.
OCLSVMONOCLSVMON is a process that runs when vendor clusterware is installed. Basically dueto the existence of this process, the Oracle Clusterware can delay log flushes. Thisdelay is useful in diagnosing problems because the vendor clusterware allows a delayof eviction processing until after log files have flushed.
OCSSD
A Linux or UNIX process that manages the Cluster Synchronization Services (CSS)daemon. Manages cluster node membership and runs as oracle user; failure of thisprocess results in cluster restart.
Oracle Interface Configuration Tool (OIFCFG)
A command-line tool for both single-instance Oracle databases and Oracle RACdatabases that enables you to allocate and de-allocate network interfaces tocomponents, direct components to use specific network interfaces, and retrievecomponent configuration information. The Oracle Universal Installer (OUI) also usesOIFCFG to identify and display available interfaces.
Oracle Notification Services (ONS)
A publish and subscribe service for communicating information about all FAN events.
OPROCD
A Linux or UNIX process monitor for a cluster. Note that this process will only appearon platforms that do not use vendor clusterware with Oracle Clusterware.
Oracle Clusterware
This is clusterware that is provided by Oracle to manage cluster database processingincluding node membership, group services, global resource management, and highavailability functions.
Oracle Inventory directory
The Oracle Inventory directory is the central inventory location for all Oracle softwareinstalled on a server.

8/8/2019 Oracle 11g RAC Guide
http://slidepdf.com/reader/full/oracle-11g-rac-guide 201/208
Server Control (SRVCTL) Utility
Glossary-7
Oracle Universal Installer (OUI)
A tool to install Oracle Clusterware, the Oracle relational database software, and theOracle Real Application Clusters software. You can also use the Oracle UniversalInstaller to launch the Database Configuration Assistant (DBCA).
policy-managed database
A policy-managed database is created using a server pool. Oracle Clusterwareallocates and reassigns capacity based on policies you define, enabling faster resourcefailover and dynamic capacity assignment.
raw device
A disk drive that does not yet have a file system set up. Raw devices are used forOracle Real Application Clusters because they enable the sharing of disks. See also rawpartition .
raw partition
A portion of a physical disk that is accessed at the lowest possible level. A rawpartition is created when an extended partition is created and logical partitions areassigned to it without any formatting. Once formatting is complete, it is called acooked partition. See also raw device.
Recovery Manager (RMAN)
An Oracle tool that enables you to back up, copy, restore, and recover data files,control files, and archived redo logs. It is included with the Oracle server and does notrequire separate installation. You can invoke RMAN as a command line utility fromthe operating system (O/S) prompt or use the GUI-based Enterprise Manager BackupManager.
rolling patching
In Rolling Patching, one node (or group of nodes) is shutdown, the patch applied andthe node brought back up again. This is repeated for each node in the cluster until all
the nodes in the Real Application Clusters are patched.Runtime Connection Load Balancing
Enables Oracle to make intelligent service connection decisions based on theconnection pool that provides the optimal service for the requested application basedon current workloads. The JDBC, ODP.NET, and OCI clients are integrated with theload balancing advisory; you can use any of these client environments to provideruntime connection load balancing.
scalability
The ability to add additional nodes to Oracle Real Application Clusters applicationsand achieve markedly improved scale-up and speed-up.
Secure Shell (SSH)A program for logging into a remote computer over a network. You can use SSH toexecute commands on a remote machine and to move files from one machine toanother. SSH uses strong authentication and secure communications over insecurechannels.
Server Control (SRVCTL) Utility
Server Management (SRVM) comprises the components required to operate OracleEnterprise Manager in Oracle Real Application Clusters. The SRVM components, such

8/8/2019 Oracle 11g RAC Guide
http://slidepdf.com/reader/full/oracle-11g-rac-guide 202/208
server pool
Glossary-8
as the Intelligent Agent, Global Services Daemon, and SRVCTL, enable you to managecluster databases running in heterogeneous environments through an openclient/server architecture using Oracle Enterprise Manager.
server pool
A server pool is a logical division of nodes in a cluster into a group to supportpolicy-managed databases.
services
Entities that you can define in Oracle RAC databases that enable you to groupdatabase workloads and route work to the optimal instances that are assigned to offerthe service.
shared everything
A database architecture in which all instances share access to all of the data.
singleton services
Services that run on only one instance at any one time. By defining the DistributedTransaction Property (DTP) property of a service, you can force the service to be asingleton service.
split brain syndrome
Where two or more instances attempt to control a cluster database. In a two-nodeenvironment, for example, one instance attempts to manage updates simultaneouslywhile the other instance attempts to manage updates.
system identifier (SID)
The Oracle system identifier (SID) identifies a specific instance of the running Oraclesoftware. For a Oracle Real Application Clusters database, each node within thecluster has an instance referencing the database.
thread
Each Oracle instance has its own set of online redo log groups. These groups are calleda thread of online redo. In non-Oracle Real Application Clusters environments, eachdatabase has only one thread that belongs to the instance accessing it. In Oracle RealApplication Clusters environments, each instance has a separate thread, that is, eachinstance has its own online redo log. Each thread has its own current log member.
thread number
An identifier for the redo thread to be used by an instance, specified by theINSTANCE_NUMBERinitialization parameter. You can use any available redo threadnumber but an instance cannot use the same redo thread number as another instance.
transparent application failover (TAF)
A runtime failover for high-availability environments, such as Oracle Real ApplicationClusters, TAF refers to the failover and re-establishment of application-to-serviceconnections. It enables client applications to automatically reconnect to the database ifthe connection fails, and optionally resume a SELECT statement that was in progress.This reconnect happens automatically from within the Oracle Call Interface (OCI)library.
voting disk
A file that manages information about node membership.

8/8/2019 Oracle 11g RAC Guide
http://slidepdf.com/reader/full/oracle-11g-rac-guide 203/208
Index-1
Index
Aadd instance, 9-5adding OCR locations, 5-7additional Real Application Clusters
documentation, 1-2ADDM
SeeAutomatic Database Diagnostic Monitoradministrative tools
overview, 1-5administrator-managed database
adding instances, 4-14, 9-4, 9-5and rconfig, 3-21creating redo log groups, 4-14defintion of, 1-2deleting instances, 9-7
affinity, 7-10alert log, 8-37architecture
chip architecture, 1-5, 2-2, 2-5, 9-2determining the chip architecture, 2-5
enterprise grid computing, 1-4archive logs, 6-3 backing up, 6-4, 6-7deleting after backups, 6-7instance access to, 6-3, 6-9recovery, 6-8, 6-9
ARCHIVE_LAG_TARGET, 4-6archiving
configuring, 6-5enabling, 6-4
ASMSeeAutomatic Storage Management
ASM Configuration Assistant (ASMCA)description of, 1-6
starting, 3-10ASMCASeeASM Configuration Assistant (ASMCA)
ASMCMDdescription of, 1-6
ASMLiband device persistency, 2-25configuring, 2-23creating ASM disks, 2-24installing, 2-23
Automatic Database Diagnostic Monitor (ADDM)
database findings, 8-3description, 8-2instance findings, 8-3recommendations, 8-3
Automatic Storage Management (ASM), 2-20and multiple Oracle RAC databases, 4-2convert to clustered Oracle ASM, 3-21
creating disk groups, 3-10file management, 1-3installing, 3-3managingmirroring, 1-3number of instances per node, 1-4operating system group requirements, 2-8rebalancing, 1-3striping, 1-3use of, 2-2use with Oracle RAC, 1-4
B
backupsarchive logs, 6-3, 6-7description of, 6-1emkey.ora, 3-17location of OCR backups, 5-4managing backups, 6-11manual OCR backups, 5-4Oracle Cluster Registry (OCR), 5-3Oracle software, 10-11parallelism, 6-4performing using Enterprise Manager, 6-2, 6-7privileges, 6-6root.sh script, 3-17settings, 6-6storing in a fast recovery area, 6-2viewing backup reports, 6-12viewing OCR backups, 5-3voting disks, 5-2
block devices, 2-20configuring partitions, 2-21
blockscache transfers of, 8-7cached, 1-4, 8-18corrupt, 6-2OCR format, 5-9

8/8/2019 Oracle 11g RAC Guide
http://slidepdf.com/reader/full/oracle-11g-rac-guide 204/208
Index-2
request latency, 8-7 to 8-14undo, 4-12
buffer cache, 8-7
CCache Fusion
definition of, 1-4mechanism, 8-7
client connections, 2-5client-side load balancing, 7-8cluster database
adding a new node, 9-1ADDM findings, 8-3administration, 4-1alert log, 8-37alerts, 8-36and Oracle ASM, 4-12and the OCRand the private interconnect, 2-3archiving, 6-5 backing up, 6-1, 6-7 buffer cache, 8-7comparison of Oracle RAC to single-instance, 1-4configuring initialization parameters, 4-4connecting to, 7-8converting to, 3-19performance, 8-1recovery, 6-1, 6-10server parameter files, 4-7starting and stopping, 4-3topology, 8-19undo tablespaces, 4-12
Cluster Ready Services (CRS), 1-6checking daemon status, 8-31
Cluster Ready Services Control (CRSCTL)checking the Oracle Clusterware status, 5-7description of, 1-6using to add and remove voting disks, 5-2using to start Oracle Clusterware processes, 5-5using to stop Oracle Clusterware processes, 5-5using to troubleshoot Oracle Clusterware
issues, 8-31Cluster Synchronization Services (CSS), 1-6
checking daemon status, 8-31Cluster Time Synchronization Service (CTSS), 2-16Cluster Verification Utility
check postinstallation configuration, 9-3description of, 1-5
location of trace files, 8-36use by OUI, 3-16verify node applications, 8-33verifying network connectivity, 8-35verifying OCR integrity, 5-5
CLUSTER_DATABASE, 4-5CLUSTER_INTERCONNECTS, 4-5CLUVFY
SeeCluster Verification UtilityCOMPATIBLE, 4-5configuring ASMLib, 2-23
connect descriptor, 7-8connection load balancing, 7-8
goals, 7-9connection pools, 7-9control files
location, 2-2parallelized backups, 6-4
CONTROL_FILES, 4-5CONTROL_MANAGEMENT_PACK_ACCESS, 4-6converting single-instance databases to Oracle
RAC, 3-19prerequisites, 3-19using rconfig, 3-20
creating ASM disks, 2-24CRSCTL
SeeCluster Ready Services ControlCSS
SeeCluster Synchronization ServicesCVU
SeeCluster Verification Utility
Ddata files
location, 2-2parallelized backups, 6-4
databaseadministrator-managed, 1-2findings in ADDM analysis, 8-3policy-managed, 1-2Seecluster database
Database Configuration Assistant (DBCA)deleting an instance, 9-4, 9-6description of, 1-6
Database Resource Manager, 7-4terminology, 7-4
DB_BLOCK_SIZE, 4-5DB_DOMAIN, 4-5DB_FILES, 4-5DB_NAME, 4-5DB_RECOVERY_FILE_DEST, 4-5DB_RECOVERY_FILE_DEST_SIZE, 4-5DB_UNIQUE_NAME, 4-5dba group, 2-7delete instance, 9-7Desktop class, 3-11device path persistency, 2-25diagcollection.pl script, 8-31DIAGNOSTIC_DEST, 4-6
disk groupscreating, 3-10DML_LOCKS, 4-5documentation
Real Application Clusters, 1-2domain name system, 2-12DSA keys, 2-10
EEnterprise Manager

8/8/2019 Oracle 11g RAC Guide
http://slidepdf.com/reader/full/oracle-11g-rac-guide 205/208
Index-3
alerts, 8-36and My Oracle Support, 10-1Average Active Sessions chart, 8-9
backup and recovery, 6-2 backup reports, 6-12Cluster Cache Coherency page, 8-14Cluster Database page, 8-1Cluster Database Performance page, 8-6Cluster Host Load Average chart, 8-7Cluster Managed Database Services page, 7-15Database Locks page, 8-19Database Throughput charts, 8-10description of, 1-6encryption key, 3-17Global Cache Block Access Latency chart, 8-7Instance Activity page, 8-17Instances charts, 8-12performing recovery, 6-10Recovery wizard, 6-2, 6-8Services charts, 8-11Top Consumers page, 8-15Top Segments page, 8-18Top Sessions page, 8-16
errata level, 2-6erratum kernel
Seeerrata levelevent
FAN load balancing, 7-7UP and DOWN, 7-5use by FAN callouts, 7-6
Event Manager (EVM), 1-6checking daemon status, 8-31
EVMSeeEvent Manager
FFAN
SeeFast Application NotificationFast Application Notification, 7-5
callouts, 7-6events, 7-5
fast recovery area, 6-2configuring, 6-3creating disk group for, 3-10
GGeneral Parallel File System (GPFS), 2-20Global Services Daemon (GSD), 1-6GNS
SeeGrid Naming ServiceGrid Naming Service (GNS), 2-4Grid Plug and Play, 4-5grid user, 2-7Grid_home
choosing, 2-18definition of, 3-1disk space requirements, 2-18
GSD
SeeGlobal Services Daemon
Hhardware requirements, 2-6high availability framework, 5-1
Iinitialization parameters
ARCHIVE_LAG_TARGET, 4-6CLUSTER_DATABASE, 4-5CLUSTER_INTERCONNECTS, 4-5COMPATIBLE, 4-5CONTROL_FILES, 4-5CONTROL_MANAGEMENT_PACK_
ACCESS, 4-6DB_BLOCK_SIZE, 4-5DB_DOMAIN, 4-5DB_FILES, 4-5DB_NAME, 4-5DB_RECOVERY_FILE_DEST, 4-5DB_RECOVERY_FILE_DEST_SIZE, 4-5DB_UNIQUE_NAME, 4-5DIAGNOSTIC_DEST, 4-6DML_LOCKS, 4-5INSTANCE_NAME, 4-5INSTANCE_NUMBER, 4-5INSTANCE_TYPE, 4-5LICENSE_MAX_SESSIONS, 4-6LICENSE_MAX_USERS, 4-6LOG_ARCHIVE_FORMAT, 4-6modifying for the current instance, 4-8modifying for the SPFILE, 4-9PARALLEL_EXECUTION_MESSAGE_SIZE, 4-5REDO_TRANSPORT_USER, 4-6REMOTE_LOGIN_PASSWORDFILE, 4-5RESULT_CACHE_MAX_SIZE, 4-5ROLLBACK_SEGMENTS, 4-5SERVICE_NAMES, 4-7SPFILE, 4-7that must be different on each instance, 4-5that must be identical on all instances, 4-5that should be the same on each instance, 4-6TRACE_ENABLED, 4-7UNDO_MANAGEMENT, 4-5UNDO_RETENTION, 4-7UNDO_TABLESPACE, 4-5
installing ASMLib, 2-23installing RPMs, 2-6instance
adding, 9-5deleting, 9-7findings in ADDM analysis, 8-3Oracle ASM instances for multiple Oracle RAC
databases, 4-2Oracle ASM instances in Enterprise Manager, 4-2setting initialization parameters, 4-4starting for the database, 4-3stopping for the database, 4-3

8/8/2019 Oracle 11g RAC Guide
http://slidepdf.com/reader/full/oracle-11g-rac-guide 206/208
Index-4
instance management, 4-2INSTANCE_NAME, 4-5INSTANCE_NUMBER, 4-5INSTANCE_TYPE, 4-5integrated clients, 7-7interconnect
definition of, 1-4, 2-3
Kkernel parameters
configuring on Linux x86 operating system, 2-16
LLICENSE_MAX_SESSIONS, 4-6LICENSE_MAX_USERS, 4-6Linux x86 operating system
configuring kernel parameters, 2-16listener
and client-side load balancing, 7-8and server-side load balancing, 7-9checking status of, 7-14description of, 7-7service registration, 4-7
load balancingclient-side, 7-8connection goals, 7-9definition of, 7-8runtime connection, 7-9server-side, 7-9
Load Balancing Advisory, 7-6 to 7-7, 7-9LOG_ARCHIVE_FORMAT, 4-6
Mmembership
and the OCR, 2-2memory requirements, 2-6minimum downtime patching, 10-13
NNAS devices
configuring for ASM, 2-21network adapters, 2-3network file system (NFS)
configuring for use with Oracle ASM, 2-21support for, 2-20using for shared storage, 2-20
Network Time Protocol (NTP), 2-16NFS
Seenetwork file systemnodeapps
definition of, 1-6nodes
definition of, 1-2eviction, 5-2
OOCFS, 2-20OCFS2, 2-20OCR
SeeOracle Cluster RegistryOCRCHECK
check status of OLR, 5-6
description of, 5-9using to verify status of the OCR, 5-4
OCRCONFIGadministering OLR, 5-6
OCRDUMPdump content of OLR, 5-6
oinstall group, 2-7OLR
SeeOracle Local RegistryONS
SeeOracle Notification ServiceOPatch
"Not a valid patch area" error, 10-16partially installed patch, 10-17preparing to use, 10-10updating the cluster node list, 10-15viewing log and trace files, 10-15
Optimal Flexible Architecture (OFA), 2-19Oracle ASM Cluster File System (Oracle ACFS), 1-4,
2-20Oracle Automatic Storage Management (Oracle ASM)
SeeAutomatic Storage ManagementOracle base directory, 2-19Oracle Cluster Registry (OCR)
backing up, 5-3changing the location of, 5-7definition of, 2-2location of OCR backups, 5-4manual backups, 5-4mirroring the OCR, 5-7multiplexing, 2-2recovering, 5-4removing a mirror, 5-8repairing, 5-8restoring from backup, 5-5status, 5-4troubleshooting, 5-9usage in Oracle RAC, 7-5viewing backups of, 5-3
Oracle Clusterware, 1-2and process control, 5-1monitoring using Enterprise Manager, 8-21use of, 5-1
Oracle Configuration Manager (OCM), 3-11Oracle Flashback, 6-1Oracle grid infrastructure, 1-2
software owner, 2-7Oracle home directory
creating, 2-20definition of, 3-1
Oracle Inventorygroup, 2-7
Oracle Local Registry (OLR)

8/8/2019 Oracle 11g RAC Guide
http://slidepdf.com/reader/full/oracle-11g-rac-guide 207/208
Index-5
administering, 5-6check status of, 5-6defined, 5-1dump content of, 5-6
Oracle Netconfiguration, 7-7
Oracle Notification Service (ONS), 1-6, 7-6Oracle Real Application Clusters
high availability framework, 7-5installation on different platforms, 1-5overview of administration, 1-1, 3-1patching, 3-18
Oracle software owner, 2-7Oracle Universal Installer (OUI)
description of, 1-5grid infrastructure installation, 3-3Oracle Real Application Clusters installation, 3-1preparing for installation, 3-1starting, 3-4
oracle user, 2-7creating, 2-9modifying environment of, 2-10
ORACLE_BASE, 2-19ORACLE_HOME, 3-1
backing up, 10-11when to set the environment variable, 1-6
oracleasmconfigure, 2-23drivers, 2-23packages, 2-23
OSASM group, 2-8OSDBA group, 2-7OSOPER group, 2-8OUI
SeeOracle Universal Installer
Ppackages, 2-6parallel recovery, 6-10PARALLEL_EXECUTION_MESSAGE_SIZE, 4-5parameters
Seeinitialization parameterspatch sets
applying, 10-9definition of, 10-1
patchesapplying, 10-5definition of, 10-1
minimum downtime patching, 10-13obtaining, 10-3rolling patching, 10-6staging, 10-11uploading to the Patch Cache, 10-4uploading to the Software Library, 10-4
permissions file for udev, 2-25physical RAM requirements, 2-6policy-managed database
definition of, 1-2private interconnect
and Oracle Clusterware, 2-3
RRAM requirements, 2-6rconfig, 3-19recovery
archive logs, 6-8, 6-9database, 6-10description of, 6-1enabling archiving, 6-4instance state during, 6-9Oracle Cluster Registry (OCR), 5-4parallelism, 6-10privileges, 6-6restoring the OCR from backup, 5-5server parameter file, 6-11voting disks, 5-3with Enterprise Manager, 6-2
Recovery Manager (RMAN)channels, 6-4parallelism and backups, 6-4
redo logslocation, 2-2
REDO_TRANSPORT_USER, 4-6redundancy
normal, 5-2REMOTE_LOGIN_PASSWORDFILE, 4-5removing temporary files, 3-8requirements
hardware, 2-6network, 2-3 to 2-5software, 2-5storage, 2-2
resource managerSeeDatabase Resource Manager
RESULT_CACHE_MAX_SIZE, 4-5ROLLBACK_SEGMENTS, 4-5rolling patch method, 10-6root.sh, 3-17RPMs
ASMLib, 2-23RSA keys, 2-10rules files for udev, 2-25Runtime connection load balancing, 7-9
Ssecure shell
configuring, 2-10Server class, 3-11Server Control (SRVCTL)
description of, 1-6server parameter file, 4-7
description of, 4-4recovery, 6-11
server pools, 1-2server-side load balancing, 7-9SERVICE_NAMES, 4-7services

8/8/2019 Oracle 11g RAC Guide
http://slidepdf.com/reader/full/oracle-11g-rac-guide 208/208
administration, 7-15available instance, 7-2creating, 7-11definition of, 7-1failover, 7-3preferred instance, 7-2use with workload management, 7-2using for database connections, 7-8
shared Oracle home directory, 2-20shared storage
supported types, 2-20single-instance database, 3-11Software Library
configuring, 10-2software requirements
checking software requirements, 2-5SPFILE, 4-7
Seeserver parameter fileSQL*Plus
description of, 1-6
SeeVirtual IPVirtual IP (VIP), 1-6voting disks
adding and removing, 5-2 backing up, 5-2definition of, 2-2multiple, 2-2recovering, 5-3
Wworkload management, 7-1
YYUM, 2-6