Embed Size (px)
Citation preview

Oracle 11g R2 Grid Infrastructure installation on 2 node cluster using Virtualbox

IntroductionSince its inception in Oracle 9i, the Oracle RAC (Real Application Clusters) technology has been an active topic of discussion in the community. Oracle 11gR2 RAC offers high availability, scalability (scaling out capability), manageability, reduced ownership cost, and cloud architecture platform. The RAC technology allows the establishment of multiple instances to a single database server which hosts an enterprise application.
Oracle 11g R2 RAC system necessarily works on grid architecture. The master RAC node must have grid infrastructure installed with the remaining nodes replicated accordingly. The Oracle 11gR2 grid infrastructure installation integrates oracle clusterware and oracle ASM. Oracle Clusterware is responsible for High Availability framework, process monitoring, event management and group membership. On the other hand, oracle ASM suffices the need of a conventional file system while offering multiple add-on features like online disk manipulation, auto I/O load balancing, stripping and mirroring of data and finally ease the data storage management.
The RAC customers/users often report their difficulties and issues in the installation phase. Before planning the grid infrastructure installation, it has to be prepared appropriately so that it suffices all the requirements of a clusterware and memory management. There are multiple areas to be looked upon before the grid installation like network, system kernel parameters, NTPD settings, node connectivity, and ASM disk setup. The document describes the prerequisites of a system to be planned for gird installation. Please note that the document is not a guide for RAC installation but a reference to provide hands-on with RAC installation on oracle virtualbox.
ApproachThe document illustrates the installation of Oracle 11gR2 grid infrastructure and 2 node RAC database on virtualbox. The two virtualbox machine images installed with OEL, would serve as the cluster nodes. Initially, we will create only one virtual machine image and do all sorts of configurations required for the grid installation. The master node would be then cloned to create the second node participating in the cluster.
Memory requirementsThe host system running the two virtual machine images must have sufficient memory to run both images simultaneously. RAM above 4GB would be best suited for the demo.
Software RequirementFollowing software can be procured from Oracle Technology Network in order to follow this demonstration
a) Oracle Virtualbox 4.2b) Oracle Enterprise Linux 5.6c) Oracle 11gR2 Grid Infrastructure (64 bit)d) Oracle 11gR2 Database (64 bit)
System setupCreate a virtualbox machine image and install Oracle Enterprise Linux on the same. Recommended base memory (RAM) and startup disk size is shown in the below screenshots.
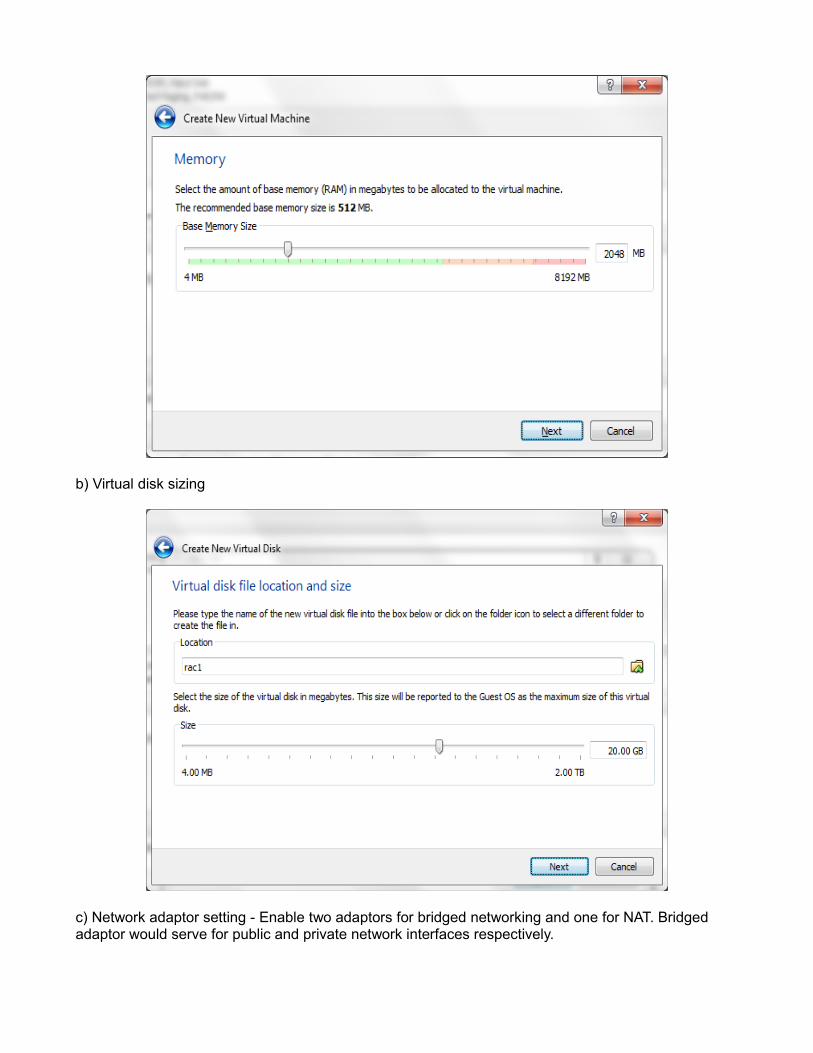
a) RAM sizing
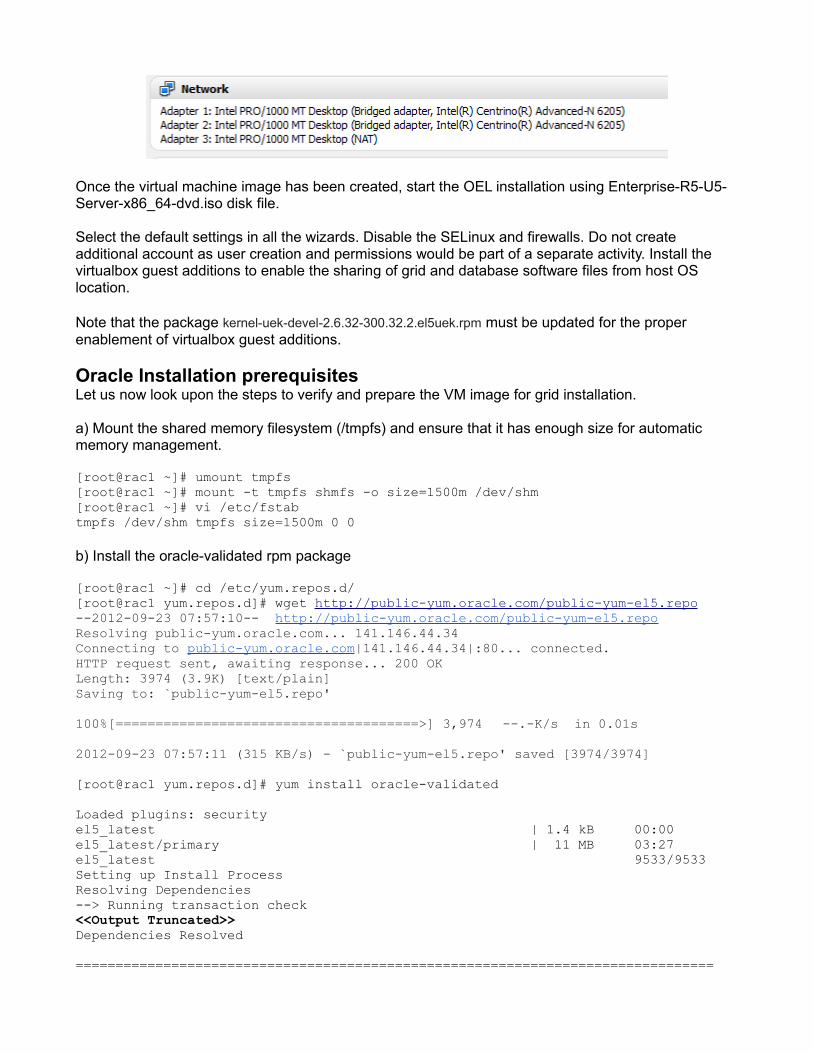
b) Virtual disk sizing
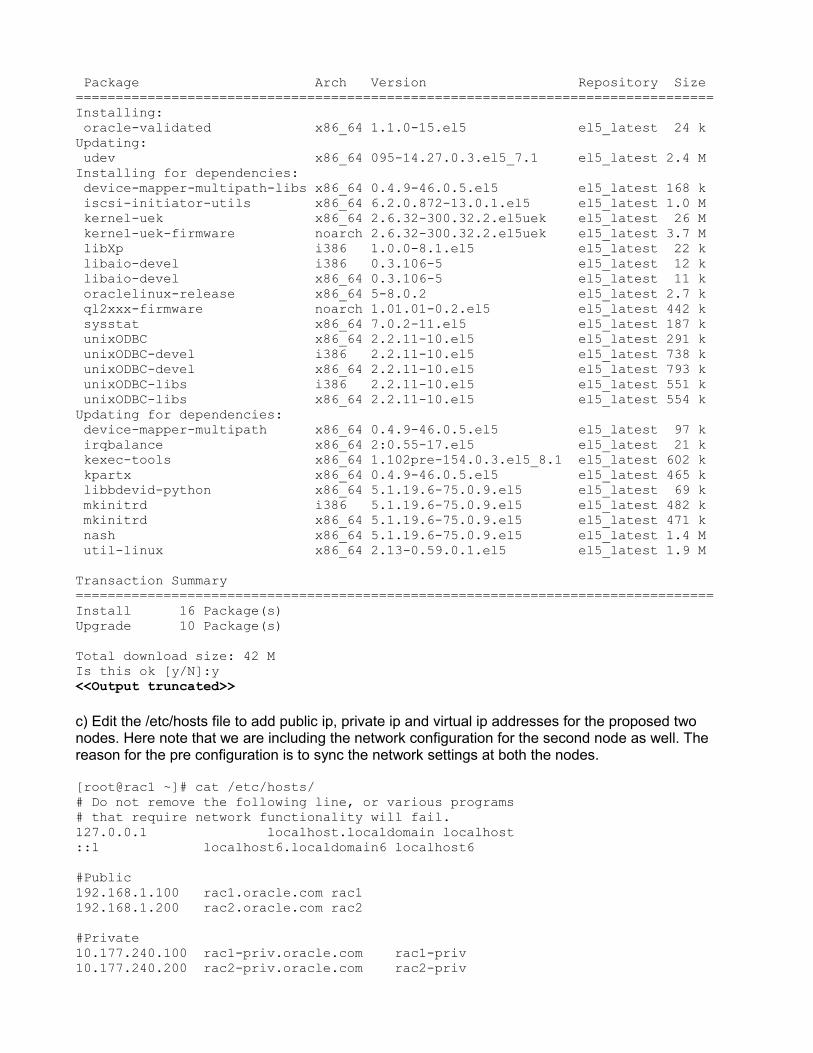
c) Network adaptor setting - Enable two adaptors for bridged networking and one for NAT. Bridged adaptor would serve for public and private network interfaces respectively.
Once the virtual machine image has been created, start the OEL installation using Enterprise-R5-U5-Server-x86_64-dvd.iso disk file.
Select the default settings in all the wizards. Disable the SELinux and firewalls. Do not create additional account as user creation and permissions would be part of a separate activity. Install the virtualbox guest additions to enable the sharing of grid and database software files from host OS location.
Note that the package kernel-uek-devel-2.6.32-300.32.2.el5uek.rpm must be updated for the proper enablement of virtualbox guest additions.
Oracle Installation prerequisitesLet us now look upon the steps to verify and prepare the VM image for grid installation.
a) Mount the shared memory filesystem (/tmpfs) and ensure that it has enough size for automatic memory management.
[root@rac1 ~]# umount tmpfs[root@rac1 ~]# mount -t tmpfs shmfs -o size=1500m /dev/shm[root@rac1 ~]# vi /etc/fstabtmpfs /dev/shm tmpfs size=1500m 0 0
b) Install the oracle-validated rpm package
[root@rac1 ~]# cd /etc/yum.repos.d/[root@rac1 yum.repos.d]# wget http://public-yum.oracle.com/public-yum-el5.repo--2012-09-23 07:57:10-- http://public-yum.oracle.com/public-yum-el5.repoResolving public-yum.oracle.com... 141.146.44.34Connecting to public-yum.oracle.com|141.146.44.34|:80... connected.HTTP request sent, awaiting response... 200 OKLength: 3974 (3.9K) [text/plain]Saving to: `public-yum-el5.repo'
100%[======================================>] 3,974 --.-K/s in 0.01s
2012-09-23 07:57:11 (315 KB/s) - `public-yum-el5.repo' saved [3974/3974]
[root@rac1 yum.repos.d]# yum install oracle-validated
Loaded plugins: securityel5_latest | 1.4 kB 00:00el5_latest/primary | 11 MB 03:27el5_latest 9533/9533Setting up Install ProcessResolving Dependencies--> Running transaction check<<Output Truncated>>Dependencies Resolved
================================================================================
Package Arch Version Repository Size================================================================================Installing: oracle-validated x86_64 1.1.0-15.el5 el5_latest 24 kUpdating: udev x86_64 095-14.27.0.3.el5_7.1 el5_latest 2.4 MInstalling for dependencies: device-mapper-multipath-libs x86_64 0.4.9-46.0.5.el5 el5_latest 168 k iscsi-initiator-utils x86_64 6.2.0.872-13.0.1.el5 el5_latest 1.0 M kernel-uek x86_64 2.6.32-300.32.2.el5uek el5_latest 26 M kernel-uek-firmware noarch 2.6.32-300.32.2.el5uek el5_latest 3.7 M libXp i386 1.0.0-8.1.el5 el5_latest 22 k libaio-devel i386 0.3.106-5 el5_latest 12 k libaio-devel x86_64 0.3.106-5 el5_latest 11 k oraclelinux-release x86_64 5-8.0.2 el5_latest 2.7 k ql2xxx-firmware noarch 1.01.01-0.2.el5 el5_latest 442 k sysstat x86_64 7.0.2-11.el5 el5_latest 187 k unixODBC x86_64 2.2.11-10.el5 el5_latest 291 k unixODBC-devel i386 2.2.11-10.el5 el5_latest 738 k unixODBC-devel x86_64 2.2.11-10.el5 el5_latest 793 k unixODBC-libs i386 2.2.11-10.el5 el5_latest 551 k unixODBC-libs x86_64 2.2.11-10.el5 el5_latest 554 kUpdating for dependencies: device-mapper-multipath x86_64 0.4.9-46.0.5.el5 el5_latest 97 k irqbalance x86_64 2:0.55-17.el5 el5_latest 21 k kexec-tools x86_64 1.102pre-154.0.3.el5_8.1 el5_latest 602 k kpartx x86_64 0.4.9-46.0.5.el5 el5_latest 465 k libbdevid-python x86_64 5.1.19.6-75.0.9.el5 el5_latest 69 k mkinitrd i386 5.1.19.6-75.0.9.el5 el5_latest 482 k mkinitrd x86_64 5.1.19.6-75.0.9.el5 el5_latest 471 k nash x86_64 5.1.19.6-75.0.9.el5 el5_latest 1.4 M util-linux x86_64 2.13-0.59.0.1.el5 el5_latest 1.9 M
Transaction Summary================================================================================Install 16 Package(s)Upgrade 10 Package(s)
Total download size: 42 MIs this ok [y/N]:y<<Output truncated>>
c) Edit the /etc/hosts file to add public ip, private ip and virtual ip addresses for the proposed two nodes. Here note that we are including the network configuration for the second node as well. The reason for the pre configuration is to sync the network settings at both the nodes.
[root@rac1 ~]# cat /etc/hosts/# Do not remove the following line, or various programs# that require network functionality will fail.127.0.0.1 localhost.localdomain localhost::1 localhost6.localdomain6 localhost6
#Public192.168.1.100 rac1.oracle.com rac1192.168.1.200 rac2.oracle.com rac2
#Private10.177.240.100 rac1-priv.oracle.com rac1-priv10.177.240.200 rac2-priv.oracle.com rac2-priv
#Virtual192.168.1.10 rac1-vip.oracle.com rac1-vip192.168.1.11 rac2-vip.oracle.com rac2-vip
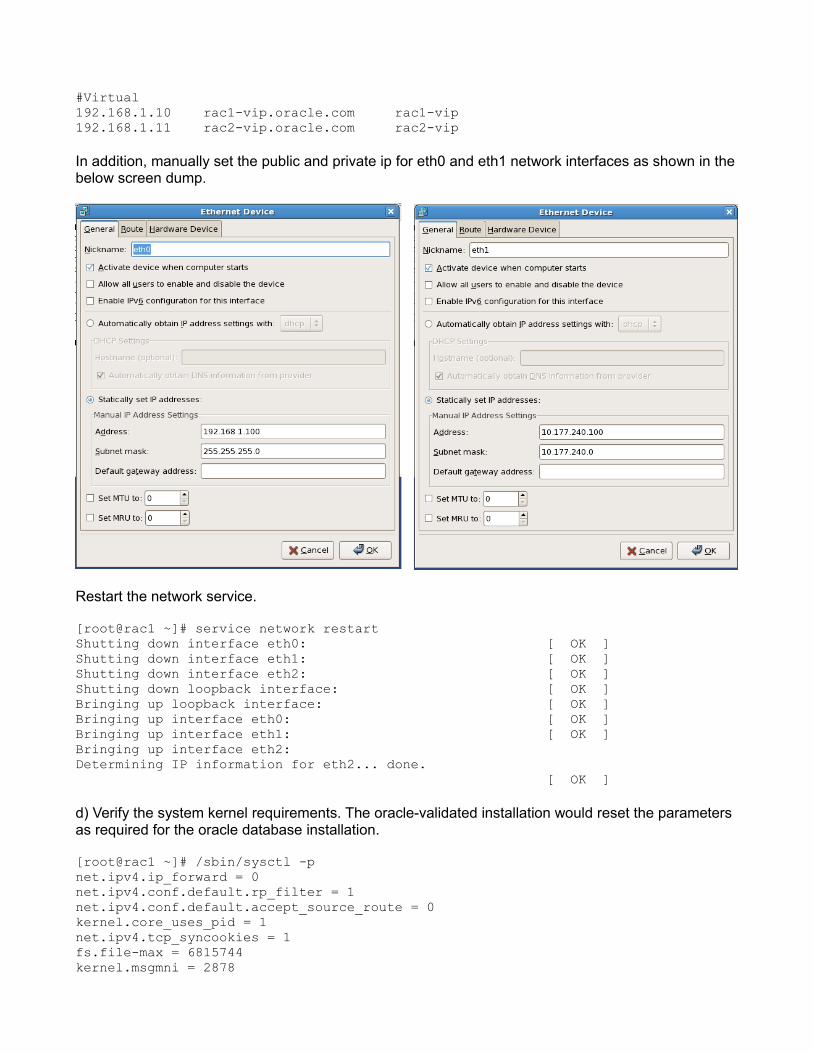
In addition, manually set the public and private ip for eth0 and eth1 network interfaces as shown in the below screen dump.
Restart the network service.
[root@rac1 ~]# service network restartShutting down interface eth0: [ OK ]Shutting down interface eth1: [ OK ]Shutting down interface eth2: [ OK ]Shutting down loopback interface: [ OK ]Bringing up loopback interface: [ OK ]Bringing up interface eth0: [ OK ]Bringing up interface eth1: [ OK ]Bringing up interface eth2: Determining IP information for eth2... done. [ OK ]
d) Verify the system kernel requirements. The oracle-validated installation would reset the parameters as required for the oracle database installation.
[root@rac1 ~]# /sbin/sysctl -pnet.ipv4.ip_forward = 0net.ipv4.conf.default.rp_filter = 1net.ipv4.conf.default.accept_source_route = 0kernel.core_uses_pid = 1net.ipv4.tcp_syncookies = 1fs.file-max = 6815744kernel.msgmni = 2878

kernel.msgmax = 8192kernel.msgmnb = 65536kernel.sem = 250 32000 100 142kernel.shmmni = 4096kernel.shmall = 1073741824kernel.shmmax = 4398046511104kernel.sysrq = 1net.core.rmem_default = 262144net.core.rmem_max = 4194304net.core.wmem_default = 262144net.core.wmem_max = 1048576fs.aio-max-nr = 3145728net.ipv4.ip_local_port_range = 9000 65500vm.min_free_kbytes = 51200
e) Verify the limits.conf values. Like kernel parameters, these values are too set by oracle-validated package.
[root@rac1 ~]# cat /etc/security/limits.conf
# Oracle-Validated setting for nofile soft limit is 131072oracle soft nofile 131072
# Oracle-Validated setting for nofile hard limit is 131072oracle hard nofile 131072
# Oracle-Validated setting for nproc soft limit is 131072oracle soft nproc 131072
# Oracle-Validated setting for nproc hard limit is 131072oracle hard nproc 131072
# Oracle-Validated setting for core soft limit is unlimitedoracle soft core unlimited
# Oracle-Validated setting for core hard limit is unlimitedoracle hard core unlimited
# Oracle-Validated setting for memlock soft limit is 50000000oracle soft memlock 50000000
# Oracle-Validated setting for memlock hard limit is 50000000oracle hard memlock 50000000
f) Verify the /etc/pam.d/login values. Include the entry [highlighted below as bold]
[root@rac1 ~]# cat /etc/pam.d/login
auth [user_unknown=ignore success=ok ignore=ignore default=bad] pam_securetty.soauth include system-authaccount required pam_nologin.soaccount include system-authpassword include system-auth# pam_selinux.so close should be the first session rulesession required pam_selinux.so closesession optional pam_keyinit.so force revokesession required pam_loginuid.sosession include system-auth

session optional pam_console.so# pam_selinux.so open should only be followed by sessions to be executed in the user contextsession required pam_selinux.so opensession required pam_limits.so
g) Verify whether SELinux has been disabled.
[root@rac1 ~]# cat /etc/selinux/config
# This file controls the state of SELinux on the system.# SELINUX= can take one of these three values:# enforcing - SELinux security policy is enforced.# permissive - SELinux prints warnings instead of enforcing.# disabled - SELinux is fully disabled.SELINUX=disabled# SELINUXTYPE= type of policy in use. Possible values are:# targeted - Only targeted network daemons are protected.# strict - Full SELinux protection.SELINUXTYPE=targeted
h) Synchronization setup for NTPD and restart. Include “-x” in the OPTIONS to enable the server synchronization.
[root@rac1 ~]# service ntpd stopShutting down ntpd: [FAILED][root@rac1 ~]# chkconfig ntpd off[root@rac1 ~]# rm /var/run/ntpd.pid[root@rac1 ~]# vi /etc/sysconfig/ntpdOPTIONS=”-x -u ntp:npt -p /var/run/ntpd.pid”[root@rac1 ~]# service ntpd restart
i) Create groups and users. Note that “oracle” user is part of oinstall and dba groups
[root@rac1 ~]# groupadd -g 500 oinstall[root@rac1 ~]# groupadd -g 501 dba[root@rac1 ~]# groupadd -g 502 oper[root@rac1 ~]# groupadd -g 503 asmadmin[root@rac1 ~]# useradd -u 1000 -g oinstall -G dba,oper,asmadmin oracle
j) Create the grid home and oracle home directories
[root@rac1 ~]# mkdir -p /u01/app/11.2.0/grid[root@rac1 ~]# mkdir -p /u01/app/oracle/product/11.2.0/dbhome_1[root@rac1 ~]# chown -R oracle:oinstall /u01[root@rac1 ~]# chmod -R 775 /u01
k) Edit the .bash_profile of “oracle” user.
[root@rac1 ~]# vi /home/oracle/.bash_profile#Get the aliases and functionsif [ -f ~/.bashrc ]; then . ~/.bashrcfi
#ORACLE SETTINGSTMP=/tmp; export TMPTMPDIR=$TMP; export TMPDIR
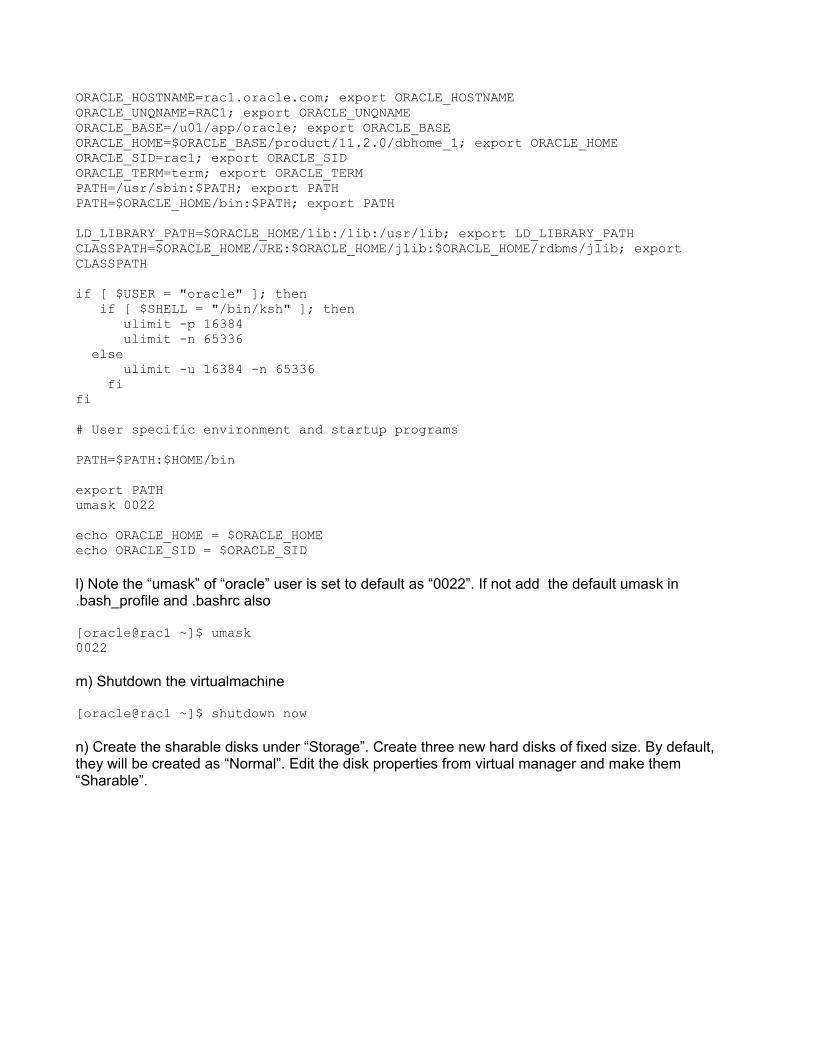
ORACLE_HOSTNAME=rac1.oracle.com; export ORACLE_HOSTNAMEORACLE_UNQNAME=RAC1; export ORACLE_UNQNAMEORACLE_BASE=/u01/app/oracle; export ORACLE_BASEORACLE_HOME=$ORACLE_BASE/product/11.2.0/dbhome_1; export ORACLE_HOMEORACLE_SID=rac1; export ORACLE_SIDORACLE_TERM=term; export ORACLE_TERMPATH=/usr/sbin:$PATH; export PATHPATH=$ORACLE_HOME/bin:$PATH; export PATH
LD_LIBRARY_PATH=$ORACLE_HOME/lib:/lib:/usr/lib; export LD_LIBRARY_PATHCLASSPATH=$ORACLE_HOME/JRE:$ORACLE_HOME/jlib:$ORACLE_HOME/rdbms/jlib; export CLASSPATH
if [ $USER = "oracle" ]; then if [ $SHELL = "/bin/ksh" ]; then ulimit -p 16384 ulimit -n 65336 else ulimit -u 16384 -n 65336 fifi
# User specific environment and startup programs
PATH=$PATH:$HOME/bin
export PATHumask 0022
echo ORACLE_HOME = $ORACLE_HOMEecho ORACLE_SID = $ORACLE_SID
l) Note the “umask” of “oracle” user is set to default as “0022”. If not add the default umask in .bash_profile and .bashrc also
[oracle@rac1 ~]$ umask0022
m) Shutdown the virtualmachine
[oracle@rac1 ~]$ shutdown now
n) Create the sharable disks under “Storage”. Create three new hard disks of fixed size. By default, they will be created as “Normal”. Edit the disk properties from virtual manager and make them “Sharable”.
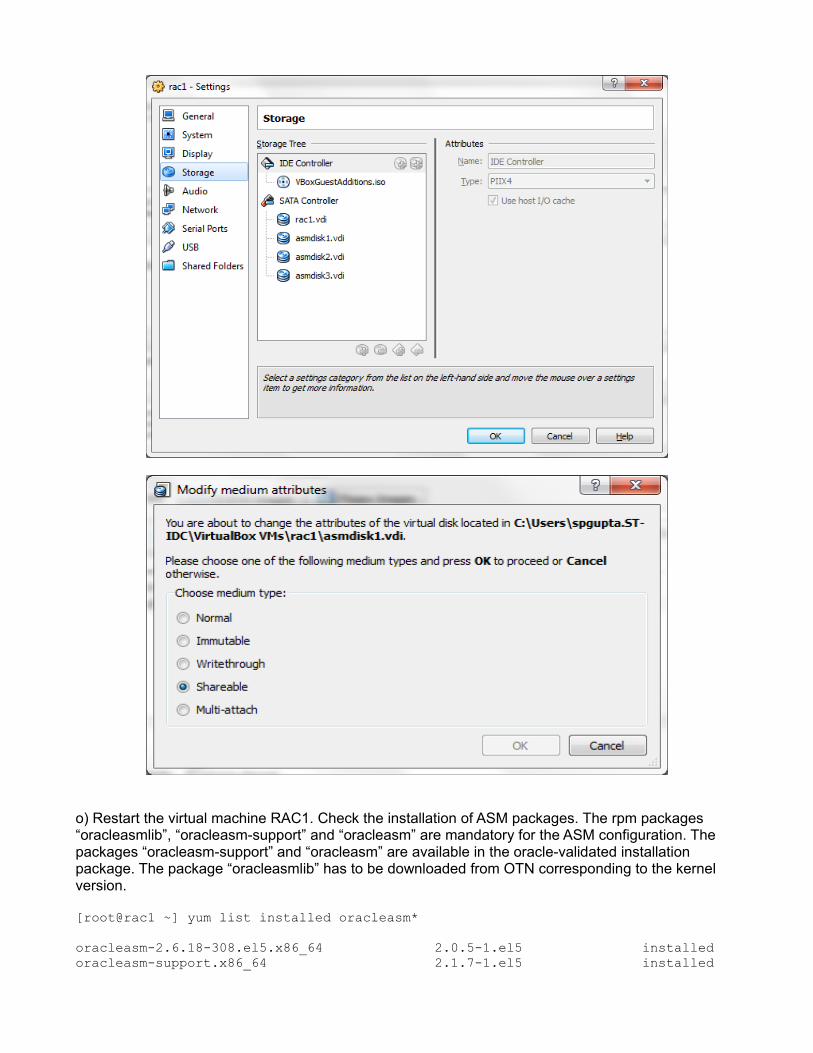
o) Restart the virtual machine RAC1. Check the installation of ASM packages. The rpm packages “oracleasmlib”, “oracleasm-support” and “oracleasm” are mandatory for the ASM configuration. The packages “oracleasm-support” and “oracleasm” are available in the oracle-validated installation package. The package “oracleasmlib” has to be downloaded from OTN corresponding to the kernel version.
[root@rac1 ~] yum list installed oracleasm*
oracleasm-2.6.18-308.el5.x86_64 2.0.5-1.el5 installedoracleasm-support.x86_64 2.1.7-1.el5 installed

oracleasmlib.x86_64 2.0.4-1.el5 installed
p) Configure oracleasm
[root@rac1 ~]# /etc/init.d/oracleasm configure
Configuring the Oracle ASM library driver.This will configure the on-boot properties of the Oracle ASM librarydriver. The following questions will determine whether the driver isloaded on boot and what permissions it will have. The current valueswill be shown in brackets ('[]'). Hitting <ENTER> without typing ananswer will keep that current value. Ctrl-C will abort.Default user to own the driver interface []: oracleDefault group to own the driver interface []: dbaStart Oracle ASM library driver on boot (y/n) [n]: yScan for Oracle ASM disks on boot (y/n) [y]: yWriting Oracle ASM library driver configuration: done
[root@rac1 ~]# /etc/init.d/oracleasm statusChecking if ASM is loaded: yesChecking if /dev/oracleasm is mounted: yes
q) Create the ASM disks
[root@rac1 ~]# ls /dev/sd*/dev/sda /dev/sda1 /dev/sda2 /dev/sdb /dev/sdc /dev/sdd[root@rac1 ~]# cd /dev[root@rac1 dev]# fdisk sdbDevice contains neither a valid DOS partition table, nor Sun, SGI or OSF disklabelBuilding a new DOS disklabel. Changes will remain in memory only,until you decide to write them. After that, of course, the previouscontent won't be recoverable.
Warning: invalid flag 0x0000 of partition table 4 will be corrected by w(rite)
Command (m for help): nCommand action e extended p primary partition (1-4)pPartition number (1-4): 1First cylinder (1-652, default 1): Using default value 1Last cylinder or +size or +sizeM or +sizeK (1-652, default 652): Using default value 652
Command (m for help): wThe partition table has been altered!
Calling ioctl() to re-read partition table.Syncing disks.[root@rac1 dev]# fdisk sdc<<Similar operation as done in /dev/sdb>>[root@rac1 dev]# fdisk sdd<<Similar operation as done in /dev/sdb>>[root@rac1 ~]# /etc/init.d/oracleasm createdisk ASM1 /dev/sdb1Marking disk "ASM1" as an ASM disk: [OK][root@rac1 ~]# /etc/init.d/oracleasm createdisk ASM2 /dev/sdc1Marking disk "ASM2" as an ASM disk: [OK]

[root@rac1 ~]# /etc/init.d/oracleasm createdisk ASM3 /dev/sdd1Marking disk "ASM3" as an ASM disk: [OK][root@rac1 ~]# /etc/init.d/oracleasm listdisksASM1ASM2ASM3[root@rac1 ~]# /etc/init.d/oracleasm scandisksScanning the system for Oracle ASMLib disks: [ OK ][root@rac1 ~]# /etc/init.d/oracleasm querydisk ASM1Disk "ASM1" is a valid ASM disk
r) Unzip the Grid Infrastructure folder. Change ownership of “grid” folder to “oracle:oinstall” Install the RPM package “cvuqdisk” from the /install/grid/rpm folder
[root@rac1 install]# ls -lt-rwxr-x--- 1 root root 1111416131 Sep 18 18:01 linux.x64_11gR2_database_2of2.zip-rwxr-x--- 1 root root 1239269270 Sep 18 18:00 linux.x64_11gR2_database_1of2.zip-rwxr-x--- 1 root root 1051619328 Sep 18 18:00 grid.zip[root@rac1 install]# unzip grid.zip<<Output truncated>>[root@rac1 install]# rpm -Uvh /grid/rpm/cvuqdisk-1.0.7-1.rpmPreparing... ########################################### [100%]Using default group oinstall to install package 1:cvuqdisk ########################################### [100%][root@rac1 install]# chown -R oracle:oinstall ./grid/
s) Shutdown Node RAC1
t) Clone the RAC1 to RAC2. It might take up some time. Once the cloned image RAC2 is done, remove the additional sharable disks from RAC2 image under the “Storage” attribute. Add the existing sharable disks (from RAC1 image).
u) Start RAC2 node. Edit the eth0 and eth1 ip addresses. Change the hostname, Edit the /home/oracle/.bash_profile.
v) Go to node RAC1 and establish the ssh connectivity. The user “oracle” must have a password so as to establish passwordless connectivity between the two nodes. The script asks for the “oracle” user passwords and updates the “authorized_keys”, “id_rsa” keys, and “known_hosts” files at /home/oracle/.ssh location.
[root@rac1 sshsetup]$ sh sshUserSetup.sh -user oracle -hosts "rac1 rac2" -noPromptPassphrase
w) Verify the cluster setup using cluvfy.sh. The cluster verification utility verifies the nodes for ssh connectivity, user equivalence, free memory, kernel parameters, package existence, and ntpd clock synchronization. Note that the cluster verfiication utility is employed in the pre-cluster installation stage (-pre crsinst).
[root@rac1 ~]# sh cluvfy.sh stage -pre crsinst -n rac1,rac2 -verbose > ClusterVerify.log
<<Output truncated>>Pre-check for cluster services setup was successful.
Oracle Grid Infrastructure Installation

The prerequisite checks and validations required for the Oracle software installation is now complete. Now, we shall move ahead to install the oracle grid infrastructure software.
a) Execute “xhost +” as the root user for xwindow configuration. [root@rac1 grid]# xhost +access control disabled, clients can connect from any host
b)Switch to Oracle user and run the software Installer[root@rac1 grid]# su oracle[oracle@rac1 grid]# sh runInstaller
Checking Temp space: must be greater than 120 MB. Actual 8213 MB PassedChecking swap space: must be greater than 150 MB. Actual 3999 MB PassedChecking monitor: must be configured to display at least 256 colors. Actual 16777216 PassedPreparing to launch Oracle Universal Installer from /tmp/OraInstall2012-09-23_05-16-40PM. Please wait ...
c) The installer open the wizard to select the “Installation Option”. Select “Install and Configure Grid Infrastructure for a Cluster” and click “Next”.
d) The next wizard prompts for the selection for “Installation Type”. Select “Typical Installation” to prioritize default settings and click “Next”. The “Advanced Installation” options lets you to select the language, different passwords and GNS settings for SCAN cluster name.

e) The third wizard does the “Cluster Configuration”. It will show a default, but modifiable SCAN name and only the master RAC node i.e. RAC1 here.
Click “Add” button to add the other participating nodes (public hostname and virtual hostname) in the cluster. Here, rac2.oracle.com (public) and rac2-vip.oracle.com (virtual hostname) is added.
Click “SSH Connectivity” to setup and test the SSH connectivity between the cluster nodes. Provide the “oracle” user password and click “Test”/”Setup”.
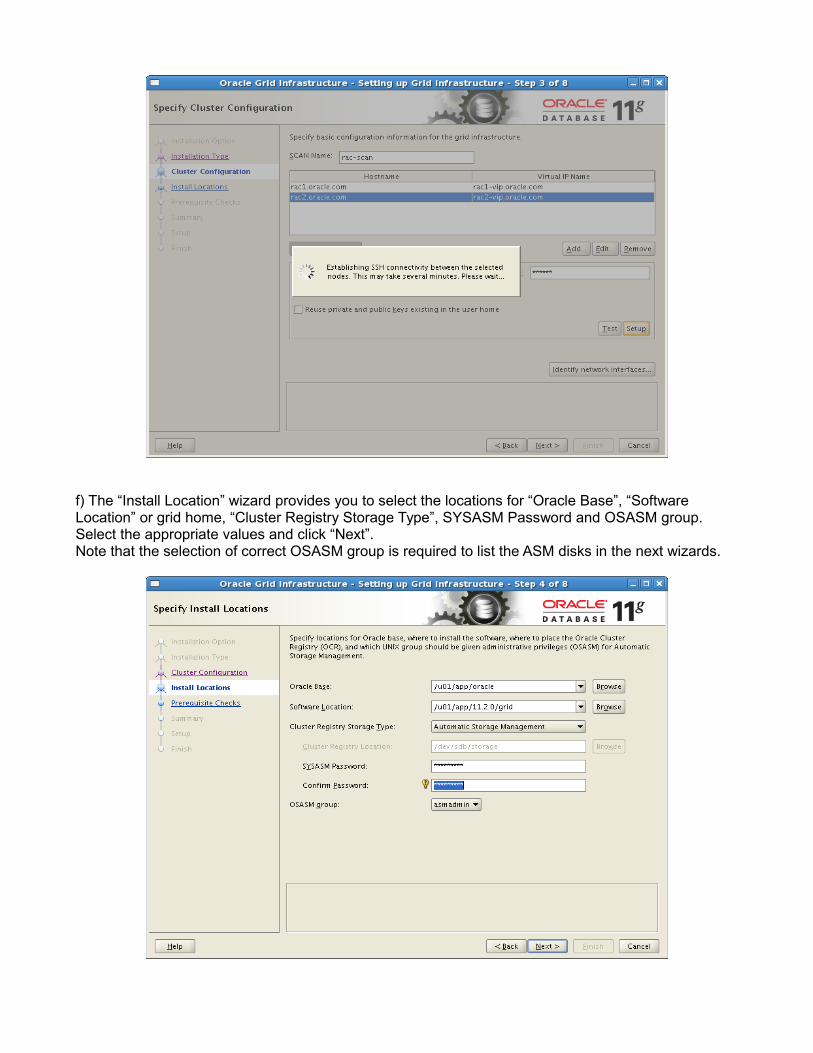
f) The “Install Location” wizard provides you to select the locations for “Oracle Base”, “Software Location” or grid home, “Cluster Registry Storage Type”, SYSASM Password and OSASM group. Select the appropriate values and click “Next”. Note that the selection of correct OSASM group is required to list the ASM disks in the next wizards.
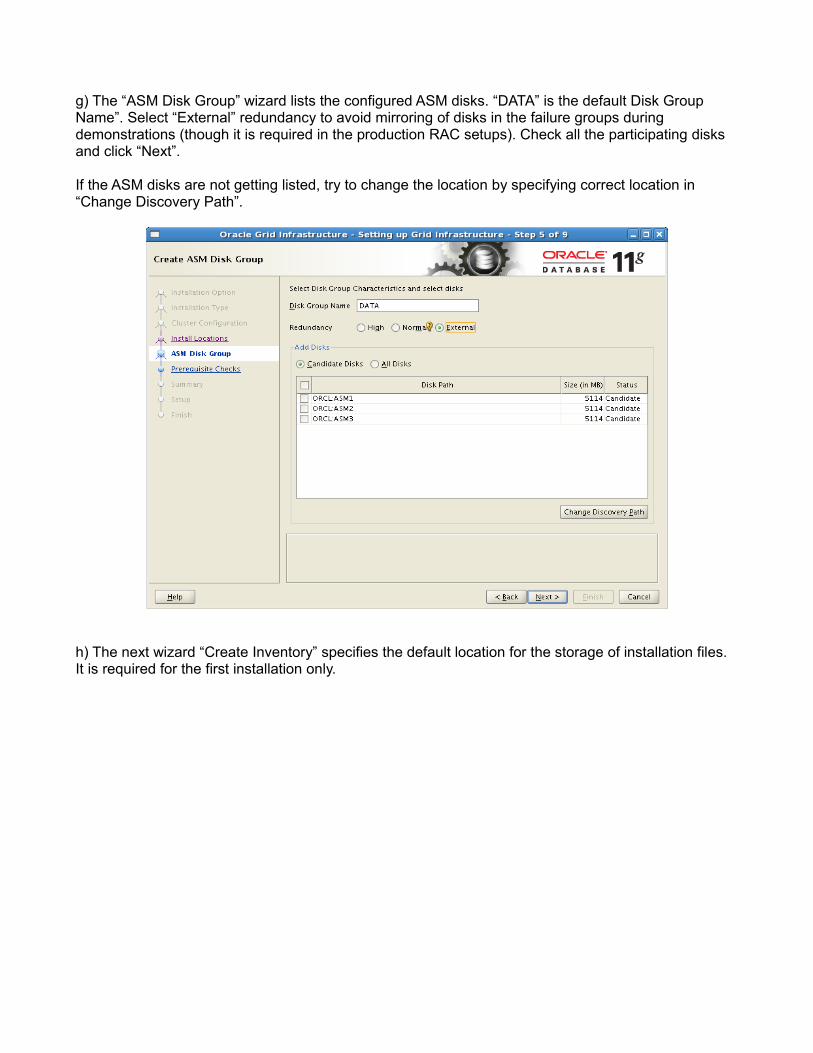
g) The “ASM Disk Group” wizard lists the configured ASM disks. “DATA” is the default Disk Group Name”. Select “External” redundancy to avoid mirroring of disks in the failure groups during demonstrations (though it is required in the production RAC setups). Check all the participating disks and click “Next”.
If the ASM disks are not getting listed, try to change the location by specifying correct location in “Change Discovery Path”.
h) The next wizard “Create Inventory” specifies the default location for the storage of installation files. It is required for the first installation only.

I) The next wizard “Prerequisite Checks” would check the system setup for the grid installation. The checks would be same as the one which we validated in the last section. After the verification, the wizard would be directed to “Summary” wizard.

j) The “Summary” wizard will list the summary of the prerequisite check performed by the installer. If the check is successful, the below screen appears. If any of the checks are failed, the page lists the failed checks, fixable or not fixable recommendation, and ‘ignore’ option. If the failed checks can be fixed, it must be resolved before further proceedings. If the failed checks are ignorable, select the ‘ignore’ option. Click “Finish” to move ahead.
k) The “Setup” wizard shows the installation tasks and the progress bar.

l) In between of the installation (stage “Execute Root Scripts for Install Grid Infrastructure for a Cluster”), below dialog box pops-up and prompts for the execution of two scripts on all the nodes in the cluster. The scripts starts the Oracle High Availability Services, cluster processes and configures oracle grid infrastructure for the cluster. In addition, it also creates (and starts) ASM service and diskgroup DATA.
Execute both the scripts on the master node RAC1 first. Upon the successful execution of the scripts, execute the scripts on the remaining nodes. Sample output of the script execution is as below
[root@rac1 ~]# /u01/app/oraInventory/orainstRoot.shChanging permissions of /u01/app/oraInventory.Adding read,write permissions for group.Removing read,write,execute permissions for world.
Changing groupname of /u01/app/oraInventory to oinstall.The execution of the script is complete.[root@rac1 ~]# /u01/app/11.2.0/grid/root.shRunning Oracle 11g root.sh script...
The following environment variables are set as: ORACLE_OWNER= oracle ORACLE_HOME= /u01/app/11.2.0/grid
Enter the full pathname of the local bin directory: [/usr/local/bin]: Copying dbhome to /usr/local/bin ... Copying oraenv to /usr/local/bin ... Copying coraenv to /usr/local/bin ...
Creating /etc/oratab file...

Entries will be added to the /etc/oratab file as needed byDatabase Configuration Assistant when a database is createdFinished running generic part of root.sh script.Now product-specific root actions will be performed.2012-09-23 18:06:35: Parsing the host name2012-09-23 18:06:35: Checking for super user privileges2012-09-23 18:06:35: User has super user privilegesUsing configuration parameter file: /u01/app/11.2.0/grid/crs/install/crsconfig_paramsCreating trace directoryLOCAL ADD MODE Creating OCR keys for user 'root', privgrp 'root'..Operation successful. root wallet root wallet cert root cert export peer wallet profile reader wallet pa wallet peer wallet keys pa wallet keys peer cert request pa cert request peer cert pa cert peer root cert TP profile reader root cert TP pa root cert TP peer pa cert TP pa peer cert TP profile reader pa cert TP profile reader peer cert TP peer user cert pa user certAdding daemon to inittabCRS-4123: Oracle High Availability Services has been started.ohasd is startingacfsroot: ACFS-9301: ADVM/ACFS installation can not proceed:
acfsroot: ACFS-9302: No installation files found at /u01/app/11.2.0/grid/install/usm/EL5/x86_64/2.6.18-8/2.6.18-8.el5uek-x86_64/bin.
CRS-2672: Attempting to start 'ora.gipcd' on 'rac1'CRS-2672: Attempting to start 'ora.mdnsd' on 'rac1'CRS-2676: Start of 'ora.gipcd' on 'rac1' succeededCRS-2676: Start of 'ora.mdnsd' on 'rac1' succeededCRS-2672: Attempting to start 'ora.gpnpd' on 'rac1'CRS-2676: Start of 'ora.gpnpd' on 'rac1' succeededCRS-2672: Attempting to start 'ora.cssdmonitor' on 'rac1'CRS-2676: Start of 'ora.cssdmonitor' on 'rac1' succeededCRS-2672: Attempting to start 'ora.cssd' on 'rac1'CRS-2672: Attempting to start 'ora.diskmon' on 'rac1'CRS-2676: Start of 'ora.diskmon' on 'rac1' succeededCRS-2676: Start of 'ora.cssd' on 'rac1' succeededCRS-2672: Attempting to start 'ora.ctssd' on 'rac1'CRS-2676: Start of 'ora.ctssd' on 'rac1' succeeded
ASM created and started successfully.

DiskGroup DATA created successfully.
clscfg: -install mode specifiedSuccessfully accumulated necessary OCR keys.Creating OCR keys for user 'root', privgrp 'root'..Operation successful.CRS-2672: Attempting to start 'ora.crsd' on 'rac1'CRS-2676: Start of 'ora.crsd' on 'rac1' succeededCRS-4256: Updating the profileSuccessful addition of voting disk 35ab9a01644a4fa1bfd2c1b1c28cfb32.Successfully replaced voting disk group with +DATA.CRS-4256: Updating the profileCRS-4266: Voting file(s) successfully replaced## STATE File Universal Id File Name Disk group-- ----- ----------------- --------- --------- 1. ONLINE 35ab9a01644a4fa1bfd2c1b1c28cfb32 (ORCL:ASM1) [DATA]Located 1 voting disk(s).CRS-2673: Attempting to stop 'ora.crsd' on 'rac1'CRS-2677: Stop of 'ora.crsd' on 'rac1' succeededCRS-2673: Attempting to stop 'ora.asm' on 'rac1'CRS-2677: Stop of 'ora.asm' on 'rac1' succeededCRS-2673: Attempting to stop 'ora.ctssd' on 'rac1'CRS-2677: Stop of 'ora.ctssd' on 'rac1' succeededCRS-2673: Attempting to stop 'ora.cssdmonitor' on 'rac1'CRS-2677: Stop of 'ora.cssdmonitor' on 'rac1' succeededCRS-2673: Attempting to stop 'ora.cssd' on 'rac1'CRS-2677: Stop of 'ora.cssd' on 'rac1' succeededCRS-2673: Attempting to stop 'ora.gpnpd' on 'rac1'CRS-2677: Stop of 'ora.gpnpd' on 'rac1' succeededCRS-2673: Attempting to stop 'ora.gipcd' on 'rac1'CRS-2677: Stop of 'ora.gipcd' on 'rac1' succeededCRS-2673: Attempting to stop 'ora.mdnsd' on 'rac1'CRS-2677: Stop of 'ora.mdnsd' on 'rac1' succeededCRS-2672: Attempting to start 'ora.mdnsd' on 'rac1'CRS-2676: Start of 'ora.mdnsd' on 'rac1' succeededCRS-2672: Attempting to start 'ora.gipcd' on 'rac1'CRS-2676: Start of 'ora.gipcd' on 'rac1' succeededCRS-2672: Attempting to start 'ora.gpnpd' on 'rac1'CRS-2676: Start of 'ora.gpnpd' on 'rac1' succeededCRS-2672: Attempting to start 'ora.cssdmonitor' on 'rac1'CRS-2676: Start of 'ora.cssdmonitor' on 'rac1' succeededCRS-2672: Attempting to start 'ora.cssd' on 'rac1'CRS-2672: Attempting to start 'ora.diskmon' on 'rac1'CRS-2676: Start of 'ora.diskmon' on 'rac1' succeededCRS-2676: Start of 'ora.cssd' on 'rac1' succeededCRS-2672: Attempting to start 'ora.ctssd' on 'rac1'CRS-2676: Start of 'ora.ctssd' on 'rac1' succeededCRS-2672: Attempting to start 'ora.asm' on 'rac1'CRS-2676: Start of 'ora.asm' on 'rac1' succeededCRS-2672: Attempting to start 'ora.crsd' on 'rac1'CRS-2676: Start of 'ora.crsd' on 'rac1' succeededCRS-2672: Attempting to start 'ora.evmd' on 'rac1'CRS-2676: Start of 'ora.evmd' on 'rac1' succeededCRS-2672: Attempting to start 'ora.asm' on 'rac1'CRS-2676: Start of 'ora.asm' on 'rac1' succeededCRS-2672: Attempting to start 'ora.DATA.dg' on 'rac1'CRS-2676: Start of 'ora.DATA.dg' on 'rac1' succeeded
rac1 2012/09/23 18:12:00
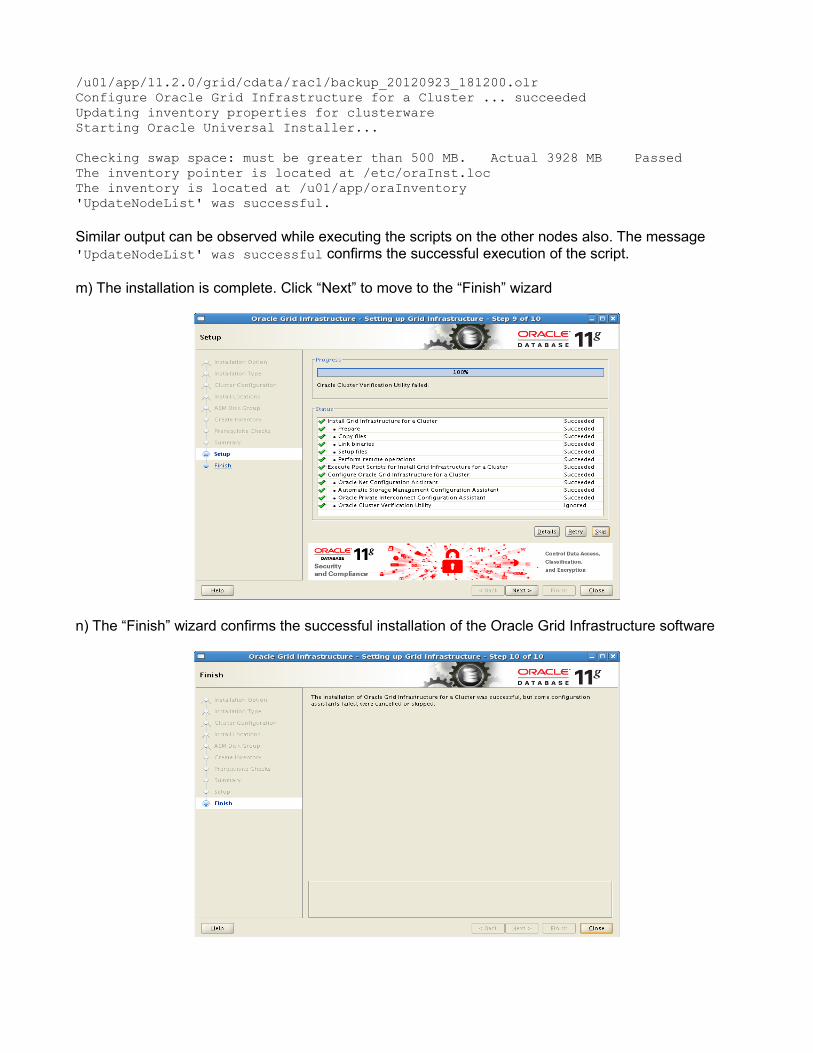
/u01/app/11.2.0/grid/cdata/rac1/backup_20120923_181200.olrConfigure Oracle Grid Infrastructure for a Cluster ... succeededUpdating inventory properties for clusterwareStarting Oracle Universal Installer...
Checking swap space: must be greater than 500 MB. Actual 3928 MB PassedThe inventory pointer is located at /etc/oraInst.locThe inventory is located at /u01/app/oraInventory'UpdateNodeList' was successful.
Similar output can be observed while executing the scripts on the other nodes also. The message 'UpdateNodeList' was successful confirms the successful execution of the script.
m) The installation is complete. Click “Next” to move to the “Finish” wizard
n) The “Finish” wizard confirms the successful installation of the Oracle Grid Infrastructure software
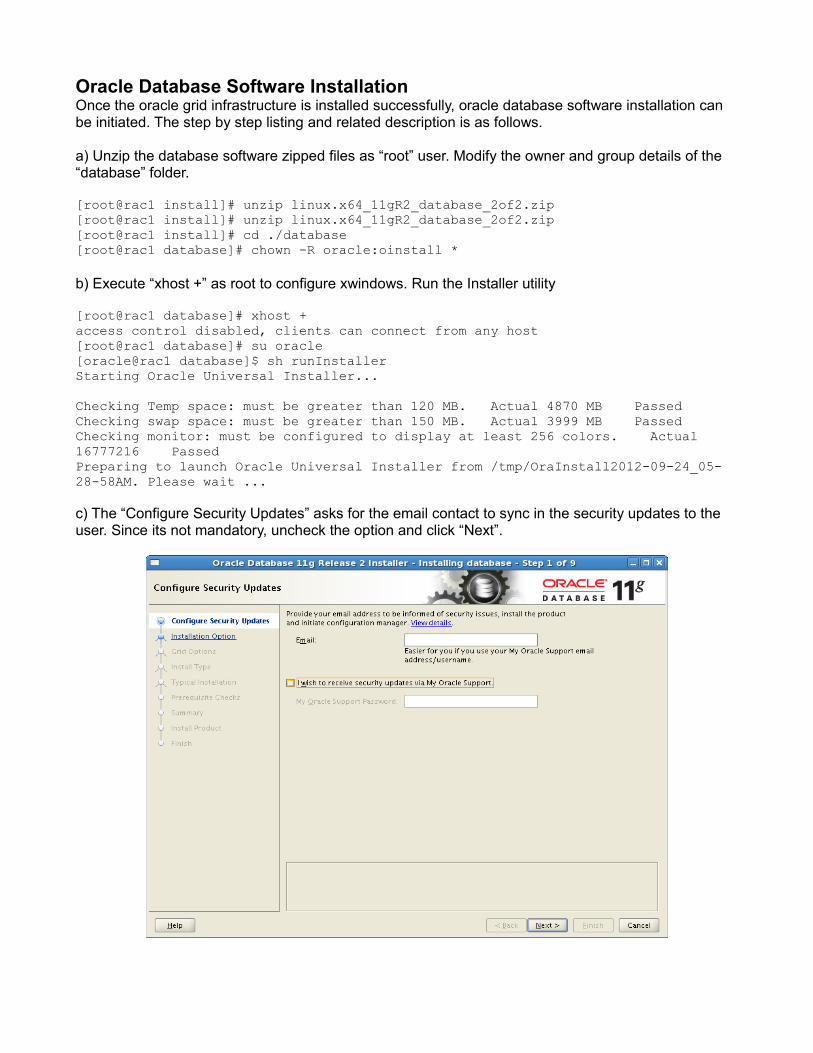
Oracle Database Software InstallationOnce the oracle grid infrastructure is installed successfully, oracle database software installation can be initiated. The step by step listing and related description is as follows.
a) Unzip the database software zipped files as “root” user. Modify the owner and group details of the “database” folder.
[root@rac1 install]# unzip linux.x64_11gR2_database_2of2.zip [root@rac1 install]# unzip linux.x64_11gR2_database_2of2.zip [root@rac1 install]# cd ./database[root@rac1 database]# chown -R oracle:oinstall *
b) Execute “xhost +” as root to configure xwindows. Run the Installer utility
[root@rac1 database]# xhost +access control disabled, clients can connect from any host[root@rac1 database]# su oracle[oracle@rac1 database]$ sh runInstaller Starting Oracle Universal Installer...
Checking Temp space: must be greater than 120 MB. Actual 4870 MB PassedChecking swap space: must be greater than 150 MB. Actual 3999 MB PassedChecking monitor: must be configured to display at least 256 colors. Actual 16777216 PassedPreparing to launch Oracle Universal Installer from /tmp/OraInstall2012-09-24_05-28-58AM. Please wait ...
c) The “Configure Security Updates” asks for the email contact to sync in the security updates to the user. Since its not mandatory, uncheck the option and click “Next”.
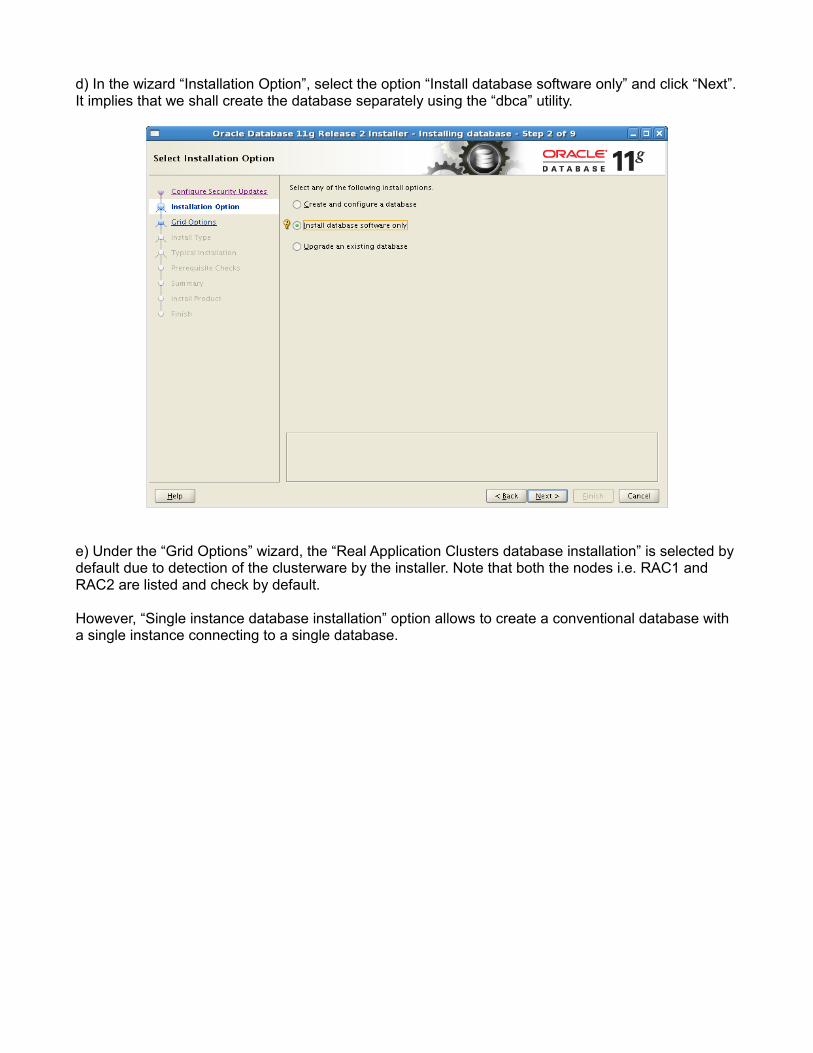
d) In the wizard “Installation Option”, select the option “Install database software only” and click “Next”. It implies that we shall create the database separately using the “dbca” utility.
e) Under the “Grid Options” wizard, the “Real Application Clusters database installation” is selected by default due to detection of the clusterware by the installer. Note that both the nodes i.e. RAC1 and RAC2 are listed and check by default.
However, “Single instance database installation” option allows to create a conventional database with a single instance connecting to a single database.

f) The “Product Languages” wizard allows you to select the language supported by the database product.
g) The “Database Edition” wizard allows you to select the appropriate edition to be installed. For

demonstration purposes, we select “Enterprise Edition” and click “Next” to move further.
h) The “Installation Location” wizard allows the user to select the “Oracle Base” and “Software Location” on the server.
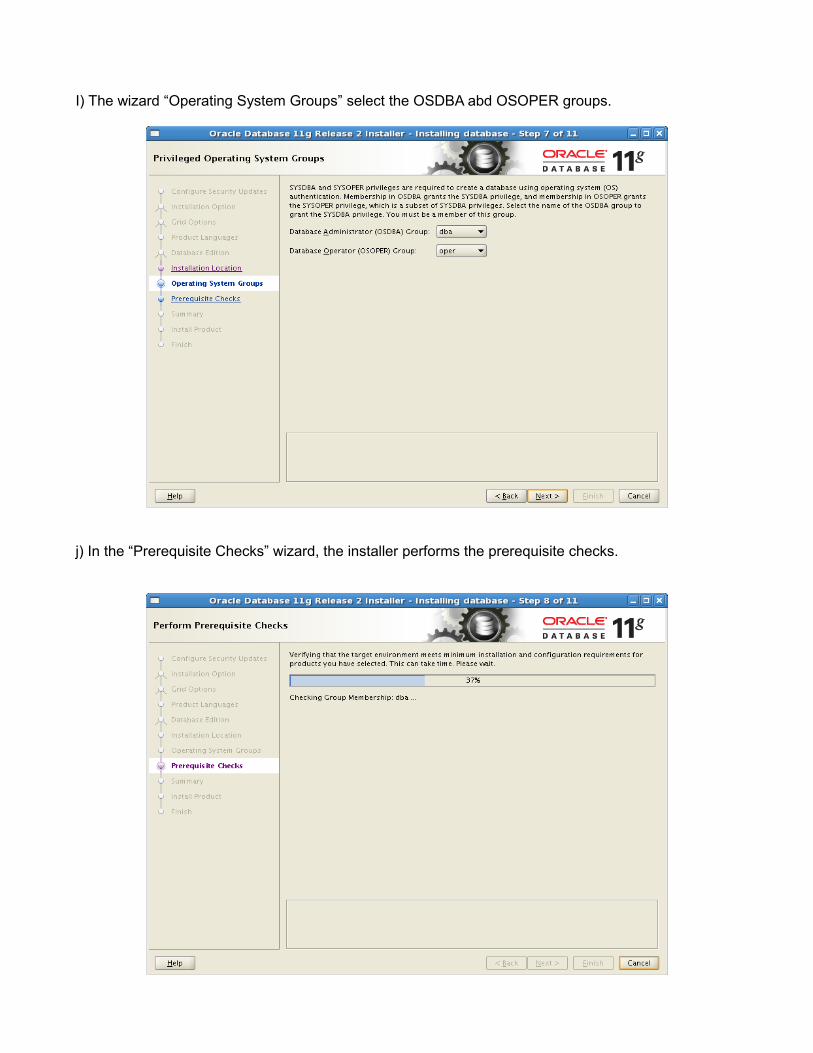
I) The wizard “Operating System Groups” select the OSDBA abd OSOPER groups.
j) In the “Prerequisite Checks” wizard, the installer performs the prerequisite checks.

k) Once the prerequisite checks are performed, the “Summary” wizard lists the summary of validations and verifications. Click “Finish’ to kick off the installation.
l) The “Install Product” wizard shows the stepwise installation and progress bar
m) Similar to grid installation, a dialog pops up to prompt the execution of Root scripts for Database Installation. Execute the scripts on both the nodes RAC1 and RAC2 respectively
[root@rac1 /]# /u01/app/oracle/product/11.2.0/dbhome_2/root.shRunning Oracle 11g root.sh script...
The following environment variables are set as: ORACLE_OWNER= oracle ORACLE_HOME= /u01/app/oracle/product/11.2.0/dbhome_2
Enter the full pathname of the local bin directory: [/usr/local/bin]: The file "dbhome" already exists in /usr/local/bin. Overwrite it? (y/n) [n]: y Copying dbhome to /usr/local/bin ...The file "oraenv" already exists in /usr/local/bin. Overwrite it? (y/n) [n]: y Copying oraenv to /usr/local/bin ...The file "coraenv" already exists in /usr/local/bin. Overwrite it? (y/n) [n]: y Copying coraenv to /usr/local/bin ...
Entries will be added to the /etc/oratab file as needed byDatabase Configuration Assistant when a database is createdFinished running generic part of root.sh script.Now product-specific root actions will be performed.Finished product-specific root actions.
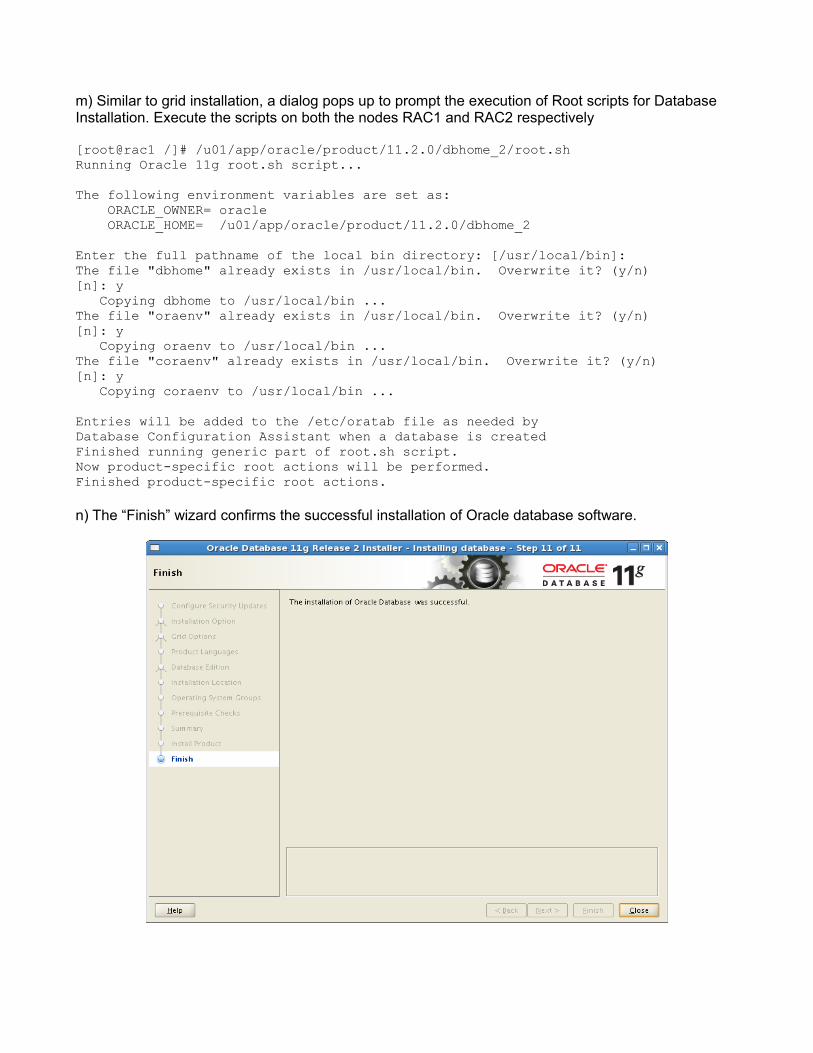
n) The “Finish” wizard confirms the successful installation of Oracle database software.


![[ORACLE 9i] - Database Utilities](https://img.pdfslide.us/doc/110x75/577dac581a28ab223f8db256/oracle-9i-database-utilities.jpg)