Embed Size (px)
Citation preview
OPTIONAL RULESET: BATTLEZONES
Sometimes the environment in which a kill team operates is almost as dangerous as their opposition.
This can be caused by the actions of a larger war wreaking havoc with the kill team’s activities or even by
the location itself. Use these rules to spice up the setting for your kill team campaign. If you’re a
glutton for punishment, you might decide to implement more than one of these, adding high gravity to a
jungle death world.
Battlezone: Death World
There are many different types of death worlds. Some are jungles where every piece of flora and fauna
is engaged in a voracious struggle for survival every hour of every day. It might be a world where
explorators unleashed a deadly nanovirus that has made long term habitation impossible. For whatever
reason, death worlds are inimical to all life, but sometimes they hold valuable ruins, crashed ships or
other objectives that kill teams must secure at all (and frequently high) costs.
To represent this, roll a d6 at the start of the game (or choose if you have a theme in mind) to determine
the nature of the death world that the kill teams will be fighting on.
D6 Roll Death World Type
1-2 Jungle Death World
3-4 Polluted Death World
5-6 Mysterious Death World
Jungle Death World
Jungle death worlds are never-ending whirlwinds of violence as the games powering evolution play out
over the course of hours instead of years. Some jungle death worlds are actually genius loci where the
world itself has gained a measure of sentience and intentionally makes itself more dangerous as a result
of the teams’ presence. Finally, some jungle death worlds have apex predators so predatory and
aggressive that shooting them with military weapons just makes them angry.
To represent a jungle death world, use the following special rules:
Dense Vegetation – A model may only fire through a total of 6” of forest terrain and may hide in forest
terrain even if it is not visually obscured from enemy models.
Run Through The Jungle – Each time a model enters a discrete piece of terrain such as a forest or a ruin,
roll a d3 and consult the following list. This will apply for the rest of the game. Mark each location with
a d6 or sticky note.
D6 Roll Death World Perils
1-2 Apex Predator: any model entering this piece of terrain must roll a d6. On a roll of 1, they are attacked and take a single automatic hit at Str 5, AP – and Dmg 1. If this is a vehicle or model that would take up more than one space in a transport, it takes d3 such hits instead as it causes an even larger disturbance. Once it has fought off the predators, the death world will leave them alone as long as they remain within that piece of terrain. Should they leave and re-enter, they will have to roll again.
3-4 Waiting Death: This area is full of quicksand, corrosive spores, carnivorous plants or a large, predatory insect hive. This area becomes impassable terrain immediately. The model that entered it is ejected from the direction they entered to 1” away from the edge of the terrain. If it contained an objective, that objective is gone now. If by some misadventure, every objective is eaten by the jungle in this way, then the game is automatically a draw as both kill teams decide that this insanity just isn’t worth it.
5-6 Explosive Flora: This area is overgrown with fruits and vines that have accelerant in place of ichor. Any time a unit in this area fails a saving throw, that unit takes a mortal wound in addition to the damage it took from the unsaved wound on a further d6 roll of 4+.
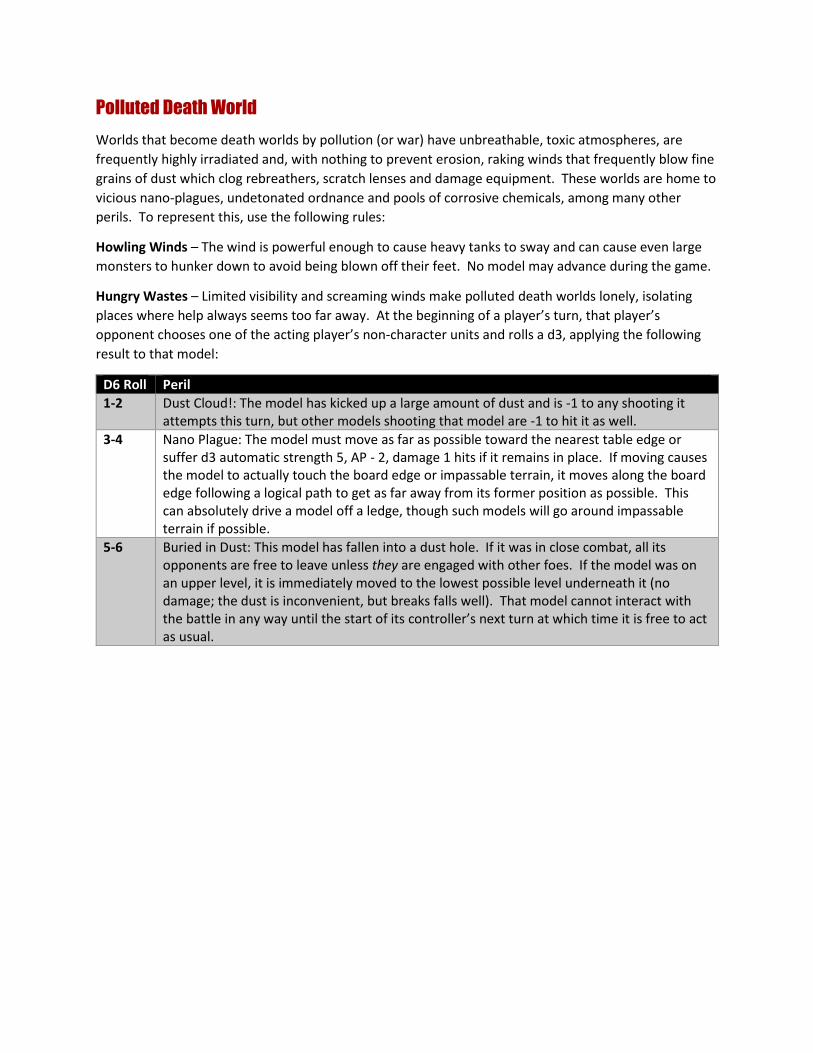
Polluted Death World
Worlds that become death worlds by pollution (or war) have unbreathable, toxic atmospheres, are
frequently highly irradiated and, with nothing to prevent erosion, raking winds that frequently blow fine
grains of dust which clog rebreathers, scratch lenses and damage equipment. These worlds are home to
vicious nano-plagues, undetonated ordnance and pools of corrosive chemicals, among many other
perils. To represent this, use the following rules:
Howling Winds – The wind is powerful enough to cause heavy tanks to sway and can cause even large
monsters to hunker down to avoid being blown off their feet. No model may advance during the game.
Hungry Wastes – Limited visibility and screaming winds make polluted death worlds lonely, isolating
places where help always seems too far away. At the beginning of a player’s turn, that player’s
opponent chooses one of the acting player’s non-character units and rolls a d3, applying the following
result to that model:
D6 Roll Peril
1-2 Dust Cloud!: The model has kicked up a large amount of dust and is -1 to any shooting it attempts this turn, but other models shooting that model are -1 to hit it as well.
3-4 Nano Plague: The model must move as far as possible toward the nearest table edge or suffer d3 automatic strength 5, AP - 2, damage 1 hits if it remains in place. If moving causes the model to actually touch the board edge or impassable terrain, it moves along the board edge following a logical path to get as far away from its former position as possible. This can absolutely drive a model off a ledge, though such models will go around impassable terrain if possible.
5-6 Buried in Dust: This model has fallen into a dust hole. If it was in close combat, all its opponents are free to leave unless they are engaged with other foes. If the model was on an upper level, it is immediately moved to the lowest possible level underneath it (no damage; the dust is inconvenient, but breaks falls well). That model cannot interact with the battle in any way until the start of its controller’s next turn at which time it is free to act as usual.

Mysterious Death World
Some death worlds defy easy classification and are labeled as death worlds because they are haunted by
warp-ghosts, dotted with ruins that sporadically vomit out eldritch energy or even covered with islands
that re-arrange themselves every 199 standard hours. To represent the random and bizarre nature of a
mysterious death world, use the following rules:
Echoes of the Past – Vox traffic on this world is full of old repeated signals in alien tongues or active
warp ghost predation which confuses the senses and makes communication difficult. Models are only
aware of hidden models within 3” rather than the usual 6”. Furthermore, abilities with auras only
extend half as far as usual.
Ravaged by the Ages – Before deployment, place a marker in the center of the table. This represents an
obelisk, a statue or some other obscure piece of archaeotech, which may also count as an objective.
Each round, the malfunctioning device does something unpredictable. Roll a d6 at the beginning of
every player turn and consult the following:
D6 Roll Peril
1 Eldritch Lightning: the model closest to the center of the table takes d3 automatic hits at Str 6, AP -1, Dmg 1.
2 Laughing Warp Ghosts: the model closest to the center of the table runs screaming 2d6” directly away from the center of the table, stopping at a table edge or at the edge or impassable terrain, though it will run off ledges.
3 Merciful Silence: The artifact does nothing.
4 Beneficial Field Modulation: the model closest to the center of the table gains +1 to their invulnerable save to a max of 3+. If the model has no invulnerable save, it gains a 6+ invulnerable save.
5 Temporal Distortion: The model closest to the center gains d3 extra attacks this turn, even if it ceases to be the closest model during its action.
6 Telekinesis: The model closest to the center gains the Fly keyword and +4 to its movement. If it already had the Fly keyword, it loses it for this round.

Battlezone: Low Gravity
Low gravity worlds are generally less dense than the standard (Terra) and thus generate less gravity.
This results in comically exaggerated motions and generally clumsy behavior. To represent a kill team
mission on a low gravity world or a space station where artificial gravity is failing, us the following rules:
Drunken Inertia – If a model gets wounded by a shooting attack, but passes its armor save, or otherwise
survives, it is flung backwards d6 inches in the opposite direction of the shooter. Note that this can push
models off ledges. If this pushes it out of combat (such as by pistol shot), then that model is out of the
combat and is considered to have fallen back.
Have a Nice Fall – Models falling take no damage. Note that this means that downward movement does
not count toward a model’s movement allowance as they can simply jump down and keep moving.
Comical Leverage – All close combat attacks are resolved with a -1 to wound representing the decreased
impact of weapons in a low gravity environment.
Battlezone: High Gravity
High G environments are worlds more dense than standard (Terra), stations built for high grav xenos or
even malfunctioning artificial gravity. Such environments lack all of the frivolity and frolicking
movements of low gravity and in general, everything hurts more.
Slogging Advance – Models attempting to climb up or down do so at half speed. This supersedes the
rules for difficult terrain. Furthermore, models attempting to advance only add a flat 2” to their
movement. Finally, models attempting to jump fail to do so on a roll of 1 or 2.
Bone Breaking Falls – Models which take falling damage add d3 to the number of inches they fell.
Horrific Injuries – All attacks in both close combat and shooting are +1 to wound.

Battlezone: Void Combat
Unquestionably the most dangerous kind of combat is that conducted in hard vacuum. The battle may
be on a moon or asteroid with no atmosphere or even (more unpleasantly) on the outer hull of a ship
repelling boarders or cutting away boarding torpedoes while bombers and fighters attempt to kill each
other overhead. Oh well. At least it’s not high-G. To represent this, use the following special rules:
Mag-Boots & Void Suits – Catachans don’t go into void combat wearing tank tops and headbands (even
if they say they do) and neither does your kill team. If the appearance of the models themselves fighting
in hard vacuum is patently absurd, assume they have some minimal void protection and ability to get
around on the battlefield’s surface, even if it’s not shown on the model. Models in hard armor who are
not bare-headed are assumed to have located their helmets and Tyranids are slathered in oxygen-rich
goop that protects them from the void, etc.
Lost to the Void – Overpenetration by weapons in standard combat is dangerous enough, but an attack
that overwhelms the self-sealing ability of void armor is nearly always fatal. To represent this, all attacks
in the void improve their AP by 1.
Battlezone: Warp Vortex
A Warp Vortex is a rift in reality where the raw stuff of the warp is spilling through. This can happen for
many reasons and can even occur naturally, but most often it is the result of a summoning gone wrong
or the incorrect destruction of a warp artifact. To represent battling in this equal parts deadly and
curious environment, use the following rules:
Field Instability – At the beginning of each player turn, roll a d6. On a 1-4, the invulnerable save of
every model on the table degrades by 1. On a 5-6, it improves by 1 to a maximum of 3+.
Psychic Apocalypse – Any non-psyker may attempt to use the Smite psychic power on 1d6 rather than
2d6 as would be the case for an actual psyker. If the test is failed, the model attempting to manifest it
takes d3 mortal wounds as that warrior’s mind is broken by the experience. Psykers roll 3d6 to manifest
psychic powers, adding them together; if any of the dice come up double, this is considered perils of the
warp.
Psychic Bleed – Psykers use the warp to communicate and read minds and now the kill team members
have a rudimentary knowledge of the thoughts and feelings of their brethren. Knowing the inner-most
thoughts of their fellow fighters, will they hate each other, or will it bring them together? To represent
this, if the roll for Field Instability was 1-4, successful rolls to pile in or contribute to overwatch must be
re-rolled. If it 5 or 6, then such tests must be re-rolled if they are failed instead.
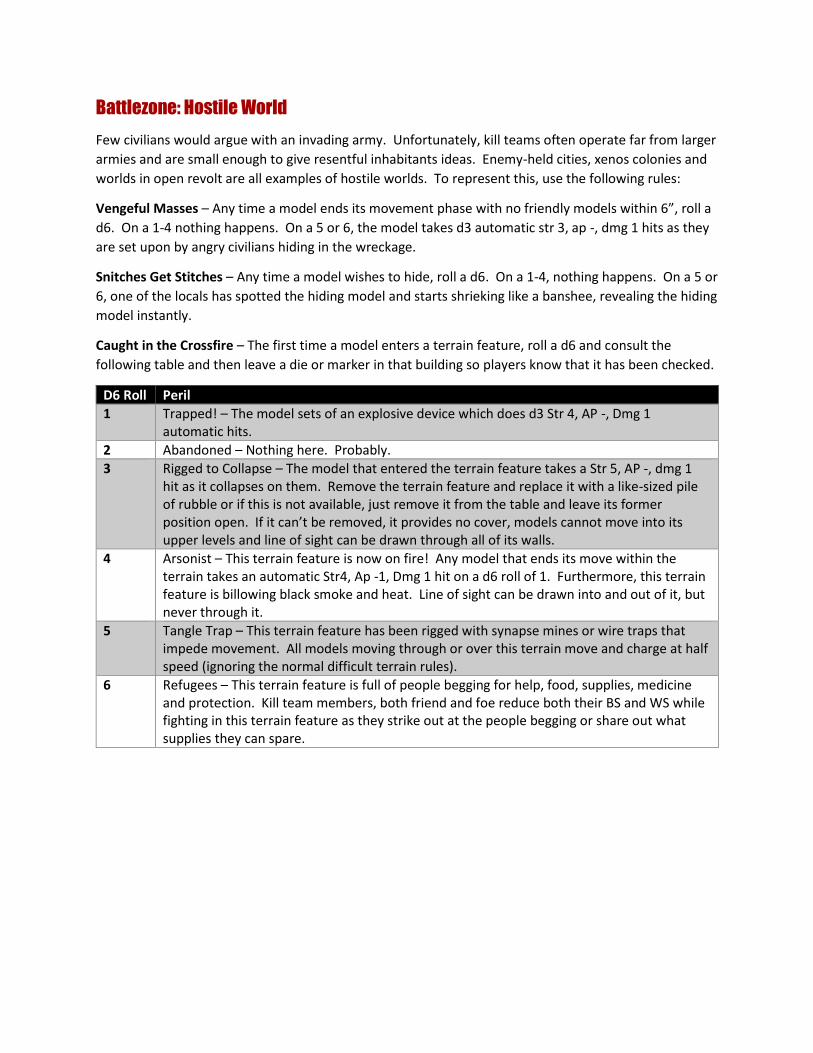
Battlezone: Hostile World
Few civilians would argue with an invading army. Unfortunately, kill teams often operate far from larger
armies and are small enough to give resentful inhabitants ideas. Enemy-held cities, xenos colonies and
worlds in open revolt are all examples of hostile worlds. To represent this, use the following rules:
Vengeful Masses – Any time a model ends its movement phase with no friendly models within 6”, roll a
d6. On a 1-4 nothing happens. On a 5 or 6, the model takes d3 automatic str 3, ap -, dmg 1 hits as they
are set upon by angry civilians hiding in the wreckage.
Snitches Get Stitches – Any time a model wishes to hide, roll a d6. On a 1-4, nothing happens. On a 5 or
6, one of the locals has spotted the hiding model and starts shrieking like a banshee, revealing the hiding
model instantly.
Caught in the Crossfire – The first time a model enters a terrain feature, roll a d6 and consult the
following table and then leave a die or marker in that building so players know that it has been checked.
D6 Roll Peril
1 Trapped! – The model sets of an explosive device which does d3 Str 4, AP -, Dmg 1 automatic hits.
2 Abandoned – Nothing here. Probably.
3 Rigged to Collapse – The model that entered the terrain feature takes a Str 5, AP -, dmg 1 hit as it collapses on them. Remove the terrain feature and replace it with a like-sized pile of rubble or if this is not available, just remove it from the table and leave its former position open. If it can’t be removed, it provides no cover, models cannot move into its upper levels and line of sight can be drawn through all of its walls.
4 Arsonist – This terrain feature is now on fire! Any model that ends its move within the terrain takes an automatic Str4, Ap -1, Dmg 1 hit on a d6 roll of 1. Furthermore, this terrain feature is billowing black smoke and heat. Line of sight can be drawn into and out of it, but never through it.
5 Tangle Trap – This terrain feature has been rigged with synapse mines or wire traps that impede movement. All models moving through or over this terrain move and charge at half speed (ignoring the normal difficult terrain rules).
6 Refugees – This terrain feature is full of people begging for help, food, supplies, medicine and protection. Kill team members, both friend and foe reduce both their BS and WS while fighting in this terrain feature as they strike out at the people begging or share out what supplies they can spare.
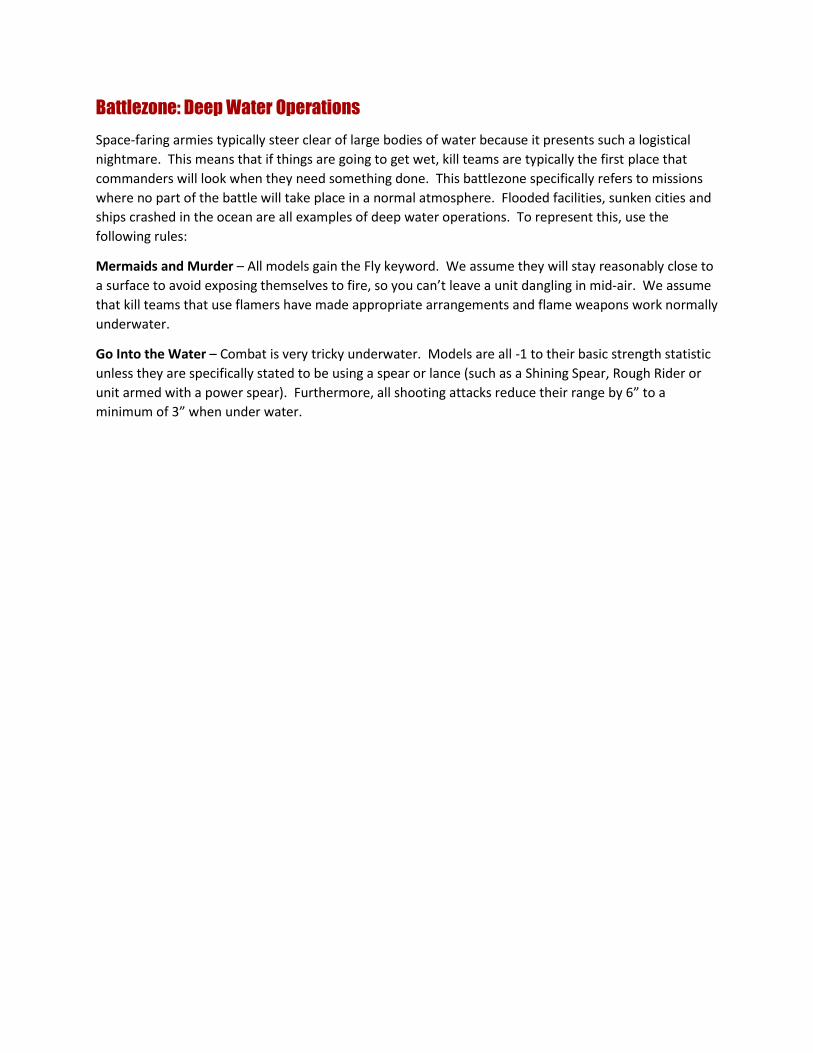
Battlezone: Deep Water Operations
Space-faring armies typically steer clear of large bodies of water because it presents such a logistical
nightmare. This means that if things are going to get wet, kill teams are typically the first place that
commanders will look when they need something done. This battlezone specifically refers to missions
where no part of the battle will take place in a normal atmosphere. Flooded facilities, sunken cities and
ships crashed in the ocean are all examples of deep water operations. To represent this, use the
following rules:
Mermaids and Murder – All models gain the Fly keyword. We assume they will stay reasonably close to
a surface to avoid exposing themselves to fire, so you can’t leave a unit dangling in mid-air. We assume
that kill teams that use flamers have made appropriate arrangements and flame weapons work normally
underwater.
Go Into the Water – Combat is very tricky underwater. Models are all -1 to their basic strength statistic
unless they are specifically stated to be using a spear or lance (such as a Shining Spear, Rough Rider or
unit armed with a power spear). Furthermore, all shooting attacks reduce their range by 6” to a
minimum of 3” when under water.

Battlezone: Amphibious Operations
Amphibious operations present their own set of challenges as many troops can’t swim and even if they
can swim, they’re often terrible at fighting in the water anyway. Kill teams must constantly practice for
operations of this sort and are often the only ones in their larger armies with any experience in such
settings. To represent fighting in a partially flooded area, use the following rules:
From the Depths – Designate 1d6 areas no larger than 6” in diameter as Deep Water (mark with dice or
sticky notes). These areas are impassable to non-infantry units without the Fly keyword. Infantry
models can move freely through and hide in deep water, but are -2 to shoot out, while enemy models
are -2 to shoot in at them. We assume that kill teams that use flamers have made appropriate
arrangements and flame weapons work normally underwater.
Tides of War – Partially submerged battlefields have a terrible habit of flooding at the worst possible
time. Such floods can derail even the most flexible battle plan and become even more unpredictable
when weapons are going off left and right. Before deployment, mark each table side 1-4. At the
beginning of each player’s turn, roll a d6 and consult the following table:
D6 Roll Peril
1 All models on the tabletop (i.e. not on an upper level) are pushed d6” directly toward table edge 1.
2 All models on the tabletop (i.e. not on an upper level) are pushed d6” directly toward table edge 2.
3 All models on the tabletop (i.e. not on an upper level) are pushed d6” directly toward table edge 3.
4 All models on the tabletop (i.e. not on an upper level) are pushed d6” directly toward table edge 4.
5 All models on the tabletop (i.e. not on an upper level) are pulled d6” directly toward the center of the table. If this takes them into impassable terrain, deep water or a table edge, stop them at the edge as they desperately dig in to prevent being washed away.
6 All models on the tabletop (i.e. not on an upper level) are pushed d6” directly away from the center of the table. If this takes them into impassable terrain, deep water or a table edge, stop them at the edge as they desperately dig in to prevent being washed away.
Note that where a d6 is rolled for distance, roll 1d6 for the entire table and move each model that
distance. This can take a model out of close combat (i.e. into deep water where their opponent cannot
follow)

Battlezone: Zone Mortalis
The Zone Mortalis is the holy grail of kill team operations and every veteran kill team has a story of
things going sideways in the winding corridors of a void station or buried stasis crypt. These missions
are fraught with peril and not just from the enemy.
Zone Mortalis has a few more moving parts than other battlefields. To represent this, use the following
rules:
Doors and Airlocks: Doors and airlocks (used interchangeably) are essentially walls that can (sometimes)
be removed without violence. Doors and airlocks exist in four states: Open, Closed, Controlled and
Locked.
Open doors are clear terrain and can be moved through freely. Any model within 1” of an open
door may close it at the beginning or end of its movement phase. This is true in both player’s
turns.
Closed doors act like walls but can be opened by any model within 1” at the beginning or end of
its movement phase, at which point, as you might imagine, it becomes an open door.
Controlled doors typically only come into play during attacker/defender missions. In this case,
the side controlling the door may open or close it with impunity, but the side which does not
control the door treats it as locked (see below). Note that a controlled door that was left open
will remain so unless a model from the controlling side closes it.
Locked doors are, for all intents and purposes, walls that look slightly different. Locked doors
cannot be opened except with violence.
Destructible Terrain: One of the most interesting concepts in Zone Mortalis is that walls and obstacles
can simply be destroyed if they are in the way. Unless otherwise specified, all walls, doors and airlocks
are assumed to have Toughness 8 and 2 wounds. Such attacks are assumed to open a 2” gap through a
wall or to remove an airlock or door entirely.
Targeting Walls and Terrain: A destroyed wall is equivalent to a single floor tile (so 2”x2”) this will allow
up to a terminator-sized base through. Some abilities (such as smite) specify that the nearest enemy
model must be targeted. This would mean smite would break the nearest wall. When an ability
references the “closest enemy unit”, it references the closest player-controlled enemy unit.
Shooting at Terrain: Terrain is affected by shooting normally. Walls may provide cover but are never
assumed to be in cover.
Assaulting Terrain: A unit within 1” of a piece of terrain may attack it as though it were an enemy model
in the assault phase, however, they may not assault toward it (this is to prevent units from assaulting
terrain to get free movement in the assault phase). In their subsequent movement phase, they are free
to move away.
Contiguous Space: When a rule references contiguous space, it refers to all of the playable (anywhere
you could legally put a model) that touches that space without having to go through a wall or a closed
door or airlock.
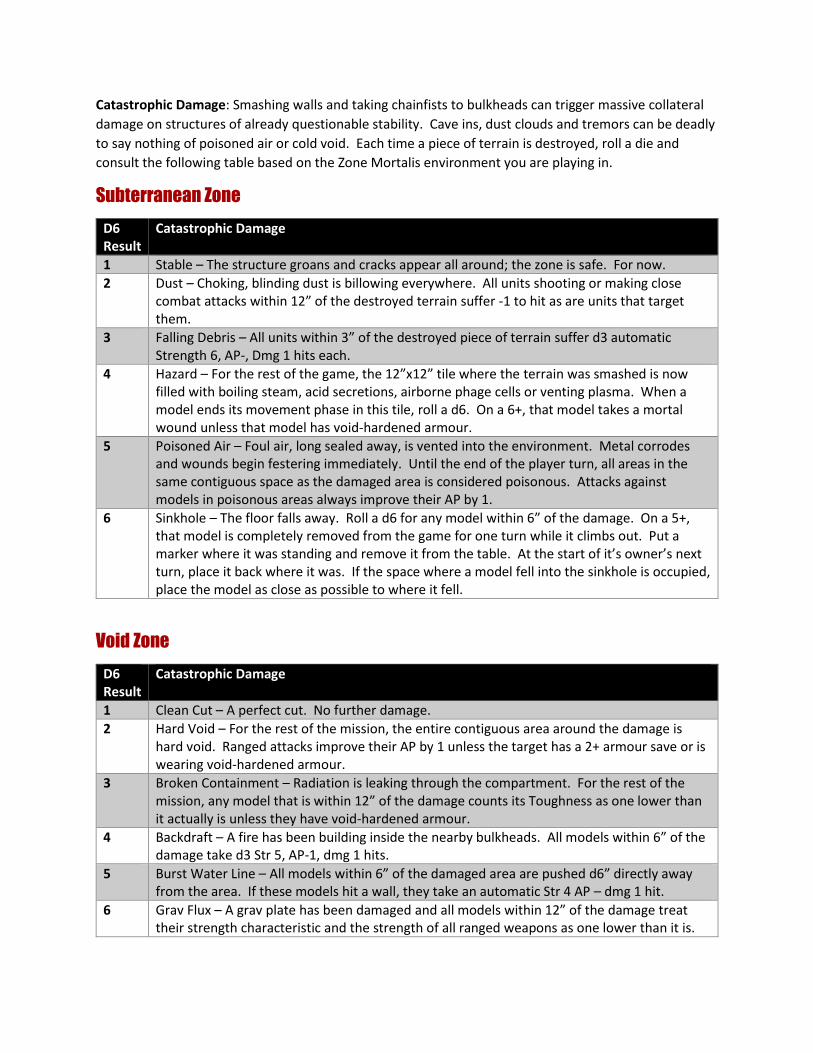
Catastrophic Damage: Smashing walls and taking chainfists to bulkheads can trigger massive collateral
damage on structures of already questionable stability. Cave ins, dust clouds and tremors can be deadly
to say nothing of poisoned air or cold void. Each time a piece of terrain is destroyed, roll a die and
consult the following table based on the Zone Mortalis environment you are playing in.
Subterranean Zone
D6 Result
Catastrophic Damage
1 Stable – The structure groans and cracks appear all around; the zone is safe. For now.
2 Dust – Choking, blinding dust is billowing everywhere. All units shooting or making close combat attacks within 12” of the destroyed terrain suffer -1 to hit as are units that target them.
3 Falling Debris – All units within 3” of the destroyed piece of terrain suffer d3 automatic Strength 6, AP-, Dmg 1 hits each.
4 Hazard – For the rest of the game, the 12”x12” tile where the terrain was smashed is now filled with boiling steam, acid secretions, airborne phage cells or venting plasma. When a model ends its movement phase in this tile, roll a d6. On a 6+, that model takes a mortal wound unless that model has void-hardened armour.
5 Poisoned Air – Foul air, long sealed away, is vented into the environment. Metal corrodes and wounds begin festering immediately. Until the end of the player turn, all areas in the same contiguous space as the damaged area is considered poisonous. Attacks against models in poisonous areas always improve their AP by 1.
6 Sinkhole – The floor falls away. Roll a d6 for any model within 6” of the damage. On a 5+, that model is completely removed from the game for one turn while it climbs out. Put a marker where it was standing and remove it from the table. At the start of it’s owner’s next turn, place it back where it was. If the space where a model fell into the sinkhole is occupied, place the model as close as possible to where it fell.
Void Zone
D6 Result
Catastrophic Damage
1 Clean Cut – A perfect cut. No further damage.
2 Hard Void – For the rest of the mission, the entire contiguous area around the damage is hard void. Ranged attacks improve their AP by 1 unless the target has a 2+ armour save or is wearing void-hardened armour.
3 Broken Containment – Radiation is leaking through the compartment. For the rest of the mission, any model that is within 12” of the damage counts its Toughness as one lower than it actually is unless they have void-hardened armour.
4 Backdraft – A fire has been building inside the nearby bulkheads. All models within 6” of the damage take d3 Str 5, AP-1, dmg 1 hits.
5 Burst Water Line – All models within 6” of the damaged area are pushed d6” directly away from the area. If these models hit a wall, they take an automatic Str 4 AP – dmg 1 hit.
6 Grav Flux – A grav plate has been damaged and all models within 12” of the damage treat their strength characteristic and the strength of all ranged weapons as one lower than it is.

Fighting in Zone Mortalis
There are several other changes to the basic rules of the game that take place in Zone Mortalis.
Movement Phase
Most models move normally in Zone Mortalis. Owing to the low ceilings, models with the fly keyword
may move 6” on foot instead of flying. If a model chooses to use the fly rule to move its full move or to
shoot after falling back from close combat, roll a d6. On a 1, that model takes a mortal wound.
Psychic Phase
The psychic phase works normally in Zone Mortalis.
Shooting Phase
The confined nature of Zone Mortalis means that blast and flame weapons tend to be more destructive.
When using a ranged weapon with a random number of shots, roll double the number of dice and keep
the highest.
Charge Phase
Linear corridors make for easy overwatch. Models firing overwatch in Zone Mortalis using pistol, assault
and rapid fire weapons hit on a base 5 instead of 6 (further modified by any other special rules). Heavy
weapons can still be fired but are unaffected by this rule.
Fight Phase
The fight phase works normally in Zone Mortalis. Walls and doors are hit automatically.
Morale Phase
The morale phase works normally in Zone Mortalis.
Campaigns in Zone Mortalis
There is now a special section in the Campaigns supplement for Zone Mortalis, with all-new battle
honours with this unique environment in mind.
Zone Mortalis Missions
The Heralds of Ruin Redacted Missions Supplement (Coming Soon) will contain several missions with
Zone Mortalis in mind. Until then, you can use any standard Zone Mortalis mission from Warhammer
40,000 or Age of Darkness.