Embed Size (px)
Citation preview

I n s t r u c t i o n M a n u a l
OPC-LM1-PS1
Option Card for Permanent Magnet Synchronous Motor Drive
CAUTION
■ Deliver this instruction manual without fail to those who actually operate the equipment.
■ Read this instruction manual and understand the description before installing, connecting (wiring), operating or performing maintenance and inspection of the option.
■ Keep this instruction manual in a safe place until the option is discarded.
■ The product is subject to change without prior notice.
Fuji Electric FA Components & Systems Co., Ltd. INR-SI47-1182-E

1
Preface Thank you for purchasing our OPC-LM1-PS1 inverter option card. Before using the option card, read this manual carefully to understand how to use the option card correctly. Improper handling blocks correct operation or causes a short life or breakdown. This manual does not describe how to use the inverter. Refer to the FRENIC-Lift Instruction Manual for details about the inverter. Keep this manual on hand for reference when using the option card.
Safety Precautions Note the following items when using the option card. Improper use may result in unexpected failure, electric shock, or possible injury. (1) Application
WARNING • This product must not be used for any life support system or other purpose directly related to human safety. • Although this product is manufactured under strict quality control, be sure to install appropriate safety devices for
applications where drive failure could result in serious accident or material loss. An accident could occur.
(2) Installation and Wiring
WARNING • Wait at least five minutes after turning off the power before installing or wiring the option card.
Use a circuit tester or similar instrument to check the voltage before performing installation or wiring. (Check whether the charge lamp goes off.) Otherwise, electric shock may occur.
• Discharge statistic electricity from your body before handling the option card. Never touch the option card with wet hands; otherwise, accident or electric shock may occur.
• No foreign matter such as screws, metal patches, lint, chips, and dust in the option card. There is risk of fire or accident.
• Do not damage or stress the wiring; otherwise, accident or electric shock may occur. • Do not connect the reducer between the motor and the encoder.
There is a risk of accident.
CAUTION • Do not install or operate a damaged option card or one that is lacking parts; otherwise, an injury may occur. • Since noise is generated by the inverter, motor, and wiring, carefully monitor surrounding sensors and devices for
abnormal operation. There is a risk of accident. (3) Operation
WARNING • Check and adjust parameters before operation. Improper parameters may cause an unexpected action for some
machines. There is a risk of accident.
CAUTION • High-speed operation can be set easily for the inverter. Fully check motor or device performance before changing the
setup; otherwise, accident may occur. (4) Maintenance and Inspection, and Parts Replacement
WARNING • Wait at least five minutes after turning off the power before inspecting the option card. (Check whether the charge lamp
goes off.) There is a risk of electric shock. • Only authorized personnel are allowed to maintain and inspect the option card and replace parts; otherwise, electric
shock or injury may occur. • Never modify the option card; otherwise, electric shock or injury may occur.
CAUTION
• Do not execute a megger test (insulation resistance measurement). (5) Discard
CAUTION • Since the option card uses soldering lead, treat it as an industrial waste when discarding it.

2
Contents
Page 1 General Information ............................................................................................................................3
1.1 Introduction to OPC-LM1-PS1 .....................................................................................................3 1.2 Applicable Inverter ROM Versions ...............................................................................................3 1.3 Before Using the Option Card ......................................................................................................3 1.4 Accessories..................................................................................................................................4 1.5 Installation Procedure ..................................................................................................................4 1.6 Product Guarantee.......................................................................................................................6
2 Specifications ......................................................................................................................................6 2.1 Storage Environment....................................................................................................................6
2.1.1 Temporary Storage................................................................................................................6 2.1.2 Long-term Storage ................................................................................................................6
2.2 Operating Environment ................................................................................................................7 2.3 Terminal Arrangement ..................................................................................................................7 2.4 Terminal Function and Specifications...........................................................................................8 2.5 Control Specifications...................................................................................................................8
3 Applicable Encoder .............................................................................................................................9 3.1 Specifications of Applicable Encoder ...........................................................................................9 3.2 Encoder Installation and Signal....................................................................................................9
4 Wiring ................................................................................................................................................10 4.1 Wiring Length and Cable Size....................................................................................................10 4.2 Plug............................................................................................................................................10 4.3 Basic Wiring Diagram.................................................................................................................11
5 Function ............................................................................................................................................12 5.1 Function Code Setting................................................................................................................12 5.2 Procedure of Magnetic Pole Position Offset Tuning ...................................................................12 5.3 Procedure of Adjusting the Unbalanced Load Compensation ....................................................14
If anything is unclear about the option card or there is something doubtful about its condition, contact your distributor or your nearest branch office.

3
1 General Information 1.1 Introduction to OPC-LM1-PS1 This product is an encoder interface card to be installed in the Fuji inverter FRENIC-Lift. It enables vector control according to feedback signals from the HEIDENHAIN rotary encoder (ECN1313 Endat2.1).
1.2 Applicable Inverter ROM Versions This option is applicable to the inverters having any of the ROM versions listed below. Before mounting this option, check the ROM version of your inverter using any of the following procedures. • Via the RS-485 communications link, check the monitor data with function code M25. (For details, refer to the RS-485
Communication User's Manual (MHT276).) • Use the multi-function keypad (option) and check Menu #5 "Maintenance Information." (For details, refer to the
Multi-function Keypad Instruction Manual (INR-SI47-1092-E).) • Use the FRENIC Loader (option) for the FRENIC-Lift and click the System monitor tab on the Operation Status Monitor
window. (For details, refer to the FRENIC Loader Instruction Manual (INR-SI47-1096-E).)
Inverter ROM Version
Versions 0804, 0808, 1100 or later
1.3 Before Using the Option Card Check the following items when you receive this product. Also check whether this product has been damaged during transport. If anything is amiss, contact your distributor or your nearest branch office. (1) The option card is contained in the package. (2) The option card is not damaged during transportation--no defective electronic devices, dents or warps. (3) The model name "OPC-LM1-PS1" is printed on the option card. (See Figure 1.1.)
Nameplate
Side View
ConnectorCN1
Option PC Board
Terminal BlockTERM1
Model name
Front View
OPC-LM1-PS 1
Figure 1.1 Product Appearance

4
Production year:Last digit of year (7 ⇒2007)
Production lot serial number
Production month
(1 to 9:January to September, X:October, Y:November, Z:December)
01 7 5 1
Production week in the month (1 to 6)
Nameplate
Figure 1.2 Nameplate
1.4 Accessories Confirm that the following accessories are included in the package:
1. Instruction Manual ・・・・・・・・・・ 1 2. Accessories 1) Plug for TERM1 ・・・・・・・・・・ 1
1.5 Installation Procedure
WARNING • Turn off the power and wait for at least five minutes before starting installation. Further, check that the LED monitor is
unlit and check that the DC link bus voltage between the P (+) and N (-) terminals is lower than 25 VDC. Otherwise, electric shock could occur.
CAUTION • Do not touch any metallic part of the connector for the main unit (CN1) or any electronic component. Otherwise,
electronic components may be damaged by static electricity charged in your body. Also, the stain or adhesion of sweat or dust may adversely affect the contact reliability of the connector in the long run.
An accident could occur.

5
Figure 1.3 Installation Drawing
Top Cover
Option Terminal Block
Option CardOPC-LM1-PS1
4 spacers
4 spacer holes
CN1
Connecter(CN1)
Option CardOPC-LM1-PS1
【STEP1】 Remove the top-cover from the inverter. 【STEP2】 Insert the four spacers and CN1 on the back of the OPC-LM1-PS1 into the spacer holes and connector (CN1) on the control circuit board in the inverter. Visually check that the spacers and CN1 are firmly inserted. 【STEP3】 Wire on OPC-LM1-PS1. 【STEP4】 Put the top-cover back to the inverter.
Control circuit board Make sure there is no idlegap between the spacers and the printed circuit board and OPC-LM1-PS1card. (Altogether 8 places)

6
1.6 Product Guarantee The product guarantee term is one year after installation or two years after manufacturing on the nameplate, whichever expires first. However, the guarantee will not apply in the following cases, even if the guarantee term has not expired. (1) The cause includes incorrect usage or inappropriate repair or modification. (2) The product is used outside the standard specified range. (3) The failure is caused by dropping, damage or breakage during transportation after the purchase. (4) The cause is earthquake, fire, storm or flood, lightening, excessive voltage, or other types of disaster or secondary
disasters.
2 Specifications 2.1 Storage Environment 2.1.1 Temporary Storage Store the option card in an environment that satisfies the requirements listed in Table 2.1.
Table 2.1 Environmental Requirements for Storage and Transportation Item Requirements
Storage Temperature *1
-25 to 70°C
Relative humidity 5 to 95% *2
Location where the option card is not subject to abrupt changes in temperature that would result in the formation of condensation or ice.
Atmosphere The inverter must not be exposed to dust, direct sunlight, corrosive or flammable gases, oil mist, vapor, water drops or vibration. The atmosphere must contain only a low level of salt. (0.01 mg/cm2 or less per year) 86 to 106 kPa (in storage) Atmospheric
pressure 70 to 106 kPa (during transportation) *1 Assuming a comparatively short storage period (e.g., during transportation or the like) *2 Even if the humidity is within the specified requirements, avoid such places where the option card will be subjected to
sudden changes in temperature that will cause condensation to form. Precautions for temporary storage (1) Do not leave the inverter directly on the floor. (2) If the environment does not satisfy the specified requirements, wrap the option card in an airtight vinyl sheet or the like
for storage. (3) If the option card is to be stored in an environment with a high level of humidity, put a drying agent (such as silica gel) in
the airtight package described in item (2).
2.1.2 Long-term Storage The long-term storage methods for the inverter vary largely according to the environment of the storage site. General storage methods are described below. (1) The storage site must satisfy the requirements specified for temporary storage. (2) The inverter must be stored in a package that is airtight to protect it from moisture. Include a drying agent inside the
package to maintain the relative humidity inside the package to within 70%. (3) If the option card has been installed in the equipment or control board at a construction site where it may be subjected to
humidity, dust or dirt, then remove the option card and store it in a suitable environment specified in Table 2.1.

7
2.2 Operating Environment Install the inverter in an environment that satisfies the requirements listed in Table 2.2.
Table 2.2 Environment Requirements Item Specifications
Location Indoors
Ambient temperature
-10 to 45°C
Relative humidity 5 to 95% (No condensation)
Atmosphere
The option card must not be exposed to dust, direct sunlight, corrosive gases, flammable gas, oil mist, vapor or water drops. The atmosphere must contain only a low level of salt. (0.01 mg/cm2 or less per year) The inverter must not be subjected to sudden changes in temperature that will cause condensation to form.
Altitude 1,000 m max. (Note)
Vibration 3 mm (Max. amplitude):2 to 9 Hz, 9.8 m/s2:9 to 20 Hz, 2 m/s2
:20 to 55 Hz 1 m/s2
:55 to 200 Hz (Note) If you use the inverter in an altitude above 1000 m, you should apply an output current derating factor as listed in
Table 2.3.
Table 2.3 Output Current Derating Factor in Relation to Altitude Altitude Output current derating factor
1000 m or lower 1.00 1000 to 1500 m 0.97
1500 to 2000 m 0.95
2000 to 2500 m 0.91
2500 to 3000 m 0.88
2.3 Terminal Arrangement
PO PO CM CM CM PA+ PA- PB+ PB- CK+ CK- DT+ DT- FPA FPB CM
TERM1
Figure 2.1 Terminal Arrangement

8
2.4 Terminal Function and Specifications
Table 2.4 Terminal Function and Electrical Specifications of OPC-LM1-PS1
Abbreviation Terminal name Terminal function Electric specifications
PO Power supply for encoder
CM Common terminal of power supply
Terminal which supplies power for encoder
・5 VDC±5%, Max. 300 mA ・5 VDC±5% Allowable wiring length.
0 to 10 m:One wire each for PO and CM line0 to 20 m:Two wire each for PO and CM line
PA+ The A phase input terminal (non-inverting)
PA- The A phase input terminal (inverting)
The A phase input the amplitude and the frequency change depending on the speed of the motor.
PB+ The B phase input terminal (non-inverting)
PB- The B phase input terminal (inverting)
The B phase input the amplitude and the frequency change depending on the speed of the motor.
・Input frequency Max. 50 kHz
・Differential input signal: PA(+) - PA(-), PB(+) - PB(-)
0.6V to 1.2V
CK+ Communication clock (non-inverting)
CK- Communication clock (inverting)
Clock transmission
DT+ Communication data (non-inverting)
DT- Communication data (inverting)
Data sending and receivingRS-485 conforming
FPA The A phase pulse output
The pulses with same frequency as the A phase input are output.
FPB The B phase pulse output
The pulses with same frequency as the B phase input are output
・Transistor output (Open collector) ・Operation voltage of OFF level : Max. 27 V ・Operation voltage of ON level : Max. 2.0 V ・Load current at ON : Max. 50 mA ・Leakage current at OFF : Max. 200µA
(Note) It is recommended that terminals FPA and FPB are pulled up with lowest value of resistor with the sink current not exceeding 50 mA when terminals FPA and FPB are used.
2.5 Control Specifications
Table 2.5 Control Specifications Item Control Specifications Remarks
Motor control method Vector control - Speed control range 0 r/min to 1500 r/min -
9
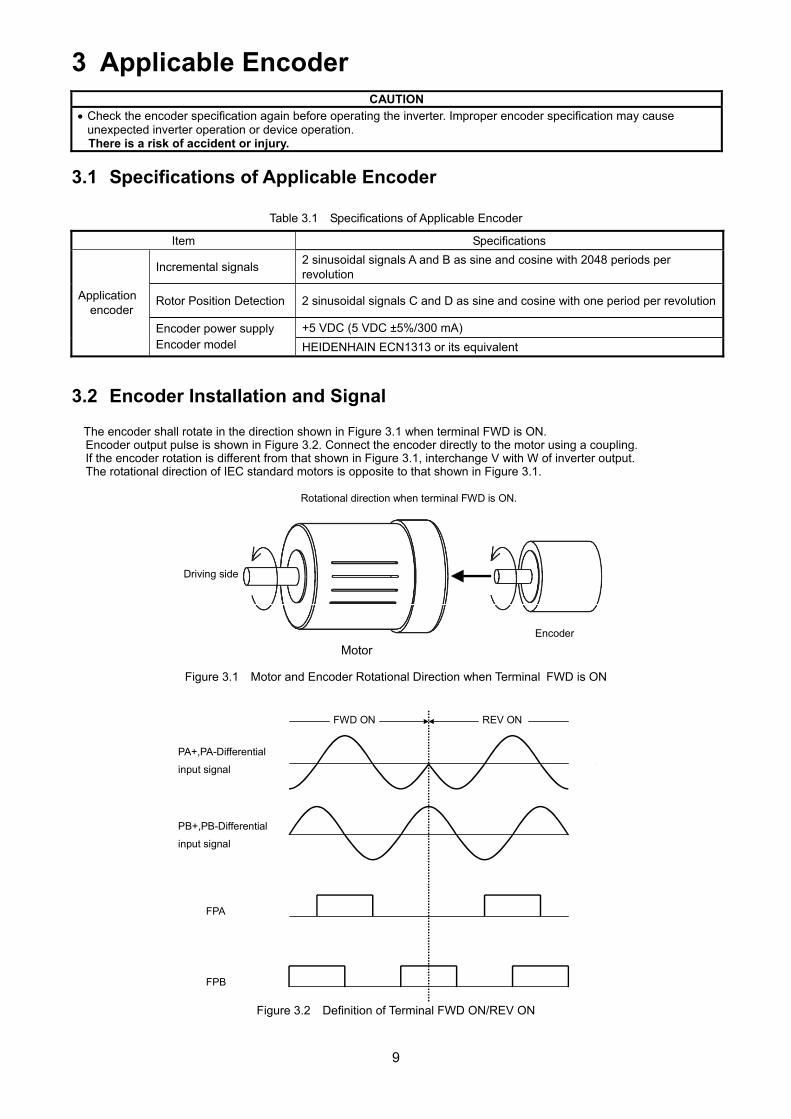
3 Applicable Encoder
CAUTION • Check the encoder specification again before operating the inverter. Improper encoder specification may cause
unexpected inverter operation or device operation. There is a risk of accident or injury.
3.1 Specifications of Applicable Encoder
Table 3.1 Specifications of Applicable Encoder
Item Specifications
Incremental signals 2 sinusoidal signals A and B as sine and cosine with 2048 periods per revolution
Rotor Position Detection 2 sinusoidal signals C and D as sine and cosine with one period per revolution
+5 VDC (5 VDC ±5%/300 mA)
Application encoder
Encoder power supply Encoder model HEIDENHAIN ECN1313 or its equivalent
3.2 Encoder Installation and Signal
The encoder shall rotate in the direction shown in Figure 3.1 when terminal FWD is ON. Encoder output pulse is shown in Figure 3.2. Connect the encoder directly to the motor using a coupling. If the encoder rotation is different from that shown in Figure 3.1, interchange V with W of inverter output. The rotational direction of IEC standard motors is opposite to that shown in Figure 3.1.
Motor Encoder
Rotational direction when terminal FWD is ON.
Driving side
Figure 3.1 Motor and Encoder Rotational Direction when Terminal FWD is ON
FWD ON REV ON
FPA
FPB
PA+,PA-Differential
input signal
PB+,PB-Differential
input signal
Figure 3.2 Definition of Terminal FWD ON/REV ON

10
4 Wiring
CAUTION • Check the wiring again before operating the inverter. Improper wiring may cause unexpected inverter operation or
device operation. There is a risk of accident or injury.
4.1 Wiring Length and Cable Size
Table 4.1 Maximum Wiring Length Item Specifications
Maximum wiring length between option card and encoder 20 m Maximum wiring length between option card (terminals FPA and FPB) and user controller 5 m
Wiring for the encoder option card and encoder The encoder connection cable must use cable made by HEIDENHAIN 17 pin (4 x 0.14) +4(2 x 0.14) + (4 x 0.5) mm2. Connect 0.5 mm2 with PO and terminal CM of the option card.
Table 4.2 Terminal Wiring of OPC-LM1-PS1 Terminal
name Wiring color Encoder side symbol Note
blown / green 5V Up PO blue 5V sensor Connect when the wiring length is 10 m or more.
white / green 0V Un CM
white 0V sensor Connect when the wiring length is 10 m or more.PA+ green / black A+ PA- yellow / black A- PB+ blue / black B+ PB- red / black B- CK+ purple CLOCK CK- yellow CLOCK DT+ gray DATA DT- pink DATA
Wiring of the option card and the encoder • The wiring of the option card and encoder must use the shield wire. Moreover, the cable length is 20 m or less. • Connect shield of the wire to terminal CM of this option card. • Separate the wiring of the option card and the wiring of other power lines to prevent the malfunction by the noise.
Never put them in the same duct. 4.2 Plug Applicable terminal plugs
The terminal block for encoder connection is removable type. The plug (electric wire connection side) is provided as an accessory of the option card.
Table 4.3 Applicable Plug Model Terminal Block Terminal Plugs Type Manufacturer
TERM1 MC1.5/16-STF-3.81 Phoenix Contact Plug specifications
Table 4.4 Plug Specifications Item Specifications
Tightening torque 0.22 to 0.25 N・m Screw size M2 Bared wire length 7 mm Maximum wire size AWG16
(Note) Insert the wire into the upper side of the metal bracket on the terminal block, and tighten the screw.

11
M2
4.3 Basic Wiring Diagram
CAUTION • Keep the power supply voltage of encoder in the specification voltage of encoder.
There is a risk of failure.
L1/R
L2/S
L3/T
U
V
W
M
CK-
DT+
DT-
FRN-LM1SG
OPC-LM1-PS1
PA-
PB+
PB-
CK+
PO
PA+
PO
CM
CM
Encoder
FPA
FPB
CM
CM
UserController
Figure 4.1 Basic Wiring Diagram
7(mm)
Connection of Wiring on Option
Terminal Side.

12
5 Function 5.1 Function Code Setting
CAUTION • Set the function code in the following order at first.
(1) C21 (2) P01 (3) F03 (4) L31 (5)P02 Because when you change them, some other function codes synchronize and change. There is a risk of accident or injury.
Set the function code as follows before beginning magnetic pole position offset tuning.
Code Name Data Setting
C21 Unit for Speed Command Your easy-to-use setting
P01 Motor - Number of poles Depends on the motor
F03 Maximum Speed Depends on the motor
L31 Elevator Parameter - Speed Depends on the elevator
P02 Motor - Rated capacity Depends on the motor
Code Name Data Setting
F04 Rated Speed Depends on the motor
F05 Rated Voltage at Rated Speed Depends on the motor
F42 Control Mode 1 (PM motor - Vector control with encoder)
P03 Motor - Rated current Depends on the motor
P07 Motor - %R1 5.0 (%)
P08 Motor - %X 10.0 (%)
L01 Pulse encoder - System 4
L02 Pulse encoder - Resolution Depends on the encoder
L36 ASR - P - Constant at high speed 2.0 (It is necessary to adjust)
L38 ASR - P - Constant at low speed 2.0 (It is necessary to adjust) 5.2 Procedure of Magnetic Pole Position Offset Tuning
You have to execute the tuning as follows before driving motor. Please inquire of the maker if tuning is impossible normally.
1. Tuning Mode (Function code L03)
Tuning mode is selected by function code L03 as follows. Usually, it is selected according to the tuning procedure. 1 : Tuning operation 2 : Tuning operation with wrong wiring detection (Er7 occurs if wrong wiring is detected.) 3 : Tuning operation with checking accuracy (Er7 occurs if tuning accuracy is not good.) 4 : Reserved for particular manufactures (Do not access this function code.) 5 : Reserved for particular manufactures (Do not access this function code.)
2. Tuning Condition The recommended condition is following.
(1) The rotor is fixed. If it is impossible to fix the rotor, it is acceptable even if the rotor is free. (In this case, if the torque bias has been set, cancel it.)
(2) Encoder abnormality detection is effective. (It is effective in the initial condition as follows. L90=1, L91=10%,
L92=0.5)

13
3. Tuning procedure
(1) Apply the brakes and fix the rotor. It is acceptable without the brake in the case of the tuning at the motor unit. (2) Confirm the motor is connected with the inverter. (3) If you use Multi Function Key Pad (MFKP), we recommend local mode. Keep pushing the "REM/LOC" key of
MFKP until the indicator “REM” change into “LOC”. (4) Execute the tuning with the function code L03=2 (Note 1). This work is used to detect the wrong wiring.
However, in the case of Surface Permanent Magnet motor (SPM motor), this work cannot detect the wrong wiring. In this case, skip to procedure 3-(5). In the case of finishing tuning normally, Skip to procedure 3-(5). If tuning error (Er7) occurs, it might be wrong wiring. Reset the error display and execute the procedure as follows.
After turning off the power supply, replace V and W of the wiring for inverter drive, and execute the tuning again afterwards. (In the case of the rotor free, if tuning error (Er7) occurs similarly even if V and W are replaced, it might be disconnection or wrong wiring of the encoder. Try to wire correctly, and execute again from the beginning.)
(5) Execute the tuning with the function code L03=3. (Note 1) The tuning procedure is completed. (Note 1) Tuning procedure after reactivates
- In the case of local mode Select "1 DATA SET" in the program mode of MFKP, change the function code L03, and set with the “FUNC/DATA” key. Pressing the “FWD” key starts tuning. The "EXECUTING" is displayed on the monitor of the MFKP during the tuning. The "EXECUTING" disappears, indicating that it is the end of tuning. The L03 data automatically returns to "0". The tuning result is stored in the function code L04. Check the result and make the note of the value.
- In the case of remote mode Set the function code L03. When the drive instruction is set, the tuning is begun. In the tuning mode (L03=1 or 3), tuning takes 4 seconds. In the tuning mode (L03=2), tuning takes 24 seconds. Release the drive instruction after the regulated time has elapsed. The L03 data returns to "0." The tuning result is stored in the function code L04. Check the result and make the note of the value.
4. Checking that tuning is completed normally
In the normal mode, run the motor. The recommended checking procedure is given below. Make the motor rotate more than one rotation at the low frequency about 1 Hz. In the MFKP local mode, do the following: 1) Push the "FWD" key and set the reference speed at about 1 Hz. 2) Make the motor rotate more than one rotation. 3) Push the "STOP" key. When the motor stops, the reference speed returns to 0.
If the motor does not rotate normally, do the following: 1) Check that the function codes are properly configured. 2) Check the wiring between the encoder and option card. 3) Match the rotational direction of the motor with that of the encoder. If any problem is found in steps 1) to 3) above, correct it (them) and perform tuning again. If no problem is found, change the motor-inverter wiring between V and W and then perform tuning again.

14
5.3 Procedure of Adjusting the Unbalanced Load Compensation 1. Procedure of control parameter setting
Set the function code as follows.
Code Name Data setting L05 ACR P Constant 1.5 to 4.0 *1 L06 ACR I Constant 0.80 ms L65 Unbalanced Load Compensation (Operation) 1 (Enable) L68 Unbalanced Load Compensation (ASR P constant) 4.00 *2 L69 Unbalanced Load Compensation (ASR I constant) 0.010s *2 L73 Unbalanced Load Compensation (APR Gain) 3.00 *2
*1 Calculate the setting value of L05 as follows.
n
n
VL×I×3
×2.5=L05
L: Motor Inductance [mH] the value of small one among Ld and Lq. Vn: Motor Rated Voltage [V] (F05) In: Motor Rated Current [A] (P03) *2 Adjust the following parameters to eliminate vibration, and the rollback becomes small.
The following table shows the tendency to the phenomenon by setting of the parameter.
Function Code Code Setting value
Rollback Vibration generation probability Condition
Too small Small High 1 L69 ASR I Too big Big Low 2
Too small Big Low 3 L73 APR Gain Too big Small High 4
Set L68 to the same value as L38.
2. Procedure of timing adjustment
Unbalanced load compensation requires keeping the reference speed (pre-ramp) at 0.00 r/min and releasing the brake during unbalanced load compensation is activated (that is, during the activation timer setting specified by L66). If the reference speed (pre-ramp) other than 0.00 r/min is entered before the time length specified by L66 elapses, unbalanced load compensation immediately finishes.

15
ⅰ) Using multistep speed command
Time
Reference speed (final) (= Actual speed)
0
ONFWD
ON
ON
Zero speedcommand
High speedcommand
Creep speedcommand
Zero speedcommand
ReleaseBrake
SS1
SS2
High speed
Creep speed
ONSS4
0 t1 t2 t3
L66
t1 : The time when real brake open. t2 : The time when unbalanced load compensation control is finished. t3 : The time when speed command switch "High speed command" from "Zero speed command".
- Please adjust "Brake open timing", "Speed command timing" and L66 to become t1 < t2 < t3.
If shock is generated at L65 = 0 and it is not generated at L65 = 1 at the time of started inverter, unbalanced load compensation works correctly.
ⅱ) Using analog speed command
Time0
ONFWD
ReleaseBrake
Reference speed(pre-ramp)(= Lift controller output)
F24
F23
Time0
Reference speed(final)(= Actual speed)
F23
H65
0 t1 t2 t4 t3
L66
t1 : The time when real brake open. t2 : The time when unbalanced load compensation control is finished. t3 : The time when reference speed (pre-ramp) arrives at F23. t4 : The time when reference speed (final) arrives at F23.
- Please adjust “Brake open timing”, “Speed command timing” and F24 to become t1 < t2 < t3. - Please set a value of L66 bigger than value of F24. - Please adjust “Speed command timing” and H65 to become t4 < t3.
If shock is generated at L65=0 and it is not generated at L65=1 at the time of started inverter, unbalanced load compensation works correctly.