Embed Size (px)
Citation preview

©2017 Optima Healthcare Solutions Page | 1
OPTIMA 102 Care Operations Management
PARTICIPANT GUIDE

©2017 Optima Healthcare Solutions Page | 2
CONTENTS
CONTENTS ...................................................................................................................... 2
ABOUT THIS GUIDE .......................................................................................................... 4
LEARNING OUTCOMES ...................................................................................................... 5
1. ACCESSING THE CASE MANAGER ................................................................................. 7
2. EDITING CASE DETAILS ............................................................................................... 7
3. ADDING ADDITIONAL PAYERS ..................................................................................... 8
4. ENDING THERAPY TRACKS AND CASE .......................................................................... 8
5. DISCHARGING A PATIENT ............................................................................................ 9
6. ACCESSING THE PATIENT RECORD ............................................................................. 10
7. ACCESSING INFO ON THE PATIENT RECORD ................................................................ 10
8. ADDING PRIOR USAGE .............................................................................................. 12
9. WORKING WITH KX MODIFIERS .................................................................................. 12
10. VIEWING YEAR TO DATE CHARGES ......................................................................... 13
11. ACCESSING PHYSICIAN INFORMATION ........................................................................ 13
12. TRACKING EXTERNAL STAYS .................................................................................. 14
13. SAVING CHANGES ON THE PATIENT RECORD ........................................................... 15
14. VIEWING PPS TRACK INFORMATION ........................................................................ 15
15. ACCESSING PROJECTIONS ..................................................................................... 15
16. ACCESSING INFORMATION IN PROJECTIONS ............................................................. 16
17. USING PROJECTIONS TEMPLATES ........................................................................... 17
18. CLEARING PROJECTED MINUTES ............................................................................. 17
19. USING THE PROJECTIONS LEGEND .......................................................................... 18
20. VIEWING PROJECTIONS INFORMATION .................................................................... 18
21. SCHEDULING IN PROJECTIONS ................................................................................ 19
22. UNDERSTANDING PROJECTED VS. ACTUAL MINUTES ................................................. 20
23. SETTING TARGET ASSESSMENT .............................................................................. 20
24. MANAGING TARGET ASSESSMENTS ......................................................................... 21
25. USING THE ASSIGNMENT BOARD ............................................................................. 22
26. CREATING LAYOUTS ON THE ASSIGNMENT BOARD ................................................... 23
27. SCHEDULING A PLANNED DISCHARGE ..................................................................... 23
28. SETTING SKIP DAYS ............................................................................................... 24
29. USING AUTO-ASSIGN FOR SCHEDULING ................................................................... 25
30. TRACKING PRODUCTIVITY ...................................................................................... 25
31. VIEWING SCHEDULING REPORTS ............................................................................. 26
32. USING THE HOTLIST .............................................................................................. 28

©2017 Optima Healthcare Solutions Page | 3
33. COMPLETING THE CLOSEOUT ................................................................................. 29
34. GENERATING THE BILLING EXPORT ......................................................................... 30
35. USING THE REPORTS CATALOG .............................................................................. 30
36. RUNNING THE MDS DATA REPORT ........................................................................... 31
©2017 Optima Healthcare Solutions Page | 4
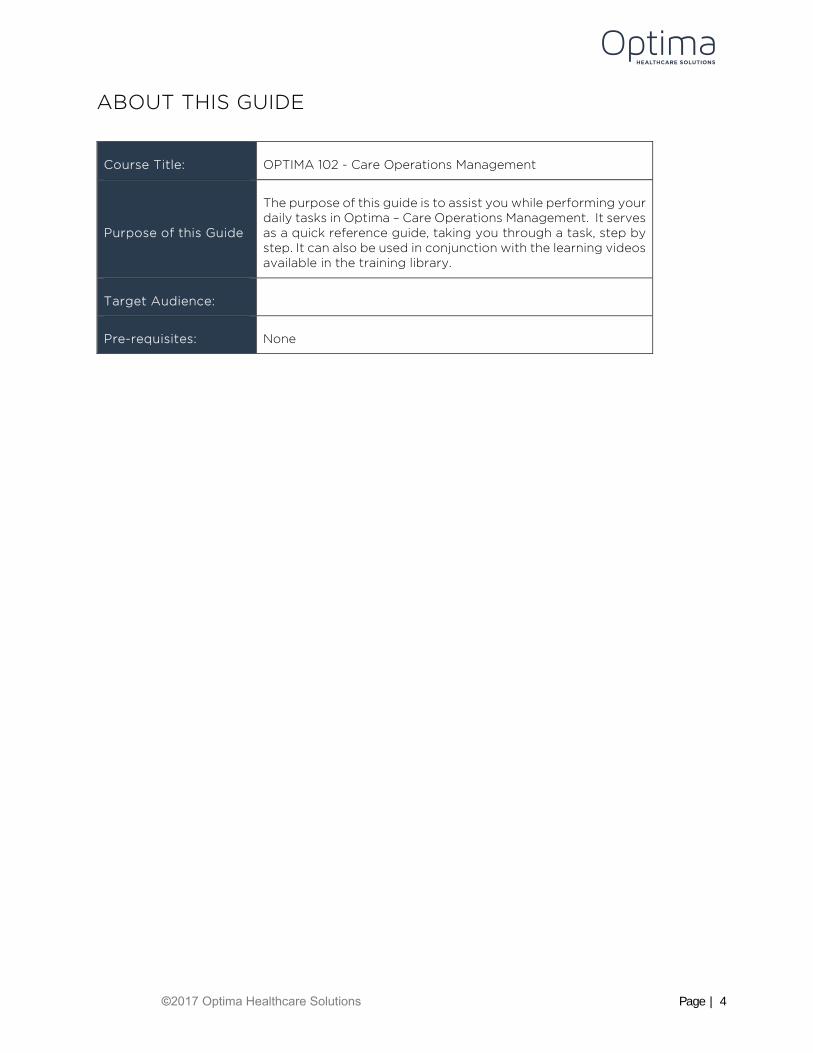
ABOUT THIS GUIDE
Course Title: OPTIMA 102 - Care Operations Management
Purpose of this Guide
The purpose of this guide is to assist you while performing your daily tasks in Optima – Care Operations Management. It serves as a quick reference guide, taking you through a task, step by step. It can also be used in conjunction with the learning videos available in the training library.
Target Audience:
Pre-requisites: None

©2017 Optima Healthcare Solutions Page | 5
LEARNING OUTCOMES
In this course you will learn about:
THE CASE MANAGER
Accessing the Case Manager
Editing the Case Details
Editing Payer Information
Editing Therapy Tracks and Details
Discharging Patients
THE PATIENT RECORD
Accessing the Patient Record
Accessing Info on the Patient Record
Adding Prior Usage
Working with KX Modifiers
Viewing Year to Date Charges
Accessing Physician Information
Tracking External Stays
Saving Changes on the Patient Record
PROJECTIONS
Viewing PPS Tracking Information
Accessing Projections
Accessing Information in Projections
Using Projections Templates
Clearing Projected Minutes
Using the Projections Legend
Viewing Projections Information
Scheduling in Projections
Understanding projected vs. Actual Minutes
Setting Target Assessments
Managing Target Assessments
Using the Assignment Board
Creating Layouts on the Assignment Board
Scheduling a Planned Discharge
Setting Skip Days
Using the Auto-Assign Feature for Scheduling

©2017 Optima Healthcare Solutions Page | 6
Tracking Productivity
Viewing Scheduling Reports
THE HOTLIST
Using the Hotlist
THE CLOSEOUT
Completing the Closeout
REPORTS
Generating the Billing Export
Using the Reports Catalog
Running the MDS Data Report
©2017 Optima Healthcare Solutions Page | 7
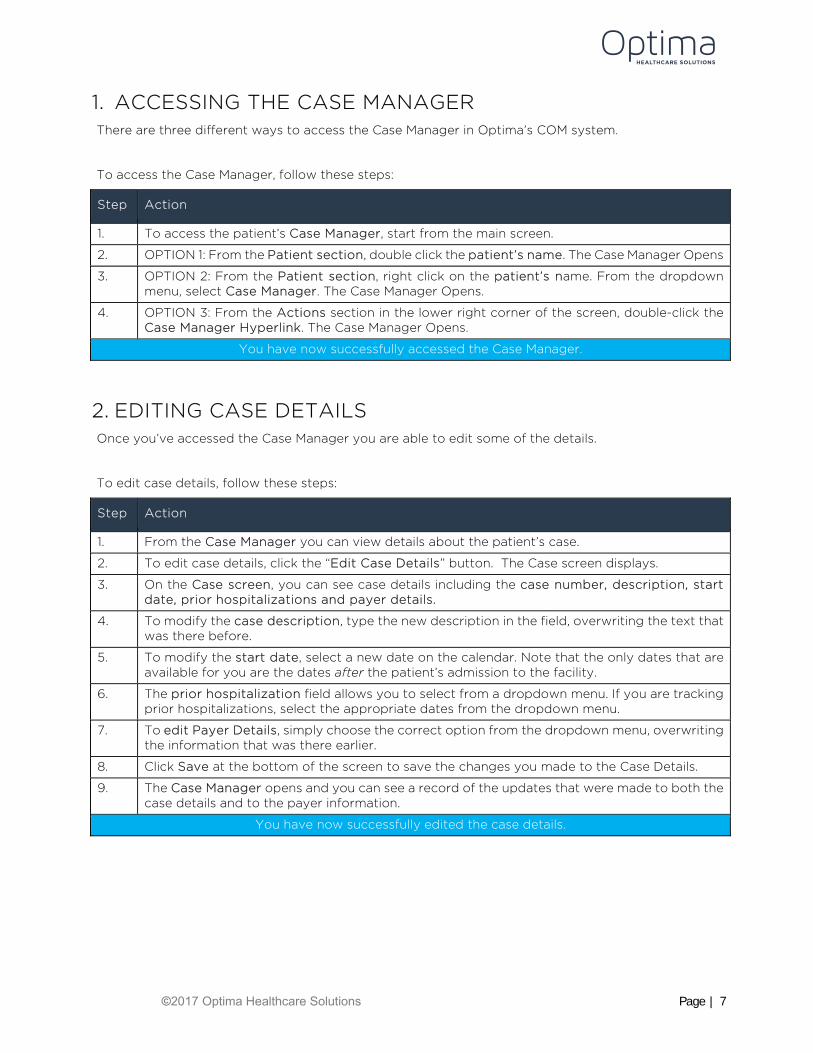
1. ACCESSING THE CASE MANAGER There are three different ways to access the Case Manager in Optima’s COM system.
To access the Case Manager, follow these steps:
Step Action
1. To access the patient’s Case Manager, start from the main screen.
2. OPTION 1: From the Patient section, double click the patient’s name. The Case Manager Opens
3. OPTION 2: From the Patient section, right click on the patient’s name. From the dropdown menu, select Case Manager. The Case Manager Opens.
4. OPTION 3: From the Actions section in the lower right corner of the screen, double-click the Case Manager Hyperlink. The Case Manager Opens.
You have now successfully accessed the Case Manager.
2. EDITING CASE DETAILS Once you’ve accessed the Case Manager you are able to edit some of the details.
To edit case details, follow these steps:
Step Action
1. From the Case Manager you can view details about the patient’s case.
2. To edit case details, click the “Edit Case Details” button. The Case screen displays.
3. On the Case screen, you can see case details including the case number, description, start date, prior hospitalizations and payer details.
4. To modify the case description, type the new description in the field, overwriting the text that was there before.
5. To modify the start date, select a new date on the calendar. Note that the only dates that are available for you are the dates after the patient’s admission to the facility.
6. The prior hospitalization field allows you to select from a dropdown menu. If you are tracking prior hospitalizations, select the appropriate dates from the dropdown menu.
7. To edit Payer Details, simply choose the correct option from the dropdown menu, overwriting the information that was there earlier.
8. Click Save at the bottom of the screen to save the changes you made to the Case Details.
9. The Case Manager opens and you can see a record of the updates that were made to both the case details and to the payer information.
You have now successfully edited the case details.
©2017 Optima Healthcare Solutions Page | 8
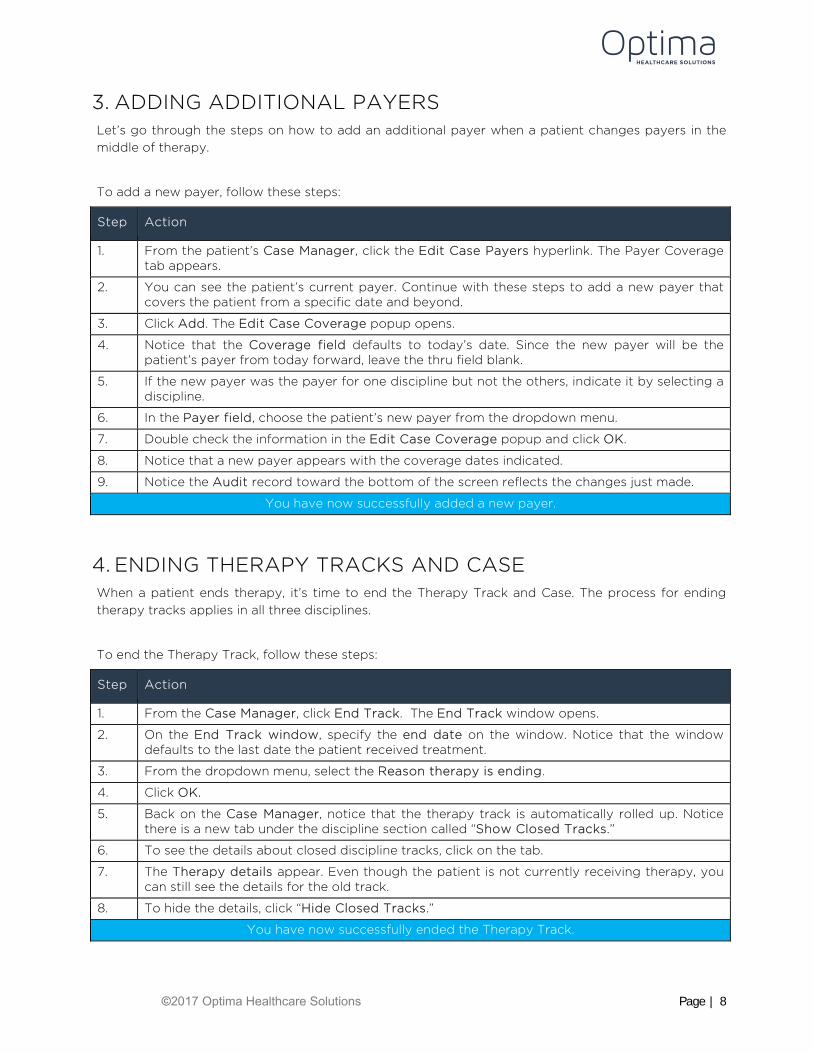
3. ADDING ADDITIONAL PAYERS Let’s go through the steps on how to add an additional payer when a patient changes payers in the middle of therapy.
To add a new payer, follow these steps:
Step Action
1. From the patient’s Case Manager, click the Edit Case Payers hyperlink. The Payer Coverage tab appears.
2. You can see the patient’s current payer. Continue with these steps to add a new payer that covers the patient from a specific date and beyond.
3. Click Add. The Edit Case Coverage popup opens.
4. Notice that the Coverage field defaults to today’s date. Since the new payer will be the patient’s payer from today forward, leave the thru field blank.
5. If the new payer was the payer for one discipline but not the others, indicate it by selecting a discipline.
6. In the Payer field, choose the patient’s new payer from the dropdown menu.
7. Double check the information in the Edit Case Coverage popup and click OK.
8. Notice that a new payer appears with the coverage dates indicated.
9. Notice the Audit record toward the bottom of the screen reflects the changes just made.
You have now successfully added a new payer.
4. ENDING THERAPY TRACKS AND CASE When a patient ends therapy, it’s time to end the Therapy Track and Case. The process for ending therapy tracks applies in all three disciplines.
To end the Therapy Track, follow these steps:
Step Action
1. From the Case Manager, click End Track. The End Track window opens.
2. On the End Track window, specify the end date on the window. Notice that the window defaults to the last date the patient received treatment.
3. From the dropdown menu, select the Reason therapy is ending.
4. Click OK.
5. Back on the Case Manager, notice that the therapy track is automatically rolled up. Notice there is a new tab under the discipline section called “Show Closed Tracks.”
6. To see the details about closed discipline tracks, click on the tab.
7. The Therapy details appear. Even though the patient is not currently receiving therapy, you can still see the details for the old track.
8. To hide the details, click “Hide Closed Tracks.”
You have now successfully ended the Therapy Track.
©2017 Optima Healthcare Solutions Page | 9
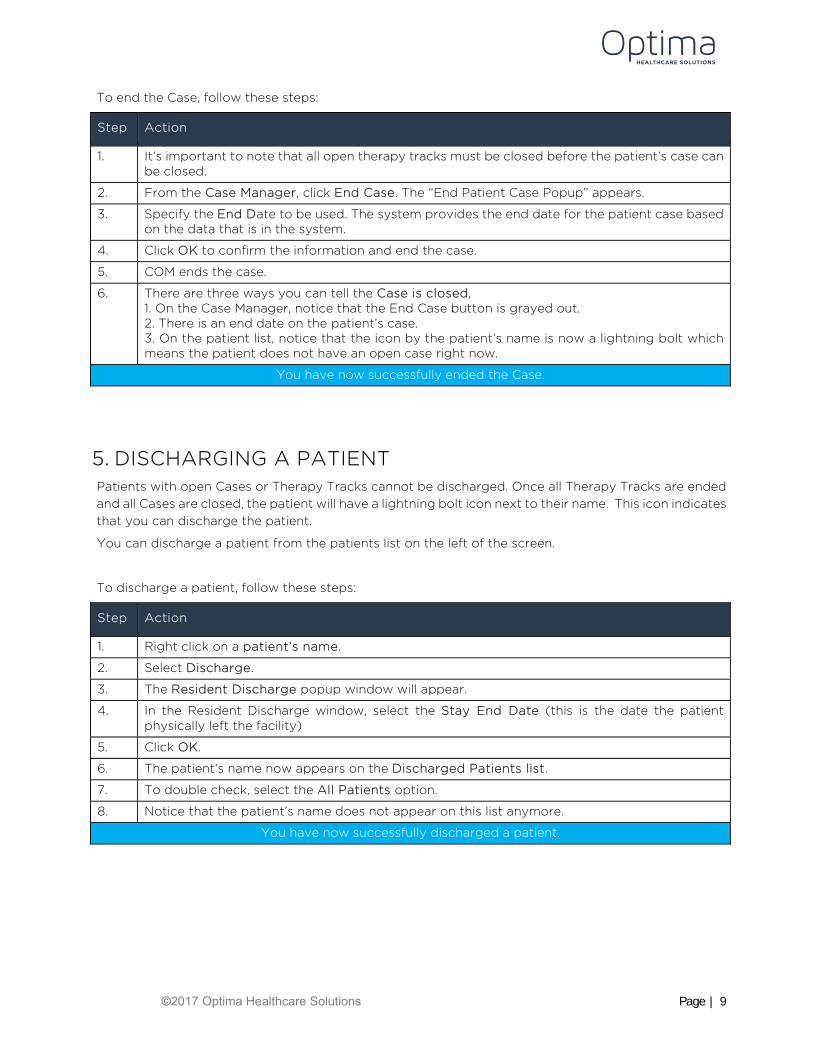
To end the Case, follow these steps:
Step Action
1. It’s important to note that all open therapy tracks must be closed before the patient’s case can be closed.
2. From the Case Manager, click End Case. The “End Patient Case Popup” appears.
3. Specify the End Date to be used. The system provides the end date for the patient case based on the data that is in the system.
4. Click OK to confirm the information and end the case.
5. COM ends the case.
6. There are three ways you can tell the Case is closed, 1. On the Case Manager, notice that the End Case button is grayed out. 2. There is an end date on the patient’s case. 3. On the patient list, notice that the icon by the patient’s name is now a lightning bolt which means the patient does not have an open case right now.
You have now successfully ended the Case.
5. DISCHARGING A PATIENT Patients with open Cases or Therapy Tracks cannot be discharged. Once all Therapy Tracks are ended and all Cases are closed, the patient will have a lightning bolt icon next to their name. This icon indicates that you can discharge the patient.
You can discharge a patient from the patients list on the left of the screen.
To discharge a patient, follow these steps:
Step Action
1. Right click on a patient’s name.
2. Select Discharge.
3. The Resident Discharge popup window will appear.
4. In the Resident Discharge window, select the Stay End Date (this is the date the patient physically left the facility)
5. Click OK.
6. The patient’s name now appears on the Discharged Patients list.
7. To double check, select the All Patients option.
8. Notice that the patient’s name does not appear on this list anymore.
You have now successfully discharged a patient.
©2017 Optima Healthcare Solutions Page | 10
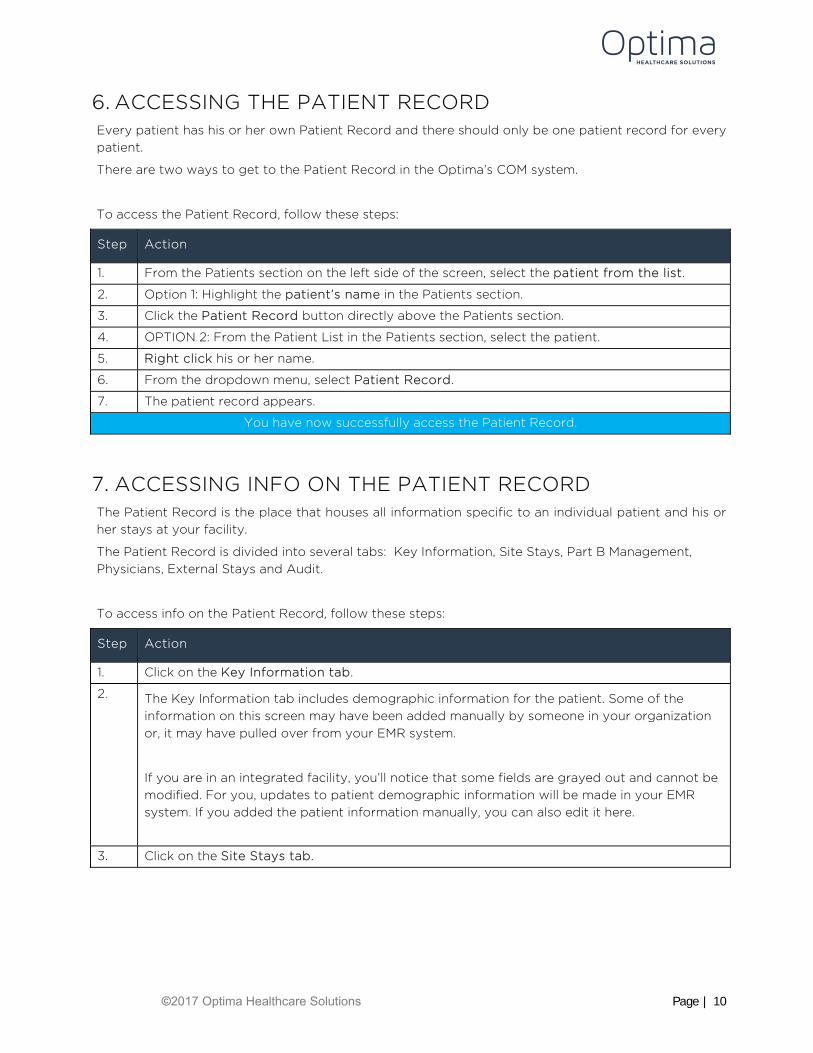
6. ACCESSING THE PATIENT RECORD Every patient has his or her own Patient Record and there should only be one patient record for every patient.
There are two ways to get to the Patient Record in the Optima’s COM system.
To access the Patient Record, follow these steps:
Step Action
1. From the Patients section on the left side of the screen, select the patient from the list.
2. Option 1: Highlight the patient’s name in the Patients section.
3. Click the Patient Record button directly above the Patients section.
4. OPTION 2: From the Patient List in the Patients section, select the patient.
5. Right click his or her name.
6. From the dropdown menu, select Patient Record.
7. The patient record appears.
You have now successfully access the Patient Record.
7. ACCESSING INFO ON THE PATIENT RECORD The Patient Record is the place that houses all information specific to an individual patient and his or her stays at your facility.
The Patient Record is divided into several tabs: Key Information, Site Stays, Part B Management, Physicians, External Stays and Audit.
To access info on the Patient Record, follow these steps:
Step Action
1. Click on the Key Information tab.
2. The Key Information tab includes demographic information for the patient. Some of the information on this screen may have been added manually by someone in your organization or, it may have pulled over from your EMR system.
If you are in an integrated facility, you’ll notice that some fields are grayed out and cannot be modified. For you, updates to patient demographic information will be made in your EMR system. If you added the patient information manually, you can also edit it here.
3. Click on the Site Stays tab.
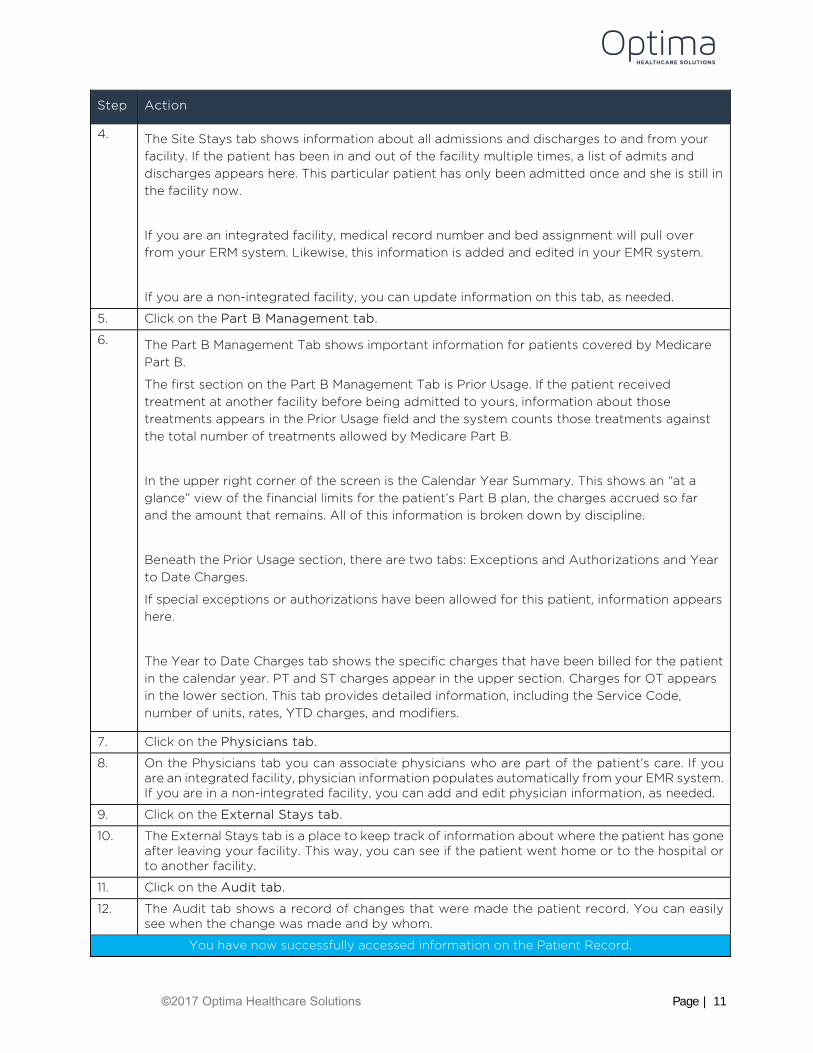
©2017 Optima Healthcare Solutions Page | 11
Step Action
4. The Site Stays tab shows information about all admissions and discharges to and from your facility. If the patient has been in and out of the facility multiple times, a list of admits and discharges appears here. This particular patient has only been admitted once and she is still in the facility now.
If you are an integrated facility, medical record number and bed assignment will pull over from your ERM system. Likewise, this information is added and edited in your EMR system.
If you are a non-integrated facility, you can update information on this tab, as needed.
5. Click on the Part B Management tab.
6. The Part B Management Tab shows important information for patients covered by Medicare Part B.
The first section on the Part B Management Tab is Prior Usage. If the patient received treatment at another facility before being admitted to yours, information about those treatments appears in the Prior Usage field and the system counts those treatments against the total number of treatments allowed by Medicare Part B.
In the upper right corner of the screen is the Calendar Year Summary. This shows an “at a glance” view of the financial limits for the patient’s Part B plan, the charges accrued so far and the amount that remains. All of this information is broken down by discipline.
Beneath the Prior Usage section, there are two tabs: Exceptions and Authorizations and Year to Date Charges.
If special exceptions or authorizations have been allowed for this patient, information appears here.
The Year to Date Charges tab shows the specific charges that have been billed for the patient in the calendar year. PT and ST charges appear in the upper section. Charges for OT appears in the lower section. This tab provides detailed information, including the Service Code, number of units, rates, YTD charges, and modifiers.
7. Click on the Physicians tab.
8. On the Physicians tab you can associate physicians who are part of the patient’s care. If you are an integrated facility, physician information populates automatically from your EMR system. If you are in a non-integrated facility, you can add and edit physician information, as needed.
9. Click on the External Stays tab.
10. The External Stays tab is a place to keep track of information about where the patient has gone after leaving your facility. This way, you can see if the patient went home or to the hospital or to another facility.
11. Click on the Audit tab.
12. The Audit tab shows a record of changes that were made the patient record. You can easily see when the change was made and by whom.
You have now successfully accessed information on the Patient Record.
©2017 Optima Healthcare Solutions Page | 12
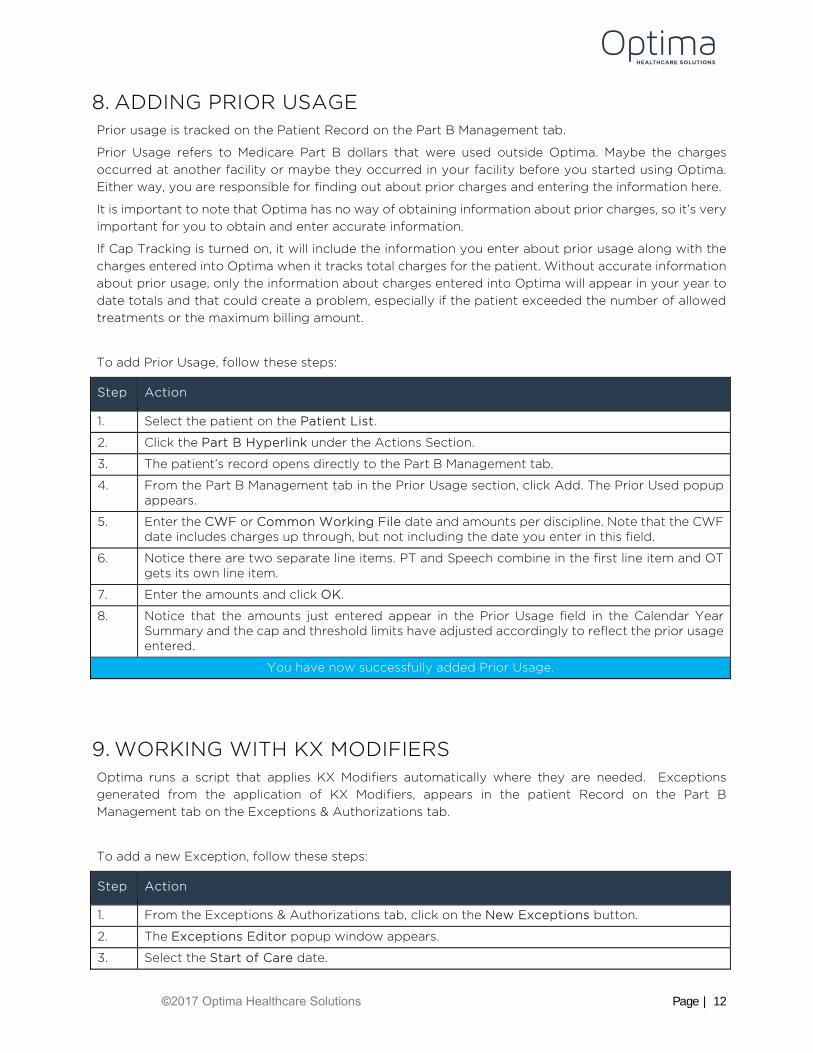
8. ADDING PRIOR USAGE Prior usage is tracked on the Patient Record on the Part B Management tab.
Prior Usage refers to Medicare Part B dollars that were used outside Optima. Maybe the charges occurred at another facility or maybe they occurred in your facility before you started using Optima. Either way, you are responsible for finding out about prior charges and entering the information here.
It is important to note that Optima has no way of obtaining information about prior charges, so it’s very important for you to obtain and enter accurate information.
If Cap Tracking is turned on, it will include the information you enter about prior usage along with the charges entered into Optima when it tracks total charges for the patient. Without accurate information about prior usage, only the information about charges entered into Optima will appear in your year to date totals and that could create a problem, especially if the patient exceeded the number of allowed treatments or the maximum billing amount.
To add Prior Usage, follow these steps:
Step Action
1. Select the patient on the Patient List.
2. Click the Part B Hyperlink under the Actions Section.
3. The patient’s record opens directly to the Part B Management tab.
4. From the Part B Management tab in the Prior Usage section, click Add. The Prior Used popup appears.
5. Enter the CWF or Common Working File date and amounts per discipline. Note that the CWF date includes charges up through, but not including the date you enter in this field.
6. Notice there are two separate line items. PT and Speech combine in the first line item and OT gets its own line item.
7. Enter the amounts and click OK.
8. Notice that the amounts just entered appear in the Prior Usage field in the Calendar Year Summary and the cap and threshold limits have adjusted accordingly to reflect the prior usage entered.
You have now successfully added Prior Usage.
9. WORKING WITH KX MODIFIERS Optima runs a script that applies KX Modifiers automatically where they are needed. Exceptions generated from the application of KX Modifiers, appears in the patient Record on the Part B Management tab on the Exceptions & Authorizations tab.
To add a new Exception, follow these steps:
Step Action
1. From the Exceptions & Authorizations tab, click on the New Exceptions button.
2. The Exceptions Editor popup window appears.
3. Select the Start of Care date.
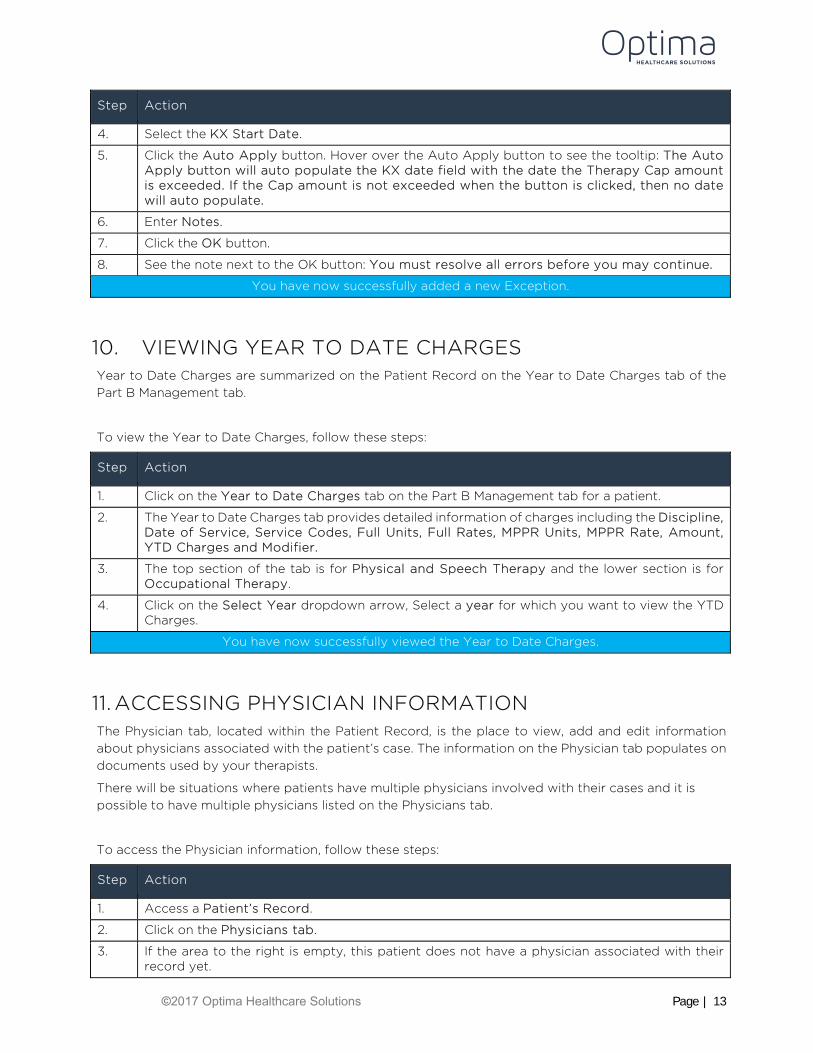
©2017 Optima Healthcare Solutions Page | 13
Step Action
4. Select the KX Start Date.
5. Click the Auto Apply button. Hover over the Auto Apply button to see the tooltip: The Auto Apply button will auto populate the KX date field with the date the Therapy Cap amount is exceeded. If the Cap amount is not exceeded when the button is clicked, then no date will auto populate.
6. Enter Notes.
7. Click the OK button.
8. See the note next to the OK button: You must resolve all errors before you may continue.
You have now successfully added a new Exception.
10. VIEWING YEAR TO DATE CHARGES Year to Date Charges are summarized on the Patient Record on the Year to Date Charges tab of the Part B Management tab.
To view the Year to Date Charges, follow these steps:
Step Action
1. Click on the Year to Date Charges tab on the Part B Management tab for a patient.
2. The Year to Date Charges tab provides detailed information of charges including the Discipline, Date of Service, Service Codes, Full Units, Full Rates, MPPR Units, MPPR Rate, Amount, YTD Charges and Modifier.
3. The top section of the tab is for Physical and Speech Therapy and the lower section is for Occupational Therapy.
4. Click on the Select Year dropdown arrow, Select a year for which you want to view the YTD Charges.
You have now successfully viewed the Year to Date Charges.
11. ACCESSING PHYSICIAN INFORMATION The Physician tab, located within the Patient Record, is the place to view, add and edit information about physicians associated with the patient’s case. The information on the Physician tab populates on documents used by your therapists.
There will be situations where patients have multiple physicians involved with their cases and it is possible to have multiple physicians listed on the Physicians tab.
To access the Physician information, follow these steps:
Step Action
1. Access a Patient’s Record.
2. Click on the Physicians tab.
3. If the area to the right is empty, this patient does not have a physician associated with their record yet.
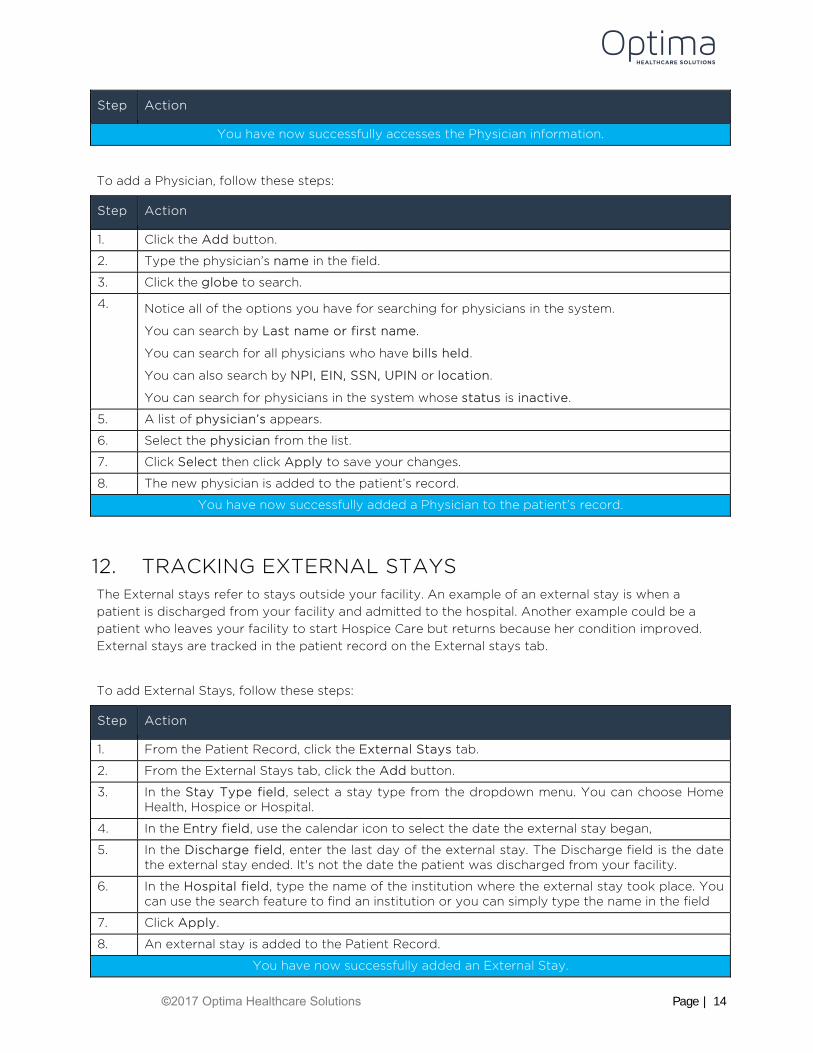
©2017 Optima Healthcare Solutions Page | 14
Step Action
You have now successfully accesses the Physician information.
To add a Physician, follow these steps:
Step Action
1. Click the Add button.
2. Type the physician’s name in the field.
3. Click the globe to search.
4. Notice all of the options you have for searching for physicians in the system.
You can search by Last name or first name.
You can search for all physicians who have bills held.
You can also search by NPI, EIN, SSN, UPIN or location.
You can search for physicians in the system whose status is inactive.
5. A list of physician’s appears.
6. Select the physician from the list.
7. Click Select then click Apply to save your changes.
8. The new physician is added to the patient’s record.
You have now successfully added a Physician to the patient’s record.
12. TRACKING EXTERNAL STAYS The External stays refer to stays outside your facility. An example of an external stay is when a patient is discharged from your facility and admitted to the hospital. Another example could be a patient who leaves your facility to start Hospice Care but returns because her condition improved. External stays are tracked in the patient record on the External stays tab.
To add External Stays, follow these steps:
Step Action
1. From the Patient Record, click the External Stays tab.
2. From the External Stays tab, click the Add button.
3. In the Stay Type field, select a stay type from the dropdown menu. You can choose Home Health, Hospice or Hospital.
4. In the Entry field, use the calendar icon to select the date the external stay began,
5. In the Discharge field, enter the last day of the external stay. The Discharge field is the date the external stay ended. It's not the date the patient was discharged from your facility.
6. In the Hospital field, type the name of the institution where the external stay took place. You can use the search feature to find an institution or you can simply type the name in the field
7. Click Apply.
8. An external stay is added to the Patient Record.
You have now successfully added an External Stay.
©2017 Optima Healthcare Solutions Page | 15
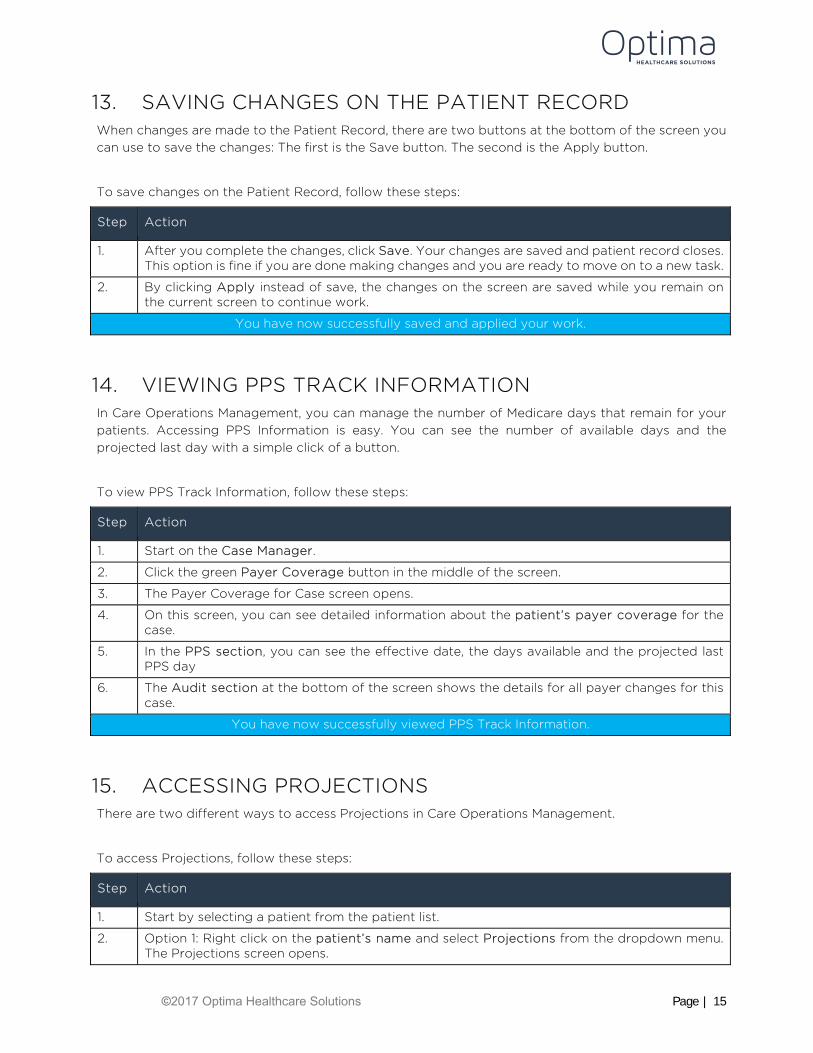
13. SAVING CHANGES ON THE PATIENT RECORD When changes are made to the Patient Record, there are two buttons at the bottom of the screen you can use to save the changes: The first is the Save button. The second is the Apply button.
To save changes on the Patient Record, follow these steps:
Step Action
1. After you complete the changes, click Save. Your changes are saved and patient record closes. This option is fine if you are done making changes and you are ready to move on to a new task.
2. By clicking Apply instead of save, the changes on the screen are saved while you remain on the current screen to continue work.
You have now successfully saved and applied your work.
14. VIEWING PPS TRACK INFORMATION In Care Operations Management, you can manage the number of Medicare days that remain for your patients. Accessing PPS Information is easy. You can see the number of available days and the projected last day with a simple click of a button.
To view PPS Track Information, follow these steps:
Step Action
1. Start on the Case Manager.
2. Click the green Payer Coverage button in the middle of the screen.
3. The Payer Coverage for Case screen opens.
4. On this screen, you can see detailed information about the patient’s payer coverage for the case.
5. In the PPS section, you can see the effective date, the days available and the projected last PPS day
6. The Audit section at the bottom of the screen shows the details for all payer changes for this case.
You have now successfully viewed PPS Track Information.
15. ACCESSING PROJECTIONS There are two different ways to access Projections in Care Operations Management.
To access Projections, follow these steps:
Step Action
1. Start by selecting a patient from the patient list.
2. Option 1: Right click on the patient’s name and select Projections from the dropdown menu. The Projections screen opens.

©2017 Optima Healthcare Solutions Page | 16
Step Action
3. Option 2: With the patient’s name highlighted, double click the Projections hyperlink which is located below the patient list. The Projections screen opens.
You have now successfully accessed Projections.
16. ACCESSING INFORMATION IN PROJECTIONS Projections is a scheduling tool as well as a tool to help you keep track of your assessment reference dates.
Notice that it is divided horizontally into two sections. The upper section is called “The Grid.” The lower section is where you can view the Assessments that have been logged for the patient along with future assessments that have been set as targets.
To access information in Projections, follow these steps:
Step Action
1. Click the upside-down triangle to the right of the patient’s name. A dropdown menu appears.
2. The dropdown contains the names of all active patients in the facility. The patients with green circles next to their names are “PPS Tracking Patients.”
3. Notice that for each patient, the payer type is listed in parentheses to the right of the patient’s name.
4. The blue Next button advances to the next patient on the list, regardless of the patient’s PPS Tracking status.
5. The green Next button advances to the next PPS Patient on the list who has a PPS track active. If you are only interested in looking at information for active PPS Tracking Patients, use the green button. If you want to review information for all patients, use the blue button.
6. The next field is Coverage and this field is actually a dropdown menu. The dropdown menu shows historical information for the patient including payer changes as well as information about admission and discharge dates for the times the patient has been in and out of the facility.
7. Click View PPS History to shows PPS History for the patient. The PPS History includes information about the Payer, the effective date, the Projected last covered date, the days at start and the uncovered days.
8. The remaining options, Templates, Clear Schedule and Legend pertain to the scheduling feature that is part of Projections.
You have now successfully accessed information in Projections.
©2017 Optima Healthcare Solutions Page | 17
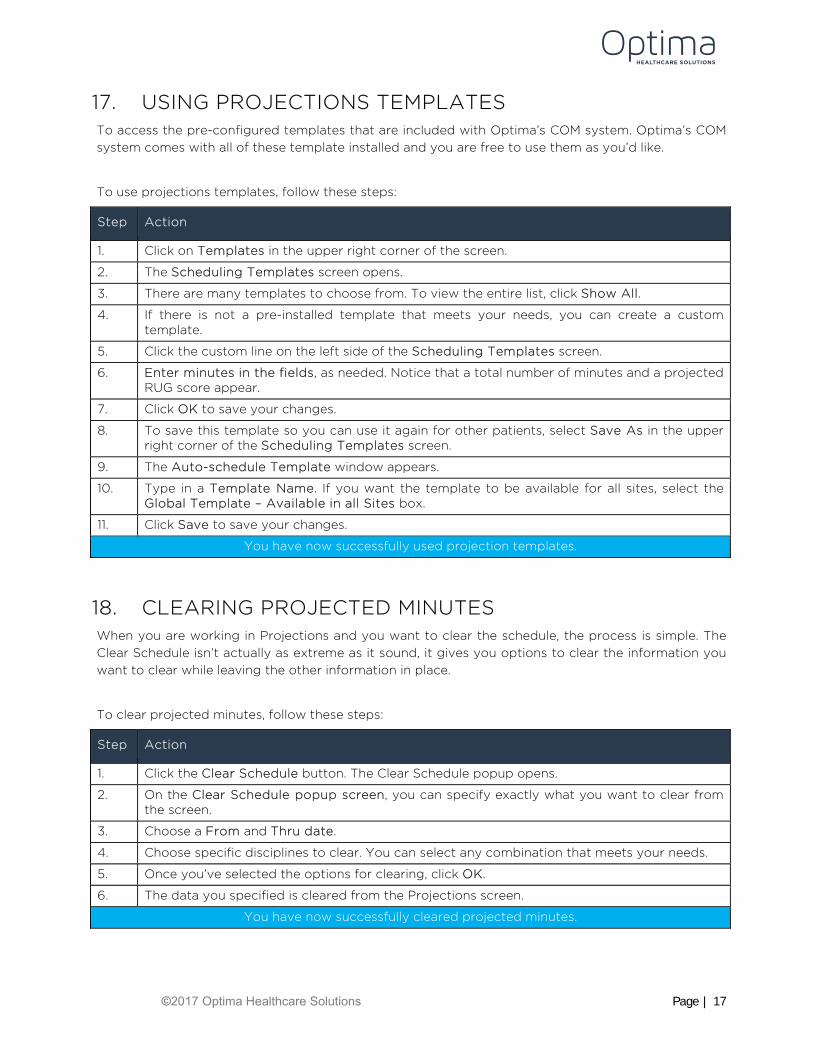
17. USING PROJECTIONS TEMPLATES To access the pre-configured templates that are included with Optima’s COM system. Optima’s COM system comes with all of these template installed and you are free to use them as you’d like.
To use projections templates, follow these steps:
Step Action
1. Click on Templates in the upper right corner of the screen.
2. The Scheduling Templates screen opens.
3. There are many templates to choose from. To view the entire list, click Show All.
4. If there is not a pre-installed template that meets your needs, you can create a custom template.
5. Click the custom line on the left side of the Scheduling Templates screen.
6. Enter minutes in the fields, as needed. Notice that a total number of minutes and a projected RUG score appear.
7. Click OK to save your changes.
8. To save this template so you can use it again for other patients, select Save As in the upper right corner of the Scheduling Templates screen.
9. The Auto-schedule Template window appears.
10. Type in a Template Name. If you want the template to be available for all sites, select the Global Template – Available in all Sites box.
11. Click Save to save your changes.
You have now successfully used projection templates.
18. CLEARING PROJECTED MINUTES When you are working in Projections and you want to clear the schedule, the process is simple. The Clear Schedule isn’t actually as extreme as it sound, it gives you options to clear the information you want to clear while leaving the other information in place.
To clear projected minutes, follow these steps:
Step Action
1. Click the Clear Schedule button. The Clear Schedule popup opens.
2. On the Clear Schedule popup screen, you can specify exactly what you want to clear from the screen.
3. Choose a From and Thru date.
4. Choose specific disciplines to clear. You can select any combination that meets your needs.
5. Once you’ve selected the options for clearing, click OK.
6. The data you specified is cleared from the Projections screen.
You have now successfully cleared projected minutes.
©2017 Optima Healthcare Solutions Page | 18
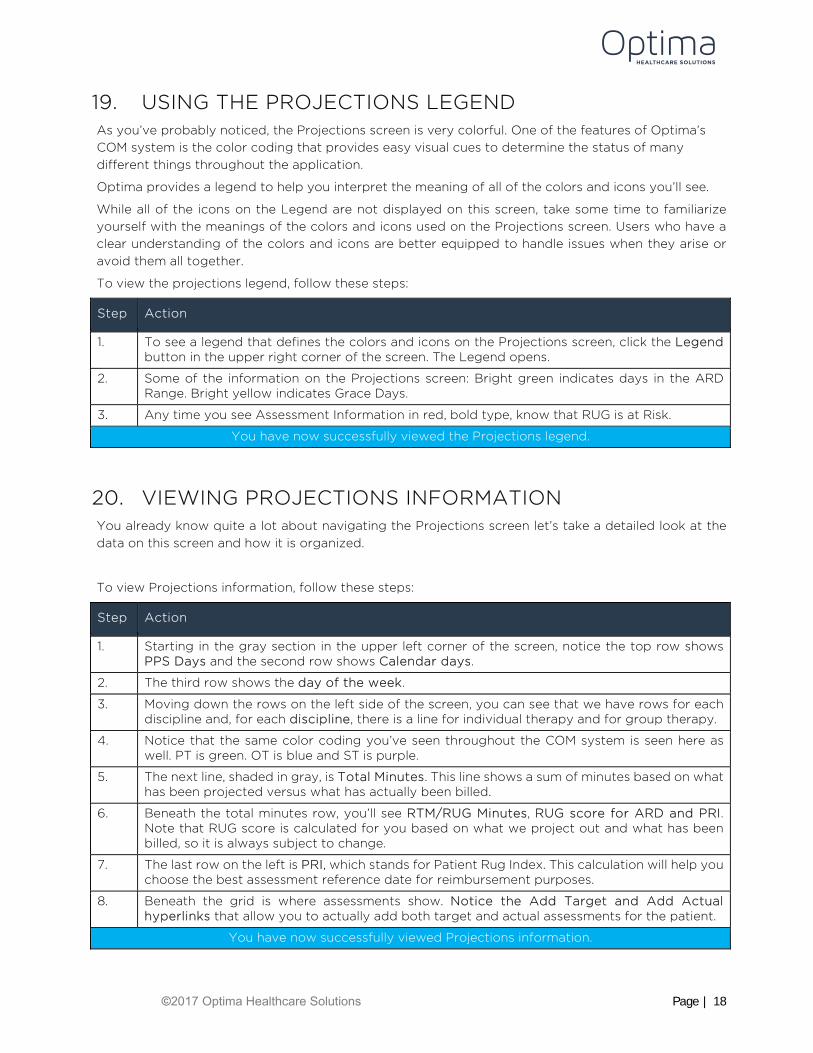
19. USING THE PROJECTIONS LEGEND As you’ve probably noticed, the Projections screen is very colorful. One of the features of Optima’s COM system is the color coding that provides easy visual cues to determine the status of many different things throughout the application.
Optima provides a legend to help you interpret the meaning of all of the colors and icons you’ll see.
While all of the icons on the Legend are not displayed on this screen, take some time to familiarize yourself with the meanings of the colors and icons used on the Projections screen. Users who have a clear understanding of the colors and icons are better equipped to handle issues when they arise or avoid them all together.
To view the projections legend, follow these steps:
Step Action
1. To see a legend that defines the colors and icons on the Projections screen, click the Legend button in the upper right corner of the screen. The Legend opens.
2. Some of the information on the Projections screen: Bright green indicates days in the ARD Range. Bright yellow indicates Grace Days.
3. Any time you see Assessment Information in red, bold type, know that RUG is at Risk.
You have now successfully viewed the Projections legend.
20. VIEWING PROJECTIONS INFORMATION You already know quite a lot about navigating the Projections screen let’s take a detailed look at the data on this screen and how it is organized.
To view Projections information, follow these steps:
Step Action
1. Starting in the gray section in the upper left corner of the screen, notice the top row shows PPS Days and the second row shows Calendar days.
2. The third row shows the day of the week.
3. Moving down the rows on the left side of the screen, you can see that we have rows for each discipline and, for each discipline, there is a line for individual therapy and for group therapy.
4. Notice that the same color coding you’ve seen throughout the COM system is seen here as well. PT is green. OT is blue and ST is purple.
5. The next line, shaded in gray, is Total Minutes. This line shows a sum of minutes based on what has been projected versus what has actually been billed.
6. Beneath the total minutes row, you’ll see RTM/RUG Minutes, RUG score for ARD and PRI. Note that RUG score is calculated for you based on what we project out and what has been billed, so it is always subject to change.
7. The last row on the left is PRI, which stands for Patient Rug Index. This calculation will help you choose the best assessment reference date for reimbursement purposes.
8. Beneath the grid is where assessments show. Notice the Add Target and Add Actual hyperlinks that allow you to actually add both target and actual assessments for the patient.
You have now successfully viewed Projections information.
©2017 Optima Healthcare Solutions Page | 19
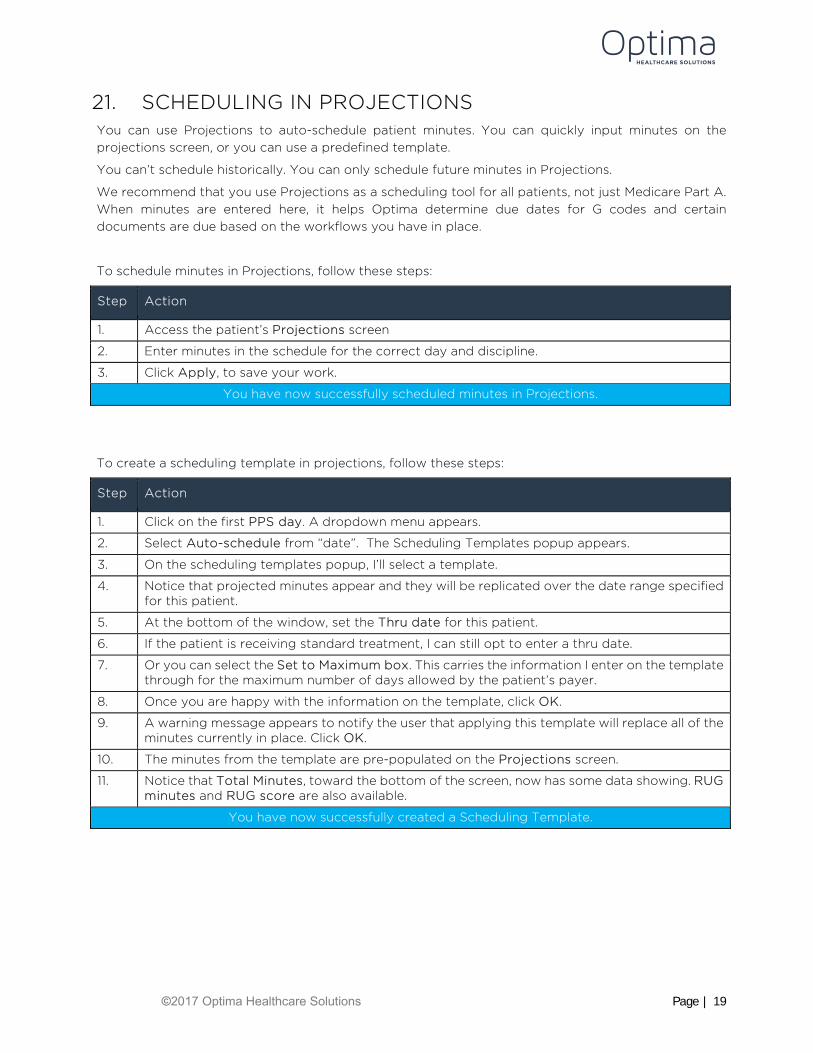
21. SCHEDULING IN PROJECTIONS You can use Projections to auto-schedule patient minutes. You can quickly input minutes on the projections screen, or you can use a predefined template.
You can’t schedule historically. You can only schedule future minutes in Projections.
We recommend that you use Projections as a scheduling tool for all patients, not just Medicare Part A. When minutes are entered here, it helps Optima determine due dates for G codes and certain documents are due based on the workflows you have in place.
To schedule minutes in Projections, follow these steps:
Step Action
1. Access the patient’s Projections screen
2. Enter minutes in the schedule for the correct day and discipline.
3. Click Apply, to save your work.
You have now successfully scheduled minutes in Projections.
To create a scheduling template in projections, follow these steps:
Step Action
1. Click on the first PPS day. A dropdown menu appears.
2. Select Auto-schedule from “date”. The Scheduling Templates popup appears.
3. On the scheduling templates popup, I’ll select a template.
4. Notice that projected minutes appear and they will be replicated over the date range specified for this patient.
5. At the bottom of the window, set the Thru date for this patient.
6. If the patient is receiving standard treatment, I can still opt to enter a thru date.
7. Or you can select the Set to Maximum box. This carries the information I enter on the template through for the maximum number of days allowed by the patient’s payer.
8. Once you are happy with the information on the template, click OK.
9. A warning message appears to notify the user that applying this template will replace all of the minutes currently in place. Click OK.
10. The minutes from the template are pre-populated on the Projections screen.
11. Notice that Total Minutes, toward the bottom of the screen, now has some data showing. RUG minutes and RUG score are also available.
You have now successfully created a Scheduling Template.
©2017 Optima Healthcare Solutions Page | 20
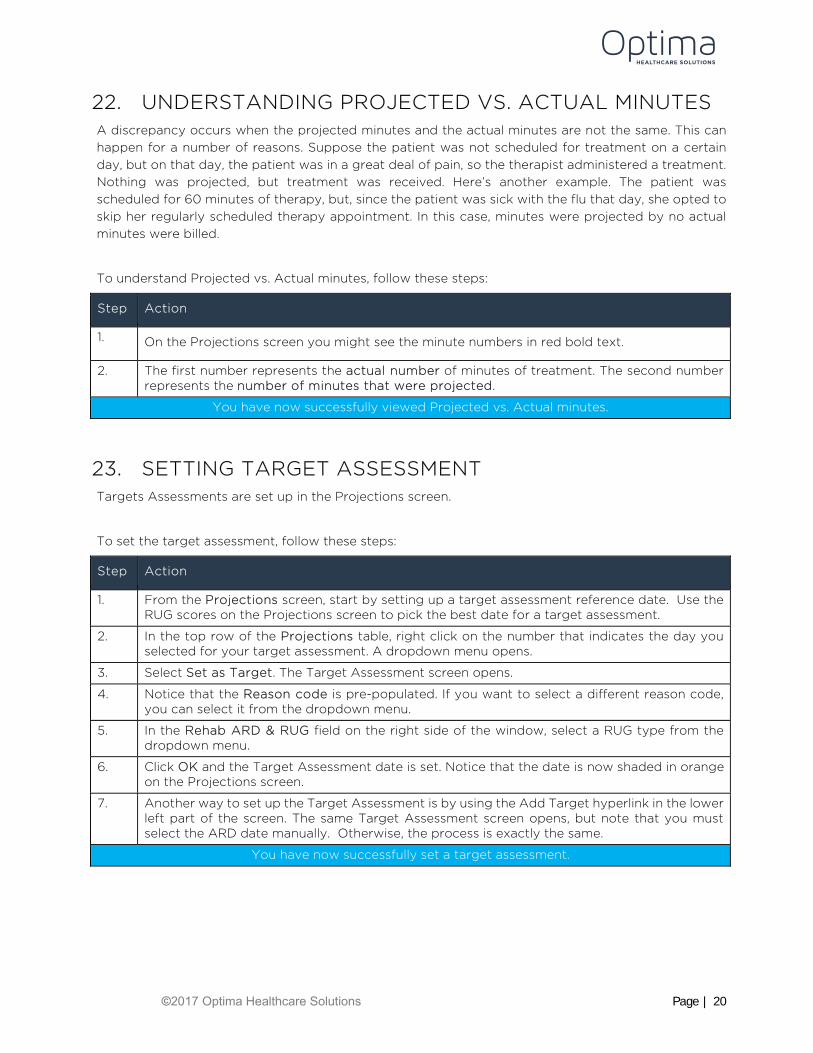
22. UNDERSTANDING PROJECTED VS. ACTUAL MINUTES A discrepancy occurs when the projected minutes and the actual minutes are not the same. This can happen for a number of reasons. Suppose the patient was not scheduled for treatment on a certain day, but on that day, the patient was in a great deal of pain, so the therapist administered a treatment. Nothing was projected, but treatment was received. Here’s another example. The patient was scheduled for 60 minutes of therapy, but, since the patient was sick with the flu that day, she opted to skip her regularly scheduled therapy appointment. In this case, minutes were projected by no actual minutes were billed.
To understand Projected vs. Actual minutes, follow these steps:
Step Action
1. On the Projections screen you might see the minute numbers in red bold text.
2. The first number represents the actual number of minutes of treatment. The second number represents the number of minutes that were projected.
You have now successfully viewed Projected vs. Actual minutes.
23. SETTING TARGET ASSESSMENT Targets Assessments are set up in the Projections screen.
To set the target assessment, follow these steps:
Step Action
1. From the Projections screen, start by setting up a target assessment reference date. Use the RUG scores on the Projections screen to pick the best date for a target assessment.
2. In the top row of the Projections table, right click on the number that indicates the day you selected for your target assessment. A dropdown menu opens.
3. Select Set as Target. The Target Assessment screen opens.
4. Notice that the Reason code is pre-populated. If you want to select a different reason code, you can select it from the dropdown menu.
5. In the Rehab ARD & RUG field on the right side of the window, select a RUG type from the dropdown menu.
6. Click OK and the Target Assessment date is set. Notice that the date is now shaded in orange on the Projections screen.
7. Another way to set up the Target Assessment is by using the Add Target hyperlink in the lower left part of the screen. The same Target Assessment screen opens, but note that you must select the ARD date manually. Otherwise, the process is exactly the same.
You have now successfully set a target assessment.
©2017 Optima Healthcare Solutions Page | 21
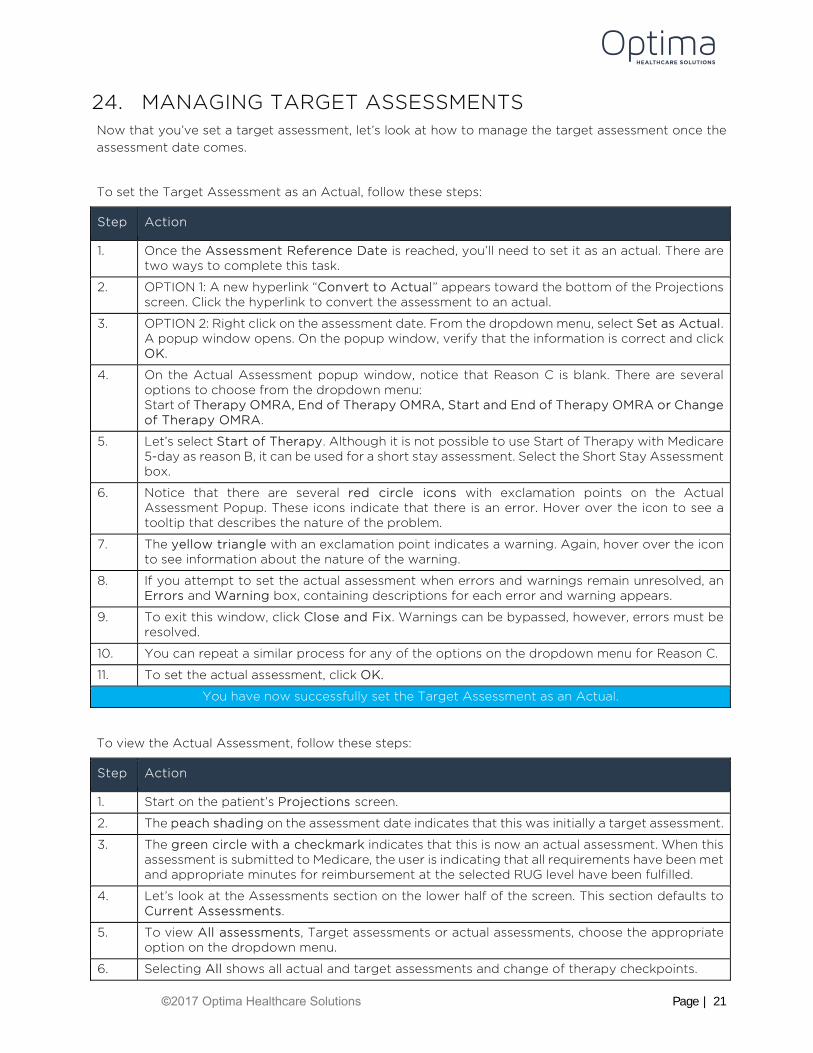
24. MANAGING TARGET ASSESSMENTS Now that you’ve set a target assessment, let’s look at how to manage the target assessment once the assessment date comes.
To set the Target Assessment as an Actual, follow these steps:
Step Action
1. Once the Assessment Reference Date is reached, you’ll need to set it as an actual. There are two ways to complete this task.
2. OPTION 1: A new hyperlink “Convert to Actual” appears toward the bottom of the Projections screen. Click the hyperlink to convert the assessment to an actual.
3. OPTION 2: Right click on the assessment date. From the dropdown menu, select Set as Actual. A popup window opens. On the popup window, verify that the information is correct and click OK.
4. On the Actual Assessment popup window, notice that Reason C is blank. There are several options to choose from the dropdown menu: Start of Therapy OMRA, End of Therapy OMRA, Start and End of Therapy OMRA or Change of Therapy OMRA.
5. Let’s select Start of Therapy. Although it is not possible to use Start of Therapy with Medicare 5-day as reason B, it can be used for a short stay assessment. Select the Short Stay Assessment box.
6. Notice that there are several red circle icons with exclamation points on the Actual Assessment Popup. These icons indicate that there is an error. Hover over the icon to see a tooltip that describes the nature of the problem.
7. The yellow triangle with an exclamation point indicates a warning. Again, hover over the icon to see information about the nature of the warning.
8. If you attempt to set the actual assessment when errors and warnings remain unresolved, an Errors and Warning box, containing descriptions for each error and warning appears.
9. To exit this window, click Close and Fix. Warnings can be bypassed, however, errors must be resolved.
10. You can repeat a similar process for any of the options on the dropdown menu for Reason C.
11. To set the actual assessment, click OK.
You have now successfully set the Target Assessment as an Actual.
To view the Actual Assessment, follow these steps:
Step Action
1. Start on the patient’s Projections screen.
2. The peach shading on the assessment date indicates that this was initially a target assessment.
3. The green circle with a checkmark indicates that this is now an actual assessment. When this assessment is submitted to Medicare, the user is indicating that all requirements have been met and appropriate minutes for reimbursement at the selected RUG level have been fulfilled.
4. Let’s look at the Assessments section on the lower half of the screen. This section defaults to Current Assessments.
5. To view All assessments, Target assessments or actual assessments, choose the appropriate option on the dropdown menu.
6. Selecting All shows all actual and target assessments and change of therapy checkpoints.
©2017 Optima Healthcare Solutions Page | 22
Step Action
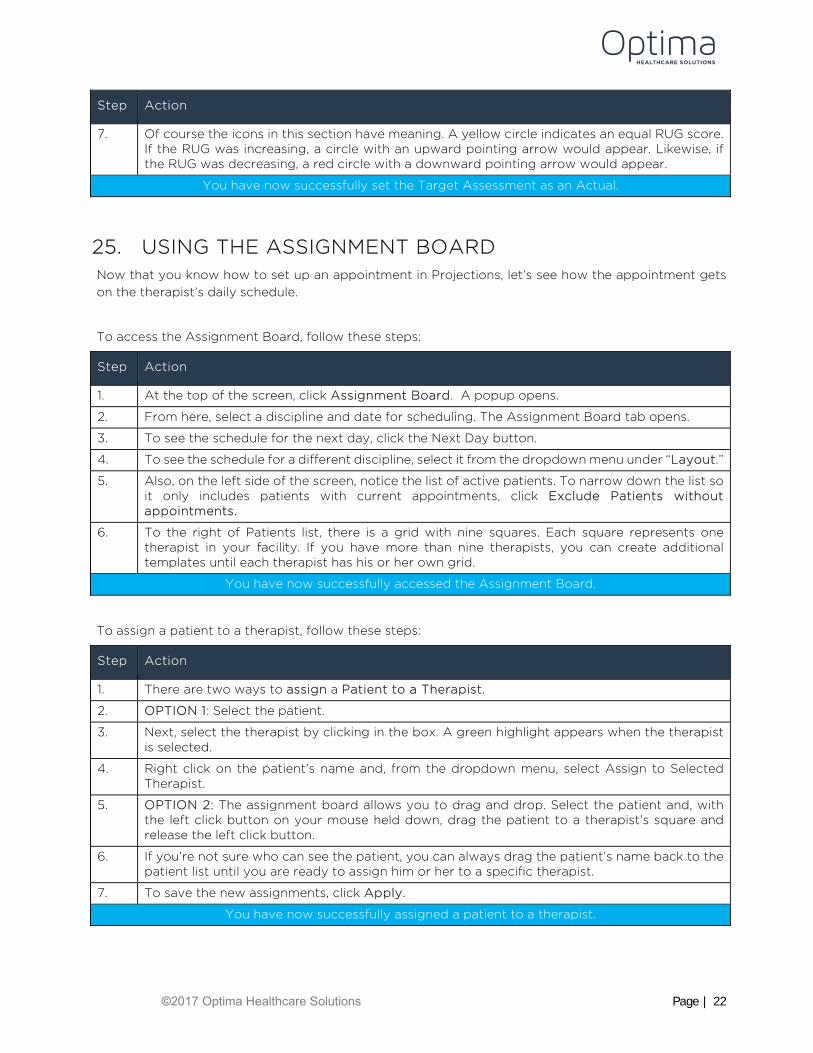
7. Of course the icons in this section have meaning. A yellow circle indicates an equal RUG score. If the RUG was increasing, a circle with an upward pointing arrow would appear. Likewise, if the RUG was decreasing, a red circle with a downward pointing arrow would appear.
You have now successfully set the Target Assessment as an Actual.
25. USING THE ASSIGNMENT BOARD Now that you know how to set up an appointment in Projections, let’s see how the appointment gets on the therapist’s daily schedule.
To access the Assignment Board, follow these steps:
Step Action
1. At the top of the screen, click Assignment Board. A popup opens.
2. From here, select a discipline and date for scheduling. The Assignment Board tab opens.
3. To see the schedule for the next day, click the Next Day button.
4. To see the schedule for a different discipline, select it from the dropdown menu under “Layout.”
5. Also, on the left side of the screen, notice the list of active patients. To narrow down the list so it only includes patients with current appointments, click Exclude Patients without appointments.
6. To the right of Patients list, there is a grid with nine squares. Each square represents one therapist in your facility. If you have more than nine therapists, you can create additional templates until each therapist has his or her own grid.
You have now successfully accessed the Assignment Board.
To assign a patient to a therapist, follow these steps:
Step Action
1. There are two ways to assign a Patient to a Therapist.
2. OPTION 1: Select the patient.
3. Next, select the therapist by clicking in the box. A green highlight appears when the therapist is selected.
4. Right click on the patient’s name and, from the dropdown menu, select Assign to Selected Therapist.
5. OPTION 2: The assignment board allows you to drag and drop. Select the patient and, with the left click button on your mouse held down, drag the patient to a therapist’s square and release the left click button.
6. If you’re not sure who can see the patient, you can always drag the patient’s name back to the patient list until you are ready to assign him or her to a specific therapist.
7. To save the new assignments, click Apply.
You have now successfully assigned a patient to a therapist.
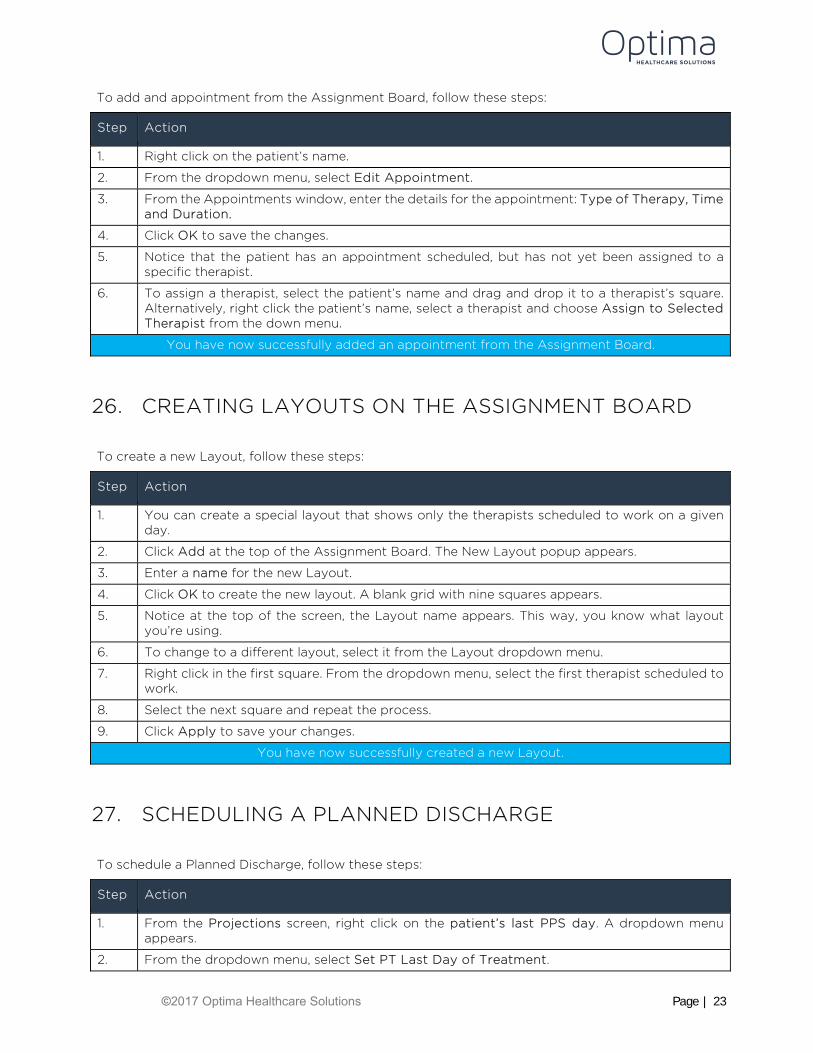
©2017 Optima Healthcare Solutions Page | 23
To add and appointment from the Assignment Board, follow these steps:
Step Action
1. Right click on the patient’s name.
2. From the dropdown menu, select Edit Appointment.
3. From the Appointments window, enter the details for the appointment: Type of Therapy, Time and Duration.
4. Click OK to save the changes.
5. Notice that the patient has an appointment scheduled, but has not yet been assigned to a specific therapist.
6. To assign a therapist, select the patient’s name and drag and drop it to a therapist’s square. Alternatively, right click the patient’s name, select a therapist and choose Assign to Selected Therapist from the down menu.
You have now successfully added an appointment from the Assignment Board.
26. CREATING LAYOUTS ON THE ASSIGNMENT BOARD
To create a new Layout, follow these steps:
Step Action
1. You can create a special layout that shows only the therapists scheduled to work on a given day.
2. Click Add at the top of the Assignment Board. The New Layout popup appears.
3. Enter a name for the new Layout.
4. Click OK to create the new layout. A blank grid with nine squares appears.
5. Notice at the top of the screen, the Layout name appears. This way, you know what layout you’re using.
6. To change to a different layout, select it from the Layout dropdown menu.
7. Right click in the first square. From the dropdown menu, select the first therapist scheduled to work.
8. Select the next square and repeat the process.
9. Click Apply to save your changes.
You have now successfully created a new Layout.
27. SCHEDULING A PLANNED DISCHARGE
To schedule a Planned Discharge, follow these steps:
Step Action
1. From the Projections screen, right click on the patient’s last PPS day. A dropdown menu appears.
2. From the dropdown menu, select Set PT Last Day of Treatment.
©2017 Optima Healthcare Solutions Page | 24
Step Action
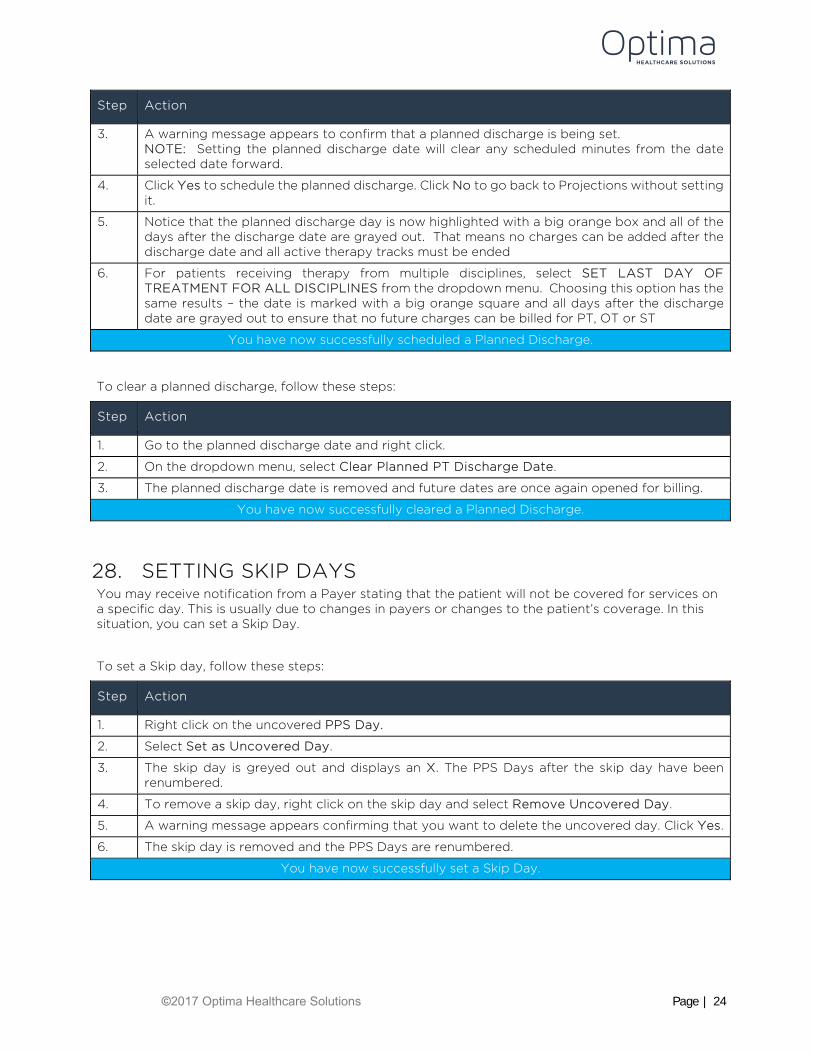
3. A warning message appears to confirm that a planned discharge is being set. NOTE: Setting the planned discharge date will clear any scheduled minutes from the date selected date forward.
4. Click Yes to schedule the planned discharge. Click No to go back to Projections without setting it.
5. Notice that the planned discharge day is now highlighted with a big orange box and all of the days after the discharge date are grayed out. That means no charges can be added after the discharge date and all active therapy tracks must be ended
6. For patients receiving therapy from multiple disciplines, select SET LAST DAY OF TREATMENT FOR ALL DISCIPLINES from the dropdown menu. Choosing this option has the same results – the date is marked with a big orange square and all days after the discharge date are grayed out to ensure that no future charges can be billed for PT, OT or ST
You have now successfully scheduled a Planned Discharge.
To clear a planned discharge, follow these steps:
Step Action
1. Go to the planned discharge date and right click.
2. On the dropdown menu, select Clear Planned PT Discharge Date.
3. The planned discharge date is removed and future dates are once again opened for billing.
You have now successfully cleared a Planned Discharge.
28. SETTING SKIP DAYS You may receive notification from a Payer stating that the patient will not be covered for services on a specific day. This is usually due to changes in payers or changes to the patient’s coverage. In this situation, you can set a Skip Day.
To set a Skip day, follow these steps:
Step Action
1. Right click on the uncovered PPS Day.
2. Select Set as Uncovered Day.
3. The skip day is greyed out and displays an X. The PPS Days after the skip day have been renumbered.
4. To remove a skip day, right click on the skip day and select Remove Uncovered Day.
5. A warning message appears confirming that you want to delete the uncovered day. Click Yes.
6. The skip day is removed and the PPS Days are renumbered.
You have now successfully set a Skip Day.
©2017 Optima Healthcare Solutions Page | 25
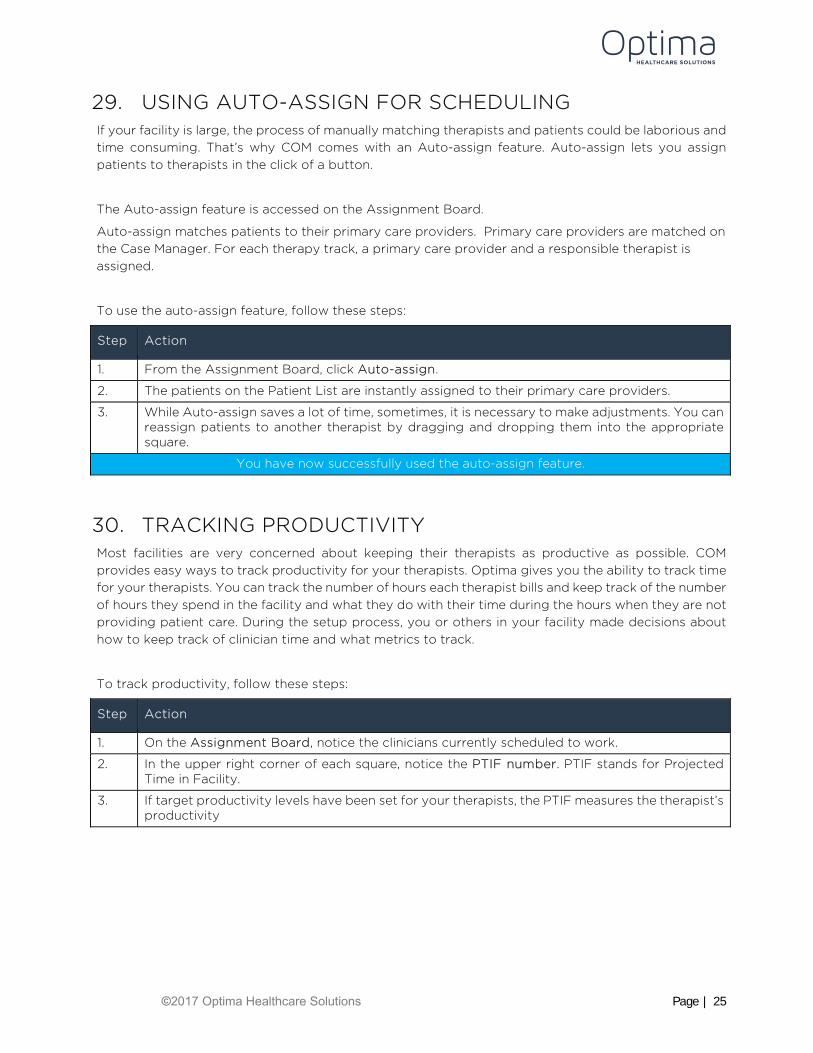
29. USING AUTO-ASSIGN FOR SCHEDULING If your facility is large, the process of manually matching therapists and patients could be laborious and time consuming. That’s why COM comes with an Auto-assign feature. Auto-assign lets you assign patients to therapists in the click of a button.
The Auto-assign feature is accessed on the Assignment Board.
Auto-assign matches patients to their primary care providers. Primary care providers are matched on the Case Manager. For each therapy track, a primary care provider and a responsible therapist is assigned.
To use the auto-assign feature, follow these steps:
Step Action
1. From the Assignment Board, click Auto-assign.
2. The patients on the Patient List are instantly assigned to their primary care providers.
3. While Auto-assign saves a lot of time, sometimes, it is necessary to make adjustments. You can reassign patients to another therapist by dragging and dropping them into the appropriate square.
You have now successfully used the auto-assign feature.
30. TRACKING PRODUCTIVITY Most facilities are very concerned about keeping their therapists as productive as possible. COM provides easy ways to track productivity for your therapists. Optima gives you the ability to track time for your therapists. You can track the number of hours each therapist bills and keep track of the number of hours they spend in the facility and what they do with their time during the hours when they are not providing patient care. During the setup process, you or others in your facility made decisions about how to keep track of clinician time and what metrics to track.
To track productivity, follow these steps:
Step Action
1. On the Assignment Board, notice the clinicians currently scheduled to work.
2. In the upper right corner of each square, notice the PTIF number. PTIF stands for Projected Time in Facility.
3. If target productivity levels have been set for your therapists, the PTIF measures the therapist’s productivity
©2017 Optima Healthcare Solutions Page | 26
Step Action
4. Here are two examples to understand the PTIF number:
If there was a 50% productivity goal set for the therapist, it means in an eight-hour workday, the therapist would have to be scheduled for 240 minutes, or four hours of billable time treating patients. If she spends less, she will not meet her productivity goal.
If the patient sees extra patients during the day and actually bills for 6 out of 8 hours, her PTIF would be 75% and her productivity would exceed her productivity goal.
All that being said, to determine PTIF, divide total hours in the facility by total billable hours.
You have now successfully tracked productivity.
To view productivity goals, follow these steps:
Step Action
1. On the Productivity screen, click View Summary in the upper right corner of the screen. Productivity information for each therapist appears in the squares.
2. To remove the productivity information and return to the regular grid, click View Summary again. The productivity information is cleared from the therapists’ box on the assignment board.
You have now successfully viewed productivity for a therapist.
31. VIEWING SCHEDULING REPORTS There are two helpful reports you can run related to scheduling. Those reports are: The Daily Activities Schedule Report and the Care Provider Daily Schedule.
To run the Daily Activities Schedule Report, follow these steps:
Step Action
1. From the Assignment Board, click Save and Print.
2. The Print Appointments popup appears.
3. On the Print Appointments Popup, select Daily Activities Schedule. The Daily Activities Schedule Report opens.
©2017 Optima Healthcare Solutions Page | 27
Step Action
4. The Daily Activity Schedule Report shows a summary of the daily activities for one, specific therapist. It also contains:
Site of Service Therapist name Date of Service Total Treatment minutes Estimated treatment time
Moving down the report, notice there is a box for each patient the therapist saw on the report date. Patient information includes the patient’s name, payer, minutes scheduled, assessment reference date as well as all treatment approaches pulling from the most recent document.
Additionally, the Daily Activities Schedule shows Time in Facility, travel time, mileage and benefit time, assuming you track those things for your therapist.
If a report contains multiple pages, navigate between pages using the buttons in the upper left corner of the screen.
You have now successfully run the Daily Activities Schedule Report.
To run the Care Providers Daily Schedule Report, follow these steps:
Step Action
1. From the Assignment Board, click Save and Print. The Print Appointments popup appears.
2. On the Print Appointments Popup, select Care Provider Daily Schedule.
3. The Parameters screen opens.
4. Click View. The system prepares the report and it opens.
5. The Care Provider Daily Schedule shows most of the information shown on the Daily Activities Schedule, however, it also shows Appointment Comments and a “visits remaining count” based on visit frequency for each discipline. The AVR # is the number of assisted visits remaining.
6. All reports in Optima can be printed. They can also be exported to Excel, PDF or Word. Click the print icon and follow the prompts for your printer or system.
You have now successfully run the Care Providers Daily Schedule Report.
©2017 Optima Healthcare Solutions Page | 28
32. USING THE HOTLIST The Hotlist is a list of issues that require your attention. Errors that need to be resolved, missing signatures and functional limitations due are just a few examples of the items that appear on the hotlist. The items on the Hotlist are user-specific so generally, no two users will have the same items on their hotlists.
To access the Hotlist, follow these steps:
Step Action
1. Click View at the top of the main screen.
2. From the Dropdown menu, select Hotlist. The Hotlist appears.
3. Alternatively, you can access the Hotlist by clicking the Hotlist button at the top of the screen.
4. By default, the Hotlist opens in the lower left corner of the screen.
5. You can expand the Hotlist by dragging and dropping it into a space on the screen.
You have now successfully accessed the Hotlist.
To view and resolve items on the Hotlist, follow these steps:
Step Action
1. To view an Item on the Hotlist, select it on the Hotlist.
2. In the Action Items panel, at the bottom of the screen, a list of actions items for that Hotlist item appears.
3. Double click any of the error messages to go to the appropriate area of the application where you can either research the situation to figure out what is going on or, you can resolve the issue.
4. Once issues are resolved, they are automatically removed from the Hotlist.
5. Once you’ve resolved an issue, click the Refresh icon in the upper left corner of the screen to see the updated Hotlist with the item removed.
You have now successfully viewed and resolved an item on the Hotlist.
To print the Hotlist, follow these steps:
Step Action
1. To print the Hotlist, click on the Print icon.
2. A Hotlist Print tab opens, displaying all the items that will be printed.
3. Click on the Print icon in the Hotlist Print tab.
4. When the Hotlist is printed, it prints all items that have a Count next to it. Note at a value of zero in the Count column indicates that there are no errors related to the issue in that row. Numbers in the count column indicate the number of outstanding issues that relate to the selected item.
You have now successfully printed the Hotlist.
©2017 Optima Healthcare Solutions Page | 29
33. COMPLETING THE CLOSEOUT The Closeout is a list of validations set up during the initial setup of your system. Settings can be changed, as needed, so the items on your closeout can meet the needs of your organization.
It is important to note that items on the Closeout listed as Errors must be resolved before the Closeout is completed. If the item is listed as a Warning, you may opt to do some research in order to resolve it, but unresolved warnings will not keep you from completing the Closeout.
The Errors tab contains multiple tabs to complete as part of the Closeout. This screen contains the information and links that are needed to complete the closeout. You can click on any of the closeout issues to go directly to the part of the screen where the issue can be researched and resolved. It is important to note that the blue exclamation points near the closeout items contain help files that provide information about how to resolve the specific issue.
Note also that the yellow triangle with the exclamation point indicates a warning. These warning messages can be bypassed and the Closeout can be completed without resolving them.
Red circles with exclamation points indicate errors and they must be resolved before the closeout can be completed.
To complete the Closeout using the Closeout Wizard, follow these steps:
Step Action
1. To access the Closeout, click the closeout button. Notice that when I hover over the Closeout button, it says “launch Closeout Wizard”.
2. The Closeout Wizard Opens.
3. The Closeout Wizard shows the closeouts that are due as well as upcoming closeouts. It also shows information about closeouts that have been completed historically.
4. Upcoming Closeouts appear in the middle window and they are listed as “Pending.” It is possible to run an upcoming closeout at any time in order to review and resolve issues and errors. To run a pending closeout, select it and click Next. The Closeout will run, but it cannot be completed until the status changes to Ready to be Processed which displays in the top window.
5. You can continue to complete the Closeout, one all errors have been resolved.
6. When all error messages have been resolved, click Next.
7. A verification screen appears for the user to indicate that everything is accurate.
8. Click Next again. A checkered flag appears.
9. Click Finish to complete the closeout
You have now succesfully completed the Closeout.

©2017 Optima Healthcare Solutions Page | 30
34. GENERATING THE BILLING EXPORT Once the Closeout is complete, it is time for billing. Customers who generate bills in Optima do so in the Financials Terminal.
It is important to note that the billing export cannot be run until the Closeout is completed successfully.
To generate the billing export, follow these steps:
Step Action
1. If you are a customer who exports bills to a third party export, go to click on Activities.
2. Select Billing Export.
3. Select Billing Data Export.
4. From the dropdown menu, select the appropriate export.
5. Verify the date range for the billing export.
6. Click Export Save As.
7. Name the file and save it in the appropriate folder on your computer.
8. This is the file that is sent to third party billers or imported to a billing software provider.
You have now successfully generated the Billing Export.
35. USING THE REPORTS CATALOG The Reports Catalog is a list of all reports a specific user may access.
To access the Reports Catalog, follow these steps:
Step Action
1. Click the Reports button.
2. A list of all reports the user has access to appear.
3. It contains the name and description of all of the reports available in COM.
4. The list can be filtered to make it easier to find the report the user needs.
5. One way to search is to filter by category. With this option, users can see financial reports or reports about claims management or a variety of other topics.
You have now successfully accessed the Reports Catalog.
©2017 Optima Healthcare Solutions Page | 31
36. RUNNING THE MDS DATA REPORT The MDS Data Report is specific to an individual patient.
To run the MDS Data Report, follow these steps:
Step Action
1. Select the patient from the Patient List.
2. Under the Patient List, click the MDS Data Report hyperlink. The MDS Data Report popup window opens.
3. At the top of the popup window, select the assessment type. The choices are PPS Assessment or Discharge Assessment.
4. The rest of the information on the popup prepopulates based on the patient’s information.
5. To create the MDS Data Report, click Print and Close. The report generates and displays.
6. Note that if you are tracking section GG information in Optima, the information can be viewed in the MDS Data Report.
7. Like other reports, the MDS Data Report can be printed or it can be exported in Word, Excel or as a PDF.
You have now successfully run the MDS Data Report.


![Leferi popup store [lancome] 2014.10.17](https://img.pdfslide.us/doc/110x75/5590d5f51a28ab56148b47a3/leferi-popup-store-lancome-20141017.jpg)