Embed Size (px)
Citation preview
OpManager
A quick installation guide
©2018 ZOHOCorp.,ManageEngine-‐All rights reserved.
1
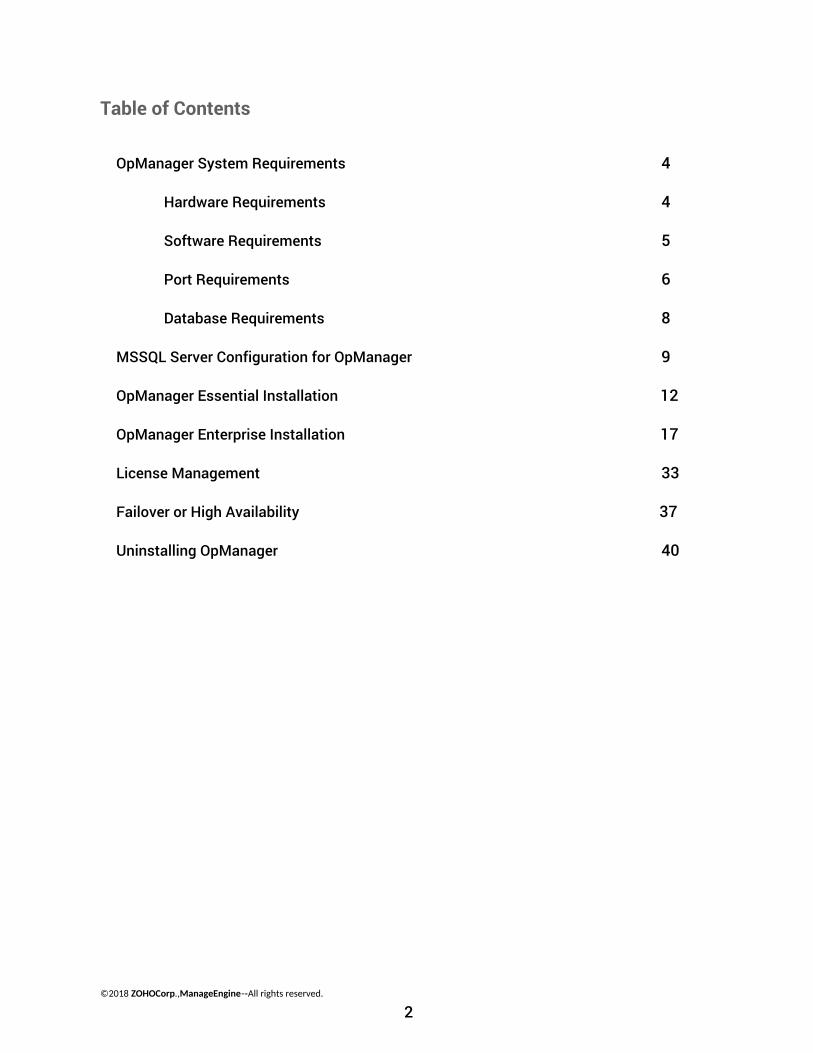
Table of Contents
OpManager System Requirements 4
Hardware Requirements 4
Software Requirements 5
Port Requirements 6
Database Requirements 8
MSSQL Server Configuration for OpManager 9
OpManager Essential Installation 12
OpManager Enterprise Installation 17
License Management 33
Failover or High Availability 37
Uninstalling OpManager 40
©2018 ZOHOCorp.,ManageEngine-‐All rights reserved.
2

©2018 ZOHOCorp.,ManageEngine-‐All rights reserved.
3
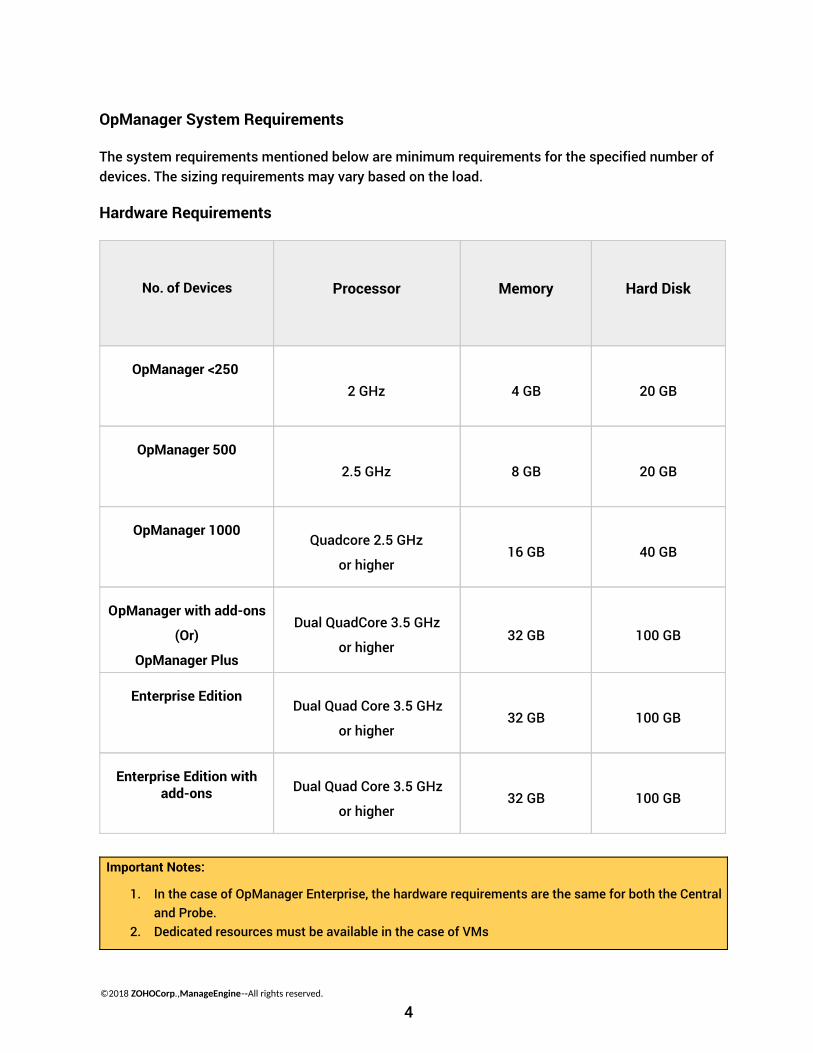
OpManager System Requirements
The system requirements mentioned below are minimum requirements for the specified number of devices. The sizing requirements may vary based on the load.
Hardware Requirements
No. of Devices Processor Memory Hard Disk
OpManager <250 2 GHz 4 GB 20 GB
OpManager 500 2.5 GHz 8 GB 20 GB
OpManager 1000 Quadcore 2.5 GHz
or higher 16 GB 40 GB
OpManager with add-ons
(Or)
OpManager Plus
Dual QuadCore 3.5 GHz
or higher 32 GB 100 GB
Enterprise Edition Dual Quad Core 3.5 GHz
or higher 32 GB 100 GB
Enterprise Edition with add-ons Dual Quad Core 3.5 GHz
or higher 32 GB 100 GB
Important Notes:
1. In the case of OpManager Enterprise, the hardware requirements are the same for both the Central and Probe.
2. Dedicated resources must be available in the case of VMs
©2018 ZOHOCorp.,ManageEngine-‐All rights reserved.
4
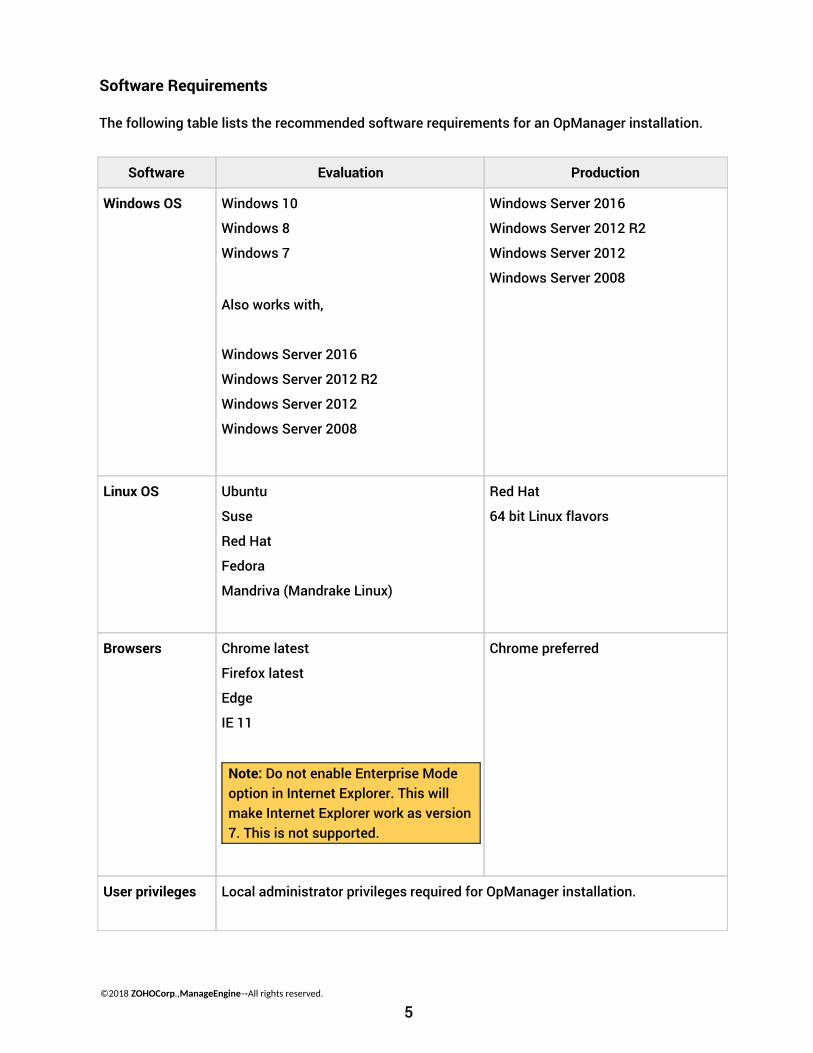
Software Requirements
The following table lists the recommended software requirements for an OpManager installation.
Software Evaluation Production
Windows OS Windows 10
Windows 8
Windows 7
Also works with,
Windows Server 2016
Windows Server 2012 R2
Windows Server 2012
Windows Server 2008
Windows Server 2016
Windows Server 2012 R2
Windows Server 2012
Windows Server 2008
Linux OS Ubuntu
Suse
Red Hat
Fedora
Mandriva (Mandrake Linux)
Red Hat
64 bit Linux flavors
Browsers Chrome latest
Firefox latest
Edge
IE 11
Note: Do not enable Enterprise Mode option in Internet Explorer. This will make Internet Explorer work as version 7. This is not supported.
Chrome preferred
User privileges Local administrator privileges required for OpManager installation.
©2018 ZOHOCorp.,ManageEngine-‐All rights reserved.
5
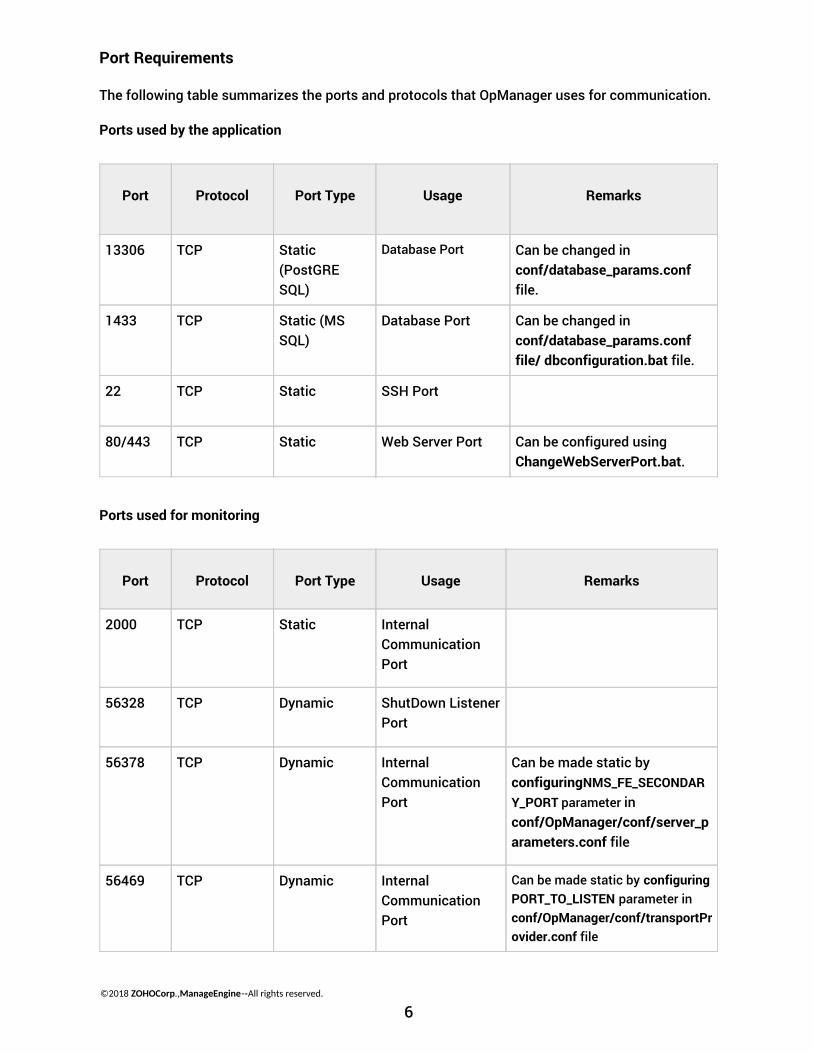
Port Requirements
The following table summarizes the ports and protocols that OpManager uses for communication.
Ports used by the application
Port Protocol Port Type Usage Remarks
13306 TCP Static (PostGRE
SQL)
Database Port Can be changed in conf/database_params.conf
file.
1433 TCP Static (MS SQL)
Database Port Can be changed in conf/database_params.conf file/ dbconfiguration.bat file.
22 TCP Static SSH Port
80/443 TCP Static Web Server Port Can be configured using ChangeWebServerPort.bat.
Ports used for monitoring
Port Protocol Port Type Usage Remarks
2000 TCP Static Internal Communication
Port
56328 TCP Dynamic ShutDown Listener Port
56378 TCP Dynamic Internal Communication
Port
Can be made static byconfiguringNMS_FE_SECONDAR
Y_PORT parameter inconf/OpManager/conf/server_p
arameters.conf file
56469 TCP Dynamic Internal Communication
Port
Can be made static by configuring PORT_TO_LISTEN parameter in
conf/OpManager/conf/transportPr ovider.conf file
©2018 ZOHOCorp.,ManageEngine-‐All rights reserved.
6
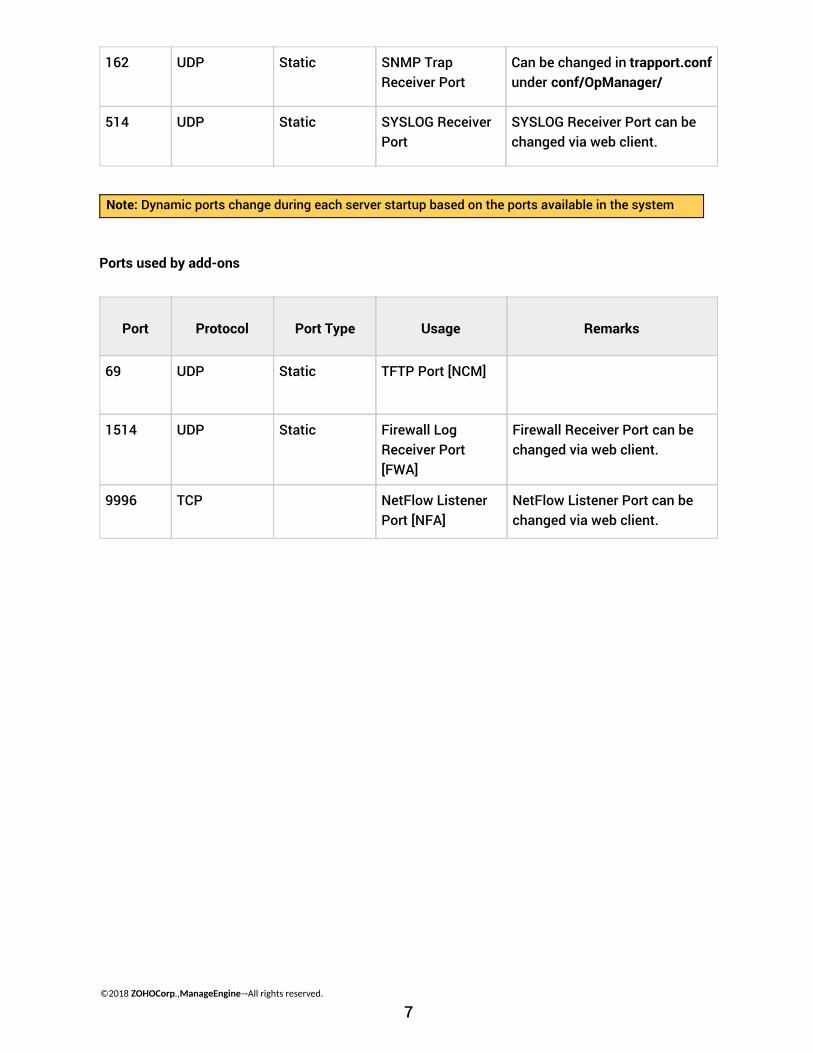
162 UDP Static SNMP Trap Receiver Port
Can be changed in trapport.conf under conf/OpManager/
514 UDP Static SYSLOG Receiver Port
SYSLOG Receiver Port can be changed via web client.
Note: Dynamic ports change during each server startup based on the ports available in the system
Ports used by add-ons
Port Protocol Port Type Usage Remarks
69 UDP Static TFTP Port [NCM]
1514 UDP Static Firewall Log Receiver Port
[FWA]
Firewall Receiver Port can be changed via web client.
9996 TCP
NetFlow Listener Port [NFA]
NetFlow Listener Port can be changed via web client.
©2018 ZOHOCorp.,ManageEngine-‐All rights reserved.
7
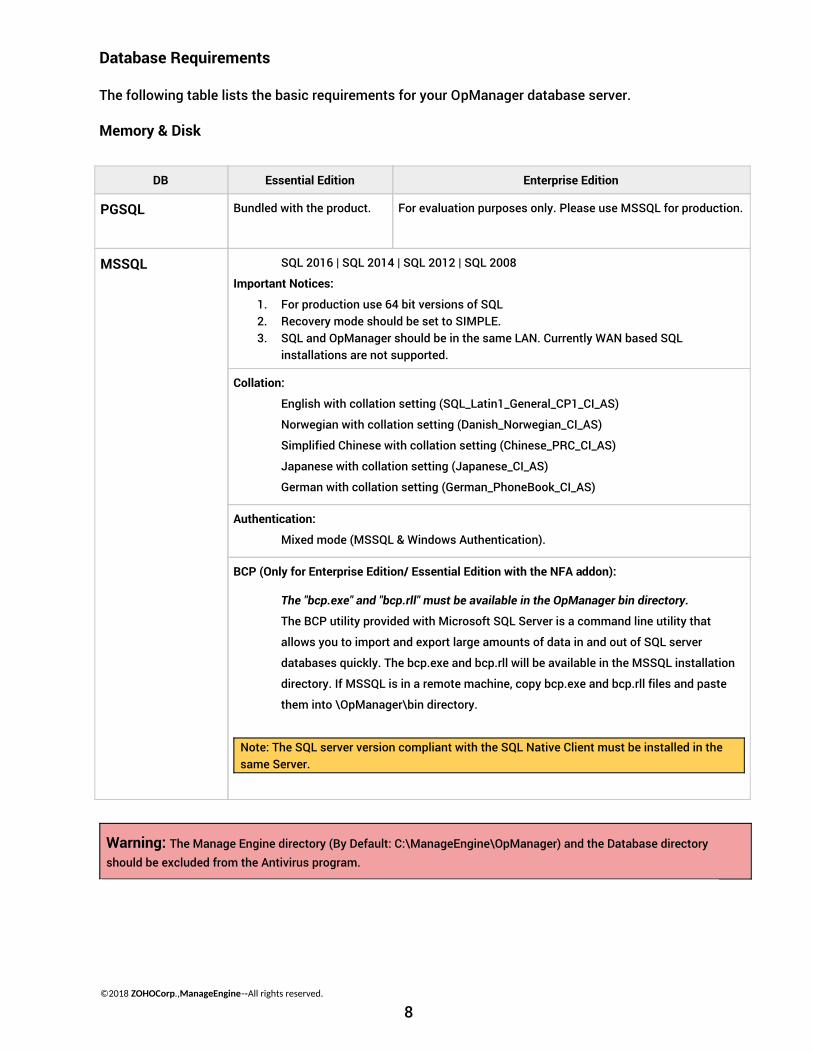
Database Requirements
The following table lists the basic requirements for your OpManager database server.
Memory & Disk
DB Essential Edition Enterprise Edition
PGSQL Bundled with the product. For evaluation purposes only. Please use MSSQL for production.
MSSQL
SQL 2016 | SQL 2014 | SQL 2012 | SQL 2008
Important Notices:
1. For production use 64 bit versions of SQL2. Recovery mode should be set to SIMPLE.3. SQL and OpManager should be in the same LAN. Currently WAN based SQL
installations are not supported.
Collation:
English with collation setting (SQL_Latin1_General_CP1_CI_AS)
Norwegian with collation setting (Danish_Norwegian_CI_AS)
Simplified Chinese with collation setting (Chinese_PRC_CI_AS)
Japanese with collation setting (Japanese_CI_AS)
German with collation setting (German_PhoneBook_CI_AS)
Authentication:
Mixed mode (MSSQL & Windows Authentication).
BCP (Only for Enterprise Edition/ Essential Edition with the NFA addon):
The "bcp.exe" and "bcp.rll" must be available in the OpManager bin directory.
The BCP utility provided with Microsoft SQL Server is a command line utility that
allows you to import and export large amounts of data in and out of SQL server
databases quickly. The bcp.exe and bcp.rll will be available in the MSSQL installation
directory. If MSSQL is in a remote machine, copy bcp.exe and bcp.rll files and paste
them into \OpManager\bin directory.
Note: The SQL server version compliant with the SQL Native Client must be installed in the same Server.
Warning: The Manage Engine directory (By Default: C:\ManageEngine\OpManager) and the Database directory should be excluded from the Antivirus program.
©2018 ZOHOCorp.,ManageEngine-‐All rights reserved.
8
MSSQL Server Configuration for OpManager
Note: If you wish to proceed with your existing server authentication credentials, please skip this stepprocedure. and directly move to the installation
Steps to configure MSSQL
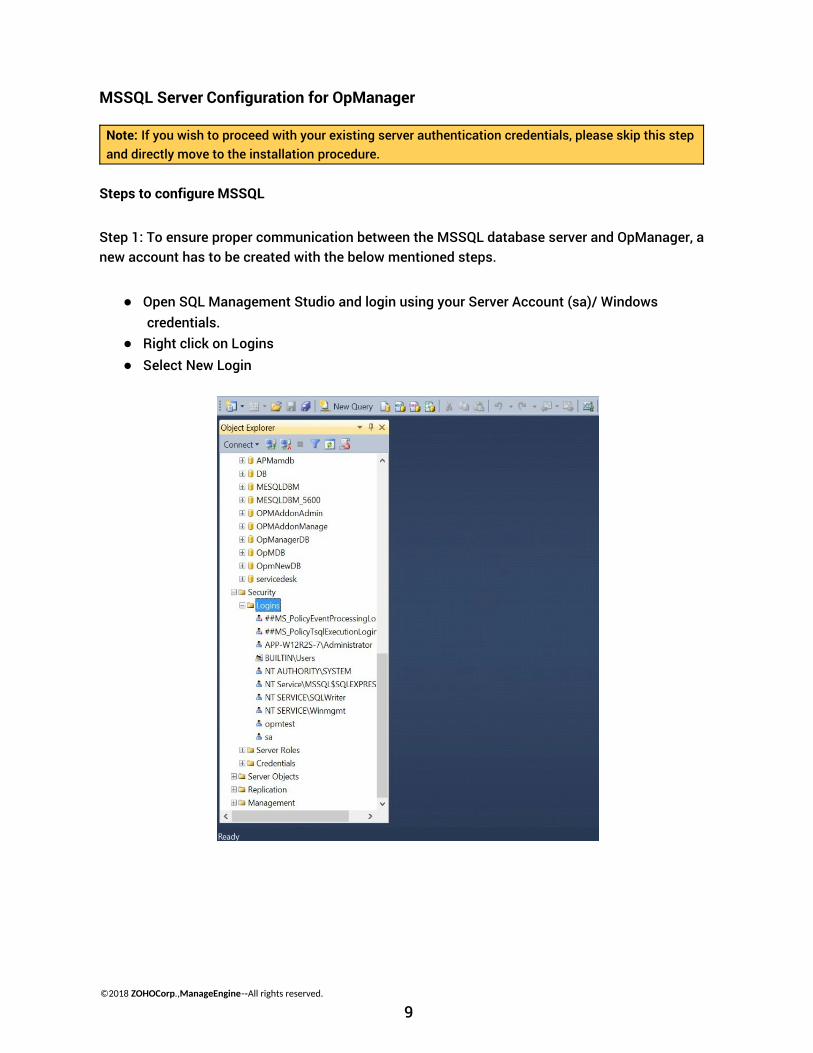
Step 1: To ensure proper communication between the MSSQL database server and OpManager, a new account has to be created with the below mentioned steps.
● Open SQL Management Studio and login using your Server Account (sa)/ Windows credentials.
● Right click on Logins● Select New Login
©2018 ZOHOCorp.,ManageEngine-‐All rights reserved.
9
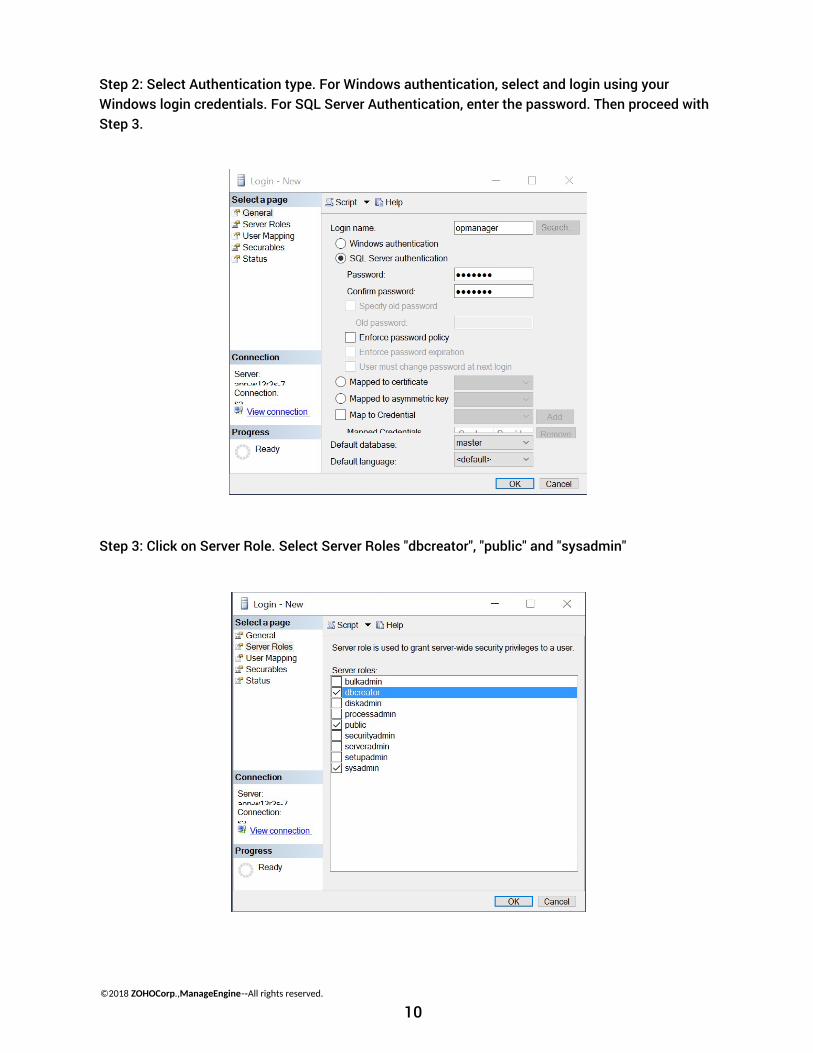
Step 2: Select Authentication type. For Windows authentication, select and login using your Windows login credentials. For SQL Server Authentication, enter the password. Then proceed with
Step 3.
Step 3: Click on Server Role. Select Server Roles "dbcreator", "public" and "sysadmin"
©2018 ZOHOCorp.,ManageEngine-‐All rights reserved.
10
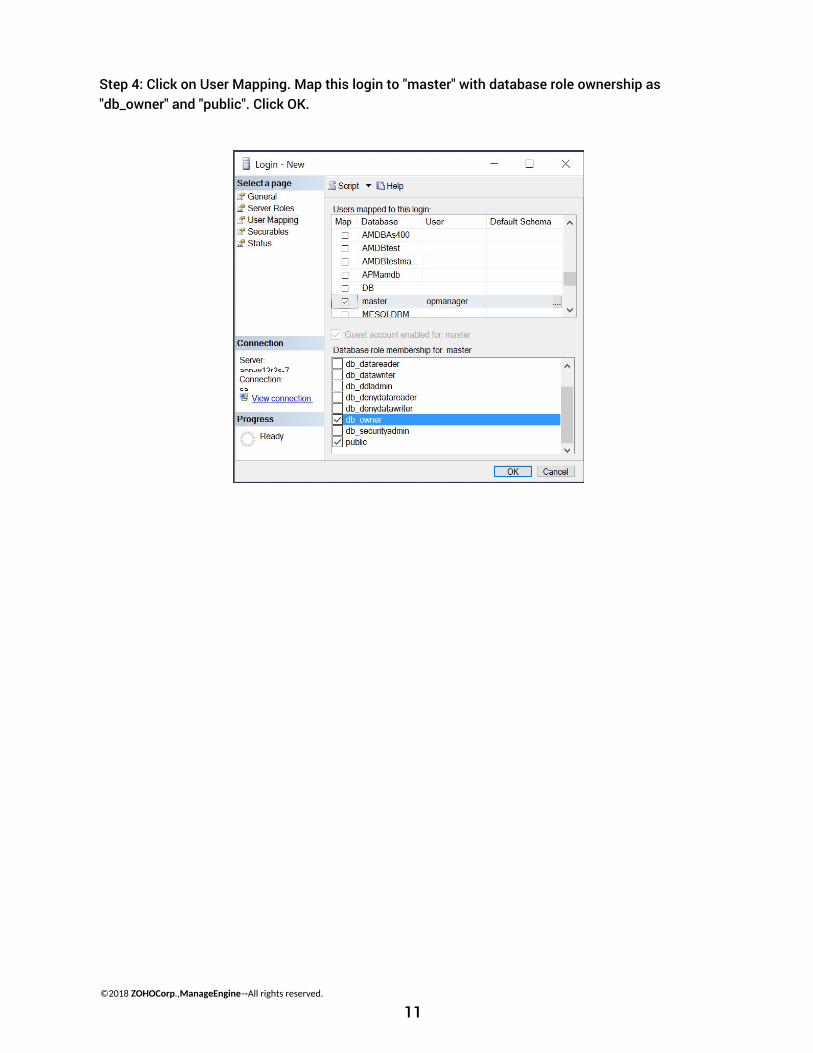
Step 4: Click on User Mapping. Map this login to "master" with database role ownership as "db_owner" and "public". Click OK.
©2018 ZOHOCorp.,ManageEngine-‐All rights reserved.
11
OpManager Essential Installation
Note: If OpManager is run with MSSQL as the backend database, then the MSSQL database must be configured before proceeding with the following installation.
Installing OpManager on Windows
Steps to install
Step 1: Download OpManager for Windows.
Step 2: Execute the downloaded "OpManager.exe" to install and follow the instructions in the installation wizard.
Step 3: Click 'Next' to begin the installation process. Go through the license agreement and click 'Yes' to proceed to the next step.
Step 4: In the subsequent steps of the wizard, select the OpManager language and the directory to install OpManager. Proceed to the next step.
Step 5: Specify the port number to run OpManager Web Server (OpManager Central uses 80 as the default web server port) and click 'Next'.
Step 6: Register for technical support by providing your contact information such as Name, E-mail Id, etc., and click 'Next'.
Step 7: Select the Server Mode (i.e., Primary or Standby server) and click 'Next'.
Step 8: If the Server Mode is selected as Standby, then enter the Primary webserver host, port and login details and complete the installation.
Step 9: Now, select the database. OpManager supports both, PostgreSQL and MSSQL as database and click 'Next'.
Step 10: Click 'Finish' to complete the installation process.
Installing OpManager on Linux
Prerequisites
1. Sometimes, you might encounter errors such as database connection not getting established or the server not starting up. To workaround these issues, comment the IPv6
related entries in the /etc/hosts file.2. Check if the DNS resolves properly to the IP Address on the system in which OpManager is
installed. Add an entry to /etc/host file with ipaddress and host name if there is trouble starting OpManager.
©2018 ZOHOCorp.,ManageEngine-‐All rights reserved.
12
Steps to install
1. Download OpManager for Linux.2. Login as root user.3. Assign the executable permission to the downloaded file using the following command:
chmod a+x ManageEngine_OpManager_64bit.bin4. Execute ./ManageEngine_OpManager_64bit.bin This will display the installation wizard.5. Click 'Next' to begin the installation process. Go through the license agreement and proceed
to the next step.6. In the subsequent steps of the wizard, select the OpManager Edition, language, the directory
to install OpManager, and the port number to run OpManager Web Server. Proceed to the next step.
7. Verify the installation details and click 'Next'.8. Click 'Finish' to complete the installation process.
It is recommended to install OpManager in the opt folder. By default, OpManager is installed in the /opt/ManageEngine/OpManager directory.
Installing OpManager on Linux using Console mode/ Silent mode
This is a quick walk-through of the console mode installation of OpManager on a Linux box - an easy thing to do if you are working on a Windows box and want to install on a remote Linux system.
Prerequisites
To begin with, make sure you have downloaded the binary for Linux. (http://www.manageengine.com/network-monitoring/download.html)
Steps to install
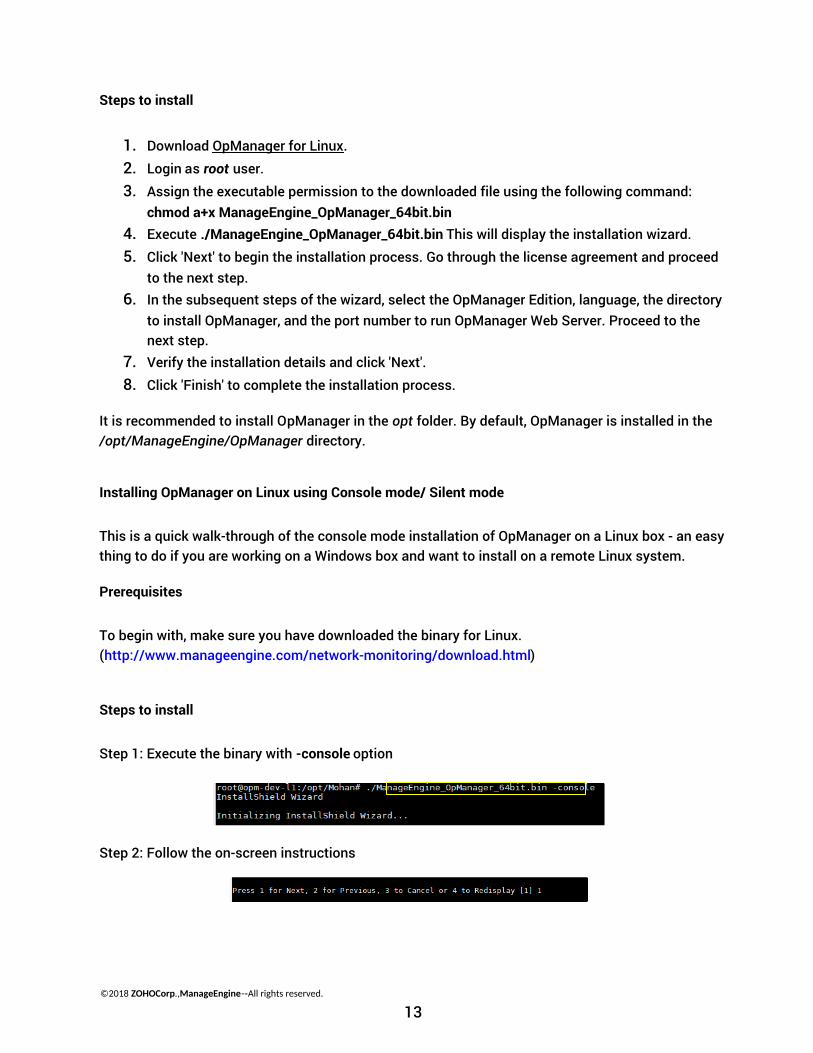
Step 1: Execute the binary with -console option
Step 2: Follow the on-screen instructions
©2018 ZOHOCorp.,ManageEngine-‐All rights reserved.
13
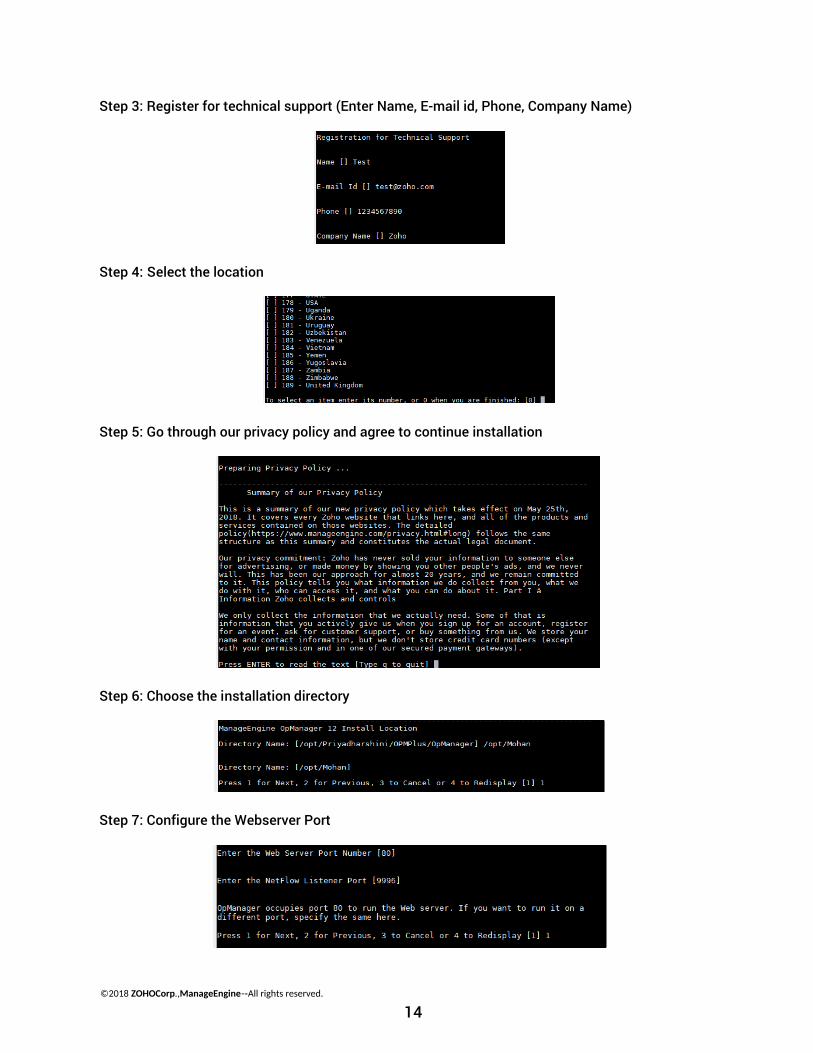
Step 3: Register for technical support (Enter Name, E-mail id, Phone, Company Name)
Step 4: Select the location
Step 5: Go through our privacy policy and agree to continue installation
Step 6: Choose the installation directory
Step 7: Configure the Webserver Port
©2018 ZOHOCorp.,ManageEngine-‐All rights reserved.
14
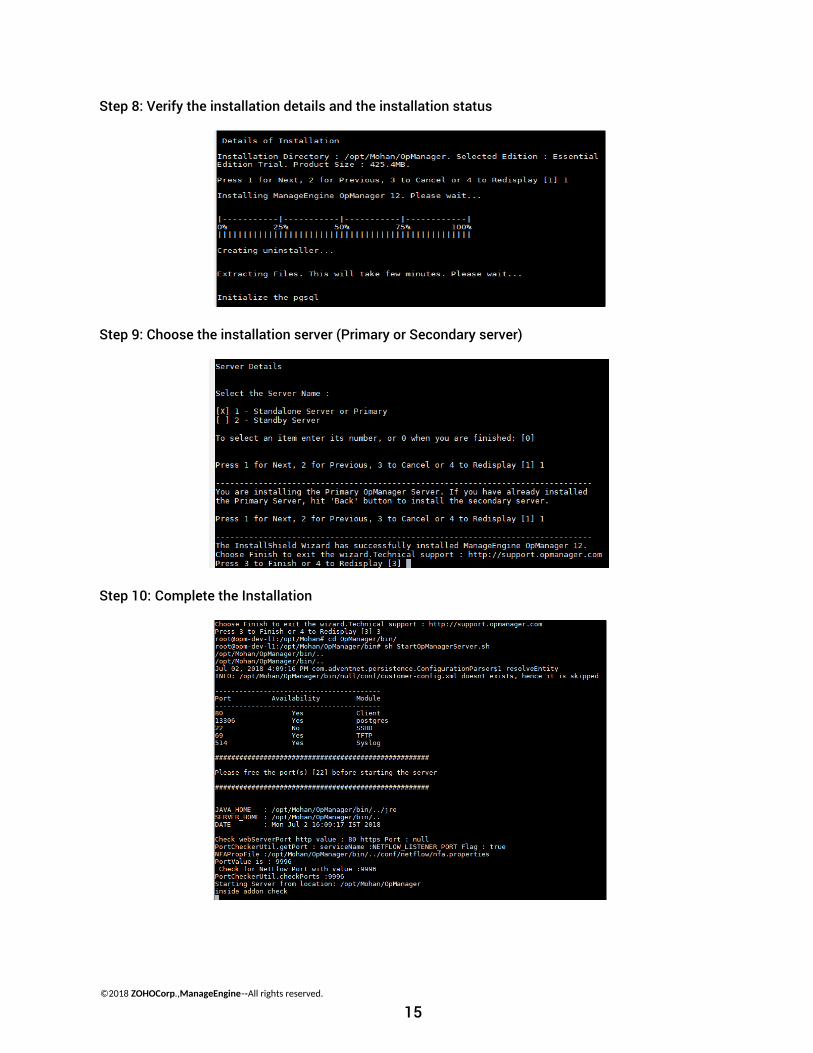
Step 8: Verify the installation details and the installation status
Step 9: Choose the installation server (Primary or Secondary server)
Step 10: Complete the Installation
©2018 ZOHOCorp.,ManageEngine-‐All rights reserved.
15
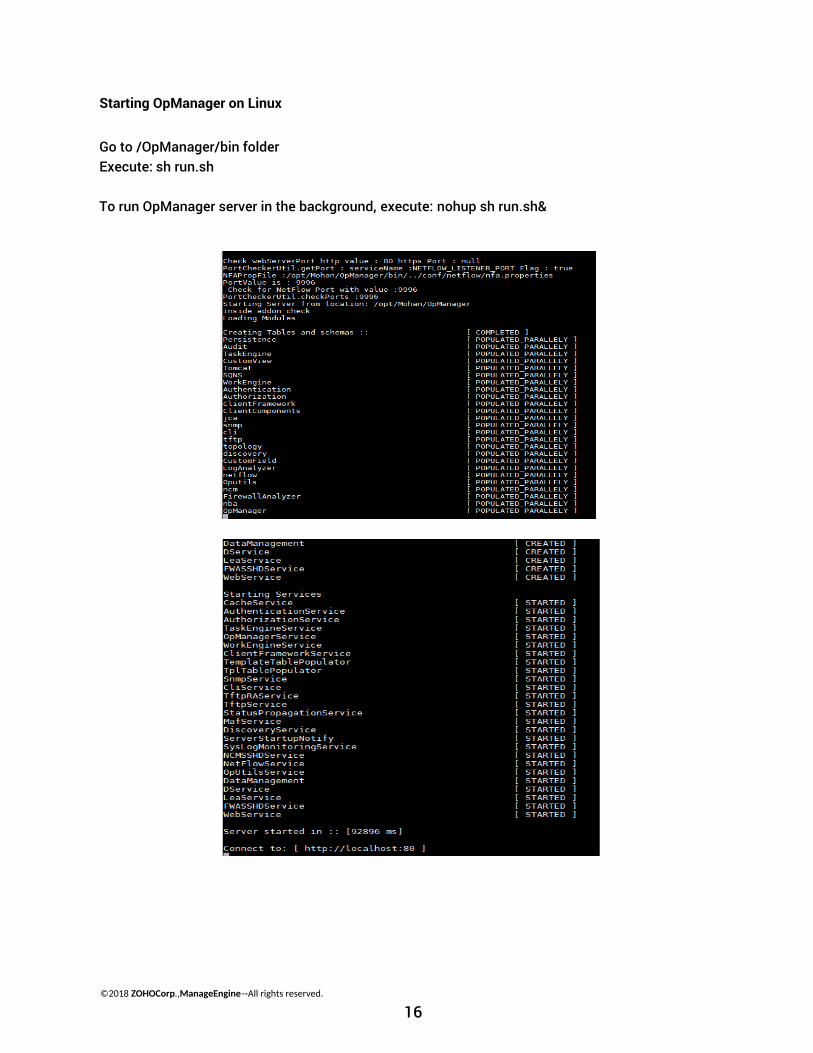
Starting OpManager on Linux
Go to /OpManager/bin folder Execute: sh run.sh
To run OpManager server in the background, execute: nohup sh run.sh&
©2018 ZOHOCorp.,ManageEngine-‐All rights reserved.
16
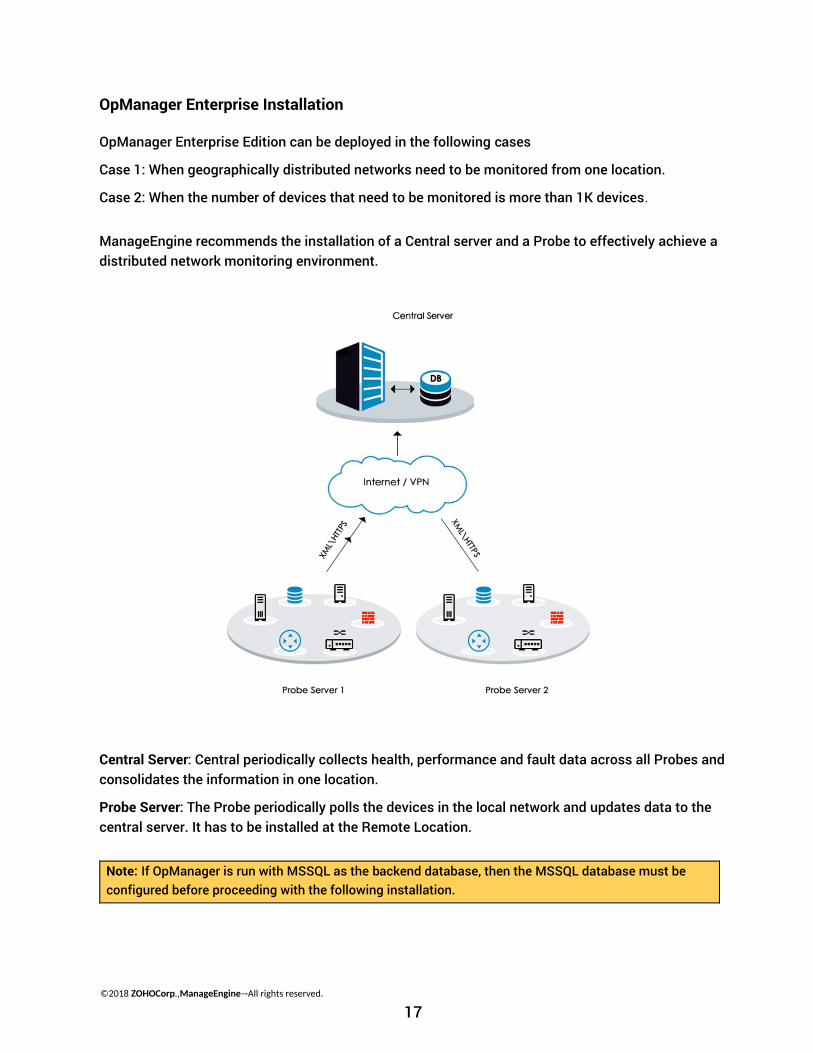
OpManager Enterprise Installation
OpManager Enterprise Edition can be deployed in the following cases
Case 1: When geographically distributed networks need to be monitored from one location.
Case 2: When the number of devices that need to be monitored is more than 1K devices.
ManageEngine recommends the installation of a Central server and a Probe to effectively achieve a distributed network monitoring environment.
Central Server: Central periodically collects health, performance and fault data across all Probes and consolidates the information in one location.
Probe Server: The Probe periodically polls the devices in the local network and updates data to the central server. It has to be installed at the Remote Location.
Note: If OpManager is run with MSSQL as the backend database, then the MSSQL database must be configured before proceeding with the following installation.
©2018 ZOHOCorp.,ManageEngine-‐All rights reserved.
17
Installing OpManager Enterprise Edition on Windows
OpManager Central Server
Step 1: Download the OpManager Central.exe from the below link
https://www.manageengine.com/cgi-bin/download_exe?id=4-883
Run the exe as 'administrator'
Step 2: Click 'Next' to proceed with installation.
Step 3: Click 'Yes' to the OpManager License agreement
Step 4: Choose your language for OpManager installation and click 'Next' to proceed
Step 5: Choose the destination folder for OpManager installation and click 'Next' to proceed
Step 6: If you want to change the default web server port for OpManager installation enter the new port number (OpManager Central uses 80 as the default web server port) and click 'Next' to proceed.
Step 7: Register your OpManager license with required details to get technical support and click 'Next' to proceed.
Step 8: Select 'Standalone' or 'Primary' server . If you are installing failover, select standby server. First configure standalone or primary for failover installation. Click 'Next' to proceed.
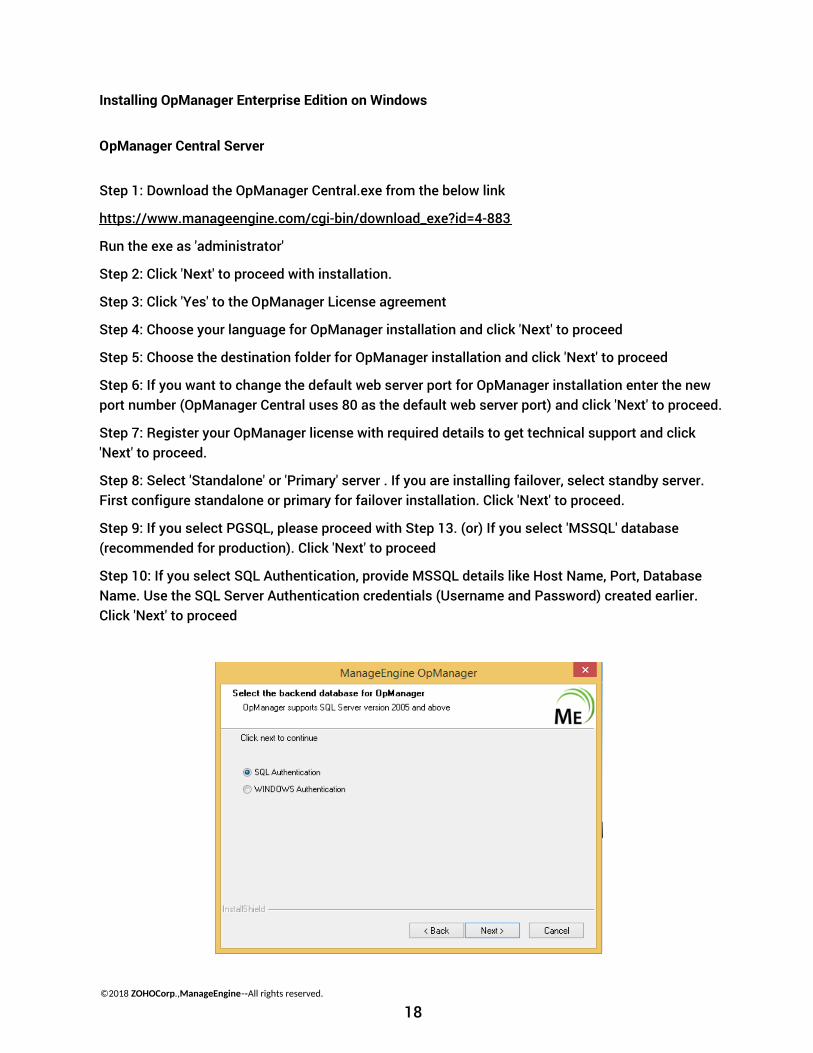
Step 9: If you select PGSQL, please proceed with Step 13. (or) If you select 'MSSQL' database (recommended for production). Click 'Next' to proceed
Step 10: If you select SQL Authentication, provide MSSQL details like Host Name, Port, Database Name. Use the SQL Server Authentication credentials (Username and Password) created earlier.
Click 'Next' to proceed
©2018 ZOHOCorp.,ManageEngine-‐All rights reserved.
18
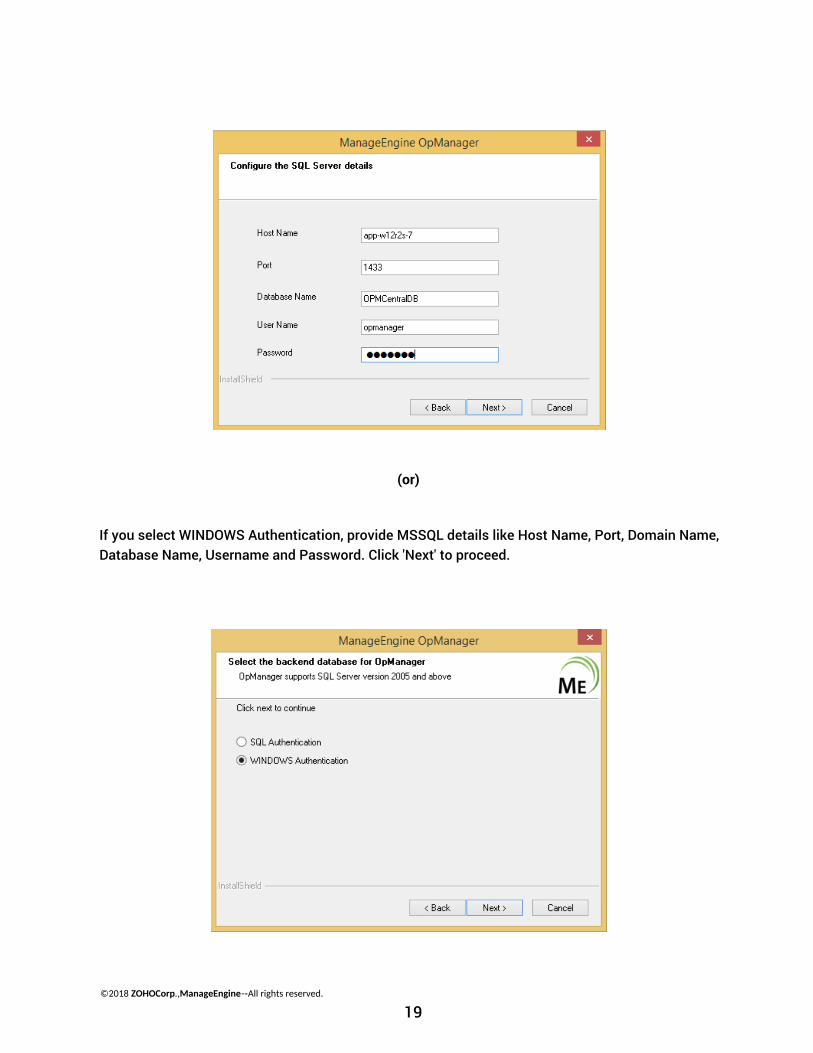
(or)
If you select WINDOWS Authentication, provide MSSQL details like Host Name, Port, Domain Name, Database Name, Username and Password. Click 'Next' to proceed.
©2018 ZOHOCorp.,ManageEngine-‐All rights reserved.
19
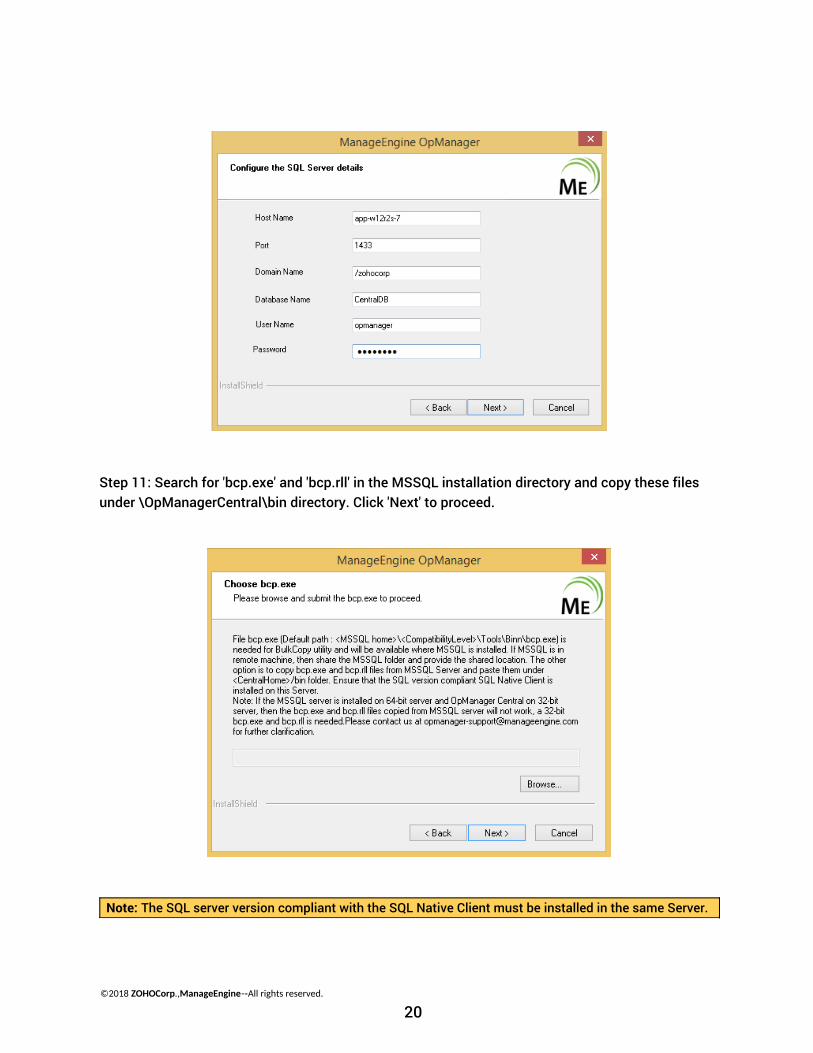
Step 11: Search for 'bcp.exe' and 'bcp.rll' in the MSSQL installation directory and copy these files under \OpManagerCentral\bin directory. Click 'Next' to proceed.
Note: The SQL server version compliant with the SQL Native Client must be installed in the same Server.
©2018 ZOHOCorp.,ManageEngine-‐All rights reserved.
20
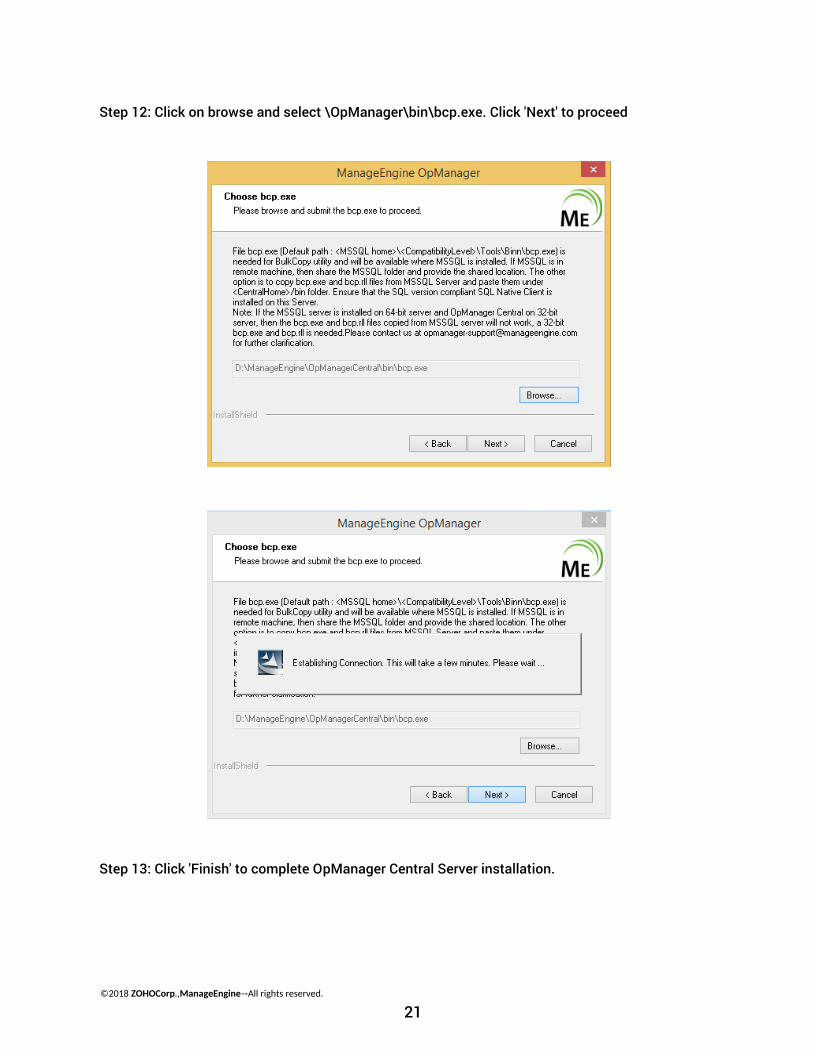
Step 12: Click on browse and select \OpManager\bin\bcp.exe. Click 'Next' to proceed
Step 13: Click 'Finish' to complete OpManager Central Server installation.
©2018 ZOHOCorp.,ManageEngine-‐All rights reserved.
21
OpManager Probe Server
Step 1: Download the OpManager Probe.exe from the below link
https://www.manageengine.com/cgi-bin/download_exe?id=4-887
Run the exe as 'administrator'
Step 2: Click 'Next' to proceed with installation
Step 3: Click 'Yes' to the OpManager License agreement
Step 4: Choose your language for OpManager Probe installation and click 'Next' to proceed
Step 5: Choose the destination folder for OpManager Probe installation and click 'Next' to proceed
Step 6: If you want to change the default web server, netflow ports for OpManager probe installation enter the new port numbers (OpManager uses 80 as the default web server port and 9996 as the
default Netflow port) and click 'Next' to proceed.
Step 7: Enter the details of the proxy server (if the probe is installed behind a proxy server) and click 'Next' to proceed
Step 8: Register your OpManager license with required details to get technical support and click 'Next' to proceed.
Step 9: Select 'Standalone' or 'Primary' server. If you are installing Failover, select standby server. First configure standalone or primary for Failover installation. Click 'Next' to proceed.
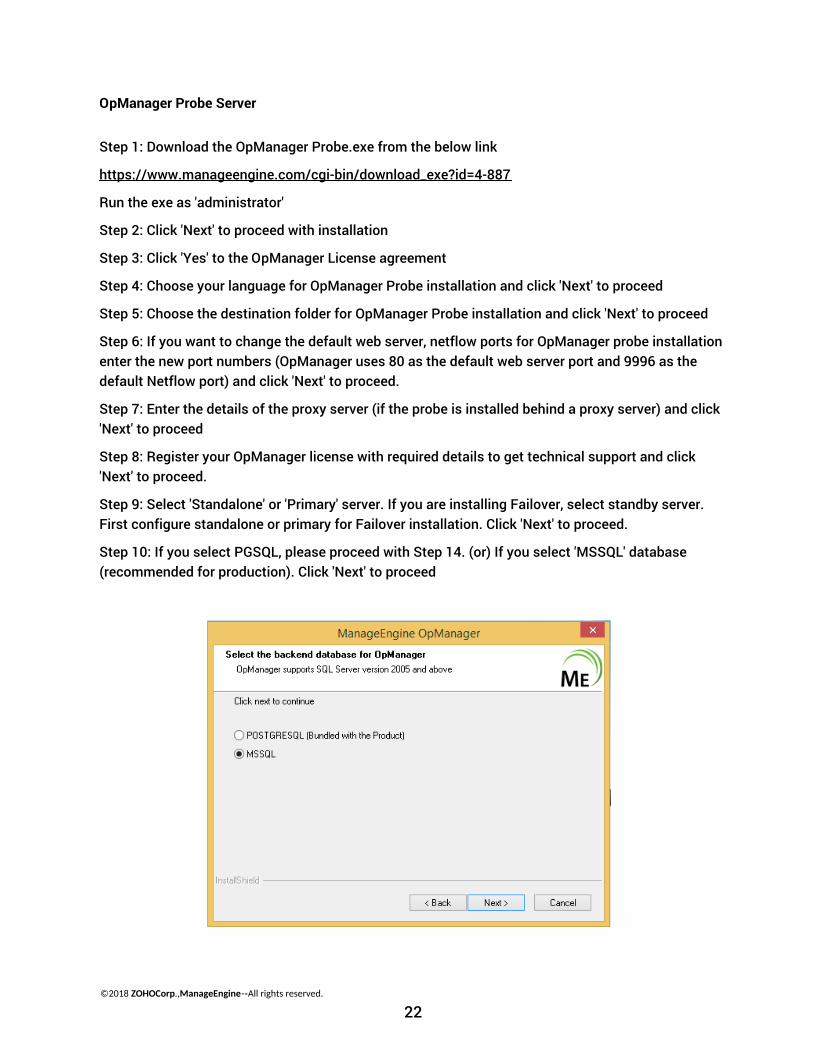
Step 10: If you select PGSQL, please proceed with Step 14. (or) If you select 'MSSQL' database (recommended for production). Click 'Next' to proceed
©2018 ZOHOCorp.,ManageEngine-‐All rights reserved.
22
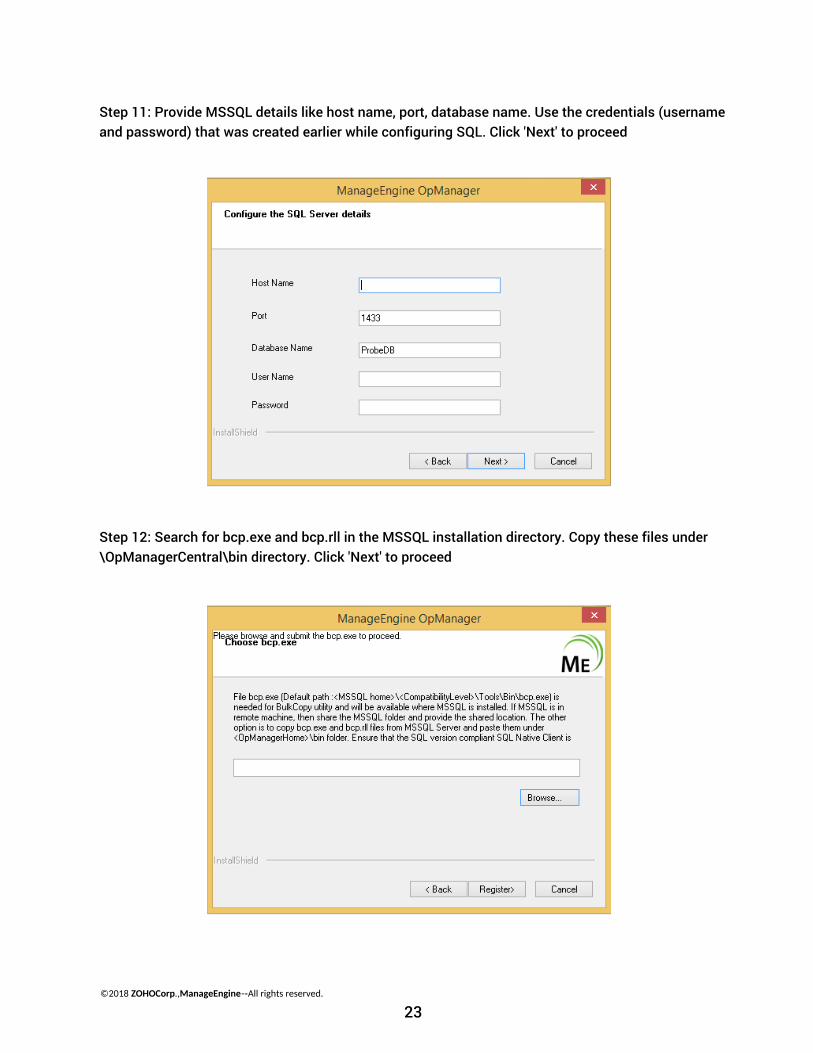
Step 11: Provide MSSQL details like host name, port, database name. Use the credentials (username and password) that was created earlier while configuring SQL. Click 'Next' to proceed
Step 12: Search for bcp.exe and bcp.rll in the MSSQL installation directory. Copy these files under \OpManagerCentral\bin directory. Click 'Next' to proceed
©2018 ZOHOCorp.,ManageEngine-‐All rights reserved.
23
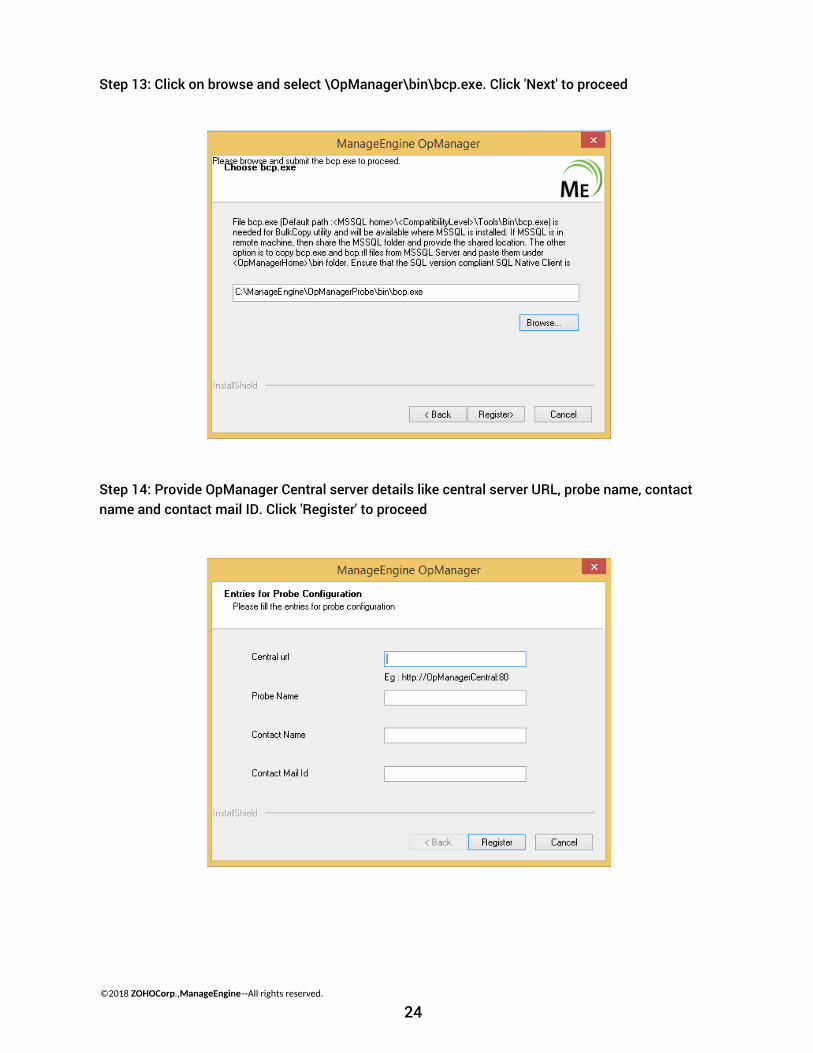
Step 13: Click on browse and select \OpManager\bin\bcp.exe. Click 'Next' to proceed
Step 14: Provide OpManager Central server details like central server URL, probe name, contact name and contact mail ID. Click 'Register' to proceed
©2018 ZOHOCorp.,ManageEngine-‐All rights reserved.
24
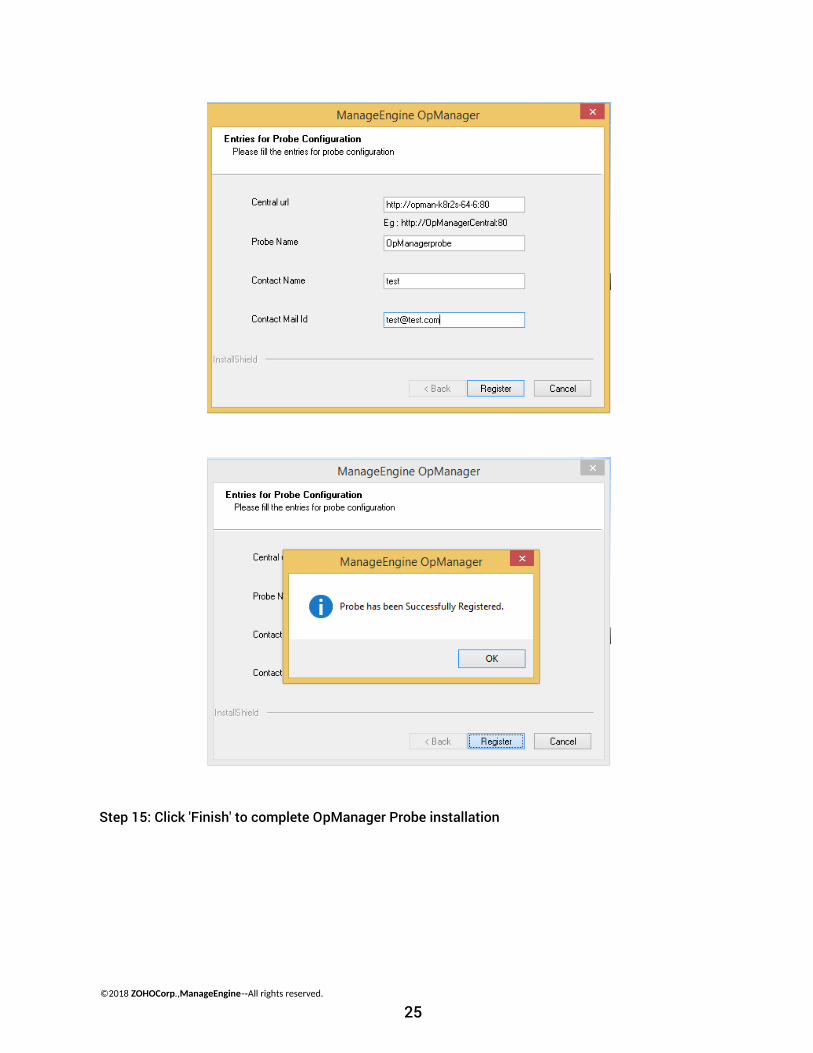
Step 15: Click 'Finish' to complete OpManager Probe installation
©2018 ZOHOCorp.,ManageEngine-‐All rights reserved.
25
Installing OpManager Enterprise Edition on Linux
Prerequisites
1. Sometimes, you might encounter errors such as database connection not getting established or the server not starting up. To workaround these issues, comment the IPv6
related entries in the /etc/hosts file.2. Check if the DNS resolves properly to the IP Address on the system in which OpManager is
installed. Add an entry to /etc/host file with ipaddress and host name if there is trouble starting OpManager.
Steps to install
Central Server
1. Download ManageEngine_OpManager_Central_64bit.bin for Linux.2. Login as root user.3. Assign the executable permission to the downloaded file using the following command:
chmod a+x ManageEngine_OpManager_Central_64bit.bin4. Execute ./ManageEngine_OpManager_Central_64bit.bin.This will display the installation
wizard.5. Click 'Next' to begin the installation process. Go through the license agreement and proceed
to the next step.6. In the subsequent steps of the wizard, select the OpManagerCentral language, the directory
to install OpManagerCentral, and the port number to run OpManagerCentral Web Server. Proceed to the next step.
7. Verify the installation details and click 'Next'.8. Click 'Finish' to complete the installation process.
It is recommended to install OpManagerCentral in the opt folder. By default, OpManagerCentral is installed in the /opt/ManageEngine/OpManagerCentral directory.
Probe Server
1. Download ManageEngine_OpManager_Probe_64bit.bin for Linux.2. Login as root user.3. Assign the executable permission to the downloaded file using the following command:
chmod a+x ManageEngine_OpManager_Probe_64bit.bin4. Execute ./ManageEngine_OpManager_Probe_64bit.bin.This will display the installation
wizard.
©2018 ZOHOCorp.,ManageEngine-‐All rights reserved.
26
5. Click 'Next' to begin the installation process. Go through the license agreement and proceed to the next step.
6. In the subsequent steps of the wizard, select the OpManagerProbe language, the directory to install OpManagerProbe, and the port number to run the OpManagerProbe Web Server.
Proceed to the next step.7. Please enter the Central URL, Probe Name, Username, Email ID and proceed to register the
Probe.8. Verify the installation details and click 'Next'.9. Click 'Finish' to complete the installation process.
It is recommended to install OpManagerProbe in the opt folder. By default, OpManagerProbe is installed in the /opt/ManageEngine/OpManagerProbe directory.
Installing OpManager Enterprise Edition on Linux using Console mode/ Silent mode
Prerequisites
To begin with, make sure you have downloaded the binary for Central and Probe for Linux OS. (https://www.manageengine.com/network-monitoring/download.html)
Central Server
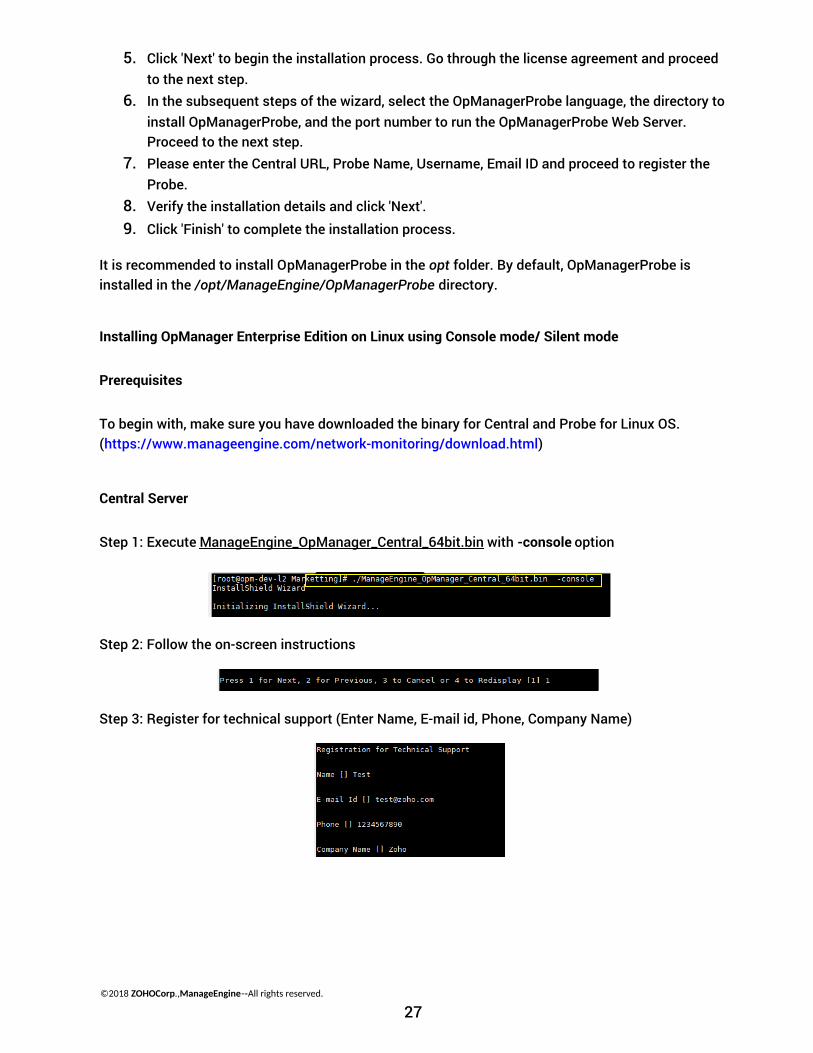
Step 1: Execute ManageEngine_OpManager_Central_64bit.bin with -console option
Step 2: Follow the on-screen instructions
Step 3: Register for technical support (Enter Name, E-mail id, Phone, Company Name)
©2018 ZOHOCorp.,ManageEngine-‐All rights reserved.
27
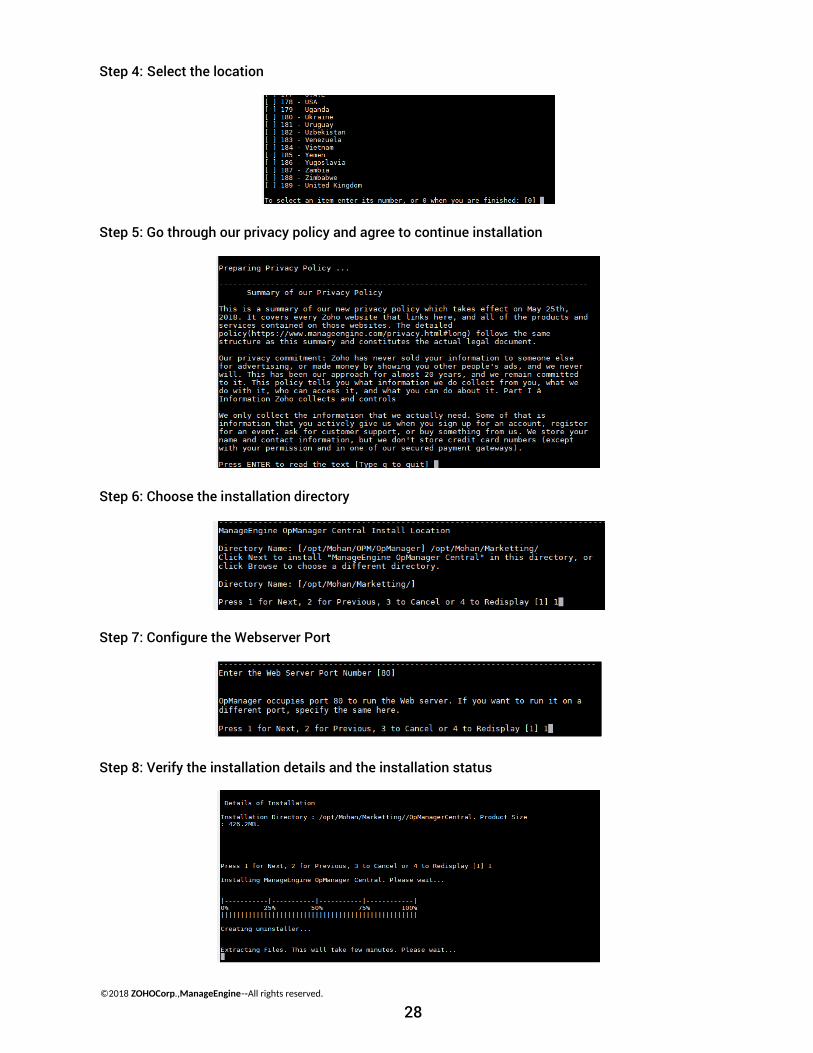
Step 4: Select the location
Step 5: Go through our privacy policy and agree to continue installation
Step 6: Choose the installation directory
Step 7: Configure the Webserver Port
Step 8: Verify the installation details and the installation status
©2018 ZOHOCorp.,ManageEngine-‐All rights reserved.
28
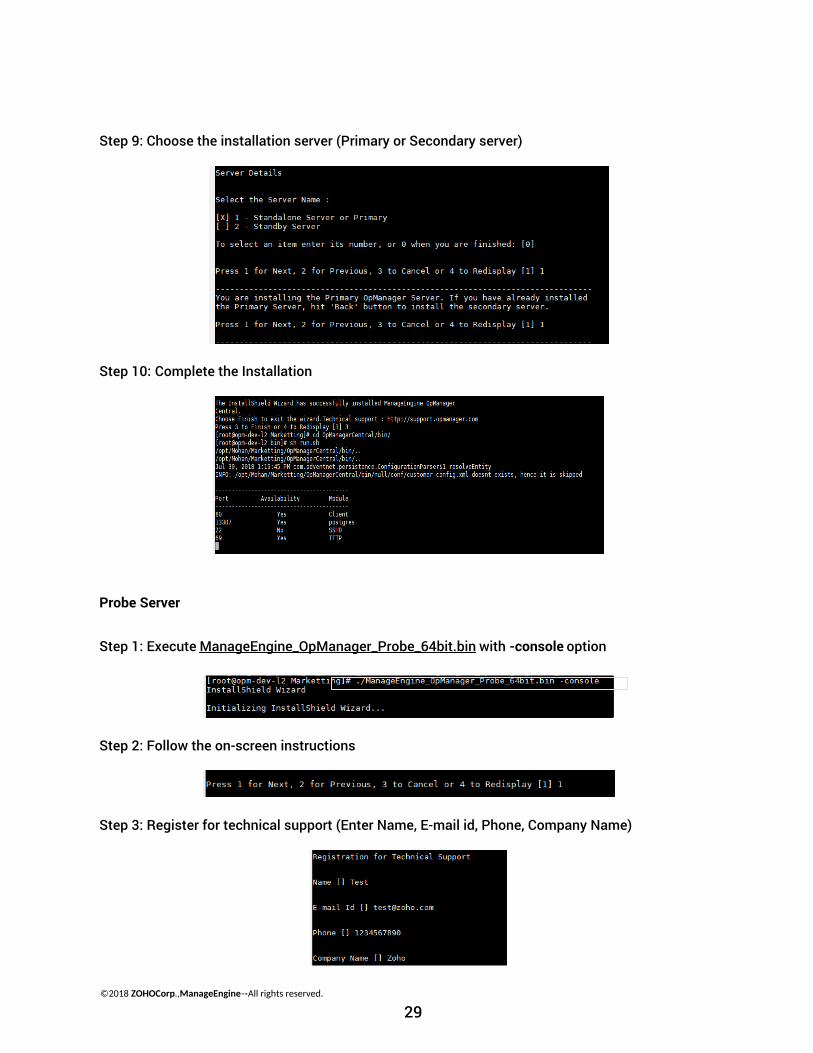
Step 9: Choose the installation server (Primary or Secondary server)
Step 10: Complete the Installation
Probe Server
Step 1: Execute ManageEngine_OpManager_Probe_64bit.bin with -console option
Step 2: Follow the on-screen instructions
Step 3: Register for technical support (Enter Name, E-mail id, Phone, Company Name)
©2018 ZOHOCorp.,ManageEngine-‐All rights reserved.
29
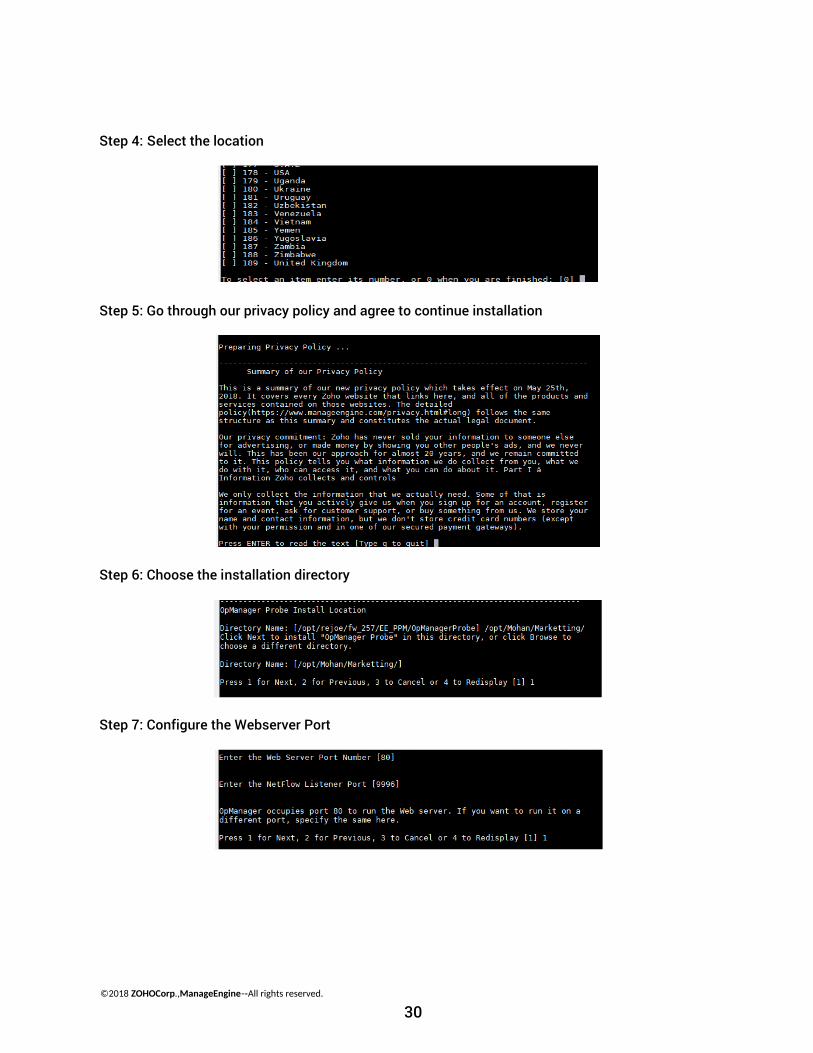
Step 4: Select the location
Step 5: Go through our privacy policy and agree to continue installation
Step 6: Choose the installation directory
Step 7: Configure the Webserver Port
©2018 ZOHOCorp.,ManageEngine-‐All rights reserved.
30
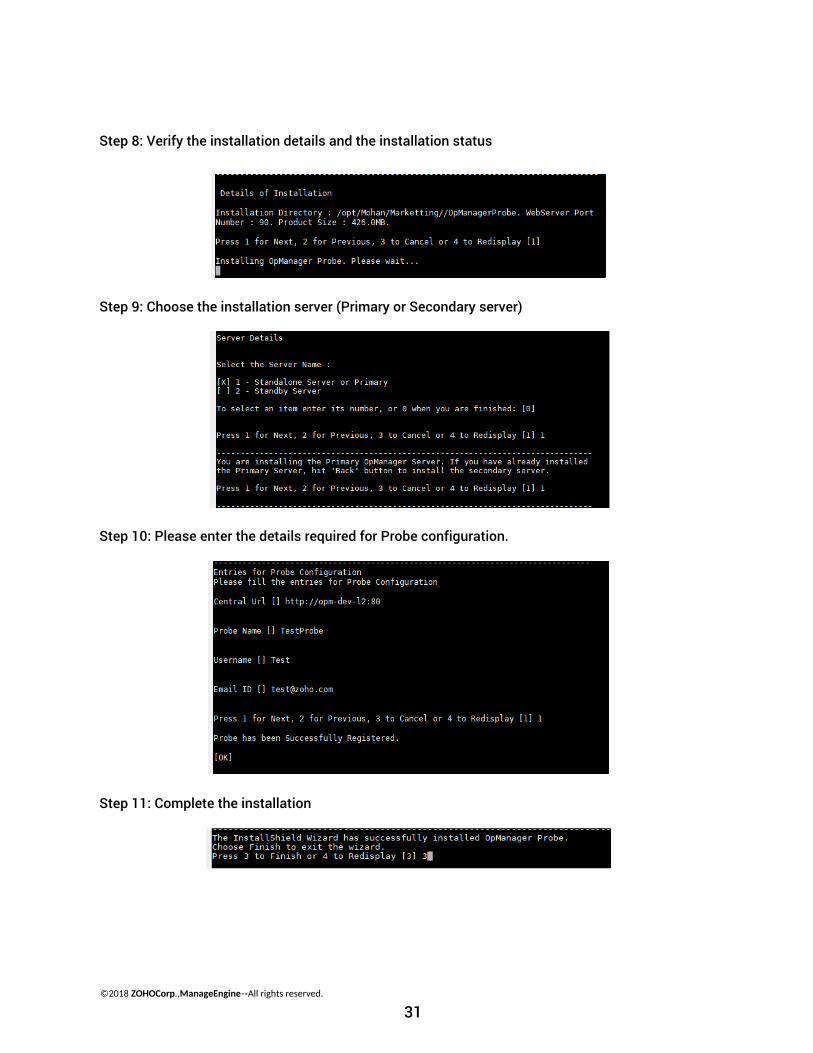
Step 8: Verify the installation details and the installation status
Step 9: Choose the installation server (Primary or Secondary server)
Step 10: Please enter the details required for Probe configuration.
Step 11: Complete the installation
©2018 ZOHOCorp.,ManageEngine-‐All rights reserved.
31
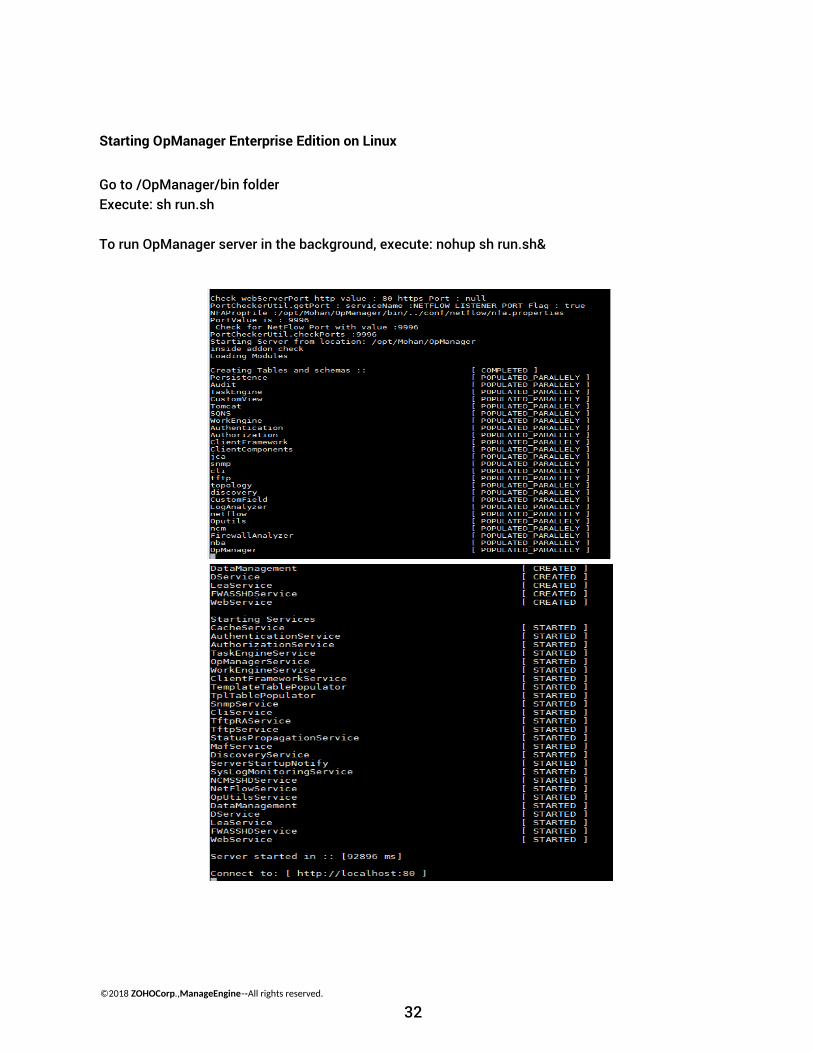
Starting OpManager Enterprise Edition on Linux
Go to /OpManager/bin folder Execute: sh run.sh
To run OpManager server in the background, execute: nohup sh run.sh&
©2018 ZOHOCorp.,ManageEngine-‐All rights reserved.
32
License Management
OpManager Licensing Model
OpManager license options depend on the number of devices to be monitored. The license is inclusive of all the interfaces, nodes or sensors in the device. A device can have any number of interfaces, elements or sensors.
Eg: Let us assume that a network has 50 devices with 4 interfaces each and the total number of interfaces will be 200. To monitor these 50 devices and 200 interfaces, OpManager needs a 50-device license.
How to register for a license in OpManager
There are two ways to invoke license registration in OpManager.
i) Using the OpManager UI
ii) During Server Startup (User Interface/Console Mode)
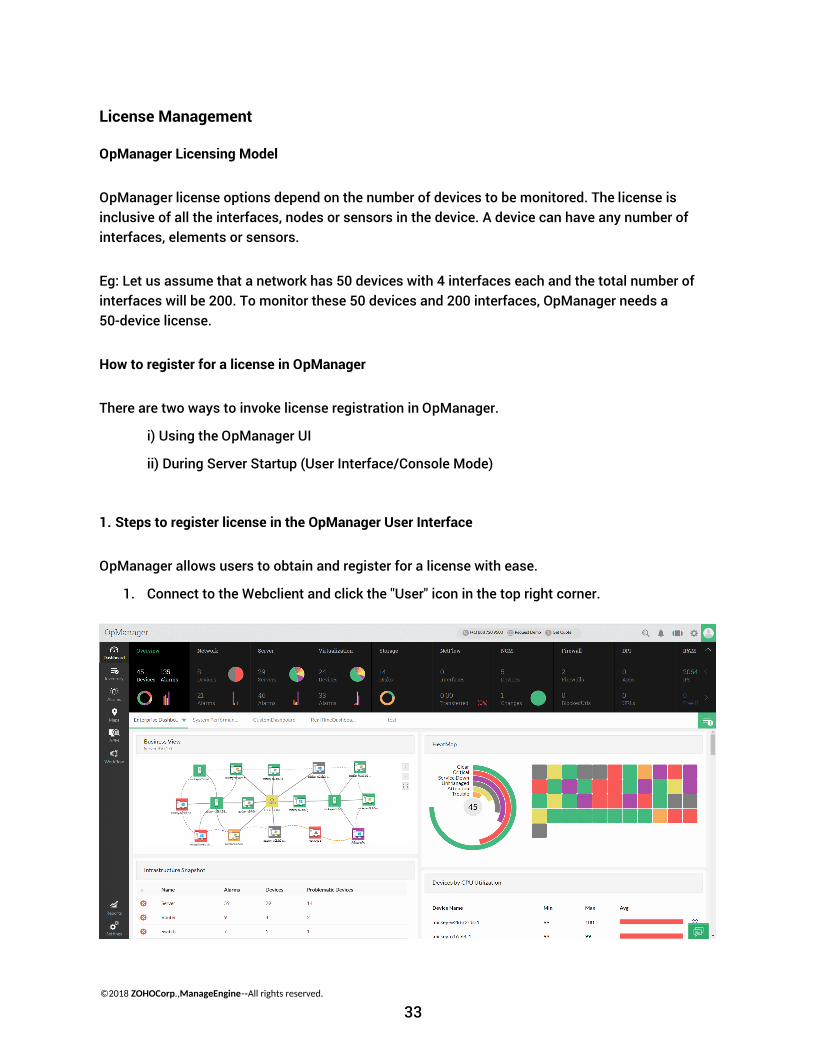
1. Steps to register license in the OpManager User Interface
OpManager allows users to obtain and register for a license with ease.
1. Connect to the Webclient and click the "User" icon in the top right corner.
©2018 ZOHOCorp.,ManageEngine-‐All rights reserved.
33
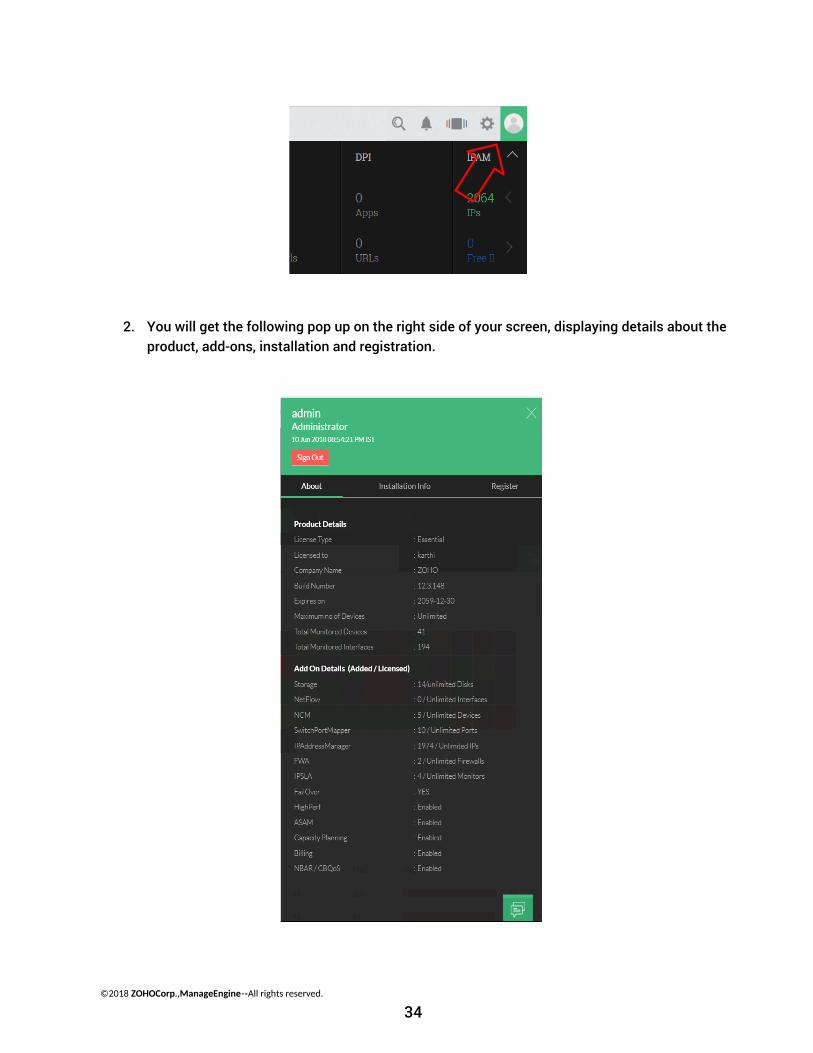
2. You will get the following pop up on the right side of your screen, displaying details about the product, add-ons, installation and registration.
©2018 ZOHOCorp.,ManageEngine-‐All rights reserved.
34
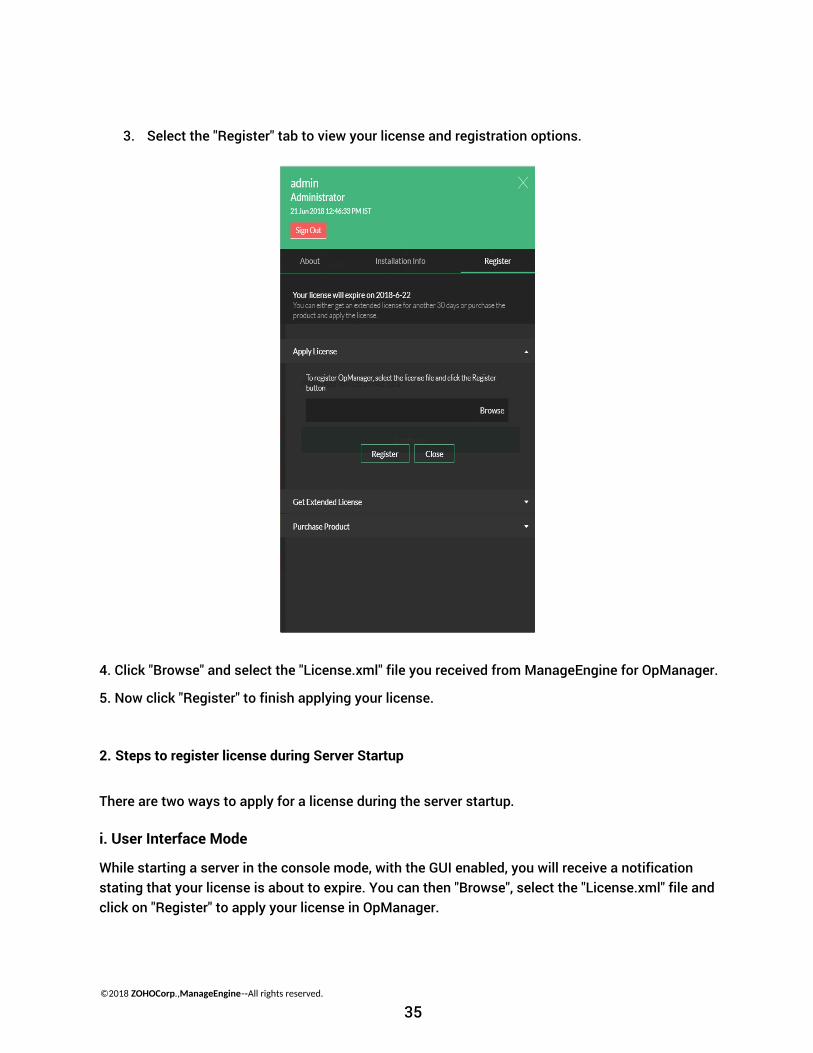
3. Select the "Register" tab to view your license and registration options.
4. Click "Browse" and select the "License.xml" file you received from ManageEngine for OpManager.
5. Now click "Register" to finish applying your license.
2. Steps to register license during Server Startup
. There are two ways to apply for a license during the server startup
i. User Interface Mode
While starting a server in the console mode, with the GUI enabled, you will receive a notification stating that your license is about to expire. You can then "Browse", select the "License.xml" file and
click on "Register" to apply your license in OpManager.
©2018 ZOHOCorp.,ManageEngine-‐All rights reserved.
35

ii. Console Mode
When in the console mode, the CMD prompt will show you a message stating that your license is about to expire and it will request the address to the directory in which the "License.xml" file is
available. Here, you can provide the path to the license file and register. How to check your license
To check your license details, you can follow the simple steps below;
1. Click the "User" icon in the top right corner of your OpManager UI.
2. Under the "About" tab, you will be able to find details about your license and add-ons in the "License Details/Add-On Details (Added/Licensed)" section respectively.
IPF & ASF License Details
The Initial Product Fee (IPF) contains both the Initial License fee and the Annual Support Fee (ASF). The initial license fee allows you to purchase the base product/add-ons while ASF provides support
to ensure healthy network monitoring from OpManager.
©2018 ZOHOCorp.,ManageEngine-‐All rights reserved.
36
High Availability Failover or
High Availability/ Failover ensures continuous and uninterrupted monitoring of network critical resources and can be setup easily by following the below three steps.
It requires you to configure OpManager Secondary or Standby server and keep monitoring the
OpManager Primary server. Incase the Primary server fails the Standby server automatically starts monitoring the network. The Standby server also triggers an email alert (email ID entered configured
in the mail server settings) about the Primary's failure. Once the Primary server is restored back to operation the Standby server automatically goes back to standby mode.
Note: The backend DB for both the Primary and Secondary servers must be MSSQL to support failover.
Steps to configure Failover/ High Availability
1. Clustering
ManageEngine recommends you to use clustering when running OpManager with MSSQL as the backend DB.
Clustering refers to an array of databases in which the data is stored and has a single virtual IP. If
any DB in the cluster environment fails, the other DBs have the data thereby providing high availability.
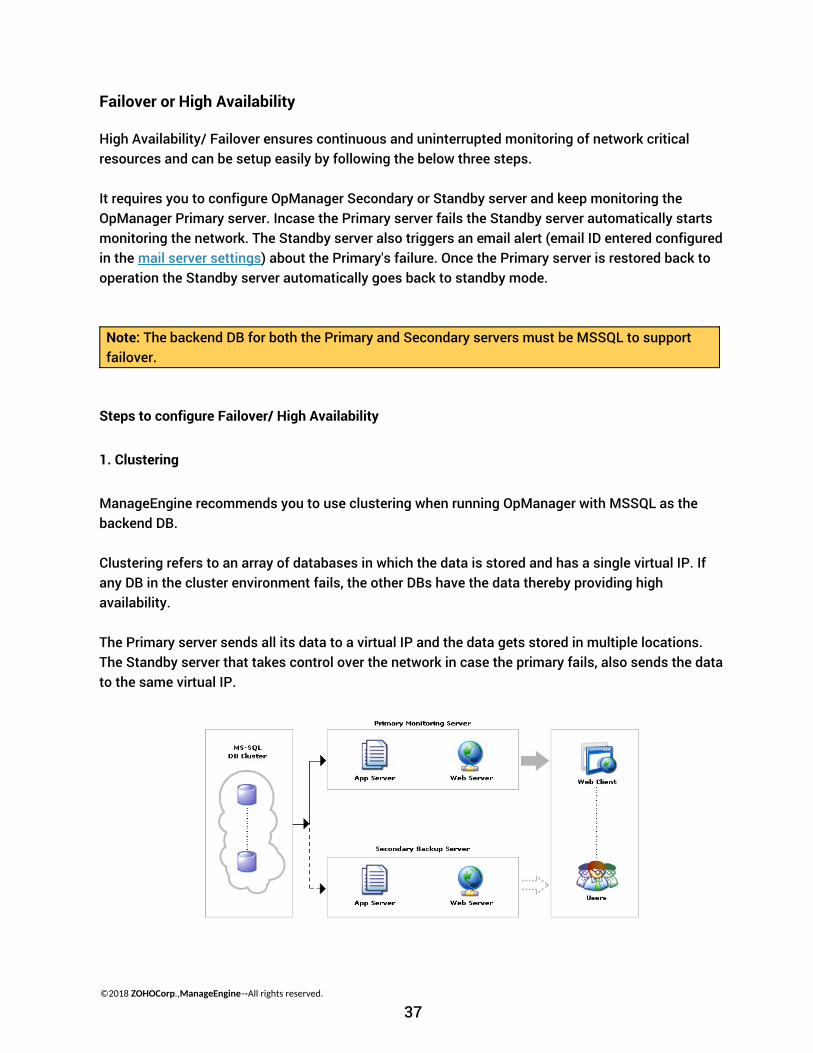
The Primary server sends all its data to a virtual IP and the data gets stored in multiple locations.
The Standby server that takes control over the network in case the primary fails, also sends the data to the same virtual IP.
©2018 ZOHOCorp.,ManageEngine-‐All rights reserved.
37
When the Primary server fails, the Standby server assumes itself as the Primary server and starts monitoring the network. Once the Primary server is up, the Standby server goes back to its standby
mode and monitors the Primary server.
For configuring MSSQL server clustering visit the below link published by Microsoft. https://technet.microsoft.com/en-us/library/hh231721(v=sql.110).aspx
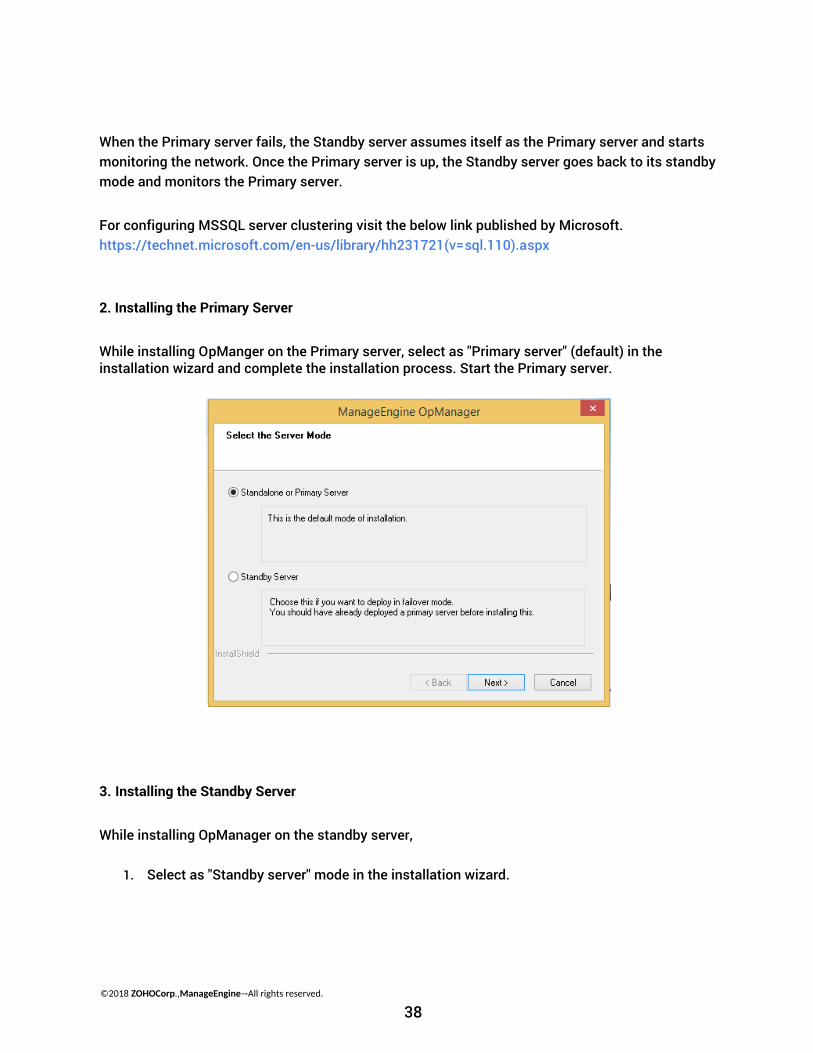
2. Installing the Primary Server
While installing OpManger on the Primary server, select as "Primary server" (default) in the installation wizard and complete the installation process. Start the Primary server.
3. Installing the Standby Server
While installing OpManager on the standby server,
1. Select as "Standby server" mode in the installation wizard.
©2018 ZOHOCorp.,ManageEngine-‐All rights reserved.
38
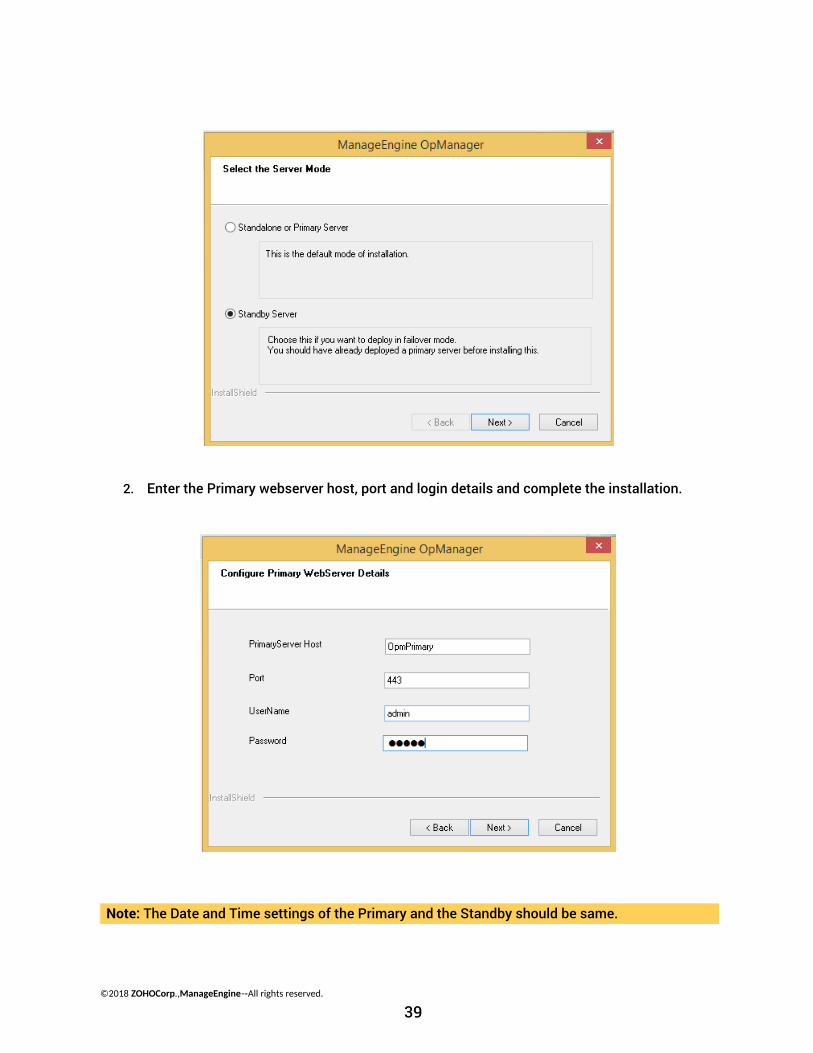
2. Enter the Primary webserver host, port and login details and complete the installation.
Note: The Date and Time settings of the Primary and the Standby should be same.
©2018 ZOHOCorp.,ManageEngine-‐All rights reserved.
39
Uninstalling OpManager
Windows
1. To uninstall from a Windows machine, try Start > Programs > ManageEngine OpManager > Uninstall OpManager.
Linux
2. To uninstall from a Linux machine, execute the command ./uninstaller.bin from the /bin/_uninst directory under OpManager installation.
©2018 ZOHOCorp.,ManageEngine-‐All rights reserved.
40


![(Ebook - French) Guide D'Installation Et Configuration Linux - 2007 - 541 Pages [Linux] [français][french][informatique][mandriva][ubuntu][debian][su](https://img.pdfslide.us/doc/110x75/55cf9c52550346d033a96e09/ebook-french-guide-dinstallation-et-configuration-linux-2007-541.jpg)