Embed Size (px)
Citation preview

OPERATOR’S MANUAL
Item No. 267- 4910
IMPORTANT: Read safety rules and instructions carefully before operating equipment.
For parts or service, please call toll free helpline at 1-888-266-7096
12" ELECTRIC GRASS TRIMMER/EDGER

This product has many features for making its use more pleasant and enjoyable. Safety, performance, anddependability
Input................................................................................................................................120 V, AC only, 60 Hz, 4 AMPCutting Swath............................................................................................................................................................12”
Item number.....................................................................................................................................................267-4910Model number.......................................................................................................................................................21068
Weight..................................................................................................................................................................5.2 lbs
have been given top priority in the design of this product making it easy to maintain and operate.
Introduction ................................................................................................................................................................. 2Important Safety Instructions ...................................................................................................................................... 3Specific Safety Rules .................................................................................................................................................. 4Symbols .................................................................................................................................................................. 5-6Electrical ......................................................................................................................................................................7Features....................................................................................................................................................................... 8Tools Needed .............................................................................................................................................................. 8Assembly..................................................................................................................................................................... 9Operation...............................................................................................................................................................10-12Maintenance..........................................................................................................................................................12-13Troubleshooting ..........................................................................................................................................................14Warranty .....................................................................................................................................................................15
Parts list ................................................................................................................................................................16-17
TABLE OF CONTENTS
INTRODUCTION
2

SAFETY INFORMATION
Please read and understand the entire manual before attempting to assemble, operate or install theproduct. These safety instructions are not meant to cover every possible condition that could occur. Ifyou have any questions regarding the product please call customer service at 1-888-266-7096,
3
The purpose of safety signal statements and symbols is to attract your attention to possible danger. Read themcarefully to understand and practice proper accident prevention.
Signals an EXTREME hazard.Failure to obey a safety DANGER signal WILL result in serious injury or death to yourself or to others.Always follow the safety precautions to reduce the risk of fire, electric shock, and personal injury.
Signals a serious hazard.Failure to obey a safety WARNING signal CAN result in serious injury to yourself and to others. Alwaysfollow the safety precautions to reduce the risk of fire, electric shock, and personal injury.
Signals a moderate hazard.Failure to obey a safety CAUTION signal MAY result in property damage or personal injury to yourself or to others.Always follow the safety precautions to reduce the risk of fire, electric shock, and personal injury.
IMPORTANT! Signals special mechanical information.
NOTE: Signals additional important general information.
Safety Tool SymbolsIMPORTANT! Some of the following symbols may be used on your tool. Please study them and learn their meanings.
Proper interpretation of these symbols will allow you to operate the tool properly and safely.
~
CAUTION
WARNING
DANGER
Safety Signals
SYMBOL NAME EXPLANATIONAlternating Type or a characteristic ofcurrent current
- - - Direct current Type or a characteristic ofcurrent
Class II Designates double insulation
Ni-Cad Battery Designates that this tool is inRecycling accordance with Ni-Cad
battery recycling program
SYMBOL NAME EXPLANATIONV Volt Potential voltageA Amperes CurrentHz Hertz Frequency (cycles per
second)n0 No load speed Rotational speed at no load.../min Movements Revolutions, strokes, surface
per minute speed, orbits, etc. per minute
8:30 a.m.-5:00 p.m. EST, Monday-Friday.

SAFETY INFORMATION
4
WARNINGREAD AND UNDERSTAND ALL INSTRUCTIONS. Failure to follow all instructions listed below may result in electric shock, fire and/ or serious personal injury.Work Area• Keep your work area clean and well lit.• Do not operate power tools in explosive atmospheres, such as in the presence of flammable liquids, gases, or dust. Power tools create sparks which may ignite the dust or fumes.• Keep bystanders, children, and visitors away while operating a power tool. Distractions can cause you to lose control.Electrical Safety•A battery-operated tool with integral batteries or a separate battery pack must be recharged only with the specified charger for the battery. A charger that may be suitable for one type of battery may create a risk of fire when used with another battery.•Use a battery-operated tool only with specified battery pack. Use of any other batteries may create a risk of fire.Personal Safety•Stay alert, watch what you are doing, and use common sense when operating a power tool. Do not use tool while tired or under the influence of drugs, alcohol, or medication. A moment of inattention while operating power tools may result in serious personal injury.•Dress properly. Do not wear loose clothing or jewelry. Contain long hair. Keep your hair, clothing, and gloves away from moving parts. Loose clothes, jewelry, or long hair can be caught in moving parts.•Avoid accidental start-ups. Make sure the switch is in the locked or off position before inserting battery pack. Carrying tools with your finger on the switch or inserting the battery pack into a tool with the switch on invites accidents.•Remove adjusting keys or wrenches before turning the tool on. A wrench or key that is left attached to a rotating part of the tool may result in personal injury.•Do not overreach. Keep proper footing and balance at all times. Proper footing and balance enable better control of the tool in unexpected situations.
Tool Use and Care•Do not use tool if switch does not turn it on or off. A tool that can not be controlled with the switch is dangerous and must be repaired.•Disconnect battery pack from tool or place the switch in the locked or off position before making any adjustments, changing accessories, or storing the tool. Such preventive safety measures reduce the risk of starting the tool accidentally.•Store idle tools out of reach of children and other untrained persons. T
users.
tools.
ools are dangerous in the hands of untrained
•When battery pack is not in use, keep it away from other metal objects like: paper clips, coins, keys, nails, screws,or other small metal objects that can make a connection from one terminal to another.. Shorting the battery terminals together may cause sparks, burns, or a fire.•Check for misalignment or binding of moving parts, breakage of parts, and any other condition that may affect the tool’s operation. If damaged, have the tool serviced before using. Many accidents are caused by poorly maintained
•Use only accessories that are recommended by the manufacturer for your tool. Accessories that may be suitable for one tool may create a risk of injury when used on another tool.Service•Tool service must be performed only by qualified repair personnel. Service or maintenance performed by unqualified personnel may result in a risk of injury.•When servicing a tool, use only identical replacement parts. Follow instructions in the Maintenance section of this manual. Use of unauthorized parts or failure to follow Maintenance Instructions may create a risk of shock or injury.
ALWAYS WEAR EYE PROTECTION.A grass trimmer can throw foreign objects into your eyes which could cause permanent eye damage. ALWAYS wear safety goggles (not glasses). ordinary eyeglases have only impact-resistant lenses... they are NOT safety goggles.

For ALLGarden Tools•Avoid dangerous environment. Don’t use tool in damp or wet locations.•Don’t use in rain.•Keep bystanders and children away while operating.•Dress properly. Do not wear loose clothing or jewellery.They can be caught in moving parts. Use of rubber gloves and substantial footwear is recommended when working outdoors.•Avoid unintentional start-ups.•Don’t grasp the exposed cutting line when picking up or holding the tool.•Don’t force the tool. It will do the job better and with less likelihood of a risk of injury at the rate for which it was designed.•Don’t overreach. Keep proper footing and balance at all times.•When not in use, tool should be stored indoors in dry, high, or a locked-up place-out of reach of children.•Maintain tool with care. Keep cutting line clean for best performance and to reduce the risk of injury. •Keep guards in place and in working order.•Keep hands and feet away from cutting line.•Always use eye protection.For Grass Trimmers•When lengthening new cutting line, be careful of the line cutter on the guard. It is sharp. •NEVER fit metal cutting elements or blades.•Keep ventilation openings clear of debris. Keep handles dry, clean, and free of oil and grease.•Before using the grass trimmer, remove any stones, sticks, debris or objects that could become entangled or thrown by the trimmer.•DO NOT switch ON until the grass trimmer is in its normal operating position. Do not press the lock-OFF button or squeeze the trigger while the grass trimmer is inverted.•NEVER reach under the grass trimmer (the cutting line area) until it has completely stopped. The trimmer’s cutting line continues to rotate for 5 seconds after being switched OFF.•During operation, ensure that there are no other persons or animals within a radius of 3’. Stop using the tool while people, especially children, or pets are nearby.•Keep the cutting head and motor clean to reduce the risk of injury.•Use only the specified size and type of cutting line. Do not substitute.For Battery Pack and ChargerTo avoid serious injury, risk of fire, explosion and danger of electric shock or electrocution:• DO NOT probe the charger with conductive materials. The charging terminals hold 120 V.• If the battery pack case is cracked or damaged, DO NOT insert into the charger. Replace the battery pack.• DO NOT charge these battery packs with any other type of charger.• Charge only the grass trimmer battery pack provided.• DO NOT allow liquid inside the charger.• DO NOT try to use the charger for any other purpose than what is presented in this manual.
If the battery fluid gets in your eyes, flush immediately with clean water for at least 15 minutes. Get immediate medical attention. Do not charge the battery pack in rain or in wet conditions. Do not immerse the tool, battery pack, or charger in water or other liquid.• Do not allow the battery pack or charger to over heat. If they are warm, allow them to cool down. Recharge only at room temperature.• Do not cover the ventilation slots on the top of the charger. Do not set the charger on a soft surface. Keep the ventilation slots of the charger clear..• Do not allow small metal items or material such as steel wool, aluminum foil, or other foreign particles into the charger cavity.• Unplug the charger before cleaning and when there is no battery pack in the cavity.• Do not place the battery charger or the battery pack in the sun or in a warm environment. Keep at normal room temperature.• Do not try to connect two chargers together.• The battery pack cells may develop a small leak under extreme usage or temperature conditions. If the outer seal is broken and the leakage gets on your skin:– Use soap and water to wash immediately.– Neutralize with lemon juice, vinegar, or other mild acid.
WARNING
SAFETY INFORMATION
5
WARNING
Fig. B
Minimum Gauge for Extension Cords (AWG)(when using 120 V only)
Ampere Rating Total Length of Cord in Feet (meters)More Than Not More Than 25' (7.6 m) 50' (15 m) 100' (30.4 m) 150' (45.7 m)
0 6 18 16 16 14
6 10 18 16 14 12
10 12 16 16 14 12
12 16 14 12 Not Recommended
2 ProngPolarized Plug
ProperlyGroundedOutlet
Fig. A
Properlygroundedoutlet
2-prongpolarized plug
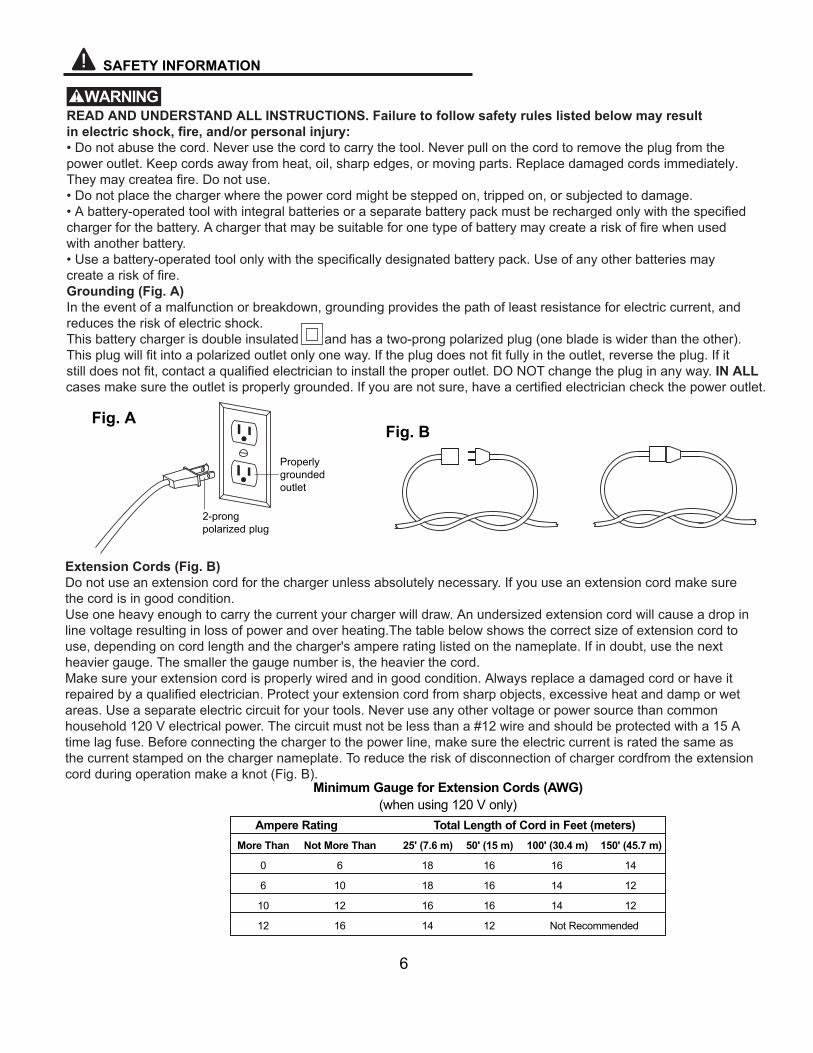
READ AND UNDERSTAND ALL INSTRUCTIONS. Failure to follow safety rules listed below may result in electric shock, fire, and/or personal injury:• Do not abuse the cord. Never use the cord to carry the tool. Never pull on the cord to remove the plug from the power outlet. Keep cords away from heat, oil, sharp edges, or moving parts. Replace damaged cords immediately.They may createa fire. Do not use. • Do not place the charger where the power cord might be stepped on, tripped on, or subjected to damage.• A battery-operated tool with integral batteries or a separate battery pack must be recharged only with the specified charger for the battery. A charger that may be suitable for one type of battery may create a risk of fire when used with another battery.• Use a battery-operated tool only with the specifically designated battery pack. Use of any other batteries may create a risk of fire.Grounding (Fig. A)In the event of a malfunction or breakdown, grounding provides the path of least resistance for electric current, and reduces the risk of electric shock.This battery charger is double insulated and has a two-prong polarized plug (one blade is wider than the other). This plug will fit into a polarized outlet only one way. If the plug does not fit fully in the outlet, reverse the plug. If it still does not fit, contact a qualified electrician to install the proper outlet. DO NOT change the plug in any way. IN ALL
cases make sure the outlet is properly grounded. If you are not sure, have a certified electrician check the power outlet.
Extension Cords (Fig. B)Do not use an extension cord for the charger unless absolutely necessary. If you use an extension cord make sure the cord is in good condition.Use one heavy enough to carry the current your charger will draw. An undersized extension cord will cause a drop in line voltage resulting in loss of power and over heating.The table below shows the correct size of extension cord to use, depending on cord length and the charger's ampere rating listed on the nameplate. If in doubt, use the next heavier gauge. The smaller the gauge number is, the heavier the cord.Make sure your extension cord is properly wired and in good condition. Always replace a damaged cord or have it repaired by a qualified electrician. Protect your extension cord from sharp objects, excessive heat and damp or wet areas. Use a separate electric circuit for your tools. Never use any other voltage or power source than common household 120 V electrical power. The circuit must not be less than a #12 wire and should be protected with a 15 Atime lag fuse. Before connecting the charger to the power line, make sure the electric current is rated the same as the current stamped on the charger nameplate. To reduce the risk of disconnection of charger cordfrom the extension cord during operation make a knot (Fig. B).
SAFETY INFORMATION
6
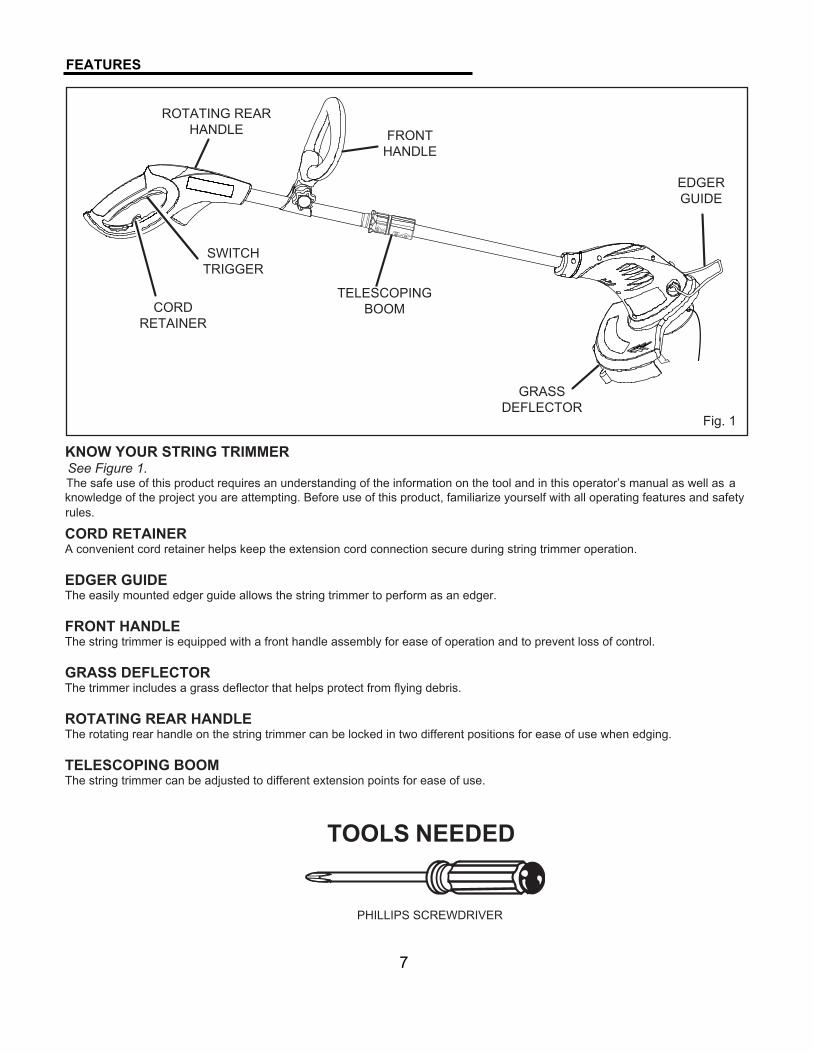
KNOW YOUR STRING TRIMMERSee Figure 1.The safe use of this product requires an understanding of the information on the tool and in this operator’s manual as well as a knowledge of the project you are attempting. Before use of this product, familiarize yourself with all operating features and safety rules.
CORD RETAINERA convenient cord retainer helps keep the extension cord connection secure during string trimmer operation.
EDGER GUIDEThe easily mounted edger guide allows the string trimmer to perform as an edger.
FRONT HANDLEThe string trimmer is equipped with a front handle assembly for ease of operation and to prevent loss of control.
GRASS DEFLECTORThe trimmer includes a grass deflector that helps protect from flying debris.
ROTATING REAR HANDLEThe rotating rear handle on the string trimmer can be locked in two different positions for ease of use when edging.
TELESCOPING BOOMThe string trimmer can be adjusted to different extension points for ease of use.
7
TOOLS NEEDED
PHILLIPS SCREWDRIVER
Fig. 1
ROTATING REAR HANDLE
SWITCHTRIGGER
CORDRETAINER
TELESCOPINGBOOM
FRONTHANDLE
EDGERGUIDE
GRASSDEFLECTOR
FEATURES
UNPACKINGThis product requires assembly.• Carefully remove the product and any accessories from the box. Make sure that all items listed in the packing list are included.• Inspect the product carefully to make sure no breakage or damage occurred during shipping.• Do not discard the packing material until you have carefully inspected and satisfactorily operated the product.• If any parts are damaged or missing, please call 1-888-266-7096 for assistance.
PACKING LISTTrimmer AssemblyGrass Deflector Assembly with ScrewOperator’s Manual
WARNING: If any parts are damaged or missing do not operate this product until the parts are replaced. Failure to heed this warning could result in serious personal injury.
WARNING: Do not attempt to modify this product or create accessories not recommended for use with this product. Any such alteration or modification is misuse and could result in a hazardous condition leading to possible serious personal injury.
WARNING: Do not connect to power supply until assembly is complete. Failure to comply could result in accidental starting and possible serious personal injury.
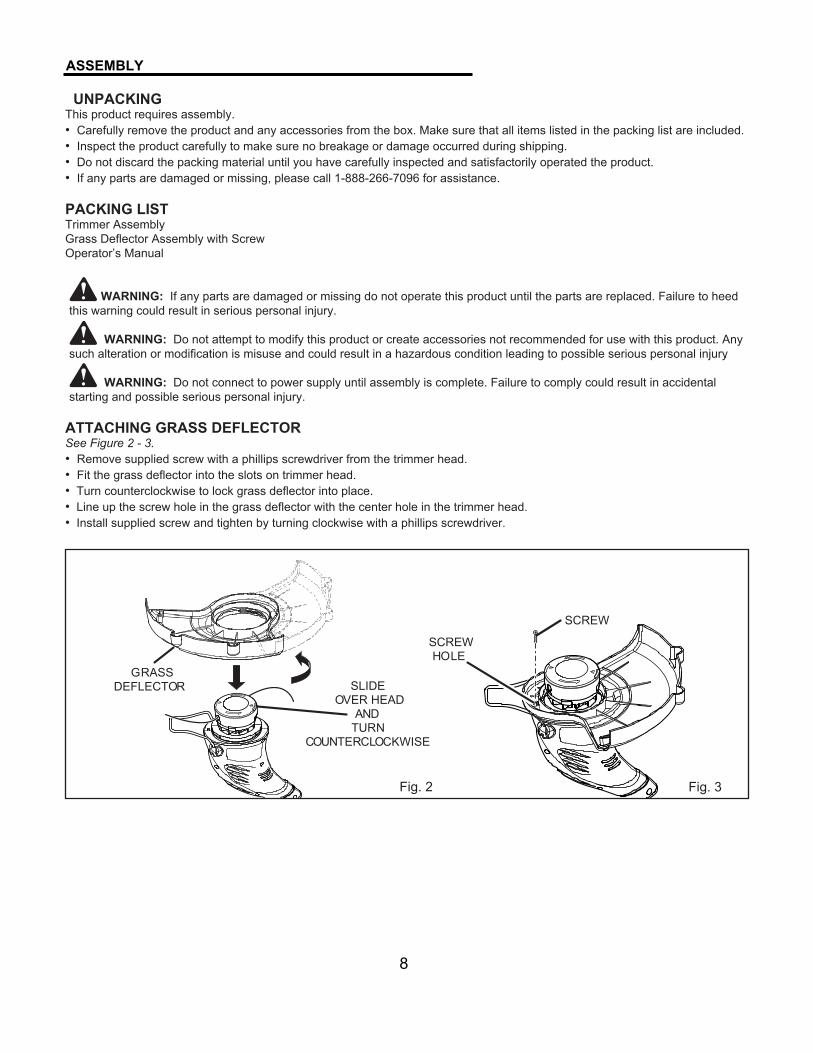
ATTACHING GRASS DEFLECTORSee Figure 2 - 3.• Remove supplied screw with a phillips screwdriver from the trimmer head.• Fit the grass deflector into the slots on trimmer head.• Turn counterclockwise to lock grass deflector into place.• Line up the screw hole in the grass deflector with the center hole in the trimmer head.• Install supplied screw and tighten by turning clockwise with a phillips screwdriver.
Fig. 2
GRASSDEFLECTOR SLIDE
OVER HEADAND
TURNCOUNTERCLOCKWISE
SCREW
SCREWHOLE
Fig. 3
8
ASSEMBLY
WARNING: Do not allow familiarity with products to make you careless. Remember that a careless fraction of a second is sufficient to inflict severe injury.
WARNING: Always wear safety goggles or safety glasses with side shields when operating products. Failure to do so could result in objects being thrown into your eyes resulting in possible serious injury.
WARNING: Do not use any attachments or accessories not recommended by the manufacturer of this product. The use of attachments or accessories not recommended can result in serious personal injury.
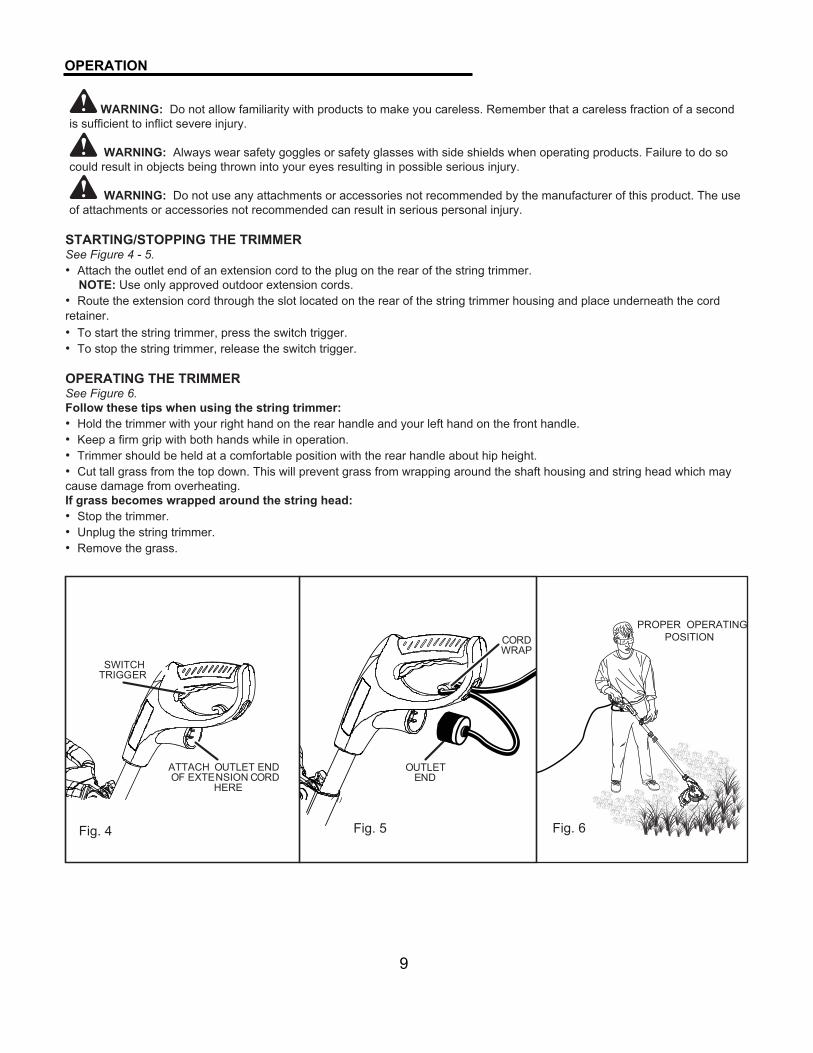
STARTING/STOPPING THE TRIMMERSee Figure 4 - 5.• Attach the outlet end of an extension cord to the plug on the rear of the string trimmer.
NOTE: Use only approved outdoor extension cords.• Route the extension cord through the slot located on the rear of the string trimmer housing and place underneath the cord
• To start the string trimmer, press the switch trigger.• To stop the string trimmer, release the switch trigger.
OPERATING THE TRIMMERSee Figure 6.Follow these tips when using the string trimmer:• Hold the trimmer with your right hand on the rear handle and your left hand on the front handle. • Keep a firm grip with both hands while in operation. • Trimmer should be held at a comfortable position with the rear handle about hip height.• Cut tall grass from the top down. This will prevent grass from wrapping around the shaft housing and string head which may cause damage from overheating.
retainer.
If grass becomes wrapped around the string head:• Stop the trimmer.• Unplug the string trimmer.• Remove the grass.
Fig. 6
PROPER OPERATINGPOSITION
Fig. 4
SWITCHTRIGGER
ATTACH OUTLET ENDOF EXTENSION CORD
HERE
Fig. 5
CORDWRAP
OUTLETEND
OPERATION
9
WARNING: Always hold the string trimmer away from the body keeping clearance between the body and the string trimmer. Any contact with the string trimmer cutting head while operating can result in serious personal injury.
ADVANCING STRINGSNOTE: The trimmer is equipped with an autofeed head. Bumping the head to try to advance the line will damage trimmer and void warranty.• With the trimmer running, release the switch trigger.• Wait two seconds, and press the switch trigger.
NOTE: The strings will extend approximately 1/4" with each stop and start of the switch trigger until the strings reach the length of the grass deflector blade.• Resume trimming.
ADVANCING THE STRINGS MANUALLYDisconnect the string trimmer from the power supply, then push the spool retainer button in while pulling on strings to manually advance the strings.
CUT OFF BLADEThis trimmer is equipped with a cut-off blade on the grass deflector. For best cutting, advance strings until they are trimmed to length by the cut-off blade. Advance strings whenever you hear the engine running faster than normal, or when trimming efficiency diminishes. This will maintain best performance and keep strings long enough to advance properly.
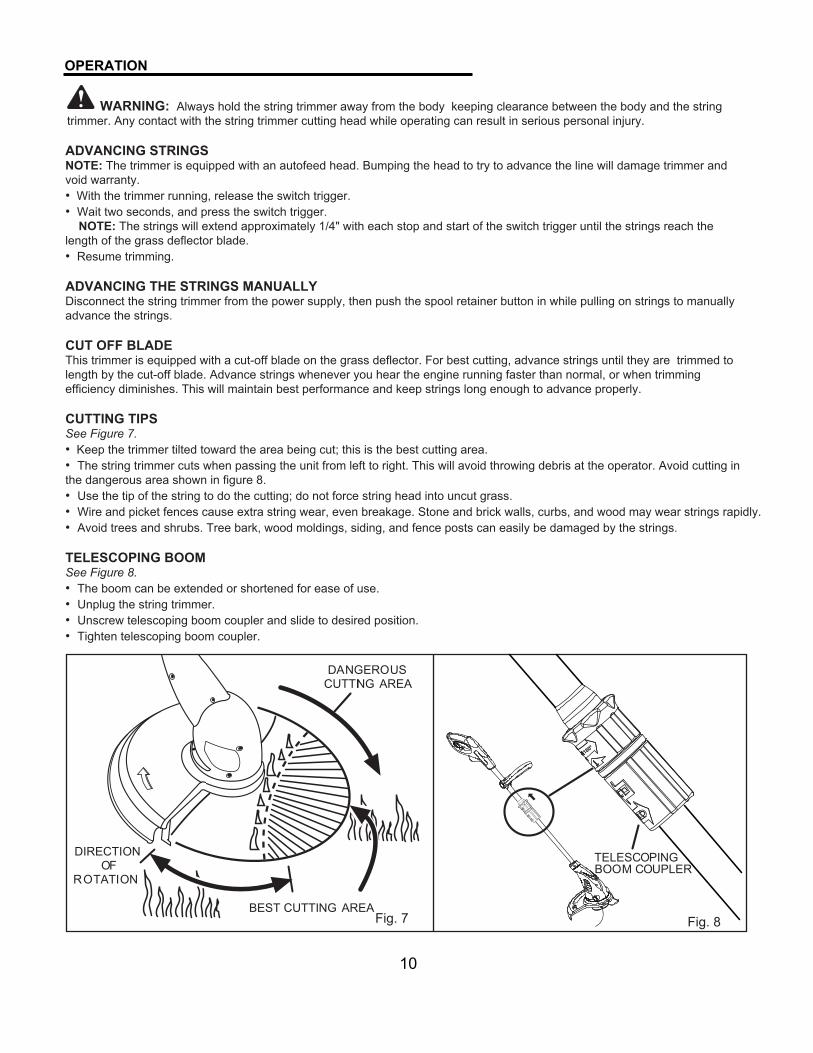
CUTTING TIPSSee Figure 7.• Keep the trimmer tilted toward the area being cut; this is the best cutting area.• The string trimmer cuts when passing the unit from left to right. This will avoid throwing debris at the operator. Avoid cutting in the dangerous area shown in figure 8.• Use the tip of the string to do the cutting; do not force string head into uncut grass. • Wire and picket fences cause extra string wear, even breakage. Stone and brick walls, curbs, and wood may wear strings rapidly.• Avoid trees and shrubs. Tree bark, wood moldings, siding, and fence posts can easily be damaged by the strings.
TELESCOPING BOOMSee Figure 8. • The boom can be extended or shortened for ease of use.• Unplug the string trimmer.• Unscrew telescoping boom coupler and slide to desired position.• Tighten telescoping boom coupler.
DANGEROUSCUTTING AREA
BEST CUTTING AREA
DIRECTIONOF
ROTATION
Fig. 7 Fig. 8
TELESCOPINGBOOM COUPLER
OPERATION
10

ROTATING REAR HANDLESee Figure 9.• Unplug the string trimmer.• Pull up edging coupler and turn handle end counterclockwise.• Release edging boom coupler when handle has been rotated 180°.
EDGINGSee Figures 10 - 11.The rotating handle can be used in combination with the edger guide for edging sidewalks and walkways. To use the edger guide, flip down from it’s stored position.
PULL UPEDGINGCOUPLER
TO ROTATEFig. 9
REARHANDLE
Fig. 10
EDGER GUIDE
Fig. 11
11
OPERATION
GENERAL MAINTENANCEAvoid using solvents when cleaning plastic parts. Most plastics are susceptible to damage from various types of commercial solvents and may be damaged by their use. Use clean cloths to remove dirt, dust, oil, grease, etc.Periodically, clean all foreign material from the trimmer head vents. You can often make repairs described here. For other repairs, have the trimmer serviced by an authorized service dealer.
WARNING: Do not at any time let brake fluids, gasoline, petroleum-based products, penetrating oils, etc., come in contact with plastic parts. Chemicals can damage, weaken or destroy plastic which may result in serious personal injury.
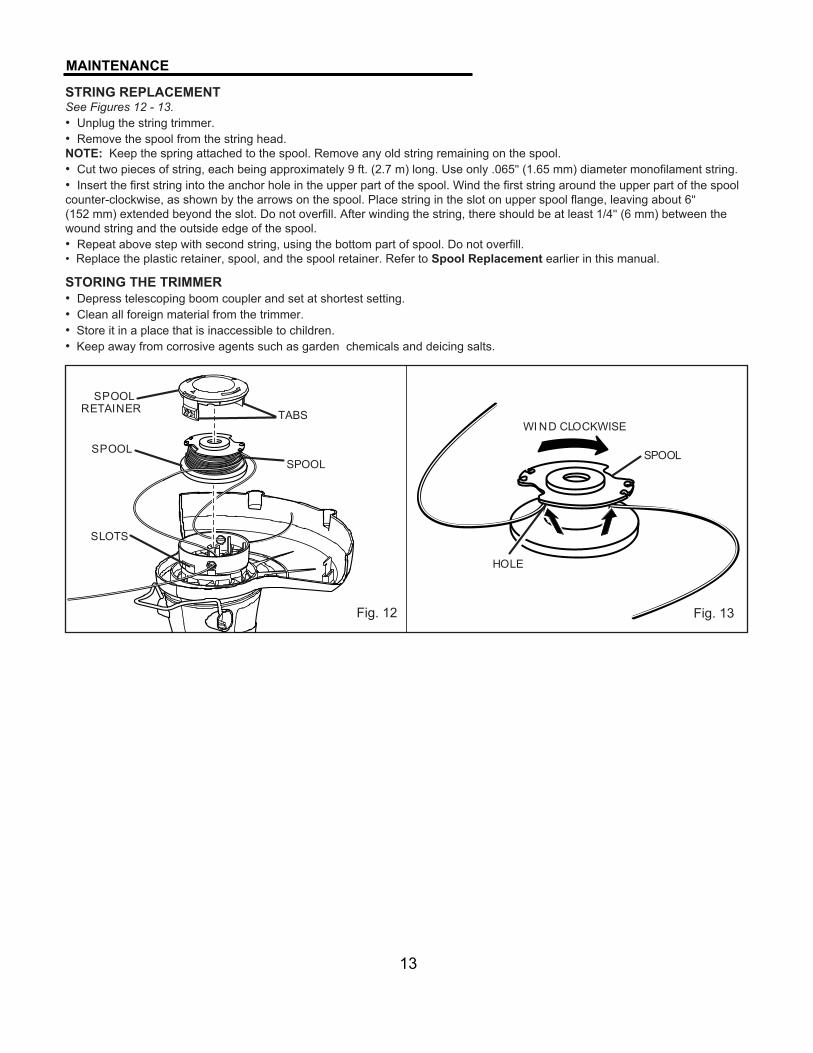
SPOOL REPLACEMENTSee Figure 12.Use only .065" diameter monofilament string. Use original manufacturer’s replacement string for best performance.• Unplug the string trimmer.• Push in tabs on side of spool retainer.• Pull spool retainer up to remove.• Remove spool.• To install the new spool, make sure the two strings are captured in the slots opposite each other on the new spool. Make sure the end of each string is extended approximately 6" beyond each slot.• Install the new spool so that the strings and slots align with the eyelets in the string head. Thread the strings into the eyelets.• Pull the strings extending from the string head so the string releases from the slots in the spool. • Reinstall the spool retainer by depressing tabs into slots and pushing down until spool retainer clicks into place.
STRING REPLACEMENTSee Figures 12 - 13.• Unplug the string trimmer.• Remove the spool from the string head. NOTE: Keep the spring attached to the spool. Remove any old string remaining on the spool.• Cut two pieces of string, each being approximately 9 ft. (2.7 m) long. Use only .065" (1.65 mm) diameter monofilament string.• Insert the first string into the anchor hole in the upper part of the spool. Wind the first string around the upper part of the spool counter-clockwise, as shown by the arrows on the spool. Place string in the slot on upper spool flange, leaving about 6"(152 mm) extended beyond the slot. Do not overfill. After winding the string, there should be at least 1/4" (6 mm) between the wound string and the outside edge of the spool.• Repeat above step with second string, using the bottom part of spool. Do not overfill.• Replace the plastic retainer, spool, and the spool retainer. Refer to Spool Replacement earlier in this manual.
12
MAINTENANCE
WARNING: When servicing, use only identical replacement parts. Use of any other parts may create a hazard or cause product damage.
WARNING: Always wear safety goggles or safety glasses with side shields during product operation. If operation is dusty, also wear a dust mask.
WARNING: Before inspecting, cleaning, or servicing the machine, shut off motor, wait for all moving parts to stop, and disconnect extension cord. Failure to follow these instructions can result in serious personal injury or property damage.
13
MAINTENANCE
STRING REPLACEMENTSee Figures 12 - 13.• Unplug the string trimmer.• Remove the spool from the string head. NOTE: Keep the spring attached to the spool. Remove any old string remaining on the spool.• Cut two pieces of string, each being approximately 9 ft. (2.7 m) long. Use only .065" (1.65 mm) diameter monofilament string.• Insert the first string into the anchor hole in the upper part of the spool. Wind the first string around the upper part of the spool counter-clockwise, as shown by the arrows on the spool. Place string in the slot on upper spool flange, leaving about 6"(152 mm) extended beyond the slot. Do not overfill. After winding the string, there should be at least 1/4" (6 mm) between the wound string and the outside edge of the spool.• Repeat above step with second string, using the bottom part of spool. Do not overfill.• Replace the plastic retainer, spool, and the spool retainer. Refer to Spool Replacement earlier in this manual.
STORING THE TRIMMER • Depress telescoping boom coupler and set at shortest setting.• Clean all foreign material from the trimmer. • Store it in a place that is inaccessible to children. • Keep away from corrosive agents such as garden chemicals and deicing salts.
Fig. 13
HOLE
WI ND CLOCKWISE
SPOOL
Fig. 12
SPOOLRETAINER
SLOTS
SPOOL
TABS
SPOOL

1. Lubricate with silicone spray.2. Install more string. Refer to String Replacement earlier in this manual.3. Pull strings while alternately pressing down on and releasing spool retainer.4. Remove strings from spool and rewind. Refer to String Replacement earlier in this manual.
1. Cut tall grass from the top down to prevent wrapping.
1. Plug in the power cord.
2. Check circuit breaker.
1. Strings are welded to themselves.2. Not enough string on spool.
3. Strings are worn too short.
4. Strings are tangled on spool.
1. Cutting tall grass at ground level.
1. Power cord is not plugged in or connection is loose.
2. Household circuit breaker is tripped.
Strings will not advance whenusing the Auto Feed Head:
Grass wraps around driveshaft housing and string head
Motor fails to start when switch trigger is depressed.
PROBLEM POSSIBLE CAUSE SOLUTION
14
TROUBLESHOOTING

15
LIMITED TWO-YEAR WARRANTY
The manufacturer warrants to the original purchaser that each new product and service part is free from defects in
material and workmanship and agrees to repair or replace under this warranty any defective product or part as
follows from the original date of purchase.
2 —Year Limited Warranty
THIS WARRANTY IS NOT TRANSFERABLE AND DOES NOT COVER:
Products sold damaged or incomplete, sold “as is”, sold reconditioned or used as rental equipment.
Delivery, installation or normal adjustments explained in the owner’s manual.
Damage or liability caused by shipping, improper handling, improper installation, incorrect voltage or improper
wiring, improper maintenance, improper modification, or the use of
recommended.
accessories and /or attachments not specifically
Repairs necessary because of operator abuse or negligence, or the failure to install, operate, maintain and store the
product according to the instructions in the owner’s manual.
Damage caused by cold, heat, rain, excessive humidity, corrosive environments and materials, or other contaminants.
Expendable items that become worn during normal use.
Cosmetic defects that do not interfere with tool functionality.
Freight costs from customer to vendor.
ANY INCIDENTAL, INDIRECT OR CONSEQUENTIAL LOSS, DAMAGE, OR EXPENSE THAT MAY RESULT FROM
ANY DEFECT, FAILURE OR MALFUNCTION OF THE PRODUCT
.
Some states do not allow the exclusion or limitations on how long an implied warranty lasts, so the above limitations
may not apply to you.
WARRANTY REPLACEMENT PARTS are available by calling the toll free number, 1-888-266-7096, 8:30am – 5:00
pm EST, Monday-Friday.
When servicing use only identical replacement parts.
16
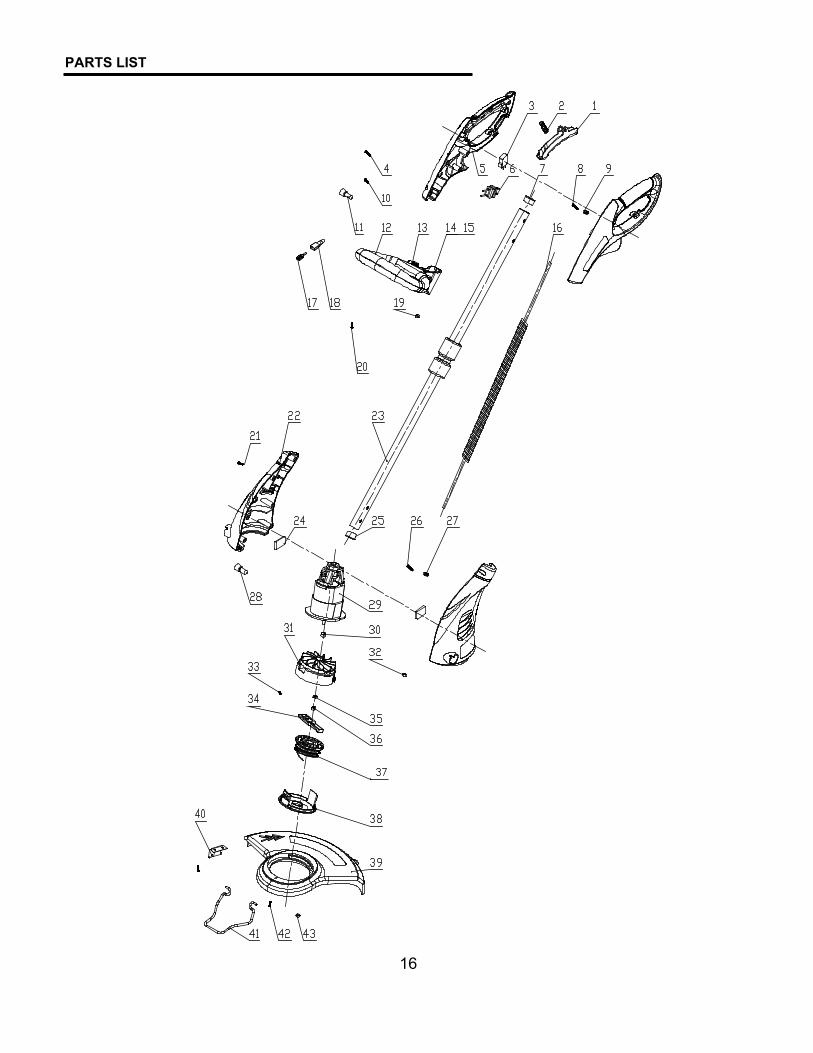
PARTS LIST

17
PARTS LIST
Item No. Part No. Description Qty12345678910111213141516171819202122232425
Switch boardSwitch springMicro switchScrewHandle housingInner plugCord protectorScrewWire holderScrewB terminalAuxiliary handle
Auxiliary handle holderRubber
Knob
CordFlag terminalFlag terminal bushingNut M6ScrewScrewMotor housingTelescoping shaft assy.Rubber padCord protector
111611
212111111221771121
26272829303132333435
ScrewWire holderB terminalMotorSheathFan assy.Nut M4SpringSpool buttonNut M5
2111111111
363738394041
3410133633401178363031523220313313013363640185341018232205053410801322090536501353410805A341023363410605A342030636902853650316334903161329020532203133220313313003363330117634201178341110532205053410801365013536101178-133202178311051783290805A33406463410368322043934125053110033634108178A311013363330033633301178
Fan plugSpool assy.Spool cover
Blade
Screw M4×16Guide
Guard
111111
4243
32208113290805A Nut M4
11
1