Embed Size (px)
Citation preview
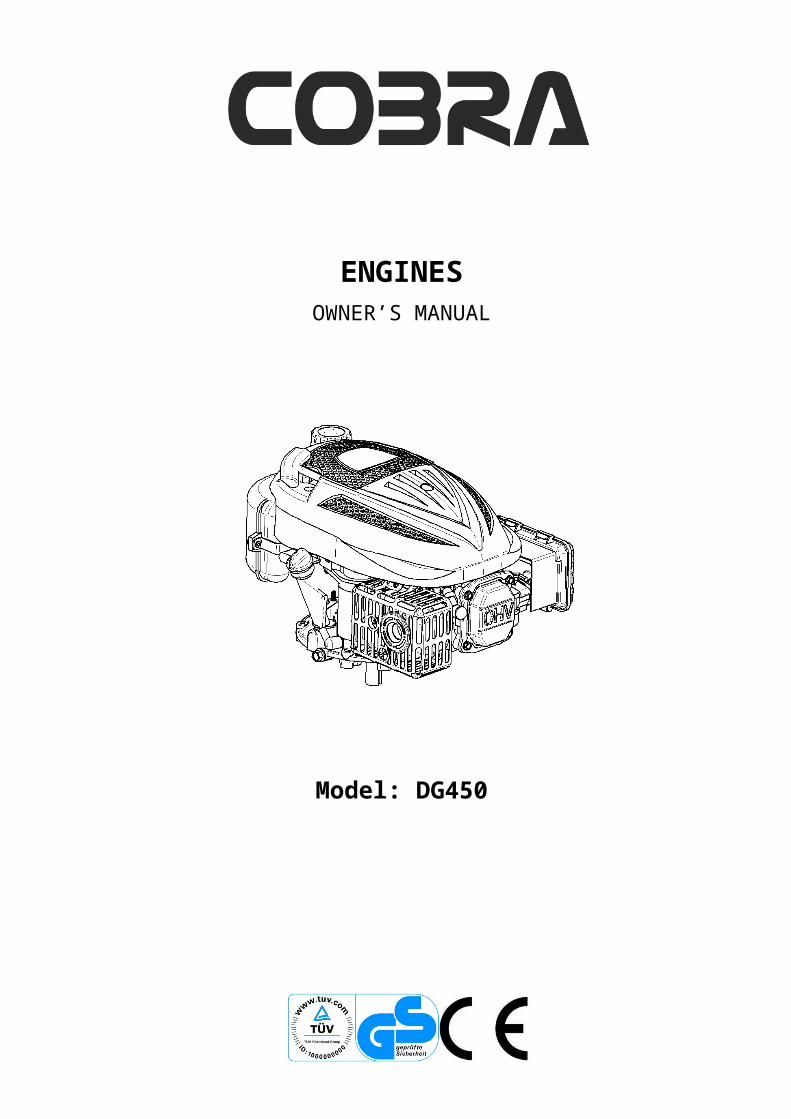
ENGINESOWNER’S MANUAL
Model: DG450
1
1
CONTENTSINTRODUCTION........................................................................ 2SAFETY MESSAGES................................................................ 2Safety Information...................................................................... 2PARTS DESCRIPTION……………………................................. 2BEFORE OPERATION CHECKS............................................... 2/3OPERATION............................................................................... 3Safe Operating Precautions........................................................ 3Starting the Engine..................................................................... 3/4Stopping the Engine.................................................................... 4Specifications.............................................................................. 5SERVICING YOUR ENGINE...................................................... 5The Importance of Maintenance................................................. 5Maintenance Safety.................................................................... 5Safety Precautions...................................................................... 6Maintenance Schedule................................................................ 6Refueling .................................................................................... 6Fuel Recommendations ............................................................. 6
Engine Oil................................................................................... 7/8Air Filter ................................................................................. 9Spark Plug ................................................................................. 9/10Fly Wheel Brake Inspection………............................................. 10Engine Adjustments………………………………………………… 11Adding a Fuel Stabiliser to Extend Fuel Storage Life................. 11Draining the Fuel Tank and Carburetor....................................... 11/12Transporting................................................................................ 13TAKING CARE OF UNEXPECTED PROBLEMS....................... 13/14
TECHNICAL& CONSUMER INFORMATIONTECHNICAL INFORMATION...................................................... 14Serial Number Location............................................................... 14Warranty……………………………………………………………… 14
2
INTRODUCTIONThank you for purchasing the Cobra DG450 engine. In order to get the best results and fully understand how to operate it safely, please read these instructions carefully before attempting to use this engine.Please keep the manual safe should you require it for future instruction. Should you resell the lawnmower please do not forget to include this manual with the machine.
Please pay attention to the instruction manual provided with the equipment powered by this engine. Pay particular attention to safe engine start up/engine shut down, safe operation, adjustments and maintenance. SAFETY MESSAGES
Please pay particular attention to this symbol , or It is a warning sign, and features throughout
this instruction manual. Faliure to follow these warnings exactly can result in personal injury and even death to yourself or others. And injury to property.SAFETY INFORMATION
Fully understand how to operate all of the controls and learn how to stop the engine quickly and safely, in the case of an emergency. Before attempting to operate this equipment, make sure the user receives adequate instruction and training.This engine produces poisonous carbon monoxide from the exhaust. Never run the engine indoors and always ensure there is adequate ventilation. The engine and exhaust become very hot during operation. Keep the engine at least 3 feet (1 meter) away from buildings and other equipment during operation. Keep flammable materials away, and do not place anything on the engine while it is running
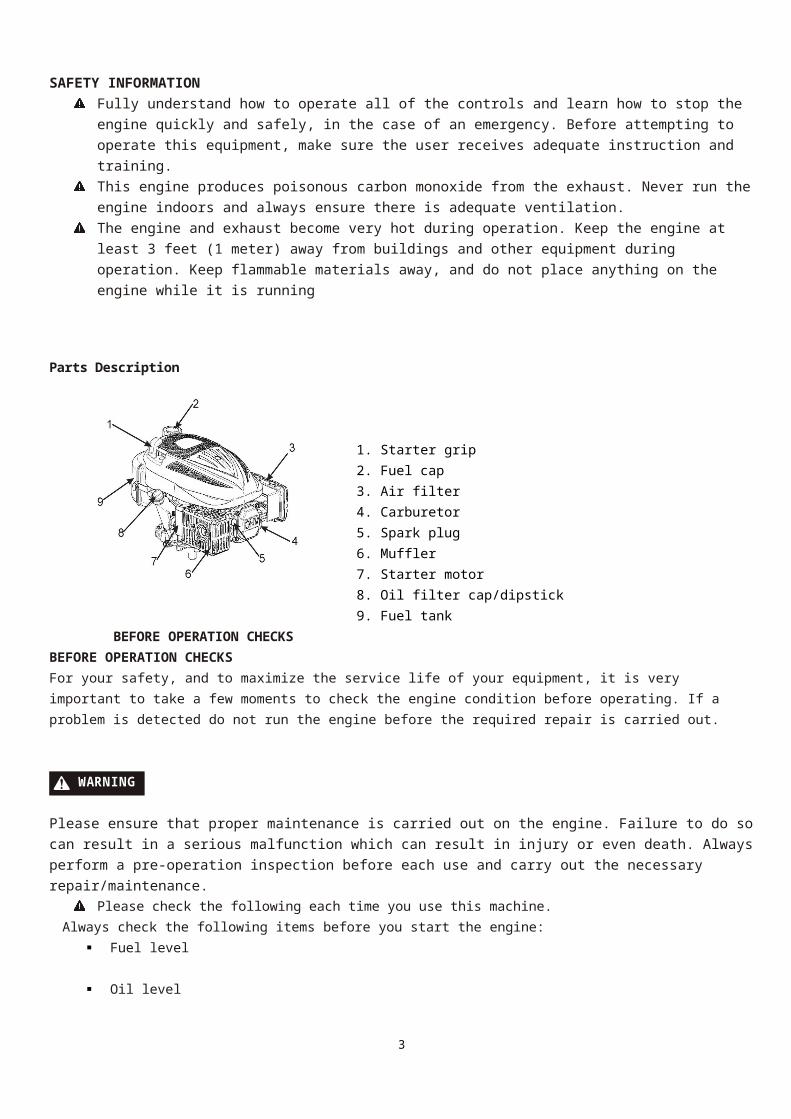
Parts Description
1. Starter grip2. Fuel cap3. Air filter4. Carburetor5. Spark plug6. Muffler7. Starter motor8. Oil filter cap/dipstick9. Fuel tank
3
BEFORE OPERATION CHECKSBEFORE OPERATION CHECKSFor your safety, and to maximize the service life of your equipment, it is very important to take a few moments to check the engine condition before operating. If a problem is detected do not run the engine before the required repair is carried out.
WARNING
Please ensure that proper maintenance is carried out on the engine. Failure to do so can result in a serious malfunction which can result in injury or even death. Always perform a pre-operation inspection before each use and carry out the necessary repair/maintenance.
Please check the following each time you use this machine.Always check the following items before you start the engine:
Fuel level
Oil level
Air cleaner
General inspection: Check for fluid leaks and loose or damaged parts.
Check the equipment powered by this engine.
OPERATIONSAFE OPERATING PRECAUTIONSBefore operating the engine for the first time, please review the SAFETY INFORMATION section and the BEFORE OPERATION
CHECKS above.
WARNINGCarbon monoxide gas is toxic. Breathing it can cause you to become unconscious and even kill you.Avoid any areas or actions that expose you to carbon monoxideNever start this machinery indoors or where there isn’t enough ventilation including your shed and garage. Carbon Monoxide can
build up quickly and cause unconsciousness and death.
Pay attention to the instructions provided with the equipment powered by this engine for any safety precautions that should be
observed with engine startup, shutdown, or operation.
STARTING THE ENGINETurn the fuel valve switch to the ON position
A1. FOR STARTING A COLD ENGINE:
Move the throttle control to the choke position. Close the safety brake control handle (on the equipment), you can choose one of the following two methods to start the engine.
4
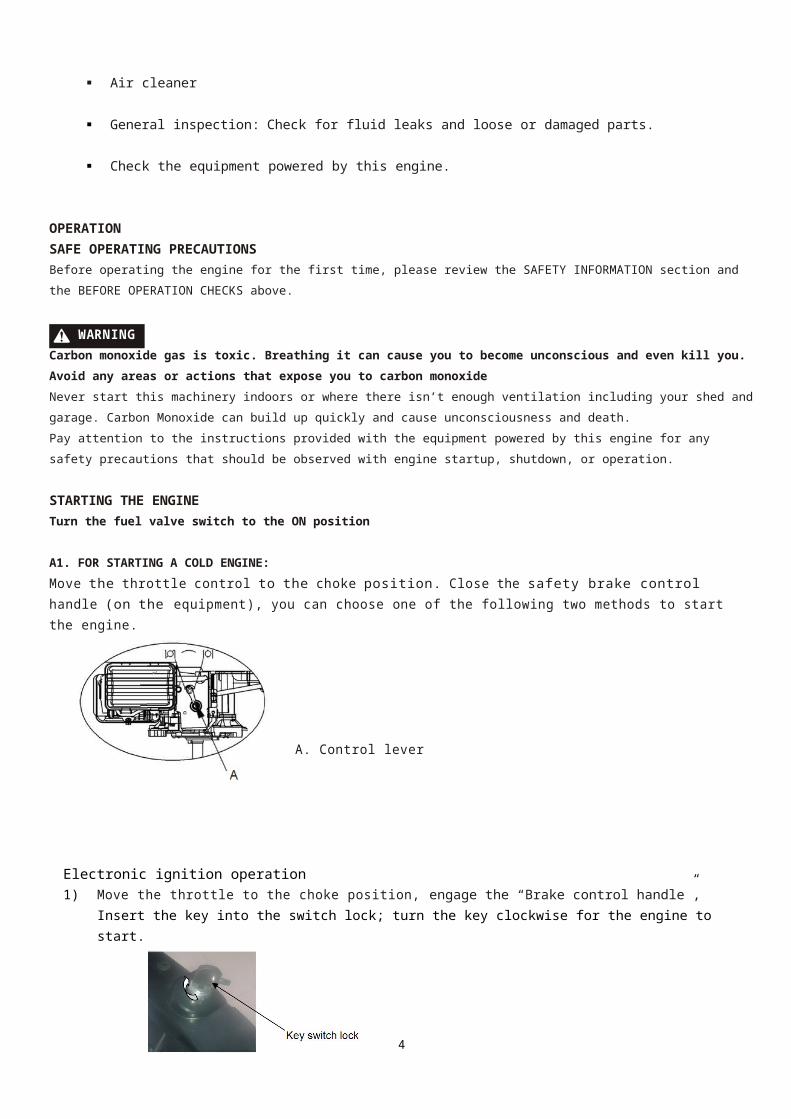
A. Control lever
Electronic ignition operation1) Move the throttle to the choke position, engage the “Brake control handle”, Insert the key into the switch lock;
turn the key clockwise for the engine to start.
Warning
Each successive electronic ignition time can not exceed 10 seconds; this will affect the service life of the battery.
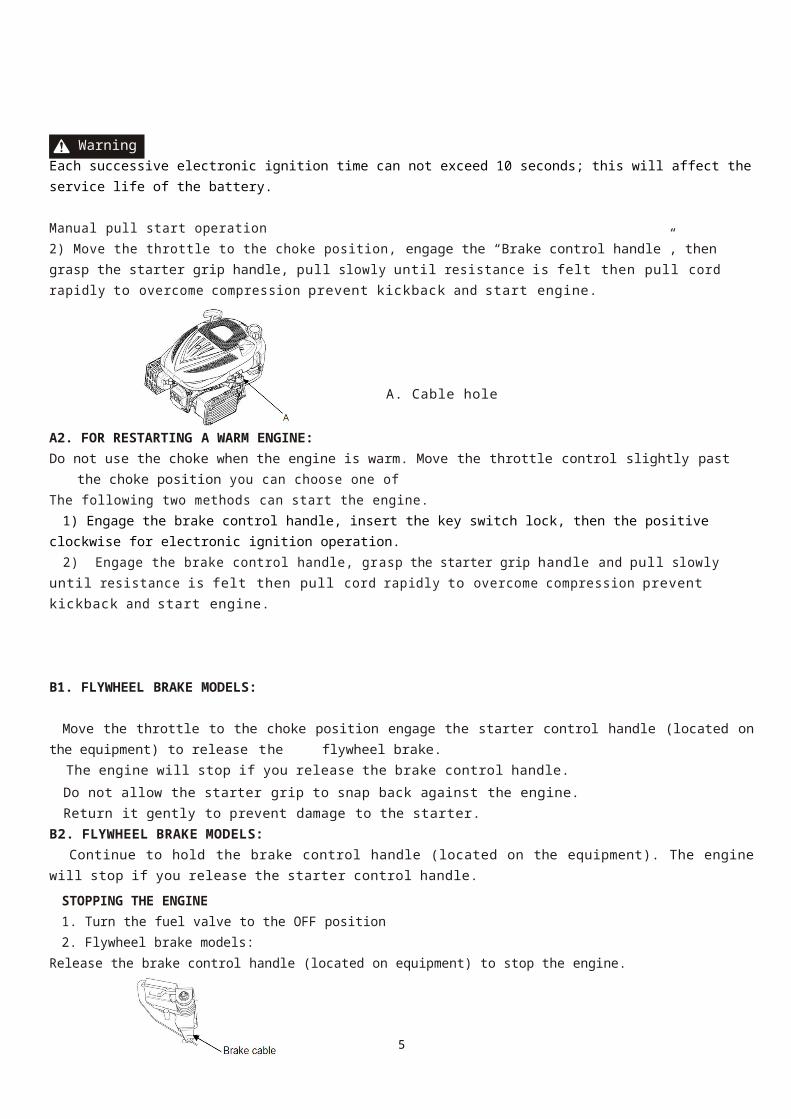
Manual pull start operation2) Move the throttle to the choke position, engage the “Brake control handle”, then grasp the starter grip handle, pull slowly until resistance is felt then pull cord rapidly to overcome compression prevent kickback and start engine.
A. Cable hole
A2. FOR RESTARTING A WARM ENGINE:Do not use the choke when the engine is warm. Move the throttle control slightly past the choke position you can choose one of The following two methods can start the engine.
1) Engage the brake control handle, insert the key switch lock, then the positive clockwise for electronic ignition operation.
2) Engage the brake control handle, grasp the starter grip handle and pull slowly until resistance is felt then pull cord rapidly to overcome compression prevent kickback and start engine.
B1. FLYWHEEL BRAKE MODELS:
Move the throttle to the choke position engage the starter control handle (located on the equipment) to release the flywheel brake. The engine will stop if you release the brake control handle.
5

Do not allow the starter grip to snap back against the engine.Return it gently to prevent damage to the starter.
B2. FLYWHEEL BRAKE MODELS: Continue to hold the brake control handle (located on the equipment). The engine will stop if you release the starter control handle.
STOPPING THE ENGINE1. Turn the fuel valve to the OFF position 2. Flywheel brake models:
Release the brake control handle (located on equipment) to stop the engine.
6

Type DG450 DG550Dry weight(kg) 14 16Engine type 4-stroke, overhead valve, single cylinderDisplacement[Bore x Stroke] 135cc 64x42mm 173cc 70x45mm Max. torque 7N·m at 2,800 min-1 10 N·m at 2,800 min-1
Cooling system Forced airLubrication systems Forced splashIgnition system TDIPTO shaft rotation CounterclockwiseStarting Method Electric motor starting & Recoil starter mode Recoil
starter mode
Specifications
Tuneup Specifications
ITEM SPECIFICATION MAINTENANCESpark plug gap 0.028-0.031 in
(0.7-0.8 mm)
Refer to page 13.
Valve clearance (cold) IN:0.06+0.02mm
EX:0.08+0.02mm
See your authorized
dealerOther specifications No other adjustments needed
SERVICING YOUR ENGINETHE IMPORTANCE OF MAINTENANCE
It is essential that good maintenance is carried out on this engine; it ensures safety and economical trouble free operation.
Failure to carry out proper maintenance to correct a problem before operation can cause your engine to malfunction which can cause serious injury or even death. Always follow the inspection recommendations and schedules in this owner’s manual.
In order for your engine to run safely and trouble free there is a maintenance schedule included in these instructions. Routine and simple maintenance procedures can be carried out with simple hand tools by you the user if you feel confident to do so. There are other service tasks that require specialist tools and are more difficult to carry out. These are best handled by a professional and we would recommend that they are performed by a qualified technician or mechanic. A list of service dealers can be found at www.cobragarden.co.uk or by calling 0115 986646.
Please pay attention to the maintenance schedule. Should you operate your engine under severe conditions such as unusual wet or dusty conditions or high load or high temperatures consult your servicing dealer to discuss your individual circumstances. In all other cases the maintenance schedule applies to normal operating conditions. MAINTENANCE AND SAFETYIt is always recommended that more difficult maintenance and service to your engine is undertaken by a qualified technician preferably a Cobra service agent. Only you can decide if you can perform a given task. Service agents can be found at: www.cobragarden.co.uk
Failure to properly follow maintenance instructions and precautions can result in injury or even death.Always follow the procedures and precautions in this owner's manual.
SAFETY PRECAUTIONS
7
Always ensure the engine is off and cooled down before carrying out maintenance or repairs.This safe guards’ and eliminates the following serious potential hazards;
Carbon monoxide poisoning from engine exhaust. Be sure there is adequate ventilation whenever you operate the engine.
Burns from hot parts.Always make sure the engine and exhaust system are cool before touching.Injury from moving parts.
Do not run the engine unless the instructions require you to do so.
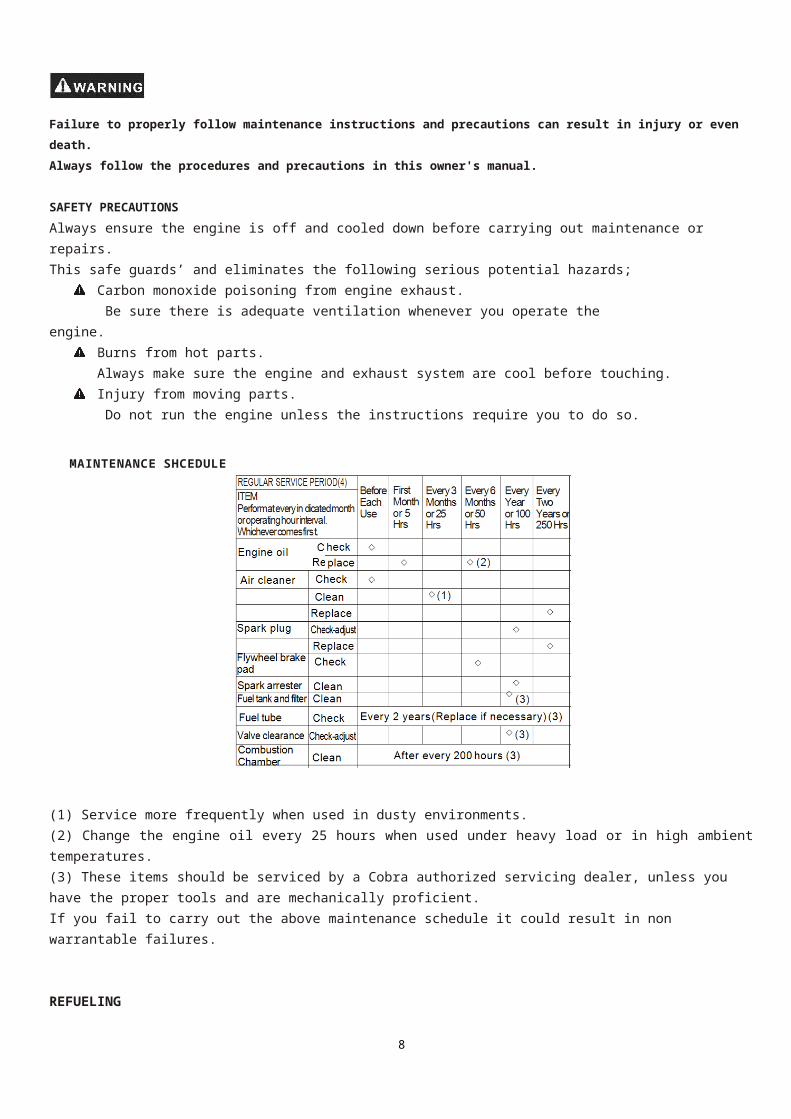
MAINTENANCE SHCEDULE
(1) Service more frequently when used in dusty environments.(2) Change the engine oil every 25 hours when used under heavy load or in high ambient temperatures.(3) These items should be serviced by a Cobra authorized servicing dealer, unless you have the proper tools and are mechanically proficient. If you fail to carry out the above maintenance schedule it could result in non warrantable failures.
REFUELINGUse unleaded Petrol with a pump octane rating of 86 or higher. This engine is certified to operate on unleaded petrol. Unleaded Petrol produces fewer engine and spark plug deposits and extends the exhaust system life. Fill with fuel before mowing.
8
10
Petrol is highly flammable and explosive, take care when refueling as you can burn or seriously injure yourself.Stop engine and keep heat, sparks, and flame away. (never smoke when refueling) Wait at least 15 minutes for the engine to coolRefuel only outdoors.Wipe up spills immediately.If fuel is spilt on the machine or engine wipe up immediately and wait for vapors to dissipate before restarting.
Fuel can damage and corrode some paint and some types of plastic. Always be careful not to spill fuel when re-fueling your fuel tank. Any damage caused by spilled fuel is not covered under the Warranty.
Always use the specified fuel. Never use stale or contaminated petrol or oil mixture. Avoid getting dirt or water in the fuel tank.
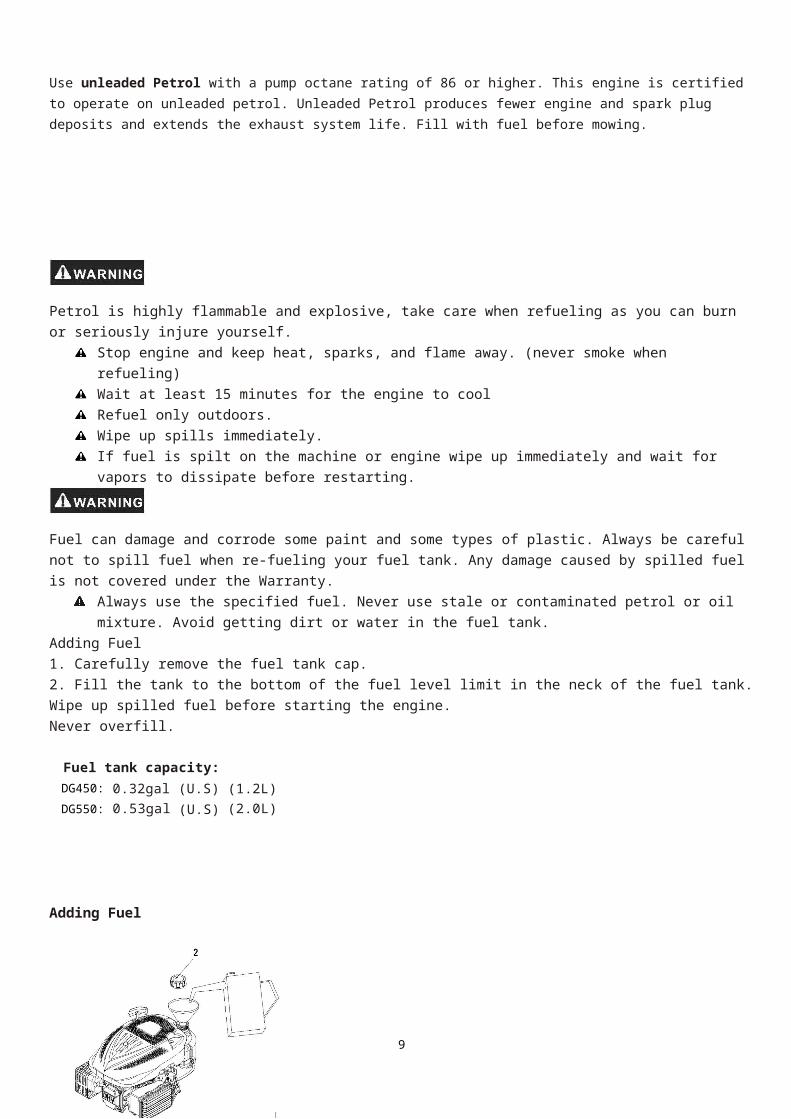
Adding Fuel1. Carefully remove the fuel tank cap.2. Fill the tank to the bottom of the fuel level limit in the neck of the fuel tank. Wipe up spilled fuel before starting the engine.Never overfill.
Fuel tank capacity:DG450: 0.32gal (U.S) (1.2L)DG550: 0.53gal (U.S) (2.0L)
Adding Fuel
2: Fuel tank cap
ENGINE OIL Use 4-stroke motor oil that exceeds or meets the requirements for API service classification SH, SJ, or equivalent. Always check the API service label on the oil container to be sure it includes the letters SH, SJ, or equivalent
Always change the oil at the required service interval.(please refer to the maintenance schedule)
SAE 10W-30 is recommended for general use.
Oil Level Check
9
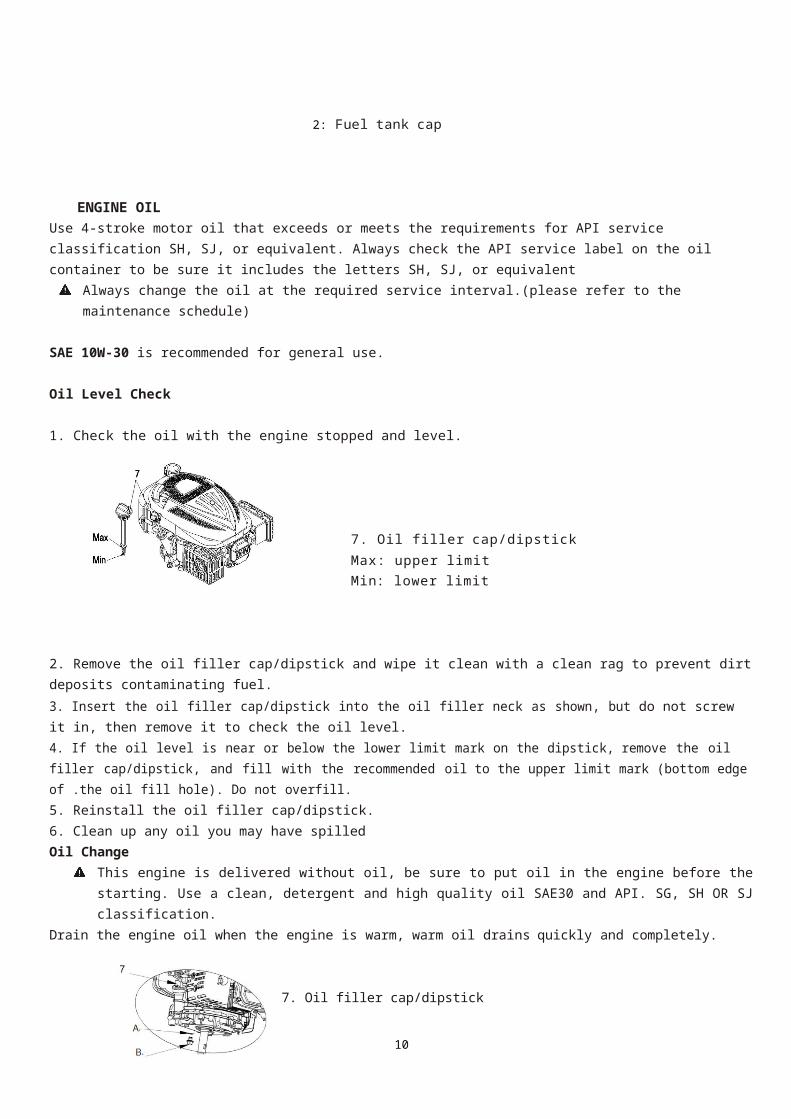
1. Check the oil with the engine stopped and level.
7. Oil filler cap/dipstickMax: upper limitMin: lower limit
2. Remove the oil filler cap/dipstick and wipe it clean with a clean rag to prevent dirt deposits contaminating fuel.
3. Insert the oil filler cap/dipstick into the oil filler neck as shown, but do not screw it in, then remove it to check the oil level.4. If the oil level is near or below the lower limit mark on the dipstick, remove the oil filler cap/dipstick, and fill with the recommended oil to the upper limit mark (bottom edge of .the oil fill hole). Do not overfill.5. Reinstall the oil filler cap/dipstick.6. Clean up any oil you may have spilledOil Change
This engine is delivered without oil, be sure to put oil in the engine before the starting. Use a clean, detergent and high quality oil SAE30 and API. SG, SH OR SJ classification.
Drain the engine oil when the engine is warm, warm oil drains quickly and completely.
7. Oil filler cap/dipstickA: Sealing washerB: Drain bolt
1. Turn the fuel valve to the OFF position to reduce the possibility of fuel leakage 2. Place a suitable container next to the engine to catch the used oil.3. Remove the drain bolt and drain the oil into the container by slightly tipping the engine toward the oil filler cap/dipstick.Please dispose of used motor oil in a manner that is compatible with the environment. We suggest you take used oil in a sealed container to your local recycling center or service station for reclamation. Do not throw it in the bin or pour it on the groundor down a drain.4. With the engine in a level position, fill to the upper limit mark on the dipstick with the recommended oil (see below). Engine Oil Capacity:0.63 US qt (0.60L)
10

1 Running the engine with a low oil level can cause engine damage.
Reinstall the oil filler cap/dipstick securely.
AIR FILTERIt is essential that the air filter is clean and free from dirt and dust. If dirt is allowed to build up it will restrict air flow to the carburetor and cause poor engine performance and use up more fuel. Inspect the air filter before you operate the machine. If required clean the air filter. You will need to clean/change the air filter more frequently if you are operating the engine in very dusty and dry environments. Never operate the engine without an air filter, or with a damaged air filter, as it will allow dirt to enter the engine, causing rapid engine wear. This type of damage is not covered under the warranty
A: Air cleaner caseB: Foam FilterC: Air cleaner cover
Inspection1. Remove the air filter cover. Be careful to prevent dirt and debris from falling into the air cleaner base.
2. Remove the air cleaner from the air filter base.3. Inspect the air filter elements. Replace any damaged elements. Clean or replace dirty elements.
Cleaning1. Remove the air filter cover and foam element, as described in the “INSPECTION” procedure.2. Remove the foam element from the air cleaner base.3. Tap the element several times on a hard surface to remove excess dirt. Never try to brush off dirt; brushing will force dirt into the fibers. Clean the foam element with water and detergent. Leave to fully air dry before reinstalling it. 4. Wipe dirt from the air filter base and clean using a moist rag. Be careful to prevent dirt from entering the air duct that leads to the carburetor.5. Reinstall the air filter element, and make sure it is properly positioned. Install the air filter cover and tighten the two bolts securely.
SPARK PLUGAlways use the correct replacement spark plug as listed below.
Recommended Spark Plug: BPR5ES (NGK) The recommended spark plug is the correct heat range for normal engine
11

operating temperatures.
A loose spark plug can become very hot and can damage the engine. Over tightening the spark plug can damage the threads in the cylinder head.
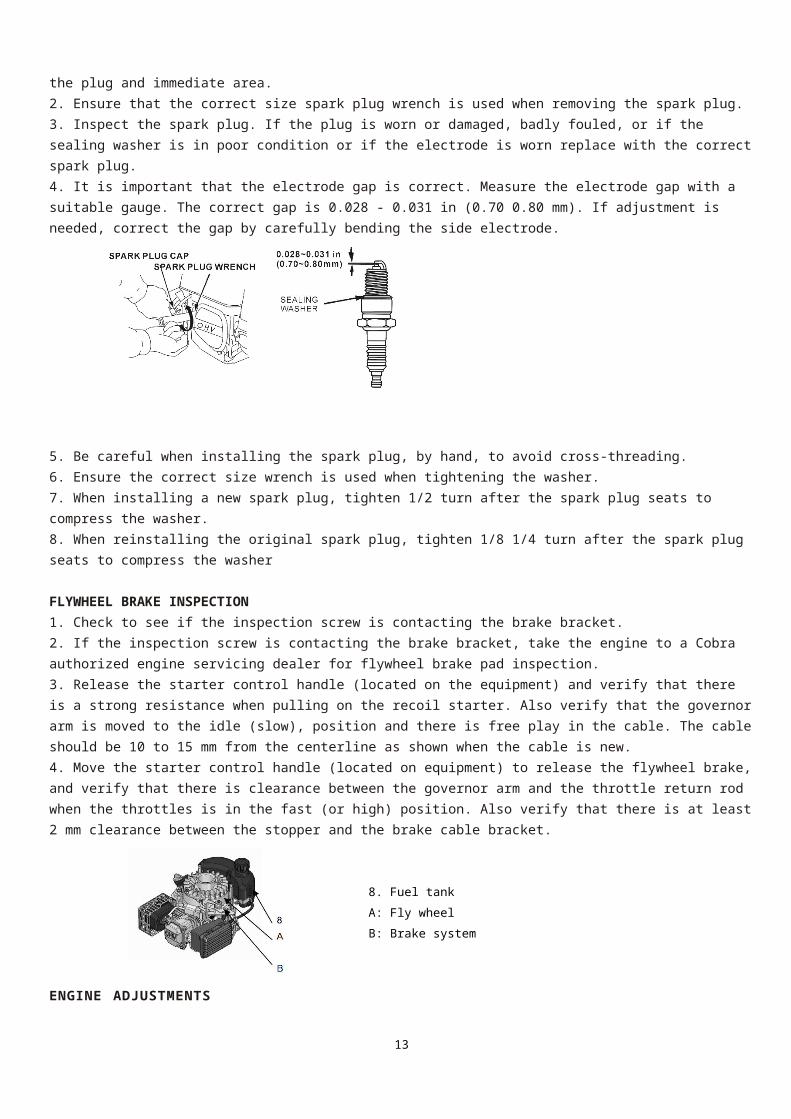
Please be aware that incorrect spark plugs can cause engine damage.Always ensure that the spark plug must be properly gapped and free of deposits.Please be aware that incorrect spark plugs can cause engine damage.Always ensure that the spark plug must be properly gapped and free of deposits.1. Remove/disconnect the cap from the spark plug, clean and remove the dirt from around the plug and immediate area.2. Ensure that the correct size spark plug wrench is used when removing the spark plug. 3. Inspect the spark plug. If the plug is worn or damaged, badly fouled, or if the sealing washer is in poor condition or if the electrode is worn replace with the correct spark plug.4. It is important that the electrode gap is correct. Measure the electrode gap with a suitable gauge. The correct gap is 0.028 - 0.031 in (0.70 0.80 mm). If adjustment is needed, correct the gap by carefully bending the side electrode.
5. Be careful when installing the spark plug, by hand, to avoid cross-threading.6. Ensure the correct size wrench is used when tightening the washer. 7. When installing a new spark plug, tighten 1/2 turn after the spark plug seats to compress the washer.8. When reinstalling the original spark plug, tighten 1/8 1/4 turn after the spark plug seats to compress the washer
FLYWHEEL BRAKE INSPECTION1. Check to see if the inspection screw is contacting the brake bracket.2. If the inspection screw is contacting the brake bracket, take the engine to a Cobra authorized engine servicing dealer for flywheel brake pad inspection.3. Release the starter control handle (located on the equipment) and verify that there is a strong resistance when pulling on the recoil starter. Also verify that the governor arm is moved to the idle (slow), position and there is free play in the cable. The cable should be 10 to 15 mm from the centerline as shown when the cable is new.4. Move the starter control handle (located on equipment) to release the flywheel brake, and verify that there is clearance between the governor arm and the throttle return rod when the throttles is in the fast (or high) position. Also verify that there is at least 2 mm clearance between the stopper and the brake cable bracket.
8. Fuel tank12
15
A: Fly wheel
B: Brake system
ENGINE ADJUSTMENTS
Do not change in any way the rated speed of the engine (carburetor side or regulator side).Your engine was adjusted in the factory and the non-respect of the homologation speed engine could be dangerous for your safety and others safety. If the rated speed is changed in any way, the factory warranty will be cancelled.Helpful tips and suggestions when storing your engineStorage PreparationProper storage preparation is essential for keeping your engine trouble free and looking good. The following steps will help to keep rust and corrosion from impairing your engine's function and appearance, and will make the engine easier to start when you use it again.
CleaningIf the engine has been running, allow it to cool for at least half an hour before cleaning. Clean all exterior surfaces, touch up any damaged paint, and coat other areas that may rust with a light film of oil.
Using a garden hose or pressure washing equipment can force water into the air cleaner or muffler opening. Water in the air cleaner will soak the air filter, and water that passes through the air filter or muffler can enter the cylinder, causing damage.FuelPetrol will oxidize and deteriorate in storage. Deteriorated fuel will cause hard starting, and it leaves gum deposits that clog the fuel system. If the petrol in your engine deteriorates during storage, you may need to have the carburetor, and other fuel system components, serviced or replaced. The air in a partially filled fuel tank promotes fuel deterioration. Very warm storage temperatures accelerate fuel deterioration. Fuel problems may occur within a few months, or even less if the petrol was not fresh when you filled the fuel tank.Fuel system damage or engine performance problems resulting from neglected storage preparation are not covered under Warranty.
Adding a fuel stabilizer or additive to extend fuel storage lifeWhen adding a petrol stabilizer, fill the fuel tank with fresh petrol. If only partially filled, air in the tank will promote fuel deterioration during storage. If you keep a container of petrol for refueling, be sure that it contains only fresh fuel.1. Add the petrol stabilizer by following the manufacturer's instructions.2. After adding a petrol stabilizer, run the engine outdoors for 10 minutes to be sure that treated fuel has replaced the untreated fuel in the carburetor.
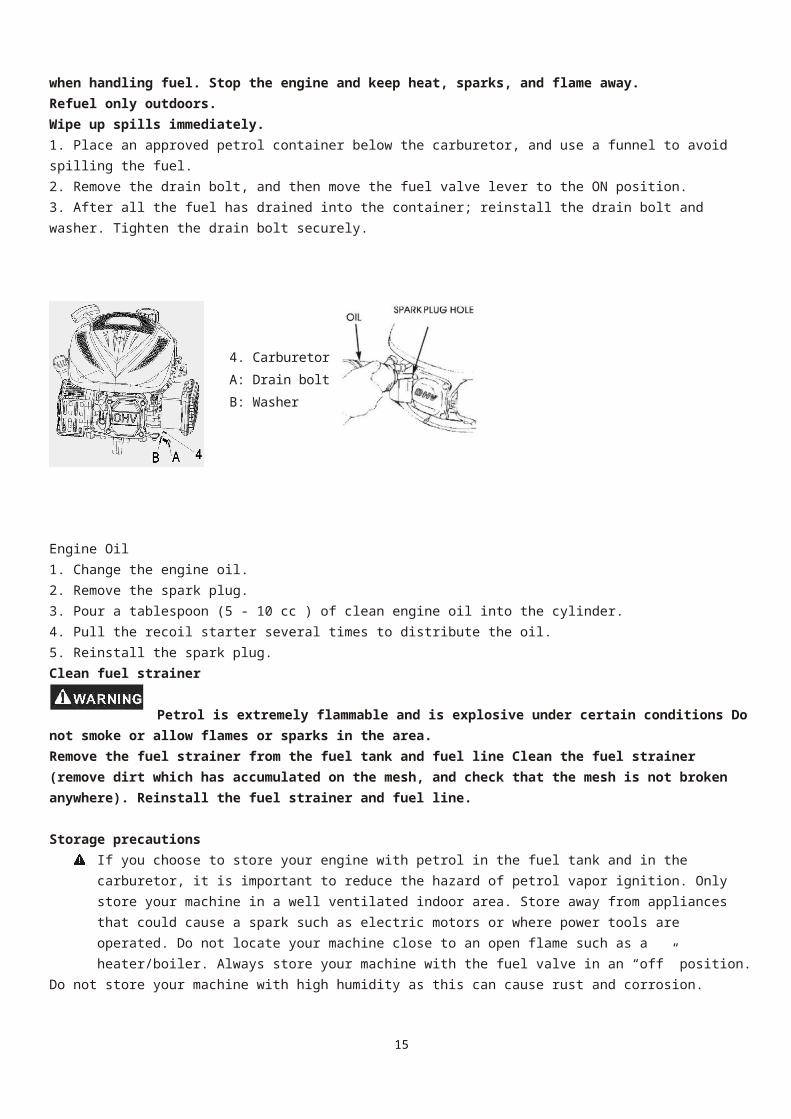
Draining the fuel tank and carburetor warning
Petrol is highly flammable and explosive, and you can be burned or seriously injured when handling fuel. Stop the engine and keep heat, sparks, and flame away. Refuel only outdoors.Wipe up spills immediately.
13
1. Place an approved petrol container below the carburetor, and use a funnel to avoid spilling the fuel.2. Remove the drain bolt, and then move the fuel valve lever to the ON position.3. After all the fuel has drained into the container; reinstall the drain bolt and washer. Tighten the drain bolt securely.
4. Carburetor
A: Drain bolt
B: Washer
Engine Oil1. Change the engine oil.2. Remove the spark plug.3. Pour a tablespoon (5 - 10 cc ) of clean engine oil into the cylinder.4. Pull the recoil starter several times to distribute the oil.5. Reinstall the spark plug.Clean fuel strainer
Petrol is extremely flammable and is explosive under certain conditions Do not smoke or allow flames or sparks in the area.Remove the fuel strainer from the fuel tank and fuel line Clean the fuel strainer (remove dirt which has accumulated on the mesh, and check that the mesh is not broken anywhere). Reinstall the fuel strainer and fuel line.
Storage precautionsIf you choose to store your engine with petrol in the fuel tank and in the carburetor, it is important to reduce the hazard of petrol vapor ignition. Only store your machine in a well ventilated indoor area. Store away from appliances that could cause a spark such as electric motors or where power tools are operated. Do not locate your machine close to an open flame such as a heater/boiler. Always store your machine with the fuel valve in an “off” position.
Do not store your machine with high humidity as this can cause rust and corrosion.
Keep the engine level in storage. Tilting can cause fuel or oil leakage.Removal from Storage
Always fully check your machine before use. Check your engine as described in the “BEFORE OPERATIONCHECKS” section of this manual.If you drained your engine before storage, re-fuel using only fresh petrol. Do not use fuel stored in containers for long periods of time as petrol oxidizers and deteriorates which could cause difficulty when trying to start the engine.
14
If the cylinder was coated with oil during storage preparation, the engine will smoke briefly at startup. This is normal.
TRANSPORTING Always keep the machine level when transporting and make sure the fuel valve is in an “off” position.
TAKING CARE OF UNEXPECTED PROBLEMS
ENGINE WILL NOT START
Possible Cause Correction
1. Check fuel.
Out of fuel. Refuel
Bad fuel; engine stored without eating or draining petrol, of refueled with bad petrol.
Drain the fuel tank and Carburetor. Refuel With fresh petrol.
2. Remove and inspect Spark plug.
Spark plug faulty, fouled, or Improperly gapped. Spark plug wet with fuel (flooded engine).
Replace the spark plug Dry and reinstall spark plug.
3.Check choke Choke is opened Shut off choke well
4. Take engine to an authorized our Servicing dealer, or refer to shop manual
Fuel filter clogged, carburetor malfunction, ignition malfunction, valves stuck, etc.
Replace or repair faulty components as necessary.
5.Key start does not start the engine
Battery needs to be recharged or isn’t connected correctly.
Recharge the battery and check the connections.
15
ENGINE LACKS POWER Possible Cause Correction
1. Check air cleanerAir cleaner elements clogged.
Clean or replace airCleaner elements(p. 12)
2. Check fuel.without treating or draining gasoline, of refueled with bad gasoline.
carburetor (p. 9). Refuel with fresh gasoline.
3. Take engine to an authorized our servicing dealer, or refer to shop manual.
Fuel filter clogged, carburetor malfunction, ignition malfunction,valves stuck,etc
Replace or repair faulty Components as necessary.
TECHNICAL & CONSUMER INFORMATION TECHNICAL INFORMATIONSerial Number Location
A: Serial number location
Record the engine serial number in the space below. You will need this information when ordering parts and when making technical or warranty inquiries.
Engine serial number:
Warranty: Please refer to the mower manual for warranty
16
17