Embed Size (px)
Citation preview
Crestron ADMS Intermedia Delivery System™ Operations Guide

This document was prepared and written by the Technical Documentation department at:
Crestron Electronics, Inc.
15 Volvo Drive Rockleigh, NJ 07647
1-888-CRESTRON
Important Safety Instructions
• Read these instructions.
• Keep these instructions.
• Heed all warnings.
• Follow all instructions.
• Do not use this apparatus near water.
• Clean only with dry cloth.
• Do not block any ventilation openings. Install in accordance with the manufacturer's instructions.
• Do not install near any heat sources such as radiators, heat registers, stoves, or other apparatus (including amplifiers) that produce heat.
• Do not defeat the safety purpose of the polarized or grounding-type plug. A polarized plug has two blades with one wider than the other. A grounding-type plug has two blades and a third grounding prong. The wide blade or the third prong are provided for your safety. If the provided plug does not fit into your outlet, consult an electrician for replacement of the obsolete outlet.
• Protect the power cord from being walked on or pinched particularly at plugs, convenience receptacles, and the point where they exit from the apparatus.
• Only use attachments/accessories specified by the manufacturer.
• Use only with the cart, stand, tripod, bracket or table specified by the manufacturer or sold with the apparatus. When a cart is used, use caution when moving the cart/apparatus combination to avoid injury from tip-over.
• Unplug this apparatus during lightning storms or when unused for long periods of time.
• Refer all servicing to qualified service personnel. Servicing is required when the apparatus has been damaged in any way, such as power-supply cord or plug is damaged, liquid has been spilled or objects have fallen into the apparatus, the apparatus has been exposed to rain or moisture, does not operate normally, or has been dropped.
• Disconnect power prior to connecting or disconnecting equipment.
• Do not install in direct sunlight.
• The apparatus must be installed in a way that the power cord can be removed either from the wall outlet or from the device itself in order to disconnect the mains power.
• Prevent foreign objects from entering the device.
The lightning flash with arrowhead symbol, within an equilateral triangle, is intended to alert the user to the presence of uninsulated “dangerous voltage” within the product's enclosure that may be of sufficient magnitude to constitute a risk of electric shock to persons.
The exclamation point within an equilateral triangle is intended to alert the user to the presence of important operating and maintenance (servicing) instructions in the literature accompanying the appliance.
WARNING:TO REDUCE THE RISK OF FIRE OR ELECTRIC SHOCK, DO NOT EXPOSE THIS APPARATUS TO RAIN OR MOISTURE. THE APPARATUS SHALL NOT BE EXPOSED TO DRIPPING OR SPLASHING. OBJECTS FILLED WITH LIQUIDS, SUCH AS VASES, SHOULD NOT BE PLACED ON THE APPARATUS.
WARNING:TO PREVENT ELECTRIC SHOCK, DO NOT REMOVE COVER. THERE ARE NO USER SERVICEABLE PARTS INSIDE. ONLY QUALIFIED SERVICE PERSONNEL SHOULD PERFORM SERVICE.
CAUTIONRISK OF ELECTRIC SHOCK
DO NOT OPEN
AVIS: RISQUE DE CHOC ELECTRIQUE NE PAS OUVRIR
WARNING:THIS IS AN APPARATUS WITH CLASS I CONSTRUCTION. IT SHALL BE CONNECTED TO AN ELECTRICAL OUTLET WITH AN EARTHING GROUND TERMINAL.
IMPORTANT:
The ADMS can be used with Class 2 output wiring.

Regulatory Compliance
Federal Communications Commission (FCC) Compliance Statement
This Class B digital apparatus complies with Canadian ICES-003.
Cet appareil numérique de la classe B est conforme à la norme NMB-003 du Canada.
Industry Canada (IC) Compliance Statement
This device complies with part 15 of the FCC Rules. Operation is subject to the following conditions:(1) This device may not cause harmful interference and (2) this device must accept any interference received, including interference that may cause undesired operation.
CAUTION: Changes or modifications not expressly approved by the manufacturer responsible for compliance could void the user’s authority to operate the equipment.
NOTE: This equipment has been tested and found to comply with the limits for a Class B digital device, pursuant to part 15 of the FCC Rules. These limits are designed to provide reasonable protection against harmful interference in a residential installation. This equipment generates, uses and can radiate radio frequency energy and, if not installed and used in accordance with the instructions, may cause harmful interference to radio communications. However, there is no guarantee that interference will not occur in a particular installation. If this equipment does cause harmful interference to radio or television reception, which can be determined by turning the equipment off and on, the user is encouraged to try to correct the interference by one or more of the following measures:
Reorient or relocate the receiving antennaIncrease the separation between the equipment and receiverConnect the equipment into an outlet on a circuit different from that to which the receiver is connectedConsult the dealer or an experienced radio/TV technician for help
As of the date of manufacture, the ADMS has been tested and found to comply with specifications for CE marking and standards per EMC and Radiocommunications Compliance Labelling.
All brand names, product names and trademarks are the property of their respective owners. ©2010 Crestron Electronics, Inc.

Crestron ADMS Intermedia Delivery System™
Contents
Intermedia Delivery System™: ADMS 1 Introduction ...............................................................................................................................1
Features and Functions ................................................................................................1 Applications.................................................................................................................3 Specifications ..............................................................................................................4 Physical Description....................................................................................................7
Setup ........................................................................................................................................12 Network Wiring.........................................................................................................12 Identity Code .............................................................................................................12 Installation.................................................................................................................12 Hardware Hookup .....................................................................................................14 Configure the ADMS ................................................................................................15
System Recovery .....................................................................................................................62 Programming Software............................................................................................................63
Earliest Version Software Requirements for the PC .................................................63 Programming with Crestron SystemBuilder..............................................................63 Programming with SIMPL Windows ........................................................................63 Example Program ......................................................................................................65
Operation .................................................................................................................................66 Front Panel Operation................................................................................................66 On-Screen-Display Operation ...................................................................................66
Problem Solving ......................................................................................................................80 Troubleshooting.........................................................................................................80 Reference Documents................................................................................................81 Further Inquiries ........................................................................................................81 Future Updates ..........................................................................................................81
Appendix: Internet Browser Keyboard Shortcuts ....................................................................82 Software License Agreement...................................................................................................83 Return and Warranty Policies ..................................................................................................85
Merchandise Returns / Repair Service ......................................................................85 CRESTRON Limited Warranty.................................................................................85 Trademark Information .............................................................................................86
Operations Guide – DOC. 6854C Contents • i

Crestron ADMS Intermedia Delivery System™
Intermedia Delivery System™: ADMS
Introduction The Crestron® Intermedia Delivery System™ (ADMS) Provides a powerful and user-friendly solution for accessing movies, videos, and music content from a full array of sources, whether from a DVD or Blu-ray Disc™, local hard drive, network device, or the Internet.
Features and Functions • Removes the boundaries between movies, music, TV, and the Internet
• Delivers all the content you want from DVDs, Blu-ray Discs, CDs, MP3s, iTunes Plus®, Windows Media™, Netflix®, Amazon.com®, YouTube® and virtually any other online source you desire
• Organizes everything in an intuitive on-screen or touchpanel user interface
• Allows easy searching by title, actor, artist, genre, etc. • WorldSearch® instantly finds the content you want ― whether it is on a
hard drive, optical disc, or the Internet ― and delivers it to your home theater in full HD and 7.1 surround sound
• Purchase or rent movies and videos right on-screen • Integrated Web browser enables access to all your favorite websites • Onboard Blu-ray Disc drive allows playing DVDs and importing CDs • Stores up to 1,000 Blu-ray Discs and DVDs by linking up to five
Crestron ADC-200BR units (optional) • 1TB internal hard drive storage • RAID 1 (mirrored) data loss prevention technology • Expandable using NAS or Windows Home Server appliances • Outputs up to 1080p high-definition video and 7.1 surround sound, plus
two discrete zones of stereo audio • Home Control screen enables onscreen control of lighting, climate, and
other home automation functions
(Continued on following page)
Operations Guide – DOC. 6854C Intermedia Delivery System™: ADMS • 1
Intermedia Delivery System™ Crestron ADMS
Features and Functions (continued)
• Provides native Crestron control system integration via Ethernet • Gigabit LAN port enables ultra high-speed downloads and glitch-free
streaming • Front panel USB and 1394 ports enable easy transfer of home movies,
photos, and music files • Advanced HDCP support ensures compatibility with protected content • Ultra secure and reliable operating system delivers a superior
alternative to HTPCs • Ultra-quiet design allows placement in the immediate listening
environment • VNC remote access enables off-premises dealer support • 3-space 19” rack-mountable (rack ears included)
Part of a complete Crestron home entertainment system, the ADMS provides a powerful way to gather every type of content from a full array of sources, whether from a DVD or Blu-ray Disc™, local hard drive, network device, or online. Exclusive WorldSearch® finds anything you want, instantly presenting every available movie title, streaming video, Internet TV program, and music file that matches your search — all within a beautiful graphic interface, onscreen or on a Crestron touchpanel, for immediate enjoyment through your home theater or whole-house audio system.
Crestron Intermedia Delivery™ brings together all the most popular content sources so you do not have to search your computer hard drive or DVD changer, or comb through countless websites looking for that new blockbuster release, viral video, or online TV episode. The ADMS provides a cohesive and intuitive user interface for everything, displaying cover art and metadata for music and movies, with multiple ways to find the content you want — quickly and easily — delivering it on demand right to your HD display in full 1080p resolution and 7.1 surround sound.
The ADMS lets you purchase and rent movies right through you HDTV display or touchpanel. Or, visit your favorite websites using the integrated web browser. Use the built-in Blu-ray Disc drive to play DVDs and import CDs. Transfer home movies, photos, and music files through the front panel USB and 1394 ports. Even access home automation controls right on screen.
With its user-friendly onscreen interface, native Crestron control integration, ultra secure and reliable operating system, RAID 1 data loss prevention, quiet operation, and remote dealer support access, the ADMS offers much more than traditional media servers and HTPCs.
Mass Movie Storage In addition to your online downloads, adding the ADC-200BR 200-Disc Blu-ray Changer (sold separately) to the ADMS seamlessly integrates an entire collection of DVDs and high-definition Blu-ray Discs into the media library. Up to five changers can be daisy-chained, providing ready access to an incredible 1000 discs. Since the discs are not “ripped” to the hard drive, copyrighted content can be stored and played legally for your personal enjoyment.
Easy Hard Drive Expansion Expanding storage beyond the system's internal 1TB hard drive is made easy with the CEN-NAS-4TB (sold separately). It comes pre-configured for the ADMS, and
2 • Intermedia Delivery System™: ADMS Operations Guide – DOC. 6854C
Crestron ADMS Intermedia Delivery System™
features four hot-swappable 1TB hard drives with RAID 5 protection, all in a single rack space. It can store 1500 standard definition movie downloads, and well over 300,000 songs (compressed @ 320kbps).
Wireless Keyboard Navigate the ADMS and surf the Web with ease from any seat in the room with the KB-RFUSB Wireless Keyboard (sold separately). It features a 360 degree mouse pad, plus extra keys for quick-access to the many ADMS features.
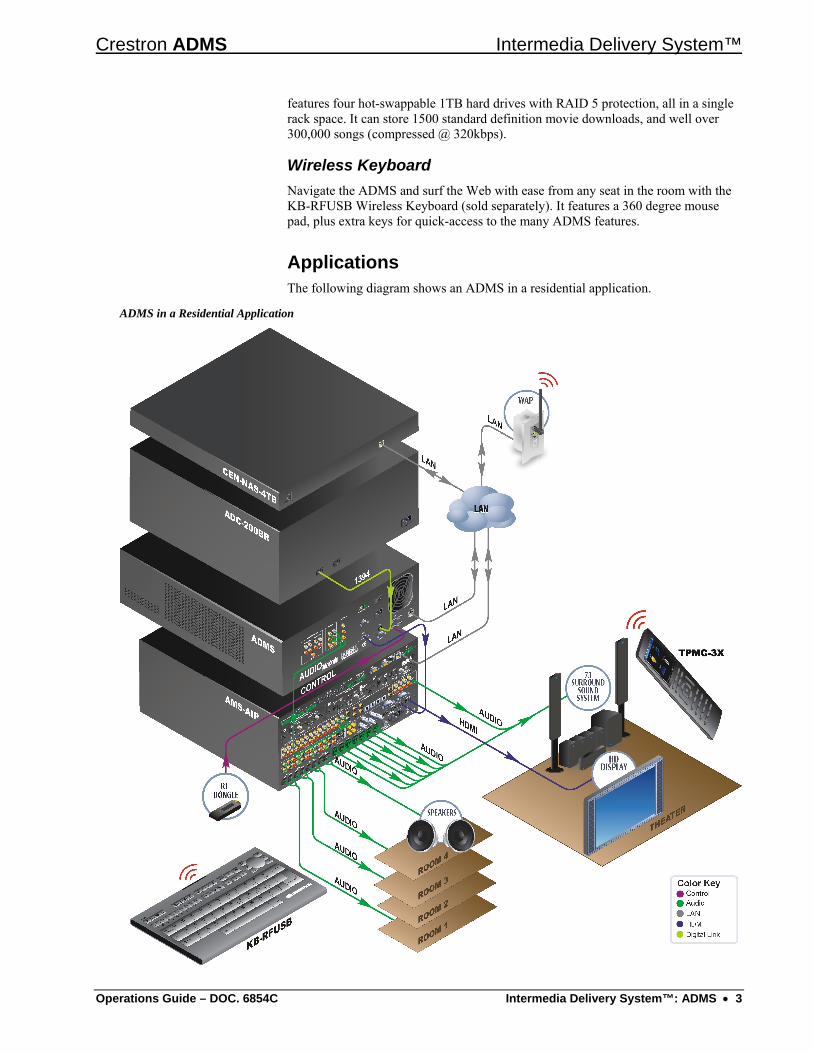
Applications The following diagram shows an ADMS in a residential application.
ADMS in a Residential Application
Operations Guide – DOC. 6854C Intermedia Delivery System™: ADMS • 3
Intermedia Delivery System™ Crestron ADMS
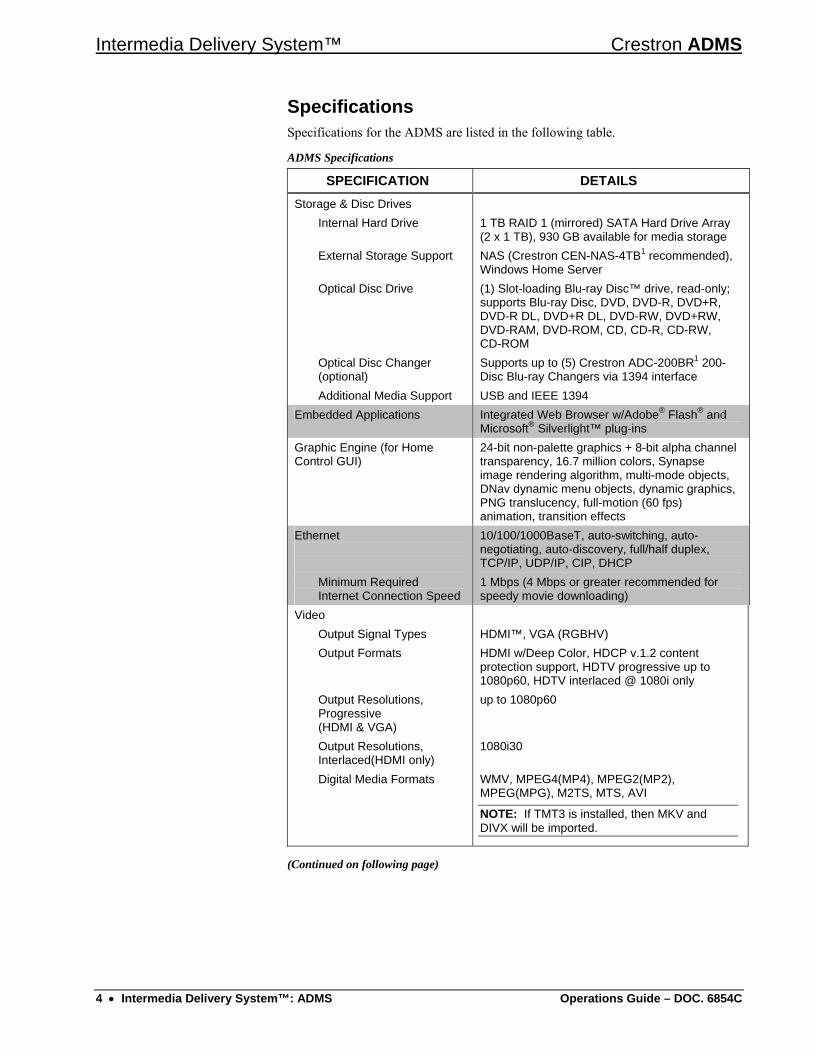
Specifications Specifications for the ADMS are listed in the following table.
ADMS Specifications
SPECIFICATION DETAILS Storage & Disc Drives Internal Hard Drive External Storage Support Optical Disc Drive Optical Disc Changer (optional) Additional Media Support
1 TB RAID 1 (mirrored) SATA Hard Drive Array (2 x 1 TB), 930 GB available for media storage NAS (Crestron CEN-NAS-4TB1 recommended), Windows Home Server (1) Slot-loading Blu-ray Disc™ drive, read-only; supports Blu-ray Disc, DVD, DVD-R, DVD+R, DVD-R DL, DVD+R DL, DVD-RW, DVD+RW, DVD-RAM, DVD-ROM, CD, CD-R, CD-RW, CD-ROM Supports up to (5) Crestron ADC-200BR1 200-Disc Blu-ray Changers via 1394 interface USB and IEEE 1394
Embedded Applications Integrated Web Browser w/Adobe® Flash® and Microsoft® Silverlight™ plug-ins
Graphic Engine (for Home Control GUI)
24-bit non-palette graphics + 8-bit alpha channel transparency, 16.7 million colors, Synapse image rendering algorithm, multi-mode objects, DNav dynamic menu objects, dynamic graphics, PNG translucency, full-motion (60 fps) animation, transition effects
Ethernet Minimum Required Internet Connection Speed
10/100/1000BaseT, auto-switching, auto-negotiating, auto-discovery, full/half duplex, TCP/IP, UDP/IP, CIP, DHCP 1 Mbps (4 Mbps or greater recommended for speedy movie downloading)
Video Output Signal Types Output Formats Output Resolutions, Progressive (HDMI & VGA) Output Resolutions, Interlaced(HDMI only) Digital Media Formats
HDMI™, VGA (RGBHV) HDMI w/Deep Color, HDCP v.1.2 content protection support, HDTV progressive up to 1080p60, HDTV interlaced @ 1080i only up to 1080p60 1080i30 WMV, MPEG4(MP4), MPEG2(MP2), MPEG(MPG), M2TS, MTS, AVI
NOTE: If TMT3 is installed, then MKV and DIVX will be imported.
(Continued on following page)
4 • Intermedia Delivery System™: ADMS Operations Guide – DOC. 6854C
Crestron ADMS Intermedia Delivery System™
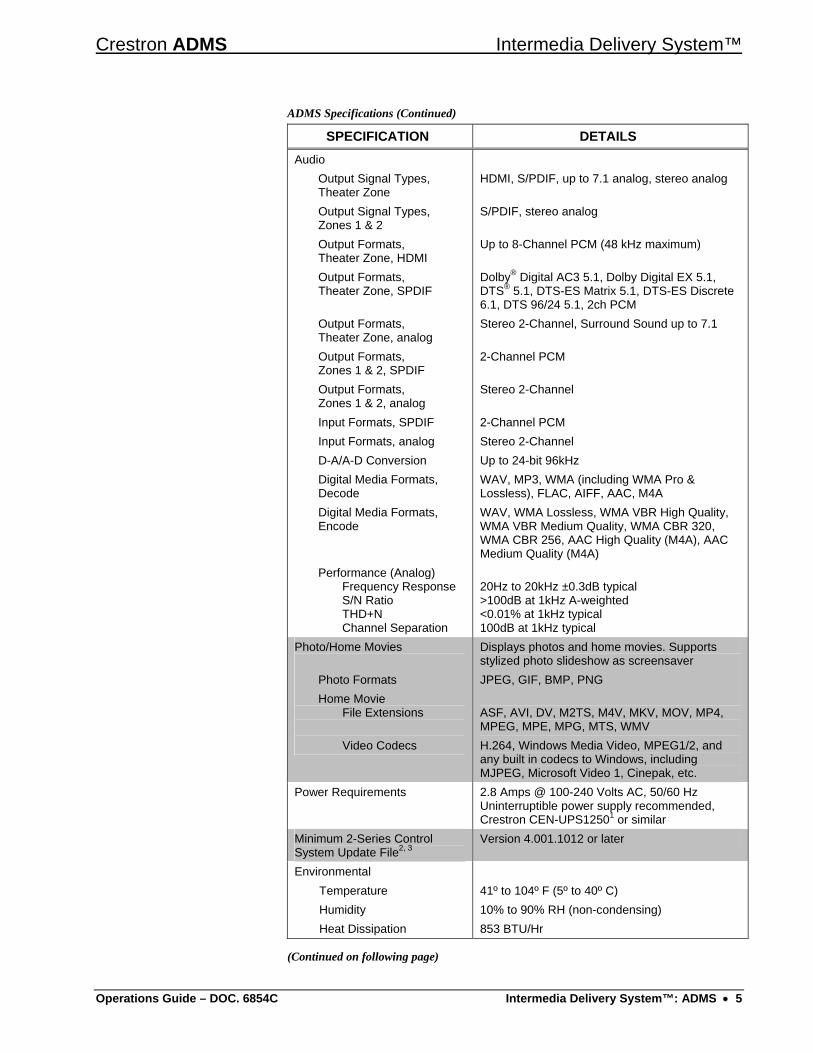
ADMS Specifications (Continued)
SPECIFICATION DETAILS Audio Output Signal Types, Theater Zone Output Signal Types, Zones 1 & 2 Output Formats, Theater Zone, HDMI Output Formats, Theater Zone, SPDIF Output Formats, Theater Zone, analog Output Formats, Zones 1 & 2, SPDIF Output Formats, Zones 1 & 2, analog Input Formats, SPDIF Input Formats, analog D-A/A-D Conversion Digital Media Formats, Decode Digital Media Formats, Encode Performance (Analog) Frequency Response S/N Ratio THD+N Channel Separation
HDMI, S/PDIF, up to 7.1 analog, stereo analog
S/PDIF, stereo analog Up to 8-Channel PCM (48 kHz maximum) Dolby® Digital AC3 5.1, Dolby Digital EX 5.1, DTS® 5.1, DTS-ES Matrix 5.1, DTS-ES Discrete 6.1, DTS 96/24 5.1, 2ch PCM Stereo 2-Channel, Surround Sound up to 7.1 2-Channel PCM Stereo 2-Channel 2-Channel PCM Stereo 2-Channel Up to 24-bit 96kHz WAV, MP3, WMA (including WMA Pro & Lossless), FLAC, AIFF, AAC, M4A WAV, WMA Lossless, WMA VBR High Quality, WMA VBR Medium Quality, WMA CBR 320, WMA CBR 256, AAC High Quality (M4A), AAC Medium Quality (M4A) 20Hz to 20kHz ±0.3dB typical >100dB at 1kHz A-weighted <0.01% at 1kHz typical 100dB at 1kHz typical
Photo/Home Movies Photo Formats Home Movie File Extensions Video Codecs
Displays photos and home movies. Supports stylized photo slideshow as screensaver JPEG, GIF, BMP, PNG ASF, AVI, DV, M2TS, M4V, MKV, MOV, MP4, MPEG, MPE, MPG, MTS, WMV H.264, Windows Media Video, MPEG1/2, and any built in codecs to Windows, including MJPEG, Microsoft Video 1, Cinepak, etc.
Power Requirements 2.8 Amps @ 100-240 Volts AC, 50/60 Hz Uninterruptible power supply recommended, Crestron CEN-UPS12501 or similar
Minimum 2-Series Control System Update File2, 3
Version 4.001.1012 or later
Environmental Temperature 41º to 104º F (5º to 40º C) Humidity 10% to 90% RH (non-condensing) Heat Dissipation 853 BTU/Hr
(Continued on following page)
Operations Guide – DOC. 6854C Intermedia Delivery System™: ADMS • 5
Intermedia Delivery System™ Crestron ADMS
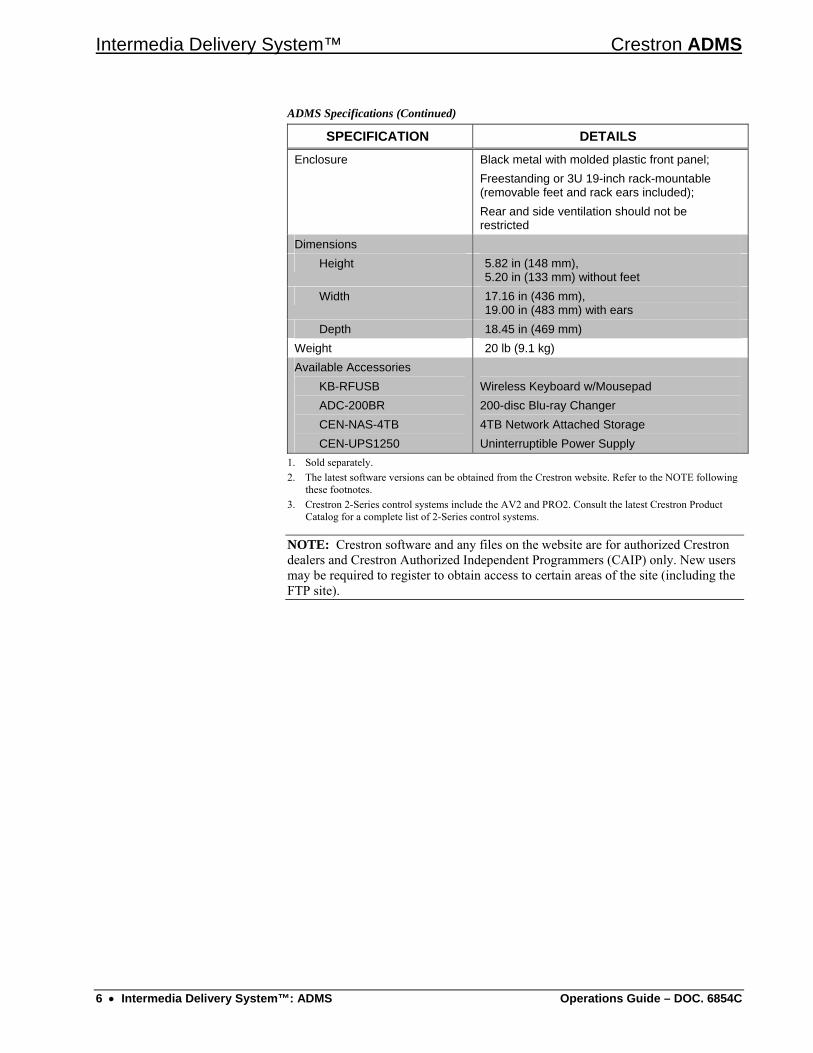
ADMS Specifications (Continued)
SPECIFICATION DETAILS Enclosure Black metal with molded plastic front panel;
Freestanding or 3U 19-inch rack-mountable (removable feet and rack ears included); Rear and side ventilation should not be restricted
Dimensions Height 5.82 in (148 mm),
5.20 in (133 mm) without feet Width 17.16 in (436 mm),
19.00 in (483 mm) with ears Depth 18.45 in (469 mm) Weight 20 lb (9.1 kg) Available Accessories KB-RFUSB ADC-200BR CEN-NAS-4TB CEN-UPS1250
Wireless Keyboard w/Mousepad 200-disc Blu-ray Changer 4TB Network Attached Storage Uninterruptible Power Supply
1. Sold separately. 2. The latest software versions can be obtained from the Crestron website. Refer to the NOTE following
these footnotes. 3. Crestron 2-Series control systems include the AV2 and PRO2. Consult the latest Crestron Product
Catalog for a complete list of 2-Series control systems.
NOTE: Crestron software and any files on the website are for authorized Crestron dealers and Crestron Authorized Independent Programmers (CAIP) only. New users may be required to register to obtain access to certain areas of the site (including the FTP site).
6 • Intermedia Delivery System™: ADMS Operations Guide – DOC. 6854C
Crestron ADMS Intermedia Delivery System™
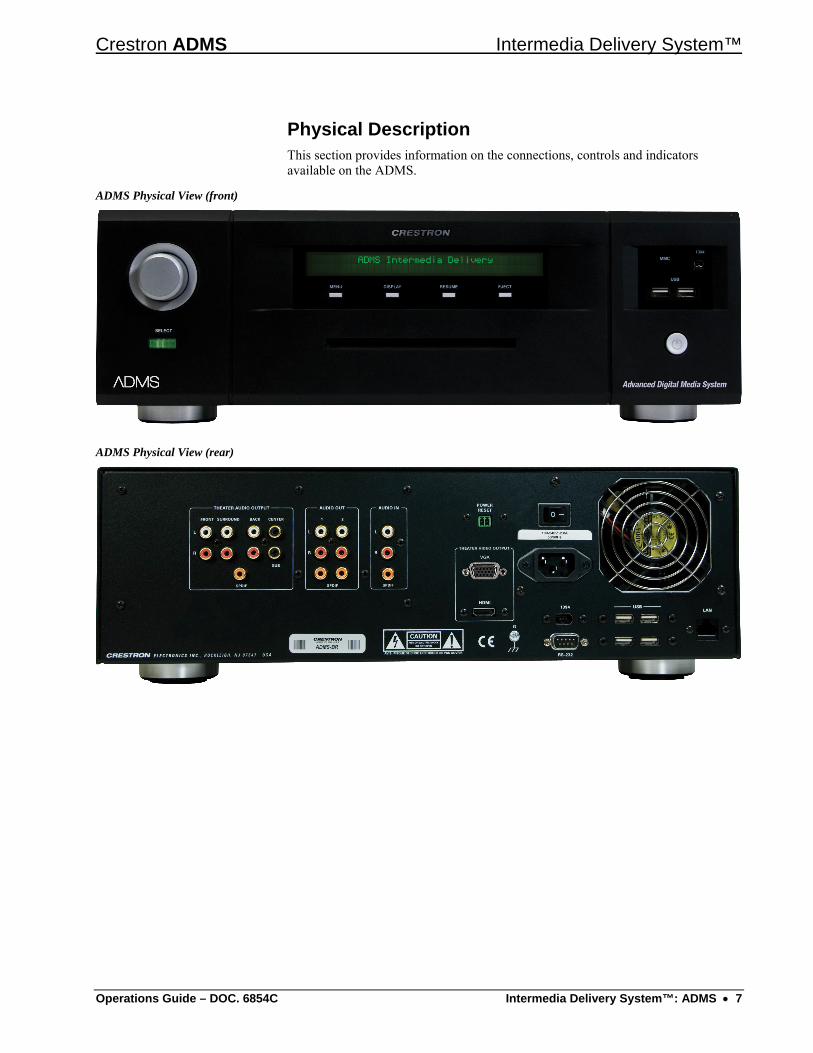
Physical Description This section provides information on the connections, controls and indicators available on the ADMS.
ADMS Physical View (front)
ADMS Physical View (rear)
Operations Guide – DOC. 6854C Intermedia Delivery System™: ADMS • 7
Intermedia Delivery System™ Crestron ADMS
ADMS Overall Dimensions
17.56 in(447 mm)
18.45 in(469 mm)
17.16 in(436 mm)
5.20 in(133 mm)
5.82 in(148 mm)
1 2 3 54 6 7
8 9 10 11 14
13 15 16 17 18
12
8 • Intermedia Delivery System™: ADMS Operations Guide – DOC. 6854C
Crestron ADMS Intermedia Delivery System™
Connectors, Controls & Indicators
# CONNECTORS*, CONTROLS & INDICATORS
DESCRIPTION
1 SELECT KNOB
(1) Continuous turn rotary encoder, for navigating menu and adjusting values
2 SELECT BUTTON
(1) Pushbutton with green LED, executes highlighted menu item or value
3 LCD DISPLAY Green LCD, 2 lines by 40 characters, adjustable LED backlight; Displays network and system settings, audio video test controls, errors notifications, disc/media notifications, current media playing per output, drive space, device connections
4 FUNCTION BUTTONS
MENU: (1) Pushbutton, steps menu back one level DISPLAY: (1) Pushbutton, advances through menus RESUME: (1) Pushbutton, resumes last file playing in Theater Zone EJECT: (1) Pushbutton, ejects disc from the optical disc drive
5 OPTICAL DISK DRIVE (1) Slot-loading Blu-ray Disc™ drive, read-only; supports Blu-ray Disc, DVD, DVD-R, DVD+R, DVD-R DL, DVD+R DL, DVD-RW, DVD+RW, DVD-RAM, DVD-ROM, CD, CD-R, CD-RW, CD-ROM
6 MMC, 1394, USB MMC: (1) MultiMediaCard compatible memory card slot 1394: (1) 4-pin Type 2 IEEE 1394a port, female USB: (2) USB Type A female, USB 2.0 Host ports
7 POWER (FRONT)
(1) Pushbutton; starts or shuts down the operating system
(Continued on following page)
Operations Guide – DOC. 6854C Intermedia Delivery System™: ADMS • 9
Intermedia Delivery System™ Crestron ADMS
Connectors, Controls & Indicators (Continued)
# CONNECTORS*, CONTROLS & INDICATORS
DESCRIPTION
8 THEATER AUDIO OUTPUT FRONT L/R,
SURROUND L/R, BACK L/R, CENTER,
SUB, SPDIF
(8) RCA female;Unbalanced line-level 7.1 surround sound audio output; Maximum Output Level: 2 Vrms; Output Impedance: 100 Ohms (1) RCA female; S/PDIF coaxial/digital audio output; Output Impedance: 75 Ohms; Output Level: 0.5 Vrmsnominal
9 AUDIO OUT, L/R 1 & 2, SPDIF 1 & 2
(4) RCA female comprising (2) unbalanced stereo line-level audio; outputs from Zones 1 & 2; Maximum Output Level: 2 Vrms; Output Impedance: 100 Ohms
(2) RCA female comprising (2) S/PDIF coaxial digital audio outputs from Zones 1 & 2; Output Impedance: 75 Ohms; Output Level: 0.5 Vrmsnominal
10 AUDIO IN, L/R, SPDIF
Not currently used.
11 POWER RESET
(1) 2-pin 3.5mm detachable terminal block; Contact closure sensing input for remote system shutdown and restart
MODE FUCNTION
Momentary Shuts down the ADMS Momentary Again Restart the ADMS Hold for 7 seconds Hard reset; no
shutdown processes are run. If writing to disk corruption can result.
(Continued on following page)
10 • Intermedia Delivery System™: ADMS Operations Guide – DOC. 6854C
Crestron ADMS Intermedia Delivery System™
Connectors, Controls & Indicators (Continued)
# CONNECTORS*, CONTROLS & INDICATORS
DESCRIPTION
12 THEATER VIDEO OUTPUT VGA, HDMI
(1) DB15HD female, VGA/RGBHV, output; Formats: RGBHV Output Level: 0.7 to 0.75 Vp-p (terminated, with 0.7 Vp-p input, unity gain); Output Impedance: 75 ohms nominal; H/V Sync Output Level: 4 to 5 Vp-p; H/V Sync Output Impedance: 55 ohms; H/V Sync Polarity: Follows input (1) 19-pin Type A HDMI female; HDMI digital video/audio output
13 G
(1) 6-32 screw, chassis ground lug
14 POWER (REAR) & 100-240V ~2.8A
50/60Hz
(1) Rocker switch, turns main power on/off (1) IEC C14 male chassis plug; Mates with removable power cord (included)
15 1394
(1) 6-pin Type 1 IEEE 1394a port, female
16 RS-232
(1) DB9 male, not used
17 USB
(4) USB Type A female, USB 2.0 Host ports
18 LAN
(1) 8-wire RJ-45 with 2 LED indicators, 10/100/1000BaseT Ethernet port
* Interface connector for the POWER RESET port is provided with the unit.
Operations Guide – DOC. 6854C Intermedia Delivery System™: ADMS • 11
Intermedia Delivery System™ Crestron ADMS
Setup
Network Wiring When wiring the Ethernet network, consider the following:
• Use Crestron Certified Wire.
• Use Crestron power supplies for Crestron equipment.
• Provide sufficient power to the system.
Ethernet Unlike other Crestron network devices, the ADMS does not use Cresnet® for communications between the device and the control system. The ADMS requires the use of a high-speed Ethernet connection for communications with the control system and other devices.
For information on connecting Ethernet devices in a Crestron system, refer to the latest version of the Crestron e-Control® Reference Guide (Doc. 6052), which is available from the Crestron website (www.crestron.com/manuals).
Identity Code IP ID The IP ID is set within the ADMS’ table using the ADMS’ SETUP MENU. For
information on setting an IP table, refer to “IP Table” on page 42. The IP IDs of multiple ADMS devices in the same system must be unique.
When setting the IP ID, consider the following:
• The IP ID of each unit must match an IP ID specified in the SIMPL™ Windows program.
• Each device using IP to communicate with a control system must have a unique IP ID.
Installation Ventilation The ADMS should be used in a well-ventilated area. The venting holes should not be
obstructed under any circumstances.
To prevent overheating, do not operate this product in an area that exceeds the environmental temperature range listed in the table of specifications. Consider using forced air ventilation and/or incrementing the spacing between units to reduce overheating. Consideration must be given if installed in a closed or multi-unit rack assembly since the operating ambient temperature of the environment may be greater than the room ambient temperature. Contact with thermal insulating materials should be avoided on all sides of the unit.
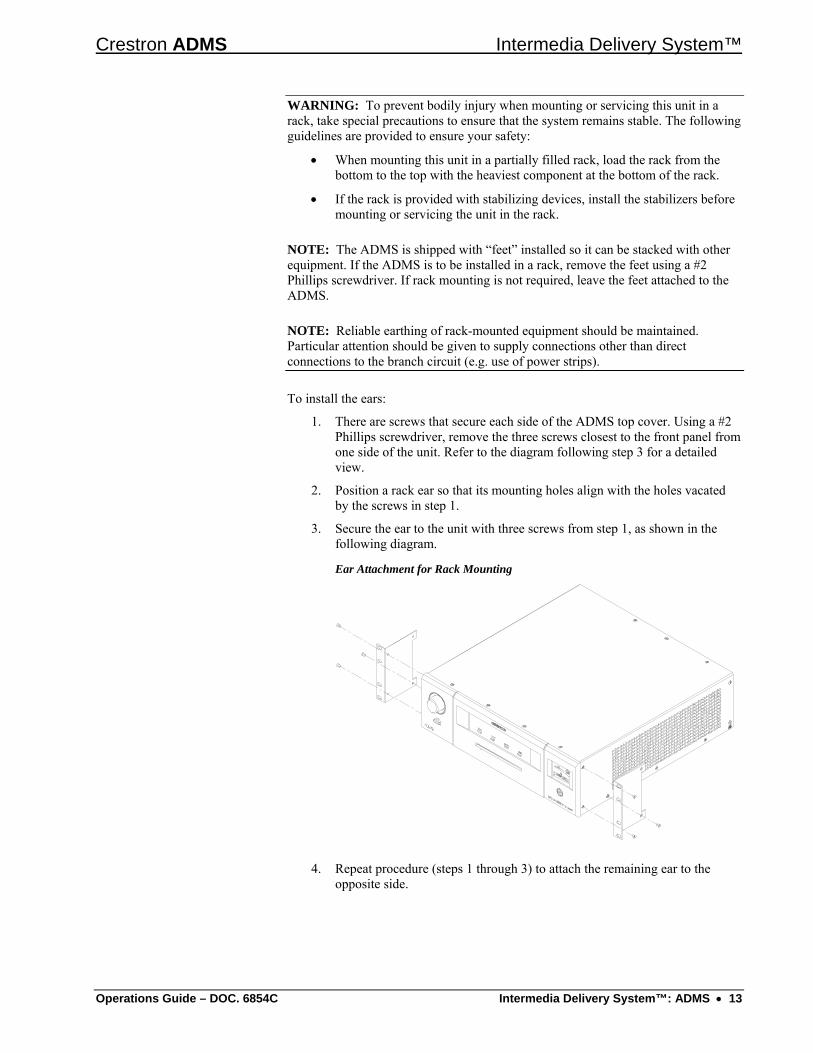
Rack Mounting The ADMS can be mounted in a rack or stacked with other equipment. Two “ears” are provided with the ADMS so that the unit can be rack mounted. These ears must be installed prior to mounting. Complete the following procedure to attach the ears to the unit. The only tool required is a #2 Phillips screwdriver.
12 • Intermedia Delivery System™: ADMS Operations Guide – DOC. 6854C
Crestron ADMS Intermedia Delivery System™
WARNING: To prevent bodily injury when mounting or servicing this unit in a rack, take special precautions to ensure that the system remains stable. The following guidelines are provided to ensure your safety:
• When mounting this unit in a partially filled rack, load the rack from the bottom to the top with the heaviest component at the bottom of the rack.
• If the rack is provided with stabilizing devices, install the stabilizers before mounting or servicing the unit in the rack.
NOTE: The ADMS is shipped with “feet” installed so it can be stacked with other equipment. If the ADMS is to be installed in a rack, remove the feet using a #2 Phillips screwdriver. If rack mounting is not required, leave the feet attached to the ADMS.
NOTE: Reliable earthing of rack-mounted equipment should be maintained. Particular attention should be given to supply connections other than direct connections to the branch circuit (e.g. use of power strips).
To install the ears:
1. There are screws that secure each side of the ADMS top cover. Using a #2 Phillips screwdriver, remove the three screws closest to the front panel from one side of the unit. Refer to the diagram following step 3 for a detailed view.
2. Position a rack ear so that its mounting holes align with the holes vacated by the screws in step 1.
3. Secure the ear to the unit with three screws from step 1, as shown in the following diagram.
Ear Attachment for Rack Mounting
4. Repeat procedure (steps 1 through 3) to attach the remaining ear to the opposite side.
Operations Guide – DOC. 6854C Intermedia Delivery System™: ADMS • 13
Intermedia Delivery System™ Crestron ADMS
Stacking Four “feet” are integrated into the ADMS so that if the unit is not rack mounted, the feet can provide stability when the unit is placed on a flat surface or stacked.
NOTE: No more than two ADMS units should be stacked.
NOTE: If the ADMS is to be rack mounted, the feet should be removed with a #2 Phillips screwdriver.
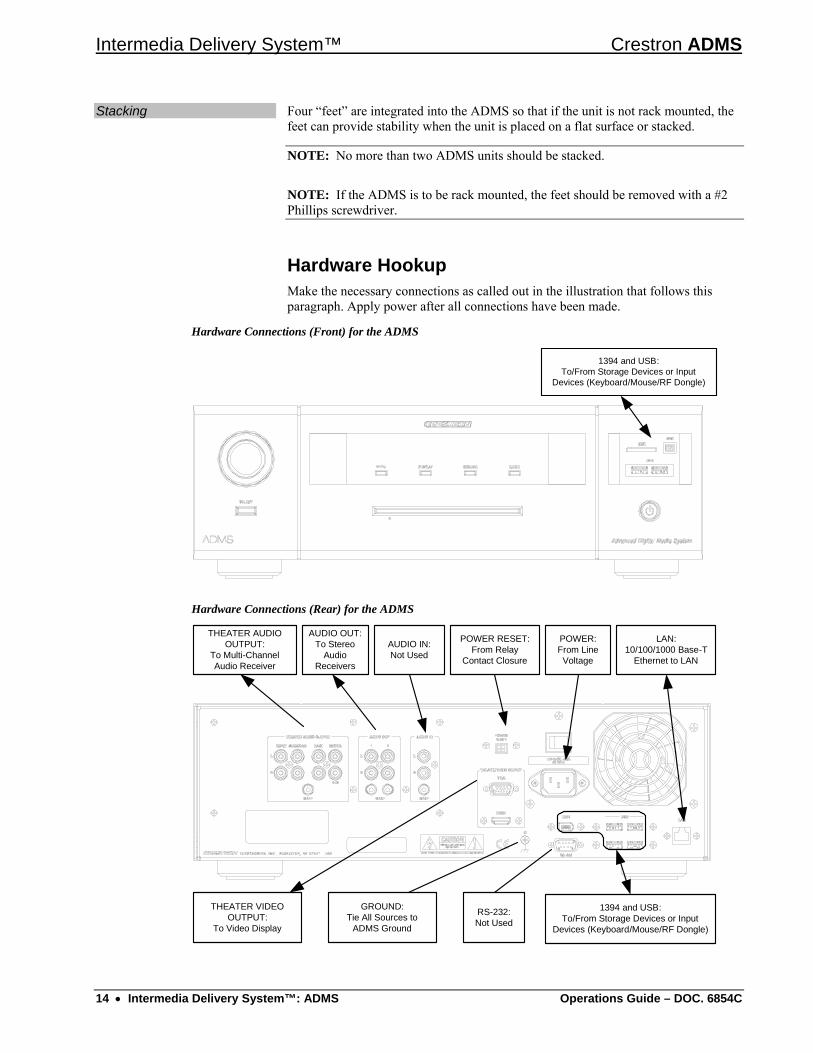
Hardware Hookup Make the necessary connections as called out in the illustration that follows this
paragraph. Apply power after all connections have been made.
Hardware Connections (Front) for the ADMS
1394 and USB:To/From Storage Devices or Input
Devices (Keyboard/Mouse/RF Dongle)
Hardware Connections (Rear) for the ADMS
THEATER AUDIO OUTPUT:
To Multi-Channel Audio Receiver
AUDIO OUT:To Stereo
Audio Receivers
AUDIO IN:Not Used
POWER RESET:From Relay
Contact Closure
GRTie All
AD
OUND: Sources to
MS Ground
LAN:10/100/1000 Base-T
Ethernet to LAN
1394 and USB:To/From Storage Devices or Input
Devices (Keyboard/Mouse/RF Dongle)
POWER:From Line Voltage
THEATER VIDEO OUTPUT:
To Video Display
RS-232:Not Used
14 • Intermedia Delivery System™: ADMS Operations Guide – DOC. 6854C
Crestron ADMS Intermedia Delivery System™
NOTE: Connect either the HDMI or VGA output but not both. Connecting both outputs will result in poor video playback issues caused by HDCP errors.
NOTE: When installing an ADMS, Crestron recommends an uninterruptable power supply such as the CEN-UPS1250 Uninterruptible Power Supply.
NOTE: Ensure the unit is properly grounded by connecting the chassis ground lug to an earth ground (building steel).
NOTE: To prevent overheating, do not operate this product in an area that exceeds the environmental temperature range listed in the table of specifications.
Configure the ADMS The ADMS can be configured using the front panel or the On-Screen-Display (OSD). The front panel offers limited configuration capabilities while the OSD can access all of the ADMS’ configuration options.
Configure the ADMS with the Front Panel The ADMS’ front panel can be used to view and or set the video settings, audio settings, front panel settings, and DHCP mode. It can also be used to view the status of the IP table, software version information, and Ethernet information.
NOTE: The On-Screen-Display can be used to configure all aspects of ADMS operation. For more information, refer to “Configure the ADMS with the On-Screen-Display” on page 22.
Required Equipment To set up the ADMS with the front panel, a power connection and an Ethernet
connection are required. There are no equipment requirements to set up the ADMS with the front panel.
Open the SYSTEM SETUP MENU The SYSTEM SETUP MENU is used to configure the ADMS. To open the
SYSTEM SETUP MENU:
1. Turn on the ADMS (press the switch on the rear of the unit and/or the power button on the front as necessary). The ADMS will perform its startup procedure.
2. When ADMS Intermedia Delivery is displayed on the front panel, press and hold the MENU and DISPLAY buttons for approximately five seconds. The SYSTEM SETUP MENU will be displayed.
Operations Guide – DOC. 6854C Intermedia Delivery System™: ADMS • 15

Intermedia Delivery System™ Crestron ADMS
The SYSTEM SETUP MENU SYSTEM SETUP MENU
DISPLAY EJECTRESUMEMENU
System Setup MenuEthernet
The SYSTEM SETUP MENU is divided into the following sections to configure the ADMS:
• Ethernet: Configures the ADMS’ Ethernet settings.
• Audio: Configures the ADMS’ audio outputs.
• Video: Configures the ADMS’ video output signal.
• IP Table Status: Displays the status of the communication link between the ADMS and a control system.
• Front Panel: Configures the brightness of the buttons and display on the ADMS’ front panel.
• Version Information: Displays the ADMS’ software version information.
To navigate the SYSTEM SETUP MENU, Turn the selection knob to display the desired option. To select the displayed option, press SELECT.
Ethernet Use the Ethernet section of the SYSTEM SETUP MENU to configure the ADMS’ Ethernet settings. To configure the Ethernet settings:
1. Open the SYSTEM SETUP MENU as described on page 15.
2. Turn the selection knob to display Ethernet and press SELECT.
Ethernet Settings
EJECTRESUMEDISPLAYMENU
Ethernet SettingsDHCP: Enabled
3. Turn the selection knob to the parameter to be adjusted and press SELECT. To cancel, press MENU.
• DHCP: The ADMS can use DHCP to obtain an IP address from a DHCP server.
a. Turn the selection knob to display DHCP and press SELECT.
b. Turn the selection knob to display the desired setting and press SELECT. To cancel, press MENU.
• IP Address: Displays or edits the ADMS’ IP address.
NOTE: When DHCP is enabled, the IP addresses obtained from the DHCP server will be displayed. When DHCP is disabled, the IP address can be entered from the front panel.
16 • Intermedia Delivery System™: ADMS Operations Guide – DOC. 6854C

Crestron ADMS Intermedia Delivery System™
a. Turn the selection knob to display IP Address and press SELECT. The IP address is displayed. To return to the Ethernet section, press MENU.
IP Address
EJECTRESUMEDISPLAYMENU
Ethernet SettingsIP Address 172.30.128.48
If DHCP is disabled, the IP address can be entered from the front panel.
b. Press SELECT. The first octet of the IP address will be enclosed in brackets.
IP Address
EJECTRESUMEDISPLAYMENU
IP Address[172] 30.128.48 Done
c. Turn the selection knob to display the desired number.
d. Press SELECT to move the cursor to the next octet.
e. Repeat steps c and d until Done is enclosed in brackets or press MENU to cancel.
f. Press SELECT to confirm the IP address.
• Subnet Mask: Displays or edits the IP Address of the ADMS’ subnet mask.
NOTE: When DHCP is enabled, the subnet mask obtained from the DHCP server will be displayed. When DHCP is disabled, the IP address can be entered from the front panel.
a. Turn the selection knob to display Subnet Mask and press SELECT. The IP address of the subnet mask is displayed. To return to the Ethernet section, press MENU.
Subnet Mask
EJECTRESUMEDISPLAYMENU
Ethernet SettingsSubnet Mask 255.255.255.0
If DHCP is disabled, the subnet mask can be entered from the front panel.
b. Press SELECT. The first octet of the IP address will be enclosed in brackets.
Operations Guide – DOC. 6854C Intermedia Delivery System™: ADMS • 17
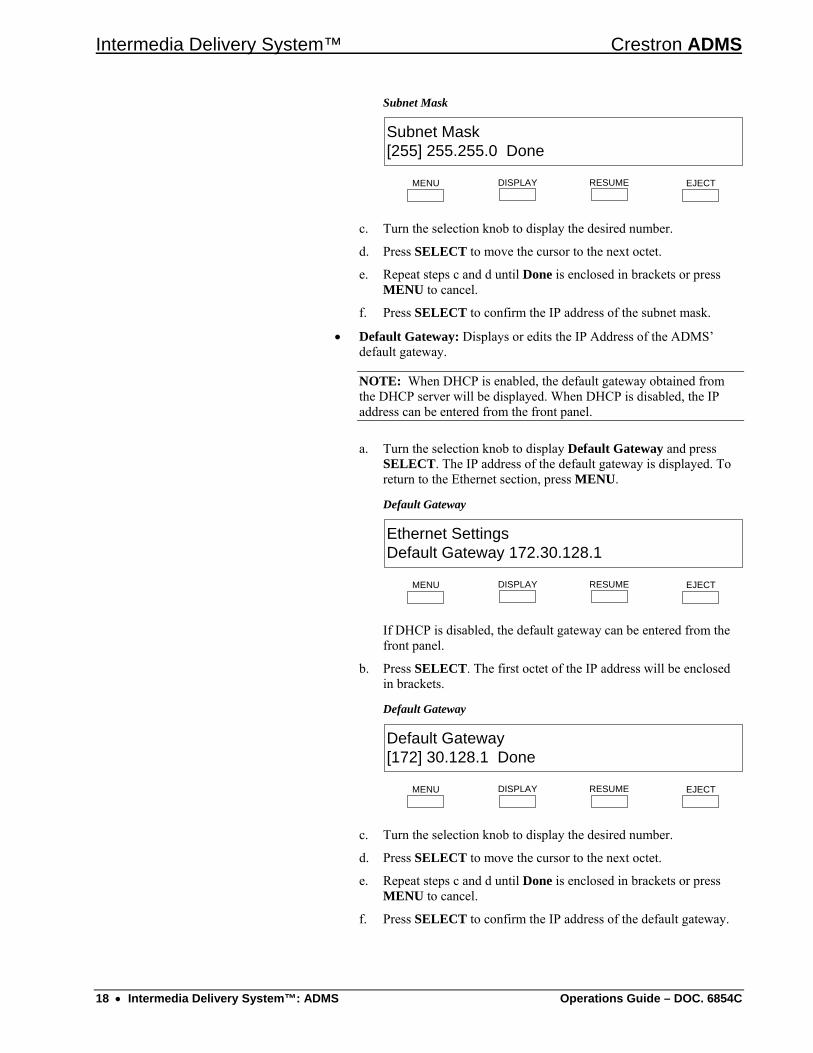
Intermedia Delivery System™ Crestron ADMS
Subnet Mask
EJECTRESUMEDISPLAYMENU
Subnet Mask[255] 255.255.0 Done
c. Turn the selection knob to display the desired number.
d. Press SELECT to move the cursor to the next octet.
e. Repeat steps c and d until Done is enclosed in brackets or press MENU to cancel.
f. Press SELECT to confirm the IP address of the subnet mask.
• Default Gateway: Displays or edits the IP Address of the ADMS’ default gateway.
NOTE: When DHCP is enabled, the default gateway obtained from the DHCP server will be displayed. When DHCP is disabled, the IP address can be entered from the front panel.
a. Turn the selection knob to display Default Gateway and press SELECT. The IP address of the default gateway is displayed. To return to the Ethernet section, press MENU.
Default Gateway
Ethernet SettingsDefault Gateway 172.30.128.1
EJECTRESUMEDISPLAYMENU
If DHCP is disabled, the default gateway can be entered from the front panel.
b. Press SELECT. The first octet of the IP address will be enclosed in brackets.
Default Gateway
EJECTRESUMEDISPLAYMENU
Default Gateway[172] 30.128.1 Done
c. Turn the selection knob to display the desired number.
d. Press SELECT to move the cursor to the next octet.
e. Repeat steps c and d until Done is enclosed in brackets or press MENU to cancel.
f. Press SELECT to confirm the IP address of the default gateway.
18 • Intermedia Delivery System™: ADMS Operations Guide – DOC. 6854C
Crestron ADMS Intermedia Delivery System™
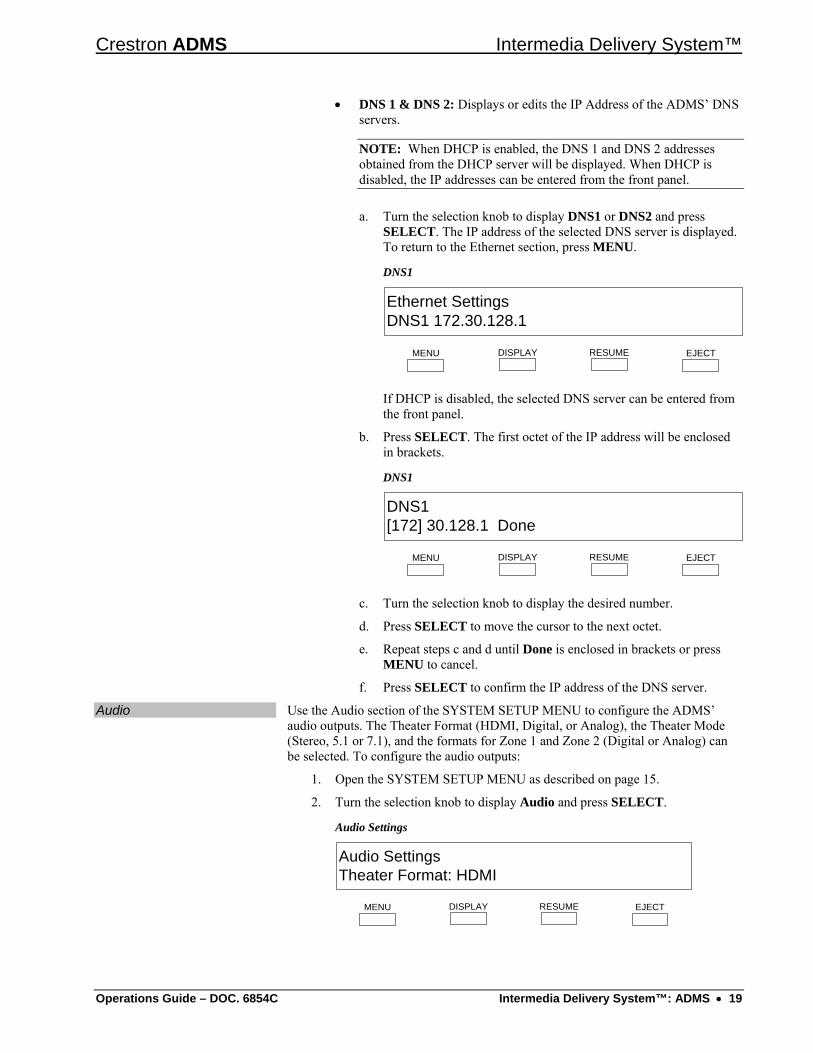
• DNS 1 & DNS 2: Displays or edits the IP Address of the ADMS’ DNS servers.
NOTE: When DHCP is enabled, the DNS 1 and DNS 2 addresses obtained from the DHCP server will be displayed. When DHCP is disabled, the IP addresses can be entered from the front panel.
a. Turn the selection knob to display DNS1 or DNS2 and press SELECT. The IP address of the selected DNS server is displayed. To return to the Ethernet section, press MENU.
DNS1
Ethernet SettingsDNS1 172.30.128.1
EJECTRESUMEDISPLAYMENU
If DHCP is disabled, the selected DNS server can be entered from the front panel.
b. Press SELECT. The first octet of the IP address will be enclosed in brackets.
DNS1
EJECTRESUMEDISPLAYMENU
DNS1[172] 30.128.1 Done
c. Turn the selection knob to display the desired number.
d. Press SELECT to move the cursor to the next octet.
e. Repeat steps c and d until Done is enclosed in brackets or press MENU to cancel.
f. Press SELECT to confirm the IP address of the DNS server.
Audio Use the Audio section of the SYSTEM SETUP MENU to configure the ADMS’ audio outputs. The Theater Format (HDMI, Digital, or Analog), the Theater Mode (Stereo, 5.1 or 7.1), and the formats for Zone 1 and Zone 2 (Digital or Analog) can be selected. To configure the audio outputs:
1. Open the SYSTEM SETUP MENU as described on page 15.
2. Turn the selection knob to display Audio and press SELECT.
Audio Settings
EJECTRESUMEDISPLAYMENU
Audio SettingsTheater Format: HDMI
Operations Guide – DOC. 6854C Intermedia Delivery System™: ADMS • 19
Intermedia Delivery System™ Crestron ADMS
3. Turn the selection knob to the parameter to be adjusted and press SELECT. To cancel, press MENU.
• Theater Format: Selects the format of the theater output (HDMI, Digital (coax) or Analog).
a. Turn the selection knob to display Theater Format and press SELECT.
b. Turn the selection knob to display the desired setting and press SELECT. To cancel, press MENU.
• Theater Mode: Selects the mode of the theater output (Stereo, 5.1 or 7.1).
a. Turn the selection knob to display Theater Mode and press SELECT.
b. Turn the selection knob to display the desired setting and press SELECT. To cancel, press MENU.
• Zone 1 Format: Selects the format of the Zone 1output (Digital (coax) or Analog).
a. Turn the selection knob to display Zone 1 Format and press SELECT.
b. Turn the selection knob to display the desired setting and press SELECT. To cancel, press MENU.
• Zone 2 Format: Selects the format of the Zone 2output (Digital (coax) or Analog).
a. Turn the selection knob to display Zone 2 Format and press SELECT.
b. Turn the selection knob to display the desired setting and press SELECT. To cancel, press MENU.
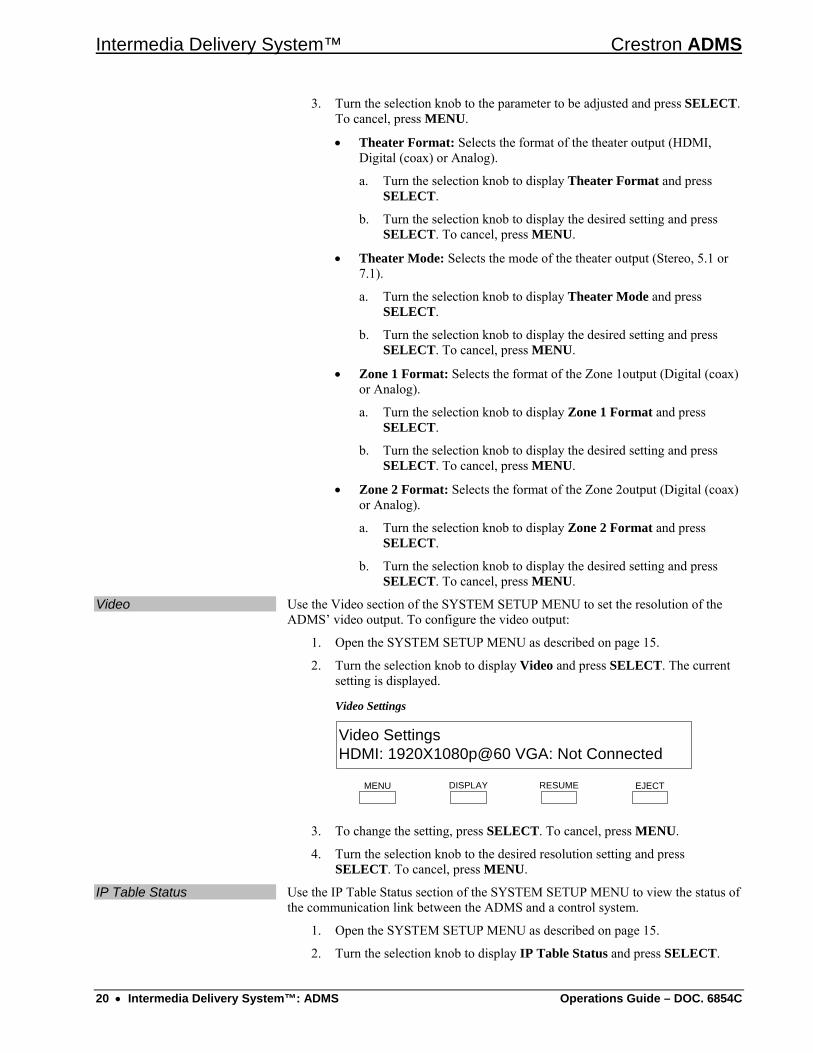
Video Use the Video section of the SYSTEM SETUP MENU to set the resolution of the ADMS’ video output. To configure the video output:
1. Open the SYSTEM SETUP MENU as described on page 15.
2. Turn the selection knob to display Video and press SELECT. The current setting is displayed.
Video Settings
EJECTRESUMEDISPLAYMENU
Video SettingsHDMI: 1920X1080p@60 VGA: Not Connected
3. To change the setting, press SELECT. To cancel, press MENU.
4. Turn the selection knob to the desired resolution setting and press SELECT. To cancel, press MENU.
IP Table Status Use the IP Table Status section of the SYSTEM SETUP MENU to view the status of the communication link between the ADMS and a control system.
1. Open the SYSTEM SETUP MENU as described on page 15.
2. Turn the selection knob to display IP Table Status and press SELECT.
20 • Intermedia Delivery System™: ADMS Operations Guide – DOC. 6854C
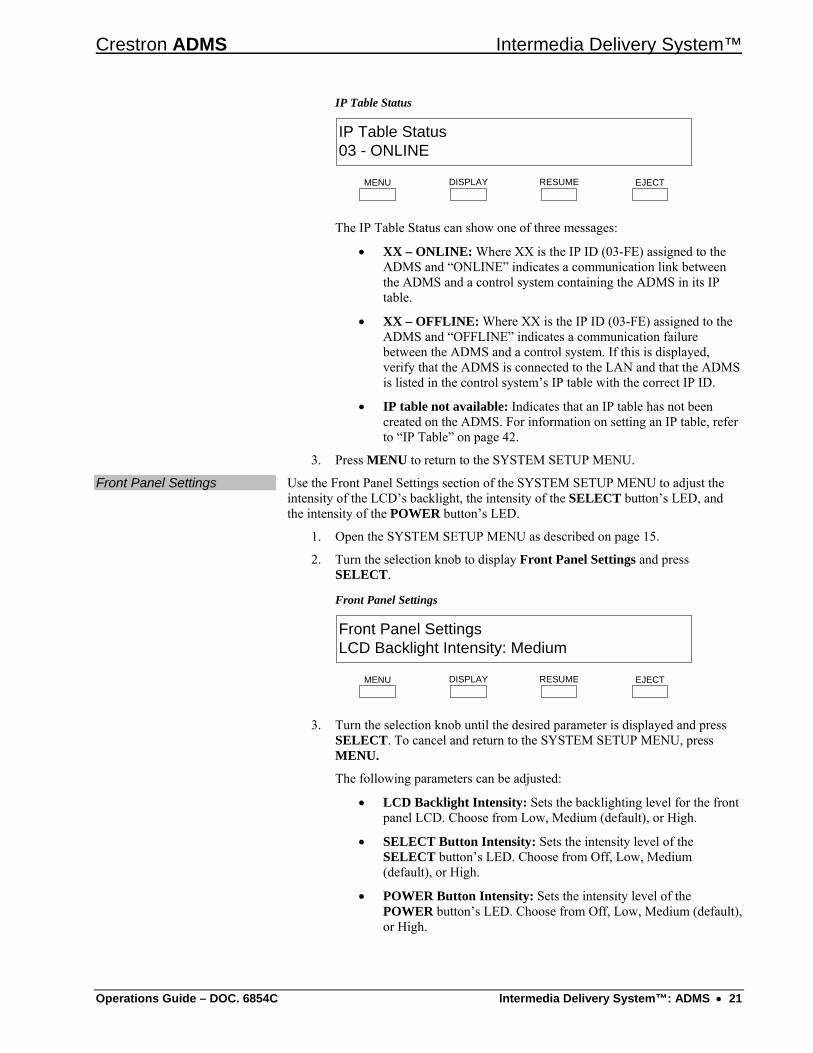
Crestron ADMS Intermedia Delivery System™
IP Table Status
EJECTRESUMEDISPLAYMENU
IP Table Status03 - ONLINE
The IP Table Status can show one of three messages:
• XX – ONLINE: Where XX is the IP ID (03-FE) assigned to the ADMS and “ONLINE” indicates a communication link between the ADMS and a control system containing the ADMS in its IP table.
• XX – OFFLINE: Where XX is the IP ID (03-FE) assigned to the ADMS and “OFFLINE” indicates a communication failure between the ADMS and a control system. If this is displayed, verify that the ADMS is connected to the LAN and that the ADMS is listed in the control system’s IP table with the correct IP ID.
• IP table not available: Indicates that an IP table has not been created on the ADMS. For information on setting an IP table, refer to “IP Table” on page 42.
3. Press MENU to return to the SYSTEM SETUP MENU.
Front Panel Settings Use the Front Panel Settings section of the SYSTEM SETUP MENU to adjust the intensity of the LCD’s backlight, the intensity of the SELECT button’s LED, and the intensity of the POWER button’s LED.
1. Open the SYSTEM SETUP MENU as described on page 15.
2. Turn the selection knob to display Front Panel Settings and press SELECT.
Front Panel Settings
EJECTRESUMEDISPLAYMENU
Front Panel SettingsLCD Backlight Intensity: Medium
3. Turn the selection knob until the desired parameter is displayed and press SELECT. To cancel and return to the SYSTEM SETUP MENU, press MENU.
The following parameters can be adjusted:
• LCD Backlight Intensity: Sets the backlighting level for the front panel LCD. Choose from Low, Medium (default), or High.
• SELECT Button Intensity: Sets the intensity level of the SELECT button’s LED. Choose from Off, Low, Medium (default), or High.
• POWER Button Intensity: Sets the intensity level of the POWER button’s LED. Choose from Off, Low, Medium (default), or High.
Operations Guide – DOC. 6854C Intermedia Delivery System™: ADMS • 21
Intermedia Delivery System™ Crestron ADMS
4. Turn the selection knob to the desired setting and press SELECT. To cancel and return to the list of front panel settings, press MENU.
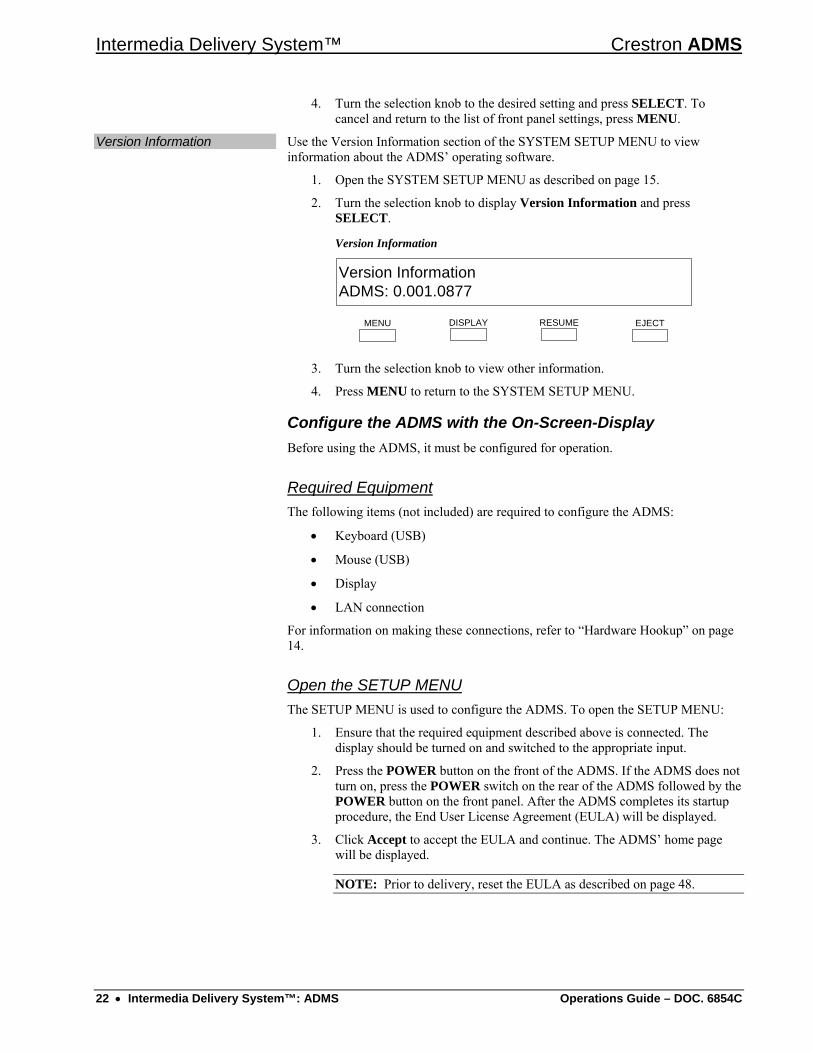
Version Information Use the Version Information section of the SYSTEM SETUP MENU to view information about the ADMS’ operating software.
1. Open the SYSTEM SETUP MENU as described on page 15.
2. Turn the selection knob to display Version Information and press SELECT.
Version Information
Version InformationADMS: 0.001.0877
EJECTRESUMEDISPLAYMENU
3. Turn the selection knob to view other information.
4. Press MENU to return to the SYSTEM SETUP MENU.
Configure the ADMS with the On-Screen-Display Before using the ADMS, it must be configured for operation.
Required Equipment The following items (not included) are required to configure the ADMS:
• Keyboard (USB)
• Mouse (USB)
• Display
• LAN connection
For information on making these connections, refer to “Hardware Hookup” on page 14.
Open the SETUP MENU The SETUP MENU is used to configure the ADMS. To open the SETUP MENU:
1. Ensure that the required equipment described above is connected. The display should be turned on and switched to the appropriate input.
2. Press the POWER button on the front of the ADMS. If the ADMS does not turn on, press the POWER switch on the rear of the ADMS followed by the POWER button on the front panel. After the ADMS completes its startup procedure, the End User License Agreement (EULA) will be displayed.
3. Click Accept to accept the EULA and continue. The ADMS’ home page will be displayed.
NOTE: Prior to delivery, reset the EULA as described on page 48.
22 • Intermedia Delivery System™: ADMS Operations Guide – DOC. 6854C

Crestron ADMS Intermedia Delivery System™
ADMS Home Page
4. Press the down arrow ( ) to move the cursor down until Advanced is highlighted.
Advanced listing on ADMS Home Page
5. Press Enter. The Advanced section will be displayed.
6. Press the down arrow ( ) to move the cursor down until Advanced Configuration is highlighted.
Operations Guide – DOC. 6854C Intermedia Delivery System™: ADMS • 23

Intermedia Delivery System™ Crestron ADMS
Advanced Configuration
7. Press Enter. The Advanced Configuration login will be displayed.
Advanced Configuration Login
8. Enter the password dealeradmin and press Enter. The SETUP MENU will be displayed.
24 • Intermedia Delivery System™: ADMS Operations Guide – DOC. 6854C
Crestron ADMS Intermedia Delivery System™
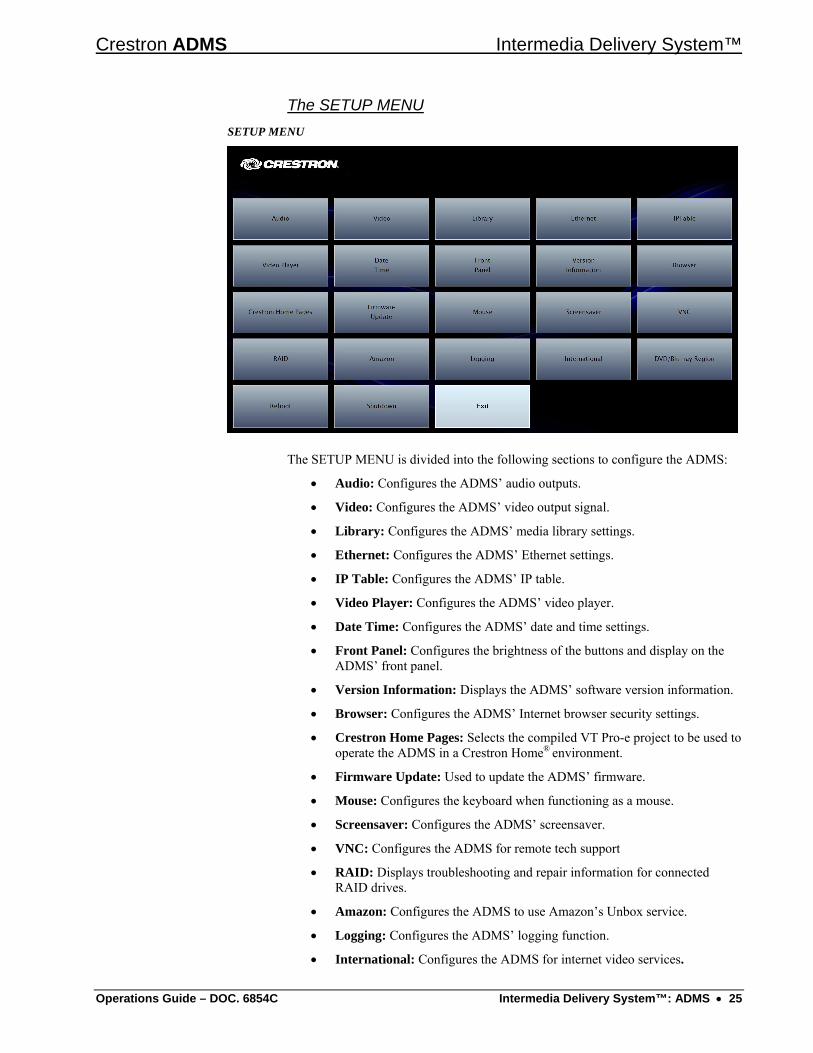
The SETUP MENU SETUP MENU
The SETUP MENU is divided into the following sections to configure the ADMS:
• Audio: Configures the ADMS’ audio outputs.
• Video: Configures the ADMS’ video output signal.
• Library: Configures the ADMS’ media library settings.
• Ethernet: Configures the ADMS’ Ethernet settings.
• IP Table: Configures the ADMS’ IP table.
• Video Player: Configures the ADMS’ video player.
• Date Time: Configures the ADMS’ date and time settings.
• Front Panel: Configures the brightness of the buttons and display on the ADMS’ front panel.
• Version Information: Displays the ADMS’ software version information.
• Browser: Configures the ADMS’ Internet browser security settings.
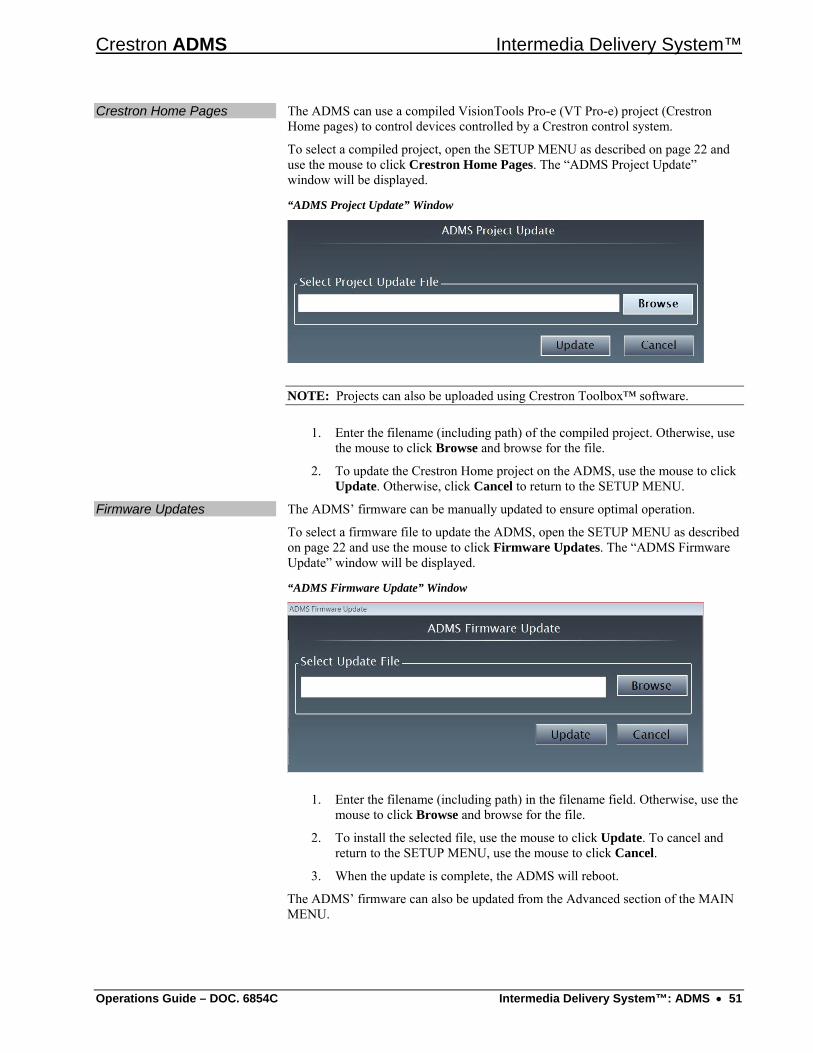
• Crestron Home Pages: Selects the compiled VT Pro-e project to be used to operate the ADMS in a Crestron Home® environment.
• Firmware Update: Used to update the ADMS’ firmware.
• Mouse: Configures the keyboard when functioning as a mouse.
• Screensaver: Configures the ADMS’ screensaver.
• VNC: Configures the ADMS for remote tech support
• RAID: Displays troubleshooting and repair information for connected RAID drives.
• Amazon: Configures the ADMS to use Amazon’s Unbox service.
• Logging: Configures the ADMS’ logging function.
• International: Configures the ADMS for internet video services.
Operations Guide – DOC. 6854C Intermedia Delivery System™: ADMS • 25
Intermedia Delivery System™ Crestron ADMS
• DVD/Blu-ray Region: Configures the region setting for the DVD/Blu-ray player.
• Reboot: Reboots the ADMS.
• Shutdown: Shuts down the ADMS.
• Exit: Exits the SETUP MENU and returns the ADMS to normal operation.
Using the mouse, click the name of the section to configure.
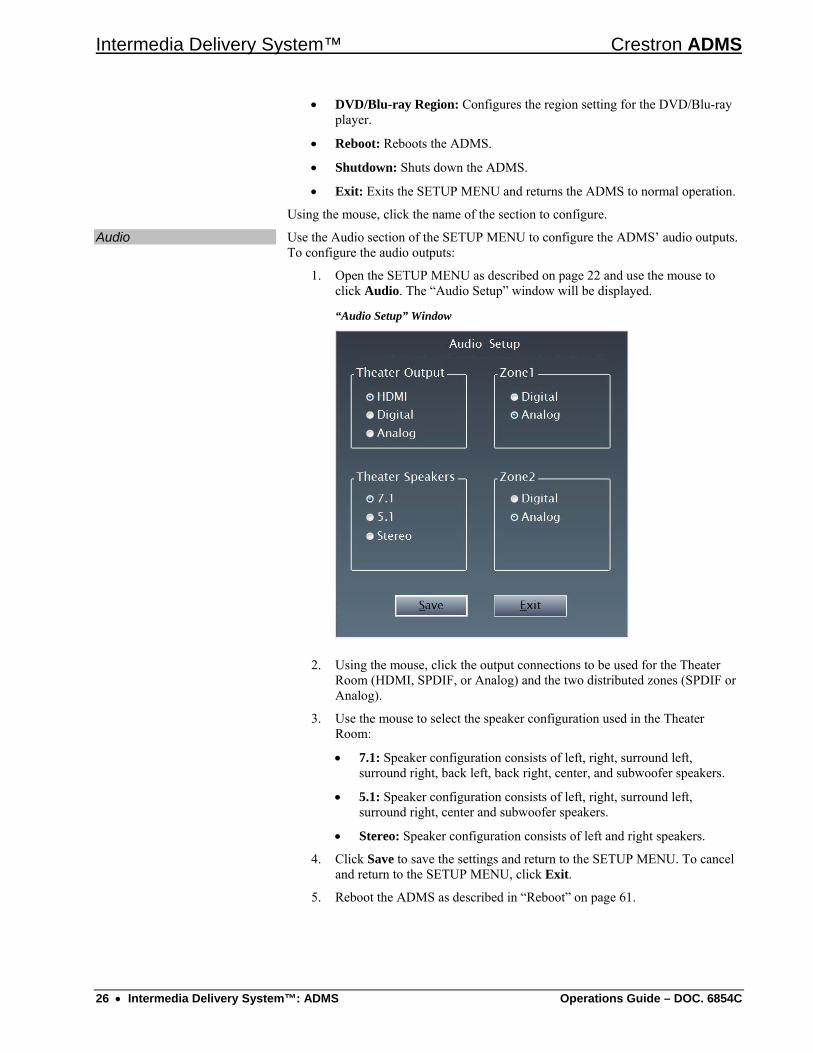
Audio Use the Audio section of the SETUP MENU to configure the ADMS’ audio outputs. To configure the audio outputs:
1. Open the SETUP MENU as described on page 22 and use the mouse to click Audio. The “Audio Setup” window will be displayed.
“Audio Setup” Window
2. Using the mouse, click the output connections to be used for the Theater Room (HDMI, SPDIF, or Analog) and the two distributed zones (SPDIF or Analog).
3. Use the mouse to select the speaker configuration used in the Theater Room:
• 7.1: Speaker configuration consists of left, right, surround left, surround right, back left, back right, center, and subwoofer speakers.
• 5.1: Speaker configuration consists of left, right, surround left, surround right, center and subwoofer speakers.
• Stereo: Speaker configuration consists of left and right speakers.
4. Click Save to save the settings and return to the SETUP MENU. To cancel and return to the SETUP MENU, click Exit.
5. Reboot the ADMS as described in “Reboot” on page 61.
26 • Intermedia Delivery System™: ADMS Operations Guide – DOC. 6854C
Crestron ADMS Intermedia Delivery System™
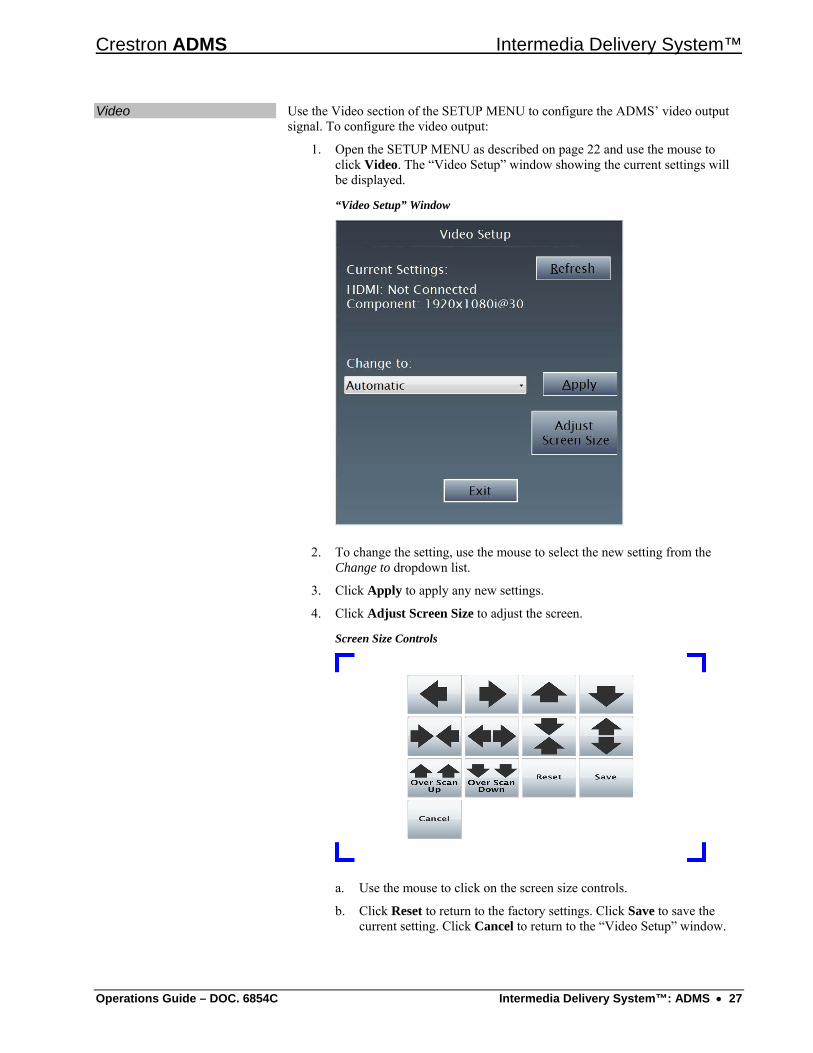
Video Use the Video section of the SETUP MENU to configure the ADMS’ video output signal. To configure the video output:
1. Open the SETUP MENU as described on page 22 and use the mouse to click Video. The “Video Setup” window showing the current settings will be displayed.
“Video Setup” Window
2. To change the setting, use the mouse to select the new setting from the Change to dropdown list.
3. Click Apply to apply any new settings.
4. Click Adjust Screen Size to adjust the screen.
Screen Size Controls
a. Use the mouse to click on the screen size controls.
b. Click Reset to return to the factory settings. Click Save to save the current setting. Click Cancel to return to the “Video Setup” window.
Operations Guide – DOC. 6854C Intermedia Delivery System™: ADMS • 27
Intermedia Delivery System™ Crestron ADMS
5. Click Exit to return to the SETUP MENU. If a new setting was applied, it will be saved.
6. Reboot the ADMS as described in “Reboot” on page 61.
NOTE: Approved methods for converting VGA video to Component video are posted in Online help at http://support.crestron.com, answer ID 4987.
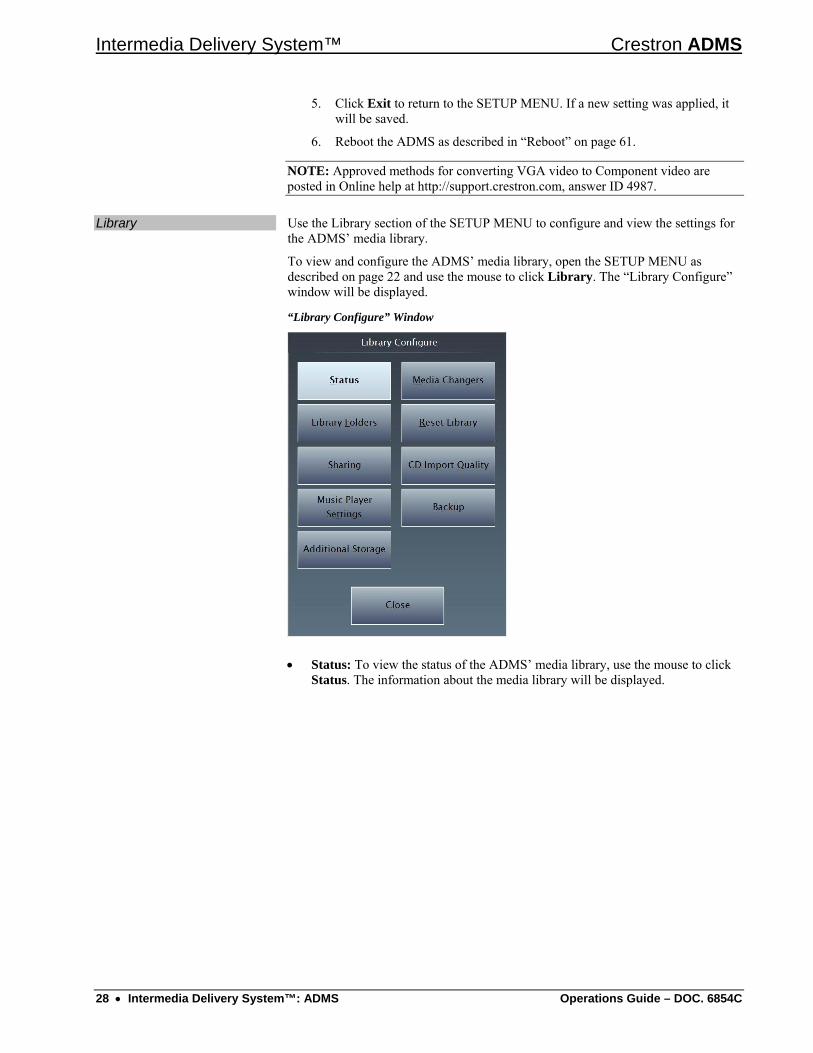
Library Use the Library section of the SETUP MENU to configure and view the settings for the ADMS’ media library.
To view and configure the ADMS’ media library, open the SETUP MENU as described on page 22 and use the mouse to click Library. The “Library Configure” window will be displayed.
“Library Configure” Window
• Status: To view the status of the ADMS’ media library, use the mouse to click Status. The information about the media library will be displayed.
28 • Intermedia Delivery System™: ADMS Operations Guide – DOC. 6854C
Crestron ADMS Intermedia Delivery System™
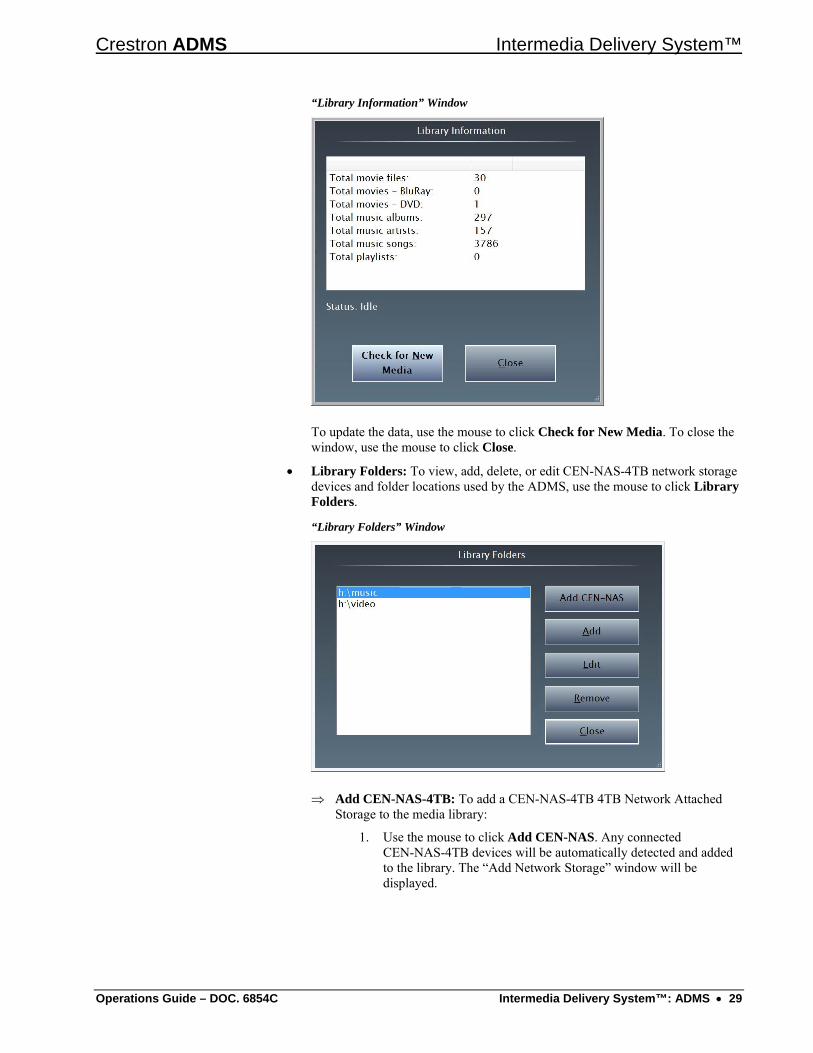
“Library Information” Window
To update the data, use the mouse to click Check for New Media. To close the window, use the mouse to click Close.
• Library Folders: To view, add, delete, or edit CEN-NAS-4TB network storage devices and folder locations used by the ADMS, use the mouse to click Library Folders.
“Library Folders” Window
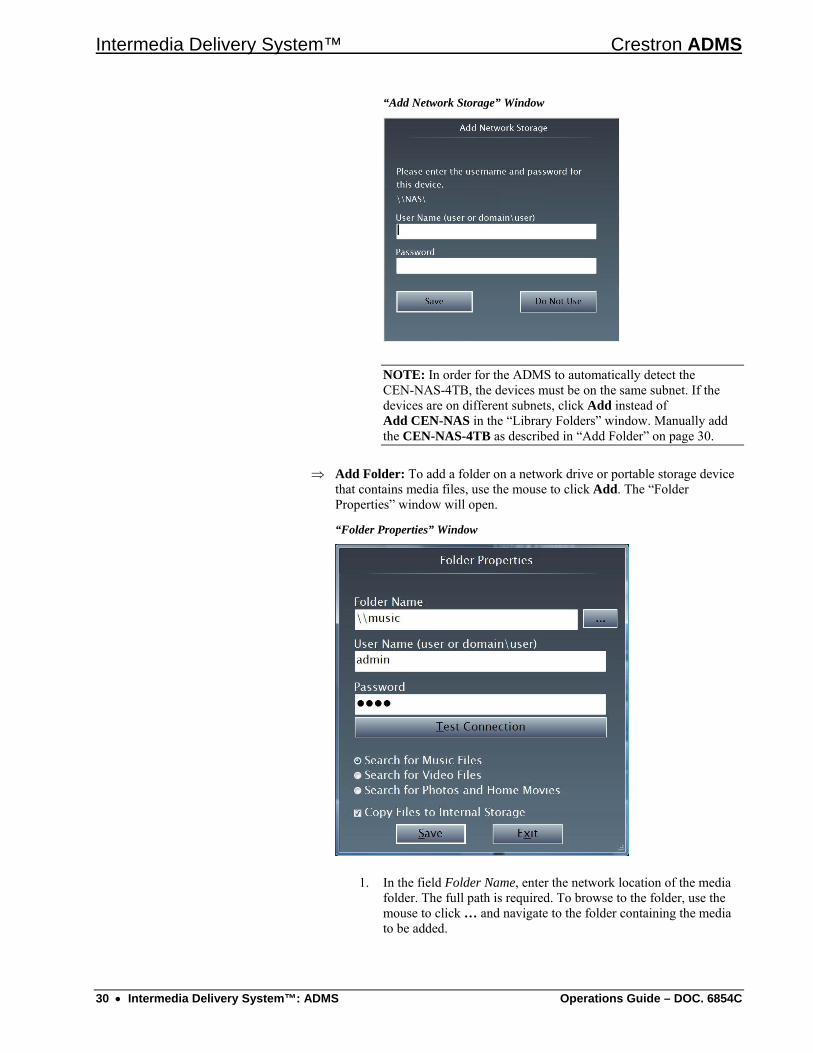
⇒ Add CEN-NAS-4TB: To add a CEN-NAS-4TB 4TB Network Attached Storage to the media library:
1. Use the mouse to click Add CEN-NAS. Any connected CEN-NAS-4TB devices will be automatically detected and added to the library. The “Add Network Storage” window will be displayed.
Operations Guide – DOC. 6854C Intermedia Delivery System™: ADMS • 29
Intermedia Delivery System™ Crestron ADMS
“Add Network Storage” Window
NOTE: In order for the ADMS to automatically detect the CEN-NAS-4TB, the devices must be on the same subnet. If the devices are on different subnets, click Add instead of Add CEN-NAS in the “Library Folders” window. Manually add the CEN-NAS-4TB as described in “Add Folder” on page 30.
⇒ Add Folder: To add a folder on a network drive or portable storage device that contains media files, use the mouse to click Add. The “Folder Properties” window will open.
“Folder Properties” Window
1. In the field Folder Name, enter the network location of the media folder. The full path is required. To browse to the folder, use the mouse to click … and navigate to the folder containing the media to be added.
30 • Intermedia Delivery System™: ADMS Operations Guide – DOC. 6854C
Crestron ADMS Intermedia Delivery System™
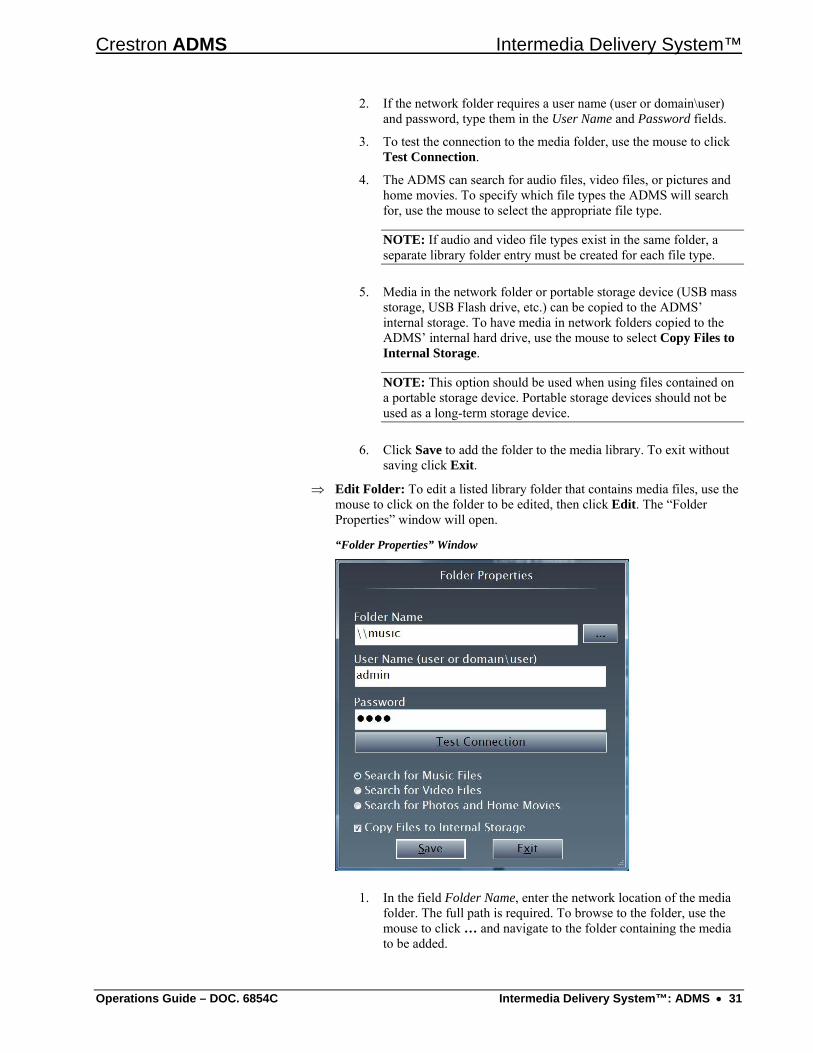
2. If the network folder requires a user name (user or domain\user) and password, type them in the User Name and Password fields.
3. To test the connection to the media folder, use the mouse to click Test Connection.
4. The ADMS can search for audio files, video files, or pictures and home movies. To specify which file types the ADMS will search for, use the mouse to select the appropriate file type.
NOTE: If audio and video file types exist in the same folder, a separate library folder entry must be created for each file type.
5. Media in the network folder or portable storage device (USB mass storage, USB Flash drive, etc.) can be copied to the ADMS’ internal storage. To have media in network folders copied to the ADMS’ internal hard drive, use the mouse to select Copy Files to Internal Storage.
NOTE: This option should be used when using files contained on a portable storage device. Portable storage devices should not be used as a long-term storage device.
6. Click Save to add the folder to the media library. To exit without saving click Exit.
⇒ Edit Folder: To edit a listed library folder that contains media files, use the mouse to click on the folder to be edited, then click Edit. The “Folder Properties” window will open.
“Folder Properties” Window
1. In the field Folder Name, enter the network location of the media folder. The full path is required. To browse to the folder, use the mouse to click … and navigate to the folder containing the media to be added.
Operations Guide – DOC. 6854C Intermedia Delivery System™: ADMS • 31
Intermedia Delivery System™ Crestron ADMS
2. If the network folder requires a user name (user or domain\user) and password, type them in the User Name and Password fields.
3. To test the connection to the media folder, use the mouse to click Test Connection.
4. The ADMS can search for audio files or video files. To specify which file types the ADMS will search for, use the mouse to select the appropriate file type.
5. Click Save to save changes to the folder. To exit without saving click Exit.
⇒ Remove Folder: Folders can be removed from the library. To remove a folder, use the mouse to select a folder and click Remove.
NOTE: If an NAS entry is to be deleted, the ADMS will ask if library references to removed folders should be removed as well.
⇒ Close: To exit and return to the “Library Configuration” window, use the mouse to click Close.
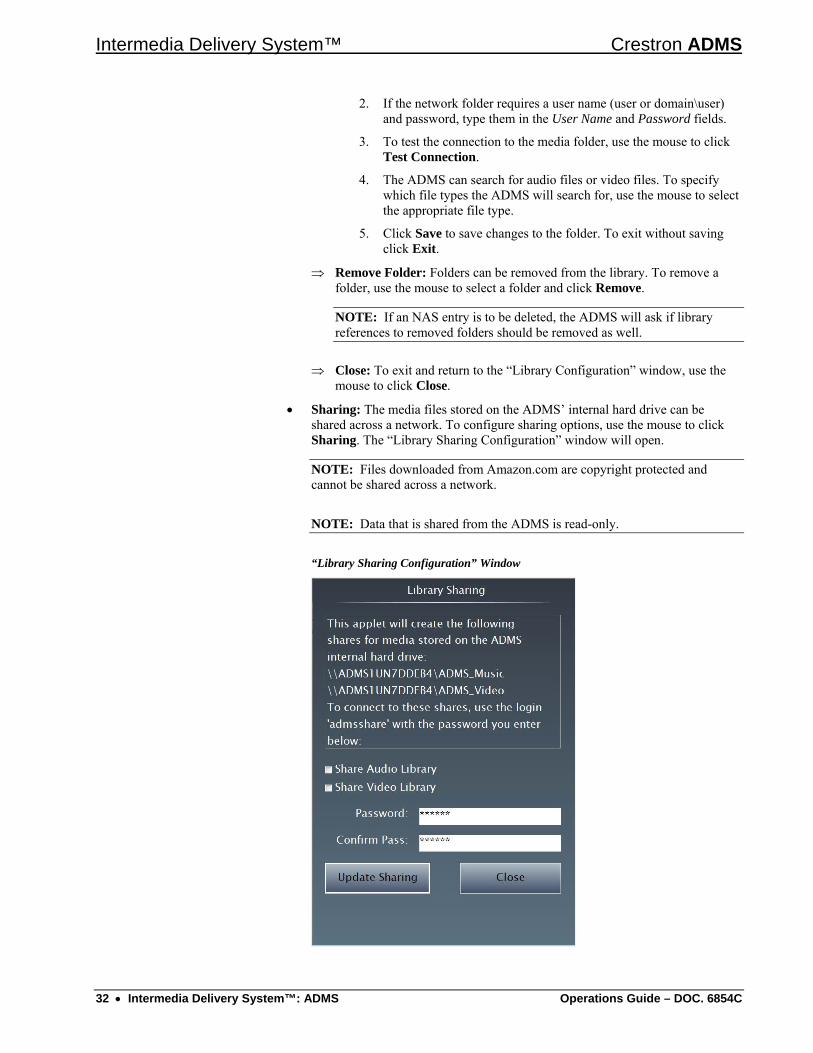
• Sharing: The media files stored on the ADMS’ internal hard drive can be shared across a network. To configure sharing options, use the mouse to click Sharing. The “Library Sharing Configuration” window will open.
NOTE: Files downloaded from Amazon.com are copyright protected and cannot be shared across a network.
NOTE: Data that is shared from the ADMS is read-only.
“Library Sharing Configuration” Window
32 • Intermedia Delivery System™: ADMS Operations Guide – DOC. 6854C
Crestron ADMS Intermedia Delivery System™
1. Use the mouse to select which libraries should be shared (audio, video, or both).
2. Enter a password to allow access to the shared media.
3. To apply the sharing settings, use the mouse to click Update Sharing. To cancel the sharing settings, use the mouse to click Cancel.
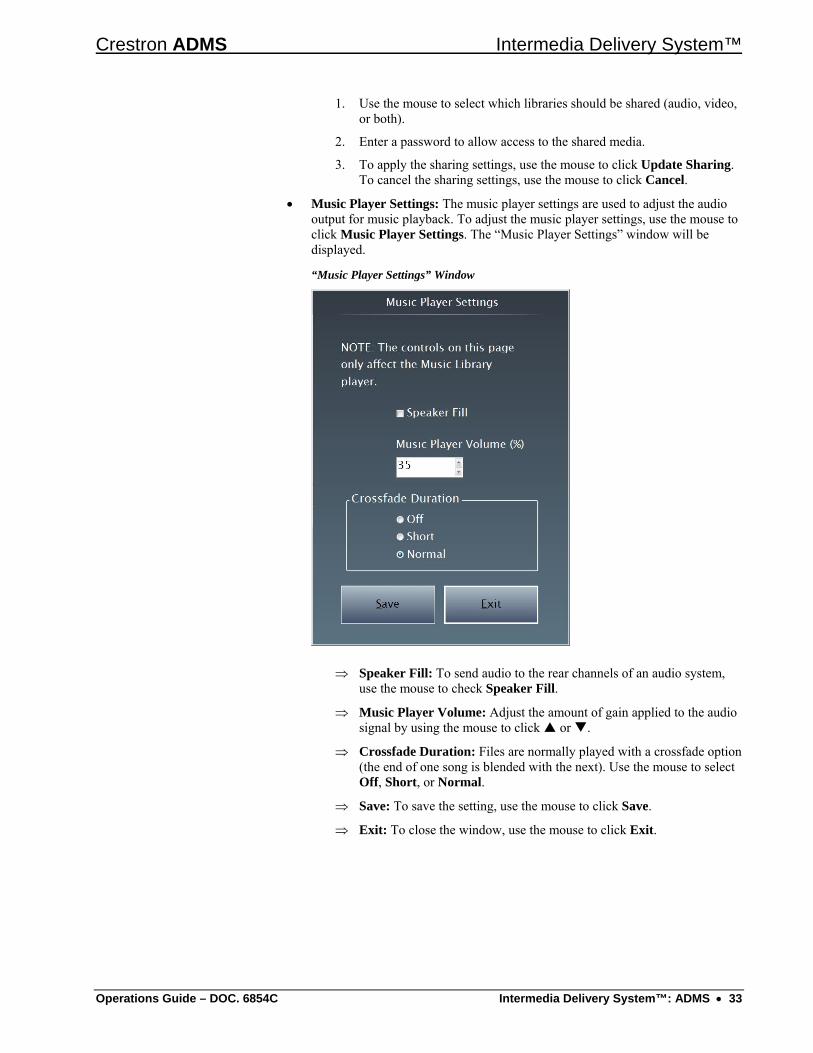
• Music Player Settings: The music player settings are used to adjust the audio output for music playback. To adjust the music player settings, use the mouse to click Music Player Settings. The “Music Player Settings” window will be displayed.
“Music Player Settings” Window
⇒ Speaker Fill: To send audio to the rear channels of an audio system, use the mouse to check Speaker Fill.
⇒ Music Player Volume: Adjust the amount of gain applied to the audio signal by using the mouse to click or .
⇒ Crossfade Duration: Files are normally played with a crossfade option (the end of one song is blended with the next). Use the mouse to select Off, Short, or Normal.
⇒ Save: To save the setting, use the mouse to click Save.
⇒ Exit: To close the window, use the mouse to click Exit.
Operations Guide – DOC. 6854C Intermedia Delivery System™: ADMS • 33
Intermedia Delivery System™ Crestron ADMS
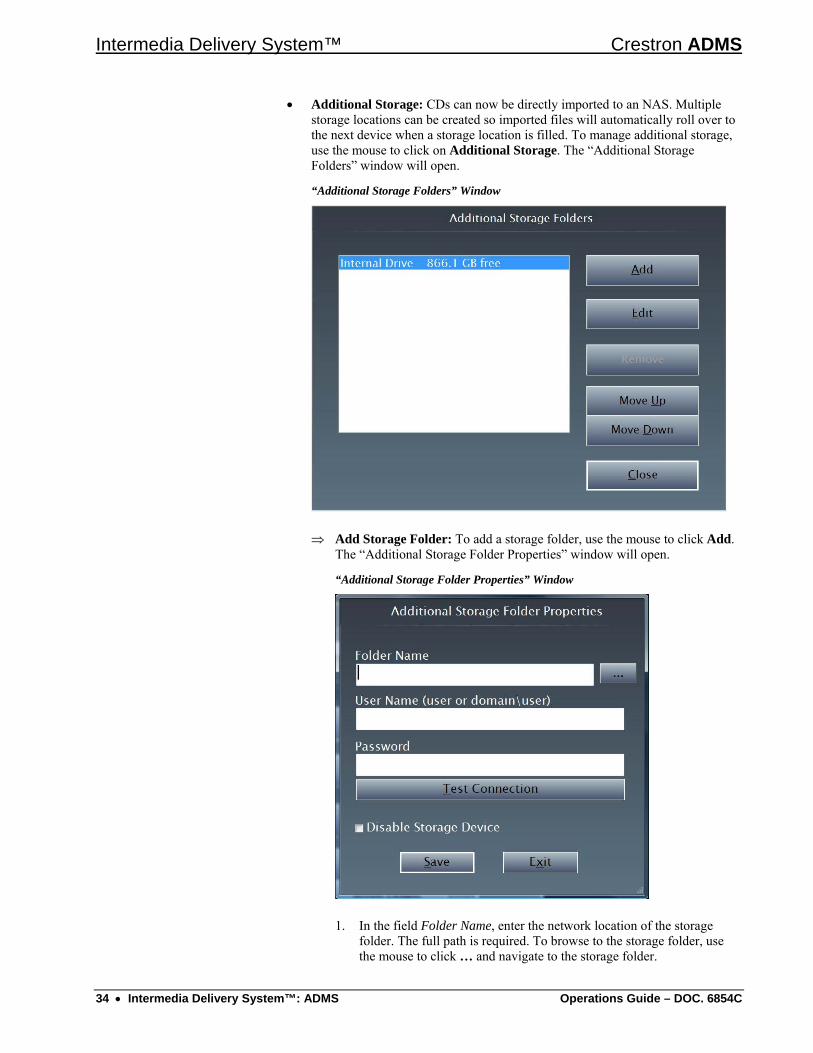
• Additional Storage: CDs can now be directly imported to an NAS. Multiple storage locations can be created so imported files will automatically roll over to the next device when a storage location is filled. To manage additional storage, use the mouse to click on Additional Storage. The “Additional Storage Folders” window will open.
“Additional Storage Folders” Window
⇒ Add Storage Folder: To add a storage folder, use the mouse to click Add. The “Additional Storage Folder Properties” window will open.
“Additional Storage Folder Properties” Window
1. In the field Folder Name, enter the network location of the storage folder. The full path is required. To browse to the storage folder, use the mouse to click … and navigate to the storage folder.
34 • Intermedia Delivery System™: ADMS Operations Guide – DOC. 6854C
Crestron ADMS Intermedia Delivery System™
2. If the storage folder requires a user name (user or domain\user) and password, type them in the User Name and Password fields.
3. To test the connection to the storage folder, use the mouse to click Test Connection.
4. To disable the folder from storing files, check the box Disable Storage Device.
5. Click Save to add the storage folder to the list of storage locations. To exit without saving click Exit.
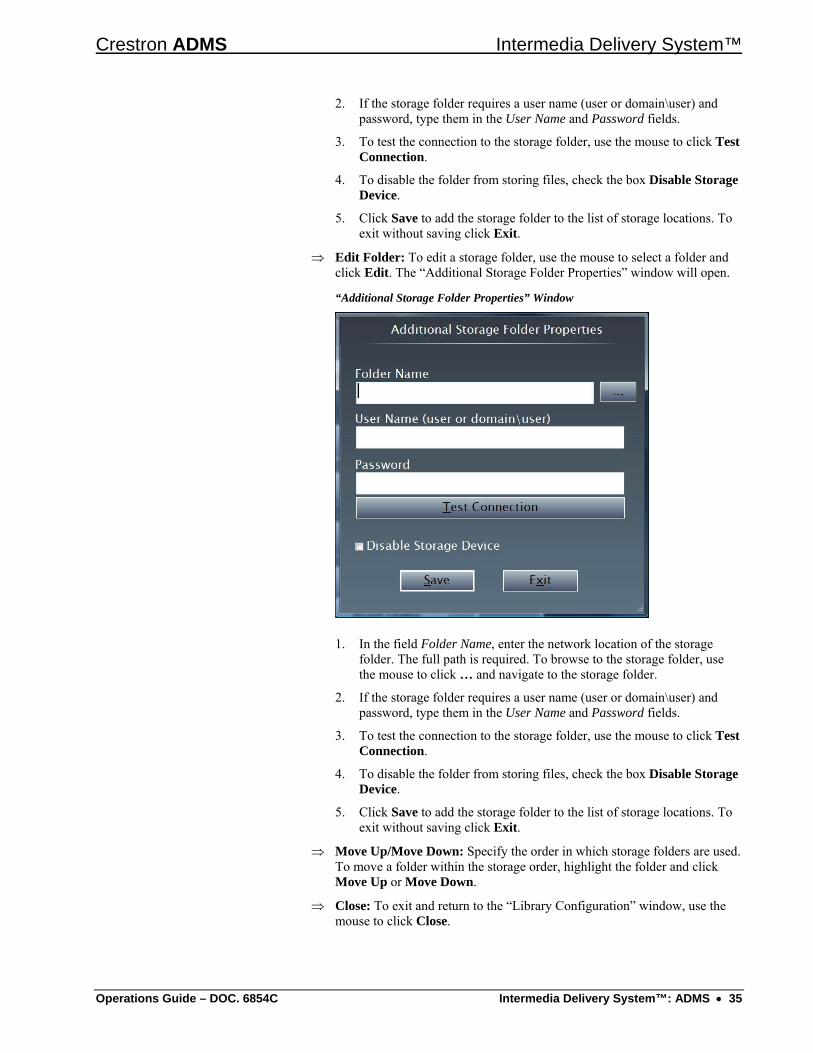
⇒ Edit Folder: To edit a storage folder, use the mouse to select a folder and click Edit. The “Additional Storage Folder Properties” window will open.
“Additional Storage Folder Properties” Window
1. In the field Folder Name, enter the network location of the storage folder. The full path is required. To browse to the storage folder, use the mouse to click … and navigate to the storage folder.
2. If the storage folder requires a user name (user or domain\user) and password, type them in the User Name and Password fields.
3. To test the connection to the storage folder, use the mouse to click Test Connection.
4. To disable the folder from storing files, check the box Disable Storage Device.
5. Click Save to add the storage folder to the list of storage locations. To exit without saving click Exit.
⇒ Move Up/Move Down: Specify the order in which storage folders are used. To move a folder within the storage order, highlight the folder and click Move Up or Move Down.
⇒ Close: To exit and return to the “Library Configuration” window, use the mouse to click Close.
Operations Guide – DOC. 6854C Intermedia Delivery System™: ADMS • 35
Intermedia Delivery System™ Crestron ADMS
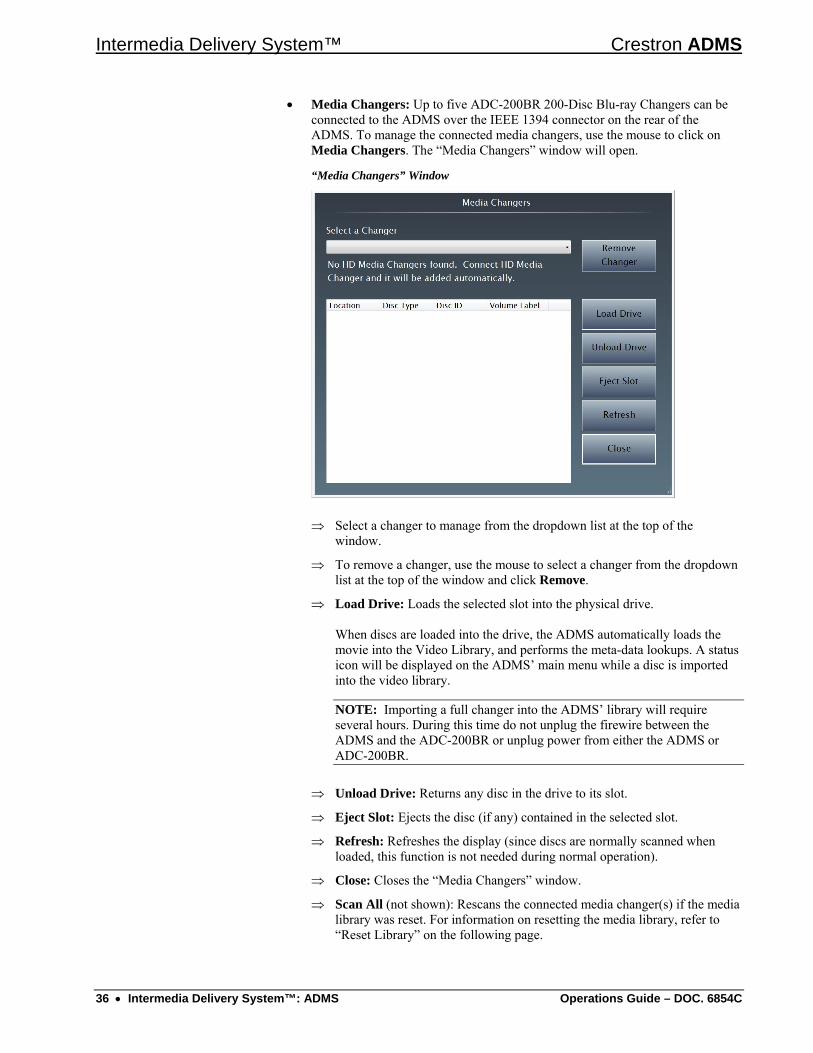
• Media Changers: Up to five ADC-200BR 200-Disc Blu-ray Changers can be connected to the ADMS over the IEEE 1394 connector on the rear of the ADMS. To manage the connected media changers, use the mouse to click on Media Changers. The “Media Changers” window will open.
“Media Changers” Window
⇒ Select a changer to manage from the dropdown list at the top of the window.
⇒ To remove a changer, use the mouse to select a changer from the dropdown list at the top of the window and click Remove.
⇒ Load Drive: Loads the selected slot into the physical drive. When discs are loaded into the drive, the ADMS automatically loads the movie into the Video Library, and performs the meta-data lookups. A status icon will be displayed on the ADMS’ main menu while a disc is imported into the video library.
NOTE: Importing a full changer into the ADMS’ library will require several hours. During this time do not unplug the firewire between the ADMS and the ADC-200BR or unplug power from either the ADMS or ADC-200BR.
⇒ Unload Drive: Returns any disc in the drive to its slot.
⇒ Eject Slot: Ejects the disc (if any) contained in the selected slot.
⇒ Refresh: Refreshes the display (since discs are normally scanned when loaded, this function is not needed during normal operation).
⇒ Close: Closes the “Media Changers” window.
⇒ Scan All (not shown): Rescans the connected media changer(s) if the media library was reset. For information on resetting the media library, refer to “Reset Library” on the following page.
36 • Intermedia Delivery System™: ADMS Operations Guide – DOC. 6854C
Crestron ADMS Intermedia Delivery System™
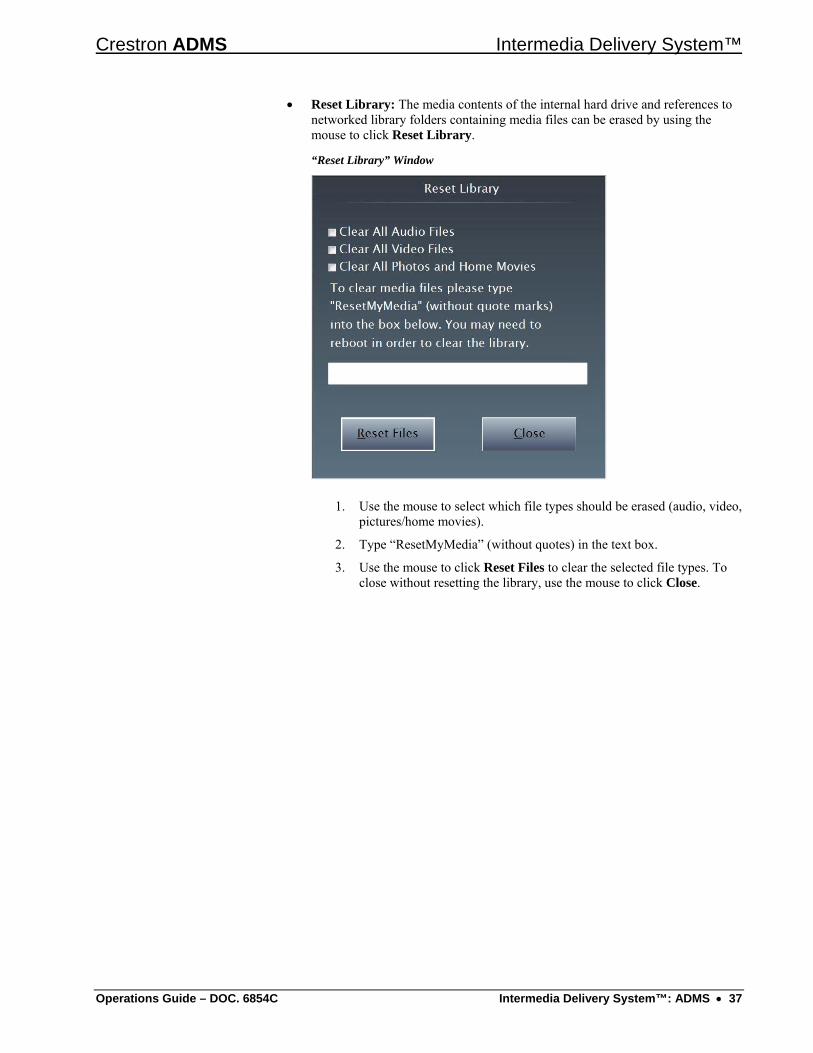
• Reset Library: The media contents of the internal hard drive and references to networked library folders containing media files can be erased by using the mouse to click Reset Library.
“Reset Library” Window
1. Use the mouse to select which file types should be erased (audio, video, pictures/home movies).
2. Type “ResetMyMedia” (without quotes) in the text box.
3. Use the mouse to click Reset Files to clear the selected file types. To close without resetting the library, use the mouse to click Close.
Operations Guide – DOC. 6854C Intermedia Delivery System™: ADMS • 37
Intermedia Delivery System™ Crestron ADMS
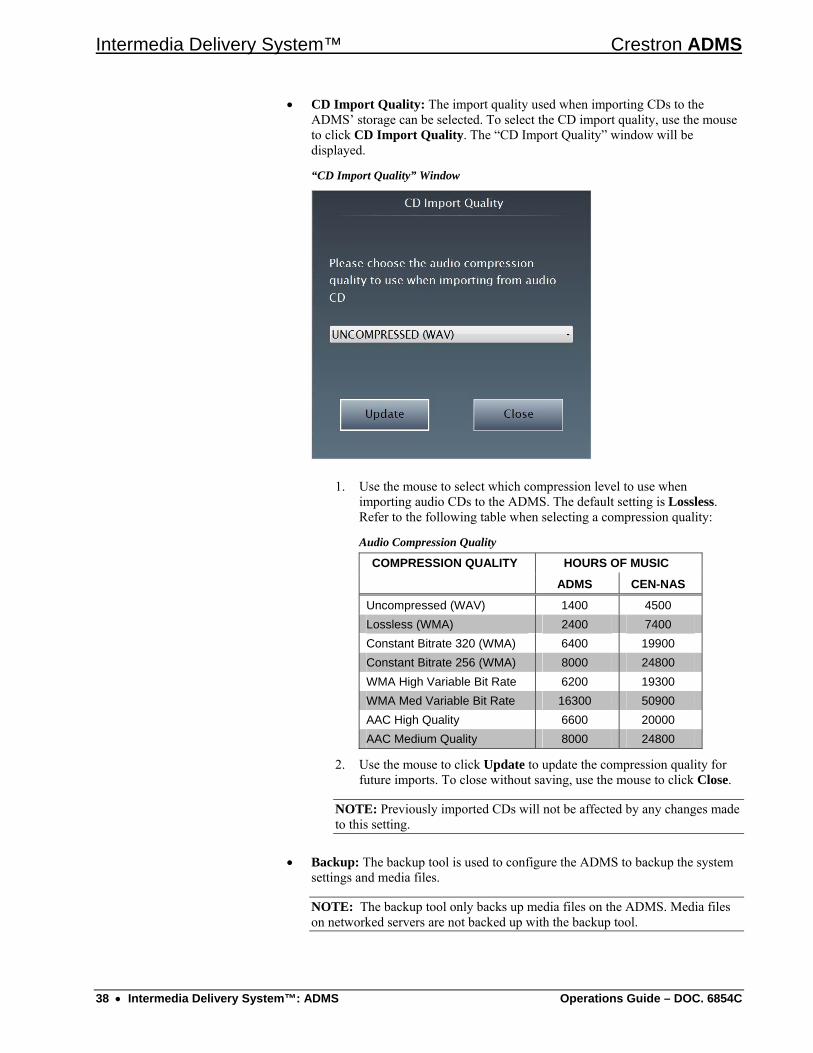
• CD Import Quality: The import quality used when importing CDs to the ADMS’ storage can be selected. To select the CD import quality, use the mouse to click CD Import Quality. The “CD Import Quality” window will be displayed.
“CD Import Quality” Window
1. Use the mouse to select which compression level to use when importing audio CDs to the ADMS. The default setting is Lossless. Refer to the following table when selecting a compression quality:
Audio Compression Quality
HOURS OF MUSIC COMPRESSION QUALITY
ADMS CEN-NAS Uncompressed (WAV) 1400 4500 Lossless (WMA) 2400 7400 Constant Bitrate 320 (WMA) 6400 19900 Constant Bitrate 256 (WMA) 8000 24800 WMA High Variable Bit Rate 6200 19300 WMA Med Variable Bit Rate 16300 50900 AAC High Quality 6600 20000 AAC Medium Quality 8000 24800
2. Use the mouse to click Update to update the compression quality for future imports. To close without saving, use the mouse to click Close.
NOTE: Previously imported CDs will not be affected by any changes made to this setting.
• Backup: The backup tool is used to configure the ADMS to backup the system settings and media files.
NOTE: The backup tool only backs up media files on the ADMS. Media files on networked servers are not backed up with the backup tool.
38 • Intermedia Delivery System™: ADMS Operations Guide – DOC. 6854C
Crestron ADMS Intermedia Delivery System™
NOTE: Crestron recommends configuring the backup tool with a relatively small amount of media on the ADMS (i.e. one or two music albums and several video files in the local library).
NOTE: Before configuration, prepare a suitable destination to which the ADMS will copy all its critical data. One full terabyte is required to ensure the remote location can accommodate all of the locally stored media.
Once configured, the ADMS will initiate a background process that will copy to the specified destination, all locally stored imported media along with several other sets of files which comprise all that is needed to restore the ADMS to its present condition in the case of a major hardware failure. This includes:
⇒ The most recent local backup of the ADMS database. This is the backup made the prior night during the regularly scheduled 4:00 AM local backup process.
NOTE: The existing “local backup” process already makes a copy of the active database every night, and provides some level of protection against certain types of failures. However, the copy is stored on the same physical device and cannot be relied upon in cases where the local hardware fails or is damaged by external forces.
⇒ Amazon Unbox related media and supporting files.
⇒ The Windows “DRM Store” which contains various Digital Rights Management licences used primarily in relation to Amazon Unbox rentals and purchases.
⇒ Internet Explorer Favorites which have been set by the user when using the embedded browser.
⇒ Configuration files found in the Settings folder which change over the lifetime of usage.
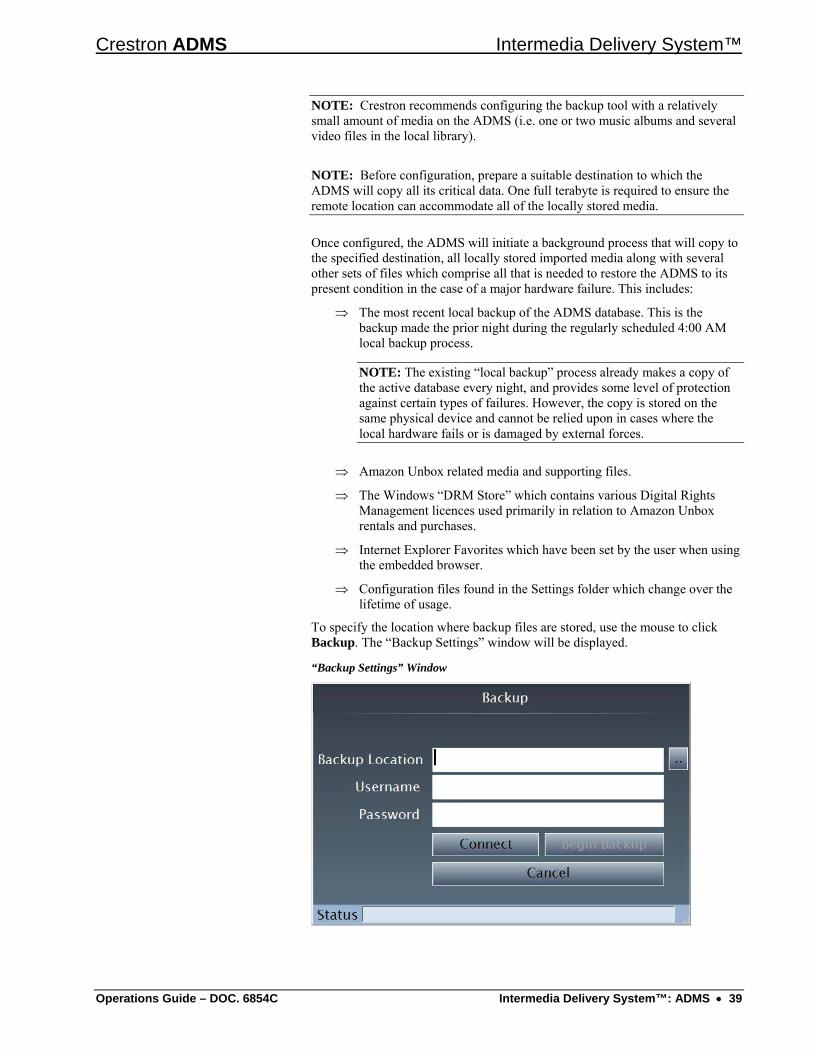
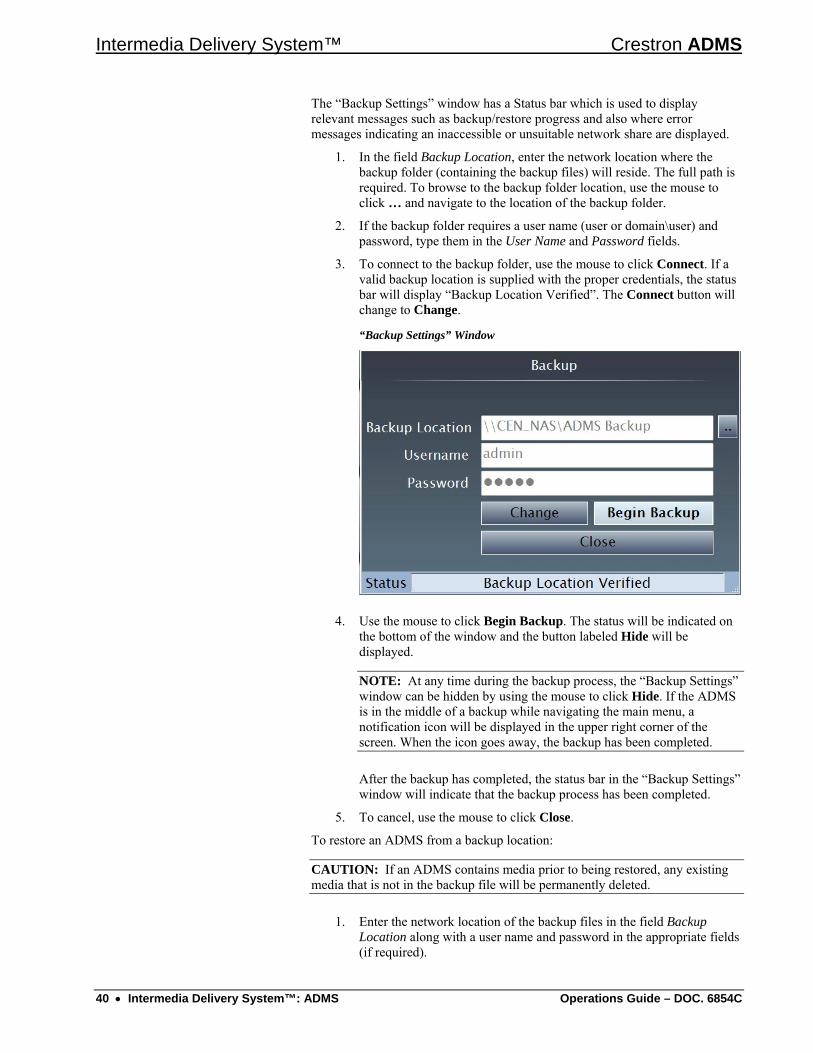
To specify the location where backup files are stored, use the mouse to click Backup. The “Backup Settings” window will be displayed.
“Backup Settings” Window
Operations Guide – DOC. 6854C Intermedia Delivery System™: ADMS • 39
Intermedia Delivery System™ Crestron ADMS
The “Backup Settings” window has a Status bar which is used to display relevant messages such as backup/restore progress and also where error messages indicating an inaccessible or unsuitable network share are displayed.
1. In the field Backup Location, enter the network location where the backup folder (containing the backup files) will reside. The full path is required. To browse to the backup folder location, use the mouse to click … and navigate to the location of the backup folder.
2. If the backup folder requires a user name (user or domain\user) and password, type them in the User Name and Password fields.
3. To connect to the backup folder, use the mouse to click Connect. If a valid backup location is supplied with the proper credentials, the status bar will display “Backup Location Verified”. The Connect button will change to Change.
“Backup Settings” Window
4. Use the mouse to click Begin Backup. The status will be indicated on the bottom of the window and the button labeled Hide will be displayed.
NOTE: At any time during the backup process, the “Backup Settings” window can be hidden by using the mouse to click Hide. If the ADMS is in the middle of a backup while navigating the main menu, a notification icon will be displayed in the upper right corner of the screen. When the icon goes away, the backup has been completed.
After the backup has completed, the status bar in the “Backup Settings” window will indicate that the backup process has been completed.
5. To cancel, use the mouse to click Close.
To restore an ADMS from a backup location:
CAUTION: If an ADMS contains media prior to being restored, any existing media that is not in the backup file will be permanently deleted.
1. Enter the network location of the backup files in the field Backup Location along with a user name and password in the appropriate fields (if required).
40 • Intermedia Delivery System™: ADMS Operations Guide – DOC. 6854C
Crestron ADMS Intermedia Delivery System™
2. Use the mouse to click Connect. A message indicating that a backup file has been found will be displayed.
3. To restore the ADMS using this file, use the mouse to click Begin Restore. To cancel and return to the “Backup Settings” window, use the mouse to click Cancel.
NOTE: The ADMS cannot be used while the database is being restored.
When the restore process is complete, the status bar will indicate as such.
4. Use the mouse to click Reboot.
• Close: Use the mouse to click Close to close the “Library Configure” window and return to the SETUP MENU.
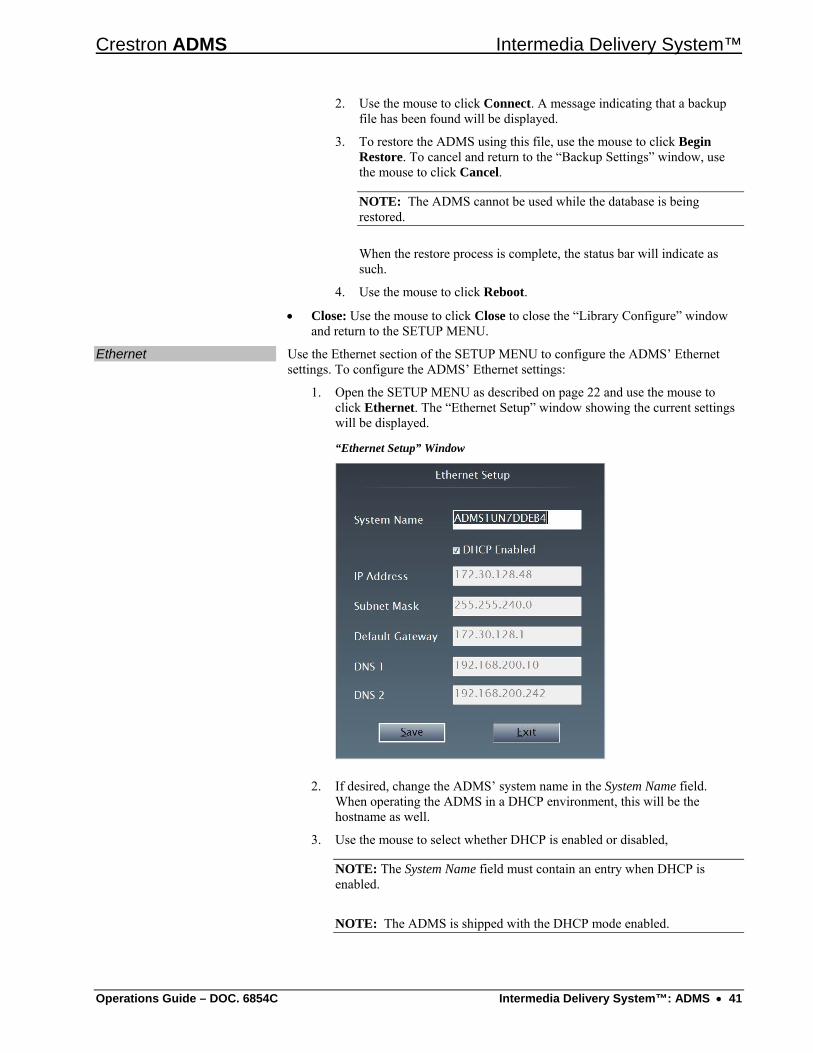
Ethernet Use the Ethernet section of the SETUP MENU to configure the ADMS’ Ethernet settings. To configure the ADMS’ Ethernet settings:
1. Open the SETUP MENU as described on page 22 and use the mouse to click Ethernet. The “Ethernet Setup” window showing the current settings will be displayed.
“Ethernet Setup” Window
2. If desired, change the ADMS’ system name in the System Name field. When operating the ADMS in a DHCP environment, this will be the hostname as well.
3. Use the mouse to select whether DHCP is enabled or disabled,
NOTE: The System Name field must contain an entry when DHCP is enabled.
NOTE: The ADMS is shipped with the DHCP mode enabled.
Operations Guide – DOC. 6854C Intermedia Delivery System™: ADMS • 41
Intermedia Delivery System™ Crestron ADMS
If DHCP is not enabled, static IP addresses can be assigned for the IP Address, Subnet Mask, Default Gateway, DNS 1 and DNS 2 fields.
4. To save changes made to the Ethernet settings and return to the SETUP menu, use the mouse to click Save. To exit without saving changes, use the mouse to click Exit.
NOTE: If changes to Ethernet settings have been made, the ADMS may need to be rebooted.
IP Table Use the IP table section of the SETUP MENU to configure the ADMS for Ethernet communication with a Crestron control system. To configure the ADMS’ IP table:
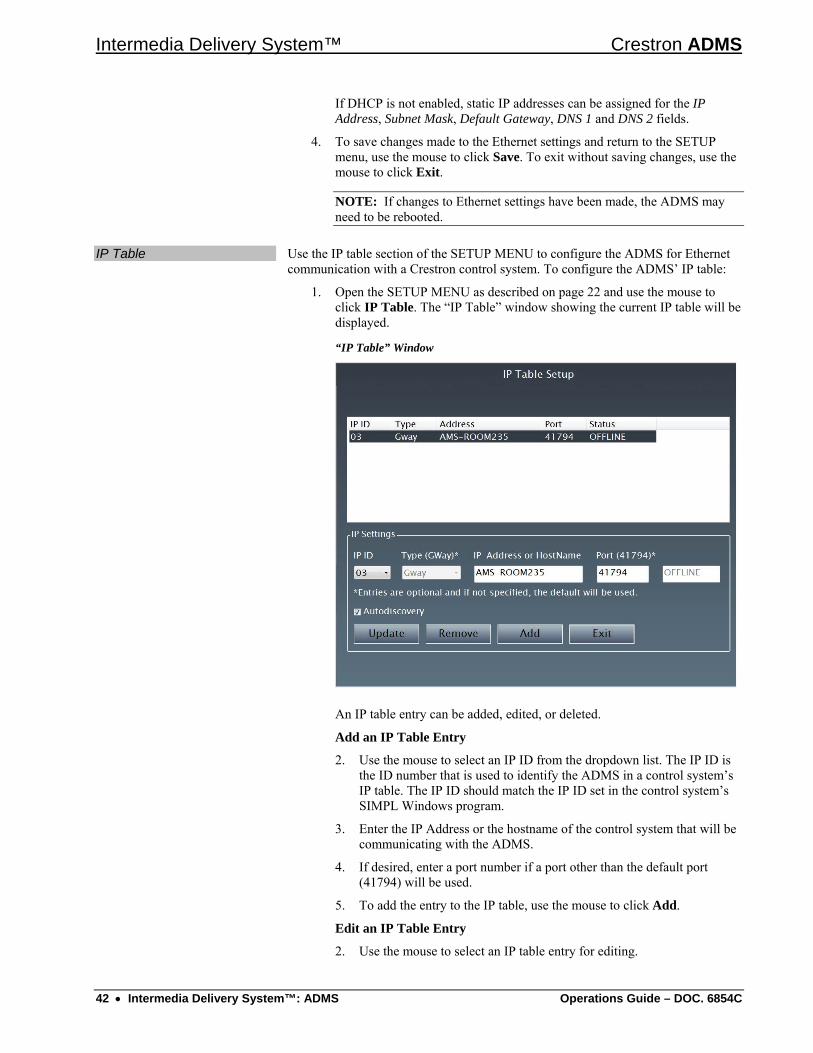
1. Open the SETUP MENU as described on page 22 and use the mouse to click IP Table. The “IP Table” window showing the current IP table will be displayed.
“IP Table” Window
An IP table entry can be added, edited, or deleted.
Add an IP Table Entry
2. Use the mouse to select an IP ID from the dropdown list. The IP ID is the ID number that is used to identify the ADMS in a control system’s IP table. The IP ID should match the IP ID set in the control system’s SIMPL Windows program.
3. Enter the IP Address or the hostname of the control system that will be communicating with the ADMS.
4. If desired, enter a port number if a port other than the default port (41794) will be used.
5. To add the entry to the IP table, use the mouse to click Add.
Edit an IP Table Entry
2. Use the mouse to select an IP table entry for editing.
42 • Intermedia Delivery System™: ADMS Operations Guide – DOC. 6854C
Crestron ADMS Intermedia Delivery System™
3. Use the mouse to select an IP ID from the dropdown list. The IP ID is the ID number that is used to identify the ADMS in a control system’s IP table. The IP ID should match the IP ID set in the control system’s SIMPL Windows program.
4. Enter the IP Address or the hostname of the control system that will be communicating with the ADMS.
5. If desired, enter a port number if a port other than the default port (41794) will be used.
6. To update the entry, use the mouse to click Update.
Remove an IP Table Entry
2. Use the mouse to select an IP table entry for removal.
3. To remove the entry, use the mouse to click Remove.
Autodiscovery
To enable the ADMS to be discovered by a Crestron control system using autodiscovery, use to enable the Autodiscovery feature.
Exit
To exit, use the mouse to click Exit.
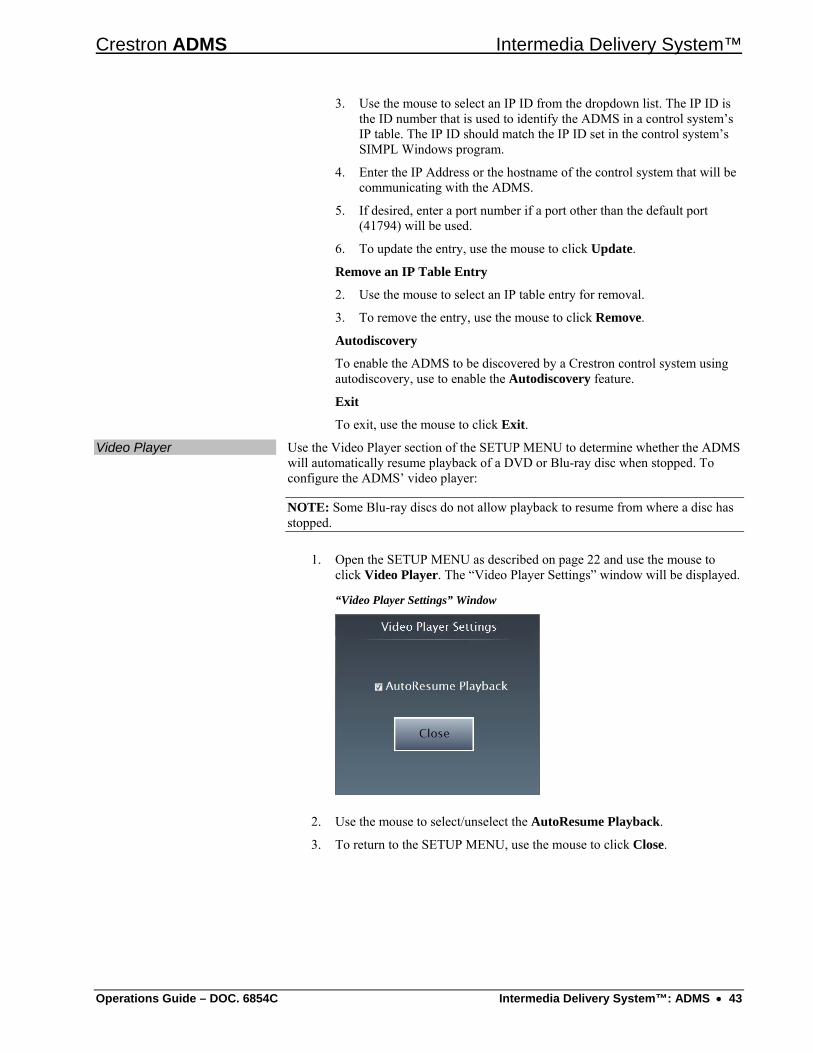
Video Player Use the Video Player section of the SETUP MENU to determine whether the ADMS will automatically resume playback of a DVD or Blu-ray disc when stopped. To configure the ADMS’ video player:
NOTE: Some Blu-ray discs do not allow playback to resume from where a disc has stopped.
1. Open the SETUP MENU as described on page 22 and use the mouse to click Video Player. The “Video Player Settings” window will be displayed.
“Video Player Settings” Window
2. Use the mouse to select/unselect the AutoResume Playback.
3. To return to the SETUP MENU, use the mouse to click Close.
Operations Guide – DOC. 6854C Intermedia Delivery System™: ADMS • 43
Intermedia Delivery System™ Crestron ADMS
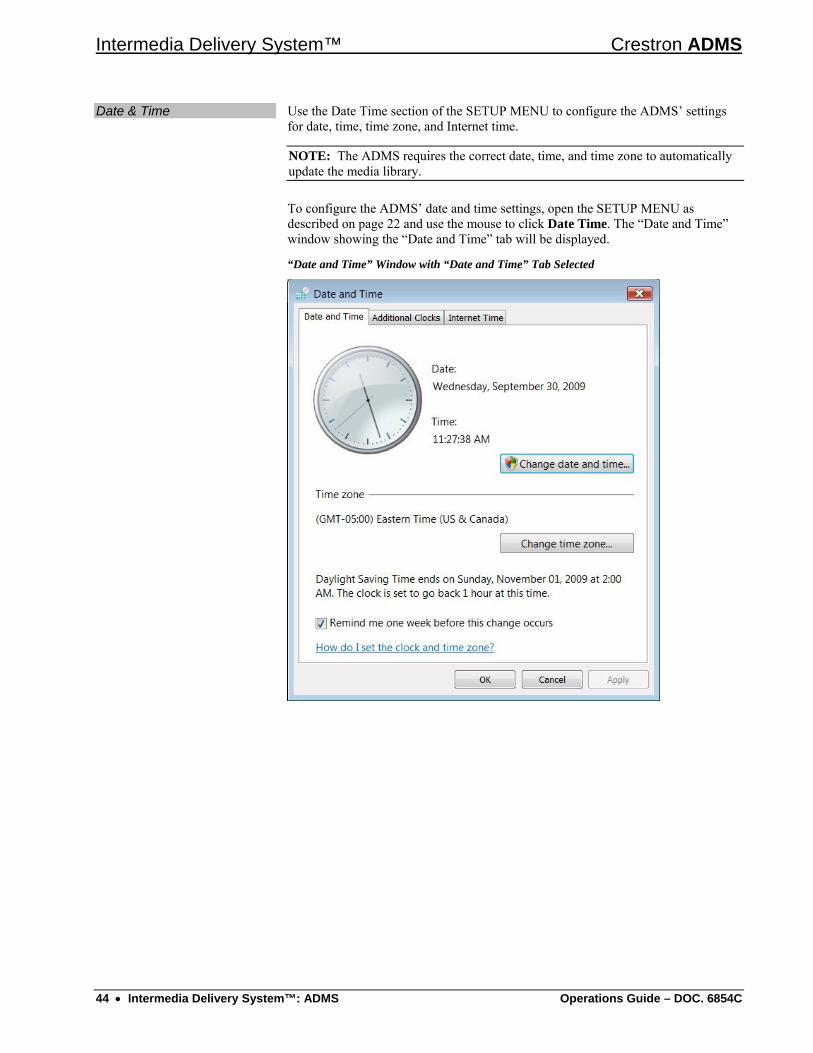
Date & Time Use the Date Time section of the SETUP MENU to configure the ADMS’ settings for date, time, time zone, and Internet time.
NOTE: The ADMS requires the correct date, time, and time zone to automatically update the media library.
To configure the ADMS’ date and time settings, open the SETUP MENU as described on page 22 and use the mouse to click Date Time. The “Date and Time” window showing the “Date and Time” tab will be displayed.
“Date and Time” Window with “Date and Time” Tab Selected
44 • Intermedia Delivery System™: ADMS Operations Guide – DOC. 6854C
Crestron ADMS Intermedia Delivery System™
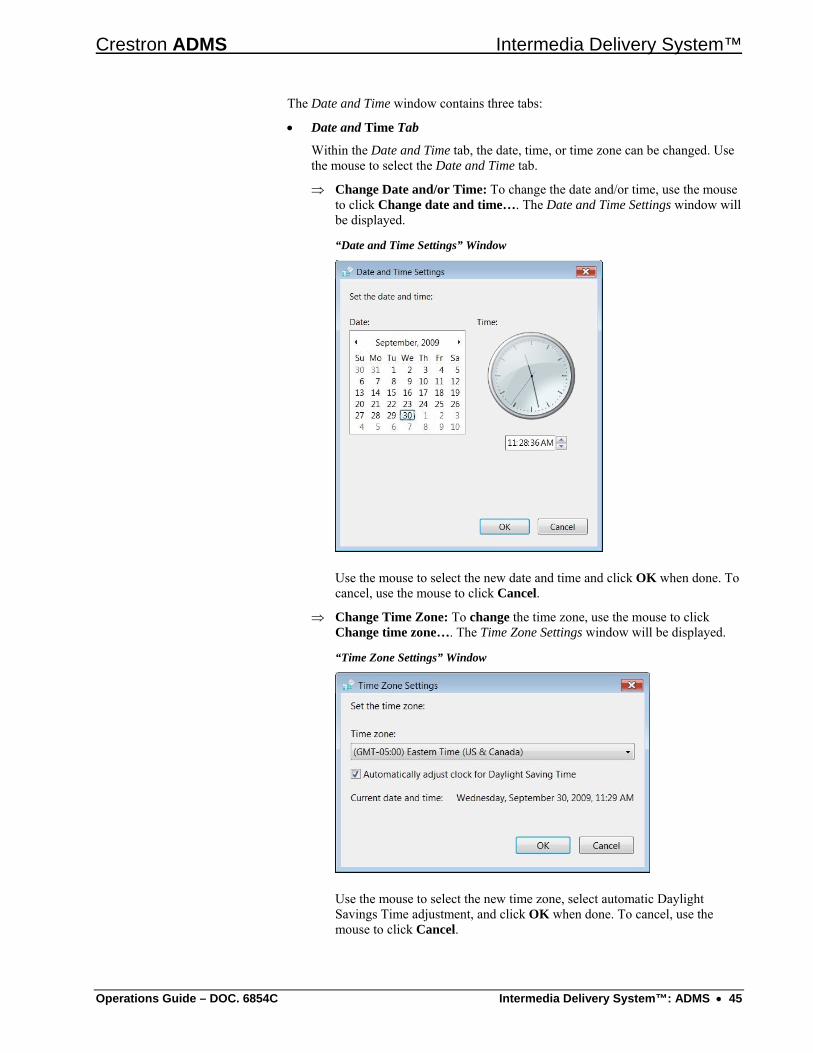
The Date and Time window contains three tabs:
• Date and Time Tab
Within the Date and Time tab, the date, time, or time zone can be changed. Use the mouse to select the Date and Time tab.
⇒ Change Date and/or Time: To change the date and/or time, use the mouse to click Change date and time…. The Date and Time Settings window will be displayed.
“Date and Time Settings” Window
Use the mouse to select the new date and time and click OK when done. To cancel, use the mouse to click Cancel.
⇒ Change Time Zone: To change the time zone, use the mouse to click Change time zone…. The Time Zone Settings window will be displayed.
“Time Zone Settings” Window
Use the mouse to select the new time zone, select automatic Daylight Savings Time adjustment, and click OK when done. To cancel, use the mouse to click Cancel.
Operations Guide – DOC. 6854C Intermedia Delivery System™: ADMS • 45
Intermedia Delivery System™ Crestron ADMS
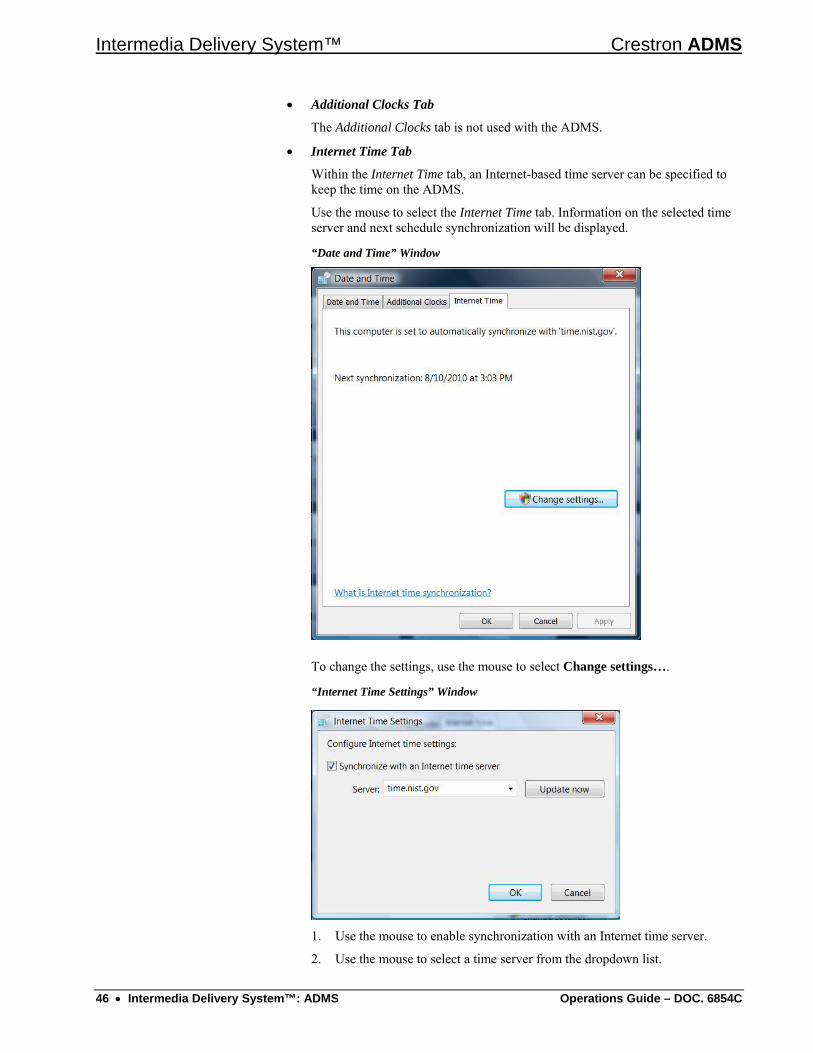
• Additional Clocks Tab
The Additional Clocks tab is not used with the ADMS.
• Internet Time Tab
Within the Internet Time tab, an Internet-based time server can be specified to keep the time on the ADMS.
Use the mouse to select the Internet Time tab. Information on the selected time server and next schedule synchronization will be displayed.
“Date and Time” Window
To change the settings, use the mouse to select Change settings….
“Internet Time Settings” Window
1. Use the mouse to enable synchronization with an Internet time server.
2. Use the mouse to select a time server from the dropdown list.
46 • Intermedia Delivery System™: ADMS Operations Guide – DOC. 6854C
Crestron ADMS Intermedia Delivery System™
3. Click Update Now to sync the ADMS with the selected Internet time server.
4. Click OK to save changes or Cancel to cancel without saving changes.
After adjustments to the time, time zone, and Internet time have been made, use the mouse to click OK to save changes and close the window, or click Cancel to cancel the changes.
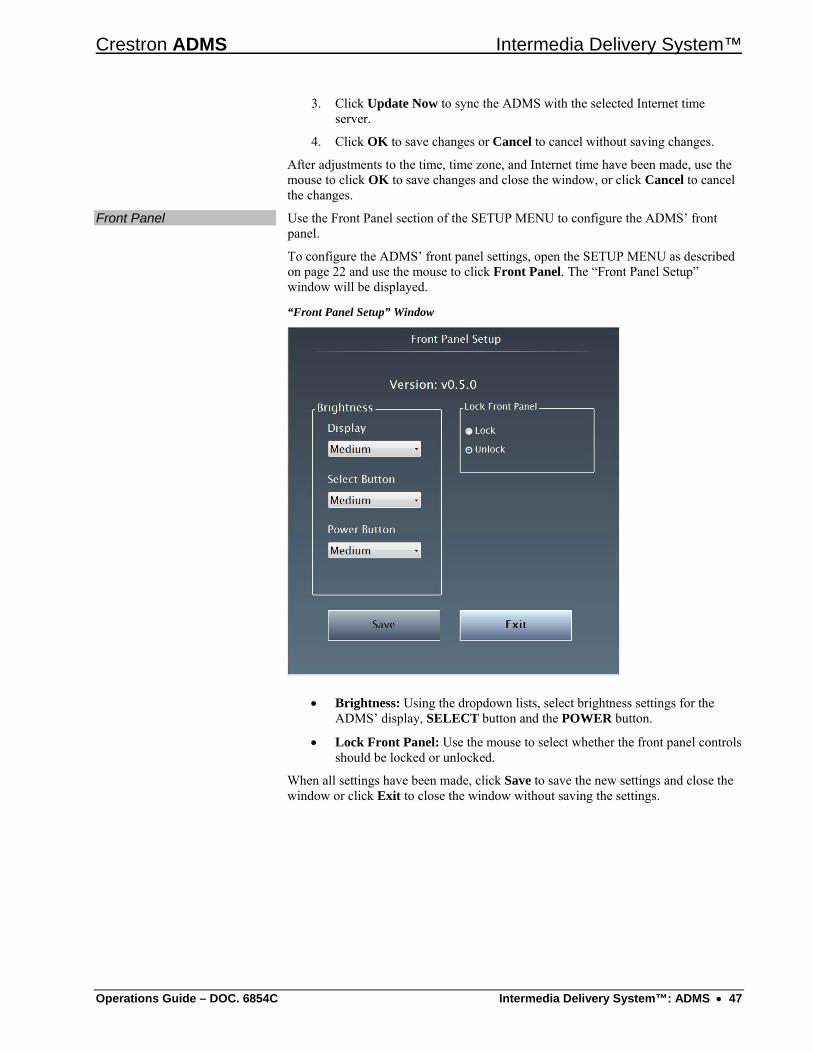
Front Panel Use the Front Panel section of the SETUP MENU to configure the ADMS’ front panel.
To configure the ADMS’ front panel settings, open the SETUP MENU as described on page 22 and use the mouse to click Front Panel. The “Front Panel Setup” window will be displayed.
“Front Panel Setup” Window
• Brightness: Using the dropdown lists, select brightness settings for the ADMS’ display, SELECT button and the POWER button.
• Lock Front Panel: Use the mouse to select whether the front panel controls should be locked or unlocked.
When all settings have been made, click Save to save the new settings and close the window or click Exit to close the window without saving the settings.
Operations Guide – DOC. 6854C Intermedia Delivery System™: ADMS • 47

Intermedia Delivery System™ Crestron ADMS
Version Information Use the Version Information section of the SETUP MENU to view information about the ADMS’ operating software and reset the End User License Agreement (EULA).
To view information about the ADMS or reset the EULA, open the SETUP MENU as described on page 22 and use the mouse to click Version Information. The “Version Information” window will be displayed.
“Version Information” Window
• Prior to delivery, the EULA should be reset so the customer will be forced to accept it when they take ownership of the ADMS. To reset the EULA, use the mouse to click Reset.
• To close the window and return to the setup menu, use the mouse to click Exit.
48 • Intermedia Delivery System™: ADMS Operations Guide – DOC. 6854C
Crestron ADMS Intermedia Delivery System™
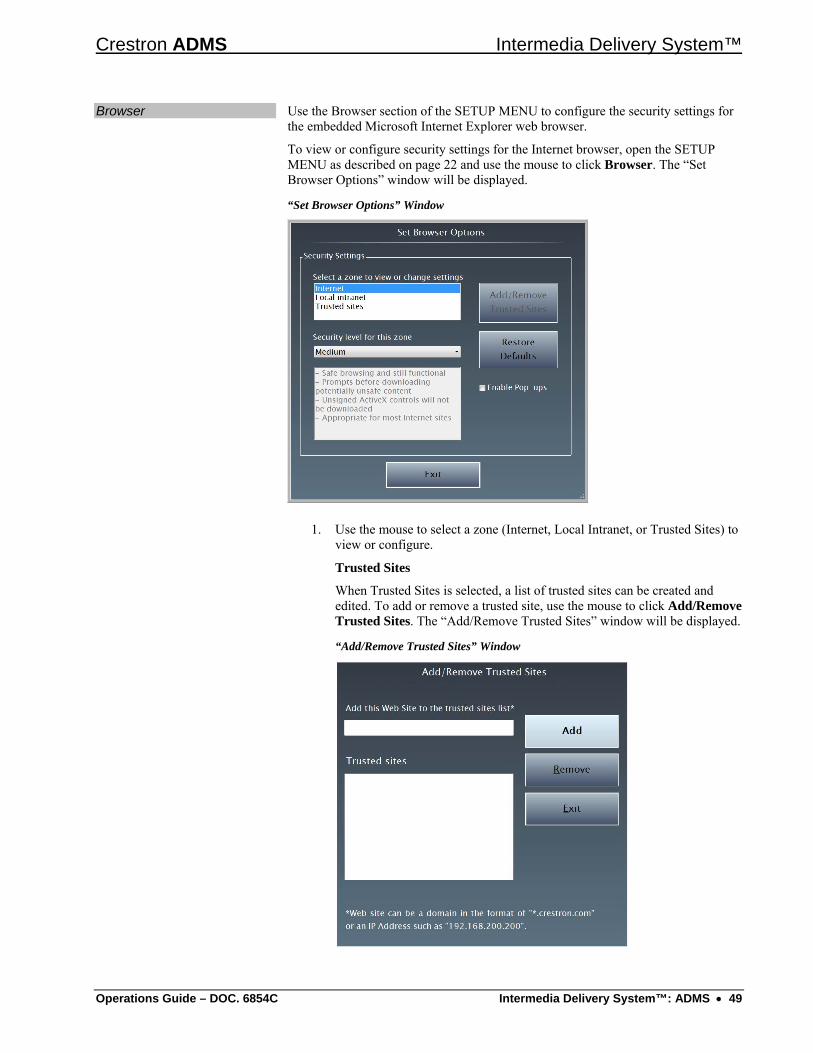
Browser Use the Browser section of the SETUP MENU to configure the security settings for the embedded Microsoft Internet Explorer web browser.
To view or configure security settings for the Internet browser, open the SETUP MENU as described on page 22 and use the mouse to click Browser. The “Set Browser Options” window will be displayed.
“Set Browser Options” Window
1. Use the mouse to select a zone (Internet, Local Intranet, or Trusted Sites) to view or configure.
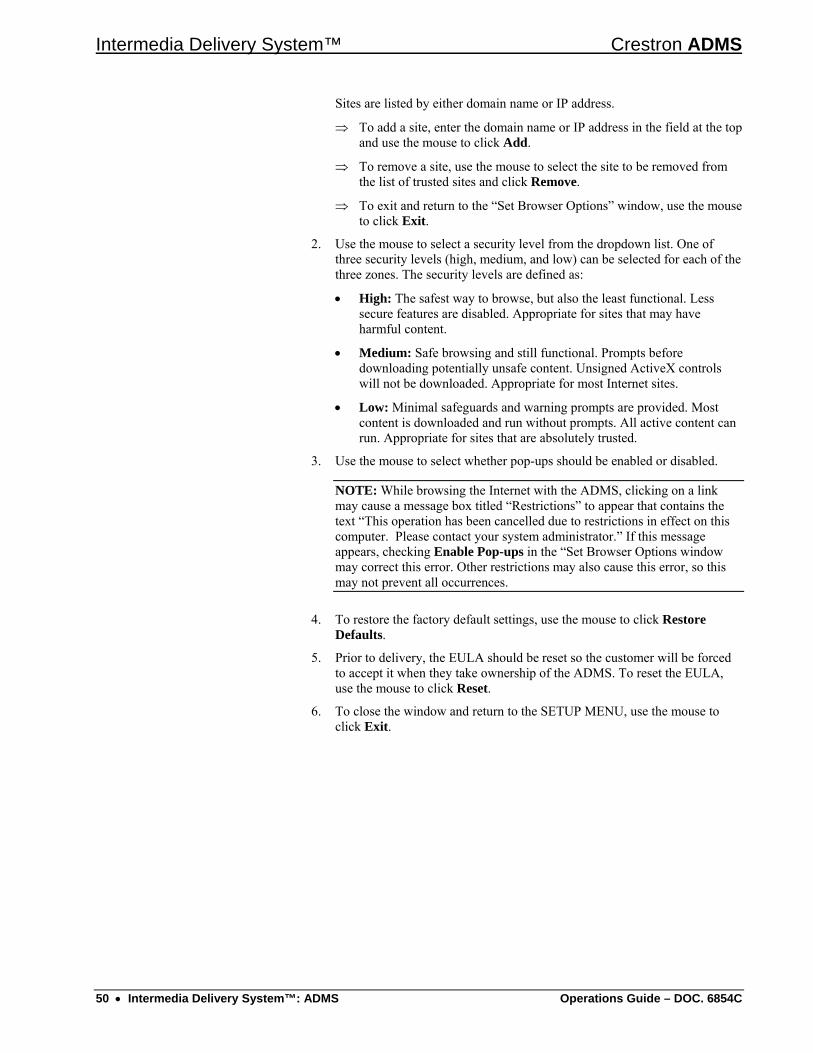
Trusted Sites
When Trusted Sites is selected, a list of trusted sites can be created and edited. To add or remove a trusted site, use the mouse to click Add/Remove Trusted Sites. The “Add/Remove Trusted Sites” window will be displayed.
“Add/Remove Trusted Sites” Window
Operations Guide – DOC. 6854C Intermedia Delivery System™: ADMS • 49
Intermedia Delivery System™ Crestron ADMS
Sites are listed by either domain name or IP address.
⇒ To add a site, enter the domain name or IP address in the field at the top and use the mouse to click Add.
⇒ To remove a site, use the mouse to select the site to be removed from the list of trusted sites and click Remove.
⇒ To exit and return to the “Set Browser Options” window, use the mouse to click Exit.
2. Use the mouse to select a security level from the dropdown list. One of three security levels (high, medium, and low) can be selected for each of the three zones. The security levels are defined as:
• High: The safest way to browse, but also the least functional. Less secure features are disabled. Appropriate for sites that may have harmful content.
• Medium: Safe browsing and still functional. Prompts before downloading potentially unsafe content. Unsigned ActiveX controls will not be downloaded. Appropriate for most Internet sites.
• Low: Minimal safeguards and warning prompts are provided. Most content is downloaded and run without prompts. All active content can run. Appropriate for sites that are absolutely trusted.
3. Use the mouse to select whether pop-ups should be enabled or disabled.
NOTE: While browsing the Internet with the ADMS, clicking on a link may cause a message box titled “Restrictions” to appear that contains the text “This operation has been cancelled due to restrictions in effect on this computer. Please contact your system administrator.” If this message appears, checking Enable Pop-ups in the “Set Browser Options window may correct this error. Other restrictions may also cause this error, so this may not prevent all occurrences.
4. To restore the factory default settings, use the mouse to click Restore Defaults.
5. Prior to delivery, the EULA should be reset so the customer will be forced to accept it when they take ownership of the ADMS. To reset the EULA, use the mouse to click Reset.
6. To close the window and return to the SETUP MENU, use the mouse to click Exit.
50 • Intermedia Delivery System™: ADMS Operations Guide – DOC. 6854C
Crestron ADMS Intermedia Delivery System™
Crestron Home Pages The ADMS can use a compiled VisionTools Pro-e (VT Pro-e) project (Crestron Home pages) to control devices controlled by a Crestron control system.
To select a compiled project, open the SETUP MENU as described on page 22 and use the mouse to click Crestron Home Pages. The “ADMS Project Update” window will be displayed.
“ADMS Project Update” Window
NOTE: Projects can also be uploaded using Crestron Toolbox™ software.
1. Enter the filename (including path) of the compiled project. Otherwise, use the mouse to click Browse and browse for the file.
2. To update the Crestron Home project on the ADMS, use the mouse to click Update. Otherwise, click Cancel to return to the SETUP MENU.
Firmware Updates The ADMS’ firmware can be manually updated to ensure optimal operation.
To select a firmware file to update the ADMS, open the SETUP MENU as described on page 22 and use the mouse to click Firmware Updates. The “ADMS Firmware Update” window will be displayed.
“ADMS Firmware Update” Window
1. Enter the filename (including path) in the filename field. Otherwise, use the mouse to click Browse and browse for the file.
2. To install the selected file, use the mouse to click Update. To cancel and return to the SETUP MENU, use the mouse to click Cancel.
3. When the update is complete, the ADMS will reboot.
The ADMS’ firmware can also be updated from the Advanced section of the MAIN MENU.
Operations Guide – DOC. 6854C Intermedia Delivery System™: ADMS • 51
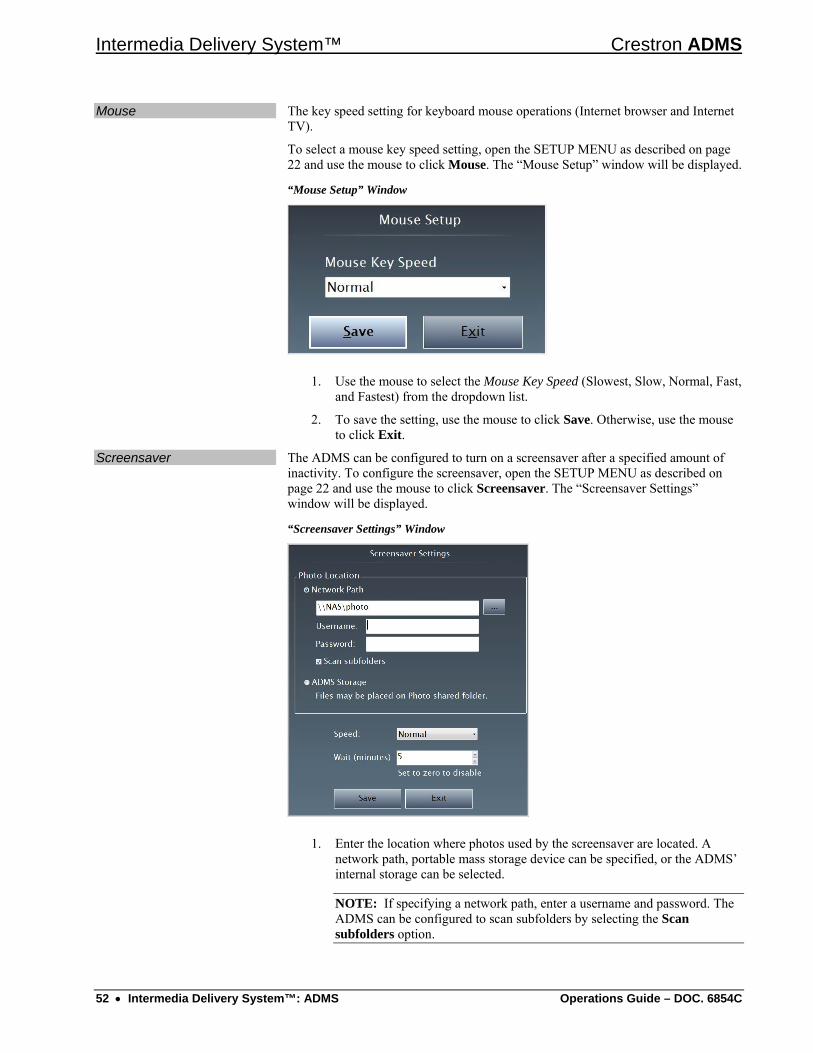
Intermedia Delivery System™ Crestron ADMS
Mouse The key speed setting for keyboard mouse operations (Internet browser and Internet TV).
To select a mouse key speed setting, open the SETUP MENU as described on page 22 and use the mouse to click Mouse. The “Mouse Setup” window will be displayed.
“Mouse Setup” Window
1. Use the mouse to select the Mouse Key Speed (Slowest, Slow, Normal, Fast, and Fastest) from the dropdown list.
2. To save the setting, use the mouse to click Save. Otherwise, use the mouse to click Exit.
Screensaver The ADMS can be configured to turn on a screensaver after a specified amount of inactivity. To configure the screensaver, open the SETUP MENU as described on page 22 and use the mouse to click Screensaver. The “Screensaver Settings” window will be displayed.
“Screensaver Settings” Window
1. Enter the location where photos used by the screensaver are located. A network path, portable mass storage device can be specified, or the ADMS’ internal storage can be selected.
NOTE: If specifying a network path, enter a username and password. The ADMS can be configured to scan subfolders by selecting the Scan subfolders option.
52 • Intermedia Delivery System™: ADMS Operations Guide – DOC. 6854C
Crestron ADMS Intermedia Delivery System™
NOTE: If using the ADMS’ internal storage, files are stored in \\<ipaddress or hostname>\photos
2. Use the mouse to select the operating speed of the screensaver.
3. Use the mouse to select the wait time (in minutes) before the screensaver activates.
4. To save the changes, use the mouse to click Save. Otherwise, use the mouse to click Exit.
Virtual Network Computing (VNC)
Use the VNC section of the SETUP MENU to configure the ADMS to receive remote assistance. To configure the ADMS’ for VNC operation:
1. Open the SETUP MENU as described on page 22 and use the mouse to click VNC. The “UltraVnc Settings” window showing the current settings will be displayed.
“UltraVnc Settings” Window
The following changes can be made in the “UltraVnc Settings” window:
Enable/Disable VNC: To enable and/or disable VNC, use the mouse to select the Network tab and select and/or unselect the Incoming Connections|Enable incoming port checkbox.
Manually select a port: To manually select a port, use the mouse to select Manual and enter a port number. The default setting is Auto.
NOTE: Any router connected to the ADMS must have port 5900 (by default) open to enable communications with the ADMS from outside of the installation.
NOTE: A VNC client such as UltraVNC (http://uvnc.com) is required to remotely connect to an ADMS.
Operations Guide – DOC. 6854C Intermedia Delivery System™: ADMS • 53
Intermedia Delivery System™ Crestron ADMS
To change the password: Use the mouse to select the Security tab and enter a new password. The default password is dealeradmin.
2. To save changes, use the mouse to click Save to ultravnc.ini. To exit and return to the SETUP MENU, use the mouse to click Quit.
RAID The ADMS uses RAID 1 technology for data loss prevention. When a drive has failed and requires replacement, the Raid Configuration Tool is used. To use the RAID Configuration Tool, open the SETUP MENU as described on page 22 and use the mouse to click RAID. The “Raid Configuration” window will be displayed.
During normal operation, the screen will be displayed as shown below.
“Raid Configuration” Window
If the drive is failing, follow the instructions on screen.
Degraded Drive: If one of the hard drives becomes bad, the status will be listed as “Degraded” and the serial number of the degraded hard drive is indicated. Instructions will be provided for correcting the problem as shown in the following diagram.
RAID Drive: Degraded
54 • Intermedia Delivery System™: ADMS Operations Guide – DOC. 6854C
Crestron ADMS Intermedia Delivery System™
New Drive: When a new blank hard drive is installed, the Configure button will be enabled and instructions to configure the hard drive will be provided.
RAID Drive: Replace
NOTE: Rebuilding a RAID array can take up to five hours. System performance is not affected while the RAID array is being rebuilt.
To exit and return to the SETUP MENU, use the mouse to click Close.
Amazon The ADMS uses Amazon.com to provide video-on-demand.
The ADMS requires a customer’s Amazon.com account to be registered on the ADMS. To configure the ADMS to use Amazon.com’s video-on-demand service, open the SETUP MENU as described on page 22 and use the mouse to click Amazon. The “Amazon Setup” window will be displayed.
“Amazon Setup” Window
Operations Guide – DOC. 6854C Intermedia Delivery System™: ADMS • 55
Intermedia Delivery System™ Crestron ADMS
1. Verify that an internet connection is present and the customer has a registered Amazon.com account.
2. Use the mouse to click Unbox Player. The “Amazon Unbox Player” setup will launch.
“Amazon Unbox Player” Setup
NOTE: Setup is only launched once, so make sure this procedure is followed as described.
3. Where prompted for a name, enter a unique name for the ADMS to be identified by Amazon.com. The name will be listed in the Video Library on Amazon.com’s website.
4. Select “No – do not download portable video files”
5. Enter the customer’s Amazon.com email address and password.
6. (Optional): Use the mouse to select whether to receive “The Download” newsletter from Amazon.com via email.
7. Use the mouse to click OK and return to the SETUP MENU.
8. Use the mouse to click Exit and exit the SETUP MENU.
9. Use the up ( ) or down ( ) arrow keys on the keyboard to highlight Internet Browser and press Enter. The Internet browser will open.
10. Enter the URL www.amazon.com and log in with the customer’s login and password from step 5.
11. Use the mouse to click Your Account.
12. In the Payment section, use the mouse to add a credit card if a credit card is not already stored.
56 • Intermedia Delivery System™: ADMS Operations Guide – DOC. 6854C
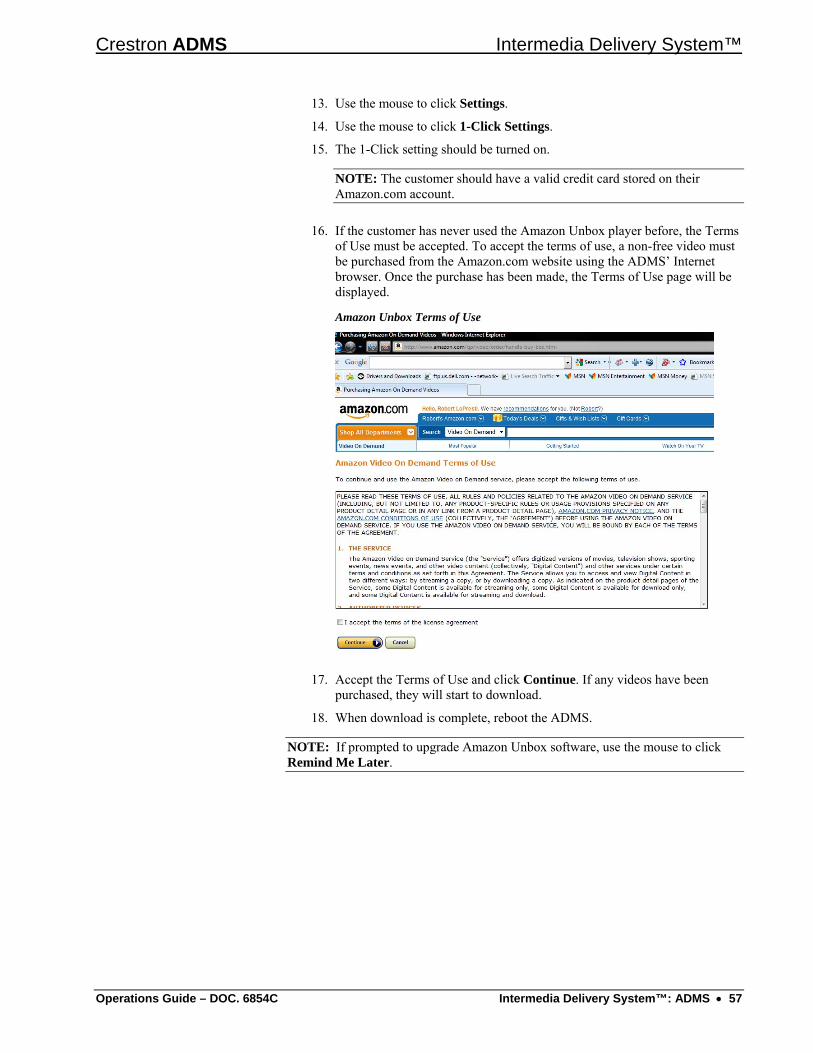
Crestron ADMS Intermedia Delivery System™
13. Use the mouse to click Settings.
14. Use the mouse to click 1-Click Settings.
15. The 1-Click setting should be turned on.
NOTE: The customer should have a valid credit card stored on their Amazon.com account.
16. If the customer has never used the Amazon Unbox player before, the Terms of Use must be accepted. To accept the terms of use, a non-free video must be purchased from the Amazon.com website using the ADMS’ Internet browser. Once the purchase has been made, the Terms of Use page will be displayed.
Amazon Unbox Terms of Use
17. Accept the Terms of Use and click Continue. If any videos have been purchased, they will start to download.
18. When download is complete, reboot the ADMS.
NOTE: If prompted to upgrade Amazon Unbox software, use the mouse to click Remind Me Later.
Operations Guide – DOC. 6854C Intermedia Delivery System™: ADMS • 57
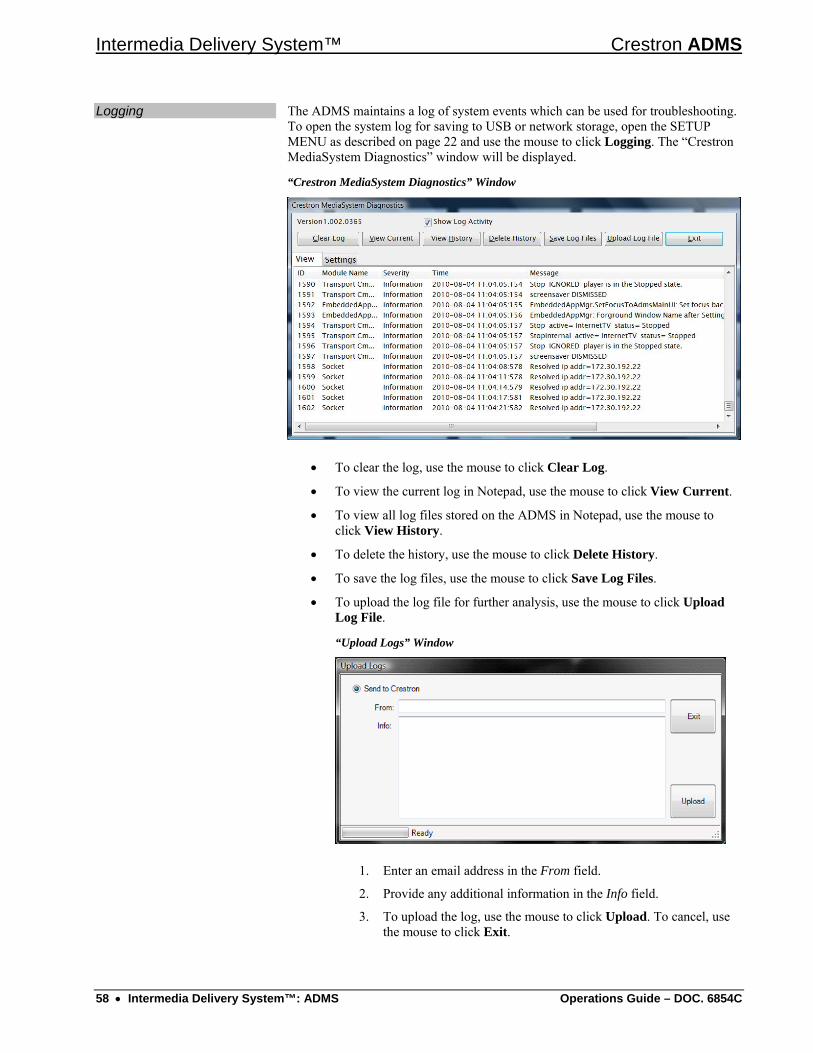
Intermedia Delivery System™ Crestron ADMS
Logging The ADMS maintains a log of system events which can be used for troubleshooting. To open the system log for saving to USB or network storage, open the SETUP MENU as described on page 22 and use the mouse to click Logging. The “Crestron MediaSystem Diagnostics” window will be displayed.
“Crestron MediaSystem Diagnostics” Window
• To clear the log, use the mouse to click Clear Log.
• To view the current log in Notepad, use the mouse to click View Current.
• To view all log files stored on the ADMS in Notepad, use the mouse to click View History.
• To delete the history, use the mouse to click Delete History.
• To save the log files, use the mouse to click Save Log Files.
• To upload the log file for further analysis, use the mouse to click Upload Log File.
“Upload Logs” Window
1. Enter an email address in the From field.
2. Provide any additional information in the Info field.
3. To upload the log, use the mouse to click Upload. To cancel, use the mouse to click Exit.
58 • Intermedia Delivery System™: ADMS Operations Guide – DOC. 6854C
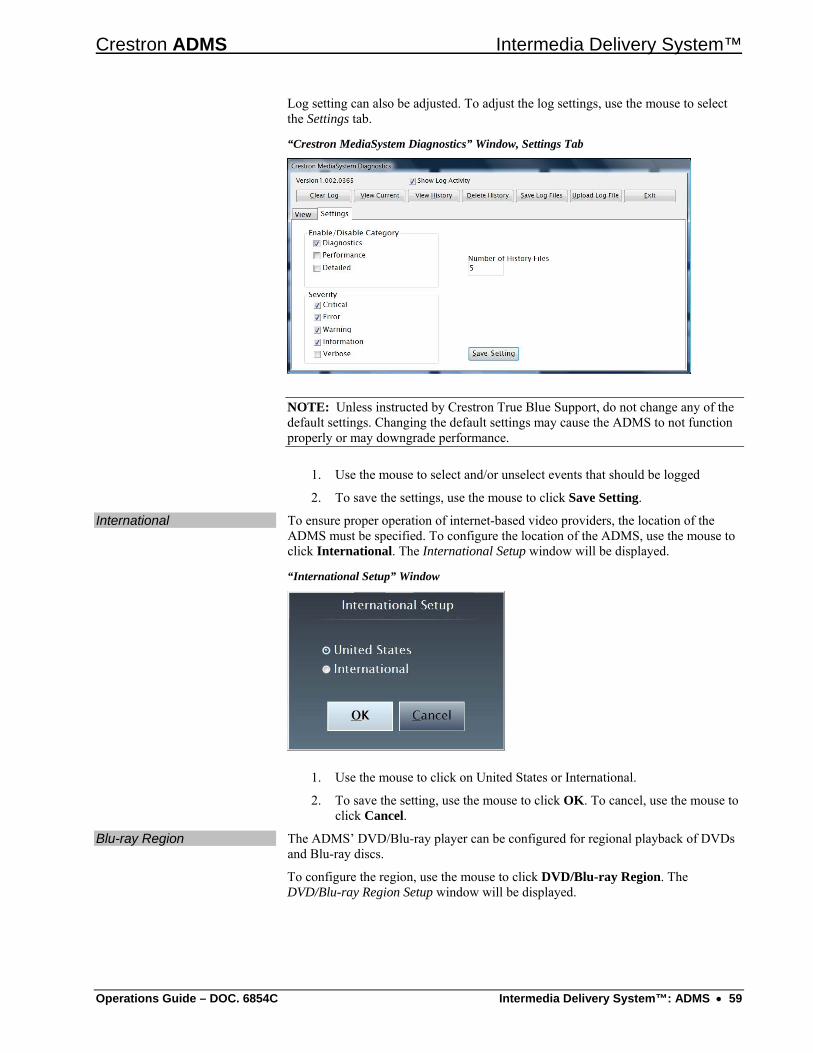
Crestron ADMS Intermedia Delivery System™
Log setting can also be adjusted. To adjust the log settings, use the mouse to select the Settings tab.
“Crestron MediaSystem Diagnostics” Window, Settings Tab
NOTE: Unless instructed by Crestron True Blue Support, do not change any of the default settings. Changing the default settings may cause the ADMS to not function properly or may downgrade performance.
1. Use the mouse to select and/or unselect events that should be logged
2. To save the settings, use the mouse to click Save Setting.
International To ensure proper operation of internet-based video providers, the location of the ADMS must be specified. To configure the location of the ADMS, use the mouse to click International. The International Setup window will be displayed.
“International Setup” Window
1. Use the mouse to click on United States or International.
2. To save the setting, use the mouse to click OK. To cancel, use the mouse to click Cancel.
Blu-ray Region The ADMS’ DVD/Blu-ray player can be configured for regional playback of DVDs and Blu-ray discs.
To configure the region, use the mouse to click DVD/Blu-ray Region. The DVD/Blu-ray Region Setup window will be displayed.
Operations Guide – DOC. 6854C Intermedia Delivery System™: ADMS • 59

Intermedia Delivery System™ Crestron ADMS
“DVD/Blu-ray Region Setup” Window
1. In the DVD Region field, use the mouse to select a region number from the dropdown menu.
2. To set the DVD region, use the mouse to click Set DVD Region.
NOTE: Only one region can be selected for playback at a time.
NOTE: To minimize unauthorized playback, the DVD region setting can be changed up to five times. Afterwards, the setting can no longer be changed.
3. In the Blu-ray Region field, use the mouse to select a region letter from the dropdown menu.
4. To set the Blu-ray region, use the mouse to click Set Blu-ray Region.
NOTE: Only one region can be selected for playback at a time.
NOTE: To minimize unauthorized playback, the Blu-ray region setting can be changed up to five times. Afterwards, the setting can no longer be changed.
5. To exit, use the mouse to click Exit.
60 • Intermedia Delivery System™: ADMS Operations Guide – DOC. 6854C
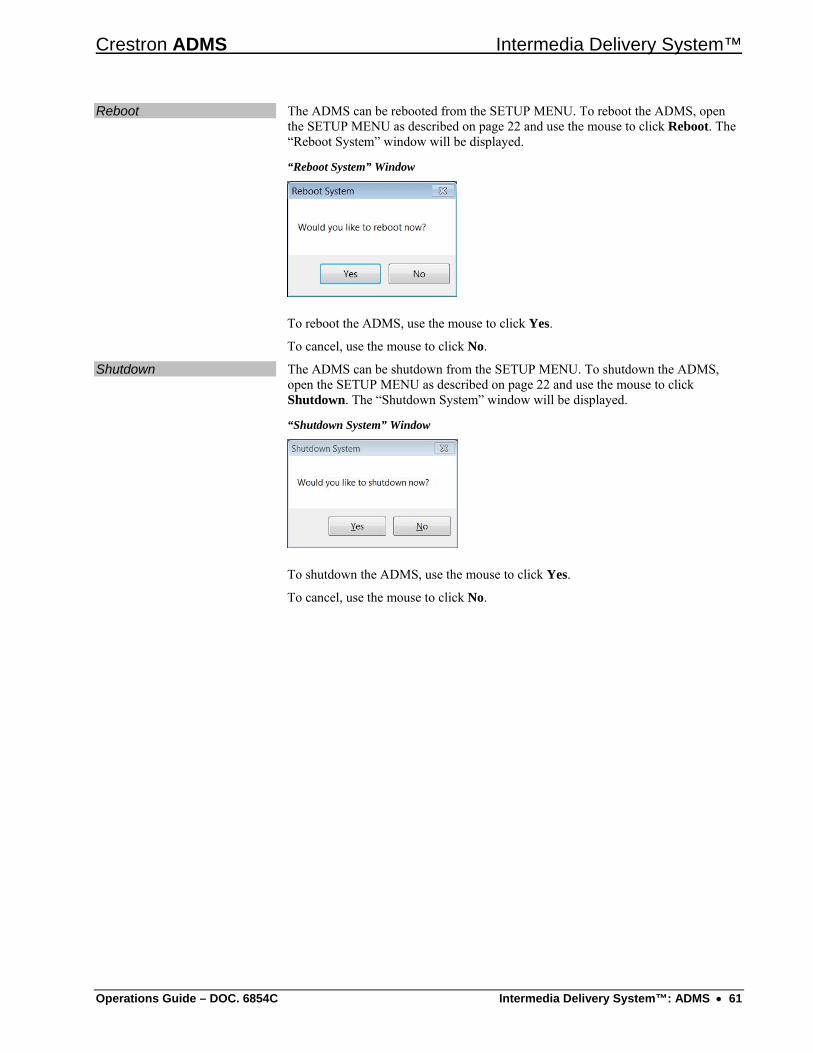
Crestron ADMS Intermedia Delivery System™
Reboot The ADMS can be rebooted from the SETUP MENU. To reboot the ADMS, open the SETUP MENU as described on page 22 and use the mouse to click Reboot. The “Reboot System” window will be displayed.
“Reboot System” Window
To reboot the ADMS, use the mouse to click Yes.
To cancel, use the mouse to click No.
Shutdown The ADMS can be shutdown from the SETUP MENU. To shutdown the ADMS, open the SETUP MENU as described on page 22 and use the mouse to click Shutdown. The “Shutdown System” window will be displayed.
“Shutdown System” Window
To shutdown the ADMS, use the mouse to click Yes.
To cancel, use the mouse to click No.
Operations Guide – DOC. 6854C Intermedia Delivery System™: ADMS • 61
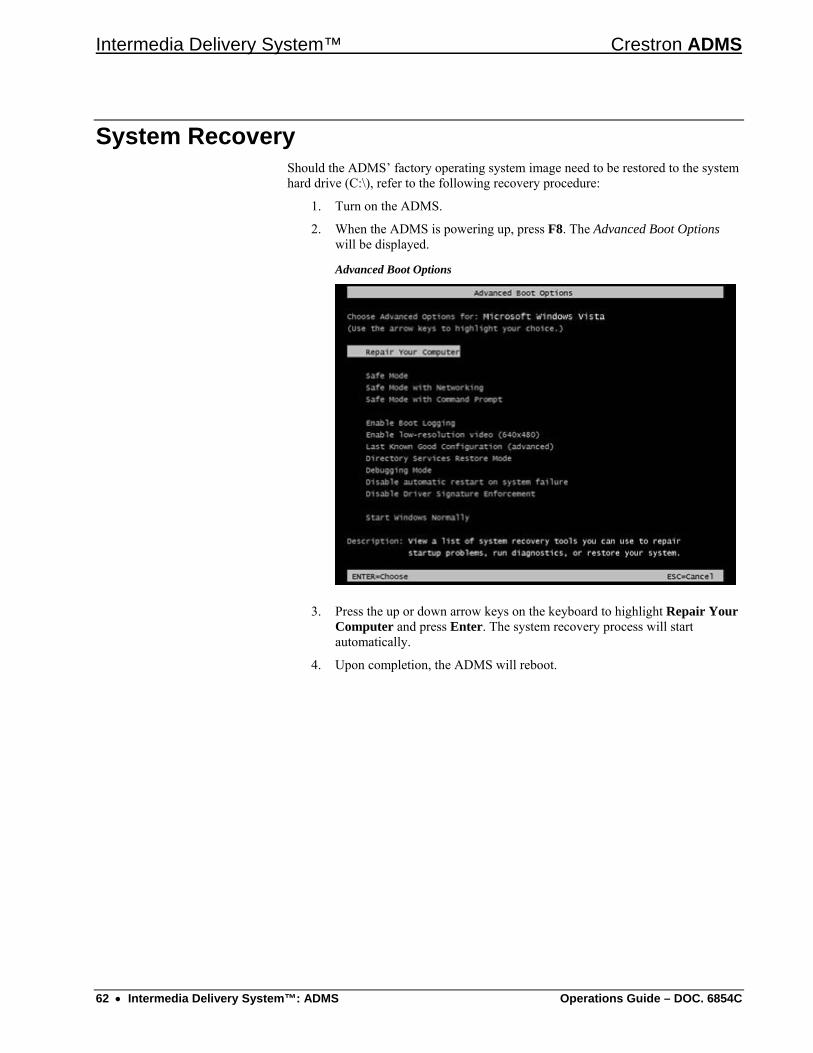
Intermedia Delivery System™ Crestron ADMS
System Recovery Should the ADMS’ factory operating system image need to be restored to the system hard drive (C:\), refer to the following recovery procedure:
1. Turn on the ADMS.
2. When the ADMS is powering up, press F8. The Advanced Boot Options will be displayed.
Advanced Boot Options
3. Press the up or down arrow keys on the keyboard to highlight Repair Your Computer and press Enter. The system recovery process will start automatically.
4. Upon completion, the ADMS will reboot.
62 • Intermedia Delivery System™: ADMS Operations Guide – DOC. 6854C
Crestron ADMS Intermedia Delivery System™
Programming Software Have a question or comment about Crestron software? Answers to frequently asked questions (FAQs) can be viewed in the Online Help section of the Crestron website. To post a question or view questions you have submitted to Crestron’s True Blue Support, log in at www.crestron.com/support. First-time users will need to establish a user account.
Earliest Version Software Requirements for the PC NOTE: Crestron recommends that you use the latest software to take advantage of the most recently released features. The latest software is available from the Crestron website.
Crestron has developed an assortment of Windows®-based software tools to develop a controlled system. You can create a program to control the ADMS using the Crestron programming tools Crestron SystemBuilder or SIMPL Windows. For the minimum recommended software versions, visit the Version Tracker page of the Crestron website (www.crestron.com/versiontracker).
Programming with Crestron SystemBuilder Crestron SystemBuilder is the easiest method of programming but does not offer as much flexibility as SIMPL Windows. For additional details, download SystemBuilder from the Crestron website and examine the extensive help file.
Programming with SIMPL Windows NOTE: While SIMPL Windows can be used to program the ADMS, it is recommended to use SystemBuilder for configuring a system.
SIMPL Windows is Crestron’s premier software for programming Crestron control systems. It is organized into two separate but equally important “Managers”.
Configuration Manager Configuration Manager is the view where programmers “build” a Crestron control system by selecting hardware from the Device Library.
1. To incorporate the ADMS into the system, drag the ADMS from the Ethernet Control Modules |Ethernet Audio/Video Modules folder of the Device Library and drop it in the System Views.
Operations Guide – DOC. 6854C Intermedia Delivery System™: ADMS • 63
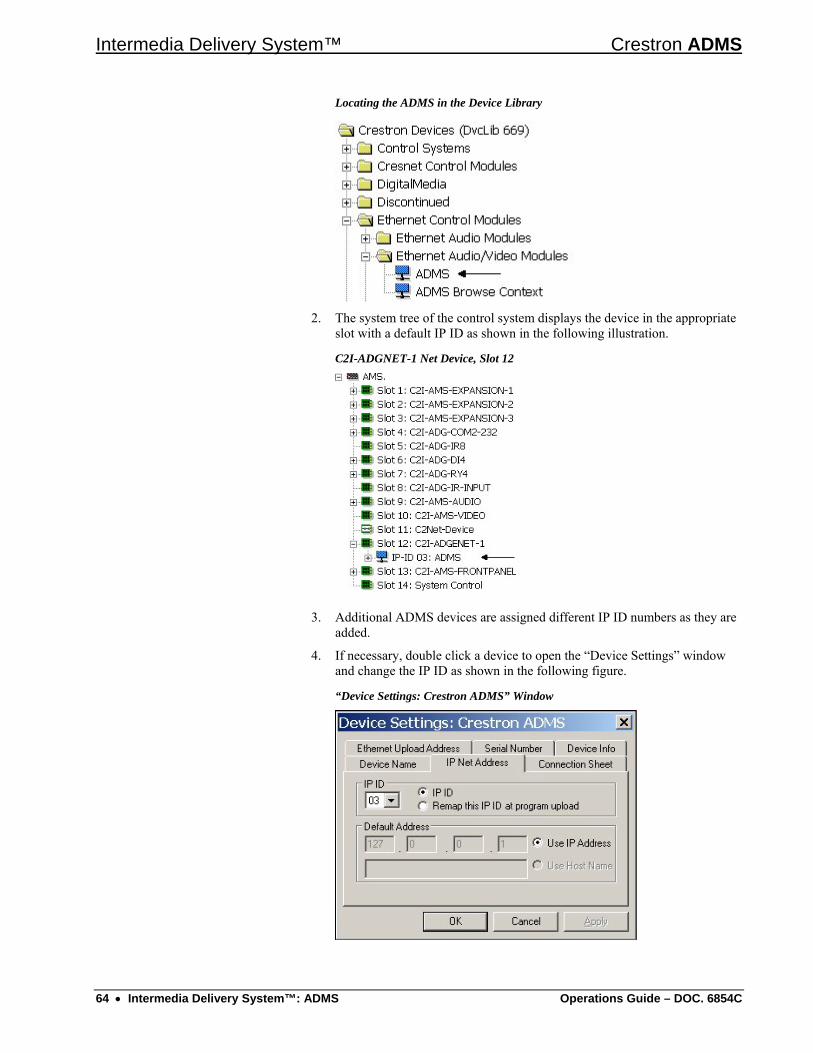
Intermedia Delivery System™ Crestron ADMS
Locating the ADMS in the Device Library
2. The system tree of the control system displays the device in the appropriate
slot with a default IP ID as shown in the following illustration.
C2I-ADGNET-1 Net Device, Slot 12
3. Additional ADMS devices are assigned different IP ID numbers as they are added.
4. If necessary, double click a device to open the “Device Settings” window and change the IP ID as shown in the following figure.
“Device Settings: Crestron ADMS” Window
64 • Intermedia Delivery System™: ADMS Operations Guide – DOC. 6854C
Crestron ADMS Intermedia Delivery System™
5. The ID code specified in the SIMPL Windows program must match the IP ID of each unit. Refer to “Identity Code” on page 12.
Program Manager Program Manager is the view where programmers “program” a Crestron control system by assigning signals to symbols.
The symbol can be viewed by double clicking on the icon or dragging it into Detail View. Each signal in the symbol is described in the SIMPL Windows help file (F1).
Example Program An example program for the ADMS is available from the Crestron website (www.crestron.com/exampleprograms).
Operations Guide – DOC. 6854C Intermedia Delivery System™: ADMS • 65
Intermedia Delivery System™ Crestron ADMS
Operation The front panel can be used to play audio files stored in the ADMS’ media library while the On-Screen-Display can be used to play all media (audio and video) stored in the ADMS’ media library, view internet video, and browse the Internet with the integrated Internet browser.
Front Panel Operation Use the ADMS’ front panel to play audio files stored in the ADMS’ media library.
Navigation Front panel navigation is accomplished with the selection knob and the SELECT button.
1. Turn the selection knob to browse through list items such as albums, playlists, and the current disc. Press MENU to return to the previous item.
2. To select the displayed item, press SELECT. If a selected item is an audio file, playback will begin.
Playback Controls Selecting an album automatically starts playing the album. Audio playback is controlled with the selection knob and the SELECT button.
1. Turn the selection knob to display the desired function (pause, resume, stop, play).
2. Press SELECT to perform the displayed function.
On-Screen-Display Operation Use the ADMS’ On-Screen-Display (OSD) controls to play all media (audio and video) stored in the ADMS’ media library, view internet video, and browse the Internet with the integrated Internet browser.
Required Equipment To use the OSD, a keyboard (not included) is required.
Navigation The arrow ( , , , and ), F11 (EXIT on KB-RFUSB), F12 (MENU on KB-RFUSB), and Enter keys are used to operate the ADMS.
• , , , and : Moves cursor left, right, up and down (respectively) to highlight items in the menu.
• F11 (EXIT on KB-RFUSB): Press F11 (or EXIT on KB-RFUSB) to return to the previous menu.
• F12 (MENU on KB-RFUSB): Press F12 (or MENU on KB-RFUSB) to return to the main menu.
• Enter: Performs the highlighted function.
66 • Intermedia Delivery System™: ADMS Operations Guide – DOC. 6854C

Crestron ADMS Intermedia Delivery System™
Main Menu The ADMS’ main menu is where all of the ADMS’ functionality can be accessed. Refer to “On-Screen-Display Operation” above to navigate the ADMS’ main menu.
ADMS Main Menu
The ADMS’ main menu consists of nine sections:
• WorldSearch: Search the ADMS’ video and music libraries, Internet TV, and video store.
• Video: Browse and/or search through the video library, the video store, and Internet TV.
• Music: Browse and/or search through the music library and playlists.
• Photos and Home Movies: Browse through the photo and home movie libraries.
• Internet Browser: Visit websites with the ADMS’ integrated Internet browser.
• Crestron Home: View controls for the Crestron home.
• Current Disc: Play the disc in the ADMS’ optical disk drive.
• Help: View available tutorial videos.
• Advanced: View system information, view a list of downloaded files, activate the photo slideshow (screensaver), check for firmware updates, check for new media, and configure the ADMS.
System Notification Icons The ADMS will display notification icons when certain system events occur. For more information, use a keyboard to move the focus to the displayed icon or refer to the ADMS’ online help.
Operations Guide – DOC. 6854C Intermedia Delivery System™: ADMS • 67

Intermedia Delivery System™ Crestron ADMS
Internet Browser The ADMS’ integrated Internet browser can be used for navigating the World Wide Web. To navigate the web browser, a keyboard or a touchpanel with keyboard programming is required. The following diagram shows the Internet browser’s controls.
Internet Browser Controls
NOTE: Up/Down/Left/Right keys on either a remote control or an actual keyboard are changed to move the mouse when pressed.
• Browser Tabs: The Internet browser can have multiple websites available as different tabs. To select a tab for viewing, use the arrow keys to move the cursor to a tab and press Enter. Tabs can be created, browsed, or removed with the Browser Tab Controls. For more information, refer to “Browser Tab Controls” on page 69.
NOTE: Up/Down/Left/Right keys on either a remote control or an actual keyboard are changed to move the mouse when pressed.
• Navigation Controls: Use the navigation controls to move forward and backward through browsed web pages and return to the Internet browser’s startup (home) page. To move back to the previous page, use the arrow keys to move the cursor to the BACK button and press Enter. To move forward to the previous page, use the keyboard to move the cursor to the FORWARD button and press Enter. To return to the Internet browser’s home page, use the keyboard to move the cursor to the HOME button and press Enter.
• SEARCH Button: To display the Internet browser’s search engine page, use the arrow keys to move the cursor to the SEARCH button and press Enter.
68 • Intermedia Delivery System™: ADMS Operations Guide – DOC. 6854C
Crestron ADMS Intermedia Delivery System™
• Address Bar: The address bar contains the website address of the displayed web page. To enter an address of a web page to visit:
1. Use the arrow keys to move the cursor to the address bar and press Enter.
2. Type in the website address and press Enter.
• ENTER Button: The ENTER button can be used to accept whatever is displayed in the address bar. To use the ENTER button, use the arrow keys to move the cursor to the ENTER button and press Enter.
• Browser Controls: Use the REFRESH button to reload the currently displayed page. Use the STOP button to stop a page from loading. To use the REFRESH or STOP button, use the arrow keys to move the cursor to the desired button and press Enter.
• Zoom Controls: Use the zoom controls to zoom in (ZOOM IN button) or zoom out (ZOOM OUT button) of a web page. To use the ZOOM IN or STOP button, use the arrow keys to move the cursor to the desired function and press Enter.
• Browser Tab Controls: Use the browser tab controls to add, scroll through, or delete browser tabs from the Internet browser.
+ (Add): Use the Add function to add a browser tab to the Internet browser. New browser tabs are added as blank web pages and are labeled “New Tab”.
and (Browse): Use the Browse functions to browse through browser tabs.
X (Close): Use the Close function to close the selected browser tab.
To use a browser tab control, use the arrow keys to move the cursor to the desired function and press Enter.
The Internet browser can also use shortcuts to perform commonly used functions. For a list of keyboard shortcuts to use with the ADMS’ integrated Internet browser, refer to “Appendix: Internet Browser Keyboard Shortcuts” on page 82.
Netflix The ADMS can be used to view videos using a Netflix account.
NOTE: A valid Netflix account with “Instant Watch” capability must be available.
To link the ADMS to a Netflix account:
1. Open the ADMS’ Internet browser to the member login page.
2. Select Remember me on this computer and sign in to the Netflix account.
3. Close the Internet browser and select Netflix from the ADMS’ Video menu.
4. Follow the on-screen instructions to link the ADMS to the Netflix account. After the link procedure is completed, the Netflix catalog is available for browsing.
NOTE: First-time playback may require the user to log in.
To remove the Netflix account associated with the ADMS:
1. Open the ADMS’ Internet browser to the Netflix member login page.
Operations Guide – DOC. 6854C Intermedia Delivery System™: ADMS • 69

Intermedia Delivery System™ Crestron ADMS
2. Sign in to the Netflix account.
3. Click Your Account.
4. Under Preferences, click on the link Manage social software access.
5. For the Crestron ADMS entry, click Remove.
NOTE: This will unlink all ADMS systems that are linked to the account.
6. Under Watch Instantly On Your TV or Computer, click on the link Manage Netflix ready devices and computers.
7. Deactivate the PC device identified as the ADMS.
8. Use the ADMS’ Internet browser to go to the Netflix member login page and click Sign Out.
9. Reboot the ADMS.
Import Music to Music Library The ADMS can import CDs to its music library. To import a CD:
1. Insert a CD (label side up) into the ADMS’ optical disk drive. The ADMS will search for album information. If the ADMS is set to automatically import CDs, the album information will be displayed and the CD will be imported to the ADMS’ music library. To cancel the import, use the arrow keys on the keyboard to highlight Cancel and press Enter.
CD Imported to ADMS’ Music Library
If the ADMS is not set to automatically import CDs, the album information will be displayed with an option to import the album.
70 • Intermedia Delivery System™: ADMS Operations Guide – DOC. 6854C
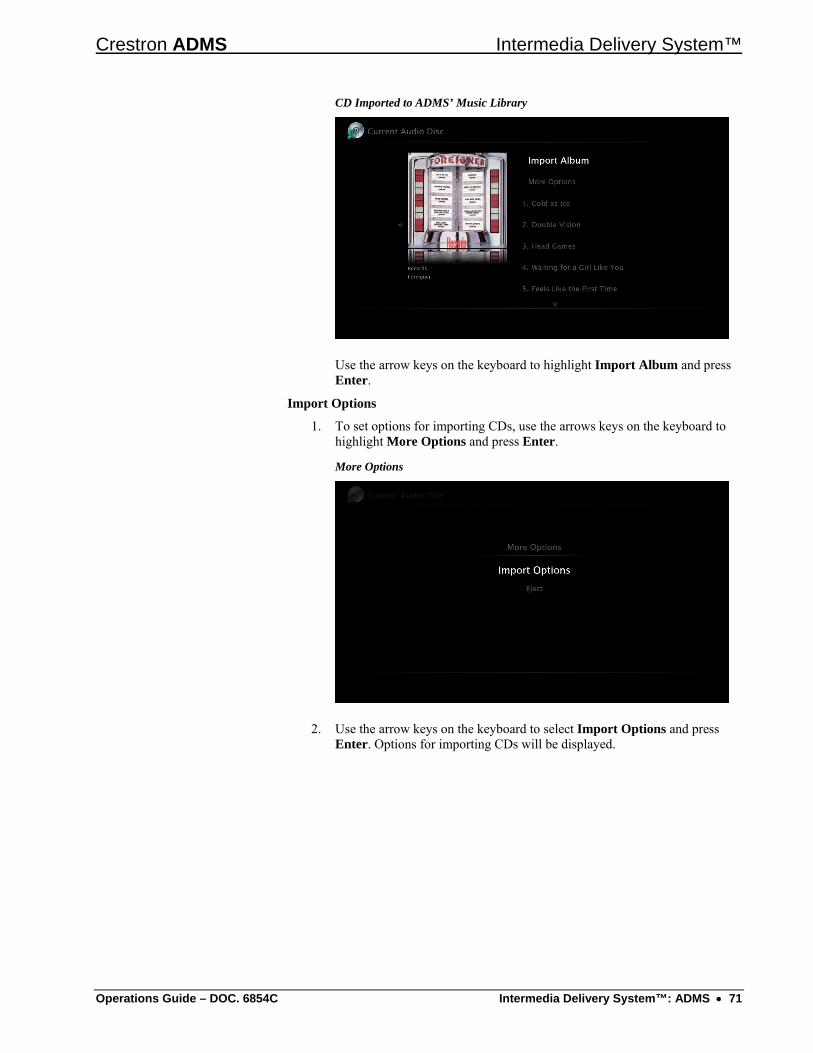
Crestron ADMS Intermedia Delivery System™
CD Imported to ADMS’ Music Library
Use the arrow keys on the keyboard to highlight Import Album and press Enter.
Import Options
1. To set options for importing CDs, use the arrows keys on the keyboard to highlight More Options and press Enter.
More Options
2. Use the arrow keys on the keyboard to select Import Options and press Enter. Options for importing CDs will be displayed.
Operations Guide – DOC. 6854C Intermedia Delivery System™: ADMS • 71
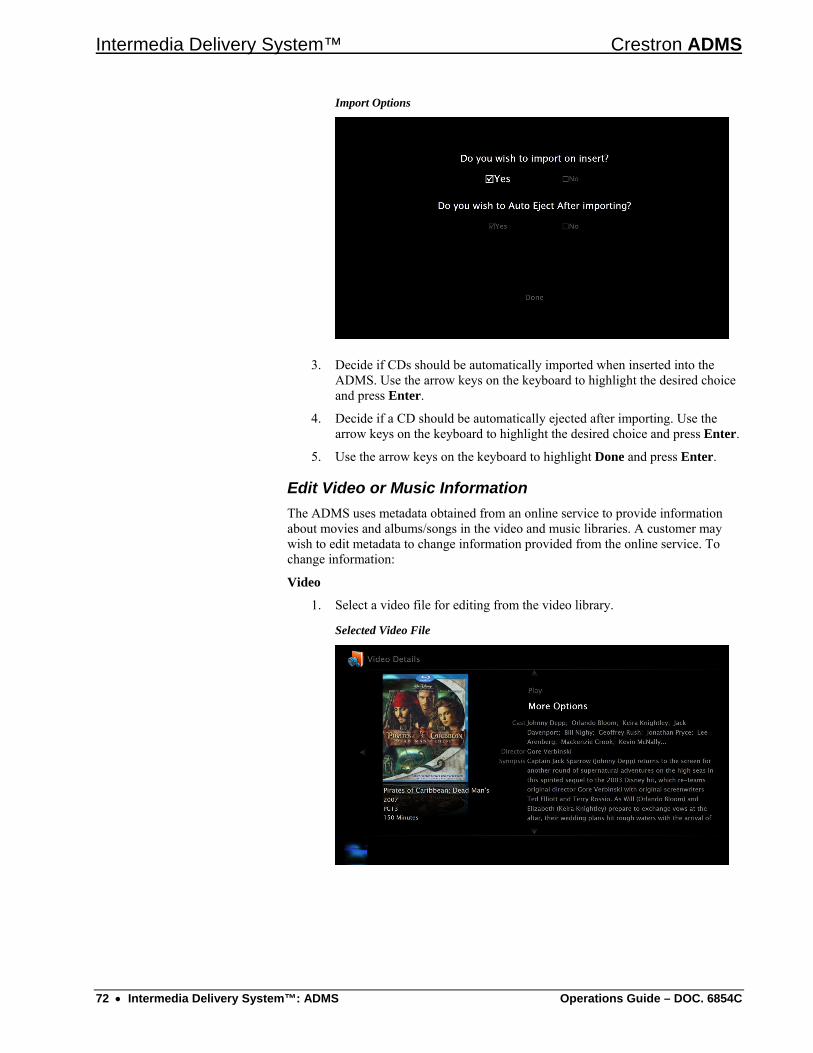
Intermedia Delivery System™ Crestron ADMS
Import Options
3. Decide if CDs should be automatically imported when inserted into the ADMS. Use the arrow keys on the keyboard to highlight the desired choice and press Enter.
4. Decide if a CD should be automatically ejected after importing. Use the arrow keys on the keyboard to highlight the desired choice and press Enter.
5. Use the arrow keys on the keyboard to highlight Done and press Enter.
Edit Video or Music Information The ADMS uses metadata obtained from an online service to provide information about movies and albums/songs in the video and music libraries. A customer may wish to edit metadata to change information provided from the online service. To change information:
Video
1. Select a video file for editing from the video library.
Selected Video File
72 • Intermedia Delivery System™: ADMS Operations Guide – DOC. 6854C
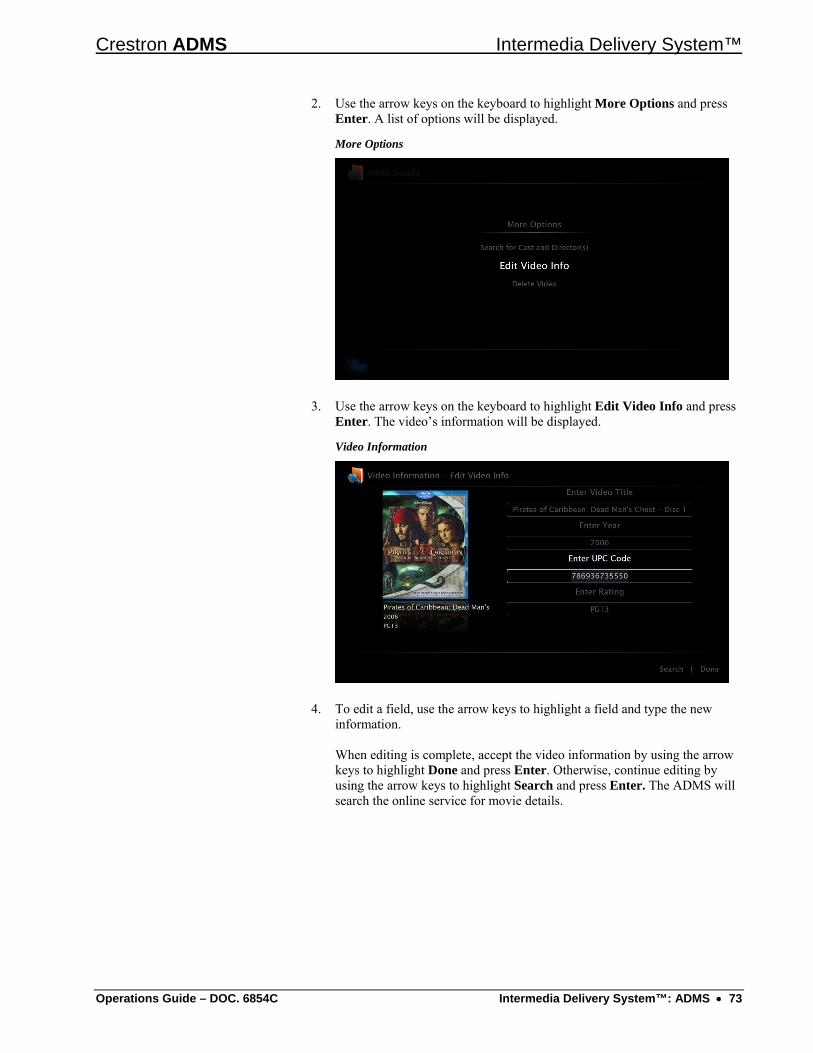
Crestron ADMS Intermedia Delivery System™
2. Use the arrow keys on the keyboard to highlight More Options and press Enter. A list of options will be displayed.
More Options
3. Use the arrow keys on the keyboard to highlight Edit Video Info and press Enter. The video’s information will be displayed.
Video Information
4. To edit a field, use the arrow keys to highlight a field and type the new information. When editing is complete, accept the video information by using the arrow keys to highlight Done and press Enter. Otherwise, continue editing by using the arrow keys to highlight Search and press Enter. The ADMS will search the online service for movie details.
Operations Guide – DOC. 6854C Intermedia Delivery System™: ADMS • 73

Intermedia Delivery System™ Crestron ADMS
Search Results
5. To use the current information for editing, use the arrow keys to highlight Continue Editing… and press Enter. Otherwise, select a search result to be used for video details and press Enter. Options for selecting the video’s cover art will be displayed.
Cover Art
6. Cover art can be created from the video’s title, selected from a web-based image search of the video title, or accepted from the online service. Use the arrow keys to highlight the desired function and press Enter.
• Create from Title: Use the Create from Title function to create a generic cover art image that contains the video title.
• Select from Web: Use the Select from Web function to display a web-based image search of the video title. A selected image can then be used as the video cover art.
a. Use the arrow keys to move the cursor to the GET IMAGE button and press Enter.
b. Use the arrow keys to move the cursor to the desired image and press Enter. A popup window will prompt the user to confirm the selection.
74 • Intermedia Delivery System™: ADMS Operations Guide – DOC. 6854C
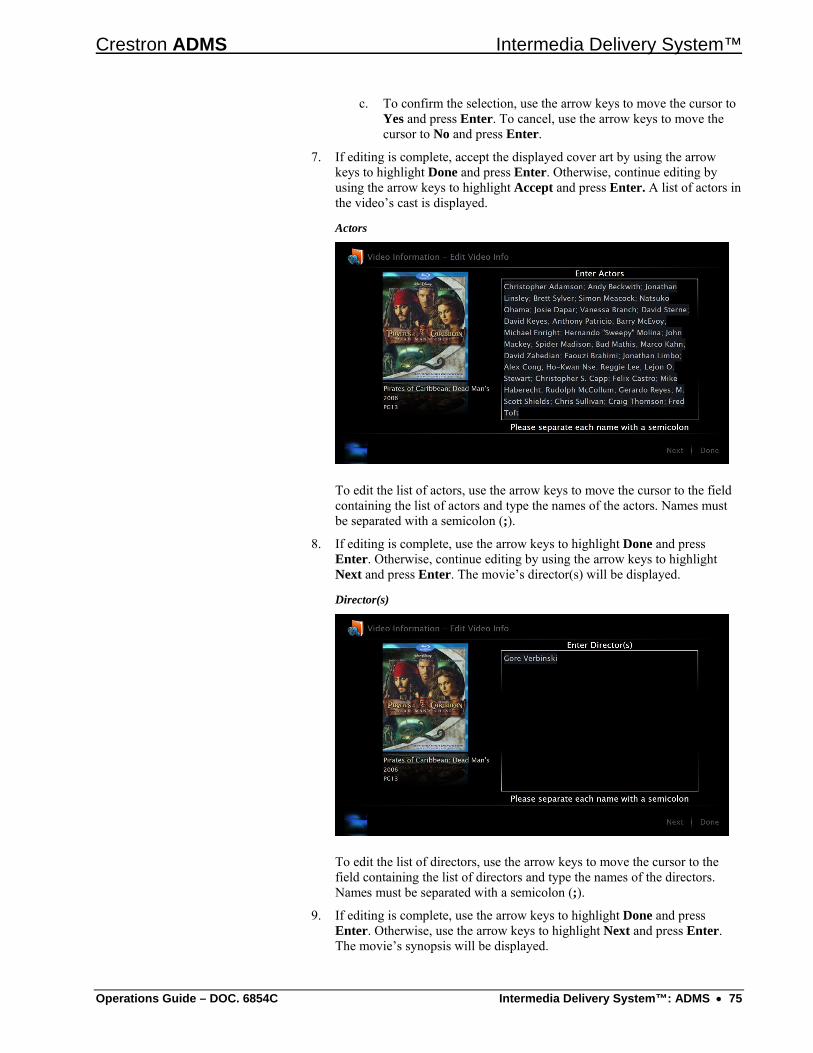
Crestron ADMS Intermedia Delivery System™
c. To confirm the selection, use the arrow keys to move the cursor to Yes and press Enter. To cancel, use the arrow keys to move the cursor to No and press Enter.
7. If editing is complete, accept the displayed cover art by using the arrow keys to highlight Done and press Enter. Otherwise, continue editing by using the arrow keys to highlight Accept and press Enter. A list of actors in the video’s cast is displayed.
Actors
To edit the list of actors, use the arrow keys to move the cursor to the field containing the list of actors and type the names of the actors. Names must be separated with a semicolon (;).
8. If editing is complete, use the arrow keys to highlight Done and press Enter. Otherwise, continue editing by using the arrow keys to highlight Next and press Enter. The movie’s director(s) will be displayed.
Director(s)
To edit the list of directors, use the arrow keys to move the cursor to the field containing the list of directors and type the names of the directors. Names must be separated with a semicolon (;).
9. If editing is complete, use the arrow keys to highlight Done and press Enter. Otherwise, use the arrow keys to highlight Next and press Enter. The movie’s synopsis will be displayed.
Operations Guide – DOC. 6854C Intermedia Delivery System™: ADMS • 75
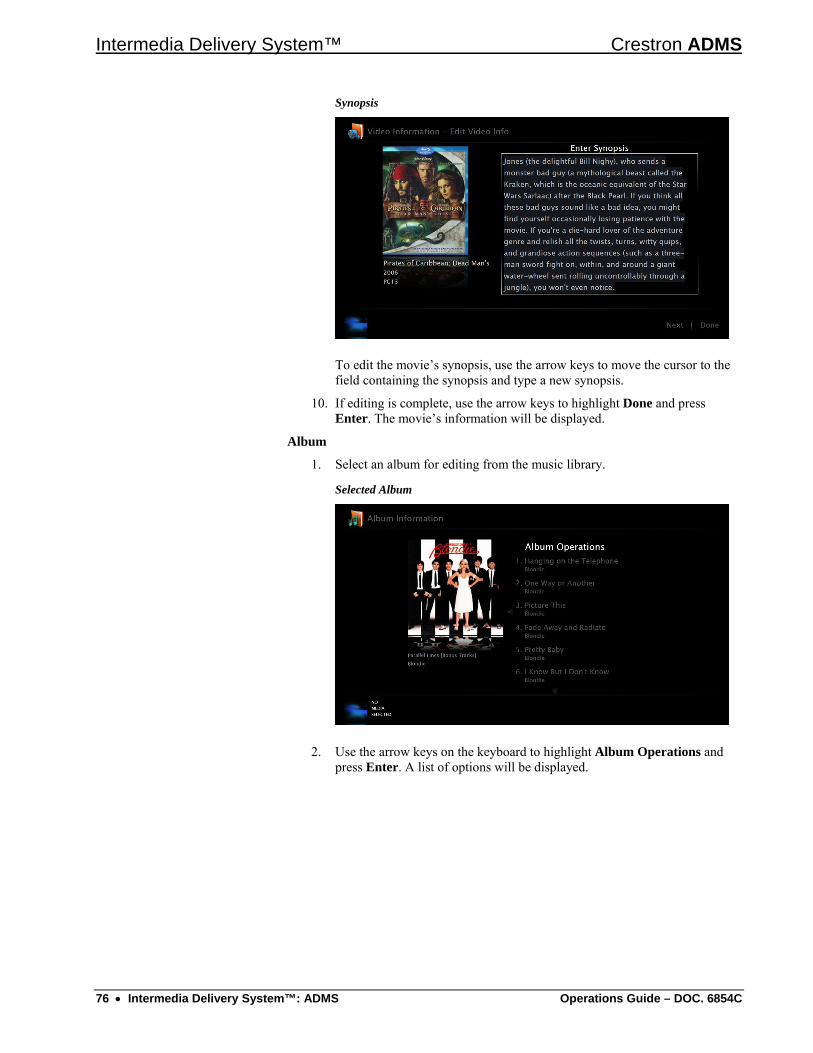
Intermedia Delivery System™ Crestron ADMS
Synopsis
To edit the movie’s synopsis, use the arrow keys to move the cursor to the field containing the synopsis and type a new synopsis.
10. If editing is complete, use the arrow keys to highlight Done and press Enter. The movie’s information will be displayed.
Album
1. Select an album for editing from the music library.
Selected Album
2. Use the arrow keys on the keyboard to highlight Album Operations and press Enter. A list of options will be displayed.
76 • Intermedia Delivery System™: ADMS Operations Guide – DOC. 6854C
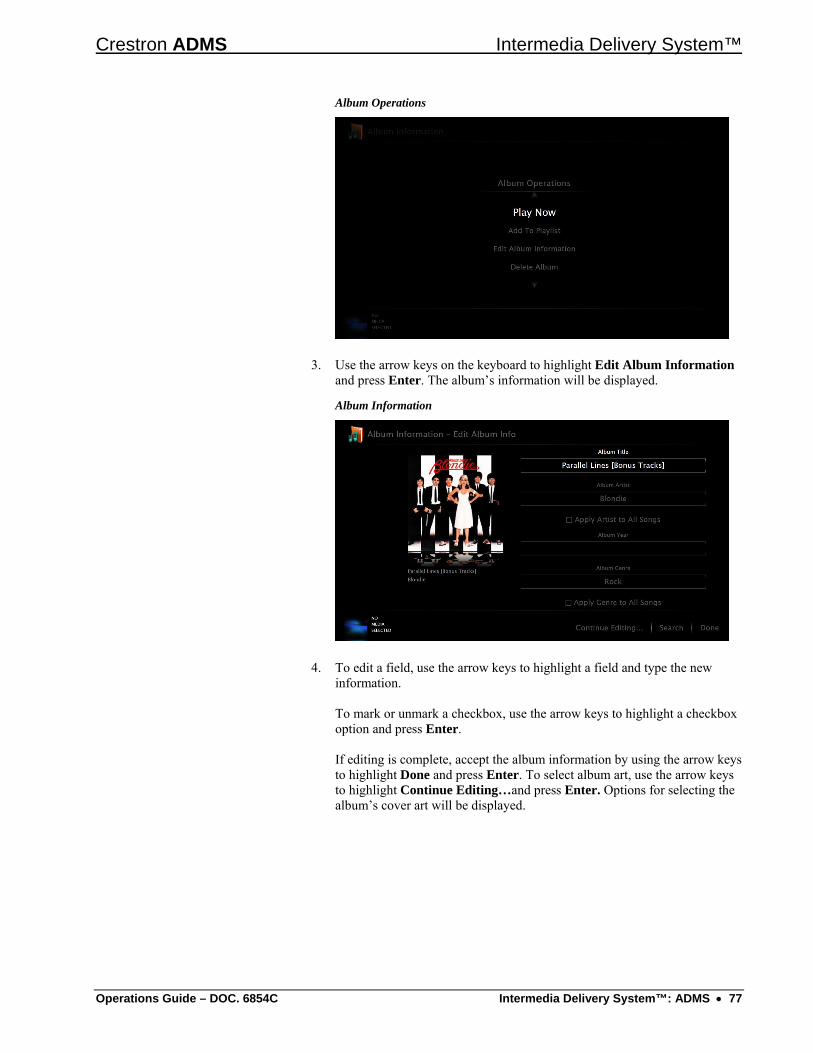
Crestron ADMS Intermedia Delivery System™
Album Operations
3. Use the arrow keys on the keyboard to highlight Edit Album Information and press Enter. The album’s information will be displayed.
Album Information
4. To edit a field, use the arrow keys to highlight a field and type the new information. To mark or unmark a checkbox, use the arrow keys to highlight a checkbox option and press Enter. If editing is complete, accept the album information by using the arrow keys to highlight Done and press Enter. To select album art, use the arrow keys to highlight Continue Editing…and press Enter. Options for selecting the album’s cover art will be displayed.
Operations Guide – DOC. 6854C Intermedia Delivery System™: ADMS • 77
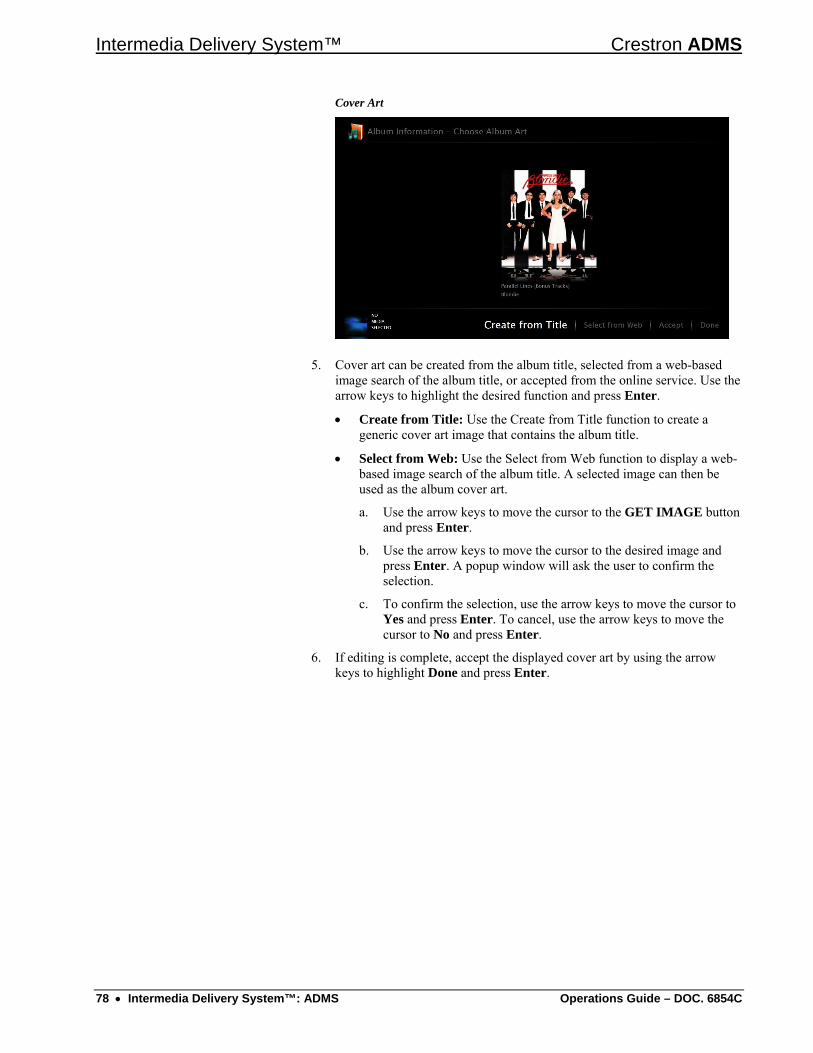
Intermedia Delivery System™ Crestron ADMS
Cover Art
5. Cover art can be created from the album title, selected from a web-based image search of the album title, or accepted from the online service. Use the arrow keys to highlight the desired function and press Enter.
• Create from Title: Use the Create from Title function to create a generic cover art image that contains the album title.
• Select from Web: Use the Select from Web function to display a web-based image search of the album title. A selected image can then be used as the album cover art.
a. Use the arrow keys to move the cursor to the GET IMAGE button and press Enter.
b. Use the arrow keys to move the cursor to the desired image and press Enter. A popup window will ask the user to confirm the selection.
c. To confirm the selection, use the arrow keys to move the cursor to Yes and press Enter. To cancel, use the arrow keys to move the cursor to No and press Enter.
6. If editing is complete, accept the displayed cover art by using the arrow keys to highlight Done and press Enter.
78 • Intermedia Delivery System™: ADMS Operations Guide – DOC. 6854C
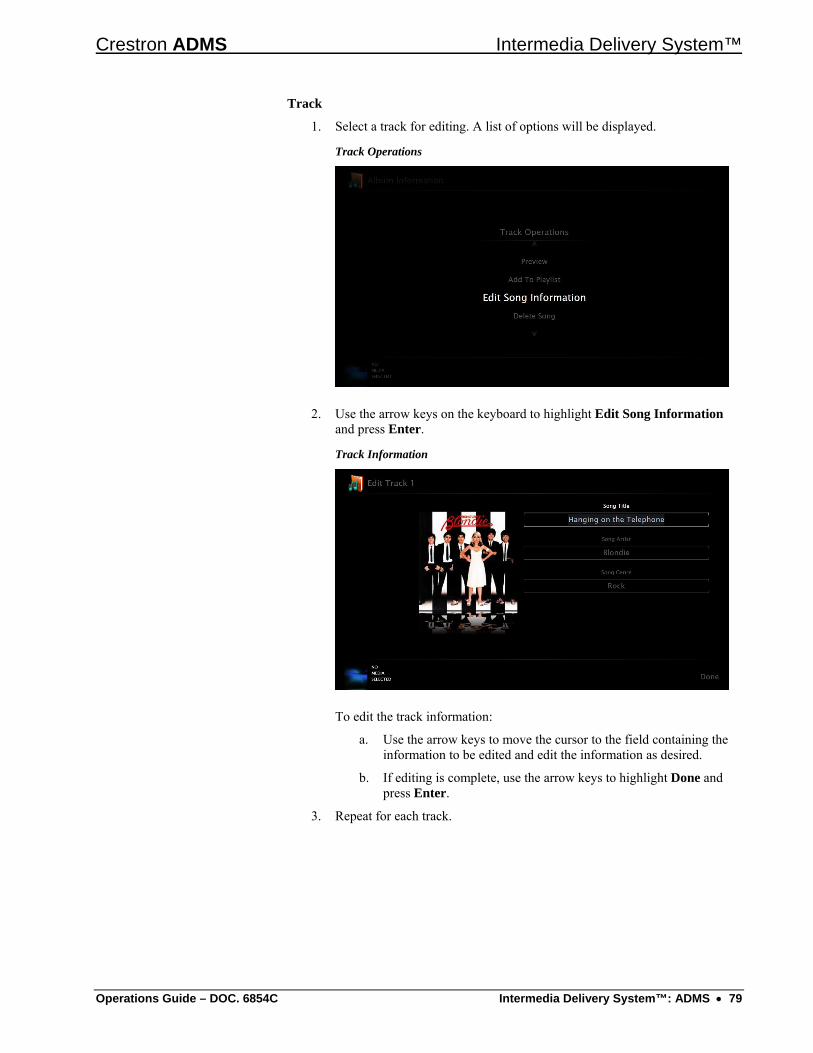
Crestron ADMS Intermedia Delivery System™
Track
1. Select a track for editing. A list of options will be displayed.
Track Operations
2. Use the arrow keys on the keyboard to highlight Edit Song Information and press Enter.
Track Information
To edit the track information:
a. Use the arrow keys to move the cursor to the field containing the information to be edited and edit the information as desired.
b. If editing is complete, use the arrow keys to highlight Done and press Enter.
3. Repeat for each track.
Operations Guide – DOC. 6854C Intermedia Delivery System™: ADMS • 79
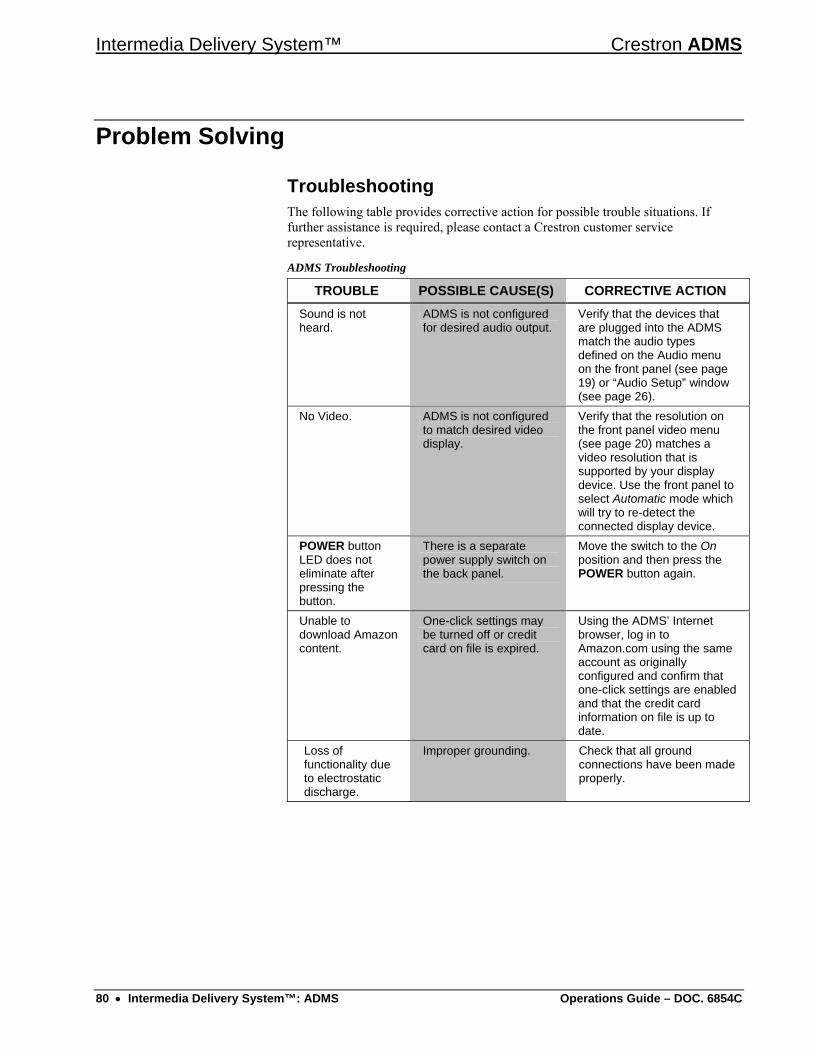
Intermedia Delivery System™ Crestron ADMS
Problem Solving
Troubleshooting The following table provides corrective action for possible trouble situations. If further assistance is required, please contact a Crestron customer service representative.
ADMS Troubleshooting
TROUBLE POSSIBLE CAUSE(S) CORRECTIVE ACTION Sound is not heard.
ADMS is not configured for desired audio output.
Verify that the devices that are plugged into the ADMS match the audio types defined on the Audio menu on the front panel (see page 19) or “Audio Setup” window (see page 26).
No Video. ADMS is not configured to match desired video display.
Verify that the resolution on the front panel video menu (see page 20) matches a video resolution that is supported by your display device. Use the front panel to select Automatic mode which will try to re-detect the connected display device.
POWER button LED does not eliminate after pressing the button.
There is a separate power supply switch on the back panel.
Move the switch to the On position and then press the POWER button again.
Unable to download Amazon content.
One-click settings may be turned off or credit card on file is expired.
Using the ADMS’ Internet browser, log in to Amazon.com using the same account as originally configured and confirm that one-click settings are enabled and that the credit card information on file is up to date.
Loss of functionality due to electrostatic discharge.
Improper grounding. Check that all ground connections have been made properly.
80 • Intermedia Delivery System™: ADMS Operations Guide – DOC. 6854C
Crestron ADMS Intermedia Delivery System™
Reference Documents The latest version of all documents mentioned within the guide can be obtained from the Crestron website (www.crestron.com/manuals). This link will provide a list of product manuals arranged in alphabetical order by model number.
List of Related Reference Documents
DOCUMENT TITLE Crestron e-Control Reference Guide
Further Inquiries If you cannot locate specific information or have questions after reviewing this guide, please take advantage of Crestron's award winning customer service team by calling Crestron at 1-888-CRESTRON [1-888-273-7876].
You can also log onto the online help section of the Crestron website (www.crestron.com/onlinehelp) to ask questions about Crestron products. First-time users will need to establish a user account to fully benefit from all available features.
Future Updates As Crestron improves functions, adds new features and extends the capabilities of the ADMS, additional information may be made available as manual updates. These updates are solely electronic and serve as intermediary supplements prior to the release of a complete technical documentation revision.
Check the Crestron website periodically for manual update availability and its relevance. Updates are identified as an “Addendum” in the Download column.
Operations Guide – DOC. 6854C Intermedia Delivery System™: ADMS • 81
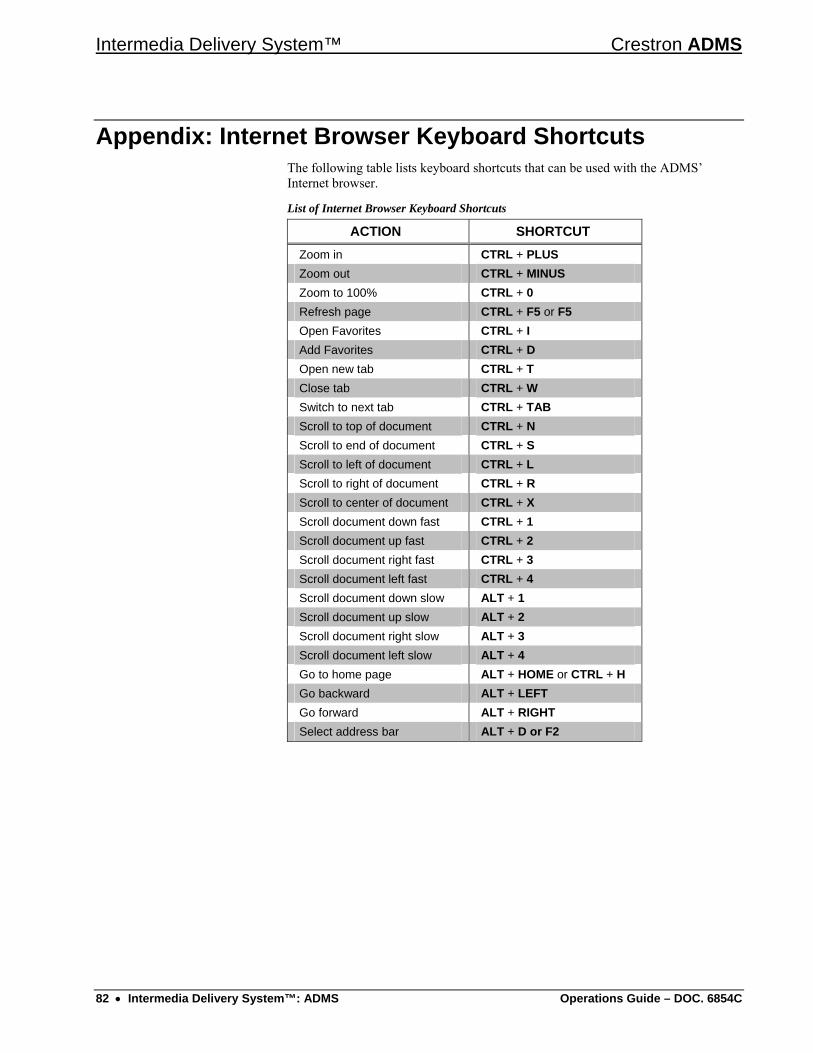
Intermedia Delivery System™ Crestron ADMS
Appendix: Internet Browser Keyboard Shortcuts The following table lists keyboard shortcuts that can be used with the ADMS’ Internet browser.
List of Internet Browser Keyboard Shortcuts
ACTION SHORTCUT Zoom in CTRL + PLUS Zoom out CTRL + MINUS Zoom to 100% CTRL + 0 Refresh page CTRL + F5 or F5 Open Favorites CTRL + I Add Favorites CTRL + D Open new tab CTRL + T Close tab CTRL + W Switch to next tab CTRL + TAB Scroll to top of document CTRL + N Scroll to end of document CTRL + S Scroll to left of document CTRL + L Scroll to right of document CTRL + R Scroll to center of document CTRL + X Scroll document down fast CTRL + 1 Scroll document up fast CTRL + 2 Scroll document right fast CTRL + 3 Scroll document left fast CTRL + 4 Scroll document down slow ALT + 1 Scroll document up slow ALT + 2 Scroll document right slow ALT + 3 Scroll document left slow ALT + 4 Go to home page ALT + HOME or CTRL + H Go backward ALT + LEFT Go forward ALT + RIGHT Select address bar ALT + D or F2
82 • Intermedia Delivery System™: ADMS Operations Guide – DOC. 6854C
Crestron ADMS Intermedia Delivery System™
Software License Agreement This License Agreement (“Agreement”) is a legal contract between you (either an individual or a single business entity) and
Crestron Electronics, Inc. (“Crestron”) for software referenced in this guide, which includes computer software and as applicable, associated media, printed materials and “online” or electronic documentation (the “Software”).
BY INSTALLING, COPYING OR OTHERWISE USING THE SOFTWARE, YOU REPRESENT THAT YOU ARE AN AUTHORIZED DEALER OF CRESTRON PRODUCTS OR A CRESTRON AUTHORIZED INDEPENDENT PROGRAMMER AND YOU AGREE TO BE BOUND BY THE TERMS OF THIS AGREEMENT. IF YOU DO NOT AGREE TO THE TERMS OF THIS AGREEMENT, DO NOT INSTALL OR USE THE SOFTWARE.
IF YOU HAVE PAID A FEE FOR THIS LICENSE AND DO NOT ACCEPT THE TERMS OF THIS AGREEMENT, CRESTRON WILL REFUND THE FEE TO YOU PROVIDED YOU (1) CLICK THE DO NOT ACCEPT BUTTON, (2) DO NOT INSTALL THE SOFTWARE AND (3) RETURN ALL SOFTWARE, MEDIA AND OTHER DOCUMENTATION AND MATERIALS PROVIDED WITH THE SOFTWARE TO CRESTRON AT: CRESTRON ELECTRONICS, INC., 15 VOLVO DRIVE, ROCKLEIGH, NEW JERSEY 07647, WITHIN 30 DAYS OF PAYMENT.
LICENSE TERMS
Crestron hereby grants You and You accept a nonexclusive, nontransferable license to use the Software (a) in machine readable object code together with the related explanatory written materials provided by Crestron (b) on a central processing unit (“CPU”) owned or leased or otherwise controlled exclusively by You and (c) only as authorized in this Agreement and the related explanatory files and written materials provided by Crestron.
If this software requires payment for a license, you may make one backup copy of the Software, provided Your backup copy is not installed or used on any CPU. You may not transfer the rights of this Agreement to a backup copy unless the installed copy of the Software is destroyed or otherwise inoperable and You transfer all rights in the Software.
You may not transfer the license granted pursuant to this Agreement or assign this Agreement without the express written consent of Crestron.
If this software requires payment for a license, the total number of CPUs on which all versions of the Software are installed may not exceed one per license fee (1) and no concurrent, server or network use of the Software (including any permitted back-up copies) is permitted, including but not limited to using the Software (a) either directly or through commands, data or instructions from or to another computer (b) for local, campus or wide area network, internet or web hosting services or (c) pursuant to any rental, sharing or “service bureau” arrangement.
The Software is designed as a software development and customization tool. As such Crestron cannot and does not guarantee any results of use of the Software or that the Software will operate error free and You acknowledge that any development that You perform using the Software or Host Application is done entirely at Your own risk.
The Software is licensed and not sold. Crestron retains ownership of the Software and all copies of the Software and reserves all rights not expressly granted in writing.
OTHER LIMITATIONS
You must be an Authorized Dealer of Crestron products or a Crestron Authorized Independent Programmer to install or use the Software. If Your status as a Crestron Authorized Dealer or Crestron Authorized Independent Programmer is terminated, Your license is also terminated.
You may not rent, lease, lend, sublicense, distribute or otherwise transfer or assign any interest in or to the Software. You may not reverse engineer, decompile or disassemble the Software. You agree that the Software will not be shipped, transferred or exported into any country or used in any manner prohibited
by the United States Export Administration Act or any other export laws, restrictions or regulations (“Export Laws”). By downloading or installing the Software You (a) are certifying that You are not a national of Cuba, Iran, Iraq, Libya, North Korea, Sudan, Syria or any country to which the United States embargoes goods (b) are certifying that You are not otherwise prohibited from receiving the Software and (c) You agree to comply with the Export Laws.
If any part of this Agreement is found void and unenforceable, it will not affect the validity of the balance of the Agreement, which shall remain valid and enforceable according to its terms. This Agreement may only be modified by a writing signed by an authorized officer of Crestron. Updates may be licensed to You by Crestron with additional or different terms. This is the entire agreement between Crestron and You relating to the Software and it supersedes any prior representations, discussions, undertakings, communications or advertising relating to the Software. The failure of either party to enforce any right or take any action in the event of a breach hereunder shall constitute a waiver unless expressly acknowledged and set forth in writing by the party alleged to have provided such waiver.
Operations Guide – DOC. 6854C Intermedia Delivery System™: ADMS • 83

Intermedia Delivery System™ Crestron ADMS
If You are a business or organization, You agree that upon request from Crestron or its authorized agent, You will within thirty (30) days fully document and certify that use of any and all Software at the time of the request is in conformity with Your valid licenses from Crestron of its authorized agent.
Without prejudice to any other rights, Crestron may terminate this Agreement immediately upon notice if you fail to comply with the terms and conditions of this Agreement. In such event, you must destroy all copies of the Software and all of its component parts.
PROPRIETARY RIGHTS
Copyright. All title and copyrights in and to the Software (including, without limitation, any images, photographs, animations, video, audio, music, text and “applets” incorporated into the Software), the accompanying media and printed materials and any copies of the Software are owned by Crestron or its suppliers. The Software is protected by copyright laws and international treaty provisions. Therefore, you must treat the Software like any other copyrighted material, subject to the provisions of this Agreement.
Submissions. Should you decide to transmit to Crestron’s website by any means or by any media any materials or other information (including, without limitation, ideas, concepts or techniques for new or improved services and products), whether as information, feedback, data, questions, comments, suggestions or the like, you agree such submissions are unrestricted and shall be deemed non-confidential and you automatically grant Crestron and its assigns a non-exclusive, royalty-free, worldwide, perpetual, irrevocable license, with the right to sublicense, to use, copy, transmit, distribute, create derivative works of, display and perform the same.
Trademarks. CRESTRON and the Swirl Logo are registered trademarks of Crestron Electronics, Inc. You shall not remove or conceal any trademark or proprietary notice of Crestron from the Software including any back-up copy.
GOVERNING LAW
This Agreement shall be governed by the laws of the State of New Jersey, without regard to conflicts of laws principles. Any disputes between the parties to the Agreement shall be brought in the state courts in Bergen County, New Jersey or the federal courts located in the District of New Jersey. The United Nations Convention on Contracts for the International Sale of Goods shall not apply to this Agreement.
CRESTRON LIMITED WARRANTY
CRESTRON warrants that: (a) the Software will perform substantially in accordance with the published specifications for a period of ninety (90) days from the date of receipt and (b) that any hardware accompanying the Software will be subject to its own limited warranty as stated in its accompanying written material. Crestron shall, at its option, repair or replace or refund the license fee for any Software found defective by Crestron if notified by you within the warranty period. The foregoing remedy shall be your exclusive remedy for any claim or loss arising from the Software.
CRESTRON shall not be liable to honor warranty terms if the product has been used in any application other than that for which it was intended or if it as been subjected to misuse, accidental damage, modification or improper installation procedures. Furthermore, this warranty does not cover any product that has had the serial number or license code altered, defaced, improperly obtained or removed.
Notwithstanding any agreement to maintain or correct errors or defects, Crestron shall have no obligation to service or correct any error or defect that is not reproducible by Crestron or is deemed in Crestron’s reasonable discretion to have resulted from (1) accident; unusual stress; neglect; misuse; failure of electric power, operation of the Software with other media not meeting or not maintained in accordance with the manufacturer’s specifications or causes other than ordinary use; (2) improper installation by anyone other than Crestron or its authorized agents of the Software that deviates from any operating procedures established by Crestron in the material and files provided to You by Crestron or its authorized agent; (3) use of the Software on unauthorized hardware or (4) modification of, alteration of or additions to the Software undertaken by persons other than Crestron or Crestron’s authorized agents.
ANY LIABILITY OF CRESTRON FOR A DEFECTIVE COPY OF THE SOFTWARE WILL BE LIMITED EXCLUSIVELY TO REPAIR OR REPLACEMENT OF YOUR COPY OF THE SOFTWARE WITH ANOTHER COPY OR REFUND OF THE INITIAL LICENSE FEE CRESTRON RECEIVED FROM YOU FOR THE DEFECTIVE COPY OF THE PRODUCT. THIS WARRANTY SHALL BE THE SOLE AND EXCLUSIVE REMEDY TO YOU. IN NO EVENT SHALL CRESTRON BE LIABLE FOR INCIDENTAL, CONSEQUENTIAL, SPECIAL OR PUNITIVE DAMAGES OF ANY KIND (PROPERTY OR ECONOMIC DAMAGES INCLUSIVE), EVEN IF A CRESTRON REPRESENTATIVE HAS BEEN ADVISED OF THE POSSIBILITY OF SUCH DAMAGES OR OF ANY CLAIM BY ANY THIRD PARTY. CRESTRON MAKES NO WARRANTIES, EXPRESS OR IMPLIED, AS TO TITLE OR INFRINGEMENT OF THIRD-PARTY RIGHTS, MERCHANTABILITY OR FITNESS FOR ANY PARTICULAR PURPOSE, OR ANY OTHER WARRANTIES, NOR AUTHORIZES ANY OTHER PARTY TO OFFER ANY WARRANTIES, INCLUDING WARRANTIES OF MERCHANTABILITY FOR THIS PRODUCT. THIS WARRANTY STATEMENT SUPERSEDES ALL PREVIOUS WARRANTIES.
84 • Intermedia Delivery System™: ADMS Operations Guide – DOC. 6854C
Crestron ADMS Intermedia Delivery System™
Return and Warranty Policies
Merchandise Returns / Repair Service 1. No merchandise may be returned for credit, exchange or service without prior authorization
from CRESTRON. To obtain warranty service for CRESTRON products, contact an authorized CRESTRON dealer. Only authorized CRESTRON dealers may contact the factory and request an RMA (Return Merchandise Authorization) number. Enclose a note specifying the nature of the problem, name and phone number of contact person, RMA number and return address.
2. Products may be returned for credit, exchange or service with a CRESTRON Return Merchandise Authorization (RMA) number. Authorized returns must be shipped freight prepaid to CRESTRON, 6 Volvo Drive, Rockleigh, N.J. or its authorized subsidiaries, with RMA number clearly marked on the outside of all cartons. Shipments arriving freight collect or without an RMA number shall be subject to refusal. CRESTRON reserves the right in its sole and absolute discretion to charge a 15% restocking fee plus shipping costs on any products returned with an RMA.
3. Return freight charges following repair of items under warranty shall be paid by CRESTRON, shipping by standard ground carrier. In the event repairs are found to be non-warranty, return freight costs shall be paid by the purchaser.
CRESTRON Limited Warranty CRESTRON ELECTRONICS, Inc. warrants its products to be free from manufacturing defects in materials and workmanship under normal use for a period of three (3) years from the date of purchase from CRESTRON, with the following exceptions: disk drives and any other moving or rotating mechanical parts, pan/tilt heads and power supplies are covered for a period of one (1) year; touchscreen display and overlay components are covered for 90 days; batteries and incandescent lamps are not covered.
This warranty extends to products purchased directly from CRESTRON or an authorized CRESTRON dealer. Purchasers should inquire of the dealer regarding the nature and extent of the dealer's warranty, if any.
CRESTRON shall not be liable to honor the terms of this warranty if the product has been used in any application other than that for which it was intended or if it has been subjected to misuse, accidental damage, modification or improper installation procedures. Furthermore, this warranty does not cover any product that has had the serial number altered, defaced or removed.
This warranty shall be the sole and exclusive remedy to the original purchaser. In no event shall CRESTRON be liable for incidental or consequential damages of any kind (property or economic damages inclusive) arising from the sale or use of this equipment. CRESTRON is not liable for any claim made by a third party or made by the purchaser for a third party.
CRESTRON shall, at its option, repair or replace any product found defective, without charge for parts or labor. Repaired or replaced equipment and parts supplied under this warranty shall be covered only by the unexpired portion of the warranty.
Except as expressly set forth in this warranty, CRESTRON makes no other warranties, expressed or implied, nor authorizes any other party to offer any warranty, including any implied warranties of merchantability or fitness for a particular purpose. Any implied warranties that may be imposed by law are limited to the terms of this limited warranty. This warranty statement supersedes all previous warranties. Trademark Information All brand names, product names and trademarks are the sole property of their respective owners. Windows is a registered trademark of Microsoft Corporation. Windows95/98/Me/XP/Vista/7 and WindowsNT/2000/7 are trademarks of Microsoft Corporation.
Operations Guide – DOC. 6854C Intermedia Delivery System™: ADMS • 85
Intermedia Delivery System™ Crestron ADMS
Trademark Information All brand names, product names, and trademarks are the sole property of their respective owners.
Crestron Crestron, Crestron Watchdog, Intermedia Delivery, Intermedia Delivery System, SystemBuilder, The World is Your Server, and WorldSearch are trademarks or registered trademarks of Crestron Electronics, Inc.
Apple Apple, iTunes Plus, and QuickTime are registered trademarks of Apple Inc.
Adobe Adobe and Flash are either registered trademarks or trademarks of Adobe Systems Incorporated in the United States and/or other countries.
Blu-Ray Blu-ray Disc is a trademark of the Blu-ray Disc Association.
Dolby Manufactured under license from Dolby Laboratories. Dolby and the double-D symbol are trademarks of Dolby Laboratories.
DTS Manufactured under license under U.S. Patent #’s: 5,451,942; 5,956,674; 5,974,380; 5,978,762; 6,226,616; 6,487,535; 7,212,872; 7,333,929; 7,392,195; 7,272,567 & other U.S. and worldwide patents issued & pending. DTS is a registered trademark and the DTS logos, Symbol, DTS-HD and DTS-HD Master Audio are trademarks of DTS, Inc. © 1996-2008 DTS, Inc. All Rights Reserved.
HDMI HDMI, the HDMI Logo, and High-Definition Multimedia Interface are trademarks or registered trademarks of HDMI Licensing LLC in the United States and other countries.
Microsoft Microsoft, Silverlight, Vista, Windows, Windows 95/98/Me/XP/Vista/7 and WindowsNT/2000 and Windows Media are either registered trademarks or trademarks of Microsoft Corporation in the United States and/or other countries.
Others All other trademarks are property of their respective owners.
86 • Intermedia Delivery System™: ADMS Operations Guide – DOC. 6854C

Crestron ADMS Intermedia Delivery System™
This page is intentionally left blank.
Operations Guide – DOC. 6854C Intermedia Delivery System™: ADMS • 87

Crestron Electronics, Inc. Operations Guide – DOC. 6854C 15 Volvo Drive Rockleigh, NJ 07647 (2024783) Tel: 888.CRESTRON 08.10
Fax: 201.767.7576 Specifications subject to www.crestron.com change without notice.