Embed Size (px)
Citation preview
Group
Servic
e
w w w . v i r t u s n e t . d e
Virtus Group GmbHHüserstraße 5359075 Hamm / Germany
% +49 (0) 23 81/ 973 71– 07 +49 (0) 23 81/ 973 71– 88
w w w . v i r t u s n e t . e u
Virtus s.r.l.via Milano 95/e27045 Casteggio (PV) / Italy
% +39 0 383 89 06 127 +39 0 383 80 96 01

OOPPEERRAATTIIOONN IINNSSTTRRUUCCTTIIOONN FFOORR CCOOFFFFEEEE MMAAKKEERR

-1-

OPERATION INSTRUCTION
BEFORE USING COFFEE PERCOLATER, READ ALL INSTRUCTIONS
BELOW.
1. General information.
- Coarsely ground coffee is the most suitable for this appliance.
- Never immerse the appliance in water.
- Never switch on the appliance, if there is no water in tank.
- Always use appliance on a dry, level, heating-resistant surface, away
from any edge. Be sure hands are dry.
THE APPLIANCE MUST BE EARTHED.
2. Installation
a. Before using the appliance, first clean the filter basket, filter cover,
percolator pipe and inside of tank with a non-abrasive detergent.
b. Place the appliance upright on a firm, flat surface.
c. Place the grate in the tank.
d. Plug the appliance into a grounded socket (while the appliance is switch
off)
e. Insert the appliance unit to the base of black plastic pad. (only for CP06)
THE APPLIANCE IS NOW READY TO USE.
3. Making coffee
Warning!
The outside of the appliance gets very hot during use.
Do not touch!
- When making coffee, at least half of total capacity of the machine must
-2-
be utilized. (in the case of the CM05, the minimum quantity is 20 cups)
- Coarsely ground coffee is preferable.
- If another sort of coffee is used, a paper filter is required.
a. Fill the tank with COLD water in accordance with the amount of coffee
required.
b. Place the ground coffee in the filter basket. ( 6 grams per cup is a
general indication).
c. Seal the filter basket by attaching the filter cover.
d. Place the percolator pipe and the filter basket in the tank. Making sure
that the foot of the percolator pipe is positioned firmly on the cavity of
the base.
e. Replace the top cover on the appliance.
f. Switch on the appliance. The lamp in the switch should now light up.
When the green pilot goes on, the coffee is ready and will be kept warm
automatically.
g. When about three cups of coffee remain in the tank or when coffee can
no longer be seen in glass gauge, unplug cord from electric outlet and
turn switch “OFF”.
h. To reheat cold coffee, simply plug appliance in and turn switch “ON”.
Be sure the basket and percolator pipe are remover. There must be at
least 12 cups of coffee in the tank to reheat.
4. Heating water for instant beverages.
Plain water may be heated in your appliance for use with instant beverages.
Simply fill the clean appliance with COLD water to the desire cup level and
place percolator pipe and empty basket into position as for making coffee .
Plug appliance in and switch to “ON” position until the perking stops.
Unplug the appliance when less than 3 cups of water remain.
-3-
When appliance is used to heat water only. It must be thoroughly cleaned
“WELL” after each use. In addition to special weekly cleaning using
vinegar to move mineral deposits. If these deposits are not removed, pitting
of the metal can occur and result in damage to the appliance. See special
cleaning instructions.
5. Cleaning after use.
a. Remove the filter basket and percolator pipe from the tank and empty the
filter basket is easier if the coffee dregs have dried up slightly.
b. Rinse the filter basket, filter cover and percolator pipe under the tap.
c. Rinse the inside of tank until it is clean.
The appliance is now ready to use again.
6. Special cleaning.
Improper cleaning of appliance, especially the heating unit “WELL” will
affect performance, resulting in weak, lukewarm coffee and may even cause
appliance to stop perking.
To keep the appliance working properly regularly, follow these instructions.
If appliance is used daily, a special cleaning every 2 week, or every week
used for heating water is necessary to thoroughly clean the heating unit
“WELL”. If not kept clean, the appliance will not work properly.
See the other sheet of instructions of the special cleaning tool for coffee
percolator.
7. Maintenance.
a. Clean the filter basket, filter cover and top cover with a non-abrasive
detergent and then dry them off with a soft dry cloth.
-4-
b. The inside of the tank and the percolator pipe are made of stainless steel
and can be cleaned with a scouring agent, possibly in combination with a
scouring pad.
c. If the appliance is to function properly, the cavity in the middle of the
base must be free of lime scale and coffee deposits. Use a scale remove if
necessary.
d. The inside of the glass gauge can be cleaned with the aid of the enclosed
pipe cleaner. First unscrew the gauge cap, then insert the pipe cleaner
into the glass gauge from above. Brush may also be used to clean
percolator.
Do not dismantle the glass gauge in the process.
e. To clean faucet, unscrew handle. Move a brush up and down though
faucet, then insert brush through opening inside appliance to clean faucet
connection.
Wash faucet handle in hot soapy water and rinse. Replace faucet.
Do not use baking Soda to clean appliance as it can discolor and pit the
metal!
8. Thermal cut-out.
The appliance must be unplugged before it can reset. The appliance is fitted
with a thermal cut-out. If this is activated, the appliance will turn itself off,
although the lamp in the switch will remain on. In order to make the
appliance operational again, the reset button on the bottom of the appliance
must be pressed once the appliance has COOLED DOWN. If the appliance
still does not work, you should consult your dealer. This safety device may
have been switched off during transport. If so , follow the above
instructions.
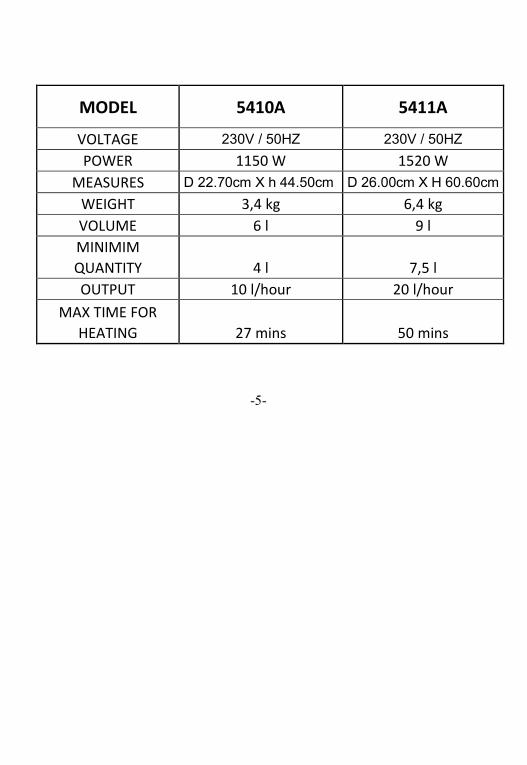
MODEL 5410A 5411A
VOLTAGE 230V / 50HZ 230V / 50HZ
POWER 1150 W 1520 W
MEASURES D 22.70cm X h 44.50cm D 26.00cm X H 60.60cm
WEIGHT 3,4 kg 6,4 kg
VOLUME 6 l 9 l
MINIMIM
QUANTITY 4 l 7,5 l
OUTPUT 10 l/hour 20 l/hour
MAX TIME FOR
HEATING 27 mins 50 mins
-5-

MMAANNUUAALLEE DD’’UUSSOO PPEERR
PPEERRCCOOLLAATTOORRII DDII CCAAFFFFEE’’


ISTRUZIONI PER L’USO
PRIMA DELL’UTILIZZO LEGGERE ATTENTAMENTE IL MANUALE
1. Informazioni generali
- Utilizzare preferibilmente caffè in polvere.
- Non immergere il prodotto in acqua o altri liquidi.
- Non accendere il prodotto senza acqua all’interno
- Posizionare il prodotto su una superificie piana e priva di ogni asperità,
asciutta e resistente al calore. Assicurarsi che le maniglie siano asciutte
VERIFICARE DI AVER COLLEGATO LA MESSA A TERRA!
2. Installazione
a. Prima dell’utilizzo effettuare la pulizia con detergente non aggressivo di
vasca, filtri e percolatore.
b. Posizionare il prodotto nel verso corretto, su un piano stabile e asciutto.
c. Posizionare la grata all’interno della vasca.
d. Assicurarsi che l’interruttore sia posizionato su OFF e collegare
all’alimentazione elettrica.
e. Inserire l’apparecchio nella base inferiore (solo per 5410A)
IL PRODOTTO È ORA PRONTO PER L’UTILIZZO
3. Preparazione del caffè
Attenzione!
La superficie dell’apparecchio diventerà molto calda durante e dopo
l’utilizzo! Non toccare!
-1-

- Durante la preparazione del caffè dovrà essere riempita almeno metà
della capacità della vasca.
- Utilizzare preferibilmente caffè in polvere
- In caso di utilizzo di altre tipologie di caffè è richiesta l’applicazione di
un filtro di carta.
a. Riempire la vasca con acqua fredda in quantità in funzione del caffè
richiesto.
b. Posizionare il caffè nel cestello nella qauntità richiesta (indicazione
generica 6 gr per tazzina).
c. Sigillare il filtro con l’apposita copertura.
d. Posizionare il tubo di percolazione e il filtro all’interno della vasca ed
assicurarsi che i componenti sono posizionati saldamente.
e. Posizionare il coperchio.
f. Accendere l’apparecchio, la spia di funzionamento dovrebbe ora
segnalare la fase di riscaldamento in corso. L’accensione della spia
verde segnalerà quando il caffè sarà pronto e verrà mantenuto in
temperatura.
g. Quando il livello del caffè non sarà più visibile attraverso l’indicatore,
scollegare il cavo di alimentazione.
h. In caso si voglia riscaldare del caffè già pronto, rimuovere il percolatore
e il filtro, collegare l’alimentazione e impostare l’interruttore su ON.
4. Preparazione di bevande calde
L’apparecchio potrà essere utilizzato anche per il riscaldamento di acqua
destinata alla preparazione di bevande calde.
Riempire la vasca pulita con acqua fredda, posizionare il percolatore e il
filtro (vuoto) e accendere l’apparecchio.
Scollegare l’alimentazione quando il livello dell’acqua non sarà più visibile
dall’apposito indicatore.
5. Pulizia ordinaria
a. Rimuovere il tubo di percolazione e il filtro dall’apparecchio e
provvedere allo svuotamento e alla pulizia con acqua.
b. Risciacquare l’interno della vasca con acqua e rimuovere eventuali
depositi utilizzando aceto di vino.
Il prodotto è ora pronto per essere riutilizzato
6. Pulizia straordinaria
Una pulizia impropria del prodotto, specie relativamente agli elementi
riscaldanti può provocare il non funzionamento della macchina o un calo di
prestazioni.
Per mantenere la macchina in condizioni ideali fare attenzione alle seguenti
istruzioni.
Se l’apparecchio viene utilizzato quotidianamente è consigliato effettuare
una pulizia straordinaria con cadenza settimanale, per manentere gli
elementi riscaldanti puliti ed efficient.If appliance is used daily, a special
cleaning every 2 week, or every week used for heating water is necessary to
thoroughly clean the heating unit “WELL”. If not kept clean, the appliance
will not work properly.
See the other sheet of instructions of the special cleaning tool for coffee
percolator.
7. Manutenzione.
a. Pulire filtro, coprifiltro e coperchio superiore utilizzando un panno
morbid imbevuto di detergente non abrasivo. Risciacquare con un panno
umido ed asciugare.
b. La superficie interna della vasca ed il tubo di percolazione sono costituiti
in acciaio inossidabile. Possono essere quindi puliti con una spugna
leggermente abrasiva. Utilizzare comunque la massima attenzione per
evitare graffi o danni all’apparecchio.
c. Pulire l’interno della vasca e rimuovere i residui di caffè dal filtro.
d. Il segnalatore di livello del liquid può essere pulito attraverso un
tampone o uno sturatubi. Per effettuare la pulizia provvedere prima a
rimuovere il segnalatore svitando le apposite viti.
Attenzione: non disassemblare il segnalatore durante il procedimento.
e. Per effettuare la pulizia del rubinetto rimuovere prima la manopola e
pulire il rubinetto in corrispondenza dell’apertura.
Lavare la manopola del rubinetto in acqua e sapone, sciacquare ed
asciugare prima di riassemblare.
Non utilizzare bicarbonato di sodio durante le operazioni di pulizia,
potrebbe causare scolorimento del metallo!
8. Protezione termica
L’apparecchio deve essere scollegato per effettuare l’operazione di reset.
L’apparecchio è dotato di dispositive di sicurezza termici. Se questo è
attivato l’apparecchio verrà disattivato automaticamente in caso di
surriscaldamento sebbene la spia continuerà a segnalarne il funzionamento.
Per riattivare l’apparecchio effettuare l’operazione di reset tramite
l’apposito tasto posto sulla base inferiore. Prima di effettuare l’operazione
accertarsi che l’apparecchio si sia raffreddato! Nel caso l’apparecchio
continui a non funzionare La preghiamo di contattare il servizio assistenza.

SPECIFICHE TECNICHE
MODELLO 5410A 5411A
ALIMENTAZIONE 230V / 50HZ 230V / 50HZ
POTENZA 1150 W 1520 W
DIMENSIONI D 22.70cm X h 44.50cm D 26.00cm X H 60.60cm
PESO 3,4 kg 6,4 kg
CAPACITA' 6 l 9 l
CAPACITA' MINIMA 4 l 7,5 l
RESA 10 l/ora 20 l/ora
TEMPO MASSIMO
DI RISCALDAMENTO 27 min 50 min