Embed Size (px)
Citation preview
www.pageonepager.com
Operating instructions
PageOne 2-way PagerAssured 2-way messaging for critical communications

2
ContentsForeword . . . . . . . . . . . . . . . . . . . . . . . . . . . . . . . . . . . . . . . . . . . . . . . . . . . . . . . . . 3Getting Started . . . . . . . . . . . . . . . . . . . . . . . . . . . . . . . . . . . . . . . . . . 5Display . . . . . . . . . . . . . . . . . . . . . . . . . . . . . . . . . . . . . . . . . . . . . . . . . . . . . . . . . . 6Status symbols . . . . . . . . . . . . . . . . . . . . . . . . . . . . . . . . . . . . . . . . . . . . . . . . . . . . . 7Keys . . . . . . . . . . . . . . . . . . . . . . . . . . . . . . . . . . . . . . . . . . . . . . . . . . . . . . . . . . . . 8Key lock function . . . . . . . . . . . . . . . . . . . . . . . . . . . . . . . . . . . . . . . . . . . . . . . . . . . 9Menu structure . . . . . . . . . . . . . . . . . . . . . . . . . . . . . . . . . . . . . . . . . . . . . . . . . . . . . 10Menu . . . . . . . . . . . . . . . . . . . . . . . . . . . . . . . . . . . . . . . . . . . . . . . . . . . . . . . . . . . . 12Messages . . . . . . . . . . . . . . . . . . . . . . . . . . . . . . . . . . . . . . . . . . . . . . . . . . . . . . . . 13Confirming messages . . . . . . . . . . . . . . . . . . . . . . . . . . . . . . . . . . . . . . . . . . . . . . . 16Location . . . . . . . . . . . . . . . . . . . . . . . . . . . . . . . . . . . . . . . . . . . . . . . 17Profile . . . . . . . . . . . . . . . . . . . . . . . . . . . . . . . . . . . . . . . . . . . . . . . . . . . . . . . . . . . 18Alerts . . . . . . . . . . . . . . . . . . . . . . . . . . . . . . . . . . . . . . . . . . . . . . . . . . . . . . . . . . . 19Alarm clock . . . . . . . . . . . . . . . . . . . . . . . . . . . . . . . . . . . . . . . . . . . . . . . . . . . . . . . 21Settings . . . . . . . . . . . . . . . . . . . . . . . . . . . . . . . . . . . . . . . . . . . . . . . . . . . . . . . . . . 23Battery condition indicator . . . . . . . . . . . . . . . . . . . . . . . . . . . . . . . . . . . . . . . . . . . . 26Switching on / switching off . . . . . . . . . . . . . . . . . . . . . . . . . . . . . . . . . . . . . . . . . . . . 27
3
ForewordThese operating instructions provide you with important information about how to get the best from your device. Please keep these instructions handy in order to consult them if need be.

4
Important Note / Useful Function
Warning / important information
Important information• This product should not be used in an environment where there is the risk of explosions• This device should not be opened and the labelling should not be removed

5
Getting StartedCharging the 2-way PagerThe 2-way Pager is supplied with a lithium polymer rechargeable battery.
The 2-way Pager can be charged using the mains adapter which is attached to the bottom of the battery charger, supplied together with the pager.
Important information• Do not expose lithium polymer rechargeable batteries to high temperatures• Do not destroy lithium polymer rechargeable batteries• Do not short circuit lithium polymer rechargeable batteries
Inserting the batteryInsert the battery in the back of the 2-way Pager and make sure that it has clicked completey into place at both the top end and the bottom end.
Switching on automaticallyAfter the batteries have been installed the 2-way Pager switches itself on automatically.

6
Display
Field strength indicatorShould the receiver remain outside the reception area for any length of time then the field strength indicator becomes visible on the display. This function requires that messages are sent at regular intervals.
Type of alarmKey lock active
GSM off GPS off Field strength alarm
Battery condition indicator
Alarm clock
Stand-by profile with extension profile
Charging indicator
Date and time

Type of alert: Loud; see section on ‘Alerts’
Type of alert: Discrete: see section on ‘Alerts’
Type of alert: Mute/vibration; see section on ‘Alerts’
No audible alert: see section on ‘Alerts’
The alarm clock function is switched on (or delayed); see ‘Alarm clock’
Key lock is activated; see section on ‘Key lock’
GPRS relay channel switched off; see section on ‘Settings’
GPS switched off; see section on ‘Settings’
Field strength alarm; outside POCSAG reception area
Battery condition indicator: see section on ‘Battery condition indicator’
7
Status symbolsThe following symbols can be shown from left to right in the display when the device is in standby
8
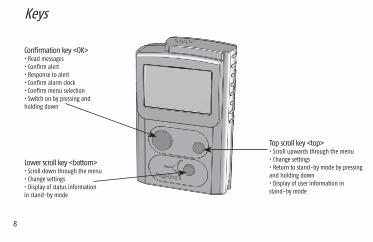
Keys
Confirmation key <OK>• Read messages• Confirm alert• Response to alert• Confirm alarm clock• Confirm menu selection• Switch on by pressing and holding down
Lower scroll key <bottom>• Scroll down through the menu• Change settings• Display of status informationin stand-by mode
Top scroll key <top>• Scroll upwards through the menu• Change settings• Return to stand-by mode by pressing and holding down• Display of user information instand-by mode

9
Key lock functionThe key lock function prevents the unintentional pressing of the keys by mistake. It is activated automatically after a predetermined time if the key lock function is switched on. This can be switched on or off by means of the menu function Settings.
To deactivate the key lock functionThe key lock function can be deactivated by pressing the top scroll key <top> and the lower scroll
key <bottom> at the same time and then letting go of the keys.
To read the last message inspite of the key lock functionThe last (read or unread) message can also be read even when the key lock is activated. It can however not be designated as read when the key lock is activated.

10
Read latest message
Messages
ProfileAlertsAlarm clockSettingsSwitch off
Back
Read messages
Saved messages
‘Folder’ A‘Folder’ B
Back
BackSave messageDelete messageDelete message list
BackUnsave messageDelete messageDelete message list
BackDelete messageDelete message list
Menu structureThe main menu is opened from the stand-by menu using the confirmation key <OK>. It can contain the fol-lowing menu items and submenus:
<OK>
<OK>
<OK>
<OK>
<OK>

11
Date and timeKey LockGPSGSM
Back

12
MenuTo switch to the main menu in stand-by mode press the confirmation key <OK>. The first item to appear on the menu is generally Read latest message. The main menu can be scrolled upwards or downwards by pressing on the lower <bottom> and upper <top> scroll keys. By repeatedly pressing on the confirmation key <OK> a selection of items on the menu is obtained or else there is a change to the submenu that has been selected.
The current menu can be exited in each case by means of the menu item Back.
Directly switching back to stand-byTo directly switch back to the stand-by mode press and hold the upper scroll key <top>

13
MessagesYou are alerted immediately of any messages received; they are displayed and filed in the message memory. In stand-by mode new (unread) messages are indicated with the New message! symbol.
Reading new messagesNew messages are immediately displayed on-screen and accompanied by the configured alert notification. To stop the audible alert, press any key. With the acknowledgement key <OK> or the lower scroll key <bottom> scroll through the various items and the message will be designated as having been read.
In stand-by mode messages displayed with New message! can be read by pressing on the confirmation key <ok>.
In order to be able to designate these messages as read the key lock function must be deactivated.

Main address and subaddressTime and date the message was receivedText messageSecond of three messages
14
Call memoryReading, deleting and saving messagesMessages designated as read are filed in the Messages menu under Read Messages.At the end of the message by pressing the confirmation key <OK>, the menu to save or delete this message will be shown. Additionally the complete message list can be deleted.
Using Save message the current message can be saved. As a result Saved messages will appear in the menu. The protection of saved messages can be removed again in the same way. The message is then to be found under Read Messages.Using Delete Message the message will finally be deleted. Delete message list deletes all messages in a list of messages.

15
Confirming messagesWith the 2-way Pager the receipt of messages can be confirmed automatically and a response sent to the message. By means of the GPRS reply path the relevant information (e.g. I am coming or I am not coming) can be returned at once to the control centre to be evaluated.
Reading and responding to new messagesA newly received message appears at once on the display and an alert signal is produced. To stop the audible alert, press any key. With the confirmation key <OK> or the lower scroll key <bottom> then you will scroll through the items and the message will be designated as having been read.
You will then have the opportunity to provide information about your status by replying with 1 of 8 predefined messages. To do this choose one of the possibilities which are available for selection and confirm your choice with the confirmation key <OK>. Choose Abort in order to not send a response and to not provide any feedback.

16
Responding at a later time to a message to which no response was initially givenIf a message was read, but no response was sent, or if the response was aborted, the status report No response to m appears on the display. Respond as described above. See section: Reading and responding to new mes-sages.
Period of time allowed for responding to messagesThe default period of time allowed for responding to messages is 10 minutes, but this may be configured ac-cording to your organisations requirements. If this predetermined period of time is exceeded then no response can be made to any messages.
LocationBy means of the integrated GPS receiver module which is integrated into the 2-way Pager it is possible, at the same time the response is given, for an alert to provide information to the control centre about the location of your device.

17
ProfileInitial position: stand-by mode• Press <OK> and the menu item Read latest message will be displayed• Choose the menu item Profile using the <bottom> key• Press <OK> again• Select the desired profile using <bottom> and <top>• Activate and save the profile that has been selected using <OK>• The profile extension can then be activated or deactivated as desired and confirmed using <OK>

18
AlertsAlert messages can basically be divided into messages with and without a priority assigned to them. This depends on the configuration of the corresponding receiver address (RIC).
In the alert menu the 2-way Pager can be configured to Loud (loud alarm with vibration),
Discrete (minibeep with vibrator), Mute (vibration only) and Off (visual display only).
Initial position: stand-by mode• Press <OK> and the menu item Read latest message will be displayed• Choose the menu item Alarms using the <bottom> key• Press <OK> again• Select the desired alarm setting using the <bottom> and <top> keys
• Press <OK> to apply the selected alarm settings
WARNING:
The device should not be brought close to your ears. The very loud sound produced by the alarm could damage your hearing.

19
Alarm clockInitial position: stand-by mode• Press <OK> and the menu item Read latest message will be displayed• Choose the menu item Alarm clock using the <bottom> key
• Again press <OK>
Switching the alarm on and off and setting the time the alarm will go offInitial position: menu item Alarm clock• Press the <bottom> key in order to select the menu ‘On/Off’• Switch to setting the time using the <OK> key• Set the time using the <top> or <bottom> keys• Save the time the alarm is to go off by pressing the <OK> key once more

Switching on the Alarm Clock FunctionIf the alarm clock is switched on and the receiver is switched off the 2-way Pager becomes switched on at the time set for the alarm to go off and the alarm will sound.
20
Responding to the alarm clockAs soon as the alarm clock sounds then a selection screen will be displayed asking you to confirm or to delay the alarm. Using Snooze the alarm clock function is switched off for the time being, and will sound again after a certain time to wake you up again. As long as the repeat alarm function is active the alarm clock symbol flashes in the stand-by display.
Using Stop the alarm clock is switched off for the whole day. The alarm clock does however remain active and will wake you again at the same time the following day.Switching on using the alarm clock If the alarm clock is switched on and the receiver is switched off the 2-way Pager becomes switched on at the time set for the alarm to go off and the alarm will sound.
21
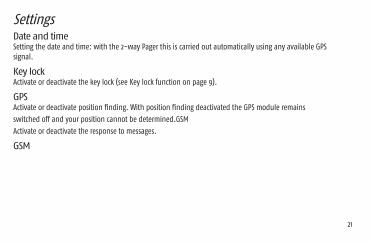
SettingsDate and timeSetting the date and time: with the 2-way Pager this is carried out automatically using any available GPS signal.
Key lockActivate or deactivate the key lock (see Key lock function on page 9).
GPSActivate or deactivate position finding. With position finding deactivated the GPS module remains
switched off and your position cannot be determined.GSM
Activate or deactivate the response to messages.
GSM

22
Battery condition indicator
The battery condition indicator is always visible when the device is switched on, and indicates the amount of charge remaining. The duration of operation can be up to around 500 hours depending on battery charge, the network configuration and the method of operation programmed for the device.
Should the integrated rechargeable battery become flat then the empty battery symbol begins to flash; at the same time there is a sound produced at regular intervals to remind you about the battery. There is still at least 24 hours of operational service available to you. By pressing the acknowledgement key the audible battery alarm is switched off, but the empty battery symbol continues to flash.
Charging the batteryThe integrated lithium polymer rechargeable battery is recharged by means of the mains adapter supplied with the battery charger located on the underside of the casing, or with some other suitable charging device sup-plied by Swissphone. The charging process lasts around 2 hours.
80%– 100% 60%– 80% 40%– 60% 20%– 40% 0%– 20%

23
Switching on / switching offSwitching offInitial position: stand-by mode• Press <OK> and the menu item Read latest message will be displayed• Choose the menu item Switch off using the <bottom> key• Again press <OK>. The dialogue now appears Do you want to switch off?
• Switch the terminal off using the <OK> and <bottom> keys
Switching onShould the 2-way Pager be found to be switched off it can be switched on by pressing any key for a long time.
Switching on using the alarm clockIf the alarm clock is switched on and the receiver is switched off the 2-way Pager becomes switched on at the time set for the alarm to go off and the alarm will sound.

24
PageOne Communications Ltd
2 Brentside Executive Centre
Great West Road Brentford
Middlesex TW8 9DA
United Kingdom
Customer Services: 0844 811 0070
www.pageonepager.com