Embed Size (px)
Citation preview

Operating instructions
Steam ovenDG 155DG 155-1DG 155-2DG 155-3
To prevent accidents andmachine damage,read these instructionsbeforeinstallation or use.
UV
M.-Nr. 05 229 041
IMPORTANT SAFETY INSTRUCTIONS
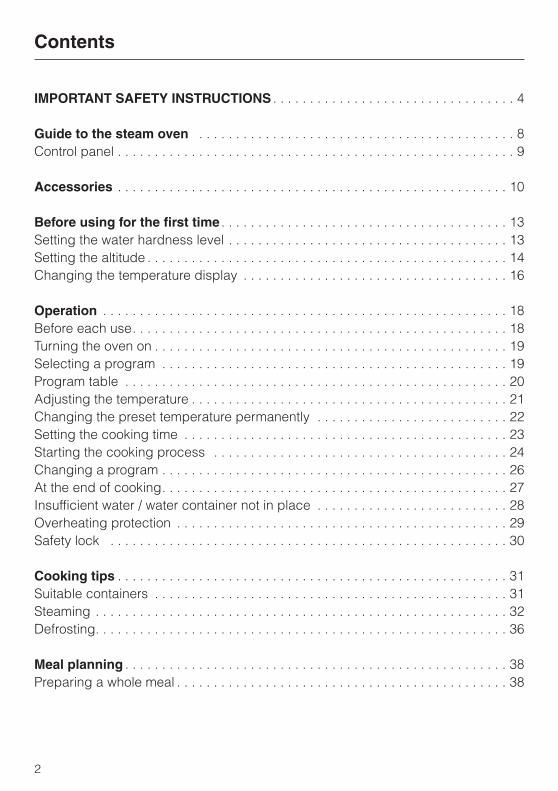
Guide to the steam ovenControl panel . . . . . . . . . . . . . . . . . . . . . . . . . . . . . . . . . . . . . . . . . . . . . . . . . . . . . . 9
Accessories
Before using for the first timeSetting the water hardness level . . . . . . . . . . . . . . . . . . . . . . . . . . . . . . . . . . . . . . 13Setting the altitude . . . . . . . . . . . . . . . . . . . . . . . . . . . . . . . . . . . . . . . . . . . . . . . . . 14Changing the temperature display . . . . . . . . . . . . . . . . . . . . . . . . . . . . . . . . . . . . 16
OperationBefore each use. . . . . . . . . . . . . . . . . . . . . . . . . . . . . . . . . . . . . . . . . . . . . . . . . . . 18Turning the oven on . . . . . . . . . . . . . . . . . . . . . . . . . . . . . . . . . . . . . . . . . . . . . . . . 19Selecting a program . . . . . . . . . . . . . . . . . . . . . . . . . . . . . . . . . . . . . . . . . . . . . . . 19Program table . . . . . . . . . . . . . . . . . . . . . . . . . . . . . . . . . . . . . . . . . . . . . . . . . . . . 20Adjusting the temperature . . . . . . . . . . . . . . . . . . . . . . . . . . . . . . . . . . . . . . . . . . . 21Changing the preset temperature permanently . . . . . . . . . . . . . . . . . . . . . . . . . . 22Setting the cooking time . . . . . . . . . . . . . . . . . . . . . . . . . . . . . . . . . . . . . . . . . . . . 23Starting the cooking process . . . . . . . . . . . . . . . . . . . . . . . . . . . . . . . . . . . . . . . . 24Changing a program . . . . . . . . . . . . . . . . . . . . . . . . . . . . . . . . . . . . . . . . . . . . . . . 26At the end of cooking. . . . . . . . . . . . . . . . . . . . . . . . . . . . . . . . . . . . . . . . . . . . . . . 27Insufficient water / water container not in place . . . . . . . . . . . . . . . . . . . . . . . . . . 28Overheating protection . . . . . . . . . . . . . . . . . . . . . . . . . . . . . . . . . . . . . . . . . . . . . 29Safety lock . . . . . . . . . . . . . . . . . . . . . . . . . . . . . . . . . . . . . . . . . . . . . . . . . . . . . . 30
Cooking tipsSuitable containers . . . . . . . . . . . . . . . . . . . . . . . . . . . . . . . . . . . . . . . . . . . . . . . . 31Steaming . . . . . . . . . . . . . . . . . . . . . . . . . . . . . . . . . . . . . . . . . . . . . . . . . . . . . . . . 32Defrosting. . . . . . . . . . . . . . . . . . . . . . . . . . . . . . . . . . . . . . . . . . . . . . . . . . . . . . . . 36
Meal planningPreparing a whole meal . . . . . . . . . . . . . . . . . . . . . . . . . . . . . . . . . . . . . . . . . . . . . 38
Contents
2
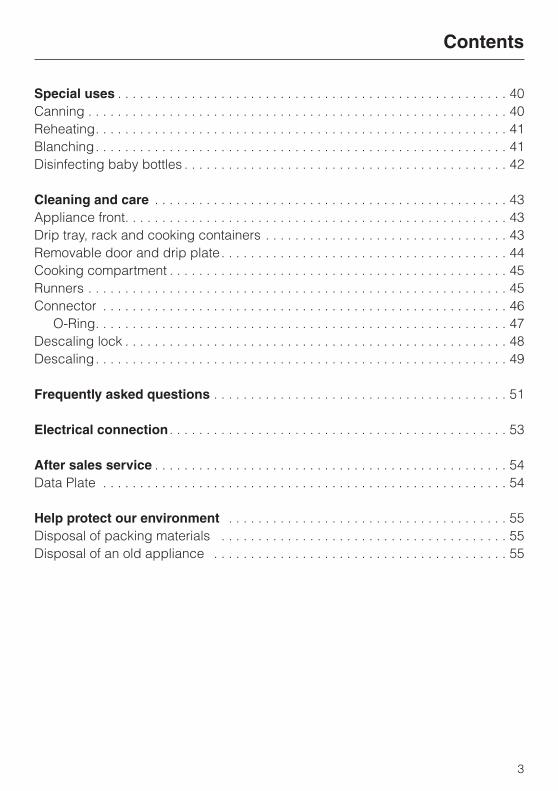
Special usesCanning . . . . . . . . . . . . . . . . . . . . . . . . . . . . . . . . . . . . . . . . . . . . . . . . . . . . . . . . . 40Reheating. . . . . . . . . . . . . . . . . . . . . . . . . . . . . . . . . . . . . . . . . . . . . . . . . . . . . . . . 41Blanching. . . . . . . . . . . . . . . . . . . . . . . . . . . . . . . . . . . . . . . . . . . . . . . . . . . . . . . . 41Disinfecting baby bottles . . . . . . . . . . . . . . . . . . . . . . . . . . . . . . . . . . . . . . . . . . . . 42
Cleaning and careAppliance front. . . . . . . . . . . . . . . . . . . . . . . . . . . . . . . . . . . . . . . . . . . . . . . . . . . . 43Drip tray, rack and cooking containers . . . . . . . . . . . . . . . . . . . . . . . . . . . . . . . . . 43Removable door and drip plate. . . . . . . . . . . . . . . . . . . . . . . . . . . . . . . . . . . . . . . 44Cooking compartment . . . . . . . . . . . . . . . . . . . . . . . . . . . . . . . . . . . . . . . . . . . . . . 45Runners . . . . . . . . . . . . . . . . . . . . . . . . . . . . . . . . . . . . . . . . . . . . . . . . . . . . . . . . . 45Connector . . . . . . . . . . . . . . . . . . . . . . . . . . . . . . . . . . . . . . . . . . . . . . . . . . . . . . . 46
O-Ring. . . . . . . . . . . . . . . . . . . . . . . . . . . . . . . . . . . . . . . . . . . . . . . . . . . . . . . . 47Descaling lock . . . . . . . . . . . . . . . . . . . . . . . . . . . . . . . . . . . . . . . . . . . . . . . . . . . . 48Descaling. . . . . . . . . . . . . . . . . . . . . . . . . . . . . . . . . . . . . . . . . . . . . . . . . . . . . . . . 49
Frequently asked questions
Electrical connection
After sales serviceData Plate . . . . . . . . . . . . . . . . . . . . . . . . . . . . . . . . . . . . . . . . . . . . . . . . . . . . . . . 54
Help protect our environmentDisposal of packing materials . . . . . . . . . . . . . . . . . . . . . . . . . . . . . . . . . . . . . . . 55Disposal of an old appliance . . . . . . . . . . . . . . . . . . . . . . . . . . . . . . . . . . . . . . . . 55
Contents
3
WARNING- When using yoursteam oven, follow basicprecautions, including thefollowing:
Read all instructions beforeinstallation or use of the steamoven to prevent injury andmachine damage.
Use the steam oven only for itsintended purpose. This applianceis intended for residential cookingonly.
This appliance conforms to alluniform safety codes andregulations. The manufacturercannot be held responsible fordamage or injury caused byimproper use of this appliance.
Keep these operating instructionsin a safe place and pass them onto any future user.
SAVE THESE INSTRUCTIONS
Electrical SafetyBefore installation make sure thatthe voltage and frequency listed on
the data plate correspond with thehousehold electrical supply. This datamust correspond to prevent injury andmachine damage. Consult a qualifiedelectrician if in doubt.
Installation, repair andmaintenance work should be by a
Miele authorized service technician.Work by unqualified persons could bedangerous and may void the warranty.
Before installation or service,disconnect the power supply to the
work area by removing the fuse,"tripping" the circuit breaker, orswitching off the power main. Ensurethat the power is not restored to theappliance during maintenance or repairwork.
Be certain your appliance isproperly installed and grounded by
a qualified technician. To guarantee theelectrical safety of this appliance,continuity must exist between theappliance and an effective groundingsystem. It is imperative that this basicsafety requirement be met. If there isany doubt, have the electrical system ofthe house checked by a qualifiedelectrician. The manufacturer cannot beheld responsible for damage causedby the lack, or inadequacy of, aneffective grounding system.
Do not use an extension cord toconnect this appliance to
electricity. Extension cords do notguarantee the required safety of theappliance, e.g. danger of overheating.
Do not operate any appliance witha damaged cord or plug, or if the
appliance has been damaged in anymanner. Return the appliance to thenearest authorized service facility forexamination, repair or adjustment.
IMPORTANT SAFETY INSTRUCTIONS
4
UseInspect the steam oven forshipping damage. Do not install or
operate a damaged unit. Contact yourMiele Dealer.
The steam oven should be installedat a safe height for users to safely
access all cooking levels andcontainers. Otherwise spills couldcause burns or scalding and childrenmight be put at risk by the hotappliance door.
This equipment is not designed formaritime use or for use in mobile
installations such as recreationalvehicles or aircraft. However, undercertain conditions it may be possible foran installation in these applications.Please contact the nearest Miele dealeror the Miele Technical ServiceDepartment with specific requirements.
This appliance is intended fordomestic use only. It should not be
used for commercial purposes.
This appliance must only beoperated after it has been correctly
installed in cabinetry. This is necessaryto ensure that all electrical componentsare shielded.
Only use the appliance for itsintended purpose. Any other use is
at the owner’s risk and could bedangerous.
Scalding and Burning hazardsWhen in use, the oven, particularlythe inside of the door as well as the
outer side by the vent, may becomevery hot and remain so for a while afterthe oven has been turned off. Keepchildren away.
Allow the steam oven to coolbefore putting in or taking out
racks.
Use pot holders when working witha hot appliance.
Avoid hot steam, serious burns andscalds could result.
Do not touch hot surfaces, use thehandles.
When handling cooking containerstake care not to let the contents
spill.
Extreme caution must be usedwhen moving hot liquids.
Do not use plastic containers. Theymay melt at high temperatures in
the oven.
IMPORTANT SAFETY INSTRUCTIONS
5
ChildrenTo reduce the risk of injury, do notallow children to play in, on, or
near the steam oven.
Do not store items of interest tochildren in cabinets near the oven.
Children climbing on the oven to reachitems could be seriously injured.
Use the safety lock so that childrencannot turn the steam oven on or
change the settings.
The door hinges of the appliancecould be hazardous. Ensure that
children are kept at a safe distance.
Ensure that any plastic wrap, isdisposed of safely and kept out of
the reach of children. Danger ofsuffocation!
Before discarding an oldappliance, disconnect it from the
electrical supply, cut off the powercord, and remove any doors to preventhazards.
Appliance damageDo not heat unopened containersof food in the oven. Pressure will
build up causing an explosion that willdamage the cooking compartment.
To prevent condensation whichcould corrode the appliance; do
not leave cooked foods in the oven foran extended period of time.
Do not use items in the steam ovenwhich might rust. This can lead to
corrosion of the appliance.
Do not lean, sit or place heavyitems on the open door of the
appliance. The door can support amaximum weight of 17 lbs. (8 kg).
IMPORTANT SAFETY INSTRUCTIONS
6

Appliance maintenanceWhen descaling the oven, only usedescaling agents with a citric acid
base or the descaling tablets availablefrom Miele. Do not use vinegar. Vinegarwill damage the appliance. Follow themanufacturer’s safety instructions onthe packaging.
Wipe out the appliance after eachuse and leave the door open until
the moisture in the cookingcompartment has evaporated.
If the steam oven is not used for alengthy period, e.g. vacationing,
clean it to avoid odors.See "Before using for the first time -Setting the altitude" and leave the dooropen until the cooking compartment isdry.
Do not use a steam cleaner toclean this appliance. The steam
from the cleaning appliance couldpenetrate live components andpermanently damage the oven or causeinjury.
Further safety notesIn the event of damage or a defect,turn off the appliance immediately.
After it has been turned off, isolate itfrom the main power supply andcontact the Miele Technical ServiceDepartment. Ensure that the power isnot restored to the appliance duringmaintenance or repair work.
While the appliance is underwarranty repairs should only be
performed by a Miele authorizedservice technician. Otherwise thewarranty will be void.
Do not tamper with electricalconnections, components or
mechanical parts. Never open the outercasing of the appliance.
Be sure that cords of otherelectrical appliances do not come
in contact with the steam oven door.The insulation of the cords couldbecome damaged creating a hazard.
To protect against electric shock,keep the appliance cord clear of
liquids.
Do not let the cord hang over theedge of tables or counters, or
come in contact with hot surfaces.
The use of accessories notrecommended by Miele may cause
injury.
IMPORTANT SAFETY INSTRUCTIONS
7

aControl panel
bDoor seal
cSide runners with 4 levels
dTemperature sensor
eAir Outlet
fVent
gSteam inlet
hWater container contact
iFeed tube for water return
jWater container connector
kWater Valve
lDrip channel
Guide to the steam oven
8
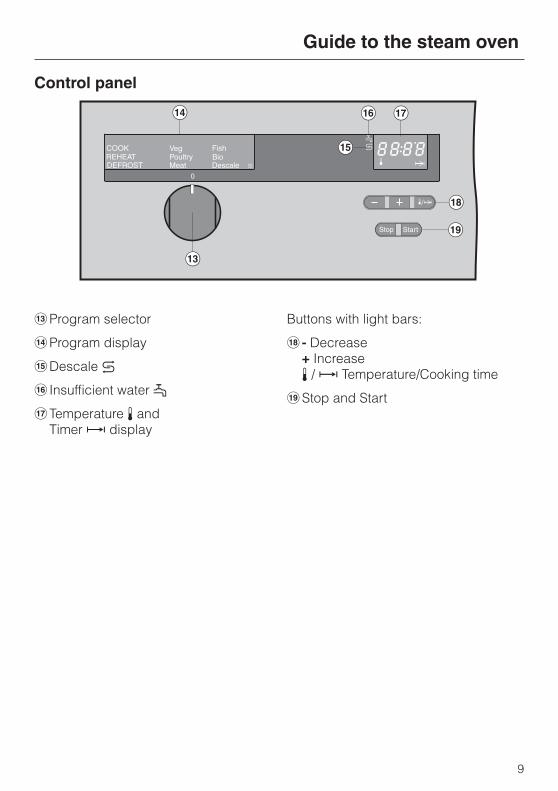
Control panel
mProgram selector
nProgram display
oDescale k
p Insufficient water p
qTemperature z andTimer x display
Buttons with light bars:
r - Decrease+ Increasez / x Temperature/Cooking time
sStop and Start
Guide to the steam oven
9
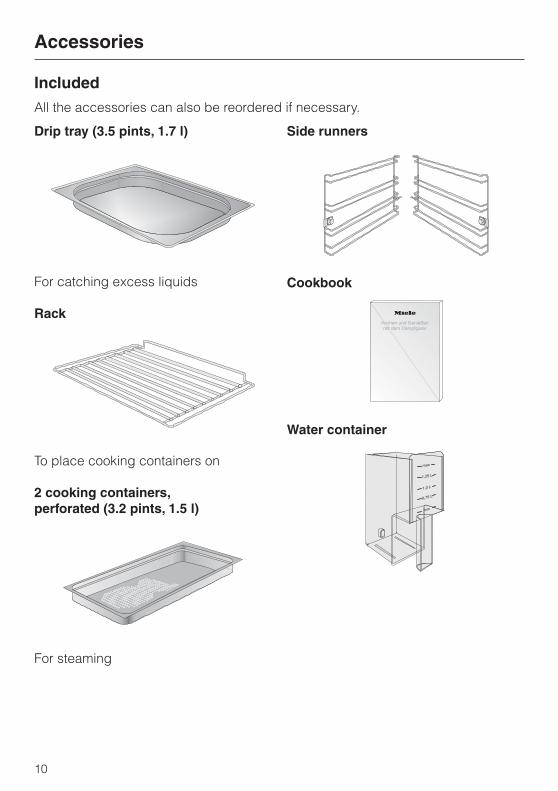
IncludedAll the accessories can also be reordered if necessary.
Drip tray (3.5 pints, 1.7 l)
For catching excess liquids
Rack
To place cooking containers on
2 cooking containers,perforated (3.2 pints, 1.5 l)
For steaming
Side runners
Cookbook
Water container
Accessories
10

Silicone grease
For lubricating the O-Rings on theconnecting valve of the water container.See, "Cleaning and care-O-Ring" formore details.
Connecting valve
with:
Valve insert, t, whitecreates a bridge between the watercontainer, j, and the appliance, k.
O-Ring, u, black
These two parts along with the tool, see"Accessories-optional" can be orderedindividually or together as a repair kit.
Accessories
11

OptionalThe following stainless steel cooking containers for steaming can be ordered asoptional accessories:
Container Capacityin pt (l)
Height in inches (cm)
DGG 2solid
4 (2.0) 2 3/8" (6)
DGG 3solid
6.5 (3.1) 2 3/8" (6)
DGGL 4perforated
6.5 (3.1) 2 3/8" (6)
Tool
For removing and inserting the valve insert.
This part can be ordered individually or together with the connecting valve parts,see "Accessories-connecting valve," as a repair kit.
Accessories
12
Setting the water hardnesslevelFor the steam oven to function properly,the water hardness level must beprogrammed into the unit.
You can use the supplied test strip tocheck your water hardness level or yourlocal water company can tell you thewater hardness of your area.
The steam oven is preset to waterhardness level IV (4). If your water issofter than 21 gr/gal the setting shouldbe adjusted.
Please check that the program selectoris at "0".
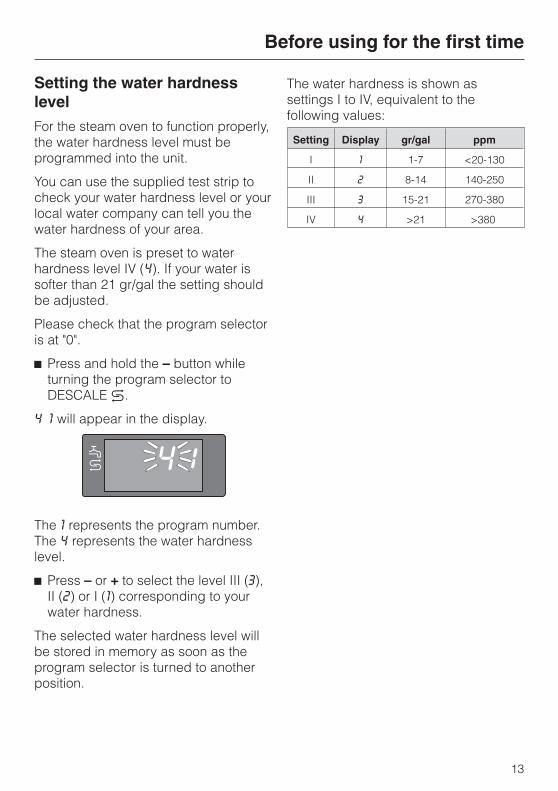
^ Press and hold the – button whileturning the program selector toDESCALE k.
4 1 will appear in the display.
The 1 represents the program number.The 4 represents the water hardnesslevel.
^ Press – or + to select the level III (3),II (2) or I (1) corresponding to yourwater hardness.
The selected water hardness level willbe stored in memory as soon as theprogram selector is turned to anotherposition.
The water hardness is shown assettings I to IV, equivalent to thefollowing values:
Setting Display gr/gal ppm
I 1 1-7 <20-130
II 2 8-14 140-250
III 3 15-21 270-380
IV 4 >21 >380
Before using for the first time
13
Setting the altitudeThe steam oven must be run throughthe DESCALE k program before thefirst use to set the unit for the altitude inyour area.
If this is not done, too much steam willbe released from the appliance duringuse.
^ Fill the water container with a quart(1 l) of water (do not add descalingagent), place in the appliance andclose the door.
^ Select DESCALE k using theprogram selector.
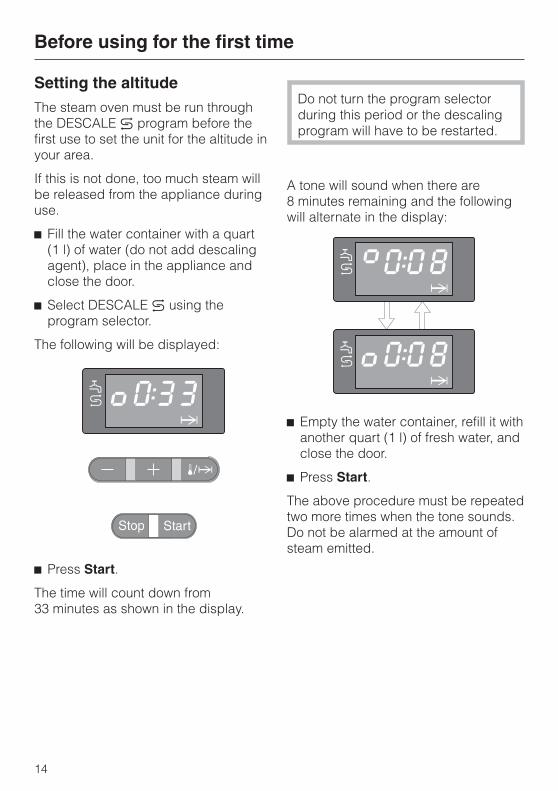
The following will be displayed:
^ Press Start.
The time will count down from33 minutes as shown in the display.
Do not turn the program selectorduring this period or the descalingprogram will have to be restarted.
A tone will sound when there are8 minutes remaining and the followingwill alternate in the display:
^ Empty the water container, refill it withanother quart (1 l) of fresh water, andclose the door.
^ Press Start.
The above procedure must be repeatedtwo more times when the tone sounds.Do not be alarmed at the amount ofsteam emitted.
Before using for the first time
14
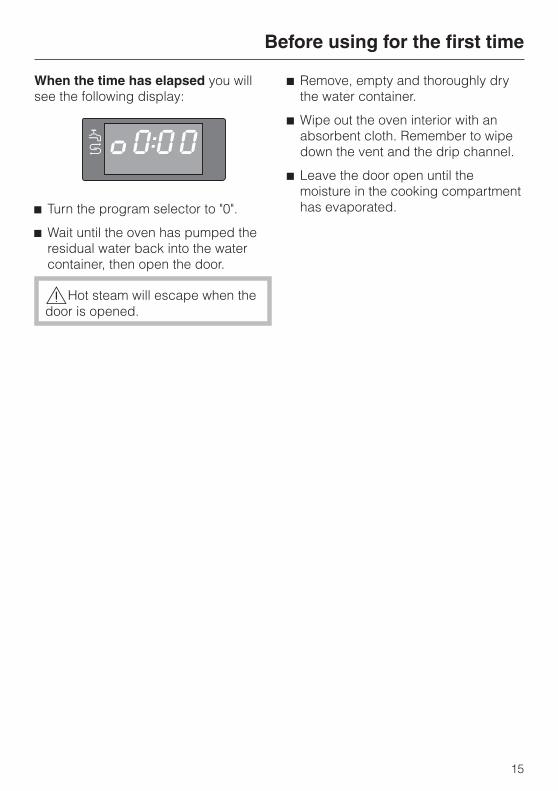
When the time has elapsed you willsee the following display:
^ Turn the program selector to "0".
^ Wait until the oven has pumped theresidual water back into the watercontainer, then open the door.
,Hot steam will escape when thedoor is opened.
^ Remove, empty and thoroughly drythe water container.
^ Wipe out the oven interior with anabsorbent cloth. Remember to wipedown the vent and the drip channel.
^ Leave the door open until themoisture in the cooking compartmenthas evaporated.
Before using for the first time
15

Changing the temperaturedisplayThe display is set to show thetemperatures in °F but it can beprogrammed to show °C.
Please check that the program selectoris set to "0".
^ Press and hold the - button whileturning the program selector toDESCALE k.
^ Release the - button.
4 1 will appear in the display.
^ Press the z/g repeatedly until F9appears in the display.
^ Press the - button.
C9 will appear in the display.
^ Turn the program selector to "0".
The conversion is now stored.
If you wish to revert back to °F followthe previous instructions until C9appears in the display.
^ Press the + button.
F9 will appear in the display.
^ Turn the program selector to "0".
Before using for the first time
16
kp

Selecting a temperatureIn the cookbook, temperatures arespecified in °C, but are shown on theappliance display in °F. Use thefollowing conversion table for settingthe temperature on your steam oven.
The temperature on the display canonly be shown in 10 °F increments.Therefore, the temperature shown in °Fdoes not always correspond exactlywith the temperature specified in °C,i.e. the actual measurable temperature.This discrepancy in temperature isnominal and will not cause a significantdifference in cooking time or results.
Temperaturein °C
CorrespondingTemperature in °F
100 boil
95 205
90 195
85 185
80 175
75 165
70 155
65 145
60 135
55 125
50 115
Before using for the first time
17
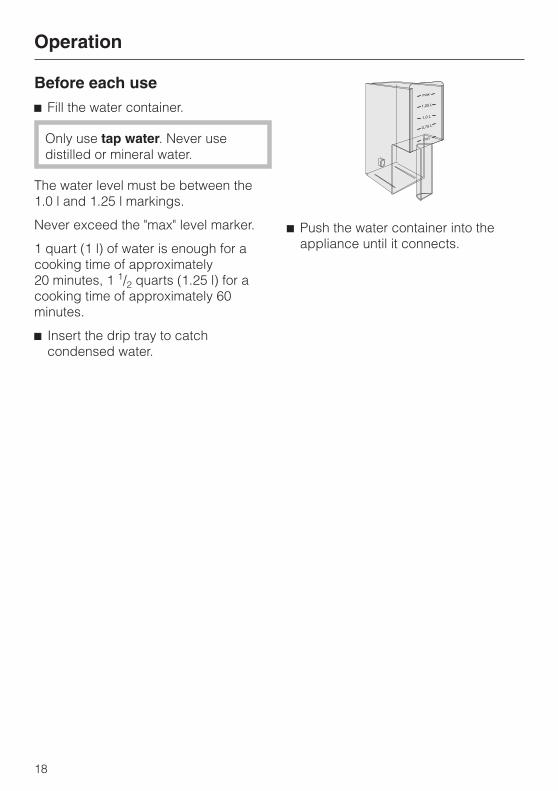
Before each use^ Fill the water container.
Only use tap water. Never usedistilled or mineral water.
The water level must be between the1.0 l and 1.25 l markings.
Never exceed the "max" level marker.
1 quart (1 l) of water is enough for acooking time of approximately20 minutes, 1 1/2 quarts (1.25 l) for acooking time of approximately 60minutes.
^ Insert the drip tray to catchcondensed water.
^ Push the water container into theappliance until it connects.
Operation
18

Turning the oven onDo not worry if your appliance makesunusual noises. This will occur whenthe steam generating unit is being filledor emptied and when the pump isactivated.
When the oven is turned on, the fanwhich extracts steam from the oven willalso be heard. The fan will continuerunning for a while after the oven hasbeen turned off.
To use the oven follow these four steps:
1. Select a program
2. Adjust the temperature if necessary
3. Set the cooking time
4. Press Start
The lit bar between the buttons willprompt you to set the next step.
The following pages describe thesesteps in more detail.
Selecting a program^ Turn the program selector to the
desired program, e.g. COOK - Veg.
The preset temperature, e.g. 100 °C(boil) will appear in the display for ashort time.
Operation
19

Program table
Program Presettemperature
in °F (°C)
Temperaturerange °F (°C)
Suggested use
COOKUniversal
212 (100) 175-212(80-100)
For food which can becooked at high temperatures,or for boiling
COOK Veg 212 (100) 195-212(90-100)
For all types of vegetables
COOKPoultry /
Meat
212 (100) 195-212(90-100)
For all types of meat andpoultry suitable for steaming
COOK Fish 165 (75) 155-205(70-95)
For all types of fish
COOK Bio 165 (75) 155-175(70-80)
For food requiring very gentlecooking
DEFROST 125 (55) 115-140(50-60)
For defrosting meat, fish, fruit,etc.
REHEAT 205 (95) 175-212(80-100)
For reheating food
DESCALE - - For descaling
Operation
20
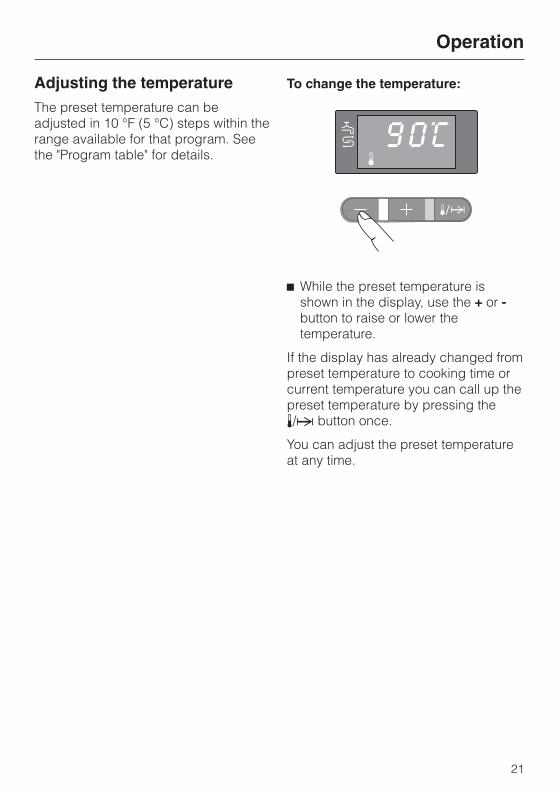
Adjusting the temperatureThe preset temperature can beadjusted in 10 °F (5 °C) steps within therange available for that program. Seethe "Program table" for details.
To change the temperature:
^ While the preset temperature isshown in the display, use the + or -button to raise or lower thetemperature.
If the display has already changed frompreset temperature to cooking time orcurrent temperature you can call up thepreset temperature by pressing thez/g button once.
You can adjust the preset temperatureat any time.
Operation
21

Changing the presettemperature permanentlyIt is possible to permanently changethe preset temperature of a program,but only within the range oftemperatures available for thatparticular program (see the tablebelow).
Program Programnumber
Presettemp
in °F (°C)
Temprange
in °F (°C)
CookUniversal
2 212(100)
175-212(80-100)
REHEAT 3 205(95)
175-212(80-100)
DEFROST 4 130(55)
115-135(50-60)
Veg 5 212(100)
195-212(90-100)
Fish 6 165(75)
155-205(70-95)
Poultry /Meat
7 212(100)
195-212(90-100)
Bio 8 165(75)
155-175(70-80)
Please check that the program selectoris set to "0".
^ Press and hold the - button whileturning the program selector toDESCALE k.
4 1 will appear in the display.
^ Press the z/g button.
1002 will appear in the display.
(2112 will appear if the temperature isset to °F.)
The flashing figures in the first threepositions show the temperature, 100 °Cin the above example. The figure in thefourth position, number 2 in theexample, shows the program number(see table).
^ To change the preset temperature forthis program press - or +. Forexample, to set 80 °C (175 °F) forCOOK Universal.
^ Press the z/g button to move to thenext program and change itstemperature as described above.
The new recommended temperature isnow stored in memory.
^ Turn the program selector to "0" if youdo not wish to change any othertemperatures.
The next time the changed program isselected the new temperature willappear in the display.
Operation
22
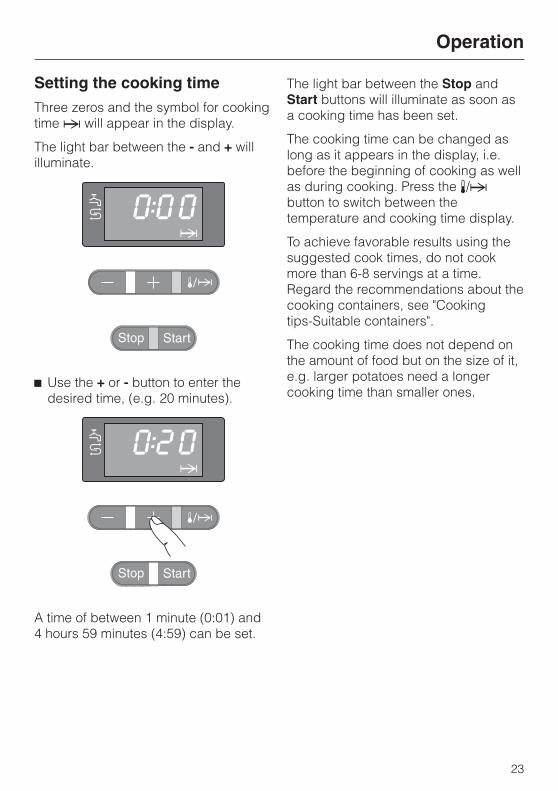
Setting the cooking timeThree zeros and the symbol for cookingtime g will appear in the display.
The light bar between the - and + willilluminate.
^ Use the + or - button to enter thedesired time, (e.g. 20 minutes).
A time of between 1 minute (0:01) and4 hours 59 minutes (4:59) can be set.
The light bar between the Stop andStart buttons will illuminate as soon asa cooking time has been set.
The cooking time can be changed aslong as it appears in the display, i.e.before the beginning of cooking as wellas during cooking. Press the z/gbutton to switch between thetemperature and cooking time display.
To achieve favorable results using thesuggested cook times, do not cookmore than 6-8 servings at a time.Regard the recommendations about thecooking containers, see "Cookingtips-Suitable containers".
The cooking time does not depend onthe amount of food but on the size of it,e.g. larger potatoes need a longercooking time than smaller ones.
Operation
23

Starting the cooking process
^ Press Start. The two light bars will go out and thedisplay will change to show the currenttemperature of the cookingcompartment and the temperaturesymbol z.
Operation
24

Once the steam oven has begun tooperate you will hear a pumping noiseas water is pumped from the watercontainer into the steam generatingunit.
The appliance will then heat up. Duringthis heating time the rise in temperaturein the cooking compartment will beshown in the display.
As soon as the set temperature hasbeen reached, the display will changeto show the cooking time and the timewill begin to count down. This isindicated by the colon flashing betweenthe figures.
Please note that if the cookingtemperature selected is 185 °F (85 °C)or higher and the cooking time is longerthan 30 minutes, the steam generatingunit will turn off 3 minutes before theend of cooking to make use of residualenergy. This is indicated by the lettersEC in the display.
Operation
25

Interrupting a programYou can interrupt a program at anytime.
^ Press Stop.
The colon in the display stops flashing.The light bar between Stop and Startcomes on.
The heat is turned off and the remainingcooking time is stored in memory.
You can now open the door, forexample, to stir something.
,Hot steam will escape when thedoor is opened.Use caution when taking containersout of the oven.
To continue:
^ Close the door.
^ Press Start.
If you have only interrupted theprogram briefly, you will see the timeremaining continue to count down afterthe door has been closed.
If the program has been interrupted fora longer period, the oven will havecooled and will need to heat up again.In this case, the display will show thecurrent oven temperature rising until itreaches the set temperature. When theset temperature has been reached, thedisplay will switch over to show theremaining cooking time.
Changing a programTo change a program while the oven isin use:
^ Press Stop.
^ Turn the program selector to the newprogram.
^ Enter the new cook time.
^ Press Start.
Operation
26
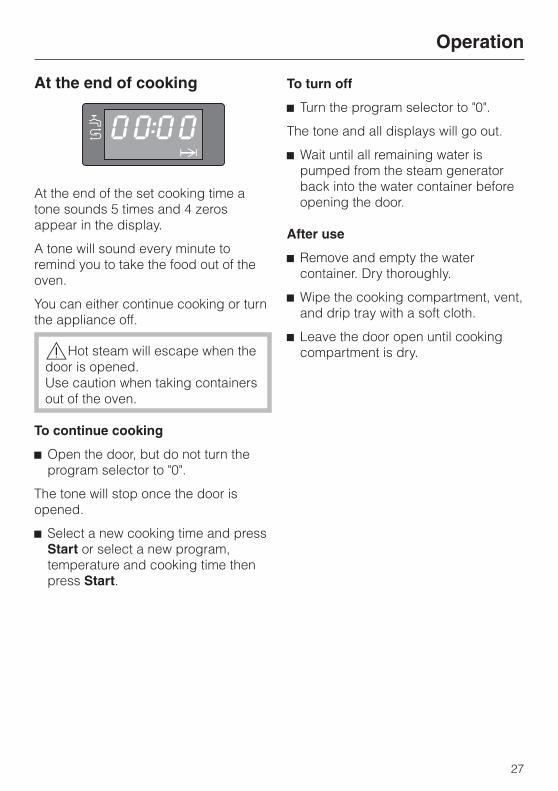
At the end of cooking
At the end of the set cooking time atone sounds 5 times and 4 zerosappear in the display.
A tone will sound every minute toremind you to take the food out of theoven.
You can either continue cooking or turnthe appliance off.
,Hot steam will escape when thedoor is opened.Use caution when taking containersout of the oven.
To continue cooking
^ Open the door, but do not turn theprogram selector to "0".
The tone will stop once the door isopened.
^ Select a new cooking time and pressStart or select a new program,temperature and cooking time thenpress Start.
To turn off
^ Turn the program selector to "0".
The tone and all displays will go out.
^ Wait until all remaining water ispumped from the steam generatorback into the water container beforeopening the door.
After use
^ Remove and empty the watercontainer. Dry thoroughly.
^ Wipe the cooking compartment, vent,and drip tray with a soft cloth.
^ Leave the door open until cookingcompartment is dry.
Operation
27
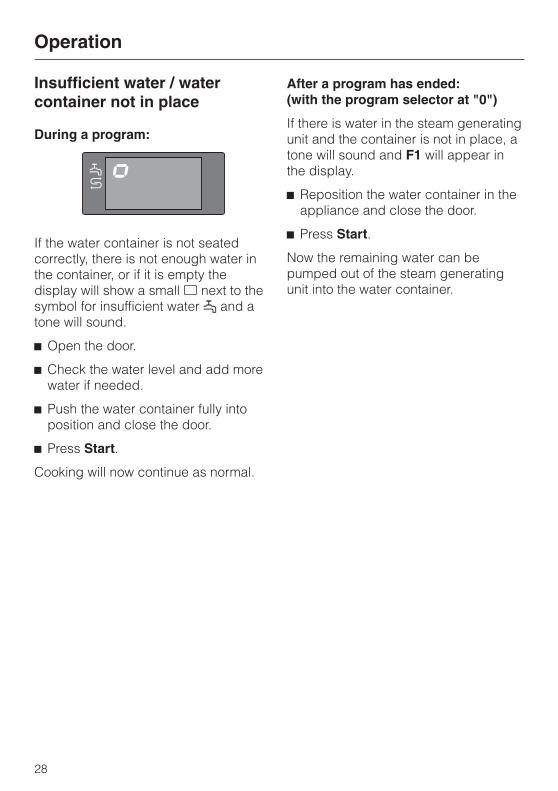
Insufficient water / watercontainer not in place
During a program:
If the water container is not seatedcorrectly, there is not enough water inthe container, or if it is empty thedisplay will show a smallj next to thesymbol for insufficient water p and atone will sound.
^ Open the door.
^ Check the water level and add morewater if needed.
^ Push the water container fully intoposition and close the door.
^ Press Start.
Cooking will now continue as normal.
After a program has ended:(with the program selector at "0")
If there is water in the steam generatingunit and the container is not in place, atone will sound and F1 will appear inthe display.
^ Reposition the water container in theappliance and close the door.
^ Press Start.
Now the remaining water can bepumped out of the steam generatingunit into the water container.
Operation
28

Overheating protectionThis appliance has a safety featurewhich prevents overheating. If thetemperature in the steam generatingunit becomes too high the oven willshut off automatically.
The oven has shut off if:
– during operation the display onlyshows the temperature decreasing.
– after starting a new program theoven temperature fails to rise.
To reset the oven
^ Turn the program selector to "0" andallow the appliance to cool.
^ Restart the program.
If the appliance still does not heatcontact the Miele Technical ServiceDepartment for assistance.
Operation
29
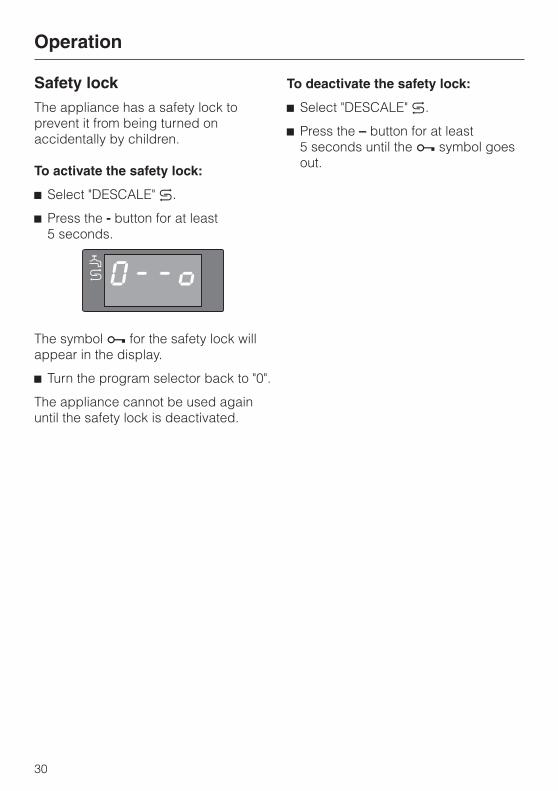
Safety lockThe appliance has a safety lock toprevent it from being turned onaccidentally by children.
To activate the safety lock:
^ Select "DESCALE" k.
^ Press the - button for at least5 seconds.
The symbol a for the safety lock willappear in the display.
^ Turn the program selector back to "0".
The appliance cannot be used againuntil the safety lock is deactivated.
To deactivate the safety lock:
^ Select "DESCALE" k.
^ Press the – button for at least5 seconds until the a symbol goesout.
Operation
30

Suitable containersStainless steel cooking containers aresupplied with the appliance.Other containers, are available in avariety of sizes, both perforated andsolid, as optional accessories.
– To achieve good results using thesuggested cook times, do not cookmore than 6-8 servings at a time.
– Use the perforated cookingcontainers whenever possible, e.g.for cooking vegetables. The steamcan reach the food from all sides andcook evenly.
– Place the drip tray at the lowestrunner level to collect condensation.Always use the drip tray when usinga perforated cooking container.
– Larger and deeper containers canbe used for larger items. It is best tospace food as much as possible sosteam can surround each piece.
– Dense dishes such as casseroles, orfood such as peas or asparagus,which have little space betweenthem will take longer to cookbecause the steam has less space towork in. It is best to use 2 or 3shallow containers for these foods.
You can also use your own containersand dishes. However, please note thefollowing:
– The container must be heat resistantto 212 °F (100° C). Heat resistantglass, ceramics, porcelain(chinaware), stainless steel orenamel dishes are all suitable.
– Food will take longer to cook in adish with thick sides.
Ensure that there is a gap of at least 1"(3 cm) between the upper rim of thecontainer and the top of the cookingcompartment to allow sufficient steaminto the container.
Cooking tips
31

Steaming
Food Program Temperaturein °F (°C)
Time inminutes
Vegetables
Green beans COOK Veg 212 (100) 3-4
Cauliflower, whole | 212 (100) 15-20
Cauliflower, florets | 212 (100) 3-4
Broccoli, whole | 212 (100) 10-18
Broccoli, florets | 212 (100) 7-8
Peas | 212 (100) 4-8
Green cabbage, shredded | 212 (100) 4-10
Potatoes, unpeeled | 212 (100) 15-20
Potatoes, peeled | 212 (100) 10-15
Carrots, sliced | 212 (100) 3-6
Carrots, whole | 212 (100) 8-15
Brussels sprouts | 212 (100) 8-15
Celery, sliced | 212 (100) 8-10
Spinach | 212 (100) 6-8
Asparagus | 212 (100) 7-9
White cabbage, chopped | 212 (100) 15-25
Savoy cabbage, chopped | 212 (100) 10-15
Stuffed peppers e 195 (90) 40-50
Tomatoes Bio 165 (75) 2-5
Note: Temperatures and times in this table are for guidance only.
Cooking tips
32
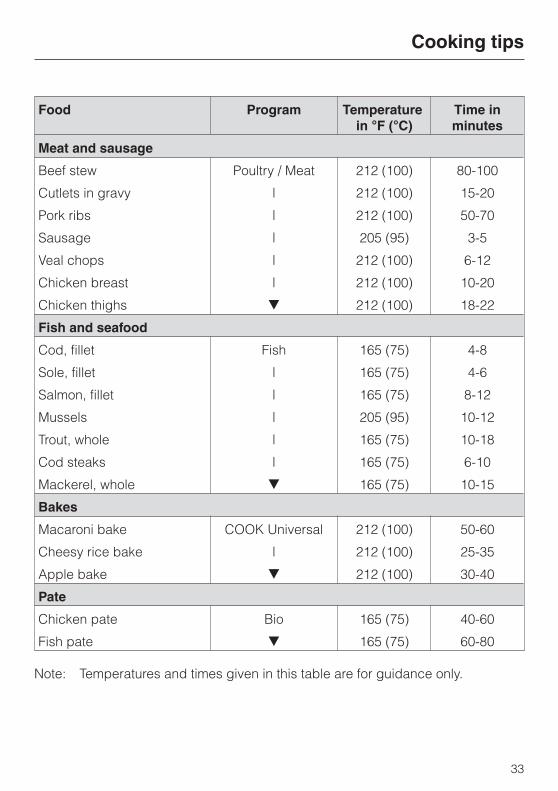
Food Program Temperaturein °F (°C)
Time inminutes
Meat and sausage
Beef stew Poultry / Meat 212 (100) 80-100
Cutlets in gravy | 212 (100) 15-20
Pork ribs | 212 (100) 50-70
Sausage | 205 (95) 3-5
Veal chops | 212 (100) 6-12
Chicken breast | 212 (100) 10-20
Chicken thighs e 212 (100) 18-22
Fish and seafood
Cod, fillet Fish 165 (75) 4-8
Sole, fillet | 165 (75) 4-6
Salmon, fillet | 165 (75) 8-12
Mussels | 205 (95) 10-12
Trout, whole | 165 (75) 10-18
Cod steaks | 165 (75) 6-10
Mackerel, whole e 165 (75) 10-15
Bakes
Macaroni bake COOK Universal 212 (100) 50-60
Cheesy rice bake | 212 (100) 25-35
Apple bake e 212 (100) 30-40
Pate
Chicken pate Bio 165 (75) 40-60
Fish pate e 165 (75) 60-80
Note: Temperatures and times given in this table are for guidance only.
Cooking tips
33
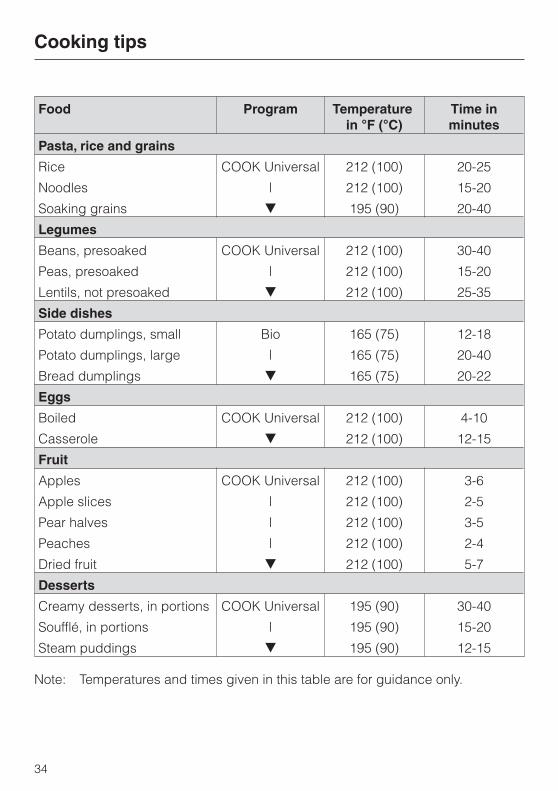
Food Program Temperaturein °F (°C)
Time inminutes
Pasta, rice and grains
Rice COOK Universal 212 (100) 20-25
Noodles | 212 (100) 15-20
Soaking grains e 195 (90) 20-40
Legumes
Beans, presoaked COOK Universal 212 (100) 30-40
Peas, presoaked | 212 (100) 15-20
Lentils, not presoaked e 212 (100) 25-35
Side dishes
Potato dumplings, small Bio 165 (75) 12-18
Potato dumplings, large | 165 (75) 20-40
Bread dumplings e 165 (75) 20-22
Eggs
Boiled COOK Universal 212 (100) 4-10
Casserole e 212 (100) 12-15
Fruit
Apples COOK Universal 212 (100) 3-6
Apple slices | 212 (100) 2-5
Pear halves | 212 (100) 3-5
Peaches | 212 (100) 2-4
Dried fruit e 212 (100) 5-7
Desserts
Creamy desserts, in portions COOK Universal 195 (90) 30-40
Soufflé, in portions | 195 (90) 15-20
Steam puddings e 195 (90) 12-15
Note: Temperatures and times given in this table are for guidance only.
Cooking tips
34

– You can cook on any level or onmultiple levels at a time. The cookingtime will not change.
– When cooking frozen food, e.g.vegetables, break up large clumpsso that they cook evenly. Thecooking time is approximately thesame as for fresh vegetables.
– Since steam cooking retains flavorsso well, food should not be seasoneduntil after it has been cooked.
– Fish should be cooked at 165°F(75°C) to maintain its texture andnatural color. At this temperature youshould cook on only one level.
Fish can be cooked on more thanone level at 195°F (90°C). However,when cooking at this temperature,please note that cooking times willbe reduced by several minutes.
– To avoid any transfer of tastescaused by moisture dripping fromabove, solid containers should beused under any perforatedcontainers.
– When cooking with fluids, fill solidcontainers to the lower rim.
– Food like noodles or rice need to becooked in fluids. Rice, beans andcereals need to be cooked in equalamounts of food and water.
– Grease the perforated containerwhen cooking fish.
– Grease the solid container whencooking eggs, e.g. scrambled eggs.
Cooking tips
35

DefrostingFood to be defrosted Program Weight in
lb (g)Temperature
in °F (°C)Defrost time
inMinutes
Standingtime inMinutes
Meat
Chopped meat DEFROST 1/2 lb (250 g) 115 (50) 15-20 10-15
Chopped meat | 1 lb (500 g) 115 (50) 20-30 10-15
Chopped meat | 2 lb (1000 g) 115 (50) 30-40 10-15
Stew | 1/2 lb (250 g) 135 (60) 20-25 10-15
Stew | 1 lb (500 g) 135 (60) 30-40 10-15
Stew | 2 lb (1000 g) 135 (60) 50-60 10-15
Liver | 1/2 lb (250 g) 135 (60) 20-25 10-15
Liver | 1 lb (500 g) 135 (60) 25-35 10-15
Liver | 2 lb (1000 g) 135 (60) 30-40 10-15
Rabbit | 1 lb (500 g) 115 (50) 30-40 10-15
Venison | 2 lb (1000 g) 115 (50) 40-50 10-15
Cutlets, sausages | 1 3/4 lb(800 g)
135 (60) 25-35 15-20
Poultry
Chicken | 2 lb (1000 g) 135 (60) 40-50 15-20
Chicken legs | 1/4 lb (150 g) 135 (60) 20-25 15
Turkey | 4 1/2 lb(2000 g)
135 (60) 80-90 15-20
Turkey drumsticks | 1 lb (500 g) 135 (60) 40-45 10-15
Turkey drumsticks | 2 lb (1000 g) 135 (60) 45-55 10-15
Duck | 2 lb (1000 g) 135 (60) 40-50 10-15
Goose | 4 1/2 lb(2000 g)
135 (60) 80-90 10-15
Fish
Fillet | 3/4 lb (300 g) 135 (60) 10-15 5-10
Trout | 3/4 lb (300 g) 135 (60) 15-20 5-10
Whole fish | 2 lb (1000 g) 135 (60) 30-40 10-15
Vegetables
Frozen in a block,e.g. spinach,green cabbage
|||
3/4 lb (300 g) 135 (60) 20-25 10-15
Fruit
Berries e 3/4 lb (300 g) 135 (60) 6-10 10-12
Note: Temperatures and times given in this table are for guidance only.
Cooking tips
36

DefrostingFrozen food can be defrosted in thesteam oven in considerably less timethan defrosting at room temperature.
^ Remove frozen food from the originalpackaging and place it in a cookingcontainer or on the rack.
^ Select DEFROST.
^ If necessary adjust the temperature(see table, "Defrosting").
^ Select the defrost time (see table,"Defrosting").
^ Press Start.
Tips on defrosting
,Be careful when defrostingpoultry. Do not use the liquid fromdefrosted poultry for cooking. Pourliquid down the drain and thoroughlywash the tray, sink and hands.
– Fish does not need to be fullydefrosted before cooking. Defrost itso that the surface is sufficientlythawed to take herbs and seasoning.Fish coated with breadcrumbsshould be fully defrosted so that thecoating sticks.
– Turn, stir or separate food abouthalfway through the defrostingperiod.
– Allow food to stand at roomtemperature after defrosting. Thisstanding time (see table) isnecessary to ensure that the food isfully defrosted.
– Do not refreeze food once it hasbeen defrosted.
– Defrost deep frozen, precookedmeals according to themanufacturer’s instructions.
– Defrost baked items such as pastryor cakes in a closed freezer bag.
Cooking tips
37
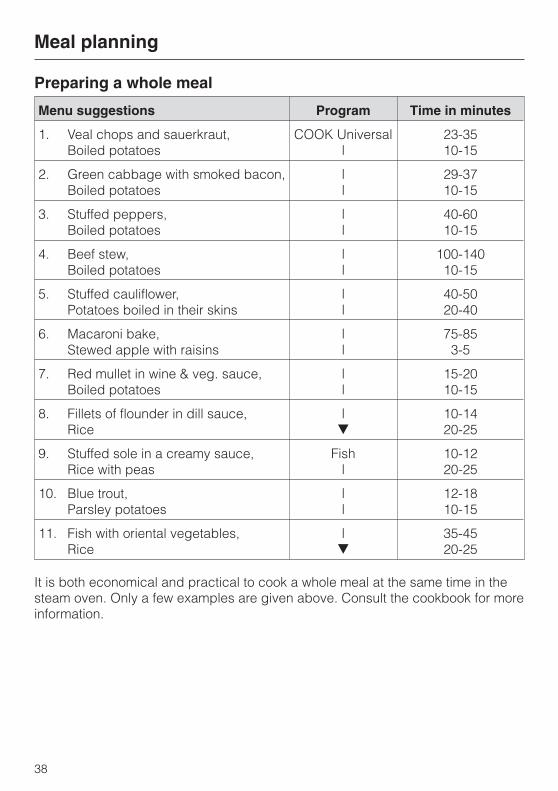
Preparing a whole meal
Menu suggestions Program Time in minutes
1. Veal chops and sauerkraut,Boiled potatoes
COOK Universal|
23-3510-15
2. Green cabbage with smoked bacon,Boiled potatoes
||
29-3710-15
3. Stuffed peppers,Boiled potatoes
||
40-6010-15
4. Beef stew,Boiled potatoes
||
100-14010-15
5. Stuffed cauliflower,Potatoes boiled in their skins
||
40-5020-40
6. Macaroni bake,Stewed apple with raisins
||
75-853-5
7. Red mullet in wine & veg. sauce,Boiled potatoes
||
15-2010-15
8. Fillets of flounder in dill sauce,Rice
|e
10-1420-25
9. Stuffed sole in a creamy sauce,Rice with peas
Fish|
10-1220-25
10. Blue trout,Parsley potatoes
||
12-1810-15
11. Fish with oriental vegetables,Rice
|e
35-4520-25
It is both economical and practical to cook a whole meal at the same time in thesteam oven. Only a few examples are given above. Consult the cookbook for moreinformation.
Meal planning
38

Preparing a whole mealWith some planning, an entire meal canbe cooked in the steam oven.
^ Place cooking containers on differentlevels or side by side on the rack.
^ Insert the drip tray at the lowest level.
In general, cooking times will varyaccording to the type of food. Thismeans that you will need to open thesteam oven at different times to addeach dish. Calculate cooking times asfollows:
Stuffed peppers 40 minuteswithBoiled potatoes 10 minutes
(See menu suggestion 3 in the table.)
^ First, place the dish with the longestcooking time in the oven.
^ To calculate its cooking time, subtractthe shorter time from the longer time,i.e. 40 minutes - 10 minutes = 30minutes in the example given above.
^ Press Start.
^ Set the cooking time for the food thattakes longer to cook, e.g. 30 minutesin the above example.
^ When the tone sounds, the seconddish, the potatoes in this example,should be placed in the oven.
^ Set the cooking time for the seconddish, e.g. 10 minutes.
^ Press Start again.
At the end of cooking a tone will soundand both dishes can be removed.
Meal planning
39
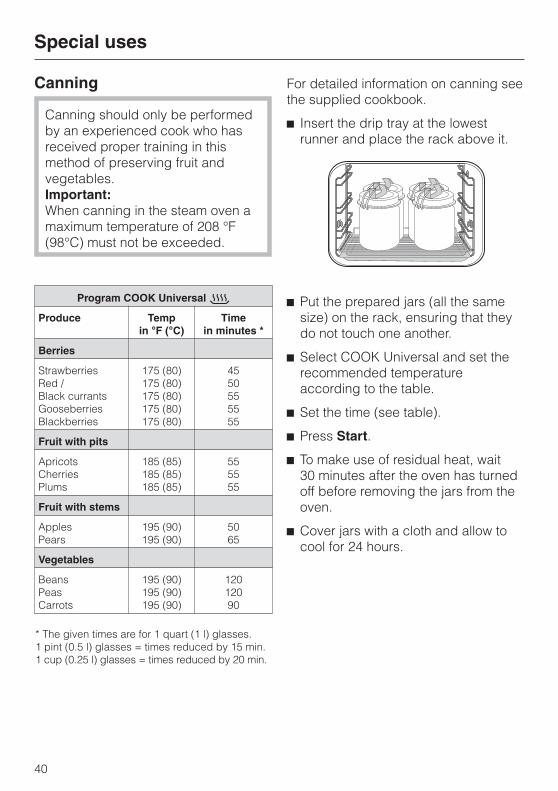
Canning
Canning should only be performedby an experienced cook who hasreceived proper training in thismethod of preserving fruit andvegetables.Important:When canning in the steam oven amaximum temperature of 208 °F(98°C) must not be exceeded.
Program COOK Universal Q
Produce Tempin °F (°C)
Timein minutes *
Berries
StrawberriesRed /Black currantsGooseberriesBlackberries
175 (80)175 (80)175 (80)175 (80)175 (80)
4550555555
Fruit with pits
ApricotsCherriesPlums
185 (85)185 (85)185 (85)
555555
Fruit with stems
ApplesPears
195 (90)195 (90)
5065
Vegetables
BeansPeasCarrots
195 (90)195 (90)195 (90)
12012090
* The given times are for 1 quart (1 l) glasses.1 pint (0.5 l) glasses = times reduced by 15 min.1 cup (0.25 l) glasses = times reduced by 20 min.
For detailed information on canning seethe supplied cookbook.
^ Insert the drip tray at the lowestrunner and place the rack above it.
^ Put the prepared jars (all the samesize) on the rack, ensuring that theydo not touch one another.
^ Select COOK Universal and set therecommended temperatureaccording to the table.
^ Set the time (see table).
^ Press Start.
^ To make use of residual heat, wait30 minutes after the oven has turnedoff before removing the jars from theoven.
^ Cover jars with a cloth and allow tocool for 24 hours.
Special uses
40

ReheatingThe steam oven can be used to reheatdishes.
^ Place the food on a flat plate andcover it with a deeper plate oraluminum foil.
^ Select REHEAT.
^ Select a time of between 5-8 minutes,depending on the type of food.
^ Press Start.
BlanchingThe steam oven can also be used toblanch vegetables to prepare them forfreezing.
^ Put the prepared vegetables(cleaned, washed, chopped etc.) intoa perforated cooking container.
^ Place the container on the rack in theoven and insert the drip tray at thelowest level.
^ Blanch using COOK Universal at atemperature of 195 °F (90 °C).
^ Set a time of 1-2 minutes.
^ Press Start.
^ Once blanched, plunge thevegetables into cold water to coolquickly. You can then freeze themwhen they have dried thoroughly.
Special uses
41
Disinfecting baby bottlesThe steam oven can be used todisinfect baby bottles and othercontainers. Check beforehand that allparts are heat resistant to 212 °F(100 °C).
^ Place the drip tray on the lowestrunner level and place the rackabove it.
^ Dismantle, clean and thoroughlyrinse the bottles. Space the individualparts out on the rack, ensuring thatthey do not touch one another. Thisallows the hot steam to reach allsides.
^ Select COOK Universal. Therecommended temperature of 212 °F(100 °C) is suitable for disinfection.
^ Set a time of 15 minutes.
^ Allow to dry naturally and use assoon as possible after disinfection.All parts of the bottles must becompletely dry before they arereassembled.
Special uses
42

Let the appliance cool beforecleaning. Clean and dry the steamoven after each use.Close the door only after the cookingcompartment is completely dry.
Never use a steam cleaner to cleanthe appliance. Pressurized steamcould damage electricalcomponents and cause a shortcircuit.
Never use cleaners containing sand,silica, soda, chlorides or scouringagents. Hard brushes, scouringcloths, steel wool and other abrasivematerials should not be used.
Appliance frontThe front of the appliance and thecontrol area can be cleaned with asponge and a solution of warm waterand non abrasive liquid detergent. Drywith a soft cloth.
Stainless steel
Stainless steel surfaces can be cleanedusing a non-abrasive stainless steelcleaner.
To help prevent soiling, a conditionerfor stainless steel can also be used.Apply sparingly with even pressure.
Stainless steel colored controls
Clean the buttons and knobs with asponge and a solution of warm waterand liquid soap.
These controls may become discoloredor damaged if not cleaned regularly.Do not use a stainless steel cleaner onthe knobs or buttons.
Drip tray, rack and cookingcontainersThe drip tray, rack and cookingcontainers should be washed and driedeach time they are used.
They can be washed in the dishwasher.
Cleaning and care
43

Removable door and drip plateRemoving the door will make it easier toreach into the oven interior to removethe drip plate, w.
^ Open the door fully.
^ Flip up the clamps at the front of thedoor hinges.
^ Slowly close the door until the clampsare touching the frame of the oveninterior.
^ While holding the door with bothhands, lift the door until the hingesdisengage. Remove the door.
^ If necessary the drip plate, w, canbe removed for cleaning. Aftercleaning, dry it and slide back intothe oven with the cut-out to the rear.
To refit the door:
^ Place the door on the hinges andslide down.
^ Open the door fully and push theclamps back down.
^ Close the door.
Cleaning and care
44
Cooking compartmentThe cooking compartment including thedoor seal and the steam oven doorshould be cleaned after each use.Allow the oven to cool before cleaning.
Most cooking residues can be easilyremoved using a sponge, liquiddetergent and warm water.
Wipe the interior with clean water anddry with a soft cloth.
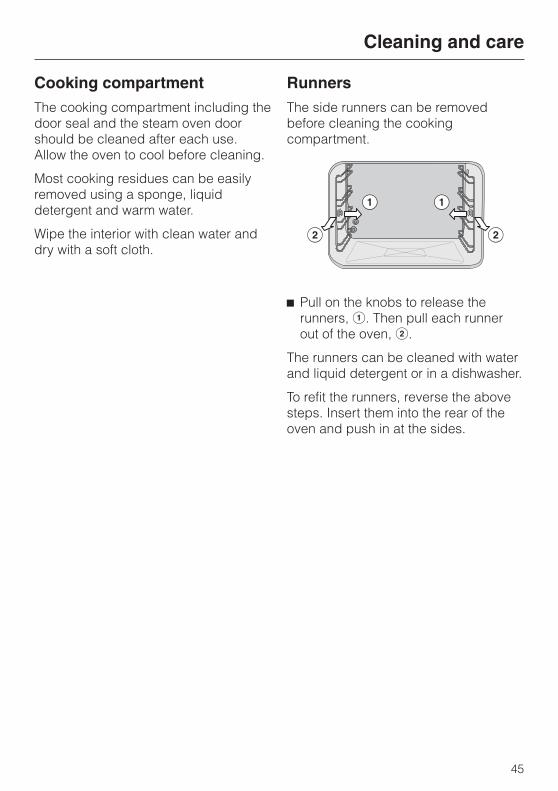
RunnersThe side runners can be removedbefore cleaning the cookingcompartment.
^ Pull on the knobs to release therunners, a. Then pull each runnerout of the oven, b.
The runners can be cleaned with waterand liquid detergent or in a dishwasher.
To refit the runners, reverse the abovesteps. Insert them into the rear of theoven and push in at the sides.
Cleaning and care
45
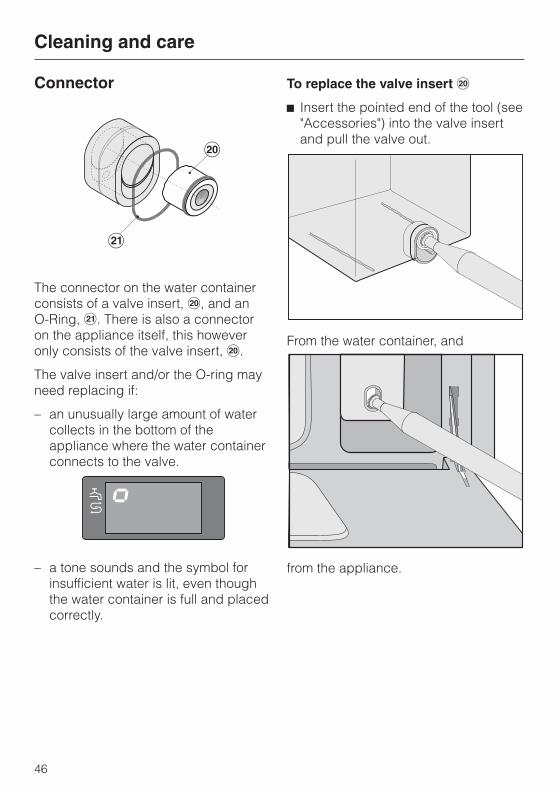
Connector
The connector on the water containerconsists of a valve insert, t, and anO-Ring, u. There is also a connectoron the appliance itself, this howeveronly consists of the valve insert, t.
The valve insert and/or the O-ring mayneed replacing if:
– an unusually large amount of watercollects in the bottom of theappliance where the water containerconnects to the valve.
– a tone sounds and the symbol forinsufficient water is lit, even thoughthe water container is full and placedcorrectly.
To replace the valve insert t
^ Insert the pointed end of the tool (see"Accessories") into the valve insertand pull the valve out.
From the water container, and
from the appliance.
Cleaning and care
46

^ Attach a new valve insert, t, to theblunt end of the special tool.
^ Insert this into the opening of theconnector.
Make sure that the sealing ring on thevalve insert is at the front.
^ Press the valve insert firmly intoposition using the blunt end of thetool.
O-Ring
Over time the water container maybecome difficult to insert and removefrom the appliance.
If this happens the black O-Ring, u,should be lubricated with a very smallamount of the silicone grease supplied.Leave the O-Ring on the connectorwhile doing do.
Take care when using siliconegrease.– Remove any silicone grease
from your skin by washing withsoap and water.
– If silicone gets into the eyesflush with plenty of clean water.
– If silicone is swallowed seekmedical attention.
When lubricating the O-Ring only usethe silicone grease supplied. Never usemargarine, oil, or any other grease orfat on the O-Ring because they willcause deterioration.
Cleaning and care
47
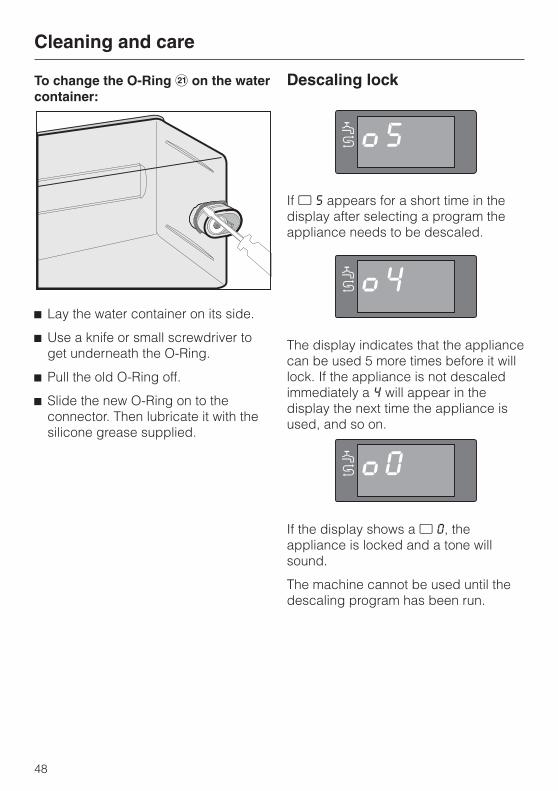
To change the O-Ring u on the watercontainer:
^ Lay the water container on its side.
^ Use a knife or small screwdriver toget underneath the O-Ring.
^ Pull the old O-Ring off.
^ Slide the new O-Ring on to theconnector. Then lubricate it with thesilicone grease supplied.
Descaling lock
Ifj 5 appears for a short time in thedisplay after selecting a program theappliance needs to be descaled.
The display indicates that the appliancecan be used 5 more times before it willlock. If the appliance is not descaledimmediately a 4 will appear in thedisplay the next time the appliance isused, and so on.
If the display shows aj 0, theappliance is locked and a tone willsound.
The machine cannot be used until thedescaling program has been run.
Cleaning and care
48

Descaling
Only use citric acid agents fordescaling.Do not use vinegar or descalingagents containing vinegar or aceticacid; they will damage theappliance.
^ Use a household descaling agentcontaining citric acid diluted withwater to make 1 quart (1 l) of solution,or contact Miele to order descalingtablets. Follow the manufacturer’sinstructions.
^ Place the solution in the watercontainer and push it into themachine until it engages.
^ Turn the program selector toDESCALE k.
A smallj will appear in the displaynext to the symbol for descaling k anda program time of 33 minutes will alsoappear. At the same time the light barbetween the Stop and Start buttonswill illuminate.
^ Press Start.
The descaling program can only becanceled during the 1st minute afterpressing the Start button. A newprogram cannot be selected until thedescaling program has beencompleted.
Do not turn the program selectorduring the descaling process. If it isturned before the end of theprogram the entire process will haveto be restarted.
Cleaning and care
49
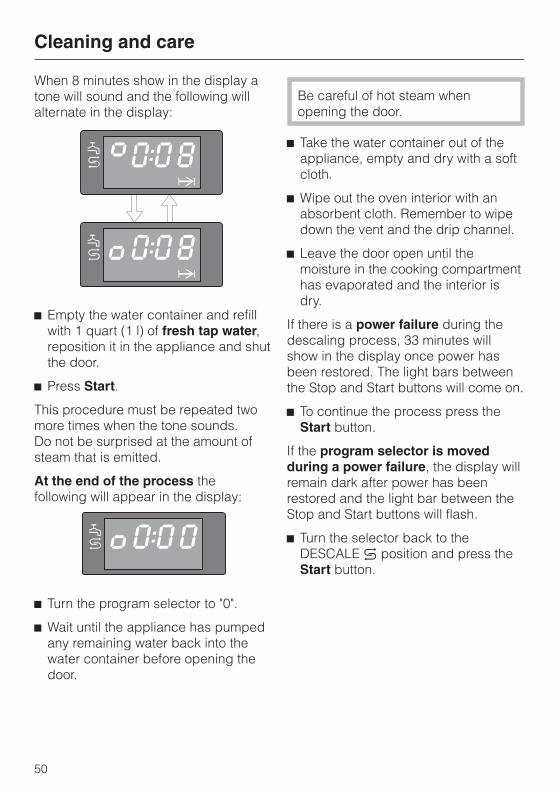
When 8 minutes show in the display atone will sound and the following willalternate in the display:
^ Empty the water container and refillwith 1 quart (1 l) of fresh tap water,reposition it in the appliance and shutthe door.
^ Press Start.
This procedure must be repeated twomore times when the tone sounds.Do not be surprised at the amount ofsteam that is emitted.
At the end of the process thefollowing will appear in the display:
^ Turn the program selector to "0".
^ Wait until the appliance has pumpedany remaining water back into thewater container before opening thedoor.
Be careful of hot steam whenopening the door.
^ Take the water container out of theappliance, empty and dry with a softcloth.
^ Wipe out the oven interior with anabsorbent cloth. Remember to wipedown the vent and the drip channel.
^ Leave the door open until themoisture in the cooking compartmenthas evaporated and the interior isdry.
If there is a power failure during thedescaling process, 33 minutes willshow in the display once power hasbeen restored. The light bars betweenthe Stop and Start buttons will come on.
^ To continue the process press theStart button.
If the program selector is movedduring a power failure, the display willremain dark after power has beenrestored and the light bar between theStop and Start buttons will flash.
^ Turn the selector back to theDESCALE k position and press theStart button.
Cleaning and care
50

Maintenance and repair work shouldbe by a Miele authorized servicetechnician. Work by unqualifiedpersons could be dangerous andmay void the warranty.
What to do if ...
... the fan can still be heard after theappliance has been turned off?
The appliance has a fan which removessteam from the oven.The fan will continue to run for a whileafter the oven has been turned off.
... the appliance does not heat?
Check whether:
– the Start button has been pressed.
– the safety lock has been activated.
– the Overheating Protection has beentriggered (see, "OverheatingProtection").
– the circuit breaker has tripped.
– the fuse has blown.
If one of these is not the cause thendisconnect the appliance from thepower supply for about 1 minute, byswitching off the power main or trippingthe circuit breaker.
Reconnect the power and turn theappliance on. If it still does not heat,contact the Miele Technical ServiceDepartment.
... a great deal of steam comes out ofthe appliance while it is in use?
It is possible that the appliance was notthoroughly rinsed during the"Descaling" program before it was usedfor the first time.Refer to "Setting the altitude" and carryout the procedure as described.If this does not solve the problem, callthe Miele Technical ServiceDepartment.
... steam escapes out of a closedappliance door or any other part ofthe steam oven?
Check whether the door seal:
– is seated correctly. If necessary,press it in all the way around thedoor to make sure it is seated.
– shows any signs of wear and tear,(e.g. cracks). If so it must bereplaced. Call the Miele TechnicalService Department.
Frequently asked questions
51

... the following symbols and figuresappear in the display and a tonesounds:
pj: Insufficient water
Check whether:
– the water container has been pushedin as far as it will go.
– there is sufficient water in the watercontainer.
– any parts of the connector aredeteriorated or broken and needreplacing.See "Connector" section for details.
kj 0: The appliance has locked andrequires descaling (see "Descaling").
... the oven cavity temperature andthe temperature symbol are flashingin the display:
There was a power failure during aprogram. Press Start.
... after turning the appliance off(program selector at the "0" position)a continual tone is heard and F1appears in the display?
Check whether the water container is inthe appliance to accept residual waterbeing pumped back out of the oven.
Frequently asked questions
52
All electrical work should be by alicensed electrician, in strictaccordance with national and localsafety regulations and standards.
^ Note to installer:Please leave these instructions withthe consumer.
^ Power supply:Please check the data plate forverification of:240 VAC, 60 Hz, 15A,L1, L2, Ground.
Caution:Disconnect the main power supplybefore servicing. To reduce the riskof electric shock, make sure that theappliance is properly grounded afterinstallation.
WARNING : THIS APPLIANCEMUST BE GROUNDED
For USA only
The appliance is provided with 3terminal leads, 1 black wire (L1), 1 redwire (L 2) and 1 green wire (GND)which have to be connected to adedicated junction box. Connect theblack wire to L1, the red wire to L2 andthe green wire to GND.
ALSO SEE THE WIRING DIAGRAMPROVIDED WITH THE APPLIANCE.
For CDN only
The appliance is provided with 3terminal leads, 1 black wire (L1), 1 redwire (L 2) and 1 green wire (GND)which have to be connected to adedicated junction box. Connect theblack wire to L1, the red wire to L2 andthe green wire to GND.
All hot wires (black and red) have to befused individually before connectingthem to the main power supply leads.
Use 15 Amp fuses or circuitbreakers for appliances rated 240VAC.
ALSO SEE THE WIRING DIAGRAMPROVIDED WITH THE APPLIANCE.
Electrical connection
53
In the event of a fault which you cannotcorrect yourself please contact theMiele Technical Service Department
When contacting the Technical ServiceDepartment, please quote the modeland serial number of your appliance.These are shown on the data plate.
Data PlatePlease attach the data plate in the space provided below.
After sales service
54

Disposal of packing materialsThe cardboard box and packingmaterials are biodegradable andrecyclable. Please recycle.
Ensure that any plastic wrap, isdisposed of safely and kept out of thereach of children. Danger ofsuffocation!
Disposal of an old applianceOld appliances contain materials thatcan be recycled. Please contact yourlocal recycling center about thepossibility of recycling these materials.Disposal of an old appliance
Before discarding an old appliance,disconnect it from the electricity supply,cut off the power cord and remove anydoors to prevent hazards.
Help protect our environment
55

M.-Nr. 05 229 041 / 01Alteration rights reserved / 4504