Embed Size (px)
Citation preview
OPERATING INSTRUCTIONS
STAINLESS STEEL HARD ANODISED
1
IMPORTANT SAFEGUARDS1. Read all instructions.
2. Do not touch hot surfaces. Use handles.
3. Close supervision is necessary when the pressure cooker is used near children.
4. Use the appropriate heat source(s) according to the instructions for use.
5. Do not place the pressure cooker in a heated oven.
6. Do not wash the hard anodised Futura Pressure Cooker in a dishwasher. The body and grid of the Futura Stainless Steel Pressure Cooker may be washed in a dishwasher; do not wash the lid, sealing ring or pressure regulator in the dishwasher.
7. Extreme care must be used when moving a pressure cooker containing hot liquids.
8. Do not use pressure cooker for any use other than its intended use.
9. This appliance cooks under pressure of 103 kPa (15 lbs/in2). Improper use may result in scalding injury. Do not use it unless it is properly closed. See “How to Close the Futura” on page 3.
10. Always check that the steam vent is clear immediately before closing the lid for pressure cooking.
11. The pressure regulator is an accurately weighted device to regulate operating pressure. Never place anything over the pressure regulator while cooking.
12. When starting to pressure cook, close the lid WITHOUT the pressure regulator in position on the steam vent. Place the pressure regulator on the steam vent ONLY AFTER steam starts to
come out of the steam vent steadily. See “Trial Run” on page 10.
13. As a general rule, place a minimum of one cup water for the first 10 minutes of pressure cooking time and one-half cup for every subsequent 10 minutes or part thereof. Total contents including water should not exceed as stated in the next point.
14. Do not fill the unit over 2/3 full. When cooking foods that expand during cooking such as rice or dried vegetables, do not fill the unit over 1/2 full. When cooking dal/pulses which sprout, never fill the cooker more than 1/3 full. Over filling may cause a risk of clogging the steam vent and developing excess pressure. See Food Preparation Instructions i.e. “Product Information” on page 7.
15. Be aware that certain foods, such as applesauce, cranberries, pearl barley, oatmeal or other cereals, split peas, noodles, macaroni, rhubarb, or spaghetti can foam, froth and sputter, and clog the pressure release device (steam vent). These foods should not be cooked in a pressure cooker.
16. After cooking meat with a skin which may swell under the effect of pressure, do not prick the meat while the skin is swollen; you might be scalded.
17. When the normal operating pressure is reached, turn the heat down so all the liquid, which creates the steam, does not evaporate.
18. Never attempt to force open the pressure cooker. Do not open the pressure cooker until the unit has cooled and internal pressure has been released. If the handles are difficult to move apart, this indicates that the cooker is still pressurized – do not force it open. Any
pressure in the cooker can be hazardous. See Operating Instructions i.e. “Futura Cooking Tips” on page 14.
19. Never use fingertip control of pressure regulator for reducing pressure in the case of liquid or frothing foods.
20. Do not use the pressure cooker for pressure frying with oil.
21. Never use the hard anodised cooker body for deep frying or light frying for more than 20 minutes at a time or as an oven for dry heating or baking, since the strength of the metal may decrease to a dangerous level. With a stainless steel pressure cooker, dry heating may damage the bottom cladding.
22. The safety valve fuses and operates automatically in the event of excess pressure. If it fuses, please shut off the heat. When cool, replace the safety valve with a genuine Futura safety valve. See page 33.
23. Do not attempt to make any changes to the pressure regulator and safety valve. Repairs other than the replacement of sealing ring, plastic handles, safety valve and the pressure regulator must be done only by an authorised person. All replacement parts must be genuine Futura parts.
24. In case of use on an electric hot plate, use a plate of diameter equal to or less than that of the base of the pressure cooker.
25. SAVE THESEINSTRUCTIONS.
Hawkins Cookers Limited is the proprietor of the trademarks ‘Hawkins’ and ‘Futura’ in India and in various other countries throughout the world. The Futura pressure cooker is manufactured by Hawkins Cookers Limited, Maker Tower F 101, Cuffe Parade, Mumbai 400 005, India. Design registered in Benelux 15533. 2011 Copyright reserved. All Rights Reserved. Edited and published by Neil Vasudeva on behalf of Hawkins Cookers Limited. Printed in 2011 at Usha Multigraphs Pvt. Ltd., Lower Parel, Mumbai 400 013.
FUTURA PRESSURE COOKER OPERATING INSTRUCTIONS
All the photographs in this Manual except on the cover are of the hard anodised Futura Pressure Cooker and its accessories but the functions and methods demonstrated apply also to the Futura Stainless Steel Pressure Cooker.
2
9
8
10 11
76
3 4
5
2
3
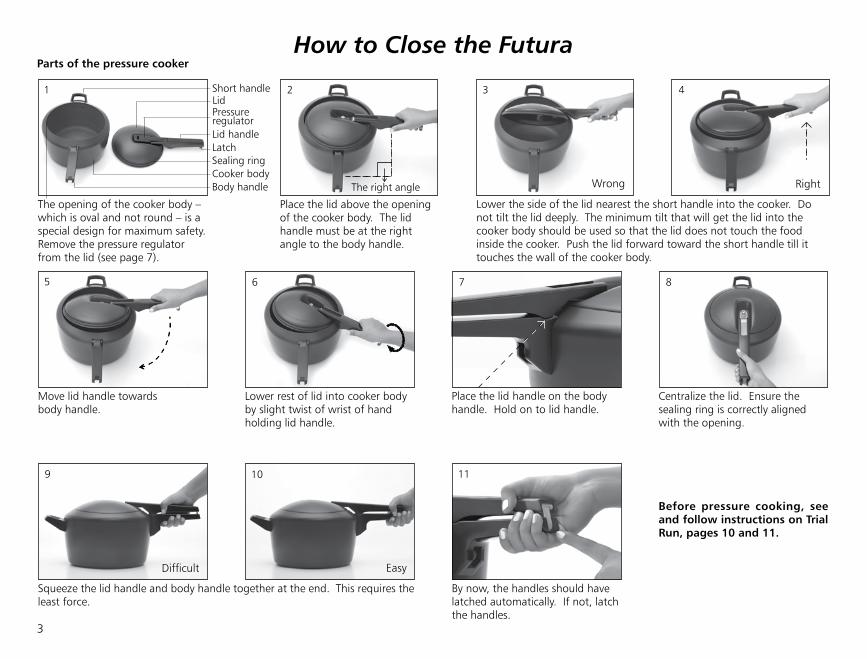
How to Close the Futura
The opening of the cooker body – which is oval and not round – is a special design for maximum safety. Remove the pressure regulator from the lid (see page 7).
Place the lid above the opening of the cooker body. The lid handle must be at the right angle to the body handle.
Lower the side of the lid nearest the short handle into the cooker. Do not tilt the lid deeply. The minimum tilt that will get the lid into the cooker body should be used so that the lid does not touch the food inside the cooker. Push the lid forward toward the short handle till it touches the wall of the cooker body.
Wrong Right
Move lid handle towards body handle.
Lower rest of lid into cooker body by slight twist of wrist of hand holding lid handle.
Place the lid handle on the body handle. Hold on to lid handle.
Centralize the lid. Ensure the sealing ring is correctly aligned with the opening.
Squeeze the lid handle and body handle together at the end. This requires the least force.
Difficult Easy
By now, the handles should have latched automatically. If not, latch the handles.
Before pressure cooking, see and follow instructions on Trial Run, pages 10 and 11.
1 Short handle
Lid handleLatch
Lid
Sealing ringCooker bodyBody handle The right angle
Pressure regulator
Parts of the pressure cooker
9
8
10 11
76
3 4
5
4
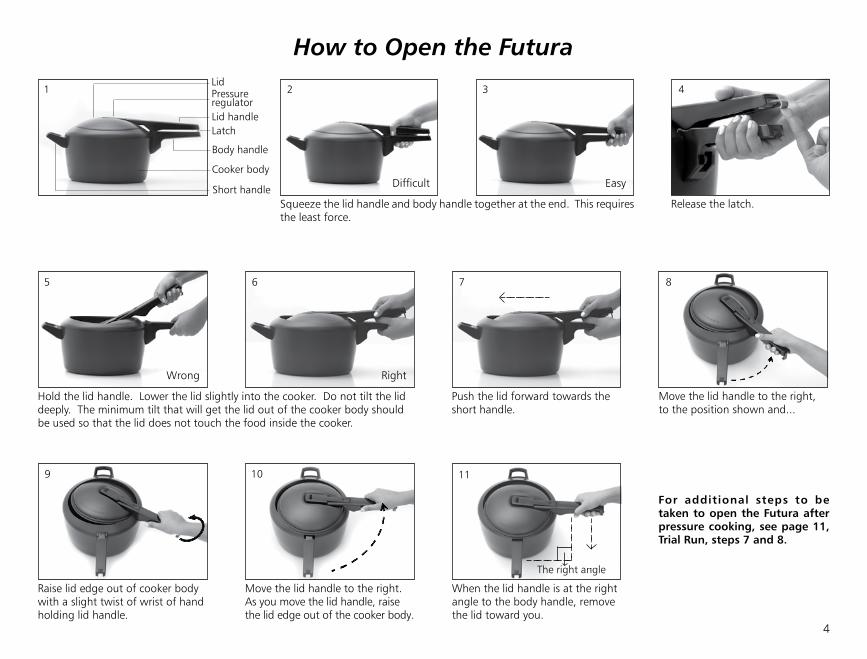
How to Open the Futura
Squeeze the lid handle and body handle together at the end. This requires the least force.
Difficult Easy
Release the latch.
Hold the lid handle. Lower the lid slightly into the cooker. Do not tilt the lid deeply. The minimum tilt that will get the lid out of the cooker body should be used so that the lid does not touch the food inside the cooker.
Wrong Right
Push the lid forward towards the short handle.
Move the lid handle to the right, to the position shown and...
Raise lid edge out of cooker body with a slight twist of wrist of hand holding lid handle.
Move the lid handle to the right. As you move the lid handle, raise the lid edge out of the cooker body.
When the lid handle is at the right angle to the body handle, remove the lid toward you.
1 2
Lid handleLatch
Lid
Cooker body
Body handle
The right angle
Pressure regulator
For additional steps to be taken to open the Futura after pressure cooking, see page 11, Trial Run, steps 7 and 8.
Short handle
Useful General InformationPrinciples of Pressure Cooking
Ordinary open-pot cooking is done at the boiling point of water which produces steam at sea level at 100°C (212°F). Pressure cooking works by sealing the steam in a pot so that there is a rise in pressure to a safe, controlled extent which raises the boiling point of water and therefore the cooking temperature. The steam permeates through the food, tenderising it, infusing it with flavour, preserving nutrients, colour, texture and juices and cooking much faster. The Futura Pressure Cooker cooks food at 121°C (250°F) at a pressure of 15 lb per square inch (1 kg per square cm).
Benefits of Futura Pressure Cooking
Futura pressure cooking can reduce normal cooking times by as much as half. Economical foods such as legumes (lentils, dried peas and beans) and tough cuts of meat can be cooked to perfection in a fraction of the normal time. Because food cooks faster in a pressure cooker, you save fuel, and therefore money. Scientific literature indicates that certain nutritive elements such as proteins and vitamins are better retained by pressure cooking. Steaming is ideal for low-calorie, low-fat cooking. The higher temperature while pressure cooking gives more hygienic food. Closed cooking in steam under pressure may better evoke the natural flavours of the food – producing delicious results. A wide range of foods, whether parts of recipes or entire meals, can be cooked in your Futura.
5
CONTENTS
IMPORTANT SAFEGUARDS 1
How to Close the Futura 3
How to Open the Futura 4
Useful General Information 5
Product Information: Getting to Know Your Futura 7
Trial Run 10
Futura Cooking Tips 12
Measurements 15
Pressure Cooking Time Charts 16
Rice 16
Meat 18
Poultry 19
Seafood 19
Vegetables 20
Legumes 22
Using Grid, Separators and Molds 25
Care and Cleaning 27
What to Do if This Happens 29
Capacity/Volumes for the Futura Pressure Cookers 29
Special Instructions for the Futura Stainless Steel Pressure Cooker 30
Parts and Service 32
Do-it-Yourself Repairs 33
PAGE
Advantages of Futura
Beautifully integrated form and function
Stay-cool Handles
Safe
• Pressure-locked Safety Lid. When there is pressure inside the cooker, the lid is pressure-locked like a modern jetliner door. It cannot be opened until the pressure has fallen to a safe level.
• Automatic Safety Valve is positioned such that, if it operates, the steam and food are deflected safely downwards.
• Unique Pressure Regulation The pressure regulating system gives you the convenience of direction-controlled, fingertip pressure release and minimizes clogging of the steam vent.
• Two Maximum Food Level Lines are marked inside the cooker body for convenience when filling and for safety to avoid overfilling.
Trouble-Free
• Longer Lasting Sealing Ring. As the lid fits from inside, the sealing ring does not get rubbed sideways every time the pressure cooker is opened or closed. Also, the sealing ring is not exposed to food acids in the pressure cooker due to the protection given to it by the rim of the lid.
• Extra-thick Base
The base stays flat and heats quickly and evenly. It is ideal for light frying before pressure cooking and for quick and economical cooking on electric, gas, ceramic and halogen stoves.
• Rust Proof Components. The Futura Pressure Cooker has stainless steel handle bar and handle brackets to withstand rust.
6
The Futura Pressure Cooker
The Futura Pressure Cooker has a beautiful, durable black finish given by 60 micron thick hard anodising which will not tarnish, pit or corrode. The hard anodised finish stays looking new for years and allows the pressure cooker to absorb heat faster making it more energy-efficient. The base of the Futura is 6.35 mm thick.
The Futura Stainless Steel Pressure Cooker
The Futura Stainless Steel Pressure Cooker is made of high quality, polished, durable stainless steel. It has a 7 mm thick base which contains a 4.9 mm thick aluminium disc sandwiched in stainless steel for efficient heat dispersion.
DO NOT ATTEMPT TO COOK IN THE FUTURA WITHOUT FIRST READING CAREFULLY THE REMAINING INSTRUCTIONS.
Product Information: Getting to Know Your Futura
MAXIMUM FOOD LEVELS
7
LID ASSEMBLYLID
pressure reguLator
fIngertIp controL
seaLIng rIng
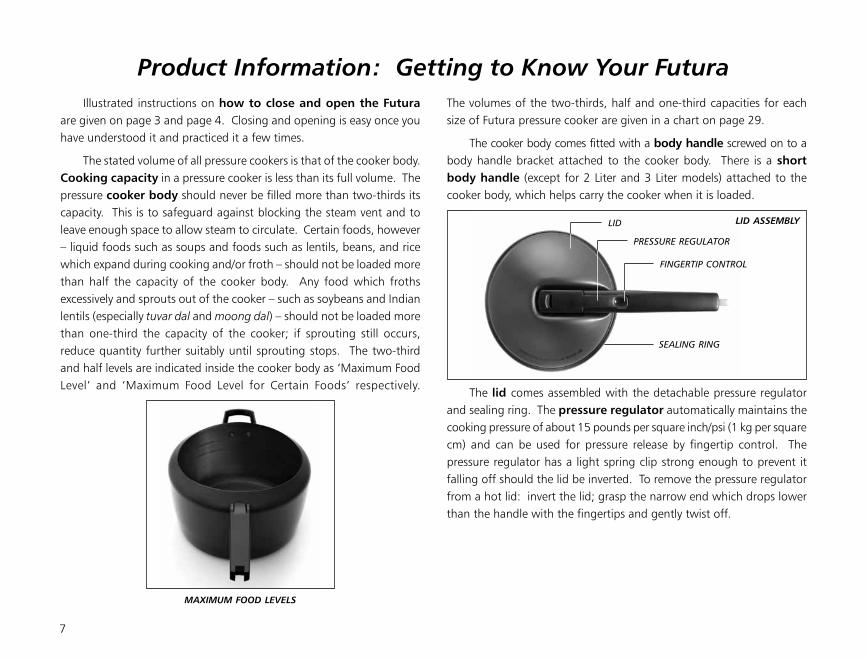
Illustrated instructions on how to close and open the Futura are given on page 3 and page 4. Closing and opening is easy once you have understood it and practiced it a few times.
The stated volume of all pressure cookers is that of the cooker body. Cooking capacity in a pressure cooker is less than its full volume. The pressure cooker body should never be filled more than two-thirds its capacity. This is to safeguard against blocking the steam vent and to leave enough space to allow steam to circulate. Certain foods, however – liquid foods such as soups and foods such as lentils, beans, and rice which expand during cooking and/or froth – should not be loaded more than half the capacity of the cooker body. Any food which froths excessively and sprouts out of the cooker – such as soybeans and Indian lentils (especially tuvar dal and moong dal) – should not be loaded more than one-third the capacity of the cooker; if sprouting still occurs, reduce quantity further suitably until sprouting stops. The two-third and half levels are indicated inside the cooker body as ‘Maximum Food Level’ and ‘Maximum Food Level for Certain Foods’ respectively.
The volumes of the two-thirds, half and one-third capacities for each size of Futura pressure cooker are given in a chart on page 29.
The cooker body comes fitted with a body handle screwed on to a body handle bracket attached to the cooker body. There is a short body handle (except for 2 Liter and 3 Liter models) attached to the cooker body, which helps carry the cooker when it is loaded.
The lid comes assembled with the detachable pressure regulator and sealing ring. The pressure regulator automatically maintains the cooking pressure of about 15 pounds per square inch/psi (1 kg per square cm) and can be used for pressure release by fingertip control. The pressure regulator has a light spring clip strong enough to prevent it falling off should the lid be inverted. To remove the pressure regulator from a hot lid: invert the lid; grasp the narrow end which drops lower than the handle with the fingertips and gently twist off.
8
PRESSURE REGULATOR
HOLD BETWEEN THUMB ANDMIDDLE FINGER...
PLACE ON STEAM VENT AND PRESSDOWN FIRMLY UNTIL IT CLICKS
PUT THE LID HANDLE THROUGH THESEALING RING...
SETTLE IT COMFORTABLYIN THE LID CURL
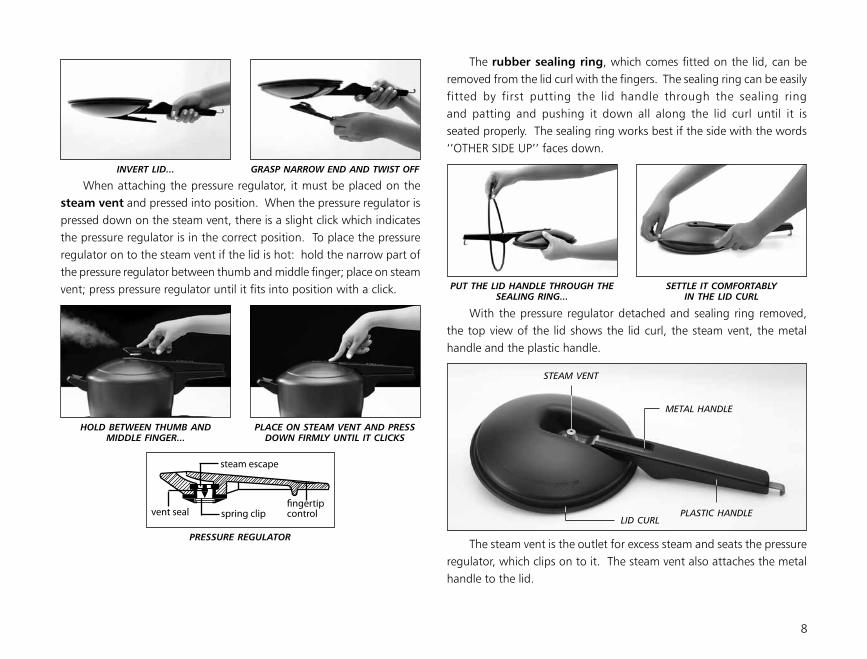
INVERT LID... GRASP NARROW END AND TWIST OFF
LID curL
metaL hanDLe
pLastIc hanDLe
steam vent
The rubber sealing ring, which comes fitted on the lid, can be removed from the lid curl with the fingers. The sealing ring can be easily fitted by first putting the lid handle through the sealing ring and patting and pushing it down all along the lid curl until it is seated properly. The sealing ring works best if the side with the words ‘’OTHER SIDE UP’’ faces down.
With the pressure regulator detached and sealing ring removed, the top view of the lid shows the lid curl, the steam vent, the metal handle and the plastic handle.
The steam vent is the outlet for excess steam and seats the pressure regulator, which clips on to it. The steam vent also attaches the metal handle to the lid.
When attaching the pressure regulator, it must be placed on the steam vent and pressed into position. When the pressure regulator is pressed down on the steam vent, there is a slight click which indicates the pressure regulator is in the correct position. To place the pressure regulator on to the steam vent if the lid is hot: hold the narrow part of the pressure regulator between thumb and middle finger; place on steam vent; press pressure regulator until it fits into position with a click.
9
MOVEMENT OF METAL HANDLE:FRONT VIEW
MOVEMENT OF METAL HANDLE:SIDE VIEW
UNDERSIDE OF LID
LID HanDLe SCReWS
LaTCH
SaFeTY VaLVeSTeaM VenT nUT
GRID
FUSIBLE ALLOY... ...WHICH MELTS WHEN REQUIRED
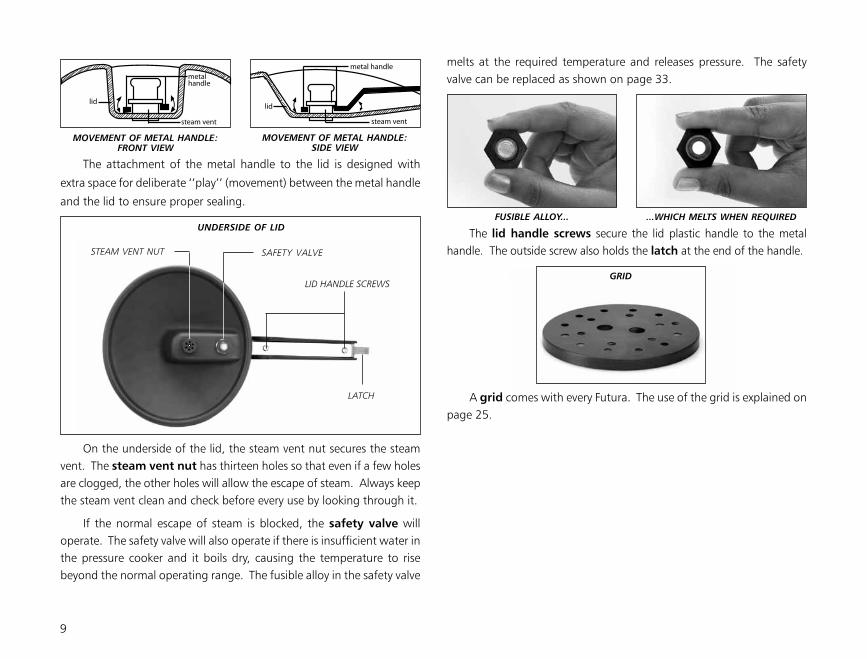
The attachment of the metal handle to the lid is designed with
extra space for deliberate ‘’play’’ (movement) between the metal handle
and the lid to ensure proper sealing.
On the underside of the lid, the steam vent nut secures the steam vent. The steam vent nut has thirteen holes so that even if a few holes are clogged, the other holes will allow the escape of steam. Always keep the steam vent clean and check before every use by looking through it.
If the normal escape of steam is blocked, the safety valve will operate. The safety valve will also operate if there is insufficient water in the pressure cooker and it boils dry, causing the temperature to rise beyond the normal operating range. The fusible alloy in the safety valve
melts at the required temperature and releases pressure. The safety valve can be replaced as shown on page 33.
The lid handle screws secure the lid plastic handle to the metal handle. The outside screw also holds the latch at the end of the handle.
A grid comes with every Futura. The use of the grid is explained on page 25.
Trial Run
10
ONCE STEAM ISSUES STEADILYFROM STEAM VENT...
STeaM VenT
PLACE PRESSURE REGULATORON STEAM VENT
PRESS DOWN FIRMLYUNTIL IT CLICKS
WRONG: STEAM COMINGOUT FROM EDGE OF LID
RIGHT: NO STEAMLEAKAGE
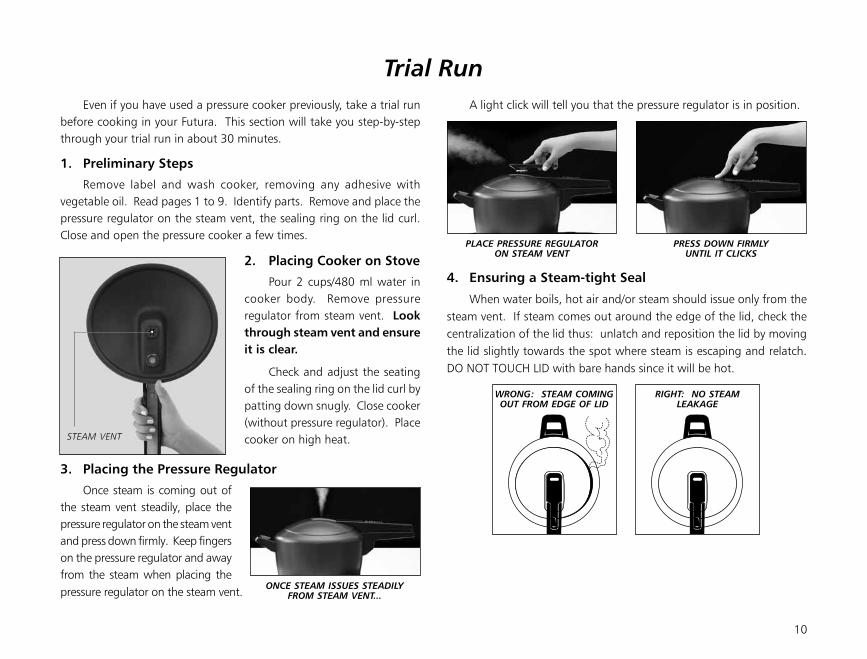
Even if you have used a pressure cooker previously, take a trial run before cooking in your Futura. This section will take you step-by-step through your trial run in about 30 minutes.
1. Preliminary Steps
Remove label and wash cooker, removing any adhesive with vegetable oil. Read pages 1 to 9. Identify parts. Remove and place the pressure regulator on the steam vent, the sealing ring on the lid curl. Close and open the pressure cooker a few times.
2. Placing Cooker on Stove
Pour 2 cups/480 ml water in cooker body. Remove pressure regulator from steam vent. Look through steam vent and ensure it is clear.
Check and adjust the seating of the sealing ring on the lid curl by patting down snugly. Close cooker (without pressure regulator). Place cooker on high heat.
3. Placing the Pressure Regulator
Once steam is coming out of the steam vent steadily, place the pressure regulator on the steam vent and press down firmly. Keep fingers on the pressure regulator and away from the steam when placing the pressure regulator on the steam vent.
A light click will tell you that the pressure regulator is in position.
4. Ensuring a Steam-tight Seal
When water boils, hot air and/or steam should issue only from the steam vent. If steam comes out around the edge of the lid, check the centralization of the lid thus: unlatch and reposition the lid by moving the lid slightly towards the spot where steam is escaping and relatch. DO NOT TOUCH LID with bare hands since it will be hot.
11
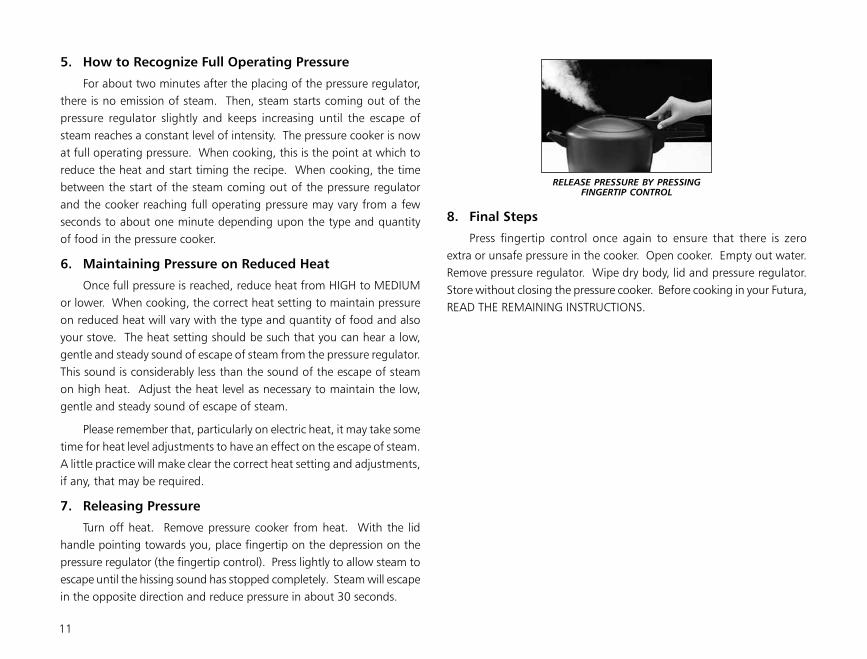
RELEASE PRESSURE BY PRESSINGFINGERTIP CONTROL
5. How to Recognize Full Operating Pressure
For about two minutes after the placing of the pressure regulator, there is no emission of steam. Then, steam starts coming out of the pressure regulator slightly and keeps increasing until the escape of steam reaches a constant level of intensity. The pressure cooker is now at full operating pressure. When cooking, this is the point at which to reduce the heat and start timing the recipe. When cooking, the time between the start of the steam coming out of the pressure regulator and the cooker reaching full operating pressure may vary from a few seconds to about one minute depending upon the type and quantity of food in the pressure cooker.
6. Maintaining Pressure on Reduced Heat
Once full pressure is reached, reduce heat from HIGH to MEDIUM or lower. When cooking, the correct heat setting to maintain pressure on reduced heat will vary with the type and quantity of food and also your stove. The heat setting should be such that you can hear a low, gentle and steady sound of escape of steam from the pressure regulator. This sound is considerably less than the sound of the escape of steam on high heat. Adjust the heat level as necessary to maintain the low, gentle and steady sound of escape of steam.
Please remember that, particularly on electric heat, it may take some time for heat level adjustments to have an effect on the escape of steam. A little practice will make clear the correct heat setting and adjustments, if any, that may be required.
7. Releasing Pressure
Turn off heat. Remove pressure cooker from heat. With the lid handle pointing towards you, place fingertip on the depression on the pressure regulator (the fingertip control). Press lightly to allow steam to escape until the hissing sound has stopped completely. Steam will escape in the opposite direction and reduce pressure in about 30 seconds.
8. Final Steps
Press fingertip control once again to ensure that there is zero extra or unsafe pressure in the cooker. Open cooker. Empty out water. Remove pressure regulator. Wipe dry body, lid and pressure regulator. Store without closing the pressure cooker. Before cooking in your Futura, READ THE REMAINING INSTRUCTIONS.
Read this section after you have taken the trial run and before you attempt to cook in the Futura.
Basic Pressure Cooking Steps
1. Prepare ingredients.
2. Fry, if necessary.
3. Put prepared ingredients (in separators or on grid, if necessary) and the required quantity of water in the cooker.
4. Look through the steam vent and ensure it is clear.
5. Close the cooker.
6. Place the cooker on heat.
7. Place the pressure regulator once steam emerges from the steam vent.
8. Reduce the heat when the cooker reaches full operating pressure and start timing the cooking of the recipe.
9. At the end of the pressure cooking time, remove the cooker from heat.
10. Release pressure, either gradually or immediately as needed.
11. Open pressure cooker.
12. Carry out post-pressure cooking operations, if any.
13. Serve and enjoy!
Ingredients
• See page 15, Measurements, for information on weights and measures.
• The pressure cooker should not be filled more than its appropriate capacity. See page 7, Product Information, and the Capacity/ Volumes chart on page 29.
• Most foods that can be cooked with moist heat – boiled, steamed, braised and stewed – are suitable for pressure cooking.
• While adapting recipes to pressure cooking, care should be taken not to add too much liquid – always ensuring there is enough liquid for the entire cooking time (see page 13).
• Pressure cooking retains flavours so season with restraint. Taste and add more seasoning, if required, after pressure cooking.
• Milk, cream and yogurt tend to curdle and froth when pressure cooked in the base of the cooker and should generally be added to recipes after pressure cooking.
• Most roasts, large pieces of meat, whole birds, whole artichokes and whole cauliflowers are too big to fit in the 2 Liter, 3 Liter and 4 Liter Futura.
• Smaller individual pieces of food will cook faster than larger pieces of the same food.
• Cut food in even sizes for even cooking.
• Ingredients requiring roughly the same cooking time can be cooked together in a pressure cooker, without mixing their flavours, if kept physically separated and not mixed in the same liquid.
• Ingredients with different cooking times may be cooked together by using the following techniques:
1. Speed up cooking time by cutting food into smaller pieces and by presoaking lentils, beans and cereals.
2. Slow down cooking time by cutting food into larger pieces and by wrapping in foil.
3. Start longer-cooking ingredients first, interrupt pressure cooking to add quicker-cooking ingredients and then complete pressure cooking.
Futura Cooking Tips
12
13
Heat Source
• The Futura can be used on domestic electric, gas, halogen, ceramic and kerosene stoves. It is not suitable for induction stoves.
• Use a burner to suit the size of the cooker – gas flames should not lick the sides of the cooker and the hot plate of an electric stove should be equal to or less than the diameter of the base of the pressure cooker. When cooking in the 2 Liter and 3 Liter Futura on a gas stove, use the small burner or do not exceed the medium heat setting of a large burner.
• The cooker can be used on wood or coal fires provided it is not in direct contact with hot coals. WARNING: DIRECT CONTACT WITH HOT COALS CAN DAMAGE THE METAL. There should be at least a 1 inch/2.5 cm gap between the burning coals and the base of the cooker. On improvised fires or commercial burners, limit the heat to the level usually found in domestic stoves. This pressure cooker must not be used on an industrial burner.
• When cooking foods that may sprout such as pulses or legumes, bring cooker to full operating pressure on medium heat and reduce heat as soon as full pressure is reached. Remove cooker briefly from heat if the steam seems to be evacuating too forcefully.
Frying Prior to Pressure Cooking
• Frying or browning in a small amount of butter, oil or other fat can be done in the pressure cooker body without the lid.
• Browning meat and poultry before pressure cooking helps to seal in the juices and improves the appearance and taste of the food. If you want to eliminate the additional fat and/or save time, browning can be omitted – it is not necessary for pressure cooking.
• After frying, remove cooker body from heat before adding liquid to the cooker.
• It is a safety requirement that deep-frying, involving more than 1/2 cup oil or frying for more than 20 minutes at a time,
is not done in the hard anodised pressure cooker.
• Do not pressure fry in the pressure cooker. It is designed to be operated only with liquid which produces steam.
Water
• There must be enough water (or stock, juice, vinegar, beer or wine) in the pressure cooker to make steam throughout the entire pressure cooking time and prevent burning. Oils and fats do not produce steam and should not be counted as cooking liquid for steam. Cooking liquid should always be water or a liquid which produces steam.
• The minimum quantity of cooking liquid required is 1 cup/240 ml for the first 10 minutes of pressure cooking time plus 1/2 cup/120 ml for every subsequent 10 minutes or part thereof. This quantity will prevent boiling dry provided you reduce the heat when cooker has reached full operating pressure.
• Foods such as meat, fish, poultry, tomatoes and other vegetables give off juices during cooking (whereas pulses or legumes and rice absorb liquid).
• If you open the cooker and decide to pressure cook longer, always check that there is enough cooking liquid to bring cooker back to full pressure and cook the additional time.
• The Futura Pressure Cooker should never be used as an oven for dry heating or baking as it may reduce the strength of the metal.
Pressure Regulator
• Allow steam to start issuing from the steam vent in a steady stream before placing the pressure regulator (see page 10, point 3).
Reducing Heat
• When the Futura has reached full operating pressure (see page 11, point 5), reduce the heat to medium or lower such that you can hear a low, gentle and steady sound of escape of steam from the pressure regulator. The heat setting required varies according to
14
the type and quantity of food in the cooker and the stove.
• Cooking on high heat after full pressure is reached does not result in faster cooking. It wastes energy and increases the likelihood of boiling dry and/or spoiling the food.
• When cooking on wood stoves or camp fires, move pressure cooker to a cooler part of the stove or shift cooker partly off the burner to cook at reduced heat ensuring that cooker is not tilted.
Timing
• Reaching full operating pressure is also the signal to start timing the recipe/food.
• Use a kitchen timer or watch/clock. Exact timing is critical to successful pressure cooking. Pressure cooking is much faster than conventional cooking so timing errors have greater consequences. If in doubt, cook for less time rather than more. It is possible to correct undercooking by cooking or pressure cooking more.
• If the food is only slightly undercooked, you may be able to complete the cooking without pressure. This method is especially suitable for foods which are easily overcooked. If the food requires more pressure cooking, decide how many minutes, ensure there is enough cooking liquid for the extra time, and bring cooker back to full operating pressure and cook the additional time.
• Cooking times given in this Manual are a guide. More or less time may be necessary depending on the age, tenderness and variety of the ingredients and how well cooked you prefer the food to be. Experience will enable you to adjust the times suitably.
• ‘’Pressure Cooking Time 0 minute’’ in the charts signifies that the pressure cooker is to be taken off the heat as soon as the pressure cooker has reached full operating pressure.
Releasing Pressure
There are three methods to release pressure in the Futura pressure cooker.
1. ‘’Allow to cool naturally’’ means to remove the cooker from heat and leave it until the pressure has dropped to normal and the lid can be opened. This takes from 10 to 20 minutes, depending on the type and quantity of food and the size of the cooker. This method is required for soups, legumes, recipes containing leavening agents and custards.
2. ‘’Release pressure immediately’’ means to remove the cooker from heat and lightly press the fingertip control on the pressure regulator, allowing steam to escape so the lid can be opened immediately. This method is required for easily overcooked foods such as delicate vegetables and fish. This method cannot be used when the cooker contains predominantly liquid or frothing foods as the food/liquid may come out of the steam vent.
3. ‘’Release pressure by placing cooker in about 4 inches/10 cm of cold water in a basin or in a sink for a few minutes’’. For the 2 Liter Futura place cooker in about 2 inches/5 cm of cold water. Open when the pressure has fallen. Do not run water over the lid. This method is required when the cooker contains liquid or frothing foods and you wish to open immediately.
Beyond the requirements discussed above, how to release pressure is one of personal preference. Some cooks believe that the texture, tenderness and taste of food, especially meat, are improved by releasing pressure gradually using Method #1 above whenever possible.
Saving Energy
To obtain optimum energy efficiency while cooking with the Futura pressure cooker:
1. Place the pressure regulator on the steam vent as soon as the steam is coming out of the steam vent steadily (see page 10, Trial Run, point 3).
2. Reduce heat as soon as the Futura has reached full operating pressure (see page 11, Trial Run, point 5). Reduce heat to a heat setting such that there is a low, gentle and steady sound of escape of steam from the pressure regulator (see page 11, Trial Run, point 6).
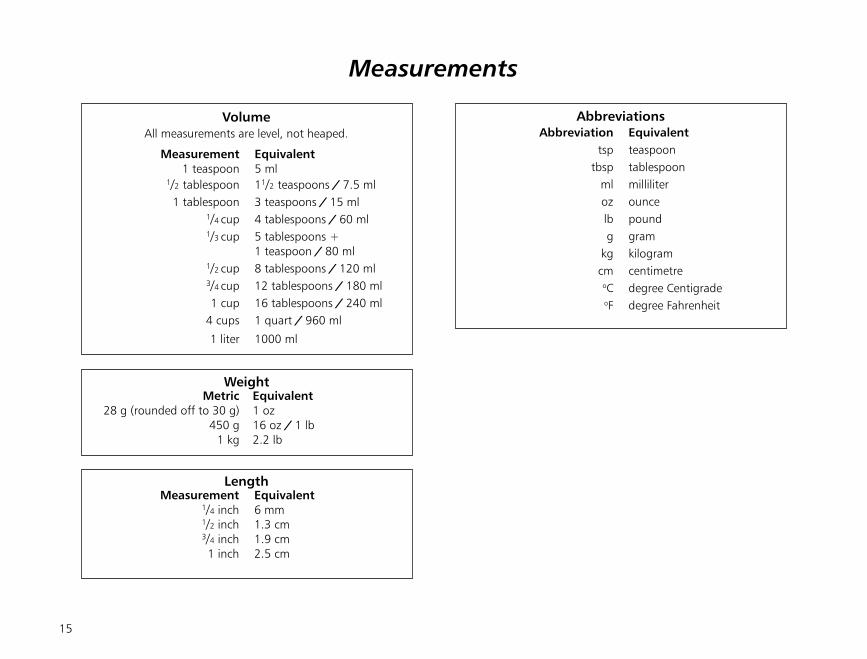
Measurements
VolumeAll measurements are level, not heaped.
Measurement Equivalent 1 teaspoon 5 ml 1/2 tablespoon 11/2 teaspoons / 7.5 ml 1 tablespoon 3 teaspoons / 15 ml 1/4 cup 4 tablespoons / 60 ml 1/3 cup 5 tablespoons + 1 teaspoon / 80 ml 1/2 cup 8 tablespoons / 120 ml 3/4 cup 12 tablespoons / 180 ml 1 cup 16 tablespoons / 240 ml 4 cups 1 quart / 960 ml
1 liter 1000 ml
Weight Metric Equivalent
28 g (rounded off to 30 g) 1 oz 450 g 16 oz / 1 lb 1 kg 2.2 lb
Length Measurement Equivalent 1/4 inch 6 mm 1/2 inch 1.3 cm 3/4 inch 1.9 cm 1 inch 2.5 cm
Abbreviations
Abbreviation Equivalent tsp teaspoon tbsp tablespoon ml milliliter oz ounce lb pound g gram kg kilogram cm centimetre oC degree Centigrade oF degree Fahrenheit
15
16
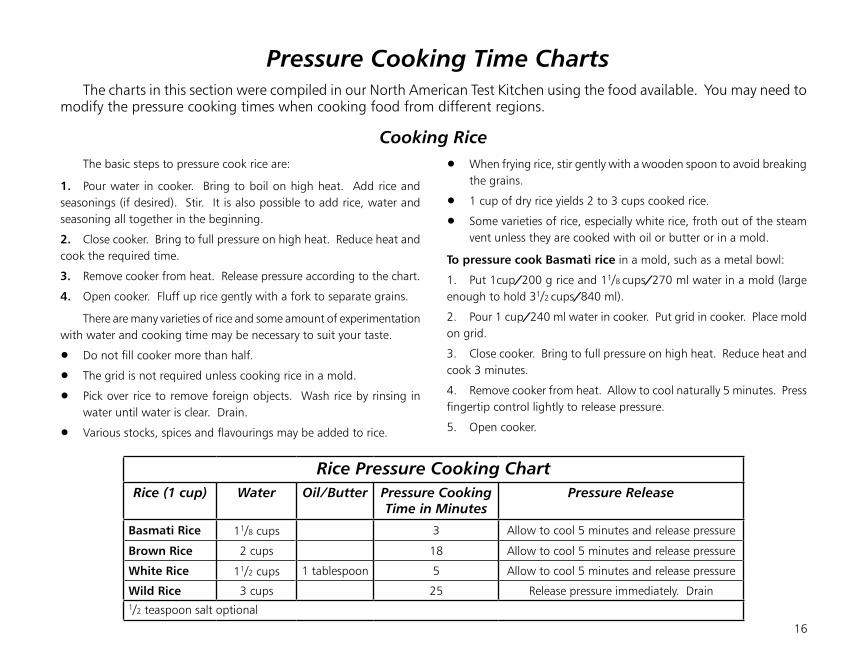
Pressure Cooking Time ChartsThe charts in this section were compiled in our North American Test Kitchen using the food available. You may need to
modify the pressure cooking times when cooking food from different regions.
Cooking Rice The basic steps to pressure cook rice are:
1. Pour water in cooker. Bring to boil on high heat. Add rice and seasonings (if desired). Stir. It is also possible to add rice, water and seasoning all together in the beginning.
2. Close cooker. Bring to full pressure on high heat. Reduce heat and cook the required time.
3. Remove cooker from heat. Release pressure according to the chart.
4. Open cooker. Fluff up rice gently with a fork to separate grains.
There are many varieties of rice and some amount of experimentation with water and cooking time may be necessary to suit your taste.
• Do not fill cooker more than half.
• The grid is not required unless cooking rice in a mold.
• Pick over rice to remove foreign objects. Wash rice by rinsing in water until water is clear. Drain.
• Various stocks, spices and flavourings may be added to rice.
• When frying rice, stir gently with a wooden spoon to avoid breaking the grains.
• 1 cup of dry rice yields 2 to 3 cups cooked rice.
• Some varieties of rice, especially white rice, froth out of the steam vent unless they are cooked with oil or butter or in a mold.
To pressure cook Basmati rice in a mold, such as a metal bowl:
1. Put 1cup/200 g rice and 11/8 cups/270 ml water in a mold (large enough to hold 31/2 cups/840 ml).
2. Pour 1 cup/240 ml water in cooker. Put grid in cooker. Place mold on grid.
3. Close cooker. Bring to full pressure on high heat. Reduce heat and cook 3 minutes.
4. Remove cooker from heat. Allow to cool naturally 5 minutes. Press fingertip control lightly to release pressure.
5. Open cooker.
Rice Pressure Cooking ChartRice (1 cup) Water Oil/Butter Pressure Cooking
Time in MinutesPressure Release
Basmati Rice 11/8 cups 3 Allow to cool 5 minutes and release pressure
Brown Rice 2 cups 18 Allow to cool 5 minutes and release pressure
White Rice 11/2 cups 1 tablespoon 5 Allow to cool 5 minutes and release pressure
Wild Rice 3 cups 25 Release pressure immediately. Drain1/2 teaspoon salt optional

• Cooking time is affected by the thickness, the cut, the quality, the
preparation (boneless, rolled etc.) of the meat and personal
preference. The smaller the piece of meat, the greater its tenderness,
the higher the quality and the bigger the bone - the shorter the
cooking time required. Meat varies widely from region to region.
The times given in the chart are for specific cuts and should serve as
guides to be modified according to your ingredients, experience
and taste.
• The pressure cooking time for large pieces of meat, called roasts, is
according to weight - minutes of cooking per lb/kg of meat. The
shape and thickness of the roast affect the cooking time. Short, fat
roasts take longer to cook than long, flat roasts. Boneless and rolled
roasts take longer to cook than roasts with bones. Allow enough
space around the roast in the cooker for steam circulation to ensure
even cooking. For a more “roasted” effect, cook roast on grid.
• All the times in the Poultry Pressure Cooking Chart except turkey are
for poultry which has been lightly browned. The amount of
browning can affect the cooking time - the less the browning the
longer the pressure cooking time. You may have to adjust the
cooking time to reflect the degree of browning you prefer.
• Cooking times in the Poultry Pressure Cooking Chart are based on
medium-sized pieces of young poultry. Increase time when cooking
larger and/or older pieces.
Meat and Poultry
17
18
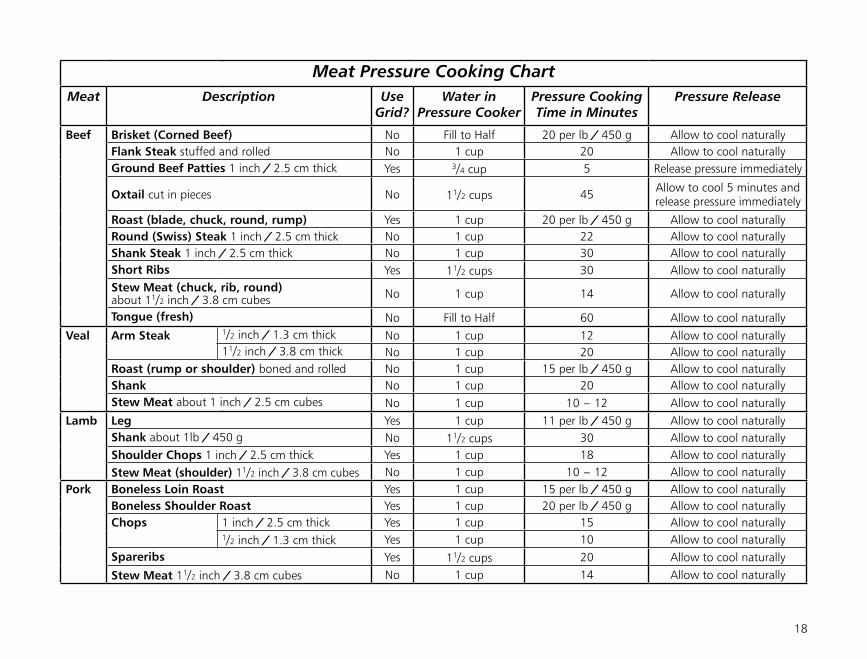
Meat Pressure Cooking ChartMeat Description Use
Grid?Water in
Pressure CookerPressure Cooking Time in Minutes
Pressure Release
Beef Brisket (Corned Beef) No Fill to Half 20 per lb / 450 g Allow to cool naturallyFlank Steak stuffed and rolled No 1 cup 20 Allow to cool naturallyGround Beef Patties 1 inch / 2.5 cm thick Yes 3/4 cup 5 Release pressure immediately
Oxtail cut in pieces No 11/2 cups 45 Allow to cool 5 minutes and release pressure immediately
Roast (blade, chuck, round, rump) Yes 1 cup 20 per lb / 450 g Allow to cool naturallyRound (Swiss) Steak 1 inch / 2.5 cm thick No 1 cup 22 Allow to cool naturallyShank Steak 1 inch / 2.5 cm thick No 1 cup 30 Allow to cool naturallyShort Ribs Yes 11/2 cups 30 Allow to cool naturallyStew Meat (chuck, rib, round) about 11/2 inch / 3.8 cm cubes No 1 cup 14 Allow to cool naturally
Tongue (fresh) No Fill to Half 60 Allow to cool naturallyVeal Arm Steak 1/2 inch / 1.3 cm thick No 1 cup 12 Allow to cool naturally
11/2 inch / 3.8 cm thick No 1 cup 20 Allow to cool naturallyRoast (rump or shoulder) boned and rolled No 1 cup 15 per lb / 450 g Allow to cool naturallyShank No 1 cup 20 Allow to cool naturallyStew Meat about 1 inch / 2.5 cm cubes No 1 cup 10 - 12 Allow to cool naturally
Lamb Leg Yes 1 cup 11 per lb / 450 g Allow to cool naturallyShank about 1lb / 450 g No 11/2 cups 30 Allow to cool naturallyShoulder Chops 1 inch / 2.5 cm thick Yes 1 cup 18 Allow to cool naturallyStew Meat (shoulder) 11/2 inch / 3.8 cm cubes No 1 cup 10 - 12 Allow to cool naturally
Pork Boneless Loin Roast Yes 1 cup 15 per lb / 450 g Allow to cool naturallyBoneless Shoulder Roast Yes 1 cup 20 per lb / 450 g Allow to cool naturallyChops 1 inch / 2.5 cm thick Yes 1 cup 15 Allow to cool naturally
1/2 inch / 1.3 cm thick Yes 1 cup 10 Allow to cool naturallySpareribs Yes 11/2 cups 20 Allow to cool naturally
Stew Meat 11/2 inch / 3.8 cm cubes No 1 cup 14 Allow to cool naturally
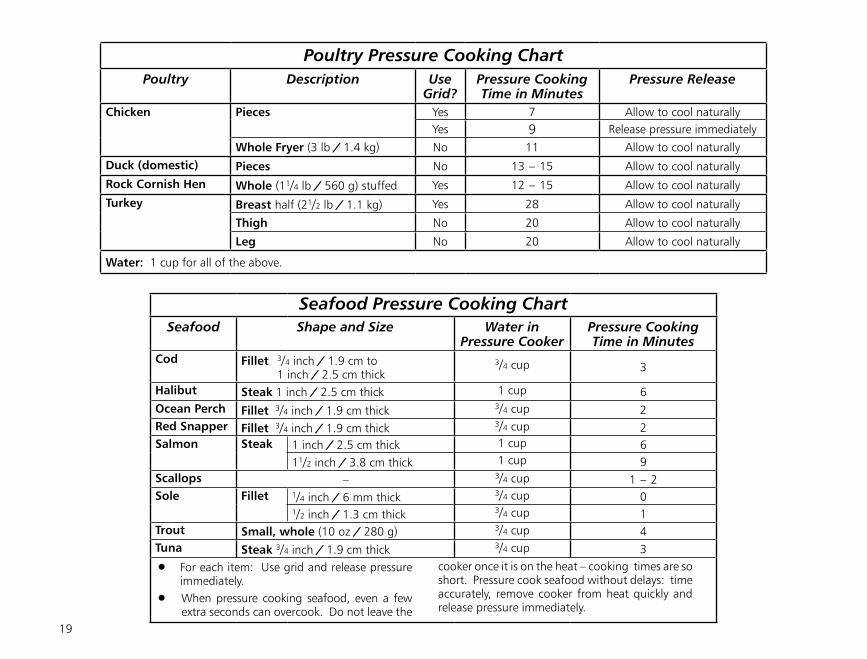
Seafood Pressure Cooking ChartSeafood Shape and Size Water in
Pressure CookerPressure Cooking Time in Minutes
Cod Fillet 3/4 inch / 1.9 cm to 1 inch / 2.5 cm thick
3/4 cup 3
Halibut Steak 1 inch / 2.5 cm thick 1 cup 6Ocean Perch Fillet 3/4 inch / 1.9 cm thick 3/4 cup 2Red Snapper Fillet 3/4 inch / 1.9 cm thick 3/4 cup 2Salmon Steak 1 inch / 2.5 cm thick 1 cup 6
11/2 inch / 3.8 cm thick 1 cup 9Scallops – 3/4 cup 1 - 2Sole Fillet 1/4 inch / 6 mm thick 3/4 cup 0
1/2 inch / 1.3 cm thick 3/4 cup 1Trout Small, whole (10 oz / 280 g) 3/4 cup 4Tuna Steak 3/4 inch / 1.9 cm thick 3/4 cup 3
• For each item: Use grid and release pressure
immediately.
• When pressure cooking seafood, even a few extra seconds can overcook. Do not leave the
19
Poultry Pressure Cooking ChartPoultry Description Use
Grid?Pressure Cooking Time in Minutes
Pressure Release
Chicken Pieces Yes 7 Allow to cool naturallyYes 9 Release pressure immediately
Whole Fryer (3 lb / 1.4 kg) No 11 Allow to cool naturallyDuck (domestic) Pieces No 13 - 15 Allow to cool naturallyRock Cornish Hen Whole (11/4 lb / 560 g) stuffed Yes 12 - 15 Allow to cool naturallyTurkey Breast half (21/2 lb / 1.1 kg) Yes 28 Allow to cool naturally
Thigh No 20 Allow to cool naturally
Leg No 20 Allow to cool naturally
Water: 1 cup for all of the above.
cooker once it is on the heat – cooking times are so short. Pressure cook seafood without delays: time accurately, remove cooker from heat quickly and release pressure immediately.
20
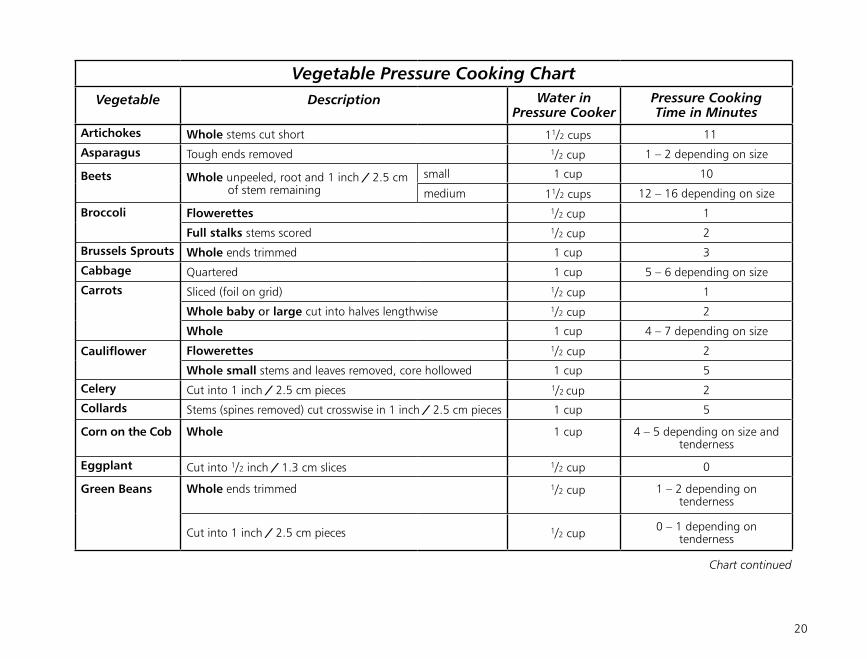
Vegetable Pressure Cooking ChartVegetable Description Water in
Pressure CookerPressure Cooking Time in Minutes
Artichokes Whole stems cut short 11/2 cups 11
Asparagus Tough ends removed 1/2 cup 1 – 2 depending on size
Beets Whole unpeeled, root and 1 inch / 2.5 cm of stem remaining
small 1 cup 10
medium 11/2 cups 12 – 16 depending on size
Broccoli Flowerettes 1/2 cup 1
Full stalks stems scored 1/2 cup 2
Brussels Sprouts Whole ends trimmed 1 cup 3
Cabbage Quartered 1 cup 5 – 6 depending on size
Carrots Sliced (foil on grid) 1/2 cup 1
Whole baby or large cut into halves lengthwise 1/2 cup 2
Whole 1 cup 4 – 7 depending on size
Cauliflower Flowerettes 1/2 cup 2
Whole small stems and leaves removed, core hollowed 1 cup 5
Celery Cut into 1 inch / 2.5 cm pieces 1/2 cup 2
Collards Stems (spines removed) cut crosswise in 1 inch / 2.5 cm pieces 1 cup 5
Corn on the Cob Whole 1 cup 4 – 5 depending on size and tenderness
Eggplant Cut into 1/2 inch / 1.3 cm slices 1/2 cup 0
Green Beans Whole ends trimmed 1/2 cup 1 – 2 depending on tenderness
Cut into 1 inch / 2.5 cm pieces 1/2 cup 0 – 1 depending on tenderness
Chart continued
21
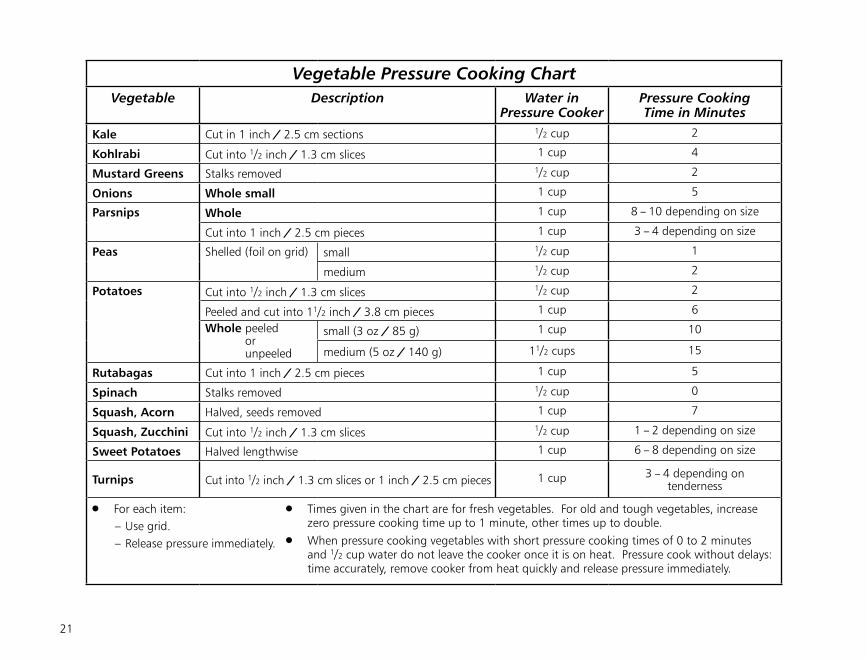
Vegetable Pressure Cooking ChartVegetable Description Water in
Pressure CookerPressure Cooking Time in Minutes
Kale Cut in 1 inch / 2.5 cm sections 1/2 cup 2
Kohlrabi Cut into 1/2 inch / 1.3 cm slices 1 cup 4
Mustard Greens Stalks removed 1/2 cup 2
Onions Whole small 1 cup 5
Parsnips Whole 1 cup 8 – 10 depending on size
Cut into 1 inch / 2.5 cm pieces 1 cup 3 – 4 depending on size
Peas Shelled (foil on grid) small 1/2 cup 1
medium 1/2 cup 2
Potatoes Cut into 1/2 inch / 1.3 cm slices 1/2 cup 2
Peeled and cut into 11/2 inch / 3.8 cm pieces 1 cup 6
Whole peeled or unpeeled
small (3 oz / 85 g) 1 cup 10
medium (5 oz / 140 g) 11/2 cups 15
Rutabagas Cut into 1 inch / 2.5 cm pieces 1 cup 5
Spinach Stalks removed 1/2 cup 0
Squash, Acorn Halved, seeds removed 1 cup 7
Squash, Zucchini Cut into 1/2 inch / 1.3 cm slices 1/2 cup 1 – 2 depending on size
Sweet Potatoes Halved lengthwise 1 cup 6 – 8 depending on size
Turnips Cut into 1/2 inch / 1.3 cm slices or 1 inch / 2.5 cm pieces 1 cup 3 – 4 depending on tenderness
• For each item:
- Use grid. - Release pressure immediately.
• Times given in the chart are for fresh vegetables. For old and tough vegetables, increase
zero pressure cooking time up to 1 minute, other times up to double.
• When pressure cooking vegetables with short pressure cooking times of 0 to 2 minutes
and 1/2 cup water do not leave the cooker once it is on heat. Pressure cook without delays: time accurately, remove cooker from heat quickly and release pressure immediately.
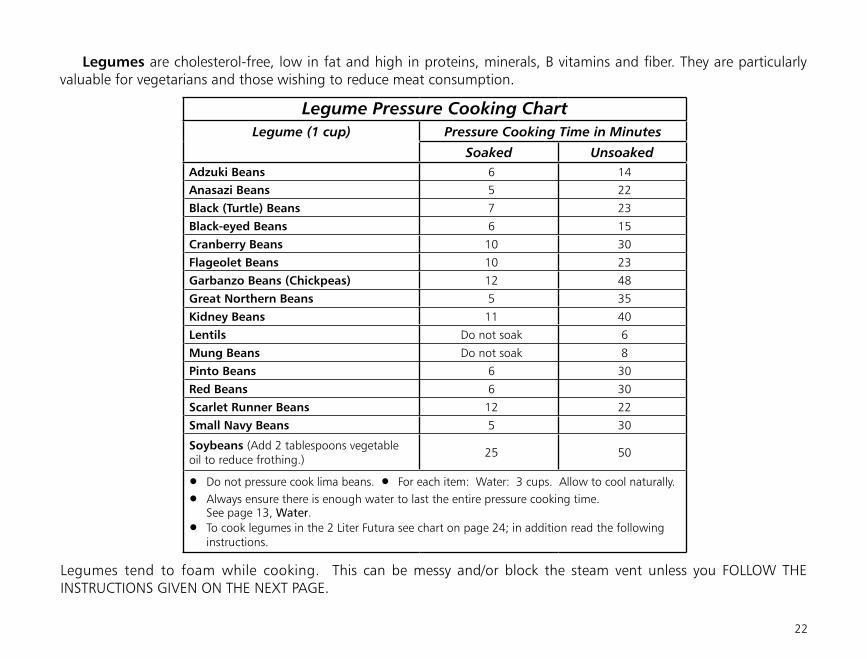
Legumes are cholesterol-free, low in fat and high in proteins, minerals, B vitamins and fiber. They are particularly valuable for vegetarians and those wishing to reduce meat consumption.
Legumes tend to foam while cooking. This can be messy and/or block the steam vent unless you FOLLOW THE INSTRUCTIONS GIVEN ON THE NExT PAGE.
22
Legume Pressure Cooking ChartLegume (1 cup) Pressure Cooking Time in Minutes
Soaked UnsoakedAdzuki Beans 6 14
Anasazi Beans 5 22
Black (Turtle) Beans 7 23
Black-eyed Beans 6 15
Cranberry Beans 10 30
Flageolet Beans 10 23
Garbanzo Beans (Chickpeas) 12 48
Great Northern Beans 5 35
Kidney Beans 11 40
Lentils Do not soak 6
Mung Beans Do not soak 8
Pinto Beans 6 30
Red Beans 6 30
Scarlet Runner Beans 12 22
Small Navy Beans 5 30
Soybeans (Add 2 tablespoons vegetable oil to reduce frothing.)
25 50
• Do not pressure cook lima beans. • For each item: Water: 3 cups. Allow to cool naturally.
• Always ensure there is enough water to last the entire pressure cooking time. See page 13, Water.
• To cook legumes in the 2 Liter Futura see chart on page 24; in addition read the following instructions.

Precautions
• Never fill cooker more than half. If frothing occurs, reduce quantity by a further 10%. Legumes expand when cooked and absorb water. Do not reduce water quantity below 11/2 cups.
• Measure legumes. Pick over to remove stones, dirt and shriveled, broken pieces and wash before cooking. To wash: place legumes in a bowl. Cover with water and agitate gently. Remove and discard floating pieces. Tip bowl to one side to drain off water, keeping one hand on the edge of the bowl to prevent legumes spilling. Repeat several times.
• Most varieties of beans yield about 21/2 cups cooked beans for every 1 cup dry beans.
Soaking Legumes
You may or may not soak most legumes before pressure cooking. Soaked legumes cook more evenly, more quickly and may taste better. Soaking legumes and then discarding the soaking water can reduce the water soluble complex sugars which may cause the discomfort some people experience digesting legumes. If you soak legumes, adding 1 tablespoon of vegetable oil for each cup of legumes while pressure cooking helps reduce frothing. Unsoaked legumes froth less and hold their shape better. Some legumes also retain more of their colour when unsoaked. Two methods of soaking are:
1. To soak overnight: Put legumes in double their volume (enough to cover) of cold water overnight.
2. To soak one hour: Put legumes in a pan. Pour boiling water over legumes until they are covered by 1 inch/2.5 cm. Cover the pan and allow to stand 1 hour.
Drain and rinse legumes. Remove any floating, loose skins before cooking.
Pressure Cooking Legumes
1. Put legumes and water in cooker. The grid is not required. A standard proportion is 3 cups of water for every 1 cup of legumes. The quantity of water can be reduced or increased according to your experience. Be sure the legumes are well covered with water. Legumes absorb water while cooking. Do not fill cooker more than half.
2. Adding 1 tablespoon of vegetable oil for every cup of legumes helps reduce frothing – especially with soaked beans. Add 2 tablespoons of oil for every 1 cup of soybeans. Salt and acidic foods such as tomatoes, ketchup, lemon juice, vinegar and molasses cause the skins of the beans to harden and extend the cooking times substantially. These are not ordinarily added while cooking. You may add flavourings such as 1 clove garlic (minced or whole), 1 bay leaf and/or a whole onion, according to your taste.
3. Boil. Skim off any scum with a slotted spoon. Close cooker. Bring to full pressure on medium heat. Reduce heat immediately when full pressure has been reached to prevent frothing. Remove cooker briefly from heat if the steam seems to be evacuating too forcefully. Heat should be the minimum necessary to maintain pressure.
4. Time according to the chart. The times given are approximate – the variety of legume, freshness, growing conditions affect cooking time. Cook until ALL the legumes are cooked. Beans should be cooked until they can be squeezed with thumb and finger or mashed with your tongue against the roof of your mouth quite easily. Do not eat legumes which are undercooked. The times given in the chart are for ‘’just cooked’’ legumes. Cook longer when softer legumes are required, as for purées and soups.
5. When cooking is complete, remove cooker from heat and allow to cool naturally or place cooker in about 4 inches/10 cm (2 inches/5 cm for the 2 Liter Futura) of cold water in a basin or in a sink for a few
23
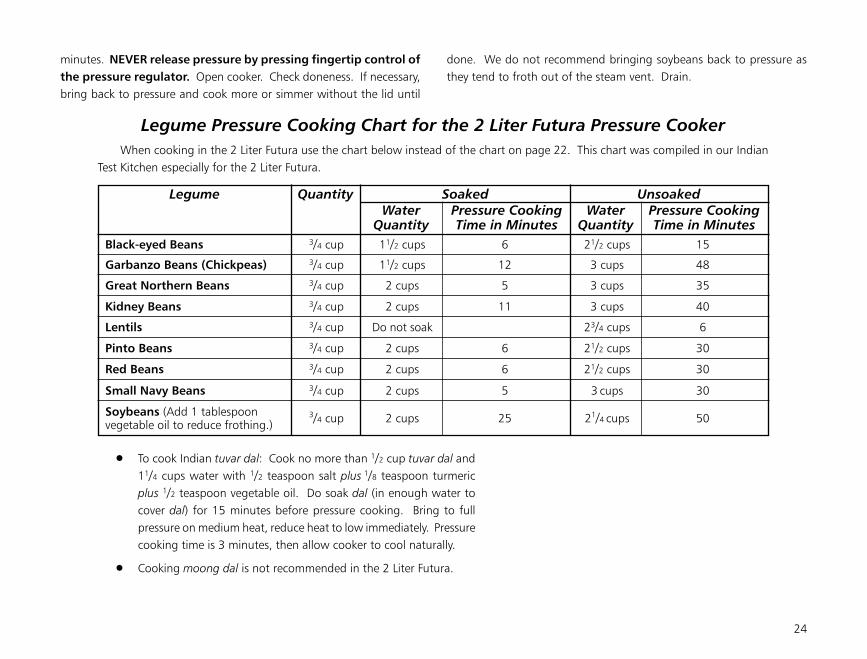
minutes. NEVER release pressure by pressing fingertip control of the pressure regulator. Open cooker. Check doneness. If necessary, bring back to pressure and cook more or simmer without the lid until
done. We do not recommend bringing soybeans back to pressure as they tend to froth out of the steam vent. Drain.
Legume Quantity Soaked Unsoaked Water Pressure Cooking Water Pressure Cooking Quantity Time in Minutes Quantity Time in Minutes Black-eyed Beans 3/4 cup 11/2 cups 6 21/2 cups 15
Garbanzo Beans (Chickpeas) 3/4 cup 11/2 cups 12 3 cups 48
Great Northern Beans 3/4 cup 2 cups 5 3 cups 35
Kidney Beans 3/4 cup 2 cups 11 3 cups 40
Lentils 3/4 cup Do not soak 23/4 cups 6
Pinto Beans 3/4 cup 2 cups 6 21/2 cups 30
Red Beans 3/4 cup 2 cups 6 21/2 cups 30
Small Navy Beans 3/4 cup 2 cups 5 3 cups 30
Soybeans (Add 1 tablespoon 3/4 cup 2 cups 25 21/4 cups 50 vegetable oil to reduce frothing.)
When cooking in the 2 Liter Futura use the chart below instead of the chart on page 22. This chart was compiled in our Indian Test Kitchen especially for the 2 Liter Futura.
Legume Pressure Cooking Chart for the 2 Liter Futura Pressure Cooker
• To cook Indian tuvar dal: Cook no more than 1/2 cup tuvar dal and 11/4 cups water with 1/2 teaspoon salt plus 1/8 teaspoon turmeric plus 1/2 teaspoon vegetable oil. Do soak dal (in enough water to cover dal) for 15 minutes before pressure cooking. Bring to full pressure on medium heat, reduce heat to low immediately. Pressure cooking time is 3 minutes, then allow cooker to cool naturally.
• Cooking moong dal is not recommended in the 2 Liter Futura.
24
Using Grid, Separators and Molds
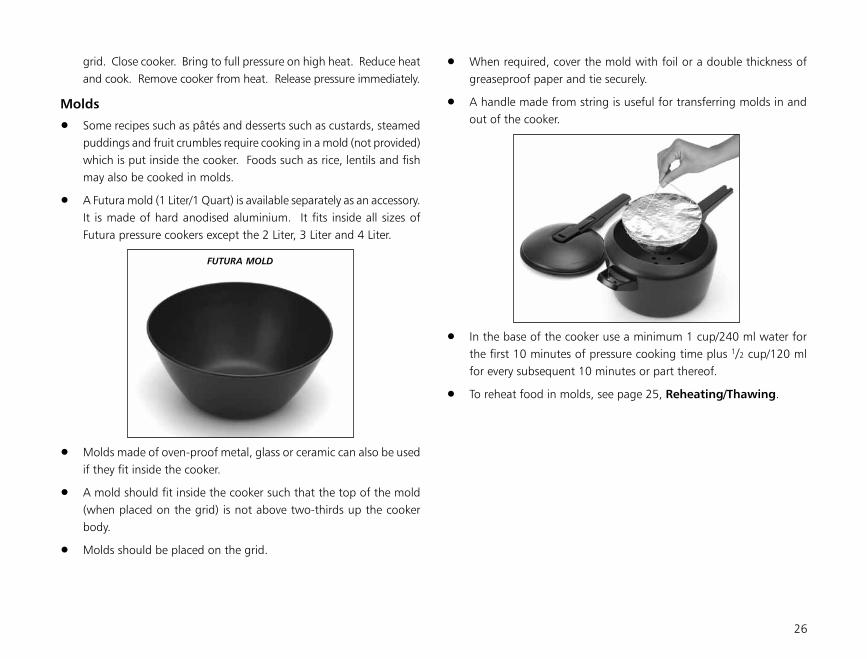
GRID TO STEAM FOOD GRID AS A COASTER
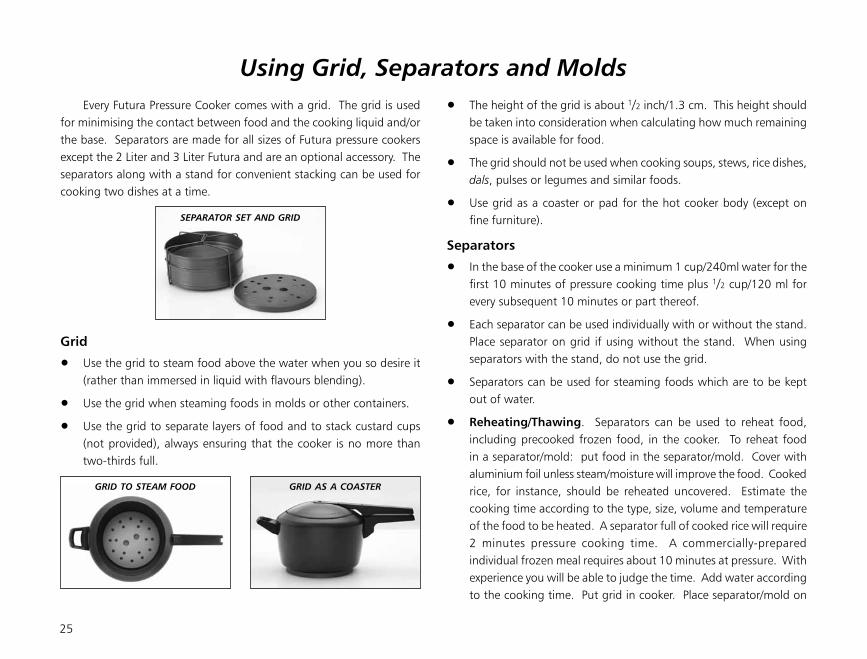
SEPARATOR SET AND GRID
25
Every Futura Pressure Cooker comes with a grid. The grid is used for minimising the contact between food and the cooking liquid and/or the base. Separators are made for all sizes of Futura pressure cookers except the 2 Liter and 3 Liter Futura and are an optional accessory. The separators along with a stand for convenient stacking can be used for cooking two dishes at a time.
Grid
• Use the grid to steam food above the water when you so desire it (rather than immersed in liquid with flavours blending).
• Use the grid when steaming foods in molds or other containers.
• Use the grid to separate layers of food and to stack custard cups (not provided), always ensuring that the cooker is no more than two-thirds full.
• The height of the grid is about 1/2 inch/1.3 cm. This height should be taken into consideration when calculating how much remaining space is available for food.
• The grid should not be used when cooking soups, stews, rice dishes, dals, pulses or legumes and similar foods.
• Use grid as a coaster or pad for the hot cooker body (except on fine furniture).
Separators
• In the base of the cooker use a minimum 1 cup/240ml water for the first 10 minutes of pressure cooking time plus 1/2 cup/120 ml for every subsequent 10 minutes or part thereof.
• Each separator can be used individually with or without the stand. Place separator on grid if using without the stand. When using separators with the stand, do not use the grid.
• Separators can be used for steaming foods which are to be kept out of water.
• Reheating/Thawing. Separators can be used to reheat food, including precooked frozen food, in the cooker. To reheat food in a separator/mold: put food in the separator/mold. Cover with aluminium foil unless steam/moisture will improve the food. Cooked rice, for instance, should be reheated uncovered. Estimate the cooking time according to the type, size, volume and temperature of the food to be heated. A separator full of cooked rice will require 2 minutes pressure cooking time. A commercially-prepared individual frozen meal requires about 10 minutes at pressure. With experience you will be able to judge the time. Add water according to the cooking time. Put grid in cooker. Place separator/mold on
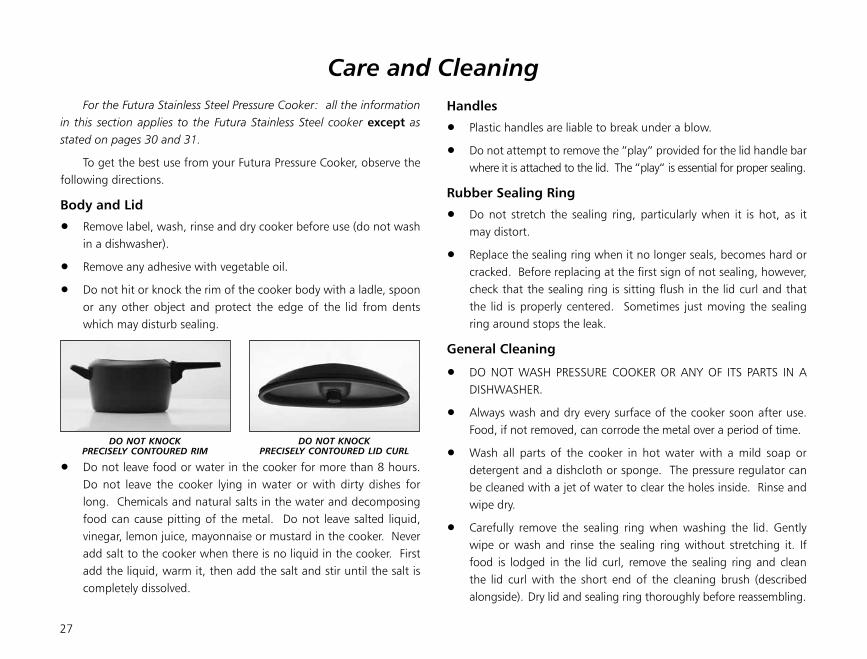
FUTURA MOLD
26
grid. Close cooker. Bring to full pressure on high heat. Reduce heat and cook. Remove cooker from heat. Release pressure immediately.
Molds
• Some recipes such as pâtés and desserts such as custards, steamed puddings and fruit crumbles require cooking in a mold (not provided) which is put inside the cooker. Foods such as rice, lentils and fish may also be cooked in molds.
• A Futura mold (1 Liter/1 Quart) is available separately as an accessory. It is made of hard anodised aluminium. It fits inside all sizes of Futura pressure cookers except the 2 Liter, 3 Liter and 4 Liter.
• Molds made of oven-proof metal, glass or ceramic can also be used if they fit inside the cooker.
• A mold should fit inside the cooker such that the top of the mold (when placed on the grid) is not above two-thirds up the cooker body.
• Molds should be placed on the grid.
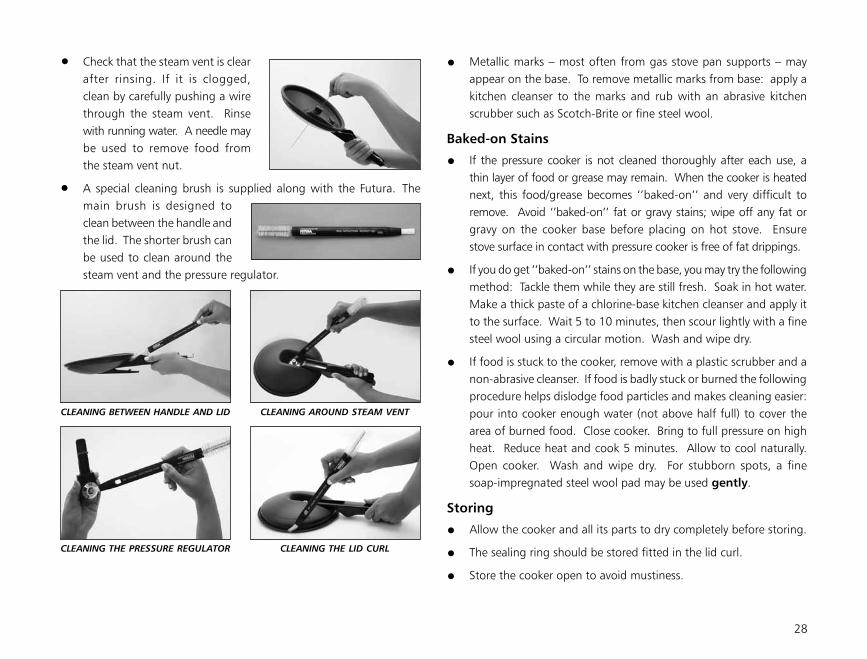
• When required, cover the mold with foil or a double thickness of greaseproof paper and tie securely.
• A handle made from string is useful for transferring molds in and out of the cooker.
• In the base of the cooker use a minimum 1 cup/240 ml water for the first 10 minutes of pressure cooking time plus 1/2 cup/120 ml for every subsequent 10 minutes or part thereof.
• To reheat food in molds, see page 25, Reheating/Thawing.
Care and Cleaning
27
DO NOT KNOCKPRECISELY CONTOURED RIM
DO NOT KNOCKPRECISELY CONTOURED LID CURL
For the Futura Stainless Steel Pressure Cooker: all the information in this section applies to the Futura Stainless Steel cooker except as stated on pages 30 and 31.
To get the best use from your Futura Pressure Cooker, observe the following directions.
Body and Lid
• Remove label, wash, rinse and dry cooker before use (do not wash in a dishwasher).
• Remove any adhesive with vegetable oil.
• Do not hit or knock the rim of the cooker body with a ladle, spoon or any other object and protect the edge of the lid from dents which may disturb sealing.
• Do not leave food or water in the cooker for more than 8 hours. Do not leave the cooker lying in water or with dirty dishes for long. Chemicals and natural salts in the water and decomposing food can cause pitting of the metal. Do not leave salted liquid, vinegar, lemon juice, mayonnaise or mustard in the cooker. Never add salt to the cooker when there is no liquid in the cooker. First add the liquid, warm it, then add the salt and stir until the salt is completely dissolved.
Handles
• Plastic handles are liable to break under a blow.
• Do not attempt to remove the “play“ provided for the lid handle bar where it is attached to the lid. The “play“ is essential for proper sealing.
Rubber Sealing Ring
• Do not stretch the sealing ring, particularly when it is hot, as it may distort.
• Replace the sealing ring when it no longer seals, becomes hard or cracked. Before replacing at the first sign of not sealing, however, check that the sealing ring is sitting flush in the lid curl and that the lid is properly centered. Sometimes just moving the sealing ring around stops the leak.
General Cleaning
• DO NOT WASH PRESSURE COOKER OR ANY OF ITS PARTS IN A DISHWASHER.
• Always wash and dry every surface of the cooker soon after use. Food, if not removed, can corrode the metal over a period of time.
• Wash all parts of the cooker in hot water with a mild soap or detergent and a dishcloth or sponge. The pressure regulator can be cleaned with a jet of water to clear the holes inside. Rinse and wipe dry.
• Carefully remove the sealing ring when washing the lid. Gently wipe or wash and rinse the sealing ring without stretching it. If food is lodged in the lid curl, remove the sealing ring and clean the lid curl with the short end of the cleaning brush (described alongside). Dry lid and sealing ring thoroughly before reassembling.
CLEANING BETWEEN HANDLE AND LID CLEANING AROUND STEAM VENT
CLEANING THE PRESSURE REGULATOR CLEANING THE LID CURL
28
• Check that the steam vent is clear after rinsing. If it is clogged, clean by carefully pushing a wire through the steam vent. Rinse with running water. A needle may be used to remove food from the steam vent nut.
• A special cleaning brush is supplied along with the Futura. The main brush is designed to clean between the handle and the lid. The shorter brush can be used to clean around the steam vent and the pressure regulator.
• Metallic marks – most often from gas stove pan supports – may appear on the base. To remove metallic marks from base: apply a kitchen cleanser to the marks and rub with an abrasive kitchen scrubber such as Scotch-Brite or fine steel wool.
Baked-on Stains
• If the pressure cooker is not cleaned thoroughly after each use, a thin layer of food or grease may remain. When the cooker is heated next, this food/grease becomes ‘’baked-on’’ and very difficult to remove. Avoid ‘’baked-on’’ fat or gravy stains; wipe off any fat or gravy on the cooker base before placing on hot stove. Ensure stove surface in contact with pressure cooker is free of fat drippings.
• If you do get ‘’baked-on’’ stains on the base, you may try the following method: Tackle them while they are still fresh. Soak in hot water. Make a thick paste of a chlorine-base kitchen cleanser and apply it to the surface. Wait 5 to 10 minutes, then scour lightly with a fine steel wool using a circular motion. Wash and wipe dry.
• If food is stuck to the cooker, remove with a plastic scrubber and a non-abrasive cleanser. If food is badly stuck or burned the following procedure helps dislodge food particles and makes cleaning easier: pour into cooker enough water (not above half full) to cover the area of burned food. Close cooker. Bring to full pressure on high heat. Reduce heat and cook 5 minutes. Allow to cool naturally. Open cooker. Wash and wipe dry. For stubborn spots, a fine soap-impregnated steel wool pad may be used gently.
Storing
• Allow the cooker and all its parts to dry completely before storing.
• The sealing ring should be stored fitted in the lid curl.
• Store the cooker open to avoid mustiness.
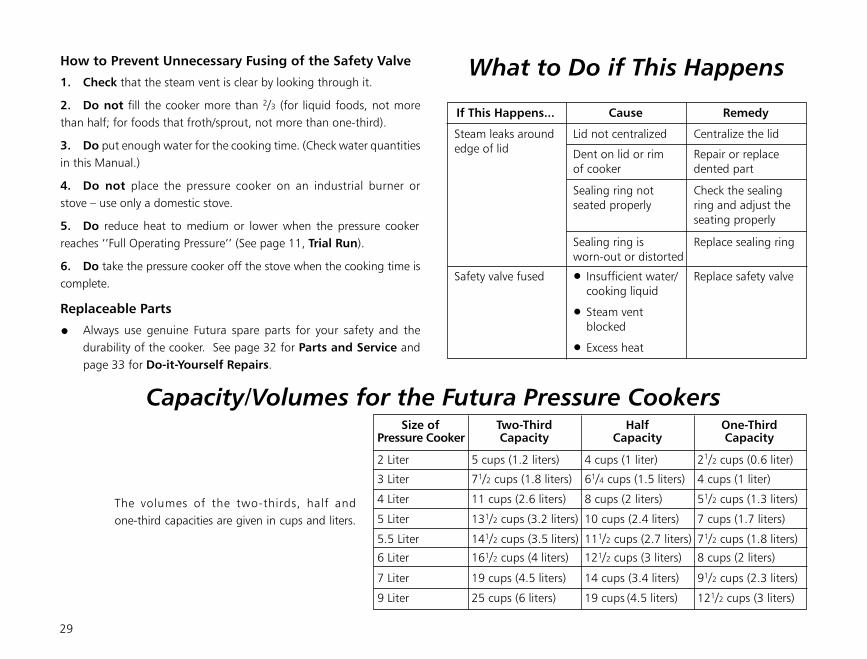
How to Prevent Unnecessary Fusing of the Safety Valve
1. Check that the steam vent is clear by looking through it.
2. Do not fill the cooker more than 2/3 (for liquid foods, not more than half; for foods that froth/sprout, not more than one-third).
3. Do put enough water for the cooking time. (Check water quantities in this Manual.)
4. Do not place the pressure cooker on an industrial burner or stove – use only a domestic stove.
5. Do reduce heat to medium or lower when the pressure cooker reaches ‘’Full Operating Pressure’’ (See page 11, Trial Run).
6. Do take the pressure cooker off the stove when the cooking time is complete.
Replaceable Parts
• Always use genuine Futura spare parts for your safety and the durability of the cooker. See page 32 for Parts and Service and page 33 for Do-it-Yourself Repairs.
What to Do if This Happens
If This Happens... Cause Remedy
Steam leaks around Lid not centralized Centralize the lid
edge of lid Dent on lid or rim Repair or replace of cooker dented part
Sealing ring not Check the sealing seated properly ring and adjust the seating properly
Sealing ring is Replace sealing ring worn-out or distorted
Safety valve fused • Insufficient water/ Replace safety valve cooking liquid
• Steam vent blocked
• Excess heat
The volumes of the two-thirds, half and one-third capacities are given in cups and liters.
Size of Two-Third Half One-Third Pressure Cooker Capacity Capacity Capacity
2 Liter 5 cups (1.2 liters) 4 cups (1 liter) 21/2 cups (0.6 liter)
3 Liter 71/2 cups (1.8 liters) 61/4 cups (1.5 liters) 4 cups (1 liter)
4 Liter 11 cups (2.6 liters) 8 cups (2 liters) 51/2 cups (1.3 liters)
5 Liter 131/2 cups (3.2 liters) 10 cups (2.4 liters) 7 cups (1.7 liters)
5.5 Liter 141/2 cups (3.5 liters) 111/2 cups (2.7 liters) 71/2 cups (1.8 liters)
6 Liter 161/2 cups (4 liters) 121/2 cups (3 liters) 8 cups (2 liters)
7 Liter 19 cups (4.5 liters) 14 cups (3.4 liters) 91/2 cups (2.3 liters)
9 Liter 25 cups (6 liters) 19 cups (4.5 liters) 121/2 cups (3 liters)
29
Capacity/Volumes for the Futura Pressure Cookers
The information in this section is for the Futura Stainless Steel pressure cooker. All the information in this Manual applies to the Futura Stainless Steel pressure cooker except when Futura hard anodised equipment is specifically mentioned or except as stated in this section.
CAUTION
• Never heat the Futura Stainless Steel Pressure Cooker without food or water in the cooker. Doing so may permanently damage the cooker.
• Always reduce the heat once full operating pressure is reached. Cooking on high heat after full operating pressure has been reached may cause food to burn and/or the cooker to boil dry.
Tips to Prevent Burning
• High heat can cause some foods to stick and burn. Reduce heat if you find that food is sticking – especially while frying. While cooking rice or pilaf, do not reduce heat while bringing the cooker to full operating pressure.
• If using gas heat, ensure that the burner is properly clean and efficient. Protect the flame from drafts or fans.
• After frying and/or before bringing the cooker to full pressure on high heat, stir to remove any frying or other residue attached to base.
Care and Cleaning
Follow the instructions on pages 27 and 28 except for the following:
1. Body and Lid
First paragraph: The stainless steel cooker body and grid may be washed in a dishwasher but this may dull the mirror finish. Do not put the lid, sealing ring or pressure regulator in the dishwasher.
2. General Cleaning
First paragraph: Same change as for Body and Lid.
3. Baked-on Stains
a. Second paragraph: Use a chlorine-free kitchen cleanser instead of a chlorine-base cleanser as free chlorine can adversely affect stainless steel.
b. Add the following: Do not use steel wool or harsh cleaning pads on the exterior of the cooker as they can scratch the finish.
Stains
To remove rainbow-coloured stains and cloudiness, dullness and white marks:
– Clean with a stainless steel cleanser or
– Wipe vinegar or lemon juice on the stain, allow to stand about 5 minutes and then clean cooker with a non-abrasive cleansing powder and
– Wash and dry.
These stains do not affect the food or the cooker and may disappear after further cooking.
Blue and/or golden stains can be caused by overheating and may be removed with the methods mentioned in the preceding paragraphs.
Special Instructions for the Futura Stainless Steel Pressure Cooker
30
Removing the Black Residue of Burned Food from Stainless Steel Pressure Cookers
Burned black residue may be removed from inside the cooker as follows:
1. Pour a solution of hot water and liquid detergent in cooker sufficient to cover the black residue. Allow to stand for one hour.
2. Rinse and dry.
3. Scour with a circular motion with a fine steel wool cleaning pad and a cleansing powder or stainless steel cleanser, pushing down hard till residue is removed.
4. Rinse and dry.
If your cooker is still not clean, try one of the following procedures:
• Soak the cooker for 2 hours in a solution of 1 tablespoon/15 ml baking soda per cup/240 ml of water sufficient to cover the black residue. Drain.
• With an efficient exhaust system over your heat source or in a well-ventilated room (as detergent fumes can be irritating), add 1 tablespoon/15 ml dishwasher detergent powder in 3 cups/720 ml of water in the cooker. Bring to boil, reduce heat and simmer 15 minutes. Allow solution to cool in the cooker. Drain.
In either case, carry out steps 2 to 4 as stated above.
Do not use this procedure for the mirror-polished exterior of the cooker.
31
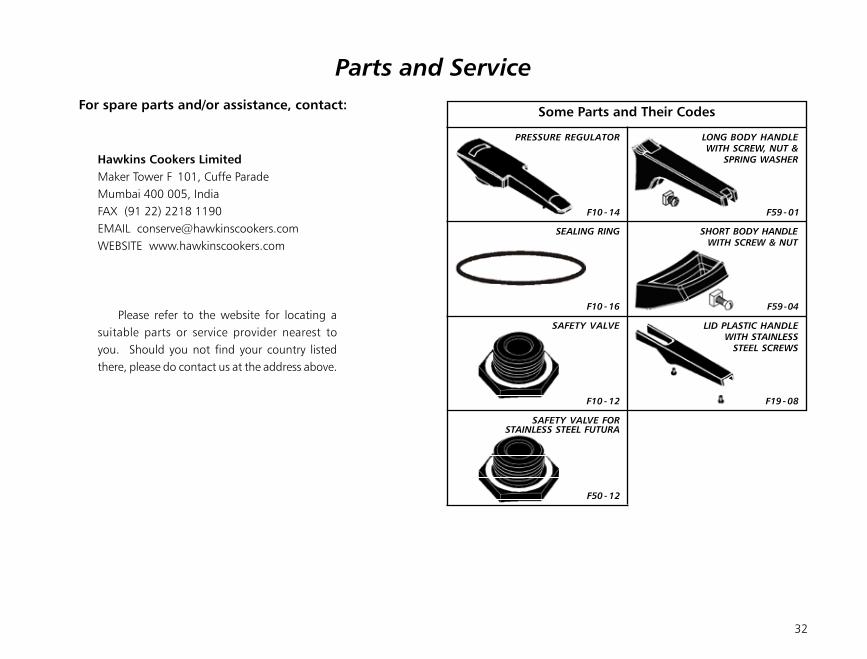
Parts and Service
Some Parts and Their Codes
LONG BODY HANDLE WITH SCREW, NUT &
SPRING WASHER
SHORT BODY HANDLE WITH SCREW & NUT
F59 - 04
SAFETY VALVE LID PLASTIC HANDLE WITH STAINLESS
STEEL SCREWS
F19 - 08
PRESSURE REGULATOR
F10 - 14 F59 - 01
SEALING RING
F10 - 16
SAFETY VALVE FOR STAINLESS STEEL FUTURA
F50 - 12
32
F10 - 12
For spare parts and/or assistance, contact:
Hawkins Cookers Limited Maker Tower F 101, Cuffe Parade Mumbai 400 005, India FAx (91 22) 2218 1190 EMAIL [email protected] WEBSITE www.hawkinscookers.com
Please refer to the website for locating a suitable parts or service provider nearest to you. Should you not find your country listed there, please do contact us at the address above.

Do-it-Yourself Repairs
VALVE WASHER
33
TO REPLACE
1. Clean and dry the area (called the safety valve body) from which the used safety valve was unscrewed and into which the replacement safety valve will be screwed.
2. Place the replacement washer over the replacement safety valve as shown below.
3. Hold the valve with the washer on it as shown above and apply a small amount of food compatible glue on the valve threads. Holding the safety valve with the threads pointing into the safety valve body, screw the valve (with washer) clockwise into the safety valve body. Tighten clockwise with spanner.
Replacement of Plastic Handles
The short body handle, the long body handle and the lid handle are all replaceable by unscrewing the existing handle and screwing on a replacement handle. Clean any accumulated dirt from the area before attaching the new handle.
If the long body handle or the short body handle is difficult to unscrew, a second person holding the cooker body firmly while one person turns the handle screw anti-clockwise will make it easier.
Sealing Ring Replacement
If leakage develops along the rim of the cooker body which is not due to the misalignment of the lid or a dent on the rim or lid curl, the sealing ring needs to be replaced. This is simply done by changing it with a replacement genuine Futura sealing ring to fit the size of your Futura (see page 8).
Safety Valve Replacement
1. Get a genuine Futura safety valve. The two parts of the safety valve are:
2. The ring end of a 3/4 inch/19 mm offset spanner/wrench or the ring or open end of a 3/4 inch/19 mm spanner is recommended to replace the safety valve.
3. A food compatible glue is recommended.
4. Remove the pressure regulator from lid.
TO REMOVE
With one hand, hold and brace the lid upside down on a soft surface such as a folded kitchen cloth or a rubber mat. Take care not to bend or warp the lid curl. Do not hold the lid by the handle. With the other hand, place a spanner on the used safety valve and unscrew the safety valve in the direction (anti-clockwise) shown by the two arrows marked on the safety valve. Remove safety valve and washer. Discard; do not reuse either part.
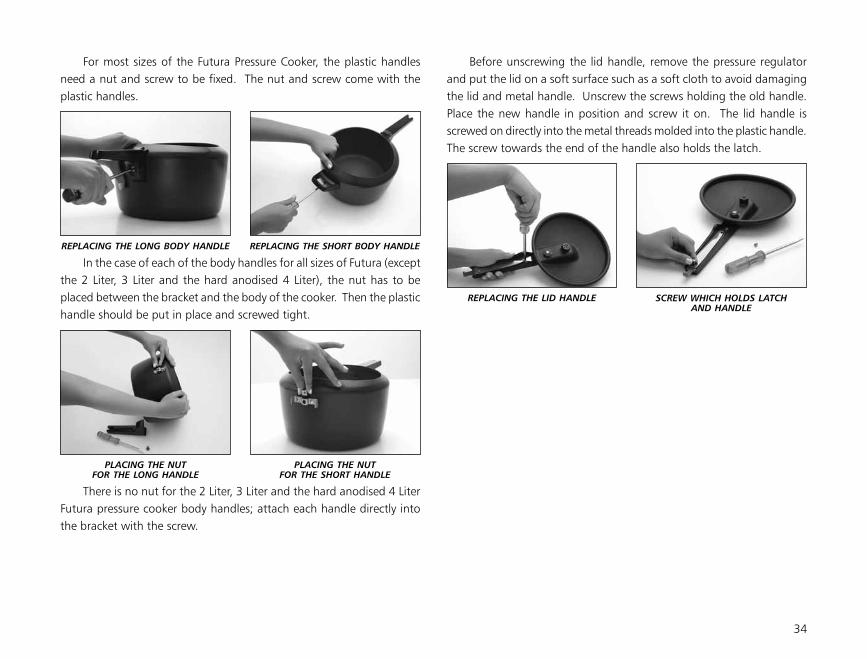
REPLACING THE LID HANDLE SCREW WHICH HOLDS LATCH AND HANDLE
REPLACING THE LONG BODY HANDLE REPLACING THE SHORT BODY HANDLE
PLACING THE NUTFOR THE LONG HANDLE
PLACING THE NUTFOR THE SHORT HANDLE
34
Before unscrewing the lid handle, remove the pressure regulator and put the lid on a soft surface such as a soft cloth to avoid damaging the lid and metal handle. Unscrew the screws holding the old handle. Place the new handle in position and screw it on. The lid handle is screwed on directly into the metal threads molded into the plastic handle. The screw towards the end of the handle also holds the latch.
For most sizes of the Futura Pressure Cooker, the plastic handles need a nut and screw to be fixed. The nut and screw come with the plastic handles.
In the case of each of the body handles for all sizes of Futura (except the 2 Liter, 3 Liter and the hard anodised 4 Liter), the nut has to be placed between the bracket and the body of the cooker. Then the plastic handle should be put in place and screwed tight.
There is no nut for the 2 Liter, 3 Liter and the hard anodised 4 Liter Futura pressure cooker body handles; attach each handle directly into the bracket with the screw.
Space for Your Notes/Recipes
35