Embed Size (px)
Citation preview
SPRINGDALE FARM MAPLE EQUIPMENT AND SUPPLIES
Bricking Guide for “Classic, Backyarder, Junior, and Mini-Pro Evaporators” built by Lapierre\Waterloo\Small
Installation of Firebricks
When installing the fire bricks be sure to leave a ½ inch space between the iron fire grates and the front edge of the fire bricks. We recommend placing a ½ inch piece of wood between the rear edge of the grates and the front edge of the firebricks to ensure sufficient room for expansion of the grates. Follow the bricking instruction diagrams carefully.
1
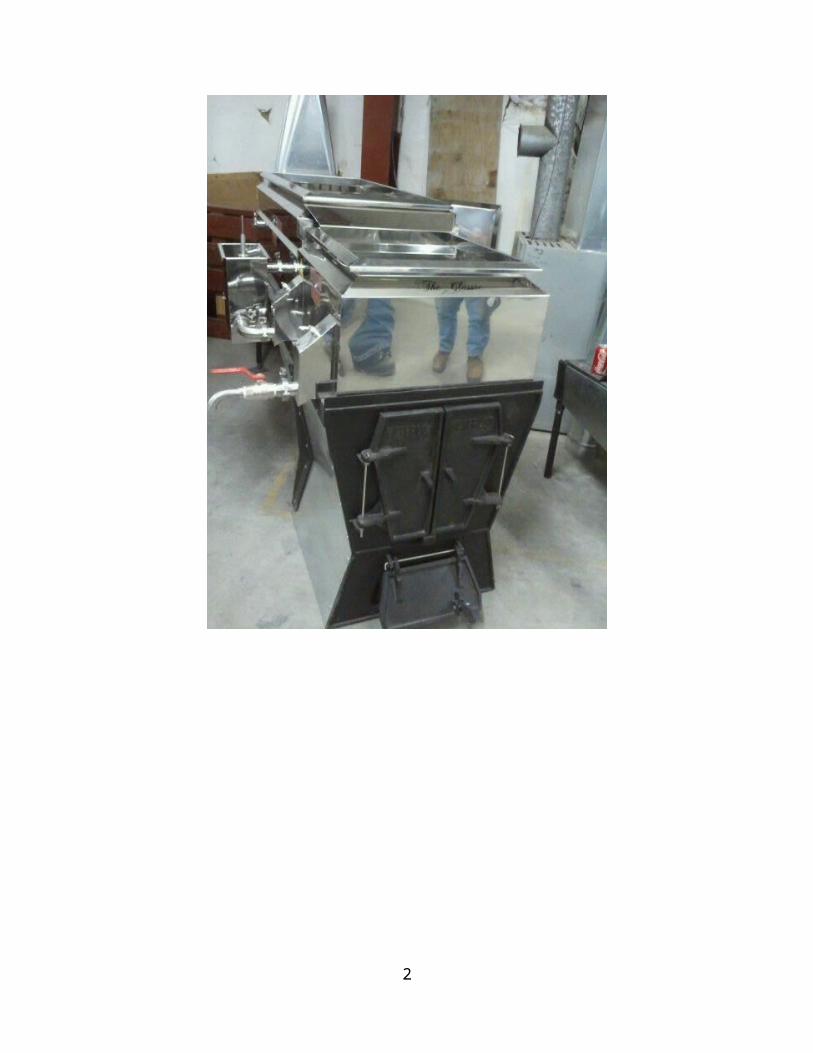
Figure 1 - Begin bricking the fire box as shown. Note the insulation panel is installed behind brick (recommended if sides of arch are constructed of stainless steel.
Figure 2 - Continue bricking side of fire box. Note how bricks are cut and placed.
2
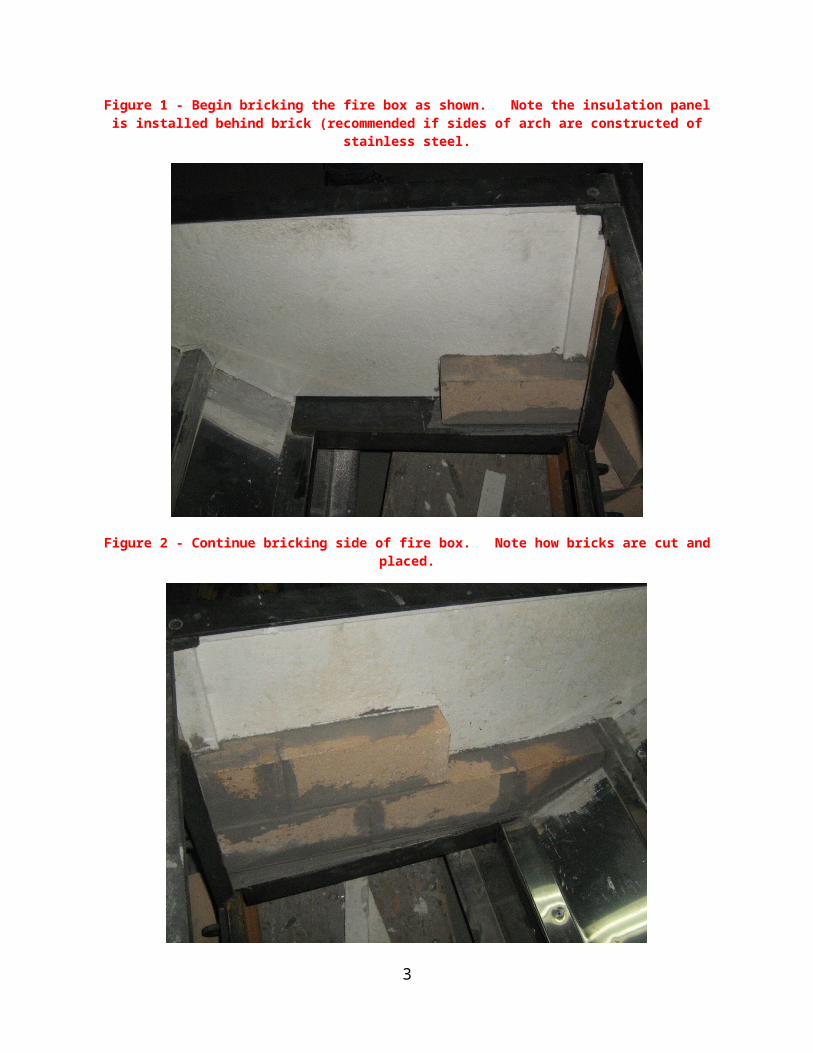
Figure 3 - Bricking base showing how to place the 1/2" wood spacer in place.
Figure 4 - Fire box bricked with wood spacer in place ready to support the bricks and provide the proper expansion joint.
3
Figure 5 - Bricking sides or rear compartment of evaporator. Note the notch cut out of the middle brick on the bottom row.
Figure 6 - Bricking second row on rear compartment of evaporator showing the staggering of the brick joints.
4
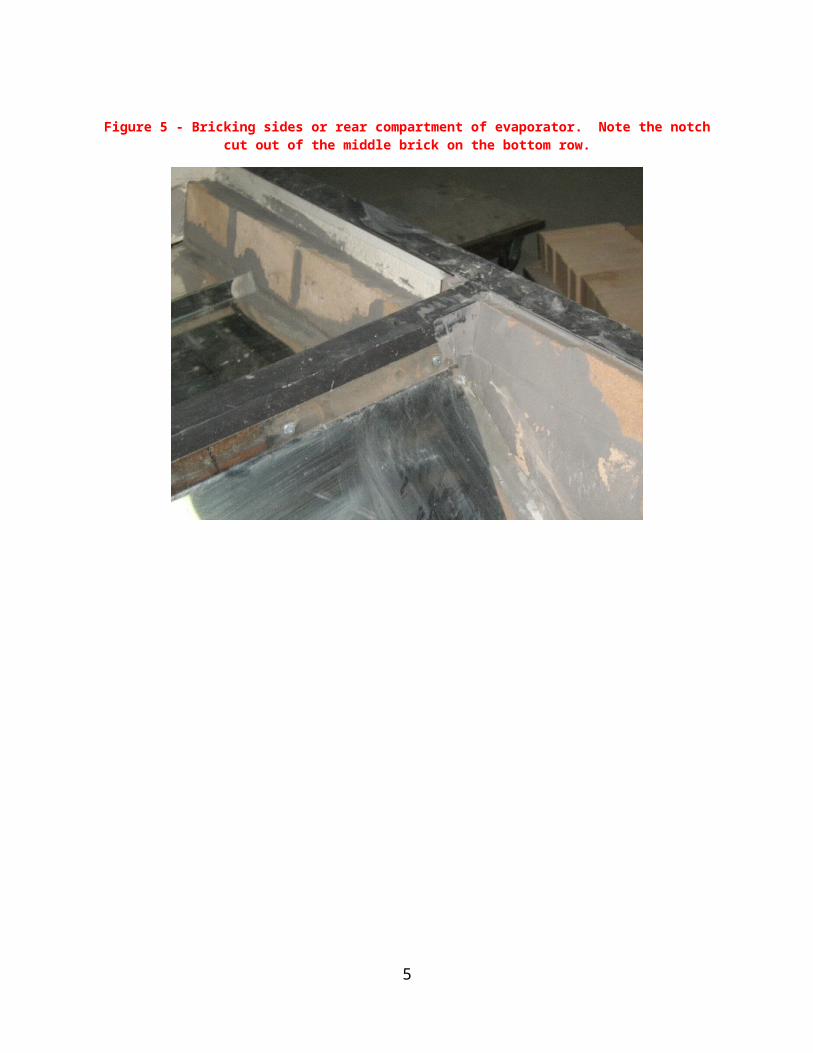
Figure 7 - Bottom of rear compartment of evaporator arch with insulation installed with four stainless steel pins. You may use bricks in place of insulation if you wish.
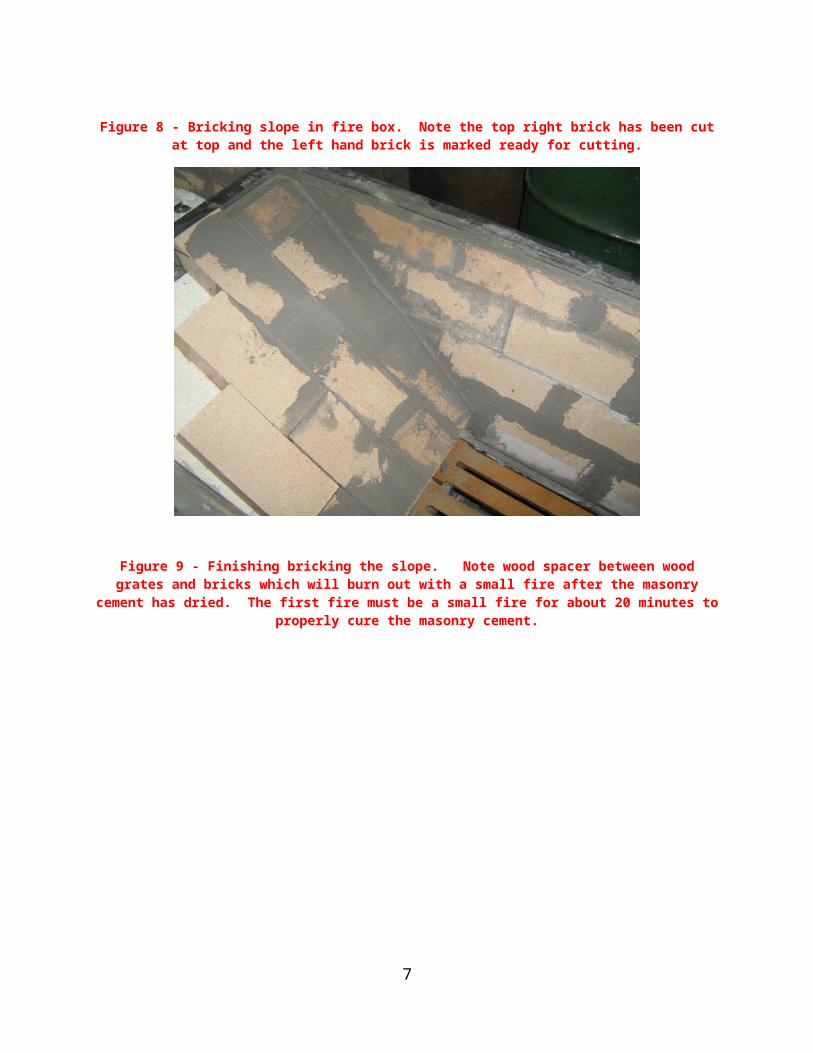
Figure 8 - Bricking slope in fire box. Note the top right brick has been cut at top and the left hand brick is marked ready for cutting.
5
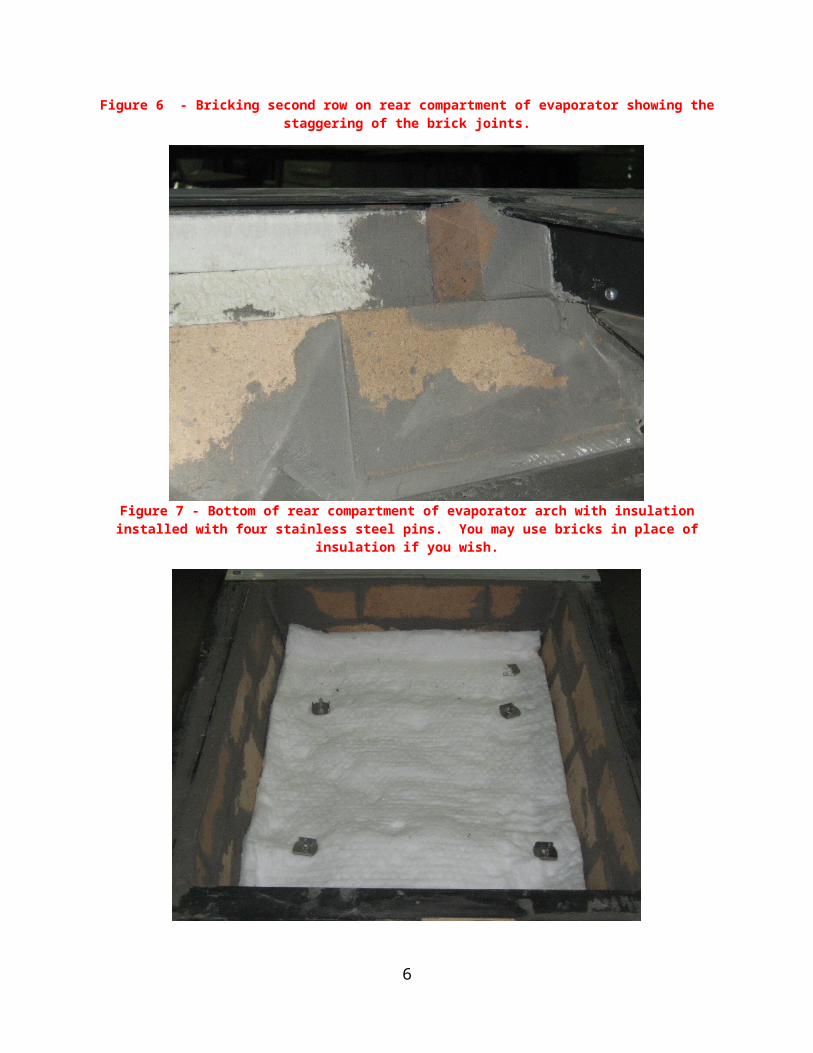
Figure 9 - Finishing bricking the slope. Note wood spacer between wood grates and bricks which will burn out with a small fire after the masonry cement has dried. The first fire must be a small fire for about 20
minutes to properly cure the masonry cement.
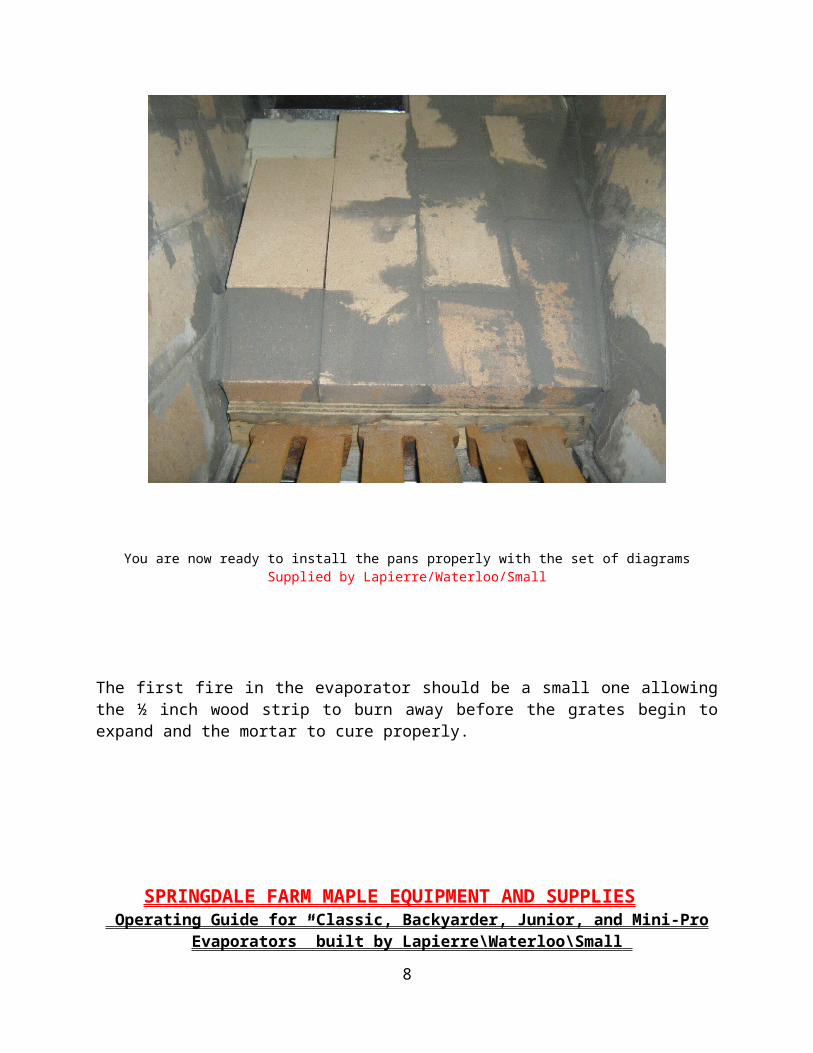
You are now ready to install the pans properly with the set of diagrams Supplied by Lapierre/Waterloo/Small
The first fire in the evaporator should be a small one allowing the ½ inch wood strip to burn away before the grates begin to expand and the mortar to cure properly.
SPRINGDALE FARM MAPLE EQUIPMENT AND SUPPLIES6
Operating Guide for “Classic, Backyarder, Junior, and Mini-Pro Evaporators” built by Lapierre\Waterloo\Small
Before using your evaporator for the first time each year, wash out the inside of the pans with a solution of baking soda and water to remove anything that might have a negative effect on the flavour of the syrup.
IMPORTANT NOTE:
These evaporators are designed to operate on a continuous flow principle and you should not attempt to make large batches of syrup with the unit. The method outlined on page two and three is the continuous flow method which requires the operator to be present at all times during the boiling process to take off small batches of syrup as they reach the correct density.
Tighten in the ¼ inch pipe plug in the front pan and install a dial thermometer hand tight that has been adjusted to the correct boiling point. To calibrate the thermometer for your altitude, place it in boiling water for about 2 minutes and then adjust the screw/lever on the rear of the unit until the dial reads 0. The thermometer reads in Fahrenheit and the 7 indicates 7 degrees above the boiling point of water or 219 degrees F. For syrup it is advisable to take it up to 7.5 degrees above the boiling point of water. Please remember that water boils at 212 degrees F. at sea level but we are not at sea level. Water boils in Eastern Ontario at about 210.8 degrees F. subject to atmospheric pressure.
If you installed the plugs between the pans after you stopped boiling the previous day be sure to remove them in the morning when you start up.
Visually check the entire unit and make sure you have no leaks or any frozen sap in the float box or the pans. If you have frozen sap, heat the unit gently with a small heater until the ice is melted.
Remove all wood ashes from the ash pit under the grates and place them in a steel storage container to prevent embers from causing an unwanted fire. If the ashes build up until they touch the grates, they may warp and spoil them. Removing the ashes each day before you start up will alleviate this problem.
Turn on the sap valve coming into the cold float box from the sap supply tank and press down on the rear float to check that sap flows into the float box.
Set both floats so there are about 1½ inches of sap in the front (syrup) pan and 1½ inches above the corrugations in the rear (flue) pan. This will ensure there is a sufficient level of sap in the both pans. When you become comfortable with the evaporator, you may wish to operate it with a lower level of sap in the syrup pan and one inch of sap over the flues in the flue pan but this is not recommended until you become an experienced syrup maker as pans are easily damaged and are very expensive to replace.
7
On a wood fired evaporator make sure the small draft door under the fire wood doors is partially open so that the evaporator can get oxygen to the fire. Adjust the draft door so that you get a good boil in both the flue and syrup pans. If only the flue pan boils well, close the draft door one or two notches until a good boil is achieved in both pans.
Make sure your fire wood is 16 inches in length or as specified for a larger sized evaporator because the wood should not be allowed to rest against or touch the door when it is closed. If the wood touches the door when it is burning it could possibly crack the door. If your evaporator is equipped with two doors, only open one door at a time to refill the fire box with wood. Make sure that your wood is dry and of good quality. A mix of hardwood and softwood is ideal and will increase the production of the evaporator each hour.
Start a small fire in the fire box as you normally would and close the fire door. You can now fire the unit with wood so that it boils and foams up well. If it begins to boil over in the syrup pan you can add a drop of defoamer (a commercial product available from maple equipment suppliers). If it begins to boil over in the flue pan, close the ash door draft one more notch. If it isn’t boiling enough in the rear pan open the draft door one more notch. If it still isn’t boiling enough in the rear pan then add more good dry fire wood
As the water evaporates from the sap, the float valve will automatically maintain the level of sap in your evaporator so you don’t have to be concerned about that for as long as you have plenty of sap in your storage tank. This process is known as continuous flow and results in the sweetest sap being forced to the outlet on the syrup pan.
When the dial pointer on the thermometer reaches 7.4 + degrees, check the density of the syrup with a hydrometer or refractometer. If the density is correct, open the syrup valve and let the syrup run off into a unit that you will use to transfer it into the finishing unit ( it is advisable to filter the syrup at this time to remove as much precipitate as possible). Open the valve only a little way so the syrup flows out slowly. A flow stream of about twice the diameter of a pencil should work well. This will allow the incoming sap to maintain the level of sap required in the pans. When the temperature pointer starts to fall close the valve. If the temperature pointer continues to rise above 7.4 degrees, open the valve more to drain the syrup from the front pan more quickly. While you are running off syrup from the evaporator, it is important that you do not open the fire door(s) to restock the wood in the evaporator. The cold air rushing in when the door(s) is/are open will cause the boil to go off the syrup pan and the syrup that was ready to be taken off will intermix with under density syrup. This results in the syrup having to be brought up to the proper density again, resulting in the darkening of the syrup.
It is advisable for inexperienced syrup makers to have a pail of sap nearby that can be poured into the evaporator if fluid levels etc are falling too low. It is cheap insurance until you feel 100% comfortable operating the unit.
As your sap supply diminishes in the sap tank, you should start to let the fire die down if it is wood fired. Propane fired systems can continue to operate until the sap tank is empty, but turn off the burners immediately when the sap tank empties. On a wood evaporator I believe you should let the fire die down when about three inches of sap remain in the site gauge on the sap
8
tank. Because there are a lot of coals in the fire box and the fire bricks remain hot, evaporation will continue to some extent for up to an hour. As mentioned above, inexperienced syrup makers should have a pail of sap available until they know what level of sap in the site gauge is sufficient for the cool down period. You may also use a method known as "flooding the pans" which involves holding down the float valve and allowing a lot of extra sap into the pans which stops the boiling. You may now install the plugs in the pans, but check regularly to ensure you have sufficient sap in both the syrup and flue pan. Installing the plugs will keep the richer sap in the front pan, so you will get syrup off sooner the next day. If you think there won’t be any sap for a few days it would be advisable to completely drain the pans and finish it off in your finisher.
If you drain the syrup pan, you should fill it with water and allow it to soak overnight to remove the nitre build up on the bottom of the pan. Don’t use aggressive scouring pads to clean the pan. A soft 3M pad should be sufficient but, if necessary, use a CFIA approved acid to remove the nitre build up on the pan. Be sure to rinse the pans extremely well if you use an acid to remove the nitre build up.
If some sap remains in the stainless steel sap storage tank, drain it into a pail so it won’t freeze. Once all the sap is out of the stainless tank it is advisable to wash it with water.
Now it is time to enjoy the fruits of your labour with your friends.
9

![Folder A, Canadian Pacific Railway [microform]caldernorthern.uk/wp-content/uploads/2018/04/Canadian... · 2018. 4. 2. · Waterloo..66. Knowlton. SuttonJuno Sutton Riohford NorthTroy](https://img.pdfslide.us/doc/110x75/6123925b9b50694d534e14fc/folder-a-canadian-pacific-railway-microform-2018-4-2-waterloo66-knowlton.jpg)