Embed Size (px)
Citation preview

KERN & Sohn GmbH
Ziegelei 1 D-72336 Balingen E-Mail: [email protected]
Tel: +49-[0]7433- 9933-0 Fax: +49-[0]7433-9933-149 Internet: www.kern-sohn.com
Operating Instructions Electronic crane scale
KERN HTS Version 2.4 11/2010 GB
HTS-BA-e-1024
ME-Nr. 71209203-E

HTS-BA-e-1024 2
Weitere Sprachversionen finden Sie online unter www.kern-sohn.com/manuals
Další jazykové verze najdete na webu pod adresou www.kern-sohn.com/manuals
Yderligere sprogversioner finder de online på www.kern-sohn.com/manuals
Más versiones de idiomas se encuentran online bajowww.kern-sohn.com/manuals
Rohkem keeli internetis aadressil www.kern-sohn.com/manuals
Vous trouverez d’autres versions de langue online sous www.kern-sohn.com/manuals
Further language versions you will find online under www.kern-sohn.com/manuals
A használati utasítás egyéb nyelveken a www.kern-sohn.com/manuals címről tölthető le
Trovate altre versioni di lingue online inwww.kern-sohn.com/manuals
Ytterligere språkversjoner finner du online under www.kern-sohn.com/manuals
Bijkomende taalversies vindt u online op www.kern-sohn.com/manuals
Encontram-se online mais versões de línguas em www.kern-sohn.com/manuals
Inne wersje językowe znajdą Państwo na stroniewww.kern-sohn.com/manuals
Другие языковые версии Вы найдете по адресу в Интернете www.kern-sohn.com/manuals
Ytterligare språkversioner finns online under www.kern-sohn.com/manuals
Muita kieliversioita löydät osoitteesta www.kern-sohn.com/manuals
Ostale jezikovne različice boste našli online na www.kern-sohn.com/manuals
Diğer lisan versiyonlarını internetten www.kern-sohn.com/manuals adresinden temin edeblirsiniz

HTS-BA-e-1024 3
GB
KERN HTS Version 2.4 11/2010 Operating Instructions Electronic crane scale
Contents 1. Technical specifications ................................................................................................................... 5 1.1 Small construction____________________________________________________________ 5 1.2 Large construction ___________________________________________________________ 7 1.3 Dimensions _________________________________________________________________ 9 2. Declaration of conformity ............................................................................................................... 12
3. General Safety Instructions ............................................................................................................ 18
4. Crane scale at a glance ................................................................................................................... 20 4.1 Overview__________________________________________________________________ 20 4.2 Display ___________________________________________________________________ 22 4.3 Keyboard__________________________________________________________________ 23 4.4 Remote control _____________________________________________________________ 24 5. Commissioning................................................................................................................................ 25 5.1 Unpacking (large construction) _________________________________________________ 25 5.2 Unpacking (large and small construction)_________________________________________ 25 5.3 Checking the original dimensions _______________________________________________ 25 5.4 Recharge the battery ________________________________________________________ 26 5.5 Suspend scale _____________________________________________________________ 28 6. Operation .......................................................................................................................................... 29 6.1 Safety instructions___________________________________________________________ 29 6.2 Load the crane scale_________________________________________________________ 29 6.3 Turn on/off_________________________________________________________________ 33 6.4 Resetting the scale __________________________________________________________ 33 6.5 Taring ____________________________________________________________________ 34 6.6 Working with the tare weights saved ____________________________________________ 35 6.7 Weighing__________________________________________________________________ 37 6.8 Accumulation ______________________________________________________________ 37 6.9 Displaying peak weight _______________________________________________________ 39 6.10 Weighing with a tolerance range________________________________________________ 40 6.11 Stop weight value (freeze) ____________________________________________________ 40 6.12 Battery operation____________________________________________________________ 41 6.13 Operation with remote control__________________________________________________ 42

HTS-BA-e-1024 4
7. User menu ........................................................................................................................................ 43 7.1 Overview__________________________________________________________________ 43 7.2 Accessing the user menu _____________________________________________________ 43 7.3 Operation in menu __________________________________________________________ 44 7.4 Description of the user menu __________________________________________________ 47 8. Service menu.................................................................................................................................... 50 8.1 Overview__________________________________________________________________ 50 8.2 Access service menu ________________________________________________________ 51 8.3 Description of service menu ___________________________________________________ 52 8.4 Verification ________________________________________________________________ 58 9. Error messages................................................................................................................................ 60
10. Maintenance & Cleaning............................................................................................................. 61 10.1 Regular maintenance ________________________________________________________ 61 10.2 Checklist for regular safety inspections __________________________________________ 63 10.3 Cleaning __________________________________________________________________ 66 10.4 Changing the batteries of the remote control ______________________________________ 66 11. Enclosure ..................................................................................................................................... 67 11.1 Checklist extended safety inspection ____________________________________________ 67 11.2 Proof of replacement and repair of safety relevant parts _____________________________ 68

HTS-BA-e-1024 5
1. Technical specifications
1.1 Small construction
KERN HTS150K 50IP
HTS300K 100IP
HTS600K 200IP
HTS1.5T 0.5IP
Readability (d) 50 g 100 g 200 g 500 g Weighing range (Max) 150 kg 300 kg 600 kg 1500 kg
Taring range (subtractive) 150 kg 300 kg 600 kg 1500 kg
Reproductability 50 g 100 g 200 g 500g Linearity ± 100 g ± 200 g ± 400 g ± 1000g Verifiable no no no no Filters Selectable: disabled, low, medium or high Units Switchable: lb, kg Display Luminosity, 5 settings, 25mm high numeric LED for weight value
9 LEDs to display the status of the crane scale Luminosity may be adjusted in the user menu
Casing Zinc coated aluminium casting IP65, silver colour
Hook and loop nickel-plated steel Power 6V 7Ah rechargeable lead acid battery P65
approx. 300 loading cycles battery charger included: 6.5 V / 0.8
Operating time Max. 150 hours between charging Working temperature –10 to +40 °C
Storage temperature -30 to +60 °)
Relative humidity 10 to 85%, non-condensing Battery charger Serially
Power supply • 2 AA alkaline batteries Remote control Serially Battery change • After approximately 6
months
HTS-BA-e-1024 6
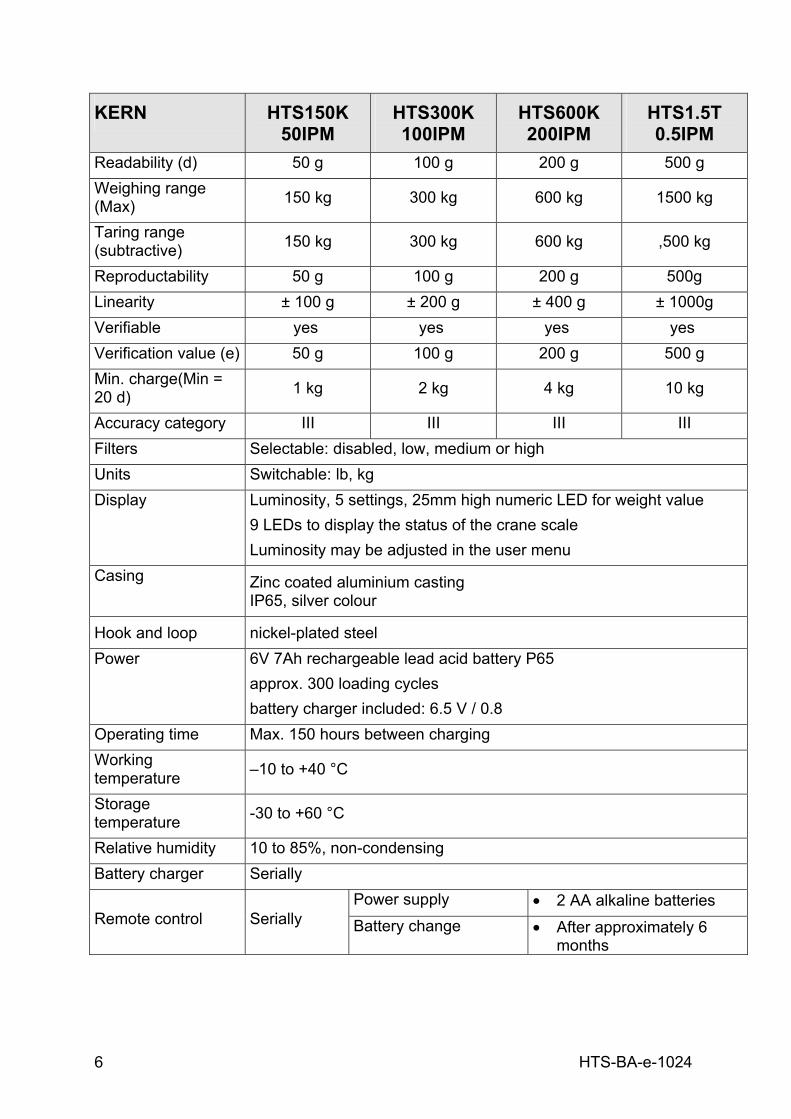
KERN HTS150K 50IPM
HTS300K 100IPM
HTS600K 200IPM
HTS1.5T 0.5IPM
Readability (d) 50 g 100 g 200 g 500 g Weighing range (Max) 150 kg 300 kg 600 kg 1500 kg
Taring range (subtractive) 150 kg 300 kg 600 kg ,500 kg
Reproductability 50 g 100 g 200 g 500g Linearity ± 100 g ± 200 g ± 400 g ± 1000g Verifiable yes yes yes yes Verification value (e) 50 g 100 g 200 g 500 g Min. charge(Min = 20 d) 1 kg 2 kg 4 kg 10 kg
Accuracy category III III III III Filters Selectable: disabled, low, medium or high Units Switchable: lb, kg Display Luminosity, 5 settings, 25mm high numeric LED for weight value
9 LEDs to display the status of the crane scale Luminosity may be adjusted in the user menu
Casing Zinc coated aluminium casting IP65, silver colour
Hook and loop nickel-plated steel Power 6V 7Ah rechargeable lead acid battery P65
approx. 300 loading cycles battery charger included: 6.5 V / 0.8
Operating time Max. 150 hours between charging Working temperature –10 to +40 °C
Storage temperature -30 to +60 °C
Relative humidity 10 to 85%, non-condensing Battery charger Serially
Power supply • 2 AA alkaline batteries Remote control Serially Battery change • After approximately 6
months

HTS-BA-e-1024 7
1.2 Large construction
KERN HTS3T1IP HTS6T2IP HTS10T5IP Readability (d) 1 kg 2 kg 5 kg Weighing range (Max) 3 000 kg 6 000 kg 10 000 kg
Taring range (subtractive) 3 000 kg 6 000 kg 7 500 kg
Reproductability 1 000 g 2 000 g 5 000g Linearity ±2 000g ±4 000g ±10 000 g Verifiable no no no Filters Selectable: disabled, low, medium or high Units Switchable: lb, kg Display Luminosity, 6 settings, 30 mm high numeric LED for weight value
bright, 1-digit, 20 mm high numeric LED for the current accumulator number 9 LEDs to display the status of the crane scale Luminosity may be adjusted in the user menu
Casing Zinc coated aluminium casting IP65, silver colour
Hook and loop nickel-plated steel Power 6V 7Ah rechargeable lead acid battery P65
approx. 300 loading cycles battery charger included: 6.5 V / 0.8
Operating time Max. 150 hours between charging Working temperature –10 to +40 °C
Storage temperature -30 to +60 °C) Relative humidity 10 to 85%, non-condensing Battery block Serially Battery charger Serially
Power supply • 2 AA alkaline batteries Remote control Serially
Battery change • After approximately 6 months

HTS-BA-e-1024 8
KERN HTS3T1IPM HTS6T2IPM HTS10T5IPM Readability (d) 1 kg 2 kg 5 kg Weighing range (Max)
3 000 kg 6 000 kg 10 000 kg
Taring range (subtractive) 3 000 kg 6 000 kg 7 500 kg
Reproductability 1 000 g 2 000 g 5 000g Linearity ±2 000g ±4 000g ±10 000 g Verifiable yes yes yes Verification value (e) 1000 g 2000 g 5000 g Min. charge(Min = 20 d) 20 kg 40 kg 100 kg
Accuracy category III III III Filters Selectable: disabled, low, medium or high Units Switchable: lb, kg Display Luminosity, 6 settings, 30 mm high numeric LED for weight value
bright, 1-digit, 20 mm high numeric LED for the current accumulator number 9 LEDs to display the status of the crane scale Luminosity may be adjusted in the user menu
Casing Zinc coated aluminium casting IP65, silver colour
Hook and loop nickel-plated steel Power
6V 7Ah rechargeable lead acid battery P65 approx. 300 loading cycles battery charger included: 6.5 V / 0.8
Operating time Max. 150 hours between charging Working temperature –10 to +40 °C
Storage temperature -30 to +60 °C Relative humidity 10 to 85%, non-condensing Battery block Serially Battery charger Serially
Power supply • 2 AA alkaline batteries Remote control Serially
Battery change • After approximately 6 months

HTS-BA-e-1024 9
1.3 Dimensions Small construction:
HTS 150kg—600kg

HTS-BA-e-1024 10
HTS1.5t
Dimensions (mm) Packing
Model D F H Ø1 Ø2 Ø3 X
Net weight
(kg) Gross weight (kg)
L×B×H (mm)
HTS150kg
HTS300kg
HTS600kg
30 60 435 37.5 45 16 480 12 14
HTS1.5t 28 78 465 40 60 23 516 13 15
540x270x310

HTS-BA-e-1024 11
Large construction:
Dimensions (mm) Packing Model
D F H D F H D F
Net weight
(kg) H
Gross weight (kg)
L×B×H (mm)
HTS3t 380 45 140 735 60 90 28 815 41 46 900x470x400
HTS6t
HTS10t 450 67 185 900 85 100 36 1040 65 73 1140x540x400

HTS-BA-e-1024 12
2. Declaration of conformity
KERN & Sohn GmbH D-72322 Balingen-Frommern Postfach 4052 E-Mail: [email protected]
Tel: 0049-[0]7433- 9933-0 Fax: 0049-[0]7433-9933-149 Internet: www.kern-sohn.de
Konformitätserklärung EC-Konformitätserklärung EC-Declaration of -Conformity
EC- Déclaration de conformité EC-Declaración de Conformidad
EC-Dichiarazione di conformità EC-Conformiteitverklaring
EC- Declaração de conformidade EC- Prohlášení o shode
EC-Deklaracja zgodności EC-Заявление о соответствии
D Konformitäts-erklärung
Wir erklären hiermit, dass das Produkt, auf das sich diese Erklärung bezieht, mit den nachstehenden Normen übereinstimmt.
GB Declaration of conformity
We hereby declare that the product to which this declaration refers conforms with the following standards.
CZ Prohlášení o shode
Tímto prohlašujeme, že výrobek, kterého se toto prohlášení týká, je v souladu s níže uvedenými normami.
E Declaración de conformidad
Manifestamos en la presente que el producto al que se refiere esta declaración está de acuerdo con las normas siguientes.
F Déclaration de conformité
Nous déclarons avec cela responsabilité que le produit, auquel se rapporte la présente déclaration, est conforme aux normes citées ci-après.
I Dichiarazione di conformità
Dichiariamo con ciò che il prodotto al quale la presente dichiarazione si riferisce è conforme alle norme di seguito citate.
NL Conformiteit-verklaring
Wij verklaren hiermede dat het product, waarop deze verklaring betrekking heeft, met de hierna vermelde normen overeenstemt.
P Declaração de conformidade
Declaramos por meio da presente que o produto no qual se refere esta declaração, corresponde às normas seguintes.
PL Deklaracja zgodności
Niniejszym oświadczamy, że produkt, którego niniejsze oświadczenie dotyczy, jest zgodny z poniższymi normami.
RUS Заявление о соответствии
Мы заявляем, что продукт, к которому относится данная декларация, соответствует перечисленным ниже нормам.

HTS-BA-e-1024 13
Electronic Crane Scale: HTS
Mark applied EU Directive Standards Approval/ Test-certificate N°
2006/95/EC
Low Voltage Directive
EN 60950-1 : 2006
2004/108/EC
EMC Directive
EN61326-1: 1997
+A1: 1998+A2: 2001 (Class B)
2006/42/EC
Machine directive
EN13155: 1998 (2)
year
1259 90/384/EEC
Non-automatic Weighing Instruments Directive
EN45501 1) T6778 1)
gilt nur für geeichte Waagen applies only to certified balances
valable uniquement pour les balances vérifiées sólo aplicable a balanzas verficadas
la dichiarazione vale solo per le bilance omologate
Geldt uitsluitend voor geijkte weegschalen
vale só para balanças com aferição platí jen pro cejchované váhy
1)
dotyczy tylko wag legalizowanych действует только для поверенных весов
Date: 17.09.2009 Signature:
Gottl. KERN & Sohn GmbH
Management
Gottl. KERN & Sohn GmbH, Ziegelei 1, D-72336 Balingen, Tel. +49-[0]7433/9933-0,Fax +49-[0]7433/9933-149

HTS-BA-e-1024 14
English Important notice for verified weighing instruments
M Weighing instruments verified at the place of manufacture bear the preceding mark on the packing label and a green M-sticker on the descriptive plate. They may be set to work immediately.
M Weighing instruments which are verified in two steps has no green "M" on the descriptive plate, bear the aforementioned identification on the packing label. The second step of the verification must be carried out by the W&M authorities
The first step of the verification has been carried out at the manufacturing plant. It comprises all tests according to EN 45501-8.2.2. If national regulations in individual countries limit the period of validity of the certification, the operator of such a scale is himself responsible for its timely re-certification. Deutsch Wichtiger Vermerk für geeichte Waagen in EU-Ländern
M Werksgeeichte Waagen tragen vorstehendes Kennzeichen auf dem Packetikett und eine grünen M-Kleber auf dem Eichschild. Sie dürfen sofort in Betrieb genommen werden.
M Waagen die in zwei Schritten geeicht werden und kein grünes "M" auf dem Eichschild haben, tragen vorstehendes Kennzeichen auf dem Packetikett. Der zweite Schritt der Eichung ist durch den Eichbeamten durchzuführen.
Der erste Schritt der Eichung wurde im Herstellerwerk durchgeführt. Er umfasst alle Prüfungen gemäß EN45501-8.2.2. Sofern gemäß den nationalen Vorschriften in den einzelnen Staaten die Gültigkeitsdauer der Eichung beschränkt ist, ist der Betreiber einer solchen Waage für die rechtzeitige Nacheichung Selbst verantwortlich.
Français Remarque Importante pour les Instruments de pesage vérifiées dans les pays membre de l’Union Européenne
M Les instruments de pesage vérifiés en usine sont identifiés par un M sur leur emballage et par un sticker M vert sur la plaque d'identification. Ils peuvent être utilisés après leur installation.
M Les instruments de pesage vérifiés en deux étapes portent l'identification M barré sur leur emballage. La seconde étape de la vérification doit être effectuée par l’assistant technique de l’administration des poids et mesures.
La première étape de la vérification a été effectuée en usine. Cela comprend tous les essais suivant la norme EN45501-8.2.2. Dans la mesure où la durée de la vérification est limitée en fonction des prescriptions nationales dans les différents pays, I’ utilisateur ďune telle balance est lui-même responsable de la vérification ultérieure dans les délais. Español Nota importante para balanzas verificadas en paises de la UE
M Las balanzas verificadas en origen llevan esta indicación en la etiqueta del embalaje y con la etiqueta M sobre fondo verde en la placa de caracteristicas pueden ser utilizadas inmediatamente.
M Balanzas cuya verificación se realiza en dos fases llevan esta indicación en la etiqueta del embalaje. La segunda fase de la verificación debe ser realizada por el asistente técnico de la oficina de contraste.
La primera fase de la verificación ha sido realizada en origen. Incluye todos los ensayos según lo norma EN45501-8.2.2. Si el plazo de validez de la verificación está limitado por las normas nacionales de cada estado, el usuario será responsable de las verificaciones posteriores reglamentarias de su balanza. Italiano Nota Importante per la bilance approvate nei paesi UE
M Le bilance verificate in fabbrica portano questo contrassegno sull'etichetta dell'imballo e con il sigillo M su sfondo verde sulla targhetta metrologica possono essere messe in uso immediatamente.
M
Le bilance che vengono verificate in due fasi, portano questo contrassegno sull'etichetta dell'imballo. La seconda fase della verifica deve essere eseguita dal servizio assistenza tecnica dell'ufficio di pesi e misure.
La prima fase della verifica è stata eseguita dal produttore e comprende tutte le prove previste dalla norma EN 45501-8.2.2. Se la durata di validità della verifica è limitata in accordo con le prescrizioni nazionali vigenti nei singoli paesi, l’utente stesso di una bilancia di tale tipa sarà responsabile dell’esecuzione, entro le date di scadenza previste, delle verifiche periodiche.

HTS-BA-e-1024 15
Netherlands Belangrijke aanmerking voor geijkte weegschalen in EG-landen
M In de fabriek geijkte weegschalen dragen dit kenteken op het emballage-etiket en een groene M-sticker op het ijklabel. Deze kunnen meteen in gebruik genomen worden.
M Bij weegschalen die in twee stappen geijkt moeten worden en geen groene “M” op het ijklabel hebben, staat dit kenteken op het emballage-etiket. De tweede stap van de ijking moet door het ijkwezen uitgevoerd worden.
De eerste stap van de ijking werd in de fabriek doorgevoerd. Deze omvat alle inspecties conform EN45501-8.2.2. Voor zover in overeenstemming met de nationale voorschriften in de individuele staten de geldigheidsduur van de ijking beperkt is, is de exploitant van een dergelijke weegschaal voor een tijdige herijking zelf verantwoordelijk. De eerste stap van de ijking werd in de fabriek uitgevoerd. Deze stap omvat alle tests overeenkomstig EN45501-8.2.2. Bij weegschalen met een analoge weegbruggenaansluiting moet aanvullend de nauwkeurigheid overeenkomstig EN45501-3.5.3.3 getest worden. Deze controle is niet nodig als de terminal het serienummer van de weegbrug heeft. Português Nota importante para as balanças aferidas em países EU
M As balanças aferidas pela fábrica levam o cartaz identificador sobre a etiqueta de pacote e um adhesivo M verde sobre a placa de aferição. Têm que colocar-se em funcionamento sem demora.
M As balanças que foram aferidas em dois passos e que não tenham um "M" verde sobre a placa de aferição, têm o rótulo antecedente na etiqueta de pacote. O segundo passo da aferição tem que ser feito por um empregado público de aferição.
A primeira fase da aferição foi feita na fábrica do produtor. Abrange todas as inspecções segundo EN45501-8.2.2. Logo que segundo as normas nacionais nos estados individuais a duração de validez da aferição esteja limitada, o usuário-proprietário duma tal balança é mesmo responsável pela aferição posterior a tempo. Česky Důležitý pokyn pro cejchované váhy v zemích EU
M Váhy ocejchované ve výrobním závodě jsou opatřeny výše uvedenou značkou na etiketě balení a zelenou nálepkou M na cejchovacím štítku. Takže se mohou okamžitě uvést do provozu.
M Váhy se cejchují ve dvou etapách, a jestliže nemají zelené M na cejchovacím štítku, mají na etiketě balení výše uvedenou značku. Druhou etapu cejchování provádí cejchovní úřad.
První fáze cejchování byla provedena ve výrobním závodě. Zahrnuje všechny testy podle EN45501-8.2.2. Pokud je podle národních předpisů v jednotlivých státech omezená časová platnost cejchování, je provozovatel takových váh sám odpovědný za včasné přecejchování. Polski Adnotacje dotyczące legalizowanych wag w państwach UE
M Legalizowane u producenta wagi mają wystające oznaczenie na opakowaniu i zieloną nalepkę M na znaku legalizacji. Takie wagi można natychmiast eksploatować.
M Wagi, które są legalizowane w dwóch etapach i nie mają zielonego „M“ na znaku legalizacji, mają wystające oznaczenie na etykiecie opakowania. Drugi etap legalizowania musi przeprowadzić pracownik urzędu miar i wag.
Pierwszy etap legalizowania przeprowadzono w zakładzie producenta. Obejmuje wszystkie kontrole według EN45501-8.2.2. Jeśli okres ważności legalizacji wagi jest ograniczony zgodnie z narodowymi przepisami obowiązującymi w poszczególnych państwach, użytkownik ponosi wyłączną odpowiedzialność za przeprowadzenie w odpowiednim czasie ponownej legalizacji wagi. Pyccкu Примечание для поверенных весов в странах ЕЭС
M Поверенные на заводе весы помечаются вышеуказанным символом на упаковочной этикетке и зеленой наклейкой "M" на табличке поверки. Они могут немедленно приниматься в эксплуатацию.
M Весы, которые поверяются в два этапа и не имеют зеленой наклейки "M" на табличке поверки, помечаются вышеуказанным символом на упаковочной этикетке. Второй этап поверки должен производиться поверочным ведомством.
Первый шаг поверки был выполнен на заводе-изготовителе. Он включает все проверки согласно EN45501-8.2.2. Если в соответствии с национальными предписаниями отдельных государств срок действия поверки ограничен, эксплуатирующая организация сама несет ответственность за своевременную повторную поверку таких весов.

HTS-BA-e-1024 16
Notice Certified balances and balances used for legal applications have the EU type approval. The year of the initial verification is shown next to the CE mark. Such balances are verified in the factory and carry the „M“ mark on the actual balance and the packaging. The year of initial verification is shown next to the CE mark. The GEO value of verified balances explains for which location of use the balance has been verified. This GEO value is shown on the balance itself and on the packing. Further details see GEO value table. Hinweise Für geeichte/eichpflichtige Waagen liegt eine EU Bauartzulassung vor. Das Jahr der ersten Eichung ist neben dem CE Zeichen aufgeführt. Solche Waagen sind ab Werk geeicht und tragen die Kennzeichnung „M“ auf dem Gerät selbst und auf der Verpackung. Der GEO-Wert gibt bei vom Hersteller geeichten Waagen an, für welchen Aufstellungsort die Waage geeicht ist. Dieser GEO-Wert befindet sich auf der Waage sowie der Verpackung. Genaueres ist der GEO-Wert-Tabelle zu entnehmen. Remarques Les balances vérifiées/admissibles à la vérification font l’objet d’une approbation de modèle UE. L’année de la vérification primitive est indiqués à côté de la marque CE. Ces balances sont vérifiées d’origine et portent la marque „M“ sur l’appareil lui-même et sur l’emballage. Le valeur GEO indique le lieu d’utilisation pour lequel la balance été vérifiée. Ce valeur GEO se trouve sur la balance ainsi que sur l’emballage. Veuillez trouver plus de détails dans le tableau GEO. Notas Las balanzas verificadas/verificables cuentan con una aprobación de modelo UE. El año de la primera verificación está indicado al lado del distintivo CE. Estas balanzas están verificadas en fábrica y llevan la designación „M“ sobre el propio aparato y sobre el embalaje. El valor GEO indica el lugar de ubicación por lo cual la balanza está verificado. El valor se encuentra sobre la balanza así como sobre el embalaje. Por favor tomen los demás detalles de la tabla GEO. Avvertenza Per le bilance approvate esiste un’approvazione CE del tipo. L´anno della prima verifica è indicato a fianco della marcatura CE. I tipi marcati con un contrassegno „M“ su sfondo verde possono essere impiegati da subito. Il coefficiente GEO di bilance omologate indica per quale luogo la bilancia è stata omologata. Questo coefficiente GEO si trova sulla bilancia e sull’imballo. Ulteriori informazioni vedi tabella coefficiente GEO Opmerkingen Voor geijkte weegschalen/weegschalen, die verplicht geijkt moeten worden, ligt er een EG-modelgoedkeuring ter inzage. Het jaar van de eerste ijking werd naast het EG-conformiteitsteken vermeld. Dergelijke weegschalen werden in de fabriek geijkt en dragen het identificatielabel „M“ op het apparaat zelf en op de verpakking. De GEO-waarde geeft bij door de fabrikant geijkte weegschalen aan, voor welke plaats van opstelling de weegschaal geijkt is. Deze GEO-waarde bevindt zich op de weegschaal en ook op de verpakking. Meer details kan er uit de tabel met de GEO-waarde afgeleid worden. Instruções Para as balanças aferidas / obrigadas à aferição existe uma homologação de tipo construtivo da EU. O ano da primeira aferição fica ao lado do simbolo CE. Tais balanças foram aferidas na fábrica e levam o rótulo „M“ no mesmo aparelho e na embalagem. O valor GEO indica nas balanças aferidas pelo produtor para qual lugar de colocação a balança foi aferida. Este valor GEO encontra-se na balança assim como na embalagem. Mais pormenores podem ver-se na tablela dos valores GEO. Poznámky Pro ocejchované a cejchování podléhající váhy existuje povolení EU podle typu konstrukce. Rok prvního cejchování se uvádí vedle značky CE. Takové váhy se cejchují ve výrobním závodě, a jsou označeny znakem „M“ na vlastním přístroji, i na obalu. Hodnota GEO udává u výrobcem cejchovaných vah, pro jaké místo instalace je váha ocejchována. Tato hodnota GEO se nachází na váze, jakož i na obalu. Přesnější je odečíst hodnotu GEO z tabulky.

HTS-BA-e-1024 17
Wskazówki Dla wag legalizowanych/podlegających obowiązkowi legalizowania istnieje dokument dopuszczenia rodzaju konstrukcji UE. Rok pierwszej legalizacji jest podany obok znaku CE. Takie wagi są legalizowane w zakładzie producenta i mają oznaczenie „M“ na sobie i na opakowaniu. W przypadku wag legalizowanych u producenta wartość geograficzna podaje, dla jakich miejsc ustawienia waga została legalizowana. Ta wartość geograficzna znajduje się zarówno na wadze jak i na opakowaniu. Dokładne informacje znajdują się w tabeli wartości geograficznych. Указания Калиброванные/подлежащие поверке весы получают допуск на конструкцию ЕС. Год первой поверки приведен рядом с символом CE. Такие весы поверены на заводе и имеют маркировку „M“ на самом устройстве и на упаковке. Значение GEO на откалиброванных изготовителем весах указывает, для какого места установки произведена калибровка весов. Это значение GEO находится на весах и на упаковке. Более подробная информация содержится в таблице значений GEO GEO-WERT-Tabelle / GEO-value table
Höhe über Meer in Metern / altitude
geographische Breite /geo- graphical latitude 0-650 650-1300 1300-1950 1950-2600 2600-3250
0° 0‘ - 9° 52‘ 4 / 5 3 / 4 2 / 3 1 / 2 0 / 1
9° 52‘ - 15° 6‘ 5 / 6 4 / 5 3 / 4 2 / 3 1 / 2
15° 6‘ - 19° 2‘ 6 / 7 5 / 6 4/ 5 3 / 4 2 / 3
19° 2‘ - 22° 22‘ 7 / 8 6 / 7 5 / 6 4 / 5 3 / 4
22° 22‘ - 25° 21‘ 8 / 9 7 / 8 6 / 7 5 / 6 4 / 5
25° 21‘ - 28° 6‘ 9 / 10 8 / 9 7 / 8 6 / 7 5 / 6
28° 6‘ - 30° 41‘ 10 / 11 9 / 10 8 / 9 7 / 8 6 / 7
30° 41‘ - 33° 9‘ 11 / 12 10 / 11 9 / 10 8 / 9 7 / 8
33° 9‘ - 35° 31‘ 12 / 13 11 / 12 10 / 11 9 / 10 8 / 9
35° 31‘ - 37° 50‘ 13 / 14 12 / 13 11 / 12 10 / 11 9 / 10
37° 50‘ - 40° 5‘ 14 / 15 13 / 14 12 / 13 11 / 12 10 / 11
40° 5‘ - 42° 19‘ 15 / 16 14 / 15 13 / 14 12 / 13 11 / 12
42° 19‘ - 44° 32‘ 16 / 17 15 / 16 14 / 15 13 / 14 12 / 13
44° 32‘ - 46° 45‘ 17 / 18 16 / 17 15 / 16 14 / 15 13 / 14
46° 45‘ - 48° 58‘ 18 / 19 17 / 18 16 / 17 15 / 16 14 / 15
48° 58‘ - 51° 13‘ 19 / 20 18 / 19 17 / 18 16 / 17 15 / 16
51° 13‘ - 53° 31‘ 20 / 21 19 / 20 18 / 19 17 / 18 16 / 17
53° 31‘ - 55° 52‘ 21 / 22 20 / 21 19 / 20 18 / 19 17 / 18
55° 52‘ - 58° 17‘ 22 / 23 21 / 22 20 / 21 19 / 20 18 / 19
58° 17‘ - 60° 49‘ 23 / 24 22 / 23 21 / 22 20 / 21 19 / 20
60° 49‘ - 63° 30‘ 24 / 25 23 / 24 22 / 23 21 / 22 20 / 21
63° 30‘ - 66° 24‘ 25 / 26 24 / 25 23 / 24 22 / 23 21 / 22
66° 24‘ - 69° 35‘ 26 / 27 25 / 26 24 / 25 23 / 24 22 / 23
69° 35‘ - 73° 16‘ 27 / 28 26 / 27 25 / 26 24 / 25 23 / 24
73° 16‘ - 77° 52‘ 28 / 29 27 / 28 26 / 27 25 / 26 24 / 25
77° 52‘ - 85° 45‘ 29 / 30 28 / 29 27 / 28 26 / 27 25 / 26

HTS-BA-e-1024 18
3. General Safety Instructions Duties of the owner-operator Adhere to national accident prevention prescriptions and the operator’s work,
operating and safety prescriptions. Adhere to all of the crane manufacturer’s safety prescriptions. The scale must only be used for the intended purpose. Any type of use which is not
described in these operating instructions is regarded as improper use. The owner takes full responsibility for material damage and personal injury which is a result of such improper use. KERN & Sohn take no responsibility whatsoever. KERN & Sohn cannot be made liable, if the crane scale is altered or used improperly, and if damage occurs because of this.
You must service and maintain the crane scale, crane and load support regularly (see chapter 10).
Record test results and keep in test book. Organizational measures Only trained and instructed persons may operate the appliance. Make sure that the instruction manual is always available on the installation site of
the crane. Have installation, commissioning, maintenance and repairs carried out by specially
trained personnel only. Repairs must only be carried by service partners authorised by KERN. Only use original replacement parts. All repairs and replacement parts must be documented by the service partner (see
list, chapter 11.3). All service work must be documented (see checklist, chapter 10.2).
Environmental conditions Never operate the crane scale in explosion hazard areas. The standard model is not
explosion-proof. Crane scales must only be installed in the conditions as described in these operating
instructions (see chapter 1, "Technical Specifications"). Do not expose the crane scale to high levels of humidity. Unauthorised levels of
condensation (condensation of air moisture on the equipment) can occur, if a cold unit is moved to a significantly warmer environment. In this situation, acclimatise the unit for approximately 2 hours at room temperature. Make sure the equipment is not connected to the mains at that time.
Do not use the crane scale in a corrosive atmosphere. Protect the crane scale from high levels of air humidity, vapours, liquids and dust;

HTS-BA-e-1024 19
Intended use Use the crane scale exclusively for lifting and weighing freely moveable loads. Failure to adhere to prescriptions when using the appliance may result in injury. For
example, the following is not permitted: - exceeding the permissible nominal load of the crane, crane scale or any type
of load attachment equipment, - transporting persons, - pulling loads at an angle, - tearing loose, pulling or dragging loads.
Changes or modifications to the crane scale or the crane are not permitted. Safety conscious working methods Do not stop under suspended loads. Only position the crane so that the load is lifted vertically. Wear personal safety equipment (helmet, safety gloves) when working with the
crane and crane scale. Decommissioning and storage Remove the crane scale from the crane and remove all load attachment equipment
from the crane scale. Do not store the crane scale outside Remove battery block (large construction) from the crane scale if the crane scale is
out of use for an extended period of time.

HTS-BA-e-1024 20
4. Crane scale at a glance The crane scale is a versatile and economic solution for overhead material handling and weighing applications, i.e. recycling, metal works, machine repair and rebuilding, transport and logistics. Optional infrared remote control makes operation even easier.
4.1 Overview Small construction:
�
��
�
�
�
�
�
�
1 Eye 6 Connecting pipe
2 Gauge propeller 7 Keyboard
3 Retaining pins (2 items) 8 Display
4 Hook 9 Cover battery charging connection
5 Safety clip 10 Nameplate

HTS-BA-e-1024 21
Large construction:
1 Eye 7 Gauge propeller
2 Splint 8 Battery screw
3 Display 9 Battery and battery cover
4 Keyboard 10 Nameplate
5 Window for IR remote control 11 Swivel joint
6 Safety clip 12 Hook

HTS-BA-e-1024 22
4.2 Display Small construction:
The weight display is a 5 digit LED display. Large construction:
The weight display is a 6 digit LED display (big numbers). The small number on the right hand side indicates the current accumulator number.
LED Meaning The LED will illuminate when …
Movement The scale is in motion
Total Total the scale adds a new value into the totals memory or
The display shows the accumulated weight or the number of posts
BAT low Battery falls below a certain value
kg The weight unit currently shown is Kg
lb The weight unit currently shown is lb
t large construction
only the current displayed weight unit is t
→0← Zero Weight is approximately +/- ¼ d around the zero point
Gross Gross The scale shows the gross weight
Tare Tare The scale shows the tare weight
Net Net The scale shows the net weight
PEAK the scale displays the highest load value of a weighing (peak value)

HTS-BA-e-1024 23
4.3 Keyboard
Key Meaning Functional Description
On/Off On / Off Switches the scale on or off...
→0← Zero / master Corrects the zero point of the scale The display is set to zero.
Only use this key in gross mode.
TARE/M Tare/M In gross mode this button saves the current weight value as tare weight. The scale will display the net weight 0
C Delete In net mode: the scale returns to gross mode
In gross mode: the scale starts a self-test
In weight hold mode: the scale returns to weighing mode
TOTAL Amount / maximum
The current weight value is added to the amount memory, the Total LED will blink for 3 seconds.
F Call / stop In Hold mode: The scale displays the most recently-stored peak value
In Net and Gross mode: The scale displays the tare weight.
In Totals mode: When pressed repeatedly the crane scale displays the tare value, the accumulated value, the number of items and the gross value.
MODE + →0← Access user menu to set parameters, see chapter 7
MODE + TARE/M Checks, saves and calls up the tare weight
MODE + TOTAL The heaviest load of the last weighings shall be shown
MODE + F A stable weight value shall be maintained (frozen)

HTS-BA-e-1024 24
4.4 Remote control
The infra-red remote control can operate the scale as the keyboard does. In addition the remote control adds 10 numerical keys: 0 to 9. The red LED lights every time a key is pressed.

HTS-BA-e-1024 25
5. Commissioning
5.1 Unpacking (large construction)
CAUTION
Risk of straining your back! The crane scale is compact and relatively heavy.
Remove the scale from the shipping container only with assistance of another person.
Use a power-lifting device such as a crane or
forklift.
Secure the scale to ensure it doesn’t drop when lifting.
5.2 Unpacking (large and small construction)
Ensure that the all parts are accounted for.
• Crane scale
• Battery charger
• Remote control
• Operating Instructions
5.3 Checking the original dimensions
Carry out all safety checks, see chapter 10.1 “Regular maintenance after 3 months of operation”.
Enter all information (date, examiner, results) in the first line under “Checking before first use” on the checklist (see chapter 10.2)
If the dimensions of your first safety check do not match those of the manufacturer, then the scale must not be used. In this situation, contact a service partner authorised by KERN.

HTS-BA-e-1024 26
5.4 Recharge the battery A sealed, rechargeable lead-acid battery powers the crane scale.
CAUTION
Damage to the crane scale!
Only use the battery charger provided with the crane scale.
Check that battery charger, cables and mains plug are in
good order and condition.
Do not use the crane scale while charging.
Loading (small construction)
1. Take off the loader connector cover at the back of the crane scale.
2. Connect the battery charger on the one end to the battery pack connector and on the other end to the power outlet (mains). During the charging process, 1 green LED will be lit on the battery charger.
3. The battery is completely charged when both green LEDs on the battery charger are lit. The battery charges completely in 15 hours.

HTS-BA-e-1024 27
�
Loading (large construction) 1. Undo the 2 screws of the battery cover on top of the crane scale and pull out the
battery pack (1).
2. Unplug the battery pack from the connector in the housing.
3. Connect the battery charger on the one end to the battery pack connector and on the other end to the power outlet (mains).
During the charging process, 1 green LED will be lit on the battery charger. 4. The battery is completely charged when both green LEDs on the battery charger are
lit. The battery charges completely in 15 hours.

HTS-BA-e-1024 28
5.5 Suspend scale
�
�
Pre-condition Your crane must have a safety latch (1) to prevent the crane scale from falling when there is no load. If there is no safety latch or the safety latch is damaged, please contact the crane manufacturer to obtain a hook with this safety feature.
Hang the crane scale from the bottom hook of a crane and lock the secure latch. The crane scale’s upper shackle should rest in the saddle (2).

HTS-BA-e-1024 29
6. Operation
6.1 Safety instructions
Danger Risk of injury due to falling loads!
Always operate with great care according to the general rules for operating a crane, see chapter 1.
Persons are forbidden to walk or stand in dangerous area.
Do not exceed the rated load capacity of the crane, crane scale or
any load bearing item attached to the crane scale.
Check all parts (hook, loop, rings, rope loops, cables, chains, etc.) for excessive wear or damage
If there are visible defects on the safety latch of the hook, or if it is missing altogether, the scale must not be used.
Only work at the appropriate speed You must avoid oscillations and horizontal force. Avoid any type of
impacts, twisting (torsion) and oscillations (e.g. caused by suspending at an angle).
Do not use crane scale for transporting loads The nature of loads, which can be handled by the equipment must
be observed. Prohibition to use in a building area.
6.2 Load the crane scale For good weighing results note the following, for figures see next page:
Do use hardware that creates single point attachments and allows the scale freedom of alignment.
Do not use oversize interface hardware which restricts single point loading. Do not use multiple attachments. Do not push or pull the load or the loaded scale. Do not pull laterally on the hook.

HTS-BA-e-1024 30
Loading the scale 1. Position the crane scale hook over the load. 2. Lower the crane scale until the load can be attached to the scale hook. Reduce
speed when reaching the appropriate level. 3. Attach the load to the hook. Make sure that the scale hook latch is closed. If slings
are used to handle the load, make sure that the slings are fully seated in the saddle of the scale hook.
4. Start lifting the load slowly. If slings are used to handle the load, make sure that the load is properly balanced and that the slings are positioned properly.

HTS-BA-e-1024 31
Loading small construction:

HTS-BA-e-1024 32
Loading large construction:

HTS-BA-e-1024 33
6.3 Turn on/off Switching on
Press and hold the On/Off key on the keyboard of the scale. The display illuminates and the scale runs a self test.
The self test is complete when weight value 0 is shown on the display. The crane scale works in gross mode. Note: Switching on is only possible via the keyboard of the scale. Switching Off
Press and hold the On/Off key on the keyboard of the scale.
or
Press the Off key on the remote control.
6.4 Resetting the scale For best weighing results set the empty scale to zero before weighing.
Resetting is only possible if the weight value shown is within the preset zero area (see user menu, chapter 8.3) and if the scale is not moving, i.e. the „LED “ is not lit up. Manual setting to zero
Press button →0← in gross mode. 0 (kg) shall appear in the display and "LED →0←" shall illuminate.
Auto zero with power up With this function activated in the Service menu (not accessible on verified scales) (see chapter 8.3), the scale is automatically set to zero after powering up.

HTS-BA-e-1024 34
6.5 Taring Taring is only possible if the scale ist not in motion, i.e. the motion „LED “ is not lit. Once the tare weight is accepted the scale is working in the net mode. Manual taring
In gross mode press the Tare key. The scale stores the weight value as tare value. The display shows 0 (kg) and the Net LED lights.
Numeric tare When you know the tare weight of the container, you don’t have to weigh and tare the empty container, you can enter the tare weight on the remote control.
In gross mode enter the known tare value on the remote control, then press the Tare key. The display shows the net weight and the Net LED lights.

HTS-BA-e-1024 35
Call up current tare weight
In net mode press the F key. The tare weight is displayed and the Tare LED lights.
Note: With the F key you can switch between net and tare weight. See chapter 6.7 for working with the accumulation function.
Clearing tare weight
In net mode press the C key. The tare weight is cleared. The gross weight is displayed and the Gross LED lights.
6.6 Working with the tare weights saved The crane scale has 10 memories (storage areas 0...9) for tare weights. The first storage space (0) shall be used for numerical and manual tares. Weights saved here shall be overwritten with manual or numerical tares. For saving tare weights that are used frequently, storage spaces 1 … 9 should be used. Note: Tare weights can only be stored without decimal places.

HTS-BA-e-1024 36
Note You can transfer into gross mode at any time by pressing button C. Save new tare weight
1. Select storage area as described above. 2. Enter tare weight using the remote control and confirm with the Mode key. or
Press key →0← and enter the tare weight with the tare and F keys. Note Tare weight entries that have not been confirmed may be cancelled by pressing the →0←key.
Calling and taking over the tare weights saved 1. Press mode and tare buttons consecutively.
The content of the first tare memory shall be displayed. The number of the storage area shall be represented by a small figure on the right.
2. Press key F to call the second tare memory.
3. Press key F to call additional tare accumulators. 4. Press the tare button to take over a saved tare
weight. The crane scale changes into net mode and uses the tare weight saved.

HTS-BA-e-1024 37
6.7 Weighing
Load the crane scale. The weight value is indicated immediately.
Note The crane scale offers optical weighing help, i.e. the display blinks if the weight value is not within boundaries set. To do this, an upper and lower limit must be entered in the “Weighing with tolerance range” user menu (see chapter 7.4).
6.8 Accumulation Manual or automatic accumulation must be activated in the User menu (see chapter 7.4). Manual accumulating
In gross or net mode, press the Total key to add the weight value to the accumulator. The Total LED is lit. The internal item counter is increased by 1.

HTS-BA-e-1024 38
Automatic accumulating
Load a weight equal or heavier than the minimum accept limit. The weight is automatically added to the accumulator. The Total LED is lit. The internal item counter is increased by 1.
Notes
• The weight is accumulated automatically if it is equal or heavier than the minimum accept limit set in the User menu, see chapter 8.3.
• Between successive weighings the weight value must decrease by 10 digits to be
recognized as a new accumulation value. • When the accumulated weight exceeds 8 digits or the item counter exceeds 4 digits,
FULL is displayed and the Total LED is flashing for 5 seconds. The last accumulating is invalid!
Recall accumulation values
When pressing the Recall key repeatedly the crane scale displays the following values: Tare weight First 4 digits of the accumulated weight The last 4 figures of the accumulated weight. In this example the accumulated weight is 22,000kg. Number of items accumulated Back to gross mode

HTS-BA-e-1024 39
Clearing the accumulator
6.9 Displaying peak weight To do this, the weighing mode must be set as Hold Mode, see User menu chapter 7.4. In this situation the totalising function is not available. In Hold mode the crane scale can display the maximum weighed load and then hold this in the display. Activating peak weight mode To start a peak weight measuring cycle in gross or net mode, press the MODE and TOTAL in succession. The PEAK LED lights up. While the PEAK LED is lit, the scale stores the highest load value of a weighing (peak value). Recalling the peak weight
Press the F key, the heaviest load of the last weighing will flash in the display. Returning to weighing mode
Press the F key again.
1. Press repeatedly the F key to recall the
first digits of the accumulated weight (H…) 2. Press key →0← in order to delete the
amount accumulator..
3. Confirm SAVE with the mode key.The
accumulator is cleared; the crane scale is back to gross mode.

HTS-BA-e-1024 40
Returning to the peak weight measuring cycle
When the peak weight is displayed, press the C key. The display changes to the current gross weight and the peak weight measuring cycle is ended.
Clearing the peak weight 1. When the peak weight is displayed, press the a keys. The display returns to the
actual gross weight. 2. Press the C key. The stored peak value is deleted and a new measuring cycle can
be started.
6.10 Weighing with a tolerance range To ensure that your weighing value is within a defined tolerance range, you can program separate upper and lower limits. Optical weighing help can support you when using tolerance weighing. If optical weighing help is active, then the weight display will flash when the weight is below the lower limit or above the upper limit. Weighing with a tolerance range must be activated in the User menu, see chapter 7.4. Defining limits When “Weighing with a tolerance range” is selected as the weighing mode, then the parameters F3.6.1 to F3.6.3 will be available in the user menu, see chapter 7.4. 1. Entering the upper limit, F3.6.1. 2. Entering the lower limit, F3.6.2 3. Activate/deactivate optical weighing help F3.6.3.
6.11 Stop weight value (freeze) Once a stable weight value is detected, you can "freeze" or lock the weight value displayed until it is cleared for the next weighing.
Press the buttons Mode and F to "freeze" or hold the current weight value. It will be displayed as long as it isn’t cleared.
To clear the "frozen" or locked weight, press the C key.

HTS-BA-e-1024 41
6.12 Battery operation For optimum battery operation please observe the following:
Do not recharge the battery until it has been fully discharged.
Charge the battery at least every 3 months to keep it in good condition.
When the crane scale is not in use for a long time, remove the battery.
Battery indicator There are two levels of battery indicators:
Notes
• The battery is not warranted due to its service time is greatly influenced by individual use.
• Battery charge is less than normal if the battery is not used for a long time, e.g. for more than 2 months. To return the battery to normal operation conditions cycle the battery at least 3 times by charging it and using it until it is fully discharged.
• Battery charge and scale operation duration will decline with use. We recommend replacement of the battery after 300 charging cycles.
Checking battery capacity In the self test the crane scale checks the display and the battery capacity.
In gross mode press the C key. The following is displayed: • 000000 • 111111 • … • 999999
• bat x, with x = 1 (low) ... 4 (high)
With the BAT LOW LED lit, charge the battery soon.
With the L bat display, charge the battery immediately

HTS-BA-e-1024 42
6.13 Operation with remote control The remote control can be operated at distances up to 15 meters.
You can operate all functions except switching on via the remote control. With the
remote control the additional function numeric tare is possible.
Aim the top of the remote control to the front of the crane scale. Notes
• The red LED must light up with every key touch. If it fails to light up, the batteries of the remote control must be changed, see chapter 10.3.
• Change the batteries every 2 months.

HTS-BA-e-1024 43
7. User menu In the master mode you can modify parameters concerning your specific weighing application.
7.1 Overview The crane scale menu consists of two areas: The user menu and the service menu for service technicians, see chapter 8. Operation is the same in both areas. The user menu parameters are represented by numbers in the display. Parameter Factory settings No. Name Value Meaning F2.4.1 Minimum weight for
totalising 0 Totalising is not possible
F2.4.2 Totalising mode 0 off F2.5 Weighing mode 0 normal F3.1 Sleep mode 1 On F3.2 Display luminosity 0 very light F3.6.1 Upper boundary value F3.6.2 Lower boundary value F3.6.3 Weighing help 0 Off F3.7 Save status 0 Off F3.8 Remote control
function 1 On
F4.3 Display test 0 Skip display test F4.4 Keyboard test 0 Skip keyboard test F5.1 Exit menu 1 Save changed settings If no factory settings have been given, then they depend on the model or on the country and its respective laws on measures and calibration.
7.2 Accessing the user menu
Press the buttons Mode and a simultaneously. The final parameter F3 group of the user menu shall be displayed. No LED is lit. The scale is ready for modifying parameters.

HTS-BA-e-1024 44
7.3 Operation in menu Display in user menu The display is divided in 3 groups:
Selecting parameter groups or settings Example 1: to get from parameter group F3 directly to parameter group F4
Press the Tare key to get to the next parameter group.
Example 2: In order to access sub-parameter F3.1 from parameter group F3
Press the Mode button to access the sub-parameters.
Example 3: change setting for parameter F3.1 from 0 to 1
Press the Tare key to change the parameter setting.

HTS-BA-e-1024 45
Returning to the previous step Example 1: to return from parameter group F4 to parameter group F3
Press key→0←to access the previous parameter group.
Example 2: to return from parameter group F3.8 to parameter group F3.7
Press key→0←to access the previous parameter group.
Confirming selected parameter (settings)
Press Mode button.
The selected parameter (setting) is confirmed and the next master mode step is displayed in the user menu.

HTS-BA-e-1024 46
Enter numerical values The most comfortable way to enter numerical values is via the remote control.
On the crane scale keyboard use the Tare and F keys.
Use the F key to increase the flashing digit (in the example: 0) by 1.
Use the Tare key to move the flashing digit (in the example: 1) one digit to the left. The leftmost digit will move to the rightmost digit.
Use the Mode key to confirm the entry and proceed to the next step. End menu
Press button C.
F5, the final parameter group of the user menu shall be displayed.
For further steps see chapter 7.4 or chapter 8.3.

HTS-BA-e-1024 47
7.4 Description of the user menu Factory settings are printed in bold. F2.4.1 – Minimum weight for totalising The current set minimum weight for totalising is displayed immediately.
Use the MODE key to confirm the displayed minimum weight Enter the minimum weight for totalising using the remote control.
or
Press the a key and use the Tare and F keys to enter the minimum weight for totalising.
Note For totalising, the minimum weight must be >0. F2.4.2 – Totalising 0 Totalising off (factory setting) 1 Manual totalising 2 Automatic totalising Note When using automatic totalising, the weight value between two successive weighings must decrease by at least 10 digits, to be recognised as a new totals value. F2.5 – Weighing mode 0 Normal weighing (factory setting)
1 Hold mode
2 Weighing with tolerance range
Note • In Hold mode the scale displays the maximum weight up to that point and holds this
value in the display. The Total LED lights up. In this mode, totalising is not possible. • When weighing with a tolerance range is selected, you will see the parameters
F3.6.1 to F3.6.3 in the User menu.

HTS-BA-e-1024 48
F3.1 – Sleep mode The crane scale will enter sleep mode if the keyboard is not in use and if the weight has not changed for 5 minutes. SLEEP will be displayed. To escape the sleep mode, press a key on the keyboard or on the remote control. 0 Sleep mode is switched off
1 Sleep mode activated (factory setting)
F3.2 – Display luminosity 0 Very light (factory setting) 1 Light
2 Dark
F3.6.1 – upper boundary value This parameter only appears when the “boundary value monitoring” weighing mode is selected in the service menu. After selecting the parameter, the current upper boundary value set shall appear.
Enter the upper boundary values with the remote control.
or
Enter the upper boundary value with the buttons Tare and F.
F3.6.2 – lower boundary value This parameter only appears when the “boundary value monitoring” weighing mode is selected in the service menu. After selecting the parameter, the current lower boundary value set shall appear.
Enter the lower boundary values with the remote control.
or
Enter the lower boundary value with the buttons Tare and F.
Note The lower boundary value must be smaller than the upper value. F3.6.3 – initial weight help This parameter only appears when the “boundary value monitoring” weighing mode is selected in the service menu. 0 No optical initial weight help (factory setting)
1 The weight display flashes when weight falls below the lower boundary value or exceeds the upper boundary value.

HTS-BA-e-1024 49
F3.7 – Memory retention When memory retention is enabled, the crane scale returns to the last status (zero point, gross/net mode etc.) when powering up. 0 Save status off (factory setting) 1 Save status on F3.8 – Remote control function 0 Remote control function disabled 1 Remote control function enabled (factory setting) F4.3 – display test
Press the Mode key in order to skip the keyboard test and continue with step F4.4. or
Press the Tare key to enter the keyboard test (F4.3 1), then press the Mode key to start the keyboard test. The following is displayed:
• All possible numbers: from only zeros through only nines, • all LEDs illuminate When F4.4 is displayed, the display test is finished. F4.4 – keyboard test
Press the Mode key in order to skip the keyboard test and continue with step F5.1. or 1. Press the Tare button to select keyboard test (F4.41) then press the Mode button
again in order to start the keyboard test. E is displayed.
2. Press the Mode button and then press all of the keys on the keyboard from right to
left. The number in the display indicates the key number (from the right) to be pressed next. Pressing the →0←button ends the keyboard test and the next parameter (F5) appears.
F5.1 – End menu 1 Saves settings 2 Restores the most recently saved parameters

HTS-BA-e-1024 50
8. Service menu
8.1 Overview Parameter Factory settings No. Name Value Meaning F1.2 Digital filter 2 medium F1.5 Taring 1 On F1.6.2 Automatic zero points 0 Off F1.6.3 Reset area when switching on 2 +/–10 % F1.6.4 Reset area for manual reset 1 +/–2 % F1.7.1 Area for motion sensor 1 +/–0.5 d
F1.8 Edit weighing unit F1.9 Select capacity F1.10 Select resolution F1.11 Calibrate mode 0 Standard F1.12 Calibration 0 Skip calibration F1.13 Zero adjustment 0 Skip zero adjustment F1.14 Span adjustment 0 Skip span adjustment F2.6 Switching weight unit 0 Off F2.7 Geo-value F4.1 Expanded display 0 Off F5.1 Exit menu 1 Save changed settings If no factory settings have been given, then they depend on the model or on the country and its respective laws on measures and calibration.

HTS-BA-e-1024 51
8.2 Access service menu Parameters which can be changed in Service Mode are protected through verification. On a verified crane scale, the verification seal must first be destroyed in order to activate Service Mode. It is then necessary to re-verify the crane scale.
Operation in service menu Navigation in the service menu is the same as in the user menu, see chapter 7.3. * To do this on verified scales the lead seal must be destroyed; the verification status is then no longer valid, see chapter 8.4.
Entering the service menu, large construction
1. Remove the sealing screw (1) *. 2. Switch on the scale. 3. Press the switch in the hole. The display shows F1. The scale is ready for modifying parameters.
Entering the service menu, small construction
1. Remove the sealing screw (1) *. 2. Switch on the scale. 3. Press the switch in the hole. The display shows F1. The scale is ready for modifying parameters.

HTS-BA-e-1024 52
8.3 Description of service menu Factory settings are printed in bold. F1.2 – Digital filter The digital filter stabilises the weight display when
0 Filter off
1 Filter setting low
2 Filter setting medium (factory setting)
3 Filter setting high
F1.5 – Tare operation Tare operation can be enabled or disabled.
0 Tare function off
1 Tare function on (factory installation)
F1.6.2 – Auto zero operation Zero setting within a set threshold value can be done automatically by the crane scale. 0 Automatic reset off (factory setting)
1 Automatic reset in +/–0.5 d area
2 Automatic reset in +/-1.0 d area
3 Automatic reset in +/-3 d area
F1.6.3 – Auto zero with power up When the crane scale is powered up it will re-zero based on the tolerances below. 0 Automatic reset off when switching on (factory setting)
1 Automatic reset when switching on in +/–2% area
2 Automatic reset when switching on in +/-10 % area
3 Automatic reset when switching on in +/-100 % area

HTS-BA-e-1024 53
F1.6.4 – Manual zero operation This setting affects the tolerance of the pushbutton or remote control zero. 0 Manual reset off
1 Manual zero operation with zero range +/–2 % (factory setting)
2 Manual reset in reset area +/–20%
3 Manual reset in reset area +/-100 %
F1.7.1 – Motion detection With the motion detection you can determine the stability of the weight value. It affects the acceptance of a zero or tare request when the load is vibrating or moving. 0 Motion sensor switched off
1 Motion detection range +/–0.5 d (factory setting)
2 Motion sensor in +/–1 d area
3 Motion sensor in +/-3 d area
F1.8 – Weight unit The possible weight units depend on the capacity of your crane scale and on verification. 0 Edit weighing unit kg 1 Edit weighing unit lb
2 Weight unit: t (metric tonne),
large construction only
1 lb ≈ 0.454 kg
1 mt = 1000 kg
F1.9 – Capacity selection After 2 seconds the current capacity is displayed.
Press key →0← and enter the tare weight with the tare and F keys. or
Press the Mode key to confirm the displayed capacity. Note You can set a capacity equal to or less than the maximum capacity specified for your crane scale.

HTS-BA-e-1024 54
F1.10 – Select resolution After 2 seconds the current set resolution will be displayed.
Press the Mode key, to confirm the displayed capacity
Press the Tare key, to set the resolution in accordance with the following table.
Capacity Resolution Capacity resolution 150 0.02 0.05 0.1 3000 0.5 1 2 300 0.05 0.1 0.2 6000 1 2 5 600 0.1 0.2 0.5 10000 2 5 10 1500 0.2 0.5 1
F1.11 – Adjustment mode The crane scale offers two adjustment procedures: Standard and 3 point adjustment, see F.1.12. 0 Standard adjustment (factory setting)
1 3 point adjustment
F1.12 0 – Adjustment 0 Skip adjustment (factory setting)
1 Activate adjustment
Notes
• Do not enter adjustment unless you have sufficient test weights, min. 20 % of the capacity.
• For highest accuracy use test weights of 80 % or more. • Test weights should relate to the lowest significant digit, e.g. with a lowest significant
digit of 5 kg the test weight should be a multiple of 5 kg. Press the Mode key in order to skip the adjustment and continue with step F1.13.
or
Press the Tare key to enter adjustment (F1.12 1), then press the Mode key to start the adjustment procedure according to the setting in F1.11.

HTS-BA-e-1024 55
Standard setting Display Key Description
E SCL * Unload the scale
Mode The scale shall wait for a stable weight value
15 SCL …
0 SCL
While counting down from 15 to 0 the scale records zero
Add L * Attach test weight of at least 20% of capacity
Mode Confirm attachment of test weight
000000 Enter weight value for test weight
Tare, F or remote control Enter weight value
002000 Enter weight value for test weight
Mode Confirm weight value
15 SCL
…
0 SCL
While counting down from 15 to 0 the scale records span
CAL d Adjustment complete. This message is displayed for 2 seconds.
F1.130 Next step in service menu *When these displays appear, adjustment may be cancelled by pressing the a button.

HTS-BA-e-1024 56
3 point adjustment
Display Key Description
E SCL * Unload the scale
Mode The scale shall wait for a stable weight value
15 SCL …
0 SCL
While counting down from 15 to 0 the scale records zero
Add H * Attach test weight of at least 50 % of capacity
Mode Confirm attachment of test weight
000000 Enter weight value for test weight
Tare, F or remote control
Enter weight value
002000 Enter weight value for test weight
Mode Confirm weight value
15 SCL …
0 SCL
While counting down from 15 to 0 the scale records high span
Add L* Attach test weight of at least 10 % of capacity
Mode Confirm attachment of test weight
000000 Enter weight value for test weight
Tare, F or remote control
Enter weight value
002000 Enter weight value for test weight
Mode Confirm weight value
15 SCL …
0 SCL
While counting down from 15 to 0 the scale records low span
CAL d Adjustment complete. This message is displayed for 2 seconds
F1.130 Next step in service menu *When these displays appear, adjustment may be cancelled by pressing the a button.

HTS-BA-e-1024 57
F1.13 0 - Zero adjustment This function allows re-zeroing after removing chains, slings and lifting devices used in calibration. 0 Skip zero setting (factory setting)
1 Activate zero setting
Press the Tare key to enter zero adjustment.
Remove all weight from the scale and then press the Mode key.
The scale counts down from 15 SCL to 0 SCL while recording zero.
When F14.1 0 is displayed, zero adjustment is finished. F1.14 0 – Not documented Changes can not be made.
F2.6 – changing weight units 0 No switching (factory setting)
1 Switching from lb to kg
2 Switching from kg to lb
F2.7 – geo value For adjustment to local gravitational relationships. The current geo values set are displayed. 1. The appropriate geo values of the tables can be found in chapter 11.
2. Press the a key and use the Tare and F keys to enter the appropriate Geo value.
or
Press the Mode button in order to confirm the geo value displayed.
F4.1 – Expanded display In expanded display operation the weight value is indicated with the internal interval.
1 (normal) resolution point = 10 internal resolution points
0 Enlarged display off (factory setting)
1 Enlarged display activated

HTS-BA-e-1024 58
F5.1 – End service menu 1 Save settings
2 Restores the most recently saved parameters
3 Resets the factory settings information
When “restore factory settings” has been selected, "SURE" shall appear in the display Confirm this enquiry with the Mode key.
8.4 Verification General: According to the EU guideline 90/384/EEC balances must be verified officially if they are to be used as follows (legally regulated area):
a) For commercial transactions if the price of goods is determined by weighing b) For the production of medicines in pharmacies as well as for analyses in the
medical and pharmaceutical laboratory c) For official purposes d) For the production of finished packages
In case of doubt, please contact your local office of weights and measures. Verification information An EU qualification approval is available for those balances marked as appropriate for verification in the technical data. In the event that the balance is applied in an area subject to verification as described above, it must be officially verified and re-verified at regular intervals. Re-verification of a balance is carried out in compliance with the respective legal provisions of the states. The term of verification validity for balances in Germany, for example, is normally 2 years. The legal provisions of the country of use are to be observed. After verification the seal screw is plumbed with a seal thread. Verification of the balance is invalid without the seal.

HTS-BA-e-1024 59
Position of the seal:
Small construction Large construction
Balances with obligatory verification must be taken out of service if: • The weighing result of the balance is outside the maximum limits of operating
errors. Therefore load balance is regular intervals with known test weight (ca. 1/3 of the max. load) and compare with displayed value.
• The date for subsequent or periodical verification has passed.

HTS-BA-e-1024 60
9. Error messages Error code Fault Remedy
E1, E2, E3 Internal error Switch crane scale off and then on again
If message is still on, call Service E35 Adjustment weight to low Attach additional test weight
E37 Scale in motion Re-adjust
Full Overflow data accumulator Data record deletion
Underload, i.e. weight below power on auto zero limit
Unload the scale Press button→0← If message is still on, call Service
Overlaod, i.e. weight is 9 digits over full capacity
Decrease the load Check if the scale has not been
damaged Weight values are drifting
Internal error Inform service
BAT LOW Low battery voltage Recharge the battery
L bAT Battery power low, automatic switch off in one minute
Charge the battery immediately
SLEEP Sleep mode, automatically entered when the weight has not changed and the scale was not in use for 5 minutes
Press any key on the keyboard of the scale or on the remote control
Remote control does not work
• IR windows dirty • Low battery voltage
Clean the window on top of the remote control and the receiving window on the crane scale with alcohol and a clean cloth
Change the batteries of the remote
control

HTS-BA-e-1024 61
10. Maintenance & Cleaning
Danger
Risk of injury and damage! The crane scale is part of the lifting gear!For safe operation observe the following:
Have regular inspections be done by trained experts, Carry out regular servicing and maintenance, see chapters 10.1 and
10.2 Have parts replaced only by trained experts. If there are discrepancies with the safety checklist, then the scale
should not be used. Do not repair the crane scale yourself. Repairs must only be carried
out by service partners authorised by KERN.
10.1 Regular maintenance
The regular 3-month service must only be carried out by experts with through knowledge of working with crane scales. When doing this, national accident prevention regulations, as well as the operator’s work, operating and safety regulations are to be taken into account.
The regular 12-month service must only be carried out by trained experts (KERN service).
The results of this service are to be entered into the checklist (chapter 10.2). The additional results of the extended service are to be entered into the checklist
(chapter 11.1). Replaced parts are also to be entered, (chapter 11.2)

HTS-BA-e-1024 62
Regular service: Every 3 months or in any case after 12,500 weighings
Check all dimensions, see checklist chapter 10.2 Check shackle or loop for wear, such as for example, plastic
deformation, mechanical damage (unevenness), notches, grooves, cracks, corrosion, damage to thread and distortions.
Check the fit of the safety latch on the hook, also check it for defects and make sure that it operates correctly
When weighing using the large construction: check that the splint and nut on the shackle are not loose
If a dimension should be below the permissible deviation from the original dimension (see checklist, chapter 10.2) or if there are other discrepancies, the scale must be repaired immediately by trained experts (KERN Service). Do not repair it yourself under any circumstances. Take the scale out of operation immediately! All repairs and replacement parts must be documented by the service partner (see list, chapter 11.2).
Every 12 months or in any case after 50,000 weighings
The extended service must be carried out by trained experts (KERN Service). In this general inspection, all load-carrying parts must be checked for cracks using magnetic powder
Every 5 years or in any case after 250,000 weighings
All load-carrying parts must be replaced by trained experts (KERN Service).
Every 10 years or in any case after 500,000 weighings
Replace the crane scale completely
Note When checking for wear, pay attention to the following descriptions (chapter 10.2).

HTS-BA-e-1024 63
10.2
C
heck
list f
or re
gula
r saf
ety
insp
ectio
ns

HTS-BA-e-1024 64
Bol
d pr
int m
eans
that
an
exte
nded
saf
ety
chec
k ha
s to
be
perfo
rmed
by
serv
ice
partn
ers
auth
oris
ed b
y K
ER
N

HTS-BA-e-1024 65
Small construction:
HTS 150 kg – 600 kg
HTS 1.5 t

HTS-BA-e-1024 66
Large construction:
10.3 Cleaning
CAUTION
Damage to the crane scale!
Do not use any type of industrial solvents or chemicals.
Clean the keybord and the display with a soft cloth that has been dampened with a
mild window type cleaner or detergent.
10.4 Changing the batteries of the remote control To change the batteries, the remote control has to be taken from the yellow rubber housing. 1. Push the head of the remote control slowly out of the rubber housing through the
upper hole on the back of the housing and pull the black remote control out. 2. Undo the battery compartment cover and replace the batteries. Be sure that the
battery poles are positioned correctly. 3. Close the battery compartment and slip the remote control into the yellow housing.

HTS-BA-e-1024 67
11. Enclosure
11.1
C
heck
list e
xten
ded
safe
ty in
spec
tion
The
exte
nded
saf
ety
insp
ectio
n m
ay o
nly
be p
erfo
rmed
by
serv
ice
partn
ers
auth
oris
ed b
y K
ER
N

HTS-BA-e-1024 68
11.2
Pr
oof o
f rep
lace
men
t and
repa
ir of
saf
ety
rele
vant
par
ts
The
cran
e sc
ale
may
onl
y be
repa
ired
by s
ervi
ce p
artn
ers
auth
oris
ed b
y K
ER
N

HTS-BA-e-1024 69