Embed Size (px)
Citation preview

For Models:NN-CF760M NN-CF750WNN-CF771S
Operating Instructions and Cookery Book
Microwave, Grill & Convection Oven
For domestic use only
Important safety instructionsPlease read carefully and keep for future reference
CF771S_BP - cover UK:cover 26/2/13 10:17 Page 3
Brugervejledning
Mikrobølge-, grill- og varmluftovn
Til modellerne:NN-CF760MNN-CF750WNN-CF771S
Kun til privatbrug
Vigtige sikkerhedsinstruktioner.Læs venligst denne vejledning omhyggeligt
og gem den til senere brug.

Standard Conversion Chart
Weight1/2oz – 15g1oz – 25g2oz – 50g3oz – 75g4oz – 100g5oz – 150g6oz – 175g7oz – 200g8oz – 225g9oz – 250g10oz – 275g11oz – 300g12oz – 350g13oz – 375g14oz – 400g15oz – 425g1lb/16oz – 450g
Capacity1/2tsp – 3ml1tsp – 5ml1tbsp – 15ml1/4pt – 150ml1/2pt – 300ml3/4pt – 450ml1pt – 600ml13/4pt – 1 litre
When using recipes in this book always follow metric orimperial measurements. Do not combine the two. In somerecipes the conversions are not a direct equivalent due torecipe result.
Important Notice
Your oven is rated 1000 Watts (IEC). When using othercookbooks remember to adjust cooking times accordingly. The symbol above, which is displayed on your oven door,indicates the heating category for your oven when cooking orreheating convenience foods.Your oven is rated ʻEʼ, which is very efficient. It is thereforevery important that you refer carefully to the packetinstructions on convenience foods. Some packet instructionsonly display information for B or D rated ovens. We thereforeprovide additional guidelines for reheating on pages 59-75 ofthis book. ALWAYS check the progress of the food as it cooksor reheats by simply opening the door and after checking theprogress of the foods press START to continue the cookingtime.
Failure to follow the instructions given in this Cookbookand Operating Instructions, may affect the recipe resultand in some instances may be dangerous.
� COOKERY ADVICE LINE 01344 862108Customer Care Centre 0844 8443899Selected Spares and Accessories:Order direct on line at www.panasonic.co.uk or by telephoning the Customer Care Centre number above.
E
1000WThe IEC (60705) poweroutput (watts)
The heating category forsmall packs of food
Microwave symbol
CF771S_BP - cover UK:cover 26/2/13 10:17 Page 1Ovnens effektklasse er 1.000 W (IEC). Husk ved brug af andre opskrifter eller kogebøger at justere tilberedningstiden tilsvarende. Symbolet ovenfor, som vises på ovndøren, angiver opvarmningskategorien for din ovn ved tilberedning eller genopvarmning af færdigretter og convenience foods.
Ovnens klassifikation er ”E”, som er meget effektiv. Det er derfor meget vigtigt, at du omhyggeligt følger pakkeinstruktionerne på færdigretter og convenience foods. Nogle pakkeinstruktioner viser kun information for ovne i klasse B eller D. Vi bringer derfor
IEC (60705) mikrobølge effekt (W) 1.000 W
E Opvarmningskategori for små portioner mad
Mikrobølge symbol
Vigtig meddelelse
yderligere retningslinjer til genopvarmning på side 59-75 i denne vejledning. Kontroller ALTID status for de fødevarer, som ovnen til-bereder eller varmer ved blot at åbne døren. Når du har tjekket fødevarernes tilstand, så tryk på START for at fortsætte tilberedningen.
Hvis du ikke følger instruktionerne i denne brugervejledning, risikerer du, at tilberedningen mislykkes og i nogle tilfælde kan være farlig.

1
Vigtige sikkerhedsinstruktioner. Før du betjener denne ovn, bedes du læse denne vejledning omhyggeligt og opbevare den til senere brug.
Dette apparat kan bruges af børn i alderen fra 8 år og opefter samt personer med ned- satte fysiske, motoriske og mentale evner eller manglende erfaring og viden, hvis de er blevet vejledt eller instrueret af en person, der er ansvarlig for deres sikkerhed, vedrør- ende brug af apparatet på en sikker måde og forstår farerne ved det. Børn må ikke lege med apparatet. Rengøring og almindelig ved-ligeholdelse må ikke foretages af børn uden opsyn. Hold apparatet og dets netledning ude af rækkevide for børn under 8 år.
Når denne ovn er installeret, bør det være let at isolere apparatet fra strømforsyningen ved at trække stikket ud eller betjene en afbryder.
Hvis netledningen er beskadiget, skal den udskiftes af fabrikanten, dennes serviceværk-sted eller af en tilsvarende kvalificeret person for at undgå fare.

2
Advarsel! Apparatet bør efterses for skader på lågen og dens tætninger, og hvis disse områder er beskadiget, bør apparatet ikke anvendes, før det er blevet repareret af en kvalificeret servicetekniker.
Advarsel! Forsøg ikke at manipulere med eller foretage justeringer eller reparationer på lågen, kontrolpanelets indkapsling, sikker-hedsafbrydere eller nogen anden del af ovnen. Fjern ikke det udvendige panel fra ovnen, som giver beskyttelse mod mikrobølgestråling. Reparationer bør kun foretages af en kvalificeret servicetekniker.
Væsker og andre fødevarer må ikke opvarmes i lukkede beholdere, da de så kan eksplodere.
Advarsel! Placer ikke ovnen i nærheden af et el- eller gaskomfur.
Advarsel! Lad kun børn bruge ovnen uden opsyn, når tilstrækkelige anvisninger er givet, så barnet kan bruge ovnen på en sikker måde og forstår risikoen ved forkert brug.

3
Denne ovn er kun beregnet til fritstående brug og indbygning. Den er ikke beregnet til brug inde i et skab. Denne ovn kan indbygges i et køkkenelement ved brug af et egnet indbyg-ningskit, som kan købes hos din Panasonic forhandler.
Til fritstående brug: Ovnen skal placeres på en plan, stabil flade ca. 85 cm over gulvet, og dens bagside bør vende ind mod en væg. For at fungere korrekt skal ovnen have tilstrækkelig luftcirculation. Sørg for at der er mindst 15 cm plads over ovnen, samt at den ene side af ovnen ikke er tildækket.
Ved opvarmning mad i plast- eller papirbehol-dere, bør du kontrollere ovnen ofte, da disse typer af containere antændes, hvis de over- ophedes.
Hvis røg udsendes, eller en brand opstår i ovnen, skal du trykke på Stop/Cancel knap-pen og lade lågen være lukket for at kvæle eventuelle flammer. Afbryd strømkablet eller sluk for ovnen på stikkontakten.

4
Ved opvarmning af væsker, f.eks. suppe, saucer og drikkevarer i din ovn, kan over- ophedning af væsken over kogepunktet forekomme uden tegn på bobler. Dette kan resultere i, at væsken pludselig koger over.
Indholdet af sutteflasker og glas med baby- mad skal omrøres eller rystes. Temperaturen skal kontrolleres før indtagelse for at undgå forbrændinger.
Du må ikke koge æg i deres skaller og opvar-me hele hårdkogte æg ved MIKROBØLGE. Tryk kan bygges op, og æggene kan eksplo-dere, selv efter at opvarmningen er afsluttet.
Rengør det indvendige af ovnen, lågen og dens tætninger regelmæssigt. Når fødevare- stænk eller spildt væske sidder fast på ovnens vægge, låge eller tætninger, aftørres med en fugtig klud. Mildt rengøringsmiddel kan anven-des, hvis fladerne er meget tilsmudsede. Brug af stærke rengøringsmidler eller slibemidler kan ikke anbefales.
BRUG IKKE ALMINDELIGE OVNRENSE- MIDLER.

5
Når du bruger GRILL eller KOMBINATION funktioner, kan nogle fødevarer sprøjte fedt på ovnens vægge. Hvis ovnen ikke rengøres efter behov, kan den begynde at ryge under brug.
Hvis du ikke holder ovnen ren, kan det føre til forringelse af overfladerne, hvad der igen kan påvirke apparatets levetid og eventuelt resul-tere i farlige situationer.
Advarsel! De tilgængelige dele kan blive var-me ved kombinationsbrug. Små børn bør holdes væk. Børn bør kun bruge ovnen under opsyn af voksne på grund af de høje tempera-turer, som udvikles.
En damprenser må ikke bruges til rengøring.
Brug ikke skrappe, slibende rengøringsmidler eller skarpe metalskrabere til at rengøre ovn-lågen, da de kan ridse overfladen og medføre brud på glasset.

6
Udvendige ovnoverflader, bl.a. ventilationsåb-ninger på kabinettet og ovnlågen bliver varme under GRILL og KOMBINATION funktioner. Vær forsigtig, når du åbner eller lukker lågen, samt når du indsætter eller fjerner mad og tilbehør.
Dette apparat er ikke beregnet til at blive betjent ved hjælp af en ekstern timer eller et separat fjernbetjeningssystem.
Brug kun redskaber, som er egnet til brug i mikrobølgeovne.
Se side 14 vedrørende korrekt installation af riste og plader.
Ovnen har tre varmelegemer øverst og bagest i ovnen. Efter brug af VARMLUFT, KOMBINA-TION, og GRILL funktionen, skal du undgå at berøre de indvendige flader i ovnen, da disse vil være meget varme. Undgå varmelegemet inde i ovnen.

7
Velkommen til Panasonic mikrobølge-tilberedning
Tak, fordi du har købt en Panasonic mikro- bølgeovn.
Selv om dette apparat måske ikke er din første mikrobølgeovn, bedes du læse de indledende kapitler i denne brugervejledning for at opnå et perfekt resultat hver gang.
Indhold
Vigtige sikkerhedsinstruktioner . . . . . 8 – 9Udpakning af ovnen . . . . . . . . . . . . . . . . 9Placering af ovnen . . . . . . . . . . . . . . . . 10Vedligeholdelse af ovnen . . . . . . . . . . . 10Før ovnen tages i brug . . . . . . . . . . . . . 11Pleje og rengøring . . . . . . . . . . . . . . . . . 12Ovnens dele . . . . . . . . . . . . . . . . . 13 – 14Vigtig information . . . . . . . . . . . . . 15 – 17Mikrobølge-principper . . . . . . . . . . . . . . 18Vigtige noter . . . . . . . . . . . . . . . . . . . . . 19Generelle retningslinjer . . . . . . . . . 20 – 23Brugbare beholdere . . . . . . . . . . . 24 – 26Kontrolpanel . . . . . . . . . . . . . . . . . . . . . 27
Brugervejledning• Demo-funktion . . . . . . . . . . . . . . . . . . 28• Børnesikring . . . . . . . . . . . . . . . . . . . . 28• Indstilling af uret . . . . . . . . . . . . . . . . . 29• Mikrobølgetilberedning/optøning . . 30 – 34• Optøningstabeller . . . . . . . . . . . . 35 – 37• Hviletid / Udskudt start . . . . . . . . . . . . 38• Hukommelse . . . . . . . . . . . . . . . . . . . . 39• Grilning . . . . . . . . . . . . . . . . . . . . 40 – 41• Varmluft-tilberedning . . . . . . . . . . 42 – 45• Varmluft- og grilltilberedning . . . . 46 – 47• Kombinationstilberedning . . . . . . 48 – 57
Auto-vægt programmer . . . . . . . . . 58 – 63Tilberedning og genopvarmning . . 63 – 64 Genopvarmningstabeller . . . . . . . . 65 – 71Tilberedningstabeller . . . . . . . . . . . 72 – 81Tilpasning af opskrifter . . . . . . . . . . . . . 82Spørgsmål og svar . . . . . . . . . . . . . . . . 83Indbygning af ovnen . . . . . . . . . . . . . . . 83Tekniske specifikationer . . . . . . . . . . . . 84Information om bortskaffelse . . . . . . . . . 84
Denne mikrobølgeovn har fordelene ved in-verter-teknologi. Denne teknologi har været i brug i mikrobølgeovne i Japan i mange år, hvor den har forbedret tilberedningen i ov-nen. Det betyder også, at du har mere plads inde i din ovn, uden at den optager mere plads i dit køkken.
Mikrobølger får de fleste fødevarer til at smage bedre og efterlader dig med mindre opvask, men forvent ikke at blive en perfekt mikrobølge-kok fra den ene dag til den anden. Nogle af metoderne er meget for-skellige fra dem, som bruges til almindelig madlavning. Vores ovne er programmeret specielt til det nordiske marked. Instruk-tionerne er også testet mange gange for at sikre, at du opnår gode resultater derhjem-me.
Vi håber, at du vil nyde at bruge din nye ovn.

8
Vigtige sikkerhedsinstruktionerLæs venligst denne vejledning omhyggeligt og gem den til senere brug
ADVARSEL: AF HENSYN TIL DIN SIKKER-HED SKAL DENNE ENHED VÆRE KORREKT JORDFORBUNDET.
Jordforbindelse instruktionerHvis din stikkontakt ikke har jordforbindelse, er det dit personlige ansvar at få den erstattet med en korrekt jordet stikkontakt.
Hvis netstikket på netledningen til dette appa- rat ikke kan skabe den nødvendige jordfor-bindelse, må du enten købe en passende stika-dapter, skifte netstikket eller skifte til en korrekt stikkontakt. Vi anbefaler, at du kontakter en autoriseret elinstallatør.
DriftsspændingNetspændingen skal være den samme som angivet på etiketten på ovnen. Hvis der anvendes en højere spænding end angivet, kan det forårsage brand eller andre skader.
Nedsænk ikke ledningen, stikket eller ovnen i vand. Hold ledningen væk fra varme overflader. Lad ikke ledningen hænge ud over kanten af et bord eller en bordplade. Tilslut ikke ovnen via et forlængerkabel – dette kan være farligt. Det er vigtigt, at ovnen strømforsynes direkte fra en stikkontakt.Apparatets bagside bliver varm under brug. Lad ikke ledningen komme i kontakt med ap-paratets bagside eller andre kabinetoverflader.

9
1. Hot SurfacesExterior oven surfaces, including air ventson the cabinet and the oven door, will gethot during CONVECTION, COMBINATIONand GRILLING. Use care when opening orclosing door and when inserting or removing food and accessories. The ovenhas three heaters situated in the top andrear of the oven. After using the CONVECTION, COMBINATION and GRILLfunctions the roof and walls will be veryhot.Care should be taken to avoid touchingthe heating elements inside the oven.
2. The accessible parts may become hot incombination use. Young children should bekept away. Children less than 8 years ofage should only use the oven undercontinuous adult supervision due to thetemperatures generated.
Caution: Hot surfaces
Important safety instructions Please read carefully and keep for future reference
1. Examine Your OvenUnpack oven, remove all packing material,and examine the oven for any damage suchas dents, broken door latches or cracks inthe door. Notify dealer immediately if unit isdamaged. Do NOT install if unit is damaged.
2. GuaranteeYour receipt is your guarantee, please keepsafely.
3. CordIf the supply cord of this appliance is damaged, it must be replaced by the manufacturer or itʼs service agent or a similarly qualified person in order to avoid ahazard.
N.B. The appliance should be inspected fordamage to the door seals and door seal areas.If these areas are damaged the applianceshould not be operated until it has beenrepaired by a service technician trained by themanufacturer.
Unpacking your oven
9
NN-CF760M CF750W CF771 BP_Regs:F00039M69BP 26/2/13 10:19 Page 9
Vigtige sikkerhedsinstruktionerLæs venligst denne vejledning omhyggeligt og gem den til senere brug
Udpakning af ovnen
1. Varme overflader Udvendige ovnoverflader, bl.a. ventila-tionsåbninger på kabinettet og ovnlågen, bliver varme under VARMLUFT, KOM-BINATION og GRILL. Vær forsigtig, når du åbner eller lukker lågen, samt når du indsætter eller fjerner mad og tilbehør. Ovnen har tre varmelegemer øverst og bagest i ovnen. Efter brug af VARMLUFT, KOMBINATION, og GRILL funktionen, skal du undgå at berøre de indvendige flader i ovnen, da disse vil være meget varme.
Undgå at berøre varmelegemerne inde i
ovnen.
1. Undersøg din ovn Pak ovnen ud, fjern al emballage og un-dersøg ovnen for eventuelle skader som buler, defekte lågehængsler eller revner i lågen. Hvis du finder nogen skader, bedes du kontakte forhandleren med det samme. Installer ikke en beskadiget mikrobølgeovn.
Advarsel: Varme overflader
2. De tilgængelige dele kan blive varme ved kombinationsbrug. Små børn bør holdes væk, og børn bør kun bruge ovnen under konstant opsyn af voksne på grund af de høje temperaturer, der udvikles.
2. Garanti Din kvittering er dit garantibevis. Gem den på et sikkert sted.
3. Netledning Hvis netledningen er beskadiget, skal den udskiftes af fabrikanten, dennes serviceværksted eller af en tilsvarende kvalificeret person for at undgå fare.
NB: Apparatet bør efterses for skader på lågen og dens tætninger. Hvis disse områder er beskadiget, bør apparatet ikke anvendes, før det er blevet repareret af en kvalificeret servicetekniker.

1010
Placement of your oven
Maintenance of your oven1. Service
IF YOUR OVEN REQUIRES A SERVICE call your local Panasonic engineer (Customer CommunicationsCentre on 0844 8443899 can recommendan engineer). It is hazardous for anyoneother than a competent person to carry out any serviceor repair operation which involves theremoval of a cover which gives protectionagainst exposure to microwave energy.
2. Door SealsDo not attempt to tamper with or make anyadjustments or repairs to the door, controlpanel housing, safety interlock switches orany other part of the oven. Do not removethe outer panel from the oven which givesprotection against exposure to microwaveenergy. Repairs should only be by aqualified service person.
3. Oven LightThe oven lamp must be replaced by aservice technician trained by the manufacturer. DO NOT attempt to removethe outer casing from the oven.
4. Selected Spares and AccessoriesThese may be ordered direct; on line atwww.panasonic.co.uk or by telephoningthe Customer Communications Centre0844 8443899. Most major credit and debitcards accepted. Ensure you quote thecorrect model number.
1. This oven is intended for Counter-top andBuilt-in use only. It is not intended for useinside a cupboard. This oven may be Builtinto a wall cabinet by using the proper trimkit, which may be purchased from a localPanasonic dealer. Refer to building-in youroven on page 159.
2. Counter top useThe oven must be placed on a flat, stablesurface 85 cm above the floor, with rear ofoven placed against a back wall. Forproper operation the oven must havesufficient air flow. At least 15cm/6" shouldbe clear over the top of the oven, and oneside of the oven should be kept open.
3. Do not place this oven near an electric orgas cooker range. This may be a safetyhazard and the oven may be damaged.
4. Do not block air vents on the rear and bottom or top of the cabinet. Do not placeany articles on the top of the oven over thevents. If air vents are blocked during operation, the oven may overheat. If theoven overheats, a thermal safety devicewill turn the oven off. The oven will remain inoperable with blank display until it hascooled.
5. Do not use outdoors.
15cm
�
Open
NN-CF760M CF750W CF771 BP_Regs:F00039M69BP 26/2/13 10:19 Page 10
10
Placement of your oven
Maintenance of your oven1. Service
IF YOUR OVEN REQUIRES A SERVICE call your local Panasonic engineer (Customer CommunicationsCentre on 0844 8443899 can recommendan engineer). It is hazardous for anyoneother than a competent person to carry out any serviceor repair operation which involves theremoval of a cover which gives protectionagainst exposure to microwave energy.
2. Door SealsDo not attempt to tamper with or make anyadjustments or repairs to the door, controlpanel housing, safety interlock switches orany other part of the oven. Do not removethe outer panel from the oven which givesprotection against exposure to microwaveenergy. Repairs should only be by aqualified service person.
3. Oven LightThe oven lamp must be replaced by aservice technician trained by the manufacturer. DO NOT attempt to removethe outer casing from the oven.
4. Selected Spares and AccessoriesThese may be ordered direct; on line atwww.panasonic.co.uk or by telephoningthe Customer Communications Centre0844 8443899. Most major credit and debitcards accepted. Ensure you quote thecorrect model number.
1. This oven is intended for Counter-top andBuilt-in use only. It is not intended for useinside a cupboard. This oven may be Builtinto a wall cabinet by using the proper trimkit, which may be purchased from a localPanasonic dealer. Refer to building-in youroven on page 159.
2. Counter top useThe oven must be placed on a flat, stablesurface 85 cm above the floor, with rear ofoven placed against a back wall. Forproper operation the oven must havesufficient air flow. At least 15cm/6" shouldbe clear over the top of the oven, and oneside of the oven should be kept open.
3. Do not place this oven near an electric orgas cooker range. This may be a safetyhazard and the oven may be damaged.
4. Do not block air vents on the rear and bottom or top of the cabinet. Do not placeany articles on the top of the oven over thevents. If air vents are blocked during operation, the oven may overheat. If theoven overheats, a thermal safety devicewill turn the oven off. The oven will remain inoperable with blank display until it hascooled.
5. Do not use outdoors.
15cm
�
Open
NN-CF760M CF750W CF771 BP_Regs:F00039M69BP 26/2/13 10:19 Page 10
Vedligeholdelse af ovnen
Placering af ovnen1. Denne ovn er kun beregnet til fritstående
brug og indbygning. Den er ikke bereg-net til brug inde i et skab. Denne ovn kan indbygges i et køkkenelement ved brug af et egnet indbygningskit, som kan kø-bes hos din Panasonic forhandler. Se ”Indbygning af ovnen” på side 83.
1. Service HVIS DIN OVN BEHØVER SERVICE, bedes du kontakte din lokale Panasonic forhandler. Det er farligt for alle andre end en kompetent person at udføre service- eller reparationsarbejder, som omfatter fjernelse af det udvendige panel fra ovnen, som giver beskyttelse mod mikrobølgestråling.
2. Lågetætninger Forsøg ikke at manipulere med eller fore- tage justeringer eller reparationer på lågen, kontrolpanelets indkapsling, sikker- hedsafbrydere eller nogen anden del af ovnen. Fjern ikke det udvendige panel fra ovnen, som giver beskyttelse mod mikrobølgestråling. Reparationer bør kun foretages af en kvalificeret servicetekniker.
2. Fritstående brug: Ovnen skal placeres på en plan, stabil flade ca. 85 cm over gulvet, og dens bagside bør vende ind mod en væg. For at fungere korrekt skal ovnen have tilstrækkelig luftcirculation. Sørg for at der er mindst 15 cm plads over ovnen, samt at den ene side af ovnen ikke er tildækket.
3. Placer ikke ovnen i nærheden af et el- eller gaskomfur. Dette kan være en sikkerhedsrisiko, og ovnen kan blive beskadiget.
4. Bloker ikke ventilationsåbningerne på bagsiden samt kabinettets under- og overside. Lad være med at stille noget oven på ovnen over ventilationsåbnin-gerne. Hvis disse åbninger er blokeret under drift, kan ovnen blive overophedet. Hvis ovnen overophedes, afbrydes den af en termisk sikkerhedsafbryder. Ovnen vil ikke kunne betjenes, og dens display vil intet vise, indtil den er afkølet.
5. Brug ikke ovnen udendørs.
Åbent
15 cm
3. Ovnlys Ovnlampen skal udskiftes af en kvalifice-ret servicetekniker. Forsøg ikke at fjerne det udvendige panel fra ovnen.
4. Tilbehør og reservedele Kontakt din Panasonic forhandler.

1111
Before using your oven
1. Exterior oven surfaces, including air ventson the cabinet and the oven door will gethot during CONVECTION, COMBINATIONand GRILLING, take care when opening orclosing the door and when inserting orremoving food and accessories.
2. The oven has three grill heaters situated inthe top of the oven and a convection heatersituated in the back of the oven. After usingeither the GRILL, CONVECTION or COMBINATION functions, the insidesurfaces of the oven will be very hot. Careshould be taken to avoid touching theheating elements inside the oven.N.B. After cooking by these modes, theoven accessories will be very hot.
3. The accessible parts may become hot inuse. Children should be kept away.
4. Only allow children to use the oven withoutsupervision when adequate instructionshave been given so that the child is able touse the oven in a safe way and understands the hazards of improper use.Ensure that children do not touch the hotouter casing either during or after operationof the oven.
5. This appliance can be used by childrenaged from 8 years and above and personswith reduced physical, sensory and mentalcapabilities or lack of experience andknowledge if they have been givensupervision or instruction by a personresponsible for their safety concerning theuse of the appliance in a safe way andunderstand the hazards involved. Children
shall not play with the appliance. Cleaningand user maintenance shall not be made bychildren without supervision. Keep theappliance and its cord out of reach ofchildren less than 8 years.
6. Storage of AccessoriesDo not store any objects other than ovenaccessories inside the oven in case it isaccidentally turned on. In case of electronic failure, oven can only be turnedoff at wall socket.
7. Before UseBefore using CONVECTION, COMBINATION or GRILL function for thefirst time operate the oven without food andaccessories on CONVECTION 250°C for 5mins. This will allow the oil that is used forrust protection to be burned off. This is theonly time that the oven is operatedcompletely empty.CAUTION: Grill element and oven will behot. DO NOT OPERATE THE OVENEMPTY apart from point 7 above. Theappliance must not be operated byMicrowave or Combination includingmicrowave WITHOUT FOOD IN THEOVEN. Operation when empty willdamage the appliance.
8. WARNING: When the appliance isoperated in CONVECTION, GRILL orCOMBINATION mode, Children shouldonly use the oven under adultsupervision due to the temperaturesgenerated.
NN-CF760M CF750W CF771 BP_Regs:F00039M69BP 26/2/13 10:19 Page 11
Før ovnen tages i brug1. Udvendige ovnoverflader, bl.a. ventila-
tionsåbninger på kabinettet og ovnlågen bliver varme under VARMLUFT, GRILL og KOMBINATION funktioner. Vær forsigtig, når du åbner eller lukker lågen, samt når du indsætter eller fjerner mad og tilbehør.
2. Ovnen har tre varmelegemer øverst og bagest i ovnen. Efter brug af VARMLUFT, KOMBINATION, og GRILL funktionen, skal du undgå at berøre de indvendige flader i ovnen, da disse vil være meget varme. Undgå varmelegemerne inde i ovnen. NB: Efter tilberedning med disse funktio-ner kan ovntilbehøret blive meget varmt.
3. De tilgængelige dele kan blive varme under brug. Hold børn væk fra ovnen.
4. Lad kun børn bruge ovnen uden opsyn, når tilstrækkelige anvisninger er givet, så barnet kan bruge ovnen på en sikker måde og forstår risikoen ved forkert brug. Sørg for at børn ikke berører det varme udvendige panel under eller efter brug af ovnen.
5. Dette apparat kan bruges af børn i alderen fra 8 år og opefter samt perso-ner med nedsatte fysiske, motoriske og mentale evner eller manglende erfaring og viden, hvis de er blevet vejledt eller instrueret af en person, der er ansvarlig for deres sikkerhed, vedrørende brug af apparatet på en sikker måde og forstår
farerne ved det. Børn må ikke lege med apparatet. Rengøring og almindelig ved-ligeholdelse må ikke foretages af børn uden opsyn. Hold apparatet og dets netledning ude af rækkevide for børn under 8 år.
6. Opbevaring af tilbehør Opbevar ikke andre genstande end ovntilbehør i ovnen, i tilfælde af at den tændes ved et uheld. I tilfælde af en elektronisk fejl kan ovnen slukkes på stikkontakten.
7. Før brug Før du bruger VARMLUFT, KOMBINATION eller GRILL funktionen for første gang, skal du starte ovnen uden mad og tilbe-hør på VARMLUFT 250 °C i 5 minutter. Dette vil afbrænde den olie, som bruges til rustbeskyttelse. Dette er den eneste gang, ovnen må bruges helt tom.
FORSIGTIG: Grillelementet og ovnen vil være varm. BETJEN IKKE OVNEN I TOM TILSTAND undtagen som i punkt 7 herover. Apparatet må ikke betjenes med Mikrobølge eller Kombination med mikrobølge UDEN FØDEVARER I OVNEN. Betjening i tom tilstand kan beskadige apparatet.
8. ADVARSEL! Når apparatet bruges i VARMLUFT, GRILL eller KOMBINATION funktion, bør børn kun bruge ovnen under opsyn af voksne på grund af de høje temperaturer, som udvikles.

12
Pleje og rengøring af mikrobølgeovnen
VIGTIGT
1. Sluk ovnen før rengøring, og træk så vidt muligt netstikket ud af stikkontakten.
2. Hold det indvendige af ovnen, lågen og dens tætninger rent. Når fødevare- stænk eller spildt væske sidder fast på ovnens vægge, låge eller dens tætninger, aftørres med en fugtig klud. Mildt rengøringsmiddel kan anvendes, hvis fladerne er meget tilsmudsede. Brug af stærke rengøringsmidler eller slibemidler kan ikke anbefales.
3. Ovnens bagvæg har en selvrensende katalytisk belægning. Det er derfor ikke nødvendigt at rengøre dette område.
4. Efter brug af VARMLUFT, GRILL eller KOMBINATION tilberedning bør væg-gene i ovnen rengøres med en blød klud opvredet i sæbevand. Vær særlig omhyg- gelig med at holde ruden i lågen ren. Genstridige pletter inde i ovnen kan fjernes ved hjælp af lidt almindeligt ovnrenser, som sprayes på en blød, fugtig klud. Gnid på de genstridige pletter, lad midlet sidde i den anbefalede tid og aftør det derefter. SPRØJT IKKE DIREKTE IND I OVNEN.
5. Brug ikke skrappe, slibende rengørings-midler eller skarpe metalskrabere til at rengøre ruden i ovnlågen, da de kan ridse overfladen og medføre brud på glasset.
6. Ovnens udvendige overflader rengøres med en fugtig klud. For at undgå skader på komponenterne inde i ovnen, må vand ikke sive ind i ventilationsåbnin-gerne.
7. Hvis kontrolpanelet bliver snavset, rengøres det med en blød, tør klud. Brug ikke skrappe rengøringsmidler eller slibe-midler på kontrolpanelet. Ved rengøring af kontrolpanelet bør du lade ovnlågen stå åben for at forhindre ovnen i at
Det er afgørende for en sikker drift af ovnen, at den holdes ren og aftørres efter hver brug. Hvis ovnen ikke holdes ren, kan dens overflader tage skade, og det kan igen forkorte apparatets levetid og eventuelt føre til farlige situationer.
tænde ved et uheld. Tryk efter rengøring på STOP/CANCEL knappen for at rydde displayet.
8. Hvis damp dannes på indersiden eller omkring ydersiden af ovnlågen, aftørres den med en blød klud. Dette kan ske, når ovnen bruges ved høj luftfugtighed og er på ingen måde tegn på en funk-tionsfejl eller lækage af mikrobølger.
9. Ovnrummets bund bør rengøres regel-mæssigt. Aftør ovnbunden med en blød klud fugtet med et mildt rengøringsmid-del og varmt vand. Tør efter med en ren klud.
Damp fra tilberedningen samles under gentagen brug, men påvirker ikke på nogen måde bundens overflade.
10. Ved brug af GRILL eller tilberedning med KOMBINATION eller VARMLUFT, kan nogle madvarer sprøjte fedt på ovnens vægge. Hvis ovnen ikke rengøres regelmæssigt, kan fedtet ophobe sig, så ovnen begynder at ryge under brug. Disse pletter vil blive vanskeligere at fjer-ne på et senere tidspunkt. Der er ingen grund til at rengøre den katalytiske belægning på ovnens bagvæg.
11. En damprenser må ikke bruges til rengøring.
12. Sørg for at alt tilbehør altid holdes helt rent, især ved brug af mikrobølger eller kombinationsprogrammer.
13. Hold altid ventilationsåbningerne rene. Kontroller, at støv eller andet materiale ikke blokerer nogen af ventilationsåb-ningerne på toppen, bunden eller på bagsiden af ovnen. Hvis ventilationsåb-ninger bliver blokeret, er der risiko for overophedning, som kan påvirke driften af ovnen og eventuelt resultere i farlige situationer.

13
Ovnens dele
1. Mad må ikke tilberedes direkte på bun-den i ovnrummet. Mad skal altid placeres i en mikrobølgesikker skål.
2. Det medfølgende metaltilbehør må KUN bruges som anvist til GRILL, VARMLUFT og KOMBINATION tilberedning. Brug aldrig metaltilbehør, når mad tilbe-redes alene med mikrobølge. Metal-tilbehør må ikke anvendes, hvis ovnen bruges med mindre end 200 g fødevarer på et manuelt kombinationsprogram. Brug kun emaljepladen til VARMLUFT og GRILL tilberedning. Den maksimale vægt, der kan bruges på emaljepladen er 4 kg. HVIS TILBEHØR IKKE BRUGES KORREKT, KAN OVNEN TAGE SKADE.
3. Ved tilberedning med MIKROBØLGE kan gnistdannelse forekomme, hvis der anvendes en forkert mængde mad, en metalbeholder er blevet brugt forkert, eller tilbehøret er blevet beskadiget. Hvis dette sker, skal du standse apparatet øjeblikkeligt. Du kan kun fortsætte tilbe-redningen med GRILL eller VARMLUFT.
4. Se altid instruktionerne for korrekt tilbe-hør til at bruge på alle programmer.
Glasfad
1. Glasfadet kan kun anvendes direkte på den keramiske plade til tilberedning med MIKROBØLGE. Madvarerne må ikke an-bringes direkte på den keramiske plade på bunden i ovnrummet.
2. Glasfadet kan anvendes direkte på risten (i enhver position) til GRILL, VARMLUFT eller KOMBINATION tilberedning.
3. Hvis glasfadet er varmt, så lad det køle af inden rengøring eller anbringelse i koldt vand, da dette kan knække eller splintre fadet.
Anti-gnist ringAnti-gnist ringen bør placeres oven på risten, når du bruger metalbeholdere til kombinationstilberedning. Anti-gnist ringen forhindrer gnistdannelse under KOMBINA-TION tilberedning.
Rist
1. Risten kan anvendes i den øverste position til GRILL af madvarer. Den kan bruges i den øverste eller nederste posi-tion til VARMLUFT eller KOMBINATION tilberedning.
2. Brug ikke nogen metalbeholder direkte på risten i KOMBINATION med MIKRO- BØLGE. (Se afsnittet herover om anti- gnist ring).
3. Brug ikke risten alene til MIKROBØLGE.
4. Den maksimale vægt, der kan placeres på risten er 4 kg (dette omfatter den samlede vægt af mad og fad).
Emaljeplade
1. Emaljepladen er beregnet til VARMLUFT eller GRILL tilberedning. Brug den ikke til MIKROBØLGE eller KOMBINATION tilberedning.
2. Til VARMLUFT tilberedning i 2 niveauer kan emaljepladen bruges nederst og risten øverst.
3. Den maksimale vægt, der kan placeres på emaljepladen er 4 kg (dette omfatter den samlede vægt af mad og fad).

14
Ovnens dele
Ovnvindue Advarselslabel Grillelementer
Advarselslabel
Netledning
Netstik
Kontrolpanel
Riller til ovnplader Mærkelabel
Keramisk plade
Bund med mikrobølgetilførsel
Plastiklister
Glasfad
Låge sikkerhedslåsesystem LågeåbnerTryk for at åbne lågen. Når du åbner ovnlågen under tilberedningen, stoppes tilberedningen, uden at programmet annulleres. Tilberednin- gen genoptages, så snart døren lukkes, og der trykkes på Start knappen. Ovnlyset tæn-des og forbliver tændt, når døren åbnes.
Anti-gnist ringBruges sammen med risten ved KOMBINA-TION tilberedning og brug af metalbeholdere.
RistBrug kun risten til VARMLUFT, GRILL eller TURBO BAKE (Varmluft og Grill) og KOM-BINATION tilberedning. Må ikke bruges alene til MIKROBØLGE. Vigtig bruger-information – Vær opmærksom på, at plastiklisterne på risten er konstrueret til at være i rillerne under brug. De er ikke emballage og må ikke fjernes.
EmaljepladeMå kun bruges til VARMLUFT, GRILL eller VARMLUFT og GRILL. Må ikke bruges alene til MIKROBØLGE eller KOMBINATION tilberedning.
Låge sikkerheds- låsesystem For at undgå skader må du ikke stikke fingre, knive, skeer eller andre genstande ind i låsehullet.
Eksterne ventilations
åbningerOvn
ventilations- åbninger

15
Vigtig informationSikkerhed Hvis røg udsendes, eller en brand opstår i ovnen, skal du trykke på Stop/Cancel knap- pen og lade lågen være lukket for at kvæle eventuelle flammer. Afbryd strømkablet, eller sluk for ovnen på stikkontakten.
Korte tilberedningstider Da mikrobølge tilberedningstider er meget kortere end andre tilberedningsmetoder, er det vigtigt, at de anbefalede tilberednings-tider ikke overskrides, uden at madvarerne først kontrolleres.
Tilberedningstider i opskrifter og kogebøger er omtrentlige. Faktorer, som kan påvirke tilberedningstider, er: Foretrukken grad af tilberedning, starttemperatur, højde over havet, madvarers volumen, størrelse og form samt anvendte redskaber. Efterhånden som du bliver fortrolig med ovnen, kan du justere disse faktorer.
Det er bedre at tilberede madvarer for lidt end for meget. Hvis mad er utilstrækkeligt tilberedt, kan det altid sættes tilbage i ovnen til yderligere tilberedning. Hvis mad har fået for meget, kan intet gøres. Start altid med minimum tilberedningstider.
Vigtigt Hvis de anbefalede tilberedningstider over- skrides, vil maden være ødelagt, og i ekstre-me tilfælde kan der gå ild i den, så ovnens indre tager skade.
1. Små mængder mad Vær forsigtig ved opvarmning af små mængder mad, da disse nemt kan blive brændte, tørre ud eller bryde i brand, hvis de tilberedes for længe. Indstil altid korte tilberedningstider og tjek maden ofte. BRUG ALDRIG OVNEN UDEN MAD I DEN PÅ MIKROBØLGER INDVENDIGT PÅ MIKROBØLGE ELLER KOMBINA-TION, SOM INVOLVERER MIKROBØLGE.
2. Madvarer med lavt vandindhold Vær forsigtig ved opvarmning af mad-varer med lavt vandindhold, f.eks. brød, chokolade, kiks og kager. Disse kan nemt blive brændte, tørre ud eller bryde i brand, hvis de tilberedes for længe. Vi anbefaler ikke opvarmning af madvarer med lavt vandindhold som popcorn eller vafler. Denne ovn er udviklet til brug med madvarer. Vi anbefaler ikke, at den anvendes til opvarmning af nonfood-ting som omslag, varmedunke og lignende.
3. Christmas Pudding Engelsk Christmas Pudding og andre madvarer med højt fedt- eller sukkerind-hold, f.eks. marmelade og kødtærter, må ikke overophedes. Disse madvarer må aldrig efterlades uden opsyn, da der ved overophedning kan gå ild i dem. Se side 70.
4. Kogte æg Du må ikke koge æg i deres skaller og opvarme hele hårdkogte æg ved MIKRO-BØLGE. Tryk kan bygges op, og æggene kan eksplodere, selv efter at opvarmnin-gen er afsluttet.
5. Madvarer med skind Kartofler, æbler, æggeblommer, hele grøntsager og pølser er eksempler på madvarer med ikke-porøse skind. Disse skal perforeres ved hjælp af en gaffel før tilberedning for at forhindre bristning.
6. Væsker Væsker og andre madvarer må ikke op-varmes i lukkede beholdere, da de kan eksplodere. Ved opvarmning af væsker, f.eks. suppe, saucer og drikkevarer i mikrobølgeovnen, kan der ske over- ophedning af væsken over kogepunktet uden tegn på bobler.

16
Vigtig informationDette kan resultere i, at den varme væske pludselig koger over. For at forhindre denne mulighed bør der tages følgende skridt:
a. Undgå at bruge ligesidede beholdere med smalle halse.
b. Undgå overophedning.
c. Rør i væsken, før beholderen stilles i ovnen og igen halvvejs gennem tilbe-redningstiden.
d. Efter opvarmning, lad beholderen stå i ovnen i kort tid, og rør igen, før den forsigtigt tages ud.
e. Når drikkevarer opvarmes med mikrobølger, kan der opstå forsinket voldsom kogning. Du bør derfor være forsigtig, når du håndterer beholderen.
7. Låg Fjern altid låg på krukker, beholdere og takeaway-bakker, før du tilbereder dem med mikrobølger. Hvis du ikke gør det, kan damp og tryk dannes i emballagen og forårsage en eksplosion, selv efter at tilberedningen er afsluttet.
8. Friturestegning Forsøg ikke at friturestege i ovnen.
9. Stegetermometer Brug kun et stegetermometer til at kontrollere tilberedningen af stege og fjerkræ, når kødet er blevet fjernet fra mikrobølgeovnen. Hvis det ikke har fået nok, så sæt det tilbage i ovnen og giv det et par minutter mere ved det anbefalede effektniveau. Efterlad ikke et konventionelt stegetermometer i ovnen, når du bruger mikrobølger.
10. Papir, plast Ved opvarmning af mad i plast- eller pa-pirbeholdere, bør du kontrollere ovnen ofte, da disse typer beholdere kan antændes ved overophedning. Brug ikke lukkebånd med metaltråd til stegeposer, når tilberedningen omfatter mikrobølger, da dette kan forårsage gnistdannelse.
Brug ikke genanvendte papirprodukter, f.eks. køkkenrulle, med mindre de er specielt fremstillet til brug i en mikrobøl-geovn.
Disse produkter indeholder urenheder, som kan forårsage gnister og/eller brand, når de anvendes.
11. Genopvarmning Det er vigtigt, at genopvarmet mad serveres “rygende varm”.
Tag maden ud af ovnen og kontroller, at den er “rygende varm”, dvs. at damp udsendes fra alle dele, og en sauce bobler. (Hvis du vil, kan du kontrollere, at maden har nået 72 °C med et stegetermo- meter. Men husk at sådan et termometer ikke må bruges inde i mikrobølgeovnen.)
Ved tilberedning af madvarer, der ikke kan omrøres, f.eks. lasagne og tærter, kan du skære maden igennem med en kniv for at teste, at den er godt gennem-varm. Selv hvis en producents anvisnin-ger er blevet fulgt, bør du altid tjekke, at maden er rygende varm før servering, og hvis du er i tvivl, sætte den tilbage i ovnen til yderligere opvarmning.

17
Vigtig information12. Hviletid
Hviletid er den periode ved slutningen af tilberedningen eller genopvarmningen, hvor maden hviler, inden den spises. Denne hviletid tillader varmen i maden at fortsætte ind i midten og fjerne kolde pletter. Se side 20.
13. Hold ovnen ren Det er afgørende for en sikker drift af ovnen, at den aftørres regelmæssigt. Brug varmt sæbevand, vrid kluden godt og brug den til at fjerne fedt eller mad fra ovnrummet. Vær især opmærksom på området med lågens tætninger. Ovnen skal være frakoblet fra lysnettet ved rengøring. Den katalytiske belæg-ning på bagvæggen behøver ikke blive rengjort.
14. Grilning Ovnen fungerer kun med GRILL med døren lukket.
15. Ventilatormotor Efter brug af mikrobølgeovnen kan ventilatormotoren rotere i nogle minutter for at afkøle de elektriske komponenter. Dette er normalt, og du kan tage mad ud, selv om ventilatormotoren kører. Du kan fortsætte med at bruge ovnen i denne tid.
16. Beholdere Før brug bør du kontrollere, at redska-ber/beholdere er egnet til brug i mikro-
bølgeovne. Se side 24-26.
17. Sutteflasker og babymad Sutter og låg skal altid fjernes fra sutteflasker, før de sættes i ovnen til genopvarmning. Væsken øverst i flasken vil være meget varmere end i bunden og skal rystes grundigt før kontrol af temperaturen. Låget skal også fjernes fra bægre med babymad, og indholdet omrøres eller rystes, før temperaturen kontrolleres. Dette bør udføres før serve-ring for at undgå forbrændinger. Se side 64.
18. Gnistdannelse Gnistdannelse kan forekomme, hvis en metalbeholder er blevet brugt forkert, hvis der anvendes en forkert mængde mad, eller tilbehøret er blevet beska-diget. Gnistdannelse er glimt af blåt lys i forbindelse med mikrobølger. Hvis dette sker, skal du standse apparatet øjeblikkeligt. Hvis ovnen efterlades uden opsyn, og dette fortsætter, kan det beskadige apparatet. Du kan kun fortsætte tilberedningen med GRILL eller VARMLUFT.

18
Mikrobølge-principperMikrobølge-energi er blevet brugt til at lave mad og genopvarmning af madvarer siden tidlige eksperimenter med radar i Anden Verdenskrig.
Mikrobølger er til stede i atmosfæren hele tiden, både naturligt og fra menneskeskabte kilder.
Menneskeskabte kilder omfatter radar, radio, fjernsyn, telekommunikationsforbin-delser og mobiltelefoner.
I en mikrobølgeovn omdannes elektricitet til mikrobølger af magnetronen.
Mikrobølgerne får vandmolekylerne til at vibrere, hvad der forårsager friktion, dvs. VARME. Denne varme tilbereder derefter madvarerne. Mikrobølger tiltrækkes også af fedt og sukkerpartikler, og madvarer med et højt indhold af disse vil blive hurtigere tilberedt.
REFLEKSION Mikrobølgerne preller af metalvæggene og metalskærmen i lågen.
TRANSMISSION Derefter passerer de gennem madlavnings-beholdere og bliver absorberet af vandmo-lekylerne i maden. Alle madvarer indeholder vand i større eller mindre grad.
Hvordan mikrobølger tilbereder mad
Mikrobølger kan kun trænge ind til en dybde på 4 – 5 cm, og spredes som varme gennem maden ved ledning. Ligesom i en traditionel ovn tilberedes madvarer udefra og indefter.
Ovnrum
Keramisk plade
Mikrobølge- fordeler
Fordelermotor
Bølgeleder
Magnetron

19
Vigtige noter Skålen eller fadet, som bruges til tilbered-ning eller genopvarmning af maden, bliver varm under tilberedningen, da varmen over-føres fra madvarerne. Selv med mikrobølger kan grydelapper være påkrævet!
MIKROBØLGER KAN IKKE PASSERE GENNEM METAL. DERFOR KAN KØK- KENREDSKABER AF METAL ALDRIG BRUGES TIL MIKROBØLGE TILBERED-NING ALENE I DENNE OVN.
Madvarer som ikke er egnet til tilberedning ved mikrobølge aleneEngelske Yorkshire Puddings, souffleer, kødtærter.
Da disse madvarer behøver tør ekstern varme til korrekt tilberedning, bør du ikke forsøge at tilberede dem med mikrobølger.
Madvarer, som kræver friturestegning, kan heller ikke tilberedes i denne ovn.
Hviletid Når en mikrobølgeovn slukkes, vil maden fortsætte med at blive tilberedt ved varme-ledning – ikke ved MIKROBØLGEENER-GI. Derfor er HVILETID meget vigtigt ved mikrobølge tilberedning, især for kompakte madvarer som kød, kager og genopvarmede måltider (se side 20).
Bottom Feeding teknologi Bemærk, at dette produkt bruger Bottom Feeding teknologi til mikrobølgedistribution, som adskiller sig fra traditionelle løsninger med drejeskive og Side Feeding teknologi. Således bliver der mere brugbar plads til retter i forskellige størrelser.
Denne mikrobølge distributionsteknologi kan give en forskel i tilberedningstider (med mikrobølge) i sammenligning med Side Fee-ding apparater. Dette er helt normalt og bør ikke give anledning til nogen bekymring. Se genopvarmnings- og tilberedningstabellerne på side 65 – 81.
Kogte æg
Æg må ikke koges i mikrobølgeovnen. Rå æg kogt i deres skaller kan eksplodere og forårsage alvorlig personskade.

20
General GuidelinesStanding time
Dense foods e.g. meat, jacket potatoes andcakes, require a STANDING TIME (inside oroutside of the oven) after cook ing, to allowheat to finish con ducting through the food.
• Meat Joints – Stand 15 mins. wrapped inaluminium foil.
• Jacket Potatoes – Stand 5 mins. wrappedin aluminium foil when cooked bymicrowave only. It is not necessary tostand jacket potatoes cooked inCOMBINATION mode.
• Light Cakes – Stand 5 mins. beforeremoving from dish.
• Rich Dense Cakes – Stand 15-20 mins.
• Fish – Stand 2-3 mins.
• Egg Dishes – Stand 1-2 mins.
• Precooked Convenience Foods – Standfor 2-3 mins.
• Plated Meals – Stand for 2-3 mins.
• Vegetables – Boiled potatoes benefit fromstanding 1-2 mins., however most othertypes of vegetables can be servedimmediately.
If food is not cooked after STANDINGTIME, return to oven and cook foradditional time.
• Defrosting – It is essential to allowstanding time to com plete the process.This can vary for example from 5 mins forraspberries and up to 1 hour for a joint ofmeat. See page 35-37.
20
NN-CF760M CF750W CF771 BP_Regs:F00039M69BP 26/2/13 10:19 Page 20
Generelle retningslinjerHviletid
Kompakte madvarer som kød, bagekartofler og kager, kræver en HVILETID (i eller uden for ovnen) efter tilberedningen, så varmen kan blive færdig med at strømme gennem maden.
• Stege – Hviletid 15 minutter indpakket i aluminiumsfolie.
• Bagekartofler – Hviletid 5 minutter indpakket i aluminiumsfolie, når de er tilberedt med MIKROBØLGE alene. Dette er ikke nødvendigt, når bagekar-tofler er tilberedt i KOMBINATION.
• Lette kager – Hviletid 5 minutter før de fjernes fra fadet.
• Tungere kager – Hviletid 15 – 20 minutter.
• Fisk – Hviletid 2 – 3 minutter.
• Æggeretter – Hviletid 1 – 2 minutter.
• Convenience Food – Hviletid 2 – 3 minutter.
• Færdigretter – Hviletid til 2 – 3 minutter.
• Grøntsager – Kogte kartofler har gavn af at stå 1 – 2 minutter, men de fleste andre typer grøntsager kan serveres straks.
Hvis maden ikke er tilberedt efter HVILETID, så sæt den tilbage til ovnen til yderligere tilberedning.
• Optøning – Det er vigtigt med hviletid til at fuldføre processen. Denne kan variere for eksempel fra 5 minutter for hindbær og op til 1 time for en steg. Se side 35 – 37.

21
PiercingThe skin or membrane on some foods willcause steam to build up during cooking. Thesefoods must be pierced or a strip of skin shouldbe peeled off before cooking to allow the steamto escape. Eggs, potatoes, apples, sausagesetc, will all need to be pierced before cooking.DO NOT ATTEMPT TO BOIL EGGS IN THEIR SHELLS.
Moisture ContentMany fresh foods e.g. vegetables and fruit,vary in moisture content throughout the season. Jacket potatoes are a particular example of this. For this reason cooking timesmay have to be adjusted throughout the year.Dry ingredients e.g. rice, pasta, can dry out further during storage and cooking times maydiffer from ingredients freshly purchased.
Cling filmCling film helps keep the food moist and thetrapped steam assists in speeding up cookingtimes. However it should be pierced beforecooking, to allow excess steam to escape. Always take care when removing cling filmfrom a dish as the build-up of steam will bevery hot. Always purchase cling film that stateson the packet “suitable for microwave cooking”and use as a covering only. Do not line disheswith cling film. Do not cover foods when cooking by COMBINATION, CONVECTION orGRILL.
General Guidelines
Dish SizeFollow the dish sizes given in the recipes, asthese affect the cooking and reheating times. Aquantity of food spread in a bigger dish cooksand reheats more quickly.
21
NN-CF760M CF750W CF771 BP_Regs:F00039M69BP 26/2/13 10:19 Page 21
Generelle retningslinjer
Perforering Skindet eller membranen på nogle madvarer vil medføre dampdannelse under tilbered-ning. Disse madvarer bør perforeres, eller en strimmel af skindet skal skrælles af før tilbe-redning for at tillade dampen at undslippe. Æg, kartofler, æbler, pølser osv., bør altid perforeres før tilberedning. FORSØG IKKE AT KOGE ÆG I DERES SKALLER.
Plastfolie Plastfolie hjælper med at holde maden fugtig og den indespærrede damp hjælper med at fremskynde tilberedningstiden. Folien bør perforeres før tilberedning, så over- skydende damp kan undslippe. Vær altid forsigtig, når plastfolie fjernes fra en skål, da dampen kan være meget varm. Køb altid plastfolie, som er mærket “egnet til mikrobøl-getilberedning” og bruge kun den til tildæk-ning. Læg ikke plastfolie under madvarer. Tildæk ikke fødevarer ved tilberedning med KOMBINATION, VARMLUFT eller GRILL.
Fugtindhold Mange friske fødevarer, f.eks. grøntsager og frugt, varierer i fugtindhold efter årstiden. Bagekartofler er et særligt eksempel på dette. Af denne grund skal tilberedningstiden måske justeres i løbet af året. Tørre ingredienser som ris og pasta kan udtørre yderligere under opbevaring, og tilberedningstiden kan variere fra netop indkøbte råvarer.
Fadstørrelse Brug de fadstørrelser, som anbefales i op- skrifterne, da disse påvirker tilberednings- og genopvarmningstider. Madvarer fordelt på et større fad tilberedes og genopvarmes hurtigere.

22
ShapeEven shapes cook evenly.
ArrangingIndividual foods e.g. chicken portions or chops,should be placed on a dish so that the thickerparts are to the outside.
QuantitySmall quantities cook faster than large quantities, also small meals will reheat morequickly than large portions.
DensityPorous airy foods heat more quickly thandense heavy foods.
SpacingFoods cook more quickly and evenly if spacedapart. NEVER pile foods on top of each other.
IngredientsFoods containing fat, sugar or salt heat up veryquickly. The filling may be much hotter than thepastry. Take care when eating. Do not overheateven if the pastry does not appear to be veryhot.
General Guidelines
22
NN-CF760M CF750W CF771 BP_Regs:F00039M69BP 26/2/13 10:19 Page 22
Generelle retningslinjer
Mængde Små mængder tilberedes hurtigere end store mængder. Små måltider genopvarmes også hurtigere end store portioner.
Form Regulære former tilberedes ensartet.
Plads Madvarer tilberedes hurtigere og mere ensartet i en vis afstand fra hinanden. Læg ALDRIG madvarer oven på hinanden.
Ingredienser Madvarer, der indeholder fedt, sukker eller salt, opvarmes meget hurtigt. Fyldet kan være meget varmere end brødet. Vær forsigtig, når du spiser. Vær forsigtig med at overophede, selv om brødet ikke virker særlig varmt.
Tæthed Porøse luftige madvarer opvarmes hurtigere end tætte tunge madvarer.
Placering Enkelte madvarer som kyllingestykker eller koteletter bør anbringes på et fad, så de tykkere dele vender udad.

23
Starting TemperatureThe colder the food, the longer it takes to heatup. Food from a fridge takes longer to reheatthan food at room temperature. Food temperature should be between 5-8ºC beforecooking.
CoveringCover foods with microwave cling film or a self-fitting lid. Cover fish, vegetables,casseroles, soups. Do not cover cakes,sauces, jacket potatoes, pastry items. Pleaserefer to cooking charts and recipes for moreinformation.
General Guidelines
Checking FoodIt is essential that food is checked during andafter a recommended cooking time, even if anAUTO PROGRAM has been used (just as youwould check food cooked in a conven tionaloven). Return the food to the oven for furthercooking if necessary.
CleaningAs microwaves work on food particles, keep youroven clean at all times. Stubborn spots of foodcan be removed by using a branded oven cleaner,sprayed onto a soft cloth. Always wipe the ovendry after cleaning. Avoid any plastic parts anddoor area. Customers should not spray directlyinto the cavity. The catalylic lining at the back ofthe oven is self cleaning. See page 12 point 4.
Turning and StirringSome foods require stirring during cooking.Meat and poultry should be turned after halfthe cooking time.
LiquidsAll liquids must be stirred before, during andafter heating. Water espe cially must be stirredbefore and during heating, to avoid eruption.Do not heat liquids that have previously beenboiled. DO NOT OVERHEAT. Stir beforeserving.
23
NN-CF760M CF750W CF771 BP_Regs:F00039M69BP 26/2/13 10:19 Page 23
Generelle retningslinjer
Starttemperatur Jo koldere madvarerne er, desto længere tager det at varme dem op. Madvarer fra et køleskab tager længere tid at genopvarme end madvarer ved stuetemperatur. Madens temperatur skal være mellem 5 – 8 ºC før tilberedning.
Vending og omrøring Nogle fødevarer kræver omrøring under tilberedningen. Kød og fjerkræ skal vendes efter halvdelen af tilberedningstiden.
Kontrol af madvarer Det er vigtigt, at madvarer kontrolleres under og efter en anbefalet tilberedningstid, selv om der er anvendt et AUTO PROGRAM (ligesom du ville tjekke mad tilberedt i en konventionel ovn). Sæt maden tilbage i ovnen til yderligere tilberedning, hvis det er nødvendigt.
Rengøring Da mikrobølger arbejde med madpartikler, bør du altid holde ovnen ren. Genstridige mad- rester kan fjernes ved hjælp af lidt almindeligt ovnrenser, som sprayes på en blød, fugtig klud. Tør altid ovnen efter rengøring. Undgå plastdele og lågeområdet. Sprøjt ikke direkte ind i ovn-rummet. Den katalytiske belægning på ovnens bagvæg er selvrensende. Se s. 12 punkt 4.
Tildækning Dæk madvarer med mikrobølgefilm eller et godt passende låg. Dæk fisk, grøntsager, gryderetter, supper. Tildæk ikke kager, sau-cer, bagekartofler og brød. Se tilberednings-tabeller og opskrifter for mere information.
Væsker Alle væsker skal omrøres før, under og efter opvarmning. Især vand skal omrøres før og under opvarmning for at undgå over- kogning. Opvarm ikke væsker, der tidligere har været kogt. OVEROPHED IKKE. Omrøres før servering.

24
China and CeramicEveryday glazed china, porcelain or ceramicplates, bowls, mugs and cups can be used ifthey are heat resis tant. Fine bone chinashould only be used for reheating for shortperiods. Do not use dishes with a metal rim orpattern. Do not use jugs or mugs with gluedhandles, since the glue can melt. If dishes areheat resistant they may be used onConvection and Combination but not directlyunder the Grill.
Containers to use
1. Fill a microwave safe measur ing jug with300ml (½ pt) cold water.
2. Place it on the base of the oven along sidethe dish to be tested. If the dish you aretesting is a large dish, then stand themeasur ing jug on top of the empty dish.
3. Heat on HIGH power for 1 minute.
ResultIf the dish is suitable for micro waving, it willremain cool, whilst the water in the jug willbegin to feel warm. If the testing dish feelswarm, do not use as it is obvious ly absorbingmicrowave energy.
N.B. This test does not apply to plastic or metalbased con tainers e.g. Le Creuset® style dishes,which should not be used as they are cast ironcovered with enamel.
Quick Check Guide to Cooking Utensils
Choosing the correct container is a very important factor in deciding the success or failure of yourcooking.
Testing Dishes for Suitability - For Microwave Cooking Only.
Oven GlassEveryday glass that is heat resistant e.g.Pyrex, is ideal for Microwave, Convection orCombination cooking. Do not use delicateglass or lead crystal which may crack or arc.
When unsure that a cooking con tainer issuitable for use in your microwave, check bythe follow ing test:
24
NN-CF760M CF750W CF771 BP_Regs:F00039M69BP 26/2/13 10:19 Page 24
Brugbare beholdereAt vælge den rigtige beholder er en meget vigtig faktor for, om din madlavning skal være vellykket eller mislykket.
Test af fades egnethed – Kun til mikrobølgetilberedning.
Er du i tvivl, om en beholder eller fad er egnet til brug i mikrobølgeovnen, så tjek det med denne test:
1. Fyld et mikrobølgesikkert målebæger med 300 ml koldt vand.
2. Stil det på bunden af ovnen ved siden af det fad, der skal testes. Hvis fadet er stort, så stil målebægeret oven på det tomme fad.
3. Opvarm på HIGH effekt i 1 minut.
ResultatHvis fadet er egnet til mikrobølger, vil det forblive køligt, mens vandet i bægeret vil begynde at føles varmt. Hvis fadet føles varmt, bør du ikke bruge det, da det åbenbart ab-sorberer mikrobølgeenergi.
NB: Denne test gælder ikke for plast- eller metalbaserede beholdere som f.eks. Le Creuset®, der ikke bør anvendes, da de er af støbejern belagt med emalje.
Ovnfast glasAlmindeligt glas, der er varmebestandig, f.eks. Pyrex, er ideelt til mikrobølge, varmluft eller kombination tilberedning. Brug ikke sarte glas eller krystalglas, der kan revne eller udsende gnister.
Lynguide til køkkenredskaber
Porcelæn og keramikAlmindeligt glaseret porcelæn, fajance eller keramiske tallerkener, skåle, krus og kopper kan bruges, hvis de er varmebestandige. Fint benporcelæn bør kun anvendes til genopvarmning i korte perioder. Brug ikke tallerkener eller fade med en metalkant eller et forgyldt mønster. Brug ikke kander eller krus med limede håndtag, da limen kan smelte. Hvis fade er varmebestandige, kan de anvendes til varmluft og kombination, men ikke direkte under grillen.

25
Foil/Metal ContainersNEVER ATTEMPT TO COOK IN FOIL ORMETAL con tai ners on Microwave only as themicrowaves cannot pass through and the foodwill not heat evenly, it may also damage youroven. Foil and metal containers can be usedon grill and convection modes and may beused with care during certain combinationcooking as long as they are not damaged ordented.
PlasticMany plastic containers are designed formicrowave use, but do not use for cooking foodshigh in sugar or fat or for foods that require longcooking times e.g. brown rice. Only useTupperware® containers if they are designed formicrowave use.
Do not use Melamine. Never cook in margarinecartons or yoghurt pots, as these will melt withthe heat from the food. If heatproof they can beused for Convection or Combination cooking.DO NOT USE UNDER THE GRILL.
Containers to use
Pottery, Earthenware, StonewareIf completely glazed, these dishes aresuitable. Do not use if partially glazed orunglazed, since they are able to absorb waterwhich in turn absorbs microwave energy,making the container very hot and slows downthe cooking of food.
25
NN-CF760M CF750W CF771 BP_Regs:F00039M69BP 26/2/13 10:19 Page 25
Brugbare beholdere
Keramik, fajance, stentøjHvis de er fuldstændigt glaserede, er disse fade egnede. Brug dem ikke, hvis de er delvist glaserede eller uglaserede, da de kan absorbere vand, som igen absorberer mikrobølgeenergi. Så kan beholderne blive meget varme og sinke tilberedningen af mad.
PlastMange plastbeholdere er konstrueret til brug i mikrobølgeovn, men bør ikke bruges til tilberedning af madvarer med højt indhold af sukker eller fedt eller til madvarer, der kræver lang tilberedningstid, f.eks. brune ris. Brug kun Tupperware® beholdere, hvis de er beregnet til brug i mikrobølgeovn.
Folie/MetalbeholdereFORSØG ALDRIG AT TILBEREDE MAD I FOLIE ELLER METALBEHOLDERE på Mikrobølge, da mikrobølger ikke trænge igennem metal. Maden vil ikke blive varmet jævnt, og det kan også skade din ovn. Folie og metalbeholdere kan bruges til Grill og Varmluft tilberedning, og de kan også anvendes med omhu under nogle kombi-nationstilberedninger, så længe de ikke er beskadiget eller bulet.
Brug ikke Melamin. Tilbered aldrig mad i margarinekartoner eller yoghurtbægre, da disse vil smelte med varmen fra maden. Hvis de er varmefaste, kan de bruges til Varmluft eller Kombination tilberedning. MÅ IKKE ANVENDES UNDER GRILLEN.

26
�
Wicker, Wood, Straw Baskets
Dishes will crack and could ignite. Do not use wooden dishes in your microwave.DO NOT USE ON ANY COOKING MODE.
Roasting BagsRoasting bags are useful when slit up one sideto tent a joint, for roasting by power and time.Do not use the metal twists supplied, whenusing Microwave or Combination.
Cling FilmMicrowave cling film can only be used forcovering food that is reheated by microwave. It is also useful for covering food to be cooked,but care should be taken to avoid the filmbeing in direct contact with the food. DO NOTUSE ON ANY OTHER COOKING MODE.
Aluminium FoilSmall amounts of smooth aluminium foil can beused to SHIELD joints of meat during defrostingand cook ing by Microwave, as the microwavescannot pass through the foil, this prevents theparts shielded from overcook ing or over de frost ing. Take care that the foil does nottouch the sides or roof of the oven, as this maycause arcing and damage your oven. Aluminiumfoil can be used for Convection cooking.
PaperPlain white absorbent kitchen paper (kitchentowel) can only be used for microwave cookinge.g. covering blind pastry cases and for cover ing bacon to prevent splattering. ONLYUSE FOR SHORT COOKING TIMES. NEVERRE-USE A PIECE OF KITCHEN TOWEL.ALWAYS USE A FRESH PIECE OF PAPERFOR EACH DISH.Avoid kitchen paper containing manmadefibres. If you are using branded re-cycledkitchen towel, check first that it isrecommended for microwave use. Do not usewaxed or plastic coated cups or plates as thefinish may melt. Greaseproof paper can beused to line the base of dishes and to coverfatty foods e.g. bacon rashers, to stopsplattering. White paper plates can be used forSHORT RE HEATING TIMES, on Microwaveonly.
Containers to use
26
NN-CF760M CF750W CF771 BP_Regs:F00039M69BP 26/2/13 10:19 Page 26
Brugbare beholdere
Peddigrør-, træ- og halmkurveKurve af disse materialer kan gå i stykker og antændes. Brug ikke trætallerkener i mikrobølgeovnen. MÅ IKKE BRUGES TIL TILBEREDNING AF MAD.
StegeposerStegeposer er nyttige, når de slidses op i den ene side til tildækning ved stegning ef-ter effekt og tid. Brug ikke de medfølgende metalstrips i forbindelse med Mikrobølger eller Kombination.
PlastfolieMikrobølgefilm kan ikke kun bruges til at dække mad, der genopvarmes med mikro-bølge. Det er også nyttigt til at dække mad, som skal tilberedes, men der bør udvises omhu for at undgå, at filmen kommer i direk-te kontakt med madvarer. MÅ IKKE ANVENDES I NOGEN ANDEN TILBEREDNINGSINDSTILLING.
AluminiumsfolieSmå stykker glat aluminiumfolie kan anvendes til at beskytte kødstykker under optøning og tilberedning med mikrobølge. Da mikrobølger ikke kan passere gennem folien, forhindrer dette de beskyttede dele mod overdreven tilberedning eller optøning. Pas på at folien ikke rører siderne eller loftet i ovnen, da dette kan medføre gnistdannelse og beskadige ovnen. Aluminiumsfolie kan anvendes til Varmluft tilberedning.
PapirAlmindelig hvid absorberende køkkenru-lle kan kun anvendes til tilberedning med mikrobølge, f.eks. tildækning af tærtebunde uden fyld samt til at dække bacon for at forhindre sprøjt. KUN til korte tilberednings- tider. GENBRUG ALDRIG ET STYKKE KØKKENRULLE. BRUG ALTID ET FRISK STYKKE PAPIR TIL HVERT FAD.
Undgå køkkenpapir indeholdende synte-tiske fibre. Hvis du bruger køkkenrulle af genbrugspapir, så tjek først, at det anbefa-les til mikrobølge. Brug ikke vokspapir eller plastovertrukne kopper eller tallerkener, hvis finish kan smelte. Fedttæt papir kan anvendes til at lægge i bunden af tallerke-ner og dække fedtholdige madvarer, f.eks. baconterninger, for at forhindre sprøjt. Hvide papirtallerkener kan bruges til KORTE GENOPVARMNINGSTIDER på Mikrobølge.

27
Control Panel NN-CF771SNN-CF760M NN-CF750W*
(1) Display Window(2) Microwave Power Button(3) Grill Button(4) Convection Button(5) Auto Weight Defrost Programs
(Chaos Defrost)(6) Auto Weight Programs Button(7) Time/Weight Dial(8) Memory Button(9) Timer Button:
This can be used to delay a cooking program for up to 9 hrs; or used as atimer or for standing (non-cooking) time.It is also used to set the clock.
(10) Clock Button(11) Stop/Cancel Button:
Before Cooking:one press clears your instructions.During Cooking:one press temporarily stops the cooking program. Another press cancels all your instructions and a colonor the time of day will appear in thedisplay.
(12) Start Button:Press to start operating the oven.If during cooking the door is opened orStop/Cancel Button is pressed once,Start Button has to be pressed again to continue cooking.
(1)
(2)
(12)
(3)(4)
(10)
(5)
(7)
Beep Sound:A beep sounds when a button is pressed. Ifthis beep does not sound, the setting is incorrect. When the oven changes from onefunction to another, two beeps sound. Aftercompletion of cooking, five beeps sound.
(6)
(8)(9)
(11)
27
Note:If an operation is set and Start Button is notpressed, after 6 minutes, the oven will automatically cancel the operation.The displaywill revert back to colon or Clock Mode.
The design of your control panel may varyfrom the panel displayed (depending oncolour), but the words on the buttons willbe the same.
*
NN-CF760M CF750W CF771 BP_Regs:F00039M69BP 26/2/13 10:19 Page 27
Kontrolpanel
NB:Hvis en operation er indstillet, og der ikke trykkes på Start knappen, vil ovnen efter 6 minutter automatisk annullere handlingen. Displayet vender tilbage til kolon eller klok-ken.
* Udformningen af dit kontrolpanel kan variere fra det viste panel (afhængigt af farve), men ordene på knapperne vil være de samme.
(1) Display-vindue
(2) Mikrobølge effekt knap
(3) Grill knap
(4) Varmluft knap
(5) Automatisk vægt optønings- programmer (Chaos Defrost)
(6) Automatisk vægt programmer knap
(7) Tid/Vægt drejeknap
(8) Hukommelse knap
(9) Timer knap: Denne funktion kan anvendes til at forsinke en tilberedning i op til 9 timer; eller anvendes som timer eller til hviletid (ikke tilberedning) tid. Knappen bruges også til at indstille uret.
(10) Ur knap
(11) Stop/Annuller knap: Før tilberedning: Et tryk sletter dine instruktioner. Under tilberedning: Et tryk stopper tilberedningsprogram-met midlertidigt. Endnu et tryk annul-lerer alle dine instruktioner, og et kolon eller klokken bliver vist på displayet.
(12) Start knap: Tryk for at begynde at betjene ovnen. Hvis lågen åbnes under tilberedning-en, eller der trykkes én gang på Stop/Annuller knappen, skal der trykkes på Start knappen igen for at fortsætte tilberedningen.
Biplyd: Der lyder et bip, når der trykkes på en knap. Hvis dette bip ikke lyder, er ind- stillingen forkert. Når ovnen skifter fra en funktion til en anden, lyder to bip. Efter afslutning af tilberedningen lyder fem bip.
NN-CF771SNN-CF760MNN-CF750W*

28
1 Plug in
Plug into a 13 amp fused electrical socket. You will bereminded to read your operating instructions.
2 Press Clock Button to set clock
Set clock as a 24 hr clock. (See page 29 for details).
3 Press Convection Button
( will appear in the display window with the oventemperature)(this procedure is to burn off the oil used forrust protection in the oven.) Press the Convection Buttonuntil 250ºC is in the display window. Remove allaccessories from the oven.
4 Enter Time
Turn Time/Weight dial until 5 minutes is displayed in thewindow.
5 Press Start Button
The time will be displayed in the window and countdown. The oven will beep at the end of the program. Theoven is now ready to use.Caution: Grill elements and oven will be hot.
6 Demonstration Mode
This is to enable you to experiment setting variousprograms. (The letter D will always appear in the displaywindow. This is to confirm that there is no microwavepower produced and it is safe to use the oven withoutany food). To set Demonstration Mode: press micropower once, then press Stop/Cancel 4 times. To cancelDemonstration Mode press Micro power once, thenpress Stop/Cancel 4 times.
7 Child Lock
To operate the child lock facility press the Start Buttonthree times, this will deactivate the microwave. “Lock” willappear in the display and none of the controls willoperate. To clear child lock facility press Stop/Cancelbutton three times.
Letʼs Start to Use your Oven
28
NN-CF760M CF750W CF771 BP_Regs:F00039M69BP 26/2/13 10:19 Page 28
Lad os begynde at bruge din ovn
1 Tilslutning
Sæt netstikket i en stikkontakt med en kapacitet på13 A. Du bliver mindet om at læse brugervejledningen.
2 Tryk på Clock knappen for at indstille uret
Indstil uret som et 24-timers ur. (Se side 29 for detaljer).
3 Tryk på Varmluft knappen
([
1 Plug in
Plug into a 13 amp fused electrical socket. You will bereminded to read your operating instructions.
2 Press Clock Button to set clock
Set clock as a 24 hr clock. (See page 29 for details).
3 Press Convection Button
( will appear in the display window with the oventemperature)(this procedure is to burn off the oil used forrust protection in the oven.) Press the Convection Buttonuntil 250ºC is in the display window. Remove allaccessories from the oven.
4 Enter Time
Turn Time/Weight dial until 5 minutes is displayed in thewindow.
5 Press Start Button
The time will be displayed in the window and countdown. The oven will beep at the end of the program. Theoven is now ready to use.Caution: Grill elements and oven will be hot.
6 Demonstration Mode
This is to enable you to experiment setting variousprograms. (The letter D will always appear in the displaywindow. This is to confirm that there is no microwavepower produced and it is safe to use the oven withoutany food). To set Demonstration Mode: press micropower once, then press Stop/Cancel 4 times. To cancelDemonstration Mode press Micro power once, thenpress Stop/Cancel 4 times.
7 Child Lock
To operate the child lock facility press the Start Buttonthree times, this will deactivate the microwave. “Lock” willappear in the display and none of the controls willoperate. To clear child lock facility press Stop/Cancelbutton three times.
Letʼs Start to Use your Oven
28
NN-CF760M CF750W CF771 BP_Regs:F00039M69BP 26/2/13 10:19 Page 28
] vises på displayet sammen med ovntemperaturen) (denne procedure har til formål at afbrænde olien til rust-beskyttelse i ovnen.) Tryk på Varmluft knappen indtil 250 ºC vises på displayet. Fjern alt tilbehør fra ovnen.
4 Indstil tid
Drej Tid/Vægt knappen, til 5 minutter vises i vinduet.
5 Tryk på Start knappen
Tiden bliver vist i vinduet og tæller ned. Ovnen bipper ved afslutningen af programmet. Ovnen er nu klar til brug. Forsigtig: Grillelementerne og ovnen vil være varme.
6 Demo-funktion
Denne funktion gør det muligt for dig at eksperimentere med indstilling af forskellige programmer. (Bogstavet D vises altid på displayet. Dette sker for at bekræfte, at der er ikke produceres mikrobølger, og det er sikkert at bruge ovnen uden mad). Sådan indstilles Demo-funktionen: Tryk én gang på Mikrobølge effekt, og tryk derefter på Stop/Annuller 4 gange. Sådan annulleres Demo-funktionen: Tryk én gang på Mikrobølge effekt, og tryk derefter på Stop/Annuller 4 gange.
7 Børnesikring
For at aktivere børnesikringen, tryk på Start knappen tre gange. Dette vil deaktivere mikrobølgeovnen. ”Lock” vises på displayet, og ingen af kontrollerne vil fungere. Børnesikringen deaktiveres ved at trykke på Stop/Annuller knappen tre gange.
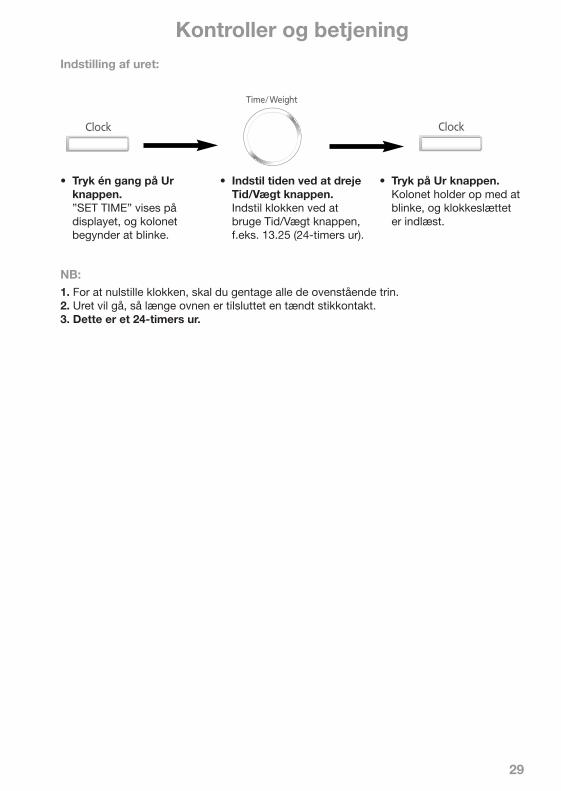
2929
Clock Setting:
• Press Clock ButtonOnce“SET TIME” will appearin the display windowand the colon starts toblink.
• Enter the time by turning theTime/Weight Dial.Enter time of day by using Time/Weight Dial e.g. 13.25pm (24 hr clock).
• Press Clock Button.The colon stops blinking andthe time of day is entered.
NOTE:1. To reset the time of day repeat all the above steps.2. The clock will keep the time of day as long as the oven is plugged in and electricity is supplied.3. This is a 24 hour clock.
Controls and Operation Procedure
NN-CF760M CF750W CF771 BP_Regs:F00039M69BP 26/2/13 10:19 Page 29
Kontroller og betjening
NB:1. For at nulstille klokken, skal du gentage alle de ovenstående trin. 2. Uret vil gå, så længe ovnen er tilsluttet en tændt stikkontakt. 3. Dette er et 24-timers ur.
• Tryk én gang på Ur knappen. ”SET TIME” vises på displayet, og kolonet begynder at blinke.
• Indstil tiden ved at dreje Tid/Vægt knappen. Indstil klokken ved at bruge Tid/Vægt knappen, f.eks. 13.25 (24-timers ur).
• Tryk på Ur knappen. Kolonet holder op med at blinke, og klokkeslættet er indlæst.
Indstilling af uret:

3030
• Select desiredMicrowavepower level.
• Select the cookingtime using theTime/Weight Dial.
• Press StartButton.
There are 6 different microwave power levels available.Do not place food directly on the ceramic plate. Place on glass dish supplied with the oven or useyour own dishes, plates or bowls directly on the ceramic plate.
Selecting Microwave Power Level:
N.B.1. Maximum time that can be set on HIGH
power is 30 min.2. On all Power Levels, except HIGH power,
the maximum time that can be set is 1hr 30mins.
3. You can add to the cooking time duringcooking, if required. Turn Time/ Weight Dialto increase the cooking time. (Time can beincreased/decreased in 1 minuteincrements, up to 10 minutes. This is onlythe case for one stage cooking).
4. DO NOT attempt to use microwave onlywith any metal accessory in the oven.
5. DO NOT place food directly onto the oven cavity floor. Place in a microwave or Glassdish. Foods reheated or cooked byMICROWAVE only are normally coveredwith a lid or cling film, unless otherwise stated.
Two Stage Cooking:e.g. High power 10 minutes followed bySimmer power 20 minutes; Select High powerand program 10 minutes then select secondpower (Simmer) with second cooking time (20minutes) then press Start.
Three Stage Cooking:e.g. High power 5 minutes, Delay 5 minutes,High power 2 minutes; Select first Power leveland cooking time, then press Timer and time,then select final power level and final cookingtime. Then press Start.
Microwave Cooking and Defrosting
Press PowerLevel Wattage
Once High 1000WTwice Defrost 270W3 Times Medium 600W4 Times Low 440W5 Times Simmer 250W6 Times Warm 100W
NN-CF760M CF750W CF771 BP_Regs:F00039M69BP 26/2/13 10:19 Page 30
30
• Select desiredMicrowavepower level.
• Select the cookingtime using theTime/Weight Dial.
• Press StartButton.
There are 6 different microwave power levels available.Do not place food directly on the ceramic plate. Place on glass dish supplied with the oven or useyour own dishes, plates or bowls directly on the ceramic plate.
Selecting Microwave Power Level:
N.B.1. Maximum time that can be set on HIGH
power is 30 min.2. On all Power Levels, except HIGH power,
the maximum time that can be set is 1hr 30mins.
3. You can add to the cooking time duringcooking, if required. Turn Time/ Weight Dialto increase the cooking time. (Time can beincreased/decreased in 1 minuteincrements, up to 10 minutes. This is onlythe case for one stage cooking).
4. DO NOT attempt to use microwave onlywith any metal accessory in the oven.
5. DO NOT place food directly onto the oven cavity floor. Place in a microwave or Glassdish. Foods reheated or cooked byMICROWAVE only are normally coveredwith a lid or cling film, unless otherwise stated.
Two Stage Cooking:e.g. High power 10 minutes followed bySimmer power 20 minutes; Select High powerand program 10 minutes then select secondpower (Simmer) with second cooking time (20minutes) then press Start.
Three Stage Cooking:e.g. High power 5 minutes, Delay 5 minutes,High power 2 minutes; Select first Power leveland cooking time, then press Timer and time,then select final power level and final cookingtime. Then press Start.
Microwave Cooking and Defrosting
Press PowerLevel Wattage
Once High 1000WTwice Defrost 270W3 Times Medium 600W4 Times Low 440W5 Times Simmer 250W6 Times Warm 100W
NN-CF760M CF750W CF771 BP_Regs:F00039M69BP 26/2/13 10:19 Page 30
Mikrobølgetilberedning og optøningDer er 6 forskellige mikrobølge effekt niveauer til rådighed. Madvarerne må ikke anbringes direkte på den keramiske plade. Brug det medfølgende glasfad eller dine egne fade, tallerkener eller skåle direkte på den keramiske plade.
Valg af mikrobølgeeffekt:
• Tryk på Start knappen.
• Vælg det ønskede mikrobølge effektniveau
30
• Select desiredMicrowavepower level.
• Select the cookingtime using theTime/Weight Dial.
• Press StartButton.
There are 6 different microwave power levels available.Do not place food directly on the ceramic plate. Place on glass dish supplied with the oven or useyour own dishes, plates or bowls directly on the ceramic plate.
Selecting Microwave Power Level:
N.B.1. Maximum time that can be set on HIGH
power is 30 min.2. On all Power Levels, except HIGH power,
the maximum time that can be set is 1hr 30mins.
3. You can add to the cooking time duringcooking, if required. Turn Time/ Weight Dialto increase the cooking time. (Time can beincreased/decreased in 1 minuteincrements, up to 10 minutes. This is onlythe case for one stage cooking).
4. DO NOT attempt to use microwave onlywith any metal accessory in the oven.
5. DO NOT place food directly onto the oven cavity floor. Place in a microwave or Glassdish. Foods reheated or cooked byMICROWAVE only are normally coveredwith a lid or cling film, unless otherwise stated.
Two Stage Cooking:e.g. High power 10 minutes followed bySimmer power 20 minutes; Select High powerand program 10 minutes then select secondpower (Simmer) with second cooking time (20minutes) then press Start.
Three Stage Cooking:e.g. High power 5 minutes, Delay 5 minutes,High power 2 minutes; Select first Power leveland cooking time, then press Timer and time,then select final power level and final cookingtime. Then press Start.
Microwave Cooking and Defrosting
Press PowerLevel Wattage
Once High 1000WTwice Defrost 270W3 Times Medium 600W4 Times Low 440W5 Times Simmer 250W6 Times Warm 100W
NN-CF760M CF750W CF771 BP_Regs:F00039M69BP 26/2/13 10:19 Page 30
.
• Vælg tilberednings- tiden med Tid/Vægt knappen.
Tryk Effekt- niveau
Effekt
En gang High 1.000 W
To gange Defrost 270 W3 gange Medium 600 W4 gange Low 440 W5 gange Slimmer 250 W6 gange Varm 100 W
NB:
1. Maksimal tid, som kan indstilles på High effekt, er 30 min.
2. På alle effektniveauer, undtagen High, er den maksimale tid, der kan indstilles, 1 time 30 min.
3. Du kan ændre tilberedningstiden, mens ovnen er i gang, hvis det kræves. Drej Tid/Vægt knappen for at ændre tilbered-ningstiden. (Tiden kan øges/mindskes i trin af 1 minut, op til 10 minutter. Dette gælder kun for et-trins tilberedning).
4. Forsøg IKKE at bruge mikrobølge alene med metaltilbehør i ovnen.
5. Madvarerne må IKKE anbringes di-rekte på bunden i ovnrummet. Brug et mikrobølge- eller glasfad. Madvarer, som genopvarmes eller tilberedes med mikrobølge alene, bør normalt tildækkes med et låg eller plastfolie, med mindre andet er angivet.
To-trins tilberedning:
F.eks. High effekt 10 minutter efterfulgt af Simmer effekt 20 minutter. Vælg High effekt og programmer 10 minutter. Vælg derefter anden effekt (Simmer) med tilberedningstid (20 minutter) og tryk derefter på Start.
Tre-trins tilberedning:
F.eks. High effekt 5 minutter, hviletid 5 minutter, High effekt 2 minutter. Vælg først effektniveau og tilberedningstid. Tryk deref-ter på Timer og tid, og vælg derefter endelig effekt og tilberedningstid. Tryk derefter på Start.

31
Program Weight Range Suitable
1 Bread 100 - 900g Bread and rolls. Place on a plate. Turn at beep. Seestanding times on page 37.
2 Mince/Chops 200 - 1200g Small pieces of meat, minced meat, chicken portions,steaks, chops. Place on a plate or shallow dish. Turnat beeps. See standing times on pages 35-36.
3 Meat Joints 400 - 2000g Whole chicken, meat joints.Place on a plate on an upturned saucer.Turn at beeps and shield. See standing times onpages 35-36.
31
Auto Weight Defrost - Chaos DefrostWith this feature you can defrost frozen foods according to the weight. Select the category andset the weight of the food. The weight starts from the minimum weight for each category.
• Set the weight ofthe food byusing theTime/Weight Dial.
• Press Start Button. • Press the Chaos DefrostButton.Once breadTwice Mince/chopsThree times meat Joints.
NN-CF760M CF750W CF771 BP_Regs:F00039M69BP 26/2/13 10:19 Page 31
Med denne funktion kan du optø frosne madvarer efter deres vægt. Vælg kategori og indstil vægten af madvarerne. Vægten starter fra den mindste vægt for hver kategori.
Auto-vægt optøning – Chaos Defrost
• Tryk på Chaos Defrost knappen. En gang brød To gange hakket kød/koteletter Tre gange stege.
• Tryk på Startknappen.• Indstil vægten af madvarerne med Tid/vægt kanppen.
Program Vægtinterval Egnet til
1 Brød 100 – 900 g Brød og boller.Læg på en tallerken. Vend ved bip. Se hviletider på side 37.
2 Hakket kød/Koteletter 200 – 1.200 g Små stykker kød, hakket kød, kyllinge- portioner, steaks, koteletter. Læg på en plade eller dyb tallerken. Vend ved bip. Se hviletider på side 35 – 36.
3 Stege 400 – 2.000 g Hel kylling, stege. Læg på en tallerken på en omvendt underkop. Vend ved bip og tildæk. Se hviletider på side 35 – 36.

3232
This feature allows you to defrost minced meat,chops, chicken portions, meat joints and bread.
The CHAOS defrost button should be pressedto select the correct defrost category and thenenter in the weight of the food in grams (seepage 31).
Foods should be placed in a suitable dish,whole chickens and joints of meat should beon an upturned saucer or on a microwave safeplate. Chops, chicken portions and slices ofbread should be placed in a single layer. It isnot necessary to cover the foods. The CHAOS Theory principle is used in AutoWeight defrost programs to give you a quickand more even defrost.The CHAOS system uses a random sequenceof pulsing microwave energy which speeds upthe defrosting process.
During the program the oven will beep toremind you to check the food. IT IS ESSENTIAL THAT YOU TURN ANDSTIR THE FOOD FREQUENTLY AND SHIELDIF NECESSARY.On hearing the first beep you should TURN andSHIELD (if possible). On the second beep youshould turn the food or break it up.
Auto Weight Defrost Programs
1st Beep 1st Beep
Turn or Shield
2nd Beep
Turn or break up
Turn or Shield
NN-CF760M CF750W CF771 BP_Regs:F00039M69BP 26/2/13 10:19 Page 32
32
This feature allows you to defrost minced meat,chops, chicken portions, meat joints and bread.
The CHAOS defrost button should be pressedto select the correct defrost category and thenenter in the weight of the food in grams (seepage 31).
Foods should be placed in a suitable dish,whole chickens and joints of meat should beon an upturned saucer or on a microwave safeplate. Chops, chicken portions and slices ofbread should be placed in a single layer. It isnot necessary to cover the foods. The CHAOS Theory principle is used in AutoWeight defrost programs to give you a quickand more even defrost.The CHAOS system uses a random sequenceof pulsing microwave energy which speeds upthe defrosting process.
During the program the oven will beep toremind you to check the food. IT IS ESSENTIAL THAT YOU TURN ANDSTIR THE FOOD FREQUENTLY AND SHIELDIF NECESSARY.On hearing the first beep you should TURN andSHIELD (if possible). On the second beep youshould turn the food or break it up.
Auto Weight Defrost Programs
1st Beep 1st Beep
Turn or Shield
2nd Beep
Turn or break up
Turn or Shield
NN-CF760M CF750W CF771 BP_Regs:F00039M69BP 26/2/13 10:19 Page 32
Auto-vægt optøningsprogrammer
Denne funktion gør det muligt at optø hak-ket kød, koteletter, kyllingeportioner, stege og brød.
Tryk på Chaos Defrost knappen for at vælge den korrekte optøningskategori, og indtast derefter madvarernes vægt i gram (se side 31).
Madvarer bør placeres i et passende fad, hele kyllinger og stege bør ligge på en omvendt underkop eller på et mikrobølge-sikkert fad. Koteletter, kyllingeportioner og brødskiver bør placeres i et enkelt lag. Det er ikke nødvendigt at tildække madvarerne.
Kaosteori-princippet anvendes i auto-vægt optøningsprogrammer til at give dig en hurtig og mere ensartet optøning.
Kaossystemet bruger en tilfældig sekvens af pulserende mikrobølgeenergi, som frem-skynder optøningen.
I løbet af programmet bipper ovnen for at minde dig om at kontrollere maden.
DET ER VIGTIGT AT DU OFTE VENDER OG RØRER I MADEN SAMT OM NØDVENDIGT TILDÆKKER DEN.
Når du hører det første bip, bør du vende og tildække (hvis muligt). Ved det andet bip skal du vende maden eller dele den op.
1. bip 2. bip
1. bip
Vend eller tildæk
Vend eller tildæk
Vend eller del op

33
32
This feature allows you to defrost minced meat,chops, chicken portions, meat joints and bread.
The CHAOS defrost button should be pressedto select the correct defrost category and thenenter in the weight of the food in grams (seepage 31).
Foods should be placed in a suitable dish,whole chickens and joints of meat should beon an upturned saucer or on a microwave safeplate. Chops, chicken portions and slices ofbread should be placed in a single layer. It isnot necessary to cover the foods. The CHAOS Theory principle is used in AutoWeight defrost programs to give you a quickand more even defrost.The CHAOS system uses a random sequenceof pulsing microwave energy which speeds upthe defrosting process.
During the program the oven will beep toremind you to check the food. IT IS ESSENTIAL THAT YOU TURN ANDSTIR THE FOOD FREQUENTLY AND SHIELDIF NECESSARY.On hearing the first beep you should TURN andSHIELD (if possible). On the second beep youshould turn the food or break it up.
Auto Weight Defrost Programs
1st Beep 1st Beep
Turn or Shield
2nd Beep
Turn or break up
Turn or Shield
NN-CF760M CF750W CF771 BP_Regs:F00039M69BP 26/2/13 10:19 Page 32
Auto-vægt optøningsprogrammer
Kategori 1 – Brød Brød programmet er velegnet til optøning af små madvarer som rundstykker, boller og brødskiver, der skal bruges med det samme. Madvarerne kan føles varme umiddelbart efter optøning. Hele brød kan også optøs på dette program, men vil kræve hviletid, indtil midten er helt optøet. Hviletiden kan afkor-tes, hvis skiver adskilles, og boller og brød skæres i halve stykker. Madvarer bør vendes halvvejs under optøning. DETTE PROGRAM ER IKKE EGNET TIL FLØDEKAGER ELLER DESSERTER, f.eks. cheesecake. Se side 37 om hviletider.
Kategori 2 – Kødstykker (Hakket kød/Koteletter/Kyllingeportioner) Det er nødvendigt for hakket kød at blive brudt op flere gange under optøning, og dette gøres bedst i en stor dyb tallerken. Koteletter og kyllingeportioner bør arrange-res i et enkelt lag og vendes ofte. Se side 35 – 36 om hviletider.
Kategori 3 – Stege/Hele kyllinger Stege og kyllinger kræver tildækning under optøning, især hvis de består af særligt fede stykker. Dette skal forhindre overdre-ven optøning på de udvendige kanter. Glat aluminiumsfolie fastgjort med cocktailpinde bør anvendes. LAD IKKE FOLIEN RØRE VÆGGENE I OVNEN. Fede stykker som led, ben, vinger og bryst behøver tildækning (se foto side 32). Afsæt en hviletid på mindst 1 time (rullestege kan kræve længere tid) før tilberedning for at sikre, at midten er fuldt optøet. Se side 35 – 36 om hviletider.
Optøning retningslinjer
TIP:1. Hold øje med madvarer under optø-
ning. Fødevarer optøs med varierende hastighed.
2. Det er ikke nødvendigt at tildække maden.
3. Husk at vende eller røre i maden, især når ovnen bipper. Tildæk om nødvendigt (se punkt 5).
4. Hakket kød/koteletter/kyllingeportioner bør deles op eller adskilles så hurtigt som muligt og placeres i et enkelt lag.
5. Tildækning forhindrer tilberedning. Det er afgørende ved optøning af kyllinger og stege. Ydersiden tør op først, så beskyt vinger/bryst/fedt med glatte stykker alu-miniumsfolie fastgjort med cocktailpinde. Se side 32.
6. Afsæt hviletid, så midten af maden tør op. (minimum 1 time for stege og hele kyllinger)

34
Turn dense foods and meat 2/3 timesduring defrosting.
Break up small items e.g. minced meat,frequently during defrosting.
Defrosting GuidelinesBy selecting the DEFROST power level fromthe microwave power button and setting atime, you can defrost food in your microwave.The biggest problem is getting the insidedefrosted before the outside starts to cook.
For this reason a defrost program alternatesbetween a defrost power and a standing time.The name for this type of defrost is cyclic.During the standing stages there is not anymicrowave power in the oven, although thelight will remain on.
The automatic stand times ensure a moreeven defrost but it is still necessary to allow forstanding time before use. Place foods in asuitable container. Meat joints and chickensshould be placed on an upturned saucer or ona plastic rack if you have one.
Separate chops and small items e.g.bread slices where possible.
Chickens and joints of meat will requireshielding during defrosting.
34
NN-CF760M CF750W CF771 BP_Regs:F00039M69BP 26/2/13 10:19 Page 34
Optøning retningslinjer
Ved at vælge DEFROST effektniveau med mikrobølgeeffekt knappen og indstille en tid, kan du optø mad i mikrobølgeovnen. Det største problem er, at få det inderste optøet, før ydersiden begynder at blive stegt.
Af denne grund skifter et optøningsprogram mellem optøning og hviletid. Denne type optøning kaldes cyklisk. I hviletiderne er der ikke nogen mikrobølgeeffekt i ovnen, men lyset forbliver tændt.
De automatiske hviletider sikrer en mere jævn optøning, men det er stadig nødven-digt at afsætte hviletid før brug. Placer føde-varer i en egnet beholder. Stege og kyllinger bør placeres på en omvendt underkop eller en plastholder, hvis du har sådan en.
Adskil koteletter og små stykker, f.eks. brødskiver, hvor det er muligt.
Vend kompakte madvarer og kød 2 – 3 gange under optøning.
Kyllinger og stege kræver tildækning under optøning.
Opdel små stykker, f.eks. hakket kød, ofte under optøning.

35
Op
tøni
ng a
f m
adva
rer
– O
ptø
ning
seff
ekt
og
tid
Ti
der
ne i
tab
elle
n er
kun
vej
led
end
e. K
ontr
olle
r al
tid t
ilber
edni
ngen
ved
at
åbne
ovn
låge
n og
der
efte
r ge
nsta
rte
ovne
n. F
or s
tørr
e m
æng
der
just
eres
tid
erne
pro
por
tiona
lt. F
ødev
arer
bør
ikke
tild
ækk
es u
nder
op
tøni
ng.
Mad
vare
rVæ
gt
Op
tøni
ngst
idM
eto
de
Hvi
leti
d
KØ
D
Oks
ekød
/Lam
/Fl
æsk
este
g 70
0 g
20 m
in.
Pla
cer
i et p
asse
nde
fad
elle
r p
å en
om
vend
t und
erko
p e
ller
bru
g en
hol
der
. Ve
nd 3
– 4
gan
ge.
60 m
in.
Oks
ekød
/Lam
/Fl
æsk
este
g1,
0 kg
20 m
in.
Pla
cer
i et p
asse
nde
fad
elle
r p
å en
om
vend
t und
erko
p e
ller
bru
g en
hol
der
. Ve
nd 3
– 4
gan
ge.
60 m
in.
File
t/In
der
lår
500
g15
min
.P
lace
r i e
t p
asse
nde
fad
. Op
del
og
vend
to
gang
e.15
min
.
Bøf
fer
100
g (x
1)
227
g (x
4)
350
g (x
2)
4 –
5 m
in.
4 –
5 m
in.
7 –
8 m
in.
Pla
cer
i et
pas
send
e fa
d. V
end
. P
lace
r i e
t p
asse
nde
fad
. Op
del
og
vend
to
gang
e.
Pla
cer
i et
pas
send
e fa
d. O
pd
el o
g ve
nd t
o ga
nge.
2 m
in.
5 m
in.
15 m
in.
Hak
ket
okse
kød
500
g15
min
.P
lace
r i e
t p
asse
nde
fad
. Op
del
og
vend
to
gang
e.15
min
.
Kød
til
stuv
ning
500
g12
min
.P
lace
r i e
t p
asse
nde
fad
i et
enk
elt
lag.
Op
del
og
vend
to
gang
e.20
min
.
Lam
mek
otel
ette
r50
0 g
10 m
in.
Pla
cer
i et
pas
send
e fa
d i
et e
nkel
t la
g. V
end
to
gang
e.15
min
.
Lam
mefi
let
300
g8
min
.P
lace
r i e
t p
asse
nde
fad
i et
enk
elt
lag.
Ven
d t
o ga
nge.
20 m
in.

36
Op
tøni
ng a
f m
adva
rer
– O
ptø
ning
seff
ekt
og
tid
Ti
der
ne i
tab
elle
n er
kun
vej
led
end
e. K
ontr
olle
r al
tid t
ilber
edni
ngen
ved
at
åbne
ovn
låge
n og
der
efte
r ge
nsta
rte
ovne
n. F
or s
tørr
e m
æng
der
just
eres
tid
erne
pro
por
tiona
lt. F
ødev
arer
bør
ikke
tild
ækk
es u
nder
op
tøni
ng.
Mad
vare
rVæ
gt
Op
tøni
ngst
idM
eto
de
Hvi
leti
d
KØ
D
Lam
mek
ølle
x 2
900
g20
min
.P
lace
r i e
t p
asse
nde
fad
i et
enk
elt
lag.
Op
del
og
vend
to
gang
e.
Tild
æk
om n
ødve
ndig
t45
min
.
Svi
nerib
ben
700
g15
min
.P
lace
r i e
t p
asse
nde
fad
. Op
del
og
vend
to
gang
e.30
min
.
Svi
neko
tele
tter
350
g8
min
.P
lace
r i e
t p
asse
nde
fad
. Op
del
og
vend
to
gang
e.
15 m
in.
Bac
on25
0 g
6 m
in.
Pla
cer
i et
pas
send
e fa
d. O
pd
el o
g ve
nd 2
– 3
gan
ge.
15 m
in.
Pøl
ser
100
g50
0 g
3 m
in.
8 m
in.
Pla
cer
i et
pas
send
e fa
d. V
end
.P
lace
r i e
t p
asse
nde
fad
. Ven
d t
o ga
nge.
5 m
in.
10 m
in.
Kyl
ling
(hel
)1,
5 kg
30 m
in.
Pla
cer
i et p
asse
nde
fad
elle
r p
å en
om
vend
t und
erko
p e
ller
bru
g en
hol
der
. Ve
nd 3
– 4
gan
ge. T
ildæ
k om
nød
vend
igt.
60 m
in.
Kyl
linge
por
tione
r x
1x
2x
3 –
4
150
g35
0 g
500
– 60
0 g
5 m
in.
7 m
in.
9 m
in.
Pla
cer
i et
pas
send
e fa
d. V
end
.P
lace
r i e
t p
asse
nde
fad
. Ven
d t
o ga
nge.
Pla
cer
i et
pas
send
e fa
d. V
end
to
gang
e.
10 m
in.
15 m
in.
20 m
in.
And
ebry
stfil
et45
0 g
12 m
in.
Pla
cer
i et
pas
send
e fa
d. V
end
to
gang
e.20
min
.

37
Op
tøni
ng a
f m
adva
rer
– O
ptø
ning
seff
ekt
og
tid
Ti
der
ne i
tab
elle
n er
kun
vej
led
end
e. K
ontr
olle
r al
tid t
ilber
edni
ngen
ved
at
åbne
ovn
låge
n og
der
efte
r ge
nsta
rte
ovne
n. F
or s
tørr
e m
æng
der
just
eres
tid
erne
pro
por
tiona
lt. F
ødev
arer
bør
ikke
tild
ækk
es u
nder
op
tøni
ng.
Mad
vare
rVæ
gt
Op
tøni
ngst
idM
eto
de
Hvi
leti
d
FIS
K
Fisk
(hel
)15
0 –
225
g7
min
.P
lace
r i e
t p
asse
nde
fad
. Ven
d t
o ga
nge.
15 m
in.
Fisk
(hel
) x 2
500
g14
min
.P
lace
r i e
t p
asse
nde
fad
. Op
del
om
nød
vend
igt
og v
end
to
gang
e.20
min
.
Fisk
efile
t10
0 –
150
g35
0 g
5 m
in.
10 –
12
min
.P
lace
r i e
t p
asse
nde
fad
. Op
del
om
nød
vend
igt
og v
end
to
gang
e.5
min
.10
min
.
Fisk
ekot
elet
ter
100
g25
0 g
400
g
3 –
4 m
in.
6 –
7 m
in.
10 –
12
min
.
Pla
cer
i et
pas
send
e fa
d. V
end
.P
lace
r i e
t p
asse
nde
fad
. Op
del
om
nød
vend
igt
og v
end
to
gang
e.P
lace
r i e
t p
asse
nde
fad
. Op
del
om
nød
vend
igt
og v
end
to
gang
e.
10 m
in.
15 m
in.
20 m
in.
Rej
er45
0 g
15 m
in.
Pla
cer
i et
pas
send
e fa
d. R
ør t
o ga
nge.
15 m
in.
BR
ØD
OG
AN
DR
E M
AD
VAR
ER
Ski
vesk
året
brø
d40
0 g
6 m
in.
Pla
cer
på
glas
fad
. Op
del
og
arra
nger
.10
min
.
Brø
dsk
ive
30 g
40 s
ek.
Pla
cer
på
glas
fad
.1
– 2
min
.
Blø
d fr
ugt
500
g10
min
.P
lace
r i e
t p
asse
nde
fad
. Rør
to
gang
e.20
min
.
Kag
e35
0 g
3 –
4 m
in.
Pla
cer
på
et fa
d.
20 m
in.
Che
esec
ake
400
g5
min
.P
lace
r p
å et
fad
.20
min
.
Mar
engs
des
sert
450
g2
– 3
min
.P
lace
r p
å et
fad
.15
min
.
Sm
ør25
0 g
3 m
in.
Pla
cer
på
et fa
d.
10 m
in.
But
terd
ej50
0 g
4 –
5 m
in.
Pla
cer
på
et fa
d.
15 m
in.

38
Using the Delay/Stand FeatureThe Timer Button is used as a timing button either before, during or after a cooking program.When the Timer Button is selected with a time, there is no microwave power in the oven duringthis time.
1. To Set a Standing Time:
• Press the TimerButton.
• Set desired standing time (max9 hrs). When timeis over 60 minutesan “H” will appearin the display todenote hours.
• Set the cookingprogram, byentering cooking methodand time required.
• Press Start Button.Delayed time willcount down thenthe cooking program will start.
• Set the desired Cooking Program,by selecting cooking methodand time required.
• Then Press theTimer Button.
• Set desired standing time (max9 hrs). When timeis over 60 minutesan “H” will appearin the display todenote hours.
• Press Start Button.Cooking programwill commenceafter which thestanding time willcount down.
2. To Set a Delay Start:
NB1. If the oven door is opened during the stand or delay time, the time in the display window will
continue to count down.2. Delay Start cannot be used before an Auto Program.
Select CookingMethod
& Time
Select CookingMethod
& Time
38
NN-CF760M CF750W CF771 BP_Regs:F00039M69BP 26/2/13 10:19 Page 38
Hviletid/Udskudt startTimer knappen bruges som timingknap enten før, under eller efter et tilberedningsprogram. Når Timer knappen er valgt med en tid, er der ingen mikrobølgeeffekt i ovnen i løbet af denne tid.
1. Indstilling af en hviletid:
• Tryk på Start knappen. Tilbered-ningsprogrammet begynder, hvorefter hviletiden vil tælle ned.
• Tryk på Start knap-pen. Den udskudte tid tæller ned, hvor- efter tilberednings- programmet begynder.
• Indstil det ønskede tilberedningsprogram ved at vælge den ønskede tilberednings- metode og tid.
• Tryk på Timer knappen.
• Tryk derefter på Timer knappen.
• Vælg den ønskede hviletid (max. 9 timer). Når tiden er over 60 minutter, vises ”H” på dis-playet for at angive timer.
• Vælg den ønskede hviletid (max. 9 timer). Når tiden er over 60 minutter, vises ”H” på display- et for at angive timer.
• Indstil det ønskede tilberedningsprogram ved at vælge den ønskede tilbered-ningsmetode og tid.
Vælg tilberedningsmetode
og tid
2. Indstilling af en udskudt start:
Vælg tilberedningsmetode
og tid
NB:
1. Hvis ovnlågen åbnes under hviletid eller udskudt start, fortsætter tiden på displayet med at tælle ned.
2. Hviletid kan ikke programmeres før et auto-program.

39
• Press Memory Button.The oven is automatically pre-set to memory 1.To select memory 2 press button twice. To selectmemory 3 press memory button 3 times.
This feature allows you to pre-program your oven for regular reheating or cooking tasks. You areable to pre-program your oven for a specific power level and time that is convenient for you. Youare able to pre-program three memory tasks.
Program the desiredcooking method.
• Press Memory Button to storethis task or press Start Buttonto start cooking in thissequence.
• Press Memory Button.The oven is automatically pre-set to memory 1.To select memory 2 press button twice. Toselect memory 3 press memory button 3 times.
• Press Start Button tobegin cooking.
NOTE:1. Auto programs cannot be programmed into memory.2. Convection pre-heat mode cannot be programmed into memory.3. Memory can only store 1 stage cooking. It is not possible to store 2 or 3 stage cooking.4. Setting a new cooking program into memory will cancel the cooking program previously
stored.5. Memory program will be cancelled if the power supply is off or the plug gets disconnected.
Memory
To set a Memory Program
To use a Memory Program
39
NN-CF760M CF750W CF771 BP_Regs:F00039M69BP 26/2/13 10:19 Page 39
Denne funktion gør det muligt at forprogrammere ovnen til en regelmæssige genopvarm-nings- eller tilberedningsopgaver. Du kan forprogrammere ovnen til et bestemt effektniveau og en tid, som er bekvem for dig. Du kan forprogrammere tre hukommelsesopgaver.
Indstilling af et hukommelsesprogram
• Tryk på Memory knappen. Ovnen er automatisk forudindstillet til hukommelse 1. Vælg hukommelse 2 ved at trykke 2 gange på Memory. Vælg hukommelse 3 ved at trykke 3 gange på Memory.
• Tryk på Memory knappen. Ovnen er automatisk forudindstillet til hukommelse 1. Vælg hukommelse 2 ved at trykke 2 gange på Memory. Vælg hukommelse 3 ved at trykke 3 gange på Memory.
• Tryk på Memory for at gemme denne opgave, eller tryk på Start for at starte tilberedning i denne rækkefølge.
• Tryk på Start knappen for at starte tilberedning.
Programmer det ønskede tilberedningsprogram
Hukommelse
Brug af et hukommelsesprogram
NB:
1. Auto-programmer kan ikke programmeres i hukommelsen.
2. Varmluft forvarmning kan ikke programmeres i hukommelsen.
3. Hukommelsen kan kun gemme 1-trins tilberedning. Det er ikke muligt at gemme 2- eller 3-trins tilberedning.
4. Lagring af et nyt tilberedningsprogram i hukommelsen annullerer et tidligere gemt program.
5. Et hukommelsesprogram annulleres, hvis strømforsyningen afbrydes, eller netstikket trækkes ud.
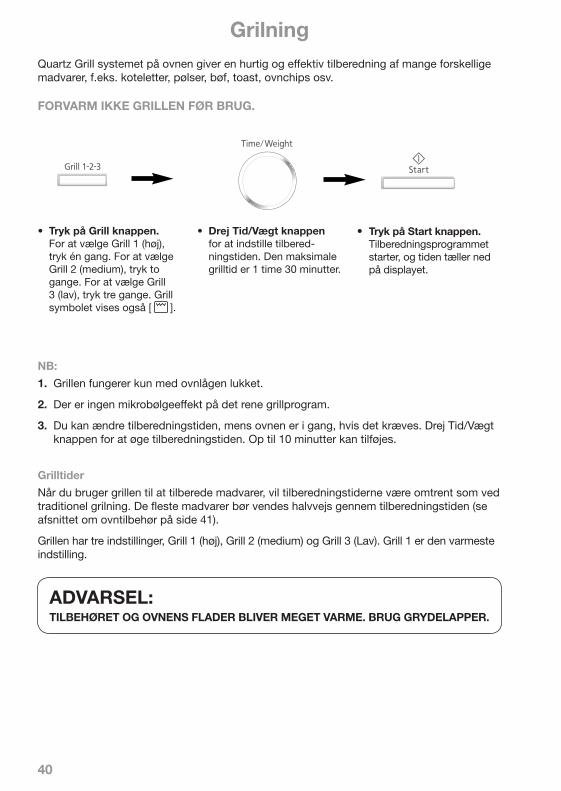
4040
Grilling
CAUTIONS:THE ACCESSORIES AND SURROUNDING OVEN WILL GET VERY HOT. USE OVEN GLOVES.
The Quartz Grill system on the oven gives fast efficient cooking for a wide variety of foods e.g.chops, sausages, steak, toast, oven chips etc.
DO NOT PREHEAT THE GRILL BEFORE USE.
Grilling TimesWhen using the grill to cook foods, the cooking times will be similar to traditional grilling. Mostfoods will require turning halfway through the cooking time (see section on oven accessoriespage 41).The Grill has three settings, Grill 1 (High), Grill 2 (Medium) and Grill 3 (Low). Grill 1 will be thehottest.
• Press Grill Button. ToSelect Grill 1, (high) pressonce. To select Grill 2,(medium) press twice. Toselect Grill 3, (low) pressthree times. The grillsymbol will also appear .
• Turn Time/WeightDial to enter cookingtime. Maximum timeis 1 hour 30 mins.
• Press StartButton.The cookingprogram will startand the time in thedisplay will countdown.
NOTE: 1. The Grill will only operate with the oven door closed. 2. There is no microwave power on the GRILL only program.3. You can add to the cooking time during cooking, if required. Turn Time/Weight Dial to increase
the cooking time. A maximum time of 10 minutes can be added.
NN-CF760M CF750W CF771 BP_Regs:F00039M69BP 26/2/13 10:19 Page 40
GrilningQuartz Grill systemet på ovnen giver en hurtig og effektiv tilberedning af mange forskellige madvarer, f.eks. koteletter, pølser, bøf, toast, ovnchips osv.
FORVARM IKKE GRILLEN FØR BRUG.
• Tryk på Grill knappen. For at vælge Grill 1 (høj), tryk én gang. For at vælge Grill 2 (medium), tryk to gange. For at vælge Grill 3 (lav), tryk tre gange. Grill symbolet vises også [
40
Grilling
CAUTIONS:THE ACCESSORIES AND SURROUNDING OVEN WILL GET VERY HOT. USE OVEN GLOVES.
The Quartz Grill system on the oven gives fast efficient cooking for a wide variety of foods e.g.chops, sausages, steak, toast, oven chips etc.
DO NOT PREHEAT THE GRILL BEFORE USE.
Grilling TimesWhen using the grill to cook foods, the cooking times will be similar to traditional grilling. Mostfoods will require turning halfway through the cooking time (see section on oven accessoriespage 41).The Grill has three settings, Grill 1 (High), Grill 2 (Medium) and Grill 3 (Low). Grill 1 will be thehottest.
• Press Grill Button. ToSelect Grill 1, (high) pressonce. To select Grill 2,(medium) press twice. Toselect Grill 3, (low) pressthree times. The grillsymbol will also appear .
• Turn Time/WeightDial to enter cookingtime. Maximum timeis 1 hour 30 mins.
• Press StartButton.The cookingprogram will startand the time in thedisplay will countdown.
NOTE: 1. The Grill will only operate with the oven door closed. 2. There is no microwave power on the GRILL only program.3. You can add to the cooking time during cooking, if required. Turn Time/Weight Dial to increase
the cooking time. A maximum time of 10 minutes can be added.
NN-CF760M CF750W CF771 BP_Regs:F00039M69BP 26/2/13 10:19 Page 40
].
• Drej Tid/Vægt knappen for at indstille tilbered-ningstiden. Den maksimale grilltid er 1 time 30 minutter.
• Tryk på Start knappen. Tilberedningsprogrammet starter, og tiden tæller ned på displayet.
NB:
1. Grillen fungerer kun med ovnlågen lukket.
2. Der er ingen mikrobølgeeffekt på det rene grillprogram.
3. Du kan ændre tilberedningstiden, mens ovnen er i gang, hvis det kræves. Drej Tid/Vægt knappen for at øge tilberedningstiden. Op til 10 minutter kan tilføjes.
Grilltider
Når du bruger grillen til at tilberede madvarer, vil tilberedningstiderne være omtrent som ved traditionel grilning. De fleste madvarer bør vendes halvvejs gennem tilberedningstiden (se afsnittet om ovntilbehør på side 41).
Grillen har tre indstillinger, Grill 1 (høj), Grill 2 (medium) og Grill 3 (Lav). Grill 1 er den varmeste indstilling.
ADVARSEL: TILBEHØRET OG OVNENS FLADER BLIVER MEGET VARME. BRUG GRYDELAPPER.

41
1. There is no microwave power on theGRILL only program.
2. Use the accessories provided, asexplained above.
3. The Grill will only operate with the ovendoor closed.
4. Most meat items e.g. bacon, sausages,chops can be cooked on the hottest setting - GRILL 1. This setting is also suitable for toasting bread, muffins andteakakes etc.
5. GRILL 2 and GRILL 3 are used for moredelicate foods or those that require alonger grill time e.g. fish or chicken portions.
6. DO NOT PREHEAT THE GRILL.
7. NEVER COVER THE FOOD WHENGRILLING.
8. ALWAYS USE OVEN GLOVES WHENREMOVING THE FOOD AND ACCESSORIES AFTER GRILLING ASTHE OVEN AND ACCESSORIES WILLBE VERY HOT.
9. After Grilling it is important that the Grillaccessories are removed for cleaningbefore reuse and that the oven walls andfloor are wiped with a cloth squeezed inhot soapy water to remove any grease.DO NOT PUT ACCESSORIES IN DISHWASHER. It is not necessary to clean theback of the oven which has a catalytic selfclean lining.
Guidelines
41
GrillingOven accessories to use
Place food on Wire Shelf.
The Wire Shelf will allow fat and juices to dripthrough into the Enamel Shelf to reduceexcess splatter and smoke when grilling.
Most foods require turning halfway duringcooking. When turning food, open oven doorand CAREFULLY remove the Wire Shelf byholding the accessories firmly.
Use oven gloves when removing accessoriesas they will be very hot, and so will the roofand walls of the oven.
After turning, return food to the oven, closedoor and press START. The oven will continueto count down the remaining cooking time. It isquite safe to open the oven door at any time tocheck the progress of the food as it is grilling.
If grilling fish, chops or small items, place theenamel shelf in the upper position.
When grilling foods the Wire Shelf should be in the top shelf position and the enamelshelf should be in the bottom shelf position or you can use the enamel shelf in the topshelf position.When positioning the wire shelf, the vertical wires of the shelf should sit higher thanthe sides of the shelf.
NN-CF760M CF750W CF771 BP_Regs:F00039M69BP 26/2/13 10:19 Page 41
Grilning
Placer maden på risten.
Risten tillader fedt og saft at dryppe igen-nem til emaljepladen for at reducere unød-vendigt sprøjt og røg, når du griller.
De fleste madvarer kræver vending halvvejs gennem tilberedningen. Ved vending af mad, åbn ovnlågen og tag FORSIGTIGT risten ud, mens du holder godt fast i tilbehøret.
Brug grydelapper, når du tager tilbehør ud af ovnen, da det vil være meget varmt, og det samme vil ovnens indvendige flader være.
Efter at maden er vendt, sæt den tilbage i ovnen, luk lågen og tryk på Start. Ovnen fortsætter med at nedtælle den resterende tilberedningstid. Det er helt sikkert at åbne ovnlågen til enhver tid for at kontrollere tilberedningen af madvarerne, mens ovnen griller.
Hvis du griller fisk, koteletter eller små mad-varer, bør emaljepladen placeres i øverste position.
Retningslinjer
1. Der er ingen mikrobølgeeffekt på det rene grillprogram.
2. Brug det medfølgende tilbehør, som forklaret ovenfor.
3. Grillen fungerer kun med ovnlågen lukket.
4. De fleste kødstykker, f.eks. bacon, pølser og koteletter, kan tilberedes på den varmeste indstilling – Grill 1. Denne indstilling er også velegnet til at riste brød, boller, skærekager osv.
5. Grill 2 og Grill 3 bruges til sartere mad-varer eller ting, som kræver en længere grilltid f.eks. fisk eller kyllingeportioner.
6. FORVARM IKKE GRILLEN.
Brug af ovntilbehør
Når du griller madvarer, bør risten være i den øverste position, og emaljepladen bør være i den nederste position. Du kan dog også bruge emaljepladen i den øverste position.
Ved placering af risten bør de lodrette tråde sidde højere end siderne af risten.
7. TILDÆK ALDRIG MADVARER, NÅR DU GRILLER.
8. BRUG ALTID GRYDELAPPER ELLER GRILLHANDSKER, NÅR DU TAGER MAD OG TILBEHØR UD EFTER GRIL-NING, DA OVNEN OG TILBEHØRET VIL VÆRE MEGET VARME.
9. Efter grilning er det vigtigt, at grilltilbe-høret tages ud til rengøring, før det skal bruges igen, samt at ovnens vægge og bund aftørres med en klud opvredet i varmt sæbevand for at fjerne fedt. STIL IKKE TILBEHØR I EN OPVASKE-MASKINE. Det er ikke nødvendigt at rengøre ovnens bagvæg, som har en selvrensende katalytisk belægning.
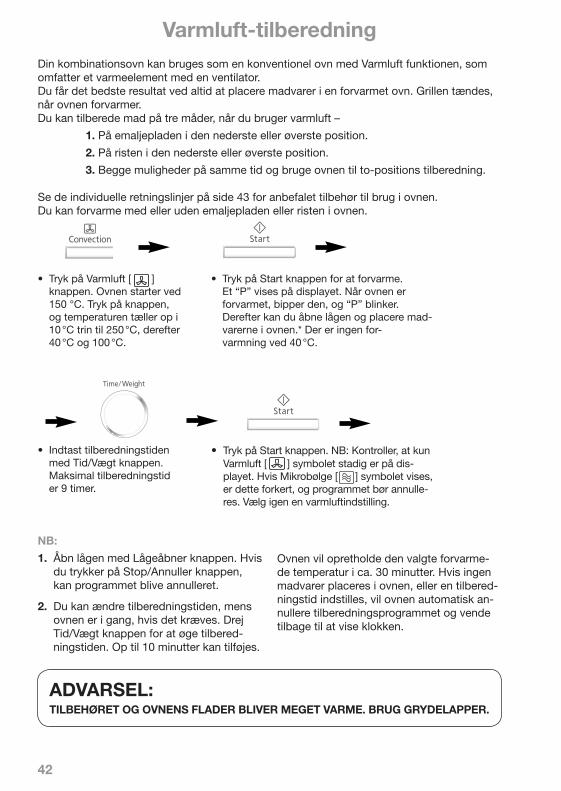
42
• Enter cooking time using Time/Weight Dial. Maximum cooking time is 9 hours.
• Press Start Button. Note: Checkthat only the convection symbol
is still in the display. If themicrowave symbol is displayedthis is incorrect and the programshould be cancelled. Reselect theconvection setting.
Convection Cooking
• Press ConvectionButton. The oven starts at150°C. Press the buttonand the temperature willcount up in 10°C stages to250°C, then 40°C and100°C .
NOTE:1. Open the door using the Door release
button, because if the Stop/Cancel Button ispressed the program may be cancelled.
2. You can add to the cooking time duringcooking, if required. Turn Time/Weight Dialto increase the cooking time. A maximumtime of 10 minutes can be added.
The oven will maintain the selected preheatedtemperature for approximately 30 minutes. Ifno food has been placed inside the oven or acooking time set, then it will automatically cancel the cooking program and revert to timeof day.
CAUTIONS:THE ACCESSORIES AND THE SURROUNDING OVEN WILL GET VERY HOT. USE OVENGLOVES.
Your Combination Oven can be used as a conventional oven using the CONVECTION modewhich incorporates a heating element with a fan.For best results always place food in a preheated oven. The grill will come on when the oven ispreheating.You can cook in three ways when using convection cooking -
1. On the Enamel shelf in the lower or upper shelf position.2. On the Wire rack shelf in the lower or upper shelf position.3. Both of the above at the same time, to use the oven for two level cooking.
See individual guidelines on pages 43 for recommended accessories to use.You can preheat with or without the Enamel shelf or Wire shelf in position.
42
• Press Start Button to preheat. A “P” willappear in the display window. When theoven is preheated the oven will beep andthe “P” will flash. Then open the door andplace the food inside.* There is no preheatat 40°C.
NN-CF760M CF750W CF771 BP_Regs:F00039M69BP 26/2/13 10:19 Page 42
Varmluft-tilberedningDin kombinationsovn kan bruges som en konventionel ovn med Varmluft funktionen, som omfatter et varmeelement med en ventilator. Du får det bedste resultat ved altid at placere madvarer i en forvarmet ovn. Grillen tændes, når ovnen forvarmer. Du kan tilberede mad på tre måder, når du bruger varmluft –
1. På emaljepladen i den nederste eller øverste position.
2. På risten i den nederste eller øverste position.
3. Begge muligheder på samme tid og bruge ovnen til to-positions tilberedning.
Se de individuelle retningslinjer på side 43 for anbefalet tilbehør til brug i ovnen. Du kan forvarme med eller uden emaljepladen eller risten i ovnen.
• Tryk på Varmluft [
• Enter cooking time using Time/Weight Dial. Maximum cooking time is 9 hours.
• Press Start Button. Note: Checkthat only the convection symbol
is still in the display. If themicrowave symbol is displayedthis is incorrect and the programshould be cancelled. Reselect theconvection setting.
Convection Cooking
• Press ConvectionButton. The oven starts at150°C. Press the buttonand the temperature willcount up in 10°C stages to250°C, then 40°C and100°C .
NOTE:1. Open the door using the Door release
button, because if the Stop/Cancel Button ispressed the program may be cancelled.
2. You can add to the cooking time duringcooking, if required. Turn Time/Weight Dialto increase the cooking time. A maximumtime of 10 minutes can be added.
The oven will maintain the selected preheatedtemperature for approximately 30 minutes. Ifno food has been placed inside the oven or acooking time set, then it will automatically cancel the cooking program and revert to timeof day.
CAUTIONS:THE ACCESSORIES AND THE SURROUNDING OVEN WILL GET VERY HOT. USE OVENGLOVES.
Your Combination Oven can be used as a conventional oven using the CONVECTION modewhich incorporates a heating element with a fan.For best results always place food in a preheated oven. The grill will come on when the oven ispreheating.You can cook in three ways when using convection cooking -
1. On the Enamel shelf in the lower or upper shelf position.2. On the Wire rack shelf in the lower or upper shelf position.3. Both of the above at the same time, to use the oven for two level cooking.
See individual guidelines on pages 43 for recommended accessories to use.You can preheat with or without the Enamel shelf or Wire shelf in position.
42
• Press Start Button to preheat. A “P” willappear in the display window. When theoven is preheated the oven will beep andthe “P” will flash. Then open the door andplace the food inside.* There is no preheatat 40°C.
NN-CF760M CF750W CF771 BP_Regs:F00039M69BP 26/2/13 10:19 Page 42
] knappen. Ovnen starter ved 150 °C. Tryk på knappen, og temperaturen tæller op i 10 °C trin til 250 °C, derefter 40 °C og 100 °C.
• Tryk på Start knappen for at forvarme. Et “P” vises på displayet. Når ovnen er forvarmet, bipper den, og “P” blinker. Derefter kan du åbne lågen og placere mad-varerne i ovnen.* Der er ingen for- varmning ved 40 °C.
• Indtast tilberedningstiden med Tid/Vægt knappen. Maksimal tilberedningstid er 9 timer.
• Tryk på Start knappen. NB: Kontroller, at kun Varmluft [
• Enter cooking time using Time/Weight Dial. Maximum cooking time is 9 hours.
• Press Start Button. Note: Checkthat only the convection symbol
is still in the display. If themicrowave symbol is displayedthis is incorrect and the programshould be cancelled. Reselect theconvection setting.
Convection Cooking
• Press ConvectionButton. The oven starts at150°C. Press the buttonand the temperature willcount up in 10°C stages to250°C, then 40°C and100°C .
NOTE:1. Open the door using the Door release
button, because if the Stop/Cancel Button ispressed the program may be cancelled.
2. You can add to the cooking time duringcooking, if required. Turn Time/Weight Dialto increase the cooking time. A maximumtime of 10 minutes can be added.
The oven will maintain the selected preheatedtemperature for approximately 30 minutes. Ifno food has been placed inside the oven or acooking time set, then it will automatically cancel the cooking program and revert to timeof day.
CAUTIONS:THE ACCESSORIES AND THE SURROUNDING OVEN WILL GET VERY HOT. USE OVENGLOVES.
Your Combination Oven can be used as a conventional oven using the CONVECTION modewhich incorporates a heating element with a fan.For best results always place food in a preheated oven. The grill will come on when the oven ispreheating.You can cook in three ways when using convection cooking -
1. On the Enamel shelf in the lower or upper shelf position.2. On the Wire rack shelf in the lower or upper shelf position.3. Both of the above at the same time, to use the oven for two level cooking.
See individual guidelines on pages 43 for recommended accessories to use.You can preheat with or without the Enamel shelf or Wire shelf in position.
42
• Press Start Button to preheat. A “P” willappear in the display window. When theoven is preheated the oven will beep andthe “P” will flash. Then open the door andplace the food inside.* There is no preheatat 40°C.
NN-CF760M CF750W CF771 BP_Regs:F00039M69BP 26/2/13 10:19 Page 42
] symbolet stadig er på dis- playet. Hvis Mikrobølge [
• Enter cooking time using Time/Weight Dial. Maximum cooking time is 9 hours.
• Press Start Button. Note: Checkthat only the convection symbol
is still in the display. If themicrowave symbol is displayedthis is incorrect and the programshould be cancelled. Reselect theconvection setting.
Convection Cooking
• Press ConvectionButton. The oven starts at150°C. Press the buttonand the temperature willcount up in 10°C stages to250°C, then 40°C and100°C .
NOTE:1. Open the door using the Door release
button, because if the Stop/Cancel Button ispressed the program may be cancelled.
2. You can add to the cooking time duringcooking, if required. Turn Time/Weight Dialto increase the cooking time. A maximumtime of 10 minutes can be added.
The oven will maintain the selected preheatedtemperature for approximately 30 minutes. Ifno food has been placed inside the oven or acooking time set, then it will automatically cancel the cooking program and revert to timeof day.
CAUTIONS:THE ACCESSORIES AND THE SURROUNDING OVEN WILL GET VERY HOT. USE OVENGLOVES.
Your Combination Oven can be used as a conventional oven using the CONVECTION modewhich incorporates a heating element with a fan.For best results always place food in a preheated oven. The grill will come on when the oven ispreheating.You can cook in three ways when using convection cooking -
1. On the Enamel shelf in the lower or upper shelf position.2. On the Wire rack shelf in the lower or upper shelf position.3. Both of the above at the same time, to use the oven for two level cooking.
See individual guidelines on pages 43 for recommended accessories to use.You can preheat with or without the Enamel shelf or Wire shelf in position.
42
• Press Start Button to preheat. A “P” willappear in the display window. When theoven is preheated the oven will beep andthe “P” will flash. Then open the door andplace the food inside.* There is no preheatat 40°C.
NN-CF760M CF750W CF771 BP_Regs:F00039M69BP 26/2/13 10:19 Page 42
] symbolet vises, er dette forkert, og programmet bør annulle-res. Vælg igen en varmluftindstilling.
NB:
1. Åbn lågen med Lågeåbner knappen. Hvis du trykker på Stop/Annuller knappen, kan programmet blive annulleret.
2. Du kan ændre tilberedningstiden, mens ovnen er i gang, hvis det kræves. Drej Tid/Vægt knappen for at øge tilbered-ningstiden. Op til 10 minutter kan tilføjes.
ADVARSEL: TILBEHØRET OG OVNENS FLADER BLIVER MEGET VARME. BRUG GRYDELAPPER.
Ovnen vil opretholde den valgte forvarme-de temperatur i ca. 30 minutter. Hvis ingen madvarer placeres i ovnen, eller en tilbered-ningstid indstilles, vil ovnen automatisk an-nullere tilberedningsprogrammet og vende tilbage til at vise klokken.

43
Convection Cooking
Roasting Meat: Wire shelf in lower position.
Baking: Enamel shelf in lower position.
Oven accessories to use:
ONE LEVEL COOKINGIf cooking on one level, you can use the Enamel Shelf or Wire Shelf in the lower or upper shelfposition.
GuidelinesWhen using the oven as a CONVECTION oven, there is NO MICROWAVE POWER, i.e. theoven is operating as a conventional oven and you can use all your standard metal bakingtins and ovenware.
It is possible to cook on one or two levels when using convection cooking. When cooking largejoints of meat roasting tins can be placed directly on the base
You can use the Enamel Shelf as a baking dish for roasting potatoes or vegetables, and for baking fairy cakes, scones and cookies. It is also ideal for re-heating pre-cooked conveniencepastry items.
Roasting Veg / Potatoes: Enamel Shelf inlower position.
Reheating: Enamel Shelf in lower position.
43
NN-CF760M CF750W CF771 BP_Regs:F00039M69BP 26/2/13 10:19 Page 43
Varmluft-tilberedningRetningslinjerNår du bruger ovnen som en VARMLUFT ovn, er der ingen MIKROBØLGEEFFEKT. Ovnen fungerer som en konventionel ovn, og du kan bruge alle dine standard metal bageforme og ovnfade.
Det er muligt at tilberede mad på et eller to niveauer, når du bruger varmluft. Ved tilbered-ning af store kødstykker kan fadet placeres direkte på ovnbunden.
Brug af ovntilbehør
EN-POSITIONS TILBEREDNING Hvis du tilbereder i én position, kan du bruge emaljepladen eller risten i den nederste eller øverste position.
Stegning af kød: Rist i nederste position.
Stegning af Grøntsager/Kartofler: Emaljeplade i nederste position.
Du kan bruge emaljepladen som et ovnfast fad til stegning af kartofler eller grøntsager samt til bagning af kager, scones og småkager. Den er også ideel til genopvarmning af forbagte brødprodukter.
Bagning: Emaljeplade i nederste position.
Genopvarmning: Emaljeplade i nederste position.

44
Two level cookingWhen cooking on two levels use the Enamelshelf on the lower shelf position and the Wireshelf in the upper shelf position.
Depending on the recipe, you can preheat withor without the accessories in position. See individual recipes for details.
Two level cooking is ideal for:
1. Batch baking, fairy cakes, cookies andscones on two levels.
2. Cooking a complete meal together. Frozenpizza on the upper level and frozen chipson the lower level.
3. Cooking roast potatoes on the upper leveland roast vegetables on the lower level.
4. Re-heating small pastry items in largebatches- Sausage rolls, pastry pies, quiches(all pre-cooked). Ensure that the shelves are inserted correctly, and are secure before use.Do not place a dish of food weighing morethan 4 Kg (8 lb 14 oz) on the shelf.
Batch Baking: Fairy Cakes Cooking a complete meal: Frozen pizza onupper level, frozen oven chips on lowerlevel
ALWAYS USE OVEN GLOVES WHEN REMOVING THE FOOD AND ACCESSORIES AFTER COOKING AS THE OVEN AND ACCESSORIES WILL BEVERY HOT.
MAKE SURE THAT YOU HOLD THE DISH AND/OR SHELF FIRMLY WITH BOTHHANDS WHEN YOU ARE REMOVING THEM FROM THE OVEN.
44
NN-CF760M CF750W CF771 BP_Regs:F00039M69BP 26/2/13 10:19 Page 44
To-positions tilberedningVed tilberedning på to niveauer bruges emalje-pladen i den nederste position og risten i den øverste.
Bagning: Kager Tilberedning af et komplet måltid: Frossen pizza i øverste position, frosne ovnchips i nederste position
Afhængigt af opskriften, kan du forvarme ovnen med eller uden tilbehør. Se de enkelte opskrifter for detaljer.
To-positions tilberedning er ideel til:
1. Bagning af kager, småkager og scones på to plader.
2. Tilberedning af et komplet måltid sam-men. Frossen pizza i øverste position og frosne chips i nederste position.
3. Tilberedning af stegte kartofler i øverste position og stegte grøntsager i nederste position.
BRUG ALTID GRYDELAPPER ELLER GRILLHANDSKER, NÅR DU TAGER MAD OG TILBEHØR UD EFTER TILBEREDNING, DA OVNEN OG TILBEHØRET VIL VÆRE MEGET VARME.
SØRG FOR AT HOLDE FADET OG/ELLER PLADEN FAST MED BEGGE HÆNDER, NÅR DU TAGER DEM UD FRA OVNEN.
4. Genopvarmning af små brødstykker i store mængder – pølseruller, tærter, quiches (alle forbagt). Sørg for, at pladerne er indsat korrekt, og er sikre før brug. Placer ikke et fad med madvarer, der vejer mere end 4 kg, på en plade.

45
Anbefalede ovntemperaturer
For at opnå det bedste resultat, bør du altid placere madvarer i en forvarmet ovn. Glem ikke, at for at lette programmeringen af de mest anvendte temperaturer, vil din ovn starte ved 150 °C og tælle op i 10 °C trin til 250 °C, og derefter ned til 40 °C efterfulgt af 100 °C. Madvarer bør generelt tilberedes UDEN TILDÆKNING – medmindre det er en gryderet, eller du vil bruge stegeposer.
Mikrobølgeovnen holder ovntemperaturer over 200 °C i de første 20 minutter. Efter 20 min. reduceres ovntemperaturen automatisk til omkring 200 °C. Dette vil næppe resultere i reduceret effektivitet, men du bør altid sikre dig, at tilberedningstiden er indstillet efter din smag.
Temp °C Formål
40 °C Hævning af dej
100 °C Frugttærte
110 °C Marengs
140 °C Frugtkage
150 °C Roulade, cheesecake
160/170 °C Gryderetter, honningkage, små tærter, småkager
180 °C Souffle, strudel, kager, stege
190 °C Filodej, quiche, gratiner, lasagne, tærter, kylling
200 °C Fyldte peberfrugter, scones, vandbakkelser, muffins
220 °C Grøntsager, kødrande, brød
230 °C Hvidløgsbrød
240/250 °C Stegte kartofler
250 °C Bagning af pizza
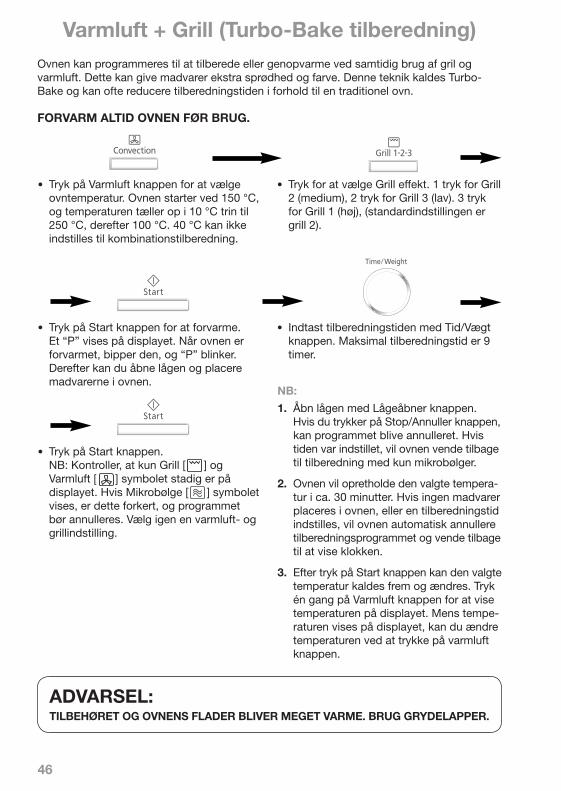
46
Press Start Button.Note: Check that just the grill andconvection symbols are still in thedisplay. If the microwave symbol isdisplayed this is incorrect and the programshould be cancelled. Reselect theConvection and Grill setting.
46
Convection + Grill (Turbo-Bake Cooking)The oven can be programmed to cook or reheat food by the grill and the convection oven workingsimultaneously, to give foods that extra crispness and colour. This is known as Turbo-Bake andcan often reduce traditional oven cooking times. ALWAYS PREHEAT BEFORE USE.
NOTE:1. Open the door using the door release
button, because if the STOP/CANCELbutton is pressed the program may becancelled. Then if the time was entered theoven would revert to cooking on Microwaveonly.
2. The oven will maintain the selectedtemperature for approximately 30 minutes. Ifno food has been placed inside the oven ora cooking time set, then it will automaticallycancel the cooking program and revert totime of day.
3. After pressing Start Button, the selectedtemperature can be recalled and changed.Press Convection Button once to indicatethe temperature in the display window.While the temperature is recalled in thedisplay window, you can change thetemperature by pressing convection button.
• Press Convection Button to select oventemperature. The oven starts at 150°C, thetemperature will count up in 10°C stages to250°C then 100°C. 40°C can not be set incombination mode.
• Press Start Button to preheat. “P” will appearin the display window. When the oven ispreheated the oven will beep and the “P” willflash. Then open the door and place thefood inside.*
• Enter cooking time using Time/ Weight Dial.Maximum time is 9 hours.
CAUTION:THE ACCESSORIES AND THE SURROUNDING OVEN WILL GET VERY HOT.USE OVEN GLOVES.
• Press to select Grill power. 1 press for Grill2 (Medium), 2 presses for Grill 3 (Low). 3presses for Grill 1 (High), (default setting isgrill 2).
NN-CF760M CF750W CF771 BP_Regs:F00039M69BP 26/2/13 10:19 Page 46
Varmluft + Grill (Turbo-Bake tilberedning) Ovnen kan programmeres til at tilberede eller genopvarme ved samtidig brug af gril og varmluft. Dette kan give madvarer ekstra sprødhed og farve. Denne teknik kaldes Turbo- Bake og kan ofte reducere tilberedningstiden i forhold til en traditionel ovn.
FORVARM ALTID OVNEN FØR BRUG.
• Tryk på Varmluft knappen for at vælge ovntemperatur. Ovnen starter ved 150 °C, og temperaturen tæller op i 10 °C trin til 250 °C, derefter 100 °C. 40 °C kan ikke indstilles til kombinationstilberedning.
• Tryk for at vælge Grill effekt. 1 tryk for Grill 2 (medium), 2 tryk for Grill 3 (lav). 3 tryk for Grill 1 (høj), (standardindstillingen er grill 2).
• Indtast tilberedningstiden med Tid/Vægt knappen. Maksimal tilberedningstid er 9 timer.
• Tryk på Start knappen for at forvarme. Et “P” vises på displayet. Når ovnen er forvarmet, bipper den, og “P” blinker. Derefter kan du åbne lågen og placere madvarerne i ovnen.
• Tryk på Start knappen. NB: Kontroller, at kun Grill [Press Start Button.Note: Check that just the grill andconvection symbols are still in thedisplay. If the microwave symbol isdisplayed this is incorrect and the programshould be cancelled. Reselect theConvection and Grill setting.
46
Convection + Grill (Turbo-Bake Cooking)The oven can be programmed to cook or reheat food by the grill and the convection oven workingsimultaneously, to give foods that extra crispness and colour. This is known as Turbo-Bake andcan often reduce traditional oven cooking times. ALWAYS PREHEAT BEFORE USE.
NOTE:1. Open the door using the door release
button, because if the STOP/CANCELbutton is pressed the program may becancelled. Then if the time was entered theoven would revert to cooking on Microwaveonly.
2. The oven will maintain the selectedtemperature for approximately 30 minutes. Ifno food has been placed inside the oven ora cooking time set, then it will automaticallycancel the cooking program and revert totime of day.
3. After pressing Start Button, the selectedtemperature can be recalled and changed.Press Convection Button once to indicatethe temperature in the display window.While the temperature is recalled in thedisplay window, you can change thetemperature by pressing convection button.
• Press Convection Button to select oventemperature. The oven starts at 150°C, thetemperature will count up in 10°C stages to250°C then 100°C. 40°C can not be set incombination mode.
• Press Start Button to preheat. “P” will appearin the display window. When the oven ispreheated the oven will beep and the “P” willflash. Then open the door and place thefood inside.*
• Enter cooking time using Time/ Weight Dial.Maximum time is 9 hours.
CAUTION:THE ACCESSORIES AND THE SURROUNDING OVEN WILL GET VERY HOT.USE OVEN GLOVES.
• Press to select Grill power. 1 press for Grill2 (Medium), 2 presses for Grill 3 (Low). 3presses for Grill 1 (High), (default setting isgrill 2).
NN-CF760M CF750W CF771 BP_Regs:F00039M69BP 26/2/13 10:19 Page 46
] og Varmluft [
• Enter cooking time using Time/Weight Dial. Maximum cooking time is 9 hours.
• Press Start Button. Note: Checkthat only the convection symbol
is still in the display. If themicrowave symbol is displayedthis is incorrect and the programshould be cancelled. Reselect theconvection setting.
Convection Cooking
• Press ConvectionButton. The oven starts at150°C. Press the buttonand the temperature willcount up in 10°C stages to250°C, then 40°C and100°C .
NOTE:1. Open the door using the Door release
button, because if the Stop/Cancel Button ispressed the program may be cancelled.
2. You can add to the cooking time duringcooking, if required. Turn Time/Weight Dialto increase the cooking time. A maximumtime of 10 minutes can be added.
The oven will maintain the selected preheatedtemperature for approximately 30 minutes. Ifno food has been placed inside the oven or acooking time set, then it will automatically cancel the cooking program and revert to timeof day.
CAUTIONS:THE ACCESSORIES AND THE SURROUNDING OVEN WILL GET VERY HOT. USE OVENGLOVES.
Your Combination Oven can be used as a conventional oven using the CONVECTION modewhich incorporates a heating element with a fan.For best results always place food in a preheated oven. The grill will come on when the oven ispreheating.You can cook in three ways when using convection cooking -
1. On the Enamel shelf in the lower or upper shelf position.2. On the Wire rack shelf in the lower or upper shelf position.3. Both of the above at the same time, to use the oven for two level cooking.
See individual guidelines on pages 43 for recommended accessories to use.You can preheat with or without the Enamel shelf or Wire shelf in position.
42
• Press Start Button to preheat. A “P” willappear in the display window. When theoven is preheated the oven will beep andthe “P” will flash. Then open the door andplace the food inside.* There is no preheatat 40°C.
NN-CF760M CF750W CF771 BP_Regs:F00039M69BP 26/2/13 10:19 Page 42
] symbolet stadig er på displayet. Hvis Mikrobølge [
• Enter cooking time using Time/Weight Dial. Maximum cooking time is 9 hours.
• Press Start Button. Note: Checkthat only the convection symbol
is still in the display. If themicrowave symbol is displayedthis is incorrect and the programshould be cancelled. Reselect theconvection setting.
Convection Cooking
• Press ConvectionButton. The oven starts at150°C. Press the buttonand the temperature willcount up in 10°C stages to250°C, then 40°C and100°C .
NOTE:1. Open the door using the Door release
button, because if the Stop/Cancel Button ispressed the program may be cancelled.
2. You can add to the cooking time duringcooking, if required. Turn Time/Weight Dialto increase the cooking time. A maximumtime of 10 minutes can be added.
The oven will maintain the selected preheatedtemperature for approximately 30 minutes. Ifno food has been placed inside the oven or acooking time set, then it will automatically cancel the cooking program and revert to timeof day.
CAUTIONS:THE ACCESSORIES AND THE SURROUNDING OVEN WILL GET VERY HOT. USE OVENGLOVES.
Your Combination Oven can be used as a conventional oven using the CONVECTION modewhich incorporates a heating element with a fan.For best results always place food in a preheated oven. The grill will come on when the oven ispreheating.You can cook in three ways when using convection cooking -
1. On the Enamel shelf in the lower or upper shelf position.2. On the Wire rack shelf in the lower or upper shelf position.3. Both of the above at the same time, to use the oven for two level cooking.
See individual guidelines on pages 43 for recommended accessories to use.You can preheat with or without the Enamel shelf or Wire shelf in position.
42
• Press Start Button to preheat. A “P” willappear in the display window. When theoven is preheated the oven will beep andthe “P” will flash. Then open the door andplace the food inside.* There is no preheatat 40°C.
NN-CF760M CF750W CF771 BP_Regs:F00039M69BP 26/2/13 10:19 Page 42
] symbolet vises, er dette forkert, og programmet bør annulleres. Vælg igen en varmluft- og grillindstilling.
NB:
1. Åbn lågen med Lågeåbner knappen. Hvis du trykker på Stop/Annuller knappen, kan programmet blive annulleret. Hvis tiden var indstillet, vil ovnen vende tilbage til tilberedning med kun mikrobølger.
2. Ovnen vil opretholde den valgte tempera- tur i ca. 30 minutter. Hvis ingen madvarer placeres i ovnen, eller en tilberedningstid indstilles, vil ovnen automatisk annullere tilberedningsprogrammet og vende tilbage til at vise klokken.
3. Efter tryk på Start knappen kan den valgte temperatur kaldes frem og ændres. Tryk én gang på Varmluft knappen for at vise temperaturen på displayet. Mens tempe-raturen vises på displayet, kan du ændre temperaturen ved at trykke på varmluft knappen.
ADVARSEL: TILBEHØRET OG OVNENS FLADER BLIVER MEGET VARME. BRUG GRYDELAPPER.
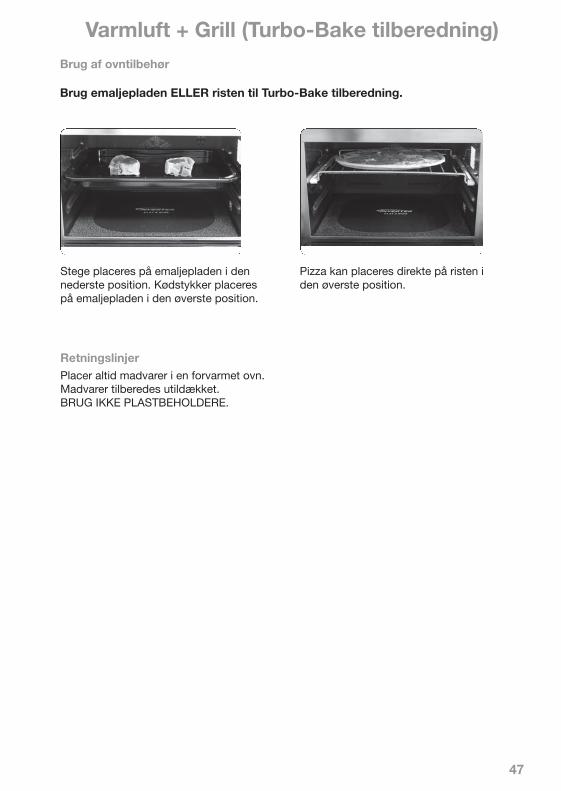
4747
Convection + Grill (Turbo-Bake Cooking)
Use the Enamel Shelf OR Wire rack Shelf for Turbo-Bake cooking.
Joints of meat are placed on theenamel shelf in the lower shelf position. Items of meat are placed onthe enamel shelf in the upper position.
Pizza can be placed directly on thewire shelf in the upper shelf position.
Oven accessories to use:
GuidelinesAlways place food in a preheated oven.Food is cooked UNCOVERED.DO NOT USE PLASTIC CONTAINERS.
NN-CF760M CF750W CF771 BP_Regs:F00039M69BP 26/2/13 10:19 Page 47
47
Convection + Grill (Turbo-Bake Cooking)
Use the Enamel Shelf OR Wire rack Shelf for Turbo-Bake cooking.
Joints of meat are placed on theenamel shelf in the lower shelf position. Items of meat are placed onthe enamel shelf in the upper position.
Pizza can be placed directly on thewire shelf in the upper shelf position.
Oven accessories to use:
GuidelinesAlways place food in a preheated oven.Food is cooked UNCOVERED.DO NOT USE PLASTIC CONTAINERS.
NN-CF760M CF750W CF771 BP_Regs:F00039M69BP 26/2/13 10:19 Page 47
Varmluft + Grill (Turbo-Bake tilberedning)
Stege placeres på emaljepladen i den nederste position. Kødstykker placeres på emaljepladen i den øverste position.
RetningslinjerPlacer altid madvarer i en forvarmet ovn. Madvarer tilberedes utildækket. BRUG IKKE PLASTBEHOLDERE.
Brug af ovntilbehør
Brug emaljepladen ELLER risten til Turbo-Bake tilberedning.
Pizza kan placeres direkte på risten i den øverste position.
48
Kombinationstilberedning
KOMBINATION tilberedning er ideel til man-ge madvarer. Mikrobølgeeffekten opvarmer dem hurtigt, mens ovn, grill eller begge dele giver den traditionelle bruning og sprødhed.
Alt dette sker samtidigt, så de fleste mad- varer bliver tilberedt på 1/2 – 2/3 af den nor-male tid.
Der er ingen grund til at forvarme på KOMBINATION programmer, undtagen ved tilberedning af bagværk.
Det er muligt at bruge glatte metal- og foliebeholdere på KOMBINATION. De skal placeres direkte på anti-gnist ringen på risten. De må ikke anbringes direkte på risten, da der så kan forekomme gnist- dannelse.
Ud over varmluft plus grill tilberedning har ovnen har tre andre metoder til kombina-tionstilberedning.
1. Varmluft og Mikrobølge
2. Grill og Mikrobølge
3. Varmluft, Grill og Mikrobølge
Hvis du oplever gnistdannelse – ser blå gnister eller hører skrattende lyde, er metal-beholderen uegnet, eller du har for lidt mad i ovnen. Du bør straks stoppe programmet og skifte til en anden beholder eller ompro-grammere til kun at bruge VARMLUFT.
For at lave vellykket mad med KOMBI-NATION, skal du altid bruge mindst 200 g madvarer. Små mængder skal tilberedes med Varmluft, Grill eller Varmluft plus Grill.
NB: EMALJEPLADEN KAN IKKE BRUGES TIL KOMBINATIONSTILBEREDNING.

49
CAUTION: Take care to use oven gloves when removing dishes from the oven - especially when turning or stirring foods as the oven walls and roof will be very hot.
NOTE:1. When placing food in the oven after
preheating, just press door release buttonbecause if STOP/CANCEL Button ispressed the program may be cancelled.Then, if the time was entered, the ovenwould revert to cooking on microwave only.
2. You can add to the cooking time duringcooking, if required. Turn Time/Weight Dialto increase the cooking time. A maximumtime of 10 minutes can be added.
Oven accessoriesWhen using any Combination cooking program the wire shelf may be used in theupper or lower shelf position. Do not placemetal containers directly on the wire shelfwhen cooking on combination mode. Usethe anti-spark ring on top of the wire shelf,then place any metal container. Your metalcontainers can then be used in combinationmode without arcing. DO NOT USE THEENAMEL SHELF ON COMBINATION COOKING.
Containers to useDO NOT use plastic MICROWAVE containerson Combination Programs (unless suitable forcombination cooking). Dishes must be able towithstand the heat of the top grill - heatproofglass e.g. Glass or ceramic are ideal. But donot put dishes on wire rack in upper shelf position directly under the grill. Place the wirerack in the lower shelf position.
or
Oven can be preheated onceconvection button is pressed.
• Set cooking time using Time/ Weight Dial.
• Press Start Button.
• Select firstcooking mode.
• Select microwavepower. Optionsavailable depend onfirst cooking modeselected.
• Press if preheating.
Combination Cooking
or
49
+
+
+
+
NN-CF760M CF750W CF771 BP_Regs:F00039M69BP 26/2/13 10:19 Page 49
KombinationstilberedningOvnen kan forvarmes, så snart der er trykket på Varmluft knappen.
eller
eller
• Vælg først tilberedningsmetode.
• Vælg tilberedningstiden med Tid/Vægt knappen.
• Tryk for forvarmning.• Vælg mikrobølgeeffekt. Valgmulighederne afhænger nu af den først valgte tilberedningsmetode.
• Tryk på Start knappen.
ADVARSEL: Vær omhyggelig med at bruge grydelapper, når du tager fade ud af ovnen – især ved vending eller omrøring af madvarer, da ovnens indvendige flader vil være meget varme.
NB:
1. Når du sætter madvarer ind i ovnen, så åbn lågen med Lågeåbner knappen. Hvis du trykker på Stop/Annuller knappen, kan programmet blive annulleret. Hvis tiden var indstillet, vil ovnen vende tilbage til tilberedning med kun mikrobølger.
Egnede beholdereBRUG IKKE plast mikrobølgebeholdere på kombinationsprogrammer, med mindre de er egnet til dette formål. Fade skal kunne tåle varmen fra det øverste grillelement. Varmebestandigt glas eller keramik er ideelt. Stil ikke fade på risten i den øverste position direkte under grillen. Placer risten i den nederste position.
2. Du kan ændre tilberedningstiden, mens ovnen er i gang, hvis det kræves. Drej Tid/Vægt knappen for at øge tilberednings- tiden. Op til 10 minutter kan tilføjes.
OvntilbehørNår du bruger et Kombination tilbered-ningsprogram, kan risten anvendes i den øverste eller nederste position. Placer ikke metalbeholdere direkte på risten ved kombinationstilberedning. Brug anti-gnist ringen oven på risten, og placer derefter metalbeholderen på ringen. Dine metalbeholdere kan derefter bruges til Kombination uden gnistdan-nelse. BRUG IKKE EMALJEPLADEN TIL KOMBINATIONSTILBEREDNING.

50
Combination 1. Convection and MicrowaveThis is the most popular combination mode combining convection heat with microwave power.Casseroles, fruit crumble and pastries are very successful using this combination. Unsuitablefoods are those which contain whisked eggs, meringues, celebration cakes, biscuits andyorkshire puddings.It is not necessary to preheat on combination except when cooking pastry dishes, to achieve abetter result. For pastry dishes preheat oven to 210°C on Convection so that the oven is hot,press stop cancel and then select the desired Combination program. Do not use this programwith less than 200g (7oz) of food.
• Press Microwave Power Button toselect desired microwave power level.HIGH/DEFROST power is not available.
• Press convection button to select thedesired temperature. The oven starts at150°C, and then the temperature will countup in 10°C stages to 250°C, then 100°C.40°C can not be set in combination mode.
• Press Start Button.
50
• Set the desired cookingtime (up to 9 hours).
NN-CF760M CF750W CF771 BP_Regs:F00039M69BP 26/2/13 10:19 Page 50
Kombination 1. Varmluft og MikrobølgeDette er den mest populære kombination, som kombinerer varmluft med mikrobølger. Gry-deretter, frugtkager og bagværk kan blive meget vellykket med denne kombination. Uegnet til madvarer, som indeholder piskede æg, marengs, kager, kiks og kødrande.
Det er ikke nødvendigt at forvarme på kombination, undtagen ved tilberedning af bagværk, for at opnå et bedre resultat. Til bagværk forvarmes ovnen til 210 °C på Varmluft, og når ovnen er varm, skal du trykke på Stop/Annuller og derefter vælge det ønskede kombina-tionsprogram. Brug ikke dette program med mindre end 200 g madvarer.
• Tryk på Varmluft [
• Enter cooking time using Time/Weight Dial. Maximum cooking time is 9 hours.
• Press Start Button. Note: Checkthat only the convection symbol
is still in the display. If themicrowave symbol is displayedthis is incorrect and the programshould be cancelled. Reselect theconvection setting.
Convection Cooking
• Press ConvectionButton. The oven starts at150°C. Press the buttonand the temperature willcount up in 10°C stages to250°C, then 40°C and100°C .
NOTE:1. Open the door using the Door release
button, because if the Stop/Cancel Button ispressed the program may be cancelled.
2. You can add to the cooking time duringcooking, if required. Turn Time/Weight Dialto increase the cooking time. A maximumtime of 10 minutes can be added.
The oven will maintain the selected preheatedtemperature for approximately 30 minutes. Ifno food has been placed inside the oven or acooking time set, then it will automatically cancel the cooking program and revert to timeof day.
CAUTIONS:THE ACCESSORIES AND THE SURROUNDING OVEN WILL GET VERY HOT. USE OVENGLOVES.
Your Combination Oven can be used as a conventional oven using the CONVECTION modewhich incorporates a heating element with a fan.For best results always place food in a preheated oven. The grill will come on when the oven ispreheating.You can cook in three ways when using convection cooking -
1. On the Enamel shelf in the lower or upper shelf position.2. On the Wire rack shelf in the lower or upper shelf position.3. Both of the above at the same time, to use the oven for two level cooking.
See individual guidelines on pages 43 for recommended accessories to use.You can preheat with or without the Enamel shelf or Wire shelf in position.
42
• Press Start Button to preheat. A “P” willappear in the display window. When theoven is preheated the oven will beep andthe “P” will flash. Then open the door andplace the food inside.* There is no preheatat 40°C.
NN-CF760M CF750W CF771 BP_Regs:F00039M69BP 26/2/13 10:19 Page 42
] knappen for at vælge den ønskede temperatur. Ovnen starter ved 150 °C, og temperaturen tæller op i 10 °C trin til 250 °C, derefter 100 °C. 40 °C kan ikke indstilles til kombinations-tilberedning.
• Indstil den ønskede tilberedningstid med Tid/Vægt knappen (op til 9 timer).
• Tryk på Start knappen.
• Tryk på Mikrobølgeeffekt [
• Enter cooking time using Time/Weight Dial. Maximum cooking time is 9 hours.
• Press Start Button. Note: Checkthat only the convection symbol
is still in the display. If themicrowave symbol is displayedthis is incorrect and the programshould be cancelled. Reselect theconvection setting.
Convection Cooking
• Press ConvectionButton. The oven starts at150°C. Press the buttonand the temperature willcount up in 10°C stages to250°C, then 40°C and100°C .
NOTE:1. Open the door using the Door release
button, because if the Stop/Cancel Button ispressed the program may be cancelled.
2. You can add to the cooking time duringcooking, if required. Turn Time/Weight Dialto increase the cooking time. A maximumtime of 10 minutes can be added.
The oven will maintain the selected preheatedtemperature for approximately 30 minutes. Ifno food has been placed inside the oven or acooking time set, then it will automatically cancel the cooking program and revert to timeof day.
CAUTIONS:THE ACCESSORIES AND THE SURROUNDING OVEN WILL GET VERY HOT. USE OVENGLOVES.
Your Combination Oven can be used as a conventional oven using the CONVECTION modewhich incorporates a heating element with a fan.For best results always place food in a preheated oven. The grill will come on when the oven ispreheating.You can cook in three ways when using convection cooking -
1. On the Enamel shelf in the lower or upper shelf position.2. On the Wire rack shelf in the lower or upper shelf position.3. Both of the above at the same time, to use the oven for two level cooking.
See individual guidelines on pages 43 for recommended accessories to use.You can preheat with or without the Enamel shelf or Wire shelf in position.
42
• Press Start Button to preheat. A “P” willappear in the display window. When theoven is preheated the oven will beep andthe “P” will flash. Then open the door andplace the food inside.* There is no preheatat 40°C.
NN-CF760M CF750W CF771 BP_Regs:F00039M69BP 26/2/13 10:19 Page 42
] knappen for at vælge det ønskede mikrobølge effektniveau. High/Defrost effekt er ikke tilgængelig.

51
Combination 1. Convection and Microwave
Non-metallic dishes or items of food canbe placed directly onto wire shelf in thelower shelf position.
Joints and portions of meat should beplaced in a glass dish on the wire shelfin the lower shelf position. Very largejoints can be placed in a glass dish onthe ceramic plate.
Recipes using foil or metal containerse.g. cakes and pastries should not to beplaced directly on the wire shelf. Usethe anti-spark ring on top of the wireshelf, then place any metal container.
Oven accessories to useDo not use this program with less than 200g (7oz) of food.DO NOT USE THE ENAMEL SHELF FOR COMBINATION COOKING.
51
NN-CF760M CF750W CF771 BP_Regs:F00039M69BP 26/2/13 10:19 Page 51
Kombination 1. Varmluft og Mikrobølge Brug af ovntilbehør
Brug ikke dette program med mindre end 200 g madvarer.
BRUG IKKE EMALJEPLADEN TIL KOMBINATIONSTILBEREDNING.
Ikke-metalliske fade eller portioner af madvarer kan placeres direkte på risten i nederste position.
Stege og kødstykker bør placeres i en glasskål på risten i nederste position. Meget store stege kan placeres i en glasskål på den keramiske plade.
Opskrifter, som bruger folie eller metalbe-holdere, f.eks. kager og bagværk, bør ikke placeres direkte på risten. Brug anti-gnist ringen oven på risten, og placer derefter en metalbeholder på ringen.

52
Kombination 1. Varmluft og Mikrobølge
ADVARSEL: BRUG ALTID GRYDELAPPER, NÅR DU TAGER FADE UD AF OVNEN – ISÆR VED VENDING ELLER OMRØRING AF MADVARER, DA TILBE-HØRET OG OVNENS INDVENDIGE FLADER VIL VÆRE MEGET VARME.
Brug ikke dette program med mindre end 200 g madvarer.
Retningslinjer
• Madvarer tilberedes normalt UTILDÆKKET.
• Efter tilberedning er det vigtigt, at tilbehøret tages ud til rengøring, før det skal bruges igen, samt at ovnens vægge og bund aftørres med en klud opvredet i varmt sæbevand for at fjerne fedt. Det er ikke nødvendigt at rengøre ovnens bagvæg, som har en selvren-sende katalytisk belægning. STIL IKKE TILBEHØR I EN OPVASKEMASKINE.
Tabellen herunder giver forslag til Kombination programmer. Hvad angår tilberedningstider, se også tilberedningstabellerne i denne vejledning eller lignende opskrifter. Det er ikke muligt at bruge High eller Defrost mikrobølgeeffekt til denne kombination.
Madvarer bør altid tilberedes, indtil de er brunet og rygende varme.
Ovntemperatur Mikrobølge effekt Formål
230 °C Warm Frugtkage
220 °C Simmer Gratineret blomkål, makaroni, quiche
220 °C Warm Nedkølet risbudding
190 °C Simmer Hel kylling / Kalkun
160 °C Warm Kager, gryderetter

53
Combination 2. Grill and Microwave
This Combination mode is suitable for foodswhich are normally grilled and for reheatingsmall savoury items.Do not use this program with less than 200 g(7 oz) of food.
It is NOT necessary to preheat when usingthis Combination mode and food shouldalways be cooked uncovered. The Grill will glow on and off during cooking -this is normal.
• Set the desired cooking time using theTime/Weight Dial (up to 9 hours).
• Press Start Button
• Press the Grill PowerButton to select the desiredgrill level.
One press: Grill 1 - HIGHTwo presses: Grill 2 - MEDIUMThree pressses: Grill 3 - LOW
• Press the microwave power button to select the desiredmicrowave power level.HIGH/DEFROST power is not available.
53
NN-CF760M CF750W CF771 BP_Regs:F00039M69BP 26/2/13 10:19 Page 53
Kombination 2. Grill og MikrobølgeDenne Kombination er egnet til madvarer, som normalt skal grilles, samt til genop-varmning af små krydrede retter.
Brug ikke dette program med mindre end 200 g madvarer.
Det er IKKE nødvendigt at forvarme ved brug af denne Kombination, og madvarer bør altid tilberedes utildækket.
Grillen vil tænde og slukke under tilbered-ningen. Dette er normalt.
• Tryk på Grill [
Combination 2. Grill and Microwave
This Combination mode is suitable for foodswhich are normally grilled and for reheatingsmall savoury items.Do not use this program with less than 200 g(7 oz) of food.
It is NOT necessary to preheat when usingthis Combination mode and food shouldalways be cooked uncovered. The Grill will glow on and off during cooking -this is normal.
• Set the desired cooking time using theTime/Weight Dial (up to 9 hours).
• Press Start Button
• Press the Grill PowerButton to select the desiredgrill level.
One press: Grill 1 - HIGHTwo presses: Grill 2 - MEDIUMThree pressses: Grill 3 - LOW
• Press the microwave power button to select the desiredmicrowave power level.HIGH/DEFROST power is not available.
53
NN-CF760M CF750W CF771 BP_Regs:F00039M69BP 26/2/13 10:19 Page 53
] knappen for at vælge det ønskede effektniveau.
1 tryk: Grill 1 – Høj
2 tryk: Grill 2 – Medium
3 tryk: Grill 3 – Lav
• Indstil den ønskede tilberedningstid med Tid/Vægt knappen (op til 9 timer).
• Tryk på Mikrobølgeeffekt [
• Enter cooking time using Time/Weight Dial. Maximum cooking time is 9 hours.
• Press Start Button. Note: Checkthat only the convection symbol
is still in the display. If themicrowave symbol is displayedthis is incorrect and the programshould be cancelled. Reselect theconvection setting.
Convection Cooking
• Press ConvectionButton. The oven starts at150°C. Press the buttonand the temperature willcount up in 10°C stages to250°C, then 40°C and100°C .
NOTE:1. Open the door using the Door release
button, because if the Stop/Cancel Button ispressed the program may be cancelled.
2. You can add to the cooking time duringcooking, if required. Turn Time/Weight Dialto increase the cooking time. A maximumtime of 10 minutes can be added.
The oven will maintain the selected preheatedtemperature for approximately 30 minutes. Ifno food has been placed inside the oven or acooking time set, then it will automatically cancel the cooking program and revert to timeof day.
CAUTIONS:THE ACCESSORIES AND THE SURROUNDING OVEN WILL GET VERY HOT. USE OVENGLOVES.
Your Combination Oven can be used as a conventional oven using the CONVECTION modewhich incorporates a heating element with a fan.For best results always place food in a preheated oven. The grill will come on when the oven ispreheating.You can cook in three ways when using convection cooking -
1. On the Enamel shelf in the lower or upper shelf position.2. On the Wire rack shelf in the lower or upper shelf position.3. Both of the above at the same time, to use the oven for two level cooking.
See individual guidelines on pages 43 for recommended accessories to use.You can preheat with or without the Enamel shelf or Wire shelf in position.
42
• Press Start Button to preheat. A “P” willappear in the display window. When theoven is preheated the oven will beep andthe “P” will flash. Then open the door andplace the food inside.* There is no preheatat 40°C.
NN-CF760M CF750W CF771 BP_Regs:F00039M69BP 26/2/13 10:19 Page 42
] knappen for at vælge det ønskede mikrobølge effektniveau. High/Defrost effekt er ikke tilgængelig.
• Tryk på Start knappen.

5454
Combination 2. Grill and Microwave
Guidelines• Food is always cooked UNCOVERED.
• To turn food just press door release button,remove the accessories, turn the food, returnto the oven, close the door and pressSTART button. The oven will continue tocount down the remaining cooking time.
• After Grilling it is important that the Grillaccessories are removed for cleaning beforere-use and that the oven walls and floor arewiped with a cloth squeezed in hot soapywater to remove any grease. It is not necessary to clean the back of the ovenwhich has a catalytic self clean lining. DONOT PUT THE SHELVES IN THE DISHWASHER.
Food can be placed directly onto the wire shelf inthe upper or lower shelf position. The glass dish can beplaced underneath to catchany drips.When cooking fish or smallitems, food can be placeddirectly on the glass dish onthe wire shelf.
Oven accessories to use
DO NOT USE THE ENAMEL SHELF FOR COMBINATION COOKING.
For advice on cooking times refer to cooking charts and recipes in this book. See pages 63-81.Foods should always be cooked until browned and piping hot.
CAUTION:ALWAYS USE OVEN GLOVES WHEN REMOVING DISHES FROM THE OVEN -ESPECIALLY WHEN TURNING OR STIRRING FOODS, AS THE ACCESSORIESAND SURROUNDING OVEN WILL GET VERY HOT.
Containers to useDO NOT use plastic MICROWAVE containers on Combination Programs (unless suitable for combination cooking). Dishes must be able to withstand the heat of the top grill - heatproof glasse.g. Pyrex or ceramic are ideal.
NN-CF760M CF750W CF771 BP_Regs:F00039M69BP 26/2/13 10:19 Page 54
54
Combination 2. Grill and Microwave
Guidelines• Food is always cooked UNCOVERED.
• To turn food just press door release button,remove the accessories, turn the food, returnto the oven, close the door and pressSTART button. The oven will continue tocount down the remaining cooking time.
• After Grilling it is important that the Grillaccessories are removed for cleaning beforere-use and that the oven walls and floor arewiped with a cloth squeezed in hot soapywater to remove any grease. It is not necessary to clean the back of the ovenwhich has a catalytic self clean lining. DONOT PUT THE SHELVES IN THE DISHWASHER.
Food can be placed directly onto the wire shelf inthe upper or lower shelf position. The glass dish can beplaced underneath to catchany drips.When cooking fish or smallitems, food can be placeddirectly on the glass dish onthe wire shelf.
Oven accessories to use
DO NOT USE THE ENAMEL SHELF FOR COMBINATION COOKING.
For advice on cooking times refer to cooking charts and recipes in this book. See pages 63-81.Foods should always be cooked until browned and piping hot.
CAUTION:ALWAYS USE OVEN GLOVES WHEN REMOVING DISHES FROM THE OVEN -ESPECIALLY WHEN TURNING OR STIRRING FOODS, AS THE ACCESSORIESAND SURROUNDING OVEN WILL GET VERY HOT.
Containers to useDO NOT use plastic MICROWAVE containers on Combination Programs (unless suitable for combination cooking). Dishes must be able to withstand the heat of the top grill - heatproof glasse.g. Pyrex or ceramic are ideal.
NN-CF760M CF750W CF771 BP_Regs:F00039M69BP 26/2/13 10:19 Page 54
Kombination 2. Grill og MikrobølgeBrug af ovntilbehør
BRUG IKKE EMALJEPLADEN TIL KOMBINATIONSTILBEREDNING.
Madvarer kan placeres direkte på risten i den øverste eller nederste position. Glasfadet kan placeres nedenunder til at fange eventuelle dryp.
Ved tilberedning af fisk eller små kødstykker, kan mad-varerne placeres direkte på glasfadet på risten.
For vejledning om tilberedningstider, se opskrifter og tilberedningstabeller på side 63 – 81. Madvarer bør altid tilberedes, indtil de er brunet og rygende varme.
Retningslinjer
• Madvarer tilberedes altid UTILDÆKKET.
• Når maden skal vendes, så tryk blot på Lågeåbner knappen, tag tilbehøret ud, vend maden, sæt den tilbage i ovnen, luk lågen og tryk på Start. Ovnen fortsætter med at nedtælle den resterende tilbered-ningstid.
Egnede beholdere
BRUG IKKE plast mikrobølgebeholdere på kombinationsprogrammer, med mindre de er egnet til dette formål. Fade skal kunne tåle varmen fra det øverste grillelement. Varmebestandigt glas eller keramik er ideelt.
• Efter grilning er det vigtigt, at grilltilbe-høret tages ud til rengøring, før det skal bruges igen, samt at ovnens vægge og bund aftørres med en klud opvredet i varmt sæbevand for at fjerne fedt. Det er ikke nødvendigt at rengøre ovnens bag-væg, som har en selvrensende katalytisk belægning. STIL IKKE TILBEHØR I EN OPVASKEMASKINE.
ADVARSEL: BRUG ALTID GRYDELAPPER, NÅR DU TAGER FADE UD AF OVNEN – ISÆR VED VENDING ELLER OMRØRING AF MADVARER, DA TILBE-HØRET OG OVNENS INDVENDIGE FLADER VIL VÆRE MEGET VARME.

5555
• Pressconvectionbutton to selectoventemperature.The oven startsat 150°C andthe temperaturewill count up in10°C stages to250°C then100°C. 40°Ccan not be setin combinationmode.
• Press to selectgrill power. 1press for Grill 2(Medium) 2presses for Grill3 (Low), 3presses for Grill1 (High).
• PressMicrowave buttonto select desiredmicrowave powerlavel. The optionsavailable willdepend on theother cookingmodes previouslyselected.(High/defrost notavailable).
• Set the desiredcooking timeusing the Time/Weight Dial (upto 9 hours).
• Press Start button.
Combination 3. Convection, Grilland Microwave.
NN-CF760M CF750W CF771 BP_Regs:F00039M69BP 26/2/13 10:19 Page 55
Kombination 3. Varmluft, Grill og Mikrobølge
• Tryk på Varmluft [
• Enter cooking time using Time/Weight Dial. Maximum cooking time is 9 hours.
• Press Start Button. Note: Checkthat only the convection symbol
is still in the display. If themicrowave symbol is displayedthis is incorrect and the programshould be cancelled. Reselect theconvection setting.
Convection Cooking
• Press ConvectionButton. The oven starts at150°C. Press the buttonand the temperature willcount up in 10°C stages to250°C, then 40°C and100°C .
NOTE:1. Open the door using the Door release
button, because if the Stop/Cancel Button ispressed the program may be cancelled.
2. You can add to the cooking time duringcooking, if required. Turn Time/Weight Dialto increase the cooking time. A maximumtime of 10 minutes can be added.
The oven will maintain the selected preheatedtemperature for approximately 30 minutes. Ifno food has been placed inside the oven or acooking time set, then it will automatically cancel the cooking program and revert to timeof day.
CAUTIONS:THE ACCESSORIES AND THE SURROUNDING OVEN WILL GET VERY HOT. USE OVENGLOVES.
Your Combination Oven can be used as a conventional oven using the CONVECTION modewhich incorporates a heating element with a fan.For best results always place food in a preheated oven. The grill will come on when the oven ispreheating.You can cook in three ways when using convection cooking -
1. On the Enamel shelf in the lower or upper shelf position.2. On the Wire rack shelf in the lower or upper shelf position.3. Both of the above at the same time, to use the oven for two level cooking.
See individual guidelines on pages 43 for recommended accessories to use.You can preheat with or without the Enamel shelf or Wire shelf in position.
42
• Press Start Button to preheat. A “P” willappear in the display window. When theoven is preheated the oven will beep andthe “P” will flash. Then open the door andplace the food inside.* There is no preheatat 40°C.
NN-CF760M CF750W CF771 BP_Regs:F00039M69BP 26/2/13 10:19 Page 42
] knappen for at vælge den ønskede temperatur. Ovnen starter ved 150 °C, og temperaturen tæller op i 10 °C trin til 250 °C, derefter 100 °C. 40 °C kan ikke indstilles til kombinations- tilberedning.
• Tryk på Grill [
Combination 2. Grill and Microwave
This Combination mode is suitable for foodswhich are normally grilled and for reheatingsmall savoury items.Do not use this program with less than 200 g(7 oz) of food.
It is NOT necessary to preheat when usingthis Combination mode and food shouldalways be cooked uncovered. The Grill will glow on and off during cooking -this is normal.
• Set the desired cooking time using theTime/Weight Dial (up to 9 hours).
• Press Start Button
• Press the Grill PowerButton to select the desiredgrill level.
One press: Grill 1 - HIGHTwo presses: Grill 2 - MEDIUMThree pressses: Grill 3 - LOW
• Press the microwave power button to select the desiredmicrowave power level.HIGH/DEFROST power is not available.
53
NN-CF760M CF750W CF771 BP_Regs:F00039M69BP 26/2/13 10:19 Page 53
] knappen for at vælge det ønskede effekt-niveau. 1 tryk for Grill 2 (Medium), 2 tryk for Grill 3 (Lav), 3 tryk for Grill 1 (Høj)
• Tryk på Mikro- bølgeeffekt [
• Enter cooking time using Time/Weight Dial. Maximum cooking time is 9 hours.
• Press Start Button. Note: Checkthat only the convection symbol
is still in the display. If themicrowave symbol is displayedthis is incorrect and the programshould be cancelled. Reselect theconvection setting.
Convection Cooking
• Press ConvectionButton. The oven starts at150°C. Press the buttonand the temperature willcount up in 10°C stages to250°C, then 40°C and100°C .
NOTE:1. Open the door using the Door release
button, because if the Stop/Cancel Button ispressed the program may be cancelled.
2. You can add to the cooking time duringcooking, if required. Turn Time/Weight Dialto increase the cooking time. A maximumtime of 10 minutes can be added.
The oven will maintain the selected preheatedtemperature for approximately 30 minutes. Ifno food has been placed inside the oven or acooking time set, then it will automatically cancel the cooking program and revert to timeof day.
CAUTIONS:THE ACCESSORIES AND THE SURROUNDING OVEN WILL GET VERY HOT. USE OVENGLOVES.
Your Combination Oven can be used as a conventional oven using the CONVECTION modewhich incorporates a heating element with a fan.For best results always place food in a preheated oven. The grill will come on when the oven ispreheating.You can cook in three ways when using convection cooking -
1. On the Enamel shelf in the lower or upper shelf position.2. On the Wire rack shelf in the lower or upper shelf position.3. Both of the above at the same time, to use the oven for two level cooking.
See individual guidelines on pages 43 for recommended accessories to use.You can preheat with or without the Enamel shelf or Wire shelf in position.
42
• Press Start Button to preheat. A “P” willappear in the display window. When theoven is preheated the oven will beep andthe “P” will flash. Then open the door andplace the food inside.* There is no preheatat 40°C.
NN-CF760M CF750W CF771 BP_Regs:F00039M69BP 26/2/13 10:19 Page 42
] knappen for at vælge det øn- skede mikrobøl-ge effektniveau. De tilgængelige valgmuligheder afhænger af de allerede valgte tilberednings- indstillinger. High/Defrost effekt er ikke tilgængelig.
• Indstil den øn- skede tilbered-ningstid med Tid/Vægt knappen (op til 9 timer).
• Tryk på Start knappen.

56
Guidelines• Food is always cooked UNCOVERED. • After cooking it is important that the accessories are removed for cleaning before re-use and
that the oven walls and floor are wiped with a cloth squeezed in hot soapy water to remove anygrease. It is not necessary to clean the back of the oven which has a catalytic self clean lining.DO NOT PUT THE SHELVES IN THE DISHWASHER.
Non-metallic dishes or items of food canbe placed directly onto the wire shelf inthe lower shelf position.
Food should be placed directly onto thewire shelf in the upper or lower shelfposition. The glass dish can be placedunderneath to catch any drips.
Oven accessories to use
DO NOT USE THE ENAMEL SHELF FOR COMBINATION COOKING.
When cooking small items or fish,food should be placed directly onto the glass dish in the upper orlower shelf position.
Combination 3. Convection, Grill andMicrowave.
56
Do not use this program with less than 200g (7oz) of food.
NN-CF760M CF750W CF771 BP_Regs:F00039M69BP 26/2/13 10:19 Page 56
Kombination 3. Varmluft, Grill og MikrobølgeBrug af ovntilbehør
Brug ikke dette program med mindre end 200 g madvarer.
BRUG IKKE EMALJEPLADEN TIL KOMBINATIONSTILBEREDNING.
Ikke-metalliske fade eller portioner af madvarer kan placeres direkte på risten i nederste position.
Madvarer kan placeres direkte på risten i den øverste eller nederste position. Glas-fadet kan placeres nedenunder til at fange eventuelle dryp.
Ved tilberedning af fisk eller små kødstykker, kan madvarerne placeres direkte på glasfadet på risten.
Retningslinjer
• Madvarer tilberedes altid UTILDÆKKET.
• Efter tilberedning er det vigtigt, at tilbehøret tages ud til rengøring, før det skal bruges igen, samt at ovnens vægge og bund aftørres med en klud opvredet i varmt sæbevand for at fjerne fedt. Det er ikke nødvendigt at rengøre ovnens bagvæg, som har en selv- rensende katalytisk belægning. STIL IKKE TILBEHØR I EN OPVASKEMASKINE.

57
Kombination 3. Varmluft, Grill eller Turbo-Bake og MikrobølgeBrug ikke dette program med mindre end 200 g madvarer. Vi foreslår de følgende valgmuligheder til denne Kombination.
For vejledning om tilberedningstider, se opskrifter og tilberedningstabeller på side 63 – 81. Madvarer bør altid tilberedes, indtil de er brunet og rygende varme.
Varmluft (Ovn temp) Grill Mikrobølge effekt Formål
250 °C 1 Simmer Bagekartofler
250 °C 1 Warm Rundstykker, ciabatta
240 °C 1 Medium Frossen tynd og sprød pizza
240 °C 1 Lav Tynd og sprød pizza
230 °C 1 Warm Friske panerede fiskefileter
230 °C 2 Simmer Frosne scampi, genopvarmning af kødtærter og postejer, større lasagne
230 °C 2 Simmer Frosne panerede fiskefilete
230 °C 1 Simmer Lasagne, gratineret blomkål, schnitzle
220 °C 2 Simmer Genopvarmning af store kødtærter, quiche, frugttærter
ADVARSEL: BRUG ALTID GRYDELAPPER, NÅR DU TAGER FADE UD AF OVNEN – ISÆR VED VENDING ELLER OMRØRING AF MADVARER, DA TILBE-HØRET OG OVNENS INDVENDIGE FLADER VIL VÆRE MEGET VARME.

58
Auto Weight Cook ProgramsThis feature allows you to cook or reheat most of your favourite foods by setting the weight only.The oven determines the Microwave power level and/or Combination setting, then the cookingtime automatically. Select the category of food and then just enter the weight. Only enter theweight of the food. Do not include the weight of any added water or the container weight.
When you select an automatic program symbols will appear in the display to show the cookingmode that will be used and the accessories that are needed. See below to identify the symbols:-
Microwave
Gril
Convection
• Press the AutoWeight ProgramButton to selectthe desiredprogram.
• Set the weightof food by usingthe Time/Weight Dial.
• Press Start Button.The displayreminds you whichaccessory to useand which cookingmodes are in use.
Wire shelf
Square glass dish
eg.
58
NN-CF760M CF750W CF771 BP_Regs:F00039M69BP 26/2/13 10:19 Page 58
Auto-vægt programmer Denne funktion giver dig mulighed for at tilberede eller genopvarme de fleste af dine retter blot ved at indstille vægten. Ovnen bestemmer Mikrobølge effektniveauet og/eller Kombina-tion indstilling, hvorefter tilberedningstiden automatisk beregnes. Vælg kategori for madva-rer og indstil derefter vægten. Indstil kun vægten af madvarer. Medtag ikke vægten af tilsat vand eller en beholder.
Når du vælger et automatisk program, vises symboler på displayet for at informere om den anvendte tilberedningsfunktion samt det nødvendige tilbehør. Se symbolerne herunder:
f.eks.
• Tryk på Auto-vægt program knappen for at vælge det ønskede program.
• Indstil vægten med Tid/Vægt knappen.
Mikrobølge
Grill
Varmluft Rist
Firkantet glasfad
• Tryk på Start knappen. Displayet viser, hvilket tilbehør der skal bruges, samt hvilke tilberedningsfunktioner der anvendes.

59
Retningslinjer for brug
Minimum/Maksimum vægt til brug på Auto-vægt programmer
Auto-vægt programmerne er udviklet til at tage gætteriet ud af tilberedning eller genopvarmning af din mad. De må KUN anvendes til de beskrevne madvarer.
1. Tilbered kun madvarer inden for de angivne vægtintervaller (se tabellen herunder).
2. Brug kun tilbehør, som er angivet på side 60 – 63.
3. Tildæk IKKE madvarer, medmindre andet er angivet. Kombination auto-programmerne bruger en kombination af Mikrobølge og Grill og/eller Varmluft, og tildækning vil forhin-dre bruning af maden. Varmen fra grillen vil også smelte enhver plastfolie.
4. De fleste madvarer bliver bedre af at HVILE i nogen tid efter tilberedning på et Auto-program, så varmen kan fortsætte med at trænge ind i midten.
5. For at tage højde for variationer, som kan forekomme i madvarer, bør du kontrollere, at maden helt færdig og rygende varm før servering.
6. Vej ALTID kyllingen til Auto-programmet til hel kylling. Stol IKKE på vægten på pakken.
Program Minimum Maximum
1 tryk
Program Minimum Maximum
1 Press 4. Fresh Vegetables 200g 1000g
2 Presses 5. Frozen Vegetables 200g 1000g
3 Presses 6. Fresh Fish 200g 1000g
4 Presses 7. Breaded Fish 100g 800g
1 Press 8. Boiled Potatoes 200g 1000g
2 Presses 9. Jacket Potatoes 200g 1500g
3 Presses 10. Frozen Potato Products 200g 500g
1 Press 11. Whole Chicken 1000g 1900g
2 Presses 12. Chicken Pieces 200g 1000g
1 Press 13. Chilled Pizza 100g 600g
2 Presses 14. Frozen Pizza 100g 600g
1 Press 15. Crispy Top 350g 600g
2 Presses 16. Pastry Items 100g 650g
59
The Auto Weight Programs are designed totake the guesswork out of cooking or reheatingyour food. They must ONLY be used for thefoods described.1. Only cook foods within the weight ranges
described (see table below).2. Only use the accessories as indicated on
pages 60-63.3. DO NOT cover food unless stated.
Combination auto programs use aCombination of Microwave and Grill and/orConvection and covering will prevent thefood browning. The heat of the grill will alsomelt any plastic covering.
4. Most foods benefit from a STANDING timeafter cooking on an Auto Program, to allowheat to continue conducting to the centre.
5. To allow for some variations that occur infood, check that food is thoroughly cookedand piping hot before serving.
6. ALWAYS weigh the chicken for the wholechicken Auto program. DO NOT rely on thepacket weight.
Guidelines for Use
Minimum/Maximum Weights to use onAuto Weight Programs
NN-CF760M CF750W CF771 BP_Regs:F00039M69BP 26/2/13 10:19 Page 59
4. Friske grøntsager 200 g 1.000 g
2 tryk
Program Minimum Maximum
1 Press 4. Fresh Vegetables 200g 1000g
2 Presses 5. Frozen Vegetables 200g 1000g
3 Presses 6. Fresh Fish 200g 1000g
4 Presses 7. Breaded Fish 100g 800g
1 Press 8. Boiled Potatoes 200g 1000g
2 Presses 9. Jacket Potatoes 200g 1500g
3 Presses 10. Frozen Potato Products 200g 500g
1 Press 11. Whole Chicken 1000g 1900g
2 Presses 12. Chicken Pieces 200g 1000g
1 Press 13. Chilled Pizza 100g 600g
2 Presses 14. Frozen Pizza 100g 600g
1 Press 15. Crispy Top 350g 600g
2 Presses 16. Pastry Items 100g 650g
59
The Auto Weight Programs are designed totake the guesswork out of cooking or reheatingyour food. They must ONLY be used for thefoods described.1. Only cook foods within the weight ranges
described (see table below).2. Only use the accessories as indicated on
pages 60-63.3. DO NOT cover food unless stated.
Combination auto programs use aCombination of Microwave and Grill and/orConvection and covering will prevent thefood browning. The heat of the grill will alsomelt any plastic covering.
4. Most foods benefit from a STANDING timeafter cooking on an Auto Program, to allowheat to continue conducting to the centre.
5. To allow for some variations that occur infood, check that food is thoroughly cookedand piping hot before serving.
6. ALWAYS weigh the chicken for the wholechicken Auto program. DO NOT rely on thepacket weight.
Guidelines for Use
Minimum/Maximum Weights to use onAuto Weight Programs
NN-CF760M CF750W CF771 BP_Regs:F00039M69BP 26/2/13 10:19 Page 59
5. Frosne grøntsager 200 g 1.000 g
3 tryk
Program Minimum Maximum
1 Press 4. Fresh Vegetables 200g 1000g
2 Presses 5. Frozen Vegetables 200g 1000g
3 Presses 6. Fresh Fish 200g 1000g
4 Presses 7. Breaded Fish 100g 800g
1 Press 8. Boiled Potatoes 200g 1000g
2 Presses 9. Jacket Potatoes 200g 1500g
3 Presses 10. Frozen Potato Products 200g 500g
1 Press 11. Whole Chicken 1000g 1900g
2 Presses 12. Chicken Pieces 200g 1000g
1 Press 13. Chilled Pizza 100g 600g
2 Presses 14. Frozen Pizza 100g 600g
1 Press 15. Crispy Top 350g 600g
2 Presses 16. Pastry Items 100g 650g
59
The Auto Weight Programs are designed totake the guesswork out of cooking or reheatingyour food. They must ONLY be used for thefoods described.1. Only cook foods within the weight ranges
described (see table below).2. Only use the accessories as indicated on
pages 60-63.3. DO NOT cover food unless stated.
Combination auto programs use aCombination of Microwave and Grill and/orConvection and covering will prevent thefood browning. The heat of the grill will alsomelt any plastic covering.
4. Most foods benefit from a STANDING timeafter cooking on an Auto Program, to allowheat to continue conducting to the centre.
5. To allow for some variations that occur infood, check that food is thoroughly cookedand piping hot before serving.
6. ALWAYS weigh the chicken for the wholechicken Auto program. DO NOT rely on thepacket weight.
Guidelines for Use
Minimum/Maximum Weights to use onAuto Weight Programs
NN-CF760M CF750W CF771 BP_Regs:F00039M69BP 26/2/13 10:19 Page 59
6. Fersk fisk 200 g 1.000 g
4 tryk
Program Minimum Maximum
1 Press 4. Fresh Vegetables 200g 1000g
2 Presses 5. Frozen Vegetables 200g 1000g
3 Presses 6. Fresh Fish 200g 1000g
4 Presses 7. Breaded Fish 100g 800g
1 Press 8. Boiled Potatoes 200g 1000g
2 Presses 9. Jacket Potatoes 200g 1500g
3 Presses 10. Frozen Potato Products 200g 500g
1 Press 11. Whole Chicken 1000g 1900g
2 Presses 12. Chicken Pieces 200g 1000g
1 Press 13. Chilled Pizza 100g 600g
2 Presses 14. Frozen Pizza 100g 600g
1 Press 15. Crispy Top 350g 600g
2 Presses 16. Pastry Items 100g 650g
59
The Auto Weight Programs are designed totake the guesswork out of cooking or reheatingyour food. They must ONLY be used for thefoods described.1. Only cook foods within the weight ranges
described (see table below).2. Only use the accessories as indicated on
pages 60-63.3. DO NOT cover food unless stated.
Combination auto programs use aCombination of Microwave and Grill and/orConvection and covering will prevent thefood browning. The heat of the grill will alsomelt any plastic covering.
4. Most foods benefit from a STANDING timeafter cooking on an Auto Program, to allowheat to continue conducting to the centre.
5. To allow for some variations that occur infood, check that food is thoroughly cookedand piping hot before serving.
6. ALWAYS weigh the chicken for the wholechicken Auto program. DO NOT rely on thepacket weight.
Guidelines for Use
Minimum/Maximum Weights to use onAuto Weight Programs
NN-CF760M CF750W CF771 BP_Regs:F00039M69BP 26/2/13 10:19 Page 59
7. Paneret fisk 100 g 800 g
1 tryk
Program Minimum Maximum
1 Press 4. Fresh Vegetables 200g 1000g
2 Presses 5. Frozen Vegetables 200g 1000g
3 Presses 6. Fresh Fish 200g 1000g
4 Presses 7. Breaded Fish 100g 800g
1 Press 8. Boiled Potatoes 200g 1000g
2 Presses 9. Jacket Potatoes 200g 1500g
3 Presses 10. Frozen Potato Products 200g 500g
1 Press 11. Whole Chicken 1000g 1900g
2 Presses 12. Chicken Pieces 200g 1000g
1 Press 13. Chilled Pizza 100g 600g
2 Presses 14. Frozen Pizza 100g 600g
1 Press 15. Crispy Top 350g 600g
2 Presses 16. Pastry Items 100g 650g
59
The Auto Weight Programs are designed totake the guesswork out of cooking or reheatingyour food. They must ONLY be used for thefoods described.1. Only cook foods within the weight ranges
described (see table below).2. Only use the accessories as indicated on
pages 60-63.3. DO NOT cover food unless stated.
Combination auto programs use aCombination of Microwave and Grill and/orConvection and covering will prevent thefood browning. The heat of the grill will alsomelt any plastic covering.
4. Most foods benefit from a STANDING timeafter cooking on an Auto Program, to allowheat to continue conducting to the centre.
5. To allow for some variations that occur infood, check that food is thoroughly cookedand piping hot before serving.
6. ALWAYS weigh the chicken for the wholechicken Auto program. DO NOT rely on thepacket weight.
Guidelines for Use
Minimum/Maximum Weights to use onAuto Weight Programs
NN-CF760M CF750W CF771 BP_Regs:F00039M69BP 26/2/13 10:19 Page 59
8. Kogte kartofler 200 g 1.000 g
2 tryk
Program Minimum Maximum
1 Press 4. Fresh Vegetables 200g 1000g
2 Presses 5. Frozen Vegetables 200g 1000g
3 Presses 6. Fresh Fish 200g 1000g
4 Presses 7. Breaded Fish 100g 800g
1 Press 8. Boiled Potatoes 200g 1000g
2 Presses 9. Jacket Potatoes 200g 1500g
3 Presses 10. Frozen Potato Products 200g 500g
1 Press 11. Whole Chicken 1000g 1900g
2 Presses 12. Chicken Pieces 200g 1000g
1 Press 13. Chilled Pizza 100g 600g
2 Presses 14. Frozen Pizza 100g 600g
1 Press 15. Crispy Top 350g 600g
2 Presses 16. Pastry Items 100g 650g
59
The Auto Weight Programs are designed totake the guesswork out of cooking or reheatingyour food. They must ONLY be used for thefoods described.1. Only cook foods within the weight ranges
described (see table below).2. Only use the accessories as indicated on
pages 60-63.3. DO NOT cover food unless stated.
Combination auto programs use aCombination of Microwave and Grill and/orConvection and covering will prevent thefood browning. The heat of the grill will alsomelt any plastic covering.
4. Most foods benefit from a STANDING timeafter cooking on an Auto Program, to allowheat to continue conducting to the centre.
5. To allow for some variations that occur infood, check that food is thoroughly cookedand piping hot before serving.
6. ALWAYS weigh the chicken for the wholechicken Auto program. DO NOT rely on thepacket weight.
Guidelines for Use
Minimum/Maximum Weights to use onAuto Weight Programs
NN-CF760M CF750W CF771 BP_Regs:F00039M69BP 26/2/13 10:19 Page 59
9. Bagekartofler 200 g 1.500 g
3 tryk
Program Minimum Maximum
1 Press 4. Fresh Vegetables 200g 1000g
2 Presses 5. Frozen Vegetables 200g 1000g
3 Presses 6. Fresh Fish 200g 1000g
4 Presses 7. Breaded Fish 100g 800g
1 Press 8. Boiled Potatoes 200g 1000g
2 Presses 9. Jacket Potatoes 200g 1500g
3 Presses 10. Frozen Potato Products 200g 500g
1 Press 11. Whole Chicken 1000g 1900g
2 Presses 12. Chicken Pieces 200g 1000g
1 Press 13. Chilled Pizza 100g 600g
2 Presses 14. Frozen Pizza 100g 600g
1 Press 15. Crispy Top 350g 600g
2 Presses 16. Pastry Items 100g 650g
59
The Auto Weight Programs are designed totake the guesswork out of cooking or reheatingyour food. They must ONLY be used for thefoods described.1. Only cook foods within the weight ranges
described (see table below).2. Only use the accessories as indicated on
pages 60-63.3. DO NOT cover food unless stated.
Combination auto programs use aCombination of Microwave and Grill and/orConvection and covering will prevent thefood browning. The heat of the grill will alsomelt any plastic covering.
4. Most foods benefit from a STANDING timeafter cooking on an Auto Program, to allowheat to continue conducting to the centre.
5. To allow for some variations that occur infood, check that food is thoroughly cookedand piping hot before serving.
6. ALWAYS weigh the chicken for the wholechicken Auto program. DO NOT rely on thepacket weight.
Guidelines for Use
Minimum/Maximum Weights to use onAuto Weight Programs
NN-CF760M CF750W CF771 BP_Regs:F00039M69BP 26/2/13 10:19 Page 59
10. Frosne kartoffelprodukter 200 g 500 g
1 tryk
Program Minimum Maximum
1 Press 4. Fresh Vegetables 200g 1000g
2 Presses 5. Frozen Vegetables 200g 1000g
3 Presses 6. Fresh Fish 200g 1000g
4 Presses 7. Breaded Fish 100g 800g
1 Press 8. Boiled Potatoes 200g 1000g
2 Presses 9. Jacket Potatoes 200g 1500g
3 Presses 10. Frozen Potato Products 200g 500g
1 Press 11. Whole Chicken 1000g 1900g
2 Presses 12. Chicken Pieces 200g 1000g
1 Press 13. Chilled Pizza 100g 600g
2 Presses 14. Frozen Pizza 100g 600g
1 Press 15. Crispy Top 350g 600g
2 Presses 16. Pastry Items 100g 650g
59
The Auto Weight Programs are designed totake the guesswork out of cooking or reheatingyour food. They must ONLY be used for thefoods described.1. Only cook foods within the weight ranges
described (see table below).2. Only use the accessories as indicated on
pages 60-63.3. DO NOT cover food unless stated.
Combination auto programs use aCombination of Microwave and Grill and/orConvection and covering will prevent thefood browning. The heat of the grill will alsomelt any plastic covering.
4. Most foods benefit from a STANDING timeafter cooking on an Auto Program, to allowheat to continue conducting to the centre.
5. To allow for some variations that occur infood, check that food is thoroughly cookedand piping hot before serving.
6. ALWAYS weigh the chicken for the wholechicken Auto program. DO NOT rely on thepacket weight.
Guidelines for Use
Minimum/Maximum Weights to use onAuto Weight Programs
NN-CF760M CF750W CF771 BP_Regs:F00039M69BP 26/2/13 10:19 Page 59
11. Hel kylling 1.000 g 1.900 g
2 tryk
Program Minimum Maximum
1 Press 4. Fresh Vegetables 200g 1000g
2 Presses 5. Frozen Vegetables 200g 1000g
3 Presses 6. Fresh Fish 200g 1000g
4 Presses 7. Breaded Fish 100g 800g
1 Press 8. Boiled Potatoes 200g 1000g
2 Presses 9. Jacket Potatoes 200g 1500g
3 Presses 10. Frozen Potato Products 200g 500g
1 Press 11. Whole Chicken 1000g 1900g
2 Presses 12. Chicken Pieces 200g 1000g
1 Press 13. Chilled Pizza 100g 600g
2 Presses 14. Frozen Pizza 100g 600g
1 Press 15. Crispy Top 350g 600g
2 Presses 16. Pastry Items 100g 650g
59
The Auto Weight Programs are designed totake the guesswork out of cooking or reheatingyour food. They must ONLY be used for thefoods described.1. Only cook foods within the weight ranges
described (see table below).2. Only use the accessories as indicated on
pages 60-63.3. DO NOT cover food unless stated.
Combination auto programs use aCombination of Microwave and Grill and/orConvection and covering will prevent thefood browning. The heat of the grill will alsomelt any plastic covering.
4. Most foods benefit from a STANDING timeafter cooking on an Auto Program, to allowheat to continue conducting to the centre.
5. To allow for some variations that occur infood, check that food is thoroughly cookedand piping hot before serving.
6. ALWAYS weigh the chicken for the wholechicken Auto program. DO NOT rely on thepacket weight.
Guidelines for Use
Minimum/Maximum Weights to use onAuto Weight Programs
NN-CF760M CF750W CF771 BP_Regs:F00039M69BP 26/2/13 10:19 Page 59
12. Kyllingestykker 200 g 1.000 g
1 tryk
Program Minimum Maximum
1 Press 4. Fresh Vegetables 200g 1000g
2 Presses 5. Frozen Vegetables 200g 1000g
3 Presses 6. Fresh Fish 200g 1000g
4 Presses 7. Breaded Fish 100g 800g
1 Press 8. Boiled Potatoes 200g 1000g
2 Presses 9. Jacket Potatoes 200g 1500g
3 Presses 10. Frozen Potato Products 200g 500g
1 Press 11. Whole Chicken 1000g 1900g
2 Presses 12. Chicken Pieces 200g 1000g
1 Press 13. Chilled Pizza 100g 600g
2 Presses 14. Frozen Pizza 100g 600g
1 Press 15. Crispy Top 350g 600g
2 Presses 16. Pastry Items 100g 650g
59
The Auto Weight Programs are designed totake the guesswork out of cooking or reheatingyour food. They must ONLY be used for thefoods described.1. Only cook foods within the weight ranges
described (see table below).2. Only use the accessories as indicated on
pages 60-63.3. DO NOT cover food unless stated.
Combination auto programs use aCombination of Microwave and Grill and/orConvection and covering will prevent thefood browning. The heat of the grill will alsomelt any plastic covering.
4. Most foods benefit from a STANDING timeafter cooking on an Auto Program, to allowheat to continue conducting to the centre.
5. To allow for some variations that occur infood, check that food is thoroughly cookedand piping hot before serving.
6. ALWAYS weigh the chicken for the wholechicken Auto program. DO NOT rely on thepacket weight.
Guidelines for Use
Minimum/Maximum Weights to use onAuto Weight Programs
NN-CF760M CF750W CF771 BP_Regs:F00039M69BP 26/2/13 10:19 Page 59
13. Kold pizza 100 g 600 g
2 tryk
Program Minimum Maximum
1 Press 4. Fresh Vegetables 200g 1000g
2 Presses 5. Frozen Vegetables 200g 1000g
3 Presses 6. Fresh Fish 200g 1000g
4 Presses 7. Breaded Fish 100g 800g
1 Press 8. Boiled Potatoes 200g 1000g
2 Presses 9. Jacket Potatoes 200g 1500g
3 Presses 10. Frozen Potato Products 200g 500g
1 Press 11. Whole Chicken 1000g 1900g
2 Presses 12. Chicken Pieces 200g 1000g
1 Press 13. Chilled Pizza 100g 600g
2 Presses 14. Frozen Pizza 100g 600g
1 Press 15. Crispy Top 350g 600g
2 Presses 16. Pastry Items 100g 650g
59
The Auto Weight Programs are designed totake the guesswork out of cooking or reheatingyour food. They must ONLY be used for thefoods described.1. Only cook foods within the weight ranges
described (see table below).2. Only use the accessories as indicated on
pages 60-63.3. DO NOT cover food unless stated.
Combination auto programs use aCombination of Microwave and Grill and/orConvection and covering will prevent thefood browning. The heat of the grill will alsomelt any plastic covering.
4. Most foods benefit from a STANDING timeafter cooking on an Auto Program, to allowheat to continue conducting to the centre.
5. To allow for some variations that occur infood, check that food is thoroughly cookedand piping hot before serving.
6. ALWAYS weigh the chicken for the wholechicken Auto program. DO NOT rely on thepacket weight.
Guidelines for Use
Minimum/Maximum Weights to use onAuto Weight Programs
NN-CF760M CF750W CF771 BP_Regs:F00039M69BP 26/2/13 10:19 Page 59
14. Frossen pizza 100 g 600 g
1 tryk
Program Minimum Maximum
1 Press 4. Fresh Vegetables 200g 1000g
2 Presses 5. Frozen Vegetables 200g 1000g
3 Presses 6. Fresh Fish 200g 1000g
4 Presses 7. Breaded Fish 100g 800g
1 Press 8. Boiled Potatoes 200g 1000g
2 Presses 9. Jacket Potatoes 200g 1500g
3 Presses 10. Frozen Potato Products 200g 500g
1 Press 11. Whole Chicken 1000g 1900g
2 Presses 12. Chicken Pieces 200g 1000g
1 Press 13. Chilled Pizza 100g 600g
2 Presses 14. Frozen Pizza 100g 600g
1 Press 15. Crispy Top 350g 600g
2 Presses 16. Pastry Items 100g 650g
59
The Auto Weight Programs are designed totake the guesswork out of cooking or reheatingyour food. They must ONLY be used for thefoods described.1. Only cook foods within the weight ranges
described (see table below).2. Only use the accessories as indicated on
pages 60-63.3. DO NOT cover food unless stated.
Combination auto programs use aCombination of Microwave and Grill and/orConvection and covering will prevent thefood browning. The heat of the grill will alsomelt any plastic covering.
4. Most foods benefit from a STANDING timeafter cooking on an Auto Program, to allowheat to continue conducting to the centre.
5. To allow for some variations that occur infood, check that food is thoroughly cookedand piping hot before serving.
6. ALWAYS weigh the chicken for the wholechicken Auto program. DO NOT rely on thepacket weight.
Guidelines for Use
Minimum/Maximum Weights to use onAuto Weight Programs
NN-CF760M CF750W CF771 BP_Regs:F00039M69BP 26/2/13 10:19 Page 59
15. Sprød skorpe 350 g 600 g
2 tryk
Program Minimum Maximum
1 Press 4. Fresh Vegetables 200g 1000g
2 Presses 5. Frozen Vegetables 200g 1000g
3 Presses 6. Fresh Fish 200g 1000g
4 Presses 7. Breaded Fish 100g 800g
1 Press 8. Boiled Potatoes 200g 1000g
2 Presses 9. Jacket Potatoes 200g 1500g
3 Presses 10. Frozen Potato Products 200g 500g
1 Press 11. Whole Chicken 1000g 1900g
2 Presses 12. Chicken Pieces 200g 1000g
1 Press 13. Chilled Pizza 100g 600g
2 Presses 14. Frozen Pizza 100g 600g
1 Press 15. Crispy Top 350g 600g
2 Presses 16. Pastry Items 100g 650g
59
The Auto Weight Programs are designed totake the guesswork out of cooking or reheatingyour food. They must ONLY be used for thefoods described.1. Only cook foods within the weight ranges
described (see table below).2. Only use the accessories as indicated on
pages 60-63.3. DO NOT cover food unless stated.
Combination auto programs use aCombination of Microwave and Grill and/orConvection and covering will prevent thefood browning. The heat of the grill will alsomelt any plastic covering.
4. Most foods benefit from a STANDING timeafter cooking on an Auto Program, to allowheat to continue conducting to the centre.
5. To allow for some variations that occur infood, check that food is thoroughly cookedand piping hot before serving.
6. ALWAYS weigh the chicken for the wholechicken Auto program. DO NOT rely on thepacket weight.
Guidelines for Use
Minimum/Maximum Weights to use onAuto Weight Programs
NN-CF760M CF750W CF771 BP_Regs:F00039M69BP 26/2/13 10:19 Page 59
16. Bagværk 100 g 650 g

60
C
7. Breaded Fish
Auto Weight Cook ProgramsAuto Programs must ONLY be used for the foods described below.
M
To cook FRESH vegetables. Place preparedvegetables into a shallow container. Add 15 ml(1tbsp) of water per 100 g. Cover with piercedcling film or lid. Place the container on theceramic plate on the base of the oven. Pressveg/fish button once. Enter the weight. PressSTART. Stir halfway through cooking.
To cook FROZEN vegetables like frozen peas,sweetcorn or mixed vegetables. Place prepared vegetables into a container. Add 30ml (2 tbsp) of water. Cover with pierced clingfilm or lid. Place the container on the ceramicplate on the base of the oven. Press veg/fishbutton twice. Enter the weight. Press START.Stir halfway through cooking.
To cook FRESH fish. Shield the thinner portions. Place in a shallow container.Add 30 ml (2tbsp) water. Cover with piercedcling film or lid. Place the container on theceramic plate on the base of the oven. Pressveg/fish button three times. Enter the weight.Press START.
To cook precooked FROZEN breaded fish .Place frozen breaded fish on glass dish onwire shelf in lower shelf position. Pressveg/fish button four times. Enter total weight offrozen breaded fish. Press START.
4. Fresh Vegetables 5. Frozen Vegetables
6. Fresh Fish
M M
M = Microwave cooking only = Combination e.g. Convection + Micro power or Grill + Micro power or Convection + Grill + Micro power
C
60
NN-CF760M CF750W CF771 BP_Regs:F00039M69BP 26/2/13 10:19 Page 60
C
7. Breaded Fish
Auto Weight Cook ProgramsAuto Programs must ONLY be used for the foods described below.
M
To cook FRESH vegetables. Place preparedvegetables into a shallow container. Add 15 ml(1tbsp) of water per 100 g. Cover with piercedcling film or lid. Place the container on theceramic plate on the base of the oven. Pressveg/fish button once. Enter the weight. PressSTART. Stir halfway through cooking.
To cook FROZEN vegetables like frozen peas,sweetcorn or mixed vegetables. Place prepared vegetables into a container. Add 30ml (2 tbsp) of water. Cover with pierced clingfilm or lid. Place the container on the ceramicplate on the base of the oven. Press veg/fishbutton twice. Enter the weight. Press START.Stir halfway through cooking.
To cook FRESH fish. Shield the thinner portions. Place in a shallow container.Add 30 ml (2tbsp) water. Cover with piercedcling film or lid. Place the container on theceramic plate on the base of the oven. Pressveg/fish button three times. Enter the weight.Press START.
To cook precooked FROZEN breaded fish .Place frozen breaded fish on glass dish onwire shelf in lower shelf position. Pressveg/fish button four times. Enter total weight offrozen breaded fish. Press START.
4. Fresh Vegetables 5. Frozen Vegetables
6. Fresh Fish
M M
M = Microwave cooking only = Combination e.g. Convection + Micro power or Grill + Micro power or Convection + Grill + Micro power
C
60
NN-CF760M CF750W CF771 BP_Regs:F00039M69BP 26/2/13 10:19 Page 60
Auto-vægt tilberedningsprogrammerAuto-programmerne må KUN bruges til de madvarer, som er beskrevet herunder.
Tilberedning af friske grøntsager. Placer de forberedte grøntsager i et fad med lav kant. Tilsæt 15 ml (1 spsk.) vand pr. 100 g. Dæk med perforeret plastfolie eller et låg. Sæt fadet på den keramiske plade på bunden af ovnen. Tryk én gang på Veg/Fish knappen. Indstil vægten. Tryk på Start. Omrør halvvejs gennem tilberedningen.
Tilberedning af fersk fisk. Beskyt de tyndere dele. Placer fisken i et fad med lav kant. Tilsæt 30 ml (2 spsk.) vand. Dæk med per-foreret plastfolie eller et låg. Sæt fadet på den keramiske plade på bunden af ovnen. Tryk tre gange på Veg/Fish knappen. Indstil vægten. Tryk på Start.
Tilberedning af frosne grøntsager som frosne ærter, majs eller blandede grøntsager. Placer de forberedte grøntsager i en skål. Tilsæt 30 ml (2 spsk.) vand. Dæk med perforeret plast-folie eller et låg. Sæt skålen på den keramiske plade på bunden af ovnen. Tryk to gange på Veg/Fish knappen. Indstil vægten. Tryk på Start. Omrør halvvejs gennem tilberedningen.
Tilberedning af forkogte FROSNE panerede fisk. Placer de frosne panerede fisk på et glasfad på risten i nederste position. Tryk fire gange på Veg/Fish knappen. Indstil den samlede vægt af den frosne panerede fisk. Tryk på Start.
4. Friske grøntsager
6. Fersk fisk
5. Frosne grøntsager
7. Paneret fisk
Program Minimum Maximum
1 Press 4. Fresh Vegetables 200g 1000g
2 Presses 5. Frozen Vegetables 200g 1000g
3 Presses 6. Fresh Fish 200g 1000g
4 Presses 7. Breaded Fish 100g 800g
1 Press 8. Boiled Potatoes 200g 1000g
2 Presses 9. Jacket Potatoes 200g 1500g
3 Presses 10. Frozen Potato Products 200g 500g
1 Press 11. Whole Chicken 1000g 1900g
2 Presses 12. Chicken Pieces 200g 1000g
1 Press 13. Chilled Pizza 100g 600g
2 Presses 14. Frozen Pizza 100g 600g
1 Press 15. Crispy Top 350g 600g
2 Presses 16. Pastry Items 100g 650g
59
The Auto Weight Programs are designed totake the guesswork out of cooking or reheatingyour food. They must ONLY be used for thefoods described.1. Only cook foods within the weight ranges
described (see table below).2. Only use the accessories as indicated on
pages 60-63.3. DO NOT cover food unless stated.
Combination auto programs use aCombination of Microwave and Grill and/orConvection and covering will prevent thefood browning. The heat of the grill will alsomelt any plastic covering.
4. Most foods benefit from a STANDING timeafter cooking on an Auto Program, to allowheat to continue conducting to the centre.
5. To allow for some variations that occur infood, check that food is thoroughly cookedand piping hot before serving.
6. ALWAYS weigh the chicken for the wholechicken Auto program. DO NOT rely on thepacket weight.
Guidelines for Use
Minimum/Maximum Weights to use onAuto Weight Programs
NN-CF760M CF750W CF771 BP_Regs:F00039M69BP 26/2/13 10:19 Page 59
= Kun mikrobølgetilberedning = Kombination f.eks. Varmluft + Mikrobølge eller Grill + Mikrobølge eller Varmluft + Grill + Mikrobølge
6161
Auto Weight Cook Programs
M = Microwave cooking only = Combination e.g. Convection + Micro power or Grill + Micro poweror Convection + Grill + Micro power
C
Prepare potatoes and cut into even sizedpieces. For weights under 500 g Place pota-toes into a container with 90 ml (6 tbsp) ofwater. For weights over 500g, place potatoesinto a container with 150 ml (10 tbsp) of water.Cover with pierced cling film or lid. Place thecontainer on the ceramic plate on the base ofthe oven. Press potatoes button once. Enterthe weight. Press START. Stir halfway throughcooking.
To cook jacket potatoes with a crisper drierskin. Choose medium sized potatoes 200-250 g each (7-9 oz), for best results. Washand dry potatoes and prick with a fork severaltimes. Place potatoes on wire shelf in lowershelf position. Press potatoes button twice.Enter total weight of potatoes, then pressSTART.
To cook FROZEN oven chips and potato products, e.g. Hash Browns, Croquettes, etc,.that are suitable for GRILLING. Place potato products on glass dish on wire shelf in lowershelf position. Press potatoes button threetimes. Enter the weight. Press START. Turnduring cooking. For best results cook in a single layer. NOTE: Potato products vary considerably. Wesuggest checking a few minutes before theend of cooking to assess personal browning.
To cook WHOLE FRESH unstuffed chickens.Cook stuffing seperately. Place chicken onglass dish on base of the oven. Press chickenbutton once. Enter in the weight of chicken,then press START. Start cooking breast sidedown and turn halfway, taking care with hotjuices. Stand for 5 minutes.
C C
C
9. Jacket Potatoes
10. Frozen Potato Products 11. Whole Chicken
8. Boiled Potatoes
M
NN-CF760M CF750W CF771 BP_Regs:F00039M69BP 26/2/13 10:19 Page 61
61
Auto Weight Cook Programs
M = Microwave cooking only = Combination e.g. Convection + Micro power or Grill + Micro poweror Convection + Grill + Micro power
C
Prepare potatoes and cut into even sizedpieces. For weights under 500 g Place pota-toes into a container with 90 ml (6 tbsp) ofwater. For weights over 500g, place potatoesinto a container with 150 ml (10 tbsp) of water.Cover with pierced cling film or lid. Place thecontainer on the ceramic plate on the base ofthe oven. Press potatoes button once. Enterthe weight. Press START. Stir halfway throughcooking.
To cook jacket potatoes with a crisper drierskin. Choose medium sized potatoes 200-250 g each (7-9 oz), for best results. Washand dry potatoes and prick with a fork severaltimes. Place potatoes on wire shelf in lowershelf position. Press potatoes button twice.Enter total weight of potatoes, then pressSTART.
To cook FROZEN oven chips and potato products, e.g. Hash Browns, Croquettes, etc,.that are suitable for GRILLING. Place potato products on glass dish on wire shelf in lowershelf position. Press potatoes button threetimes. Enter the weight. Press START. Turnduring cooking. For best results cook in a single layer. NOTE: Potato products vary considerably. Wesuggest checking a few minutes before theend of cooking to assess personal browning.
To cook WHOLE FRESH unstuffed chickens.Cook stuffing seperately. Place chicken onglass dish on base of the oven. Press chickenbutton once. Enter in the weight of chicken,then press START. Start cooking breast sidedown and turn halfway, taking care with hotjuices. Stand for 5 minutes.
C C
C
9. Jacket Potatoes
10. Frozen Potato Products 11. Whole Chicken
8. Boiled Potatoes
M
NN-CF760M CF750W CF771 BP_Regs:F00039M69BP 26/2/13 10:19 Page 61
C
7. Breaded Fish
Auto Weight Cook ProgramsAuto Programs must ONLY be used for the foods described below.
M
To cook FRESH vegetables. Place preparedvegetables into a shallow container. Add 15 ml(1tbsp) of water per 100 g. Cover with piercedcling film or lid. Place the container on theceramic plate on the base of the oven. Pressveg/fish button once. Enter the weight. PressSTART. Stir halfway through cooking.
To cook FROZEN vegetables like frozen peas,sweetcorn or mixed vegetables. Place prepared vegetables into a container. Add 30ml (2 tbsp) of water. Cover with pierced clingfilm or lid. Place the container on the ceramicplate on the base of the oven. Press veg/fishbutton twice. Enter the weight. Press START.Stir halfway through cooking.
To cook FRESH fish. Shield the thinner portions. Place in a shallow container.Add 30 ml (2tbsp) water. Cover with piercedcling film or lid. Place the container on theceramic plate on the base of the oven. Pressveg/fish button three times. Enter the weight.Press START.
To cook precooked FROZEN breaded fish .Place frozen breaded fish on glass dish onwire shelf in lower shelf position. Pressveg/fish button four times. Enter total weight offrozen breaded fish. Press START.
4. Fresh Vegetables 5. Frozen Vegetables
6. Fresh Fish
M M
M = Microwave cooking only = Combination e.g. Convection + Micro power or Grill + Micro power or Convection + Grill + Micro power
C
60
NN-CF760M CF750W CF771 BP_Regs:F00039M69BP 26/2/13 10:19 Page 60
C
7. Breaded Fish
Auto Weight Cook ProgramsAuto Programs must ONLY be used for the foods described below.
M
To cook FRESH vegetables. Place preparedvegetables into a shallow container. Add 15 ml(1tbsp) of water per 100 g. Cover with piercedcling film or lid. Place the container on theceramic plate on the base of the oven. Pressveg/fish button once. Enter the weight. PressSTART. Stir halfway through cooking.
To cook FROZEN vegetables like frozen peas,sweetcorn or mixed vegetables. Place prepared vegetables into a container. Add 30ml (2 tbsp) of water. Cover with pierced clingfilm or lid. Place the container on the ceramicplate on the base of the oven. Press veg/fishbutton twice. Enter the weight. Press START.Stir halfway through cooking.
To cook FRESH fish. Shield the thinner portions. Place in a shallow container.Add 30 ml (2tbsp) water. Cover with piercedcling film or lid. Place the container on theceramic plate on the base of the oven. Pressveg/fish button three times. Enter the weight.Press START.
To cook precooked FROZEN breaded fish .Place frozen breaded fish on glass dish onwire shelf in lower shelf position. Pressveg/fish button four times. Enter total weight offrozen breaded fish. Press START.
4. Fresh Vegetables 5. Frozen Vegetables
6. Fresh Fish
M M
M = Microwave cooking only = Combination e.g. Convection + Micro power or Grill + Micro power or Convection + Grill + Micro power
C
60
NN-CF760M CF750W CF771 BP_Regs:F00039M69BP 26/2/13 10:19 Page 60
Auto-vægt tilberedningsprogrammerAuto-vægt tilberedningsprogrammerAuto-programmerne må KUN bruges til de madvarer, som er beskrevet herunder.
Forbered kartoflerne og skær dem i lige store stykker. Er der under 500 g, lægges kartoflerne i en skål med 90 ml (6 spsk.) vand. Er der mere end 500 g, lægges kartofler i en skål med 150 ml (10 spsk.) vand. Dæk med perforeret plastfolie eller et låg. Sæt skålen på den keramiske plade på bunden af ovnen. Tryk én gang på Potatoes knappen. Indstil vægten. Tryk på Start. Omrør halvvejs gennem tilberedningen.
Tilberedning af frosne ovnchips og kartof- felprodukter, f.eks. kartoffelpandekager, kroketter, osv., der er egnede til at grille. Placer kartoffelprodukterne på et glasfad på risten i nederste position. Tryk tre gange på Potatoes knappen. Indstil vægten. Tryk på Start. Vend under tilberedningen. For de bedste resultater tilbered i et enkelt lag. NB: Kartoffelprodukter kan variere betydeligt. Vi foreslår, at du tjekker et par minutter før slutningen af tilberedningen for at vurdere bruningen.
Tilberedning af bagekartofler med sprødt, tørt skind. Vælg mellemstore kartofler på 200 – 250 g hver for de bedste resultater. Vask og tør kartoflerne og prik dem flere gange med en gaffel. Placer kartoflerne på risten i nederste position. Tryk to gange på Potatoes knappen. Indstil den samlede vægt af kartoflerne. Tryk på Start.
Tilberedning af HELE, FERSKE kyllinger uden fyld. Tilbered eventuelt fyld separat. Placer kyllingen på et glasfad på bunden af ovnen. Tryk én gang på Chicken knappen. Indstil vægten. Tryk på Start. Start tilberedningen med brystsiden nedad og vend halvvejs. Pas på den varme saft. Lad hvile i 5 minutter.
8. Kogte kartofler
10. Frosne kartoffelprodukter
9. Bagekartofler
11. Hel kylling
= Kun mikrobølgetilberedning = Kombination f.eks. Varmluft + Mikrobølge eller Grill + Mikrobølge eller Varmluft + Grill + Mikrobølge
Program Minimum Maximum
1 Press 4. Fresh Vegetables 200g 1000g
2 Presses 5. Frozen Vegetables 200g 1000g
3 Presses 6. Fresh Fish 200g 1000g
4 Presses 7. Breaded Fish 100g 800g
1 Press 8. Boiled Potatoes 200g 1000g
2 Presses 9. Jacket Potatoes 200g 1500g
3 Presses 10. Frozen Potato Products 200g 500g
1 Press 11. Whole Chicken 1000g 1900g
2 Presses 12. Chicken Pieces 200g 1000g
1 Press 13. Chilled Pizza 100g 600g
2 Presses 14. Frozen Pizza 100g 600g
1 Press 15. Crispy Top 350g 600g
2 Presses 16. Pastry Items 100g 650g
59
The Auto Weight Programs are designed totake the guesswork out of cooking or reheatingyour food. They must ONLY be used for thefoods described.1. Only cook foods within the weight ranges
described (see table below).2. Only use the accessories as indicated on
pages 60-63.3. DO NOT cover food unless stated.
Combination auto programs use aCombination of Microwave and Grill and/orConvection and covering will prevent thefood browning. The heat of the grill will alsomelt any plastic covering.
4. Most foods benefit from a STANDING timeafter cooking on an Auto Program, to allowheat to continue conducting to the centre.
5. To allow for some variations that occur infood, check that food is thoroughly cookedand piping hot before serving.
6. ALWAYS weigh the chicken for the wholechicken Auto program. DO NOT rely on thepacket weight.
Guidelines for Use
Minimum/Maximum Weights to use onAuto Weight Programs
NN-CF760M CF750W CF771 BP_Regs:F00039M69BP 26/2/13 10:19 Page 59

62
14. Frozen Pizza
C
13. Chilled Pizza
C
Auto Weight Cook ProgramsAuto programs must ONLY be used for the foods described below.
To cook FRESH chicken pieces. Place chicken,skin side up, on glass dish on wire shelf inlower shelf position. Press chicken buttontwice. Enter weight. Take care with hot juices.Stand for 5 minutes.
For reheating and browning chilled, purchasedpizza. Remove all packaging and place on wireshelf in lower shelf position. Press pizzabutton once. Enter weight. Press START.
For reheating and browning frozen, purchasedpizza. Remove all packaging and place on wireshelf in lower shelf position. Press pizza buttontwice. Enter weight. Press START. Please notethis program is not suitable for very deep panpizzas.
12. Chicken Pieces(with Bone)
C
M = Microwave cooking only C
62
= Combination e.g. Convection + Micro power or Grill + Micro Power or Convection + Grill + Microwave Power
NN-CF760M CF750W CF771 BP_Regs:F00039M69BP 26/2/13 10:19 Page 62
C
7. Breaded Fish
Auto Weight Cook ProgramsAuto Programs must ONLY be used for the foods described below.
M
To cook FRESH vegetables. Place preparedvegetables into a shallow container. Add 15 ml(1tbsp) of water per 100 g. Cover with piercedcling film or lid. Place the container on theceramic plate on the base of the oven. Pressveg/fish button once. Enter the weight. PressSTART. Stir halfway through cooking.
To cook FROZEN vegetables like frozen peas,sweetcorn or mixed vegetables. Place prepared vegetables into a container. Add 30ml (2 tbsp) of water. Cover with pierced clingfilm or lid. Place the container on the ceramicplate on the base of the oven. Press veg/fishbutton twice. Enter the weight. Press START.Stir halfway through cooking.
To cook FRESH fish. Shield the thinner portions. Place in a shallow container.Add 30 ml (2tbsp) water. Cover with piercedcling film or lid. Place the container on theceramic plate on the base of the oven. Pressveg/fish button three times. Enter the weight.Press START.
To cook precooked FROZEN breaded fish .Place frozen breaded fish on glass dish onwire shelf in lower shelf position. Pressveg/fish button four times. Enter total weight offrozen breaded fish. Press START.
4. Fresh Vegetables 5. Frozen Vegetables
6. Fresh Fish
M M
M = Microwave cooking only = Combination e.g. Convection + Micro power or Grill + Micro power or Convection + Grill + Micro power
C
60
NN-CF760M CF750W CF771 BP_Regs:F00039M69BP 26/2/13 10:19 Page 60
C
7. Breaded Fish
Auto Weight Cook ProgramsAuto Programs must ONLY be used for the foods described below.
M
To cook FRESH vegetables. Place preparedvegetables into a shallow container. Add 15 ml(1tbsp) of water per 100 g. Cover with piercedcling film or lid. Place the container on theceramic plate on the base of the oven. Pressveg/fish button once. Enter the weight. PressSTART. Stir halfway through cooking.
To cook FROZEN vegetables like frozen peas,sweetcorn or mixed vegetables. Place prepared vegetables into a container. Add 30ml (2 tbsp) of water. Cover with pierced clingfilm or lid. Place the container on the ceramicplate on the base of the oven. Press veg/fishbutton twice. Enter the weight. Press START.Stir halfway through cooking.
To cook FRESH fish. Shield the thinner portions. Place in a shallow container.Add 30 ml (2tbsp) water. Cover with piercedcling film or lid. Place the container on theceramic plate on the base of the oven. Pressveg/fish button three times. Enter the weight.Press START.
To cook precooked FROZEN breaded fish .Place frozen breaded fish on glass dish onwire shelf in lower shelf position. Pressveg/fish button four times. Enter total weight offrozen breaded fish. Press START.
4. Fresh Vegetables 5. Frozen Vegetables
6. Fresh Fish
M M
M = Microwave cooking only = Combination e.g. Convection + Micro power or Grill + Micro power or Convection + Grill + Micro power
C
60
NN-CF760M CF750W CF771 BP_Regs:F00039M69BP 26/2/13 10:19 Page 60
= Kun mikrobølgetilberedning = Kombination f.eks. Varmluft + Mikrobølge eller Grill + Mikrobølge eller Varmluft + Grill + Mikrobølge
Auto-vægt tilberedningsprogrammerAuto-programmerne må KUN bruges til de madvarer, som er beskrevet herunder.
Tilberedning af ferske kyllingestykker. Placer kyllingen med skindsiden opad på et glasfad på risten i nederste position. Tryk to gange på Chicken knappen. Indstil vægten. Tryk på Start. Pas på den varme saft. Lad hvile i 5 minutter.
Til genopvarmning og bruning af frossen købepizza. Fjern al emballage og placer pizzaen på risten i nederste position. Tryk to gange på Pizza knappen. Indstil vægten. Tryk på Start. Bemærk, at dette program ikke er egnet til deep pan pizzaer.
Til genopvarmning og bruning af kold købe-pizza. Fjern al emballage og placer pizzaen på risten i nederste position. Tryk én gang på Pizza knappen. Indstil vægten. Tryk på Start.
12. Kyllingestykker (med ben)
14. Frossen pizza
13. Kold pizza
Program Minimum Maximum
1 Press 4. Fresh Vegetables 200g 1000g
2 Presses 5. Frozen Vegetables 200g 1000g
3 Presses 6. Fresh Fish 200g 1000g
4 Presses 7. Breaded Fish 100g 800g
1 Press 8. Boiled Potatoes 200g 1000g
2 Presses 9. Jacket Potatoes 200g 1500g
3 Presses 10. Frozen Potato Products 200g 500g
1 Press 11. Whole Chicken 1000g 1900g
2 Presses 12. Chicken Pieces 200g 1000g
1 Press 13. Chilled Pizza 100g 600g
2 Presses 14. Frozen Pizza 100g 600g
1 Press 15. Crispy Top 350g 600g
2 Presses 16. Pastry Items 100g 650g
59
The Auto Weight Programs are designed totake the guesswork out of cooking or reheatingyour food. They must ONLY be used for thefoods described.1. Only cook foods within the weight ranges
described (see table below).2. Only use the accessories as indicated on
pages 60-63.3. DO NOT cover food unless stated.
Combination auto programs use aCombination of Microwave and Grill and/orConvection and covering will prevent thefood browning. The heat of the grill will alsomelt any plastic covering.
4. Most foods benefit from a STANDING timeafter cooking on an Auto Program, to allowheat to continue conducting to the centre.
5. To allow for some variations that occur infood, check that food is thoroughly cookedand piping hot before serving.
6. ALWAYS weigh the chicken for the wholechicken Auto program. DO NOT rely on thepacket weight.
Guidelines for Use
Minimum/Maximum Weights to use onAuto Weight Programs
NN-CF760M CF750W CF771 BP_Regs:F00039M69BP 26/2/13 10:19 Page 59

6363
= Microwave Power only
For heating and browning CHILLED purchasedsavoury dishes e.g. lasagne, sheperds pie, fishpie etc. Remove any lid or covering. If in a foilcontainer transfer to a similar sized heatproofdish and place on Low wire shelf in lower shelfposition. If using heatproof plastic based dishthat food is purchased in, take care and support underneath when removing. Presscrispy top button once. Enter weight. PressSTART. DO NOT COVER. Stand for 1 minutebefore serving. Ensure the food is piping hot.
For reheating and browning purchasedpastry items eg. meat or vegetable pies,sausage rolls or pasties. Do not use for largedeep filled family pies. Remove all packagingand place on glass dish on wire shelf in lowerposition. Press crispy top button twice. Enterweight. Press START. DO NOT COVER.
Auto Weight Cook Programs
Cooking and Reheating GuidelinesMost foods reheat very quickly in your oven byHIGH power. Meals can be brought back toserving temperature in just minutes and willtaste freshly cooked and NOT leftover. Alwayscheck food is piping hot and return to oven ifnecessary.
As a general rule, always cover wet foods, e.g.soups, casseroles and plated meals.
Do not cover dry foods e.g. bread rolls, mincepies, sausage rolls etc.
The charts on pages 65-81 show you the bestway to cook or reheat your favourite foods. Thebest method depends on the type of food.
Remember when cooking or reheating anyfood that it should be stirred or turnedwherever possible. This ensures even cookingor reheating on the outside and in the centre.
When is food reheated?Food that has been reheated or cooked shouldbe served “piping hot” i.e. steam should bevisibly emitted from all parts. As long as goodhygiene practices have been followed duringthe prepa ra tion and storage of the food, thencooking or reheating presents no safety risks.
Foods that cannot be stirred should be cut witha knife to test that they are adequately heatedthroughout. Even if a manufac tur erʼsinstructions or the times in the cookbook havebeen followed, it is still important to check thefood is heated thoroughly. If in doubt, alwaysreturn to the oven for further reheating.
If you cannot find the equivalent food in thechart then choose a similar type and size listedand adjust the cooking time if necessary.
16. Pastry Items
C
M C
C
15. Crispy Top
= Combination e.g. Convection + Micro power or Grill + Micro Power or Convection + Grill + Microwave Power
NN-CF760M CF750W CF771 BP_Regs:F00039M69BP 26/2/13 10:19 Page 63
Auto-vægt tilberedningsprogrammer
Tilberedning og genopvarmning retningslinjer
Til genopvarmning og bruning af KOLDE krydrede færdigretter, f.eks. lasagne, kød-tærter, fisketætter osv. Fjern et eventuelt låg eller indpakning. Hvis retten er i en foliepak-ning, så overfør den til et tilsvarende størrel- se varmefast fad og placer den på den lave rist i nederste position. Hvis du bruger et varmefast plastfad, som retten er købt i, så vær forsigtig og støt fadet fra neden, når du tager det ud. Tryk én gang på Crispy Top knappen. Indstil vægten. Tryk på Start. TILDÆK IKKE. Lad hvile 1 minut før serve-ring. Sørg for, at maden er rygende varm.
De fleste madvarer kan genopvarmes meget hurtigt i ovnen ved High effekt. Måltider kan bringes op til serveringstemperatur på få mi-nutter og vil smage frisk. Kontroller altid, at maden er rygende varm og sæt den tilbage i ovnen, hvis det er nødvendigt.
Generelt bør du altid tildække våde madvarer, f.eks. supper, gryderetter og færdigretter.
Tildæk ikke tørre madvarer, f.eks. rundstykker, kødtærter, pølseruller osv. Tabellerne på side 65 – 81 viser dig den bedste måde at tilberede eller genopvarme mange forskellige retter.
Den bedste metode afhænger af typen af madvarer. Husk, når du tilbereder mad, at den bør omrøres eller vendes, når det er muligt. Dette sikrer en ensartet tilberedning eller genopvarmning på ydersiden og i midten.
Til genopvarmning og bruning af købt bagværk, f.eks. kød- eller grønsagstærter, pølseruller eller postejer. Må ikke bruges til store dybe familietærter med fyld. Fjern al emballage og placer på et glasfad på risten i nederste position. Tryk to gange på Crispy Top knappen. Indstil vægten. Tryk på Start. TILDÆK IKKE.
15. Sprød skorpe 13. Bagværk
C
7. Breaded Fish
Auto Weight Cook ProgramsAuto Programs must ONLY be used for the foods described below.
M
To cook FRESH vegetables. Place preparedvegetables into a shallow container. Add 15 ml(1tbsp) of water per 100 g. Cover with piercedcling film or lid. Place the container on theceramic plate on the base of the oven. Pressveg/fish button once. Enter the weight. PressSTART. Stir halfway through cooking.
To cook FROZEN vegetables like frozen peas,sweetcorn or mixed vegetables. Place prepared vegetables into a container. Add 30ml (2 tbsp) of water. Cover with pierced clingfilm or lid. Place the container on the ceramicplate on the base of the oven. Press veg/fishbutton twice. Enter the weight. Press START.Stir halfway through cooking.
To cook FRESH fish. Shield the thinner portions. Place in a shallow container.Add 30 ml (2tbsp) water. Cover with piercedcling film or lid. Place the container on theceramic plate on the base of the oven. Pressveg/fish button three times. Enter the weight.Press START.
To cook precooked FROZEN breaded fish .Place frozen breaded fish on glass dish onwire shelf in lower shelf position. Pressveg/fish button four times. Enter total weight offrozen breaded fish. Press START.
4. Fresh Vegetables 5. Frozen Vegetables
6. Fresh Fish
M M
M = Microwave cooking only = Combination e.g. Convection + Micro power or Grill + Micro power or Convection + Grill + Micro power
C
60
NN-CF760M CF750W CF771 BP_Regs:F00039M69BP 26/2/13 10:19 Page 60
C
7. Breaded Fish
Auto Weight Cook ProgramsAuto Programs must ONLY be used for the foods described below.
M
To cook FRESH vegetables. Place preparedvegetables into a shallow container. Add 15 ml(1tbsp) of water per 100 g. Cover with piercedcling film or lid. Place the container on theceramic plate on the base of the oven. Pressveg/fish button once. Enter the weight. PressSTART. Stir halfway through cooking.
To cook FROZEN vegetables like frozen peas,sweetcorn or mixed vegetables. Place prepared vegetables into a container. Add 30ml (2 tbsp) of water. Cover with pierced clingfilm or lid. Place the container on the ceramicplate on the base of the oven. Press veg/fishbutton twice. Enter the weight. Press START.Stir halfway through cooking.
To cook FRESH fish. Shield the thinner portions. Place in a shallow container.Add 30 ml (2tbsp) water. Cover with piercedcling film or lid. Place the container on theceramic plate on the base of the oven. Pressveg/fish button three times. Enter the weight.Press START.
To cook precooked FROZEN breaded fish .Place frozen breaded fish on glass dish onwire shelf in lower shelf position. Pressveg/fish button four times. Enter total weight offrozen breaded fish. Press START.
4. Fresh Vegetables 5. Frozen Vegetables
6. Fresh Fish
M M
M = Microwave cooking only = Combination e.g. Convection + Micro power or Grill + Micro power or Convection + Grill + Micro power
C
60
NN-CF760M CF750W CF771 BP_Regs:F00039M69BP 26/2/13 10:19 Page 60
= Kun mikrobølgetilberedning = Kombination f.eks. Varmluft + Mikrobølge eller Grill + Mikrobølge eller Varmluft + Grill + Mikrobølge
Program Minimum Maximum
1 Press 4. Fresh Vegetables 200g 1000g
2 Presses 5. Frozen Vegetables 200g 1000g
3 Presses 6. Fresh Fish 200g 1000g
4 Presses 7. Breaded Fish 100g 800g
1 Press 8. Boiled Potatoes 200g 1000g
2 Presses 9. Jacket Potatoes 200g 1500g
3 Presses 10. Frozen Potato Products 200g 500g
1 Press 11. Whole Chicken 1000g 1900g
2 Presses 12. Chicken Pieces 200g 1000g
1 Press 13. Chilled Pizza 100g 600g
2 Presses 14. Frozen Pizza 100g 600g
1 Press 15. Crispy Top 350g 600g
2 Presses 16. Pastry Items 100g 650g
59
The Auto Weight Programs are designed totake the guesswork out of cooking or reheatingyour food. They must ONLY be used for thefoods described.1. Only cook foods within the weight ranges
described (see table below).2. Only use the accessories as indicated on
pages 60-63.3. DO NOT cover food unless stated.
Combination auto programs use aCombination of Microwave and Grill and/orConvection and covering will prevent thefood browning. The heat of the grill will alsomelt any plastic covering.
4. Most foods benefit from a STANDING timeafter cooking on an Auto Program, to allowheat to continue conducting to the centre.
5. To allow for some variations that occur infood, check that food is thoroughly cookedand piping hot before serving.
6. ALWAYS weigh the chicken for the wholechicken Auto program. DO NOT rely on thepacket weight.
Guidelines for Use
Minimum/Maximum Weights to use onAuto Weight Programs
NN-CF760M CF750W CF771 BP_Regs:F00039M69BP 26/2/13 10:19 Page 59
Hvornår er mad genopvarmet?Madvarer, der er blevet genopvarmet eller kogt, bør serveres “rygende varm”, dvs. damp bør synligt udsendes fra alle dele af maden. Så længe god hygiejne er blevet fulgt i forbindelse med tilberedning og opbevaring af mad, udgør tilberedning eller opvarmning ingen sikkerhedsrisiko.
Madvarer, som ikke kan omrøres, bør skæres med en kniv for at teste, at de er tilstrækkeligt opvarmet hele vejen igennem. Selv hvis en producents anvisninger eller ti-der i en opskrift er blevet fulgt, er det stadig vigtigt at tjekke, at maden helt opvarmet.Hvis du er i tvivl, så sæt den altid tilbage i ovnen til yderligere genopvarmning.
Hvis du ikke kan finde de tilsvarende mad-varer i tabellerne, så vælg en lignende type og størrelse og juster tilberedningstiden hvis det er nødvendigt.

64
Tilberedning og genopvarmning retningslinjerFærdigretterGenopvarmningstider afhænger af måltidets størrelse indhold. Kompakte ting som kar-toffelmos bør spredes godt ud. Hvis der er meget sauce, kan ekstra tid være påkrævet. Placer de mest kompakte ting langs ydersi-den af fadet. Fra 7 – 8 minutter på Medium effekt vil genopvarme en gennemsnitlig portion.
DåsemadFjern madvarerne fra dåsen og placer dem i et egnet fad før opvarmning.
SupperBrug en skål og omrør før opvarmning og mindst én gang under opvarmningen og igen ved slutningen.
GryderetterOmrør halvvejs igennem og igen ved slut-ningen af opvarmningen.
KødtærterHUSK at selv om brødet er koldt at røre ved, vil fyldet være rygende varmt og kunne varme brødet igennem. Pas på med at overophede. Ellers kan der gå ild i madvarerne på grund af fyldets høje fedt- og sukkerindhold. Tjek temperaturen af fyldet, før du spiser det, så du undgår at brænde munden.
Engelsk Christmas Pudding og væskerVær yderst forsigtig ved genopvarmning af disse emner. Se side 70.
Efterlad ikke uden opsyn.
Tilsæt ikke ekstra spiritus.
Sutteflasker - Advarsel
Mælk eller pulver skal rystes grundigt før opvarmning og igen ved slutningen. Tjek temperaturen omhyggeligt, før madning af en baby. Se side 65 for detaljer.
VI ANBEFALER IKKE, AT DU BRUGER EN MIKROBØLGEOVN TIL AT STERILISERE SUTTEFLASKER. Hvis du har en særlig mikrobølge sterilisator bør du være yderst forsigtig på grund af den lille mængde vand. Det er meget vigtigt at følge producentens anvisninger.

65
BA
BIE
S B
OTT
LES
– C
AU
TIO
NA
fter h
eatin
g by
Mic
row
ave
liqui
d at
the
top
of a
bot
tle w
ill b
e m
uch
hotte
r tha
n at
the
botto
m o
f the
bot
tle a
nd m
ust b
e sh
aken
thor
ough
lybe
fore
che
ckin
g th
e te
mpe
ratu
re. W
hen
test
ing
the
tem
pera
ture
of t
he m
ilk, s
quirt
a li
ttle
onto
you
r inn
er w
rist.
The
milk
dro
plet
s on
you
r ski
nsh
ould
feel
war
m, n
ot h
ot.
For 2
50m
l of m
ilk fr
om fr
idge
tem
pera
ture
, rem
ove
top
and
teat
. Hea
t on
HIG
H P
ower
for 3
0 se
cs. C
HEC
K C
AR
EFU
LLY
For 1
00m
l of m
ilk fr
om fr
idge
tem
pera
ture
, rem
ove
top
and
teat
. Hea
t on
HIG
H P
ower
for 1
0-15
sec
s. C
HEC
K C
AR
EFU
LLY
Food
Wei
ght /
Qua
ntity
Pow
er L
evel
Tim
eIn
stru
ctio
ns/ G
uide
lines
Cro
issa
nts
/ Brio
che
1H
IGH
Mic
ro15
-20
secs
Plac
e on
gla
ss d
ish
on b
ase.
Do
not c
over
.
4H
IGH
Mic
ro30
-40
secs
Plac
e on
gla
ss d
ish
on b
ase.
Do
not c
over
.
any
200°
C2-
3 m
ins
Preh
eat o
ven
with
ena
mel
she
lf in
low
er p
ositi
on.
CA
NN
ED P
AST
A
Rav
ioli
400g
HIG
HM
icro
3 - 3
½ m
ins
Plac
e in
a h
eatp
roof
bow
l and
cov
er. P
lace
on
base
and
stir
halfw
ay.
Mac
aron
i Che
ese
400g
HIG
HM
icro
3 m
ins
Plac
e in
a h
eatp
roof
bow
l and
cov
er. P
lace
on
base
and
stir
halfw
ay.
Spag
hetti
400g
HIG
HM
icro
3 m
ins
Plac
e in
a h
eatp
roof
bow
l and
cov
er. P
lace
on
base
and
stir
halfw
ay.
POIN
TS F
OR
CH
ECK
ING
Alw
ays
chec
k th
at fo
od is
pip
ing
hot a
fter r
ehea
ting
in th
e m
icro
wav
e. F
oods
rehe
ated
on
mic
row
ave
only
will
requ
ire a
sta
nd ti
me,
esp
ecia
lly if
they
can
not
be s
tirre
d. T
he d
ense
r the
food
the
long
er th
e st
and
time.
65
1000
W
E
The
times
giv
en in
the
char
ts b
elow
are
a g
uide
line
only
, and
will
var
y de
pend
ing
on S
TAR
TIN
G te
mpe
ratu
re, d
ish
size
and
qua
ntity
.Pa
stry
or B
read
item
s re
heat
ed b
y m
icro
wav
e w
ill b
e so
ft no
t cris
p.
HEA
TIN
G C
ATEG
ORY
Your
ove
n is
Hea
ting
Cat
egor
y E
and
this
is d
ispl
ayed
on
the
front
of y
our
oven
doo
r. Th
e in
form
atio
n on
this
labe
l will
assi
st y
ou in
usi
ng n
ewin
stru
ctio
ns o
n fo
od p
acks
to e
nabl
e yo
u to
pro
gram
the
best
hea
ting
time
in y
our o
ven.
The
IEC
(607
05)
pow
er o
utpu
t (w
atts
)
The
heat
ing
cate
gory
for
smal
l pac
ks o
f foo
dM
icro
wav
e sy
mbo
l
NN-CF760M CF750W CF771 BP_Regs:F00039M69BP 26/2/13 10:19 Page 65
De
ang
ivne
tid
er i
tab
elle
rne
heru
nder
er
kun
vejle
den
de
og
vil
vari
ere
afhæ
ngig
t af
sta
rtte
mp
erat
ur, f
adst
ørr
else
og
mæ
ngd
e.
Bag
værk
elle
r b
rød
, so
m g
eno
pva
rmes
ved
mik
rob
ølg
e, v
il væ
re b
lød
t –
ikke
sp
rød
t.
OP
VAR
MN
ING
SK
AT
EG
OR
I O
vnen
tilh
ører
op
varm
ning
skat
egor
i E, o
g d
ette
vis
es p
å fo
rsid
en a
f ovn
låge
n.
Info
rmat
ione
n p
å d
enne
lab
el v
il hj
ælp
e d
ig m
ed a
t b
ruge
nye
anv
isni
nger
på
mad
vare
r, så
du
kan
pro
gram
mer
e d
en b
edst
e op
varm
ning
stid
i d
in o
vn.
Mik
rob
ølge
sym
bol
IEC
(607
05)
mik
rob
ølge
effe
kt (W
)
Op
varm
ning
skat
egor
i fo
r sm
å p
ortio
ner
mad
1.00
0 W
SU
TT
EFL
AS
KE
R –
AD
VAR
SE
L E
fter
op
varm
ning
ved
mik
rob
ølg
e vi
l væ
ske
i to
pp
en a
f en
flas
ke v
ære
meg
et v
arm
ere
end
i b
und
en, o
g s
kal r
yste
s g
rund
igt
før
kont
rol a
f te
mp
erat
uren
. Når
du
test
er m
ælk
ens
tem
per
atur
, så
sprø
jt li
dt
på
ind
ersi
den
af
dit
hån
dle
d. M
ælk
edrå
ber
ne p
å d
in h
ud
bø
r fø
les
lune
, ikk
e va
rme.
T
il 25
0 m
l mæ
lk f
ra k
øle
skab
stem
per
atur
, fje
rn t
op
og
sut
. Var
m p
å H
igh
effe
kt i
30 s
ek. K
ON
TR
OLL
ER
OM
HY
GG
ELI
GT
Til
100
ml m
ælk
fra
kø
lesk
abst
emp
erat
ur, f
jern
to
p o
g s
ut. V
arm
på
Hig
h ef
fekt
i 10
– 1
5 se
k. K
ON
TR
OLL
ER
OM
HY
GG
ELI
GT
Mad
Væg
t/M
æng
de
Eff
ektn
ivea
uT
idIn
stru
ktio
ner/
Ret
ning
slin
jer
Cro
issa
nter
/Brio
che
1H
igh
Mik
ro15
– 2
0 se
k.P
lace
r p
å gl
asfa
d p
å b
und
en. T
ildæ
k ik
ke.
4H
igh
Mik
ro30
– 4
0 se
k.P
lace
r p
å gl
asfa
d p
å b
und
en. T
ildæ
k ik
ke.
Eth
vert
ant
al20
0 °C
2 –
3 m
inut
ter
Forv
arm
ovn
en m
ed e
mal
jep
lad
en i
ned
erst
e p
ositi
on.
PAS
TA P
Å D
ÅS
E
Rav
ioli
400
gH
igh
Mik
ro3
– 3½
min
utte
rP
lace
r i e
n va
rmef
ast
skål
og
tild
æk.
Pla
cer
på
bun
den
og
omrø
r ha
lvve
js.
Mak
aron
i ost
400
gH
igh
Mik
ro3
min
utte
rP
lace
r i e
n va
rmef
ast
skål
og
tild
æk.
Pla
cer
på
bun
den
og
omrø
r ha
lvve
js.
Sp
aghe
tti
400
gH
igh
Mik
ro3
min
utte
rP
lace
r i e
n va
rmef
ast
skål
og
tild
æk.
Pla
cer
på
bun
den
og
omrø
r ha
lvve
js.
VIG
TIG
TK
ontr
olle
r al
tid, a
t m
aden
er
ryge
nde
varm
eft
er g
enop
varm
ning
i m
ikro
bøl
geov
n. M
adva
rer,
som
gen
opva
rmes
på
mik
rob
ølge
ale
ne, k
ræve
r lid
t hv
iletid
, isæ
r hv
is d
e ik
ke k
an o
mrø
res.
Jo
mer
e ko
mp
akte
mad
vare
r, d
esto
læng
ere
hvile
tid.

66
GenopvarmningstabellerM
adVæ
gt/
Mæ
ngd
eE
ffek
tniv
eau
Tid
Inst
rukt
ione
r/R
etni
ngsl
inje
r
BU
DD
ING
PÅ
DÅ
SE
Ris
bud
din
g15
0 g
425
gH
igh
Mik
ro
Hig
h M
ikro
1 m
inut
2
– 2½
min
utte
rP
lace
r i e
n va
rmef
ast s
kål o
g til
dæk.
Pla
cer
på b
unde
n og
om
rør
halv
vejs
. P
lace
r i e
n va
rmef
ast s
kål o
g til
dæk.
Pla
cer
på b
unde
n og
om
rør
halv
vejs
.
Siru
psb
udd
ing
300
gM
ediu
m M
ikro
3 m
inut
Pla
cer
i en
varm
efas
t sk
ål p
å b
und
en.
Vani
llecr
eme
250
g 50
0 g
Hig
h M
ikro
H
igh
Mik
ro1½
min
ut
3 m
inut
ter
Pla
cer
i en
varm
efas
t skå
l og
tildæ
k. P
lace
r på
bun
den
og o
mrø
r ha
lvve
js.
Pla
cer
i en
varm
efas
t skå
l og
tildæ
k. P
lace
r på
bun
den
og o
mrø
r ha
lvve
js.
SU
PP
E P
Å D
ÅS
E
Pul
ver
295
gH
igh
Mik
ro4
– 5
min
utte
rP
lace
r i e
n va
rmef
ast
skål
og
rør
ud i
en d
åse
vand
. Ti
ldæ
k, p
lace
r p
å b
und
en o
g om
rør
halv
vejs
.
Alm
ind
elig
400
gH
igh
Mik
ro2½
min
utte
rP
lace
r i e
n va
rmef
ast s
kål o
g til
dæk.
Pla
cer
på b
unde
n og
om
rør
halv
vejs
.
Luks
us/
Grø
ntsa
g/
Bou
illon
400
gH
igh
Mik
ro3
min
utte
rP
lace
r i e
n va
rmef
ast s
kål o
g til
dæk.
Pla
cer
på b
unde
n og
om
rør
halv
vejs
.
Flød
e30
0 g
Hig
h M
ikro
2½ m
inut
ter
Pla
cer
i en
varm
efas
t skå
l og
tildæ
k. P
lace
r på
bun
den
og o
mrø
r ha
lvve
js.
KO
LDE
SU
PP
ER
1 p
ortio
n25
0 m
lH
igh
Mik
ro2
min
utte
rP
lace
r i e
n va
rmef
ast s
kål o
g til
dæk.
Pla
cer
på b
unde
n og
om
rør
halv
vejs
.
2 p
ortio
ner
500
ml
Hig
h M
ikro
4 m
inut
ter
Pla
cer
i en
varm
efas
t skå
l og
tildæ
k. P
lace
r på
bun
den
og o
mrø
r ha
lvve
js.
GR
ØN
TS
AG
ER
PÅ
DÅ
SE
Bag
te b
ønne
r B
agte
bøn
ner
400
g20
0 g
Hig
h M
ikro
H
igh
Mik
ro2½
min
utte
r 1
– 1½
min
utP
lace
r i e
n va
rmef
ast s
kål o
g til
dæk.
Pla
cer
på b
unde
n og
om
rør
halv
vejs
. P
lace
r i e
n va
rmef
ast s
kål o
g til
dæk.
Pla
cer
på b
unde
n og
om
rør
halv
vejs
.

67
Genopvarmningstabeller
Mad
Vægt
/Mæ
ngde
Eff
ektn
ivea
uT
idIn
stru
ktio
ner/
Ret
ning
slin
jer
Bag
te b
ønne
r m
ed p
ølse
r20
0 g
Hig
h M
ikro
2 –
2½ m
inut
ter
Pla
cer
i en
varm
efas
t skå
l og
tildæ
k. P
lace
r på
bun
den
og o
mrø
r ha
lvve
js.
Bøn
ner
300
gH
igh
Mik
ro2
min
utte
rP
lace
r i e
n va
rmef
ast s
kål o
g til
dæk.
Pla
cer
på b
unde
n og
om
rør
halv
vejs
.
But
terb
eans
200
gH
igh
Mik
ro1½
min
utP
lace
r i e
n va
rmef
ast s
kål o
g til
dæk.
Pla
cer
på b
unde
n og
om
rør
halv
vejs
.
Gul
erød
der
, sk
iver
300
gM
ediu
m M
ikro
3 m
inut
ter
Pla
cer
i en
varm
efas
t skå
l og
tildæ
k. P
lace
r på
bun
den
og o
mrø
r ha
lvve
js.
Grø
nne
bøn
ner
200
gM
ediu
m M
ikro
3 m
inut
ter
Pla
cer
i en
varm
efas
t skå
l og
tildæ
k. P
lace
r på
bun
den
og o
mrø
r ha
lvve
js.
Cha
mp
igno
ns30
0 g
Hig
h M
ikro
2 m
inut
ter
Pla
cer
i en
varm
efas
t skå
l og
tildæ
k. P
lace
r på
bun
den
og o
mrø
r ha
lvve
js.
Ært
er, m
osed
e40
0 g
Hig
h M
ikro
3 m
inut
ter
Pla
cer
i en
varm
efas
t skå
l og
tildæ
k. P
lace
r på
bun
den
og o
mrø
r ha
lvve
js.
Ært
er, fi
ne20
0 g
Hig
h M
ikro
1½ m
inut
Pla
cer
i en
varm
efas
t skå
l og
tildæ
k. P
lace
r på
bun
den
og o
mrø
r ha
lvve
js.
Ært
er, h
ave
300
gH
igh
Mik
ro2
min
utte
rP
lace
r i e
n va
rmef
ast s
kål o
g til
dæk.
Pla
cer
på b
unde
n og
om
rør
halv
vejs
.
Ært
er, t
ørre
de
300
gM
ediu
m M
ikro
3 –
3½ m
inut
ter
Pla
cer
i en
varm
efas
t skå
l og
tildæ
k. P
lace
r på
bun
den
og o
mrø
r ha
lvve
js.
Suk
kerm
ajs
200
g 33
0 g
Med
ium
Mik
ro
Med
ium
Mik
ro2
– 2½
min
utte
r 2½
min
utte
rP
lace
r i e
n va
rmef
ast s
kål o
g til
dæk.
Pla
cer
på b
unde
n og
om
rør
halv
vejs
. P
lace
r i e
n va
rmef
ast s
kål o
g til
dæk.
Pla
cer
på b
unde
n og
om
rør
halv
vejs
.
Tom
ater
400
gM
ediu
m M
ikro
5 m
inut
ter
Pla
cer
i en
varm
efas
t skå
l og
tildæ
k. P
lace
r på
bun
den
og o
mrø
r ha
lvve
js.
FÆR
DIG
RE
T –
ST
UE
TE
MP
ER
AT
UR
Lille
, bør
nep
ortio
n1
Med
ium
Mik
ro5
– 6
min
utte
rTi
ldæ
k og
pla
cer
på
bun
den
.
Sto
r, vo
ksen
porti
on1
Med
ium
Mik
ro7
– 8
min
utte
rTi
ldæ
k og
pla
cer
på b
unde
n.
DR
IKK
EVA
RE
R
1 kr
us k
old
mæ
lk25
0 m
lH
igh
Mik
ro1½
– 2
min
utte
r P
lace
r i e
t var
mef
ast k
rus
på b
unde
n. O
mrø
r hal
vvej
s og
efte
r gen
opva
rmni
ng.
1 kr
us k
old
mæ
lk50
0 m
lH
igh
Mik
ro4
– 5
min
utte
rP
lace
r i e
t var
mef
ast k
rus
på b
unde
n. O
mrø
r hal
vvej
s og
efte
r gen
opva
rmni
ng.
1 kr
us k
old
kaf
fe25
0 m
lH
igh
Mik
ro1½
min
utP
lace
r i e
t var
mef
ast k
rus
på b
unde
n. O
mrø
r hal
vvej
s og
efte
r gen
opva
rmni
ng.
1 kr
us k
old
mæ
lke-
ka
ffe25
0 m
lH
igh
Mik
ro1
min
ut 1
0 se
k.P
lace
r i e
t var
mef
ast k
rus
på b
unde
n. O
mrø
r hal
vvej
s og
efte
r gen
opva
rmni
ng.

68
GenopvarmningstabellerM
adVæ
gt/
M
æng
de
Eff
ektn
ivea
uT
idIn
stru
ktio
ner/
Ret
ning
slin
jer
KR
YD
RE
T B
AG
VÆR
K –
FÆ
RD
IGR
ET
TE
R
BA
GVÆ
RK
, SO
M G
EN
OP
VAR
ME
S V
ED
MIK
RO
BØ
LGE
, VIL
FÅ
EN
BLØ
D B
UN
D.
Pos
teje
r/S
lices
150/
165
g 16
5 g
225
g
Hig
h M
ikro
23
0 °C
+ G
rill 1
+ W
arm
Mik
ro
230
°C +
Gril
l 1 +
Sim
mer
Mik
ro
1 m
inut
– 1
m
inut
10
sek.
10
min
utte
r 10
min
utte
r
Pla
cer
på
et g
lasf
ad p
å b
und
en.
Pla
cer
på
et g
lasf
ad p
å ris
ten
i ned
erst
e p
ositi
on.
Pla
cer
på
et g
lasf
ad p
å ris
ten
i ned
erst
e p
ositi
on.
Kød
tært
er
150
g
150
g
150
g x
2
250
g
600
g
Hig
h M
ikro
230
°C +
Gril
l 2 +
Sim
mer
Mik
ro
230
°C +
Gril
l 2 +
Sim
mer
Mik
ro
180
°C +
Gril
l 3 +
Sim
mer
Mik
ro
180
°C +
Gril
l 3 +
Sim
mer
Mik
ro
1 m
inut
– 1
min
ut
10 s
ek.
8 –
10 m
inut
ter
12 m
inut
ter
15 –
18
min
utte
r
18 –
20
min
utte
r
Pla
cer
på e
t gla
sfad
på
riste
n i n
eder
ste
posi
tion.
Pla
cer
i en
folie
bakk
e på
ant
i-gn
ist r
inge
n på
ris
ten
i ne
ders
te p
ositi
on.
Pla
cer
i fol
ieba
kker
(sør
g fo
r ba
kker
ne ik
ke rø
rer
hina
nden
) på
ant
i-gn
ist r
inge
n på
ris
ten
i ned
erst
e po
sitio
n.
Pla
cer
i en
folie
bakk
e på
ant
i-gn
ist r
inge
n på
ris
ten
i ne
ders
te p
ositi
on.
Pla
cer
i en
folie
bakk
e på
ant
i-gn
ist r
inge
n på
ris
ten
i ne
ders
te p
ositi
on.
Qui
che
175
g
400
g
220
°C +
Gril
l 2 +
Sim
mer
Mik
ro
220
°C +
Sim
mer
Mik
ro
10 m
inut
ter
12 –
15
min
utte
r
Pla
cer
i en
folie
bak
ke p
å an
ti-gn
ist
ringe
n p
å ris
ten
i ne
der
ste
pos
ition
. P
lace
r i e
n fo
lieb
akke
på
anti-
gnis
t rin
gen
på
riste
n i
ned
erst
e p
ositi
on.
Pøl
seru
ller
x 1
Pøl
seru
ller,
små
x 6
150
g
200
g
Hig
h M
ikro
elle
r23
0 °C
+ G
rill 2
+ W
arm
Mik
ro23
0 °C
+ G
rill 2
+ W
arm
Mik
ro
1 m
inut
30
sek.
8 m
inut
ter
8 –
9 m
inut
ter
Pla
cer
på e
t gla
sfad
på
bund
en.
Pla
cer
på e
t gla
sfad
på
riste
n i n
eder
ste
posi
tion.
P
lace
r på
et g
lasf
ad p
å ris
ten
i ned
erst
e po
sitio
n.

69
Genopvarmningstabeller
Mad
Væg
t/
Mæ
ngd
eT
ilber
edni
ngT
idIn
stru
ktio
ner/
Ret
ning
slin
jer
BU
DD
ING
ER
OG
DE
SS
ER
TE
R, S
OM
KU
N S
KA
L T
ILB
ER
ED
ES
VE
D M
IKR
OB
ØLG
E: O
VE
RFØ
R M
AD
EN
FR
A F
OLI
EB
AK
KE
N T
IL E
T
VAR
ME
FAS
T F
AD
I E
N P
AS
SE
ND
E S
TØ
RR
ELS
E.
EN
FO
LIE
BA
KK
E K
AN
DO
G B
RU
GE
S I
KO
MB
INA
TIO
N M
ED
MIK
RO
BØ
LGE
, HV
IS A
NT
I-G
NIS
T R
ING
EN
AN
VE
ND
ES
.
Brø
d-
og s
mør
bud
-d
ing
395
g25
0 °C
+ G
rill 2
+ W
arm
Mik
ro15
min
utte
rP
lace
r p
å ris
ten
i ned
erst
e p
ositi
on.
Vani
llecr
eme
500
gH
igh
Mik
ro4
– 5
min
utte
rP
lace
r i e
t sto
rt b
æge
r. Ti
ldæ
k, p
lace
r på
bun
den
og
omrø
r ha
lvve
js.
Kol
d r
isb
udd
ing
150
g 50
0 g
Hig
h M
ikro
22
0 °C
+ V
arm
Mik
ro1
– 1½
min
ut
15 m
inut
ter
Pla
cer
på
bun
den
. P
lace
r p
å ris
ten
i ned
erst
e p
ositi
on.
Frui
t C
rum
ble
600
g23
0 °C
+ V
arm
Mik
ro16
– 1
8 m
i-nu
tter
Pla
cer
på r
iste
n i n
eder
ste
posi
tion.
Frug
ttæ
rte
– st
or –
Sty
kke
x 1
700
g 22
0 °C
+ G
rill 2
+ S
imm
er M
ikro
Hig
h M
ikro
15 m
inut
ter
15 –
20
sek.
Pla
cer
i en
folie
bak
ke p
å an
ti-gn
ist
ringe
n p
å ris
ten
i ne
der
ste
pos
ition
. P
lace
r p
å et
gla
sfad
på
bun
den
.
Kød
tært
er x
2H
igh
Mik
ro20
– 3
0 se
k.P
lace
r p
å et
mik
rob
ølge
sikk
ert
fad
på
bun
den
.
Pan
dek
ager
200
gM
ediu
m M
ikro
2 m
inut
ter
Prik
hul
ler
i em
bal
lage
n og
pla
cer
på
et g
lasf
ad p
å b
und
en.
Siru
psbu
ddin
g –
stor
–
Sty
kke
x 1
300
g 12
0 g
Med
ium
Mik
ro
Med
ium
Mik
ro3
– 4
min
utte
r 50
– 6
0 se
k.P
rik h
ulle
r i l
åget
og
pla
cer
på
bun
den
. P
rik h
ulle
r i l
åget
og
pla
cer
på
bun
den
.
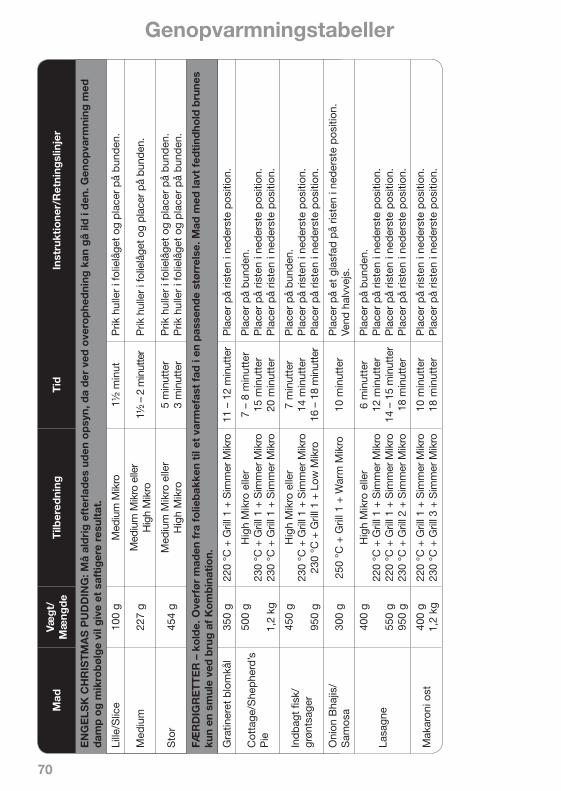
70
GenopvarmningstabellerM
adVæ
gt/
M
æng
de
Tilb
ered
ning
Tid
Inst
rukt
ione
r/R
etni
ngsl
inje
r
EN
GE
LSK
CH
RIS
TM
AS
PU
DD
ING
: Må
ald
rig
eft
erla
des
ud
en o
psy
n, d
a d
er v
ed o
vero
phe
dni
ng k
an g
å ild
i d
en. G
eno
pva
rmni
ng m
ed
dam
p o
g m
ikro
bø
lge
vil g
ive
et s
afti
ger
e re
sult
at.
Lille
/Slic
e10
0 g
Med
ium
Mik
ro1½
min
ut
Prik
hul
ler
i fol
ielå
get
og p
lace
r p
å b
und
en.
Med
ium
227
gM
ediu
m M
ikro
elle
r H
igh
Mik
ro1½
– 2
min
utte
rP
rik h
ulle
r i f
olie
låge
t og
plac
er p
å bu
nden
.
Sto
r45
4 g
Med
ium
Mik
ro e
ller
Hig
h M
ikro
5 m
inut
ter
3 m
inut
ter
Prik
hul
ler
i fol
ielå
get
og p
lace
r p
å b
und
en.
Prik
hul
ler
i fol
ielå
get
og p
lace
r p
å b
und
en.
FÆR
DIG
RE
TT
ER
– k
old
e. O
verf
ør
mad
en f
ra f
olie
bak
ken
til e
t va
rmef
ast
fad
i en
pas
send
e st
ørr
else
. Mad
med
lavt
fed
tind
hold
bru
nes
kun
en s
mul
e ve
d b
rug
af
Ko
mb
inat
ion.
Gra
tiner
et b
lom
kål
350
g22
0 °C
+ G
rill 1
+ S
imm
er M
ikro
11 –
12
min
utte
rP
lace
r p
å ris
ten
i ned
erst
e p
ositi
on.
Cot
tage
/She
phe
rd’s
P
ie
500
g
1,2
kg
Hig
h M
ikro
elle
r 23
0 °C
+ G
rill 1
+ S
imm
er M
ikro
23
0 °C
+ G
rill 1
+ S
imm
er M
ikro
7 –
8 m
inut
ter
15 m
inut
ter
20 m
inut
ter
Pla
cer
på
bun
den
. P
lace
r p
å ris
ten
i ned
erst
e p
ositi
on.
Pla
cer
på
riste
n i n
eder
ste
pos
ition
.
Ind
bag
t fis
k/
grøn
tsag
er
450
g
950
g
Hig
h M
ikro
elle
r 23
0 °C
+ G
rill 1
+ S
imm
er M
ikro
23
0 °C
+ G
rill 1
+ L
ow M
ikro
7 m
inut
ter
14 m
inut
ter
16 –
18
min
utte
r
Pla
cer
på
bun
den
. P
lace
r p
å ris
ten
i ned
erst
e p
ositi
on.
Pla
cer
på
riste
n i n
eder
ste
pos
ition
.
Oni
on B
hajis
/ S
amos
a30
0 g
250
°C +
Gril
l 1 +
War
m M
ikro
10 m
inut
ter
Pla
cer
på
et g
lasf
ad p
å ris
ten
i ned
erst
e p
ositi
on.
Vend
hal
vvej
s.
Lasa
gne
400
g
550
g 95
0 g
Hig
h M
ikro
elle
r 22
0 °C
+ G
rill 1
+ S
imm
er M
ikro
22
0 °C
+ G
rill 1
+ S
imm
er M
ikro
23
0 °C
+ G
rill 2
+ S
imm
er M
ikro
6 m
inut
ter
12 m
inut
ter
14 –
15
min
utte
r 18
min
utte
r
Pla
cer
på
bun
den
. P
lace
r p
å ris
ten
i ned
erst
e p
ositi
on.
Pla
cer
på
riste
n i n
eder
ste
pos
ition
. P
lace
r p
å ris
ten
i ned
erst
e p
ositi
on.
Mak
aron
i ost
400
g 1,
2 kg
220
°C +
Gril
l 1 +
Sim
mer
Mik
ro
230
°C +
Gril
l 3 +
Sim
mer
Mik
ro10
min
utte
r 18
min
utte
rP
lace
r p
å ris
ten
i ned
erst
e p
ositi
on.
Pla
cer
på
riste
n i n
eder
ste
pos
ition
.

71
Genopvarmningstabeller
Mad
Væg
t/
Mæ
ngd
eT
ilber
edni
ngT
idIn
stru
ktio
ner/
Ret
ning
slin
jer
FÆR
DIG
RE
TT
ER
– k
old
e.O
verf
ør
mad
en f
ra f
olie
bak
ken
til e
t va
rmef
ast
fad
i en
pas
send
e st
ørr
else
. Mad
med
lavt
fed
tind
hold
bru
nes
kun
en s
mul
e ve
d b
rug
af
Ko
mb
inat
ion.
Kar
toffe
lmos
450
gM
ediu
m M
ikro
6 –
7 m
inut
ter
Prik
hul
ler
i låg
et o
g p
lace
r p
å b
und
en. O
mrø
r ha
lvve
js.
Gul
erod
smos
500
gM
ediu
m M
ikro
6 –
7 m
inut
ter
Prik
hul
ler
i låg
et o
g p
lace
r p
å b
und
en. O
mrø
r ha
lvve
js.
Forå
rsru
ller
x 6
130
g25
0 °C
+ G
rill 1
+ W
arm
Mik
ro8
min
utte
rP
lace
r p
å et
gla
sfad
på
riste
n i n
eder
ste
pos
ition
.
FÆR
DIG
RE
TT
ER
– f
rosn
e.O
verf
ør
mad
en f
ra f
olie
bak
ken
til e
t va
rmef
ast
fad
i en
pas
send
e st
ørr
else
. Fje
rn t
ildæ
knin
g o
g lå
g.
Gra
tiner
et b
lom
kål
400
g22
0 °C
+ S
imm
er M
ikro
20 m
inut
ter
Pla
cer
på
riste
n i n
eder
ste
pos
ition
.
Cot
tage
/Fis
h/S
hep
herd
’s P
ie45
0 g
Hig
h M
ikro
elle
r 23
0 °C
+ G
rill 2
+ L
ow M
ikro
20 m
inut
ter
Pla
cer
på
riste
n i n
eder
ste
pos
ition
.
Lasa
gne/
Can
nello
ni
400
gH
igh
Mik
ro e
ller
230
°C +
Gril
l 2 +
Low
Mik
ro10
– 1
2 m
inut
ter
20 –
22
min
utte
rP
lace
r p
å b
und
en.
Pla
cer
på
riste
n i n
eder
ste
pos
ition
.
Mak
aron
i ost
400
gH
igh
Mik
ro e
ller
220
°C +
Sim
mer
Mik
ro10
– 1
2 m
inut
ter
18 –
20
min
utte
rP
lace
r p
å b
und
en.
Pla
cer
på
riste
n i n
eder
ste
pos
ition
.
QU
OR
N®
Bur
gere
200
g (4
) M
ediu
m M
ikro
4 –
5 m
inut
ter
Pla
cer
på
et g
lasf
ad.
Sch
nitz
ler
240
g22
0 °C
+ G
rill 1
+ S
imm
er M
ikro
8 –
10 m
inut
ter
Pla
cer
på
et g
lasf
ad p
å ris
ten
i ned
erst
e p
ositi
on.

72
TilberedningstabellerM
adVæ
gt/
M
æng
de
Tilb
ered
ning
Tid
Inst
rukt
ione
r/R
etni
ngsl
inje
r
BR
ØD
Forb
agte
rund
styk
ker
300
g (6
) 25
0 °C
+ G
rill 1
+ V
arm
Mik
ro10
min
utte
r P
lace
r p
å et
gla
sfad
på
riste
n i n
eder
ste
pos
ition
.
Forb
agte
hvi
dlø
gs-
brø
d/C
iab
atta
210
g25
0 °C
+ G
rill 1
+ V
arm
Mik
ro9
– 10
min
utte
r P
lace
r på
et g
lasf
ad p
å ris
ten
i ned
erst
e po
sitio
n.
Gar
lic D
ough
balls
x 1
619
5 g
250
°C +
Gril
l 1 +
Var
m M
ikro
10 m
inut
ter
Pla
cer
på
et g
lasf
ad p
å ris
ten
i ned
erst
e p
ositi
on.
BA
CO
N O
G S
VIN
EK
ØD
– f
ra r
å ti
lsta
nd –
AD
VAR
SE
L: V
arm
t fe
dt!
Væ
r fo
rsig
tig
, når
du
tag
er f
ade
og
tilb
ehø
r ud
af
ovn
en.
Bac
on, t
ynd
e sk
iver
228
g (8
)H
igh
Mik
ro e
ller
Gril
l 1
4 –
6 m
inut
ter
elle
r 50
sek
. pr.
skiv
e 10
– 1
2 m
inut
ter
Pla
cer
på
mik
rob
ølge
sikk
er h
old
er e
ller
fad
på
bun
den
og
tild
æk
med
køk
kenr
ulle
for
at m
inim
ere
sprø
jt. P
lace
r p
å em
alje
pla
de
i øve
rste
pos
ition
.
Ski
nke-
stea
ks x
250
0 g
Med
ium
Mik
ro8
– 10
min
utte
r P
lace
r p
å et
gla
sfad
og
tild
æk
med
per
fore
ret
pla
stfo
lie.
Flæ
skes
teg
250
°C e
fter
fulg
t af
190
°C
30 m
inut
ter d
er-
efte
r 40
min
utte
r pr
. 500
g
Forv
arm
ovn
en m
ed r
iste
n i n
eder
ste
pos
ition
. Pla
cer
steg
en i
en b
rad
epan
de.
Lad
hvi
le i
10 m
inut
ter
efte
r til
ber
edni
ng o
g fø
r ud
skæ
ring.
Svi
neka
m50
0 g
(3)
Gril
l 120
– 2
2 m
inut
ter
Pla
cer
på
emal
jep
lad
e i ø
vers
te p
ositi
on. V
end
hal
vvej
s.
Ski
nkes
teg
750
g18
0 °C
30 m
inut
ter
pr.
500
g p
lus
30
min
utte
r ek
stra
Forv
arm
ovn
en. P
lace
r st
egen
i en
bra
dep
and
e, t
ildæ
k m
ed fo
lie o
g p
lace
r p
å ris
ten
i ned
erst
e p
ositi
on. F
jern
fo
lie 1
0 m
inut
ter
før
slut
ning
en. L
ad h
vile
i 10
min
utte
r ef
ter
tilb
ered
ning
og
før
udsk
ærin
g.
BØ
NN
ER
OG
BÆ
LGFR
UG
TE
R –
bø
r lig
ge
i blø
d i
kold
t va
nd n
atte
n o
ver
(ko
gen
de
vand
til
gul
e æ
rter
), un
dta
gen
lins
er, s
om
ikke
be-
høve
r at
lig
ge
i blø
d.
Sor
tøje
de
bøn
ner
250
gH
igh
Mik
ro d
eref
ter S
imm
er M
ikro
10 m
inut
ter
der
-ef
ter
40 m
inut
ter
Bru
g 60
0 m
l kog
end
e va
nd i
en s
tor
skål
. Tild
æk.
Kik
ært
er25
0 g
Hig
h M
ikro
der
efte
r Sim
mer
Mik
ro10
min
utte
r d
er-
efte
r 40
min
utte
rB
rug
600
ml k
ogen
de
vand
i en
sto
r sk
ål. T
ildæ
k.
Grø
nne
bøn
ner
250
gH
igh
Mik
ro d
eref
ter S
imm
er M
ikro
10 m
inut
ter
der
-ef
ter
40 m
inut
ter
Bru
g 60
0 m
l kog
end
e va
nd i
en s
tor
skål
. Tild
æk.

73
Tilberedningstabeller
Mad
Vægt
/ M
æng
deT
ilber
edni
ngT
idIn
stru
ktio
ner/
Ret
ning
slin
jer
BØ
NN
ER
OG
BÆ
LGFR
UG
TE
R –
bø
r lig
ge
i blø
d i
kold
t va
nd n
atte
n o
ver
(ko
gen
de
vand
til
gul
e æ
rter
), un
dta
gen
lins
er, s
om
ikke
be-
høve
r at
lig
ge
i blø
d.
Lins
er25
0 g
Hig
h M
ikro
12 m
inut
ter
Bru
g 60
0 m
l kog
end
e va
nd i
en s
tor
skål
. Tild
æk.
Tørr
ede
grøn
ne
ært
er25
0 g
Hig
h M
ikro
der
efte
r Sim
mer
Mik
ro3
min
utte
r der
efte
r 40
min
utte
rB
rug
600
ml k
ogen
de v
and
i en
stor
skå
l. Ti
ldæ
k.
Rød
e ki
dney
bønn
er25
0 g
Hig
h M
ikro
der
efte
r Sim
mer
Mik
ro15
min
utte
r de
reft
er
40 m
inut
ter
Bru
g 60
0 m
l kog
ende
van
d i e
n st
or s
kål.
Tild
æk.
Ska
l kog
e i m
inds
t 12
min
utte
r fo
r at
ned
bryd
e gi
ftig
e en
zym
er.
Gul
e æ
rter
250
gH
igh
Mik
ro d
eref
ter S
imm
er M
ikro
10 m
inut
ter
der
efte
r 30
min
utte
rB
rug
600
ml k
ogen
de
vand
i en
sto
r sk
ål. T
ildæ
k.
Bøn
nem
ix25
0 g
Hig
h M
ikro
der
efte
r Sim
mer
Mik
ro12
min
utte
r d
eref
ter
50 m
inut
ter
Bru
g 60
0 m
l kog
ende
van
d i e
n st
or s
kål.
Tild
æk.
Ska
l kog
e i m
inds
t 12
min
utte
r fo
r at
ned
bryd
e gi
ftig
e en
zym
er.
OK
SE
KØ
D –
AD
VAR
SE
L: V
arm
t fe
dt!
Væ
r fo
rsig
tig
, når
du
tag
er f
ade
og
tilb
ehø
r ud
af
ovn
en.
Anb
efal
ede
tem
per
atur
er: R
ød
t 60
°C
; Med
ium
70
°C; G
enne
mst
egt
80 °
C.
Bur
gere
(fer
ske)
225
g (2
) H
igh
Mik
ro e
ller
Gril
l 13
– 4
min
utte
r
10 –
12
min
utte
r P
lace
r p
å m
ikro
bøl
gesi
kker
hol
der
elle
r fa
d p
å b
und
en.
Pla
cer
på
emal
jep
lad
e i ø
vers
te p
ositi
on.
Bur
gere
(fro
sne,
rå)
240
g (2
) G
rill 1
15 –
16
min
utte
rP
lace
r p
å em
alje
pla
de
i øve
rste
pos
ition
.
Ste
g25
0 °C
eft
erfu
lgt
af 1
80 °
C
20 m
inut
ter/
450
g R
ød: 2
0 m
in.
Med
ium
: 40
min
. G
enne
mst
egt:
50
– 6
0 m
in.
Forv
arm
ovn
en. P
lace
r st
egen
i en
bra
depa
nde
i ned
erst
e p
ositi
on. V
end
hal
vvej
s.
Hak
ket
kød
Hig
h d
eref
ter
Med
ium
Mik
ro10
min
utte
r der
efte
r 15
min
utte
r/45
0 g
Pla
cer
på
mik
rob
ølge
sikk
ert
fad
med
fond
og
kryd
der
ier.
Tild
æk
og o
mrø
r ha
lvve
js.
Ind
erlå
r/Fi
let
400
g G
rill 1
Med
ium
: 12
min
. G
enne
mst
egt:
16
min
utte
rP
lace
r p
å em
alje
pla
de
i øve
rste
pos
ition
. Ven
d h
alvv
ejs.

74
TilberedningstabellerM
adVæ
gt/
M
æng
de
Tilb
ered
ning
Tid
Inst
rukt
ione
r/R
etni
ngsl
inje
r
OK
SE
KØ
D –
AD
VAR
SE
L: V
arm
t fe
dt!
Væ
r fo
rsig
tig
, når
du
tag
er f
ade
og
tilb
ehø
r ud
af
ovn
en.
Gul
lasc
h45
0 –
676
g
Hig
h de
refte
r Sim
mer
Mik
ro
elle
r 16
0 °C
+ W
arm
Mik
ro
10 m
inut
ter
der
-ef
ter
60 m
inut
ter
10 m
inut
ter
der
-ef
ter
60 m
inut
ter
Pla
cer
på
mik
rob
ølge
sikk
ert
fad
. Tils
æt
fond
og
grøn
tsa-
ger.
Tild
æk,
pla
cer
på
bun
den
og
omrø
r ha
lvve
js.
Pla
cer
i en
gryd
e m
ed lå
g. T
ilsæ
t fo
nd o
g gr
ønts
ager
. Ti
ldæ
k, p
lace
r p
å b
und
en o
g om
rør
halv
vejs
.
KY
LLIN
G –
fra
rå
tils
tand
– A
DVA
RS
EL:
Var
mt
fed
t! V
ær
fors
igti
g, n
år d
u ta
ger
fad
e o
g t
ilbeh
ør
ud a
f o
vnen
.
Bry
st, u
den
ben
og
skin
d
200
g 50
0 g
500
g
Med
ium
Mik
ro
Med
ium
Mik
ro
250
°C +
Gril
l 1
6 –
7 m
inut
ter
12 m
inut
ter
16 –
17
min
utte
r
Pla
cer
på
et g
lasf
ad. T
ildæ
k.
Pla
cer
på
et g
lasf
ad. T
ildæ
k.
Forv
arm
ovn
en. P
lace
r p
å em
alje
pla
den
i ne
der
ste
pos
ition
.
Pan
eret
kyl
linge
-b
ryst
350
g24
0 °C
+ G
rill 1
+ W
arm
Mik
ro16
– 1
7 m
inut
ter
Pla
cer
på
et g
lasf
ad p
å ris
ten
i ned
erst
e p
ositi
on.
Kyl
linge
over
lår
1,0
kgM
ediu
m M
ikro
elle
r 25
0 °C
+ G
rill 1
15 m
inut
ter
25 m
inut
ter
Pla
cer
på
et g
lasf
ad p
å b
und
en a
f ovn
en. T
ildæ
k.
Pla
cer
på
emal
jep
lad
e i n
eder
ste
pos
ition
. Ven
d h
alvv
ejs.
Kyl
linge
lår
600
g (5
)
Med
ium
Mik
ro e
ller
Gril
l 1 e
ller
250
°C +
Gril
l 1
12 m
inut
ter
25 m
inut
ter
15 –
20
min
utte
r
Pla
cer
på
et g
lasf
ad p
å b
und
en a
f ovn
en.
Pla
cer
på
emal
jep
lad
e i ø
vers
te p
ositi
on. V
end
hal
vvej
s.
Forv
arm
ovn
en. P
lace
r p
å em
alje
pla
de
i øve
rste
pos
ition
. Ve
nd h
alvv
ejs.
Kyl
ling
Kie
v (fe
rsk)
285
g (2
)23
0 °C
+ G
rill 1
+ S
imm
er M
ikro
11 m
inut
ter
Pla
cer
på
et g
lasf
ad p
å ris
ten
i ned
erst
e p
ositi
on.
Hel
kyl
ling/
Kyl
linge
b
ryst
steg
Med
ium
Mik
ro e
ller
190
°C +
Sim
mer
Mik
ro
8 m
inut
ter
pr.
450
g 12
– 1
3 m
inut
ter
pr.
450
g
Pla
cer
på
et g
lasf
ad p
å b
und
en a
f ovn
en. T
ildæ
k.
Pla
cer
med
bry
stsi
den
ned
ad p
å en
om
vend
t un
der
kop
p
å et
gla
sfad
på
bun
den
af o
vnen
. Ven
d h
alvv
ejs.

75
Tilberedningstabeller
Mad
Vægt
/ M
æng
deT
ilber
edni
ngT
idIn
stru
ktio
ner/
Ret
ning
slin
jer
ÆG
– p
och
ered
e.
1 æ
g 2
æg
4 æ
g
45 m
l van
d
90 m
l van
d
180
ml v
and
Hig
h M
ikro
der
efte
rM
ediu
m M
ikro
Hig
h M
ikro
der
efte
r M
ediu
m M
ikro
Hig
h M
ikro
der
efte
r M
ediu
m M
ikro
1 m
inut
10
sek.
50
sek
.
1 m
inut
40
sek.
1 m
inut
30
sek.
3 m
inut
ter
3 m
inut
ter
30 s
ek.
- H
æld
van
det
i en
flad
skå
l og
opva
rm t
il 1.
kog
etid
.-
Tils
æt
æg
(stø
rrel
se 3
elle
r M
).-
Prik
hul
i b
lom
me
og h
vid
e.-
Op
varm
til
2. k
oget
id.
- La
d h
vile
i 1
min
ut.
RØ
RÆ
G –
Bru
g e
n m
ikro
bø
lges
ikke
r sk
ål.
1 æ
g
2 æ
g
4 æ
g
Hig
h M
ikro
Hig
h M
ikro
Hig
h M
ikro
30 s
ek.
30 s
ek.
1 m
inut
30
sek
. 1
min
ut 3
0 se
k.
1 m
inut
- Ti
lsæ
t 1
spsk
. mæ
lk fo
r hv
ert
æg.
- P
isk
æg,
mæ
lk o
g en
kla
t sm
ør s
amm
en.
- Ti
lber
ed fo
r 1.
kog
etid
og
omrø
r.-
Tilb
ered
for
2. k
oget
id, o
mrø
r ha
lvve
js o
g la
d h
vile
i 1
min
ut.
FIS
K –
FE
RS
K fr
a rå
tils
tand
.
Let
pan
ered
e fil
eter
280
g23
0 °C
+ G
rill 2
+ W
arm
Mik
ro15
min
utte
rP
lace
r p
å et
gla
sfad
på
riste
n i n
eder
ste
pos
ition
.
Pan
ered
e fil
eter
350
g (2
)23
0 °C
+ G
rill 1
+ W
arm
Mik
ro15
min
utte
rP
lace
r p
å et
gla
sfad
på
riste
n i n
eder
ste
pos
ition
.
Ind
bag
t fis
k20
0 g
(2)
230
°C +
Gril
l 1 +
War
m M
ikro
10 –
12
min
utte
r P
lace
r p
å et
gla
sfad
på
riste
n i n
eder
ste
pos
ition
.
Cal
amar
i25
0 g
250
°C +
Gril
l 1 +
War
m M
ikro
8 –
10 m
inut
ter
Pla
cer
på
et g
lasf
ad p
å ris
ten
i ned
erst
e p
ositi
on. V
end
ha
lvve
js.
File
ter
300
g 70
0 g
Med
ium
Mik
ro
Med
ium
Mik
ro4
– 5
min
utte
r 10
min
utte
rP
lace
r p
å et
gla
sfad
.
Sca
mp
i30
0 g
230
°C +
Gril
l 1 +
War
m M
ikro
10 –
12
min
utte
rP
lace
r p
å et
gla
sfad
på
riste
n i n
eder
ste
pos
ition
.

76
TilberedningstabellerM
adVæ
gt/
M
æng
de
Tilb
ered
ning
Tid
Inst
rukt
ione
r/R
etni
ngsl
inje
r
FIS
K –
FE
RS
K f
ra r
å ti
lsta
nd.
Fisk
ebøf
fer
300
g (x
2)
190
°C +
Sim
mer
Mik
ro12
– 1
5 m
inut
ter
Pla
cer
på
et g
lasf
ad p
å ris
ten
i ned
erst
e p
ositi
on.
Hel
x 1
Hel
x 2
225
– 30
0 g
40
0 –
500
g
Hig
h M
ikro
elle
r
180
°C +
Sim
mer
Mik
ro
4 –
5 m
inut
ter
10
– 1
2 m
inut
ter
Pla
cer
på
et g
lasf
ad o
g p
rik h
ulle
r i s
kind
et. T
ilsæ
t 30
ml v
æsk
e. T
ildæ
k.
Pla
cer
på
et g
lasf
ad p
å ris
ten
i ned
erst
e p
ositi
on.
FIS
K –
FR
OS
SE
N f
ra r
å ti
lsta
nd.
Pan
ered
e fil
eter
350
g (2
)23
0 °C
+ G
rill 2
+ S
imm
er M
ikro
15
min
utte
rP
lace
r p
å et
gla
sfad
på
riste
n i n
eder
ste
pos
ition
. Ve
nd h
alvv
ejs.
Ind
bag
t fis
k20
0 g
(2)
250
°C +
Gril
l 2 +
War
m M
ikro
15
– 1
6 m
inut
ter
Pla
cer
på
et g
lasf
ad p
å ris
ten
i ned
erst
e p
ositi
on.
Vend
hal
vvej
s.
Fisk
efing
re12
5 g
(4)
250
g (8
)25
0 °C
+ G
rill 1
+ S
imm
er M
ikro
8 –
10
10 –
12
min
utte
rP
lace
r p
å et
gla
sfad
på
riste
n i n
eder
ste
pos
ition
.
File
ter
200
gM
ediu
m M
ikro
6 –
8 m
inut
ter
Pla
cer
på
et g
lasf
ad o
g til
dæ
k m
ed p
last
folie
.
Sca
mp
i30
0 g
230
°C +
Gril
l 2 +
Sim
mer
Mik
ro10
– 1
2 m
inut
ter
Pla
cer
på
et g
lasf
ad p
å ris
ten
i ned
erst
e p
ositi
on.
Fisk
i ko
gep
ose
150
gM
ediu
m M
ikro
6 m
inut
ter
Pla
cer
pos
en m
ed s
auce
sid
en n
edad
på
et g
lasf
ad.
Prik
hul
ler
i ove
rsid
en. R
yst
pos
en h
alvv
ejs.
FRU
GT
– S
kræ
l, ud
skæ
r, ha
k i o
mtr
ent
lige
sto
re s
tykk
er. P
lace
r i e
n fl
ad v
arm
efas
t sk
ål p
å b
und
en.
Bag
t æ
ble
– u
dke
rnet
200
gM
ediu
m M
ikro
5 –
6½ m
inut
ter
Pla
cer
i et
glas
fad
på
bun
den
.
Æb
ler
– ko
gte
500
gM
ediu
m M
ikro
10 –
11
min
utte
rTi
lsæ
t 15
ml (
1 sp
sk.)
vand
. Tild
æk.
Ab
rikos
er –
kog
te30
0 g
Med
ium
Mik
ro5
– 6
min
utte
rTi
lsæ
t 15
ml (
1 sp
sk.)
vand
. Tild
æk.
Pæ
rer
– ko
gte
500
gM
ediu
m M
ikro
10 –
12
min
utte
rTi
lsæ
t 15
ml (
1 sp
sk.)
vand
. Tild
æk.
Blo
mm
er –
poc
here
de
400
gH
igh
Mik
ro8
min
utte
rTi
lsæ
t 30
0 m
l van
d. F
yld
kun
skå
len
halv
t. T
ildæ
k.
Blo
mm
er –
kog
te40
0 g
Med
ium
Mik
ro7
– 8
min
utte
rTi
lsæ
t 15
ml (
1 sp
sk.)
vand
. Tild
æk.
Rab
arb
er –
kog
te45
0 g
Med
ium
Mik
ro6
min
utte
rTi
lsæ
t 15
ml (
1 sp
sk.)
vand
. Tild
æk.
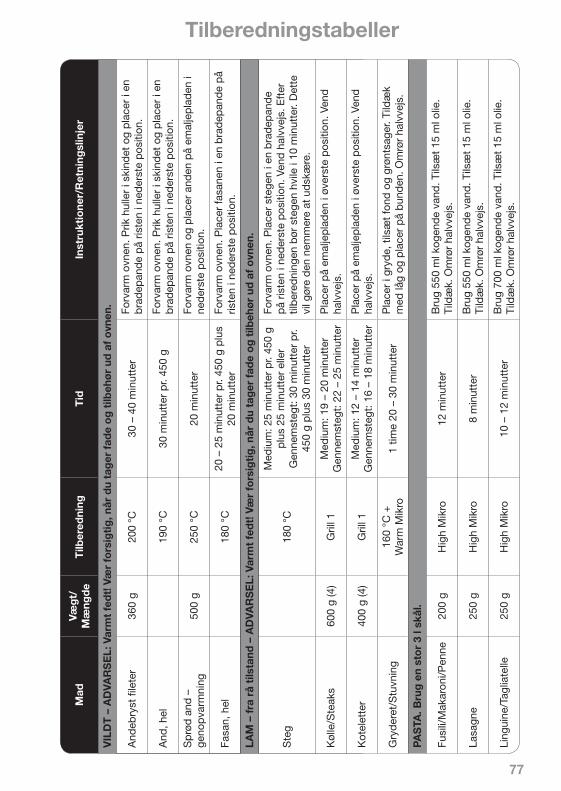
77
Tilberedningstabeller
Mad
Væg
t/
Mæ
ngd
eT
ilber
edni
ngT
idIn
stru
ktio
ner/
Ret
ning
slin
jer
VIL
DT
– A
DVA
RS
EL:
Var
mt
fed
t! V
ær
fors
igti
g, n
år d
u ta
ger
fad
e o
g t
ilbeh
ør
ud a
f o
vnen
.
And
ebry
st fi
lete
r36
0 g
200
°C30
– 4
0 m
inut
ter
Forv
arm
ovn
en. P
rik h
ulle
r i s
kind
et o
g p
lace
r i e
n b
rad
epan
de
på
riste
n i n
eder
ste
pos
ition
.
And
, hel
190
°C30
min
utte
r p
r. 45
0 g
Forv
arm
ovn
en. P
rik h
ulle
r i s
kind
et o
g p
lace
r i e
n b
rad
epan
de
på
riste
n i n
eder
ste
pos
ition
.
Sp
rød
and
–
geno
pva
rmni
ng50
0 g
250
°C20
min
utte
rFo
rvar
m o
vnen
og
pla
cer
and
en p
å em
alje
pla
den
i ne
der
ste
pos
ition
.
Fasa
n, h
el18
0 °C
20 –
25
min
utte
r p
r. 45
0 g
plu
s 20
min
utte
rFo
rvar
m o
vnen
. Pla
cer
fasa
nen
i en
bra
dep
and
e p
å ris
ten
i ned
erst
e p
ositi
on.
LAM
– f
ra r
å ti
lsta
nd –
AD
VAR
SE
L: V
arm
t fe
dt!
Væ
r fo
rsig
tig
, når
du
tag
er f
ade
og
tilb
ehø
r ud
af
ovn
en.
Ste
g18
0 °C
Med
ium
: 25
min
utte
r p
r. 45
0 g
plu
s 25
min
utte
r el
ler
Gen
nem
steg
t: 3
0 m
inut
ter
pr.
450
g p
lus
30 m
inut
ter
Forv
arm
ovn
en. P
lace
r st
egen
i en
bra
dep
and
e p
å ris
ten
i ned
erst
e p
ositi
on. V
end
hal
vvej
s. E
fter
til
ber
edni
ngen
bør
ste
gen
hvile
i 10
min
utte
r. D
ette
vi
l gør
e d
en n
emm
ere
at u
dsk
ære
.
Køl
le/S
teak
s60
0 g
(4)
Gril
l 1M
ediu
m: 1
9 –
20 m
inut
ter
Gen
nem
steg
t: 2
2 –
25 m
inut
ter
Pla
cer
på
emal
jep
lad
en i
øver
ste
pos
ition
. Ven
d
halv
vejs
.
Kot
elet
ter
400
g (4
)G
rill 1
Med
ium
: 12
– 14
min
utte
rG
enne
mst
egt:
16
– 18
min
utte
r P
lace
r p
å em
alje
pla
den
i øv
erst
e p
ositi
on. V
end
ha
lvve
js.
Gry
der
et/S
tuvn
ing
160
°C +
W
arm
Mik
ro1
time
20 –
30
min
utte
rP
lace
r i g
ryd
e, t
ilsæ
t fo
nd o
g gr
ønts
ager
. Tild
æk
med
låg
og p
lace
r p
å b
und
en. O
mrø
r ha
lvve
js.
PAS
TA. B
rug
en
sto
r 3
l skå
l.
Fusi
li/M
akar
oni/P
enne
200
gH
igh
Mik
ro12
min
utte
rB
rug
550
ml k
ogen
de
vand
. Tils
æt
15 m
l olie
. Ti
ldæ
k. O
mrø
r ha
lvve
js.
Lasa
gne
250
gH
igh
Mik
ro8
min
utte
rB
rug
550
ml k
ogen
de
vand
. Tils
æt
15 m
l olie
. Ti
ldæ
k. O
mrø
r ha
lvve
js.
Ling
uine
/Tag
liate
lle25
0 g
Hig
h M
ikro
10 –
12
min
utte
rB
rug
700
ml k
ogen
de
vand
. Tils
æt
15 m
l olie
. Ti
ldæ
k. O
mrø
r ha
lvve
js.

78
TilberedningstabellerM
adVæ
gt/
M
æng
de
Tilb
ered
ning
Tid
Inst
rukt
ione
r/R
etni
ngsl
inje
r
PAS
TA. B
rug
en
sto
r 3
l skå
l.
Sp
aghe
tti
250
gH
igh
Mik
ro8
– 10
min
utte
rB
rug
700
ml k
ogen
de
vand
. Tils
æt
15 m
l ol
ie. T
ildæ
k. O
mrø
r ha
lvve
js.
Dam
pko
gt p
asta
150
gH
igh
Mik
ro1½
min
utP
lace
r p
å en
gla
spla
de
på
bun
den
.
PIZ
ZA
– F
RIS
K k
old
– N
B: F
jern
al i
ndp
akni
ng. P
izza
er f
år e
n b
lød
bun
d, h
vis
de
tilb
ered
es a
lene
med
mik
rob
ølg
e.
Dee
p P
an55
5 g
240
°C +
Gril
l 1 +
Low
Mik
ro10
– 1
2 m
inut
ter
Pla
cer
dire
kte
på
riste
n i n
eder
ste
pos
ition
.
Tynd
og
sprø
d
140
g 18
0 g
250
g 44
0 g
240
°C +
Gril
l 1 +
Low
Mik
ro
240
°C +
Gril
l 1 +
Low
Mik
ro
240
°C +
Gril
l 1 +
Low
Mik
ro
240
°C +
Gril
l 1 +
Low
Mik
ro
4 –
5½ m
inut
ter
4 –
5 m
inut
ter
5 –
6 m
inut
ter
8 –
9 m
inut
ter
Pla
cer
dire
kte
på
riste
n i n
eder
ste
pos
ition
. P
lace
r d
irekt
e p
å ris
ten
i ned
erst
e p
ositi
on.
Pla
cer
dire
kte
på
riste
n i n
eder
ste
pos
ition
. P
lace
r d
irekt
e p
å ris
ten
i ned
erst
e p
ositi
on.
PIZ
ZA
– F
RO
SS
EN
– N
B: F
jern
al i
ndp
akni
ng.
Dee
p P
an45
0 g
240
°C +
Gril
l 1 +
Low
Mik
ro10
– 1
2 m
inut
ter
Pla
cer
dire
kte
på
riste
n i n
eder
ste
pos
ition
.
Dee
p P
an S
lice
240
g (2
)24
0 °C
+ G
rill 1
+ L
ow M
ikro
10 m
inut
ter
Pla
cer
dire
kte
på
riste
n i n
eder
ste
pos
ition
.
Tynd
og
sprø
d34
0 g
240
°C +
Gril
l 1 +
Med
ium
Mik
ro
8 –
9 m
inut
ter
Pla
cer
dire
kte
på
riste
n i n
eder
ste
pos
ition
.
GR
ØD
– N
B: B
rug
en
sto
r sk
ål.
1 p
ortio
n25
g h
avre
gryn
15
0 m
l mæ
lkH
igh
Mik
ro1½
– 2
min
utte
rP
lace
r p
å b
und
en o
g om
rør
halv
vejs
.
2 p
ortio
ner
50 g
hav
regr
yn27
5 m
l mæ
lkH
igh
Mik
ro2½
– 3
min
utte
rP
lace
r p
å b
und
en o
g om
rør
halv
vejs
.
4 p
ortio
ner
100
g ha
vreg
ryn
550
ml m
ælk
Hig
h M
ikro
4 –
4½ m
inut
ter
Pla
cer
på
bun
den
og
omrø
r ha
lvve
js.
KA
RT
OFF
ELP
RO
DU
KT
ER
del
vist
tilb
ered
t -
FRO
SN
E
Kro
kett
er30
0 g
250
°C +
Gril
l 110
– 1
2 m
inut
ter
Forv
arm
ovn
en. P
lace
r p
å em
alje
pla
den
i øv
erst
e p
ositi
on.
Kar
toffe
lpan
de-
kage
r30
0 g
250
°C +
Gril
l 110
– 1
2 m
inut
ter
Forv
arm
ovn
en. P
lace
r p
å em
alje
pla
den
i øv
erst
e p
ositi
on.

79
Tilberedningstabeller
Mad
Væg
t/
Mæ
ngd
eT
ilber
edni
ngT
idIn
stru
ktio
ner/
Ret
ning
slin
jer
KA
RT
OFF
ELP
RO
DU
KT
ER
del
vist
tilb
ered
t -
FRO
SN
E
Pom
mes
frite
s30
0 g
250
°C +
Gril
l 110
– 1
2 m
inut
ter
Forv
arm
ovn
en. P
lace
r på
em
alje
plad
en i
øver
ste
posi
tion.
Kar
toffe
lsni
tter
300
g25
0 °C
12 –
14
min
utte
rFo
rvar
m o
vnen
. Pla
cer
på e
mal
jepl
aden
i øv
erst
e po
sitio
n.
Kar
toffe
lpin
de
300
g25
0 °C
15 m
inut
ter
Forv
arm
ovn
en. P
lace
r på
em
alje
plad
en i
øver
ste
posi
tion.
Vafle
r30
0 g
250
°C +
Gril
l 110
– 1
2 m
inut
ter
Forv
arm
ovn
en. P
lace
r på
em
alje
plad
en i
øver
ste
posi
tion.
RIS
. Bru
g e
n st
or
3 l s
kål.
Bas
mat
i25
0 g
Hig
h M
ikro
8 –
10 m
inut
ter
Bru
g 55
0 m
l kog
end
e va
nd. T
ildæ
k og
om
rør
halv
vejs
.
Lang
korn
et25
0 g
Hig
h M
ikro
12 –
14
min
utte
rB
rug
550
ml k
ogen
de
vand
. Tild
æk
og o
mrø
r ha
lvve
js.
Lang
korn
et h
vid
250
gH
igh
Mik
ro8
– 9
min
utte
rB
rug
550
ml k
ogen
de
vand
. Tild
æk
og o
mrø
r ha
lvve
js.
Dam
ped
e ris
200
gH
igh
Mik
ro3
– 4
min
utte
rP
lace
r p
å et
gla
sfad
.
PØ
LSE
R –
fra
rå
tils
tand
– A
DVA
RS
EL:
Var
mt
fed
t! V
ær
fors
igti
g, n
år d
u ta
ger
fad
e o
g t
ilbeh
ør
ud a
f o
vnen
.
Coc
ktai
lpøl
ser
340
g (2
4)G
rill 1
14 m
inut
ter
Pla
cer
på
emal
jep
lad
en i
ned
erst
e p
ositi
on. V
end
hal
vvej
s.
Tykk
e45
0 g
(8)
Gril
l 112
– 1
5 m
inut
ter
Pla
cer
på
emal
jep
lad
en i
ned
erst
e p
ositi
on. V
end
hal
vvej
s.
Tynd
e34
0 g
(12)
Gril
l 116
min
utte
rP
lace
r p
å em
alje
pla
den
i ne
der
ste
pos
ition
. Ven
d h
alvv
ejs.
Vege
taris
ke25
0 g
(5)
Gril
l 115
min
utte
rP
lace
r p
å em
alje
pla
den
i ne
der
ste
pos
ition
. Ven
d h
alvv
ejs.
KA
LKU
N
Bry
st, u
den
ben
og
ski
nd50
0 g
Med
ium
Mik
ro10
min
utte
rP
lace
r p
å et
gla
sfad
. Tild
æk.
Hel
190
°C +
Sim
mer
Mik
ro13
– 1
4 m
inut
ter p
r. 45
0 g
Pla
cer
i en
bra
dep
and
e p
å en
om
vend
t un
der
kop
på
bun
den
af o
vnen
. Ven
d h
alvv
ejs.
FRIS
KE
GR
ØN
TS
AG
ER
– P
lace
r i e
t la
vt m
ikro
bø
lges
ikke
rt f
ad.
Asp
arge
s20
0 g
Med
ium
Mik
ro4½
– 5
min
utte
r Ti
lsæ
t 45
ml (
3 sp
sk.)
vand
og
tild
æk.
Bab
ymaj
s20
0 g
Med
ium
Mik
ro10
min
utte
rTi
lsæ
t 45
ml (
3 sp
sk.)
vand
og
tild
æk.
Bøn
ner
200
gM
ediu
m M
ikro
8 m
inut
ter
Tils
æt
45 m
l (3
spsk
.) va
nd o
g til
dæ
k.

80
TilberedningstabellerM
adVæ
gt/
M
æng
de
Tilb
ered
ning
Tid
Inst
rukt
ione
r/R
etni
ngsl
inje
r
FRIS
KE
GR
ØN
TS
AG
ER
– P
lace
r i e
t la
vt m
ikro
bø
lges
ikke
rt f
ad.
Kla
treb
ønne
r15
0 g
Med
ium
Mik
ro8
min
utte
rTi
lsæ
t 45
ml (
3 sp
sk.)
vand
og
tild
æk.
Rød
bed
er45
0 g
Med
ium
Mik
ro15
min
utte
rTi
lsæ
t 45
ml (
3 sp
sk.)
vand
og
tild
æk.
Bro
ccol
i25
0 g
Med
ium
Mik
ro8
min
utte
rTi
lsæ
t 45
ml (
3 sp
sk.)
vand
og
tild
æk.
Ros
enkå
l20
0 g
Med
ium
Mik
ro8
min
utte
rTi
lsæ
t 45
ml (
3 sp
sk.)
vand
og
tild
æk.
Vin
ters
qua
sh30
0 g
Med
ium
Mik
ro8
min
utte
rTi
lsæ
t 45
ml (
3 sp
sk.)
vand
og
tild
æk.
Kål
– s
nitt
et30
0 g
Med
ium
Mik
ro10
min
utte
rTi
lsæ
t 45
ml (
3 sp
sk.)
vand
og
tild
æk.
Gul
erød
der
– s
kive
r20
0 g
Med
ium
Mik
ro6
min
utte
rTi
lsæ
t 45
ml (
3 sp
sk.)
vand
og
tild
æk.
Blo
mkå
l40
0 g
Med
ium
Mik
ro10
min
utte
rTi
lsæ
t 45
ml (
3 sp
sk.)
vand
og
tild
æk.
Sq
uash
250
gM
ediu
m M
ikro
5 m
inut
ter
Tils
æt
45 m
l (3
spsk
.) va
nd o
g til
dæ
k.
Maj
s, h
el /
x 2
Med
ium
Mik
ro7
min
utte
rTi
lsæ
t 45
ml (
3 sp
sk.)
vand
og
tild
æk.
Por
rer,
skiv
er35
0 g
(4)
Med
ium
Mik
ro8
min
utte
rTi
lsæ
t 45
ml (
3 sp
sk.)
vand
og
tild
æk.
Pas
tinak
– fo
rkog
t til
ris
tnin
gsk
iver
300
gM
ediu
m M
ikro
5 –
6 m
inut
ter
10 m
inut
ter
Tils
æt
45 m
l (3
spsk
.) va
nd o
g til
dæ
k.
Ært
er20
0 g
Med
ium
Mik
ro5
min
utte
rTi
lsæ
t 45
ml (
3 sp
sk.)
vand
og
tild
æk.
Kar
tofle
r50
0 g
Med
ium
Mik
ro10
– 1
2 m
inut
ter
Tils
æt
45 m
l (3
spsk
.) va
nd o
g til
dæ
k.
Kar
tofle
r –
fork
ogt
500
gM
ediu
m M
ikro
6 –
7 m
inut
ter
Tils
æt
45 m
l (3
spsk
.) va
nd o
g til
dæ
k.
Bag
ekar
tofle
r –
250
g hv
er
x 1
x 2
x 4
x 6
Hig
h M
ikro
elle
r25
0 °C
+ G
rill 1
+ S
imm
er M
ikro
Hig
h M
ikro
elle
r25
0 °C
+ G
rill 1
+ S
imm
er M
ikro
Hig
h M
ikro
elle
r25
0 °C
+ G
rill 1
+ S
imm
er M
ikro
Hig
h M
ikro
elle
r25
0 °C
+ G
rill 1
+ S
imm
er M
ikro
7 –
8 m
inut
ter
20 m
inut
ter
12 m
inut
ter
25 m
inut
ter
20 m
inut
ter
30 m
inut
ter
25 m
inut
ter
35 m
inut
ter
Pla
cer
på
et g
lasf
ad.
Pla
cer
på
riste
n i n
eder
ste
pos
ition
.P
lace
r p
å et
gla
sfad
.P
lace
r p
å ris
ten
i ned
erst
e p
ositi
on.
Pla
cer
på
et g
lasf
ad
Pla
cer
på
riste
n i n
eder
ste
pos
ition
. P
lace
r p
å et
gla
sfad
Pla
cer
på
riste
n i n
eder
ste
pos
ition
.

81
Tilberedningstabeller
Mad
Væg
t/
Mæ
ngd
eT
ilber
edni
ngT
idIn
stru
ktio
ner/
Ret
ning
slin
jer
FRIS
KE
GR
ØN
TS
AG
ER
– P
lace
r i e
t la
vt m
ikro
bø
lges
ikke
rt f
ad.
Sp
inat
300
gM
ediu
m M
ikro
5 –
6 m
inut
ter
Tils
æt
45 m
l (3
spsk
.) va
nd o
g til
dæ
k.
Slik
ært
er30
0 g
Med
ium
Mik
ro8
min
utte
rTi
lsæ
t 45
ml (
3 sp
sk.)
vand
og
tild
æk.
Sød
e ka
rtofl
er40
0 g
Med
ium
Mik
ro10
min
utte
rTi
lsæ
t 45
ml (
3 sp
sk.)
vand
og
tild
æk.
Maj
roer
300
gM
ediu
m M
ikro
12 m
inut
ter
Tils
æt
45 m
l (3
spsk
.) va
nd o
g til
dæ
k.
FRO
SN
E G
RØ
NT
SA
GE
R –
Pla
cer
i et
lavt
mik
rob
ølg
esik
kert
fad
.
Ind
bag
te lø
grin
ge25
0 g
250
°C20
min
utte
r Fo
rvar
m o
vnen
. Pla
cer
på
emal
jep
lad
en i
øver
ste
pos
ition
.
Bøn
ner
200
gM
ediu
m M
ikro
7 –
8 m
inut
ter
Tils
æt
30 m
l (2
spsk
.) va
nd o
g til
dæ
k.
Bøn
ner
– gr
ønne
200
gM
ediu
m M
ikro
8 –
9 m
inut
ter
Tils
æt
30 m
l (2
spsk
.) va
nd o
g til
dæ
k.
Bro
ccol
i25
0 g
Med
ium
Mik
ro8
– 9
min
utte
rTi
lsæ
t 30
ml (
2 sp
sk.)
vand
og
tild
æk.
Gul
erød
der
– s
kive
r20
0 g
Hig
h M
ikro
4 m
inut
ter
Tils
æt
30 m
l (2
spsk
.) va
nd o
g til
dæ
k.
Blo
mkå
l25
0 g
Med
ium
Mik
ro9
– 10
min
utte
rTi
lsæ
t 30
ml (
2 sp
sk.)
vand
og
tild
æk.
Grø
ntsa
gs-m
ix20
0 g
Med
ium
Mik
ro8
min
utte
rTi
lsæ
t 30
ml (
2 sp
sk.)
vand
og
tild
æk.
Ært
er20
0 g
Med
ium
Mik
ro6
– 7
min
utte
rTi
lsæ
t 30
ml (
2 sp
sk.)
vand
og
tild
æk.
Soj
abøn
ner
200
gH
igh
Mik
ro3
– 4
min
utte
rTi
lsæ
t 30
ml (
2 sp
sk.)
vand
og
tild
æk
Dam
ped
e gr
ønts
ager
80 g
12
5 g
Hig
h M
ikro
2 –
2 m
inut
ter 3
0 se
k.
3 m
inut
ter
Pla
cer
på
et g
lasf
ad.
Suk
kerm
ajs
200
gM
ediu
m M
ikro
6 m
inut
ter
Tils
æt
30 m
l (2
spsk
.) va
nd o
g til
dæ
k.

82
Tilpasning af opskrifter
Brug af opskrifter fra andre kilder
Madlavning til én
Flere portioner For at øge en opskrift fra 4 til 6 portioner
• Øg hver ingrediens på listen med halvde-len. Vil du fordoble mængden, fordobler du simpelthen hver ingrediens på listen.
• Glem ikke, at større mængder også vil kræve et større fad. Sørg for, at det er dybt nok til at forhindre maden i at koge over under tilberedningen.
• Tildæk som anvist i opskriften. Omrør eller flyt madvarerne som anbefalet.
• Øg hviletiden med 5 minutter pr. 500 g.
• Kontroller altid opskriften under tilbered-ningen.
• Når du øger ingredienserne til 6 portioner, så øg den oprindelige tilberedningstid med en tredjedel, dvs. 30 minutter på Medium effekt til 4 portioner bliver til 40 minutter på Medium effekt til 6 portioner.
Den bedste måde at konvertere en ret er at finde en lignende opskrift i en kogebog, så du får en vejledning til den korrekte metode og tid at bruge.
Mange kogebøger henviser til 650 W ovne, men siden 1990 har ovnes udgangseffekt været bestemt af en ny standard (IEC). Når du bruger andre kilder end denne vejledning,
• Til en enkelt portion skal du bruge en fjerdedel af alle ingredienser på listen.
• Vælg et fad, som er forholdsvist mindre end det, der anbefales i opskriften.
• Brug den samme tilberedningseffekt, som anbefales i den oprindelige opskrift.
• Start med at lave mad på en fjerdedel af den anbefalede tilberedningstid, selv om ekstra tid i de fleste tilfælde vil være påkrævet.
Fordobling af en opskrift fra 4 til 8
• Øg den oprindelige tilberedningstid med en tredjedel, dvs. 30 minutter på Medium effekt til 4 portioner bliver til 40 minutter på Medium effekt til 6 portioner.
Færre portioner
• Du kan reducere en opskrift fra 4 portio-ner til 2 portioner ved at halvere ingre-dienserne på listen.
• Vælg et fad, som er forholdsvist mindre end det, der anbefales i opskriften, men sørg for at det er dybt nok til at forhindre maden i at koge over.
• Afsæt halvdelen til to tredjedele af den oprindelige tilberedningstid, dvs. 30 minutter på Medium effekt til 4 portioner bliver 15 – 20 minutter på Medium effekt til 2 portioner.
skal du tage højde for denne ovns udgangs- effekt på 1.000 W. Brug det samme effektni-veau som foreslået, f.eks. Høj eller Medium, og vælg den samme tilberedningstid, men sørg for at kontrollere status for maden under tilberedning, og juster tiden om nød-vendigt.
• Kontroller altid maden under tilberednin-gen.
• Der er ikke en stor besparelse for mindre mængder af supper, gryderetter og ris, da et minimum af tid kræves til at mørne kød og blande smagsstoffer.
• Ved tilberedning til én er det ofte fornuf-tigt at lave mad til to og anrette begge måltider. Frys derefter et måltid til en anden gang.

83
Spørgsmål og svar – Q & A
Indbygning af ovnen
Q Min mikrobølgeovn forårsager interfe-rens med mit TV. Er det normalt?
Q Min ovn lugter og udvikler røg ved brug af Varmluft, Kombination og Grill. Hvorfor?
Q Sommetider kommer der varm luft fra ovnens ventilationsåbninger. Hvorfor?
A Der kan forekomme nogen radio- og TV-interferens, når du laver mad med mikrobølgeovnen. Denne interferens svarer til forstyrrelser forårsaget af små elapparater som blendere, støvsugere, hårtørrere osv. Det betyder ikke, at der er et problem med din ovn.
A Det er vigtigt, at ovnen aftørres, især efter tilberedning med Kombination eller Grill. Fedt og rester, som samler sig i ovnen, begynder at ryge, hvis ovnen ikke rengøres.
A Varmen afgives fra tilberedning af mad, som opvarmer luften i ovnrummet. Den opvarmede luft udledes via et luftstrøms- mønster i ovnen. Der er ikke en lufttæt forsegling, og derfor kan damp slippe ud. Der er ingen mikrobølger i luften. Ovnens ventilationsåbninger må aldrig være blokeret under tilberedningen.
1. Hvis ovnen skal indbygges i et køkkene-lement, bør du bruge et originalt Panaso-nic indbygningskit. NN-TKF70WFP – Hvid NN-TKF70MFP – Sølv NN-TKF71SFP – Rustfri
2. Mikrobølgeovne bør ikke indbygges i et element direkte over et almindeligt komfur. Dette kan medføre, at fabriks- garantien bortfalder.
3. En mikrobølgeovn, som er indbygget, skal være mere end 850 mm over gulv- niveau. Læs omhyggeligt vejledningen til indbyg-ningskittet før installation.

84160
Technical SpecificationsRated Voltage: 230-240 V 50 Hz
Operating Frequency: 2,450 MHzInput Power: Max 2700 W
Microwave 840 WGrill 1380 W
Convection: 1450 WOutput Power: 1000 W (IEC-60705)
Grill 1350 WConvection 1400 W
Outer Dimensions: 529 mm (W) x 494 mm (D) x 326 mm (H)Oven Cavity Dimensions: 354 mm (W) x 343 mm (D) x 205 mm (H)
Weight: 17.5 kg (without internal accessories)Noise: 56 dB
Weight and Dimensions are approximate.
This product is an equipment that fulfills the European standard for EMC disturbances (EMC =Electromagnetic Compatibility) EN 55011. According to this standard this product is an equipmentof group 2, class B and is within required limits. Group 2 means that radio-frequency energy isintentionally generated in the form of electromagnetic radiation for warming up of foods. Class Bmeans that this product may be used in normal household areas.
Information on Disposal for Users of Waste Electrical & Electronic Equipment(private households)
This symbol on the products and/or accompanying documents means that used electrical and electronic products should not be mixed with general household waste.For proper treatment, recovery and recycling, please take these products to designated collection points, where they will be accepted on a free of charge basis.Alternatively, in some countries you may be able to return your products to your localretailer upon the purchase of an equivalent new product.Disposing of this product correctly will help to save valuable resources and prevent
any potential negative effects on human health and the environment which could otherwise arise from inappropriate waste handling. Please contact your local authority for furtherdetails of your nearest designated collection point.Penalties may be applicable for incorrect disposal of this waste, in accordance with national legislation.
For business users in the European UnionIf you wish to discard electrical and electronic equipment, please contact your dealer or supplierfor further information.
Information on Disposal in other Countries outside the European UnionThis symbol is only valid in the European Union.If you wish to discard this product, please contact your local authorities or dealer and ask for thecorrectmethod of disposal.
Pursuant to the directive 2004/108/EC, article 9(2)Panasonic Testing CentrePanasonic Service Europe, a division of Panasonic Marketing Europe GmbHWinsbergring 15,22525 Hamburg, F.R.GermanyManufactured by Panasonic Home Appliances Microwave Oven (Shanghai) Co.,Ltd, 898 Longdong Road, Pudong, Shanghai, 201203, China.
NN-CF760M CF750W CF771 BP_Regs:F00039M69BP 26/2/13 10:20 Page 160
Tekniske specifikationerStrømforsyning:
Arbejdsfrekvens:Effektforbrug:
Mikrobølge:Grill:
Varmluft: Udgangseffekt:
Grill:Varmluft:
Udvendige mål:Ovnrum mål:
Vægt: Støj:
230 – 240 V, 50 Hz2.450 MHzMax: 2.700 W840 W1.380 W1.450 WMikrobølge: 1.000 W (IEC-60705)1.350 W1.400 W529 mm (B) x 494 mm (D) x 326 mm (H)354 mm (B) x 343 mm (D) x 205 mm (H)17,5 kg (uden tilbehør)56 dBVægt og mål er omtrentlige.
Dette produkt er et udstyr, som opfylder den europæiske standard for EMC forstyrrelser (EMC = elektromagnetisk kompatibilitet) EN 55011. Ifølge denne standard er dette produkt et udstyr i gruppe 2, klasse B og er inden for de krævede grænser. Gruppe 2 betyder, at radiofrekvensenergi bevidst genereres i form af elektromagnetisk stråling til opvarmning eller tilberedning af mad. Klasse B betyder, at produktet kan anvendes i normale husholdninger.
Information til brugerne om bortskaffelse af elektriske apparater og elektronisk udstyr (private husholdninger)
Dette symbol på produkter og/eller medfølgende dokumenter betyder, at brugte elek-triske og elektroniske produkter ikke må blandes med almindeligt husholdningsaffald.
For at sikre korrekt behandling, indsamling og genbrug, bedes du aflevere disse pro-dukter på dertil indrettede indsamlingssteder, hvor de vil blive modtaget uden ekstra omkostninger.
Alternativt kan du i nogle lande have mulighed for at returnere dine produkter til din lokale forhandler, hvis du køber et nyt og tilsvarende produkt.
Korrekt bortskaffelse af dette produkt vil hjælpe med at spare værdifulde ressourcer og forhindre eventuelle negative virkninger på menneskers sundhed og miljøet, som ellers kunne opstå fra upassende affaldshåndtering. Kontakt de lokale myndigheder for yderligere information om dit nærmeste indsamlingssted.
Sanktioner kan være gældende for ukorrekt bortskaffelse af dette affald, i overensstemmelse med national lovgivning.
Til kommercielle brugere i Den Europæiske UnionHvis du ønsker at kassere elektriske eller elektroniske apparater, bedes du kontakte din forhandler eller leverandør for yderligere information.
Information om bortskaffelse i lande uden for Den Europæiske UnionDette symbol er kun gyldigt i Den Europæiske Union. Hvis du ønsker at bortskaffe dette produkt, bedes du kontakte de lokale myndigheder eller din forhandler, og spørge om den korrekte bortskaffelsesmetode.
I henhold til direktiv 2004/108/EF, artikel 9 (2)Panasonic Testing CentrePanasonic Service Europe, en division af Panasonic Marketing Europe GmbH, Winsbergring 15, 22525 Hamburg, TysklandFremstillet af Panasonic Home Appliances Microwave Oven (Shanghai) Co., Ltd., 898 Long-dong Road, Pudong, Shanghai, 201203, Kina.

85

© Panasonic Corporation 2014
www.panasonic.dk


![B. TH. PETERSEV - Hansen, 023 · "528" 1 x sekt.vinder (4) u B1åb. 229-02-206 Gaby Vandenabee]-e Købt som æa hos Gabv Barmebarn aJ "Wittenbirik" mortil 2 x sekt.vinder.bedstemor](https://img.pdfslide.us/doc/110x75/5eabf664c3511e088f17e642/b-th-petersev-hansen-528-1-x-sektvinder-4-u-b1b-229-02-206.jpg)