Embed Size (px)
Citation preview
1
Informative article August, 2004. OpenVPN 101: introduction to OpenVPN. About this document. The latest version of this document can be found on http://thti.telindus.be. Current version 20040810.B, © 2004 Telindus High-Tech Institute, Stijn Huyghe (stijn at thti dot telindus dot be). All trademarks and (registered) names belong to their respective owners. This article comes with absolutely no guarantee. This article can be distributed freely as long as it is distributed in the original form – including this header. It cannot be used for commercial purposes without the explicit written permission from the Telindus High-Tech Institute (http://www.thti.telindus.be). All tests with were done using OpenVPN 1.6.0 on Microsoft Windows 2000/XP Professional or on (Red Hat) Fedora Linux Core 2 I386 (http://fedora.redhat.com). If you have suggestions, remarks or encountered some mistakes, feel free to send them to stijn at thti dot telindus dot be. Goal of the document. This document will introduce OpenVPN as a free, secure and easy to use and configure SSL-based VPN solution. The document will present some simple (and verified) scenario’s that might be useful for preparing security/networking labs with students, for creating a remote access solution or as a new project for the interested home user. All scenarios presented in this document have been tested using a mix of Red Hat Linux Fedora Core 2, Microsoft Windows 2000 Professional and Microsoft Windows XP Professional. However, this document comes with no support and no guarantees. This document supposes that the reader knows the fundamental basics of the Linux and Microsoft operating systems, basic VPN technology and IP routing. The document will not explain how to build firewall rule bases, it will not explain (the used) technologies like “IP”, “VPN”, “firewalls”, “SSL”, “PKI”, “certificates”, “IPSEC” etc. Introduction to OpenVPN1. Virtual Private Network (VPN) technology is a popular way of using a public telecommunication network infrastructure (like the worldwide Internet) to interconnect private & remote networks and to provide secure (remote) access to offices or networks. This can be done by using various tunneling protocols and by encrypting, decrypting and authenticating traffic. It provides more or less the same capabilities as (e.g.) a leased line but at a lower cost. Today, VPN technology is often related with the word “IPSEC” or IP Security which is an industrial standard for establishing VPN communications on the network layer. IPSEC is often considered to be a technology that has a relatively steep learning curve for new users and might not be so easy to setup and maintain in all situations (e.g. filtered networks, networks that deal 1 OpenVPN – the Open Source VPN solution by James Yonan can be found on http://openvpn.sourceforge.net.
2
with some kind of Network Address Translation or NAT). Because of this, more and more vendors start to implement SSL-based VPN systems. OpenVPN is also based on SSL or the Secure Sockets Layer, a commonly-used protocol for securing transactions on the Internet (e.g. think about the https and the lock icon in your web browser when you are doing e-banking or buying things online). This protocol is robust and is quite easy to understand and learn for new users and often more simple to implement and manage by administrators. Some OpenSSL characteristics. Some advantages of OpenVPN: - Build VPN tunnels between all major operating systems of today, including Linux, SUN Solaris, *BSD, Mac OS X, Microsoft Windows 2000 and Microsoft Windows XP2. - Tunnel any IP subnetwork or virtual Ethernet adaptor over a single UDP or TCP port. - Easy installation and configuration. The installation does not require kernel compilations or patches in most cases! - OpenVPN is build for portability. It is easier to port because it is written as a user-space daemon rather than a kernel module or a complex modification of the IP layer. - The OpenSSL3 library is used for encryption, authentication and certification features4 of the OpenVPN secure tunnel. Any cipher, key size and HMAC digest supported by this library can be used. - Build secure tunnels using static, pre-shared keys or use TLS-based dynamic key exchanges. - Tunnel networks over NAT devices, deploy VPN clients without any problems behind NAT devices. - Support for dynamic IP addresses. - Good documentation. - Compatible with SSL/TLS, RSA certificates, X.509 PKI, TUN/TAP virtual devices5. Introduction to the OpenVPN test environment. We performed some tests using the following equipment: - A Linux router running Red Hat Fedora Core 2 (kernel 2.6.6-1.435). This host will play an important role during our tests as it will “concentrate” different VPN tunnels. - Various OpenVPN clients running either Microsoft Windows 2000 Professional, Microsoft Windows XP professional or Red Hat Fedora Core 2. - Several ISPs and Internet connections have been tested (the connections used depend on the tests performed): ADSL connections with dynamic IP addresses, cable connections with dynamic IP addresses, leased lines with fixed IP ranges 2 Also check the OpenVPN compatibility notes on http://openvpn.sourceforge.net/compat.html and the OpenVPN change log on http://openvpn.sourceforge.net/changelog.html. 3 The OpenSSL project can be found on http://www.openssl.org. The goal of the project is to develop a robust, commercial-grade, full-featured and Open Source implementation of the Secure Sockets Layer (SSL version 2 and version 3) and Transport Layer Security (TLS version 1) including a full-strength general purpose cryptography library. It is licensed under an Apache-style license, which basically means that you are free to get and use it for commercial and non-commercial purposes subject to some simple license conditions. 4 With OpenVPN, you can choose any OpenSSL supported cipher and key size for encryption, between a choice of CBC/CFB/OFB cipher modes, HMAC for datagram authentication, explicit IV usage to hide patterns in the plaintext data, anti-replay protection using a unique timestamp/sequence-number datagram identifier and TLS certificate-based session authentication. 5 More information about Virtual Point-to-Point (TUN) and Ethernet (TAP) devices can be found on http://vtun.sourceforge.net/tun/.

3
- A Linksys wireless-B broadband router6.This device connects one of the DSL test networks to the internet and will forward incoming VPN connections to the Linux (VPN) router running OpenVPN. - Squid HTTP proxy server7 on Red Hat Fedora Core 1 I386 to demonstrate HTTP CONNECT tunneling. 6 Linksys Wireless-B broadband router: http://www.linksys.com/products/product.asp?grid=33&scid=35&prid=544 7 More information about the Squid Web Proxy Cache can be found on http://www.squid-cache.org.

4
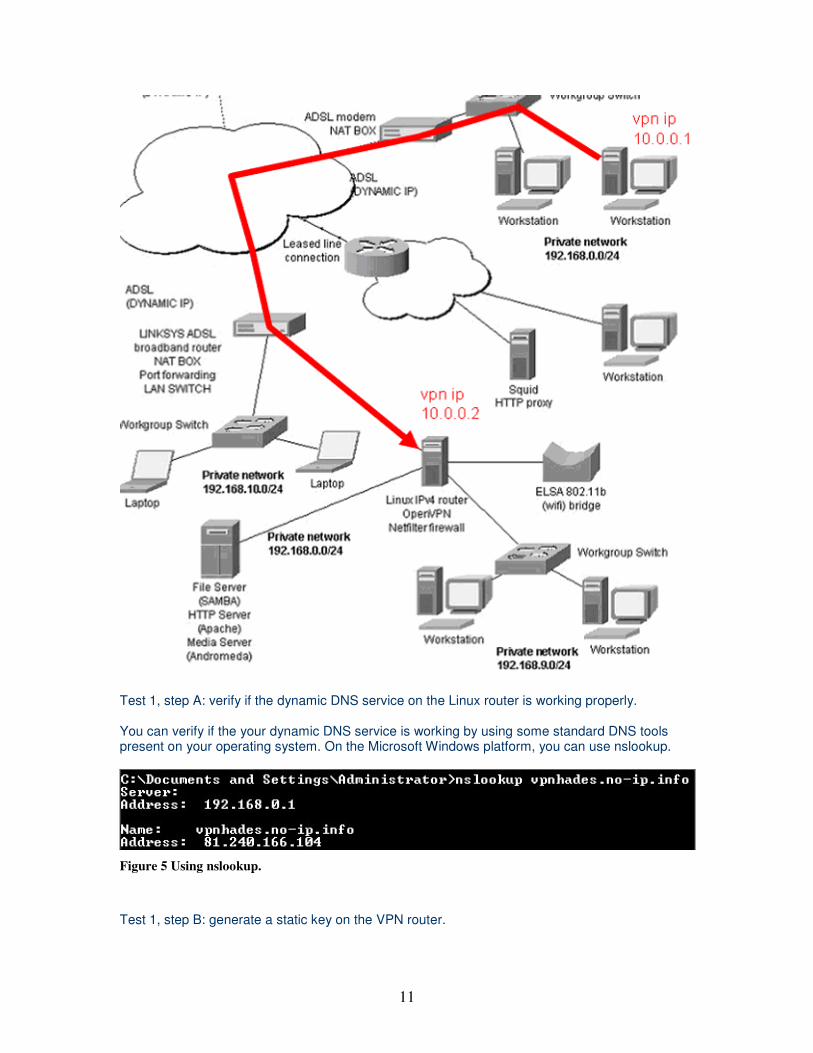
Network scheme of the test networks:
Figure 1 Quick overview of the test network.
Installation of OpenVPN on Linux.

5
Note: the installation is done using OpenVPN 1.6.0 on Red Hat Fedora Core 2 I386 using the LZO real-time data compression library v1.08 by Markus Oberhummer. >> Download and extract the OpenVPN source code on Linux. Step 1: download OpenVPN 1.6.0 at http://prdownloads.sourceforge.net/openvpn/openvpn-1.6.0.tar.gz. Step 2: extract the files by using the commands gzip –d openvpn-1.6.0.tar.gz and tar –xvf openvpn-1.6.0.tar. The files should have been extracted and a new directory should have been created (openvpn-1.6.0). >> Install and build the LZO real-time8 data compression library. Step 1: download the LZO code at http://www.oberhumer.com/opensource/lzo/download/lzo-1.08.tar.gz. Step 2: extract the files by using the commands gzip –d lzo-1.08.tar.gz and tar –xvf lzo-1.08.tar. The files should have been extracted and a new directory should have been created (lzo-1.08). Step 3: build the library by using the commands ./configure, make, make check. Step 4: verify if everything has been build ok by running a full test. Use the command make test. This should result in something like: ./tests/chksum Checksum test passed. ./examples/simple LZO real-time data compression library (v1.08, Jul 12 2002). Copyright (C) 1996-2002 Markus Franz Xaver Johannes Oberhumer compressed 131072 bytes into 526 bytes decompressed 526 bytes back into 131072 bytes Simple compression test passed. ./minilzo/testmini LZO real-time data compression library (v1.08, Jul 12 2002). Copyright (C) 1996-2002 Markus Franz Xaver Johannes Oberhumer compressed 131072 bytes into 526 bytes decompressed 526 bytes back into 131072 bytes miniLZO simple compression test passed. All tests passed. Now you are ready to install LZO. Step 5: when the entire test has been completed without any problems, you can continue to install the library by using the command make install. >> Install and build OpenVPN. Step 1: go into your OpenVPN directory (openvpn-1.6.0). Step 2: build the software from source code by using the commands: ./configure, make, make install. Step 3: perform some standard tests on the OpenVPN software (loopback tests): 8 LZO is a portable data compression library written in ANSI C and offers fast compression and extremely fast decompression. More information can be found on http://www.oberhumer.com/opensource/lzo.
6
Test crypto: ./openvpn --genkey --secret key ./openvpn --test-crypto --secret key Test SSL/TLS negotiations – execute each command in a different window at the same time: (window 1) ./openvpn --config sample-config-files/loopback-client (window 2) ./openvpn --config sample-config-files/loopback-server Step 4: install/verify the TUN/TAP driver configuration. A TUN device is already present with a default installation on Red Hat Fedora Core 2 I386. Check the TUN device on Fedora Core 2: [root@Hades net]# ls -l total 0 crw------- 1 root root 10, 200 Feb 23 22:02 tun You can verify this by searching for if_tun.h: [root@Hades net]# locate if_tun.h /usr/src/linux-2.6.5-1.358/include/linux/if_tun.h /usr/include/linux/if_tun.h /lib/modules/2.6.5-1.358/build/include/linux/if_tun.h /lib/modules/2.6.6-1.427/build/include/linux/if_tun.h /lib/modules/2.6.6-1.435/build/include/linux/if_tun.h Installation of OpenVPN on MS Windows 2000 or MS Windows XP. Note: the OpenVPN installations are done using OpenVPN 1.6.0 on Microsoft Windows XP SP1 (including all critical hot fixes) and Microsoft Windows 2000 Professional SP4 (including all critical hot fixes). Step 1: download the OpenVPN windows installation executable at http://prdownloads.sourceforge.net/openvpn/openvpn-1.6.0-install.exe. Step 2: run the executable and follow the wizard installation steps9 (Windows XP might ask for a confirmation to install a non-signed/verified driver – you will need to agree to this). Step 3: reboot the Windows machine. It is essential to reboot after installing (and uninstalling) OpenVPN. Not doing so can lead to Winsock registry corruption10. Step 4: verify after reboot that a new network adaptor has been installed (check “control panel” > “network connections”). 9 Make sure that you read the OpenVPN Windows installation notes at http://openvpn.sourceforge.net/INSTALL-win32.html. 10 For more information about the Winsock registry corruption, check the OpenVPN troubleshooting guide at http://openvpn.sourceforge.net/trouble.html.
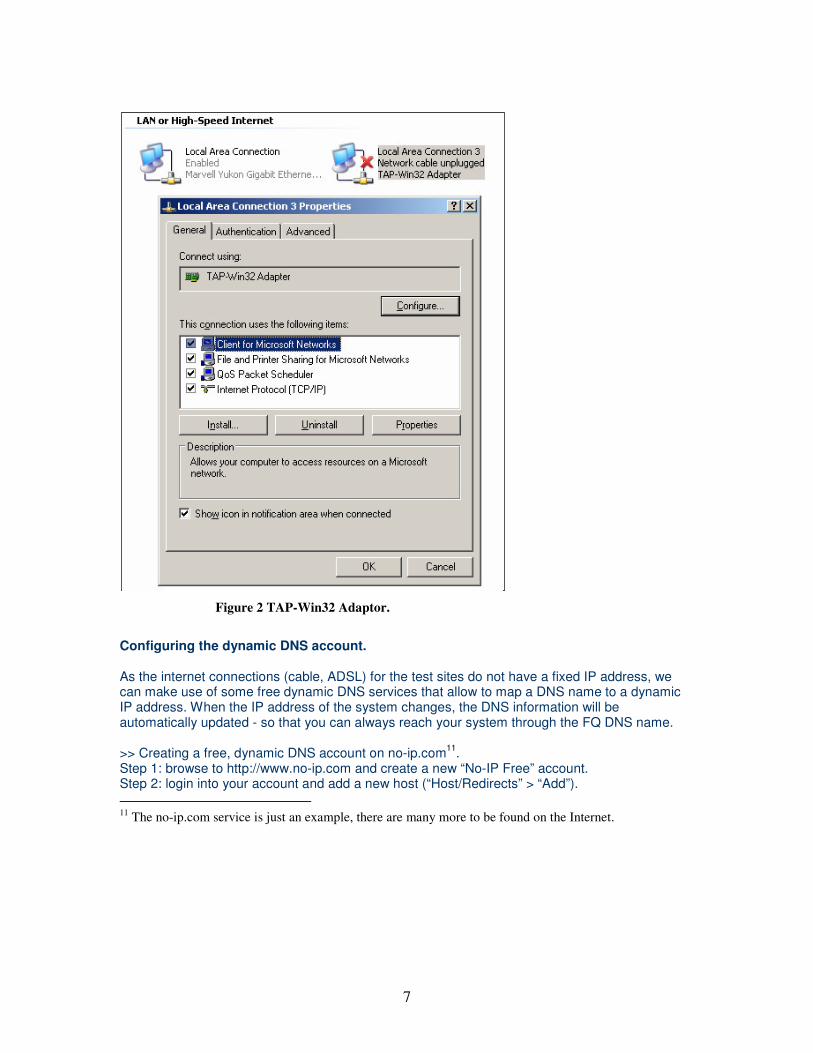
7
Figure 2 TAP-Win32 Adaptor.
Configuring the dynamic DNS account. As the internet connections (cable, ADSL) for the test sites do not have a fixed IP address, we can make use of some free dynamic DNS services that allow to map a DNS name to a dynamic IP address. When the IP address of the system changes, the DNS information will be automatically updated - so that you can always reach your system through the FQ DNS name. >> Creating a free, dynamic DNS account on no-ip.com11. Step 1: browse to http://www.no-ip.com and create a new “No-IP Free” account. Step 2: login into your account and add a new host (“Host/Redirects” > “Add”). 11 The no-ip.com service is just an example, there are many more to be found on the Internet.

8
Figure 3 The no-ip.com web interface
Step 3: go to “downloads” and download the software that is appropriate for your operating system. In our case, we are going to install the client on the Linux IPv4 router behind the Linksys broadband router - AP, so we fetched the Linux / Unix version (noip-duc-linux.tar.gz). Step 4: install the software by using the commands gzip –d noip-duc-linux.tar.gz and tar –xvf no-ip-duc-linux.tar. A new directory should have been created, called noip-2.1.1. Enter this directory and issue the command make and make install. This will build the code. Step 5: configure the “noip” client by running the command /usr/local/bin/noip2 –C12. Fill in the requested information about your free no-ip.com account. Step 6: start the client by using the command /usr/local/bin/noip. Step 7: verify that everything is running fine: [root@Hades noip-2.1.1]# noip2 -S 1 noip2 process active. Process 1885, started as /root/dynamic_dns/noip-2.1.1/noip2 Using configuration from /usr/local/etc/no-ip2.conf Last IP Address set 80.201.206.63 Account [email protected] configured for: host vpnhades.no-ip.info Updating every 30 minutes via /dev/eth2 with NAT enabled. Process: nobody 1885 0.0 0.3 2336 712 ? S 09:34 0:00 ./noip2 12 See the no-ip README.FIRST file.
9
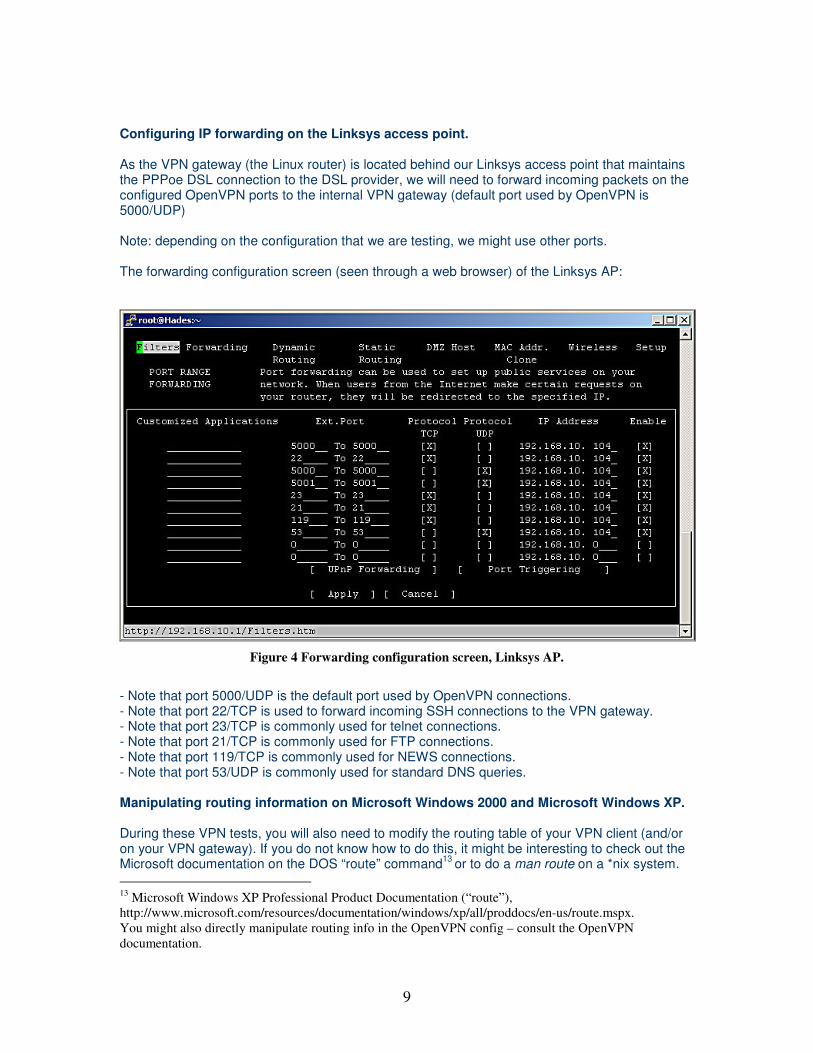
Configuring IP forwarding on the Linksys access point. As the VPN gateway (the Linux router) is located behind our Linksys access point that maintains the PPPoe DSL connection to the DSL provider, we will need to forward incoming packets on the configured OpenVPN ports to the internal VPN gateway (default port used by OpenVPN is 5000/UDP) Note: depending on the configuration that we are testing, we might use other ports. The forwarding configuration screen (seen through a web browser) of the Linksys AP:
Figure 4 Forwarding configuration screen, Linksys AP.
- Note that port 5000/UDP is the default port used by OpenVPN connections. - Note that port 22/TCP is used to forward incoming SSH connections to the VPN gateway. - Note that port 23/TCP is commonly used for telnet connections. - Note that port 21/TCP is commonly used for FTP connections. - Note that port 119/TCP is commonly used for NEWS connections. - Note that port 53/UDP is commonly used for standard DNS queries. Manipulating routing information on Microsoft Windows 2000 and Microsoft Windows XP. During these VPN tests, you will also need to modify the routing table of your VPN client (and/or on your VPN gateway). If you do not know how to do this, it might be interesting to check out the Microsoft documentation on the DOS “route” command13 or to do a man route on a *nix system. 13 Microsoft Windows XP Professional Product Documentation (“route”), http://www.microsoft.com/resources/documentation/windows/xp/all/proddocs/en-us/route.mspx. You might also directly manipulate routing info in the OpenVPN config – consult the OpenVPN documentation.
10
Configuring IPv4 IP forwarding on the Linux router. Because we are going to route IPv4 packets between different IP networks, we need to enable IPv4 forwarding on the Linux router. # Enable IP ROUTING echo 1 > /proc/sys/net/ipv4/ip_forward OpenVPN test 1: remote OpenVPN user on DSL connection. Goal of the test: Establish a VPN connection from a Windows XP Professional machine behind a NAT device connected to the Internet using a DSL line (with a dynamic IP address), to the VPN gateway on a DSL line (also on a dynamic IP address, but using dynamic DNS services). Packets are forwarded from the Linksys access point - that maintains DSL connectivity for one of the test networks - to the Linux router. Protocols used: - The OpenVPN client (Windows XP Professional) uses the default settings of OpenVPN; the UDP protocol and port 5000/UDP to establish the VPN connection with the Linux router (Fedora Core 2). - Port 5000/UDP is forwarded on the Linksys AP towards the Linux VPN router. Authentication and encryption: - Static key (2048 bit OpenVPN static key). - Encryption is done by using a BF-CBC cipher with a 128bits key and HMAC authentication (OpenVPN default).
11
Test 1, step A: verify if the dynamic DNS service on the Linux router is working properly. You can verify if the your dynamic DNS service is working by using some standard DNS tools present on your operating system. On the Microsoft Windows platform, you can use nslookup.
Figure 5 Using nslookup.
Test 1, step B: generate a static key on the VPN router.
12
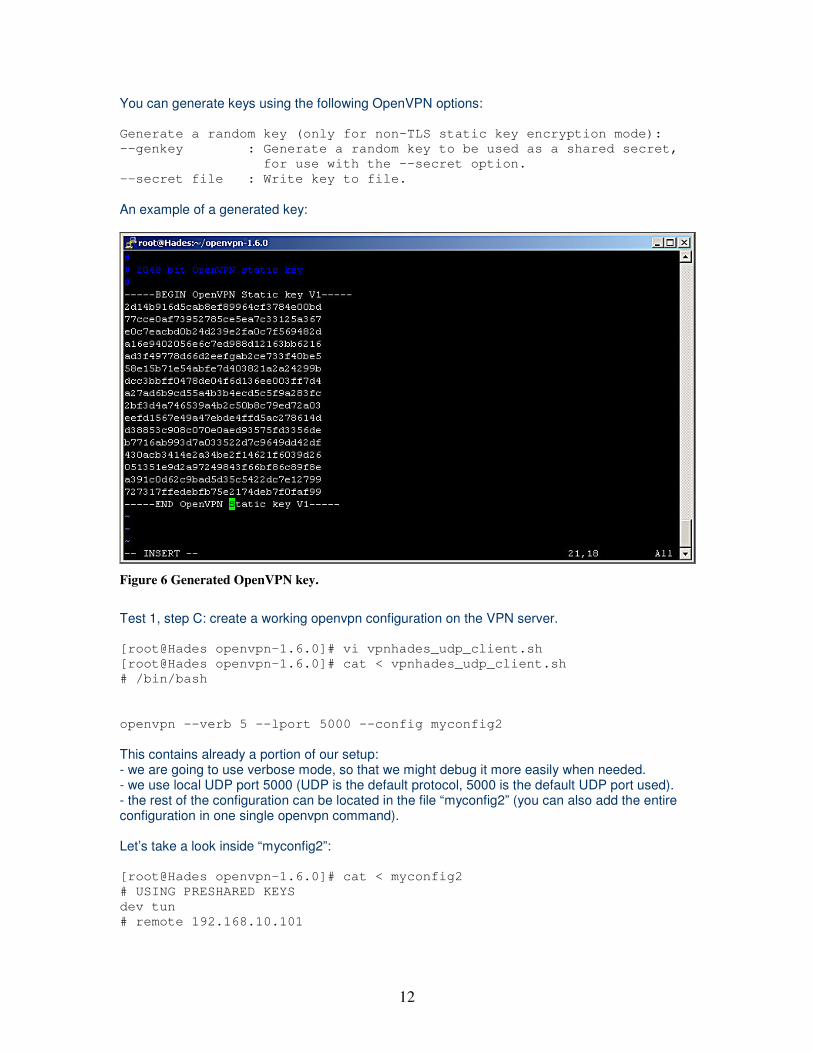
You can generate keys using the following OpenVPN options: Generate a random key (only for non-TLS static key encryption mode): --genkey : Generate a random key to be used as a shared secret, for use with the --secret option. --secret file : Write key to file. An example of a generated key:
Figure 6 Generated OpenVPN key.
Test 1, step C: create a working openvpn configuration on the VPN server. [root@Hades openvpn-1.6.0]# vi vpnhades_udp_client.sh [root@Hades openvpn-1.6.0]# cat < vpnhades_udp_client.sh # /bin/bash openvpn --verb 5 --lport 5000 --config myconfig2 This contains already a portion of our setup: - we are going to use verbose mode, so that we might debug it more easily when needed. - we use local UDP port 5000 (UDP is the default protocol, 5000 is the default UDP port used). - the rest of the configuration can be located in the file “myconfig2” (you can also add the entire configuration in one single openvpn command). Let’s take a look inside “myconfig2”: [root@Hades openvpn-1.6.0]# cat < myconfig2 # USING PRESHARED KEYS dev tun # remote 192.168.10.101
13
ifconfig 10.0.0.2 10.0.0.1 #tun-mtu 1500 secret hawk.key This piece of the configuration specifies that: - we are going to use a TUN device. - the local IP VPN address of the VPN gateway is 10.0.0.2, the IP address of the VPN client will be 10.0.0.1. - we use the key located in the file “hawk.key”. This concludes the configuration of the server. Test 1, step D: build the OpenVPN configuration on the Windows XP client. - Make sure that you transfer the key file using a secure connection to the Windows XP client (and no, FTP is not “secure”, Microsoft Networking is not “secure”, etc – use SCP, or SSH14). - Create a small bat file (easier for the end-user to use) with the following content: openvpn –verb 5 –-remote vpnhades.no-ip.info --dev tun --ifconfig 10.0.0.2 10.0.0.1 --secret key.txt This configuration line specifies that: - we use verbose mode 5 (nice debugging information, but slower). - the remote endpoint of the VPN connection is the host vpnhades.no-ip.info (dynamic dns of the Linux router that is going to terminate the VPN connection). - we use a TUN device to build the VPN connection. - the local vpn address of the client will be 10.0.0.2 while the remote VPN IP address of the server will be 10.0.0.1. - we are going to use the key specified in the key.txt file. Test 1, step E: start up the VPN connection (run the bat file) and verify if the VPN connection is up and running. - Start up the bat file. Use the ipconfig command to verify that your TUN adaptor is up and running with the IP address of 10.0.0.2. 14 OpenSSH can be found on http://www.openssh.org, a freeware SSH client for Microsoft Windows – “Putty” - can be found on http://www.chiark.greenend.org.uk/~sgtatham/putty/, a freeware SCP client for Microsoft Windows – “WinSCP” - can be found on http://winscp.sourceforge.net/eng/.

14
- Try to ping the remote end point of the VPN connection (10.0.0.1). This should work (if it does not work, check out the debug information!).
Figure 7 "Ping" the endpoint of the VPN connection.
- Because we have enabled debugging, you will also see read and write activity on the VPN link when you ping through the VPN tunnel.
Figure 8 OpenVPN output information.
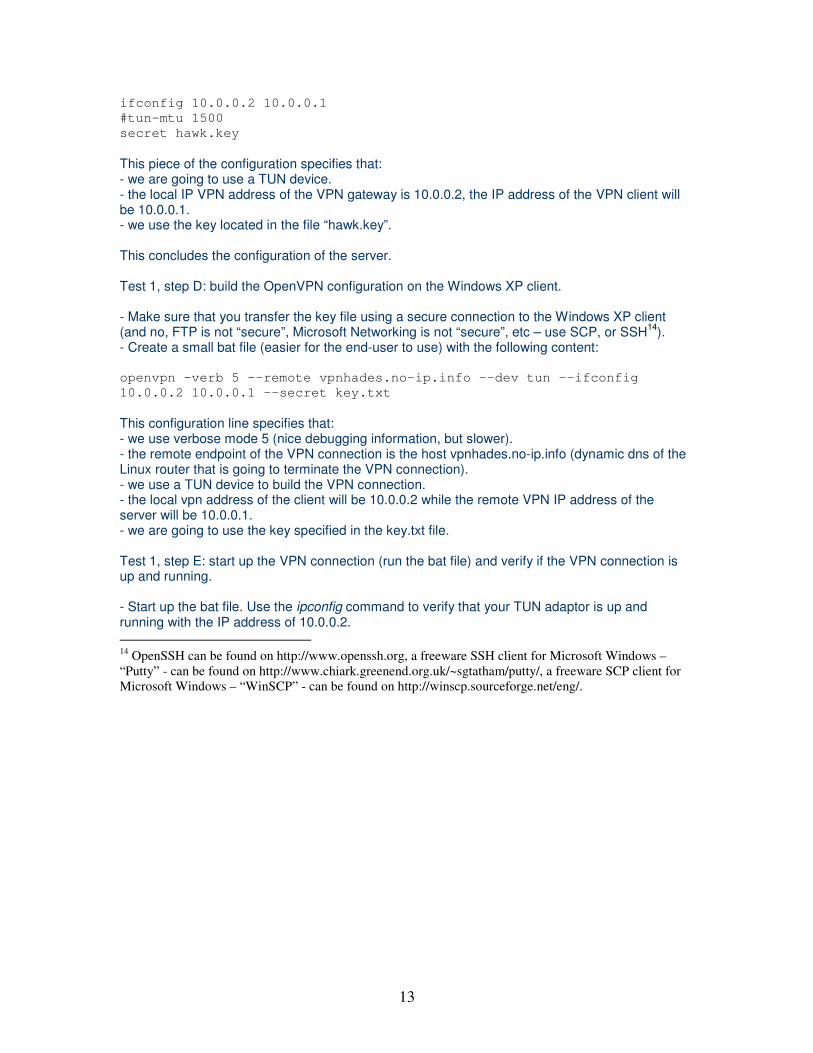
Nice! The OpenVPN tunnel is working! Test 1, step F: try to access the file server on the remote network through the VPN tunnel. We want to have a remote and secure access to our file server (192.168.0.4). If we want to reach this network, we need to add some routes so that all traffic intended for this host is going through the encrypted tunnel. So, on our client we type the command: route add 192.168.0.0 MASK 255.255.255.0 10.0.0.2 METRIC 1
15
This command tells our Windows operating system that all traffic for the 192.168.0.0/24 network (that includes the file server) needs to be send through the VPN tunnel (10.0.0.2 is the remote VPN peer) [normally, you do not need the METRIC entry].
Figure 9 Adding a route...
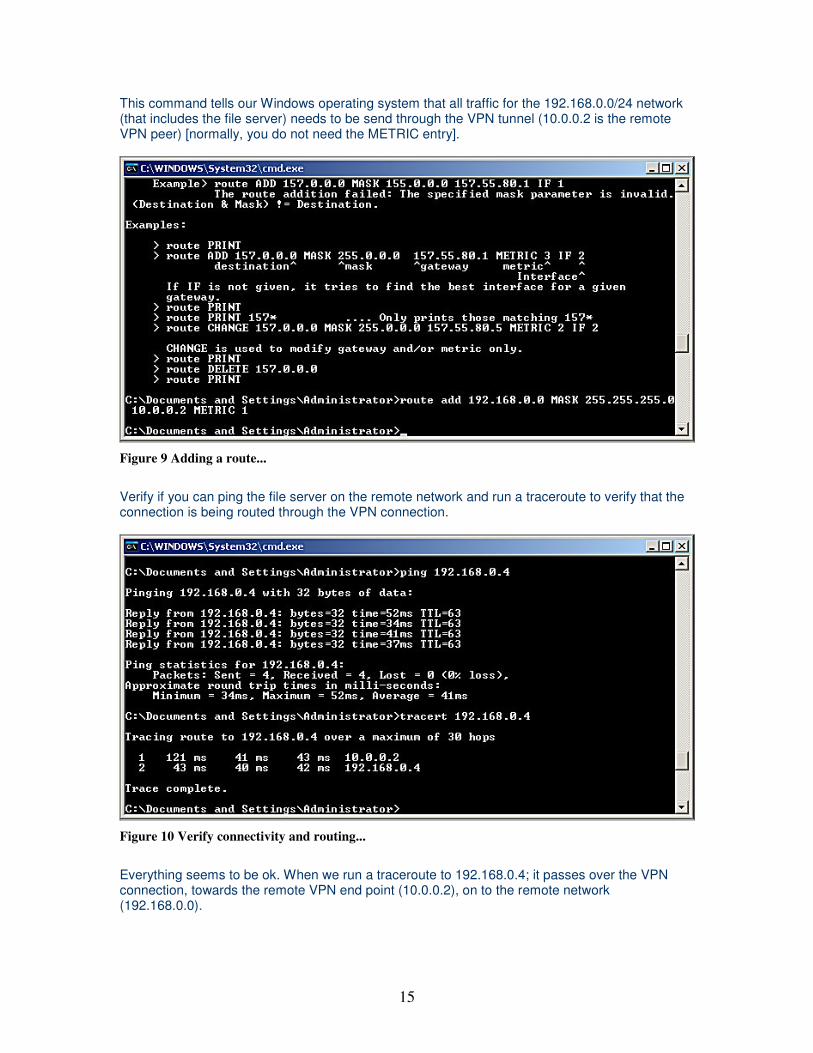
Verify if you can ping the file server on the remote network and run a traceroute to verify that the connection is being routed through the VPN connection.
Figure 10 Verify connectivity and routing...
Everything seems to be ok. When we run a traceroute to 192.168.0.4; it passes over the VPN connection, towards the remote VPN end point (10.0.0.2), on to the remote network (192.168.0.0).
16
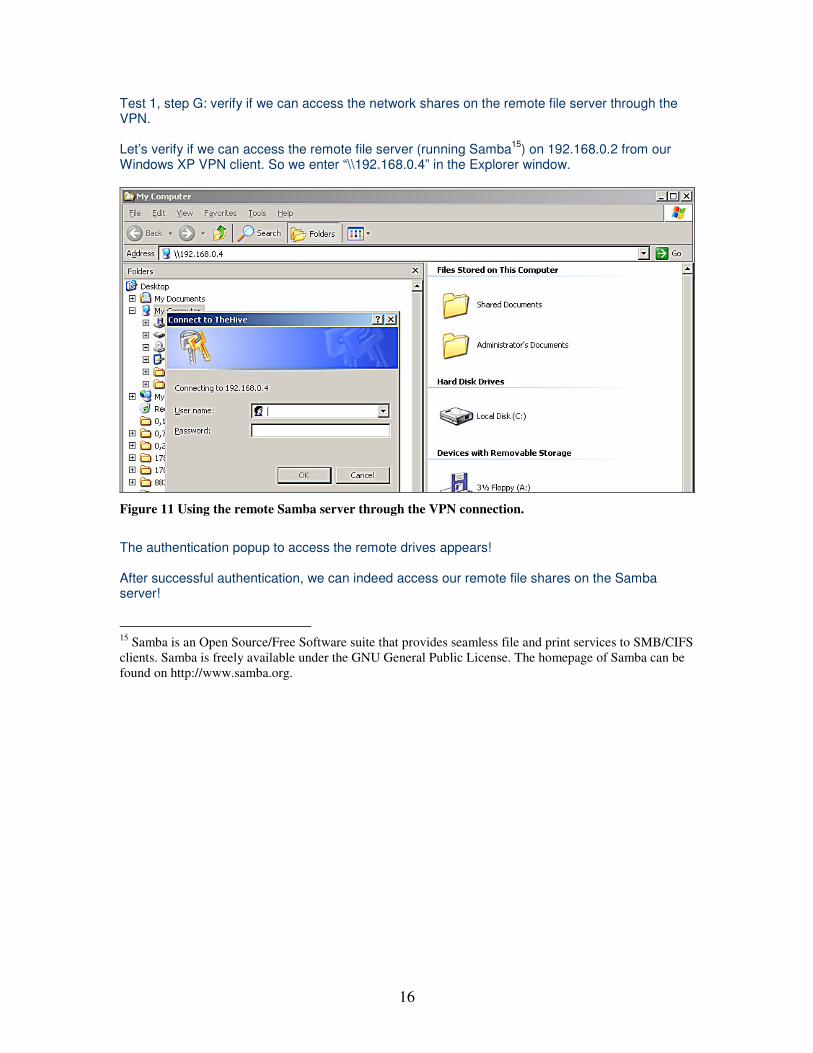
Test 1, step G: verify if we can access the network shares on the remote file server through the VPN. Let’s verify if we can access the remote file server (running Samba15) on 192.168.0.2 from our Windows XP VPN client. So we enter “\\192.168.0.4” in the Explorer window.
Figure 11 Using the remote Samba server through the VPN connection.
The authentication popup to access the remote drives appears! After successful authentication, we can indeed access our remote file shares on the Samba server! 15 Samba is an Open Source/Free Software suite that provides seamless file and print services to SMB/CIFS clients. Samba is freely available under the GNU General Public License. The homepage of Samba can be found on http://www.samba.org.
17
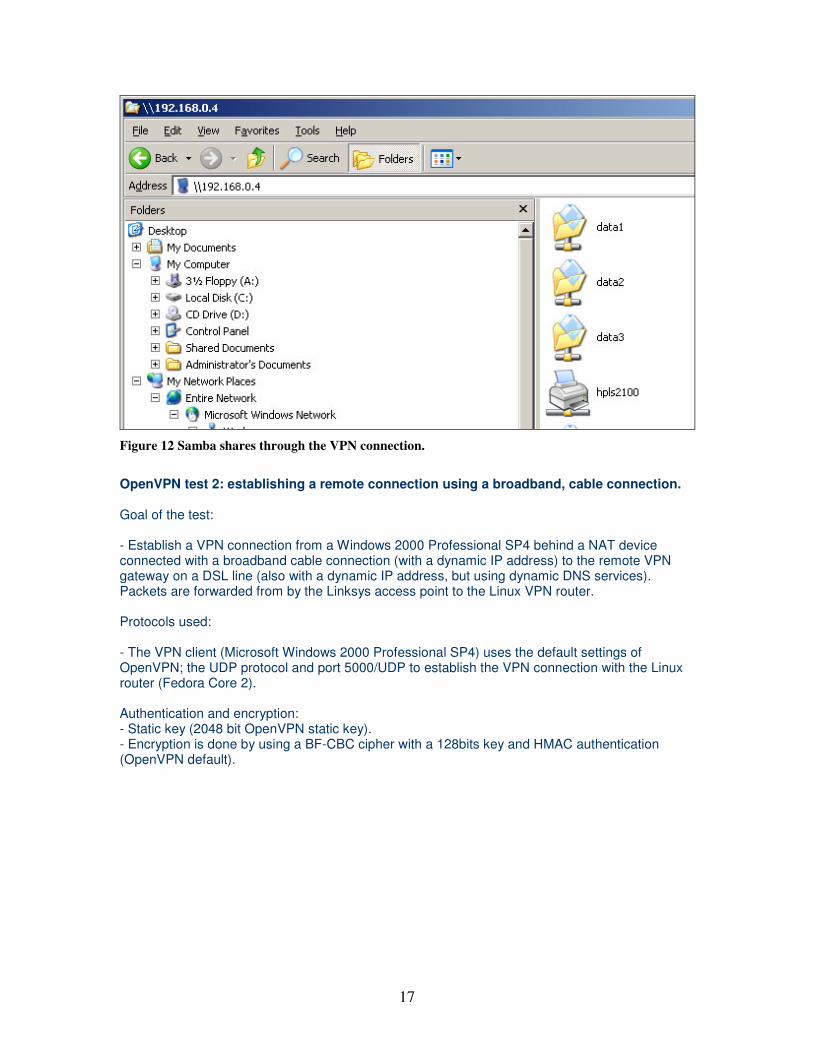
Figure 12 Samba shares through the VPN connection.
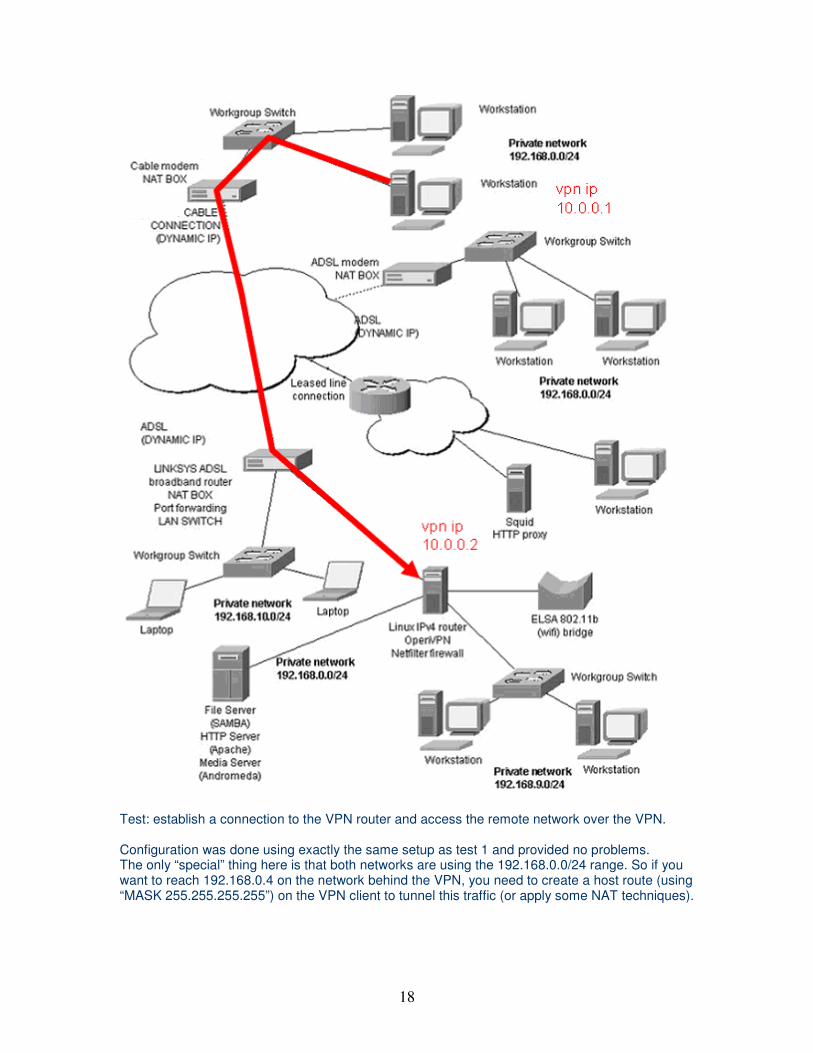
OpenVPN test 2: establishing a remote connection using a broadband, cable connection. Goal of the test: - Establish a VPN connection from a Windows 2000 Professional SP4 behind a NAT device connected with a broadband cable connection (with a dynamic IP address) to the remote VPN gateway on a DSL line (also with a dynamic IP address, but using dynamic DNS services). Packets are forwarded from by the Linksys access point to the Linux VPN router. Protocols used: - The VPN client (Microsoft Windows 2000 Professional SP4) uses the default settings of OpenVPN; the UDP protocol and port 5000/UDP to establish the VPN connection with the Linux router (Fedora Core 2). Authentication and encryption: - Static key (2048 bit OpenVPN static key). - Encryption is done by using a BF-CBC cipher with a 128bits key and HMAC authentication (OpenVPN default).
18
Test: establish a connection to the VPN router and access the remote network over the VPN. Configuration was done using exactly the same setup as test 1 and provided no problems. The only “special” thing here is that both networks are using the 192.168.0.0/24 range. So if you want to reach 192.168.0.4 on the network behind the VPN, you need to create a host route (using “MASK 255.255.255.255”) on the VPN client to tunnel this traffic (or apply some NAT techniques).
19
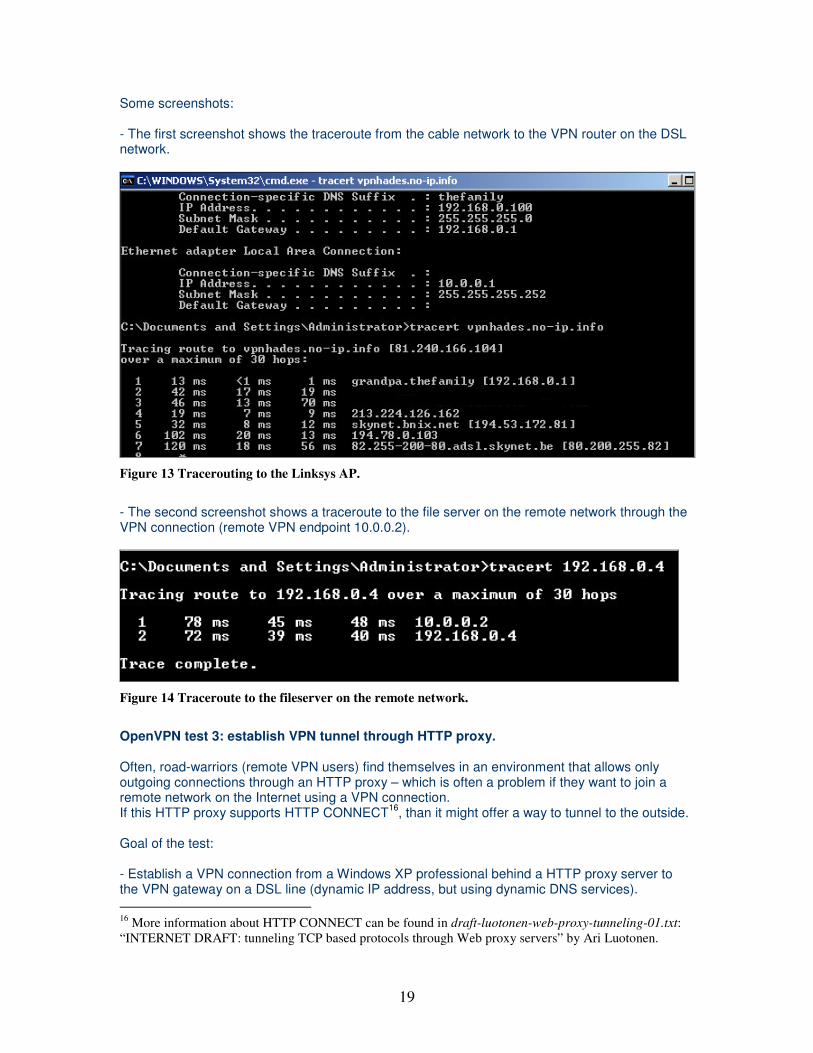
Some screenshots: - The first screenshot shows the traceroute from the cable network to the VPN router on the DSL network.
Figure 13 Tracerouting to the Linksys AP.
- The second screenshot shows a traceroute to the file server on the remote network through the VPN connection (remote VPN endpoint 10.0.0.2).
Figure 14 Traceroute to the fileserver on the remote network.
OpenVPN test 3: establish VPN tunnel through HTTP proxy. Often, road-warriors (remote VPN users) find themselves in an environment that allows only outgoing connections through an HTTP proxy – which is often a problem if they want to join a remote network on the Internet using a VPN connection. If this HTTP proxy supports HTTP CONNECT16, than it might offer a way to tunnel to the outside. Goal of the test: - Establish a VPN connection from a Windows XP professional behind a HTTP proxy server to the VPN gateway on a DSL line (dynamic IP address, but using dynamic DNS services). 16 More information about HTTP CONNECT can be found in draft-luotonen-web-proxy-tunneling-01.txt: “INTERNET DRAFT: tunneling TCP based protocols through Web proxy servers” by Ari Luotonen.
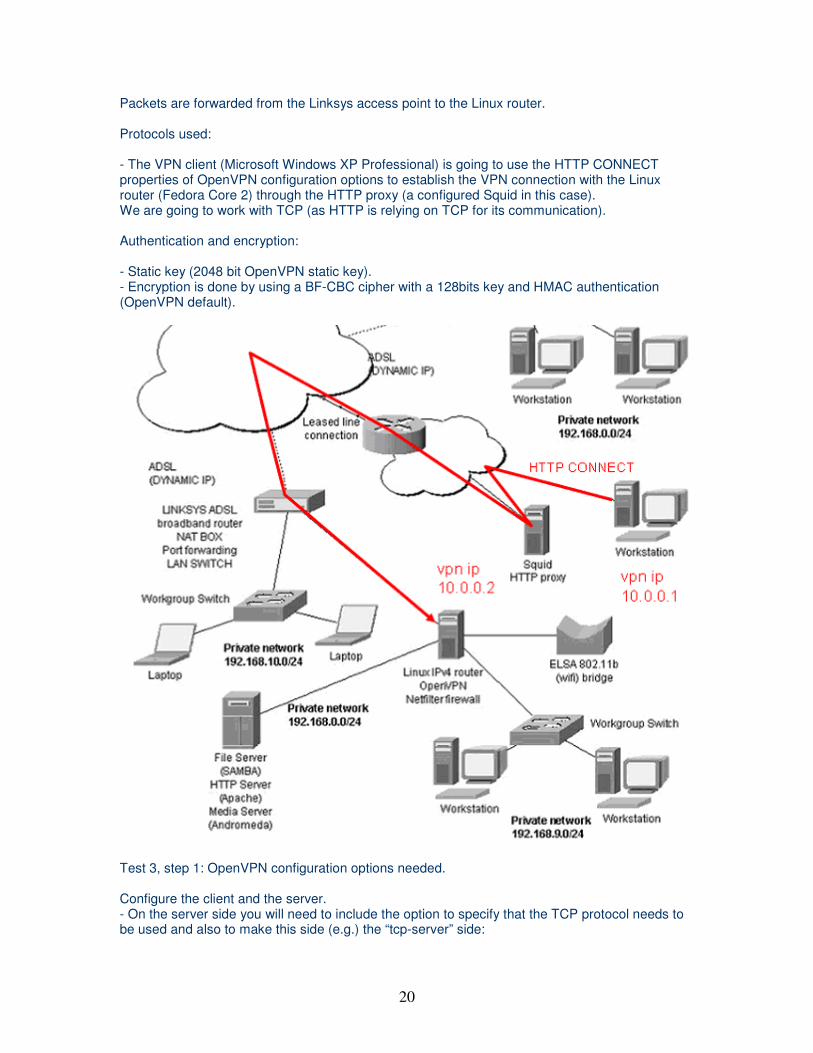
20
Packets are forwarded from the Linksys access point to the Linux router. Protocols used: - The VPN client (Microsoft Windows XP Professional) is going to use the HTTP CONNECT properties of OpenVPN configuration options to establish the VPN connection with the Linux router (Fedora Core 2) through the HTTP proxy (a configured Squid in this case). We are going to work with TCP (as HTTP is relying on TCP for its communication). Authentication and encryption: - Static key (2048 bit OpenVPN static key). - Encryption is done by using a BF-CBC cipher with a 128bits key and HMAC authentication (OpenVPN default).
Test 3, step 1: OpenVPN configuration options needed. Configure the client and the server. - On the server side you will need to include the option to specify that the TCP protocol needs to be used and also to make this side (e.g.) the “tcp-server” side:
21
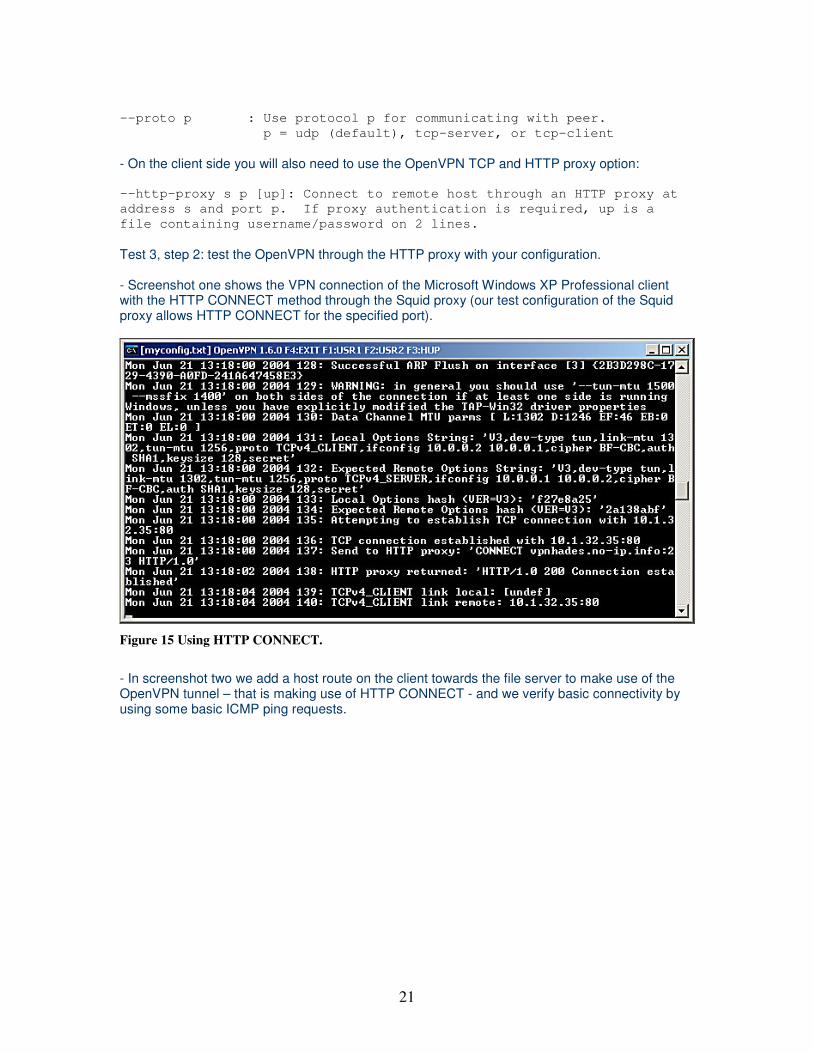
--proto p : Use protocol p for communicating with peer. p = udp (default), tcp-server, or tcp-client - On the client side you will also need to use the OpenVPN TCP and HTTP proxy option: --http-proxy s p [up]: Connect to remote host through an HTTP proxy at address s and port p. If proxy authentication is required, up is a file containing username/password on 2 lines. Test 3, step 2: test the OpenVPN through the HTTP proxy with your configuration. - Screenshot one shows the VPN connection of the Microsoft Windows XP Professional client with the HTTP CONNECT method through the Squid proxy (our test configuration of the Squid proxy allows HTTP CONNECT for the specified port).
Figure 15 Using HTTP CONNECT.
- In screenshot two we add a host route on the client towards the file server to make use of the OpenVPN tunnel – that is making use of HTTP CONNECT - and we verify basic connectivity by using some basic ICMP ping requests.
THE TELECOM VISION SUPPLIER
22
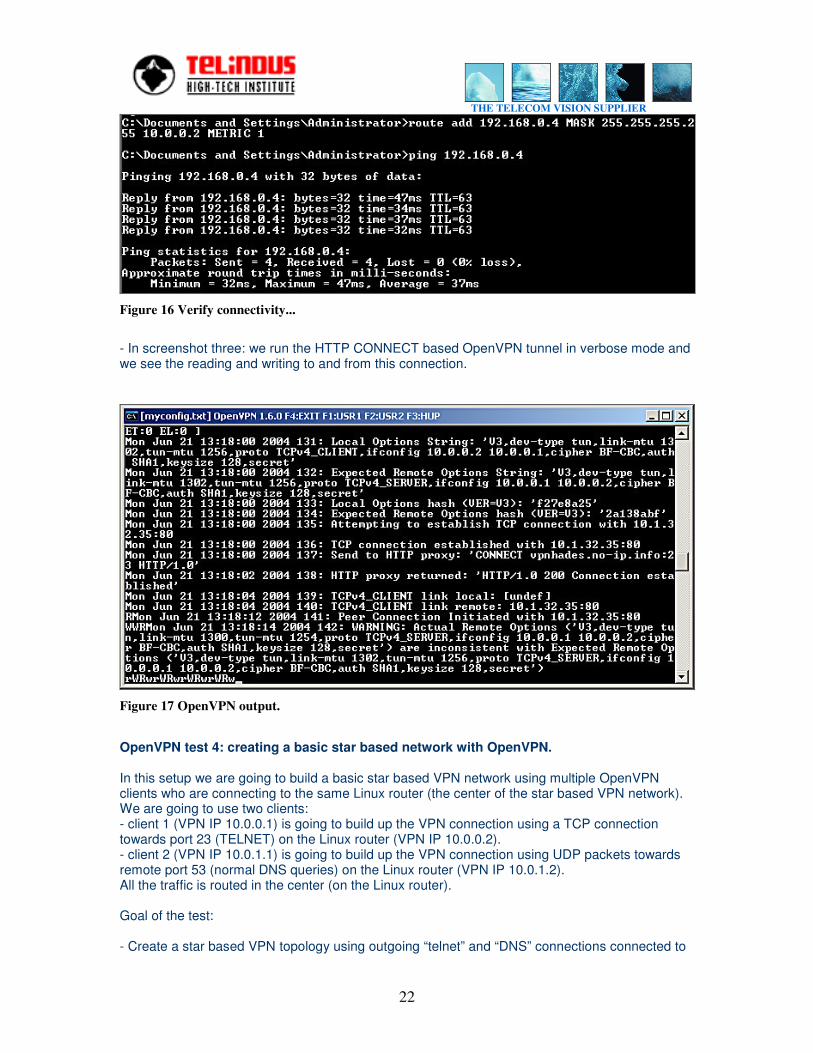
Figure 16 Verify connectivity...
- In screenshot three: we run the HTTP CONNECT based OpenVPN tunnel in verbose mode and we see the reading and writing to and from this connection.
Figure 17 OpenVPN output.
OpenVPN test 4: creating a basic star based network with OpenVPN. In this setup we are going to build a basic star based VPN network using multiple OpenVPN clients who are connecting to the same Linux router (the center of the star based VPN network). We are going to use two clients: - client 1 (VPN IP 10.0.0.1) is going to build up the VPN connection using a TCP connection towards port 23 (TELNET) on the Linux router (VPN IP 10.0.0.2). - client 2 (VPN IP 10.0.1.1) is going to build up the VPN connection using UDP packets towards remote port 53 (normal DNS queries) on the Linux router (VPN IP 10.0.1.2). All the traffic is routed in the center (on the Linux router). Goal of the test: - Create a star based VPN topology using outgoing “telnet” and “DNS” connections connected to
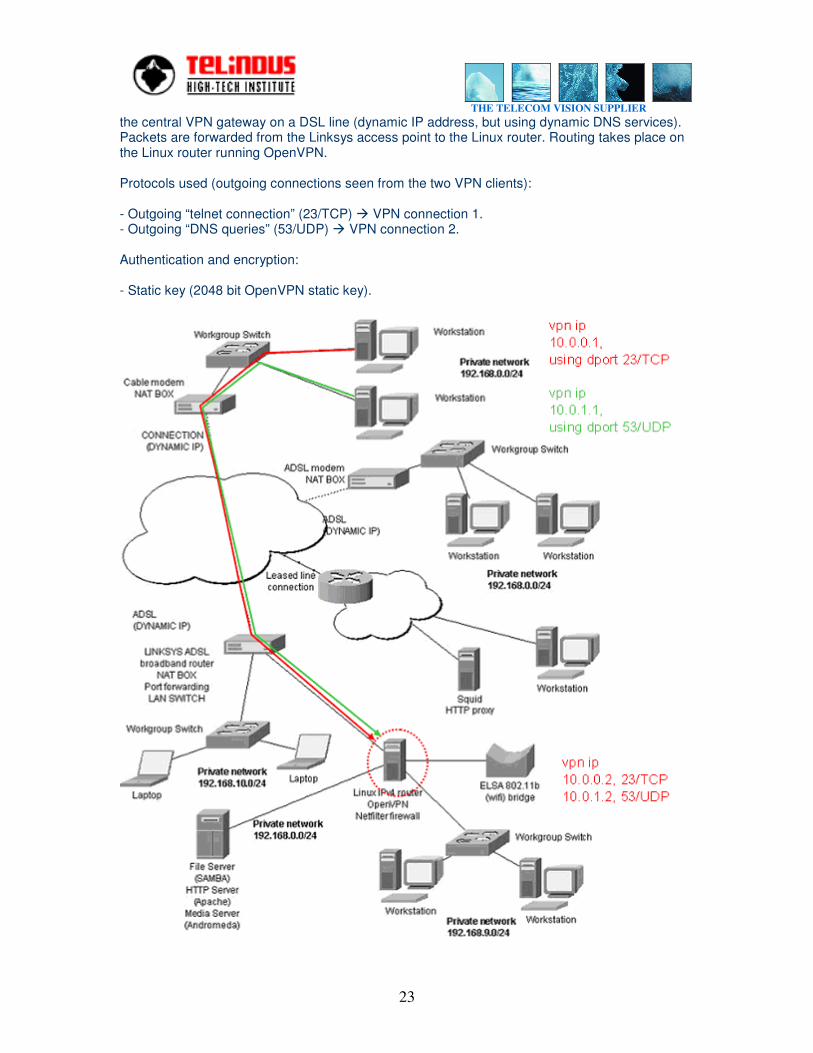
THE TELECOM VISION SUPPLIER
23
the central VPN gateway on a DSL line (dynamic IP address, but using dynamic DNS services). Packets are forwarded from the Linksys access point to the Linux router. Routing takes place on the Linux router running OpenVPN. Protocols used (outgoing connections seen from the two VPN clients): - Outgoing “telnet connection” (23/TCP) � VPN connection 1. - Outgoing “DNS queries” (53/UDP) � VPN connection 2. Authentication and encryption: - Static key (2048 bit OpenVPN static key).
THE TELECOM VISION SUPPLIER
24
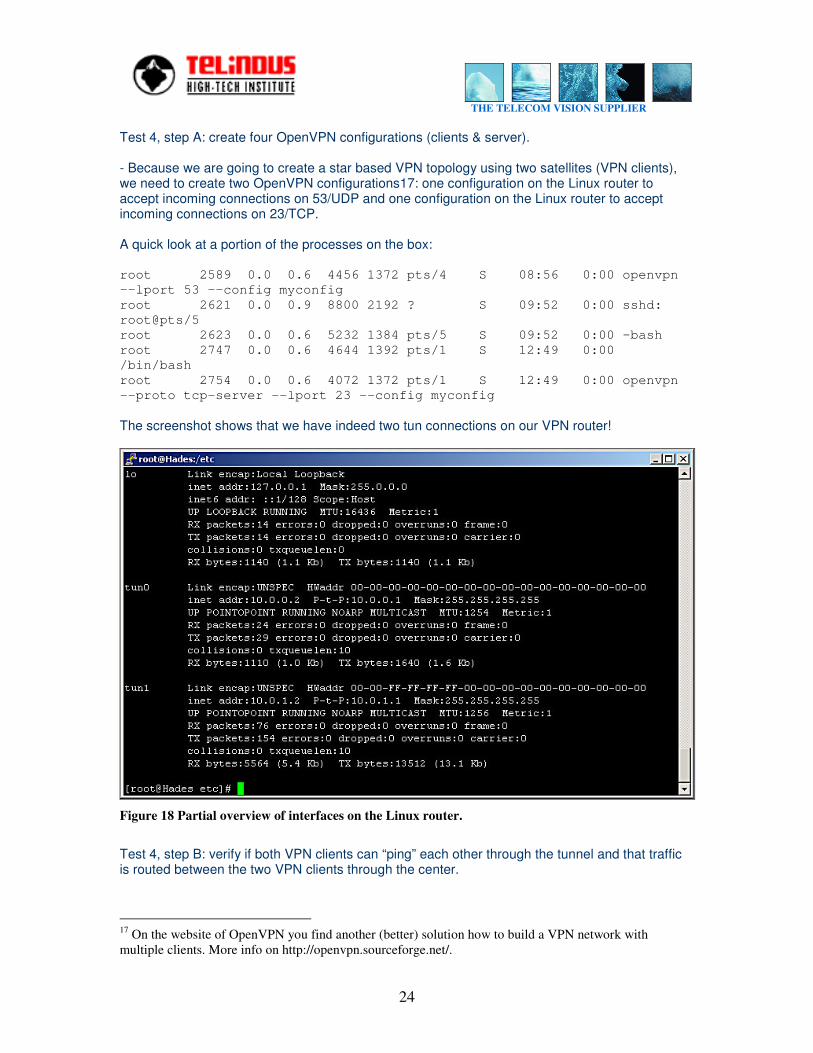
Test 4, step A: create four OpenVPN configurations (clients & server). - Because we are going to create a star based VPN topology using two satellites (VPN clients), we need to create two OpenVPN configurations17: one configuration on the Linux router to accept incoming connections on 53/UDP and one configuration on the Linux router to accept incoming connections on 23/TCP. A quick look at a portion of the processes on the box: root 2589 0.0 0.6 4456 1372 pts/4 S 08:56 0:00 openvpn --lport 53 --config myconfig root 2621 0.0 0.9 8800 2192 ? S 09:52 0:00 sshd: root@pts/5 root 2623 0.0 0.6 5232 1384 pts/5 S 09:52 0:00 -bash root 2747 0.0 0.6 4644 1392 pts/1 S 12:49 0:00 /bin/bash root 2754 0.0 0.6 4072 1372 pts/1 S 12:49 0:00 openvpn --proto tcp-server --lport 23 --config myconfig The screenshot shows that we have indeed two tun connections on our VPN router!
Figure 18 Partial overview of interfaces on the Linux router.
Test 4, step B: verify if both VPN clients can “ping” each other through the tunnel and that traffic is routed between the two VPN clients through the center.
17 On the website of OpenVPN you find another (better) solution how to build a VPN network with multiple clients. More info on http://openvpn.sourceforge.net/.
THE TELECOM VISION SUPPLIER
25
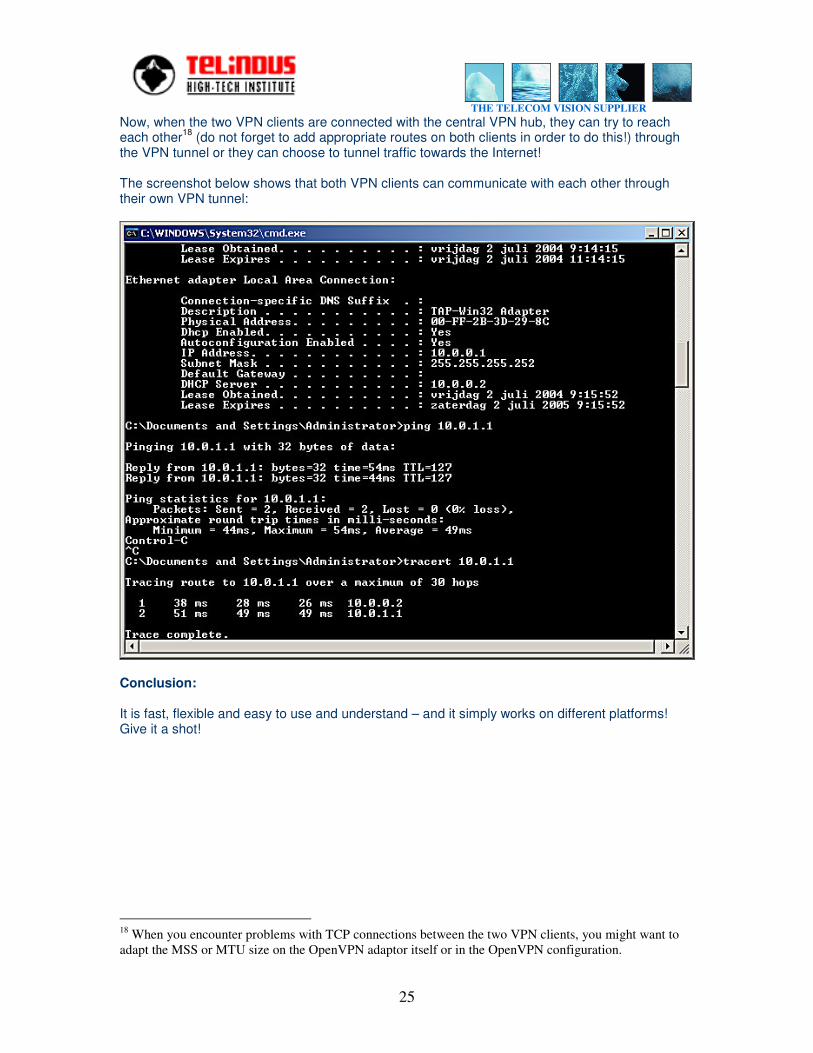
Now, when the two VPN clients are connected with the central VPN hub, they can try to reach each other18 (do not forget to add appropriate routes on both clients in order to do this!) through the VPN tunnel or they can choose to tunnel traffic towards the Internet! The screenshot below shows that both VPN clients can communicate with each other through their own VPN tunnel:
Conclusion: It is fast, flexible and easy to use and understand – and it simply works on different platforms! Give it a shot!
18 When you encounter problems with TCP connections between the two VPN clients, you might want to adapt the MSS or MTU size on the OpenVPN adaptor itself or in the OpenVPN configuration.