Embed Size (px)
Citation preview
Red Hat OpenShift Documentation Team
OpenShift Online 1User Guide
Managing Applications in the Cloud with OpenShift OnlineEdition 1.0
OpenShift Online 1 User Guide
Managing Applications in the Cloud with OpenShift OnlineEdition 1.0
Red Hat OpenShift Documentation Team
Legal Notice
Copyright © 2014 Red Hat.
This document is licensed by Red Hat under the Creative Commons Attribution-ShareAlike 3.0 UnportedLicense. If you distribute this document, or a modified version of it, you must provide attribution to RedHat, Inc. and provide a link to the original. If the document is modified, all Red Hat trademarks must beremoved.
Red Hat, as the licensor of this document, waives the right to enforce, and agrees not to assert, Section4d of CC-BY-SA to the fullest extent permitted by applicable law.
Red Hat, Red Hat Enterprise Linux, the Shadowman logo, JBoss, MetaMatrix, Fedora, OpenShift, theInfinity Logo, and RHCE are trademarks of Red Hat, Inc., registered in the United States and othercountries.
Linux ® is the registered trademark of Linus Torvalds in the United States and other countries.
Java ® is a registered trademark of Oracle and/or its affiliates.
XFS ® is a trademark of Silicon Graphics International Corp. or its subsidiaries in the United Statesand/or other countries.
MySQL ® is a registered trademark of MySQL AB in the United States, the European Union and othercountries.
Node.js ® is an official trademark of Joyent. Red Hat Software Collections is not formally related to orendorsed by the official Joyent Node.js open source or commercial project.
All other trademarks are the property of their respective owners.
Abstract
This guide provides an introduction to OpenShift Online and documents its application managementfunctions.
. . . . . . . . . . . . . . . . . . . . . . . . . . . . . . . . . . . . . . . . . . . . . . . . . . . . . . . . . . . . . . . . . . . . . . . . . . . . . . . . . . . . . . . . . . . . . . . . . . . . . . . . . . . . . . . . . . . . . . . . . . . . . . . . . . . . . . . . . . . . . . . . . . . . . . . . . . . . . . . . . . . . . . . . . . . . . . . . . . . . . . . . . . . . . . . . . . . . . . . . . . . . . . . . . . . . . . . . . . . . . . . . . . . . . . . . . . . . . . . . . . . . . . . . . . . . . . . . . . . . . . . . . . . . . . . . . . . . . . . .
. . . . . . . . . . . . . . . . . . . . . . . . . . . . . . . . . . . . . . . . . . . . . . . . . . . . . . . . . . . . . . . . . . . . . . . . . . . . . . . . . . . . . . . . . . . . . . . . . . . . . . . . . . . . . . . . . . . . . . . . . . . . . . . . . . . . . . . . . . . . . . . . . . . . . . . . . . . . . . . . . . . . . . . . . . . . . . . . . . . . . . . . . . . . . . . . . . . . . . . . . . . . . . . . . . . . . . . . . . . . . . . . . . . . . . . . . . . . . . . . . . . . . . . . . . . . . . . . . . . . . . . . . . . . . . . . . . . . . . . .
. . . . . . . . . . . . . . . . . . . . . . . . . . . . . . . . . . . . . . . . . . . . . . . . . . . . . . . . . . . . . . . . . . . . . . . . . . . . . . . . . . . . . . . . . . . . . . . . . . . . . . . . . . . . . . . . . . . . . . . . . . . . . . . . . . . . . . . . . . . . . . . . . . . . . . . . . . . . . . . . . . . . . . . . . . . . . . . . . . . . . . . . . . . . . . . . . . . . . . . . . . . . . . . . . . . . . . . . . . . . . . . . . . . . . . . . . . . . . . . . . . . . . . . . . . . . . . . . . . . . . . . . . . . . . . . . . . . . . . . .
. . . . . . . . . . . . . . . . . . . . . . . . . . . . . . . . . . . . . . . . . . . . . . . . . . . . . . . . . . . . . . . . . . . . . . . . . . . . . . . . . . . . . . . . . . . . . . . . . . . . . . . . . . . . . . . . . . . . . . . . . . . . . . . . . . . . . . . . . . . . . . . . . . . . . . . . . . . . . . . . . . . . . . . . . . . . . . . . . . . . . . . . . . . . . . . . . . . . . . . . . . . . . . . . . . . . . . . . . . . . . . . . . . . . . . . . . . . . . . . . . . . . . . . . . . . . . . . . . . . . . . . . . . . . . . . . . . . . . . . .
. . . . . . . . . . . . . . . . . . . . . . . . . . . . . . . . . . . . . . . . . . . . . . . . . . . . . . . . . . . . . . . . . . . . . . . . . . . . . . . . . . . . . . . . . . . . . . . . . . . . . . . . . . . . . . . . . . . . . . . . . . . . . . . . . . . . . . . . . . . . . . . . . . . . . . . . . . . . . . . . . . . . . . . . . . . . . . . . . . . . . . . . . . . . . . . . . . . . . . . . . . . . . . . . . . . . . . . . . . . . . . . . . . . . . . . . . . . . . . . . . . . . . . . . . . . . . . . . . . . . . . . . . . . . . . . . . . . . . . . .
. . . . . . . . . . . . . . . . . . . . . . . . . . . . . . . . . . . . . . . . . . . . . . . . . . . . . . . . . . . . . . . . . . . . . . . . . . . . . . . . . . . . . . . . . . . . . . . . . . . . . . . . . . . . . . . . . . . . . . . . . . . . . . . . . . . . . . . . . . . . . . . . . . . . . . . . . . . . . . . . . . . . . . . . . . . . . . . . . . . . . . . . . . . . . . . . . . . . . . . . . . . . . . . . . . . . . . . . . . . . . . . . . . . . . . . . . . . . . . . . . . . . . . . . . . . . . . . . . . . . . . . . . . . . . . . . . . . . . . . .
. . . . . . . . . . . . . . . . . . . . . . . . . . . . . . . . . . . . . . . . . . . . . . . . . . . . . . . . . . . . . . . . . . . . . . . . . . . . . . . . . . . . . . . . . . . . . . . . . . . . . . . . . . . . . . . . . . . . . . . . . . . . . . . . . . . . . . . . . . . . . . . . . . . . . . . . . . . . . . . . . . . . . . . . . . . . . . . . . . . . . . . . . . . . . . . . . . . . . . . . . . . . . . . . . . . . . . . . . . . . . . . . . . . . . . . . . . . . . . . . . . . . . . . . . . . . . . . . . . . . . . . . . . . . . . . . . . . . . . . .
Table of Contents
Preface1. Document Conventions
1.1. Typographic Conventions1.2. Pull-quote Conventions1.3. Notes and Warnings
2. Getting Help2.1. Do You Need Help?2.2. We Need Feedback!
Part I. Introduction
Chapter 1. Product Introduction1.1. Overview1.2. Basic Architecture1.3. Subscription Plans1.4. User Interfaces
1.4.1. Management Console1.4.2. Client Tools
1.5. What's New in Current Release
Chapter 2. Getting Started2.1. OpenShift Account2.2. Client Tools2.3. Basic Administration
2.3.1. Viewing Account Information2.3.2. Ending Current Session
Chapter 3. Authentication3.1. Authorization Tokens
3.1.1. Introduction to Authorization Tokens3.1.2. Creating Authorization Tokens3.1.3. Viewing Authorization Tokens3.1.4. Deleting Authorization Tokens
3.2. SSH Keys3.2.1. Introduction to SSH Keys3.2.2. Generating Keys Manually3.2.3. Adding a Key
3.2.3.1. Adding a Specific SSH Key Type3.2.4. Viewing All Public Keys3.2.5. Viewing a Specific Public Key3.2.6. Deleting a Key3.2.7. Resolving Authentication Issues
3.2.7.1. Resolving Issues with Interactive Setup Wizard
Part II. Domains and SSL Certificates
Chapter 4 . Domains4.1. Introduction to Domains4.2. Domain Management
4.2.1. Creating a Domain4.2.2. Listing Available Domains4.2.3. Viewing a Domain4.2.4. Renaming a Domain
66678889
10
1111111212121314
151515151515
17171717181819191920202021212121
23
24242424242526
Table of Contents
1
. . . . . . . . . . . . . . . . . . . . . . . . . . . . . . . . . . . . . . . . . . . . . . . . . . . . . . . . . . . . . . . . . . . . . . . . . . . . . . . . . . . . . . . . . . . . . . . . . . . . . . . . . . . . . . . . . . . . . . . . . . . . . . . . . . . . . . . . . . . . . . . . . . . . . . . . . . . . . . . . . . . . . . . . . . . . . . . . . . . . . . . . . . . . . . . . . . . . . . . . . . . . . . . . . . . . . . . . . . . . . . . . . . . . . . . . . . . . . . . . . . . . . . . . . . . . . . . . . . . . . . . . . . . . . . . . . . . . . . . .
. . . . . . . . . . . . . . . . . . . . . . . . . . . . . . . . . . . . . . . . . . . . . . . . . . . . . . . . . . . . . . . . . . . . . . . . . . . . . . . . . . . . . . . . . . . . . . . . . . . . . . . . . . . . . . . . . . . . . . . . . . . . . . . . . . . . . . . . . . . . . . . . . . . . . . . . . . . . . . . . . . . . . . . . . . . . . . . . . . . . . . . . . . . . . . . . . . . . . . . . . . . . . . . . . . . . . . . . . . . . . . . . . . . . . . . . . . . . . . . . . . . . . . . . . . . . . . . . . . . . . . . . . . . . . . . . . . . . . . . .
. . . . . . . . . . . . . . . . . . . . . . . . . . . . . . . . . . . . . . . . . . . . . . . . . . . . . . . . . . . . . . . . . . . . . . . . . . . . . . . . . . . . . . . . . . . . . . . . . . . . . . . . . . . . . . . . . . . . . . . . . . . . . . . . . . . . . . . . . . . . . . . . . . . . . . . . . . . . . . . . . . . . . . . . . . . . . . . . . . . . . . . . . . . . . . . . . . . . . . . . . . . . . . . . . . . . . . . . . . . . . . . . . . . . . . . . . . . . . . . . . . . . . . . . . . . . . . . . . . . . . . . . . . . . . . . . . . . . . . . .
. . . . . . . . . . . . . . . . . . . . . . . . . . . . . . . . . . . . . . . . . . . . . . . . . . . . . . . . . . . . . . . . . . . . . . . . . . . . . . . . . . . . . . . . . . . . . . . . . . . . . . . . . . . . . . . . . . . . . . . . . . . . . . . . . . . . . . . . . . . . . . . . . . . . . . . . . . . . . . . . . . . . . . . . . . . . . . . . . . . . . . . . . . . . . . . . . . . . . . . . . . . . . . . . . . . . . . . . . . . . . . . . . . . . . . . . . . . . . . . . . . . . . . . . . . . . . . . . . . . . . . . . . . . . . . . . . . . . . . . .
. . . . . . . . . . . . . . . . . . . . . . . . . . . . . . . . . . . . . . . . . . . . . . . . . . . . . . . . . . . . . . . . . . . . . . . . . . . . . . . . . . . . . . . . . . . . . . . . . . . . . . . . . . . . . . . . . . . . . . . . . . . . . . . . . . . . . . . . . . . . . . . . . . . . . . . . . . . . . . . . . . . . . . . . . . . . . . . . . . . . . . . . . . . . . . . . . . . . . . . . . . . . . . . . . . . . . . . . . . . . . . . . . . . . . . . . . . . . . . . . . . . . . . . . . . . . . . . . . . . . . . . . . . . . . . . . . . . . . . . .
. . . . . . . . . . . . . . . . . . . . . . . . . . . . . . . . . . . . . . . . . . . . . . . . . . . . . . . . . . . . . . . . . . . . . . . . . . . . . . . . . . . . . . . . . . . . . . . . . . . . . . . . . . . . . . . . . . . . . . . . . . . . . . . . . . . . . . . . . . . . . . . . . . . . . . . . . . . . . . . . . . . . . . . . . . . . . . . . . . . . . . . . . . . . . . . . . . . . . . . . . . . . . . . . . . . . . . . . . . . . . . . . . . . . . . . . . . . . . . . . . . . . . . . . . . . . . . . . . . . . . . . . . . . . . . . . . . . . . . . .
. . . . . . . . . . . . . . . . . . . . . . . . . . . . . . . . . . . . . . . . . . . . . . . . . . . . . . . . . . . . . . . . . . . . . . . . . . . . . . . . . . . . . . . . . . . . . . . . . . . . . . . . . . . . . . . . . . . . . . . . . . . . . . . . . . . . . . . . . . . . . . . . . . . . . . . . . . . . . . . . . . . . . . . . . . . . . . . . . . . . . . . . . . . . . . . . . . . . . . . . . . . . . . . . . . . . . . . . . . . . . . . . . . . . . . . . . . . . . . . . . . . . . . . . . . . . . . . . . . . . . . . . . . . . . . . . . . . . . . . .
4.2.5. Deleting a Domain
Chapter 5. Domain Membership5.1. Introduction to Domain Membership5.2. Managing Domain Membership
5.2.1. Adding a Member5.2.2. Changing Member Role5.2.3. Listing Members of a Domain5.2.4. Listing Members of an Application5.2.5. Removing a Member
Chapter 6. Custom Domains and SSL Certificates6.1. Introduction to Custom Domains and SSL Certificates6.2. Managing Custom Domain Names6.3. Managing Custom SSL Certificates
Part III. Cartridges and Applications
Chapter 7. Cartridges7.1. Introduction to Cartridges
7.1.1. Web Framework Cartridges7.1.2. Add-on Cartridges7.1.3. Downloadable Cartridges
Chapter 8. Applications8.1. Introduction to Applications
8.1.1. Application Life Cycle8.1.2. Scalable and Non-Scalable Applications
Chapter 9. Application Management9.1. General Information9.2. Creating an Application9.3. Cloning the Remote Application Repository9.4. Viewing Applications for a User9.5. Scaling an Application Manually9.6. Application Management Commands9.7. Managing Applications in a Secure Shell Environment
9.7.1. Introduction to Secure Shell Environment9.7.2. Accessing an Application9.7.3. Accessing a Specific Gear9.7.4. Accessing a Database Cartridge
9.8. Scheduling Cron Jobs9.9. Binding Applications to Ports
9.9.1. Configuring WebSocket Ports9.9.2. Configuring Email Ports
9.10. Port Forwarding9.10.1. Introduction to Port Forwarding9.10.2. Application Port Forwarding9.10.3. Gear Port Forwarding9.10.4. Port Forwarding on Mac OS X
9.11. Deleting an Application
Chapter 10. Cartridge Management10.1. Viewing Available Cartridges10.2. Adding a Cartridge to an Application10.3. Viewing Cartridges for an Application10.4. Cartridge Management Commands
26
2828282828282929
30303031
32
3333333334
36363637
39393943434445464647484950515454545455565657
5959596060
OpenShift Online 1 User Guide
2

. . . . . . . . . . . . . . . . . . . . . . . . . . . . . . . . . . . . . . . . . . . . . . . . . . . . . . . . . . . . . . . . . . . . . . . . . . . . . . . . . . . . . . . . . . . . . . . . . . . . . . . . . . . . . . . . . . . . . . . . . . . . . . . . . . . . . . . . . . . . . . . . . . . . . . . . . . . . . . . . . . . . . . . . . . . . . . . . . . . . . . . . . . . . . . . . . . . . . . . . . . . . . . . . . . . . . . . . . . . . . . . . . . . . . . . . . . . . . . . . . . . . . . . . . . . . . . . . . . . . . . . . . . . . . . . . . . . . . . . .
. . . . . . . . . . . . . . . . . . . . . . . . . . . . . . . . . . . . . . . . . . . . . . . . . . . . . . . . . . . . . . . . . . . . . . . . . . . . . . . . . . . . . . . . . . . . . . . . . . . . . . . . . . . . . . . . . . . . . . . . . . . . . . . . . . . . . . . . . . . . . . . . . . . . . . . . . . . . . . . . . . . . . . . . . . . . . . . . . . . . . . . . . . . . . . . . . . . . . . . . . . . . . . . . . . . . . . . . . . . . . . . . . . . . . . . . . . . . . . . . . . . . . . . . . . . . . . . . . . . . . . . . . . . . . . . . . . . . . . . .
. . . . . . . . . . . . . . . . . . . . . . . . . . . . . . . . . . . . . . . . . . . . . . . . . . . . . . . . . . . . . . . . . . . . . . . . . . . . . . . . . . . . . . . . . . . . . . . . . . . . . . . . . . . . . . . . . . . . . . . . . . . . . . . . . . . . . . . . . . . . . . . . . . . . . . . . . . . . . . . . . . . . . . . . . . . . . . . . . . . . . . . . . . . . . . . . . . . . . . . . . . . . . . . . . . . . . . . . . . . . . . . . . . . . . . . . . . . . . . . . . . . . . . . . . . . . . . . . . . . . . . . . . . . . . . . . . . . . . . . .
. . . . . . . . . . . . . . . . . . . . . . . . . . . . . . . . . . . . . . . . . . . . . . . . . . . . . . . . . . . . . . . . . . . . . . . . . . . . . . . . . . . . . . . . . . . . . . . . . . . . . . . . . . . . . . . . . . . . . . . . . . . . . . . . . . . . . . . . . . . . . . . . . . . . . . . . . . . . . . . . . . . . . . . . . . . . . . . . . . . . . . . . . . . . . . . . . . . . . . . . . . . . . . . . . . . . . . . . . . . . . . . . . . . . . . . . . . . . . . . . . . . . . . . . . . . . . . . . . . . . . . . . . . . . . . . . . . . . . . . .
Chapter 11. Build and Deployment11.1. Introduction to Deployment11.2. Preparing an Application for Deployment11.3. Deployment Mechanisms
11.3.1. Automatic Deployment11.3.1.1. Configuring Automatic Deployment
11.3.2. Manual Deployment11.3.2.1. Configuring Manual Deployment11.3.2.2. Preserving Deployments11.3.2.3. Deploying from a Git Branch11.3.2.4. Deploying from a Snapshot11.3.2.5. Viewing Previous Deployments11.3.2.6. Activating a Previous Deployment
11.4. Action Hooks11.4.1. Introduction to Action Hooks11.4.2. Cartridge Action Hooks11.4.3. Build and Deployment Action Hooks11.4.4. Scaling Action Hooks
11.5. Environment Variables11.5.1. Introduction to Environment Variables11.5.2. Informational Environment Variables11.5.3. Directory Environment Variables11.5.4. Database Environment Variables11.5.5. Library Environment Variables11.5.6. Jenkins Environment Variables11.5.7. Gear Environment Variables11.5.8. JBoss Environment Variables11.5.9. Ruby Environment Variables11.5.10. Custom Environment Variables
11.6. Hot Deployment11.6.1. Introduction to Hot Deployment11.6.2. Hot Deployment Build Details11.6.3. Enabling and Disabling Hot Deployment
11.7. Jenkins Continuous Integration11.7.1. Introduction to Jenkins11.7.2. Configuring Jenkins
11.7.2.1. Configuring Jenkins with New Applications11.7.2.2. Configuring Jenkins with Existing Applications
11.7.3. Building Applications with Jenkins11.7.3.1. Building Custom Applications
Chapter 12. Gear Storage and Disk Space Management12.1. Introduction to Gear Storage and Disk Space12.2. Viewing Gear Storage12.3. Adding Gear Storage12.4. Setting Gear Storage12.5. Removing Gear Storage12.6. T idying an Application
Chapter 13. Application Backup and Restoration with Snapshots13.1. Introduction to Snapshots13.2. Creating an Application Snapshot13.3. Restoring from an Application Snapshot13.4. Migrating an Application to Another Gear
Revision History
62626263636363636364646465656565666667676767686969707071717272727373737474747576
78787879798080
8282828283
85
Table of Contents
3

OpenShift Online 1 User Guide
4

Table of Contents
5
Preface
1. Document ConventionsThis manual uses several conventions to highlight certain words and phrases and draw attention tospecific pieces of information.
In PDF and paper editions, this manual uses typefaces drawn from the Liberation Fonts set. TheLiberation Fonts set is also used in HTML editions if the set is installed on your system. If not, alternativebut equivalent typefaces are displayed. Note: Red Hat Enterprise Linux 5 and later include the LiberationFonts set by default.
1.1. Typographic ConventionsFour typographic conventions are used to call attention to specific words and phrases. Theseconventions, and the circumstances they apply to, are as follows.
Mono-spaced Bold
Used to highlight system input, including shell commands, file names and paths. Also used to highlightkeys and key combinations. For example:
To see the contents of the file my_next_bestselling_novel in your current workingdirectory, enter the cat my_next_bestselling_novel command at the shell promptand press Enter to execute the command.
The above includes a file name, a shell command and a key, all presented in mono-spaced bold and alldistinguishable thanks to context.
Key combinations can be distinguished from an individual key by the plus sign that connects each part ofa key combination. For example:
Press Enter to execute the command.
Press Ctrl+Alt+F2 to switch to a virtual terminal.
The first example highlights a particular key to press. The second example highlights a key combination:a set of three keys pressed simultaneously.
If source code is discussed, class names, methods, functions, variable names and returned valuesmentioned within a paragraph will be presented as above, in mono-spaced bold. For example:
File-related classes include filesystem for file systems, file for files, and dir fordirectories. Each class has its own associated set of permissions.
Proportional Bold
This denotes words or phrases encountered on a system, including application names; dialog-box text;labeled buttons; check-box and radio-button labels; menu titles and submenu titles. For example:
Choose System → Preferences → Mouse from the main menu bar to launch MousePreferences. In the Buttons tab, select the Left-handed mouse check box and clickClose to switch the primary mouse button from the left to the right (making the mousesuitable for use in the left hand).
To insert a special character into a gedit file, choose Applications → Accessories →
OpenShift Online 1 User Guide
6
Character Map from the main menu bar. Next, choose Search → Find… from theCharacter Map menu bar, type the name of the character in the Search field and clickNext. The character you sought will be highlighted in the Character Table. Double-clickthis highlighted character to place it in the Text to copy field and then click the Copybutton. Now switch back to your document and choose Edit → Paste from the gedit menubar.
The above text includes application names; system-wide menu names and items; application-specificmenu names; and buttons and text found within a GUI interface, all presented in proportional bold and alldistinguishable by context.
Mono-spaced Bold Italic or Proportional Bold Italic
Whether mono-spaced bold or proportional bold, the addition of italics indicates replaceable or variabletext. Italics denotes text you do not input literally or displayed text that changes depending oncircumstance. For example:
To connect to a remote machine using ssh, type ssh [email protected] at a shellprompt. If the remote machine is example.com and your username on that machine isjohn, type ssh [email protected] .
The mount -o remount file-system command remounts the named file system. Forexample, to remount the /home file system, the command is mount -o remount /home.
To see the version of a currently installed package, use the rpm -q package command. Itwill return a result as follows: package-version-release.
Note the words in bold italics above: username, domain.name, file-system, package, version and release.Each word is a placeholder, either for text you enter when issuing a command or for text displayed bythe system.
Aside from standard usage for presenting the title of a work, italics denotes the first use of a new andimportant term. For example:
Publican is a DocBook publishing system.
1.2. Pull-quote ConventionsTerminal output and source code listings are set off visually from the surrounding text.
Output sent to a terminal is set in mono-spaced roman and presented thus:
books Desktop documentation drafts mss photos stuff svnbooks_tests Desktop1 downloads images notes scripts svgs
Source-code listings are also set in mono-spaced roman but add syntax highlighting as follows:
Preface
7
package org.jboss.book.jca.ex1;
import javax.naming.InitialContext;
public class ExClient{ public static void main(String args[]) throws Exception { InitialContext iniCtx = new InitialContext(); Object ref = iniCtx.lookup("EchoBean"); EchoHome home = (EchoHome) ref; Echo echo = home.create();
System.out.println("Created Echo");
System.out.println("Echo.echo('Hello') = " + echo.echo("Hello")); }}
1.3. Notes and WarningsFinally, we use three visual styles to draw attention to information that might otherwise be overlooked.
Note
Notes are tips, shortcuts or alternative approaches to the task at hand. Ignoring a note shouldhave no negative consequences, but you might miss out on a trick that makes your life easier.
Important
Important boxes detail things that are easily missed: configuration changes that only apply to thecurrent session, or services that need restarting before an update will apply. Ignoring a boxlabeled “Important” will not cause data loss but may cause irritation and frustration.
Warning
Warnings should not be ignored. Ignoring warnings will most likely cause data loss.
2. Getting Help
2.1. Do You Need Help?If you experience difficulty with a procedure or other information described in this documentation, visit theRed Hat Customer Portal at http://access.redhat.com where you can:
search or browse through a knowledgebase of technical support articles about Red Hat products
submit a support case to Red Hat Global Support Services (GSS)
access other product documentation
OpenShift Online 1 User Guide
8
You can also access the OpenShift web site at https://openshift.redhat.com/ to find blogs, FAQs, forums,and other sources of information.
Red Hat also hosts a large number of electronic mailing lists for discussion of Red Hat software andtechnology. You can find a list of publicly available mailing lists at https://www.redhat.com/mailman/listinfo.Click the name of any mailing list to subscribe to that list or to access the list archives.
2.2. We Need Feedback!If you find a typographical or any other error in this manual, or if you have thought of a way to make thismanual better, we would love to hear from you! Please submit a report in Bugzilla:http://bugzilla.redhat.com/ against the product OpenShift Online.
When submitting a bug report, be sure to mention the manual's identifier: Docs User Guide
If you have a suggestion for improving the documentation, try to be as specific as possible whendescribing it. If you have found an error, please include the section number and some of the surroundingtext so we can find it easily.
Preface
9

Part I. Introduction
OpenShift Online 1 User Guide
10
Chapter 1. Product Introduction
1.1. OverviewOpenShift Online by Red Hat is a Platform as a Service (PaaS) provides developers and ITorganizations an auto scaling cloud application platform for deploying new applications on securescalable resources with minimal configuration and management overhead. OpenShift Online supports awide selection of programming languages and frameworks, such as Java, Ruby, and PHP. Integrateddeveloper tools, such as Eclipse integration, JBoss Developer Studio, and Jenkins support theapplication life cycle.
Built on Red Hat Enterprise Linux, OpenShift Online provides a secure and scalable multi-tenantoperating system for todays enterprise-class applications while providing integrated application runtimesand libraries.
This document describes how to navigate and use an OpenShift Online environment. It providesinformation on overall architecture, common application management tasks, and basic troubleshooting. Itis intended for developers and application administrators.
Report a bug
1.2. Basic ArchitectureOpenShift Online provides disk space, CPU resources, memory, network connectivity, and an Apache orJBoss server to create, deploy, and manage applications in the cloud. For most types of applications,OpenShift Online creates a file system layout that you can use as a template for building an application.It also generates a limited Domain Name System (DNS) so your application is accessible online.
The following table describes the basic system components of OpenShift Online.
Table 1.1. Basic Components
System Component Description
Gears Resource-constrained containers for application code wherecartridges run. Gears determine the amount of RAM and disk spaceavailable to a cartridge.
Cartridges Cartridges provide the functionality to run applications. Numerouscartridges are currently available to support languages such as Perl,PHP, and Ruby, as well as many database cartridges, such asPostgreSQL and MySQL.
The following gear sizes are available with OpenShift Online:
Small gears provide 512MB of RAM, 100MB of swap space, and 1GB of disk space
Medium gears provide 1GB of RAM, 100MB of swap space, and 1GB of disk space
Large gears provide 2GB of RAM, 100MB of swap space, and 1GB of disk space
By default, there are three small gears available with a total of 1.5GB of RAM and 3GB of disk space.OpenShift Online can assign these three gears to a single application and its cartridges (Cron, MySQL,etc.), use each gear for a separate application, or use the gears for scaling an application.
Report a bug
Chapter 1. Product Introduction
11
1.3. Subscription PlansCurrently there are two subscription plans available for OpenShift Online: Free and Silver. The followingtable describes the features of each plan.
Table 1.2. Subscription Plans
Feature Free Plan Silver Plan
Free Gears 3 small gears 3 small gears
Maximum Gears 3 small gears 16 small, medium, or large gears
Available Gear Sizes Small Small, medium, and large
Storage 1GB per gear Up to 6GB per gear - no extracost
SSL Shared For custom domains
Auto Scaling Limited to 3 gears Up to 16 gears
JBoss EAP with Java EE6 Full Profile Only on small gears On small, medium, and largegears
Support Community Red Hat Professional
Visit https://www.openshift.com/ for more information on each subscription plan.
Report a bug
1.4. User InterfacesThere are two mechanisms available for interacting with OpenShift Online: the Management Console andthe command line interface (CLI), referred to as the Client Tools.
Report a bug
1.4.1. Management ConsoleThe OpenShift Online Management Console is a graphical interface accessed with a web browser athttps://www.openshift.com/.
The Management Console is best suited for:
Setting up, administering and managing accounts
Launching new applications
Managing and monitoring applications
The following screenshot shows the home page of the Management Console when you first log into youraccount. Each tab across the top navigation bar provides further functionality to help you manage youraccount, applications, and more.
OpenShift Online 1 User Guide
12
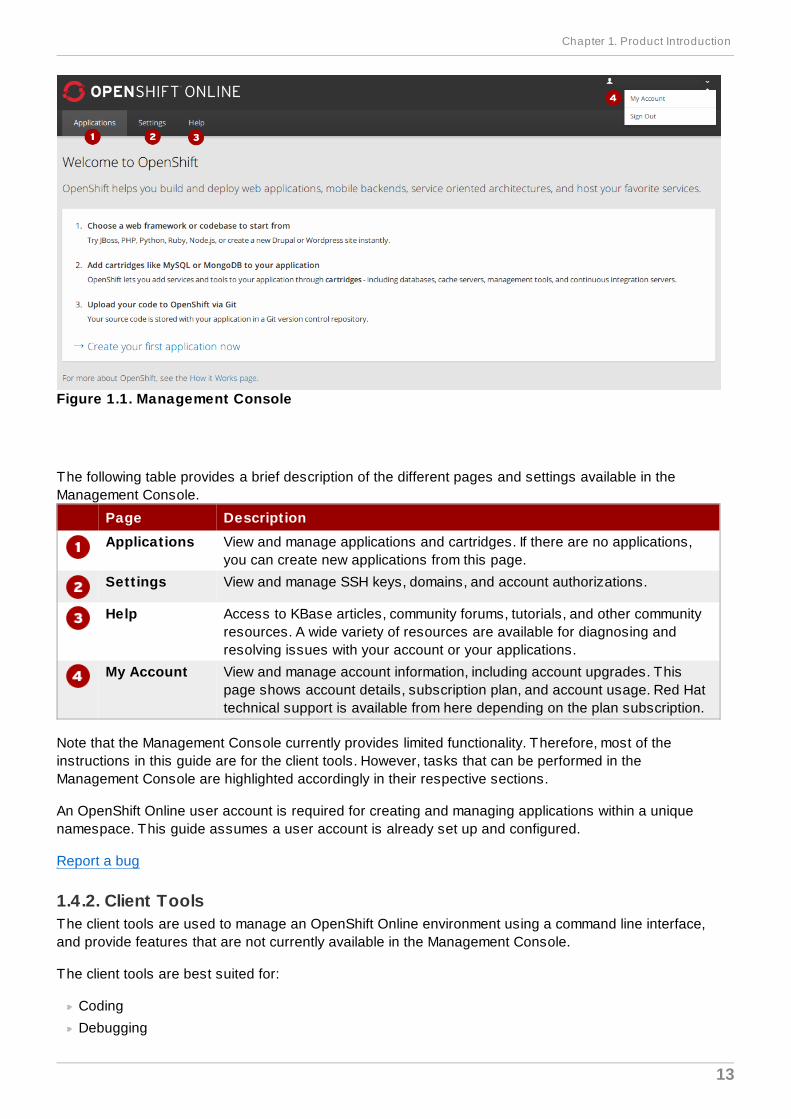
Figure 1.1. Management Console
The following table provides a brief description of the different pages and settings available in theManagement Console.
Page Description
Applications View and manage applications and cartridges. If there are no applications,you can create new applications from this page.
Settings View and manage SSH keys, domains, and account authorizations.
Help Access to KBase articles, community forums, tutorials, and other communityresources. A wide variety of resources are available for diagnosing andresolving issues with your account or your applications.
My Account View and manage account information, including account upgrades. Thispage shows account details, subscription plan, and account usage. Red Hattechnical support is available from here depending on the plan subscription.
Note that the Management Console currently provides limited functionality. Therefore, most of theinstructions in this guide are for the client tools. However, tasks that can be performed in theManagement Console are highlighted accordingly in their respective sections.
An OpenShift Online user account is required for creating and managing applications within a uniquenamespace. This guide assumes a user account is already set up and configured.
Report a bug
1.4.2. Client ToolsThe client tools are used to manage an OpenShift Online environment using a command line interface,and provide features that are not currently available in the Management Console.
The client tools are best suited for:
Coding
Debugging
Chapter 1. Product Introduction
13
Advanced application management
For example, although you can create an application using the Management Console, the applicationmust be cloned to your workstation to make any code changes, and then redeployed to the remoteserver using the client tools.
Note
The rhc package found in the OpenShift Online client tools channel is based on the Red HatEnterprise Linux 6 RPM version of the client tools, and not the Ruby gem version, which isupdated more frequently. Therefore, some updated features may be temporarily only available forthe Ruby gem version. See the OpenShift Online Client Tools Installation Guide athttps://access.redhat.com/site/documentation to install the latest Ruby gem version of the clienttools and get all available features.
Report a bug
1.5. What's New in Current ReleaseFor a complete list of all the new features available in the current release of OpenShift Online, see thecurrent edition of OpenShift Online Release Notes at https://access.redhat.com/site/documentation.
Report a bug
OpenShift Online 1 User Guide
14
Chapter 2. Getting Started
2.1. OpenShift AccountBefore you can develop OpenShift Online applications, you must register for an OpenShift Onlineaccount at https://www.openshift.com/. During registration you are provided an opportunity to select asubscription plan that suits your requirements. This guide assumes you already have an activeOpenShift Online account.
Note
Some features described in this guide are only available with a paid subscription plan.
Report a bug
2.2. Client ToolsAs mentioned previously, the client tools provide access to advanced management features currently notavailable in the Management Console. Therefore, most of the instructions provided in this guide assumethat the client tools are already installed and configured on your workstation.
See the Client Tools Installation Guide at https://access.redhat.com/site/documentation for moreinformation on how to install the client tools.
Report a bug
2.3. Basic Administration
2.3.1. Viewing Account InformationView basic information for an account with the following command:
$ rhc account
Example 2.1. Viewing Account Information
$ rhc accountLogin User@example.com----------------------------------------------------- ID: 52424geb2587c836b106001b Gears Used: 10 Gears Allowed: 16 Domains Allowed: 3 Allowed Gear Sizes: small SSL Certificates: yes
Report a bug
2.3.2. Ending Current Session
Chapter 2. Getting Started
15

End the current session with the remote server and remove all local session files with the followingcommand:
$ rhc logout
Report a bug
OpenShift Online 1 User Guide
16
Chapter 3. Authentication
3.1. Authorization Tokens
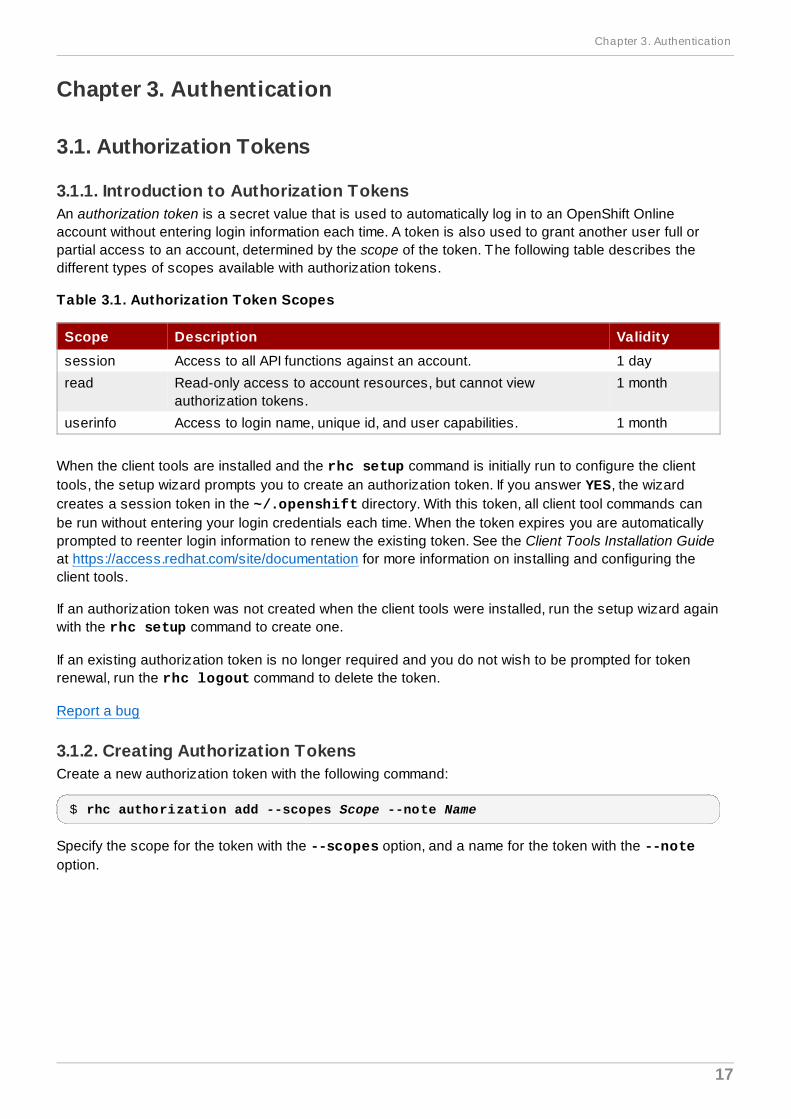
3.1.1. Introduction to Authorization TokensAn authorization token is a secret value that is used to automatically log in to an OpenShift Onlineaccount without entering login information each time. A token is also used to grant another user full orpartial access to an account, determined by the scope of the token. The following table describes thedifferent types of scopes available with authorization tokens.
Table 3.1. Authorization Token Scopes
Scope Description Validity
session Access to all API functions against an account. 1 day
read Read-only access to account resources, but cannot viewauthorization tokens.
1 month
userinfo Access to login name, unique id, and user capabilities. 1 month
When the client tools are installed and the rhc setup command is initially run to configure the clienttools, the setup wizard prompts you to create an authorization token. If you answer YES, the wizardcreates a session token in the ~/.openshift directory. With this token, all client tool commands canbe run without entering your login credentials each time. When the token expires you are automaticallyprompted to reenter login information to renew the existing token. See the Client Tools Installation Guideat https://access.redhat.com/site/documentation for more information on installing and configuring theclient tools.
If an authorization token was not created when the client tools were installed, run the setup wizard againwith the rhc setup command to create one.
If an existing authorization token is no longer required and you do not wish to be prompted for tokenrenewal, run the rhc logout command to delete the token.
Report a bug
3.1.2. Creating Authorization TokensCreate a new authorization token with the following command:
$ rhc authorization add --scopes Scope --note Name
Specify the scope for the token with the --scopes option, and a name for the token with the --noteoption.
Chapter 3. Authentication
17
Example 3.1. Creating an Authorization Token
rhc authorization add --scopes session --note My_TokenAdding authorization ... done
My_token-------- Token: 787a57211d42f251204136b05d490038830d9b7057f54f816c2a9fcd0c8333b8 Scopes: session Created: 4:40 PM Expires In: about 1 day
After creating a new authorization token, use the --token token_string global option to run rhccommands as the user associated with the authorization token that was provided.
Report a bug
3.1.3. Viewing Authorization TokensView the tokens associated with your account with the following command:
$ rhc authorization list
Example 3.2. Viewing Authorization Tokens
$ rhc authorization listMy_token-------- Token: 787a57211d42f251204136b05d490038830d9b7057f54f816c2a9fcd0c8333b8 Scopes: session Created: 4:40 PM Expires In: about 23 hours
RHC/1.8.0 (from laptop.example.com on x86_64-linux)--------------------------------------------------- Token: 28f6e375dc7ea57b0dcabb3850d08ee9bc023f7df5dbfa4958afe7ad71d33e37 Scopes: session Created: 12:58 PM Expires In: about 19 hours
Report a bug
3.1.4. Deleting Authorization TokensDelete authorization tokens when they are no longer required, or to end access to your account by otherusers:
Delete Specific Authorization Tokens
Delete one or more tokens with the following command, separating multiple tokens with commas:
$ rhc authorization delete token_1, token_2
Delete All Authorization Tokens
OpenShift Online 1 User Guide
18
Delete all tokens associated with your account with the following command:
$ rhc authorization delete-all
Report a bug
3.2. SSH Keys
3.2.1. Introduction to SSH KeysOpenShift Online uses the Secure Shell (SSH) network protocol to authenticate account credentials tothe OpenShift Online servers for secure communication, and supports both RSA and DSA keys for SSHauthentication. This section describes how authentication with OpenShift Online works, and providesinformation on how to manage SSH keys for user accounts.
Successful authentication occurs when the public SSH key on your computer matches the public key thathas been uploaded to the OpenShift Online server. When the client tools are initially configured, theinteractive setup wizard generates a new pair of SSH keys in the default .ssh folder of your homedirectory. The SSH key pair consists of the public key, id_rsa.pub, and the private key, id_rsa. Aspart of the initial configuration, you have the option of automatically uploading the public key, id_rsa.pub, to the OpenShift Online server. See the OpenShift Online Client Tools Installation Guide athttps://access.redhat.com/site/documentation for more information on how to configure the client tools.
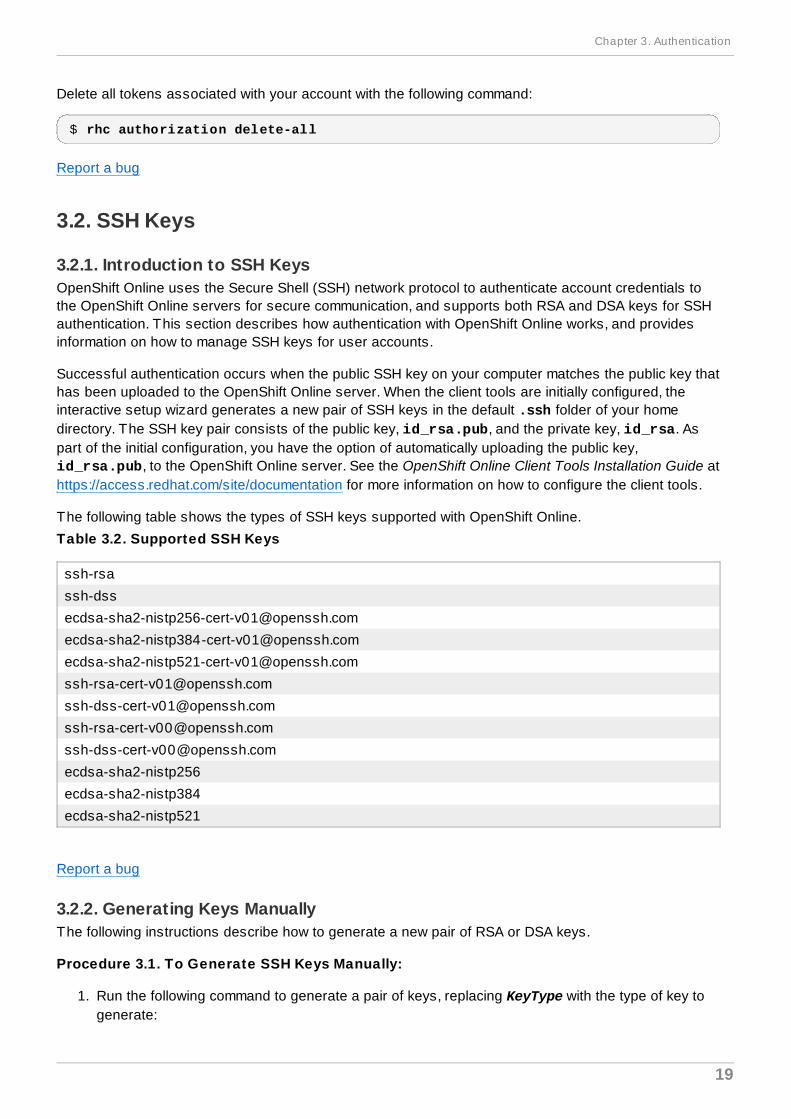
The following table shows the types of SSH keys supported with OpenShift Online.
Table 3.2. Supported SSH Keys
ssh-rsa
ssh-dss
ecdsa-sha2-nistp256
ecdsa-sha2-nistp384
ecdsa-sha2-nistp521
Report a bug
3.2.2. Generating Keys ManuallyThe following instructions describe how to generate a new pair of RSA or DSA keys.
Procedure 3.1. To Generate SSH Keys Manually:
1. Run the following command to generate a pair of keys, replacing KeyType with the type of key togenerate:
Chapter 3. Authentication
19
$ ssh-keygen -t KeyType
2. Press Enter when prompted to save the key file in the default location:
...Generating public/private rsa key pair.Enter file in which to save the key (/home/username/.ssh/id_rsa): /home/username/.ssh/id_rsa
Note
Red Hat recommends to save all SSH keys in the default location. If an id_rsa file alreadyexists, rename the new SSH key file to avoid overwriting the existing one.
3. Enter a passphrase or leave blank when prompted, then press Enter:
Enter passphrase (empty for no passphrase):Enter same passphrase again:Your identification has been saved in /home/username/.ssh/id_rsaYour public key has been saved in /home/username/.ssh/id_rsa.pub....
Report a bug
3.2.3. Adding a KeyOnce an SSH key has been generated, add the key by uploading it to the remote server with thefollowing command, replacing KeyName and KeyPath with the name and path of the key to upload:
$ rhc sshkey add KeyName KeyPath
Report a bug
3.2.3.1. Adding a Specific SSH Key TypeAfter an SSH key is generated, rather than uploading the key file, add the contents of the key file directlyto the remote server with the following command:
$ rhc sshkey add KeyName --type KeyType --content KeyContent
An SSH key is a long string of alphanumeric characters.
Report a bug
3.2.4. Viewing All Public KeysView a list of all public keys associated with an account with the following command:
$ rhc sshkey list
OpenShift Online 1 User Guide
20
Example 3.3. Viewing All Public Keys
$ rhc sshkey listlibra (type: ssh-rsa)--------------------- Fingerprint: 43:f5:29:ad:9f:b8:b3:a6:e7:88:c9:7f:4c:a9:0c:ad
winKey (type: ssh-rsa)---------------------- Fingerprint: 0c:16:81:e3:51:eb:12:90:f6:03:80:g2:a2:10:78:14
default (type: ssh-rsa)----------------------- Fingerprint: 43:f8:93:re:9f:a3:a8:f4:f3:34:g8:3d:1g:d8:3c:as Available: true
You have 3 SSH keys associated with your account.
Report a bug
3.2.5. Viewing a Specific Public KeyView details of a specific key with the following command, specifying the name of the key:
$ rhc sshkey show KeyName
Report a bug
3.2.6. Deleting a KeyDelete an existing public key from the remote server with the following command:
$ rhc sshkey remove KeyName
Report a bug
3.2.7. Resolving Authentication IssuesOccasionally, a local public key might not match the public key stored on the OpenShift Online remoteserver, or the matching key might not be found on the local file system. This can cause connectionissues, or the SSH key authentication process can fail, in which case a new pair of SSH keys must begenerated. If you are having problems authenticating, generate a new pair of SSH keys in one of twoways:
Use the interactive setup wizard (recommended)
Manually generate and add SSH keys
Report a bug
3.2.7.1. Resolving Issues with Interactive Setup WizardRed Hat recommends resolving authentication issues with the interactive setup wizard to generate anew pair of SSH keys. The interactive setup wizard also provides the option to automatically upload anew public key to the OpenShift Online server. Launch the interactive setup wizard with the rhc setupcommand and follow the onscreen instructions.
Chapter 3. Authentication
21

See the OpenShift Online Client Tools Installation Guide at https://access.redhat.com/site/documentationfor more information about the client tools and the interactive setup wizard.
Report a bug
OpenShift Online 1 User Guide
22

Part II. Domains and SSL Certificates
Part II. Domains and SSL Certificates
23
Chapter 4. Domains
4.1. Introduction to DomainsAn OpenShift Online domain forms part of an application's URL and is unique to an account. The syntaxfor an application URL is application-domain.example.com. Each user name supports a single domain,but you can create multiple applications within the domain. Note that a domain must be created beforeyou can create an application.
An OpenShift Online blacklist restricts the domain names that are available. A warning message informsyou if a blacklisted domain name has been selected when you attempt to create a domain.
Domain names consist of a maximum of 16 alphanumeric characters and cannot contain spaces orsymbols.
Report a bug
4.2. Domain Management
4.2.1. Creating a DomainA domain is required to create applications on OpenShift Online. Create a new domain with the followingcommand, specifying the name of the domain:
$ rhc domain create Domain_Name
The following example creates a domain named automobile.
Example 4 .1. Creating a Domain
$ rhc domain create automobile Creating domain 'automobile'
You may now create an application using the 'rhc app create' command
Note
The number of domains you can create depends on the type of account and its limitations. Awarning message alerts you when the account limitations are exceeded.
See Also:
Section 6.1, “Introduction to Custom Domains and SSL Certificates”
Section 9.2, “Creating an Application”
Report a bug
4.2.2. Listing Available Domains
OpenShift Online 1 User Guide
24
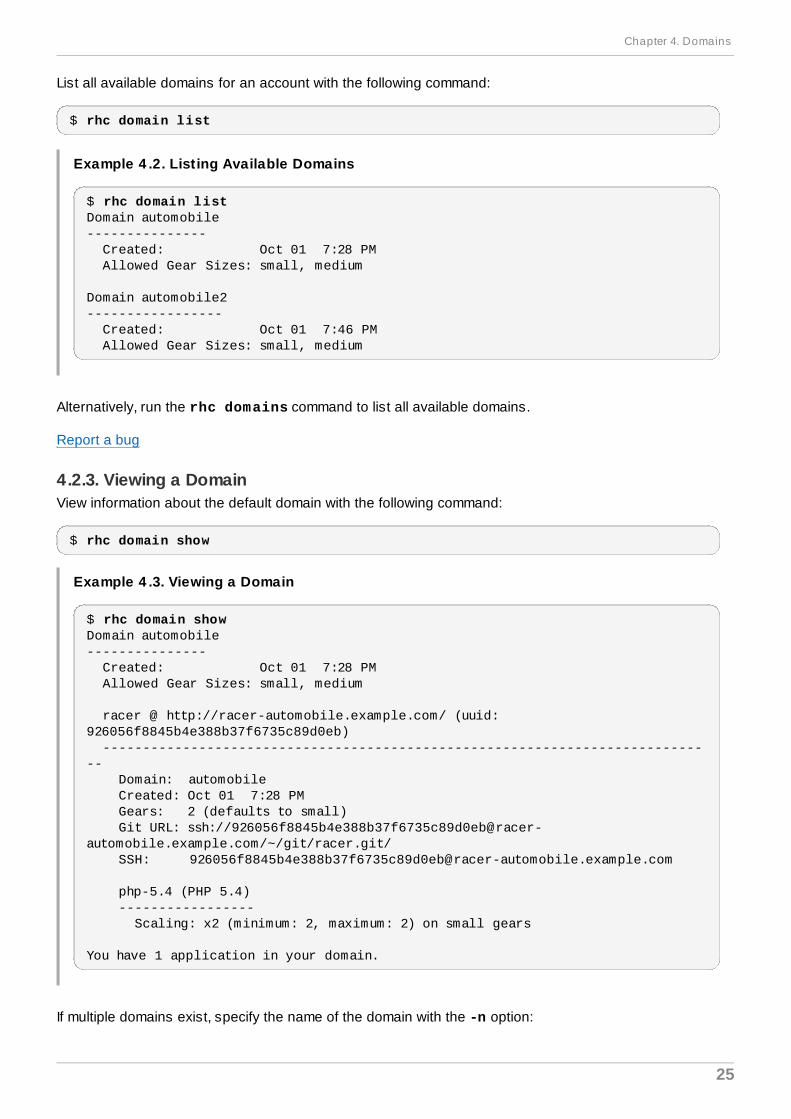
List all available domains for an account with the following command:
$ rhc domain list
Example 4 .2. Listing Available Domains
$ rhc domain listDomain automobile--------------- Created: Oct 01 7:28 PM Allowed Gear Sizes: small, medium
Domain automobile2----------------- Created: Oct 01 7:46 PM Allowed Gear Sizes: small, medium
Alternatively, run the rhc domains command to list all available domains.
Report a bug
4.2.3. Viewing a DomainView information about the default domain with the following command:
$ rhc domain show
Example 4 .3. Viewing a Domain
$ rhc domain showDomain automobile--------------- Created: Oct 01 7:28 PM Allowed Gear Sizes: small, medium
racer @ http://racer-automobile.example.com/ (uuid: 926056f8845b4e388b37f6735c89d0eb) ----------------------------------------------------------------------------- Domain: automobile Created: Oct 01 7:28 PM Gears: 2 (defaults to small) Git URL: ssh://[email protected]/~/git/racer.git/ SSH: [email protected]
php-5.4 (PHP 5.4) ----------------- Scaling: x2 (minimum: 2, maximum: 2) on small gears
You have 1 application in your domain.
If multiple domains exist, specify the name of the domain with the -n option:
Chapter 4. Domains
25
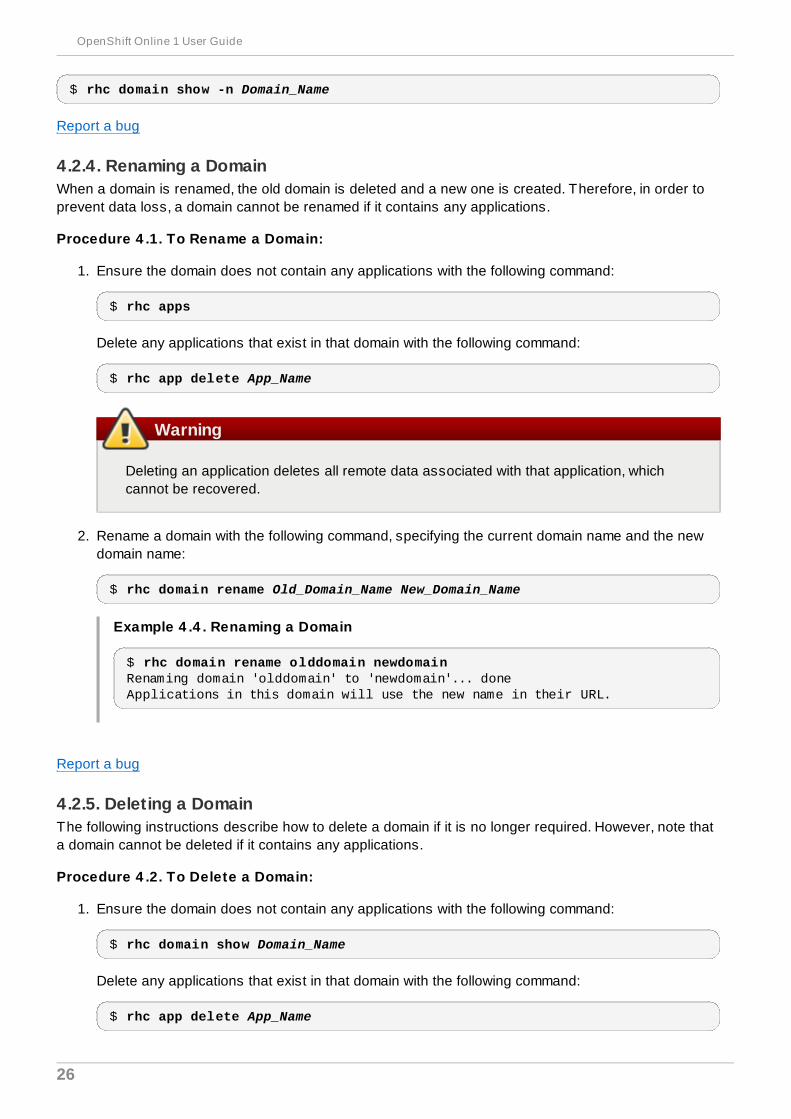
$ rhc domain show -n Domain_Name
Report a bug
4.2.4. Renaming a DomainWhen a domain is renamed, the old domain is deleted and a new one is created. Therefore, in order toprevent data loss, a domain cannot be renamed if it contains any applications.
Procedure 4 .1. To Rename a Domain:
1. Ensure the domain does not contain any applications with the following command:
$ rhc apps
Delete any applications that exist in that domain with the following command:
$ rhc app delete App_Name
Warning
Deleting an application deletes all remote data associated with that application, whichcannot be recovered.
2. Rename a domain with the following command, specifying the current domain name and the newdomain name:
$ rhc domain rename Old_Domain_Name New_Domain_Name
Example 4 .4 . Renaming a Domain
$ rhc domain rename olddomain newdomainRenaming domain 'olddomain' to 'newdomain'... doneApplications in this domain will use the new name in their URL.
Report a bug
4.2.5. Deleting a DomainThe following instructions describe how to delete a domain if it is no longer required. However, note thata domain cannot be deleted if it contains any applications.
Procedure 4 .2. To Delete a Domain:
1. Ensure the domain does not contain any applications with the following command:
$ rhc domain show Domain_Name
Delete any applications that exist in that domain with the following command:
$ rhc app delete App_Name
OpenShift Online 1 User Guide
26
Warning
Deleting an application deletes all remote data associated with that application, whichcannot be recovered.
2. Delete the domain with the following command:
$ rhc domain delete Domain_Name
Note
You must have at least one domain to create an application.
See Also:
Section 4.2.1, “Creating a Domain”
Report a bug
Chapter 4. Domains
27
Chapter 5. Domain Membership
5.1. Introduction to Domain MembershipDevelopers can collaborate on application development with domain membership. The following tabledescribes the three roles that are available in domain membership.
Table 5.1. Domain Membership Roles
Role Description
View Member has read-only access to view information about the domain and itsapplications and cannot make any changes.
Edit Member can create, update, and delete all applications in the domain, and has Gitand SSH access.
Administer Member has access to all features, but cannot change allowed gear sizes or editthe domain name.
The default role for each member is the edit role, but it can be changed.
Report a bug
5.2. Managing Domain Membership
5.2.1. Adding a MemberAdd a member to a domain with the following command, specifying the user login and domain name:
$ rhc member add [email protected] -n Domain_Name
New members are added with the default role of edit.
Report a bug
5.2.2. Changing Member RoleChange an existing member's role with the following command:
$ rhc member add --role Role
where Role is view, edit, or admin depending on the desired role.
Report a bug
5.2.3. Listing Members of a DomainView the existing members of a domain with the following command, specifying the name of the domain:
$ rhc member list Domain_Name
OpenShift Online 1 User Guide
28
Example 5.1. Listing Domain Members
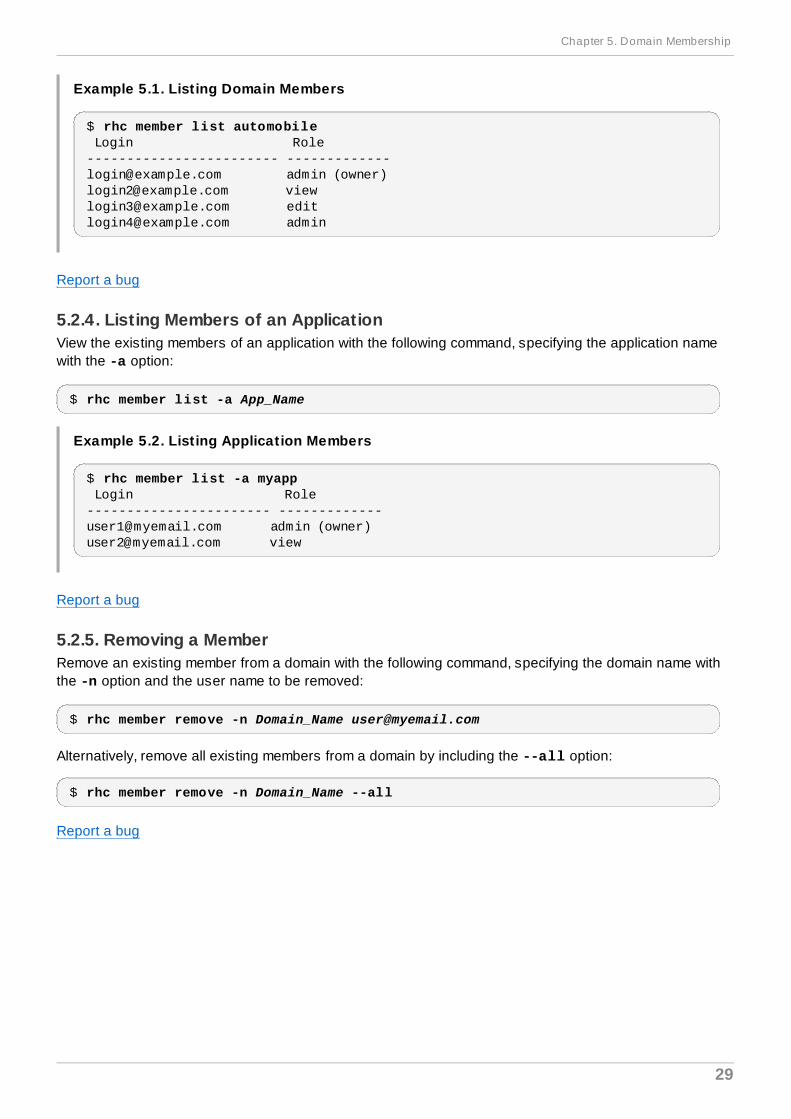
$ rhc member list automobile Login Role------------------------ [email protected] admin (owner)[email protected] [email protected] [email protected] admin
Report a bug
5.2.4. Listing Members of an ApplicationView the existing members of an application with the following command, specifying the application namewith the -a option:
$ rhc member list -a App_Name
Example 5.2. Listing Application Members
$ rhc member list -a myapp Login Role----------------------- [email protected] admin (owner)[email protected] view
Report a bug
5.2.5. Removing a MemberRemove an existing member from a domain with the following command, specifying the domain name withthe -n option and the user name to be removed:
$ rhc member remove -n Domain_Name [email protected]
Alternatively, remove all existing members from a domain by including the --all option:
$ rhc member remove -n Domain_Name --all
Report a bug
Chapter 5. Domain Membership
29
Chapter 6. Custom Domains and SSL Certificates
6.1. Introduction to Custom Domains and SSL CertificatesCustom domain aliases are designated so that applications can use custom DNS entries rather than thedomain generated by the system. Note that a CNAME record with your DNS provider is required forcustom aliases to work correctly.
Custom SSL certificates with domain aliases are available for added security to users with upgradedOpenShift Online accounts.
Management Console
Click on an application name in the My Applications tab in the Management Console to view customdomain name and SSL certificate management options for the selected application.
Report a bug
6.2. Managing Custom Domain NamesAdding a Custom Domain Name
Add a custom domain name to an application with the following command, specifying the applicationname and custom domain name:
$ rhc alias add App_Name Custom_Domain_Name
Example 6.1. Adding a Custom Domain Name
$ rhc alias add racer fast.cars.comRESULT:Alias 'fast.cars.com' has been added.
Viewing Custom Domain Names
View domain name aliases and SSL certificate status with the following command, specifying theapplication name:
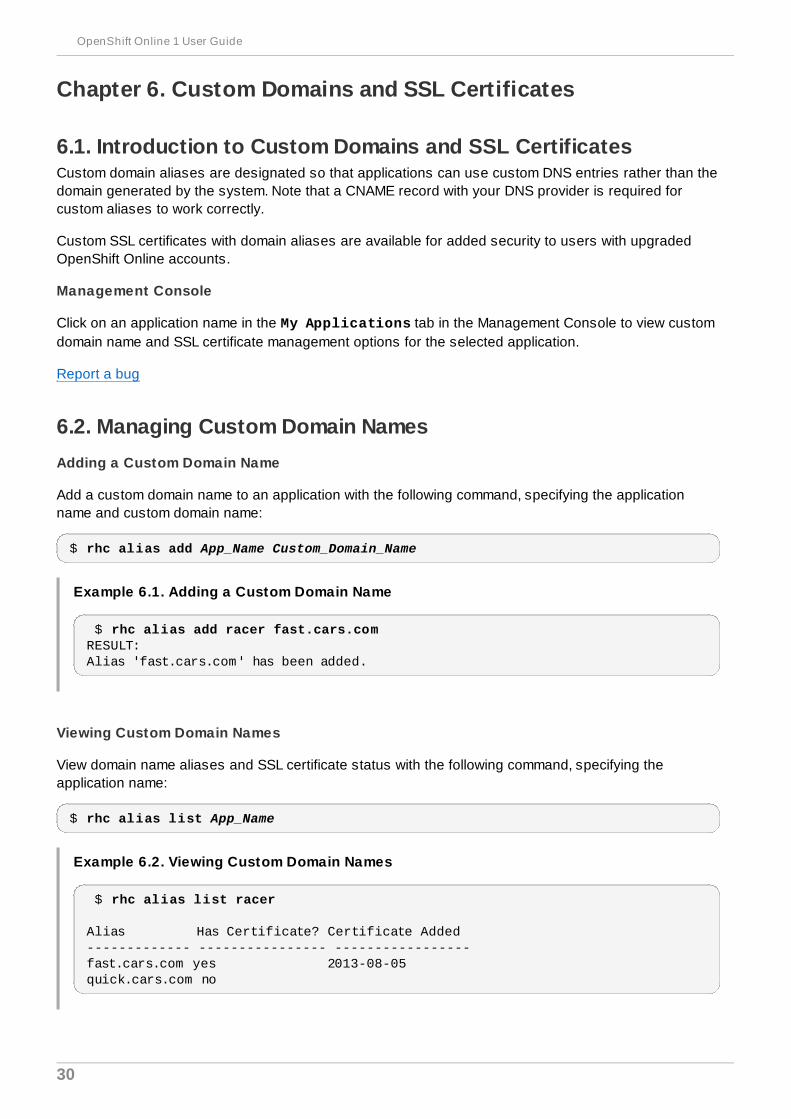
$ rhc alias list App_Name
Example 6.2. Viewing Custom Domain Names
$ rhc alias list racer
Alias Has Certificate? Certificate Added------------- ---------------- -----------------fast.cars.com yes 2013-08-05quick.cars.com no
OpenShift Online 1 User Guide
30
Removing a Custom Domain Name
Remove a domain name alias from an application with the following command, specifying the applicationname and the custom domain name to be removed:
$ rhc alias remove App_Name Custom_Domain_Name
Report a bug
6.3. Managing Custom SSL CertificatesAdding a Custom SSL Certificate
Add a custom SSL certificate to an alias with the following command.
$ rhc alias update-cert App_Name Domain_Name --certificate Cert_File --private-key Key_File
If the private key is encrypted, specify the passphrase with the --passphrase option.
Viewing Custom SSL Certificate Status
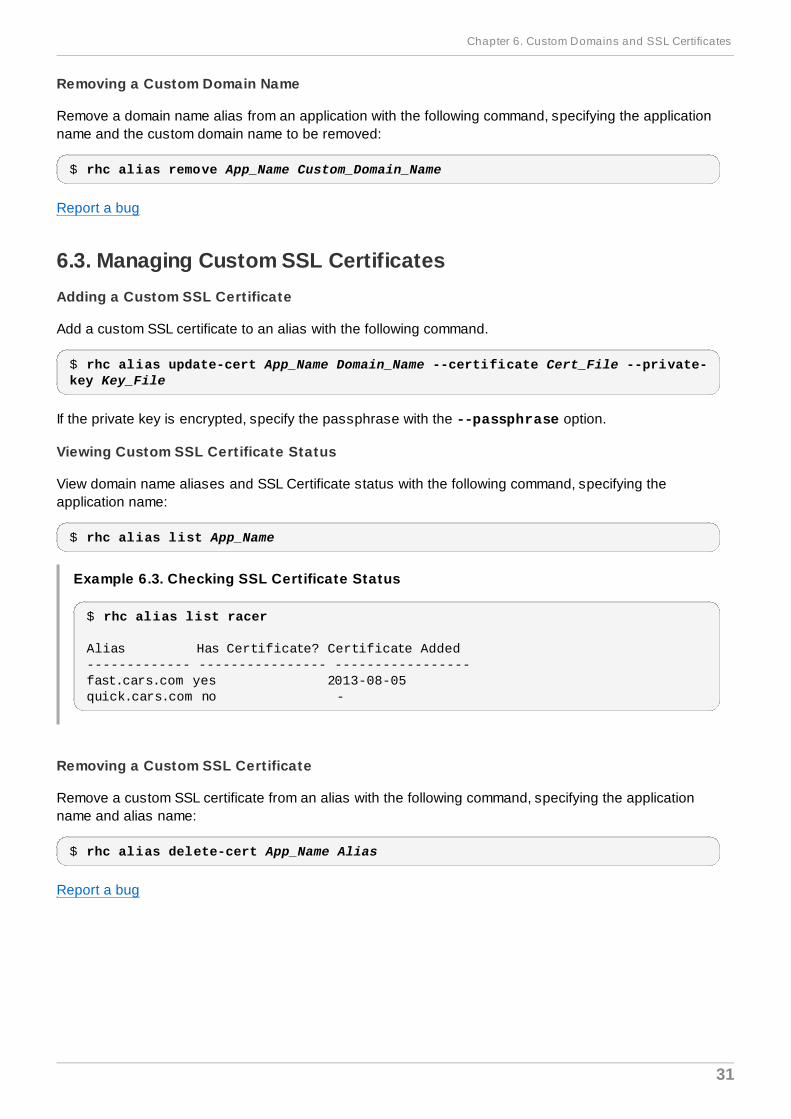
View domain name aliases and SSL Certificate status with the following command, specifying theapplication name:
$ rhc alias list App_Name
Example 6.3. Checking SSL Certificate Status
$ rhc alias list racer
Alias Has Certificate? Certificate Added------------- ---------------- -----------------fast.cars.com yes 2013-08-05quick.cars.com no -
Removing a Custom SSL Certificate
Remove a custom SSL certificate from an alias with the following command, specifying the applicationname and alias name:
$ rhc alias delete-cert App_Name Alias
Report a bug
Chapter 6. Custom Domains and SSL Certificates
31

Part III. Cartridges and Applications
OpenShift Online 1 User Guide
32
Chapter 7. Cartridges
7.1. Introduction to CartridgesCartridges are the components of an OpenShift Online application, and contain the application code toprovide the actual functionality required to run applications. Cartridges are available to support variousprogramming languages, databases, monitoring services, and management. Adding a cartridge to anapplication provides the desired capability without having to administer or update the included feature.When added to an application, a cartridge is deployed to one or more gears based on its requirements.Cartridges that listen to incoming traffic are placed on one or more gears, while other cartridges can beplaced across multiple gears of an application.
Report a bug
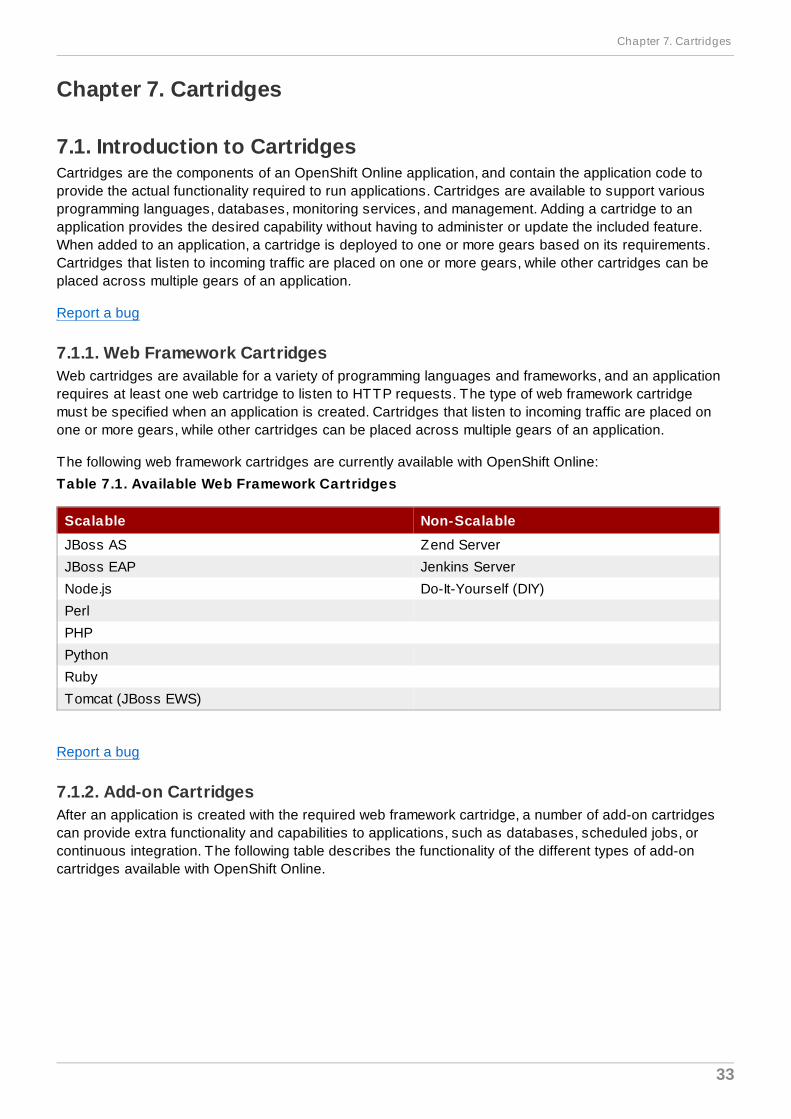
7.1.1. Web Framework CartridgesWeb cartridges are available for a variety of programming languages and frameworks, and an applicationrequires at least one web cartridge to listen to HTTP requests. The type of web framework cartridgemust be specified when an application is created. Cartridges that listen to incoming traffic are placed onone or more gears, while other cartridges can be placed across multiple gears of an application.
The following web framework cartridges are currently available with OpenShift Online:
Table 7.1. Available Web Framework Cartridges
Scalable Non-Scalable
JBoss AS Zend Server
JBoss EAP Jenkins Server
Node.js Do-It-Yourself (DIY)
Perl
PHP
Python
Ruby
Tomcat (JBoss EWS)
Report a bug
7.1.2. Add-on CartridgesAfter an application is created with the required web framework cartridge, a number of add-on cartridgescan provide extra functionality and capabilities to applications, such as databases, scheduled jobs, orcontinuous integration. The following table describes the functionality of the different types of add-oncartridges available with OpenShift Online.
Chapter 7. Cartridges
33
Table 7.2. Add-on Cartridge Functions
Function Description
Database Provide the application with one of several database back ends. Examplesinclude MySQL and PostgreSQL.
Database management Provide functionality for managing the application's database using third-party software. Examples include HAProxy.
Monitoring andManagement
Provide a range of options for managing and monitoring the application.Examples include the Cron task scheduler, and the Jenkins Client.
The following add-on cartridges are currently available for OpenShift Online.
Database Cartridges
The following table describes all available database cartridges, and shows whether they are scalable ornot.
Table 7.3. Database Cartridges
Cartridge Scalable Description
MySQL Yes Multi-user, multi-threaded SQL database server.
MongoDB NoSQL Yes High-performance, open source NoSQL database.
PostgreSQL 8 Yes Advanced object-relational database managementsystem.
Management Cartridges
The following table describes all available management cartridges, and shows whether they are scalableor not.
Table 7.4 . Management Cartridges
Cartridge Scalable Description
phpMyAdmin 3 Yes Web-based MySQL administration tool.
HAProxy 1 Yes High performance TCP/HTTP load balancer.
Cron 1 Yes A daemon that runs specified programs at scheduledtimes.
SwitchYard 0 Yes Lightweight service delivery framework providing full lifecycle support for developing, deploying, and managingservice-oriented applications.
RockMongo 1 No Web-based MongoDB administration tool.
Jenkins Client 1 No A client for managing Jenkins-enabled applications.
OpenShift Metrics 0 No An experimental cartridge for monitoring applications.
Report a bug
7.1.3. Downloadable CartridgesDownloadable cartridges are available for new and existing applications along with the supportedstandard OpenShift Online cartridges. These are custom cartridges created by users, or available from
OpenShift Online 1 User Guide
34
the OpenShift community. These cartridges are downloaded and installed using the URL to the manifestof the hosted downloadable cartridge.
Visit https://www.openshift.com/developers/download-cartridges for more community tips and informationon downloadable cartridges.
See Also:
Section 9.2, “Creating an Application”
Report a bug
Chapter 7. Cartridges
35
Chapter 8. Applications
8.1. Introduction to ApplicationsWhen a new application is created, a URL with name of the application and the name of the domain isregistered in DNS. A copy of the application code is checked out locally into a folder with the same nameas the application. Note that different types of applications may require different folder structures.Application components are run on gears.
With each new application that is created with the client tools, a remote Git repository is populated withthe selected cartridge, which is then cloned to the current directory on the local machine. The host nameand IP address of the application are also added to the list of known hosts in the ~/.ssh/known_hosts directory.
The following table describes each component that makes up an OpenShift Online application.
Table 8.1. Application Components
Component Description
Domain The domain provides a unique group identifier for all the applications of aspecific user. The domain is not directly related to DNS; instead, it isappended to the application name to form a final application URL of the formhttp://App_Name-domain.example.com
Application Name The name of the application is selected by a user. The final URL to accessthe application is of the form http://App_Name-domain.example.com
Alias DNS names can be provided for the application by registering an alias withOpenShift Online and pointing the DNS entry to the OpenShift Onlineservers.
Git repository A Git repository is used to modify application code locally. After the code isapplied, the git push command is required to deploy the revised code.
OpenShift Online provides dedicated /var/tmp and /tmp directories for each user application. The /var/tmp directory is a symbolic link to /tmp. Each /tmp directory is completely isolated from the /tmp directories of all other applications. Files that are untouched for any period of ten days areautomatically deleted from these directories.
Report a bug
8.1.1. Application Life CycleThe following table describes the general life cycle of most OpenShift Online applications.
OpenShift Online 1 User Guide
36
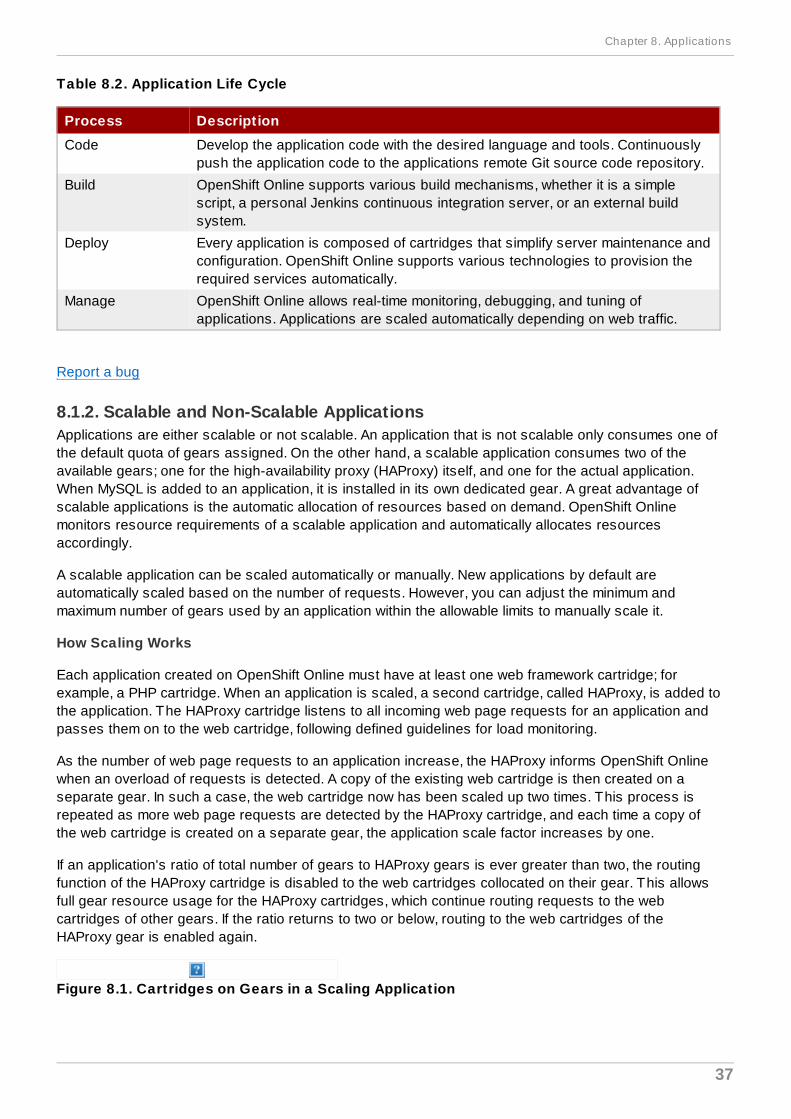
Table 8.2. Application Life Cycle
Process Description
Code Develop the application code with the desired language and tools. Continuouslypush the application code to the applications remote Git source code repository.
Build OpenShift Online supports various build mechanisms, whether it is a simplescript, a personal Jenkins continuous integration server, or an external buildsystem.
Deploy Every application is composed of cartridges that simplify server maintenance andconfiguration. OpenShift Online supports various technologies to provision therequired services automatically.
Manage OpenShift Online allows real-time monitoring, debugging, and tuning ofapplications. Applications are scaled automatically depending on web traffic.
Report a bug
8.1.2. Scalable and Non-Scalable ApplicationsApplications are either scalable or not scalable. An application that is not scalable only consumes one ofthe default quota of gears assigned. On the other hand, a scalable application consumes two of theavailable gears; one for the high-availability proxy (HAProxy) itself, and one for the actual application.When MySQL is added to an application, it is installed in its own dedicated gear. A great advantage ofscalable applications is the automatic allocation of resources based on demand. OpenShift Onlinemonitors resource requirements of a scalable application and automatically allocates resourcesaccordingly.
A scalable application can be scaled automatically or manually. New applications by default areautomatically scaled based on the number of requests. However, you can adjust the minimum andmaximum number of gears used by an application within the allowable limits to manually scale it.
How Scaling Works
Each application created on OpenShift Online must have at least one web framework cartridge; forexample, a PHP cartridge. When an application is scaled, a second cartridge, called HAProxy, is added tothe application. The HAProxy cartridge listens to all incoming web page requests for an application andpasses them on to the web cartridge, following defined guidelines for load monitoring.
As the number of web page requests to an application increase, the HAProxy informs OpenShift Onlinewhen an overload of requests is detected. A copy of the existing web cartridge is then created on aseparate gear. In such a case, the web cartridge now has been scaled up two times. This process isrepeated as more web page requests are detected by the HAProxy cartridge, and each time a copy ofthe web cartridge is created on a separate gear, the application scale factor increases by one.
If an application's ratio of total number of gears to HAProxy gears is ever greater than two, the routingfunction of the HAProxy cartridge is disabled to the web cartridges collocated on their gear. This allowsfull gear resource usage for the HAProxy cartridges, which continue routing requests to the webcartridges of other gears. If the ratio returns to two or below, routing to the web cartridges of theHAProxy gear is enabled again.
Figure 8.1. Cartridges on Gears in a Scaling Application
Chapter 8. Applications
37
Chapter 9. Application Management
9.1. General InformationA reliable network connection is required because only a single attempt is made to create an application.OpenShift Online makes seven attempts to see if the DNS entry for the new application exists. If it is notfound an error message is returned.
The --timeout option on the command line is used to override the default values when there areconstant timeout issues. OpenShift Online uses two timeout parameters: a connection timeout, whichdetermines how long the client tries to connect to the server before timing out; and a read timeout, whichdetermines how long the client waits for a response from the server. The default connection timeoutvalue is 20 seconds. The default read timeout value is 120 seconds.
The --timeout option affects both timeout parameters, but it can only be used to increase the defaultvalues. The timeout value cannot be set to be less than the default. For example, if --timeout 50 isused, it sets the connection timeout value to 50 seconds, but does not affect the read timeout value.Similarly, if --timeout 150 is used, it sets both the connection and read timeout values to 150seconds.
Report a bug
9.2. Creating an ApplicationPrerequisites:
Section 4.2.1, “Creating a Domain”
There are some factors that must be considered before you create an application. There are certainaspects of the application that cannot be changed after it is created. For example, whether an applicationis scalable or not must be specified when it is created. An application that is not scalable cannot bechanged to scalable after it is created, and vice versa. The web framework of a cartridge also cannot bechanged after an application is created. An application can be created with either the ManagementConsole or the client tools.
New applications are created with the rhc app create command and using the command options tosupply the required information, such as the type of web framework to be used with the new application.Note that if multiple versions are available for the specified web framework cartridge, you are promptedto specify the version number to use for the new application.
The following table describes some of the common options available when creating a new applicationwith the client tools.
Chapter 9. Application Management
39
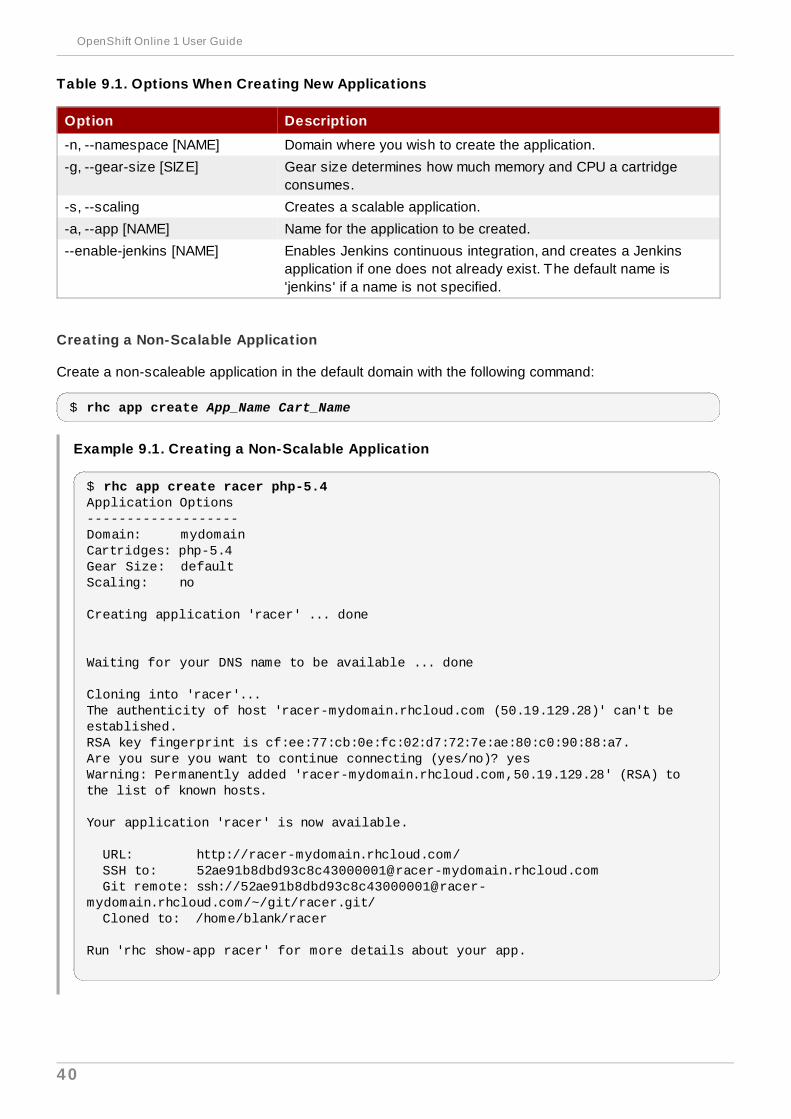
Table 9.1. Options When Creating New Applications
Option Description
-n, --namespace [NAME] Domain where you wish to create the application.
-g, --gear-size [SIZE] Gear size determines how much memory and CPU a cartridgeconsumes.
-s, --scaling Creates a scalable application.
-a, --app [NAME] Name for the application to be created.
--enable-jenkins [NAME] Enables Jenkins continuous integration, and creates a Jenkinsapplication if one does not already exist. The default name is'jenkins' if a name is not specified.
Creating a Non-Scalable Application
Create a non-scaleable application in the default domain with the following command:
$ rhc app create App_Name Cart_Name
Example 9.1. Creating a Non-Scalable Application
$ rhc app create racer php-5.4Application Options-------------------Domain: mydomainCartridges: php-5.4Gear Size: defaultScaling: no
Creating application 'racer' ... done
Waiting for your DNS name to be available ... done
Cloning into 'racer'...The authenticity of host 'racer-mydomain.rhcloud.com (50.19.129.28)' can't be established.RSA key fingerprint is cf:ee:77:cb:0e:fc:02:d7:72:7e:ae:80:c0:90:88:a7.Are you sure you want to continue connecting (yes/no)? yesWarning: Permanently added 'racer-mydomain.rhcloud.com,50.19.129.28' (RSA) to the list of known hosts.
Your application 'racer' is now available.
URL: http://racer-mydomain.rhcloud.com/ SSH to: [email protected] Git remote: ssh://[email protected]/~/git/racer.git/ Cloned to: /home/blank/racer
Run 'rhc show-app racer' for more details about your app.
OpenShift Online 1 User Guide
40
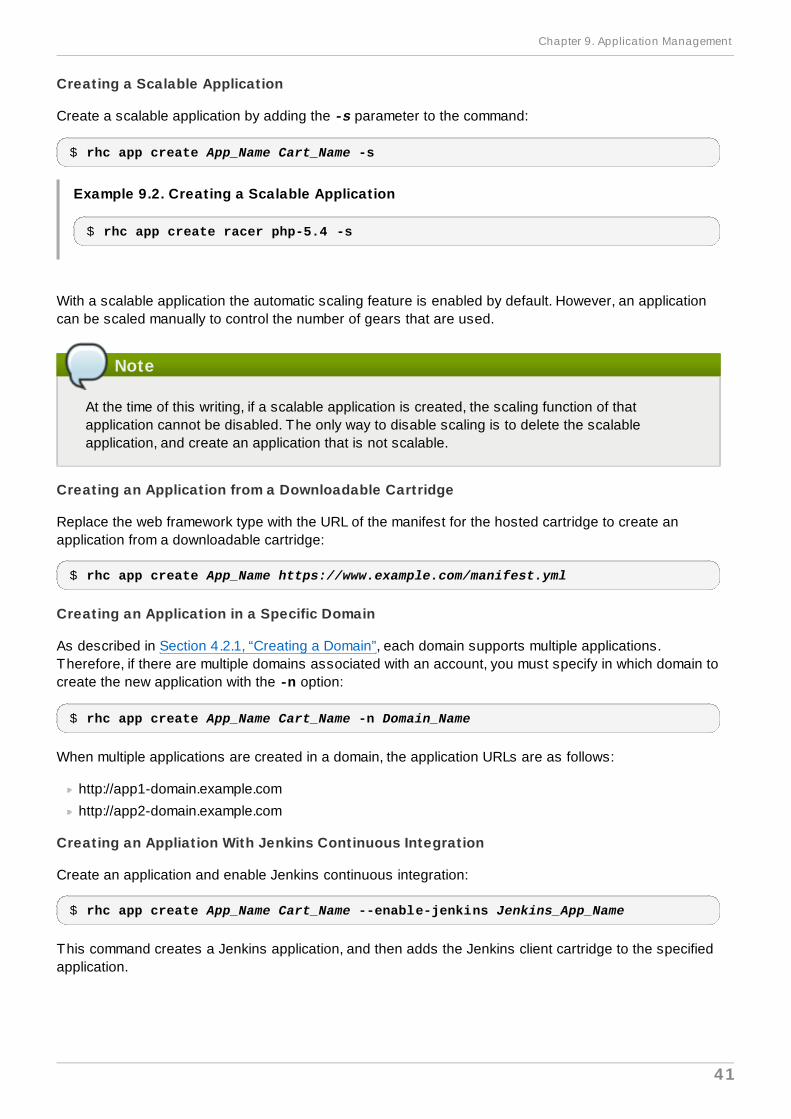
Creating a Scalable Application
Create a scalable application by adding the -s parameter to the command:
$ rhc app create App_Name Cart_Name -s
Example 9.2. Creating a Scalable Application
$ rhc app create racer php-5.4 -s
With a scalable application the automatic scaling feature is enabled by default. However, an applicationcan be scaled manually to control the number of gears that are used.
Note
At the time of this writing, if a scalable application is created, the scaling function of thatapplication cannot be disabled. The only way to disable scaling is to delete the scalableapplication, and create an application that is not scalable.
Creating an Application from a Downloadable Cartridge
Replace the web framework type with the URL of the manifest for the hosted cartridge to create anapplication from a downloadable cartridge:
$ rhc app create App_Name https://www.example.com/manifest.yml
Creating an Application in a Specific Domain
As described in Section 4.2.1, “Creating a Domain”, each domain supports multiple applications.Therefore, if there are multiple domains associated with an account, you must specify in which domain tocreate the new application with the -n option:
$ rhc app create App_Name Cart_Name -n Domain_Name
When multiple applications are created in a domain, the application URLs are as follows:
http://app1-domain.example.com
http://app2-domain.example.com
Creating an Appliation With Jenkins Continuous Integration
Create an application and enable Jenkins continuous integration:
$ rhc app create App_Name Cart_Name --enable-jenkins Jenkins_App_Name
This command creates a Jenkins application, and then adds the Jenkins client cartridge to the specifiedapplication.
Chapter 9. Application Management
41

Example 9.3. Creating an Application With Jenkins Continuous Integration
$ rhc app create mynewapp php-5.4 --enable-jenkins myjenkinsappApplication Options-------------------Domain: mydomainCartridges: php-5.4Gear Size: defaultScaling: no
Creating application 'mynewapp' ... done
Setting up a Jenkins application ... done
Jenkins created successfully. Please make note of these credentials:
User: admin Password: wEXesNXyEe1M
Note: You can change your password at: https://myjenkinsapp-mydomain.rhcloud.com/me/configure
Setting up Jenkins build ... done
Associated with job 'mynewapp-build' in Jenkins server.
Waiting for your DNS name to be available ... done
Cloning into 'mynewapp'...The authenticity of host 'mynewapp-mydomain.rhcloud.com (54.234.56.174)' can't be established.RSA key fingerprint is cf:ee:77:cb:0e:fc:02:d7:72:7e:ae:80:c0:90:88:a7.Are you sure you want to continue connecting (yes/no)? yesWarning: Permanently added 'mynewapp-mydomain.rhcloud.com,54.234.56.174' (RSA) to the list of known hosts.
Your application 'mynewapp' is now available.
URL: http://mynewapp-mydomain.rhcloud.com/ SSH to: [email protected] Git remote: ssh://[email protected]/~/git/mynewapp.git/ Cloned to: /home/blank/mynewapp
Run 'rhc show-app mynewapp' for more details about your app.
Important
Take note of the login credentials for the newly created Jenkins application. These credentialsare required to log in to the Jenkins home page.
Creating an Empty Application
For build or other testing purposes, create an application of no specific type with the DIY cartridge:
OpenShift Online 1 User Guide
42
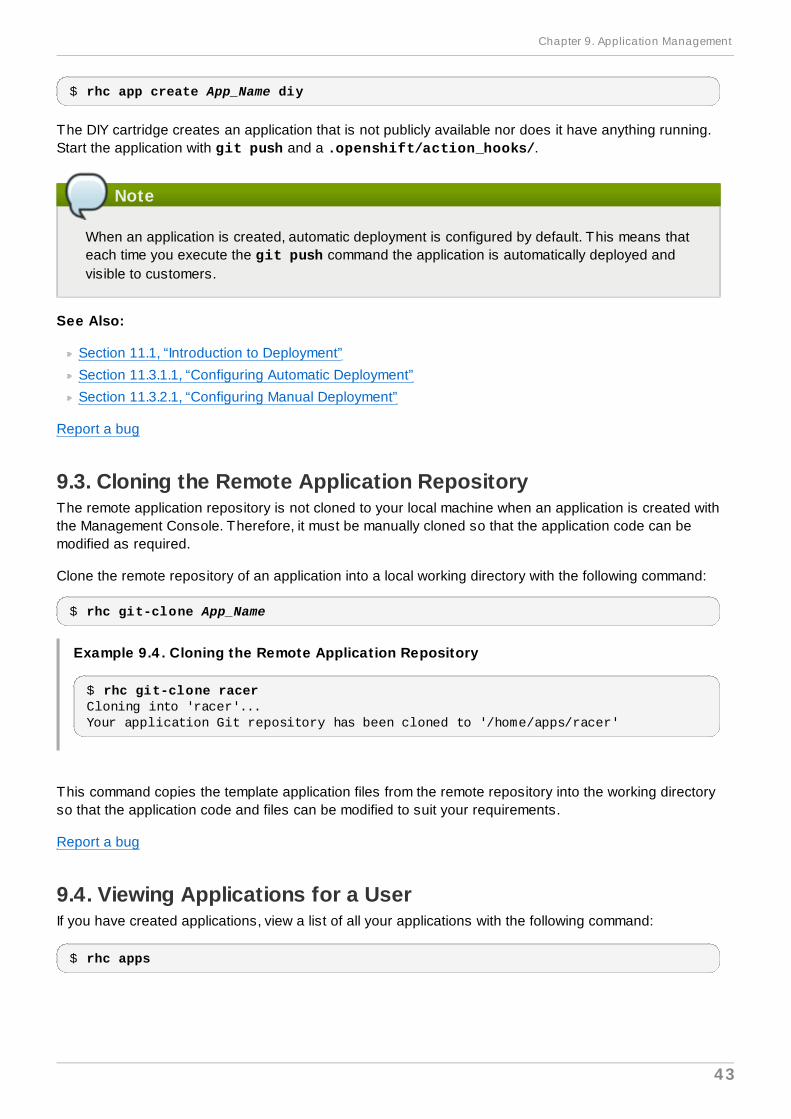
$ rhc app create App_Name diy
The DIY cartridge creates an application that is not publicly available nor does it have anything running.Start the application with git push and a .openshift/action_hooks/.
Note
When an application is created, automatic deployment is configured by default. This means thateach time you execute the git push command the application is automatically deployed andvisible to customers.
See Also:
Section 11.1, “Introduction to Deployment”
Section 11.3.1.1, “Configuring Automatic Deployment”
Section 11.3.2.1, “Configuring Manual Deployment”
Report a bug
9.3. Cloning the Remote Application RepositoryThe remote application repository is not cloned to your local machine when an application is created withthe Management Console. Therefore, it must be manually cloned so that the application code can bemodified as required.
Clone the remote repository of an application into a local working directory with the following command:
$ rhc git-clone App_Name
Example 9.4 . Cloning the Remote Application Repository
$ rhc git-clone racerCloning into 'racer'...Your application Git repository has been cloned to '/home/apps/racer'
This command copies the template application files from the remote repository into the working directoryso that the application code and files can be modified to suit your requirements.
Report a bug
9.4. Viewing Applications for a UserIf you have created applications, view a list of all your applications with the following command:
$ rhc apps
Chapter 9. Application Management
43
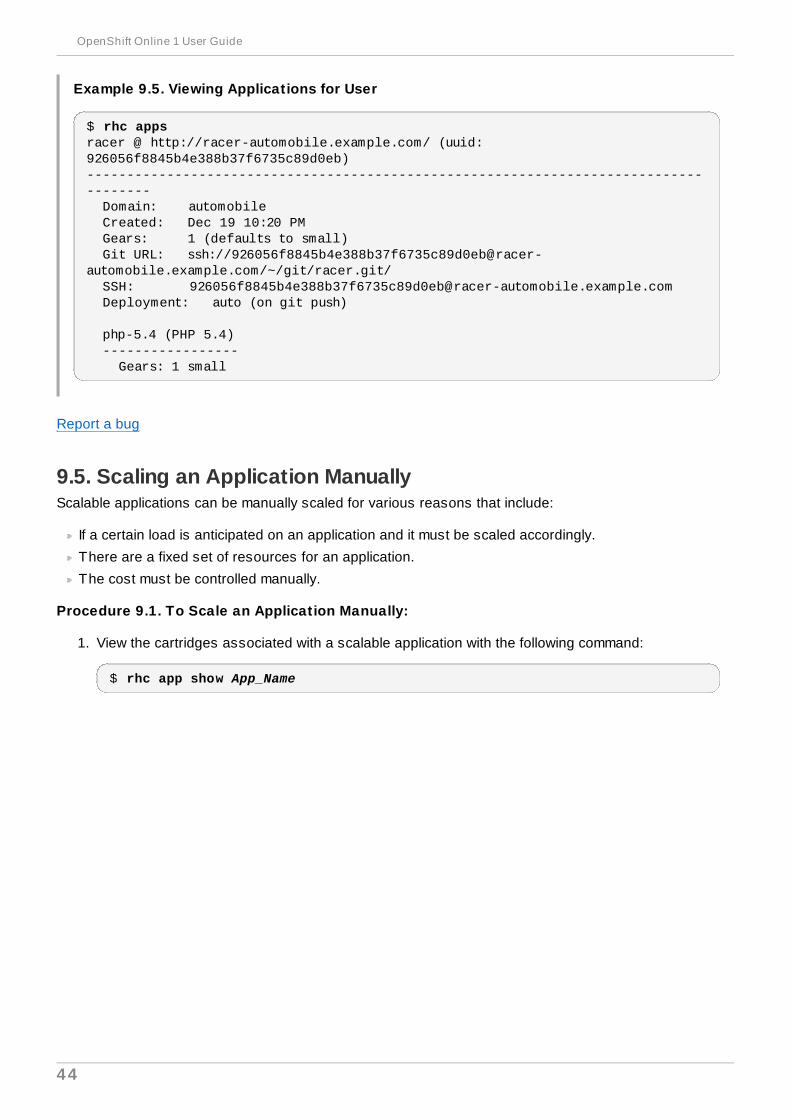
Example 9.5. Viewing Applications for User
$ rhc appsracer @ http://racer-automobile.example.com/ (uuid: 926056f8845b4e388b37f6735c89d0eb)------------------------------------------------------------------------------------- Domain: automobile Created: Dec 19 10:20 PM Gears: 1 (defaults to small) Git URL: ssh://[email protected]/~/git/racer.git/ SSH: [email protected] Deployment: auto (on git push)
php-5.4 (PHP 5.4) ----------------- Gears: 1 small
Report a bug
9.5. Scaling an Application ManuallyScalable applications can be manually scaled for various reasons that include:
If a certain load is anticipated on an application and it must be scaled accordingly.
There are a fixed set of resources for an application.
The cost must be controlled manually.
Procedure 9.1. To Scale an Application Manually:
1. View the cartridges associated with a scalable application with the following command:
$ rhc app show App_Name
OpenShift Online 1 User Guide
44
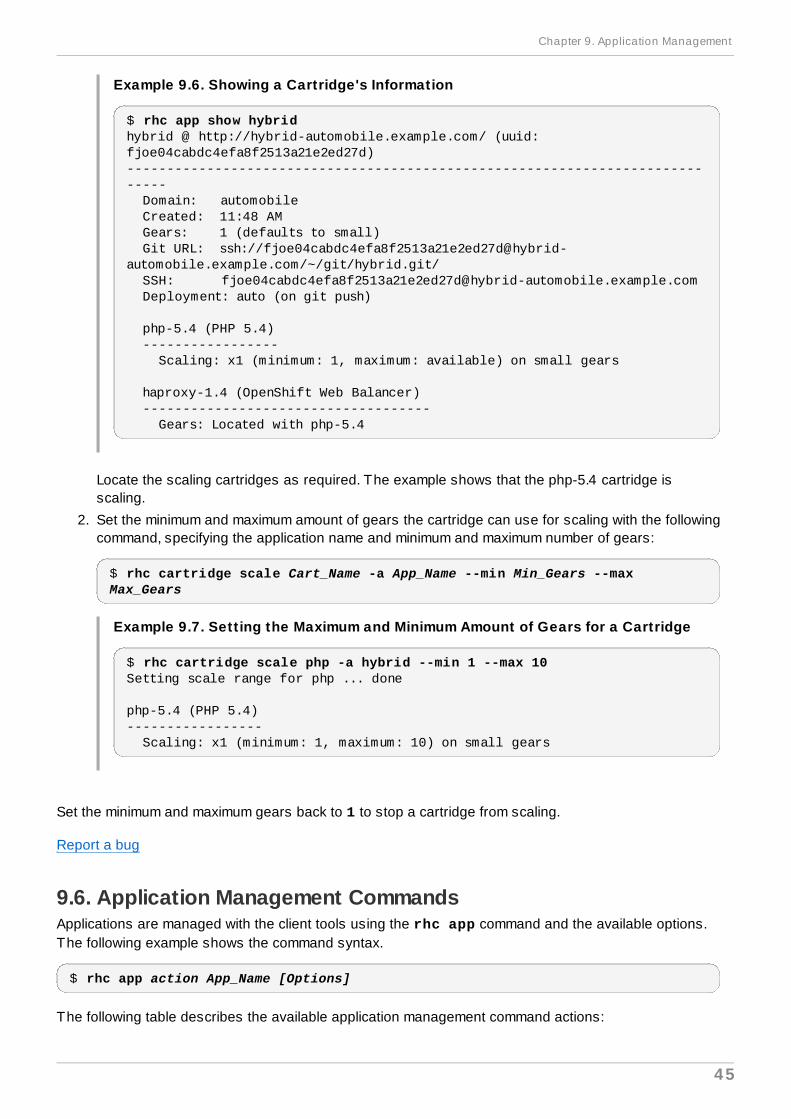
Example 9.6. Showing a Cartridge's Information
$ rhc app show hybridhybrid @ http://hybrid-automobile.example.com/ (uuid: fjoe04cabdc4efa8f2513a21e2ed27d)----------------------------------------------------------------------------- Domain: automobile Created: 11:48 AM Gears: 1 (defaults to small) Git URL: ssh://[email protected]/~/git/hybrid.git/ SSH: [email protected] Deployment: auto (on git push)
php-5.4 (PHP 5.4) ----------------- Scaling: x1 (minimum: 1, maximum: available) on small gears
haproxy-1.4 (OpenShift Web Balancer) ------------------------------------ Gears: Located with php-5.4
Locate the scaling cartridges as required. The example shows that the php-5.4 cartridge isscaling.
2. Set the minimum and maximum amount of gears the cartridge can use for scaling with the followingcommand, specifying the application name and minimum and maximum number of gears:
$ rhc cartridge scale Cart_Name -a App_Name --min Min_Gears --max Max_Gears
Example 9.7. Sett ing the Maximum and Minimum Amount of Gears for a Cartridge
$ rhc cartridge scale php -a hybrid --min 1 --max 10Setting scale range for php ... done
php-5.4 (PHP 5.4)----------------- Scaling: x1 (minimum: 1, maximum: 10) on small gears
Set the minimum and maximum gears back to 1 to stop a cartridge from scaling.
Report a bug
9.6. Application Management CommandsApplications are managed with the client tools using the rhc app command and the available options.The following example shows the command syntax.
$ rhc app action App_Name [Options]
The following table describes the available application management command actions:
Chapter 9. Application Management
45
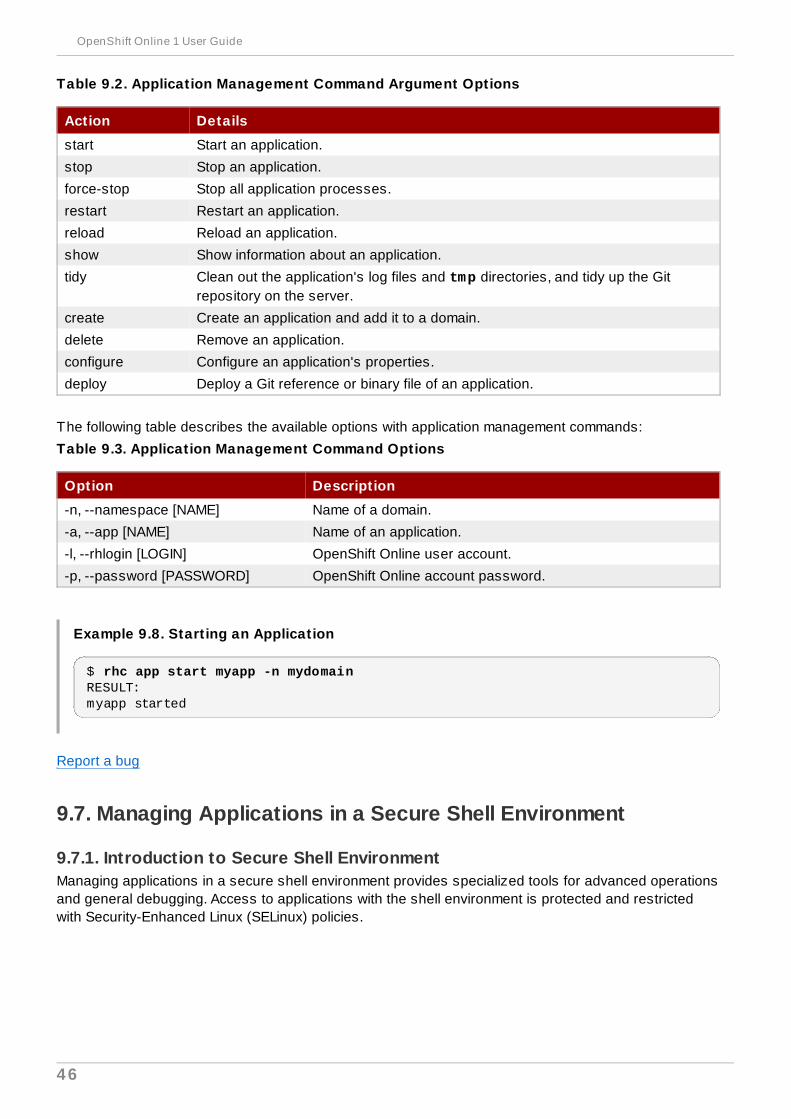
Table 9.2. Application Management Command Argument Options
Action Details
start Start an application.
stop Stop an application.
force-stop Stop all application processes.
restart Restart an application.
reload Reload an application.
show Show information about an application.
tidy Clean out the application's log files and tmp directories, and tidy up the Gitrepository on the server.
create Create an application and add it to a domain.
delete Remove an application.
configure Configure an application's properties.
deploy Deploy a Git reference or binary file of an application.
The following table describes the available options with application management commands:
Table 9.3. Application Management Command Options
Option Description
-n, --namespace [NAME] Name of a domain.
-a, --app [NAME] Name of an application.
-l, --rhlogin [LOGIN] OpenShift Online user account.
-p, --password [PASSWORD] OpenShift Online account password.
Example 9.8. Starting an Application
$ rhc app start myapp -n mydomainRESULT:myapp started
Report a bug
9.7. Managing Applications in a Secure Shell Environment
9.7.1. Introduction to Secure Shell EnvironmentManaging applications in a secure shell environment provides specialized tools for advanced operationsand general debugging. Access to applications with the shell environment is protected and restrictedwith Security-Enhanced Linux (SELinux) policies.
OpenShift Online 1 User Guide
46
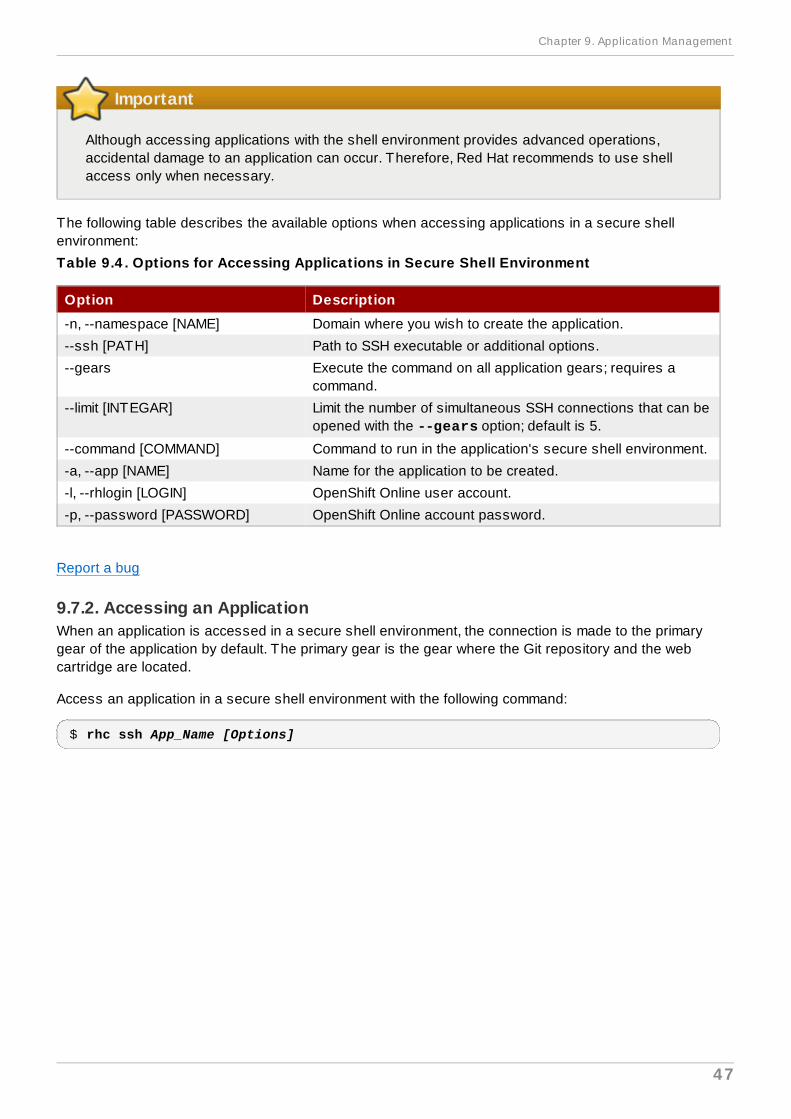
Important
Although accessing applications with the shell environment provides advanced operations,accidental damage to an application can occur. Therefore, Red Hat recommends to use shellaccess only when necessary.
The following table describes the available options when accessing applications in a secure shellenvironment:
Table 9.4 . Options for Accessing Applications in Secure Shell Environment
Option Description
-n, --namespace [NAME] Domain where you wish to create the application.
--ssh [PATH] Path to SSH executable or additional options.
--gears Execute the command on all application gears; requires acommand.
--limit [INTEGAR] Limit the number of simultaneous SSH connections that can beopened with the --gears option; default is 5.
--command [COMMAND] Command to run in the application's secure shell environment.
-a, --app [NAME] Name for the application to be created.
-l, --rhlogin [LOGIN] OpenShift Online user account.
-p, --password [PASSWORD] OpenShift Online account password.
Report a bug
9.7.2. Accessing an ApplicationWhen an application is accessed in a secure shell environment, the connection is made to the primarygear of the application by default. The primary gear is the gear where the Git repository and the webcartridge are located.
Access an application in a secure shell environment with the following command:
$ rhc ssh App_Name [Options]
Chapter 9. Application Management
47
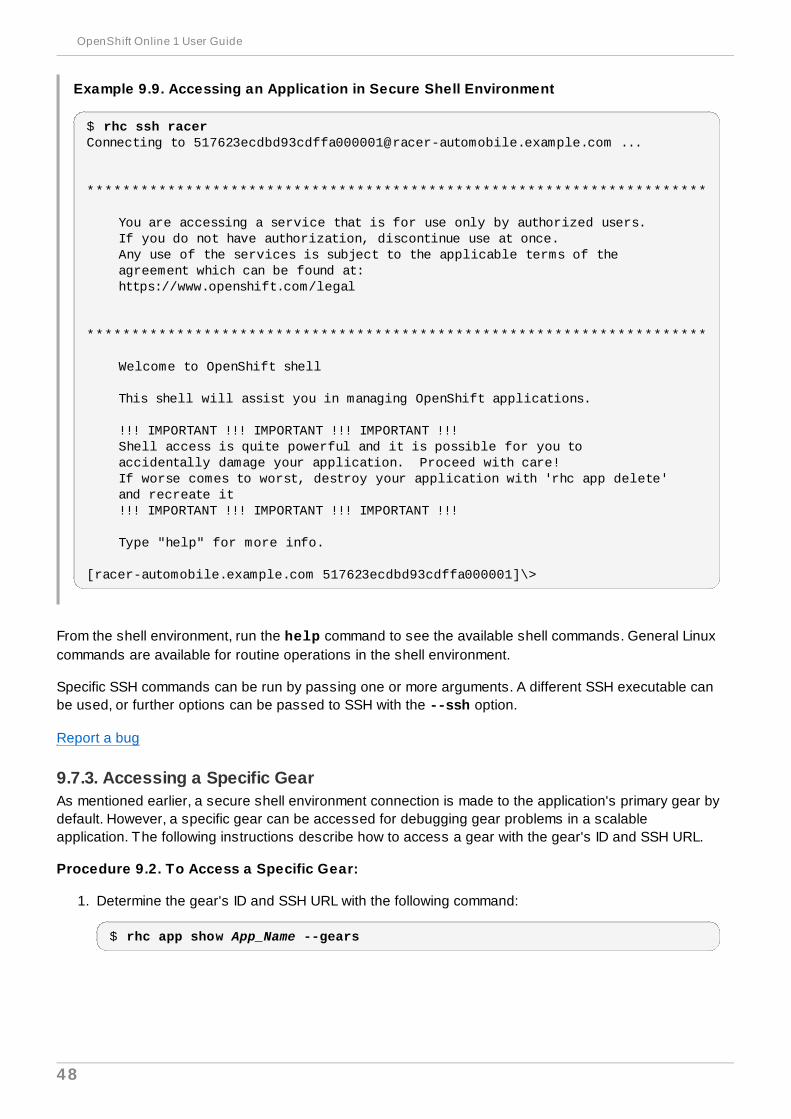
Example 9.9. Accessing an Application in Secure Shell Environment
$ rhc ssh racerConnecting to [email protected] ...
*********************************************************************
You are accessing a service that is for use only by authorized users. If you do not have authorization, discontinue use at once. Any use of the services is subject to the applicable terms of the agreement which can be found at: https://www.openshift.com/legal
*********************************************************************
Welcome to OpenShift shell
This shell will assist you in managing OpenShift applications.
!!! IMPORTANT !!! IMPORTANT !!! IMPORTANT !!! Shell access is quite powerful and it is possible for you to accidentally damage your application. Proceed with care! If worse comes to worst, destroy your application with 'rhc app delete' and recreate it !!! IMPORTANT !!! IMPORTANT !!! IMPORTANT !!!
Type "help" for more info.
[racer-automobile.example.com 517623ecdbd93cdffa000001]\>
From the shell environment, run the help command to see the available shell commands. General Linuxcommands are available for routine operations in the shell environment.
Specific SSH commands can be run by passing one or more arguments. A different SSH executable canbe used, or further options can be passed to SSH with the --ssh option.
Report a bug
9.7.3. Accessing a Specific GearAs mentioned earlier, a secure shell environment connection is made to the application's primary gear bydefault. However, a specific gear can be accessed for debugging gear problems in a scalableapplication. The following instructions describe how to access a gear with the gear's ID and SSH URL.
Procedure 9.2. To Access a Specific Gear:
1. Determine the gear's ID and SSH URL with the following command:
$ rhc app show App_Name --gears
OpenShift Online 1 User Guide
48

Example 9.10. Viewing Application Gears
$ rhc app show automobile --gearsID State Cartridges Size SSH URL------------------------ ------- ------------------- ----- ----------------------------------------------------------------------------51774b712587c83ddb00009d started php-5.4 haproxy-1.4 small 51774b712587c83ddb00009d@hybrid-automobile.example.com519b0fd02587c84b860002d8 started php-5.4 haproxy-1.4 small 519b0fd02587c84b860002d8@519b0fd02587c84b860002d8-automobile.example.com519b1018dbd93c85180001fc started php-5.4 haproxy-1.4 small 519b1018dbd93c85180001fc@519b1018dbd93c85180001fc-automobile.example.com519b06ebdbd93cd439000027 started postgresql-9.2 small 519b06ebdbd93cd439000027@519b06ebdbd93cd439000027-automobile.example.com
In the example output the ID of the first scaling gear is 519b0fd02587c84b860002d8 and itsSSH URL is 519b0fd02587c84b860002d8@519b0fd02587c84b860002d8-automobile.example.com .
2. Open a secure shell environment to the desired gear with the gear's SSH URL:
$ ssh 519b0fd02587c84b860002d8@519b0fd02587c84b860002d8-automobile.example.com
Report a bug
9.7.4. Accessing a Database CartridgeThe integrity of a database is verified by connecting to an application using SSH and running the shellfor the database cartridge. A successful connection to the database shell indicates that the databasehas been created correctly.
The shell for each database also offers a selection of management commands. See the appropriatedatabase documentation for more information on the available database shell commands.
Important
Although accessing applications with the shell environment provides advanced operations,accidental damage to your application can occur. Therefore, Red Hat recommends to use shellaccess only when necessary.
Procedure 9.3. To Manage a Database in a Shell Environment:
1. Access the desired application in a shell environment with the following command:
$ rhc ssh App_Name
2. From the application's shell environment prompt, run the appropriate command for the database toaccess the interactive database shell:
Run the mysql command to access the MySQL shell
Run the psql command to access the PostgreSQL shell
Run the mongo command to access the MongoDB shell
Chapter 9. Application Management
49
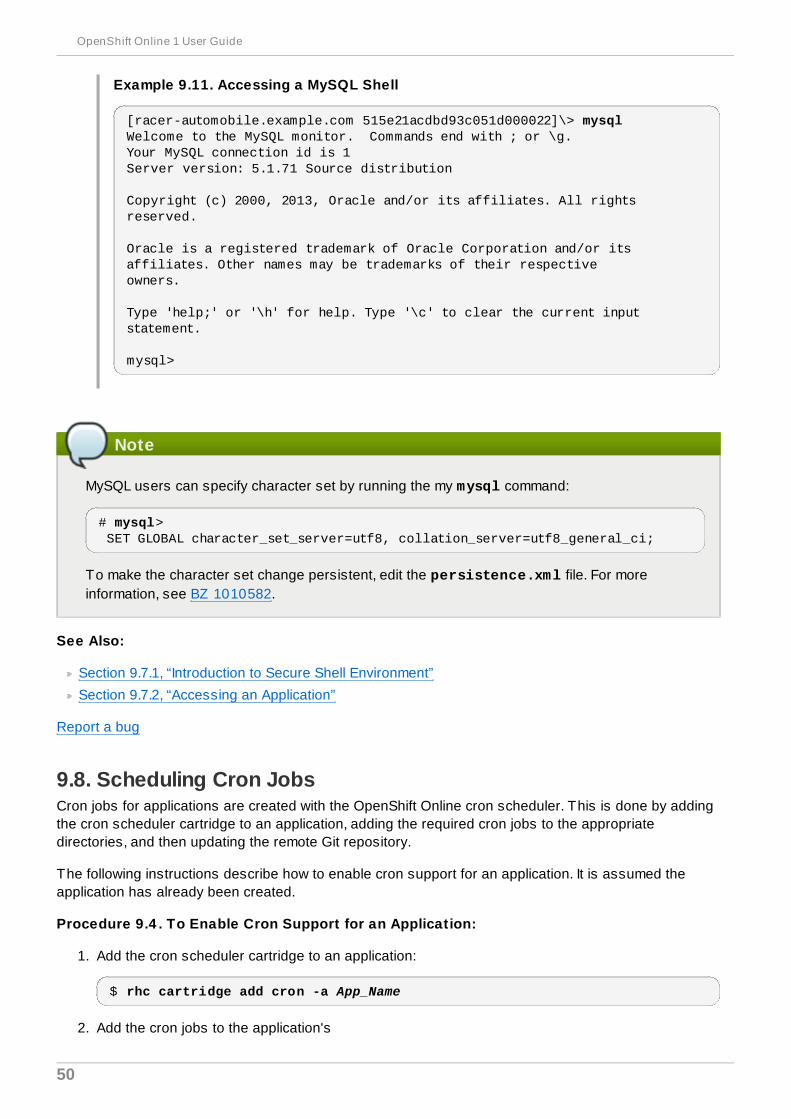
Example 9.11. Accessing a MySQL Shell
[racer-automobile.example.com 515e21acdbd93c051d000022]\> mysqlWelcome to the MySQL monitor. Commands end with ; or \g.Your MySQL connection id is 1Server version: 5.1.71 Source distribution
Copyright (c) 2000, 2013, Oracle and/or its affiliates. All rights reserved.
Oracle is a registered trademark of Oracle Corporation and/or itsaffiliates. Other names may be trademarks of their respectiveowners.
Type 'help;' or '\h' for help. Type '\c' to clear the current input statement.
mysql>
Note
MySQL users can specify character set by running the my mysql command:
# mysql> SET GLOBAL character_set_server=utf8, collation_server=utf8_general_ci;
To make the character set change persistent, edit the persistence.xml file. For moreinformation, see BZ 1010582.
See Also:
Section 9.7.1, “Introduction to Secure Shell Environment”
Section 9.7.2, “Accessing an Application”
Report a bug
9.8. Scheduling Cron JobsCron jobs for applications are created with the OpenShift Online cron scheduler. This is done by addingthe cron scheduler cartridge to an application, adding the required cron jobs to the appropriatedirectories, and then updating the remote Git repository.
The following instructions describe how to enable cron support for an application. It is assumed theapplication has already been created.
Procedure 9.4 . To Enable Cron Support for an Application:
1. Add the cron scheduler cartridge to an application:
$ rhc cartridge add cron -a App_Name
2. Add the cron jobs to the application's
OpenShift Online 1 User Guide
50
.openshift/cron/{minutely,hourly,weekly,daily,monthly}/ directories.
Example 9.12. Sample Cron File
$ mkdir -p .openshift/cron/minutely$ echo 'date >> $OPENSHIFT_REPO_DIR/php/date.txt' > .openshift/cron/minutely/date.sh
The example cron job appends a new line of date information to the $OPENSHIFT_REPO_DIR/php/date.txt file every minute.
3. Commit the changes and push them to the remote repository:
$ git add .openshift/cron/$ git commit -m "configuring cron jobs"$ git push
Verify that the cron job script you create works correctly. For the script used in the example, verify that itworks correctly with the following command:
$ curl http://holy-roller.example.com/date.txt
Thu Feb 2 01:02:01 EST 2012Thu Feb 2 01:03:01 EST 2012Thu Feb 2 01:04:01 EST 2012
The scripts placed in the /cron subdirectories are executed at the respective frequencies. Forexample, scripts in each subdirectory are executed in alphabetical order; scripts in the /cron/hourlydirectory are executed on the first minute of every hour.
Disabling Cron Job Scripts
Disable all cron job scripts with the following command:
$ rhc cartridge stop cron -a App_Name
Enabling Cron Job Scripts
Enable all cron job scripts with the following command:
$ rhc cartridge start cron -a App_Name
Note
The cron commands affect all cron jobs. You cannot disable or enable individual cron jobs.
Report a bug
9.9. Binding Applications to PortsAll ports less than 1024 are reserved for OpenShift Online operations, and developers cannot bind tothese ports. However, ports greater than 1024 are available for binding, and the following table showsthe commonly used ports.
Chapter 9. Application Management
51

Important
While the following ports are suggestions for available applications or gears, ports 2303 - 2308are reserved for OpenShift SNI Implementation, and port 10050 is reserved for the OpenShiftOnline Zabbix agent. You cannot bind to these ports.
OpenShift Online 1 User Guide
52
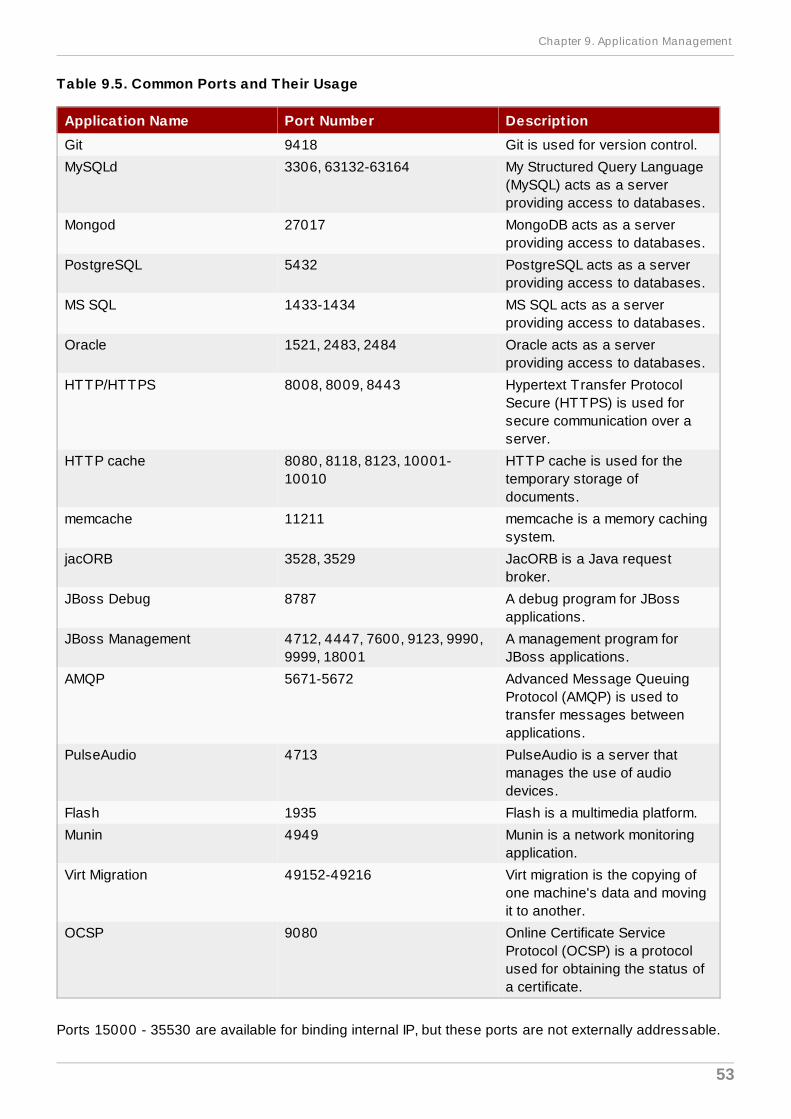
Table 9.5. Common Ports and Their Usage
Application Name Port Number Description
Git 9418 Git is used for version control.
MySQLd 3306, 63132-63164 My Structured Query Language(MySQL) acts as a serverproviding access to databases.
Mongod 27017 MongoDB acts as a serverproviding access to databases.
PostgreSQL 5432 PostgreSQL acts as a serverproviding access to databases.
MS SQL 1433-1434 MS SQL acts as a serverproviding access to databases.
Oracle 1521, 2483, 2484 Oracle acts as a serverproviding access to databases.
HTTP/HTTPS 8008, 8009, 8443 Hypertext Transfer ProtocolSecure (HTTPS) is used forsecure communication over aserver.
HTTP cache 8080, 8118, 8123, 10001-10010
HTTP cache is used for thetemporary storage ofdocuments.
memcache 11211 memcache is a memory cachingsystem.
jacORB 3528, 3529 JacORB is a Java requestbroker.
JBoss Debug 8787 A debug program for JBossapplications.
JBoss Management 4712, 4447, 7600, 9123, 9990,9999, 18001
A management program forJBoss applications.
AMQP 5671-5672 Advanced Message QueuingProtocol (AMQP) is used totransfer messages betweenapplications.
PulseAudio 4713 PulseAudio is a server thatmanages the use of audiodevices.
Flash 1935 Flash is a multimedia platform.
Munin 4949 Munin is a network monitoringapplication.
Virt Migration 49152-49216 Virt migration is the copying ofone machine's data and movingit to another.
OCSP 9080 Online Certificate ServiceProtocol (OCSP) is a protocolused for obtaining the status ofa certificate.
Ports 15000 - 35530 are available for binding internal IP, but these ports are not externally addressable.
Chapter 9. Application Management
53
You can also bind to $ OPENSHIFT_Cart_Name_PORT (8080) for HTTP connectivity, which reroutesexternally through port 80.
Report a bug
9.9.1. Configuring WebSocket PortsBecause the main routing layer is currently based on Apache, WebSocket can be used by connecting tospecific ports on an application. WebSocket connections are supported with browser based applicationson OpenShift Online, allowing bidirectional communication without requiring multiple, open HTTPconnections. The TCP based protocol uses HTTP as an initiation handshake which is handled as anupgrade request. If successful, the connection remains open and switches to the WebSocket protocol.
For plain WebSocket connections (ws://), requests are directed to port 8000, while WebSocket Secureconnections (wss://) use port 8443, as shown in the following example:
http://example.example.com:8000
https://example.example.com:8443
Report a bug
9.9.2. Configuring Email PortsOpenShift Online provides support for externally hosted email services, such as POP, IMAP, and SMTP.An application can be connected to your own email serer, or to one of the popular public email services,such as Gmail or YahooMail. With support for popular blogging or wiki software, such as Drupal, Joomla,MediaWiki, or WordPress, email settings of the software can be modified to point to the appropriate emailservice.
The following ports are the suggested options for email support:
SMTP/submission: 25, 465, 587
IMAP: 143, 220, 993
POP: 109, 110, 995
Communication occurs at a limited rate. Port 587 (submission) is restricted to a maximum rate of 256Kbps. Ports 25 (SMTP) and 465 (SMTPS) are restricted to a maximum rate of 24 Kbps. Both consumean extremely small share of the available bandwidth if there is congestion.
Important
Note that access to email servers from cloud providers may be blocked by Realtime BlackholeLists (RBLs), affecting connections to some email servers. If you are unable to connect to one ofthese services, ensure the email provider allows authenticated connections from Amazon AWSEC2 hosts.
Report a bug
9.10. Port Forwarding
9.10.1. Introduction to Port ForwardingPort forwarding permits connections to remote services from a local workstation, without having to
OpenShift Online 1 User Guide
54
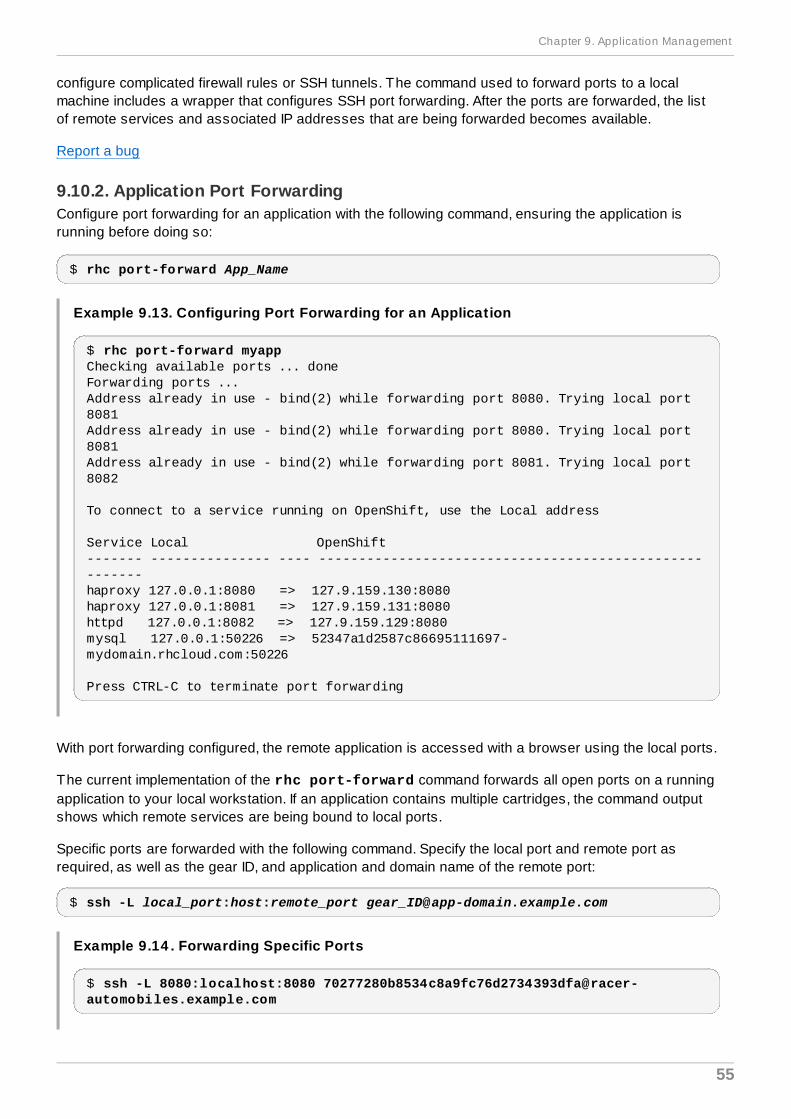
configure complicated firewall rules or SSH tunnels. The command used to forward ports to a localmachine includes a wrapper that configures SSH port forwarding. After the ports are forwarded, the listof remote services and associated IP addresses that are being forwarded becomes available.
Report a bug
9.10.2. Application Port ForwardingConfigure port forwarding for an application with the following command, ensuring the application isrunning before doing so:
$ rhc port-forward App_Name
Example 9.13. Configuring Port Forwarding for an Application
$ rhc port-forward myappChecking available ports ... doneForwarding ports ...Address already in use - bind(2) while forwarding port 8080. Trying local port 8081Address already in use - bind(2) while forwarding port 8080. Trying local port 8081Address already in use - bind(2) while forwarding port 8081. Trying local port 8082
To connect to a service running on OpenShift, use the Local address
Service Local OpenShift------- --------------- ---- -------------------------------------------------------haproxy 127.0.0.1:8080 => 127.9.159.130:8080haproxy 127.0.0.1:8081 => 127.9.159.131:8080httpd 127.0.0.1:8082 => 127.9.159.129:8080mysql 127.0.0.1:50226 => 52347a1d2587c86695111697-mydomain.rhcloud.com:50226
Press CTRL-C to terminate port forwarding
With port forwarding configured, the remote application is accessed with a browser using the local ports.
The current implementation of the rhc port-forward command forwards all open ports on a runningapplication to your local workstation. If an application contains multiple cartridges, the command outputshows which remote services are being bound to local ports.
Specific ports are forwarded with the following command. Specify the local port and remote port asrequired, as well as the gear ID, and application and domain name of the remote port:
$ ssh -L local_port:host:remote_port [email protected]
Example 9.14 . Forwarding Specific Ports
$ ssh -L 8080:localhost:8080 [email protected]
Chapter 9. Application Management
55
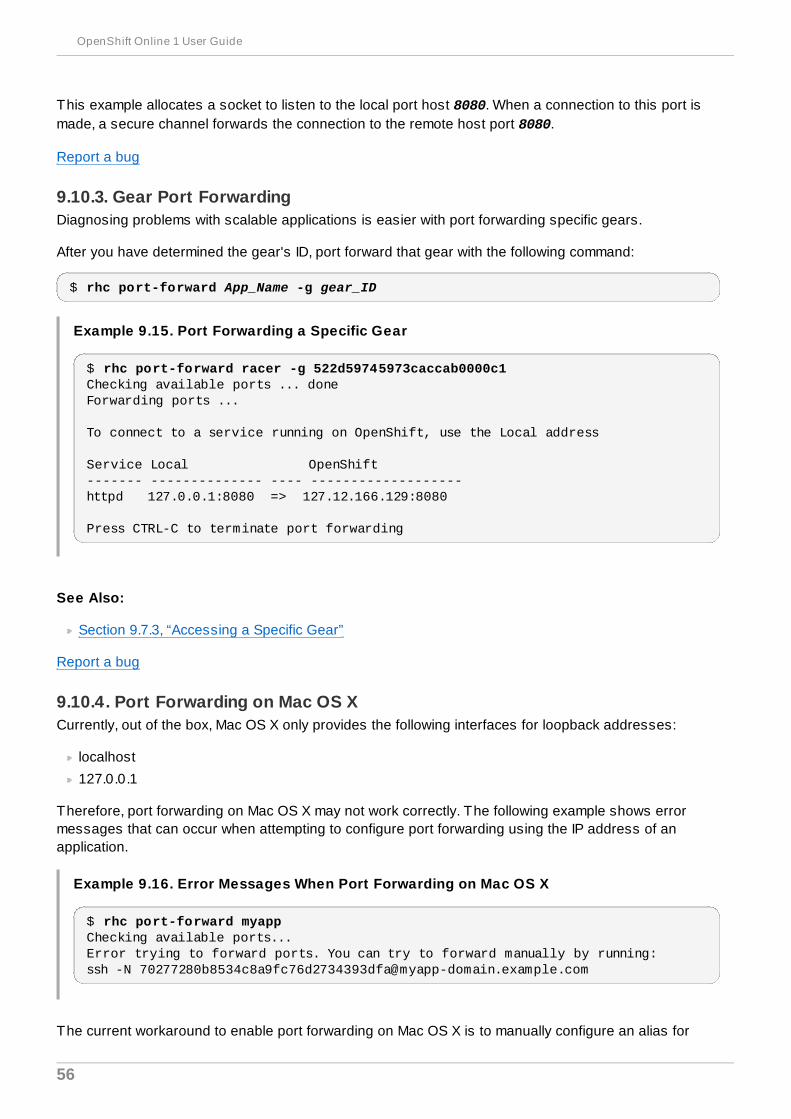
This example allocates a socket to listen to the local port host 8080. When a connection to this port ismade, a secure channel forwards the connection to the remote host port 8080.
Report a bug
9.10.3. Gear Port ForwardingDiagnosing problems with scalable applications is easier with port forwarding specific gears.
After you have determined the gear's ID, port forward that gear with the following command:
$ rhc port-forward App_Name -g gear_ID
Example 9.15. Port Forwarding a Specific Gear
$ rhc port-forward racer -g 522d59745973caccab0000c1Checking available ports ... doneForwarding ports ...
To connect to a service running on OpenShift, use the Local address
Service Local OpenShift------- -------------- ---- -------------------httpd 127.0.0.1:8080 => 127.12.166.129:8080
Press CTRL-C to terminate port forwarding
See Also:
Section 9.7.3, “Accessing a Specific Gear”
Report a bug
9.10.4. Port Forwarding on Mac OS XCurrently, out of the box, Mac OS X only provides the following interfaces for loopback addresses:
localhost
127.0.0.1
Therefore, port forwarding on Mac OS X may not work correctly. The following example shows errormessages that can occur when attempting to configure port forwarding using the IP address of anapplication.
Example 9.16. Error Messages When Port Forwarding on Mac OS X
$ rhc port-forward myappChecking available ports...Error trying to forward ports. You can try to forward manually by running:ssh -N [email protected]
The current workaround to enable port forwarding on Mac OS X is to manually configure an alias for
OpenShift Online 1 User Guide
56
each IP address used by the application:
$ sudo ifconfig lo0 alias application_IP_address
Example 9.17. Manually Configured IP Address
$ sudo ifconfig lo0 alias 127.10.51.129
Note
Root or administrative privileges are required to run the ifconfig command on Mac OS X.
If the application uses multiple IP addresses, you must configure an alias for each IP address. Forexample, suppose a PHP application has both MySQL and phpMyAdmin cartridges added, and it usesthe IP addresses 127.11.25.1 and 127.11.25.2. For port forwarding to work correctly, configure an aliasfor each IP address as shown in the following example:
Example 9.18. Configuring Aliases for Multiple IP Addresses
$ sudo ifconfig lo0 alias 127.11.25.1$ sudo ifconfig lo0 alias 127.11.25.2
Finally, enable port forwarding with the rhc port-forward command.
Important
The IP address alias configured for an application is not persistent through system reboots. If thesystem is rebooted, you must repeat these steps to correctly enable port forwarding on Mac OSX.
Report a bug
9.11. Deleting an Application
Warning
Deleting an application deletes all remote data associated with that application, which cannot berecovered.
Run the following command to delete an application and all associated remote data, answering yeswhen prompted:
$ rhc app delete App_Name
Note that this process only deletes remote application data. Data stored on your local machine must be
Chapter 9. Application Management
57
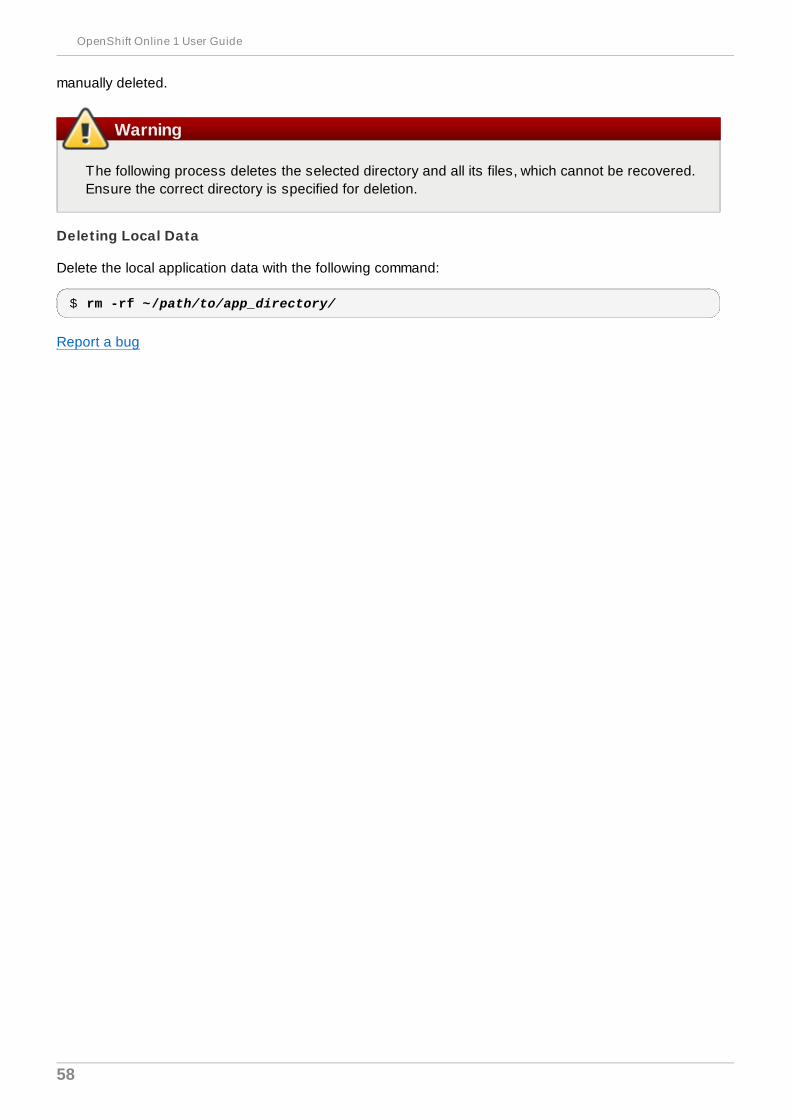
manually deleted.
Warning
The following process deletes the selected directory and all its files, which cannot be recovered.Ensure the correct directory is specified for deletion.
Deleting Local Data
Delete the local application data with the following command:
$ rm -rf ~/path/to/app_directory/
Report a bug
OpenShift Online 1 User Guide
58

Chapter 10. Cartridge Management
10.1. Viewing Available CartridgesView a list of all available cartridges with the following command:
$ rhc cartridge list
This command displays all available web framework and add-on cartridges.
Report a bug
10.2. Adding a Cartridge to an ApplicationWhen adding a cartridge to an application with the client tools, there are several options available thatare used to specify the required information.
Table 10.1. Options When Adding Cartridges
Option Description
-a, --app [NAME] Name of an application.
-n, --namespace [NAME] Name of a domain.
-e, --env [VARIABLE=VALUE] Environment variable(s) to be set on this cartridge. It can also be apath to a file that contains the environment variables.
-g, --gear-size [SIZE] Gear size determines how much memory and CPU a cartridgeconsumes.
-c, --cartridge [CART_TYPE] Type of cartridge to add to an application.
Add a cartridge to an application with the following command, specifying the desired cartridge and thename of the application:
$ rhc cartridge add Cart_Name -a App_Name
Specifying Cartridge Gear Size
When adding a cartridge to an application, specify the cartridge gear size with the -g, or --gear-sizeoption along with the gear size. Note that this option is not available with non-scalable applications,because the web cartridge and any add-on cartridges are placed on the same gear. Currently the gearsizes available are small, medium, and large.
$ rhc cartridge add Cart_Name -a App_Name -g Gear_Size
Note
The medium and large gears are only available with the silver plan. Customers on the free planare limited to small gears. Log on to the Management Console at https://www.openshift.com/ toview plan upgrade options.
Report a bug
Chapter 10. Cartridge Management
59
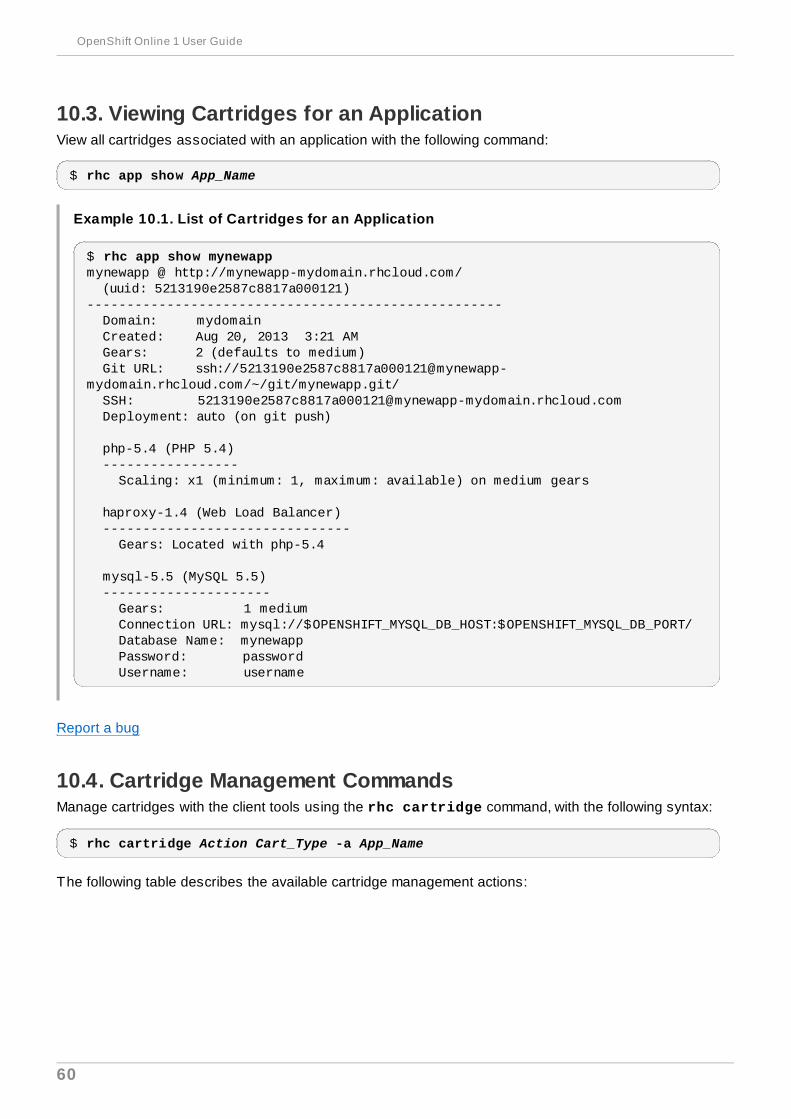
10.3. Viewing Cartridges for an ApplicationView all cartridges associated with an application with the following command:
$ rhc app show App_Name
Example 10.1. List of Cartridges for an Application
$ rhc app show mynewappmynewapp @ http://mynewapp-mydomain.rhcloud.com/ (uuid: 5213190e2587c8817a000121)---------------------------------------------------- Domain: mydomain Created: Aug 20, 2013 3:21 AM Gears: 2 (defaults to medium) Git URL: ssh://[email protected]/~/git/mynewapp.git/ SSH: [email protected] Deployment: auto (on git push)
php-5.4 (PHP 5.4) ----------------- Scaling: x1 (minimum: 1, maximum: available) on medium gears
haproxy-1.4 (Web Load Balancer) ------------------------------- Gears: Located with php-5.4
mysql-5.5 (MySQL 5.5) --------------------- Gears: 1 medium Connection URL: mysql://$OPENSHIFT_MYSQL_DB_HOST:$OPENSHIFT_MYSQL_DB_PORT/ Database Name: mynewapp Password: password Username: username
Report a bug
10.4. Cartridge Management CommandsManage cartridges with the client tools using the rhc cartridge command, with the following syntax:
$ rhc cartridge Action Cart_Type -a App_Name
The following table describes the available cartridge management actions:
OpenShift Online 1 User Guide
60
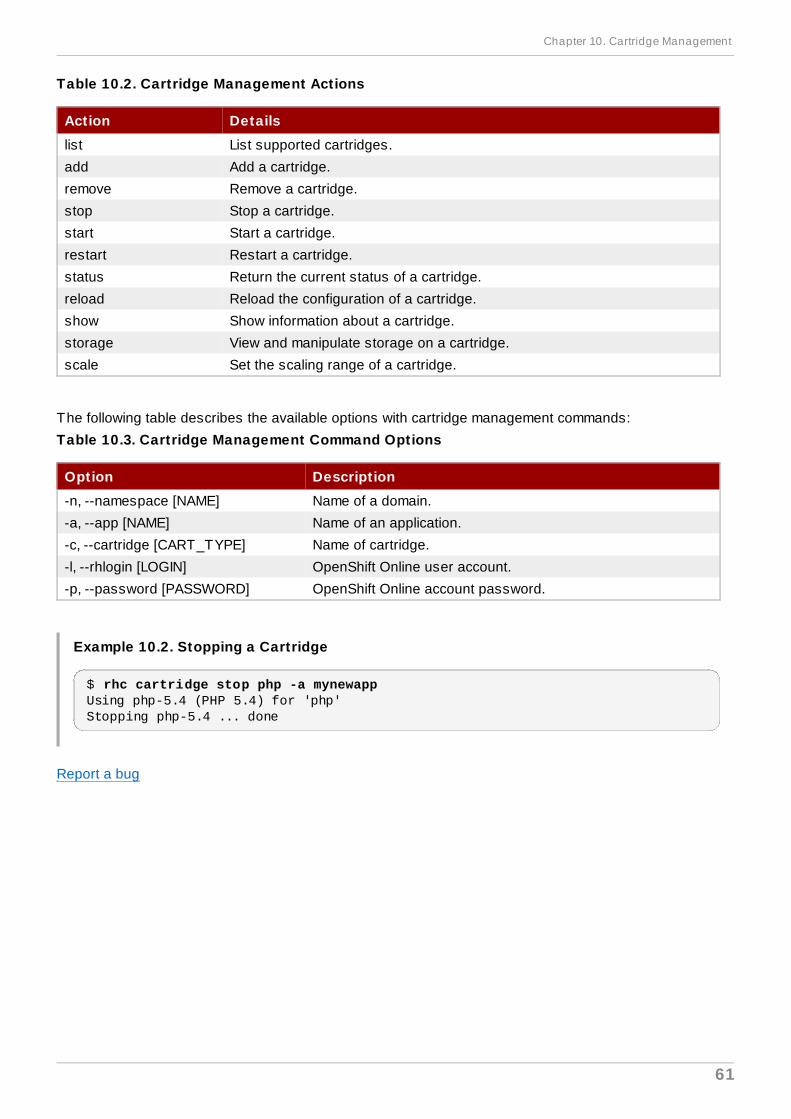
Table 10.2. Cartridge Management Actions
Action Details
list List supported cartridges.
add Add a cartridge.
remove Remove a cartridge.
stop Stop a cartridge.
start Start a cartridge.
restart Restart a cartridge.
status Return the current status of a cartridge.
reload Reload the configuration of a cartridge.
show Show information about a cartridge.
storage View and manipulate storage on a cartridge.
scale Set the scaling range of a cartridge.
The following table describes the available options with cartridge management commands:
Table 10.3. Cartridge Management Command Options
Option Description
-n, --namespace [NAME] Name of a domain.
-a, --app [NAME] Name of an application.
-c, --cartridge [CART_TYPE] Name of cartridge.
-l, --rhlogin [LOGIN] OpenShift Online user account.
-p, --password [PASSWORD] OpenShift Online account password.
Example 10.2. Stopping a Cartridge
$ rhc cartridge stop php -a mynewappUsing php-5.4 (PHP 5.4) for 'php'Stopping php-5.4 ... done
Report a bug
Chapter 10. Cartridge Management
61
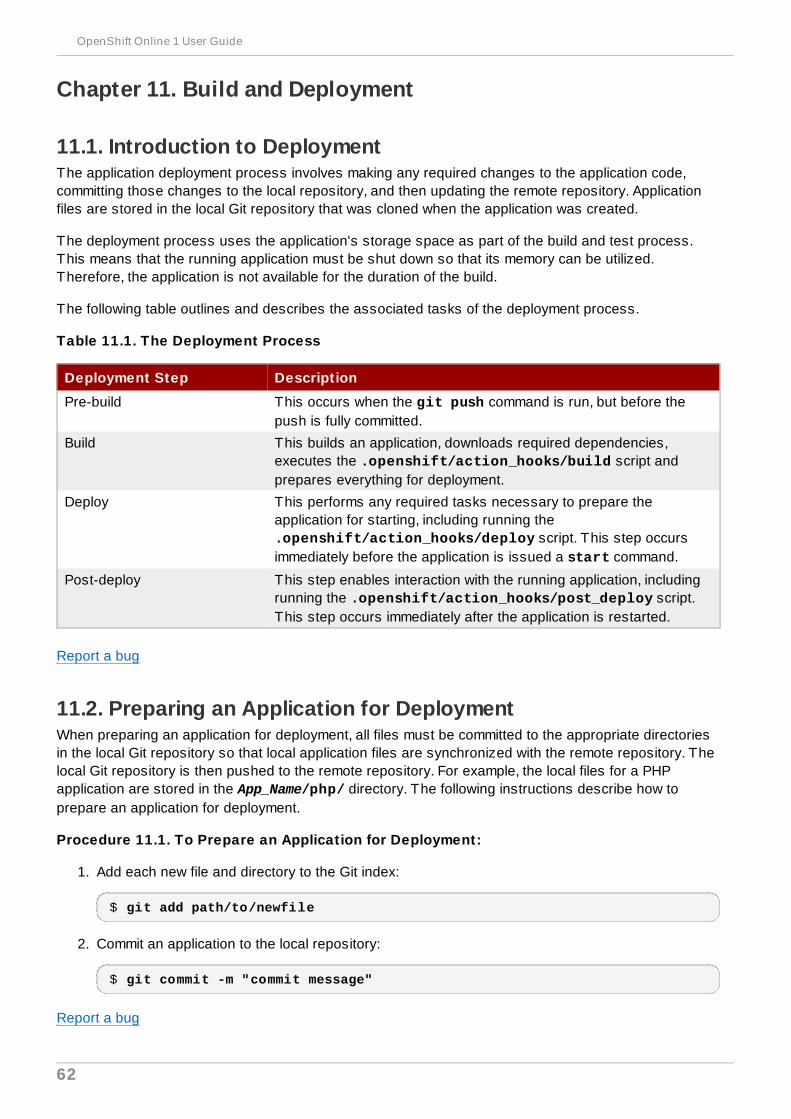
Chapter 11. Build and Deployment
11.1. Introduction to DeploymentThe application deployment process involves making any required changes to the application code,committing those changes to the local repository, and then updating the remote repository. Applicationfiles are stored in the local Git repository that was cloned when the application was created.
The deployment process uses the application's storage space as part of the build and test process.This means that the running application must be shut down so that its memory can be utilized.Therefore, the application is not available for the duration of the build.
The following table outlines and describes the associated tasks of the deployment process.
Table 11.1. The Deployment Process
Deployment Step Description
Pre-build This occurs when the git push command is run, but before thepush is fully committed.
Build This builds an application, downloads required dependencies,executes the .openshift/action_hooks/build script andprepares everything for deployment.
Deploy This performs any required tasks necessary to prepare theapplication for starting, including running the .openshift/action_hooks/deploy script. This step occursimmediately before the application is issued a start command.
Post-deploy This step enables interaction with the running application, includingrunning the .openshift/action_hooks/post_deploy script.This step occurs immediately after the application is restarted.
Report a bug
11.2. Preparing an Application for DeploymentWhen preparing an application for deployment, all files must be committed to the appropriate directoriesin the local Git repository so that local application files are synchronized with the remote repository. Thelocal Git repository is then pushed to the remote repository. For example, the local files for a PHPapplication are stored in the App_Name/php/ directory. The following instructions describe how toprepare an application for deployment.
Procedure 11.1. To Prepare an Application for Deployment:
1. Add each new file and directory to the Git index:
$ git add path/to/newfile
2. Commit an application to the local repository:
$ git commit -m "commit message"
Report a bug
OpenShift Online 1 User Guide
62
11.3. Deployment Mechanisms
11.3.1. Automatic DeploymentWhen an application is created as described in Section 9.2, “Creating an Application”, it is configured forautomatic deployment by default. If the application code is changed locally, run the following commandsto commit and deploy the application automatically:
$ git commit$ git push
The git push command sends the application data to the remote repository and automatically deploysthe application. The application automatically stops, builds, and restarts when the code changes arepushed to the remote server.
Report a bug
11.3.1.1. Configuring Automatic DeploymentAutomatic deployment is configured by default when a new application is created. However, if thedeployment mechanism was changed and you wish to revert back to automatic deployment, do so withthe following command:
$ rhc configure-app -a App_Name --auto-deploy
Report a bug
11.3.2. Manual DeploymentIn contrast to automatic deployment, manual deployment of applications provides greater control of theapplication deployment process. Manual deployments of an application can be from a Git reference, suchas commit ID, tag, or branch, or from a binary artifact. Because automatic deployment is configured bydefault when a new application is created, it must be disabled to configure manual deployment for thatapplication.
Report a bug
11.3.2.1. Configuring Manual DeploymentConfigure manual deployment for an application by disabling automatic deployment with the followingcommand, specifying the application name:
$ rhc configure-app -a App_Name --no-auto-deploy
This command enables manual deployment of an application so that when the git push command isrun, the application data is only pushed to the remote repository; the application is not deployed.
See Also:
Section 11.3.1.1, “Configuring Automatic Deployment”
Report a bug
11.3.2.2. Preserving DeploymentsPreserving a number of deployments permits rollbacks to previous deployments of an application.
Chapter 11. Build and Deployment
63
Configure an application to preserve deployments with the following command:
$ rhc configure-app -a App_Name --keep-deployments No_of_Deps
where No_of_Deps is the number of deployments to keep in the application's history. Older deploymentsare deleted when this number is exceeded.
Report a bug
11.3.2.3. Deploying from a Git BranchWhen manual application deployment is configured, deploy an application from any Git branch with thefollowing command, specifying the Git branch to deploy from:
$ rhc configure-app -a App_Name deployment-branch Git_Branch
The Git references supported with this command are SHA, branch, and tag.
Report a bug
11.3.2.4 . Deploying from a SnapshotThe following instructions describe how to deploy an application from a snapshot. Note that anapplication can be deployed from a binary artifact.
Procedure 11.2. To Deploy From a Snapshot:
1. Save an application snapshot to build a deployable .tar.gz artifact:
$ rhc save-snapshot App_Name --deployment
2. Configure the application for binary artifact deployments:
$ rhc configure-app App_Name --deployment-type binary
Note that this command changes the application's deployment process and disables the git push command.
3. Deploy the application using the binary artifact that was created:
$ rhc deploy ./app.tar.gz -a App_Name
Alternatively, use the following command to deploy from a URL:
$ rhc deploy http://foo.com/path/to/file.tar.gz -a App_Name
See Also:
Section 13.1, “Introduction to Snapshots”
Report a bug
11.3.2.5. Viewing Previous DeploymentsPrevious deployments are viewed with the following command:
$ rhc deployments App_Name
OpenShift Online 1 User Guide
64
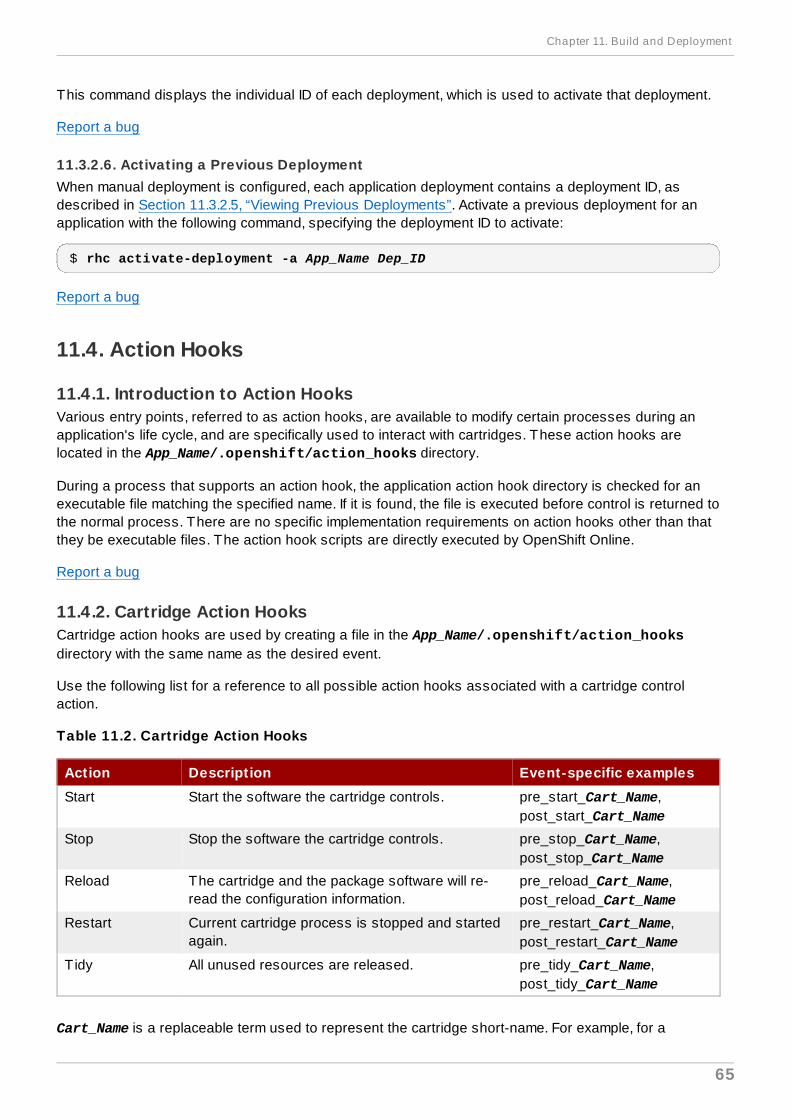
This command displays the individual ID of each deployment, which is used to activate that deployment.
Report a bug
11.3.2.6. Activating a Previous DeploymentWhen manual deployment is configured, each application deployment contains a deployment ID, asdescribed in Section 11.3.2.5, “Viewing Previous Deployments”. Activate a previous deployment for anapplication with the following command, specifying the deployment ID to activate:
$ rhc activate-deployment -a App_Name Dep_ID
Report a bug
11.4. Action Hooks
11.4.1. Introduction to Action HooksVarious entry points, referred to as action hooks, are available to modify certain processes during anapplication's life cycle, and are specifically used to interact with cartridges. These action hooks arelocated in the App_Name/.openshift/action_hooks directory.
During a process that supports an action hook, the application action hook directory is checked for anexecutable file matching the specified name. If it is found, the file is executed before control is returned tothe normal process. There are no specific implementation requirements on action hooks other than thatthey be executable files. The action hook scripts are directly executed by OpenShift Online.
Report a bug
11.4.2. Cartridge Action HooksCartridge action hooks are used by creating a file in the App_Name/.openshift/action_hooksdirectory with the same name as the desired event.
Use the following list for a reference to all possible action hooks associated with a cartridge controlaction.
Table 11.2. Cartridge Action Hooks
Action Description Event-specific examples
Start Start the software the cartridge controls. pre_start_Cart_Name,post_start_Cart_Name
Stop Stop the software the cartridge controls. pre_stop_Cart_Name,post_stop_Cart_Name
Reload The cartridge and the package software will re-read the configuration information.
pre_reload_Cart_Name,post_reload_Cart_Name
Restart Current cartridge process is stopped and startedagain.
pre_restart_Cart_Name,post_restart_Cart_Name
Tidy All unused resources are released. pre_tidy_Cart_Name,post_tidy_Cart_Name
Cart_Name is a replaceable term used to represent the cartridge short-name. For example, for a
Chapter 11. Build and Deployment
65
JBossAS cartridge to be implemented during the pre-start process, create the file App_Name/.openshift/action_hooks/pre_start_jbossas, edit it and add the desiredinformation.
Report a bug
11.4.3. Build and Deployment Action HooksThe list of action hooks for build and deployment are:
pre-build
build
deploy
post-deploy
Create a new file in the App_Name/.openshift/action_hooks directory to use the build anddeployment action hooks. For example, to use an action hook during the application build phase, createthe file App_Name/.openshift/action_hooks/build, edit it and add the following to the file'scontents:
Example 11.1. Adding an Action Hook to the Build Process
echo Downloading my.zip...curl -o $OPENSHIFT_DATA_DIR/my.zip http://myserver/my.zip
The file is downloaded during the git push process.
Report a bug
11.4.4. Scaling Action HooksAutomatic scaling is controlled by the haproxy_ctld daemon. The haproxy_ctld.rb script, whichchanges the thresholds and algorithms used to control scale up and down behavior, can be customizedfor use as an action hook in scalable applications.
Procedure 11.3. To Customize Automatic Scaling for an Application:
1. Use SSH to connect to a scalable application and consult the generic ~/haproxy/usr/bin/haproxy_ctld.rb script for detailed usage information.
2. Copy the file to the Git repository of the application in the App_Name/.openshift/action_hooks/ directory.
3. Ensure the file is executable:
# chmod +x App_Name/.openshift/action_hooks/haproxy_ctld.rb
4. Edit the file to the desired specifications.
5. Deploy the changes. To ensure that the changes take effect immediately, the HAProxy cartridgerestarts automatically during deployment if the haproxy_ctld.rb action hook is detected.
Report a bug
OpenShift Online 1 User Guide
66
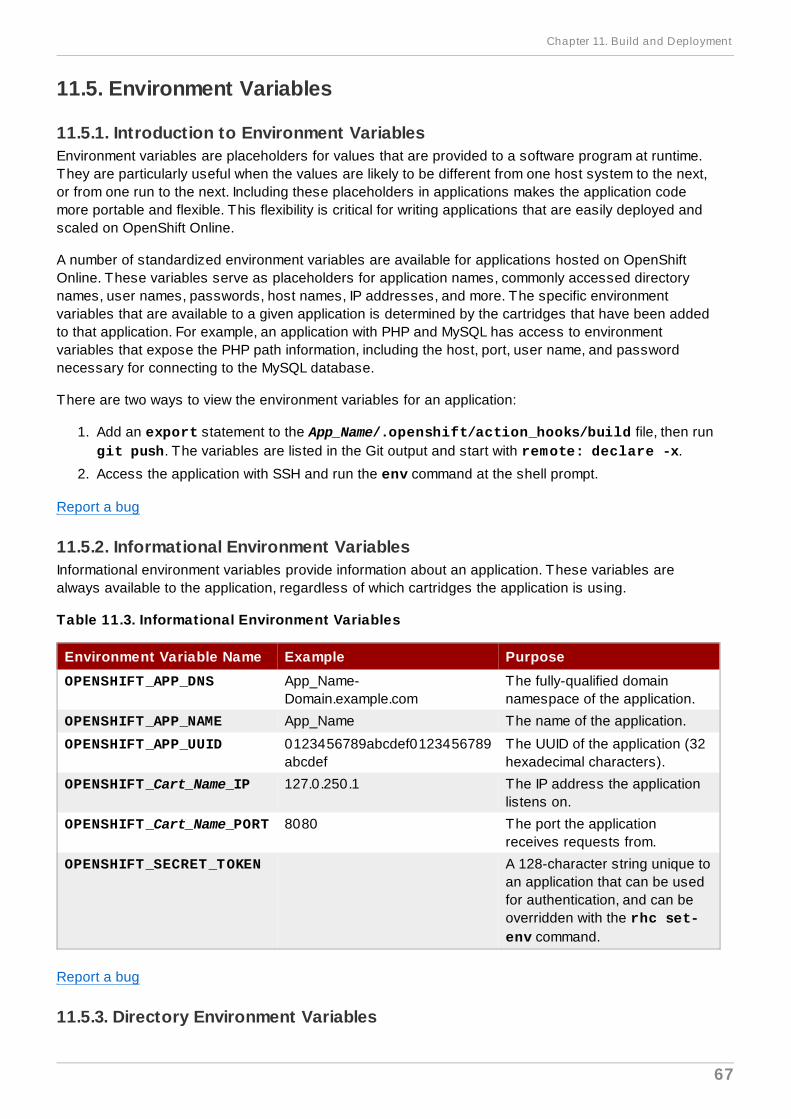
11.5. Environment Variables
11.5.1. Introduction to Environment VariablesEnvironment variables are placeholders for values that are provided to a software program at runtime.They are particularly useful when the values are likely to be different from one host system to the next,or from one run to the next. Including these placeholders in applications makes the application codemore portable and flexible. This flexibility is critical for writing applications that are easily deployed andscaled on OpenShift Online.
A number of standardized environment variables are available for applications hosted on OpenShiftOnline. These variables serve as placeholders for application names, commonly accessed directorynames, user names, passwords, host names, IP addresses, and more. The specific environmentvariables that are available to a given application is determined by the cartridges that have been addedto that application. For example, an application with PHP and MySQL has access to environmentvariables that expose the PHP path information, including the host, port, user name, and passwordnecessary for connecting to the MySQL database.
There are two ways to view the environment variables for an application:
1. Add an export statement to the App_Name/.openshift/action_hooks/build file, then run git push. The variables are listed in the Git output and start with remote: declare -x.
2. Access the application with SSH and run the env command at the shell prompt.
Report a bug
11.5.2. Informational Environment VariablesInformational environment variables provide information about an application. These variables arealways available to the application, regardless of which cartridges the application is using.
Table 11.3. Informational Environment Variables
Environment Variable Name Example Purpose
OPENSHIFT_APP_DNS App_Name-Domain.example.com
The fully-qualified domainnamespace of the application.
OPENSHIFT_APP_NAME App_Name The name of the application.
OPENSHIFT_APP_UUID 0123456789abcdef0123456789abcdef
The UUID of the application (32hexadecimal characters).
OPENSHIFT_Cart_Name_IP 127.0.250.1 The IP address the applicationlistens on.
OPENSHIFT_Cart_Name_PORT 8080 The port the applicationreceives requests from.
OPENSHIFT_SECRET_TOKEN A 128-character string unique toan application that can be usedfor authentication, and can beoverridden with the rhc set-env command.
Report a bug
11.5.3. Directory Environment Variables
Chapter 11. Build and Deployment
67
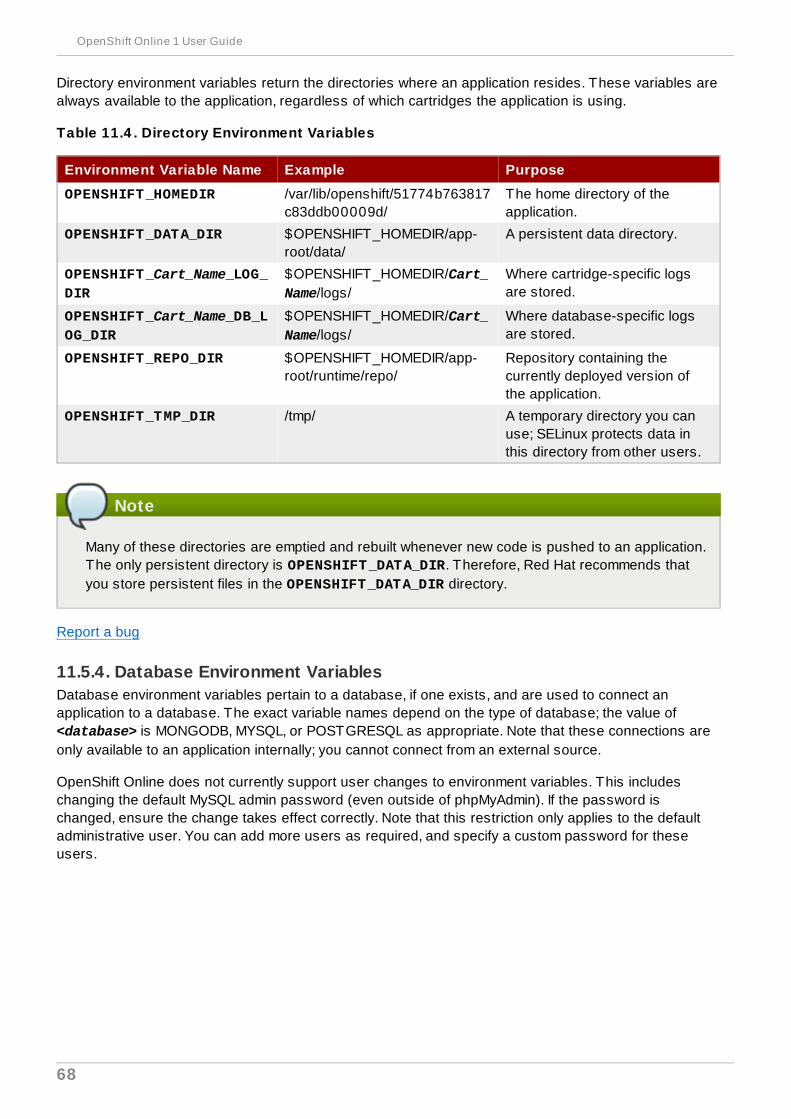
Directory environment variables return the directories where an application resides. These variables arealways available to the application, regardless of which cartridges the application is using.
Table 11.4 . Directory Environment Variables
Environment Variable Name Example Purpose
OPENSHIFT_HOMEDIR /var/lib/openshift/51774b763817c83ddb00009d/
The home directory of theapplication.
OPENSHIFT_DATA_DIR $OPENSHIFT_HOMEDIR/app-root/data/
A persistent data directory.
OPENSHIFT_Cart_Name_LOG_DIR
$OPENSHIFT_HOMEDIR/Cart_Name/logs/
Where cartridge-specific logsare stored.
OPENSHIFT_Cart_Name_DB_LOG_DIR
$OPENSHIFT_HOMEDIR/Cart_Name/logs/
Where database-specific logsare stored.
OPENSHIFT_REPO_DIR $OPENSHIFT_HOMEDIR/app-root/runtime/repo/
Repository containing thecurrently deployed version ofthe application.
OPENSHIFT_TMP_DIR /tmp/ A temporary directory you canuse; SELinux protects data inthis directory from other users.
Note
Many of these directories are emptied and rebuilt whenever new code is pushed to an application.The only persistent directory is OPENSHIFT_DATA_DIR. Therefore, Red Hat recommends thatyou store persistent files in the OPENSHIFT_DATA_DIR directory.
Report a bug
11.5.4. Database Environment VariablesDatabase environment variables pertain to a database, if one exists, and are used to connect anapplication to a database. The exact variable names depend on the type of database; the value of <database> is MONGODB, MYSQL, or POSTGRESQL as appropriate. Note that these connections areonly available to an application internally; you cannot connect from an external source.
OpenShift Online does not currently support user changes to environment variables. This includeschanging the default MySQL admin password (even outside of phpMyAdmin). If the password ischanged, ensure the change takes effect correctly. Note that this restriction only applies to the defaultadministrative user. You can add more users as required, and specify a custom password for theseusers.
OpenShift Online 1 User Guide
68
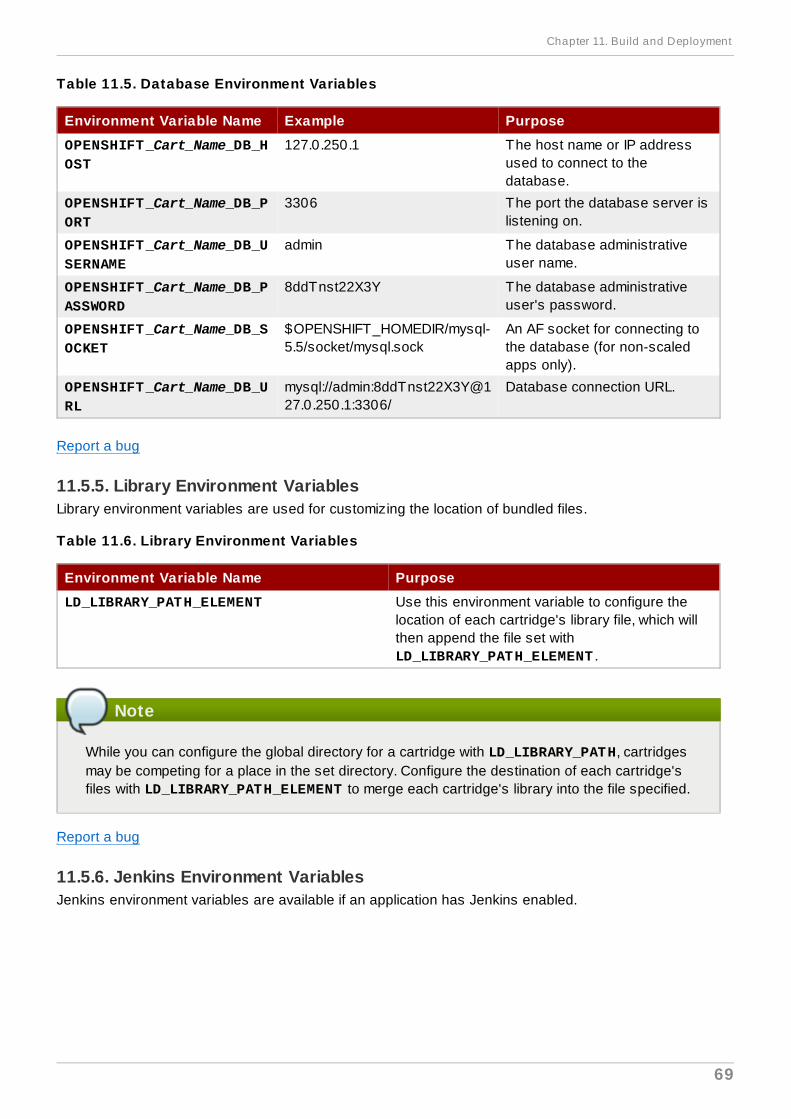
Table 11.5. Database Environment Variables
Environment Variable Name Example Purpose
OPENSHIFT_Cart_Name_DB_HOST
127.0.250.1 The host name or IP addressused to connect to thedatabase.
OPENSHIFT_Cart_Name_DB_PORT
3306 The port the database server islistening on.
OPENSHIFT_Cart_Name_DB_USERNAME
admin The database administrativeuser name.
OPENSHIFT_Cart_Name_DB_PASSWORD
8ddTnst22X3Y The database administrativeuser's password.
OPENSHIFT_Cart_Name_DB_SOCKET
$OPENSHIFT_HOMEDIR/mysql-5.5/socket/mysql.sock
An AF socket for connecting tothe database (for non-scaledapps only).
OPENSHIFT_Cart_Name_DB_URL
mysql://admin:[email protected]:3306/
Database connection URL.
Report a bug
11.5.5. Library Environment VariablesLibrary environment variables are used for customizing the location of bundled files.
Table 11.6. Library Environment Variables
Environment Variable Name Purpose
LD_LIBRARY_PATH_ELEMENT Use this environment variable to configure thelocation of each cartridge's library file, which willthen append the file set with LD_LIBRARY_PATH_ELEMENT .
Note
While you can configure the global directory for a cartridge with LD_LIBRARY_PATH, cartridgesmay be competing for a place in the set directory. Configure the destination of each cartridge'sfiles with LD_LIBRARY_PATH_ELEMENT to merge each cartridge's library into the file specified.
Report a bug
11.5.6. Jenkins Environment VariablesJenkins environment variables are available if an application has Jenkins enabled.
Chapter 11. Build and Deployment
69
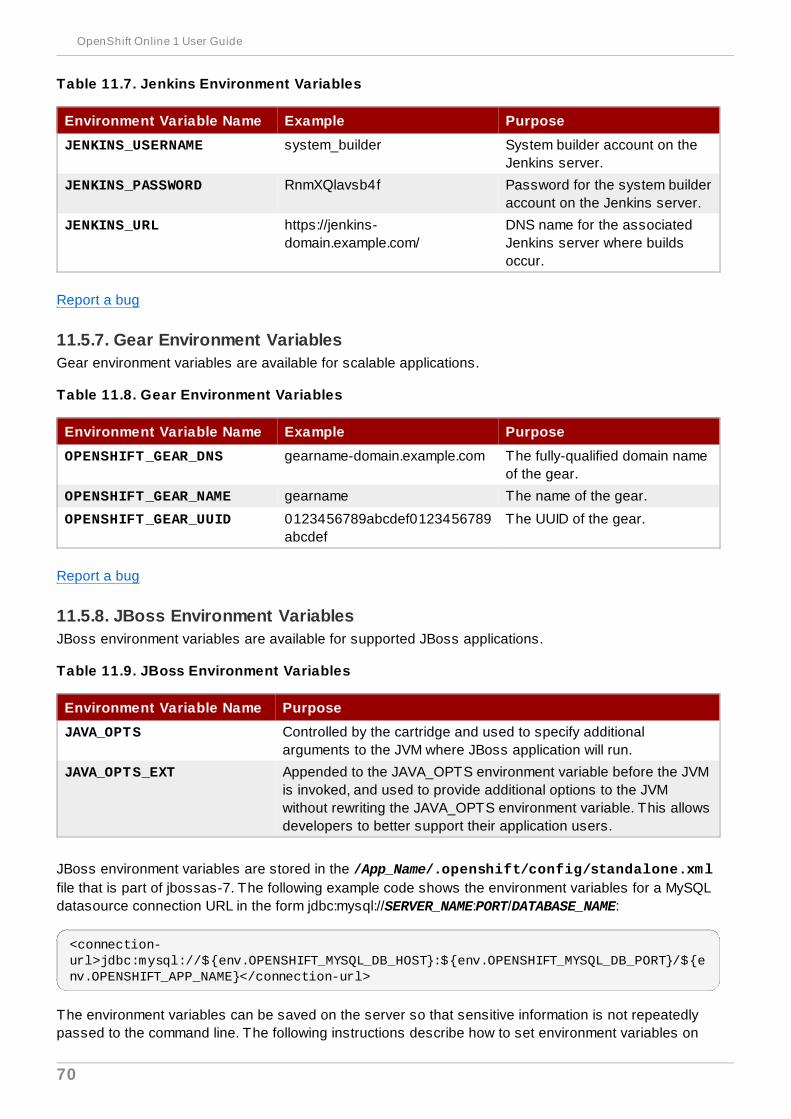
Table 11.7. Jenkins Environment Variables
Environment Variable Name Example Purpose
JENKINS_USERNAME system_builder System builder account on theJenkins server.
JENKINS_PASSWORD RnmXQlavsb4f Password for the system builderaccount on the Jenkins server.
JENKINS_URL https://jenkins-domain.example.com/
DNS name for the associatedJenkins server where buildsoccur.
Report a bug
11.5.7. Gear Environment VariablesGear environment variables are available for scalable applications.
Table 11.8. Gear Environment Variables
Environment Variable Name Example Purpose
OPENSHIFT_GEAR_DNS gearname-domain.example.com The fully-qualified domain nameof the gear.
OPENSHIFT_GEAR_NAME gearname The name of the gear.
OPENSHIFT_GEAR_UUID 0123456789abcdef0123456789abcdef
The UUID of the gear.
Report a bug
11.5.8. JBoss Environment VariablesJBoss environment variables are available for supported JBoss applications.
Table 11.9. JBoss Environment Variables
Environment Variable Name Purpose
JAVA_OPTS Controlled by the cartridge and used to specify additionalarguments to the JVM where JBoss application will run.
JAVA_OPTS_EXT Appended to the JAVA_OPTS environment variable before the JVMis invoked, and used to provide additional options to the JVMwithout rewriting the JAVA_OPTS environment variable. This allowsdevelopers to better support their application users.
JBoss environment variables are stored in the /App_Name/.openshift/config/standalone.xmlfile that is part of jbossas-7. The following example code shows the environment variables for a MySQLdatasource connection URL in the form jdbc:mysql://SERVER_NAME:PORT/DATABASE_NAME:
<connection-url>jdbc:mysql://${env.OPENSHIFT_MYSQL_DB_HOST}:${env.OPENSHIFT_MYSQL_DB_PORT}/${env.OPENSHIFT_APP_NAME}</connection-url>
The environment variables can be saved on the server so that sensitive information is not repeatedlypassed to the command line. The following instructions describe how to set environment variables on
OpenShift Online 1 User Guide
70
the server.
Procedure 11.4 . To Set Environment Variables on the Server:
1. Open the App_Name/.openshift/config/standalone.xml file.
2. Specify the required values for any of your environment variables, then save and close the file.
3. Commit and push the changes to the server:
$ git commit -a -m "COMMIT MESSAGE"$ git push
Important
Sensitive information stored in environment variables is visible if you use the rhc snapshotcommands.
Report a bug
11.5.9. Ruby Environment VariablesRuby environment variables are available for supported Ruby applications.
Table 11.10. JBoss Environment Variables
Environment Variable Name Purpose
OPENSHIFT_RUBY_LOGDIR Where cartridge-specific logs are stored.
BUNDLE_WITHOUT Prevents Bundler from installing certain groups specified inthe Gemfile.
Report a bug
11.5.10. Custom Environment VariablesCustom environment variables are user defined to use with applications.
Setting Custom Environment Variables
Set one of more environment variables for an application with the following command:
$ rhc env set Variable=Value Variable2=Value2 -a App_Name
Add additional Variable=Value arguments separated by spaces to set multiple variables.
Viewing Custom Environment Variables
View the custom environment variables set for an application with the following command:
$ rhc env list -a App_Name
Viewing the Value of a Custom Environment Variable
Display the value of one or more custom environment variables with the following command:
Chapter 11. Build and Deployment
71
$ rhc env show Variable Variable2 -a App_Name
Removing Custom Environment Variables
Remove a custom environment variable with the following command:
$ rhc env unset Variable -a App_Name
Report a bug
11.6. Hot Deployment
11.6.1. Introduction to Hot DeploymentWhen the git push command is run to upload code modifications, OpenShift Online stops, builds,deploys, and restarts an application. This entire process takes time to complete and is unnecessary formany types of code changes. With hot deployment the changes to application code are applied withoutrestarting the application cartridge, resulting in increased deployment speed and minimized applicationdowntime.
OpenShift Online provides support for hot deployment through a hot_deploy marker file. If the markeris present, supported application cartridges automatically hot deploy when the git push command isexecuted.
Table 11.11. Application Types That Can or Cannot Be Hot Deployed
Type of Application Hot Deploy
JBoss Application Server Yes
JBoss Enterprise Application Platform Yes
Tomcat 6 (JBoss Enterprise Web Server 1.0) Yes
Tomcat 7 (JBoss Enterprise Web Server 2.0) Yes
PHP Yes
Perl Yes
Ruby Yes
Python Yes
Node.js Yes
Zend Server Yes
Jenkins No
HAProxy No
DIY No
Report a bug
11.6.2. Hot Deployment Build Details
JBoss AS, JBoss EAP, Tomcat 6, and Tomcat 7
When JBoss AS, JBoss EAP, Tomcat 6, and Tomcat 7 applications are hot deployed, the Maven build isexecuted (either with Jenkins or without), but the server does not restart. Following the build, the JBossHDScanner notices any modifications and redeploys them. If previously deployed artifacts are removed
OpenShift Online 1 User Guide
72

as part of the update, they are undeployed automatically.
PHP, Zend Server, Perl, Python, and Node.js
When PHP, Zend Server, Perl, Python, and Node.js applications are hot deployed, the application code isbuilt (dependencies are processed and user build action_hooks are run) and deployed to the applicationserver. The server does not restart. This is true regardless of whether an application has Jenkinsenabled or not. For applications that have Jenkins enabled, the build is performed on a Jenkins slaveinstance and then synced to the gear(s) where the application server is running.
Ruby
When a Ruby application is hot deployed, the Passenger restart.txt file is touched, and theapplication server serves the new code without requiring a full server restart. See the PassengerDocumentation for more information.
Report a bug
11.6.3. Enabling and Disabling Hot DeploymentFollow the instructions applicable to your operating system to enable or disable hot deployment.
Windows
Enable hot deployment by creating the hot_deploy marker file in the application's root directory withthe following command:
C:\app_directory> copy NUL > .openshift\markers\hot_deploy
Disable hot deployment by deleting the hot_deploy marker file from the application's root directory:
C:\app_directory> del .openshift\markers\hot_deploy
Mac OS X and Linux
Enable hot deployment by creating the hot_deploy marker file in the application's root directory:
[user@user app_directory]$ touch .openshift/markers/hot_deploy
Disable hot deployment by deleting the hot_deploy marker file from the application's root directory:
[user@user app_directory]$ rm .openshift/markers/hot_deploy
Report a bug
11.7. Jenkins Continuous Integration
11.7.1. Introduction to JenkinsThe Jenkins cartridge integrates with OpenShift Online applications to provide continuous integration bymonitoring execution of repeated jobs. Visit http://jenkins-ci.org/ for more information about Jenkins.
The Jenkins client cartridge must be added to a new or existing application to build with Jenkins. Afterthe Jenkins client cartridge is added to an application, the git push command initiates a build process
Chapter 11. Build and Deployment
73
inside Jenkins. For custom applications, or applications that have no upstream repositories, the buildprocess is initiated directly from the Jenkins web interface rather than with the git push command.
There are a number of benefits with using Jenkins to build applications:
Archived build information
No application downtime during the build process
Failed builds do not get deployed, which leaves the previous working version in place
Additional memory and storage resources are available with Jenkins builders
A large community of Jenkins plug-ins
Jenkins can be used to build any number of applications, and is only limited by the number of availablegears. For example, if a PHP application is created and MySQL database is on the first gear, thenJenkins is added to a separate gear. A third gear is used for the Jenkins builder. In other words,whenever the Jenkins builder is active, it occupies one of the available gears.
Report a bug
11.7.2. Configuring Jenkins
11.7.2.1. Configuring Jenkins with New ApplicationsJenkins is configured with a new application by using the --jenkins-enable option:
$ rhc app create App_Name App_Type --enable-jenkins Jenkins_App_Name
Add the -s to create a scalable application.
See Also:
Section 9.2, “Creating an Application”
Report a bug
11.7.2.2. Configuring Jenkins with Existing ApplicationsThe following instructions describe how to configure Jenkins with an existing application. Note thatJenkins can be configured with both scalable and non-scalable applications.
Procedure 11.5. To Configure Jenkins with an Existing Application:
1. Create the Jenkins application:
$ rhc app create App_Name jenkins-1
OpenShift Online 1 User Guide
74
Example 11.2. Creating Jenkins Applications
$ rhc app create myjenkins jenkins-1Application Options-------------------Domain: mydomainCartridges: jenkins-1Gear Size: defaultScaling: no
Creating application 'myjenkins' ... done
Jenkins created successfully. Please make note of these credentials:
User: admin Password: Zek_Mdtr86uq
Note: You can change your password at: https://myjenkins-mydomain.rhcloud.com/me/configure........Run 'rhc show-app myjenkins' for more details about your app.
2. Add the Jenkins client cartridge to the specified application:
$ rhc cartridge add jenkins-client-1 -a App_Name
Example 11.3. Adding Jenkins Client to Application
$ rhc cartridge add jenkins-client-1 -a myappAdding jenkins-client-1 to application 'myapp' ... done
jenkins-client-1 (Jenkins Client)--------------------------------- Gears: Located with php-5.4 Job URL: https://myjenkins-mydomain.rhcloud.com/job/myapp-build/
Associated with job 'myapp-build' in Jenkins server.
Report a bug
11.7.3. Building Applications with JenkinsBuilding applications with Jenkins uses dedicated application space, which can be larger than theapplication runtime space. The Jenkins online build system monitors applications that have anembedded Jenkins Client, and automatically rebuilds and deploys those applications whenever changesto the Git repository are pushed to the remote server without any further interaction. The existingapplication is not affected until a new, successful build has been created. If the build fails, the existingapplication continues to run. However, note that a failure in the deployment process (deploy - start -post_deploy) could leave the application partially deployed or inaccessible.
The actual build and deployment process that Jenkins executes involves the following steps:
Chapter 11. Build and Deployment
75
1. The git push command is executed, and Jenkins is notified that a new push is ready.
2. A dedicated Jenkins slave (a builder) is created. The rhc apps command shows slaveinformation. The application name is the same as that of the originating application, but with a .bldr suffix.
Important
The first 28 characters of the application name must be unique to avoid build issues thatare caused when builders are shared across applications.
3. Jenkins runs the build.
4. Content from the originating application is downloaded to the builder application using git (forsource code) and rsync (for existing libraries).
5. ci_build.sh is called from the Jenkins shell. This sets up the builder application for the Jenkinsenvironment and performs some built-in bundling steps (PHP pear processing, Python virtualenvironment, etc).
6. .openshift/action_hooks/build is executed on the Jenkins builder.
7. Any additional desired steps are executed from the Jenkins shell (Maven build, Gem install, testcases, etc).
8. Jenkins stops the currently running application, and runs rsync to synchronize all new contentover to the originating application.
9. .openshift/action_hooks/deploy is executed on the originating application.
10. Jenkins starts the originating application, and .openshift/action_hooks/post_deploy isexecuted on this application.
11. Jenkins archives all build artifacts for later reference.
12. After 15 minutes of idle time, the "build app" will be destroyed and will no longer appear in theoutput of the rhc apps command. The build artifacts, however, will still exist in Jenkins and canbe viewed there.
The build job can be monitored using the Jenkins interface. The interface provides an extensive rangeof information about the current build, build history, artifacts, as well as plug-ins to graph, track, run testsand perform other operations.
Log all errors related to Jenkins, such as DNS timeout and builder configuration, with the followingcommand, specifying the name of the Jenkins application if it was changed:
$ rhc tail jenkins
Error logs for applications, such as compilation or test failures are available from the Jenkins webinterface under the corresponding build history. Deployment related errors are logged in the application'slog files, and can be viewed with the following command:
$ rhc tail App_Name
Report a bug
11.7.3.1. Building Custom ApplicationsBuild custom applications, or applications that have no upstream repositories, directly from the Jenkinsweb interface instead of using the git push command.
OpenShift Online 1 User Guide
76

Click on the icon of the application from the Jenkins web interface, located on the right side, to buildit.
View the status of the build process in the web interface under the Build Executor Status section.
Report a bug
Chapter 11. Build and Deployment
77
Chapter 12. Gear Storage and Disk Space Management
12.1. Introduction to Gear Storage and Disk SpaceAs an application is developed and the changes are pushed to the Git repository, the amount ofavailable disk space to run an application slowly decreases. This is because Git stores all repositoryinformation, whether it is still required or not. Other aspects of developing and running applications alsoresult in wasted disk space, such as old log files and unused application libraries. In such cases, eitheradditional storage is required, or the existing disk space must be optimized to achieve the best possibleapplication performance.
Gear storage and disk space can be managed with the client tools to optimize application performance.
Note
Additional gear storage is not available with all subscription plans. Therefore, ensure youraccount allows additional gear storage before attempting to increase it. Log on to theManagement Console at https://www.openshift.com/ to view plan upgrade options.
Report a bug
12.2. Viewing Gear StorageView the current gear storage allocation for each cartridge that exists in an application with the followingcommand:
$ rhc cartridge storage --show -a App_Name
Example 12.1. Viewing Gear Storage
$ rhc cartridge storage --show -a myappRESULT:
MySQL Database 5.5------------------ Base Gear Storage: 1GB Additional Gear Storage: 3GB
OpenShift Web Balancer---------------------- Base Gear Storage: 1GB Additional Gear Storage: None
PHP 5.4------- Base Gear Storage: 1GB Additional Gear Storage: None
View gear storage for a specific cartridge by using the -c option to specify the cartridge:
OpenShift Online 1 User Guide
78
$ rhc cartridge storage --show -a App_Name -c Cart_Name
Example 12.2. Viewing Gear Storage for a Specific Cartridge
$ rhc cartridge storage --show -a myapp -c php-5RESULT:PHP 5.4------- Base Gear Storage: 1GB Additional Gear Storage: None
Report a bug
12.3. Adding Gear StorageAdd a specified amount of gear storage to an application with the following command, specifying theapplication name and the amount of storage(GB) to add:
$ rhc cartridge storage Cart_Name -a App_Name --add Storage_Amount(GB)
Example 12.3. Adding Gear Storage
$ rhc cartridge storage php-5.4 -a myapp --add 3gbSet storage on cartridge ... set to 3GB
Storage Info------------ Base Gear Storage: 1GB Additional Gear Storage: 3GB
If the same command is used to add another 1GB of storage, there will be a total of 4GB of additionalgear storage.
Report a bug
12.4. Setting Gear StorageSet a specific amount of gear storage for an application with the following command, using the --setoption.
$ rhc cartridge storage php-5 -a App_Name --set Storage_Amount(GB)
Chapter 12. Gear Storage and Disk Space Management
79

Example 12.4 . Sett ing Gear Storage
$ rhc cartridge storage php-5 -a racer --set 5gbSet storage on cartridge ... set to 5GB
Storage Info------------ Base Gear Storage: 1GB Additional Gear Storage: 5GB
Note that this is different from the --add option because the exact amount of gear storage is specified,rather than adding more storage to the existing amount.
Report a bug
12.5. Removing Gear StorageRemove a specified amount of gear storage with the following command, specifying the application nameand the amount of storage to remove:
$ rhc cartridge storage Cart_Name -a App_Name --remove Storage_Amount(GB)
Example 12.5. Removing Gear Storage
$ rhc cartridge storage php-5 -a myapp --remove 3gbSet storage on cartridge ... 2GB
Storage Info------------ Base Gear Storage: 1GB Additional Gear Storage: 2GB
Report a bug
12.6. Tidying an ApplicationTidying an application helps manage application disk space, and performs the following functions:
Run the git gc command on the application's Git repository on the server.
Clear the application's /tmp and log file directories that are specified by the application's OPENSHIFT_Cart_Name_LOG_DIR and OPENSHIFT_TMP_DIR environment variables.
Clear unused application libraries and remove any library files previously installed by a git pushcommand.
OpenShift Online 1 User Guide
80

Important
Log files are not automatically backed up or rotated. T idying an application runs the rm -rfcommand to clear the contents of these directories. Before performing this step, save the log filesby creating a snapshot of the system with the rhc snapshot save command.
Tidy an application with the following command:
$ rhc app tidy App_Name
Report a bug
Chapter 12. Gear Storage and Disk Space Management
81
Chapter 13. Application Backup and Restoration withSnapshots
13.1. Introduction to SnapshotsApplication snapshots are used to back up and restore applications. Snapshots are stored in tar.gzfiles that contain the application and all local files, including log files.
Important
Application backups and user data are not stored on OpenShift Online servers. These files areonly stored on the local system.
Report a bug
13.2. Creating an Application SnapshotCreate an application snapshot with the following command:
$ rhc snapshot save App_Name
Example 13.1. Creating an Application Snapshot
$ rhc snapshot save myappPulling down a snapshot to myapp.tar.gz...Creating and sending tar.gz
RESULT:Success
The command prompts for any required information. The default filename for the snapshot is $App_Name.tar.gz. Choose a different filename or file path by using the --filepath option tooverride the defaults.
Report a bug
13.3. Restoring from an Application SnapshotRestoring from an application snapshot restores the Git repository, the application data directories, andthe log files found in the specified archive. When the restoration is complete, the deployment script is runon the restored repository as though git push was run.
OpenShift Online 1 User Guide
82
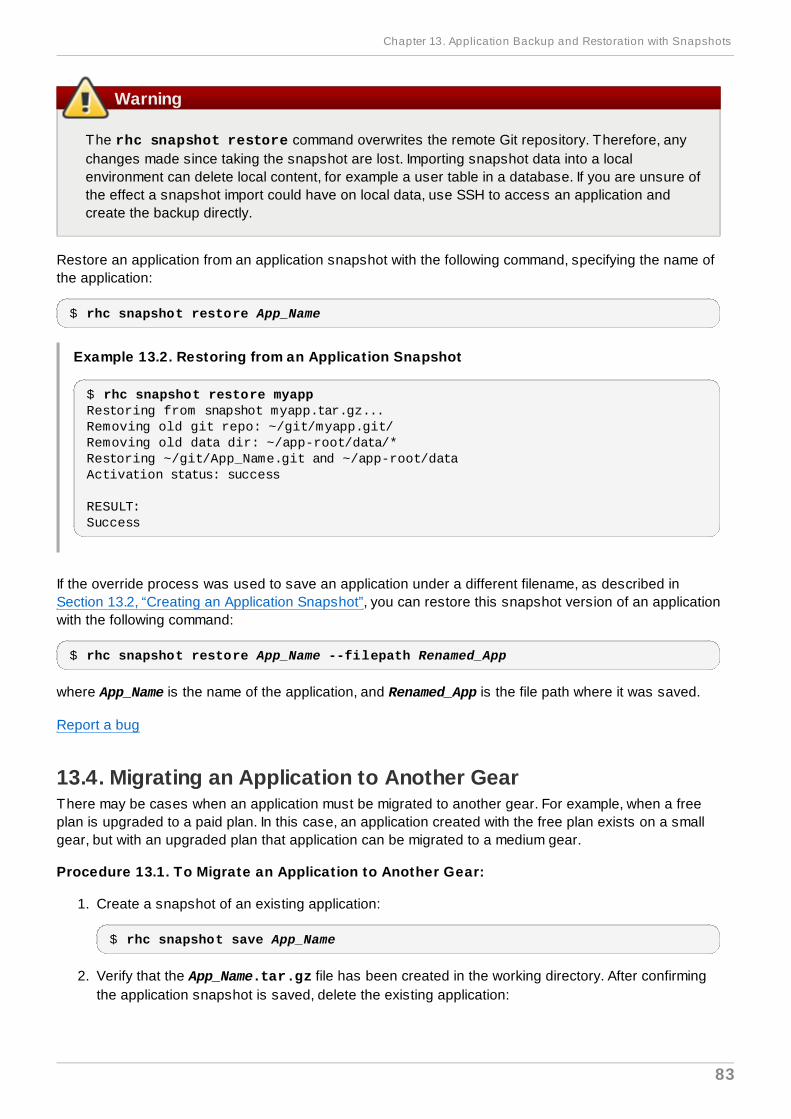
Warning
The rhc snapshot restore command overwrites the remote Git repository. Therefore, anychanges made since taking the snapshot are lost. Importing snapshot data into a localenvironment can delete local content, for example a user table in a database. If you are unsure ofthe effect a snapshot import could have on local data, use SSH to access an application andcreate the backup directly.
Restore an application from an application snapshot with the following command, specifying the name ofthe application:
$ rhc snapshot restore App_Name
Example 13.2. Restoring from an Application Snapshot
$ rhc snapshot restore myappRestoring from snapshot myapp.tar.gz...Removing old git repo: ~/git/myapp.git/Removing old data dir: ~/app-root/data/*Restoring ~/git/App_Name.git and ~/app-root/dataActivation status: success
RESULT:Success
If the override process was used to save an application under a different filename, as described inSection 13.2, “Creating an Application Snapshot”, you can restore this snapshot version of an applicationwith the following command:
$ rhc snapshot restore App_Name --filepath Renamed_App
where App_Name is the name of the application, and Renamed_App is the file path where it was saved.
Report a bug
13.4. Migrating an Application to Another GearThere may be cases when an application must be migrated to another gear. For example, when a freeplan is upgraded to a paid plan. In this case, an application created with the free plan exists on a smallgear, but with an upgraded plan that application can be migrated to a medium gear.
Procedure 13.1. To Migrate an Application to Another Gear:
1. Create a snapshot of an existing application:
$ rhc snapshot save App_Name
2. Verify that the App_Name.tar.gz file has been created in the working directory. After confirmingthe application snapshot is saved, delete the existing application:
Chapter 13. Application Backup and Restoration with Snapshots
83
$ rhc app delete App_Name
3. Create a new application using the same cartridges, but with the correct gear size:
$ rhc app create App_Name Cart_Name -g gear_size
4. Finally, restore the previously saved application snapshot to the newly created application. Besure to specify the correct path to the saved application snapshot:
$ rhc snapshot restore App_Name -f App_Name.tar.gz
Report a bug
OpenShift Online 1 User Guide
84

Revision HistoryRevision 1.0.4 0-2 Thu Feb 27 2014 Bilhar Aulakh
Restructured book.BZ 1051190: Added Section 11.4.4, “Scaling Action Hooks”.BZ 1065804: Fixed command error.
Revision 1.0.36-0 Tue Nov 26 2013 Bilhar AulakhAdded information on specifying the size of cartridges.Added information to clarify action_hooks.
Revision 1.0.35-0 Thu Nov 7 2013 Bilhar AulakhAdded two new topics about action hooks for cartridges and during the build process.Added information on configuring application deployment.Added information on adding specific SSH key types.Added information on managing domain membership with client tools.Added information on disabling local gears with multiple HA proxies.Added information on making deployment and rollback changes to applications.Updated port information for binding applications.
Revision 1.0.34 -0 Tue Oct 15 2013 Bilhar AulakhAdded information on configuring application deployment.Added support for PostgreSQL 9.2 from SCL.Added SECRET_TOKEN environment variable.Added Members section for domain membership.Added support for multiple domains.Added table and information about ports available for binding.
Revision 1.0.33-0 Wed Sep 18 2013 Bilhar AulakhAdded information on port forwarding with individual gears.Updated cartridge version numbers.Added Custom Environment Variables section.
Revision History
85