Embed Size (px)
Citation preview

OpenScape UC Application V7OpenScape Fusion for Microsoft Lync
User Guide
A31003-S5070-U120-4-7619
Our Quality and Environmental Management Systems are implemented according to the requirements of the ISO9001 and ISO14001 standards and are certified by an external certification company.
Copyright © Unify GmbH & Co. KG 01/2014 Hofmannstr. 51, 81379 Munich/Germany
All rights reserved.
Reference No.: A31003-S5070-U120-4-7619
The information provided in this document contains merely general descriptions or characteristics of performance which in case of actual use do not always apply as described or which may change as a result of further development of the products. An obligation to provide the respective characteristics shall only exist if expressly agreed in the terms of contract.
Availability and technical specifications are subject to change without notice.
Unify, OpenScape, OpenStage and HiPath are registered trademarks of Unify GmbH & Co. KG. All other company, brand, product and service names are trademarks or registered trademarks of their respective holders.
unify.com
Contents
Contents
History of Changes . . . . . . . . . . . . . . . . . . . . . . . . . . . . . . . . . . . . . . . . . . . . . . . . . . . . . . . . . . . . . . . . . . . . . . . 7
1 Working with this Manual. . . . . . . . . . . . . . . . . . . . . . . . . . . . . . . . . . . . . . . . . . . . . . . . . . . . . . . . . . . . . . . . 91.1 Target Group of this Manual . . . . . . . . . . . . . . . . . . . . . . . . . . . . . . . . . . . . . . . . . . . . . . . . . . . . . . . . . . . . . 91.2 Contents of this Manual . . . . . . . . . . . . . . . . . . . . . . . . . . . . . . . . . . . . . . . . . . . . . . . . . . . . . . . . . . . . . . . . . 91.3 Representation Conventions . . . . . . . . . . . . . . . . . . . . . . . . . . . . . . . . . . . . . . . . . . . . . . . . . . . . . . . . . . . . 10
1.3.1 Formats and Display Forms . . . . . . . . . . . . . . . . . . . . . . . . . . . . . . . . . . . . . . . . . . . . . . . . . . . . . . . . . 101.3.2 Notes . . . . . . . . . . . . . . . . . . . . . . . . . . . . . . . . . . . . . . . . . . . . . . . . . . . . . . . . . . . . . . . . . . . . . . . . . . 11
1.4 Continuative Documentation . . . . . . . . . . . . . . . . . . . . . . . . . . . . . . . . . . . . . . . . . . . . . . . . . . . . . . . . . . . . 111.5 Acronyms . . . . . . . . . . . . . . . . . . . . . . . . . . . . . . . . . . . . . . . . . . . . . . . . . . . . . . . . . . . . . . . . . . . . . . . . . . . 11
2 OpenScape Fusion for Microsoft Lync Overview . . . . . . . . . . . . . . . . . . . . . . . . . . . . . . . . . . . . . . . . . . . 13
3 Configuration and Settings . . . . . . . . . . . . . . . . . . . . . . . . . . . . . . . . . . . . . . . . . . . . . . . . . . . . . . . . . . . . . 153.1 “Audio Schemes” Tab . . . . . . . . . . . . . . . . . . . . . . . . . . . . . . . . . . . . . . . . . . . . . . . . . . . . . . . . . . . . . . . . . 153.2 “Modules” Tab . . . . . . . . . . . . . . . . . . . . . . . . . . . . . . . . . . . . . . . . . . . . . . . . . . . . . . . . . . . . . . . . . . . . . . . 183.3 “Advanced” Tab . . . . . . . . . . . . . . . . . . . . . . . . . . . . . . . . . . . . . . . . . . . . . . . . . . . . . . . . . . . . . . . . . . . . . . 20
3.3.1 General Settings . . . . . . . . . . . . . . . . . . . . . . . . . . . . . . . . . . . . . . . . . . . . . . . . . . . . . . . . . . . . . . . . . . 213.3.1.1 General Configuration . . . . . . . . . . . . . . . . . . . . . . . . . . . . . . . . . . . . . . . . . . . . . . . . . . . . . . . . . . 213.3.1.2 User Data . . . . . . . . . . . . . . . . . . . . . . . . . . . . . . . . . . . . . . . . . . . . . . . . . . . . . . . . . . . . . . . . . . . 223.3.1.3 Starting the Program . . . . . . . . . . . . . . . . . . . . . . . . . . . . . . . . . . . . . . . . . . . . . . . . . . . . . . . . . . . 233.3.1.4 Changing the Connection Status. . . . . . . . . . . . . . . . . . . . . . . . . . . . . . . . . . . . . . . . . . . . . . . . . . 253.3.1.5 Task Bar and Notification Area . . . . . . . . . . . . . . . . . . . . . . . . . . . . . . . . . . . . . . . . . . . . . . . . . . . 263.3.1.6 Program Update . . . . . . . . . . . . . . . . . . . . . . . . . . . . . . . . . . . . . . . . . . . . . . . . . . . . . . . . . . . . . . 273.3.1.7 Central Configuration . . . . . . . . . . . . . . . . . . . . . . . . . . . . . . . . . . . . . . . . . . . . . . . . . . . . . . . . . . 28
3.3.2 Device State Settings . . . . . . . . . . . . . . . . . . . . . . . . . . . . . . . . . . . . . . . . . . . . . . . . . . . . . . . . . . . . . . 293.3.2.1 Line Settings . . . . . . . . . . . . . . . . . . . . . . . . . . . . . . . . . . . . . . . . . . . . . . . . . . . . . . . . . . . . . . . . . 29
3.3.3 Web Browser Settings . . . . . . . . . . . . . . . . . . . . . . . . . . . . . . . . . . . . . . . . . . . . . . . . . . . . . . . . . . . . . 303.3.3.1 Internet Page Settings. . . . . . . . . . . . . . . . . . . . . . . . . . . . . . . . . . . . . . . . . . . . . . . . . . . . . . . . . . 31
3.3.4 OpenScape Provider Settings . . . . . . . . . . . . . . . . . . . . . . . . . . . . . . . . . . . . . . . . . . . . . . . . . . . . . . . 323.3.4.1 Connection . . . . . . . . . . . . . . . . . . . . . . . . . . . . . . . . . . . . . . . . . . . . . . . . . . . . . . . . . . . . . . . . . . 323.3.4.2 Web Access . . . . . . . . . . . . . . . . . . . . . . . . . . . . . . . . . . . . . . . . . . . . . . . . . . . . . . . . . . . . . . . . . 343.3.4.3 Web Conference . . . . . . . . . . . . . . . . . . . . . . . . . . . . . . . . . . . . . . . . . . . . . . . . . . . . . . . . . . . . . . 353.3.4.4 Conference . . . . . . . . . . . . . . . . . . . . . . . . . . . . . . . . . . . . . . . . . . . . . . . . . . . . . . . . . . . . . . . . . . 36
3.3.5 SIP Service Provider Settings. . . . . . . . . . . . . . . . . . . . . . . . . . . . . . . . . . . . . . . . . . . . . . . . . . . . . . . . 363.3.5.1 System Services . . . . . . . . . . . . . . . . . . . . . . . . . . . . . . . . . . . . . . . . . . . . . . . . . . . . . . . . . . . . . . 373.3.5.2 Connection . . . . . . . . . . . . . . . . . . . . . . . . . . . . . . . . . . . . . . . . . . . . . . . . . . . . . . . . . . . . . . . . . . 393.3.5.3 Main Line. . . . . . . . . . . . . . . . . . . . . . . . . . . . . . . . . . . . . . . . . . . . . . . . . . . . . . . . . . . . . . . . . . . . 413.3.5.4 Additional Lines . . . . . . . . . . . . . . . . . . . . . . . . . . . . . . . . . . . . . . . . . . . . . . . . . . . . . . . . . . . . . . . 433.3.5.5 Line Parameters . . . . . . . . . . . . . . . . . . . . . . . . . . . . . . . . . . . . . . . . . . . . . . . . . . . . . . . . . . . . . . 463.3.5.6 Registrar . . . . . . . . . . . . . . . . . . . . . . . . . . . . . . . . . . . . . . . . . . . . . . . . . . . . . . . . . . . . . . . . . . . . 483.3.5.7 Proxy . . . . . . . . . . . . . . . . . . . . . . . . . . . . . . . . . . . . . . . . . . . . . . . . . . . . . . . . . . . . . . . . . . . . . . . 483.3.5.8 Outbound Domain . . . . . . . . . . . . . . . . . . . . . . . . . . . . . . . . . . . . . . . . . . . . . . . . . . . . . . . . . . . . . 493.3.5.9 Network Access. . . . . . . . . . . . . . . . . . . . . . . . . . . . . . . . . . . . . . . . . . . . . . . . . . . . . . . . . . . . . . . 513.3.5.10 Address Conversion . . . . . . . . . . . . . . . . . . . . . . . . . . . . . . . . . . . . . . . . . . . . . . . . . . . . . . . . . . 533.3.5.11 Additional Functions . . . . . . . . . . . . . . . . . . . . . . . . . . . . . . . . . . . . . . . . . . . . . . . . . . . . . . . . . . 553.3.5.12 System Functions . . . . . . . . . . . . . . . . . . . . . . . . . . . . . . . . . . . . . . . . . . . . . . . . . . . . . . . . . . . . 563.3.5.13 Codes . . . . . . . . . . . . . . . . . . . . . . . . . . . . . . . . . . . . . . . . . . . . . . . . . . . . . . . . . . . . . . . . . . . . . 58
A31003-S5070-U120-4-7619, 01/2014OpenScape UC Application V7 OpenScape Fusion for Microsoft Lync, User Guide 3

Contents
3.3.5.14 Sounds . . . . . . . . . . . . . . . . . . . . . . . . . . . . . . . . . . . . . . . . . . . . . . . . . . . . . . . . . . . . . . . . . . . . . 593.3.5.15 Ring Tones . . . . . . . . . . . . . . . . . . . . . . . . . . . . . . . . . . . . . . . . . . . . . . . . . . . . . . . . . . . . . . . . . . 603.3.5.16 Video Schemes . . . . . . . . . . . . . . . . . . . . . . . . . . . . . . . . . . . . . . . . . . . . . . . . . . . . . . . . . . . . . . 613.3.5.17 Bandwidth. . . . . . . . . . . . . . . . . . . . . . . . . . . . . . . . . . . . . . . . . . . . . . . . . . . . . . . . . . . . . . . . . . . 633.3.5.18 Port Restrictions . . . . . . . . . . . . . . . . . . . . . . . . . . . . . . . . . . . . . . . . . . . . . . . . . . . . . . . . . . . . . . 653.3.5.19 Mobile User . . . . . . . . . . . . . . . . . . . . . . . . . . . . . . . . . . . . . . . . . . . . . . . . . . . . . . . . . . . . . . . . . 66
3.3.6 Settings of the "WebHidden Main Window" Module . . . . . . . . . . . . . . . . . . . . . . . . . . . . . . . . . . . . . . . 693.3.7 Notifier Toast (Desktop Alerts) Settings. . . . . . . . . . . . . . . . . . . . . . . . . . . . . . . . . . . . . . . . . . . . . . . . . 70
4 Operation Reference . . . . . . . . . . . . . . . . . . . . . . . . . . . . . . . . . . . . . . . . . . . . . . . . . . . . . . . . . . . . . . . . . . . 714.1 Starting OpenScape Fusion for Microsoft Lync. . . . . . . . . . . . . . . . . . . . . . . . . . . . . . . . . . . . . . . . . . . . . . . 714.2 Terminating OpenScape Fusion for Microsoft Lync . . . . . . . . . . . . . . . . . . . . . . . . . . . . . . . . . . . . . . . . . . . 714.3 Introduction to the OpenScape Fusion for Microsoft Lync GUI. . . . . . . . . . . . . . . . . . . . . . . . . . . . . . . . . . . 724.4 OpenScape Fusion for Microsoft Lync Context Menu. . . . . . . . . . . . . . . . . . . . . . . . . . . . . . . . . . . . . . . . . . 744.5 User Presence . . . . . . . . . . . . . . . . . . . . . . . . . . . . . . . . . . . . . . . . . . . . . . . . . . . . . . . . . . . . . . . . . . . . . . . 77
4.5.1 Presence Setting . . . . . . . . . . . . . . . . . . . . . . . . . . . . . . . . . . . . . . . . . . . . . . . . . . . . . . . . . . . . . . . . . . 784.5.2 How to Set your Presence Status Manually. . . . . . . . . . . . . . . . . . . . . . . . . . . . . . . . . . . . . . . . . . . . . . 79
4.6 Preferred Device . . . . . . . . . . . . . . . . . . . . . . . . . . . . . . . . . . . . . . . . . . . . . . . . . . . . . . . . . . . . . . . . . . . . . . 794.6.1 One-Number Service . . . . . . . . . . . . . . . . . . . . . . . . . . . . . . . . . . . . . . . . . . . . . . . . . . . . . . . . . . . . . . . 804.6.2 Preferred Device - Controls . . . . . . . . . . . . . . . . . . . . . . . . . . . . . . . . . . . . . . . . . . . . . . . . . . . . . . . . . . 814.6.3 Managing Devices and Named Device Lists . . . . . . . . . . . . . . . . . . . . . . . . . . . . . . . . . . . . . . . . . . . . . 824.6.4 How to Configure a new Device. . . . . . . . . . . . . . . . . . . . . . . . . . . . . . . . . . . . . . . . . . . . . . . . . . . . . . . 874.6.5 How to Set your currently Preferred Device. . . . . . . . . . . . . . . . . . . . . . . . . . . . . . . . . . . . . . . . . . . . . . 894.6.6 Auto Device Selection . . . . . . . . . . . . . . . . . . . . . . . . . . . . . . . . . . . . . . . . . . . . . . . . . . . . . . . . . . . . . . 90
4.7 Call Tab. . . . . . . . . . . . . . . . . . . . . . . . . . . . . . . . . . . . . . . . . . . . . . . . . . . . . . . . . . . . . . . . . . . . . . . . . . . . . 914.7.1 Call Control Dialog . . . . . . . . . . . . . . . . . . . . . . . . . . . . . . . . . . . . . . . . . . . . . . . . . . . . . . . . . . . . . . . . . 92
4.7.1.1 Inbound Call . . . . . . . . . . . . . . . . . . . . . . . . . . . . . . . . . . . . . . . . . . . . . . . . . . . . . . . . . . . . . . . . . . 974.7.1.2 Incoming Team Call . . . . . . . . . . . . . . . . . . . . . . . . . . . . . . . . . . . . . . . . . . . . . . . . . . . . . . . . . . . . 984.7.1.3 Outbound Connection. . . . . . . . . . . . . . . . . . . . . . . . . . . . . . . . . . . . . . . . . . . . . . . . . . . . . . . . . . . 984.7.1.4 Active Call. . . . . . . . . . . . . . . . . . . . . . . . . . . . . . . . . . . . . . . . . . . . . . . . . . . . . . . . . . . . . . . . . . . 1004.7.1.5 Consultation Call . . . . . . . . . . . . . . . . . . . . . . . . . . . . . . . . . . . . . . . . . . . . . . . . . . . . . . . . . . . . . 1004.7.1.6 Conference Connection . . . . . . . . . . . . . . . . . . . . . . . . . . . . . . . . . . . . . . . . . . . . . . . . . . . . . . . . 1014.7.1.7 Operation in Restricted Mode. . . . . . . . . . . . . . . . . . . . . . . . . . . . . . . . . . . . . . . . . . . . . . . . . . . . 1044.7.1.8 How to Dial a Phone Number . . . . . . . . . . . . . . . . . . . . . . . . . . . . . . . . . . . . . . . . . . . . . . . . . . . . 1054.7.1.9 How to Call a Microsoft Lync Contact. . . . . . . . . . . . . . . . . . . . . . . . . . . . . . . . . . . . . . . . . . . . . . 106
4.7.2 Video Telephony (SIP). . . . . . . . . . . . . . . . . . . . . . . . . . . . . . . . . . . . . . . . . . . . . . . . . . . . . . . . . . . . . 1074.7.2.1 Video Features . . . . . . . . . . . . . . . . . . . . . . . . . . . . . . . . . . . . . . . . . . . . . . . . . . . . . . . . . . . . . . . 1084.7.2.2 Views of the Video Window . . . . . . . . . . . . . . . . . . . . . . . . . . . . . . . . . . . . . . . . . . . . . . . . . . . . . 1144.7.2.3 Behavior of the Video Streaming . . . . . . . . . . . . . . . . . . . . . . . . . . . . . . . . . . . . . . . . . . . . . . . . . 1194.7.2.4 Controlling a Video Conference via Video Menu . . . . . . . . . . . . . . . . . . . . . . . . . . . . . . . . . . . . . 1204.7.2.5 How to Initiate a Video Call (SIP only) . . . . . . . . . . . . . . . . . . . . . . . . . . . . . . . . . . . . . . . . . . . . . 1234.7.2.6 How to Start Video Streaming . . . . . . . . . . . . . . . . . . . . . . . . . . . . . . . . . . . . . . . . . . . . . . . . . . . 1254.7.2.7 How to Stop Video Streaming . . . . . . . . . . . . . . . . . . . . . . . . . . . . . . . . . . . . . . . . . . . . . . . . . . . 126
4.7.3 Journal Dialog . . . . . . . . . . . . . . . . . . . . . . . . . . . . . . . . . . . . . . . . . . . . . . . . . . . . . . . . . . . . . . . . . . . 1264.7.3.1 Controls in the Journal Dialog . . . . . . . . . . . . . . . . . . . . . . . . . . . . . . . . . . . . . . . . . . . . . . . . . . . 1274.7.3.2 Information in the Journal Dialog . . . . . . . . . . . . . . . . . . . . . . . . . . . . . . . . . . . . . . . . . . . . . . . . . 1284.7.3.3 Time Zone . . . . . . . . . . . . . . . . . . . . . . . . . . . . . . . . . . . . . . . . . . . . . . . . . . . . . . . . . . . . . . . . . . 129
4.7.4 Voicemail Box Dialog . . . . . . . . . . . . . . . . . . . . . . . . . . . . . . . . . . . . . . . . . . . . . . . . . . . . . . . . . . . . . . 1304.7.4.1 Controlling the Voicemail Playback (Voicemail Player) . . . . . . . . . . . . . . . . . . . . . . . . . . . . . . . . 1324.7.4.2 How to Play Voicemails via Telephone . . . . . . . . . . . . . . . . . . . . . . . . . . . . . . . . . . . . . . . . . . . . 1334.7.4.3 How to Play Voicemails via the Windows Media Player. . . . . . . . . . . . . . . . . . . . . . . . . . . . . . . . 133
4.8 Conference Tab . . . . . . . . . . . . . . . . . . . . . . . . . . . . . . . . . . . . . . . . . . . . . . . . . . . . . . . . . . . . . . . . . . . . . 135
A31003-S5070-U120-4-7619, 01/20144 OpenScape UC Application V7 OpenScape Fusion for Microsoft Lync, User Guide
Contents
4.8.1 Supported Conference Types. . . . . . . . . . . . . . . . . . . . . . . . . . . . . . . . . . . . . . . . . . . . . . . . . . . . . . . 1354.8.2 Ad-hoc Conference Dialog . . . . . . . . . . . . . . . . . . . . . . . . . . . . . . . . . . . . . . . . . . . . . . . . . . . . . . . . . 138
4.8.2.1 How to Start an Ad-hoc Conference via the OpenScape Fusion for Microsoft Lync Contact List 1404.8.3 Dialog for creating a Meet Me Conference . . . . . . . . . . . . . . . . . . . . . . . . . . . . . . . . . . . . . . . . . . . . . 142
4.8.3.1 How to Configure a Meet Me Conference . . . . . . . . . . . . . . . . . . . . . . . . . . . . . . . . . . . . . . . . . . 1474.8.4 Conference List Dialog . . . . . . . . . . . . . . . . . . . . . . . . . . . . . . . . . . . . . . . . . . . . . . . . . . . . . . . . . . . . 149
4.8.4.1 How to Start a Meet Me Web Conference via the Conference List . . . . . . . . . . . . . . . . . . . . . . . 1524.9 Team Function - Overview. . . . . . . . . . . . . . . . . . . . . . . . . . . . . . . . . . . . . . . . . . . . . . . . . . . . . . . . . . . . . 153
4.9.1 Controls and Features in the Team View Dialog . . . . . . . . . . . . . . . . . . . . . . . . . . . . . . . . . . . . . . . . 1544.9.2 Managing a Team. . . . . . . . . . . . . . . . . . . . . . . . . . . . . . . . . . . . . . . . . . . . . . . . . . . . . . . . . . . . . . . . 1594.9.3 How to Create a new Team . . . . . . . . . . . . . . . . . . . . . . . . . . . . . . . . . . . . . . . . . . . . . . . . . . . . . . . . 1624.9.4 How to Assign a new Member to a Team. . . . . . . . . . . . . . . . . . . . . . . . . . . . . . . . . . . . . . . . . . . . . . 164
4.10 Settings Tab. . . . . . . . . . . . . . . . . . . . . . . . . . . . . . . . . . . . . . . . . . . . . . . . . . . . . . . . . . . . . . . . . . . . . . . 1654.10.1 How to Configure an Audio Device. . . . . . . . . . . . . . . . . . . . . . . . . . . . . . . . . . . . . . . . . . . . . . . . . . 1684.10.2 How to Configure an individual Ring Tone . . . . . . . . . . . . . . . . . . . . . . . . . . . . . . . . . . . . . . . . . . . . 170
4.11 Integration in Microsoft Outlook 2010 . . . . . . . . . . . . . . . . . . . . . . . . . . . . . . . . . . . . . . . . . . . . . . . . . . . 1714.11.1 OpenScape Fusion for Microsoft Outlook Dialog . . . . . . . . . . . . . . . . . . . . . . . . . . . . . . . . . . . . . . . 1724.11.2 Ad-hoc Conferences from the Microsoft Outlook Contact List . . . . . . . . . . . . . . . . . . . . . . . . . . . . . 173
4.11.2.1 How to Initiate an Ad-hoc Conference via the Microsoft Outlook Contact List . . . . . . . . . . . . . 1754.11.3 Meet Me Conferences from the Microsoft Outlook Calendar . . . . . . . . . . . . . . . . . . . . . . . . . . . . . . 1774.11.4 Ad-hoc Conferences from the Microsoft Outlook E-Mail List . . . . . . . . . . . . . . . . . . . . . . . . . . . . . . 177
4.11.4.1 How to Initiate an Ad-hoc Conference via the Microsoft Outlook Mailbox. . . . . . . . . . . . . . . . . 1814.12 Notifier Toast . . . . . . . . . . . . . . . . . . . . . . . . . . . . . . . . . . . . . . . . . . . . . . . . . . . . . . . . . . . . . . . . . . . . . . 1824.13 Webbrowser. . . . . . . . . . . . . . . . . . . . . . . . . . . . . . . . . . . . . . . . . . . . . . . . . . . . . . . . . . . . . . . . . . . . . . . 184
Index. . . . . . . . . . . . . . . . . . . . . . . . . . . . . . . . . . . . . . . . . . . . . . . . . . . . . . . . . . . . . . . . . . . . . . . . . . . . . . . . . 187
A31003-S5070-U120-4-7619, 01/2014OpenScape UC Application V7 OpenScape Fusion for Microsoft Lync, User Guide 5

Contents
A31003-S5070-U120-4-7619, 01/20146 OpenScape UC Application V7 OpenScape Fusion for Microsoft Lync, User Guide
Fusion_Lync_History.fm
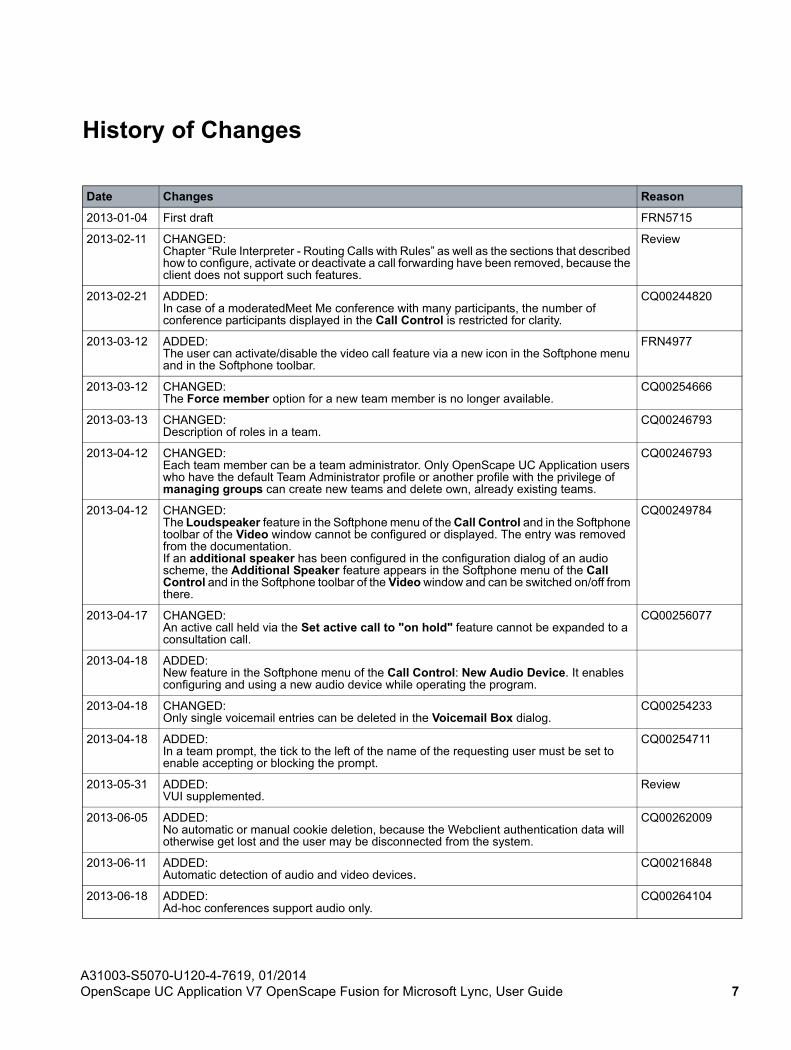
History of Changes
Date Changes Reason
2013-01-04 First draft FRN5715
2013-02-11 CHANGED:Chapter “Rule Interpreter - Routing Calls with Rules” as well as the sections that described how to configure, activate or deactivate a call forwarding have been removed, because the client does not support such features.
Review
2013-02-21 ADDED:In case of a moderatedMeet Me conference with many participants, the number of conference participants displayed in the Call Control is restricted for clarity.
CQ00244820
2013-03-12 ADDED:The user can activate/disable the video call feature via a new icon in the Softphone menu and in the Softphone toolbar.
FRN4977
2013-03-12 CHANGED:The Force member option for a new team member is no longer available.
CQ00254666
2013-03-13 CHANGED:Description of roles in a team.
CQ00246793
2013-04-12 CHANGED:Each team member can be a team administrator. Only OpenScape UC Application users who have the default Team Administrator profile or another profile with the privilege of managing groups can create new teams and delete own, already existing teams.
CQ00246793
2013-04-12 CHANGED:The Loudspeaker feature in the Softphone menu of the Call Control and in the Softphone toolbar of the Video window cannot be configured or displayed. The entry was removed from the documentation. If an additional speaker has been configured in the configuration dialog of an audio scheme, the Additional Speaker feature appears in the Softphone menu of the Call Control and in the Softphone toolbar of the Video window and can be switched on/off from there.
CQ00249784
2013-04-17 CHANGED:An active call held via the Set active call to "on hold" feature cannot be expanded to a consultation call.
CQ00256077
2013-04-18 ADDED:New feature in the Softphone menu of the Call Control: New Audio Device. It enables configuring and using a new audio device while operating the program.
2013-04-18 CHANGED:Only single voicemail entries can be deleted in the Voicemail Box dialog.
CQ00254233
2013-04-18 ADDED:In a team prompt, the tick to the left of the name of the requesting user must be set to enable accepting or blocking the prompt.
CQ00254711
2013-05-31 ADDED:VUI supplemented.
Review
2013-06-05 ADDED:No automatic or manual cookie deletion, because the Webclient authentication data will otherwise get lost and the user may be disconnected from the system.
CQ00262009
2013-06-11 ADDED:Automatic detection of audio and video devices.
CQ00216848
2013-06-18 ADDED:Ad-hoc conferences support audio only.
CQ00264104
A31003-S5070-U120-4-7619, 01/2014OpenScape UC Application V7 OpenScape Fusion for Microsoft Lync, User Guide 7
Fusion_Lync_History.fm
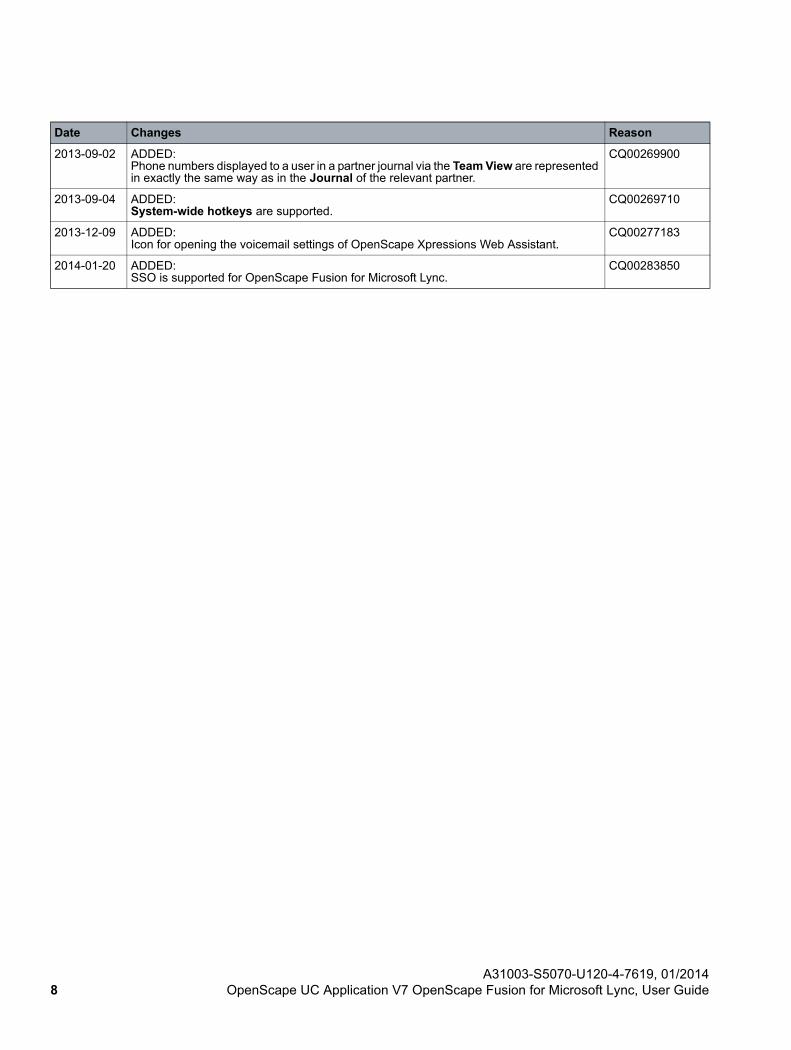
2013-09-02 ADDED:Phone numbers displayed to a user in a partner journal via the Team View are represented in exactly the same way as in the Journal of the relevant partner.
CQ00269900
2013-09-04 ADDED:System-wide hotkeys are supported.
CQ00269710
2013-12-09 ADDED:Icon for opening the voicemail settings of OpenScape Xpressions Web Assistant.
CQ00277183
2014-01-20 ADDED:SSO is supported for OpenScape Fusion for Microsoft Lync.
CQ00283850
Date Changes Reason
A31003-S5070-U120-4-7619, 01/20148 OpenScape UC Application V7 OpenScape Fusion for Microsoft Lync, User Guide

Working with this ManualTarget Group of this Manual
1 Working with this Manual
Here you find information about the structure and use of this manual.
1.1 Target Group of this Manual
This manual addresses:
• all users who deploy OpenScape Fusion for Microsoft Lync; in particular also newcomers who require information about the program interface and operating OpenScape Fusion for Microsoft Lync.
• advanced users who want to customize OpenScape Fusion for Microsoft Lync.
The instructions contain important information about using OpenScape Fusion for Microsoft Lync safely and correctly. Please follow them precisely to avoid operating OpenScape Fusion for Microsoft Lync incorrectly and to make best use of this application.
1.2 Contents of this Manual
This manual describes the OpenScape Fusion for Microsoft Lync GUI and how to use the available functions and features. Furthermore, it assists you in custom-izing OpenScape Fusion for Microsoft Lync.
The information is structured as follows:
Chapter 1: Working with this Manual
In this chapter you find information about the structure and use of these operating instructions as well as a list of all acronyms used.
Chapter 2: OpenScape Fusion for Microsoft Lync - Overview
This chapter contains an introductory overview of the functions and user interface of OpenScape Fusion for Microsoft Lync.
Chapter 3: Configuration and Settings
This chapter describes the options to configure OpenScape Fusion for Microsoft Lync.
Chapter 4: Operation Reference
This chapter represents the different OpenScape Fusion for Microsoft Lync controls and explains how to use them.
This manual does not cover the following topics:
• General information about the features of OpenScape Fusion for Microsoft Lync. You find information about this topic in the OpenScape UC Application V7 System Description.
A31003-S5070-U120-4-7619, 01/2014OpenScape UC Application V7 OpenScape Fusion for Microsoft Lync, User Guide 9
Working with this ManualRepresentation Conventions
• Installing an OpenScape Fusion for Microsoft Lync solution. You find infor-mation about this topic in the OpenScape Fusion for Microsoft Outlook/Lync Setup Guide.
• Configuring an OpenScape Fusion for Microsoft Lync solution. Information about the configuration is contained in the OpenScape Fusion for Microsoft Outlook/Lync Setup Guide.
• Configuring an OpenScape UC Application server/OpenScape Voice environment. You find information on this in the manuals OpenScape UC Application V7 Installation and Upgrade and OpenScape UC Application V7 Configuration and Administration.
1.3 Representation Conventions
We use the following markups and representations to highlight information in this manual.
1.3.1 Formats and Display Forms
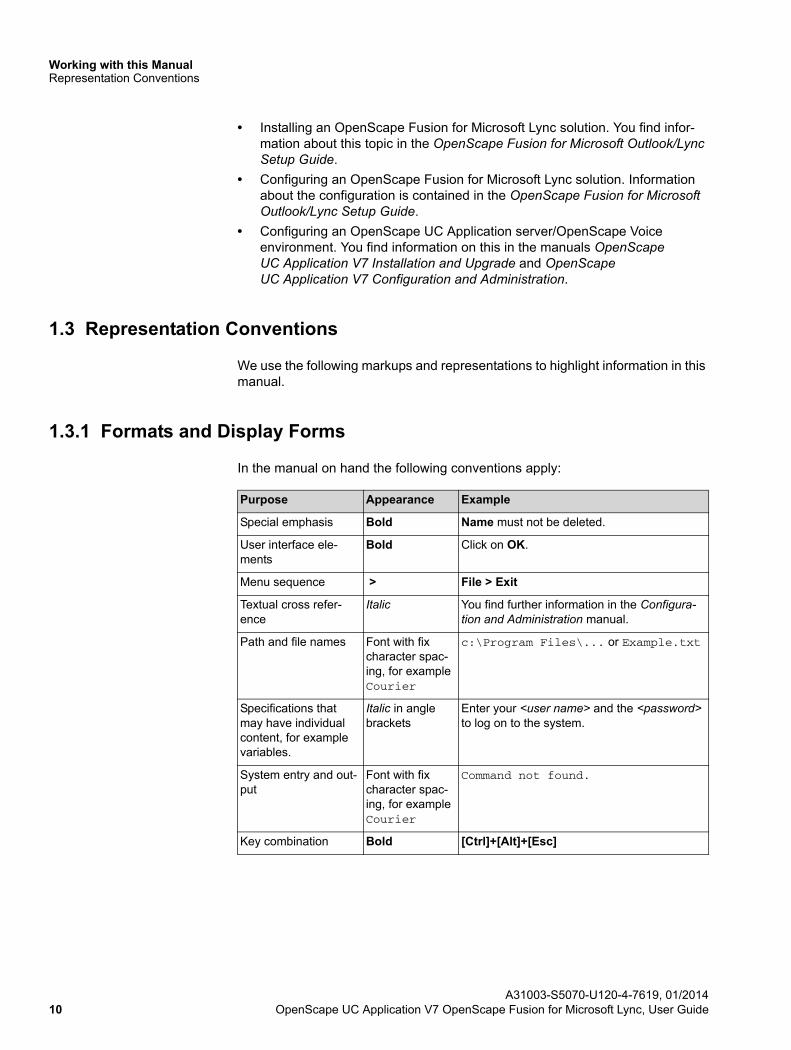
In the manual on hand the following conventions apply:
Purpose Appearance Example
Special emphasis Bold Name must not be deleted.
User interface ele-ments
Bold Click on OK.
Menu sequence > File > Exit
Textual cross refer-ence
Italic You find further information in the Configura-tion and Administration manual.
Path and file names Font with fix character spac-ing, for example Courier
c:\Program Files\... or Example.txt
Specifications that may have individual content, for example variables.
Italic in angle brackets
Enter your <user name> and the <password> to log on to the system.
System entry and out-put
Font with fix character spac-ing, for example Courier
Command not found.
Key combination Bold [Ctrl]+[Alt]+[Esc]
A31003-S5070-U120-4-7619, 01/201410 OpenScape UC Application V7 OpenScape Fusion for Microsoft Lync, User Guide
Working with this ManualContinuative Documentation
1.3.2 Notes
Types of notes
Critical notes and additional information are indicated in this manual in the following manner:
NOTICE: Denotes information worth knowing or useful tips.
IMPORTANT: Denotes information of high priority. Please definitely read and heed such notes to avoid malfunctions, loss of data or damages to devices.
1.4 Continuative Documentation
You find continuative information about OpenScape Fusion for Microsoft Lync in the following documentation:
• OpenScape UC Application V7 System Description
• OpenScape UC Application V7 OpenScape Fusion for Microsoft Outlook/Lync Installation Guide
• OpenScape UC Application V7 Planning Guide
• OpenScape UC Application V7 Installation and Upgrade
• OpenScape UC Application V7 Configuration and Administration
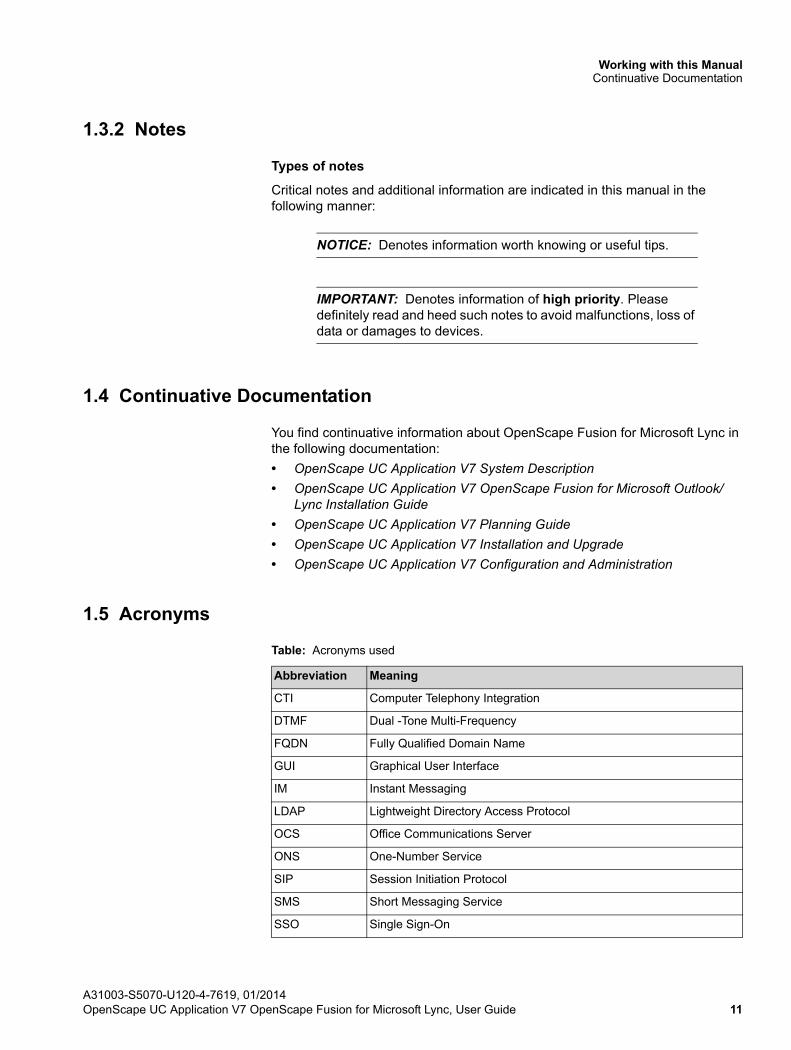
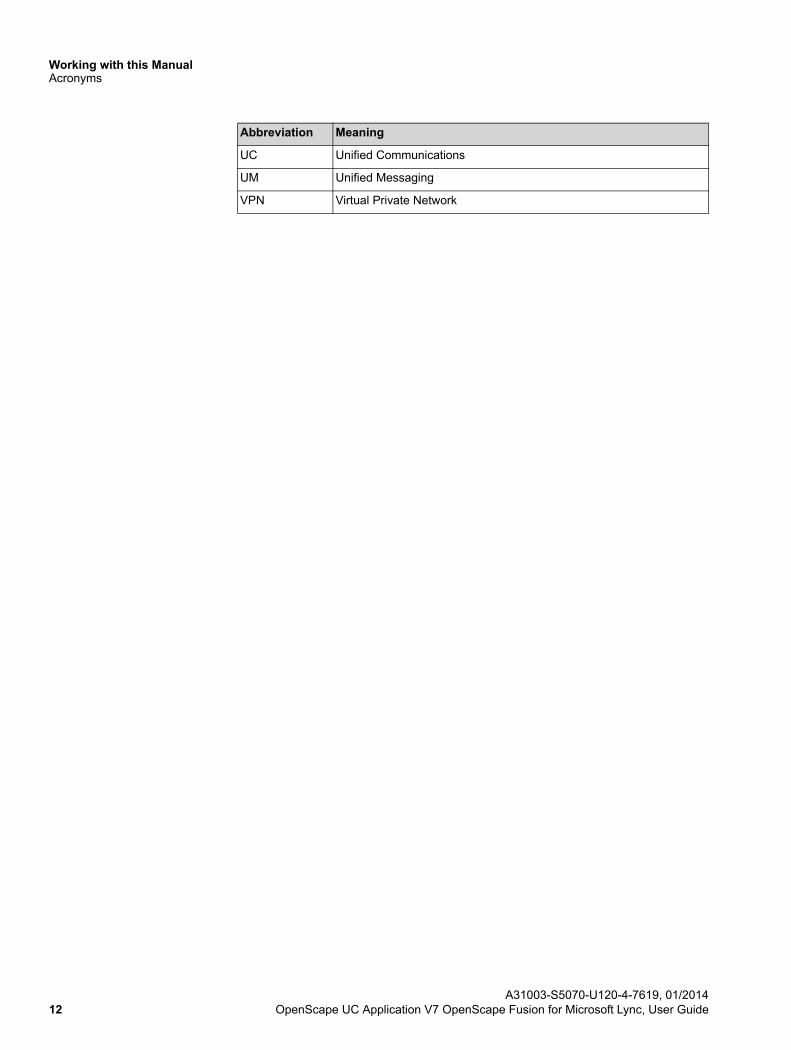
1.5 Acronyms
Table: Acronyms used
Abbreviation Meaning
CTI Computer Telephony Integration
DTMF Dual -Tone Multi-Frequency
FQDN Fully Qualified Domain Name
GUI Graphical User Interface
IM Instant Messaging
LDAP Lightweight Directory Access Protocol
OCS Office Communications Server
ONS One-Number Service
SIP Session Initiation Protocol
SMS Short Messaging Service
SSO Single Sign-On
A31003-S5070-U120-4-7619, 01/2014OpenScape UC Application V7 OpenScape Fusion for Microsoft Lync, User Guide 11
Working with this ManualAcronyms
UC Unified Communications
UM Unified Messaging
VPN Virtual Private Network
Abbreviation Meaning
A31003-S5070-U120-4-7619, 01/201412 OpenScape UC Application V7 OpenScape Fusion for Microsoft Lync, User Guide
OpenScape Fusion for Microsoft Lync OverviewAcronyms
2 OpenScape Fusion for Microsoft Lync Overview
The OpenScape Fusion for Microsoft Lync solution provides the large number of OpenScape UC Application features on the graphic user interface (GUI) of Microsoft Lync 2010. OpenScape Fusion for Microsoft Lync uses the OpenScape Fusion Client that, in turn, is based on the OpenScape Desktop Client Enterprise Web Embedded Edition as part of the OpenScape UC Application client portfolio.
You can use OpenScape Fusion for Microsoft Lync as CTI client and SIP Softphone at an SIP communications system (e.g. OpenScape Voice). It provides the following functions:
• Initiating and taking calls
• Initiating Ad-hoc conferences
• Configuring and initiating Meet Me conferences
• Participating in spontaneous and scheduled audio, web and video confer-ences (SIP)
• Logging of completed and unsuccessful calls in the journal
• Managing your own presence status
• Managing the preferred devices for incoming and outgoing calls
• One-number service for incoming and outgoing calls
• Call Screening
• Accessing the voicemail box (in case of an OpenScape Xpressions integration)
• Working in the team - Several OpenScape UC Application users can be grouped in teams, thus using functions for telephoning in the team.
OpenScape Fusion for Microsoft Lync expands the Microsoft Lync 2010 GUI with the following controls:
• Call tabThis tab provides controls and features that enable the user to make calls and to access his/her call journal and voicemail box.
• Conference tabThis tab enables accessing your own conference list as well as the controls and features for initiating an Ad-hoc conference and for creating/scheduling a Meet Me conference.
• Settings tabThis tab provides fast access to the settings for audio/video devices and individual ring tones.
If a Microsoft Outlook 2010 client is present on the computer at the time of the OpenScape Fusion for Microsoft Lync installation, the functional range of Microsoft Outlook 2010 is automatically extended by the following features:
• Displaying missed calls and new voicemail entries via the OpenScape icon (available in the function group OpenScape Fusion of the Microsoft Outlook Home tab)
• Calling a Microsoft Outlook contact (available in the context menu of a Microsoft Outlook contact)
A31003-S5070-U120-4-7619, 01/2014OpenScape UC Application V7 OpenScape Fusion for Microsoft Lync, User Guide 13
OpenScape Fusion for Microsoft Lync OverviewAcronyms
• Calling an e-mail originator (available in the context menu of a Microsoft Outlook e-mail originator)
• Configuring an Ad-hoc conference via the Microsoft Outlook contact list (available in the context menu of a Microsoft Outlook contact)
• Configuring an Ad-hoc conference via the Microsoft Outlook inbox (available in the context menu of a Microsoft Outlook e-mail originator).
A31003-S5070-U120-4-7619, 01/201414 OpenScape UC Application V7 OpenScape Fusion for Microsoft Lync, User Guide
Configuration and Settings“Audio Schemes” Tab
3 Configuration and Settings
Operating OpenScape Fusion for Microsoft Lync smoothly requires various individual user settings in the OpenScape Fusion Client. Type and volume of these settings depend among other things on the installed and activated modules, basic network parameters and installed audio hardware. Some settings must be performed before the initial login, since proper operation is otherwise not possible. Other settings can be performed during operation.
You edit user settings in the Settings dialog.
You can invoke this dialog from the Logon dialog of the user login with a click on the Manage button and subsequently on Settings. You can also open the config-uration dialog during operation after logging in. To do this, open the OpenScape Fusion for Microsoft Lync context menu in the notification area of the Windows task bar and select OpenScape Options.
The configuration options you have in the Settings dialog are divided in tabs. Depending on the default provider selected during the installation, the Settings dialog may feature the following tabs:
• Audio SchemesOn this tab you can configure your audio devices. You can see it only if you have selected the OpenScape & SIP Provider as default provider when installing the OpenScape Fusion Client. The settings on this tab are available while you log on to the communications system as well as during operation.
• AdvancedOn this tab you perform the main settings for the OpenScape Fusion Client. It is displayed by default and, depending on the installed modules, contains different setting options. Some settings on this tab are only available while you log on to the communications system, others can only be performed during operation.
• ModulesThis tab lists all modules determined for operation with the standard provider selected during the installation. This determination is based on the function-ality and features of these modules. It is displayed by default. You can activate and deactivate modules only before you log on to the communications system.
3.1 “Audio Schemes” Tab
The Audio Schemes tab contains a list of the configured audio schemes that enable conducting phone calls. An audio scheme combines different audio hardware components, for example speakers and microphone in the form of a headset.
NOTICE: This tab can only be displayed if the OpenScape & SIP Provider has been selected as default provider during the OpenScape Fusion Client installation.
A31003-S5070-U120-4-7619, 01/2014OpenScape UC Application V7 OpenScape Fusion for Microsoft Lync, User Guide 15
Configuration and Settings“Audio Schemes” Tab
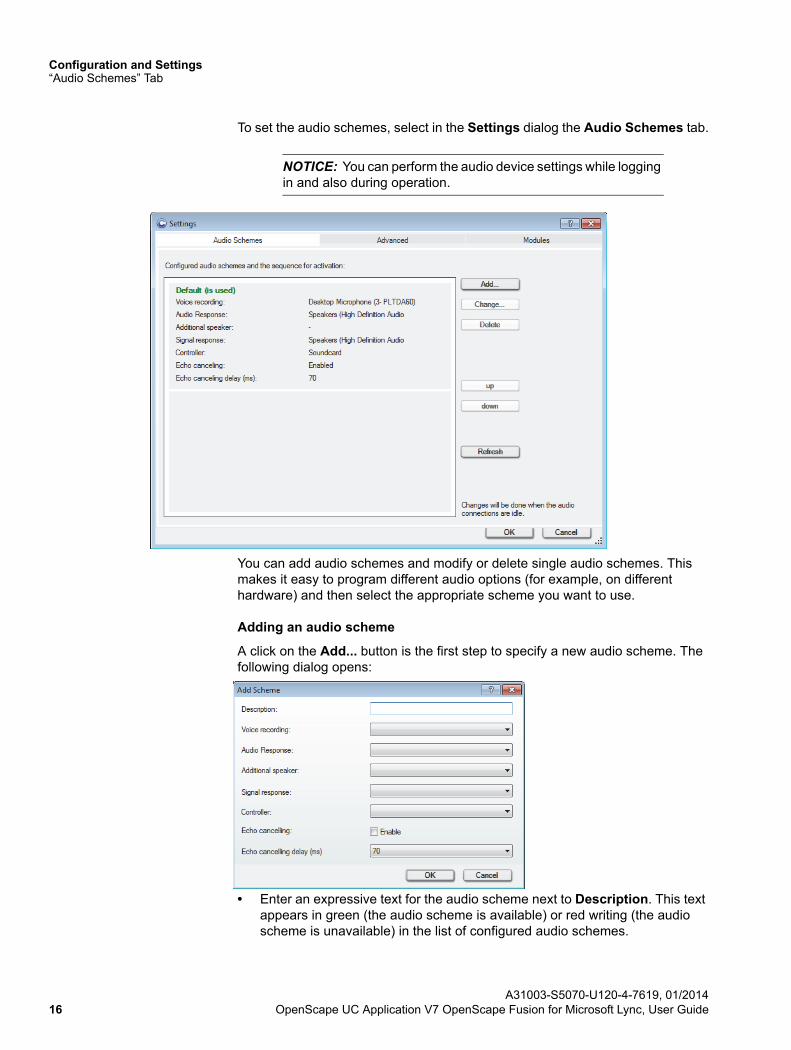
To set the audio schemes, select in the Settings dialog the Audio Schemes tab.
NOTICE: You can perform the audio device settings while logging in and also during operation.
You can add audio schemes and modify or delete single audio schemes. This makes it easy to program different audio options (for example, on different hardware) and then select the appropriate scheme you want to use.
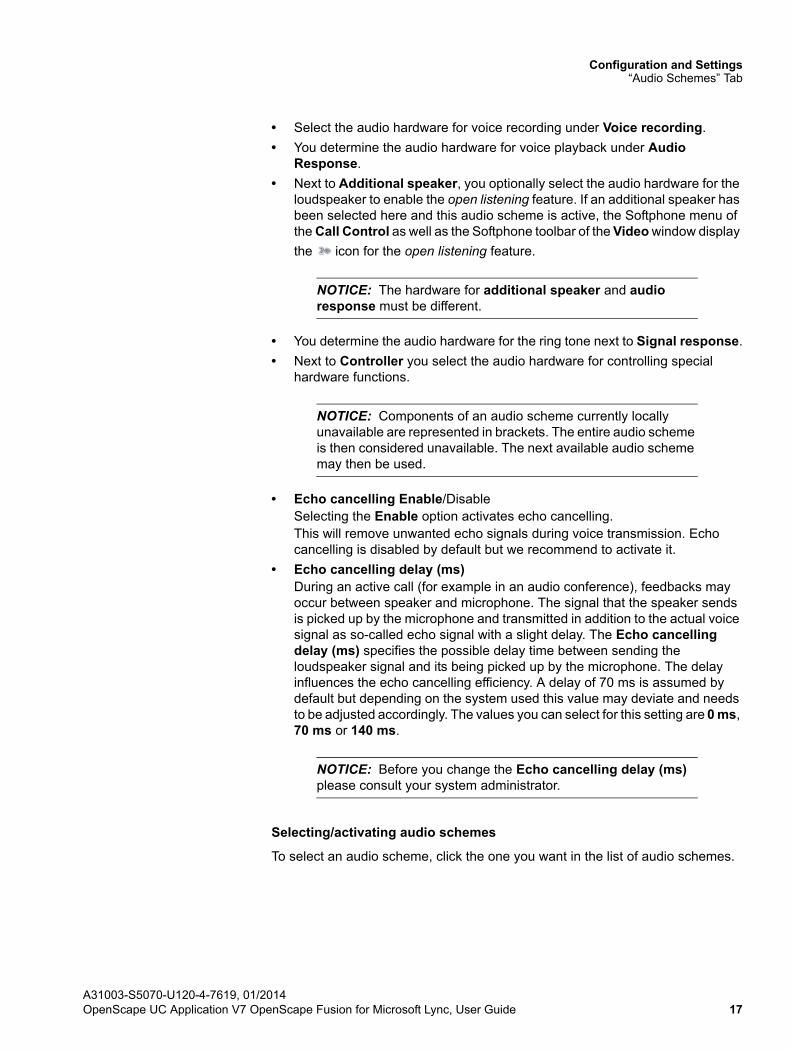
Adding an audio scheme
A click on the Add... button is the first step to specify a new audio scheme. The following dialog opens:
• Enter an expressive text for the audio scheme next to Description. This text appears in green (the audio scheme is available) or red writing (the audio scheme is unavailable) in the list of configured audio schemes.
A31003-S5070-U120-4-7619, 01/201416 OpenScape UC Application V7 OpenScape Fusion for Microsoft Lync, User Guide
Configuration and Settings“Audio Schemes” Tab
• Select the audio hardware for voice recording under Voice recording.
• You determine the audio hardware for voice playback under Audio Response.
• Next to Additional speaker, you optionally select the audio hardware for the loudspeaker to enable the open listening feature. If an additional speaker has been selected here and this audio scheme is active, the Softphone menu of the Call Control as well as the Softphone toolbar of the Video window display
the icon for the open listening feature.
NOTICE: The hardware for additional speaker and audio response must be different.
• You determine the audio hardware for the ring tone next to Signal response.
• Next to Controller you select the audio hardware for controlling special hardware functions.
NOTICE: Components of an audio scheme currently locally unavailable are represented in brackets. The entire audio scheme is then considered unavailable. The next available audio scheme may then be used.
• Echo cancelling Enable/DisableSelecting the Enable option activates echo cancelling.This will remove unwanted echo signals during voice transmission. Echo cancelling is disabled by default but we recommend to activate it.
• Echo cancelling delay (ms)During an active call (for example in an audio conference), feedbacks may occur between speaker and microphone. The signal that the speaker sends is picked up by the microphone and transmitted in addition to the actual voice signal as so-called echo signal with a slight delay. The Echo cancelling delay (ms) specifies the possible delay time between sending the loudspeaker signal and its being picked up by the microphone. The delay influences the echo cancelling efficiency. A delay of 70 ms is assumed by default but depending on the system used this value may deviate and needs to be adjusted accordingly. The values you can select for this setting are 0 ms, 70 ms or 140 ms.
NOTICE: Before you change the Echo cancelling delay (ms) please consult your system administrator.
Selecting/activating audio schemes
To select an audio scheme, click the one you want in the list of audio schemes.
A31003-S5070-U120-4-7619, 01/2014OpenScape UC Application V7 OpenScape Fusion for Microsoft Lync, User Guide 17
Configuration and Settings“Modules” Tab
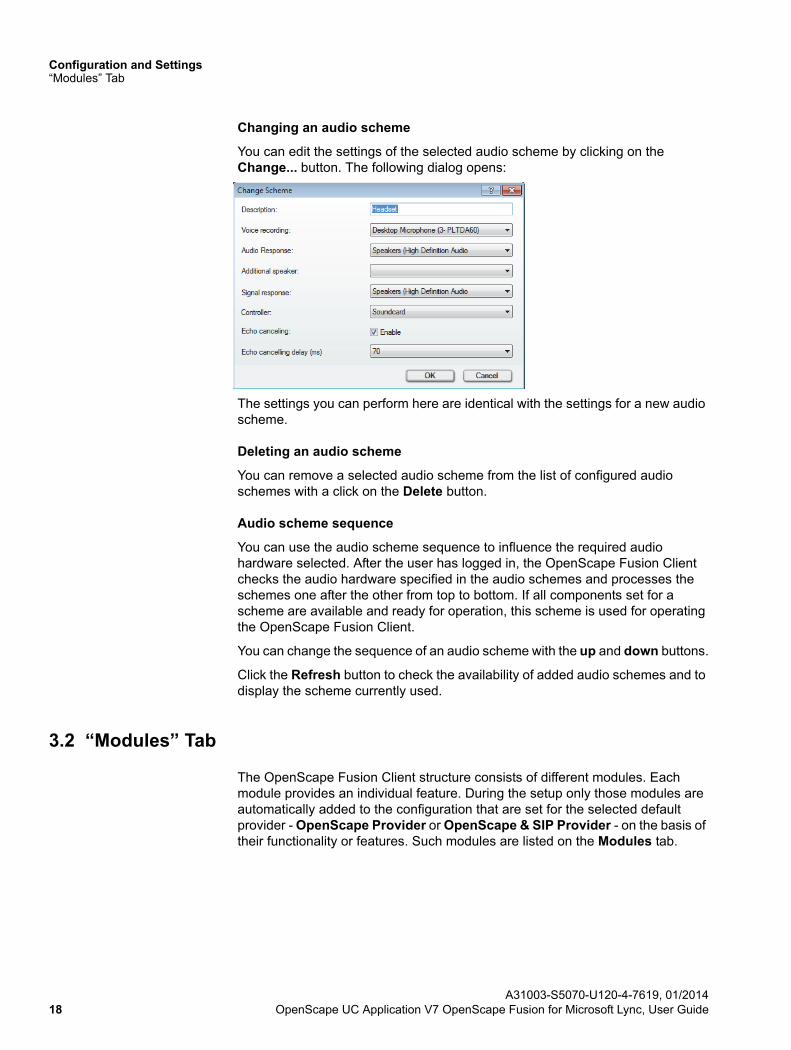
Changing an audio scheme
You can edit the settings of the selected audio scheme by clicking on the Change... button. The following dialog opens:
The settings you can perform here are identical with the settings for a new audio scheme.
Deleting an audio scheme
You can remove a selected audio scheme from the list of configured audio schemes with a click on the Delete button.
Audio scheme sequence
You can use the audio scheme sequence to influence the required audio hardware selected. After the user has logged in, the OpenScape Fusion Client checks the audio hardware specified in the audio schemes and processes the schemes one after the other from top to bottom. If all components set for a scheme are available and ready for operation, this scheme is used for operating the OpenScape Fusion Client.
You can change the sequence of an audio scheme with the up and down buttons.
Click the Refresh button to check the availability of added audio schemes and to display the scheme currently used.
3.2 “Modules” Tab
The OpenScape Fusion Client structure consists of different modules. Each module provides an individual feature. During the setup only those modules are automatically added to the configuration that are set for the selected default provider - OpenScape Provider or OpenScape & SIP Provider - on the basis of their functionality or features. Such modules are listed on the Modules tab.
A31003-S5070-U120-4-7619, 01/201418 OpenScape UC Application V7 OpenScape Fusion for Microsoft Lync, User Guide
Configuration and Settings“Modules” Tab
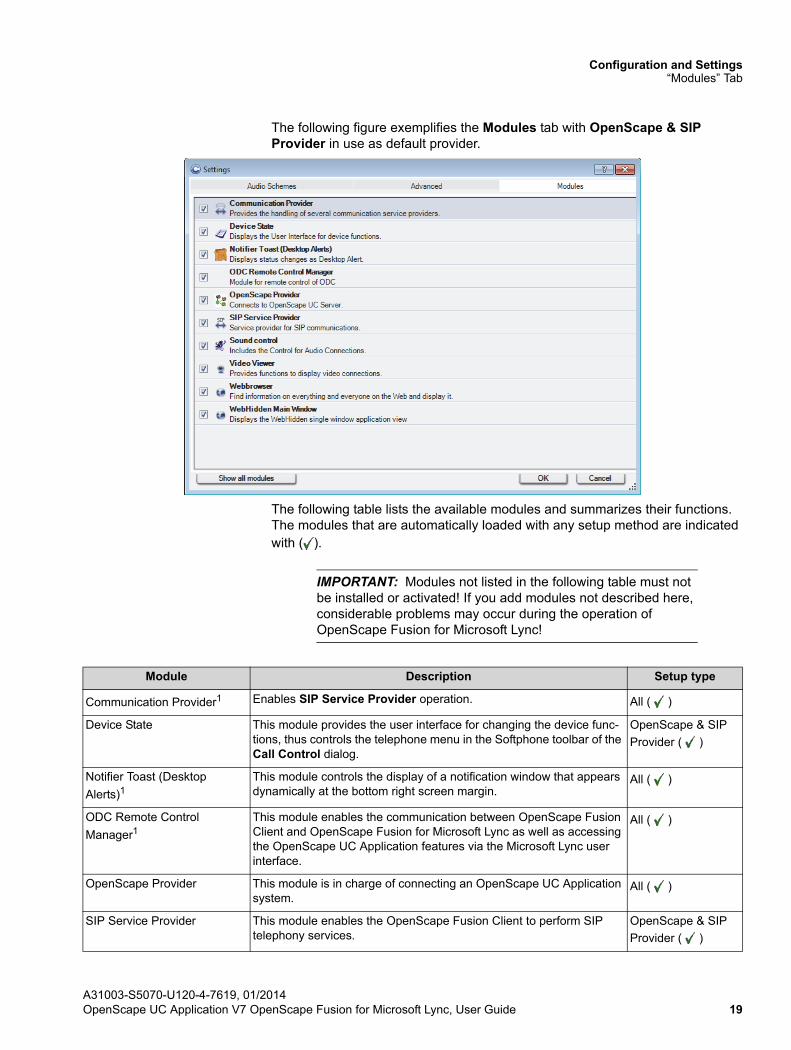
The following figure exemplifies the Modules tab with OpenScape & SIP Provider in use as default provider.
The following table lists the available modules and summarizes their functions. The modules that are automatically loaded with any setup method are indicated with ( ).
IMPORTANT: Modules not listed in the following table must not be installed or activated! If you add modules not described here, considerable problems may occur during the operation of OpenScape Fusion for Microsoft Lync!
Module Description Setup type
Communication Provider1 Enables SIP Service Provider operation. All ( )
Device State This module provides the user interface for changing the device func-tions, thus controls the telephone menu in the Softphone toolbar of the Call Control dialog.
OpenScape & SIP
Provider ( )
Notifier Toast (Desktop
Alerts)1This module controls the display of a notification window that appears dynamically at the bottom right screen margin.
All ( )
ODC Remote Control
Manager1This module enables the communication between OpenScape Fusion Client and OpenScape Fusion for Microsoft Lync as well as accessing the OpenScape UC Application features via the Microsoft Lync user interface.
All ( )
OpenScape Provider This module is in charge of connecting an OpenScape UC Application system.
All ( )
SIP Service Provider This module enables the OpenScape Fusion Client to perform SIP telephony services.
OpenScape & SIP
Provider ( )
A31003-S5070-U120-4-7619, 01/2014OpenScape UC Application V7 OpenScape Fusion for Microsoft Lync, User Guide 19
Configuration and Settings“Advanced” Tab
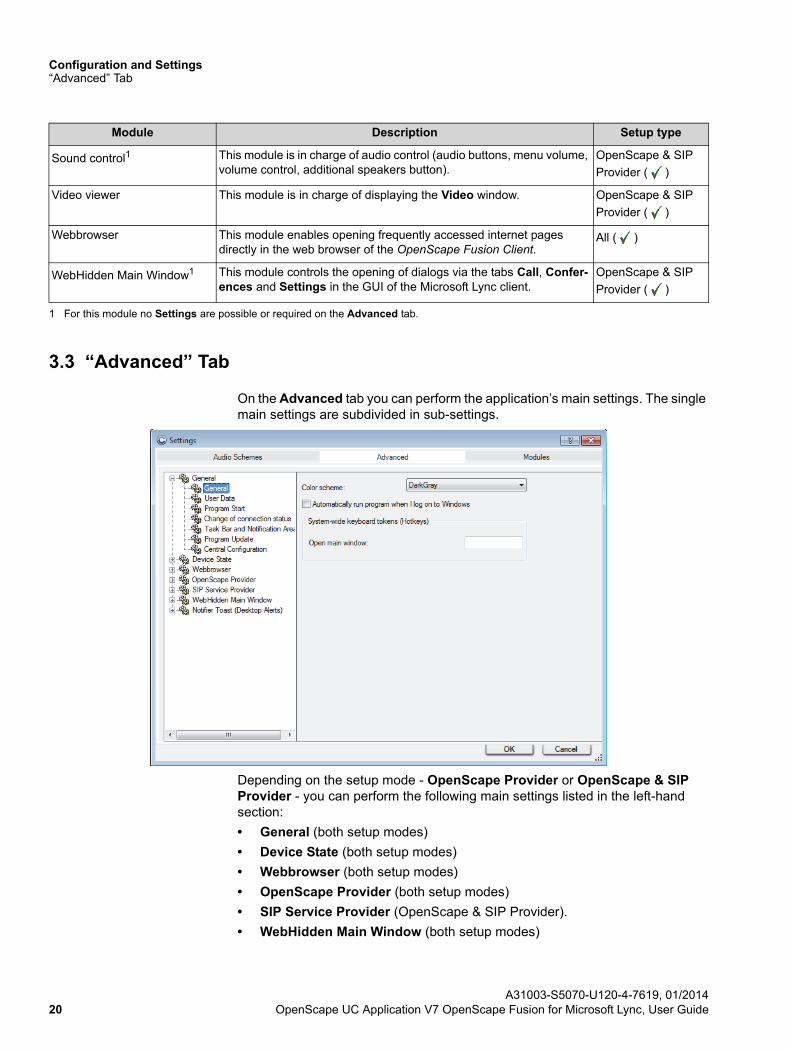
3.3 “Advanced” Tab
On the Advanced tab you can perform the application’s main settings. The single main settings are subdivided in sub-settings.
Depending on the setup mode - OpenScape Provider or OpenScape & SIP Provider - you can perform the following main settings listed in the left-hand section:
• General (both setup modes)
• Device State (both setup modes)
• Webbrowser (both setup modes)
• OpenScape Provider (both setup modes)
• SIP Service Provider (OpenScape & SIP Provider).
• WebHidden Main Window (both setup modes)
Sound control1 This module is in charge of audio control (audio buttons, menu volume, volume control, additional speakers button).
OpenScape & SIP
Provider ( )
Video viewer This module is in charge of displaying the Video window. OpenScape & SIP
Provider ( )
Webbrowser This module enables opening frequently accessed internet pages directly in the web browser of the OpenScape Fusion Client.
All ( )
WebHidden Main Window1 This module controls the opening of dialogs via the tabs Call, Confer-ences and Settings in the GUI of the Microsoft Lync client.
OpenScape & SIP
Provider ( )
1 For this module no Settings are possible or required on the Advanced tab.
Module Description Setup type
A31003-S5070-U120-4-7619, 01/201420 OpenScape UC Application V7 OpenScape Fusion for Microsoft Lync, User Guide
Configuration and Settings“Advanced” Tab
• Notifier Toast (Desktop Alerts) (both setup modes).
3.3.1 General Settings
The General settings include the following sub-settings.
3.3.1.1 General Configuration
NOTICE: You can perform these settings while logging in and during operation.
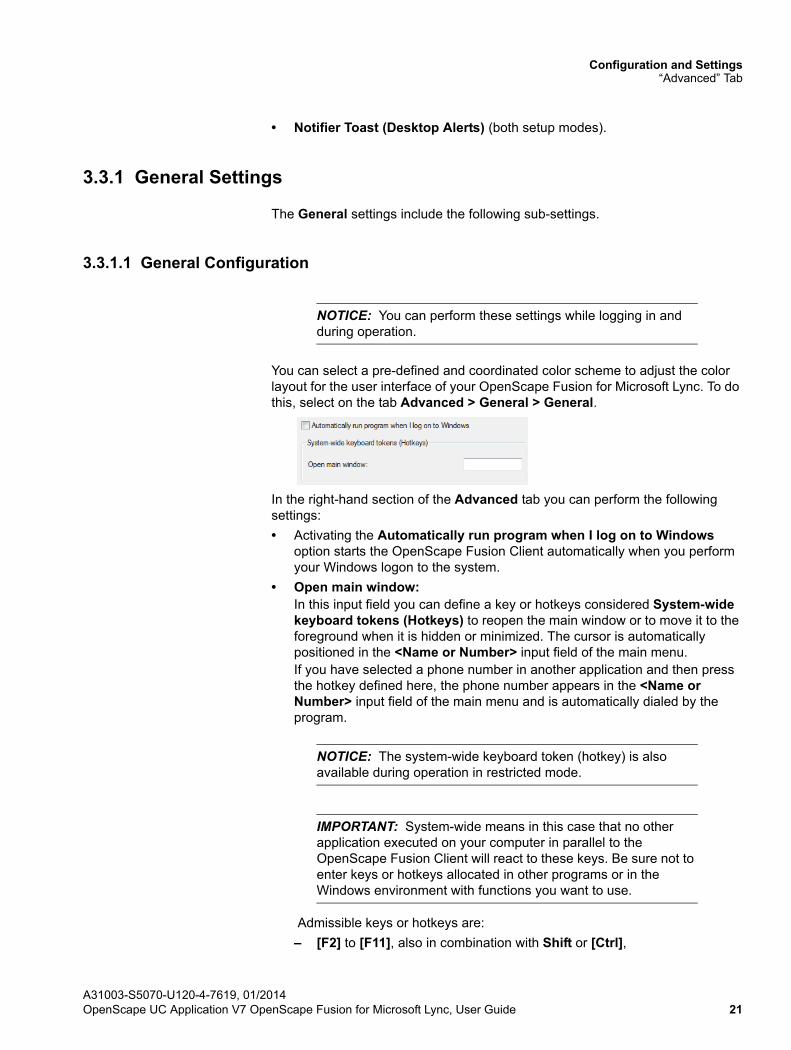
You can select a pre-defined and coordinated color scheme to adjust the color layout for the user interface of your OpenScape Fusion for Microsoft Lync. To do this, select on the tab Advanced > General > General.
In the right-hand section of the Advanced tab you can perform the following settings:
• Activating the Automatically run program when I log on to Windows option starts the OpenScape Fusion Client automatically when you perform your Windows logon to the system.
• Open main window:In this input field you can define a key or hotkeys considered System-wide keyboard tokens (Hotkeys) to reopen the main window or to move it to the foreground when it is hidden or minimized. The cursor is automatically positioned in the <Name or Number> input field of the main menu.If you have selected a phone number in another application and then press the hotkey defined here, the phone number appears in the <Name or Number> input field of the main menu and is automatically dialed by the program.
NOTICE: The system-wide keyboard token (hotkey) is also available during operation in restricted mode.
IMPORTANT: System-wide means in this case that no other application executed on your computer in parallel to the OpenScape Fusion Client will react to these keys. Be sure not to enter keys or hotkeys allocated in other programs or in the Windows environment with functions you want to use.
Admissible keys or hotkeys are:
– [F2] to [F11], also in combination with Shift or [Ctrl],
A31003-S5070-U120-4-7619, 01/2014OpenScape UC Application V7 OpenScape Fusion for Microsoft Lync, User Guide 21
Configuration and Settings“Advanced” Tab
– Letter keys A to Z and the digit key 0 to 9, also in combination with [Ctrl],
– The hotkey Shift + [Esc],
– Blank key,
– [Alt] + Shift + [Ctrl].
NOTICE: You must not define the function keys [F1] and [F12] as hotkeys.
To specify hotkeys, click in the input field and push the desired key or hotkey. The desired key or hotkey is displayed in the input field.
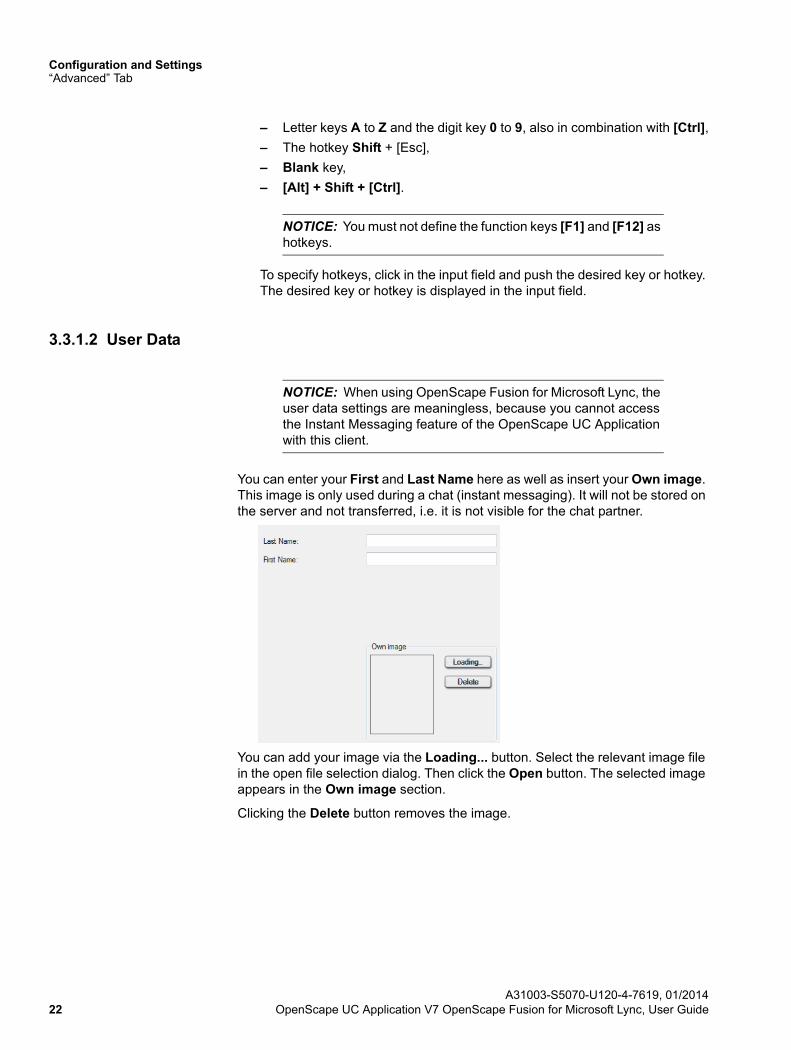
3.3.1.2 User Data
NOTICE: When using OpenScape Fusion for Microsoft Lync, the user data settings are meaningless, because you cannot access the Instant Messaging feature of the OpenScape UC Application with this client.
You can enter your First and Last Name here as well as insert your Own image. This image is only used during a chat (instant messaging). It will not be stored on the server and not transferred, i.e. it is not visible for the chat partner.
You can add your image via the Loading... button. Select the relevant image file in the open file selection dialog. Then click the Open button. The selected image appears in the Own image section.
Clicking the Delete button removes the image.
A31003-S5070-U120-4-7619, 01/201422 OpenScape UC Application V7 OpenScape Fusion for Microsoft Lync, User Guide
Configuration and Settings“Advanced” Tab
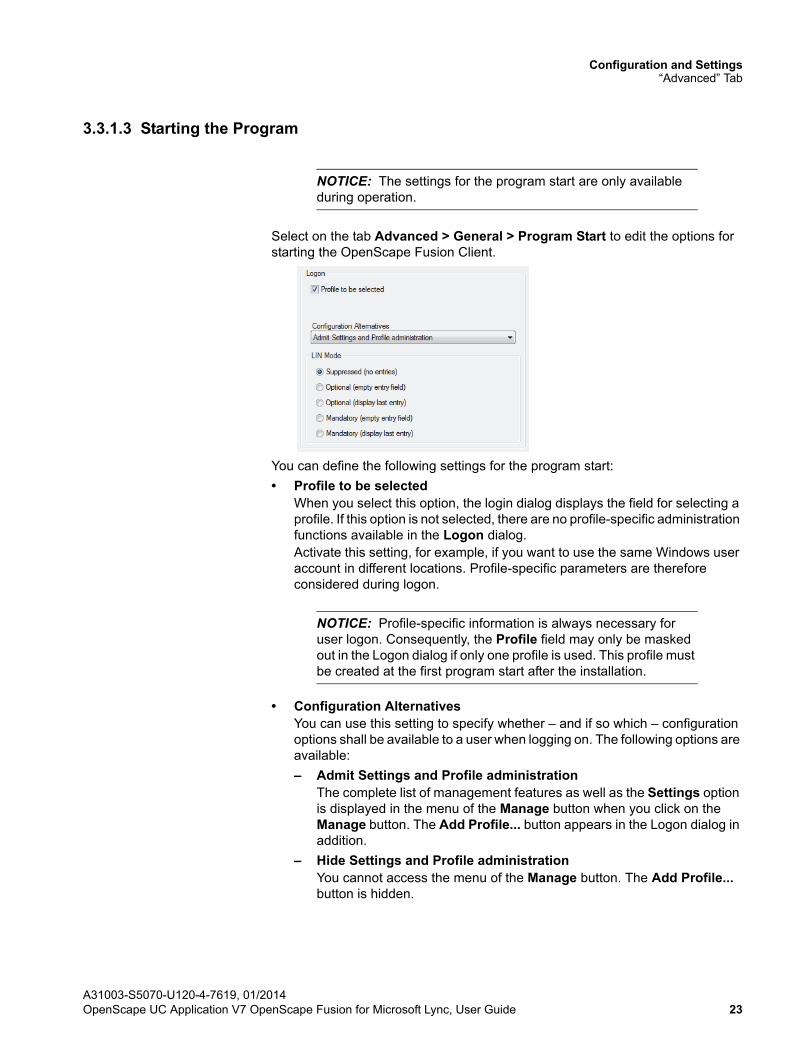
3.3.1.3 Starting the Program
NOTICE: The settings for the program start are only available during operation.
Select on the tab Advanced > General > Program Start to edit the options for starting the OpenScape Fusion Client.
You can define the following settings for the program start:
• Profile to be selectedWhen you select this option, the login dialog displays the field for selecting a profile. If this option is not selected, there are no profile-specific administration functions available in the Logon dialog.Activate this setting, for example, if you want to use the same Windows user account in different locations. Profile-specific parameters are therefore considered during logon.
NOTICE: Profile-specific information is always necessary for user logon. Consequently, the Profile field may only be masked out in the Logon dialog if only one profile is used. This profile must be created at the first program start after the installation.
• Configuration AlternativesYou can use this setting to specify whether – and if so which – configuration options shall be available to a user when logging on. The following options are available:
– Admit Settings and Profile administrationThe complete list of management features as well as the Settings option is displayed in the menu of the Manage button when you click on the Manage button. The Add Profile... button appears in the Logon dialog in addition.
– Hide Settings and Profile administrationYou cannot access the menu of the Manage button. The Add Profile... button is hidden.
A31003-S5070-U120-4-7619, 01/2014OpenScape UC Application V7 OpenScape Fusion for Microsoft Lync, User Guide 23
Configuration and Settings“Advanced” Tab
– Only accept settingsThe Settings entry is displayed in the Manage button menu after you have clicked on that button. The other management functions are not available. The Add Profile... button is hidden from the login dialog.
• Settings for the LIN modeThis option controls how an LIN (Local Identification Number) is entered in the logon dialog. The LIN can be used to pinpoint emergency calls by assigning location numbers to buildings, building section numbers, etc.
NOTICE: Please obtain detailed information about configuring an LIN number in a HiPath 4000 from the documentation of the respective HiPath 4000 PBX.
IMPORTANT: OpenScape Fusion for Microsoft Lync has not been released for operation at a HiPath 4000.
The following options are available:
– Suppressed (no entries)The LIN field is not displayed in the login dialog.
NOTICE: If the Suppressed (no entries) option was selected and no password was assigned to the user, the program starts automatically without displaying the logon dialog.
– Optional (empty input field)The LIN field appears blank in the Logon dialog and need not be filled in for logging on.
– Optional (display last entry)The LIN field is displayed in the Logon dialog. The LIN from the last logon is set by default. The field can be left blank for logon.
– Mandatory (empty input field) The LIN field appears blank in the Logon dialog and need to be filled in for logging on.
– Mandatory (display last entry)The LIN field is displayed in the Logon dialog. The LIN from the last logon is set by default. The field must be filled out for logon.
NOTICE: If you want to see the Logon dialog every time you start the program but do not wish to assign a password, select the Optional (empty input field) option.
A31003-S5070-U120-4-7619, 01/201424 OpenScape UC Application V7 OpenScape Fusion for Microsoft Lync, User Guide
Configuration and Settings“Advanced” Tab
3.3.1.4 Changing the Connection Status
NOTICE: Options for editing settings that change the connection status are only available when activated during logon, not when activated during live operation.
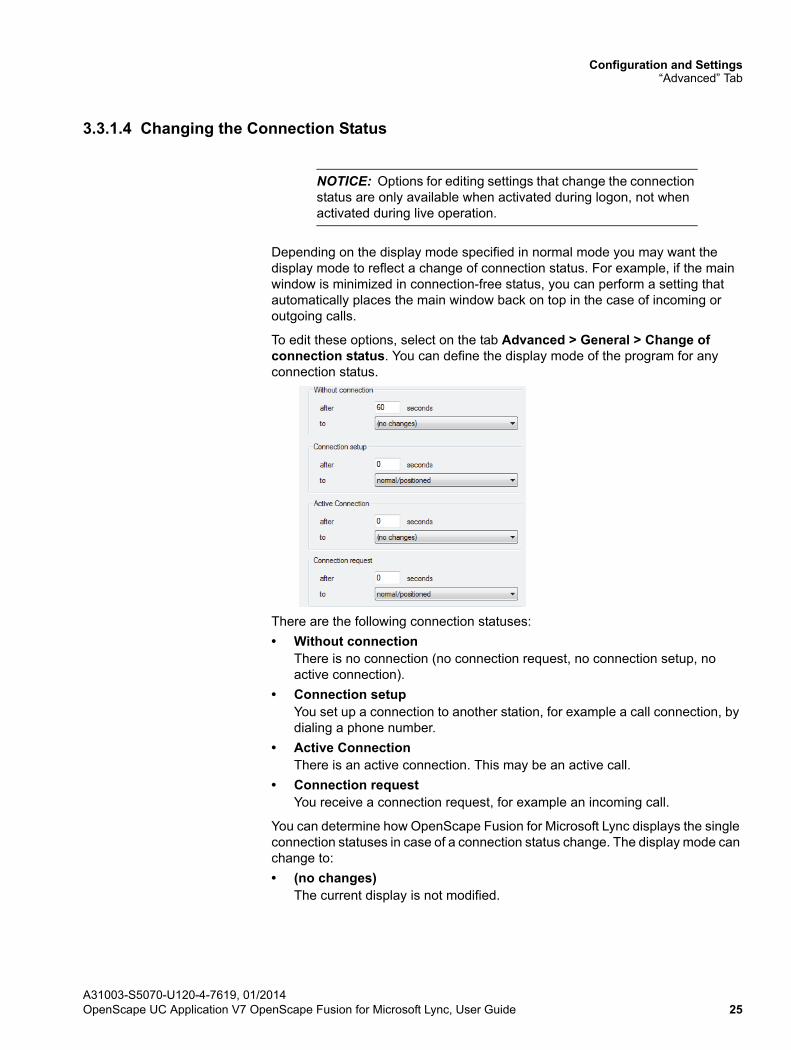
Depending on the display mode specified in normal mode you may want the display mode to reflect a change of connection status. For example, if the main window is minimized in connection-free status, you can perform a setting that automatically places the main window back on top in the case of incoming or outgoing calls.
To edit these options, select on the tab Advanced > General > Change of connection status. You can define the display mode of the program for any connection status.
There are the following connection statuses:
• Without connectionThere is no connection (no connection request, no connection setup, no active connection).
• Connection setupYou set up a connection to another station, for example a call connection, by dialing a phone number.
• Active ConnectionThere is an active connection. This may be an active call.
• Connection requestYou receive a connection request, for example an incoming call.
You can determine how OpenScape Fusion for Microsoft Lync displays the single connection statuses in case of a connection status change. The display mode can change to:
• (no changes)The current display is not modified.
A31003-S5070-U120-4-7619, 01/2014OpenScape UC Application V7 OpenScape Fusion for Microsoft Lync, User Guide 25
Configuration and Settings“Advanced” Tab
• normal/positionedThe main window is reset to the active status (normal or positioned) in which it was before it was minimized. OpenScape Fusion for Microsoft Lync reappears on the desktop.
• minimized/hiddenThe main window is minimized or hidden. It is hidden if you did not select the icon display in the notification area settings.
The time entered in the after field for all connection statuses and all display modes indicates for how many seconds the specified display mode is to be active after a connection status change. This setting ensures that OpenScape Fusion for Microsoft Lync is automatically minimized/hidden again within a certain period after a connection has ended.
3.3.1.5 Task Bar and Notification Area
NOTICE: Options for editing settings for the Windows task bar and notification area of the Windows task bar are only available when activated during logon, not when activated during operation.
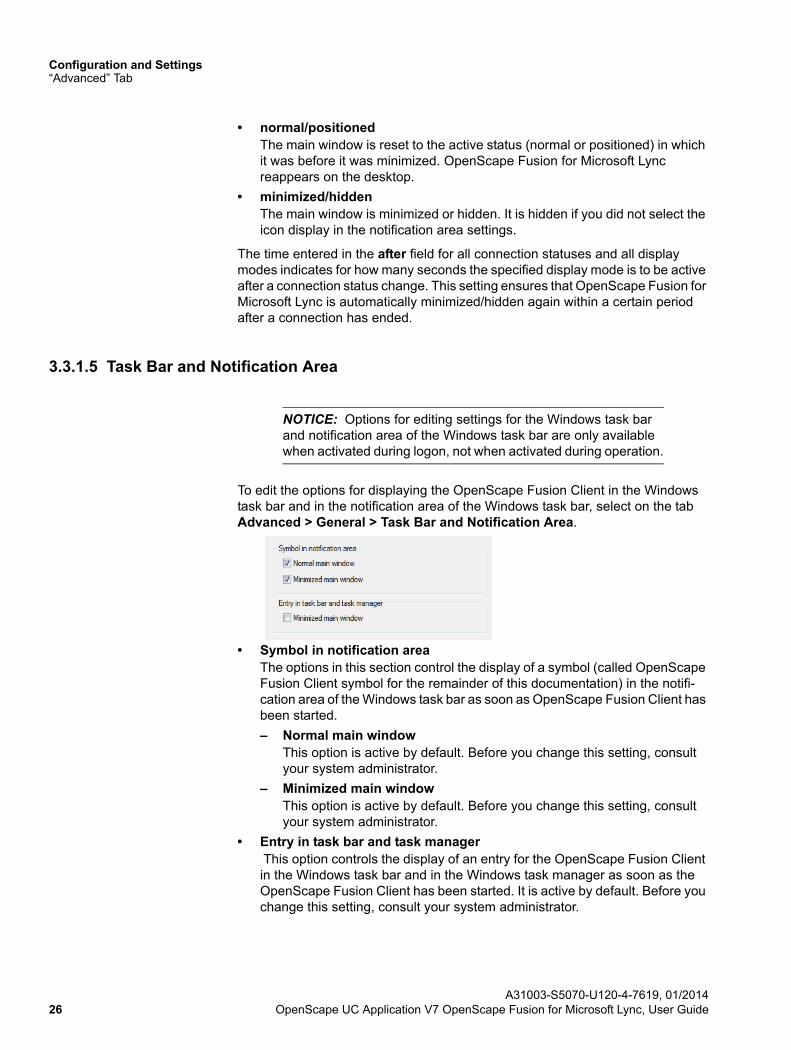
To edit the options for displaying the OpenScape Fusion Client in the Windows task bar and in the notification area of the Windows task bar, select on the tab Advanced > General > Task Bar and Notification Area.
• Symbol in notification areaThe options in this section control the display of a symbol (called OpenScape Fusion Client symbol for the remainder of this documentation) in the notifi-cation area of the Windows task bar as soon as OpenScape Fusion Client has been started.
– Normal main windowThis option is active by default. Before you change this setting, consult your system administrator.
– Minimized main windowThis option is active by default. Before you change this setting, consult your system administrator.
• Entry in task bar and task manager This option controls the display of an entry for the OpenScape Fusion Client in the Windows task bar and in the Windows task manager as soon as the OpenScape Fusion Client has been started. It is active by default. Before you change this setting, consult your system administrator.
A31003-S5070-U120-4-7619, 01/201426 OpenScape UC Application V7 OpenScape Fusion for Microsoft Lync, User Guide
Configuration and Settings“Advanced” Tab
3.3.1.6 Program Update
NOTICE: Options for editing program update settings are only available when activated during logon, not when activated during live operation.
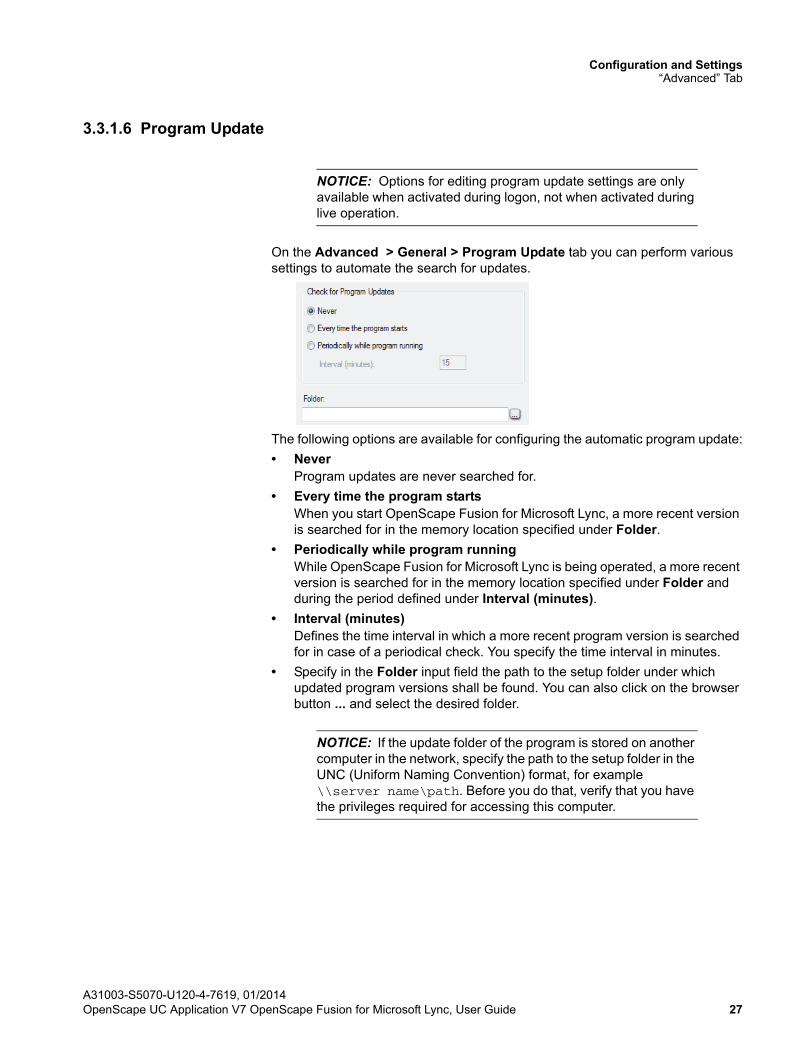
On the Advanced > General > Program Update tab you can perform various settings to automate the search for updates.
The following options are available for configuring the automatic program update:
• NeverProgram updates are never searched for.
• Every time the program startsWhen you start OpenScape Fusion for Microsoft Lync, a more recent version is searched for in the memory location specified under Folder.
• Periodically while program runningWhile OpenScape Fusion for Microsoft Lync is being operated, a more recent version is searched for in the memory location specified under Folder and during the period defined under Interval (minutes).
• Interval (minutes)Defines the time interval in which a more recent program version is searched for in case of a periodical check. You specify the time interval in minutes.
• Specify in the Folder input field the path to the setup folder under which updated program versions shall be found. You can also click on the browser button ... and select the desired folder.
NOTICE: If the update folder of the program is stored on another computer in the network, specify the path to the setup folder in the UNC (Uniform Naming Convention) format, for example \\server name\path. Before you do that, verify that you have the privileges required for accessing this computer.
A31003-S5070-U120-4-7619, 01/2014OpenScape UC Application V7 OpenScape Fusion for Microsoft Lync, User Guide 27
Configuration and Settings“Advanced” Tab
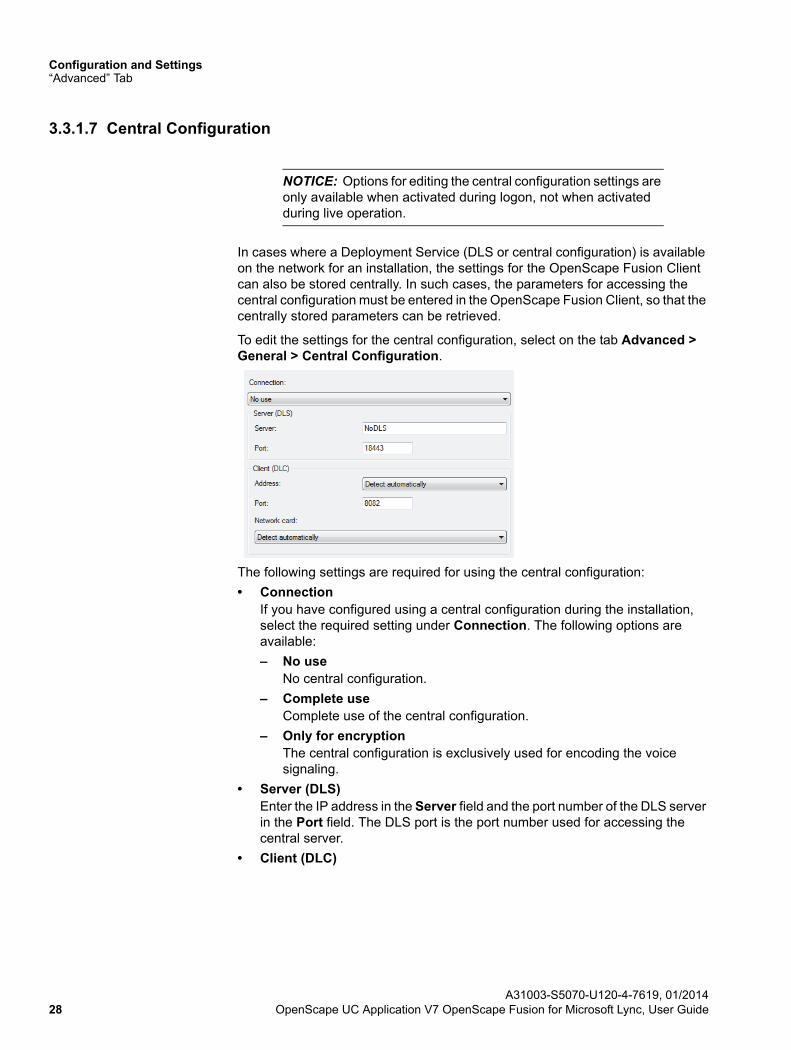
3.3.1.7 Central Configuration
NOTICE: Options for editing the central configuration settings are only available when activated during logon, not when activated during live operation.
In cases where a Deployment Service (DLS or central configuration) is available on the network for an installation, the settings for the OpenScape Fusion Client can also be stored centrally. In such cases, the parameters for accessing the central configuration must be entered in the OpenScape Fusion Client, so that the centrally stored parameters can be retrieved.
To edit the settings for the central configuration, select on the tab Advanced > General > Central Configuration.
The following settings are required for using the central configuration:
• ConnectionIf you have configured using a central configuration during the installation, select the required setting under Connection. The following options are available:
– No useNo central configuration.
– Complete useComplete use of the central configuration.
– Only for encryptionThe central configuration is exclusively used for encoding the voice signaling.
• Server (DLS)Enter the IP address in the Server field and the port number of the DLS server in the Port field. The DLS port is the port number used for accessing the central server.
• Client (DLC)
A31003-S5070-U120-4-7619, 01/201428 OpenScape UC Application V7 OpenScape Fusion for Microsoft Lync, User Guide
Configuration and Settings“Advanced” Tab
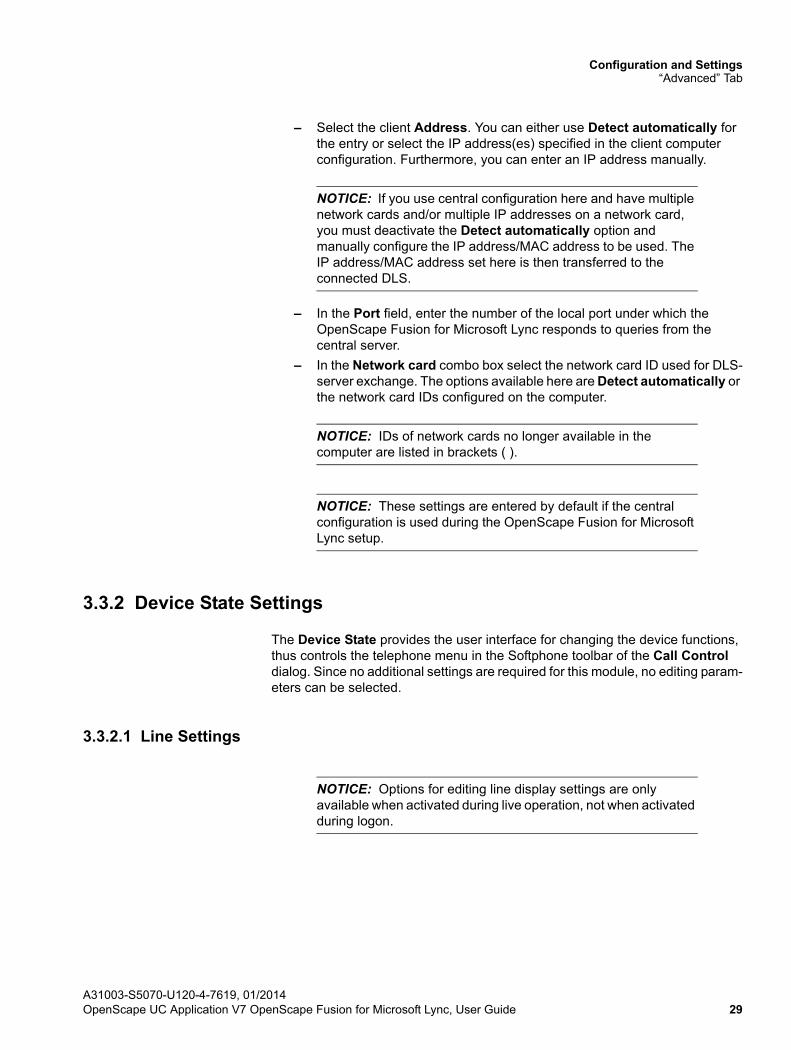
– Select the client Address. You can either use Detect automatically for the entry or select the IP address(es) specified in the client computer configuration. Furthermore, you can enter an IP address manually.
NOTICE: If you use central configuration here and have multiple network cards and/or multiple IP addresses on a network card, you must deactivate the Detect automatically option and manually configure the IP address/MAC address to be used. The IP address/MAC address set here is then transferred to the connected DLS.
– In the Port field, enter the number of the local port under which the OpenScape Fusion for Microsoft Lync responds to queries from the central server.
– In the Network card combo box select the network card ID used for DLS-server exchange. The options available here are Detect automatically or the network card IDs configured on the computer.
NOTICE: IDs of network cards no longer available in the computer are listed in brackets ( ).
NOTICE: These settings are entered by default if the central configuration is used during the OpenScape Fusion for Microsoft Lync setup.
3.3.2 Device State Settings
The Device State provides the user interface for changing the device functions, thus controls the telephone menu in the Softphone toolbar of the Call Control dialog. Since no additional settings are required for this module, no editing param-eters can be selected.
3.3.2.1 Line Settings
NOTICE: Options for editing line display settings are only available when activated during live operation, not when activated during logon.
A31003-S5070-U120-4-7619, 01/2014OpenScape UC Application V7 OpenScape Fusion for Microsoft Lync, User Guide 29
Configuration and Settings“Advanced” Tab
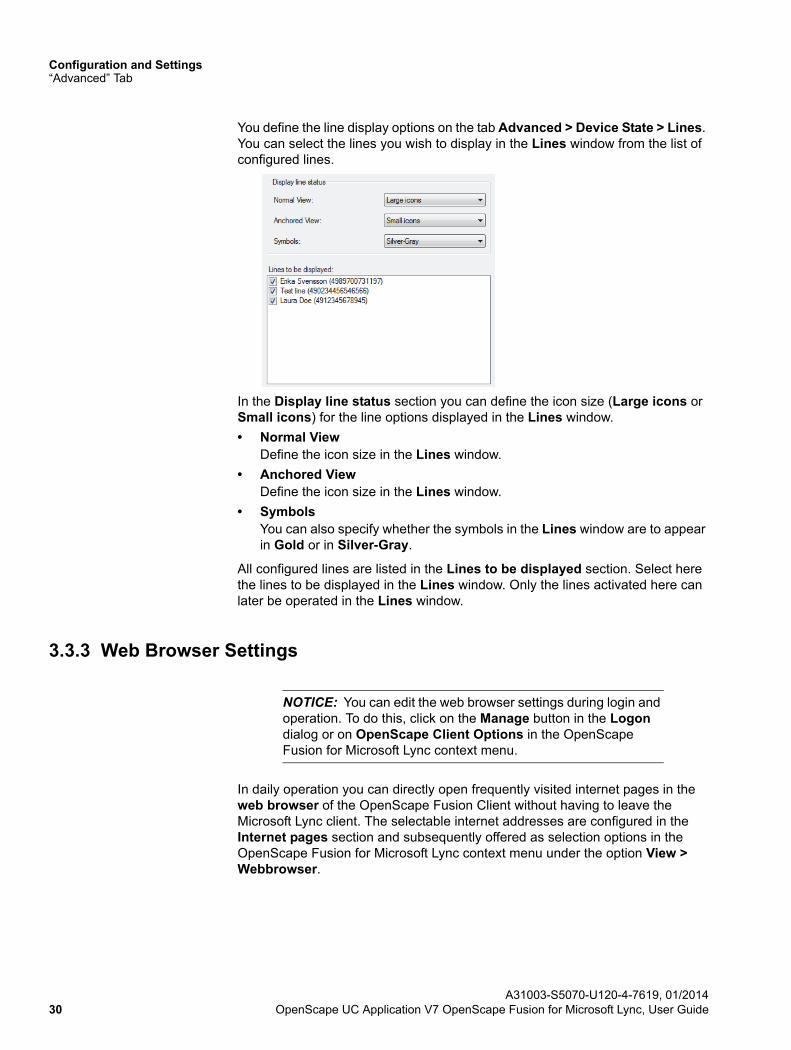
You define the line display options on the tab Advanced > Device State > Lines. You can select the lines you wish to display in the Lines window from the list of configured lines.
In the Display line status section you can define the icon size (Large icons or Small icons) for the line options displayed in the Lines window.
• Normal ViewDefine the icon size in the Lines window.
• Anchored ViewDefine the icon size in the Lines window.
• SymbolsYou can also specify whether the symbols in the Lines window are to appear in Gold or in Silver-Gray.
All configured lines are listed in the Lines to be displayed section. Select here the lines to be displayed in the Lines window. Only the lines activated here can later be operated in the Lines window.
3.3.3 Web Browser Settings
NOTICE: You can edit the web browser settings during login and operation. To do this, click on the Manage button in the Logon dialog or on OpenScape Client Options in the OpenScape Fusion for Microsoft Lync context menu.
In daily operation you can directly open frequently visited internet pages in the web browser of the OpenScape Fusion Client without having to leave the Microsoft Lync client. The selectable internet addresses are configured in the Internet pages section and subsequently offered as selection options in the OpenScape Fusion for Microsoft Lync context menu under the option View > Webbrowser.
A31003-S5070-U120-4-7619, 01/201430 OpenScape UC Application V7 OpenScape Fusion for Microsoft Lync, User Guide

Configuration and Settings“Advanced” Tab
3.3.3.1 Internet Page Settings
If you want to perform web browser settings, click on the Internet pages option in the Webbrowser area.
Here you can add a new internet page, edit already configured web pages or delete them. The following operating elements are available in this dialog:
• Add...A click on this button opens the following dialog:
In this dialog you can configure a new internet page address for the web browser.
– NameEnter an expressive name for the desired internet page in this field. This name appears during operation in the OpenScape Fusion for Microsoft Lync context menu under the option View > Webbrowser and enables invoking the respective internet page.
– AddressEnter the URL of the desired internet page in this field.
• Change...A click on this button opens the following dialog:
In this dialog you can change the already configured Name and the Address of a selected internet page.
NOTICE: The corresponding button remains inactive until you select an entry in the list of configured internet pages.
A31003-S5070-U120-4-7619, 01/2014OpenScape UC Application V7 OpenScape Fusion for Microsoft Lync, User Guide 31
Configuration and Settings“Advanced” Tab
• DeleteA click on this button removes a selected entry from the list of configured internet pages.
NOTICE: The corresponding button remains inactive until you select an entry in the list of configured internet pages.
3.3.4 OpenScape Provider Settings
The OpenScape Provider module is in charge of connecting the OpenScape UC Application system. This module must be configured correctly to grant access to the entire functionality of the OpenScape UC Application.
The following settings are available for configuring the OpenScape Provider module:
• Connection
• Web Access
• Web Conference
• Conference
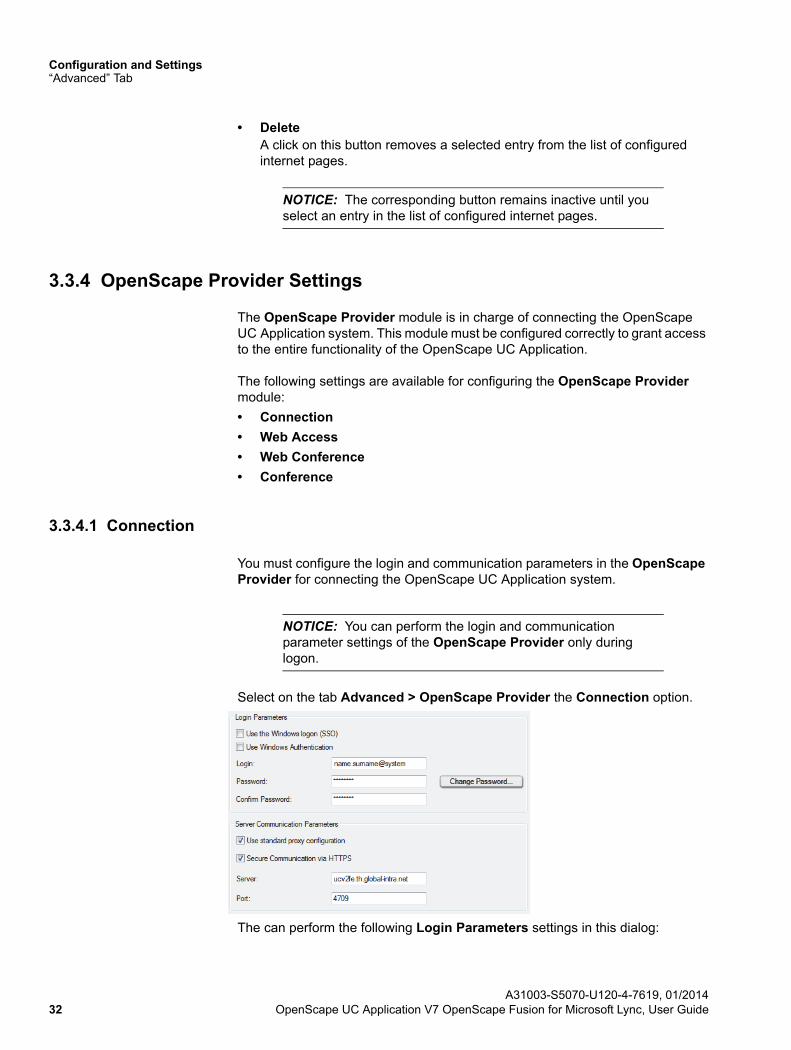
3.3.4.1 Connection
You must configure the login and communication parameters in the OpenScape Provider for connecting the OpenScape UC Application system.
NOTICE: You can perform the login and communication parameter settings of the OpenScape Provider only during logon.
Select on the tab Advanced > OpenScape Provider the Connection option.
The can perform the following Login Parameters settings in this dialog:
A31003-S5070-U120-4-7619, 01/201432 OpenScape UC Application V7 OpenScape Fusion for Microsoft Lync, User Guide
Configuration and Settings“Advanced” Tab
• Use the Windows logon (SSO)Activating this option determines that Single Sign-On shall be used for your logging on to the OpenScape UC Application system. This requires the Single Sign-On feature to be active in your system. Logging on then occurs automat-ically with the Windows logon data if you are already logged in at your workstation. In this case, leave the input fields Login and Password for logging on to the OpenScape UC Application system empty and ensure that the FQDN of the OpenScape UC Application application computer is entered in the Server input field.
• Use Windows AuthenticationIf Windows authentication is active at your system, you can enable this option to determine that your Windows logon data shall be used for logging on to the OpenScape UC Application system. In this case, the data you use for logging on to your workstation must also be entered in the Login and Password input fields for logging on to the OpenScape UC Application system.
• LoginEnter the ID your system administrator has provided for logging on at the OpenScape UC Application system.
• PasswordEnter the password your system administrator has provided for logging on at the OpenScape UC Application system.
• Confirm PasswordEnter the above password once again to avoid typing errors.
NOTICE: To authenticate the user the integrated OpenScape Web Client places a cookie in the corresponding folders of your browser that must not be deleted. Therefore, make sure that the option to automatically delete cookies is not active when you shut the browser down. For example, the Microsoft Internet Explorer option Cookies under Tools > Internet options > General > Browsing history > Delete browsing history on exit > Delete... must not be active. Closing any browser window would otherwise disconnect you from the system and you would have to log on again. Do not delete the cookies manually either.
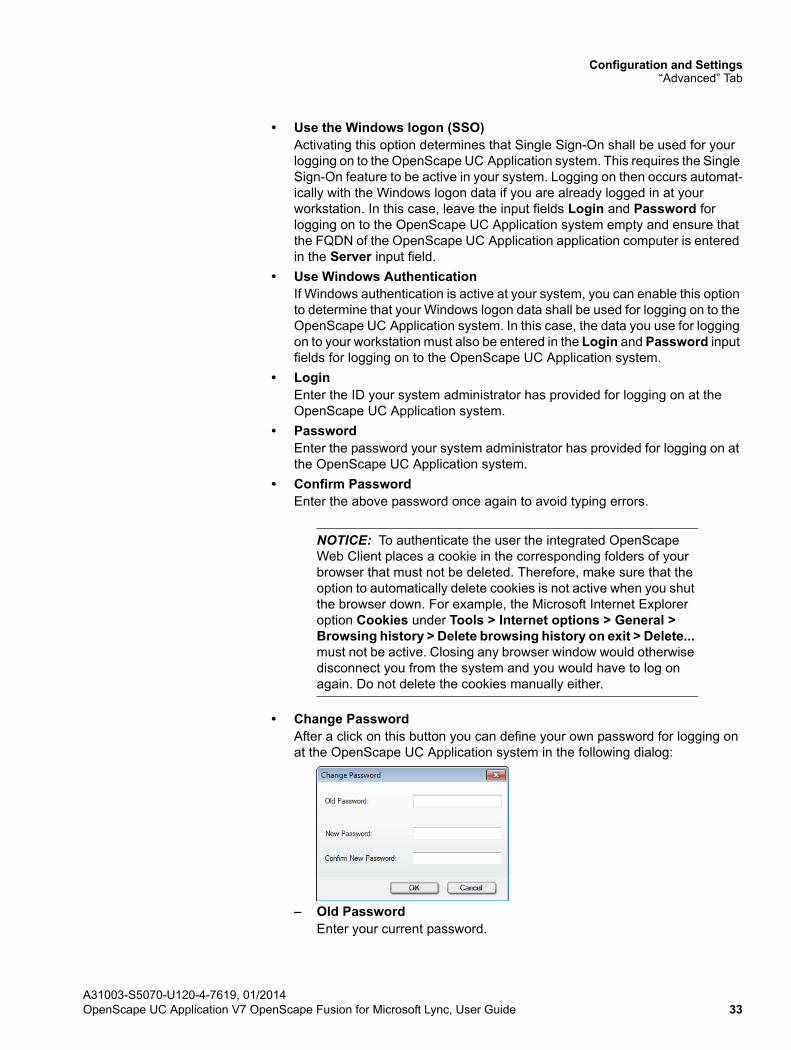
• Change PasswordAfter a click on this button you can define your own password for logging on at the OpenScape UC Application system in the following dialog:
– Old PasswordEnter your current password.
A31003-S5070-U120-4-7619, 01/2014OpenScape UC Application V7 OpenScape Fusion for Microsoft Lync, User Guide 33
Configuration and Settings“Advanced” Tab
– New PasswordEnter your new password.
– Confirm New PasswordEnter your new password once again to avoid typing errors.
– OKA click on this button applies the password settings you have performed.
– CancelA click on this button discards the password settings you have performed.
The can perform the following Server Communication Parameters settings in this dialog:
• Use standard proxy configurationThis option should be enabled. Your system administrator will tell you whether or not to change this setting.
• Secure Communication via HTTPSThis option is active by default. Your system administrator will tell you whether or not to change this setting.
• ServerEnter here the FQDN of the OpenScape UC Application application computer.
• PortThis field defines the port number for communicating with the OpenScape UC Application system. When you enable the Secure Communication via HTTPS check box, port number 4709 is automatically entered in this field. If the Secure Communication via HTTPS option is disabled, the port number field is automatically allocated with port number 4708. Your system adminis-trator will inform you about whether or not these settings should be changed.
3.3.4.2 Web Access
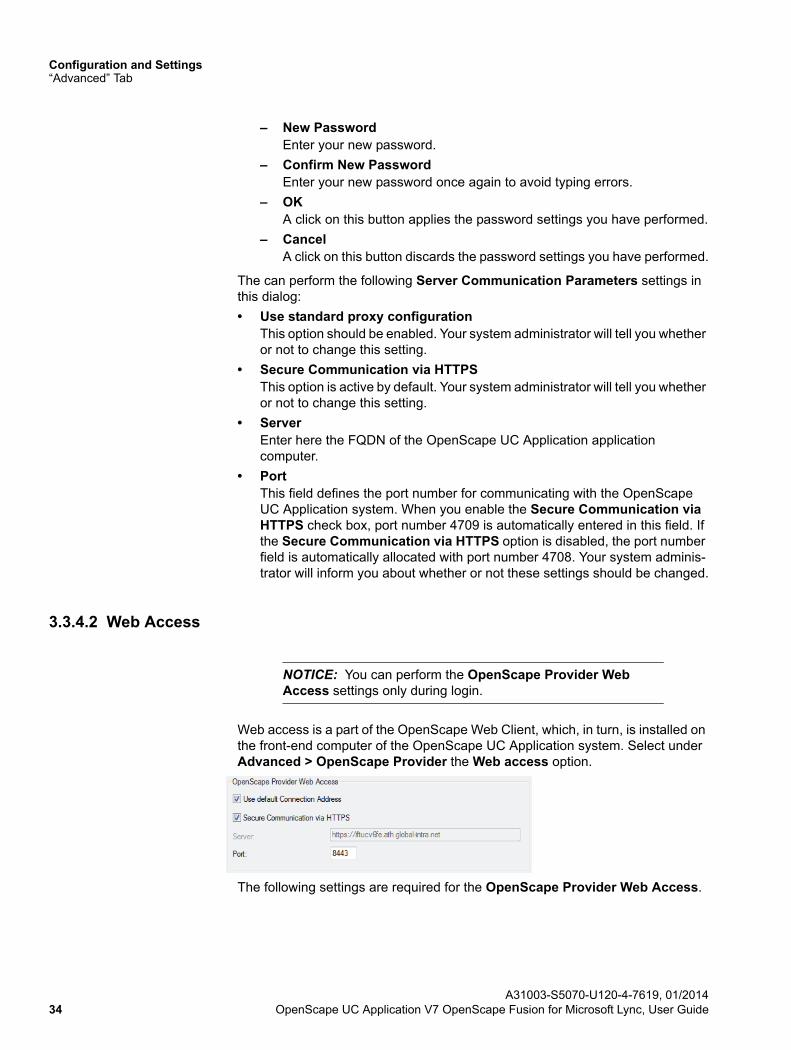
NOTICE: You can perform the OpenScape Provider Web Access settings only during login.
Web access is a part of the OpenScape Web Client, which, in turn, is installed on the front-end computer of the OpenScape UC Application system. Select under Advanced > OpenScape Provider the Web access option.
The following settings are required for the OpenScape Provider Web Access.
A31003-S5070-U120-4-7619, 01/201434 OpenScape UC Application V7 OpenScape Fusion for Microsoft Lync, User Guide
Configuration and Settings“Advanced” Tab
• Use default Connection AddressThis option is active by default. If you wish to use another connection address, you need to disable this option first. Subsequently, you can specify the desired connection address in the Server field.
• Secure Communication via HTTPSActivating this option determines that a secure connection is set up via HTTPS for the communication between OpenScape Fusion for Microsoft Lync and the OpenScape UC Application system.
• Server
NOTICE: You can edit this field only if the Use default Connection Address option is disabled.
The URL of the OpenScape UC Application front-end computer must be entered in this input field in the following format:
or in case of selected Secure Communication via HTTPS option:
IMPORTANT: Depending on your OpenScape UC Application system environment the front-end and application computer may be installed on the same computer system. In this case, the front-end and application computer FQDNs are identical.
• PortWhen you enable the Secure Communication via HTTPS check box, port number 8443 is automatically entered in this field.When you disable the Secure Communication via HTTPS check box, port number 7789 is automatically entered in this field.
3.3.4.3 Web Conference
Under the Web Conferencing option on the Advanced > OpenScape Provider tab you find information about the available web conferencing applications on your communications system.
NOTICE: The Web Conferencing option is only available during operation and not while you log in.
In the right-hand section of the Settings dialog the OpenScape UC Application system reports the available web conferencing applications and indicates which parameters are required for using them. An individual configuration page in the
http://<FQDN of the OpenScape UC Application front-end com-puter>
https://<FQDN of the OpenScape UC Application front-end computer>
A31003-S5070-U120-4-7619, 01/2014OpenScape UC Application V7 OpenScape Fusion for Microsoft Lync, User Guide 35
Configuration and Settings“Advanced” Tab
form of a tab is created for each application. The parameters specified there must be defined for using the application. The OpenScape Web Collaboration web conferencing application is shipped with OpenScape UC Application by default.
3.3.4.4 Conference
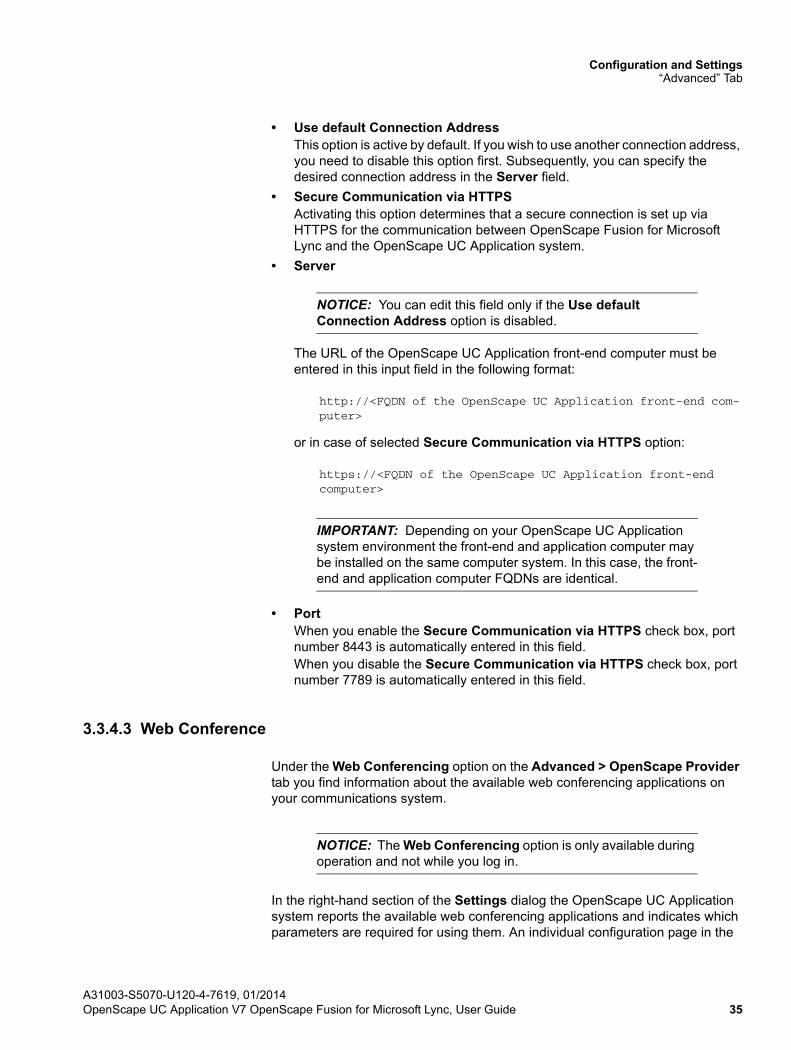
This option lets you pre-set the connection direction (dial-in or call from the conference system) for open and moderated Meet Me or Ad-hoc conferences.
NOTICE: You can edit the settings on the tab Advanced > OpenScape Provider > Conference while you log in or during operation.
The following options are available in the Dial-in/dial-out default settings for open conferences section:
• Dial-inWhen you select this option, the users who take part in an open Meet Me or Ad-hoc conference need to dial into the conference by themselves.
• Dial-outWhen you select this option, the users who take part in an open Meet Me or Ad-hoc conference are called by the conference system.
The following options are available in the Dial-in/dial-out default settings for moderated conferences section:
• Dial-inWhen you select this option, the users who take part in a moderated Meet Me or Ad-hoc conference need to dial into the conference by themselves.
• Dial-outWhen you select this option, the users who take part in a moderated Meet Me or Ad-hoc conference are called by the conference system.
3.3.5 SIP Service Provider Settings
NOTICE: To edit the SIP Service Provider settings you must open the Settings dialog during the program start. Click on the Manage button in the Logon dialog for this purpose.
A31003-S5070-U120-4-7619, 01/201436 OpenScape UC Application V7 OpenScape Fusion for Microsoft Lync, User Guide
Configuration and Settings“Advanced” Tab
By setting the SIP Service Provider you configure OpenScape Fusion for Microsoft Lync for use as softphone at an SIP communications system.
To edit the SIP Service Provider settings, select on the tab Advanced > SIP Service Provider. Then click on one of the following settings.
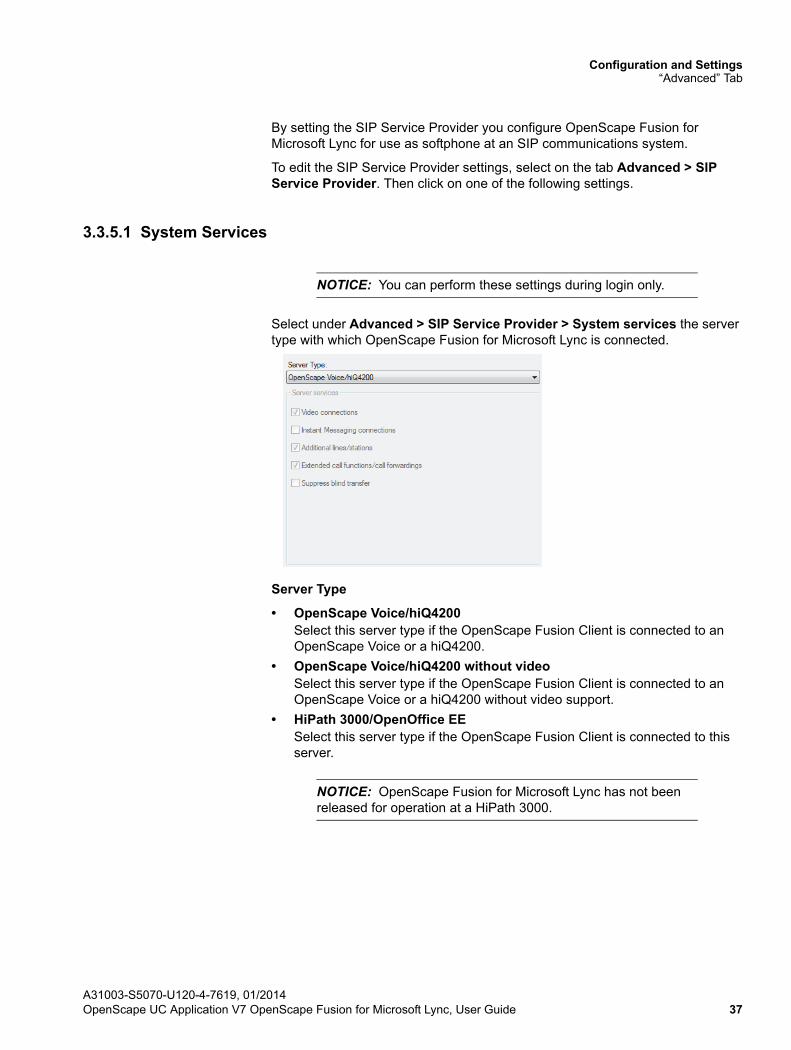
3.3.5.1 System Services
NOTICE: You can perform these settings during login only.
Select under Advanced > SIP Service Provider > System services the server type with which OpenScape Fusion for Microsoft Lync is connected.
Server Type
• OpenScape Voice/hiQ4200Select this server type if the OpenScape Fusion Client is connected to an OpenScape Voice or a hiQ4200.
• OpenScape Voice/hiQ4200 without videoSelect this server type if the OpenScape Fusion Client is connected to an OpenScape Voice or a hiQ4200 without video support.
• HiPath 3000/OpenOffice EESelect this server type if the OpenScape Fusion Client is connected to this server.
NOTICE: OpenScape Fusion for Microsoft Lync has not been released for operation at a HiPath 3000.
A31003-S5070-U120-4-7619, 01/2014OpenScape UC Application V7 OpenScape Fusion for Microsoft Lync, User Guide 37
Configuration and Settings“Advanced” Tab
• HiPath 3000 >=V8Select this server type if the OpenScape Fusion Client is connected to an HiPath 3000 V8 or later.
NOTICE: OpenScape Fusion for Microsoft Lync has not been released for operation at a HiPath 3000.
• HiPath 4000 >=V6Select this server type if the OpenScape Fusion Client is connected to an HiPath 4000 V6 or later.
NOTICE: OpenScape Fusion for Microsoft Lync has not been released for operation at a HiPath 4000.
• Default without Video/Instant MessagingSelect this server type if the OpenScape Fusion Client is connected to any SIP-protocol-based SIP server. In this case the video and instant messaging features are not supported.
• CustomIf you select this server type, you can individually activate the support for the following features for the connected communications system (if available):
Server services
• Video connectionsEnables connections for exchanging video images.
• Instant Messaging connectionsEnables connections for exchanging instant messages.
• Additional lines/stationsEnables the Lines module window.
• Extended call functions/call forwardingsEnables extended features and functions, such as Transfer.
• Suppress blind transferThe "Blind Transfer" feature (transfer to a device or subscriber) is not supported by this PBX.
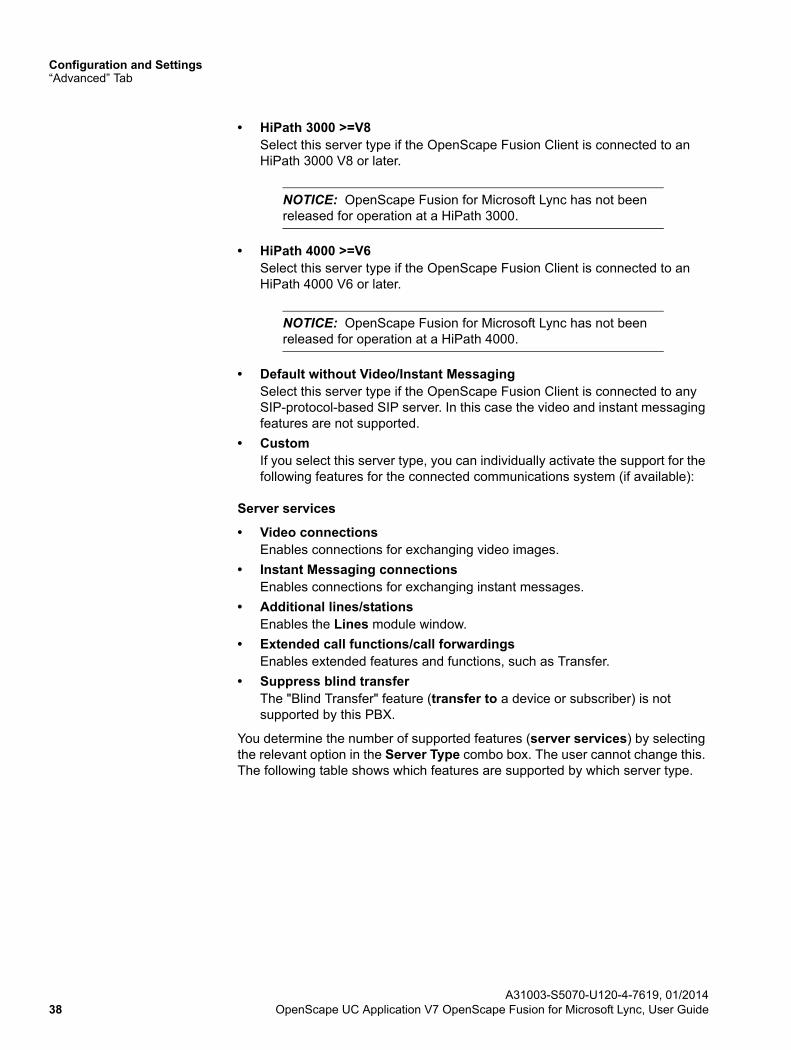
You determine the number of supported features (server services) by selecting the relevant option in the Server Type combo box. The user cannot change this. The following table shows which features are supported by which server type.
A31003-S5070-U120-4-7619, 01/201438 OpenScape UC Application V7 OpenScape Fusion for Microsoft Lync, User Guide
Configuration and Settings“Advanced” Tab
NOTICE: If a listed server service is active, the associated features and elements such as buttons, menu options, module windows, etc. are also active in OpenScape Fusion for Microsoft Lync. These controls are unavailable or inactive if the associated server service is not active.
3.3.5.2 Connection
NOTICE: You can perform these settings during login only.
Server Type Server Services
OpenScape Voice/hiQ4200 • Video connections
• Additional lines/stations
• Extended call functions/call forwardings
OpenScape Voice/hiQ4200 without Video
• Additional lines/stations
• Extended call functions/call forwardings
HiPath 3000/OpenOffice EE OpenScape Fusion for Microsoft Lync has not been released for operation at a HiPath 3000/OpenOffice EE.
HiPath 3000 >=V8 OpenScape Fusion for Microsoft Lync has not been released for operation at a HiPath 3000.
HiPath 4000>=V6 OpenScape Fusion for Microsoft Lync has not been released for operation at a HiPath 4000.
Default without Video/Instant Messaging
None of the listed services is supported.
Custom You can individually activate the support of the features for the connected communications system (if avail-able):
A31003-S5070-U120-4-7619, 01/2014OpenScape UC Application V7 OpenScape Fusion for Microsoft Lync, User Guide 39
Configuration and Settings“Advanced” Tab
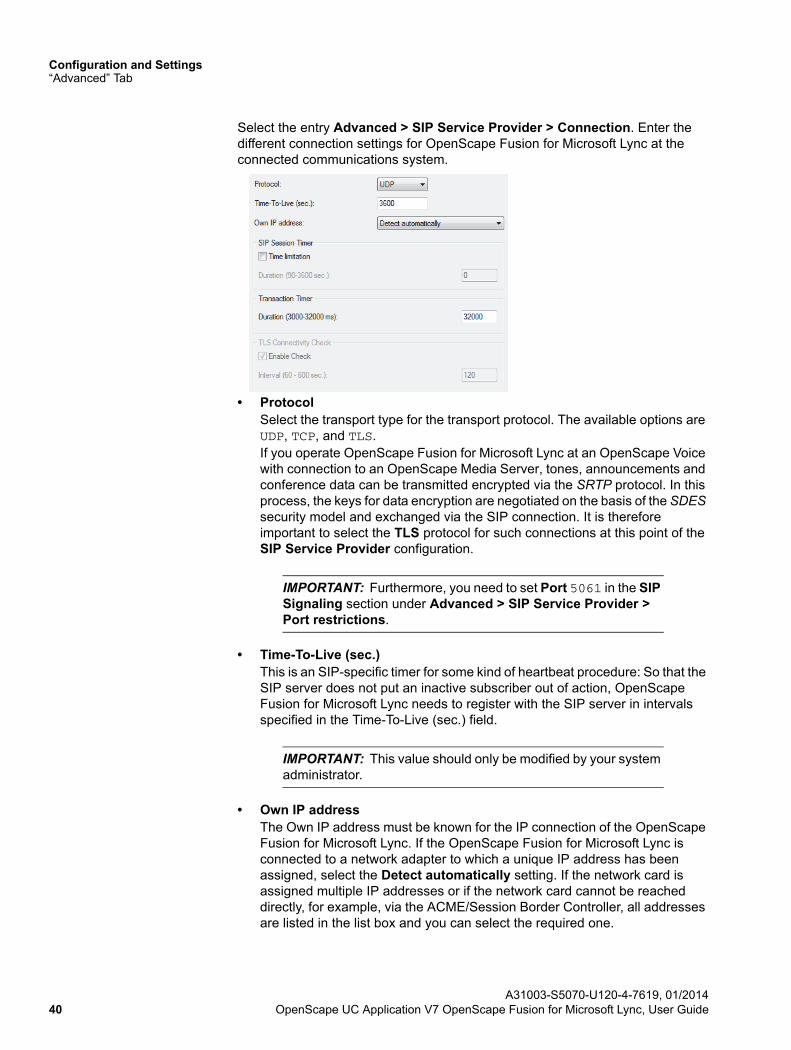
Select the entry Advanced > SIP Service Provider > Connection. Enter the different connection settings for OpenScape Fusion for Microsoft Lync at the connected communications system.
• ProtocolSelect the transport type for the transport protocol. The available options are UDP, TCP, and TLS.If you operate OpenScape Fusion for Microsoft Lync at an OpenScape Voice with connection to an OpenScape Media Server, tones, announcements and conference data can be transmitted encrypted via the SRTP protocol. In this process, the keys for data encryption are negotiated on the basis of the SDES security model and exchanged via the SIP connection. It is therefore important to select the TLS protocol for such connections at this point of the SIP Service Provider configuration.
IMPORTANT: Furthermore, you need to set Port 5061 in the SIP Signaling section under Advanced > SIP Service Provider > Port restrictions.
• Time-To-Live (sec.)This is an SIP-specific timer for some kind of heartbeat procedure: So that the SIP server does not put an inactive subscriber out of action, OpenScape Fusion for Microsoft Lync needs to register with the SIP server in intervals specified in the Time-To-Live (sec.) field.
IMPORTANT: This value should only be modified by your system administrator.
• Own IP addressThe Own IP address must be known for the IP connection of the OpenScape Fusion for Microsoft Lync. If the OpenScape Fusion for Microsoft Lync is connected to a network adapter to which a unique IP address has been assigned, select the Detect automatically setting. If the network card is assigned multiple IP addresses or if the network card cannot be reached directly, for example, via the ACME/Session Border Controller, all addresses are listed in the list box and you can select the required one.
A31003-S5070-U120-4-7619, 01/201440 OpenScape UC Application V7 OpenScape Fusion for Microsoft Lync, User Guide
Configuration and Settings“Advanced” Tab
SIP Session Timer
• Time limitationActivate this option to specify whether the validity of active sessions should be monitored by means of heartbeat procedures.
• Duration (90-3600 sec.)Specify here the duration of the timer in seconds (admissible range 90 - 3600 sec.). Value 0 means the timer is off.
Transaction Timer
• Duration (3000-32000 ms)The OpenScape Fusion Client expects a response from the SIP server to its SIP request (for example when setting up an SIP connection) within this period. The default value set for this parameter is 32000 ms. When this period has expired and the OpenScape Fusion Client has not yet received an answer from the SIP server, an error message is generated. An example is the error message “Request Timeout”, in the case that the network can be reached but the SIP server temporarily or permanently cannot.
NOTICE: The required details are provided by your administrator or PBX administrator.
TLS Connectivity Check
If OpenScape Fusion for Microsoft Lync is connected to an OpenScape Voice via the TLS protocol, the connection to the PBX can be regularly checked. As soon as a connection breakdown has been detected, the program attempts automati-cally to re-establish the connection to the PBX.
NOTICE: You can change the settings for monitoring the TLS connection to the OpenScape Voice after you have selected the TLS option under Protocol.
• Enable CheckIf a tick is placed in the Enable Check check box (default settings), monitoring the TLS connection is active.
• Interval (60 - 600 sec.)With this parameter you can define an interval of 60 sec. to 600 sec. in which the existence of the TLS connection to the OpenScape Voice is checked. The default value is 120 sec.
3.3.5.3 Main Line
NOTICE: You can perform these settings during login only.
A31003-S5070-U120-4-7619, 01/2014OpenScape UC Application V7 OpenScape Fusion for Microsoft Lync, User Guide 41
Configuration and Settings“Advanced” Tab
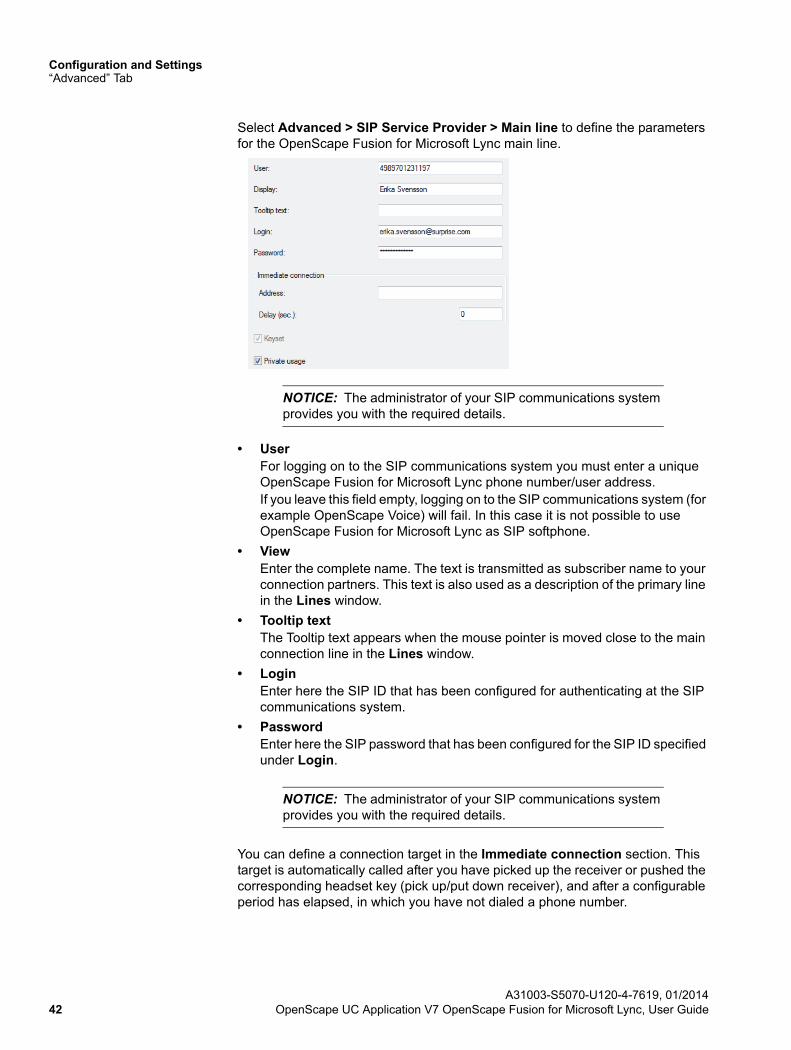
Select Advanced > SIP Service Provider > Main line to define the parameters for the OpenScape Fusion for Microsoft Lync main line.
NOTICE: The administrator of your SIP communications system provides you with the required details.
• UserFor logging on to the SIP communications system you must enter a unique OpenScape Fusion for Microsoft Lync phone number/user address.If you leave this field empty, logging on to the SIP communications system (for example OpenScape Voice) will fail. In this case it is not possible to use OpenScape Fusion for Microsoft Lync as SIP softphone.
• ViewEnter the complete name. The text is transmitted as subscriber name to your connection partners. This text is also used as a description of the primary line in the Lines window.
• Tooltip textThe Tooltip text appears when the mouse pointer is moved close to the main connection line in the Lines window.
• LoginEnter here the SIP ID that has been configured for authenticating at the SIP communications system.
• PasswordEnter here the SIP password that has been configured for the SIP ID specified under Login.
NOTICE: The administrator of your SIP communications system provides you with the required details.
You can define a connection target in the Immediate connection section. This target is automatically called after you have picked up the receiver or pushed the corresponding headset key (pick up/put down receiver), and after a configurable period has elapsed, in which you have not dialed a phone number.
A31003-S5070-U120-4-7619, 01/201442 OpenScape UC Application V7 OpenScape Fusion for Microsoft Lync, User Guide
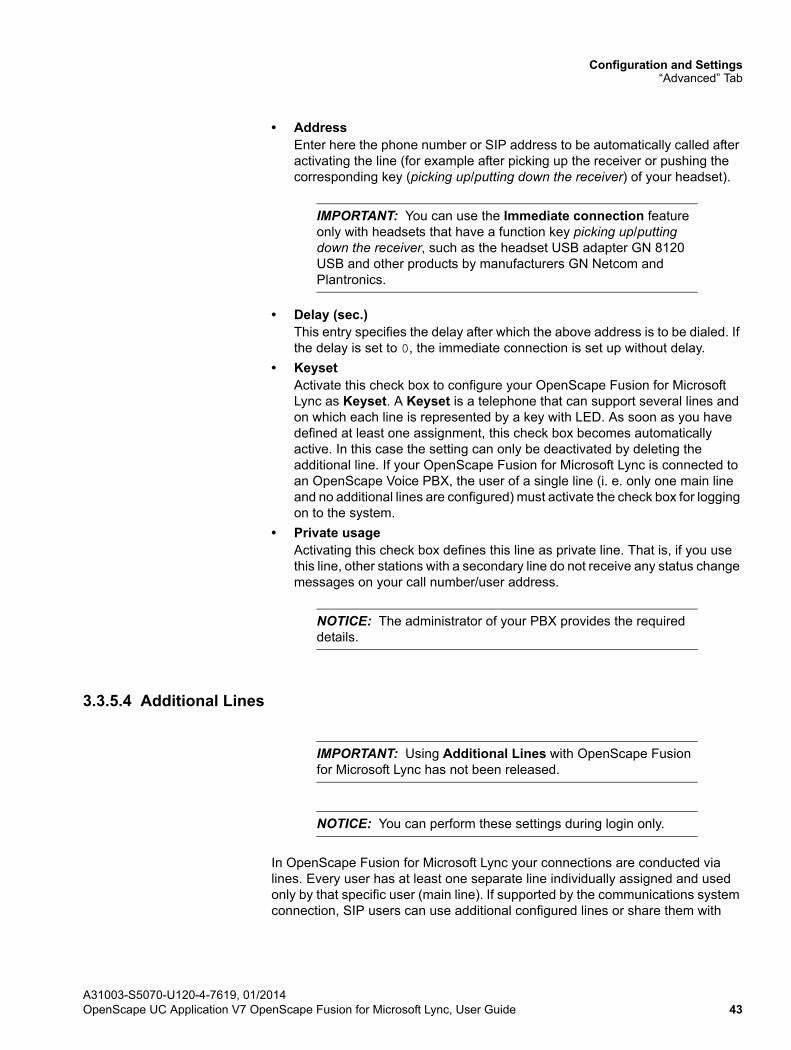
Configuration and Settings“Advanced” Tab
• AddressEnter here the phone number or SIP address to be automatically called after activating the line (for example after picking up the receiver or pushing the corresponding key (picking up/putting down the receiver) of your headset).
IMPORTANT: You can use the Immediate connection feature only with headsets that have a function key picking up/putting down the receiver, such as the headset USB adapter GN 8120 USB and other products by manufacturers GN Netcom and Plantronics.
• Delay (sec.)This entry specifies the delay after which the above address is to be dialed. If the delay is set to 0, the immediate connection is set up without delay.
• KeysetActivate this check box to configure your OpenScape Fusion for Microsoft Lync as Keyset. A Keyset is a telephone that can support several lines and on which each line is represented by a key with LED. As soon as you have defined at least one assignment, this check box becomes automatically active. In this case the setting can only be deactivated by deleting the additional line. If your OpenScape Fusion for Microsoft Lync is connected to an OpenScape Voice PBX, the user of a single line (i. e. only one main line and no additional lines are configured) must activate the check box for logging on to the system.
• Private usageActivating this check box defines this line as private line. That is, if you use this line, other stations with a secondary line do not receive any status change messages on your call number/user address.
NOTICE: The administrator of your PBX provides the required details.
3.3.5.4 Additional Lines
IMPORTANT: Using Additional Lines with OpenScape Fusion for Microsoft Lync has not been released.
NOTICE: You can perform these settings during login only.
In OpenScape Fusion for Microsoft Lync your connections are conducted via lines. Every user has at least one separate line individually assigned and used only by that specific user (main line). If supported by the communications system connection, SIP users can use additional configured lines or share them with
A31003-S5070-U120-4-7619, 01/2014OpenScape UC Application V7 OpenScape Fusion for Microsoft Lync, User Guide 43
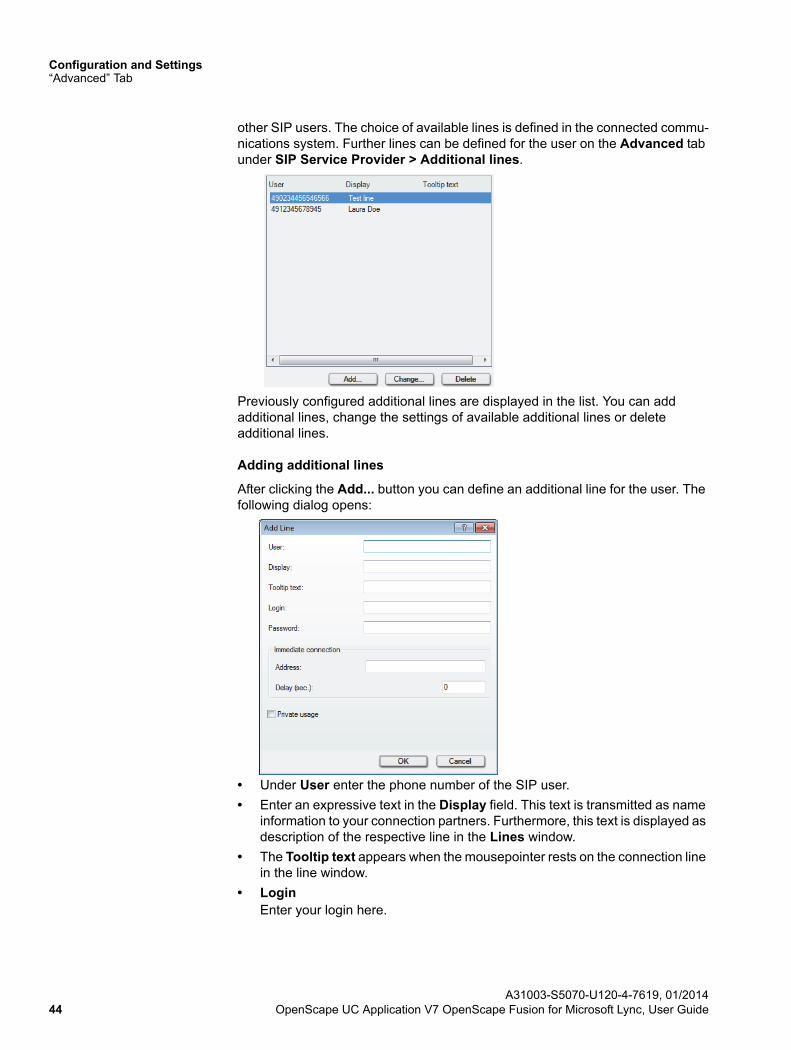
Configuration and Settings“Advanced” Tab
other SIP users. The choice of available lines is defined in the connected commu-nications system. Further lines can be defined for the user on the Advanced tab under SIP Service Provider > Additional lines.
Previously configured additional lines are displayed in the list. You can add additional lines, change the settings of available additional lines or delete additional lines.
Adding additional lines
After clicking the Add... button you can define an additional line for the user. The following dialog opens:
• Under User enter the phone number of the SIP user.
• Enter an expressive text in the Display field. This text is transmitted as name information to your connection partners. Furthermore, this text is displayed as description of the respective line in the Lines window.
• The Tooltip text appears when the mousepointer rests on the connection line in the line window.
• LoginEnter your login here.
A31003-S5070-U120-4-7619, 01/201444 OpenScape UC Application V7 OpenScape Fusion for Microsoft Lync, User Guide
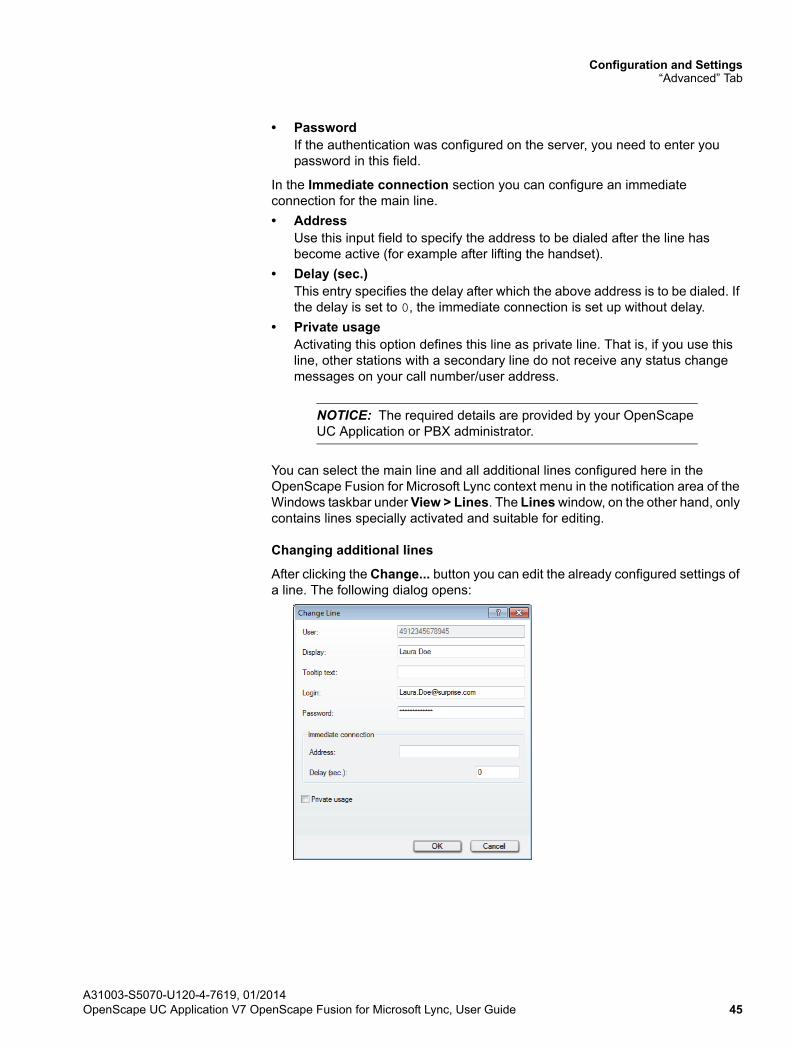
Configuration and Settings“Advanced” Tab
• PasswordIf the authentication was configured on the server, you need to enter you password in this field.
In the Immediate connection section you can configure an immediate connection for the main line.
• AddressUse this input field to specify the address to be dialed after the line has become active (for example after lifting the handset).
• Delay (sec.)This entry specifies the delay after which the above address is to be dialed. If the delay is set to 0, the immediate connection is set up without delay.
• Private usageActivating this option defines this line as private line. That is, if you use this line, other stations with a secondary line do not receive any status change messages on your call number/user address.
NOTICE: The required details are provided by your OpenScape UC Application or PBX administrator.
You can select the main line and all additional lines configured here in the OpenScape Fusion for Microsoft Lync context menu in the notification area of the Windows taskbar under View > Lines. The Lines window, on the other hand, only contains lines specially activated and suitable for editing.
Changing additional lines
After clicking the Change... button you can edit the already configured settings of a line. The following dialog opens:
A31003-S5070-U120-4-7619, 01/2014OpenScape UC Application V7 OpenScape Fusion for Microsoft Lync, User Guide 45
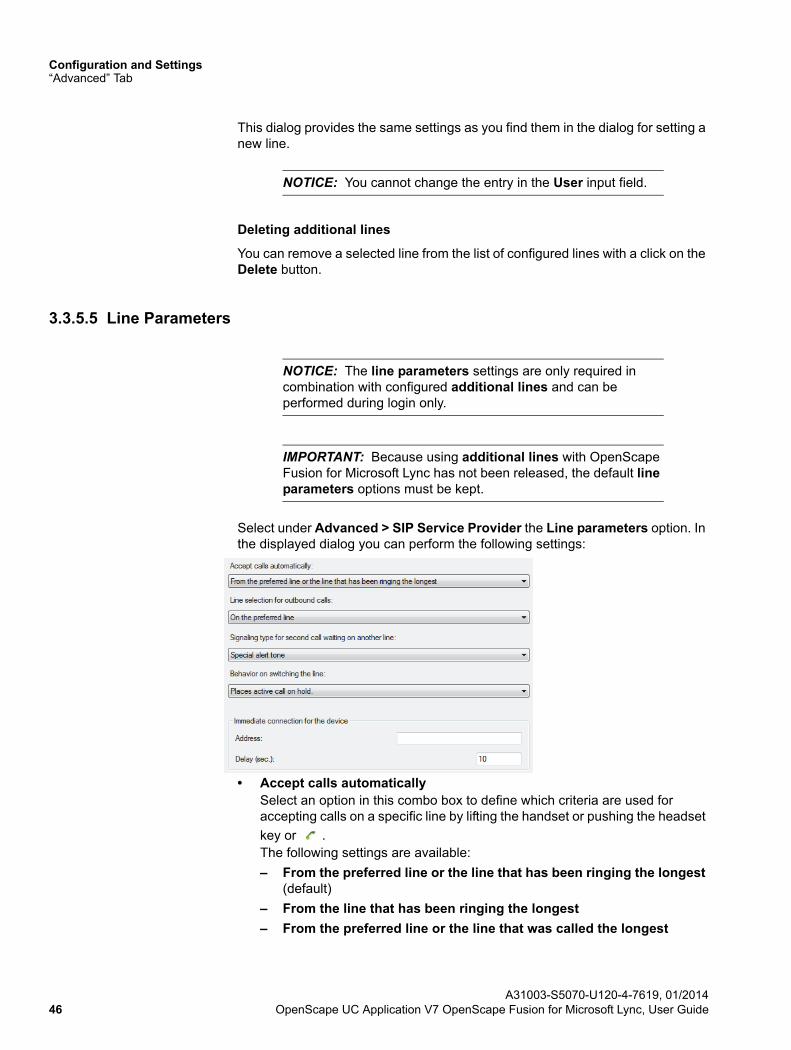
Configuration and Settings“Advanced” Tab
This dialog provides the same settings as you find them in the dialog for setting a new line.
NOTICE: You cannot change the entry in the User input field.
Deleting additional lines
You can remove a selected line from the list of configured lines with a click on the Delete button.
3.3.5.5 Line Parameters
NOTICE: The line parameters settings are only required in combination with configured additional lines and can be performed during login only.
IMPORTANT: Because using additional lines with OpenScape Fusion for Microsoft Lync has not been released, the default line parameters options must be kept.
Select under Advanced > SIP Service Provider the Line parameters option. In the displayed dialog you can perform the following settings:
• Accept calls automaticallySelect an option in this combo box to define which criteria are used for accepting calls on a specific line by lifting the handset or pushing the headset
key or .The following settings are available:
– From the preferred line or the line that has been ringing the longest (default)
– From the line that has been ringing the longest
– From the preferred line or the line that was called the longest
A31003-S5070-U120-4-7619, 01/201446 OpenScape UC Application V7 OpenScape Fusion for Microsoft Lync, User Guide
Configuration and Settings“Advanced” Tab
– From the line that was called the longest
– Only from the preferred line for incoming calls
• Line selection for outbound callsSelect an option in this combo box to define which criteria are used for accepting calls on a specific line by lifting the handset or pushing the headset
key or .The following settings are available:
– On the preferred line (default)
– On the next free line (lines always considered from first to last)
– On the last line used
– No automatic line seizure
• Signaling type for second call waiting on another lineSelect an option in this combo box to define if and how OpenScape Fusion for Microsoft Lync should signal inbound connection requests if an active call is in progress when you receive a second connection request on another line.You can choose between:
– Special alert tone (default)
– Normal alert tone
– No Alert tone
• Behavior on switching the lineSelect an option in this combo box to determine active-call handling in OpenScape Fusion for Microsoft Lync for the case that you answer another connection request:
– Places active call on hold (default)
– Ends (disconnects) the active call
In the Immediate connection for the device section you can configure an instant connection for your device.
• AddressUse this input field to specify a number to which a connection is automatically set up independently from the line-specific immediate-connection settings.
• Delay (sec.)This entry specifies the delay after which the number specified under Address is to be dialed. 0 seconds here means an immediate connection without delay.
NOTICE: If values have been configured for a device-specific and a line-specific immediate connection, the lower delay setting is used. If the delay time settings are identical for the line and device, the immediate connection is set up first for the line.
A31003-S5070-U120-4-7619, 01/2014OpenScape UC Application V7 OpenScape Fusion for Microsoft Lync, User Guide 47
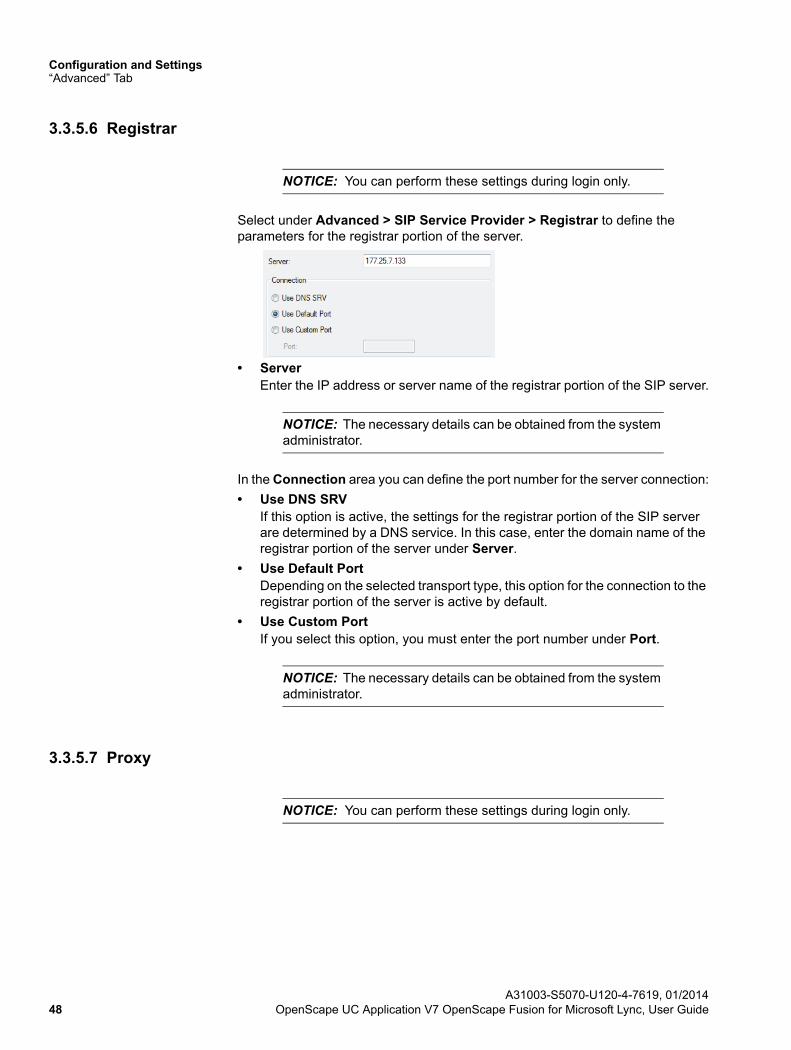
Configuration and Settings“Advanced” Tab
3.3.5.6 Registrar
NOTICE: You can perform these settings during login only.
Select under Advanced > SIP Service Provider > Registrar to define the parameters for the registrar portion of the server.
• ServerEnter the IP address or server name of the registrar portion of the SIP server.
NOTICE: The necessary details can be obtained from the system administrator.
In the Connection area you can define the port number for the server connection:
• Use DNS SRVIf this option is active, the settings for the registrar portion of the SIP server are determined by a DNS service. In this case, enter the domain name of the registrar portion of the server under Server.
• Use Default Port Depending on the selected transport type, this option for the connection to the registrar portion of the server is active by default.
• Use Custom PortIf you select this option, you must enter the port number under Port.
NOTICE: The necessary details can be obtained from the system administrator.
3.3.5.7 Proxy
NOTICE: You can perform these settings during login only.
A31003-S5070-U120-4-7619, 01/201448 OpenScape UC Application V7 OpenScape Fusion for Microsoft Lync, User Guide
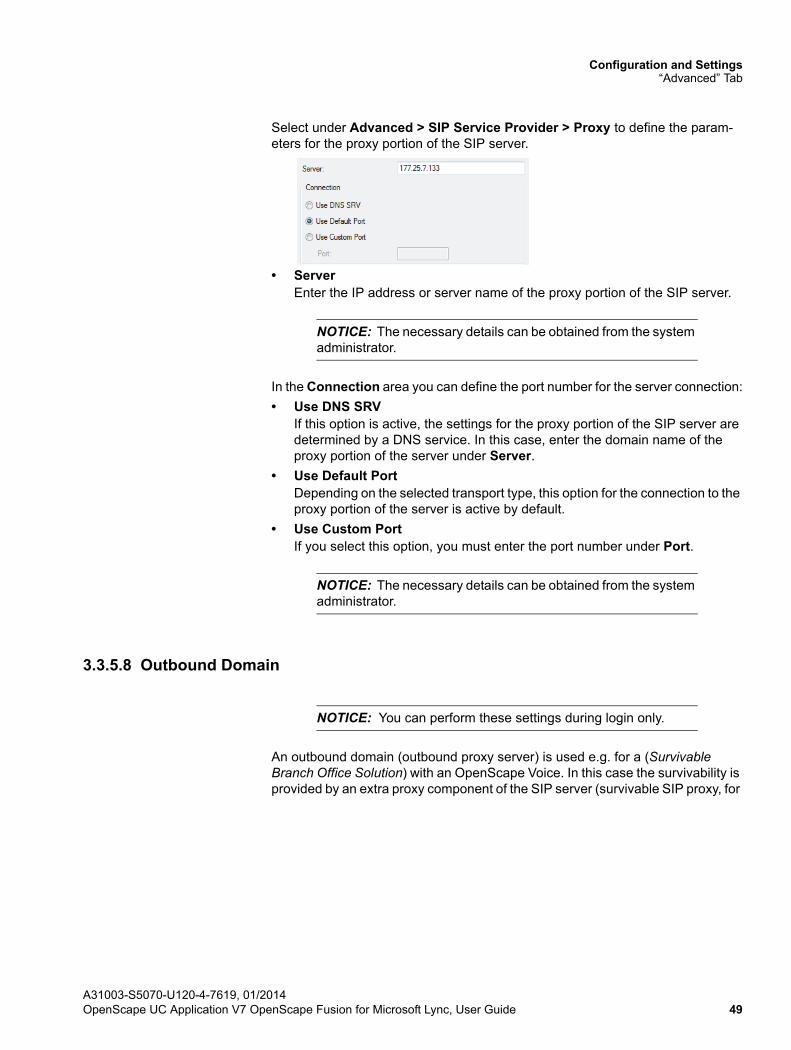
Configuration and Settings“Advanced” Tab
Select under Advanced > SIP Service Provider > Proxy to define the param-eters for the proxy portion of the SIP server.
• ServerEnter the IP address or server name of the proxy portion of the SIP server.
NOTICE: The necessary details can be obtained from the system administrator.
In the Connection area you can define the port number for the server connection:
• Use DNS SRVIf this option is active, the settings for the proxy portion of the SIP server are determined by a DNS service. In this case, enter the domain name of the proxy portion of the server under Server.
• Use Default PortDepending on the selected transport type, this option for the connection to the proxy portion of the server is active by default.
• Use Custom PortIf you select this option, you must enter the port number under Port.
NOTICE: The necessary details can be obtained from the system administrator.
3.3.5.8 Outbound Domain
NOTICE: You can perform these settings during login only.
An outbound domain (outbound proxy server) is used e.g. for a (Survivable Branch Office Solution) with an OpenScape Voice. In this case the survivability is provided by an extra proxy component of the SIP server (survivable SIP proxy, for
A31003-S5070-U120-4-7619, 01/2014OpenScape UC Application V7 OpenScape Fusion for Microsoft Lync, User Guide 49

Configuration and Settings“Advanced” Tab
example Comdasys Convergence). A survivable SIP proxy (gateway) provides restricted SIP server functions (restricted operation mode), as soon as it realizes that the OpenScape Voice cannot be reached. Operation is not interrupted.
NOTICE: Survivability describes here the ability of the communi-cations network to maintain the service for network subscribers even in case of existing errors in the network. You find detailed information about Survivability in the administrator manual of the OpenScape Voice.
Using an outbound domain enables you to make calls without having to specify the complete SIP addresses (SIP URIs/SIP phone numbers) when dialing. For example, the SIP phone number to be dialed reads: sip:0123456789@Domain Name. You can enter only 0123456789 in the <Name or Number> input field in the main menu. The SIP communications system completes the SIP phone number to the dialed.
Select the entry Advanced > SIP Service Provider > Outbound Domain to define the parameters for the outbound domain and the SIP gateway server.
• Use Outbound DomainActivate this option so that you can fill in the fields in this dialog.
NOTICE: This check box must be ticked for connecting OpenScape Fusion for Microsoft Lync to an OpenScape Voice in the central as well as in a branch office.
• Domain nameEnter the name of your outbound domain in this input field. The SIP commu-nications system automatically completes it in the phone number to be dialed before the connection is set up.
NOTICE: Leave this input field empty for connecting OpenScape Fusion for Microsoft Lync to an OpenScape Voice with an OpenScape Branch solution in the central as well as in a branch office.
A31003-S5070-U120-4-7619, 01/201450 OpenScape UC Application V7 OpenScape Fusion for Microsoft Lync, User Guide

Configuration and Settings“Advanced” Tab
• Delete port entries in INVITE headersActivating this option removes the ports from the INVITE headers for the domain names entered. This is necessary, for example, in the case of ACME/Session Border Controller configurations.
• If, for example, OpenScape Fusion for Microsoft Lync is used with an OpenScape Voice in a survivable branch solution (for example OpenScape Branch), enter the IP address or the server name of the gateway server or of the Survivable SIP Proxy in the Server field of the Gateway section.
NOTICE: You need to set the IP address or the server name of the Survivable SIP Proxy also under SIP Service Provider > Proxy.
IMPORTANT: Leave this input field empty for connecting OpenScape Fusion for Microsoft Lync to an OpenScape Voice with an OpenScape Branch solution in the central office.
NOTICE: The necessary details can be obtained from the system administrator.
Set the port number for the server connection in the Connection section:
• Delete DNS SRV / port specification in ROUTE headersIf this option is active, a DNS server can be used to search the gateway settings. In this case, enter the domain name of the gateway server under Server. Alternatively, the ports can be removed from the ROUTE header. This is necessary, for example, in the case of ACME/Session Border Controller configuration. To do this, enter the IP address of the gateway under Server.
IMPORTANT: You must set this option for connecting an OpenScape Voice in survivable branch solutions (for example OpenScape Branch).
• Use Default PortDepending on the selected transport type, this option for connecting the proxy server is active by default.
• Use Custom PortIf you select this option, you must enter the port number under Port.
3.3.5.9 Network Access
NOTICE: You can perform the network access settings during login only.
A31003-S5070-U120-4-7619, 01/2014OpenScape UC Application V7 OpenScape Fusion for Microsoft Lync, User Guide 51
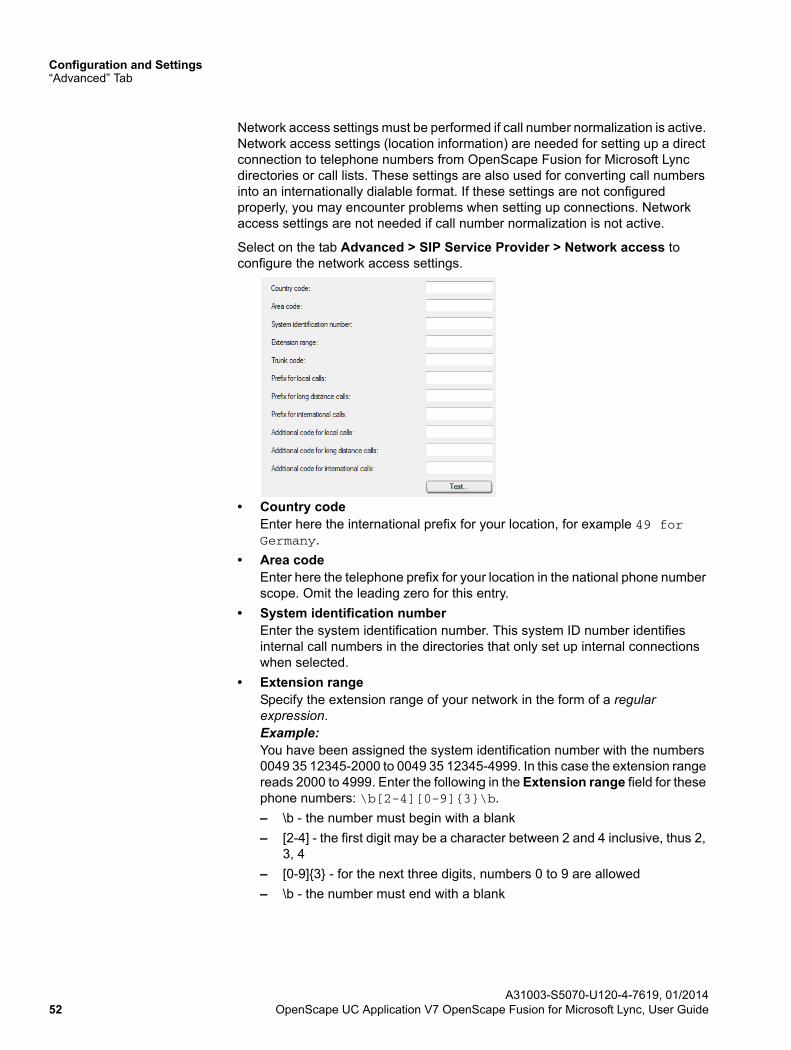
Configuration and Settings“Advanced” Tab
Network access settings must be performed if call number normalization is active. Network access settings (location information) are needed for setting up a direct connection to telephone numbers from OpenScape Fusion for Microsoft Lync directories or call lists. These settings are also used for converting call numbers into an internationally dialable format. If these settings are not configured properly, you may encounter problems when setting up connections. Network access settings are not needed if call number normalization is not active.
Select on the tab Advanced > SIP Service Provider > Network access to configure the network access settings.
• Country codeEnter here the international prefix for your location, for example 49 for Germany.
• Area codeEnter here the telephone prefix for your location in the national phone number scope. Omit the leading zero for this entry.
• System identification numberEnter the system identification number. This system ID number identifies internal call numbers in the directories that only set up internal connections when selected.
• Extension rangeSpecify the extension range of your network in the form of a regular expression. Example:You have been assigned the system identification number with the numbers 0049 35 12345-2000 to 0049 35 12345-4999. In this case the extension range reads 2000 to 4999. Enter the following in the Extension range field for these phone numbers: \b[2-4][0-9]{3}\b.
– \b - the number must begin with a blank
– [2-4] - the first digit may be a character between 2 and 4 inclusive, thus 2, 3, 4
– [0-9]{3} - for the next three digits, numbers 0 to 9 are allowed
– \b - the number must end with a blank
A31003-S5070-U120-4-7619, 01/201452 OpenScape UC Application V7 OpenScape Fusion for Microsoft Lync, User Guide
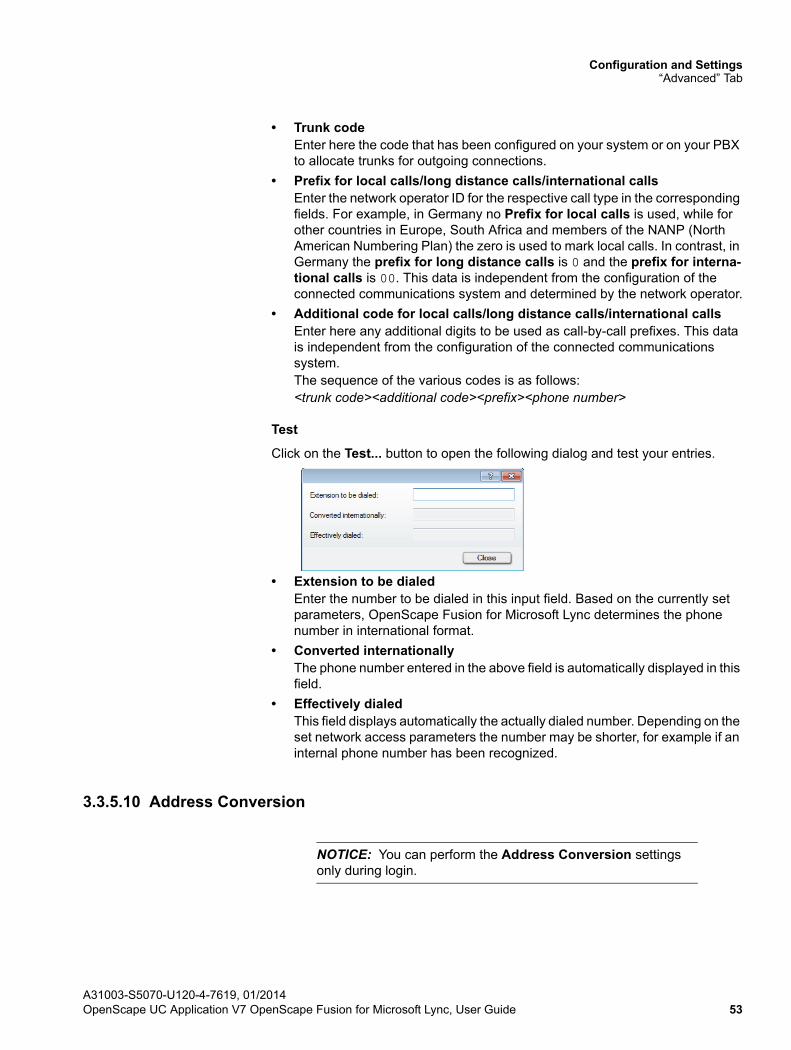
Configuration and Settings“Advanced” Tab
• Trunk codeEnter here the code that has been configured on your system or on your PBX to allocate trunks for outgoing connections.
• Prefix for local calls/long distance calls/international callsEnter the network operator ID for the respective call type in the corresponding fields. For example, in Germany no Prefix for local calls is used, while for other countries in Europe, South Africa and members of the NANP (North American Numbering Plan) the zero is used to mark local calls. In contrast, in Germany the prefix for long distance calls is 0 and the prefix for interna-tional calls is 00. This data is independent from the configuration of the connected communications system and determined by the network operator.
• Additional code for local calls/long distance calls/international calls Enter here any additional digits to be used as call-by-call prefixes. This data is independent from the configuration of the connected communications system.The sequence of the various codes is as follows:<trunk code><additional code><prefix><phone number>
Test
Click on the Test... button to open the following dialog and test your entries.
• Extension to be dialedEnter the number to be dialed in this input field. Based on the currently set parameters, OpenScape Fusion for Microsoft Lync determines the phone number in international format.
• Converted internationallyThe phone number entered in the above field is automatically displayed in this field.
• Effectively dialedThis field displays automatically the actually dialed number. Depending on the set network access parameters the number may be shorter, for example if an internal phone number has been recognized.
3.3.5.10 Address Conversion
NOTICE: You can perform the Address Conversion settings only during login.
A31003-S5070-U120-4-7619, 01/2014OpenScape UC Application V7 OpenScape Fusion for Microsoft Lync, User Guide 53
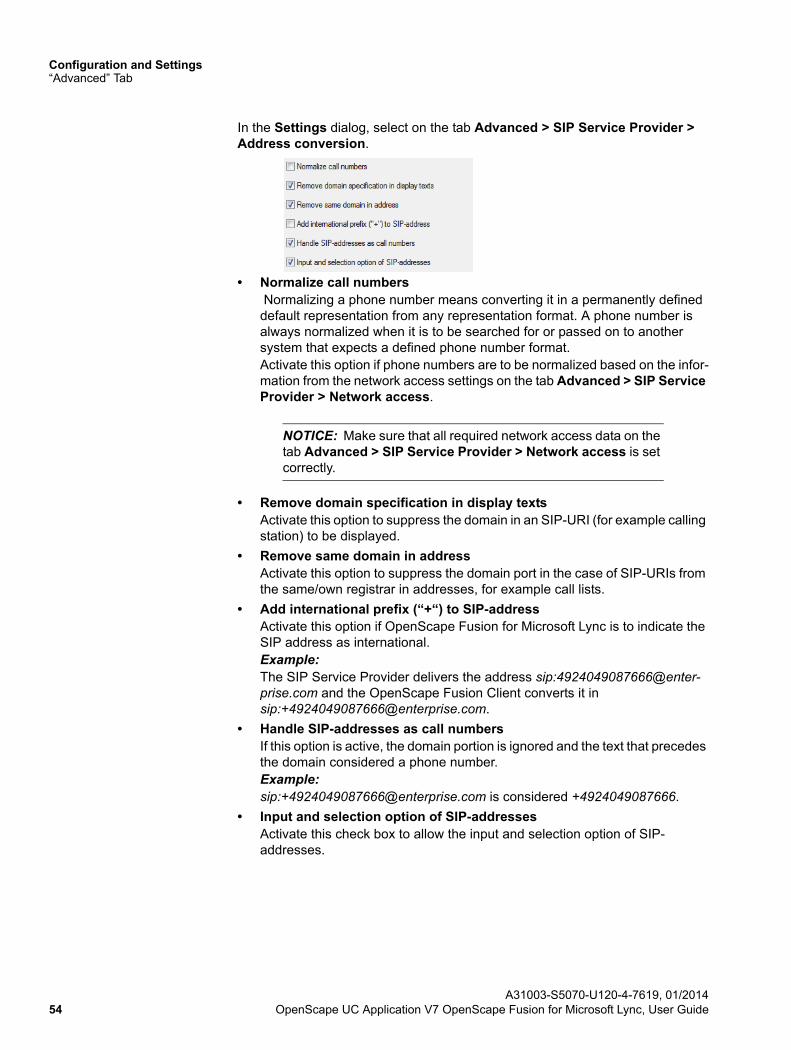
Configuration and Settings“Advanced” Tab
In the Settings dialog, select on the tab Advanced > SIP Service Provider > Address conversion.
• Normalize call numbers Normalizing a phone number means converting it in a permanently defined default representation from any representation format. A phone number is always normalized when it is to be searched for or passed on to another system that expects a defined phone number format.Activate this option if phone numbers are to be normalized based on the infor-mation from the network access settings on the tab Advanced > SIP Service Provider > Network access.
NOTICE: Make sure that all required network access data on the tab Advanced > SIP Service Provider > Network access is set correctly.
• Remove domain specification in display textsActivate this option to suppress the domain in an SIP-URI (for example calling station) to be displayed.
• Remove same domain in addressActivate this option to suppress the domain port in the case of SIP-URIs from the same/own registrar in addresses, for example call lists.
• Add international prefix (“+“) to SIP-addressActivate this option if OpenScape Fusion for Microsoft Lync is to indicate the SIP address as international.Example:The SIP Service Provider delivers the address sip:[email protected] and the OpenScape Fusion Client converts it in sip:[email protected].
• Handle SIP-addresses as call numbersIf this option is active, the domain portion is ignored and the text that precedes the domain considered a phone number.Example:sip:[email protected] is considered +4924049087666.
• Input and selection option of SIP-addressesActivate this check box to allow the input and selection option of SIP-addresses.
A31003-S5070-U120-4-7619, 01/201454 OpenScape UC Application V7 OpenScape Fusion for Microsoft Lync, User Guide
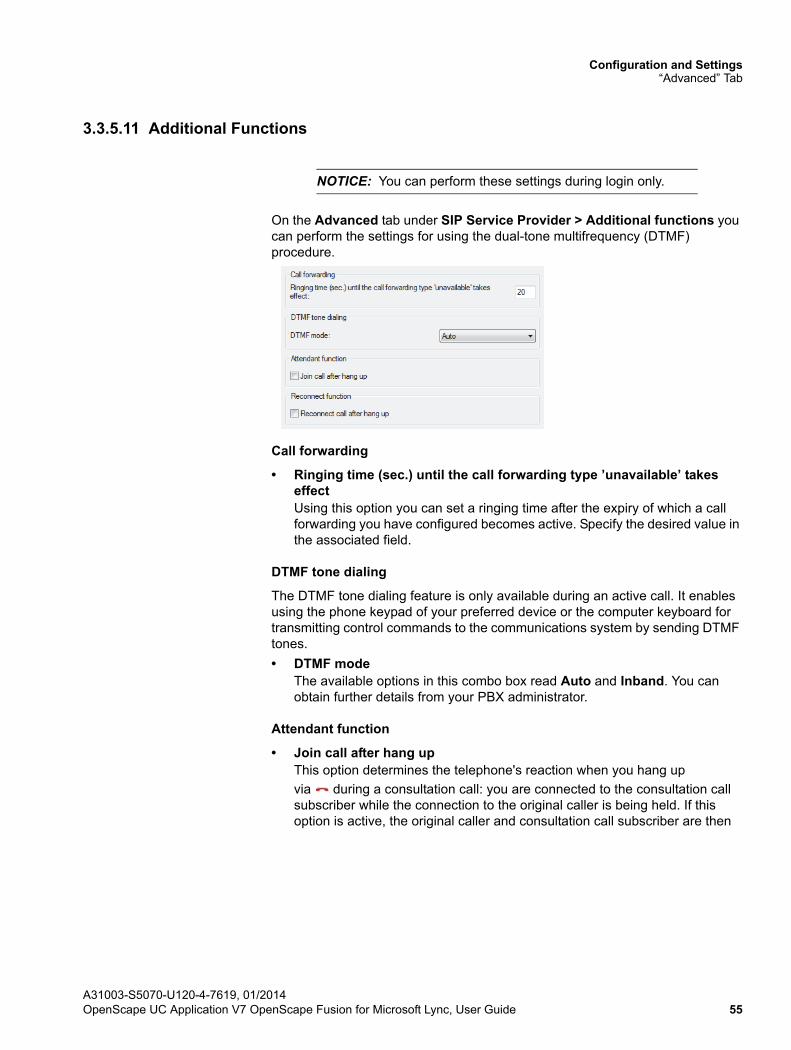
Configuration and Settings“Advanced” Tab
3.3.5.11 Additional Functions
NOTICE: You can perform these settings during login only.
On the Advanced tab under SIP Service Provider > Additional functions you can perform the settings for using the dual-tone multifrequency (DTMF) procedure.
Call forwarding
• Ringing time (sec.) until the call forwarding type ’unavailable’ takes effectUsing this option you can set a ringing time after the expiry of which a call forwarding you have configured becomes active. Specify the desired value in the associated field.
DTMF tone dialing
The DTMF tone dialing feature is only available during an active call. It enables using the phone keypad of your preferred device or the computer keyboard for transmitting control commands to the communications system by sending DTMF tones.
• DTMF modeThe available options in this combo box read Auto and Inband. You can obtain further details from your PBX administrator.
Attendant function
• Join call after hang upThis option determines the telephone's reaction when you hang up
via during a consultation call: you are connected to the consultation call subscriber while the connection to the original caller is being held. If this option is active, the original caller and consultation call subscriber are then
A31003-S5070-U120-4-7619, 01/2014OpenScape UC Application V7 OpenScape Fusion for Microsoft Lync, User Guide 55
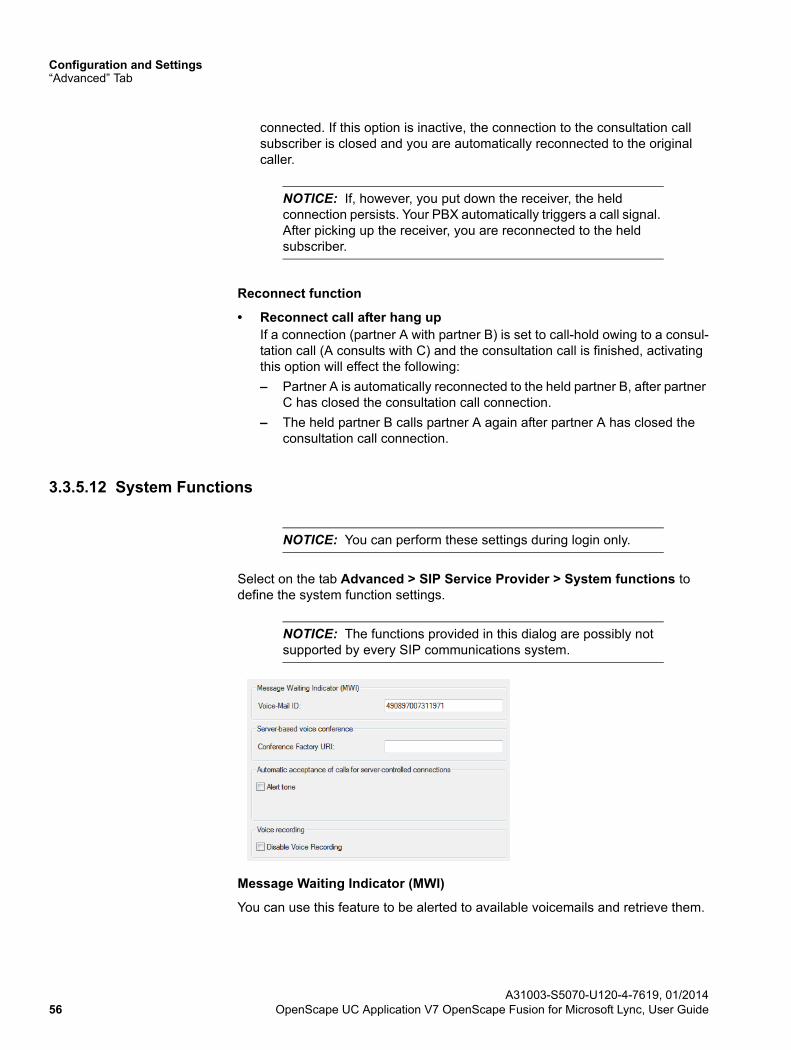
Configuration and Settings“Advanced” Tab
connected. If this option is inactive, the connection to the consultation call subscriber is closed and you are automatically reconnected to the original caller.
NOTICE: If, however, you put down the receiver, the held connection persists. Your PBX automatically triggers a call signal. After picking up the receiver, you are reconnected to the held subscriber.
Reconnect function
• Reconnect call after hang upIf a connection (partner A with partner B) is set to call-hold owing to a consul-tation call (A consults with C) and the consultation call is finished, activating this option will effect the following:
– Partner A is automatically reconnected to the held partner B, after partner C has closed the consultation call connection.
– The held partner B calls partner A again after partner A has closed the consultation call connection.
3.3.5.12 System Functions
NOTICE: You can perform these settings during login only.
Select on the tab Advanced > SIP Service Provider > System functions to define the system function settings.
NOTICE: The functions provided in this dialog are possibly not supported by every SIP communications system.
Message Waiting Indicator (MWI)
You can use this feature to be alerted to available voicemails and retrieve them.
A31003-S5070-U120-4-7619, 01/201456 OpenScape UC Application V7 OpenScape Fusion for Microsoft Lync, User Guide
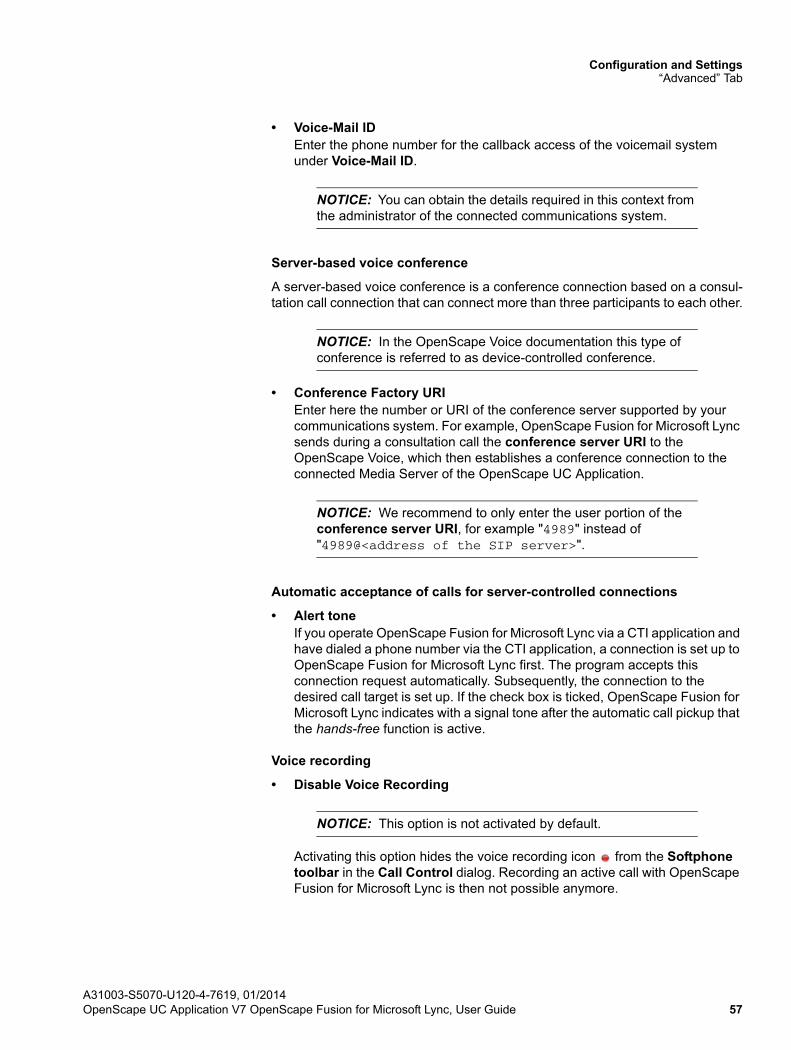
Configuration and Settings“Advanced” Tab
• Voice-Mail IDEnter the phone number for the callback access of the voicemail system under Voice-Mail ID.
NOTICE: You can obtain the details required in this context from the administrator of the connected communications system.
Server-based voice conference
A server-based voice conference is a conference connection based on a consul-tation call connection that can connect more than three participants to each other.
NOTICE: In the OpenScape Voice documentation this type of conference is referred to as device-controlled conference.
• Conference Factory URIEnter here the number or URI of the conference server supported by your communications system. For example, OpenScape Fusion for Microsoft Lync sends during a consultation call the conference server URI to the OpenScape Voice, which then establishes a conference connection to the connected Media Server of the OpenScape UC Application.
NOTICE: We recommend to only enter the user portion of the conference server URI, for example "4989" instead of "4989@<address of the SIP server>".
Automatic acceptance of calls for server-controlled connections
• Alert toneIf you operate OpenScape Fusion for Microsoft Lync via a CTI application and have dialed a phone number via the CTI application, a connection is set up to OpenScape Fusion for Microsoft Lync first. The program accepts this connection request automatically. Subsequently, the connection to the desired call target is set up. If the check box is ticked, OpenScape Fusion for Microsoft Lync indicates with a signal tone after the automatic call pickup that the hands-free function is active.
Voice recording
• Disable Voice Recording
NOTICE: This option is not activated by default.
Activating this option hides the voice recording icon from the Softphone toolbar in the Call Control dialog. Recording an active call with OpenScape Fusion for Microsoft Lync is then not possible anymore.
A31003-S5070-U120-4-7619, 01/2014OpenScape UC Application V7 OpenScape Fusion for Microsoft Lync, User Guide 57
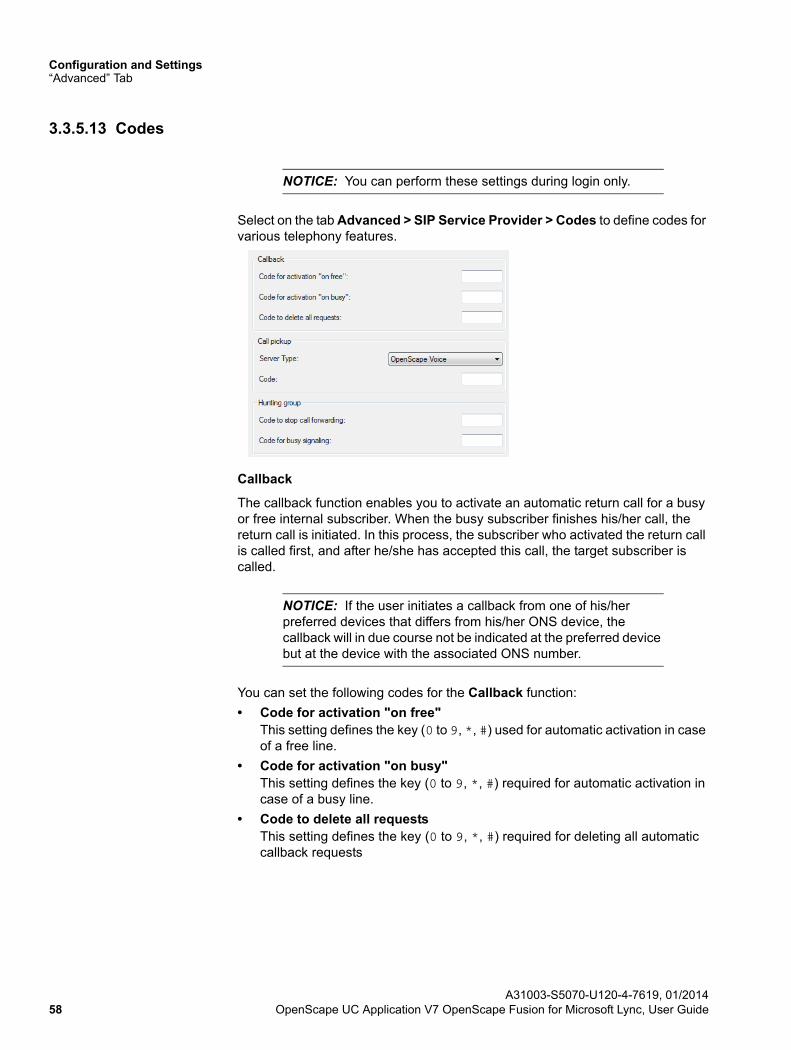
Configuration and Settings“Advanced” Tab
3.3.5.13 Codes
NOTICE: You can perform these settings during login only.
Select on the tab Advanced > SIP Service Provider > Codes to define codes for various telephony features.
Callback
The callback function enables you to activate an automatic return call for a busy or free internal subscriber. When the busy subscriber finishes his/her call, the return call is initiated. In this process, the subscriber who activated the return call is called first, and after he/she has accepted this call, the target subscriber is called.
NOTICE: If the user initiates a callback from one of his/her preferred devices that differs from his/her ONS device, the callback will in due course not be indicated at the preferred device but at the device with the associated ONS number.
You can set the following codes for the Callback function:
• Code for activation "on free"This setting defines the key (0 to 9, *, #) used for automatic activation in case of a free line.
• Code for activation "on busy"This setting defines the key (0 to 9, *, #) required for automatic activation in case of a busy line.
• Code to delete all requestsThis setting defines the key (0 to 9, *, #) required for deleting all automatic callback requests
A31003-S5070-U120-4-7619, 01/201458 OpenScape UC Application V7 OpenScape Fusion for Microsoft Lync, User Guide
Configuration and Settings“Advanced” Tab
Call pickup
Call pickup is a telephony feature that signals calls acoustically to a subscriber of a call pickup group and at the same time visually to the other group members by an LED (next to the programmed key) on the display. You can pick up the call by pushing a key or dialing a code number.
You can set the following parameters for the call pickup function:
• Server TypeYou can select one of the following server types from this combo box:
– OpenScape Voice
– Broadsoft
– Sylantro
– Auto
– HiQ4200
NOTICE: The PBX OpenScape Voice used to be called HiPath 8000.
• CodeHere you can define the key (0 to 9, *, #) used for the call pickup.
Hunting group
The hunting group telephony feature enables call distribution within a subscriber group. These subscribers are linked, so that a call to the group is automatically routed to the next free member in case of a busy or unanswered phone.
You can set the following codes for the hunting group function:
• Code to stop call forwarding This setting defines the key (0 to 9, *, #) required for ending the automatic call forwarding.
• Code for busy signalingThis setting defines the key (0 to 9, *, #) required for signaling a busy line.
NOTICE: The necessary details can be obtained from the system administrator.
3.3.5.14 Sounds
NOTICE: You can perform these settings during login only.
A31003-S5070-U120-4-7619, 01/2014OpenScape UC Application V7 OpenScape Fusion for Microsoft Lync, User Guide 59
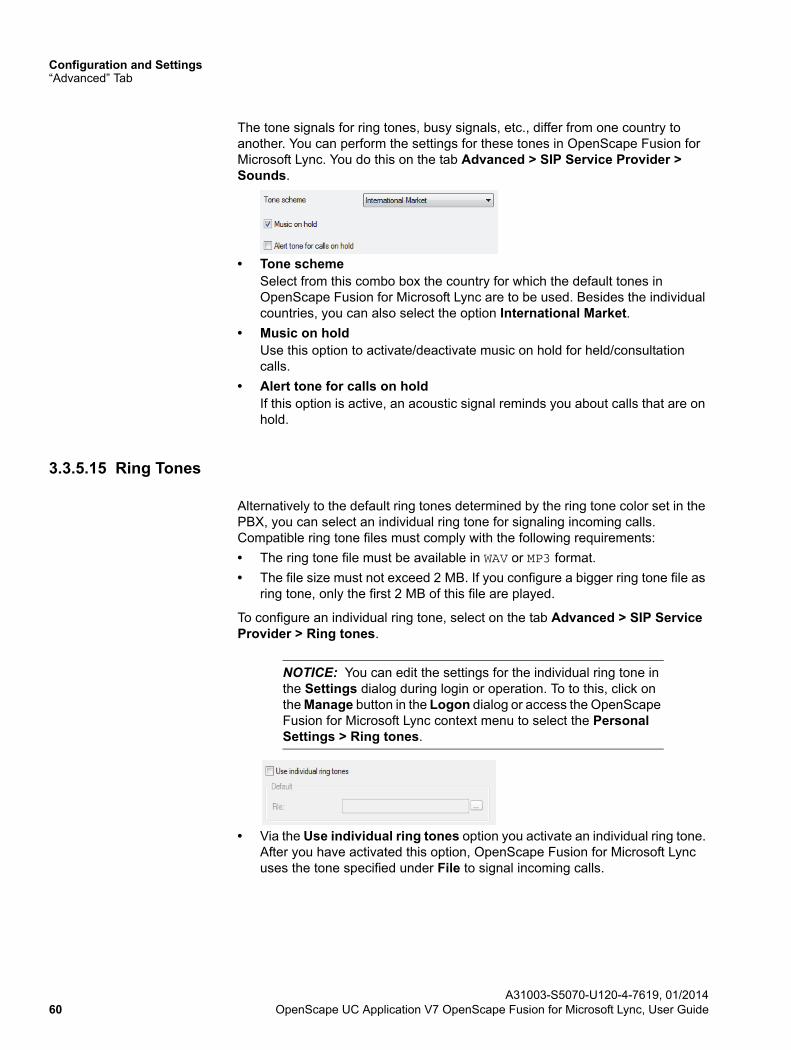
Configuration and Settings“Advanced” Tab
The tone signals for ring tones, busy signals, etc., differ from one country to another. You can perform the settings for these tones in OpenScape Fusion for Microsoft Lync. You do this on the tab Advanced > SIP Service Provider > Sounds.
• Tone schemeSelect from this combo box the country for which the default tones in OpenScape Fusion for Microsoft Lync are to be used. Besides the individual countries, you can also select the option International Market.
• Music on holdUse this option to activate/deactivate music on hold for held/consultation calls.
• Alert tone for calls on holdIf this option is active, an acoustic signal reminds you about calls that are on hold.
3.3.5.15 Ring Tones
Alternatively to the default ring tones determined by the ring tone color set in the PBX, you can select an individual ring tone for signaling incoming calls. Compatible ring tone files must comply with the following requirements:
• The ring tone file must be available in WAV or MP3 format.
• The file size must not exceed 2 MB. If you configure a bigger ring tone file as ring tone, only the first 2 MB of this file are played.
To configure an individual ring tone, select on the tab Advanced > SIP Service Provider > Ring tones.
NOTICE: You can edit the settings for the individual ring tone in the Settings dialog during login or operation. To to this, click on the Manage button in the Logon dialog or access the OpenScape Fusion for Microsoft Lync context menu to select the Personal Settings > Ring tones.
• Via the Use individual ring tones option you activate an individual ring tone. After you have activated this option, OpenScape Fusion for Microsoft Lync uses the tone specified under File to signal incoming calls.
A31003-S5070-U120-4-7619, 01/201460 OpenScape UC Application V7 OpenScape Fusion for Microsoft Lync, User Guide
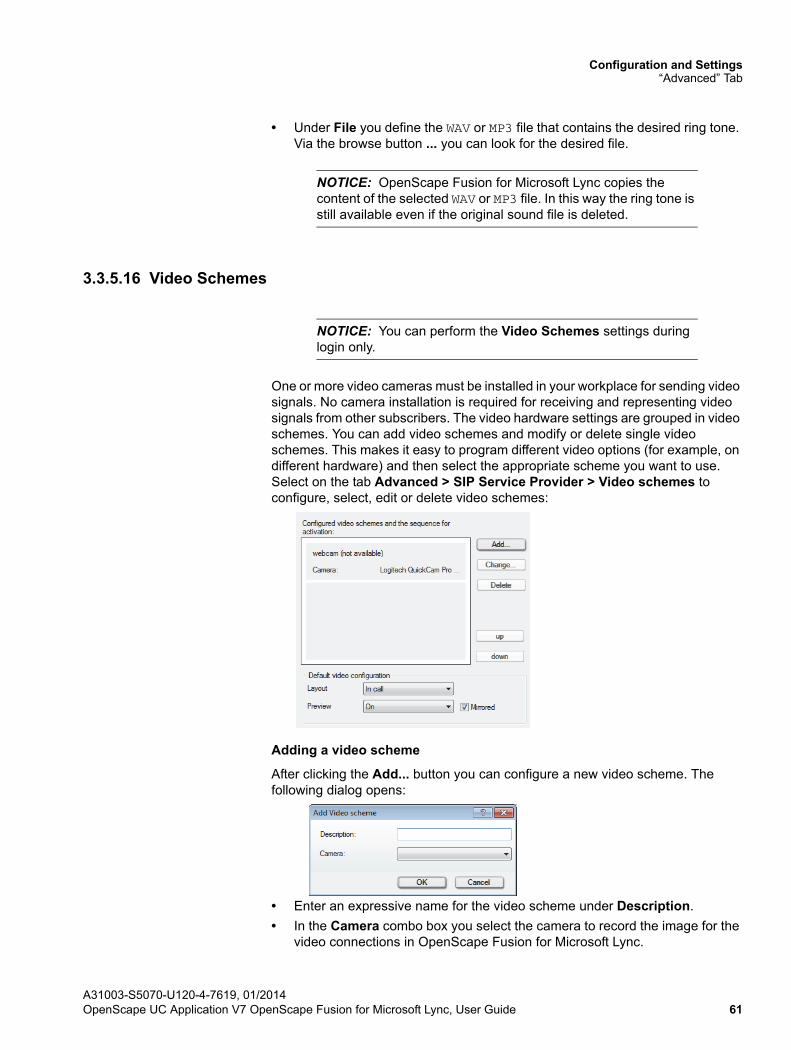
Configuration and Settings“Advanced” Tab
• Under File you define the WAV or MP3 file that contains the desired ring tone. Via the browse button ... you can look for the desired file.
NOTICE: OpenScape Fusion for Microsoft Lync copies the content of the selected WAV or MP3 file. In this way the ring tone is still available even if the original sound file is deleted.
3.3.5.16 Video Schemes
NOTICE: You can perform the Video Schemes settings during login only.
One or more video cameras must be installed in your workplace for sending video signals. No camera installation is required for receiving and representing video signals from other subscribers. The video hardware settings are grouped in video schemes. You can add video schemes and modify or delete single video schemes. This makes it easy to program different video options (for example, on different hardware) and then select the appropriate scheme you want to use. Select on the tab Advanced > SIP Service Provider > Video schemes to configure, select, edit or delete video schemes:
Adding a video scheme
After clicking the Add... button you can configure a new video scheme. The following dialog opens:
• Enter an expressive name for the video scheme under Description.
• In the Camera combo box you select the camera to record the image for the video connections in OpenScape Fusion for Microsoft Lync.
A31003-S5070-U120-4-7619, 01/2014OpenScape UC Application V7 OpenScape Fusion for Microsoft Lync, User Guide 61
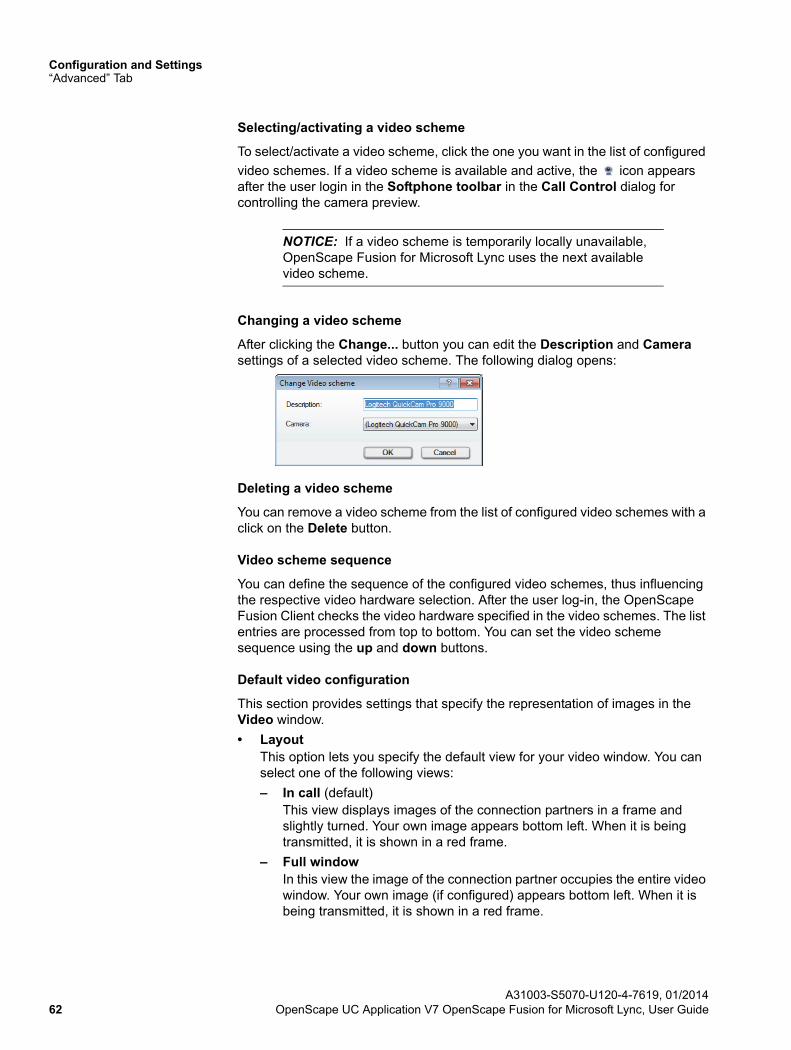
Configuration and Settings“Advanced” Tab
Selecting/activating a video scheme
To select/activate a video scheme, click the one you want in the list of configured
video schemes. If a video scheme is available and active, the icon appears after the user login in the Softphone toolbar in the Call Control dialog for controlling the camera preview.
NOTICE: If a video scheme is temporarily locally unavailable, OpenScape Fusion for Microsoft Lync uses the next available video scheme.
Changing a video scheme
After clicking the Change... button you can edit the Description and Camera settings of a selected video scheme. The following dialog opens:
Deleting a video scheme
You can remove a video scheme from the list of configured video schemes with a click on the Delete button.
Video scheme sequence
You can define the sequence of the configured video schemes, thus influencing the respective video hardware selection. After the user log-in, the OpenScape Fusion Client checks the video hardware specified in the video schemes. The list entries are processed from top to bottom. You can set the video scheme sequence using the up and down buttons.
Default video configuration
This section provides settings that specify the representation of images in the Video window.
• LayoutThis option lets you specify the default view for your video window. You can select one of the following views:
– In call (default)This view displays images of the connection partners in a frame and slightly turned. Your own image appears bottom left. When it is being transmitted, it is shown in a red frame.
– Full windowIn this view the image of the connection partner occupies the entire video window. Your own image (if configured) appears bottom left. When it is being transmitted, it is shown in a red frame.
A31003-S5070-U120-4-7619, 01/201462 OpenScape UC Application V7 OpenScape Fusion for Microsoft Lync, User Guide
Configuration and Settings“Advanced” Tab
– Full screenIn this view the image of the connection partner occupies the entire screen. Your own image (if configured) appears bottom left. When it is being transmitted, it is shown in a red frame.
– Keep previousWith this setting you determine that the view used last is saved when you shut OpenScape Fusion for Microsoft Lync down and used again when you restart the program.
• Preview
– OffYour own image is not displayed or the video camera is switched off.
– On (default)Your own image is displayed or the video camera is switched on.
– Keep previousWith this setting you determine that the setting for your own image used last is saved when you shut OpenScape Fusion for Microsoft Lync down and used again when you restart the program.
• Mirrored
– When this option is active, your own image is displayed mirrored in the Video window but transmitted unmirrored to the connection partner.
– When this option is inactive, your own image is displayed unmirrored in the Video window and also transmitted unmirrored to the connection partner.
3.3.5.17 Bandwidth
Audio and video communication between the OpenScape Fusion Client and the communications system is based on fixed compression algorithms (codecs). To achieve high transmission quality of audio and video signals via network as far as possible, you need to perform appropriate bandwidth and codec settings in the OpenScape Fusion Client.
NOTICE: You can perform these settings during login only.
NOTICE: The video transmission or screen resolution quality may change during an active call. Such changes result from the bandwith for transmitting video data streams automatically adjusting to the available bandwidth resources of the communica-tions system.
A31003-S5070-U120-4-7619, 01/2014OpenScape UC Application V7 OpenScape Fusion for Microsoft Lync, User Guide 63
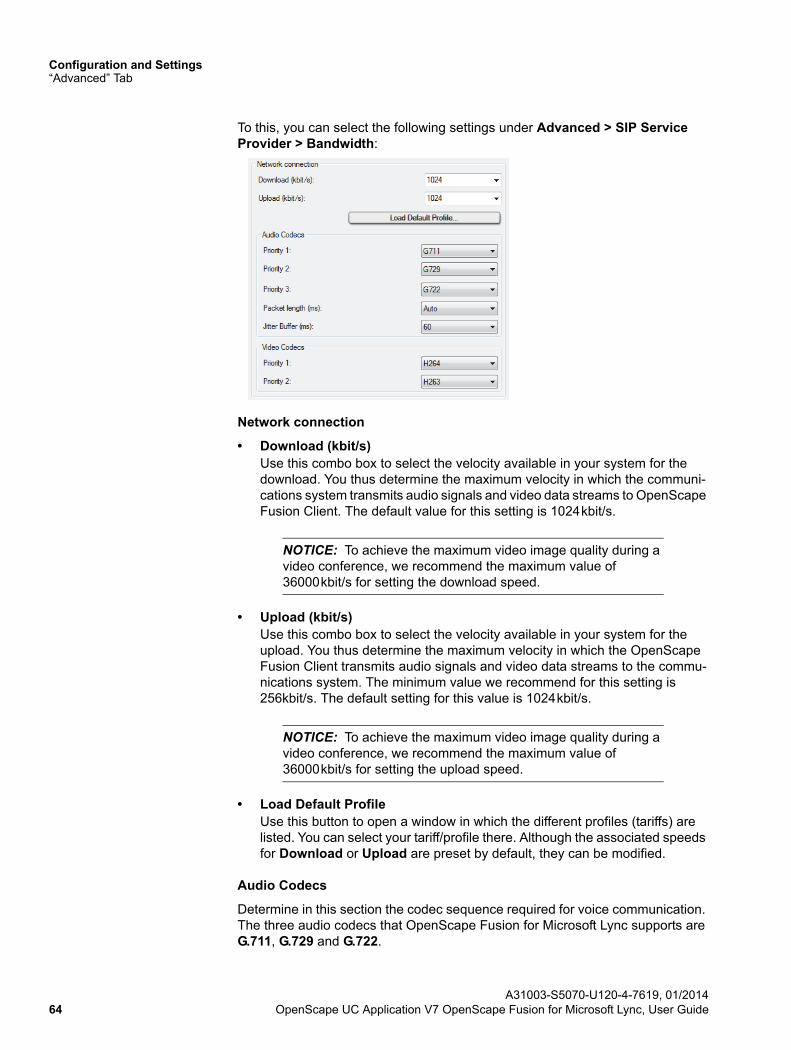
Configuration and Settings“Advanced” Tab
To this, you can select the following settings under Advanced > SIP Service Provider > Bandwidth:
Network connection
• Download (kbit/s) Use this combo box to select the velocity available in your system for the download. You thus determine the maximum velocity in which the communi-cations system transmits audio signals and video data streams to OpenScape Fusion Client. The default value for this setting is 1024kbit/s.
NOTICE: To achieve the maximum video image quality during a video conference, we recommend the maximum value of 36000kbit/s for setting the download speed.
• Upload (kbit/s)Use this combo box to select the velocity available in your system for the upload. You thus determine the maximum velocity in which the OpenScape Fusion Client transmits audio signals and video data streams to the commu-nications system. The minimum value we recommend for this setting is 256kbit/s. The default setting for this value is 1024kbit/s.
NOTICE: To achieve the maximum video image quality during a video conference, we recommend the maximum value of 36000kbit/s for setting the upload speed.
• Load Default ProfileUse this button to open a window in which the different profiles (tariffs) are listed. You can select your tariff/profile there. Although the associated speeds for Download or Upload are preset by default, they can be modified.
Audio Codecs
Determine in this section the codec sequence required for voice communication. The three audio codecs that OpenScape Fusion for Microsoft Lync supports are G.711, G.729 and G.722.
A31003-S5070-U120-4-7619, 01/201464 OpenScape UC Application V7 OpenScape Fusion for Microsoft Lync, User Guide
Configuration and Settings“Advanced” Tab
• Priority 1Use this combo box to select the audio codec to be used for your voice connections with the highest priority.
• Priority 2Use this combo box to select the audio codec to be used for your voice connections if the audio codec with the highest priority is not available.
• Priority 3Use this combo box to select the audio codec to be used for your voice connections if the audio codecs with Priority 1 and Priority 2 are not available.
• Packet length (ms)Select Auto here or enter the desired value (in milliseconds).
• Jitter Buffer (ms)To avoid voice packet loss, which can result in poor voice quality and dropouts, set the buffer size in this field. We recommend to set the jitter buffer to value 60. The jitter buffer caches all incoming voice packets for the period set and forwards them to the audio device’s sound output. The jitter buffer continues to forward voice packets until none are left, even if the network does not deliver new voice packets quickly enough. This avoids dropouts.When selecting the optimum setting for the jitter buffer the following applies:
– The better the network quality, the smaller the jitter buffer may be.
– The bigger the jitter buffer, the more the voice output will be delayed.
Video Codecs
Determine in this section the codec sequence required for video connection. The two video codecs that OpenScape Fusion for Microsoft Lync supports are H.263 and H.264.
• Priority 1Use this combo box to select the video codec to be used for your voice connections with the highest priority.
• Priority 2Use this combo box to select the video codec to be used for your voice connections if the video codec with the highest priority is not available.
3.3.5.18 Port Restrictions
NOTICE: You can perform these settings during login only.
A31003-S5070-U120-4-7619, 01/2014OpenScape UC Application V7 OpenScape Fusion for Microsoft Lync, User Guide 65
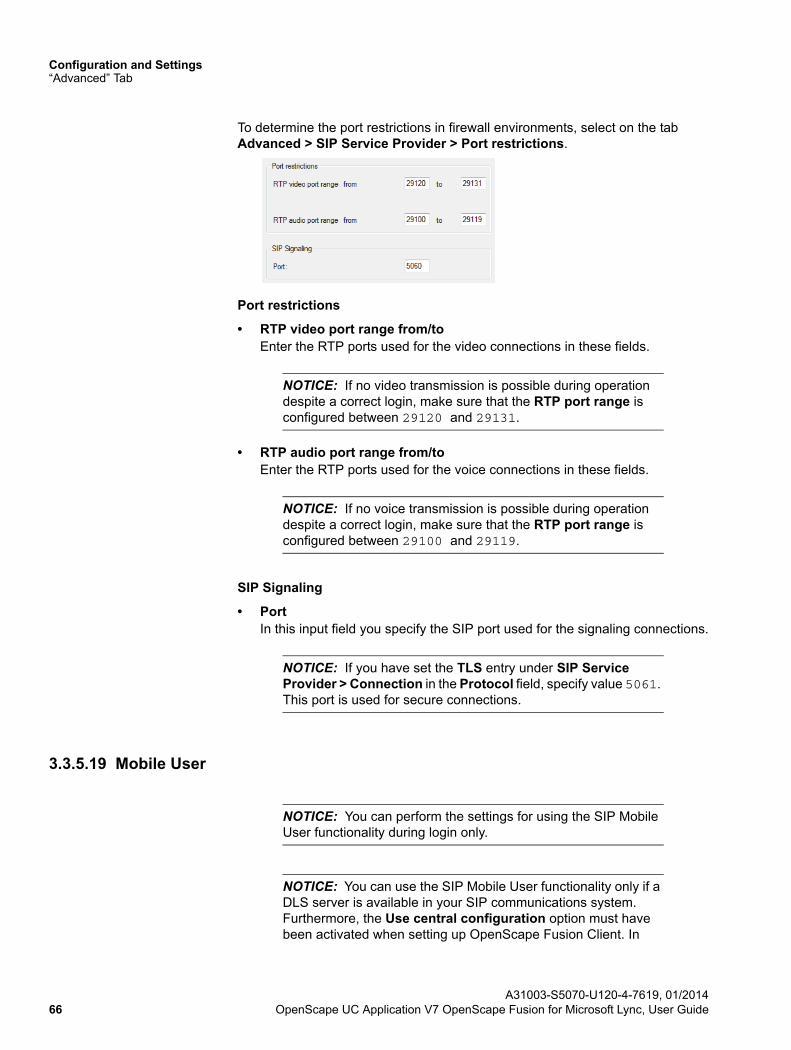
Configuration and Settings“Advanced” Tab
To determine the port restrictions in firewall environments, select on the tab Advanced > SIP Service Provider > Port restrictions.
Port restrictions
• RTP video port range from/toEnter the RTP ports used for the video connections in these fields.
NOTICE: If no video transmission is possible during operation despite a correct login, make sure that the RTP port range is configured between 29120 and 29131.
• RTP audio port range from/toEnter the RTP ports used for the voice connections in these fields.
NOTICE: If no voice transmission is possible during operation despite a correct login, make sure that the RTP port range is configured between 29100 and 29119.
SIP Signaling
• PortIn this input field you specify the SIP port used for the signaling connections.
NOTICE: If you have set the TLS entry under SIP Service Provider > Connection in the Protocol field, specify value 5061. This port is used for secure connections.
3.3.5.19 Mobile User
NOTICE: You can perform the settings for using the SIP Mobile User functionality during login only.
NOTICE: You can use the SIP Mobile User functionality only if a DLS server is available in your SIP communications system. Furthermore, the Use central configuration option must have been activated when setting up OpenScape Fusion Client. In
A31003-S5070-U120-4-7619, 01/201466 OpenScape UC Application V7 OpenScape Fusion for Microsoft Lync, User Guide
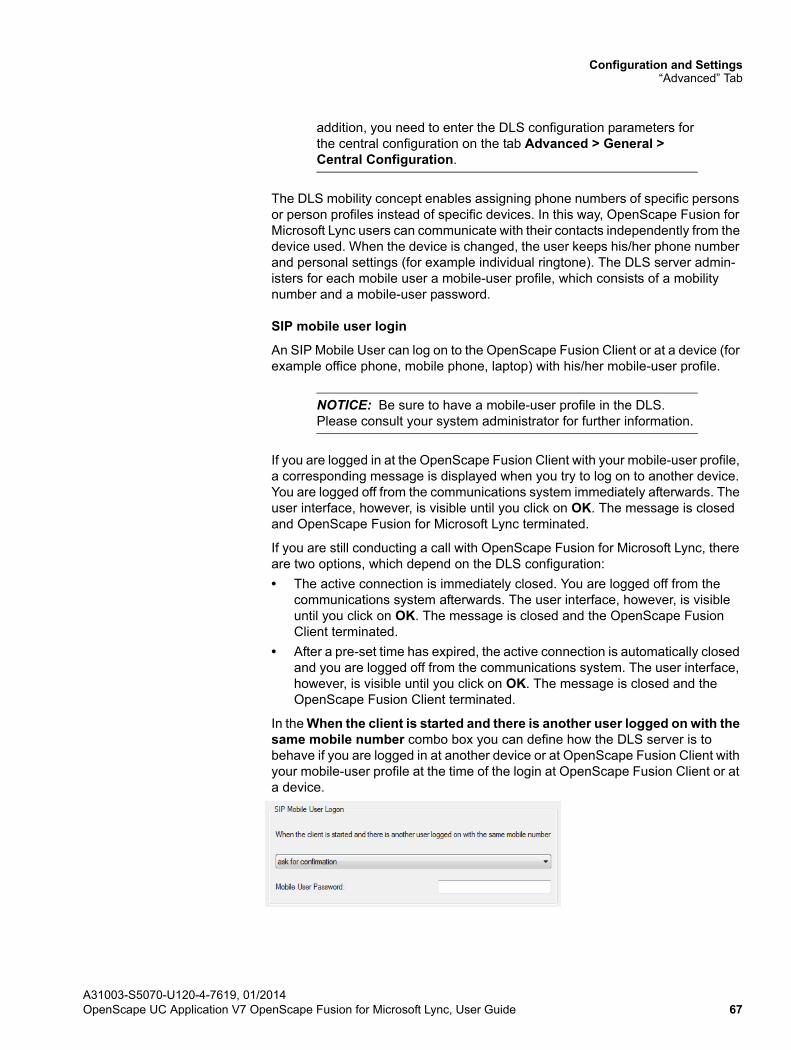
Configuration and Settings“Advanced” Tab
addition, you need to enter the DLS configuration parameters for the central configuration on the tab Advanced > General > Central Configuration.
The DLS mobility concept enables assigning phone numbers of specific persons or person profiles instead of specific devices. In this way, OpenScape Fusion for Microsoft Lync users can communicate with their contacts independently from the device used. When the device is changed, the user keeps his/her phone number and personal settings (for example individual ringtone). The DLS server admin-isters for each mobile user a mobile-user profile, which consists of a mobility number and a mobile-user password.
SIP mobile user login
An SIP Mobile User can log on to the OpenScape Fusion Client or at a device (for example office phone, mobile phone, laptop) with his/her mobile-user profile.
NOTICE: Be sure to have a mobile-user profile in the DLS. Please consult your system administrator for further information.
If you are logged in at the OpenScape Fusion Client with your mobile-user profile, a corresponding message is displayed when you try to log on to another device. You are logged off from the communications system immediately afterwards. The user interface, however, is visible until you click on OK. The message is closed and OpenScape Fusion for Microsoft Lync terminated.
If you are still conducting a call with OpenScape Fusion for Microsoft Lync, there are two options, which depend on the DLS configuration:
• The active connection is immediately closed. You are logged off from the communications system afterwards. The user interface, however, is visible until you click on OK. The message is closed and the OpenScape Fusion Client terminated.
• After a pre-set time has expired, the active connection is automatically closed and you are logged off from the communications system. The user interface, however, is visible until you click on OK. The message is closed and the OpenScape Fusion Client terminated.
In the When the client is started and there is another user logged on with the same mobile number combo box you can define how the DLS server is to behave if you are logged in at another device or at OpenScape Fusion Client with your mobile-user profile at the time of the login at OpenScape Fusion Client or at a device.
A31003-S5070-U120-4-7619, 01/2014OpenScape UC Application V7 OpenScape Fusion for Microsoft Lync, User Guide 67
Configuration and Settings“Advanced” Tab
• ask for confirmationIf you are logged in at a device with your mobile-user profile and this option is selected, a message is displayed at the OpenScape Fusion for Microsoft Lync start. This message informs you that you are already logged in at another device, which is indicated with its MAC address or assigned phone number, with the same mobile-user profile. Select Yes to log off from the other device and to start OpenScape Fusion for Microsoft Lync as mobile-user. Select No to abort logging on to the OpenScape Fusion Client.If you are still conducting a call on the device, there are two options, which depend on the DLS configuration:
– The active connection is closed after a pre-set time and the OpenScape Fusion Client logs on to the communications system.
– Logging off from the device is denied by the DLS. You can try again after finishing the call.
• log them off without confirmationYou are automatically logged off from the other device, at which you are logged in at the time of the program start with the same mobile-user profile.
• do not start the clientThe OpenScape Fusion Client is not started.
During the first start of the program you are prompted to enter the Mobile User Password. Your entry is copied to the input field of the same name.
NOTICE: If the specified Mobile User Password is incorrect, a corresponding error message appears. Thereafter, you can enter the password again.
NOTICE: The program start is also abandoned if you do not have a valid mobile-user license or if the device has not been configured as mobility-enabled device in the DLS. A corre-sponding error message is displayed.
NOTICE: You can obtain further information about DLS and the DLS mobility concept from the administrator documentation of Deployment Service V3.0.
A31003-S5070-U120-4-7619, 01/201468 OpenScape UC Application V7 OpenScape Fusion for Microsoft Lync, User Guide
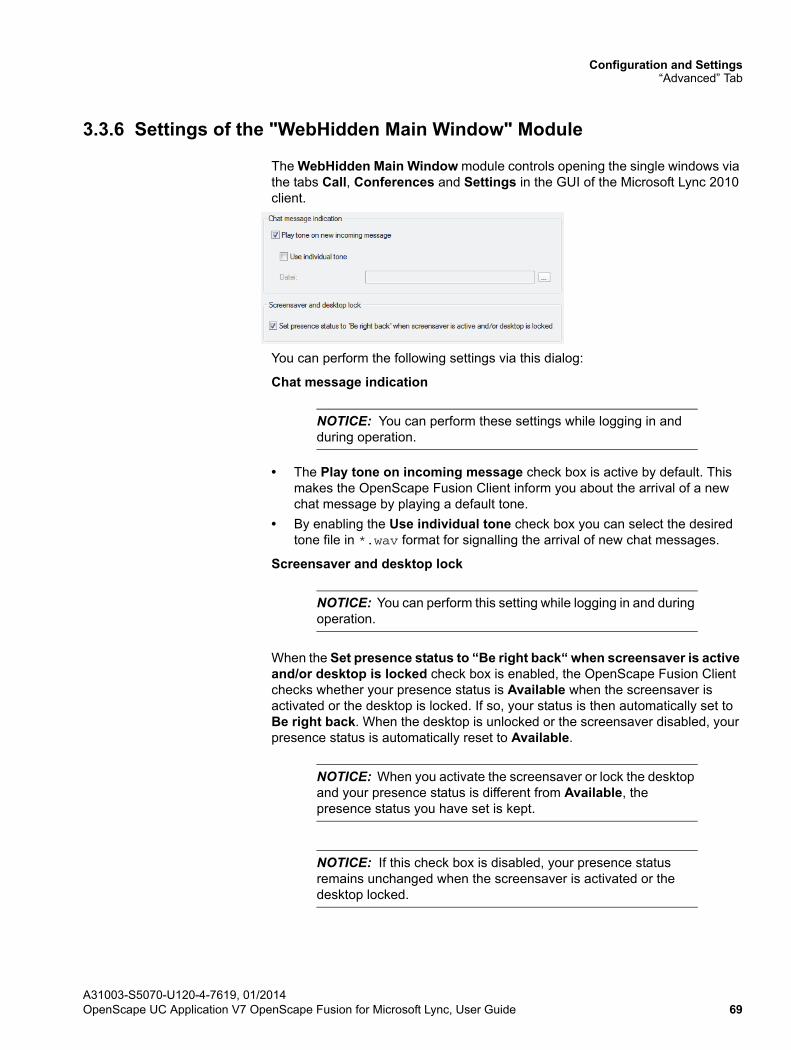
Configuration and Settings“Advanced” Tab
3.3.6 Settings of the "WebHidden Main Window" Module
The WebHidden Main Window module controls opening the single windows via the tabs Call, Conferences and Settings in the GUI of the Microsoft Lync 2010 client.
You can perform the following settings via this dialog:
Chat message indication
NOTICE: You can perform these settings while logging in and during operation.
• The Play tone on incoming message check box is active by default. This makes the OpenScape Fusion Client inform you about the arrival of a new chat message by playing a default tone.
• By enabling the Use individual tone check box you can select the desired tone file in *.wav format for signalling the arrival of new chat messages.
Screensaver and desktop lock
NOTICE: You can perform this setting while logging in and during operation.
When the Set presence status to “Be right back“ when screensaver is active and/or desktop is locked check box is enabled, the OpenScape Fusion Client checks whether your presence status is Available when the screensaver is activated or the desktop is locked. If so, your status is then automatically set to Be right back. When the desktop is unlocked or the screensaver disabled, your presence status is automatically reset to Available.
NOTICE: When you activate the screensaver or lock the desktop and your presence status is different from Available, the presence status you have set is kept.
NOTICE: If this check box is disabled, your presence status remains unchanged when the screensaver is activated or the desktop locked.
A31003-S5070-U120-4-7619, 01/2014OpenScape UC Application V7 OpenScape Fusion for Microsoft Lync, User Guide 69
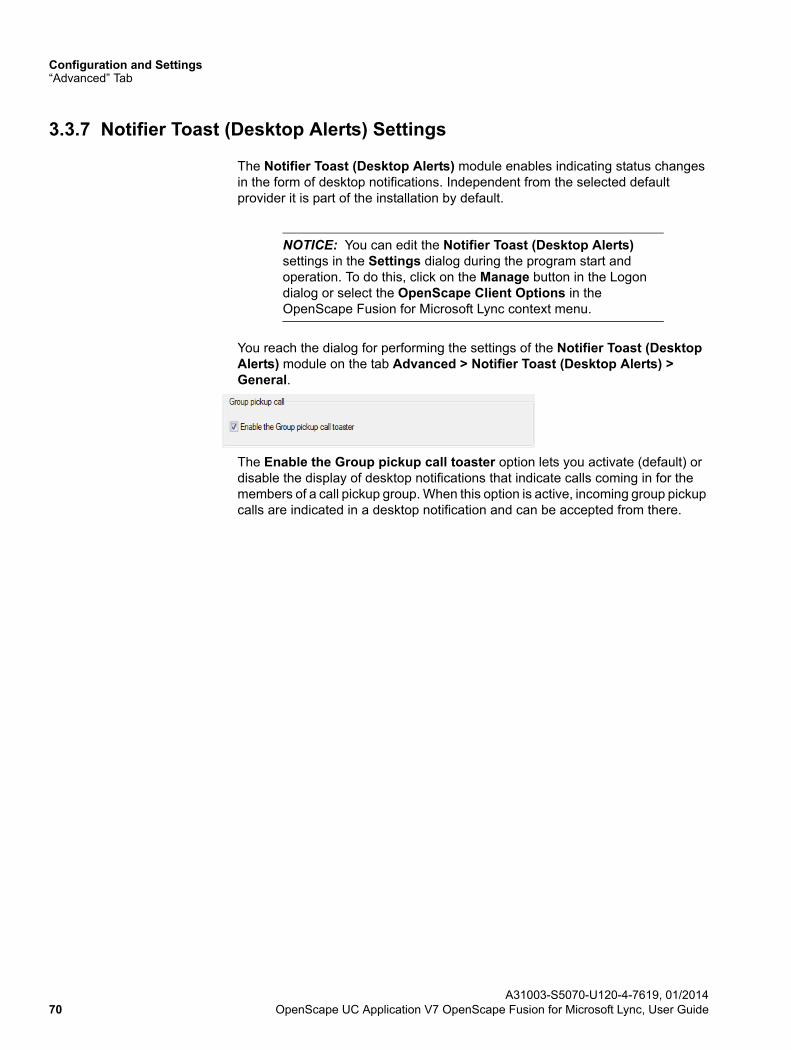
Configuration and Settings“Advanced” Tab
3.3.7 Notifier Toast (Desktop Alerts) Settings
The Notifier Toast (Desktop Alerts) module enables indicating status changes in the form of desktop notifications. Independent from the selected default provider it is part of the installation by default.
NOTICE: You can edit the Notifier Toast (Desktop Alerts) settings in the Settings dialog during the program start and operation. To do this, click on the Manage button in the Logon dialog or select the OpenScape Client Options in the OpenScape Fusion for Microsoft Lync context menu.
You reach the dialog for performing the settings of the Notifier Toast (Desktop Alerts) module on the tab Advanced > Notifier Toast (Desktop Alerts) > General.
The Enable the Group pickup call toaster option lets you activate (default) or disable the display of desktop notifications that indicate calls coming in for the members of a call pickup group. When this option is active, incoming group pickup calls are indicated in a desktop notification and can be accepted from there.
A31003-S5070-U120-4-7619, 01/201470 OpenScape UC Application V7 OpenScape Fusion for Microsoft Lync, User Guide
Operation ReferenceStarting OpenScape Fusion for Microsoft Lync
4 Operation Reference
This chapter contains detailed information about the various controls you find in the user interface.
4.1 Starting OpenScape Fusion for Microsoft Lync
You can launch OpenScape Fusion for Microsoft Lync automatically when logging on to Microsoft Windows as well as manually via the Start menu of Microsoft Windows or via an icon on the desktop.
Automatic program start
If the Automatically start Lync when I log on to Windows option is active in the Microsoft Lync 2010 Lync Options configuration dialog, OpenScape Fusion for Microsoft Lync starts jointly with Microsoft Lync 2010 at the user login to Microsoft Windows. If Microsoft Lync 2010 has already been configured correctly and completely for logging on the Microsoft Lync server, OpenScape Fusion for Microsoft Lync can be used directly after the start without any further user login.
Manual program start
If the Automatically start Lync when I log on to Windows option in the config-uration dialog of Microsoft Lync 2010 Lync Options is disabled, OpenScape Fusion for Microsoft Lync must be started manually. There are two options to do this:
• Via the menu item OpenScape Fusion for Microsoft Lync in the Start menuLaunching OpenScape Fusion for Microsoft Lync also starts Microsoft Lync 2010 and integrates it in the OpenScape Fusion for Microsoft Lync main window.
• Via the program link OpenScape Fusion for Microsoft Lync on the desktopA doubleclick on the above link starts OpenScape Fusion for Microsoft Lync. This also starts Microsoft Lync 2010 automatically and integrates it in the OpenScape Fusion for Microsoft Lync main window.
If Microsoft Lync 2010 was started as independent application via the corre-sponding program link on the desktop or via the Start menu, the Microsoft Lync user has only two OpenScape UC Application options in the context menu of a Microsoft Lync 2010 contact: calling a contact (OpenScape Call) and starting a conference (Start OpenScape Conference).
If OpenScape Fusion for Microsoft Lync is started while Microsoft Lync 2010 is already up, OpenScape Fusion for Microsoft Lync integrates in the Microsoft Lync 2010 client and extends its GUI by the tabs Call, Conference and Settings.
4.2 Terminating OpenScape Fusion for Microsoft Lync
If OpenScape Fusion for Microsoft Lync and Microsoft Lync 2010 have been launched jointly, shutting down one application closes the other automatically.
A31003-S5070-U120-4-7619, 01/2014OpenScape UC Application V7 OpenScape Fusion for Microsoft Lync, User Guide 71
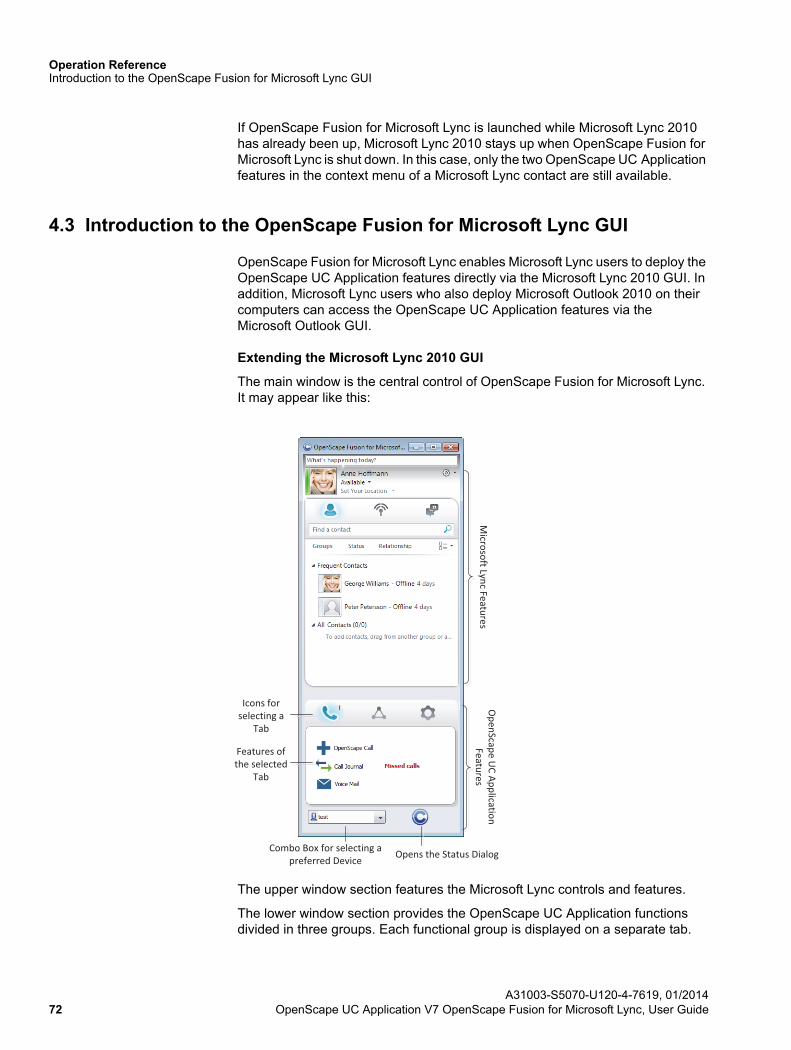
Operation ReferenceIntroduction to the OpenScape Fusion for Microsoft Lync GUI
If OpenScape Fusion for Microsoft Lync is launched while Microsoft Lync 2010 has already been up, Microsoft Lync 2010 stays up when OpenScape Fusion for Microsoft Lync is shut down. In this case, only the two OpenScape UC Application features in the context menu of a Microsoft Lync contact are still available.
4.3 Introduction to the OpenScape Fusion for Microsoft Lync GUI
OpenScape Fusion for Microsoft Lync enables Microsoft Lync users to deploy the OpenScape UC Application features directly via the Microsoft Lync 2010 GUI. In addition, Microsoft Lync users who also deploy Microsoft Outlook 2010 on their computers can access the OpenScape UC Application features via the Microsoft Outlook GUI.
Extending the Microsoft Lync 2010 GUI
The main window is the central control of OpenScape Fusion for Microsoft Lync. It may appear like this:
The upper window section features the Microsoft Lync controls and features.
The lower window section provides the OpenScape UC Application functions divided in three groups. Each functional group is displayed on a separate tab.
Combo Box for selecting a preferred Device Opens the Status Dialog
Icons for selecting a
Tab
Features of the selected
Tab
OpenScape U
C Application Features
Microsoft Lync Features
A31003-S5070-U120-4-7619, 01/201472 OpenScape UC Application V7 OpenScape Fusion for Microsoft Lync, User Guide
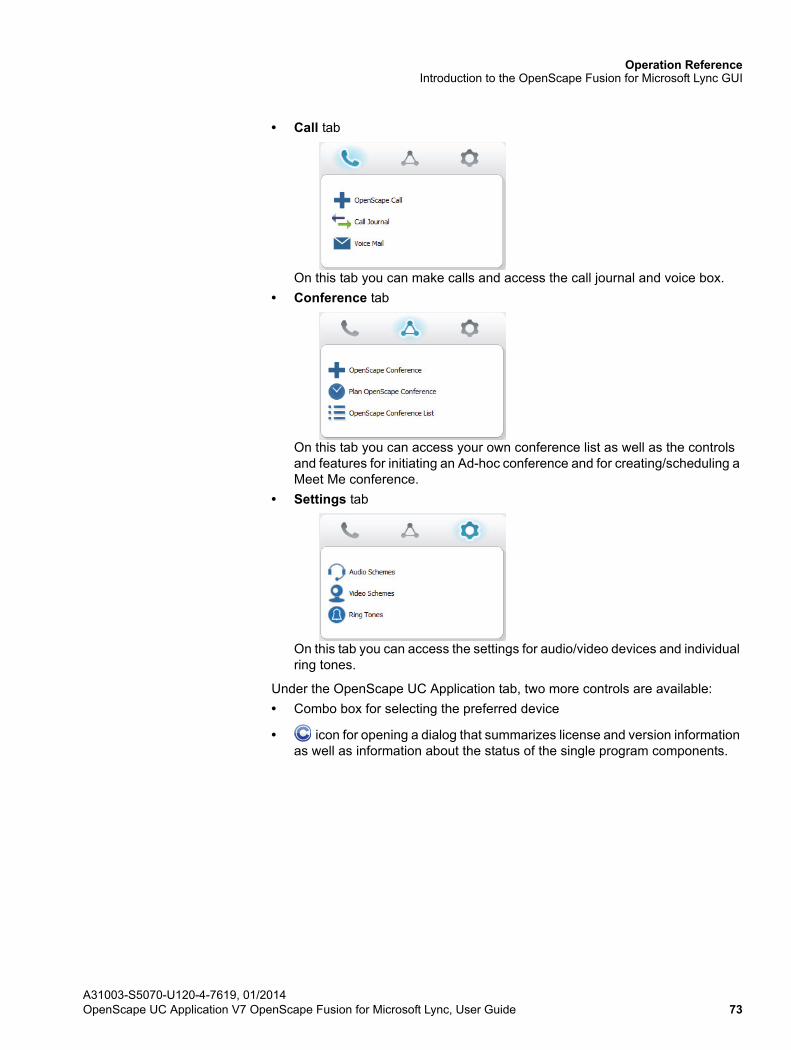
Operation ReferenceIntroduction to the OpenScape Fusion for Microsoft Lync GUI
• Call tab
On this tab you can make calls and access the call journal and voice box.
• Conference tab
On this tab you can access your own conference list as well as the controls and features for initiating an Ad-hoc conference and for creating/scheduling a Meet Me conference.
• Settings tab
On this tab you can access the settings for audio/video devices and individual ring tones.
Under the OpenScape UC Application tab, two more controls are available:
• Combo box for selecting the preferred device
• icon for opening a dialog that summarizes license and version information as well as information about the status of the single program components.
A31003-S5070-U120-4-7619, 01/2014OpenScape UC Application V7 OpenScape Fusion for Microsoft Lync, User Guide 73
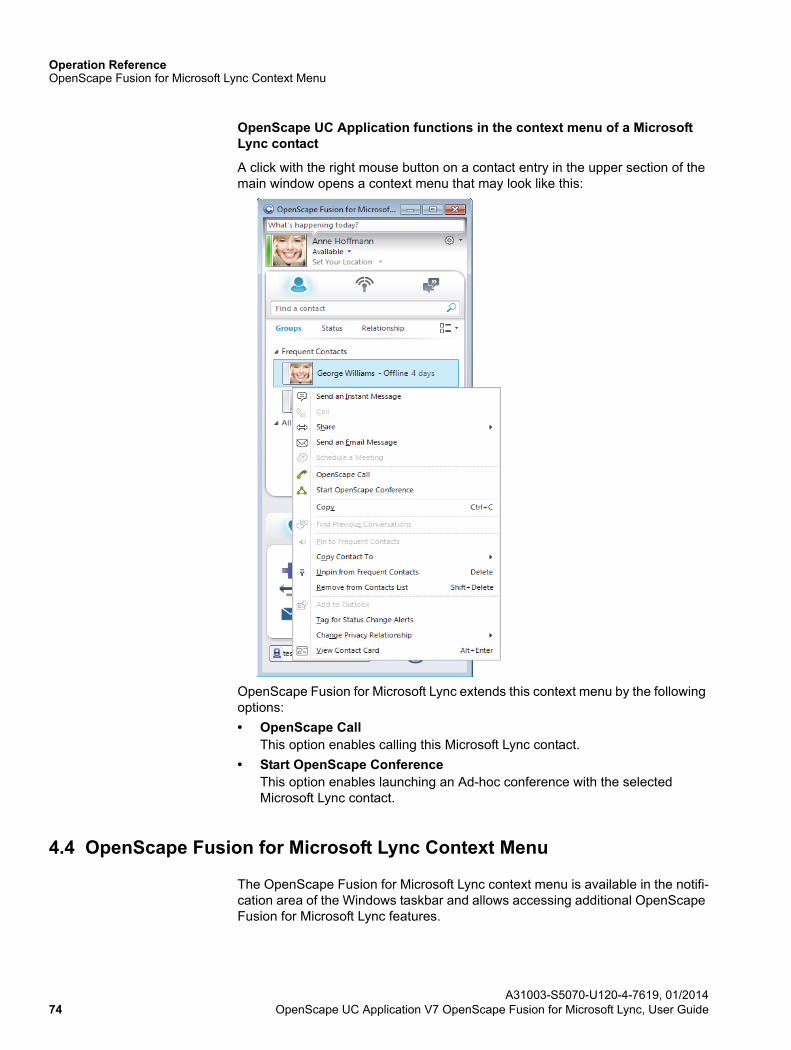
Operation ReferenceOpenScape Fusion for Microsoft Lync Context Menu
OpenScape UC Application functions in the context menu of a Microsoft Lync contact
A click with the right mouse button on a contact entry in the upper section of the main window opens a context menu that may look like this:
OpenScape Fusion for Microsoft Lync extends this context menu by the following options:
• OpenScape CallThis option enables calling this Microsoft Lync contact.
• Start OpenScape ConferenceThis option enables launching an Ad-hoc conference with the selected Microsoft Lync contact.
4.4 OpenScape Fusion for Microsoft Lync Context Menu
The OpenScape Fusion for Microsoft Lync context menu is available in the notifi-cation area of the Windows taskbar and allows accessing additional OpenScape Fusion for Microsoft Lync features.
A31003-S5070-U120-4-7619, 01/201474 OpenScape UC Application V7 OpenScape Fusion for Microsoft Lync, User Guide
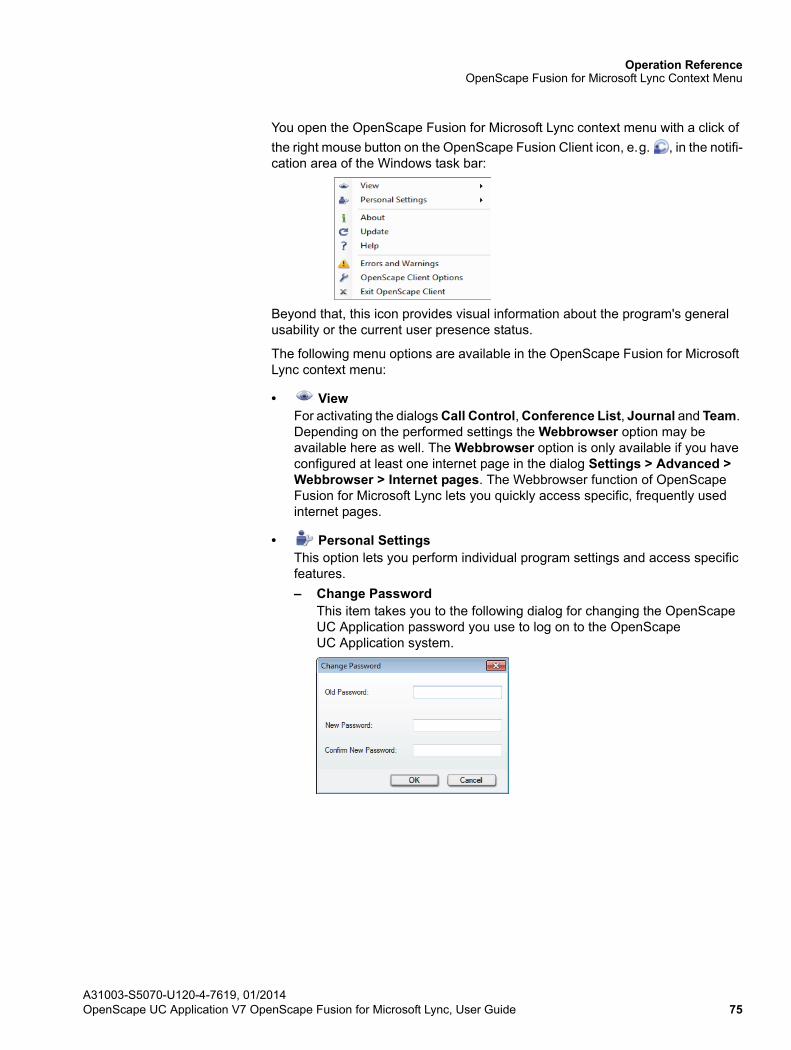
Operation ReferenceOpenScape Fusion for Microsoft Lync Context Menu
You open the OpenScape Fusion for Microsoft Lync context menu with a click of
the right mouse button on the OpenScape Fusion Client icon, e.g. , in the notifi-cation area of the Windows task bar:
Beyond that, this icon provides visual information about the program's general usability or the current user presence status.
The following menu options are available in the OpenScape Fusion for Microsoft Lync context menu:
• ViewFor activating the dialogs Call Control, Conference List, Journal and Team. Depending on the performed settings the Webbrowser option may be available here as well. The Webbrowser option is only available if you have configured at least one internet page in the dialog Settings > Advanced > Webbrowser > Internet pages. The Webbrowser function of OpenScape Fusion for Microsoft Lync lets you quickly access specific, frequently used internet pages.
• Personal SettingsThis option lets you perform individual program settings and access specific features.
– Change PasswordThis item takes you to the following dialog for changing the OpenScape UC Application password you use to log on to the OpenScape UC Application system.
A31003-S5070-U120-4-7619, 01/2014OpenScape UC Application V7 OpenScape Fusion for Microsoft Lync, User Guide 75
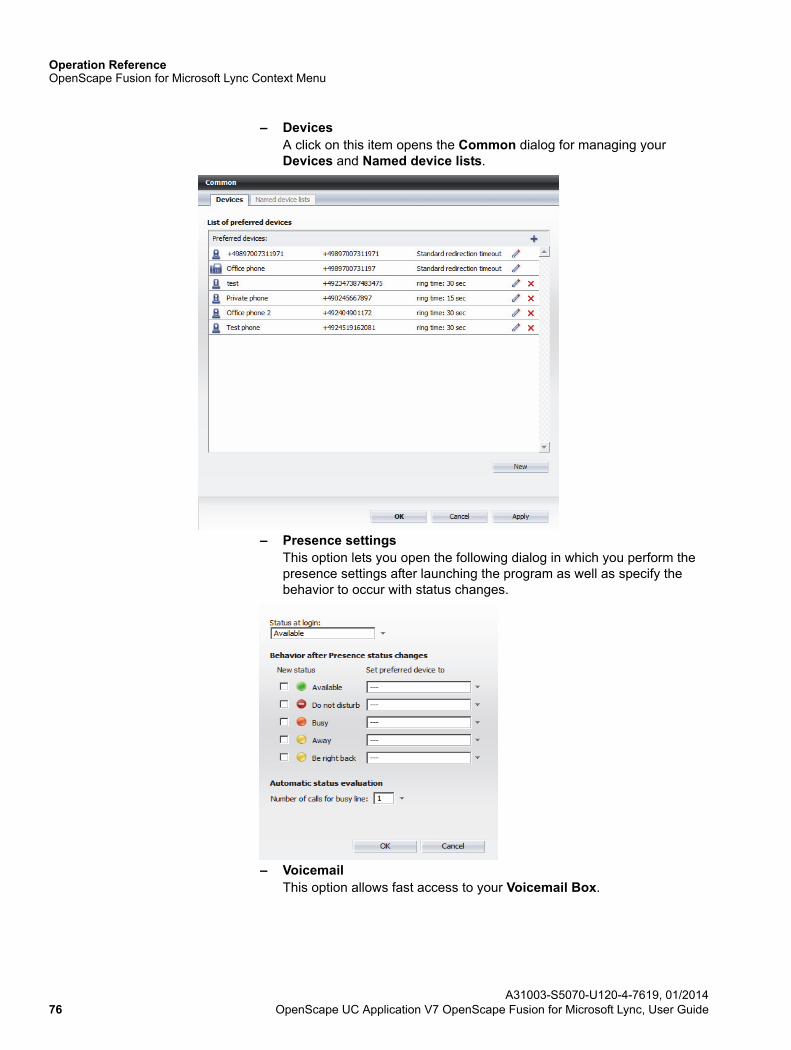
Operation ReferenceOpenScape Fusion for Microsoft Lync Context Menu
– DevicesA click on this item opens the Common dialog for managing your Devices and Named device lists.
– Presence settingsThis option lets you open the following dialog in which you perform the presence settings after launching the program as well as specify the behavior to occur with status changes.
– VoicemailThis option allows fast access to your Voicemail Box.
A31003-S5070-U120-4-7619, 01/201476 OpenScape UC Application V7 OpenScape Fusion for Microsoft Lync, User Guide
Operation ReferenceUser Presence
– Ring tonesThis option allows configuring an individual ringtone (WAV or MP3 format) for signaling incoming calls. It opens the Advanced tab in the Settings dialog. On this tab you can select the desired ring tone under SIP Service Provider > Ring tones.
• AboutYou use this option to open the Product Information window and to display the OpenScape Fusion Client version number.
• UpdateThis option establishes a connection to the latest OpenScape Fusion Client version that your system administrator has downloaded. If no update is available, a message informs you accordingly.
• HelpOpens the help file for the entire application.
• Errors and WarningsAs long as OpenScape Fusion Client is not fully connected to all required services (e. g. at the start) or if there is a communication problem with the OpenScape UC Application system, a red cross or a yellow exclamation mark
appears within the icon: or . Then appears the Errors and Warnings item in the list of context menu options. Selecting this option displays the Current Error Report window. This report contains further information about these errors.If OpenScape Fusion Client is fully connected to all required services (icon does not feature a red cross), the user's presence status is displayed in the
icon, e.g. .
• OpenScape Client OptionsSelecting this option opens the Settings dialog and the current configurations for OpenScape Fusion Client are displayed.
• Exit OpenScape ClientThis option serves for closing OpenScape Fusion Client.
4.5 User Presence
OpenScape Fusion for Microsoft Lync allows the user to set his/her personal presence status. Depending on your system configuration the presence infor-mation may only be Microsoft Lync-based or synchronized with the presence feature of the OpenScape UC Application via a UCMA proxy.
The specified personal presence information enables OpenScape Fusion for Microsoft Lync to determine which way is best for reaching the user. The user presence can be exchanged between colleagues, so that they too can harmonize their communication with the personal user presence of the respective other colleague.
OpenScape Fusion for Microsoft Lync allows the user to set his/her own presence status.
A31003-S5070-U120-4-7619, 01/2014OpenScape UC Application V7 OpenScape Fusion for Microsoft Lync, User Guide 77
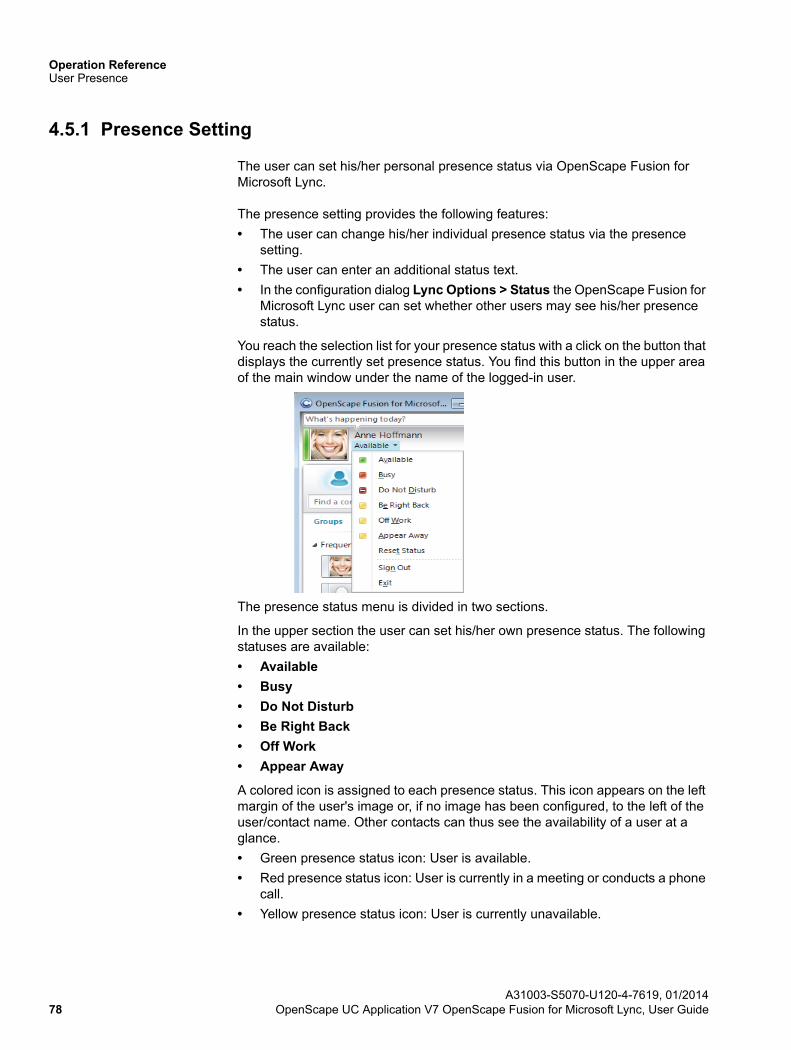
Operation ReferenceUser Presence
4.5.1 Presence Setting
The user can set his/her personal presence status via OpenScape Fusion for Microsoft Lync.
The presence setting provides the following features:
• The user can change his/her individual presence status via the presence setting.
• The user can enter an additional status text.
• In the configuration dialog Lync Options > Status the OpenScape Fusion for Microsoft Lync user can set whether other users may see his/her presence status.
You reach the selection list for your presence status with a click on the button that displays the currently set presence status. You find this button in the upper area of the main window under the name of the logged-in user.
The presence status menu is divided in two sections.
In the upper section the user can set his/her own presence status. The following statuses are available:
• Available
• Busy
• Do Not Disturb
• Be Right Back
• Off Work
• Appear Away
A colored icon is assigned to each presence status. This icon appears on the left margin of the user's image or, if no image has been configured, to the left of the user/contact name. Other contacts can thus see the availability of a user at a glance.
• Green presence status icon: User is available.
• Red presence status icon: User is currently in a meeting or conducts a phone call.
• Yellow presence status icon: User is currently unavailable.
A31003-S5070-U120-4-7619, 01/201478 OpenScape UC Application V7 OpenScape Fusion for Microsoft Lync, User Guide
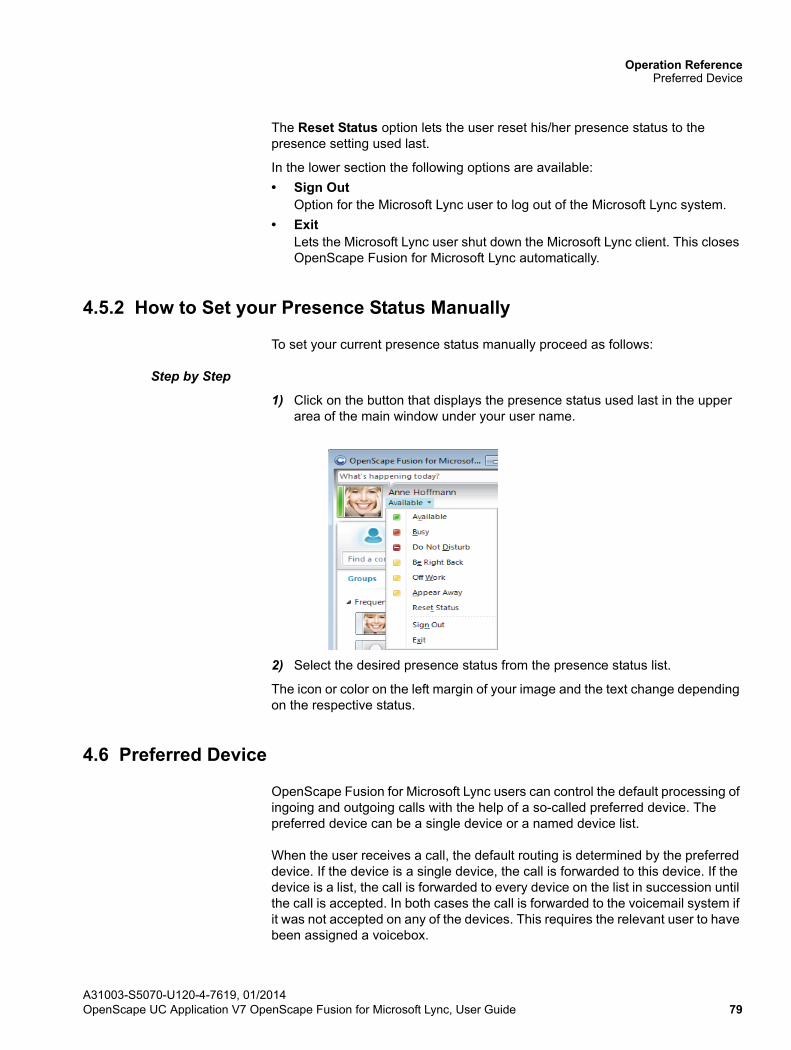
Operation ReferencePreferred Device
The Reset Status option lets the user reset his/her presence status to the presence setting used last.
In the lower section the following options are available:
• Sign OutOption for the Microsoft Lync user to log out of the Microsoft Lync system.
• ExitLets the Microsoft Lync user shut down the Microsoft Lync client. This closes OpenScape Fusion for Microsoft Lync automatically.
4.5.2 How to Set your Presence Status Manually
To set your current presence status manually proceed as follows:
Step by Step
1) Click on the button that displays the presence status used last in the upper area of the main window under your user name.
2) Select the desired presence status from the presence status list.
The icon or color on the left margin of your image and the text change depending on the respective status.
4.6 Preferred Device
OpenScape Fusion for Microsoft Lync users can control the default processing of ingoing and outgoing calls with the help of a so-called preferred device. The preferred device can be a single device or a named device list.
When the user receives a call, the default routing is determined by the preferred device. If the device is a single device, the call is forwarded to this device. If the device is a list, the call is forwarded to every device on the list in succession until the call is accepted. In both cases the call is forwarded to the voicemail system if it was not accepted on any of the devices. This requires the relevant user to have been assigned a voicebox.
A31003-S5070-U120-4-7619, 01/2014OpenScape UC Application V7 OpenScape Fusion for Microsoft Lync, User Guide 79
Operation ReferencePreferred Device
The preferred device also determines from which device OpenScape UC Application places the user's calls. If the preferred device is a single phone, it is used. If the device is a named device list, the first phone on the list is used. The user may select an alternative device to change the default setting for single calls.
You reach the list of your preferred devices via the combo box at the bottom left margin of the main window. This combo box indicates the currently set preferred device.
Examples
In the ensuing scenarios the user has set the following:
Devices: private phone, mobile phone, office phone
Named device lists: Named device list Out_of_office contains private phone and mobile phone; named device list Do_not_disturb contains voicemail.
• Scenario A: The user sets the preferred device to office phone.
– Incoming calls are routed to the office phone and, by call forwarding, to the voicemail system, if the user has been assigned a voicebox.
– Outgoing calls are initiated from the office phone.
• Scenario B: The user sets the preferred device to Out_of_office.
– Incoming calls are routed to the private phone, then to the mobile phone and eventually to the voicemail system, if the user has been assigned a voicebox.
– Outgoing calls are initiated from the private phone.
• Scenario C: The user sets the preferred device to Do_not_disturb.
– Incoming calls are directly routed to the voicemail system, if the user has been assigned a voicebox.
4.6.1 One-Number Service
The One-Number Service feature enables the user to combine mobility, optimal availability and transparency towards third parties. In the OpenScape UC Application you can define a One-Number Service for outbound calls and another one for incoming calls.
Use the One-Number Service for outgoing calls to define the preferred device to be used for outgoing calls initiated via your client. The callee always sees the defined number on his/her display.
A31003-S5070-U120-4-7619, 01/201480 OpenScape UC Application V7 OpenScape Fusion for Microsoft Lync, User Guide
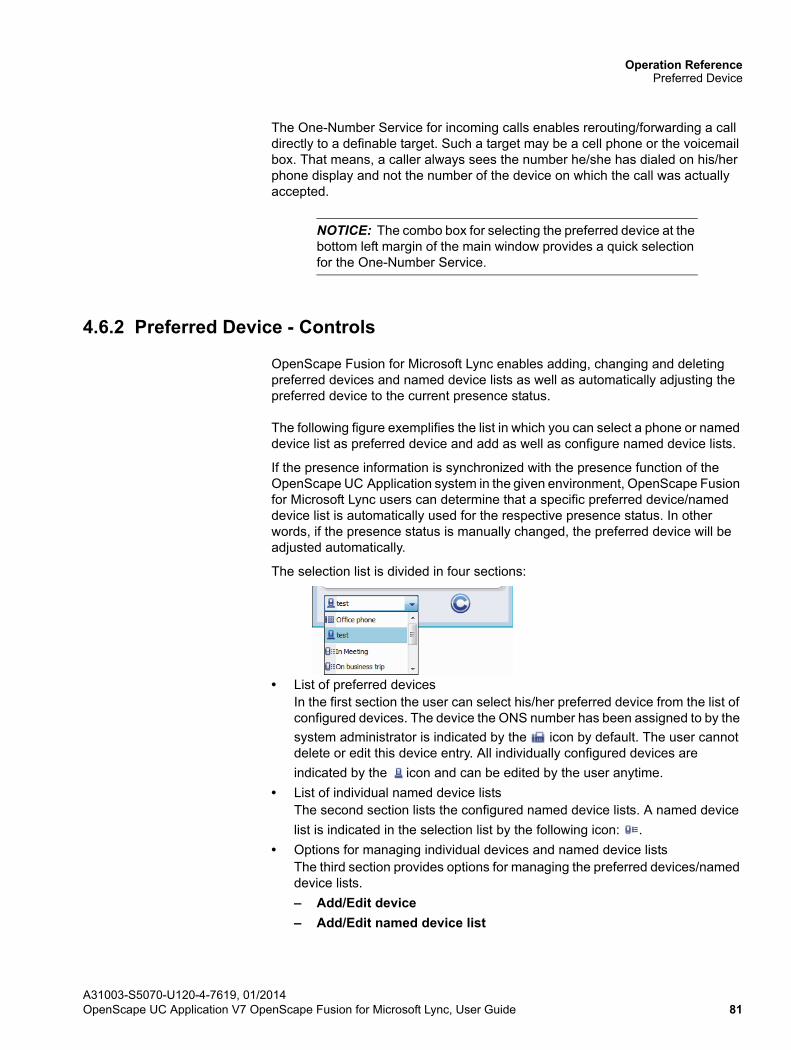
Operation ReferencePreferred Device
The One-Number Service for incoming calls enables rerouting/forwarding a call directly to a definable target. Such a target may be a cell phone or the voicemail box. That means, a caller always sees the number he/she has dialed on his/her phone display and not the number of the device on which the call was actually accepted.
NOTICE: The combo box for selecting the preferred device at the bottom left margin of the main window provides a quick selection for the One-Number Service.
4.6.2 Preferred Device - Controls
OpenScape Fusion for Microsoft Lync enables adding, changing and deleting preferred devices and named device lists as well as automatically adjusting the preferred device to the current presence status.
The following figure exemplifies the list in which you can select a phone or named device list as preferred device and add as well as configure named device lists.
If the presence information is synchronized with the presence function of the OpenScape UC Application system in the given environment, OpenScape Fusion for Microsoft Lync users can determine that a specific preferred device/named device list is automatically used for the respective presence status. In other words, if the presence status is manually changed, the preferred device will be adjusted automatically.
The selection list is divided in four sections:
• List of preferred devicesIn the first section the user can select his/her preferred device from the list of configured devices. The device the ONS number has been assigned to by the
system administrator is indicated by the icon by default. The user cannot delete or edit this device entry. All individually configured devices are
indicated by the icon and can be edited by the user anytime.
• List of individual named device listsThe second section lists the configured named device lists. A named device
list is indicated in the selection list by the following icon: .
• Options for managing individual devices and named device listsThe third section provides options for managing the preferred devices/named device lists.
– Add/Edit device
– Add/Edit named device list
A31003-S5070-U120-4-7619, 01/2014OpenScape UC Application V7 OpenScape Fusion for Microsoft Lync, User Guide 81
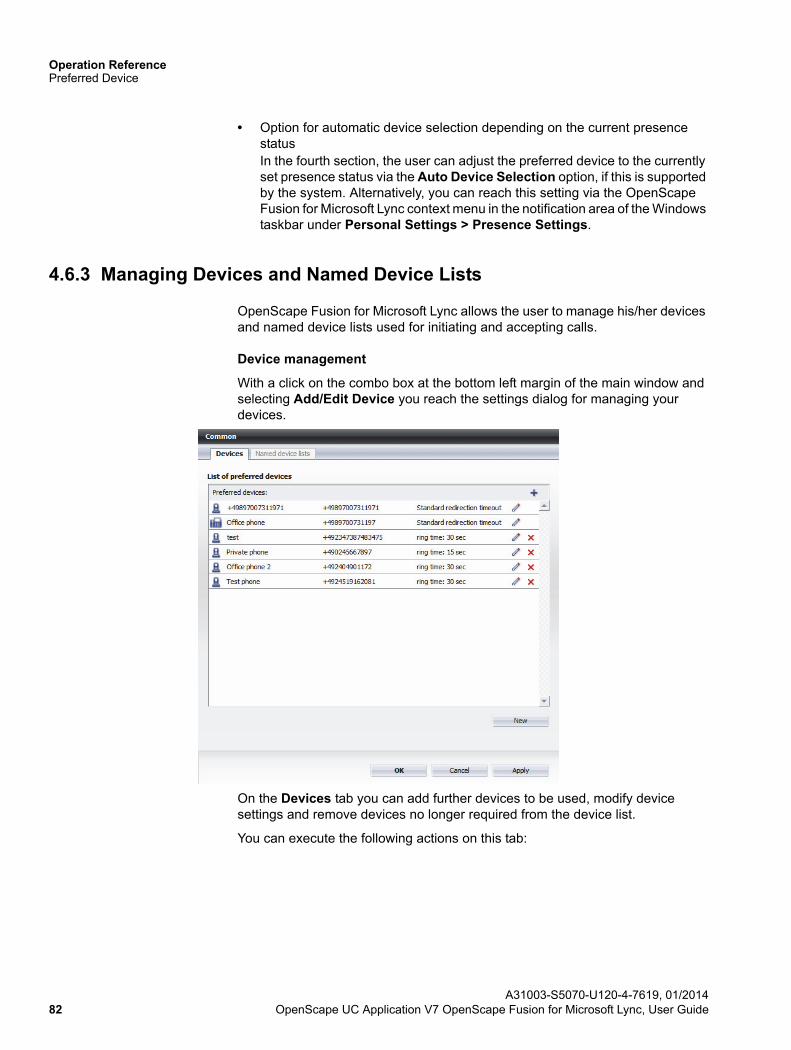
Operation ReferencePreferred Device
• Option for automatic device selection depending on the current presence statusIn the fourth section, the user can adjust the preferred device to the currently set presence status via the Auto Device Selection option, if this is supported by the system. Alternatively, you can reach this setting via the OpenScape Fusion for Microsoft Lync context menu in the notification area of the Windows taskbar under Personal Settings > Presence Settings.
4.6.3 Managing Devices and Named Device Lists
OpenScape Fusion for Microsoft Lync allows the user to manage his/her devices and named device lists used for initiating and accepting calls.
Device management
With a click on the combo box at the bottom left margin of the main window and selecting Add/Edit Device you reach the settings dialog for managing your devices.
On the Devices tab you can add further devices to be used, modify device settings and remove devices no longer required from the device list.
You can execute the following actions on this tab:
A31003-S5070-U120-4-7619, 01/201482 OpenScape UC Application V7 OpenScape Fusion for Microsoft Lync, User Guide
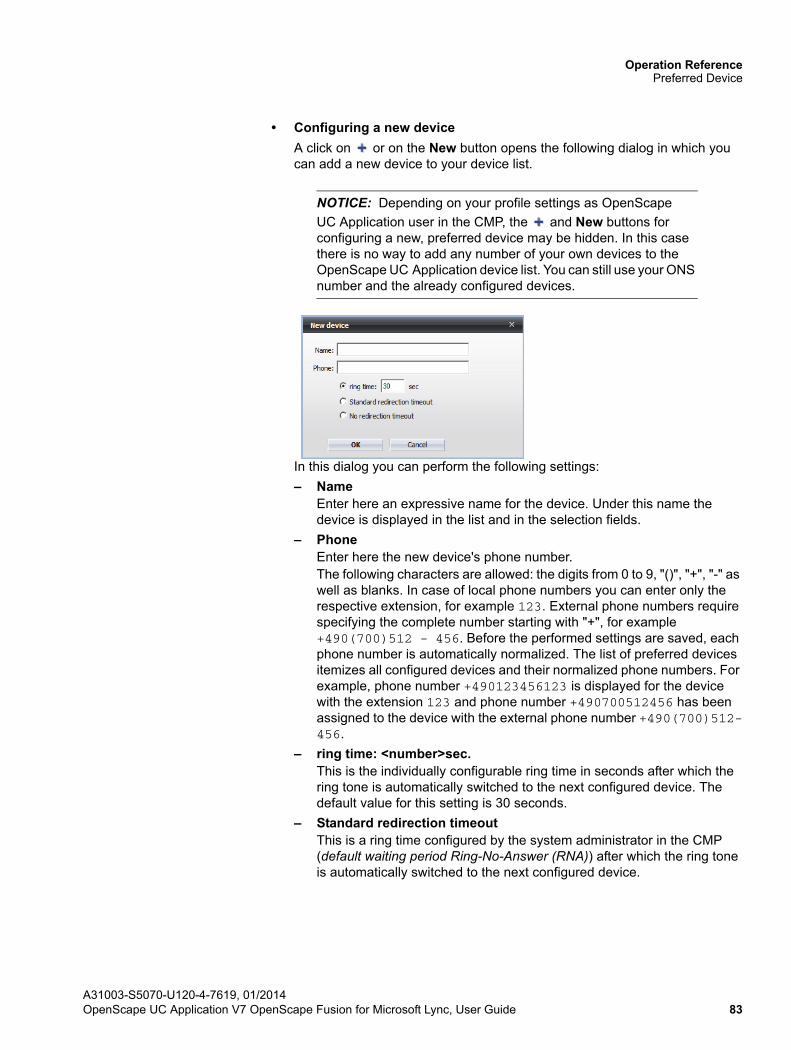
Operation ReferencePreferred Device
• Configuring a new device
A click on or on the New button opens the following dialog in which you can add a new device to your device list.
NOTICE: Depending on your profile settings as OpenScape
UC Application user in the CMP, the and New buttons for configuring a new, preferred device may be hidden. In this case there is no way to add any number of your own devices to the OpenScape UC Application device list. You can still use your ONS number and the already configured devices.
In this dialog you can perform the following settings:
– NameEnter here an expressive name for the device. Under this name the device is displayed in the list and in the selection fields.
– PhoneEnter here the new device's phone number.The following characters are allowed: the digits from 0 to 9, "()", "+", "-" as well as blanks. In case of local phone numbers you can enter only the respective extension, for example 123. External phone numbers require specifying the complete number starting with "+", for example +490(700)512 - 456. Before the performed settings are saved, each phone number is automatically normalized. The list of preferred devices itemizes all configured devices and their normalized phone numbers. For example, phone number +490123456123 is displayed for the device with the extension 123 and phone number +490700512456 has been assigned to the device with the external phone number +490(700)512-456.
– ring time: <number>sec.This is the individually configurable ring time in seconds after which the ring tone is automatically switched to the next configured device. The default value for this setting is 30 seconds.
– Standard redirection timeoutThis is a ring time configured by the system administrator in the CMP (default waiting period Ring-No-Answer (RNA)) after which the ring tone is automatically switched to the next configured device.
A31003-S5070-U120-4-7619, 01/2014OpenScape UC Application V7 OpenScape Fusion for Microsoft Lync, User Guide 83

Operation ReferencePreferred Device
– No redirection timeoutThe ring tone is not switched over to another configured device.
A click on the OK button closes the dialog. Your settings are saved.A click on the Cancel button closes the dialog. The performed settings are then dismissed.
• Modifying the settings of a list entry
Click on to edit a previously selected list entry. The above dialog Edit device opens with the available settings. The phone number of the device is grayed out and cannot be changed. Modifications to other options are possible.
• Removing a device from the list
After a click on you can remove a selected device from the list of configured devices.
IMPORTANT: The one-number service (by default the topmost entry in the list) and the device currently used cannot be deleted.
NOTICE: Depending on your profile settings as OpenScape
UC Application user in the CMP, the icon may be hidden. In this case there is no way to remove the corresponding device from your OpenScape UC Application device list.
With a click on the Apply button your settings become valid.
A31003-S5070-U120-4-7619, 01/201484 OpenScape UC Application V7 OpenScape Fusion for Microsoft Lync, User Guide

Operation ReferencePreferred Device
Named device list management
On the Named device lists tab you define the named device lists available to you when selecting the preferred device.
IMPORTANT: The members of a Multi-Line Hunt Group (MLHG) must not configure a named device list as preferred device for incoming and/or outgoing calls.
On this tab you can create priority lists of phone numbers that you can select as preferred device. Via the named device lists you can flexibly administrate the call order of the preferred devices. You can, for example, create/delete new named device lists or add single entries to a named device list/remove them from a named device list.
The device priority list is processed from top to bottom and switches the ring tone automatically to the next device after the ring time that is configured.
The Named device lists tab is divided into two sections:
• Named device lists - all configured named device lists are listed here.The following controls are available in the Named device list section:
– - Rename named device listClick on this icon to modify the name of a named device list.
NOTICE: You can also click the name of the named device list directly to rename it.
A31003-S5070-U120-4-7619, 01/2014OpenScape UC Application V7 OpenScape Fusion for Microsoft Lync, User Guide 85
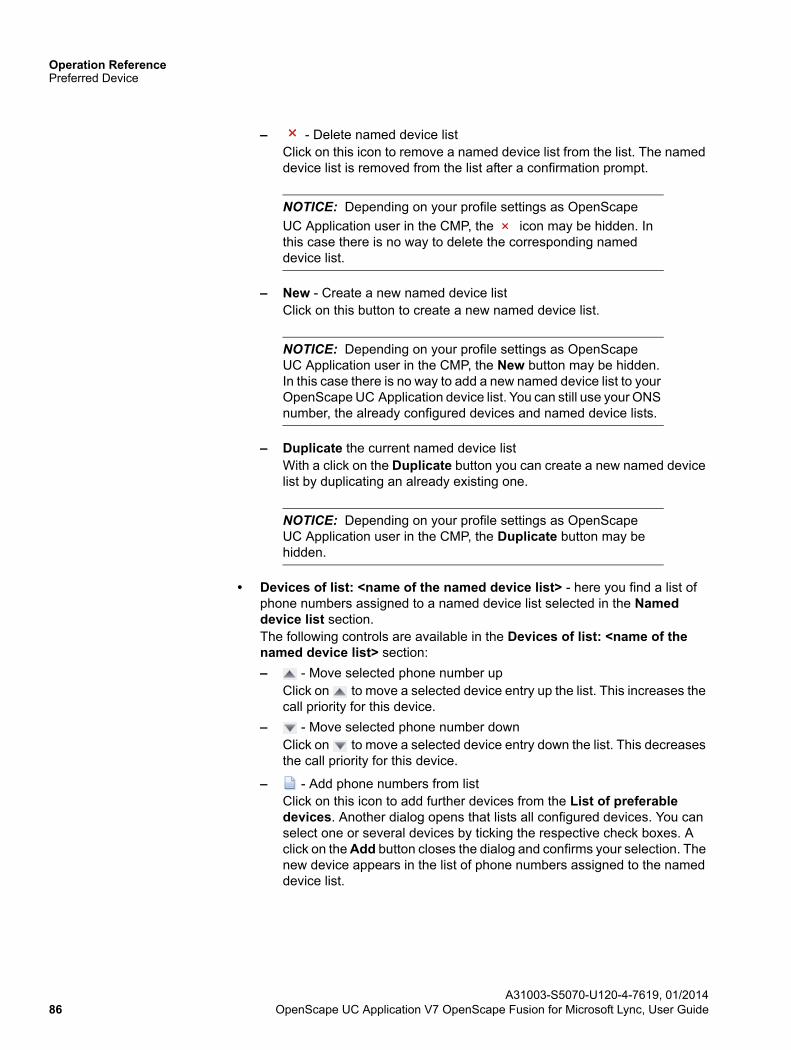
Operation ReferencePreferred Device
– - Delete named device listClick on this icon to remove a named device list from the list. The named device list is removed from the list after a confirmation prompt.
NOTICE: Depending on your profile settings as OpenScape
UC Application user in the CMP, the icon may be hidden. In this case there is no way to delete the corresponding named device list.
– New - Create a new named device listClick on this button to create a new named device list.
NOTICE: Depending on your profile settings as OpenScape UC Application user in the CMP, the New button may be hidden. In this case there is no way to add a new named device list to your OpenScape UC Application device list. You can still use your ONS number, the already configured devices and named device lists.
– Duplicate the current named device listWith a click on the Duplicate button you can create a new named device list by duplicating an already existing one.
NOTICE: Depending on your profile settings as OpenScape UC Application user in the CMP, the Duplicate button may be hidden.
• Devices of list: <name of the named device list> - here you find a list of phone numbers assigned to a named device list selected in the Named device list section.The following controls are available in the Devices of list: <name of the named device list> section:
– - Move selected phone number upClick on to move a selected device entry up the list. This increases the call priority for this device.
– - Move selected phone number downClick on to move a selected device entry down the list. This decreases the call priority for this device.
– - Add phone numbers from listClick on this icon to add further devices from the List of preferable devices. Another dialog opens that lists all configured devices. You can select one or several devices by ticking the respective check boxes. A click on the Add button closes the dialog and confirms your selection. The new device appears in the list of phone numbers assigned to the named device list.
A31003-S5070-U120-4-7619, 01/201486 OpenScape UC Application V7 OpenScape Fusion for Microsoft Lync, User Guide
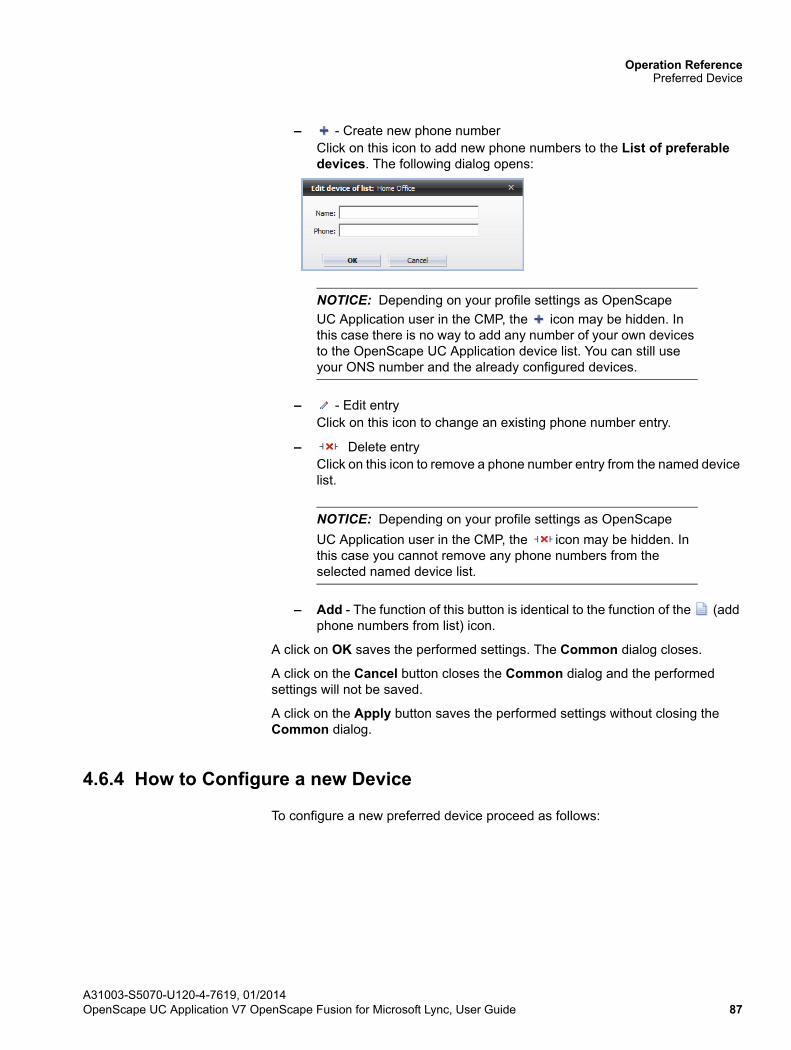
Operation ReferencePreferred Device
– - Create new phone numberClick on this icon to add new phone numbers to the List of preferable devices. The following dialog opens:
NOTICE: Depending on your profile settings as OpenScape
UC Application user in the CMP, the icon may be hidden. In this case there is no way to add any number of your own devices to the OpenScape UC Application device list. You can still use your ONS number and the already configured devices.
– - Edit entryClick on this icon to change an existing phone number entry.
– Delete entryClick on this icon to remove a phone number entry from the named device list.
NOTICE: Depending on your profile settings as OpenScape
UC Application user in the CMP, the icon may be hidden. In this case you cannot remove any phone numbers from the selected named device list.
– Add - The function of this button is identical to the function of the (add phone numbers from list) icon.
A click on OK saves the performed settings. The Common dialog closes.
A click on the Cancel button closes the Common dialog and the performed settings will not be saved.
A click on the Apply button saves the performed settings without closing the Common dialog.
4.6.4 How to Configure a new Device
To configure a new preferred device proceed as follows:
A31003-S5070-U120-4-7619, 01/2014OpenScape UC Application V7 OpenScape Fusion for Microsoft Lync, User Guide 87
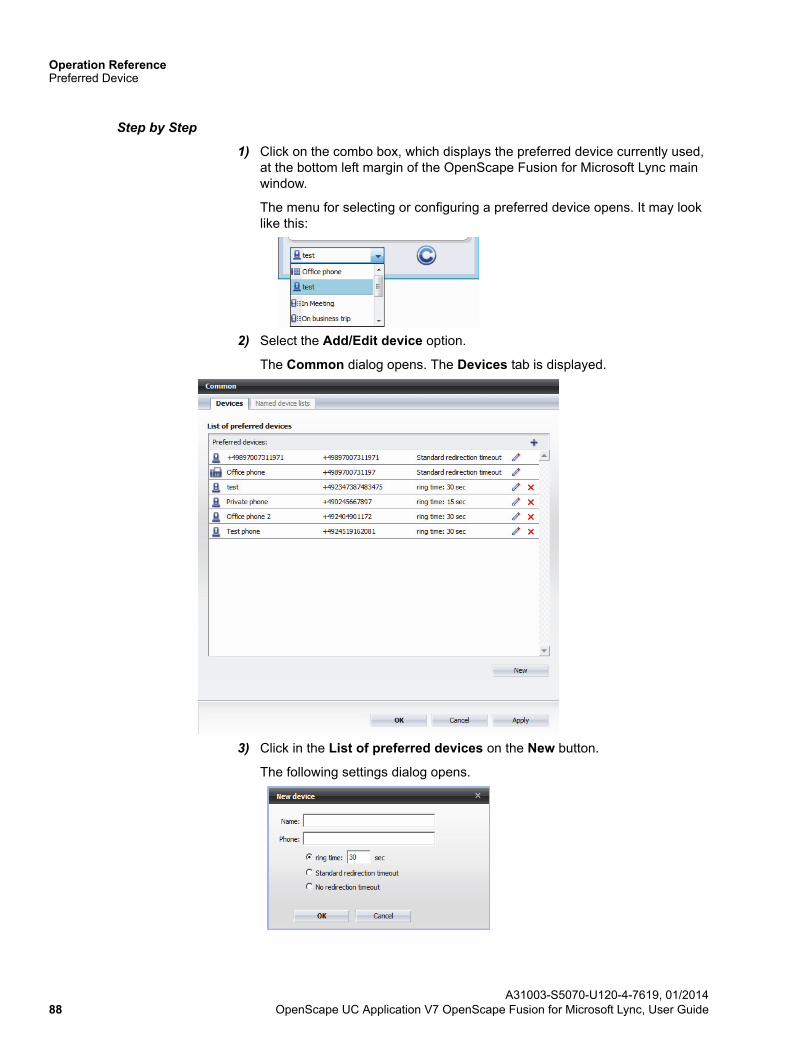
Operation ReferencePreferred Device
Step by Step
1) Click on the combo box, which displays the preferred device currently used, at the bottom left margin of the OpenScape Fusion for Microsoft Lync main window.
The menu for selecting or configuring a preferred device opens. It may look like this:
2) Select the Add/Edit device option.
The Common dialog opens. The Devices tab is displayed.
3) Click in the List of preferred devices on the New button.
The following settings dialog opens.
A31003-S5070-U120-4-7619, 01/201488 OpenScape UC Application V7 OpenScape Fusion for Microsoft Lync, User Guide
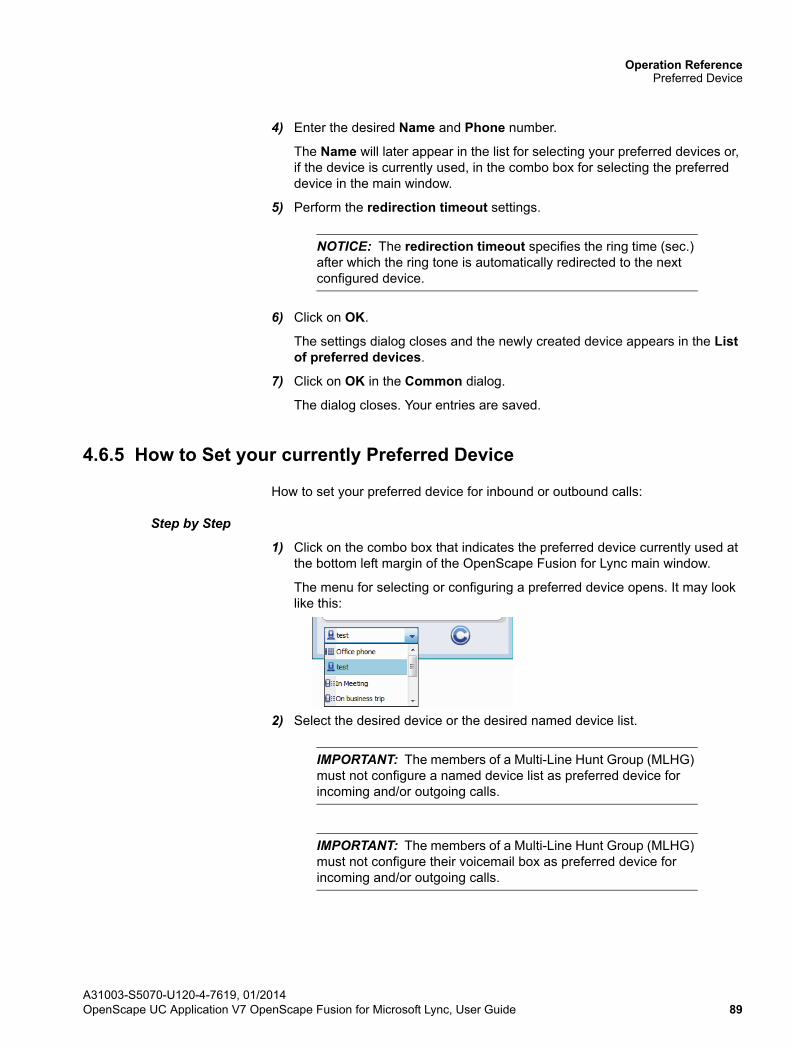
Operation ReferencePreferred Device
4) Enter the desired Name and Phone number.
The Name will later appear in the list for selecting your preferred devices or, if the device is currently used, in the combo box for selecting the preferred device in the main window.
5) Perform the redirection timeout settings.
NOTICE: The redirection timeout specifies the ring time (sec.) after which the ring tone is automatically redirected to the next configured device.
6) Click on OK.
The settings dialog closes and the newly created device appears in the List of preferred devices.
7) Click on OK in the Common dialog.
The dialog closes. Your entries are saved.
4.6.5 How to Set your currently Preferred Device
How to set your preferred device for inbound or outbound calls:
Step by Step
1) Click on the combo box that indicates the preferred device currently used at the bottom left margin of the OpenScape Fusion for Lync main window.
The menu for selecting or configuring a preferred device opens. It may look like this:
2) Select the desired device or the desired named device list.
IMPORTANT: The members of a Multi-Line Hunt Group (MLHG) must not configure a named device list as preferred device for incoming and/or outgoing calls.
IMPORTANT: The members of a Multi-Line Hunt Group (MLHG) must not configure their voicemail box as preferred device for incoming and/or outgoing calls.
A31003-S5070-U120-4-7619, 01/2014OpenScape UC Application V7 OpenScape Fusion for Microsoft Lync, User Guide 89
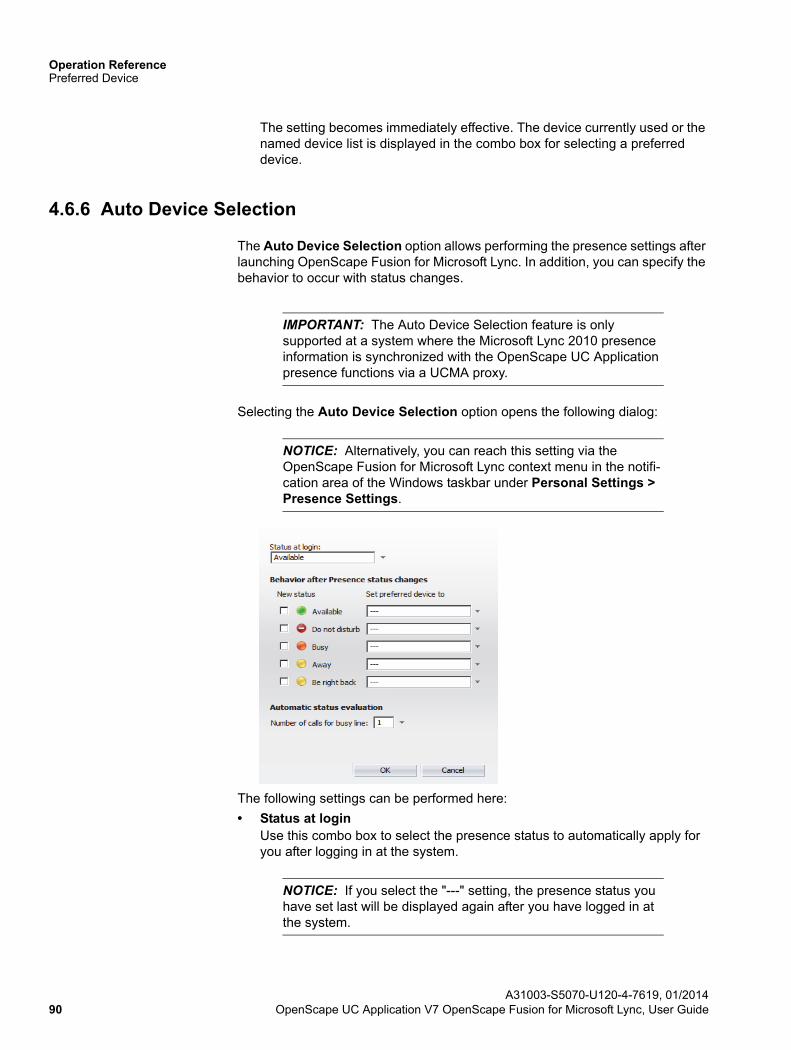
Operation ReferencePreferred Device
The setting becomes immediately effective. The device currently used or the named device list is displayed in the combo box for selecting a preferred device.
4.6.6 Auto Device Selection
The Auto Device Selection option allows performing the presence settings after launching OpenScape Fusion for Microsoft Lync. In addition, you can specify the behavior to occur with status changes.
IMPORTANT: The Auto Device Selection feature is only supported at a system where the Microsoft Lync 2010 presence information is synchronized with the OpenScape UC Application presence functions via a UCMA proxy.
Selecting the Auto Device Selection option opens the following dialog:
NOTICE: Alternatively, you can reach this setting via the OpenScape Fusion for Microsoft Lync context menu in the notifi-cation area of the Windows taskbar under Personal Settings > Presence Settings.
The following settings can be performed here:
• Status at loginUse this combo box to select the presence status to automatically apply for you after logging in at the system.
NOTICE: If you select the "---" setting, the presence status you have set last will be displayed again after you have logged in at the system.
A31003-S5070-U120-4-7619, 01/201490 OpenScape UC Application V7 OpenScape Fusion for Microsoft Lync, User Guide
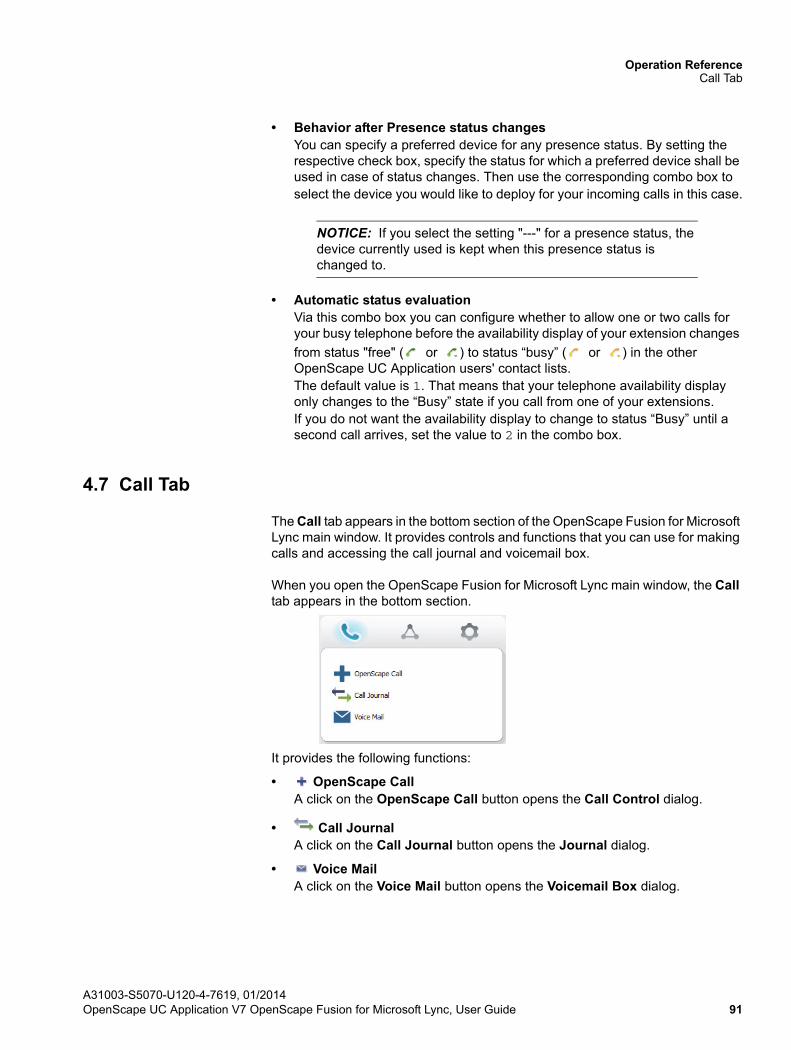
Operation ReferenceCall Tab
• Behavior after Presence status changesYou can specify a preferred device for any presence status. By setting the respective check box, specify the status for which a preferred device shall be used in case of status changes. Then use the corresponding combo box to select the device you would like to deploy for your incoming calls in this case.
NOTICE: If you select the setting "---" for a presence status, the device currently used is kept when this presence status is changed to.
• Automatic status evaluationVia this combo box you can configure whether to allow one or two calls for your busy telephone before the availability display of your extension changes
from status "free" ( or ) to status “busy” ( or ) in the other OpenScape UC Application users' contact lists.The default value is 1. That means that your telephone availability display only changes to the “Busy” state if you call from one of your extensions.If you do not want the availability display to change to status “Busy” until a second call arrives, set the value to 2 in the combo box.
4.7 Call Tab
The Call tab appears in the bottom section of the OpenScape Fusion for Microsoft Lync main window. It provides controls and functions that you can use for making calls and accessing the call journal and voicemail box.
When you open the OpenScape Fusion for Microsoft Lync main window, the Call tab appears in the bottom section.
It provides the following functions:
• OpenScape CallA click on the OpenScape Call button opens the Call Control dialog.
• Call JournalA click on the Call Journal button opens the Journal dialog.
• Voice MailA click on the Voice Mail button opens the Voicemail Box dialog.
A31003-S5070-U120-4-7619, 01/2014OpenScape UC Application V7 OpenScape Fusion for Microsoft Lync, User Guide 91
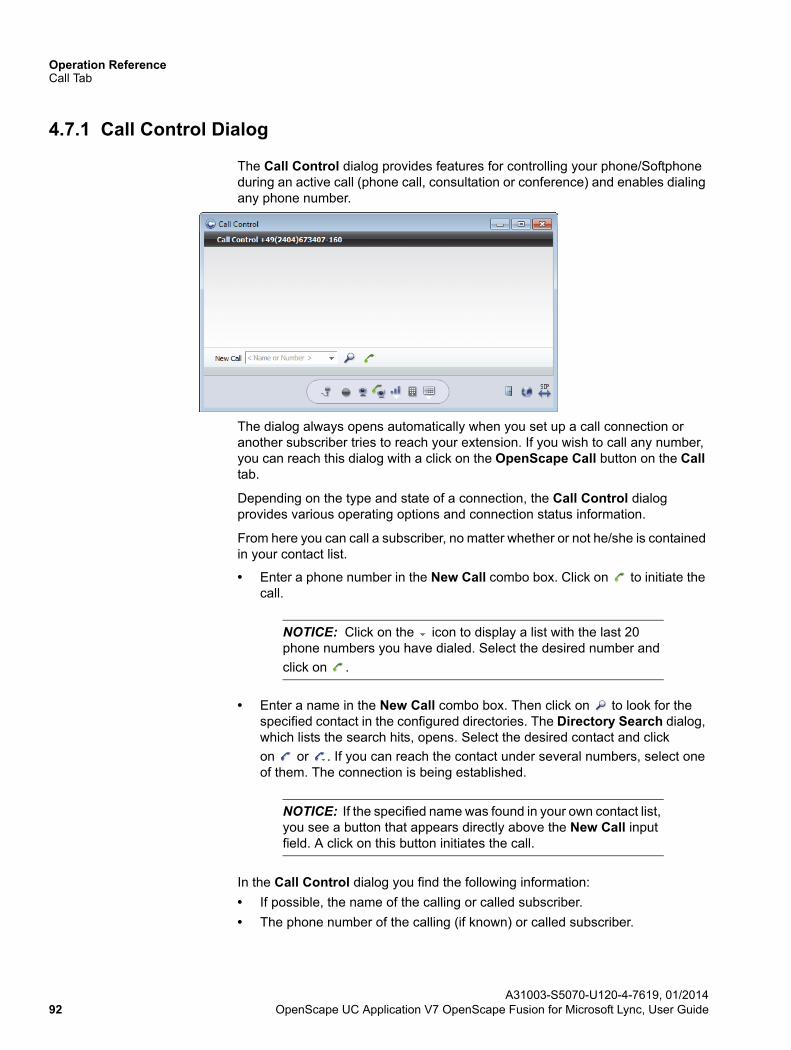
Operation ReferenceCall Tab
4.7.1 Call Control Dialog
The Call Control dialog provides features for controlling your phone/Softphone during an active call (phone call, consultation or conference) and enables dialing any phone number.
The dialog always opens automatically when you set up a call connection or another subscriber tries to reach your extension. If you wish to call any number, you can reach this dialog with a click on the OpenScape Call button on the Call tab.
Depending on the type and state of a connection, the Call Control dialog provides various operating options and connection status information.
From here you can call a subscriber, no matter whether or not he/she is contained in your contact list.
• Enter a phone number in the New Call combo box. Click on to initiate the call.
NOTICE: Click on the icon to display a list with the last 20 phone numbers you have dialed. Select the desired number and
click on .
• Enter a name in the New Call combo box. Then click on to look for the specified contact in the configured directories. The Directory Search dialog, which lists the search hits, opens. Select the desired contact and click
on or . If you can reach the contact under several numbers, select one of them. The connection is being established.
NOTICE: If the specified name was found in your own contact list, you see a button that appears directly above the New Call input field. A click on this button initiates the call.
In the Call Control dialog you find the following information:
• If possible, the name of the calling or called subscriber.
• The phone number of the calling (if known) or called subscriber.
A31003-S5070-U120-4-7619, 01/201492 OpenScape UC Application V7 OpenScape Fusion for Microsoft Lync, User Guide

Operation ReferenceCall Tab
If OpenScape Fusion for Microsoft Lync is connected to an SIP communications system (OpenScape Voice) and used as SIP Softphone, you find a Softphone menu at the bottom margin of the Call Control dialog. This menu provides the following Softphone functions and status information:
Softphone features
• / Muting on/offActivates and deactivates muting of an active call.
• Voice recording (SIP only)Activates or deactivates the voice recording function. You find the recorded conversation in the following folder:
• SpeakerActivates/deactivates the speaker in case of an active call or in idle state
NOTICE: This feature is available if for example plathosys CT-180/220/Headset is used as audio device and plathosys CT-180/220/Headset is selected under Control in the corresponding audio scheme.
• HeadsetSwitches the headset on/off in case of an active call or in idle state
NOTICE: and the headset volume control are only available if you use a terminal device with appropriate signaling and this audio device was configured in the active audio scheme.
• Additional speakerActivating/disabling the additional speaker during an active call. The additional speaker must be configured in the settings for the currently used audio scheme.
• New Audio DeviceThis button appears only if a new audio device is connected during operation. It allows you to integrate the new device in a new audio scheme and to connect and use the audio scheme or the new device. The program need not be rebooted for this purpose.
• New Video DeviceThis button appears only if a new video device is connected during operation. It allows you to integrate the new device in a new video scheme and to connect and use the video scheme or the new device. The program need not be rebooted for this purpose.
My Documents\My Music\VoiceRecordings.
A31003-S5070-U120-4-7619, 01/2014OpenScape UC Application V7 OpenScape Fusion for Microsoft Lync, User Guide 93
Operation ReferenceCall Tab
• Video camera on/off (SIP only)
NOTICE: This icon is only displayed if you operate this program at an SIP communications system (OpenScape Voice) and you have an operable video camera currently used by a video scheme of the SIP Service Provider.
A click on this icon enables/disables the preview of your video camera.
• Video call on/off (SIP only)
NOTICE: This icon is only displayed if you operate this program at an SIP communications system (OpenScape Voice) and you have an operable video camera currently used by a video scheme of the SIP Service Provider.
The state of this icon – active or disabled – specifies whether or not video resources are reserved during the connection setup. It thus determines whether the call shall be initiated as video or pure audio call. The icon for activating/disabling the video call feature is inactive by default, i .e. the video call feature is inactive by default. Consequently, all calls are set up as pure audio connection. However, you can extend such connections to
video connections via the icon at a later date.If the icon for activating/disabling the video call feature is enabled, each call is automatically initiated as video call or audio connection depending on whether or not the same icon is active/disabled on the conversational partner's side. If both conversational partners have activated this icon, a video connection is automatically added to an audio connection. The Video window opens automatically. The video images of the conversational partners are transmitted. The displayed video view corresponds to the Default video configuration in the Settings dialog on the Advanced > SIP Service Provider > Video schemes tab.If only one of the two conversational partners has activated this feature, a corresponding message in the automatically opened Video window informs him/her that the other conversational partner does not wish a video
connection to be set up. The subscriber who has activated the icon sees only his/her own image in the pre-set view of the Video window. The image is not transmitted automatically. In this case the video transmission cannot be
added retrospectively via the icon.
A31003-S5070-U120-4-7619, 01/201494 OpenScape UC Application V7 OpenScape Fusion for Microsoft Lync, User Guide
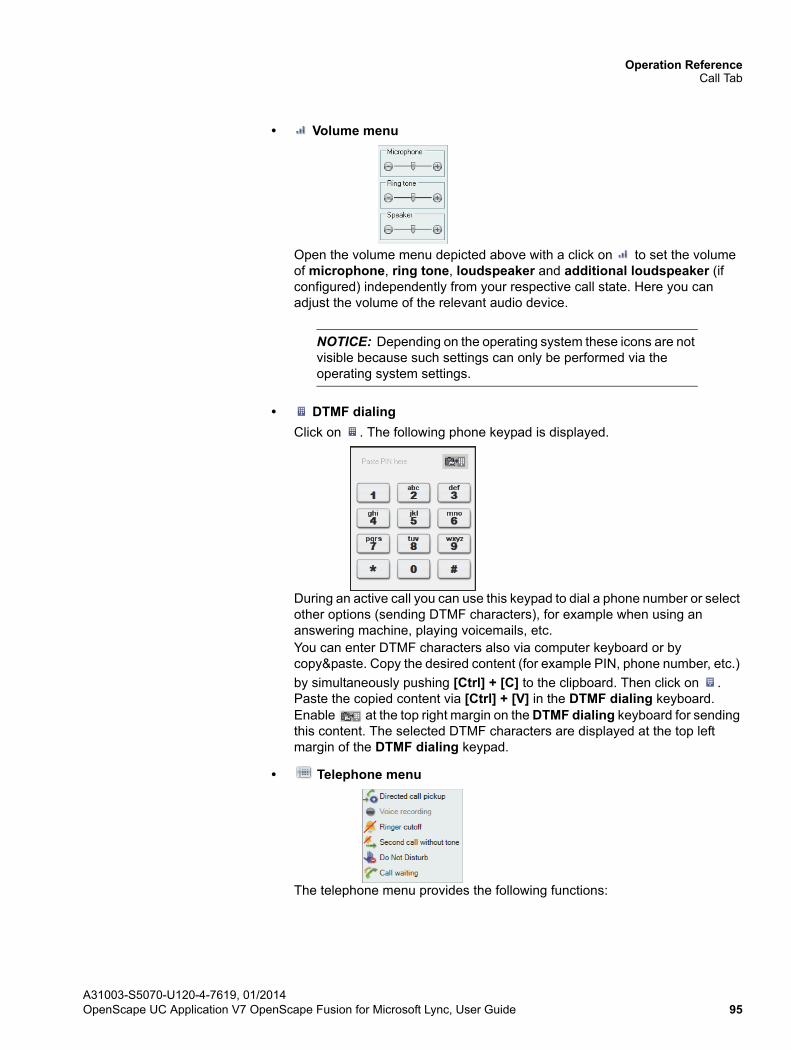
Operation ReferenceCall Tab
• Volume menu
Open the volume menu depicted above with a click on to set the volume of microphone, ring tone, loudspeaker and additional loudspeaker (if configured) independently from your respective call state. Here you can adjust the volume of the relevant audio device.
NOTICE: Depending on the operating system these icons are not visible because such settings can only be performed via the operating system settings.
• DTMF dialing
Click on . The following phone keypad is displayed.
During an active call you can use this keypad to dial a phone number or select other options (sending DTMF characters), for example when using an answering machine, playing voicemails, etc.You can enter DTMF characters also via computer keyboard or by copy&paste. Copy the desired content (for example PIN, phone number, etc.)
by simultaneously pushing [Ctrl] + [C] to the clipboard. Then click on . Paste the copied content via [Ctrl] + [V] in the DTMF dialing keyboard. Enable at the top right margin on the DTMF dialing keyboard for sending this content. The selected DTMF characters are displayed at the top left margin of the DTMF dialing keypad.
• Telephone menu
The telephone menu provides the following functions:
A31003-S5070-U120-4-7619, 01/2014OpenScape UC Application V7 OpenScape Fusion for Microsoft Lync, User Guide 95
Operation ReferenceCall Tab
– Directed call pickupThis feature allows you to accept calls that are designated for someone else. If e.g. your colleague is called but he/she cannot accept the call himself/herself (he/she is in a meeting, on the phone on another line, etc.), select the option Directed call pickup option. In the open dialog of the same name enter the phone number of the device with the alerting call. Click on OK. You are connected to the caller.
– Voice recordingActivate/deactivate the Voice recording option to activate or deactivate the recording feature. You find the recorded calls in the folder My Documents\My Music\VoiceRecordings.
– Ringer cutoffIf you have activated the Ringer cutoff option, incoming calls are signalled without ring tone.
– Second call without toneThis option corresponds to Call waiting, but no call-waiting tone is played.
– Do Not DisturbClick on the Do Not Disturb option if you do not want to receive any calls. The caller receives a busy tone.
– Call waitingWhen the Call waiting option is active, another call that comes in during an active call is signaled by a so-called call-waiting tone. The caller hears a normal ringing tone and no busy tone. You can then accept, ignore or reject the second call. To accept the second call, click on the green handset icon. The active call will then automatically be held.
Status information
• / indicate that the connection to the SIP communications system is established/closed.
• or indicates that the connection to the OpenScape UC Application system is established/closed and you can use/cannot use the OpenScape UC Application features.
A31003-S5070-U120-4-7619, 01/201496 OpenScape UC Application V7 OpenScape Fusion for Microsoft Lync, User Guide
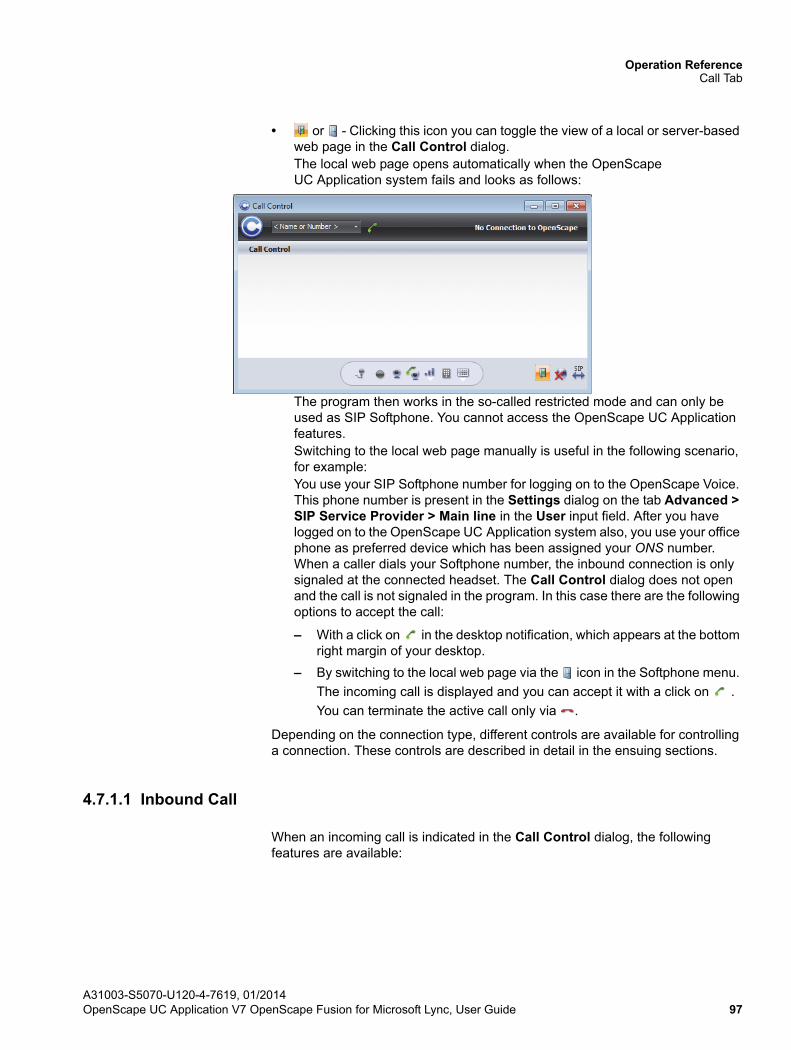
Operation ReferenceCall Tab
• or - Clicking this icon you can toggle the view of a local or server-based web page in the Call Control dialog.The local web page opens automatically when the OpenScape UC Application system fails and looks as follows:
The program then works in the so-called restricted mode and can only be used as SIP Softphone. You cannot access the OpenScape UC Application features.Switching to the local web page manually is useful in the following scenario, for example:You use your SIP Softphone number for logging on to the OpenScape Voice. This phone number is present in the Settings dialog on the tab Advanced > SIP Service Provider > Main line in the User input field. After you have logged on to the OpenScape UC Application system also, you use your office phone as preferred device which has been assigned your ONS number. When a caller dials your Softphone number, the inbound connection is only signaled at the connected headset. The Call Control dialog does not open and the call is not signaled in the program. In this case there are the following options to accept the call:
– With a click on in the desktop notification, which appears at the bottom right margin of your desktop.
– By switching to the local web page via the icon in the Softphone menu.
The incoming call is displayed and you can accept it with a click on .
You can terminate the active call only via .
Depending on the connection type, different controls are available for controlling a connection. These controls are described in detail in the ensuing sections.
4.7.1.1 Inbound Call
When an incoming call is indicated in the Call Control dialog, the following features are available:
A31003-S5070-U120-4-7619, 01/2014OpenScape UC Application V7 OpenScape Fusion for Microsoft Lync, User Guide 97
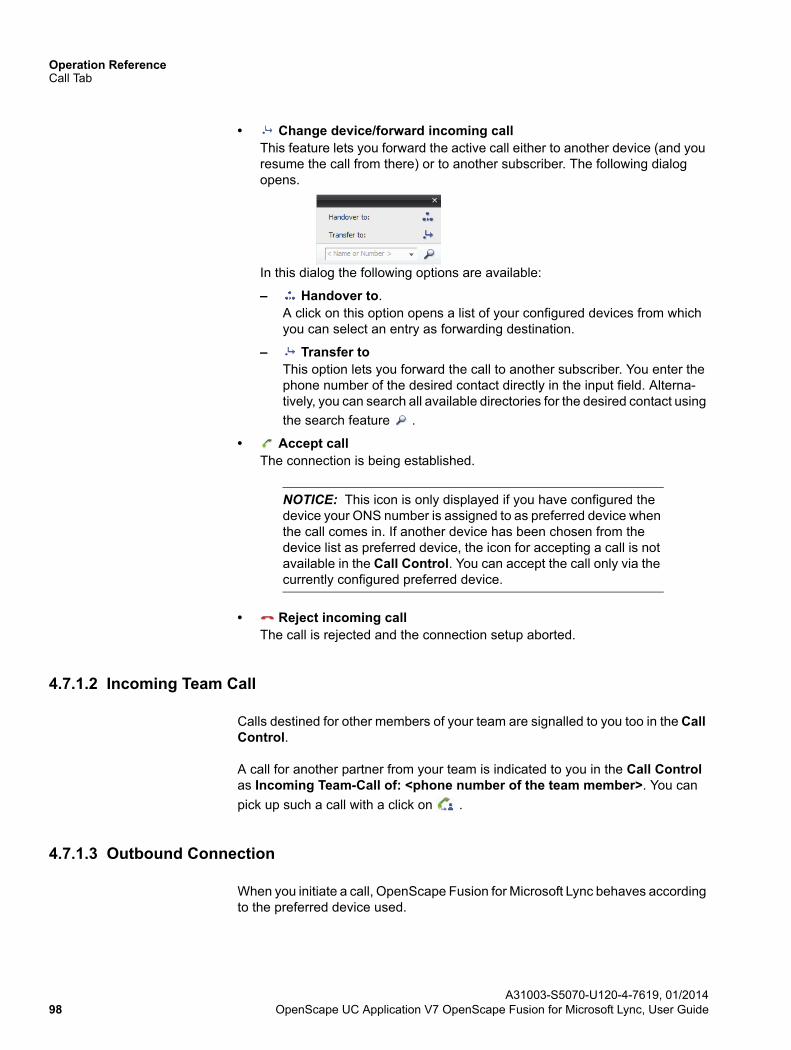
Operation ReferenceCall Tab
• Change device/forward incoming callThis feature lets you forward the active call either to another device (and you resume the call from there) or to another subscriber. The following dialog opens.
In this dialog the following options are available:
– Handover to.A click on this option opens a list of your configured devices from which you can select an entry as forwarding destination.
– Transfer toThis option lets you forward the call to another subscriber. You enter the phone number of the desired contact directly in the input field. Alterna-tively, you can search all available directories for the desired contact using
the search feature .
• Accept callThe connection is being established.
NOTICE: This icon is only displayed if you have configured the device your ONS number is assigned to as preferred device when the call comes in. If another device has been chosen from the device list as preferred device, the icon for accepting a call is not available in the Call Control. You can accept the call only via the currently configured preferred device.
• Reject incoming callThe call is rejected and the connection setup aborted.
4.7.1.2 Incoming Team Call
Calls destined for other members of your team are signalled to you too in the Call Control.
A call for another partner from your team is indicated to you in the Call Control as Incoming Team-Call of: <phone number of the team member>. You can
pick up such a call with a click on .
4.7.1.3 Outbound Connection
When you initiate a call, OpenScape Fusion for Microsoft Lync behaves according to the preferred device used.
A31003-S5070-U120-4-7619, 01/201498 OpenScape UC Application V7 OpenScape Fusion for Microsoft Lync, User Guide
Operation ReferenceCall Tab
• The system administrator has assigned you the preferred device currently used in the CMP as ONS number (for example the number of your office phone or Softphone) and the Auto Answer feature for this number is enabled in the PBX (for example OpenScape Voice).In this case the connection to the desired conversational partner is directly set up and displayed in the Call Control dialog.
• The preferred device currently used is not configured as your ONS number (for example your mobile phone) in the CMP.In this case, a connection is set up from the PBX to your currently set preferred device. You need to accept this call. Only then the connection to the desired conversation partner is set up and indicated in the Call Control.
After you have initiated a call, the following call control features are available:
• Drop a callThe connection setup is abandoned.
• Request return call
– Completion of Calls to Busy Subscriber (CCBS) - If you receive the busy sign from the desired subscriber, you can click on to automate a connection setup in the PBX to the previously busy target subscriber before hanging up. When the previously busy line becomes available again, OpenScape Fusion for Microsoft Lync is notified about that by the PBX. OpenScape Fusion for Microsoft Lync will then indicate by a call in the Call Control dialog that the subscriber is no longer busy. If you accept
this return call with a click on , the target subscriber is called by the PBX again.
– Call completion on no reply (CCNR) - When the line of the other subscriber is "free" but he/she does not accept the call, you can click on to automate the connection setup to the desired subscriber in the PBX before you hang up. Next time the subscriber hangs up, OpenScape Fusion for Microsoft Lync is notified about that by the PBX. The program then lets you know by a call in the Call Control dialog that the subscriber
is available. If you accept this call (return call) with a click on , the PBX will set up the connection to the desired subscriber once again.
NOTICE: If the user initiates a callback from one of his/her preferred devices that is not his/her ONS device, the callback will in due course not be indicated at the preferred device but at the device with the associated ONS number
NOTICE: The CCNR or CCBS feature cannot be used if the callee rejects the call or the PBX of the callee does not support the service.
A31003-S5070-U120-4-7619, 01/2014OpenScape UC Application V7 OpenScape Fusion for Microsoft Lync, User Guide 99
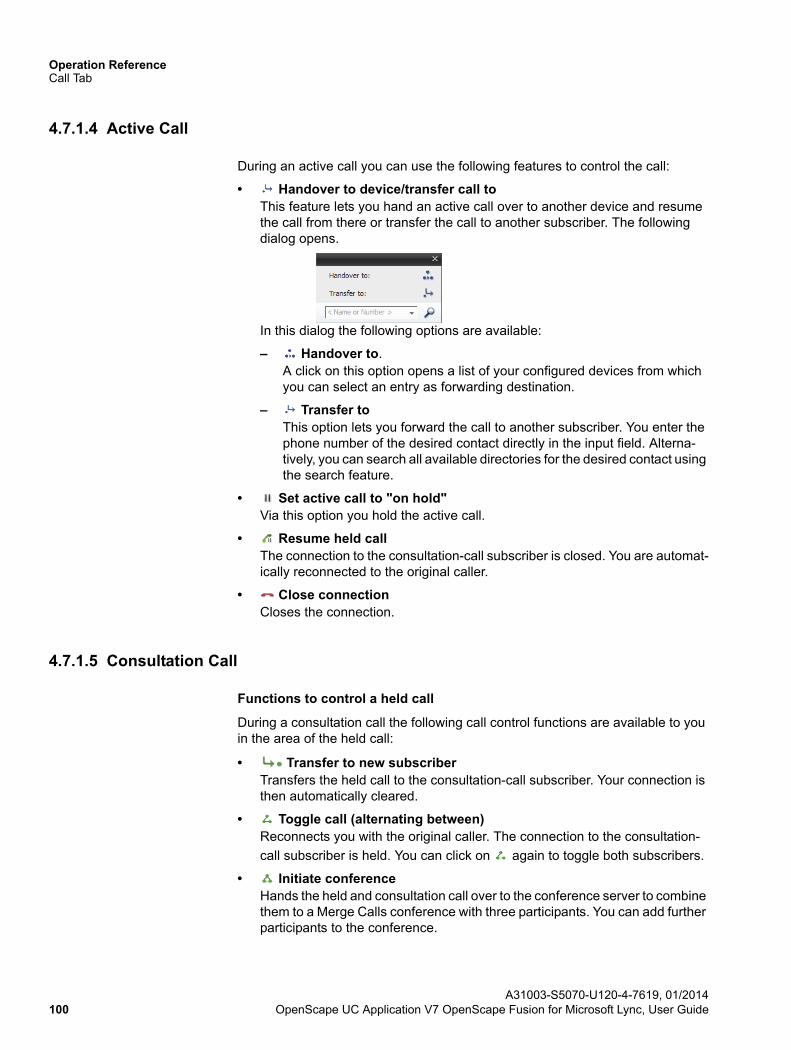
Operation ReferenceCall Tab
4.7.1.4 Active Call
During an active call you can use the following features to control the call:
• Handover to device/transfer call toThis feature lets you hand an active call over to another device and resume the call from there or transfer the call to another subscriber. The following dialog opens.
In this dialog the following options are available:
– Handover to.A click on this option opens a list of your configured devices from which you can select an entry as forwarding destination.
– Transfer toThis option lets you forward the call to another subscriber. You enter the phone number of the desired contact directly in the input field. Alterna-tively, you can search all available directories for the desired contact using the search feature.
• Set active call to "on hold"Via this option you hold the active call.
• Resume held callThe connection to the consultation-call subscriber is closed. You are automat-ically reconnected to the original caller.
• Close connectionCloses the connection.
4.7.1.5 Consultation Call
Functions to control a held call
During a consultation call the following call control functions are available to you in the area of the held call:
• Transfer to new subscriberTransfers the held call to the consultation-call subscriber. Your connection is then automatically cleared.
• Toggle call (alternating between)Reconnects you with the original caller. The connection to the consultation-
call subscriber is held. You can click on again to toggle both subscribers.
• Initiate conferenceHands the held and consultation call over to the conference server to combine them to a Merge Calls conference with three participants. You can add further participants to the conference.
A31003-S5070-U120-4-7619, 01/2014100 OpenScape UC Application V7 OpenScape Fusion for Microsoft Lync, User Guide

Operation ReferenceCall Tab
• Close connectionTerminates the held call.
Functions to control a consultation call
During a consultation the following functions are available to you in the area of the active consultation call:
• Transfer active callThis feature lets you hand an active call over to another device from the list of your preferred devices and resume the conversation from there. The following dialog opens.
A click on the Transfer to icon displays the list of your configured preferred devices. You can select a list entry as forwarding destination.
• Set active call to "on hold"Via this option you hold the active call. You can then call another subscriber to consult him/her.
• Resume held callThe connection to the consultation-call subscriber is closed. You are automat-ically reconnected to the original caller.
• Close connectionThe consultation call is terminated.
4.7.1.6 Conference Connection
Depending on the system environment and your participant privileges (creator/moderator, invited participant), the Call Control dialog of an active conference offers different controls.
Depending on the OpenScape UC Application system environment, the Call Control of an active conference opens automatically after the conference start or can be opened manually via a URL in the conference notification e-mail.
NOTICE: External users invited for a Meet Me conference cannot open the Call Control dialog.
The Call Control dialog of an active conference displays the following controls, conference and status information:
• Conference name
• Conference PIN
• Features for participants with moderator/creator privileges
A31003-S5070-U120-4-7619, 01/2014OpenScape UC Application V7 OpenScape Fusion for Microsoft Lync, User Guide 101
Operation ReferenceCall Tab
• List of participants connected to the conferenceIn case of a moderated Meet Me conference with many participants, the number of conference participants displayed in the Call Control is restricted for clarity. If the number of participants exceeds a value specified by the system administrator in the CMP (default 15), each participant only sees his/her own entry and a specific number of moderators. The number of visible moderators is also defined by the system administrator (default 15).In case of an open Meet Me conference with many participants, the list of participants who are connected to the conference contains only one entry - each participant only sees himself/herself.
• List of participants who have not joined the conference yet
• Name of the currently active speaker is highlighted
NOTICE: Depending on your OpenScape UC Application system environment (at least two media servers are available), the Call Control dialog may display another active call in addition to the ongoing conference. This is a connection to the conference system via which the existing conference is transferred to another media server to avoid a system overload.
NOTICE: Conference participants who can open the Call Control dialog via a link are not displayed in the Call Control when they click on this URL. They appear as conference participants in the Call Control of the conference as soon as they dial in.
NOTICE: Depending on the system environment, invited partici-pants may open the Call Control via the URL contained in the conference notification e-mail but see nothing but an empty Call Control dialog. The conference is displayed in the Call Control as soon as it has been started by the conference creator or moderator.
Moderators and creators can use the following features in the Call Control to control an active conference:
• Start a Meet Me web conferenceIf you have configured a web conference or were invited for a web conference, you can use this icon to set up the connection to the web conference.
• Start an Ad-hoc/MeetNow! web conferenceUsing this feature you can add a web conference session to an active Ad-hoc or MeetNow! conference, which expands every active voice conference to a web conference.
• Lock/unlock conferenceThis option blocks the conference for other users who want to join in. After you
have clicked on the icon it changes to .
A31003-S5070-U120-4-7619, 01/2014102 OpenScape UC Application V7 OpenScape Fusion for Microsoft Lync, User Guide
Operation ReferenceCall Tab
• Unlock conferenceReleases the conference locking.
• Mute conferenceThis feature is only available for subscribers with moderator or creator privi-leges. It interrupts the sound transmission to all conference participants. After
you have clicked on the icon it changes to .
• Cancel conference mutingThis feature is only available for subscribers with moderator or creator privi-leges. It cancels the conference muting.
• End conferenceThis feature is only available for subscribers with moderator or creator privi-leges. It ends the conference by closing down the connections to the other conference participants.
Invited participants can use the following features in the Call Control to control an active conference:
• Change device and resume active callThis feature lets you hand an active call over to another device and resume the call from there.
• Mute participantIt interrupts the sound transmission for a conference participant. After you
have clicked on the icon it changes to .
• Cancel muting a participant It undoes muting a conference participant.
• Leave conference
– Moderated Meet Me conferenceThe conference moderator or creator can use this option to leave the conference or to disconnect single conference participants from the conference.
– Open Meet Me conferenceEnables every participant to leave the active conference.
– Ad-hoc/MeetNow! ConferenceEnables every participant to leave the active conference. As soon as all participants leave the Ad-hoc or MeetNow! conference, it ends.
NOTICE: If you have left the conference via the icon and wish to join in again after a short period, you need to dial into the desired conference again and also specify the conference PIN.
The Call Control dialog opened via the URL in the conference notification e-mail can provide the following information and functions depending on the system environment:
• Highlighted representation of the active speaker
• Conference PIN
• Join an active web conference
A31003-S5070-U120-4-7619, 01/2014OpenScape UC Application V7 OpenScape Fusion for Microsoft Lync, User Guide 103
Operation ReferenceCall Tab
• List of current conference participants
• List of participants who have not joined the conference yet.
NOTICE: If you are on the road and do not take part in a conference with your office phone (ONS) but e.g. with your cell phone, the connection may be affected by various factors or even aborted. In case of a disconnection you have not initiated yourself, you can dial into the active conference again after a short, pre-defined period. When the connection to the conference server is up again, you are prompted by greeting to push a specific, pre-defined telephone key. By pushing this key you can instantly join the active conference without having to enter the conference PIN once more.
You can use the Call Control dialog to add further OpenScape UC Application or external participants to the conference.
• OpenScape UC Application usersFor example, you can enter the name of the desired OpenScape UC Application participant in the New Call combo box and subsequently click
on to search all configured directories for the desired contact.
• External usersYou can add an external user to the conference by entering his/her phone number in the New Call combo box and enabling the green receiver. This participant will be directly called by the conference system. He/she will not receive a conference notification e-mail because the conference system does not know his/her e-mail address.
NOTICE: For adding external participants we recommend using the Add participant dialog as it allows specifying an e-mail address for the desired participant. You reach this dialog with a
click on in the Modify conference dialog.
4.7.1.7 Operation in Restricted Mode
You can operate the program as SIP Softphone at an OpenScape Voice with a so-called survivability solution (for example OpenScape Branch). If the OpenScape Voice fails, the survivability solution ensures that the program switches automatically to restricted mode, thus being able to permanently provide basic SIP telephony services.
A31003-S5070-U120-4-7619, 01/2014104 OpenScape UC Application V7 OpenScape Fusion for Microsoft Lync, User Guide
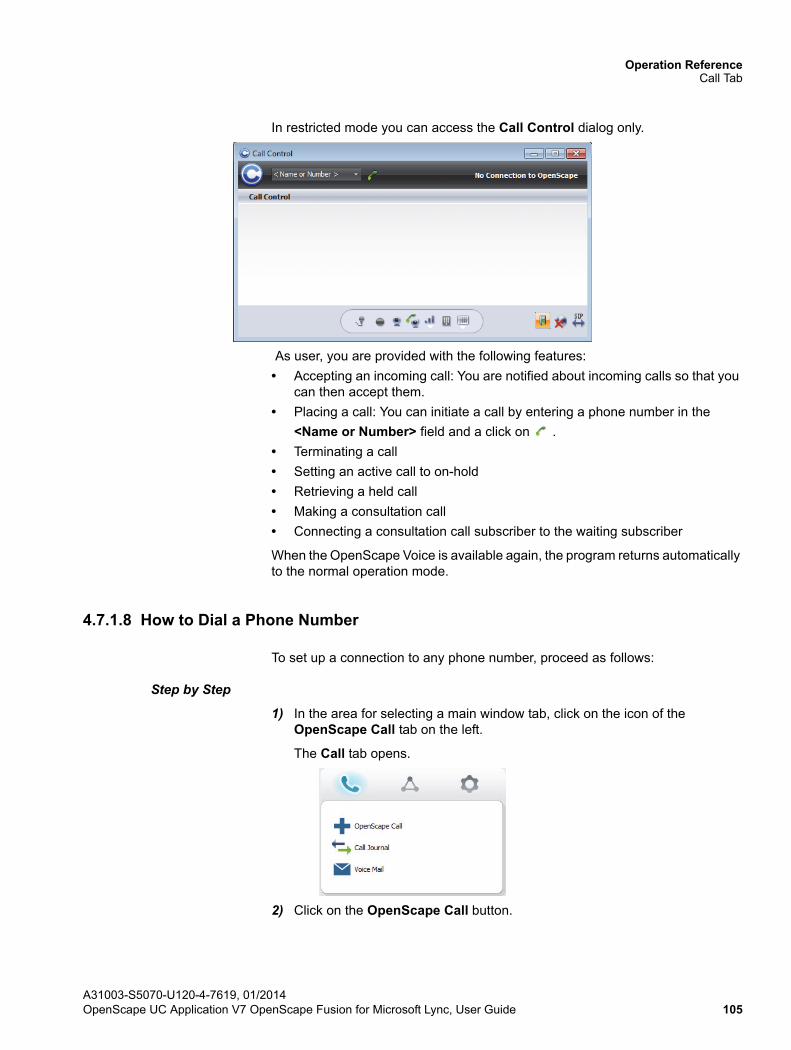
Operation ReferenceCall Tab
In restricted mode you can access the Call Control dialog only.
As user, you are provided with the following features:
• Accepting an incoming call: You are notified about incoming calls so that you can then accept them.
• Placing a call: You can initiate a call by entering a phone number in the
<Name or Number> field and a click on .
• Terminating a call
• Setting an active call to on-hold
• Retrieving a held call
• Making a consultation call
• Connecting a consultation call subscriber to the waiting subscriber
When the OpenScape Voice is available again, the program returns automatically to the normal operation mode.
4.7.1.8 How to Dial a Phone Number
To set up a connection to any phone number, proceed as follows:
Step by Step
1) In the area for selecting a main window tab, click on the icon of the OpenScape Call tab on the left.
The Call tab opens.
2) Click on the OpenScape Call button.
A31003-S5070-U120-4-7619, 01/2014OpenScape UC Application V7 OpenScape Fusion for Microsoft Lync, User Guide 105
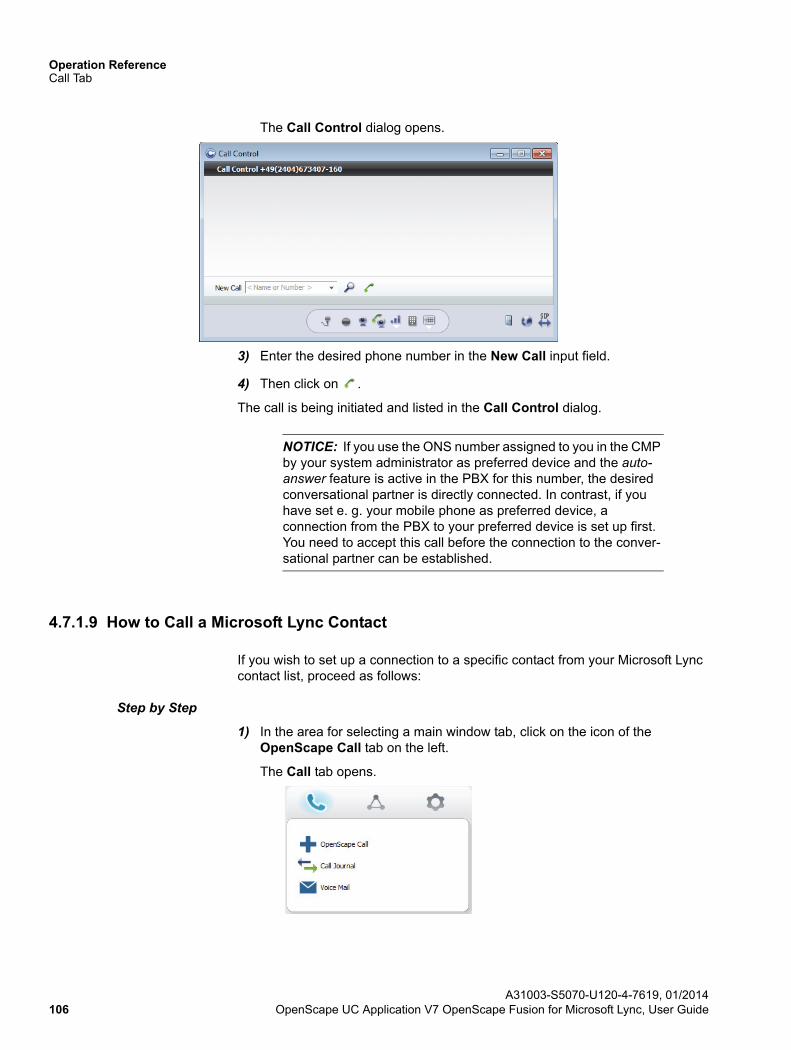
Operation ReferenceCall Tab
The Call Control dialog opens.
3) Enter the desired phone number in the New Call input field.
4) Then click on .
The call is being initiated and listed in the Call Control dialog.
NOTICE: If you use the ONS number assigned to you in the CMP by your system administrator as preferred device and the auto-answer feature is active in the PBX for this number, the desired conversational partner is directly connected. In contrast, if you have set e. g. your mobile phone as preferred device, a connection from the PBX to your preferred device is set up first. You need to accept this call before the connection to the conver-sational partner can be established.
4.7.1.9 How to Call a Microsoft Lync Contact
If you wish to set up a connection to a specific contact from your Microsoft Lync contact list, proceed as follows:
Step by Step
1) In the area for selecting a main window tab, click on the icon of the OpenScape Call tab on the left.
The Call tab opens.
A31003-S5070-U120-4-7619, 01/2014106 OpenScape UC Application V7 OpenScape Fusion for Microsoft Lync, User Guide
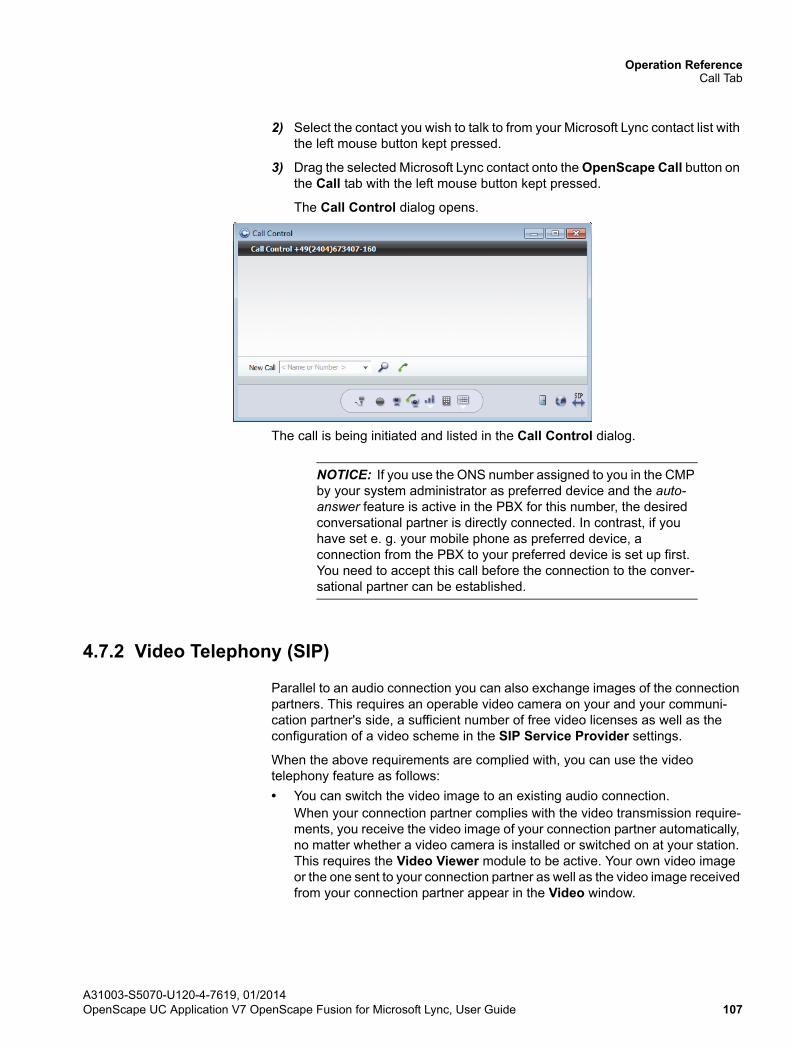
Operation ReferenceCall Tab
2) Select the contact you wish to talk to from your Microsoft Lync contact list with the left mouse button kept pressed.
3) Drag the selected Microsoft Lync contact onto the OpenScape Call button on the Call tab with the left mouse button kept pressed.
The Call Control dialog opens.
The call is being initiated and listed in the Call Control dialog.
NOTICE: If you use the ONS number assigned to you in the CMP by your system administrator as preferred device and the auto-answer feature is active in the PBX for this number, the desired conversational partner is directly connected. In contrast, if you have set e. g. your mobile phone as preferred device, a connection from the PBX to your preferred device is set up first. You need to accept this call before the connection to the conver-sational partner can be established.
4.7.2 Video Telephony (SIP)
Parallel to an audio connection you can also exchange images of the connection partners. This requires an operable video camera on your and your communi-cation partner's side, a sufficient number of free video licenses as well as the configuration of a video scheme in the SIP Service Provider settings.
When the above requirements are complied with, you can use the video telephony feature as follows:
• You can switch the video image to an existing audio connection.When your connection partner complies with the video transmission require-ments, you receive the video image of your connection partner automatically, no matter whether a video camera is installed or switched on at your station. This requires the Video Viewer module to be active. Your own video image or the one sent to your connection partner as well as the video image received from your connection partner appear in the Video window.
A31003-S5070-U120-4-7619, 01/2014OpenScape UC Application V7 OpenScape Fusion for Microsoft Lync, User Guide 107
Operation ReferenceCall Tab
• By activating the video call feature via the icon in the Softphone menu you can automatically set up a video and audio connection to the desired conver-sational partner. To initiate a video call automatically, both conversational partners must have activated the icon for enabling/disabling the video call feature at the time the call shall be made. If they have done so, the Video window opens automatically on both sides. The partners' own video image is being transmitted and they receive the image of the respective other partner. The default view of the video window currently displayed depends on the settings in the Default video configuration of the SIP Service Provider.
NOTICE: The video transmission or screen resolution quality may change during an active call. Such changes result from the bandwith for transmitting video data streams automatically adjusting to the available bandwidth resources of the communica-tions system.
4.7.2.1 Video Features
The video telephony feature enables using the following functions:
Camera image
The camera image function opens your own video image in the Video window. You can perform camera image settings in the Settings dialog on the Advanced > SIP Service Provider > Video schemes tab. For example, you can configure whether the camera image or your own video image is automatically switched on
at every program start or switched on/off with a click on in the Softphone menu. Your connection partner does not see this image. In addition, there are two options for you to represent your own image: mirrored and unmirrored. By default, you see your own video image mirrored, but it is transmitted unmirrored to the connection partner. The following figure shows an example of the Video window in which the camera image was automatically switched on at the program start. As long as there is no connection that transmits the video image of the connection
A31003-S5070-U120-4-7619, 01/2014108 OpenScape UC Application V7 OpenScape Fusion for Microsoft Lync, User Guide

Operation ReferenceCall Tab
partner, you can switch the camera image off with a click on the Close (x) button
in the screen's top right corner or on in the Softphone toolbar. This also closes the Video window.
Receiving a video image
Received video images are always accepted and represented, independent from an installed or active video camera. This, however, requires the Video Viewer module to be active. The representation of received video images cannot be suppressed or switched off. As long as your conversational partner sends his/her video image, the Video window stays open. There is no way you can close the Video window.
The next figure is an example of the Video window during an active call conducted between two connection partners. They receive the image of the respectively other participant, but do not yet send a video image by themselves.
A31003-S5070-U120-4-7619, 01/2014OpenScape UC Application V7 OpenScape Fusion for Microsoft Lync, User Guide 109
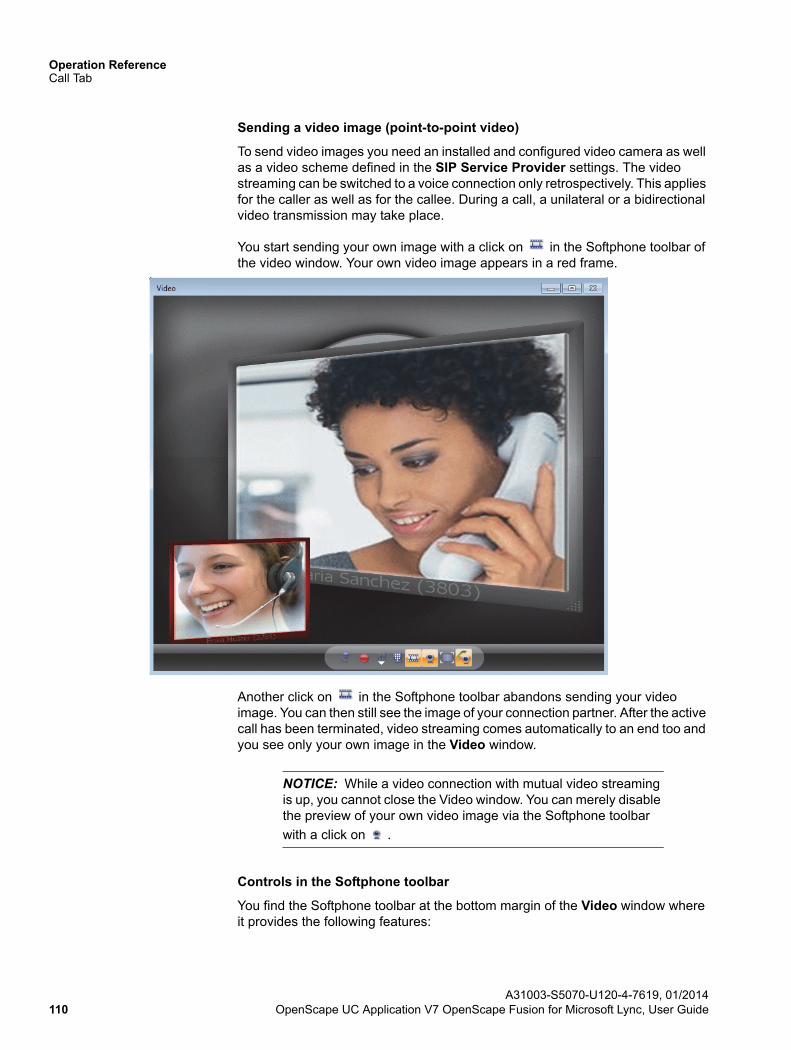
Operation ReferenceCall Tab
Sending a video image (point-to-point video)
To send video images you need an installed and configured video camera as well as a video scheme defined in the SIP Service Provider settings. The video streaming can be switched to a voice connection only retrospectively. This applies for the caller as well as for the callee. During a call, a unilateral or a bidirectional video transmission may take place.
You start sending your own image with a click on in the Softphone toolbar of the video window. Your own video image appears in a red frame.
Another click on in the Softphone toolbar abandons sending your video image. You can then still see the image of your connection partner. After the active call has been terminated, video streaming comes automatically to an end too and you see only your own image in the Video window.
NOTICE: While a video connection with mutual video streaming is up, you cannot close the Video window. You can merely disable the preview of your own video image via the Softphone toolbar
with a click on .
Controls in the Softphone toolbar
You find the Softphone toolbar at the bottom margin of the Video window where it provides the following features:
A31003-S5070-U120-4-7619, 01/2014110 OpenScape UC Application V7 OpenScape Fusion for Microsoft Lync, User Guide
Operation ReferenceCall Tab
• Switch microphone on/off
NOTICE: This icon stays inactive (grayed out) as long as there is no connection.
A click on the icon mutes the microphone. The icon then changes to . A
click on the icon undoes the muting.
• SpeakerActivates/deactivates the speaker in case of an active call or in idle state
NOTICE: This feature is available if for example plathosys CT-180/220/Headset is used as audio device and selected in the corresponding audio scheme under Control plathosys CT-180/220/Headset.
• HeadsetSwitches the headset on/off in case of an active call or in idle state
NOTICE: and the headset volume control are only available if you use a terminal device with appropriate signaling and this audio device was configured in the active audio scheme.
• Switch additional speaker on/offActivating/disabling the additional speaker during an active call. The additional speaker must be configured in the settings for the audio scheme currently used.
• Switch voice recording on/off
NOTICE: This icon stays inactive (grayed out) as long as there is no connection.
A click on activates the conversation recording. The icon then changes its color from gray to orange.
A31003-S5070-U120-4-7619, 01/2014OpenScape UC Application V7 OpenScape Fusion for Microsoft Lync, User Guide 111
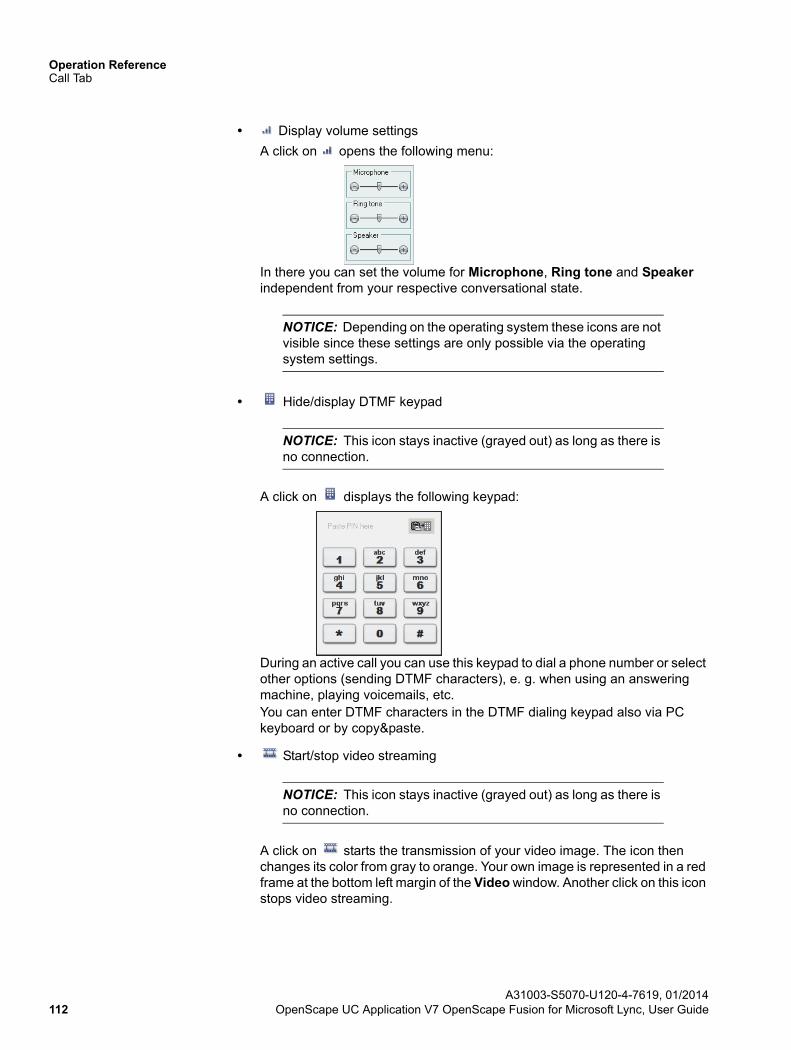
Operation ReferenceCall Tab
• Display volume settings
A click on opens the following menu:
In there you can set the volume for Microphone, Ring tone and Speaker independent from your respective conversational state.
NOTICE: Depending on the operating system these icons are not visible since these settings are only possible via the operating system settings.
• Hide/display DTMF keypad
NOTICE: This icon stays inactive (grayed out) as long as there is no connection.
A click on displays the following keypad:
During an active call you can use this keypad to dial a phone number or select other options (sending DTMF characters), e. g. when using an answering machine, playing voicemails, etc.You can enter DTMF characters in the DTMF dialing keypad also via PC keyboard or by copy&paste.
• Start/stop video streaming
NOTICE: This icon stays inactive (grayed out) as long as there is no connection.
A click on starts the transmission of your video image. The icon then changes its color from gray to orange. Your own image is represented in a red frame at the bottom left margin of the Video window. Another click on this icon stops video streaming.
A31003-S5070-U120-4-7619, 01/2014112 OpenScape UC Application V7 OpenScape Fusion for Microsoft Lync, User Guide

Operation ReferenceCall Tab
• Switch camera image on/off
A click on activates the camera image. The icon then changes its color from gray to orange. Another click on this icon deactivates the camera image.
• Toggle video player views
With a click on you can change the layout in the Video window. The following three views are available:
– In call
– Full window
– Full screen
– / Video call on/off (SIP only)
NOTICE: This icon is only displayed if you operate this program at an SIP communications system (OpenScape Voice) and you have an operable video camera currently used by a video scheme of the SIP Service Provider.
The state of this icon – active or disabled – specifies whether or not video resources are reserved during the connection setup. It thus determines whether the call shall be initiated as video or pure audio call. The icon for activating/disabling the video call feature is inactive by default, i .e. the video call feature is inactive by default. Consequently, all calls are set up as pure audio connection. However, you can extend such
connections to video connections via the icon in the Softphone toolbar at a later date.If the icon for activating/disabling the video call feature is enabled, each call is automatically initiated as video call or audio connection depending on whether or not the same icon is active/disabled on the conversational partner's side. If both conversational partners have activated this icon, a video connection is automatically added to an audio connection. The Video window opens automatically. The video images of the conversa-tional partners are transmitted. The displayed video view corresponds to the Default video configuration in the Settings dialog on the Advanced > SIP Service Provider > Video schemes tab.If only one of the two conversational partners has activated this feature, a corresponding message in the automatically opened Video window informs him/her that the other conversational partner does not wish a video connection to be set up. The subscriber who has activated
the icon sees only his/her own image in the pre-set view of the Video window. The image is not transmitted automatically. In this case, supple-
menting the audio transmission with video via the icon at a later date is not possible.
Operating via PC keyboard
[F11] key - Enabling the [F11] key you can maximize or restore the Video window. This feature is only supported for the camera image and the views In call and Full window.
A31003-S5070-U120-4-7619, 01/2014OpenScape UC Application V7 OpenScape Fusion for Microsoft Lync, User Guide 113
Operation ReferenceCall Tab
During a video conference or an active call with video streaming you can use the keys of your PC keyboard (or of your configured preferred device) to give control commands to the communications system by sending DTMF tones. You can, for example, enter the conference PIN via PC keyboard for dialing into the conference with active video window displayed in the foreground.
4.7.2.2 Views of the Video Window
The OpenScape Fusion for Microsoft Lync video window provides three default views: In call, Full window and Full screen. In addition, you can customize views of the video window. You can specify in the Settings > Advanced > SIP Service Provider > Video schemes dialog whether to switch the camera image automatically on at the program start and which view of the video window to display during an active video connection by default.
NOTICE: The figures shown in the following are examples. They help the user to imagine possible default views of the Video window.
In call
During an active video connection the Video window contains two images by default: your own (sent image) and the one of the connection partner (received image). The image of the connection partner appears in a larger frame than your
A31003-S5070-U120-4-7619, 01/2014114 OpenScape UC Application V7 OpenScape Fusion for Microsoft Lync, User Guide
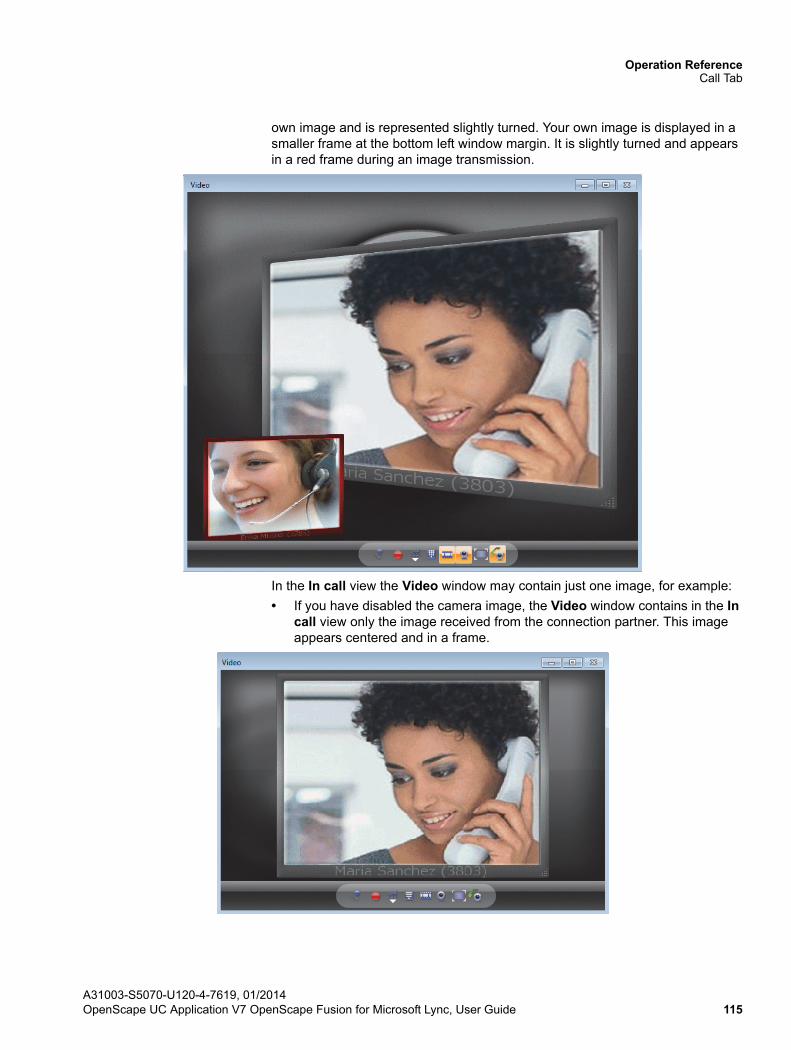
Operation ReferenceCall Tab
own image and is represented slightly turned. Your own image is displayed in a smaller frame at the bottom left window margin. It is slightly turned and appears in a red frame during an image transmission.
In the In call view the Video window may contain just one image, for example:
• If you have disabled the camera image, the Video window contains in the In call view only the image received from the connection partner. This image appears centered and in a frame.
A31003-S5070-U120-4-7619, 01/2014OpenScape UC Application V7 OpenScape Fusion for Microsoft Lync, User Guide 115
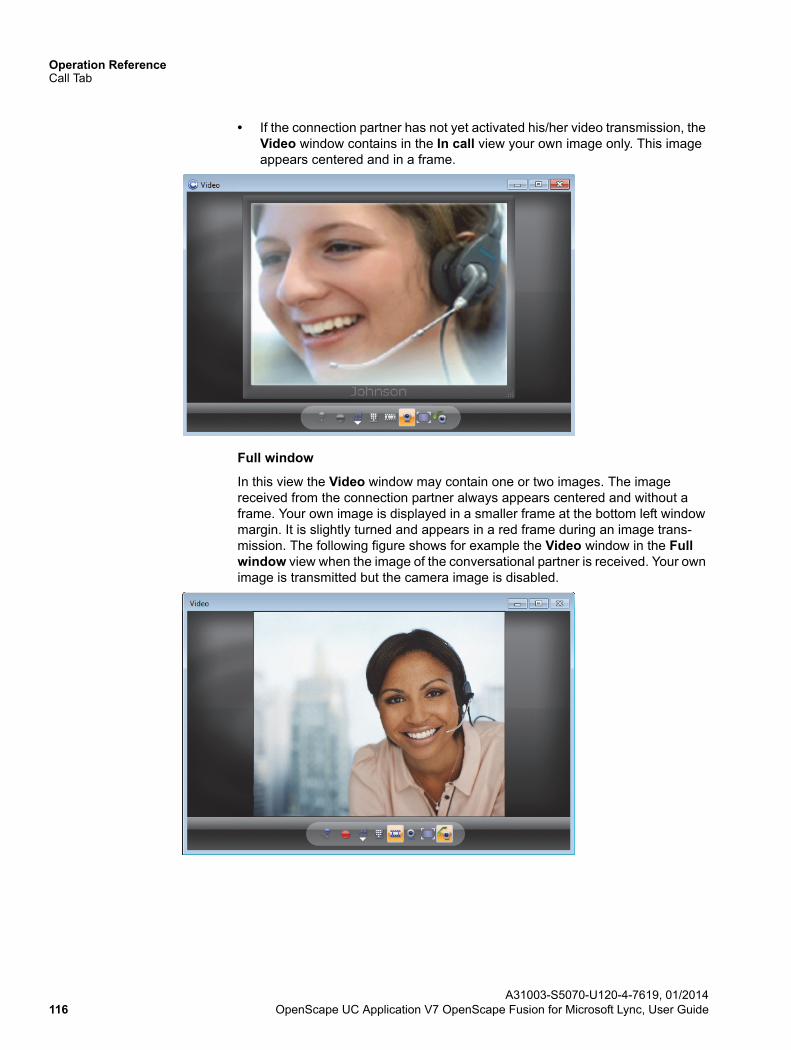
Operation ReferenceCall Tab
• If the connection partner has not yet activated his/her video transmission, the Video window contains in the In call view your own image only. This image appears centered and in a frame.
Full window
In this view the Video window may contain one or two images. The image received from the connection partner always appears centered and without a frame. Your own image is displayed in a smaller frame at the bottom left window margin. It is slightly turned and appears in a red frame during an image trans-mission. The following figure shows for example the Video window in the Full window view when the image of the conversational partner is received. Your own image is transmitted but the camera image is disabled.
A31003-S5070-U120-4-7619, 01/2014116 OpenScape UC Application V7 OpenScape Fusion for Microsoft Lync, User Guide
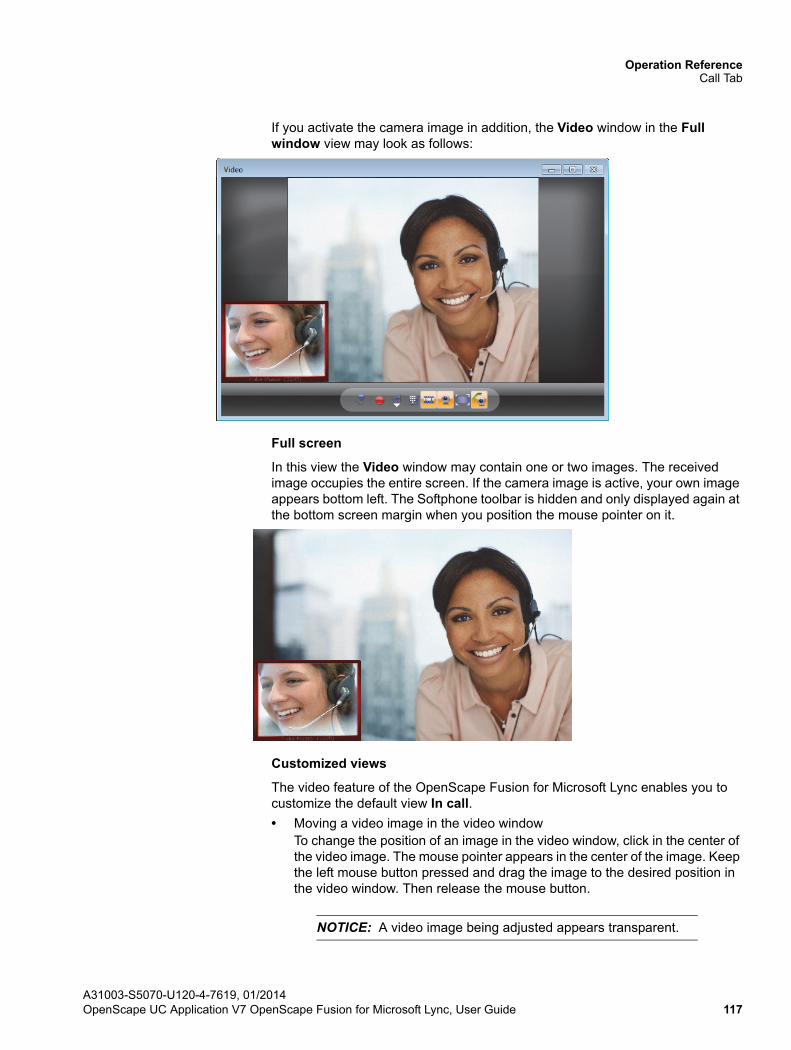
Operation ReferenceCall Tab
If you activate the camera image in addition, the Video window in the Full window view may look as follows:
Full screen
In this view the Video window may contain one or two images. The received image occupies the entire screen. If the camera image is active, your own image appears bottom left. The Softphone toolbar is hidden and only displayed again at the bottom screen margin when you position the mouse pointer on it.
Customized views
The video feature of the OpenScape Fusion for Microsoft Lync enables you to customize the default view In call.
• Moving a video image in the video windowTo change the position of an image in the video window, click in the center of the video image. The mouse pointer appears in the center of the image. Keep the left mouse button pressed and drag the image to the desired position in the video window. Then release the mouse button.
NOTICE: A video image being adjusted appears transparent.
A31003-S5070-U120-4-7619, 01/2014OpenScape UC Application V7 OpenScape Fusion for Microsoft Lync, User Guide 117
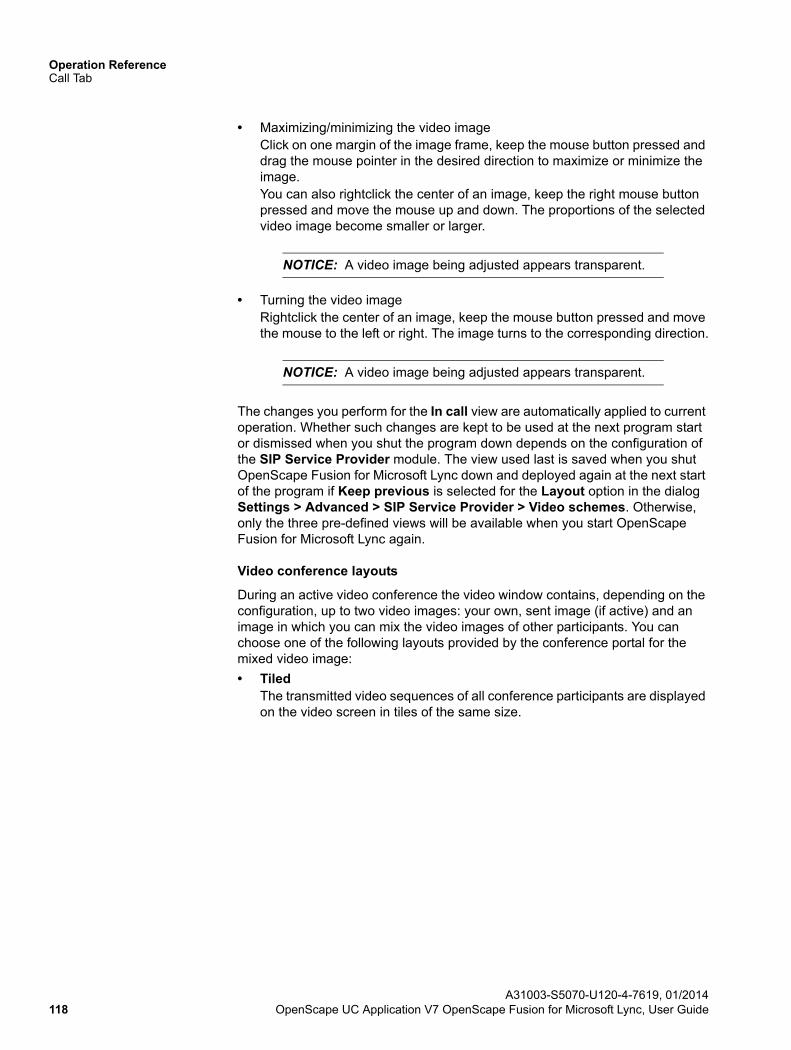
Operation ReferenceCall Tab
• Maximizing/minimizing the video imageClick on one margin of the image frame, keep the mouse button pressed and drag the mouse pointer in the desired direction to maximize or minimize the image.You can also rightclick the center of an image, keep the right mouse button pressed and move the mouse up and down. The proportions of the selected video image become smaller or larger.
NOTICE: A video image being adjusted appears transparent.
• Turning the video imageRightclick the center of an image, keep the mouse button pressed and move the mouse to the left or right. The image turns to the corresponding direction.
NOTICE: A video image being adjusted appears transparent.
The changes you perform for the In call view are automatically applied to current operation. Whether such changes are kept to be used at the next program start or dismissed when you shut the program down depends on the configuration of the SIP Service Provider module. The view used last is saved when you shut OpenScape Fusion for Microsoft Lync down and deployed again at the next start of the program if Keep previous is selected for the Layout option in the dialog Settings > Advanced > SIP Service Provider > Video schemes. Otherwise, only the three pre-defined views will be available when you start OpenScape Fusion for Microsoft Lync again.
Video conference layouts
During an active video conference the video window contains, depending on the configuration, up to two video images: your own, sent image (if active) and an image in which you can mix the video images of other participants. You can choose one of the following layouts provided by the conference portal for the mixed video image:
• TiledThe transmitted video sequences of all conference participants are displayed on the video screen in tiles of the same size.
A31003-S5070-U120-4-7619, 01/2014118 OpenScape UC Application V7 OpenScape Fusion for Microsoft Lync, User Guide
Operation ReferenceCall Tab
• Active SpeakerThe video sequence of the currently active speaker is highlighted by repre-sentation in a bigger tile. In addition, the transmitted video sequences of all conference participants are displayed on the video screen in tiles of the same size.By default, the image of the currently active speaker reacts delayed to switching the person who conducts the conversation. This prevents the image of the active speaker from changing too often.
NOTICE: The sensitivity with which the image of the active speaker reacts to switching the person who conducts the conver-sation is a system setting that the system administrator can change.
• SingleOnly the video sequence of the currently active speaker is displayed on the video screen.
The respective video conference participant does not see his/her own video sequence in a video tile by default. The user may add his/her own video sequence via the menu in the video window (Layout > Self-View).
The video tiles of participants who have left the conference are kept up in the video window for a while (grace period). The grace period is defaulted by a system setting. It enables the conference participant to dial back into the conference at a later date. The still open video tiles show the image of the respective participant sent last in black/white during the grace period. This indicates to the other participants that the grace period is active.
Conference participants whose video tile shows a video animation have either not released their video streaming or a defective video camera.
4.7.2.3 Behavior of the Video Streaming
The video streaming behavior follows changes analog to the audio transmission:
• Call is on-holdWhen a call is held, the video streaming stops as well. The held subscriber does not see a video screen. If the video streaming status changes during a held call, the restoration of the connection follows this change. If, for example, the camera is switched off, the video streaming is inactive when the call is resumed.
• During a consultation callFor modifications to the video streaming status during a consultation call the same applies as for a held call.
• TogglingWhen you toggle the active and held subscriber, the video streaming to the active subscriber is held and resumed to the held subscriber also. The Video window shows only your own video image and the one of the respective
A31003-S5070-U120-4-7619, 01/2014OpenScape UC Application V7 OpenScape Fusion for Microsoft Lync, User Guide 119
Operation ReferenceCall Tab
subscriber. The video statuses of the two connections are independent from each other in this case. In other words, if the video streaming status of one connection is changed, it does not affect the other connection.
• Transferring a callWhen a call is transferred, the video installation and configuration of the subscriber to be transferred and of the new subscriber decides whether no, a unilateral or a bidirectional video connection exists.
• Video conferenceYou can create video conferences via the Conferences function window by yourself and also participate in video conferences you have been invited for. In addition, you can take part in video conferences that were configured with the OpenScape Extensions for Microsoft Outlook application.After the video conference start, the Video window opens automatically. As long as only one participant is in the conference, a so-called "video-on-hold" is played by default. The conference participant only needs to release trans-mitting his/her video image for starting the video streaming. The Video window represents two video images: your own image in a red frame and an image in which you can mix the video images of the other participants. The conference portal provides different video layouts for the mixed image.
4.7.2.4 Controlling a Video Conference via Video Menu
This section describes the options you have to control a video conference via the video menu.
During a video conference you can use the default keypad of your phone or the DTMF dialing option in the Softphone menu to display a video menu on the video screen and to trigger conference control functions.
Open the video menu via the key command . Then select the functions you wish to edit. If you do not make an entry in the menu, the menu view is displayed for 20 seconds. After this period, the video menu closes automatically.
NOTICE: To hide the video menu manually, enter once again.
A31003-S5070-U120-4-7619, 01/2014120 OpenScape UC Application V7 OpenScape Fusion for Microsoft Lync, User Guide
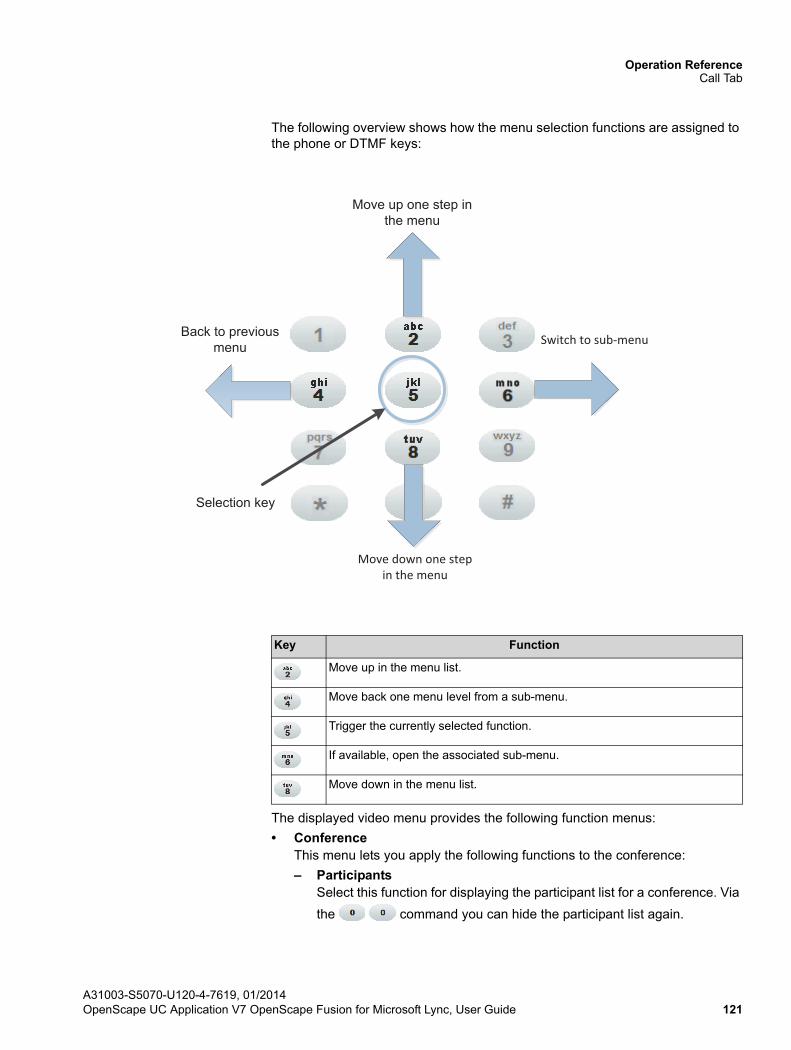
Operation ReferenceCall Tab
The following overview shows how the menu selection functions are assigned to the phone or DTMF keys:
The displayed video menu provides the following function menus:
• ConferenceThis menu lets you apply the following functions to the conference:
– ParticipantsSelect this function for displaying the participant list for a conference. Via
the command you can hide the participant list again.
Key Function
Move up in the menu list.
Move back one menu level from a sub-menu.
Trigger the currently selected function.
If available, open the associated sub-menu.
Move down in the menu list.
Selection key
Switch to sub-menu
Move down one step in the menu
Back to previousmenu
Move up one step inthe menu
A31003-S5070-U120-4-7619, 01/2014OpenScape UC Application V7 OpenScape Fusion for Microsoft Lync, User Guide 121
Operation ReferenceCall Tab
– MuteSelect this function for muting the entire conference. Invoking this function once more undoes this restriction. The current muting status of the conference is displayed in the status window (head-up display) Conference Information in the top right area of the video screen.
NOTICE: In case of a moderated conference only the moderator can mute the entire conference; in open conferences all conference participants can mute a conference.
– LockSelect this function if you do not wish any further conference participants to join in. Invoking this function once more undoes this restriction. The current locking status of the conference is displayed in the status window (head-up display) Conference Information in the top right area of the video screen.
NOTICE: In case of a moderated conference only the moderator can lock the conference; in open conferences all conference participants can lock the conference.
• LayoutThis menu lets you set the representation mode on the video screen. The system configuration determines which options are available in this menu.
NOTICE: If you change the layout setting, it changes for all conference participants.
– TiledThe transmitted video sequences of all conference participants are displayed on the video screen in tiles of the same size.
– Active SpeakerThe video sequence of the currently active speaker is highlighted by representation in a bigger tile. In addition, the transmitted video sequences of all conference participants are displayed on the video screen in tiles of the same size.
– SingleOnly the video sequence of the currently active speaker is displayed on the video screen.
– Self-ViewYou can use this option to display your own video sequence in addition to the video sequences of other video conference participants. If you invoke this function once more, displaying your own video sequence will be disabled to restore the defaulted state.
• OptionsYou can use this menu to see conference and video streaming information.
A31003-S5070-U120-4-7619, 01/2014122 OpenScape UC Application V7 OpenScape Fusion for Microsoft Lync, User Guide
Operation ReferenceCall Tab
– Conference InformationSelect this function if you wish to display the status window (head-up display) with information about the current conference on the video screen.In this status window you see the following information (from left to right):
– Video InformationSelect this function is you wish to display the status window (head-up display) with video streaming information on the video screen.In this status window you see the following information (from left to right):
NOTICE: The video transmission or screen resolution quality may change during an active call. Such changes result from the bandwith for transmitting video data streams automatically adjusting to the available bandwidth resources of the communica-tions system.
When operating the displayed menu please heed the following points:
• Each conference participant has his/her own menu. In other words, he/she is the only one to see and operate this menu.
• An inactivity timeout is implemented for displaying the menu. In other words, if nobody uses the menu for a specific period, it closes automatically. The system default for this inactivity timeout is 20 seconds.
NOTICE: Please also note the operating restrictions conditioned by the conference type (moderated conference/open conference).
4.7.2.5 How to Initiate a Video Call (SIP only)
In the following we describe how to set up a video call step-by-step.
• Name display of video-incompatible conference participants
• Conference locked/unlocked icon
• Conference muted/unmuted icon
• Conference duration display
• Number of video-incompatible conference participants
• Number of video-compatible conference participants
• Resolution of the video signal on the current device
• Encoder quality of the video signal in percent
• Bandwidth for the received video signal
• Number of data packages sent for video streaming
• Number of complete data packages for the decoder (iFrames)
A31003-S5070-U120-4-7619, 01/2014OpenScape UC Application V7 OpenScape Fusion for Microsoft Lync, User Guide 123
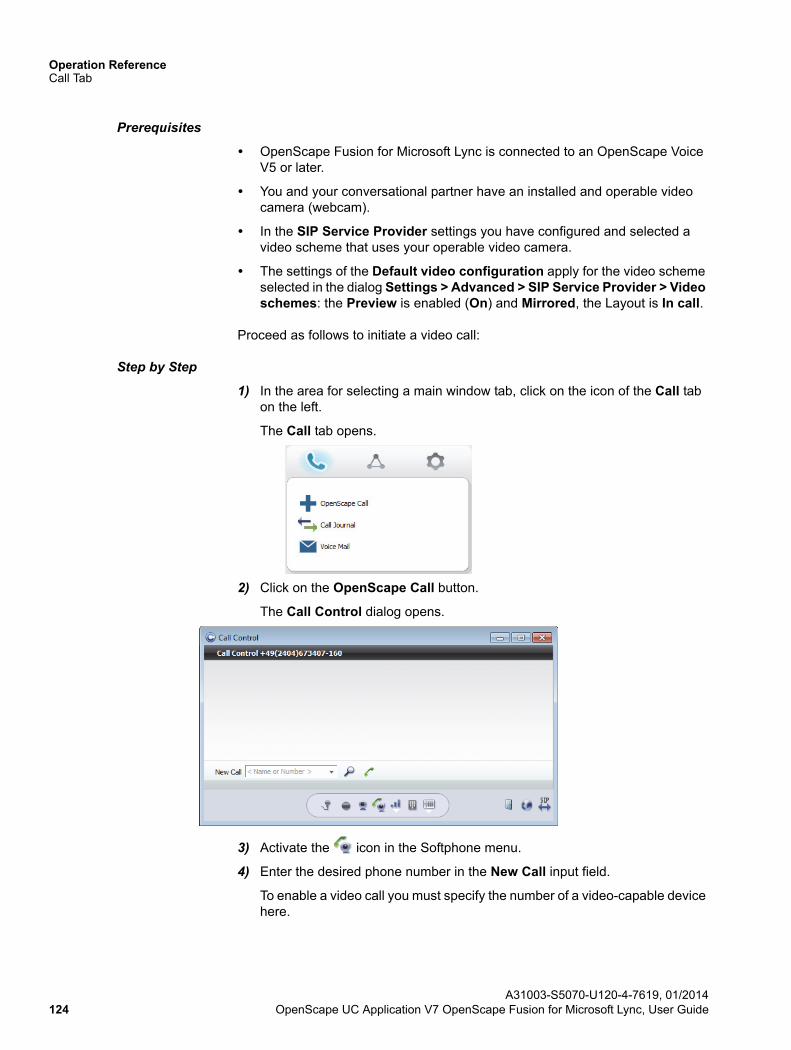
Operation ReferenceCall Tab
Prerequisites
• OpenScape Fusion for Microsoft Lync is connected to an OpenScape Voice V5 or later.
• You and your conversational partner have an installed and operable video camera (webcam).
• In the SIP Service Provider settings you have configured and selected a video scheme that uses your operable video camera.
• The settings of the Default video configuration apply for the video scheme selected in the dialog Settings > Advanced > SIP Service Provider > Video schemes: the Preview is enabled (On) and Mirrored, the Layout is In call.
Proceed as follows to initiate a video call:
Step by Step
1) In the area for selecting a main window tab, click on the icon of the Call tab on the left.
The Call tab opens.
2) Click on the OpenScape Call button.
The Call Control dialog opens.
3) Activate the icon in the Softphone menu.
4) Enter the desired phone number in the New Call input field.
To enable a video call you must specify the number of a video-capable device here.
A31003-S5070-U120-4-7619, 01/2014124 OpenScape UC Application V7 OpenScape Fusion for Microsoft Lync, User Guide
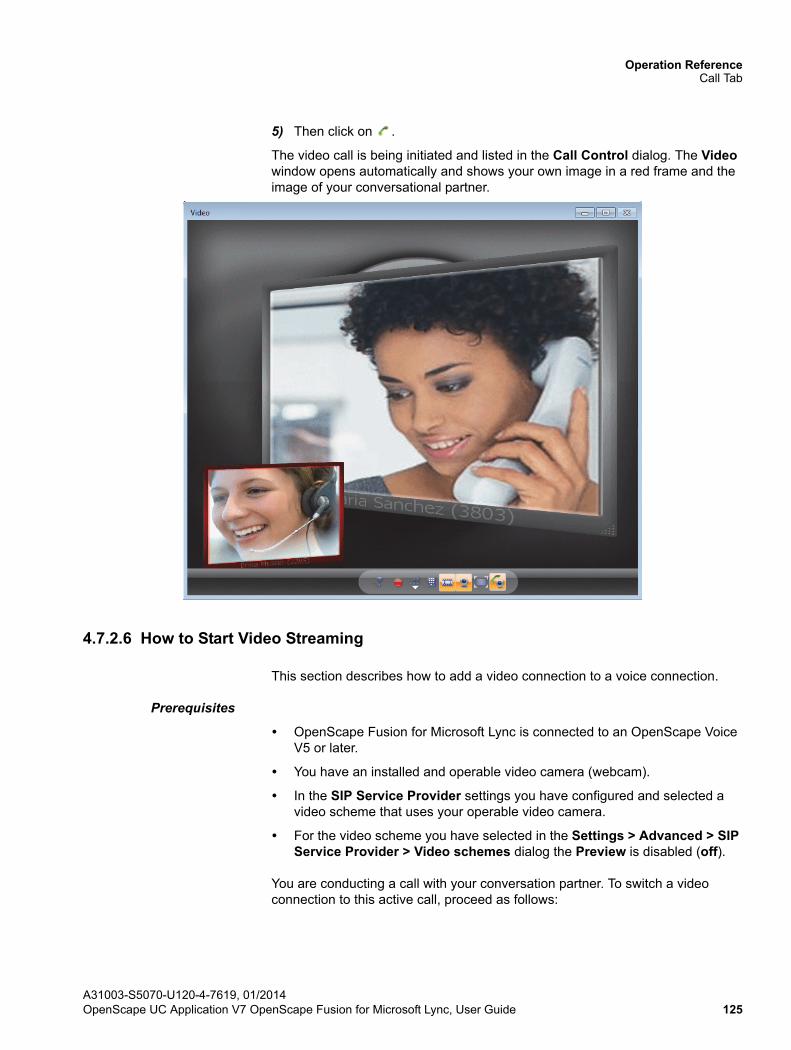
Operation ReferenceCall Tab
5) Then click on .
The video call is being initiated and listed in the Call Control dialog. The Video window opens automatically and shows your own image in a red frame and the image of your conversational partner.
4.7.2.6 How to Start Video Streaming
This section describes how to add a video connection to a voice connection.
Prerequisites
• OpenScape Fusion for Microsoft Lync is connected to an OpenScape Voice V5 or later.
• You have an installed and operable video camera (webcam).
• In the SIP Service Provider settings you have configured and selected a video scheme that uses your operable video camera.
• For the video scheme you have selected in the Settings > Advanced > SIP Service Provider > Video schemes dialog the Preview is disabled (off).
You are conducting a call with your conversation partner. To switch a video connection to this active call, proceed as follows:
A31003-S5070-U120-4-7619, 01/2014OpenScape UC Application V7 OpenScape Fusion for Microsoft Lync, User Guide 125
Operation ReferenceCall Tab
Step by Step
1) Click in the Softphone menu of the Call Control dialog on .
The Video window opens, showing your own image.
2) Click in the Softphone toolbar of the Video window on .
Your own image appears in a red frame. It is transmitted to the connection partner.
NOTICE: If your connection partner also has a video camera and switched his/her image to the conference in the same way, it appears automatically in your Video window. You cannot control or activate/deactivate receiving video images.
4.7.2.7 How to Stop Video Streaming
How to terminate transmitting your own video image:
Step by Step
1) Click in the Softphone toolbar of the Video window on .
Your own image does no longer appear in a red frame and is no longer transmitted.
NOTICE: The video image of your connection partner remains visible until he/she terminates the transmission or the connection is cleared.
2) Click in the Softphone menu of the video window on .
The Video window is closed. The video camera (Webcam) is switched off.
4.7.3 Journal Dialog
The Journal dialog logs all inbound and outbound calls as well as conferences, no matter whether or not they were successful.
A31003-S5070-U120-4-7619, 01/2014126 OpenScape UC Application V7 OpenScape Fusion for Microsoft Lync, User Guide
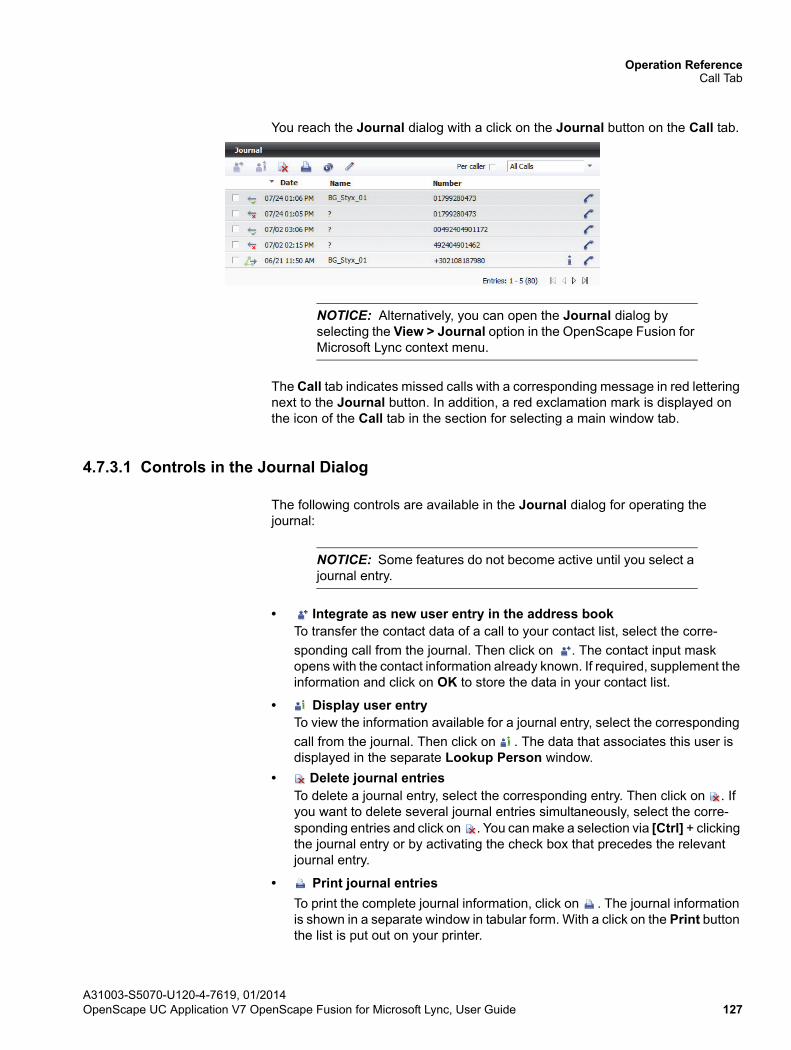
Operation ReferenceCall Tab
You reach the Journal dialog with a click on the Journal button on the Call tab.
NOTICE: Alternatively, you can open the Journal dialog by selecting the View > Journal option in the OpenScape Fusion for Microsoft Lync context menu.
The Call tab indicates missed calls with a corresponding message in red lettering next to the Journal button. In addition, a red exclamation mark is displayed on the icon of the Call tab in the section for selecting a main window tab.
4.7.3.1 Controls in the Journal Dialog
The following controls are available in the Journal dialog for operating the journal:
NOTICE: Some features do not become active until you select a journal entry.
• Integrate as new user entry in the address bookTo transfer the contact data of a call to your contact list, select the corre-
sponding call from the journal. Then click on . The contact input mask opens with the contact information already known. If required, supplement the information and click on OK to store the data in your contact list.
• Display user entryTo view the information available for a journal entry, select the corresponding
call from the journal. Then click on . The data that associates this user is displayed in the separate Lookup Person window.
• Delete journal entriesTo delete a journal entry, select the corresponding entry. Then click on . If you want to delete several journal entries simultaneously, select the corre-sponding entries and click on . You can make a selection via [Ctrl] + clicking the journal entry or by activating the check box that precedes the relevant journal entry.
• Print journal entries
To print the complete journal information, click on . The journal information is shown in a separate window in tabular form. With a click on the Print button the list is put out on your printer.
A31003-S5070-U120-4-7619, 01/2014OpenScape UC Application V7 OpenScape Fusion for Microsoft Lync, User Guide 127
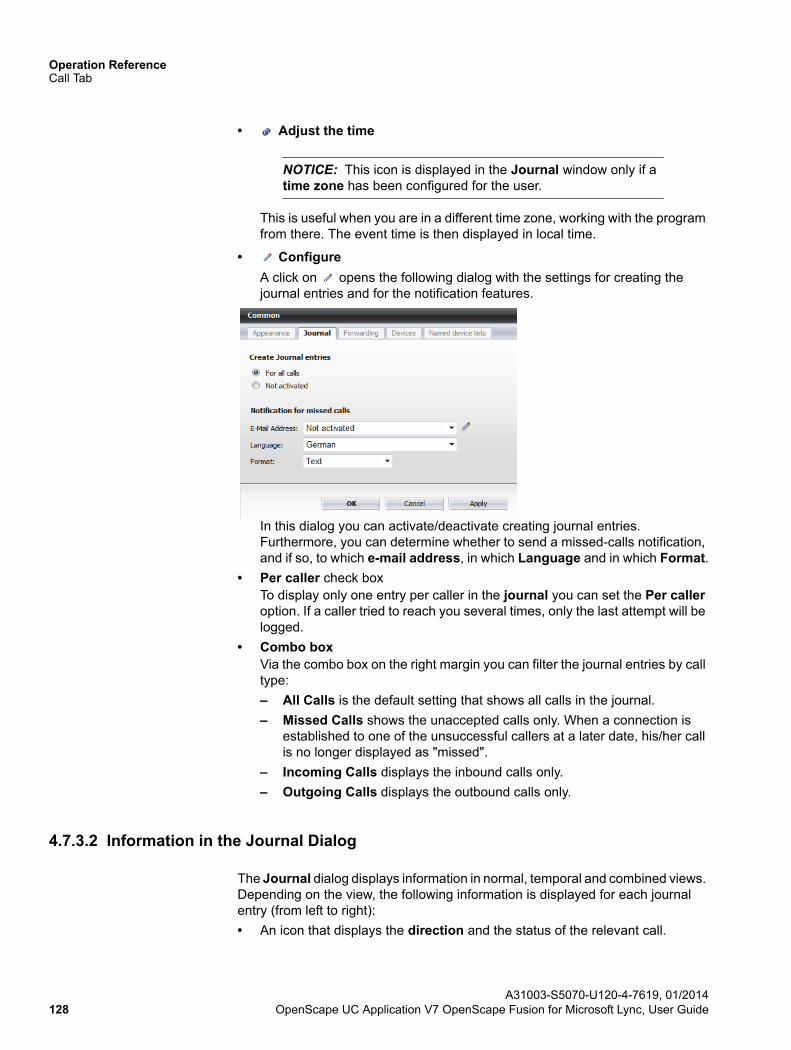
Operation ReferenceCall Tab
• Adjust the time
NOTICE: This icon is displayed in the Journal window only if a time zone has been configured for the user.
This is useful when you are in a different time zone, working with the program from there. The event time is then displayed in local time.
• Configure
A click on opens the following dialog with the settings for creating the journal entries and for the notification features.
In this dialog you can activate/deactivate creating journal entries. Furthermore, you can determine whether to send a missed-calls notification, and if so, to which e-mail address, in which Language and in which Format.
• Per caller check boxTo display only one entry per caller in the journal you can set the Per caller option. If a caller tried to reach you several times, only the last attempt will be logged.
• Combo boxVia the combo box on the right margin you can filter the journal entries by call type:
– All Calls is the default setting that shows all calls in the journal.
– Missed Calls shows the unaccepted calls only. When a connection is established to one of the unsuccessful callers at a later date, his/her call is no longer displayed as "missed".
– Incoming Calls displays the inbound calls only.
– Outgoing Calls displays the outbound calls only.
4.7.3.2 Information in the Journal Dialog
The Journal dialog displays information in normal, temporal and combined views. Depending on the view, the following information is displayed for each journal entry (from left to right):
• An icon that displays the direction and the status of the relevant call.
A31003-S5070-U120-4-7619, 01/2014128 OpenScape UC Application V7 OpenScape Fusion for Microsoft Lync, User Guide
Operation ReferenceCall Tab
– - Successful outbound call.
– - Unsuccessful outbound call.
– - Successful inbound call.
– - Unsuccessful inbound call.
– - Forwarded inbound call.
– - Conference call specifying that you have dialed into the conference.
– - Conference call specifying that the system will call you for joining the conference.
• The Time (date and time) when the call arrived or was made
• The Name of the caller or callee
NOTICE: The name can only be displayed if it is contained in the contact list or global address book.
• The Number you have dialed or that was transmitted by the caller (not shown in combined view).
• , to display the contact information that associates the selected journal entry. A click on opens the Lookup Person dialog with the subscriber's contact data (if available).
• or Enables calling the displayed phone number or another phone number of the subscriber. You can access the additional phone numbers of a user by clicking on the respective receiver icon flagged with an additional small triangle. The voicemail row is then enlarged and shows all phone numbers under which this subscriber can be reached.
The journal entries can be sorted in ascending or descending order by different criteria. For this purpose, click in the row under the toolbar of the Journal window on the desired sorting criterion: Date, Name or Number.
4.7.3.3 Time Zone
OpenScape Fusion for Microsoft Lync enables configuring and displaying the user's time zone. This makes the Journal display the arrival of calls in the current local time.
You set the current time zone via the Journal dialog. The time zone function is useful when you are in a different time zone, working from there with OpenScape Fusion for Microsoft Lync. The event time is then displayed in local time. You can switch the Journal entries display from local time to the time of the configured
mobile time zone and vice versa with a click on in the toolbar. Other OpenScape UC Application users who you have as contacts in your contact list see your current time when they hover the mousepointer on your presence status symbol. In this case this is the local time you have previously set as mobile time zone.
A31003-S5070-U120-4-7619, 01/2014OpenScape UC Application V7 OpenScape Fusion for Microsoft Lync, User Guide 129
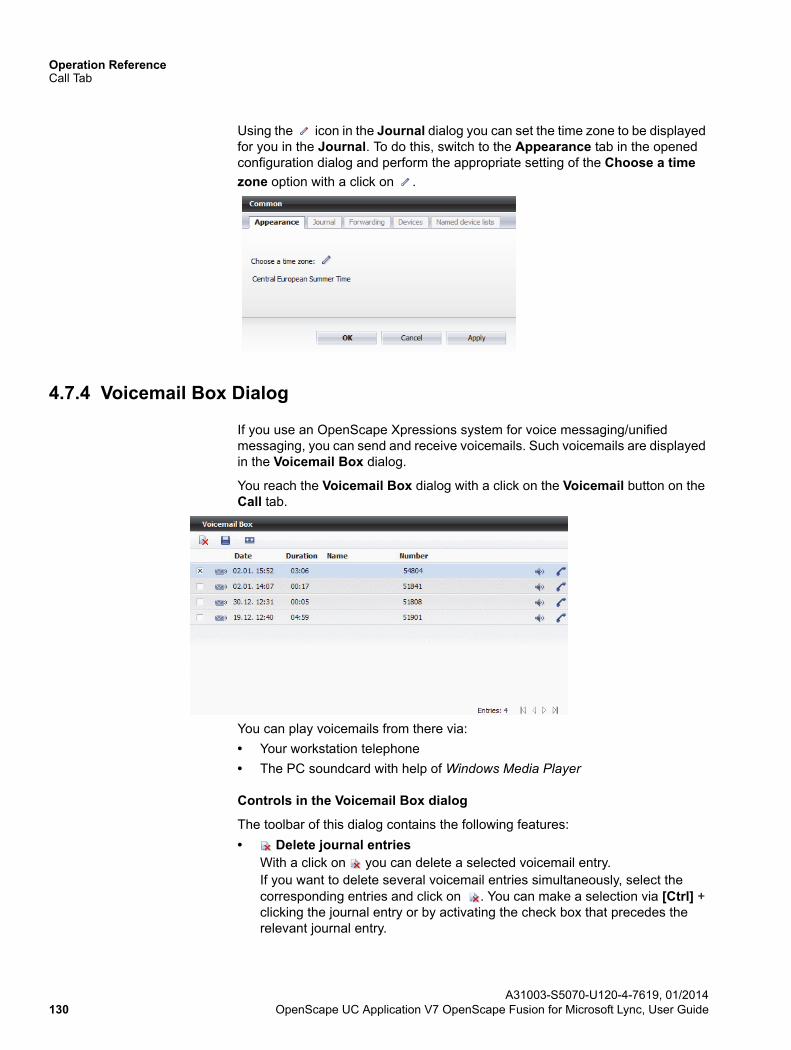
Operation ReferenceCall Tab
Using the icon in the Journal dialog you can set the time zone to be displayed for you in the Journal. To do this, switch to the Appearance tab in the opened configuration dialog and perform the appropriate setting of the Choose a time
zone option with a click on .
4.7.4 Voicemail Box Dialog
If you use an OpenScape Xpressions system for voice messaging/unified messaging, you can send and receive voicemails. Such voicemails are displayed in the Voicemail Box dialog.
You reach the Voicemail Box dialog with a click on the Voicemail button on the Call tab.
You can play voicemails from there via:
• Your workstation telephone
• The PC soundcard with help of Windows Media Player
Controls in the Voicemail Box dialog
The toolbar of this dialog contains the following features:
• Delete journal entriesWith a click on you can delete a selected voicemail entry.If you want to delete several voicemail entries simultaneously, select the corresponding entries and click on . You can make a selection via [Ctrl] + clicking the journal entry or by activating the check box that precedes the relevant journal entry.
A31003-S5070-U120-4-7619, 01/2014130 OpenScape UC Application V7 OpenScape Fusion for Microsoft Lync, User Guide
Operation ReferenceCall Tab
• Save a voicemail entry locallyIf you want to save a received voicemail locally, select it in the Voicemail Box
and click on . A directory selection dialog opens in which you can specify the storage location and the voicemail name. After you have saved the voicemail locally, it is still available even after removing it from the Voicemail Box.
• Voicemail settingsIf you use OpenScape Xpressions, you can click on to open the private settings for the OpenScape Xpressions Web Assistant.
Under the toolbar of this dialog you find the table header for the voicemail entries. With a click on the column description you can sort the journal entries ascendingly or descendingly by Date, Name and Number.
Further information and controls in the Voicemail Box dialog
A voicemail entry in the Voicemail Box contains the following elements (from left to right):
• A check box to select voicemails for playing or deleting.
• The status of the respective voicemail:
– - The voicemail has not been played yet,
– - The voicemail has been played.
NOTICE: A click on labels the voicemail that has not been
played yet as played ( ). This also disables the new-voicemail notification at the configured terminal device.
• The Date and time of the voicemail's arrival.
• The originator's Name.
NOTICE: The name can only be displayed if it is contained in the contact list or global address book.
• - Click on this icon to start playing the voicemail either by telephone or sound card (via Windows Media Player).
• or - Enables calling the displayed phone number or another phone number of the subscriber. You can access the additional phone numbers of a user by clicking on the respective receiver icon flagged with an additional small triangle. The voicemail row is then enlarged and shows all phone numbers under which this subscriber can be reached.
A31003-S5070-U120-4-7619, 01/2014OpenScape UC Application V7 OpenScape Fusion for Microsoft Lync, User Guide 131
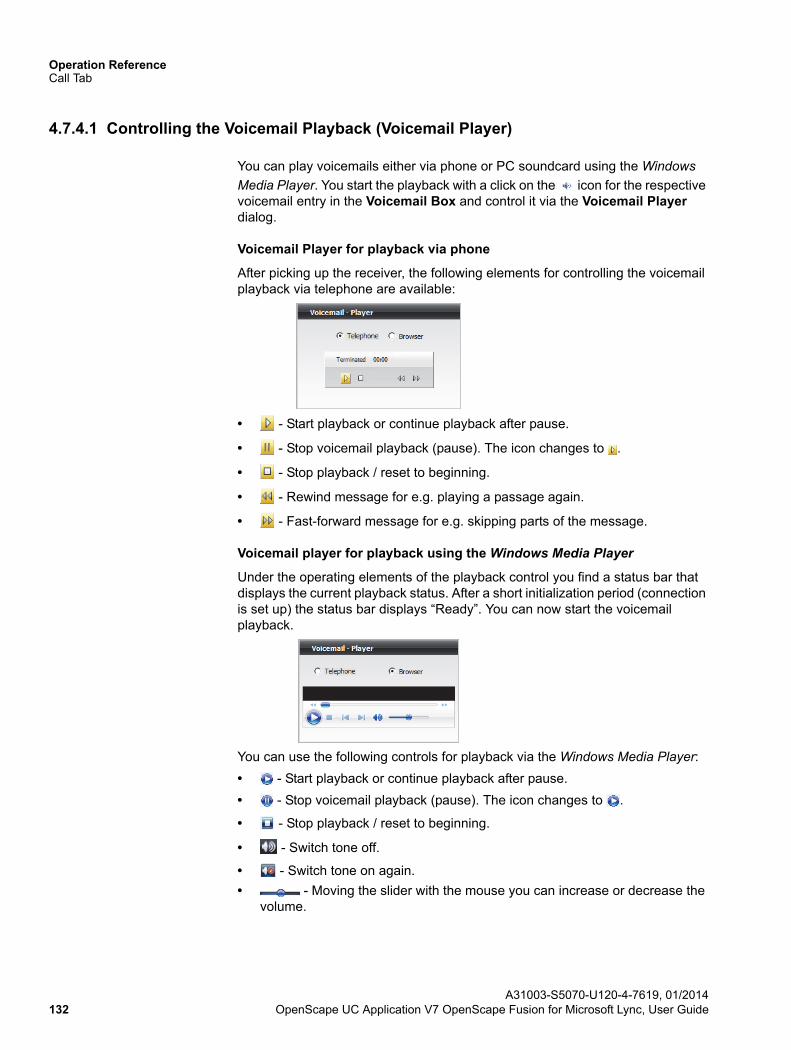
Operation ReferenceCall Tab
4.7.4.1 Controlling the Voicemail Playback (Voicemail Player)
You can play voicemails either via phone or PC soundcard using the Windows
Media Player. You start the playback with a click on the icon for the respective voicemail entry in the Voicemail Box and control it via the Voicemail Player dialog.
Voicemail Player for playback via phone
After picking up the receiver, the following elements for controlling the voicemail playback via telephone are available:
• - Start playback or continue playback after pause.
• - Stop voicemail playback (pause). The icon changes to .
• - Stop playback / reset to beginning.
• - Rewind message for e.g. playing a passage again.
• - Fast-forward message for e.g. skipping parts of the message.
Voicemail player for playback using the Windows Media Player
Under the operating elements of the playback control you find a status bar that displays the current playback status. After a short initialization period (connection is set up) the status bar displays “Ready”. You can now start the voicemail playback.
You can use the following controls for playback via the Windows Media Player:
• - Start playback or continue playback after pause.
• - Stop voicemail playback (pause). The icon changes to .
• - Stop playback / reset to beginning.
• - Switch tone off.
• - Switch tone on again.
• - Moving the slider with the mouse you can increase or decrease the volume.
A31003-S5070-U120-4-7619, 01/2014132 OpenScape UC Application V7 OpenScape Fusion for Microsoft Lync, User Guide
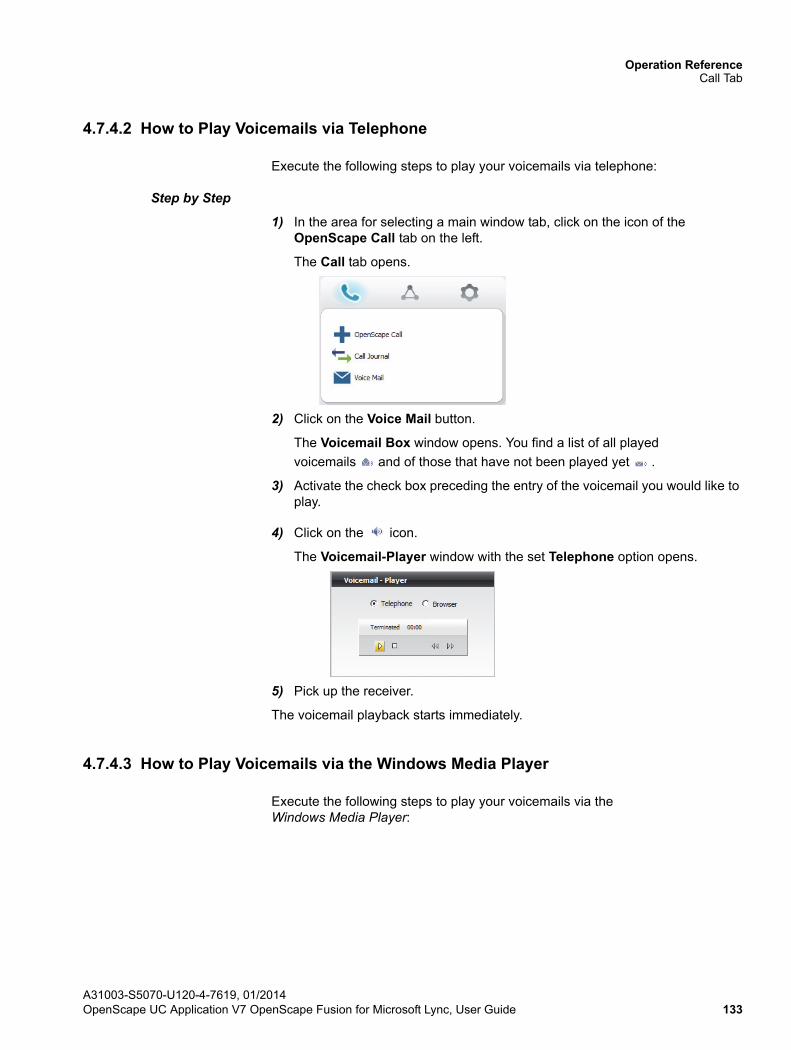
Operation ReferenceCall Tab
4.7.4.2 How to Play Voicemails via Telephone
Execute the following steps to play your voicemails via telephone:
Step by Step
1) In the area for selecting a main window tab, click on the icon of the OpenScape Call tab on the left.
The Call tab opens.
2) Click on the Voice Mail button.
The Voicemail Box window opens. You find a list of all played
voicemails and of those that have not been played yet .
3) Activate the check box preceding the entry of the voicemail you would like to play.
4) Click on the icon.
The Voicemail-Player window with the set Telephone option opens.
5) Pick up the receiver.
The voicemail playback starts immediately.
4.7.4.3 How to Play Voicemails via the Windows Media Player
Execute the following steps to play your voicemails via the Windows Media Player:
A31003-S5070-U120-4-7619, 01/2014OpenScape UC Application V7 OpenScape Fusion for Microsoft Lync, User Guide 133
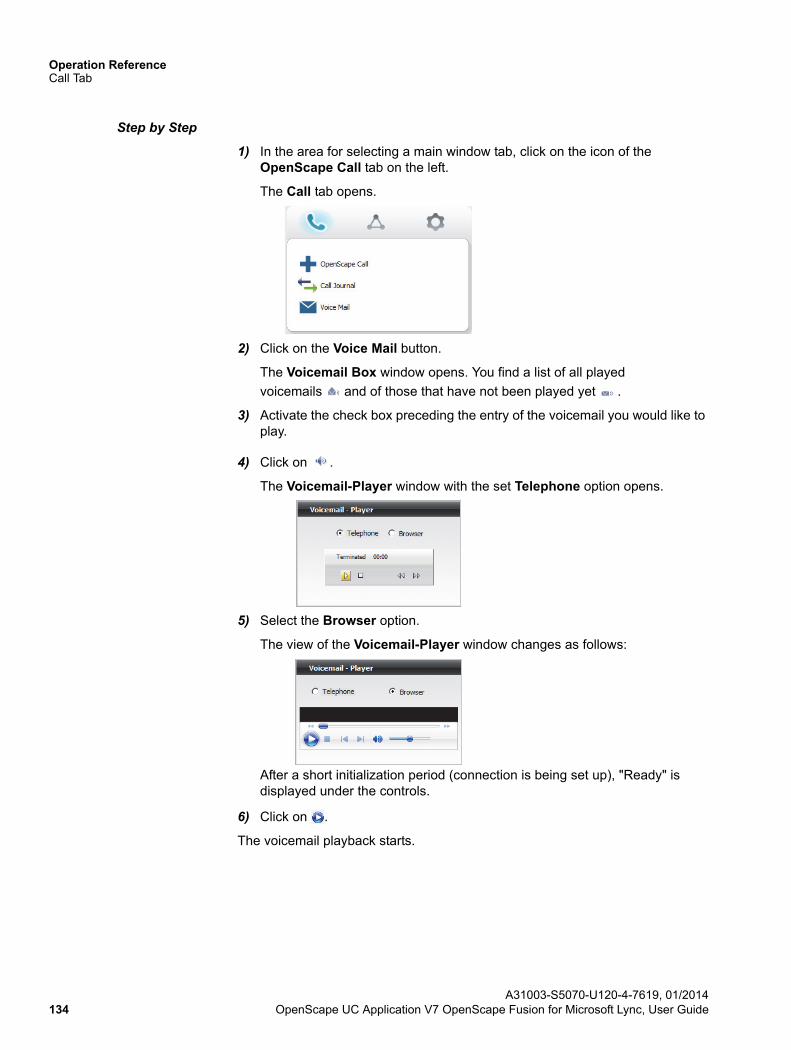
Operation ReferenceCall Tab
Step by Step
1) In the area for selecting a main window tab, click on the icon of the OpenScape Call tab on the left.
The Call tab opens.
2) Click on the Voice Mail button.
The Voicemail Box window opens. You find a list of all played
voicemails and of those that have not been played yet .
3) Activate the check box preceding the entry of the voicemail you would like to play.
4) Click on .
The Voicemail-Player window with the set Telephone option opens.
5) Select the Browser option.
The view of the Voicemail-Player window changes as follows:
After a short initialization period (connection is being set up), "Ready" is displayed under the controls.
6) Click on .
The voicemail playback starts.
A31003-S5070-U120-4-7619, 01/2014134 OpenScape UC Application V7 OpenScape Fusion for Microsoft Lync, User Guide
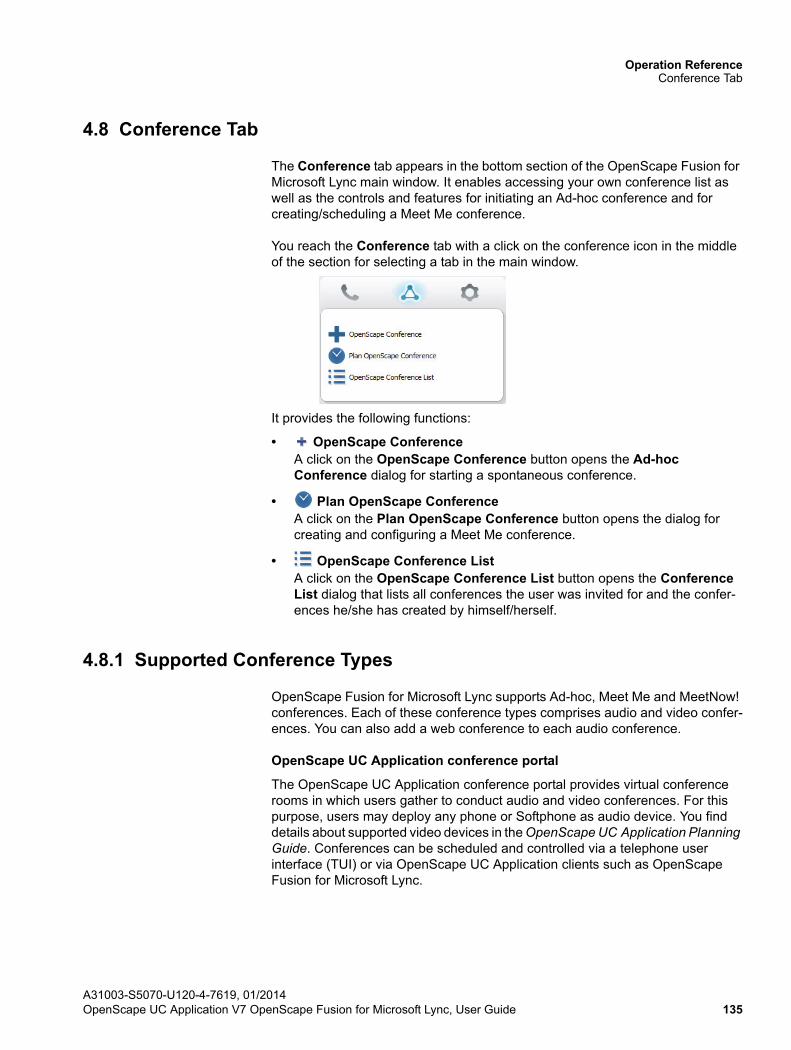
Operation ReferenceConference Tab
4.8 Conference Tab
The Conference tab appears in the bottom section of the OpenScape Fusion for Microsoft Lync main window. It enables accessing your own conference list as well as the controls and features for initiating an Ad-hoc conference and for creating/scheduling a Meet Me conference.
You reach the Conference tab with a click on the conference icon in the middle of the section for selecting a tab in the main window.
It provides the following functions:
• OpenScape ConferenceA click on the OpenScape Conference button opens the Ad-hoc Conference dialog for starting a spontaneous conference.
• Plan OpenScape ConferenceA click on the Plan OpenScape Conference button opens the dialog for creating and configuring a Meet Me conference.
• OpenScape Conference ListA click on the OpenScape Conference List button opens the Conference List dialog that lists all conferences the user was invited for and the confer-ences he/she has created by himself/herself.
4.8.1 Supported Conference Types
OpenScape Fusion for Microsoft Lync supports Ad-hoc, Meet Me and MeetNow! conferences. Each of these conference types comprises audio and video confer-ences. You can also add a web conference to each audio conference.
OpenScape UC Application conference portal
The OpenScape UC Application conference portal provides virtual conference rooms in which users gather to conduct audio and video conferences. For this purpose, users may deploy any phone or Softphone as audio device. You find details about supported video devices in the OpenScape UC Application Planning Guide. Conferences can be scheduled and controlled via a telephone user interface (TUI) or via OpenScape UC Application clients such as OpenScape Fusion for Microsoft Lync.
A31003-S5070-U120-4-7619, 01/2014OpenScape UC Application V7 OpenScape Fusion for Microsoft Lync, User Guide 135
Operation ReferenceConference Tab
Ad-hoc conference
An Ad-hoc conference is a dynamically, spontaneously configured conference performed directly. If you want to stage a meeting with several persons and the Microsoft Lync contact list shows that they are all available, you can select them and start a one-time audio conference. You can also determine several origi-nators of e-mails selected in the Microsoft Outlook inbox as well as several contacts from the Microsoft Outlook contact list as conference participants.
Ad-hoc conferences support audio connections only.
Meet Me conference
This conference type is scheduled and configured in advance. You can configure Meet Me conferences as scheduled conferences, which start automatically at a set time, or as unscheduled conferences, which are started manually by the moderator or automatically by the first conference participant who dials in.
There are two types of Meet Me conferences:
• Open conferenceAn open conference is a Meet Me conference in which all participants have equal control privileges. Such a conference is started either automatically at the scheduled time or manually by one of the conference participants or automatically by the first conference participant who dials in. The conference configuration allows two ways of joining in: Participants are either called automatically by the system after the conference start (dial-out), or they need to dial in by themselves (dial-in).
• Moderated conferenceA moderated conference is a Meet Me conference that can only be controlled by participants who have moderator privileges or by the conference creator. The conference starts automatically at the scheduled time if such a point in time has been configured. If no start time has been defined, the moderator can start the conference manually or by dialing in. Depending on the configu-ration, the conference participants can dial into the conference (Dial-In) or are called by the system (Dial-Out). With the moderator leaving the conference, it comes automatically to an end for the other participants, too.Please heed the following for moderated conferences:
– If the moderator of a scheduled conference leaves the conference during the initially scheduled period, the conference persists until the initially scheduled end time. So, the other conference participants can resume the conference.
– If the moderator of an unscheduled conference leaves the conference during the initially scheduled period, the grace period starts when the moderator terminates the conference call. The grace period enables the other conference participants to end the conference also. When the grace period has expired, the conference ends.
– If the moderator leaves the conference during a conference prolongation, the grace period starts when the moderator terminates the conference call. The grace period enables the other conference participants to end the conference also. When the grace period has expired, the conference ends.
A31003-S5070-U120-4-7619, 01/2014136 OpenScape UC Application V7 OpenScape Fusion for Microsoft Lync, User Guide
Operation ReferenceConference Tab
– The default system configuration plays a short signal tone audible to all conference participants when a conference participant joins or leaves the conference. In case of a larger number of conference participants joining or leaving, this signal tone may become annoying to the others. Therefore, it is not played anymore when the number of participants specified by the system administrator in the CMP (default 15) is reached.
– In case of a moderated Meet Me conference with many participants, the number of conference participants displayed in the Call Control is restricted for clarity. If the number of participants exceeds a value specified by the system administrator in the CMP (default 15), each partic-ipant only sees his/her own entry and a specific number of moderators. The number of visible moderators is also defined by the system adminis-trator (default 15).
Video conferences
You can create and configure video conferences by yourself via the Conference tab and also participate in video conferences you have been invited for. In addition, you can take part in video-compatible Meet Me conferences created with the OpenScape Extensions for Microsoft Outlook application. To ensure video streaming, specific requirements must be met. These comprise e. g. free video licenses and operable video cameras. As soon as a video conference starts, the Video screen opens automatically. As long as only one participant is in the conference, a so-called "video-on-hold" is played by default. The user only needs to release transmitting his/her video image to start video streaming.
MeetNow! conference
You can configure MeetNow! conferences quickly via a special bridge number with all external and internal participants. The conference room is exclusively defined by entering an arbitrary PIN. In other words, all conference participants who dial the bridge number and enter the same PIN are in the same conference room and can communicate with each other directly.
NOTICE: The special character of this conference type does not allow the conference portal to control the assignment of access PINs for MeetNow! conferences. This may lead to participants of different conferences using the same access PIN for their respective conference. In this case, users who take part in such conferences are inadvertently connected in the same conference room. To control the assignment of access PINs for MeetNow! conferences, each user may receive a personal access PIN. Users will then have to specify this access PIN when inviting other participants for a MeetNow! conference. Personal access PINs may be derived from the extensions within a company, for example.
A31003-S5070-U120-4-7619, 01/2014OpenScape UC Application V7 OpenScape Fusion for Microsoft Lync, User Guide 137
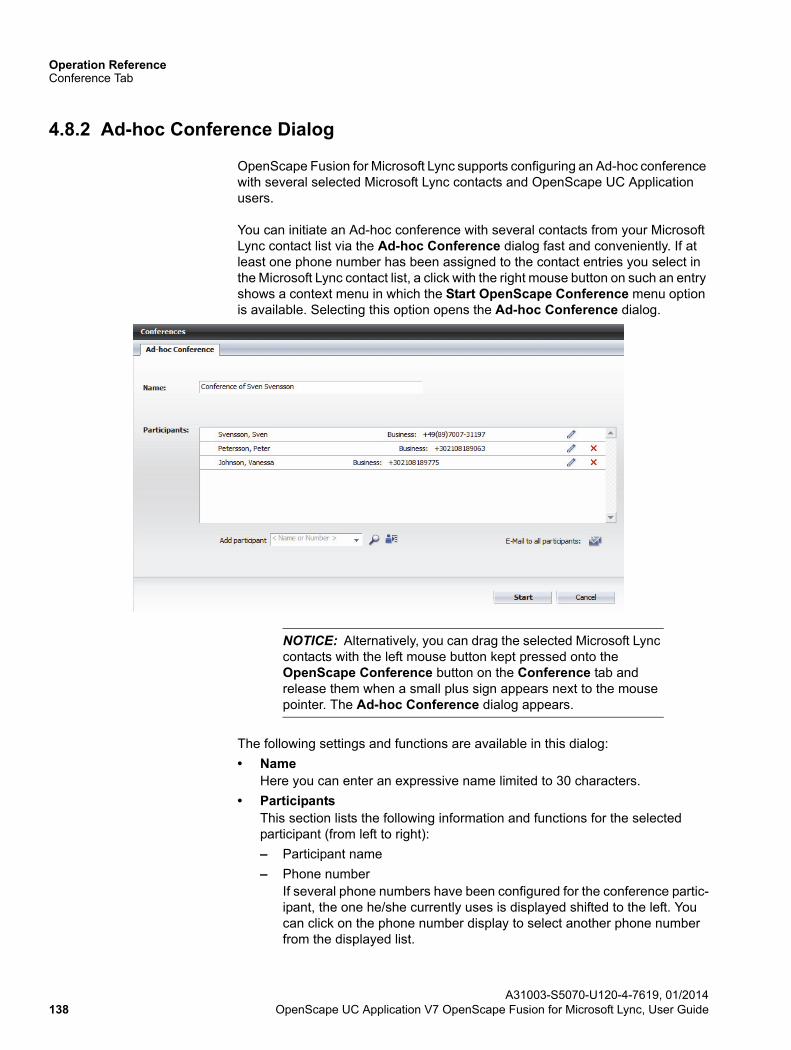
Operation ReferenceConference Tab
4.8.2 Ad-hoc Conference Dialog
OpenScape Fusion for Microsoft Lync supports configuring an Ad-hoc conference with several selected Microsoft Lync contacts and OpenScape UC Application users.
You can initiate an Ad-hoc conference with several contacts from your Microsoft Lync contact list via the Ad-hoc Conference dialog fast and conveniently. If at least one phone number has been assigned to the contact entries you select in the Microsoft Lync contact list, a click with the right mouse button on such an entry shows a context menu in which the Start OpenScape Conference menu option is available. Selecting this option opens the Ad-hoc Conference dialog.
NOTICE: Alternatively, you can drag the selected Microsoft Lync contacts with the left mouse button kept pressed onto the OpenScape Conference button on the Conference tab and release them when a small plus sign appears next to the mouse pointer. The Ad-hoc Conference dialog appears.
The following settings and functions are available in this dialog:
• NameHere you can enter an expressive name limited to 30 characters.
• ParticipantsThis section lists the following information and functions for the selected participant (from left to right):
– Participant name
– Phone numberIf several phone numbers have been configured for the conference partic-ipant, the one he/she currently uses is displayed shifted to the left. You can click on the phone number display to select another phone number from the displayed list.
A31003-S5070-U120-4-7619, 01/2014138 OpenScape UC Application V7 OpenScape Fusion for Microsoft Lync, User Guide

Operation ReferenceConference Tab
– Edit participant entry
A click on opens the Add participant dialog in which you can change the Display name, the Phone number and the E-mail address of the selected conference participant. A click on OK applies your modifications and the Add participants dialog closes.
–Via this icon you can remove the corresponding participant from the conference participant list.
NOTICE: All conference participants are called by the conference system and have the same privileges for controlling the conference.
• Add participantUse one of the following options to select conference participants:
– Enter the phone number or name of the desired contact in the Add partic-
ipant combo box. Then click on . The Add participant dialog to complete the participant data opens. Specify the missing data (name, phone number and e-mail address) and click on OK in this dialog. The selected contact is added to the list of conference participants.
NOTICE: If you do not configure an e-mail address for the partic-ipant here, he/she will not receive a conference notification e-mail and thus no information about the conference access data.
– Click on the triangle icon on the right margin of the Add participant combo box. The list that displays the last 20 phone numbers you have dialed opens. Select the phone number of the subscriber to be added to
the conference. Then click on . The Add participant dialog to complete the participant data opens. Specify in there the Name and E-mail address of the contact for display in the conference list. Finally click on OK in this dialog. The selected contact is added to the participant list and notified about the conference access data by e-mail.
NOTICE: If you do not configure an e-mail address for the partic-ipant here, he/she will not receive a conference notification e-mail and thus no information about the conference access data.
– Click on to initiate a contact search in the available directories. The input mask with the search criteria opens. Select the desired contact from the hits and click on OK in the Directory Search dialog. The selected contact is added to the participant list and notified about the conference access data by e-mail.
A31003-S5070-U120-4-7619, 01/2014OpenScape UC Application V7 OpenScape Fusion for Microsoft Lync, User Guide 139
Operation ReferenceConference Tab
– Click on . The Add participant dialog opens. Specify here the Name, the Phone number as well as the E-mail address of the conference participant. Finally click on OK in this dialog. The contact is added to the list of conference participants.
NOTICE: If you do not configure an e-mail address for the partic-ipant here, he/she will not receive a conference notification e-mail and thus no information about the conference access data.
• E-mail to all participants
With a click on you can send an e-mail to all conference participants. The e-mail contains the current conference access data and can be furnished with additional information. This is useful e.g. if an external conference participant is to join and you have recreated the conference access data on short notice.
A click on opens your default e-mail application with the dialog for sending e-mails. Here, all conference participants are already addressed and the updated conference data entered.
• StartWith a click on this button you can initiate the Ad-hoc conference after you have applied the settings determined in the template.
4.8.2.1 How to Start an Ad-hoc Conference via the OpenScape Fusion for Microsoft Lync
Contact List
To start an Ad-hoc conference with selected participants from your Microsoft Lync contact list, proceed as follows:
Step by Step
1) Select your contacts for conducting a conference call in your Microsoft Lync contact list with the [Ctrl] key kept pressed.
2) Drag the selected Microsoft Lync contacts onto the OpenScape Conference button on the Conference tab with the left mouse button kept pressed.
A31003-S5070-U120-4-7619, 01/2014140 OpenScape UC Application V7 OpenScape Fusion for Microsoft Lync, User Guide
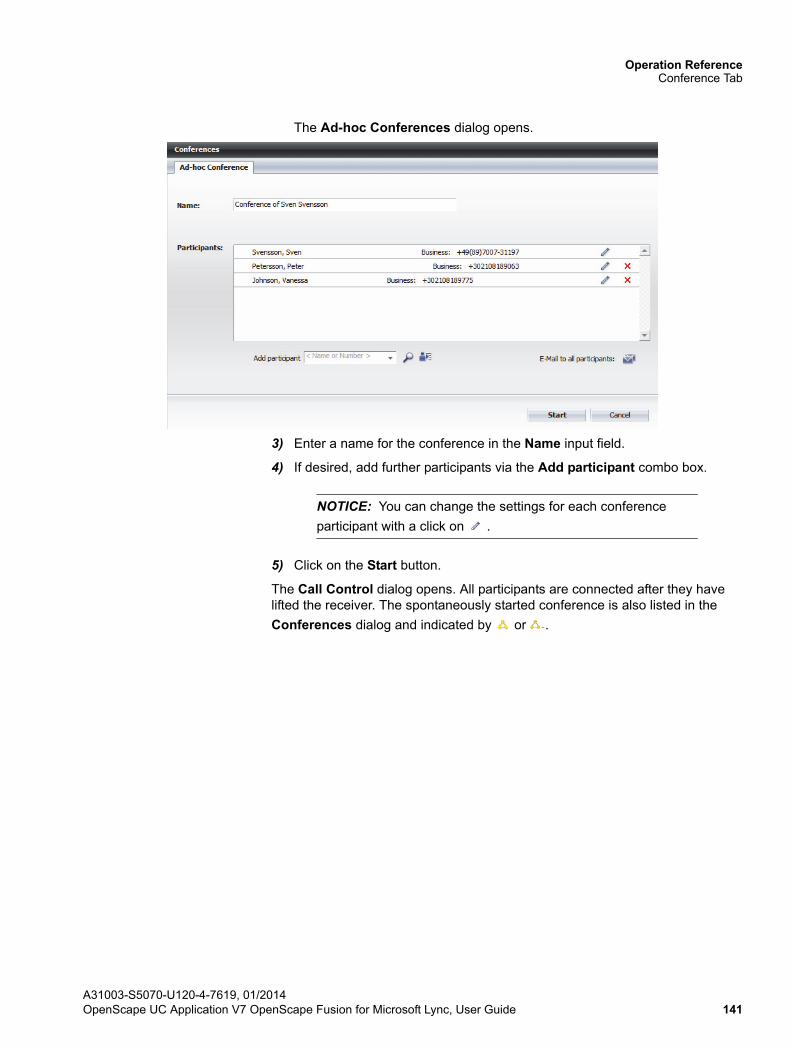
Operation ReferenceConference Tab
The Ad-hoc Conferences dialog opens.
3) Enter a name for the conference in the Name input field.
4) If desired, add further participants via the Add participant combo box.
NOTICE: You can change the settings for each conference
participant with a click on .
5) Click on the Start button.
The Call Control dialog opens. All participants are connected after they have lifted the receiver. The spontaneously started conference is also listed in the
Conferences dialog and indicated by or .
A31003-S5070-U120-4-7619, 01/2014OpenScape UC Application V7 OpenScape Fusion for Microsoft Lync, User Guide 141
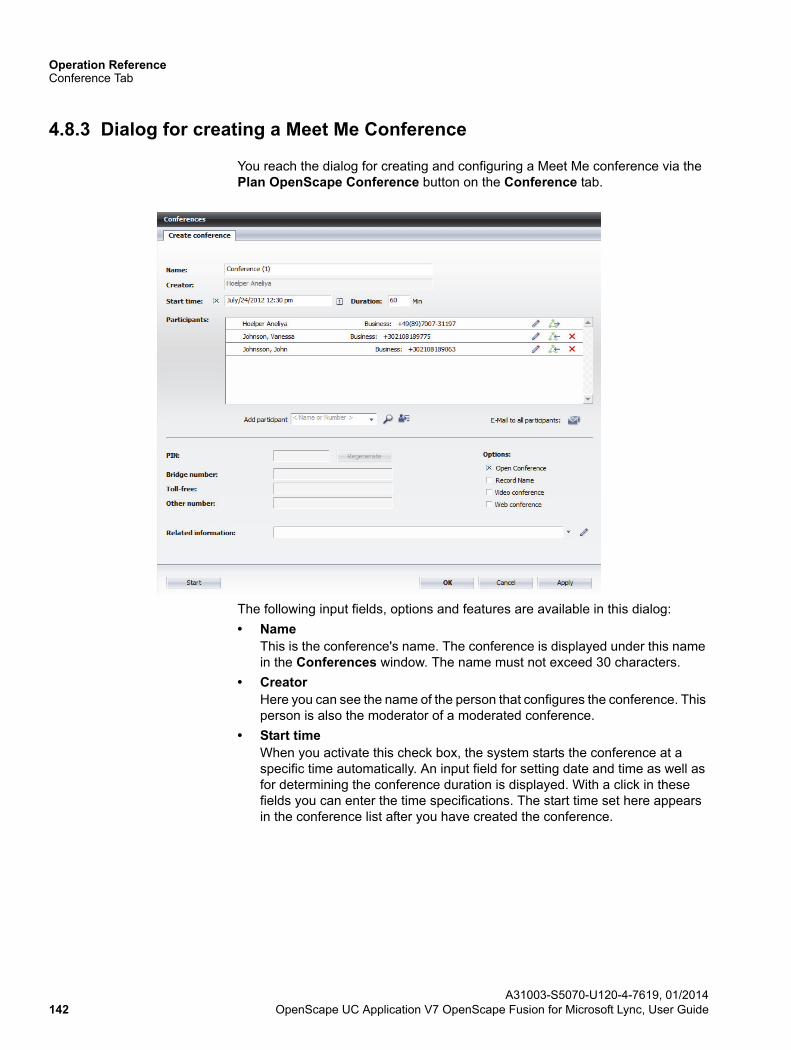
Operation ReferenceConference Tab
4.8.3 Dialog for creating a Meet Me Conference
You reach the dialog for creating and configuring a Meet Me conference via the Plan OpenScape Conference button on the Conference tab.
The following input fields, options and features are available in this dialog:
• NameThis is the conference's name. The conference is displayed under this name in the Conferences window. The name must not exceed 30 characters.
• CreatorHere you can see the name of the person that configures the conference. This person is also the moderator of a moderated conference.
• Start timeWhen you activate this check box, the system starts the conference at a specific time automatically. An input field for setting date and time as well as for determining the conference duration is displayed. With a click in these fields you can enter the time specifications. The start time set here appears in the conference list after you have created the conference.
A31003-S5070-U120-4-7619, 01/2014142 OpenScape UC Application V7 OpenScape Fusion for Microsoft Lync, User Guide
Operation ReferenceConference Tab
– Configuring date and timeDefault for the start time is the time at which the Conferences dialog was invoked. You can change the start time with a click in the input field next to the check box or on . A calendar dialog in which you define date and time opens.To set the conference day, click on it in the displayed month. You can browse the months using the two up and down arrow icons.You can set the time via the Hour and Min slide controls found under the time display. Use the Hour slide control to set hours and the Min slide control to specify minutes.A click on the now button displays the current date and time and you can apply these specifications to the new conference.A click on the Close button closes the calendar dialog.
– DurationIn the Duration input field you can determine how long the conference is to last. You can make entries from 10 to 9999 minutes. The default setting is 60 minutes.
NOTICE: A scheduled Meet Me conference stays active until the scheduled time has elapsed. If the conference has been prolonged and the moderator(s) leave(s) the conference before the default prolongation of 30 minutes is up, the scheduled conference ends automatically after one minute.
NOTICE: A moderated Meet Me conference is prolonged by the time set in the CMP if the participants do not leave the conference prematurely. This pre-set time is 30 minutes by default and can be changed by the system administrator. As soon as all moderators have left the conference, it stays active for one minute. This period allows the moderators to log back into the active conference. If they do not, the moderated Meet Me conference ends automati-cally after this one-minute period.
• ParticipantsThis section lists all conference participants. The inviting participant (moderator) is automatically placed as first list entry.A participant entry in the list of conference participants contains the following information (from left to right):
– The name of the conference participant
– The phone number of the conference participant
NOTICE: If several phone numbers have been configured for the conference participant, the one he/she currently uses is displayed shifted to the left. You can click right in front of the phone number display to select another phone number from the displayed list.
A31003-S5070-U120-4-7619, 01/2014OpenScape UC Application V7 OpenScape Fusion for Microsoft Lync, User Guide 143
Operation ReferenceConference Tab
– Role of the participant in the conference if the conference is a moderated one. In this case the inviting participant is the creator and simultaneously also the moderator of the conference. His/her role cannot be changed. The moderator privileges enable the user to control the conference and to change its settings. The participant role is for users who cannot or must not control the conference.You can set the role of all participants except for the creator manually with a click on the label Participant or Moderator. Other conference partici-pants, except for the creator, may thus be assigned moderator privileges also.
NOTICE: In case of an open conference no roles are assigned to the participants.
– Edit participant entry
A click on opens the Add participant dialog in which you can change the Display name, the Phone number and the E-mail address of the selected conference participant. A click on OK copies your modifications and the Add participants dialog closes.
– or. Type of the conference setupThese icons indicate whether the participant needs to dial in by himself/
herself ( ) or is called by the system ( ). Moreover, you can reverse the call behavior by clicking the respective icon.
– Delete entryA click on this icon removes the corresponding conference entry from the conference list. All conference participants, except for the creator, can be removed from the conference.
• Add participantUse one of the following options to select conference participants:
– Enter the phone number or name of the desired contact in the Add partic-
ipant combo box. Then click on . The Add participant dialog to complete the participant data opens. Specify the missing data (name, phone number and e-mail address) and click on OK in this dialog. The selected contact is added to the list of conference participants.
NOTICE: If you do not configure an e-mail address for the partic-ipant here, he/she will not receive a conference notification e-mail and thus no information about the conference access data.
– Click on the triangle icon on the right margin of the Add participant combo box. The list that displays the last 20 phone numbers you have dialed opens. Select the phone number of the subscriber to be added to
the conference. Then click on . The Add participant dialog to complete the participant data opens. Specify in there the Name and E-mail address
A31003-S5070-U120-4-7619, 01/2014144 OpenScape UC Application V7 OpenScape Fusion for Microsoft Lync, User Guide
Operation ReferenceConference Tab
of the contact for display in the conference list. Finally click on OK in this dialog. The selected contact is added to the participant list and notified about the conference access data by e-mail.
NOTICE: If you do not configure an e-mail address for the partic-ipant here, he/she will not receive a conference notification e-mail and thus no information about the conference access data.
– Click on to initiate a contact search in the available directories. The entry mask with the search criteria opens. Select the desired contact from the hits and click on OK in the Directory Search dialog. The selected contact is added to the participant list and notified about the conference access data by e-mail.
– Click on . The Add participant dialog opens. Specify here the Name, the Phone number as well as the E-mail address of the conference participant. Finally click on OK in this dialog. The contact is added to the list of conference participants.
NOTICE: If you do not configure an e-mail address for the partic-ipant here, he/she will not receive a conference notification e-mail and thus no information about the conference access data.
• E-mail to all participants
With a click on you can send an e-mail to all conference participants. The e-mail contains the current conference access data and can be furnished with additional information. This is useful for example when an external conference participant is to join and you have recreated the conference access data on short notice.
A click on opens your default e-mail application with the dialog for sending e-mails. Here, all conference participants are already addressed and the updated conference data has been entered.
• PINWhen you create the conference with a click on the Apply button, a PIN is automatically generated and displayed in this field. Using the PIN the conference participants authorize themselves to join the conference.Via the Regenerate button you can create a new PIN.
• Bridge numberThis field displays the bridge number, which the system automatically sets when you click on the Apply button. Under this phone number the conference participant needs to log on to the conference. A bridge number supports several callers under a single phone number.
• Toll-freeThe Toll-free field displays an alternative bridge number for logging on to the conference free of charge. This feature needs to be configured, so that the system can automatically display this number after you have clicked on the Apply button.
A31003-S5070-U120-4-7619, 01/2014OpenScape UC Application V7 OpenScape Fusion for Microsoft Lync, User Guide 145
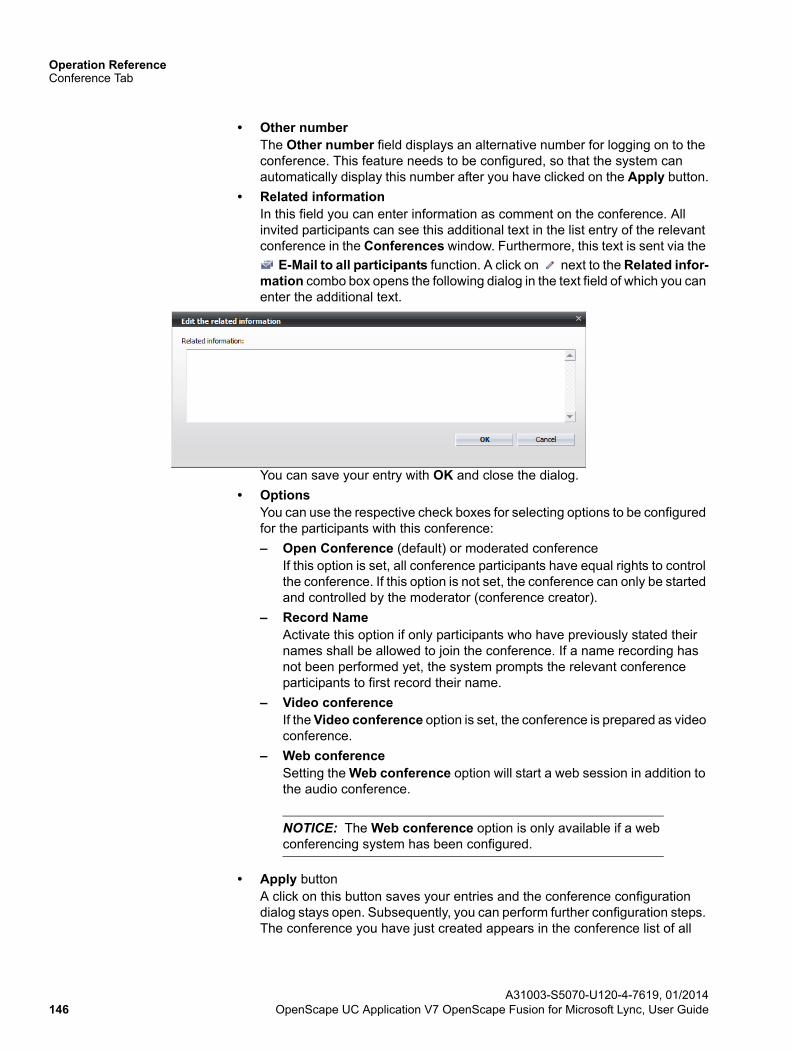
Operation ReferenceConference Tab
• Other numberThe Other number field displays an alternative number for logging on to the conference. This feature needs to be configured, so that the system can automatically display this number after you have clicked on the Apply button.
• Related informationIn this field you can enter information as comment on the conference. All invited participants can see this additional text in the list entry of the relevant conference in the Conferences window. Furthermore, this text is sent via the
E-Mail to all participants function. A click on next to the Related infor-mation combo box opens the following dialog in the text field of which you can enter the additional text.
You can save your entry with OK and close the dialog.
• OptionsYou can use the respective check boxes for selecting options to be configured for the participants with this conference:
– Open Conference (default) or moderated conferenceIf this option is set, all conference participants have equal rights to control the conference. If this option is not set, the conference can only be started and controlled by the moderator (conference creator).
– Record NameActivate this option if only participants who have previously stated their names shall be allowed to join the conference. If a name recording has not been performed yet, the system prompts the relevant conference participants to first record their name.
– Video conferenceIf the Video conference option is set, the conference is prepared as video conference.
– Web conferenceSetting the Web conference option will start a web session in addition to the audio conference.
NOTICE: The Web conference option is only available if a web conferencing system has been configured.
• Apply buttonA click on this button saves your entries and the conference configuration dialog stays open. Subsequently, you can perform further configuration steps. The conference you have just created appears in the conference list of all
A31003-S5070-U120-4-7619, 01/2014146 OpenScape UC Application V7 OpenScape Fusion for Microsoft Lync, User Guide
Operation ReferenceConference Tab
OpenScape UC Application participants. An e-mail with conference dial-in data is automatically sent to all participants for whom an e-mail address has been specified.
• Start buttonWith a click on this button you can initiate an unscheduled Meet Me conference after you have applied the settings determined in the template.If the configured Meet Me conference is a scheduled one, you can use this button to join the already automatically started conference.
• OK buttonWith a click on this button you can save the conference settings and close the configuration dialog.
• Cancel buttonClick on this button to close the configuration dialog without creating a conference or to dismiss all modifications you have made to an existing conference that are not applied yet.
4.8.3.1 How to Configure a Meet Me Conference
If you wish to configure a new Meet Me conference, proceed as follows:
A31003-S5070-U120-4-7619, 01/2014OpenScape UC Application V7 OpenScape Fusion for Microsoft Lync, User Guide 147
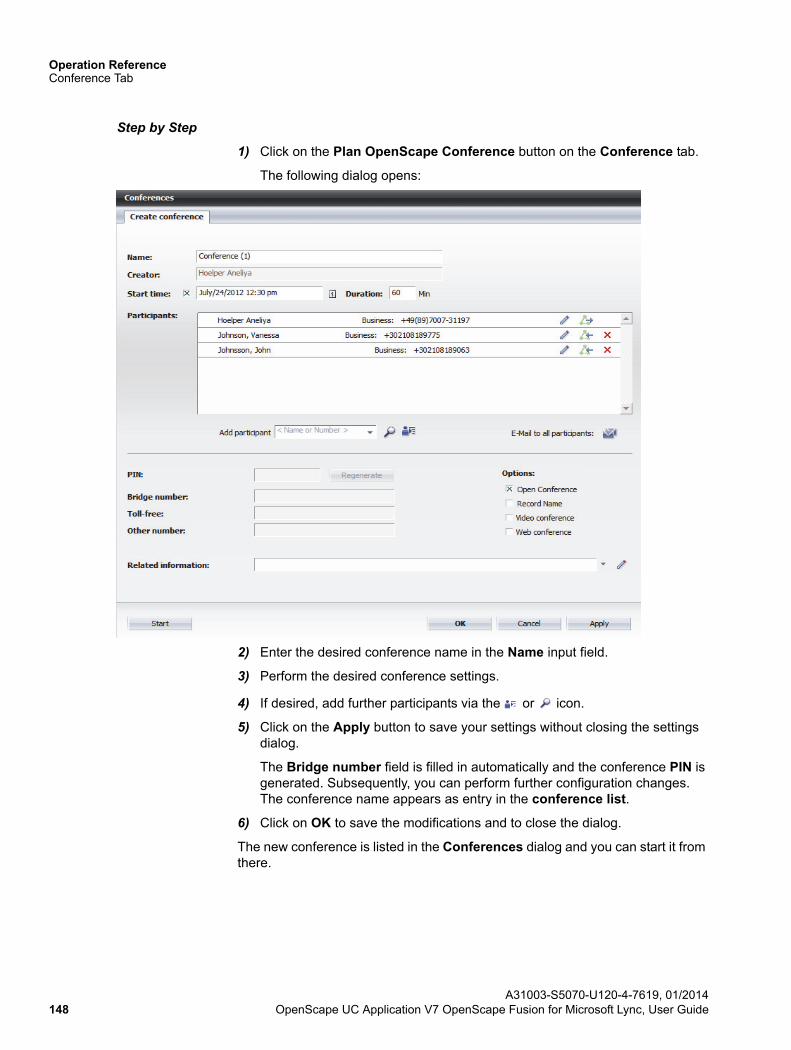
Operation ReferenceConference Tab
Step by Step
1) Click on the Plan OpenScape Conference button on the Conference tab.
The following dialog opens:
2) Enter the desired conference name in the Name input field.
3) Perform the desired conference settings.
4) If desired, add further participants via the or icon.
5) Click on the Apply button to save your settings without closing the settings dialog.
The Bridge number field is filled in automatically and the conference PIN is generated. Subsequently, you can perform further configuration changes. The conference name appears as entry in the conference list.
6) Click on OK to save the modifications and to close the dialog.
The new conference is listed in the Conferences dialog and you can start it from there.
A31003-S5070-U120-4-7619, 01/2014148 OpenScape UC Application V7 OpenScape Fusion for Microsoft Lync, User Guide
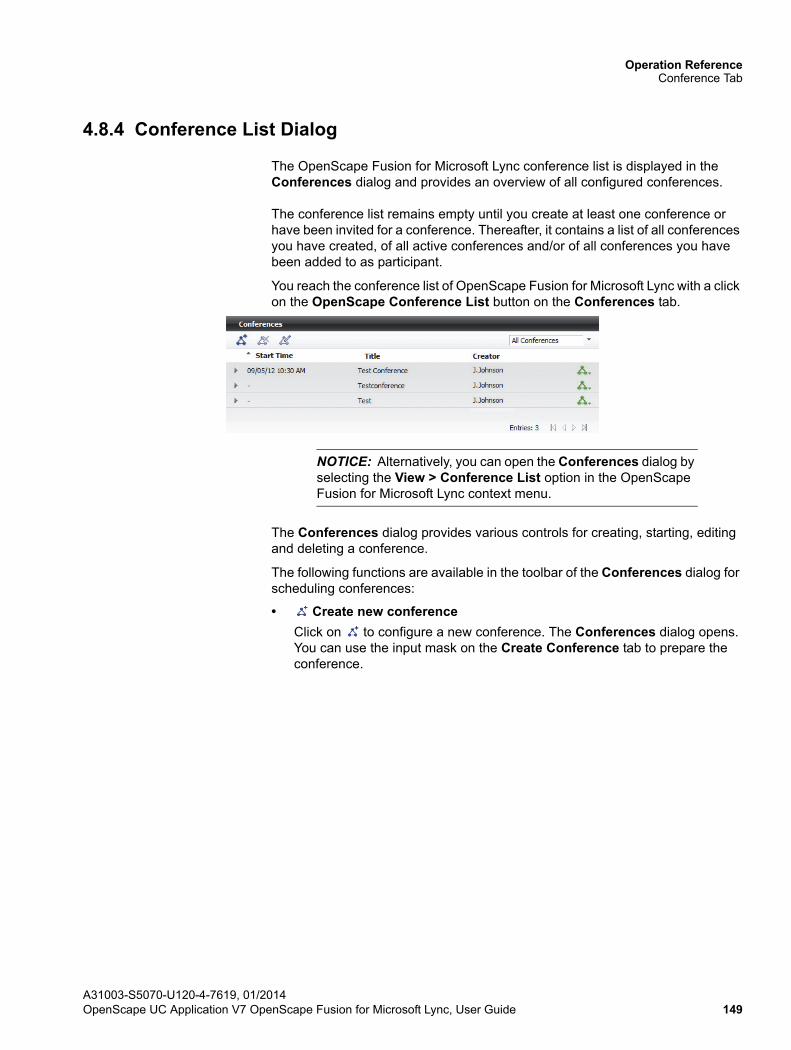
Operation ReferenceConference Tab
4.8.4 Conference List Dialog
The OpenScape Fusion for Microsoft Lync conference list is displayed in the Conferences dialog and provides an overview of all configured conferences.
The conference list remains empty until you create at least one conference or have been invited for a conference. Thereafter, it contains a list of all conferences you have created, of all active conferences and/or of all conferences you have been added to as participant.
You reach the conference list of OpenScape Fusion for Microsoft Lync with a click on the OpenScape Conference List button on the Conferences tab.
NOTICE: Alternatively, you can open the Conferences dialog by selecting the View > Conference List option in the OpenScape Fusion for Microsoft Lync context menu.
The Conferences dialog provides various controls for creating, starting, editing and deleting a conference.
The following functions are available in the toolbar of the Conferences dialog for scheduling conferences:
• Create new conference
Click on to configure a new conference. The Conferences dialog opens. You can use the input mask on the Create Conference tab to prepare the conference.
A31003-S5070-U120-4-7619, 01/2014OpenScape UC Application V7 OpenScape Fusion for Microsoft Lync, User Guide 149
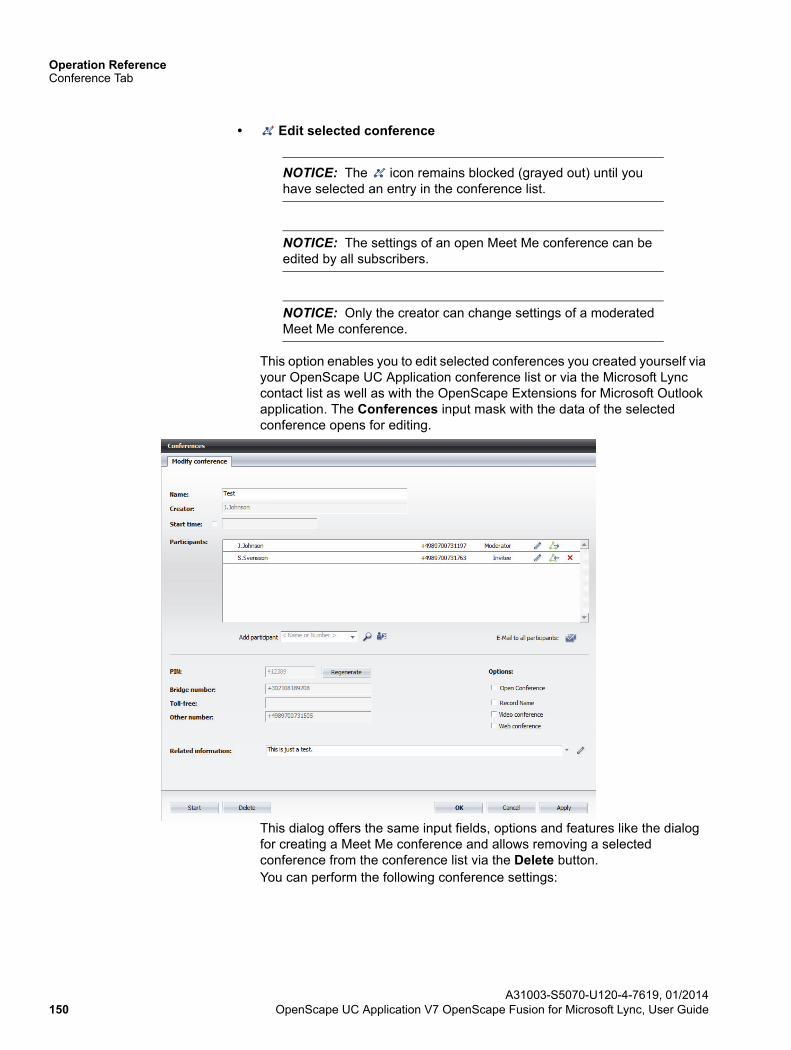
Operation ReferenceConference Tab
• Edit selected conference
NOTICE: The icon remains blocked (grayed out) until you have selected an entry in the conference list.
NOTICE: The settings of an open Meet Me conference can be edited by all subscribers.
NOTICE: Only the creator can change settings of a moderated Meet Me conference.
This option enables you to edit selected conferences you created yourself via your OpenScape UC Application conference list or via the Microsoft Lync contact list as well as with the OpenScape Extensions for Microsoft Outlook application. The Conferences input mask with the data of the selected conference opens for editing.
This dialog offers the same input fields, options and features like the dialog for creating a Meet Me conference and allows removing a selected conference from the conference list via the Delete button. You can perform the following conference settings:
A31003-S5070-U120-4-7619, 01/2014150 OpenScape UC Application V7 OpenScape Fusion for Microsoft Lync, User Guide
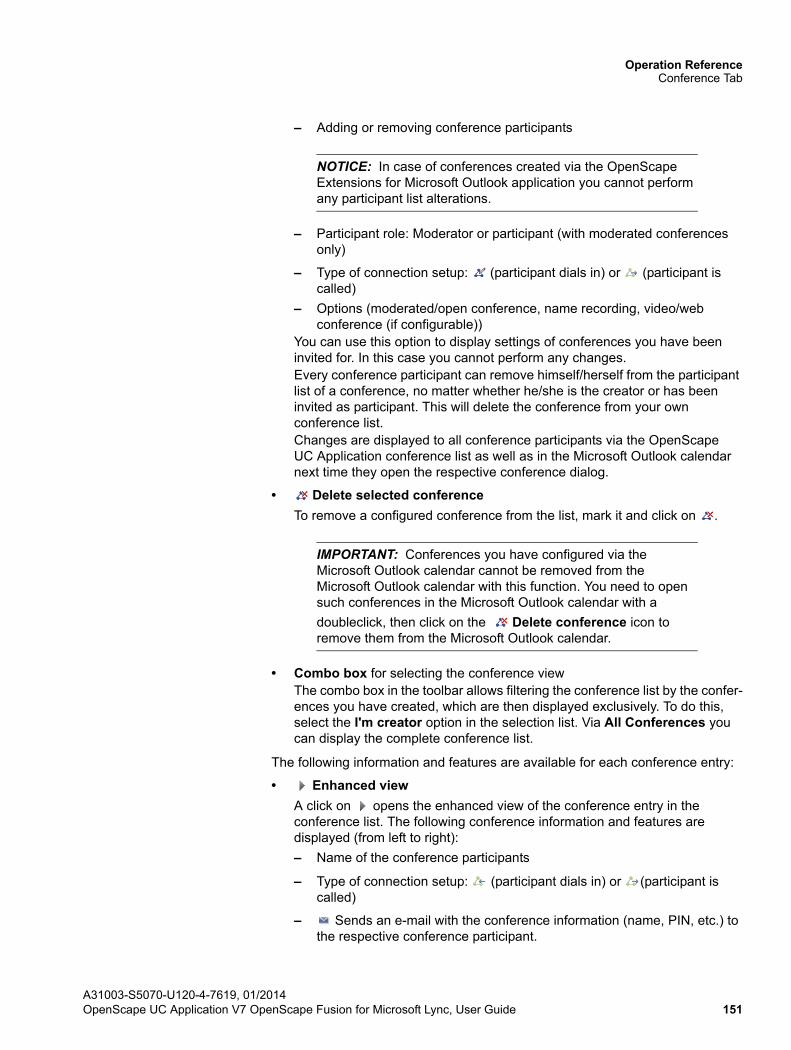
Operation ReferenceConference Tab
– Adding or removing conference participants
NOTICE: In case of conferences created via the OpenScape Extensions for Microsoft Outlook application you cannot perform any participant list alterations.
– Participant role: Moderator or participant (with moderated conferences only)
– Type of connection setup: (participant dials in) or (participant is called)
– Options (moderated/open conference, name recording, video/web conference (if configurable))
You can use this option to display settings of conferences you have been invited for. In this case you cannot perform any changes.Every conference participant can remove himself/herself from the participant list of a conference, no matter whether he/she is the creator or has been invited as participant. This will delete the conference from your own conference list.Changes are displayed to all conference participants via the OpenScape UC Application conference list as well as in the Microsoft Outlook calendar next time they open the respective conference dialog.
• Delete selected conference
To remove a configured conference from the list, mark it and click on .
IMPORTANT: Conferences you have configured via the Microsoft Outlook calendar cannot be removed from the Microsoft Outlook calendar with this function. You need to open such conferences in the Microsoft Outlook calendar with a
doubleclick, then click on the Delete conference icon to remove them from the Microsoft Outlook calendar.
• Combo box for selecting the conference viewThe combo box in the toolbar allows filtering the conference list by the confer-ences you have created, which are then displayed exclusively. To do this, select the I'm creator option in the selection list. Via All Conferences you can display the complete conference list.
The following information and features are available for each conference entry:
• Enhanced view
A click on opens the enhanced view of the conference entry in the conference list. The following conference information and features are displayed (from left to right):
– Name of the conference participants
– Type of connection setup: (participant dials in) or (participant is called)
– Sends an e-mail with the conference information (name, PIN, etc.) to the respective conference participant.
A31003-S5070-U120-4-7619, 01/2014OpenScape UC Application V7 OpenScape Fusion for Microsoft Lync, User Guide 151
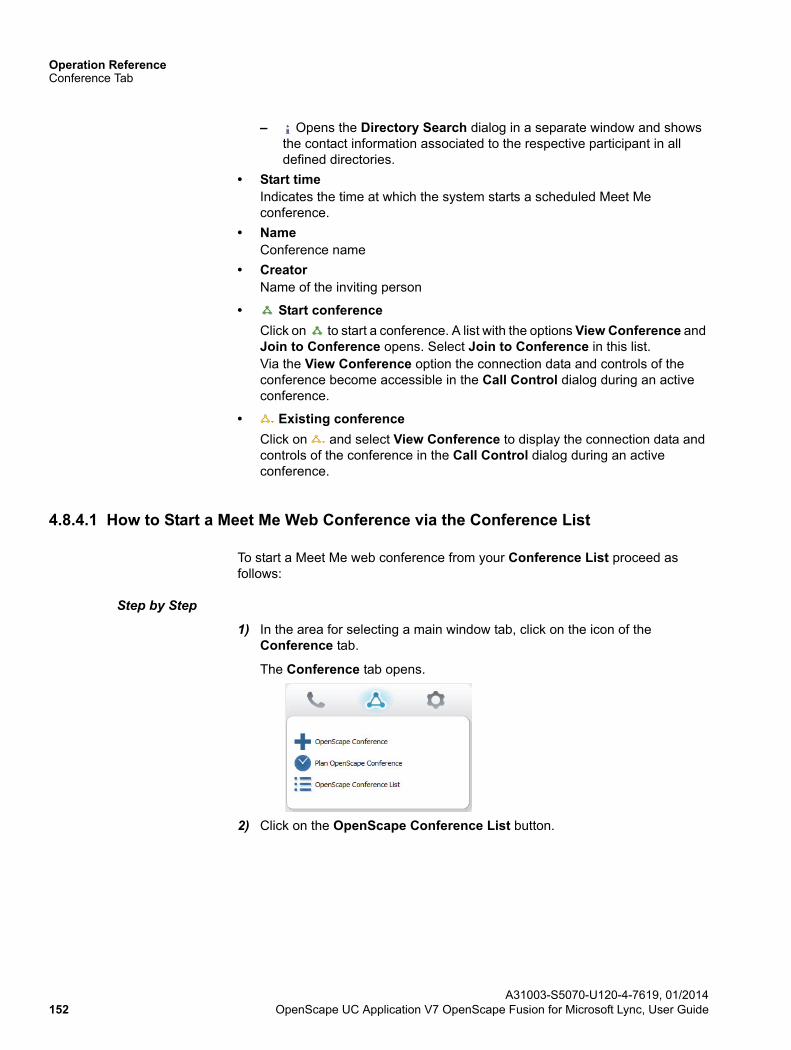
Operation ReferenceConference Tab
– Opens the Directory Search dialog in a separate window and shows the contact information associated to the respective participant in all defined directories.
• Start timeIndicates the time at which the system starts a scheduled Meet Me conference.
• NameConference name
• CreatorName of the inviting person
• Start conference
Click on to start a conference. A list with the options View Conference and Join to Conference opens. Select Join to Conference in this list.Via the View Conference option the connection data and controls of the conference become accessible in the Call Control dialog during an active conference.
• Existing conference
Click on and select View Conference to display the connection data and controls of the conference in the Call Control dialog during an active conference.
4.8.4.1 How to Start a Meet Me Web Conference via the Conference List
To start a Meet Me web conference from your Conference List proceed as follows:
Step by Step
1) In the area for selecting a main window tab, click on the icon of the Conference tab.
The Conference tab opens.
2) Click on the OpenScape Conference List button.
A31003-S5070-U120-4-7619, 01/2014152 OpenScape UC Application V7 OpenScape Fusion for Microsoft Lync, User Guide
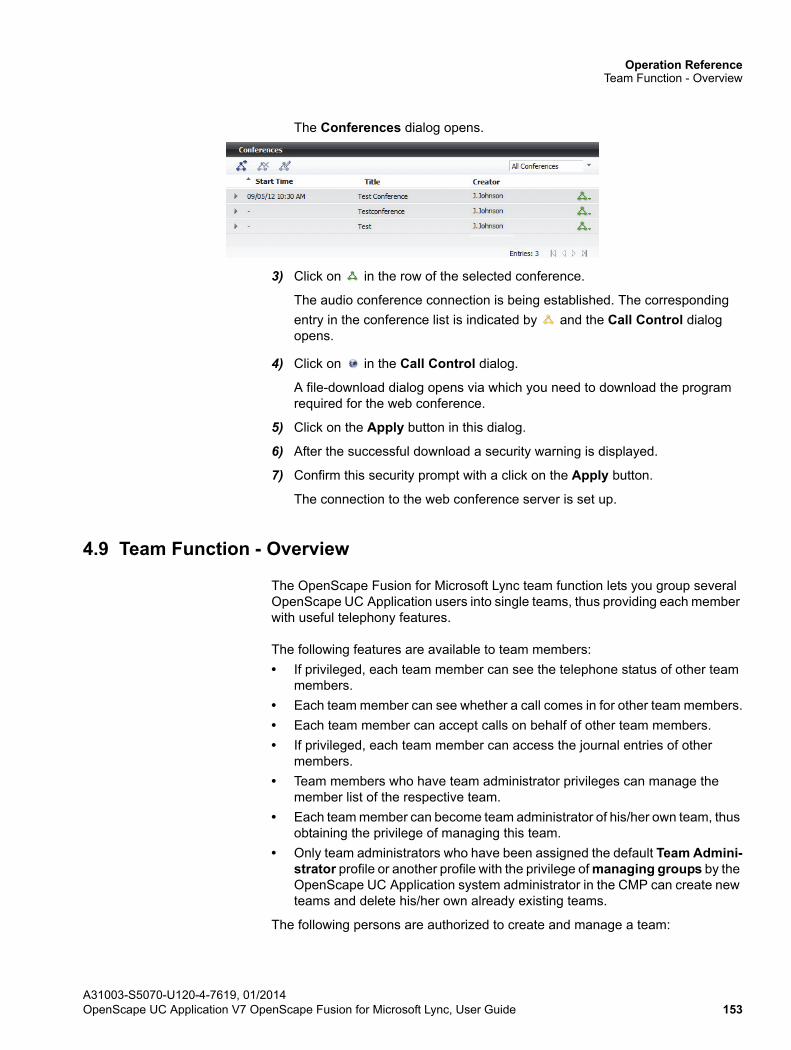
Operation ReferenceTeam Function - Overview
The Conferences dialog opens.
3) Click on in the row of the selected conference.
The audio conference connection is being established. The corresponding
entry in the conference list is indicated by and the Call Control dialog opens.
4) Click on in the Call Control dialog.
A file-download dialog opens via which you need to download the program required for the web conference.
5) Click on the Apply button in this dialog.
6) After the successful download a security warning is displayed.
7) Confirm this security prompt with a click on the Apply button.
The connection to the web conference server is set up.
4.9 Team Function - Overview
The OpenScape Fusion for Microsoft Lync team function lets you group several OpenScape UC Application users into single teams, thus providing each member with useful telephony features.
The following features are available to team members:
• If privileged, each team member can see the telephone status of other team members.
• Each team member can see whether a call comes in for other team members.
• Each team member can accept calls on behalf of other team members.
• If privileged, each team member can access the journal entries of other members.
• Team members who have team administrator privileges can manage the member list of the respective team.
• Each team member can become team administrator of his/her own team, thus obtaining the privilege of managing this team.
• Only team administrators who have been assigned the default Team Admini-strator profile or another profile with the privilege of managing groups by the OpenScape UC Application system administrator in the CMP can create new teams and delete his/her own already existing teams.
The following persons are authorized to create and manage a team:
A31003-S5070-U120-4-7619, 01/2014OpenScape UC Application V7 OpenScape Fusion for Microsoft Lync, User Guide 153
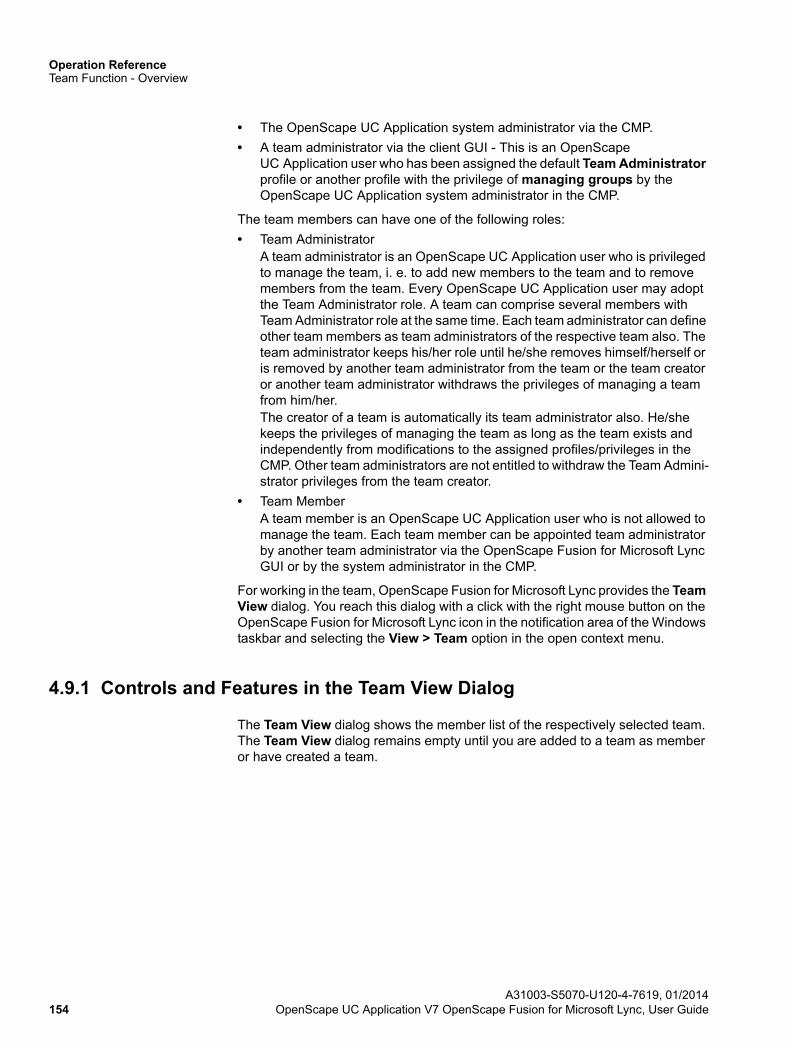
Operation ReferenceTeam Function - Overview
• The OpenScape UC Application system administrator via the CMP.
• A team administrator via the client GUI - This is an OpenScape UC Application user who has been assigned the default Team Administrator profile or another profile with the privilege of managing groups by the OpenScape UC Application system administrator in the CMP.
The team members can have one of the following roles:
• Team AdministratorA team administrator is an OpenScape UC Application user who is privileged to manage the team, i. e. to add new members to the team and to remove members from the team. Every OpenScape UC Application user may adopt the Team Administrator role. A team can comprise several members with Team Administrator role at the same time. Each team administrator can define other team members as team administrators of the respective team also. The team administrator keeps his/her role until he/she removes himself/herself or is removed by another team administrator from the team or the team creator or another team administrator withdraws the privileges of managing a team from him/her.The creator of a team is automatically its team administrator also. He/she keeps the privileges of managing the team as long as the team exists and independently from modifications to the assigned profiles/privileges in the CMP. Other team administrators are not entitled to withdraw the Team Admini-strator privileges from the team creator.
• Team MemberA team member is an OpenScape UC Application user who is not allowed to manage the team. Each team member can be appointed team administrator by another team administrator via the OpenScape Fusion for Microsoft Lync GUI or by the system administrator in the CMP.
For working in the team, OpenScape Fusion for Microsoft Lync provides the Team View dialog. You reach this dialog with a click with the right mouse button on the OpenScape Fusion for Microsoft Lync icon in the notification area of the Windows taskbar and selecting the View > Team option in the open context menu.
4.9.1 Controls and Features in the Team View Dialog
The Team View dialog shows the member list of the respectively selected team. The Team View dialog remains empty until you are added to a team as member or have created a team.
A31003-S5070-U120-4-7619, 01/2014154 OpenScape UC Application V7 OpenScape Fusion for Microsoft Lync, User Guide
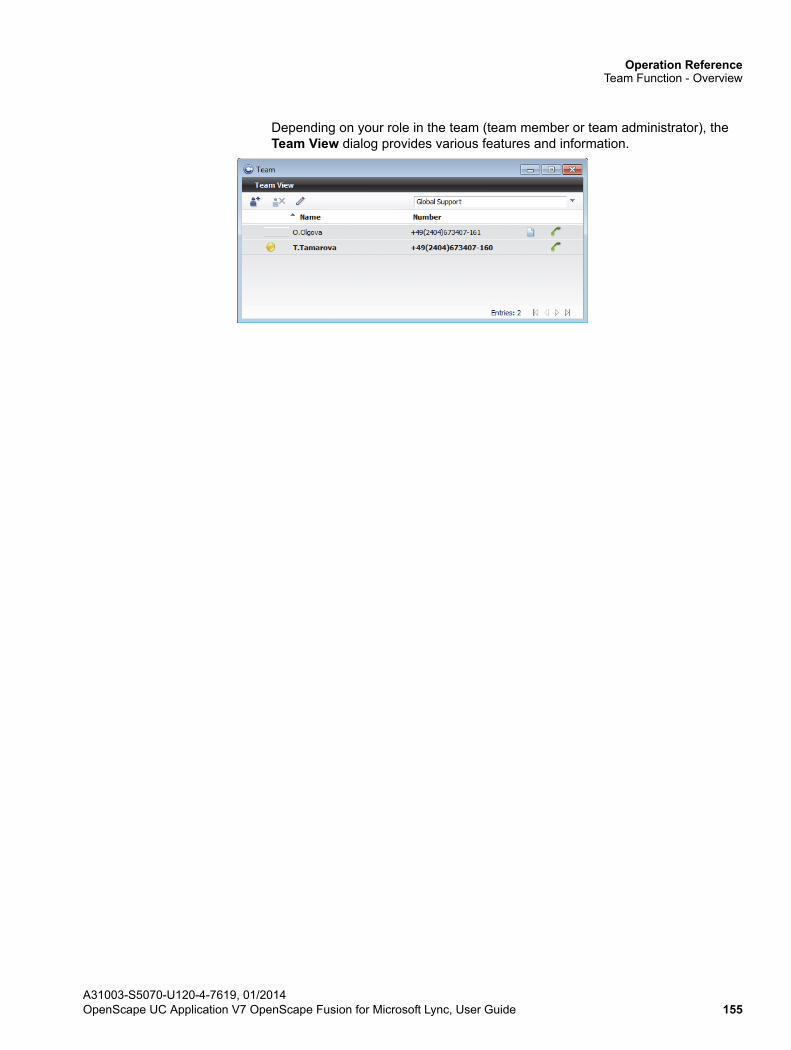
Operation ReferenceTeam Function - Overview
Depending on your role in the team (team member or team administrator), the Team View dialog provides various features and information.
A31003-S5070-U120-4-7619, 01/2014OpenScape UC Application V7 OpenScape Fusion for Microsoft Lync, User Guide 155
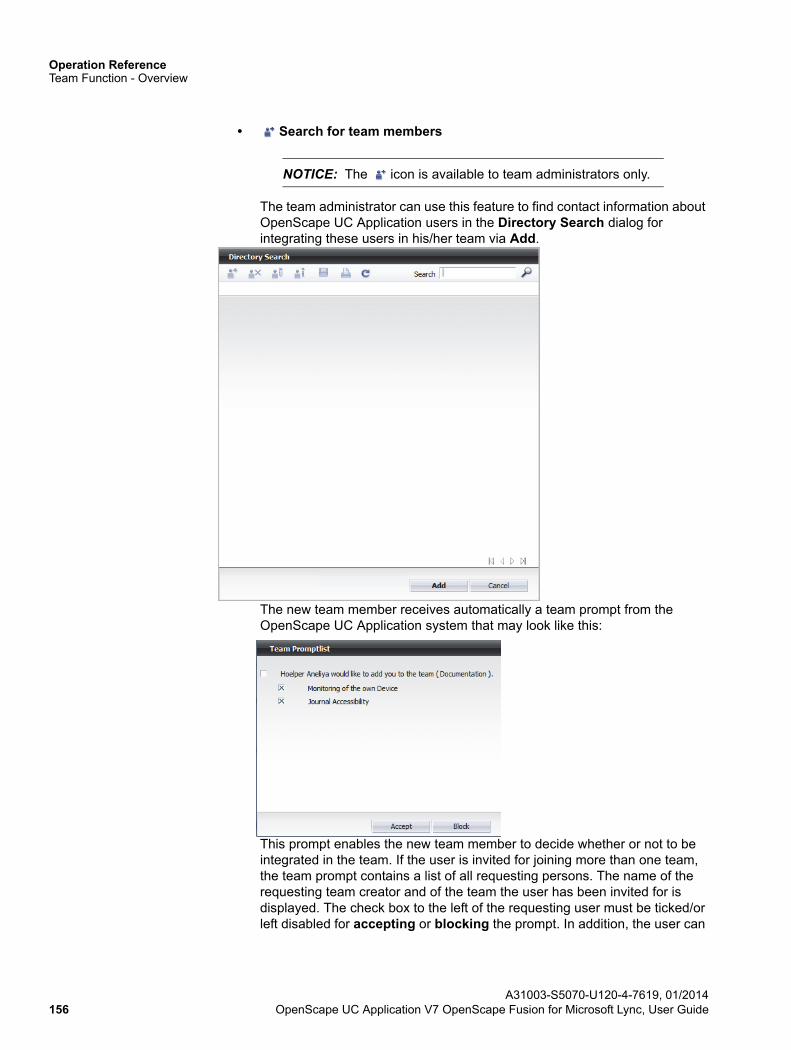
Operation ReferenceTeam Function - Overview
• Search for team members
NOTICE: The icon is available to team administrators only.
The team administrator can use this feature to find contact information about OpenScape UC Application users in the Directory Search dialog for integrating these users in his/her team via Add.
The new team member receives automatically a team prompt from the OpenScape UC Application system that may look like this:
This prompt enables the new team member to decide whether or not to be integrated in the team. If the user is invited for joining more than one team, the team prompt contains a list of all requesting persons. The name of the requesting team creator and of the team the user has been invited for is displayed. The check box to the left of the requesting user must be ticked/or left disabled for accepting or blocking the prompt. In addition, the user can
A31003-S5070-U120-4-7619, 01/2014156 OpenScape UC Application V7 OpenScape Fusion for Microsoft Lync, User Guide
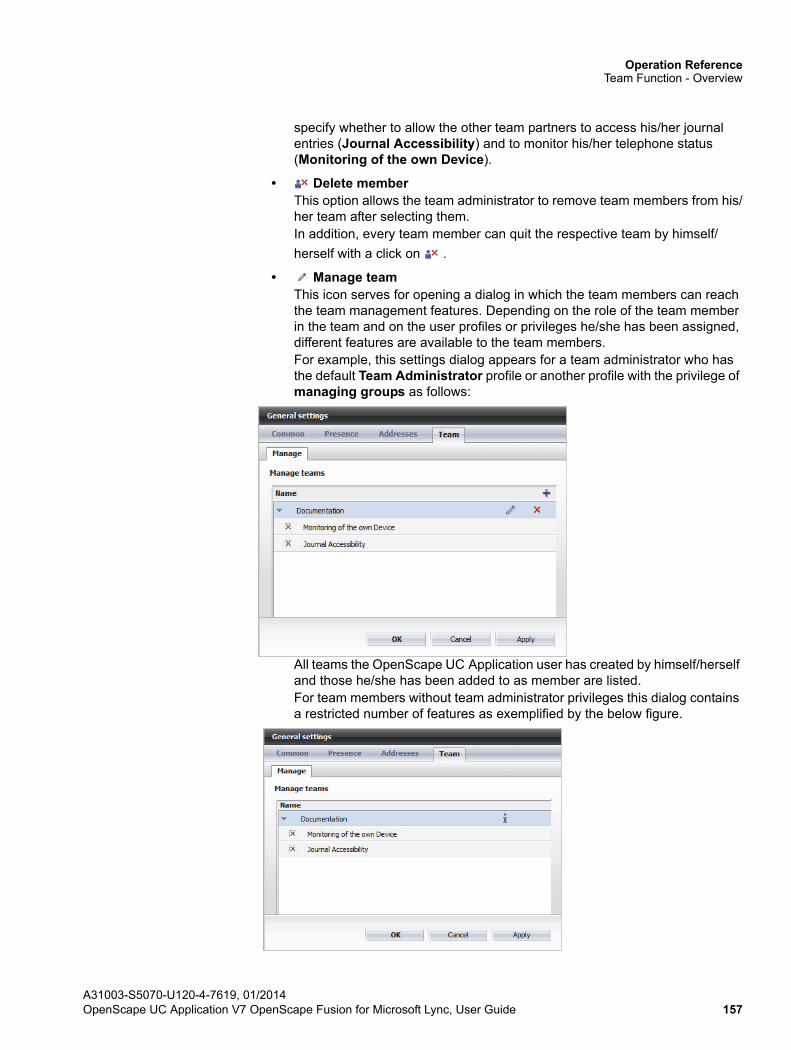
Operation ReferenceTeam Function - Overview
specify whether to allow the other team partners to access his/her journal entries (Journal Accessibility) and to monitor his/her telephone status (Monitoring of the own Device).
• Delete memberThis option allows the team administrator to remove team members from his/her team after selecting them.In addition, every team member can quit the respective team by himself/
herself with a click on .
• Manage teamThis icon serves for opening a dialog in which the team members can reach the team management features. Depending on the role of the team member in the team and on the user profiles or privileges he/she has been assigned, different features are available to the team members.For example, this settings dialog appears for a team administrator who has the default Team Administrator profile or another profile with the privilege of managing groups as follows:
All teams the OpenScape UC Application user has created by himself/herself and those he/she has been added to as member are listed.For team members without team administrator privileges this dialog contains a restricted number of features as exemplified by the below figure.
A31003-S5070-U120-4-7619, 01/2014OpenScape UC Application V7 OpenScape Fusion for Microsoft Lync, User Guide 157
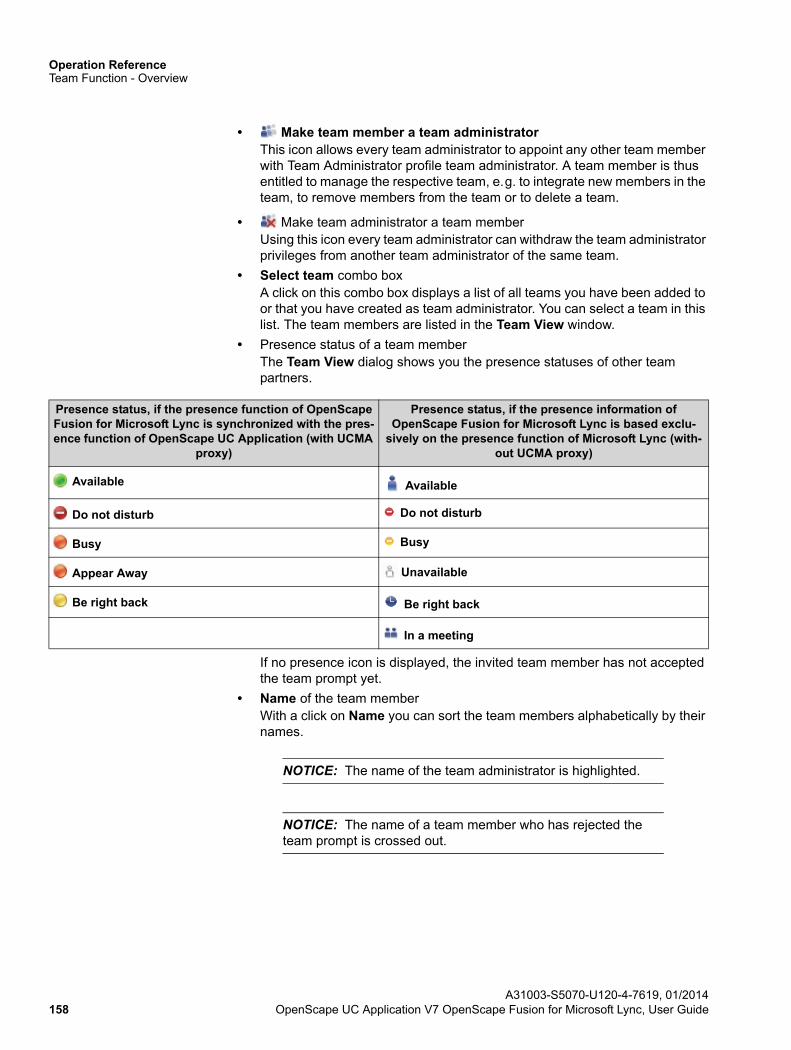
Operation ReferenceTeam Function - Overview
• Make team member a team administrator This icon allows every team administrator to appoint any other team member with Team Administrator profile team administrator. A team member is thus entitled to manage the respective team, e.g. to integrate new members in the team, to remove members from the team or to delete a team.
• Make team administrator a team memberUsing this icon every team administrator can withdraw the team administrator privileges from another team administrator of the same team.
• Select team combo boxA click on this combo box displays a list of all teams you have been added to or that you have created as team administrator. You can select a team in this list. The team members are listed in the Team View window.
• Presence status of a team memberThe Team View dialog shows you the presence statuses of other team partners.
If no presence icon is displayed, the invited team member has not accepted the team prompt yet.
• Name of the team memberWith a click on Name you can sort the team members alphabetically by their names.
NOTICE: The name of the team administrator is highlighted.
NOTICE: The name of a team member who has rejected the team prompt is crossed out.
Presence status, if the presence function of OpenScape Fusion for Microsoft Lync is synchronized with the pres-ence function of OpenScape UC Application (with UCMA
proxy)
Presence status, if the presence information of OpenScape Fusion for Microsoft Lync is based exclu-
sively on the presence function of Microsoft Lync (with-out UCMA proxy)
Available Available
Do not disturb Do not disturb
Busy Busy
Appear Away Unavailable
Be right back Be right back
In a meeting
A31003-S5070-U120-4-7619, 01/2014158 OpenScape UC Application V7 OpenScape Fusion for Microsoft Lync, User Guide
Operation ReferenceTeam Function - Overview
• Number of the team memberWith a click on Number you can sort the team members in descending or ascending order by their phone numbers.
NOTICE: The number of the team administrator is highlighted.
NOTICE: The number of a team member who has rejected the team prompt is crossed out.
• Display the partner journalThis icon is only displayed if the relevant team partner has allowed other users to access his/her journal (All Calls). With a click on this icon you can have the Journal of the selected team partner displayed.
NOTICE: In the journal of the team partner you see question marks instead of the names of his/her private contacts.
NOTICE: Phone numbers displayed to a user in a partner journal via the Team View are represented in exactly the same way as in the Journal of the relevant partner. This representation depends on the numbering plan of the respective partner. As a result, a phone number may be displayed in the partner journal in a format that the monitoring user cannot dial.
• Displaying a team member's telephone statusIf a team partner has accepted your team prompt, one of the following icons is displayed. This is independent from whether or not he/she has allowed you to see his/her presence status also.
– This icon indicates that the team partner has allowed you to monitor his/her presence status and that his/her telephone is ready for a call. With
a click on you can directly initiate a call to the team partner via the Team View dialog.
– This icon indicates that the team partner has allowed you to monitor his/her presence status and that his/her telephone is currently busy.
– This icon indicates that the team partner has not allowed you to monitor his/her presence status.
4.9.2 Managing a Team
The Team View dialog allows team administrators to manage teams and team members to determine the privileges to be assigned to other team partners.
A31003-S5070-U120-4-7619, 01/2014OpenScape UC Application V7 OpenScape Fusion for Microsoft Lync, User Guide 159
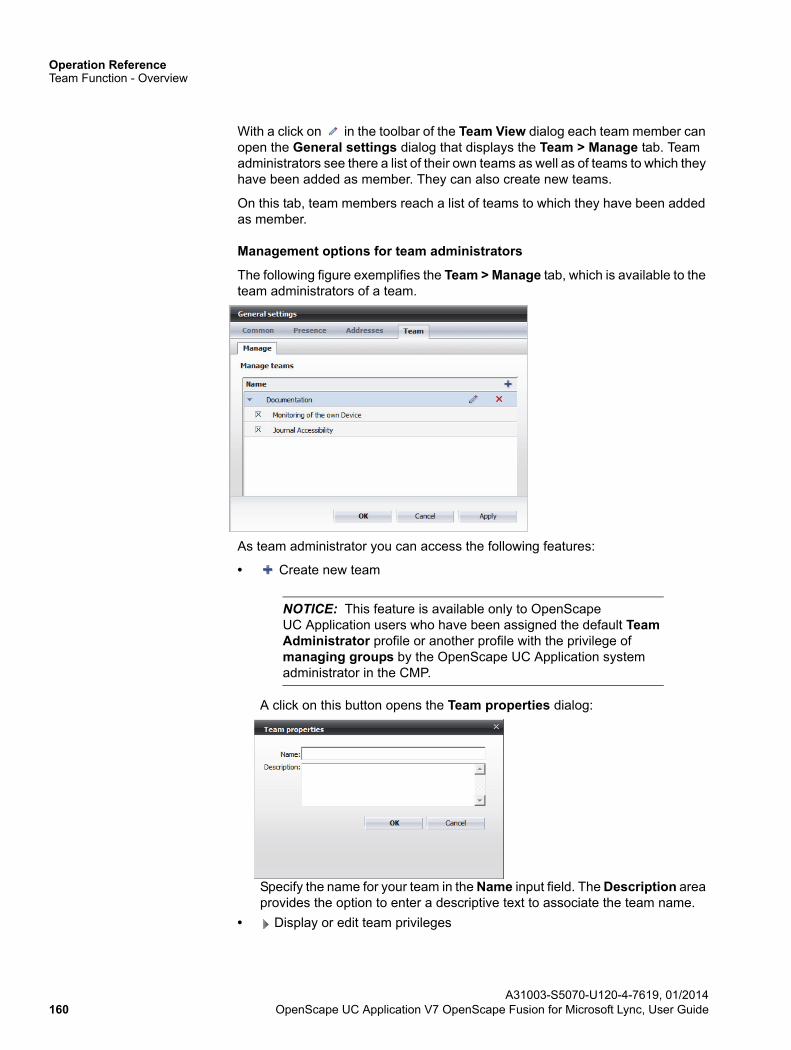
Operation ReferenceTeam Function - Overview
With a click on in the toolbar of the Team View dialog each team member can open the General settings dialog that displays the Team > Manage tab. Team administrators see there a list of their own teams as well as of teams to which they have been added as member. They can also create new teams.
On this tab, team members reach a list of teams to which they have been added as member.
Management options for team administrators
The following figure exemplifies the Team > Manage tab, which is available to the team administrators of a team.
As team administrator you can access the following features:
• Create new team
NOTICE: This feature is available only to OpenScape UC Application users who have been assigned the default Team Administrator profile or another profile with the privilege of managing groups by the OpenScape UC Application system administrator in the CMP.
A click on this button opens the Team properties dialog:
Specify the name for your team in the Name input field. The Description area provides the option to enter a descriptive text to associate the team name.
• Display or edit team privileges
A31003-S5070-U120-4-7619, 01/2014160 OpenScape UC Application V7 OpenScape Fusion for Microsoft Lync, User Guide
Operation ReferenceTeam Function - Overview
– Monitoring of the own DeviceBy enabling this option you allow your team partners to accept calls on your behalf.
– Journal AccessibilityWhen you activate this option you grant your team partners the privilege to view your journal (the icon appears in the Team View). This enables your partners to access your call list (All Calls). The names of callers or callees are displayed to the team partners as question marks. Your team partners are not allowed to delete entries in your journal.
• Display team properties
NOTICE: The feature is available to all team members.
With a click on this icon you can have the Name and Description of the respective team to which you have been added as member displayed in the Team properties dialog. No changes can be made.
• Edit team properties
NOTICE: The feature is available to team administrators only.
After a click on this icon you can change the Name and Description of the respective team created by yourself in the Team properties dialog.
• Delete team
NOTICE: This feature is available only to OpenScape UC Application users who have been assigned the default Team Administrator profile or another profile with the privilege of managing groups by the OpenScape UC Application system administrator in the CMP.
With a click on you can delete the selected team.
A31003-S5070-U120-4-7619, 01/2014OpenScape UC Application V7 OpenScape Fusion for Microsoft Lync, User Guide 161
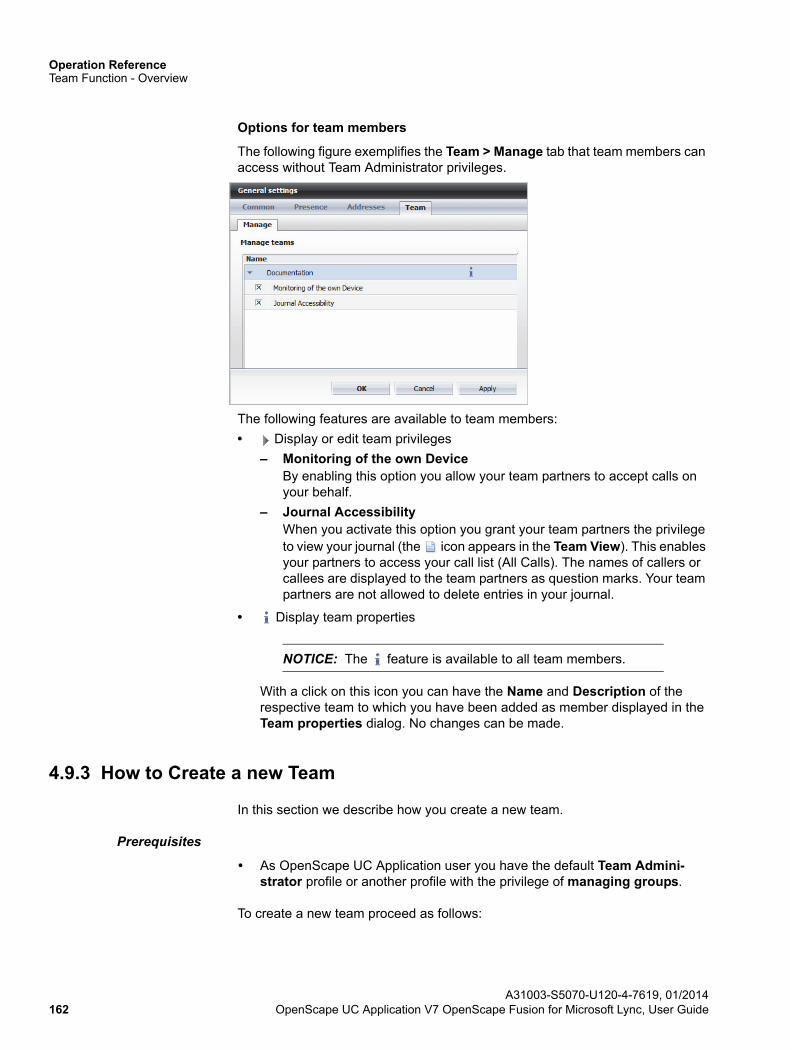
Operation ReferenceTeam Function - Overview
Options for team members
The following figure exemplifies the Team > Manage tab that team members can access without Team Administrator privileges.
The following features are available to team members:
• Display or edit team privileges
– Monitoring of the own DeviceBy enabling this option you allow your team partners to accept calls on your behalf.
– Journal AccessibilityWhen you activate this option you grant your team partners the privilege to view your journal (the icon appears in the Team View). This enables your partners to access your call list (All Calls). The names of callers or callees are displayed to the team partners as question marks. Your team partners are not allowed to delete entries in your journal.
• Display team properties
NOTICE: The feature is available to all team members.
With a click on this icon you can have the Name and Description of the respective team to which you have been added as member displayed in the Team properties dialog. No changes can be made.
4.9.3 How to Create a new Team
In this section we describe how you create a new team.
Prerequisites
• As OpenScape UC Application user you have the default Team Admini-strator profile or another profile with the privilege of managing groups.
To create a new team proceed as follows:
A31003-S5070-U120-4-7619, 01/2014162 OpenScape UC Application V7 OpenScape Fusion for Microsoft Lync, User Guide
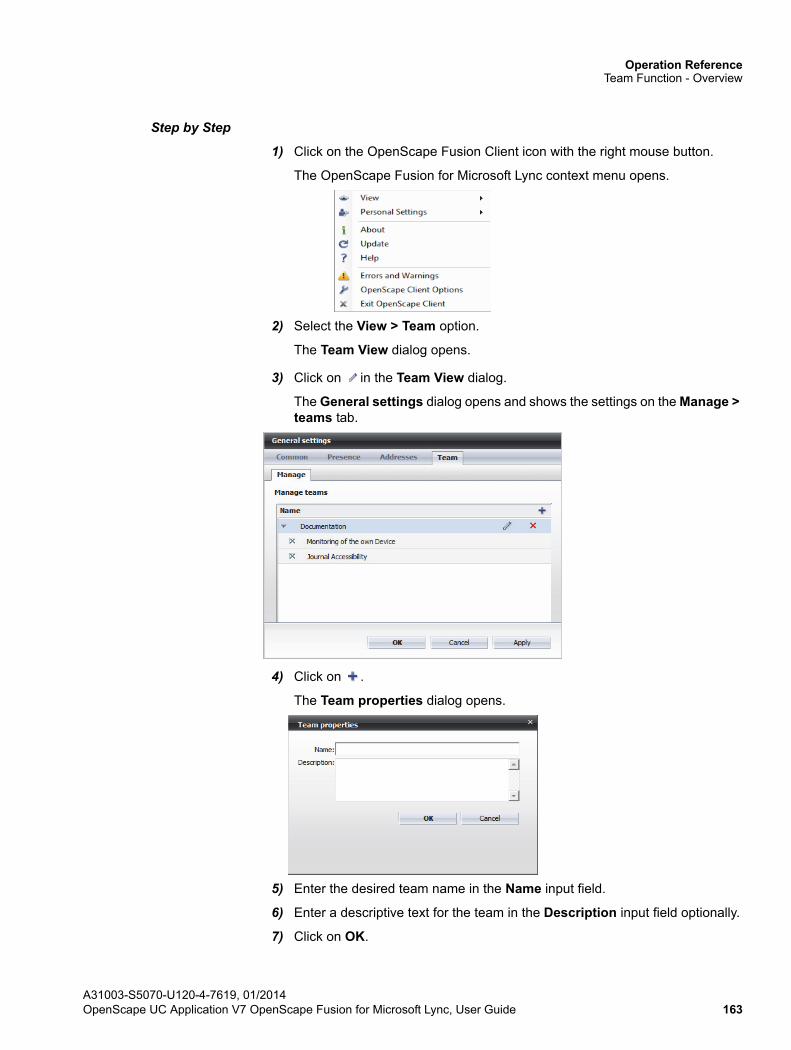
Operation ReferenceTeam Function - Overview
Step by Step
1) Click on the OpenScape Fusion Client icon with the right mouse button.
The OpenScape Fusion for Microsoft Lync context menu opens.
2) Select the View > Team option.
The Team View dialog opens.
3) Click on in the Team View dialog.
The General settings dialog opens and shows the settings on the Manage > teams tab.
4) Click on .
The Team properties dialog opens.
5) Enter the desired team name in the Name input field.
6) Enter a descriptive text for the team in the Description input field optionally.
7) Click on OK.
A31003-S5070-U120-4-7619, 01/2014OpenScape UC Application V7 OpenScape Fusion for Microsoft Lync, User Guide 163
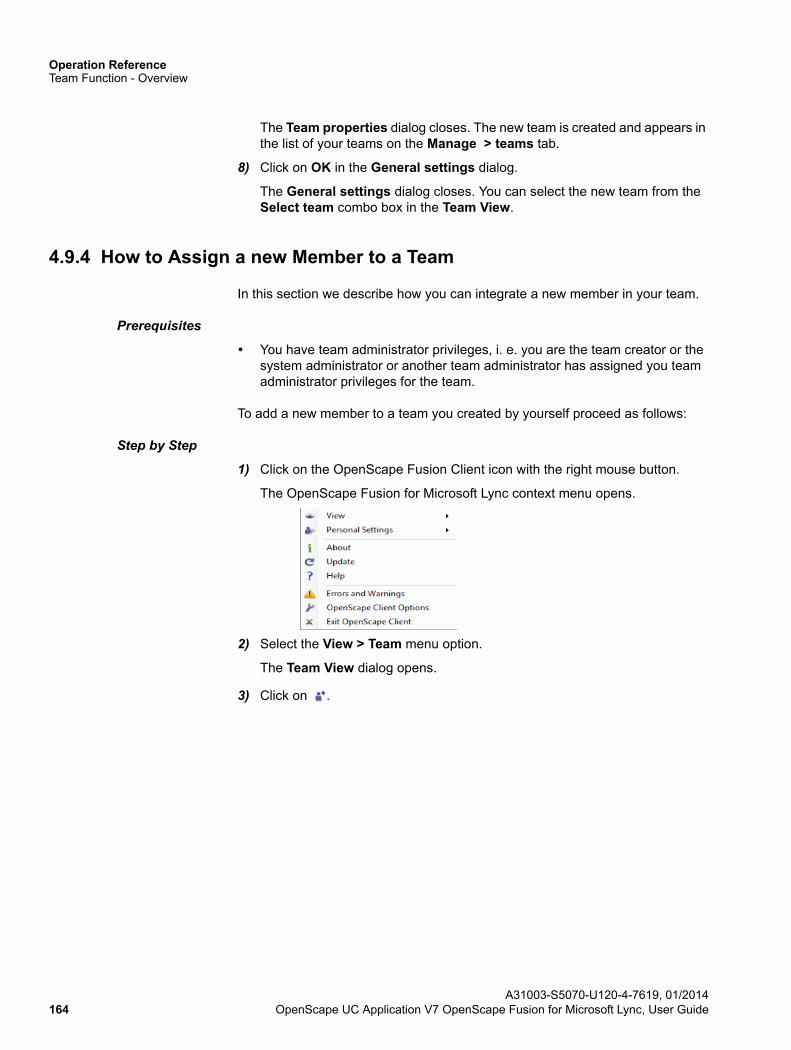
Operation ReferenceTeam Function - Overview
The Team properties dialog closes. The new team is created and appears in the list of your teams on the Manage > teams tab.
8) Click on OK in the General settings dialog.
The General settings dialog closes. You can select the new team from the Select team combo box in the Team View.
4.9.4 How to Assign a new Member to a Team
In this section we describe how you can integrate a new member in your team.
Prerequisites
• You have team administrator privileges, i. e. you are the team creator or the system administrator or another team administrator has assigned you team administrator privileges for the team.
To add a new member to a team you created by yourself proceed as follows:
Step by Step
1) Click on the OpenScape Fusion Client icon with the right mouse button.
The OpenScape Fusion for Microsoft Lync context menu opens.
2) Select the View > Team menu option.
The Team View dialog opens.
3) Click on .
A31003-S5070-U120-4-7619, 01/2014164 OpenScape UC Application V7 OpenScape Fusion for Microsoft Lync, User Guide
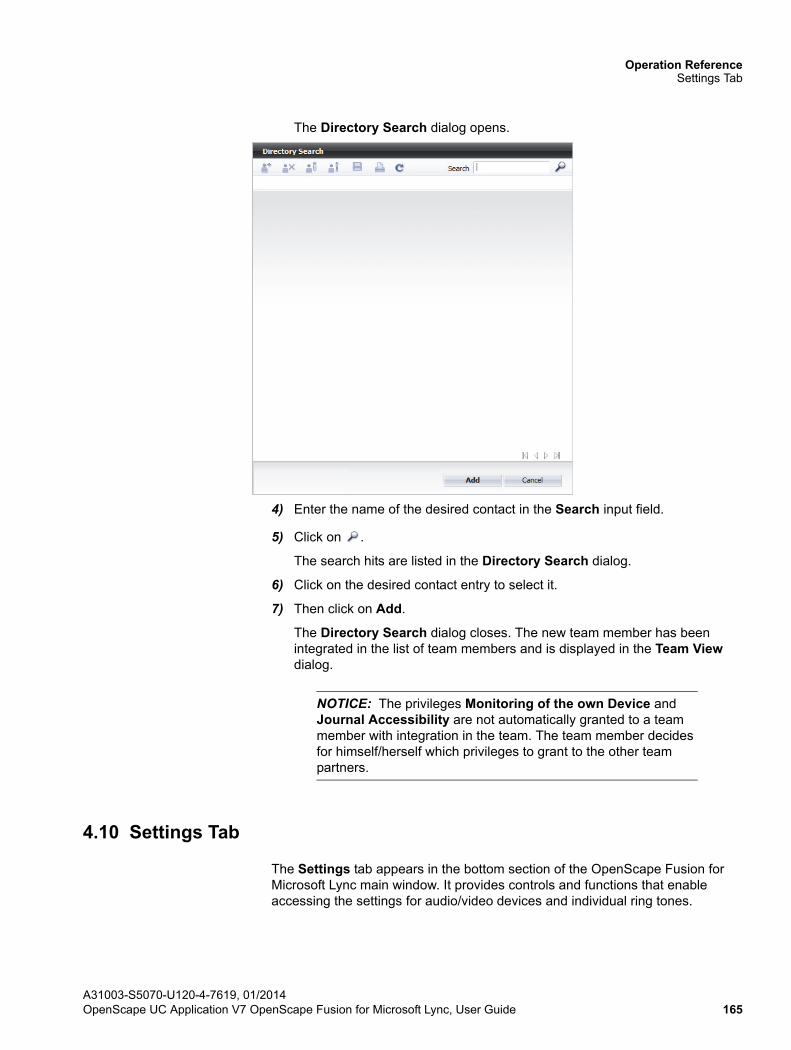
Operation ReferenceSettings Tab
The Directory Search dialog opens.
4) Enter the name of the desired contact in the Search input field.
5) Click on .
The search hits are listed in the Directory Search dialog.
6) Click on the desired contact entry to select it.
7) Then click on Add.
The Directory Search dialog closes. The new team member has been integrated in the list of team members and is displayed in the Team View dialog.
NOTICE: The privileges Monitoring of the own Device and Journal Accessibility are not automatically granted to a team member with integration in the team. The team member decides for himself/herself which privileges to grant to the other team partners.
4.10 Settings Tab
The Settings tab appears in the bottom section of the OpenScape Fusion for Microsoft Lync main window. It provides controls and functions that enable accessing the settings for audio/video devices and individual ring tones.
A31003-S5070-U120-4-7619, 01/2014OpenScape UC Application V7 OpenScape Fusion for Microsoft Lync, User Guide 165
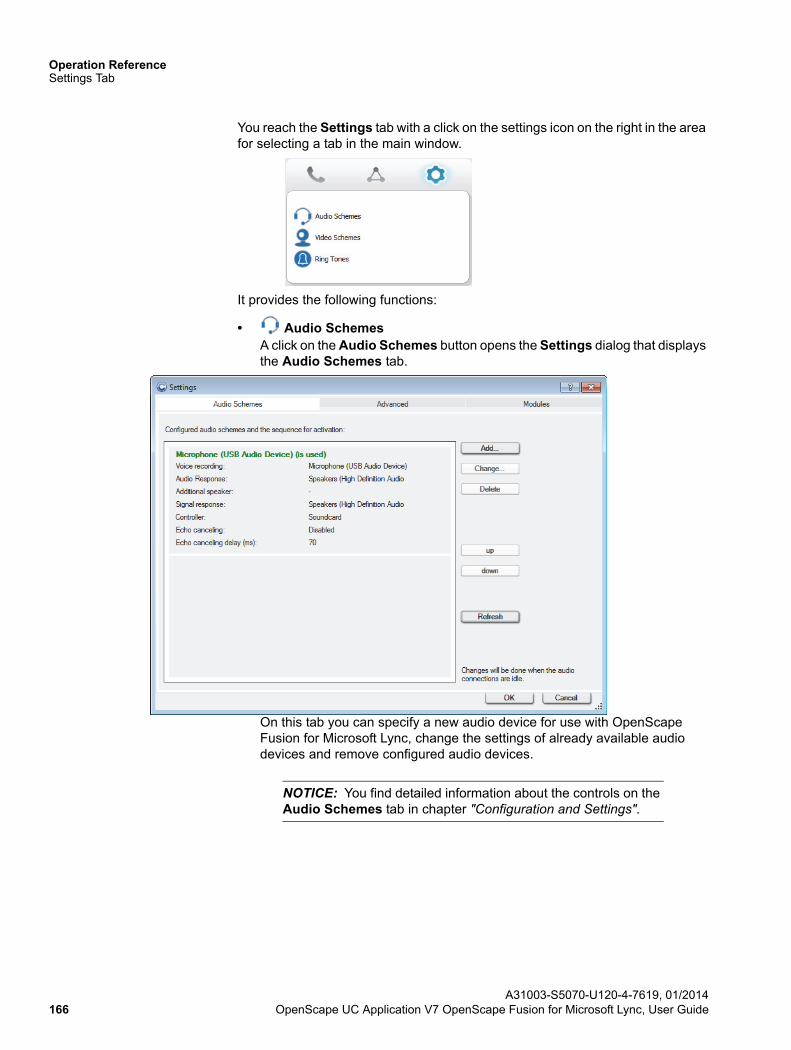
Operation ReferenceSettings Tab
You reach the Settings tab with a click on the settings icon on the right in the area for selecting a tab in the main window.
It provides the following functions:
• Audio SchemesA click on the Audio Schemes button opens the Settings dialog that displays the Audio Schemes tab.
On this tab you can specify a new audio device for use with OpenScape Fusion for Microsoft Lync, change the settings of already available audio devices and remove configured audio devices.
NOTICE: You find detailed information about the controls on the Audio Schemes tab in chapter "Configuration and Settings".
A31003-S5070-U120-4-7619, 01/2014166 OpenScape UC Application V7 OpenScape Fusion for Microsoft Lync, User Guide
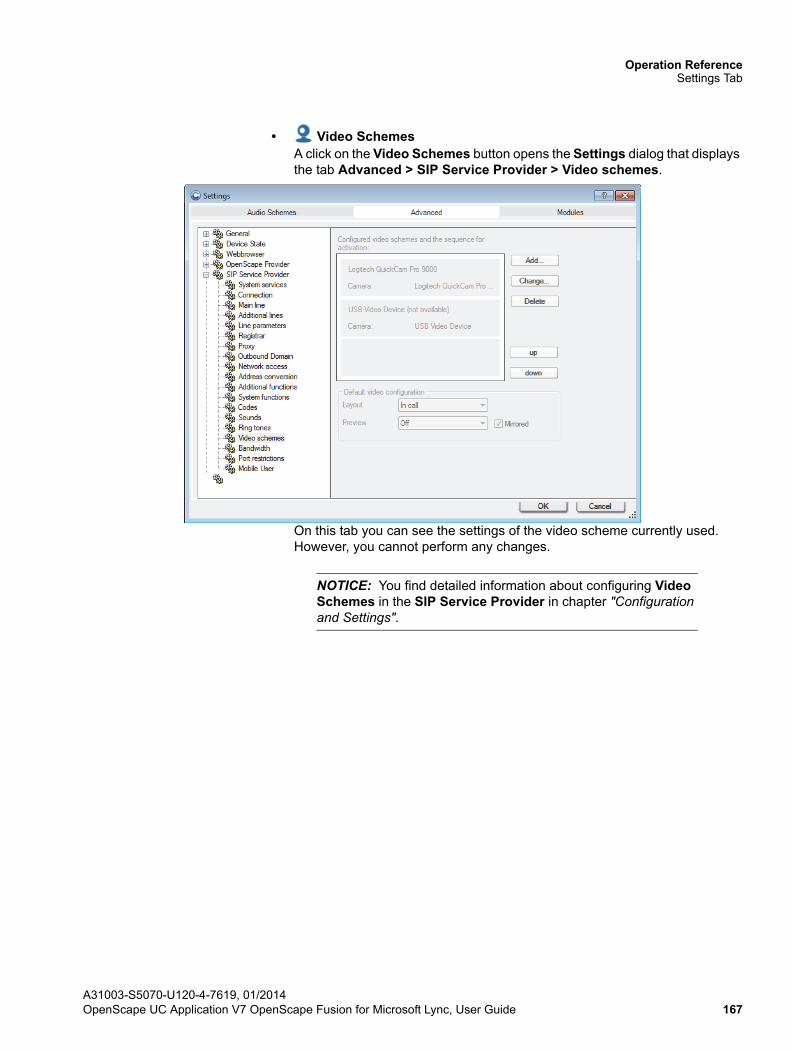
Operation ReferenceSettings Tab
• Video SchemesA click on the Video Schemes button opens the Settings dialog that displays the tab Advanced > SIP Service Provider > Video schemes.
On this tab you can see the settings of the video scheme currently used. However, you cannot perform any changes.
NOTICE: You find detailed information about configuring Video Schemes in the SIP Service Provider in chapter "Configuration and Settings".
A31003-S5070-U120-4-7619, 01/2014OpenScape UC Application V7 OpenScape Fusion for Microsoft Lync, User Guide 167
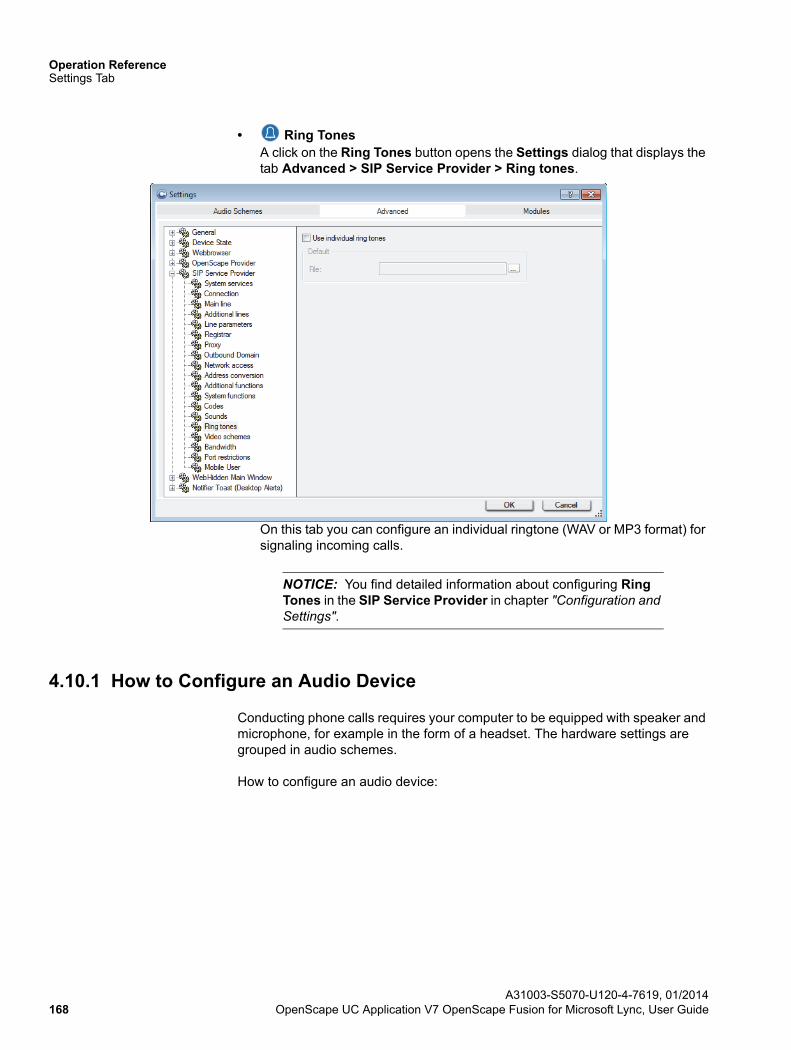
Operation ReferenceSettings Tab
• Ring TonesA click on the Ring Tones button opens the Settings dialog that displays the tab Advanced > SIP Service Provider > Ring tones.
On this tab you can configure an individual ringtone (WAV or MP3 format) for signaling incoming calls.
NOTICE: You find detailed information about configuring Ring Tones in the SIP Service Provider in chapter "Configuration and Settings".
4.10.1 How to Configure an Audio Device
Conducting phone calls requires your computer to be equipped with speaker and microphone, for example in the form of a headset. The hardware settings are grouped in audio schemes.
How to configure an audio device:
A31003-S5070-U120-4-7619, 01/2014168 OpenScape UC Application V7 OpenScape Fusion for Microsoft Lync, User Guide
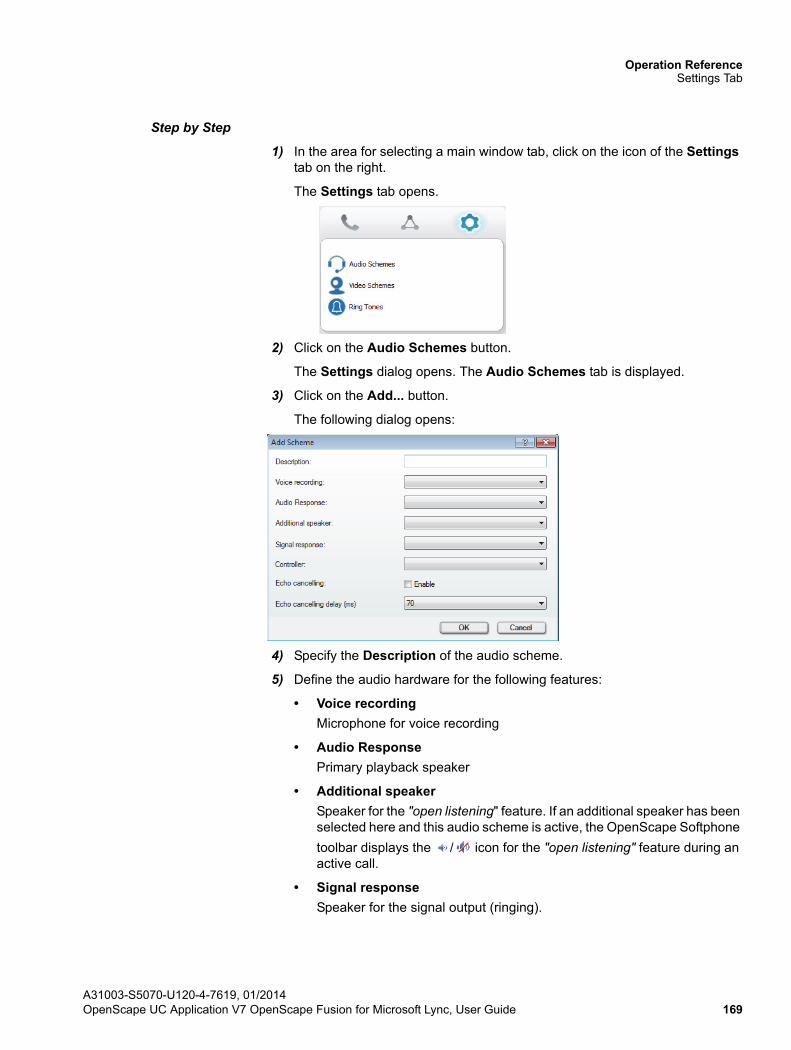
Operation ReferenceSettings Tab
Step by Step
1) In the area for selecting a main window tab, click on the icon of the Settings tab on the right.
The Settings tab opens.
2) Click on the Audio Schemes button.
The Settings dialog opens. The Audio Schemes tab is displayed.
3) Click on the Add... button.
The following dialog opens:
4) Specify the Description of the audio scheme.
5) Define the audio hardware for the following features:
• Voice recording
Microphone for voice recording
• Audio Response
Primary playback speaker
• Additional speaker
Speaker for the "open listening" feature. If an additional speaker has been selected here and this audio scheme is active, the OpenScape Softphone
toolbar displays the / icon for the "open listening" feature during an active call.
• Signal response
Speaker for the signal output (ringing).
A31003-S5070-U120-4-7619, 01/2014OpenScape UC Application V7 OpenScape Fusion for Microsoft Lync, User Guide 169
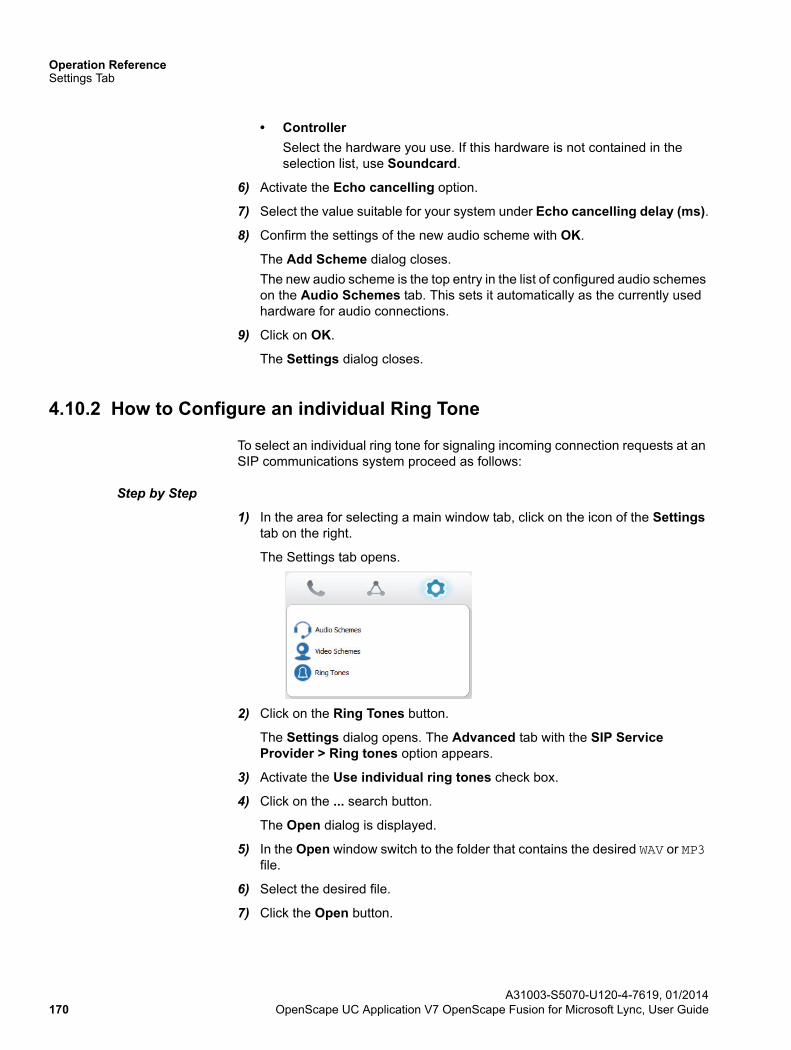
Operation ReferenceSettings Tab
• Controller
Select the hardware you use. If this hardware is not contained in the selection list, use Soundcard.
6) Activate the Echo cancelling option.
7) Select the value suitable for your system under Echo cancelling delay (ms).
8) Confirm the settings of the new audio scheme with OK.
The Add Scheme dialog closes.
The new audio scheme is the top entry in the list of configured audio schemes on the Audio Schemes tab. This sets it automatically as the currently used hardware for audio connections.
9) Click on OK.
The Settings dialog closes.
4.10.2 How to Configure an individual Ring Tone
To select an individual ring tone for signaling incoming connection requests at an SIP communications system proceed as follows:
Step by Step
1) In the area for selecting a main window tab, click on the icon of the Settings tab on the right.
The Settings tab opens.
2) Click on the Ring Tones button.
The Settings dialog opens. The Advanced tab with the SIP Service Provider > Ring tones option appears.
3) Activate the Use individual ring tones check box.
4) Click on the ... search button.
The Open dialog is displayed.
5) In the Open window switch to the folder that contains the desired WAV or MP3 file.
6) Select the desired file.
7) Click the Open button.
A31003-S5070-U120-4-7619, 01/2014170 OpenScape UC Application V7 OpenScape Fusion for Microsoft Lync, User Guide
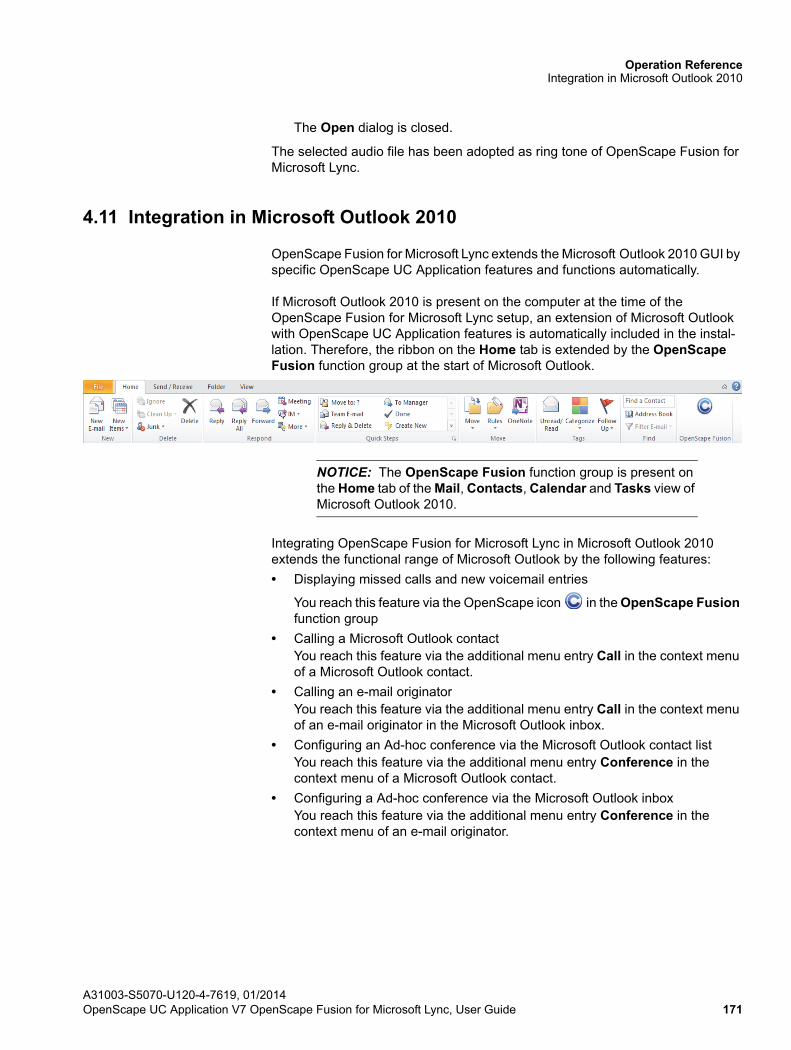
Operation ReferenceIntegration in Microsoft Outlook 2010
The Open dialog is closed.
The selected audio file has been adopted as ring tone of OpenScape Fusion for Microsoft Lync.
4.11 Integration in Microsoft Outlook 2010
OpenScape Fusion for Microsoft Lync extends the Microsoft Outlook 2010 GUI by specific OpenScape UC Application features and functions automatically.
If Microsoft Outlook 2010 is present on the computer at the time of the OpenScape Fusion for Microsoft Lync setup, an extension of Microsoft Outlook with OpenScape UC Application features is automatically included in the instal-lation. Therefore, the ribbon on the Home tab is extended by the OpenScape Fusion function group at the start of Microsoft Outlook.
NOTICE: The OpenScape Fusion function group is present on the Home tab of the Mail, Contacts, Calendar and Tasks view of Microsoft Outlook 2010.
Integrating OpenScape Fusion for Microsoft Lync in Microsoft Outlook 2010 extends the functional range of Microsoft Outlook by the following features:
• Displaying missed calls and new voicemail entries
You reach this feature via the OpenScape icon in the OpenScape Fusion function group
• Calling a Microsoft Outlook contactYou reach this feature via the additional menu entry Call in the context menu of a Microsoft Outlook contact.
• Calling an e-mail originatorYou reach this feature via the additional menu entry Call in the context menu of an e-mail originator in the Microsoft Outlook inbox.
• Configuring an Ad-hoc conference via the Microsoft Outlook contact listYou reach this feature via the additional menu entry Conference in the context menu of a Microsoft Outlook contact.
• Configuring a Ad-hoc conference via the Microsoft Outlook inboxYou reach this feature via the additional menu entry Conference in the context menu of an e-mail originator.
A31003-S5070-U120-4-7619, 01/2014OpenScape UC Application V7 OpenScape Fusion for Microsoft Lync, User Guide 171
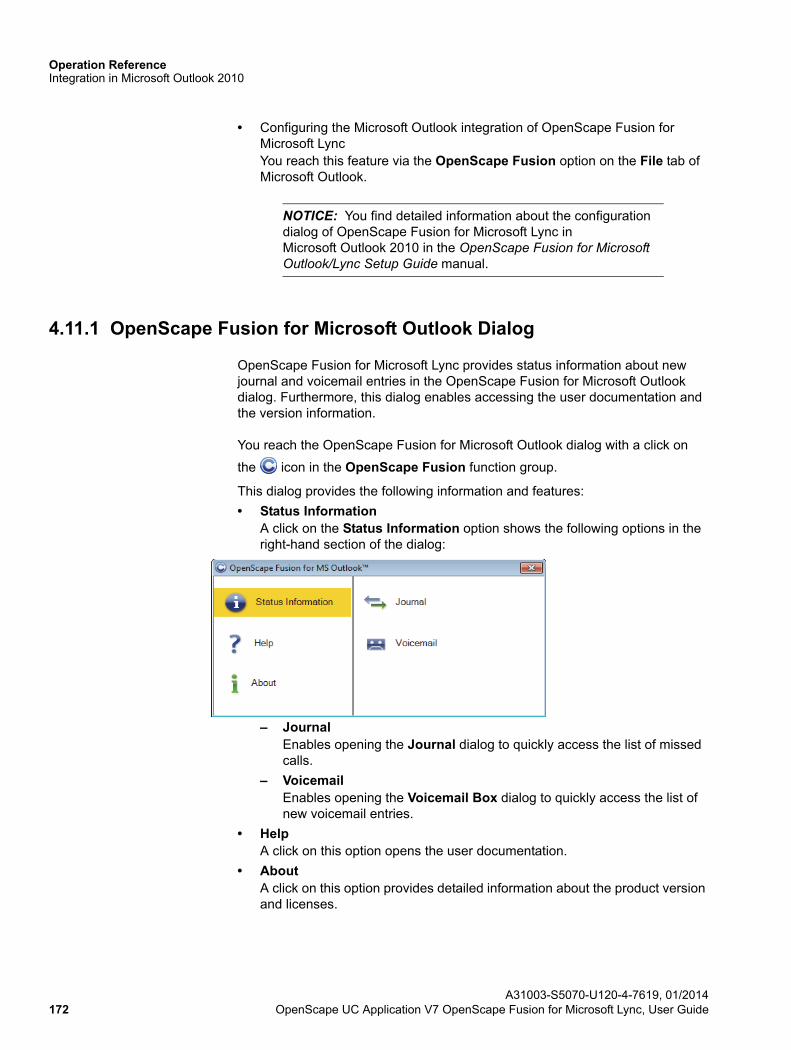
Operation ReferenceIntegration in Microsoft Outlook 2010
• Configuring the Microsoft Outlook integration of OpenScape Fusion for Microsoft LyncYou reach this feature via the OpenScape Fusion option on the File tab of Microsoft Outlook.
NOTICE: You find detailed information about the configuration dialog of OpenScape Fusion for Microsoft Lync in Microsoft Outlook 2010 in the OpenScape Fusion for Microsoft Outlook/Lync Setup Guide manual.
4.11.1 OpenScape Fusion for Microsoft Outlook Dialog
OpenScape Fusion for Microsoft Lync provides status information about new journal and voicemail entries in the OpenScape Fusion for Microsoft Outlook dialog. Furthermore, this dialog enables accessing the user documentation and the version information.
You reach the OpenScape Fusion for Microsoft Outlook dialog with a click on
the icon in the OpenScape Fusion function group.
This dialog provides the following information and features:
• Status InformationA click on the Status Information option shows the following options in the right-hand section of the dialog:
– JournalEnables opening the Journal dialog to quickly access the list of missed calls.
– VoicemailEnables opening the Voicemail Box dialog to quickly access the list of new voicemail entries.
• HelpA click on this option opens the user documentation.
• AboutA click on this option provides detailed information about the product version and licenses.
A31003-S5070-U120-4-7619, 01/2014172 OpenScape UC Application V7 OpenScape Fusion for Microsoft Lync, User Guide
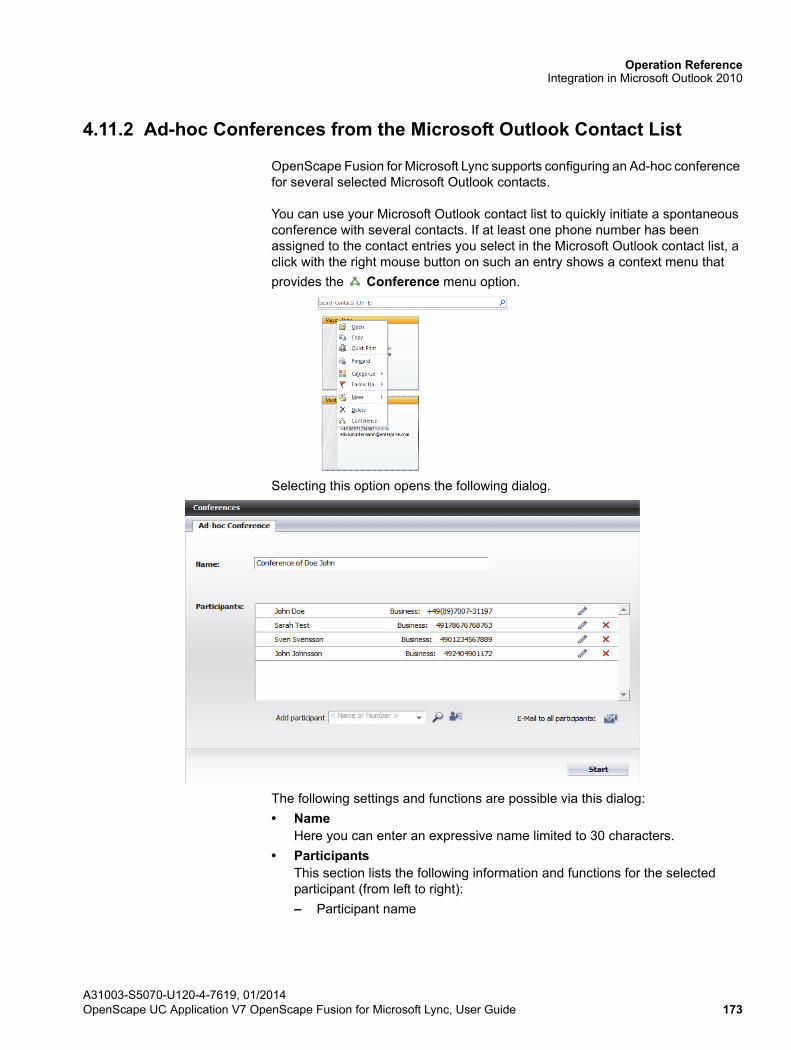
Operation ReferenceIntegration in Microsoft Outlook 2010
4.11.2 Ad-hoc Conferences from the Microsoft Outlook Contact List
OpenScape Fusion for Microsoft Lync supports configuring an Ad-hoc conference for several selected Microsoft Outlook contacts.
You can use your Microsoft Outlook contact list to quickly initiate a spontaneous conference with several contacts. If at least one phone number has been assigned to the contact entries you select in the Microsoft Outlook contact list, a click with the right mouse button on such an entry shows a context menu that
provides the Conference menu option.
Selecting this option opens the following dialog.
The following settings and functions are possible via this dialog:
• NameHere you can enter an expressive name limited to 30 characters.
• ParticipantsThis section lists the following information and functions for the selected participant (from left to right):
– Participant name
A31003-S5070-U120-4-7619, 01/2014OpenScape UC Application V7 OpenScape Fusion for Microsoft Lync, User Guide 173
Operation ReferenceIntegration in Microsoft Outlook 2010
– Phone numberIf several phone numbers have been configured for the conference partic-ipant, the one he/she currently uses is displayed shifted to the left. You can click on the phone number display to select another phone number from the displayed list.
– Edit participant entry
A click on opens the Add participant dialog in which you can change the Display name, the Phone number and the E-mail address of the selected conference participant. A click on OK copies your modifications and the Add participants dialog closes.
–Via this icon you can remove the corresponding participant from the conference participant list.
NOTICE: All conference participants are called by the conference system and have the same privileges for controlling the conference.
• Add participantUse one of the following options to select conference participants:
– Enter the phone number or name of the desired contact in the Add partic-
ipant combo box. Then click on . The Add participant dialog for completing the participant data opens. Specify the missing data (name, phone number and e-mail address) and click on OK in this dialog. The selected contact is added to the list of conference participants.
NOTICE: If you do not configure an e-mail address for the partic-ipant here, he/she will not receive a conference notification e-mail and thus no information about the conference access data.
– Click on the triangle icon on the right margin of the Add participant combo box. The list that displays the last 20 phone numbers you have dialed opens. Select the phone number of the subscriber to be added to
the conference. Then click on . The Add participant dialog for completing the participant data opens. Specify in there the Name and E-mail address of the contact for display in the conference list. Finally click on OK in this dialog. The selected contact is added to the participant list and notified about the conference access data by e-mail.
NOTICE: If you do not configure an e-mail address for the partic-ipant here, he/she will not receive a conference notification e-mail and thus no information about the conference access data.
A31003-S5070-U120-4-7619, 01/2014174 OpenScape UC Application V7 OpenScape Fusion for Microsoft Lync, User Guide
Operation ReferenceIntegration in Microsoft Outlook 2010
– Click on to initiate a contact search in the available directories. The input mask with the search criteria opens. Select the desired contact from the hits and click on OK in the Directory Search dialog. The selected contact is added to the participant list and notified about the conference access data by e-mail.
– Click on . The Add participant dialog opens. Specify here the Name, the Phone number as well as the E-mail address of the conference participant. Finally click on OK in this dialog. The contact is added to the list of conference participants.
NOTICE: If you do not configure an e-mail address for the partic-ipant here, he/she will not receive a conference notification e-mail and thus no information about the conference access data.
• Send e-mail to all participants
With a click on you can send an e-mail to all conference participants. The e-mail contains the current conference access data and can be furnished with additional information. This is useful for example when an external conference participant is to join and you have recreated the conference access data on short notice.
A click on opens your default e-mail application with the dialog for sending e-mails. Here, all conference participants are already addressed and the updated conference data entered.
• StartWith a click on this button you can initiate the Ad-hoc conference after you have applied the settings determined in the template.
4.11.2.1 How to Initiate an Ad-hoc Conference via the Microsoft Outlook Contact List
Prerequisites
• At least one phone number has been configured for the Microsoft Outlook contacts to take part in the Ad-hoc conference.
To initiate an Ad-hoc conference with several contacts via your Microsoft Outlook contact list proceed as follows:
Step by Step
1) Switch to the contact view in your Microsoft Outlook client.
2) Keep the [Ctrl] key pressed and select the contacts you wish to have as conference participants.
3) Click on one of the selected contacts with the right mouse button.
A31003-S5070-U120-4-7619, 01/2014OpenScape UC Application V7 OpenScape Fusion for Microsoft Lync, User Guide 175
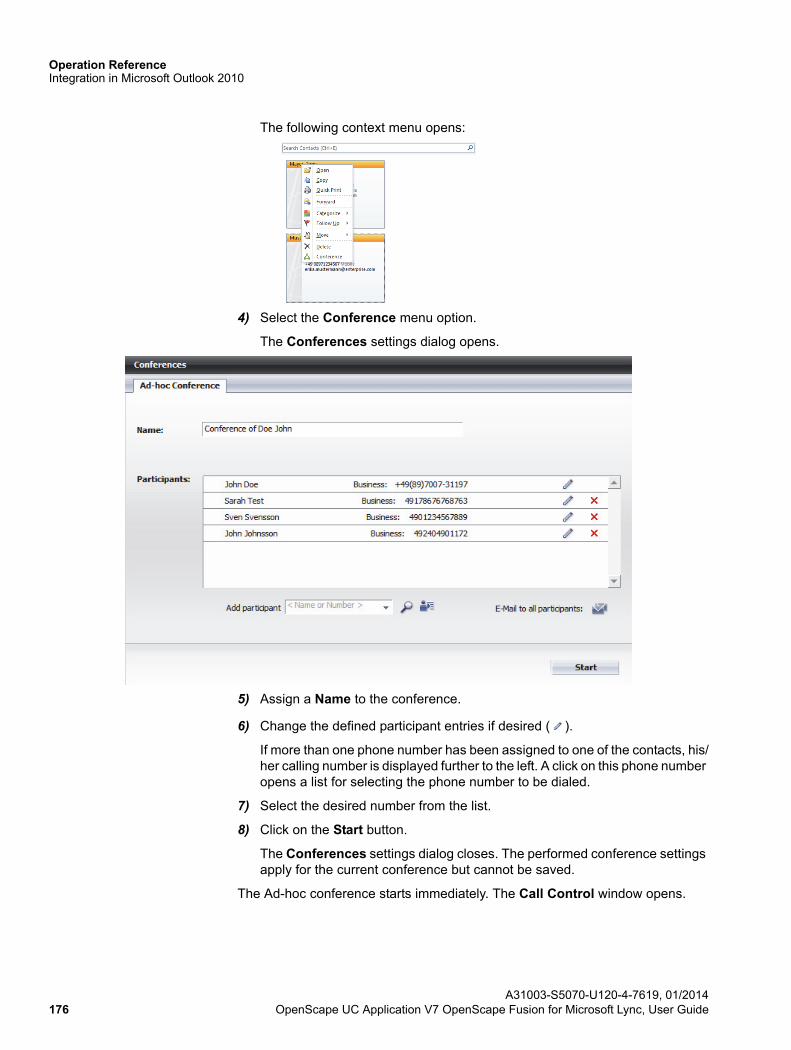
Operation ReferenceIntegration in Microsoft Outlook 2010
The following context menu opens:
4) Select the Conference menu option.
The Conferences settings dialog opens.
5) Assign a Name to the conference.
6) Change the defined participant entries if desired ( ).
If more than one phone number has been assigned to one of the contacts, his/her calling number is displayed further to the left. A click on this phone number opens a list for selecting the phone number to be dialed.
7) Select the desired number from the list.
8) Click on the Start button.
The Conferences settings dialog closes. The performed conference settings apply for the current conference but cannot be saved.
The Ad-hoc conference starts immediately. The Call Control window opens.
A31003-S5070-U120-4-7619, 01/2014176 OpenScape UC Application V7 OpenScape Fusion for Microsoft Lync, User Guide

Operation ReferenceIntegration in Microsoft Outlook 2010
4.11.3 Meet Me Conferences from the Microsoft Outlook Calendar
OpenScape Fusion for Microsoft Lync does not provide an option for configuring scheduled Meet Me conferences in the Microsoft Outlook calendar.
Scheduling server-based Meet Me conferences in the Microsoft Outlook calendar is possible after installing the OpenScape Extensions for Microsoft Outlook appli-cation of the OpenScape UC Application.
NOTICE: You find information about installing and operating the OpenScape Extensions for Microsoft Outlook application in the OpenScape UC Application V7 Client Applications manual.
4.11.4 Ad-hoc Conferences from the Microsoft Outlook E-Mail List
OpenScape Fusion for Microsoft Lync enables configuring an Ad-hoc conference with the originators of several selected e-mails in one of the Microsoft Outlook e-mail lists.
You can quickly initiate a spontaneous conference with several e-mail originators via one of your Microsoft Outlook e-mail lists. The e-mail addresses of the selected e-mail originators are resolved by the Microsoft Exchange server. If at
A31003-S5070-U120-4-7619, 01/2014OpenScape UC Application V7 OpenScape Fusion for Microsoft Lync, User Guide 177
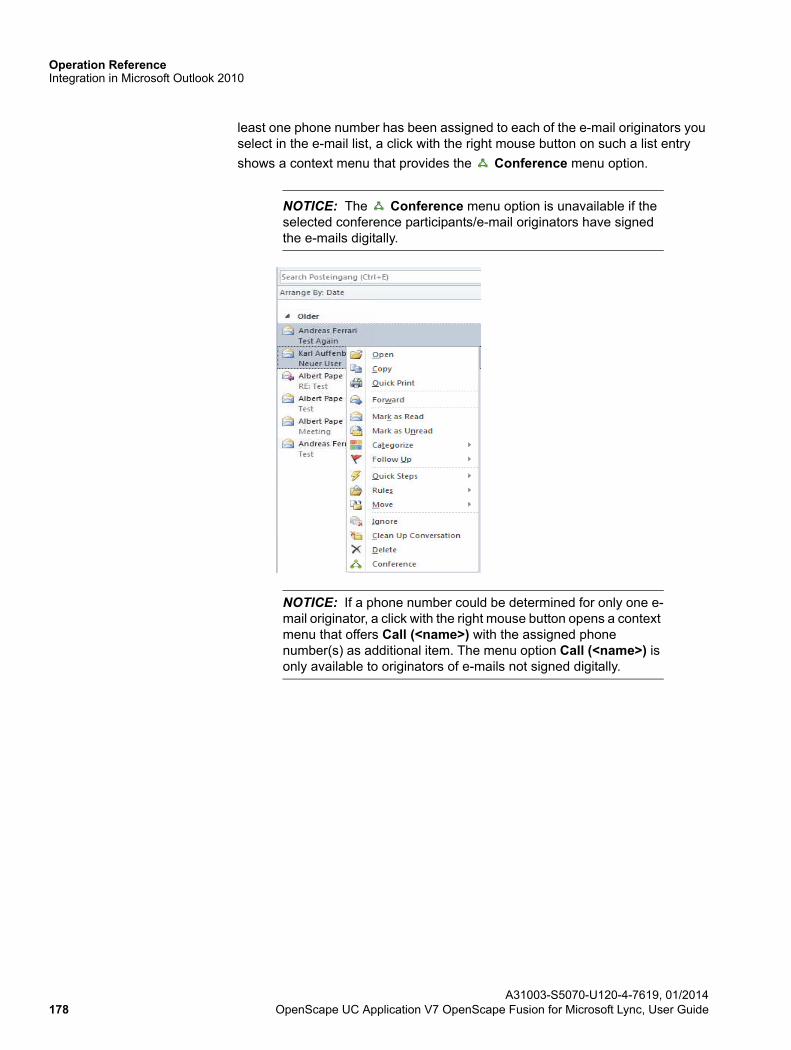
Operation ReferenceIntegration in Microsoft Outlook 2010
least one phone number has been assigned to each of the e-mail originators you select in the e-mail list, a click with the right mouse button on such a list entry
shows a context menu that provides the Conference menu option.
NOTICE: The Conference menu option is unavailable if the selected conference participants/e-mail originators have signed the e-mails digitally.
NOTICE: If a phone number could be determined for only one e-mail originator, a click with the right mouse button opens a context menu that offers Call (<name>) with the assigned phone number(s) as additional item. The menu option Call (<name>) is only available to originators of e-mails not signed digitally.
A31003-S5070-U120-4-7619, 01/2014178 OpenScape UC Application V7 OpenScape Fusion for Microsoft Lync, User Guide
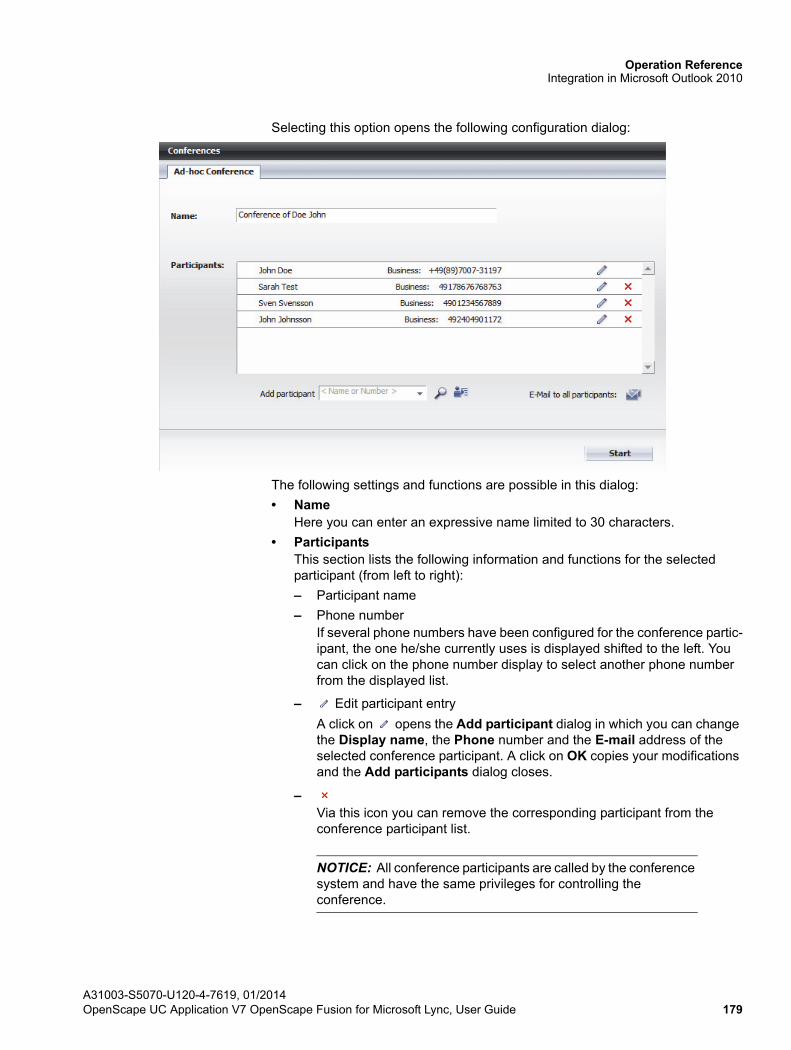
Operation ReferenceIntegration in Microsoft Outlook 2010
Selecting this option opens the following configuration dialog:
The following settings and functions are possible in this dialog:
• NameHere you can enter an expressive name limited to 30 characters.
• ParticipantsThis section lists the following information and functions for the selected participant (from left to right):
– Participant name
– Phone numberIf several phone numbers have been configured for the conference partic-ipant, the one he/she currently uses is displayed shifted to the left. You can click on the phone number display to select another phone number from the displayed list.
– Edit participant entry
A click on opens the Add participant dialog in which you can change the Display name, the Phone number and the E-mail address of the selected conference participant. A click on OK copies your modifications and the Add participants dialog closes.
–Via this icon you can remove the corresponding participant from the conference participant list.
NOTICE: All conference participants are called by the conference system and have the same privileges for controlling the conference.
A31003-S5070-U120-4-7619, 01/2014OpenScape UC Application V7 OpenScape Fusion for Microsoft Lync, User Guide 179
Operation ReferenceIntegration in Microsoft Outlook 2010
• Add participantUse one of the following options to select conference participants:
– Enter the phone number or name of the desired contact in the Add partic-
ipant combo box. Then click on . The Add participant dialog to complete the participant data opens. Specify the missing data (name, phone number and e-mail address) and click on OK in this dialog. The selected contact is added to the list of conference participants.
NOTICE: If you do not configure an e-mail address for the partic-ipant here, he/she will not receive a conference notification e-mail and thus no information about the conference access data.
– Click on the triangle icon on the right margin of the Add participant combo box. The list that displays the last 20 phone numbers you have dialed opens. Select the phone number of the subscriber to be added to
the conference. Then click on . The Add participant dialog to complete the participant data opens. Specify in there the Name and E-mail address of the contact for display in the conference list. Finally click on OK in this dialog. The selected contact is added to the participant list and notified about the conference access data by e-mail.
NOTICE: If you do not configure an e-mail address for the partic-ipant here, he/she will not receive a conference notification e-mail and thus no information about the conference access data.
– Click on to initiate a contact search in the available directories. The input mask with the search criteria opens. Select the desired contact from the hits and click on OK in the Directory Search dialog. The selected contact is added to the participant list and notified about the conference access data by e-mail.
– Click on . The Add participant dialog opens. Specify here the Name, the Phone number as well as the E-mail address of the conference participant. Finally, click on OK in this dialog. The contact is added to the list of conference participants.
NOTICE: If you do not configure an e-mail address for the partic-ipant here, he/she will not receive a conference notification e-mail and thus no information about the conference access data.
• E-mail to all participants
With a click on you can send an e-mail to all conference participants. The e-mail contains the current conference access data and can be furnished with additional information. This is useful e.g. when an external conference partic-ipant is to join and you have recreated the conference access data on short notice.
A click on opens your default e-mail application with the dialog for sending e-mails. Here, all conference participants are already addressed and the updated conference data entered.
A31003-S5070-U120-4-7619, 01/2014180 OpenScape UC Application V7 OpenScape Fusion for Microsoft Lync, User Guide
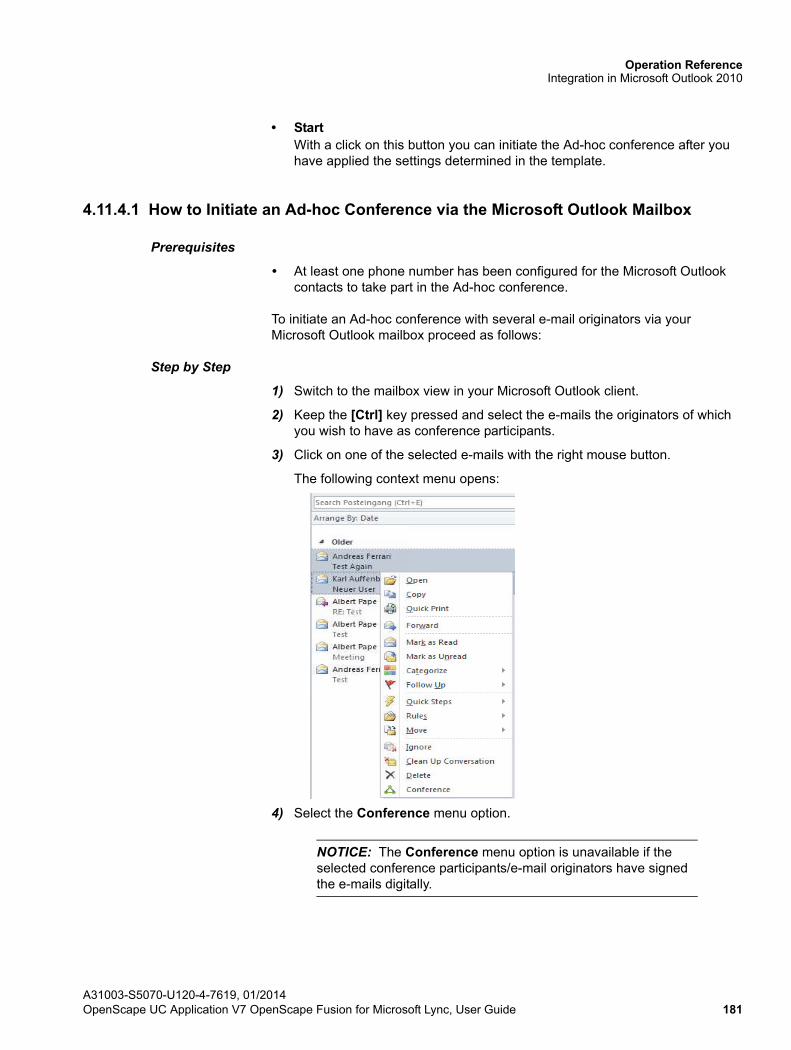
Operation ReferenceIntegration in Microsoft Outlook 2010
• StartWith a click on this button you can initiate the Ad-hoc conference after you have applied the settings determined in the template.
4.11.4.1 How to Initiate an Ad-hoc Conference via the Microsoft Outlook Mailbox
Prerequisites
• At least one phone number has been configured for the Microsoft Outlook contacts to take part in the Ad-hoc conference.
To initiate an Ad-hoc conference with several e-mail originators via your Microsoft Outlook mailbox proceed as follows:
Step by Step
1) Switch to the mailbox view in your Microsoft Outlook client.
2) Keep the [Ctrl] key pressed and select the e-mails the originators of which you wish to have as conference participants.
3) Click on one of the selected e-mails with the right mouse button.
The following context menu opens:
4) Select the Conference menu option.
NOTICE: The Conference menu option is unavailable if the selected conference participants/e-mail originators have signed the e-mails digitally.
A31003-S5070-U120-4-7619, 01/2014OpenScape UC Application V7 OpenScape Fusion for Microsoft Lync, User Guide 181
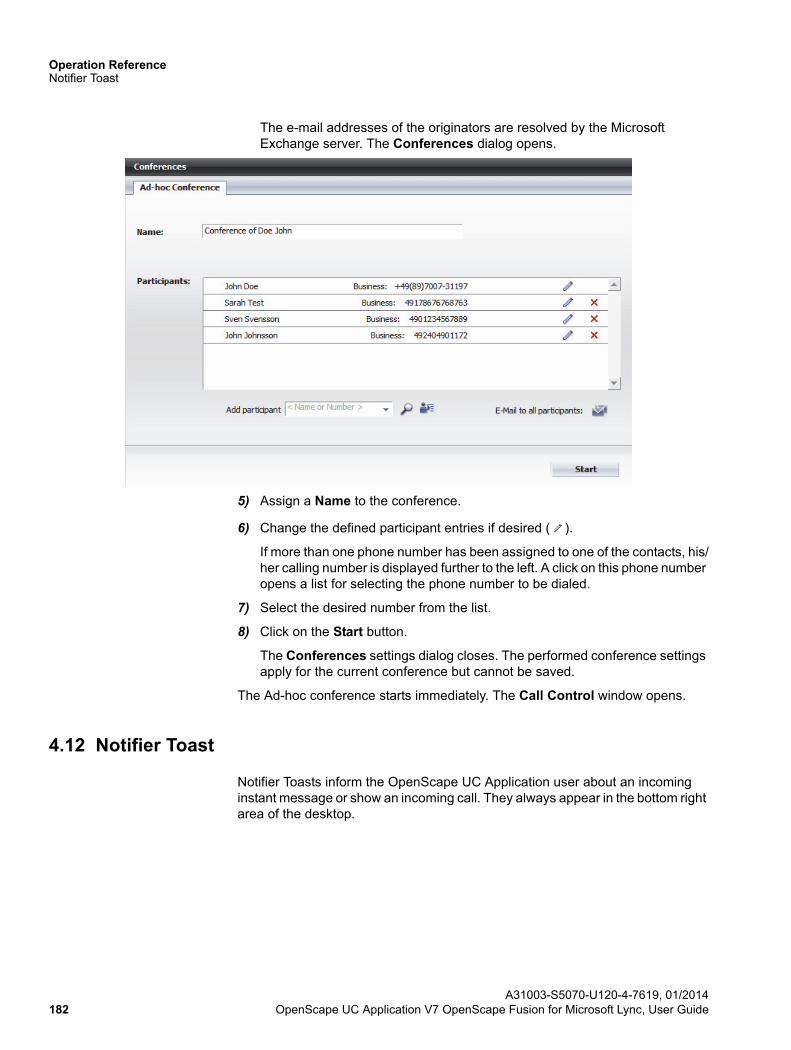
Operation ReferenceNotifier Toast
The e-mail addresses of the originators are resolved by the Microsoft Exchange server. The Conferences dialog opens.
5) Assign a Name to the conference.
6) Change the defined participant entries if desired ( ).
If more than one phone number has been assigned to one of the contacts, his/her calling number is displayed further to the left. A click on this phone number opens a list for selecting the phone number to be dialed.
7) Select the desired number from the list.
8) Click on the Start button.
The Conferences settings dialog closes. The performed conference settings apply for the current conference but cannot be saved.
The Ad-hoc conference starts immediately. The Call Control window opens.
4.12 Notifier Toast
Notifier Toasts inform the OpenScape UC Application user about an incoming instant message or show an incoming call. They always appear in the bottom right area of the desktop.
A31003-S5070-U120-4-7619, 01/2014182 OpenScape UC Application V7 OpenScape Fusion for Microsoft Lync, User Guide
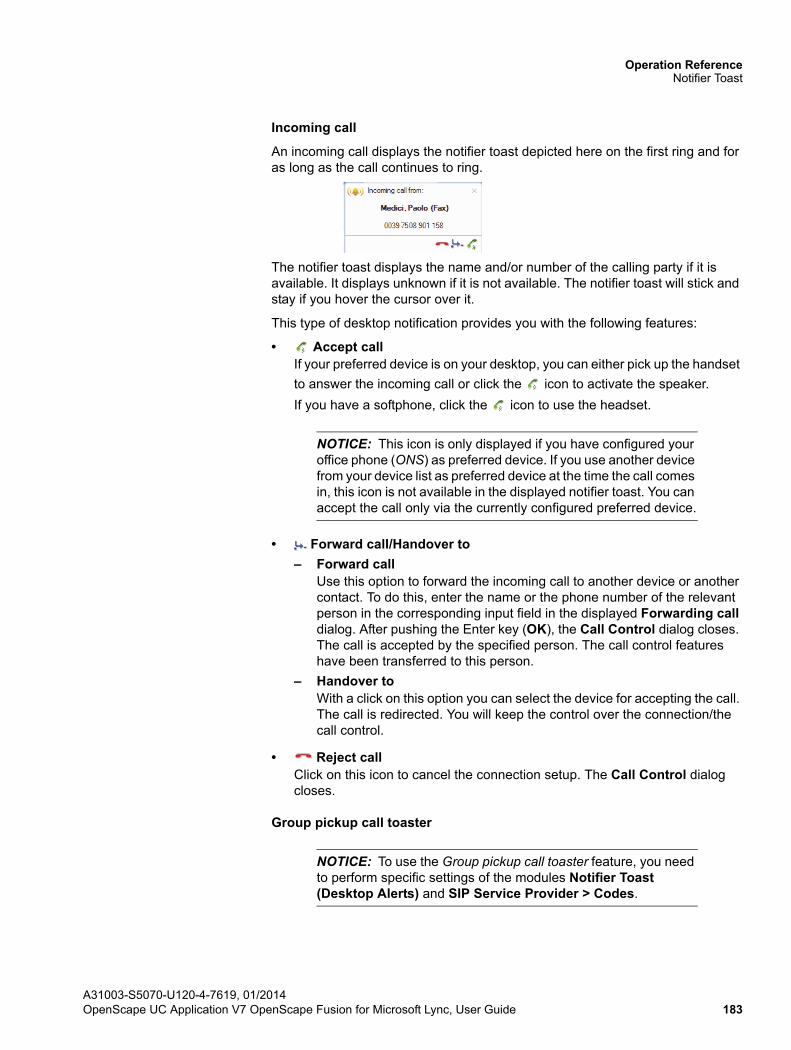
Operation ReferenceNotifier Toast
Incoming call
An incoming call displays the notifier toast depicted here on the first ring and for as long as the call continues to ring.
The notifier toast displays the name and/or number of the calling party if it is available. It displays unknown if it is not available. The notifier toast will stick and stay if you hover the cursor over it.
This type of desktop notification provides you with the following features:
• Accept callIf your preferred device is on your desktop, you can either pick up the handset
to answer the incoming call or click the icon to activate the speaker.
If you have a softphone, click the icon to use the headset.
NOTICE: This icon is only displayed if you have configured your office phone (ONS) as preferred device. If you use another device from your device list as preferred device at the time the call comes in, this icon is not available in the displayed notifier toast. You can accept the call only via the currently configured preferred device.
• Forward call/Handover to
– Forward callUse this option to forward the incoming call to another device or another contact. To do this, enter the name or the phone number of the relevant person in the corresponding input field in the displayed Forwarding call dialog. After pushing the Enter key (OK), the Call Control dialog closes. The call is accepted by the specified person. The call control features have been transferred to this person.
– Handover toWith a click on this option you can select the device for accepting the call. The call is redirected. You will keep the control over the connection/the call control.
• Reject callClick on this icon to cancel the connection setup. The Call Control dialog closes.
Group pickup call toaster
NOTICE: To use the Group pickup call toaster feature, you need to perform specific settings of the modules Notifier Toast (Desktop Alerts) and SIP Service Provider > Codes.
A31003-S5070-U120-4-7619, 01/2014OpenScape UC Application V7 OpenScape Fusion for Microsoft Lync, User Guide 183
Operation ReferenceWebbrowser
The group pickup call toaster is always displayed when a group member receives a call. It is displayed until the call is answered or the caller hangs up. The names of the caller and callee are displayed if they could be found in the configured direc-tories. Otherwise, the names are represented as "Unknown".
You can accept the group pickup call with a click on .
4.13 Webbrowser
NOTICE: Using the web browser features requires the Webbrowser module to be active.
You can use the OpenScape Fusion for Microsoft Lync web browser like any other standard browser to open configured internet pages and deploy navigation features. The web browser thus enables fast access to internet pages frequently visited.
Opening the webbrowser
To open the window that displays the webbrowser, open the OpenScape Fusion for Microsoft Lync context menu and select the option View > Webbrowser. In the sub-menu then available select a previously configured internet page.
A31003-S5070-U120-4-7619, 01/2014184 OpenScape UC Application V7 OpenScape Fusion for Microsoft Lync, User Guide
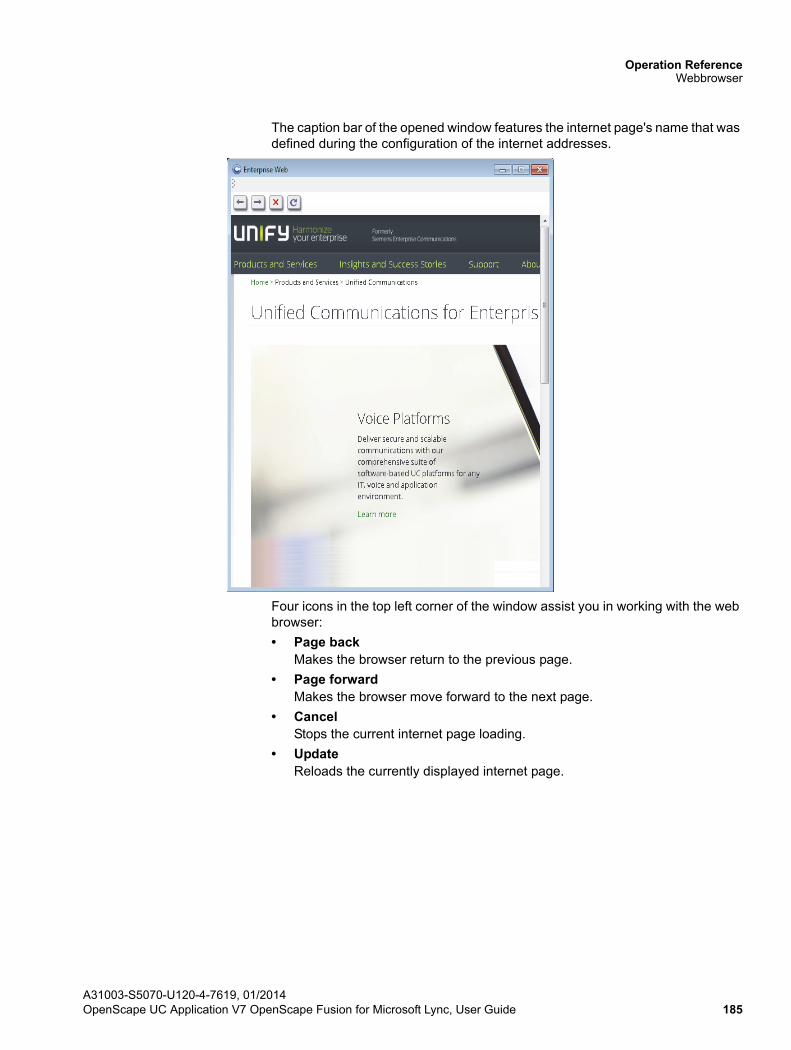
Operation ReferenceWebbrowser
The caption bar of the opened window features the internet page's name that was defined during the configuration of the internet addresses.
Four icons in the top left corner of the window assist you in working with the web browser:
• Page backMakes the browser return to the previous page.
• Page forwardMakes the browser move forward to the next page.
• CancelStops the current internet page loading.
• UpdateReloads the currently displayed internet page.
A31003-S5070-U120-4-7619, 01/2014OpenScape UC Application V7 OpenScape Fusion for Microsoft Lync, User Guide 185

Operation ReferenceWebbrowser
A31003-S5070-U120-4-7619, 01/2014186 OpenScape UC Application V7 OpenScape Fusion for Microsoft Lync, User Guide
Index
AAcronym directory 11Additional code 53Additional speaker 17Ad-hoc conference
from the Microsoft Outlook contact list 173from the Microsoft Outlook e-mail list 177starting 140starting via the Microsoft Outlook contact list 175starting via the Microsoft Outlook mailbox 181
Alert tone 47Area code (SIP) 52Attendant function 55Audio codec 65Audio devices 16, 168
configuring 168Audio response 17Audio scheme
adding 16changing 18deleting 18selecting/activating 17Signal response 17
Audio scheme sequence 18Auto device selection 90Automatic program start 71
BBehavior of the video streaming 119Blind transfer 38Bridge number 145
CCall control
active call 100consultation call 100incoming call 97outbound connection 99
Call forwarding 55Callback
key configuration 58Calling a Microsoft Lync contact 106Camera image 108central configuration 28Changing the connection status 25
display mode 25Chat message indication 69
Color layout 21color scheme 21Conference
operating options 149Conference bridge, number 145Conference settings
Conference PIN 145open conference 146PIN 145record name 146toll-free number 145web conference 146
configuration alternatives 23Configuring a ring tone 170connection 32Context menu 75Controlling conferences 101Conventions 10Country code (SIP) 52Current error report 77
DDevice management 82Directed call pickup 96DLS 28Download 64DTMF control
of a video call 114of a video conference 114
DTMF keypad 95DTMF mode 55
EEcho cancelling 17Echo cancelling delay 17Extension range
SIP service provider 52
FFormats in the manual 10
GGeneral settings 21
HHotkeys 21How to End Video Streaming 126How to Start Video Streaming 125
A31003-S5070-U120-4-7619, 01/2014OpenScape UC Application V7 OpenScape Fusion for Microsoft Lync, User Guide 187
Index
Iindividual ringtone 60Initiating a call 105Initiating a video call 124Internet page
adding 31changing 31deleting 32
JJournal 92, 126, 127
LLIN 24Line settings 30Load Default Profile 64Location 23Location information 52
MMain connection (SIP) 42Main line (SIP) 42Main window 72Manual program start 71Meet Me conference
configuring 147from the Microsoft Outlook calendar 177open conference 146record name 146settings 147Start time 142web conference 146
MeetNow! conferencestarting 102
Microsoft Outlook integration 171Mobile user 67
logging on 67mode 24MP3 file 60Muting 93
NNamed device list
priority of the devices 86Named device lists 85network access settings 52New Call 92Notification area 26Notifier toast 183
pickup group call 184settings 70
OOne-number service 80Open listening 169OpenScape call 74OpenScape Fusion Clicent symbol in the task bar 26OpenScape Fusion for Microsoft Outlook dialog 172OpenScape Provider 32
settings 32conference 36web access 34web conference 35
options 24, 127Outbound domain 50Own presence status 79Own video image 108
PPersonal settings 75
change password 75devices 76presence settings 76ring tones 77voicemail 76
Persönliche EinstellungenGeräte 76
Phone number normalization 54Picking up a team call 98Playback 17Playing voicemails
via telephone 133via Windows Media Player 133
Point-to-point video 110Ports
restrictions 66settings (SIP Service Provider) 66
Preferred device 79adding 87selecting 89
Prefix (SIP Service Provider) 53Presence setting 78Presence status 78, 79program start settings 23Program update 27Proxy server 49
Rreceiving 109Registerkarte
Audio-Schemen 16Registrar server 48Restricted mode 105Ring tones 60
A31003-S5070-U120-4-7619, 01/2014188 OpenScape UC Application V7 OpenScape Fusion for Microsoft Lync, User Guide
Index
SSecond call waiting signalling 47Secure connection 40settings 23, 32single sign-on 33SIP server 37
instant messages 38video 38
SIP service provider 37Start OpenScape conference 74Start time 152Starting a Meet Me web conference
via conference list 152Starting the program 23System identification number 52
TTab
audio schemes 16call 91conference 135conferences 166modules 19settings 166
Task bar 26Task manager 26Team
adding a new member 164creating 160creating a new team 162deleting 161displaying team properties 161editing team properties 161granting team privileges 160managing 160picking up a team call 98
Team functionaccessing the journal entries of a team
member 159monitoring a team member's telephone status 159overview 153searching for team members 156
Terminating the program 71Time zone 129TLS protocol 40Tone signals 60Trunk code 53
UUpdate 27Updating the program 27Upload 64
User administration 23
VVideo call
DTMF control 114Video camera 94Video codec 65Video conference 120
DTMF control 114, 120Video Features 108Video image 109
sending 110Video scheme 61
activating 62adding 61changing 62deleting 62
Video schemessequence 62Video scheme sequence 62
Video streamingbehavior 119
Video telephony 119Video telephony (SIP) 107Video viewer 20Video window
views 114Voice recording 17, 57
disabling 57Voicemail box 130Voicemail playback
via browser 132via telephone 132
Voicemail player 132Volume menu 95
WWebbrowser 184WebHidden Main Window 69Windows authentication 33Windows login (SSO) 33Windows Media Player 132
A31003-S5070-U120-4-7619, 01/2014OpenScape UC Application V7 OpenScape Fusion for Microsoft Lync, User Guide 189