Embed Size (px)
Citation preview
OpenFX Tutorial Exercise 0 – Getting Started Making a Movie
This introduction exercise is designed to show you how to run the program and render an animation.
First make sure you have OpenFX installed on the computer – look for its Icon on the desktop or in the All-Programs menu on the task bar. (We will be assuming you are familiar with Windows – you know how to start a program and navigate your way round the computer’s files and folders and most importantly you know how to use the mouse – click, double click, click and drag and right click.)
Start OpenFX, its icon looks like this:
The program consists of two main sections, one for making animations and one for making the computer models of the things you want to animate. It always starts in the Animation module. When it loads it looks like this:
Notice the ‘Splash Screen’ in the middle of the screen. Move the mouse over the word animation (it lights up) and click it. The splash screen goes away. (If you had clicked on the word design you would have been taken to the other section.
Open FX is controlled by executing commands from one of its menus or using the tool bar down the side of the screen.
Have a look at all the menu commands and move your mouse down the tool bar (DO NOT SELECT ANY MENU COMMAND OR CLICK ON AN ICON IN THE TOOL BAR.)
Once the splash screen has gone away you will see the animation screen that looks like:
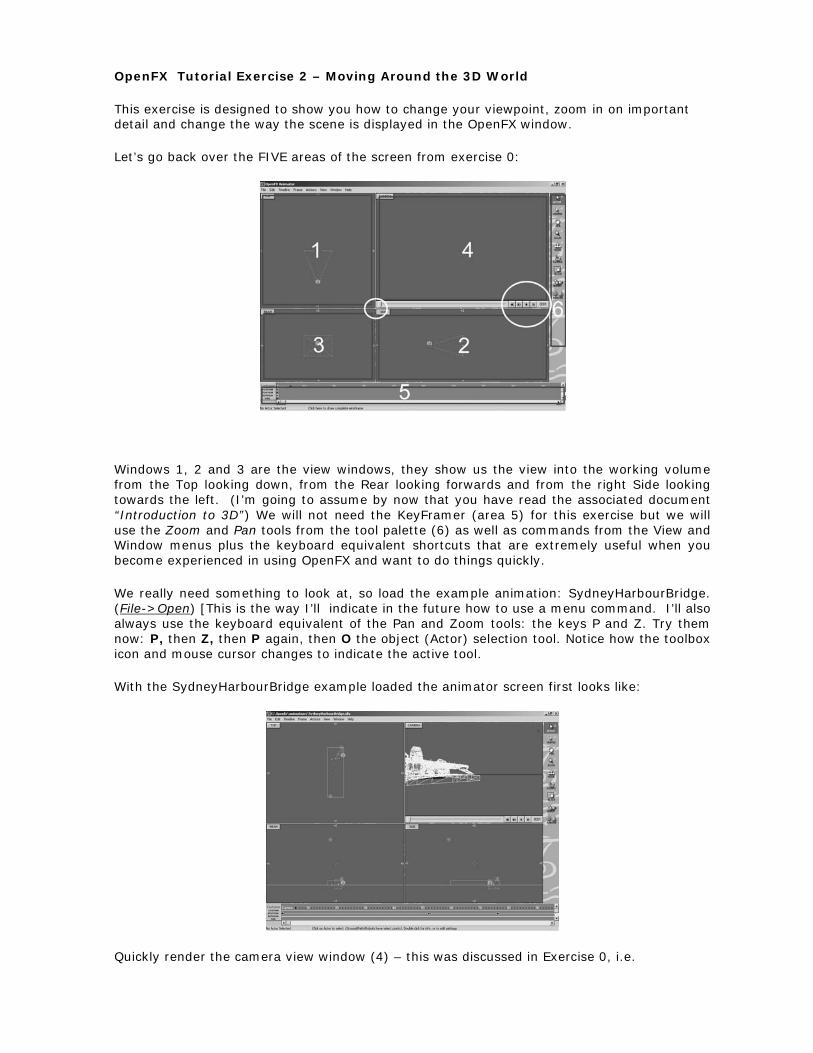
Notice the six important areas outlined in red, they are numbered 1 to 6 and the two regions circled in white. The menu bar it at the top and there is a status bar at the bottom (below region 5) that gives useful Information.
You should already recognise region 6 (which may be on the left of your screen) as the tool panel for OpenFX.
Much more information will be given on regions 1 to 5 in subsequent exercises. If you move your mouse to the point in the screen at the very centre of the smaller white circle you should see the mouse cursor change shape. When it does this, click and drag the mouse – notice that the windows change shape! This can be useful later. For now though we are just going to try making a simple movie.
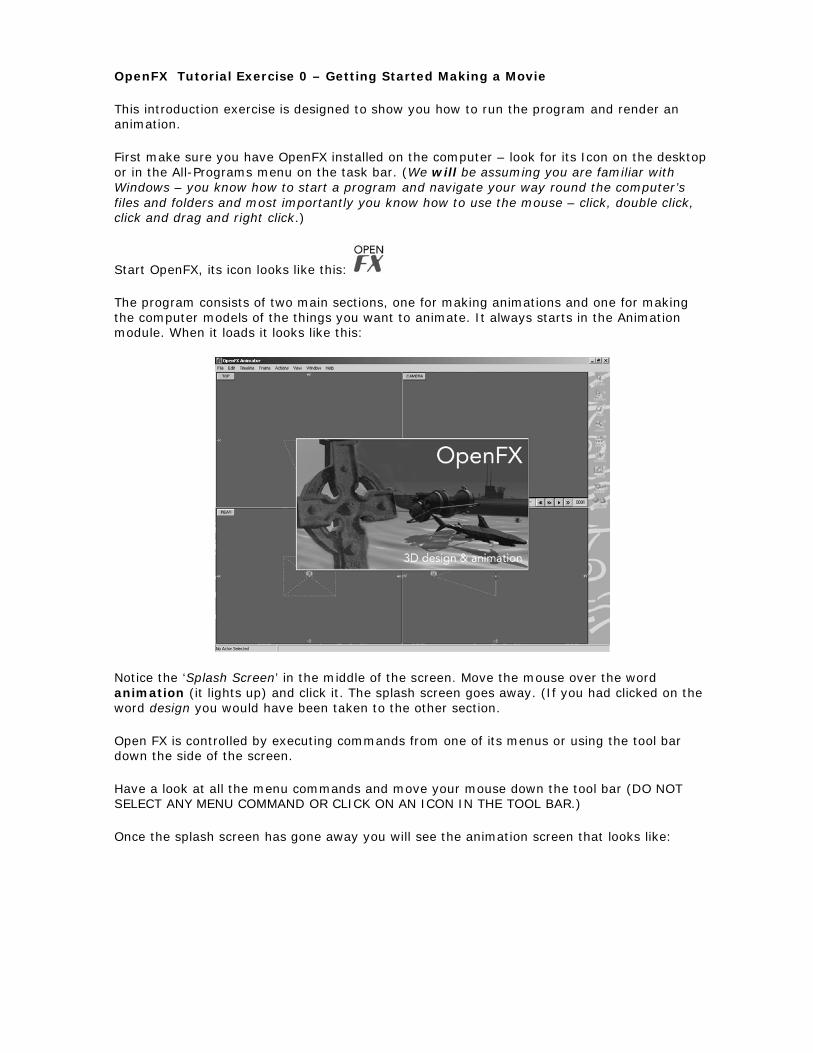
From the FILE menu select the command OPEN. The File open dialog bog shows a long list of example animations. (You should try some of these later) Double click on the folder names SimpleExamples and then double click on the file StarShape1 – this opens a very simple example of an OpenFX animation.
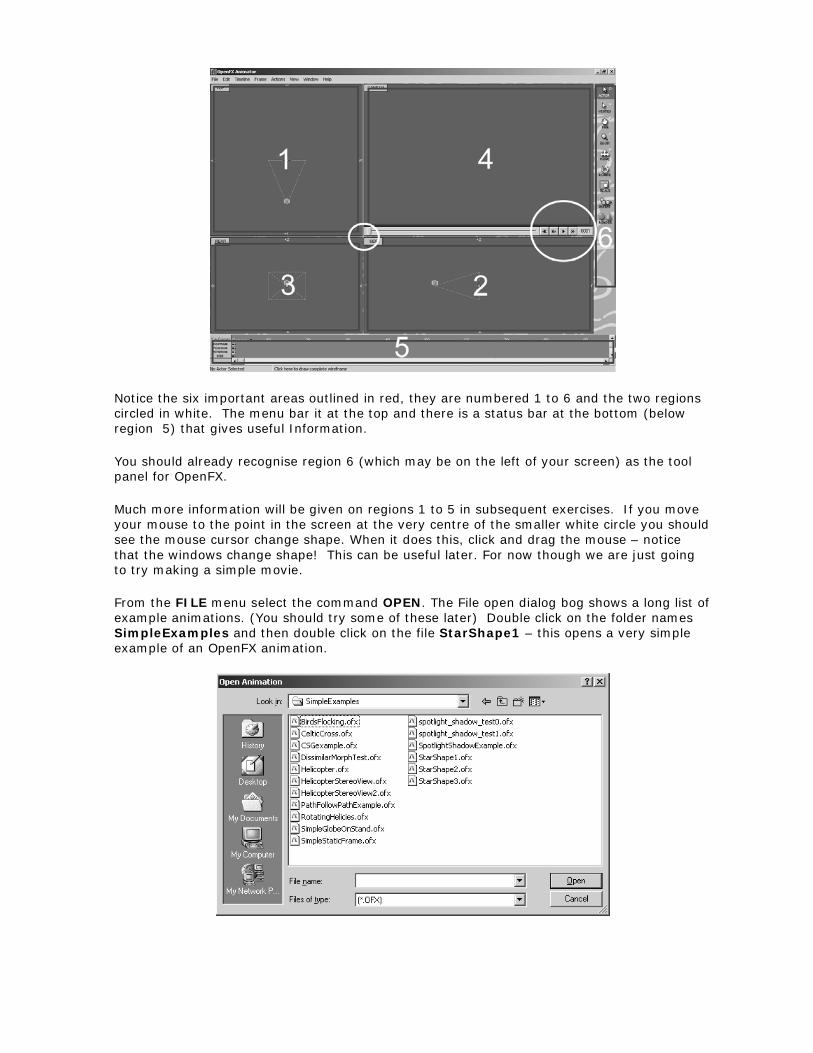
Once you’ve done this the OpenFX animation screen will look like this:
At this stage you are probably not too sure what has changed but notice the blue drawings in windows 1, 2 and 3 the white drawing in window 4 (Note the little button in the top left corner of window 4 says Camera – this should give you a clue as to what you are seeing in window 4!)
Now we are ready to make the movie.
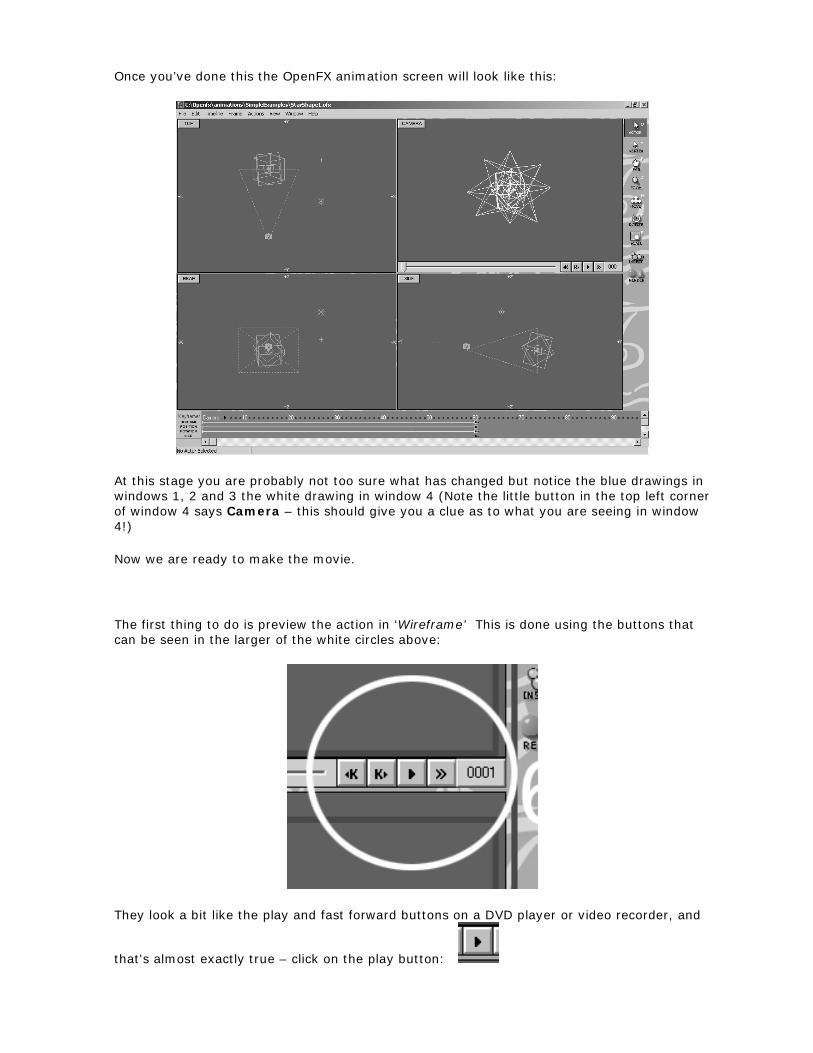
The first thing to do is preview the action in ‘Wireframe’ This is done using the buttons that can be seen in the larger of the white circles above:
They look a bit like the play and fast forward buttons on a DVD player or video recorder, and
that's almost exactly true – click on the play button:
Now click Stop or Cancel ! - That was Wireframe preview in the Camera window!
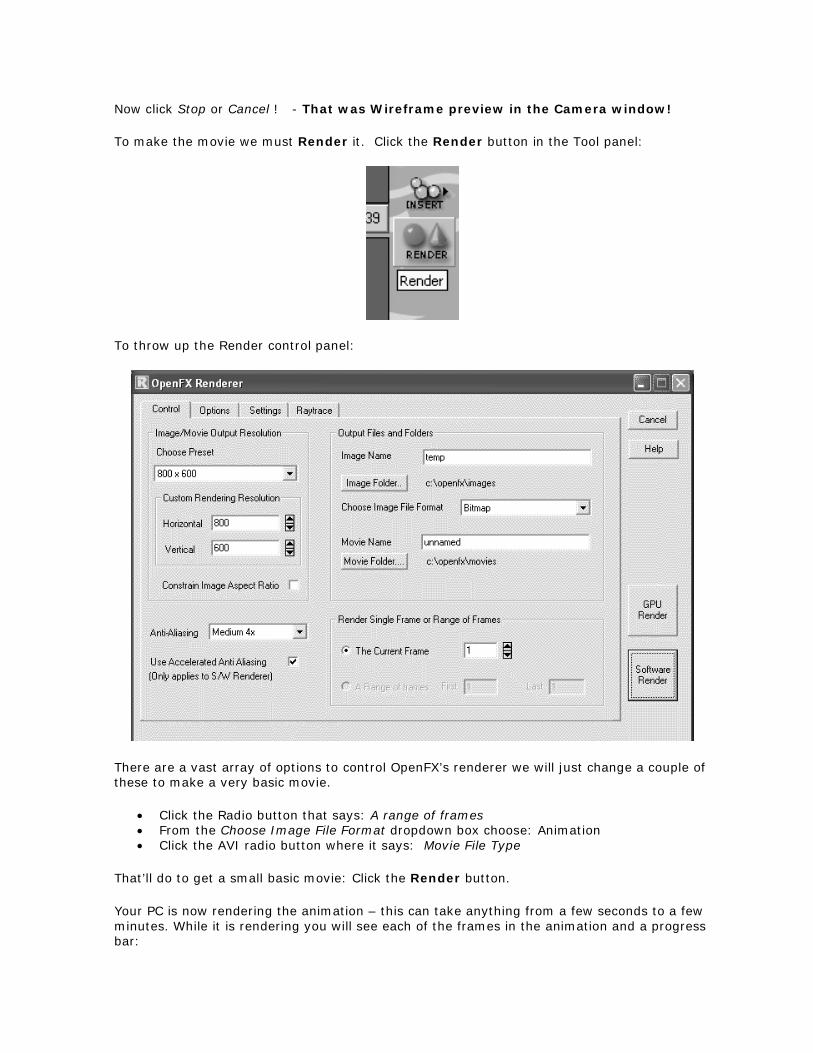
To make the movie we must Render it. Click the Render button in the Tool panel:
To throw up the Render control panel:
There are a vast array of options to control OpenFX’s renderer we will just change a couple of these to make a very basic movie.
• Click the Radio button that says: A range of frames • From the Choose Image File Format dropdown box choose: Animation • Click the AVI radio button where it says: Movie File Type
That’ll do to get a small basic movie: Click the Render button.
Your PC is now rendering the animation – this can take anything from a few seconds to a few minutes. While it is rendering you will see each of the frames in the animation and a progress bar:
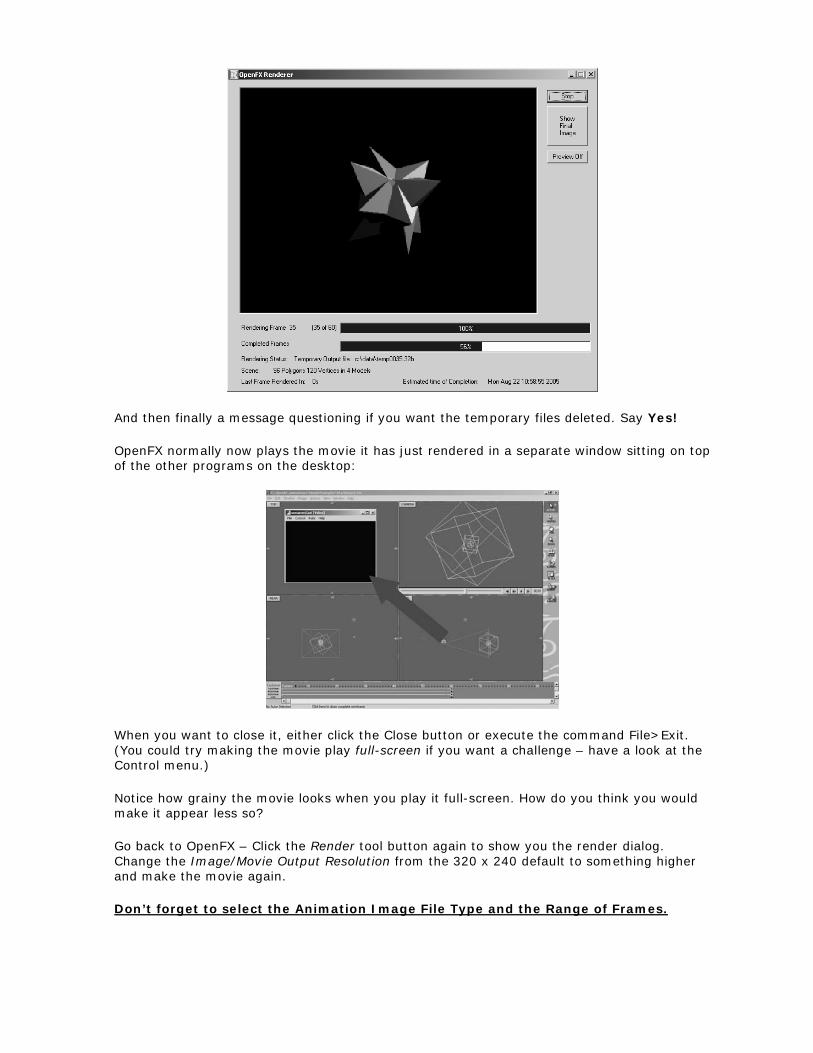
And then finally a message questioning if you want the temporary files deleted. Say Yes!
OpenFX normally now plays the movie it has just rendered in a separate window sitting on top of the other programs on the desktop:
When you want to close it, either click the Close button or execute the command File>Exit. (You could try making the movie play full-screen if you want a challenge – have a look at the Control menu.)
Notice how grainy the movie looks when you play it full-screen. How do you think you would make it appear less so?
Go back to OpenFX – Click the Render tool button again to show you the render dialog. Change the Image/Movie Output Resolution from the 320 x 240 default to something higher and make the movie again.
Don’t forget to select the Animation Image File Type and the Range of Frames.

Additional Rendering Practice
Load, render and play the following OpenFX animation files:
SimpleExamples\Helicopter, render in resolution 640 x 480
SimpleExamples\BirdsFlocking, render with Best Antialiasing and resolution of 320 x 240
SimpleExamples\SimpleGlobeOnStand, before rendering this movie, move the mouse pointer into the Camera window and ‘right-click’ Select Quick Render from the context menu that appears.
Now drag the slider below the camera window back and forward. This shows the whole movie and lets to navigate to any time instant in the movie. Each time you release the left mouse button note the frame number and do a Quick Render from the RMB(right mouse button) context menu.
Click on the frame number, type 30 into the edit box and click OK. Render just this frame.
Now render the whole move – remember AVI file format!
Finally, load, preview and render the UnderWaterExploration animation, this is one of the most complex animation sequences that you will encounter with OpenFX.
Try as many of the other examples as you like until you are confident about rendering OpenFX movies.
OpenFX Tutorial Exercise 1 – Making a Simple Movie
This exercise is designed to show you how set up a very simple animation. We will simply show an object rotating in front of the camera.
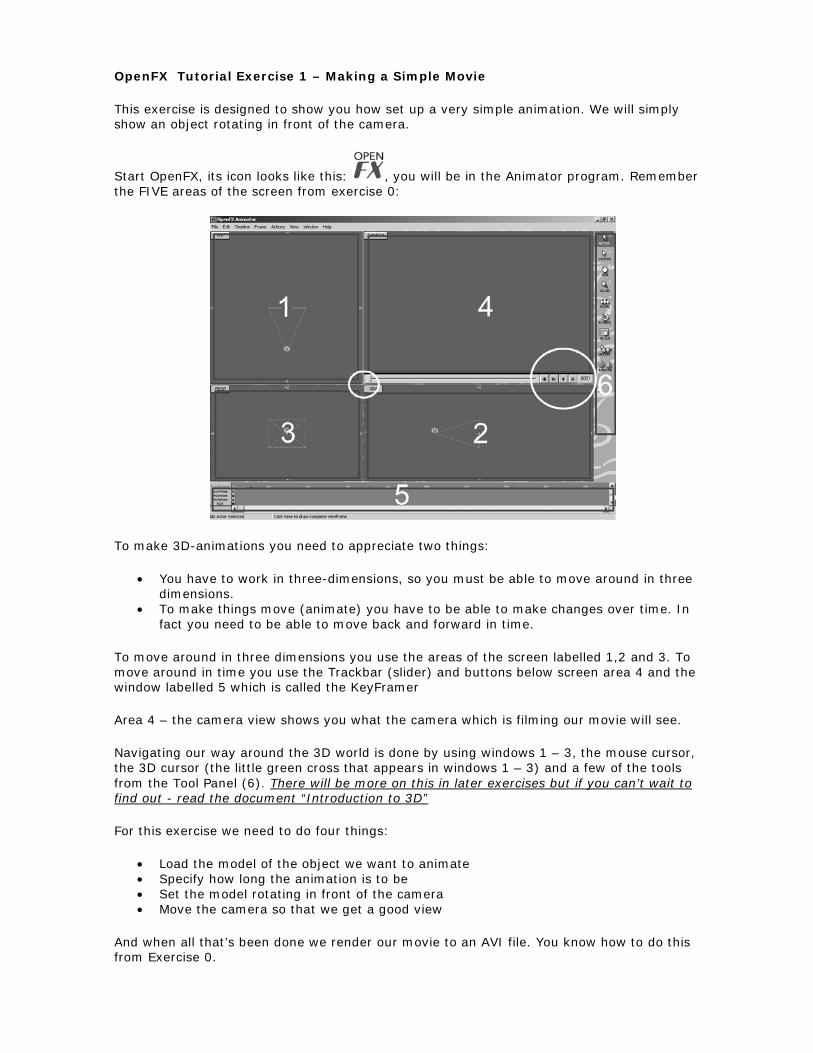
Start OpenFX, its icon looks like this: , you will be in the Animator program. Remember the FIVE areas of the screen from exercise 0:
To make 3D-animations you need to appreciate two things:
• You have to work in three-dimensions, so you must be able to move around in three dimensions.
• To make things move (animate) you have to be able to make changes over time. In fact you need to be able to move back and forward in time.
To move around in three dimensions you use the areas of the screen labelled 1,2 and 3. To move around in time you use the Trackbar (slider) and buttons below screen area 4 and the window labelled 5 which is called the KeyFramer
Area 4 – the camera view shows you what the camera which is filming our movie will see.
Navigating our way around the 3D world is done by using windows 1 – 3, the mouse cursor, the 3D cursor (the little green cross that appears in windows 1 – 3) and a few of the tools from the Tool Panel (6). There will be more on this in later exercises but if you can’t wait to find out - read the document “Introduction to 3D”
For this exercise we need to do four things:
• Load the model of the object we want to animate • Specify how long the animation is to be • Set the model rotating in front of the camera • Move the camera so that we get a good view
And when all that’s been done we render our movie to an AVI file. You know how to do this from Exercise 0.
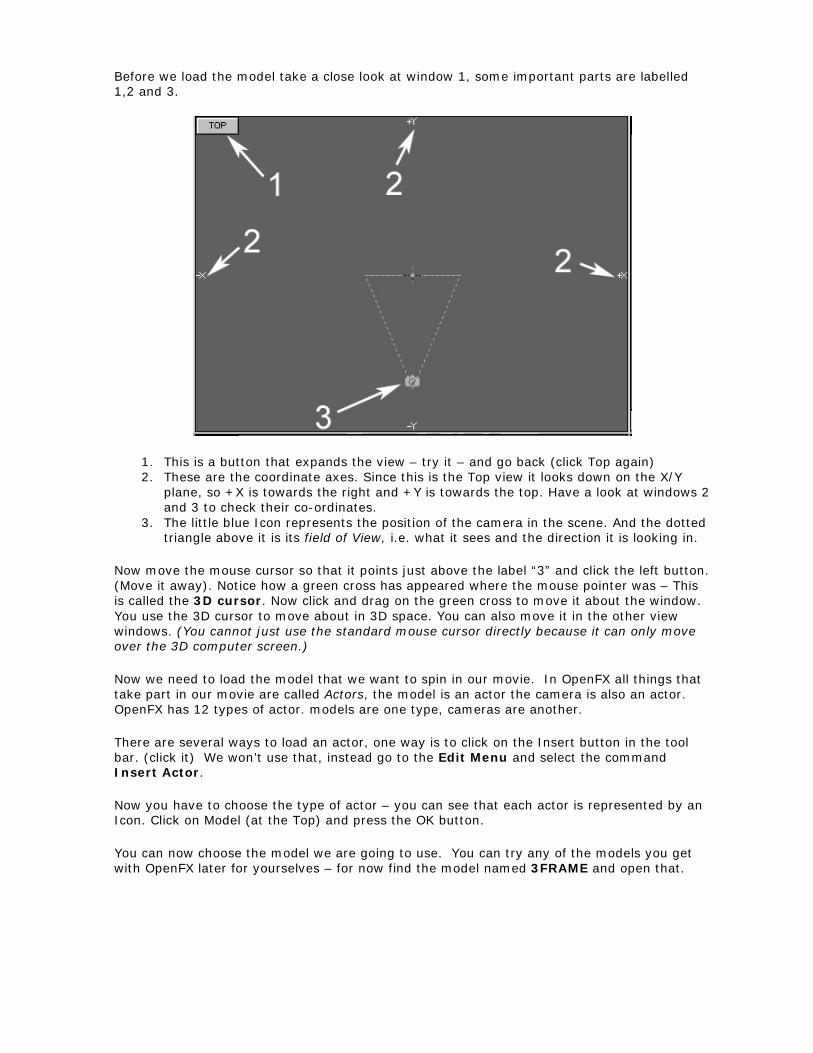
Before we load the model take a close look at window 1, some important parts are labelled 1,2 and 3.
1. This is a button that expands the view – try it – and go back (click Top again) 2. These are the coordinate axes. Since this is the Top view it looks down on the X/Y
plane, so +X is towards the right and +Y is towards the top. Have a look at windows 2 and 3 to check their co-ordinates.
3. The little blue Icon represents the position of the camera in the scene. And the dotted triangle above it is its field of View, i.e. what it sees and the direction it is looking in.
Now move the mouse cursor so that it points just above the label “3” and click the left button. (Move it away). Notice how a green cross has appeared where the mouse pointer was – This is called the 3D cursor. Now click and drag on the green cross to move it about the window. You use the 3D cursor to move about in 3D space. You can also move it in the other view windows. (You cannot just use the standard mouse cursor directly because it can only move over the 3D computer screen.)
Now we need to load the model that we want to spin in our movie. In OpenFX all things that take part in our movie are called Actors, the model is an actor the camera is also an actor. OpenFX has 12 types of actor. models are one type, cameras are another.
There are several ways to load an actor, one way is to click on the Insert button in the tool bar. (click it) We won’t use that, instead go to the Edit Menu and select the command Insert Actor.
Now you have to choose the type of actor – you can see that each actor is represented by an Icon. Click on Model (at the Top) and press the OK button.
You can now choose the model we are going to use. You can try any of the models you get with OpenFX later for yourselves – for now find the model named 3FRAME and open that.

Things will now have changed on the screen. Yours may not look exactly like this but it should be pretty similar:
Step one is now complete – the model is loaded.
Now we need to specify how long the animation is to take. We can do this in two ways: We can say the animation is to take 30 seconds or we can say the animation is to take 750 frames. (25 frames or pictures are flashed before your eyes every second give you the illusion of jerk free motion.)
You do this by using the Frame Menu and the Set Animation Length command. We’ll start with a very short movie of 90 frame. Enter that in the dialog. (Again you can make a 30 second film for yourselves later.)
You may think nothing has change but if you compare the area near the bottom of the screen (the area labelled 5) you will see a difference.
This region is called the KeyFramer and it plays a very important role in computer animation. (In the same way that windows 1,2 and three allow you to change things in 3D space the Keyframes allows you to change things in time.)
You will also be able to use the trackbar slider (below the camera view window) to step forwards and backwards in time by sliding it back and forwards. Now move it fully over to the right so that the Frame indicator shows 0090.
That’s step two finished.
In step 3 we must command the 3FRAME object to rotate. (Again) there are many ways to do this, we will choose to use the KeyFramer.
The first job is to tell OpenFX it is the 3FRAME model we wish to rotate and not the camera (or any other actor who might happen to be in the scene.) This is done by selecting it.
To select an actor – click on it’s icon or outline in one of the view windows (windows 1,2 or 3). When it is selected it will change colour to Yellow. Try clicking on the Camera icon first, then on the outline of the 3FRAME object. (It appears as a rectangle in the view windows.)
The Keyframer is used to control the motion of the actor. The name Key-framer gives the game away. OpenFX uses the concept of Key frame animation (just like Disney etc.) You tell the actors where to be, what to do etc. in Key frames (at key times) , after that it’s up to the computer to fill in all the gaps.
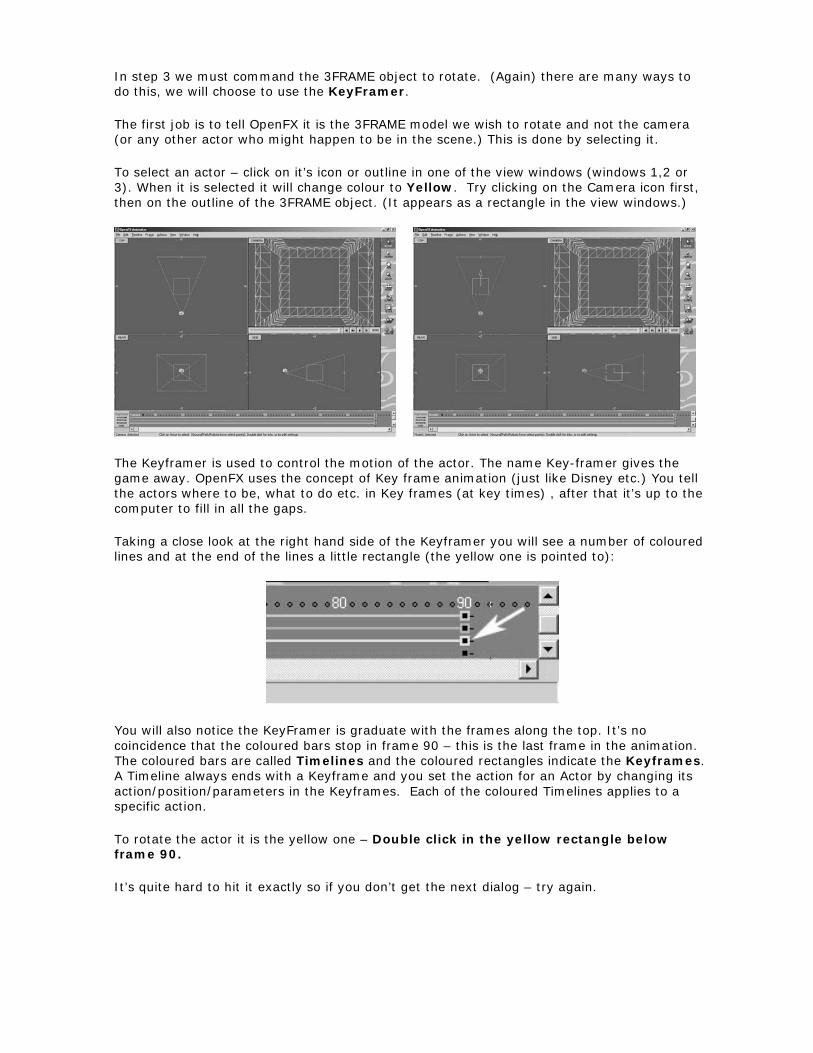
Taking a close look at the right hand side of the Keyframer you will see a number of coloured lines and at the end of the lines a little rectangle (the yellow one is pointed to):
You will also notice the KeyFramer is graduate with the frames along the top. It’s no coincidence that the coloured bars stop in frame 90 – this is the last frame in the animation. The coloured bars are called Timelines and the coloured rectangles indicate the Keyframes. A Timeline always ends with a Keyframe and you set the action for an Actor by changing its action/position/parameters in the Keyframes. Each of the coloured Timelines applies to a specific action.
To rotate the actor it is the yellow one – Double click in the yellow rectangle below frame 90.
It’s quite hard to hit it exactly so if you don’t get the next dialog – try again.

Fortunately we don’t need to use all the controls for this simple exercise. To make our object rotate we just need an Internal Rotation abut a vertical axis – Ckick the radio button that says Vertical Axis and press OK.
That’s the end of step 3. So now we can check to see if our 3FRAME object is rotating.
Press the Play button below the camera window…..
Drag the track bar slider back and forwards…..
You could virtually render the movie as it is but. You may like to move the camera so that you get a better view of the object. This is step 4 and we have to do it in a keyframe for the camera actor. This happens to be the last frame in the movie so click on the frame indicator and type in 90 in the box.
It’s quite simple to move the camera – click and drag its icon in one of the view windows 1,2 or 3. To go from this:
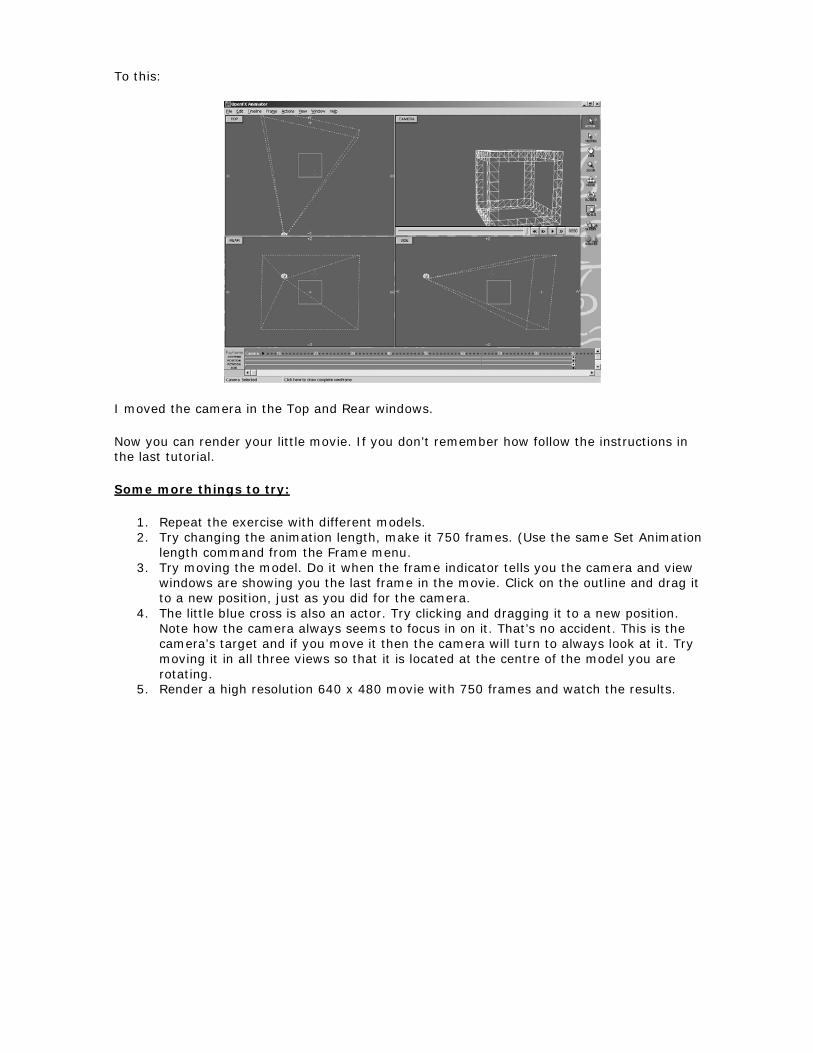
To this:
I moved the camera in the Top and Rear windows.
Now you can render your little movie. If you don’t remember how follow the instructions in the last tutorial.
Some more things to try:
1. Repeat the exercise with different models. 2. Try changing the animation length, make it 750 frames. (Use the same Set Animation
length command from the Frame menu. 3. Try moving the model. Do it when the frame indicator tells you the camera and view
windows are showing you the last frame in the movie. Click on the outline and drag it to a new position, just as you did for the camera.
4. The little blue cross is also an actor. Try clicking and dragging it to a new position. Note how the camera always seems to focus in on it. That’s no accident. This is the camera’s target and if you move it then the camera will turn to always look at it. Try moving it in all three views so that it is located at the centre of the model you are rotating.
5. Render a high resolution 640 x 480 movie with 750 frames and watch the results.
OpenFX Tutorial Exercise 2 – Moving Around the 3D World
This exercise is designed to show you how to change your viewpoint, zoom in on important detail and change the way the scene is displayed in the OpenFX window.
Let’s go back over the FIVE areas of the screen from exercise 0:
Windows 1, 2 and 3 are the view windows, they show us the view into the working volume from the Top looking down, from the Rear looking forwards and from the right Side looking towards the left. (I’m going to assume by now that you have read the associated document “Introduction to 3D”) We will not need the KeyFramer (area 5) for this exercise but we will use the Zoom and Pan tools from the tool palette (6) as well as commands from the View and Window menus plus the keyboard equivalent shortcuts that are extremely useful when you become experienced in using OpenFX and want to do things quickly.
We really need something to look at, so load the example animation: SydneyHarbourBridge. (File->Open) [This is the way I’ll indicate in the future how to use a menu command. I’ll also always use the keyboard equivalent of the Pan and Zoom tools: the keys P and Z. Try them now: P, then Z, then P again, then O the object (Actor) selection tool. Notice how the toolbox icon and mouse cursor changes to indicate the active tool.
With the SydneyHarbourBridge example loaded the animator screen first looks like:
Quickly render the camera view window (4) – this was discussed in Exercise 0, i.e.
Right-click-in-window(4)->Quick Render and while you are there, draw the hidden line view too.
Let’s try zooming. Select the zoom tool Z. The mouse cursor changes to a little magnifying glass. Click-(in the top window near the camera icon)-and-gently-drag the mouse cursor to the left and right.
The result is either that: we appear to be zooming in closer to the camera location, or zooming out, further away from the camera. Don’t zoom too far in or you’ll see nothing. Try doing this in the other two views, click in different places (did you notice that the place where you click is the place you zoom in towards?)
Zooming is very helpful in letting you work on fine detail close to the action or in pulling back to get the overview. But when combined with panning you can go anywhere you want in the 3D world and look at something from near by or far away. Now try the pan tool: P.
Say you start with this view:
With the pan tool you appear to move the actors about – again click the little Hand shaped mouse cursor in views 1,2 or 3 and drag the mouse up/down left/right – try it. (Truth be told you are actually moving the view but it looks the same as moving the objects. Of course the relative positions of the objects don’t change when using the pan tool.
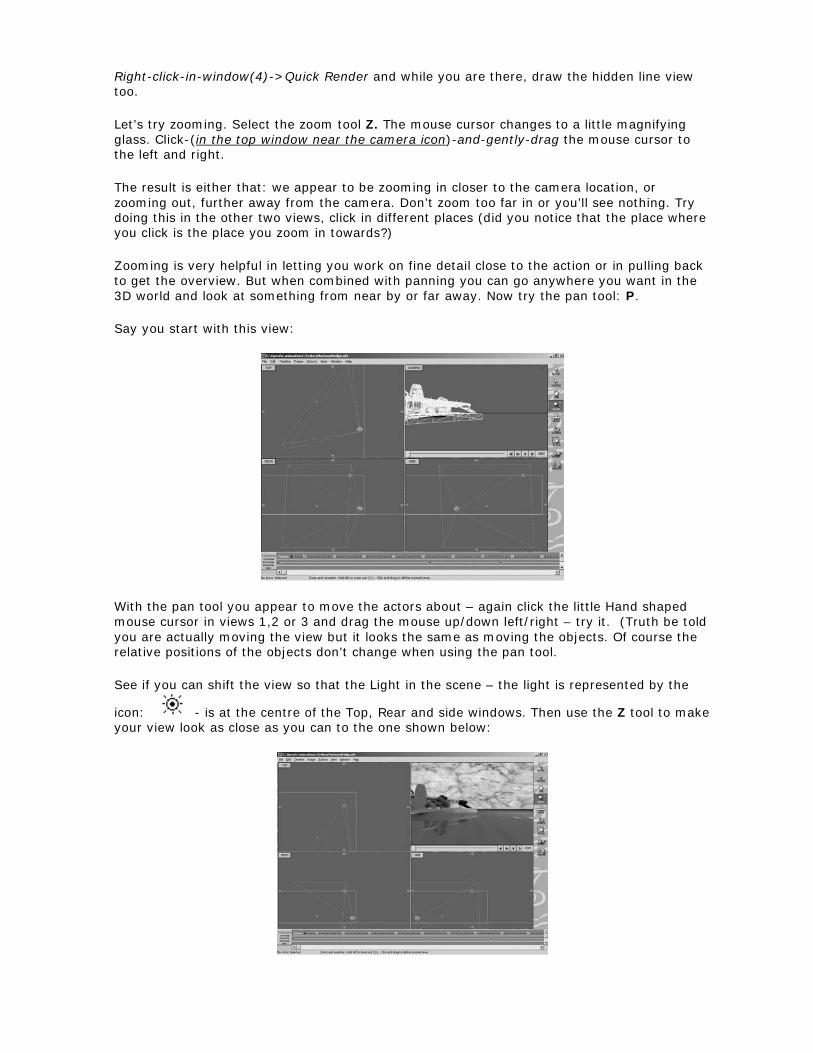
See if you can shift the view so that the Light in the scene – the light is represented by the
icon: - is at the centre of the Top, Rear and side windows. Then use the Z tool to make your view look as close as you can to the one shown below:
Before moving on it is worth mentioning a couple of very useful shortcuts for panning and zooming. These can be used at any time, even if you are in the progress of using another tool or the object selector. They are:
To pan around the scene hold down the spacebar and you will be transported to the Pan tool, when you release the spacebar you will go back to the previous tool whatever that was.
If you hold down the Control key and the spacebar at the same time you will be switched to the Zoom In tool – and back when you release these keys. Holding down the Alt and spacebar keys gives you quick access to the zoom out tool.
We cannot emphasise the usefulness of these shortcuts enough – TRY THEM NOW
Now we will explore some of the command options from the View menu. The command Crosswire Cursor changes the 3D cursor from a small crosshair cursor into a crosswire cursor that spans across the whole window. Like some of OpenFX’s other commands the menu command itself changes, in this case it now becomes Crosshair Cursor so that you can switch back to the crosshair cursor – try it. You might also have spotted that as you browse the menu a hint appears in the status bar along the bottom of the OpenFX window.
The commands associated with using a grid are pretty obvious, experiment with them to see if they would be of any use to you as you work with more and more complex animations.
The “drawing detail” group of commands (Global QuickDraw etc.) can we particularly useful when you are working with models that have 10,000 or more edges and vertices. By default, only a box that encloses each model actor (a bounding box) is shown in the view windows. This makes drawing very fast and is often enough to allow you to position your actors.
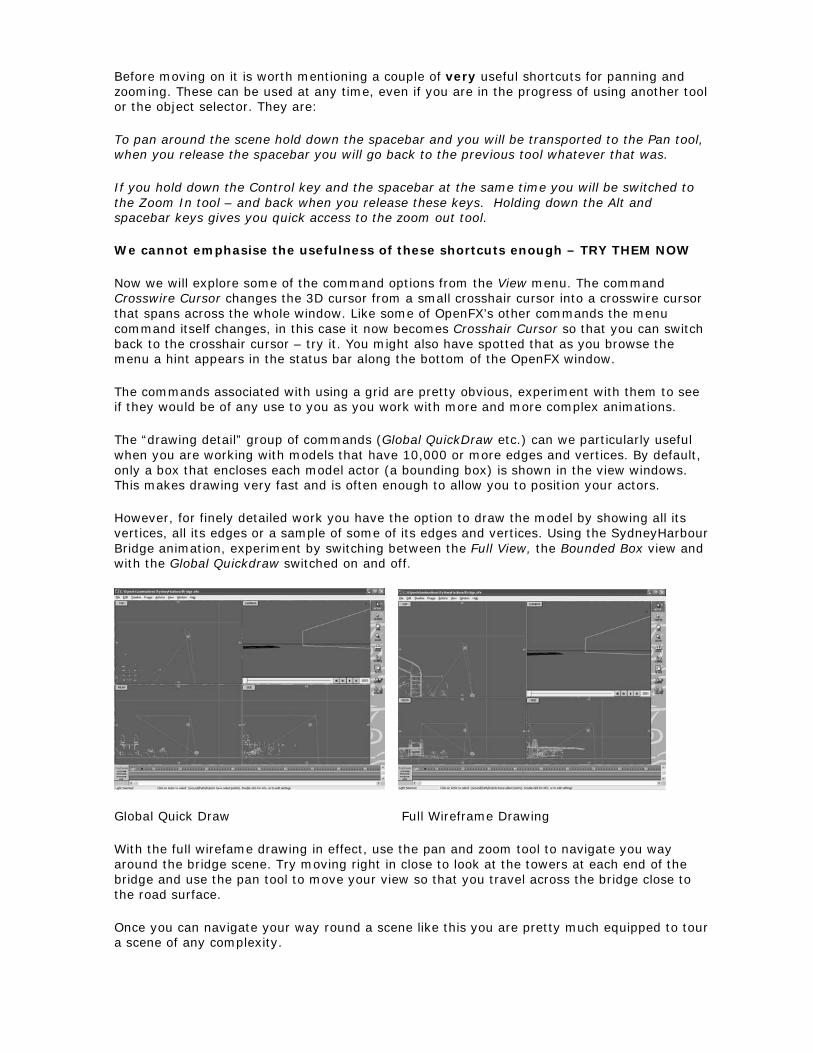
However, for finely detailed work you have the option to draw the model by showing all its vertices, all its edges or a sample of some of its edges and vertices. Using the SydneyHarbour Bridge animation, experiment by switching between the Full View, the Bounded Box view and with the Global Quickdraw switched on and off.
Global Quick Draw Full Wireframe Drawing
With the full wirefame drawing in effect, use the pan and zoom tool to navigate you way around the bridge scene. Try moving right in close to look at the towers at each end of the bridge and use the pan tool to move your view so that you travel across the bridge close to the road surface.
Once you can navigate your way round a scene like this you are pretty much equipped to tour a scene of any complexity.
Additional Exercises
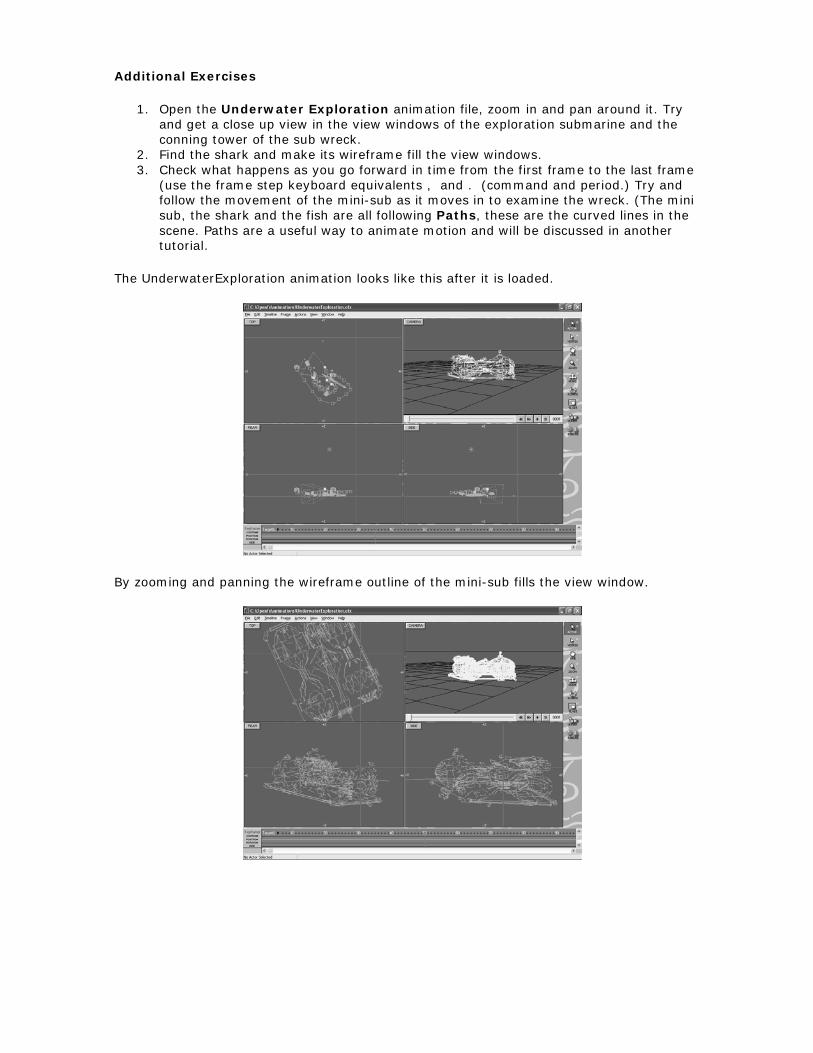
1. Open the Underwater Exploration animation file, zoom in and pan around it. Try and get a close up view in the view windows of the exploration submarine and the conning tower of the sub wreck.
2. Find the shark and make its wireframe fill the view windows. 3. Check what happens as you go forward in time from the first frame to the last frame
(use the frame step keyboard equivalents , and . (command and period.) Try and follow the movement of the mini-sub as it moves in to examine the wreck. (The mini sub, the shark and the fish are all following Paths, these are the curved lines in the scene. Paths are a useful way to animate motion and will be discussed in another tutorial.
The UnderwaterExploration animation looks like this after it is loaded.
By zooming and panning the wireframe outline of the mini-sub fills the view window.
OpenFX Tutorial Exercise 3 – Key Frame Tweening
In this exercise we will be using the most basic ideas of computer animation to make the camera move around a model so that it can be viewed from different directions.
Although we will only be moving the camera the same ideas can be applied to any number of actors in the movie and the range of movement possible covers just about any situation you can imagine.
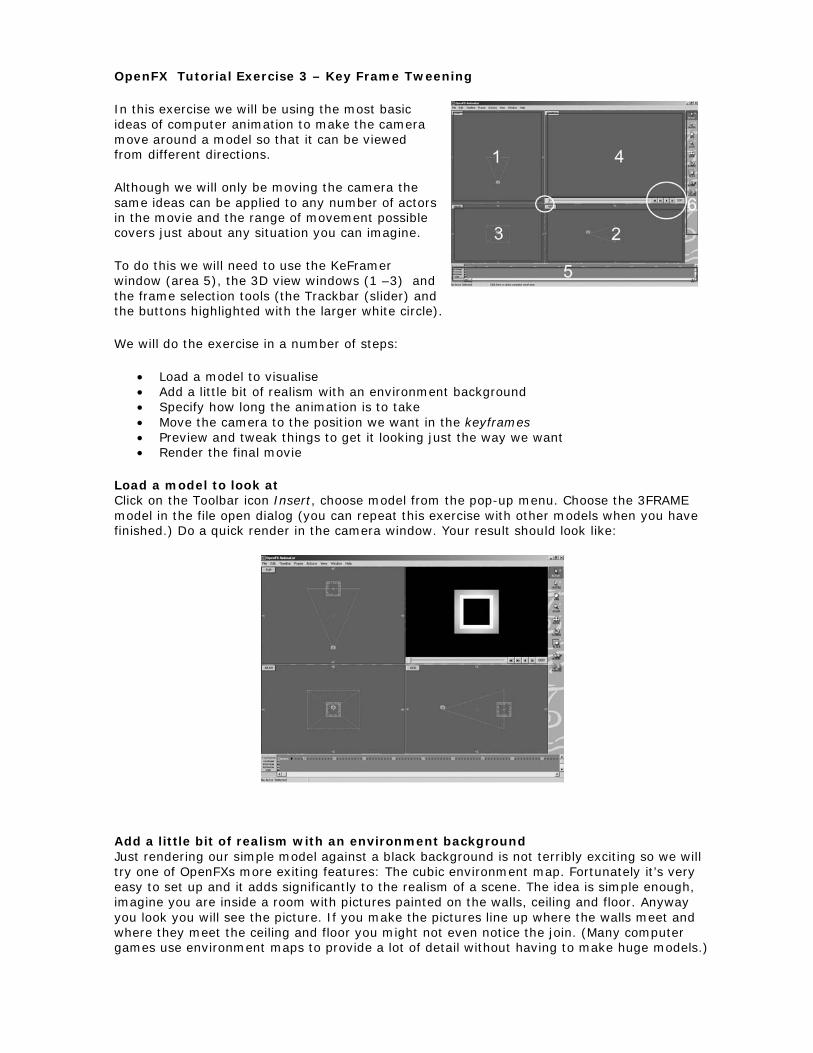
To do this we will need to use the KeFramer window (area 5), the 3D view windows (1 –3) and the frame selection tools (the Trackbar (slider) and the buttons highlighted with the larger white circle).
We will do the exercise in a number of steps:
• Load a model to visualise • Add a little bit of realism with an environment background • Specify how long the animation is to take • Move the camera to the position we want in the keyframes • Preview and tweak things to get it looking just the way we want • Render the final movie
Load a model to look at Click on the Toolbar icon Insert, choose model from the pop-up menu. Choose the 3FRAME model in the file open dialog (you can repeat this exercise with other models when you have finished.) Do a quick render in the camera window. Your result should look like:
Add a little bit of realism with an environment background Just rendering our simple model against a black background is not terribly exciting so we will try one of OpenFXs more exiting features: The cubic environment map. Fortunately it’s very easy to set up and it adds significantly to the realism of a scene. The idea is simple enough, imagine you are inside a room with pictures painted on the walls, ceiling and floor. Anyway you look you will see the picture. If you make the pictures line up where the walls meet and where they meet the ceiling and floor you might not even notice the join. (Many computer games use environment maps to provide a lot of detail without having to make huge models.)
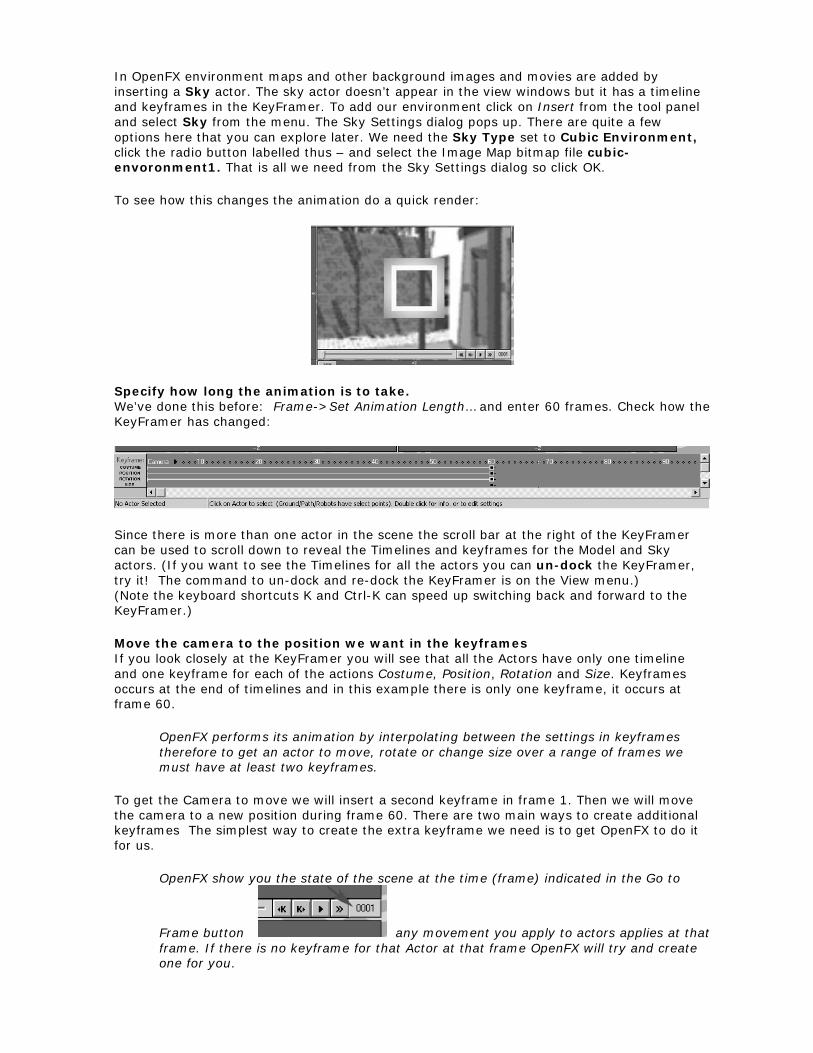
In OpenFX environment maps and other background images and movies are added by inserting a Sky actor. The sky actor doesn’t appear in the view windows but it has a timeline and keyframes in the KeyFramer. To add our environment click on Insert from the tool panel and select Sky from the menu. The Sky Settings dialog pops up. There are quite a few options here that you can explore later. We need the Sky Type set to Cubic Environment, click the radio button labelled thus – and select the Image Map bitmap file cubic-envoronment1. That is all we need from the Sky Settings dialog so click OK.
To see how this changes the animation do a quick render:
Specify how long the animation is to take. We’ve done this before: Frame->Set Animation Length… and enter 60 frames. Check how the KeyFramer has changed:
Since there is more than one actor in the scene the scroll bar at the right of the KeyFramer can be used to scroll down to reveal the Timelines and keyframes for the Model and Sky actors. (If you want to see the Timelines for all the actors you can un-dock the KeyFramer, try it! The command to un-dock and re-dock the KeyFramer is on the View menu.) (Note the keyboard shortcuts K and Ctrl-K can speed up switching back and forward to the KeyFramer.)
Move the camera to the position we want in the keyframes If you look closely at the KeyFramer you will see that all the Actors have only one timeline and one keyframe for each of the actions Costume, Position, Rotation and Size. Keyframes occurs at the end of timelines and in this example there is only one keyframe, it occurs at frame 60.
OpenFX performs its animation by interpolating between the settings in keyframes therefore to get an actor to move, rotate or change size over a range of frames we must have at least two keyframes.
To get the Camera to move we will insert a second keyframe in frame 1. Then we will move the camera to a new position during frame 60. There are two main ways to create additional keyframes The simplest way to create the extra keyframe we need is to get OpenFX to do it for us.
OpenFX show you the state of the scene at the time (frame) indicated in the Go to
Frame button any movement you apply to actors applies at that frame. If there is no keyframe for that Actor at that frame OpenFX will try and create one for you.
To get the idea: Click on the Camera icon in the Top view window - Window 1. The icon changes colour (Yellow). That means that it is selected. Now you can use the Move tool from the toolbox to move the camera to its new position during Frame 1. Click on the Move tool. Note how the camera icon has changed colour again. This means that it is ready to be moved.
Try it! Click anywhere in the Top window. As soon as you click the mouse OpenFX will ask you if you want to create a keyframe for the camera in frame 1. You do! So select Make a New Keyframe from the dialog.
Now try clicking again – hold the LMB down and move the mouse. The camera icon will move and at the same time the Camera window will show you the new view of the 3FRAME model.
Try moving it by clicking and dragging in the Rear and Side windows too!
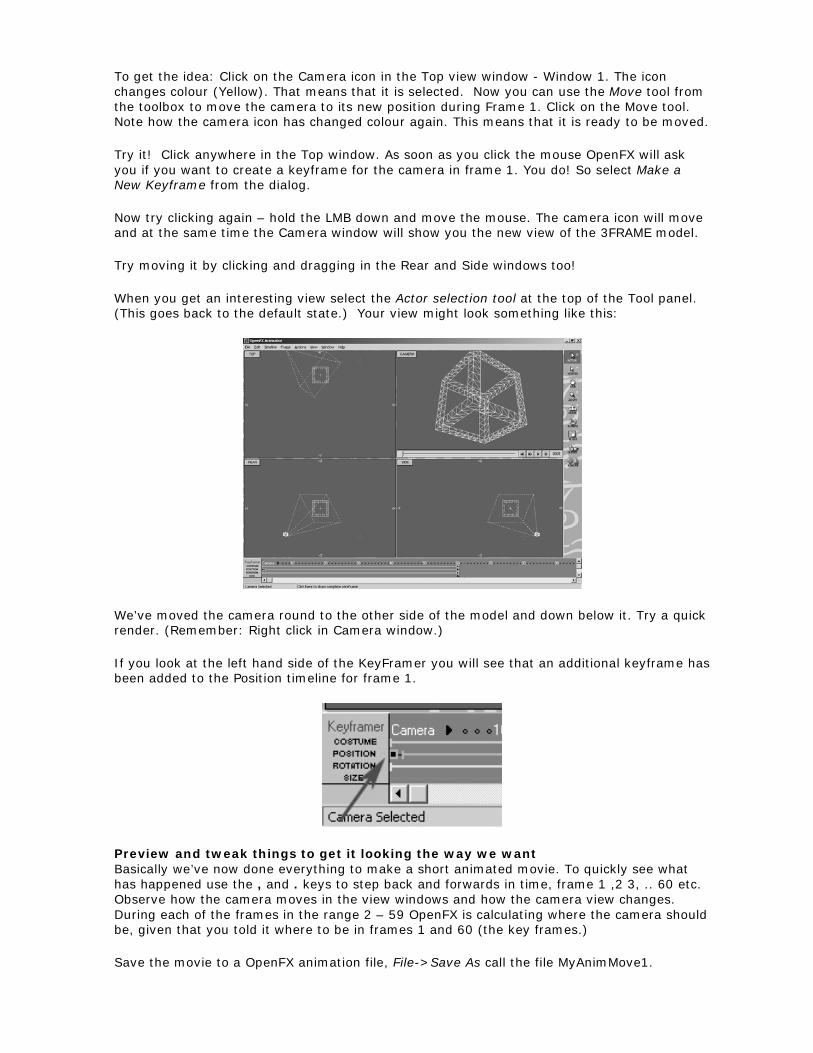
When you get an interesting view select the Actor selection tool at the top of the Tool panel. (This goes back to the default state.) Your view might look something like this:
We’ve moved the camera round to the other side of the model and down below it. Try a quick render. (Remember: Right click in Camera window.)
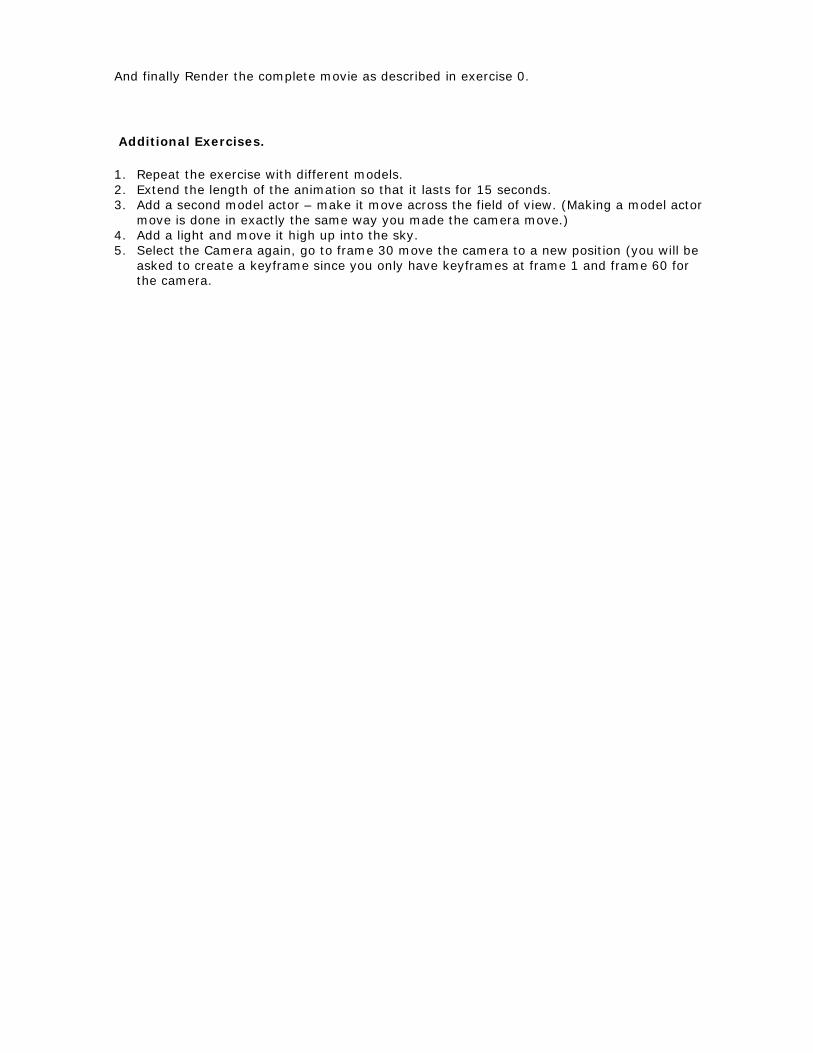
If you look at the left hand side of the KeyFramer you will see that an additional keyframe has been added to the Position timeline for frame 1.
Preview and tweak things to get it looking the way we want Basically we’ve now done everything to make a short animated movie. To quickly see what has happened use the , and . keys to step back and forwards in time, frame 1 ,2 3, .. 60 etc. Observe how the camera moves in the view windows and how the camera view changes. During each of the frames in the range 2 – 59 OpenFX is calculating where the camera should be, given that you told it where to be in frames 1 and 60 (the key frames.)
Save the movie to a OpenFX animation file, File->Save As call the file MyAnimMove1.
And finally Render the complete movie as described in exercise 0.
Additional Exercises.
1. Repeat the exercise with different models. 2. Extend the length of the animation so that it lasts for 15 seconds. 3. Add a second model actor – make it move across the field of view. (Making a model actor
move is done in exactly the same way you made the camera move.) 4. Add a light and move it high up into the sky. 5. Select the Camera again, go to frame 30 move the camera to a new position (you will be
asked to create a keyframe since you only have keyframes at frame 1 and frame 60 for the camera.
OpenFX Tutorial Exercise 4 – Using the KeyFramer
The KeyFramer is a very powerful feature of OpenFX it is from this that all the action in the movie is controlled.
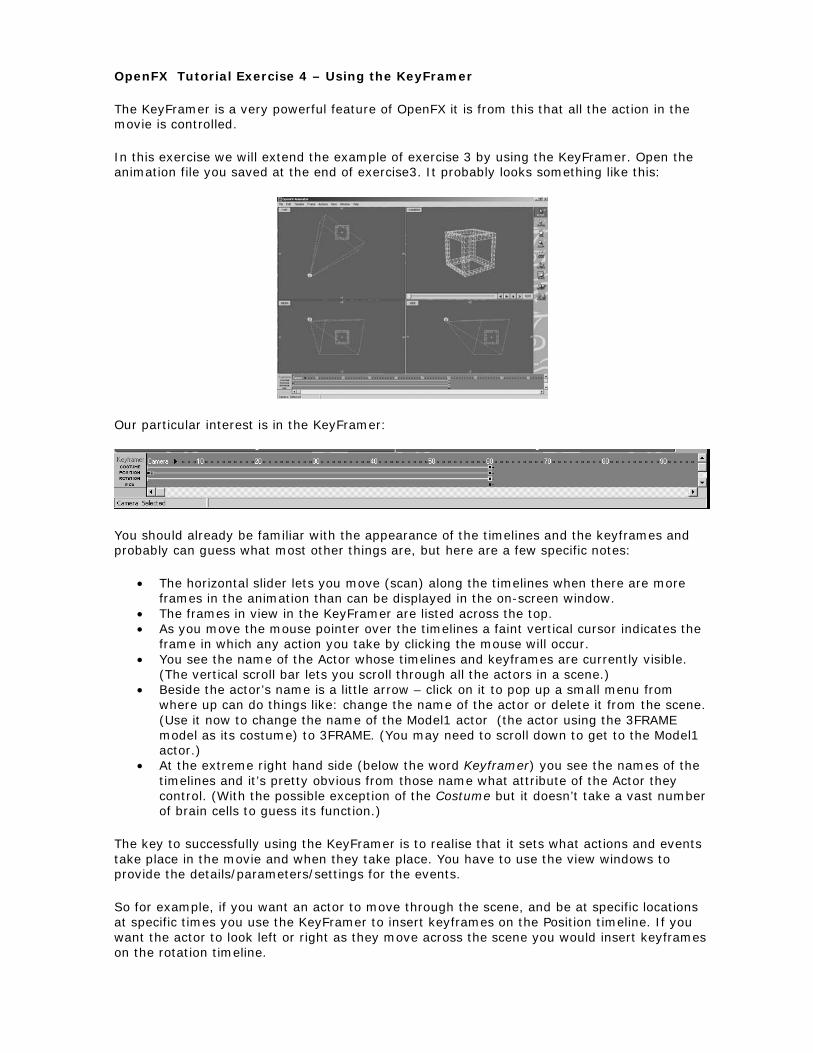
In this exercise we will extend the example of exercise 3 by using the KeyFramer. Open the animation file you saved at the end of exercise3. It probably looks something like this:
Our particular interest is in the KeyFramer:
You should already be familiar with the appearance of the timelines and the keyframes and probably can guess what most other things are, but here are a few specific notes:
• The horizontal slider lets you move (scan) along the timelines when there are more frames in the animation than can be displayed in the on-screen window.
• The frames in view in the KeyFramer are listed across the top. • As you move the mouse pointer over the timelines a faint vertical cursor indicates the
frame in which any action you take by clicking the mouse will occur. • You see the name of the Actor whose timelines and keyframes are currently visible.
(The vertical scroll bar lets you scroll through all the actors in a scene.) • Beside the actor’s name is a little arrow – click on it to pop up a small menu from
where up can do things like: change the name of the actor or delete it from the scene. (Use it now to change the name of the Model1 actor (the actor using the 3FRAME model as its costume) to 3FRAME. (You may need to scroll down to get to the Model1 actor.)
• At the extreme right hand side (below the word Keyframer) you see the names of the timelines and it’s pretty obvious from those name what attribute of the Actor they control. (With the possible exception of the Costume but it doesn’t take a vast number of brain cells to guess its function.)
The key to successfully using the KeyFramer is to realise that it sets what actions and events take place in the movie and when they take place. You have to use the view windows to provide the details/parameters/settings for the events.
So for example, if you want an actor to move through the scene, and be at specific locations at specific times you use the KeyFramer to insert keyframes on the Position timeline. If you want the actor to look left or right as they move across the scene you would insert keyframes on the rotation timeline.
Alternatively, if you want the actor to move quickly at the start and then slow down you would change the time of the keyframe. This is what we will specifically look at in this tutorial and you will also learn how to edit timelines and keyframes.
To edit the settings in a keyframe you Double Click on the keyframe in the KeyFramer.
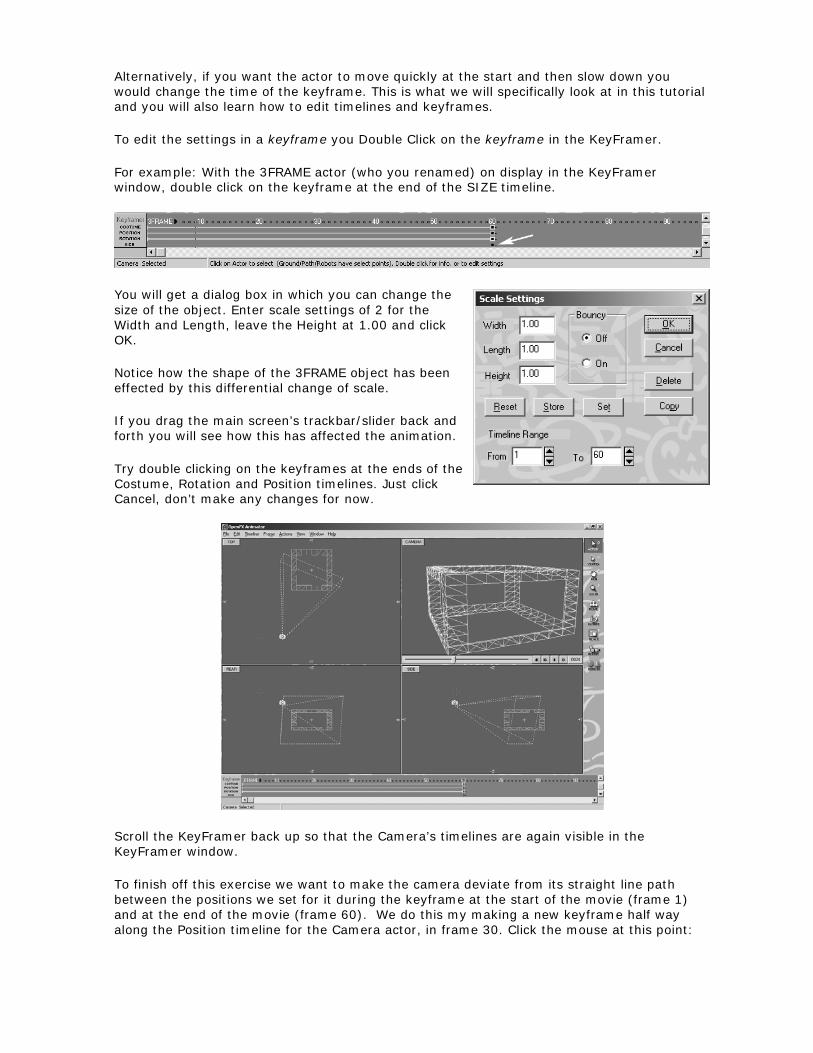
For example: With the 3FRAME actor (who you renamed) on display in the KeyFramer window, double click on the keyframe at the end of the SIZE timeline.
You will get a dialog box in which you can change the size of the object. Enter scale settings of 2 for the Width and Length, leave the Height at 1.00 and click OK.
Notice how the shape of the 3FRAME object has been effected by this differential change of scale.
If you drag the main screen’s trackbar/slider back and forth you will see how this has affected the animation.
Try double clicking on the keyframes at the ends of the Costume, Rotation and Position timelines. Just click Cancel, don’t make any changes for now.
Scroll the KeyFramer back up so that the Camera’s timelines are again visible in the KeyFramer window.
To finish off this exercise we want to make the camera deviate from its straight line path between the positions we set for it during the keyframe at the start of the movie (frame 1) and at the end of the movie (frame 60). We do this my making a new keyframe half way along the Position timeline for the Camera actor, in frame 30. Click the mouse at this point:
Say Yes in the conformation dialog. You should now have 3 keyframes on the Camera actor’s Position timeline, in frames 1, 30 and 60:
At this time nothing appears to have changed with the animation because we now have to move the camera using the view windows to the place we require it to be during frame 30.
Go to frame 30, use either the Trackbar, the GoTo Frame button or the keyboard keys , and .
Click on the camera Icon in one of the view windows and click-and-drag it to a different place. (I’m moving mine down in the Side window.)
Now preview the movie – (Either: trackbar slider, keys ,/. or Play button. I won’t remind you of this again.)
To finish off this exercise we will change the rate at which the Camera moves between its start point in frame 1 and its end point in frame 60. We will do this by changing the time of the keyframe we created at frame 30.
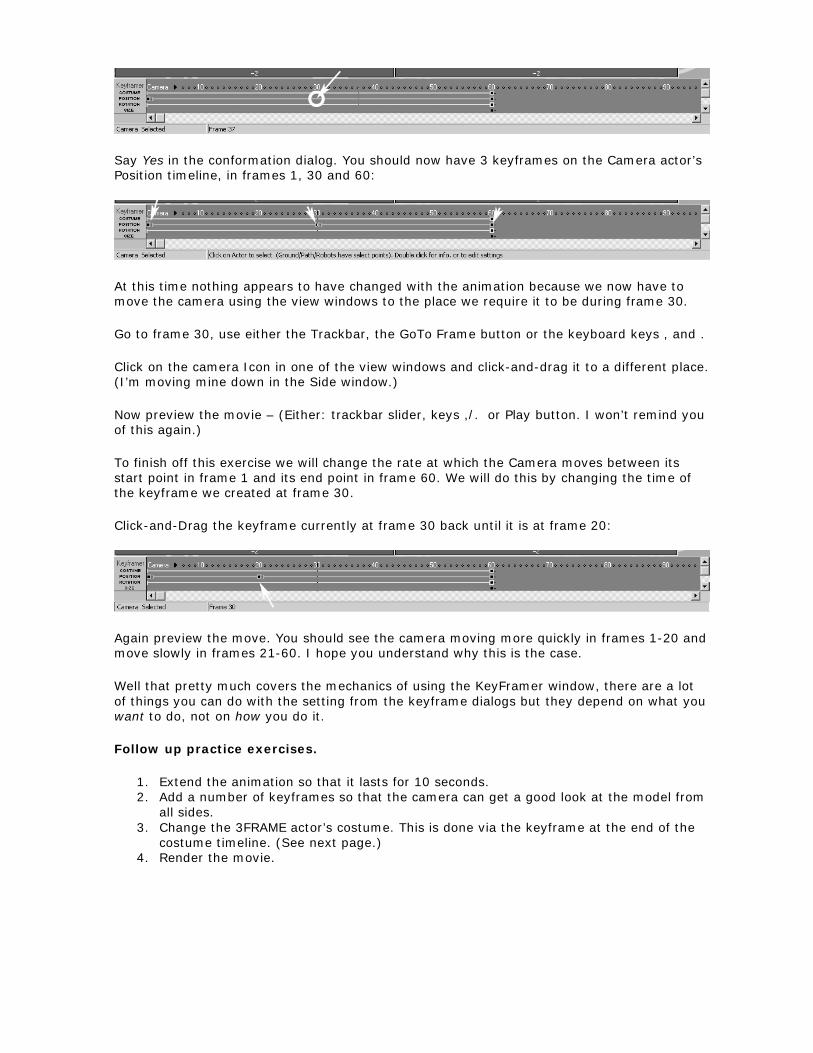
Click-and-Drag the keyframe currently at frame 30 back until it is at frame 20:
Again preview the move. You should see the camera moving more quickly in frames 1-20 and move slowly in frames 21-60. I hope you understand why this is the case.
Well that pretty much covers the mechanics of using the KeyFramer window, there are a lot of things you can do with the setting from the keyframe dialogs but they depend on what you want to do, not on how you do it.
Follow up practice exercises.
1. Extend the animation so that it lasts for 10 seconds. 2. Add a number of keyframes so that the camera can get a good look at the model from
all sides. 3. Change the 3FRAME actor’s costume. This is done via the keyframe at the end of the
costume timeline. (See next page.) 4. Render the movie.
With the 3FRAME actor a still from the movie might look like:
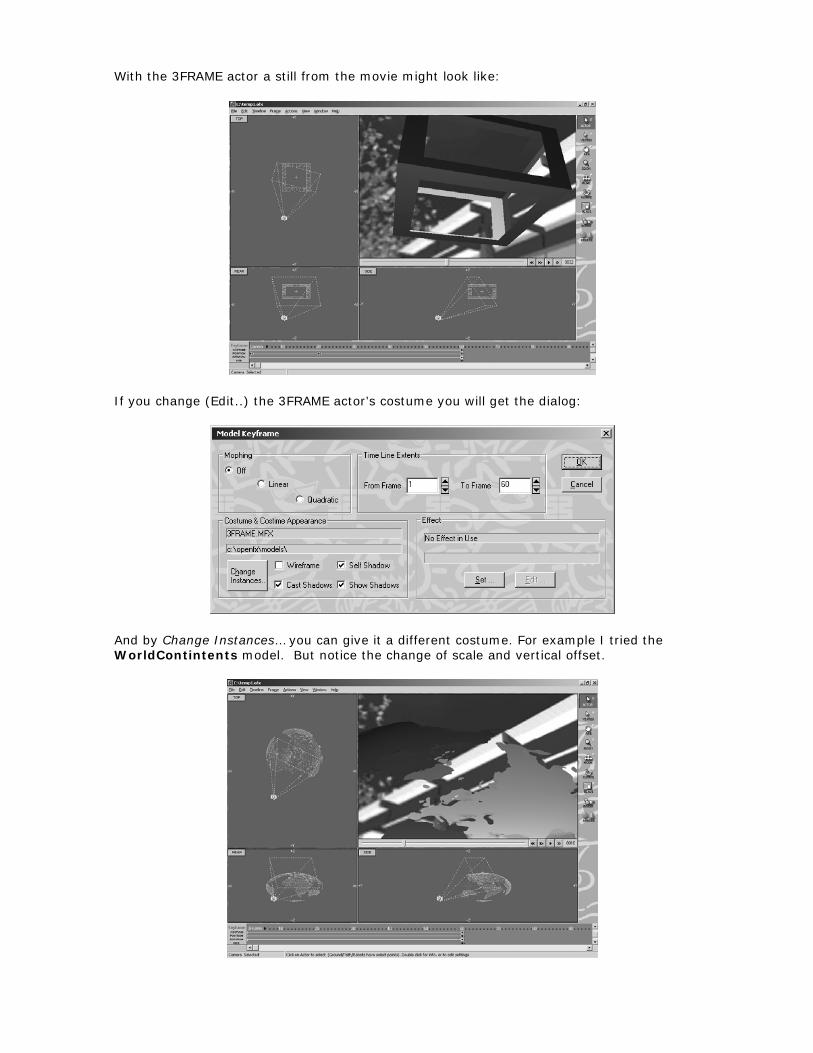
If you change (Edit..) the 3FRAME actor’s costume you will get the dialog:
And by Change Instances… you can give it a different costume. For example I tried the WorldContintents model. But notice the change of scale and vertical offset.
OpenFX Tutorial Exercise 5 – Lights and Targets
Ask any computer animator what make a movie look as realistic as possible and they’ll say: “lighting, lighting, lighting”. So in this exercise we are going to look at OpenFX’s lighting.
You can light a scene using four type of light in OpenFX
1. An omni-directional light that illuminates in all directions 2. A spotlight that shines in a specific direction 3. A light that only illuminates nearby objects 4. Dummy lights that don’t shine any light at all but can be used to created special
effects like flames, fireballs and camera lens flares
and you can adjust the colour and brightness of each type.
It is not a good idea to use more than two or three lights at any one time unless their brightness is turned down quite a bit.
Lets try lighting a scene: Load OpenFX and from the toolbox Insert a model actor. Choose the TestModels\DividedSphere file.
Do a quick render. It’s a very simple model but that helps us see the effect of the lighting.
The other thing to do is add a Ground actor. This will help up see the effect of local lighting. Do this by: Toolbox->Insert->Ground. In the dialog box click on the Green rectangle and change the colour to white – and press OK.
You’ll see the horizontal line in the rear and side windows that represents the ground. Unfortunately this cuts the Sphere in half so we need to move the sphere up.
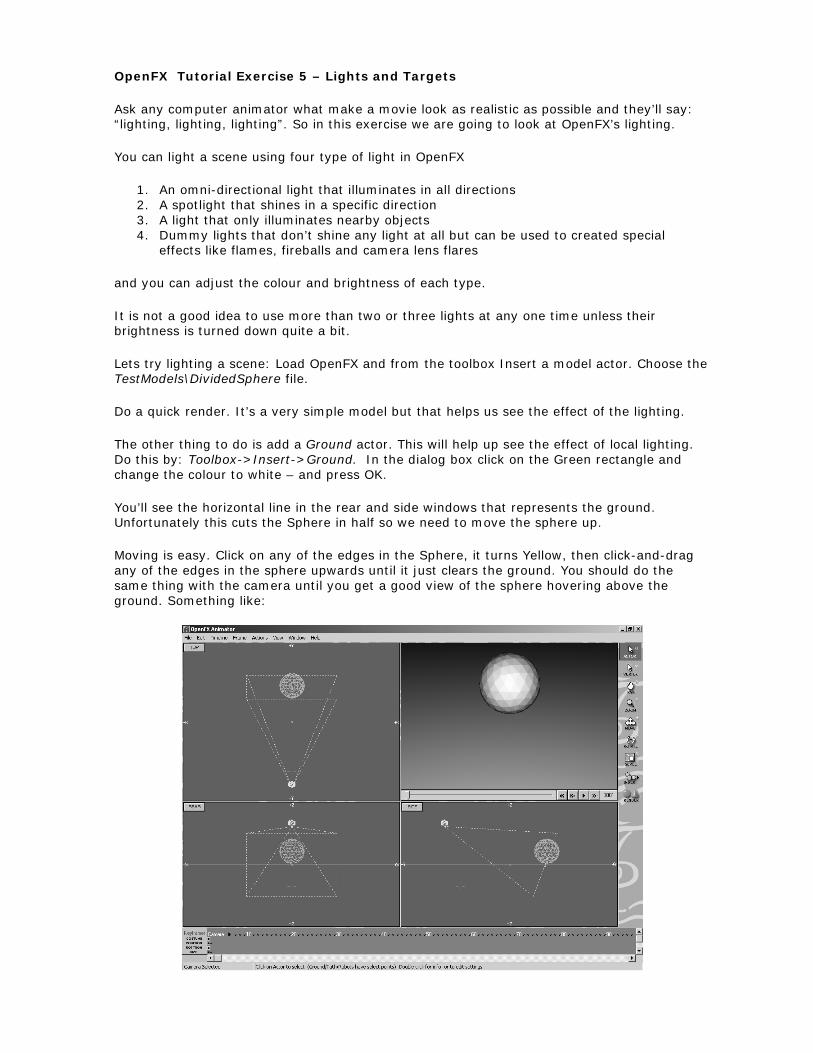
Moving is easy. Click on any of the edges in the Sphere, it turns Yellow, then click-and-drag any of the edges in the sphere upwards until it just clears the ground. You should do the same thing with the camera until you get a good view of the sphere hovering above the ground. Something like:
So far we haven’t done anything about lights but OpenFX knows this and if there are no lights in the scene it turns on a light on the camera to give us some basic illumination.
Now we will add a single light. Toolbox-> Insert->Light, the defaults from the Light Settings Dialog will be sufficient for now, click OK.
Can you see the icon for the light ? It can be moved and changed in much the same way as any other actor. It is certainly not in the right position. Click on its icon and move it upwards so that it is well above the sphere.
Render the scene. (This time click on the Render button in the toolbox and use the full renderer for the Current Frame, select a JPEG image output from the Choose Image File Format listbox.
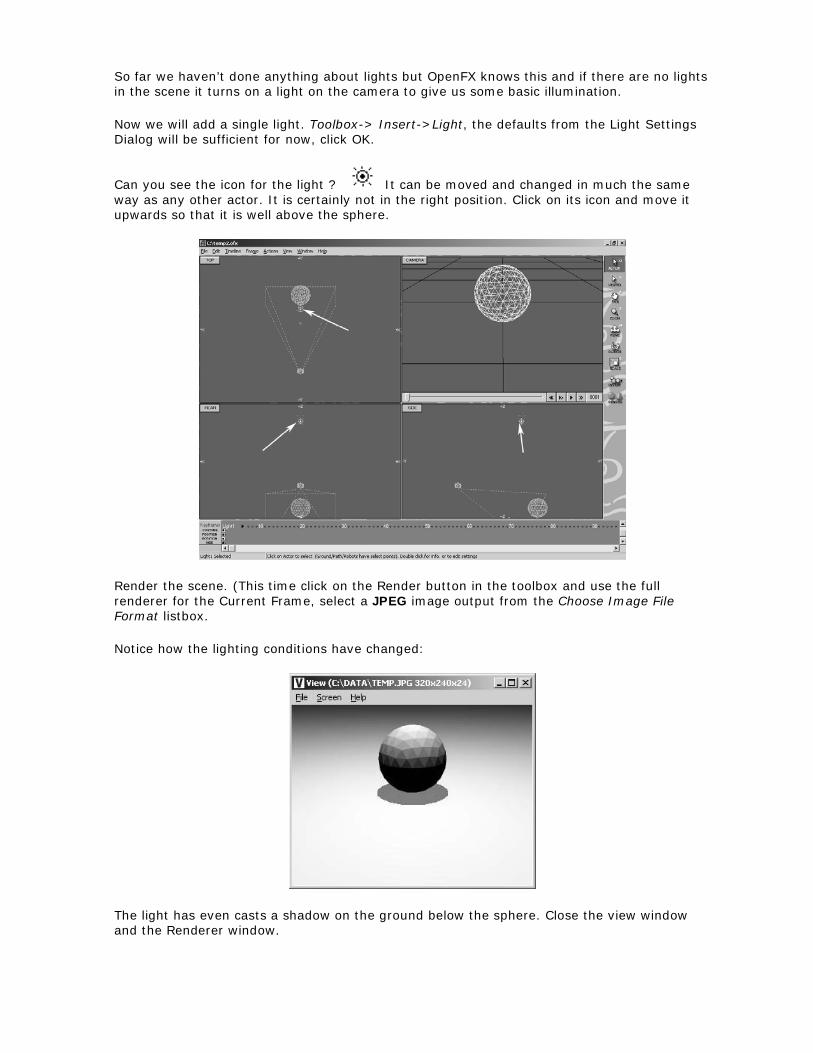
Notice how the lighting conditions have changed:
The light has even casts a shadow on the ground below the sphere. Close the view window and the Renderer window.
Now you should experiment moving the light to the left, to the right, up and down. Make a mental note of the effect it has and how it depends on where you put the light. What you learn now will be invaluable when you start working on your own ideas.
So we have a normal light high above a sphere resting on a ground plane. What do you think would happen if you change the colour of the light, to say red? Well let’s see.
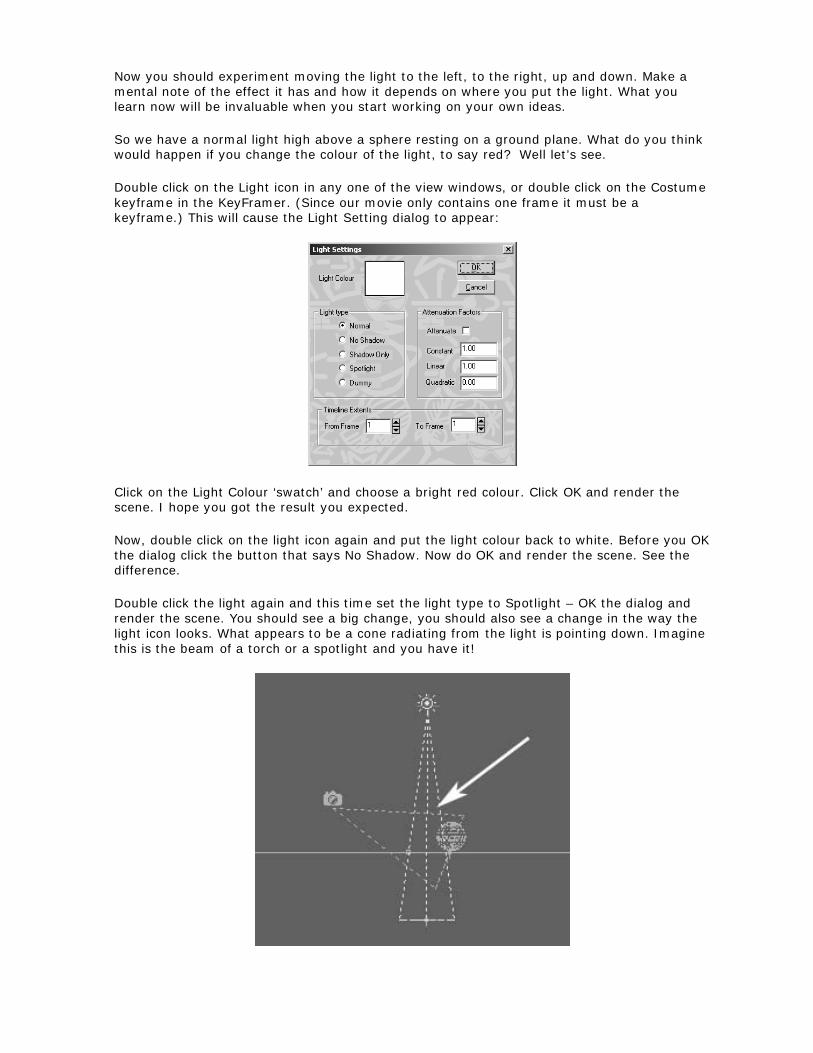
Double click on the Light icon in any one of the view windows, or double click on the Costume keyframe in the KeyFramer. (Since our movie only contains one frame it must be a keyframe.) This will cause the Light Setting dialog to appear:
Click on the Light Colour ‘swatch’ and choose a bright red colour. Click OK and render the scene. I hope you got the result you expected.
Now, double click on the light icon again and put the light colour back to white. Before you OK the dialog click the button that says No Shadow. Now do OK and render the scene. See the difference.
Double click the light again and this time set the light type to Spotlight – OK the dialog and render the scene. You should see a big change, you should also see a change in the way the light icon looks. What appears to be a cone radiating from the light is pointing down. Imagine this is the beam of a torch or a spotlight and you have it!
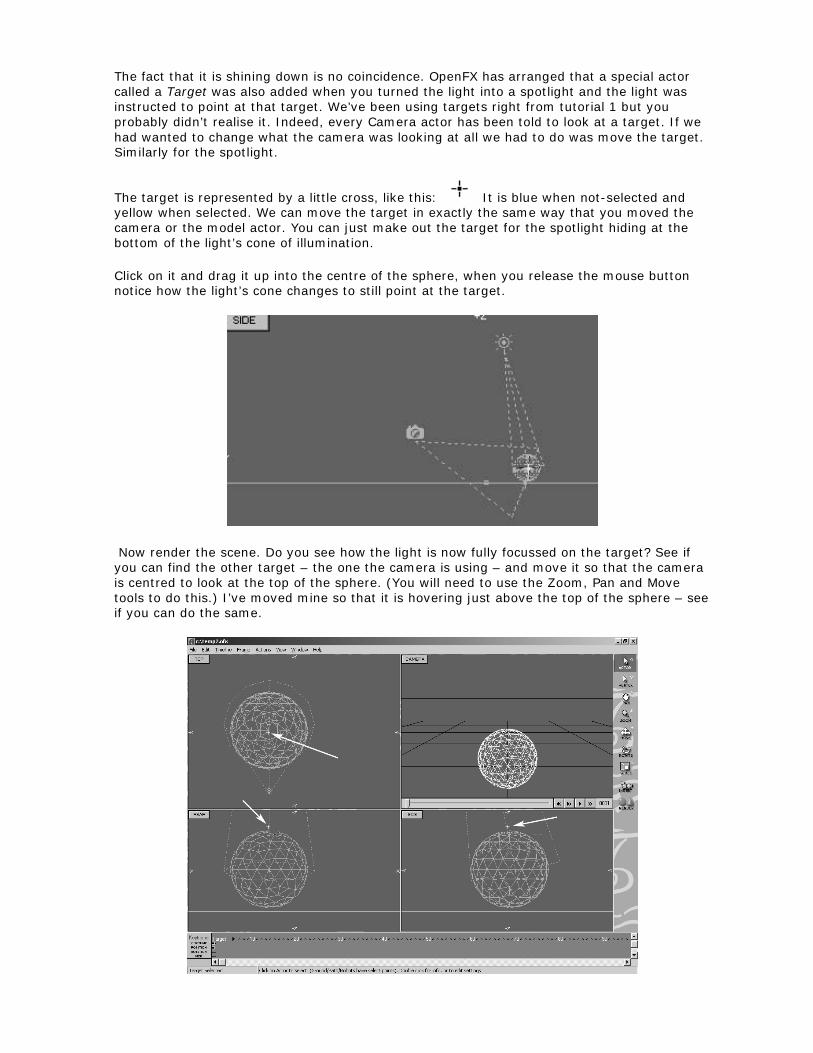
The fact that it is shining down is no coincidence. OpenFX has arranged that a special actor called a Target was also added when you turned the light into a spotlight and the light was instructed to point at that target. We’ve been using targets right from tutorial 1 but you probably didn’t realise it. Indeed, every Camera actor has been told to look at a target. If we had wanted to change what the camera was looking at all we had to do was move the target. Similarly for the spotlight.
The target is represented by a little cross, like this: It is blue when not-selected and yellow when selected. We can move the target in exactly the same way that you moved the camera or the model actor. You can just make out the target for the spotlight hiding at the bottom of the light’s cone of illumination.
Click on it and drag it up into the centre of the sphere, when you release the mouse button notice how the light’s cone changes to still point at the target.
Now render the scene. Do you see how the light is now fully focussed on the target? See if you can find the other target – the one the camera is using – and move it so that the camera is centred to look at the top of the sphere. (You will need to use the Zoom, Pan and Move tools to do this.) I’ve moved mine so that it is hovering just above the top of the sphere – see if you can do the same.
It’s also interesting to see the Target actors in the KeyFramer. When you select an actor in the view window its timelines and keyframes are automatically brought into the ‘one actor view’ at the bottom of the main screen. Select the light and camera targets one by one and look at the KeyFramer. Also check on the bottom left hand corner of the status bar - this shows you the name of the selected actor. You can easily tell when you have selected the light’s target because it says “Target(<name of light>)”
The last thing that I want to show you in this exercise is just why the spotlight knew to point at the target:
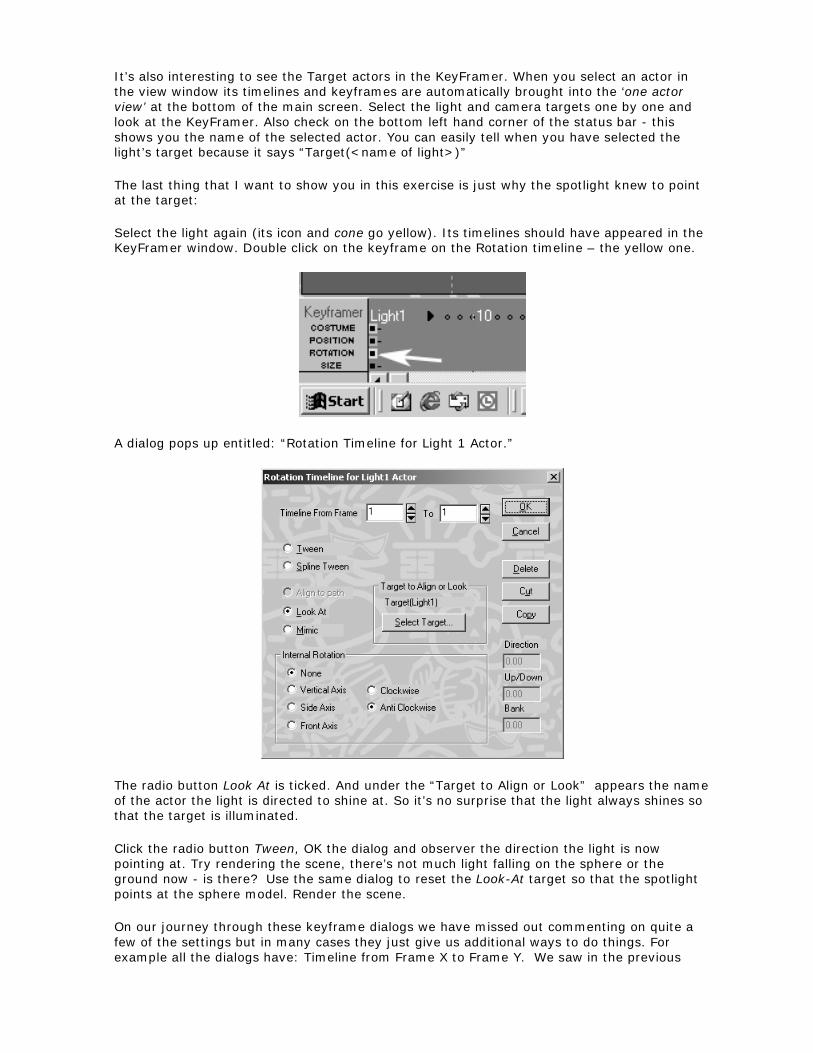
Select the light again (its icon and cone go yellow). Its timelines should have appeared in the KeyFramer window. Double click on the keyframe on the Rotation timeline – the yellow one.
A dialog pops up entitled: “Rotation Timeline for Light 1 Actor.”
The radio button Look At is ticked. And under the “Target to Align or Look” appears the name of the actor the light is directed to shine at. So it’s no surprise that the light always shines so that the target is illuminated.
Click the radio button Tween, OK the dialog and observer the direction the light is now pointing at. Try rendering the scene, there’s not much light falling on the sphere or the ground now - is there? Use the same dialog to reset the Look-At target so that the spotlight points at the sphere model. Render the scene.
On our journey through these keyframe dialogs we have missed out commenting on quite a few of the settings but in many cases they just give us additional ways to do things. For example all the dialogs have: Timeline from Frame X to Frame Y. We saw in the previous
exercise that you can change the length of a timeline just by clicking-and-dragging the keyframes at the end of the timelines. So entering numbers in these boxes is effectively the same thing.
Nevertheless you should experiment with changing all of these settings to get a feel of the behaviour of OpenFX’s animator before embarking on a major animation project.
Additional Things to Try in this exercise.
1. Drag the spotlight around to see how the shadow of the sphere and the illumination changes.
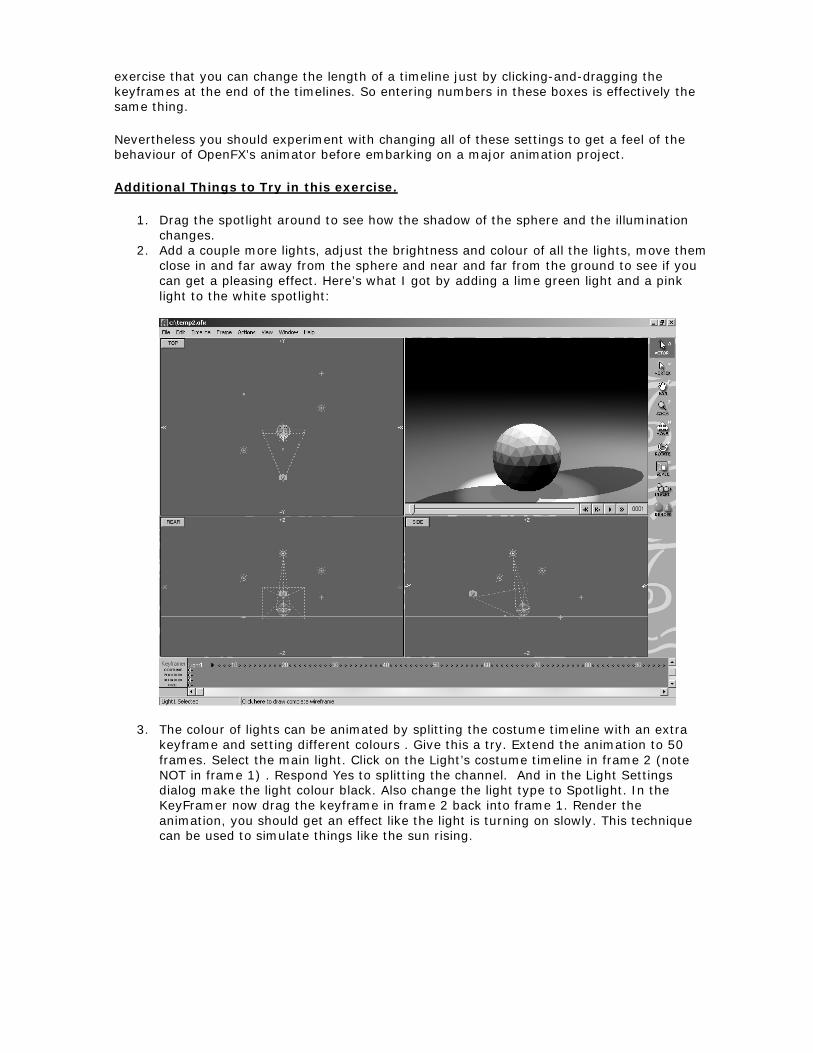
2. Add a couple more lights, adjust the brightness and colour of all the lights, move them close in and far away from the sphere and near and far from the ground to see if you can get a pleasing effect. Here’s what I got by adding a lime green light and a pink light to the white spotlight:
3. The colour of lights can be animated by splitting the costume timeline with an extra keyframe and setting different colours . Give this a try. Extend the animation to 50 frames. Select the main light. Click on the Light’s costume timeline in frame 2 (note NOT in frame 1) . Respond Yes to splitting the channel. And in the Light Settings dialog make the light colour black. Also change the light type to Spotlight. In the KeyFramer now drag the keyframe in frame 2 back into frame 1. Render the animation, you should get an effect like the light is turning on slowly. This technique can be used to simulate things like the sun rising.
OpenFX Tutorial Exercise 6 – Hierarchical Animation
You can make an infinite variety of movies using the techniques of keyframe animation which we looked at in the previous exercises. In fact you can make ANY movie want using these simple techniques. But – to do some things with the basics of keyframe animation that we have discussed so far would be so time consuming as to make it almost as easy to use pencil and paper as to use OpenFX.
The sort of thing I am talking about is the helicopter example in SimpleExamples\Helicopter (note: Not the helicopter.ofx file in the animations folder it’s in the SimpleExamples folder which is in the Animations folder!) Load it into OpenFX and run the preview. You can render and make a movie too if you like.)
Do you see how the body is rotating the main rotor is rotating and the tail rotor is rotating. How would you make an animation of this in OpenFX? Sure you can easily use the rotation timeline to make the helicopter rotate but then how do you get the main rotor to rotate in the opposite direction? And worse still: how do you get the tail rotor to rotate in a plane at 90 degrees to the body and (worse again) rotate about the point where it is attached to the tail of the helicopter’s fuselage which is rotating!
Well, as you can see, OpenFX is animating exactly that and it only took me a few minutes to make the animation. If you want to try and figure it out for yourself the clues are all in the KeyFramer. For those of you who simply what to know – This is how it was done:
Hierarchical Animation: put simply, one object follows another – which follows another which follows… etc. etc. for as many times as you need. Hierarchical animation lies at the heart of Character animation! Character animation is what makes totally computer generated movies possible, Shrek, Toy Story, The Incredibles etc. are all character driven. To understand character animation you have to understand Hierarchical Animation and where better to start than with our little helicopter example.
The secret to the rotating helicopter example is in the fact that the main rotor and the tail rotor are NOT part of the same model.
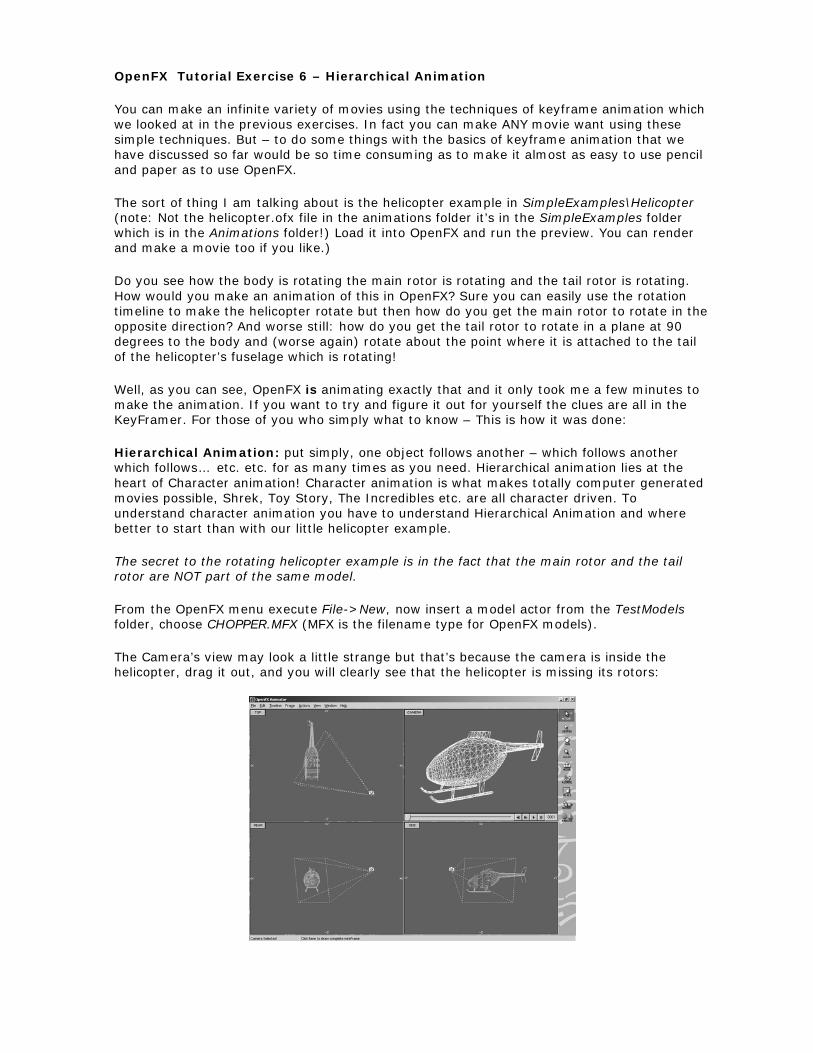
From the OpenFX menu execute File->New, now insert a model actor from the TestModels folder, choose CHOPPER.MFX (MFX is the filename type for OpenFX models).
The Camera’s view may look a little strange but that’s because the camera is inside the helicopter, drag it out, and you will clearly see that the helicopter is missing its rotors:
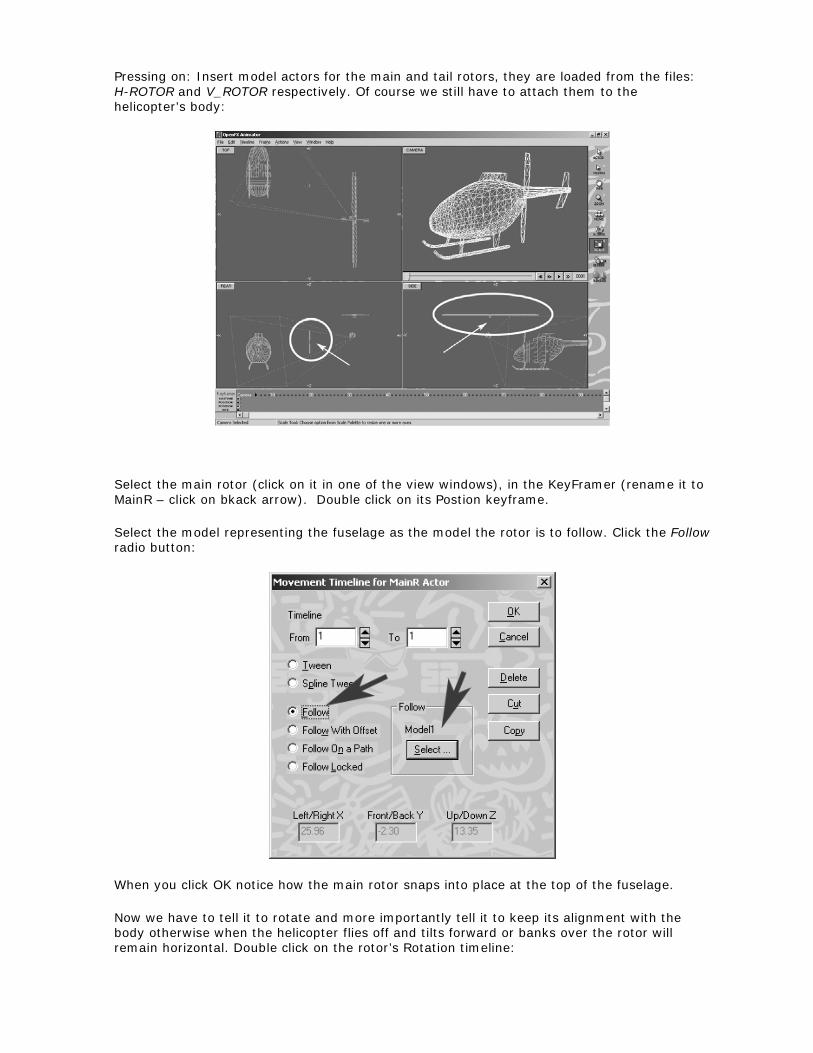
Pressing on: Insert model actors for the main and tail rotors, they are loaded from the files: H-ROTOR and V_ROTOR respectively. Of course we still have to attach them to the helicopter’s body:
Select the main rotor (click on it in one of the view windows), in the KeyFramer (rename it to MainR – click on bkack arrow). Double click on its Postion keyframe.
Select the model representing the fuselage as the model the rotor is to follow. Click the Follow radio button:
When you click OK notice how the main rotor snaps into place at the top of the fuselage.
Now we have to tell it to rotate and more importantly tell it to keep its alignment with the body otherwise when the helicopter flies off and tilts forward or banks over the rotor will remain horizontal. Double click on the rotor’s Rotation timeline:
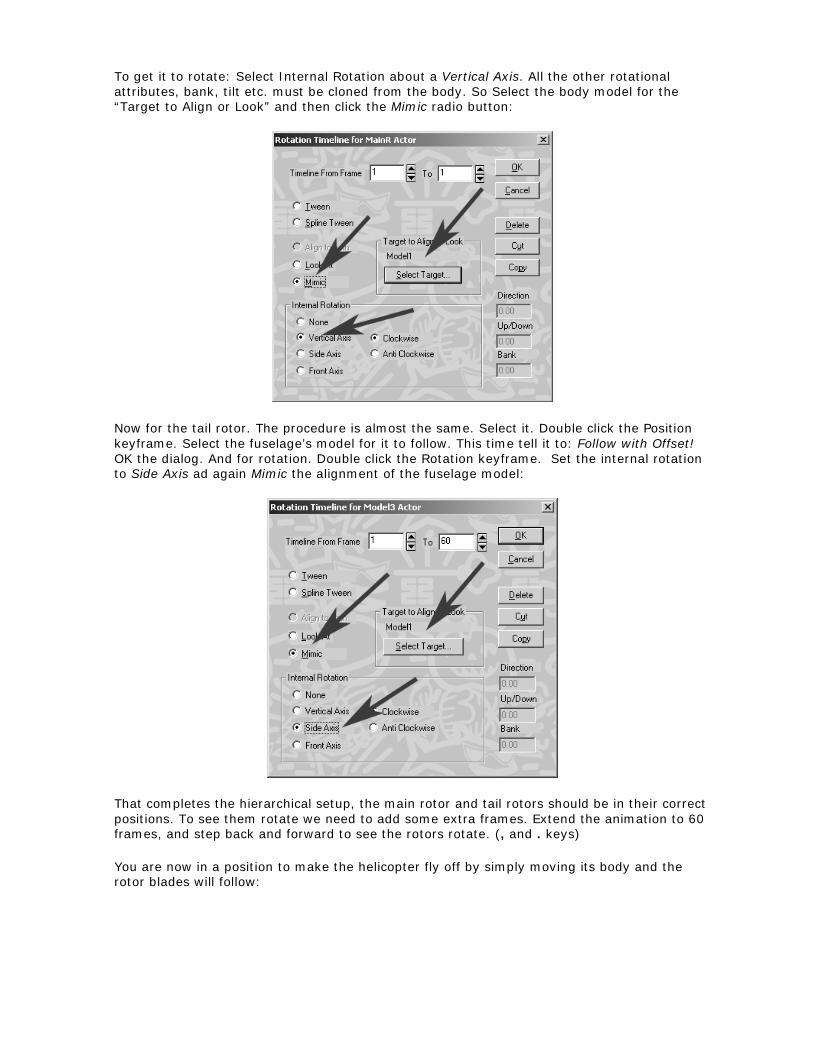
To get it to rotate: Select Internal Rotation about a Vertical Axis. All the other rotational attributes, bank, tilt etc. must be cloned from the body. So Select the body model for the “Target to Align or Look” and then click the Mimic radio button:
Now for the tail rotor. The procedure is almost the same. Select it. Double click the Position keyframe. Select the fuselage’s model for it to follow. This time tell it to: Follow with Offset! OK the dialog. And for rotation. Double click the Rotation keyframe. Set the internal rotation to Side Axis ad again Mimic the alignment of the fuselage model:
That completes the hierarchical setup, the main rotor and tail rotors should be in their correct positions. To see them rotate we need to add some extra frames. Extend the animation to 60 frames, and step back and forward to see the rotors rotate. (, and . keys)
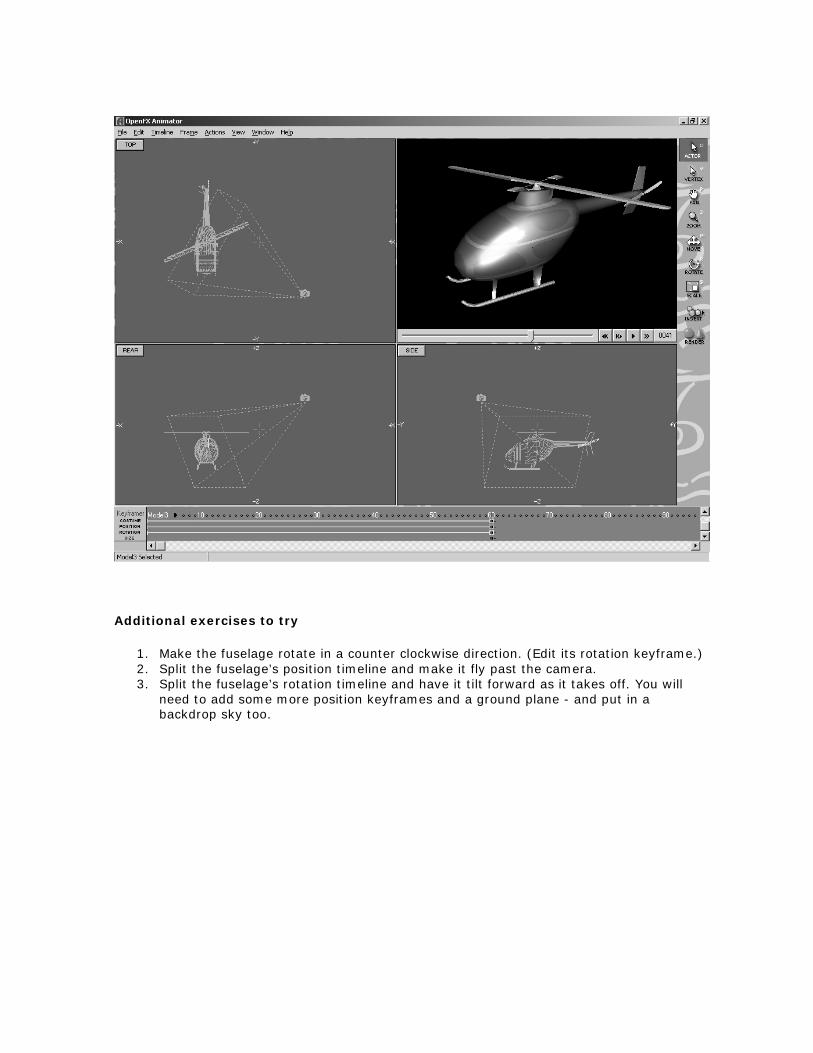
You are now in a position to make the helicopter fly off by simply moving its body and the rotor blades will follow:
Additional exercises to try
1. Make the fuselage rotate in a counter clockwise direction. (Edit its rotation keyframe.) 2. Split the fuselage’s position timeline and make it fly past the camera. 3. Split the fuselage’s rotation timeline and have it tilt forward as it takes off. You will
need to add some more position keyframes and a ground plane - and put in a backdrop sky too.
OpenFX Tutorial Exercise 7 – Paths
The keyframe approach to animation which we have been investigating over the last few tutorials is very flexible and powerful but it can be quite difficult to achieve realistic looking dynamic motion e.g. a car accelerating along a road, then slowing and accelerating again. It can also be very tedious to arrange for actor to move along complex and/or winding paths. To help make the process of animating such scenarios OpenFX has a special type of actor called a Path. The Path actor does exactly what its name implies. It provides a route which other actors can follow and whilst it does not show up in the final movie it is very easy to see in every frame the path along which an actor will be travelling possibly over a time period of 100s of frames.
This exercise will familiarise you with how to make a path, use a pre-made path, adjust a path and tell an actor to follow that path.
To start the exercise we will use one of OpenFX’s template animations. File->New From Template choose Model on open path and click OK. Pick the 3FRAME model which we will make follow the path. The default of 60 frames will do for the length of the movie.
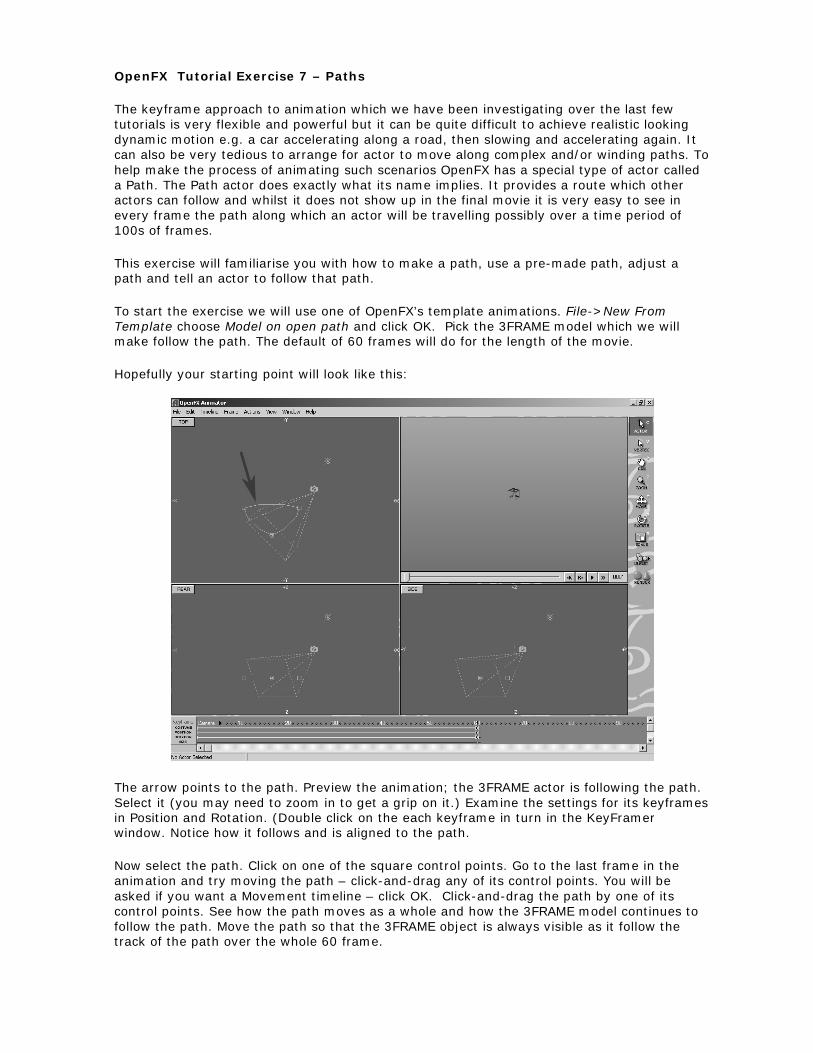
Hopefully your starting point will look like this:
The arrow points to the path. Preview the animation; the 3FRAME actor is following the path. Select it (you may need to zoom in to get a grip on it.) Examine the settings for its keyframes in Position and Rotation. (Double click on the each keyframe in turn in the KeyFramer window. Notice how it follows and is aligned to the path.
Now select the path. Click on one of the square control points. Go to the last frame in the animation and try moving the path – click-and-drag any of its control points. You will be asked if you want a Movement timeline – click OK. Click-and-drag the path by one of its control points. See how the path moves as a whole and how the 3FRAME model continues to follow the path. Move the path so that the 3FRAME object is always visible as it follow the track of the path over the whole 60 frame.
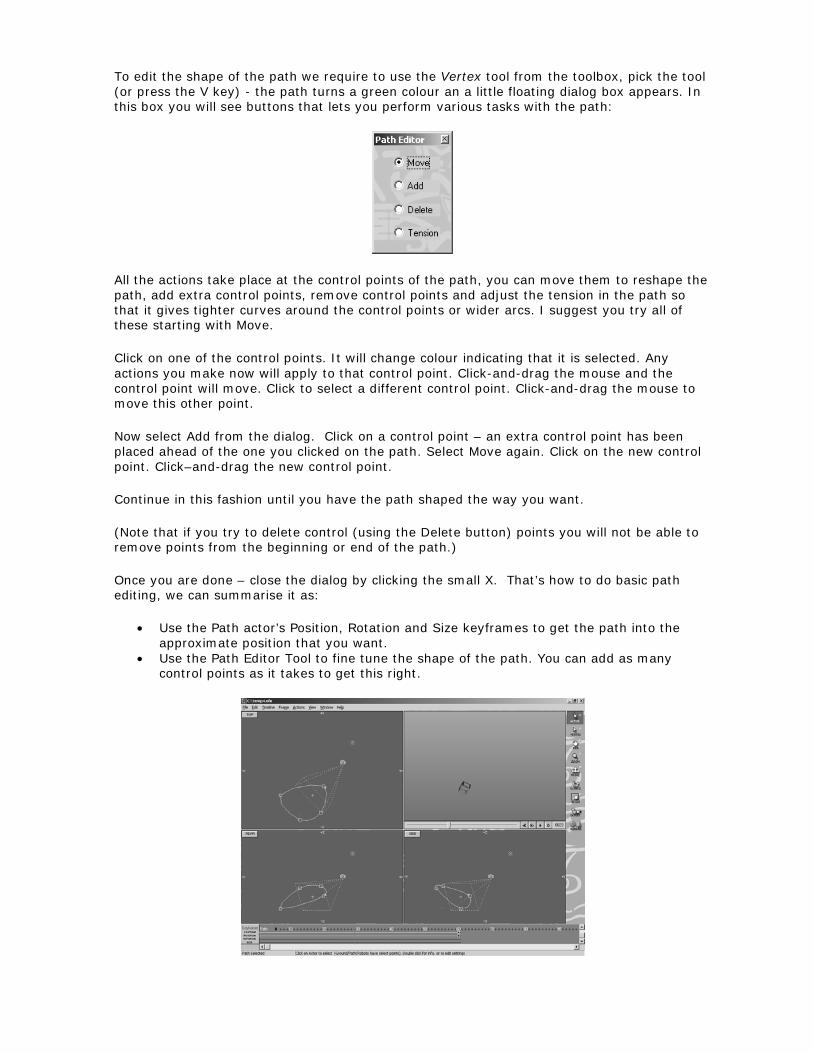
To edit the shape of the path we require to use the Vertex tool from the toolbox, pick the tool (or press the V key) - the path turns a green colour an a little floating dialog box appears. In this box you will see buttons that lets you perform various tasks with the path:
All the actions take place at the control points of the path, you can move them to reshape the path, add extra control points, remove control points and adjust the tension in the path so that it gives tighter curves around the control points or wider arcs. I suggest you try all of these starting with Move.
Click on one of the control points. It will change colour indicating that it is selected. Any actions you make now will apply to that control point. Click-and-drag the mouse and the control point will move. Click to select a different control point. Click-and-drag the mouse to move this other point.
Now select Add from the dialog. Click on a control point – an extra control point has been placed ahead of the one you clicked on the path. Select Move again. Click on the new control point. Click–and-drag the new control point.
Continue in this fashion until you have the path shaped the way you want.
(Note that if you try to delete control (using the Delete button) points you will not be able to remove points from the beginning or end of the path.)
Once you are done – close the dialog by clicking the small X. That’s how to do basic path editing, we can summarise it as:
• Use the Path actor’s Position, Rotation and Size keyframes to get the path into the approximate position that you want.
• Use the Path Editor Tool to fine tune the shape of the path. You can add as many control points as it takes to get this right.
Before we finish this exercise. There is one additional feature of a path that is very useful. It is possible to change the velocity of the actor travelling along the path so that it accelerates at the start and slows down near the end. Or indeed, have almost any other combination of motion.
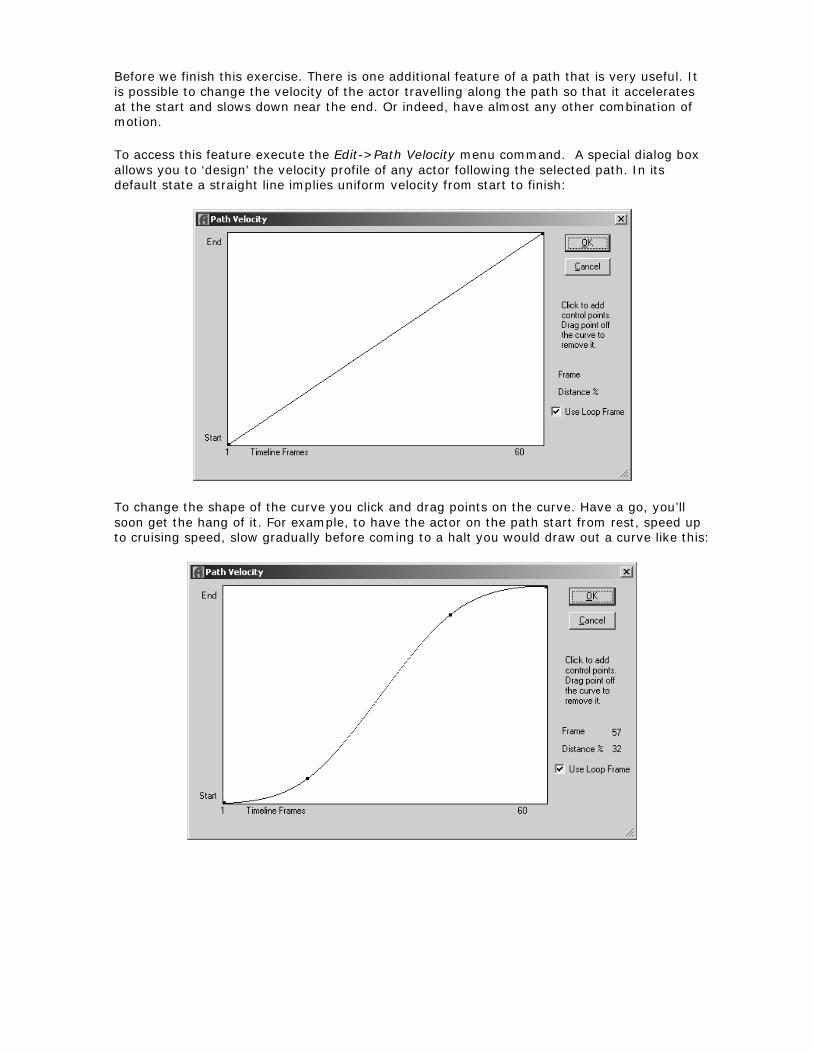
To access this feature execute the Edit->Path Velocity menu command. A special dialog box allows you to ‘design’ the velocity profile of any actor following the selected path. In its default state a straight line implies uniform velocity from start to finish:
To change the shape of the curve you click and drag points on the curve. Have a go, you’ll soon get the hang of it. For example, to have the actor on the path start from rest, speed up to cruising speed, slow gradually before coming to a halt you would draw out a curve like this:
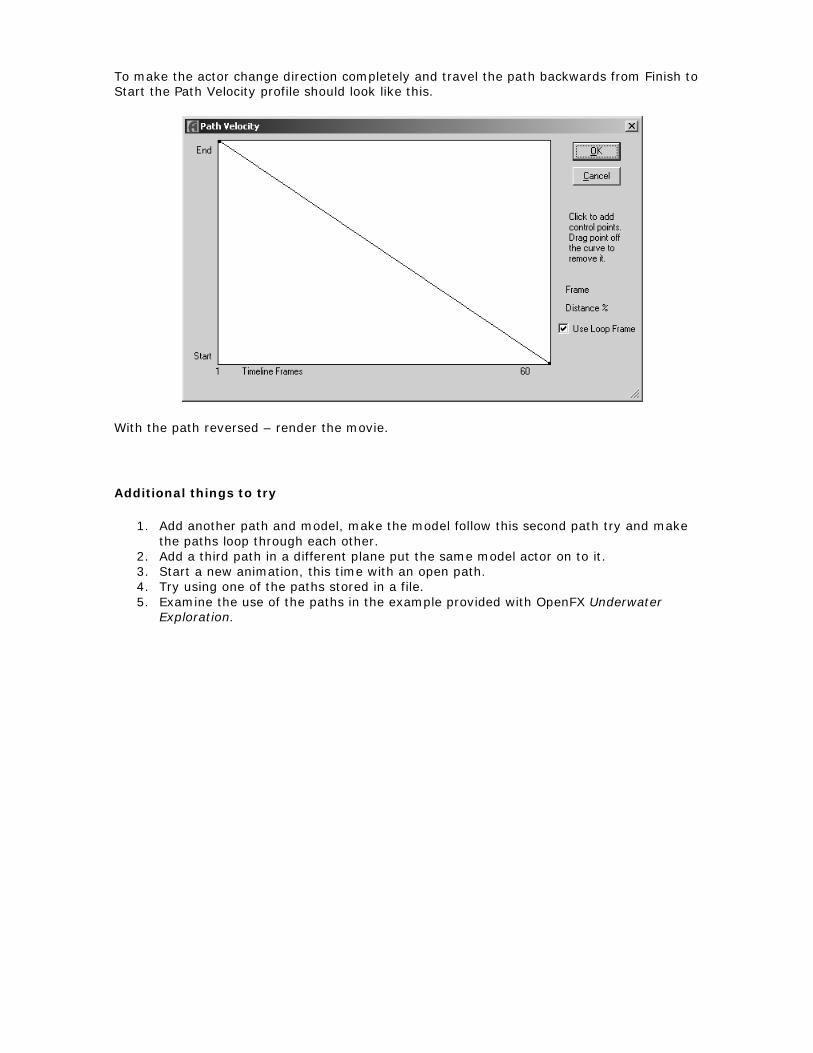
To make the actor change direction completely and travel the path backwards from Finish to Start the Path Velocity profile should look like this.
With the path reversed – render the movie.
Additional things to try
1. Add another path and model, make the model follow this second path try and make the paths loop through each other.
2. Add a third path in a different plane put the same model actor on to it. 3. Start a new animation, this time with an open path. 4. Try using one of the paths stored in a file. 5. Examine the use of the paths in the example provided with OpenFX Underwater
Exploration.
OpenFX Tutorial Exercise 8 – The Ground (Textures and Image Maps)
We used the ground in the exercise on basic lighting, but there is a lot more you can do with a ground than just providing a flat surface that extends to infinity in all directions and provide a convenient surface onto which models cast shadows.
Before looking in detail at the ground we shall refresh our memory of how the ground appears in OpenFX’s view windows and in the Camera view.
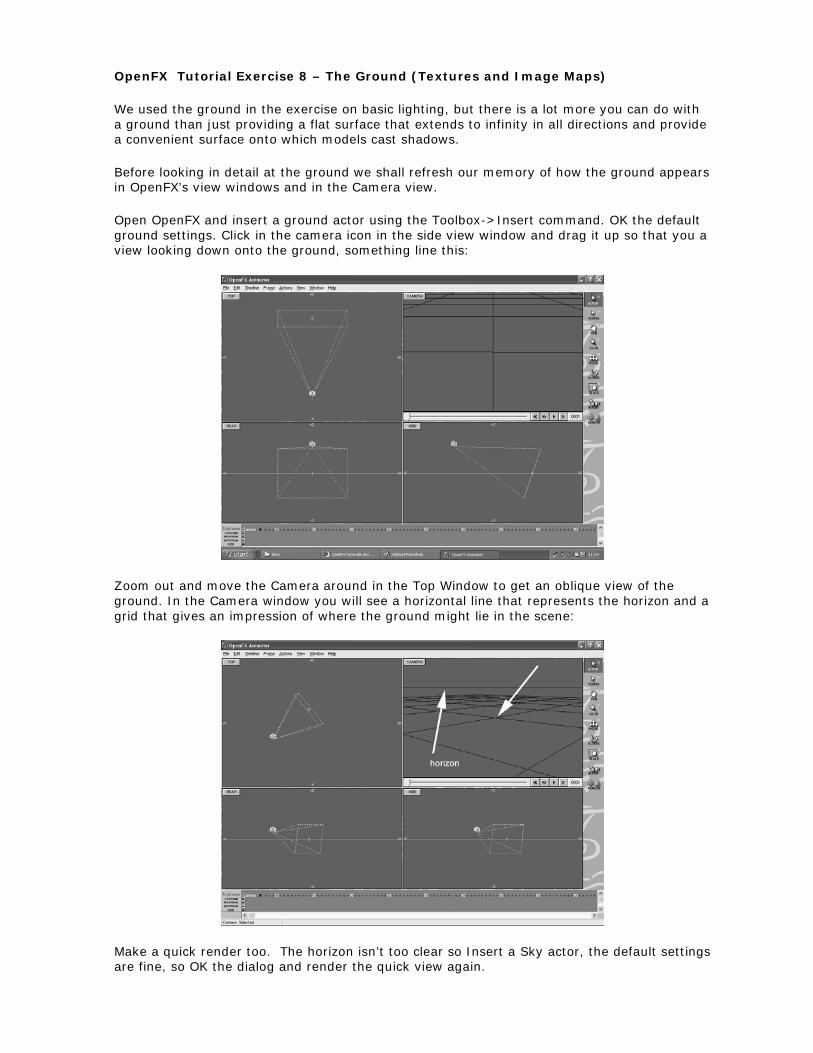
Open OpenFX and insert a ground actor using the Toolbox->Insert command. OK the default ground settings. Click in the camera icon in the side view window and drag it up so that you a view looking down onto the ground, something line this:
Zoom out and move the Camera around in the Top Window to get an oblique view of the ground. In the Camera window you will see a horizontal line that represents the horizon and a grid that gives an impression of where the ground might lie in the scene:
Make a quick render too. The horizon isn’t too clear so Insert a Sky actor, the default settings are fine, so OK the dialog and render the quick view again.

In the rest of this exercise we will look at some the things we can do with the ground plane to improve the realism of the scene, such as:
• Making it look rough • Painting images onto it
To change the ground plane it first has to be selected. This can be done in the view windows but sometimes it is quite difficult to see the selection mark so the easiest way to select the ground is use the Edit->Select Actor menu command or its keyboard shortcut A. Hit the A key! Double click on Ground!
There can be three types of ground, we will have a look at each of these now. The default Plain Colour is pretty obvious – click on the Ground Colour Swatch and try a different colour. You’ll need to OK the dialog and render the scene to see your changes.
Ground Textures are not quite so obvious but when you try a few of them you should get the message. Click Ground Texture and from the pop-up box select Checker. Change the Ground Colour to White and the Texture Colour to Red. Ok and render! Go back and try the Dots texture.
And try again, but this time render the scene with the Rough texture on the ground!
Make sure you can see the little dimples in the ground at 1 in the screen shot above. They look a bit like rolling sand dunes in a desert. You should also see the yellow box at 2 and the vertical line at 3? These represent the ground (when it is selected) in the view windows. They are important because they allow us to change the parameters which control the appearance of the ground and its location.
In the Rear and Side windows the point where the vertical and horizontal lines meet can be used move the ground by clicking-and-dragging it. If the ground is selected, the Move tool can also be used to move the Ground up an down or move its rectangle in the top window. Try moving the ground using both of these methods.
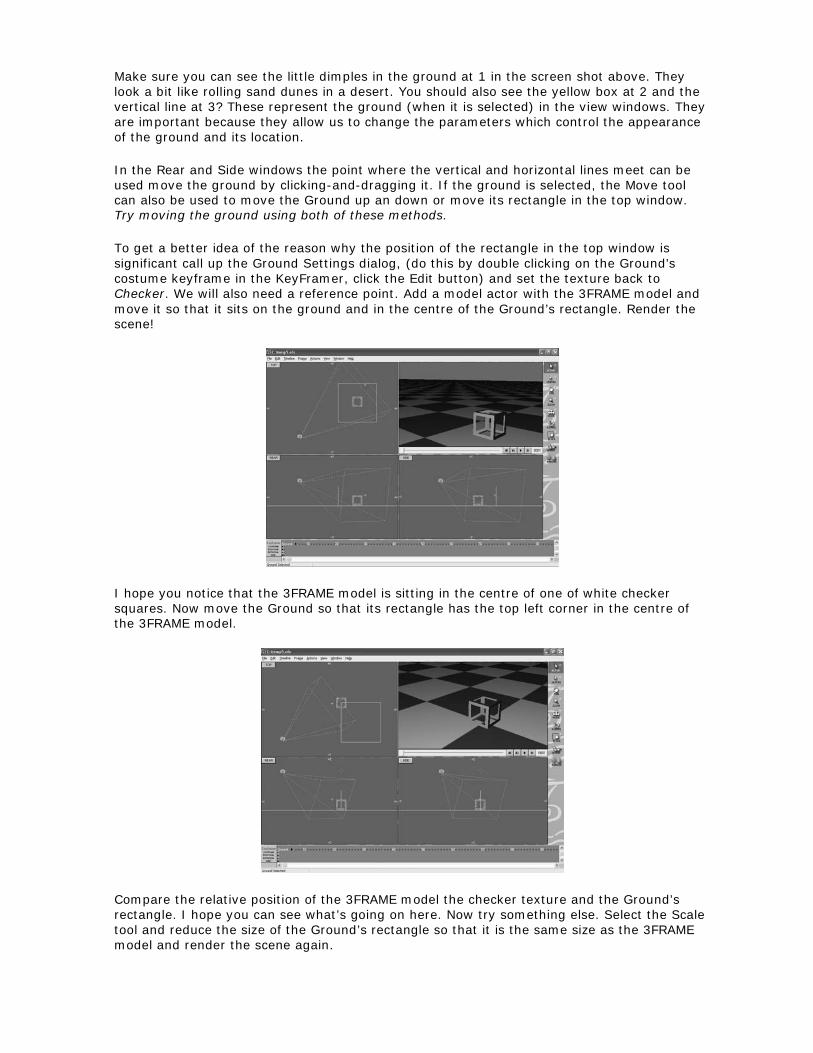
To get a better idea of the reason why the position of the rectangle in the top window is significant call up the Ground Settings dialog, (do this by double clicking on the Ground’s costume keyframe in the KeyFramer, click the Edit button) and set the texture back to Checker. We will also need a reference point. Add a model actor with the 3FRAME model and move it so that it sits on the ground and in the centre of the Ground’s rectangle. Render the scene!
I hope you notice that the 3FRAME model is sitting in the centre of one of white checker squares. Now move the Ground so that its rectangle has the top left corner in the centre of the 3FRAME model.
Compare the relative position of the 3FRAME model the checker texture and the Ground’s rectangle. I hope you can see what’s going on here. Now try something else. Select the Scale tool and reduce the size of the Ground’s rectangle so that it is the same size as the 3FRAME model and render the scene again.
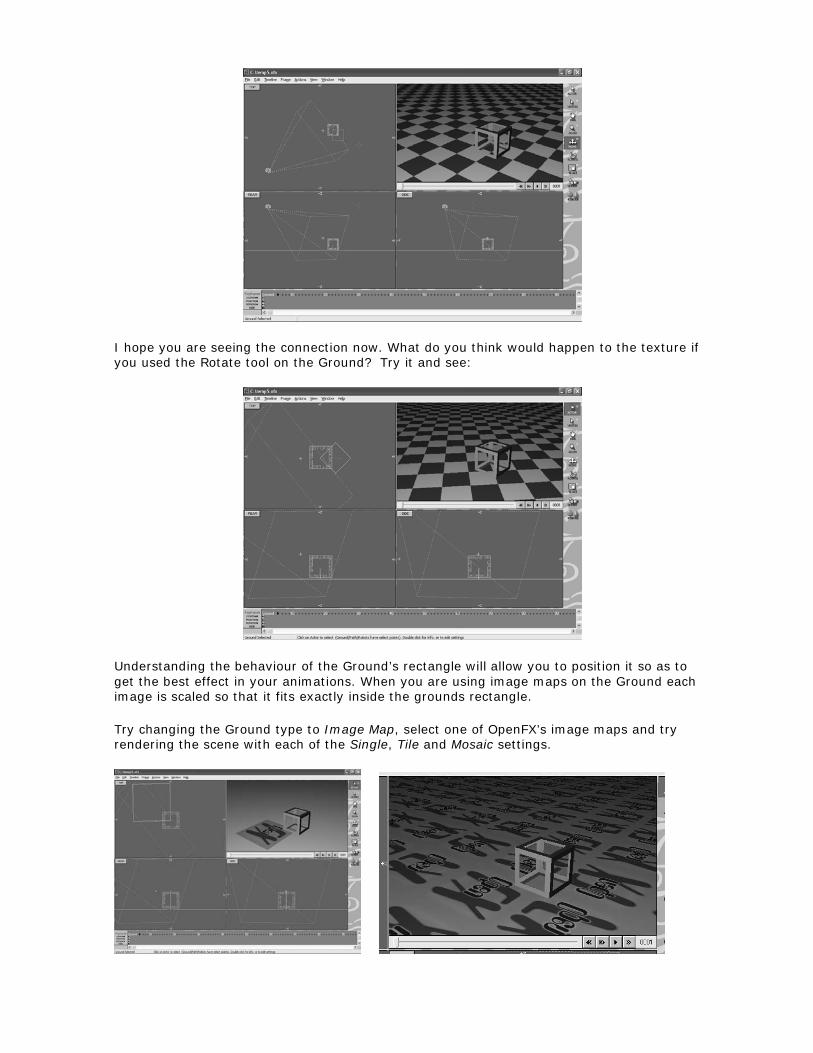
I hope you are seeing the connection now. What do you think would happen to the texture if you used the Rotate tool on the Ground? Try it and see:
Understanding the behaviour of the Ground’s rectangle will allow you to position it so as to get the best effect in your animations. When you are using image maps on the Ground each image is scaled so that it fits exactly inside the grounds rectangle.
Try changing the Ground type to Image Map, select one of OpenFX’s image maps and try rendering the scene with each of the Single, Tile and Mosaic settings.
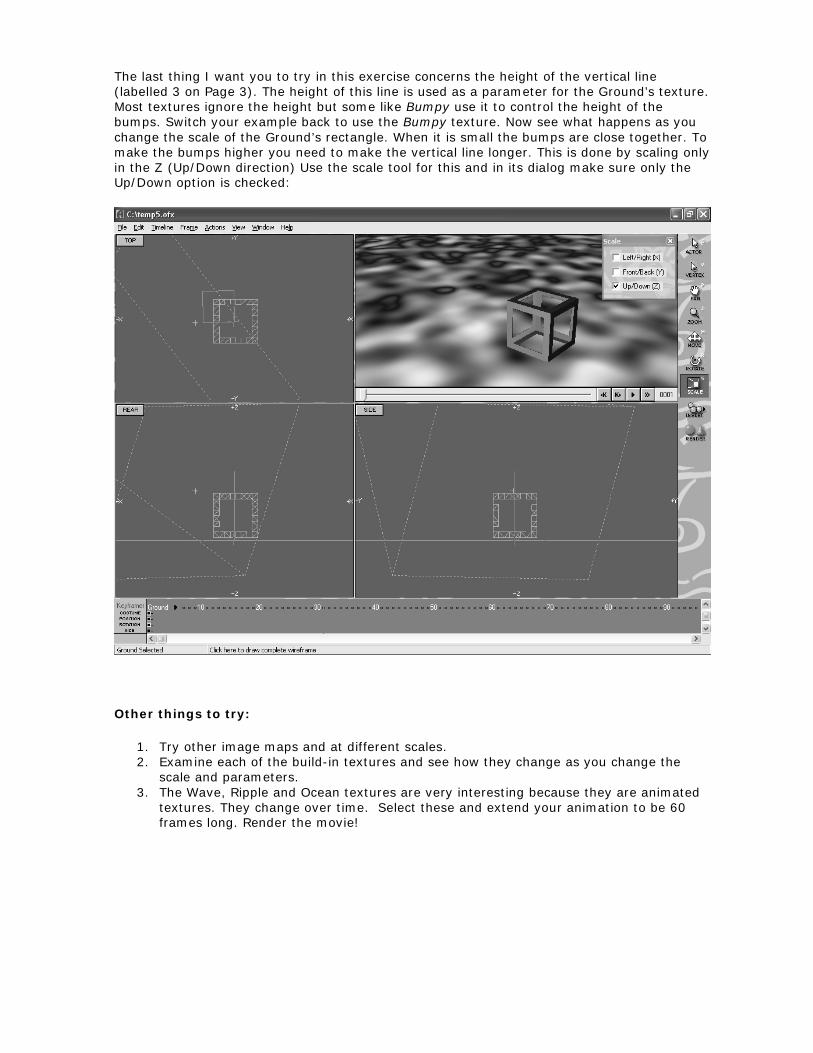
The last thing I want you to try in this exercise concerns the height of the vertical line (labelled 3 on Page 3). The height of this line is used as a parameter for the Ground’s texture. Most textures ignore the height but some like Bumpy use it to control the height of the bumps. Switch your example back to use the Bumpy texture. Now see what happens as you change the scale of the Ground’s rectangle. When it is small the bumps are close together. To make the bumps higher you need to make the vertical line longer. This is done by scaling only in the Z (Up/Down direction) Use the scale tool for this and in its dialog make sure only the Up/Down option is checked:
Other things to try:
1. Try other image maps and at different scales. 2. Examine each of the build-in textures and see how they change as you change the
scale and parameters. 3. The Wave, Ripple and Ocean textures are very interesting because they are animated
textures. They change over time. Select these and extend your animation to be 60 frames long. Render the movie!
OpenFX Tutorial Exercise 9 – Animation Effects
OpenFX is loaded with features to make your animations as exciting as possible but just in case its built-in facilities don’t do exactly what you want you can write your own – these are called plug-ins. We won’t be discussing how to write plugins in this exercise just how to use some of the ones that come with OpenFX. Plugins fall into four categories you can use two of these in the animation module. They are Animation effects and Post(or image)processing effects. Animation effects can be used to alter the behaviour of an Actor’s costume during an animation e.g. its shape, position or size. They can be used to add ‘physics’ effects such as falling under gravity or being shot from a cannon. Image or post-processing effects let you draw over the final rendered image but because you also have access to the 3D information from the animation module you can automatically draw behind actors, interact with actors, replace actors or (if you really really want to) write a complete rendering module to do things like render the scene in the infrared!
This exercise shows you how to use the Animation effects.
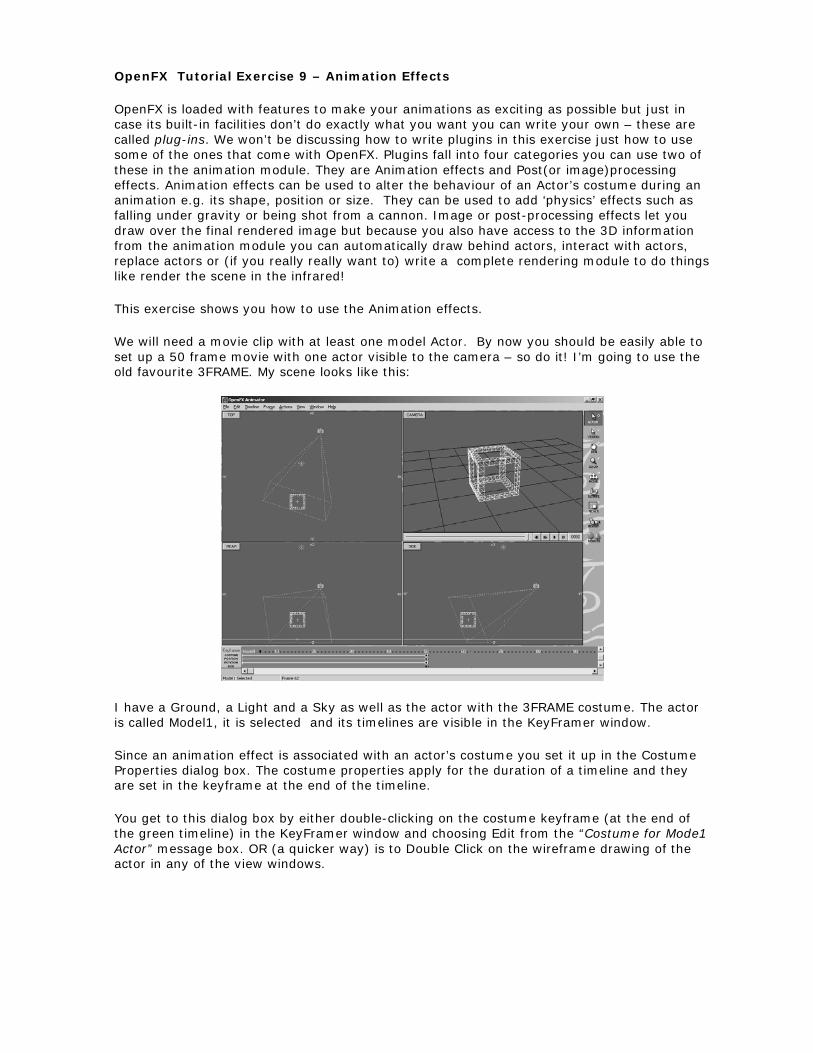
We will need a movie clip with at least one model Actor. By now you should be easily able to set up a 50 frame movie with one actor visible to the camera – so do it! I’m going to use the old favourite 3FRAME. My scene looks like this:
I have a Ground, a Light and a Sky as well as the actor with the 3FRAME costume. The actor is called Model1, it is selected and its timelines are visible in the KeyFramer window.
Since an animation effect is associated with an actor’s costume you set it up in the Costume Properties dialog box. The costume properties apply for the duration of a timeline and they are set in the keyframe at the end of the timeline.
You get to this dialog box by either double-clicking on the costume keyframe (at the end of the green timeline) in the KeyFramer window and choosing Edit from the “Costume for Mode1 Actor” message box. OR (a quicker way) is to Double Click on the wireframe drawing of the actor in any of the view windows.
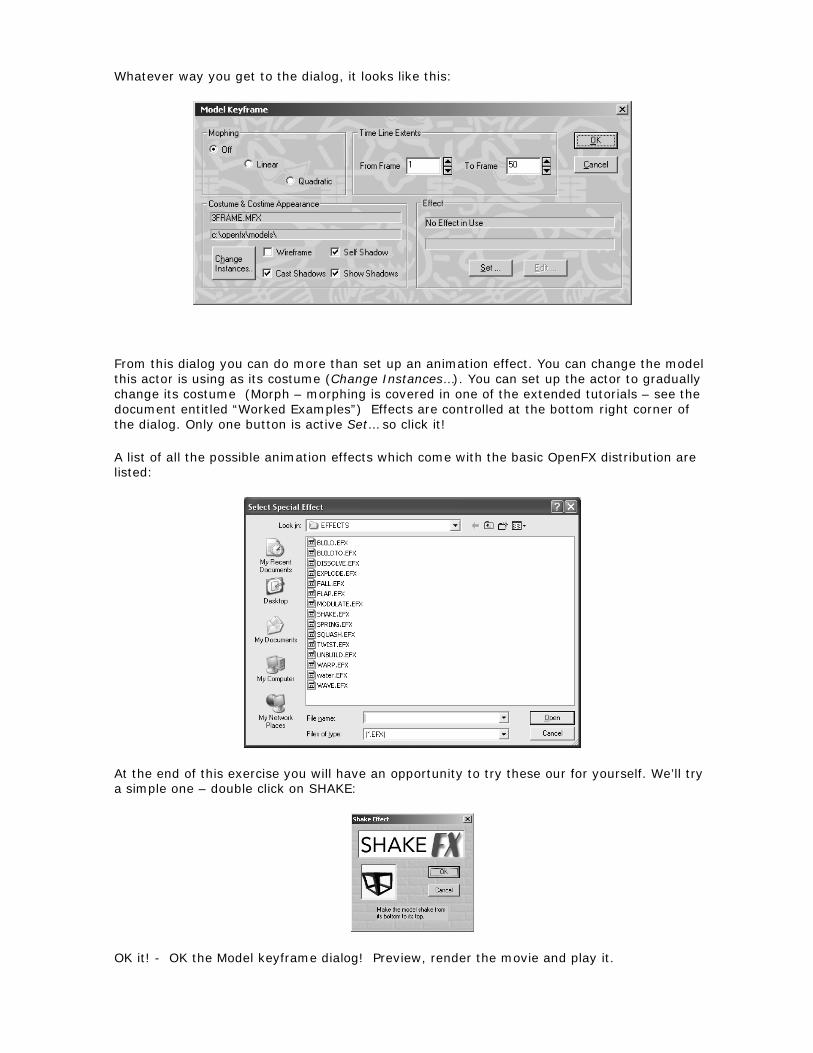
Whatever way you get to the dialog, it looks like this:
From this dialog you can do more than set up an animation effect. You can change the model this actor is using as its costume (Change Instances…). You can set up the actor to gradually change its costume (Morph – morphing is covered in one of the extended tutorials – see the document entitled “Worked Examples”) Effects are controlled at the bottom right corner of the dialog. Only one button is active Set… so click it!
A list of all the possible animation effects which come with the basic OpenFX distribution are listed:
At the end of this exercise you will have an opportunity to try these our for yourself. We’ll try a simple one – double click on SHAKE:
OK it! - OK the Model keyframe dialog! Preview, render the movie and play it.
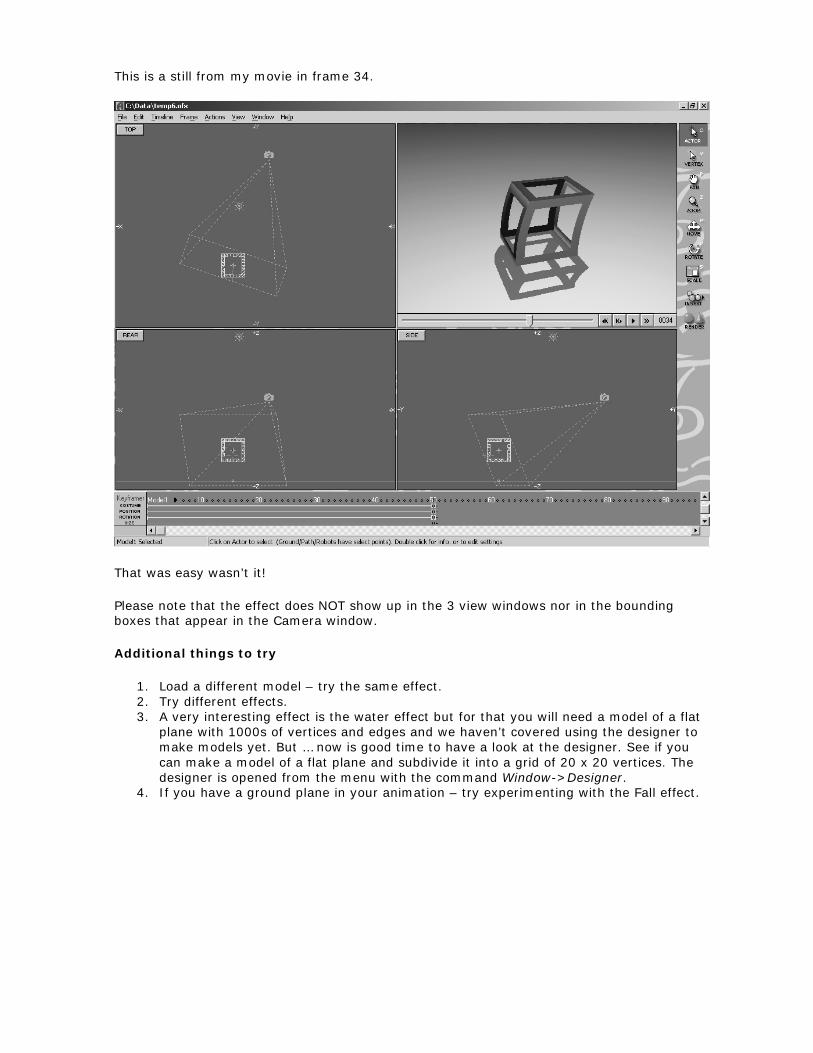
This is a still from my movie in frame 34.
That was easy wasn’t it!
Please note that the effect does NOT show up in the 3 view windows nor in the bounding boxes that appear in the Camera window.
Additional things to try
1. Load a different model – try the same effect. 2. Try different effects. 3. A very interesting effect is the water effect but for that you will need a model of a flat
plane with 1000s of vertices and edges and we haven’t covered using the designer to make models yet. But … now is good time to have a look at the designer. See if you can make a model of a flat plane and subdivide it into a grid of 20 x 20 vertices. The designer is opened from the menu with the command Window->Designer.
4. If you have a ground plane in your animation – try experimenting with the Fall effect.
OpenFX Tutorial Exercise 10 – Postprocessing Effects
We mentioned Post(or image) processing effects in the previous exercise. In this exercise I will show you how to insert and use a postprocessing effect. What you do with them is up to you. Like all the other OpenFX plugins you can write your own postprocessing effects. One excellent postprocessor (originally written by a project student) lets you create a fireworks display.
There are two ways in which you can add a postprocess in OpenFX.
• Add the postprocess to effect the whole animation. This is done with the menu command Edit->Image Process All Frames… This is quickest way to add a simple image processor function e.g. Blur which blurs all frames in the animation. If you use this command you can add as many processors to the list as you like.
• There is an Image Processor actor called Post-Pro. This behaves rather like the Sky actor. There are no visible icons for it in the view window but using the KeyFramer you can add as many post-processors as you like and if you put two or more timelines for the Post-Pro actor’s costume you can gradually change the settings (morph) over a range of frames.
To get started we’ll try method one. Start OpenFX and load the example animation SIMPLE. Set the animation length to 20 frames.
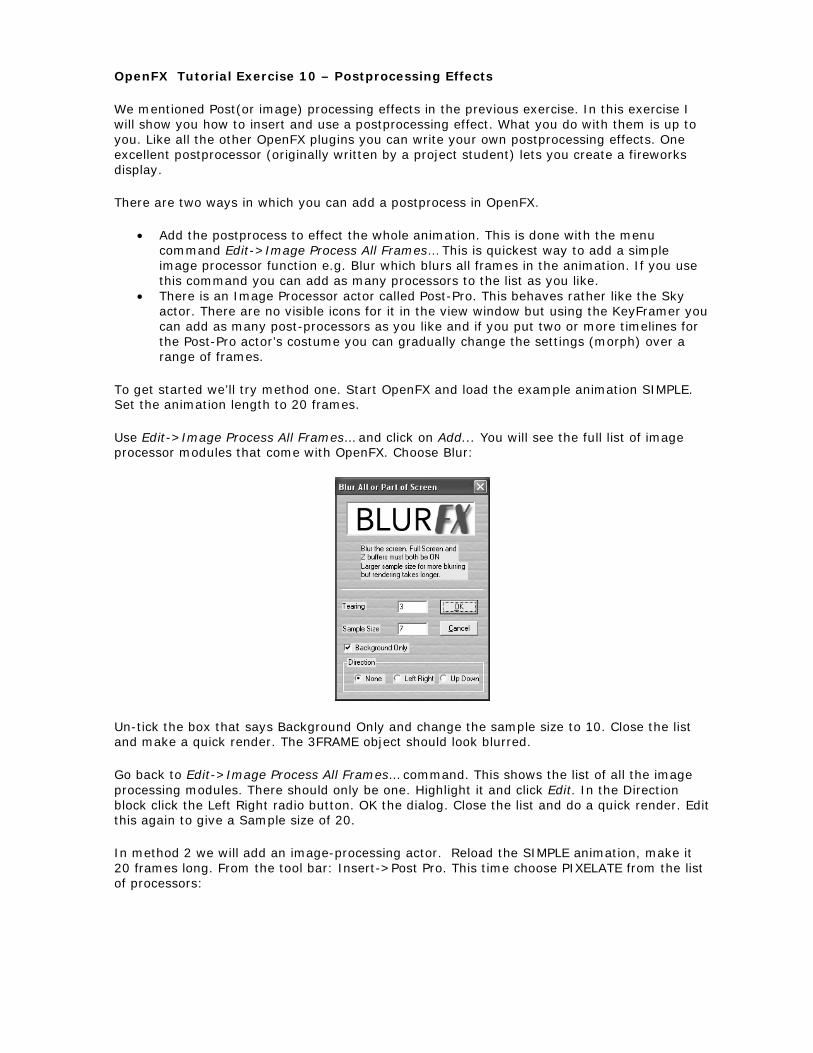
Use Edit->Image Process All Frames… and click on Add... You will see the full list of image processor modules that come with OpenFX. Choose Blur:
Un-tick the box that says Background Only and change the sample size to 10. Close the list and make a quick render. The 3FRAME object should look blurred.
Go back to Edit->Image Process All Frames… command. This shows the list of all the image processing modules. There should only be one. Highlight it and click Edit. In the Direction block click the Left Right radio button. OK the dialog. Close the list and do a quick render. Edit this again to give a Sample size of 20.
In method 2 we will add an image-processing actor. Reload the SIMPLE animation, make it 20 frames long. From the tool bar: Insert->Post Pro. This time choose PIXELATE from the list of processors:
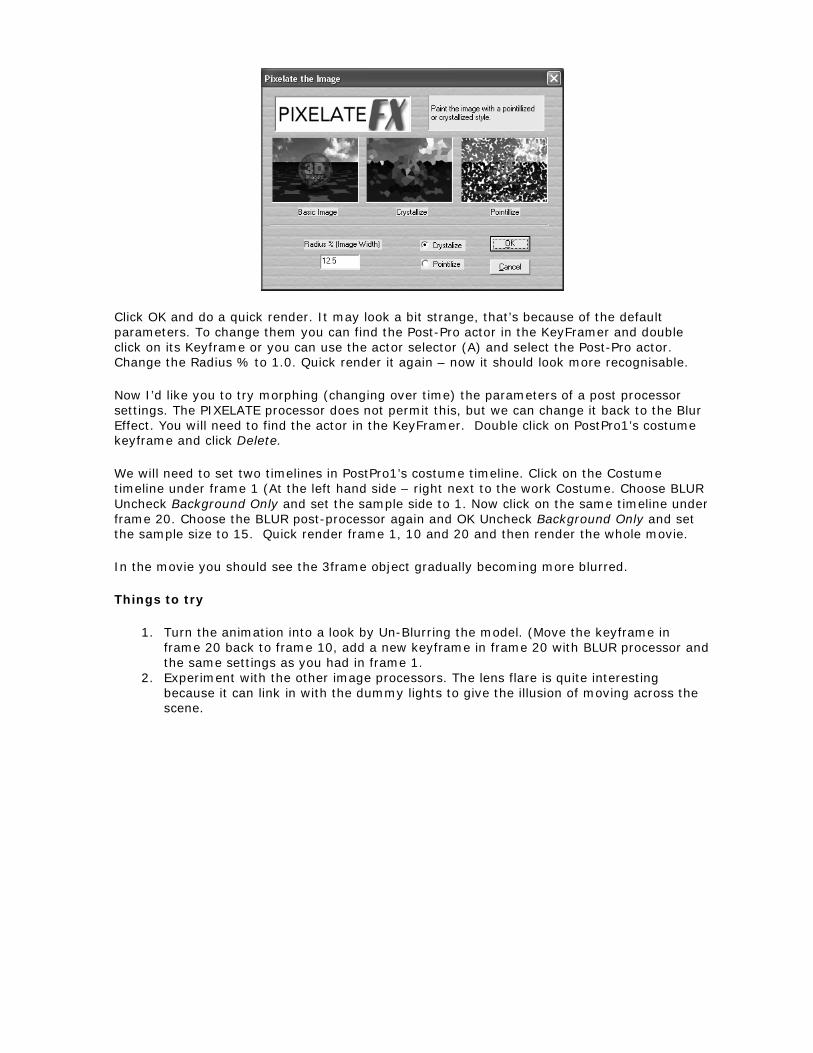
Click OK and do a quick render. It may look a bit strange, that’s because of the default parameters. To change them you can find the Post-Pro actor in the KeyFramer and double click on its Keyframe or you can use the actor selector (A) and select the Post-Pro actor. Change the Radius % to 1.0. Quick render it again – now it should look more recognisable.
Now I’d like you to try morphing (changing over time) the parameters of a post processor settings. The PIXELATE processor does not permit this, but we can change it back to the Blur Effect. You will need to find the actor in the KeyFramer. Double click on PostPro1’s costume keyframe and click Delete.
We will need to set two timelines in PostPro1’s costume timeline. Click on the Costume timeline under frame 1 (At the left hand side – right next to the work Costume. Choose BLUR Uncheck Background Only and set the sample side to 1. Now click on the same timeline under frame 20. Choose the BLUR post-processor again and OK Uncheck Background Only and set the sample size to 15. Quick render frame 1, 10 and 20 and then render the whole movie.
In the movie you should see the 3frame object gradually becoming more blurred.
Things to try
1. Turn the animation into a look by Un-Blurring the model. (Move the keyframe in frame 20 back to frame 10, add a new keyframe in frame 20 with BLUR processor and the same settings as you had in frame 1.
2. Experiment with the other image processors. The lens flare is quite interesting because it can link in with the dummy lights to give the illusion of moving across the scene.
OpenFX Tutorial Exercise 11 – Introduction to the Designer and Selection
Before you try this exercise make sure you have read the document “Introduction to 3D” and especially the section 3D Models of Objects.
Start OpenFX, on the splash screen click on designer. If you miss doing this and the program goes to the animation module, you can start the Designer module from the menus Window->Designer or keyboard Ctrl+D.
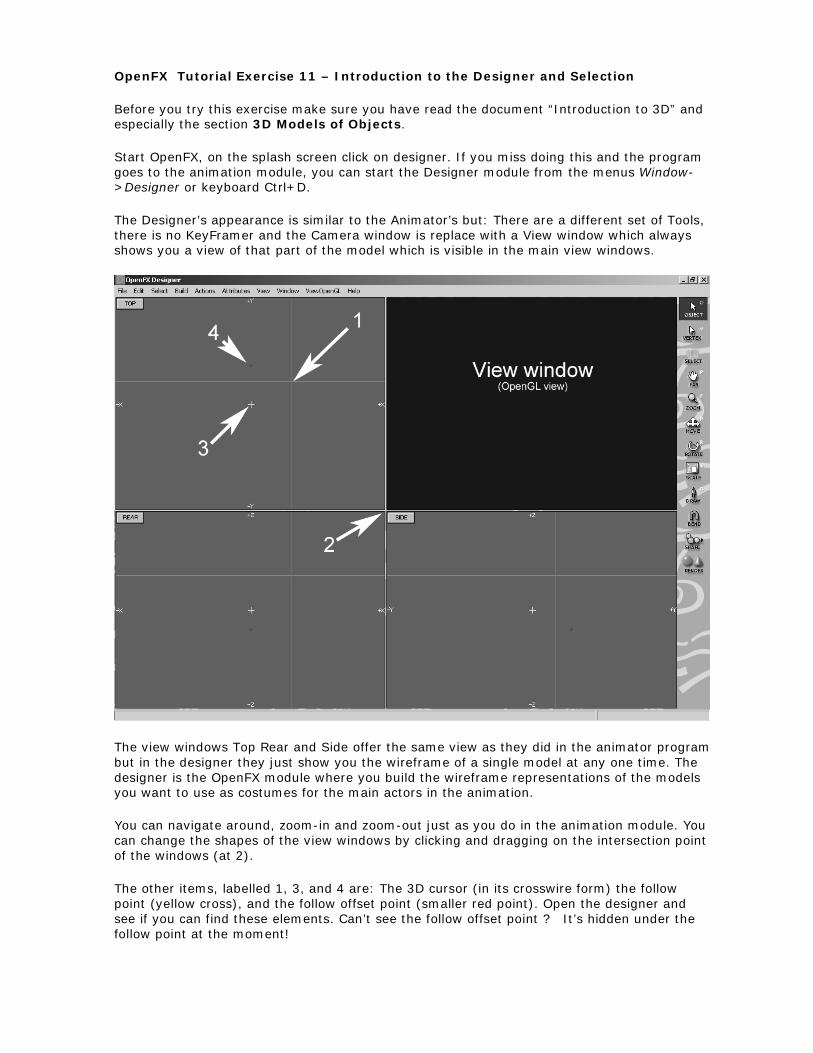
The Designer’s appearance is similar to the Animator’s but: There are a different set of Tools, there is no KeyFramer and the Camera window is replace with a View window which always shows you a view of that part of the model which is visible in the main view windows.
The view windows Top Rear and Side offer the same view as they did in the animator program but in the designer they just show you the wireframe of a single model at any one time. The designer is the OpenFX module where you build the wireframe representations of the models you want to use as costumes for the main actors in the animation.
You can navigate around, zoom-in and zoom-out just as you do in the animation module. You can change the shapes of the view windows by clicking and dragging on the intersection point of the windows (at 2).
The other items, labelled 1, 3, and 4 are: The 3D cursor (in its crosswire form) the follow point (yellow cross), and the follow offset point (smaller red point). Open the designer and see if you can find these elements. Can’t see the follow offset point ? It’s hidden under the follow point at the moment!
Click-and-drag the mouse pointer in each view window in turn and observe how the 3D crosswire cursor follows. Switch back to the crosshair cursor (you learned how to do this using a menu command in an earlier tutorial.)
The view window is an interesting one – it can show you a view from any direction of your model and it do this with either a wireframe or use a real-time rendering graphics adapter and library (OpenGL) to present a solid shaded view.
To change the view of your model in the view window Click-and-drag the mouse in the window. To switch between the Wireframe View and the (OpenGL) shaded view click the right mouse button in the window and select the mode you require from the context menu.
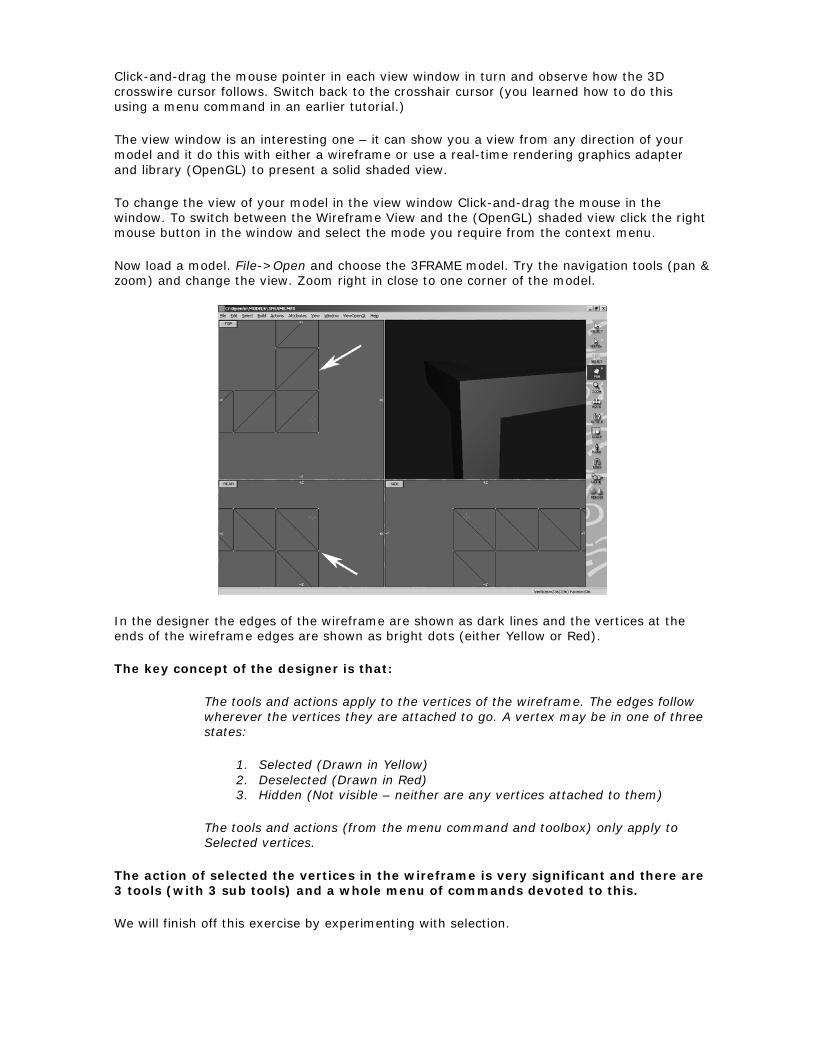
Now load a model. File->Open and choose the 3FRAME model. Try the navigation tools (pan & zoom) and change the view. Zoom right in close to one corner of the model.
In the designer the edges of the wireframe are shown as dark lines and the vertices at the ends of the wireframe edges are shown as bright dots (either Yellow or Red).
The key concept of the designer is that:
The tools and actions apply to the vertices of the wireframe. The edges follow wherever the vertices they are attached to go. A vertex may be in one of three states:
1. Selected (Drawn in Yellow) 2. Deselected (Drawn in Red) 3. Hidden (Not visible – neither are any vertices attached to them)
The tools and actions (from the menu command and toolbox) only apply to Selected vertices.
The action of selected the vertices in the wireframe is very significant and there are 3 tools (with 3 sub tools) and a whole menu of commands devoted to this.
We will finish off this exercise by experimenting with selection.
Zoom out so that you can see the whole of the model in all views.
Try selecting all and deselecting all vertices. Use the keyboard equivalents Ctrl+A and Ctrl+D
Try swap selected – twice! (Leave all the vertices deslected.)
Click on the Selection tool: In the view windows drag out the selection marquee to surround some of the vertices. Observe as the one that are enclosed torn Yellow i.e. become selected. Do Ctrl+D to deselect all.
Now try the selection marquee again this time with the modifier key pressed:
1. Ctrl – circular selection 2. Shift – lasso selection
Now try Ctrl+A (select all) – double click on the Select Tool – it becomes the Deselect Tool. Try it!
Again deselect all the vertices Ctrl+D. Now click on the Object Select tool (at the top or the O key.) Click on a single vertex in the model. Click on another vertex. This tool selects all vertices in a model that are joined together by edges. In this example that is all the vertices. If there were two distinct pieces in the model the Object selector tool would select only one.
Now try the Vertex Selector tool. (2nd in the tool panned or the V key). Start with all vertices deslected. Click on a single, and another and another.
The remainder of the selection commands from the menu allow you to select the vertices that surround faces with certain colour or other attributes. Again start with all vertices deselected. Ctrl+D. We will try select by colour since this model does not use any image maps or textures. Execute the menu command Select->Select by Colour, Click on the colour swatch and find the darkest blue (R=0 G=0 B=255) now click Near match. The vertices along one side of the 3FRAME object will have been selected because they are a very dark blue. (Their colour components are (R=4 G=18 B=255).
As a final little task and hint towards using the tools. Click on the Move tool - then move to the Side window and click and drag the mouse towards the left. Note how the selected vertices have been moved after you release the mouse button.
UnDo the action (Ctrl+Z) – do another Click and drag in the Side window but this time hold down the Shift key at the same time. Do you see how movement is restricted to directions that are multiples of 45 degrees.