Embed Size (px)
Citation preview

8200-2748-01-B0
ONVIF Interface Development Guide

2 AD ONVIF Interface Development Guide
Notice
The information in this development guide was current when published. The
manufacturer reserves the right to revise and improve its products. All specifications
are therefore subject to change without notice.
Copyright
Under copyright laws, the contents of this manual may not be copied, photocopied,
reproduced, translated or reduced to any electronic medium or machine-readable
form, in whole or in part, without prior written consent of Tyco International Ltd. ©
2010 and its Respective Companies. All Rights Reserved.
American Dynamics
6600 Congress Avenue
Boca Raton, FL 33487 U.S.A.
Trademarks
The trademarks, logos, and service marks displayed on this document are registered
in the United States [or other countries]. Any misuse of the trademarks is strictly
prohibited and Tyco International Ltd. will aggressively enforce its intellectual property
rights to the fullest extent of the law, including pursuit of criminal prosecution
wherever necessary. All trademarks not owned by Tyco International Ltd. are the
property of their respective owners, and are used with permission or allowed under
applicable laws.
Product offerings and specifications are subject to change without notice. Actual
products may vary from photos. Not all products include all features. Availability varies
by region; contact your sales representative.

3
Contents Overview ....................................................................................................................................................... 4
Acronyms ...................................................................................................................................................... 4
Reference Documents ................................................................................................................................... 4
IP SpeedDome ............................................................................................................................................... 5
VE IP SpeedDome ONVIF Compatibility .................................................................................................... 5
VE IP SpeedDome ONVIF Functionality .................................................................................................... 5
VE IP SpeedDome ONVIF High Level Design Summary ............................................................................. 6
Other American Dynamics NVT Devices with ONVIF .................................................................................. 12
Illustra Connect Advanced ONVIF Verification Mode ................................................................................. 12
Starting illustra Connect in Advanced Verification Mode ....................................................................... 13
Extra ONVIF Properties ........................................................................................................................... 14
Advanced Menu ...................................................................................................................................... 14
Device Diagnostics .............................................................................................................................. 14
Device Discovery ................................................................................................................................. 17
Verifying an ONVIF Device is on the Network ........................................................................................ 21
Viewing NVT Device Video ...................................................................................................................... 21
Diagnostic Tips and Tricks ....................................................................................................................... 22

4 AD ONVIF Interface Development Guide
Overview The purpose of this Development Guide is to provide information for interfacing to the American
Dynamics Network Video Transmitters (NVT) devices utilizing an ONVIF interface. It is limited to defining
what ONVIF functions and compatibility are provided by the products. An advanced ONVIF verification
mode of the American Dynamic illustra Connect discovery and configuration tool is documented here to
allow on site operation and verification of basic functions. There is no intent to teach or consult for
specific NVR or DVR implementations, as the ONVIF web site and ONVIF organization will be relied upon
for such.
Acronyms Acronym Definition
DPWS The Devices Profile for Web Services (DPWS) defines a minimal set of implementation constraints to enable secure Web Service messaging, discovery, description, and eventing on resource-constrained devices.
gSOAP An open source C and C++ software development toolkit for SOAP/XML Web services and non-SOAP C/C++ XML data bindings. The toolkit analyzes WSDLs and XML schemas (separately or as a combined set) to map the XML schema types and the SOAP messaging protocols to easy-to-use and efficient C and C++ code. It also supports exposing (legacy) C and C++ applications as SOAP/XML Web services by auto-generating XML serialization code and WSDL specifications to advertize your Web service.
GUI Graphical user interface
NVT Network Video Transmitter is a Network video server (an IP network camera or an encoder
device, for example) that sends media data over an IP network to an NVC.
NVC Network Video Client, an IP network client that communicate with a NVT to obtain media data.
ONVIF Open Network Video Interface Forum is an open industry forum for the development of a global standard for the interface of network video products
PTZ Dome control for pan right/left, tilt up/down, zoom in/out, iris open/close, and focus near/far.
WS4D Web Services for Devices (WS4D) is an initiative bringing Service-Oriented Architecture (SOA) and Web services technology to applications
Reference Documents Documents containing additional information useful toward interface development with AD NVT devices
include:
1. American Dynamics VE IP SpeedDome Camera Configuration and User Guide; Part Number:
8200-2613-01
2. American Dynamics VE IP SpeedDome Camera Quick Installation Guide; Part Number: 8200-
2613-02
3. American Dynamics illustra Connect Discovery Tool User Guide; Part Number: 8200-XXXX-XX
4. Open Network Video Interface Forum Core Specification

5
a. Version 1.0; November 2008
b. Version 1.01; July 2009
c. Version 1.02; June 1010
The American Dynamics documents can be obtained from the www.americandynamics.net web site.
IP SpeedDome This subsection provides information for interfacing to the American Dynamics VE IP SpeedDome
products that have software version 2.0 or higher. Previous firmware versions are not ONVIF
compatible, but the product can be field upgraded by a procedure available on AmericanDynamics.net
web site. Other previous SpeedDome products are not compatible with ONVIF.
IP SpeedDome Description Product Code
VE IP SpeedDome Camera Module, D/N, WDR, EIS, POE, 35x, 540 TVL, NTSC ADVEIPSD35N
VE IP SpeedDome Camera Module, POE, 22x, 470 TVL, NTSC ADVEIPSD22N
VE IP SpeedDome Camera Module, D/N, WDR, EIS, POE, 35x, 540 TVL, PAL ADVEIPSD35P
VE IP SpeedDome Camera Module, POE, 22x, 470 TVL, PAL ADVEIPSD22P
VE IP SpeedDome ONVIF Compatibility The VE IP SpeedDome with software version 2.0 or higher is compatible and compliant with versions 1.0,
1.01, and 1.02 of the ONVIF core specification; however for PTZ control it will only communicate using
1.01 or the 1.02 ONVIF protocol standards.
For further information refer to the Open Network Video Interface Forum Core Specification, Version
1.02, June, 2010. Full information and specifications are available from the Open Network Video
Interface Forum ONVIF http://www.onvif.org/
The web browser interface is compatible with Windows Internet Explorer, version 7 and version 8.
The product utilizes and is therefore compatible with the following open source or licensed software
components in order to implement the required open interface:
1. WS4D (www.ws4d.org)
2. Microsoft DPWS Profile web services
3. gSOAP (http://www.cs.fsu.edu/~engelen/soap.html)
4. gSOAP wsdl2h autocode generator licenced from Genivia - http://www.genivia.com/
VE IP SpeedDome ONVIF Functionality The VE IP SpeedDome ONVIF control interface functionality summary:
6 AD ONVIF Interface Development Guide
1. ONVIF will be enabled by default and be GUI selectable to be enabled or disabled.
2. It will support absolute zoom (to allow for example client mouse selection of an area to
zoom to fill viewing area).
3. Generally ONVIF extensions will not be provided, therefore:
a. Privacy zones are only configurable with web pages, and are not configurable using the
ONVIF programmatic interface, but privacy areas of the video will be masked out if they
are configured by the web pages.
b. Presets are supported by ONVIF to be settable and callable by preset token. SetPreset
on the IP SpeedDome generates a numerical PresetToken that correspond to the preset
slot number in the Web GUI. ONVIF does not provide support for patterns, dome
sequences, or scans, (extensions would be required and this is outside the scope of this
release).
4. ONVIF user Authentication, WS-Security, is fully supported but disabled by default. Therefore by default the camera will accept ONVIF commands from any ONVIF client without requiring any credentials. WS-Security is automatically enabled when the first Administrator level user is created using CreateUsers or SetUser. Likewise it is automatically disabled when the last Administrator level user is removed using DeleteUsers or SetUser. There are no default users on the camera. Four user levels are supported: a. Administrator b. Operator c. User d. Anonymous. The camera implements WS-Security “Username Token Profile 1.1” “PasswordDigest” as described at http://www.oasis-open.org/specs/#wssv1.1. WS-Security can be automatically disabled as stated above by removing all Administrator level users, or by un-checking the Web GUI “ONVIF User Authentication” button. This Web GUI button control disables WS-Security regardless of the existence of Administrator level users. Under this mode, the ONVIF service will still offer user management functions (CreateUsers, SetUser, GetUsers and DeleteUsers) and correctly update the database but non-authenticated commands will still be accepted. The main purpose of this GUI over-ride feature is to allow users to temporarily disable security without having to modify the user database.
A complete description of the product functionality and default settings is available in the American
Dynamics VE IP SpeedDome Camera Configuration and User Guide.
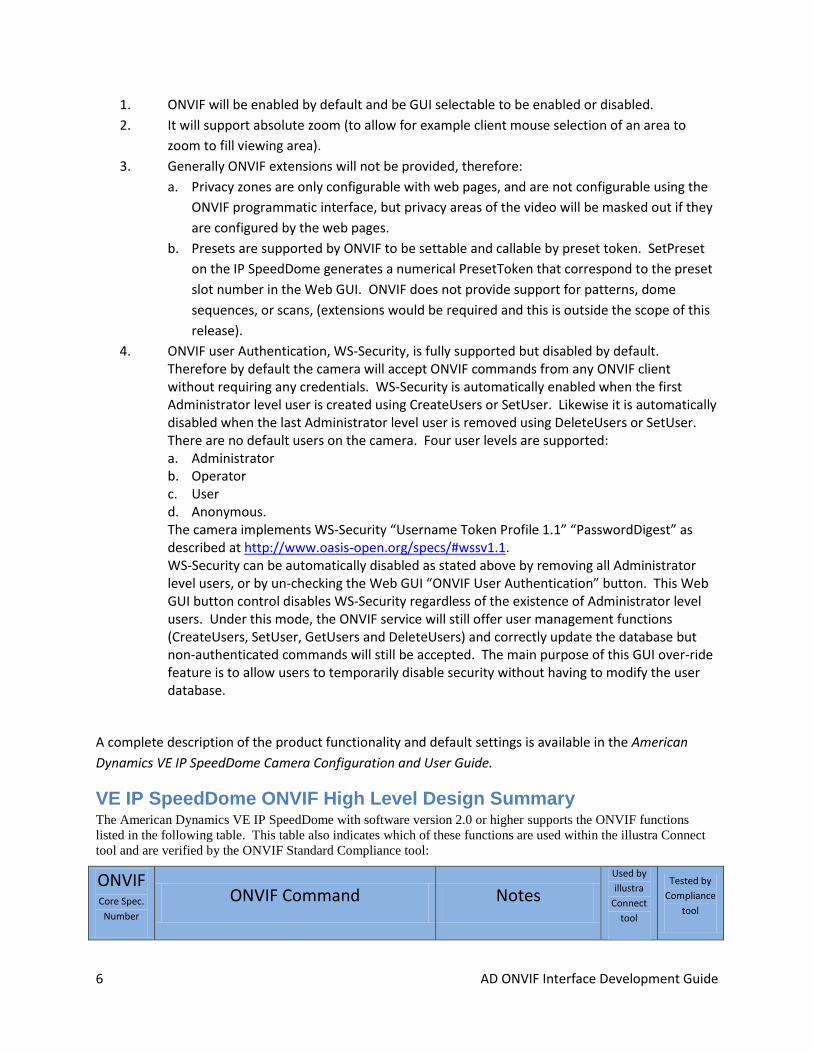
VE IP SpeedDome ONVIF High Level Design Summary The American Dynamics VE IP SpeedDome with software version 2.0 or higher supports the ONVIF functions
listed in the following table. This table also indicates which of these functions are used within the illustra Connect
tool and are verified by the ONVIF Standard Compliance tool:
ONVIF Core Spec.
Number
ONVIF Command Notes
Used by
illustra
Connect
tool
Tested by
Compliance
tool

7
ONVIF Core Spec.
Number
ONVIF Command Notes
Used by
illustra
Connect
tool
Tested by
Compliance
tool
8 ONVIF Device Management Section
8.1 ONVIF Capabilities Section
8.1.1 GetWsdlUrl Yes
8.1.2 GetCapabilities Yes Yes
8.2 ONVIF Network Section
8.2.1 GetHostname Yes Yes
8.2.2 SetHostname Yes
8.2.3 GetDNS Only IPv4 support Yes Yes
8.2.4 SetDNS Only IPv4 support Yes Yes
8.2.5 GetNTP Only IPv4 support Yes Yes
8.2.6 SetNTP Only IPv4 support Yes Yes
8.2.9 GetNetworkInterfaces Only IPv4 support Yes
8.2.10 SetNetworkInterfaces Only IPv4 support Yes
8.2.11 GetNetworkProtocols
8.2.12 SetNetworkProtocols
8.2.13 GetNetworkDefaultGateway Only IPv4 support Yes
8.2.14 SetNetworkDefaultGateway Only IPv4 support Yes
8.2.15 GetZeroConfiguration
8.2.16 SetZeroConfiguration
8.3 ONVIF System Section
8.3.1 GetDeviceInformation Yes Yes
8.3.2 GetSystemBackup

8 AD ONVIF Interface Development Guide
ONVIF Core Spec.
Number
ONVIF Command Notes
Used by
illustra
Connect
tool
Tested by
Compliance
tool
8.3.3 RestoreSystem
8.3.4 GetSystemDateAndTime Yes Yes
8.3.5 SetSystemDateAndTime Yes Yes
8.3.6 SetSystemFactoryDefault Yes
8.3.7 UpgradeSystemFirmware Yes
8.3.10 SystemReboot Yes Yes
8.3.11 GetScopes Yes
8.3.12 SetScopes Yes
8.3.13 AddScopes Yes Yes
8.3.14 RemoveScopes Yes Yes
8.3.15 GetDiscoveryMode
8.3.16 SetDiscoveryMode
8.4 ONVIF Security Section
8.4.1 GetAccessPolicy
8.4.2 SetAccessPolicy Not end user modifiable.
8.4.3 GetUsers
8.4.4 CreateUsers Supported user level:
Administrator, Operator,
User, Anonymous
8.4.5 DeleteUsers
8.4.6 SetUser
10 ONVIF Media Configuration Section
10.2 ONVIF Media Profile Section

9
ONVIF Core Spec.
Number
ONVIF Command Notes
Used by
illustra
Connect
tool
Tested by
Compliance
tool
10.2.1 CreateProfile Yes
10.2.2 GetProfiles Default profiles list:
h264_bandwidth,
h264_balanced,
h264_quality,
mjpeg_bandwidth,
mjpeg_balanced,
mjpeg_quality,
mpeg2_bandwidth,
mpeg2_balanced,
mpeg2_quality
Yes Yes
10.2.3 GetProfile Yes
10.2.4 AddVideoSourceConfiguration Yes
10.2.5 AddVideoEncoderConfiguration Yes
10.2.6 AddAudioSourceConfiguration
10.2.7 AddAudioEncoderConfiguration
10.2.8 AddPTZConfiguration
10.2.11 RemoveVideoSourceConfiguration Yes
10.2.12 RemoveVideoEncoderConfiguration Yes
10.2.13 RemoveAudioSourceConfiguration
10.2.14 RemoveAudioEncoderConfiguration
10.2.15 RemovePTZConfiguration
10.2.18 DeleteProfile Yes
10.3 ONVIF Video Source Section
10.3.1 GetVideoSources One video source only.
PAL: 720x576@25fps
10 AD ONVIF Interface Development Guide
ONVIF Core Spec.
Number
ONVIF Command Notes
Used by
illustra
Connect
tool
Tested by
Compliance
tool
NTSC: 720x480@30fps
10.4 ONVIF Video Source Configuration Section
10.4.1 GetVideoSourceConfigurations
10.4.2 GetVideoSourceConfiguration
10.4.3 GetCompatibleVideoSourceConfigurations
10.4.4 GetVideoSourceconfigurationOptions
10.4.5 SetVideoSourceConfiguration
10.5 ONVIF Video Encoder Configuration Section
10.5.1 GetVideoEncoderConfigurations Default corresponding to
the profiles.
10.5.2 GetVideoEncoderConfiguration
10.5.3 GetCompatibleVideoEncoderConfigurations
10.5.4 GetVideoEncoderConfigurationOptions
10.5.5 SetVideoEncoderConfiguration No support for changing
GOV length
Yes
10.6 ONVIF Audio Source Section
10.6.1 GetAudioSources One audio source. Mono
channel.
10.7 ONVIF Audio Source Configuration Section
10.7.1 GetAudioSourceConfigurations
10.7.2 GetAudioSourceConfiguration
10.7.3 GetAudioSourceConfiguration
10.7.4 GetAudioSourceConfigurationOptions
10.7.5 SetAudioSourceConfiguration

11
ONVIF Core Spec.
Number
ONVIF Command Notes
Used by
illustra
Connect
tool
Tested by
Compliance
tool
10.8 ONVIF Audio Encoder Configuration Section
10.8.1 GetAudioEncoderConfigurations Only support G711 at
8Khz 64Kbs.
10.8.2 GetAudioEncoderConfiguration
10.8.3 GetCompatibleAudioEncoderConfigurations
10.8.4 GetAudioEncoderConfigurationOptions
10.8.5 GetAudioEncoderConfigurationOptions
10.11 ONVIF Stream URI Section
10.11.1 GetStreamUri Yes Yes
10.12 Snapshot
10.12.1 GetSnapshotUri Yes
13 ONVIF PTZ Control Section
13.2.1 GetNodes
13.2.2 GetNode
13.3 ONVIF PTZ Configuration Section
13.3.1 GetConfigurations
13.3.2 GetConfiguration
13.3.3 GetConfigurationOptions
13.3.4 SetConfiguration
13.4 ONVIF Move Operations Section
13.4.1 AbsoluteMove Refer to ONVIF standard
Section 5.3 Namespaces
Table 2: Referenced
namespaces

12 AD ONVIF Interface Development Guide
ONVIF Core Spec.
Number
ONVIF Command Notes
Used by
illustra
Connect
tool
Tested by
Compliance
tool
13.4.2 RelativeMove Yes
13.4.3 ContinuousMove
13.4.4 Stop
13.4.5 GetStatus
13.5 ONVIF Preset Operations Section
13.5.1 SetPreset
13.5.2 GetPresets
13.5.3 GotoPreset
13.5.4 RemovePreset
13.6 ONVIF Home Position operations Section
13.6.1 GotoHomePosition
13.6.2 SetHomePosition
Other American Dynamics NVT Devices with ONVIF Future cameras and encoders are anticipated to also be ONVIF compliant, and this subsection will in the
future be updated to provide information for interfacing to these products.
Illustra Connect Advanced ONVIF Verification Mode The illustra connect tool can be started in a advanced verification mode to help device installers verify
which ONVIF devices are present on their network, and to help diagnose any issues they may be having
with the setup of their ONVIF devices. Diagnostic mode cannot be used to help with non ONVIF devices
and does not support ONVIF authentication – users are advised to turn off ONVIF authentication on
their ONVIF device, if wanting to use this. It allows system developers to demo, verify, and debug ONVIF
commands to NVT devices.

13
Note that this tool is based on the ONVIF standard and has been developed and tested against AD ONVIF
devices. It should however also work with other non-AD ONVIF compliant devices, but as the ONVIF
standard may have been implemented differently by other manufacturers, illustra Connect’s
functionality may be restricted for these specific devices.
It is assumed that anyone running illustra Connect in diagnostic mode has at least a basic understanding
of networks and how ONVIF devices work.
Illustra Connect implements the WS-Discovery protocol which is based on SOAP-over-UDP multicasts to
detect devices on the network using WS-Discovery and then sends commands via HTTP to query the
device for more detailed information if available.
Starting illustra Connect in Advanced Verification Mode To start illustra Connect in advanced verification mode:
1. Open a DOS command prompt. (On Windows 7 this can be done by pressing the ‘Start Menu’
button, typing cmd.exe in the ‘Search programs and files’ edit box that appears, and then
selecting cmd.exe from the menu).
2. Change directory to where illustra Connect is installed to, e.g. type ‘cd “C:\Program Files
(x86)\Tyco\illustra Connect”’
3. Start illustra Connect passing –diag on the command line e.g. illustraConnect.exe –diag
At this point illustra Connect will start and if it is in diagnostic mode there will be an ‘Advanced’ menu
tab displayed between the ‘Tools’ and ‘About’ menus (see screenshot 1).
Screenshot A – Searching for Devices

14 AD ONVIF Interface Development Guide
Extra ONVIF Properties When illustra Connect is running in advanced verification mode, the Device Properties window for
detected ONVIF devices will display extra ONVIF specific information as shown in the screenshot A. The
addresses displayed here can be used in the Discovery Diagnostics screen to make ONVIF calls to specific
devices.
Screenshot B – Device Properties Form showing extra ONVIF Information
Advanced Menu The Advanced Menu has two options to allow the user to check ONVIF devices on the network:
Device Diagnostics – This is enabled whenever a single ONVIF device is selected from the list of
detected devices.
Discovery Diagnostics – This is always enabled in Advanced Mode, regardless of the devices
detected or selected in the list.
Device Diagnostics
To display this screen, select an ONVIF device and select the ‘Advanced’-‘Display Device Diagnostics’
menu. The device diagnostics screen will then be displayed as shown in screenshot B.

15
Screenshot C – Device Diagnostics Screen
This screen displays the following information about the selected device (if available):
Device name
IP address – This information will always be displayed for detected devices.
Firmware version
Stream URI – this URI can be copied and pasted into an appropriate viewer (e.g. QuickTime) in
order to view the RTSP video stream from the device
Snapshot URI – this URI can be copied and pasted into an appropriate viewer (e.g. Internet
Explorer) in order to view a snapshot from the device. Note: some devices have a time limit on
the length of time a snapshot is valid for.
Not all of the information listed above will be displayed depending on things like whether or not the
device has security enabled etc. ONVIF security credentials are not supported in this diagnostic mode.
The control buttons on the top right hand side of the screen allow the user to send ONVIF commands to
the selected device. The commands that are sent and the replies received from the device are displayed
in the text area in the bottom half of the screen. Messages sent are displayed in blue and messages
received are displayed in red. The output displayed in this screen can be cleared by pressing the ‘Clear
Log’ button.
If the device supports ONVIF PTZ commands then the PTZ controls will be enabled and PTZ commands
can be sent to the device.
Since commands sent to the device from this screen do not have any security credentials supplied, then
any device that has security enabled will reject the ONVIF calls made from the Device Diagnostics screen
and will typically fail with an unauthorised error.

16 AD ONVIF Interface Development Guide
Device Info Button
Pressing the ‘Device Info’ button will send an ONVIF GetDeviceInformation command to the selected
device. Screenshot C shows the command successfully sent to the device (in blue) and a typical reply
received from the device (in red).
Screenshot D – GetDeviceInformation Call
If this command succeeds then the xml response will contain general information about the device
including model, manufacturer, serial number and hardware id.
17
Network Info Button
Pressing the ‘Network Info’ button will send an ONVIF GetNetworkInterfaces command to the selected
device. If this command succeeds then the xml response will contain information about the device’s IP
address and MAC address.
Date Info Button
Pressing the ‘Date Info’ button will send an ONVIF GetSystemDateAndTime command to the selected
device. If this command succeeds then the xml response will contain information about the current date
and time settings on the device.
Capabilities Button
Pressing the ‘Capabilities’ button will send an ONVIF GetCapabilities command to the selected device. If
this command succeeds then the xml response will contain information about what functionality its
ONVIF interfaces support.
PTZ Controls
The PTZ capability of the selected device can be tested using the pan left, pan right, pan up, pan down,
zoom in and zoom out buttons on the right hand side of the Device Diagnostics screen. When one of
these buttons is pressed the response is displayed in the log window.
Visual verification that a PTZ command has been processed correctly by the device can be achieved by
viewing the video stream from the selected device while sending the PTZ commands to it. To do this
either:
a) Use the ‘Launch Web GUI Configuration’ option from the main device list and use the selected
device’s web interface to view the live video feed before going to the Device Diagnostics screen
and sending the PTZ commands
b) Use a viewer application (e.g. QuickTime) to open the stream URI listed for the device
Device Discovery
To display this screen, select ‘Advanced’-‘Display Discovery Diagnostics’ from the menu. The discovery
diagnostics screen will then be displayed as shown in screenshot D.

18 AD ONVIF Interface Development Guide
Screenshot E – Discovery Diagnostics Screen
This screen can be used to:
Determine which IP addresses are responding to the discovery broadcasts
Send the ONVIF GetDeviceInformation command to any address on the network
Sending an ONVIF command to an IP Address
The ONVIF GetDeviceInformation command can be sent to any address on the network using the
Discovery Diagnostics screen. To do this:
Enter the address of the ONVIF device in the ‘Device Address’ control, e.g.
http://10.51.56.73:8080/onvif/device_services. This address is displayed in the Properties Form
when running in advanced diagnostic mode and is listed under ‘Service Address’
Press the ‘Device Info XML’ button to see detail of the exact command sent and its response
or
Press the ‘Device Info’ button to see a more human readable version of the response received
from the device (see screenshot E)

19
Screenshot F – Formatted GetDeviceInformation Response
Note: if you cannot get the device’s service address from the Properties Form because the device is not
listed by illustra Connect, but you know the device’s IP address then try using a device address of the
form:
http://<IP_ADDRESS>:<PORT_NUMBER>/onvif/device_services
Note: The discovery broadcast uses WS-Discovery and WS-Addressing to detect devices. Not all devices
use the same port or ‘onvif/device_services’ as part of their address so you may need to refer to the
device manufacturers documentation as to what the default ONVIF service address is.
Discovering ONVIF Device Addresses
The Discovery Diagnostics screen can also be used to see a list of addresses that respond to the WS-
Discovery command that is sent by illustra Connect.
To see the list of addresses, select the network card you want to use for the discovery broadcast from
the drop down box and then press the ‘Discover’ button. This will then broadcast a discovery message
on the specified subnet and the results will be displayed in the text area at the bottom of the screen.
Screenshot F below shows an example of what is displayed after a discovery broadcast.

20 AD ONVIF Interface Development Guide
Screenshot G – Example Discovery Broadcast Results
Each device that the discovery probe detects has its UUID and service address displayed. The UUID is a
unique identifier that a device uses to globally identify itself, and the service address is the address that
can be used to query the device for more information (e.g. by entering it in the Device Address control
and pressing the ‘Device Info’ button).
It is important to note that because illustra Connect uses WS-Discovery for detection of devices there
may be different devices that are not ONVIF devices, responding to the broadcast (e.g. networked
printers, some desktop PCs).
In the example screenshot above an example of an ONVIF device’s response is
urn:uuid:a15366a8-4643-11df-89d5-0030460105D4
http://10.51.56.9:8080/onvif/device_service

21
and an example of a non ONVIF device’s response is
urn:uuid:28270906-59ba-4efd-bd22-45a62f1cb95f
http://10.51.56.1:5357/28270906-59ba-4efd-bd22-45a62f1cb95f/
Verifying an ONVIF Device is on the Network To verify a device is present on the network use the discovery mechanism described in ‘Discovering
ONVIF Device Addresses’ to see if the device’s IP address appears in the list. If you are not sure what IP
address the device is on, you could try copying and pasting the service address for each detected ONVIF
device into the ‘Device Address’ control then pressing the ‘Device Info’ button and seeing if the
information returned corresponds to the device in question.
It is possible for a device to be in the ONVIF non-discoverable mode, in which case it will not appear in
the list of detected devices, but ONVIF commands can still be sent to it. Note: by default all American
Dynamics ONVIF devices will have discovery mode enabled and should be displayed in the list provided
the correct network is scanned. If this is the case then you can try entering the service address of the
device (assuming you know this) and press the ‘Device Info’ button. If you receive a valid response from
the device and it is not in the list of discovered devices then it is likely that it has been set to non-
discoverable.
Viewing NVT Device Video Live video from the camera can be viewed on the user’s PC in one of two ways
1. Selecting the camera and then going to ‘View’-‘Launch Web GUI Configuration’ from the menu which will start the device web GUI in a web browser. A live view then can then be seen from the appropriate window.
2. Select the device and then go to the advanced device diagnostics page. Select the URI in the ‘Stream URI’ text control and copy it. Open this URL using a viewer application (e.g. QuickTime or VLC) to view a live feed.

22 AD ONVIF Interface Development Guide
Diagnostic Tips and Tricks
Problem Possible Resolution
‘Unable to connect to the remote server’ error message in Device Diagnostics screen
Communication with the device cannot be established. This may be due to:
Device reboot
Firmware upgrade of device
Power loss to the device
PC is now on a different subnet to the selected device
Network cable disconnected from device or computer
Device has changed IP address
The device may have had its ONVIF server turned off. Check its web GUI to see if this is the case.
Device does not appear in the list of devices
Ensure that the PC running illustra Connect is on the same subnet as the devices, and is set to scan that subnet
Ensure that the device has ONVIF discovery enabled (see section entitled ‘Verifying a Device is on the Network’)
Device appears in the list but does not display any information other than the IP address and status
This is normally due to the device having ONVIF security enabled, but its security credentials have not been supplied to illustra Connect. Use the Tools-Settings dialog to enter the username and password for the device, before pressing the ‘Refresh List’ button.
The Properties form does not contain extra ONVIF information
Ensure the application is running in advanced diagnostic mode
Ensure the device detected is an ONVIF device as illustra Connect also displays some American Dynamics devices (Video Edge IP and some illustra 400 devices) that do not use ONVIF.
The discovery diagnostics screen fails to find any devices when the ‘Discover’ button is pressed.
This may be because:
There are no ONVIF devices accessible via the selected network card. Try choosing a different network card and press the ‘Discover’ button again.
The network you are connected to does not have any ONVIF devices on it.
There is a router, switch or firewall between the PC and the ONVIF devices, blocking UDP broadcasts. Check the configuration of any router/switch/firewall to ensure that the UDP broadcast sent by

23
Problem Possible Resolution
the discovery mechanism is allowed through.
The device can be discovered but the ONVIF commands fail when sent to it.
This may be because:
There is a router, switch or firewall between the PC and the ONVIF device which is allowing the UDP discovery broadcast through, but preventing the query commands which are sent over http. Check the configuration of any router/switch/firewall to ensure that http traffic can be correctly routed to the ONVF device.
The ONVIF device may have its discovery mode enabled, but have been configured not to respond to any other ONVIF call. Check the ONVIF configuration on the device’s Web GUI.
Security may be enabled on the ONVIF device. The diagnostic calls to ONVIF devices do not currently support security.