Embed Size (px)
Citation preview
PRO-100S series
Online Manual
Read Me FirstUseful Functions Available on the Machine
Overview of the PrinterPrinting
Troubleshooting
English
ContentsRead Me First. . . . . . . . . . . . . . . . . . . . . . . . . . . . . . . . . . . . . . . . . . . . . . . . . . . 13
How to Use the Online Manual. . . . . . . . . . . . . . . . . . . . . . . . . . . . . . . . . . . . . . 14
Trademarks and Licenses. . . . . . . . . . . . . . . . . . . . . . . . . . . . . . . . . . . . . . . . . . 15
Search Tips. . . . . . . . . . . . . . . . . . . . . . . . . . . . . . . . . . . . . . . . . . . . . . . . . . . . . 19
Notes on Operation Explanations. . . . . . . . . . . . . . . . . . . . . . . . . . . . . . . . . . . . 21
Useful Functions Available on the Machine. . . . . . . . . . . . . . . . . . . . . . . . . . . . . 22
Print Photos Easily Using My Image Garden. . . . . . . . . . . . . . . . . . . . . . . . . . . . . . . . . . . 23
Create and Print Personalized Disc Labels (CD/DVD/BD) Easily and Beautifully. . . . . . . 25
Download a Variety of Content Materials. . . . . . . . . . . . . . . . . . . . . . . . . . . . . . . . . . . . . . 26
Print Items with Easy-PhotoPrint+ (Web Application). . . . . . . . . . . . . . . . . . . . . . . . . . . . . 27
Connection Methods Available on the Printer. . . . . . . . . . . . . . . . . . . . . . . . . . . . . . . . . . . 28
Restrictions. . . . . . . . . . . . . . . . . . . . . . . . . . . . . . . . . . . . . . . . . . . . . . . . . . . . . . . . . . . . . . . . . . . . . . . 29
Print Professional Photos Using Print Studio Pro. . . . . . . . . . . . . . . . . . . . . . . . . . . . . . . . 30
Notice for Web Service Printing. . . . . . . . . . . . . . . . . . . . . . . . . . . . . . . . . . . . . . . . . . . . . 31
Using PIXMA Cloud Link. . . . . . . . . . . . . . . . . . . . . . . . . . . . . . . . . . . . . . . . . . . . . . . . . . 33
Using PIXMA Cloud Link from Your Smartphone, Tablet, or Computer. . . . . . . . . . . . . . . . . . . . . . . . . 34
Before Using Canon Inkjet Cloud Printing Center. . . . . . . . . . . . . . . . . . . . . . . . . . . . . . . . . . . . . . 35
Requirements for Canon Inkjet Cloud Printing Center operation. . . . . . . . . . . . . . . . . . . . . . . 36
Preparations Before Using Canon Inkjet Cloud Printing Center. . . . . . . . . . . . . . . . . . . . . . . . . . . 37
Canon Inkjet Cloud Printing Center window. . . . . . . . . . . . . . . . . . . . . . . . . . . . . . . . . . . . . . 43
Using Canon Inkjet Cloud Printing Center. . . . . . . . . . . . . . . . . . . . . . . . . . . . . . . . . . . . . . . . . . . . 59
Adding a Printer. . . . . . . . . . . . . . . . . . . . . . . . . . . . . . . . . . . . . . . . . . . . . . . . . . . . . . . . . . . . . . . . 63
Adding a PIXMA Cloud Link User. . . . . . . . . . . . . . . . . . . . . . . . . . . . . . . . . . . . . . . . . . . . . . . . . . 64
Troubleshooting Canon Inkjet Cloud Printing Center. . . . . . . . . . . . . . . . . . . . . . . . . . . . . . . . . . . 69
Printing from AirPrint Compliant Device. . . . . . . . . . . . . . . . . . . . . . . . . . . . . . . . . . . . . . . 71
Checking Printer Information. . . . . . . . . . . . . . . . . . . . . . . . . . . . . . . . . . . . . . . . . . . . . . . 76
Print Easily from a Smartphone or Tablet with PIXMA Printing Solutions. . . . . . . . . . . . . 78
Printing with Windows RT. . . . . . . . . . . . . . . . . . . . . . . . . . . . . . . . . . . . . . . . . . . . . . . . . . 79
Overview of the Printer. . . . . . . . . . . . . . . . . . . . . . . . . . . . . . . . . . . . . . . . . . . . 80
Safety Guide. . . . . . . . . . . . . . . . . . . . . . . . . . . . . . . . . . . . . . . . . . . . . . . . . . . . . . . . . . . . 81
Safety Precautions. . . . . . . . . . . . . . . . . . . . . . . . . . . . . . . . . . . . . . . . . . . . . . . . . . . . . . . . . . . . . . . . . . 82
Regulatory and Safety Information. . . . . . . . . . . . . . . . . . . . . . . . . . . . . . . . . . . . . . . . . . . . . . . . . . . . . 83
Main Components and Basic Operations. . . . . . . . . . . . . . . . . . . . . . . . . . . . . . . . . . . . . . 87
Main Components. . . . . . . . . . . . . . . . . . . . . . . . . . . . . . . . . . . . . . . . . . . . . . . . . . . . . . . . . . . . . . . . . . 88
Front View. . . . . . . . . . . . . . . . . . . . . . . . . . . . . . . . . . . . . . . . . . . . . . . . . . . . . . . . . . . . . . . . . . . . 89
Rear View. . . . . . . . . . . . . . . . . . . . . . . . . . . . . . . . . . . . . . . . . . . . . . . . . . . . . . . . . . . . . . . . . . . . 92
Inside View. . . . . . . . . . . . . . . . . . . . . . . . . . . . . . . . . . . . . . . . . . . . . . . . . . . . . . . . . . . . . . . . . . . 93
About the Power Supply of the Printer. . . . . . . . . . . . . . . . . . . . . . . . . . . . . . . . . . . . . . . . . . . . . . . . . . . 94
Confirming that the Power Is On. . . . . . . . . . . . . . . . . . . . . . . . . . . . . . . . . . . . . . . . . . . . . . . . . . . 95
Turning the Printer On and Off. . . . . . . . . . . . . . . . . . . . . . . . . . . . . . . . . . . . . . . . . . . . . . . . . . . . 96
Notice for the Power Plug/Power Cord. . . . . . . . . . . . . . . . . . . . . . . . . . . . . . . . . . . . . . . . . . . . . . 98
Notice for Unplugging the Power Cord. . . . . . . . . . . . . . . . . . . . . . . . . . . . . . . . . . . . . . . . . . . . . . 99
Loading Paper. . . . . . . . . . . . . . . . . . . . . . . . . . . . . . . . . . . . . . . . . . . . . . . . . . . . . . . . . 101
Loading Paper. . . . . . . . . . . . . . . . . . . . . . . . . . . . . . . . . . . . . . . . . . . . . . . . . . . . . . . . . . . . . . . . . . . . 102
Paper Sources to Load Paper. . . . . . . . . . . . . . . . . . . . . . . . . . . . . . . . . . . . . . . . . . . . . . . . . . . . 103
Loading Paper in the Rear Tray. . . . . . . . . . . . . . . . . . . . . . . . . . . . . . . . . . . . . . . . . . . . . . . . . . . 105
Loading Paper in the Manual Feed Tray. . . . . . . . . . . . . . . . . . . . . . . . . . . . . . . . . . . . . . . . . . . . 109
Loading Envelopes. . . . . . . . . . . . . . . . . . . . . . . . . . . . . . . . . . . . . . . . . . . . . . . . . . . . . . . . . . . . 112
Media Types You Can Use. . . . . . . . . . . . . . . . . . . . . . . . . . . . . . . . . . . . . . . . . . . . . . . . . . . . . . 116
Paper Load Limit. . . . . . . . . . . . . . . . . . . . . . . . . . . . . . . . . . . . . . . . . . . . . . . . . . . . . . . . . . 119
Media Types You Cannot Use. . . . . . . . . . . . . . . . . . . . . . . . . . . . . . . . . . . . . . . . . . . . . . . . . . . . 121
Handling Paper. . . . . . . . . . . . . . . . . . . . . . . . . . . . . . . . . . . . . . . . . . . . . . . . . . . . . . . . . . . . . . . 122
Before Printing on Art Paper. . . . . . . . . . . . . . . . . . . . . . . . . . . . . . . . . . . . . . . . . . . . . . . . . . . . . 123
Printing Area. . . . . . . . . . . . . . . . . . . . . . . . . . . . . . . . . . . . . . . . . . . . . . . . . . . . . . . . . . . . . . . . . 125
Printing Area. . . . . . . . . . . . . . . . . . . . . . . . . . . . . . . . . . . . . . . . . . . . . . . . . . . . . . . . . . . . . 126
Other Sizes than Letter, Legal, Envelopes. . . . . . . . . . . . . . . . . . . . . . . . . . . . . . . . . . . . . . 127
Letter, Legal. . . . . . . . . . . . . . . . . . . . . . . . . . . . . . . . . . . . . . . . . . . . . . . . . . . . . . . . . . . . . . 128
Sizes for Art Paper. . . . . . . . . . . . . . . . . . . . . . . . . . . . . . . . . . . . . . . . . . . . . . . . . . . . . . . . . 129
Envelopes. . . . . . . . . . . . . . . . . . . . . . . . . . . . . . . . . . . . . . . . . . . . . . . . . . . . . . . . . . . . . . . 131
Printable Discs. . . . . . . . . . . . . . . . . . . . . . . . . . . . . . . . . . . . . . . . . . . . . . . . . . . . . . . . . . . . 132
Placing a Printable Disc. . . . . . . . . . . . . . . . . . . . . . . . . . . . . . . . . . . . . . . . . . . . . . . . . . . . . . . . . . . . . 133
Cautions When Printing on a Printable Disc. . . . . . . . . . . . . . . . . . . . . . . . . . . . . . . . . . . . . . . . . 134
Before Placing a Printable Disc. . . . . . . . . . . . . . . . . . . . . . . . . . . . . . . . . . . . . . . . . . . . . . . . . . . 135
Placing a Printable Disc. . . . . . . . . . . . . . . . . . . . . . . . . . . . . . . . . . . . . . . . . . . . . . . . . . . . . . . . . 136
Removing a Printable Disc. . . . . . . . . . . . . . . . . . . . . . . . . . . . . . . . . . . . . . . . . . . . . . . . . . . . . . 138
Replacing an Ink Tank. . . . . . . . . . . . . . . . . . . . . . . . . . . . . . . . . . . . . . . . . . . . . . . . . . . 140
Replacing an Ink Tank. . . . . . . . . . . . . . . . . . . . . . . . . . . . . . . . . . . . . . . . . . . . . . . . . . . . . . . . . . . . . . 141
Checking the Ink Status. . . . . . . . . . . . . . . . . . . . . . . . . . . . . . . . . . . . . . . . . . . . . . . . . . . . . . . . . . . . . 146
Checking the Ink Status with the Ink Lamps. . . . . . . . . . . . . . . . . . . . . . . . . . . . . . . . . . . . . . . . . 147
Maintenance. . . . . . . . . . . . . . . . . . . . . . . . . . . . . . . . . . . . . . . . . . . . . . . . . . . . . . . . . . . 149
When Printing Becomes Faint or Colors Are Incorrect. . . . . . . . . . . . . . . . . . . . . . . . . . . . . . . . . . . . . 150
Maintenance Procedure. . . . . . . . . . . . . . . . . . . . . . . . . . . . . . . . . . . . . . . . . . . . . . . . . . . . . . . . . 151
Printing the Nozzle Check Pattern. . . . . . . . . . . . . . . . . . . . . . . . . . . . . . . . . . . . . . . . . . . . . . . . . 153
Examining the Nozzle Check Pattern. . . . . . . . . . . . . . . . . . . . . . . . . . . . . . . . . . . . . . . . . . . . . . 154
Cleaning the Print Head. . . . . . . . . . . . . . . . . . . . . . . . . . . . . . . . . . . . . . . . . . . . . . . . . . . . . . . . . 156
Aligning the Print Head. . . . . . . . . . . . . . . . . . . . . . . . . . . . . . . . . . . . . . . . . . . . . . . . . . . . . . . . . 157
Performing Maintenance from a Computer. . . . . . . . . . . . . . . . . . . . . . . . . . . . . . . . . . . . . . . . . . . . . . 158
Cleaning the Print Heads from Your Computer. . . . . . . . . . . . . . . . . . . . . . . . . . . . . . . . . . . . . . . 159
Cleaning the Paper Feed Rollers from Your Computer. . . . . . . . . . . . . . . . . . . . . . . . . . . . . . . . . 161
Aligning the Print Head. . . . . . . . . . . . . . . . . . . . . . . . . . . . . . . . . . . . . . . . . . . . . . . . . . . . . . . . . 162
Aligning the Print Head Position from Your Computer. . . . . . . . . . . . . . . . . . . . . . . . . . . . . . . . . . 163
Aligning the Print Head Position Manually from Your Computer. . . . . . . . . . . . . . . . . . . . . . . . . . 164
Use Your Computer to Print a Nozzle Check Pattern. . . . . . . . . . . . . . . . . . . . . . . . . . . . . . . . . . 168
Cleaning Inside the Printer. . . . . . . . . . . . . . . . . . . . . . . . . . . . . . . . . . . . . . . . . . . . . . . . . . . . . . 169
Cleaning the Printer. . . . . . . . . . . . . . . . . . . . . . . . . . . . . . . . . . . . . . . . . . . . . . . . . . . . . . . . . . . . . . . . 170
Cleaning the Exterior of the Printer. . . . . . . . . . . . . . . . . . . . . . . . . . . . . . . . . . . . . . . . . . . . . . . . 171
Cleaning the Paper Feed Roller. . . . . . . . . . . . . . . . . . . . . . . . . . . . . . . . . . . . . . . . . . . . . . . . . . 172
Cleaning the Inside of the Printer (Bottom Plate Cleaning). . . . . . . . . . . . . . . . . . . . . . . . . . . . . . 173
Changing the Printer Settings. . . . . . . . . . . . . . . . . . . . . . . . . . . . . . . . . . . . . . . . . . . . . . 174
Changing Printer Settings from Your Computer. . . . . . . . . . . . . . . . . . . . . . . . . . . . . . . . . . . . . . . . . . 175
Changing the Print Options. . . . . . . . . . . . . . . . . . . . . . . . . . . . . . . . . . . . . . . . . . . . . . . . . . . . . . 176
Registering a Frequently Used Printing Profile. . . . . . . . . . . . . . . . . . . . . . . . . . . . . . . . . . . . . . . 177
Managing the Printer Power. . . . . . . . . . . . . . . . . . . . . . . . . . . . . . . . . . . . . . . . . . . . . . . . . . . . . 179
Reducing the Printer Noise. . . . . . . . . . . . . . . . . . . . . . . . . . . . . . . . . . . . . . . . . . . . . . . . . . . . . . 181
Changing the Printer Operation Mode. . . . . . . . . . . . . . . . . . . . . . . . . . . . . . . . . . . . . . . . . . . . . . 182
Initializing the Printer Settings. . . . . . . . . . . . . . . . . . . . . . . . . . . . . . . . . . . . . . . . . . . . . . . . . . . . . . . . 184
Disabling the LAN Function of the Printer. . . . . . . . . . . . . . . . . . . . . . . . . . . . . . . . . . . . . . . . . . . . . . . 185
Information about Network Connection. . . . . . . . . . . . . . . . . . . . . . . . . . . . . . . . . . . . . . 186
Useful Information about Network Connection. . . . . . . . . . . . . . . . . . . . . . . . . . . . . . . . . . . . . . . . . . . 187
Default Values Set at Factory (Network). . . . . . . . . . . . . . . . . . . . . . . . . . . . . . . . . . . . . . . . . . . . 188
Connecting the Printer to the Computer Using a USB Cable. . . . . . . . . . . . . . . . . . . . . . . . . . . . 189
When Detecting the Printers Have the Same Name during Setup. . . . . . . . . . . . . . . . . . . . . . . . 190
Connecting to Other Computer with LAN/Changing the Connection Method from USB to LAN. . 191
Printing Out Network Setting Information. . . . . . . . . . . . . . . . . . . . . . . . . . . . . . . . . . . . . . . . . . . 192
About Network Communication. . . . . . . . . . . . . . . . . . . . . . . . . . . . . . . . . . . . . . . . . . . . 195
Changing and Confirming Network Settings. . . . . . . . . . . . . . . . . . . . . . . . . . . . . . . . . . . . . . . . . . . . . 196
IJ Network Tool. . . . . . . . . . . . . . . . . . . . . . . . . . . . . . . . . . . . . . . . . . . . . . . . . . . . . . . . . . . . . . . 197
Changing the Settings in the Wireless LAN Sheet. . . . . . . . . . . . . . . . . . . . . . . . . . . . . . . . . . . . 198
Changing the WEP Detailed Settings. . . . . . . . . . . . . . . . . . . . . . . . . . . . . . . . . . . . . . . . . . . . . . 200
Changing the WPA/WPA2 Detailed Settings. . . . . . . . . . . . . . . . . . . . . . . . . . . . . . . . . . . . . . . . . 202
Changing the Settings in the Wired LAN Sheet. . . . . . . . . . . . . . . . . . . . . . . . . . . . . . . . . . . . . . . 205
Changing the Settings in the Admin Password Sheet. . . . . . . . . . . . . . . . . . . . . . . . . . . . . . . . . . 206
Monitoring Wireless Network Status. . . . . . . . . . . . . . . . . . . . . . . . . . . . . . . . . . . . . . . . . . . . . . . 207
Initializing the Network Settings of the Machine. . . . . . . . . . . . . . . . . . . . . . . . . . . . . . . . . . . . . . 210
Viewing the Modified Settings. . . . . . . . . . . . . . . . . . . . . . . . . . . . . . . . . . . . . . . . . . . . . . . . . . . . 211
Screens for Network Connection of IJ Network Tool. . . . . . . . . . . . . . . . . . . . . . . . . . . . . . . . . . . . . . . 212
Canon IJ Network Tool Screen. . . . . . . . . . . . . . . . . . . . . . . . . . . . . . . . . . . . . . . . . . . . . . . . . . . 213
Configuration Screen. . . . . . . . . . . . . . . . . . . . . . . . . . . . . . . . . . . . . . . . . . . . . . . . . . . . . . . . . . . 217
Wireless LAN Sheet. . . . . . . . . . . . . . . . . . . . . . . . . . . . . . . . . . . . . . . . . . . . . . . . . . . . . . . . . . . . 218
Search Screen. . . . . . . . . . . . . . . . . . . . . . . . . . . . . . . . . . . . . . . . . . . . . . . . . . . . . . . . . . . . . . . . 220
WEP Details Screen. . . . . . . . . . . . . . . . . . . . . . . . . . . . . . . . . . . . . . . . . . . . . . . . . . . . . . . . . . . 222
WPA/WPA2 Details Screen. . . . . . . . . . . . . . . . . . . . . . . . . . . . . . . . . . . . . . . . . . . . . . . . . . . . . . 223
Authentication Type Confirmation Screen. . . . . . . . . . . . . . . . . . . . . . . . . . . . . . . . . . . . . . . . . . . 224
PSK:Passphrase and Dynamic Encryption Setup Screen. . . . . . . . . . . . . . . . . . . . . . . . . . . . . . . 225
Setup Information Confirmation Screen. . . . . . . . . . . . . . . . . . . . . . . . . . . . . . . . . . . . . . . . . . . . . 226
Wired LAN Sheet. . . . . . . . . . . . . . . . . . . . . . . . . . . . . . . . . . . . . . . . . . . . . . . . . . . . . . . . . . . . . . 227
Admin Password Sheet. . . . . . . . . . . . . . . . . . . . . . . . . . . . . . . . . . . . . . . . . . . . . . . . . . . . . . . . . 228
Network Information Screen. . . . . . . . . . . . . . . . . . . . . . . . . . . . . . . . . . . . . . . . . . . . . . . . . . . . . 229
Access Control Sheet. . . . . . . . . . . . . . . . . . . . . . . . . . . . . . . . . . . . . . . . . . . . . . . . . . . . . . . . . . 230
Edit Accessible MAC Address Screen/Add Accessible MAC Address Screen. . . . . . . . . . . . . . . 234
Edit Accessible IP Address Screen/Add Accessible IP Address Screen. . . . . . . . . . . . . . . . . . . . 235
Other Screens of IJ Network Tool. . . . . . . . . . . . . . . . . . . . . . . . . . . . . . . . . . . . . . . . . . . . . . . . . . . . . 236
Canon IJ Network Tool Screen. . . . . . . . . . . . . . . . . . . . . . . . . . . . . . . . . . . . . . . . . . . . . . . . . . . 237
Status Screen. . . . . . . . . . . . . . . . . . . . . . . . . . . . . . . . . . . . . . . . . . . . . . . . . . . . . . . . . . . . . . . . 241
Connection Performance Measurement Screen. . . . . . . . . . . . . . . . . . . . . . . . . . . . . . . . . . . . . . 242
Maintenance Screen. . . . . . . . . . . . . . . . . . . . . . . . . . . . . . . . . . . . . . . . . . . . . . . . . . . . . . . . . . . 244
Network Setup of the Card Slot Screen. . . . . . . . . . . . . . . . . . . . . . . . . . . . . . . . . . . . . . . . . . . . . 245
Associate Port Screen. . . . . . . . . . . . . . . . . . . . . . . . . . . . . . . . . . . . . . . . . . . . . . . . . . . . . . . . . . 247
Network Information Screen. . . . . . . . . . . . . . . . . . . . . . . . . . . . . . . . . . . . . . . . . . . . . . . . . . . . . 248
Appendix for Network Communication. . . . . . . . . . . . . . . . . . . . . . . . . . . . . . . . . . . . . . . . . . . . . . . . . . 249
Using the Card Slot over a Network. . . . . . . . . . . . . . . . . . . . . . . . . . . . . . . . . . . . . . . . . . . . . . . 250
When the Printer Driver Is Not Associated with a Port. . . . . . . . . . . . . . . . . . . . . . . . . . . . . . . . . 252
About Technical Terms. . . . . . . . . . . . . . . . . . . . . . . . . . . . . . . . . . . . . . . . . . . . . . . . . . . . . . . . . 253
Restrictions. . . . . . . . . . . . . . . . . . . . . . . . . . . . . . . . . . . . . . . . . . . . . . . . . . . . . . . . . . . . . . . . . . 259
About Firewall. . . . . . . . . . . . . . . . . . . . . . . . . . . . . . . . . . . . . . . . . . . . . . . . . . . . . . . . . . . . . . . . 260
Tips for Ensuring Optimal Printing Quality. . . . . . . . . . . . . . . . . . . . . . . . . . . . . . . . . . . . 261
Useful Information about Ink. . . . . . . . . . . . . . . . . . . . . . . . . . . . . . . . . . . . . . . . . . . . . . . . . . . . . . . . . 262
Key Points to Successful Printing. . . . . . . . . . . . . . . . . . . . . . . . . . . . . . . . . . . . . . . . . . . . . . . . . . . . . 263
Be Sure to Make Paper Settings after Loading Paper. . . . . . . . . . . . . . . . . . . . . . . . . . . . . . . . . . . . . . 265
Canceling a Print Job. . . . . . . . . . . . . . . . . . . . . . . . . . . . . . . . . . . . . . . . . . . . . . . . . . . . . . . . . . . . . . . 266
Printer Handling Precautions. . . . . . . . . . . . . . . . . . . . . . . . . . . . . . . . . . . . . . . . . . . . . . . . . . . . . . . . . 267
Key to Enjoying Consistent Printing Quality. . . . . . . . . . . . . . . . . . . . . . . . . . . . . . . . . . . . . . . . . . . . . . 268
Precautions for Safe Transport of the Printer. . . . . . . . . . . . . . . . . . . . . . . . . . . . . . . . . . . . . . . . . . . . 269
Legal Limitations on Use of Your Product and Use of Images. . . . . . . . . . . . . . . . . . . . . 270
Specifications. . . . . . . . . . . . . . . . . . . . . . . . . . . . . . . . . . . . . . . . . . . . . . . . . . . . . . . . . . 271
About the Administrator Password. . . . . . . . . . . . . . . . . . . . . . . . . . . . . . . . . . 274
List of Function for Each Model. . . . . . . . . . . . . . . . . . . . . . . . . . . . . . . . . . . . . 275
Printing. . . . . . . . . . . . . . . . . . . . . . . . . . . . . . . . . . . . . . . . . . . . . . . . . . . . . . . 278
Printing from a Computer. . . . . . . . . . . . . . . . . . . . . . . . . . . . . . . . . . . . . . . . . . . . . . . . . 279
Printing with Application Software that You are Using (Printer Driver). . . . . . . . . . . . . . . . . . . . . . . . . 280
Printing with Easy Setup. . . . . . . . . . . . . . . . . . . . . . . . . . . . . . . . . . . . . . . . . . . . . . . . . . . . . . . . 281
Paper Settings on the Printer Driver. . . . . . . . . . . . . . . . . . . . . . . . . . . . . . . . . . . . . . . . . . . 284
Various Printing Methods. . . . . . . . . . . . . . . . . . . . . . . . . . . . . . . . . . . . . . . . . . . . . . . . . . . . . . . . 286
Setting a Page Size and Orientation. . . . . . . . . . . . . . . . . . . . . . . . . . . . . . . . . . . . . . . . . . . 287
Setting the Number of Copies and Printing Order. . . . . . . . . . . . . . . . . . . . . . . . . . . . . . . . . 288
Setting the Stapling Margin. . . . . . . . . . . . . . . . . . . . . . . . . . . . . . . . . . . . . . . . . . . . . . . . . . 290
Execute Borderless Printing. . . . . . . . . . . . . . . . . . . . . . . . . . . . . . . . . . . . . . . . . . . . . . . . . 292
Fit-to-Page Printing. . . . . . . . . . . . . . . . . . . . . . . . . . . . . . . . . . . . . . . . . . . . . . . . . . . . . . . . 295
Scaled Printing. . . . . . . . . . . . . . . . . . . . . . . . . . . . . . . . . . . . . . . . . . . . . . . . . . . . . . . . . . . . 297
Page Layout Printing. . . . . . . . . . . . . . . . . . . . . . . . . . . . . . . . . . . . . . . . . . . . . . . . . . . . . . . 300
Tiling/Poster Printing. . . . . . . . . . . . . . . . . . . . . . . . . . . . . . . . . . . . . . . . . . . . . . . . . . . . . . . 302
Booklet Printing. . . . . . . . . . . . . . . . . . . . . . . . . . . . . . . . . . . . . . . . . . . . . . . . . . . . . . . . . . . 305
Duplex Printing. . . . . . . . . . . . . . . . . . . . . . . . . . . . . . . . . . . . . . . . . . . . . . . . . . . . . . . . . . . 307
Stamp/Background Printing. . . . . . . . . . . . . . . . . . . . . . . . . . . . . . . . . . . . . . . . . . . . . . . . . . 309
Registering a Stamp. . . . . . . . . . . . . . . . . . . . . . . . . . . . . . . . . . . . . . . . . . . . . . . . . . . . . . . 312
Registering Image Data to be Used as a Background. . . . . . . . . . . . . . . . . . . . . . . . . . . . . . 315
Setting Up Envelope Printing. . . . . . . . . . . . . . . . . . . . . . . . . . . . . . . . . . . . . . . . . . . . . . . . . 318
Printing on Postcards. . . . . . . . . . . . . . . . . . . . . . . . . . . . . . . . . . . . . . . . . . . . . . . . . . . . . . . 320
Switching the Paper Source to Match the Purpose. . . . . . . . . . . . . . . . . . . . . . . . . . . . . . . . 322
Displaying the Print Results before Printing. . . . . . . . . . . . . . . . . . . . . . . . . . . . . . . . . . . . . 324
Setting Paper Dimensions (Custom Size). . . . . . . . . . . . . . . . . . . . . . . . . . . . . . . . . . . . . . . 325
Editing the Print Document or Reprinting from the Print History. . . . . . . . . . . . . . . . . . . . . . 327
Changing the Print Quality and Correcting Image Data. . . . . . . . . . . . . . . . . . . . . . . . . . . . . . . . . 330
Setting the Print Quality Level (Custom). . . . . . . . . . . . . . . . . . . . . . . . . . . . . . . . . . . . . . . . 331
Printing a Color Document in Monochrome. . . . . . . . . . . . . . . . . . . . . . . . . . . . . . . . . . . . . . 333
Adjusting Tone. . . . . . . . . . . . . . . . . . . . . . . . . . . . . . . . . . . . . . . . . . . . . . . . . . . . . . . . . . . . 335
Adjusting Tone Using Sample Patterns (Printer Driver). . . . . . . . . . . . . . . . . . . . . . . . . . . . 338
Specifying Color Correction. . . . . . . . . . . . . . . . . . . . . . . . . . . . . . . . . . . . . . . . . . . . . . . . . . 342
Optimal Photo Printing of Image Data. . . . . . . . . . . . . . . . . . . . . . . . . . . . . . . . . . . . . . . . . . 344
Adjusting Colors with the Printer Driver. . . . . . . . . . . . . . . . . . . . . . . . . . . . . . . . . . . . . . . . . 345
Printing with ICC Profiles. . . . . . . . . . . . . . . . . . . . . . . . . . . . . . . . . . . . . . . . . . . . . . . . . . . . 347
Interpreting the ICC Profile. . . . . . . . . . . . . . . . . . . . . . . . . . . . . . . . . . . . . . . . . . . . . . . . . . 351
Adjusting Color Balance. . . . . . . . . . . . . . . . . . . . . . . . . . . . . . . . . . . . . . . . . . . . . . . . . . . . 352
Adjusting Color Balance Using Sample Patterns (Printer Driver). . . . . . . . . . . . . . . . . . . . . 354
Adjusting Brightness. . . . . . . . . . . . . . . . . . . . . . . . . . . . . . . . . . . . . . . . . . . . . . . . . . . . . . . 358
Adjusting Intensity. . . . . . . . . . . . . . . . . . . . . . . . . . . . . . . . . . . . . . . . . . . . . . . . . . . . . . . . . 360
Adjusting Contrast. . . . . . . . . . . . . . . . . . . . . . . . . . . . . . . . . . . . . . . . . . . . . . . . . . . . . . . . . 362
Adjusting Intensity/Contrast Using Sample Patterns (Printer Driver). . . . . . . . . . . . . . . . . . . 364
Overview of the Printer Driver. . . . . . . . . . . . . . . . . . . . . . . . . . . . . . . . . . . . . . . . . . . . . . . . . . . . 368
Canon IJ Printer Driver. . . . . . . . . . . . . . . . . . . . . . . . . . . . . . . . . . . . . . . . . . . . . . . . . . . . . 369
How to Open the Printer Driver Setup Window. . . . . . . . . . . . . . . . . . . . . . . . . . . . . . . . . . . 370
Canon IJ Status Monitor. . . . . . . . . . . . . . . . . . . . . . . . . . . . . . . . . . . . . . . . . . . . . . . . . . . . 371
Checking the Ink Status from Your Computer. . . . . . . . . . . . . . . . . . . . . . . . . . . . . . . . . . . . 372
Canon IJ Preview. . . . . . . . . . . . . . . . . . . . . . . . . . . . . . . . . . . . . . . . . . . . . . . . . . . . . . . . . . 373
Deleting the Undesired Print Job. . . . . . . . . . . . . . . . . . . . . . . . . . . . . . . . . . . . . . . . . . . . . . 374
Instructions for Use (Printer Driver). . . . . . . . . . . . . . . . . . . . . . . . . . . . . . . . . . . . . . . . . . . . 375
Printer Driver Description. . . . . . . . . . . . . . . . . . . . . . . . . . . . . . . . . . . . . . . . . . . . . . . . . . . . . . . . 377
Quick Setup tab Description. . . . . . . . . . . . . . . . . . . . . . . . . . . . . . . . . . . . . . . . . . . . . . . . . 378
Main tab Description. . . . . . . . . . . . . . . . . . . . . . . . . . . . . . . . . . . . . . . . . . . . . . . . . . . . . . . 384
Page Setup tab Description. . . . . . . . . . . . . . . . . . . . . . . . . . . . . . . . . . . . . . . . . . . . . . . . . . 392
Maintenance tab Description. . . . . . . . . . . . . . . . . . . . . . . . . . . . . . . . . . . . . . . . . . . . . . . . . 404
Canon IJ Preview Description. . . . . . . . . . . . . . . . . . . . . . . . . . . . . . . . . . . . . . . . . . . . . . . . 411
Canon IJ XPS Preview Description. . . . . . . . . . . . . . . . . . . . . . . . . . . . . . . . . . . . . . . . . . . . 414
Canon IJ Status Monitor Description. . . . . . . . . . . . . . . . . . . . . . . . . . . . . . . . . . . . . . . . . . . 423
Updating the Printer Driver. . . . . . . . . . . . . . . . . . . . . . . . . . . . . . . . . . . . . . . . . . . . . . . . . . . . . . 426
Obtaining the Latest Printer Driver. . . . . . . . . . . . . . . . . . . . . . . . . . . . . . . . . . . . . . . . . . . . 427
Deleting the Unnecessary Printer Driver. . . . . . . . . . . . . . . . . . . . . . . . . . . . . . . . . . . . . . . . 428
Before Installing the Printer Driver. . . . . . . . . . . . . . . . . . . . . . . . . . . . . . . . . . . . . . . . . . . . . 429
Installing the Printer Driver. . . . . . . . . . . . . . . . . . . . . . . . . . . . . . . . . . . . . . . . . . . . . . . . . . 430
Printing from a Digital Camera. . . . . . . . . . . . . . . . . . . . . . . . . . . . . . . . . . . . . . . . . . . . . 431
Printing Photographs Directly from a PictBridge Compliant Device. . . . . . . . . . . . . . . . . . . . . . . . . . . . 432
About PictBridge Print Settings. . . . . . . . . . . . . . . . . . . . . . . . . . . . . . . . . . . . . . . . . . . . . . . . . . . . . . . 434
Troubleshooting. . . . . . . . . . . . . . . . . . . . . . . . . . . . . . . . . . . . . . . . . . . . . . . . . 436
Problems with Network Communication. . . . . . . . . . . . . . . . . . . . . . . . . . . . . . . . . . . . . . 437
Cannot Detect a Printer on a Network. . . . . . . . . . . . . . . . . . . . . . . . . . . . . . . . . . . . . . . . . . . . . . . . . . 438
Cannot Detect the Printer when Setting Up Network Communication. . . . . . . . . . . . . . . . . . . . . . 439
Cannot Detect the Printer during Wireless LAN Setup: Check 1. . . . . . . . . . . . . . . . . . . . . . 440
Cannot Detect the Printer during Wireless LAN Setup: Check 2. . . . . . . . . . . . . . . . . . . . . . 441
Cannot Detect the Printer during Wireless LAN Setup: Check 3. . . . . . . . . . . . . . . . . . . . . . 442
Cannot Detect the Printer during Wireless LAN Setup: Check 4. . . . . . . . . . . . . . . . . . . . . . 443
Cannot Detect the Printer during Wired LAN Setup: Check 1. . . . . . . . . . . . . . . . . . . . . . . . 444
Cannot Detect the Printer during Wired LAN Setup: Check 2. . . . . . . . . . . . . . . . . . . . . . . . 445
Cannot Detect the Printer during Wired LAN Setup: Check 3. . . . . . . . . . . . . . . . . . . . . . . . 446
The Printer Cannot Be Detected in the Wireless LAN. . . . . . . . . . . . . . . . . . . . . . . . . . . . . . . . . . 447
The Printer Cannot Be Detected in the Wired LAN. . . . . . . . . . . . . . . . . . . . . . . . . . . . . . . . . . . . 449
Problems with the Printer while Using with Network. . . . . . . . . . . . . . . . . . . . . . . . . . . . . . . . . . . . . . . 450
The Printer Stopped Working Suddenly. . . . . . . . . . . . . . . . . . . . . . . . . . . . . . . . . . . . . . . . . . . . 451
Forgot a Wireless Router Name, SSID, or a Network Key. . . . . . . . . . . . . . . . . . . . . . . . . . . . . . 454
The Administrator Password Set to the Printer Was Forgotten. . . . . . . . . . . . . . . . . . . . . . . . . . . 456
Cannot Use the Printer on Replacing a Wireless Router or Changing Its Settings. . . . . . . . . . . . 457
Printing Speed Is Slow. . . . . . . . . . . . . . . . . . . . . . . . . . . . . . . . . . . . . . . . . . . . . . . . . . . . . . . . . . 459
Ink Remaining Level Is Not Displayed on Printer Status Monitor of the Printer. . . . . . . . . . . . . . . 460
Other Problems with Network. . . . . . . . . . . . . . . . . . . . . . . . . . . . . . . . . . . . . . . . . . . . . . . . . . . . . . . . 461
The Message Is Displayed on the Computer Screen during Setup. . . . . . . . . . . . . . . . . . . . . . . . 462
Checking Information about the Network. . . . . . . . . . . . . . . . . . . . . . . . . . . . . . . . . . . . . . . . . . . . 464
How to Restore the Printer's Network Settings to Factory Default. . . . . . . . . . . . . . . . . . . . . . . . 466
Problems while Printing from Smartphone/Tablet. . . . . . . . . . . . . . . . . . . . . . . . . . . . . . 467
Cannot Print from Smartphone/Tablet. . . . . . . . . . . . . . . . . . . . . . . . . . . . . . . . . . . . . . . . . . . . . . . . . . 468
Problems with Printing. . . . . . . . . . . . . . . . . . . . . . . . . . . . . . . . . . . . . . . . . . . . . . . . . . . 470
Printing Does Not Start. . . . . . . . . . . . . . . . . . . . . . . . . . . . . . . . . . . . . . . . . . . . . . . . . . . . . . . . . . . . . 471
Paper Jams. . . . . . . . . . . . . . . . . . . . . . . . . . . . . . . . . . . . . . . . . . . . . . . . . . . . . . . . . . . . . . . . . . . . . . 474
Print Results Not Satisfactory. . . . . . . . . . . . . . . . . . . . . . . . . . . . . . . . . . . . . . . . . . . . . . . . . . . . . . . . 475
Cannot Print to End of Job. . . . . . . . . . . . . . . . . . . . . . . . . . . . . . . . . . . . . . . . . . . . . . . . . . . . . . . 477
No Printing Results/Printing Is Blurred/Colors Are Wrong/White Streaks. . . . . . . . . . . . . . . . . . . 478
Lines Are Misaligned. . . . . . . . . . . . . . . . . . . . . . . . . . . . . . . . . . . . . . . . . . . . . . . . . . . . . . . . . . . 481
Line Does Not Print or Prints Partially. . . . . . . . . . . . . . . . . . . . . . . . . . . . . . . . . . . . . . . . . . . . . . 482
Image Does Not Print or Prints Partially. . . . . . . . . . . . . . . . . . . . . . . . . . . . . . . . . . . . . . . . . . . . 483
Printed Paper Curls or Has Ink Blots. . . . . . . . . . . . . . . . . . . . . . . . . . . . . . . . . . . . . . . . . . . . . . . 484
Paper Is Smudged/Printed Surface Is Scratched. . . . . . . . . . . . . . . . . . . . . . . . . . . . . . . . . . . . . 485
Back of the Paper Is Smudged. . . . . . . . . . . . . . . . . . . . . . . . . . . . . . . . . . . . . . . . . . . . . . . . . . . 488
Vertical Lines Are Printed on the Sides of the Printout. . . . . . . . . . . . . . . . . . . . . . . . . . . . . . . . . 489
Colors Are Uneven or Streaked. . . . . . . . . . . . . . . . . . . . . . . . . . . . . . . . . . . . . . . . . . . . . . . . . . . 490
Ink Is Not Ejected. . . . . . . . . . . . . . . . . . . . . . . . . . . . . . . . . . . . . . . . . . . . . . . . . . . . . . . . . . . . . . . . . . 492
Paper Does Not Feed Properly/"No Paper" Error Occurs. . . . . . . . . . . . . . . . . . . . . . . . . . . . . . . . . . . 493
Cannot Print on the Disc Label. . . . . . . . . . . . . . . . . . . . . . . . . . . . . . . . . . . . . . . . . . . . . . . . . . . . . . . 495
Printing Stops Before It Is Completed. . . . . . . . . . . . . . . . . . . . . . . . . . . . . . . . . . . . . . . . . . . . . . . . . . 497
Problems with the Printer. . . . . . . . . . . . . . . . . . . . . . . . . . . . . . . . . . . . . . . . . . . . . . . . . 498
The Printer Cannot Be Powered On. . . . . . . . . . . . . . . . . . . . . . . . . . . . . . . . . . . . . . . . . . . . . . . . . . . 499
The Printer Turns Off Unintentionally. . . . . . . . . . . . . . . . . . . . . . . . . . . . . . . . . . . . . . . . . . . . . . . . . . . 500
Cannot Connect to Computer with a USB Cable Properly. . . . . . . . . . . . . . . . . . . . . . . . . . . . . . . . . . . 501
Cannot Communicate with the Printer with USB Connection. . . . . . . . . . . . . . . . . . . . . . . . . . . . . . . . 502
Print Head Holder Does Not Move to the Position for Replacing. . . . . . . . . . . . . . . . . . . . . . . . . . . . . . 503
Printer Status Monitor Is Not Displayed. . . . . . . . . . . . . . . . . . . . . . . . . . . . . . . . . . . . . . . . . . . . . . . . . 504
Problems with Installation/Downloading. . . . . . . . . . . . . . . . . . . . . . . . . . . . . . . . . . . . . . 505
Cannot Install the Printer Driver. . . . . . . . . . . . . . . . . . . . . . . . . . . . . . . . . . . . . . . . . . . . . . . . . . . . . . . 506
Easy-WebPrint EX Does Not Start Up or Easy-WebPrint EX Menu Does Not Appear. . . . . . . . . . . . . 509
How to Update Printer Driver in Network Environment. . . . . . . . . . . . . . . . . . . . . . . . . . . . . . . . . . . . . 510
Uninstalling IJ Network Tool. . . . . . . . . . . . . . . . . . . . . . . . . . . . . . . . . . . . . . . . . . . . . . . . . . . . . . . . . 511
About Errors/Messages Displayed. . . . . . . . . . . . . . . . . . . . . . . . . . . . . . . . . . . . . . . . . . 512
If an Error Occurs. . . . . . . . . . . . . . . . . . . . . . . . . . . . . . . . . . . . . . . . . . . . . . . . . . . . . . . . . . . . . . . . . . 513
A Message Is Displayed. . . . . . . . . . . . . . . . . . . . . . . . . . . . . . . . . . . . . . . . . . . . . . . . . . . . . . . . . . . . 516
Error Message Appears on a PictBridge Compliant Device. . . . . . . . . . . . . . . . . . . . . . . . . . . . . . . . . 521
If You Cannot Resolve the Problem. . . . . . . . . . . . . . . . . . . . . . . . . . . . . . . . . . . . . . . . . 523
List of Support Code for Error(PRO-100S). . . . . . . . . . . . . . . . . . . . . . . . . . . . 524
List of Support Code for Error (When Paper Is Jammed). . . . . . . . . . . . . . . . . . . . . . . . . 526
1300. . . . . . . . . . . . . . . . . . . . . . . . . . . . . . . . . . . . . . . . . . . . . . . . . . . . . . . . . . . . . . . . . . . . . . . . . . . . 527
Paper Is Jammed inside the Printer. . . . . . . . . . . . . . . . . . . . . . . . . . . . . . . . . . . . . . . . . . . . . . . . . . . . 530
In Other Cases. . . . . . . . . . . . . . . . . . . . . . . . . . . . . . . . . . . . . . . . . . . . . . . . . . . . . . . . . . . . . . . . . . . . 533
1000. . . . . . . . . . . . . . . . . . . . . . . . . . . . . . . . . . . . . . . . . . . . . . . . . . . . . . . . . . . . . . . . . 534
1001. . . . . . . . . . . . . . . . . . . . . . . . . . . . . . . . . . . . . . . . . . . . . . . . . . . . . . . . . . . . . . . . . 535
1002. . . . . . . . . . . . . . . . . . . . . . . . . . . . . . . . . . . . . . . . . . . . . . . . . . . . . . . . . . . . . . . . . 536
1006. . . . . . . . . . . . . . . . . . . . . . . . . . . . . . . . . . . . . . . . . . . . . . . . . . . . . . . . . . . . . . . . . 537
1062. . . . . . . . . . . . . . . . . . . . . . . . . . . . . . . . . . . . . . . . . . . . . . . . . . . . . . . . . . . . . . . . . 538
1200. . . . . . . . . . . . . . . . . . . . . . . . . . . . . . . . . . . . . . . . . . . . . . . . . . . . . . . . . . . . . . . . . 539
1250. . . . . . . . . . . . . . . . . . . . . . . . . . . . . . . . . . . . . . . . . . . . . . . . . . . . . . . . . . . . . . . . . 540
1261. . . . . . . . . . . . . . . . . . . . . . . . . . . . . . . . . . . . . . . . . . . . . . . . . . . . . . . . . . . . . . . . . 541
1270. . . . . . . . . . . . . . . . . . . . . . . . . . . . . . . . . . . . . . . . . . . . . . . . . . . . . . . . . . . . . . . . . 542
1308. . . . . . . . . . . . . . . . . . . . . . . . . . . . . . . . . . . . . . . . . . . . . . . . . . . . . . . . . . . . . . . . . 543
1401. . . . . . . . . . . . . . . . . . . . . . . . . . . . . . . . . . . . . . . . . . . . . . . . . . . . . . . . . . . . . . . . . 544
1403. . . . . . . . . . . . . . . . . . . . . . . . . . . . . . . . . . . . . . . . . . . . . . . . . . . . . . . . . . . . . . . . . 545
1405. . . . . . . . . . . . . . . . . . . . . . . . . . . . . . . . . . . . . . . . . . . . . . . . . . . . . . . . . . . . . . . . . 546
1410. . . . . . . . . . . . . . . . . . . . . . . . . . . . . . . . . . . . . . . . . . . . . . . . . . . . . . . . . . . . . . . . . 547
1411. . . . . . . . . . . . . . . . . . . . . . . . . . . . . . . . . . . . . . . . . . . . . . . . . . . . . . . . . . . . . . . . . 548
1412. . . . . . . . . . . . . . . . . . . . . . . . . . . . . . . . . . . . . . . . . . . . . . . . . . . . . . . . . . . . . . . . . 549
1413. . . . . . . . . . . . . . . . . . . . . . . . . . . . . . . . . . . . . . . . . . . . . . . . . . . . . . . . . . . . . . . . . 550
1414. . . . . . . . . . . . . . . . . . . . . . . . . . . . . . . . . . . . . . . . . . . . . . . . . . . . . . . . . . . . . . . . . 551
1415. . . . . . . . . . . . . . . . . . . . . . . . . . . . . . . . . . . . . . . . . . . . . . . . . . . . . . . . . . . . . . . . . 552
1416. . . . . . . . . . . . . . . . . . . . . . . . . . . . . . . . . . . . . . . . . . . . . . . . . . . . . . . . . . . . . . . . . 553
1417. . . . . . . . . . . . . . . . . . . . . . . . . . . . . . . . . . . . . . . . . . . . . . . . . . . . . . . . . . . . . . . . . 554
1600. . . . . . . . . . . . . . . . . . . . . . . . . . . . . . . . . . . . . . . . . . . . . . . . . . . . . . . . . . . . . . . . . 555
1660. . . . . . . . . . . . . . . . . . . . . . . . . . . . . . . . . . . . . . . . . . . . . . . . . . . . . . . . . . . . . . . . . 556
1680. . . . . . . . . . . . . . . . . . . . . . . . . . . . . . . . . . . . . . . . . . . . . . . . . . . . . . . . . . . . . . . . . 557
1681. . . . . . . . . . . . . . . . . . . . . . . . . . . . . . . . . . . . . . . . . . . . . . . . . . . . . . . . . . . . . . . . . 558
1683. . . . . . . . . . . . . . . . . . . . . . . . . . . . . . . . . . . . . . . . . . . . . . . . . . . . . . . . . . . . . . . . . 559
1684. . . . . . . . . . . . . . . . . . . . . . . . . . . . . . . . . . . . . . . . . . . . . . . . . . . . . . . . . . . . . . . . . 560
1688. . . . . . . . . . . . . . . . . . . . . . . . . . . . . . . . . . . . . . . . . . . . . . . . . . . . . . . . . . . . . . . . . 561
1700. . . . . . . . . . . . . . . . . . . . . . . . . . . . . . . . . . . . . . . . . . . . . . . . . . . . . . . . . . . . . . . . . 562
1701. . . . . . . . . . . . . . . . . . . . . . . . . . . . . . . . . . . . . . . . . . . . . . . . . . . . . . . . . . . . . . . . . 563
1750. . . . . . . . . . . . . . . . . . . . . . . . . . . . . . . . . . . . . . . . . . . . . . . . . . . . . . . . . . . . . . . . . 564
1850. . . . . . . . . . . . . . . . . . . . . . . . . . . . . . . . . . . . . . . . . . . . . . . . . . . . . . . . . . . . . . . . . 565
1851. . . . . . . . . . . . . . . . . . . . . . . . . . . . . . . . . . . . . . . . . . . . . . . . . . . . . . . . . . . . . . . . . 566
1855. . . . . . . . . . . . . . . . . . . . . . . . . . . . . . . . . . . . . . . . . . . . . . . . . . . . . . . . . . . . . . . . . 567
1856. . . . . . . . . . . . . . . . . . . . . . . . . . . . . . . . . . . . . . . . . . . . . . . . . . . . . . . . . . . . . . . . . 568
1858. . . . . . . . . . . . . . . . . . . . . . . . . . . . . . . . . . . . . . . . . . . . . . . . . . . . . . . . . . . . . . . . . 569

1859. . . . . . . . . . . . . . . . . . . . . . . . . . . . . . . . . . . . . . . . . . . . . . . . . . . . . . . . . . . . . . . . . 570
185A. . . . . . . . . . . . . . . . . . . . . . . . . . . . . . . . . . . . . . . . . . . . . . . . . . . . . . . . . . . . . . . . . 571
2001. . . . . . . . . . . . . . . . . . . . . . . . . . . . . . . . . . . . . . . . . . . . . . . . . . . . . . . . . . . . . . . . . 572
2002. . . . . . . . . . . . . . . . . . . . . . . . . . . . . . . . . . . . . . . . . . . . . . . . . . . . . . . . . . . . . . . . . 573
2103. . . . . . . . . . . . . . . . . . . . . . . . . . . . . . . . . . . . . . . . . . . . . . . . . . . . . . . . . . . . . . . . . 574
2500. . . . . . . . . . . . . . . . . . . . . . . . . . . . . . . . . . . . . . . . . . . . . . . . . . . . . . . . . . . . . . . . . 575
4100. . . . . . . . . . . . . . . . . . . . . . . . . . . . . . . . . . . . . . . . . . . . . . . . . . . . . . . . . . . . . . . . . 576
4103. . . . . . . . . . . . . . . . . . . . . . . . . . . . . . . . . . . . . . . . . . . . . . . . . . . . . . . . . . . . . . . . . 577
5100. . . . . . . . . . . . . . . . . . . . . . . . . . . . . . . . . . . . . . . . . . . . . . . . . . . . . . . . . . . . . . . . . 578
5110. . . . . . . . . . . . . . . . . . . . . . . . . . . . . . . . . . . . . . . . . . . . . . . . . . . . . . . . . . . . . . . . . 579
5200. . . . . . . . . . . . . . . . . . . . . . . . . . . . . . . . . . . . . . . . . . . . . . . . . . . . . . . . . . . . . . . . . 580
5400. . . . . . . . . . . . . . . . . . . . . . . . . . . . . . . . . . . . . . . . . . . . . . . . . . . . . . . . . . . . . . . . . 581
5700. . . . . . . . . . . . . . . . . . . . . . . . . . . . . . . . . . . . . . . . . . . . . . . . . . . . . . . . . . . . . . . . . 582
5B00. . . . . . . . . . . . . . . . . . . . . . . . . . . . . . . . . . . . . . . . . . . . . . . . . . . . . . . . . . . . . . . . . 583
5B01. . . . . . . . . . . . . . . . . . . . . . . . . . . . . . . . . . . . . . . . . . . . . . . . . . . . . . . . . . . . . . . . . 584
5C00. . . . . . . . . . . . . . . . . . . . . . . . . . . . . . . . . . . . . . . . . . . . . . . . . . . . . . . . . . . . . . . . . 585
5C20. . . . . . . . . . . . . . . . . . . . . . . . . . . . . . . . . . . . . . . . . . . . . . . . . . . . . . . . . . . . . . . . . 586
6000. . . . . . . . . . . . . . . . . . . . . . . . . . . . . . . . . . . . . . . . . . . . . . . . . . . . . . . . . . . . . . . . . 587
6010. . . . . . . . . . . . . . . . . . . . . . . . . . . . . . . . . . . . . . . . . . . . . . . . . . . . . . . . . . . . . . . . . 588
6500. . . . . . . . . . . . . . . . . . . . . . . . . . . . . . . . . . . . . . . . . . . . . . . . . . . . . . . . . . . . . . . . . 589
6502. . . . . . . . . . . . . . . . . . . . . . . . . . . . . . . . . . . . . . . . . . . . . . . . . . . . . . . . . . . . . . . . . 590
6800. . . . . . . . . . . . . . . . . . . . . . . . . . . . . . . . . . . . . . . . . . . . . . . . . . . . . . . . . . . . . . . . . 591
6801. . . . . . . . . . . . . . . . . . . . . . . . . . . . . . . . . . . . . . . . . . . . . . . . . . . . . . . . . . . . . . . . . 592
6900. . . . . . . . . . . . . . . . . . . . . . . . . . . . . . . . . . . . . . . . . . . . . . . . . . . . . . . . . . . . . . . . . 593
6901. . . . . . . . . . . . . . . . . . . . . . . . . . . . . . . . . . . . . . . . . . . . . . . . . . . . . . . . . . . . . . . . . 594
6902. . . . . . . . . . . . . . . . . . . . . . . . . . . . . . . . . . . . . . . . . . . . . . . . . . . . . . . . . . . . . . . . . 595
6910. . . . . . . . . . . . . . . . . . . . . . . . . . . . . . . . . . . . . . . . . . . . . . . . . . . . . . . . . . . . . . . . . 596
6911. . . . . . . . . . . . . . . . . . . . . . . . . . . . . . . . . . . . . . . . . . . . . . . . . . . . . . . . . . . . . . . . . 597
6920. . . . . . . . . . . . . . . . . . . . . . . . . . . . . . . . . . . . . . . . . . . . . . . . . . . . . . . . . . . . . . . . . 598
6921. . . . . . . . . . . . . . . . . . . . . . . . . . . . . . . . . . . . . . . . . . . . . . . . . . . . . . . . . . . . . . . . . 599
6930. . . . . . . . . . . . . . . . . . . . . . . . . . . . . . . . . . . . . . . . . . . . . . . . . . . . . . . . . . . . . . . . . 600
6931. . . . . . . . . . . . . . . . . . . . . . . . . . . . . . . . . . . . . . . . . . . . . . . . . . . . . . . . . . . . . . . . . 601
6932. . . . . . . . . . . . . . . . . . . . . . . . . . . . . . . . . . . . . . . . . . . . . . . . . . . . . . . . . . . . . . . . . 602
6933. . . . . . . . . . . . . . . . . . . . . . . . . . . . . . . . . . . . . . . . . . . . . . . . . . . . . . . . . . . . . . . . . 603

6940. . . . . . . . . . . . . . . . . . . . . . . . . . . . . . . . . . . . . . . . . . . . . . . . . . . . . . . . . . . . . . . . . 604
6941. . . . . . . . . . . . . . . . . . . . . . . . . . . . . . . . . . . . . . . . . . . . . . . . . . . . . . . . . . . . . . . . . 605
6942. . . . . . . . . . . . . . . . . . . . . . . . . . . . . . . . . . . . . . . . . . . . . . . . . . . . . . . . . . . . . . . . . 606
6943. . . . . . . . . . . . . . . . . . . . . . . . . . . . . . . . . . . . . . . . . . . . . . . . . . . . . . . . . . . . . . . . . 607
6944. . . . . . . . . . . . . . . . . . . . . . . . . . . . . . . . . . . . . . . . . . . . . . . . . . . . . . . . . . . . . . . . . 608
6945. . . . . . . . . . . . . . . . . . . . . . . . . . . . . . . . . . . . . . . . . . . . . . . . . . . . . . . . . . . . . . . . . 609
6946. . . . . . . . . . . . . . . . . . . . . . . . . . . . . . . . . . . . . . . . . . . . . . . . . . . . . . . . . . . . . . . . . 610
6A00. . . . . . . . . . . . . . . . . . . . . . . . . . . . . . . . . . . . . . . . . . . . . . . . . . . . . . . . . . . . . . . . . 611
6B00. . . . . . . . . . . . . . . . . . . . . . . . . . . . . . . . . . . . . . . . . . . . . . . . . . . . . . . . . . . . . . . . . 612
8200. . . . . . . . . . . . . . . . . . . . . . . . . . . . . . . . . . . . . . . . . . . . . . . . . . . . . . . . . . . . . . . . . 613
9000. . . . . . . . . . . . . . . . . . . . . . . . . . . . . . . . . . . . . . . . . . . . . . . . . . . . . . . . . . . . . . . . . 614
9400. . . . . . . . . . . . . . . . . . . . . . . . . . . . . . . . . . . . . . . . . . . . . . . . . . . . . . . . . . . . . . . . . 615
B200. . . . . . . . . . . . . . . . . . . . . . . . . . . . . . . . . . . . . . . . . . . . . . . . . . . . . . . . . . . . . . . . . 616
B400. . . . . . . . . . . . . . . . . . . . . . . . . . . . . . . . . . . . . . . . . . . . . . . . . . . . . . . . . . . . . . . . . 617
Read Me First
Notes on Online Manual UsageHow to Print
Notes on Online Manual Usage• Reproduction, diversion or copying of any text, photo or image published in the Online Manual
(hereinafter referred to as "this guide"), in whole or in part, is prohibited.• In principle, Canon shall change or delete the contents of this guide without prior notice to customers.
In addition, Canon may suspend or stop the disclosure of this guide due to unavoidable reasons.Canon shall not be liable for any damage suffered by customers as a result of changes in or deletionof information in this guide, or suspension/stoppage of disclosure of this guide.
• Although the contents of this guide have been prepared with utmost care, please contact the servicecenter if you find any incorrect or missing information.
• In principle, the descriptions in this guide are based on the product at the time of its initial sale.• This guide does not disclose the manuals of all the products sold by Canon. See the manual supplied
with the product when using a product that is not described in this guide.
How to PrintUse the print function of your Web browser to print this guide.
To set to print background colors and images, follow the steps below.
Note• In Windows 8, print in the desktop version.
• In Internet Explorer 9, 10, or 11
1. Select (Tools) > Print > Page setup....2. Select the Print Background Colors and Images checkbox.
• In Internet Explorer 8
1. Press the Alt key to display the menus.Alternatively, from Tools, select Toolbars > Menu Bar to display the menus.
2. Select Page Setup... from the File menu.3. Select the Print Background Colors and Images checkbox.
• In Mozilla Firefox
1. Press the Alt key to display the menus.Alternatively, click Firefox, then select Menu Bar from the right arrow of Options to display themenus.
2. Select Page Setup... from the File menu.3. Select the Print Background (colors & images) checkbox in Format & Options.
• In Google Chrome
1. Select (Chrome Menu) > Print....2. Select the Background colors & images checkbox in Options.
13
How to Use the Online Manual
Symbols Used in This Document
WarningInstructions that, if ignored, could result in death or serious personal injury caused by incorrectoperation of the equipment. These must be observed for safe operation.
CautionInstructions that, if ignored, could result in personal injury or material damage caused by incorrectoperation of the equipment. These must be observed for safe operation.
ImportantInstructions including important information. To avoid damage and injury or improper use of theproduct, be sure to read these indications.
NoteInstructions including notes for operation and additional explanations.
Basic
Instructions explaining basic operations of your product.
Note• Icons may vary depending on your product.
Touch-enabled Device UsersFor touch actions, you need to replace "right-click" in this document with the action set on the operatingsystem. For example, if the action is set to "press and hold" on your operating system, replace "right-click"with "press and hold."
14
Trademarks and Licenses
• Microsoft is a registered trademark of Microsoft Corporation.• Windows is a trademark or registered trademark of Microsoft Corporation in the U.S. and/or other
countries.• Windows Vista is a trademark or registered trademark of Microsoft Corporation in the U.S. and/or other
countries.• Internet Explorer is a trademark or registered trademark of Microsoft Corporation in the U.S. and/or
other countries.• Mac, Mac OS, AirPort, Safari, Bonjour, iPad, iPhone and iPod touch are trademarks of Apple Inc.,
registered in the U.S. and other countries. AirPrint and the AirPrint logo are trademarks of Apple Inc.• IOS is a trademark or registered trademark of Cisco in the U.S. and other countries and is used under
license.• Google Cloud Print, Google Chrome, Android, Google Play and Picasa are either registered trademarks
or trademarks of Google Inc.• Adobe, Photoshop, Photoshop Elements, Lightroom, Adobe RGB and Adobe RGB (1998) are either
registered trademarks or trademarks of Adobe Systems Incorporated in the United States and/or othercountries.
• Photo Rag is a trademark of Hahnemühle FineArt GmbH.• Bluetooth is a trademark of Bluetooth SIG, Inc., U.S.A. and licensed to Canon Inc.
Note• The formal name of Windows Vista is Microsoft Windows Vista operating system.
Copyright (c) 2003-2004, Apple Computer, Inc. All rights reserved.
Redistribution and use in source and binary forms, with or without modification, are permitted providedthat the following conditions are met:
1. Redistributions of source code must retain the above copyright notice, this list of conditions and thefollowing disclaimer.
2. Redistributions in binary form must reproduce the above copyright notice, this list of conditions andthe following disclaimer in the documentation and/or other materials provided with the distribution.
3. Neither the name of Apple Computer, Inc. ("Apple") nor the names of its contributors may be used toendorse or promote products derived from this software without specific prior written permission.
THIS SOFTWARE IS PROVIDED BY APPLE AND ITS CONTRIBUTORS "AS IS" AND ANY EXPRESSOR IMPLIED WARRANTIES, INCLUDING, BUT NOT LIMITED TO, THE IMPLIED WARRANTIES OFMERCHANTABILITY AND FITNESS FOR A PARTICULAR PURPOSE ARE DISCLAIMED. IN NOEVENT SHALL APPLE OR ITS CONTRIBUTORS BE LIABLE FOR ANY DIRECT, INDIRECT,INCIDENTAL, SPECIAL, EXEMPLARY, OR CONSEQUENTIAL DAMAGES (INCLUDING, BUT NOTLIMITED TO, PROCUREMENT OF SUBSTITUTE GOODS OR SERVICES; LOSS OF USE, DATA, ORPROFITS; OR BUSINESS INTERRUPTION) HOWEVER CAUSED AND ON ANY THEORY OFLIABILITY, WHETHER IN CONTRACT, STRICT LIABILITY, OR TORT INCLUDING NEGLIGENCE OROTHERWISE) ARISING IN ANY WAY OUT OF THE USE OF THIS SOFTWARE, EVEN IF ADVISED OFTHE POSSIBILITY OF SUCH DAMAGE.
Apache License
Version 2.0, January 2004
http://www.apache.org/licenses/TERMS AND CONDITIONS FOR USE, REPRODUCTION, AND DISTRIBUTION
15
1. Definitions.
"License" shall mean the terms and conditions for use, reproduction, and distribution as defined bySections 1 through 9 of this document.
"Licensor" shall mean the copyright owner or entity authorized by the copyright owner that is grantingthe License.
"Legal Entity" shall mean the union of the acting entity and all other entities that control, are controlledby, or are under common control with that entity. For the purposes of this definition, "control" means(i) the power, direct or indirect, to cause the direction or management of such entity, whether bycontract or otherwise, or (ii) ownership of fifty percent (50%) or more of the outstanding shares, or (iii)beneficial ownership of such entity.
"You" (or "Your") shall mean an individual or Legal Entity exercising permissions granted by thisLicense.
"Source" form shall mean the preferred form for making modifications, including but not limited tosoftware source code, documentation source, and configuration files.
"Object" form shall mean any form resulting from mechanical transformation or translation of a Sourceform, including but not limited to compiled object code, generated documentation, and conversions toother media types.
"Work" shall mean the work of authorship, whether in Source or Object form, made available underthe License, as indicated by a copyright notice that is included in or attached to the work (an exampleis provided in the Appendix below).
"Derivative Works" shall mean any work, whether in Source or Object form, that is based on (orderived from) the Work and for which the editorial revisions, annotations, elaborations, or othermodifications represent, as a whole, an original work of authorship. For the purposes of this License,Derivative Works shall not include works that remain separable from, or merely link (or bind by name)to the interfaces of, the Work and Derivative Works thereof.
"Contribution" shall mean any work of authorship, including the original version of the Work and anymodifications or additions to that Work or Derivative Works thereof, that is intentionally submitted toLicensor for inclusion in the Work by the copyright owner or by an individual or Legal Entityauthorized to submit on behalf of the copyright owner. For the purposes of this definition, "submitted"means any form of electronic, verbal, or written communication sent to the Licensor or itsrepresentatives, including but not limited to communication on electronic mailing lists, source codecontrol systems, and issue tracking systems that are managed by, or on behalf of, the Licensor forthe purpose of discussing and improving the Work, but excluding communication that isconspicuously marked or otherwise designated in writing by the copyright owner as "Not aContribution."
"Contributor" shall mean Licensor and any individual or Legal Entity on behalf of whom a Contributionhas been received by Licensor and subsequently incorporated within the Work.
2. Grant of Copyright License. Subject to the terms and conditions of this License, each Contributorhereby grants to You a perpetual, worldwide, non-exclusive, no-charge, royalty-free, irrevocablecopyright license to reproduce, prepare Derivative Works of, publicly display, publicly perform,sublicense, and distribute the Work and such Derivative Works in Source or Object form.
3. Grant of Patent License. Subject to the terms and conditions of this License, each Contributor herebygrants to You a perpetual, worldwide, non-exclusive, no-charge, royalty-free, irrevocable (except asstated in this section) patent license to make, have made, use, offer to sell, sell, import, andotherwise transfer the Work, where such license applies only to those patent claims licensable bysuch Contributor that are necessarily infringed by their Contribution(s) alone or by combination of
16
their Contribution(s) with the Work to which such Contribution(s) was submitted. If You institute patentlitigation against any entity (including a cross-claim or counterclaim in a lawsuit) alleging that theWork or a Contribution incorporated within the Work constitutes direct or contributory patentinfringement, then any patent licenses granted to You under this License for that Work shall terminateas of the date such litigation is filed.
4. Redistribution. You may reproduce and distribute copies of the Work or Derivative Works thereof inany medium, with or without modifications, and in Source or Object form, provided that You meet thefollowing conditions:
1. You must give any other recipients of the Work or Derivative Works a copy of this License; and2. You must cause any modified files to carry prominent notices stating that You changed the files;
and3. You must retain, in the Source form of any Derivative Works that You distribute, all copyright,
patent, trademark, and attribution notices from the Source form of the Work, excluding thosenotices that do not pertain to any part of the Derivative Works; and
4. If the Work includes a "NOTICE" text file as part of its distribution, then any Derivative Works thatYou distribute must include a readable copy of the attribution notices contained within suchNOTICE file, excluding those notices that do not pertain to any part of the Derivative Works, in atleast one of the following places: within a NOTICE text file distributed as part of the DerivativeWorks; within the Source form or documentation, if provided along with the Derivative Works; or,within a display generated by the Derivative Works, if and wherever such third-party noticesnormally appear. The contents of the NOTICE file are for informational purposes only and do notmodify the License. You may add Your own attribution notices within Derivative Works that Youdistribute, alongside or as an addendum to the NOTICE text from the Work, provided that suchadditional attribution notices cannot be construed as modifying the License.
You may add Your own copyright statement to Your modifications and may provide additional ordifferent license terms and conditions for use, reproduction, or distribution of Your modifications,or for any such Derivative Works as a whole, provided Your use, reproduction, and distribution ofthe Work otherwise complies with the conditions stated in this License.
5. Submission of Contributions. Unless You explicitly state otherwise, any Contribution intentionallysubmitted for inclusion in the Work by You to the Licensor shall be under the terms and conditions ofthis License, without any additional terms or conditions. Notwithstanding the above, nothing hereinshall supersede or modify the terms of any separate license agreement you may have executed withLicensor regarding such Contributions.
6. Trademarks. This License does not grant permission to use the trade names, trademarks, servicemarks, or product names of the Licensor, except as required for reasonable and customary use indescribing the origin of the Work and reproducing the content of the NOTICE file.
7. Disclaimer of Warranty. Unless required by applicable law or agreed to in writing, Licensor providesthe Work (and each Contributor provides its Contributions) on an "AS IS" BASIS, WITHOUTWARRANTIES OR CONDITIONS OF ANY KIND, either express or implied, including, withoutlimitation, any warranties or conditions of TITLE, NON-INFRINGEMENT, MERCHANTABILITY, orFITNESS FOR A PARTICULAR PURPOSE. You are solely responsible for determining theappropriateness of using or redistributing the Work and assume any risks associated with Yourexercise of permissions under this License.
8. Limitation of Liability. In no event and under no legal theory, whether in tort (including negligence),contract, or otherwise, unless required by applicable law (such as deliberate and grossly negligentacts) or agreed to in writing, shall any Contributor be liable to You for damages, including any direct,indirect, special, incidental, or consequential damages of any character arising as a result of thisLicense or out of the use or inability to use the Work (including but not limited to damages for loss of
17

goodwill, work stoppage, computer failure or malfunction, or any and all other commercial damagesor losses), even if such Contributor has been advised of the possibility of such damages.
9. Accepting Warranty or Additional Liability. While redistributing the Work or Derivative Works thereof,You may choose to offer, and charge a fee for, acceptance of support, warranty, indemnity, or otherliability obligations and/or rights consistent with this License. However, in accepting such obligations,You may act only on Your own behalf and on Your sole responsibility, not on behalf of any otherContributor, and only if You agree to indemnify, defend, and hold each Contributor harmless for anyliability incurred by, or claims asserted against, such Contributor by reason of your accepting anysuch warranty or additional liability.END OF TERMS AND CONDITIONS
18
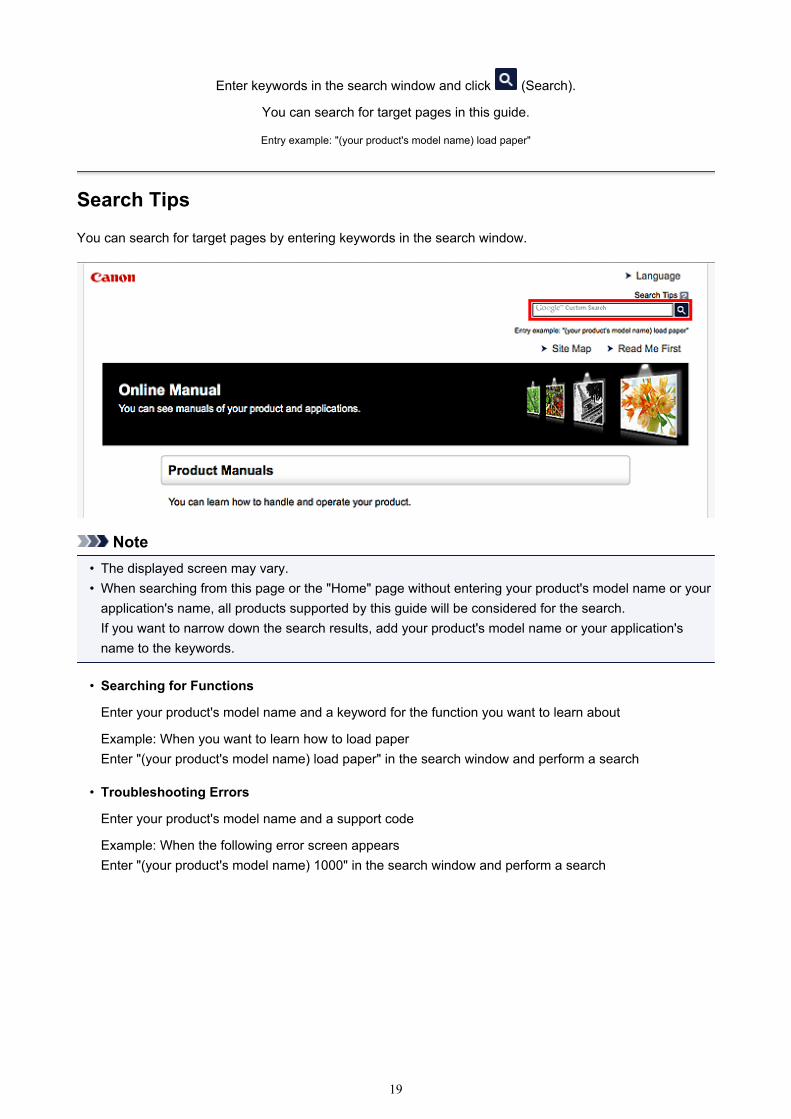
Enter keywords in the search window and click (Search).
You can search for target pages in this guide.
Entry example: "(your product's model name) load paper"
Search Tips
You can search for target pages by entering keywords in the search window.
Note• The displayed screen may vary.• When searching from this page or the "Home" page without entering your product's model name or your
application's name, all products supported by this guide will be considered for the search.If you want to narrow down the search results, add your product's model name or your application'sname to the keywords.
• Searching for Functions
Enter your product's model name and a keyword for the function you want to learn about
Example: When you want to learn how to load paperEnter "(your product's model name) load paper" in the search window and perform a search
• Troubleshooting Errors
Enter your product's model name and a support code
Example: When the following error screen appearsEnter "(your product's model name) 1000" in the search window and perform a search
19
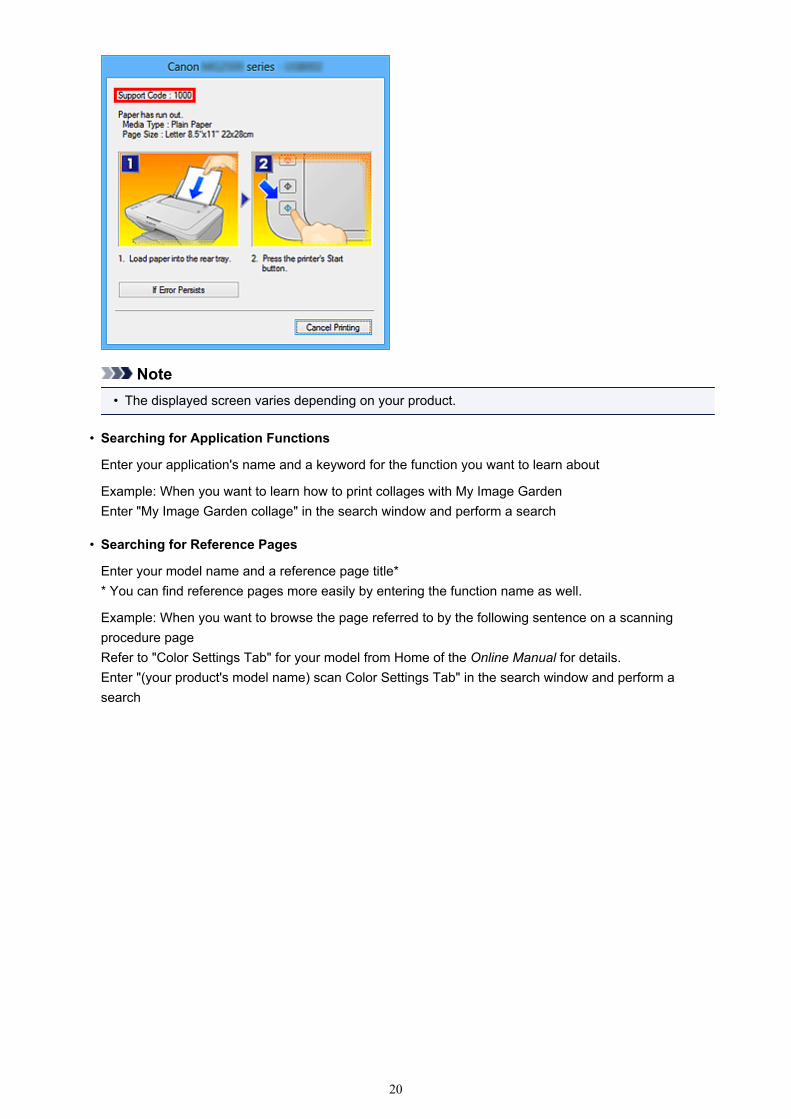
Note• The displayed screen varies depending on your product.
• Searching for Application Functions
Enter your application's name and a keyword for the function you want to learn about
Example: When you want to learn how to print collages with My Image GardenEnter "My Image Garden collage" in the search window and perform a search
• Searching for Reference Pages
Enter your model name and a reference page title** You can find reference pages more easily by entering the function name as well.
Example: When you want to browse the page referred to by the following sentence on a scanningprocedure pageRefer to "Color Settings Tab" for your model from Home of the Online Manual for details.Enter "(your product's model name) scan Color Settings Tab" in the search window and perform asearch
20

Notes on Operation Explanations
In this guide, most of the operations are described based on the windows displayed when Windows 8.1operating system (called Windows 8.1 below) or Windows 8 operating system (called Windows 8 below) isused.
21
Useful Functions Available on the Machine
Print Photos Easily Using My Image Garden
Create and Print Personalized Disc Labels (CD/DVD/BD) Easily and Beautifully
Download a Variety of Content Materials
Print Items with Easy-PhotoPrint+ (Web Application)
Connection Methods Available on the Printer
Print Professional Photos Using Print Studio Pro
Using PIXMA Cloud Link
Printing from AirPrint Compliant Device
Checking Printer Information
Print Easily from a Smartphone or Tablet with PIXMA Printing Solutions
Printing with Windows RT
22
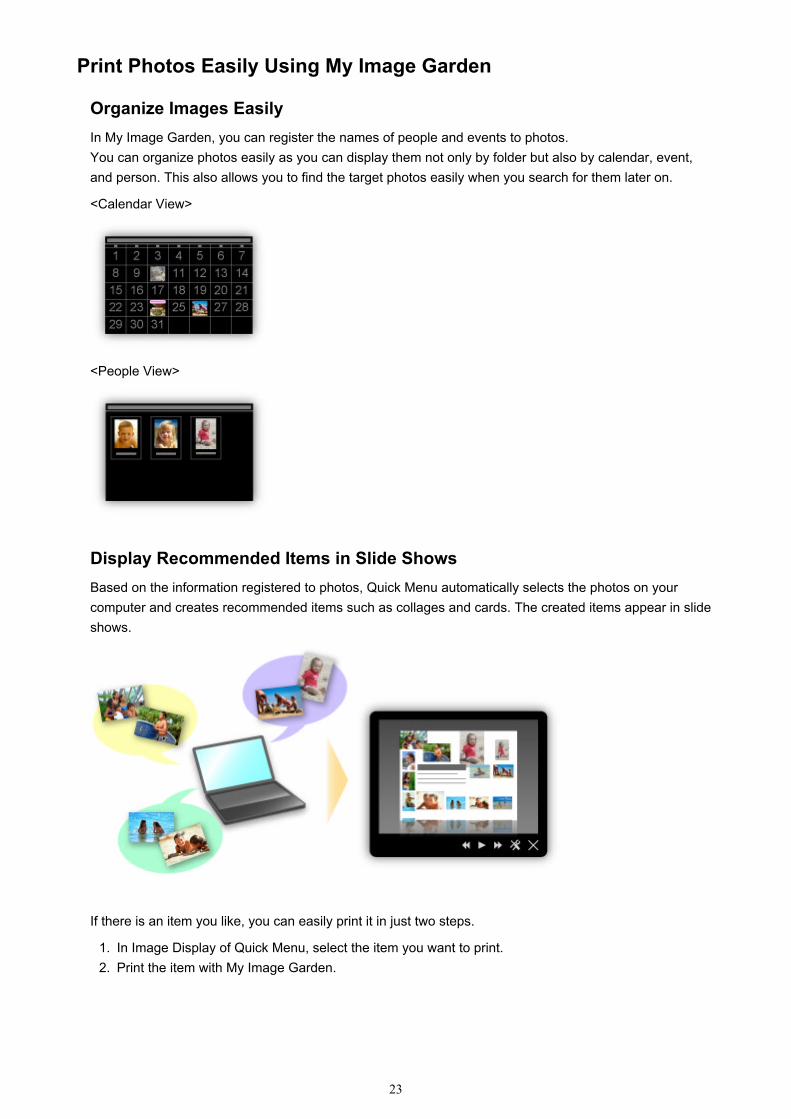
Print Photos Easily Using My Image Garden
Organize Images EasilyIn My Image Garden, you can register the names of people and events to photos.You can organize photos easily as you can display them not only by folder but also by calendar, event,and person. This also allows you to find the target photos easily when you search for them later on.
<Calendar View>
<People View>
Display Recommended Items in Slide ShowsBased on the information registered to photos, Quick Menu automatically selects the photos on yourcomputer and creates recommended items such as collages and cards. The created items appear in slideshows.
If there is an item you like, you can easily print it in just two steps.
1. In Image Display of Quick Menu, select the item you want to print.2. Print the item with My Image Garden.
23
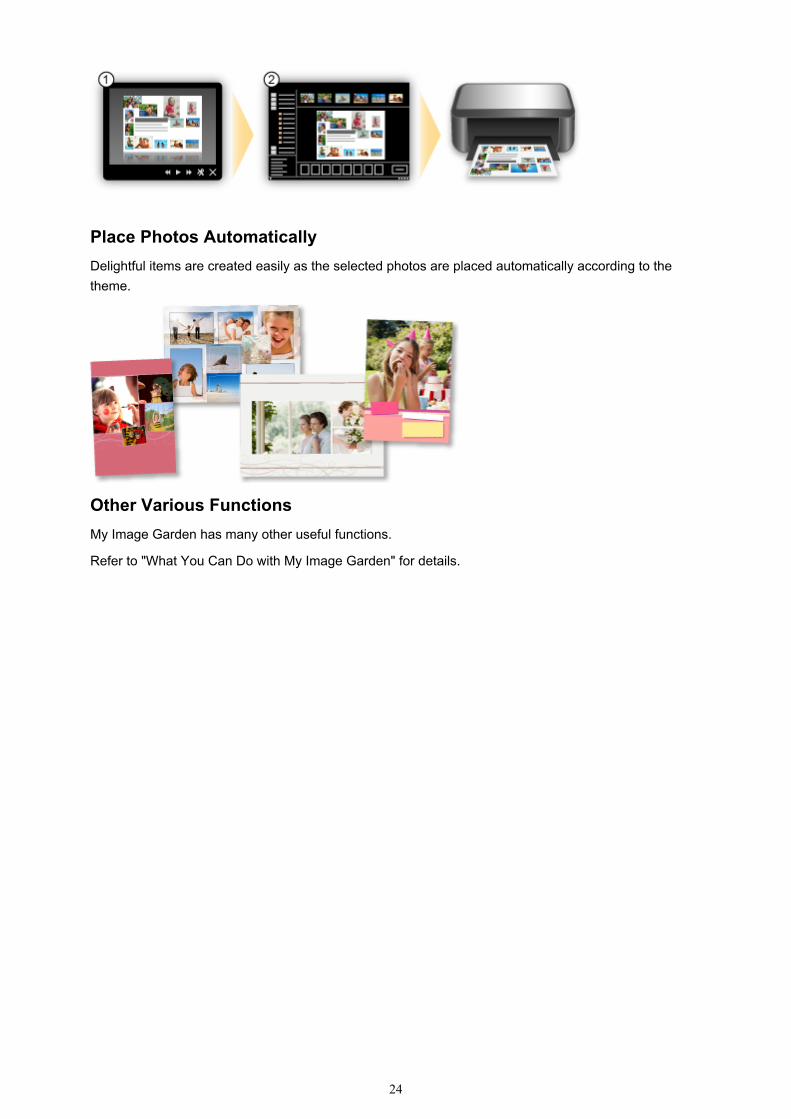
Place Photos AutomaticallyDelightful items are created easily as the selected photos are placed automatically according to thetheme.
Other Various FunctionsMy Image Garden has many other useful functions.
Refer to "What You Can Do with My Image Garden" for details.
24
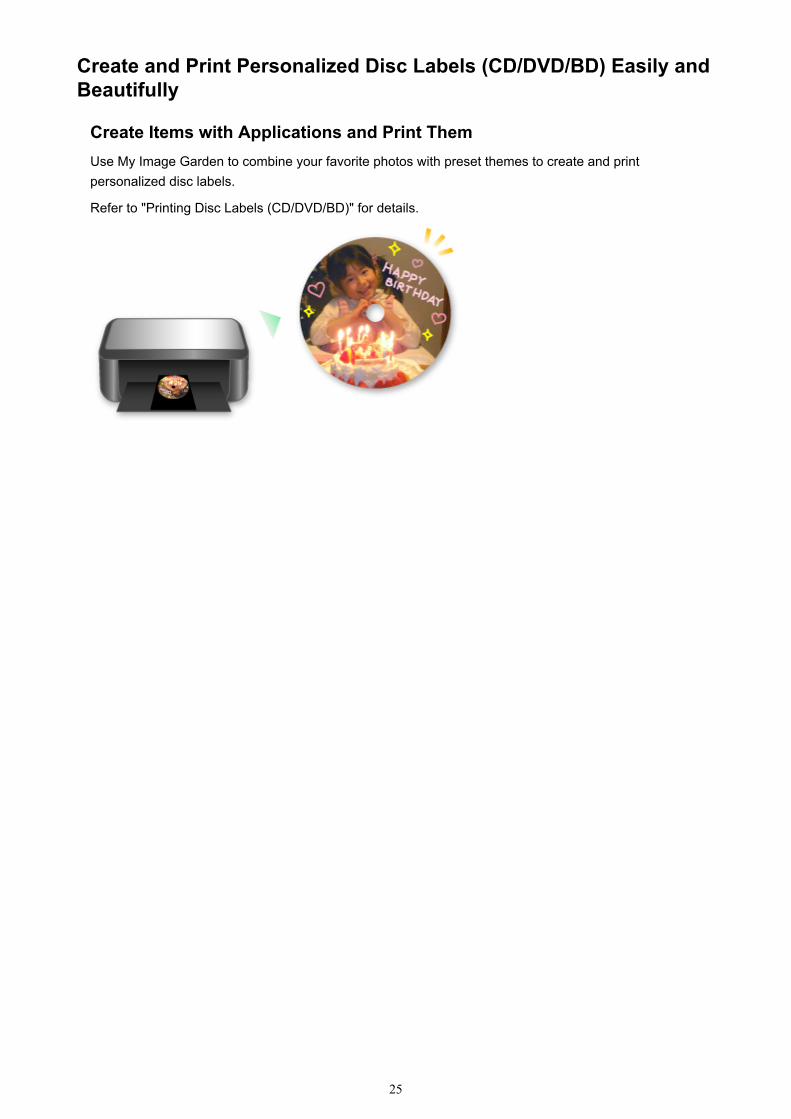
Create and Print Personalized Disc Labels (CD/DVD/BD) Easily andBeautifully
Create Items with Applications and Print ThemUse My Image Garden to combine your favorite photos with preset themes to create and printpersonalized disc labels.
Refer to "Printing Disc Labels (CD/DVD/BD)" for details.
25
Download a Variety of Content Materials
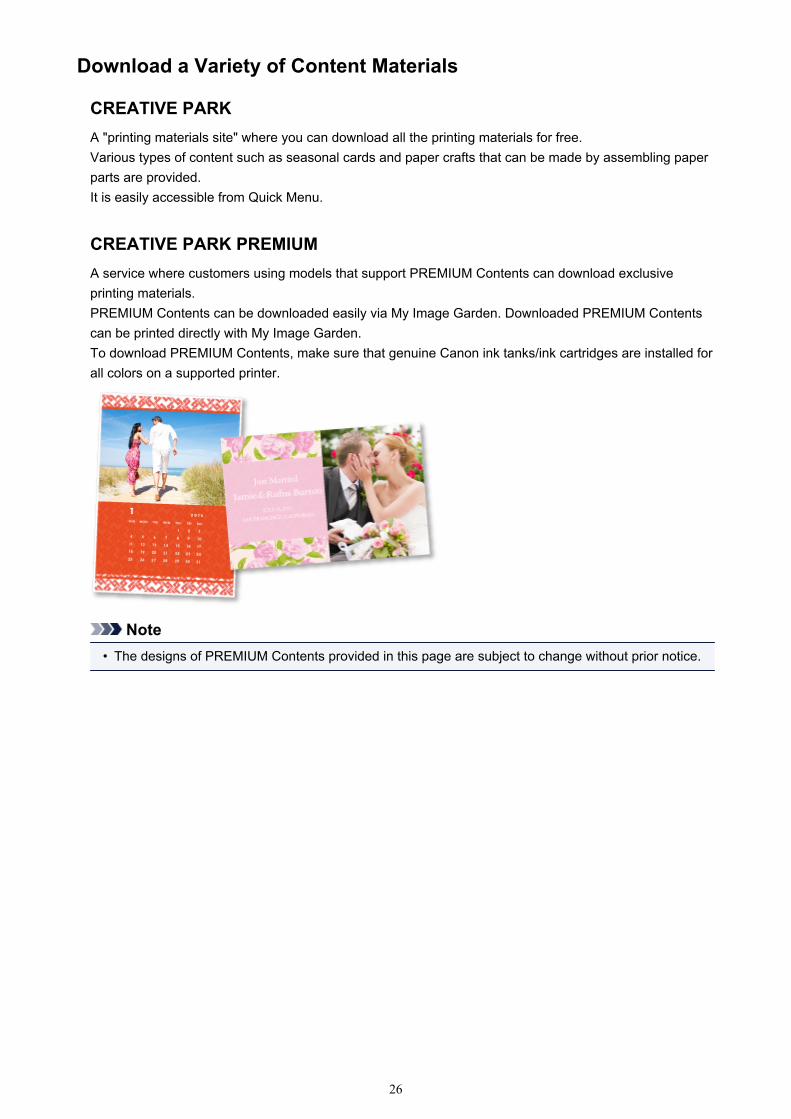
CREATIVE PARKA "printing materials site" where you can download all the printing materials for free.Various types of content such as seasonal cards and paper crafts that can be made by assembling paperparts are provided.It is easily accessible from Quick Menu.
CREATIVE PARK PREMIUMA service where customers using models that support PREMIUM Contents can download exclusiveprinting materials.PREMIUM Contents can be downloaded easily via My Image Garden. Downloaded PREMIUM Contentscan be printed directly with My Image Garden.To download PREMIUM Contents, make sure that genuine Canon ink tanks/ink cartridges are installed forall colors on a supported printer.
Note• The designs of PREMIUM Contents provided in this page are subject to change without prior notice.
26
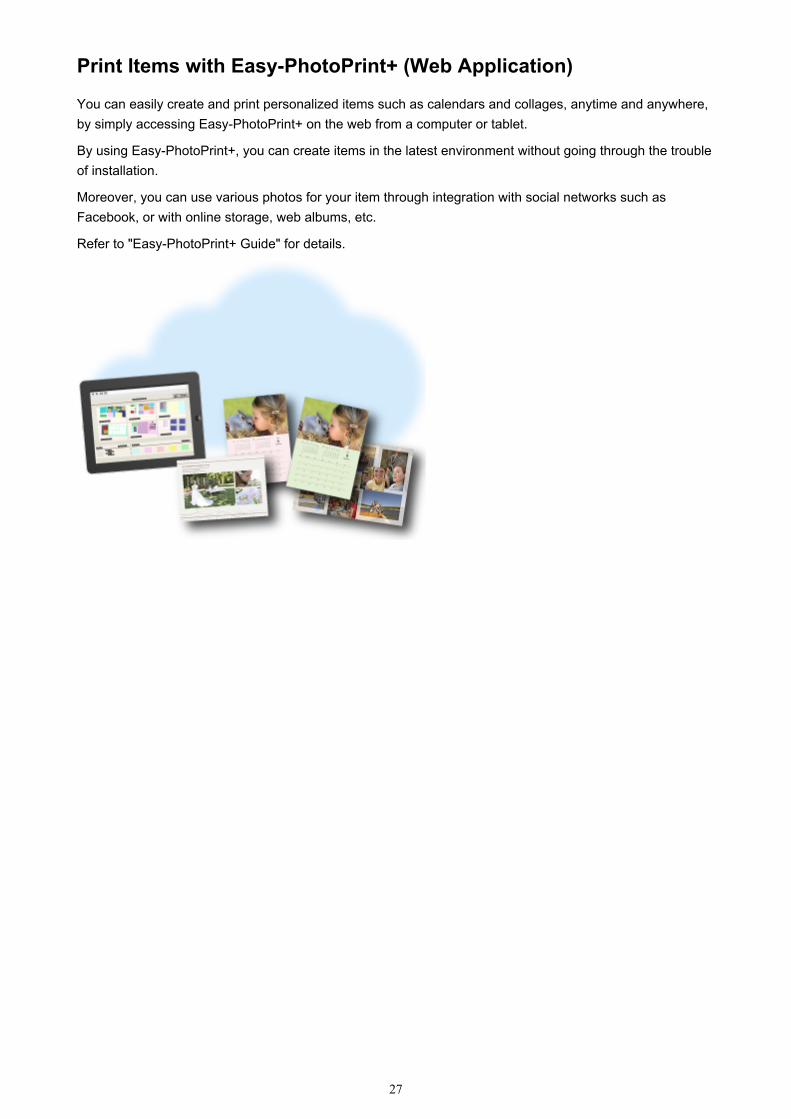
Print Items with Easy-PhotoPrint+ (Web Application)
You can easily create and print personalized items such as calendars and collages, anytime and anywhere,by simply accessing Easy-PhotoPrint+ on the web from a computer or tablet.
By using Easy-PhotoPrint+, you can create items in the latest environment without going through the troubleof installation.
Moreover, you can use various photos for your item through integration with social networks such asFacebook, or with online storage, web albums, etc.
Refer to "Easy-PhotoPrint+ Guide" for details.
27
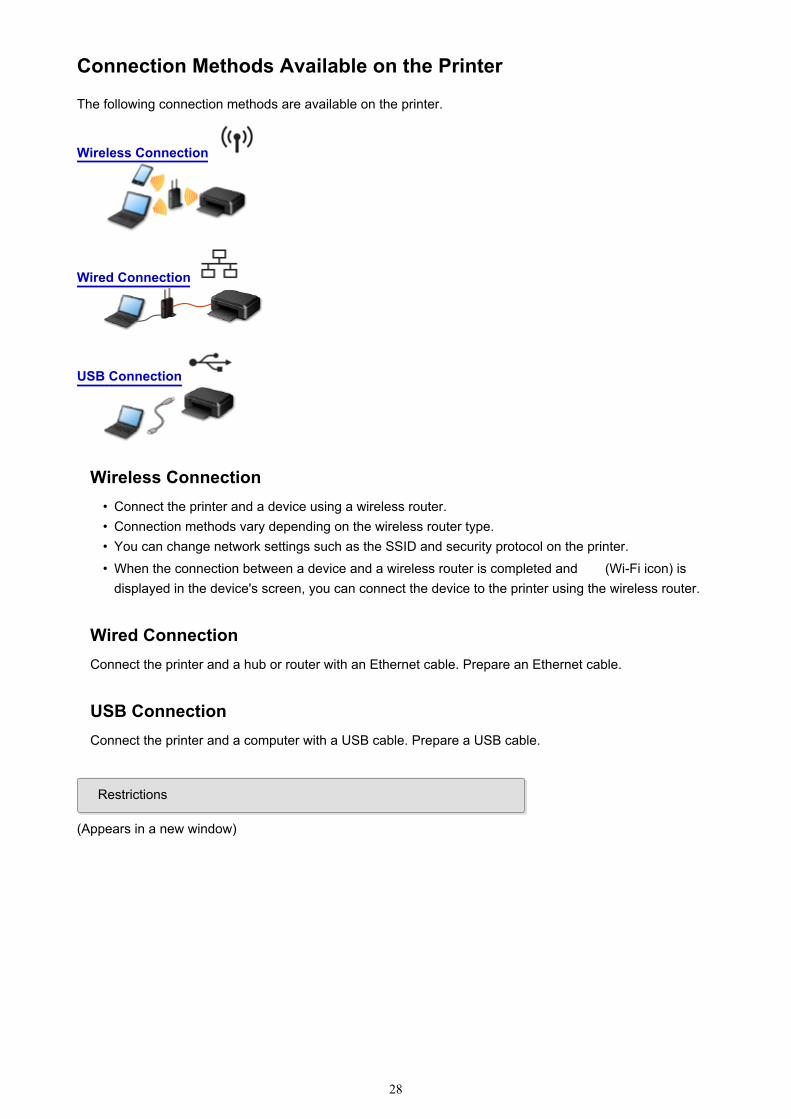
Connection Methods Available on the Printer
The following connection methods are available on the printer.
Wireless Connection
Wired Connection
USB Connection
Wireless Connection• Connect the printer and a device using a wireless router.• Connection methods vary depending on the wireless router type.• You can change network settings such as the SSID and security protocol on the printer.• When the connection between a device and a wireless router is completed and (Wi-Fi icon) is
displayed in the device's screen, you can connect the device to the printer using the wireless router.
Wired ConnectionConnect the printer and a hub or router with an Ethernet cable. Prepare an Ethernet cable.
USB ConnectionConnect the printer and a computer with a USB cable. Prepare a USB cable.
Restrictions
(Appears in a new window)
28
Restrictions
Connection Using a Wired Network cannot be performed on printers that do not support a wired connection.
Connection Using a Wireless Router• This printer cannot be used over wireless and wired connections at the same time.• Make sure that a device and a wireless router are connected. For details on how to check the
settings, refer to the manual supplied with the wireless router or contact its manufacturer.As for a device already connected to the printer without using a wireless router, reconnect it via awireless router.
• The configuration, router functions, setup procedures and security settings of the network device varydepending on your system environment. For details, refer to the manual of your network device orcontact its manufacturer.
• Check if your device supports IEEE802.11n (2.4 GHz), IEEE802.11g or IEEE802.11b.• If your device is set to the "IEEE802.11n only" mode, WEP or TKIP cannot be used as a security
protocol. Change the security protocol for your device to something other than WEP and TKIP orchange the setting to something other than "IEEE802.11n only."The connection between your device and the wireless router will be temporarily disabled whilechanging the setting. Do not operate the screen of this guide until the setup is complete.
• For office use, consult your network administrator.• Take added care when connecting to a network that is not protected with security measures, as there
is a risk of disclosing data such as your personal information to a third party.
Connection Using a Wired Network• This printer cannot be used over wireless and wired connections at the same time.• When using a router, connect the printer and a device to the LAN side (same network segment).
29

Print Professional Photos Using Print Studio Pro
Print Studio Pro is a plug-in that makes professional photo printing easier and more convenient.
In addition to printing bordered photos and borderless photos, you can perform various printing tasks suchas index printing, grayscale printing and printing using ICC profiles.
You can also adjust the margins or add text.
Print Studio Pro has many other useful functions.
Refer to "What You Can Do with Print Studio Pro" for details.
30
Notice for Web Service Printing
When Using Web Service• Canon does not guarantee the continuity and reliability of the web services provided, the availability of
site access, or permission to download the materials.• Canon may at any time update, change, or delete the information provided through the web service,
or may suspend or discontinue the service without prior notice. Canon shall not be held responsiblefor any damages resulting from such actions.
• In no event shall Canon be liable for any damages whatsoever resulting from the use of the webservices.
• User registration is necessary before using the photo sharing site.When you use the photo sharing site, observe the conditions of use of the site and use the servicewithin your own responsibility.
• All or part of the web service may not be available depending on the country or region you live in.• Depending on your network environment, some functions on web service are not available. Even if
they are available, it may take a while to print or display the contents, or communication may beinterrupted while operation is in progress.
• When you use web service, your machine's name, information of your region or country, your selectedlanguage, and what kind of service you use (e.g. photo sharing site) are sent to and saved in ourserver. Canon is unable to identify specific customers using this information.
• Your login name and password for the photo sharing site are saved in the machine's memory (notencrypted).If you hand over the machine to anyone or dispose of it, delete your login name and password fromthe machine's memory in advance.
• The account information will be sent to Canon Inc. server (located in Japan), then forwarded to theservice provider's server.
• Canon handles your account information as follows:
◦ Your account information will be used in personal identification process of the selected service.◦ Canon will not provide your account information to any third party without your consent, except for
sending to the service provider or providing based on laws and regulations.◦ After the conclusion of non-disclosure agreement, Canon may deposit your account information to
the contractor to achieve the purpose of use.◦ Canon endeavors to secure the safety of your account information.◦ It is at your option to enter and send your account information. However, the service that requires
to enter your account information is not available unless you enter and send it.◦ Your account information does not remain in Canon Inc. server. At the latest, it will be deleted
when you have disconnected your printer from LAN.◦ For details, contact a Canon-authorized sales representative in the country or region you live in.
Copyrights and Rights of Publicity
When printing from the photo sharing site:
• Observe the conditions of use of the photo sharing site when you use photos on the site.• It is unlawful to reproduce or edit the copyrighted work of another person without permission from the
copyright holder, except for personal use, use within the home, or other use within the limited scopeas defined by the copyright. Additionally, reproducing or editing photographs of people may infringeon Rights of Publicity.
31

When printing downloaded template forms:
1. The copyright of each material (photos, illustrations, logos, or documents: hereinafter referred to as"the materials") provided on the web template printing service belongs to their respective owners.Issues pertaining to Rights of Publicity may arise regarding the use of any of people or charactersdisplayed on the web template printing service.
Except as otherwise permitted (please see "2" below), copying, modifying or distributing all or aportion of any of the materials contained on the web template printing service without prior consent ofthe respective rights (Rights of Publicity and Copyright) holder is strictly prohibited.
2. All of the materials provided on the web template printing service can be freely used for personal andnon-commercial purposes.
32

Using PIXMA Cloud Link
By using PIXMA Cloud Link, you can connect your printer to a cloud service, such as CANON iMAGEGATEWAY, Evernote, or Twitter, and use the following functions without using a computer:
• Print images from a photo-sharing service• Print documents from a data management service• Use Twitter to report the printer status, such as no paper or low ink levels.
In addition, you can use various functions by adding and registering apps that are linked with various cloudservices.
Using PIXMA Cloud Link from Your Smartphone, Tablet, or Computer
Important• In certain countries, PIXMA Cloud Link may not be available or the available apps may be different.• Some apps require that you have an account before you use those apps. For such apps, please set up
an account beforehand.• To find out which models support PIXMA Cloud Link check the Canon homepage.• The screen display may change without prior notice.
33
Using PIXMA Cloud Link from Your Smartphone, Tablet, orComputer
Before Using Canon Inkjet Cloud Printing Center
Preparations Before Using Canon Inkjet Cloud Printing Center
Using Canon Inkjet Cloud Printing Center
Adding a Printer
Adding a PIXMA Cloud Link User
Troubleshooting Canon Inkjet Cloud Printing Center
34
Before Using Canon Inkjet Cloud Printing Center
Canon Inkjet Cloud Printing Center is a service that links with the cloud function of the printer and allows youto perform operations such as registering and managing apps from your smartphone or tablet device, andchecking the print status, print error, and ink status of the printer. You can also print app photos anddocuments from your smartphone or tablet.
First, check the following content:
• Precautions
If you plan to use the web service to print documents, be sure to check these precautions beforehand.
• Printer specification
Check that Canon Inkjet Cloud Printing Center supports the printer.
• Network environment
The printer must be connected to a LAN and to the Internet.
Important• The user will bear the cost of Internet access.
• Operating requirements
For computers, smartphones, and tablet devices, see "Requirements for Canon Inkjet Cloud PrintingCenter operation".
Important• This service may not be available in certain countries or regions. Also even if the service is available,
there are apps that cannot be used in certain regions.
Preparations Before Using Canon Inkjet Cloud Printing Center
35
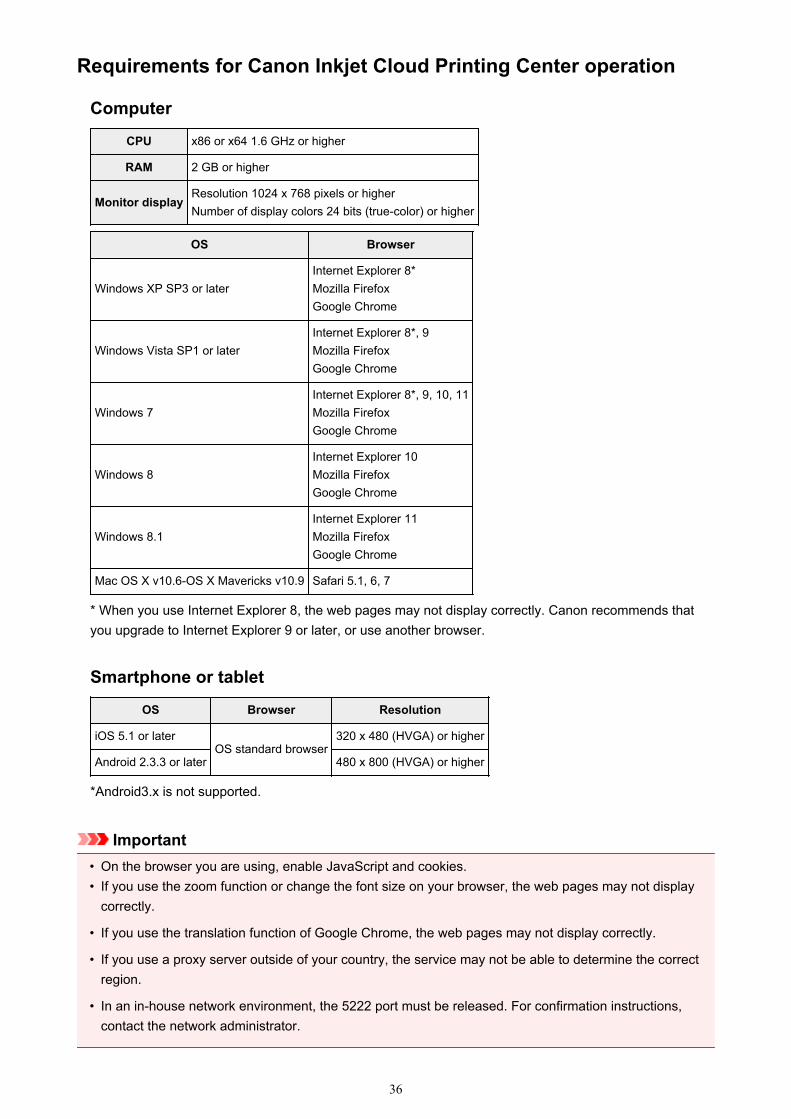
Requirements for Canon Inkjet Cloud Printing Center operation
Computer
CPU x86 or x64 1.6 GHz or higher
RAM 2 GB or higher
Monitor displayResolution 1024 x 768 pixels or higherNumber of display colors 24 bits (true-color) or higher
OS Browser
Windows XP SP3 or laterInternet Explorer 8*Mozilla FirefoxGoogle Chrome
Windows Vista SP1 or laterInternet Explorer 8*, 9Mozilla FirefoxGoogle Chrome
Windows 7Internet Explorer 8*, 9, 10, 11Mozilla FirefoxGoogle Chrome
Windows 8Internet Explorer 10Mozilla FirefoxGoogle Chrome
Windows 8.1Internet Explorer 11Mozilla FirefoxGoogle Chrome
Mac OS X v10.6-OS X Mavericks v10.9 Safari 5.1, 6, 7
* When you use Internet Explorer 8, the web pages may not display correctly. Canon recommends thatyou upgrade to Internet Explorer 9 or later, or use another browser.
Smartphone or tablet
OS Browser Resolution
iOS 5.1 or laterOS standard browser
320 x 480 (HVGA) or higher
Android 2.3.3 or later 480 x 800 (HVGA) or higher
*Android3.x is not supported.
Important• On the browser you are using, enable JavaScript and cookies.• If you use the zoom function or change the font size on your browser, the web pages may not display
correctly.
• If you use the translation function of Google Chrome, the web pages may not display correctly.
• If you use a proxy server outside of your country, the service may not be able to determine the correctregion.
• In an in-house network environment, the 5222 port must be released. For confirmation instructions,contact the network administrator.
36
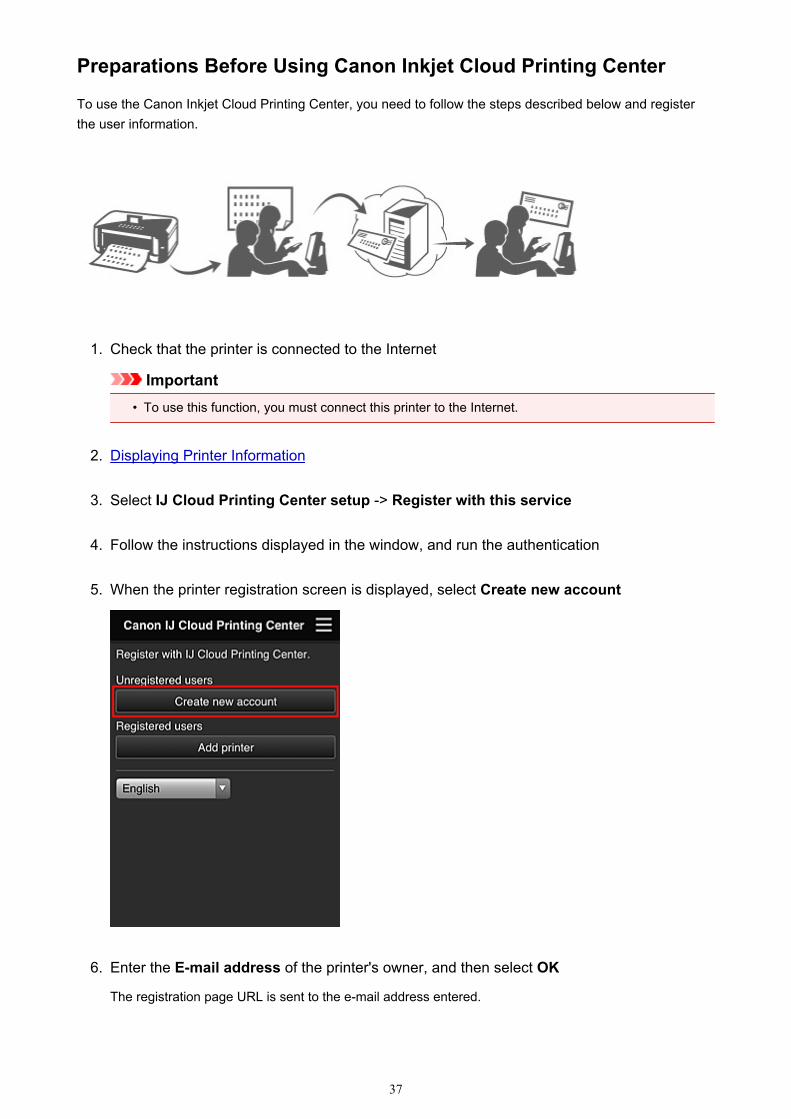
Preparations Before Using Canon Inkjet Cloud Printing Center
To use the Canon Inkjet Cloud Printing Center, you need to follow the steps described below and registerthe user information.
1. Check that the printer is connected to the Internet
Important• To use this function, you must connect this printer to the Internet.
2. Displaying Printer Information
3. Select IJ Cloud Printing Center setup -> Register with this service
4. Follow the instructions displayed in the window, and run the authentication
5. When the printer registration screen is displayed, select Create new account
6. Enter the E-mail address of the printer's owner, and then select OK
The registration page URL is sent to the e-mail address entered.
37

Important• There are character restrictions for the e-mail address, as shown below.
• Up to 255 characters consisting of single-byte alphanumeric characters and symbols (!$'*/^_{}|~.-@). (Uppercase and lowercase letters are differentiated.)
• Multibyte characters cannot be used.You will get an error if the e-mail address you enter contains a character that cannot be used.
• If you registered a different e-mail address by mistake, you can cancel the registration byDisplaying Printer Information and selecting IJ Cloud Printing Center setup -> Delete from thisservice.
• You may not be able to receive the notification if you are using a spam filter. If you have a settingto receive only the e-mails from certain domains, be sure to change the setting to allow receivinge-mails from "[email protected]".There will be no error display even if you could not receive the e-mail because of the spam filtersetting or if you entered an incorrect e-mail address.
7. When an e-mail with the subject "Information on Canon Inkjet Cloud Printing Center" is sentto the e-mail address that you entered, select the URL
8. In the License agreement and Privacy statement windows of Canon Inkjet Cloud PrintingCenter, read the statements, and select Agree if you agree
38
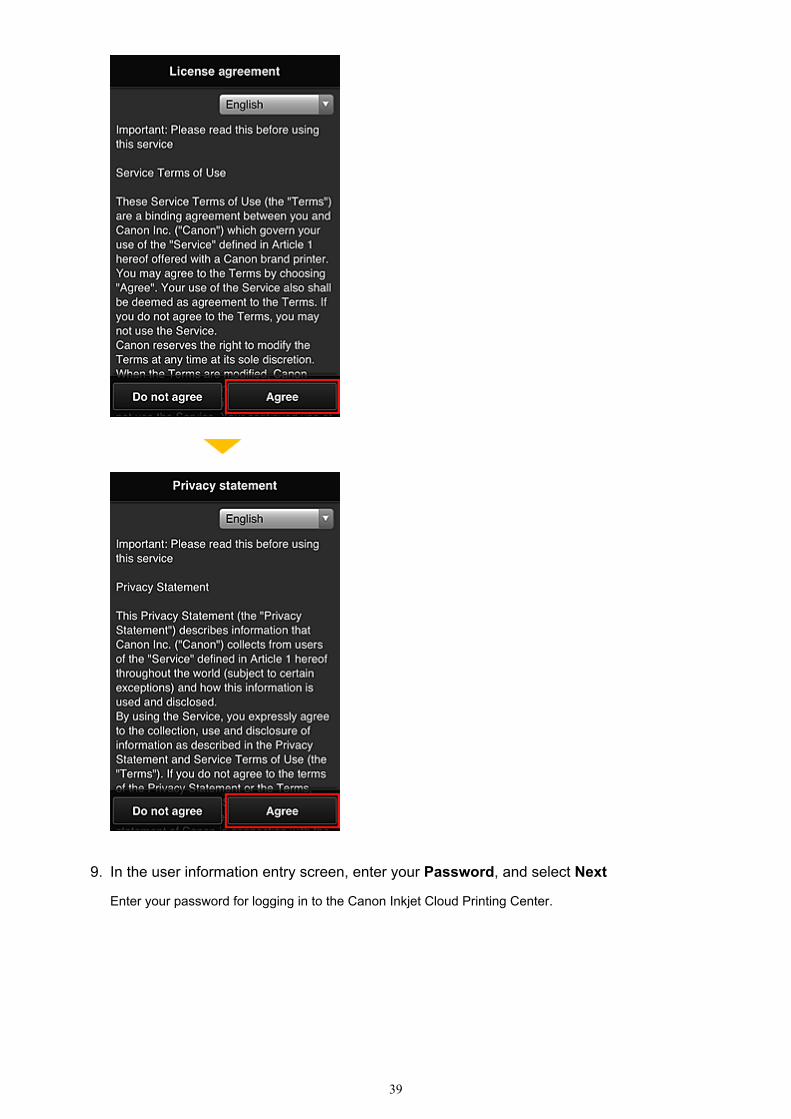
9. In the user information entry screen, enter your Password, and select Next
Enter your password for logging in to the Canon Inkjet Cloud Printing Center.
39
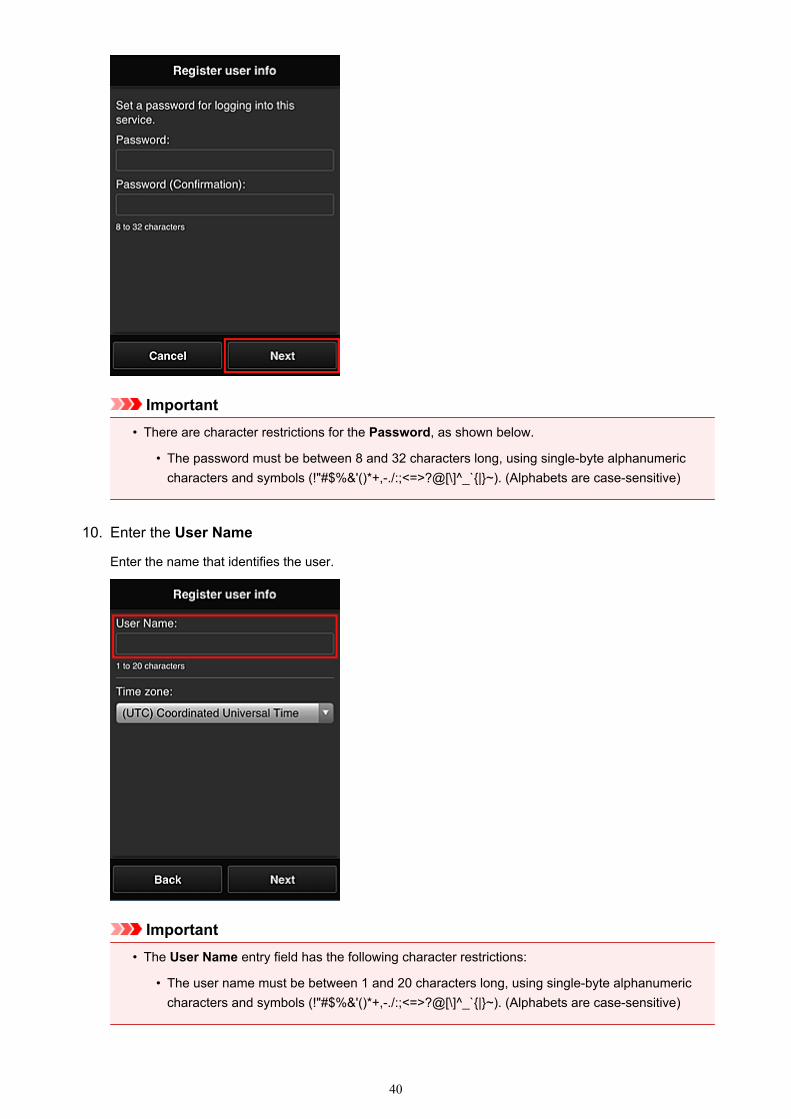
Important• There are character restrictions for the Password, as shown below.
• The password must be between 8 and 32 characters long, using single-byte alphanumericcharacters and symbols (!"#$%&'()*+,-./:;<=>?@[\]^_`{|}~). (Alphabets are case-sensitive)
10. Enter the User Name
Enter the name that identifies the user.
Important• The User Name entry field has the following character restrictions:
• The user name must be between 1 and 20 characters long, using single-byte alphanumericcharacters and symbols (!"#$%&'()*+,-./:;<=>?@[\]^_`{|}~). (Alphabets are case-sensitive)
40
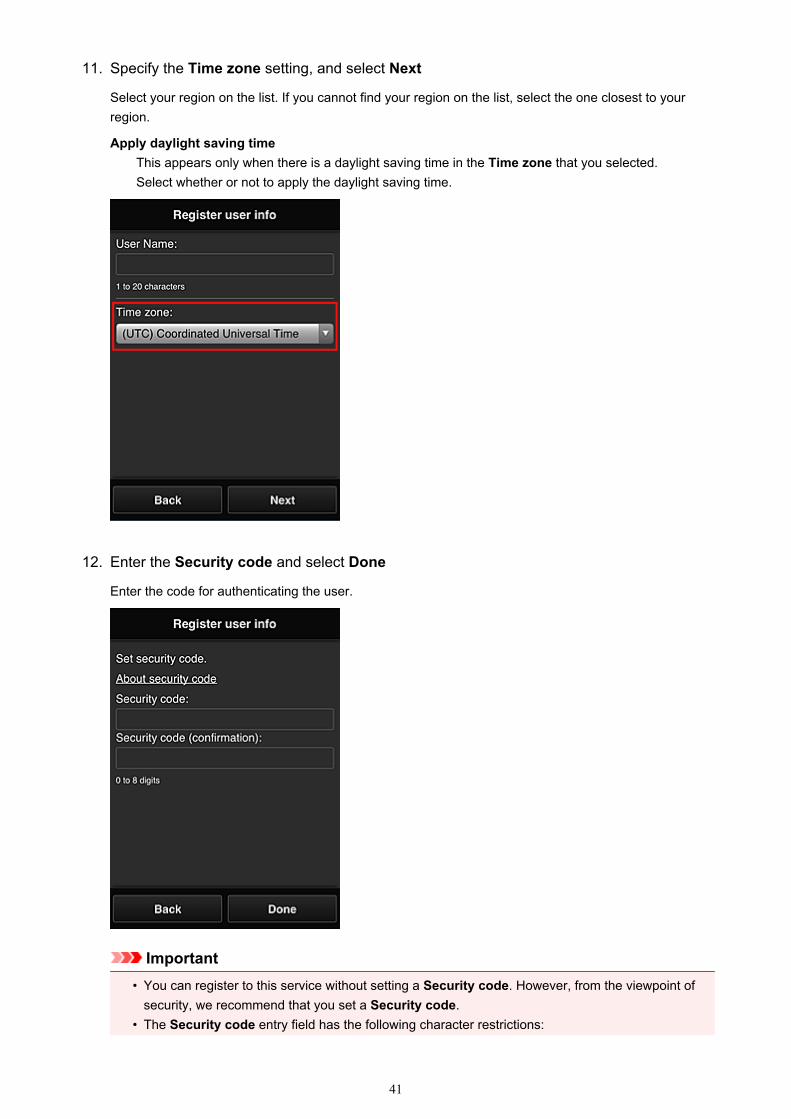
11. Specify the Time zone setting, and select Next
Select your region on the list. If you cannot find your region on the list, select the one closest to yourregion.
Apply daylight saving timeThis appears only when there is a daylight saving time in the Time zone that you selected.Select whether or not to apply the daylight saving time.
12. Enter the Security code and select Done
Enter the code for authenticating the user.
Important• You can register to this service without setting a Security code. However, from the viewpoint of
security, we recommend that you set a Security code.• The Security code entry field has the following character restrictions:
41

• Up to 8 single-byte numbers
The registration is complete. A registration completion message is displayed.When you select the OK button in the message, the login screen is displayed.
Enter the registered e-mail address and password, and log in to the Canon Inkjet Cloud Printing Center.
Using Canon Inkjet Cloud Printing Center
42
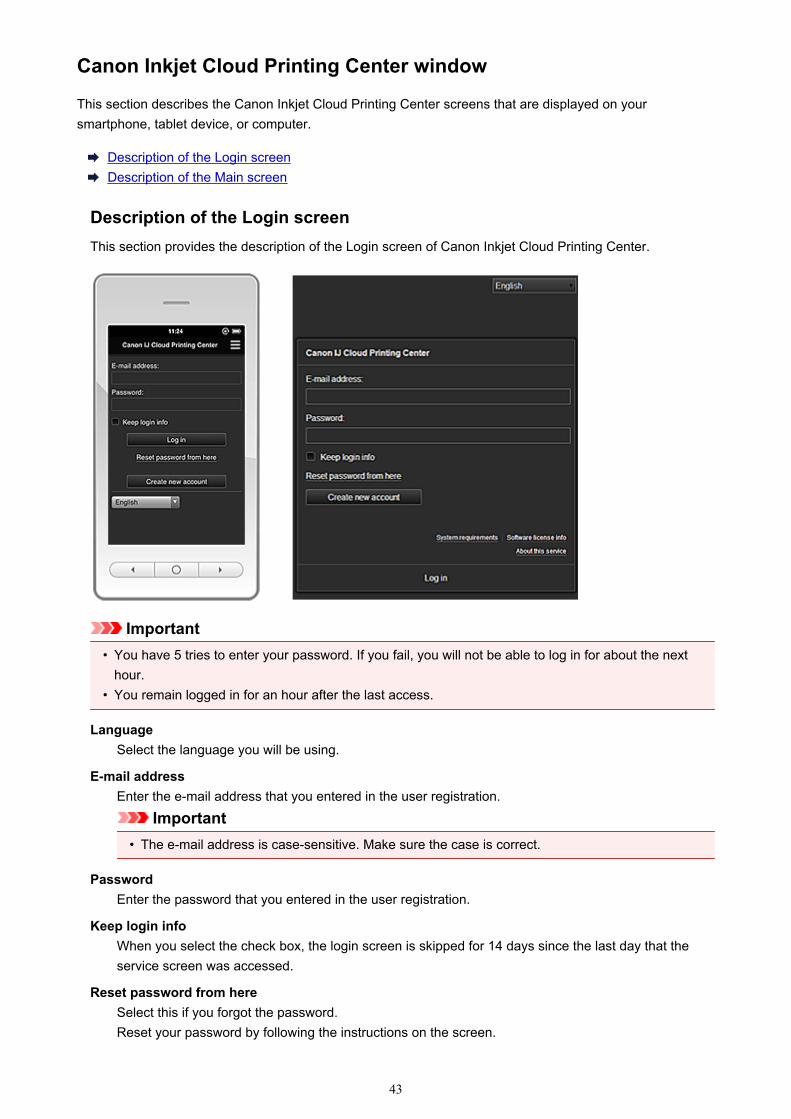
Canon Inkjet Cloud Printing Center window
This section describes the Canon Inkjet Cloud Printing Center screens that are displayed on yoursmartphone, tablet device, or computer.
Description of the Login screenDescription of the Main screen
Description of the Login screenThis section provides the description of the Login screen of Canon Inkjet Cloud Printing Center.
Important• You have 5 tries to enter your password. If you fail, you will not be able to log in for about the next
hour.• You remain logged in for an hour after the last access.
LanguageSelect the language you will be using.
E-mail addressEnter the e-mail address that you entered in the user registration.
Important• The e-mail address is case-sensitive. Make sure the case is correct.
PasswordEnter the password that you entered in the user registration.
Keep login infoWhen you select the check box, the login screen is skipped for 14 days since the last day that theservice screen was accessed.
Reset password from hereSelect this if you forgot the password.Reset your password by following the instructions on the screen.
43

Create new accountA new registration will be added to the Canon Inkjet Cloud Printing Center.
System requirementsThis displays the system requirements for the Canon Inkjet Cloud Printing Center.
Software license infoThe licensing information of Canon Inkjet Cloud Printing Center is displayed.
About this serviceThis displays the descriptions of this service.
Description of the Main screenWhen you log in to the Canon Inkjet Cloud Printing Center, the Main screen appears.
Important• With this service, the functions available to Standard user of the printer are different from those
available to the printer Administrator.Standard user can only use the functions marked by an asterisk (*).
You can use areas shown below to start*, add, and manage apps.If you are using a smartphone or a tablet, you can also print photos and documents.
If you are using a smartphone or tabletIf you are using a PC
If you are using a smartphone or tablet
(1) Left context menu(2) Printer name area(3) Right context menu(4) Display area
44
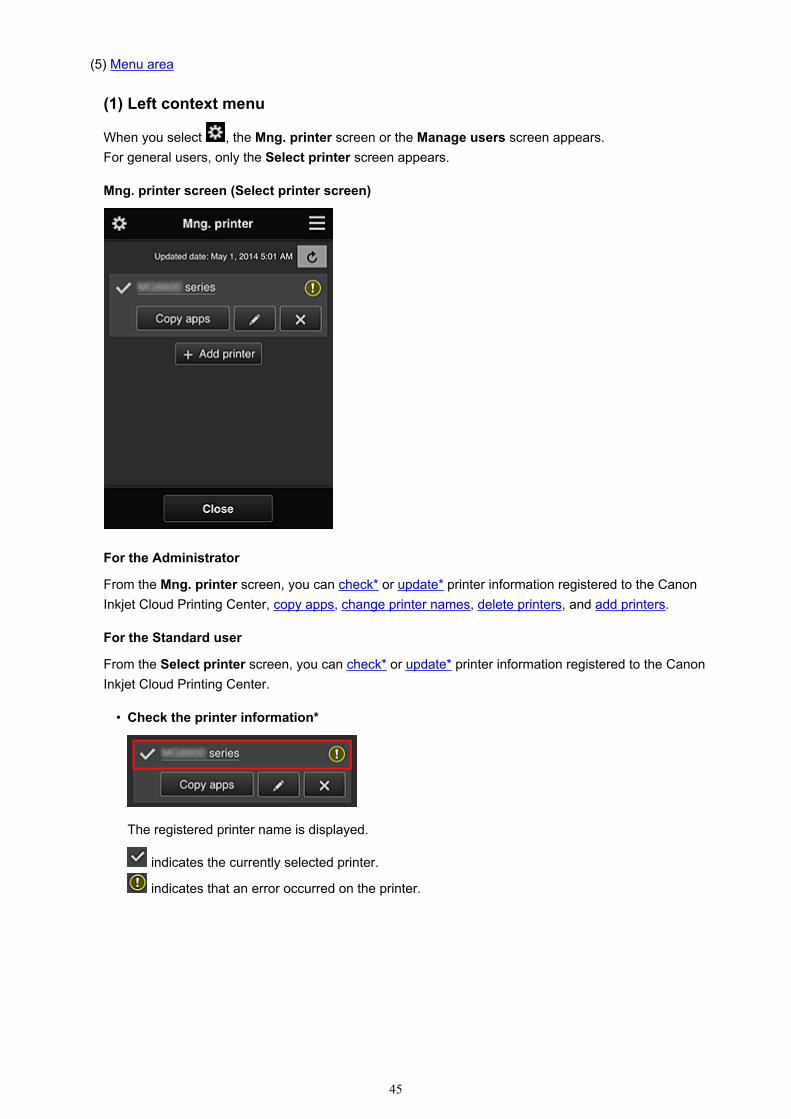
(5) Menu area
(1) Left context menu
When you select , the Mng. printer screen or the Manage users screen appears.For general users, only the Select printer screen appears.
Mng. printer screen (Select printer screen)
For the Administrator
From the Mng. printer screen, you can check* or update* printer information registered to the CanonInkjet Cloud Printing Center, copy apps, change printer names, delete printers, and add printers.
For the Standard user
From the Select printer screen, you can check* or update* printer information registered to the CanonInkjet Cloud Printing Center.
• Check the printer information*
The registered printer name is displayed.
indicates the currently selected printer.
indicates that an error occurred on the printer.
45
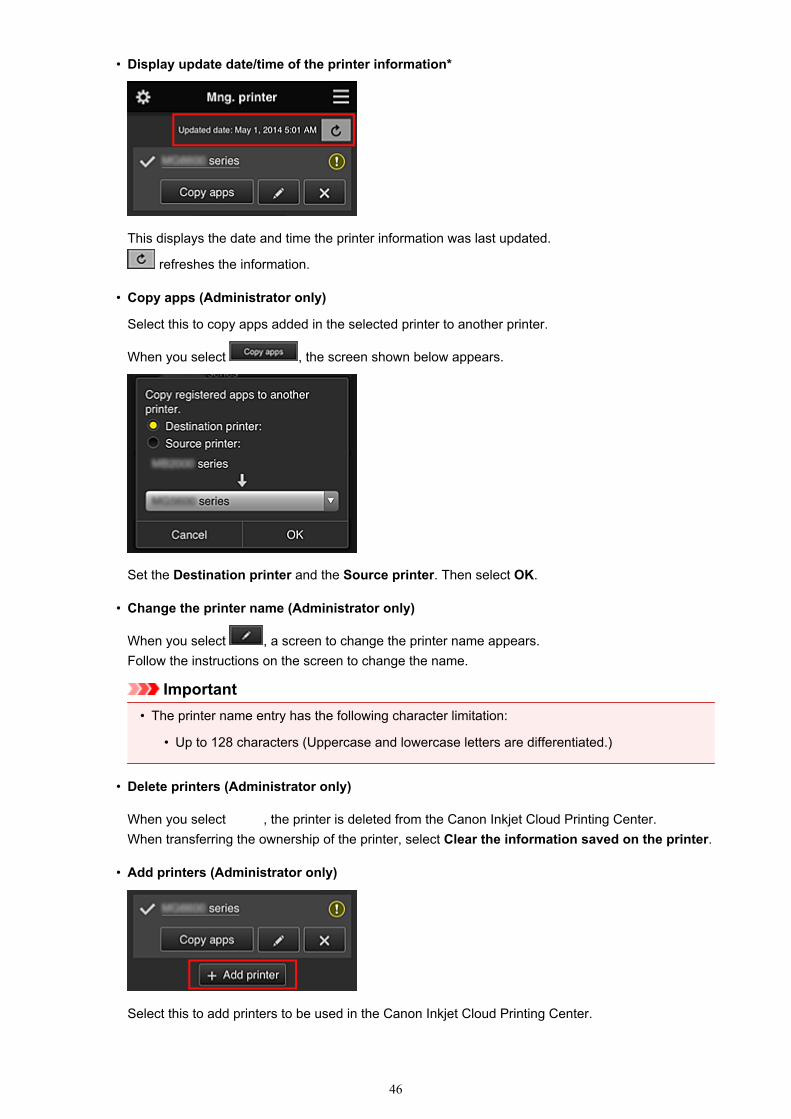
• Display update date/time of the printer information*
This displays the date and time the printer information was last updated.
refreshes the information.
• Copy apps (Administrator only)
Select this to copy apps added in the selected printer to another printer.
When you select , the screen shown below appears.
Set the Destination printer and the Source printer. Then select OK.
• Change the printer name (Administrator only)
When you select , a screen to change the printer name appears.Follow the instructions on the screen to change the name.
Important• The printer name entry has the following character limitation:
• Up to 128 characters (Uppercase and lowercase letters are differentiated.)
• Delete printers (Administrator only)
When you select , the printer is deleted from the Canon Inkjet Cloud Printing Center.When transferring the ownership of the printer, select Clear the information saved on the printer.
• Add printers (Administrator only)
Select this to add printers to be used in the Canon Inkjet Cloud Printing Center.
46
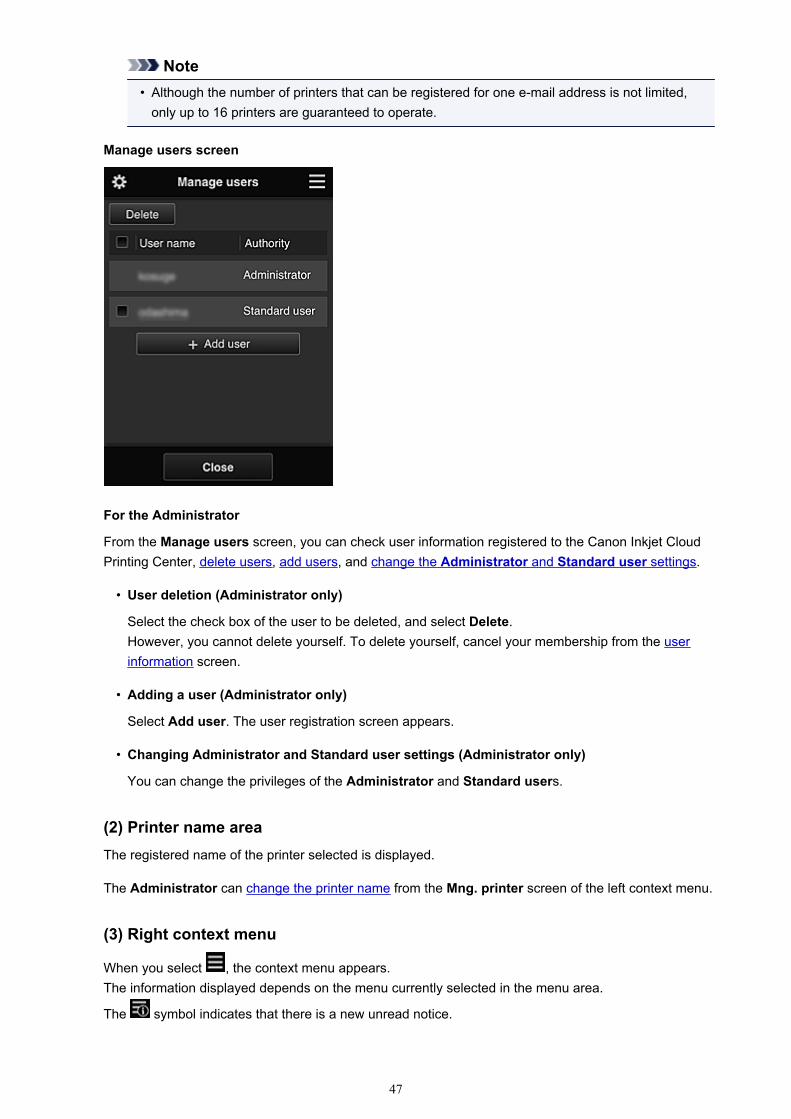
Note• Although the number of printers that can be registered for one e-mail address is not limited,
only up to 16 printers are guaranteed to operate.
Manage users screen
For the Administrator
From the Manage users screen, you can check user information registered to the Canon Inkjet CloudPrinting Center, delete users, add users, and change the Administrator and Standard user settings.
• User deletion (Administrator only)
Select the check box of the user to be deleted, and select Delete.However, you cannot delete yourself. To delete yourself, cancel your membership from the userinformation screen.
• Adding a user (Administrator only)
Select Add user. The user registration screen appears.
• Changing Administrator and Standard user settings (Administrator only)
You can change the privileges of the Administrator and Standard users.
(2) Printer name areaThe registered name of the printer selected is displayed.
The Administrator can change the printer name from the Mng. printer screen of the left context menu.
(3) Right context menu
When you select , the context menu appears.The information displayed depends on the menu currently selected in the menu area.
The symbol indicates that there is a new unread notice.
47
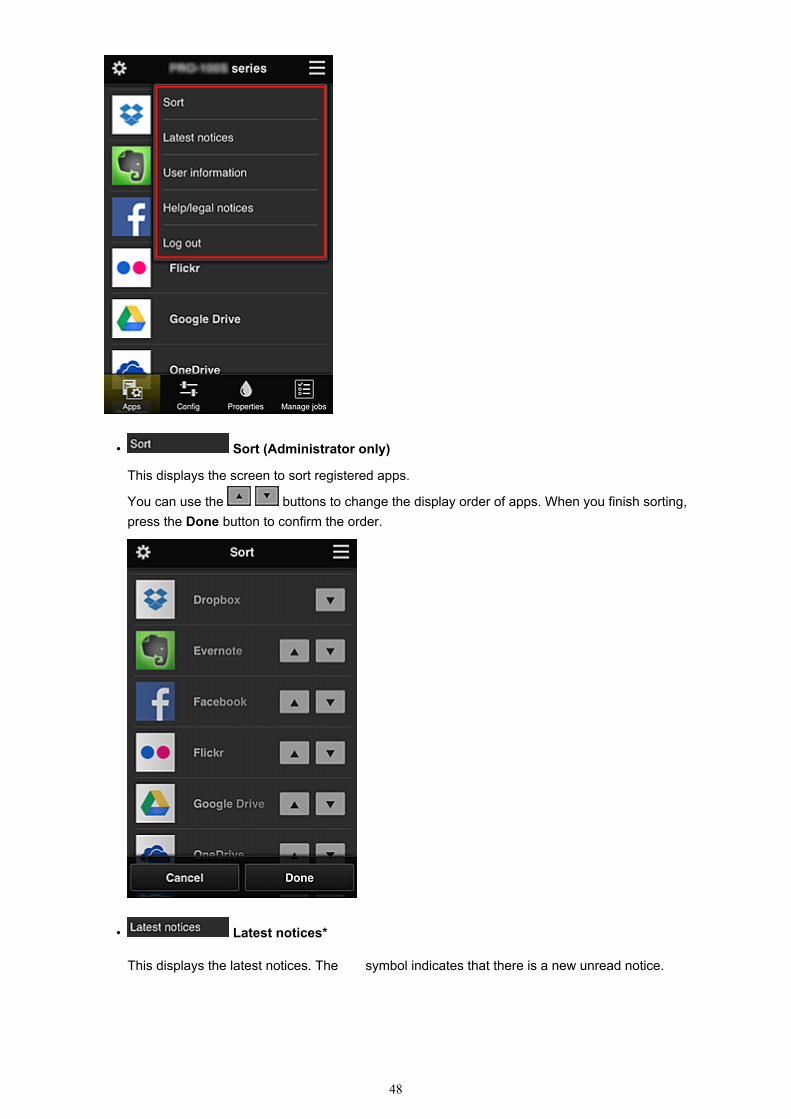
• Sort (Administrator only)
This displays the screen to sort registered apps.
You can use the buttons to change the display order of apps. When you finish sorting,press the Done button to confirm the order.
• Latest notices*
This displays the latest notices. The symbol indicates that there is a new unread notice.
48
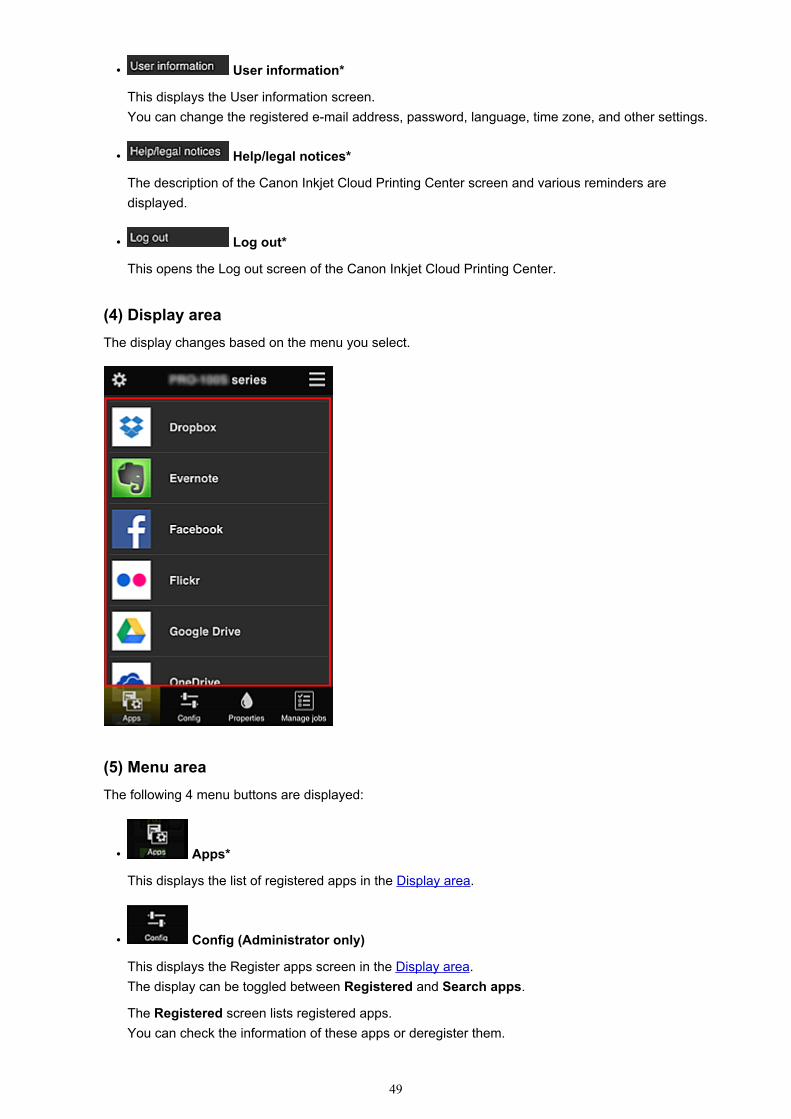
• User information*
This displays the User information screen.You can change the registered e-mail address, password, language, time zone, and other settings.
• Help/legal notices*
The description of the Canon Inkjet Cloud Printing Center screen and various reminders aredisplayed.
• Log out*
This opens the Log out screen of the Canon Inkjet Cloud Printing Center.
(4) Display areaThe display changes based on the menu you select.
(5) Menu areaThe following 4 menu buttons are displayed:
• Apps*
This displays the list of registered apps in the Display area.
• Config (Administrator only)
This displays the Register apps screen in the Display area.The display can be toggled between Registered and Search apps.
The Registered screen lists registered apps.You can check the information of these apps or deregister them.
49
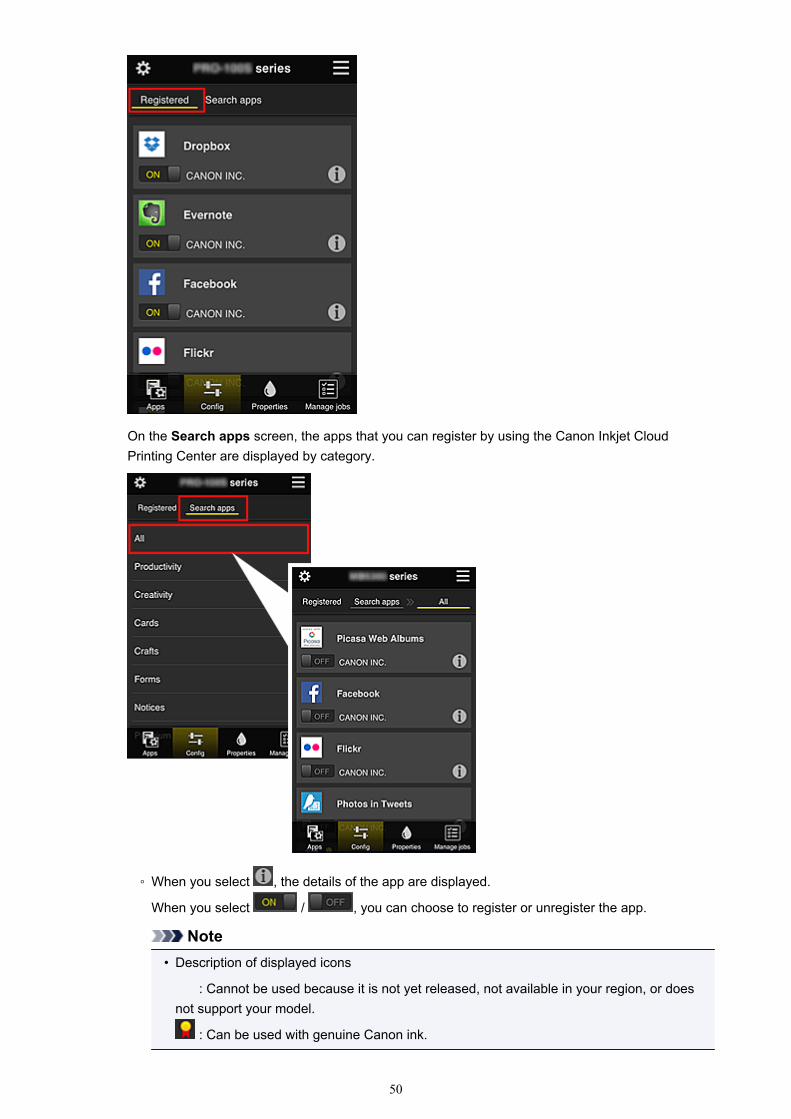
On the Search apps screen, the apps that you can register by using the Canon Inkjet CloudPrinting Center are displayed by category.
◦ When you select , the details of the app are displayed.
When you select / , you can choose to register or unregister the app.
Note• Description of displayed icons
: Cannot be used because it is not yet released, not available in your region, or doesnot support your model.
: Can be used with genuine Canon ink.
50
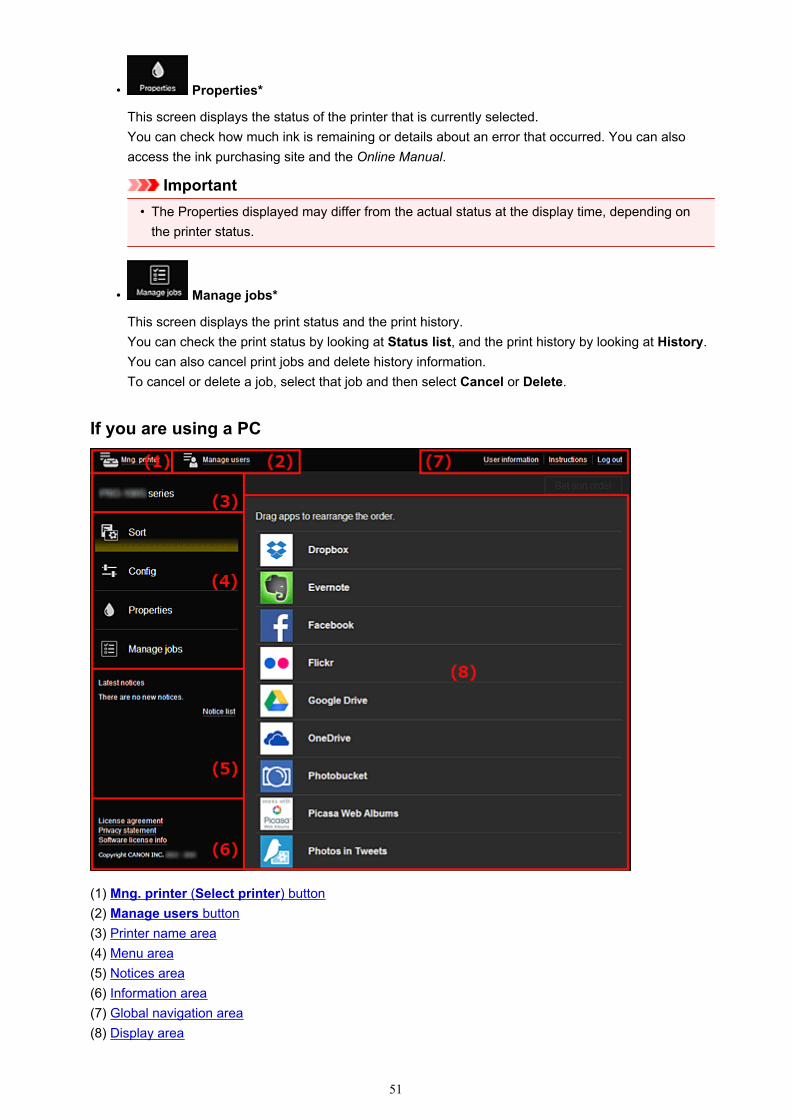
• Properties*
This screen displays the status of the printer that is currently selected.You can check how much ink is remaining or details about an error that occurred. You can alsoaccess the ink purchasing site and the Online Manual.
Important• The Properties displayed may differ from the actual status at the display time, depending on
the printer status.
• Manage jobs*
This screen displays the print status and the print history.You can check the print status by looking at Status list, and the print history by looking at History.You can also cancel print jobs and delete history information.To cancel or delete a job, select that job and then select Cancel or Delete.
If you are using a PC
(1) Mng. printer (Select printer) button(2) Manage users button(3) Printer name area(4) Menu area(5) Notices area(6) Information area(7) Global navigation area(8) Display area
51
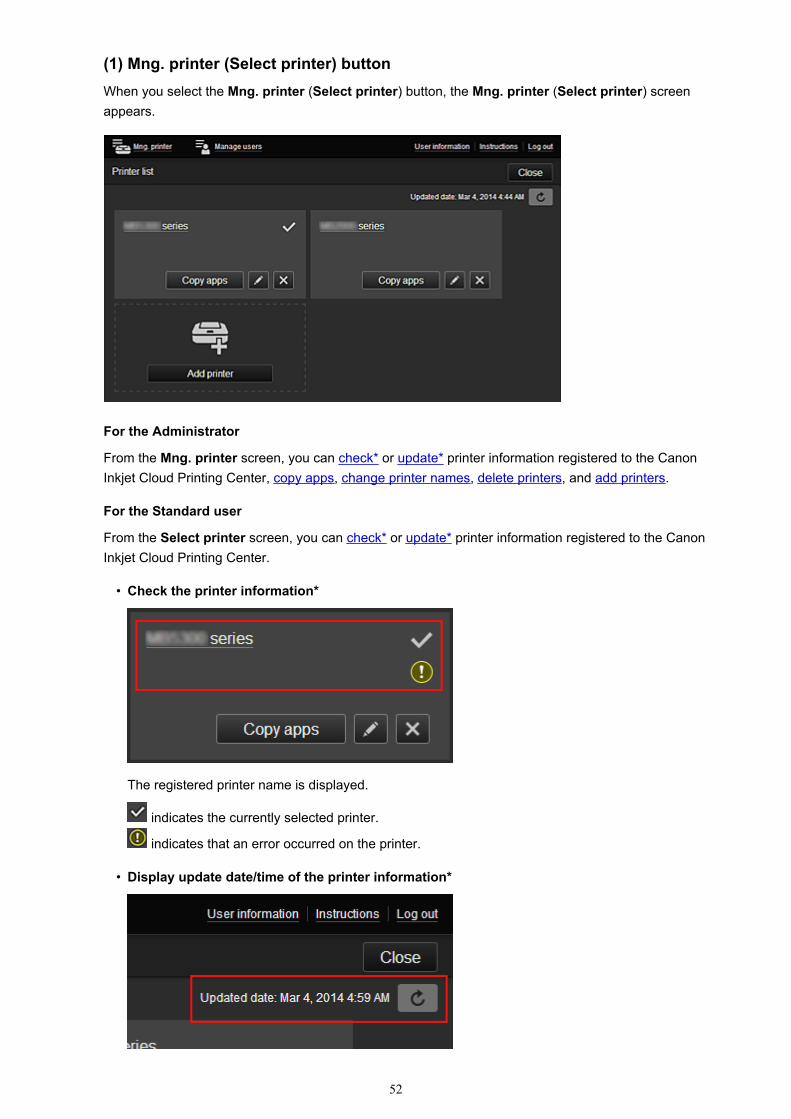
(1) Mng. printer (Select printer) buttonWhen you select the Mng. printer (Select printer) button, the Mng. printer (Select printer) screenappears.
For the Administrator
From the Mng. printer screen, you can check* or update* printer information registered to the CanonInkjet Cloud Printing Center, copy apps, change printer names, delete printers, and add printers.
For the Standard user
From the Select printer screen, you can check* or update* printer information registered to the CanonInkjet Cloud Printing Center.
• Check the printer information*
The registered printer name is displayed.
indicates the currently selected printer.
indicates that an error occurred on the printer.
• Display update date/time of the printer information*
52
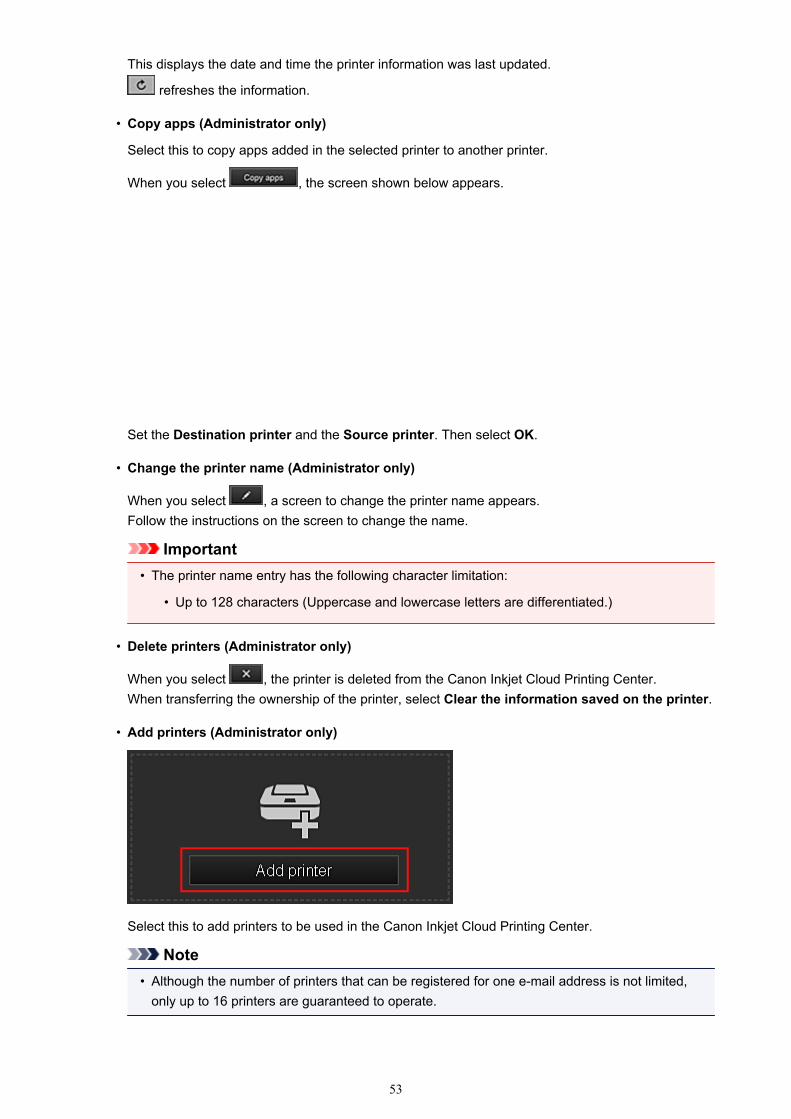
This displays the date and time the printer information was last updated.
refreshes the information.
• Copy apps (Administrator only)
Select this to copy apps added in the selected printer to another printer.
When you select , the screen shown below appears.
Set the Destination printer and the Source printer. Then select OK.
• Change the printer name (Administrator only)
When you select , a screen to change the printer name appears.Follow the instructions on the screen to change the name.
Important• The printer name entry has the following character limitation:
• Up to 128 characters (Uppercase and lowercase letters are differentiated.)
• Delete printers (Administrator only)
When you select , the printer is deleted from the Canon Inkjet Cloud Printing Center.When transferring the ownership of the printer, select Clear the information saved on the printer.
• Add printers (Administrator only)
Select this to add printers to be used in the Canon Inkjet Cloud Printing Center.
Note• Although the number of printers that can be registered for one e-mail address is not limited,
only up to 16 printers are guaranteed to operate.
53
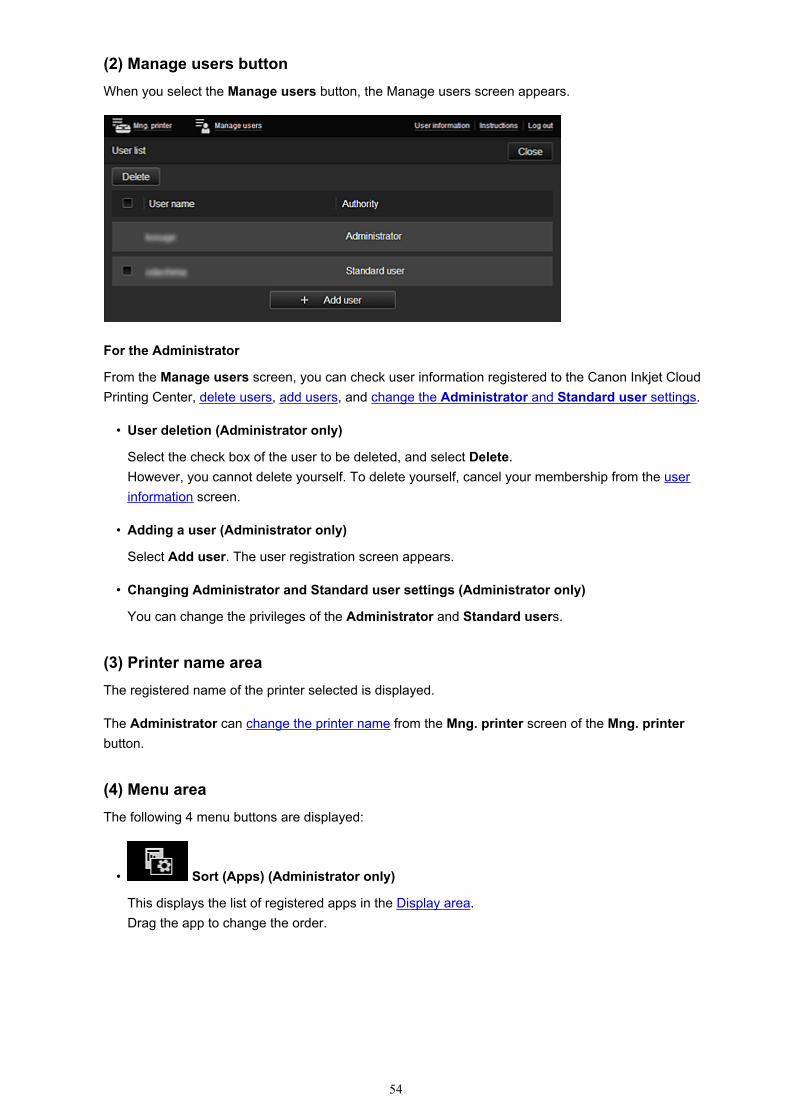
(2) Manage users buttonWhen you select the Manage users button, the Manage users screen appears.
For the Administrator
From the Manage users screen, you can check user information registered to the Canon Inkjet CloudPrinting Center, delete users, add users, and change the Administrator and Standard user settings.
• User deletion (Administrator only)
Select the check box of the user to be deleted, and select Delete.However, you cannot delete yourself. To delete yourself, cancel your membership from the userinformation screen.
• Adding a user (Administrator only)
Select Add user. The user registration screen appears.
• Changing Administrator and Standard user settings (Administrator only)
You can change the privileges of the Administrator and Standard users.
(3) Printer name areaThe registered name of the printer selected is displayed.
The Administrator can change the printer name from the Mng. printer screen of the Mng. printerbutton.
(4) Menu areaThe following 4 menu buttons are displayed:
• Sort (Apps) (Administrator only)
This displays the list of registered apps in the Display area.Drag the app to change the order.
54
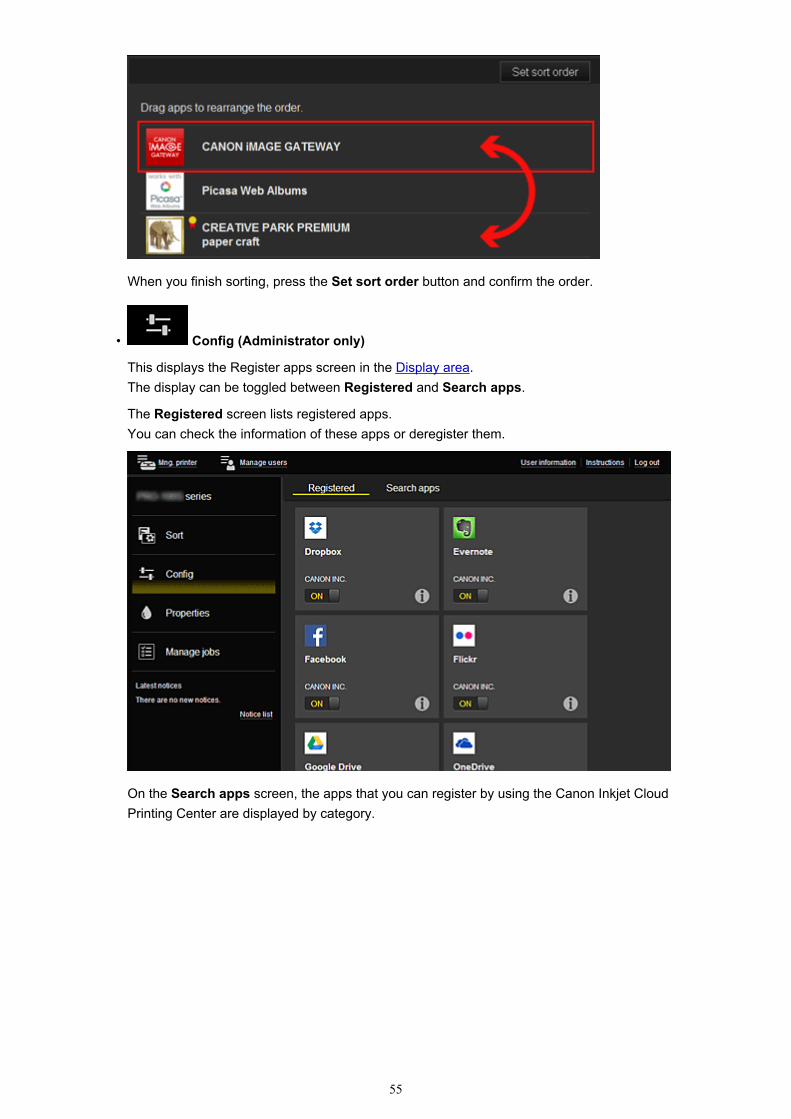
When you finish sorting, press the Set sort order button and confirm the order.
• Config (Administrator only)
This displays the Register apps screen in the Display area.The display can be toggled between Registered and Search apps.
The Registered screen lists registered apps.You can check the information of these apps or deregister them.
On the Search apps screen, the apps that you can register by using the Canon Inkjet CloudPrinting Center are displayed by category.
55
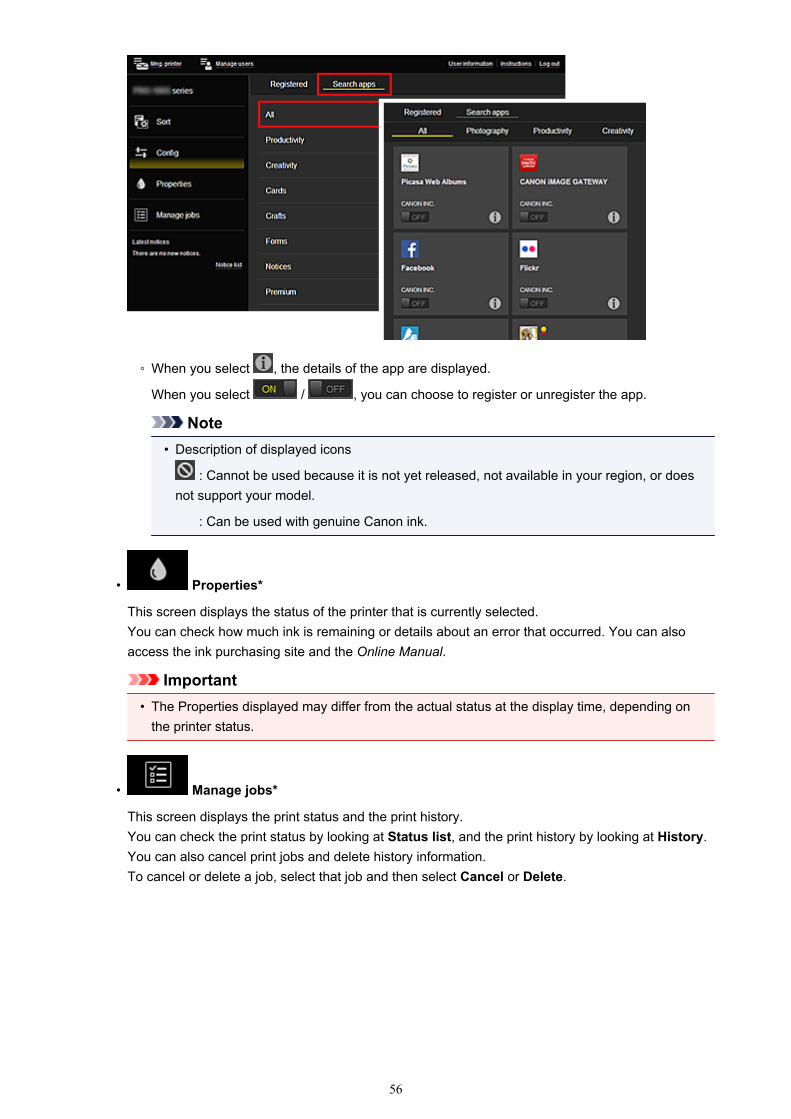
◦ When you select , the details of the app are displayed.
When you select / , you can choose to register or unregister the app.
Note• Description of displayed icons
: Cannot be used because it is not yet released, not available in your region, or doesnot support your model.
: Can be used with genuine Canon ink.
• Properties*
This screen displays the status of the printer that is currently selected.You can check how much ink is remaining or details about an error that occurred. You can alsoaccess the ink purchasing site and the Online Manual.
Important• The Properties displayed may differ from the actual status at the display time, depending on
the printer status.
• Manage jobs*
This screen displays the print status and the print history.You can check the print status by looking at Status list, and the print history by looking at History.You can also cancel print jobs and delete history information.To cancel or delete a job, select that job and then select Cancel or Delete.
56
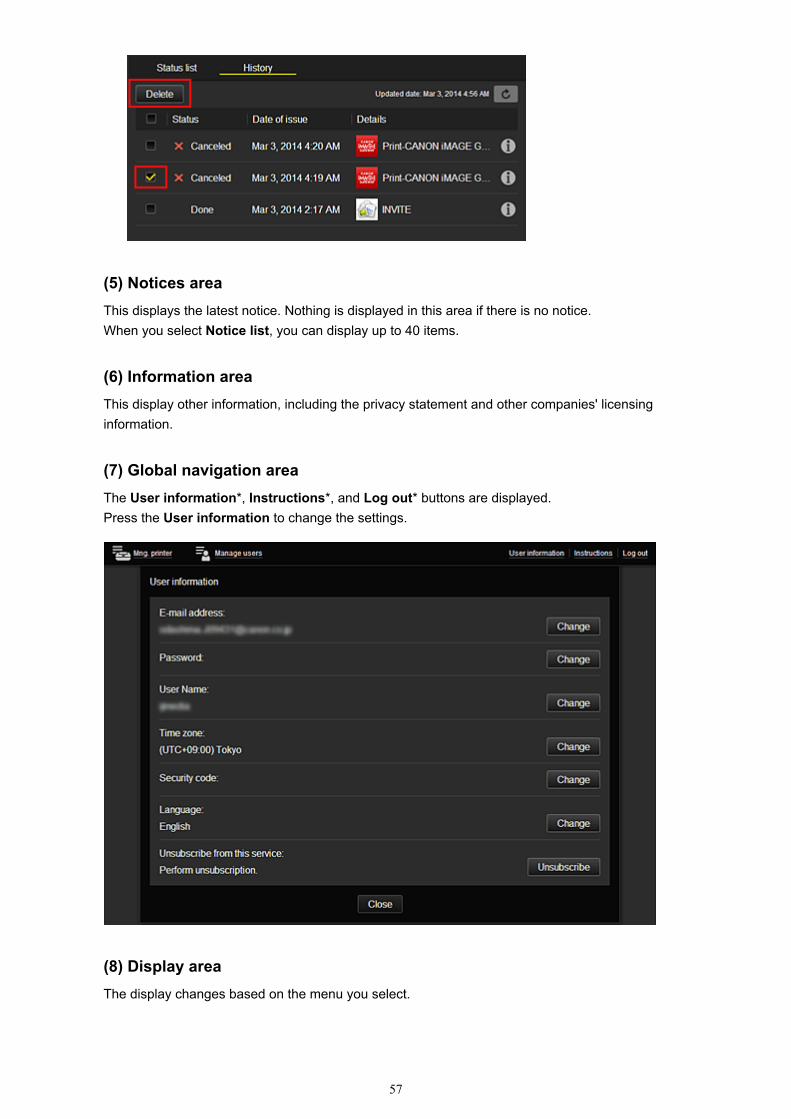
(5) Notices areaThis displays the latest notice. Nothing is displayed in this area if there is no notice.When you select Notice list, you can display up to 40 items.
(6) Information areaThis display other information, including the privacy statement and other companies' licensinginformation.
(7) Global navigation areaThe User information*, Instructions*, and Log out* buttons are displayed.Press the User information to change the settings.
(8) Display areaThe display changes based on the menu you select.
57
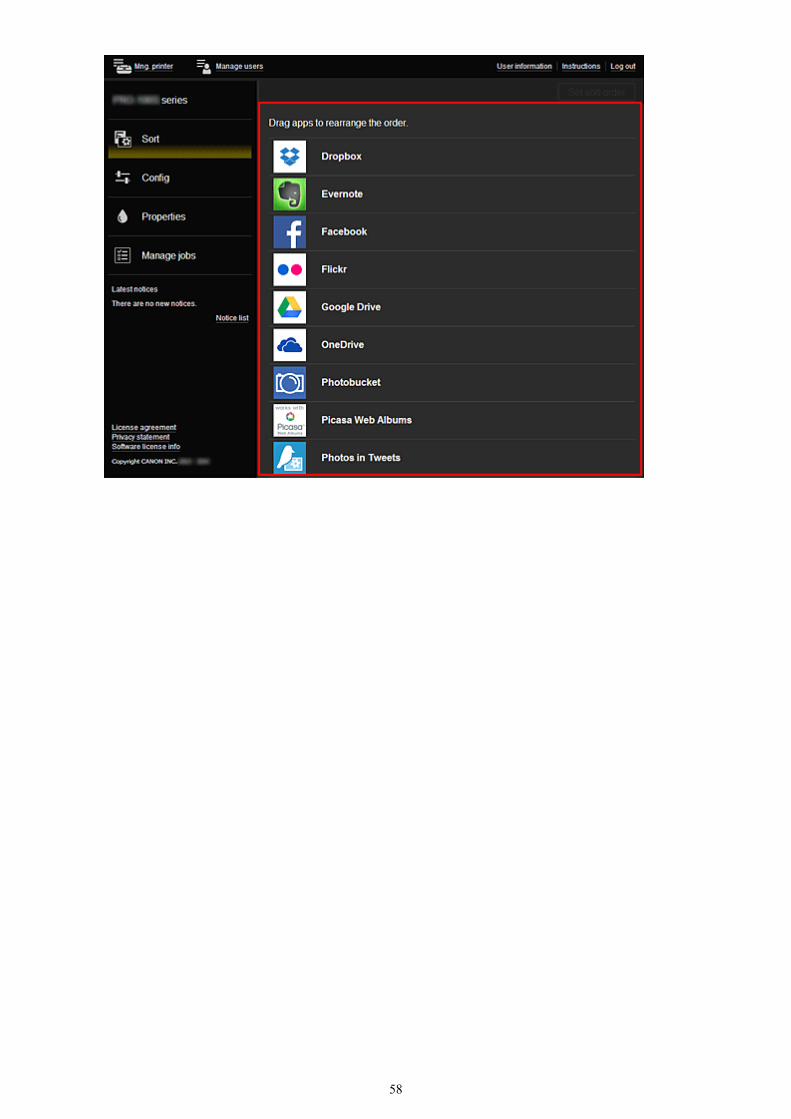
58
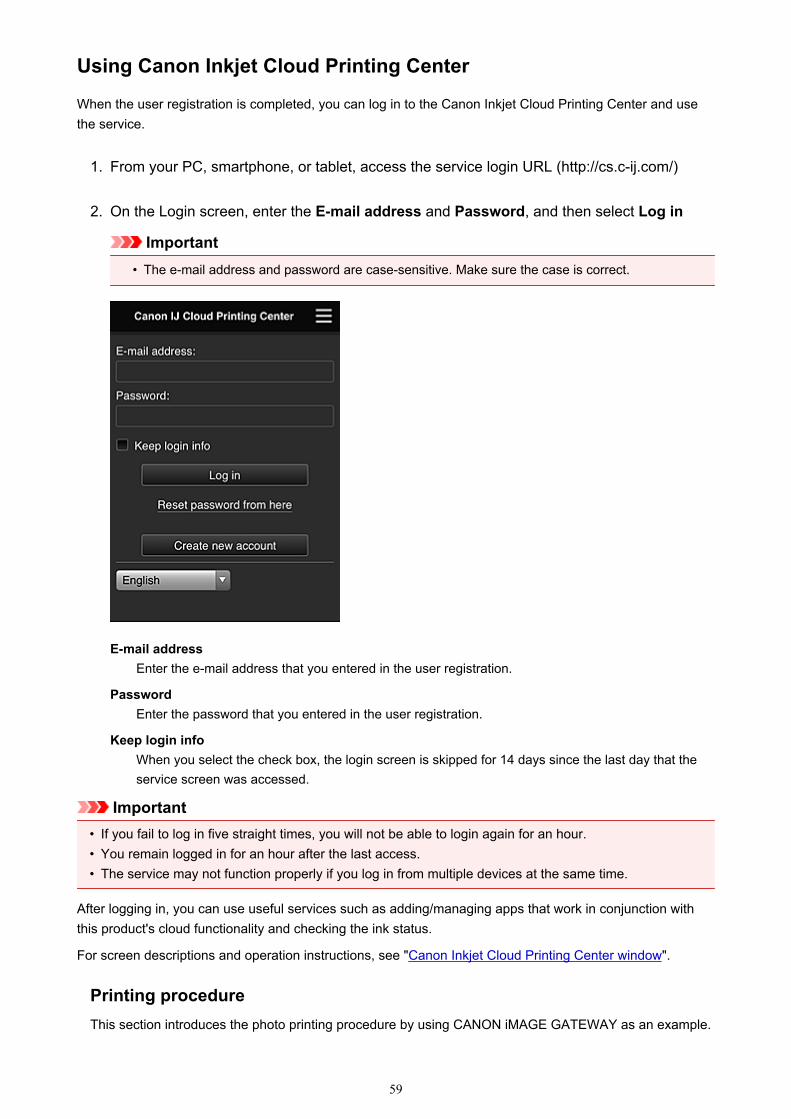
Using Canon Inkjet Cloud Printing Center
When the user registration is completed, you can log in to the Canon Inkjet Cloud Printing Center and usethe service.
1. From your PC, smartphone, or tablet, access the service login URL (http://cs.c-ij.com/)
2. On the Login screen, enter the E-mail address and Password, and then select Log in
Important• The e-mail address and password are case-sensitive. Make sure the case is correct.
E-mail addressEnter the e-mail address that you entered in the user registration.
PasswordEnter the password that you entered in the user registration.
Keep login infoWhen you select the check box, the login screen is skipped for 14 days since the last day that theservice screen was accessed.
Important• If you fail to log in five straight times, you will not be able to login again for an hour.• You remain logged in for an hour after the last access.• The service may not function properly if you log in from multiple devices at the same time.
After logging in, you can use useful services such as adding/managing apps that work in conjunction withthis product's cloud functionality and checking the ink status.
For screen descriptions and operation instructions, see "Canon Inkjet Cloud Printing Center window".
Printing procedureThis section introduces the photo printing procedure by using CANON iMAGE GATEWAY as an example.
59
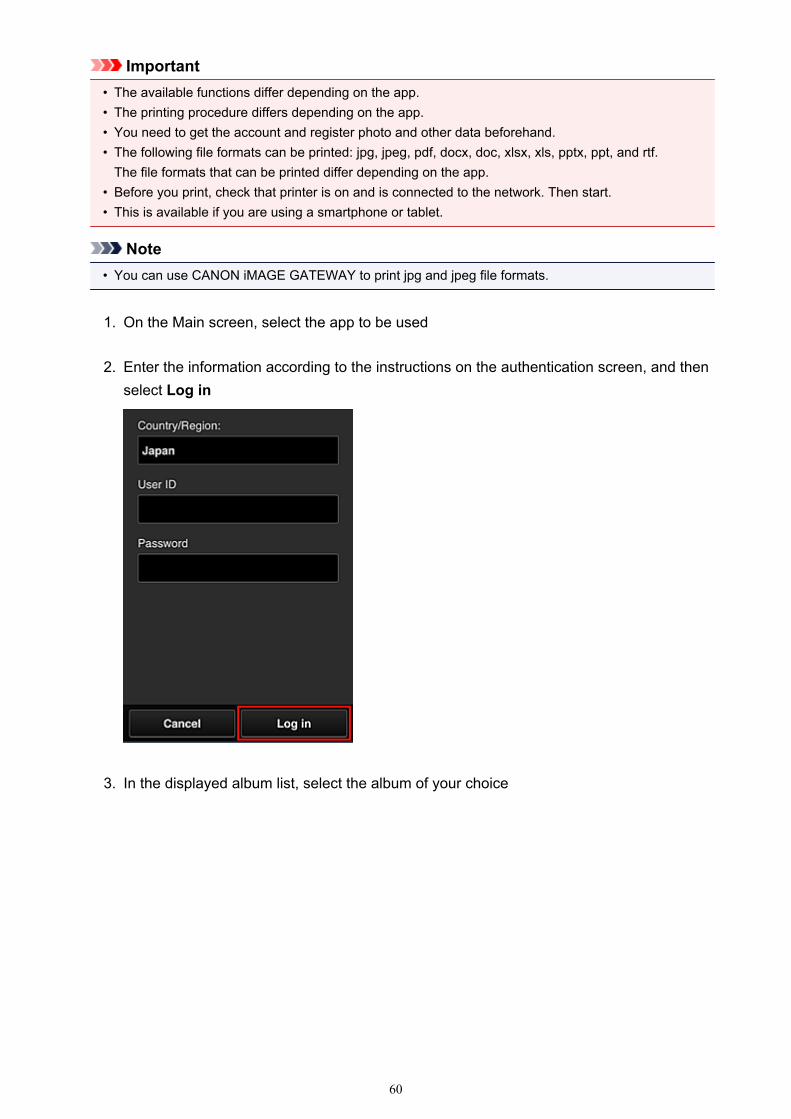
Important• The available functions differ depending on the app.• The printing procedure differs depending on the app.• You need to get the account and register photo and other data beforehand.• The following file formats can be printed: jpg, jpeg, pdf, docx, doc, xlsx, xls, pptx, ppt, and rtf.
The file formats that can be printed differ depending on the app.• Before you print, check that printer is on and is connected to the network. Then start.• This is available if you are using a smartphone or tablet.
Note• You can use CANON iMAGE GATEWAY to print jpg and jpeg file formats.
1. On the Main screen, select the app to be used
2. Enter the information according to the instructions on the authentication screen, and thenselect Log in
3. In the displayed album list, select the album of your choice
60
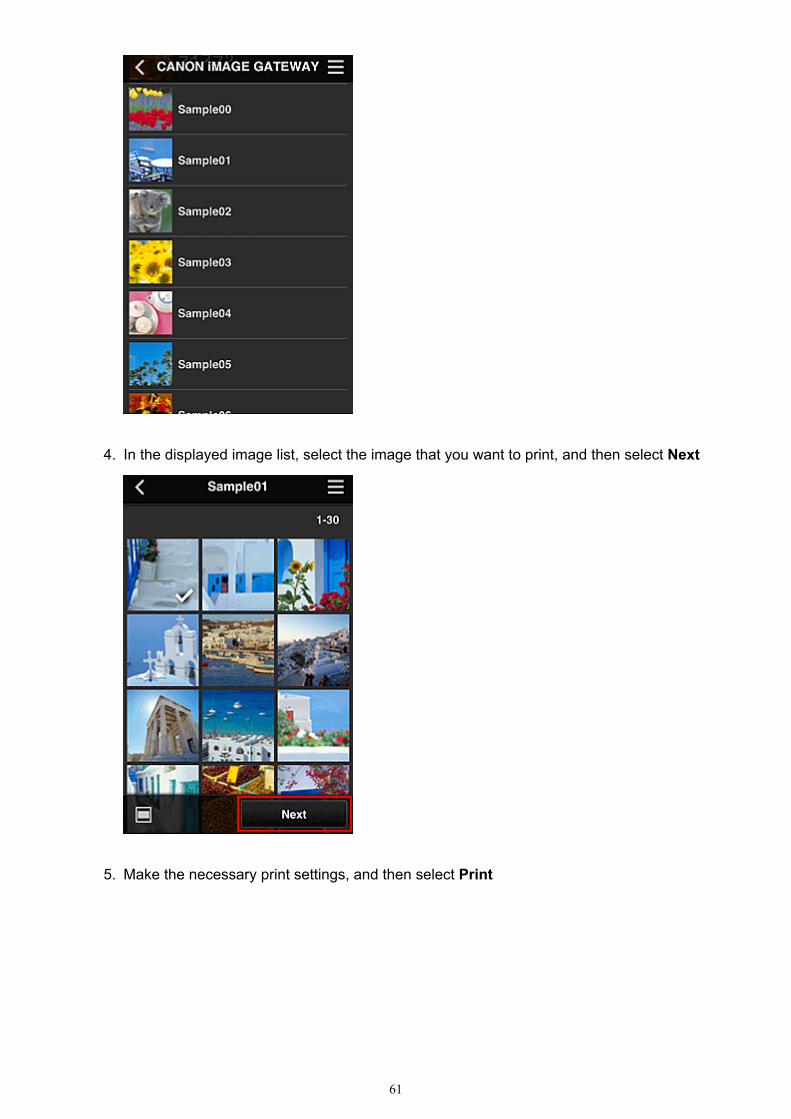
4. In the displayed image list, select the image that you want to print, and then select Next
5. Make the necessary print settings, and then select Print
61

6. A print job completion message appears, and printing starts
To continue printing, select Continue, and perform the operation from Step 3.To end the printing, select Apps. The screen returns to the apps list screen.
Important• If a print job is not printed within 24 hours after the print job is issued, the print job will expire and
cannot be printed.• With premium apps that limit the number of print jobs, print jobs that expire and cannot be printed are
also included in the print count.
Adding a Printer
62

Adding a Printer
With one account, you can use the Canon Inkjet Cloud Printing Center services on multiple printers.
The procedure for adding a printer is as follows:
1. Check that the printer is connected to the Internet
Important• To use this function, you must connect this printer to the Internet.
2. Displaying Printer Information
3. Select IJ Cloud Printing Center setup -> Register with this service
4. Follow the instructions displayed in the window, and run the authentication
5. When the printer registration screen is displayed, select Add printer
6. Enter the information according to the instructions on the authentication screen, and thenselect Log in
7. When the confirmation message is displayed, select OK
Printer addition is completed.
Adding a PIXMA Cloud Link User
63
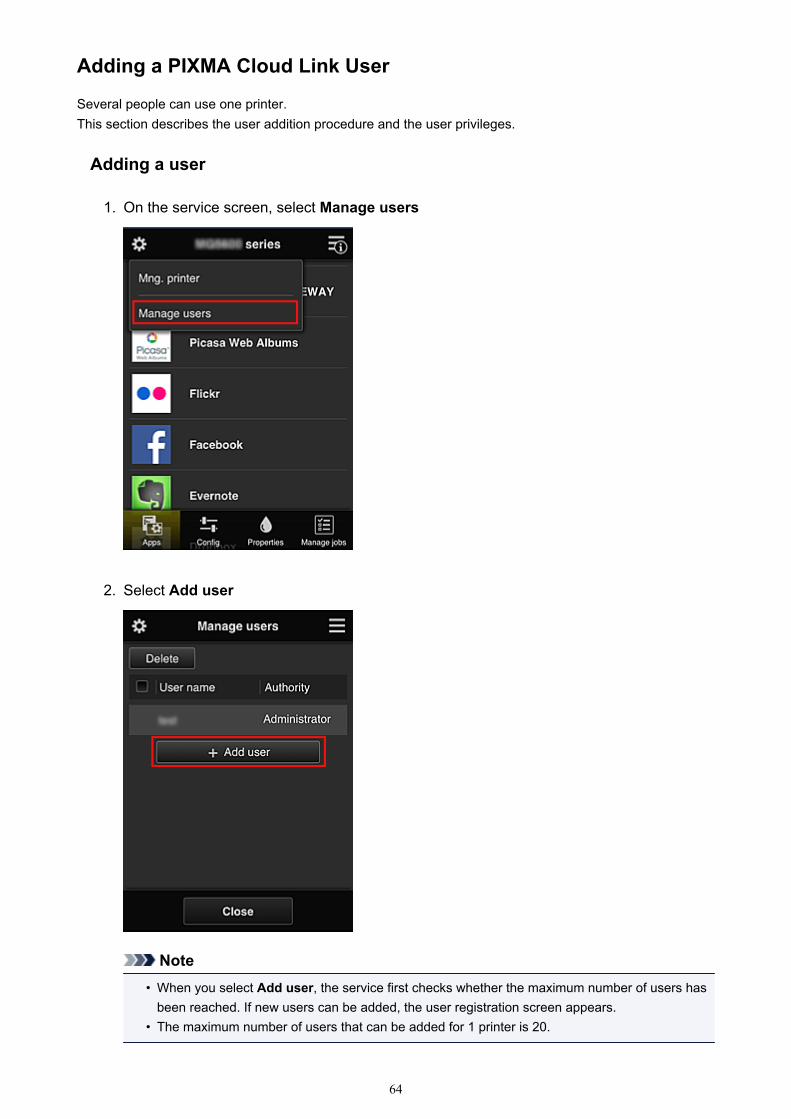
Adding a PIXMA Cloud Link User
Several people can use one printer.This section describes the user addition procedure and the user privileges.
Adding a user
1. On the service screen, select Manage users
2. Select Add user
Note• When you select Add user, the service first checks whether the maximum number of users has
been reached. If new users can be added, the user registration screen appears.• The maximum number of users that can be added for 1 printer is 20.
64
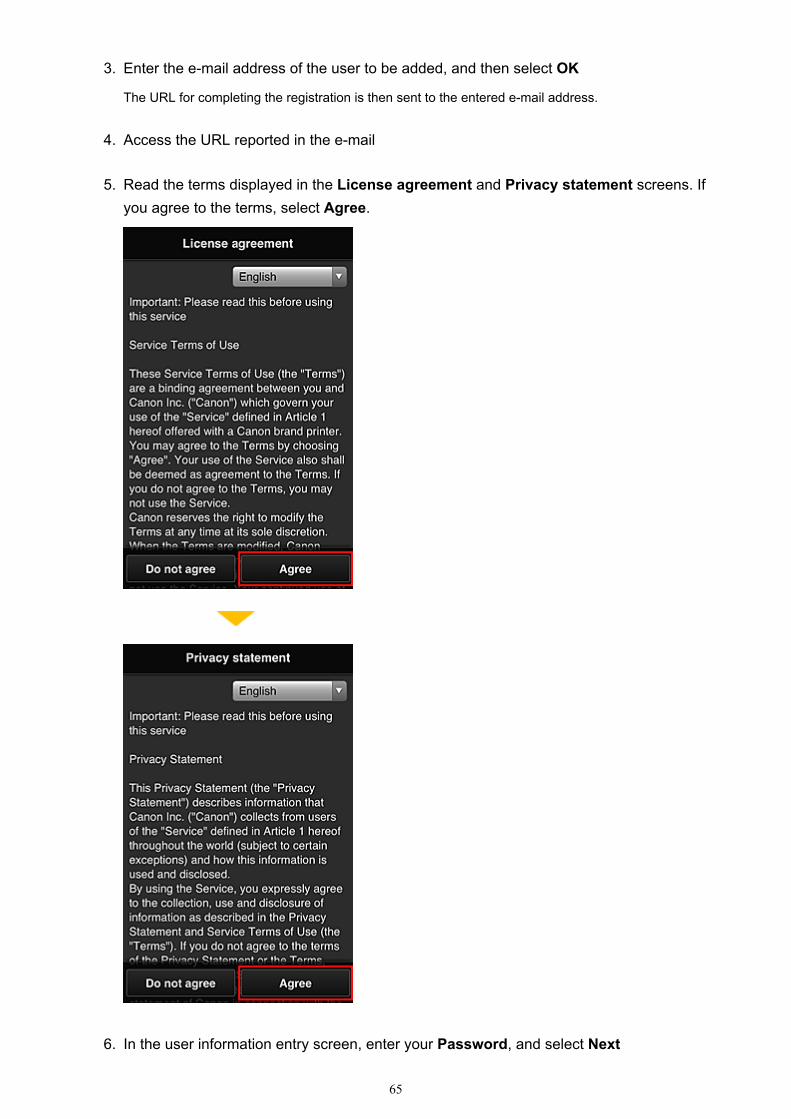
3. Enter the e-mail address of the user to be added, and then select OK
The URL for completing the registration is then sent to the entered e-mail address.
4. Access the URL reported in the e-mail
5. Read the terms displayed in the License agreement and Privacy statement screens. Ifyou agree to the terms, select Agree.
6. In the user information entry screen, enter your Password, and select Next
65
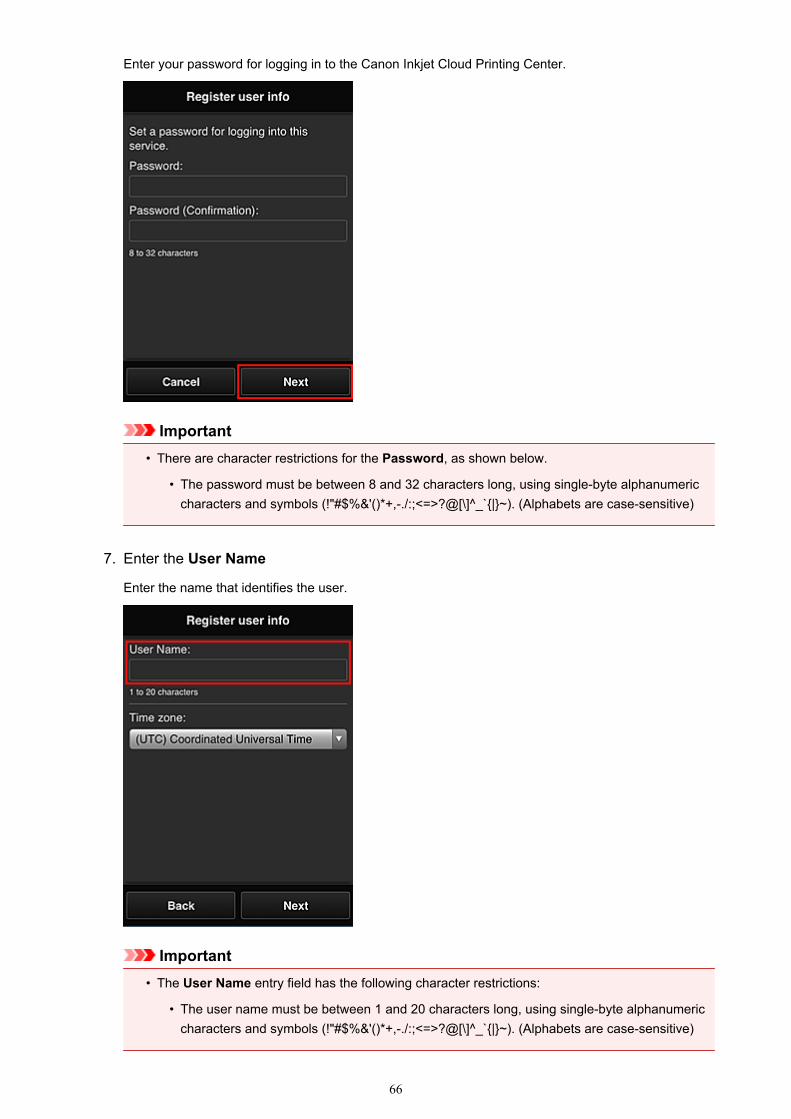
Enter your password for logging in to the Canon Inkjet Cloud Printing Center.
Important• There are character restrictions for the Password, as shown below.
• The password must be between 8 and 32 characters long, using single-byte alphanumericcharacters and symbols (!"#$%&'()*+,-./:;<=>?@[\]^_`{|}~). (Alphabets are case-sensitive)
7. Enter the User Name
Enter the name that identifies the user.
Important• The User Name entry field has the following character restrictions:
• The user name must be between 1 and 20 characters long, using single-byte alphanumericcharacters and symbols (!"#$%&'()*+,-./:;<=>?@[\]^_`{|}~). (Alphabets are case-sensitive)
66
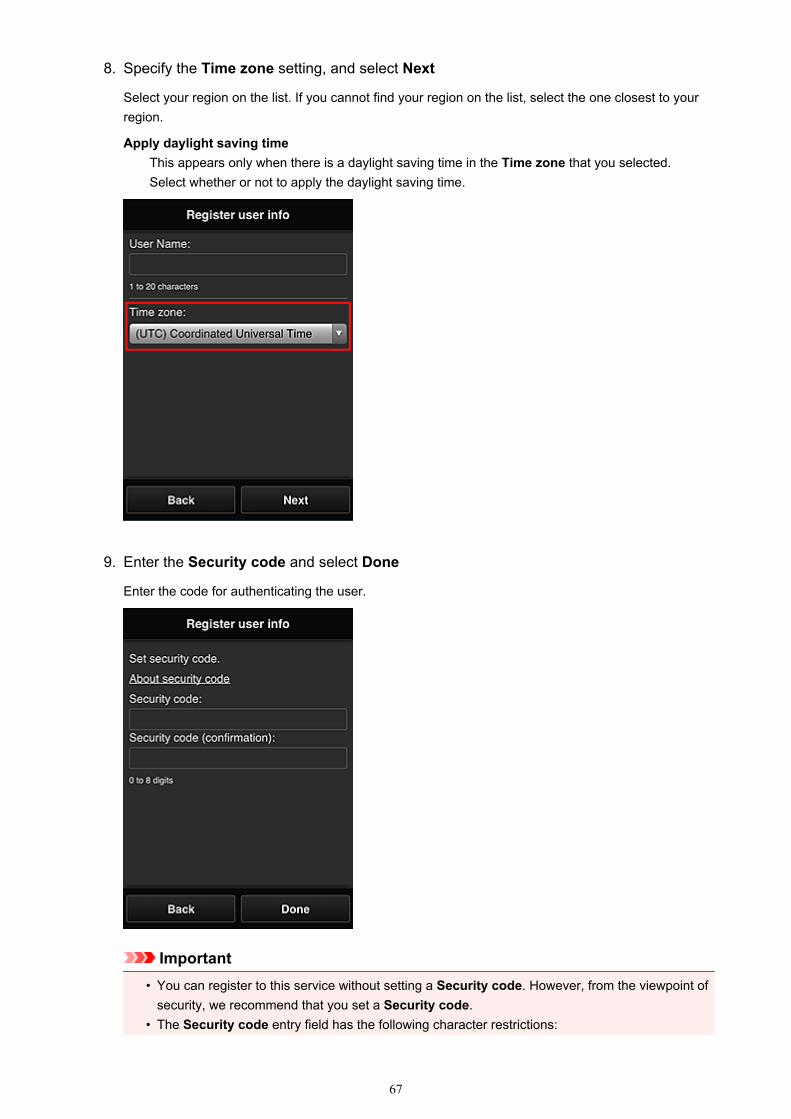
8. Specify the Time zone setting, and select Next
Select your region on the list. If you cannot find your region on the list, select the one closest to yourregion.
Apply daylight saving timeThis appears only when there is a daylight saving time in the Time zone that you selected.Select whether or not to apply the daylight saving time.
9. Enter the Security code and select Done
Enter the code for authenticating the user.
Important• You can register to this service without setting a Security code. However, from the viewpoint of
security, we recommend that you set a Security code.• The Security code entry field has the following character restrictions:
67
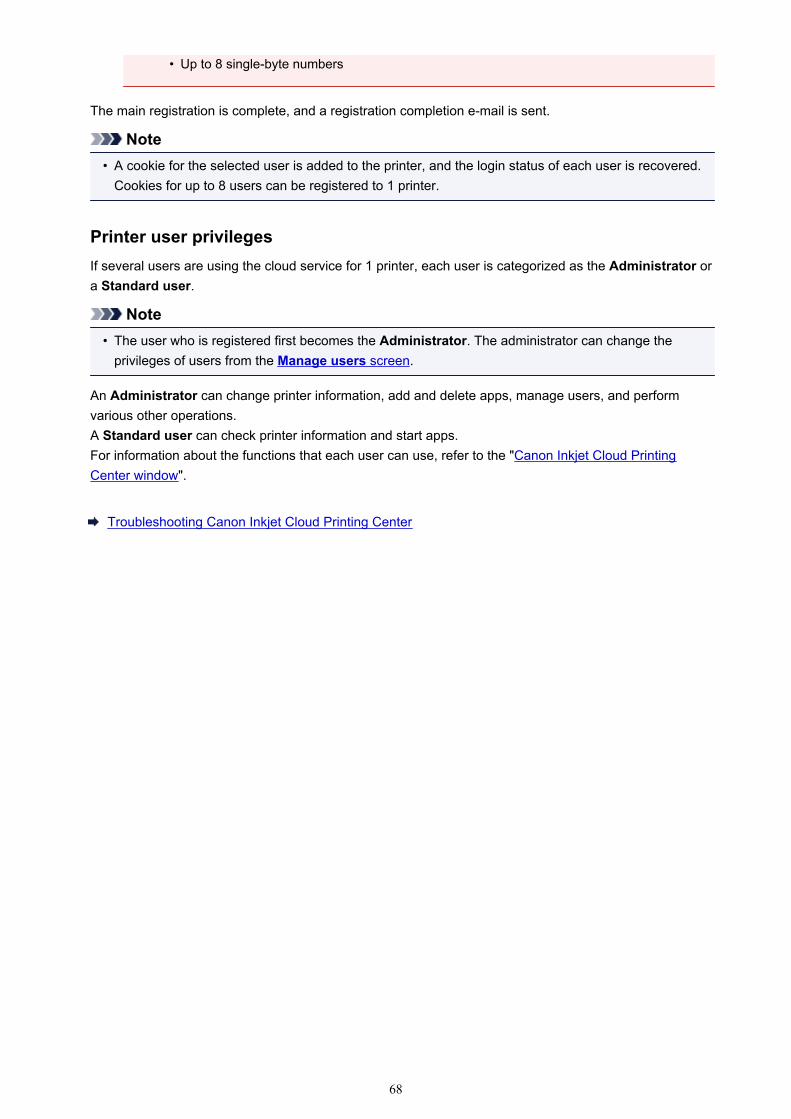
• Up to 8 single-byte numbers
The main registration is complete, and a registration completion e-mail is sent.
Note• A cookie for the selected user is added to the printer, and the login status of each user is recovered.
Cookies for up to 8 users can be registered to 1 printer.
Printer user privilegesIf several users are using the cloud service for 1 printer, each user is categorized as the Administrator ora Standard user.
Note• The user who is registered first becomes the Administrator. The administrator can change the
privileges of users from the Manage users screen.
An Administrator can change printer information, add and delete apps, manage users, and performvarious other operations.A Standard user can check printer information and start apps.For information about the functions that each user can use, refer to the "Canon Inkjet Cloud PrintingCenter window".
Troubleshooting Canon Inkjet Cloud Printing Center
68
Troubleshooting Canon Inkjet Cloud Printing Center
If an app cannot be installedIf the registered app is not in the Apps listIf the information is not updated when you press the Update buttonIf you do not receive the registration e-mailIf you cannot printPrinting starts on its own even if you do not do anythingIf you are unable to log in correctly even after entering the correct password in iOS or Mac
If an app cannot be installedCheck the country or region where the printer was purchased.If the printer is taken outside the country or region where it was purchased, apps cannot be installed.
If the registered app is not in the Apps listCheck the display language of Canon Inkjet Cloud Printing Center.If the display language is switched to a language that does not support an app, the app will not bedisplayed in the apps list but will continue to be registered.If you switch back to the target language of the app, it will be displayed in the apps list and you will beable to start, register, or unregister the app.
If the information is not updated when you press the Update buttonBecause the Properties screen requires network connection with this product, the information may not bereflected immediately. Please wait awhile, and then try updating the information again.If the information is still not updated, then check that the product is connected to the Internet.
If you do not receive the registration e-mailYou may have entered a different e-mail address during the user registration of Canon Inkjet CloudPrinting Center.Displaying Printer Information -> IJ Cloud Printing Center setup -> Delete from this service to deletethe service registration.After resetting the printer, repeat the user registration of Canon Inkjet Cloud Printing Center from thebeginning.
If you cannot printCheck the following if you cannot print.
• Check that the printer is connected to the Internet.• Check that the printer is connected to a LAN and the LAN environment is connected to the Internet.• If printing does not start even after you wait awhile, first turn off the printer, and then turn it back on
again.
If the problem is not resolved, use the printer driver from your computer to perform the print job and checkwhether the data can be printed normally on the printer.If you still cannot print, see the troubleshooting page for your model on the Home of the Online Manual.
69
Note• With a wireless LAN connection, after the printer is turned on, it may take several minutes before
communication is possible. Check that your printer is connected to the wireless network, and wait awhile before you start printing.
• If the printer is not turned on or is not connected to the Internet, and consequently a print job is notprocessed within 24 hours after it was submitted, the print job is automatically canceled. If thishappens, check the printer power and the Internet connection, and then re-submit the print job.
Printing starts on its own even if you do not do anythingA third party may be able to illegally use the Canon Inkjet Cloud Printing Center services.Displaying Printer Information -> IJ Cloud Printing Center setup -> Delete from this service to deletethe service registration.After resetting the printer, repeat the user registration of Canon Inkjet Cloud Printing Center from thebeginning.
If you are unable to log in correctly even after entering the correctpassword in iOS or MacIf you are using iOS or Mac and the password contains the ¥ or ₩ symbol, enter a backslash instead. Forinstructions on entering a backslash, see the OS help.
70

Printing from AirPrint Compliant Device
This document explains how to use AirPrint to print wirelessly from your iPad, iPhone and iPod touch to aCanon printer.
AirPrint enables you to print photos, email, Web pages and documents from your Apple device directly toyour printer without installing a driver.
Checking Your EnvironmentFirst, check your environment.
• AirPrint Operation Environment
To use AirPrint, you will need one of the following Apple devices running the latest version of iOS:
◦ iPad (all models)◦ iPhone (3GS or later)◦ iPod touch (3rd generation or later)
• Network Environment
The Apple device (iPad, iPhone, or iPod touch) and this printer must be connected to the same Wi-Finetwork or connected in AP mode.
Printing with AirPrint
1. Check that this printer is turned on and the Apple device and this printer is connected tothe LAN or connected in AP mode.
2. From the app of your Apple device, tap the operation icon to display the menu options.
71
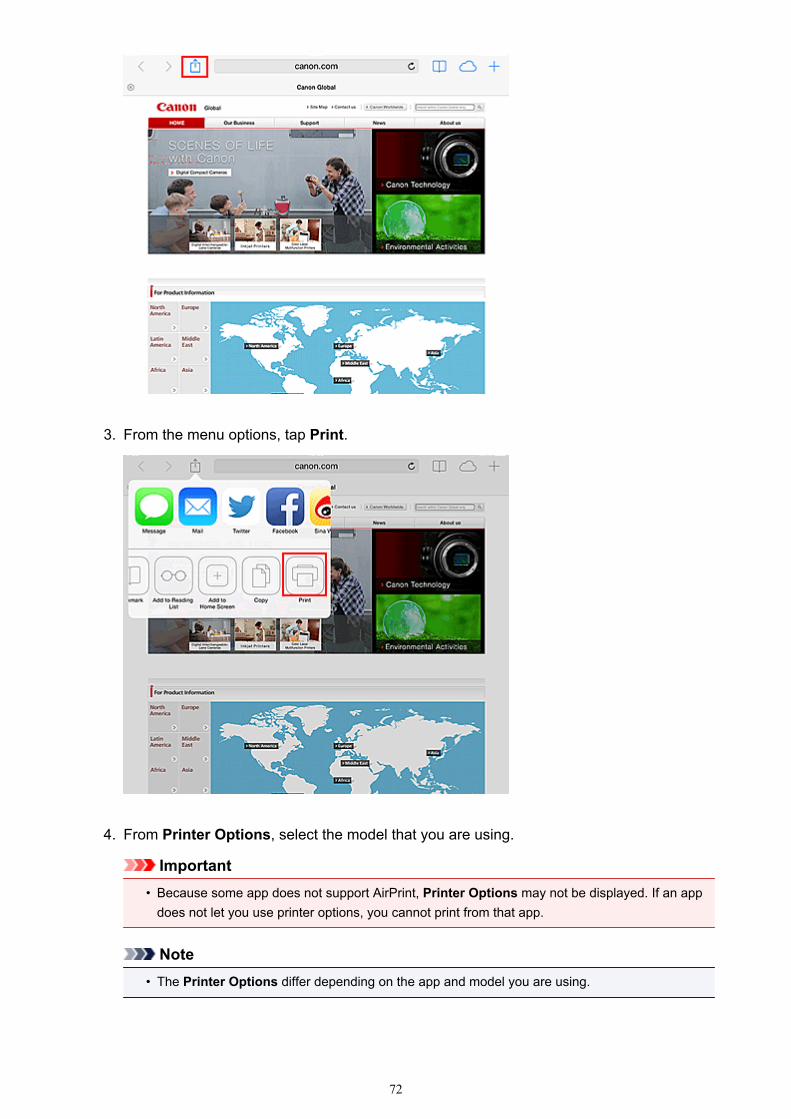
3. From the menu options, tap Print.
4. From Printer Options, select the model that you are using.
Important• Because some app does not support AirPrint, Printer Options may not be displayed. If an app
does not let you use printer options, you cannot print from that app.
Note• The Printer Options differ depending on the app and model you are using.
72
5. When printing a file type that has multiple pages, such as a PDF file, click Range andthen click All Pages or select the range of pages to be printed.
6. For 1 Copy, click + or - to set the number of required copies.
7. For Duplex Printing, click On to enable duplex printing or click Off to disable thefunction.
8. Tap the Print.
When you execute printing, the printer prints according to the specified settings.
Paper SizeWith AirPrint, the paper size is selected automatically according to the app being used on the Appledevice and the region in which AirPrint is used.
When Apple's photo app is used, the default paper size is L size in Japan, and 4"x6" or KG in othercountries and regions.
When documents are printed from Apple's Safari app, the default paper size is letter size in the U.S.region, and A4 in Japan and Europe.
Important• Your app may support different paper sizes.
Checking the Print StatusDuring printing, a Print Center icon is displayed in the list of recently used apps, and you can use it tocheck the print progress.
Press the Home button on the Apple device twice to set the Multitasking mode. Then swipe to the rightto display the Print Center icon and a Print Summary.
73
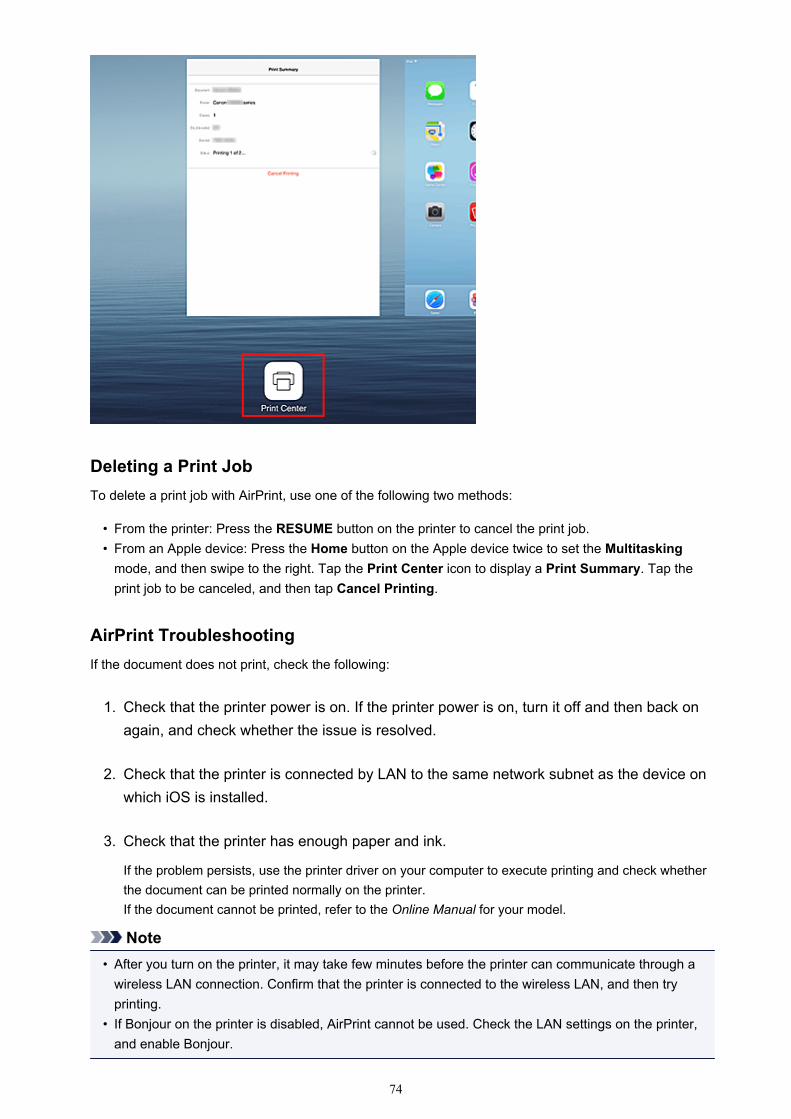
Deleting a Print JobTo delete a print job with AirPrint, use one of the following two methods:
• From the printer: Press the RESUME button on the printer to cancel the print job.• From an Apple device: Press the Home button on the Apple device twice to set the Multitasking
mode, and then swipe to the right. Tap the Print Center icon to display a Print Summary. Tap theprint job to be canceled, and then tap Cancel Printing.
AirPrint TroubleshootingIf the document does not print, check the following:
1. Check that the printer power is on. If the printer power is on, turn it off and then back onagain, and check whether the issue is resolved.
2. Check that the printer is connected by LAN to the same network subnet as the device onwhich iOS is installed.
3. Check that the printer has enough paper and ink.
If the problem persists, use the printer driver on your computer to execute printing and check whetherthe document can be printed normally on the printer.If the document cannot be printed, refer to the Online Manual for your model.
Note• After you turn on the printer, it may take few minutes before the printer can communicate through a
wireless LAN connection. Confirm that the printer is connected to the wireless LAN, and then tryprinting.
• If Bonjour on the printer is disabled, AirPrint cannot be used. Check the LAN settings on the printer,and enable Bonjour.
74

Note• The windows used in the explanations may differ from those displayed by your Apple device or app.
75
Checking Printer Information
You can use your smartphone, tablet, or computer to check the Printer status and execute utility functionsfrom apps such as Canon Inkjet Print Utility and PIXMA Printing Solutions.
You can also use the convenient web services presented by Canon.
1. Selecting Printer Information in an Apps Screen
Note• You can also enter IPv4 address directly in the web browser to display printer information.
1. Check that the printer has been turned on
2. Load one sheet of A4 size or Letter size plain paper
3. Hold down the RESUME button until the POWER lamp flashes 6 times
4. Release the button
Printing of the network setup information starts. Check the IPv4 address that was printed.
5. Check that the printer is connected to the same Wi-Fi network. Then from your smartphone,tablet device, or computer, open the Web browser, and enter the following URL:
http:// <Printer IPv4 address>
For <Printer IPv4 address>, enter the IPv4 address that you checked in the previousprocedure. Entries enclosed in brackets are not required.
2. Entering Username and Administrator's Password
From the authentication screen, enter the Username and Password.
Username: ADMINPassword: See "About the Administrator Password."
Note• The Username display may differ depending on your browser.
3. Displaying Printer Information
The top screen for printer information is displayed.
76

Printer statusThis function displays printer information such as the remaining ink amount, the status, and detailederror information.You can also connect to the ink purchase site or support page, and use Web Services.
UtilitiesThis function allows you to set and execute the printer utility functions such as cleaning.
AirPrint settingsThis function allows you to specify the Apple AirPrint settings, such as position information.
IJ Cloud Printing Center setupAllows you to register to IJ Cloud Printing Center or to delete a registration.
SecurityAllows you to set the Administrator's password and Operation restrictions for the machine.
Important• For the initial Password, see "About the Administrator Password."
For Security reasons, we recommend that you change the Password to an individualpassword.
• There are character restrictions for the password, as shown below.
• Up to 32 single-byte alphanumeric characters. (Uppercase and lowercase letters aredifferentiated.)
Records of useDisplays a record of your printer usage, such as the number of pages printed.
Firmware updateThis function allows you to update the firmware and check version information.
Manual (Online)This function displays the Online Manual.
77
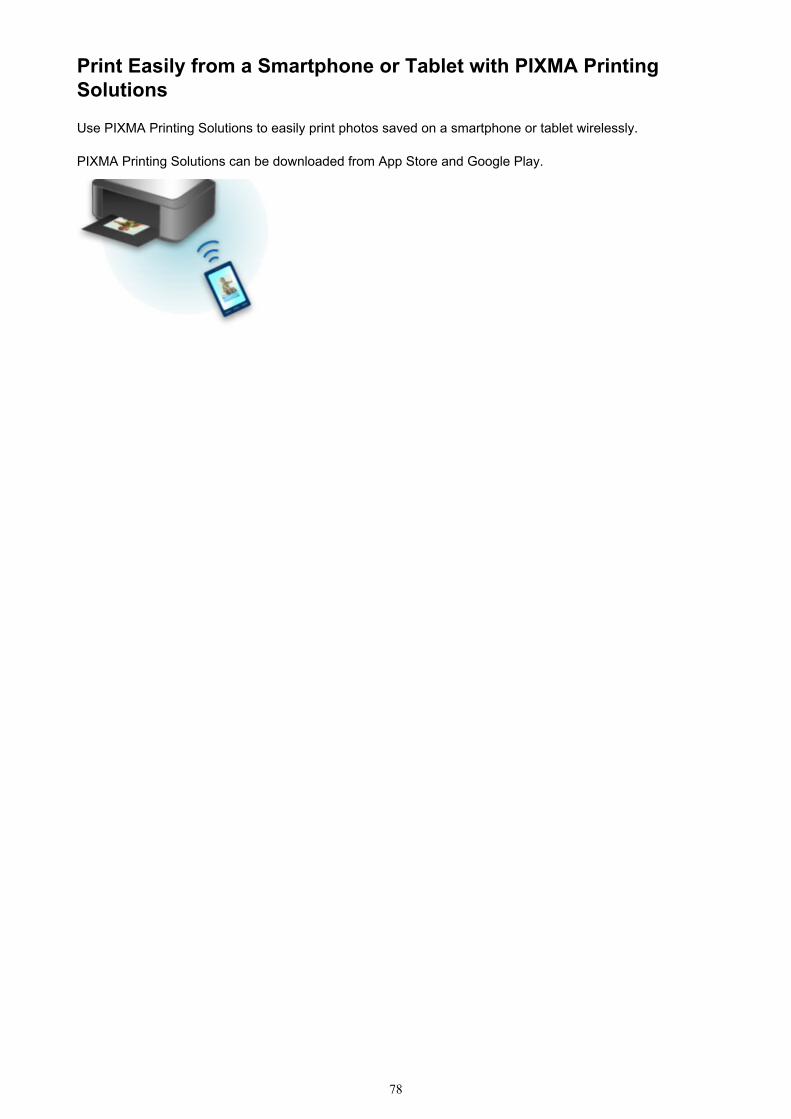
Print Easily from a Smartphone or Tablet with PIXMA PrintingSolutions
Use PIXMA Printing Solutions to easily print photos saved on a smartphone or tablet wirelessly.
PIXMA Printing Solutions can be downloaded from App Store and Google Play.
78

Printing with Windows RT
When you use Windows RT 8.1 or a later version, printing is easy because you simply connect this printer tothe network.
For information about connecting to the network, see the setup URL (http://www.canon.com/ijsetup) forusing this product from your computer, smartphone, or tablet device.
When the connection is complete, the Canon Inkjet Print Utility software, which allows you to specifydetailed print settings, is downloaded automatically.By using Canon Inkjet Print Utility, you can check the Printer status and specify detailed print settings. (Theavailable functions will differ depending on your usage environment and connection method.)
79
Overview of the Printer
Safety GuideSafety PrecautionsRegulatory and Safety Information
Main Components and Basic OperationsMain ComponentsAbout the Power Supply of the Printer
Loading PaperLoading PaperPlacing a Printable Disc
Replacing an Ink TankReplacing an Ink TankChecking the Ink Status
MaintenanceWhen Printing Becomes Faint or Colors Are IncorrectPerforming Maintenance from a ComputerCleaning the Printer
Changing the Printer SettingsChanging Printer Settings from Your ComputerInitializing the Printer SettingsDisabling the LAN Function of the Printer
Information about Network ConnectionUseful Information about Network Connection
About Network CommunicationChanging and Confirming Network SettingsScreens for Network Connection of IJ Network ToolOther Screens of IJ Network ToolAppendix for Network Communication
Tips for Ensuring Optimal Printing QualityUseful Information about InkKey Points to Successful PrintingBe Sure to Make Paper Settings after Loading PaperCanceling a Print JobPrinter Handling PrecautionsKey to Enjoying Consistent Printing QualityPrecautions for Safe Transport of the Printer
Legal Limitations on Use of Your Product and Use of Images
Specifications
80

Safety Guide
Safety Precautions
Regulatory and Safety Information
81
Safety Precautions
Choosing a location• Do not install the machine in a location that is unstable or subject to excessive vibration.• Do not install the machine in locations that are very humid or dusty, in direct sunlight, outdoors, or
close to a heating source.To avoid the risk of fire or electric shocks, use the machine under the operating environment specifiedin the On-screen Manual.
• Do not place the machine on a thick rug or carpet.• Do not place the machine with its back attached to the wall.
Power supply• Ensure that the area around the power outlet is kept clear at all times so you can easily unplug the
power cord if necessary.• Never remove the plug by pulling on the cord.
Pulling the cord may damage the power cord, leading to possible fire or electrical shock.• Do not use an extension lead/cord.
Working around the machine• Never put your hands or fingers in the machine while it is printing.• When moving the machine, carry the machine at both ends. In case the machine weighs more than
14 kg, it is recommended to have two people lifting the machine. Accidental dropping of the machinecauses injury. For the machine's weight, refer to the On-screen Manual.
• Do not place any object on the machine. Especially do not place metal objects (paper clips, staples,etc.) or containers of flammable solvents (alcohol, thinners, etc.) on top of the machine.
• Do not transport or use the machine on a slant, vertically or upside-down, as the ink may leak anddamage the machine.
Working around the machine (For the multifunction printer)• When loading a thick book on the Platen Glass, do not press hard on the Document Cover. The
Platen Glass may break and cause injury.
Print Heads/ink tanks and FINE Cartridges• Keep ink tanks out of the reach of children. In case ink* is accidentally licked or swallowed, rinse out
mouth or give one or two glasses of water to drink. If irritation or discomfort occurs, obtain medicaladvice immediately.* Clear Ink contains nitrate salts (For models containing Clear Ink).
• In case ink gets in contact with eyes, rinse with water immediately. In case ink gets in contact withskin, wash with soap and water immediately. If irritation to eyes or skin persists, obtain medical adviceimmediately.
• Never touch the electrical contacts on a Print Head or FINE Cartridges after printing.The metal parts may be very hot and could cause burns.
• Do not throw ink tanks and FINE Cartridges into fire.• Do not attempt to disassemble or modify the Print Head, ink tanks, and FINE Cartridges.
82
Regulatory and Safety Information
For models containing lithium battery• Dispose of used batteries according to the local regulations.• Risk of explosion if battery is replaced by an incorrect type.
Users in the U.S.A.FCC Notice (U.S.A. Only)For 120V, 60Hz modelModel Number: K10417 (Contains FCC Approved WLAN Module K30357)
This device complies with Part 15 of the FCC Rules. Operation is subject to the following two conditions:(1) This device may not cause harmful interference, and (2) this device must accept any interferencereceived, including interference that may cause undesired operation.
Note: This equipment has been tested and found to comply with the limits for a Class B digital device,pursuant to Part 15 of the FCC Rules. These limits are designed to provide reasonable protection againstharmful interference in a residential installation. This equipment generates, uses and can radiate radiofrequency energy and, if not installed and used in accordance with the instructions, may cause harmfulinterference to radio communications.However, there is no guarantee that interference will not occur in a particular installation. If this equipmentdoes cause harmful interference to radio or television reception, which can be determined by turning theequipment off and on, the user is encouraged to try to correct the interference by one or more of thefollowing measures:
• Reorient or relocate the receiving antenna.• Increase the separation between the equipment and receiver.• Connect the equipment into an outlet on a circuit different from that to which the receiver is
connected.• Consult the dealer or an experienced radio/TV technician for help.
Use of a shielded cable is required to comply with Class B limits in Subpart B of Part 15 of the FCC Rules.
Do not make any changes or modifications to the equipment unless otherwise specified in the manual. Ifsuch changes or modifications should be made, you could be required to stop operation of the equipment.
FCC ID:AZDK30357
Changes or modifications not expressly approved by the party responsible for compliance could void theuser's authority to operate equipment.
This transmitter must not be co-located or operating in conjunction with any other antenna or transmitter.
The equipment complies with FCC radiation exposure limits for at uncontrolled equipment. Thisequipment should be installed and operated with minimum distance at least 20cm between the radiatorand persons body (excluding extremities: hands, wrists, feet and ankles) and must not be colocated oroperated with any other antenna or transmitter.
Canon U.S.A., Inc.One Canon ParkMelville, New York 117471-800-652-2666
83

Users in CanadaThis device complies with Industry Canada license-exempt RSS standard(s). Operation is subject to thefollowing two conditions:
(1) this device may not cause interference, and (2) this device must accept any interference, includinginterference that may cause undesired operation of the device.
This equipment complies with IC radiation exposure limits set forth for an uncontrolled environment andmeets RSS-102 of the IC radio frequency (RF) Exposure rules. This equipment should be installed andoperated keeping the radiator at least 20cm or more away from person's body (excluding extremities:hands, wrists, feet and ankles).
Pour les usagers résidant au CanadaLe présent appareil est conforme aux CNR d'Industrie Canada applicables aux appareils radio exemptsde licence. L'exploitation est autorisée aux deux conditions suivantes :
(1) l'appareil ne doit pas produire de brouillage, et (2) l'utilisateur de l'appareil doit accepter tout brouillageradioélectrique subi, même si le brouillage est susceptible d'en compromettre le fonctionnement.
Cet équipement est conforme aux limites d'exposition aux rayonnements énoncées pour unenvironnement non contrôlé et respecte les règles d'exposition aux fréquences radioélectriques (RF)CNR-102 de l'IC. Cet équipement doit être installé et utilisé en gardant une distance de 20 cm ou plusentre le dispositif rayonnant et le corps (à l'exception des extrémités : mains, poignets, pieds et chevilles).
Users in JordanThis printer contains WLAN Module approved by TRC/LPD/2013/130
Name of WLAN Module : K30357
Only for European Union and EEA (Norway, Iceland and Liechtenstein)
This symbol indicates that this product is not to be disposed of with your household waste, according tothe WEEE Directive (2012/19/EU) and national legislation. This product should be handed over to adesignated collection point, e.g., on an authorized one-for-one basis when you buy a new similar productor to an authorized collection site for recycling waste electrical and electronic equipment (EEE). Improperhandling of this type of waste could have a possible negative impact on the environment and humanhealth due to potentially hazardous substances that are generally associated with EEE. At the same time,your cooperation in the correct disposal of this product will contribute to the effective usage of naturalresources. For more information about where you can drop off your waste equipment for recycling, pleasecontact your local city office, waste authority, approved WEEE scheme or your household waste disposalservice. For more information regarding return and recycling of WEEE products, please visit www.canon-europe.com/weee.
84
Korisnici u Srbiji
Ovaj simbol označava da ovaj proizvod ne sme da se odlaže sa ostalim kućnim otpadom, u skladu saWEEE Direktivom (2012/19/EU) i nacionalnim zakonima. Ovaj proizvod treba predati određenom centruza prikupljanje, npr. na osnovi "jedan-za-jedan" kada kupujete sličan novi proizvod, ili ovlašćenom centruza prikupljanje za reciklažu istrošene električne i elektronske opreme (EEE). Nepravilno rukovanje ovomvrstom otpada može da ima moguće negativne posledice po životnu sredinu i ljudsko zdravlje usledpotencijalno opasnih materijala koji se uglavnom vezuju za EEE. U isto vreme, vaša saradnja naispravnom odlaganju ovog proizvoda će doprineti efikasnom korišćenju prirodnih resursa. Za višeinformacija o tome gde možete da predate vašu staru opremu radi recikliranje, vas molimo, dakontaktirate lokalne gradske vlasti, komunalne službe, odobreni plan reciklaže ili Gradsku čistoću. Za višeinformacija o vraćanju i recikliranju WEEE proizvoda, posetite stranicu www.canon-europe.com/weee.
Environmental InformationReducing your environmental impact while saving money
Power Consumption and Activation TimeThe amount of electricity a device consumes depends on the way the device is used. This product isdesigned and set in a way to allow you to reduce your electricity costs. After the last print it switches toReady Mode. In this mode it can print again immediately if required. If the product is not used for a time,the device switches to its Power Save Mode. The devices consume less power (Watt) in these modes.If you wish to set a longer Activation Time or would like to completely deactivate the Power Save Mode,please consider that this device may then only switch to a lower energy level after a longer period oftime or not at all.Canon does not recommend extending the Activation Times from the optimum ones set as default.
Energy Star®
The Energy Star® programme is a voluntary scheme to promote the development and purchase ofenergy efficient models, which help to minimise environmental impact.Products which meet the stringent requirements of the Energy Star® programme for both environmentalbenefits and the amount of energy consumption will carry the Energy Star® logo accordingly.
Paper typesThis product can be used to print on both recycled and virgin paper (certified to an environmentalstewardship scheme), which complies with EN12281 or a similar quality standard. In addition it cansupport printing on media down to a weight of 64g/m2, lighter paper means less resources used and alower environmental footprint for your printing needs.
RMCRegulatory Model Code (RMC) is for identification and proof that the product complies with theregulations. Please note that RMC is different from the marketing model number of the product.
85

86

Main Components and Basic Operations
Main Components
About the Power Supply of the Printer
87

Main Components
Front View
Rear View
Inside View
88
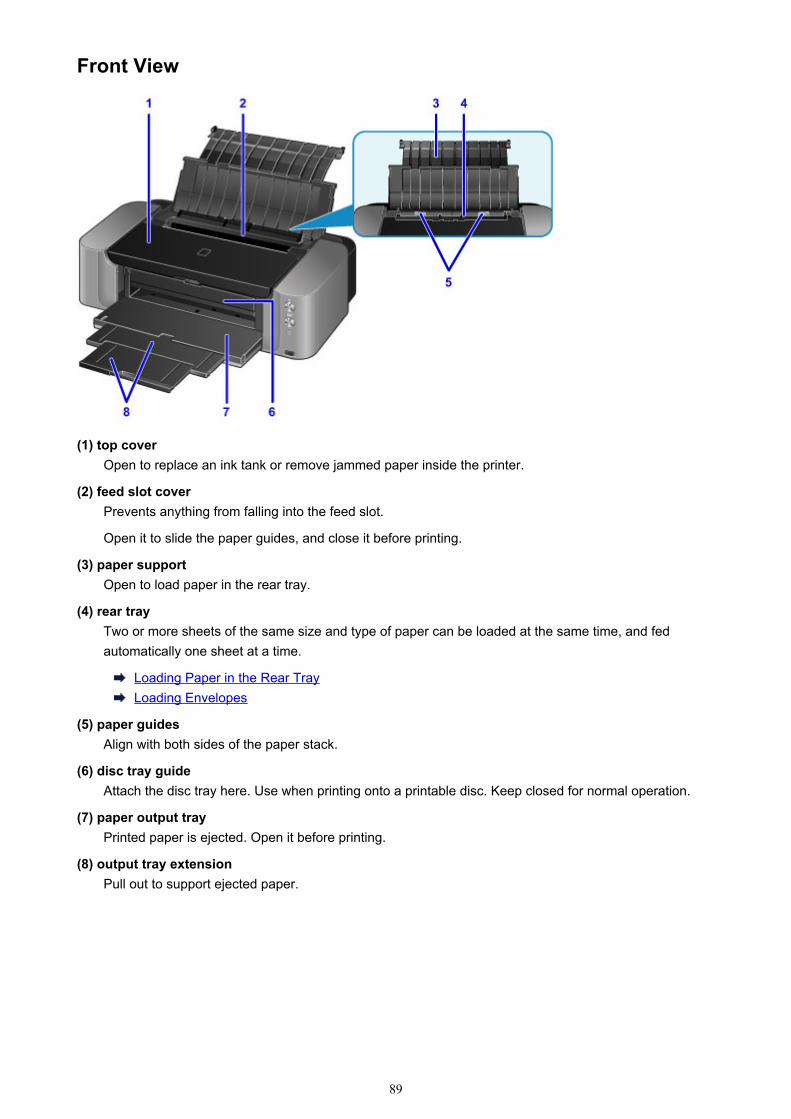
Front View
(1) top coverOpen to replace an ink tank or remove jammed paper inside the printer.
(2) feed slot coverPrevents anything from falling into the feed slot.
Open it to slide the paper guides, and close it before printing.
(3) paper supportOpen to load paper in the rear tray.
(4) rear trayTwo or more sheets of the same size and type of paper can be loaded at the same time, and fedautomatically one sheet at a time.
Loading Paper in the Rear TrayLoading Envelopes
(5) paper guidesAlign with both sides of the paper stack.
(6) disc tray guideAttach the disc tray here. Use when printing onto a printable disc. Keep closed for normal operation.
(7) paper output trayPrinted paper is ejected. Open it before printing.
(8) output tray extensionPull out to support ejected paper.
89

* All buttons and lamps are shown lit in the above figure for explanatory purposes.
(9) POWER lampLights after flashing when the power is turned on.
Note• You can check the status of the printer by the POWER and Alarm lamps.
• POWER lamp is off: The power is off.• POWER lamp lights: The printer is ready to print.• POWER lamp flashes: The printer is getting ready to print, or printing is in progress.• Alarm lamp flashes: An error has occurred and the printer is not ready to print.• POWER lamp flashes and Alarm lamp flashes alternately: An error that requires contacting the
service center may have occurred.
If an Error Occurs
(10) ON buttonTurns the power on or off.
Turning the Printer On and Off
(11) Alarm lampLights or flashes when an error occurs.
(12) RESUME/CANCEL buttonCancels a print job in progress. You can press this button to release from printer error status andresume printing, after the printer problem is resolved.
(13) Wi-Fi button/Wi-Fi lampHold down to automatically set up the wireless LAN connection.
Lights or flashes to indicate the wireless LAN status.
Lights:Wireless LAN connection is enabled.
Flashes:Printing over wireless LAN. Also flashes while configuring the wireless LAN connection.
(14) direct print portConnect a PictBridge compliant device such as a digital camera to print directly.
Warning• Do not connect any equipment other than PictBridge compliant devices to the direct print port of
the printer. This may cause fire, electric shock, or damage to the printer.
90

Important• Do not touch the metal casing.• Do not use the USB cable longer than 10 feet (3 meters) to connect any PictBridge compliant
device to the printer since it may affect the operation of other peripheral devices.
(15) disc tray storage compartmentThe disc tray supplied with the printer can be stored here.
Storing the disc tray
91
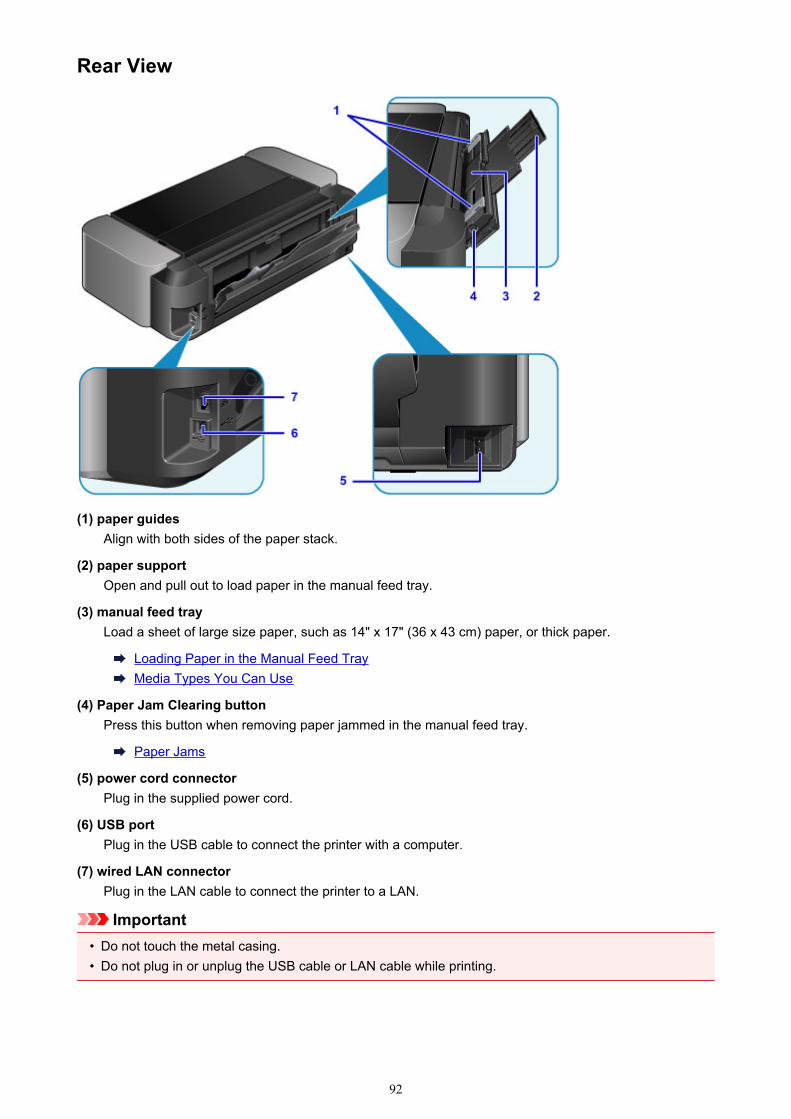
Rear View
(1) paper guidesAlign with both sides of the paper stack.
(2) paper supportOpen and pull out to load paper in the manual feed tray.
(3) manual feed trayLoad a sheet of large size paper, such as 14" x 17" (36 x 43 cm) paper, or thick paper.
Loading Paper in the Manual Feed TrayMedia Types You Can Use
(4) Paper Jam Clearing buttonPress this button when removing paper jammed in the manual feed tray.
Paper Jams
(5) power cord connectorPlug in the supplied power cord.
(6) USB portPlug in the USB cable to connect the printer with a computer.
(7) wired LAN connectorPlug in the LAN cable to connect the printer to a LAN.
Important• Do not touch the metal casing.• Do not plug in or unplug the USB cable or LAN cable while printing.
92
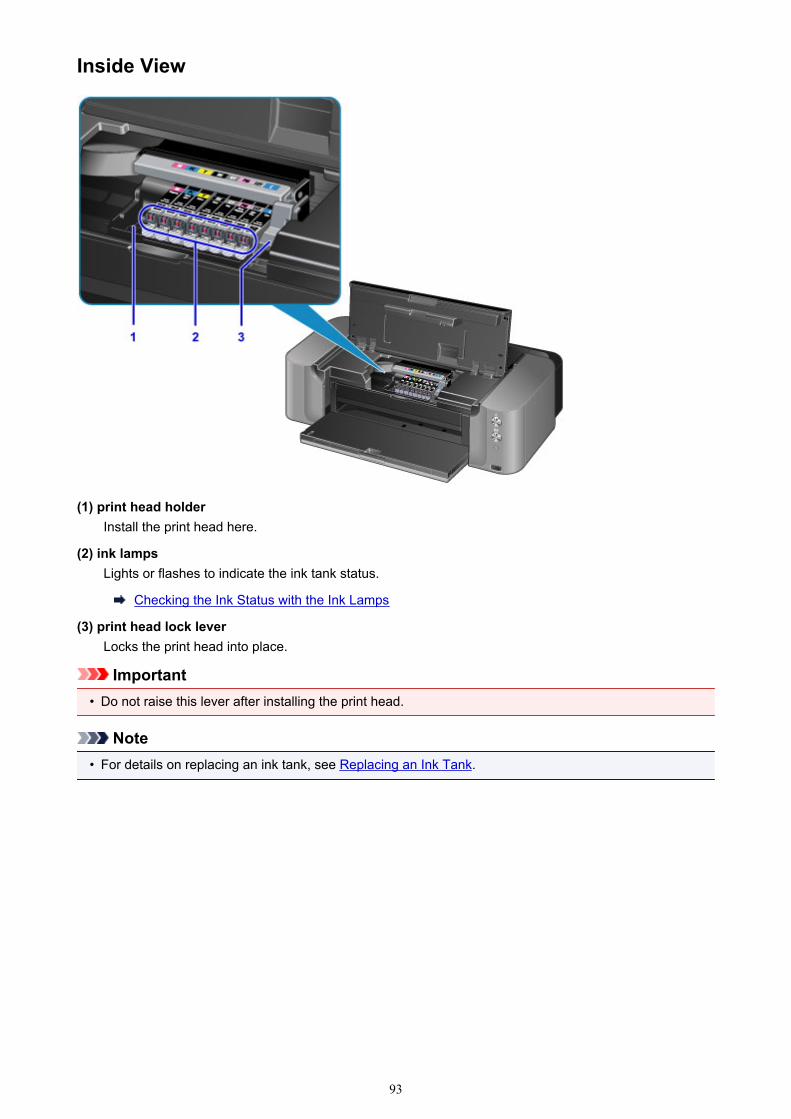
Inside View
(1) print head holderInstall the print head here.
(2) ink lampsLights or flashes to indicate the ink tank status.
Checking the Ink Status with the Ink Lamps
(3) print head lock leverLocks the print head into place.
Important• Do not raise this lever after installing the print head.
Note• For details on replacing an ink tank, see Replacing an Ink Tank.
93

About the Power Supply of the Printer
Confirming that the Power Is On
Turning the Printer On and Off
Notice for the Power Plug/Power Cord
Notice for Unplugging the Power Cord
94
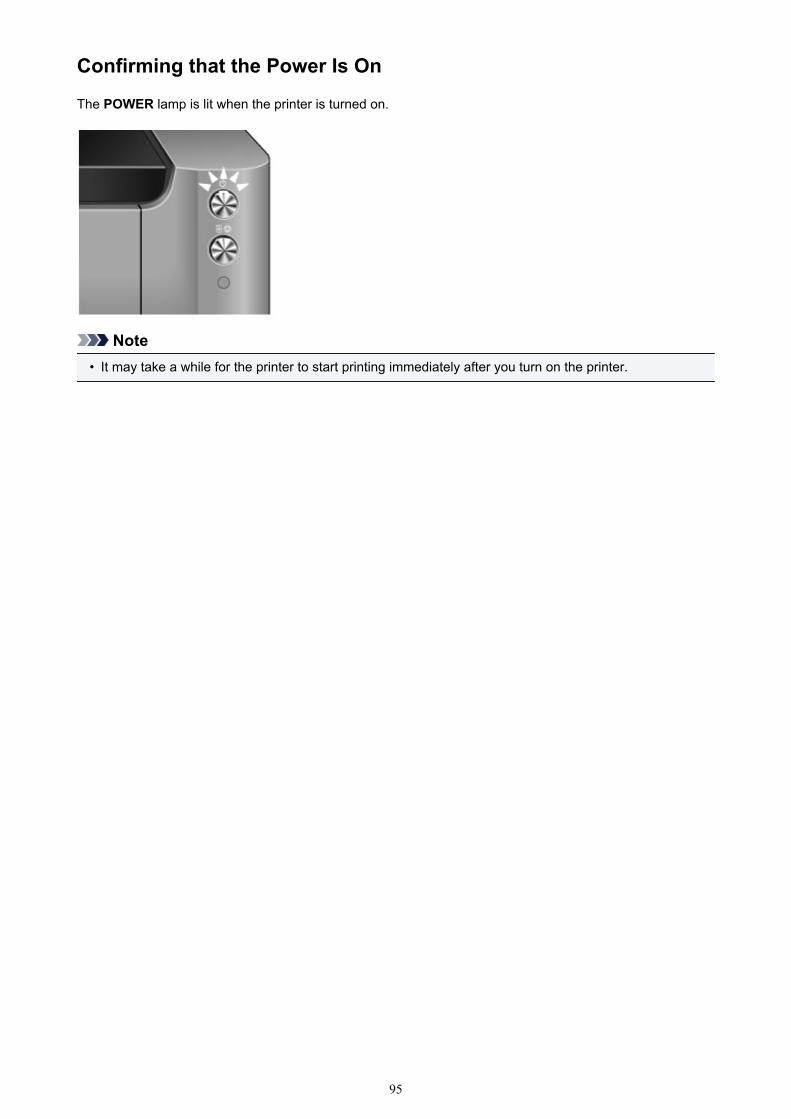
Confirming that the Power Is On
The POWER lamp is lit when the printer is turned on.
Note• It may take a while for the printer to start printing immediately after you turn on the printer.
95
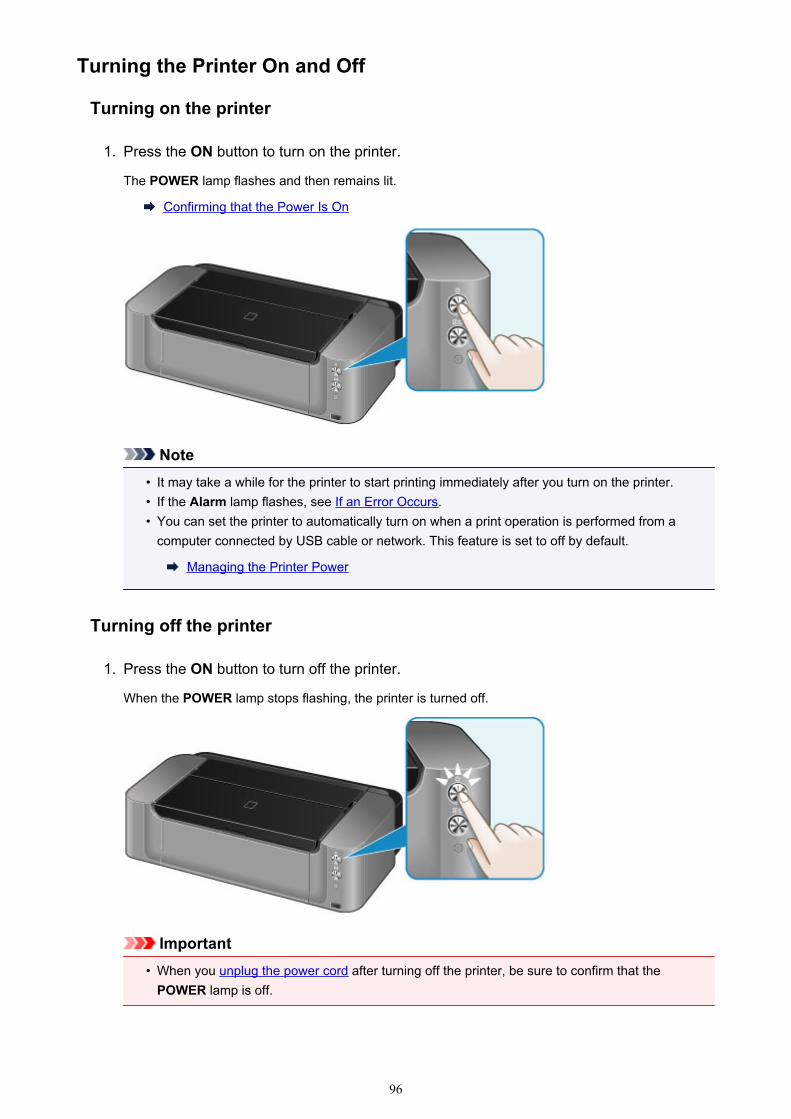
Turning the Printer On and Off
Turning on the printer
1. Press the ON button to turn on the printer.
The POWER lamp flashes and then remains lit.
Confirming that the Power Is On
Note• It may take a while for the printer to start printing immediately after you turn on the printer.• If the Alarm lamp flashes, see If an Error Occurs.• You can set the printer to automatically turn on when a print operation is performed from a
computer connected by USB cable or network. This feature is set to off by default.
Managing the Printer Power
Turning off the printer
1. Press the ON button to turn off the printer.
When the POWER lamp stops flashing, the printer is turned off.
Important• When you unplug the power cord after turning off the printer, be sure to confirm that the
POWER lamp is off.
96

Note• You can set the printer to automatically turn off when no print jobs are sent to the printer for a
certain interval. This is the default setting.
Managing the Printer Power
97

Notice for the Power Plug/Power Cord
Unplug the power cord once a month to confirm that the power plug/power cord does not have anythingunusual described below.
• The power plug/power cord is hot.• The power plug/power cord is rusty.• The power plug/power cord is bent.• The power plug/power cord is worn.• The power plug/power cord is split.
Caution• If you find anything unusual with the power plug/power cord described above, unplug the power cord
and call for service. Using the printer with one of the unusual conditions above may cause a fire or anelectric shock.
98
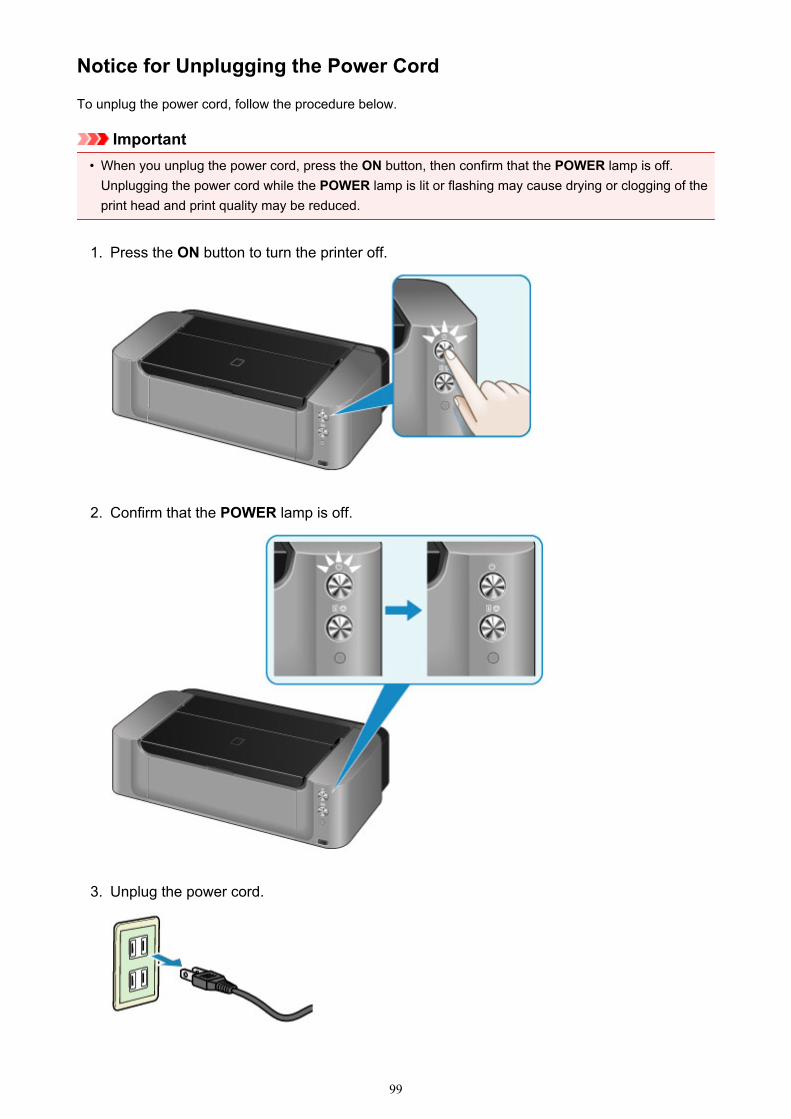
Notice for Unplugging the Power Cord
To unplug the power cord, follow the procedure below.
Important• When you unplug the power cord, press the ON button, then confirm that the POWER lamp is off.
Unplugging the power cord while the POWER lamp is lit or flashing may cause drying or clogging of theprint head and print quality may be reduced.
1. Press the ON button to turn the printer off.
2. Confirm that the POWER lamp is off.
3. Unplug the power cord.
99

The specification of the power cord differs depending on the country or region of use.
100

Loading Paper
Loading Paper
Placing a Printable Disc
101
Loading Paper
Paper Sources to Load Paper
Loading Paper in the Rear Tray
Loading Paper in the Manual Feed Tray
Loading Envelopes
Media Types You Can Use
Media Types You Cannot Use
Handling Paper
Before Printing on Art Paper
Printing Area
102
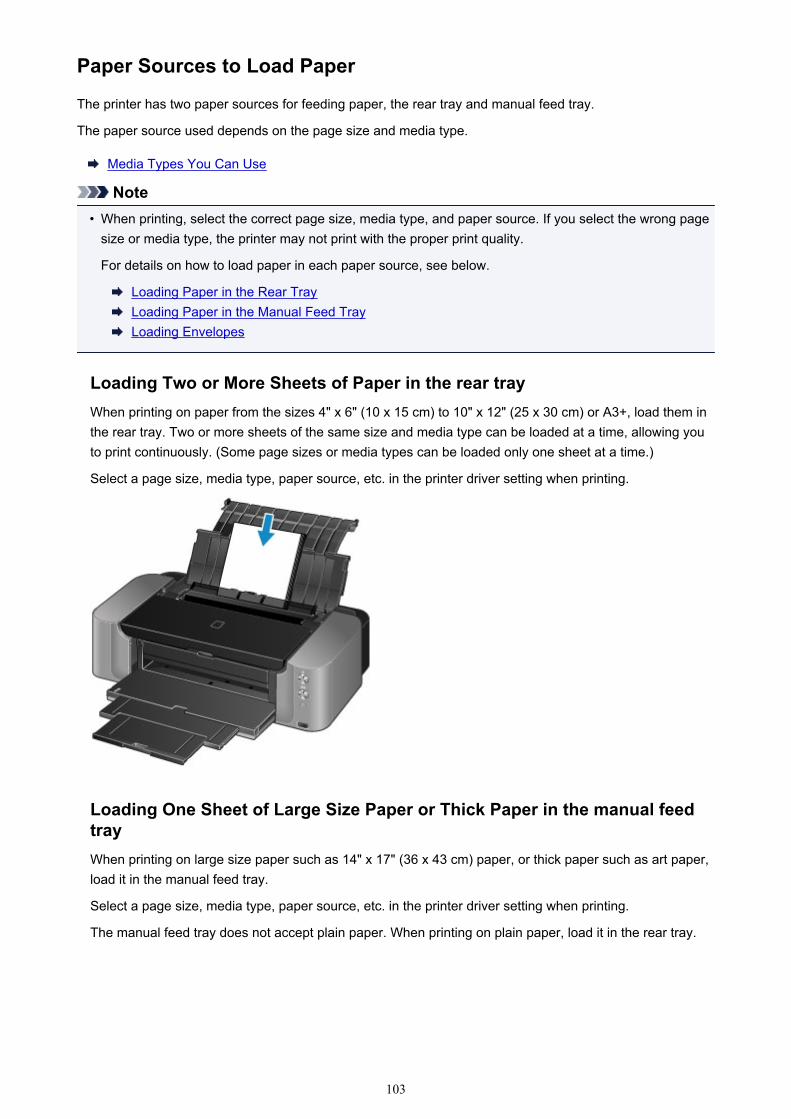
Paper Sources to Load Paper
The printer has two paper sources for feeding paper, the rear tray and manual feed tray.
The paper source used depends on the page size and media type.
Media Types You Can Use
Note• When printing, select the correct page size, media type, and paper source. If you select the wrong page
size or media type, the printer may not print with the proper print quality.
For details on how to load paper in each paper source, see below.
Loading Paper in the Rear TrayLoading Paper in the Manual Feed TrayLoading Envelopes
Loading Two or More Sheets of Paper in the rear trayWhen printing on paper from the sizes 4" x 6" (10 x 15 cm) to 10" x 12" (25 x 30 cm) or A3+, load them inthe rear tray. Two or more sheets of the same size and media type can be loaded at a time, allowing youto print continuously. (Some page sizes or media types can be loaded only one sheet at a time.)
Select a page size, media type, paper source, etc. in the printer driver setting when printing.
Loading One Sheet of Large Size Paper or Thick Paper in the manual feedtrayWhen printing on large size paper such as 14" x 17" (36 x 43 cm) paper, or thick paper such as art paper,load it in the manual feed tray.
Select a page size, media type, paper source, etc. in the printer driver setting when printing.
The manual feed tray does not accept plain paper. When printing on plain paper, load it in the rear tray.
103
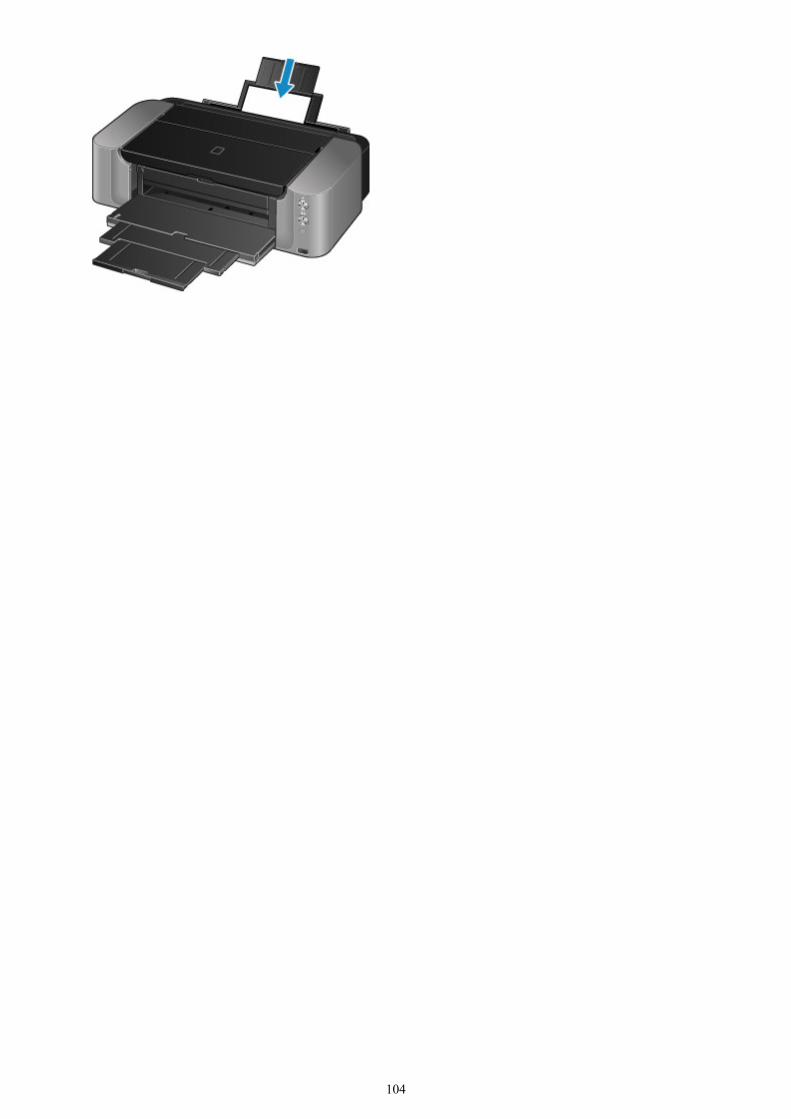
104

Loading Paper in the Rear Tray
You can load A3+, A3, B4, A4, B5, A5, Letter, Legal, 11" x 17" (279.4 x 431.8 mm), 4" x 6" (10 x 15 cm), 5" x7" (13 x 18 cm), 8" x 10" (20 x 25 cm), and 10" x 12" (25 x 30 cm) sizes of paper in the rear tray.
Important• If you cut plain paper into small size such as 4" x 6" (10 x 15 cm) or 5" x 7" (13 x 18 cm) to perform trial
print, it can cause paper jams.
Note• We recommend Canon genuine photo paper for printing photos.
For details on the Canon genuine paper, see Media Types You Can Use.
• You can use general copy paper.
For the page size and paper weight you can use for this printer, see Media Types You Can Use.
1. Prepare paper.
Align the edges of paper. If paper is curled, flatten it.
Note• Align the edges of paper neatly before loading. Loading paper without aligning the edges may
cause paper jams.• If paper is curled, hold the curled corners and gently bend them in the opposite direction until the
paper becomes completely flat.
For details on how to flatten curled paper, see "Load the paper after correcting its curl." in Paper IsSmudged/Printed Surface Is Scratched.
• When using Photo Paper Plus Semi-gloss SG-201, even if the sheet is curled, load one sheet at atime as it is. If you roll up this paper to flatten, this may cause cracks on the surface of the paperand reduce the print quality.
2. Open the paper support (A) of the rear tray.
3. Open the paper output tray (B) gently.
Important• If the disc tray guide (C) is open, be sure to close it.
4. Pull out the output tray extension (D).
105
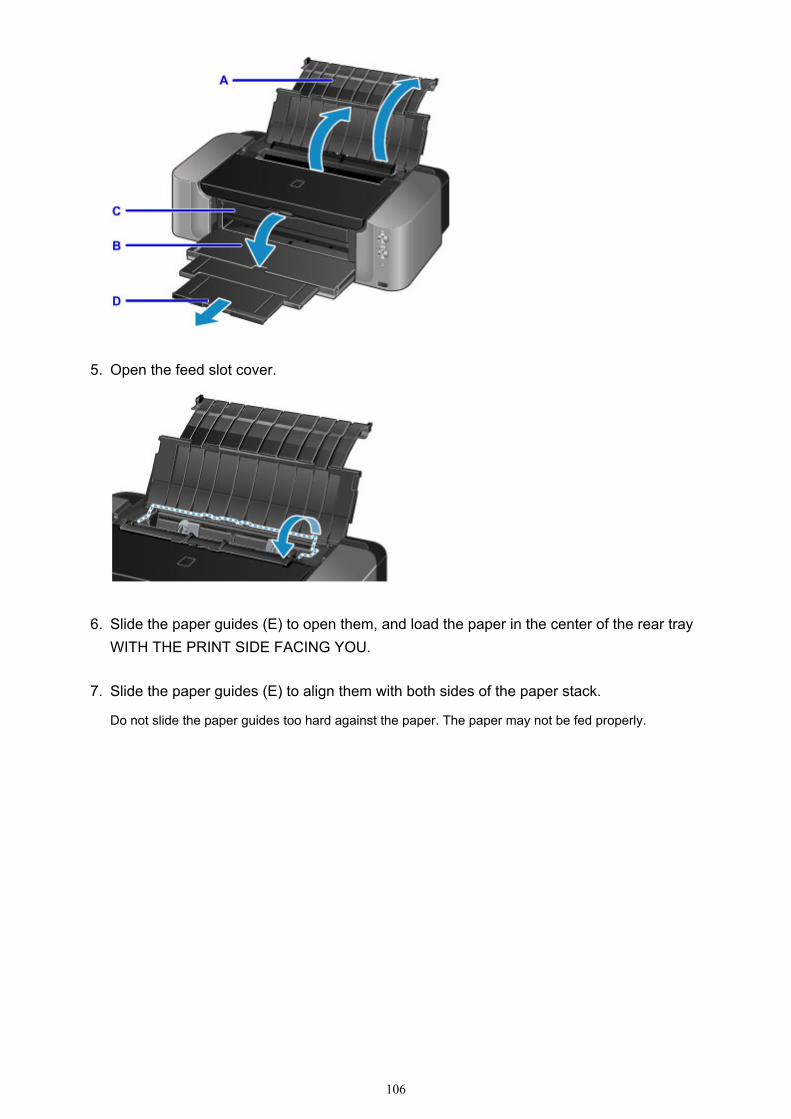
5. Open the feed slot cover.
6. Slide the paper guides (E) to open them, and load the paper in the center of the rear trayWITH THE PRINT SIDE FACING YOU.
7. Slide the paper guides (E) to align them with both sides of the paper stack.
Do not slide the paper guides too hard against the paper. The paper may not be fed properly.
106
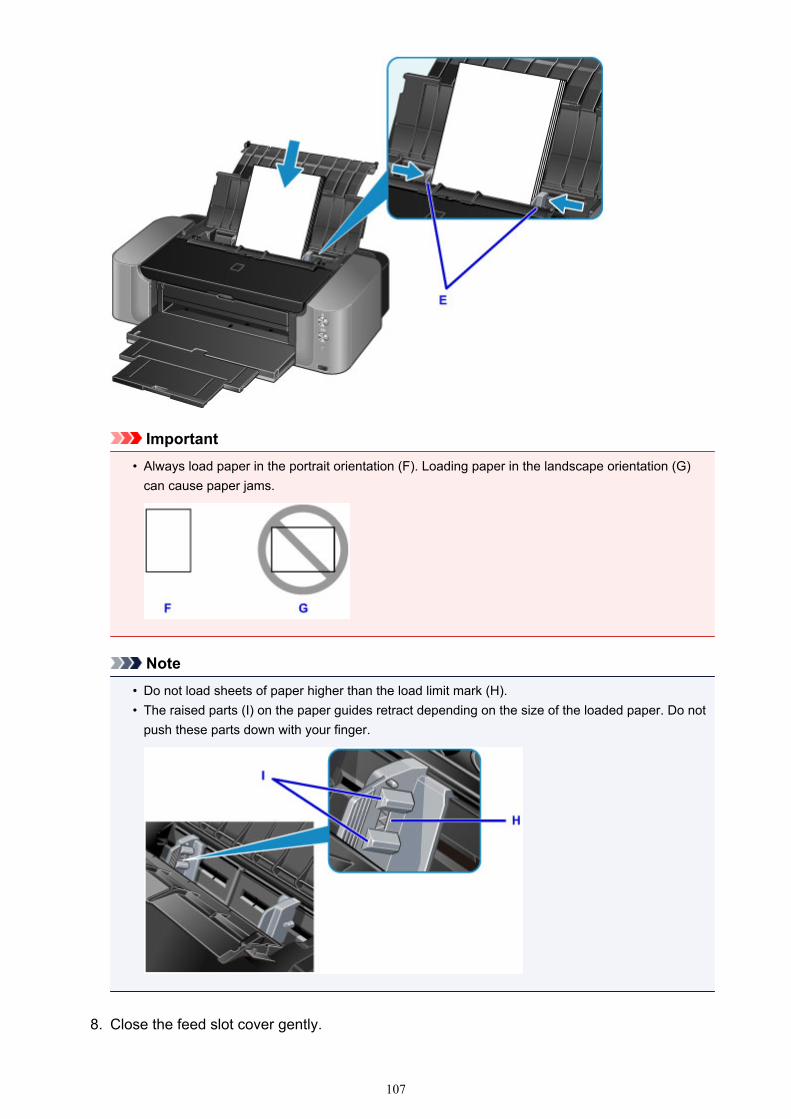
Important• Always load paper in the portrait orientation (F). Loading paper in the landscape orientation (G)
can cause paper jams.
Note• Do not load sheets of paper higher than the load limit mark (H).• The raised parts (I) on the paper guides retract depending on the size of the loaded paper. Do not
push these parts down with your finger.
8. Close the feed slot cover gently.
107
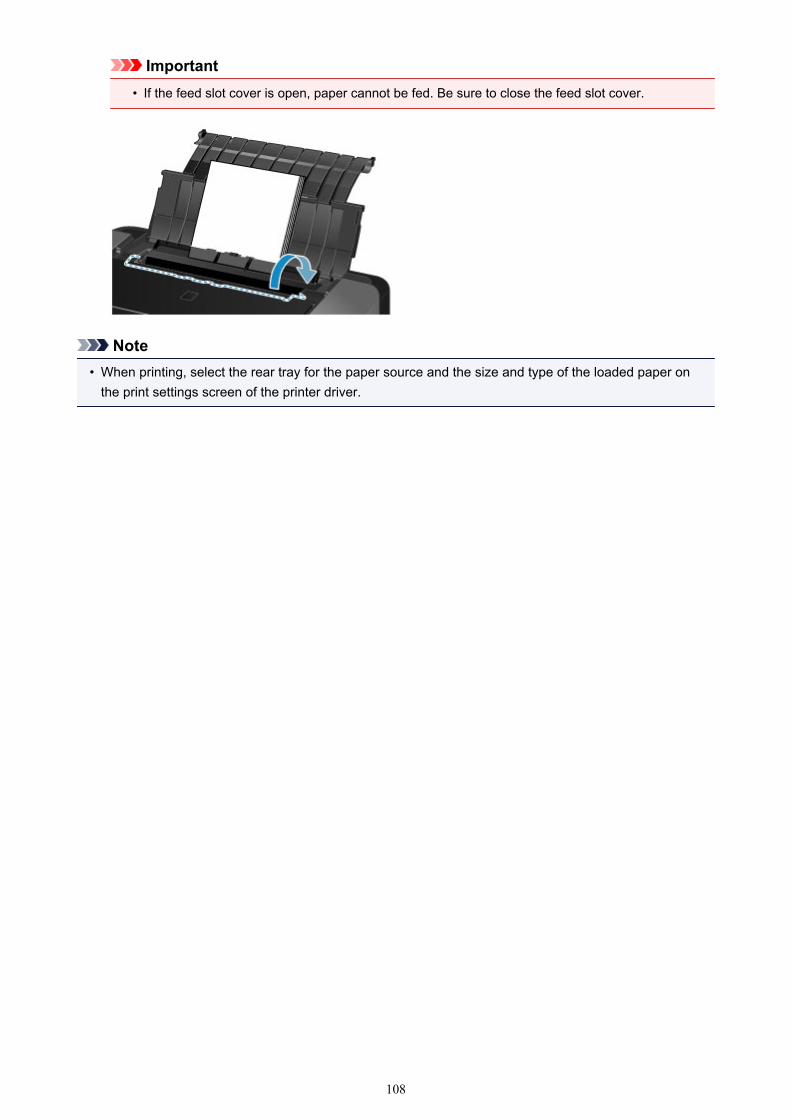
Important• If the feed slot cover is open, paper cannot be fed. Be sure to close the feed slot cover.
Note• When printing, select the rear tray for the paper source and the size and type of the loaded paper on
the print settings screen of the printer driver.
108
Loading Paper in the Manual Feed Tray
You can load A3+, A3, B4, A4, Letter, Legal, 11" x 17" (279.4 x 431.8 mm), 8" x 10" (20 x 25 cm), 10" x 12"(25 x 30 cm), and 14" x 17" (36 x 43 cm) sizes of paper in the manual feed tray.
Note• We recommend Canon genuine photo paper for printing photos.
For details on the Canon genuine paper, see Media Types You Can Use.
• The manual feed tray does not accept plain paper. When printing on plain paper, load it in the rear tray.• When printing on paper other than 14" x 17" (36 x 43 cm) size from a PictBridge compliant device, load
paper in the rear tray.
Printing from a Digital Camera
1. Prepare paper.
If paper is curled, flatten it.
Note• If paper is curled, hold the curled corners and gently bend them in the opposite direction until the
paper becomes completely flat.
For details on how to flatten curled paper, see "Load the paper after correcting its curl." in Paper IsSmudged/Printed Surface Is Scratched.
• When using Photo Paper Plus Semi-gloss SG-201, even if the sheet is curled, load one sheet at atime as it is. If you roll up this paper to flatten, this may cause cracks on the surface of the paperand reduce the print quality.
2. Open the paper support (A) of the manual feed tray, and pull it out.
3. Open the paper output tray (B) gently.
Important• If the disc tray guide (C) is open, be sure to close it.
4. Pull out the output tray extension (D).
109
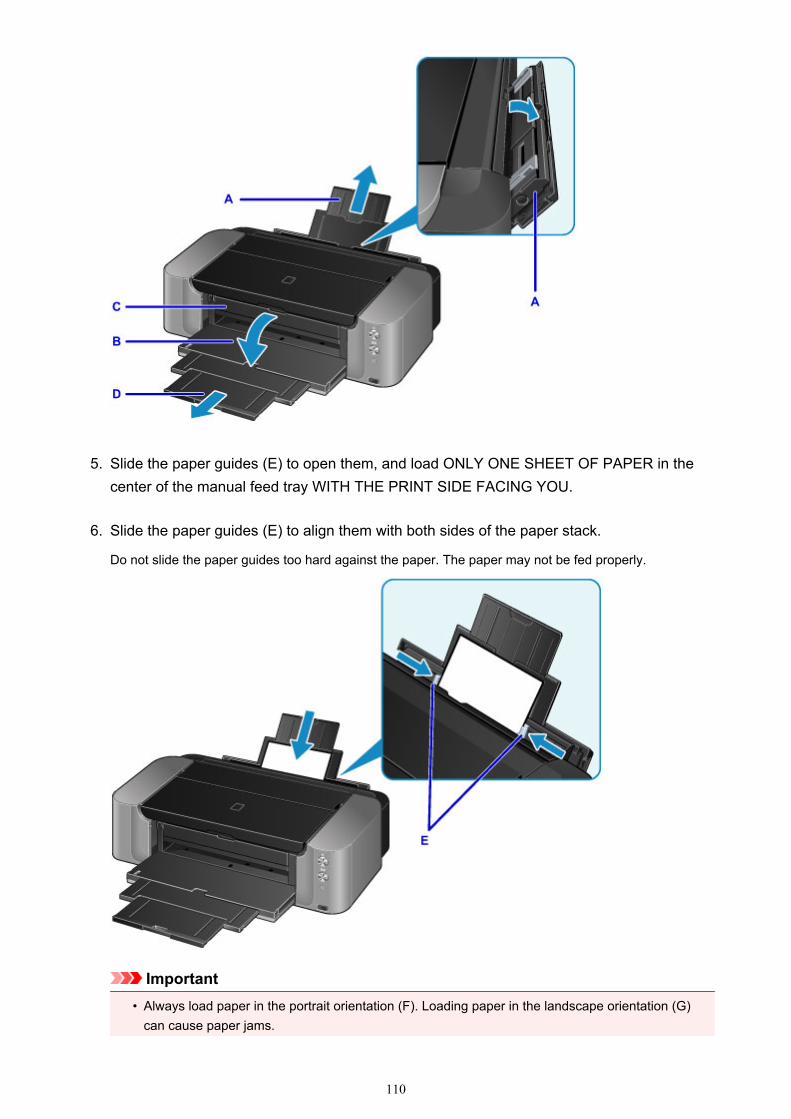
5. Slide the paper guides (E) to open them, and load ONLY ONE SHEET OF PAPER in thecenter of the manual feed tray WITH THE PRINT SIDE FACING YOU.
6. Slide the paper guides (E) to align them with both sides of the paper stack.
Do not slide the paper guides too hard against the paper. The paper may not be fed properly.
Important• Always load paper in the portrait orientation (F). Loading paper in the landscape orientation (G)
can cause paper jams.
110
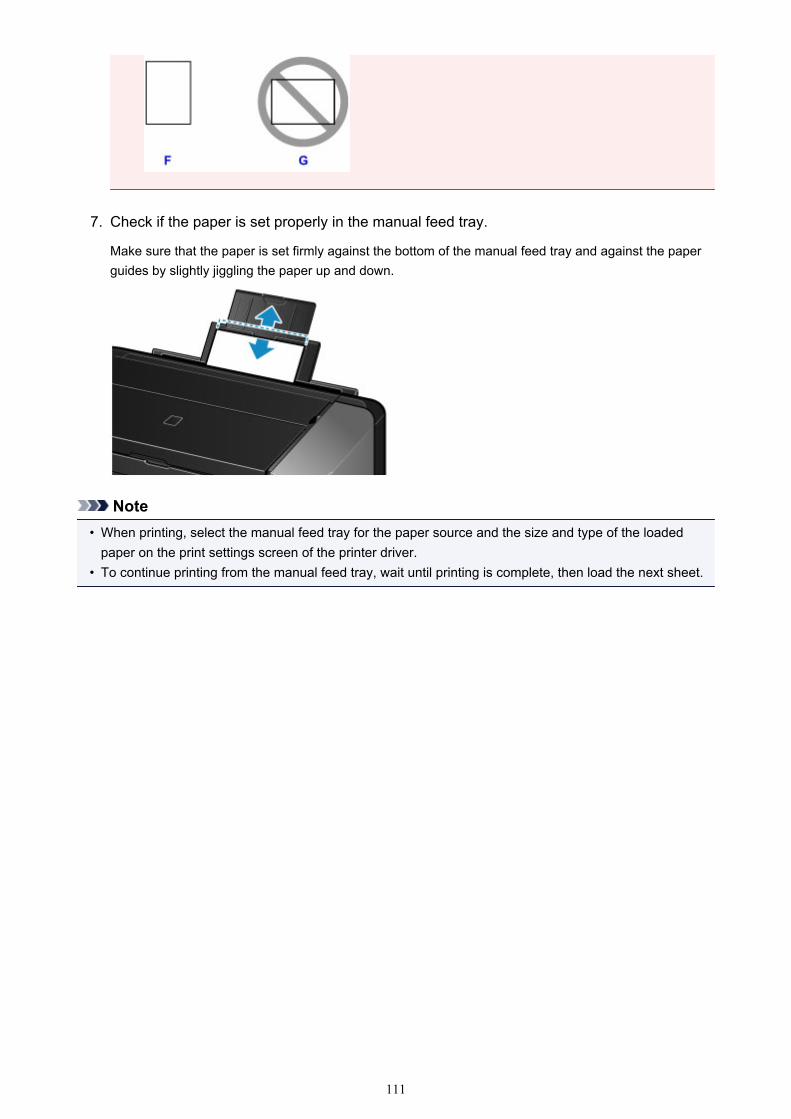
7. Check if the paper is set properly in the manual feed tray.
Make sure that the paper is set firmly against the bottom of the manual feed tray and against the paperguides by slightly jiggling the paper up and down.
Note• When printing, select the manual feed tray for the paper source and the size and type of the loaded
paper on the print settings screen of the printer driver.• To continue printing from the manual feed tray, wait until printing is complete, then load the next sheet.
111
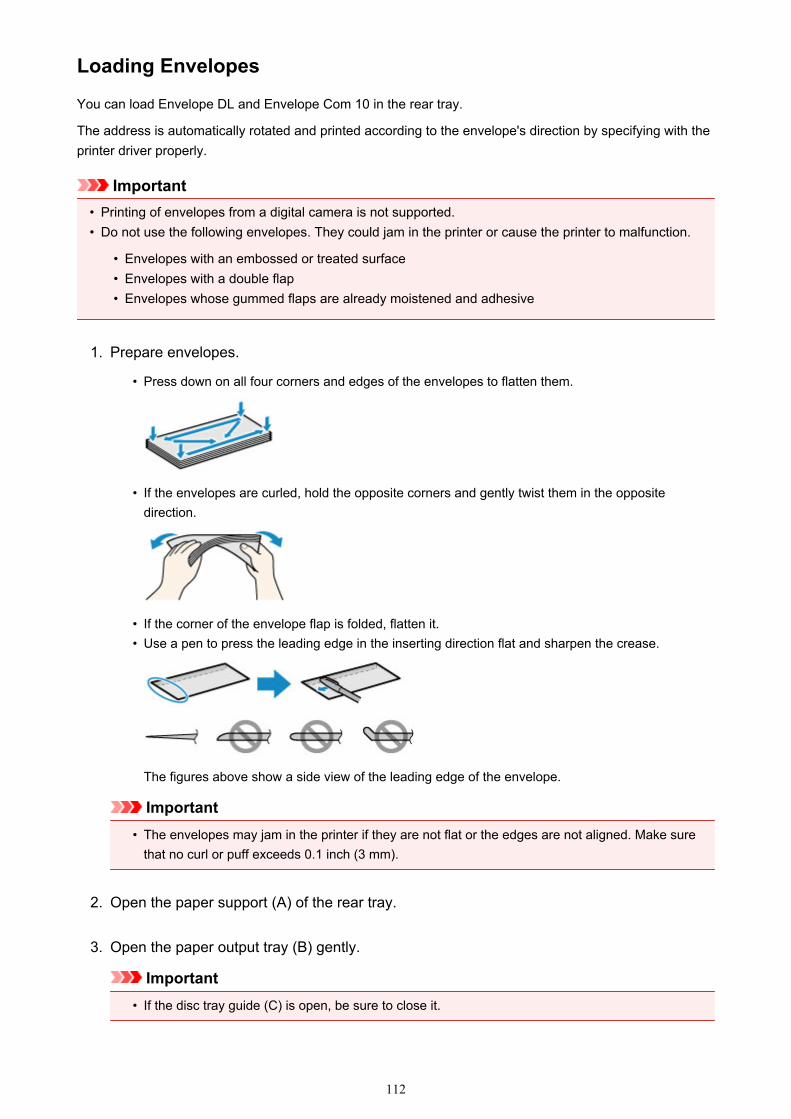
Loading Envelopes
You can load Envelope DL and Envelope Com 10 in the rear tray.
The address is automatically rotated and printed according to the envelope's direction by specifying with theprinter driver properly.
Important• Printing of envelopes from a digital camera is not supported.• Do not use the following envelopes. They could jam in the printer or cause the printer to malfunction.
• Envelopes with an embossed or treated surface• Envelopes with a double flap• Envelopes whose gummed flaps are already moistened and adhesive
1. Prepare envelopes.
• Press down on all four corners and edges of the envelopes to flatten them.
• If the envelopes are curled, hold the opposite corners and gently twist them in the oppositedirection.
• If the corner of the envelope flap is folded, flatten it.• Use a pen to press the leading edge in the inserting direction flat and sharpen the crease.
The figures above show a side view of the leading edge of the envelope.
Important• The envelopes may jam in the printer if they are not flat or the edges are not aligned. Make sure
that no curl or puff exceeds 0.1 inch (3 mm).
2. Open the paper support (A) of the rear tray.
3. Open the paper output tray (B) gently.
Important• If the disc tray guide (C) is open, be sure to close it.
112
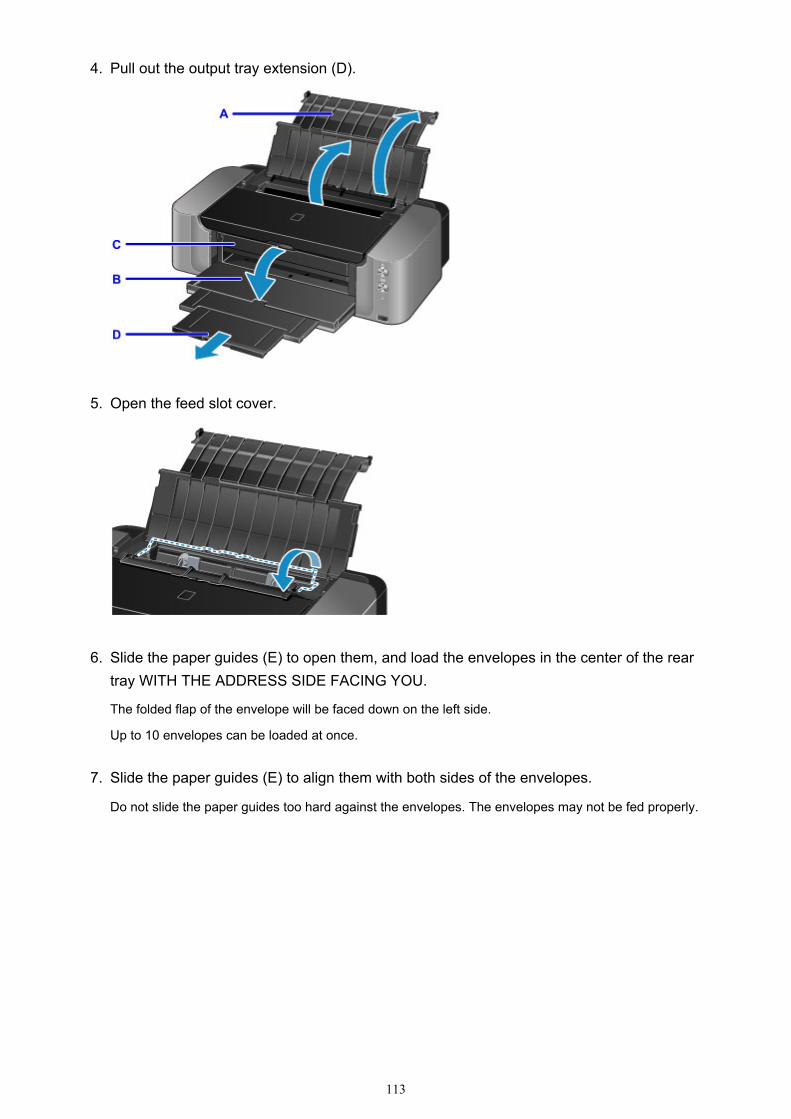
4. Pull out the output tray extension (D).
5. Open the feed slot cover.
6. Slide the paper guides (E) to open them, and load the envelopes in the center of the reartray WITH THE ADDRESS SIDE FACING YOU.
The folded flap of the envelope will be faced down on the left side.
Up to 10 envelopes can be loaded at once.
7. Slide the paper guides (E) to align them with both sides of the envelopes.
Do not slide the paper guides too hard against the envelopes. The envelopes may not be fed properly.
113
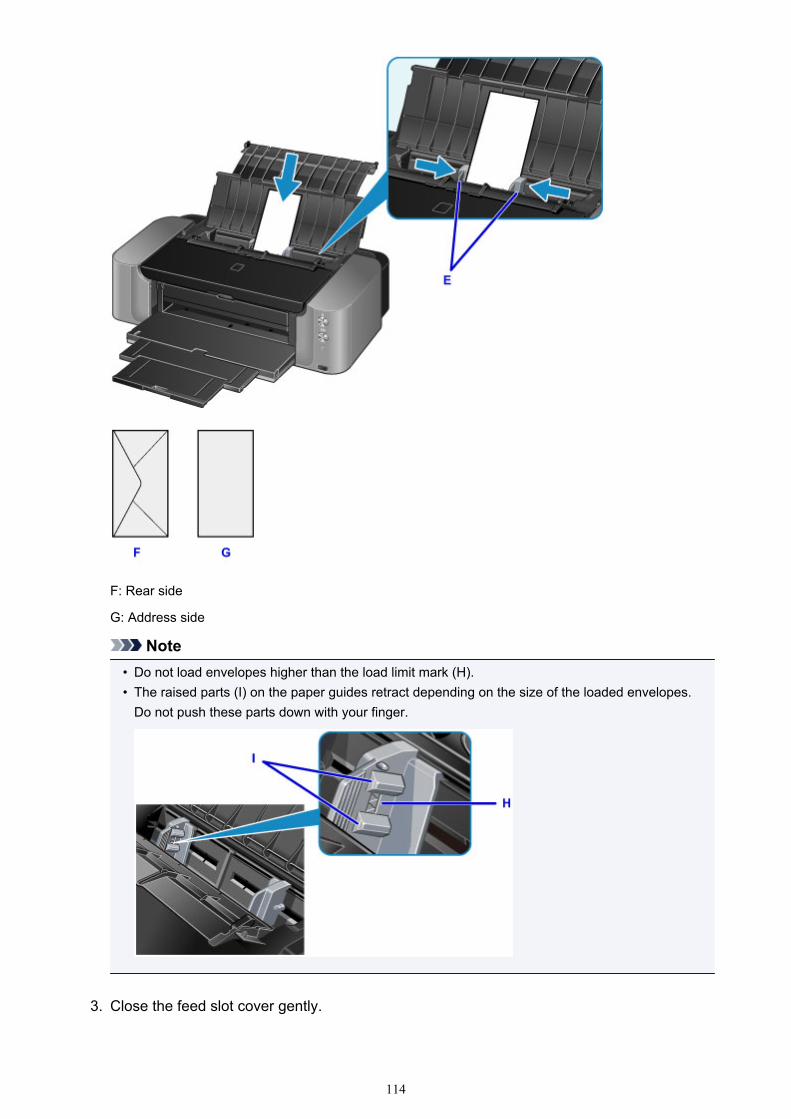
F: Rear side
G: Address side
Note• Do not load envelopes higher than the load limit mark (H).• The raised parts (I) on the paper guides retract depending on the size of the loaded envelopes.
Do not push these parts down with your finger.
3. Close the feed slot cover gently.
114
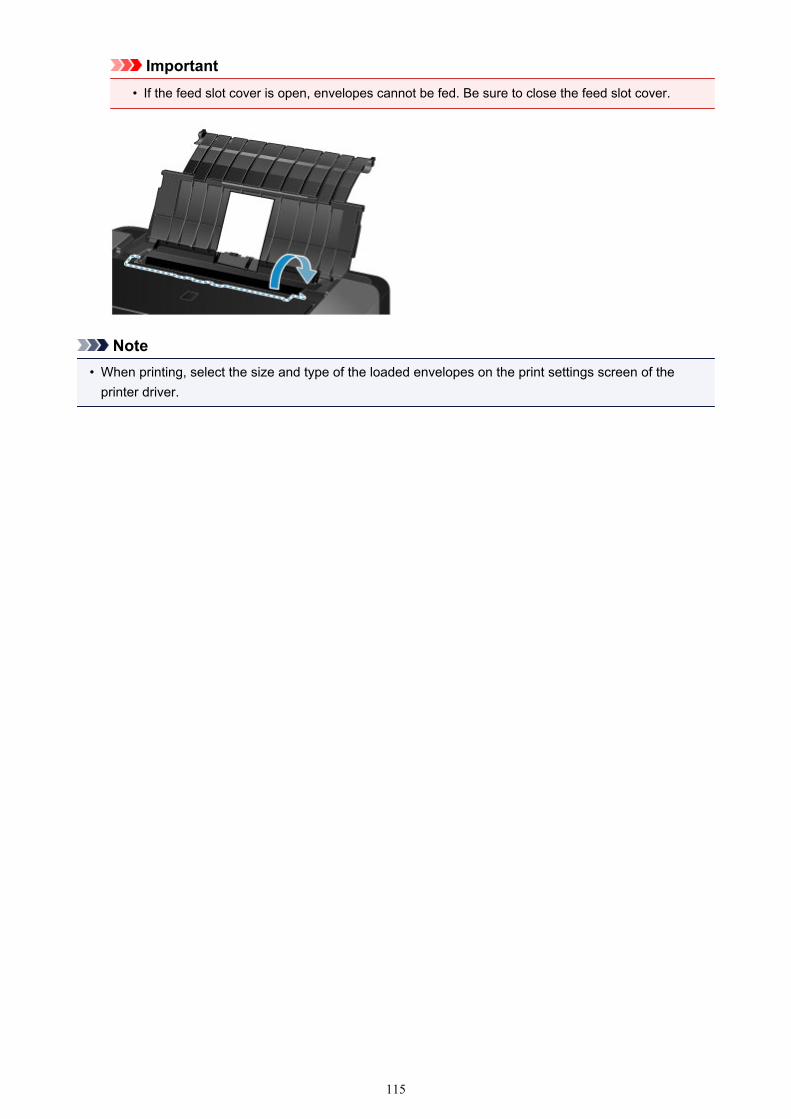
Important• If the feed slot cover is open, envelopes cannot be fed. Be sure to close the feed slot cover.
Note• When printing, select the size and type of the loaded envelopes on the print settings screen of the
printer driver.
115
Media Types You Can Use
To get the best printing result, choose paper suitable for printing. Canon provides various types of papersuitable for documents as well as paper suitable for photos or illustrations. We recommend the use ofCanon genuine paper for printing your important photos.
Media Types
Commercially available papers• Plain Paper (including recycled paper)• Envelopes*1• T-Shirt Transfers*1
Canon genuine papersThe Model Number of Canon genuine paper is shown in brackets. Refer to the instruction manualsupplied with the paper for detailed information on the printable side and notes on handling paper. Forinformation on the page sizes available for each Canon genuine paper, access our website.
Note• You may not be able to purchase some Canon genuine papers depending on the country or region
of purchase. Paper is not sold in the US by Model Number. Purchase paper by name.
Paper for printing photos:
• Photo Paper Pro Platinum <PT-101>• Glossy Photo Paper "Everyday Use" <GP-501/GP-601>*1• Photo Paper Glossy <GP-601>*1• Photo Paper Plus Glossy II <PP-201>• Photo Paper Pro Luster <LU-101>• Photo Paper Plus Semi-gloss <SG-201>• Matte Photo Paper <MP-101>*1• Fine Art Paper "Museum Etching" <FA-ME1>*1*2• Photo Paper Pro Premium Matte <PM-101>*1*2
Paper for printing business documents:
• High Resolution Paper <HR-101N>*1
*1 Printing to this paper from a digital camera is not supported.*2 You cannot print in the top and bottom 1.18 inch (30 mm) margins of the paper (in the printingdirection). For details on the printing area, see Sizes for Art Paper.
When using art paper, see Before Printing on Art Paper.
Paper Load LimitPaper Settings on the Printer Driver
Note• You can print onto a printable disc using the disc tray supplied with the printer.
Placing a Printable Disc
• When printing photos saved on a PictBridge compliant device, you must specify the page size andmedia type.
116
Printing from a Digital Camera
• You can use non-Canon genuine art paper. For details, access our website.
You cannot print in the top and bottom 1.18 inch (30 mm) margins of the paper (in the printingdirection).
Sizes for Art PaperBefore Printing on Art Paper
Page SizesYou can use the following page sizes.
Note• You can load the page sizes as follows.
• rear tray: A3+, A3, B4, A4, B5, A5, Letter, Legal, 11" x 17" (279.4 x 431.8 mm), 4" x 6" (10 x 15cm), 5" x 7" (13 x 18 cm), 8" x 10" (20 x 25 cm), 10" x 12" (25 x 30 cm), Envelope DL, andEnvelope Com 10
• manual feed tray: A3+, A3, B4, A4, Letter, Legal, 11" x 17" (279.4 x 431.8 mm), 8" x 10" (20 x 25cm), 10" x 12" (25 x 30 cm), and 14" x 17" (36 x 43 cm)
• Printing on the following page sizes from a digital camera is not supported.
• B4, B5, A5, Legal, 11" x 17" (279.4 x 431.8 mm), 10" x 12" (25 x 30 cm), 14" x 17" (36 x 43 cm),and Envelopes
Standard sizes:
• Letter• Legal• 11" x 17" (279.4 x 431.8 mm)• A5• A4• A3• A3+• B5• B4• 4" x 6" (10 x 15 cm)• 5" x 7" (13 x 18 cm)• 8" x 10" (20 x 25 cm)• 10" x 12" (25 x 30 cm)• 14" x 17" (36 x 43 cm)• Envelope DL• Envelope Com 10
Non-standard sizes:
You can print on non-standard size paper within the following ranges.
• rear tray
- Minimum size: 3.50 x 5.00 inches (89.0 x 127.0 mm)
- Maximum size: 12.95 x 26.61 inches (329.0 x 676.0 mm)
• manual feed tray
117

- Minimum size: 8.00 x 10.00 inches (203.2 x 254.0 mm)
- Maximum size: 14.00 x 23.00 inches (355.6 x 584.2 mm)
Paper Weight / ThicknessYou can use paper in the following weight/thickness ranges.
• rear tray: From 17 to 28 lb (64 to 105 g /m2) (plain paper except for Canon genuine paper)
* You can use non-Canon genuine specialty paper that is up to 53 lb (200 g /m2).
Do not use heavier or lighter paper (except for Canon genuine paper), as it could jam in the printer.
• manual feed tray: From 4 to 23.6 mil (0.1 to 0.6 mm) (up to 93 lb (350 g /m2))
Do not use paper thicker or heavier than this, as it could jam in the printer.
118
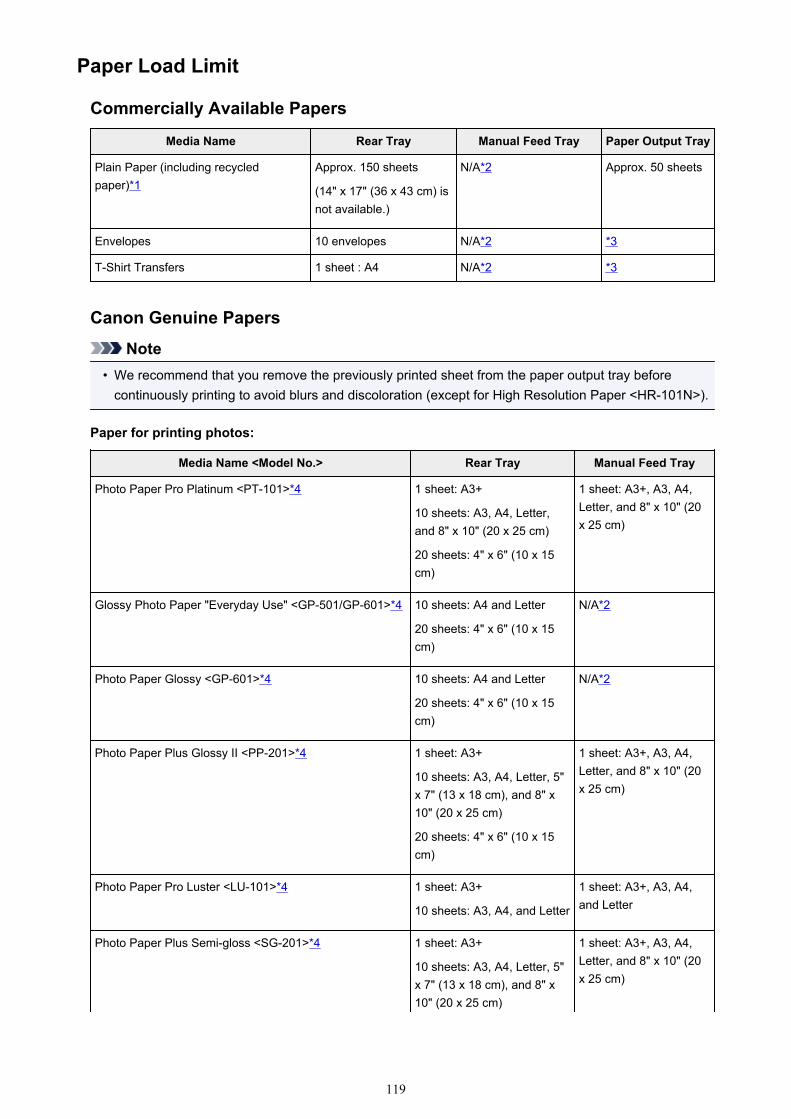
Paper Load Limit
Commercially Available Papers
Media Name Rear Tray Manual Feed Tray Paper Output Tray
Plain Paper (including recycledpaper)*1
Approx. 150 sheets
(14" x 17" (36 x 43 cm) isnot available.)
N/A*2 Approx. 50 sheets
Envelopes 10 envelopes N/A*2 *3
T-Shirt Transfers 1 sheet : A4 N/A*2 *3
Canon Genuine Papers
Note• We recommend that you remove the previously printed sheet from the paper output tray before
continuously printing to avoid blurs and discoloration (except for High Resolution Paper <HR-101N>).
Paper for printing photos:
Media Name <Model No.> Rear Tray Manual Feed Tray
Photo Paper Pro Platinum <PT-101>*4 1 sheet: A3+
10 sheets: A3, A4, Letter,and 8" x 10" (20 x 25 cm)
20 sheets: 4" x 6" (10 x 15cm)
1 sheet: A3+, A3, A4,Letter, and 8" x 10" (20x 25 cm)
Glossy Photo Paper "Everyday Use" <GP-501/GP-601>*4 10 sheets: A4 and Letter
20 sheets: 4" x 6" (10 x 15cm)
N/A*2
Photo Paper Glossy <GP-601>*4 10 sheets: A4 and Letter
20 sheets: 4" x 6" (10 x 15cm)
N/A*2
Photo Paper Plus Glossy II <PP-201>*4 1 sheet: A3+
10 sheets: A3, A4, Letter, 5"x 7" (13 x 18 cm), and 8" x10" (20 x 25 cm)
20 sheets: 4" x 6" (10 x 15cm)
1 sheet: A3+, A3, A4,Letter, and 8" x 10" (20x 25 cm)
Photo Paper Pro Luster <LU-101>*4 1 sheet: A3+
10 sheets: A3, A4, and Letter
1 sheet: A3+, A3, A4,and Letter
Photo Paper Plus Semi-gloss <SG-201>*4 1 sheet: A3+
10 sheets: A3, A4, Letter, 5"x 7" (13 x 18 cm), and 8" x10" (20 x 25 cm)
1 sheet: A3+, A3, A4,Letter, and 8" x 10" (20x 25 cm)
119
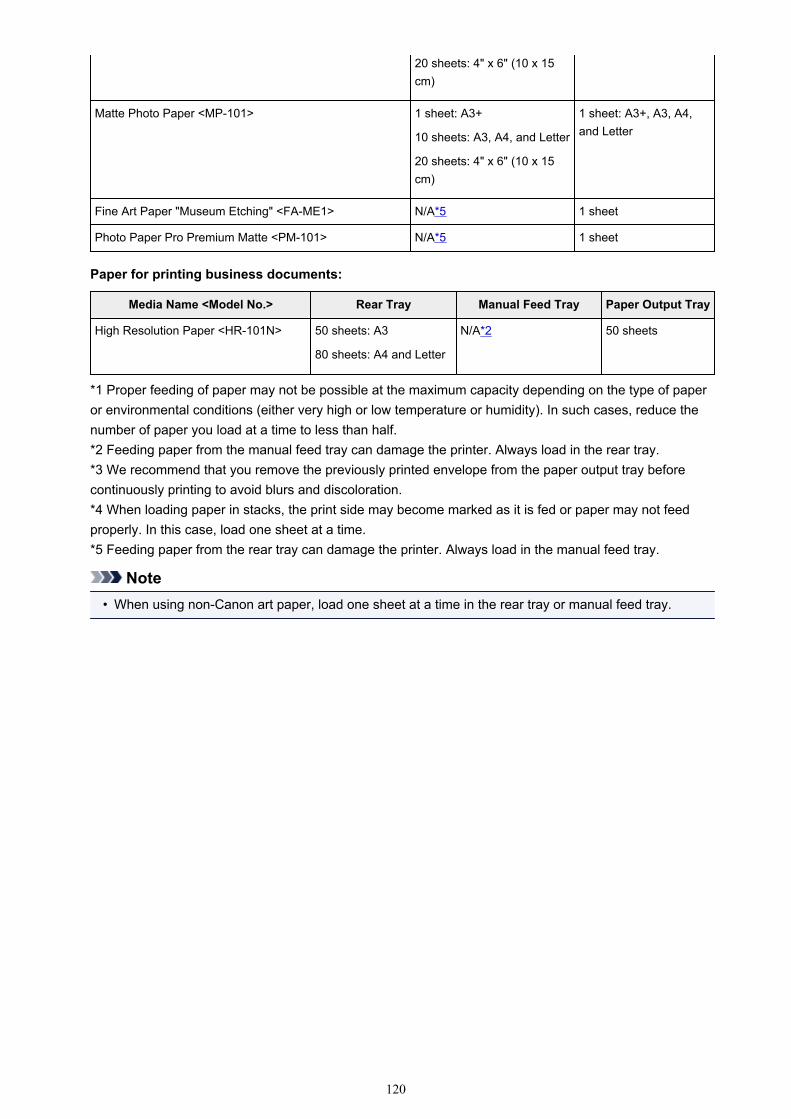
20 sheets: 4" x 6" (10 x 15cm)
Matte Photo Paper <MP-101> 1 sheet: A3+
10 sheets: A3, A4, and Letter
20 sheets: 4" x 6" (10 x 15cm)
1 sheet: A3+, A3, A4,and Letter
Fine Art Paper "Museum Etching" <FA-ME1> N/A*5 1 sheet
Photo Paper Pro Premium Matte <PM-101> N/A*5 1 sheet
Paper for printing business documents:
Media Name <Model No.> Rear Tray Manual Feed Tray Paper Output Tray
High Resolution Paper <HR-101N> 50 sheets: A3
80 sheets: A4 and Letter
N/A*2 50 sheets
*1 Proper feeding of paper may not be possible at the maximum capacity depending on the type of paperor environmental conditions (either very high or low temperature or humidity). In such cases, reduce thenumber of paper you load at a time to less than half.*2 Feeding paper from the manual feed tray can damage the printer. Always load in the rear tray.*3 We recommend that you remove the previously printed envelope from the paper output tray beforecontinuously printing to avoid blurs and discoloration.*4 When loading paper in stacks, the print side may become marked as it is fed or paper may not feedproperly. In this case, load one sheet at a time.*5 Feeding paper from the rear tray can damage the printer. Always load in the manual feed tray.
Note• When using non-Canon art paper, load one sheet at a time in the rear tray or manual feed tray.
120
Media Types You Cannot Use
Do not use the following types of paper. Using such paper will cause not only unsatisfactory results, but alsothe printer to jam or malfunction.
• Folded, curled, or wrinkled paper• Damp paper• Paper that is too thin
rear tray: Less than 17 lb (64 g /m2)
manual feed tray: Less than 4 mil (0.1 mm)
• Paper that is too thick
rear tray: More than 28 lb (105 g /m2) (plain paper except for Canon genuine paper)
manual feed tray: More than 23.6 mil (0.6 mm) in thickness or more than 93 lb (350 g /m2) in weight
• Paper thinner than a postcard, including plain paper or notepad paper cut to a small size (when printingon paper smaller than A5)
• Picture postcards• Postcards affixed with photos or stickers• Envelopes with a double flap• Envelopes with an embossed or treated surface• Envelopes whose gummed flaps are already moistened and adhesive• Any type of paper with holes• Paper that is not rectangular• Paper bound with staples or glue• Paper with adhesives• Paper decorated with glitter, etc.
121
Handling Paper
• Be careful not to rub or scratch the surfaces of any types of paper when handling.• Hold the paper as closely as possible to its edges and try not to touch the printing surface. The print
quality may be degraded if the printing surface is smudged with sweat or oil that comes from yourhands.
• Do not touch the printed surface until the ink is dried. Even when the ink is dried, be careful not to touchthe printed surface as much as possible when handling.
• Take out only the necessary number of paper from the package, just before printing.• To avoid curling, when you do not print, put unused paper back into the package and keep it on a level
surface. And also, store it avoiding heat, humidity, and direct sunlight.
122
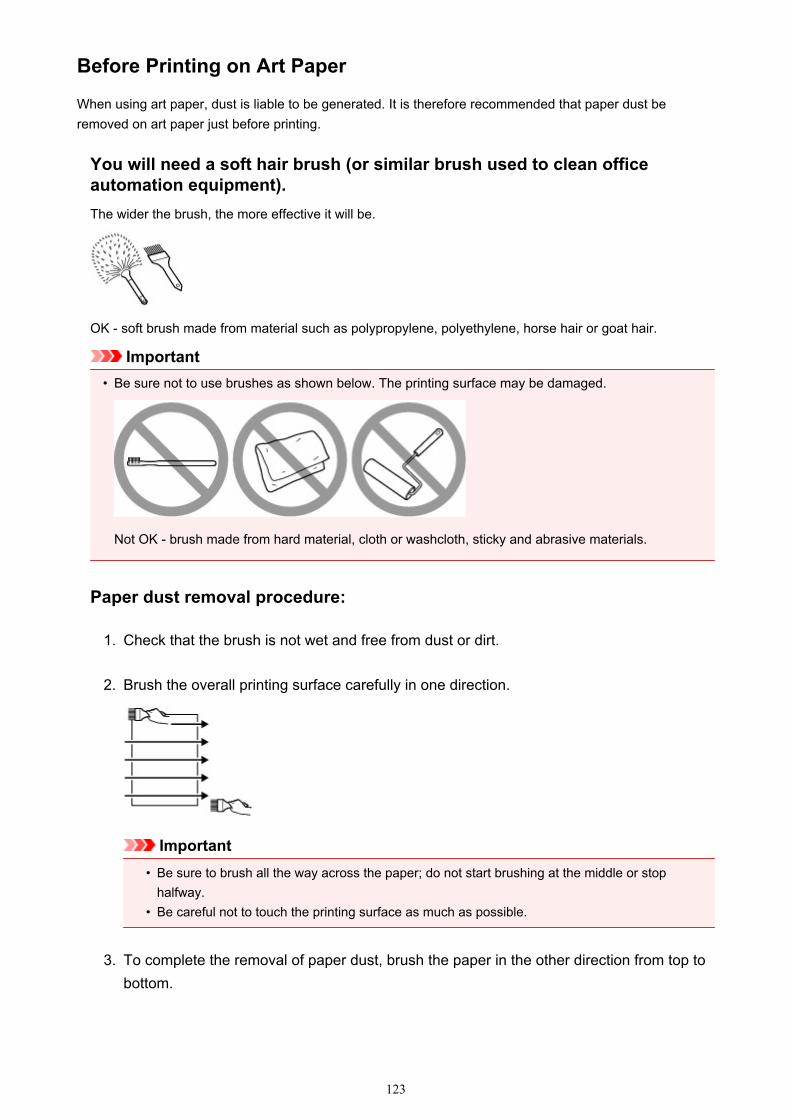
Before Printing on Art Paper
When using art paper, dust is liable to be generated. It is therefore recommended that paper dust beremoved on art paper just before printing.
You will need a soft hair brush (or similar brush used to clean officeautomation equipment).The wider the brush, the more effective it will be.
OK - soft brush made from material such as polypropylene, polyethylene, horse hair or goat hair.
Important• Be sure not to use brushes as shown below. The printing surface may be damaged.
Not OK - brush made from hard material, cloth or washcloth, sticky and abrasive materials.
Paper dust removal procedure:
1. Check that the brush is not wet and free from dust or dirt.
2. Brush the overall printing surface carefully in one direction.
Important• Be sure to brush all the way across the paper; do not start brushing at the middle or stop
halfway.• Be careful not to touch the printing surface as much as possible.
3. To complete the removal of paper dust, brush the paper in the other direction from top tobottom.
123

124

Printing Area
Printing Area
Other Sizes than Letter, Legal, Envelopes
Letter, Legal
Sizes for Art Paper
Envelopes
Printable Discs
125
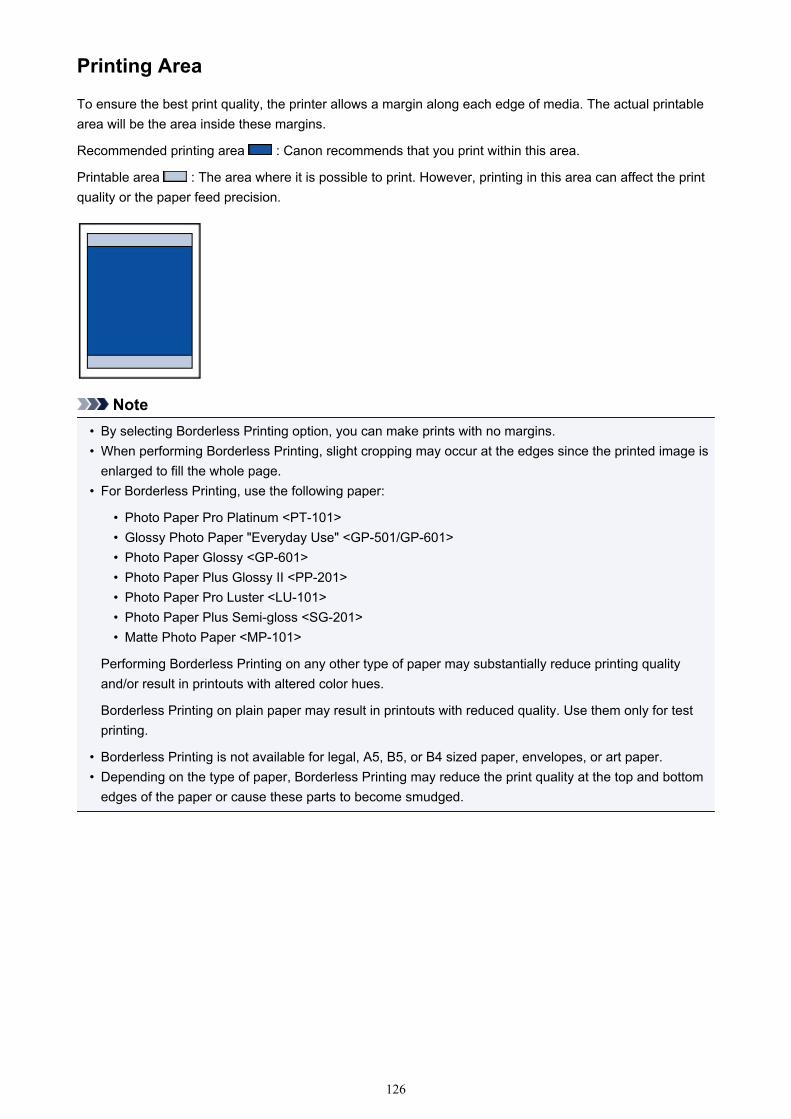
Printing Area
To ensure the best print quality, the printer allows a margin along each edge of media. The actual printablearea will be the area inside these margins.
Recommended printing area : Canon recommends that you print within this area.
Printable area : The area where it is possible to print. However, printing in this area can affect the printquality or the paper feed precision.
Note• By selecting Borderless Printing option, you can make prints with no margins.• When performing Borderless Printing, slight cropping may occur at the edges since the printed image is
enlarged to fill the whole page.• For Borderless Printing, use the following paper:
• Photo Paper Pro Platinum <PT-101>• Glossy Photo Paper "Everyday Use" <GP-501/GP-601>• Photo Paper Glossy <GP-601>• Photo Paper Plus Glossy II <PP-201>• Photo Paper Pro Luster <LU-101>• Photo Paper Plus Semi-gloss <SG-201>• Matte Photo Paper <MP-101>
Performing Borderless Printing on any other type of paper may substantially reduce printing qualityand/or result in printouts with altered color hues.
Borderless Printing on plain paper may result in printouts with reduced quality. Use them only for testprinting.
• Borderless Printing is not available for legal, A5, B5, or B4 sized paper, envelopes, or art paper.• Depending on the type of paper, Borderless Printing may reduce the print quality at the top and bottom
edges of the paper or cause these parts to become smudged.
126
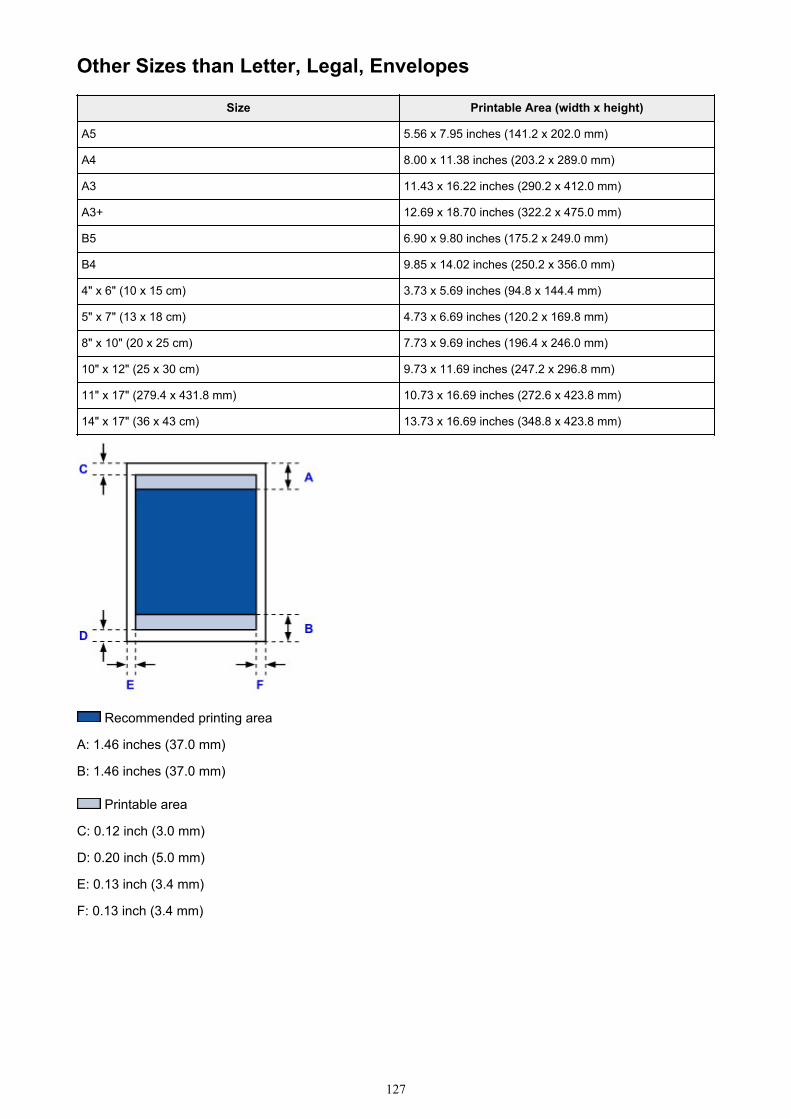
Other Sizes than Letter, Legal, Envelopes
Size Printable Area (width x height)
A5 5.56 x 7.95 inches (141.2 x 202.0 mm)
A4 8.00 x 11.38 inches (203.2 x 289.0 mm)
A3 11.43 x 16.22 inches (290.2 x 412.0 mm)
A3+ 12.69 x 18.70 inches (322.2 x 475.0 mm)
B5 6.90 x 9.80 inches (175.2 x 249.0 mm)
B4 9.85 x 14.02 inches (250.2 x 356.0 mm)
4" x 6" (10 x 15 cm) 3.73 x 5.69 inches (94.8 x 144.4 mm)
5" x 7" (13 x 18 cm) 4.73 x 6.69 inches (120.2 x 169.8 mm)
8" x 10" (20 x 25 cm) 7.73 x 9.69 inches (196.4 x 246.0 mm)
10" x 12" (25 x 30 cm) 9.73 x 11.69 inches (247.2 x 296.8 mm)
11" x 17" (279.4 x 431.8 mm) 10.73 x 16.69 inches (272.6 x 423.8 mm)
14" x 17" (36 x 43 cm) 13.73 x 16.69 inches (348.8 x 423.8 mm)
Recommended printing area
A: 1.46 inches (37.0 mm)
B: 1.46 inches (37.0 mm)
Printable area
C: 0.12 inch (3.0 mm)
D: 0.20 inch (5.0 mm)
E: 0.13 inch (3.4 mm)
F: 0.13 inch (3.4 mm)
127
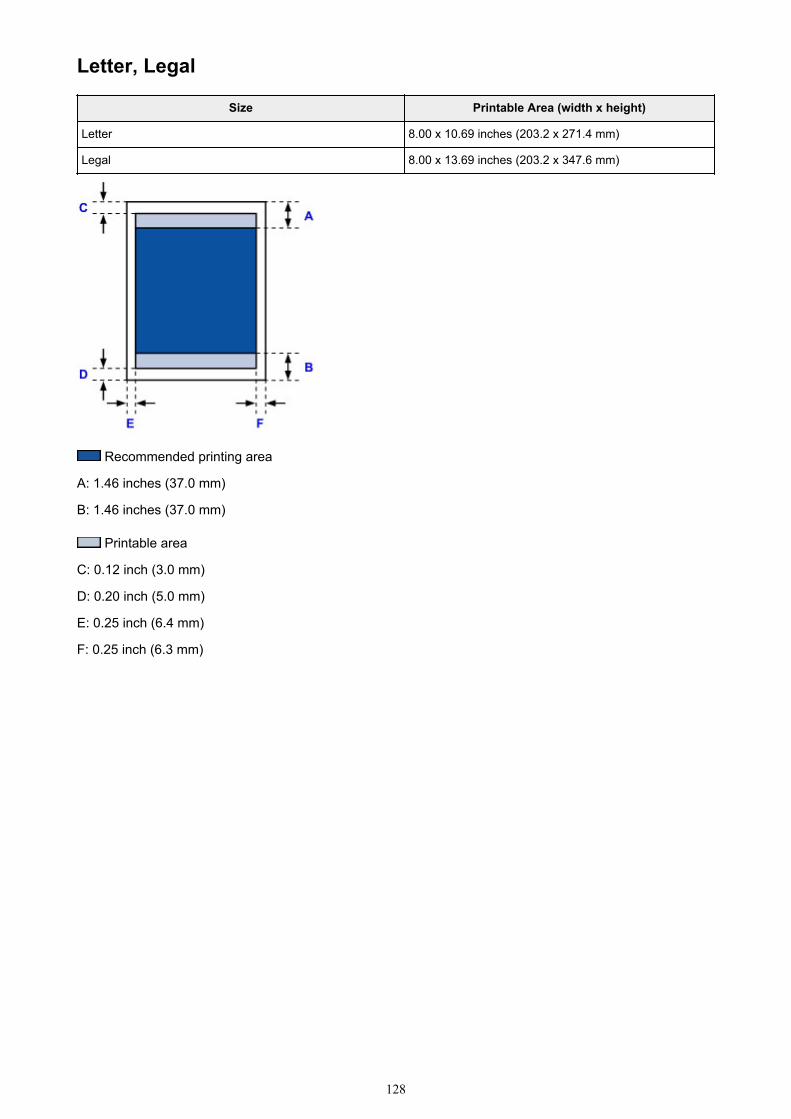
Letter, Legal
Size Printable Area (width x height)
Letter 8.00 x 10.69 inches (203.2 x 271.4 mm)
Legal 8.00 x 13.69 inches (203.2 x 347.6 mm)
Recommended printing area
A: 1.46 inches (37.0 mm)
B: 1.46 inches (37.0 mm)
Printable area
C: 0.12 inch (3.0 mm)
D: 0.20 inch (5.0 mm)
E: 0.25 inch (6.4 mm)
F: 0.25 inch (6.3 mm)
128
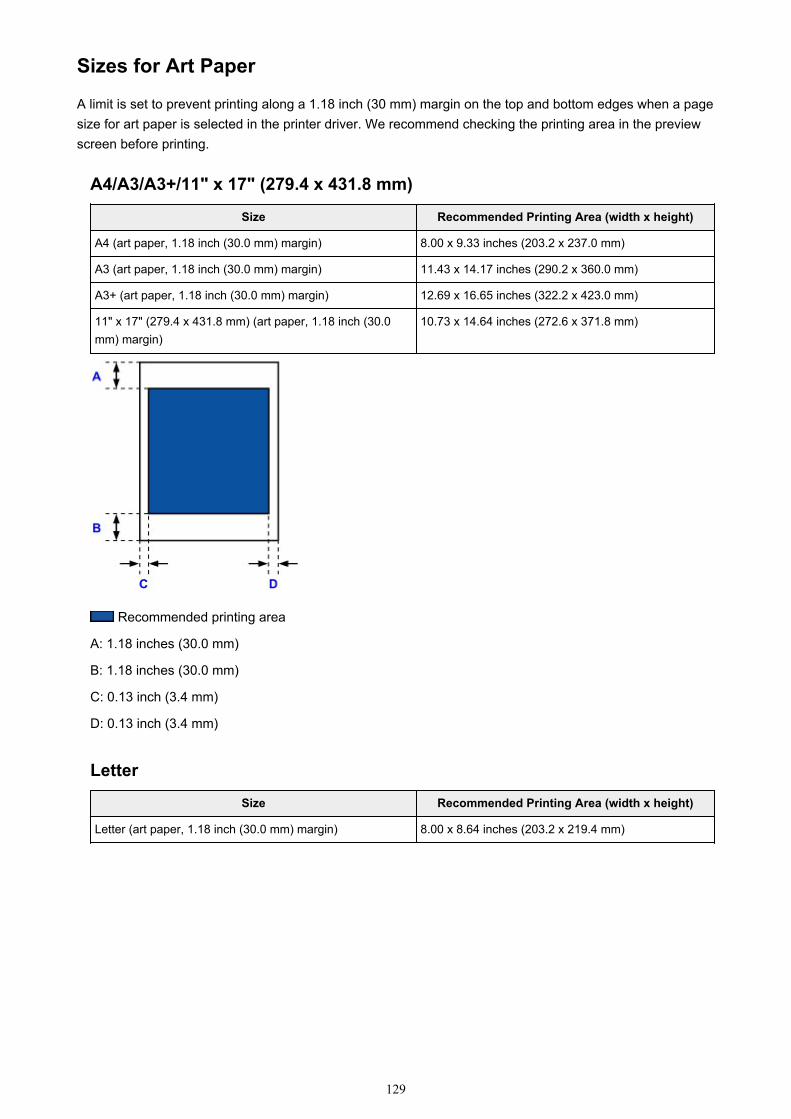
Sizes for Art Paper
A limit is set to prevent printing along a 1.18 inch (30 mm) margin on the top and bottom edges when a pagesize for art paper is selected in the printer driver. We recommend checking the printing area in the previewscreen before printing.
A4/A3/A3+/11" x 17" (279.4 x 431.8 mm)
Size Recommended Printing Area (width x height)
A4 (art paper, 1.18 inch (30.0 mm) margin) 8.00 x 9.33 inches (203.2 x 237.0 mm)
A3 (art paper, 1.18 inch (30.0 mm) margin) 11.43 x 14.17 inches (290.2 x 360.0 mm)
A3+ (art paper, 1.18 inch (30.0 mm) margin) 12.69 x 16.65 inches (322.2 x 423.0 mm)
11" x 17" (279.4 x 431.8 mm) (art paper, 1.18 inch (30.0mm) margin)
10.73 x 14.64 inches (272.6 x 371.8 mm)
Recommended printing area
A: 1.18 inches (30.0 mm)
B: 1.18 inches (30.0 mm)
C: 0.13 inch (3.4 mm)
D: 0.13 inch (3.4 mm)
Letter
Size Recommended Printing Area (width x height)
Letter (art paper, 1.18 inch (30.0 mm) margin) 8.00 x 8.64 inches (203.2 x 219.4 mm)
129
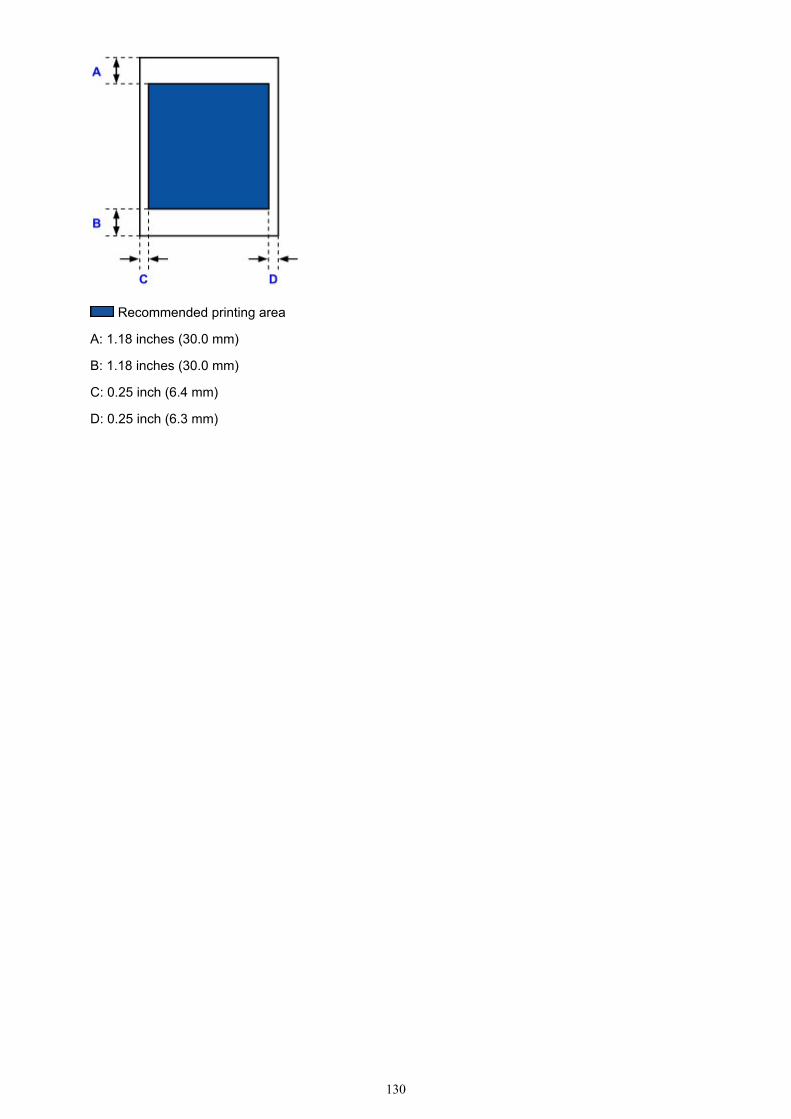
Recommended printing area
A: 1.18 inches (30.0 mm)
B: 1.18 inches (30.0 mm)
C: 0.25 inch (6.4 mm)
D: 0.25 inch (6.3 mm)
130
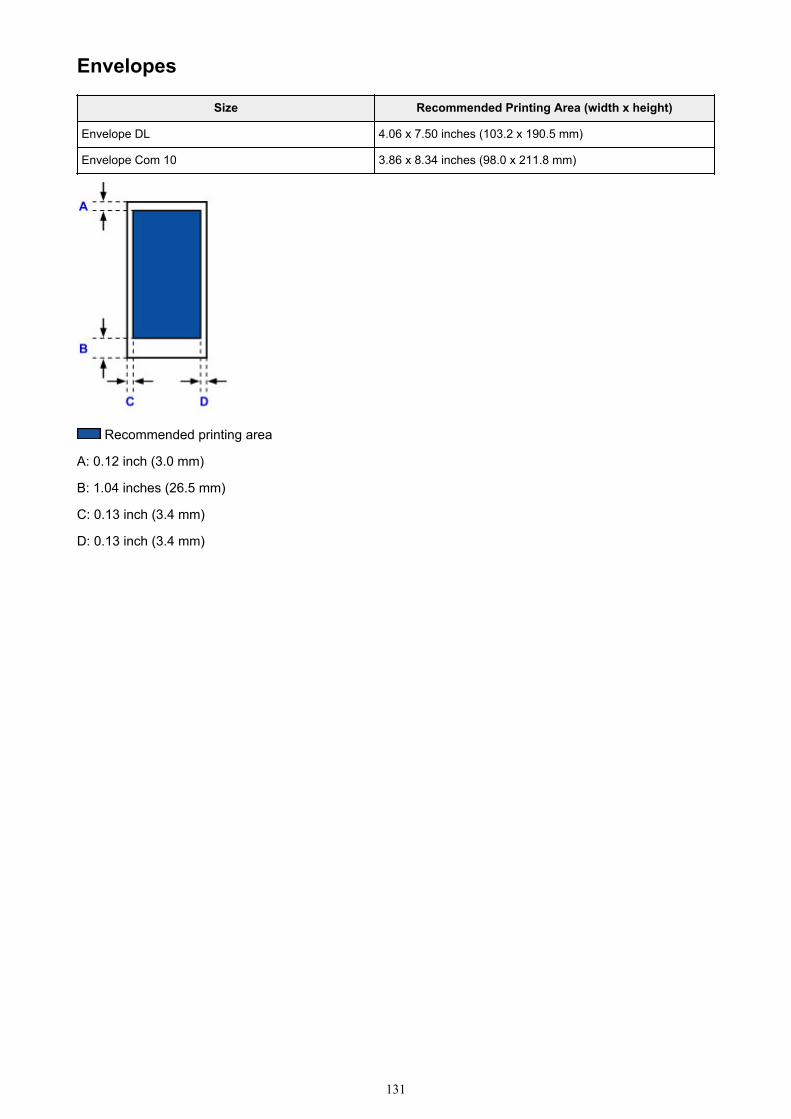
Envelopes
Size Recommended Printing Area (width x height)
Envelope DL 4.06 x 7.50 inches (103.2 x 190.5 mm)
Envelope Com 10 3.86 x 8.34 inches (98.0 x 211.8 mm)
Recommended printing area
A: 0.12 inch (3.0 mm)
B: 1.04 inches (26.5 mm)
C: 0.13 inch (3.4 mm)
D: 0.13 inch (3.4 mm)
131
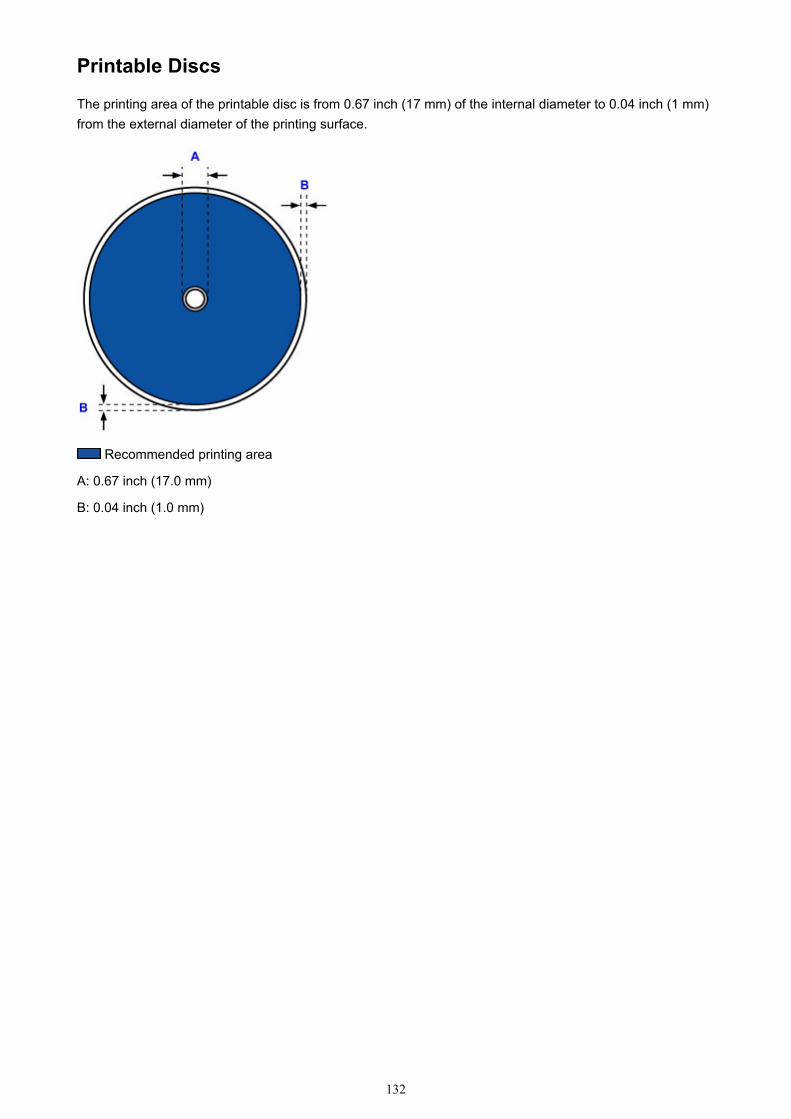
Printable Discs
The printing area of the printable disc is from 0.67 inch (17 mm) of the internal diameter to 0.04 inch (1 mm)from the external diameter of the printing surface.
Recommended printing area
A: 0.67 inch (17.0 mm)
B: 0.04 inch (1.0 mm)
132

Placing a Printable Disc
Cautions When Printing on a Printable Disc
Before Placing a Printable Disc
Placing a Printable Disc
Removing a Printable Disc
133
Cautions When Printing on a Printable Disc
• Be sure to use the disc tray supplied with this printer. It has a "K" on the upper side.• Do not print on printable discs that are not compatible with inkjet printing. The ink will not dry and may
cause problems with the disc itself or devices which the disc is loaded onto.• Do not print on the printable discs' recording surface. Doing so will make data recorded on discs
unreadable.• Hold the printable discs by their edges. Do not touch either the label surface (printing surface) or
recording surface.• Remove any dirt from the disc tray before placing printable discs on the disc tray. Loading discs in a
dirty disc tray may scratch the recording surface of the discs.• After printing, allow the printing surface of the disc to dry naturally. Do not use hairdryers or expose the
disc to direct sunlight to dry the ink. Do not touch the printing surface until the ink has dried.• Do not attach the disc tray while the printer is in operation.• Do not remove the disc tray while printing on printable discs. Doing so may damage the printer, the disc
tray, or the disc.• Do not get dirt or scratches on the reflectors of the disc tray. The printer may not be able to recognize
loading of the printable disc, or printing may become misaligned. If the reflectors on the disc traybecome dirty, wipe the reflector clean with a soft and dry cloth, taking care not to scratch the plate.
• The disc tray may become dirty if software other than My Image Garden is used.• Always close the disc tray guide after printing on printable discs.
134
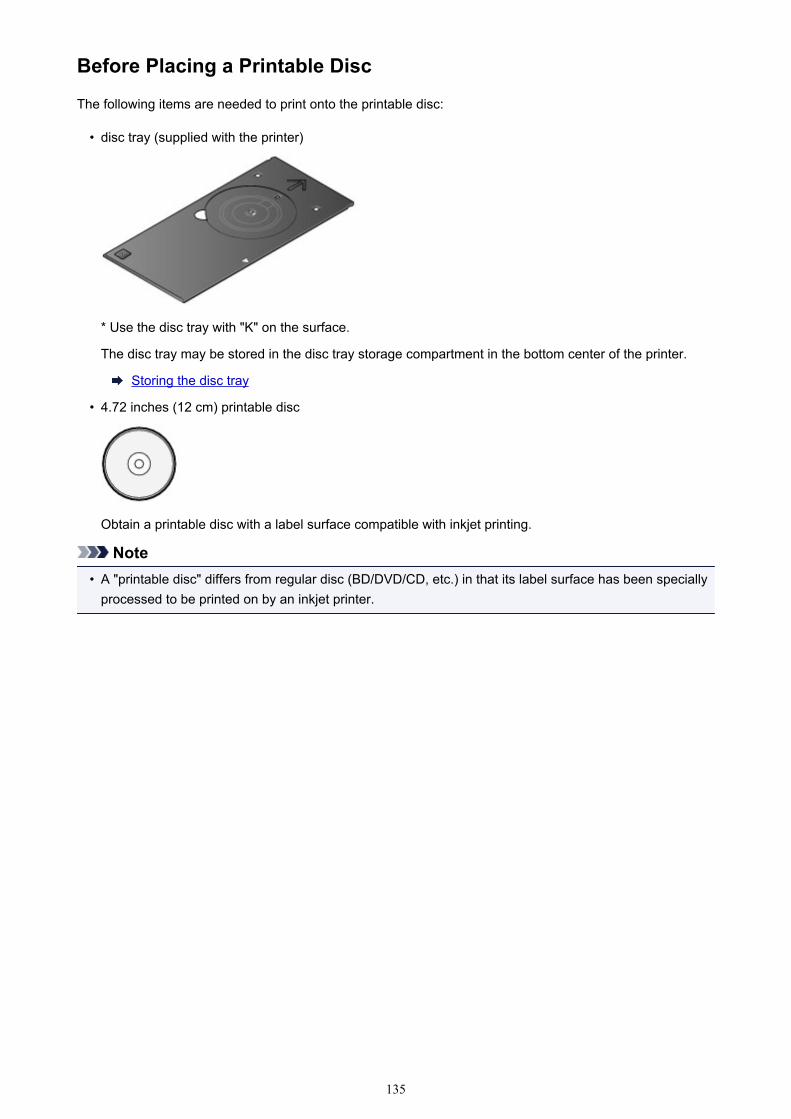
Before Placing a Printable Disc
The following items are needed to print onto the printable disc:
• disc tray (supplied with the printer)
* Use the disc tray with "K" on the surface.
The disc tray may be stored in the disc tray storage compartment in the bottom center of the printer.
Storing the disc tray
• 4.72 inches (12 cm) printable disc
Obtain a printable disc with a label surface compatible with inkjet printing.
Note• A "printable disc" differs from regular disc (BD/DVD/CD, etc.) in that its label surface has been specially
processed to be printed on by an inkjet printer.
135

Placing a Printable Disc
To print onto a printable disc, place it on the disc tray supplied with the printer, then insert it into the printer.
Important• Do not attach the disc tray until the message asking you to load the printable disc is displayed. Doing
so can damage the printer.• Remove any paper in the manual feed tray.
1. Open the paper output tray (A) gently.
2. When the message asking you to load the printable disc is displayed, open the disc trayguide (B).
3. Place the printable disc with the printable surface facing up.
Important• Make sure that there is no dirt on the disc tray before placing a printable disc on the disc tray.• When placing a printable disc on the disc tray, do not touch the printing surface of the disc or the
reflectors (C) on the disc tray.
136
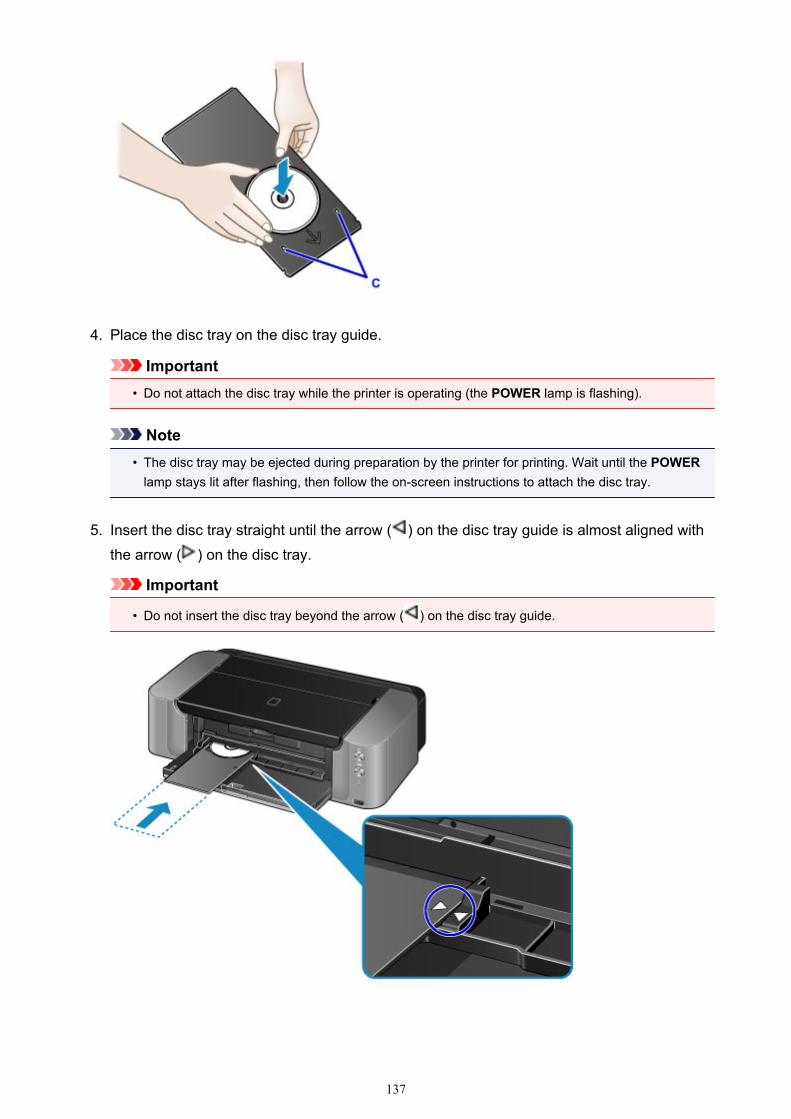
4. Place the disc tray on the disc tray guide.
Important• Do not attach the disc tray while the printer is operating (the POWER lamp is flashing).
Note• The disc tray may be ejected during preparation by the printer for printing. Wait until the POWER
lamp stays lit after flashing, then follow the on-screen instructions to attach the disc tray.
5. Insert the disc tray straight until the arrow ( ) on the disc tray guide is almost aligned withthe arrow ( ) on the disc tray.
Important
• Do not insert the disc tray beyond the arrow ( ) on the disc tray guide.
137
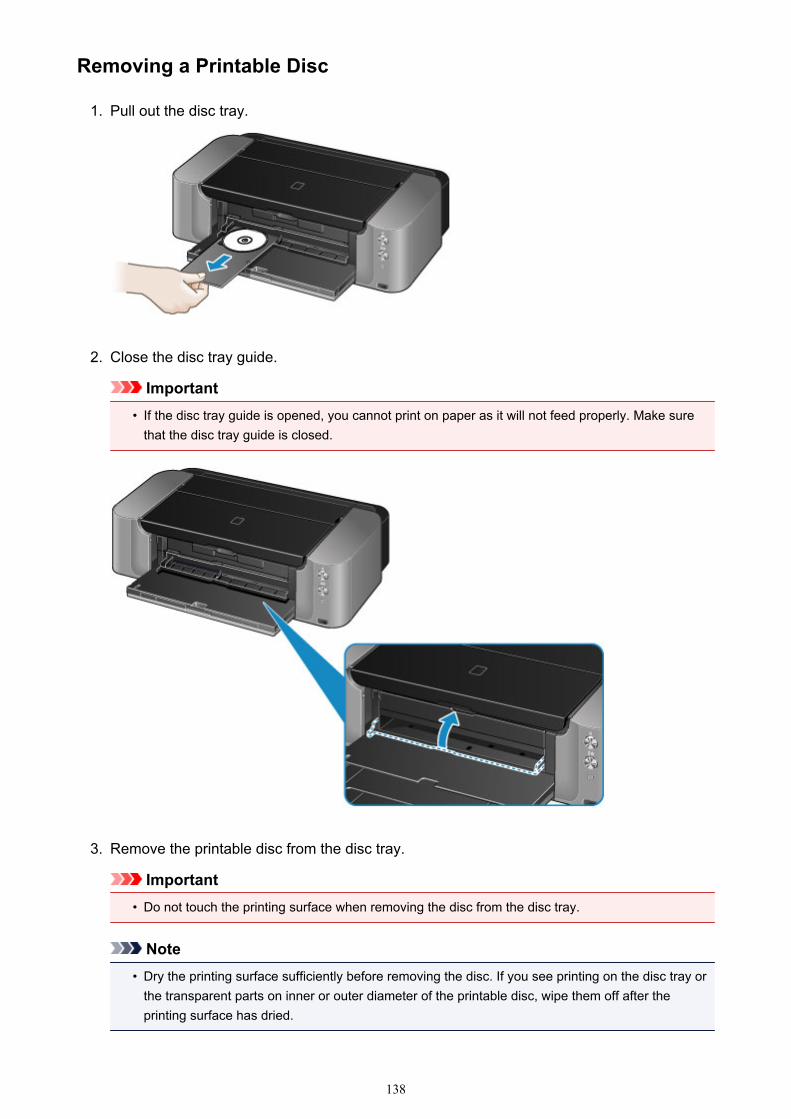
Removing a Printable Disc
1. Pull out the disc tray.
2. Close the disc tray guide.
Important• If the disc tray guide is opened, you cannot print on paper as it will not feed properly. Make sure
that the disc tray guide is closed.
3. Remove the printable disc from the disc tray.
Important• Do not touch the printing surface when removing the disc from the disc tray.
Note• Dry the printing surface sufficiently before removing the disc. If you see printing on the disc tray or
the transparent parts on inner or outer diameter of the printable disc, wipe them off after theprinting surface has dried.
138
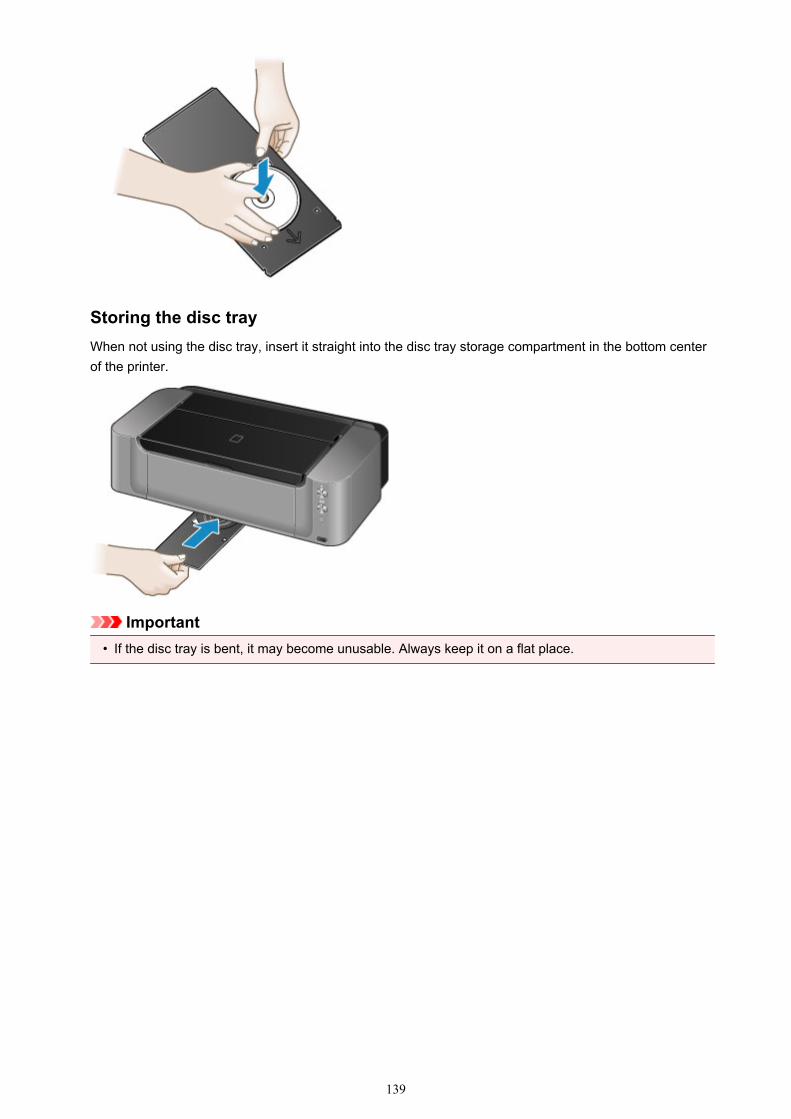
Storing the disc trayWhen not using the disc tray, insert it straight into the disc tray storage compartment in the bottom centerof the printer.
Important• If the disc tray is bent, it may become unusable. Always keep it on a flat place.
139

Replacing an Ink Tank
Replacing an Ink Tank
Checking the Ink Status
140
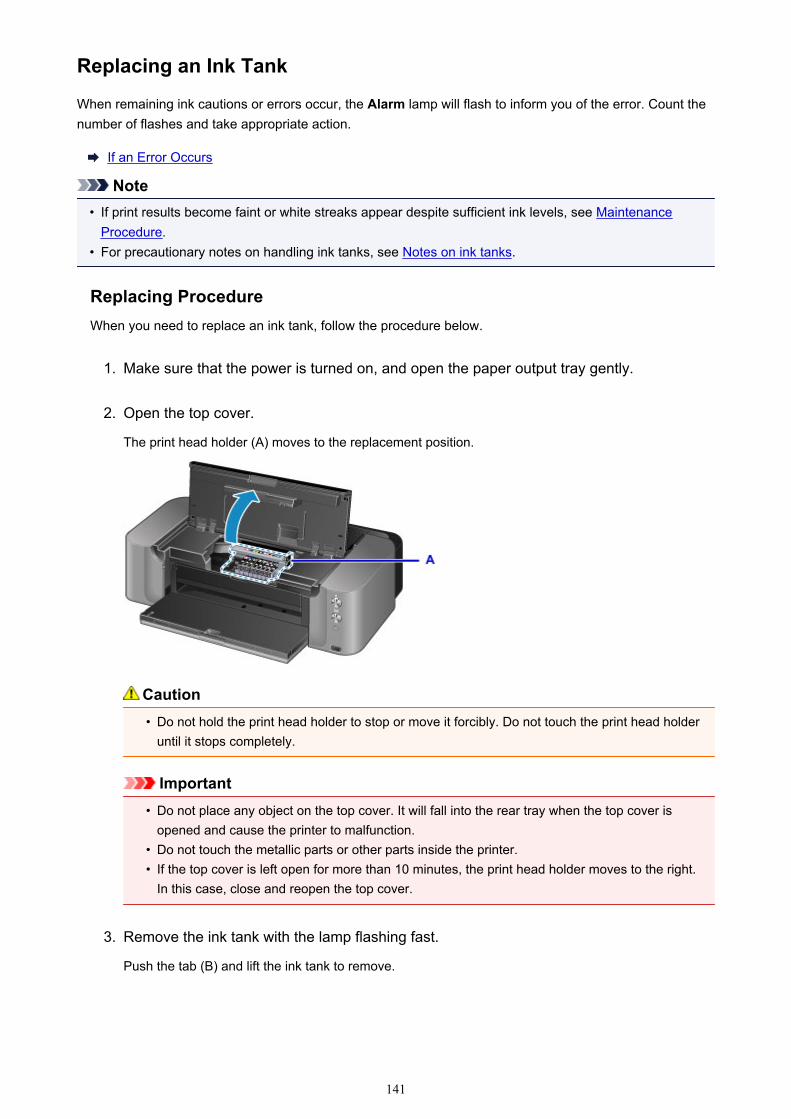
Replacing an Ink Tank
When remaining ink cautions or errors occur, the Alarm lamp will flash to inform you of the error. Count thenumber of flashes and take appropriate action.
If an Error Occurs
Note• If print results become faint or white streaks appear despite sufficient ink levels, see Maintenance
Procedure.• For precautionary notes on handling ink tanks, see Notes on ink tanks.
Replacing ProcedureWhen you need to replace an ink tank, follow the procedure below.
1. Make sure that the power is turned on, and open the paper output tray gently.
2. Open the top cover.
The print head holder (A) moves to the replacement position.
Caution• Do not hold the print head holder to stop or move it forcibly. Do not touch the print head holder
until it stops completely.
Important• Do not place any object on the top cover. It will fall into the rear tray when the top cover is
opened and cause the printer to malfunction.• Do not touch the metallic parts or other parts inside the printer.• If the top cover is left open for more than 10 minutes, the print head holder moves to the right.
In this case, close and reopen the top cover.
3. Remove the ink tank with the lamp flashing fast.
Push the tab (B) and lift the ink tank to remove.
141
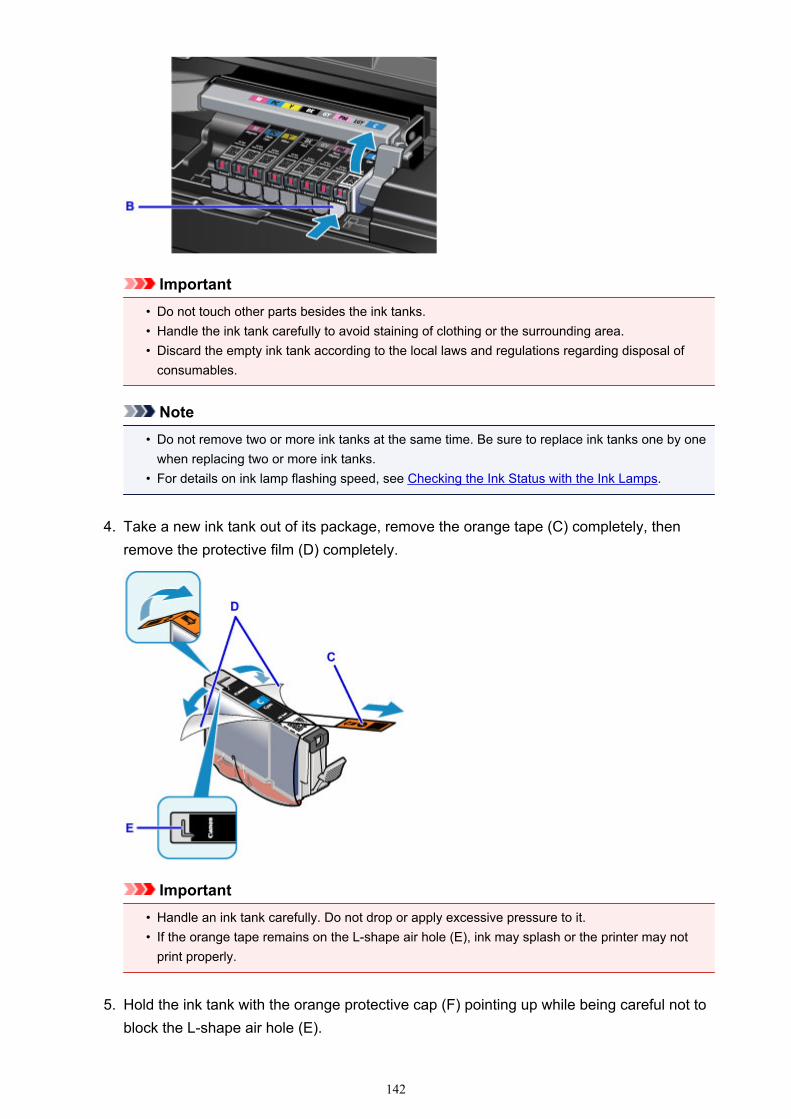
Important• Do not touch other parts besides the ink tanks.• Handle the ink tank carefully to avoid staining of clothing or the surrounding area.• Discard the empty ink tank according to the local laws and regulations regarding disposal of
consumables.
Note• Do not remove two or more ink tanks at the same time. Be sure to replace ink tanks one by one
when replacing two or more ink tanks.• For details on ink lamp flashing speed, see Checking the Ink Status with the Ink Lamps.
4. Take a new ink tank out of its package, remove the orange tape (C) completely, thenremove the protective film (D) completely.
Important• Handle an ink tank carefully. Do not drop or apply excessive pressure to it.• If the orange tape remains on the L-shape air hole (E), ink may splash or the printer may not
print properly.
5. Hold the ink tank with the orange protective cap (F) pointing up while being careful not toblock the L-shape air hole (E).
142
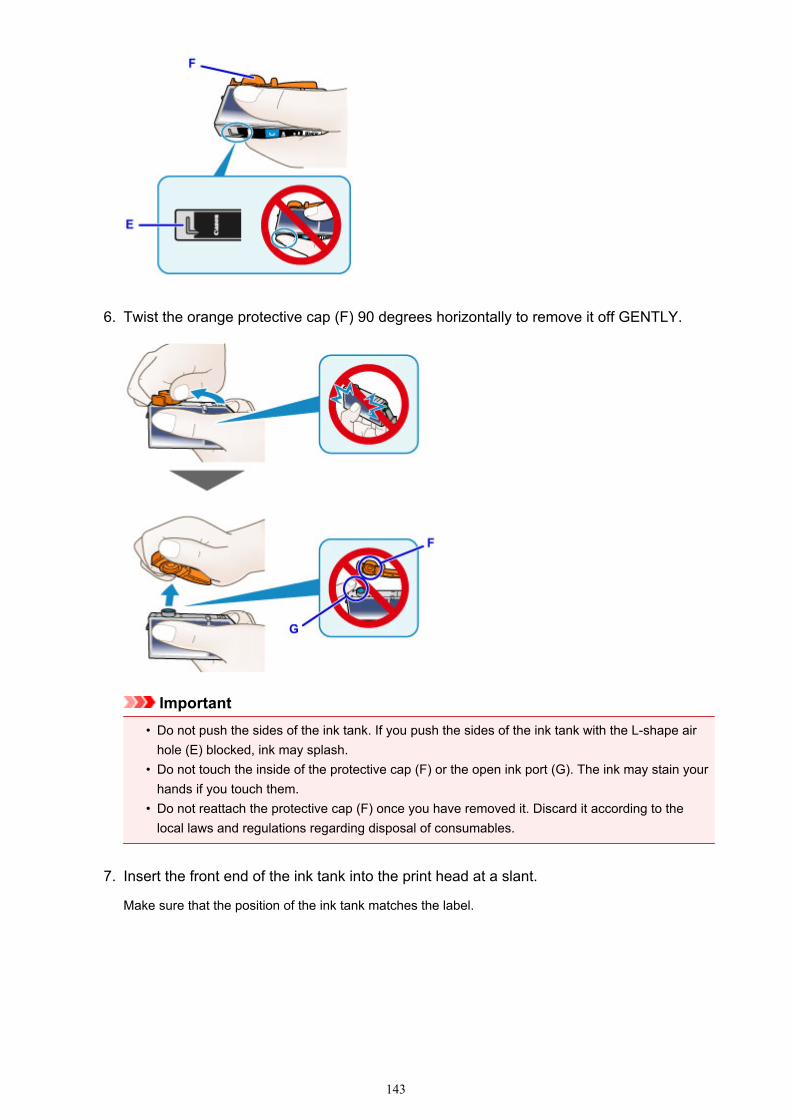
6. Twist the orange protective cap (F) 90 degrees horizontally to remove it off GENTLY.
Important• Do not push the sides of the ink tank. If you push the sides of the ink tank with the L-shape air
hole (E) blocked, ink may splash.• Do not touch the inside of the protective cap (F) or the open ink port (G). The ink may stain your
hands if you touch them.• Do not reattach the protective cap (F) once you have removed it. Discard it according to the
local laws and regulations regarding disposal of consumables.
7. Insert the front end of the ink tank into the print head at a slant.
Make sure that the position of the ink tank matches the label.
143
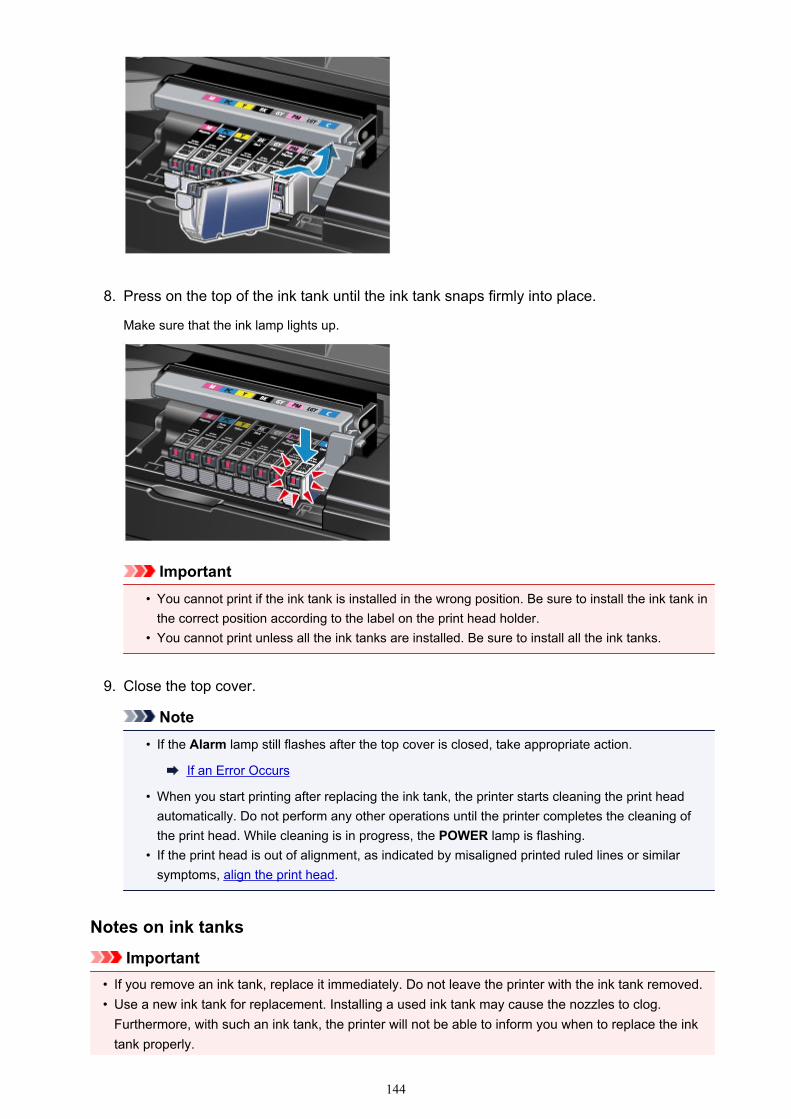
8. Press on the top of the ink tank until the ink tank snaps firmly into place.
Make sure that the ink lamp lights up.
Important• You cannot print if the ink tank is installed in the wrong position. Be sure to install the ink tank in
the correct position according to the label on the print head holder.• You cannot print unless all the ink tanks are installed. Be sure to install all the ink tanks.
9. Close the top cover.
Note• If the Alarm lamp still flashes after the top cover is closed, take appropriate action.
If an Error Occurs
• When you start printing after replacing the ink tank, the printer starts cleaning the print headautomatically. Do not perform any other operations until the printer completes the cleaning ofthe print head. While cleaning is in progress, the POWER lamp is flashing.
• If the print head is out of alignment, as indicated by misaligned printed ruled lines or similarsymptoms, align the print head.
Notes on ink tanks
Important• If you remove an ink tank, replace it immediately. Do not leave the printer with the ink tank removed.• Use a new ink tank for replacement. Installing a used ink tank may cause the nozzles to clog.
Furthermore, with such an ink tank, the printer will not be able to inform you when to replace the inktank properly.
144

• Once an ink tank has been installed, do not remove it from the printer and leave it out in the open.This will cause the ink tank to dry out, and the printer may not operate properly when it is reinstalled.To maintain optimal printing quality, use an ink tank within six months of first use.
Note• Color ink may be consumed even when printing a black-and-white document or when black-and-
white printing is specified. Every ink is also consumed in the standard cleaning and deep cleaning ofthe print head, which may be necessary to maintain the performance of the printer.
When an ink tank is out of ink, replace it immediately with a new one.
Useful Information about Ink
145

Checking the Ink Status
Checking the Ink Status with the Ink Lamps
You can also check the ink status on the computer screen.
Checking the Ink Status from Your Computer
146
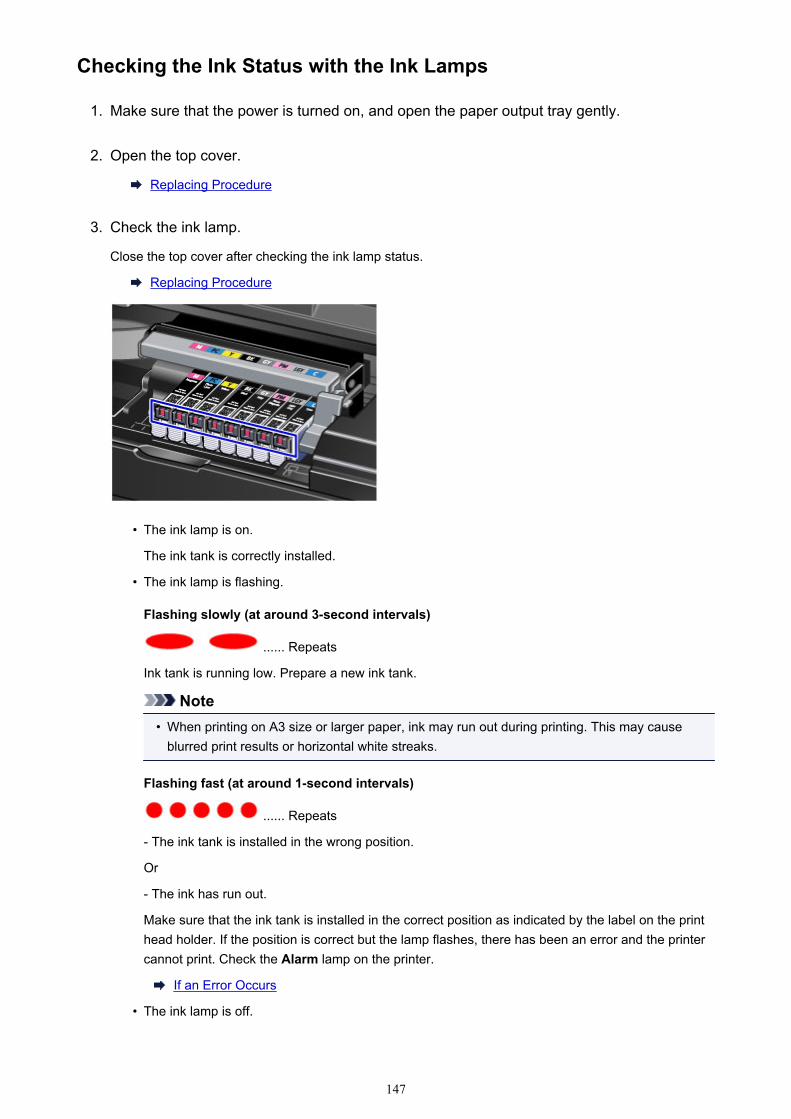
Checking the Ink Status with the Ink Lamps
1. Make sure that the power is turned on, and open the paper output tray gently.
2. Open the top cover.
Replacing Procedure
3. Check the ink lamp.
Close the top cover after checking the ink lamp status.
Replacing Procedure
• The ink lamp is on.
The ink tank is correctly installed.
• The ink lamp is flashing.
Flashing slowly (at around 3-second intervals)
...... Repeats
Ink tank is running low. Prepare a new ink tank.
Note• When printing on A3 size or larger paper, ink may run out during printing. This may cause
blurred print results or horizontal white streaks.
Flashing fast (at around 1-second intervals)
...... Repeats
- The ink tank is installed in the wrong position.
Or
- The ink has run out.
Make sure that the ink tank is installed in the correct position as indicated by the label on the printhead holder. If the position is correct but the lamp flashes, there has been an error and the printercannot print. Check the Alarm lamp on the printer.
If an Error Occurs
• The ink lamp is off.
147

The ink tank is not installed properly or the function for detecting the remaining ink level isdisabled. If the ink tank is not firmly in place, make sure that the orange protective cap has beenremoved from the bottom of the ink tank, then press on the top of the ink tank until the ink tankclicks into place.
If the ink lamp is still off after reinstalling the ink tank, there has been an error and the printercannot print. Check the Alarm lamp on the printer.
If an Error Occurs
Note• You can also check the ink status on the computer screen.
Checking the Ink Status from Your Computer
148

Maintenance
When Printing Becomes Faint or Colors Are Incorrect
Performing Maintenance from a Computer
Cleaning the Printer
149

When Printing Becomes Faint or Colors Are Incorrect
Maintenance Procedure
Printing the Nozzle Check Pattern
Examining the Nozzle Check Pattern
Cleaning the Print Head
Aligning the Print Head
150
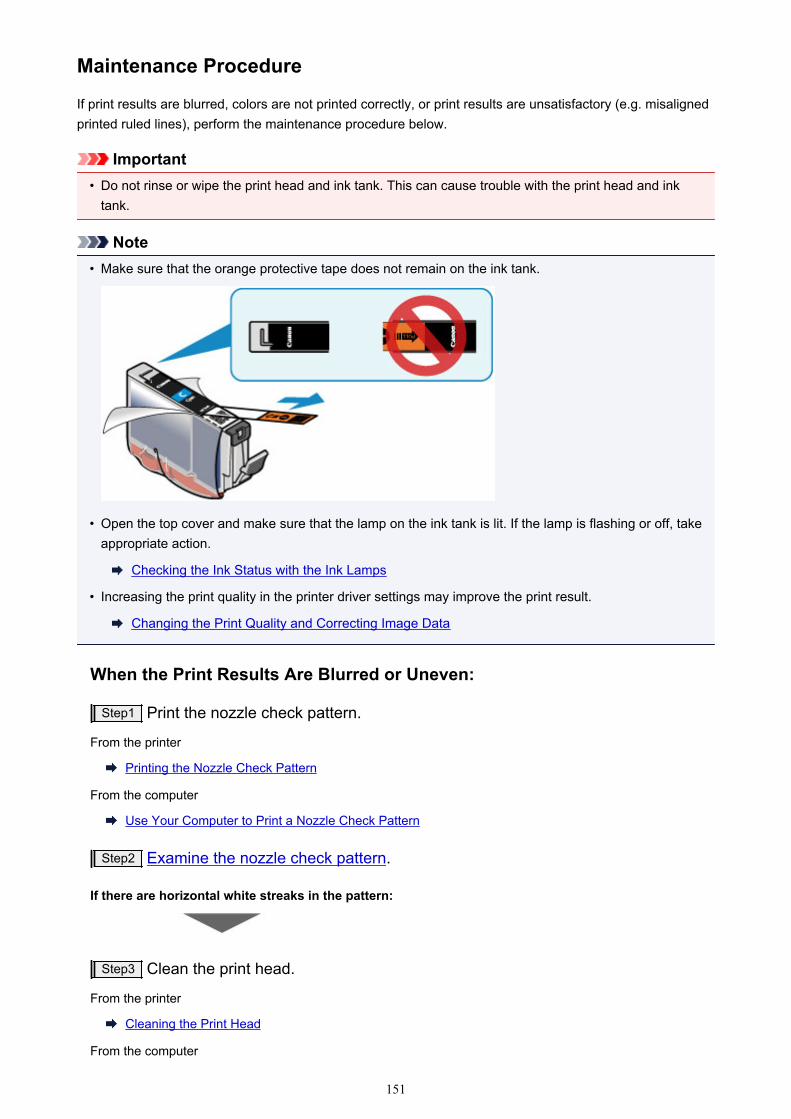
Maintenance Procedure
If print results are blurred, colors are not printed correctly, or print results are unsatisfactory (e.g. misalignedprinted ruled lines), perform the maintenance procedure below.
Important• Do not rinse or wipe the print head and ink tank. This can cause trouble with the print head and ink
tank.
Note• Make sure that the orange protective tape does not remain on the ink tank.
• Open the top cover and make sure that the lamp on the ink tank is lit. If the lamp is flashing or off, takeappropriate action.
Checking the Ink Status with the Ink Lamps
• Increasing the print quality in the printer driver settings may improve the print result.
Changing the Print Quality and Correcting Image Data
When the Print Results Are Blurred or Uneven:
Step1 Print the nozzle check pattern.
From the printer
Printing the Nozzle Check Pattern
From the computer
Use Your Computer to Print a Nozzle Check Pattern
Step2 Examine the nozzle check pattern.
If there are horizontal white streaks in the pattern:
Step3 Clean the print head.
From the printer
Cleaning the Print Head
From the computer
151

Cleaning the Print Heads from Your Computer
After cleaning the print head, print and examine the nozzle check pattern: Step1
If the problem is not resolved after performing from step 1 to step 3 twice:
Step4 Clean the print head deeply.
From the computer
Cleaning the Print Heads from Your Computer
Note• When you have performed the procedure until step 4 and the problem has not been resolved, turn off
the power and clean the print head deeply again after 24 hours.
If the problem is still not resolved, the print head may be damaged. Contact the service center.
When the Print Results Are Not Even such as the Ruled Lines AreMisaligned:
Step Align the print head.
From the printer
Aligning the Print Head
From the computer
Aligning the Print Head Position from Your Computer
152
Printing the Nozzle Check Pattern
Print the nozzle check pattern to determine whether the ink ejects properly from the print head nozzle.
Note• If the remaining ink level is low, the nozzle check pattern will not be printed correctly. Replace the ink
tank whose ink is low.
You need to prepare: a sheet of A4 or Letter-sized plain paper
1. Make sure that the power is turned on.
2. Load a sheet of A4 or Letter-sized plain paper in the rear tray.
Important• The manual feed tray is not available for the nozzle check pattern print procedure. Be sure to load
paper in the rear tray.
3. Open the paper output tray gently, then pull out the output tray extension.
Important• If the disc tray guide is open, be sure to close it.
4. Hold down the RESUME/CANCEL button until the POWER lamp flashes twice, thenrelease it immediately.
The nozzle check pattern will be printed.
Do not perform any other operations until the printer completes the printing of the nozzle check pattern.
5. Examine the nozzle check pattern.
153
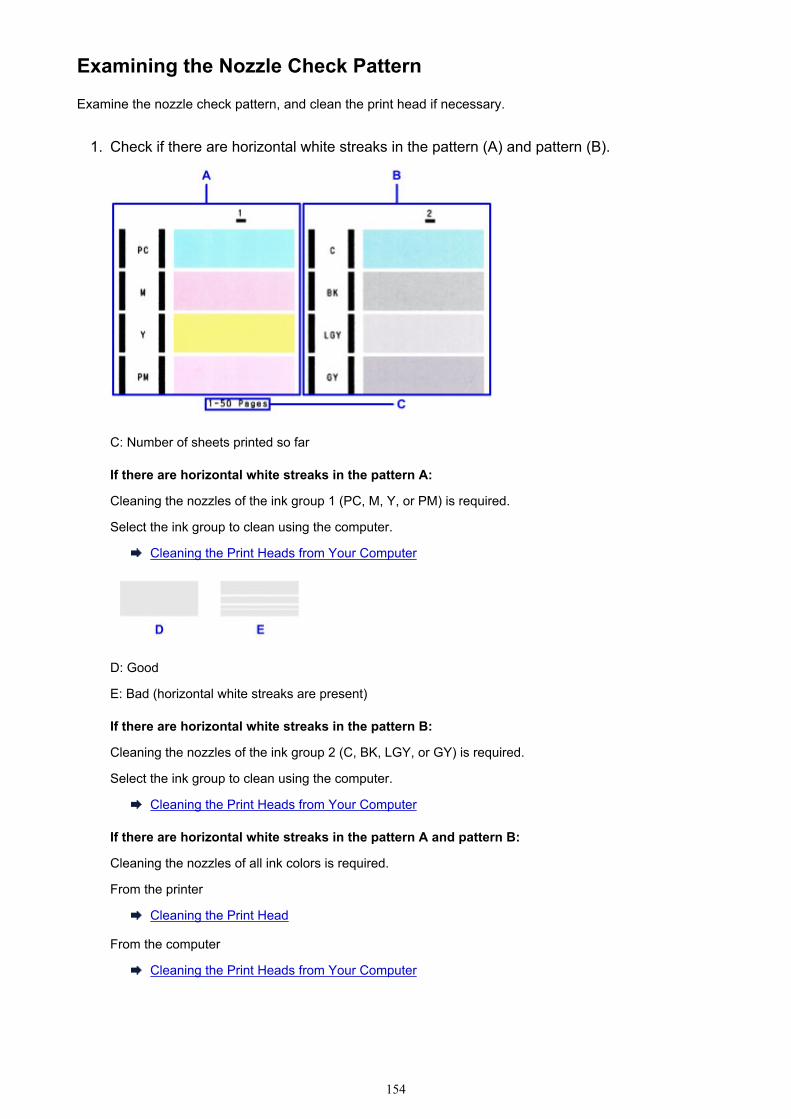
Examining the Nozzle Check Pattern
Examine the nozzle check pattern, and clean the print head if necessary.
1. Check if there are horizontal white streaks in the pattern (A) and pattern (B).
C: Number of sheets printed so far
If there are horizontal white streaks in the pattern A:
Cleaning the nozzles of the ink group 1 (PC, M, Y, or PM) is required.
Select the ink group to clean using the computer.
Cleaning the Print Heads from Your Computer
D: Good
E: Bad (horizontal white streaks are present)
If there are horizontal white streaks in the pattern B:
Cleaning the nozzles of the ink group 2 (C, BK, LGY, or GY) is required.
Select the ink group to clean using the computer.
Cleaning the Print Heads from Your Computer
If there are horizontal white streaks in the pattern A and pattern B:
Cleaning the nozzles of all ink colors is required.
From the printer
Cleaning the Print Head
From the computer
Cleaning the Print Heads from Your Computer
154

Note• The total number of sheets printed so far is shown in increments of 50 sheets on the printout of the
nozzle check pattern.
155
Cleaning the Print Head
Clean the print head if horizontal white streaks are present in the printed nozzle check pattern. Cleaningunclogs the nozzles and restores the print head condition. Cleaning the print head consumes ink, so cleanthe print head only when necessary.
Note• You can also clean the print head using the computer. When using the computer, select the ink group
to clean, then start cleaning.
Cleaning the Print Heads from Your Computer
• When cleaning the print head using the button on the printer, the nozzles of all ink colors are cleaned.
1. Make sure that the power is turned on.
2. Hold down the RESUME/CANCEL button until the POWER lamp flashes once, thenrelease it immediately.
The printer starts cleaning the print head.
The cleaning will be complete when the POWER lamp lights after flashing.
Do not perform any other operations until the printer completes the cleaning of the print head. This takesabout 2 to 3 minutes.
3. Check the print head condition.
Print the nozzle check pattern to check the print head condition.
Note• If the problem is not resolved after cleaning the print head twice, clean the print head deeply.
Cleaning the Print Heads from Your Computer
156
Aligning the Print Head
If printed ruled lines are misaligned or print results are otherwise unsatisfactory, adjust the print headposition.
Note• If the remaining ink level is low, the print head alignment sheet will not be printed correctly. Replace the
ink tank whose ink is low.
You need to prepare: two sheets of A4 or Letter-sized plain paper (including recycled paper)*
* Be sure to use paper that is white and clean on both sides.
1. Make sure that the power is turned on.
2. Load two sheets of A4 or Letter-sized plain paper in the rear tray.
Important• The manual feed tray is not available for the print head alignment procedure. Be sure to load
paper in the rear tray.
3. Open the paper output tray gently, then pull out the output tray extension.
Important• If the disc tray guide is open, be sure to close it.
4. Hold down the RESUME/CANCEL button until the POWER lamp flashes four times, thenrelease it immediately.
The print head alignment sheet will be printed and the print head position will be adjusted automatically.
Do not perform any other operations until the printer completes the printing of the print head alignmentsheet. This takes about 5 minutes.
Note• If the automatic adjustment of the print head position has failed, the Alarm lamp flashes.
If an Error Occurs
• If the print results are still not satisfactory after adjusting the print head position as described above,adjust the print head position manually from the computer.
Aligning the Print Head Position Manually from Your Computer
157

Performing Maintenance from a Computer
Cleaning the Print Heads from Your Computer
Cleaning the Paper Feed Rollers from Your Computer
Aligning the Print Head
Aligning the Print Head Position from Your Computer
Use Your Computer to Print a Nozzle Check Pattern
Cleaning Inside the Printer
158
Cleaning the Print Heads from Your Computer
The print head cleaning function allows you to clear up clogged print head nozzle. Perform print headcleaning if printing is faint or a specific color fails to print, even though there is enough ink.
The procedure for cleaning the print head is as follows:
Cleaning
1. Open the printer driver setup window
2. Click Cleaning on the Maintenance tab
When the Print Head Cleaning dialog box opens, select the ink group for which cleaning is to beperformed.Click Initial Check Items to display the items you need to check before performing cleaning.
3. Execute cleaning
Make sure that the printer is on and then click Execute.
Print head cleaning starts.
4. Complete cleaning
The Nozzle Check dialog box opens after the confirmation message.
5. Check the results
To check whether the print quality has improved, click Print Check Pattern. To cancel the checkprocess, click Cancel.
If cleaning the head once does not resolve the print head problem, clean it once more.
Important• Cleaning consumes a small amount of ink.
Cleaning the print head frequently will rapidly deplete your printer's ink supply. Consequently, performcleaning only when necessary.
Deep CleaningDeep Cleaning is more thorough than cleaning. Perform deep cleaning when two Cleaning attempts donot resolve the print head problem.
1. Open the printer driver setup window
2. Click Deep Cleaning on the Maintenance tab
159
When the Deep Cleaning dialog box opens, select the ink group for which deep cleaning is to beperformed.Click Initial Check Items to display the items you need to check before performing deep cleaning.
3. Execute deep cleaning
Make sure that the printer is on and then click Execute.Click OK when the confirmation message appears.
Print head deep cleaning starts.
4. Complete deep cleaning
The Nozzle Check dialog box opens after the confirmation message.
5. Check the results
To check whether the print quality has improved, click Print Check Pattern. To cancel the checkprocess, click Cancel.
Important• Deep Cleaning consumes a larger amount of ink than Cleaning.
Cleaning the print head frequently will rapidly deplete your printer's ink supply. Consequently, performcleaning only when necessary.
Note• If there is no sign of improvement after Deep Cleaning, turn off the printer, wait 24 hours, and then
perform Deep Cleaning again. If there is still no sign of improvement, the ink may have run out or theprint head may be worn. For details on the remedial action to be taken, see "Ink Is Not Ejected."
Related TopicUse Your Computer to Print a Nozzle Check Pattern
160
Cleaning the Paper Feed Rollers from Your Computer
Cleans the paper feed rollers. Perform feed roller cleaning when there are paper particles sticking to thepaper feed rollers and paper is not fed properly.
The procedure for performing the feed roller cleaning is as follows:
Roller Cleaning
1. Prepare the printer
Remove all sheets of paper from the paper source from which paper could not be properly fed.
2. Open the printer driver setup window
3. Click Roller Cleaning on the Maintenance tab
The Roller Cleaning dialog box opens.
4. Select Rear Tray or Manual Feed Tray, and then click OK
The confirmation message appears.
5. Execute paper feed roller cleaning
Make sure that the printer is on and then click OK.Paper feed roller cleaning starts.
6. Complete paper feed roller cleaning
Follow the instructions in the message, load plain paper into the selected paper source, and then clickOK.
Paper will be ejected and feed roller cleaning will be completed.
161

Aligning the Print Head
When you perform head position adjustment, errors in the print head adjustment position are corrected andconditions such as color and line streaking are improved.If the print results appear uneven because of line shifts or other conditions, adjust the position of the printhead.
On this printer, you can adjust the print head either automatically or manually.
162
Aligning the Print Head Position from Your Computer
Print head alignment corrects the installation positions of the print head and improves deviated colors andlines.
This printer supports two head alignment methods: automatic head alignment and manual head alignment.Normally, the printer is set for automatic head alignment.If the printing results of automatic print head alignment are not satisfactory, perform manual head alignment.
The procedure for performing automatic print head alignment is as follows:
Note• If the disc tray guide is open, close it.
Print Head Alignment
1. Open the printer driver setup window
2. Click Print Head Alignment on the Maintenance tab
The Start Print Head Alignment dialog box opens.
3. Load paper in the printer
Load two sheets of A4 size or Letter size plain paper into the rear tray.
Note• Depending on the condition of the printer, you may need to use 3 sheets of A4 size or Letter
size plain paper.• The number of sheets to be used differs when you select the manual head alignment.
4. Execute head alignment
Make sure that the printer is on and click Align Print Head.Follow the instruction in the message.
Important• Do not open the top cover while printing is in progress.
Note• Wait until printing ends before performing other operations. Printing takes about 5 minutes to
complete.
Note• To print and check the current setting, open the Start Print Head Alignment dialog box, and click
Print Alignment Value.
163
Aligning the Print Head Position Manually from Your Computer
Print head alignment corrects the installation positions of the print head and improves deviated colors andlines.
This printer supports two head alignment methods: automatic head alignment and manual head alignment.Normally, the printer is set for automatic head alignment.If the printing results of automatic print head alignment are not satisfactory, perform manual head alignment.
The procedure for performing manual print head alignment is as follows:
Note• If the disc tray guide is open, close it.
Print Head Alignment
1. Open the printer driver setup window
2. Click Custom Settings on the Maintenance tab
The Custom Settings dialog box opens.
Note• If the printer is off or if communication between the printer and the computer is disabled, an
error message may appear because the computer cannot collect the printer status.If this happens, click OK to display the most recent settings specified on your computer.
3. Switch head alignment to manual
Check the Align heads manually check box.
4. Apply the settings
Click OK and when the confirmation message appears, click OK.
5. Click Print Head Alignment on the Maintenance tab
The Start Print Head Alignment dialog box opens.
6. Load paper in the printer
Load three sheets of A4 size or Letter size plain paper into the rear tray.
Note• Depending on the condition of the printer, you may need to use 4 sheets of A4 size or Letter
size plain paper.
7. Execute head alignment
Make sure that the printer is on and click Align Print Head.Follow the instruction in the message.
164
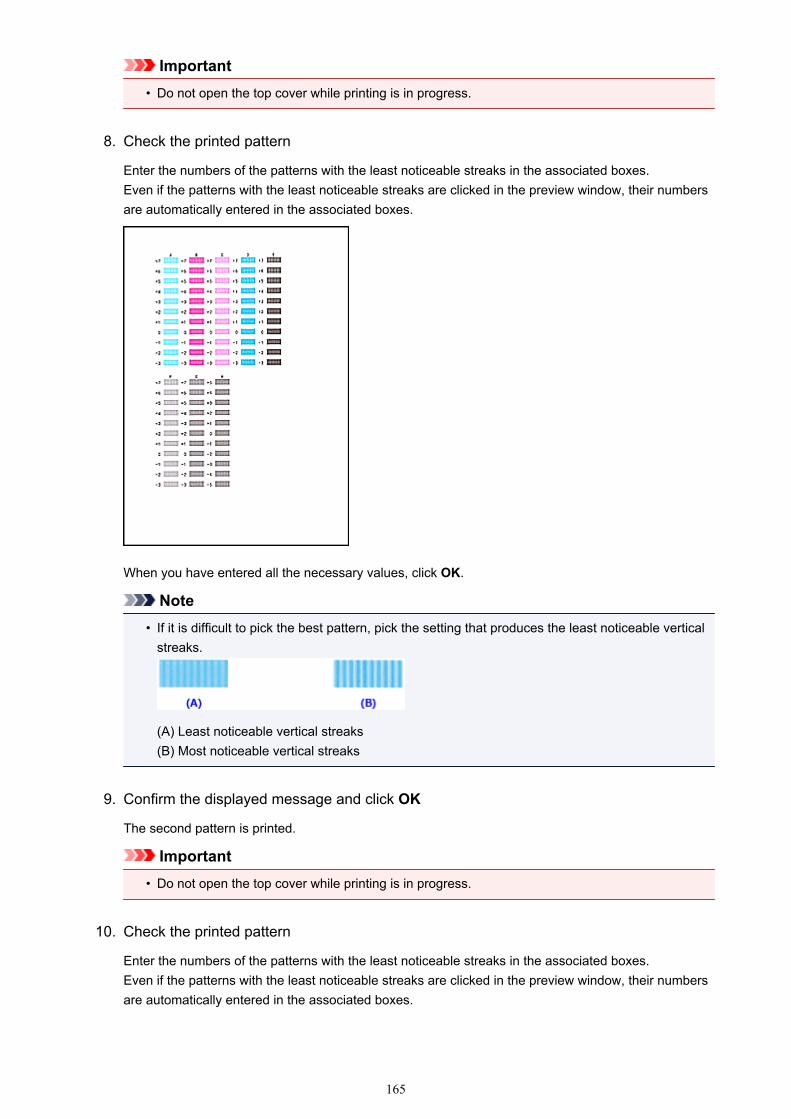
Important• Do not open the top cover while printing is in progress.
8. Check the printed pattern
Enter the numbers of the patterns with the least noticeable streaks in the associated boxes.Even if the patterns with the least noticeable streaks are clicked in the preview window, their numbersare automatically entered in the associated boxes.
When you have entered all the necessary values, click OK.
Note• If it is difficult to pick the best pattern, pick the setting that produces the least noticeable vertical
streaks.
(A) Least noticeable vertical streaks(B) Most noticeable vertical streaks
9. Confirm the displayed message and click OK
The second pattern is printed.
Important• Do not open the top cover while printing is in progress.
10. Check the printed pattern
Enter the numbers of the patterns with the least noticeable streaks in the associated boxes.Even if the patterns with the least noticeable streaks are clicked in the preview window, their numbersare automatically entered in the associated boxes.
165
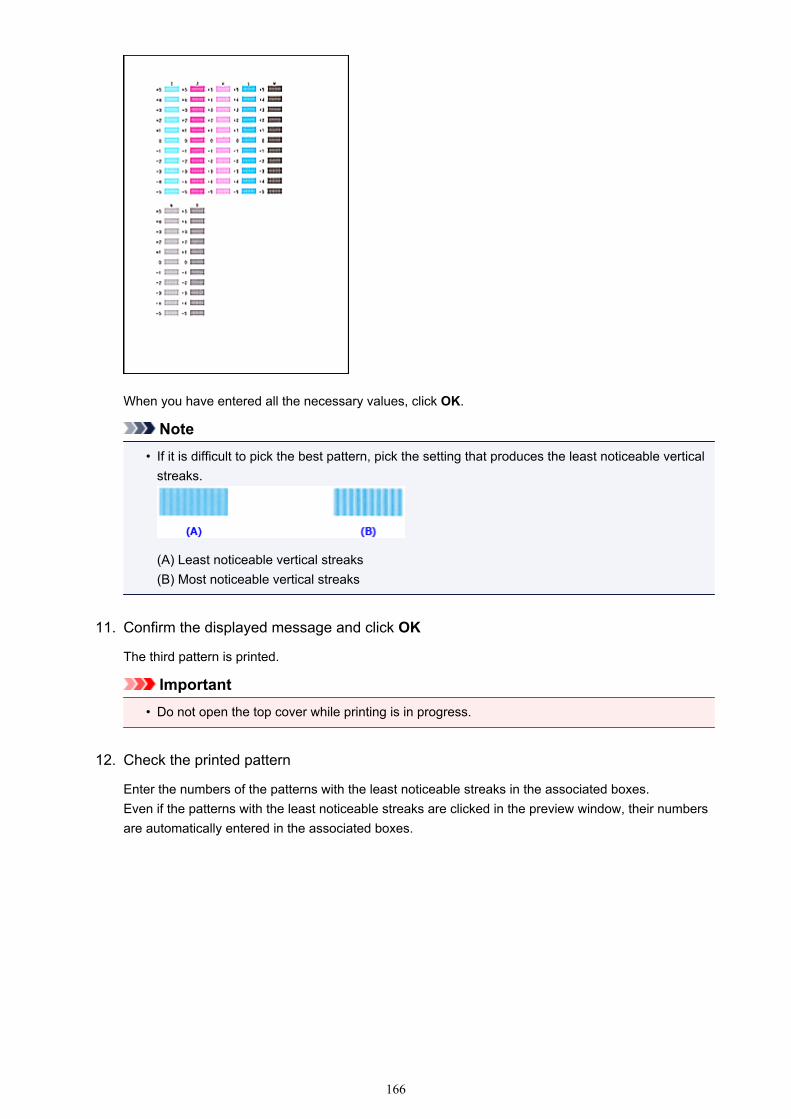
When you have entered all the necessary values, click OK.
Note• If it is difficult to pick the best pattern, pick the setting that produces the least noticeable vertical
streaks.
(A) Least noticeable vertical streaks(B) Most noticeable vertical streaks
11. Confirm the displayed message and click OK
The third pattern is printed.
Important• Do not open the top cover while printing is in progress.
12. Check the printed pattern
Enter the numbers of the patterns with the least noticeable streaks in the associated boxes.Even if the patterns with the least noticeable streaks are clicked in the preview window, their numbersare automatically entered in the associated boxes.
166
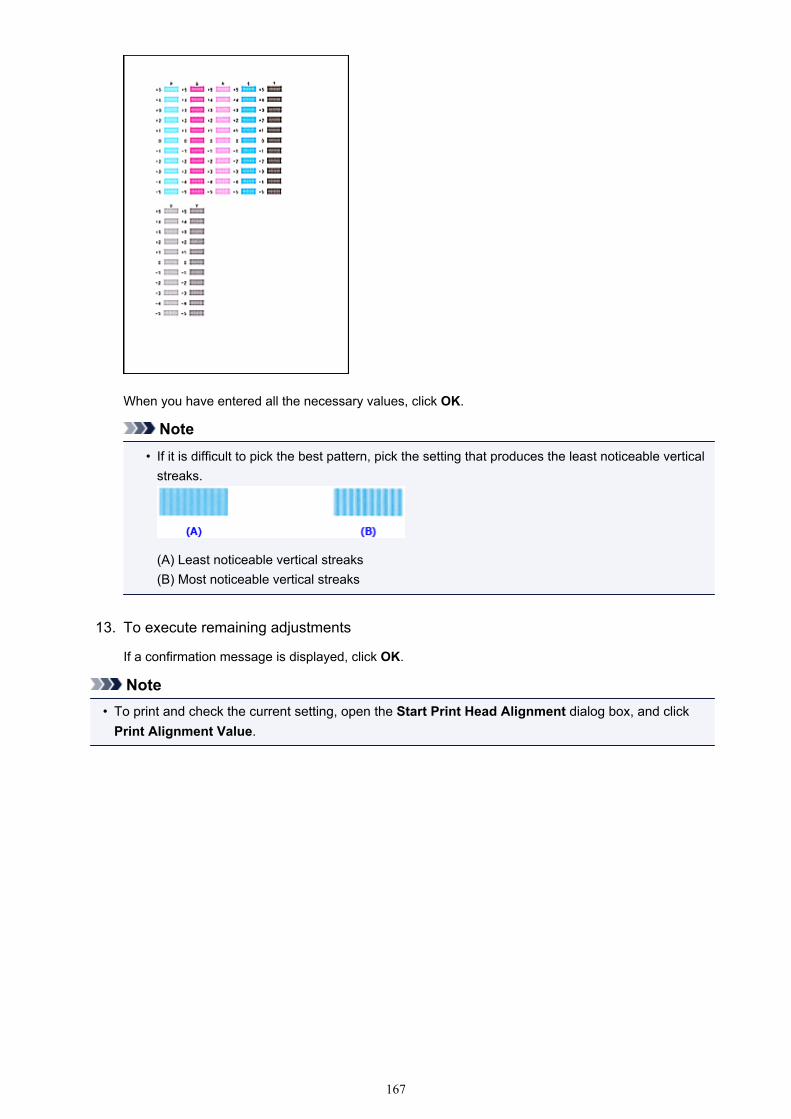
When you have entered all the necessary values, click OK.
Note• If it is difficult to pick the best pattern, pick the setting that produces the least noticeable vertical
streaks.
(A) Least noticeable vertical streaks(B) Most noticeable vertical streaks
13. To execute remaining adjustments
If a confirmation message is displayed, click OK.
Note• To print and check the current setting, open the Start Print Head Alignment dialog box, and click
Print Alignment Value.
167
Use Your Computer to Print a Nozzle Check Pattern
The nozzle check function allows you to check whether the print head is working properly by printing anozzle check pattern. Print the pattern if printing becomes faint, or if a specific color fails to print.
The procedure for printing a nozzle check pattern is as follows:
Nozzle Check
1. Open the printer driver setup window
2. Click Nozzle Check on the Maintenance tab
The Nozzle Check dialog box opens.Click Initial Check Items to display the items that you need to check before printing the nozzle checkpattern.
3. Load paper in the printer
Load one sheet of A4 size or Letter size plain paper into the rear tray.
4. Print a nozzle check pattern
Make sure that the printer is on and click Print Check Pattern.Printing of the nozzle check pattern begins.
Click OK when the confirmation message appears.The Pattern Check dialog box opens.
5. Check the print result
Check the print result. If the print result is normal, click Exit.
If the print result is smudged or if there are any unprinted sections, click Cleaning to clean the printhead.
Related TopicCleaning the Print Heads from Your Computer
168
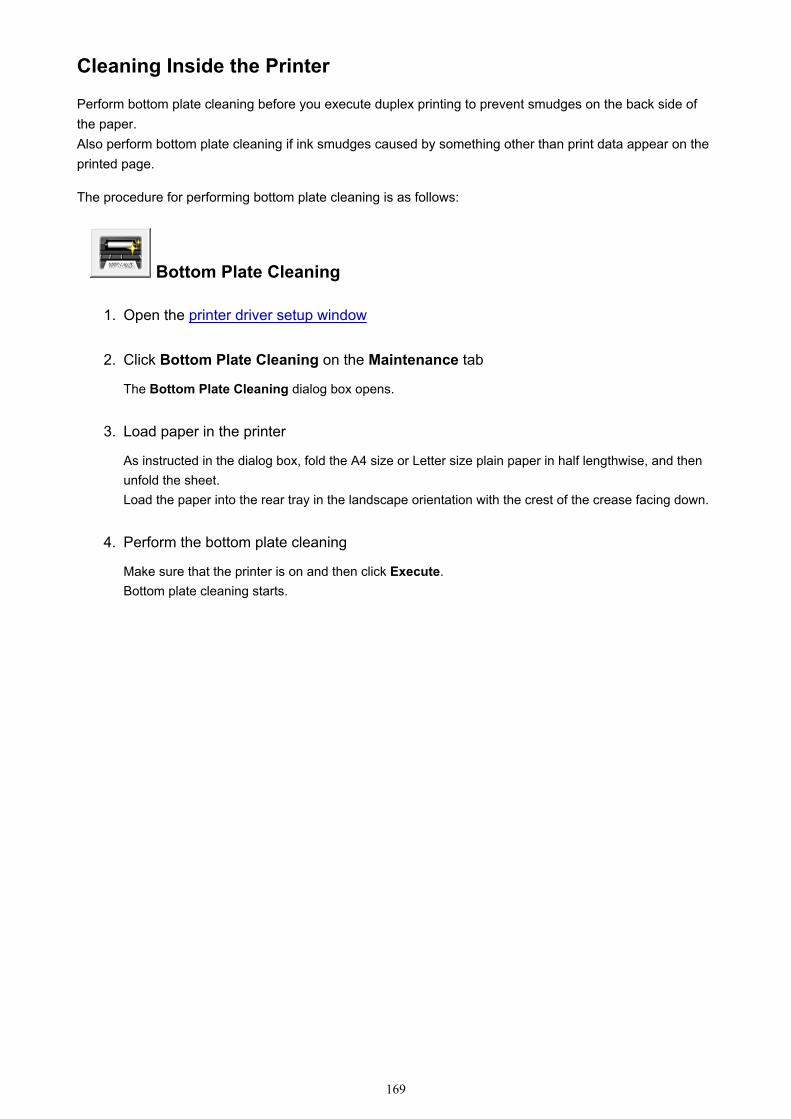
Cleaning Inside the Printer
Perform bottom plate cleaning before you execute duplex printing to prevent smudges on the back side ofthe paper.Also perform bottom plate cleaning if ink smudges caused by something other than print data appear on theprinted page.
The procedure for performing bottom plate cleaning is as follows:
Bottom Plate Cleaning
1. Open the printer driver setup window
2. Click Bottom Plate Cleaning on the Maintenance tab
The Bottom Plate Cleaning dialog box opens.
3. Load paper in the printer
As instructed in the dialog box, fold the A4 size or Letter size plain paper in half lengthwise, and thenunfold the sheet.Load the paper into the rear tray in the landscape orientation with the crest of the crease facing down.
4. Perform the bottom plate cleaning
Make sure that the printer is on and then click Execute.Bottom plate cleaning starts.
169

Cleaning the Printer
Cleaning the Exterior of the Printer
Cleaning the Paper Feed Roller
Cleaning the Inside of the Printer (Bottom Plate Cleaning)
170
Cleaning the Exterior of the Printer
Be sure to use a soft and dry cloth such as eyeglasses cleaning cloth and wipe off dirt on the surface gently.Smooth out wrinkles on the cloth if necessary before cleaning.
Important• Be sure to turn off the power and unplug the power cord before cleaning the printer.• Do not use tissue paper, paper towels, rough-textured cloth, or similar materials for cleaning so as not
to scratch the surface. Paper tissue powder or fine threads may remain inside the printer and causeproblems such as print head blockage and poor printing results.
• Never use volatile liquids such as thinners, benzene, acetone, or any other chemical cleaner to cleanthe printer, as this may cause a malfunction or damage the surface of the printer.
171
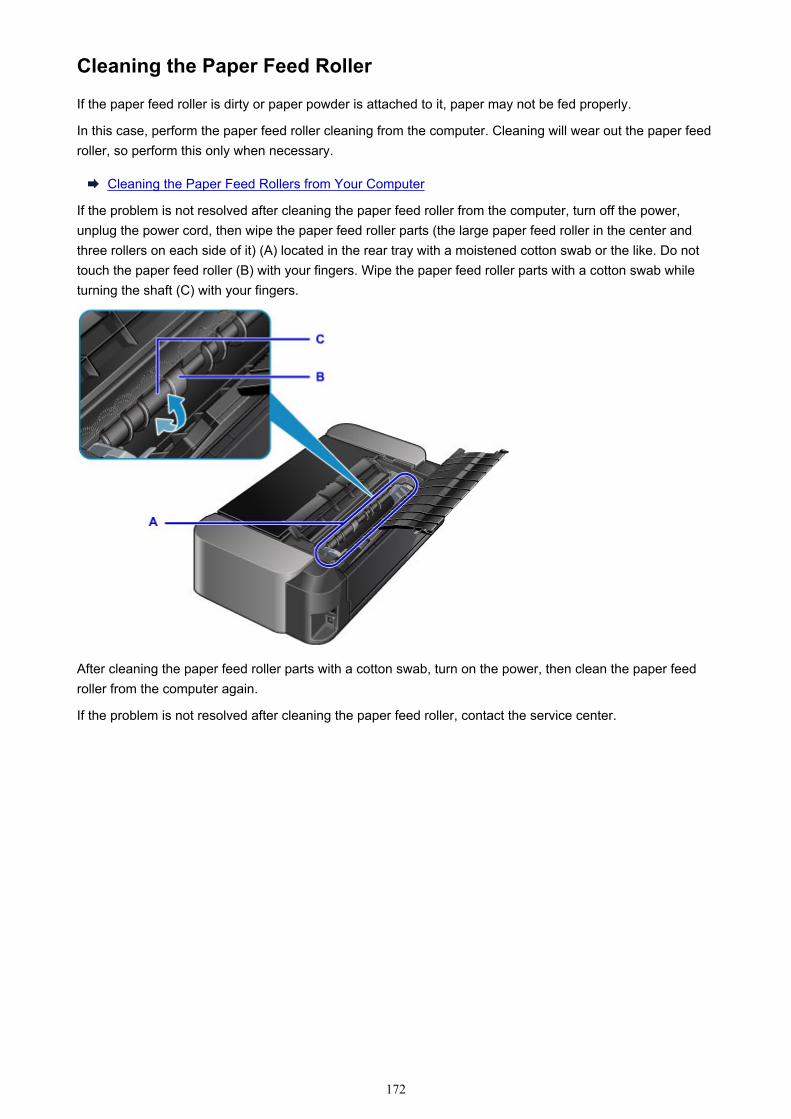
Cleaning the Paper Feed Roller
If the paper feed roller is dirty or paper powder is attached to it, paper may not be fed properly.
In this case, perform the paper feed roller cleaning from the computer. Cleaning will wear out the paper feedroller, so perform this only when necessary.
Cleaning the Paper Feed Rollers from Your Computer
If the problem is not resolved after cleaning the paper feed roller from the computer, turn off the power,unplug the power cord, then wipe the paper feed roller parts (the large paper feed roller in the center andthree rollers on each side of it) (A) located in the rear tray with a moistened cotton swab or the like. Do nottouch the paper feed roller (B) with your fingers. Wipe the paper feed roller parts with a cotton swab whileturning the shaft (C) with your fingers.
After cleaning the paper feed roller parts with a cotton swab, turn on the power, then clean the paper feedroller from the computer again.
If the problem is not resolved after cleaning the paper feed roller, contact the service center.
172
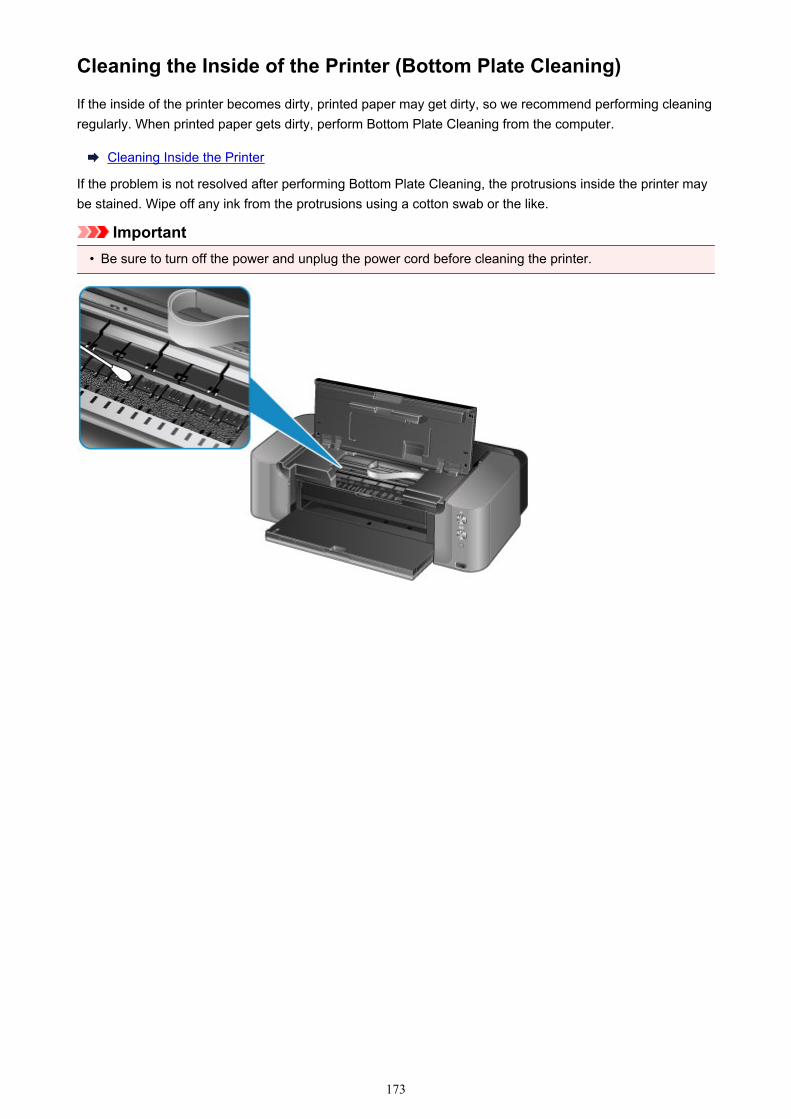
Cleaning the Inside of the Printer (Bottom Plate Cleaning)
If the inside of the printer becomes dirty, printed paper may get dirty, so we recommend performing cleaningregularly. When printed paper gets dirty, perform Bottom Plate Cleaning from the computer.
Cleaning Inside the Printer
If the problem is not resolved after performing Bottom Plate Cleaning, the protrusions inside the printer maybe stained. Wipe off any ink from the protrusions using a cotton swab or the like.
Important• Be sure to turn off the power and unplug the power cord before cleaning the printer.
173
Changing the Printer Settings
Changing Printer Settings from Your Computer
Initializing the Printer Settings
Disabling the LAN Function of the Printer
174
Changing Printer Settings from Your Computer
Changing the Print Options
Registering a Frequently Used Printing Profile
Managing the Printer Power
Reducing the Printer Noise
Changing the Printer Operation Mode
175
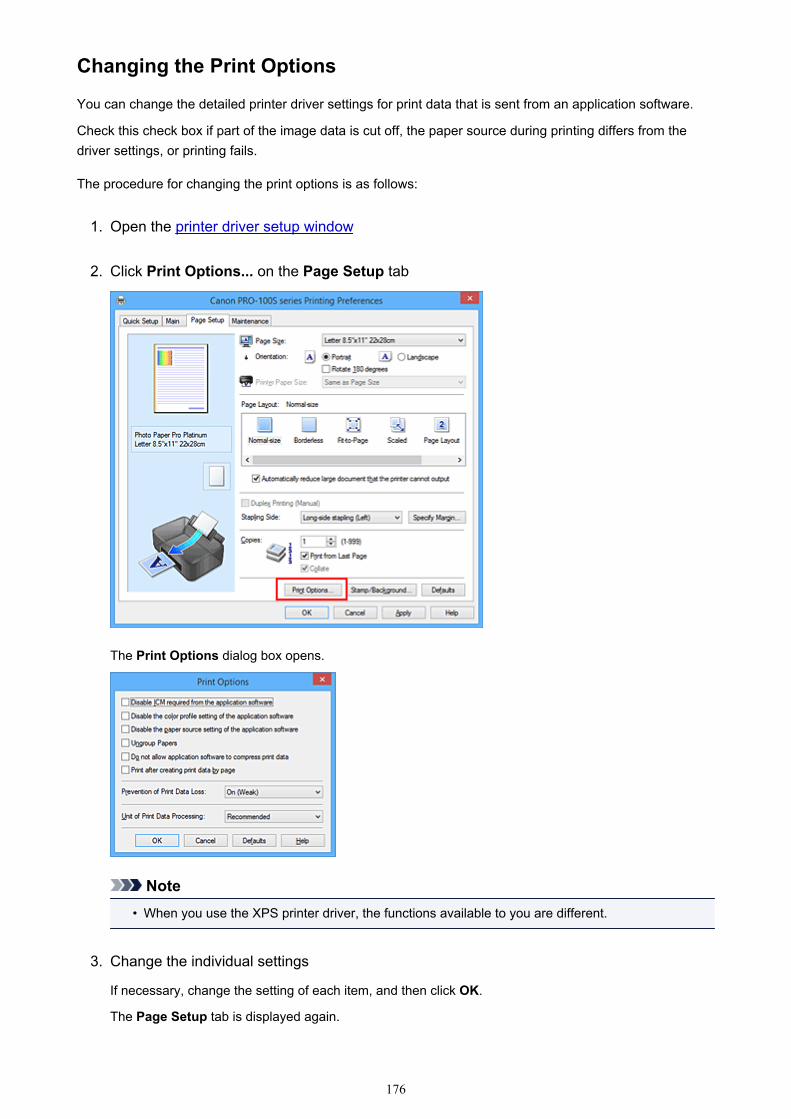
Changing the Print Options
You can change the detailed printer driver settings for print data that is sent from an application software.
Check this check box if part of the image data is cut off, the paper source during printing differs from thedriver settings, or printing fails.
The procedure for changing the print options is as follows:
1. Open the printer driver setup window
2. Click Print Options... on the Page Setup tab
The Print Options dialog box opens.
Note• When you use the XPS printer driver, the functions available to you are different.
3. Change the individual settings
If necessary, change the setting of each item, and then click OK.
The Page Setup tab is displayed again.
176
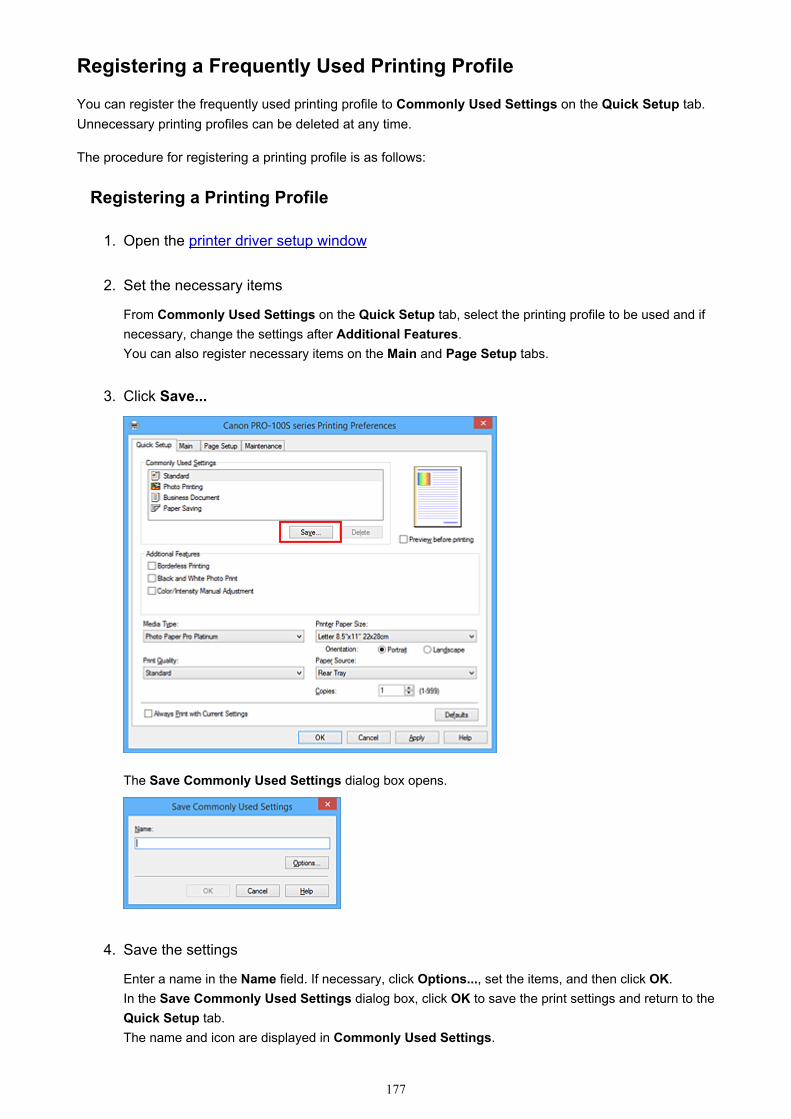
Registering a Frequently Used Printing Profile
You can register the frequently used printing profile to Commonly Used Settings on the Quick Setup tab.Unnecessary printing profiles can be deleted at any time.
The procedure for registering a printing profile is as follows:
Registering a Printing Profile
1. Open the printer driver setup window
2. Set the necessary items
From Commonly Used Settings on the Quick Setup tab, select the printing profile to be used and ifnecessary, change the settings after Additional Features.You can also register necessary items on the Main and Page Setup tabs.
3. Click Save...
The Save Commonly Used Settings dialog box opens.
4. Save the settings
Enter a name in the Name field. If necessary, click Options..., set the items, and then click OK.In the Save Commonly Used Settings dialog box, click OK to save the print settings and return to theQuick Setup tab.The name and icon are displayed in Commonly Used Settings.
177
Important• To save the page size, orientation, and number of copies that was set in each sheet, click Options...,
and check each item.
Note• When you re-install the printer driver or upgrade the printer driver version, the print settings that are
already registered will be deleted from Commonly Used Settings.Registered print settings cannot be saved and preserved. If a profile is deleted, register the printsettings again.
Deleting Unnecessary Printing Profile
1. Select the printing profile to be deleted
Select the printing profile you want to delete from the Commonly Used Settings list on the QuickSetup tab.
2. Delete the printing profile
Click Delete. When the confirmation message appears, click OK.The selected printing profile is deleted from the Commonly Used Settings list.
Note• Printing profiles that are registered in the initial settings cannot be deleted.
178
Managing the Printer Power
This function allows you to manage the printer power from the printer driver.
The procedure for managing the printer power is as follows:
Power OffThe Power Off function turns off the printer. When you use this function, you will not be able to turn theprinter on from the printer driver.
1. Open the printer driver setup window
2. Execute power off
Click Power Off on the Maintenance tab. When the confirmation message appears, click OK.
The printer power switches off, and the Maintenance tab is displayed again.
Auto PowerAuto Power allows you to set Auto Power On and Auto Power Off.The Auto Power On function automatically turns on the printer when data is received.The Auto Power Off function automatically turns off the printer when there are no operations from theprinter driver or the printer for a specified period of time.
1. Open the printer driver setup window
2. Make sure that the printer is on and then click Auto Power on the Maintenance tab
The Auto Power Settings dialog box opens.
Note• If the printer is off or if communication between the printer and the computer is disabled, an
error message may appear because the computer cannot collect the printer status.If this happens, click OK to display the most recent settings specified on your computer.
3. If necessary, complete the following settings:
Auto Power OnSpecifying Enable from the list will turn the printer on upon receipt of print data.
Auto Power OffSpecify the time from the list. When this time lapses without any operations from the printer driveror the printer, the printer is turned off automatically.
4. Apply the settings
Click OK. When the confirmation message appears, click OK.The Maintenance tab is displayed again.
179

The setting is enabled after this. When you want to disable this function, select Disable from the listaccording to the same procedure.
Note• When the printer is turned off, the Canon IJ Status Monitor message varies depending on the Auto
Power On setting.When the setting is Enable, "Printer is standing by" is displayed. When the setting is Disable,"Printer is offline" is displayed.
Important• If you connect this printer to a network and use it, you can set Auto Power Off but the power will not be
turned off automatically.
180
Reducing the Printer Noise
The silent function allows you to reduce the operating noise of this printer. Select when you wish to reducethe operating noise of the printer at night, etc.Using this function may lower the print speed.
The procedure for using the quiet mode is as follows:
Quiet Settings
1. Open the printer driver setup window
2. Click Quiet Settings on the Maintenance tab
The Quiet Settings dialog box opens.
Note• If the printer is off or if communication between the printer and the computer is disabled, an
error message may appear because the computer cannot collect the printer status.
3. Set the quiet mode
If necessary, specify one of the following items:
Do not use quiet modeSelect this option when you wish to use the printer with volume of normal operating noise.
Always use quiet modeSelect this option when you wish to reduce the operating noise of the printer.
Use quiet mode during specified hoursSelect this option when you wish to reduce the operating noise of the printer during a specifiedperiod of time.Set the Start time and the End time of the quiet mode you wish to be activated. If both are set tothe same time, the quiet mode will not function.
Important• If you specify a time for Use quiet mode during specified hours, quiet mode is not applied to
operations (direct print, etc.) performed directly from the printer.
4. Apply the settings
Make sure that the printer is on and click OK.Click OK when the confirmation message appears.
The settings are enabled hereafter.
Note• The effects of the quiet mode may be less depending on the paper source and the print quality settings.
181
Changing the Printer Operation Mode
If necessary, switch between various modes of printer operation.
The procedure for configuring Custom Settings is as follows:
Custom Settings
1. Open the printer driver setup window
2. Make sure that the printer is on, and then click Custom Settings on the Maintenancetab
The Custom Settings dialog box opens.
Note• If the printer is off or if communication between the printer and the computer is disabled, an
error message may appear because the computer cannot collect the printer status.If this happens, click OK to display the most recent settings specified on your computer.
3. If necessary, complete the following settings:
Detects a printable disc in the disc trayDetects whether a printable disc is loaded on the disc tray during disc label printing and displays amessage if a disc is not loaded.Check this check box to print with detecting whether a printable disc is loaded.Uncheck this check box to print without detecting whether a printable disc is loaded.
Important• If you leave this check box unchecked, the printer may print to the disc tray even if a printable
disc is not loaded on the disc tray. Therefore, you should check this check box under normalcircumstances.
• If you load a printable disc that has already been printed onto the disc tray, the printer maydetect that no printable disc is loaded on the disc tray. In this case, uncheck this check box.
Prevent paper abrasionThe printer can increase the gap between the print head and the paper during high-densityprinting to prevent paper abrasion.Check this check box to prevent paper abrasion.
Align heads manuallyUsually, the Print Head Alignment function on the Maintenance tab is set to automatic headalignment, but you can change it to manual head alignment.If the printing results of automatic print head alignment are not satisfactory, perform manual headalignment.Check this check box to perform the manual head alignment. Uncheck this check box to performthe automatic head alignment.
Detect paper widthDetects the width of paper loaded in the printer when printing.When the paper width detected by the printer is narrower than the width of the paper specified in
182
Page Size on the Page Setup tab, a message is displayed and printing is stopped.Check this check box to detect the paper width.
Important• When you use a custom paper size to print, specify the size of paper correctly in the Custom
Paper Size dialog box.If an error message appears when you use the specified paper size, uncheck the Detectpaper width check box.
Rotate 90 degrees left when orientation is [Landscape]On the Page Setup tab, you can change the rotation direction of the Landscape in theOrientation.To rotate the print data 90 degrees to the left during printing, select this item. To rotate the printdata 90 degrees to the right during printing, clear this item.
Important• Do not change this setting while the print job is displayed in the print wait list. Otherwise,
characters may be omitted or the layout may become corrupt.
Ink Drying Wait TimeYou can set the length of the printer rest time until printing of the next page begins. Moving theslider to the right increases the pause time, and moving the slider to the left decreases the time.If the paper gets stained because the next page is ejected before the ink on the printed pagedries, increase the ink drying wait time.Reducing the ink drying wait time speeds up printing.
4. Apply the settings
Click OK and when the confirmation message appears, click OK.
The printer operates with the modified settings hereafter.
183
Initializing the Printer Settings
You can initialize the printer settings.
Important• When using the printer over LAN, note that initialization erases all network settings on the printer, and
printing operation from a computer over network becomes impossible. To use the printer over network,perform setup with the Setup CD-ROM or perform it according to the instructions on our website.
Follow the procedure below to initialize the printer settings.
1. Make sure that the printer is turned on.
2. Press and hold the RESUME/CANCEL button then release the button when the POWERlamp flashes 15 times.
All the printer settings are initialized. The administrator password specified by IJ Network Tool returns tothe default setting.
After initializing the printer, perform setup again as necessary.
Note• You cannot initialize the current position of the print head.
184
Disabling the LAN Function of the Printer
Follow the procedure below to disable LAN.
1. Make sure that the printer is turned on.
2. Press and hold the RESUME/CANCEL button then release the button when the POWERlamp flashes 12 times.
The Wi-Fi lamp goes off if you disable the wireless LAN function.
Note• When you enable the wireless LAN, press and hold the RESUME/CANCEL button, then release
the button when the POWER lamp flashes 10 times.
When you enable the wired LAN, press and hold the RESUME/CANCEL button, then release thebutton when the POWER lamp flashes 11 times.
185

Information about Network Connection
Useful Information about Network Connection
186

Useful Information about Network Connection
Default Values Set at Factory (Network)
Connecting the Printer to the Computer Using a USB Cable
When Detecting the Printers Have the Same Name during Setup
Connecting to Other Computer with LAN/Changing the Connection Methodfrom USB to LAN
Printing Out Network Setting Information
187
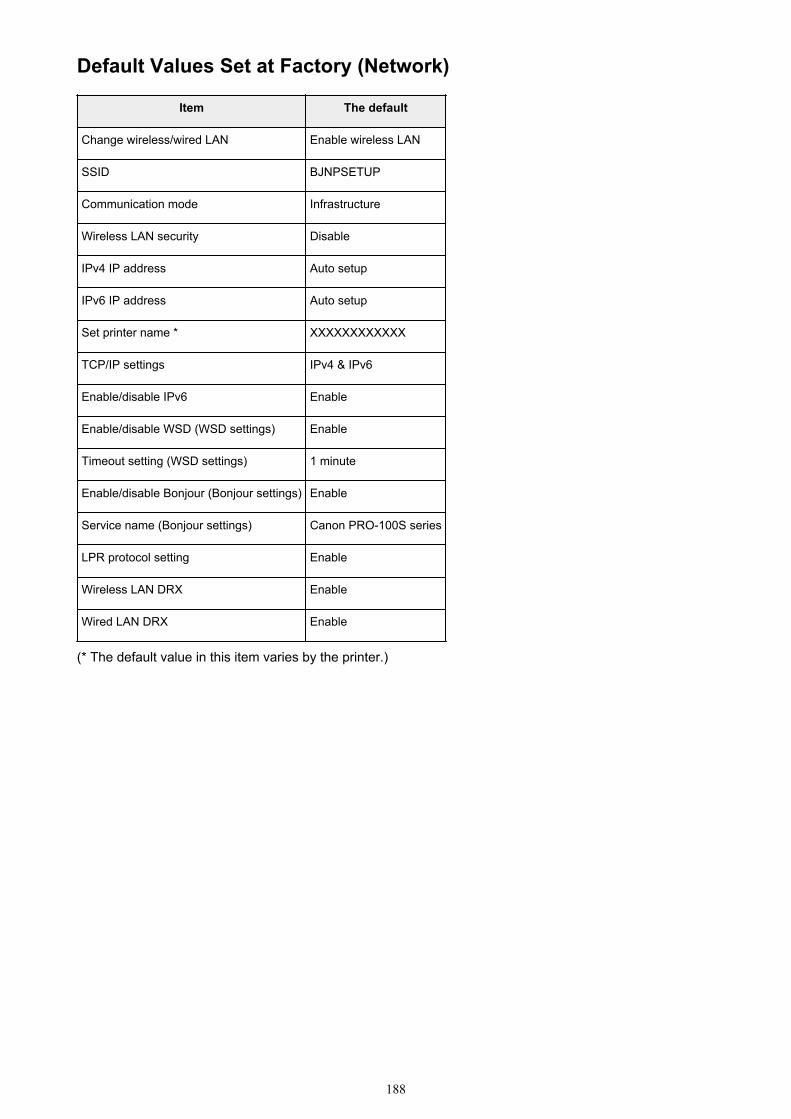
Default Values Set at Factory (Network)
Item The default
Change wireless/wired LAN Enable wireless LAN
SSID BJNPSETUP
Communication mode Infrastructure
Wireless LAN security Disable
IPv4 IP address Auto setup
IPv6 IP address Auto setup
Set printer name * XXXXXXXXXXXX
TCP/IP settings IPv4 & IPv6
Enable/disable IPv6 Enable
Enable/disable WSD (WSD settings) Enable
Timeout setting (WSD settings) 1 minute
Enable/disable Bonjour (Bonjour settings) Enable
Service name (Bonjour settings) Canon PRO-100S series
LPR protocol setting Enable
Wireless LAN DRX Enable
Wired LAN DRX Enable
(* The default value in this item varies by the printer.)
188
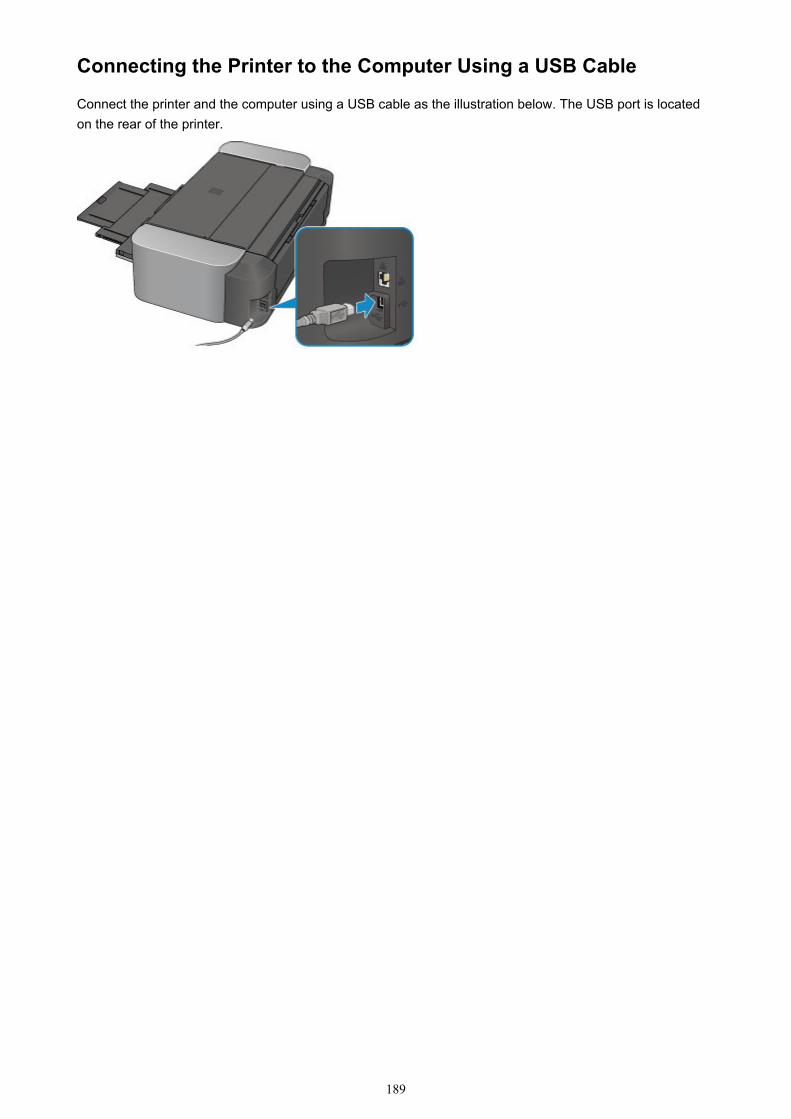
Connecting the Printer to the Computer Using a USB Cable
Connect the printer and the computer using a USB cable as the illustration below. The USB port is locatedon the rear of the printer.
189
When Detecting the Printers Have the Same Name during Setup
When the printer is detected during setup, you may see multiple printers of the same name on the detectionresult screen.
Select a printer with checking the MAC address or the serial number set to the printer against that on thedetection result screen.
Note• A serial number may not be displayed on the detection result screen.
To check the MAC address of the printer, print out the network setting information.
Printing Out Network Setting Information
190
Connecting to Other Computer with LAN/Changing the ConnectionMethod from USB to LAN
To add the computer connecting the printer with LAN or to change the connection method between theprinter and the computer from USB to LAN, perform setup with the Setup CD-ROM or perform it accordingto the instructions on our website.
Connecting to Other Computer with LANTo add the computer connecting the printer with LAN, perform setup with the Setup CD-ROM or perform itaccording to the instructions on our website.
Changing the Connection Method from USB to LANTo change the connection method to LAN while you are using the printer with USB connection, performsetup again with the Setup CD-ROM or perform it again according to the instructions on our website andselect Change Connection Method.
191
Printing Out Network Setting Information
You can print out the current network settings of the printer.
Important• This print out contains valuable information about your computer. Handle it with care.
1. Make sure that the printer is turned on.
2. Load a sheet of A4 or Letter-sized plain paper.
3. Press and hold the RESUME/CANCEL button, then release the button when the POWERlamp flashes 6 times.
The printer starts printing the network setting information.
The following information on the printer's network setting is printed out.
Item Explanations of the item Setting
Wireless LAN Wireless LAN Enable/Disable
Connection Connection status Active/Inactive
MAC Address MAC Address XX:XX:XX:XX:XX:XX
SSID SSID SSID of the wireless LAN
Communication Mode Communication Mode Infrastructure
Channel *1 Channel XX (1 to 13)
Encryption Method of the Encryption none/WEP/TKIP/AES
WEP Key Length WEP Key Length Inactive/128/64
Authentication Method of the Authentication none/auto/open/shared/WPA-PSK/WPA2-PSK
Signal Strength Signal Strength 0 to 100 [%]
TCP/IP Version TCP/IP Version IPv4 & IPv6/IPv4
IPv4 IP Address Selected IP Address (IPv4) XXX.XXX.XXX.XXX
IPv4 Default Gateway Default Gateway (IPv4) XXX.XXX.XXX.XXX
Subnet Mask Subnet Mask XXX.XXX.XXX.XXX
IPv6 IP Address *2 Selected IP Address (IPv6) XXXX:XXXX:XXXX:XXXXXXXX:XXXX:XXXX:XXXX
IPv6 Default Gateway *2 Default Gateway (IPv6) XXXX:XXXX:XXXX:XXXXXXXX:XXXX:XXXX:XXXX
Subnet Prefix Length *2 Subnet Prefix Length XXX
IPsec *3 IPsec setting Active
192
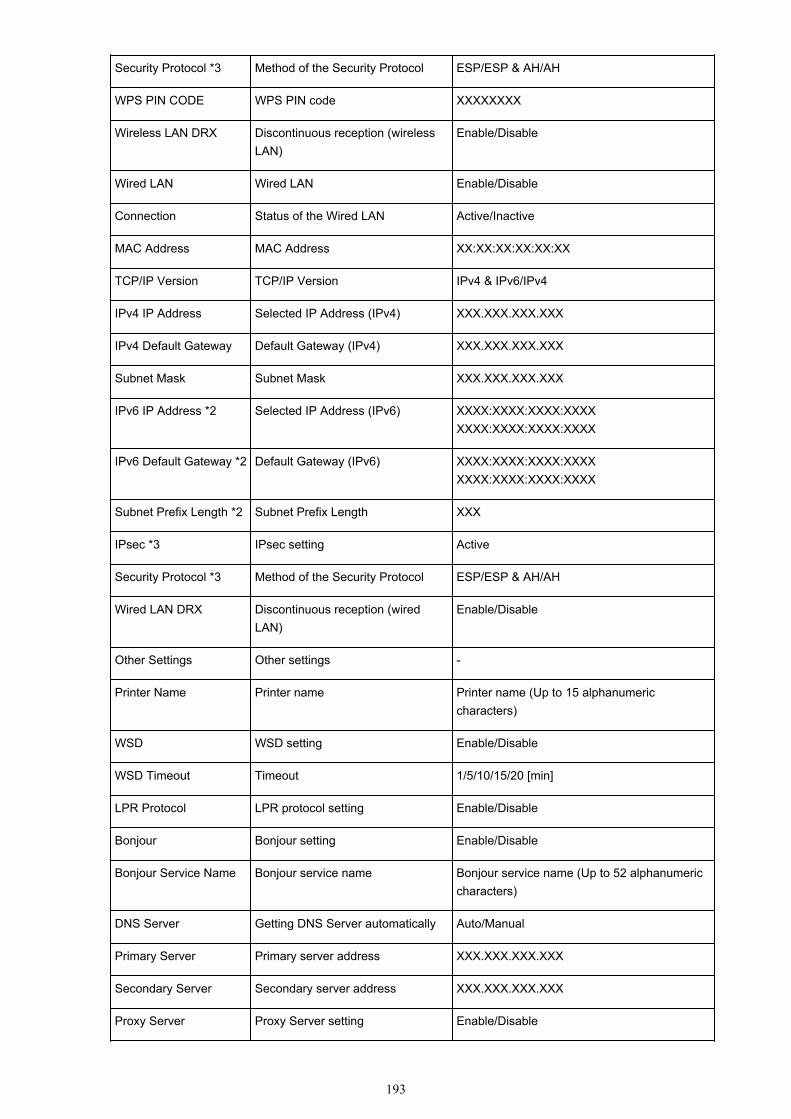
Security Protocol *3 Method of the Security Protocol ESP/ESP & AH/AH
WPS PIN CODE WPS PIN code XXXXXXXX
Wireless LAN DRX Discontinuous reception (wirelessLAN)
Enable/Disable
Wired LAN Wired LAN Enable/Disable
Connection Status of the Wired LAN Active/Inactive
MAC Address MAC Address XX:XX:XX:XX:XX:XX
TCP/IP Version TCP/IP Version IPv4 & IPv6/IPv4
IPv4 IP Address Selected IP Address (IPv4) XXX.XXX.XXX.XXX
IPv4 Default Gateway Default Gateway (IPv4) XXX.XXX.XXX.XXX
Subnet Mask Subnet Mask XXX.XXX.XXX.XXX
IPv6 IP Address *2 Selected IP Address (IPv6) XXXX:XXXX:XXXX:XXXXXXXX:XXXX:XXXX:XXXX
IPv6 Default Gateway *2 Default Gateway (IPv6) XXXX:XXXX:XXXX:XXXXXXXX:XXXX:XXXX:XXXX
Subnet Prefix Length *2 Subnet Prefix Length XXX
IPsec *3 IPsec setting Active
Security Protocol *3 Method of the Security Protocol ESP/ESP & AH/AH
Wired LAN DRX Discontinuous reception (wiredLAN)
Enable/Disable
Other Settings Other settings -
Printer Name Printer name Printer name (Up to 15 alphanumericcharacters)
WSD WSD setting Enable/Disable
WSD Timeout Timeout 1/5/10/15/20 [min]
LPR Protocol LPR protocol setting Enable/Disable
Bonjour Bonjour setting Enable/Disable
Bonjour Service Name Bonjour service name Bonjour service name (Up to 52 alphanumericcharacters)
DNS Server Getting DNS Server automatically Auto/Manual
Primary Server Primary server address XXX.XXX.XXX.XXX
Secondary Server Secondary server address XXX.XXX.XXX.XXX
Proxy Server Proxy Server setting Enable/Disable
193

Proxy Port Specifying Proxy Port 1 to 65535
Proxy Address Proxy Address XXXXXXXXXXXXXXXXXXXX
("XX" represents alphanumeric characters.)
*1 Depending on the country or region of purchase, one of the channels from 1 to 11 is printed.
*2 Only when IPv6 is enabled, the status of the network is printed.
*3 Only when IPv6 and the IPsec setting are enabled, the status of the network is printed.
194

About Network Communication
Changing and Confirming Network Settings
Screens for Network Connection of IJ Network Tool
Other Screens of IJ Network Tool
Appendix for Network Communication
195
Changing and Confirming Network Settings
IJ Network Tool
Changing the Settings in the Wireless LAN Sheet
Changing the WEP Detailed Settings
Changing the WPA/WPA2 Detailed Settings
Changing the Settings in the Wired LAN Sheet
Changing the Settings in the Admin Password Sheet
Monitoring Wireless Network Status
Initializing the Network Settings of the Machine
Viewing the Modified Settings
196
IJ Network Tool
IJ Network Tool is a utility that enables you to display and modify the machine network settings. It is installedwhen the machine is set up.
Important• To use the machine over LAN, make sure you have the equipment necessary for the connection type,
such as a wireless router or a LAN cable.
• Do not start up IJ Network Tool while printing.
• Do not print when IJ Network Tool is running.
• If the firewall function of your security software is turned on, a message may appear warning thatCanon software is attempting to access the network. If the warning message appears, set the securitysoftware to always allow access.
• IJ Network Tool has been verified to work on Windows XP, however, it does not support Fast UserSwitching. We recommend to exit IJ Network Tool before switching users.
Starting up IJ Network Tool
1. Start up IJ Network Tool as shown below.
• In Windows 8.1 or Windows 8, select IJ Network Tool on the Start screen to start IJ NetworkTool. If IJ Network Tool is not displayed on the Start screen, select the Search charm, thensearch for "IJ Network Tool".
• In Windows 7, Windows Vista, or Windows XP, click Start and select All programs, CanonUtilities, IJ Network Tool, and then IJ Network Tool.
Depending on the printer you are using, an administrator password is already specified for the printer atthe time of purchase. When you change the network settings, authentication by the administratorpassword is required.
For details:
About the Administrator Password
For improving security, we recommend to change the administrator password.
Changing the Settings in the Admin Password Sheet
197
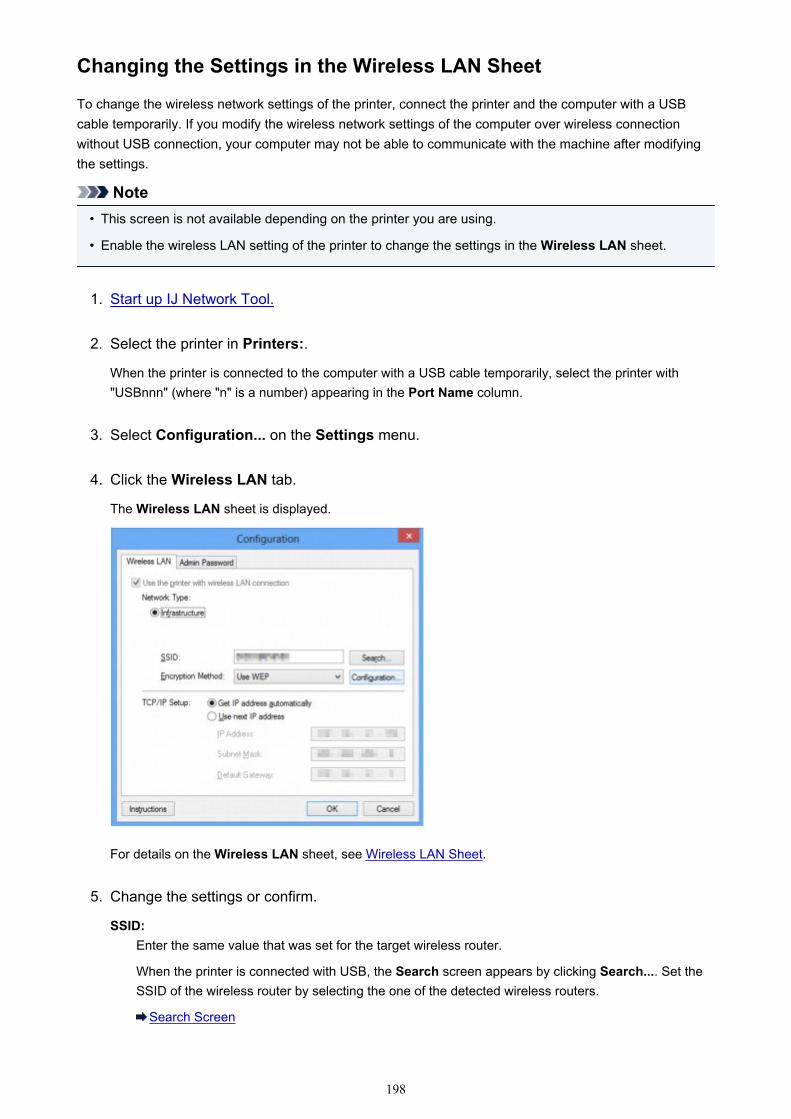
Changing the Settings in the Wireless LAN Sheet
To change the wireless network settings of the printer, connect the printer and the computer with a USBcable temporarily. If you modify the wireless network settings of the computer over wireless connectionwithout USB connection, your computer may not be able to communicate with the machine after modifyingthe settings.
Note• This screen is not available depending on the printer you are using.
• Enable the wireless LAN setting of the printer to change the settings in the Wireless LAN sheet.
1. Start up IJ Network Tool.
2. Select the printer in Printers:.
When the printer is connected to the computer with a USB cable temporarily, select the printer with"USBnnn" (where "n" is a number) appearing in the Port Name column.
3. Select Configuration... on the Settings menu.
4. Click the Wireless LAN tab.
The Wireless LAN sheet is displayed.
For details on the Wireless LAN sheet, see Wireless LAN Sheet.
5. Change the settings or confirm.
SSID:Enter the same value that was set for the target wireless router.
When the printer is connected with USB, the Search screen appears by clicking Search.... Set theSSID of the wireless router by selecting the one of the detected wireless routers.
Search Screen
198
Note• Enter the same SSID that the wireless router is configured to use. The SSID is case-sensitive.
Encryption Method:Select the encryption method used over the wireless LAN.
You can change WEP settings with selecting Use WEP and clicking Configuration....
Changing the WEP Detailed Settings
You can change WPA/WPA2 settings with selecting Use WPA/WPA2 and clicking Configuration....
Changing the WPA/WPA2 Detailed Settings
Important• If all encryption types of the wireless router, printer, or computer do not match, the printer cannot
communicate with the computer. If the printer cannot communicate with the computer after theencryption type of the printer was switched, make sure that encryption types for the computer andthe wireless router match that set to the printer.
• If you connect to a network that is not protected with security measures, there is a risk of disclosingdata such as your personal information to a third party.
TCP/IP Setup:Sets the IP address of the printer to be used over the LAN. Specify a value appropriate for yournetwork environment.
6. Click OK.
After changing configuration, a screen is displayed asking you for confirmation before the settings aresent to the printer. If you click Yes, the settings are sent to the printer and the Transmitted Settingsscreen is displayed.
Note• Changing the network settings with the USB cable temporarily may switch the default printer. In
this case, reset Set as Default Printer.
199
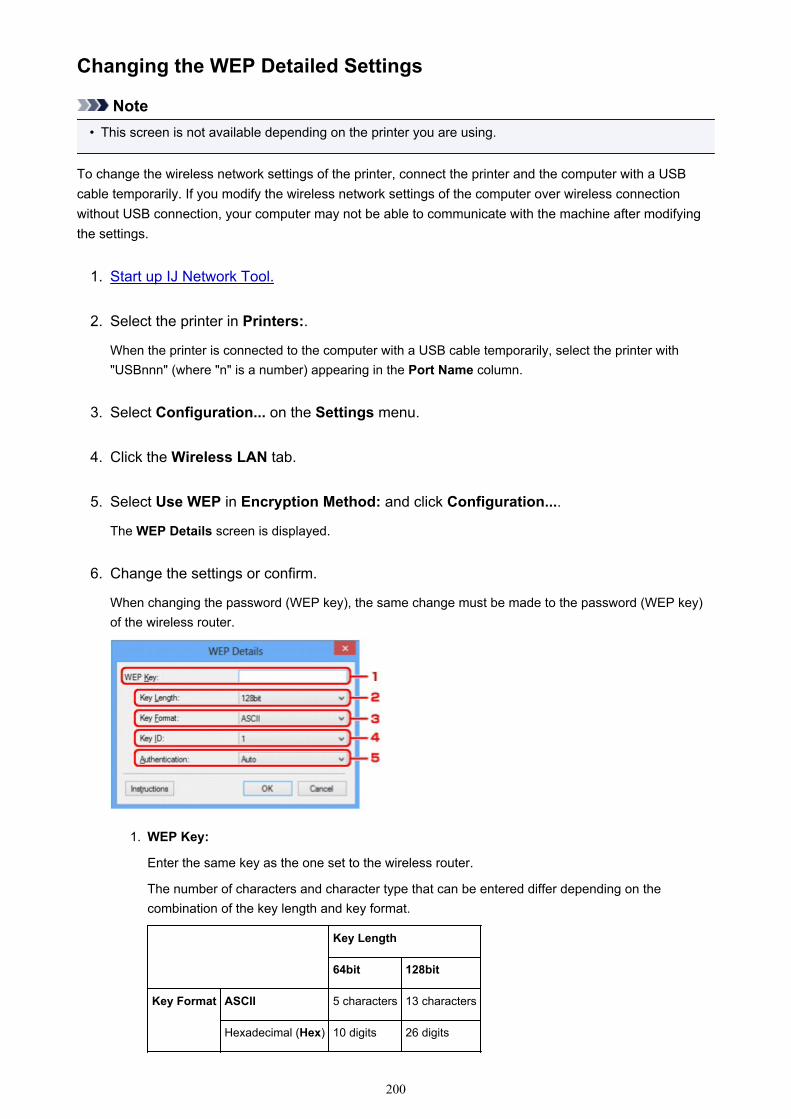
Changing the WEP Detailed Settings
Note• This screen is not available depending on the printer you are using.
To change the wireless network settings of the printer, connect the printer and the computer with a USBcable temporarily. If you modify the wireless network settings of the computer over wireless connectionwithout USB connection, your computer may not be able to communicate with the machine after modifyingthe settings.
1. Start up IJ Network Tool.
2. Select the printer in Printers:.
When the printer is connected to the computer with a USB cable temporarily, select the printer with"USBnnn" (where "n" is a number) appearing in the Port Name column.
3. Select Configuration... on the Settings menu.
4. Click the Wireless LAN tab.
5. Select Use WEP in Encryption Method: and click Configuration....
The WEP Details screen is displayed.
6. Change the settings or confirm.
When changing the password (WEP key), the same change must be made to the password (WEP key)of the wireless router.
1. WEP Key:
Enter the same key as the one set to the wireless router.
The number of characters and character type that can be entered differ depending on thecombination of the key length and key format.
Key Length
64bit 128bit
Key Format ASCII 5 characters 13 characters
Hexadecimal (Hex) 10 digits 26 digits
200
2. Key Length:
Select either 64bit or 128bit.
3. Key Format:
Select either ASCII or Hex.
4. Key ID:
Select the Key ID (index) set to the wireless router.
5. Authentication:
Select the authentication method to authenticate the printer's access to the wireless router.
Normally, select Auto. If you want to specify the method manually, select Open System orShared Key according to the setting of the wireless router.
7. Click OK.
Important• If the printer cannot communicate with the computer after the encryption type of the printer was
switched, make sure that encryption types for the computer and the wireless router match that setto the printer.
Note• Changing the network settings with the USB cable temporarily may switch the default printer. In
this case, reset Set as Default Printer.
201
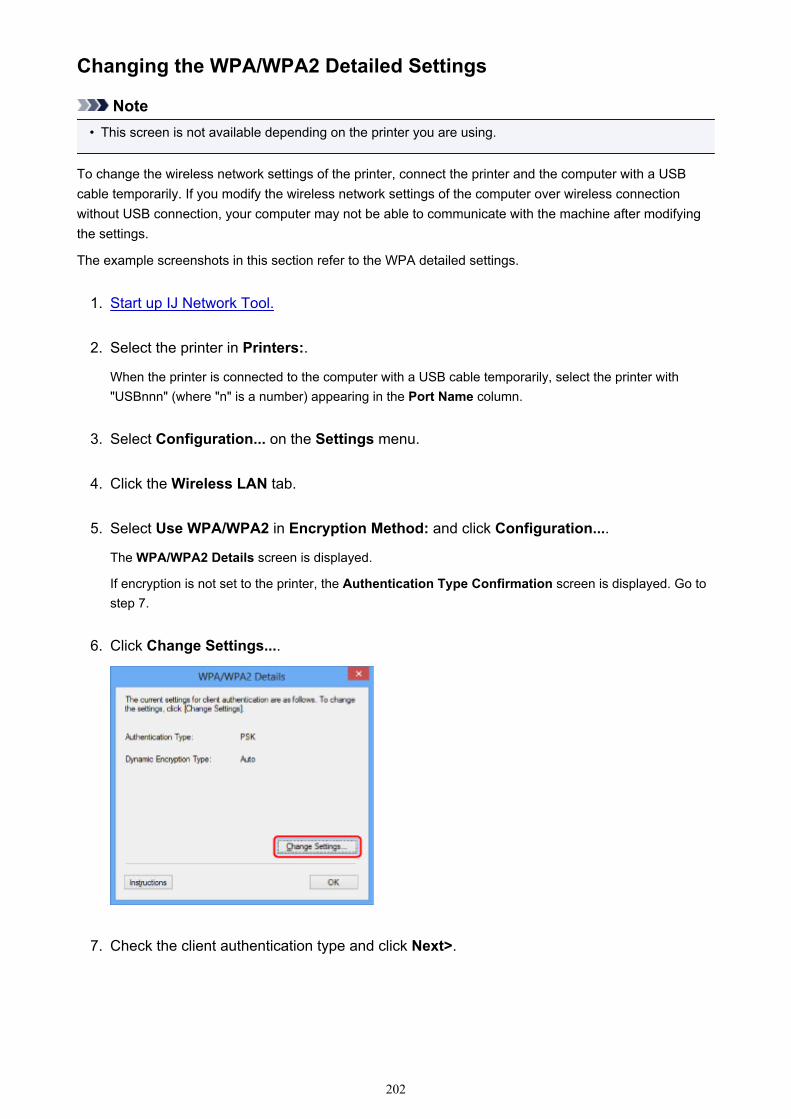
Changing the WPA/WPA2 Detailed Settings
Note• This screen is not available depending on the printer you are using.
To change the wireless network settings of the printer, connect the printer and the computer with a USBcable temporarily. If you modify the wireless network settings of the computer over wireless connectionwithout USB connection, your computer may not be able to communicate with the machine after modifyingthe settings.
The example screenshots in this section refer to the WPA detailed settings.
1. Start up IJ Network Tool.
2. Select the printer in Printers:.
When the printer is connected to the computer with a USB cable temporarily, select the printer with"USBnnn" (where "n" is a number) appearing in the Port Name column.
3. Select Configuration... on the Settings menu.
4. Click the Wireless LAN tab.
5. Select Use WPA/WPA2 in Encryption Method: and click Configuration....
The WPA/WPA2 Details screen is displayed.
If encryption is not set to the printer, the Authentication Type Confirmation screen is displayed. Go tostep 7.
6. Click Change Settings....
7. Check the client authentication type and click Next>.
202
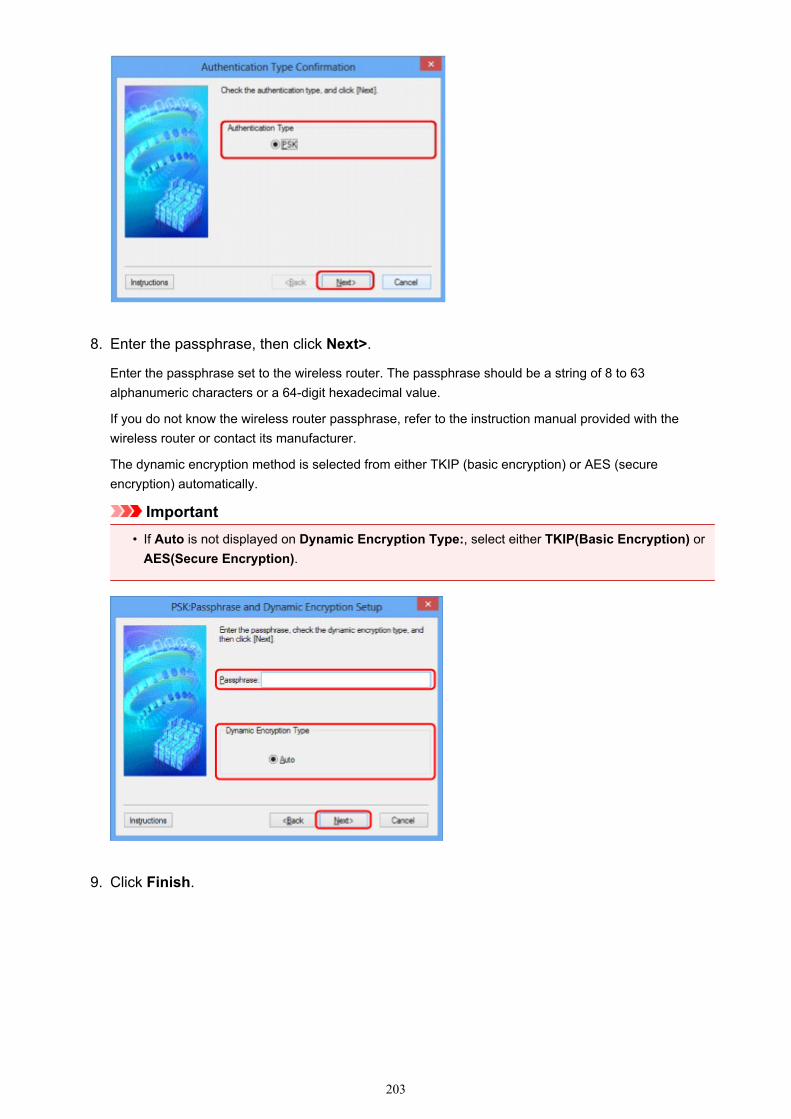
8. Enter the passphrase, then click Next>.
Enter the passphrase set to the wireless router. The passphrase should be a string of 8 to 63alphanumeric characters or a 64-digit hexadecimal value.
If you do not know the wireless router passphrase, refer to the instruction manual provided with thewireless router or contact its manufacturer.
The dynamic encryption method is selected from either TKIP (basic encryption) or AES (secureencryption) automatically.
Important• If Auto is not displayed on Dynamic Encryption Type:, select either TKIP(Basic Encryption) or
AES(Secure Encryption).
9. Click Finish.
203
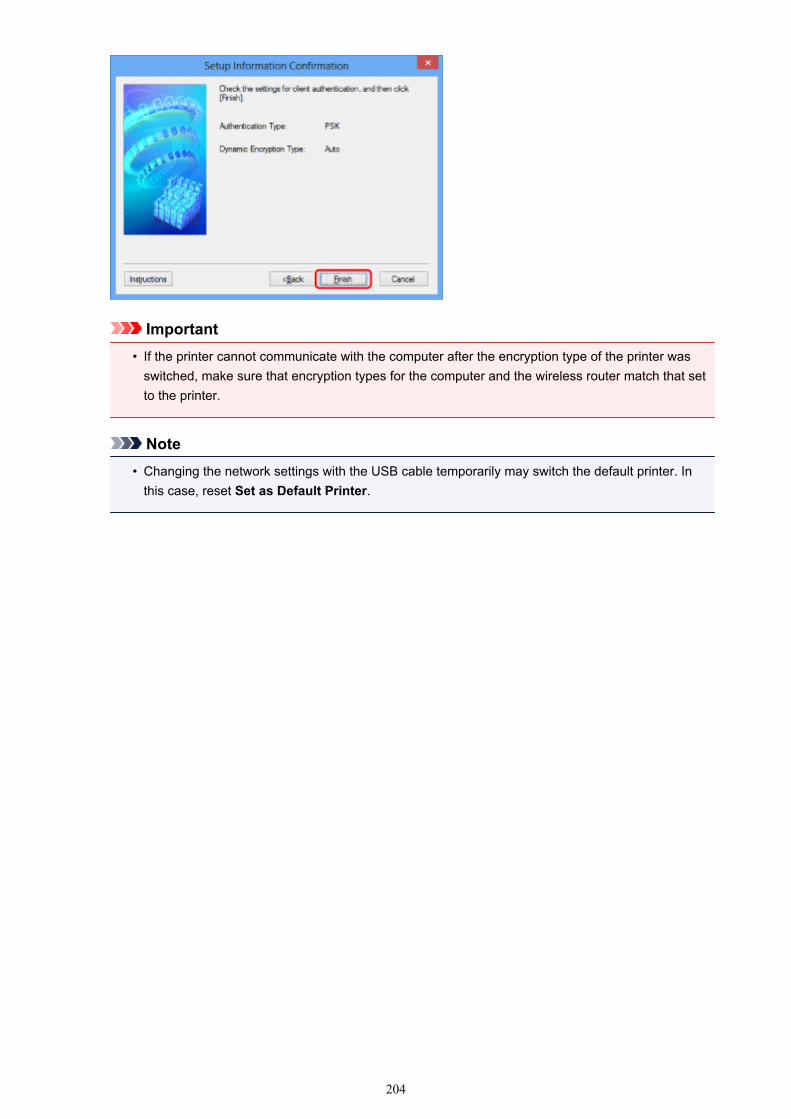
Important• If the printer cannot communicate with the computer after the encryption type of the printer was
switched, make sure that encryption types for the computer and the wireless router match that setto the printer.
Note• Changing the network settings with the USB cable temporarily may switch the default printer. In
this case, reset Set as Default Printer.
204
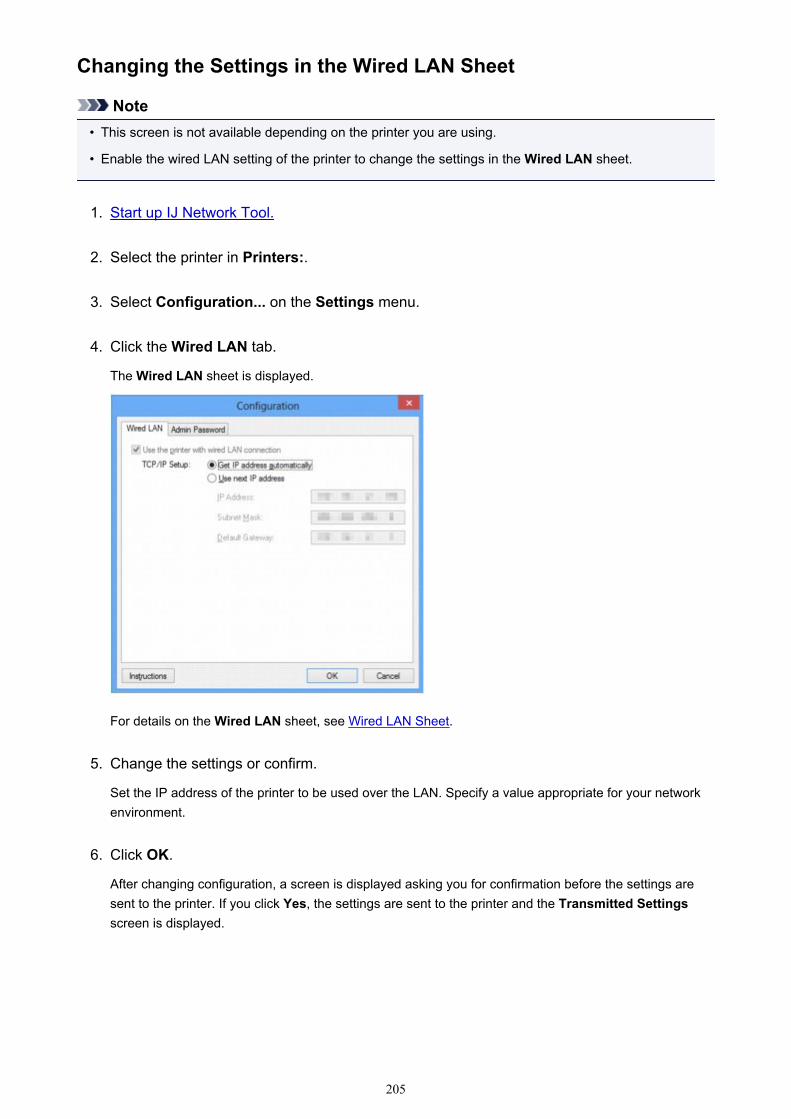
Changing the Settings in the Wired LAN Sheet
Note• This screen is not available depending on the printer you are using.
• Enable the wired LAN setting of the printer to change the settings in the Wired LAN sheet.
1. Start up IJ Network Tool.
2. Select the printer in Printers:.
3. Select Configuration... on the Settings menu.
4. Click the Wired LAN tab.
The Wired LAN sheet is displayed.
For details on the Wired LAN sheet, see Wired LAN Sheet.
5. Change the settings or confirm.
Set the IP address of the printer to be used over the LAN. Specify a value appropriate for your networkenvironment.
6. Click OK.
After changing configuration, a screen is displayed asking you for confirmation before the settings aresent to the printer. If you click Yes, the settings are sent to the printer and the Transmitted Settingsscreen is displayed.
205
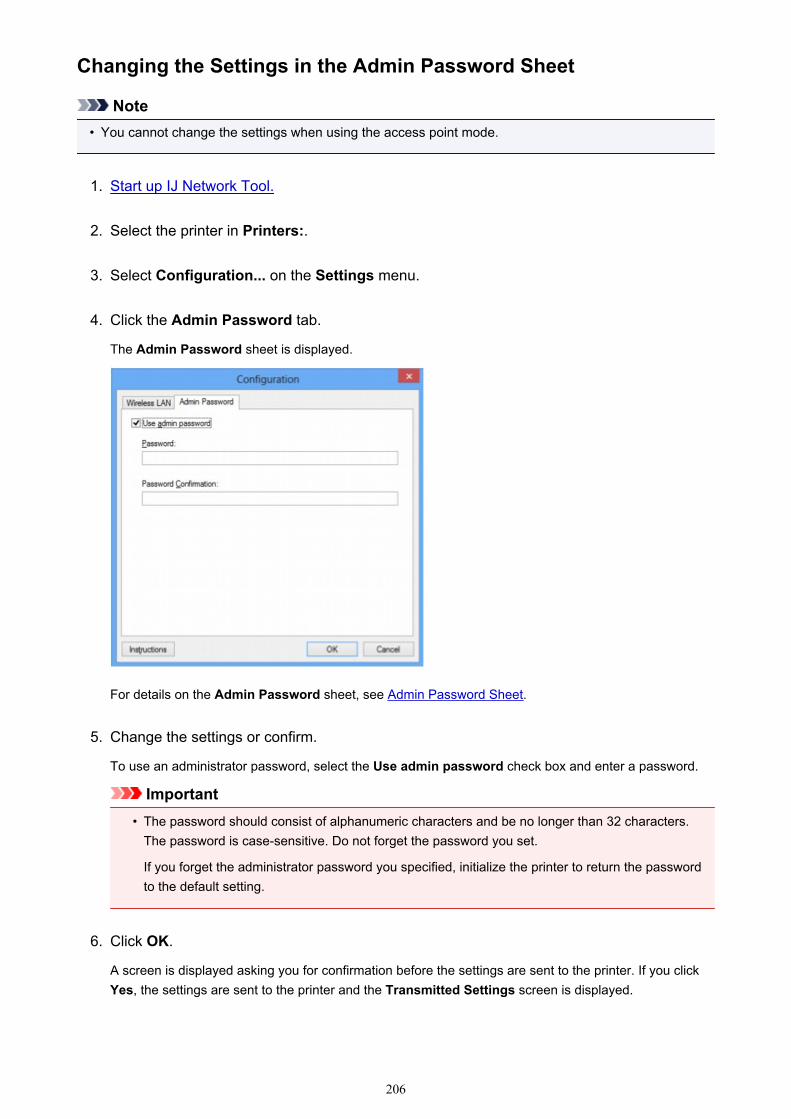
Changing the Settings in the Admin Password Sheet
Note• You cannot change the settings when using the access point mode.
1. Start up IJ Network Tool.
2. Select the printer in Printers:.
3. Select Configuration... on the Settings menu.
4. Click the Admin Password tab.
The Admin Password sheet is displayed.
For details on the Admin Password sheet, see Admin Password Sheet.
5. Change the settings or confirm.
To use an administrator password, select the Use admin password check box and enter a password.
Important• The password should consist of alphanumeric characters and be no longer than 32 characters.
The password is case-sensitive. Do not forget the password you set.
If you forget the administrator password you specified, initialize the printer to return the passwordto the default setting.
6. Click OK.
A screen is displayed asking you for confirmation before the settings are sent to the printer. If you clickYes, the settings are sent to the printer and the Transmitted Settings screen is displayed.
206
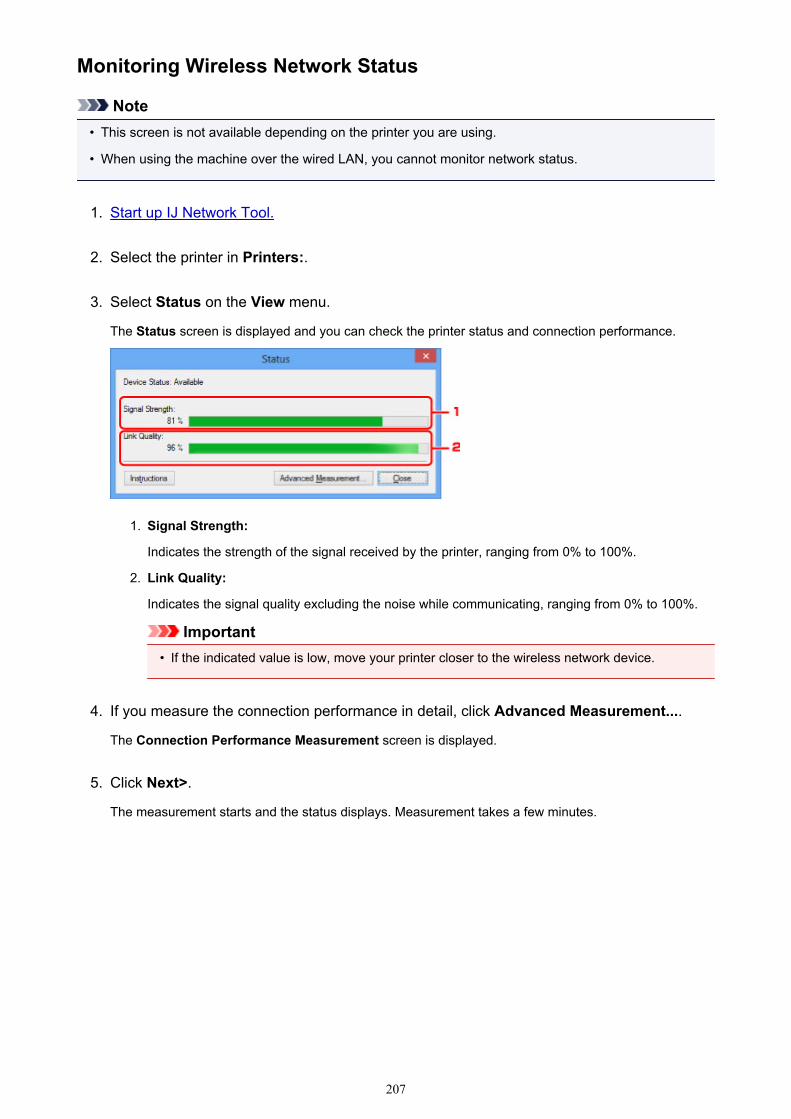
Monitoring Wireless Network Status
Note• This screen is not available depending on the printer you are using.
• When using the machine over the wired LAN, you cannot monitor network status.
1. Start up IJ Network Tool.
2. Select the printer in Printers:.
3. Select Status on the View menu.
The Status screen is displayed and you can check the printer status and connection performance.
1. Signal Strength:
Indicates the strength of the signal received by the printer, ranging from 0% to 100%.
2. Link Quality:
Indicates the signal quality excluding the noise while communicating, ranging from 0% to 100%.
Important• If the indicated value is low, move your printer closer to the wireless network device.
4. If you measure the connection performance in detail, click Advanced Measurement....
The Connection Performance Measurement screen is displayed.
5. Click Next>.
The measurement starts and the status displays. Measurement takes a few minutes.
207
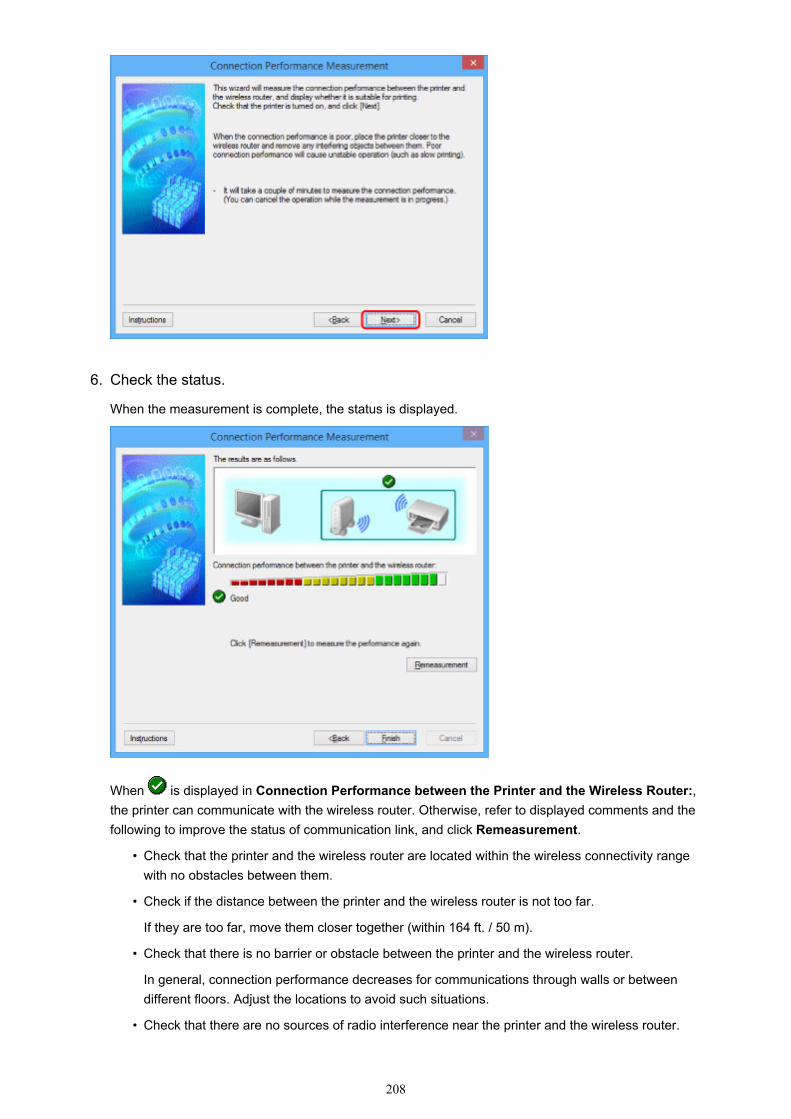
6. Check the status.
When the measurement is complete, the status is displayed.
When is displayed in Connection Performance between the Printer and the Wireless Router:,the printer can communicate with the wireless router. Otherwise, refer to displayed comments and thefollowing to improve the status of communication link, and click Remeasurement.
• Check that the printer and the wireless router are located within the wireless connectivity rangewith no obstacles between them.
• Check if the distance between the printer and the wireless router is not too far.
If they are too far, move them closer together (within 164 ft. / 50 m).
• Check that there is no barrier or obstacle between the printer and the wireless router.
In general, connection performance decreases for communications through walls or betweendifferent floors. Adjust the locations to avoid such situations.
• Check that there are no sources of radio interference near the printer and the wireless router.
208
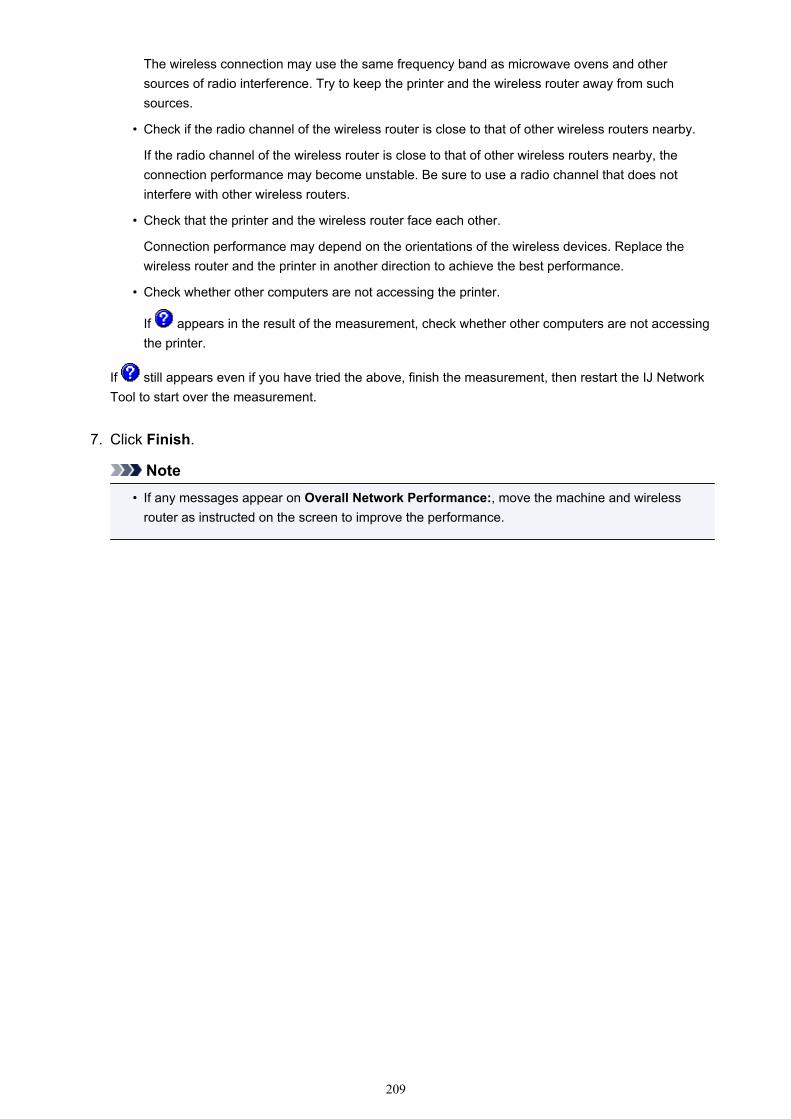
The wireless connection may use the same frequency band as microwave ovens and othersources of radio interference. Try to keep the printer and the wireless router away from suchsources.
• Check if the radio channel of the wireless router is close to that of other wireless routers nearby.
If the radio channel of the wireless router is close to that of other wireless routers nearby, theconnection performance may become unstable. Be sure to use a radio channel that does notinterfere with other wireless routers.
• Check that the printer and the wireless router face each other.
Connection performance may depend on the orientations of the wireless devices. Replace thewireless router and the printer in another direction to achieve the best performance.
• Check whether other computers are not accessing the printer.
If appears in the result of the measurement, check whether other computers are not accessingthe printer.
If still appears even if you have tried the above, finish the measurement, then restart the IJ NetworkTool to start over the measurement.
7. Click Finish.
Note• If any messages appear on Overall Network Performance:, move the machine and wireless
router as instructed on the screen to improve the performance.
209
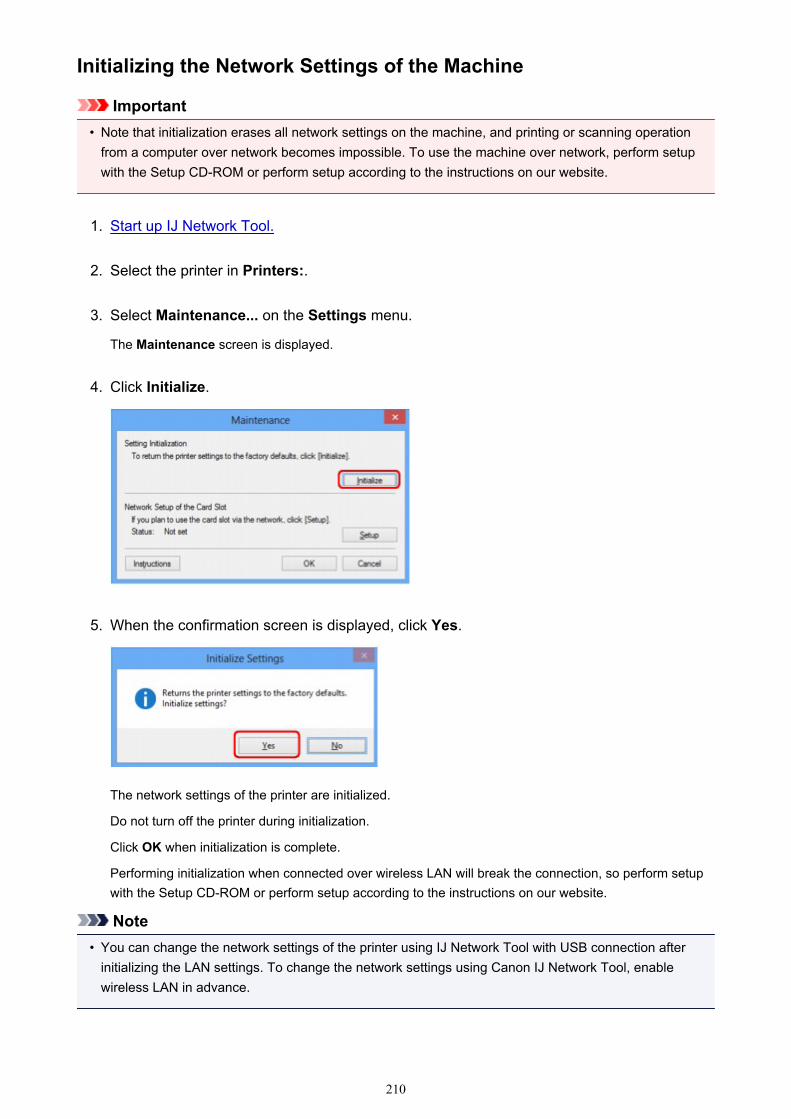
Initializing the Network Settings of the Machine
Important• Note that initialization erases all network settings on the machine, and printing or scanning operation
from a computer over network becomes impossible. To use the machine over network, perform setupwith the Setup CD-ROM or perform setup according to the instructions on our website.
1. Start up IJ Network Tool.
2. Select the printer in Printers:.
3. Select Maintenance... on the Settings menu.
The Maintenance screen is displayed.
4. Click Initialize.
5. When the confirmation screen is displayed, click Yes.
The network settings of the printer are initialized.
Do not turn off the printer during initialization.
Click OK when initialization is complete.
Performing initialization when connected over wireless LAN will break the connection, so perform setupwith the Setup CD-ROM or perform setup according to the instructions on our website.
Note• You can change the network settings of the printer using IJ Network Tool with USB connection after
initializing the LAN settings. To change the network settings using Canon IJ Network Tool, enablewireless LAN in advance.
210
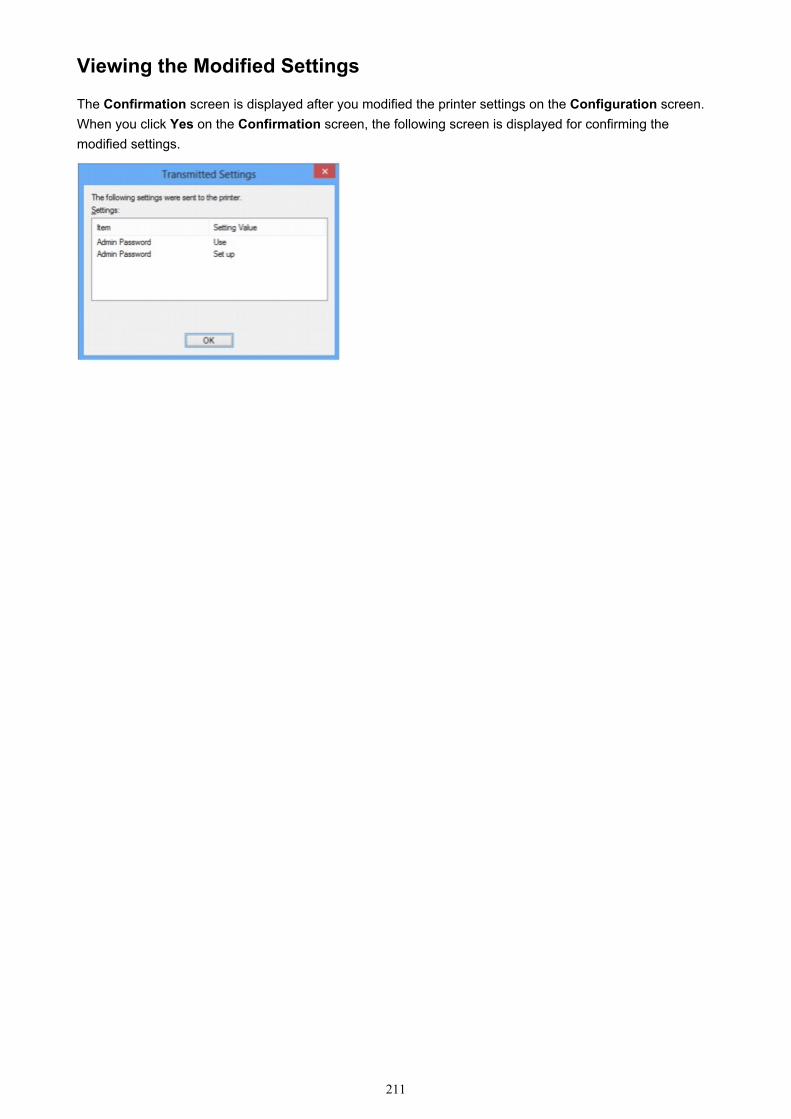
Viewing the Modified Settings
The Confirmation screen is displayed after you modified the printer settings on the Configuration screen.When you click Yes on the Confirmation screen, the following screen is displayed for confirming themodified settings.
211
Screens for Network Connection of IJ Network Tool
Canon IJ Network Tool Screen
Configuration Screen
Wireless LAN Sheet
Search Screen
WEP Details Screen
WPA/WPA2 Details Screen
Authentication Type Confirmation Screen
PSK:Passphrase and Dynamic Encryption Setup Screen
Setup Information Confirmation Screen
Wired LAN Sheet
Admin Password Sheet
Network Information Screen
Access Control Sheet
Edit Accessible MAC Address Screen/Add Accessible MAC Address Screen
Edit Accessible IP Address Screen/Add Accessible IP Address Screen
212
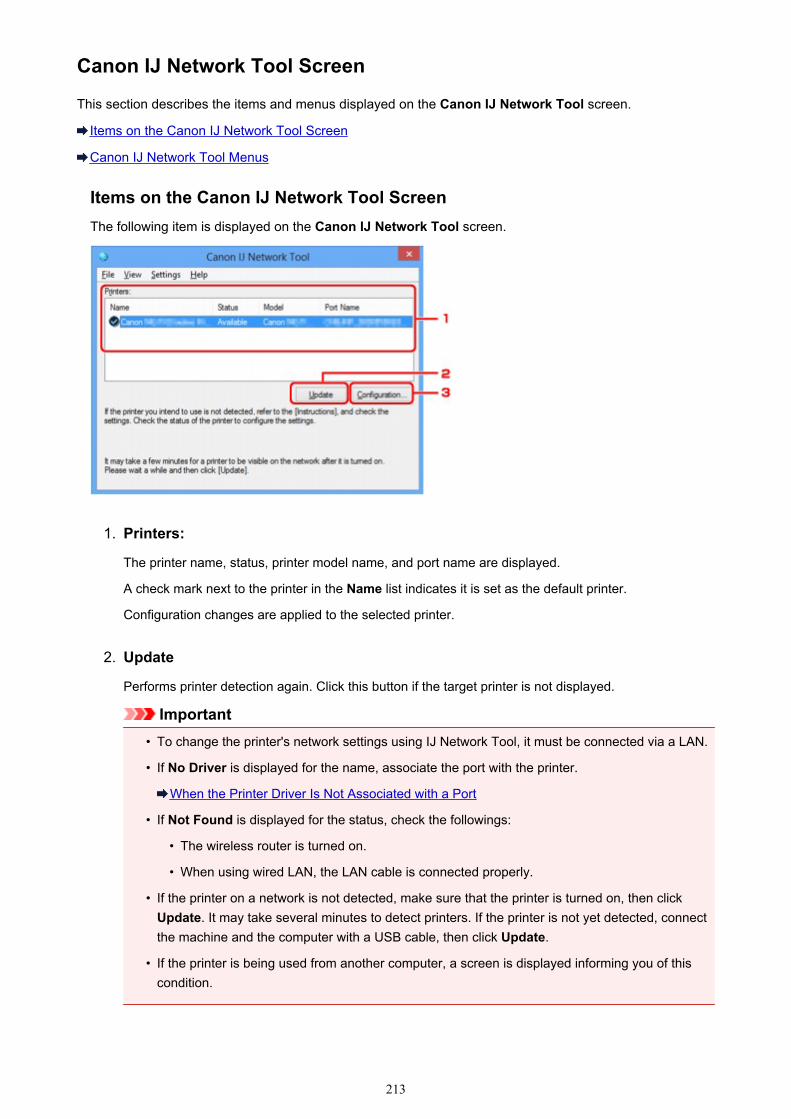
Canon IJ Network Tool Screen
This section describes the items and menus displayed on the Canon IJ Network Tool screen.
Items on the Canon IJ Network Tool Screen
Canon IJ Network Tool Menus
Items on the Canon IJ Network Tool ScreenThe following item is displayed on the Canon IJ Network Tool screen.
1. Printers:
The printer name, status, printer model name, and port name are displayed.
A check mark next to the printer in the Name list indicates it is set as the default printer.
Configuration changes are applied to the selected printer.
2. Update
Performs printer detection again. Click this button if the target printer is not displayed.
Important• To change the printer's network settings using IJ Network Tool, it must be connected via a LAN.
• If No Driver is displayed for the name, associate the port with the printer.
When the Printer Driver Is Not Associated with a Port
• If Not Found is displayed for the status, check the followings:
• The wireless router is turned on.
• When using wired LAN, the LAN cable is connected properly.
• If the printer on a network is not detected, make sure that the printer is turned on, then clickUpdate. It may take several minutes to detect printers. If the printer is not yet detected, connectthe machine and the computer with a USB cable, then click Update.
• If the printer is being used from another computer, a screen is displayed informing you of thiscondition.
213

Note• This item has the same function as Refresh in the View menu.
3. Configuration...
Click to configure settings of the selected printer.
Configuration Screen
Note• You cannot configure a printer that has the status Not Found.
• This item has the same function as Configuration... in the Settings menu.
Canon IJ Network Tool MenusThe following menu is displayed from the Canon IJ Network Tool screen.
1. File menu
ExitExits IJ Network Tool.
2. View menu
StatusDisplays the Status screen to confirm the printer connection status and wireless communicationstatus.
In the access point mode, this item is grayed out and you cannot confirm the printer connectionstatus.
Status Screen
RefreshUpdates and displays the contents of Printers: on the Canon IJ Network Tool screen to thelatest information.
Important• To change the printer's network settings using IJ Network Tool, it must be connected via a LAN.
214

• If No Driver is displayed for the name, associate the port with the printer.
When the Printer Driver Is Not Associated with a Port
• If Not Found is displayed for the status, check the followings:
• The wireless router is turned on.
• When using wired LAN, the LAN cable is connected properly.
• If the printer on a network is not detected, make sure that the printer is turned on, then selectRefresh. It may take several minutes to detect printers. If the printer is not yet detected, connectthe machine and the computer with a USB cable, then select Refresh.
• If the printer is being used from another computer, a screen is displayed informing you of thiscondition.
Note• This item has the same function as Update in the Canon IJ Network Tool screen.
Network InformationDisplays the Network Information screen to confirm the network settings of the printer and thecomputer.
Network Information Screen
Display Warning AutomaticallyEnables or disables automatic display of the instruction screen.
When this menu is selected, the instruction screen is displayed if one or more ports areunavailable for printing.
3. Settings menu
Configuration...Displays the Configuration screen to configure settings of the selected printer.
Configuration Screen
Note• This item has the same function as Configuration... in the Canon IJ Network Tool screen.
Enable switch printer functionWhen you cannot use your printer, you can use the same one on the network instead. When youenable this function and you cannot use your printer, the screen to confirm if you start searchingthe same printer as yours is displayed. Follow the message on the screen.
Note• When this function is enabled, a check mark appears on the menu.
Associate Port...Displays the Associate Port screen and you can associate a port with the printer.
Associate Port Screen
This menu is available when No Driver is displayed for the selected printer. Associating a portwith the printer enables you to use it.
215
Maintenance...Displays the Maintenance screen to return the network settings of the printer to factory defaultand to mount the card slot as the network drive.
Maintenance Screen
Set up printer's access point mode...You can change the access point mode settings. Perform settings following the message on thescreen.
If you change the Encryption Method: setting and the Password: setting on the Set up printer'saccess point mode screen, the changed settings are applied to the printer settings.
Note• You can use this function only when you are using a computer compatible with the wireless LAN.
4. Help menu
InstructionsDisplays this guide.
AboutDisplays the version of IJ Network Tool.
216
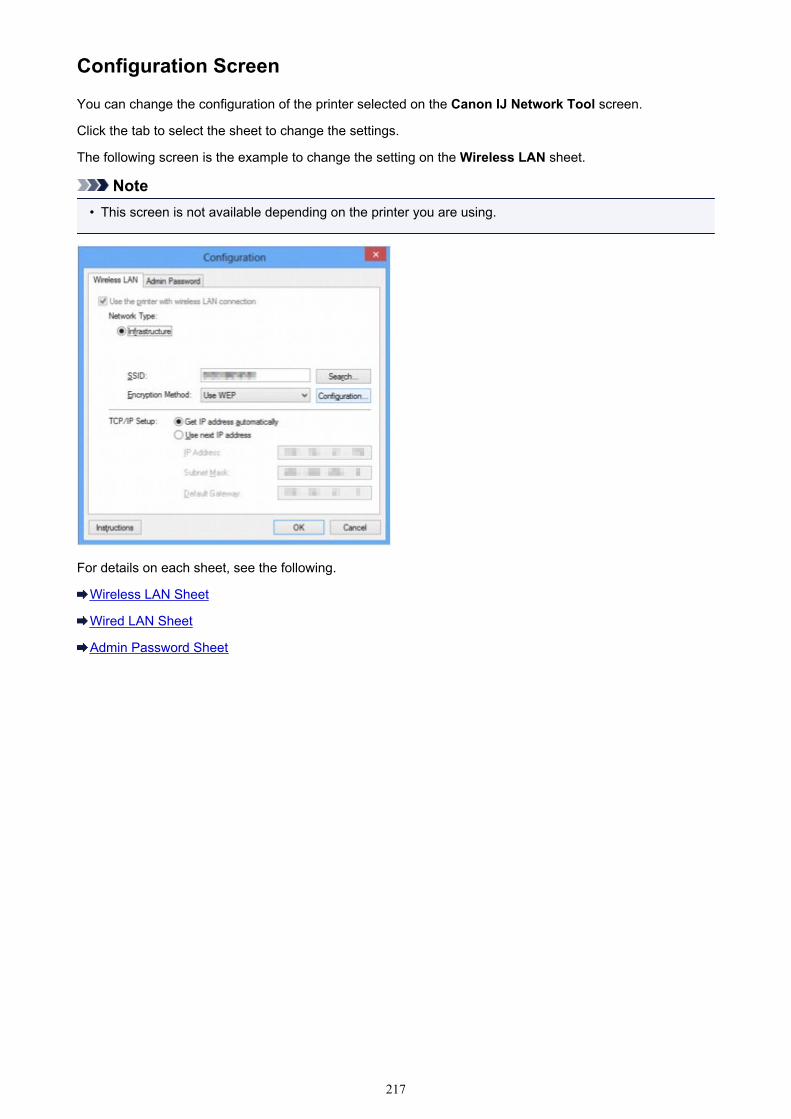
Configuration Screen
You can change the configuration of the printer selected on the Canon IJ Network Tool screen.
Click the tab to select the sheet to change the settings.
The following screen is the example to change the setting on the Wireless LAN sheet.
Note• This screen is not available depending on the printer you are using.
For details on each sheet, see the following.
Wireless LAN Sheet
Wired LAN Sheet
Admin Password Sheet
217
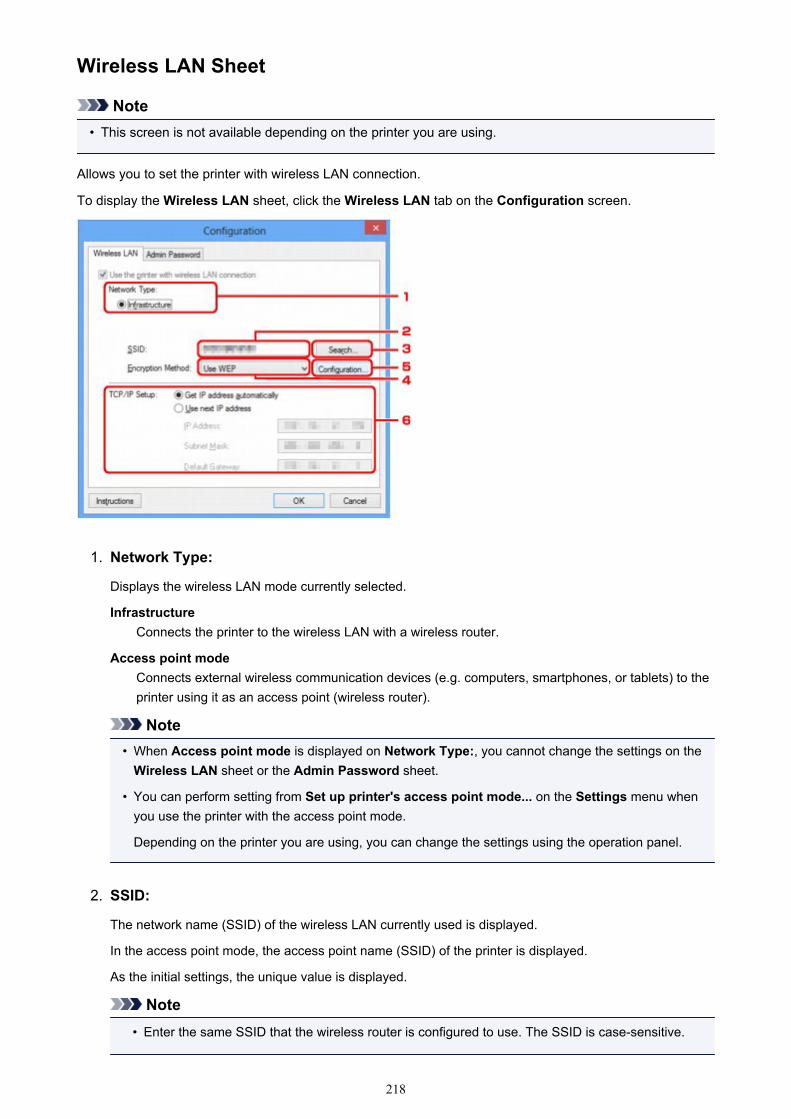
Wireless LAN Sheet
Note• This screen is not available depending on the printer you are using.
Allows you to set the printer with wireless LAN connection.
To display the Wireless LAN sheet, click the Wireless LAN tab on the Configuration screen.
1. Network Type:
Displays the wireless LAN mode currently selected.
InfrastructureConnects the printer to the wireless LAN with a wireless router.
Access point modeConnects external wireless communication devices (e.g. computers, smartphones, or tablets) to theprinter using it as an access point (wireless router).
Note• When Access point mode is displayed on Network Type:, you cannot change the settings on the
Wireless LAN sheet or the Admin Password sheet.
• You can perform setting from Set up printer's access point mode... on the Settings menu whenyou use the printer with the access point mode.
Depending on the printer you are using, you can change the settings using the operation panel.
2. SSID:
The network name (SSID) of the wireless LAN currently used is displayed.
In the access point mode, the access point name (SSID) of the printer is displayed.
As the initial settings, the unique value is displayed.
Note• Enter the same SSID that the wireless router is configured to use. The SSID is case-sensitive.
218
3. Search...
The Search screen is displayed to select a wireless router to connect to.
Search Screen
Note• When IJ Network Tool runs over a LAN, the button is grayed out and cannot be selected. Connect
the printer and the computer with a USB cable temporarily to change the settings.
4. Encryption Method:
Select the encryption method used over the wireless LAN.
Do not useSelect to disable encryption.
Use WEPTransmission is encrypted using a WEP key you specified.
If a WEP key has not been set, the WEP Details screen is displayed automatically. To change WEPsettings set before, click Configuration... to display the screen.
Changing the WEP Detailed Settings
Use WPA/WPA2Transmission is encrypted using a WPA/WPA2 key you specified.
The security has been strengthened more than WEP.
If a WPA/WPA2 key has not been set, the Authentication Type Confirmation screen is displayedautomatically. To change WPA/WPA2 settings set before, click Configuration... to display theWPA/WPA2 Details screen.
Changing the WPA/WPA2 Detailed Settings
5. Configuration...
The detailed settings screen is displayed. The WEP or the WPA/WPA2 key selected in EncryptionMethod: can be confirmed and changed.
For details on WEP setting:Changing the WEP Detailed Settings
For details on WPA/WPA2 setting:Changing the WPA/WPA2 Detailed Settings
6. TCP/IP Setup:
Sets the IP address of the printer to be used over the LAN. Specify a value appropriate for your networkenvironment.
Get IP address automaticallySelect this option to use an IP address automatically assigned by a DHCP server. DHCP serverfunctionality must be enabled on your wireless router.
Use next IP addressSelect this option if no DHCP server functionality is available in your setup where you use theprinter, or you want to use a particular IP address or a fixed IP address.
219
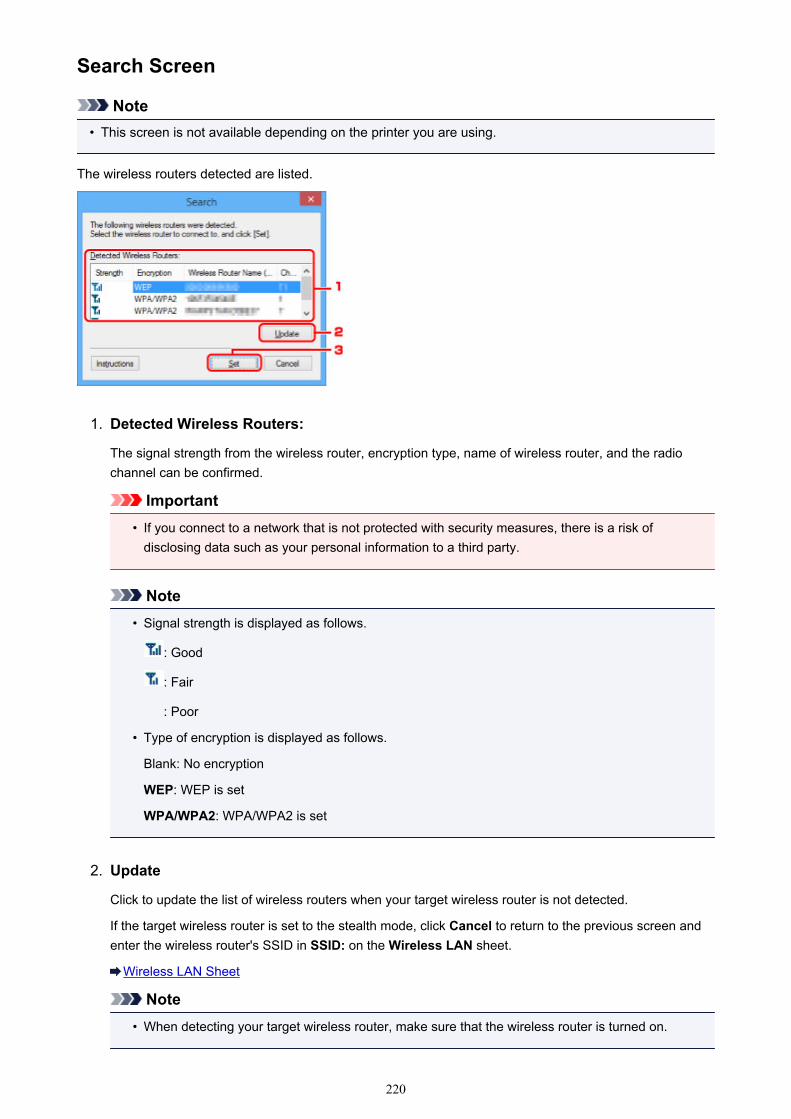
Search Screen
Note• This screen is not available depending on the printer you are using.
The wireless routers detected are listed.
1. Detected Wireless Routers:
The signal strength from the wireless router, encryption type, name of wireless router, and the radiochannel can be confirmed.
Important• If you connect to a network that is not protected with security measures, there is a risk of
disclosing data such as your personal information to a third party.
Note• Signal strength is displayed as follows.
: Good
: Fair
: Poor
• Type of encryption is displayed as follows.
Blank: No encryption
WEP: WEP is set
WPA/WPA2: WPA/WPA2 is set
2. Update
Click to update the list of wireless routers when your target wireless router is not detected.
If the target wireless router is set to the stealth mode, click Cancel to return to the previous screen andenter the wireless router's SSID in SSID: on the Wireless LAN sheet.
Wireless LAN Sheet
Note• When detecting your target wireless router, make sure that the wireless router is turned on.
220

3. Set
Click to set the wireless router's SSID in SSID: on the Wireless LAN sheet.
Note• The WPA/WPA2 Details screen or the WEP Details screen appears if the selected wireless
router is encrypted. In this case, configure the details to use the same encryption settings set tothe wireless router.
• Wireless routers that cannot be used by this machine (including those configured to use differentencryption methods) are displayed grayed out and cannot be configured.
221
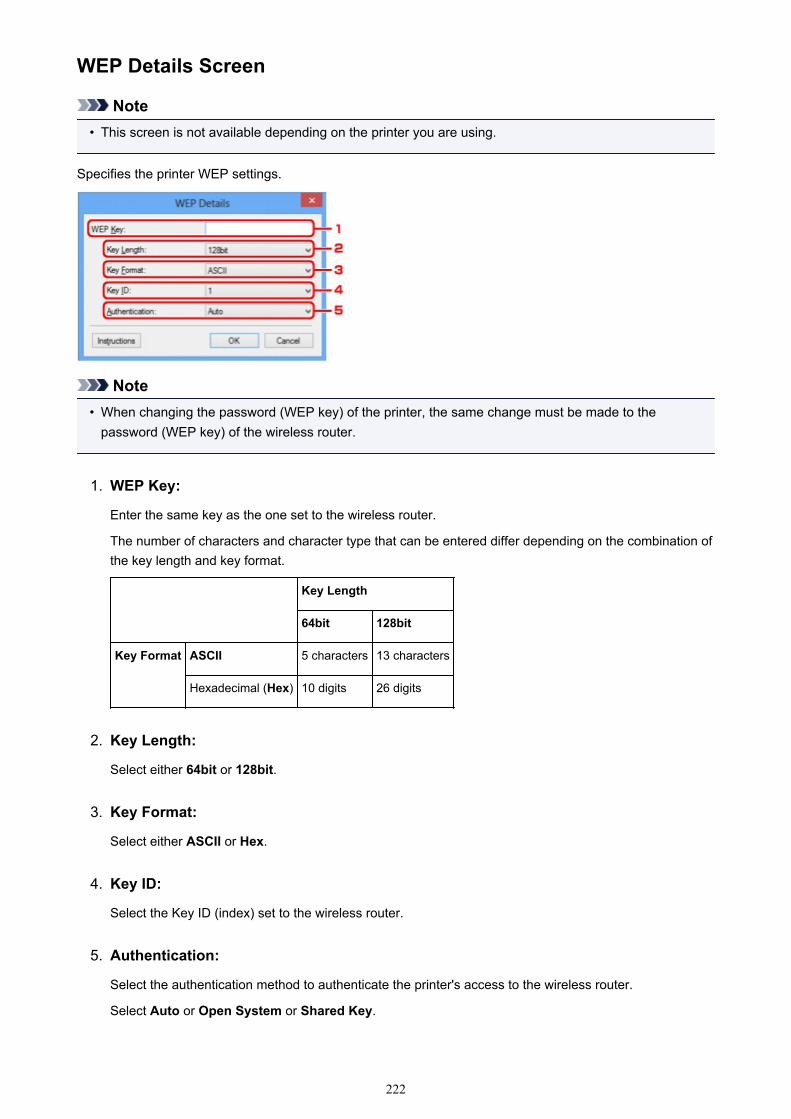
WEP Details Screen
Note• This screen is not available depending on the printer you are using.
Specifies the printer WEP settings.
Note• When changing the password (WEP key) of the printer, the same change must be made to the
password (WEP key) of the wireless router.
1. WEP Key:
Enter the same key as the one set to the wireless router.
The number of characters and character type that can be entered differ depending on the combination ofthe key length and key format.
Key Length
64bit 128bit
Key Format ASCII 5 characters 13 characters
Hexadecimal (Hex) 10 digits 26 digits
2. Key Length:
Select either 64bit or 128bit.
3. Key Format:
Select either ASCII or Hex.
4. Key ID:
Select the Key ID (index) set to the wireless router.
5. Authentication:
Select the authentication method to authenticate the printer's access to the wireless router.
Select Auto or Open System or Shared Key.
222
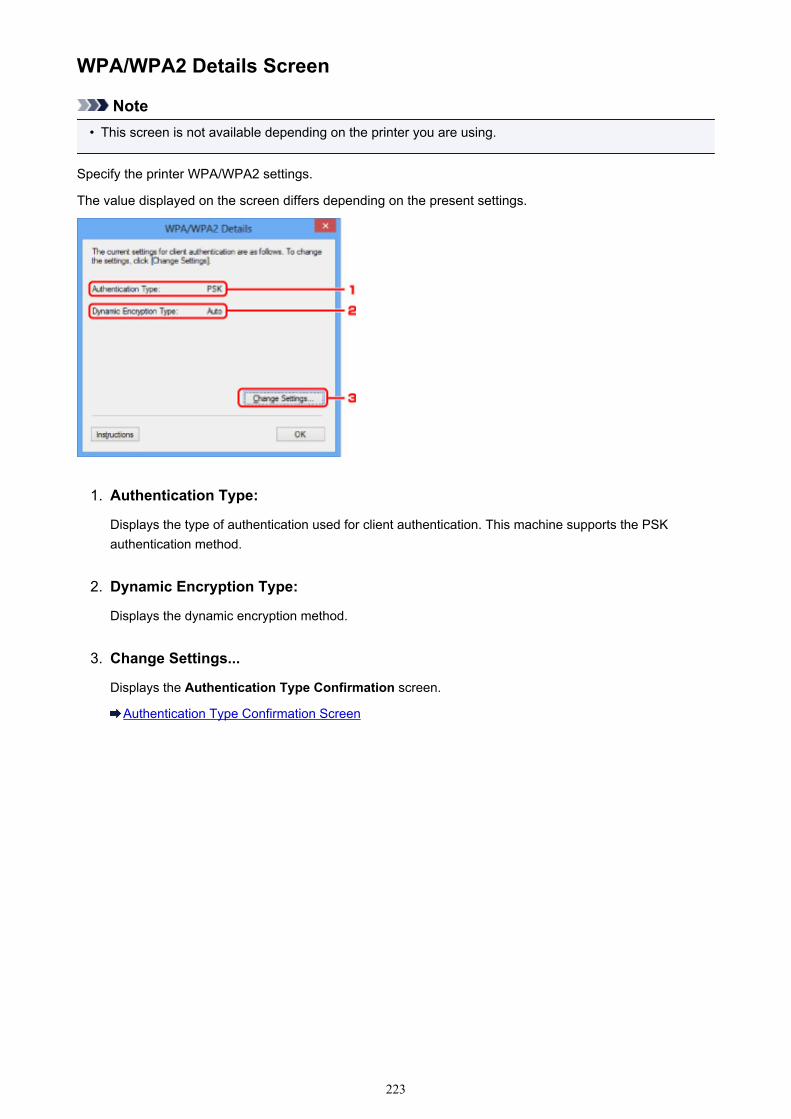
WPA/WPA2 Details Screen
Note• This screen is not available depending on the printer you are using.
Specify the printer WPA/WPA2 settings.
The value displayed on the screen differs depending on the present settings.
1. Authentication Type:
Displays the type of authentication used for client authentication. This machine supports the PSKauthentication method.
2. Dynamic Encryption Type:
Displays the dynamic encryption method.
3. Change Settings...
Displays the Authentication Type Confirmation screen.
Authentication Type Confirmation Screen
223
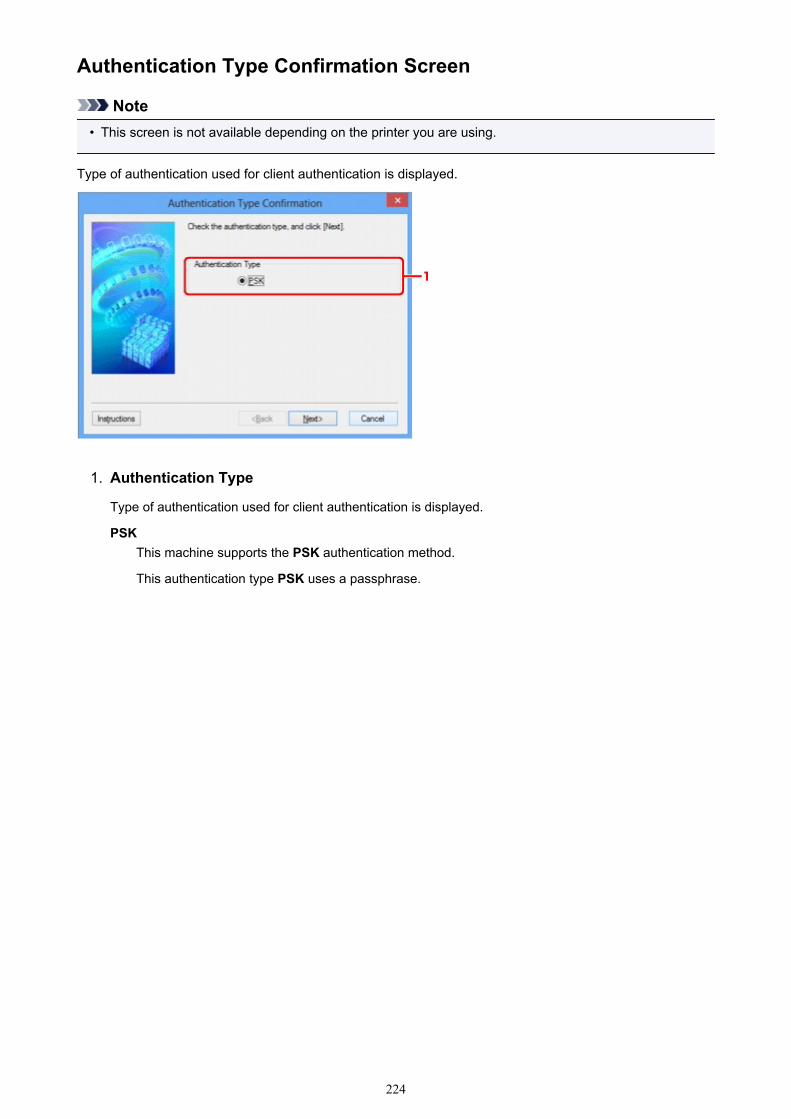
Authentication Type Confirmation Screen
Note• This screen is not available depending on the printer you are using.
Type of authentication used for client authentication is displayed.
1. Authentication Type
Type of authentication used for client authentication is displayed.
PSKThis machine supports the PSK authentication method.
This authentication type PSK uses a passphrase.
224
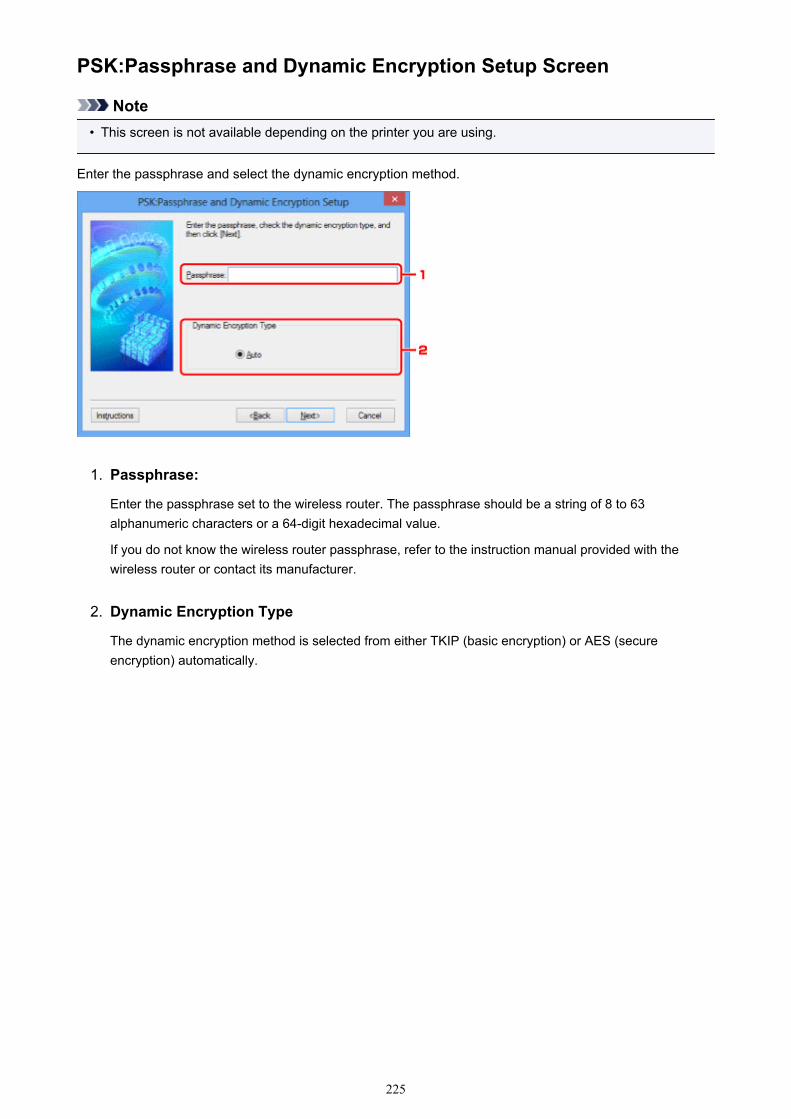
PSK:Passphrase and Dynamic Encryption Setup Screen
Note• This screen is not available depending on the printer you are using.
Enter the passphrase and select the dynamic encryption method.
1. Passphrase:
Enter the passphrase set to the wireless router. The passphrase should be a string of 8 to 63alphanumeric characters or a 64-digit hexadecimal value.
If you do not know the wireless router passphrase, refer to the instruction manual provided with thewireless router or contact its manufacturer.
2. Dynamic Encryption Type
The dynamic encryption method is selected from either TKIP (basic encryption) or AES (secureencryption) automatically.
225
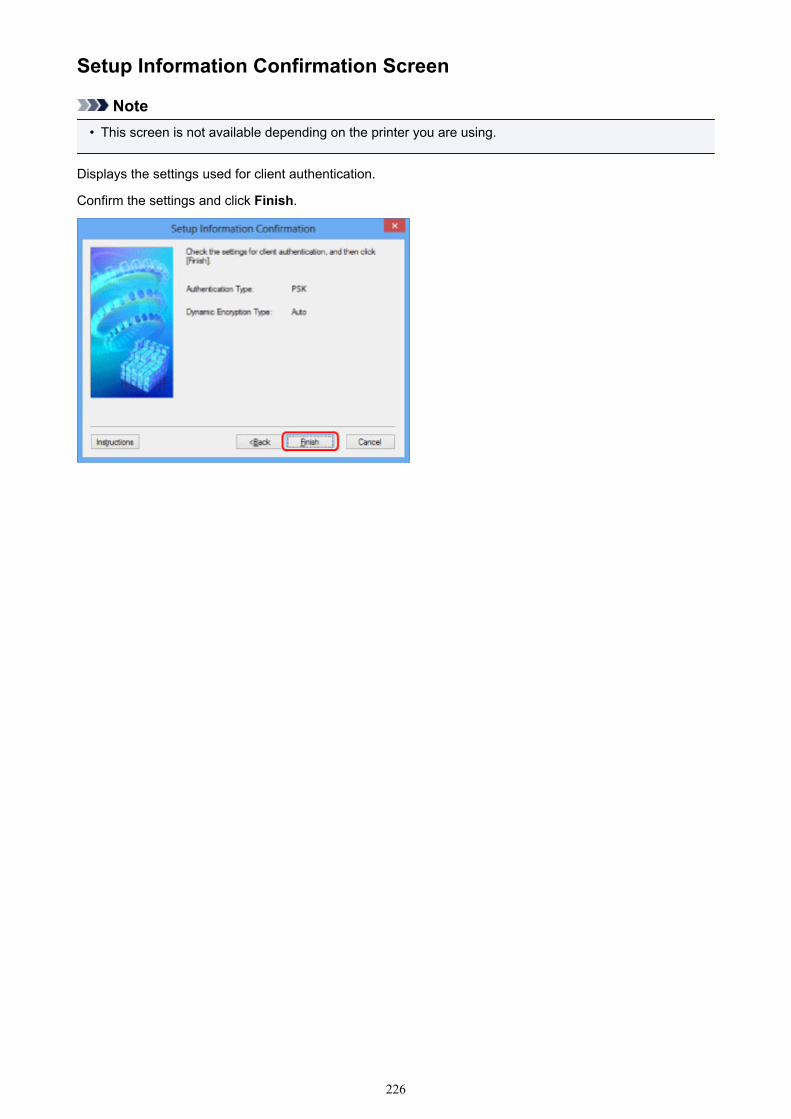
Setup Information Confirmation Screen
Note• This screen is not available depending on the printer you are using.
Displays the settings used for client authentication.
Confirm the settings and click Finish.
226
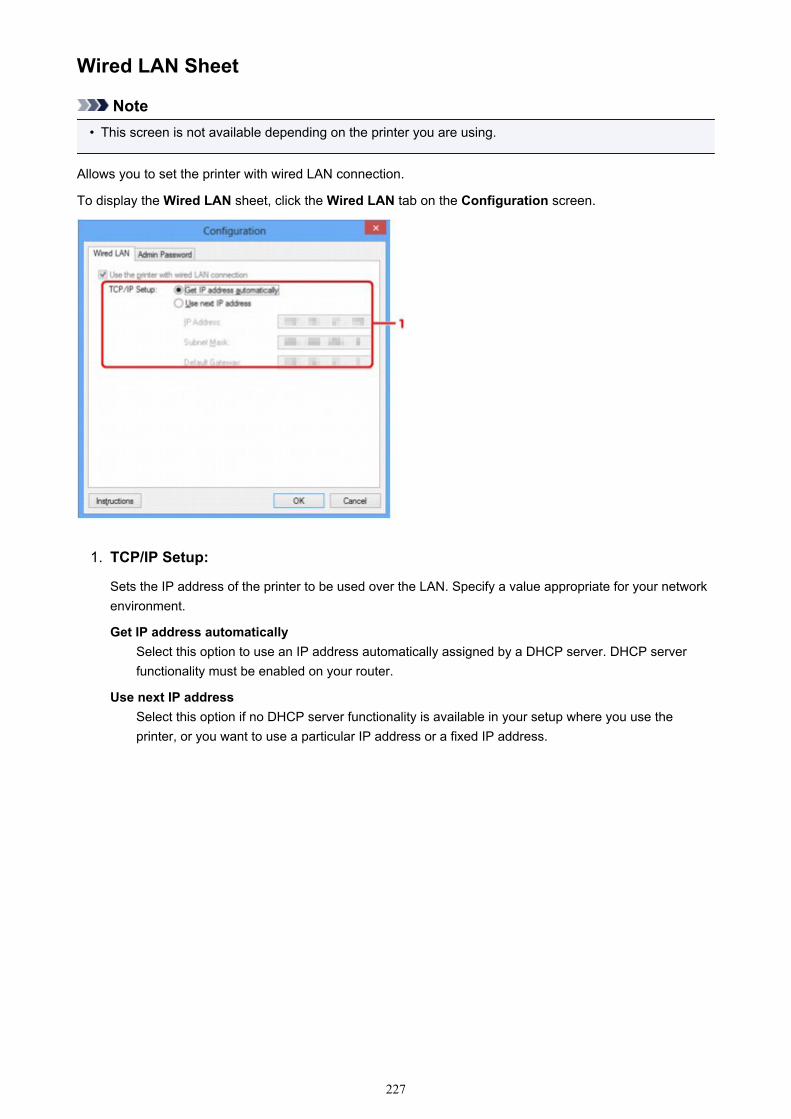
Wired LAN Sheet
Note• This screen is not available depending on the printer you are using.
Allows you to set the printer with wired LAN connection.
To display the Wired LAN sheet, click the Wired LAN tab on the Configuration screen.
1. TCP/IP Setup:
Sets the IP address of the printer to be used over the LAN. Specify a value appropriate for your networkenvironment.
Get IP address automaticallySelect this option to use an IP address automatically assigned by a DHCP server. DHCP serverfunctionality must be enabled on your router.
Use next IP addressSelect this option if no DHCP server functionality is available in your setup where you use theprinter, or you want to use a particular IP address or a fixed IP address.
227
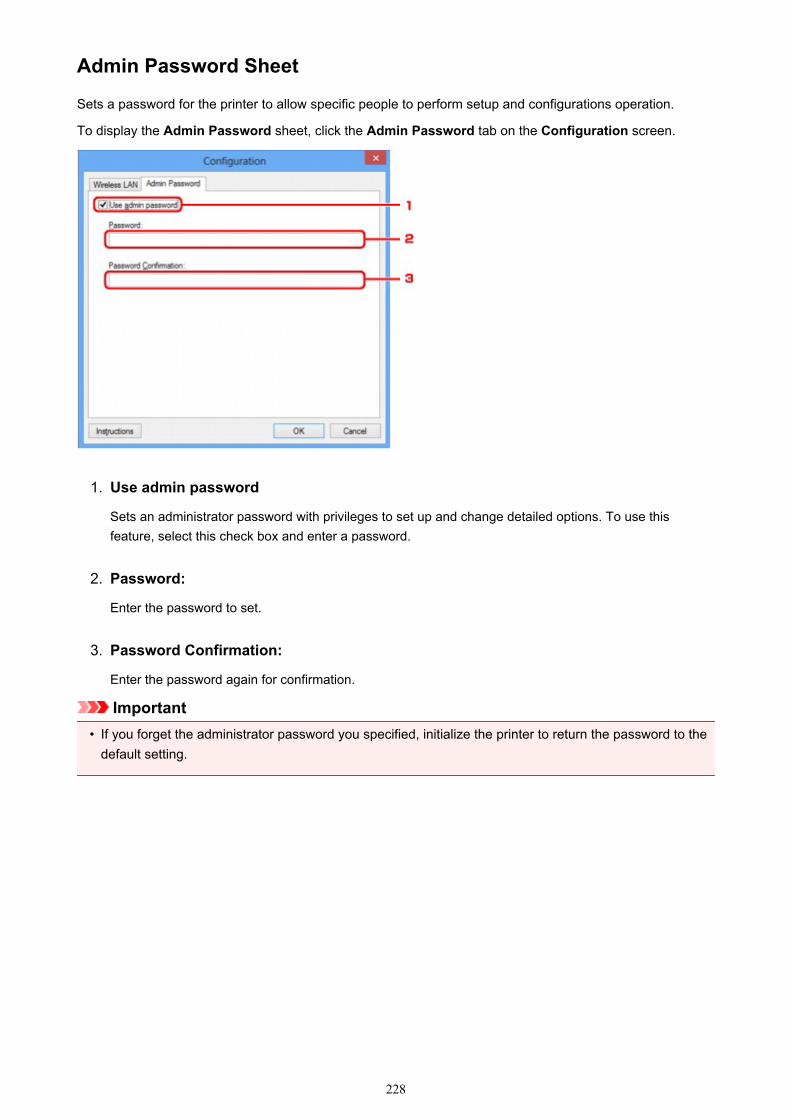
Admin Password Sheet
Sets a password for the printer to allow specific people to perform setup and configurations operation.
To display the Admin Password sheet, click the Admin Password tab on the Configuration screen.
1. Use admin password
Sets an administrator password with privileges to set up and change detailed options. To use thisfeature, select this check box and enter a password.
2. Password:
Enter the password to set.
3. Password Confirmation:
Enter the password again for confirmation.
Important• If you forget the administrator password you specified, initialize the printer to return the password to the
default setting.
228

Network Information Screen
Displays the network information that is set for the printers and the computers.
To display the Network Information screen, select Network Information from the View menu.
1. OK
Returns to the Canon IJ Network Tool screen.
2. Copy All Information
All network information displayed is copied to the clipboard.
229
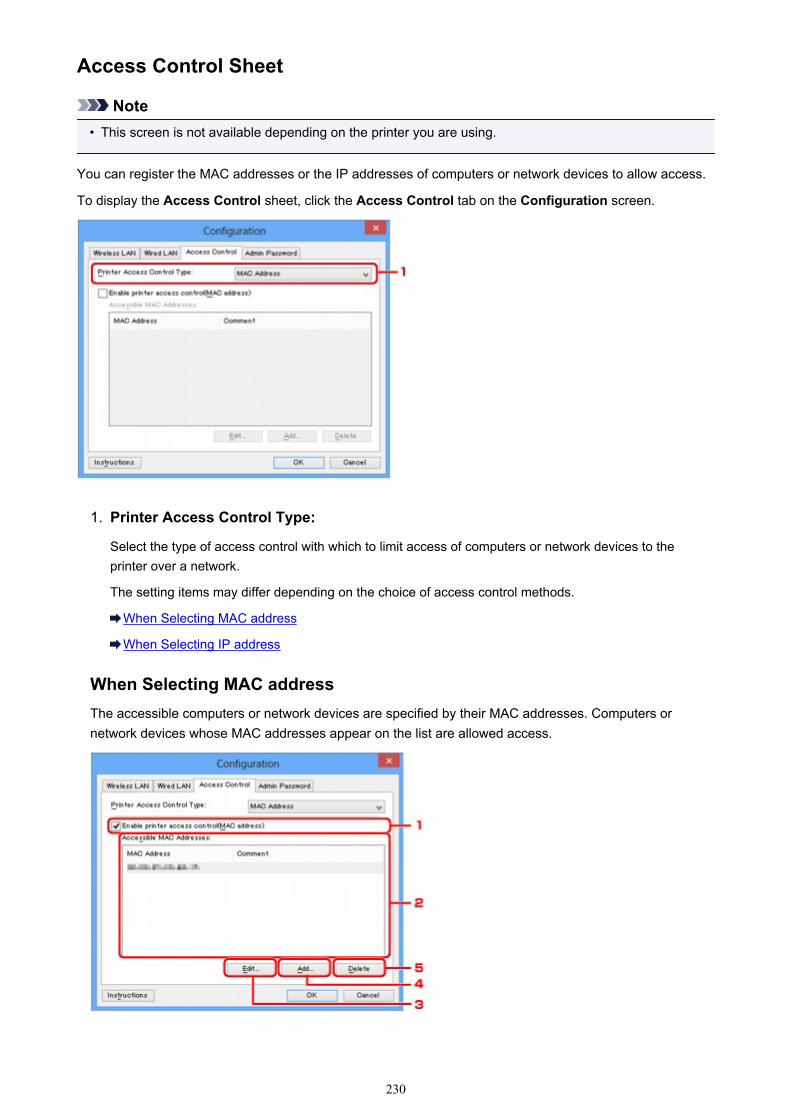
Access Control Sheet
Note• This screen is not available depending on the printer you are using.
You can register the MAC addresses or the IP addresses of computers or network devices to allow access.
To display the Access Control sheet, click the Access Control tab on the Configuration screen.
1. Printer Access Control Type:
Select the type of access control with which to limit access of computers or network devices to theprinter over a network.
The setting items may differ depending on the choice of access control methods.
When Selecting MAC address
When Selecting IP address
When Selecting MAC addressThe accessible computers or network devices are specified by their MAC addresses. Computers ornetwork devices whose MAC addresses appear on the list are allowed access.
230
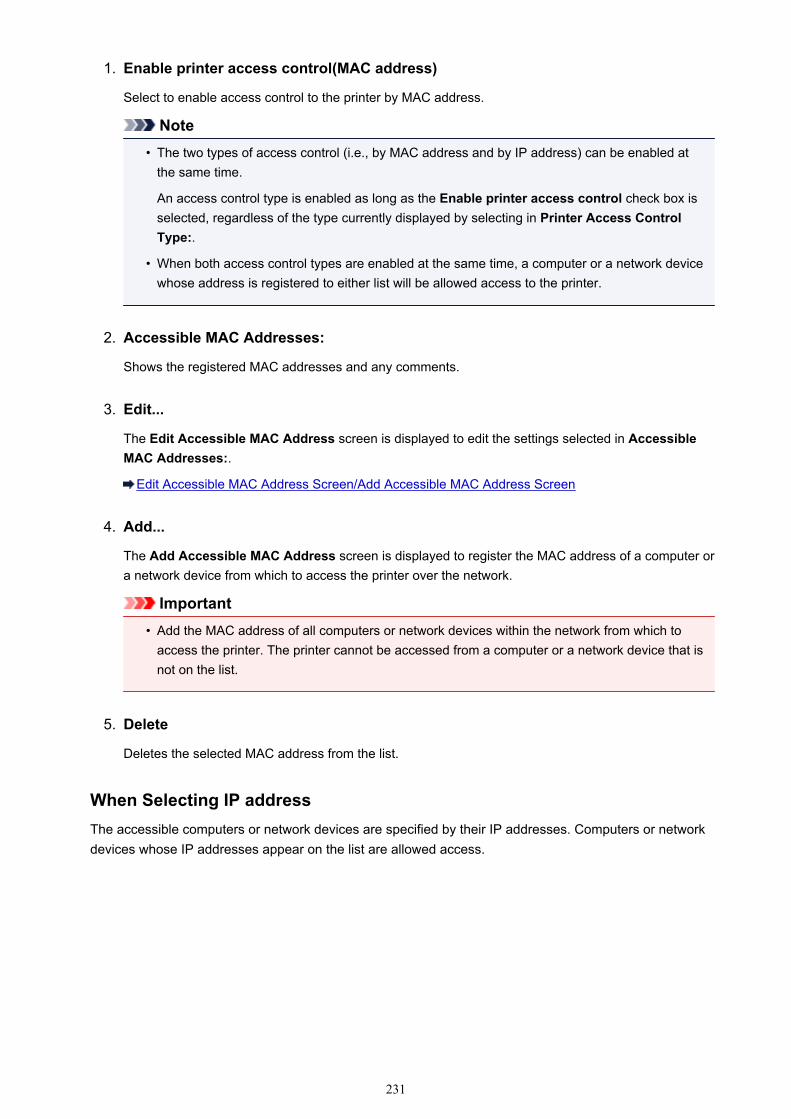
1. Enable printer access control(MAC address)
Select to enable access control to the printer by MAC address.
Note• The two types of access control (i.e., by MAC address and by IP address) can be enabled at
the same time.
An access control type is enabled as long as the Enable printer access control check box isselected, regardless of the type currently displayed by selecting in Printer Access ControlType:.
• When both access control types are enabled at the same time, a computer or a network devicewhose address is registered to either list will be allowed access to the printer.
2. Accessible MAC Addresses:
Shows the registered MAC addresses and any comments.
3. Edit...
The Edit Accessible MAC Address screen is displayed to edit the settings selected in AccessibleMAC Addresses:.
Edit Accessible MAC Address Screen/Add Accessible MAC Address Screen
4. Add...
The Add Accessible MAC Address screen is displayed to register the MAC address of a computer ora network device from which to access the printer over the network.
Important• Add the MAC address of all computers or network devices within the network from which to
access the printer. The printer cannot be accessed from a computer or a network device that isnot on the list.
5. Delete
Deletes the selected MAC address from the list.
When Selecting IP addressThe accessible computers or network devices are specified by their IP addresses. Computers or networkdevices whose IP addresses appear on the list are allowed access.
231
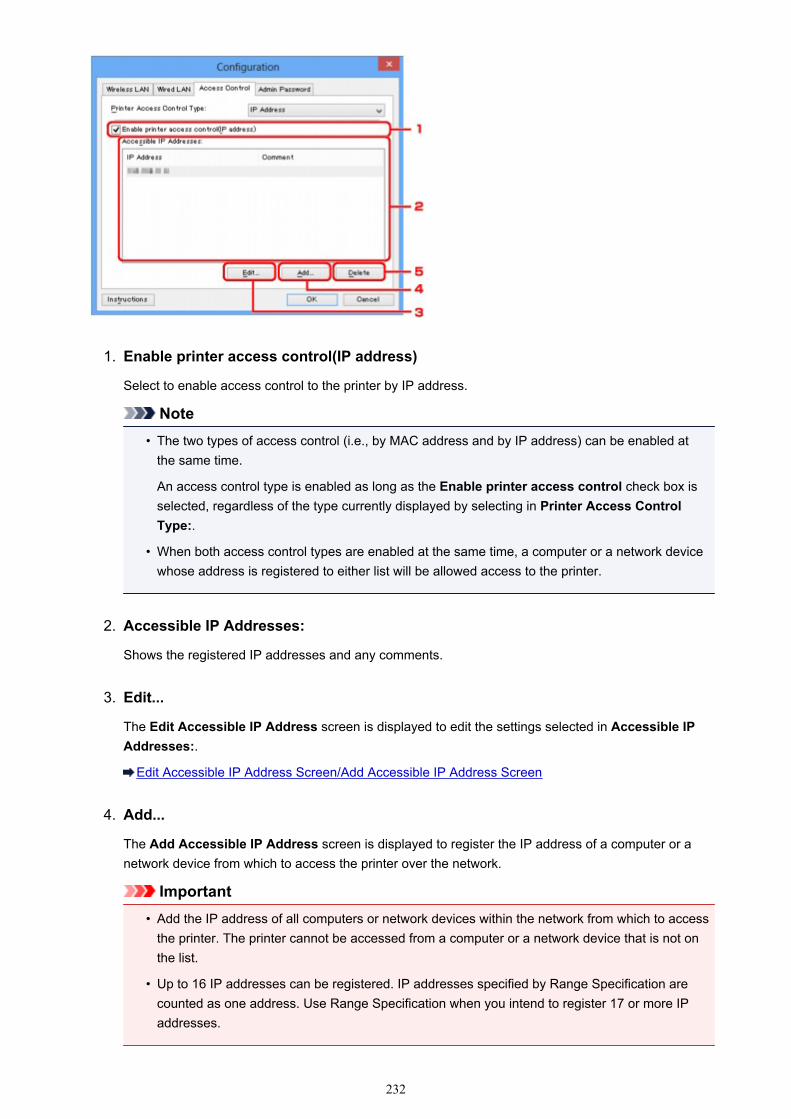
1. Enable printer access control(IP address)
Select to enable access control to the printer by IP address.
Note• The two types of access control (i.e., by MAC address and by IP address) can be enabled at
the same time.
An access control type is enabled as long as the Enable printer access control check box isselected, regardless of the type currently displayed by selecting in Printer Access ControlType:.
• When both access control types are enabled at the same time, a computer or a network devicewhose address is registered to either list will be allowed access to the printer.
2. Accessible IP Addresses:
Shows the registered IP addresses and any comments.
3. Edit...
The Edit Accessible IP Address screen is displayed to edit the settings selected in Accessible IPAddresses:.
Edit Accessible IP Address Screen/Add Accessible IP Address Screen
4. Add...
The Add Accessible IP Address screen is displayed to register the IP address of a computer or anetwork device from which to access the printer over the network.
Important• Add the IP address of all computers or network devices within the network from which to access
the printer. The printer cannot be accessed from a computer or a network device that is not onthe list.
• Up to 16 IP addresses can be registered. IP addresses specified by Range Specification arecounted as one address. Use Range Specification when you intend to register 17 or more IPaddresses.
232

5. Delete
Deletes the selected IP address from the list.
233
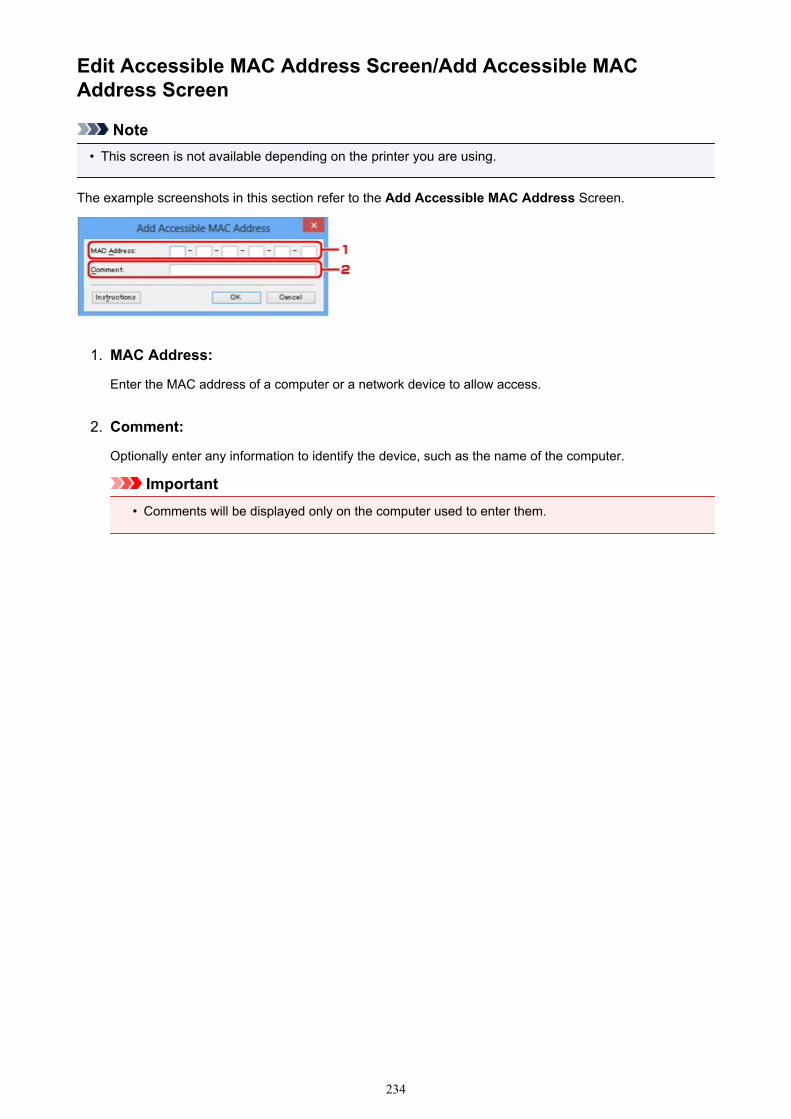
Edit Accessible MAC Address Screen/Add Accessible MACAddress Screen
Note• This screen is not available depending on the printer you are using.
The example screenshots in this section refer to the Add Accessible MAC Address Screen.
1. MAC Address:
Enter the MAC address of a computer or a network device to allow access.
2. Comment:
Optionally enter any information to identify the device, such as the name of the computer.
Important• Comments will be displayed only on the computer used to enter them.
234
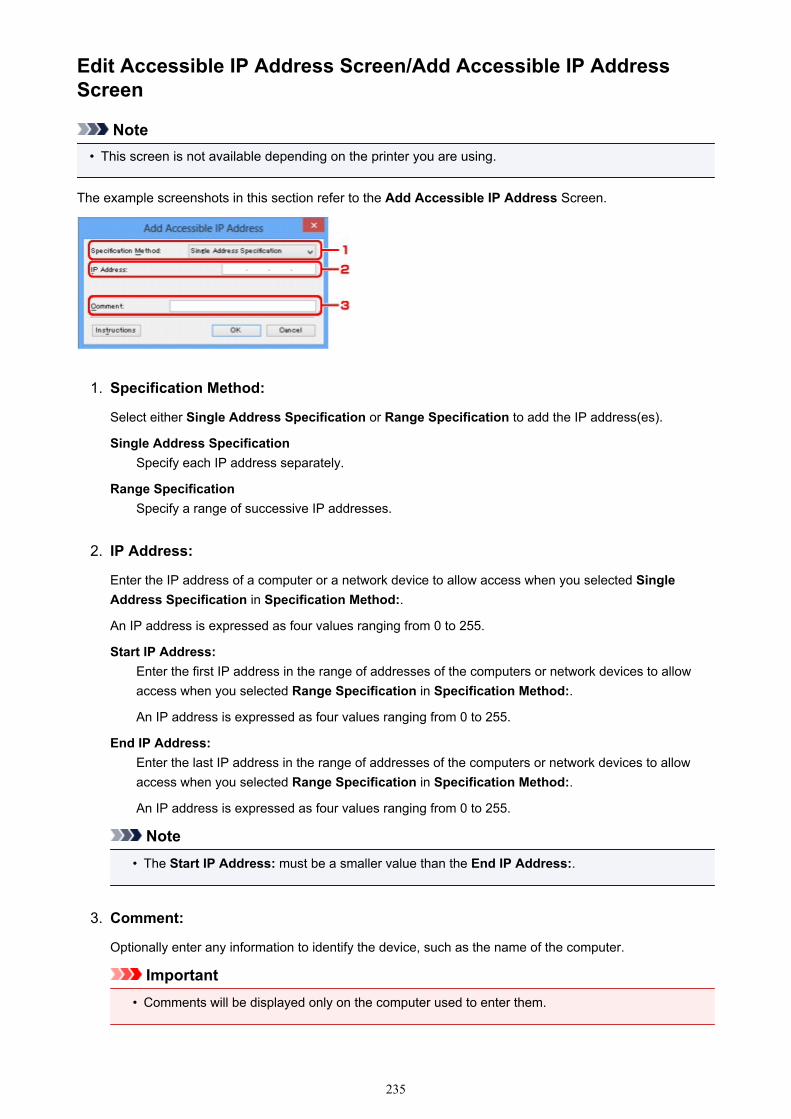
Edit Accessible IP Address Screen/Add Accessible IP AddressScreen
Note• This screen is not available depending on the printer you are using.
The example screenshots in this section refer to the Add Accessible IP Address Screen.
1. Specification Method:
Select either Single Address Specification or Range Specification to add the IP address(es).
Single Address SpecificationSpecify each IP address separately.
Range SpecificationSpecify a range of successive IP addresses.
2. IP Address:
Enter the IP address of a computer or a network device to allow access when you selected SingleAddress Specification in Specification Method:.
An IP address is expressed as four values ranging from 0 to 255.
Start IP Address:Enter the first IP address in the range of addresses of the computers or network devices to allowaccess when you selected Range Specification in Specification Method:.
An IP address is expressed as four values ranging from 0 to 255.
End IP Address:Enter the last IP address in the range of addresses of the computers or network devices to allowaccess when you selected Range Specification in Specification Method:.
An IP address is expressed as four values ranging from 0 to 255.
Note• The Start IP Address: must be a smaller value than the End IP Address:.
3. Comment:
Optionally enter any information to identify the device, such as the name of the computer.
Important• Comments will be displayed only on the computer used to enter them.
235

Other Screens of IJ Network Tool
Canon IJ Network Tool Screen
Status Screen
Connection Performance Measurement Screen
Maintenance Screen
Network Setup of the Card Slot Screen
Associate Port Screen
Network Information Screen
236

Canon IJ Network Tool Screen
This section describes the items and menus displayed on the Canon IJ Network Tool screen.
Items on the Canon IJ Network Tool Screen
Canon IJ Network Tool Menus
Items on the Canon IJ Network Tool ScreenThe following item is displayed on the Canon IJ Network Tool screen.
1. Printers:
The printer name, status, printer model name, and port name are displayed.
A check mark next to the printer in the Name list indicates it is set as the default printer.
Configuration changes are applied to the selected printer.
2. Update
Performs printer detection again. Click this button if the target printer is not displayed.
Important• To change the printer's network settings using IJ Network Tool, it must be connected via a LAN.
• If No Driver is displayed for the name, associate the port with the printer.
When the Printer Driver Is Not Associated with a Port
• If Not Found is displayed for the status, check the followings:
• The wireless router is turned on.
• When using wired LAN, the LAN cable is connected properly.
• If the printer on a network is not detected, make sure that the printer is turned on, then clickUpdate. It may take several minutes to detect printers. If the printer is not yet detected, connectthe machine and the computer with a USB cable, then click Update.
• If the printer is being used from another computer, a screen is displayed informing you of thiscondition.
237
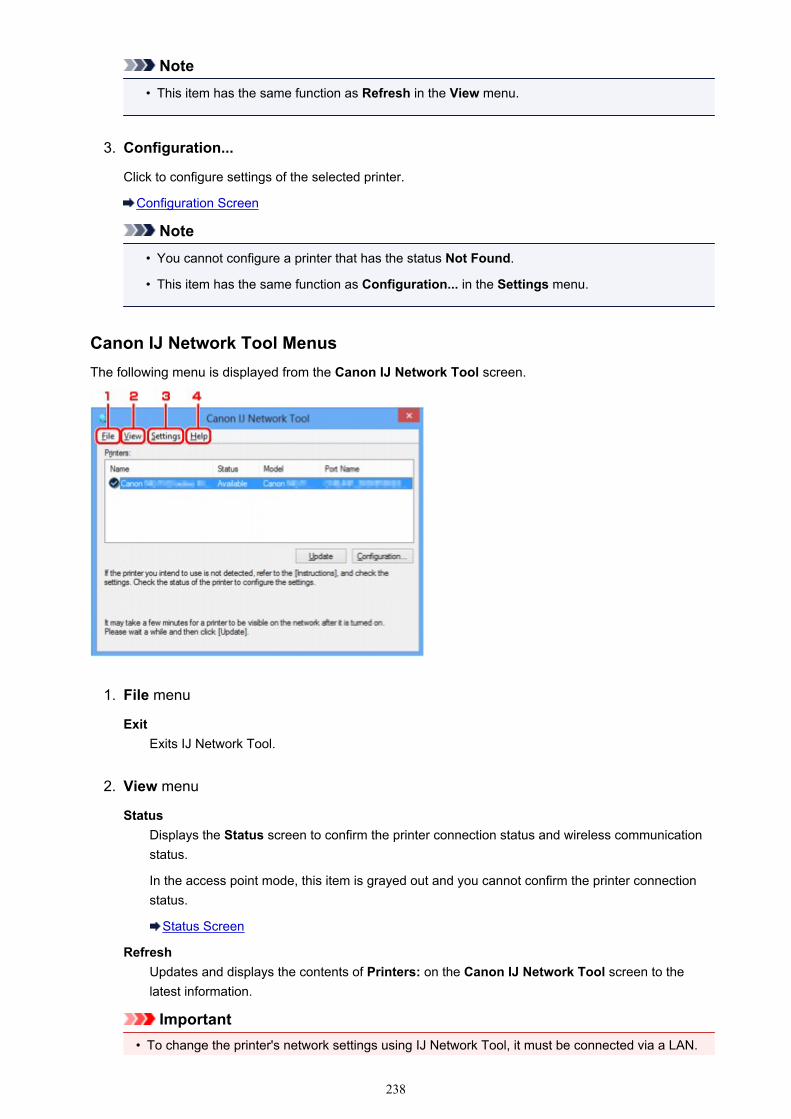
Note• This item has the same function as Refresh in the View menu.
3. Configuration...
Click to configure settings of the selected printer.
Configuration Screen
Note• You cannot configure a printer that has the status Not Found.
• This item has the same function as Configuration... in the Settings menu.
Canon IJ Network Tool MenusThe following menu is displayed from the Canon IJ Network Tool screen.
1. File menu
ExitExits IJ Network Tool.
2. View menu
StatusDisplays the Status screen to confirm the printer connection status and wireless communicationstatus.
In the access point mode, this item is grayed out and you cannot confirm the printer connectionstatus.
Status Screen
RefreshUpdates and displays the contents of Printers: on the Canon IJ Network Tool screen to thelatest information.
Important• To change the printer's network settings using IJ Network Tool, it must be connected via a LAN.
238
• If No Driver is displayed for the name, associate the port with the printer.
When the Printer Driver Is Not Associated with a Port
• If Not Found is displayed for the status, check the followings:
• The wireless router is turned on.
• When using wired LAN, the LAN cable is connected properly.
• If the printer on a network is not detected, make sure that the printer is turned on, then selectRefresh. It may take several minutes to detect printers. If the printer is not yet detected, connectthe machine and the computer with a USB cable, then select Refresh.
• If the printer is being used from another computer, a screen is displayed informing you of thiscondition.
Note• This item has the same function as Update in the Canon IJ Network Tool screen.
Network InformationDisplays the Network Information screen to confirm the network settings of the printer and thecomputer.
Network Information Screen
Display Warning AutomaticallyEnables or disables automatic display of the instruction screen.
When this menu is selected, the instruction screen is displayed if one or more ports areunavailable for printing.
3. Settings menu
Configuration...Displays the Configuration screen to configure settings of the selected printer.
Configuration Screen
Note• This item has the same function as Configuration... in the Canon IJ Network Tool screen.
Enable switch printer functionWhen you cannot use your printer, you can use the same one on the network instead. When youenable this function and you cannot use your printer, the screen to confirm if you start searchingthe same printer as yours is displayed. Follow the message on the screen.
Note• When this function is enabled, a check mark appears on the menu.
Associate Port...Displays the Associate Port screen and you can associate a port with the printer.
Associate Port Screen
This menu is available when No Driver is displayed for the selected printer. Associating a portwith the printer enables you to use it.
239

Maintenance...Displays the Maintenance screen to return the network settings of the printer to factory defaultand to mount the card slot as the network drive.
Maintenance Screen
Set up printer's access point mode...You can change the access point mode settings. Perform settings following the message on thescreen.
If you change the Encryption Method: setting and the Password: setting on the Set up printer'saccess point mode screen, the changed settings are applied to the printer settings.
Note• You can use this function only when you are using a computer compatible with the wireless LAN.
4. Help menu
InstructionsDisplays this guide.
AboutDisplays the version of IJ Network Tool.
240
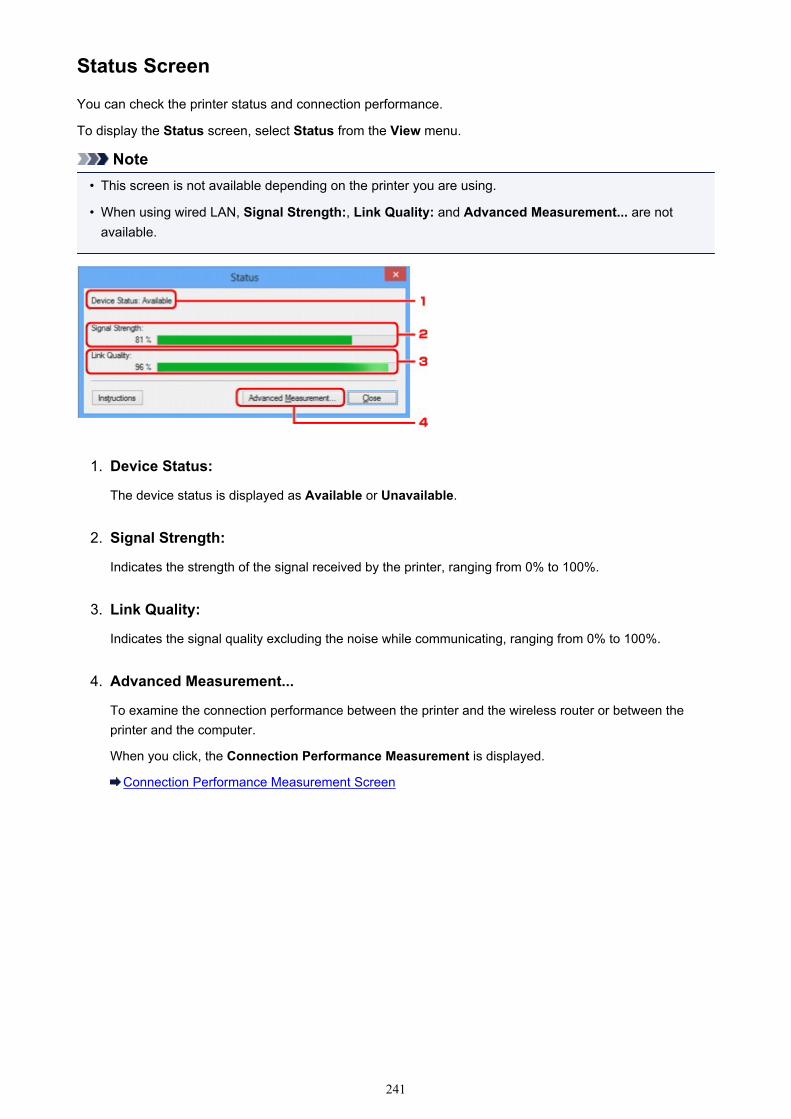
Status Screen
You can check the printer status and connection performance.
To display the Status screen, select Status from the View menu.
Note• This screen is not available depending on the printer you are using.
• When using wired LAN, Signal Strength:, Link Quality: and Advanced Measurement... are notavailable.
1. Device Status:
The device status is displayed as Available or Unavailable.
2. Signal Strength:
Indicates the strength of the signal received by the printer, ranging from 0% to 100%.
3. Link Quality:
Indicates the signal quality excluding the noise while communicating, ranging from 0% to 100%.
4. Advanced Measurement...
To examine the connection performance between the printer and the wireless router or between theprinter and the computer.
When you click, the Connection Performance Measurement is displayed.
Connection Performance Measurement Screen
241
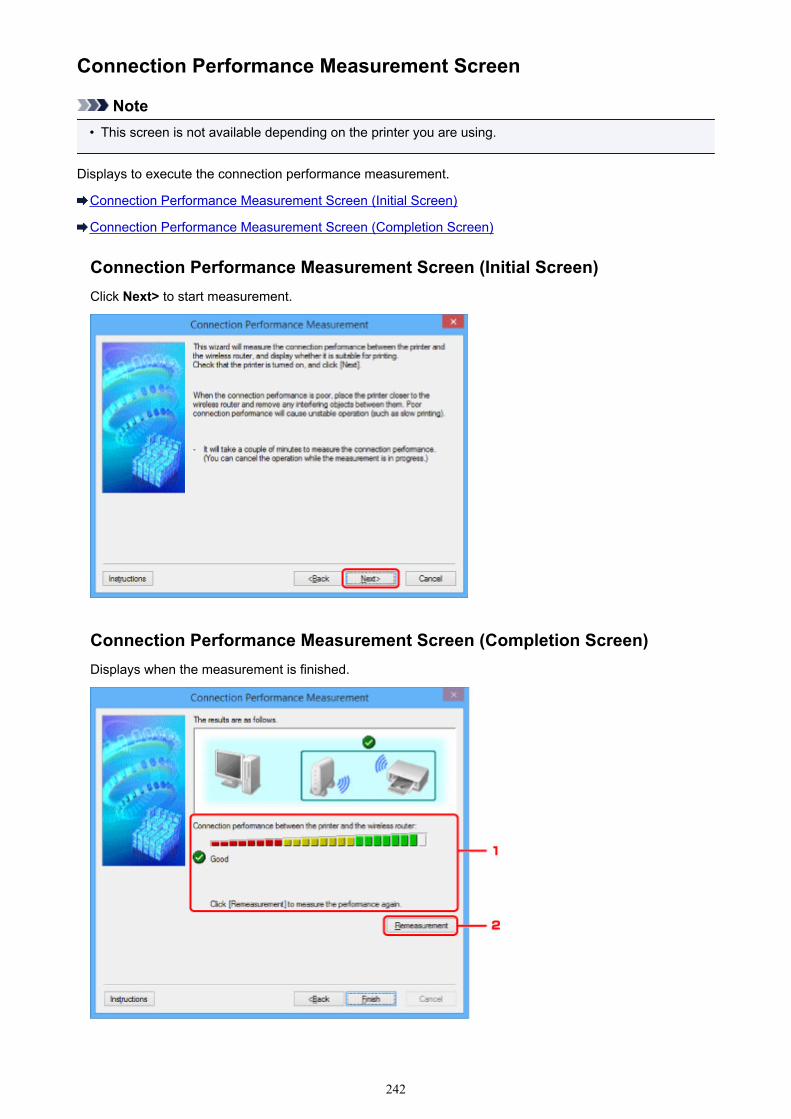
Connection Performance Measurement Screen
Note• This screen is not available depending on the printer you are using.
Displays to execute the connection performance measurement.
Connection Performance Measurement Screen (Initial Screen)
Connection Performance Measurement Screen (Completion Screen)
Connection Performance Measurement Screen (Initial Screen)Click Next> to start measurement.
Connection Performance Measurement Screen (Completion Screen)Displays when the measurement is finished.
242

1. Connection Performance between the Printer and the Wireless Router:
A mark indicates the result of the connection performance measurement between the printer and thewireless router.
: Good connection performance
: Unstable connection performance
: Cannot connect
: Measurement is canceled, or cannot measure
2. Remeasurement
Measures the connection performance again.
Note• If any messages appear on Overall Network Performance:, move the machine and wireless router
as instructed to improve the performance.
243
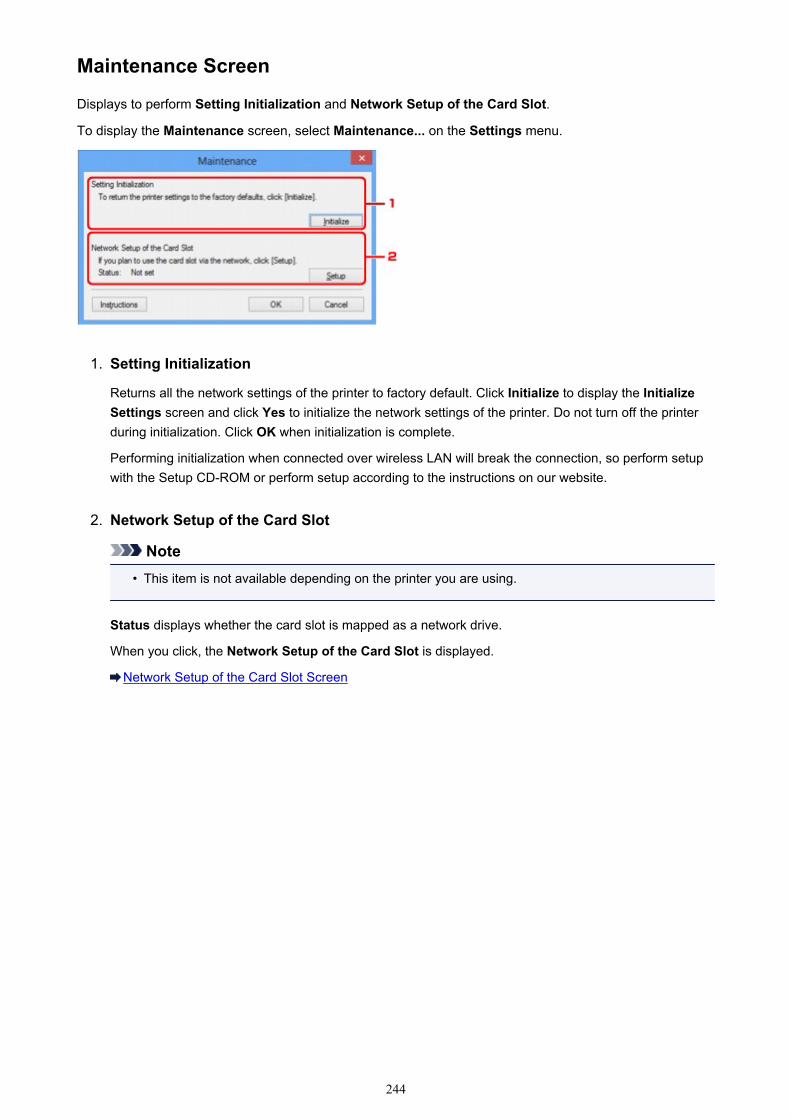
Maintenance Screen
Displays to perform Setting Initialization and Network Setup of the Card Slot.
To display the Maintenance screen, select Maintenance... on the Settings menu.
1. Setting Initialization
Returns all the network settings of the printer to factory default. Click Initialize to display the InitializeSettings screen and click Yes to initialize the network settings of the printer. Do not turn off the printerduring initialization. Click OK when initialization is complete.
Performing initialization when connected over wireless LAN will break the connection, so perform setupwith the Setup CD-ROM or perform setup according to the instructions on our website.
2. Network Setup of the Card Slot
Note• This item is not available depending on the printer you are using.
Status displays whether the card slot is mapped as a network drive.
When you click, the Network Setup of the Card Slot is displayed.
Network Setup of the Card Slot Screen
244
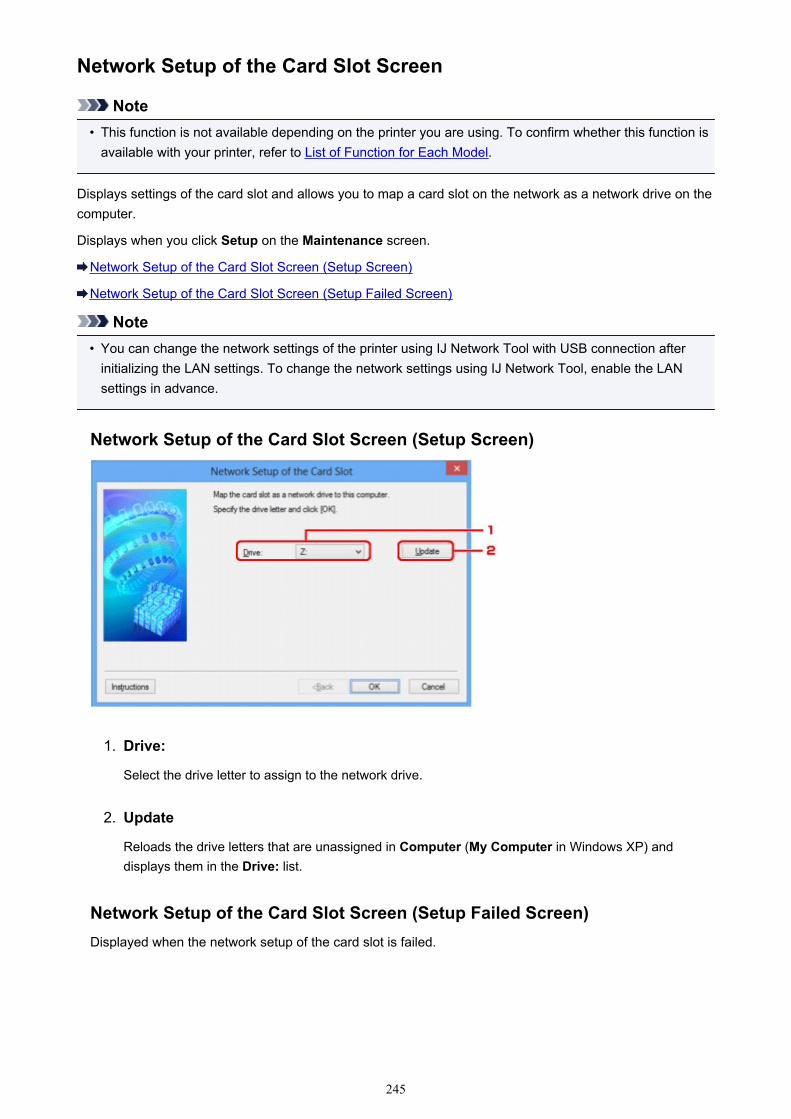
Network Setup of the Card Slot Screen
Note• This function is not available depending on the printer you are using. To confirm whether this function is
available with your printer, refer to List of Function for Each Model.
Displays settings of the card slot and allows you to map a card slot on the network as a network drive on thecomputer.
Displays when you click Setup on the Maintenance screen.
Network Setup of the Card Slot Screen (Setup Screen)
Network Setup of the Card Slot Screen (Setup Failed Screen)
Note• You can change the network settings of the printer using IJ Network Tool with USB connection after
initializing the LAN settings. To change the network settings using IJ Network Tool, enable the LANsettings in advance.
Network Setup of the Card Slot Screen (Setup Screen)
1. Drive:
Select the drive letter to assign to the network drive.
2. Update
Reloads the drive letters that are unassigned in Computer (My Computer in Windows XP) anddisplays them in the Drive: list.
Network Setup of the Card Slot Screen (Setup Failed Screen)Displayed when the network setup of the card slot is failed.
245
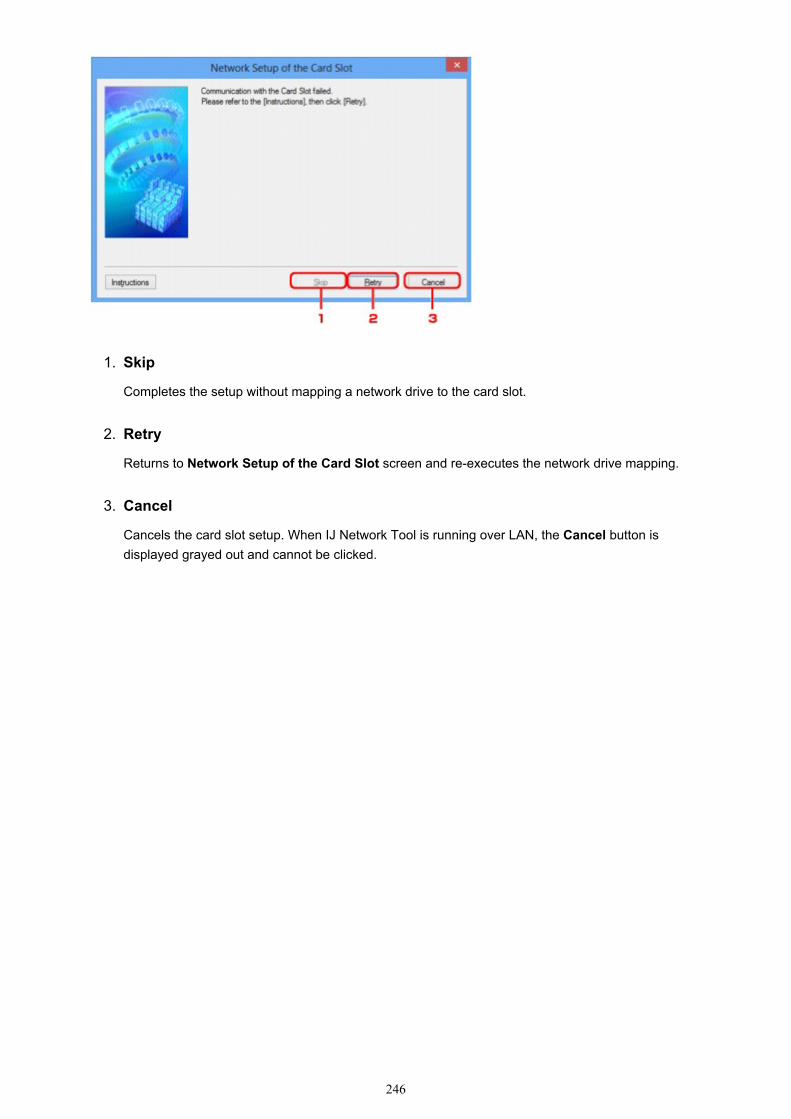
1. Skip
Completes the setup without mapping a network drive to the card slot.
2. Retry
Returns to Network Setup of the Card Slot screen and re-executes the network drive mapping.
3. Cancel
Cancels the card slot setup. When IJ Network Tool is running over LAN, the Cancel button isdisplayed grayed out and cannot be clicked.
246
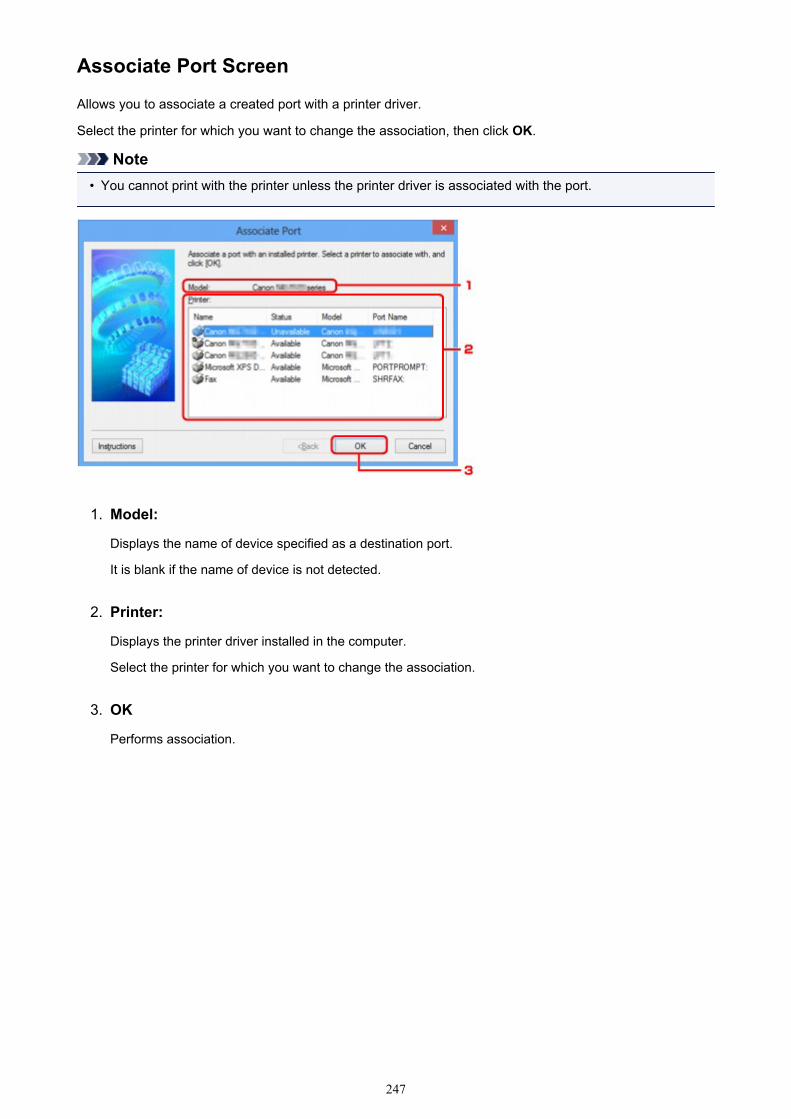
Associate Port Screen
Allows you to associate a created port with a printer driver.
Select the printer for which you want to change the association, then click OK.
Note• You cannot print with the printer unless the printer driver is associated with the port.
1. Model:
Displays the name of device specified as a destination port.
It is blank if the name of device is not detected.
2. Printer:
Displays the printer driver installed in the computer.
Select the printer for which you want to change the association.
3. OK
Performs association.
247
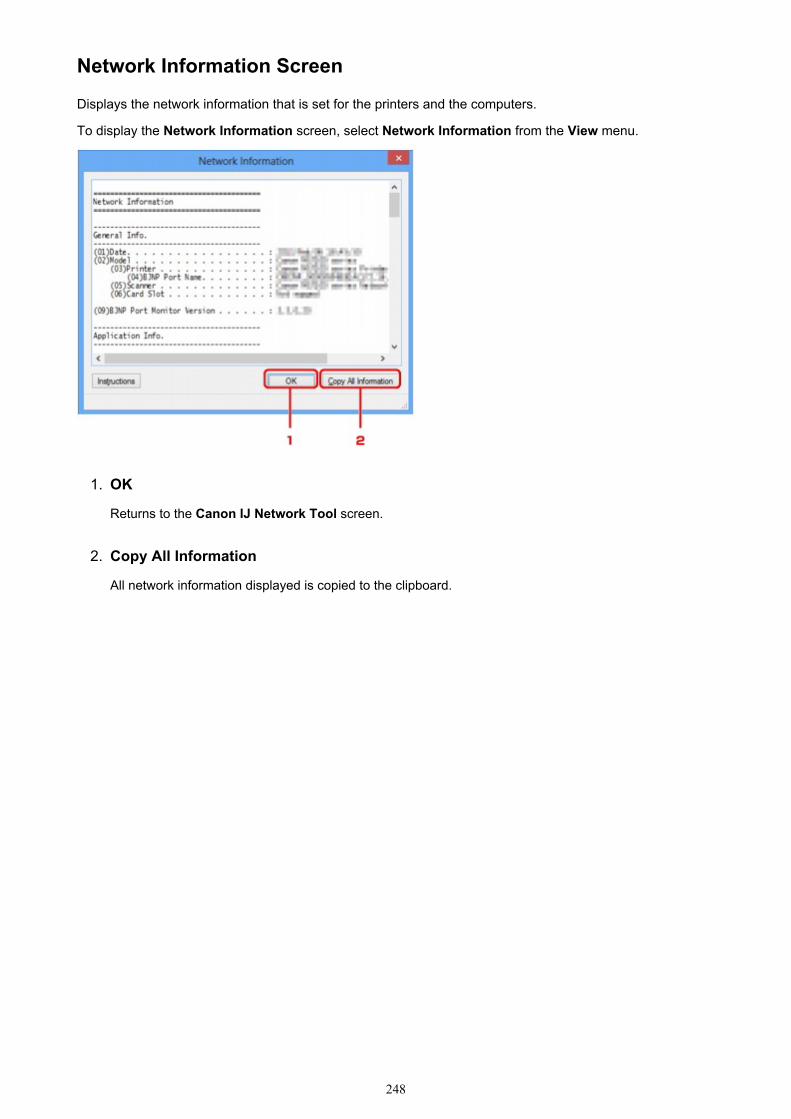
Network Information Screen
Displays the network information that is set for the printers and the computers.
To display the Network Information screen, select Network Information from the View menu.
1. OK
Returns to the Canon IJ Network Tool screen.
2. Copy All Information
All network information displayed is copied to the clipboard.
248

Appendix for Network Communication
Using the Card Slot over a Network
When the Printer Driver Is Not Associated with a Port
About Technical Terms
Restrictions
About Firewall
249
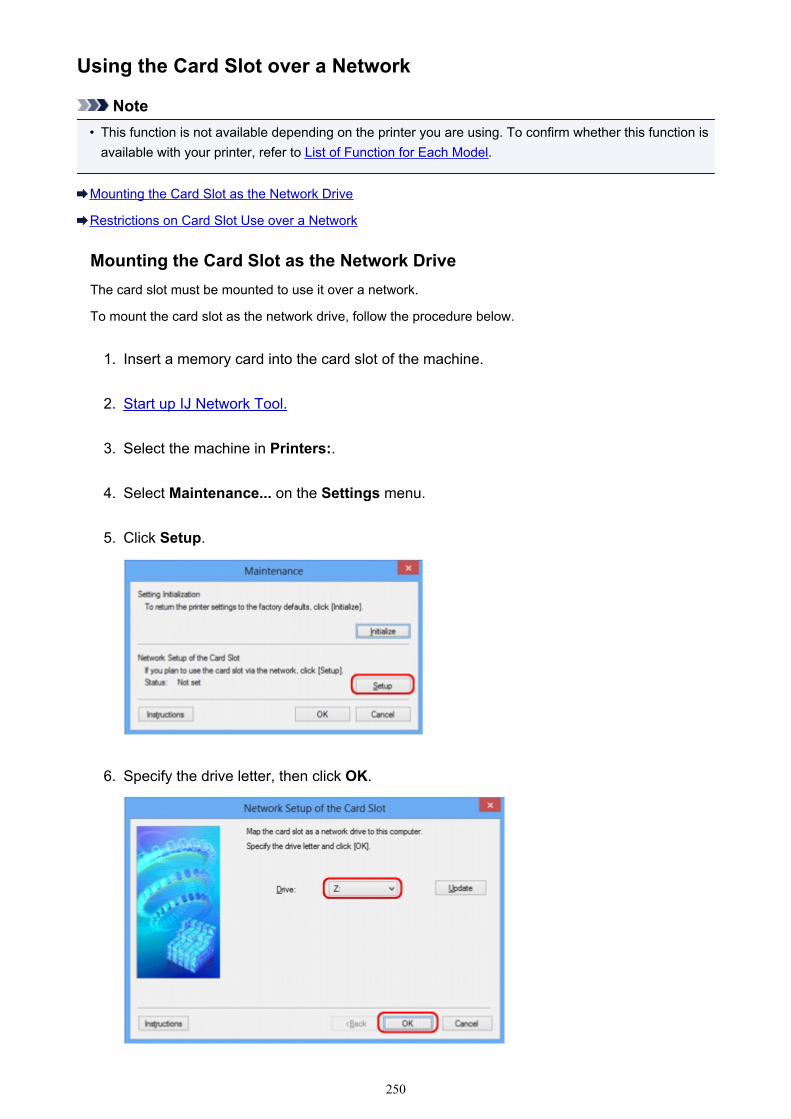
Using the Card Slot over a Network
Note• This function is not available depending on the printer you are using. To confirm whether this function is
available with your printer, refer to List of Function for Each Model.
Mounting the Card Slot as the Network Drive
Restrictions on Card Slot Use over a Network
Mounting the Card Slot as the Network DriveThe card slot must be mounted to use it over a network.
To mount the card slot as the network drive, follow the procedure below.
1. Insert a memory card into the card slot of the machine.
2. Start up IJ Network Tool.
3. Select the machine in Printers:.
4. Select Maintenance... on the Settings menu.
5. Click Setup.
6. Specify the drive letter, then click OK.
250

7. Make sure that the card slot is mounted.
When the card slot is mounted, the following icon appears on Computer (or My Computer).
Restrictions on Card Slot Use over a Network• The card slot can be shared by multiple computers, if the machine is connected to a network. Multiple
computers can read files from a memory card in the card slot at the same time. However, while onecomputer is writing a file into a memory card, other computers cannot access the same file.
• If your computer joins a domain, the card slot may not be mounted as the network drive.
• If you use the memory card stored the large size files or many files, a large amount of card accessmay be generated. In this case, the operation in the memory card may be impossible or slow. Operateafter the Access lamp of the machine is lit.
• When you access the network drive for the card slot over the network, file names consisting of eightor less lowercase letters (not including its extension) may be shown in uppercase.
For example, a file name such as "abcdefg.doc" will be "ABCDEFG.DOC", while a name such as"AbcdeFG.doc" will appear the same.
The file is not actually renamed, but merely appears to be changed.
• When you enable a memory card in the card slot of the machine to be writable only from a USB-connected computer, you cannot access the network drive of the card slot. On the other hand, whenyou enable it to be writable only from a LAN-connected computer, the card slot is not detected viaUSB. Make sure that the card slot setting is selected properly according to your connection method.
To read files from a memory card via USB and over a network, disable the function to write files to amemory card from a computer. You cannot write files to a memory card in either way with this setting.
• When you enable a memory card in the card slot of the machine to be writable only from a LAN-connected computer, you can write files to a memory card from a computer connected to a network.Note that it may increase the risk that the data on the memory card is infected by computer viruses oraccessed illegally.
We recommend to use the access control function of the machine or connect to the Internet via arouter. For information on using a router, contact your Internet service provider or a network devicemanufacturer.
• If you write files to a memory card over a network when IJ Network Scanner Selector EX is notrunning, the Date Modified of the files may not be proper. Make sure to start up IJ Network ScannerSelector EX before you write files to a memory card over the network. For details, refer to "IJ NetworkScanner Selector EX Menu and Setting Screen" from the HOME of your product's Online Manual.
251
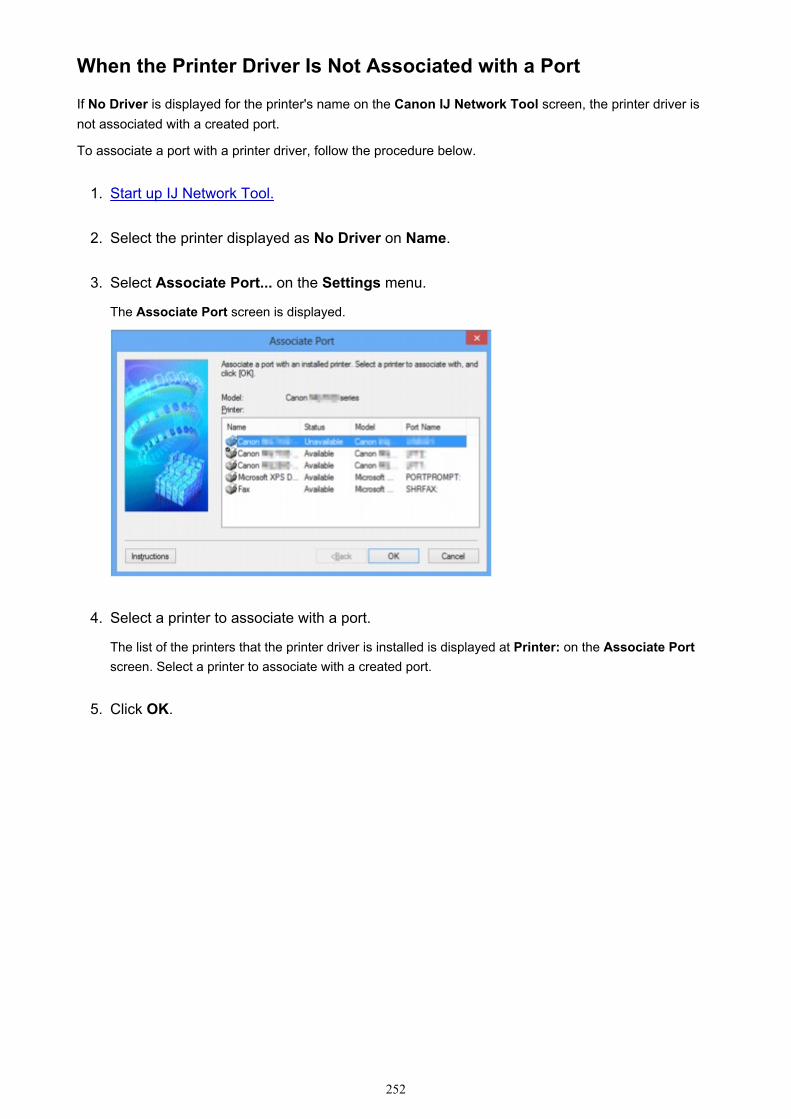
When the Printer Driver Is Not Associated with a Port
If No Driver is displayed for the printer's name on the Canon IJ Network Tool screen, the printer driver isnot associated with a created port.
To associate a port with a printer driver, follow the procedure below.
1. Start up IJ Network Tool.
2. Select the printer displayed as No Driver on Name.
3. Select Associate Port... on the Settings menu.
The Associate Port screen is displayed.
4. Select a printer to associate with a port.
The list of the printers that the printer driver is installed is displayed at Printer: on the Associate Portscreen. Select a printer to associate with a created port.
5. Click OK.
252
About Technical Terms
In this section, technical terms used in the manual are explained.
A
B
C
D
F
I
K
L
M
O
P
R
S
T
U
W
A
• Access point mode
The machine is used as a wireless router to connect external wireless communication devices (e.g.computers, smartphones, or tablets) in an environment where no wireless router is available. You canconnect up to 5 devices to the machine using the access point mode.
• Ad-hoc
Client computer and machine setting where wireless communication occurs on a peer-to-peer basis,i.e., all clients in with the same SSID/network name communicate directly with each other. No wirelessrouter is required. This machine does not support ad-hoc communication.
• Admin Password
Administrator password in IJ Network Tool to restrict access to network users. It must be entered toaccess the printer and change printer settings.
• AES
An encryption method. It is optional for WPA/WPA2. Strong cryptographic algorithm adopted withinU.S. government organizations for information processing.
• Authentication Method
The method that a wireless router uses to authenticate a printer through a wireless LAN. The methodsare agreeable each other.
253
When using WEP as an encryption method, the authentication method is able to fix to Open Systemor Shared Key.
For WPA/WPA2, authentication method is PSK.
◦ Auto
The printer automatically changes its authentication method to match the wireless router.
◦ Open System
In this authentication method, the communication partner is authenticated without using WEP keyeven if Use WEP is selected.
◦ Shared Key
In this authentication method, the communication partner is authenticated using the WEP key thatwas set for encryption.
B
• Bonjour
A service built into Mac OS X operating system to detect the connectable devices on a networkautomatically.
C
• Channel
Frequency channel for wireless communication. In the infrastructure mode, the channel isautomatically adjusted to match that set to the wireless router. This machine supports channels 1 to13. (Channels 12 and 13 are not supported depending on the country or region of purchase.) Notethat the number of channels that can be used for your wireless LAN varies depending on the region orcountry.
D
• Default Gateway
A relay device to connect to another network such as a router or a computer.
• DHCP server functionality
The router assigns an IP address automatically whenever the printer or the personal computer on anetwork starts up.
• DNS server
A server that converts device names into IP addresses. When specifying IP addresses manually,specify the addresses of both a primary and a secondary server.
F
• Firewall
It is a system that prevents an unlawful computer access in the network. To prevent, you can use thefirewall function of a broadband router, the security software installed in the computer, or operationsystem for computer.
254
I
• IEEE 802.11b
International standard for wireless LAN using the 2.4 GHz frequency range with a throughput of up to11 Mbps.
• IEEE 802.11g
International standard for wireless LAN using the 2.4 GHz frequency range with a throughput of up to54 Mbps. Compatible with 802.11b.
• IEEE 802.11n
International standard for wireless LAN using the 2.4 GHz and 5 GHz frequency ranges. Even whenusing two or more antennas simultaneously or obtaining a bigger transfer rate than before by usingmultiple communication channels at the same time, the transmission speed may be influenced by theconnected apparatus.
At the maximum transfer rate of 600 Mbps, it is possible to communicate with multiple computerterminals within a dozen or so metre radius.
Compatible with 802.11b and 802.11g.
• Infrastructure
Client computer and machine setup where all wireless communications pass through a wirelessrouter.
• IP Address
A unique number with four parts separated by dots. Every network device that is connected to theInternet has an IP address. Example: 192.168.0.1
An IP address is usually assigned by a wireless router or a DHCP server of the router automatically.
• IPv4/IPv6
They are internetwork-layer protocol used on the internet. IPv4 uses 32-bit addresses and IPv6 uses128-bit addresses.
K
• Key Format
Select either ASCII or Hex as the WEP key format. The character that can be used for the WEP keydiffers depending on the selected key formats.
◦ ASCII
Specify with a 5 or 13-character string that can include alphanumeric and underscore "_"characters. It is case-sensitive.
◦ Hex
Specify a 10-digit or 26-digit string that can contain hexadecimal (0 to 9, A to F, and a to f).
• Key Length
Length of the WEP key. Select either 64 bits or 128 bits. Longer key length allows you to set a morecomplex WEP key.
255
L
• Link Quality
The status of the connection between the wireless router and the printer excluding noise(interference) is indicated with a value from 0 to 100%.
• LPR
A platform-independent printing protocol used in TCP/IP networks. It does not support bidirectionalcommunication.
M
• MAC Address
Also known as the physical address. A unique and permanent hardware identifier that is assigned tonetwork devices by its manufacturer. MAC addresses are 48 bits long and are written as ahexadecimal number separated by colons, i.e., 11:22:33:44:55:66.
O
• Operation Status
Indicates the status on whether the printer can be used.
P
• Proxy server
A server that links a LAN-connected computer to the Internet. When using a proxy server, specify theaddress and the port number of the proxy server.
• PSK
An encryption method employed by WPA/WPA2.
R
• Router
A relay device to connect to another network.
S
• Signal Strength
The strength of the signal received by the printer from the wireless router is indicated with a valuefrom 0 to 100%.
• SSID
Unique label for wireless LAN. It is often represented such as a network name or a wireless routername.
SSID distinguishes one wireless LAN from another to prevent interference.
256
The printer and all clients on a wireless LAN must use the same SSID in order to communicate witheach other. The SSID can be up to 32 characters long, and is made up of alphanumeric characters.The SSID may also be referred to by its network name.
• Stealth
In the stealth mode, a wireless router hides itself by not broadcasting its SSID. The client must specifythe SSID set to the wireless router to detect it.
• Subnet Mask
IP address has two components, the network address and the host address. Subnet Mask used tocalculate the Subnet Mask address from the IP address. A Subnet Mask is usually assigned by awireless router or a DHCP server of the router automatically.
Example:
IP Address: 192.168.127.123
Subnet Mask: 255.255.255.0
Subnet Mask Address: 192.168.127.0
T
• TCP/IP
Suite of communications protocols used to connect hosts on the Internet or the LAN. This protocolallows different terminals to communicate with each other.
• TKIP
An encryption protocol employed by WPA/WPA2.
U
• USB
Serial interface designed to enable you to "hot-swap" devices, i.e., by plugging and unplugging themwithout turning off the power.
W
• WCN (Windows Connect Now)
Users running Windows Vista or later can obtain the setting information directly via wireless network(WCN-NET).
• WEP/WEP Key
An encryption method employed by IEEE 802.11. Shared security key used to encrypt and decryptdata sent over wireless networks. This printer supports key length of 64 bits or 128 bits, key format ofASCII code or Hexadecimal, and key number of 1 to 4.
• Wi-Fi
International association that certifies interoperability of wireless LAN products based on the IEEE802.11 specification.
This machine is a Wi-Fi authorized product.
257
• Wireless LAN
A network that, instead of being connected by physical wires, is connected by a wireless technology,such as Wi-Fi.
• Wireless Router
A wireless transceiver or base station that receives information from wireless clients/the machine andrebroadcasts it. Required in an infrastructure network.
• WPA
Security framework announced by the Wi-Fi Alliance in October 2002. The security has beenstrengthened more than WEP.
◦ Authentication
WPA defines the following authentication methods: PSK that can be used without anauthentication server, plus WPA-802.1x that do require an authentication server.
This machine supports WPA-PSK.
◦ Passphrase
This encrypted key is used to perform WPA-PSK authentication.
The passphrase should be a string of 8 to 63 alphanumeric characters or a 64-digit hexadecimalvalue.
• WPA2
Security framework released by the Wi-Fi Alliance in September 2004 as a later version of WPA.Provides a stronger encryption mechanism through Advanced Encryption Standard (AES).
◦ Authentication
WPA2 defines the following authentication methods: PSK that can be used without anauthentication server, plus WPA2-802.1x that do require an authentication server.
This machine supports WPA2-PSK.
◦ Passphrase
This encrypted key is used to perform WPA2-PSK authentication.
The passphrase should be a string of 8 to 63 alphanumeric characters or a 64-digit hexadecimalvalue.
• WPS (Wi-Fi Protected Setup)
WPS is a standard for easy and secure establishment of a wireless network.
There are 2 primary methods used in the Wi-Fi Protected Setup:
PIN entry: a mandatory method of setup for all WPS certified devices
Push button configuration (PBC): an actual push button on the hardware or through a simulated pushbutton in the software.
258

Restrictions
If you use a printer over the wireless LAN, the printer may recognize nearby wireless systems, you shouldset a network key (WEP or WPA/WPA2) to the wireless router to encrypt wireless transmission. Wirelesscommunication with a product that does not comply with the Wi-Fi standard cannot be guaranteed.
Connecting with too many computers may affect the printer performance, such as printing speed.
259
About Firewall
A firewall is a function of the security software installed in the computer or operation system for computer,and is a system that is designed to prevent unauthorized access to a network.
Precautions When a Firewall Function is Enabled• A firewall function may limit communications between a printer and a computer. This may disable
printer setup and communications.
• During the printer setup, you may be prompted to enable or disable communications, depending onthe firewall function of the security software or operation system. If so, choose to enablecommunications.
• When using IJ Network Tool, you may be prompted to enable or disable communications, dependingon the firewall function of the security software. If so, choose to enable communications.
• If you cannot set up the printer, temporarily disable the firewall function of the security software oroperation system.
Important• If you disabled the firewall function, disconnect your network from the Internet.
• Some applications (like the network configuration software) override firewall settings. Check theapplication's settings beforehand.
• If the printer you use is set to Get IP address automatically, the IP address changes every time theprinter connects to the network. This may disable printer setup and communications, depending onthe firewall settings. In this case, either change the firewall settings or assign a fixed IP address to theprinter. An IP address can be set using IJ Network Tool.
Changing the Settings in the Wireless LAN Sheet
Changing the Settings in the Wired LAN Sheet
When assigning a fixed IP address to the printer, you will need to specify an IP address with which thecomputer can communicate.
Note• For the operation system firewall settings or the security software firewall settings, refer to the
instruction manual of the computer or software, or contact its manufacturer.
260
Tips for Ensuring Optimal Printing Quality
Useful Information about Ink
Key Points to Successful Printing
Be Sure to Make Paper Settings after Loading Paper
Canceling a Print Job
Printer Handling Precautions
Key to Enjoying Consistent Printing Quality
Precautions for Safe Transport of the Printer
261
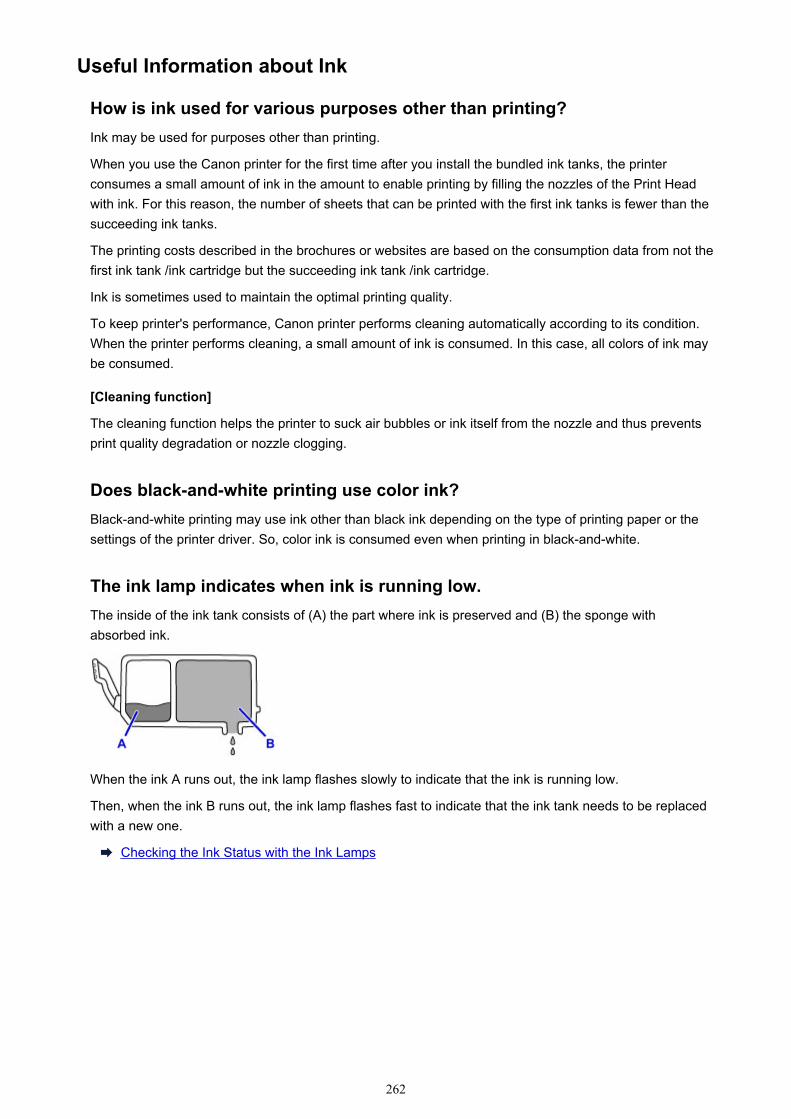
Useful Information about Ink
How is ink used for various purposes other than printing?Ink may be used for purposes other than printing.
When you use the Canon printer for the first time after you install the bundled ink tanks, the printerconsumes a small amount of ink in the amount to enable printing by filling the nozzles of the Print Headwith ink. For this reason, the number of sheets that can be printed with the first ink tanks is fewer than thesucceeding ink tanks.
The printing costs described in the brochures or websites are based on the consumption data from not thefirst ink tank /ink cartridge but the succeeding ink tank /ink cartridge.
Ink is sometimes used to maintain the optimal printing quality.
To keep printer's performance, Canon printer performs cleaning automatically according to its condition.When the printer performs cleaning, a small amount of ink is consumed. In this case, all colors of ink maybe consumed.
[Cleaning function]
The cleaning function helps the printer to suck air bubbles or ink itself from the nozzle and thus preventsprint quality degradation or nozzle clogging.
Does black-and-white printing use color ink?Black-and-white printing may use ink other than black ink depending on the type of printing paper or thesettings of the printer driver. So, color ink is consumed even when printing in black-and-white.
The ink lamp indicates when ink is running low.The inside of the ink tank consists of (A) the part where ink is preserved and (B) the sponge withabsorbed ink.
When the ink A runs out, the ink lamp flashes slowly to indicate that the ink is running low.
Then, when the ink B runs out, the ink lamp flashes fast to indicate that the ink tank needs to be replacedwith a new one.
Checking the Ink Status with the Ink Lamps
262
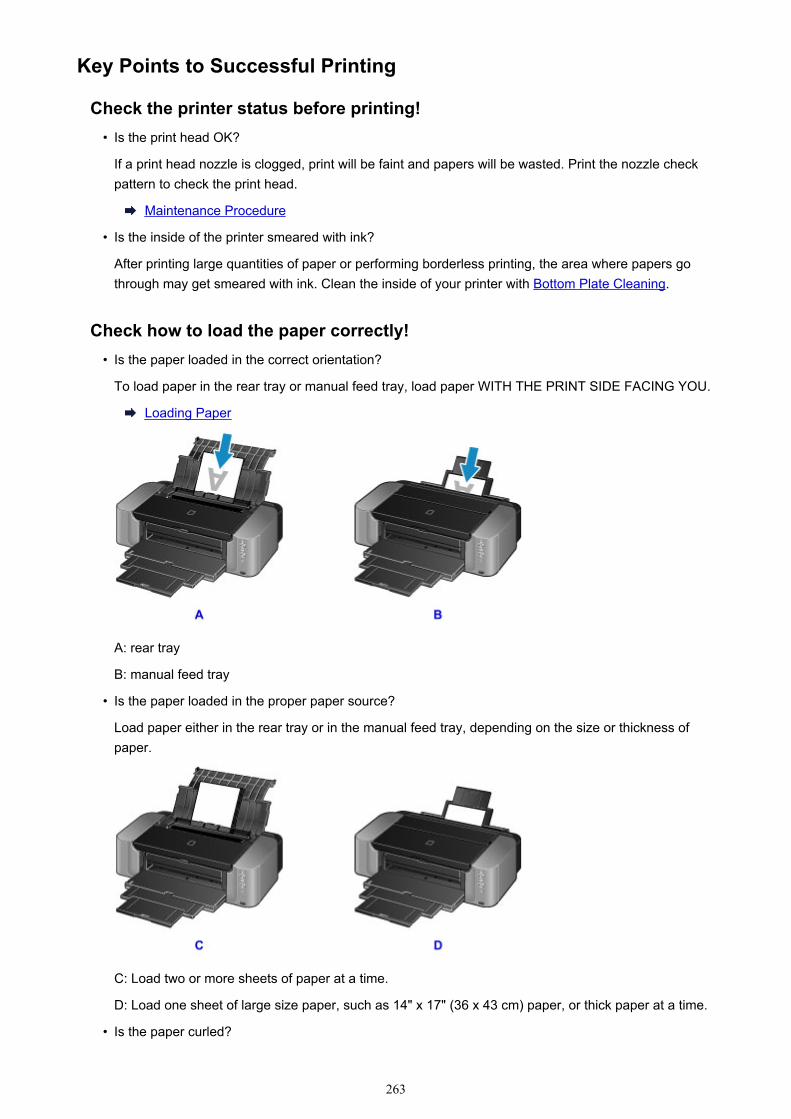
Key Points to Successful Printing
Check the printer status before printing!• Is the print head OK?
If a print head nozzle is clogged, print will be faint and papers will be wasted. Print the nozzle checkpattern to check the print head.
Maintenance Procedure
• Is the inside of the printer smeared with ink?
After printing large quantities of paper or performing borderless printing, the area where papers gothrough may get smeared with ink. Clean the inside of your printer with Bottom Plate Cleaning.
Check how to load the paper correctly!• Is the paper loaded in the correct orientation?
To load paper in the rear tray or manual feed tray, load paper WITH THE PRINT SIDE FACING YOU.
Loading Paper
A: rear tray
B: manual feed tray
• Is the paper loaded in the proper paper source?
Load paper either in the rear tray or in the manual feed tray, depending on the size or thickness ofpaper.
C: Load two or more sheets of paper at a time.
D: Load one sheet of large size paper, such as 14" x 17" (36 x 43 cm) paper, or thick paper at a time.
• Is the paper curled?
263

The curled paper causes paper jam. Flatten the curled paper, then reload it.
"Load the paper after correcting its curl." in Paper Is Smudged/Printed Surface Is Scratched
264

Be Sure to Make Paper Settings after Loading Paper
If the media type setting is not the one for the loaded paper, printing results may not be satisfactory. Afterloading paper, be sure to select the appropriate media type setting for the loaded paper.
Print Results Not Satisfactory
There are various types of paper: paper with special coating on the surface for printing photos with optimalquality and paper suitable for documents.
Each media type has specific preset settings, such as how ink is used and sprayed, distance from nozzles,etc., so that you can print on that type with optimal image quality.
This allows you to print with the settings best suited for the loaded media type just by selecting that mediatype.
265

Canceling a Print Job
Never press the ON button!If you press the ON button while printing is in progress, the print data sent from the computer queues inthe printer and you may not be able to continue to print.
Press the RESUME/CANCEL button to cancel printing.
266
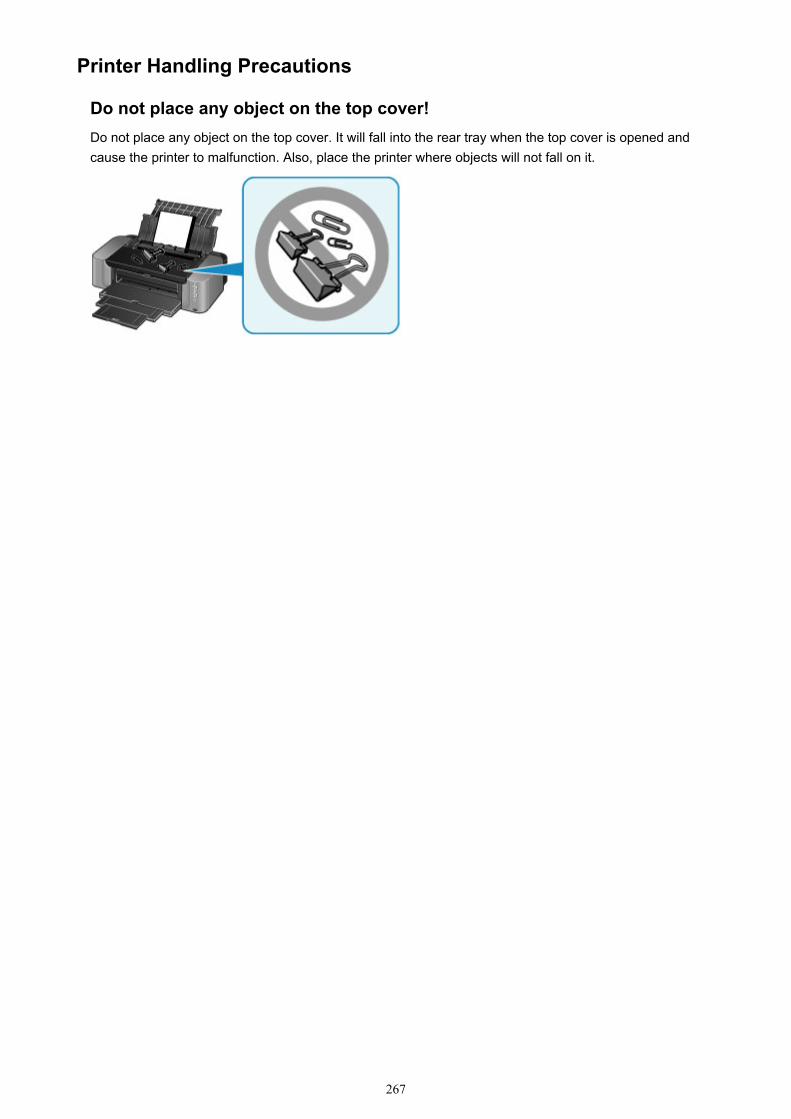
Printer Handling Precautions
Do not place any object on the top cover!Do not place any object on the top cover. It will fall into the rear tray when the top cover is opened andcause the printer to malfunction. Also, place the printer where objects will not fall on it.
267
Key to Enjoying Consistent Printing Quality
The key to printing with the optimal printing quality is to prevent the print head from drying or clogging.Always observe the following rules for optimal printing quality.
Note• Depending on the type of paper, ink may blur if you trace the printed area with a highlight pen or paint-
stick, or bleed if water or sweat comes in contact with the printed area.
Never unplug the power cord until the power is turned off!If you press the ON button to turn off the power, the printer caps the print head (nozzles) automatically toprevent from drying. If you unplug the power cord from the wall outlet before the POWER lamp is turnedoff, the print head will not be capped properly and this will cause drying or clogging.
When unplugging the power cord, make sure that the POWER lamp is not lit.
Print periodically!Just as the tip of a felt pen becomes dry and unusable if it has not been used for a long time, even if it iscapped, the print head too, may become dried or clogged if the printer has not been used for a long time.We recommend you to use the printer at least once a month.
268
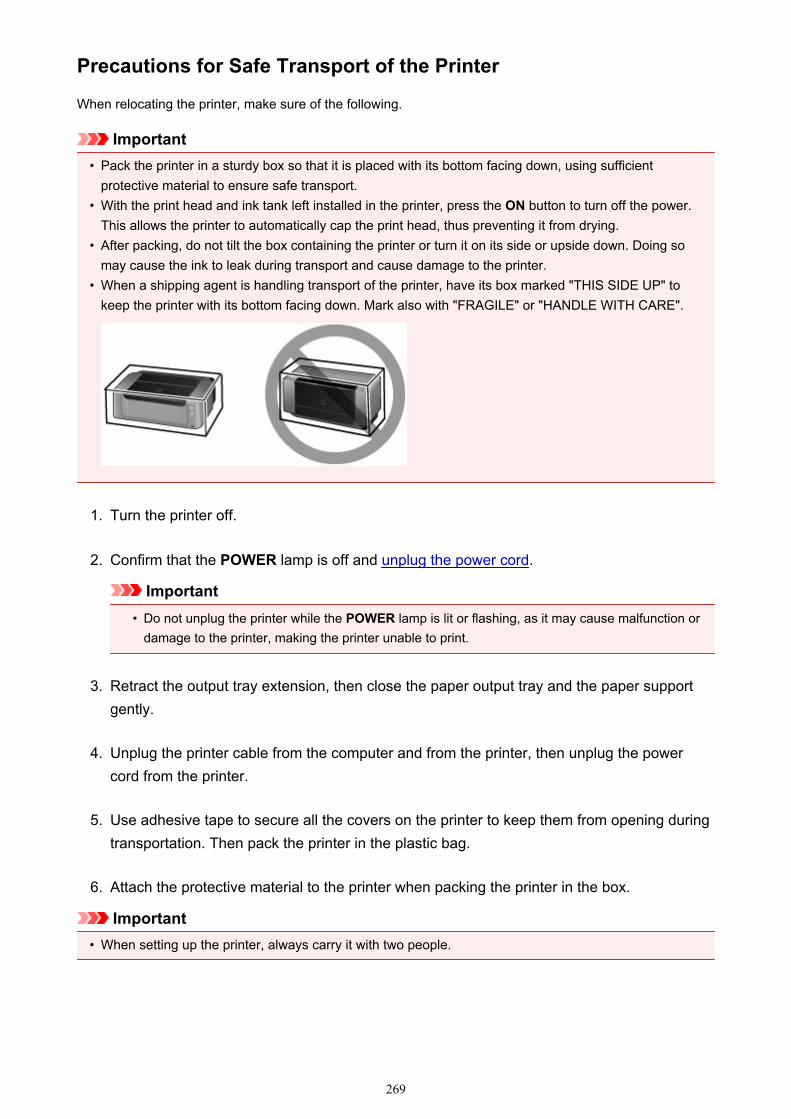
Precautions for Safe Transport of the Printer
When relocating the printer, make sure of the following.
Important• Pack the printer in a sturdy box so that it is placed with its bottom facing down, using sufficient
protective material to ensure safe transport.• With the print head and ink tank left installed in the printer, press the ON button to turn off the power.
This allows the printer to automatically cap the print head, thus preventing it from drying.• After packing, do not tilt the box containing the printer or turn it on its side or upside down. Doing so
may cause the ink to leak during transport and cause damage to the printer.• When a shipping agent is handling transport of the printer, have its box marked "THIS SIDE UP" to
keep the printer with its bottom facing down. Mark also with "FRAGILE" or "HANDLE WITH CARE".
1. Turn the printer off.
2. Confirm that the POWER lamp is off and unplug the power cord.
Important• Do not unplug the printer while the POWER lamp is lit or flashing, as it may cause malfunction or
damage to the printer, making the printer unable to print.
3. Retract the output tray extension, then close the paper output tray and the paper supportgently.
4. Unplug the printer cable from the computer and from the printer, then unplug the powercord from the printer.
5. Use adhesive tape to secure all the covers on the printer to keep them from opening duringtransportation. Then pack the printer in the plastic bag.
6. Attach the protective material to the printer when packing the printer in the box.
Important• When setting up the printer, always carry it with two people.
269
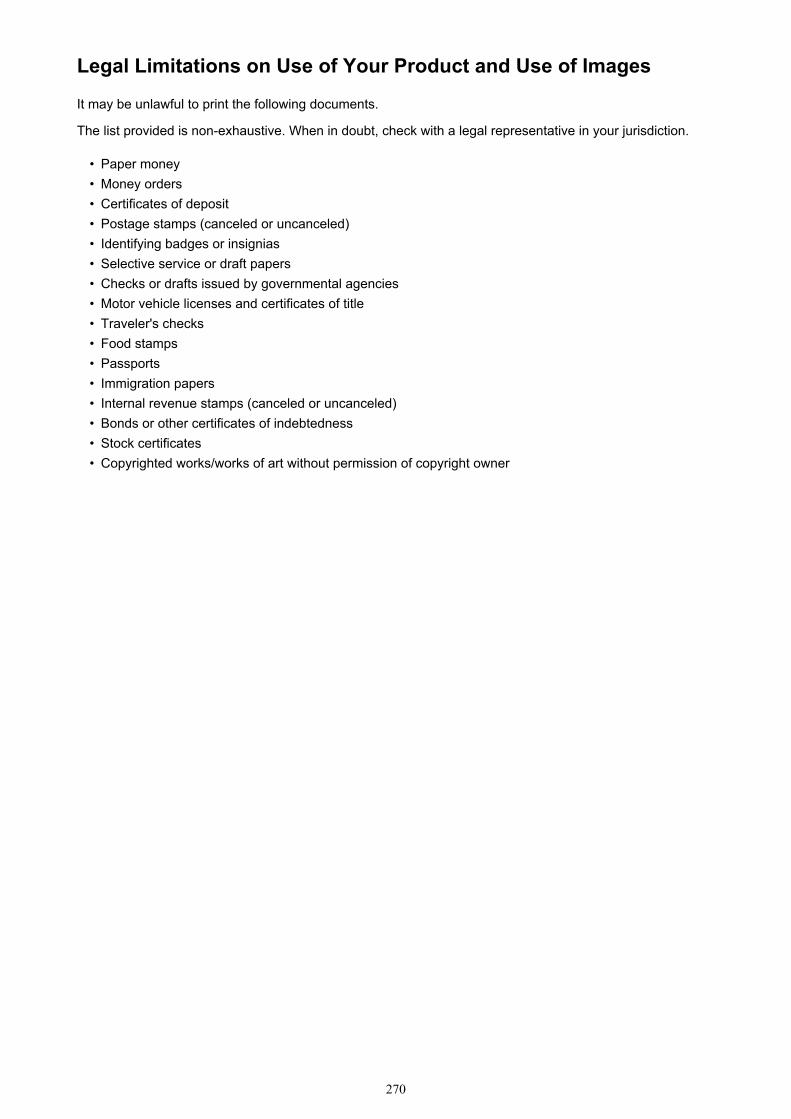
Legal Limitations on Use of Your Product and Use of Images
It may be unlawful to print the following documents.
The list provided is non-exhaustive. When in doubt, check with a legal representative in your jurisdiction.
• Paper money• Money orders• Certificates of deposit• Postage stamps (canceled or uncanceled)• Identifying badges or insignias• Selective service or draft papers• Checks or drafts issued by governmental agencies• Motor vehicle licenses and certificates of title• Traveler's checks• Food stamps• Passports• Immigration papers• Internal revenue stamps (canceled or uncanceled)• Bonds or other certificates of indebtedness• Stock certificates• Copyrighted works/works of art without permission of copyright owner
270
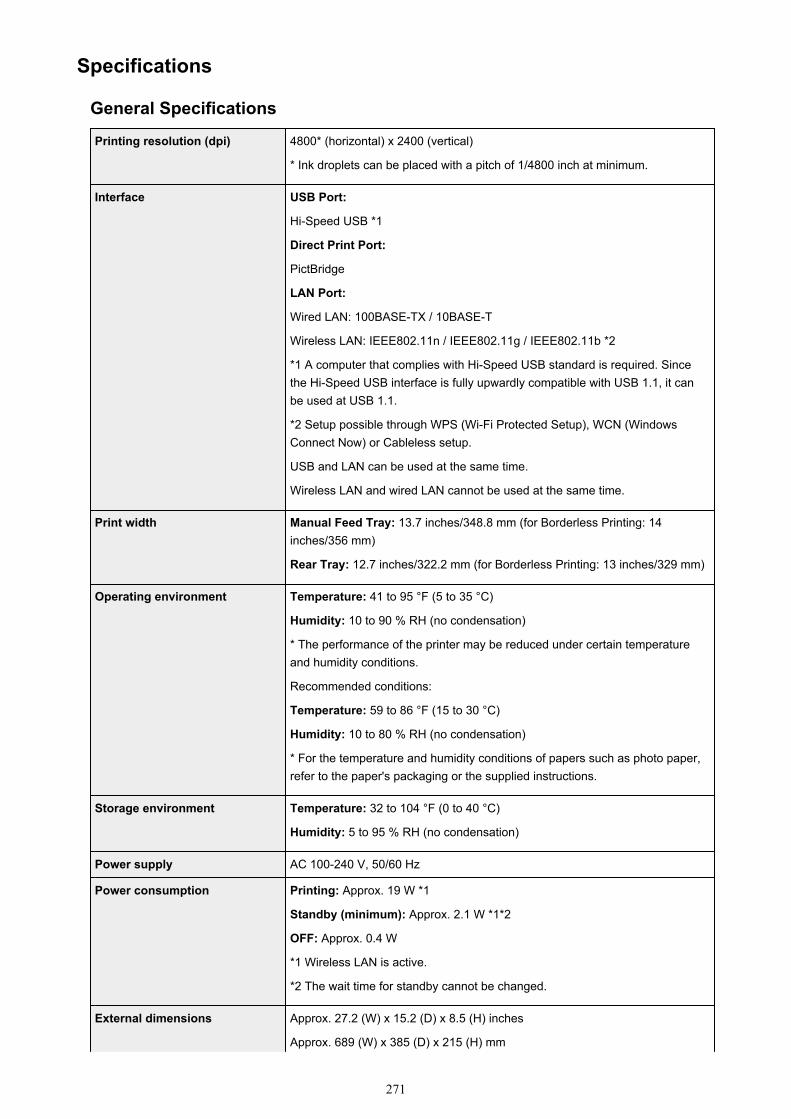
Specifications
General Specifications
Printing resolution (dpi) 4800* (horizontal) x 2400 (vertical)
* Ink droplets can be placed with a pitch of 1/4800 inch at minimum.
Interface USB Port:
Hi-Speed USB *1
Direct Print Port:
PictBridge
LAN Port:
Wired LAN: 100BASE-TX / 10BASE-T
Wireless LAN: IEEE802.11n / IEEE802.11g / IEEE802.11b *2
*1 A computer that complies with Hi-Speed USB standard is required. Sincethe Hi-Speed USB interface is fully upwardly compatible with USB 1.1, it canbe used at USB 1.1.
*2 Setup possible through WPS (Wi-Fi Protected Setup), WCN (WindowsConnect Now) or Cableless setup.
USB and LAN can be used at the same time.
Wireless LAN and wired LAN cannot be used at the same time.
Print width Manual Feed Tray: 13.7 inches/348.8 mm (for Borderless Printing: 14inches/356 mm)
Rear Tray: 12.7 inches/322.2 mm (for Borderless Printing: 13 inches/329 mm)
Operating environment Temperature: 41 to 95 °F (5 to 35 °C)
Humidity: 10 to 90 % RH (no condensation)
* The performance of the printer may be reduced under certain temperatureand humidity conditions.
Recommended conditions:
Temperature: 59 to 86 °F (15 to 30 °C)
Humidity: 10 to 80 % RH (no condensation)
* For the temperature and humidity conditions of papers such as photo paper,refer to the paper's packaging or the supplied instructions.
Storage environment Temperature: 32 to 104 °F (0 to 40 °C)
Humidity: 5 to 95 % RH (no condensation)
Power supply AC 100-240 V, 50/60 Hz
Power consumption Printing: Approx. 19 W *1
Standby (minimum): Approx. 2.1 W *1*2
OFF: Approx. 0.4 W
*1 Wireless LAN is active.
*2 The wait time for standby cannot be changed.
External dimensions Approx. 27.2 (W) x 15.2 (D) x 8.5 (H) inches
Approx. 689 (W) x 385 (D) x 215 (H) mm
271

* With the Paper Support and Paper Output Tray retracted.
Weight Approx. 43.2 lb (Approx. 19.7 kg)
* With the Print Head and ink tanks installed.
Print Head/Ink Total 6144 nozzles (M / PC / Y / BK / GY / PM / LGY / C each 768 nozzles)
Network Specifications
Communication protocol TCP/IP
Wired LAN Supported Standards: IEEE802.3u (100BASE-TX) / IEEE802.3 (10BASE-T)
Transfer speed: 10 M/100 Mbps (auto switching)
Wireless LAN Supported Standards: IEEE802.11n / IEEE802.11g / IEEE802.11b
Frequency bandwidth: 2.4 GHz
Channel: 1-11 or 1-13
* Frequency bandwidth and available channels differ depending on country orregion.
Communication distance: Indoors 164 feet/50 m
* Effective range varies depending on the installation environment and location.
Security:
WEP (64/128 bits)
WPA-PSK (TKIP/AES)
WPA2-PSK (TKIP/AES)
Setup:
WPS (Push button configuration/PIN code method)
WCN (WCN-NET)
Cableless setup
Other Features: Administration password
Minimum System RequirementsConform to the operating system's requirements when higher than those given here.
Windows
Operating System Windows 8.1*, Windows 8
Windows 7, Windows 7 SP1
Windows Vista SP1, Windows Vista SP2
Windows XP SP3 32-bit only
* Windows 8.1 includes Windows 8.1 Update.
Browser Internet Explorer 8 or later
Hard Disk Space 3 GB
Note: For bundled software installation.
The necessary amount of hard disk space may be changed without notice.
272
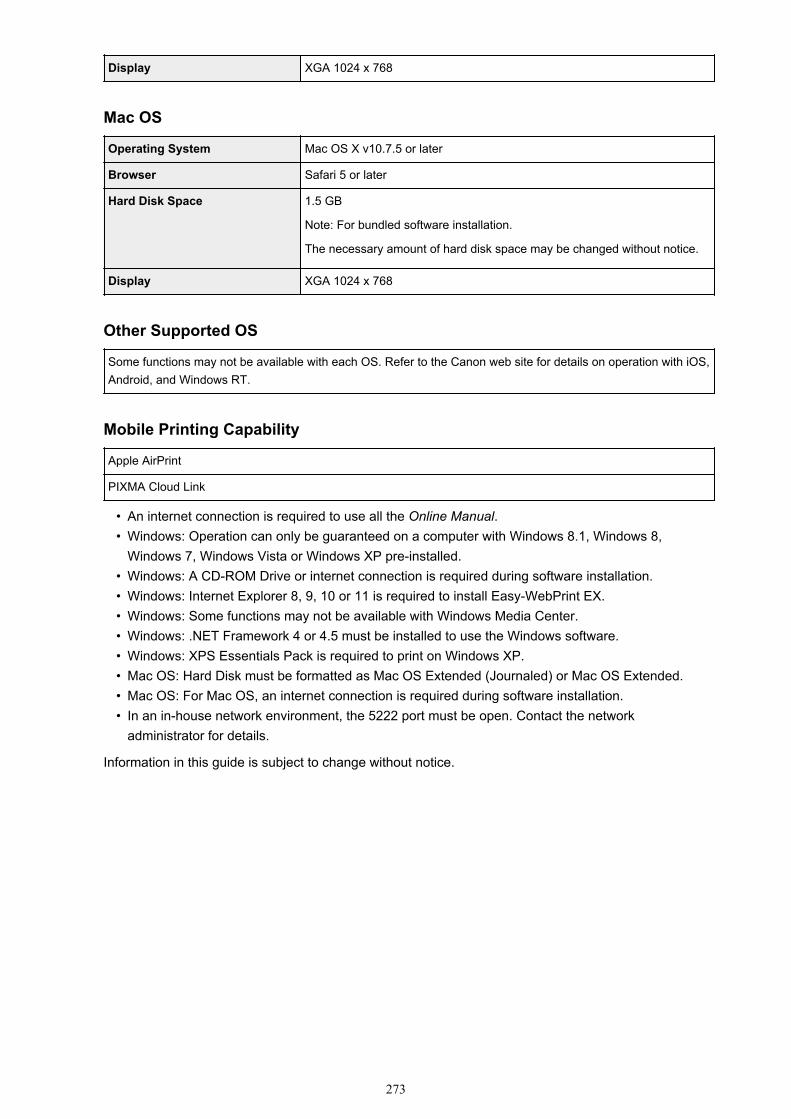
Display XGA 1024 x 768
Mac OS
Operating System Mac OS X v10.7.5 or later
Browser Safari 5 or later
Hard Disk Space 1.5 GB
Note: For bundled software installation.
The necessary amount of hard disk space may be changed without notice.
Display XGA 1024 x 768
Other Supported OS
Some functions may not be available with each OS. Refer to the Canon web site for details on operation with iOS,Android, and Windows RT.
Mobile Printing Capability
Apple AirPrint
PIXMA Cloud Link
• An internet connection is required to use all the Online Manual.• Windows: Operation can only be guaranteed on a computer with Windows 8.1, Windows 8,
Windows 7, Windows Vista or Windows XP pre-installed.• Windows: A CD-ROM Drive or internet connection is required during software installation.• Windows: Internet Explorer 8, 9, 10 or 11 is required to install Easy-WebPrint EX.• Windows: Some functions may not be available with Windows Media Center.• Windows: .NET Framework 4 or 4.5 must be installed to use the Windows software.• Windows: XPS Essentials Pack is required to print on Windows XP.• Mac OS: Hard Disk must be formatted as Mac OS Extended (Journaled) or Mac OS Extended.• Mac OS: For Mac OS, an internet connection is required during software installation.• In an in-house network environment, the 5222 port must be open. Contact the network
administrator for details.
Information in this guide is subject to change without notice.
273
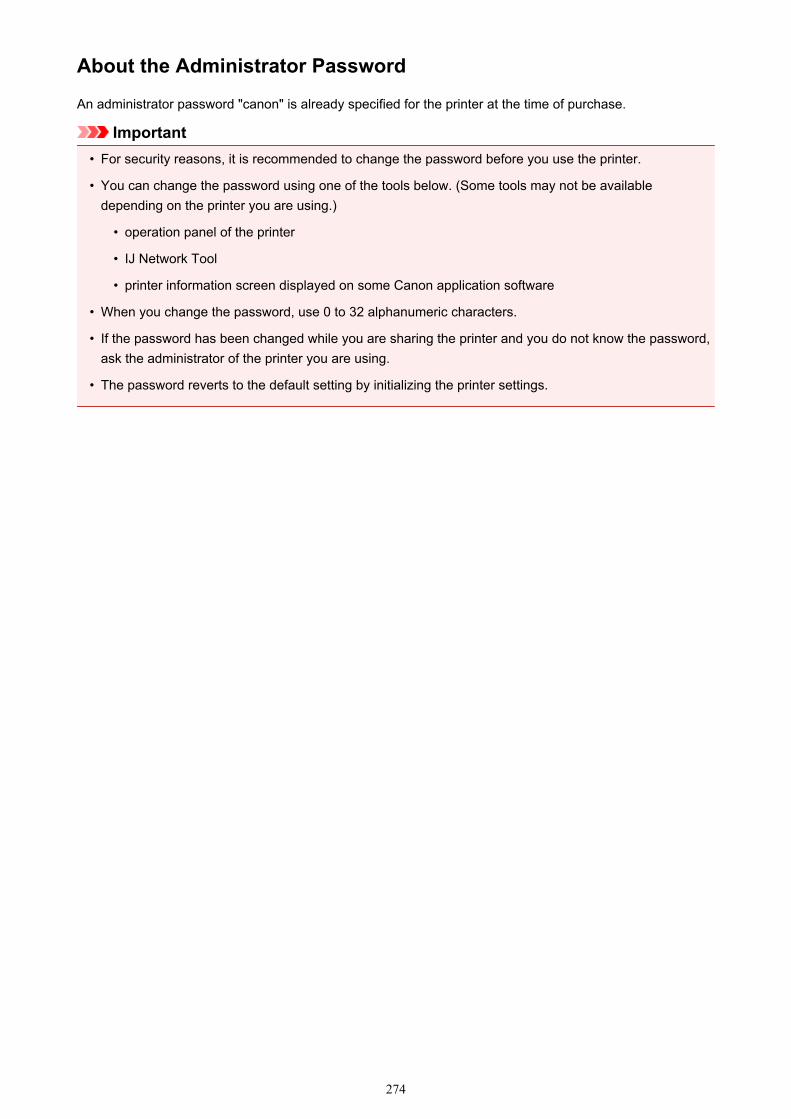
About the Administrator Password
An administrator password "canon" is already specified for the printer at the time of purchase.
Important• For security reasons, it is recommended to change the password before you use the printer.
• You can change the password using one of the tools below. (Some tools may not be availabledepending on the printer you are using.)
• operation panel of the printer
• IJ Network Tool
• printer information screen displayed on some Canon application software
• When you change the password, use 0 to 32 alphanumeric characters.
• If the password has been changed while you are sharing the printer and you do not know the password,ask the administrator of the printer you are using.
• The password reverts to the default setting by initializing the printer settings.
274
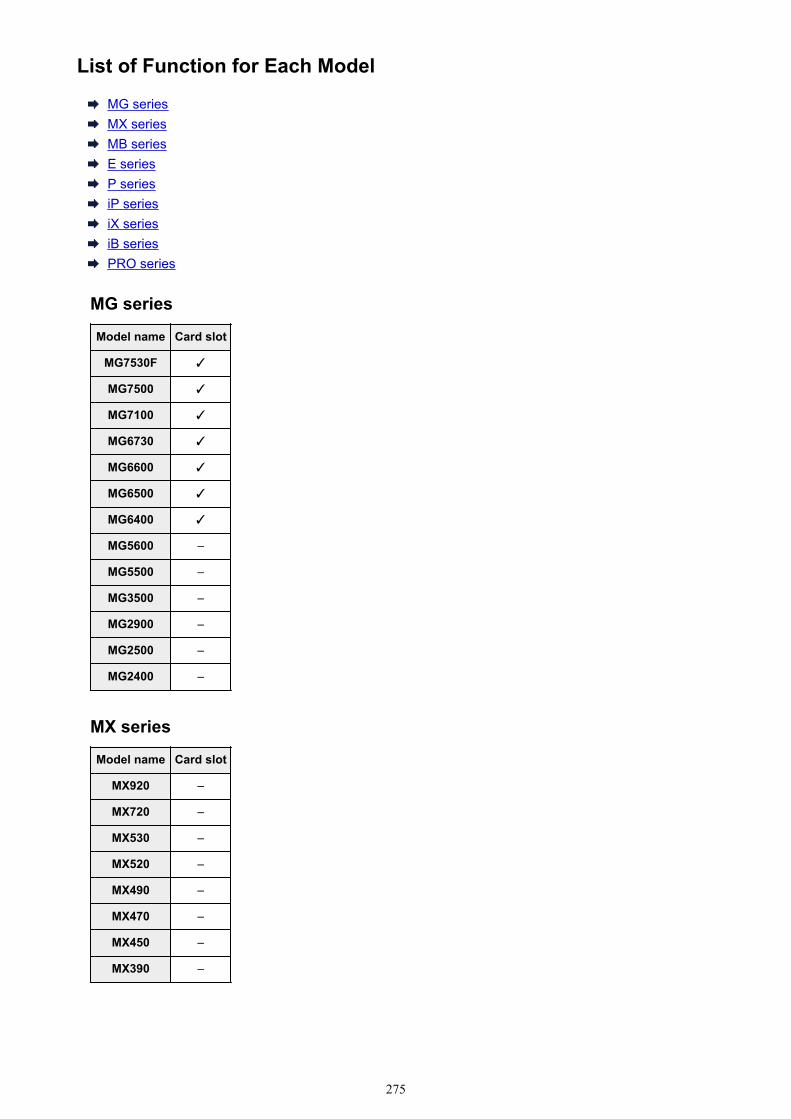
List of Function for Each Model
MG seriesMX seriesMB seriesE seriesP seriesiP seriesiX seriesiB seriesPRO series
MG series
Model name Card slot
MG7530F ✓
MG7500 ✓
MG7100 ✓
MG6730 ✓
MG6600 ✓
MG6500 ✓
MG6400 ✓
MG5600 –
MG5500 –
MG3500 –
MG2900 –
MG2500 –
MG2400 –
MX series
Model name Card slot
MX920 –
MX720 –
MX530 –
MX520 –
MX490 –
MX470 –
MX450 –
MX390 –
275

MB series
Model name Card slot
MB5300 –
MB5000 –
MB2300 –
MB2000 –
E series
Model name Card slot
E610 –
E560 –
E480 –
E460 –
E400 –
P series
Model name Card slot
P200 –
iP series
Model name Card slot
iP8700 –
iP2800 –
iP110 –
iX series
Model name Card slot
iX6800 –
iX6700 –
iB series
Model name Card slot
iB4000 –
PRO series
Model name Card slot
PRO-100S –
276

PRO-10S –
277
Printing
Printing from a Computer
Printing from a Digital Camera
278

Printing from a Computer
Printing with Application Software that You are Using (Printer Driver)
279
Printing with Application Software that You are Using (PrinterDriver)
Printing with Easy Setup Basic
Various Printing Methods
Changing the Print Quality and Correcting Image Data
Overview of the Printer Driver
Printer Driver Description
Updating the Printer Driver
280
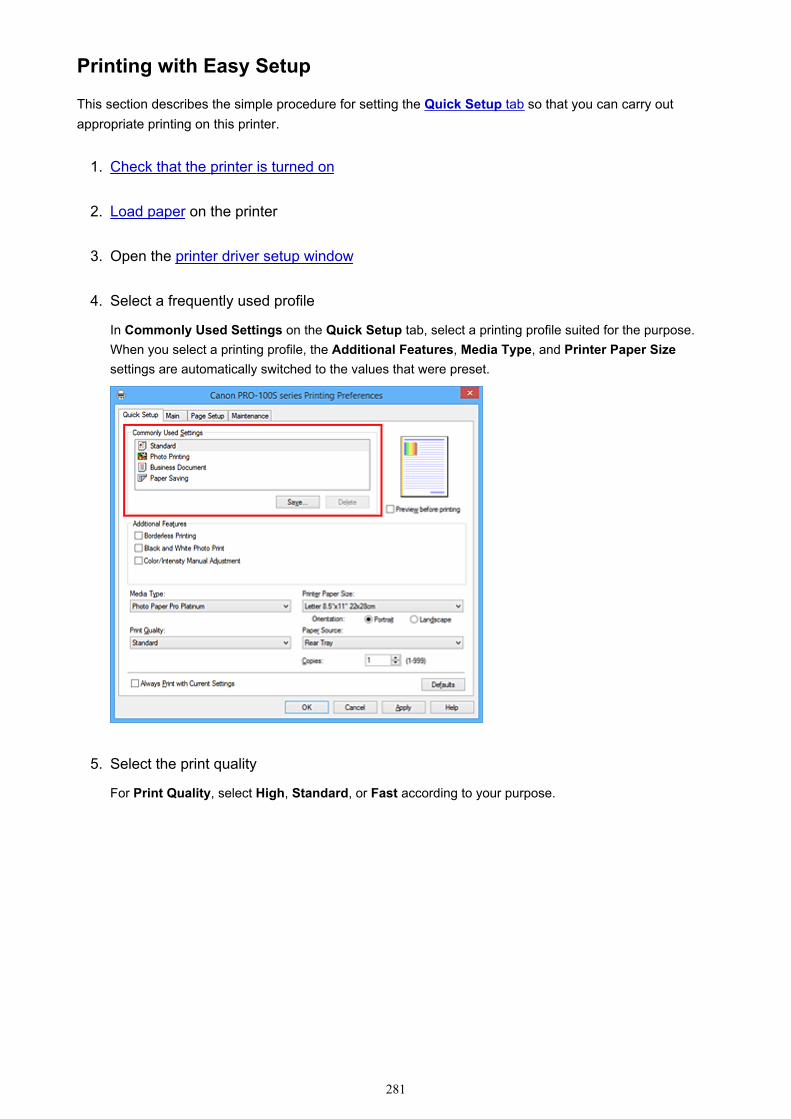
Printing with Easy Setup
This section describes the simple procedure for setting the Quick Setup tab so that you can carry outappropriate printing on this printer.
1. Check that the printer is turned on
2. Load paper on the printer
3. Open the printer driver setup window
4. Select a frequently used profile
In Commonly Used Settings on the Quick Setup tab, select a printing profile suited for the purpose.When you select a printing profile, the Additional Features, Media Type, and Printer Paper Sizesettings are automatically switched to the values that were preset.
5. Select the print quality
For Print Quality, select High, Standard, or Fast according to your purpose.
281
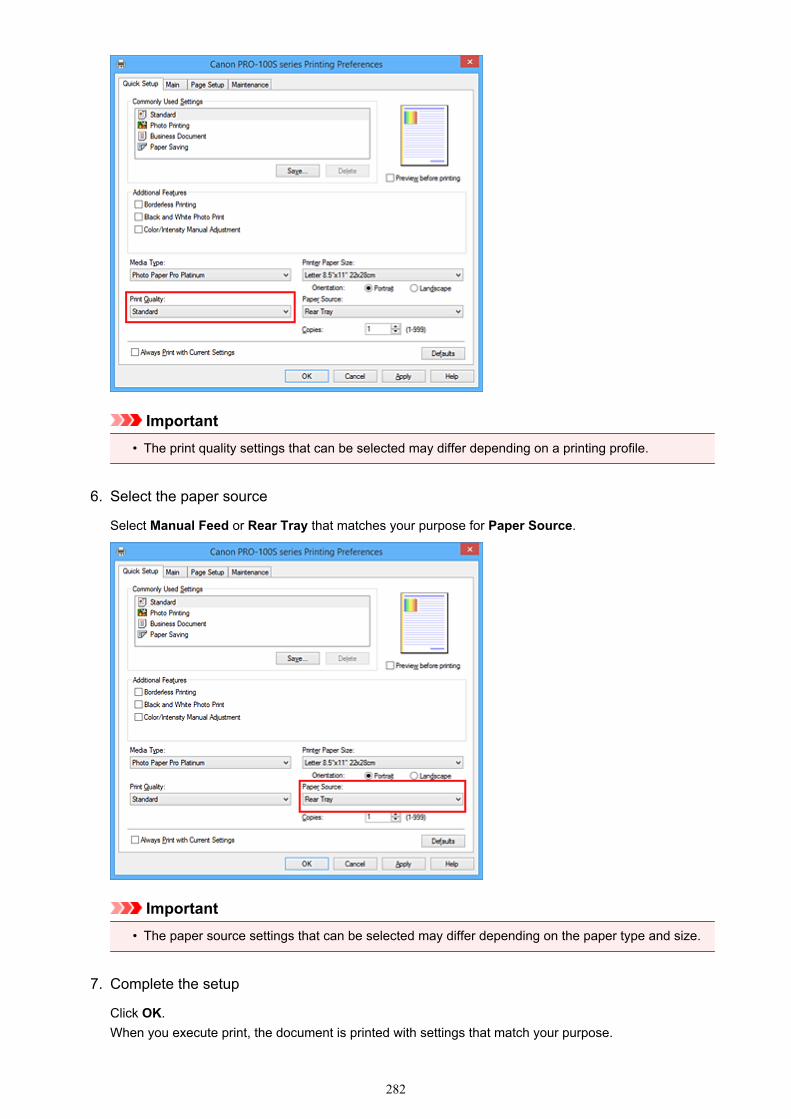
Important• The print quality settings that can be selected may differ depending on a printing profile.
6. Select the paper source
Select Manual Feed or Rear Tray that matches your purpose for Paper Source.
Important• The paper source settings that can be selected may differ depending on the paper type and size.
7. Complete the setup
Click OK.When you execute print, the document is printed with settings that match your purpose.
282
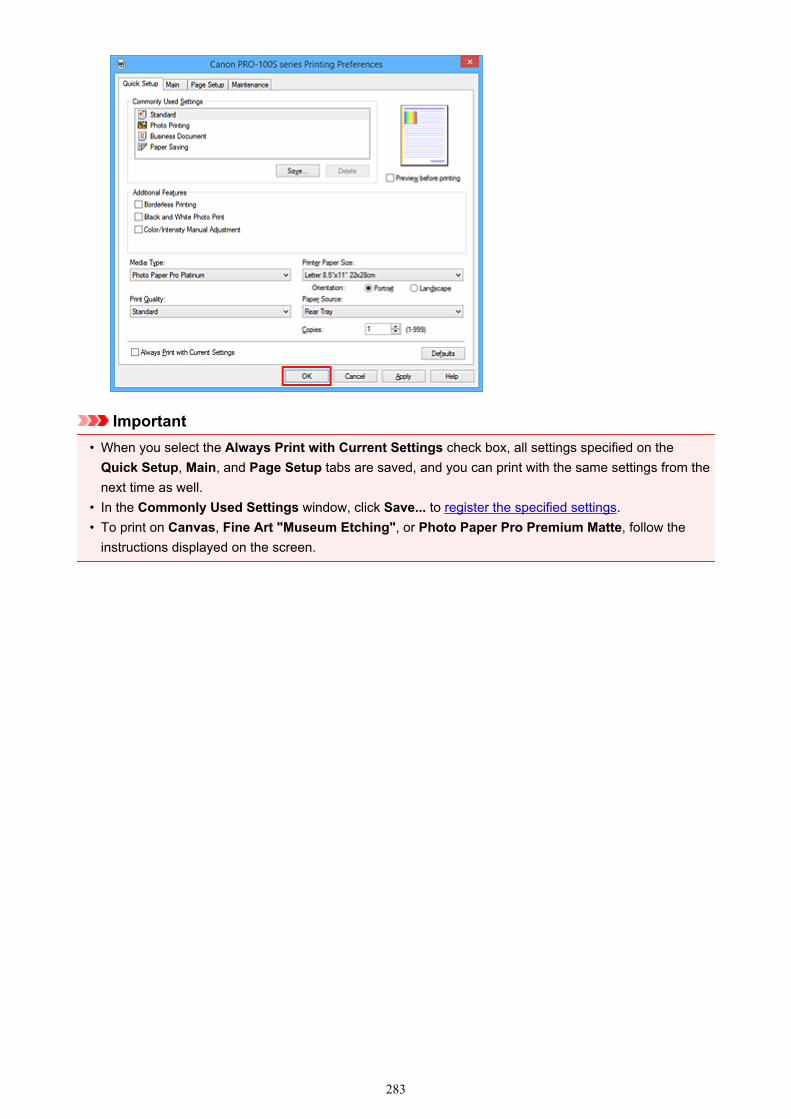
Important• When you select the Always Print with Current Settings check box, all settings specified on the
Quick Setup, Main, and Page Setup tabs are saved, and you can print with the same settings from thenext time as well.
• In the Commonly Used Settings window, click Save... to register the specified settings.• To print on Canvas, Fine Art "Museum Etching", or Photo Paper Pro Premium Matte, follow the
instructions displayed on the screen.
283
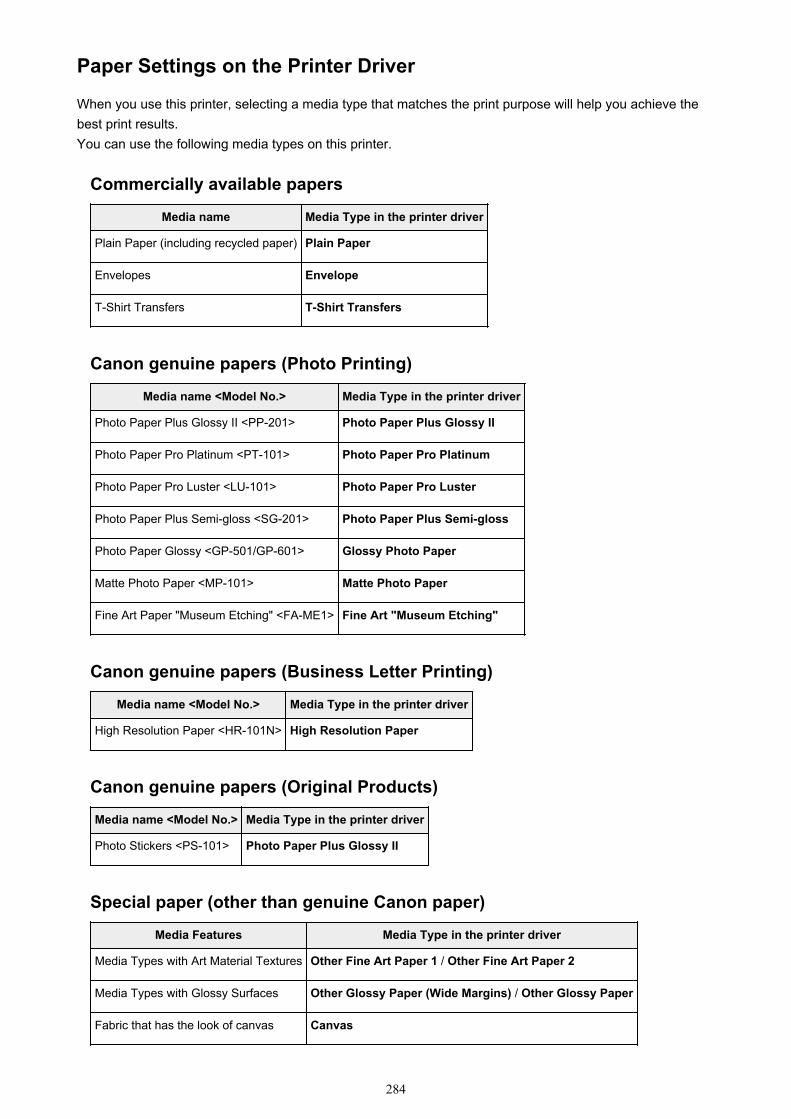
Paper Settings on the Printer Driver
When you use this printer, selecting a media type that matches the print purpose will help you achieve thebest print results.You can use the following media types on this printer.
Commercially available papers
Media name Media Type in the printer driver
Plain Paper (including recycled paper) Plain Paper
Envelopes Envelope
T-Shirt Transfers T-Shirt Transfers
Canon genuine papers (Photo Printing)
Media name <Model No.> Media Type in the printer driver
Photo Paper Plus Glossy II <PP-201> Photo Paper Plus Glossy II
Photo Paper Pro Platinum <PT-101> Photo Paper Pro Platinum
Photo Paper Pro Luster <LU-101> Photo Paper Pro Luster
Photo Paper Plus Semi-gloss <SG-201> Photo Paper Plus Semi-gloss
Photo Paper Glossy <GP-501/GP-601> Glossy Photo Paper
Matte Photo Paper <MP-101> Matte Photo Paper
Fine Art Paper "Museum Etching" <FA-ME1> Fine Art "Museum Etching"
Canon genuine papers (Business Letter Printing)
Media name <Model No.> Media Type in the printer driver
High Resolution Paper <HR-101N> High Resolution Paper
Canon genuine papers (Original Products)
Media name <Model No.> Media Type in the printer driver
Photo Stickers <PS-101> Photo Paper Plus Glossy II
Special paper (other than genuine Canon paper)
Media Features Media Type in the printer driver
Media Types with Art Material Textures Other Fine Art Paper 1 / Other Fine Art Paper 2
Media Types with Glossy Surfaces Other Glossy Paper (Wide Margins) / Other Glossy Paper
Fabric that has the look of canvas Canvas
284

Important• When Media Type on the printer driver is set to Other Glossy Paper (Wide Margins), Fine Art
"Museum Etching", Photo Paper Pro Premium Matte, Other Fine Art Paper 1, Other Fine ArtPaper 2, or Canvas, no data is printed in the top and bottom 30 mm edges (printing direction) of thepaper. For Paper Size on the printer driver, select "XXX (Art Paper Margin 30)".For information about the printable area, see "Printing Area."
285
Various Printing Methods
Setting a Page Size and Orientation
Setting the Number of Copies and Printing Order
Setting the Stapling Margin
Execute Borderless Printing
Fit-to-Page Printing
Scaled Printing
Page Layout Printing
Tiling/Poster Printing
Booklet Printing
Duplex Printing
Stamp/Background Printing
Registering a Stamp
Registering Image Data to be Used as a Background
Setting Up Envelope Printing
Printing on Postcards
Switching the Paper Source to Match the Purpose
Displaying the Print Results before Printing
Setting Paper Dimensions (Custom Size)
Editing the Print Document or Reprinting from the Print History
286
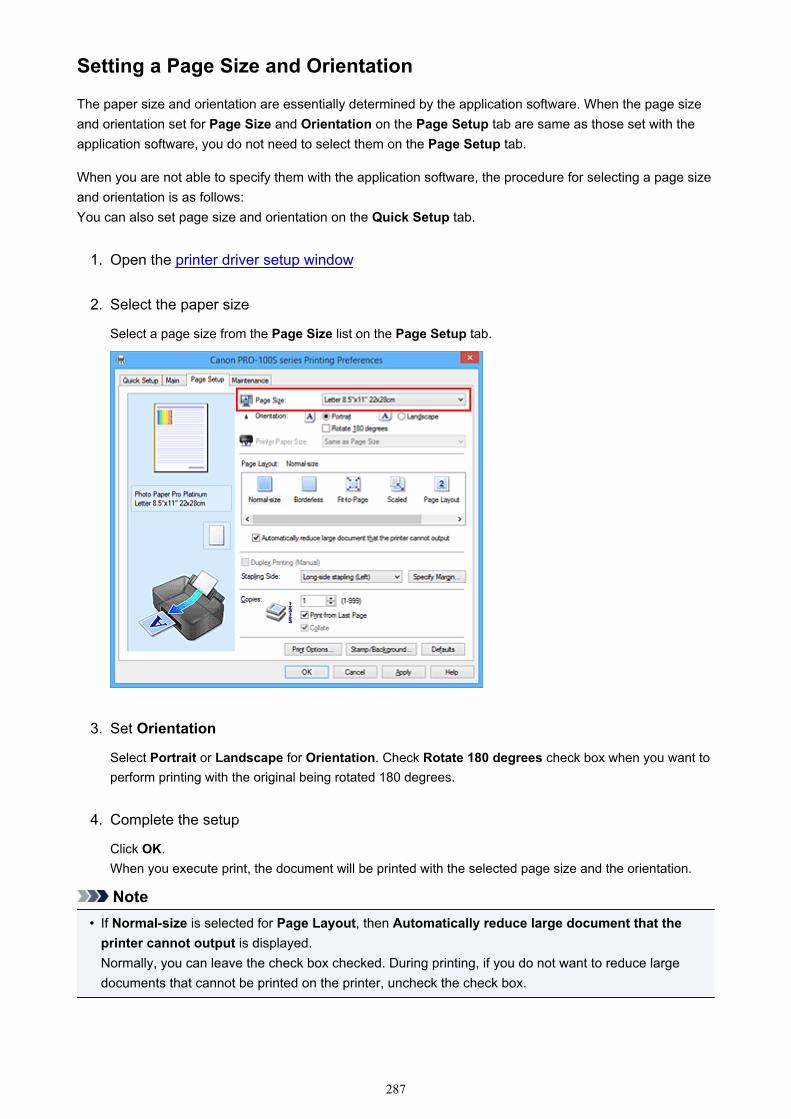
Setting a Page Size and Orientation
The paper size and orientation are essentially determined by the application software. When the page sizeand orientation set for Page Size and Orientation on the Page Setup tab are same as those set with theapplication software, you do not need to select them on the Page Setup tab.
When you are not able to specify them with the application software, the procedure for selecting a page sizeand orientation is as follows:You can also set page size and orientation on the Quick Setup tab.
1. Open the printer driver setup window
2. Select the paper size
Select a page size from the Page Size list on the Page Setup tab.
3. Set Orientation
Select Portrait or Landscape for Orientation. Check Rotate 180 degrees check box when you want toperform printing with the original being rotated 180 degrees.
4. Complete the setup
Click OK.When you execute print, the document will be printed with the selected page size and the orientation.
Note• If Normal-size is selected for Page Layout, then Automatically reduce large document that the
printer cannot output is displayed.Normally, you can leave the check box checked. During printing, if you do not want to reduce largedocuments that cannot be printed on the printer, uncheck the check box.
287
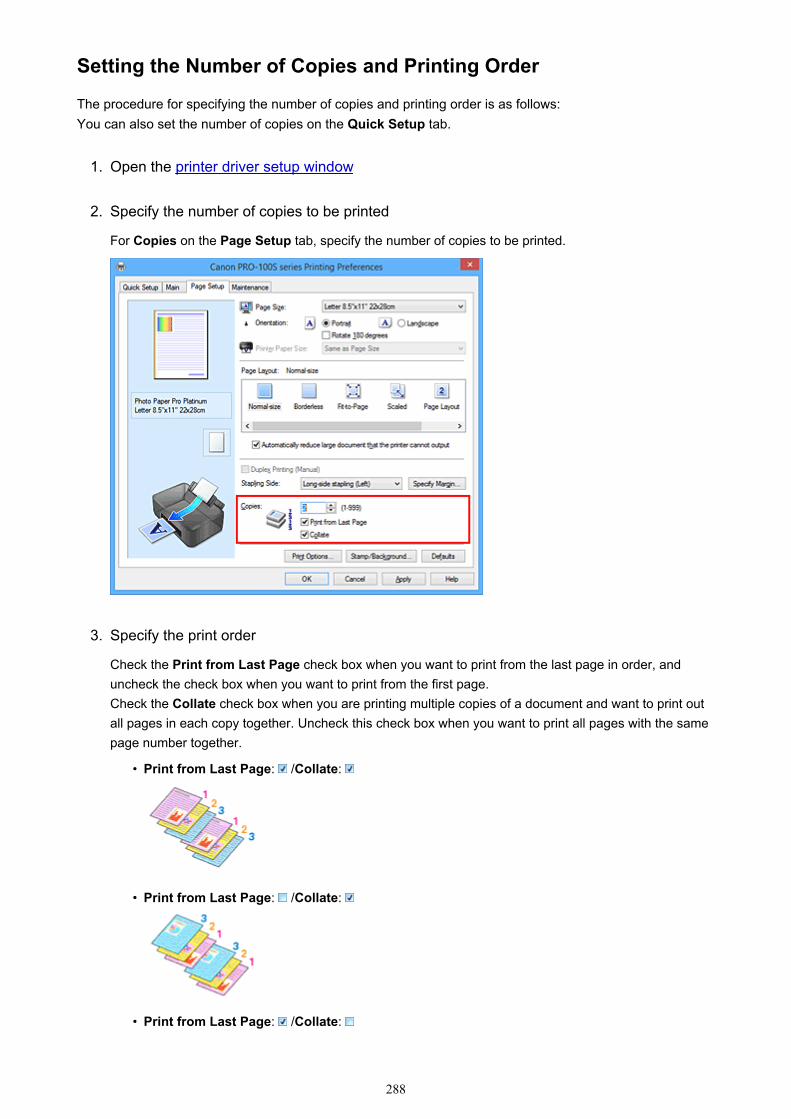
Setting the Number of Copies and Printing Order
The procedure for specifying the number of copies and printing order is as follows:You can also set the number of copies on the Quick Setup tab.
1. Open the printer driver setup window
2. Specify the number of copies to be printed
For Copies on the Page Setup tab, specify the number of copies to be printed.
3. Specify the print order
Check the Print from Last Page check box when you want to print from the last page in order, anduncheck the check box when you want to print from the first page.Check the Collate check box when you are printing multiple copies of a document and want to print outall pages in each copy together. Uncheck this check box when you want to print all pages with the samepage number together.
• Print from Last Page: /Collate:
• Print from Last Page: /Collate:
• Print from Last Page: /Collate:
288
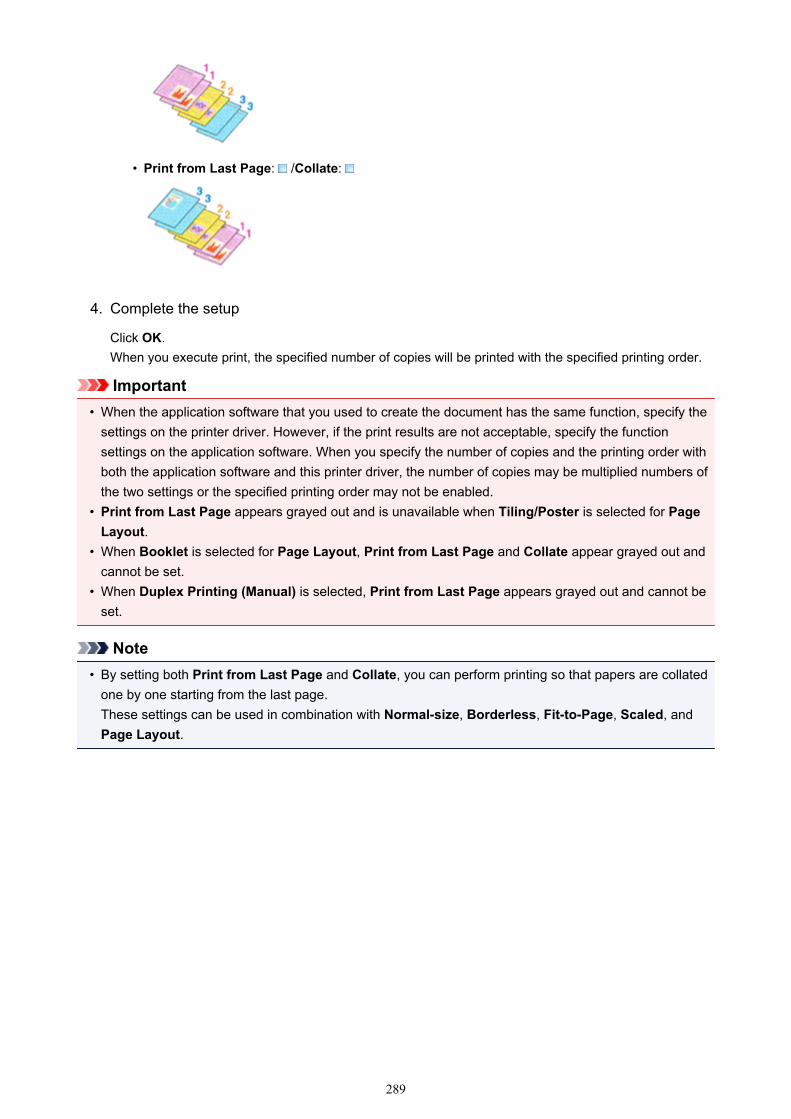
• Print from Last Page: /Collate:
4. Complete the setup
Click OK.When you execute print, the specified number of copies will be printed with the specified printing order.
Important• When the application software that you used to create the document has the same function, specify the
settings on the printer driver. However, if the print results are not acceptable, specify the functionsettings on the application software. When you specify the number of copies and the printing order withboth the application software and this printer driver, the number of copies may be multiplied numbers ofthe two settings or the specified printing order may not be enabled.
• Print from Last Page appears grayed out and is unavailable when Tiling/Poster is selected for PageLayout.
• When Booklet is selected for Page Layout, Print from Last Page and Collate appear grayed out andcannot be set.
• When Duplex Printing (Manual) is selected, Print from Last Page appears grayed out and cannot beset.
Note• By setting both Print from Last Page and Collate, you can perform printing so that papers are collated
one by one starting from the last page.These settings can be used in combination with Normal-size, Borderless, Fit-to-Page, Scaled, andPage Layout.
289
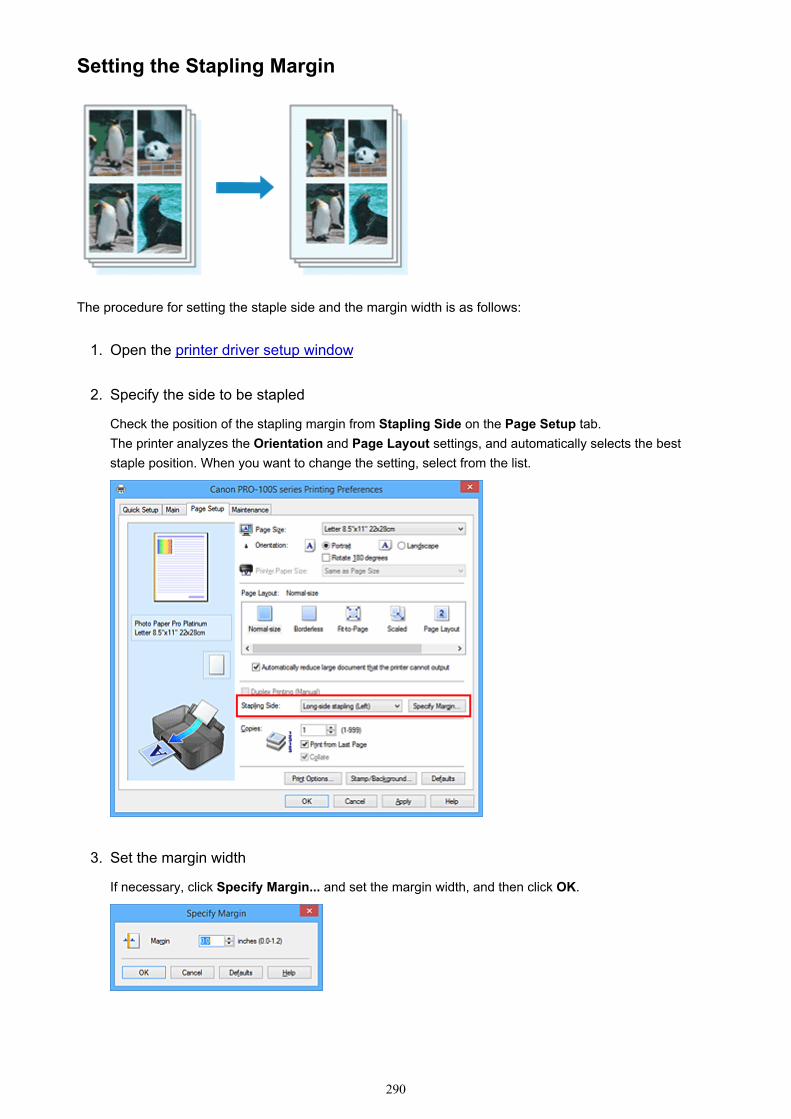
Setting the Stapling Margin
The procedure for setting the staple side and the margin width is as follows:
1. Open the printer driver setup window
2. Specify the side to be stapled
Check the position of the stapling margin from Stapling Side on the Page Setup tab.The printer analyzes the Orientation and Page Layout settings, and automatically selects the beststaple position. When you want to change the setting, select from the list.
3. Set the margin width
If necessary, click Specify Margin... and set the margin width, and then click OK.
290

Note• The printer automatically reduces the print area depending on the staple position margin.
4. Complete the setup
Click OK on the Page Setup tab.When you execute print, the data is printed with the specified staple side and margin width.
Important• Stapling Side and Specify Margin... appear grayed out and are unavailable when:
• Borderless, Tiling/Poster, or Booklet is selected for Page Layout• Scaled is selected for Page Layout (When Duplex Printing (Manual) is also selected, only
Stapling Side can be specified.)
291
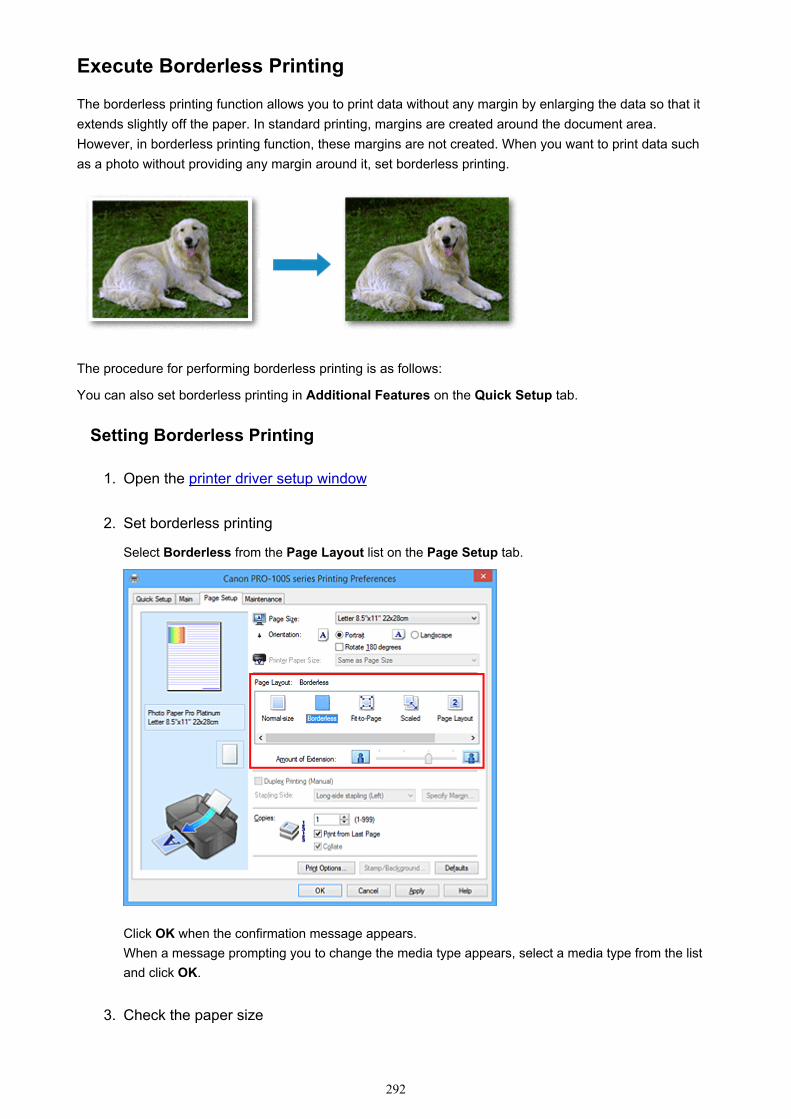
Execute Borderless Printing
The borderless printing function allows you to print data without any margin by enlarging the data so that itextends slightly off the paper. In standard printing, margins are created around the document area.However, in borderless printing function, these margins are not created. When you want to print data suchas a photo without providing any margin around it, set borderless printing.
The procedure for performing borderless printing is as follows:
You can also set borderless printing in Additional Features on the Quick Setup tab.
Setting Borderless Printing
1. Open the printer driver setup window
2. Set borderless printing
Select Borderless from the Page Layout list on the Page Setup tab.
Click OK when the confirmation message appears.When a message prompting you to change the media type appears, select a media type from the listand click OK.
3. Check the paper size
292
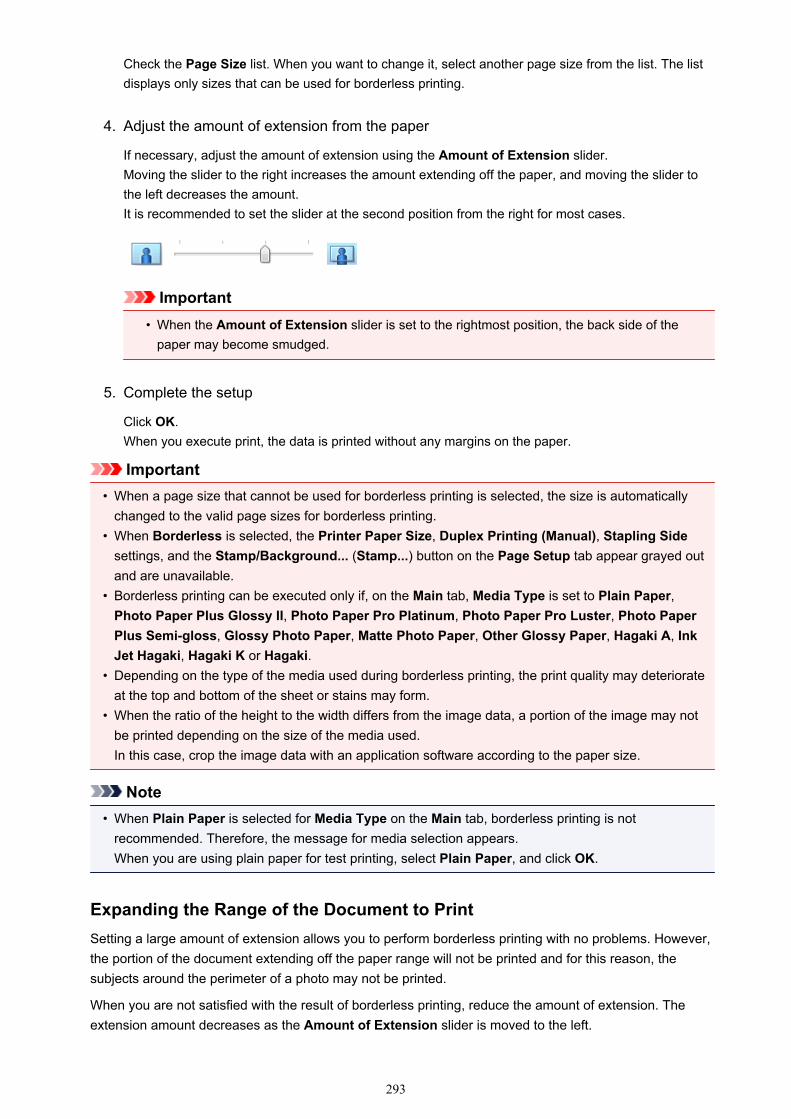
Check the Page Size list. When you want to change it, select another page size from the list. The listdisplays only sizes that can be used for borderless printing.
4. Adjust the amount of extension from the paper
If necessary, adjust the amount of extension using the Amount of Extension slider.Moving the slider to the right increases the amount extending off the paper, and moving the slider tothe left decreases the amount.It is recommended to set the slider at the second position from the right for most cases.
Important• When the Amount of Extension slider is set to the rightmost position, the back side of the
paper may become smudged.
5. Complete the setup
Click OK.When you execute print, the data is printed without any margins on the paper.
Important• When a page size that cannot be used for borderless printing is selected, the size is automatically
changed to the valid page sizes for borderless printing.• When Borderless is selected, the Printer Paper Size, Duplex Printing (Manual), Stapling Side
settings, and the Stamp/Background... (Stamp...) button on the Page Setup tab appear grayed outand are unavailable.
• Borderless printing can be executed only if, on the Main tab, Media Type is set to Plain Paper,Photo Paper Plus Glossy II, Photo Paper Pro Platinum, Photo Paper Pro Luster, Photo PaperPlus Semi-gloss, Glossy Photo Paper, Matte Photo Paper, Other Glossy Paper, Hagaki A, InkJet Hagaki, Hagaki K or Hagaki.
• Depending on the type of the media used during borderless printing, the print quality may deteriorateat the top and bottom of the sheet or stains may form.
• When the ratio of the height to the width differs from the image data, a portion of the image may notbe printed depending on the size of the media used.In this case, crop the image data with an application software according to the paper size.
Note• When Plain Paper is selected for Media Type on the Main tab, borderless printing is not
recommended. Therefore, the message for media selection appears.When you are using plain paper for test printing, select Plain Paper, and click OK.
Expanding the Range of the Document to PrintSetting a large amount of extension allows you to perform borderless printing with no problems. However,the portion of the document extending off the paper range will not be printed and for this reason, thesubjects around the perimeter of a photo may not be printed.
When you are not satisfied with the result of borderless printing, reduce the amount of extension. Theextension amount decreases as the Amount of Extension slider is moved to the left.
293

Important• When the amount of extension is decreased, an unexpected margin may be produced on the print,
depending on the size of the paper.
Note• When the Amount of Extension slider is set to the leftmost position, image data will be printed in the
full size. If you set this when printing the address side of a postcard, the postal code of the sender isprinted in the correct position.
• When Preview before printing is checked on the Main tab, you can confirm whether there will be nomargin before printing.
294
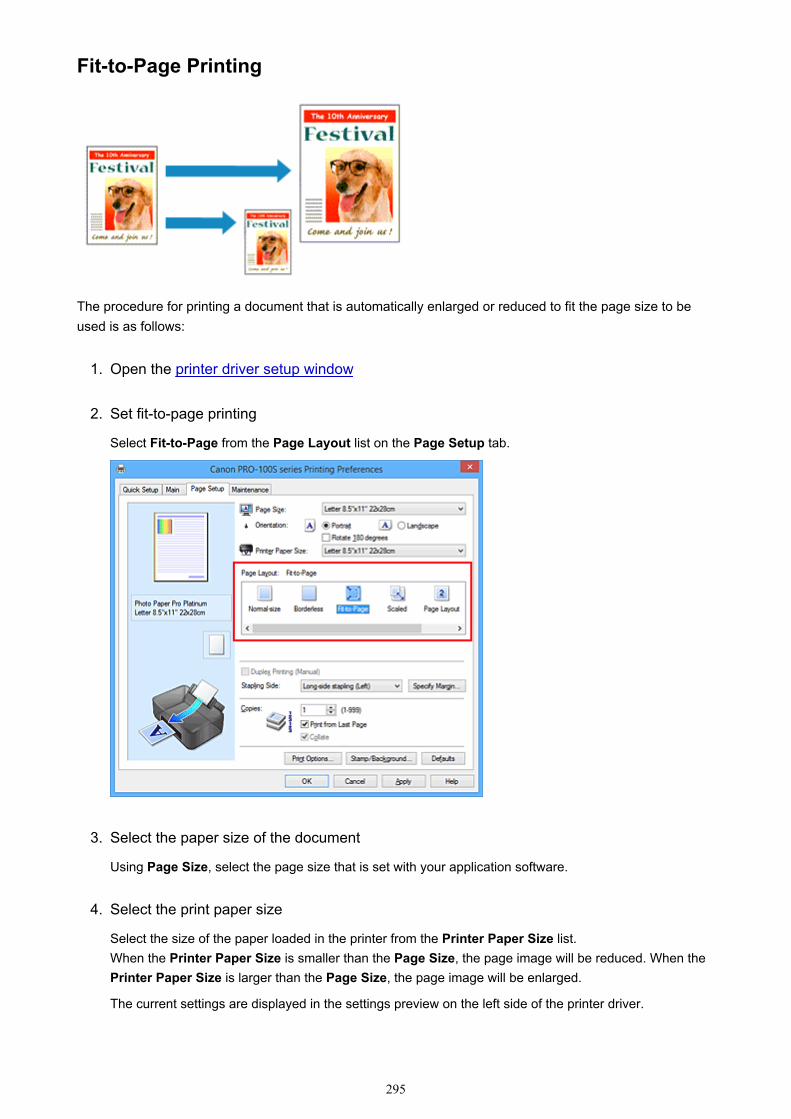
Fit-to-Page Printing
The procedure for printing a document that is automatically enlarged or reduced to fit the page size to beused is as follows:
1. Open the printer driver setup window
2. Set fit-to-page printing
Select Fit-to-Page from the Page Layout list on the Page Setup tab.
3. Select the paper size of the document
Using Page Size, select the page size that is set with your application software.
4. Select the print paper size
Select the size of the paper loaded in the printer from the Printer Paper Size list.When the Printer Paper Size is smaller than the Page Size, the page image will be reduced. When thePrinter Paper Size is larger than the Page Size, the page image will be enlarged.
The current settings are displayed in the settings preview on the left side of the printer driver.
295
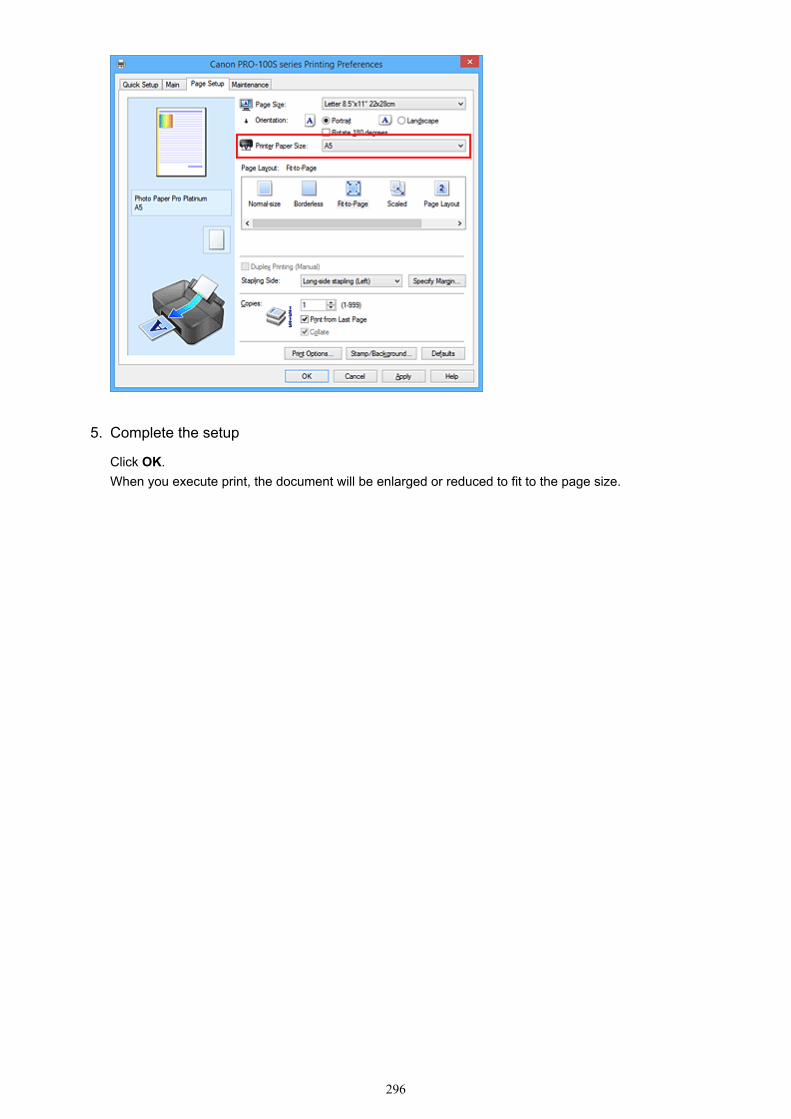
5. Complete the setup
Click OK.When you execute print, the document will be enlarged or reduced to fit to the page size.
296
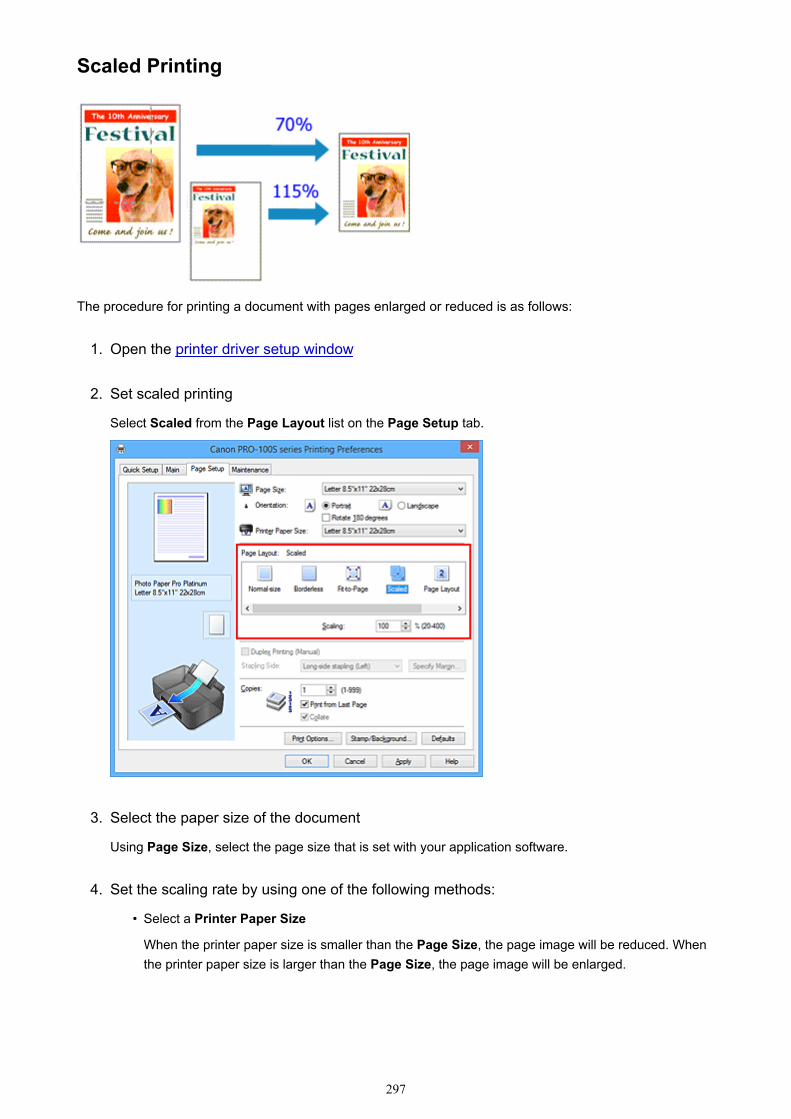
Scaled Printing
The procedure for printing a document with pages enlarged or reduced is as follows:
1. Open the printer driver setup window
2. Set scaled printing
Select Scaled from the Page Layout list on the Page Setup tab.
3. Select the paper size of the document
Using Page Size, select the page size that is set with your application software.
4. Set the scaling rate by using one of the following methods:
• Select a Printer Paper Size
When the printer paper size is smaller than the Page Size, the page image will be reduced. Whenthe printer paper size is larger than the Page Size, the page image will be enlarged.
297
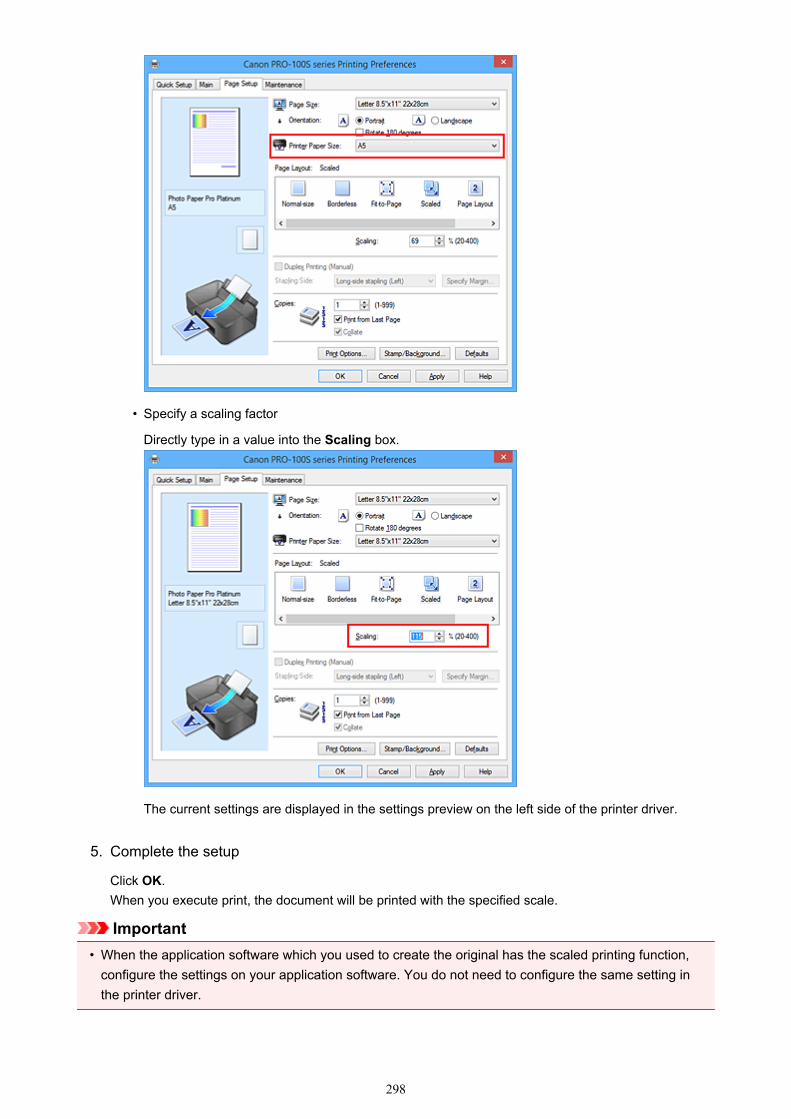
• Specify a scaling factor
Directly type in a value into the Scaling box.
The current settings are displayed in the settings preview on the left side of the printer driver.
5. Complete the setup
Click OK.When you execute print, the document will be printed with the specified scale.
Important• When the application software which you used to create the original has the scaled printing function,
configure the settings on your application software. You do not need to configure the same setting inthe printer driver.
298

Note• Selecting Scaled changes the printable area of the document.
299
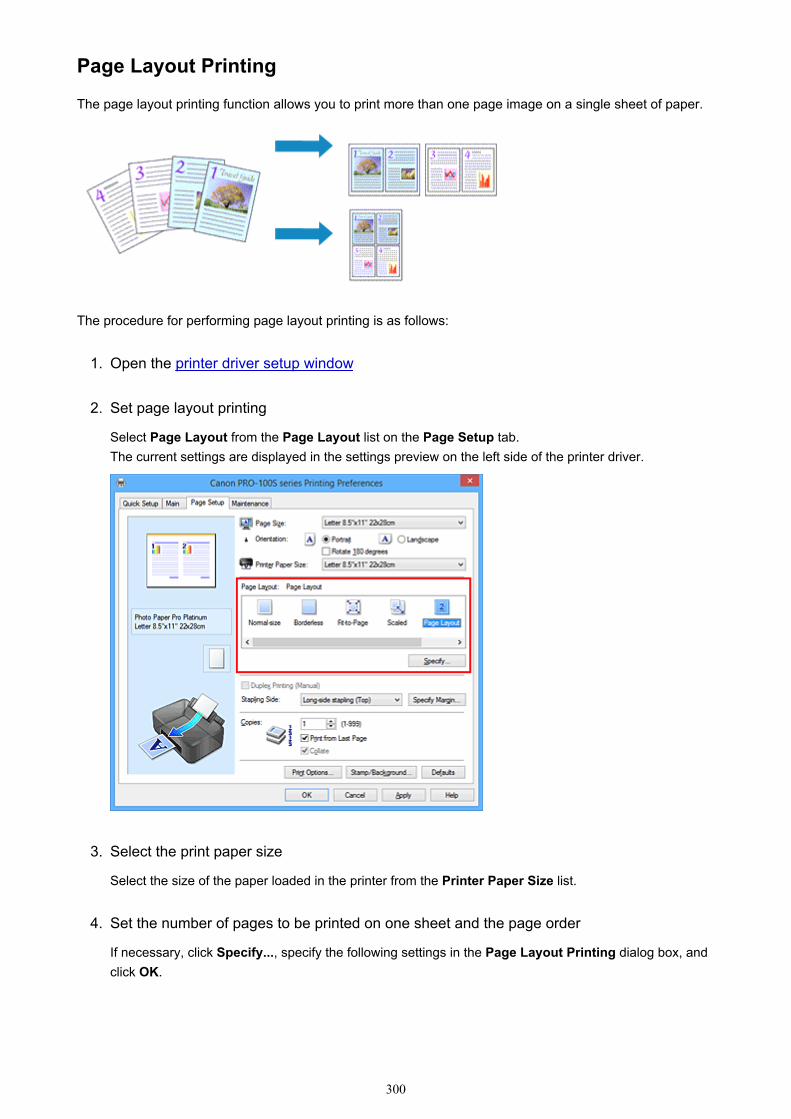
Page Layout Printing
The page layout printing function allows you to print more than one page image on a single sheet of paper.
The procedure for performing page layout printing is as follows:
1. Open the printer driver setup window
2. Set page layout printing
Select Page Layout from the Page Layout list on the Page Setup tab.The current settings are displayed in the settings preview on the left side of the printer driver.
3. Select the print paper size
Select the size of the paper loaded in the printer from the Printer Paper Size list.
4. Set the number of pages to be printed on one sheet and the page order
If necessary, click Specify..., specify the following settings in the Page Layout Printing dialog box, andclick OK.
300
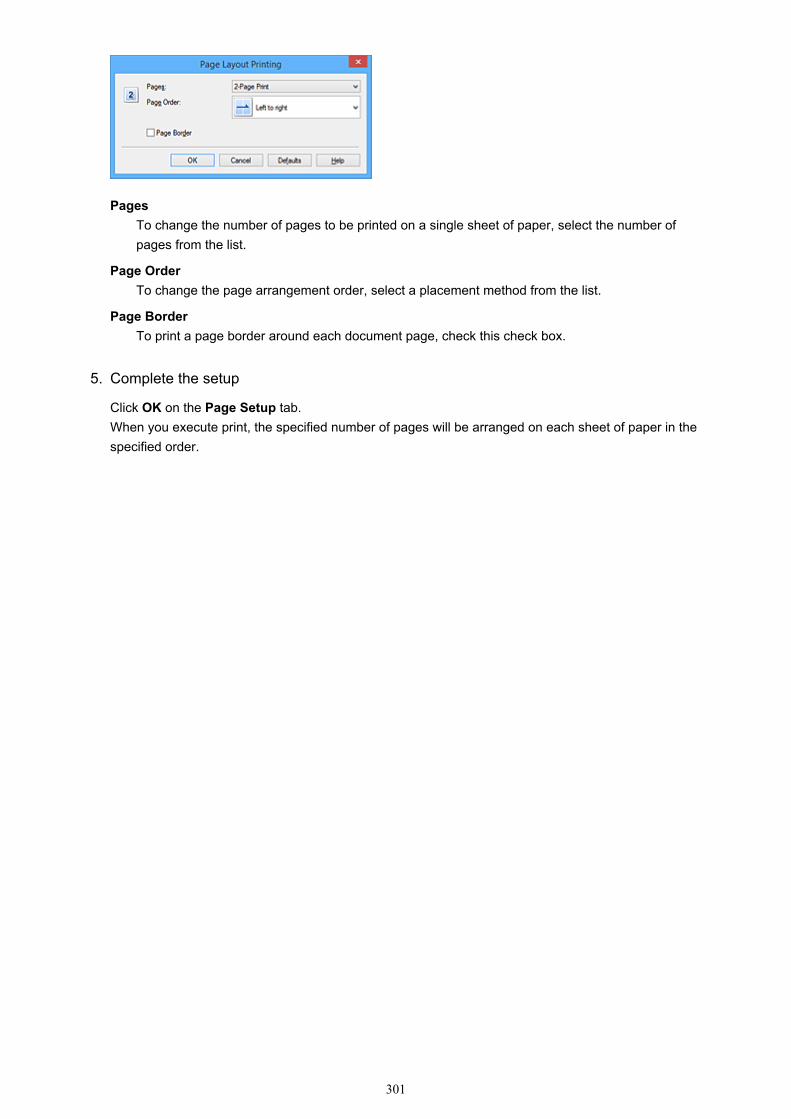
PagesTo change the number of pages to be printed on a single sheet of paper, select the number ofpages from the list.
Page OrderTo change the page arrangement order, select a placement method from the list.
Page BorderTo print a page border around each document page, check this check box.
5. Complete the setup
Click OK on the Page Setup tab.When you execute print, the specified number of pages will be arranged on each sheet of paper in thespecified order.
301
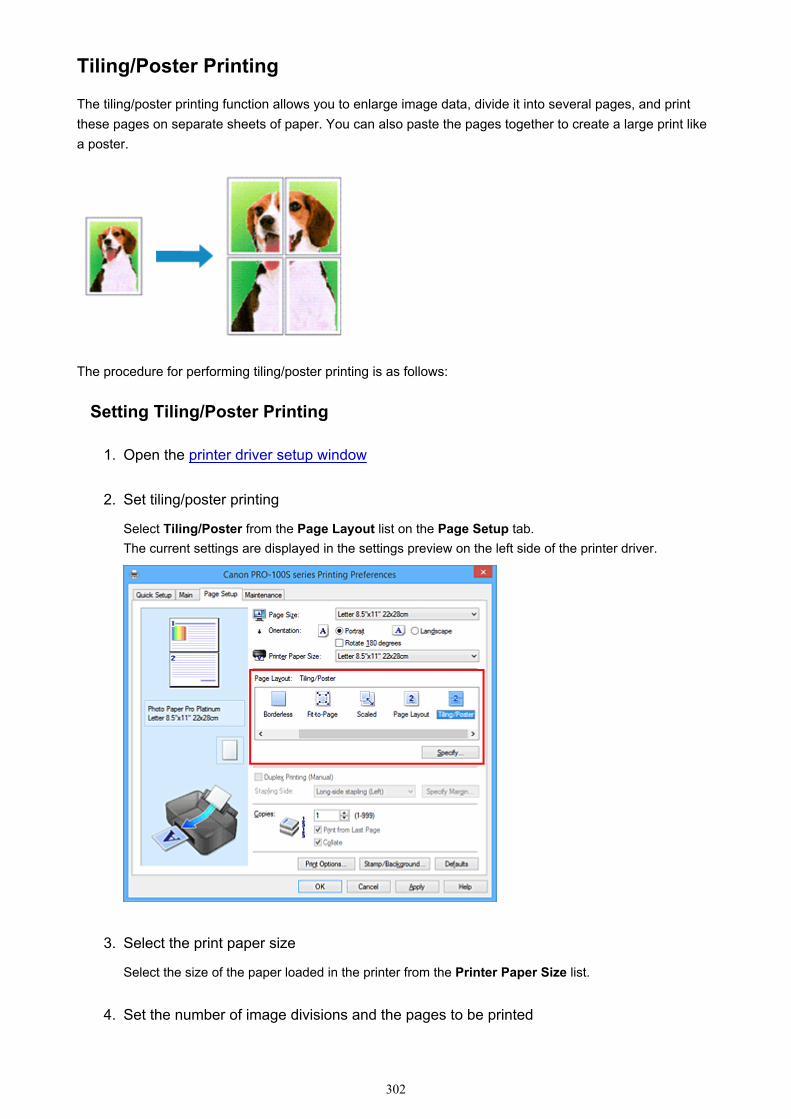
Tiling/Poster Printing
The tiling/poster printing function allows you to enlarge image data, divide it into several pages, and printthese pages on separate sheets of paper. You can also paste the pages together to create a large print likea poster.
The procedure for performing tiling/poster printing is as follows:
Setting Tiling/Poster Printing
1. Open the printer driver setup window
2. Set tiling/poster printing
Select Tiling/Poster from the Page Layout list on the Page Setup tab.The current settings are displayed in the settings preview on the left side of the printer driver.
3. Select the print paper size
Select the size of the paper loaded in the printer from the Printer Paper Size list.
4. Set the number of image divisions and the pages to be printed
302
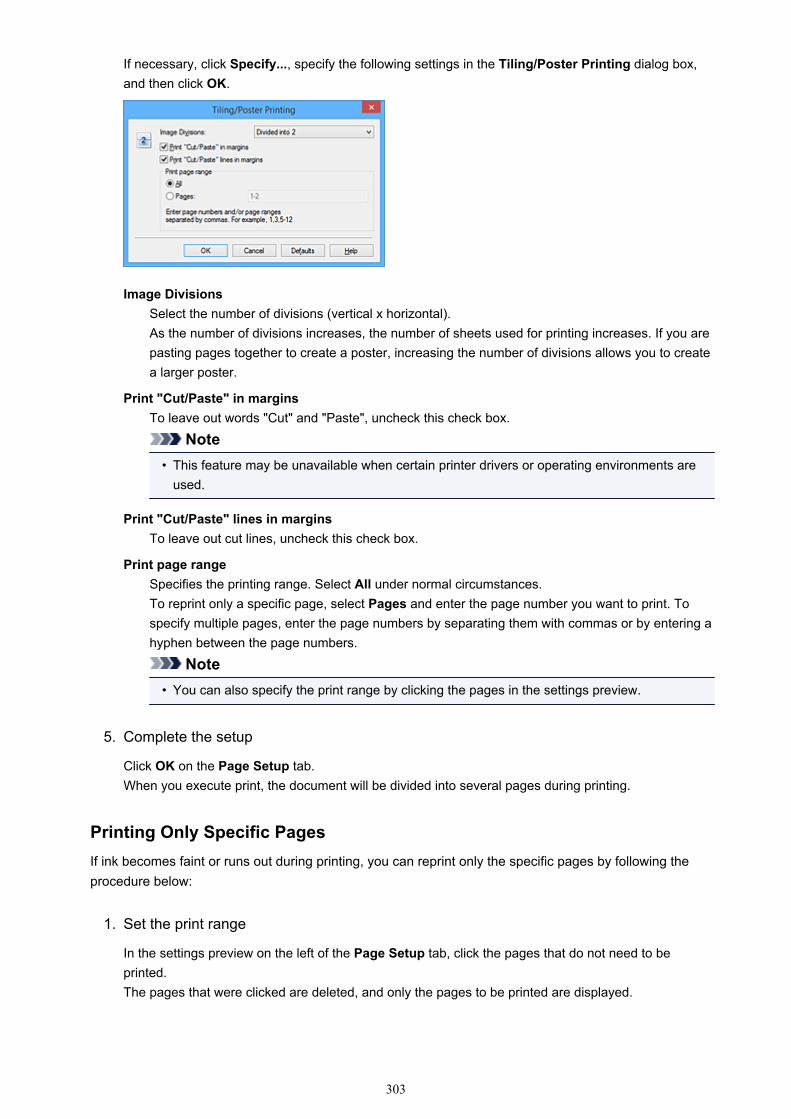
If necessary, click Specify..., specify the following settings in the Tiling/Poster Printing dialog box,and then click OK.
Image DivisionsSelect the number of divisions (vertical x horizontal).As the number of divisions increases, the number of sheets used for printing increases. If you arepasting pages together to create a poster, increasing the number of divisions allows you to createa larger poster.
Print "Cut/Paste" in marginsTo leave out words "Cut" and "Paste", uncheck this check box.
Note• This feature may be unavailable when certain printer drivers or operating environments are
used.
Print "Cut/Paste" lines in marginsTo leave out cut lines, uncheck this check box.
Print page rangeSpecifies the printing range. Select All under normal circumstances.To reprint only a specific page, select Pages and enter the page number you want to print. Tospecify multiple pages, enter the page numbers by separating them with commas or by entering ahyphen between the page numbers.
Note• You can also specify the print range by clicking the pages in the settings preview.
5. Complete the setup
Click OK on the Page Setup tab.When you execute print, the document will be divided into several pages during printing.
Printing Only Specific PagesIf ink becomes faint or runs out during printing, you can reprint only the specific pages by following theprocedure below:
1. Set the print range
In the settings preview on the left of the Page Setup tab, click the pages that do not need to beprinted.The pages that were clicked are deleted, and only the pages to be printed are displayed.
303
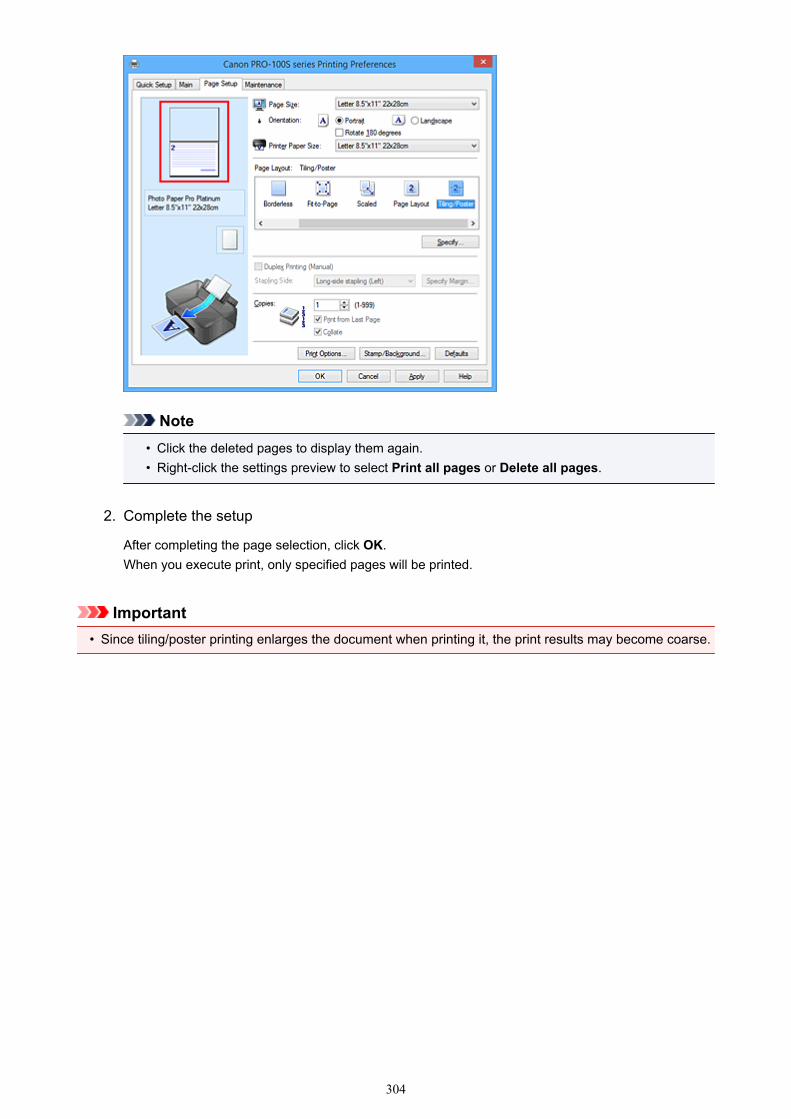
Note• Click the deleted pages to display them again.• Right-click the settings preview to select Print all pages or Delete all pages.
2. Complete the setup
After completing the page selection, click OK.When you execute print, only specified pages will be printed.
Important• Since tiling/poster printing enlarges the document when printing it, the print results may become coarse.
304
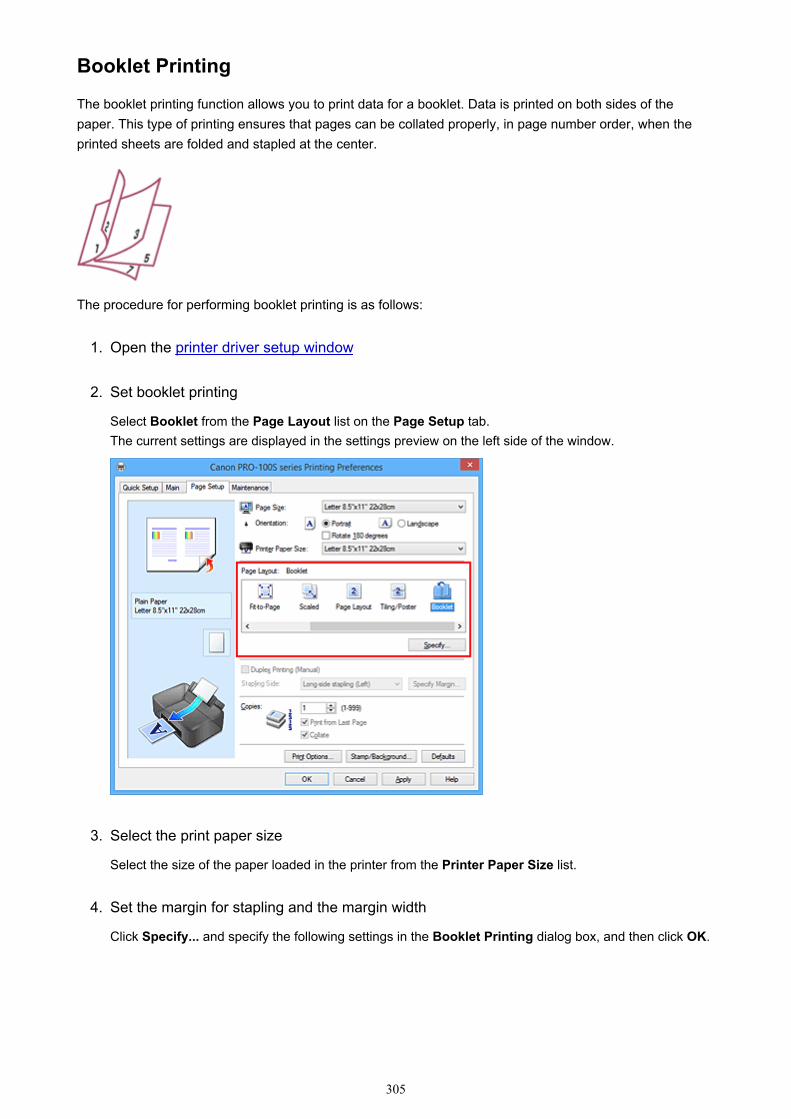
Booklet Printing
The booklet printing function allows you to print data for a booklet. Data is printed on both sides of thepaper. This type of printing ensures that pages can be collated properly, in page number order, when theprinted sheets are folded and stapled at the center.
The procedure for performing booklet printing is as follows:
1. Open the printer driver setup window
2. Set booklet printing
Select Booklet from the Page Layout list on the Page Setup tab.The current settings are displayed in the settings preview on the left side of the window.
3. Select the print paper size
Select the size of the paper loaded in the printer from the Printer Paper Size list.
4. Set the margin for stapling and the margin width
Click Specify... and specify the following settings in the Booklet Printing dialog box, and then click OK.
305
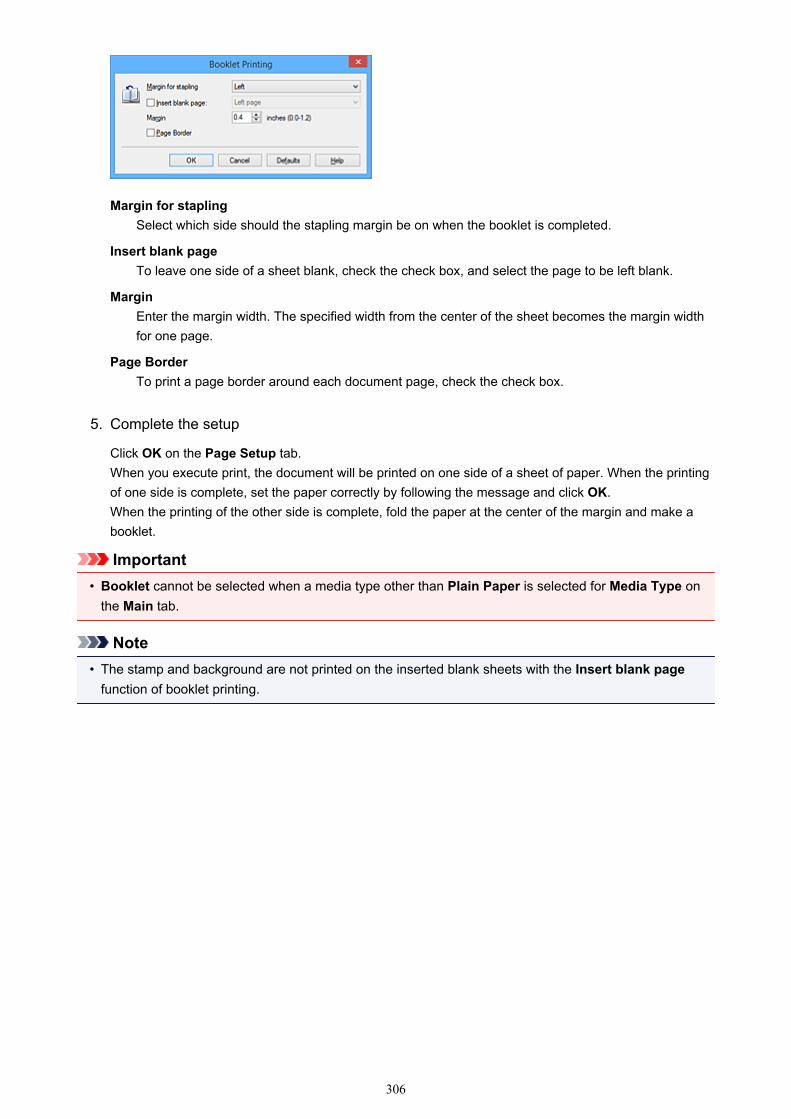
Margin for staplingSelect which side should the stapling margin be on when the booklet is completed.
Insert blank pageTo leave one side of a sheet blank, check the check box, and select the page to be left blank.
MarginEnter the margin width. The specified width from the center of the sheet becomes the margin widthfor one page.
Page BorderTo print a page border around each document page, check the check box.
5. Complete the setup
Click OK on the Page Setup tab.When you execute print, the document will be printed on one side of a sheet of paper. When the printingof one side is complete, set the paper correctly by following the message and click OK.When the printing of the other side is complete, fold the paper at the center of the margin and make abooklet.
Important• Booklet cannot be selected when a media type other than Plain Paper is selected for Media Type on
the Main tab.
Note• The stamp and background are not printed on the inserted blank sheets with the Insert blank page
function of booklet printing.
306
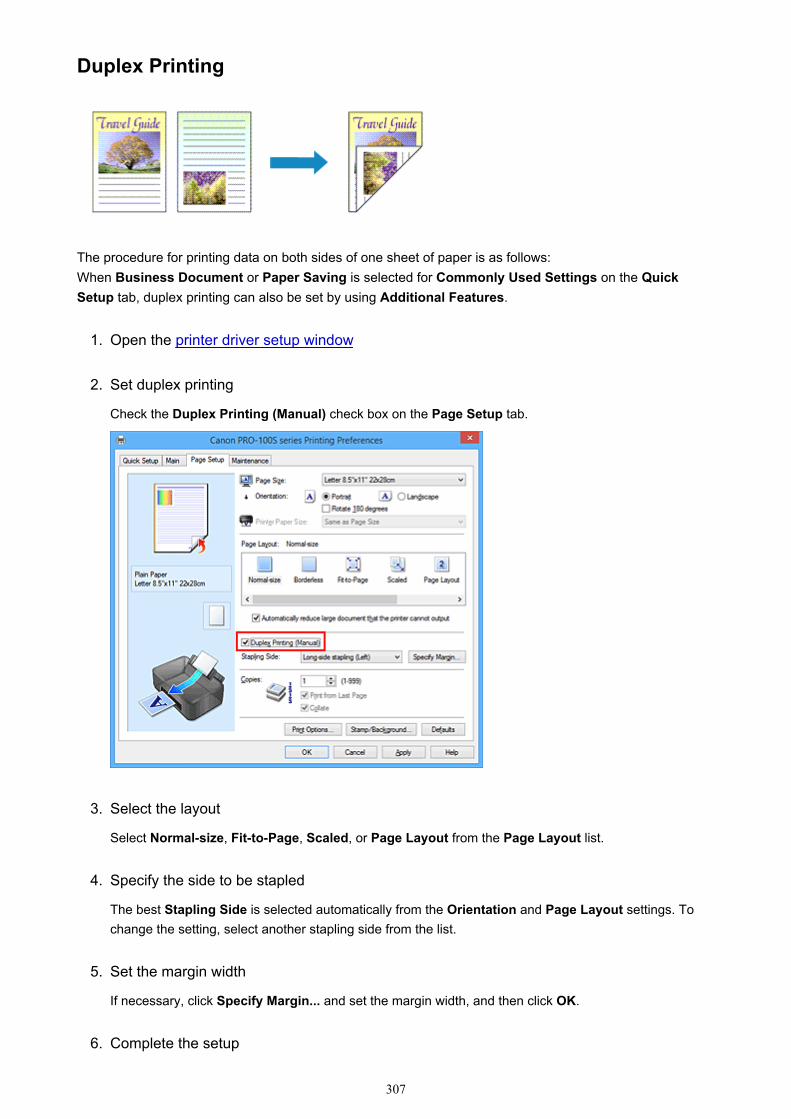
Duplex Printing
The procedure for printing data on both sides of one sheet of paper is as follows:When Business Document or Paper Saving is selected for Commonly Used Settings on the QuickSetup tab, duplex printing can also be set by using Additional Features.
1. Open the printer driver setup window
2. Set duplex printing
Check the Duplex Printing (Manual) check box on the Page Setup tab.
3. Select the layout
Select Normal-size, Fit-to-Page, Scaled, or Page Layout from the Page Layout list.
4. Specify the side to be stapled
The best Stapling Side is selected automatically from the Orientation and Page Layout settings. Tochange the setting, select another stapling side from the list.
5. Set the margin width
If necessary, click Specify Margin... and set the margin width, and then click OK.
6. Complete the setup
307
Click OK on the Page Setup tab.When you execute print, the document is first printed on one side of a sheet of paper. After one side isprinted, reload the paper correctly according to the message.Then click Start Printing to print the opposite side.
Important• When a media type other than Plain Paper is selected from Media Type on the Main tab, Duplex
Printing (Manual) appears grayed out and is unavailable.• When Borderless, Tiling/Poster or Booklet is selected from the Page Layout list, Duplex Printing
(Manual) and Stapling Side appear grayed out and are unavailable.
Note• If the back side of the paper becomes smudged during duplex printing, perform Bottom Plate Cleaning
in the Maintenance tab.
Related TopicsCleaning Inside the PrinterChanging the Printer Operation Mode
308
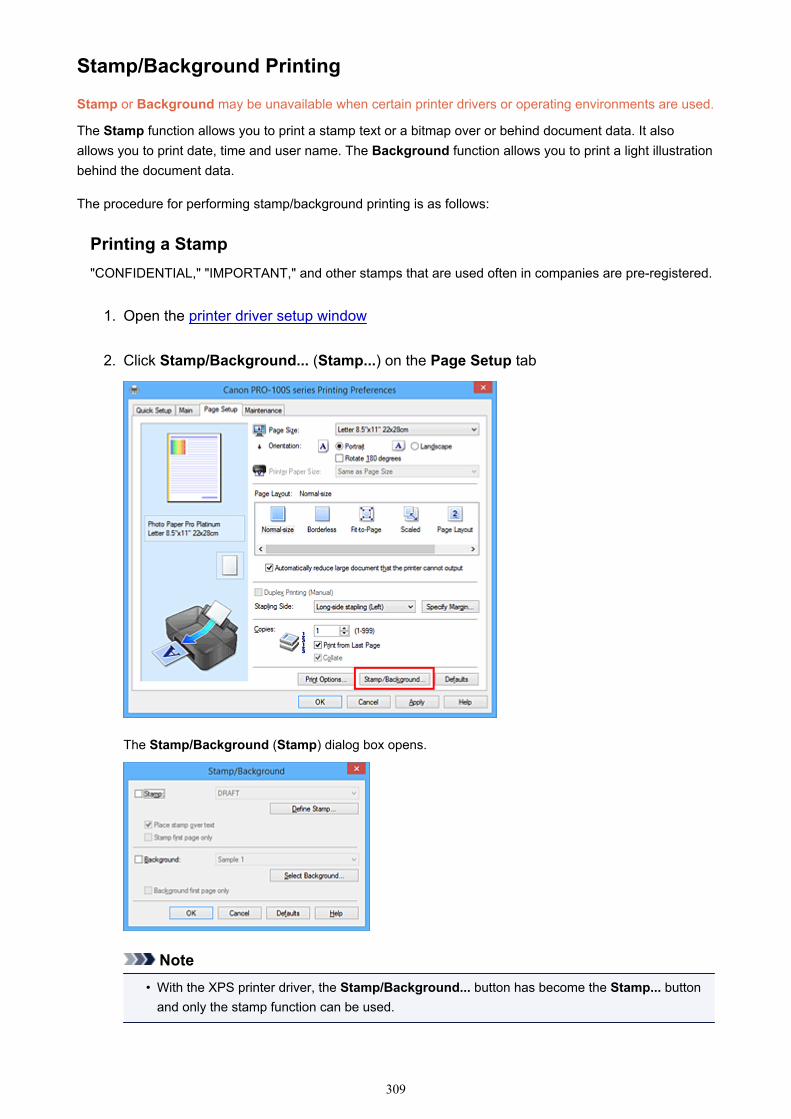
Stamp/Background Printing
Stamp or Background may be unavailable when certain printer drivers or operating environments are used.
The Stamp function allows you to print a stamp text or a bitmap over or behind document data. It alsoallows you to print date, time and user name. The Background function allows you to print a light illustrationbehind the document data.
The procedure for performing stamp/background printing is as follows:
Printing a Stamp"CONFIDENTIAL," "IMPORTANT," and other stamps that are used often in companies are pre-registered.
1. Open the printer driver setup window
2. Click Stamp/Background... (Stamp...) on the Page Setup tab
The Stamp/Background (Stamp) dialog box opens.
Note• With the XPS printer driver, the Stamp/Background... button has become the Stamp... button
and only the stamp function can be used.
309
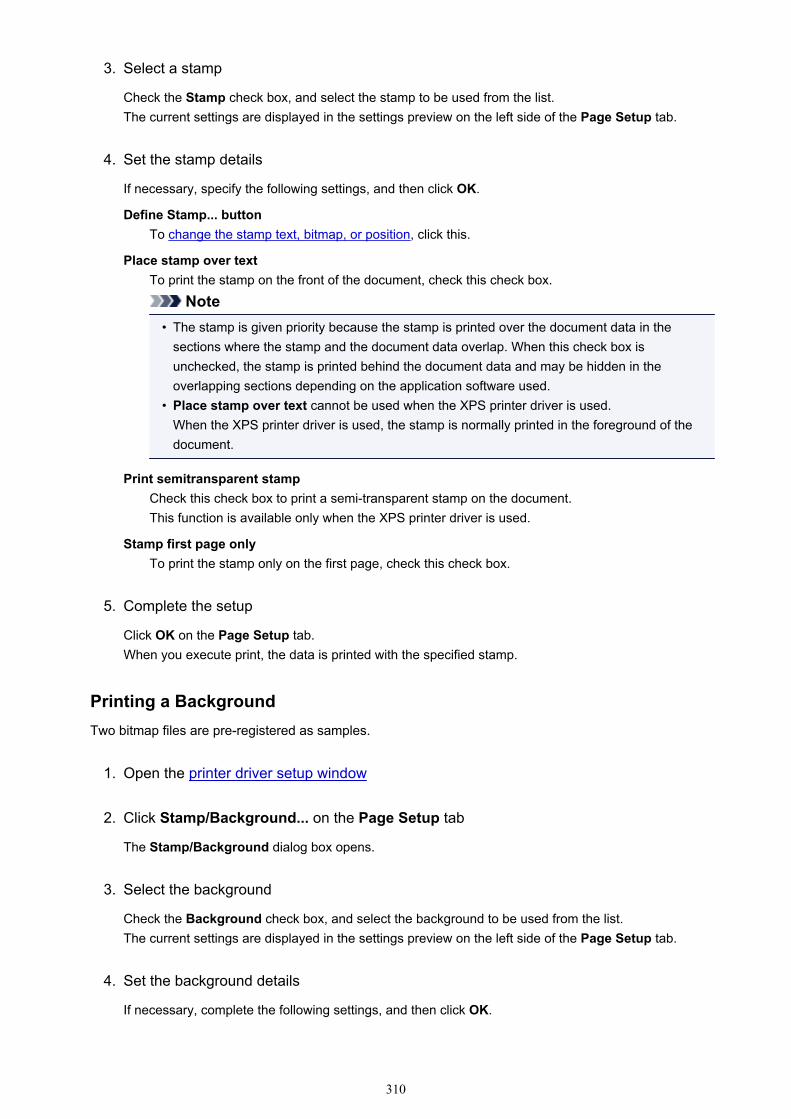
3. Select a stamp
Check the Stamp check box, and select the stamp to be used from the list.The current settings are displayed in the settings preview on the left side of the Page Setup tab.
4. Set the stamp details
If necessary, specify the following settings, and then click OK.
Define Stamp... buttonTo change the stamp text, bitmap, or position, click this.
Place stamp over textTo print the stamp on the front of the document, check this check box.
Note• The stamp is given priority because the stamp is printed over the document data in the
sections where the stamp and the document data overlap. When this check box isunchecked, the stamp is printed behind the document data and may be hidden in theoverlapping sections depending on the application software used.
• Place stamp over text cannot be used when the XPS printer driver is used.When the XPS printer driver is used, the stamp is normally printed in the foreground of thedocument.
Print semitransparent stampCheck this check box to print a semi-transparent stamp on the document.This function is available only when the XPS printer driver is used.
Stamp first page onlyTo print the stamp only on the first page, check this check box.
5. Complete the setup
Click OK on the Page Setup tab.When you execute print, the data is printed with the specified stamp.
Printing a BackgroundTwo bitmap files are pre-registered as samples.
1. Open the printer driver setup window
2. Click Stamp/Background... on the Page Setup tab
The Stamp/Background dialog box opens.
3. Select the background
Check the Background check box, and select the background to be used from the list.The current settings are displayed in the settings preview on the left side of the Page Setup tab.
4. Set the background details
If necessary, complete the following settings, and then click OK.
310
Select Background... buttonTo use another background or change the layout or density of a background, click this.
Background first page onlyTo print the background only on the first page, check this check box.
5. Complete the setup
Click OK on the Page Setup tab.When you execute print, the data is printed with the specified background.
Important• When Borderless is selected, the Stamp/Background... (Stamp...) button appears grayed out and is
unavailable.
Note• The stamp and background are not printed on blank sheets inserted with the Insert blank page
function of booklet printing.
Related TopicsRegistering a StampRegistering Image Data to be Used as a Background
311
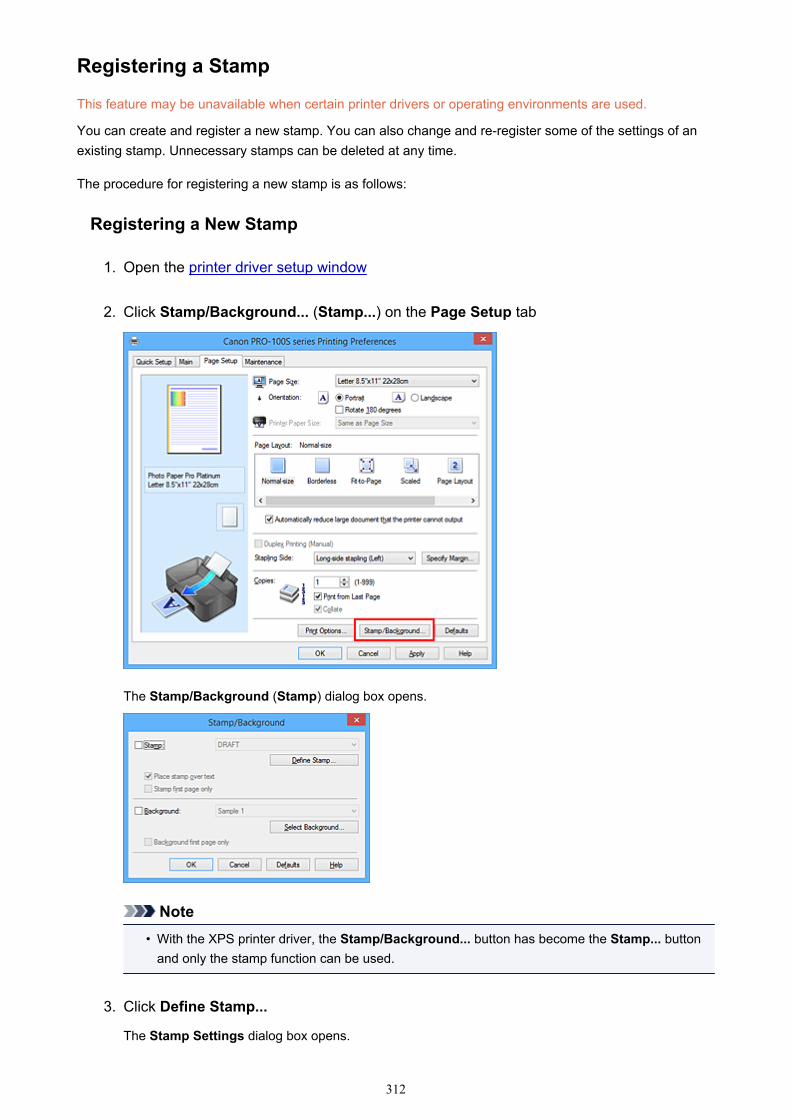
Registering a Stamp
This feature may be unavailable when certain printer drivers or operating environments are used.
You can create and register a new stamp. You can also change and re-register some of the settings of anexisting stamp. Unnecessary stamps can be deleted at any time.
The procedure for registering a new stamp is as follows:
Registering a New Stamp
1. Open the printer driver setup window
2. Click Stamp/Background... (Stamp...) on the Page Setup tab
The Stamp/Background (Stamp) dialog box opens.
Note• With the XPS printer driver, the Stamp/Background... button has become the Stamp... button
and only the stamp function can be used.
3. Click Define Stamp...
The Stamp Settings dialog box opens.
312
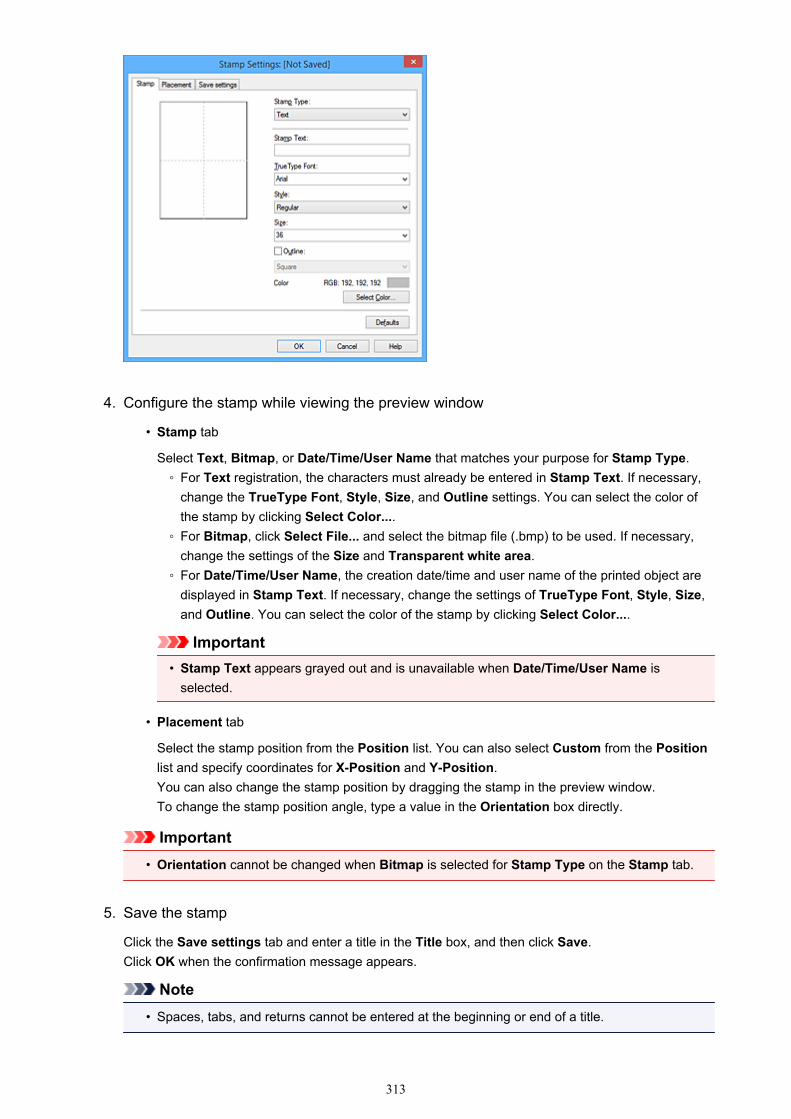
4. Configure the stamp while viewing the preview window
• Stamp tab
Select Text, Bitmap, or Date/Time/User Name that matches your purpose for Stamp Type.◦ For Text registration, the characters must already be entered in Stamp Text. If necessary,
change the TrueType Font, Style, Size, and Outline settings. You can select the color ofthe stamp by clicking Select Color....
◦ For Bitmap, click Select File... and select the bitmap file (.bmp) to be used. If necessary,change the settings of the Size and Transparent white area.
◦ For Date/Time/User Name, the creation date/time and user name of the printed object aredisplayed in Stamp Text. If necessary, change the settings of TrueType Font, Style, Size,and Outline. You can select the color of the stamp by clicking Select Color....
Important• Stamp Text appears grayed out and is unavailable when Date/Time/User Name is
selected.
• Placement tab
Select the stamp position from the Position list. You can also select Custom from the Positionlist and specify coordinates for X-Position and Y-Position.You can also change the stamp position by dragging the stamp in the preview window.To change the stamp position angle, type a value in the Orientation box directly.
Important• Orientation cannot be changed when Bitmap is selected for Stamp Type on the Stamp tab.
5. Save the stamp
Click the Save settings tab and enter a title in the Title box, and then click Save.Click OK when the confirmation message appears.
Note• Spaces, tabs, and returns cannot be entered at the beginning or end of a title.
313
6. Complete the setup
Click OK. The Stamp/Background (Stamp) dialog box opens again.The registered title appears in the Stamp list.
Changing and Registering Some of Stamp Settings
1. Select the stamp for which the settings are to be changed
Select the Stamp check box in the Stamp/Background (Stamp) dialog box. Then from the list, selectthe title of the stamp to be changed.
2. Click Define Stamp...
The Stamp Settings dialog box opens.
3. Configure the stamp while viewing the preview window
4. Overwrite save the stamp
Click Save overwrite on the Save settings tab.When you want to save the stamp with a different title, type a new title in the Title box and click Save.Click OK when the confirmation message appears.
5. Complete the setup
Click OK. The Stamp/Background (Stamp) dialog box opens again.The registered title appears in the Stamp list.
Deleting an Unnecessary Stamp
1. Click Define Stamp... in the Stamp/Background (Stamp) dialog box
The Stamp Settings dialog box opens.
2. Select the stamp to be deleted
Select the title of the stamp you want to delete from the Stamps list on the Save settings tab. Thenclick Delete.Click OK when the confirmation message appears.
3. Complete the setup
Click OK. The Stamp/Background (Stamp) dialog box opens again.
314
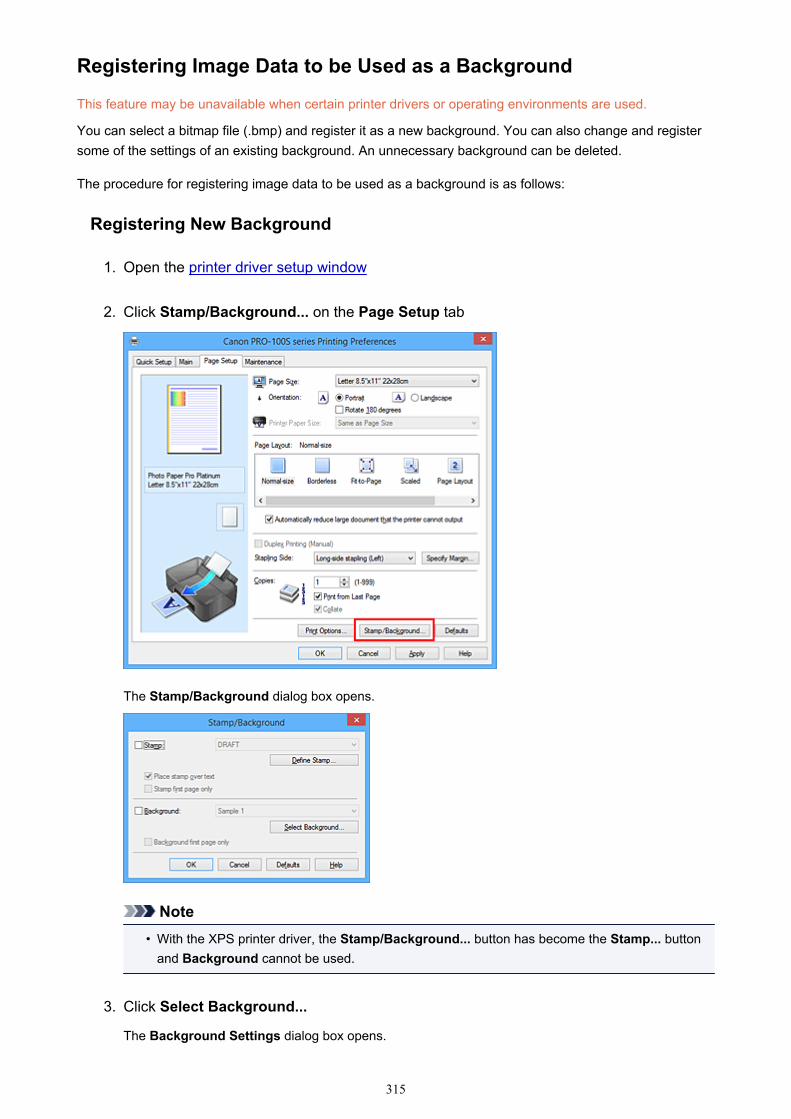
Registering Image Data to be Used as a Background
This feature may be unavailable when certain printer drivers or operating environments are used.
You can select a bitmap file (.bmp) and register it as a new background. You can also change and registersome of the settings of an existing background. An unnecessary background can be deleted.
The procedure for registering image data to be used as a background is as follows:
Registering New Background
1. Open the printer driver setup window
2. Click Stamp/Background... on the Page Setup tab
The Stamp/Background dialog box opens.
Note• With the XPS printer driver, the Stamp/Background... button has become the Stamp... button
and Background cannot be used.
3. Click Select Background...
The Background Settings dialog box opens.
315
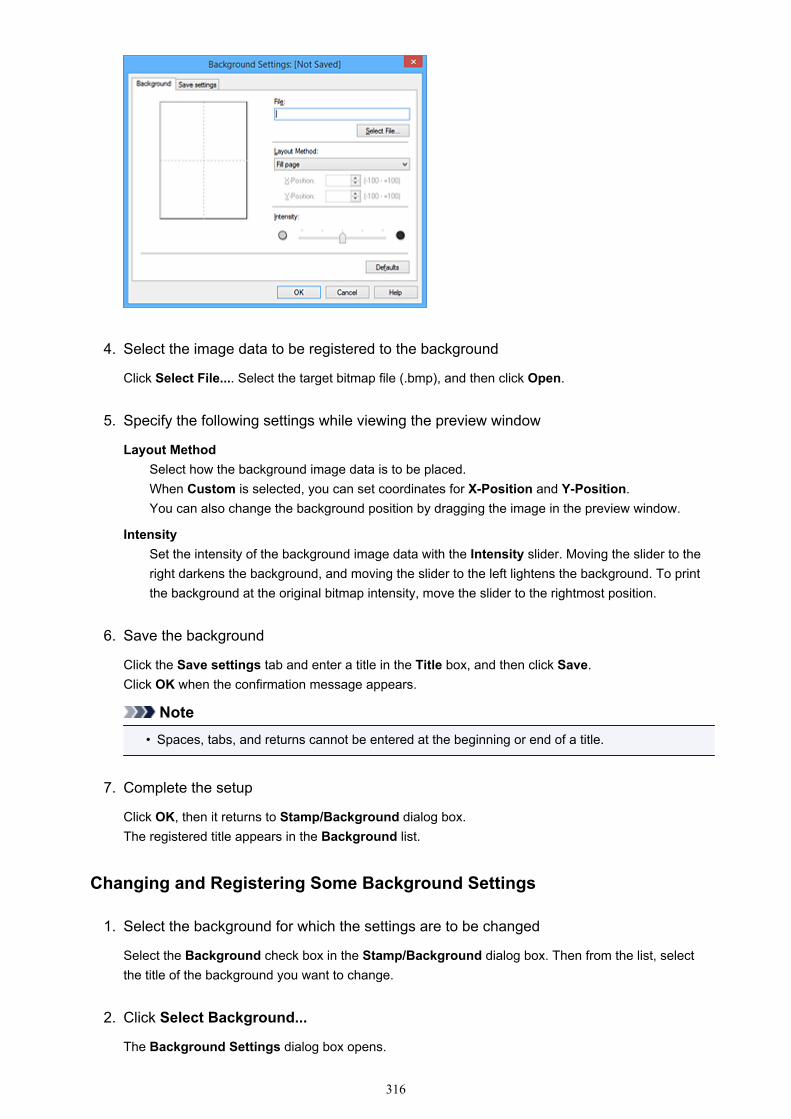
4. Select the image data to be registered to the background
Click Select File.... Select the target bitmap file (.bmp), and then click Open.
5. Specify the following settings while viewing the preview window
Layout MethodSelect how the background image data is to be placed.When Custom is selected, you can set coordinates for X-Position and Y-Position.You can also change the background position by dragging the image in the preview window.
IntensitySet the intensity of the background image data with the Intensity slider. Moving the slider to theright darkens the background, and moving the slider to the left lightens the background. To printthe background at the original bitmap intensity, move the slider to the rightmost position.
6. Save the background
Click the Save settings tab and enter a title in the Title box, and then click Save.Click OK when the confirmation message appears.
Note• Spaces, tabs, and returns cannot be entered at the beginning or end of a title.
7. Complete the setup
Click OK, then it returns to Stamp/Background dialog box.The registered title appears in the Background list.
Changing and Registering Some Background Settings
1. Select the background for which the settings are to be changed
Select the Background check box in the Stamp/Background dialog box. Then from the list, selectthe title of the background you want to change.
2. Click Select Background...
The Background Settings dialog box opens.
316
3. Specify each item on the Background tab while viewing the preview window
4. Save the background
Click Save overwrite on the Save settings tab. When you want to save the background with adifferent title, enter a new title in the Title box and click Save.Click OK when the confirmation message appears.
5. Complete the setup
Click OK, then it returns to Stamp/Background dialog box.The registered title appears in the Background list.
Deleting an Unnecessary Background
1. Click Select Background... in the Stamp/Background dialog box
The Background Settings dialog box opens.
2. Select the background to be deleted
Select the title of the background you want to delete from the Backgrounds list on the Save settingstab, and then click Delete.Click OK when the confirmation message appears.
3. Complete the setup
Click OK, then it returns to Stamp/Background dialog box.
317

Setting Up Envelope Printing
The procedure for performing envelope printing is as follows:
1. Load envelope on the printer
2. Open the printer driver setup window
3. Select the media type
Select Envelope from the Media Type list on the Main tab.
4. Select the paper size
When the Envelope Size Setting dialog box is displayed, select Envelope Com 10 or Envelope DL,and then click OK.
5. Set the orientation
To print the addressee horizontally, select Landscape for Orientation.
6. Complete the setup
Click OK.When you execute print, the information is printed on the envelope.
Important• When you execute envelope printing, guide messages are displayed.
To hide the guide messages, check the Do not show this message again check box.
318

To show the guide again, click the View Printer Status button on the Maintenance tab, and start theCanon IJ Status Monitor.Then click Envelope Printing from Display Guide Message of the Option menu to enable the setting.
319
Printing on Postcards
This section describes the procedure for postcard printing.
1. Load postcard on the printer
2. Open the printer driver setup window
3. Select commonly used settings
Display the Quick Setup tab, and for Commonly Used Settings, select Standard.
4. Select the media type
For Media Type, select Hagaki A, Ink Jet Hagaki, Hagaki K, or Hagaki.
Important• This printer cannot print on postcards that have photos or stickers attached.• When printing on each side of a postcard separately, you will get cleaner printing if you print the
message side first and then print the address side.
5. Select the paper size
For Printer Paper Size, select Hagaki 100x148mm or Hagaki 2 200x148mm.
Important• Return postcards can be used only when you print them from the computer.• When printing a return postcard, always set the paper size to Hagaki 2 200x148mm from your
application software or the printer driver.• Do not fold the return postcard. If a crease is formed, the printer will not be able to feed the
postcard properly, and this condition will cause line shifts or a paper jam.• With return postcards, borderless printing cannot be used.
6. Set the print orientation
To print the address horizontally, set Orientation to Landscape.
7. Select the print quality
For Print Quality, select High or Standard, according to your purpose.
8. Complete the setup
Click OK.When you execute printing, the data will be printed onto the postcard.
Important• When you execute postcard printing, a guide message is displayed.
When the guide message is displayed, select Do not show this message again if you do not want anyguide messages to be displayed.To display guide messages again, open the Maintenance tab and click View Printer Status to start the
320

Canon IJ Status Monitor.On the Option menu, choose Display Guide Message and click Hagaki Printing to enable the setting.
• When printing on media other than postcards, load the media according to usage method of that media,and click Start Printing.
321
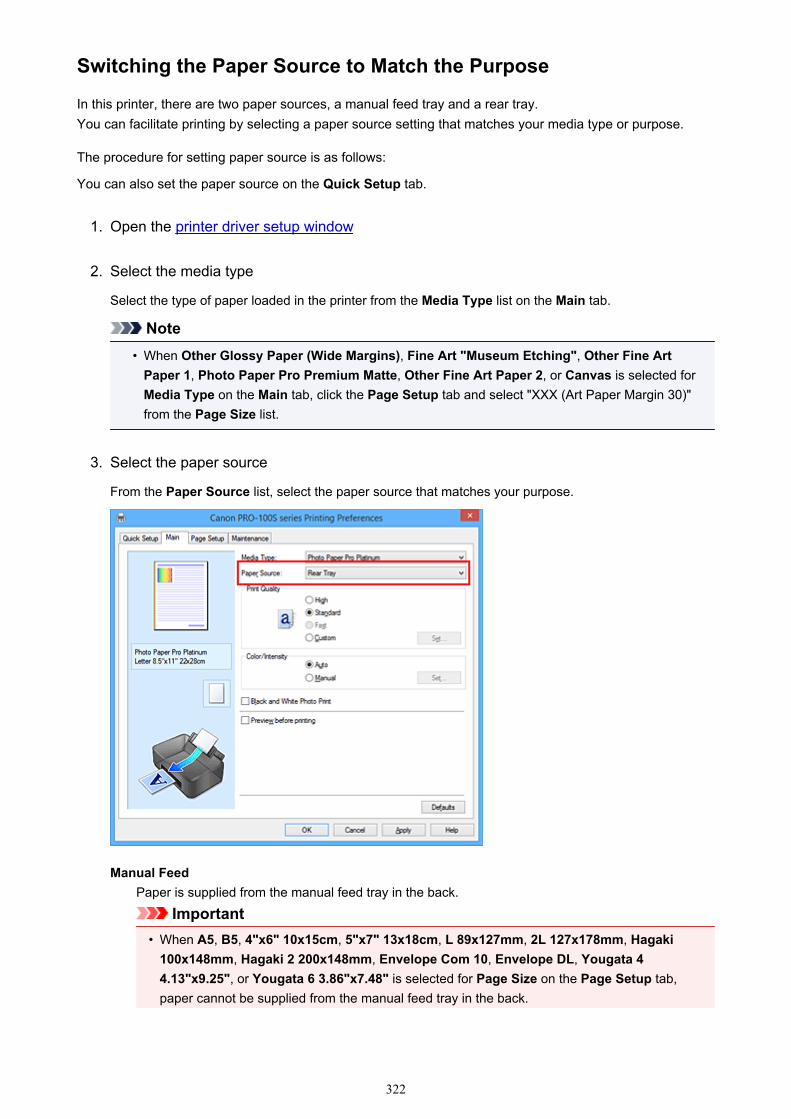
Switching the Paper Source to Match the Purpose
In this printer, there are two paper sources, a manual feed tray and a rear tray.You can facilitate printing by selecting a paper source setting that matches your media type or purpose.
The procedure for setting paper source is as follows:
You can also set the paper source on the Quick Setup tab.
1. Open the printer driver setup window
2. Select the media type
Select the type of paper loaded in the printer from the Media Type list on the Main tab.
Note• When Other Glossy Paper (Wide Margins), Fine Art "Museum Etching", Other Fine Art
Paper 1, Photo Paper Pro Premium Matte, Other Fine Art Paper 2, or Canvas is selected forMedia Type on the Main tab, click the Page Setup tab and select "XXX (Art Paper Margin 30)"from the Page Size list.
3. Select the paper source
From the Paper Source list, select the paper source that matches your purpose.
Manual FeedPaper is supplied from the manual feed tray in the back.
Important• When A5, B5, 4"x6" 10x15cm, 5"x7" 13x18cm, L 89x127mm, 2L 127x178mm, Hagaki
100x148mm, Hagaki 2 200x148mm, Envelope Com 10, Envelope DL, Yougata 44.13"x9.25", or Yougata 6 3.86"x7.48" is selected for Page Size on the Page Setup tab,paper cannot be supplied from the manual feed tray in the back.
322
• When Plain Paper, Glossy Photo Paper, Envelope, Hagaki A, Ink Jet Hagaki, Hagaki K,Hagaki, High Resolution Paper, or T-Shirt Transfers is selected for Media Type on the Maintab, paper cannot be supplied from the manual feed tray in the back.
Rear TrayPaper is fed from the rear tray.
Important• When 14"x17" 36x43cm is selected for Page Size on the Page Setup tab, paper cannot be
supplied from the rear tray.• When Fine Art "Museum Etching", Photo Paper Pro Premium Matte, or Canvas is selected
for Media Type on the Main tab, paper cannot be supplied from the rear tray.
4. Complete the setup
Click OK.When you execute print, the printer uses the specified paper source to print the data.
323
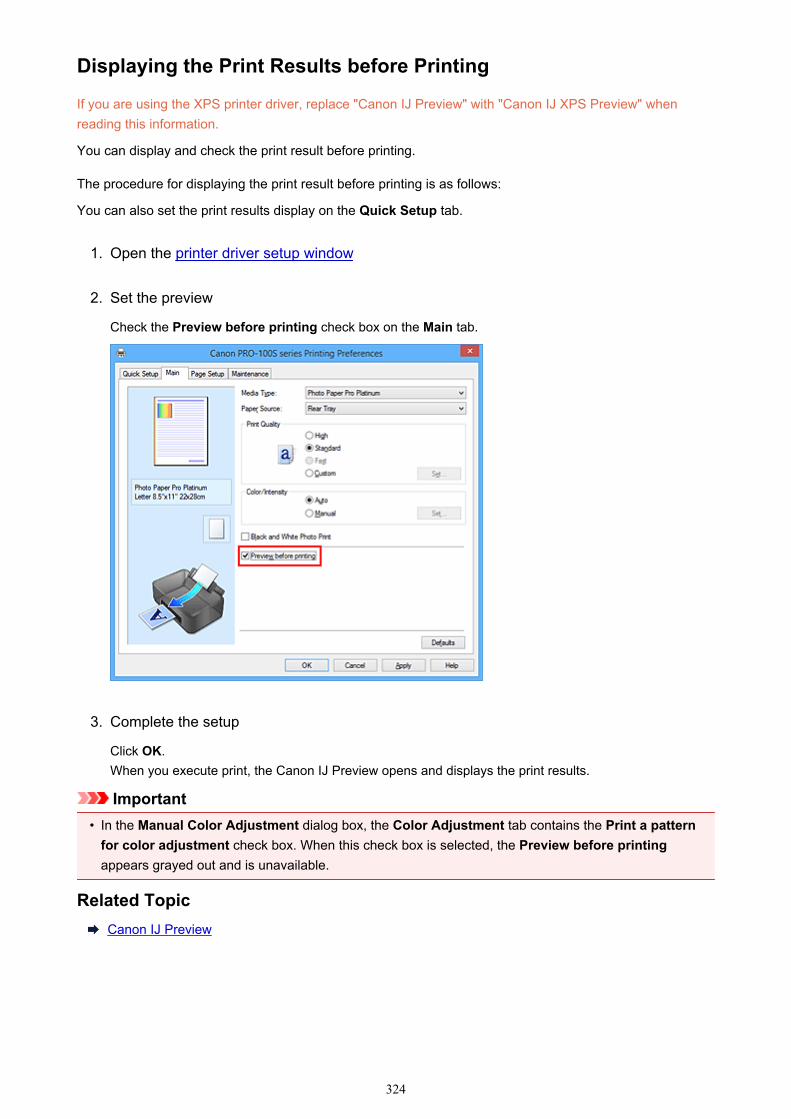
Displaying the Print Results before Printing
If you are using the XPS printer driver, replace "Canon IJ Preview" with "Canon IJ XPS Preview" whenreading this information.
You can display and check the print result before printing.
The procedure for displaying the print result before printing is as follows:
You can also set the print results display on the Quick Setup tab.
1. Open the printer driver setup window
2. Set the preview
Check the Preview before printing check box on the Main tab.
3. Complete the setup
Click OK.When you execute print, the Canon IJ Preview opens and displays the print results.
Important• In the Manual Color Adjustment dialog box, the Color Adjustment tab contains the Print a pattern
for color adjustment check box. When this check box is selected, the Preview before printingappears grayed out and is unavailable.
Related TopicCanon IJ Preview
324
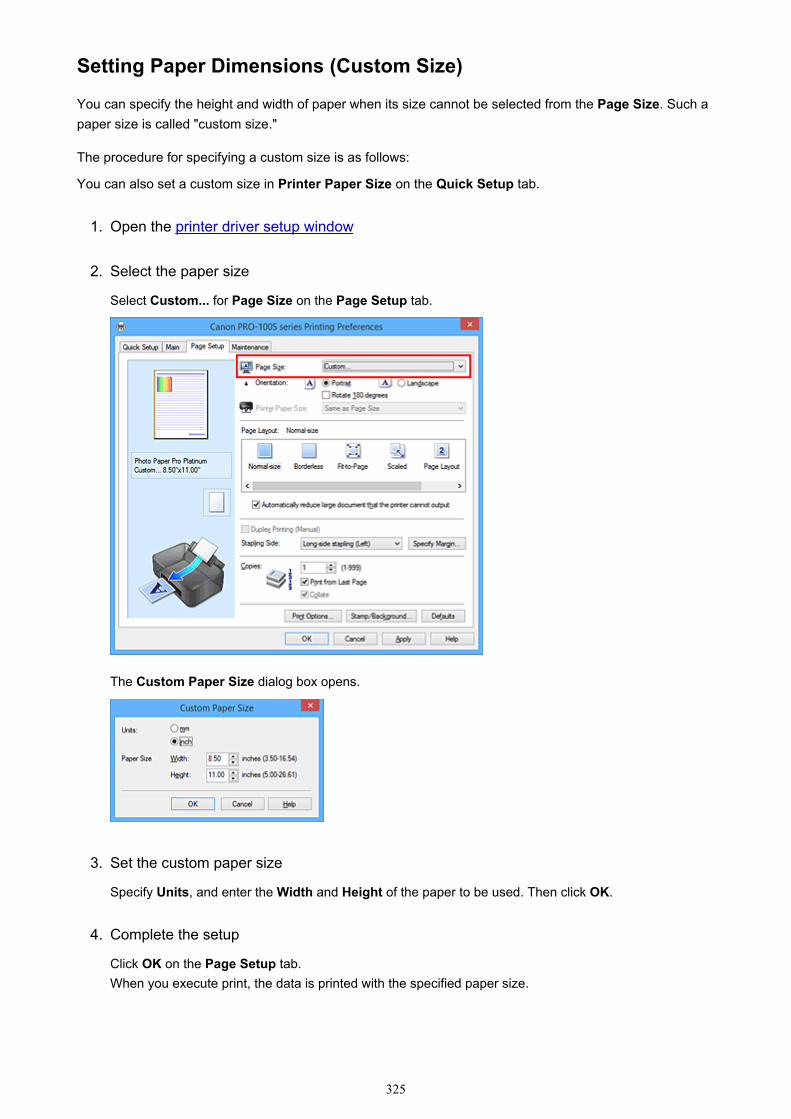
Setting Paper Dimensions (Custom Size)
You can specify the height and width of paper when its size cannot be selected from the Page Size. Such apaper size is called "custom size."
The procedure for specifying a custom size is as follows:
You can also set a custom size in Printer Paper Size on the Quick Setup tab.
1. Open the printer driver setup window
2. Select the paper size
Select Custom... for Page Size on the Page Setup tab.
The Custom Paper Size dialog box opens.
3. Set the custom paper size
Specify Units, and enter the Width and Height of the paper to be used. Then click OK.
4. Complete the setup
Click OK on the Page Setup tab.When you execute print, the data is printed with the specified paper size.
325
Important• If the application software that created the document has a function for specifying height and width
values, use the application software to set the values. If the application software does not have such afunction or if the document does not print correctly, perform the above procedure from the printer driverto set the values.
• When you use a custom paper size to print, specify the size of paper correctly in the Custom PaperSize dialog box.If an error message appears when you use the specified paper size, uncheck the Detect paper widthcheck box on the Custom Settings dialog box of the Maintenance tab.
• Printing may be disabled depending on the size of the specified user-defined media.For information about printable sizes for user-defined media, see "Media Types You Can Use."
Related TopicChanging the Printer Operation Mode
326
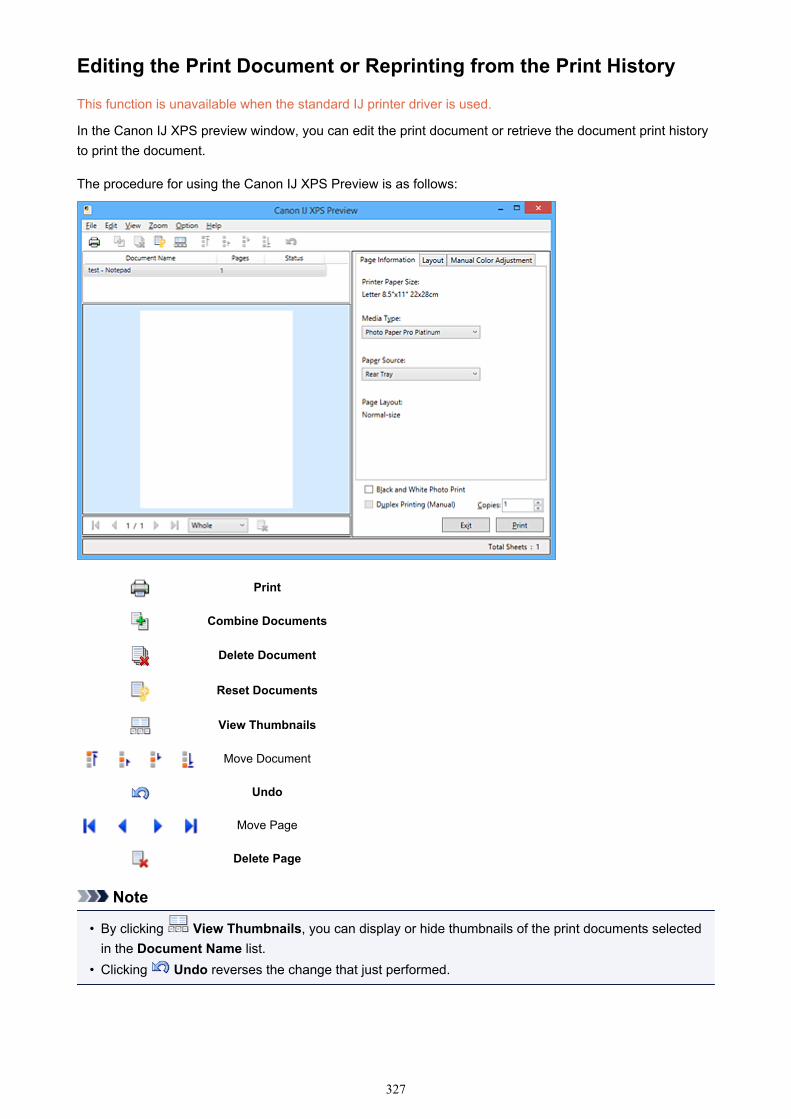
Editing the Print Document or Reprinting from the Print History
This function is unavailable when the standard IJ printer driver is used.
In the Canon IJ XPS preview window, you can edit the print document or retrieve the document print historyto print the document.
The procedure for using the Canon IJ XPS Preview is as follows:
Combine Documents
Delete Document
Reset Documents
View Thumbnails
Move Document
Undo
Move Page
Delete Page
Note
• By clicking View Thumbnails, you can display or hide thumbnails of the print documents selectedin the Document Name list.
• Clicking Undo reverses the change that just performed.
327
Editing and Printing a Print DocumentWhen printing multiple documents or pages, you can combine documents, change the print sequence ofthe documents or pages, or delete documents or pages.
1. Open the printer driver setup window
2. Set the preview
Check the Preview before printing check box on the Main tab.
3. Complete the setup
Click OK.The Canon IJ XPS Preview will start and the print result will be displayed before printing.
4. Editing print documents and print pages
• Combining print documents
You can combine multiple print documents to form a single document. By combining printdocuments, you can prevent blank pages from being inserted when you execute duplex printingor page layout printing.From the Document Name list, select the documents to be combined. On the Edit menu, selectCombine Documents from Documents to combine the documents in the listed sequence.To select multiple print documents, hold down the Ctrl key and click the documents to bemerged, or hold down the Shift key and press the upper arrow or lower arrow key. You can alsoclick a blank area in the document list and drag the mouse to select multiple documents.When you combine documents, the documents selected before the combining are deleted fromthe list and the combined document is added to the list.
• Changing the sequence of print documents or print pages
◦ To change the sequence of the print documents, go to the Document Name list, and selectthe print document to be moved. Next, on the Edit menu, select Move Document fromDocuments, and select the appropriate item. You can also click and drag a print documentto change the print sequence.
◦ To change the sequence of the print pages, click View Thumbnails from the Option menu,and select the print page to be moved. Next, on the Edit menu, select Move Page fromPages, and select the appropriate item. You can also click and drag a print page to changethe print sequence.
• Deleting print documents and print pages
◦ To delete a print document, select the target document from the Document Name list, andon the Edit menu, choose Documents and then Delete Document.
◦ To delete a print page, click View Thumbnails from the Option menu, and select the printpage to be deleted. Next, on the Edit menu, select Delete Page from Pages.
• Print page recovery
You can recover pages that were deleted with Delete Page.To recover pages, select the View Deleted Pages check box from the Option menu, and selectthe pages to be recovered from among the displayed thumbnail pages. Then from the Edit menuchose Pages and then Restore Page.
After editing the print documents or print pages, you can change the print settings on the PageInformation, Layout and Manual Color Adjustment tabs as necessary.
328
Important• To display the multiple documents in the list, open the preview and execute print again.• To return the print documents to their original condition before they were edited in the preview,
on the Edit menu, select Reset Documents from Documents.• If the documents to be combined have different print settings, a message may be displayed.
Check the contents of the displayed message before combining the documents.• If the documents to be combined have different output paper sizes and duplex printing or page
layout printing is to be performed, the printer may not produce the expected print results forcertain print pages.Check the preview before printing.
• Depending on the print settings of the print document, some functions may not be available inthe Canon IJ XPS preview.
Note• You can rename Document Name to any name.
5. Executing print
Click Print.When you execute print, the printer uses the specified settings to print the data.
Reprinting from the Print HistoryWhen you click Save Print History on the File menu to enable the setting, the document printed from thepreview is saved, and you can reprint the document with the same settings.
1. Displaying the print history
Open the printer driver setup window. Then on the Maintenance tab, select View Print History.The saved print document is displayed in the preview.
Important• To limit the number of print history registrations, click History Entry Limit on the File menu.• If the limit on the number of registration is exceeded, the print history registrations are deleted
starting from the oldest one.
2. Selecting a print document
From the Document Name list, select the document to be printed.
3. Executing print
Click Print.
Related TopicDisplaying the Print Results before Printing
329
Changing the Print Quality and Correcting Image Data
Setting the Print Quality Level (Custom)
Printing a Color Document in Monochrome
Adjusting Tone
Adjusting Tone Using Sample Patterns (Printer Driver)
Specifying Color Correction
Optimal Photo Printing of Image Data
Adjusting Colors with the Printer Driver
Printing with ICC Profiles
Interpreting the ICC Profile
Adjusting Color Balance
Adjusting Color Balance Using Sample Patterns (Printer Driver)
Adjusting Brightness
Adjusting Intensity
Adjusting Contrast
Adjusting Intensity/Contrast Using Sample Patterns (Printer Driver)
330
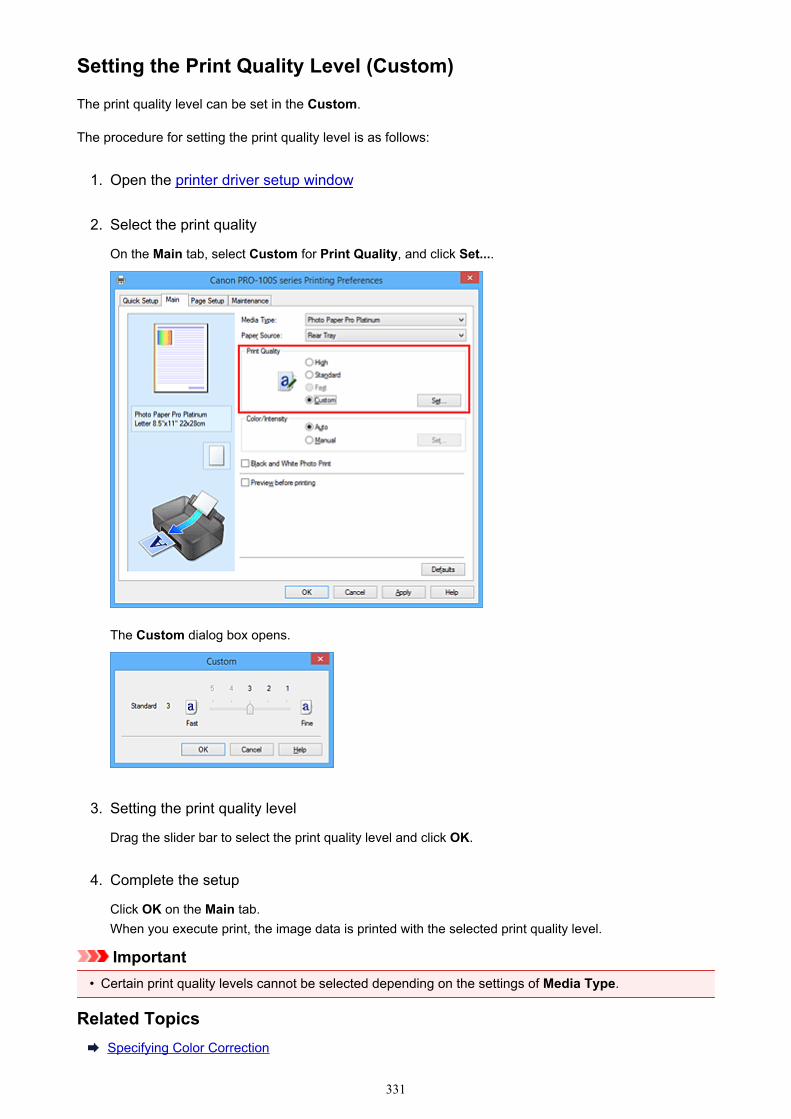
Setting the Print Quality Level (Custom)
The print quality level can be set in the Custom.
The procedure for setting the print quality level is as follows:
1. Open the printer driver setup window
2. Select the print quality
On the Main tab, select Custom for Print Quality, and click Set....
The Custom dialog box opens.
3. Setting the print quality level
Drag the slider bar to select the print quality level and click OK.
4. Complete the setup
Click OK on the Main tab.When you execute print, the image data is printed with the selected print quality level.
Important• Certain print quality levels cannot be selected depending on the settings of Media Type.
Related TopicsSpecifying Color Correction
331

Adjusting Color BalanceAdjusting BrightnessAdjusting IntensityAdjusting Contrast
332
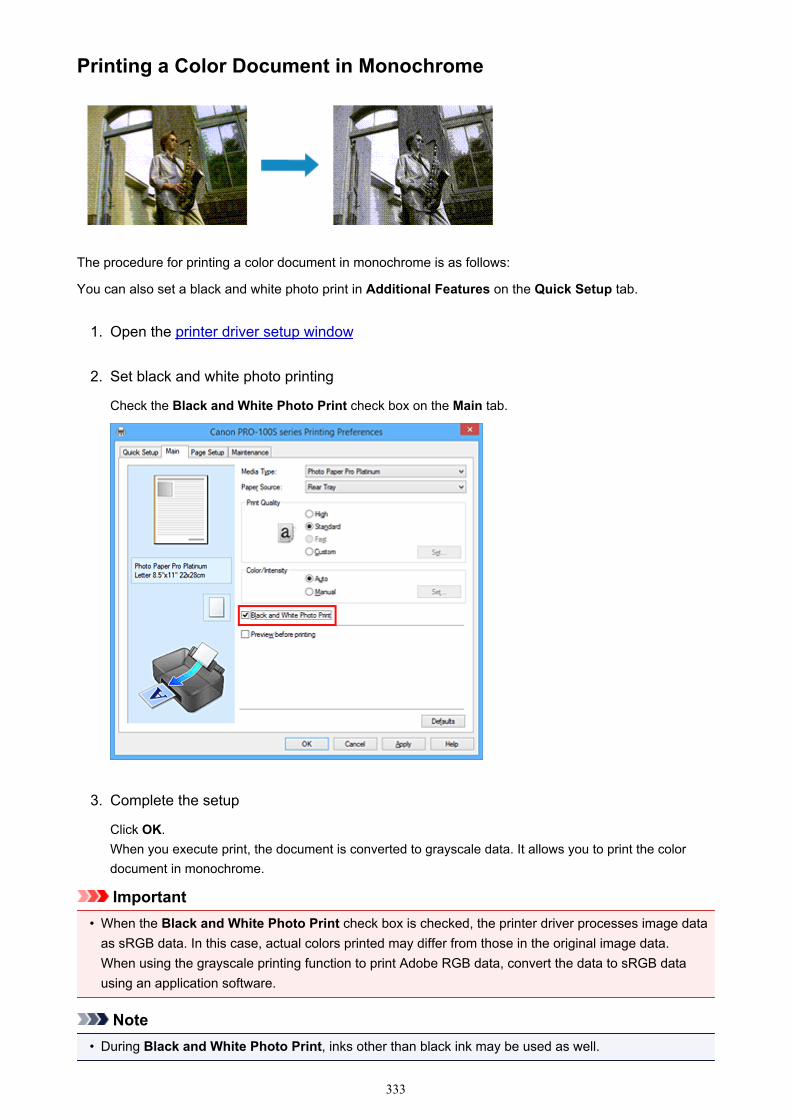
Printing a Color Document in Monochrome
The procedure for printing a color document in monochrome is as follows:
You can also set a black and white photo print in Additional Features on the Quick Setup tab.
1. Open the printer driver setup window
2. Set black and white photo printing
Check the Black and White Photo Print check box on the Main tab.
3. Complete the setup
Click OK.When you execute print, the document is converted to grayscale data. It allows you to print the colordocument in monochrome.
Important• When the Black and White Photo Print check box is checked, the printer driver processes image data
as sRGB data. In this case, actual colors printed may differ from those in the original image data.When using the grayscale printing function to print Adobe RGB data, convert the data to sRGB datausing an application software.
Note• During Black and White Photo Print, inks other than black ink may be used as well.
333

Related TopicAdjusting Tone
334
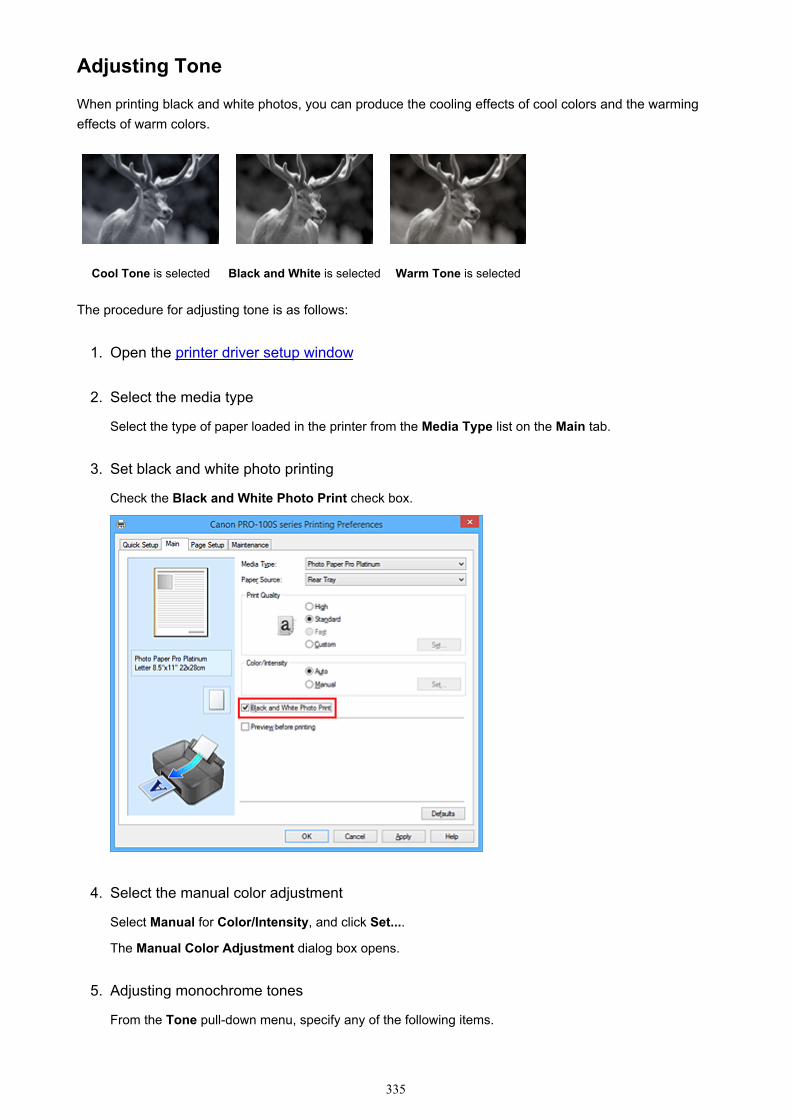
Adjusting Tone
When printing black and white photos, you can produce the cooling effects of cool colors and the warmingeffects of warm colors.
Cool Tone is selected Black and White is selected Warm Tone is selected
The procedure for adjusting tone is as follows:
1. Open the printer driver setup window
2. Select the media type
Select the type of paper loaded in the printer from the Media Type list on the Main tab.
3. Set black and white photo printing
Check the Black and White Photo Print check box.
4. Select the manual color adjustment
Select Manual for Color/Intensity, and click Set....
The Manual Color Adjustment dialog box opens.
5. Adjusting monochrome tones
From the Tone pull-down menu, specify any of the following items.
335
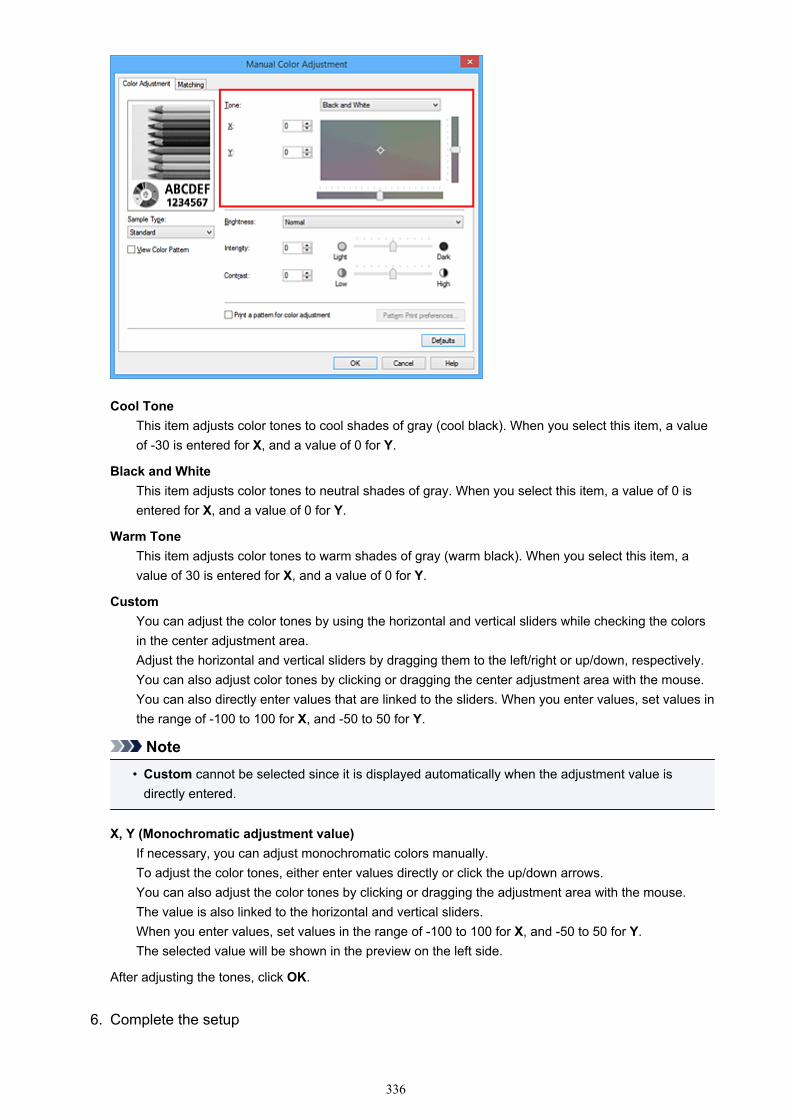
Cool ToneThis item adjusts color tones to cool shades of gray (cool black). When you select this item, a valueof -30 is entered for X, and a value of 0 for Y.
Black and WhiteThis item adjusts color tones to neutral shades of gray. When you select this item, a value of 0 isentered for X, and a value of 0 for Y.
Warm ToneThis item adjusts color tones to warm shades of gray (warm black). When you select this item, avalue of 30 is entered for X, and a value of 0 for Y.
CustomYou can adjust the color tones by using the horizontal and vertical sliders while checking the colorsin the center adjustment area.Adjust the horizontal and vertical sliders by dragging them to the left/right or up/down, respectively.You can also adjust color tones by clicking or dragging the center adjustment area with the mouse.You can also directly enter values that are linked to the sliders. When you enter values, set values inthe range of -100 to 100 for X, and -50 to 50 for Y.
Note• Custom cannot be selected since it is displayed automatically when the adjustment value is
directly entered.
X, Y (Monochromatic adjustment value)If necessary, you can adjust monochromatic colors manually.To adjust the color tones, either enter values directly or click the up/down arrows.You can also adjust the color tones by clicking or dragging the adjustment area with the mouse.The value is also linked to the horizontal and vertical sliders.When you enter values, set values in the range of -100 to 100 for X, and -50 to 50 for Y.The selected value will be shown in the preview on the left side.
After adjusting the tones, click OK.
6. Complete the setup
336

Click OK on the Main tab.When you execute print, the color document is converted to grayscale data with adjusted tones. It allowsyou to print the color document in monochrome.
Related TopicsPrinting a Color Document in MonochromeAdjusting BrightnessAdjusting IntensityAdjusting Contrast
337
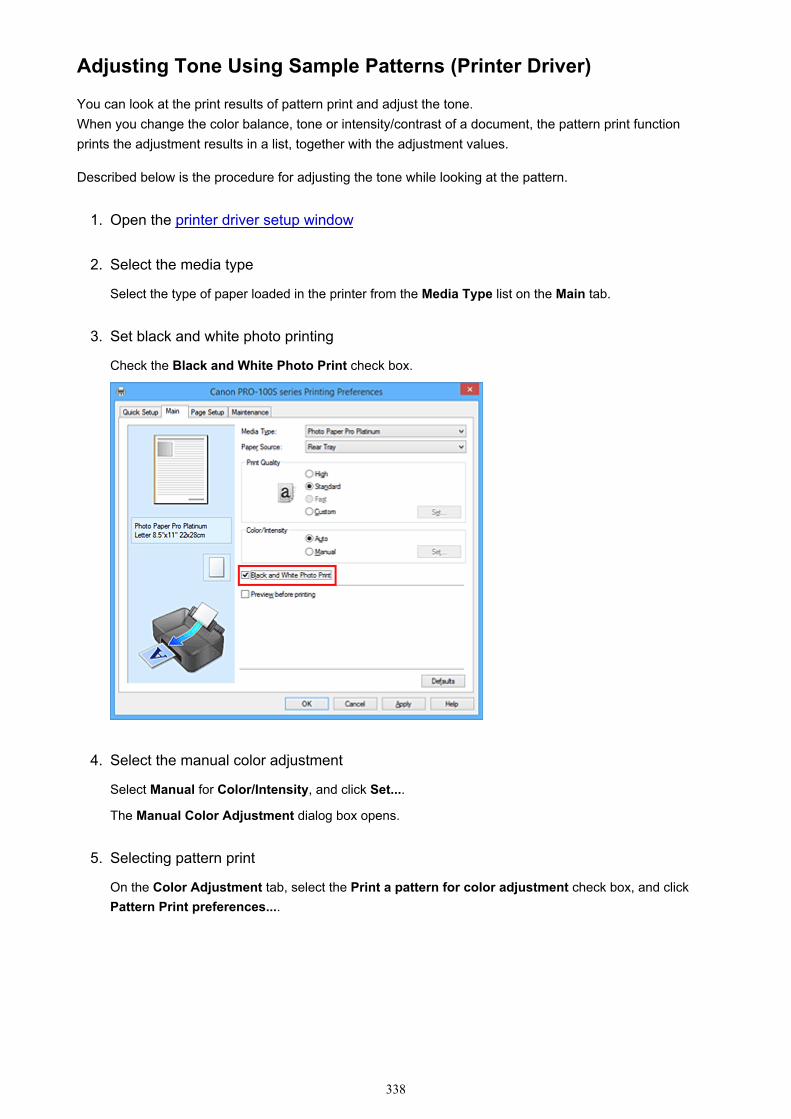
Adjusting Tone Using Sample Patterns (Printer Driver)
You can look at the print results of pattern print and adjust the tone.When you change the color balance, tone or intensity/contrast of a document, the pattern print functionprints the adjustment results in a list, together with the adjustment values.
Described below is the procedure for adjusting the tone while looking at the pattern.
1. Open the printer driver setup window
2. Select the media type
Select the type of paper loaded in the printer from the Media Type list on the Main tab.
3. Set black and white photo printing
Check the Black and White Photo Print check box.
4. Select the manual color adjustment
Select Manual for Color/Intensity, and click Set....
The Manual Color Adjustment dialog box opens.
5. Selecting pattern print
On the Color Adjustment tab, select the Print a pattern for color adjustment check box, and clickPattern Print preferences....
338
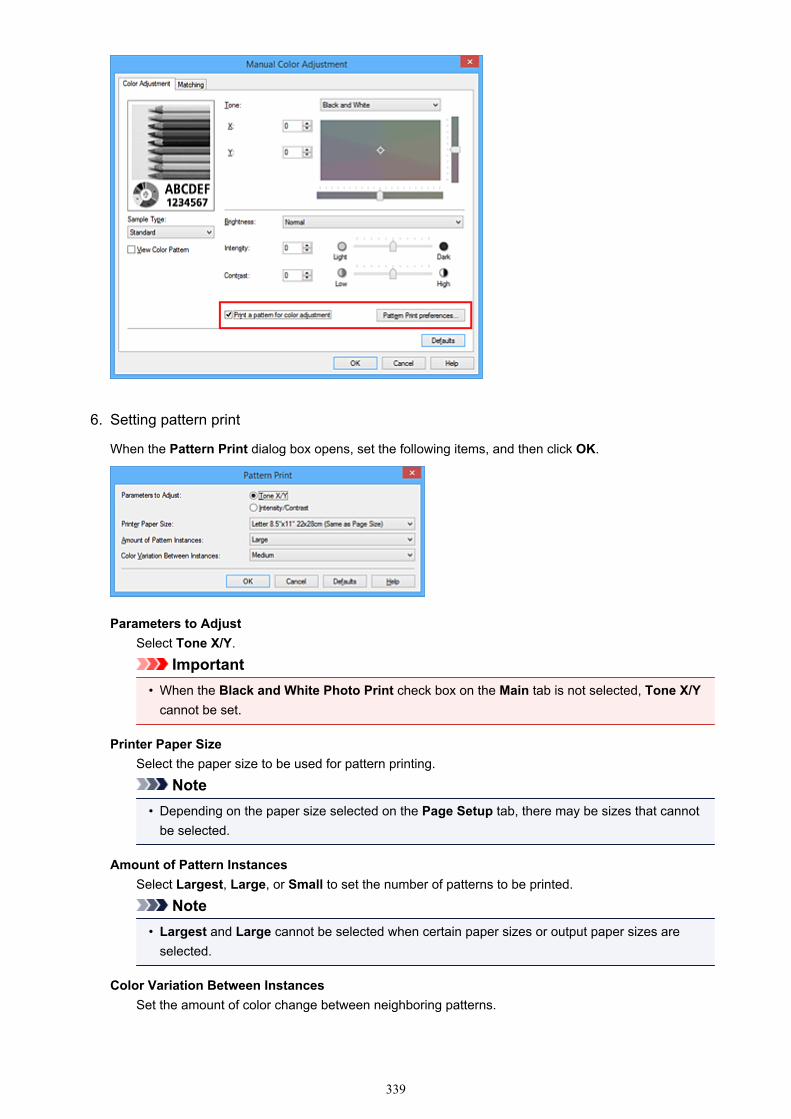
6. Setting pattern print
When the Pattern Print dialog box opens, set the following items, and then click OK.
Parameters to AdjustSelect Tone X/Y.
Important• When the Black and White Photo Print check box on the Main tab is not selected, Tone X/Y
cannot be set.
Printer Paper SizeSelect the paper size to be used for pattern printing.
Note• Depending on the paper size selected on the Page Setup tab, there may be sizes that cannot
be selected.
Amount of Pattern InstancesSelect Largest, Large, or Small to set the number of patterns to be printed.
Note• Largest and Large cannot be selected when certain paper sizes or output paper sizes are
selected.
Color Variation Between InstancesSet the amount of color change between neighboring patterns.
339
Note• Large is about double the size of Medium, and Small is about half the size of Medium.
7. Checking the print results of pattern print
On the Color Adjustment tab, select OK to close the Manual Color Adjustment dialog box.On the Main tab, select OK, and then execute printing. The printer then prints a pattern in which the tonethat you set is the center value.
8. Adjusting the tone
Look at the print results and select the image that you like best. Then enter the X and Y (monochromeadjustment) values indicated at the bottom of that image into the X and Y (monochrome adjustment)fields on the Color Adjustment tab.Clear the Print a pattern for color adjustment check box, and click OK.
340
Note• You can also set monochromatic color tones by clicking the Quick Setup tab, and then choosing
Color/Intensity Manual Adjustment under Additional Features.
9. Complete the setup
Click OK on the Main tab.Then when you execute printing, the document is printed with the tone that was adjusted by the patternprint function.
Important• When Print a pattern for color adjustment is selected on the Color Adjustment tab, the following
items are grayed out and cannot be set:• Preview before printing on the Main tab• Stapling Side and Specify Margin... on the Page Setup tab (When Duplex Printing is set, only
Stapling Side can be set.)
• You can print a pattern only if the Page Layout setting on the Page Setup tab is Normal-size orBorderless.
• When the Black and White Photo Print check box on the Main tab is not selected, Tone, X and Y(monochrome adjustment) cannot be set.
• Depending on your application software, this function may not be available.
Related TopicsAdjusting Color BalanceAdjusting IntensityAdjusting ContrastAdjusting Intensity/Contrast Using Sample Patterns (Printer Driver)
341
Specifying Color Correction
You can specify the color correction method suited to the type of document to be printed.Normally, when data is printed, the printer driver automatically adjusts the colors.
When you want to print by using the color space (Adobe RGB or sRGB) of the image data effectively, selectICM (ICC Profile Matching). When you want to use an application software to specify a printing ICC profile,select None.
The procedure for specifying color correction is as follows:
You can also set color correction on the Quick Setup tab by choosing Color/Intensity Manual Adjustmentunder Additional Features.
1. Open the printer driver setup window
2. Select the manual color adjustment
On the Main tab, select Manual for Color/Intensity, and click Set....
The Manual Color Adjustment dialog box opens.
3. Select color correction
Click Matching tab, select Color Correction setting that matches your purpose from the following, andclick OK.
342
Driver MatchingPrint in PRO mode.For information about PRO mode, see "Adjusting Colors with the Printer Driver."
ICM (ICC Profile Matching)Adjusts the colors by using an ICC profile when printing.Specify the profile or rendering intent to be used.
NoneThe printer driver does not perform color correction. Select this value when you are specifying anindividually created printing ICC profile or a printing ICC profile for special Canon paper in anapplication software to print data.
4. Complete the setup
Click OK on the Main tab.When you execute print, the document data is printed with the specified color correction.
Important• When ICM is disabled in the application software, ICM is unavailable for Color Correction and the
printer may not be able to print the image data properly.• When the Black and White Photo Print check box on the Main tab is checked, Color Correction
appears grayed out and is unavailable.
Related TopicsOptimal Photo Printing of Image DataAdjusting Colors with the Printer DriverPrinting with ICC ProfilesInterpreting the ICC Profile
343
Optimal Photo Printing of Image Data
When people print images taken with digital cameras, they sometimes feel that the printed color tones differfrom those of actual image or those displayed on the monitor.To get the print results as close as possible to the desired color tones, you must select a printing methodthat is best suited to the application software used or to your purpose.
Color ManagementDevices such as digital cameras, scanners, monitors, and printers handle color differently. Colormanagement (color matching) is a method that manages device-dependent "colors" as a common colorspace.
For Windows, a color management system called "ICM" is built into the operating system.Adobe RGB and sRGB are popularly used as common color spaces. Adobe RGB has a wider color spacethan sRGB.
ICC profiles convert device-dependent "colors" into a common color space. By using an ICC profile andcarrying out color management, you can draw out the color space of the image data within the colorreproduction area that the printer can express.
Note• Normally, image files are saved in JPEG format. Some digital cameras allow you to save images in a
format called RAW. RAW data refers to an image saving format that requires a computer to developthe image. You can embed an input ICC profile tag into a RAW file by using special applicationsoftware.
Selecting a Printing Method Suited to the Image DataThe recommended printing method depends on the color space (Adobe RGB or sRGB) of the image dataor the application software to be used.
There are two typical printing methods.Check the color space (Adobe RGB or sRGB) of the image data and the application software to be used,and then select the printing method suited to your purpose.
Adjusting Colors with the Printer DriverThis section describes the procedure for printing data by using the color correction function of theprinter driver.Print in PRO mode.Select this function when you want to print impressions that are close to those displayed on themonitor, for example, if you corrected the colors while checking the print image on the monitor.
Printing with ICC ProfilesDescribes the procedure for printing by using the color space of Adobe RGB or sRGB effectively.You can print with a common color space by setting up the application software and the printer driverso that the color management matches the input ICC profile of the image data.The method for setting up the printer driver differs depending on the application software to be used.
Related TopicInterpreting the ICC Profile
344
Adjusting Colors with the Printer Driver
To print in PRO mode, specify the color correction function of the printer driver. PRO mode accuratelyapplies the characteristics of data displayed on the monitor and allows you to obtain print results ofimpressions that are close to those displayed on the monitor.
Important• When you print in PRO mode, Canon recommends that you set the monitor and the environment light
as follows:• Monitor
Color temperature: D50 (5000K)Brightness: 120 cd/m2Gamma: 2.2
• Environment lightFluorescent light for D50 color evaluation (color temperature 5000K, high color renderingproperties)Brightness when looking at printed materials: 500 lx ± 125 lx
Note• When printing from an application software that can identify ICC profiles and allows you to specify them,
use a printing ICC profile in the application software, and select settings for color management.
The procedure for adjusting colors with the printer driver is as follows:
1. Open the printer driver setup window
2. Select the manual color adjustment
On the Main tab, select Manual for Color/Intensity, and click Set....The Manual Color Adjustment dialog box opens.
3. Select color correction
Click Matching tab, and select Driver Matching for Color Correction.
345
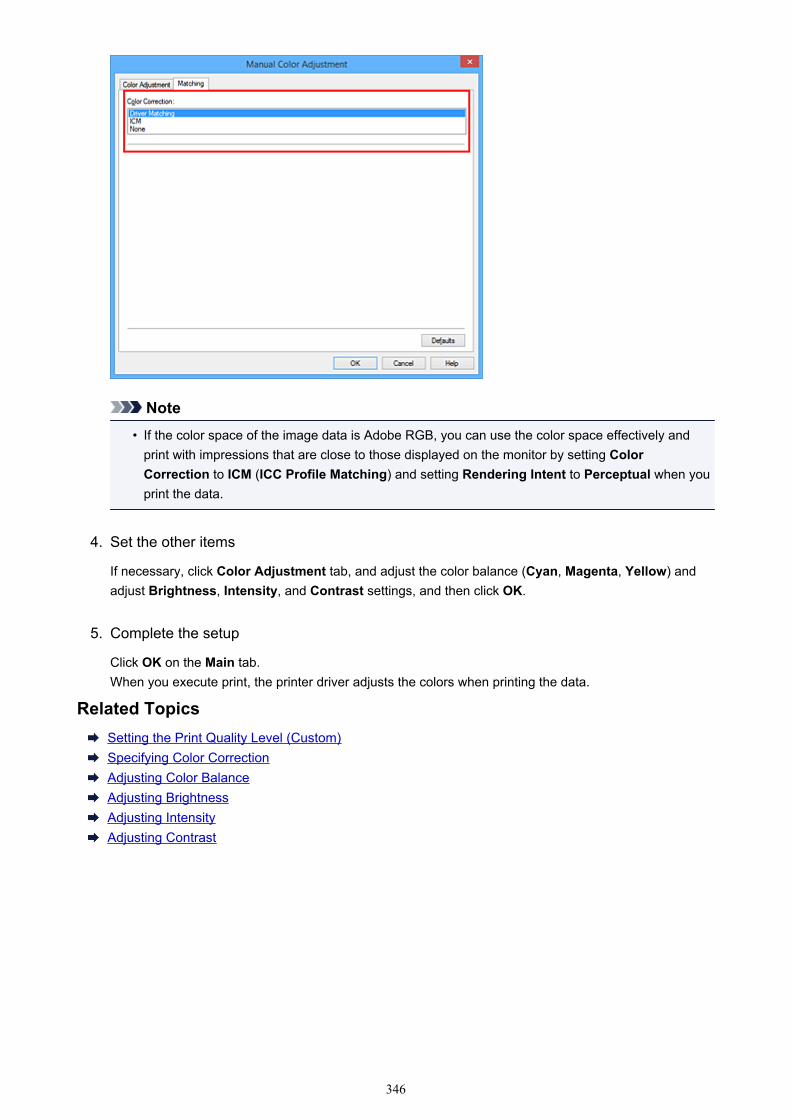
Note• If the color space of the image data is Adobe RGB, you can use the color space effectively and
print with impressions that are close to those displayed on the monitor by setting ColorCorrection to ICM (ICC Profile Matching) and setting Rendering Intent to Perceptual when youprint the data.
4. Set the other items
If necessary, click Color Adjustment tab, and adjust the color balance (Cyan, Magenta, Yellow) andadjust Brightness, Intensity, and Contrast settings, and then click OK.
5. Complete the setup
Click OK on the Main tab.When you execute print, the printer driver adjusts the colors when printing the data.
Related TopicsSetting the Print Quality Level (Custom)Specifying Color CorrectionAdjusting Color BalanceAdjusting BrightnessAdjusting IntensityAdjusting Contrast
346
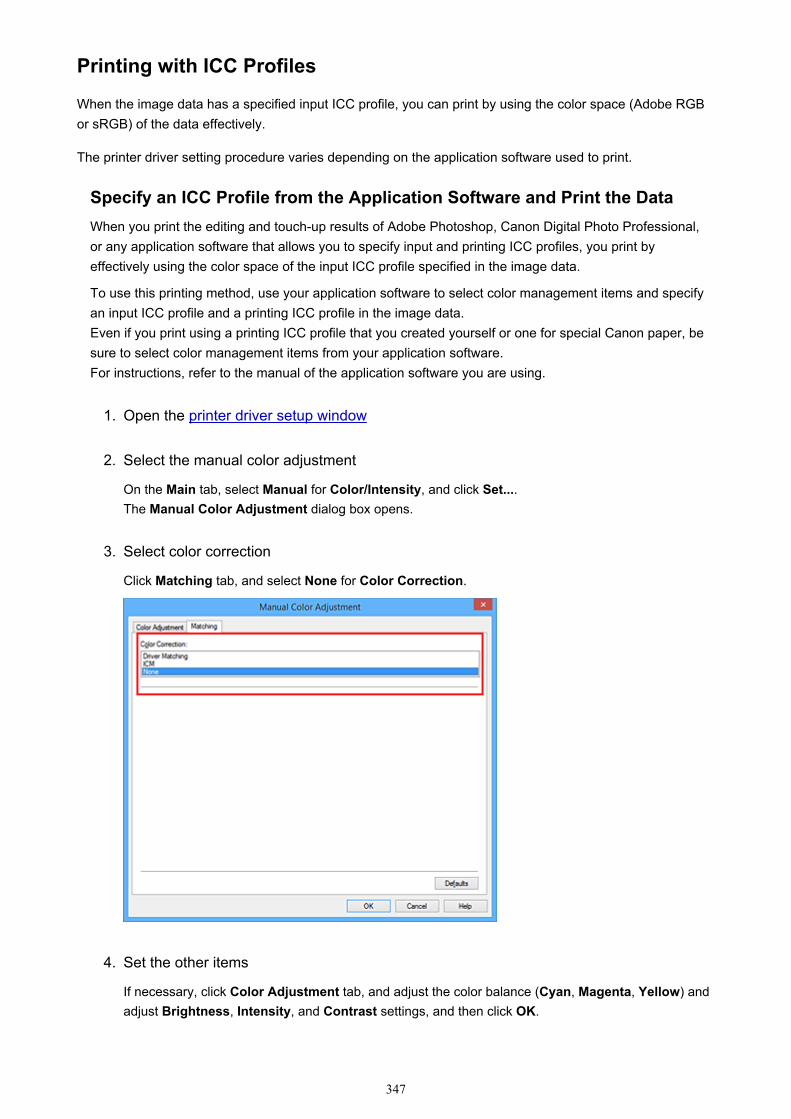
Printing with ICC Profiles
When the image data has a specified input ICC profile, you can print by using the color space (Adobe RGBor sRGB) of the data effectively.
The printer driver setting procedure varies depending on the application software used to print.
Specify an ICC Profile from the Application Software and Print the DataWhen you print the editing and touch-up results of Adobe Photoshop, Canon Digital Photo Professional,or any application software that allows you to specify input and printing ICC profiles, you print byeffectively using the color space of the input ICC profile specified in the image data.
To use this printing method, use your application software to select color management items and specifyan input ICC profile and a printing ICC profile in the image data.Even if you print using a printing ICC profile that you created yourself or one for special Canon paper, besure to select color management items from your application software.For instructions, refer to the manual of the application software you are using.
1. Open the printer driver setup window
2. Select the manual color adjustment
On the Main tab, select Manual for Color/Intensity, and click Set....The Manual Color Adjustment dialog box opens.
3. Select color correction
Click Matching tab, and select None for Color Correction.
4. Set the other items
If necessary, click Color Adjustment tab, and adjust the color balance (Cyan, Magenta, Yellow) andadjust Brightness, Intensity, and Contrast settings, and then click OK.
347
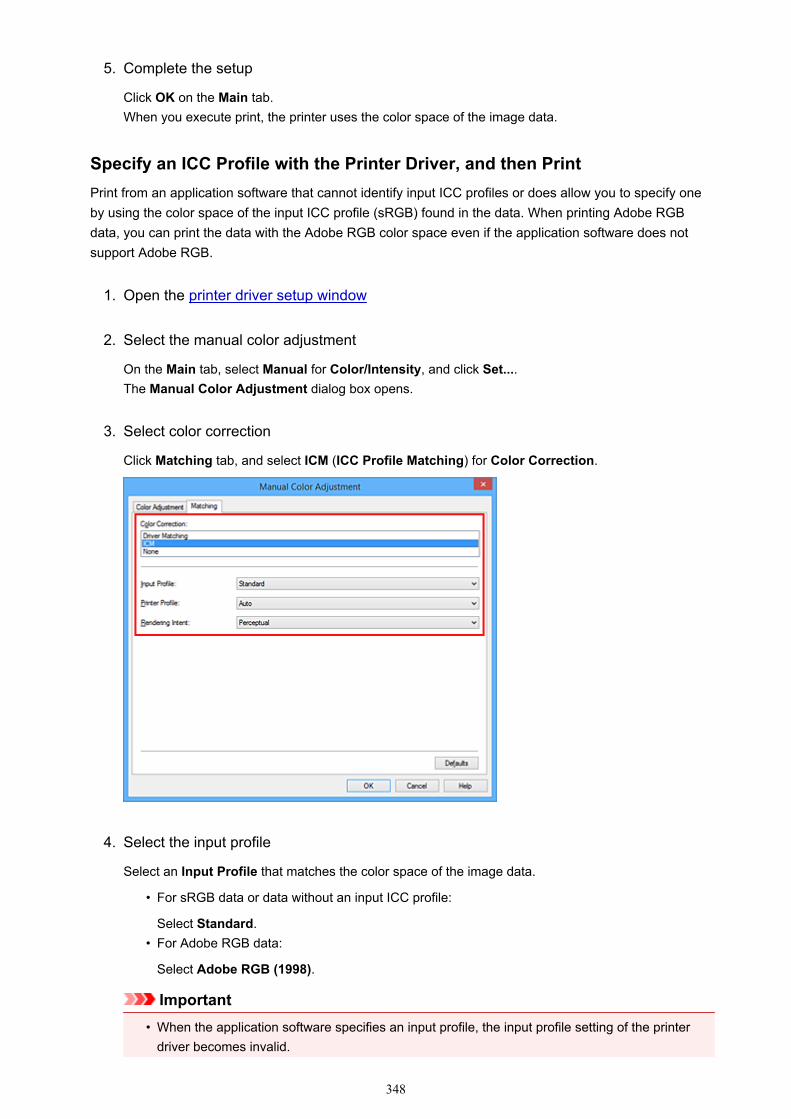
5. Complete the setup
Click OK on the Main tab.When you execute print, the printer uses the color space of the image data.
Specify an ICC Profile with the Printer Driver, and then PrintPrint from an application software that cannot identify input ICC profiles or does allow you to specify oneby using the color space of the input ICC profile (sRGB) found in the data. When printing Adobe RGBdata, you can print the data with the Adobe RGB color space even if the application software does notsupport Adobe RGB.
1. Open the printer driver setup window
2. Select the manual color adjustment
On the Main tab, select Manual for Color/Intensity, and click Set....The Manual Color Adjustment dialog box opens.
3. Select color correction
Click Matching tab, and select ICM (ICC Profile Matching) for Color Correction.
4. Select the input profile
Select an Input Profile that matches the color space of the image data.
• For sRGB data or data without an input ICC profile:
Select Standard.• For Adobe RGB data:
Select Adobe RGB (1998).
Important• When the application software specifies an input profile, the input profile setting of the printer
driver becomes invalid.
348
• Adobe RGB (1998) is not displayed when input profiles of Adobe RGB are not installed.
5. Select the printer profile
Select Printer Profile.
• To set the printer profile automatically:
Select Auto.• To set the printer profile manually:
Select a printer profile that matches the media type to be used.
6. Select the rendering intent
Select the coloring adjustment method in Rendering Intent.
• Saturation
This method reproduces images even more vividly than the Perceptual method.• Perceptual
This function effectively prints the color space that the printer can reproduce. Because thisfunction accurately renders the attributes of the data displayed on the monitor, select thisfunction when you want to print with impressions that are close to those displayed on themonitor.
Important• When you select Perceptual to print images, Canon recommends that you set the monitor
and the environment light as follows:• Monitor
Color temperature: D50 (5000K)Brightness: 120 cd/m2Gamma: 2.2
• Environment lightFluorescent light for D50 color evaluation (color temperature 5000K, high colorrendering properties)Brightness when looking at printed materials: 500 lx ± 125 lx
• Relative Colorimetric
When image data is converted to the color space of the printer, this method converts the imagedata so the color reproduction approximates the shared color regions. Select this method to printimage data with colors that are close to the original colors.The white spots are reproduced as white spots (background color) on the paper.
• Absolute Colorimetric
This method uses the white spot definitions in the input and output ICC profiles to convert theimage data.Although the color and color balance of the white spots change, you may not be able to get thedesired output results because of the profile combination.
Important• Depending on the media type, you may obtain the same print results even when you change
the Rendering Intent setting.• When Windows XP SP2 or Windows XP SP3 is used, this function is disabled.
349

7. Set the other items
If necessary, click Color Adjustment tab, and adjust Cyan, Magenta, Yellow, Brightness, Intensity,and Contrast settings, and then click OK.
8. Complete the setup
Click OK on the Main tab.When you execute print, the printer uses the color space of the image data.
Related TopicsSetting the Print Quality Level (Custom)Specifying Color CorrectionAdjusting Color BalanceAdjusting BrightnessAdjusting IntensityAdjusting Contrast
350

Interpreting the ICC Profile
When you need to specify an ICC profile for this printer, specify the ICC profile of the print output media.
The ICC profiles installed for this printer appear as follows.
• (1) is the model name of the printer.• (2) is the print quality.
The print quality is divided into 5 levels, ranging from high speed to high quality. As the numberdecreases, the print quality becomes higher. This value corresponds to the Quality slide bar in theCustom dialog box of the printer driver.
• (3) is the media type. This media name corresponds to the following media type:Photo Paper Plus Glossy&Gold: Photo Paper Plus Glossy IIPhoto Paper Pro Platinum: Photo Paper Pro PlatinumPhoto Paper Pro Luster: Photo Paper Pro LusterPhoto Paper Plus Semi-Gloss: Photo Paper Plus Semi-glossMatte Photo Paper: Matte Photo PaperOther Glossy Paper: Other Glossy Paper (Wide Margins) and Other Glossy PaperFine Art Museum Etching: Fine Art Paper "Museum Etching"Other Fine Art Paper 1: Other Fine Art Paper 1Other Fine Art Paper 2: Other Fine Art Paper 2 and Canvas
351
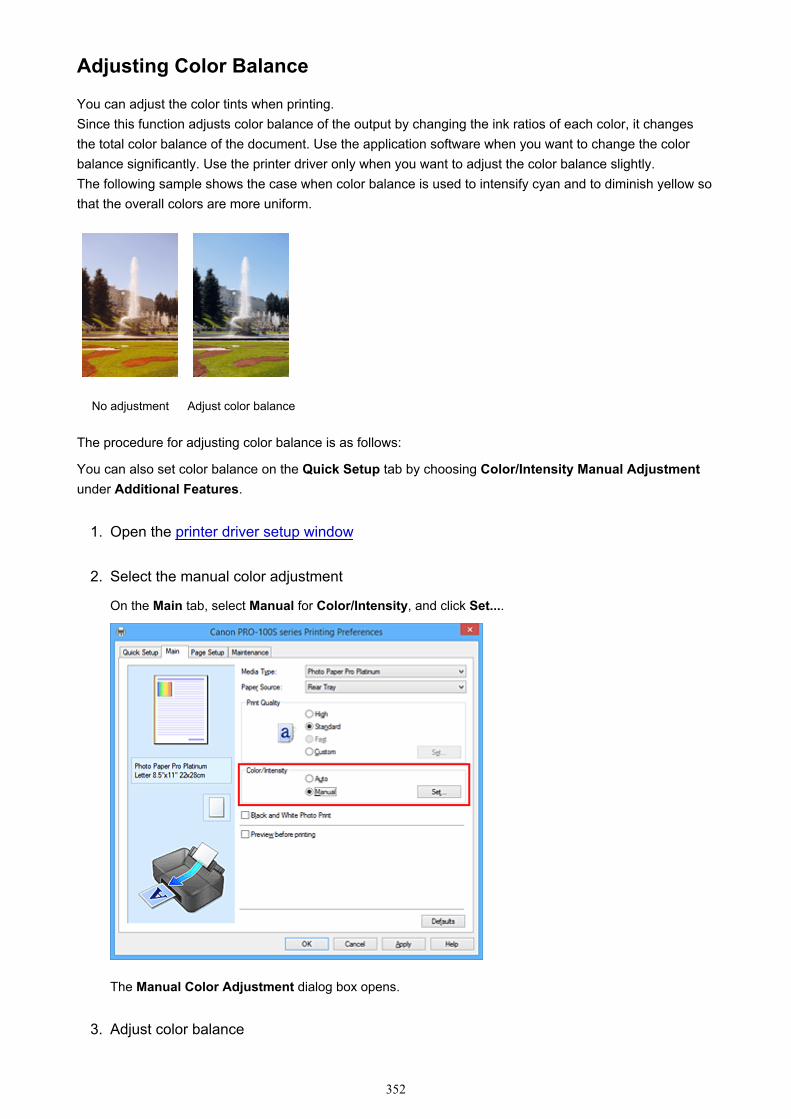
Adjusting Color Balance
You can adjust the color tints when printing.Since this function adjusts color balance of the output by changing the ink ratios of each color, it changesthe total color balance of the document. Use the application software when you want to change the colorbalance significantly. Use the printer driver only when you want to adjust the color balance slightly.The following sample shows the case when color balance is used to intensify cyan and to diminish yellow sothat the overall colors are more uniform.
No adjustment Adjust color balance
The procedure for adjusting color balance is as follows:
You can also set color balance on the Quick Setup tab by choosing Color/Intensity Manual Adjustmentunder Additional Features.
1. Open the printer driver setup window
2. Select the manual color adjustment
On the Main tab, select Manual for Color/Intensity, and click Set....
The Manual Color Adjustment dialog box opens.
3. Adjust color balance
352
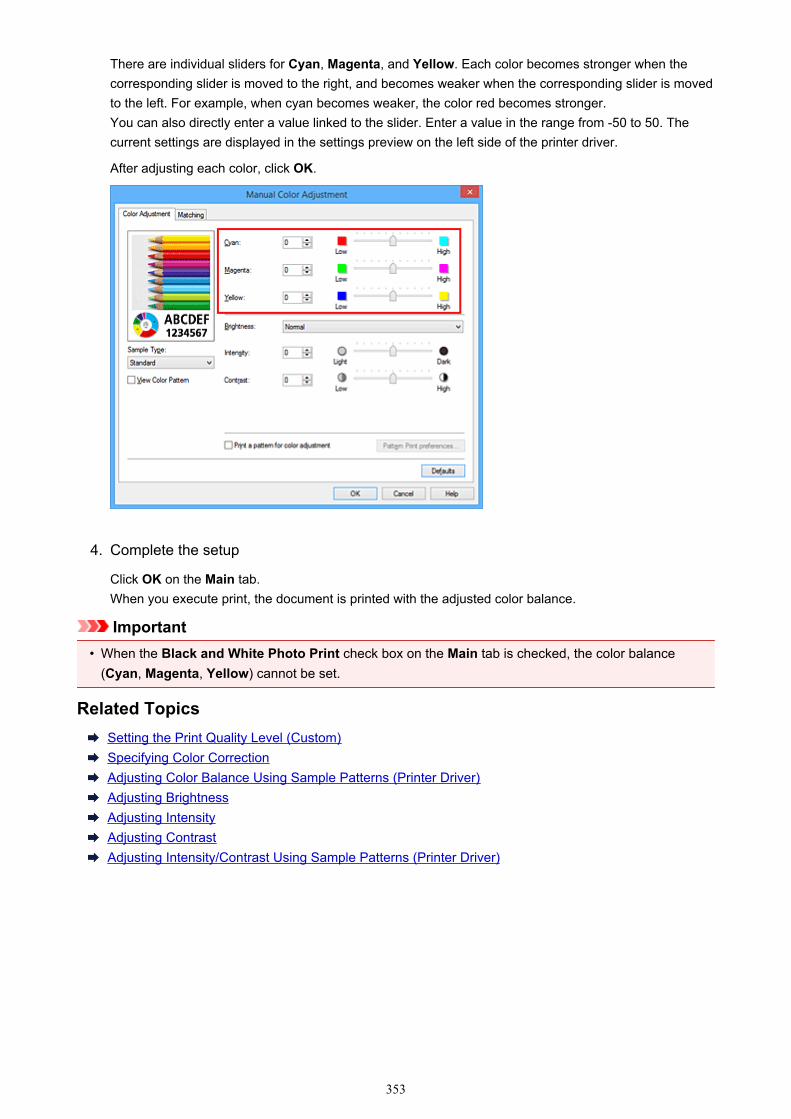
There are individual sliders for Cyan, Magenta, and Yellow. Each color becomes stronger when thecorresponding slider is moved to the right, and becomes weaker when the corresponding slider is movedto the left. For example, when cyan becomes weaker, the color red becomes stronger.You can also directly enter a value linked to the slider. Enter a value in the range from -50 to 50. Thecurrent settings are displayed in the settings preview on the left side of the printer driver.
After adjusting each color, click OK.
4. Complete the setup
Click OK on the Main tab.When you execute print, the document is printed with the adjusted color balance.
Important• When the Black and White Photo Print check box on the Main tab is checked, the color balance
(Cyan, Magenta, Yellow) cannot be set.
Related TopicsSetting the Print Quality Level (Custom)Specifying Color CorrectionAdjusting Color Balance Using Sample Patterns (Printer Driver)Adjusting BrightnessAdjusting IntensityAdjusting ContrastAdjusting Intensity/Contrast Using Sample Patterns (Printer Driver)
353

Adjusting Color Balance Using Sample Patterns (Printer Driver)
You can look at the print results of pattern print and adjust the color balance.When you change the color balance or intensity/contrast of a document, the pattern print function prints theadjustment results in a list, together with the adjustment values.
Described below is the procedure for adjusting the color balance while looking at the pattern.
1. Open the printer driver setup window
2. Select the manual color adjustment
On the Main tab, select Manual for Color/Intensity, and click Set....
The Manual Color Adjustment dialog box opens.
3. Selecting pattern print
On the Color Adjustment tab, select the Print a pattern for color adjustment check box, and clickPattern Print preferences....
354
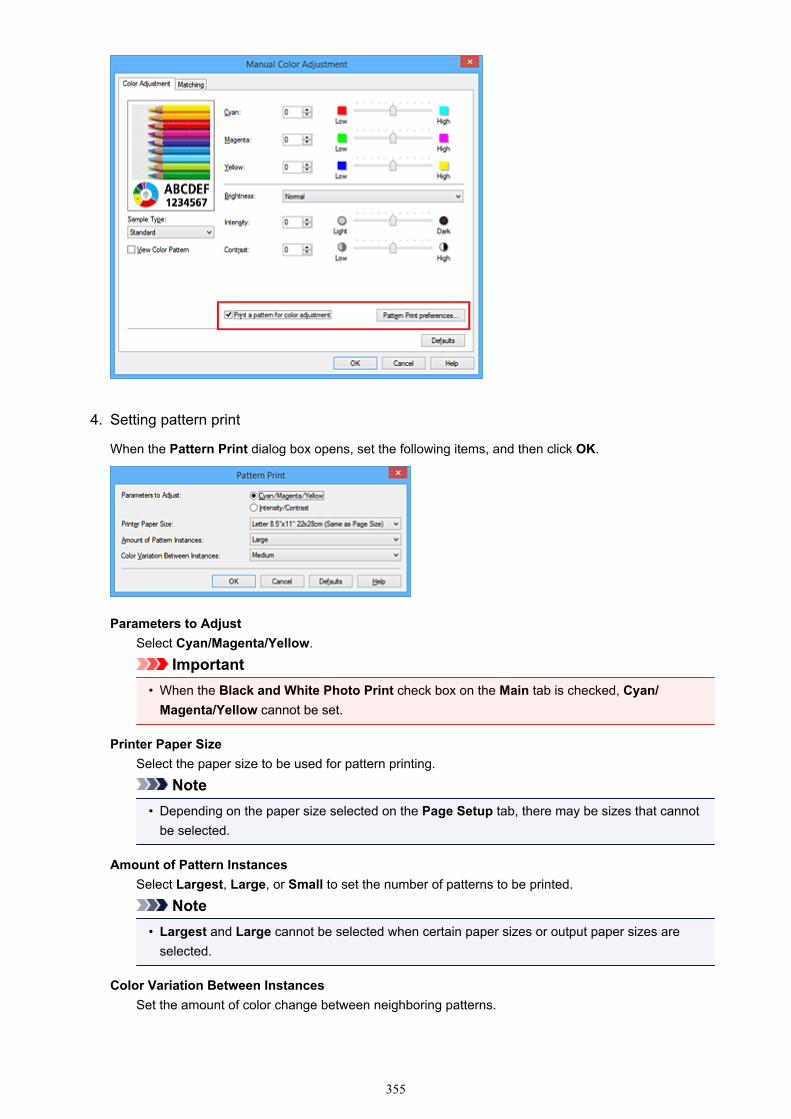
4. Setting pattern print
When the Pattern Print dialog box opens, set the following items, and then click OK.
Parameters to AdjustSelect Cyan/Magenta/Yellow.
Important• When the Black and White Photo Print check box on the Main tab is checked, Cyan/
Magenta/Yellow cannot be set.
Printer Paper SizeSelect the paper size to be used for pattern printing.
Note• Depending on the paper size selected on the Page Setup tab, there may be sizes that cannot
be selected.
Amount of Pattern InstancesSelect Largest, Large, or Small to set the number of patterns to be printed.
Note• Largest and Large cannot be selected when certain paper sizes or output paper sizes are
selected.
Color Variation Between InstancesSet the amount of color change between neighboring patterns.
355
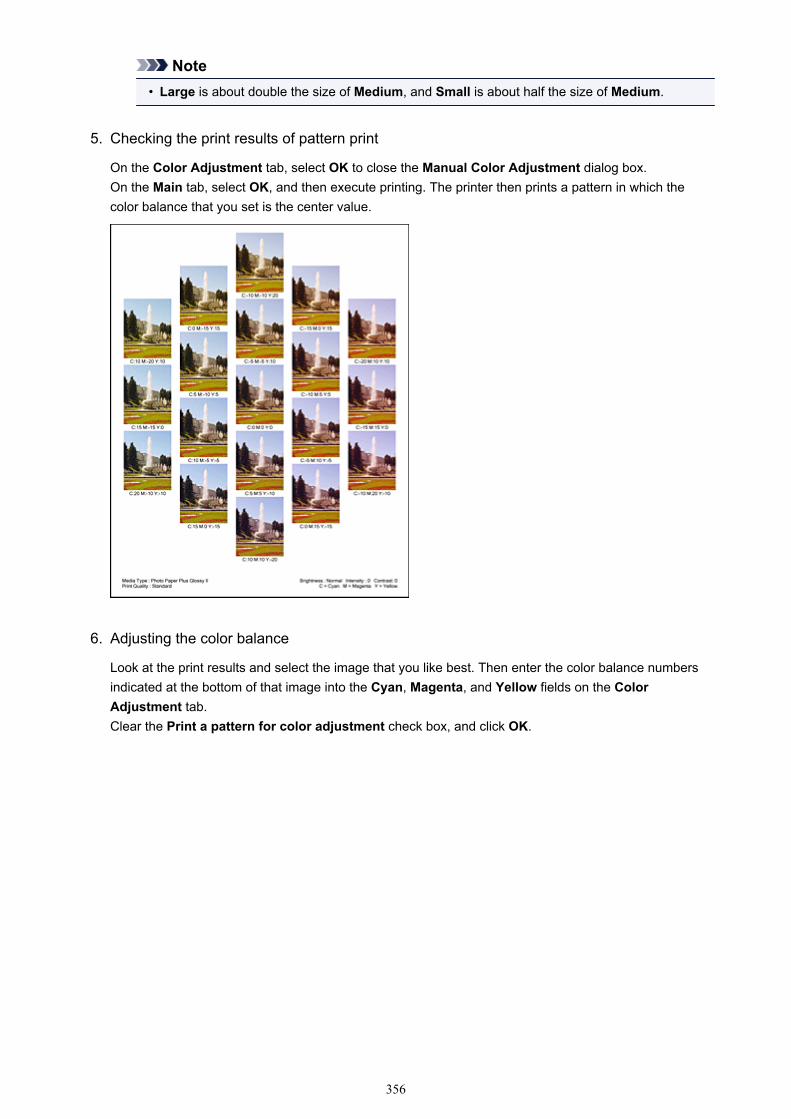
Note• Large is about double the size of Medium, and Small is about half the size of Medium.
5. Checking the print results of pattern print
On the Color Adjustment tab, select OK to close the Manual Color Adjustment dialog box.On the Main tab, select OK, and then execute printing. The printer then prints a pattern in which thecolor balance that you set is the center value.
6. Adjusting the color balance
Look at the print results and select the image that you like best. Then enter the color balance numbersindicated at the bottom of that image into the Cyan, Magenta, and Yellow fields on the ColorAdjustment tab.Clear the Print a pattern for color adjustment check box, and click OK.
356
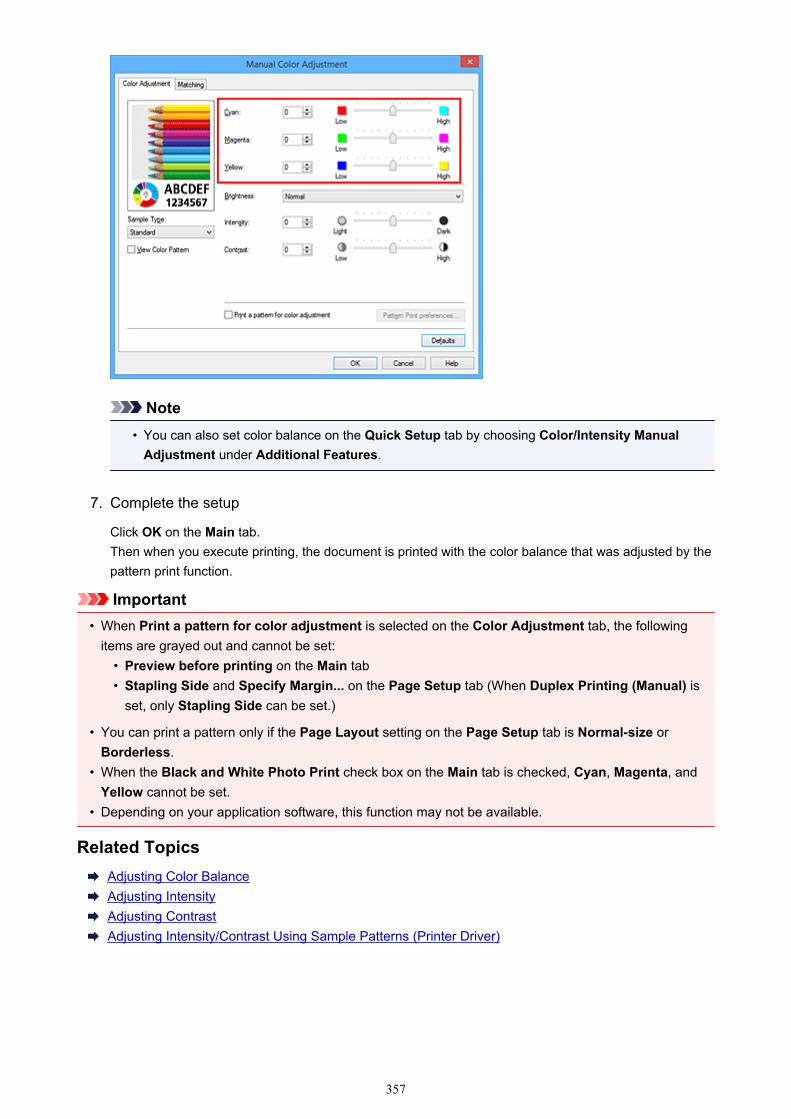
Note• You can also set color balance on the Quick Setup tab by choosing Color/Intensity Manual
Adjustment under Additional Features.
7. Complete the setup
Click OK on the Main tab.Then when you execute printing, the document is printed with the color balance that was adjusted by thepattern print function.
Important• When Print a pattern for color adjustment is selected on the Color Adjustment tab, the following
items are grayed out and cannot be set:• Preview before printing on the Main tab• Stapling Side and Specify Margin... on the Page Setup tab (When Duplex Printing (Manual) is
set, only Stapling Side can be set.)
• You can print a pattern only if the Page Layout setting on the Page Setup tab is Normal-size orBorderless.
• When the Black and White Photo Print check box on the Main tab is checked, Cyan, Magenta, andYellow cannot be set.
• Depending on your application software, this function may not be available.
Related TopicsAdjusting Color BalanceAdjusting IntensityAdjusting ContrastAdjusting Intensity/Contrast Using Sample Patterns (Printer Driver)
357
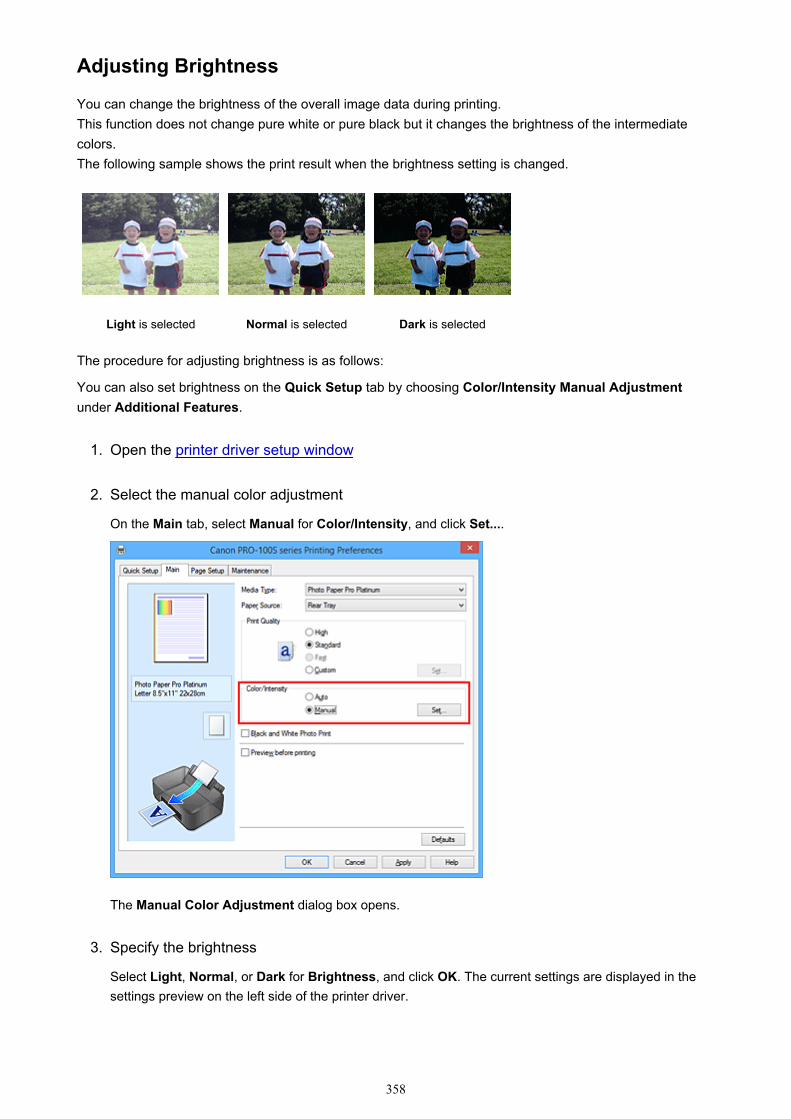
Adjusting Brightness
You can change the brightness of the overall image data during printing.This function does not change pure white or pure black but it changes the brightness of the intermediatecolors.The following sample shows the print result when the brightness setting is changed.
Light is selected Normal is selected Dark is selected
The procedure for adjusting brightness is as follows:
You can also set brightness on the Quick Setup tab by choosing Color/Intensity Manual Adjustmentunder Additional Features.
1. Open the printer driver setup window
2. Select the manual color adjustment
On the Main tab, select Manual for Color/Intensity, and click Set....
The Manual Color Adjustment dialog box opens.
3. Specify the brightness
Select Light, Normal, or Dark for Brightness, and click OK. The current settings are displayed in thesettings preview on the left side of the printer driver.
358
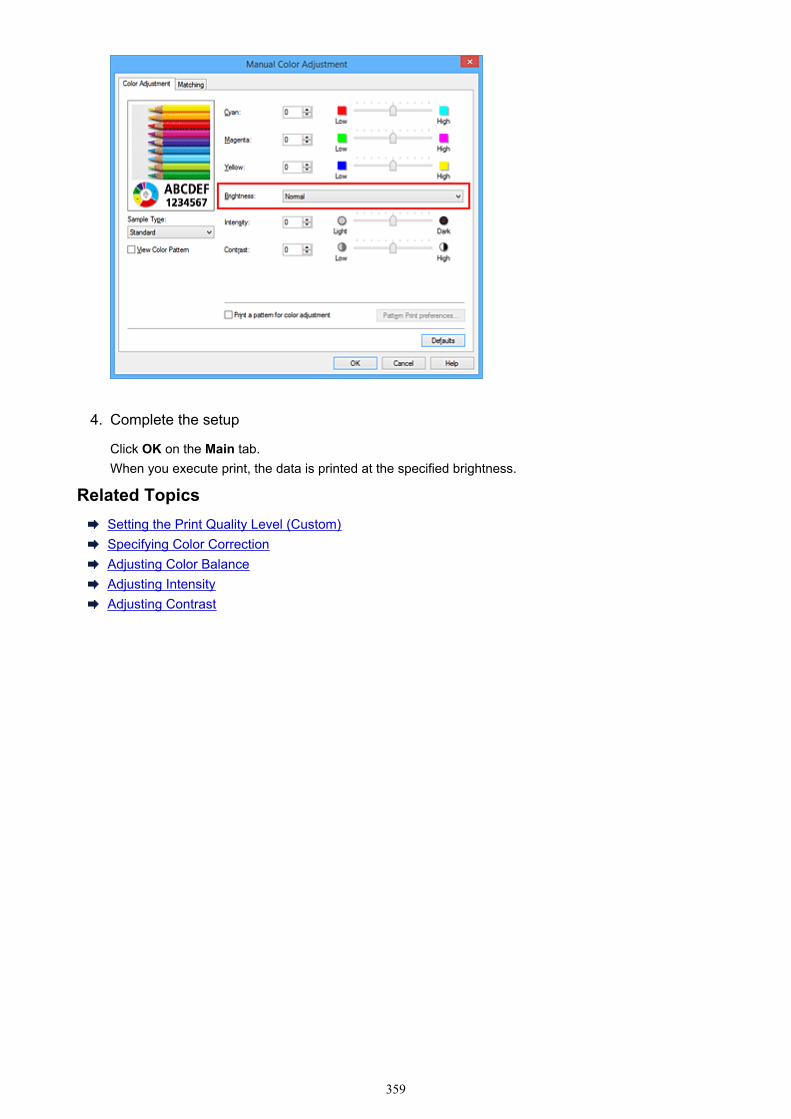
4. Complete the setup
Click OK on the Main tab.When you execute print, the data is printed at the specified brightness.
Related TopicsSetting the Print Quality Level (Custom)Specifying Color CorrectionAdjusting Color BalanceAdjusting IntensityAdjusting Contrast
359
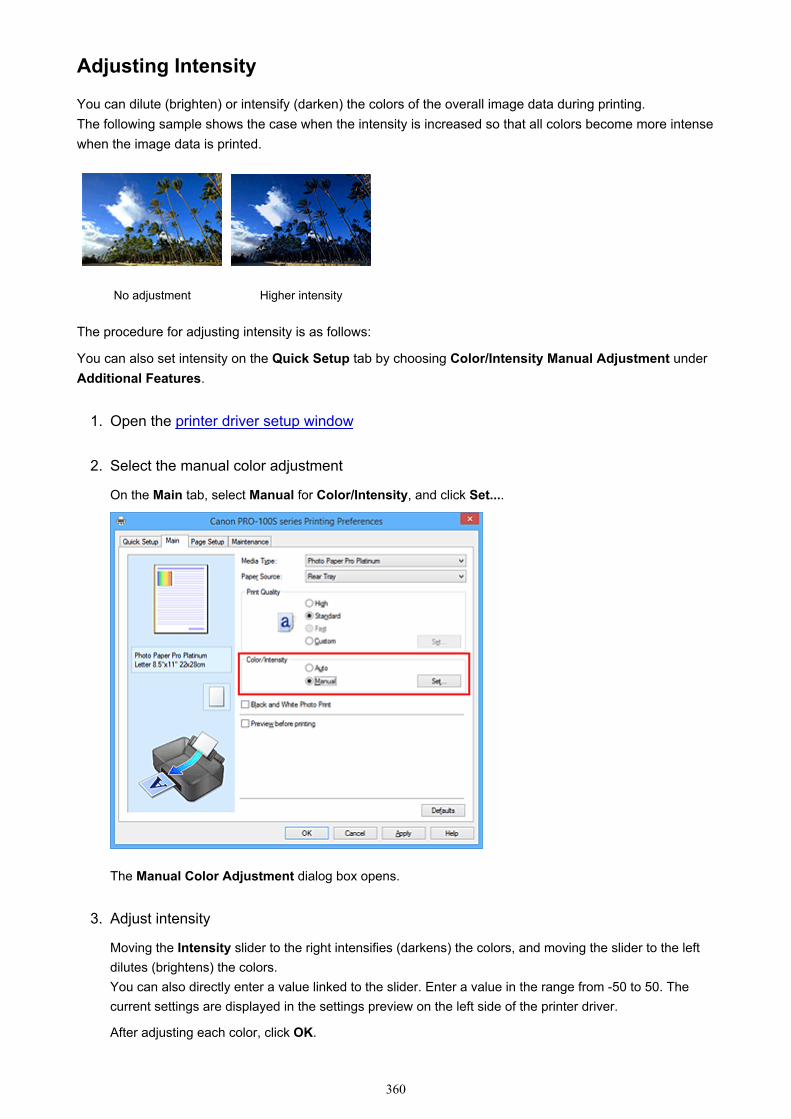
Adjusting Intensity
You can dilute (brighten) or intensify (darken) the colors of the overall image data during printing.The following sample shows the case when the intensity is increased so that all colors become more intensewhen the image data is printed.
No adjustment Higher intensity
The procedure for adjusting intensity is as follows:
You can also set intensity on the Quick Setup tab by choosing Color/Intensity Manual Adjustment underAdditional Features.
1. Open the printer driver setup window
2. Select the manual color adjustment
On the Main tab, select Manual for Color/Intensity, and click Set....
The Manual Color Adjustment dialog box opens.
3. Adjust intensity
Moving the Intensity slider to the right intensifies (darkens) the colors, and moving the slider to the leftdilutes (brightens) the colors.You can also directly enter a value linked to the slider. Enter a value in the range from -50 to 50. Thecurrent settings are displayed in the settings preview on the left side of the printer driver.
After adjusting each color, click OK.
360
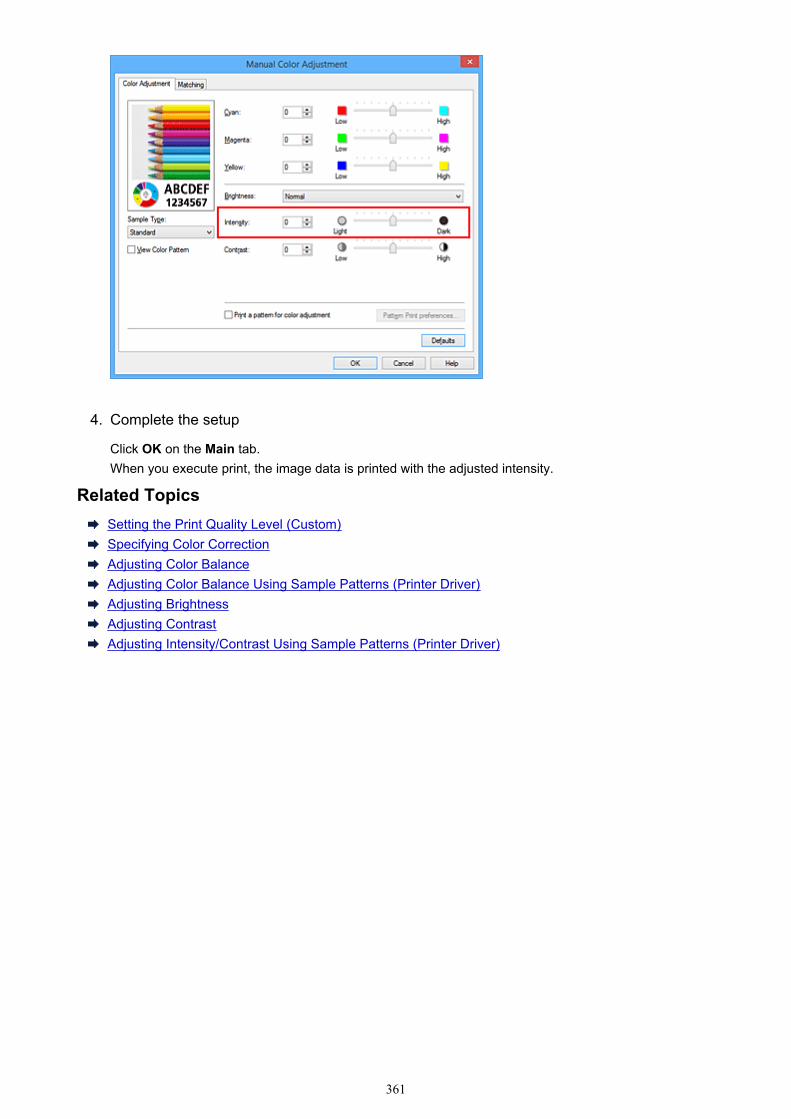
4. Complete the setup
Click OK on the Main tab.When you execute print, the image data is printed with the adjusted intensity.
Related TopicsSetting the Print Quality Level (Custom)Specifying Color CorrectionAdjusting Color BalanceAdjusting Color Balance Using Sample Patterns (Printer Driver)Adjusting BrightnessAdjusting ContrastAdjusting Intensity/Contrast Using Sample Patterns (Printer Driver)
361
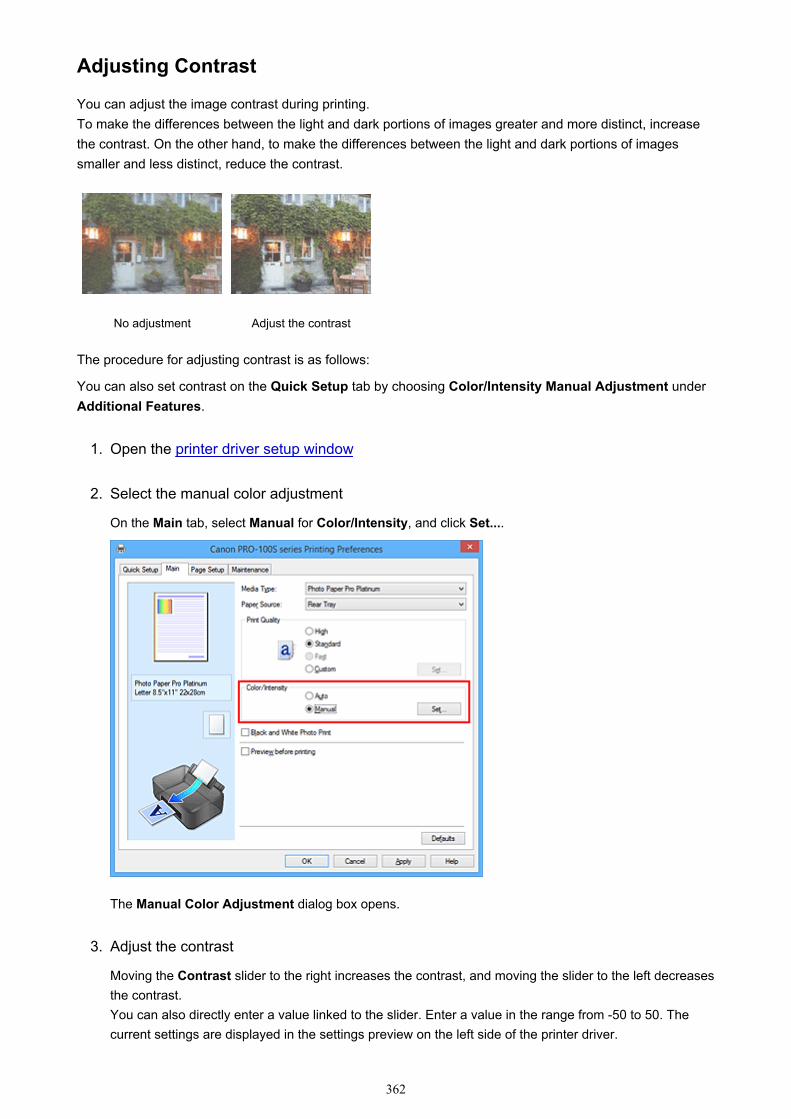
Adjusting Contrast
You can adjust the image contrast during printing.To make the differences between the light and dark portions of images greater and more distinct, increasethe contrast. On the other hand, to make the differences between the light and dark portions of imagessmaller and less distinct, reduce the contrast.
No adjustment Adjust the contrast
The procedure for adjusting contrast is as follows:
You can also set contrast on the Quick Setup tab by choosing Color/Intensity Manual Adjustment underAdditional Features.
1. Open the printer driver setup window
2. Select the manual color adjustment
On the Main tab, select Manual for Color/Intensity, and click Set....
The Manual Color Adjustment dialog box opens.
3. Adjust the contrast
Moving the Contrast slider to the right increases the contrast, and moving the slider to the left decreasesthe contrast.You can also directly enter a value linked to the slider. Enter a value in the range from -50 to 50. Thecurrent settings are displayed in the settings preview on the left side of the printer driver.
362
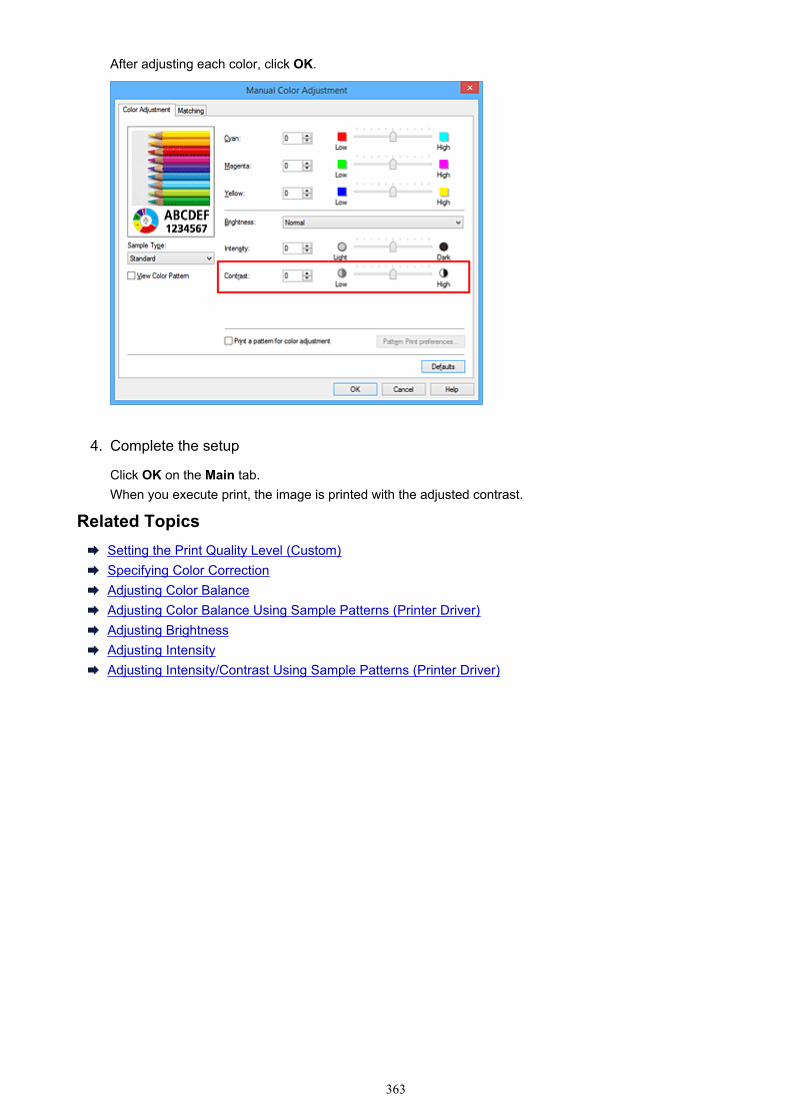
After adjusting each color, click OK.
4. Complete the setup
Click OK on the Main tab.When you execute print, the image is printed with the adjusted contrast.
Related TopicsSetting the Print Quality Level (Custom)Specifying Color CorrectionAdjusting Color BalanceAdjusting Color Balance Using Sample Patterns (Printer Driver)Adjusting BrightnessAdjusting IntensityAdjusting Intensity/Contrast Using Sample Patterns (Printer Driver)
363
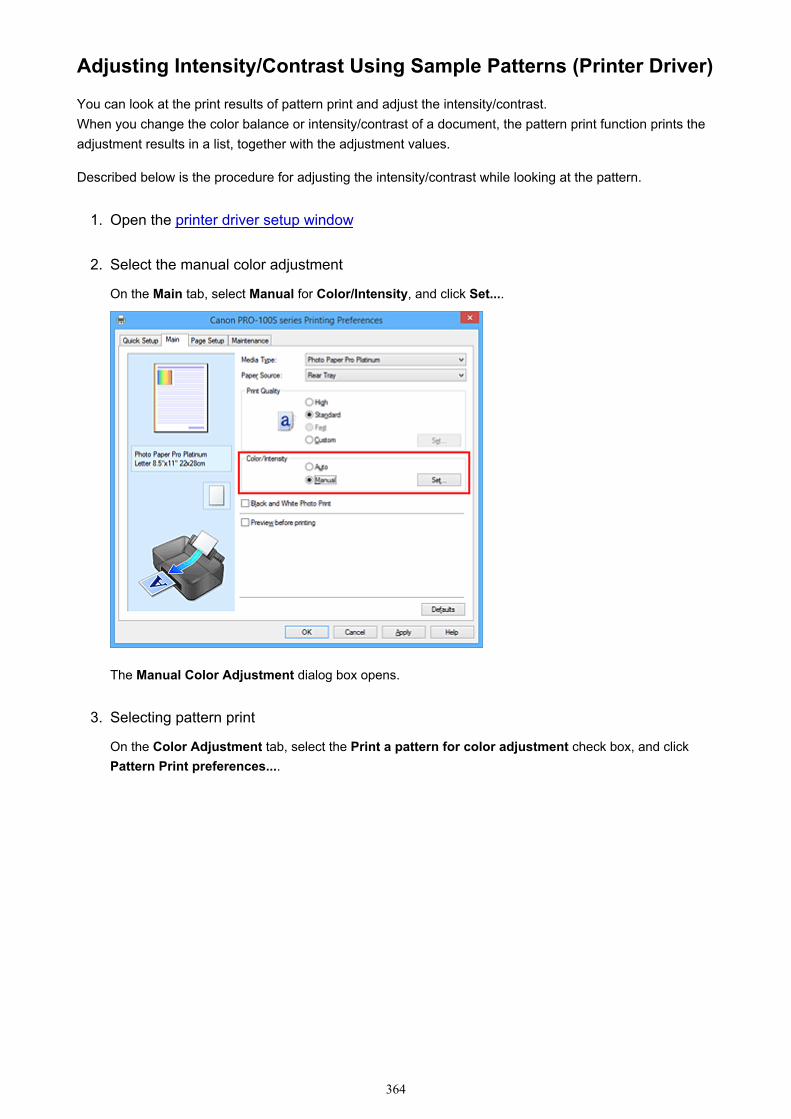
Adjusting Intensity/Contrast Using Sample Patterns (Printer Driver)
You can look at the print results of pattern print and adjust the intensity/contrast.When you change the color balance or intensity/contrast of a document, the pattern print function prints theadjustment results in a list, together with the adjustment values.
Described below is the procedure for adjusting the intensity/contrast while looking at the pattern.
1. Open the printer driver setup window
2. Select the manual color adjustment
On the Main tab, select Manual for Color/Intensity, and click Set....
The Manual Color Adjustment dialog box opens.
3. Selecting pattern print
On the Color Adjustment tab, select the Print a pattern for color adjustment check box, and clickPattern Print preferences....
364
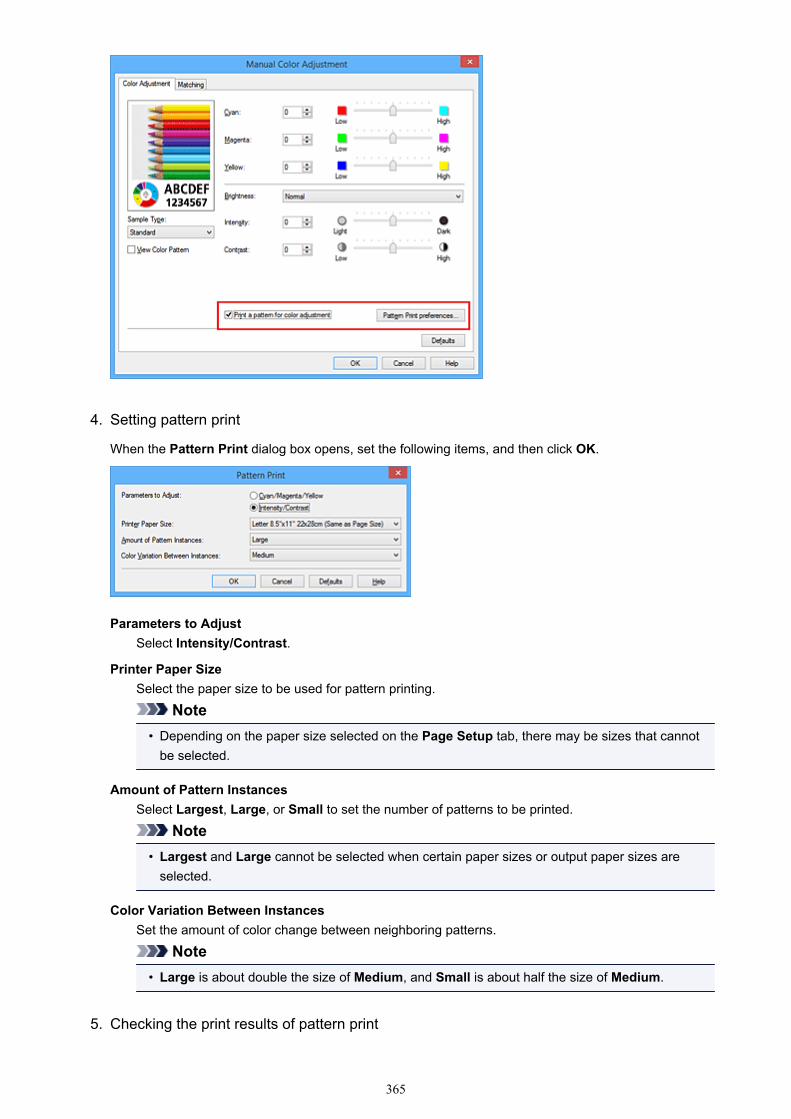
4. Setting pattern print
When the Pattern Print dialog box opens, set the following items, and then click OK.
Parameters to AdjustSelect Intensity/Contrast.
Printer Paper SizeSelect the paper size to be used for pattern printing.
Note• Depending on the paper size selected on the Page Setup tab, there may be sizes that cannot
be selected.
Amount of Pattern InstancesSelect Largest, Large, or Small to set the number of patterns to be printed.
Note• Largest and Large cannot be selected when certain paper sizes or output paper sizes are
selected.
Color Variation Between InstancesSet the amount of color change between neighboring patterns.
Note• Large is about double the size of Medium, and Small is about half the size of Medium.
5. Checking the print results of pattern print
365
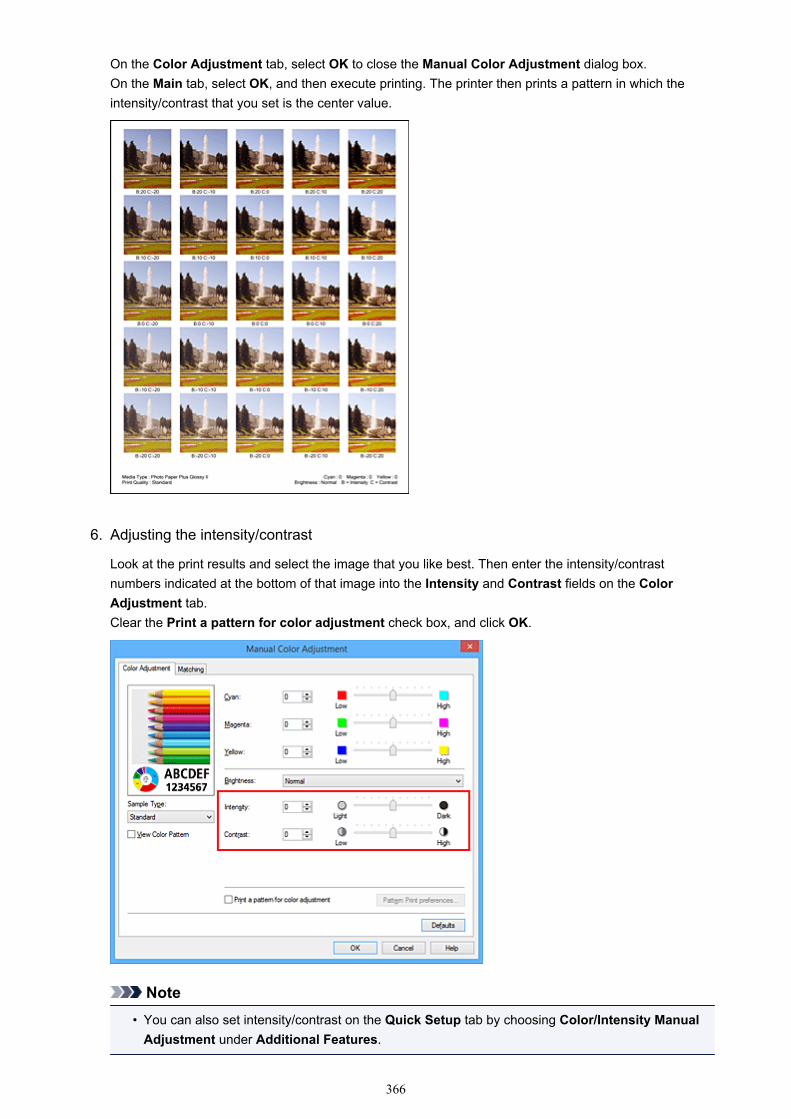
On the Color Adjustment tab, select OK to close the Manual Color Adjustment dialog box.On the Main tab, select OK, and then execute printing. The printer then prints a pattern in which theintensity/contrast that you set is the center value.
6. Adjusting the intensity/contrast
Look at the print results and select the image that you like best. Then enter the intensity/contrastnumbers indicated at the bottom of that image into the Intensity and Contrast fields on the ColorAdjustment tab.Clear the Print a pattern for color adjustment check box, and click OK.
Note• You can also set intensity/contrast on the Quick Setup tab by choosing Color/Intensity Manual
Adjustment under Additional Features.
366
7. Complete the setup
Click OK on the Main tab.Then when you execute printing, the document is printed with the intensity/contrast that was adjusted bythe pattern print function.
Important• When Print a pattern for color adjustment is selected on the Color Adjustment tab, the following
items are grayed out and cannot be set:• Preview before printing on the Main tab• Stapling Side and Specify Margin... on the Page Setup tab (When Duplex Printing (Manual) is
set, only Stapling Side can be set.)
• You can print a pattern only if the Page Layout setting on the Page Setup tab is Normal-size orBorderless.
• Depending on your application software, this function may not be available.
Related TopicsAdjusting Color BalanceAdjusting Color Balance Using Sample Patterns (Printer Driver)Adjusting IntensityAdjusting Contrast
367
Overview of the Printer Driver
Canon IJ Printer Driver
How to Open the Printer Driver Setup Window
Canon IJ Status Monitor
Checking the Ink Status from Your Computer
Canon IJ Preview
Deleting the Undesired Print Job
Instructions for Use (Printer Driver)
368
Canon IJ Printer Driver
The Canon IJ printer driver (called printer driver below) is a software that is installed on your computer forprinting data with this printer.
The printer driver converts the print data created by your application software into data that your printer canunderstand, and sends the converted data to the printer.
Because different models support different print data formats, you need a printer driver for the specificmodel you are using.
Printer Driver TypesOn Windows Vista SP1 or later, you can install the XPS printer driver in addition to the regular printerdriver.The XPS printer driver is suited to print from an application software that supports XPS printing.
Important• To use the XPS printer driver, the standard printer driver must already be installed on your computer.
Installing the Printer Driver• To install the regular printer driver, load the Setup CD-ROM that comes with the printer, and then
install the driver from Start Setup Again.• To install the XPS printer driver, load the Setup CD-ROM that comes with the printer, and then select
XPS Driver from Add Software.
Specifying the Printer DriverTo specify the printer driver, open the Print dialog box of the application software you are using, andselect "XXX" (where "XXX" is your model name) to specify the regular printer driver or select "XXX XPS"(where "XXX" is your model name) to specify the XPS printer driver.
Displaying the Manual from the Printer DriverTo display a description of a tab in the printer driver setup window, click the Help button found on the tab.
Related TopicHow to Open the Printer Driver Setup Window
369
How to Open the Printer Driver Setup Window
You can display the printer driver setup window from the application software in use or from the printer icon.
Open the Printer Driver Setup Window through the Application SoftwareFollow the procedure below to configure printing profile when printing.
1. Select the command that you perform printing on the application software
In general, select Print on the File menu to open the Print dialog box.
2. Select your model name and click Preferences (or Properties)
The printer driver setup window appears.
Note• Depending on application software you use, command names or menu names may vary and
there may be more steps. For details, refer to the user's manual of your application software.
Opening the Printer Driver Setup Window from the Printer IconFollow the procedure below to perform printer maintenance operations such as print head cleaning, or toconfigure a printing profile that is common to all application software.
1. Select as described below:
• If you are using Windows 8.1 or Windows 8, from the Desktop charms, select Settings ->Control Panel -> Hardware and Sound -> Devices and Printers.
• If you are using Windows 7, select the Start menu -> Devices and Printers.• If you are using Windows Vista, select the Start menu -> Control Panel -> Hardware and
Sound -> Printers.• If you are using Windows XP, select the start menu -> Control Panel -> Printers and Other
Hardware -> Printers and Faxes.
2. Right-click your model name icon, and then select Printing preferences from thedisplayed menu
The printer driver setup window appears.
Important• Opening the printer driver setup window through Printer properties (Windows 8.1, Windows 8,
Windows 7) or Properties (Windows Vista, Windows XP) displays such tabs regarding theWindows functions as the Ports (or Advanced) tab. Those tabs do not appear when openingthrough Printing preferences or application software. For tabs regarding Windows functions,refer to the user's manual for the Windows.
370
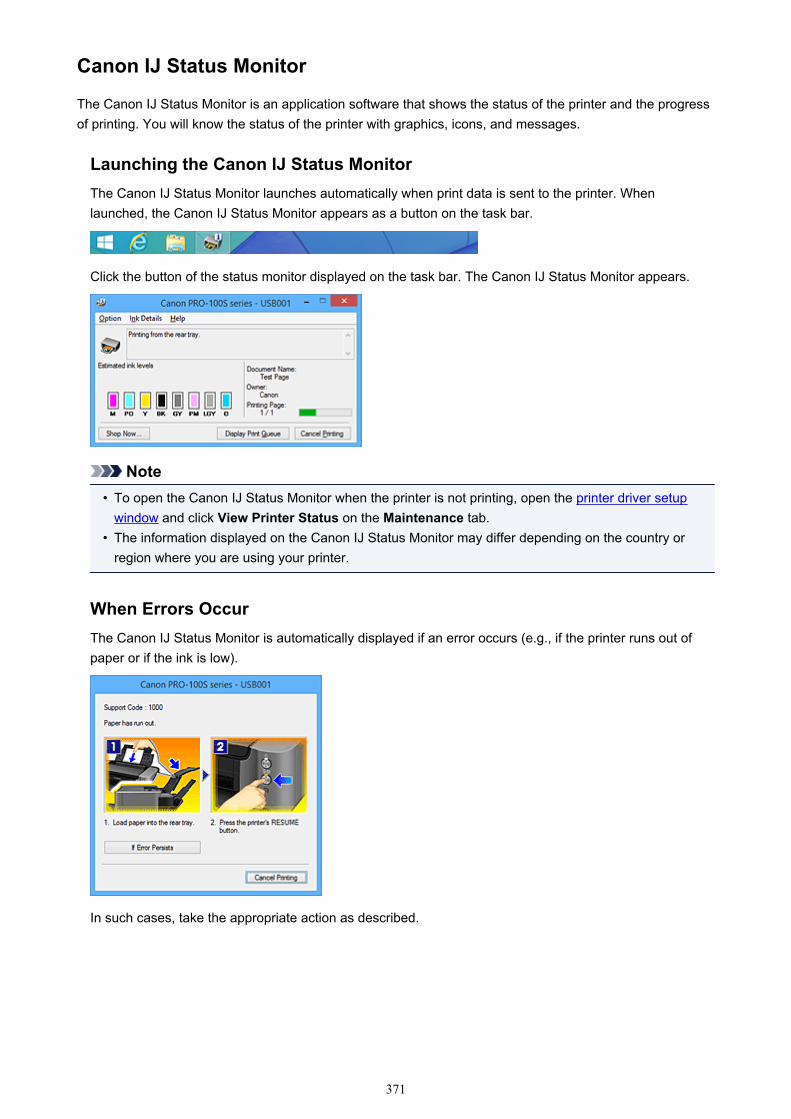
Canon IJ Status Monitor
The Canon IJ Status Monitor is an application software that shows the status of the printer and the progressof printing. You will know the status of the printer with graphics, icons, and messages.
Launching the Canon IJ Status MonitorThe Canon IJ Status Monitor launches automatically when print data is sent to the printer. Whenlaunched, the Canon IJ Status Monitor appears as a button on the task bar.
Click the button of the status monitor displayed on the task bar. The Canon IJ Status Monitor appears.
Note• To open the Canon IJ Status Monitor when the printer is not printing, open the printer driver setup
window and click View Printer Status on the Maintenance tab.• The information displayed on the Canon IJ Status Monitor may differ depending on the country or
region where you are using your printer.
When Errors OccurThe Canon IJ Status Monitor is automatically displayed if an error occurs (e.g., if the printer runs out ofpaper or if the ink is low).
In such cases, take the appropriate action as described.
371
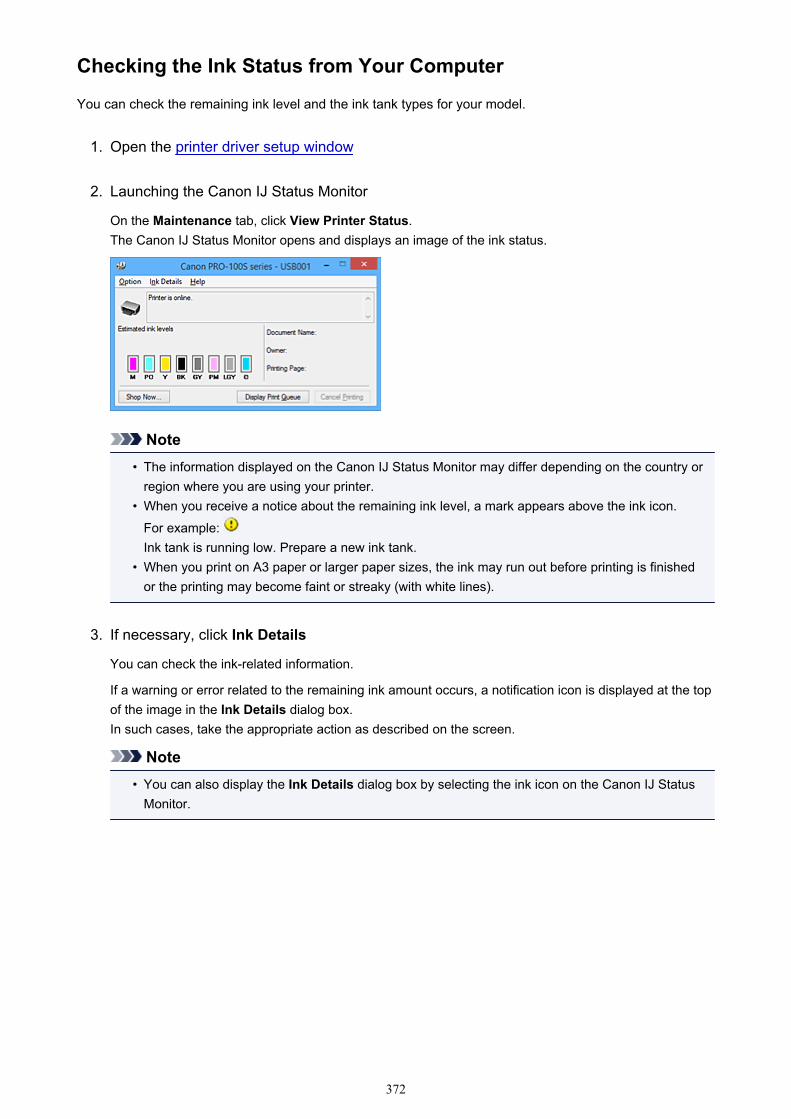
Checking the Ink Status from Your Computer
You can check the remaining ink level and the ink tank types for your model.
1. Open the printer driver setup window
2. Launching the Canon IJ Status Monitor
On the Maintenance tab, click View Printer Status.The Canon IJ Status Monitor opens and displays an image of the ink status.
Note• The information displayed on the Canon IJ Status Monitor may differ depending on the country or
region where you are using your printer.• When you receive a notice about the remaining ink level, a mark appears above the ink icon.
For example: Ink tank is running low. Prepare a new ink tank.
• When you print on A3 paper or larger paper sizes, the ink may run out before printing is finishedor the printing may become faint or streaky (with white lines).
3. If necessary, click Ink Details
You can check the ink-related information.
If a warning or error related to the remaining ink amount occurs, a notification icon is displayed at the topof the image in the Ink Details dialog box.In such cases, take the appropriate action as described on the screen.
Note• You can also display the Ink Details dialog box by selecting the ink icon on the Canon IJ Status
Monitor.
372
Canon IJ Preview
The Canon IJ Preview is an application software that displays what the print result will look like before adocument is actually printed.
The preview reflects the information that is set within the printer driver and allows you to check thedocument layout, print order, and number of pages. You can also change the media type and paper sourcesettings.
When you want to display a preview before printing, open the printer driver setup window, click the Maintab, and check the Preview before printing check box.
When you do not want to display a preview before printing, uncheck the check box.
Important• If you are using the XPS printer driver, see "Editing the Print Document or Reprinting from the Print
History."
Related TopicDisplaying the Print Results before Printing
373
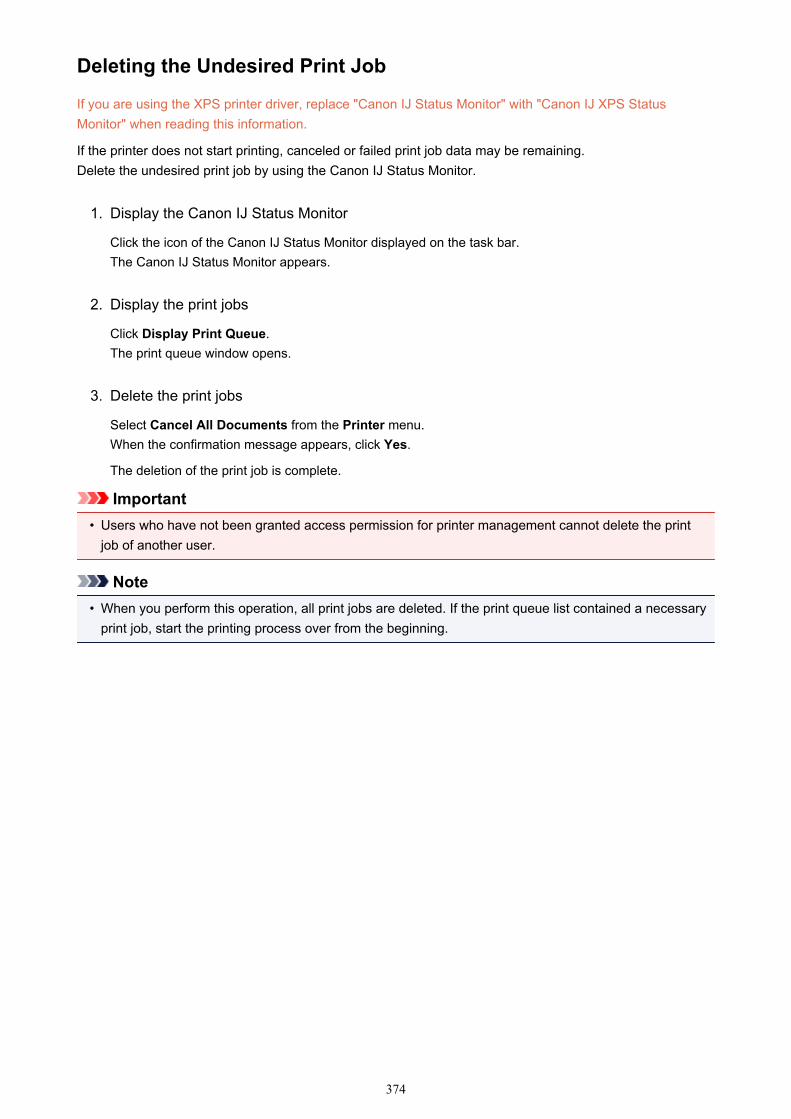
Deleting the Undesired Print Job
If you are using the XPS printer driver, replace "Canon IJ Status Monitor" with "Canon IJ XPS StatusMonitor" when reading this information.
If the printer does not start printing, canceled or failed print job data may be remaining.Delete the undesired print job by using the Canon IJ Status Monitor.
1. Display the Canon IJ Status Monitor
Click the icon of the Canon IJ Status Monitor displayed on the task bar.The Canon IJ Status Monitor appears.
2. Display the print jobs
Click Display Print Queue.The print queue window opens.
3. Delete the print jobs
Select Cancel All Documents from the Printer menu.When the confirmation message appears, click Yes.
The deletion of the print job is complete.
Important• Users who have not been granted access permission for printer management cannot delete the print
job of another user.
Note• When you perform this operation, all print jobs are deleted. If the print queue list contained a necessary
print job, start the printing process over from the beginning.
374
Instructions for Use (Printer Driver)
This printer driver is subject to the following restrictions. Keep the following points in mind when using theprinter driver.
Restrictions on the Printer Driver• Depending on the document type to be printed, the paper feed method specified in the printer driver
may not operate correctly.If this happens, open the printer driver setup window from the Print dialog box of the applicationsoftware, and check the setting in the Paper Source field on the Main tab.
• With some applications, the Copies setting in the Page Setup tab of the printer driver may not beenabled.In this case, use the copies setting in the Print dialog box of the application software.
• If the selected Language in the About dialog box of the Maintenance tab does not match theoperating system interface language, the printer driver setup window may not be displayed properly.
• Do not change the Advanced tab items of the printer properties. If you change any of the items, youwill not be able to use the following functions correctly.Also, if Print to file is selected in the Print dialog box of the application software and with applicationsthat prohibit EMF spooling, such as Adobe Photoshop LE and MS Photo Editor, the followingfunctions will not operate.
◦ Preview before printing on the Main tab◦ Prevention of Print Data Loss in the Print Options dialog box on the Page Setup tab◦ Page Layout, Tiling/Poster, Booklet, Duplex Printing (Manual), Specify Margin..., Print from
Last Page, Collate, and Stamp/Background... (Stamp...) on the Page Setup tab◦ Print a pattern for color adjustment on the Color Adjustment tab in the Manual Color
Adjustment dialog box
• Since the resolution in the preview display differs from the printing resolution, text and lines in thepreview display may appear different from the actual print result.
• With some applications, the printing is divided into multiple print jobs.To cancel printing, delete all divided print jobs.
• If image data is not printed correctly, display the Print Options dialog box from the Page Setup taband change the setting of Disable ICM required from the application software. This may solve theproblem.
Note• Disable ICM required from the application software cannot be used when the XPS printer
driver is used.
• Do not start up the Canon IJ Network Tool while printing.• Do not print when the Canon IJ Network Tool is running.
Points to Note About Applications with Restrictions• There are following restrictions in Microsoft Word (Microsoft Corporation).
◦ When Microsoft Word has the same printing functions as the printer driver, use Word to specifythem.
◦ When Fit-to-Page, Scaled, or Page Layout is used for Page Layout on the Page Setup tab ofthe printer driver, the document may not print normally in certain versions of Word.
375

◦ When Page Size in Word is set to "XXX Enlarge/Reduce", the document may not print normally incertain versions of Word.If this happens, follow the procedure below.
1. Open Word's Print dialog box.2. Open the printer driver setup window, and on the Page Setup tab, set Page Size to the same
paper size that you specified in Word.3. Set the Page Layout that you want, and then click OK to close the window.4. Without starting printing, close the Print dialog box.5. Open Word's Print dialog box again.6. Open the printer driver setup window and click OK.7. Start printing.
• If bitmap printing is enabled in Adobe Illustrator (Adobe Systems Incorporated), printing may take timeor some data may not be printed. Print after unchecking the Bitmap Printing check box in the Printdialog box.
376
Printer Driver Description
Quick Setup tab Description
Main tab Description
Page Setup tab Description
Maintenance tab Description
Canon IJ Preview Description
Canon IJ XPS Preview Description
Canon IJ Status Monitor Description
377
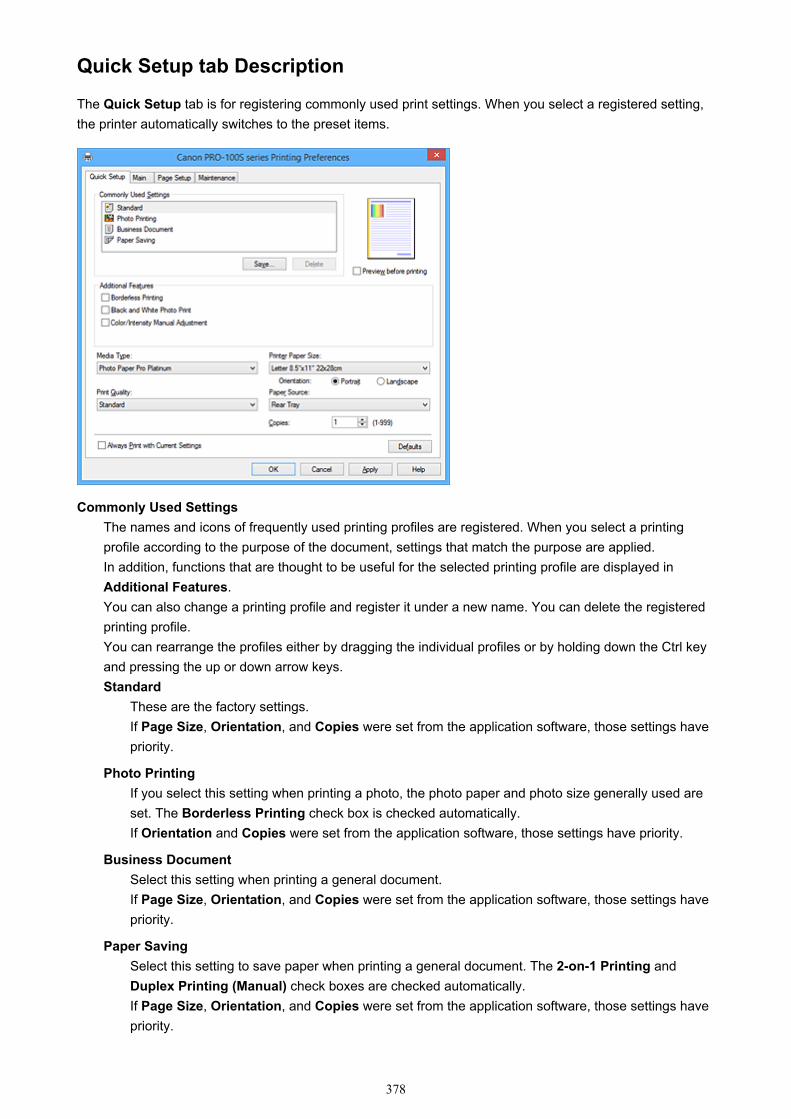
Quick Setup tab Description
The Quick Setup tab is for registering commonly used print settings. When you select a registered setting,the printer automatically switches to the preset items.
Commonly Used SettingsThe names and icons of frequently used printing profiles are registered. When you select a printingprofile according to the purpose of the document, settings that match the purpose are applied.In addition, functions that are thought to be useful for the selected printing profile are displayed inAdditional Features.You can also change a printing profile and register it under a new name. You can delete the registeredprinting profile.You can rearrange the profiles either by dragging the individual profiles or by holding down the Ctrl keyand pressing the up or down arrow keys.Standard
These are the factory settings.If Page Size, Orientation, and Copies were set from the application software, those settings havepriority.
Photo PrintingIf you select this setting when printing a photo, the photo paper and photo size generally used areset. The Borderless Printing check box is checked automatically.If Orientation and Copies were set from the application software, those settings have priority.
Business DocumentSelect this setting when printing a general document.If Page Size, Orientation, and Copies were set from the application software, those settings havepriority.
Paper SavingSelect this setting to save paper when printing a general document. The 2-on-1 Printing andDuplex Printing (Manual) check boxes are checked automatically.If Page Size, Orientation, and Copies were set from the application software, those settings havepriority.
378
Note• The combination of the Additional Features that was displayed for the printing profile that had
been selected when the added printing profile was saved is also displayed when that addedprinting profile is selected.
Save...Displays the Save Commonly Used Settings dialog box.Click this button when you want to save the information that you set on the Quick Setup, Main, andPage Setup tabs to Commonly Used Settings.
DeleteDeletes a registered printing profile.Select the name of the setting to be deleted from Commonly Used Settings, and click Delete. When aconfirmation message is displayed, click OK to delete the specified printing profile.
Note• Printing profiles that are registered in the initial settings cannot be deleted.
Settings PreviewThe paper illustration shows how the original will be laid out on a sheet of paper.You can check an overall image of the layout.
Preview before printingShows what the print result will look like before you actually print the data.Check this check box to display a preview before printing.Uncheck this check box if you do not want to display a preview.
Important• To use the Canon IJ XPS Preview, you must have Microsoft .NET Framework 4 Client Profile
installed on your computer.
Additional FeaturesDisplays the frequently used, convenient functions for the printing profile that you selected forCommonly Used Settings on the Quick Setup tab.When you move the mouse pointer near a function that can be changed, a description of that function isdisplayed.To enable a function, check the corresponding check box.For some functions, you can set detailed settings from the Main and Page Setup tabs.
Important• Depending on the printing profiles, certain function may be grayed out and you will not be able to
change them.
2-on-1 PrintingPrints two pages of the document, side by side, on one sheet of paper.To change the page sequence, click the Page Setup tab, select Page Layout for Page Layout,and click Specify.... Then in the Page Layout Printing dialog box that appears, specify the PageOrder.
4-on-1 PrintingPrints four pages of the document, side by side, on one sheet of paper.To change the page sequence, click the Page Setup tab, select Page Layout for Page Layout,and click Specify.... Then in the Page Layout Printing dialog box that appears, specify the PageOrder.
379
Duplex Printing (Manual)Select whether to print the document to both sides of the paper manually or to one side of thepaper.To change the staple side or the margins, set the new values from the Page Setup tab.
Borderless PrintingPerforms borderless printing without any margins on the paper.With the borderless printing function, the document to be printed is enlarged, so that it extendsslightly off the paper. In other words, the document is printed without any margin.To adjust the amount that the document extends beyond the paper, click the Page Setup tab,choose Borderless, and enter the value in Amount of Extension.
Black and White Photo PrintThis function converts the data to monochrome data when printing your document.
Color/Intensity Manual AdjustmentSelect when you set the Color Correction method and individual settings such as Cyan, Magenta,Yellow, Tone, Brightness, Intensity, and Contrast, etc.
Media TypeSelects a type of printing paper.Select a media type that matches the paper that is loaded in the printer. This ensures that printing iscarried out properly for the specified paper.
Printer Paper SizeSelects the size of paper actually loaded into the printer.Normally, the paper size is set automatically according to the output paper size setting, and thedocument is printed with no scaling.When you set 2-on-1 Printing or 4-on-1 Printing in Additional Features, you can manually set thepaper size with Page Size on the Page Setup tab.If you select a paper size that is smaller than the Page Size, the document size will be reduced. If youselect a paper size that is larger, the document size will be enlarged.Also if you select Custom..., the Custom Paper Size dialog box opens and allows you to specify anyvertical and horizontal dimensions for the paper size.
OrientationSelects the printing orientation.If the application used to create your document has a similar function, select the same orientation thatyou selected in that application.Portrait
Prints the document so that its top and bottom positions are unchanged relative to the paper feeddirection. This is the default setting.
LandscapePrints the document by rotating it 90 degrees relative to the paper feed direction.You can change the rotation direction by going to the Maintenance tab, opening the CustomSettings dialog box, and then using Rotate 90 degrees left when orientation is [Landscape]check box.To rotate the document 90 degrees to the left when printing, select the Rotate 90 degrees leftwhen orientation is [Landscape] check box.
Print QualitySelects your desired printing quality.Select one of the following to set the print quality level that is appropriate for the purpose.
380
HighGives priority to print quality over printing speed.
StandardPrints with average speed and quality.
Fast (Speed Priority)Gives priority to printing speed over print quality.
Paper SourceSelect the source from which paper is supplied.Rear Tray
Paper is always supplied from the rear tray.
Manual FeedPaper is supplied from the manual feed tray in the back.
Important• Depending on the media type and size, the Paper Source settings that can be selected may differ.
CopiesSpecifies the number of copies you want to print. You can specify a value from 1 to 999.
Important• When the application software that you used to create the document has the same function,
specify the settings on the printer driver. However, if the print results are not acceptable, specifythe function settings on the application software.
Always Print with Current SettingsPrints documents with the current settings starting from the next print execution.When you select this function and then close the printer driver setup window, the information that youset on the Quick Setup, Main, and Page Setup tabs are saved and printing with the same settings ispossible starting from the next print execution.
Important• If you log on with a different user name, the settings that were set when this function was enabled
are not reflected in the print settings.• If a setting was specified on the application software, it has priority.
DefaultsRestores all the settings you have changed to their default values.Click this button to return all settings on the Quick Setup, Main, and Page Setup tabs to their defaultvalues (factory settings).
Save Commonly Used Settings dialog boxThis dialog box allows you to save the information that you set on the Quick Setup, Main, and PageSetup tabs and add the information to the Commonly Used Settings list on the Quick Setup tab.
NameEnter the name for the printing profile you wish to save.Up to 255 characters can be entered.The name appears, with its associated icon, in the Commonly Used Settings list on the QuickSetup tab.
381
Options...Opens the Save Commonly Used Settings dialog box.Changes the details of printing profile to be saved.
Save Commonly Used Settings dialog boxSelect the icons of the printing profiles to be registered to Commonly Used Settings, and change theitems to be saved in the printing profiles.
IconSelect the icon for the printing profile you wish to save.The selected icon appears, with its name, in the Commonly Used Settings list on the QuickSetup tab.
Save the paper size settingSaves the paper size to the printing profile in Commonly Used Settings.To apply the saved paper size when the printing profile is selected, check this check box.If this check box is unchecked, the paper size is not saved, and consequently the paper size settingis not applied when the printing profile is selected. Instead the printer prints with the paper sizespecified with the application software.
Save the orientation settingSaves the Orientation to the printing profile in Commonly Used Settings.To apply the saved print orientation when the printing profile is selected, check this check box.If this check box is unchecked, the print orientation is not saved, and consequently the Orientationsetting is not applied when the printing profile is selected. Instead the printer prints with the printorientation specified with the application software.
Save the copies settingSaves the Copies setting to the printing profile in Commonly Used Settings.To apply the saved copies setting when the printing profile is selected, check this check box.If this check box is unchecked, the copies setting is not saved, and consequently the Copiessetting is not applied when the printing profile is selected. Instead the printer prints with the copiessetting specified with the application software.
Custom Paper Size dialog boxThis dialog box allows you to specify the size (width and height) of the custom paper.
UnitsSelect the unit for entering a user-defined paper size.
Paper SizeSpecifies the Width and the Height of the custom paper. Measurement is shown according to theunits specified in Units.
Related TopicsPrinting with Easy SetupSetting a Page Size and OrientationSetting the Number of Copies and Printing OrderExecute Borderless PrintingDuplex PrintingSetting Up Envelope Printing
382

Printing on PostcardsSwitching the Paper Source to Match the PurposeDisplaying the Print Results before PrintingSetting Paper Dimensions (Custom Size)Printing a Color Document in MonochromeSpecifying Color CorrectionAdjusting Color BalanceAdjusting Color Balance Using Sample Patterns (Printer Driver)Adjusting BrightnessAdjusting IntensityAdjusting ContrastAdjusting Intensity/Contrast Using Sample Patterns (Printer Driver)Registering a Frequently Used Printing Profile
383
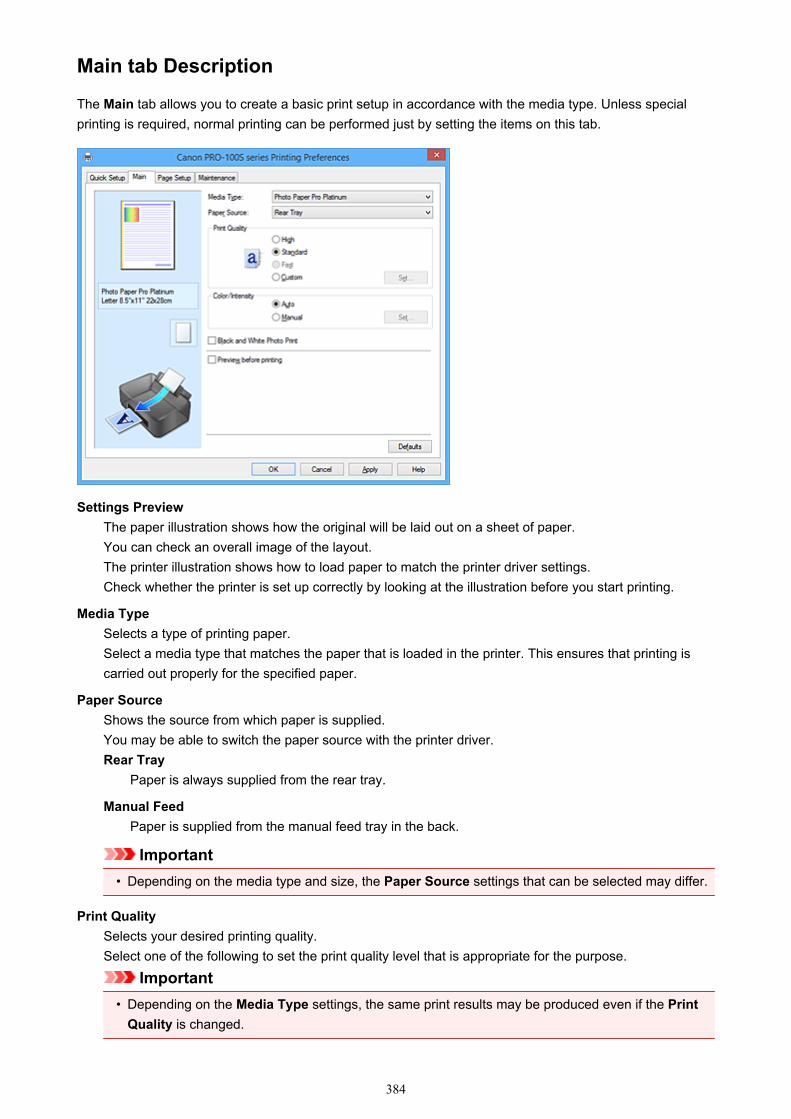
Main tab Description
The Main tab allows you to create a basic print setup in accordance with the media type. Unless specialprinting is required, normal printing can be performed just by setting the items on this tab.
Settings PreviewThe paper illustration shows how the original will be laid out on a sheet of paper.You can check an overall image of the layout.The printer illustration shows how to load paper to match the printer driver settings.Check whether the printer is set up correctly by looking at the illustration before you start printing.
Media TypeSelects a type of printing paper.Select a media type that matches the paper that is loaded in the printer. This ensures that printing iscarried out properly for the specified paper.
Paper SourceShows the source from which paper is supplied.You may be able to switch the paper source with the printer driver.Rear Tray
Paper is always supplied from the rear tray.
Manual FeedPaper is supplied from the manual feed tray in the back.
Important• Depending on the media type and size, the Paper Source settings that can be selected may differ.
Print QualitySelects your desired printing quality.Select one of the following to set the print quality level that is appropriate for the purpose.
Important• Depending on the Media Type settings, the same print results may be produced even if the Print
Quality is changed.
384
HighGives priority to print quality over printing speed.
StandardPrints with average speed and quality.
FastGives priority to printing speed over print quality.
CustomSelect this when you want to set the printing quality level individually.
Set...Select Custom for Print Quality to enable this button.Open the Custom dialog box. You can then individually set the print quality level.
Color/IntensitySelects color adjustment method.Auto
Cyan, Magenta, Yellow, Brightness, Intensity, and Contrast, and so on are adjustedautomatically.
ManualSelect when you set the individual settings such as Cyan, Magenta, Yellow, Tone, Brightness,Intensity, and Contrast, etc. and Color Correction method.
Set...Select Manual for Color/Intensity to enable this button.In the Manual Color Adjustment dialog box, you can adjust individual color settings such asCyan, Magenta, Yellow, Tone, Brightness, Intensity, and Contrast on the Color Adjustmenttab, and select the Color Correction method on the Matching tab.
Note• If you want to use an ICC profile to adjust colors, use the Manual Color Adjustment dialog
box to set the profile.
Black and White Photo PrintBlack and white photo print refers to a function that converts data to monochrome data when printingyour document.Check this check box to print a color document in monochrome.
Preview before printingShows what the print result will look like before you actually print the data.Check this check box to display a preview before printing.
Important• To use the Canon IJ XPS Preview, you must have Microsoft .NET Framework 4 Client Profile
installed on your computer.
DefaultsRestores all the settings you have changed to their default values.Clicking this button restores all the settings on the current screen to their default values (factorysettings).
Custom dialog boxSet the quality level, and select the desired print quality.
385
QualityYou can use the slider bar to adjust the print quality level.
Important• Certain print quality levels cannot be selected depending on the settings of Media Type.
Note• The High, Standard, or Fast print quality modes are linked with the slider bar. Therefore when
the slider bar is moved, the corresponding quality and value are displayed on the left. This is thesame as when the corresponding radio button is selected for Print Quality on the Main tab.
Color Adjustment TabThis tab allows you to adjust the color balance by changing the settings of the Cyan, Magenta, Yellow,Tone, Brightness, Intensity, and Contrast options.
PreviewShows the effect of color adjustment.The color and brightness change when each item is adjusted. You can check the color adjustmentstatus easily by changing the preview image to one similar to the results to be printed with SampleType.
Note• The graphic is in monochrome when the Black and White Photo Print check box is checked.
Sample TypeSelects a preview image displayed on the Color Adjustment tab.If necessary, select a preview image from Standard, Landscape, or Graphics, whichever is mostsimilar to the print results.
View Color PatternDisplays a pattern for checking color changes produced by color adjustment.If you want to display the preview image with a color pattern, check this check box.
Cyan / Magenta / YellowAdjusts the strengths of Cyan, Magenta, and Yellow.Moving the slider to the right makes a color stronger, and moving the slider to the left makes a colorweaker.You can also directly enter a value linked to the slider. Enter a value in the range from -50 to 50.This adjustment changes the relative amount of ink of each color used, which alters the total colorbalance of the document. Use your application if you want to change the total color balancesignificantly. Use the printer driver only if you want to adjust the color balance slightly.
Important• When Black and White Photo Print is checked on the Main tab, Cyan, Magenta, and Yellow
appear grayed out and are unavailable.
ToneSet the color tones for monochrome printing.You can also select colors for monochrome color tones from the pull-down menu.Cool Tone
This item adjusts color tones to cool shades of gray (cool black). When you select this item, avalue of -30 is entered for X, and a value of 0 for Y.
386
Black and WhiteThis item adjusts color tones to neutral shades of gray. When you select this item, a value of 0 isentered for X, and a value of 0 for Y.
Warm ToneThis item adjusts color tones to warm shades of gray (warm black). When you select this item, avalue of 30 is entered for X, and a value of 0 for Y.
CustomYou can adjust the color tones by using the horizontal and vertical sliders while checking thecolors in the center adjustment area.Adjust the horizontal and vertical sliders by dragging them to the left/right or up/down,respectively.You can also adjust color tones by clicking or dragging the center adjustment area with themouse.You can also directly enter values that are linked to the sliders. When you enter values, setvalues in the range of -100 to 100 for X, and -50 to 50 for Y.
Note• Custom cannot be selected since it is displayed automatically when the adjustment value is
directly entered.
X, Y (Monochromatic adjustment value)If necessary, you can adjust monochromatic colors manually.To adjust the color tones, either enter values directly or click the up/down arrows.You can also adjust the color tones by clicking or dragging the adjustment area with the mouse.The value is also linked to the horizontal and vertical sliders.When you enter values, set values in the range of -100 to 100 for X, and -50 to 50 for Y.The selected value will be shown in the preview on the left side.
BrightnessSelects the brightness of your print.You cannot change the levels of pure white and black. However, the brightness of the colors betweenwhite and black can be changed.
IntensityAdjusts the overall intensity of your print.Moving the slider to the right increases the intensity, and moving the slider to the left decreases theintensity.You can also directly enter a value linked to the slider. Enter a value in the range from -50 to 50.
ContrastAdjusts the contrast between light and dark in the image to be printed.Moving the slider to the right increases the contrast, moving the slider to the left decreases thecontrast.You can also directly enter a value linked to the slider. Enter a value in the range from -50 to 50.
Print a pattern for color adjustmentWhen the color balance, monochromatic color tones, or intensity/contrast is changed, the patternprinting function prints a list of the adjustment results along with the adjustment values.Select this function when printing a pattern for color adjustment.
Pattern Print preferences...Check Print a pattern for color adjustment to enable this button.The Pattern Print dialog box opens and allows you to set pattern printing settings.
387
Pattern Print dialog boxPerform the setup for printing patterns that allow you to check the color balance, monochromatic colortones, and intensity/contrast of documents.
Parameters to AdjustSelect the item to be checked by pattern printing.Cyan/Magenta/Yellow
Prints a pattern that allows you to check the cyan/magenta/yellow balance.
Important• When Black and White Photo Print is checked on the Main tab, Cyan/Magenta/Yellow
is not displayed.
Tone X/YPrint the pattern that allows you to check the adjustment results for the horizontal (X) andvertical (Y) directions of the monochromatic color tones.
Important• Note that when Black and White Photo Print is not selected, Tone X/Y becomes hidden
and cannot be set.
Intensity/ContrastPrints a pattern that allows you to check the intensity/contrast balance.
Printer Paper SizeSelects the paper size to be used for pattern printing.This setting is linked to Printer Paper Size on the Page Setup tab.
Note• Depending on the paper size selected on the Page Setup tab, there may be sizes that cannot
be selected.
Amount of Pattern InstancesSets the number of patterns to be printed.You can select from Largest, Large, and Small. When you select a pattern size, the number ofpatterns that can be printed is as follows:
Note• Largest and Large cannot be selected when certain paper sizes or output paper sizes are
selected.• The setting preview on the Main tab displays an image that allows you to check the overall
layout.
LargestCyan/Magenta/Yellow 37Intensity/Contrast 49
LargeCyan/Magenta/Yellow 19Intensity/Contrast 25
SmallCyan/Magenta/Yellow 7Intensity/Contrast 9
388
Color Variation Between InstancesSets the amount of color change between neighboring patterns.Select from Large, Medium, and Small. Large produces a large amount of change, and Smallproduces a small amount of change.
Note• Large is about double the size of Medium, and Small is about half the size of Medium.
Matching TabAllows you to select the method for adjusting colors to match the type of document to be printed.
Color CorrectionAllows you to select Driver Matching, ICM (ICC Profile Matching), or None to match the purpose ofthe print operation.
Important• When Black and White Photo Print is checked on the Main tab, Color Correction appears
grayed out and is unavailable.
Driver MatchingWith Canon Digital Photo Color, you can print sRGB data with color tints that most people prefer.
ICM (ICC Profile Matching)Adjusts the colors by using an ICC profile when printing.Specify the input profile, printer profile, and rendering intent to be used.
Important• If the application software is set so that ICM is disabled, ICM (ICC Profile Matching) is
unavailable for Color Correction and the printer may not be able to print the image dataproperly.
NoneDisables color adjustment with the printer driver.
Input ProfileSpecifies the input profile to be used when you select ICM (ICC Profile Matching) for ColorCorrection.Standard
The standard printer profile (sRGB), which supports the color space of ICM, is used. This is thedefault setting.
Adobe RGB (1998)The Adobe RGB profile, which supports a wider color space than sRGB, is used.
Important• Adobe RGB (1998) is not displayed when input profiles of Adobe RGB are not installed.
Printer ProfileSpecifies the printer profile to be used when ICM (ICC Profile Matching) is selected for ColorCorrection.Normally Auto is selected but you can also select a printer profile manually.
Rendering IntentSpecifies the matching method to be used when you select ICM (ICC Profile Matching) for ColorCorrection.
389

SaturationThis method reproduces images even more vividly than the Perceptual method.
PerceptualThis function effectively prints the color space that the printer can reproduce. Because thisfunction accurately renders the attributes of the data displayed on the monitor, select thisfunction when you want to print with impressions that are close to those displayed on themonitor.
Important• When you select Perceptual to print images, Canon recommends that you set the monitor
and the environment light as follows:• Monitor
Color temperature: D50 (5000K)Brightness: 120 cd/m2Gamma: 2.2
• Environment lightFluorescent light for D50 color evaluation (color temperature 5000K, high colorrendering properties)Brightness when looking at printed materials: 500 lx ± 125 lx
Relative ColorimetricWhen image data is converted to the color space of the printer, this method converts the imagedata so the color reproduction approximates the shared color regions. Select this method to printimage data with colors that are close to the original colors.The white spots are reproduced as white spots (background color) on the paper.
Absolute ColorimetricThis method uses the white spot definitions in the input and output ICC profiles to convert theimage data.Although the color and color balance of the white spots change, you may not be able to get thedesired output results because of the profile combination.
Important• Depending on the media type, you may obtain the same print results even when you change the
Rendering Intent setting.
Note• In the XPS printer driver, ICM has become ICC Profile Matching.
Related TopicsSetting the Print Quality Level (Custom)Adjusting Color BalanceAdjusting BrightnessAdjusting IntensityAdjusting ContrastAdjusting Color Balance Using Sample Patterns (Printer Driver)Adjusting Intensity/Contrast Using Sample Patterns (Printer Driver)Specifying Color CorrectionAdjusting Colors with the Printer DriverPrinting with ICC Profiles
390

Printing a Color Document in MonochromeDisplaying the Print Results before Printing
391
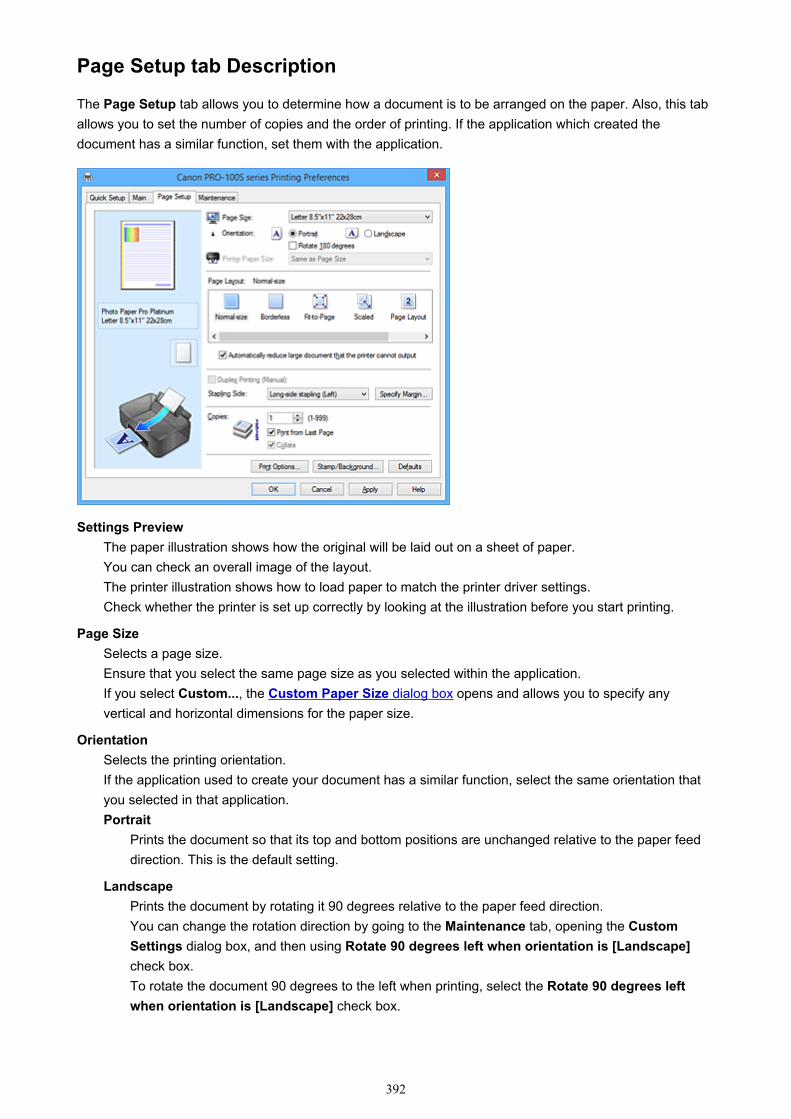
Page Setup tab Description
The Page Setup tab allows you to determine how a document is to be arranged on the paper. Also, this taballows you to set the number of copies and the order of printing. If the application which created thedocument has a similar function, set them with the application.
Settings PreviewThe paper illustration shows how the original will be laid out on a sheet of paper.You can check an overall image of the layout.The printer illustration shows how to load paper to match the printer driver settings.Check whether the printer is set up correctly by looking at the illustration before you start printing.
Page SizeSelects a page size.Ensure that you select the same page size as you selected within the application.If you select Custom..., the Custom Paper Size dialog box opens and allows you to specify anyvertical and horizontal dimensions for the paper size.
OrientationSelects the printing orientation.If the application used to create your document has a similar function, select the same orientation thatyou selected in that application.Portrait
Prints the document so that its top and bottom positions are unchanged relative to the paper feeddirection. This is the default setting.
LandscapePrints the document by rotating it 90 degrees relative to the paper feed direction.You can change the rotation direction by going to the Maintenance tab, opening the CustomSettings dialog box, and then using Rotate 90 degrees left when orientation is [Landscape]check box.To rotate the document 90 degrees to the left when printing, select the Rotate 90 degrees leftwhen orientation is [Landscape] check box.
392
Rotate 180 degreesPrints the document by rotating it 180 degrees against the paper feed direction.The width of print area and the amount of extension that are configured in other application software willbe reversed vertically and horizontally.
Printer Paper SizeSelects the size of paper actually loaded into the printer.The default setting is Same as Page Size to perform normal-sized printing.You can select a printer paper size when you select Fit-to-Page, Scaled, Page Layout, Tiling/Poster,or Booklet for Page Layout.If you select a paper size that is smaller than the Page Size, the document size will be reduced. If youselect a paper size that is larger, the document size will be enlarged.Also if you select Custom..., the Custom Paper Size dialog box opens and allows you to specify anyvertical and horizontal dimensions for the paper size.
Page LayoutSelects the size of the document you want to print and the type of printing.Normal-size
This is the normal printing method. Select this when you do not specify any page layout.Automatically reduce large document that the printer cannot output
If the printer cannot print the paper size of a document, the printer can automatically reducethe size when it prints the document.Check this check box to reduce the size when printing the document.
BorderlessChooses whether you are printing on a full page without any page margins or printing with pagemargins.In borderless printing, originals are enlarged to extend slightly off the paper. Thus, printing can beperformed without any margins (border).Use Amount of Extension to adjust how much of the document extends off the paper duringborderless printing.Amount of Extension
Adjusts how much of the document extends off the paper during borderless printing.Moving the slider to the right increases the amount of extension and allows you to performborderless printing with no problems.Moving the slider to the left reduces the amount of extension and expands the range of thedocument to print.
Fit-to-PageThis function enables you to automatically enlarge or reduce documents to fit to the paper sizeloaded in the printer without changing the paper size you specified in your application software.
ScaledDocuments can be enlarged or reduced to be printed.Specify the size in Printer Paper Size, or enter the scaling ratio in the Scaling box.Scaling
Specifies an enlargement or reduction ratio for the document you want to print.
Page LayoutMultiple pages of document can be printed on one sheet of paper.Specify...
Opens the Page Layout Printing dialog box.Click this button to set details on page layout printing.
393
Tiling/PosterThis function enables you to enlarge the image data and divide the enlarged data into severalpages to be printed. You can also glue together these sheets of paper to create large printedmatter, such as a poster.Specify...
Opens the Tiling/Poster Printing dialog box.Click this button to set details on tiling/poster printing.
BookletThe booklet printing function allows you to print data for a booklet. Data is printed on both sides ofthe paper. This type of printing ensures that pages can be collated properly, in page number order,when the printed sheets are folded and stapled at the center.Specify...
Opens the Booklet Printing dialog box.Click this button to set details on booklet printing.
Duplex Printing (Manual)Select whether to print the document to both sides of the paper manually or to one side of the paper.Check this check box to print the document on both sides.This function can be used only when Plain Paper is selected for Media Type and one of Normal-size,Fit-to-Page, Scaled, or Page Layout is selected.
Stapling SideSelects the stapling margin position.The printer analyzes the Orientation and Page Layout settings, and automatically selects the beststapling margin position. Check Stapling Side, and select from the list to change it.
Specify Margin...Opens the Specify Margin dialog box.You can specify the width of the margin.
CopiesSpecifies the number of copies you want to print. You can specify a value from 1 to 999.
Important• If the application used to create your document has a similar function, specify the number of copies
with the application without specifying it here.
Print from Last PageCheck this check box when you want to print from the last page in order. If you do this, you do not needto sort the pages into their correct order after printing.Uncheck this check box to print your document in normal order, starting from the first page.
CollateCheck this check box to group together the pages of each copy when you want to print multiple copies.Uncheck this check box when you want to print with all pages of the same page number groupedtogether.
Important• When the application software that you used to create the document has the same function, give
priority to the printer driver settings. However, if the print results are not acceptable, specify thefunction settings on the application software. When you specify the number of copies and theprinting order with both the application and this printer driver, the number of copies may bemultiplied numbers of the two settings or the specified printing order may not be enabled.
394
Print Options...Opens the Print Options dialog box.Changes detailed printer driver settings for print data that is sent from applications.
Stamp/Background... (Stamp...)Opens the Stamp/Background (Stamp) dialog box.The Stamp function allows you to print a stamp text or a bitmap over or behind document data. It alsoallows you to print date, time and user name. The Background function allows you to print a lightillustration behind the document data.
Note• With the XPS printer driver, the Stamp/Background... button has become the Stamp... button and
only the stamp function can be used.
Depending on the type of printer driver you are using and the environment, Stamp and Backgroundmay not be available.
Custom Paper Size dialog boxThis dialog box allows you to specify the size (width and height) of the custom paper.
UnitsSelect the unit for entering a user-defined paper size.
Paper SizeSpecifies the Width and the Height of the custom paper. Measurement is shown according to theunits specified in Units.
Page Layout Printing dialog boxThis dialog box allows you to select the number of document pages to be placed on one sheet of paper,the page order, and whether a page border line is to be printed around each document page.The settings specified in this dialog box can be confirmed in the settings preview on the printer driver.
Preview IconShows the settings made on the Page Layout Printing dialog box.You can check what the print result will look like before you actually print the data.
PagesSpecifies the number of document pages to fit on one sheet.
Page OrderSpecifies the document orientation to be printed on a sheet of paper.
Page BorderPrints a page border line around each document page.Check this check box to print the page border line.
Tiling/Poster Printing dialog boxThis dialog box allows you to select the size of the image to be printed. You can also make settings for cutlines and paste markers which are convenient for pasting together the pages into a poster.The settings specified in this dialog box can be confirmed in the settings preview on the printer driver.
395
Preview IconShows the settings of the Tiling/Poster Printing dialog box.You can check what the print result will look like.
Image DivisionsSelect the number of divisions (vertical x horizontal).As the number of divisions increases, the number of sheets used for printing increases. If you arepasting pages together to create a poster, increasing the number of divisions allows you to create alarger poster.
Print "Cut/Paste" in marginsSpecifies whether to print the words "Cut" and "Paste" in the margins. These words serve asguidelines for pasting together the pages into a poster.Check this check box to print the words.
Note• Depending on the type of printer driver you are using and the environment, this function may not
be available.
Print "Cut/Paste" lines in marginsSpecifies whether to print cut lines that serve as guidelines for pasting together the pages into aposter.Check this check box to print the cut lines.
Print page rangeSpecifies the printing range. Select All under normal circumstances.Select Pages to specify a specific page or range.
Note• If some of the pages have not been printed well, specify the pages that do not need to be printed
by clicking them in the settings preview of the Page Setup tab. Only the pages shown on thescreen will be printed this time.
Booklet Printing dialog boxThis dialog box allows you to set how to bind the document as a booklet. Printing only on one side andprinting a page border, can also be set in this dialog box.The settings specified in this dialog box can be confirmed in the settings preview on the printer driver.
Preview IconShows the settings made on the Booklet Printing dialog box.You can check what the document will look like when printed as a booklet.
Margin for staplingSpecifies which side of the booklet is to be stapled.
Insert blank pageSelects whether to print the document on one side or both sides of the booklet.Check this check box to print the document on one side of the booklet and select the side to be leftblank from the list.
MarginSpecifies the width of the stapling margin.The specified width becomes the stapling margin from the center of the sheet.
396
Page BorderPrints a page border line around each document page.Check this check box to print the page border line.
Specify Margin dialog boxThis dialog box allows you to specify the margin width for the side to be stapled. If a document does not fiton one page, the document is reduced when printed.
MarginSpecifies the width of the stapling margin.The width of the side specified by Stapling Side becomes the stapling margin.
Print Options dialog boxMakes changes to print data that is sent to the printer.
Depending on the type of printer driver you are using and the environment, this function may not beavailable.
Disable ICM required from the application softwareDisables the ICM function required from the application software.When an application software uses Windows ICM to print data, unexpected colors may be producedor the printing speed may decrease. If these problems occur, checking this check box may resolvethe problems.
Important• Uncheck this check box under normal circumstances.• This function does not work when ICM is selected for Color Correction on the Matching tab of
the Manual Color Adjustment dialog box.
Note• Disable ICM required from the application software tab cannot be used with the XPS printer
driver.
Disable the color profile setting of the application softwareChecking this check box disables information in the color profile that was set on the applicationsoftware.When the information in the color profile set on the application software is output to the printer driver,the print result may contain unexpected colors. If this happens, checking this check box may resolvethe problem.
Important• Even when this check box is checked, only some of the information in the color profile is
disabled, and the color profile can still be used for printing.• Uncheck this check box under normal circumstances.
Disable the paper source setting of the application softwareDisables the paper feeding method that is set by the application.With some applications such as Microsoft Word, the data may be printed with a feeding method thatdiffers from the printer driver setting. In this case, check this function.
397
Important• When this function is enabled, normally the paper feeding method cannot be changed from the
Canon IJ Preview.However, if you are using the XPS printer driver, you will be able to change the paper feedingmethod from the Canon IJ XPS Preview.
Ungroup PapersSets the display method of Media Type, Page Size, and Printer Paper Size.To display the items separately, select the check box.To display the items as a group, clear the check box.
Do not allow application software to compress print dataCompression of the application software print data is prohibited.If the print result has missing image data or unintended colors, selecting this check box may improvethe condition.
Important• Uncheck this check box under normal circumstances.
Note• Do not allow application software to compress print data tab cannot be used with the XPS
printer driver.
Print after creating print data by pageThe print data is created in page units, and printing starts after the processing of one page of printdata is complete.If a printed document contains unintended results such as streaks, selecting this check box mayimprove the results.
Important• Uncheck this check box under normal circumstances.
Scale images using nearest-neighbor interpolationWhen an image is to be enlarged or reduced when printed, the printer uses a simple interpolationprocess to enlarge or reduce the image.If the image data in a printed document is not printed clearly, selecting this check box may improvethe results.
Important• Uncheck this check box under normal circumstances.
Note• Scale images using nearest-neighbor interpolation can be used only with the XPS printer
driver.
Prevention of Print Data LossYou can reduce the size of the print data that was created with the application software and then printthe data.Depending on the application software being used, the image data may be cut off or may not beprinted properly. In such cases, select On or On (Strong).Off
The printer prints data without using this function.
398
On (Weak)The printer uses this function to print data only when the data quality is acceptable.
On (Strong)The printer always uses this function to print data.
Important• When using this function, the print quality may drop depending on the print data.
Unit of Print Data ProcessingSelects the processing unit of the print data to be sent to the printer.Select Recommended under normal circumstances.
Important• A large amount of memory may be used for certain settings.
Do not change the setting if your computer has a small amount of memory.
Note• Unit of Print Data Processing tab cannot be used with the XPS printer driver.
Stamp/Background (Stamp...) dialog boxThe Stamp/Background (Stamp...) dialog box allows you to print a stamp and/or background over orbehind the document pages. In addition to the pre-registered ones, you can register and use your originalstamp or background.
Note• With the XPS printer driver, the Stamp/Background... button has become the Stamp... button and
only the stamp function can be used.
StampStamp printing is a function that prints a stamp over a document.Check this check box and select a title from the list to print a stamp.
Define Stamp...Opens the Stamp Settings dialog box.You can check the details of a selected stamp or save a new stamp.
Place stamp over textSets how the stamp is to be printed over the document.Check the Stamp check box to enable this.Check this check box to print a stamp over the printed document page. The printed data may behidden behind the stamp.Uncheck this check box to print the document data over the stamp. The printed data will not behidden behind the stamp. However, the sections of the stamp that are overlapped by the documentmay be hidden.
Print semitransparent stampSets how the stamp is to be printed over the document.Check the Stamp check box to enable this.Check this check box to print a semi-transparent stamp over the printed document page.Uncheck this check box to print the stamp over the document data. The printed data may be hiddenbehind the stamp.
399
Note• You can use Print semitransparent stamp only with the XPS printer driver.
Stamp first page onlySelects whether the stamp is to be printed on the first page only or on all pages when the documenthas two or more pages.Check the Stamp check box to enable this.Check this check box to print a stamp on the first page only.
BackgroundBackground printing is a function that allows you to print an illustration or a similar object (bitmap)behind the document.Check this check box to print a background and select a title from the list.
Select Background...Opens the Background Settings dialog box.You can register a bitmap as a background, and change layout method and intensity of the selectedbackground.
Background first page onlySelects whether to print the background on the first page only or print on all pages when thedocument has two or more pages.Check the Background check box to enable this.Check this check box to print a background on the first page only.
Stamp TabThe Stamp tab allows you to set the text and bitmap file (.bmp) to be used for a stamp.
Preview WindowShows the status of the stamp configured in each tab.
Stamp TypeSpecifies the stamp type.Select Text to create a stamp with characters. Select Bitmap to create with a bitmap file. SelectDate/Time/User Name to display the creation date/time and user name of the printed document.The setting items in the Stamp tab change depending on the selected type.
When Stamp Type is Text or Date/Time/User Name
Stamp TextSpecifies the stamp text string.Up to 64 characters can be entered.For Date/Time/User Name, the creation date/time and user name of the printed object aredisplayed in Stamp Text.
Important• Stamp Text appears grayed out and is unavailable if Date/Time/User Name is selected.
TrueType FontSelects the font for the stamp text string.
StyleSelects the font style for the stamp text string.
SizeSelects the font size for the stamp text string.
400
OutlineSelects a frame that encloses the stamp text string.If a large font size is selected for Size, characters may extend outside of the stamp border.
Color/Select Color...Shows the current color for the stamp.To select a different color, click Select Color... to open the Color dialog box, and select or create acolor you wish to use as a stamp.
When Stamp Type is Bitmap
FileSpecifies the name of the bitmap file to be used as the stamp.
Select File...Opens the dialog box to open a file.Click this button to select a bitmap file to be used as a stamp.
SizeAdjusts the size of the bitmap file to be used as a stamp.Moving the slider to the right increases the size, moving the slider to the left decreases the size.
Transparent white areaSpecifies whether to make white-filled areas of the bitmap transparent.Check this check box to make white-filled areas of the bitmap transparent.
Note• Click Defaults to set Stamp Type to text, Stamp Text to blank, TrueType Font to Arial, Style to
Regular, Size to 36 points, Outline unchecked, and Color to gray with the RGB values (192, 192,192).
Placement TabThe Placement tab allows you to set the position where the stamp is to be printed.
Preview WindowShows the status of the stamp configured in each tab.
PositionSpecifies the stamp position on the page.Selecting Custom from the list allows you to enter values for the X-Position and Y-Positioncoordinates directly.
OrientationSpecifies the angle of rotation for the stamp. The angle can be set by entering the number ofdegrees.Negative values rotate the stamp clockwise.
Note• Orientation is enabled only when Text or Date/Time/User Name is selected for Stamp Type
on the Stamp tab.
Note• Click Defaults to set the stamp position to Center and the orientation to 0.
401
Save settings TabThe Save settings tab allows you to register a new stamp or delete an unnecessary stamp.
TitleEnter the title to save the stamp you created.Up to 64 characters can be entered.
Note• Spaces, tabs, and returns cannot be entered at the beginning or end of a title.
StampsShows a list of saved stamp titles.Specify a title to display the corresponding stamp in Title.
Save/Save overwriteSaves the stamp.Enter a title in Title, and then click this button.
DeleteDeletes an unnecessary stamp.Specify the title of an unnecessary stamp from the Stamps list, and click this button.
Background TabThe Background tab allows you to select a bitmap file (.bmp) to be used as a background or determinehow to print the selected background.
Preview WindowShows the status of the bitmap set on the Background tab.
FileSpecifies the name of the bitmap file to be used as the background.
Select File...Opens the dialog box to open a file.Click this button to select a bitmap file (.bmp) to be used as the background.
Layout MethodSpecifies how the background image is to be placed on the paper.When Custom is selected, you can set coordinates for X-Position and Y-Position.
IntensityAdjusts the intensity of the bitmap to be used as a background.Moving the slider to the right increases the intensity, and moving the slider to the left decreases theintensity. To print the background at the original bitmap intensity, move the slider to the rightmostposition.
Note• Depending on the type of printer driver you are using and the environment, this function may not be
available.• Click Defaults to set File to blank, Layout Method to Fill page, and the Intensity slider to the
middle.
Save settings TabThe Save settings tab allows you to register a new background or delete an unnecessary background.
402
TitleEnter the title to save the background image you specified.Up to 64 characters can be entered.
Note• Spaces, tabs, and returns cannot be entered at the beginning or end of a title.
BackgroundsShows a list of registered background titles.Specify a title to display the corresponding background in Title.
Save/Save overwriteSaves the image data as a background.After inserting the Title, click this button.
DeleteDeletes an unnecessary background.Specify the title of an unnecessary background from the Backgrounds list, and then click thisbutton.
403
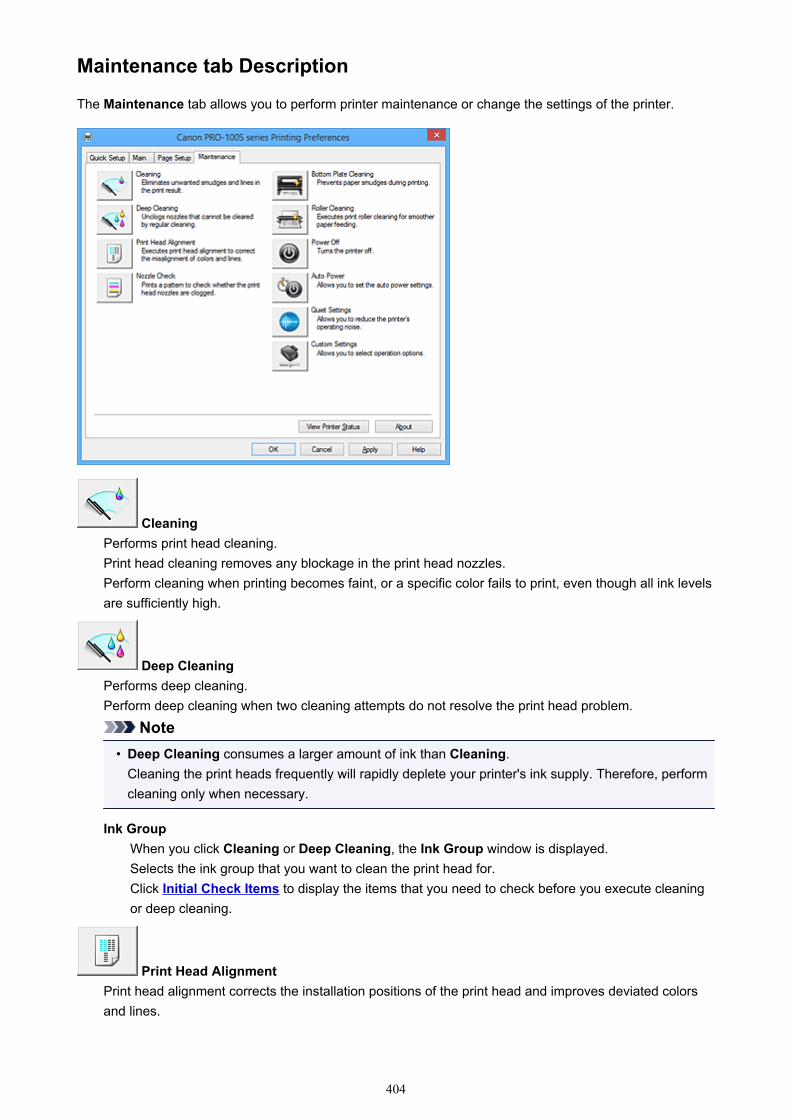
Maintenance tab Description
The Maintenance tab allows you to perform printer maintenance or change the settings of the printer.
CleaningPerforms print head cleaning.Print head cleaning removes any blockage in the print head nozzles.Perform cleaning when printing becomes faint, or a specific color fails to print, even though all ink levelsare sufficiently high.
Deep CleaningPerforms deep cleaning.Perform deep cleaning when two cleaning attempts do not resolve the print head problem.
Note• Deep Cleaning consumes a larger amount of ink than Cleaning.
Cleaning the print heads frequently will rapidly deplete your printer's ink supply. Therefore, performcleaning only when necessary.
Ink GroupWhen you click Cleaning or Deep Cleaning, the Ink Group window is displayed.Selects the ink group that you want to clean the print head for.Click Initial Check Items to display the items that you need to check before you execute cleaningor deep cleaning.
Print Head AlignmentPrint head alignment corrects the installation positions of the print head and improves deviated colorsand lines.
404
Align the print head immediately after installing the print head.When you click Print Head Alignment, the Start Print Head Alignment dialog box is displayed.
Nozzle CheckPrints a nozzle check pattern.Perform this function if printing becomes faint or a specific color fails to print. Print a nozzle checkpattern, and check whether the print head is working properly.If the print result for a specific color is fainted, or if there are any unprinted sections, click Cleaning toclean the print head.To display a list of items that you should check before printing the nozzle check pattern, click InitialCheck Items.Print Check Pattern
This function prints a pattern that allows you to check whether the any of the ink nozzles areclogged.Click Print Check Pattern. When the confirmation message is displayed, click OK. The PatternCheck dialog box is then displayed.Left-side bitmap (good)
The print head nozzles are not clogged.
Right-side bitmap (bad)The print head nozzles may be clogged.
ExitCloses the Pattern Check dialog box, and returns to the Maintenance tab.
CleaningPerforms print head cleaning.Print head cleaning removes any blockage in the print head nozzles.Perform cleaning when printing becomes faint, or if a specific color fails to print, even thoughall ink levels are sufficiently high.
Bottom Plate CleaningPerforms cleaning of the bottom plate of the printer.To prevent smudges on the back side of a sheet of paper, perform Bottom Plate Cleaning before youperform duplex printing.Also perform Bottom Plate Cleaning if ink smudges caused by something other than print data appearon the printed page.
Roller CleaningCleans the paper feed rollers.Paper feeding may fail if paper dust has stuck to the printer's paper feed rollers. In this case, clean thepaper feed rollers to improve the print result.
Power OffTurns off the printer from the printer driver.Perform this function to turn off the printer when you cannot press the ON button (POWER button) onthe printer because the printer is out of your reach.
405
You must press the ON button (POWER button) on the printer to turn the printer on again after clickingthis button. When you use this function, you will not be able to turn the printer on from the printer driver.
Auto PowerOpens the Auto Power Settings dialog box.Specify settings for operating the printer power automatically. Perform this function if you want tochange the auto power settings.
Note• If the printer is off or if communication between the printer and the computer is disabled, an error
message may appear because the computer cannot collect the printer status.If this happens, click OK to display the most recent settings specified on your computer.
Quiet SettingsOpens the Quiet Settings dialog box.Quiet Settings dialog box allows you to specify a setting that reduces the operating noise of the printer.This mode comes in handy when the operating noise of the printer becomes a concern, such whenprinting at night. Perform this operation when you want to change the quiet mode setting.
Note• If the printer is off or if communication between the printer and the computer is disabled, an error
message may appear because the computer cannot collect the printer status.
Custom SettingsOpens the Custom Settings dialog box.Perform this function to change the settings of this printer.
Note• If the printer is off or if communication between the printer and the computer is disabled, an error
message may appear because the computer cannot collect the printer status.If this happens, click OK to display the most recent settings specified on your computer.
Online Printing ResourcesGo to a Canon website with printing resources such as ICC profiles and printing tips.
Important• To use this function, you must have an Internet connection. Note that you are responsible for any
Internet connection fees.
View Print HistoryThis function starts the Canon IJ XPS preview, and displays the print history.
Note• You can use this function only with the XPS printer driver.
View Printer StatusStarts the Canon IJ Status Monitor.Perform this function when you want to check the printer status and how a print job is proceeding.
406
Note• If you are using the XPS printer driver, the "Canon IJ Status Monitor" becomes the "Canon IJ XPS
Status Monitor".
AboutOpens the About dialog box.The version of the printer driver, plus a copyright notice, can be checked.In addition, the language to be used can be switched.
Initial Check ItemsBefore running Cleaning or Deep Cleaning, check that the printer power is on, and open the cover of theprinter.Check the following items for each ink.
• Check the amount of ink remaining in the tank.• Make sure that you push in the ink tank completely until you hear a clicking sound.• If an orange tape is adhered to the ink tank, peel it off completely.
Any remaining tape will hinder ink output.• Check that the ink tanks are installed in their correct positions.
Start Print Head Alignment dialog boxThis dialog box allows you to adjust the attachment position for the print head, or to print the currentsetting value for the print head position.
Align Print HeadAligns the print head.Print head alignment corrects the installation positions of the print head and improves deviated colorsand lines.Align the print head immediately after installing the print head.
Print Alignment ValueClick this button to check the current setting value of the print head position.Prints the current setting value for the print head position.
Print Head Alignment dialog boxTo adjust the print head position manually, click Align Print Head in the Start Print Head Alignmentdialog box, and perform the operations instructed in the messages. The Print Head Alignment dialogbox is then displayed.This dialog box allows you to check the printed pattern and adjust the print head position.
Preview WindowDisplays the pattern of Print Head Alignment, and checks the position of the selected pattern.You can also change the setting by clicking the pattern on the screen directly.
Select the Pattern NumberCompare the printed adjustment patterns, and enter the pattern number of the pattern with theleast visible streaks or horizontal stripes into the corresponding box.
Note• If you do not know how to analyze the printed pattern, see Aligning the Print Head Position from
Your Computer.
407
Initial Check ItemsBefore running Nozzle Check, check that the printer power is on, and open the cover of the printer.Check the following items for each ink.
• Check the amount of ink remaining in the tank.• Make sure that you push in the ink tank completely until you hear a clicking sound.• If an orange tape is adhered to the ink tank, peel it off completely.
Any remaining tape will hinder ink output.• Check that the ink tanks are installed in their correct positions.
Auto Power Settings dialog boxWhen you click Auto Power, the Auto Power Settings dialog box is displayed.This dialog box allows you to manage the printer power from the printer driver.
Auto Power OnSelects the auto power-on setting.Specify Disable to prevent the printer from turning on automatically when print data is sent to it.Make sure the printer is on and then click OK to change the printer settings.Specify Enable to turn the printer on automatically when print data is sent to it.
Auto Power OffSelects the auto power-off setting.If a printer driver operation or a printer operation is not performed within the specified time, the printerturns off.
Important• If you connect this printer to a network and use it, you can set Auto Power Off but the power will
not be turned off automatically.
Quiet Settings dialog boxWhen you click Quiet Settings, the Quiet Settings dialog box is displayed.Quiet Settings dialog box allows you to specify a setting that reduces the operating noise of the printer.Select when you wish to reduce the operating noise of the printer at night, etc.Using this function may lower the print speed.
Do not use quiet modeSelect this option when you wish to use the printer with volume of normal operating noise.
Always use quiet modeSelect this option when you wish to reduce the operating noise of the printer.
Use quiet mode during specified hoursSelect this option when you wish to reduce the operating noise of the printer during a specified periodof time.Set the Start time and the End time of the quiet mode you wish to be activated. If both are set to thesame time, the quiet mode will not function.
Important• If you specify a time for Use quiet mode during specified hours, quiet mode is not applied to
operations (direct print, etc.) performed directly from the printer.
408

Custom Settings dialog boxWhen you click Custom Settings, the Custom Settings dialog box is displayed.If necessary, switch between various modes of printer operation.
Detects a printable disc in the disc trayDetects whether a printable disc is loaded on the disc tray during disc label printing and displays amessage if a disc is not loaded.Check this check box to print with detecting whether a printable disc is loaded.
Important• If you leave this check box unchecked, the printer may print to the disc tray even if a printable
disc is not loaded on the disc tray. Therefore, you should check this check box under normalcircumstances.
• If you load a printable disc that has already been printed onto the disc tray, the printer maydetect that no printable disc is loaded on the tray. In this case, uncheck this check box.
Prevent paper abrasionThe printer can increase the gap between the print head and the paper during high-density printing toprevent paper abrasion.Check this check box to enable this function.
Align heads manuallyUsually, the Print Head Alignment function on the Maintenance tab is set to automatic headalignment, but you can change it to manual head alignment.If the printing results of automatic print head alignment are not satisfactory, perform manual headalignment.Check this check box to perform the manual head alignment.
Detect paper widthEnables the printer to detect the width of the paper loaded in the printer during printing.If the printer detects a paper width that is smaller than the paper width that was set for Page Size inthe Page Setup tab, the printer displays a message and stops printing.Check the check box to detect the paper width.To have the printer print without detecting the paper width, uncheck this check box.
Rotate 90 degrees left when orientation is [Landscape]On the Page Setup tab, you can change the rotation direction of the Landscape in the Orientation.To rotate the document 90 degrees to the left when printing, select the check box.
Ink Drying Wait TimeThe printer can pause before printing a subsequent page. Moving the slider to the right increases thepause time, and moving the slider to the left decreases the time.If the paper gets stained because the next page is ejected before the ink on the printed page dries,increase the ink drying wait time.Reducing the ink drying wait time speeds up printing.
About dialog boxWhen you click About, the About dialog box is displayed.This dialog box displays the version, copyright, and module list of the printer driver. You can select thelanguage to be used and switch the language displayed in the setup window.
ModulesLists the printer driver modules.
409
LanguageSpecifies the language you wish to use in the printer driver setup window.
Important• If the font for displaying the language of your choice is not installed in your system, the
characters will be garbled.
Related TopicsCleaning the Print Heads from Your ComputerAligning the Print Head Position from Your ComputerUse Your Computer to Print a Nozzle Check PatternCleaning Inside the PrinterCleaning the Paper Feed Rollers from Your ComputerManaging the Printer PowerReducing the Printer NoiseChanging the Printer Operation Mode
410
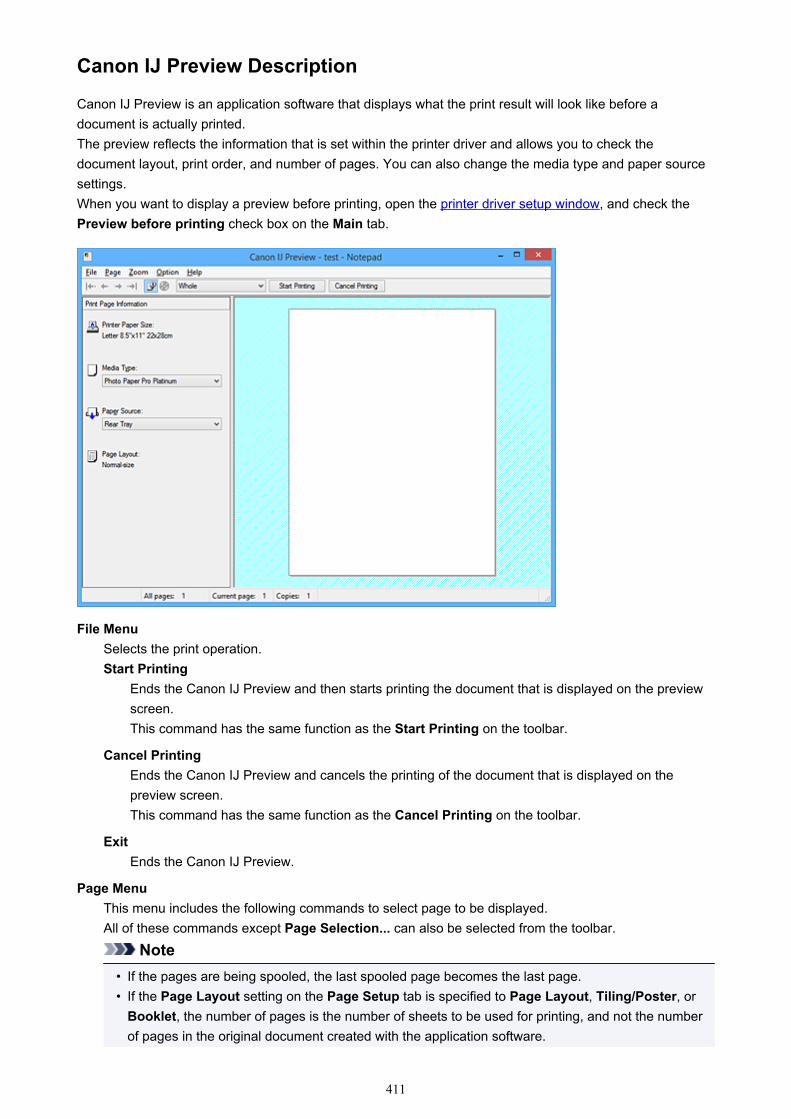
Canon IJ Preview Description
Canon IJ Preview is an application software that displays what the print result will look like before adocument is actually printed.The preview reflects the information that is set within the printer driver and allows you to check thedocument layout, print order, and number of pages. You can also change the media type and paper sourcesettings.When you want to display a preview before printing, open the printer driver setup window, and check thePreview before printing check box on the Main tab.
File MenuSelects the print operation.Start Printing
Ends the Canon IJ Preview and then starts printing the document that is displayed on the previewscreen.This command has the same function as the Start Printing on the toolbar.
Cancel PrintingEnds the Canon IJ Preview and cancels the printing of the document that is displayed on thepreview screen.This command has the same function as the Cancel Printing on the toolbar.
ExitEnds the Canon IJ Preview.
Page MenuThis menu includes the following commands to select page to be displayed.All of these commands except Page Selection... can also be selected from the toolbar.
Note• If the pages are being spooled, the last spooled page becomes the last page.• If the Page Layout setting on the Page Setup tab is specified to Page Layout, Tiling/Poster, or
Booklet, the number of pages is the number of sheets to be used for printing, and not the numberof pages in the original document created with the application software.
411
• If duplex printing manually has been set, the front pages which will be printed first are all displayedtogether, and then the back pages are displayed.
First PageDisplays the first page of the document.If the currently displayed page is the first page, this command is grayed out and cannot beselected.
Previous PageDisplays the page located before the currently displayed page.If the currently displayed page is the first page, this command is grayed out and cannot beselected.
Next PageDisplays the page located after the currently displayed page.If the currently displayed page is the last page, this command is grayed out and cannot beselected.
Last PageDisplays the last page of the document.If the currently displayed page is the last page, this command is grayed out and cannot beselected.
Page Selection...Displays the Page Selection dialog box.This command allows you to specify the page number of the page to be displayed.
Zoom MenuSelects the ratio of the actual size printed on the paper to the preview display size.You can also select the ratio from the drop-down list box located on the toolbar.Whole
Displays the entire page of data as one page.
50%Reduces the displayed data to 50% of the actual size to be printed.
100%Displays the data at the actual size to be printed.
200%Enlarges the displayed data to 200% of the actual size to be printed.
400%Enlarges the displayed data to 400% of the actual size to be printed.
Option MenuThis menu includes the following command:Displays Print Page Information
Displays print setup information (including printer paper size, media type, and page layout) for eachpage at the left side of the preview screen.This screen also allows you to change the media type and paper source settings.
Help MenuWhen you select this menu item, the Help window for Canon IJ Preview is displayed, and you cancheck the version and copyright information.
412
Start Printing buttonPrints the documents selected in the document list.The printed documents are deleted from the list, and when all documents are printed, the Canon IJ XPSPreview closes.
Cancel Printing buttonEnds the Canon IJ Preview, and cancels the printing of the document that is displayed on the previewscreen.You can click this button while spooling.
Print Page Information ScreenDisplays print setup information for each page at the left side of the preview screen.This screen also allows you to change the media type and paper source settings.
Important• If the media type and paper source are set from the application software, those settings have
priority and the changed settings may become ineffective.
Printer Paper SizeDisplays the paper size of the document to be printed.
Media TypeYou can select the media type of the document to be printed.
Paper SourceYou can select the paper source of the document to be printed.
Page LayoutDisplays the page layout of the document to be printed.
413
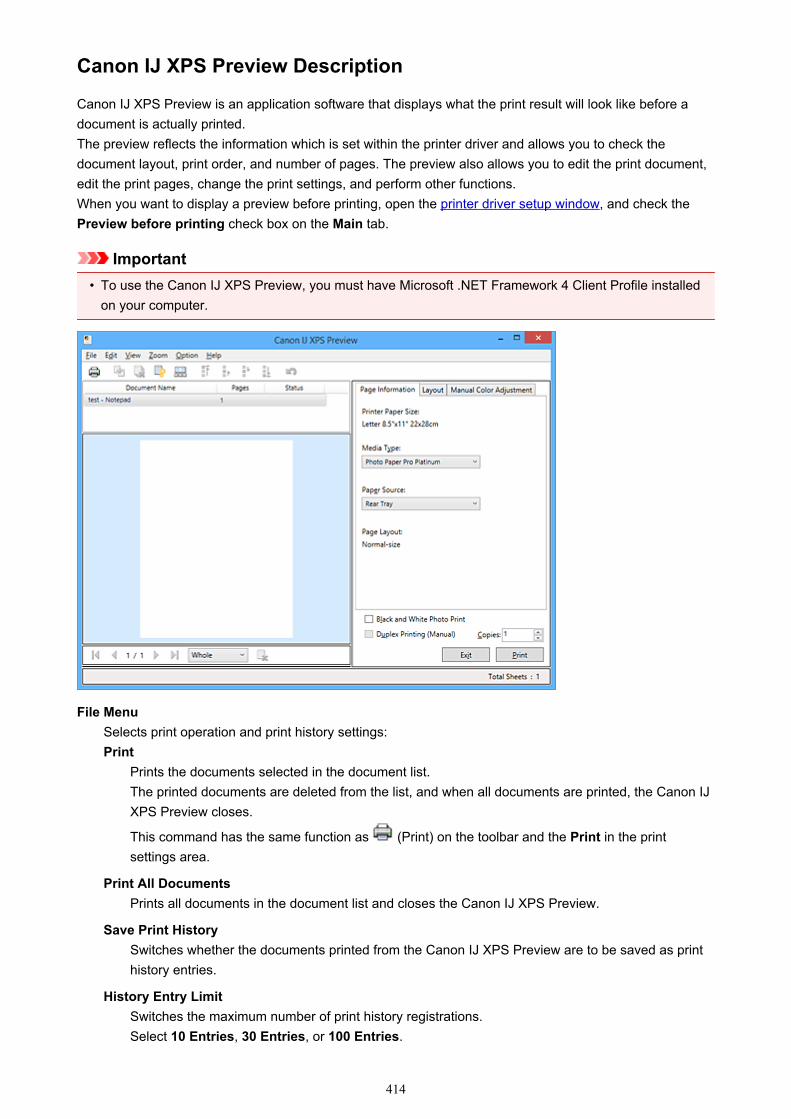
Canon IJ XPS Preview Description
Canon IJ XPS Preview is an application software that displays what the print result will look like before adocument is actually printed.The preview reflects the information which is set within the printer driver and allows you to check thedocument layout, print order, and number of pages. The preview also allows you to edit the print document,edit the print pages, change the print settings, and perform other functions.When you want to display a preview before printing, open the printer driver setup window, and check thePreview before printing check box on the Main tab.
Important• To use the Canon IJ XPS Preview, you must have Microsoft .NET Framework 4 Client Profile installed
on your computer.
File MenuSelects print operation and print history settings:Print
Prints the documents selected in the document list.The printed documents are deleted from the list, and when all documents are printed, the Canon IJXPS Preview closes.
This command has the same function as (Print) on the toolbar and the Print in the printsettings area.
Print All DocumentsPrints all documents in the document list and closes the Canon IJ XPS Preview.
Save Print HistorySwitches whether the documents printed from the Canon IJ XPS Preview are to be saved as printhistory entries.
History Entry LimitSwitches the maximum number of print history registrations.Select 10 Entries, 30 Entries, or 100 Entries.
414
Important• If the limit on the number of registration is exceeded, the print history registrations are deleted
starting from the oldest one.
Add documents from history to the listAdds the document saved in the print history to the document list.
ExitEnds the Canon IJ XPS Preview. The documents remaining in the document list will be deletedfrom the list.This command has the same function as the Exit in the print settings area.
Edit MenuSelects the method for editing multiple documents or pages.Undo
Reverses the previous change.If the change cannot be reversed, this function is grayed out and cannot be selected.This command has the same function as the (Undo) on the toolbar.
DocumentsSelects the method for editing print documents.Combine Documents
Combines the documents selected in the document list into one document.If only one document is selected, this command is grayed out and cannot be selected.
This command has the same function as the (Combine Documents) on the toolbar.
Reset DocumentsReturns the document selected in the document list to their status before they were added tothe Canon IJ XPS Preview.The combined documents are separated, and the original documents are restored.
This command has the same function as the (Reset Documents) on the toolbar.
Move DocumentUse the following command to change the order of the documents selected in the documentlist.
Move to FirstMoves the selected print document to the beginning of the document list.If the currently selected document is the first document, this command is grayed out andcannot be selected.
Move Up OneMoves the selected print document one up from its current position.If the currently selected document is the first document, this command is grayed out andcannot be selected.
Move Down OneMoves the selected print document one down from its current position.If the currently selected document is the last document, this command is grayed out andcannot be selected.
Move to LastMoves the selected print document to the end of the document list.If the currently selected document is the last document, this command is grayed out andcannot be selected.
415
Delete DocumentDeletes the selected document from the document list.If the document list contains only one document, the document is grayed out and cannot beselected.
This command has the same function as the (Delete Document) on the toolbar.
Black and White Photo PrintAllows you to change the monochrome print settings.This command has the same functionality as the Black and White Photo Print check box inthe print settings area.
Page Layout Printing...Opens the Page Layout Printing dialog box.This dialog box allows you to set Page Layout Printing, Pages, Page Order, and PageBorder.
Duplex Printing...Opens the Duplex Printing dialog box.This dialog box allows you to set Duplex Printing (Manual), Stapling Side, and Margin.
Copies...Opens the Copies dialog box.This dialog box allows you to set Copies, Collate, and Print from Last Page.
PagesSelects the method for editing print pages.Delete Page
Deletes the currently selected page.If page layout printing is set, the pages enclosed with red frame will be deleted.
This command has the same function as the (Delete Page) on the toolbar.
Restore PageRestores pages that were deleted with the Delete Page function.To restore pages, you must select the View Deleted Pages check box on the Option menuand display the deleted pages as thumbnails.
Move PageUse the following command to change the order of the currently selected pages.
Move to FirstMoves the currently selected page to the beginning of the document.If the currently selected page is the first page, this command is grayed out and cannot beselected.
Move Forward OneMoves the currently selected page one position in front of its current position.If the currently selected page is the first page, this command is grayed out and cannot beselected.
Move Backward OneMoves the currently selected page one position after its current position.If the currently selected page is the last page, this command is grayed out and cannot beselected.
416
Move to LastMoves the currently selected page to the end of the document.If the currently selected page is the last page, this command is grayed out and cannot beselected.
View MenuSelects the documents and pages to be displayed.Documents
Use the following command to select the document to display.First Document
Displays the first document in the document list.If the currently selected document is the first document, this command is grayed out andcannot be selected.
Previous DocumentDisplays the document located before the currently displayed document.If the currently selected document is the first document, this command is grayed out andcannot be selected.
Next DocumentDisplays the document located after the currently displayed document.If the currently selected document is the last document, this command is grayed out andcannot be selected.
Last DocumentDisplays the last document in the document list.If the currently selected document is the last document, this command is grayed out andcannot be selected.
PagesUse the following command to select the page to be displayed.
Note• If the Page Layout setting in the printer driver is specified to Tiling/Poster, or Booklet, the
number of pages is the number of sheets to be used for printing, and not the number of pagesin the original document created with the application software.
First PageDisplays the first page of the document.If the currently displayed page is the first page, this command is grayed out and cannot beselected.
Previous PageDisplays the page located before the currently displayed page.If the currently displayed page is the first page, this command is grayed out and cannot beselected.
Next PageDisplays the page located after the currently displayed page.If the currently displayed page is the last page, this command is grayed out and cannot beselected.
Last PageDisplays the last page of the document.If the currently displayed page is the last page, this command is grayed out and cannot beselected.
417
Page Selection...Displays the Page Selection dialog box.This command allows you to specify the page number of the page to be displayed.
Zoom MenuSelects the ratio of the actual size printed on the paper to the preview display size.You can also select the ratio from the drop-down list box located on the toolbar.Whole
Displays the entire page of data as one page.
50%Reduces the displayed data to 50% of the actual size to be printed.
100%Displays the data at the actual size to be printed.
200%Enlarges the displayed data to 200% of the actual size to be printed.
400%Enlarges the displayed data to 400% of the actual size to be printed.
Option MenuToggles the show / hide status of the following information.View Thumbnails
Reduces all pages in the document selected in the document list and displays them at the bottomof the preview window.
This command has the same function as the (View Thumbnails) on the toolbar.
View Document ListDisplays the print document list at the top of the preview window.
View Print Settings AreaDisplays the print settings area at the right side of the preview window.
View Deleted PagesWhen the thumbnails are displayed, this function displays pages that were deleted with the DeletePage function.To check deleted pages, you must first select the View Thumbnails check box.
Keep printed documents on the listLeaves the printed document in the document list.
Print Settings Displayed at StartupSwitches the tab of the print settings area to be displayed when the Canon IJ XPS Preview isstarted.Select Page Information, Layout, or Manual Color Adjustment.
Help MenuWhen you select this menu item, the Help window for Canon IJ XPS Preview is displayed, and you cancheck the version and copyright information.
(Print)Prints the documents selected in the document list.The printed documents are deleted from the list, and when all documents are printed, the Canon IJ XPSPreview closes.
418
(Combine Documents)Combines the documents selected in the document list into one document.If only one document is selected, this command is grayed out and cannot be selected.
(Delete Document)Deletes the selected document from the document list.If the document list contains only one document, the document is grayed out and cannot be selected.
(Reset Documents)Returns the document selected in the document list to their status before they were added to the CanonIJ XPS Preview.The combined documents are separated, and the original documents are restored.
(View Thumbnails)Reduces all pages in the document selected in the document list and displays them at the bottom of thepreview window.To hide the print pages, click View Thumbnails again.
(Move to First)Moves the selected print document to the beginning of the document list.If the currently selected document is the first document, this command is grayed out and cannot beselected.
(Move Up One)Moves the selected print document one up from its current position.If the currently selected document is the first document, this command is grayed out and cannot beselected.
(Move Down One)Moves the selected print document one down from its current position.If the currently selected document is the last document, this command is grayed out and cannot beselected.
(Move to Last)Moves the selected print document to the end of the document list.If the currently selected document is the last document, this command is grayed out and cannot beselected.
(Undo)Reverses the previous change.If the change cannot be reversed, this function is grayed out and cannot be selected.
(Delete Page)Deletes the currently selected page.If page layout printing is set, the pages enclosed with red frame will be deleted.
Document listDisplays the list of the print documents.The document selected in the document list becomes the target for preview display and editing.Document Name
Displays the name of the print document.If you click the name of the selected print document, a text box is displayed, and you can renamethe document to any name.
419
PagesDisplays the number of pages in the print document.
Important• The number displayed in Pages and the output page count are different.• To check the output page count, check the status bar at the bottom of the preview window.
StatusDisplays the status of the print documents.Documents that are undergoing data processing are displayed as Processing data.
Important• Documents showing Processing data cannot be printed or edited.
Wait until the data processing ends.
Print Settings Area ScreenAllows you to check and change the print settings of the documents selected in the document list.Print Settings Area is displayed on the right side of the preview window.Page Information tab
The print settings are displayed for each page.You can change the media type and paper source settings.Printer Paper Size
Displays the paper size of the document to be printed.
Media TypeAllows you to select the media type of the document to be printed.
Paper SourceAllows you to select the paper source of the document to be printed.
Page LayoutDisplays the page layout of the document to be printed.
Layout tabYou can specify settings for page layout printing.To apply the specified settings, click Apply.If the page layout print settings cannot be changed for the print document, the individual items aregrayed out and cannot be selected.
Manual Color Adjustment tabThis tab allows you to adjust the color balance by changing the settings of the Cyan, Magenta,Yellow, Brightness, Intensity, and Contrast options.Cyan/Magenta/Yellow
Adjusts the strengths of Cyan, Magenta, and Yellow.Moving the slider to the right makes a color stronger, and moving the slider to the left makes acolor weaker.You can also directly enter a value linked to the slider. Enter a value in the range from -50 to50.This adjustment changes the relative amount of ink of each color used, which alters the totalcolor balance of the document.Use your application software if you want to change the total color balance significantly. Usethe printer driver only if you want to adjust the color balance slightly.
420
Important• When Black and White Photo Print is checked, Cyan, Magenta, and Yellow appear
grayed out and are unavailable.
ToneSets the color adjustment for monochrome printing.You can adjust color tones by entering values directly, or by clicking or dragging the centeradjustment area by using your mouse.When you enter values, set values in the range of -100 to 100 for X and -50 to 50 for Y.
BrightnessSelects the brightness of your print.Pure white and black will not change, but colors between white and black will change.
IntensityAdjusts the overall intensity of your print.Moving the slider to the right increases the intensity, and moving the slider to the leftdecreases the intensity.You can also directly enter a value linked to the slider. Enter a value in the range from -50 to50.
ContrastAdjusts the contrast between light and dark in the image to be printed.Moving the slider to the right increases the contrast, moving the slider to the left decreases thecontrast.You can also directly enter a value linked to the slider. Enter a value in the range from -50 to50.
DefaultsRestores all the settings you have changed to their default values.Clicking this button restores all the settings on this tab to their default values (factory settings).
Black and White Photo PrintAllows you to change the monochrome print settings.
Duplex Printing (Manual)Select whether to print the document to both sides of the paper manually or to one side of thepaper.If the duplex print settings cannot be changed for the print document, this item is grayed out and isunavailable.
Important• When you select Booklet for Page Layout, Duplex Printing (Manual) of the print settings
area will be set automatically. In this case, Duplex Printing (Manual) is grayed out and isunavailable.
CopiesSpecifies the number of copies you want to print. You can specify a value from 1 to 999.If the numbers of copies cannot be changed for the print document, this item is grayed out and isunavailable.
ExitEnds the Canon IJ XPS Preview.The documents remaining in the document list will be deleted from the list.
421

PrintPrints the documents selected in the document list.The printed documents are deleted from the list, and when all documents are printed, the Canon IJXPS Preview closes.
422
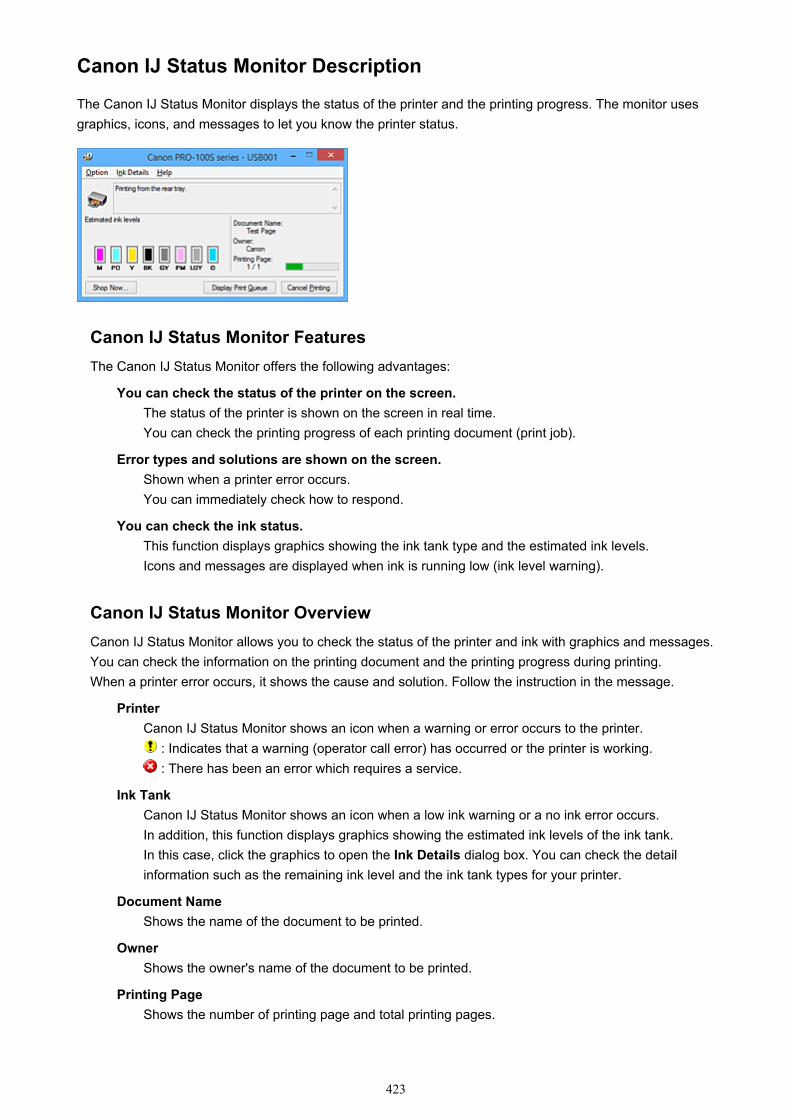
Canon IJ Status Monitor Description
The Canon IJ Status Monitor displays the status of the printer and the printing progress. The monitor usesgraphics, icons, and messages to let you know the printer status.
Canon IJ Status Monitor FeaturesThe Canon IJ Status Monitor offers the following advantages:
You can check the status of the printer on the screen.The status of the printer is shown on the screen in real time.You can check the printing progress of each printing document (print job).
Error types and solutions are shown on the screen.Shown when a printer error occurs.You can immediately check how to respond.
You can check the ink status.This function displays graphics showing the ink tank type and the estimated ink levels.Icons and messages are displayed when ink is running low (ink level warning).
Canon IJ Status Monitor OverviewCanon IJ Status Monitor allows you to check the status of the printer and ink with graphics and messages.You can check the information on the printing document and the printing progress during printing.When a printer error occurs, it shows the cause and solution. Follow the instruction in the message.
PrinterCanon IJ Status Monitor shows an icon when a warning or error occurs to the printer.
: Indicates that a warning (operator call error) has occurred or the printer is working. : There has been an error which requires a service.
Ink TankCanon IJ Status Monitor shows an icon when a low ink warning or a no ink error occurs.In addition, this function displays graphics showing the estimated ink levels of the ink tank.In this case, click the graphics to open the Ink Details dialog box. You can check the detailinformation such as the remaining ink level and the ink tank types for your printer.
Document NameShows the name of the document to be printed.
OwnerShows the owner's name of the document to be printed.
Printing PageShows the number of printing page and total printing pages.
423
Display Print QueueShows the print window used to manage the print job that is being printed or being in the printqueue.
Cancel PrintingCancels the current print job.
Important• The Cancel Printing button is enabled only while print data is being sent to the printer.
Once the print data has been sent, the button is grayed out and becomes unavailable.
Option MenuIf you select Enable Status Monitor, when a printer related message is generated the Canon IJStatus Monitor starts.When Enable Status Monitor is selected, following commands are available.Always Display Current Job
Displays the Canon IJ Status Monitor during printing.
Always Display on TopDisplays the Canon IJ Status Monitor in front of other windows.
Display Guide MessageDisplays the guide for operations in which how to set paper is complicated.Envelope Printing
Displays the guide message when envelope printing starts.To hide this guide message, select the Do not show this message again check box.To display the guide messages again, click Envelope Printing on the Display GuideMessage in the Option menu and enable this setting.
Hagaki PrintingDisplays the guide message before the printer begins hagaki printing.To hide this guide message, select the Do not show this message again check box.To display the guide messages again, click Hagaki Printing on the Display GuideMessage in the Option menu and enable this setting.
Display Warning AutomaticallyWhen a Low Ink Warning Occurs
Starts the Canon IJ Status Monitor window automatically and displays it in front of theother windows when a low ink warning occurs.
Start when Windows is StartedStarts the Canon IJ Status Monitor automatically when you start Windows.
Ink Details MenuSelect this menu to display the Ink Details dialog box. Check the detail information such as theremaining ink level and the ink tank types for your printer.Ink Details dialog box
This function displays graphics and messages showing the ink tank type and the estimatedink levels.Ink Information (displayed at left)
Shows the ink tank types with graphics.If a warning or error related to the remaining ink level occurs, the printer driver displaysan icon to let you know.If the icon is displayed, operate the printer according to the instructions displayed on thescreen.
424

Message (displayed at right)Shows information such as the ink status and ink colors with sentences.
Ink Model NumberShows the ink tank types for your printer.
CloseCloses the Ink Details dialog box to return to Canon IJ Status Monitor.
Help MenuWhen you select this menu item, the Help window for Canon IJ Status Monitor is displayed, andyou can check the version and copyright information.
425
Updating the Printer Driver
Obtaining the Latest Printer Driver
Deleting the Unnecessary Printer Driver
Before Installing the Printer Driver
Installing the Printer Driver
426
Obtaining the Latest Printer Driver
By updating the printer driver to the latest version of the printer driver, unresolved problems may be solved.
You can check the version of the printer driver by clicking the About button on the Maintenance tab.
You can access our website and download the latest printer driver for your model.
Important• You can download the printer driver for free, but any Internet access charges incurred are your
responsibility.• Before installing the latest printer driver, delete the previously installed version.
Related TopicsBefore Installing the Printer DriverInstalling the Printer Driver
427
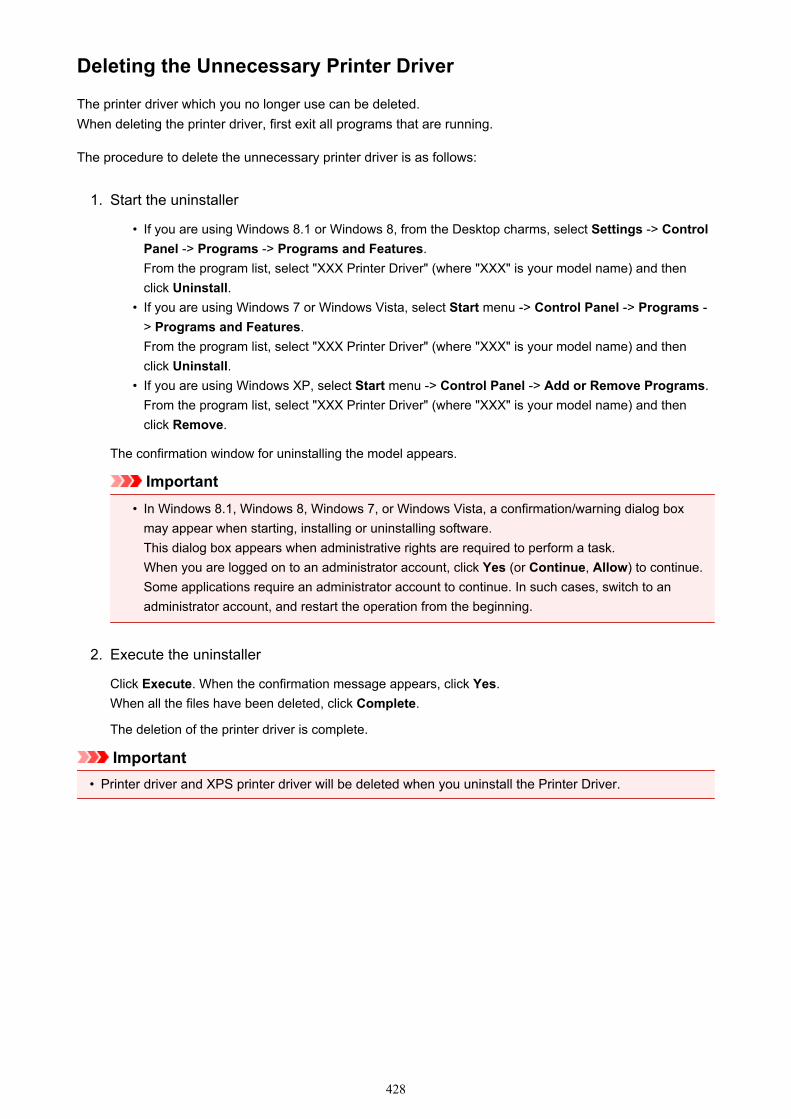
Deleting the Unnecessary Printer Driver
The printer driver which you no longer use can be deleted.When deleting the printer driver, first exit all programs that are running.
The procedure to delete the unnecessary printer driver is as follows:
1. Start the uninstaller
• If you are using Windows 8.1 or Windows 8, from the Desktop charms, select Settings -> ControlPanel -> Programs -> Programs and Features.From the program list, select "XXX Printer Driver" (where "XXX" is your model name) and thenclick Uninstall.
• If you are using Windows 7 or Windows Vista, select Start menu -> Control Panel -> Programs -> Programs and Features.From the program list, select "XXX Printer Driver" (where "XXX" is your model name) and thenclick Uninstall.
• If you are using Windows XP, select Start menu -> Control Panel -> Add or Remove Programs.From the program list, select "XXX Printer Driver" (where "XXX" is your model name) and thenclick Remove.
The confirmation window for uninstalling the model appears.
Important• In Windows 8.1, Windows 8, Windows 7, or Windows Vista, a confirmation/warning dialog box
may appear when starting, installing or uninstalling software.This dialog box appears when administrative rights are required to perform a task.When you are logged on to an administrator account, click Yes (or Continue, Allow) to continue.Some applications require an administrator account to continue. In such cases, switch to anadministrator account, and restart the operation from the beginning.
2. Execute the uninstaller
Click Execute. When the confirmation message appears, click Yes.When all the files have been deleted, click Complete.
The deletion of the printer driver is complete.
Important• Printer driver and XPS printer driver will be deleted when you uninstall the Printer Driver.
428
Before Installing the Printer Driver
This section describes the items that you should check before installing the printer driver. You should alsorefer to this section if the printer driver cannot be installed.
Checking the Printer Status• Turn off the printer.
Checking the Personal Computer Settings• Terminate all running applications.• Log on as a user who has the administrator account.
Important• Before installing the latest printer driver, delete the previously installed version.
Related TopicsObtaining the Latest Printer DriverInstalling the Printer Driver
429
Installing the Printer Driver
You can access our web site through the Internet and download the latest printer driver and XPS printerdriver for your model.
The procedure for installing the downloaded printer driver is as follows:
1. Turn off the printer
2. Start the installer
Double-click the icon of the downloaded file.The installation program starts.
Important• In Windows 8.1, Windows 8, Windows 7, or Windows Vista, a confirmation/warning dialog box
may appear when starting, installing or uninstalling software.This dialog box appears when administrative rights are required to perform a task.When you are logged on to an administrator account, click Yes (or Continue, Allow) to continue.Some applications require an administrator account to continue. In such cases, switch to anadministrator account, and restart the operation from the beginning.
3. Install the printer driver
Take the appropriate action as described on the screen.
4. Complete the installation
Click Complete.
Depending on the environment you are using, a message prompting you to restart the computer may bedisplayed. To complete the installation properly, restart the computer.
Important• You can install the XPS printer driver with the same procedure for installing the printer driver. However,
when installing the XPS printer driver, first complete installation of the printer driver.• You can download the printer driver and XPS printer driver for free, but any Internet access charges
incurred are your responsibility.• Before installing the latest printer driver, delete the previously installed version.
Related TopicsObtaining the Latest Printer DriverDeleting the Unnecessary Printer DriverBefore Installing the Printer Driver
430
Printing from a Digital Camera
Printing Photographs Directly from a PictBridge Compliant Device
About PictBridge Print Settings
431
Printing Photographs Directly from a PictBridge Compliant Device
You can connect a PictBridge compliant device such as a digital camera, camcorder, or mobile phone to theprinter using a USB cable recommended by the device's manufacturer, and print recorded images directlywithout using a computer.
Connectable devices:
Any PictBridge compliant device can be connected to the printer regardless of the manufacturer or model aslong as it is compliant with the PictBridge Standard.
Printable image data format:
The printer accepts images* taken with a camera compliant with the Design rule for Camera File system.
* Exif 2.2/2.21/2.3 compliant
Important• Do not use the USB cable longer than around 10 ft. / 3 m to connect any PictBridge compliant device to
the printer since it may affect the operation of other peripheral devices.
Note• PictBridge is the Standard to print your photos directly without using a computer, connecting a device
such as a digital still camera, digital camcorder, or camera-equipped mobile phone.
(PictBridge): A PictBridge compliant device has this mark.
• When printing photos with the PictBridge compliant device connected to the printer, we recommend theuse of the AC adapter supplied with the device. If you are using the device battery, be sure to charge itfully.
• Depending on the model or brand of your device, you may have to select a print mode compliant withPictBridge before connecting the device. You may also have to turn on the device or select Play modemanually after connecting the device to the printer.
Perform necessary operations on the PictBridge compliant device before connecting it to this printeraccording to instructions given in the device's instruction manual.
1. Make sure that the printer is turned on.
2. Load paper.
3. Make sure that the PictBridge compliant device is turned off.
4. Connect the PictBridge compliant device to the printer using a USB cable (A)recommended by the device's manufacturer.
The PictBridge compliant device turns on automatically.
If your device does not turn on automatically, turn it on manually.
When printer is correctly connected to the device, the message that the printer is connected will bedisplayed on the LCD of the device. Refer to the device's instruction manual.
432

5. Specify the print settings such as the paper type and layout.
You can perform settings using the menu on the LCD of your PictBridge compliant device. Select thesize and type of paper that you loaded in the printer.
Settings on a PictBridge Compliant Device
6. Start printing from your PictBridge compliant device.
Important• Never disconnect the USB cable during printing unless when explicitly allowed to by the
PictBridge compliant device. When disconnecting the USB cable between the PictBridgecompliant device and printer, follow the instructions given in the device's instruction manual.
433
About PictBridge Print Settings
Settings on a PictBridge Compliant DeviceThis section describes the PictBridge function of the printer. For the print settings on a PictBridgecompliant device, refer to the instructions given in the device's instruction manual.
Note• In the following description, names of setting items are given according to those used in Canon-brand
PictBridge compliant devices. Setting item names may be different depending on the brand or modelof your device.
• Some setting items explained below may not be available on some devices. When you cannotchange print settings on a device, the printer prints images as follows:
Paper size: 4" x 6"/ 10 x 15 cm
Paper type: Fast Photo
Layout: 1-up, Borderless
Date/File No. Print: Not printed
The following settings can be used when printing from a PictBridge compliant device.
Paper size 4" x 6"/ 10 x 15 cm, 5" x 7"*, 8" x 10"/ 20 x 25 cm, A4, 8.5" x 11"(Letter), A3, A3+/ 13" x 19"
* Can be selected only on certain Canon-brand PictBridge compliant devices. (May not be selecteddepending on the device.)
Paper type • Default: Photo Paper Pro Platinum PT-101
• Photo:
Photo Paper Plus Glossy II PP-201/Photo Stickers*
* When printing on sticker paper, select 4"x6"/10x15cm in Paper size. Do not set Layout toBorderless.
• Semi-gloss*:
Photo Paper Plus Semi-gloss SG-201/Photo Paper Pro Luster LU-101
• Fast Photo:
Photo Paper Pro Platinum PT-101
• Plain:
A3, A4, or Letter sized plain paper
When Paper type is set to Plain, borderless printing will be disabled even when Layout is set toBorderless.
* Available only with a Canon-brand PictBridge compliant device. (May not be available with someCanon-brand PictBridge compliant devices.)
Layout Default (Borderless), Index, Bordered, Borderless, N-up (2, 4, 9, 16)*1, 20-up*2, 35-up*3
*1 Layout compatible with Canon-brand sticker.
*2 With a Canon brand PictBridge compliant device, selecting items with "i" mark allows you to printshooting info (Exif Data) in list format (20-up) or on the margins of the specified data (1-up). (May notbe available with some Canon-brand PictBridge compliant devices.)
434
*3 Printed in 35 mm Film Style Layout (Contact Printing Layout). Available only with a Canon-brandPictBridge compliant device. (May not be available with some Canon-brand PictBridge compliantdevices.)
Print date &file no.
Default (Off: No printing), Date, File No., Both, Off
Imageoptimize
Default (Off: No optimizing), On (Auto photo fix)*1, Off, Red-Eye*2
*1 The scene or person's face of a shot photo is recognized and the most suitable correction for eachphoto is made automatically. It makes a darkened face by backlight brighter to print. It also analyzes ascene such as scenery, night scene, person, etc. and corrects each scene with the most suitablecolor, brightness, or contrasts automatically to print.
*2 Can be selected only on certain Canon-brand PictBridge compliant devices. (May not be selecteddepending on the device.)
• With some types of Canon PictBridge compliant cameras, you can make finer color adjustmentsby selecting the color mode that is most suitable for what you want to achieve. Refer to DigitalPhoto Printing Guide or the instruction manual provided with your Canon PictBridge compliantdevice. You can select the following color modes:
Natural, Natural M, B/W, Cool tone, Warm tone
Trimming Default (Off: No trimming), On (follow the camera's setting), Off
435
Troubleshooting
The Printer Cannot Be Powered On
Printing Does Not Start
Paper Does Not Feed Properly/"No Paper" Error Occurs
Print Results Not Satisfactory
Ink Is Not Ejected
Paper Jams
If an Error Occurs
Cannot Print on the Disc Label
List of Support Code for Error
Search Each Function
Problems with Network Communication
Problems while Printing from Smartphone/Tablet
Problems with Printing
Problems with the Printer
Problems with Installation/Downloading
About Errors/Messages Displayed
If You Cannot Resolve the Problem
436

Problems with Network Communication
Cannot Detect a Printer on a Network
Problems with the Printer while Using with Network
Other Problems with Network
437
Cannot Detect a Printer on a Network
Cannot Detect the Printer when Setting Up Network Communication
The Printer Cannot Be Detected in the Wireless LAN
The Printer Cannot Be Detected in the Wired LAN
Note• You cannot use the wireless LAN and the wired LAN at the same time.
438

Cannot Detect the Printer when Setting Up NetworkCommunication
If the printer could not be detected on the network when setting up the network communication, confirm thenetwork settings before redetecting the printer.
Cannot Detect the Printer during Wireless LAN Setup: Check 1
Cannot Detect the Printer during Wired LAN Setup: Check 1
439
Cannot Detect the Printer during Wireless LAN Setup: Check 1
Are the computer and network device (router, etc.) configured and can thecomputer connect to the network?Make sure that you can view web pages on your computer.
If you cannot view any web pages:Configure the computer and network device.
For the procedures, refer to the instruction manuals supplied with the computer and network device, orcontact their manufacturers.
If you can view web pages after configuring the computer and network device, try to set up the networkcommunication from the beginning.
If you can view web pages:Go to check 2.
Cannot Detect the Printer during Wireless LAN Setup: Check 2
440
Cannot Detect the Printer during Wireless LAN Setup: Check 2
Does the firewall function of your security software or operating system fora computer interfere with setting up the network communication?The firewall function of your security software or operating system for a computer may limitcommunications between the printer and your computer. Confirm the setting of firewall function of yoursecurity software or operating system or the message appearing on your computer.
If the firewall function interferes with setting up:
• When the message appears on your computer:
If the message warning that Canon software is attempting to access the network appears on thecomputer, set the security software to allow access.
• When the message does not appear on your computer:
Cancel to set up, then set the security software to allow Canon software* to access the network.
* On the Setup CD-ROM, select win > Driver > DrvSetup, then set the security software to allow thefile Setup.exe or Setup64.exe to access the network.
After setting the security software, try to set up the network communication from the beginning.
Note• For the operating system firewall settings or the security software firewall settings, refer to the
instruction manual of the computer or software, or contact its manufacturer.
If there is no problem with the firewall settings:Go to check 3.
Cannot Detect the Printer during Wireless LAN Setup: Check 3
441
Cannot Detect the Printer during Wireless LAN Setup: Check 3
Check the settings of the wireless router.Check the settings of the wireless router for the network connection such as IP address filtering, MACaddress filtering, or DHCP function.
Make sure that the radio channel of the wireless router and that assigned to the printer are the same.
For details on how to check the settings of the wireless router, refer to the instruction manual suppliedwith the wireless router or contact its manufacturer.
If there is no problem with the settings of the wireless router:Go to check 4.
Cannot Detect the Printer during Wireless LAN Setup: Check 4
442
Cannot Detect the Printer during Wireless LAN Setup: Check 4
Make sure that the printer is not placed far away from the wireless router.The wireless router is located indoors within the effective range for wireless communication. Locate theprinter within 164 ft. / 50 m from the wireless router.
In addition, check where the printer and the wireless router are located and take the appropriate action.
• Make sure that there is no obstruction between the printer and the wireless router.
Wireless communication between different rooms or floors is generally poor. Adjust the location of theprinter and the wireless router.
• Make sure that there is no source of radio wave interference near the printer or the wireless router.
If a device (e.g. microwave oven) using the same frequency bandwidth as the wireless station isplaced nearby, the device may cause interference. Place the printer or the wireless router as far awayfrom the interference source as possible.
After checking above and taking the appropriate action, perform setup again.
Note• You can set up the network communication via USB. To set up via USB, select the Set up the
network connection via USB check box on the Check Printer Settings screen and click Next.
443
Cannot Detect the Printer during Wired LAN Setup: Check 1
Is the LAN cable connected, and are the printer and the router turned on?Make sure that the LAN cable is connected.
Make sure that the printer is turned on.
Confirming that the Power Is On
Make sure that the router is turned on.
If the LAN cable is connected and the printer or the network device isturned off:Turn on the printer or the network device.
After turning on the printer or the network device, it may take some time until ready for use. After a whilejust turning on the printer or the network device, click Redetect on the Check Printer Settings screen.
When the printer is detected, follow the instructions on the screen to continue to set up the networkcommunication.
If the LAN cable is connected and the printer and the network device areturned on:If the printer could not be detected after clicking Redetect even when the printer and the network deviceare turned on, or when you have turned them on, go to check 2.
Cannot Detect the Printer during Wired LAN Setup: Check 2
444
Cannot Detect the Printer during Wired LAN Setup: Check 2
Are the computer and the router configured and can the computer connectto the network?Make sure that you can view web pages on your computer.
If you cannot view any web pages:Click Cancel on the Check Printer Settings screen to cancel to set up the network communication. Afterthat, configure the computer and network device.
For the procedures, refer to the instruction manuals supplied with the computer and network device, orcontact their manufacturers.
If you can view web pages after configuring the computer and network device, try to set up the networkcommunication from the beginning.
If you can view web pages:Go to check 3.
Cannot Detect the Printer during Wired LAN Setup: Check 3
445
Cannot Detect the Printer during Wired LAN Setup: Check 3
Enable the wired LAN setting of the printer.Press and hold the RESUME/CANCEL button, then release the button when the POWER lamp flashes 11times.
Note• To check whether the wired LAN is enabled, print out the network setting information.
Printing Out Network Setting Information
446
The Printer Cannot Be Detected in the Wireless LAN
Check1 Make sure that the printer is turned on.
Check2 Make sure that the Wi-Fi lamp is lit on the printer.
If the Wi-Fi lamp is off, the wireless LAN is disabled.
To enable wireless LAN, press and hold the RESUME/CANCEL button, then release the button when thePOWER lamp flashes 10 times.
Wireless LAN is enabled and the Wi-Fi lamp is lit.
Check3 When the printer is connected to the computer temporarily using a USB cable,make sure that the USB cable is connected properly.
When you set up the wireless LAN connection or change the wireless LAN settings using IJ Network Toolthrough USB connection, make sure that the printer is connected to the computer with a USB cable securely.
Connecting the Printer to the Computer Using a USB Cable
Check4 Make sure that the printer setup is completed.
If not, perform setup with the Setup CD-ROM or perform it according to the instructions on our website.
Check5 When using IJ Network Tool, click Update to search for the printer again.
Canon IJ Network Tool Screen
Check6 When searching for a printer over a network, make sure that the printer isassociated with the port.
When No Driver is displayed under Name in IJ Network Tool, there is no association. Select Associate Port onthe Settings menu, then associate the port with the printer.
When the Printer Driver Is Not Associated with a Port
Check7 Make sure that the network settings in the printer are identical with those of thewireless router.
Refer to the instruction manual provided with the wireless router or contact its manufacturer to check the wirelessrouter settings, and then modify the printer settings.
How to Set an Encryption Key
Check8 Make sure that there is no obstruction.
Wireless communication between different rooms or floors is generally poor. Adjust the location of the devices.
Check9 Make sure that the printer is not placed far away from the wireless router.
447
The wireless router is located indoors within the effective range for wireless communication. Locate the printerwithin 164 ft. / 50 m from the wireless router.
Check10 Make sure that there is no source of radio wave interference in your vicinity.
If a device (e.g. microwave oven) using the same frequency bandwidth as the wireless station is placed nearby,the device may cause interference. Place the wireless station as far away from the interference source aspossible.
Check11 Make sure that the network settings of the computer are correct.
Make sure that the computer can communicate with the wireless router over the wireless LAN.
Check12 Make sure that Enable bidirectional support is selected in the Ports sheet ofthe properties dialog box of the printer driver.
Check13 Make sure that the firewall of the security software is disabled.
If the firewall function of your security software is turned on, a message may appear warning that Canonsoftware is attempting to access the network. If the warning message appears, set the security software toalways allow access.
If using any programs that switch the network environment, check their settings. Some programs will enable afirewall by default.
Check14 When using a router, connect the printer and computer to the LAN side (samenetwork segment).
Check15 Confirm the TCP/IP setting of the printer and disable IPv6.
To check the current TCP/IP setting, print out the network setting information.
Printing Out Network Setting Information
When "TCP/IP Version" is set to "IPv4 & IPv6", both IPv4 and IPv6 are enabled.
Press and hold the RESUME/CANCEL button, then release the button when the POWER lamp flashes 17 times.
IPv6 is disabled and only IPv4 is enabled.
If the problem is not resolved, perform setup again with the Setup CD-ROM or perform it according to theinstructions on our website.
448
The Printer Cannot Be Detected in the Wired LAN
Check1 Make sure that the printer is turned on.
Check2 Is the wired LAN setting of the printer enabled?
To check whether the wired LAN is enabled, print out the network setting information.
Printing Out Network Setting Information
If the wired LAN is disabled, press and hold the RESUME/CANCEL button, then release the button when thePOWER lamp flashes 11 times. The wired LAN is enabled.
Check3 Make sure that the LAN cable is connected properly.
Make sure that the printer is connected to the router with the LAN cable. If the LAN cable is loose, connect thecable properly.
If the LAN cable is connected to the WAN side of the router, connect the cable to the LAN side of the router.
449
Problems with the Printer while Using with Network
The Printer Stopped Working Suddenly
Forgot a Wireless Router Name, SSID, or a Network Key
The Administrator Password Set to the Printer Was Forgotten
Cannot Use the Printer on Replacing a Wireless Router or Changing Its Settings
Printing Speed Is Slow
Ink Remaining Level Is Not Displayed on Printer Status Monitor of the Printer
450
The Printer Stopped Working Suddenly
Cannot Communicate with the Printer after the Network Settings Are Changed
Cannot Communicate with the Printer over the Wireless LAN
Cannot Communicate with the Printer over the Wired LAN
Cannot Print from a Computer Connected to the Network
Cannot Communicate with the Printer after the Network Settings AreChanged
It may take a while for the computer to obtain the IP address, or you may need to restart your computer.
Search for the printer again after confirming a valid IP address is assigned to the computer.
Cannot Communicate with the Printer over the Wireless LAN
Check1 Make sure that the printer is turned on.
Check2 Are the network settings of the printer identical with those of the wirelessrouter?
Make sure that the network settings of the printer (e.g. wireless router name, SSID, network key, etc.) areidentical with those of the wireless router.
To check the settings of the wireless router, refer to the instruction manual provided with it or contact itsmanufacturer.
To check the current network settings of the printer, print out the network setting information.
Printing Out Network Setting Information
If the network settings of the printer are not identical with those of the wireless router, change the networksettings of the printer to match with those of the wireless router using IJ Network Tool.
Check3 Make sure that the printer is not placed far away from the wireless router.
The wireless router is located indoors within the effective range for wireless communication. Locate the printerwithin 164 ft. / 50 m from the wireless router.
Check4 Make sure that there is no obstruction.
Wireless communication between different rooms or floors is generally poor. Adjust the location of the devices.
Check5 Make sure that there is no source of radio wave interference in your vicinity.
If a device (e.g. microwave oven) using the same frequency bandwidth as the wireless station is placednearby, the device may cause interference. Place the wireless station as far away from the interference sourceas possible.
451
Check6 Make sure that the network settings of the computer are correct.
For the procedures to connect a network device to the computer and set them up, refer to the instructionmanual of your network device or contact its manufacturer.
Check7 Make sure that the radio status is good and adjust the installation positionswhile monitoring the radio status with IJ Network Tool.
Monitoring Wireless Network Status
Check8 Make sure that a valid wireless channel is used.
The wireless channel to be used may be limited depending on wireless network devices installed in thecomputer. Refer to the instruction manual provided with your computer or your wireless network device tospecify the valid wireless channel.
Check9 Make sure that the channel confirmed in Check 8 can communicate with thecomputer.
If not, change the channel set to the wireless router.
Check10 Make sure that the firewall of the security software is disabled.
If the firewall function of your security software is turned on, a message may appear warning that Canonsoftware is attempting to access the network. If the warning message appears, set the security software toalways allow access.
If using any programs that switch the network environment, check their settings. Some programs will enable afirewall by default.
Check11 When using a router, connect the printer and computer to the LAN side(same network segment).
If the problem is not resolved, perform setup again with the Setup CD-ROM or perform it according to theinstructions on our website.
• For placement:
Make sure that there is no barrier or obstacle between the wireless router and the printer.
Cannot Communicate with the Printer over the Wired LAN
Check1 Make sure that the printer is turned on.
Check2 Make sure that the LAN cable is connected properly.
Make sure that the printer is connected to the router with the LAN cable. If the LAN cable is loose, connect thecable properly.
If the LAN cable is connected to the WAN side of the router, connect the cable to the LAN side of the router.
If the problem is not resolved, perform setup again with the Setup CD-ROM or perform it according to theinstructions on our website.
452
Cannot Print from a Computer Connected to the Network
Check1 Make sure that the network settings of the computer are correct.
For the procedures to set up the computer, refer to the instruction manual of your computer or contact itsmanufacturer.
Check2 If the printer driver is not installed, install it.
Install the printer driver with the Setup CD-ROM or install it from our website.
Check3 When using wireless LAN, make sure that access control is not set to thewireless router.
For the procedures to connect a wireless router and set it up, refer to the instruction manual of your wirelessrouter or contact its manufacturer.
Note• To check the MAC address or the IP address of the computer, see Checking the IP Address or the MAC
Address of the Computer.
453
Forgot a Wireless Router Name, SSID, or a Network Key
Cannot Connect with a Wireless Router to Which a WEP or WPA/WPA2 Key Is Set (You Forgot the WEPor WPA/WPA2 Key)
How to Set an Encryption Key
Cannot Connect with a Wireless Router to Which a WEP or WPA/WPA2 Key Is Set (You Forgot the WEP or WPA/WPA2 Key)
For information on how to set up the wireless router, refer to the instruction manual provided with thewireless router or contact its manufacturer. Make sure that the computer and the wireless router cancommunicate with each other.
After that, set up the printer to match the settings of the wireless router using IJ Network Tool.
How to Set an Encryption Key
For information on how to set up the wireless router, refer to the instruction manual provided with thewireless router or contact its manufacturer. Make sure that the computer and the wireless router cancommunicate with each other.
After that, set up the printer to match the settings of the wireless router using IJ Network Tool.
• When using WEP
The key length, key format, the key to use (one of 1 to 4), and the authentication method must matchamong the wireless router, the printer, and the computer.
In order to communicate with a wireless router that uses automatically generated WEP keys, youmust configure the printer to use the key generated by the wireless router by entering it inhexadecimal format.
Normally, select Auto for the authentication method. Otherwise, select Open System or Shared Keyaccording to the setting of the wireless router.
When the WEP Details screen appears after clicking Set on the Search screen, follow the on-screeninstructions and set the key length, the key format, the key number, and the authentication to enter aWEP key.
For details, see Changing the WEP Detailed Settings.
• When using WPA/WPA2
The authentication method, passphrase, and dynamic encryption type must match on the wirelessrouter, the printer, and the computer.
Enter the passphrase configured on the wireless router (a sequence of between 8 and 63alphanumeric characters, or a 64-character hexadecimal number).
454

Either TKIP (basic encryption) or AES (secure encryption) is selected automatically for the dynamicencryption method.
For details, see Changing the WPA/WPA2 Detailed Settings.
Note• This printer supports WPA/WPA2-PSK (WPA/WPA2-Personal) and WPA2-PSK (WPA2-
Personal).
455

The Administrator Password Set to the Printer Was Forgotten
Initialize the printer settings.
Initializing the Printer Settings
After initializing the printer settings, perform setup with the Setup CD-ROM or perform it according to theinstructions on our website.
456
Cannot Use the Printer on Replacing a Wireless Router orChanging Its Settings
When you replace a wireless router, perform network setup of the printer again.
Perform network setup again with the Setup CD-ROM or perform it again according to the instructions onour website.
If the problem is not resolved, see below.
Cannot Communicate with the Printer after Applying MAC/IP Address Filtering or Entering an EncryptionKey to the Wireless Router
When Encryption Is Enabled, Cannot Communicate with the Printer after the Encryption Type WasSwitched on the Wireless Router
Cannot Communicate with the Printer after Applying MAC/IP AddressFiltering or Entering an Encryption Key to the Wireless Router
Check1 Confirm the wireless router setting.
Refer to the instruction manual provided with the wireless router or contact its manufacturer to confirm thewireless router setting. Make sure that the computer and the wireless router can communicate with each otherunder this setting.
Check2 If you are performing MAC address filtering or IP address filtering at thewireless router, confirm that the MAC address or IP address for both the computer or thenetwork device and the printer are registered.
Check3 If you are using a WEP or WPA/WPA2 key, make sure that the encryptionkey for the computer or the network device and the printer matches that set to thewireless router.
Besides the WEP key itself, the key length, key format, the key ID to use, and the authentication method mustmatch among the printer, the wireless router, and the computer.
Normally, select Auto for the authentication method. If you want to specify the method manually, select OpenSystem or Shared Key according to the setting of the wireless router.
How to Set an Encryption Key
457

When Encryption Is Enabled, Cannot Communicate with the Printerafter the Encryption Type Was Switched on the Wireless Router
If the printer cannot communicate with the computer after the encryption type of the printer was switched,make sure that encryption types for the computer and the wireless router matches that set to the printer.
Cannot Communicate with the Printer after Applying MAC/IP Address Filtering or Entering anEncryption Key to the Wireless Router
458
Printing Speed Is Slow
Check1 The printer may be printing out a large job issued from another computer.
Check2 When using wireless LAN, make sure that the radio status is good and adjustthe installation positions while monitoring the radio status with IJ Network Tool.
Monitoring Wireless Network Status
Make sure that there is no barrier or obstacle between the wireless router and the printer. Wirelesscommunication between different rooms or floors is generally poor. The metal, concrete, or timber including themetallic material, mud wall, or insulator may interrupt a wireless communication. If the printer cannotcommunicate with the computer over a wireless LAN for the wall material, place the printer and the computer inthe same room or floor.
Check3 When using wireless LAN, make sure that there is no source of interference inyour vicinity.
If a device (e.g. microwave oven) using the same frequency bandwidth as the wireless station is placed nearby,the device may cause interference. Place the wireless station as far away from the interference source aspossible.
459

Ink Remaining Level Is Not Displayed on Printer Status Monitor ofthe Printer
Use the printer driver with bidirectional communication.
Select Enable bidirectional support in the Ports sheet of the properties dialog box of the printer driver.
How to Open the Printer Driver Setup Window
460

Other Problems with Network
The Message Is Displayed on the Computer Screen during Setup
Checking Information about the Network
How to Restore the Printer's Network Settings to Factory Default
461
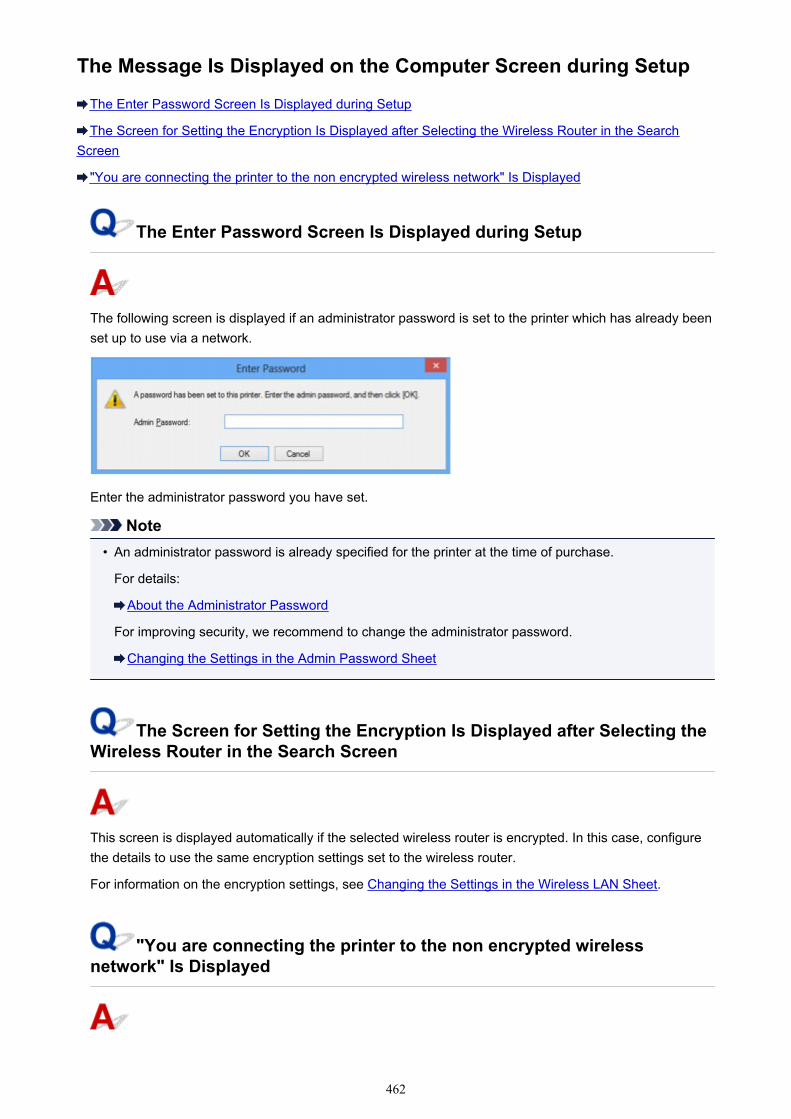
The Message Is Displayed on the Computer Screen during Setup
The Enter Password Screen Is Displayed during Setup
The Screen for Setting the Encryption Is Displayed after Selecting the Wireless Router in the SearchScreen
"You are connecting the printer to the non encrypted wireless network" Is Displayed
The Enter Password Screen Is Displayed during Setup
The following screen is displayed if an administrator password is set to the printer which has already beenset up to use via a network.
Enter the administrator password you have set.
Note• An administrator password is already specified for the printer at the time of purchase.
For details:
About the Administrator Password
For improving security, we recommend to change the administrator password.
Changing the Settings in the Admin Password Sheet
The Screen for Setting the Encryption Is Displayed after Selecting theWireless Router in the Search Screen
This screen is displayed automatically if the selected wireless router is encrypted. In this case, configurethe details to use the same encryption settings set to the wireless router.
For information on the encryption settings, see Changing the Settings in the Wireless LAN Sheet.
"You are connecting the printer to the non encrypted wirelessnetwork" Is Displayed
462

Security is not configured on the wireless router. The printer can still be used, so continue the setupprocedure to complete it.
Important• If you connect to a network that is not protected with security measures, there is a risk of disclosing
data such as your personal information to a third party.
463
Checking Information about the Network
Checking the IP Address or the MAC Address of the Printer
Checking the IP Address or the MAC Address of the Computer
Checking If the Computer and the Printer, or Computer and the Wireless Router Can Communicate
Checking the Network Setting Information
Checking the IP Address or the MAC Address of the Printer
To check the IP address or the MAC address of the printer, print out the network setting information.
Printing Out Network Setting Information
To display the network setting information using IJ Network Tool, select Network Information on theView menu.
Canon IJ Network Tool Screen
Checking the IP Address or the MAC Address of the Computer
To check the IP address or MAC address assigned to the computer, follow the procedure below.
1. Select Command Prompt as shown below.
• In Windows 8.1 or Windows 8, select Command Prompt from the Start screen. If CommandPrompt is not displayed on the Start screen, select the Search charm, then search for"Command Prompt".
• In Windows 7, Windows Vista, or Windows XP, click Start > All Programs > Accessories >Command Prompt.
2. Enter "ipconfig/all" and press the Enter key.
The IP addresses and the MAC addresses of the network devices installed on your computer aredisplayed. When the network device is not connected to the network, the IP address is not displayed.
Checking If the Computer and the Printer, or Computer and theWireless Router Can Communicate
To check that communication is available, perform the ping test.
1. Select Command Prompt as shown below.
464
• In Windows 8.1 or Windows 8, select Command Prompt from the Start screen. If CommandPrompt is not displayed on the Start screen, select the Search charm, then search for"Command Prompt".
• In Windows 7, Windows Vista, or Windows XP, click Start > All Programs > Accessories >Command Prompt.
2. Type the ping command and the IP address of the target printer or the target wirelessrouter, and then press the Enter key.
ping XXX.XXX.XXX.XXX
"XXX.XXX.XXX.XXX" is the IP address of the target device.
If the communication is available, a message such as the following is displayed.
Reply from XXX.XXX.XXX.XXX: bytes=32 time=10ms TTL=255
When Request timed out is displayed, the communication is not available.
Checking the Network Setting Information
To check the network setting information of the printer, print out the network setting information.
Printing Out Network Setting Information
465
How to Restore the Printer's Network Settings to Factory Default
Important• Note that initialization erases all network settings on the printer, and printing operation from a computer
over network becomes impossible. To use the printer over network, perform setup with the Setup CD-ROM or perform it according to the instructions on our website.
Press and hold the RESUME/CANCEL button, then release the button when the POWER lamp flashes 9times.
The network settings are initialized.
466

Problems while Printing from Smartphone/Tablet
Cannot Print from Smartphone/Tablet
467
Cannot Print from Smartphone/Tablet
If you cannot print from your smartphone/tablet, it is possible that your smartphone/tablet cannotcommunicate with the printer.
If you cannot print from your smartphone/tablet over the wireless LAN, confirm the following.
Note• For problems on printing with other connection methods or details on how to perform settings of each
connection method:
Using PIXMA Cloud Link
Printing from AirPrint Compliant Device
Check1 Make sure that the printer is turned on.
Check2 Are the network settings of the printer identical with those of the wirelessrouter?
Make sure that the network settings of the printer (e.g. wireless router name, SSID, network key, etc.) areidentical with those of the wireless router.
To check the settings of the wireless router, refer to the instruction manual provided with it or contact itsmanufacturer.
To check the current network settings of the printer, print out the network setting information.
Printing Out Network Setting Information
If the network settings of the printer are not identical with those of the wireless router, change the networksettings of the printer to match with those of the wireless router using IJ Network Tool.
Check3 Are the network settings of your smartphone/tablet identical with those of thewireless router?
Make sure that the network settings of your smartphone/tablet (e.g. wireless router name, SSID, network key,etc.) are identical with those of the wireless router.
To check the settings of your smartphone/tablet, refer to the instruction manual provided with it.
If the network settings of your smartphone/tablet are not identical with those of the wireless router, change thenetwork settings of it to match with those of the wireless router.
Check4 Make sure that the printer is not placed far away from the wireless router.
The wireless router is located indoors within the effective range for wireless communication. Locate the printerwithin 164 ft. / 50 m from the wireless router.
Check5 Make sure that there is no obstruction.
Wireless communication between different rooms or floors is generally poor. Adjust the location of the devices.
468

Check6 Make sure that there is no source of radio wave interference in your vicinity.
If a device (e.g. microwave oven) using the same frequency bandwidth as the wireless station is placed nearby,the device may cause interference. Place the wireless station as far away from the interference source aspossible.
469

Problems with Printing
Printing Does Not Start
Paper Jams
Print Results Not Satisfactory
Ink Is Not Ejected
Paper Does Not Feed Properly/"No Paper" Error Occurs
Cannot Print on the Disc Label
Printing Stops Before It Is Completed
470
Printing Does Not Start
Check1 Make sure that the power plug is securely plugged in, then press the ON buttonto turn the printer on.
While the POWER lamp is flashing, the printer is initializing. Wait until the POWER lamp stops flashing andremains lit.
Note• When printing large data such as a photo or graphics, it may take longer to start printing. While the
POWER lamp is flashing, the computer is processing data and sending it to the printer. Wait until printingstarts.
Check2 Make sure that the printer is connected to your computer properly.
When the printer is connected to your computer with a USB cable, make sure that the USB cable is securelyplugged in to the printer and the computer, then check the followings:
• If you are using a relay device such as a USB hub, disconnect it, connect the printer directly to thecomputer, and try printing again. If printing starts normally, there is a problem with the relay device. Consultthe reseller of the relay device for details.
• There could also be a problem with the USB cable. Replace the USB cable and try printing again.
When you use the printer over LAN, make sure that the printer is connected to the network with a LAN cable oris set up correctly.
Check3 If you are printing from the computer and there are any unnecessary print jobs,delete them.
Deleting the Undesired Print Job
Check4 Make sure that the disc tray guide is closed.
If the disc tray guide is opened, close the disc tray guide and press the RESUME/CANCEL button on the printer.
Check5 Is the manual feed tray in the paper feed position?
If the manual feed tray is in the paper jam clearing position, return the tray to the paper feed position and pressthe RESUME/CANCEL button on the printer.
Check6 Is the feed slot cover closed?
If the feed slot cover is opened, close it slowly and press the RESUME/CANCEL button.
Check7 Does the page size setting match the size of the paper loaded in the printer?
Press the RESUME/CANCEL button on the printer to clear the error. Then check the Page Size setting in thePage Setup sheet in the printer driver and load paper that is the same size as the setting and try printing again.
471
Set the printer not to detect the width of the paper using the printer driver.
To set the printer not to detect the width of the paper, open the printer driver setup window, and in CustomSettings under the Maintenance sheet, clear the Detect paper width check box, and then click OK.
To open the printer driver setup window, see How to Open the Printer Driver Setup Window.
* Select the Detect paper width check box again once printing is complete, and then click OK.
Check8 Are the Media Type and the Page Size settings of the printer driver correct?
When using non Canon genuine specialty paper, be sure to select the proper media type or page size correctlyin the printer driver.
Confirm the settings following the procedure below, and try printing again.
1. Make sure that A3 (Art Paper Margin 30), A3+ (Art Paper Margin 30), A4 (Art Paper Margin 30), Letter(Art Paper Margin 30), or 11"x17" (Art Paper Margin 30) is selected in the application.
If the page size you want to use is not displayed, open the File menu of the application and select Print.Then make sure that the name of your printer is selected.
2. Make sure that the paper selected for Media Type in the Main sheet in the printer driver matches thepaper loaded in the printer.
3. Make sure that the Page Size setting in the Page Setup sheet in the printer driver is the same as the sizeset in step 1.
Check9 Make sure that your printer's name is selected in the Print dialog box.
The printer will not print properly if you are using a printer driver for a different printer.
Make sure that "Canon XXX series" (where "XXX" is your printer's name) is selected in the Print dialog box.
Note• To make the printer the one selected by default, select Set as Default Printer.
Check10 Configure the printer port appropriately.
Make sure that the printer port is configured appropriately.
1. Log on as a user account with administrator privilege.
2. Select items as shown below.
• In Windows 8.1 or Windows 8, select Control Panel from the Settings charm on Desktop > Hardwareand Sound > Devices and Printers.
• In Windows 7, select Devices and Printers from the Start menu.
• In Windows Vista, select the Start menu > Control Panel > Hardware and Sound > Printers.
• In Windows XP, select the Start menu > Control Panel > Printers and Other Hardware > Printersand Faxes.
3. Open the properties of the printer driver for the printer.
• In Windows 8.1, Windows 8, or Windows 7, right-click the "Canon XXX series" icon (where "XXX" isyour printer's name), then select Printer properties.
• In Windows Vista or Windows XP, right-click the "Canon XXX series" icon (where "XXX" is yourprinter's name), then select Properties.
4. Click the Ports tab to confirm the port settings.
Make sure that a port named "USBnnn" (where "n" is a number) with "Canon XXX series" appearing in thePrinter column is selected for Print to the following port(s).
472

Note• When the printer is used over LAN, the port name of the printer is displayed as
"CNBJNP_xxxxxxxxxx". "xxxxxxxxxx" is the character string generated from the MAC address or acharacter string specified by the user when setting up the printer.
• If the setting is incorrect:
Reinstall the printer driver with the Setup CD-ROM or install it from our website.
• Printing does not start even though the printer is connected to the computer using a USB cable and theport named "USBnnn" is selected:
In Windows 8.1 or Windows 8, select My Printer on the Start screen to start My Printer. If My Printeris not displayed on the Start screen, select the Search charm, then search for "My Printer".
Set the correct printer port on Diagnose and Repair Printer. Follow the on-screen instructions to setthe correct printer port, then select your printer's name.
In Windows 7, Windows Vista, or Windows XP, click Start and select All programs, Canon Utilities,Canon My Printer, Canon My Printer, then select Diagnose and Repair Printer. Follow the on-screen instructions to set the correct printer port, then select your printer's name.
If the problem is not resolved, reinstall the printer driver with the Setup CD-ROM or install it from ourwebsite.
• Printing does not start even though the port named "CNBJNP_xxxxxxxxxx" is selected when the printeris used over LAN:
Launch IJ Network Tool, and select "CNBJNP_xxxxxxxxxx" as you confirmed in step 4, then associatethe port with the printer using Associate Port in the Settings menu.
If the problem is not resolved, reinstall the printer driver with the Setup CD-ROM or install it from ourwebsite.
Check11 Is the size of the print data extremely large?
Click Print Options on the Page Setup sheet on the printer driver. Then, make sure Prevention of Print DataLoss in the displayed dialog is set to On (Weak).
If printing does not start even though Prevention of Print Data Loss is set to On (Weak), set it to On (Strong)and start printing again.
* When On (Strong) is selected for Prevention of Print Data Loss, print quality may be reduced.
Check12 Restart your computer if you are printing from the computer.
473
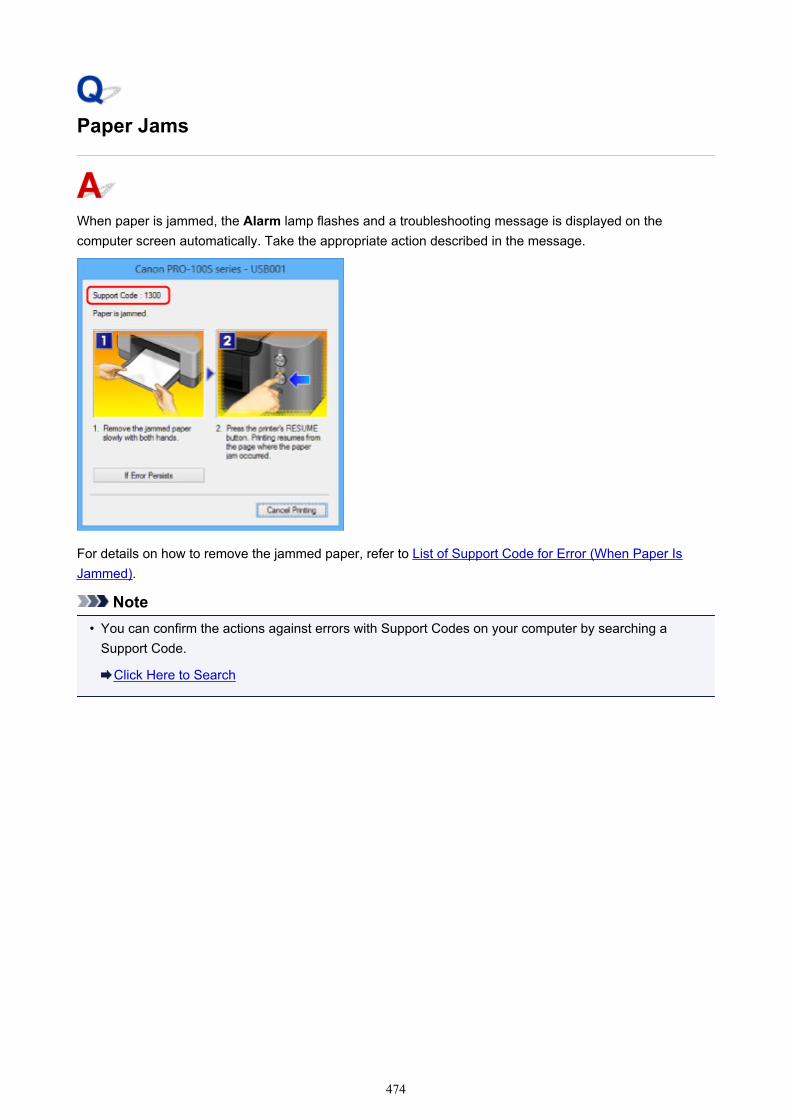
Paper Jams
When paper is jammed, the Alarm lamp flashes and a troubleshooting message is displayed on thecomputer screen automatically. Take the appropriate action described in the message.
For details on how to remove the jammed paper, refer to List of Support Code for Error (When Paper IsJammed).
Note• You can confirm the actions against errors with Support Codes on your computer by searching a
Support Code.
Click Here to Search
474
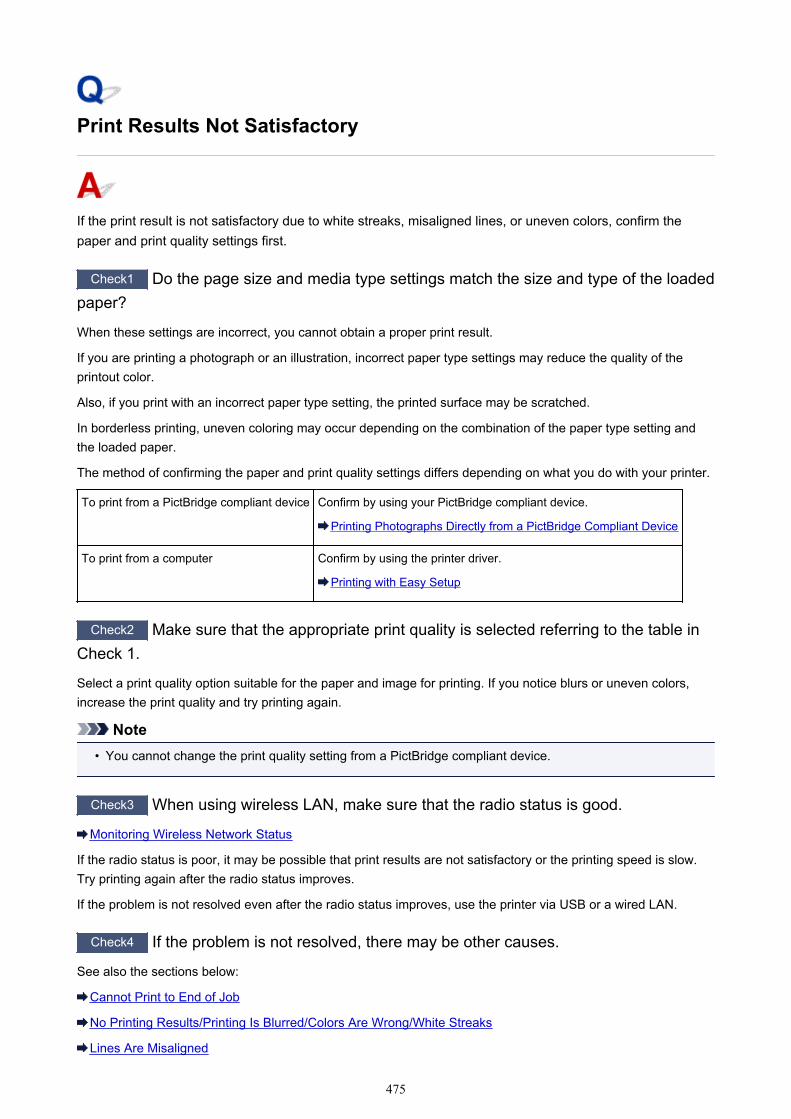
Print Results Not Satisfactory
If the print result is not satisfactory due to white streaks, misaligned lines, or uneven colors, confirm thepaper and print quality settings first.
Check1 Do the page size and media type settings match the size and type of the loadedpaper?
When these settings are incorrect, you cannot obtain a proper print result.
If you are printing a photograph or an illustration, incorrect paper type settings may reduce the quality of theprintout color.
Also, if you print with an incorrect paper type setting, the printed surface may be scratched.
In borderless printing, uneven coloring may occur depending on the combination of the paper type setting andthe loaded paper.
The method of confirming the paper and print quality settings differs depending on what you do with your printer.
To print from a PictBridge compliant device Confirm by using your PictBridge compliant device.
Printing Photographs Directly from a PictBridge Compliant Device
To print from a computer Confirm by using the printer driver.
Printing with Easy Setup
Check2 Make sure that the appropriate print quality is selected referring to the table inCheck 1.
Select a print quality option suitable for the paper and image for printing. If you notice blurs or uneven colors,increase the print quality and try printing again.
Note• You cannot change the print quality setting from a PictBridge compliant device.
Check3 When using wireless LAN, make sure that the radio status is good.
Monitoring Wireless Network Status
If the radio status is poor, it may be possible that print results are not satisfactory or the printing speed is slow.Try printing again after the radio status improves.
If the problem is not resolved even after the radio status improves, use the printer via USB or a wired LAN.
Check4 If the problem is not resolved, there may be other causes.
See also the sections below:
Cannot Print to End of Job
No Printing Results/Printing Is Blurred/Colors Are Wrong/White Streaks
Lines Are Misaligned
475

Line Does Not Print or Prints Partially
Image Does Not Print or Prints Partially
Printed Paper Curls or Has Ink Blots
Paper Is Smudged/Printed Surface Is Scratched
Back of the Paper Is Smudged
Vertical Lines Are Printed on the Sides of the Printout
Colors Are Uneven or Streaked
476
Cannot Print to End of Job
Check1 Select the setting not to compress the printing data.
If you select the setting not to compress the printing data with an application software you are using, the printingresult may be improved.
Click Print Options on the Page Setup sheet on the printer driver. Select the Do not allow applicationsoftware to compress print data check box, then click OK.
* Deselect the check box after printing is complete.
Check2 Is the size of the print data extremely large?
Click Print Options on the Page Setup sheet on the printer driver. Then, make sure Prevention of Print DataLoss in the displayed dialog is set to On (Weak).
If the print results are not enough even though Prevention of Print Data Loss is set to On (Weak), set it to On(Strong) and start printing again.
* When On (Strong) is selected for Prevention of Print Data Loss, print quality may be reduced.
Check3 Is the space of your computer's hard disk sufficient?
Delete unnecessary files to free disk space.
477
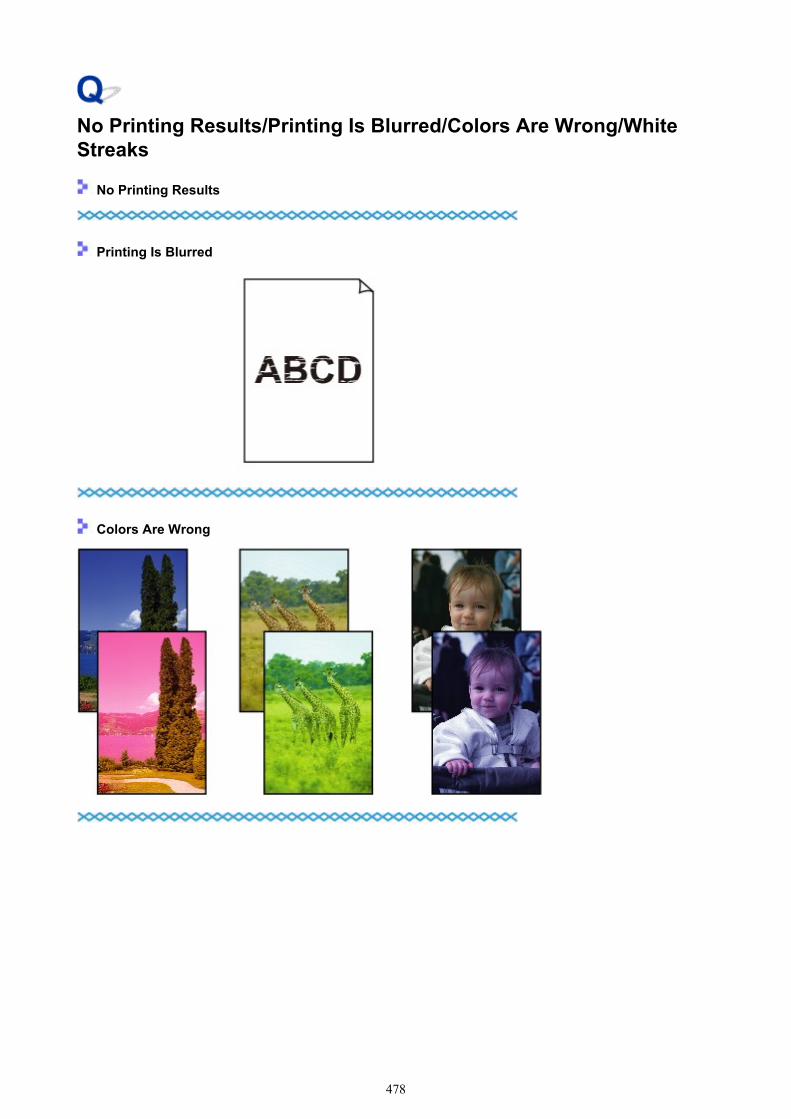
No Printing Results/Printing Is Blurred/Colors Are Wrong/WhiteStreaks
No Printing Results
Printing Is Blurred
Colors Are Wrong
478
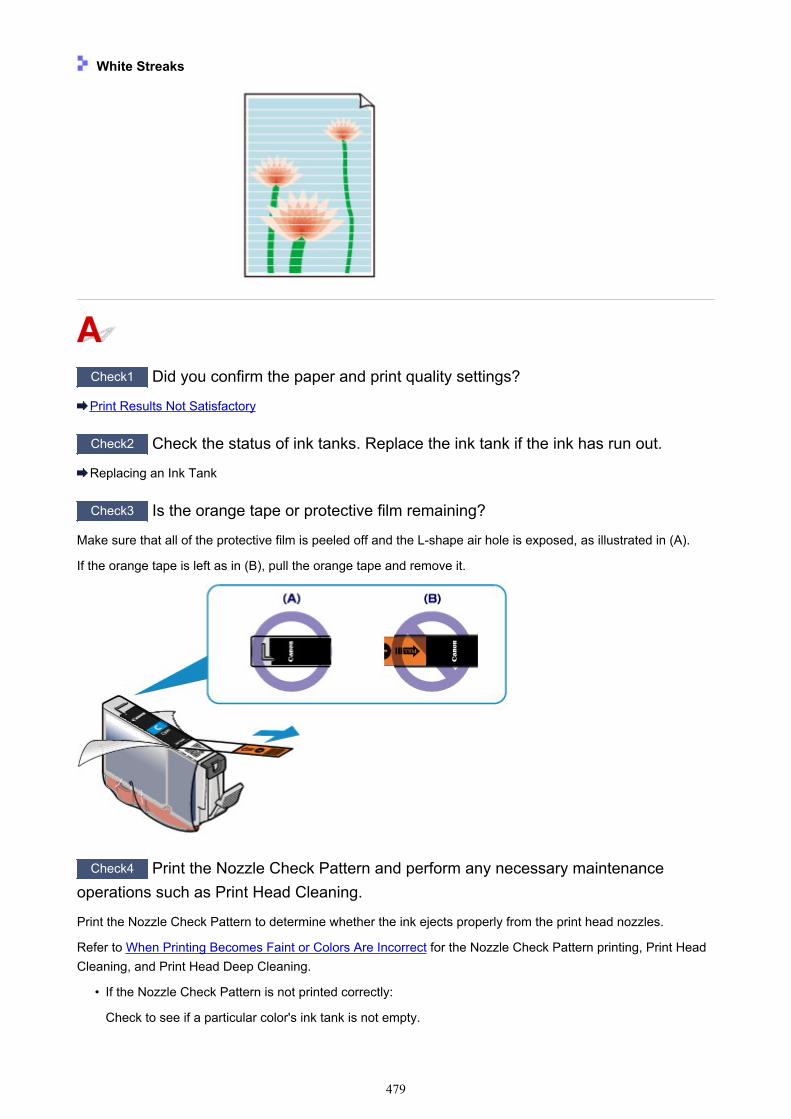
White Streaks
Check1 Did you confirm the paper and print quality settings?
Print Results Not Satisfactory
Check2 Check the status of ink tanks. Replace the ink tank if the ink has run out.
Replacing an Ink Tank
Check3 Is the orange tape or protective film remaining?
Make sure that all of the protective film is peeled off and the L-shape air hole is exposed, as illustrated in (A).
If the orange tape is left as in (B), pull the orange tape and remove it.
Check4 Print the Nozzle Check Pattern and perform any necessary maintenanceoperations such as Print Head Cleaning.
Print the Nozzle Check Pattern to determine whether the ink ejects properly from the print head nozzles.
Refer to When Printing Becomes Faint or Colors Are Incorrect for the Nozzle Check Pattern printing, Print HeadCleaning, and Print Head Deep Cleaning.
• If the Nozzle Check Pattern is not printed correctly:
Check to see if a particular color's ink tank is not empty.
479
If the Nozzle Check Pattern is not printed correctly though ink is sufficient, perform the Print Head Cleaningand try printing the Nozzle Check Pattern again.
• If the problem is not resolved after performing the Print Head Cleaning twice:
Perform the Print Head Deep Cleaning.
If the problem is not resolved after performing the Print Head Deep Cleaning, turn off the printer andperform another Print Head Deep Cleaning after 24 hours.
• If the problem is not resolved after performing the Print Head Deep Cleaning twice:
If Print Head Deep Cleaning does not resolve the problem, the print head may be damaged. Contact theservice center.
Check5 When using paper with one printable surface, make sure that the paper isloaded with the printable side facing up.
Printing on the wrong side of such paper may cause unclear prints or prints with reduced quality.
Load paper with the printable side facing up.
Refer to the instruction manual supplied with the paper for detailed information on the printable side.
Check6 Make sure that the input profile in the printer driver is set correctly.
If printout color of photographs that are taken in Adobe RGB mode is not satisfactory, configure the input profileand then try printing again. It may improve the quality of printout color.
1. Open the printer properties dialog box.
How to Open the Printer Driver Setup Window
2. On the Main sheet, select Manual for Color/Intensity, and then click Set....
3. On the Matching sheet, select ICM for Color Correction.
4. Select Adobe RGB (1998) for Input Profile.
Note• Adobe RGB (1998) is not displayed when input profiles of Adobe RGB are not installed.
480
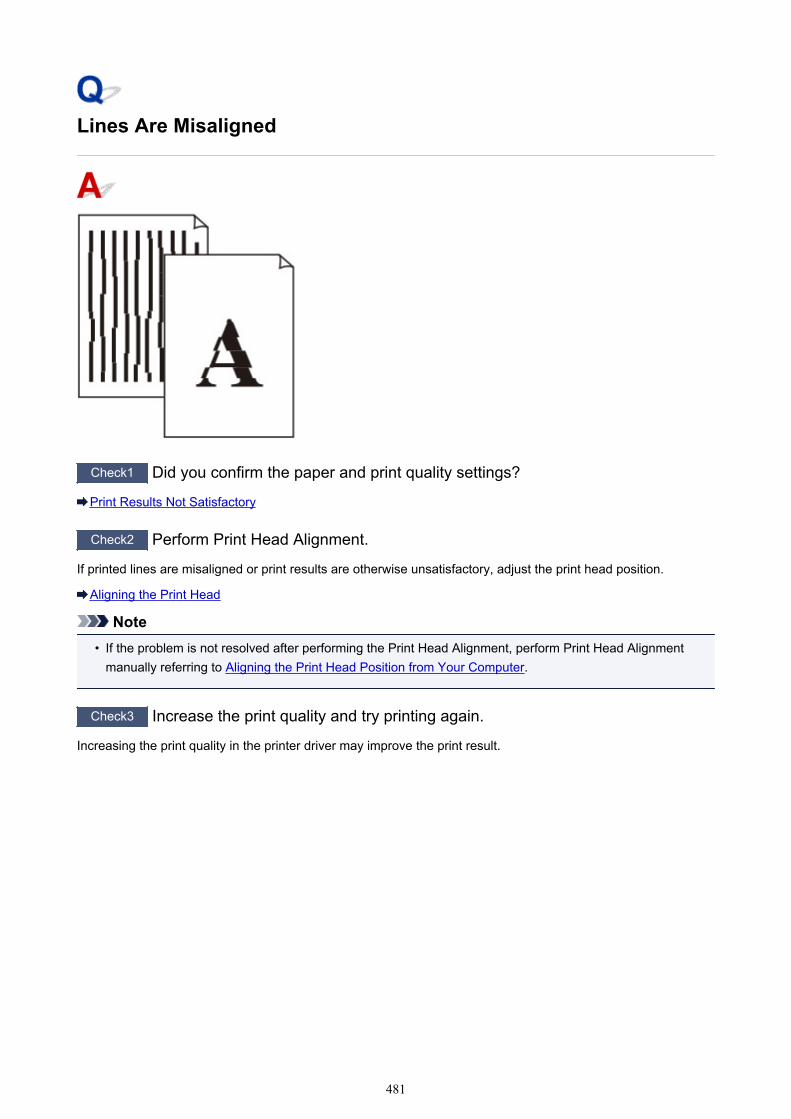
Lines Are Misaligned
Check1 Did you confirm the paper and print quality settings?
Print Results Not Satisfactory
Check2 Perform Print Head Alignment.
If printed lines are misaligned or print results are otherwise unsatisfactory, adjust the print head position.
Aligning the Print Head
Note• If the problem is not resolved after performing the Print Head Alignment, perform Print Head Alignment
manually referring to Aligning the Print Head Position from Your Computer.
Check3 Increase the print quality and try printing again.
Increasing the print quality in the printer driver may improve the print result.
481
Line Does Not Print or Prints Partially
Check1 Is the Page Layout Printing performed or the Binding margin function used?
When the Page Layout Printing or Binding margin function is being used, thin lines may not be printed. Trythickening the lines in the document.
Check2 Is the size of the print data extremely large?
Click Print Options on the Page Setup sheet on the printer driver. Then, make sure Prevention of Print DataLoss in the displayed dialog is set to On (Weak).
If the print results are not enough even though Prevention of Print Data Loss is set to On (Weak), set it to On(Strong) and start printing again.
* When On (Strong) is selected for Prevention of Print Data Loss, print quality may be reduced.
482
Image Does Not Print or Prints Partially
Check1 Select the setting not to compress the printing data.
If you select the setting not to compress the printing data with an application software you are using, the printingresult may be improved.
Click Print Options on the Page Setup sheet on the printer driver. Select the Do not allow applicationsoftware to compress print data check box, then click OK.
* Deselect the check box after printing is complete.
Check2 Is the size of the print data extremely large?
Click Print Options on the Page Setup sheet on the printer driver. Then, make sure Prevention of Print DataLoss in the displayed dialog is set to On (Weak).
If the print results are not enough even though Prevention of Print Data Loss is set to On (Weak), set it to On(Strong) and start printing again.
* When On (Strong) is selected for Prevention of Print Data Loss, print quality may be reduced.
483
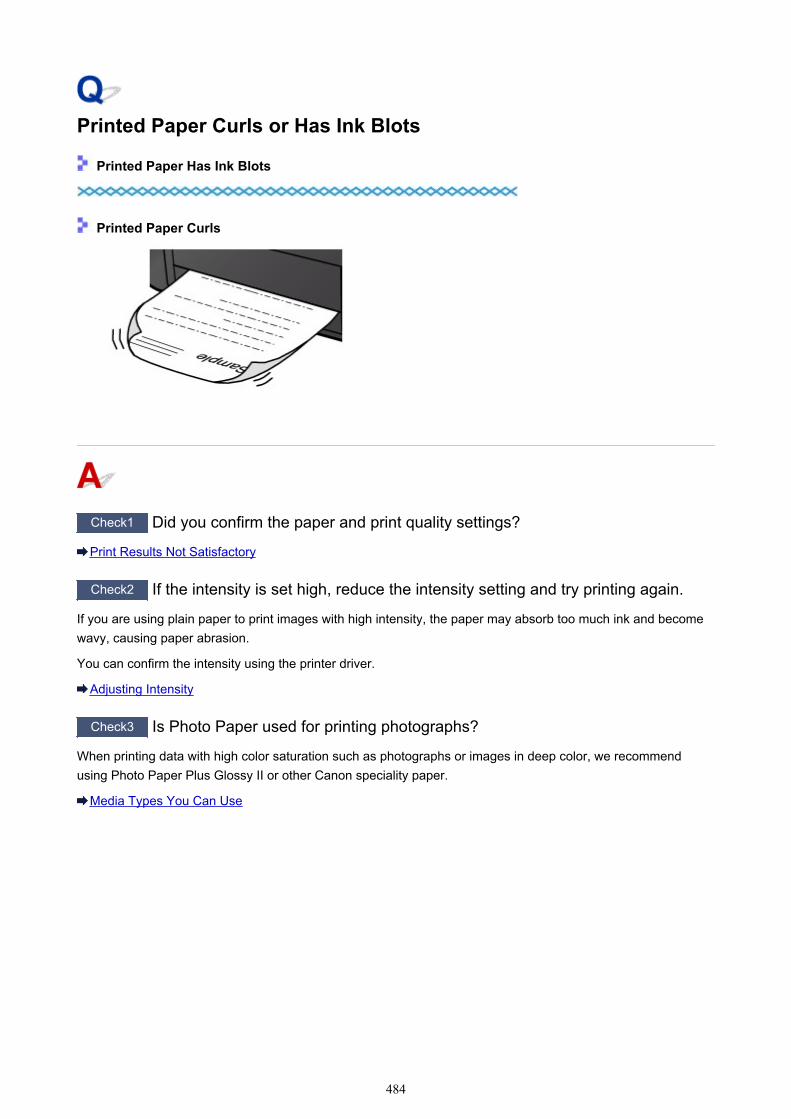
Printed Paper Curls or Has Ink Blots
Printed Paper Has Ink Blots
Printed Paper Curls
Check1 Did you confirm the paper and print quality settings?
Print Results Not Satisfactory
Check2 If the intensity is set high, reduce the intensity setting and try printing again.
If you are using plain paper to print images with high intensity, the paper may absorb too much ink and becomewavy, causing paper abrasion.
You can confirm the intensity using the printer driver.
Adjusting Intensity
Check3 Is Photo Paper used for printing photographs?
When printing data with high color saturation such as photographs or images in deep color, we recommendusing Photo Paper Plus Glossy II or other Canon speciality paper.
Media Types You Can Use
484
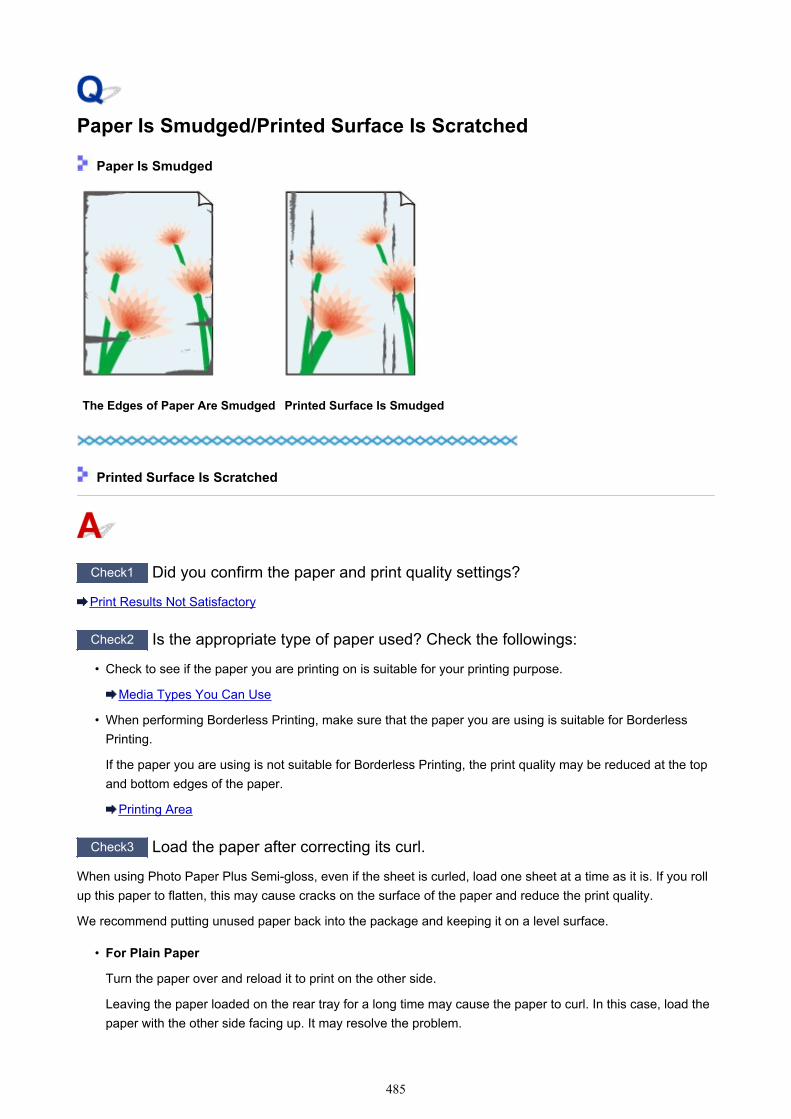
Paper Is Smudged/Printed Surface Is Scratched
Paper Is Smudged
The Edges of Paper Are Smudged Printed Surface Is Smudged
Printed Surface Is Scratched
Check1 Did you confirm the paper and print quality settings?
Print Results Not Satisfactory
Check2 Is the appropriate type of paper used? Check the followings:
• Check to see if the paper you are printing on is suitable for your printing purpose.
Media Types You Can Use
• When performing Borderless Printing, make sure that the paper you are using is suitable for BorderlessPrinting.
If the paper you are using is not suitable for Borderless Printing, the print quality may be reduced at the topand bottom edges of the paper.
Printing Area
Check3 Load the paper after correcting its curl.
When using Photo Paper Plus Semi-gloss, even if the sheet is curled, load one sheet at a time as it is. If you rollup this paper to flatten, this may cause cracks on the surface of the paper and reduce the print quality.
We recommend putting unused paper back into the package and keeping it on a level surface.
• For Plain Paper
Turn the paper over and reload it to print on the other side.
Leaving the paper loaded on the rear tray for a long time may cause the paper to curl. In this case, load thepaper with the other side facing up. It may resolve the problem.
485
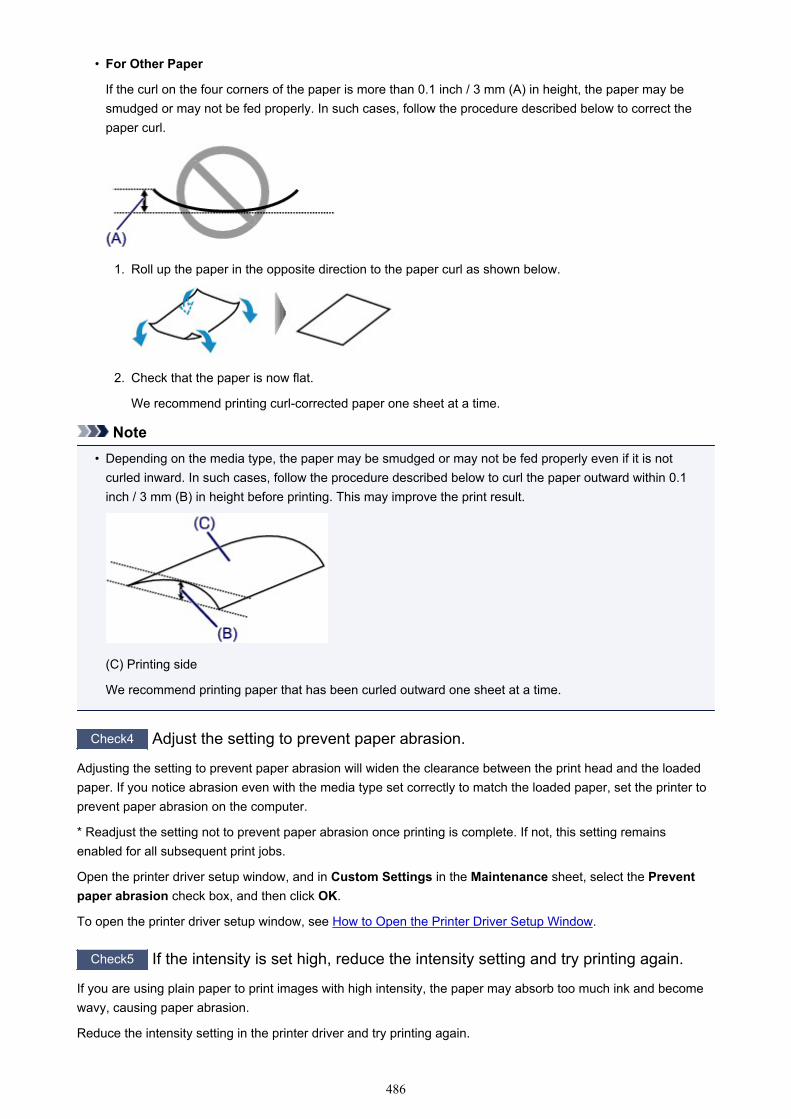
• For Other Paper
If the curl on the four corners of the paper is more than 0.1 inch / 3 mm (A) in height, the paper may besmudged or may not be fed properly. In such cases, follow the procedure described below to correct thepaper curl.
1. Roll up the paper in the opposite direction to the paper curl as shown below.
2. Check that the paper is now flat.
We recommend printing curl-corrected paper one sheet at a time.
Note• Depending on the media type, the paper may be smudged or may not be fed properly even if it is not
curled inward. In such cases, follow the procedure described below to curl the paper outward within 0.1inch / 3 mm (B) in height before printing. This may improve the print result.
(C) Printing side
We recommend printing paper that has been curled outward one sheet at a time.
Check4 Adjust the setting to prevent paper abrasion.
Adjusting the setting to prevent paper abrasion will widen the clearance between the print head and the loadedpaper. If you notice abrasion even with the media type set correctly to match the loaded paper, set the printer toprevent paper abrasion on the computer.
* Readjust the setting not to prevent paper abrasion once printing is complete. If not, this setting remainsenabled for all subsequent print jobs.
Open the printer driver setup window, and in Custom Settings in the Maintenance sheet, select the Preventpaper abrasion check box, and then click OK.
To open the printer driver setup window, see How to Open the Printer Driver Setup Window.
Check5 If the intensity is set high, reduce the intensity setting and try printing again.
If you are using plain paper to print images with high intensity, the paper may absorb too much ink and becomewavy, causing paper abrasion.
Reduce the intensity setting in the printer driver and try printing again.
486
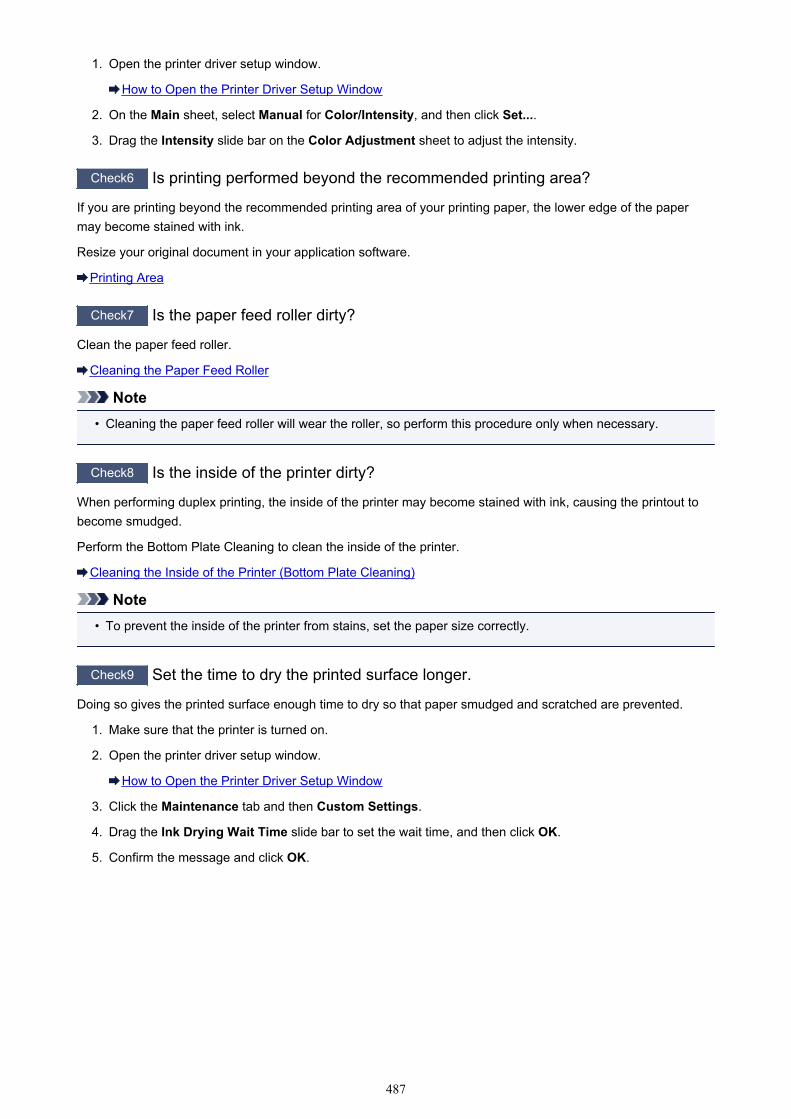
1. Open the printer driver setup window.
How to Open the Printer Driver Setup Window
2. On the Main sheet, select Manual for Color/Intensity, and then click Set....
3. Drag the Intensity slide bar on the Color Adjustment sheet to adjust the intensity.
Check6 Is printing performed beyond the recommended printing area?
If you are printing beyond the recommended printing area of your printing paper, the lower edge of the papermay become stained with ink.
Resize your original document in your application software.
Printing Area
Check7 Is the paper feed roller dirty?
Clean the paper feed roller.
Cleaning the Paper Feed Roller
Note• Cleaning the paper feed roller will wear the roller, so perform this procedure only when necessary.
Check8 Is the inside of the printer dirty?
When performing duplex printing, the inside of the printer may become stained with ink, causing the printout tobecome smudged.
Perform the Bottom Plate Cleaning to clean the inside of the printer.
Cleaning the Inside of the Printer (Bottom Plate Cleaning)
Note• To prevent the inside of the printer from stains, set the paper size correctly.
Check9 Set the time to dry the printed surface longer.
Doing so gives the printed surface enough time to dry so that paper smudged and scratched are prevented.
1. Make sure that the printer is turned on.
2. Open the printer driver setup window.
How to Open the Printer Driver Setup Window
3. Click the Maintenance tab and then Custom Settings.
4. Drag the Ink Drying Wait Time slide bar to set the wait time, and then click OK.
5. Confirm the message and click OK.
487
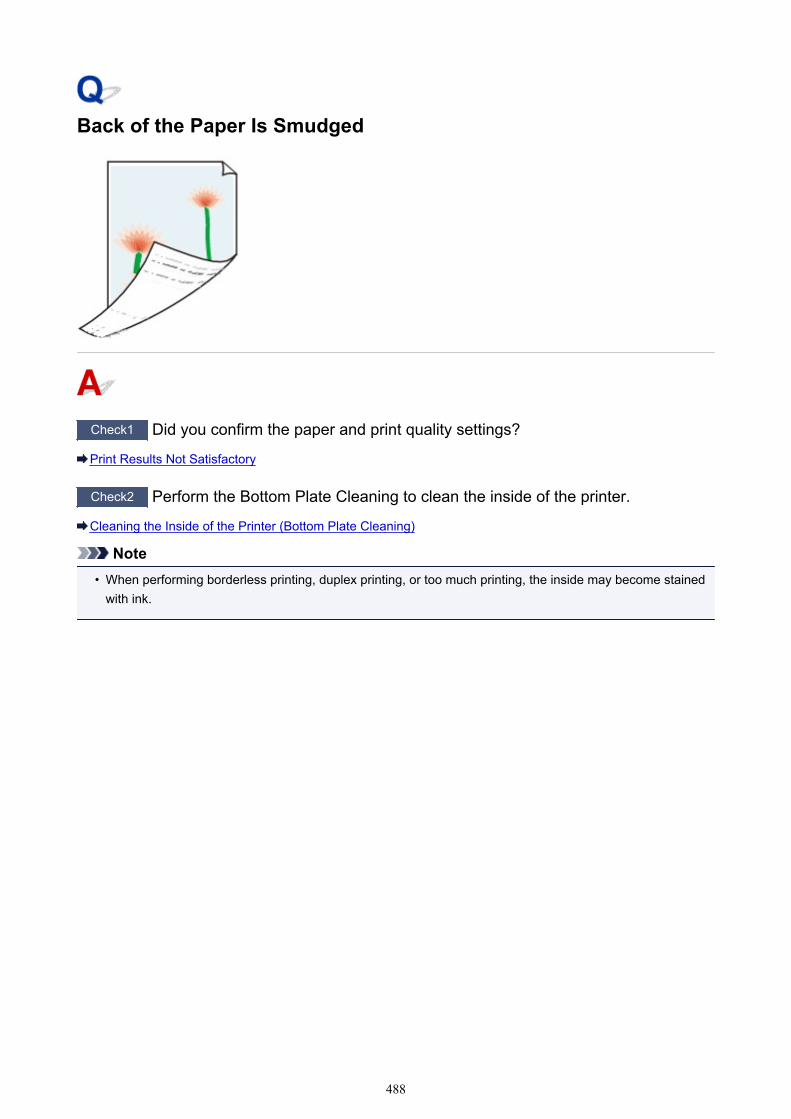
Back of the Paper Is Smudged
Check1 Did you confirm the paper and print quality settings?
Print Results Not Satisfactory
Check2 Perform the Bottom Plate Cleaning to clean the inside of the printer.
Cleaning the Inside of the Printer (Bottom Plate Cleaning)
Note• When performing borderless printing, duplex printing, or too much printing, the inside may become stained
with ink.
488

Vertical Lines Are Printed on the Sides of the Printout
Check Is the size of the loaded paper correct?
The vertical lines may be printed in the margin if the size of the loaded paper is larger than that you havespecified.
Set the paper size correctly according to the paper you loaded.
Print Results Not Satisfactory
Note• The direction of the vertical line pattern may vary depending on the image data or the print setting.
• This printer performs automatic cleaning when necessary to keep printouts clean. A small amount of ink isejected for cleaning.
Although ink is usually ejected on the ink absorber, it may be ejected on the paper if you load paper largerthan that you have specified.
489
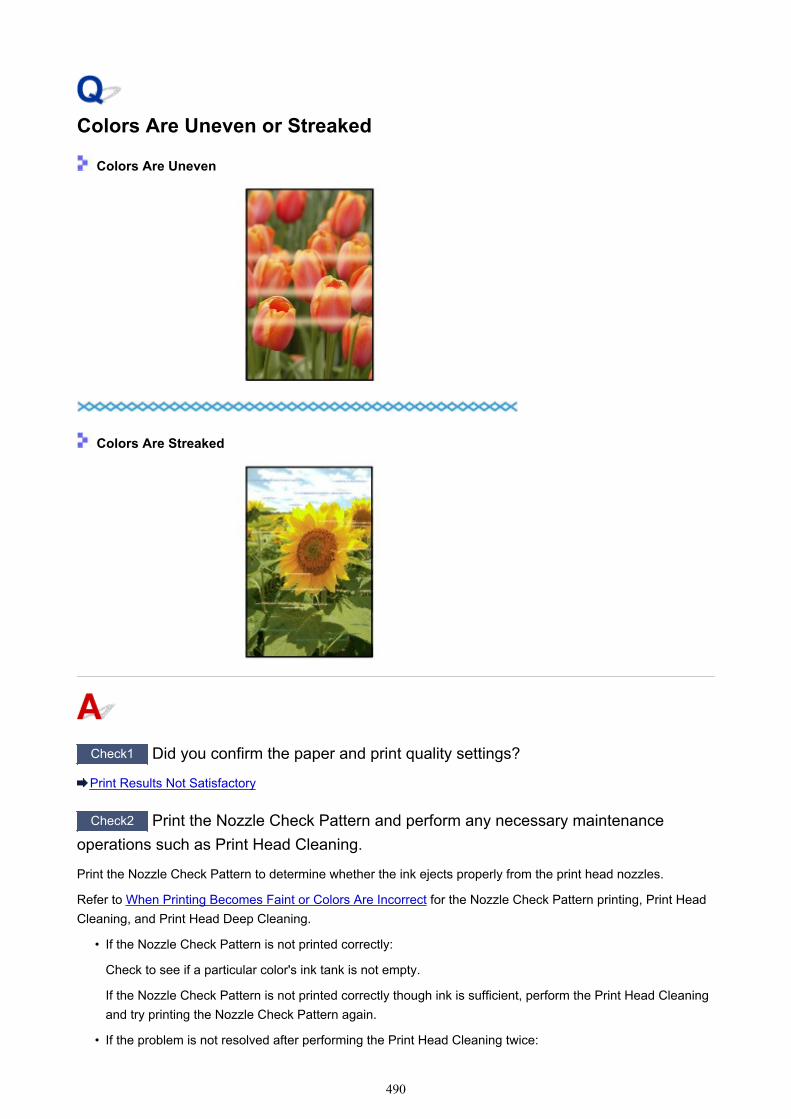
Colors Are Uneven or Streaked
Colors Are Uneven
Colors Are Streaked
Check1 Did you confirm the paper and print quality settings?
Print Results Not Satisfactory
Check2 Print the Nozzle Check Pattern and perform any necessary maintenanceoperations such as Print Head Cleaning.
Print the Nozzle Check Pattern to determine whether the ink ejects properly from the print head nozzles.
Refer to When Printing Becomes Faint or Colors Are Incorrect for the Nozzle Check Pattern printing, Print HeadCleaning, and Print Head Deep Cleaning.
• If the Nozzle Check Pattern is not printed correctly:
Check to see if a particular color's ink tank is not empty.
If the Nozzle Check Pattern is not printed correctly though ink is sufficient, perform the Print Head Cleaningand try printing the Nozzle Check Pattern again.
• If the problem is not resolved after performing the Print Head Cleaning twice:
490
Perform the Print Head Deep Cleaning.
If the problem is not resolved after performing the Print Head Deep Cleaning, turn off the printer andperform another Print Head Deep Cleaning after 24 hours.
• If the problem is not resolved after performing the Print Head Deep Cleaning twice:
If Print Head Deep Cleaning does not resolve the problem, the print head may be damaged. Contact theservice center.
Check3 Perform Print Head Alignment.
Aligning the Print Head
Note• If the problem is not resolved after performing the Print Head Alignment, perform Print Head Alignment
manually referring to Aligning the Print Head Position from Your Computer.
491
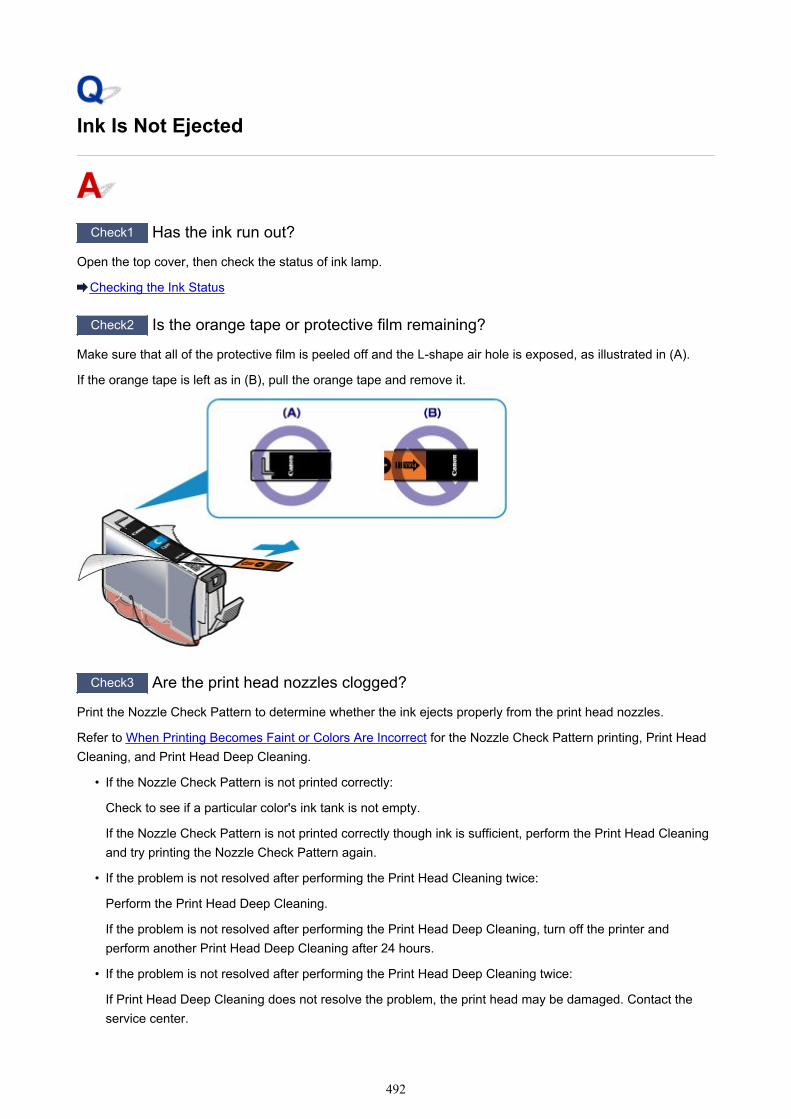
Ink Is Not Ejected
Check1 Has the ink run out?
Open the top cover, then check the status of ink lamp.
Checking the Ink Status
Check2 Is the orange tape or protective film remaining?
Make sure that all of the protective film is peeled off and the L-shape air hole is exposed, as illustrated in (A).
If the orange tape is left as in (B), pull the orange tape and remove it.
Check3 Are the print head nozzles clogged?
Print the Nozzle Check Pattern to determine whether the ink ejects properly from the print head nozzles.
Refer to When Printing Becomes Faint or Colors Are Incorrect for the Nozzle Check Pattern printing, Print HeadCleaning, and Print Head Deep Cleaning.
• If the Nozzle Check Pattern is not printed correctly:
Check to see if a particular color's ink tank is not empty.
If the Nozzle Check Pattern is not printed correctly though ink is sufficient, perform the Print Head Cleaningand try printing the Nozzle Check Pattern again.
• If the problem is not resolved after performing the Print Head Cleaning twice:
Perform the Print Head Deep Cleaning.
If the problem is not resolved after performing the Print Head Deep Cleaning, turn off the printer andperform another Print Head Deep Cleaning after 24 hours.
• If the problem is not resolved after performing the Print Head Deep Cleaning twice:
If Print Head Deep Cleaning does not resolve the problem, the print head may be damaged. Contact theservice center.
492
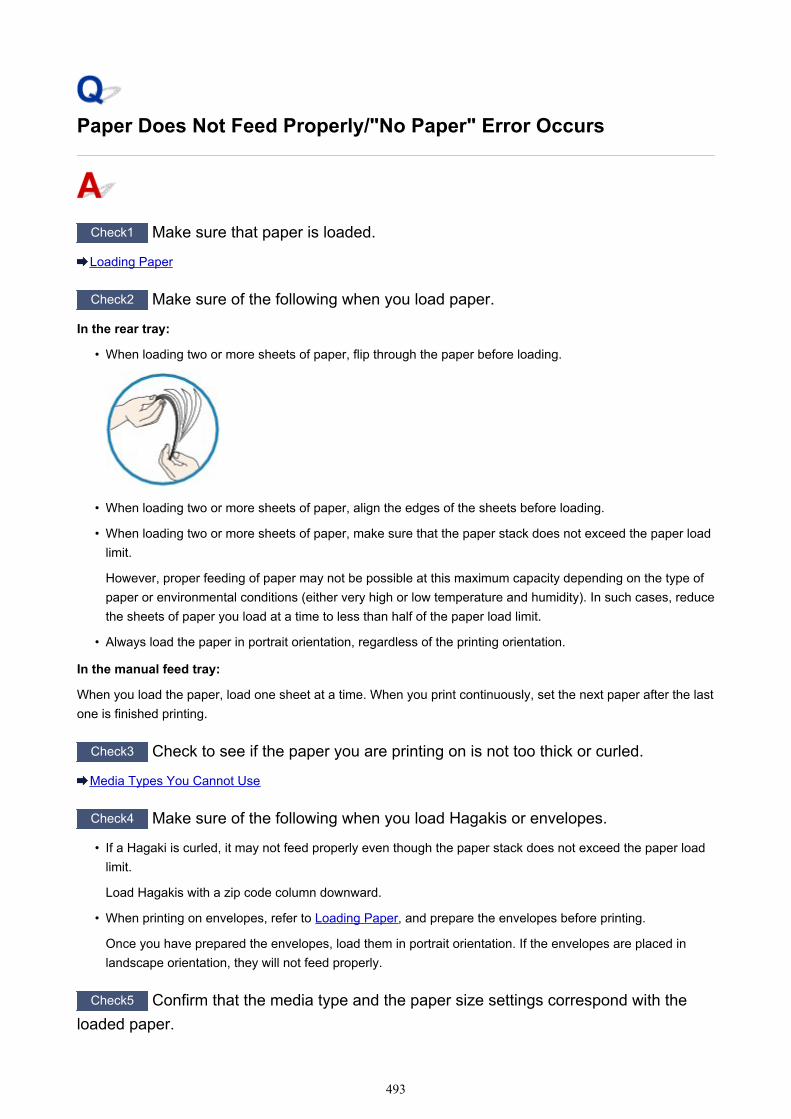
Paper Does Not Feed Properly/"No Paper" Error Occurs
Check1 Make sure that paper is loaded.
Loading Paper
Check2 Make sure of the following when you load paper.
In the rear tray:
• When loading two or more sheets of paper, flip through the paper before loading.
• When loading two or more sheets of paper, align the edges of the sheets before loading.
• When loading two or more sheets of paper, make sure that the paper stack does not exceed the paper loadlimit.
However, proper feeding of paper may not be possible at this maximum capacity depending on the type ofpaper or environmental conditions (either very high or low temperature and humidity). In such cases, reducethe sheets of paper you load at a time to less than half of the paper load limit.
• Always load the paper in portrait orientation, regardless of the printing orientation.
In the manual feed tray:
When you load the paper, load one sheet at a time. When you print continuously, set the next paper after the lastone is finished printing.
Check3 Check to see if the paper you are printing on is not too thick or curled.
Media Types You Cannot Use
Check4 Make sure of the following when you load Hagakis or envelopes.
• If a Hagaki is curled, it may not feed properly even though the paper stack does not exceed the paper loadlimit.
Load Hagakis with a zip code column downward.
• When printing on envelopes, refer to Loading Paper, and prepare the envelopes before printing.
Once you have prepared the envelopes, load them in portrait orientation. If the envelopes are placed inlandscape orientation, they will not feed properly.
Check5 Confirm that the media type and the paper size settings correspond with theloaded paper.
493
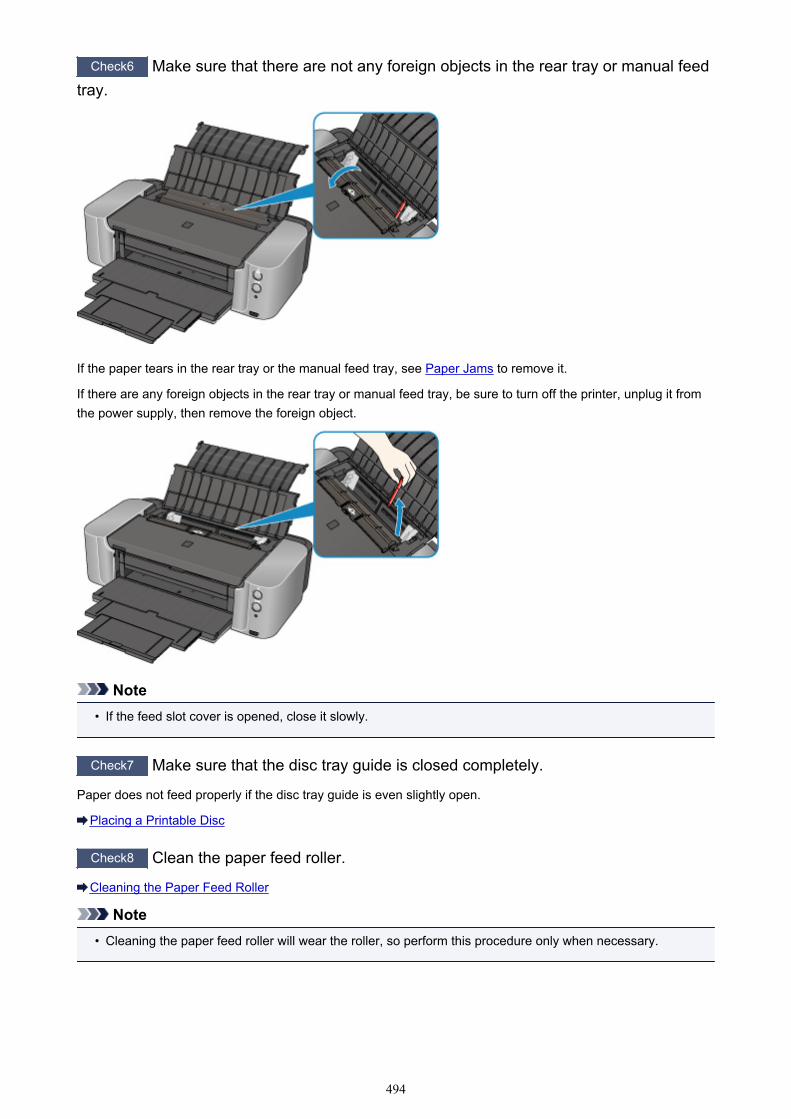
Check6 Make sure that there are not any foreign objects in the rear tray or manual feedtray.
If the paper tears in the rear tray or the manual feed tray, see Paper Jams to remove it.
If there are any foreign objects in the rear tray or manual feed tray, be sure to turn off the printer, unplug it fromthe power supply, then remove the foreign object.
Note• If the feed slot cover is opened, close it slowly.
Check7 Make sure that the disc tray guide is closed completely.
Paper does not feed properly if the disc tray guide is even slightly open.
Placing a Printable Disc
Check8 Clean the paper feed roller.
Cleaning the Paper Feed Roller
Note• Cleaning the paper feed roller will wear the roller, so perform this procedure only when necessary.
494
Cannot Print on the Disc Label
Disc Label Printing Does Not Start
Disc Tray Does Not Feed Properly
Disc Tray Jammed
Disc Label Printing Does Not Start
Check1 Is the disc tray placed properly?
Open the disc tray guide, properly place the disc tray again, then press the RESUME/CANCEL button on theprinter.
Use the disc tray supplied with this printer ("K" is on the upper side).
For details on how to place the disc tray, refer to Placing a Printable Disc.
Check2 Is the printable disc placed on the disc tray?
Place the printable disc on the disc tray properly, then press the RESUME/CANCEL button.
Use the disc tray supplied with this printer ("K" is on the upper side).
For details on how to place the disc tray, refer to Placing a Printable Disc.
Check3 If disc label printing stops before it is complete, try the operation again.
If a certain period of time has elapsed while disc label printing is in progress, the printer stops initializing.
The printer resumes initializing by pressing the RESUME/CANCEL button.
Try the operation again following the on-screen instructions.
Disc Tray Does Not Feed Properly
Check1 Is the disc tray placed properly?
Properly place the disc tray again, then press the RESUME/CANCEL button.
Use the disc tray supplied with this printer ("K" is on the upper side).
For details on how to place the disc tray, refer to Placing a Printable Disc.
Check2 Unrecognizable printable disc may be placed.
Canon recommends that you use printable discs specially processed to be printed on by an inkjet printer.
495

Disc Tray Jammed
Pull out the disc tray gently.
If the disc tray cannot be pulled out, turn the printer off, then turn the printer back on again. The disc traywill automatically be ejected.
When the disc tray is pulled out, place the disc tray ("K" is on the upper side) again, then retry printing.Place the printable disc properly referring to Placing a Printable Disc.
If the disc tray is still jammed, check if there is a problem with the printable disc.
Disc Tray Does Not Feed Properly
496
Printing Stops Before It Is Completed
Check1 Is the disc tray guide opened while printing on paper?
Close the disc tray guide and press the RESUME/CANCEL button on the printer.
Check2 Is the paper loaded?
Make sure that paper is loaded.
If the printer has run out of paper, load paper.
Check3 Do the printing documents have lots of photographs or illustrations?
As printing large data such as photos or graphics takes time for the printer and the computer to process, theprinter may appear to have stopped operating.
In addition, when printing data that uses a large amount of ink continuously on plain paper, the printer maypause temporarily. In either case, wait until the process is complete.
Note• If you are printing a document with a large printing area or printing multiple copies of a document, printing
may pause to allow the ink to dry.
Check4 Has the printer been printing continuously for a long period?
If the printer has been printing continuously for a long time, the print head or other parts around it may overheat.The printer may stop printing at a line break for a period of time and then resume printing.
In this case, wait for a while without operation. If the printing still does not resume, interrupt your print session ata convenient time and turn the printer off for at least 15 minutes.
Caution• The print head and the surrounding area can become extremely hot inside the printer. Never touch the
print head or nearby components.
497
Problems with the Printer
The Printer Cannot Be Powered On
The Printer Turns Off Unintentionally
Cannot Connect to Computer with a USB Cable Properly
Cannot Communicate with the Printer with USB Connection
Print Head Holder Does Not Move to the Position for Replacing
Printer Status Monitor Is Not Displayed
498
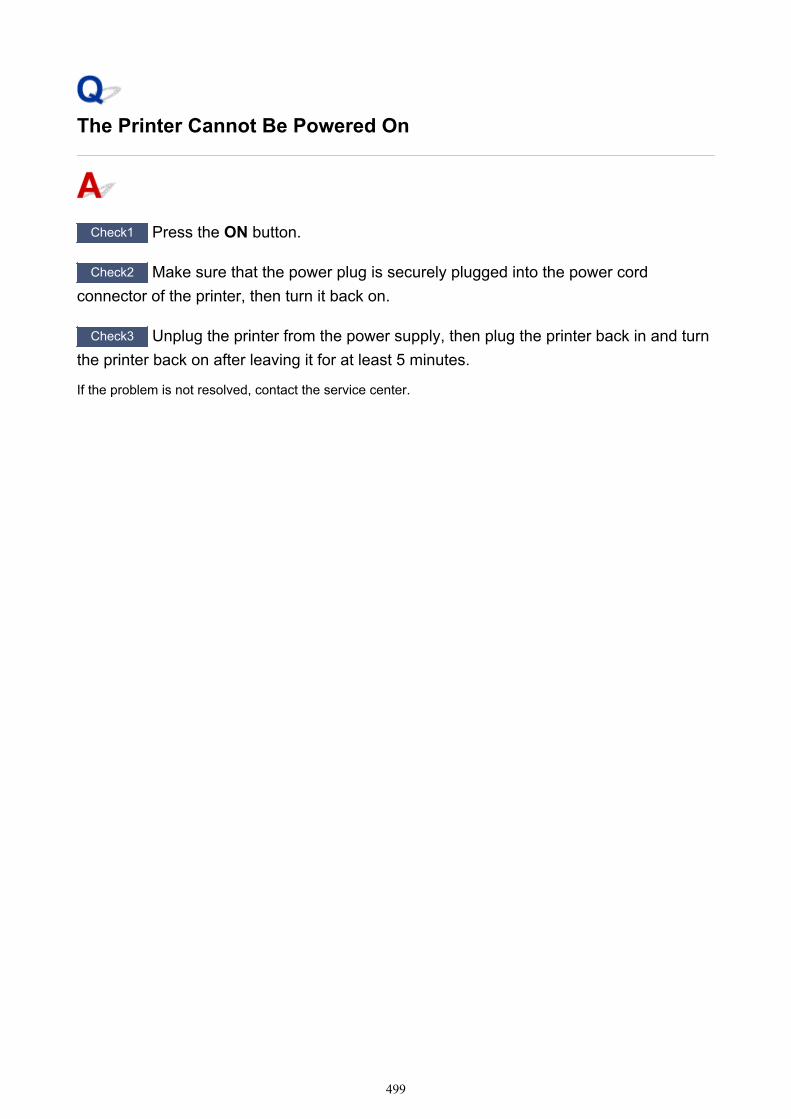
The Printer Cannot Be Powered On
Check1 Press the ON button.
Check2 Make sure that the power plug is securely plugged into the power cordconnector of the printer, then turn it back on.
Check3 Unplug the printer from the power supply, then plug the printer back in and turnthe printer back on after leaving it for at least 5 minutes.
If the problem is not resolved, contact the service center.
499
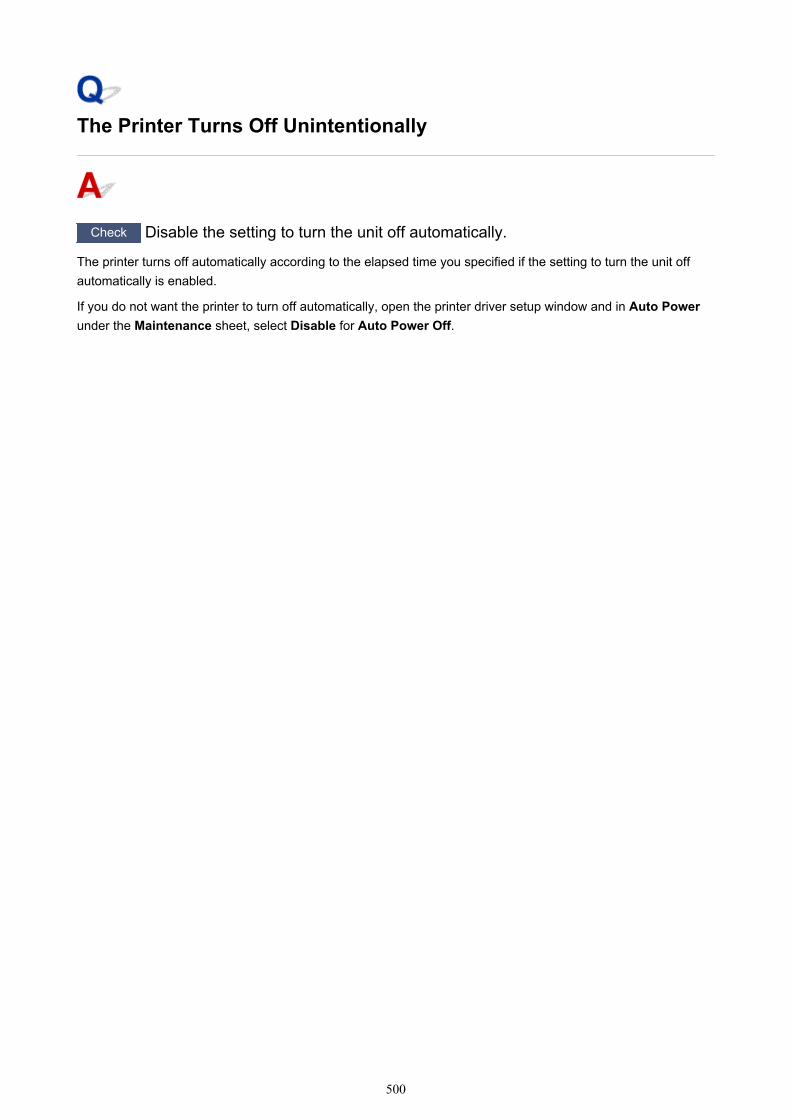
The Printer Turns Off Unintentionally
Check Disable the setting to turn the unit off automatically.
The printer turns off automatically according to the elapsed time you specified if the setting to turn the unit offautomatically is enabled.
If you do not want the printer to turn off automatically, open the printer driver setup window and in Auto Powerunder the Maintenance sheet, select Disable for Auto Power Off.
500
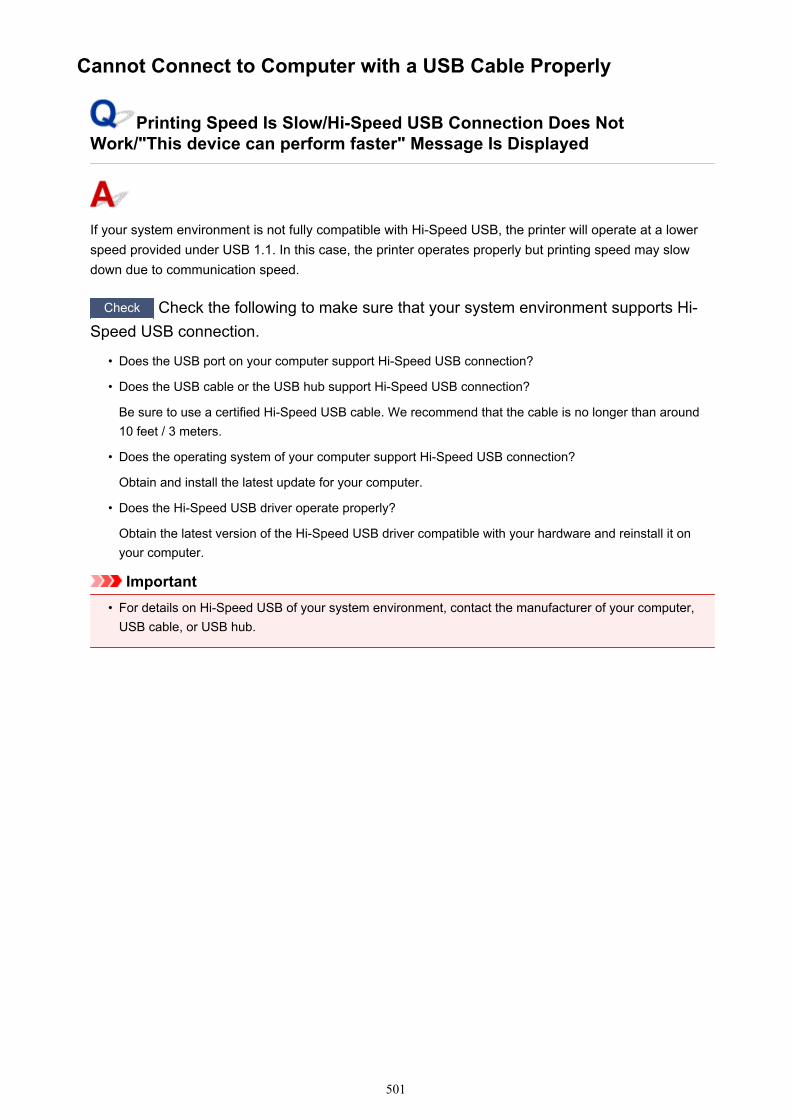
Cannot Connect to Computer with a USB Cable Properly
Printing Speed Is Slow/Hi-Speed USB Connection Does NotWork/"This device can perform faster" Message Is Displayed
If your system environment is not fully compatible with Hi-Speed USB, the printer will operate at a lowerspeed provided under USB 1.1. In this case, the printer operates properly but printing speed may slowdown due to communication speed.
Check Check the following to make sure that your system environment supports Hi-Speed USB connection.
• Does the USB port on your computer support Hi-Speed USB connection?
• Does the USB cable or the USB hub support Hi-Speed USB connection?
Be sure to use a certified Hi-Speed USB cable. We recommend that the cable is no longer than around10 feet / 3 meters.
• Does the operating system of your computer support Hi-Speed USB connection?
Obtain and install the latest update for your computer.
• Does the Hi-Speed USB driver operate properly?
Obtain the latest version of the Hi-Speed USB driver compatible with your hardware and reinstall it onyour computer.
Important• For details on Hi-Speed USB of your system environment, contact the manufacturer of your computer,
USB cable, or USB hub.
501
Cannot Communicate with the Printer with USB Connection
Check1 Make sure that the printer is turned on.
Check2 Make sure that the USB cable is connected properly.
See Connecting the Printer to the Computer Using a USB Cable to connect the USB cable properly.
Check3 Do not start up IJ Network Tool while printing.
Check4 Do not print while IJ Network Tool is running.
Check5 Make sure that Enable bidirectional support is selected in the Ports sheet ofthe properties dialog box of the printer driver.
How to Open the Printer Driver Setup Window
502
Print Head Holder Does Not Move to the Position for Replacing
Check1 Is the POWER lamp off?
Check if the POWER lamp is lit.
The print head holder will not move unless the power is on. If the POWER lamp is off, close the top cover andturn the printer on.
While the POWER lamp is flashing, the printer is initializing. Wait until the POWER lamp stops flashing andremains lit, and then open the top cover again.
Check2 Is the Alarm lamp flashing?
Close the top cover, confirm the number of times the Alarm lamp is flashing, take the appropriate action toresolve the error, and then reopen it. For details on how to resolve the error, see If an Error Occurs.
Check3 Has the top cover been left open for 10 minutes or longer?
If the top cover is left open for more than 10 minutes, the print head holder moves to the position to protect it toprevent the print head from drying out. Close and reopen the top cover to return the print head holder to theposition for replacing.
Check4 Has the printer been printing continuously for a long period?
Close the top cover, wait a while, then reopen it.
If the printer has been printing continuously for a long time, the print head holder may not move to the positionfor replacing since the print head may overheat.
Note• Opening the top cover while printing moves the print head holder to the position to protect it. Close the
top cover, and reopen it after printing finishes.
503
Printer Status Monitor Is Not Displayed
Check Is the printer status monitor enabled?
Make sure that Enable Status Monitor is selected on the Option menu of the printer status monitor.
1. Open the printer driver setup window.
How to Open the Printer Driver Setup Window
2. On the Maintenance sheet, click View Printer Status.
3. Select Enable Status Monitor on the Option menu if it is not selected.
504

Problems with Installation/Downloading
Cannot Install the Printer Driver
Easy-WebPrint EX Does Not Start Up or Easy-WebPrint EX Menu Does NotAppear
How to Update Printer Driver in Network Environment
Uninstalling IJ Network Tool
505
Cannot Install the Printer Driver
• If the installation does not start even after the Setup CD-ROM is inserted into your computer'sdisc drive:
Start the installation following the procedure below.
1. Select items as shown below.
◦ In Windows 8.1 or Windows 8, select the Explorer icon in Taskbar on Desktop, then selectComputer from the list on the left.
◦ In Windows 7 or Windows Vista, click Start then Computer.
◦ In Windows XP, click Start then My Computer.
2. Double-click the CD-ROM icon on the displayed window.
If the contents of the CD-ROM are displayed, double-click MSETUP4.EXE.
If you cannot install the printer driver with the Setup CD-ROM, install it from our website.
Note• If the CD-ROM icon is not displayed, try the following:
• Remove the CD-ROM from your computer, then insert it again.
• Restart your computer.
If the icon is not yet displayed, try different discs and see if they are displayed. If other discs aredisplayed, there is a problem with the Setup CD-ROM. In this case, contact the service center.
506
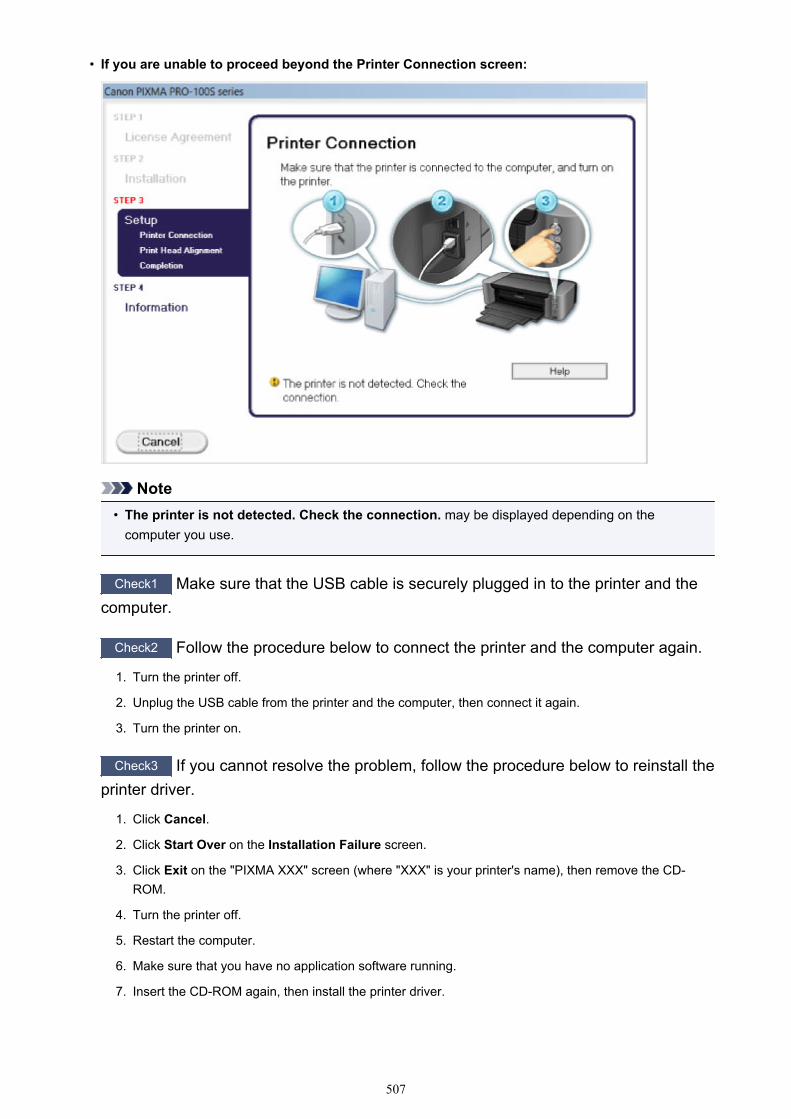
• If you are unable to proceed beyond the Printer Connection screen:
Note• The printer is not detected. Check the connection. may be displayed depending on the
computer you use.
Check1 Make sure that the USB cable is securely plugged in to the printer and thecomputer.
Check2 Follow the procedure below to connect the printer and the computer again.
1. Turn the printer off.
2. Unplug the USB cable from the printer and the computer, then connect it again.
3. Turn the printer on.
Check3 If you cannot resolve the problem, follow the procedure below to reinstall theprinter driver.
1. Click Cancel.
2. Click Start Over on the Installation Failure screen.
3. Click Exit on the "PIXMA XXX" screen (where "XXX" is your printer's name), then remove the CD-ROM.
4. Turn the printer off.
5. Restart the computer.
6. Make sure that you have no application software running.
7. Insert the CD-ROM again, then install the printer driver.
507

• In other cases:
Reinstall the printer driver.
If the driver was not installed correctly, uninstall the printer driver, restart your computer, then reinstallthe driver.
Deleting the Unnecessary Printer Driver
If you reinstall the printer driver, install the printer driver with the Setup CD-ROM or install it from ourwebsite.
Note• If the installer was forced to be terminated due to a Windows error, the system may be in an
unstable condition and you may not be able to install the driver. Restart your computer beforereinstalling.
508
Easy-WebPrint EX Does Not Start Up or Easy-WebPrint EX MenuDoes Not Appear
If Easy-WebPrint EX does not start up or its menu does not appear on Internet Explorer, confirm thefollowing.
Check1 Is Canon Easy-WebPrint EX displayed on the Toolbars menu in the InternetExplorer's View menu?
If Canon Easy-WebPrint EX is not displayed, Easy-WebPrint EX is not installed on your computer. Install thelatest Easy-WebPrint EX onto your computer from our website.
Note• If Easy-WebPrint EX is not installed on your computer, a message asking you to install it may be displayed
on the notification area on the desktop. Click the message, then follow the instructions on the computerscreen to install Easy-WebPrint EX.
• While the installation or download Easy-WebPrint EX is in progress, it is necessary to access the Internet.
Check2 Is Canon Easy-WebPrint EX selected on the Toolbars menu in the InternetExplorer's View menu?
If Canon Easy-WebPrint EX is not selected, Easy-WebPrint EX is disabled. Select Canon Easy-WebPrint EXto enable it.
Check3 Check the following to make sure that your system environment supports Easy-WebPrint EX.
• Is it installed on the computer with proper system requirements?
• Did you start it using a compatible version of Internet Explorer?
Visit our website to confirm the details on the system requirements of Easy-WebPrint EX.
509
How to Update Printer Driver in Network Environment
Download the latest printer driver in advance.
To obtain the latest printer driver, access our web site through the Internet and download the latest printerdriver for your model.
After uninstalling the printer driver, install the latest printer driver according to the regular procedure. Whenthe connection method selection screen is displayed, select Use the printer with wireless LANconnection or Use the printer with wired LAN connection according to the connection method you use.The printer will be detected automatically in the network.
After making sure that the printer is detected, install the printer driver following the on-screen instructions.
Note• You can use the printer over a LAN without performing setup again.
510
Uninstalling IJ Network Tool
Follow the procedure below to uninstall IJ Network Tool from your computer.
Important• Even if IJ Network Tool is uninstalled, you can print over network. However, you cannot change the
network settings over network.
• Log into a user account with administrator privilege.
1. Perform the procedure to uninstall IJ Network Tool.
• In Windows 8.1 or Windows 8:
1. Select Control Panel from the Settings charm on Desktop > Programs > Programs andFeatures.
2. Select Canon IJ Network Tool from the program list, then click Uninstall.
If the User Account Control screen appears, click Continue.
• In Windows 7 or Windows Vista:
1. Click Start > Control Panel > Programs > Programs and Features.
2. Select Canon IJ Network Tool from the program list, then click Uninstall.
If the User Account Control screen appears, click Continue.
• In Windows XP:
1. Click Start > Control Panel > Add or Remove Programs.
2. Select Canon IJ Network Tool from the program list, then click Remove.
2. Click Yes when the confirmation message appears.
When the message prompting you to restart your computer is displayed, click OK to restart yourcomputer.
511

About Errors/Messages Displayed
If an Error Occurs
A Message Is Displayed
Error Message Appears on a PictBridge Compliant Device
512
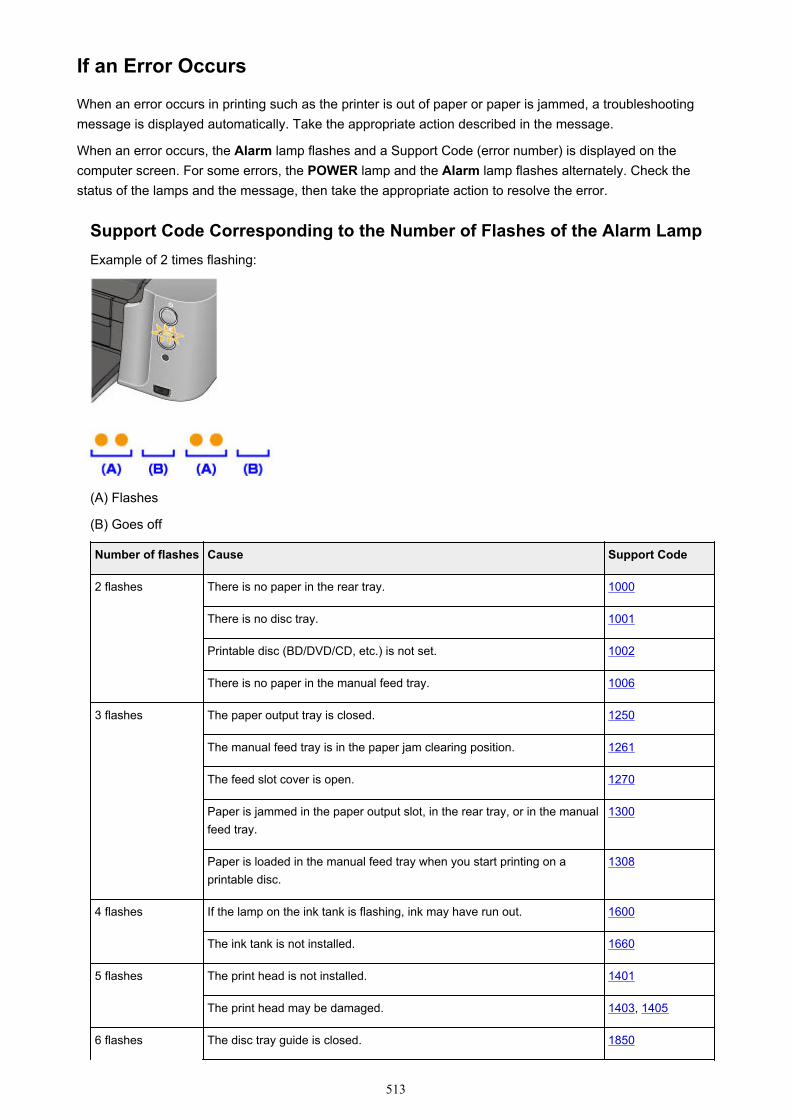
If an Error Occurs
When an error occurs in printing such as the printer is out of paper or paper is jammed, a troubleshootingmessage is displayed automatically. Take the appropriate action described in the message.
When an error occurs, the Alarm lamp flashes and a Support Code (error number) is displayed on thecomputer screen. For some errors, the POWER lamp and the Alarm lamp flashes alternately. Check thestatus of the lamps and the message, then take the appropriate action to resolve the error.
Support Code Corresponding to the Number of Flashes of the Alarm LampExample of 2 times flashing:
(A) Flashes
(B) Goes off
Number of flashes Cause Support Code
2 flashes There is no paper in the rear tray. 1000
There is no disc tray. 1001
Printable disc (BD/DVD/CD, etc.) is not set. 1002
There is no paper in the manual feed tray. 1006
3 flashes The paper output tray is closed. 1250
The manual feed tray is in the paper jam clearing position. 1261
The feed slot cover is open. 1270
Paper is jammed in the paper output slot, in the rear tray, or in the manualfeed tray.
1300
Paper is loaded in the manual feed tray when you start printing on aprintable disc.
1308
4 flashes If the lamp on the ink tank is flashing, ink may have run out. 1600
The ink tank is not installed. 1660
5 flashes The print head is not installed. 1401
The print head may be damaged. 1403, 1405
6 flashes The disc tray guide is closed. 1850
513
The disc tray guide is open. 1851
The disc tray guide has been closed. 1855
The disc tray guide has been opened. 1856
The disc tray guide is open after replacing the ink tank. 1858
To print on specified paper, you need to open the disc tray guide. 1859
To continue printing, you need to close the disc tray guide. 185A
7 flashes Some ink tanks are not installed in the correct position. (The lamp on theink tank flashes.)
1680
More than one ink tanks of the same color are installed. (The lamp on theink tank flashes.)
1681
8 flashes The ink absorber is almost full. 1700, 1701
9 flashes The device incompatible with the printer is connected. 2001
11 flashes The Page Size setting does not match the size of the paper loaded in theprinter.
1062
Automatic Print Head Alignment failed. 2500
Cannot perform printing with the current print setting. 4103
12 flashes The specified data cannot be printed. 4100
13 flashes The remaining ink level cannot be correctly detected. (The lamp on the inktank flashes.)
1683
14 flashes The ink tank cannot be recognized. 1684
Appropriate ink tank is not installed. 1750
15 flashes The ink tank cannot be recognized. 1410, 1411, 1412,1413, 1414, 1415,1416, 1417
16 flashes The ink has run out. (The lamp on the ink tank flashes.) 1688
19 flashes An unsupported USB hub is connected. 2002
21 flashes The printer cannot detect the paper size. 2103
Support Code Corresponding to the Number of Alternate Flashes of thePOWER Lamp and the Alarm LampExample of 2 times flashing:
514
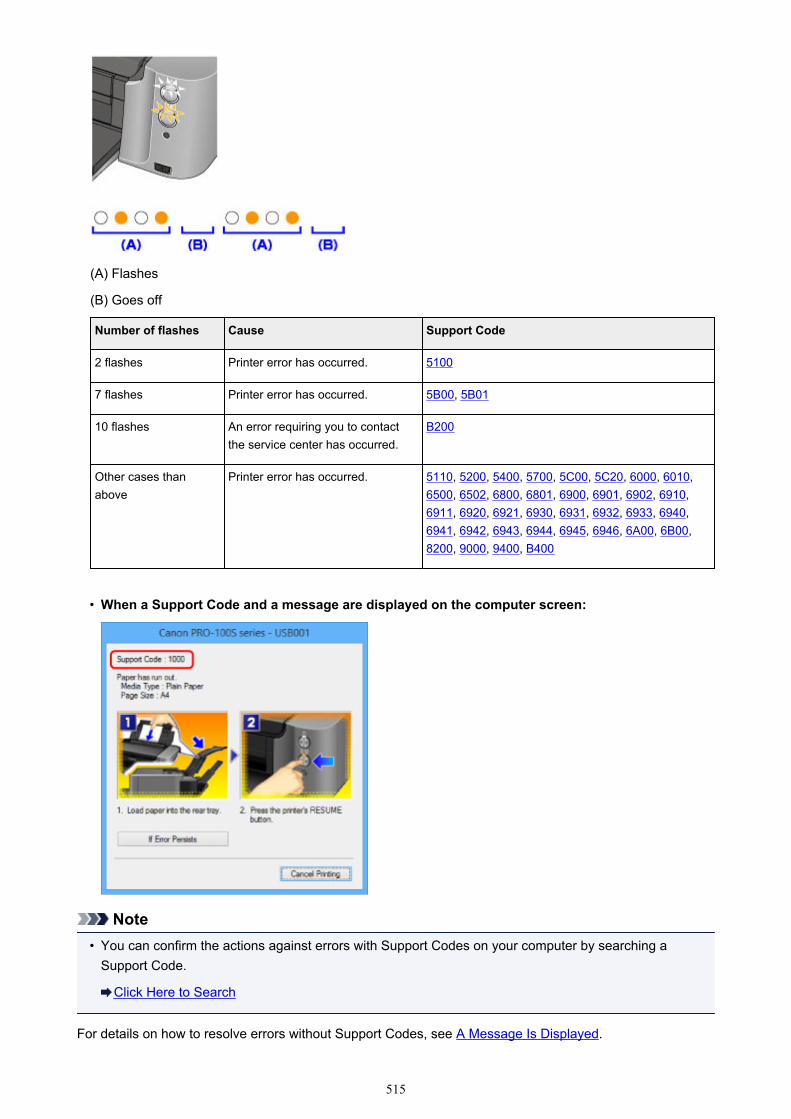
(A) Flashes
(B) Goes off
Number of flashes Cause Support Code
2 flashes Printer error has occurred. 5100
7 flashes Printer error has occurred. 5B00, 5B01
10 flashes An error requiring you to contactthe service center has occurred.
B200
Other cases thanabove
Printer error has occurred. 5110, 5200, 5400, 5700, 5C00, 5C20, 6000, 6010,6500, 6502, 6800, 6801, 6900, 6901, 6902, 6910,6911, 6920, 6921, 6930, 6931, 6932, 6933, 6940,6941, 6942, 6943, 6944, 6945, 6946, 6A00, 6B00,8200, 9000, 9400, B400
• When a Support Code and a message are displayed on the computer screen:
Note• You can confirm the actions against errors with Support Codes on your computer by searching a
Support Code.
Click Here to Search
For details on how to resolve errors without Support Codes, see A Message Is Displayed.
515
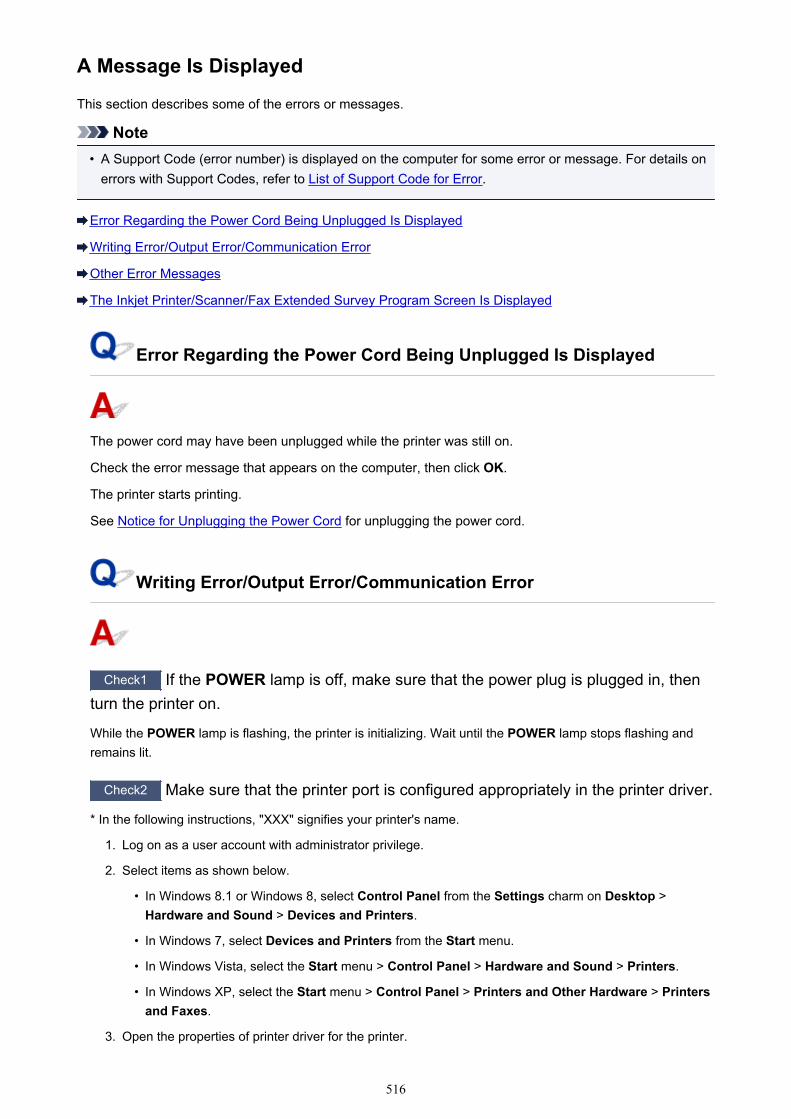
A Message Is Displayed
This section describes some of the errors or messages.
Note• A Support Code (error number) is displayed on the computer for some error or message. For details on
errors with Support Codes, refer to List of Support Code for Error.
Error Regarding the Power Cord Being Unplugged Is Displayed
Writing Error/Output Error/Communication Error
Other Error Messages
The Inkjet Printer/Scanner/Fax Extended Survey Program Screen Is Displayed
Error Regarding the Power Cord Being Unplugged Is Displayed
The power cord may have been unplugged while the printer was still on.
Check the error message that appears on the computer, then click OK.
The printer starts printing.
See Notice for Unplugging the Power Cord for unplugging the power cord.
Writing Error/Output Error/Communication Error
Check1 If the POWER lamp is off, make sure that the power plug is plugged in, thenturn the printer on.
While the POWER lamp is flashing, the printer is initializing. Wait until the POWER lamp stops flashing andremains lit.
Check2 Make sure that the printer port is configured appropriately in the printer driver.
* In the following instructions, "XXX" signifies your printer's name.
1. Log on as a user account with administrator privilege.
2. Select items as shown below.
• In Windows 8.1 or Windows 8, select Control Panel from the Settings charm on Desktop >Hardware and Sound > Devices and Printers.
• In Windows 7, select Devices and Printers from the Start menu.
• In Windows Vista, select the Start menu > Control Panel > Hardware and Sound > Printers.
• In Windows XP, select the Start menu > Control Panel > Printers and Other Hardware > Printersand Faxes.
3. Open the properties of printer driver for the printer.
516
• In Windows 8.1, Windows 8, or Windows 7, right-click the "Canon XXX series" icon (where "XXX" isyour printer's name), then select Printer properties.
• In Windows Vista or Windows XP, right-click the "Canon XXX series" icon (where "XXX" is yourprinter's name), then select Properties.
4. Click the Ports tab to confirm the port settings.
Make sure that a port named "USBnnn" (where "n" is a number) with "Canon XXX series" appearing inthe Printer column is selected for Print to the following port(s).
Note• When the printer is used over LAN, the port name of the printer is displayed as
"CNBJNP_xxxxxxxxxx". "xxxxxxxxxx" is the character string generated from the MAC address or acharacter string specified by the user when setting up the printer.
• If the setting is incorrect:
Reinstall the printer driver with the Setup CD-ROM or install it from our website.
• Printing does not start even though the printer is connected to the computer using a USB cable andthe port named "USBnnn" is selected:
In Windows 8.1 or Windows 8, select My Printer on the Start screen to start My Printer. If MyPrinter is not displayed on the Start screen, select the Search charm, then search for "My Printer".
Set the correct printer port on Diagnose and Repair Printer. Follow the on-screen instructions toset the correct printer port, then select your printer's name.
In Windows 7, Windows Vista, or Windows XP, click Start and select All programs, CanonUtilities, Canon My Printer, Canon My Printer, then select Diagnose and Repair Printer. Followthe on-screen instructions to set the correct printer port, then select your printer's name.
If the problem is not resolved, reinstall the printer driver with the Setup CD-ROM or install it from ourwebsite.
• Printing does not start even though the port named "CNBJNP_xxxxxxxxxx" is selected when theprinter is used over LAN:
Launch IJ Network Tool, and select "CNBJNP_xxxxxxxxxx" as you confirmed in step 4, thenassociate the port with the printer using Associate Port in the Settings menu.
If the problem is not resolved, reinstall the printer driver with the Setup CD-ROM or install it from ourwebsite.
Check3 Make sure that the printer is connected to your computer properly.
When the printer is connected to your computer with a USB cable, make sure that the USB cable is securelyplugged in to the printer and the computer, then check the followings:
• If you are using a relay device such as a USB hub, disconnect it, connect the printer directly to thecomputer, and try printing again. If printing starts normally, there is a problem with the relay device.Consult the reseller of the relay device for details.
• There could also be a problem with the USB cable. Replace the USB cable and try printing again.
When you use the printer over LAN, make sure that the printer is connected to the network with a LAN cableor is set up correctly.
Check4 Make sure that the printer driver is installed correctly.
Uninstall the printer driver following the procedure described in Deleting the Unnecessary Printer Driver, thenreinstall the printer driver with the Setup CD-ROM or reinstall it from our website.
517
Check5 When the printer is connected to your computer with a USB cable, check thestatus of the device on your computer.
Follow the procedure below to check the status of the device.
1. Open the Device Manager on your computer as shown below.
If the User Account Control screen is displayed, follow the on-screen instructions.
• In Windows 8.1 or Windows 8, select Control Panel from the Settings charm on Desktop >Hardware and Sound > Device Manager.
• In Windows 7 or Windows Vista, click Control Panel, Hardware and Sound, then Device Manager.
• In Windows XP, click Control Panel, Performance and Maintenance, System, then click DeviceManager on the Hardware sheet.
2. Double-click Universal Serial Bus controllers then USB Printing Support.
If the USB Printing Support Properties screen is not displayed, make sure that the printer is correctlyconnected to the computer.
Check3 Make sure that the printer is connected to your computer properly.
3. Click the General tab and make sure that there is no indication of a problem with the device.
If a device error is displayed, refer to Windows help to resolve the error.
Other Error Messages
Check If an error message is displayed outside the printer status monitor, check thefollowing:
• "Could not spool successfully due to insufficient disk space"
Delete any unnecessary files to increase the amount of free space on the disk.
• "Could not spool successfully due to insufficient memory"
Quit other running application softwares to increase available memory.
If you cannot print yet, restart your computer and retry printing.
• "Printer driver could not be found"
Uninstall the printer driver following the procedure described in Deleting the Unnecessary Printer Driver,then reinstall the printer driver with the Setup CD-ROM or reinstall it from our website.
• "Could not print Application name - File name"
Try printing again once the current job is complete.
The Inkjet Printer/Scanner/Fax Extended Survey Program Screen IsDisplayed
518
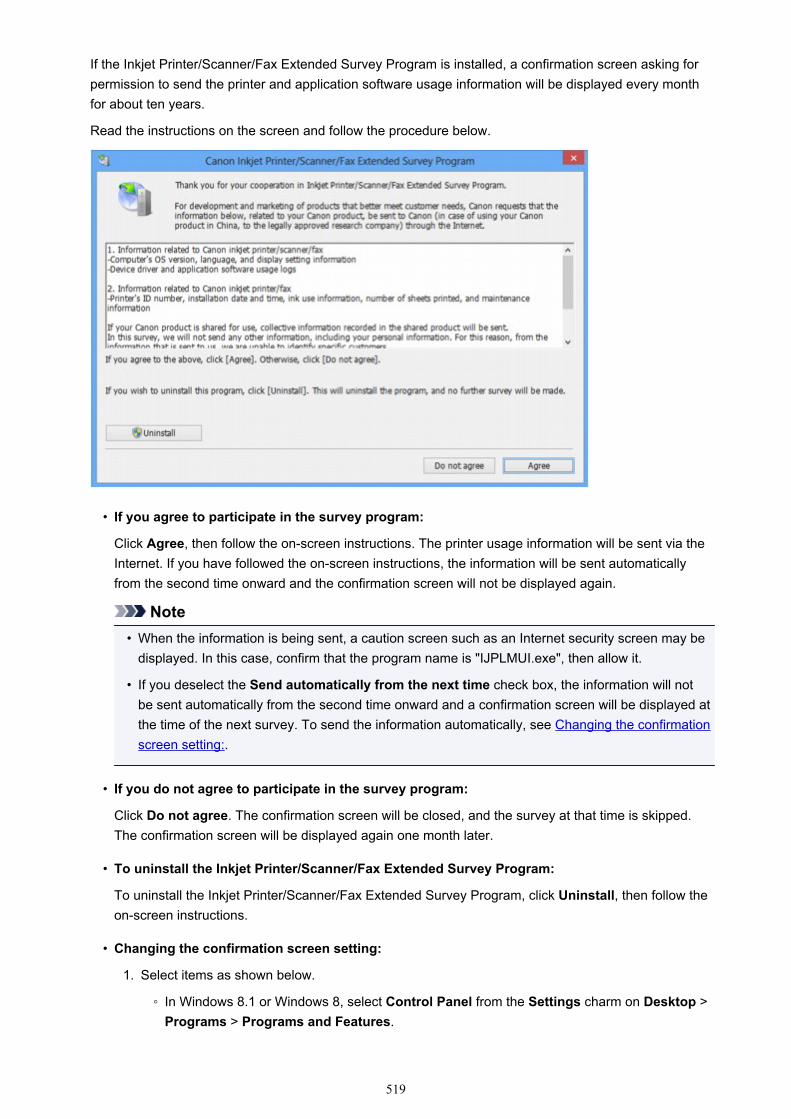
If the Inkjet Printer/Scanner/Fax Extended Survey Program is installed, a confirmation screen asking forpermission to send the printer and application software usage information will be displayed every monthfor about ten years.
Read the instructions on the screen and follow the procedure below.
• If you agree to participate in the survey program:
Click Agree, then follow the on-screen instructions. The printer usage information will be sent via theInternet. If you have followed the on-screen instructions, the information will be sent automaticallyfrom the second time onward and the confirmation screen will not be displayed again.
Note• When the information is being sent, a caution screen such as an Internet security screen may be
displayed. In this case, confirm that the program name is "IJPLMUI.exe", then allow it.
• If you deselect the Send automatically from the next time check box, the information will notbe sent automatically from the second time onward and a confirmation screen will be displayed atthe time of the next survey. To send the information automatically, see Changing the confirmationscreen setting:.
• If you do not agree to participate in the survey program:
Click Do not agree. The confirmation screen will be closed, and the survey at that time is skipped.The confirmation screen will be displayed again one month later.
• To uninstall the Inkjet Printer/Scanner/Fax Extended Survey Program:
To uninstall the Inkjet Printer/Scanner/Fax Extended Survey Program, click Uninstall, then follow theon-screen instructions.
• Changing the confirmation screen setting:
1. Select items as shown below.
◦ In Windows 8.1 or Windows 8, select Control Panel from the Settings charm on Desktop >Programs > Programs and Features.
519

◦ In Windows 7, or Windows Vista, select the Start menu > Control Panel > Programs >Programs and Features.
◦ In Windows XP, select the Start menu > Control Panel > Add or Remove Programs.
Note• In Windows 8.1, Windows 8, Windows 7, or Windows Vista, a confirmation/warning
dialog box may appear when installing, uninstalling or starting up software.
This dialog box appears when administrative rights are required to perform a task.
If you are logged on to an administrator account, follow the on-screen instructions.
2. Select Canon Inkjet Printer/Scanner/Fax Extended Survey Program.
3. Select Change.
If you select Yes after you have followed the on-screen instructions, the confirmation screen willbe displayed at the time of the next survey.
If you select No, the information will be sent automatically.
NoteIf you select Uninstall (or Remove in Windows XP), the Inkjet Printer/Scanner/FaxExtended Survey Program is uninstalled. Follow the on-screen instructions.
520
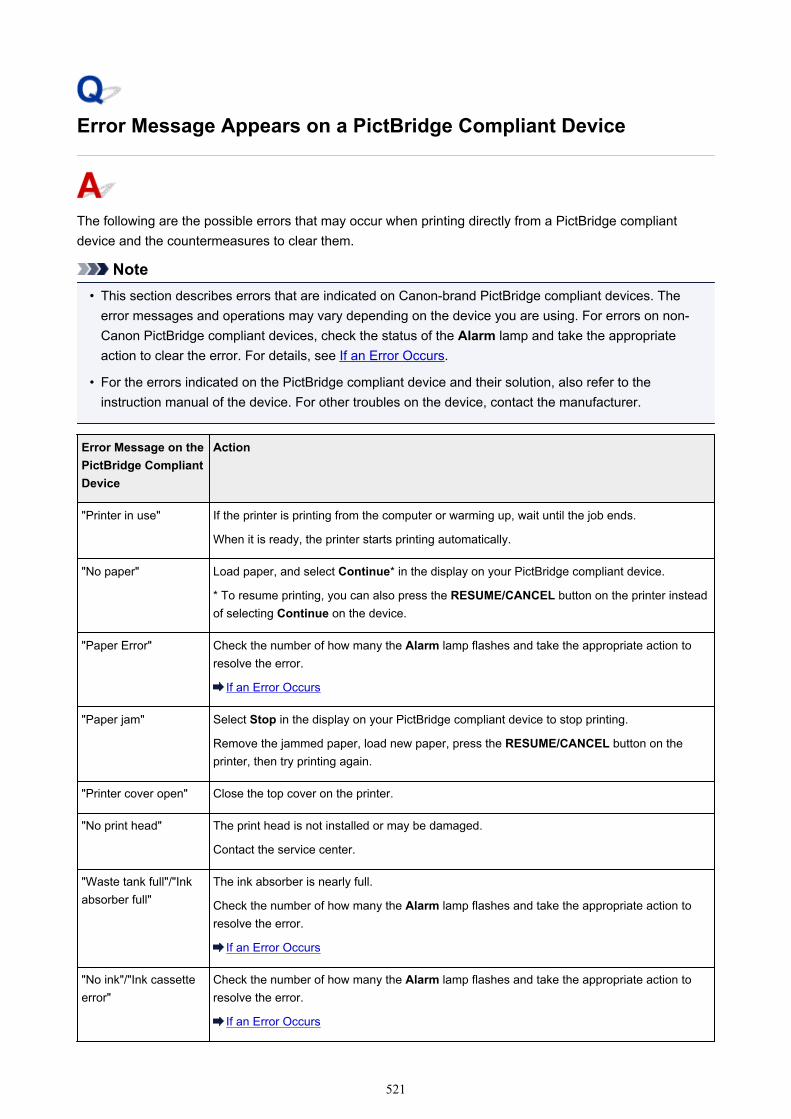
Error Message Appears on a PictBridge Compliant Device
The following are the possible errors that may occur when printing directly from a PictBridge compliantdevice and the countermeasures to clear them.
Note• This section describes errors that are indicated on Canon-brand PictBridge compliant devices. The
error messages and operations may vary depending on the device you are using. For errors on non-Canon PictBridge compliant devices, check the status of the Alarm lamp and take the appropriateaction to clear the error. For details, see If an Error Occurs.
• For the errors indicated on the PictBridge compliant device and their solution, also refer to theinstruction manual of the device. For other troubles on the device, contact the manufacturer.
Error Message on thePictBridge CompliantDevice
Action
"Printer in use" If the printer is printing from the computer or warming up, wait until the job ends.
When it is ready, the printer starts printing automatically.
"No paper" Load paper, and select Continue* in the display on your PictBridge compliant device.
* To resume printing, you can also press the RESUME/CANCEL button on the printer insteadof selecting Continue on the device.
"Paper Error" Check the number of how many the Alarm lamp flashes and take the appropriate action toresolve the error.
If an Error Occurs
"Paper jam" Select Stop in the display on your PictBridge compliant device to stop printing.
Remove the jammed paper, load new paper, press the RESUME/CANCEL button on theprinter, then try printing again.
"Printer cover open" Close the top cover on the printer.
"No print head" The print head is not installed or may be damaged.
Contact the service center.
"Waste tank full"/"Inkabsorber full"
The ink absorber is nearly full.
Check the number of how many the Alarm lamp flashes and take the appropriate action toresolve the error.
If an Error Occurs
"No ink"/"Ink cassetteerror"
Check the number of how many the Alarm lamp flashes and take the appropriate action toresolve the error.
If an Error Occurs
521

"Ink Error" An ink tank that was once empty is installed.
When the Alarm lamp flashes 13 times, refer to 1683 to resolve the error.
"Hardware Error" The ink tank cannot be recognized. (The lamp on the ink tank is off.)
Replace the ink tank.
Replacing an Ink Tank
"Printer error" An error requiring servicing may have occurred.
Turn off the printer, and unplug the power cord of the printer from the power supply.
Plug the printer back in and turn the printer back on.
If the problem is not resolved, contact the service center.
522
If You Cannot Resolve the Problem
If you cannot resolve the problem with any of the workarounds in this chapter, please contact the seller ofthe printer or the service center.
Canon support staff are trained to be able to provide technical support to satisfy customers.
Caution• If the printer emits any unusual sound, smoke, or odor, turn it off immediately. Unplug the power cord
from the outlet and contact the seller or the service center. Never attempt to repair or disassemble theprinter yourself.
• Attempts by customers to repair or take apart the printer will invalidate any warranty regardless ofwhether the warranty has expired.
Before contacting the service center, confirm the following:
• Product name:
* Your printer's name is located on the front cover of the setup manual.
• Serial number: please refer to the setup manual
• Details of the problem
• What you tried to solve the problem, and what happened
523
List of Support Code for Error
The support code appears on the computer screen when an error occurs.
"Support Code" means the error number and appears with an error message.
When an error occurs, check the support code displayed on the computer screen and take the appropriateaction.
Support Code Appears on the Computer Screen
• 1000 to 1ZZZ
1000 1001 1002 1006 1062 1200
1250 1261 1270 1300 1308 1401
1403 1405 1410 1411 1412 1413
1414 1415 1416 1417 1600 1660
1680 1681 1683 1684 1688 1700
1701 1750 1850 1851 1855 1856
1858 1859 185A
• 2000 to 2ZZZ
2001 2002 2103 2500
• 4000 to 4ZZZ
4100 4103
• 5000 to 5ZZZ
5100 5110 5200 5400 5700 5B00
5B01 5C00 5C20
• 6000 to 6ZZZ
6000 6010 6500 6502 6800 6801
6900 6901 6902 6910 6911 6920
6921 6930 6931 6932 6933 6940
6941 6942 6943 6944 6945 6946
6A00 6B00
• 8000 to 8ZZZ
8200
524

• 9000 to 9ZZZ
9000 9400
• A000 to ZZZZ
B200 B400
About the support code for paper jam, you can also refer to List of Support Code for Error (When Paper IsJammed).
525

List of Support Code for Error (When Paper Is Jammed)
If the paper is jammed, remove it following the procedure appropriate for each case.
• If you can see the jammed paper at the paper output slot, the rear tray, or the manual feed tray:
1300
• If the paper tears and you cannot remove it from the paper output slot, from the rear tray, or from themanual feed tray:
Paper Is Jammed inside the Printer
• Cases other than above:
In Other Cases
526
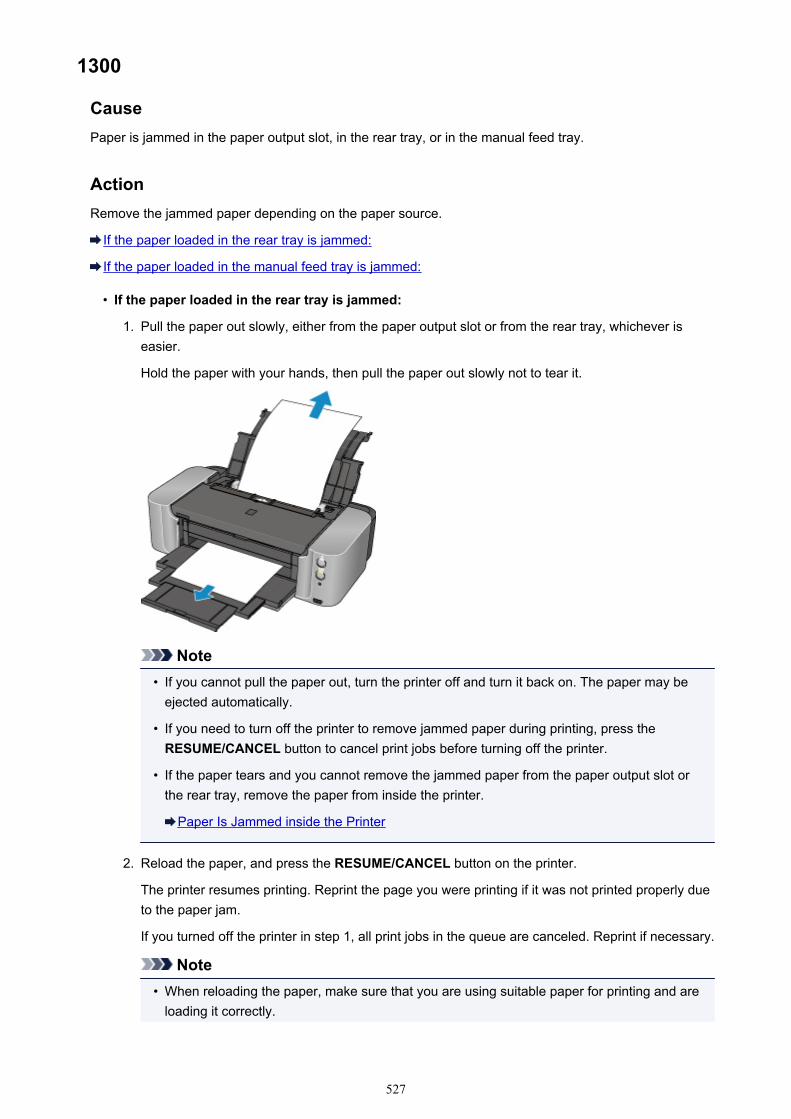
1300
CausePaper is jammed in the paper output slot, in the rear tray, or in the manual feed tray.
ActionRemove the jammed paper depending on the paper source.
If the paper loaded in the rear tray is jammed:
If the paper loaded in the manual feed tray is jammed:
• If the paper loaded in the rear tray is jammed:
1. Pull the paper out slowly, either from the paper output slot or from the rear tray, whichever iseasier.
Hold the paper with your hands, then pull the paper out slowly not to tear it.
Note• If you cannot pull the paper out, turn the printer off and turn it back on. The paper may be
ejected automatically.
• If you need to turn off the printer to remove jammed paper during printing, press theRESUME/CANCEL button to cancel print jobs before turning off the printer.
• If the paper tears and you cannot remove the jammed paper from the paper output slot orthe rear tray, remove the paper from inside the printer.
Paper Is Jammed inside the Printer
2. Reload the paper, and press the RESUME/CANCEL button on the printer.
The printer resumes printing. Reprint the page you were printing if it was not printed properly dueto the paper jam.
If you turned off the printer in step 1, all print jobs in the queue are canceled. Reprint if necessary.
Note• When reloading the paper, make sure that you are using suitable paper for printing and are
loading it correctly.
527
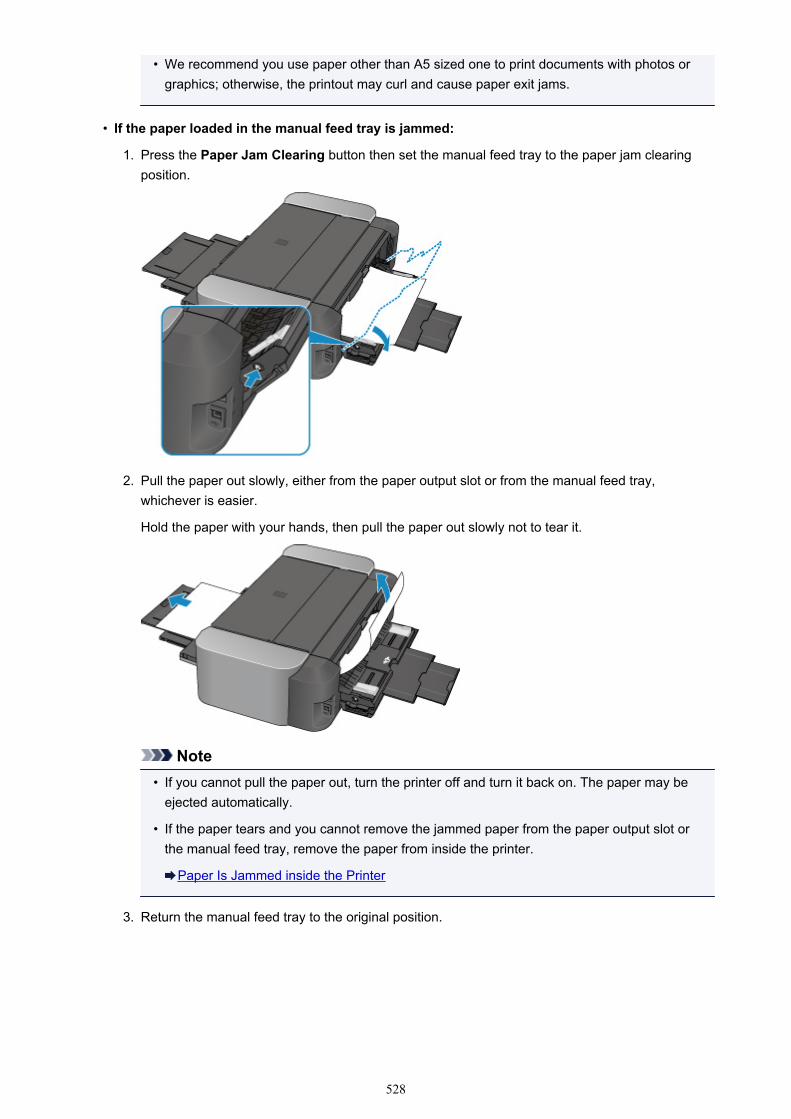
• We recommend you use paper other than A5 sized one to print documents with photos orgraphics; otherwise, the printout may curl and cause paper exit jams.
• If the paper loaded in the manual feed tray is jammed:
1. Press the Paper Jam Clearing button then set the manual feed tray to the paper jam clearingposition.
2. Pull the paper out slowly, either from the paper output slot or from the manual feed tray,whichever is easier.
Hold the paper with your hands, then pull the paper out slowly not to tear it.
Note• If you cannot pull the paper out, turn the printer off and turn it back on. The paper may be
ejected automatically.
• If the paper tears and you cannot remove the jammed paper from the paper output slot orthe manual feed tray, remove the paper from inside the printer.
Paper Is Jammed inside the Printer
3. Return the manual feed tray to the original position.
528

4. Reload the paper, and press the RESUME/CANCEL button on the printer.
The printer resumes printing. Reprint the page you were printing if it was not printed properly dueto the paper jam.
If you turned off the printer in step 2, all print jobs in the queue are canceled. Reprint if necessary.
Note• When reloading the paper, make sure that you are using suitable paper for printing and are
loading it correctly.
If you cannot remove the paper or the paper tears inside the printer, or if the paper jam error continuesafter removing the paper, contact the service center.
529
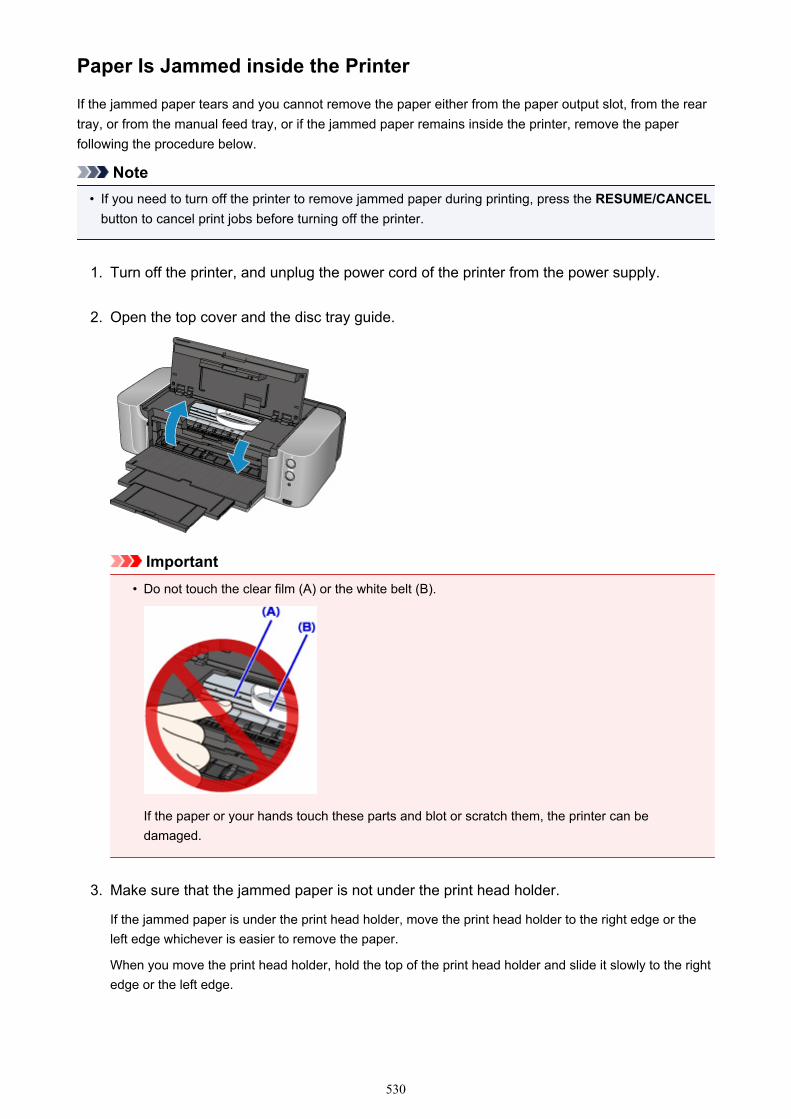
Paper Is Jammed inside the Printer
If the jammed paper tears and you cannot remove the paper either from the paper output slot, from the reartray, or from the manual feed tray, or if the jammed paper remains inside the printer, remove the paperfollowing the procedure below.
Note• If you need to turn off the printer to remove jammed paper during printing, press the RESUME/CANCEL
button to cancel print jobs before turning off the printer.
1. Turn off the printer, and unplug the power cord of the printer from the power supply.
2. Open the top cover and the disc tray guide.
Important• Do not touch the clear film (A) or the white belt (B).
If the paper or your hands touch these parts and blot or scratch them, the printer can bedamaged.
3. Make sure that the jammed paper is not under the print head holder.
If the jammed paper is under the print head holder, move the print head holder to the right edge or theleft edge whichever is easier to remove the paper.
When you move the print head holder, hold the top of the print head holder and slide it slowly to the rightedge or the left edge.
530
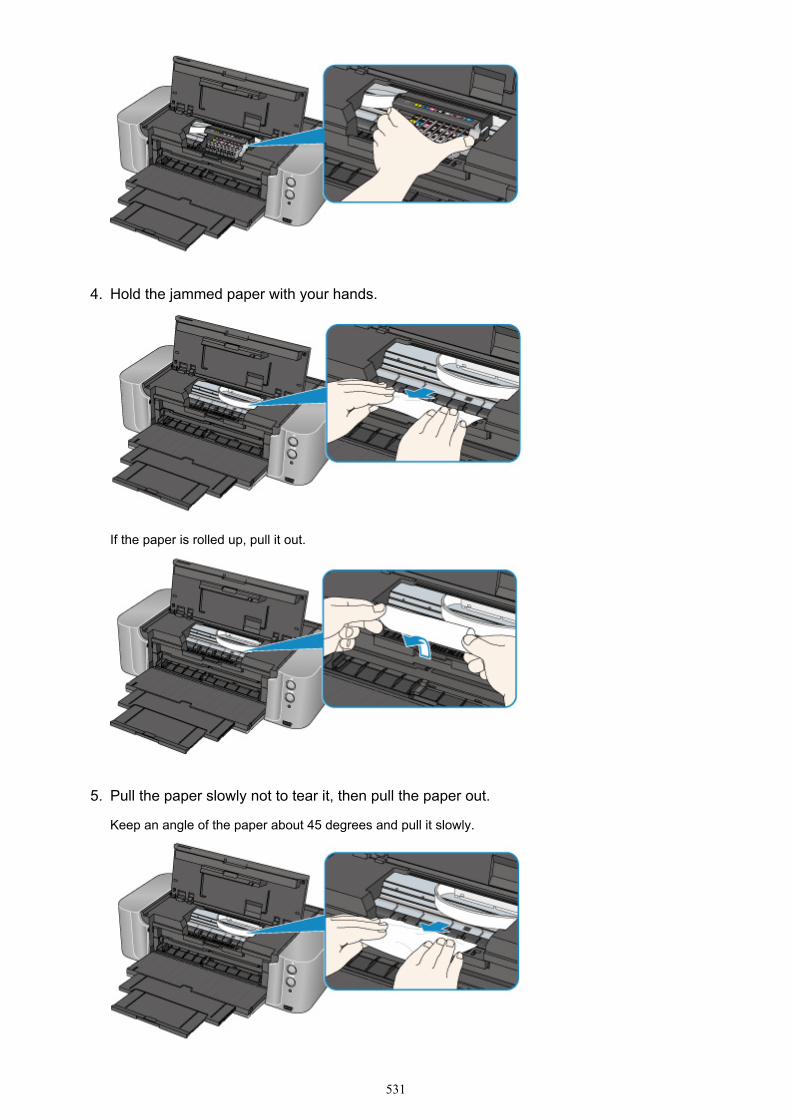
4. Hold the jammed paper with your hands.
If the paper is rolled up, pull it out.
5. Pull the paper slowly not to tear it, then pull the paper out.
Keep an angle of the paper about 45 degrees and pull it slowly.
531
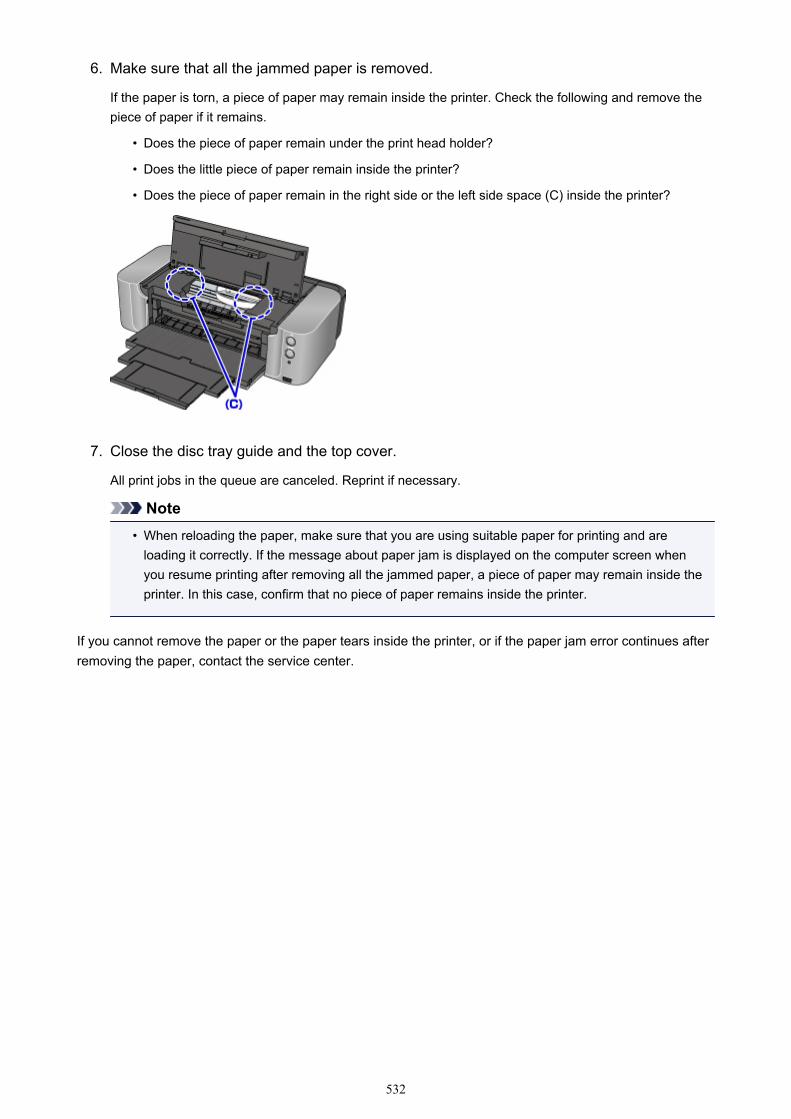
6. Make sure that all the jammed paper is removed.
If the paper is torn, a piece of paper may remain inside the printer. Check the following and remove thepiece of paper if it remains.
• Does the piece of paper remain under the print head holder?
• Does the little piece of paper remain inside the printer?
• Does the piece of paper remain in the right side or the left side space (C) inside the printer?
7. Close the disc tray guide and the top cover.
All print jobs in the queue are canceled. Reprint if necessary.
Note• When reloading the paper, make sure that you are using suitable paper for printing and are
loading it correctly. If the message about paper jam is displayed on the computer screen whenyou resume printing after removing all the jammed paper, a piece of paper may remain inside theprinter. In this case, confirm that no piece of paper remains inside the printer.
If you cannot remove the paper or the paper tears inside the printer, or if the paper jam error continues afterremoving the paper, contact the service center.
532
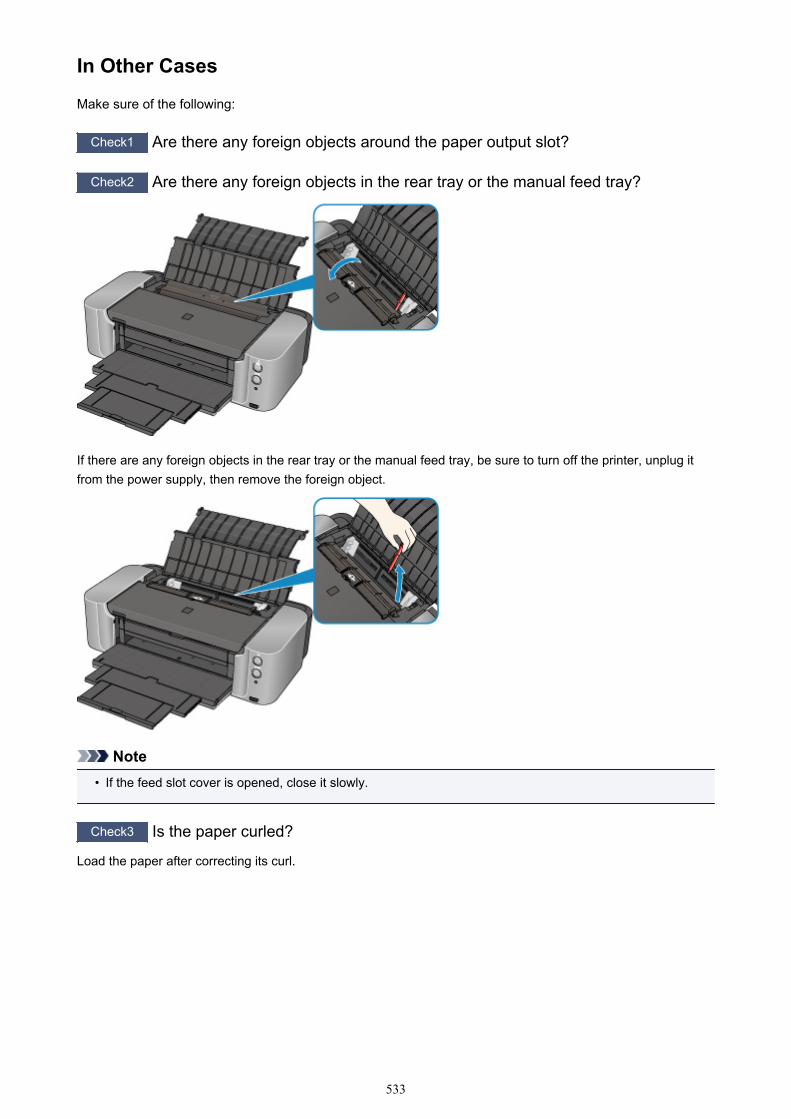
In Other Cases
Make sure of the following:
Check1 Are there any foreign objects around the paper output slot?
Check2 Are there any foreign objects in the rear tray or the manual feed tray?
If there are any foreign objects in the rear tray or the manual feed tray, be sure to turn off the printer, unplug itfrom the power supply, then remove the foreign object.
Note• If the feed slot cover is opened, close it slowly.
Check3 Is the paper curled?
Load the paper after correcting its curl.
533

1000
CausePossible causes include the following.
• There is no paper in the rear tray.
• Paper is not loaded properly.
ActionTake the corresponding actions below.
• Load paper in the rear tray.
• Align the paper guides with the both edges of the paper when you load paper.
After carrying out the above measures, press the printer's RESUME/CANCEL button to dismiss the error.
Important• Be sure to close the feed slot cover after loading paper in the rear tray. If the feed slot cover is open,
paper cannot be fed.
534

1001
CauseThere is no disc tray.
ActionWhen printing on printable discs (BD/DVD/CD, etc.), use the disc tray supplied with this printer ("K" is onthe upper side). Place a printable disc on the disc tray, attach the disc tray to the printer, then press theprinter's RESUME/CANCEL button.
535

1002
CausePrintable disc (BD/DVD/CD, etc.) is not set.
ActionWhen printing on printable discs, use the disc tray supplied with this printer ("K" is on the upper side).Place a printable disc on the disc tray, attach the disc tray to the printer, then press the printer's RESUME/CANCEL button.
536
1006
CausePossible causes include the following.
• There is no paper in the manual feed tray.
• Paper is not loaded properly.
ActionTake the corresponding actions below.
• Load a sheet of paper in the manual feed tray.
• Align the paper guides with the both edges of the paper when you load paper.
After carrying out the above measures, press the printer's RESUME/CANCEL button to dismiss the error.
Note• To continue printing from the manual feed tray, wait until printing is completed, then load the next
sheet.
537
1062
CauseThe Page Size setting does not match the size of the paper loaded in the printer.
ActionPress the printer's RESUME/CANCEL button to clear the error.
Then, take the corresponding actions below.
• In Windows:
Then check the Page Size setting in the Page Setup sheet in the printer driver and load paper that isthe same size as the setting and try printing again.
If this error occurs even you load paper of the same size as the setting, set the printer not to detectthe width of the paper using the printer driver.
To set the printer driver not to detect the width of the paper, open the printer driver setup window, andin Custom Settings under the Maintenance sheet, clear the Detect paper width check box, andthen click OK.
* Select the Detect paper width check box again once printing is complete, and then click OK.
• In Mac OS:
Then check the Paper Size setting in the Page Setup dialog and load paper that is the same size asthe setting and try printing again.
If this error occurs even you load paper of the same size as the setting, set the printer not to detectthe width of the paper using the Canon IJ Printer Utility.
To set the printer not to detect the width of the paper, open the Canon IJ Printer Utility, select CustomSettings in the pop-up menu, clear the Detect paper width check box, and then click Apply.
* Select the Detect paper width check box again once printing is complete, and then click Apply.
Note• When printing with AirPrint, you can set the printer not to detect the width of the paper using the
Remote UI.
538

1200
CauseThe top cover is open.
ActionClose the top cover and wait for a while.
Do not close it while you are replacing an ink tank.
539

1250
CauseThe paper output tray is closed.
ActionOpen the paper output tray to resume printing.
540

1261
CauseThe manual feed tray is in the paper jam clearing position.
ActionReturn the manual feed tray to the paper feed position, then press the printer's RESUME/CANCELbutton.
541

1270
CauseThe feed slot cover is open.
ActionClose the feed slot cover slowly then press the printer's RESUME/CANCEL button.
542

1308
CausePaper is loaded in the manual feed tray when you start printing on a printable disc.
ActionRemove the paper from the manual feed tray, then press the printer's RESUME/CANCEL button.
543

1401
CauseThe print head is not installed.
ActionInstall the print head.
If the print head is already installed, remove the print head once and then reinstall it.
If the error is still not resolved, the print head may be damaged. Contact the service center.
544

1403
CauseThe print head may be damaged.
ActionContact the service center.
545

1405
CauseThe print head may be damaged.
ActionContact the service center.
546

1410
CauseThe ink tank cannot be recognized.
ActionOpen the top cover and replace the ink tank which lamp is off.
547

1411
CauseThe ink tank cannot be recognized.
ActionOpen the top cover and replace the ink tank which lamp is off.
548

1412
CauseThe ink tank cannot be recognized.
ActionOpen the top cover and replace the ink tank which lamp is off.
549

1413
CauseThe ink tank cannot be recognized.
ActionOpen the top cover and replace the ink tank which lamp is off.
550

1414
CauseThe ink tank cannot be recognized.
ActionOpen the top cover and replace the ink tank which lamp is off.
551

1415
CauseThe ink tank cannot be recognized.
ActionOpen the top cover and replace the ink tank which lamp is off.
552

1416
CauseThe ink tank cannot be recognized.
ActionOpen the top cover and replace the ink tank which lamp is off.
553

1417
CauseThe ink tank cannot be recognized.
ActionOpen the top cover and replace the ink tank which lamp is off.
554

1600
CauseIf the lamp on the ink tank is flashing, ink may have run out.
ActionReplacing the ink tank is recommended.
If printing is in progress and you want to continue printing, press the printer's RESUME/CANCEL buttonwith the ink tank installed. Then printing can continue. Replacing the ink tank is recommended after theprinting. The printer may be damaged if printing is continued under the ink out condition.
Note• If multiple ink lamps are flashing, check the status of each ink tank.
555

1660
CauseThe ink tank is not installed.
ActionInstall the ink tank.
556

1680
CauseSome ink tanks are not installed in the correct position. (The lamp on the ink tank flashes.)
ActionConfirm that the ink tanks are installed in the appropriate positions.
557

1681
CauseMore than one ink tanks of the same color are installed. (The lamp on the ink tank flashes.)
ActionConfirm that the ink tanks are installed in the appropriate positions.
558
1683
CauseThe remaining ink level cannot be correctly detected. (The lamp on the ink tank flashes.)
ActionReplace the ink tank and close the top cover.
Printing with an ink tank that was once empty may damage the printer.
If you want to continue printing in this condition, you need to release the function for detecting theremaining ink level. Press and hold the printer's RESUME/CANCEL button for at least 5 seconds, andthen release it.
With this operation, releasing the function for detecting the remaining ink level is memorized. Please beadvised that Canon shall not be liable for any printer malfunction or damage caused by refilled ink tanks.
559

1684
CauseThe ink tank cannot be recognized.
ActionPrinting cannot be executed because the ink tank may not be installed properly or may not be compatiblewith this printer.
Install the appropriate ink tank.
If you want to cancel printing, press the printer's RESUME/CANCEL button.
560
1688
CauseThe ink has run out. (The lamp on the ink tank flashes.)
ActionReplace the ink tank and close the top cover.
Printing under the current condition may damage the printer.
If you want to continue printing in this condition, you need to release the function for detecting theremaining ink level. Press and hold the printer's RESUME/CANCEL button for at least 5 seconds, andthen release it.
With this operation, releasing the function for detecting the remaining ink level is memorized. Please beadvised that Canon shall not be liable for any malfunction or trouble which may be caused by continuationof printing under the ink out condition.
561

1700
CauseThe ink absorber is almost full.
ActionPress the printer's RESUME/CANCEL button to continue printing. Contact the service center.
562

1701
CauseThe ink absorber is almost full.
ActionPress the printer's RESUME/CANCEL button to continue printing. Contact the service center.
563

1750
CauseAppropriate ink tank is not installed.
ActionPrinting cannot be executed because the ink tank is not compatible with the printer.
Install the appropriate ink tank.
If you want to cancel printing, press the printer's RESUME/CANCEL button.
564

1850
CauseThe disc tray guide is closed.
ActionOpen the disc tray guide, attach the disc tray properly, then press the printer's RESUME/CANCEL button.
565

1851
CauseThe disc tray guide is open.
ActionWhen printing other than disc label printing is started, close the disc tray guide.
Close the disc tray guide, then press the printer's RESUME/CANCEL button.
566

1855
CauseThe disc tray guide has been closed.
ActionOpen the disc tray guide, then press the printer's RESUME/CANCEL button.
Do not open or close the disc tray guide while printing is in progress. Doing so may damage the printer.
567

1856
CauseThe disc tray guide has been opened.
ActionWhile printing other than disc label printing, close the disc tray guide.
Close the disc tray guide, then press the printer's RESUME/CANCEL button.
Do not open or close the disc tray guide while printing is in progress. Doing so may damage the printer.
568

1858
CauseThe disc tray guide is open after replacing the ink tank.
ActionAfter replacing the ink tank, close the disc tray guide and the top cover.
Press the printer's RESUME/CANCEL button to dismiss the error.
569

1859
CauseTo print on specified paper, you need to open the disc tray guide.
ActionOpen the disc tray guide.
Press the printer's RESUME/CANCEL button.
570

185A
CauseTo continue printing, you need to close the disc tray guide.
ActionClose the disc tray guide.
Press the printer's RESUME/CANCEL button. The printer resumes printing.
571
2001
CauseThe device incompatible with the printer is connected.
ActionCheck the device connected to the printer. Printing photos directly is possible only with a PictBridgecompliant device.
Note• A communication time out occurs if an operation takes too long or if it takes too much time to send
data. This may cancel printing. In such cases, disconnect and reconnect the USB cable.
When printing from a PictBridge compliant device, depending on the model or brand of your device,you may have to select a PictBridge compliant print mode on the device before connecting it to theprinter. You may also have to turn on your device or select Play mode manually after connecting thedevice to the printer. Perform necessary operations before connecting your device referring to itsinstruction manual.
If the error is not yet resolved, check if you can print another photograph.
572

2002
CauseAn unsupported USB hub is connected.
ActionIf a PictBridge compliant device is connected to the printer through the USB hub, disconnect the hub fromthe printer.
Connect a PictBridge compliant device directly to the printer.
573
2103
CauseThe printer cannot detect the paper size.
ActionPress the printer's RESUME/CANCEL button to dismiss the error, then try to print again.
If this error still occurs even after printing again, set the printer not to detect the paper width by using theprinter driver or Remote UI.
Note• Depending on the type of paper, the printer may not detect the paper width.
Additionally, if the top cover is opened while printing is in progress, the printer may not detect thepaper width.
574
2500
CauseThe cause of following may have occurred the failure of Automatic Print Head Alignment.
• Print head nozzles are clogged.
• The paper of size other than A4 or Letter is loaded.
• The paper output slot is exposed to strong light.
ActionPress the printer's RESUME/CANCEL button to dismiss the error, then take the actions described below.
• Print the nozzle check pattern to check the status of the print head.
• Load two sheets of A4/Letter-sized plain paper in the rear tray and perform Automatic Print HeadAlignment again.
For Automatic Print Head Alignment, always load paper in the rear tray.
• Adjust your operating environment and/or the position of the printer so that the paper output slot is notexposed directly to strong light.
After carrying out the above measures, if the problem continues after aligning the print head again, pressthe printer's RESUME/CANCEL button to dismiss the error, and then perform Manual Print HeadAlignment.
575

4100
CauseThe specified data cannot be printed.
ActionWhen you print the contents on CREATIVE PARK PREMIUM, confirm the message on the computerscreen, make sure that genuine Canon ink tanks are installed properly for all colors, then start printingagain.
576

4103
CauseCannot perform printing with the current print settings.
ActionPress the printer's RESUME/CANCEL button, to cancel printing.
Then change the print settings and print again.
577
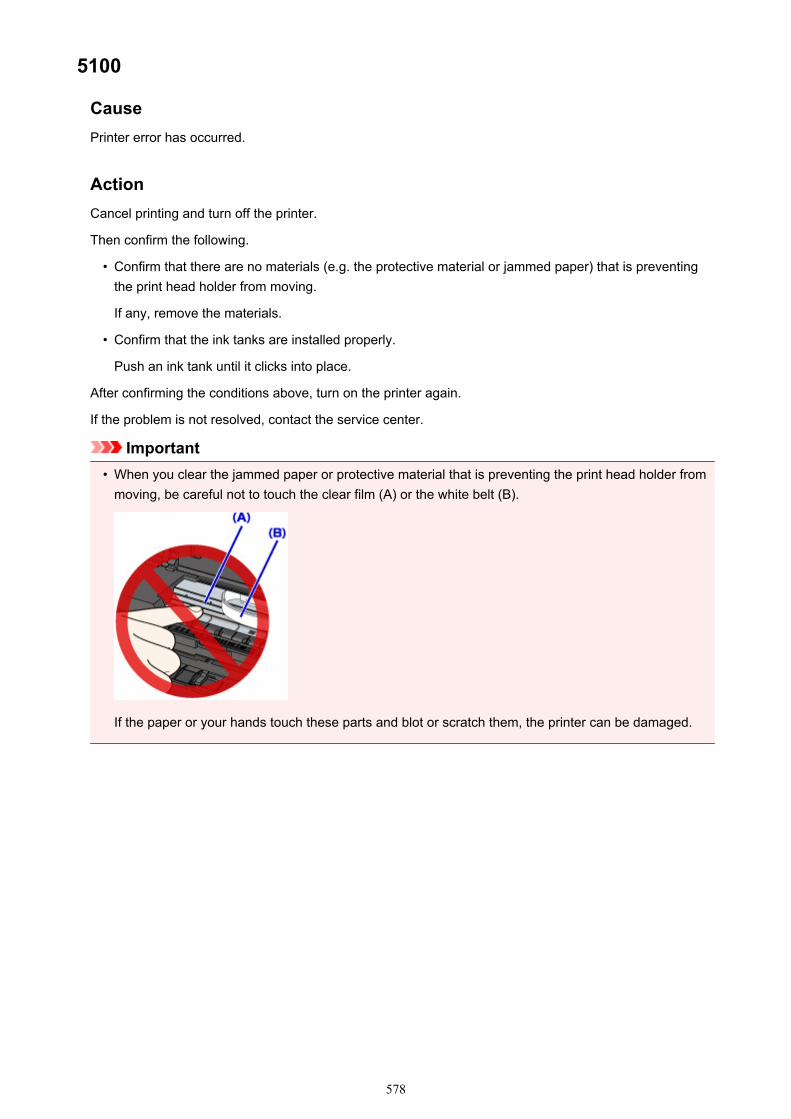
5100
CausePrinter error has occurred.
ActionCancel printing and turn off the printer.
Then confirm the following.
• Confirm that there are no materials (e.g. the protective material or jammed paper) that is preventingthe print head holder from moving.
If any, remove the materials.
• Confirm that the ink tanks are installed properly.
Push an ink tank until it clicks into place.
After confirming the conditions above, turn on the printer again.
If the problem is not resolved, contact the service center.
Important• When you clear the jammed paper or protective material that is preventing the print head holder from
moving, be careful not to touch the clear film (A) or the white belt (B).
If the paper or your hands touch these parts and blot or scratch them, the printer can be damaged.
578

5110
CausePrinter error has occurred.
ActionTurn off the printer, and unplug the power cord of the printer from the power supply.
Plug the printer back in and turn the printer back on.
If the problem is not resolved, contact the service center.
579

5200
CausePrinter error has occurred.
ActionTurn off the printer, and unplug the power cord of the printer from the power supply.
Plug the printer back in and turn the printer back on.
If the problem is not resolved, contact the service center.
580

5400
CausePrinter error has occurred.
ActionTurn off the printer, and unplug the power cord of the printer from the power supply.
Plug the printer back in and turn the printer back on.
If the problem is not resolved, contact the service center.
581

5700
CausePrinter error has occurred.
ActionTurn off the printer, and unplug the power cord of the printer from the power supply.
Plug the printer back in and turn the printer back on.
If the problem is not resolved, contact the service center.
582

5B00
CausePrinter error has occurred.
ActionContact the service center.
583

5B01
CausePrinter error has occurred.
ActionContact the service center.
584

5C00
CausePrinter error has occurred.
ActionTurn off the printer, and unplug the power cord of the printer from the power supply.
Plug the printer back in and turn the printer back on.
If the problem is not resolved, contact the service center.
585

5C20
CausePrinter error has occurred.
ActionTurn off the printer, and unplug the power cord of the printer from the power supply.
Plug the printer back in and turn the printer back on.
If the problem is not resolved, contact the service center.
586

6000
CausePrinter error has occurred.
ActionTurn off the printer, and unplug the power cord of the printer from the power supply.
Plug the printer back in and turn the printer back on.
If the problem is not resolved, contact the service center.
587

6010
CausePrinter error has occurred.
ActionTurn off the printer, and unplug the power cord of the printer from the power supply.
Plug the printer back in and turn the printer back on.
If the problem is not resolved, contact the service center.
588

6500
CausePrinter error has occurred.
ActionTurn off the printer, and unplug the power cord of the printer from the power supply.
Plug the printer back in and turn the printer back on.
If the problem is not resolved, contact the service center.
589

6502
CausePrinter error has occurred.
ActionTurn off the printer, and unplug the power cord of the printer from the power supply.
Plug the printer back in and turn the printer back on.
If the problem is not resolved, contact the service center.
590

6800
CausePrinter error has occurred.
ActionTurn off the printer, and unplug the power cord of the printer from the power supply.
Plug the printer back in and turn the printer back on.
If the problem is not resolved, contact the service center.
591

6801
CausePrinter error has occurred.
ActionTurn off the printer, and unplug the power cord of the printer from the power supply.
Plug the printer back in and turn the printer back on.
If the problem is not resolved, contact the service center.
592

6900
CausePrinter error has occurred.
ActionTurn off the printer, and unplug the power cord of the printer from the power supply.
Plug the printer back in and turn the printer back on.
If the problem is not resolved, contact the service center.
593

6901
CausePrinter error has occurred.
ActionTurn off the printer, and unplug the power cord of the printer from the power supply.
Plug the printer back in and turn the printer back on.
If the problem is not resolved, contact the service center.
594

6902
CausePrinter error has occurred.
ActionTurn off the printer, and unplug the power cord of the printer from the power supply.
Plug the printer back in and turn the printer back on.
If the problem is not resolved, contact the service center.
595

6910
CausePrinter error has occurred.
ActionTurn off the printer, and unplug the power cord of the printer from the power supply.
Plug the printer back in and turn the printer back on.
If the problem is not resolved, contact the service center.
596

6911
CausePrinter error has occurred.
ActionTurn off the printer, and unplug the power cord of the printer from the power supply.
Plug the printer back in and turn the printer back on.
If the problem is not resolved, contact the service center.
597

6920
CausePrinter error has occurred.
ActionTurn off the printer, and unplug the power cord of the printer from the power supply.
Plug the printer back in and turn the printer back on.
If the problem is not resolved, contact the service center.
598
6921
CausePrinter error has occurred.
ActionTurn off the printer, and unplug the power cord of the printer from the power supply.
Plug the printer back in and turn the printer back on.
If the problem is not resolved, contact the service center.
599

6930
CausePrinter error has occurred.
ActionTurn off the printer, and unplug the power cord of the printer from the power supply.
Plug the printer back in and turn the printer back on.
If the problem is not resolved, contact the service center.
600

6931
CausePrinter error has occurred.
ActionTurn off the printer, and unplug the power cord of the printer from the power supply.
Plug the printer back in and turn the printer back on.
If the problem is not resolved, contact the service center.
601

6932
CausePrinter error has occurred.
ActionTurn off the printer, and unplug the power cord of the printer from the power supply.
Plug the printer back in and turn the printer back on.
If the problem is not resolved, contact the service center.
602

6933
CausePrinter error has occurred.
ActionTurn off the printer, and unplug the power cord of the printer from the power supply.
Plug the printer back in and turn the printer back on.
If the problem is not resolved, contact the service center.
603

6940
CausePrinter error has occurred.
ActionTurn off the printer, and unplug the power cord of the printer from the power supply.
Plug the printer back in and turn the printer back on.
If the problem is not resolved, contact the service center.
604

6941
CausePrinter error has occurred.
ActionTurn off the printer, and unplug the power cord of the printer from the power supply.
Plug the printer back in and turn the printer back on.
If the problem is not resolved, contact the service center.
605

6942
CausePrinter error has occurred.
ActionTurn off the printer, and unplug the power cord of the printer from the power supply.
Plug the printer back in and turn the printer back on.
If the problem is not resolved, contact the service center.
606

6943
CausePrinter error has occurred.
ActionTurn off the printer, and unplug the power cord of the printer from the power supply.
Plug the printer back in and turn the printer back on.
If the problem is not resolved, contact the service center.
607

6944
CausePrinter error has occurred.
ActionTurn off the printer, and unplug the power cord of the printer from the power supply.
Plug the printer back in and turn the printer back on.
If the problem is not resolved, contact the service center.
608

6945
CausePrinter error has occurred.
ActionTurn off the printer, and unplug the power cord of the printer from the power supply.
Plug the printer back in and turn the printer back on.
If the problem is not resolved, contact the service center.
609

6946
CausePrinter error has occurred.
ActionTurn off the printer, and unplug the power cord of the printer from the power supply.
Plug the printer back in and turn the printer back on.
If the problem is not resolved, contact the service center.
610

6A00
CausePrinter error has occurred.
ActionTurn off the printer, and unplug the power cord of the printer from the power supply.
Plug the printer back in and turn the printer back on.
If the problem is not resolved, contact the service center.
611

6B00
CausePrinter error has occurred.
ActionTurn off the printer, and unplug the power cord of the printer from the power supply.
Plug the printer back in and turn the printer back on.
If the problem is not resolved, contact the service center.
612

8200
CausePrinter error has occurred.
ActionTurn off the printer, and unplug the power cord of the printer from the power supply.
Plug the printer back in and turn the printer back on.
If the problem is not resolved, contact the service center.
613

9000
CausePrinter error has occurred.
ActionTurn off the printer, and unplug the power cord of the printer from the power supply.
Plug the printer back in and turn the printer back on.
If the problem is not resolved, contact the service center.
614

9400
CausePrinter error has occurred.
ActionTurn off the printer, and unplug the power cord of the printer from the power supply.
Plug the printer back in and turn the printer back on.
If the problem is not resolved, contact the service center.
615

B200
CauseAn error requiring you to contact the service center has occurred.
ActionTurn off the printer, and unplug the power cord of the printer from the power supply.
Contact the service center.
616

B400
CausePrinter error has occurred.
ActionTurn off the printer, and unplug the power cord of the printer from the power supply.
Plug the printer back in and turn the printer back on.
If the problem is not resolved, contact the service center.
617


![Download[1].pdf cdj 100s](https://img.pdfslide.us/doc/110x75/5460c745af79593a708b5571/download1pdf-cdj-100s.jpg)