Embed Size (px)
Citation preview

Online Banking for Business
TAX AND BILL PAYMENTS
USER GUIDE

T a x a n d B i l l P a y m e n t s U s e r G u i d e
For assistance, please call the Help Desk at 1-800-565-6444 2
December 2010
Contents
Contents ................................................................................................... 2
Getting Started......................................................................................... 3
Technical Requirements ......................................................................... 4 Supported browsers .......................................................................................................4 Minimum system requirements ......................................................................................4
Contact Us................................................................................................ 4
Overview................................................................................................... 1 Features .........................................................................................................................1 System Requirements ....................................................................................................2 Need Help.......................................................................................................................3 Contact Numbers ...........................................................................................................3
Administrative Functions........................................................................ 3 Getting Started ...............................................................................................................3 Enrolling a New Payment Profile....................................................................................5 Enrolling Another Payment Profile .................................................................................7 Modifying a Payment Profile...........................................................................................8 Modifying a Payment Approval Method .......................................................................10 Enrolling a Tax & Bill Payments User ..........................................................................11 Adding a Payment Type ...............................................................................................13 Modifying a Payment Type...........................................................................................16 Removing a Payment Type ..........................................................................................17 Reviewing or Changing your Profile Information..........................................................19 Modifying a Payment User ...........................................................................................19 Deleting a Payment Profile...........................................................................................22 Removing a Payment User ..........................................................................................22
Payment Filer Functions ....................................................................... 23 Making a Payment........................................................................................................24 Payment Dates.............................................................................................................27 Processing Payments for Bi-Weekly Payrolls ..............................................................28 Weekly Payroll Deductions...........................................................................................29 Approving Payments That Are Pending Approval........................................................29 Cancelling Payments That Are Pending Approval .......................................................31 Cancelling Future Dated Payments .............................................................................32 Approving Payments That Are Pending Cancellation ..................................................35 Acknowledging Expired Payments...............................................................................37 Viewing Transaction Audit Information.........................................................................38 Viewing Transaction History.........................................................................................39
Frequently Asked Questions ................................................................ 41

T a x a n d B i l l P a y m e n t s U s e r G u i d e
For assistance, please call the Help Desk at 1-800-565-6444 3
December 2010
Getting Started
Welcome to Online Banking for Business, a powerful suite of web-based treasury management tools to help you manage cash flow easily, effectively and strategically.
A customizable homepage allows you to control and personalize the information that is most important to your business, right up front.
Monitor accounts and transactions in real time. Verify the status of payments and receivables. Search and retrieve cheque images at your convenience. Make electronic payments and transfer funds between accounts in seconds, all via the Internet.
Like turning on the ignition in your car, simply login and you’ll access all of your treasury management services, including Canada, US, UK, Euro services, wholesale lockbox, cheque images, lockbox imaging, electronic funds transfer, and foreign exchange.
This user guide is also available as an online help system. To open the help system
from within Online Banking for Business, click the Help link from any page
or the help icon on any section title bar.
Note about user access: Depending on your job, you may not be able to view all pages, or all functions in a page, or perform all the tasks outlined in this guide.

T a x a n d B i l l P a y m e n t s U s e r G u i d e
For assistance, please call the Help Desk at 1-800-565-6444 4
December 2010
Technical Requirements
The following browsers and system requirements are recommended for the best performance:
S U P P O R T E D B R O W S E R S Internet Explorer 6, 7, and 8.
M I N I M U M S Y S T E M R E Q U I R E M E N T S
486/66-Mhz processor or higher (Pentium® III Processor recommended) with a Windows® based Operating system (Windows Me, NT® 4.0 with SP6a and higher, 2000, or XP).
Contact Us
Online Banking for Business Help desk can be reached at:
(416) 867-4818 (Local GTA)
1-800-565-6444 (North America)
Our hours of service are 7:30 a.m. - 7:00 p.m. EST Monday to Friday.

T a x a n d B i l l P a y m e n t s U s e r G u i d e
For assistance, please call the Help Desk at 1-800-565-6444
December 2010
1
Overview
The Tax and Bill Payments module enables you to pay and file Federal and Provincial business taxes as well as utility and other corporate bills over the Internet. The service provides a facility to initiate payroll source deductions, corporate income tax, GST, PST, Harmonized GST and PST as well your utility and other bill payments online.
Your company administrator can enroll anyone in your company who is a user of Online Banking for Business in the Tax & Bill Payments module. To submit a payment, simply specify the recipient, the amount, and the date on which a Payments is to be made. The payment information is forwarded to any internal approvers you set up, and the amount will automatically be debited from the payment account once the payment is fully approved.
F E A T U R E S The Tax & Bill Payments module allows you to:
Arrange payment of your taxes and bill payments online when it’s convenient for you – 24 hours a day, 7 days a week
Control your cash flow by future-dating your payments up to one year in advance in most cases and help prevent late payment charges
Tailor payment approvals by specifying:
The number of approvals required to approve a payment
User and company transaction limits
Once a payment is approved, the payment is considered complete and will be released on the value date specified by the user who initiated the payment
Minimize paperwork by filing and paying electronically; saving you time and money Simplify your record keeping with confirmation numbers for each payment that appears on your statement, making reconciliation quick and easy. Registration
There is a one-time self-registration for the service, with no enrolment costs. Your company’s Customer Administrator can enrol your company online.
Tax & Bill Payments are not processed until the Payment Date indicated on your request. The funds, or adequate credit, must be available in your account at the beginning of the business day on the Payment date; if there are insufficient funds the transaction will be rejected. Please refer to the Tax & Bill Payment Agreement for further details. Approving Payments
Depending on the approval method selected Customer administrators can specify the following:

T a x a n d B i l l P a y m e n t s U s e r G u i d e
For assistance, please call the Help Desk at 1-800-565-6444
December 2010
2
authorization limits for users,
the number of approvers and
a company limit
Once you have created a Payments Profile, it will automatically be defined as Method 1 – Fixed Number of Approvers. The approval method can be changed at any time. This payment approval method, number of approvers, and company limit will apply to all of your company's payment profiles.
The initial authorization limit is set to $99,999,999.00. You can define different approval limits for each of your company's tax filers.
Users cannot approve payments that they have created, and can only approve those payments which fall within their transaction limits. Method 1 Fixed Number of Approvers
With this method, the company limit is set to $99,999,999.00 and cannot be modified. The customer administrator can select 0, 1, 2 or 3 approvers.
0 indicates that no additional approver is required if the payment amount falls within the payment creator’s transaction limit. An additional approver will still be required if the payment amount exceeds the payment creator’s transaction limit
A selection of 1, 2, 3, or indicates that the payment must be approved by the same number of approvers
If your company has only one tax filer, we suggest that you select Approval Method 1 – Fixed Number of Approvers, with 0 approvers and a transaction limit of $99,999,999.00
Method 2 Payment Amount Method
With this method, the customer administrator must specify a company limit greater than $0.00. The limit will apply to individual payments only; there is no cumulative limit.
The number of approvers can be 0, 1 or 2 where:
0 means no additional approval is required
1 or 2 means that 1 or 2 approvers must authorize the payment
If the payment amount exceeds the company limit or the payment creator’s transaction limit (only applies to the case when 0 number of approvers is selected) then the number of approvers is increased by 1.
S Y S T E M R E Q U I R E M E N T S
A Windows computer with the following minimum configuration:
1. Pentium III 500MHz
2. 256MB RAM
3. 100MB available disk space

T a x a n d B i l l P a y m e n t s U s e r G u i d e
For assistance, please call the Help Desk at 1-800-565-6444
December 2010
3
4. Windows 2000 SP3, Windows XP, Windows 2003
Note: Do not user any of the following characters in the Tax & Bill Payments module: ?<>”; ^%$. Entering these characters will result in system errors.
When using the system, we recommend using application menu options and previous/next buttons instead of the browser back/forward buttons to navigate. System performance is not guaranteed when using the back/forward buttons and may result in duplicate submission of transactions or requests.
N E E D H E L P
Contact Numbers
The BMO Financial Global Treasury Management Help desk can be reached at:
(416) 867-4818 (Local GTA)
1-800-565-6444 (North America)
Our Helpdesk hours of service are 7:30 a.m. - 7:00 p.m. EST Monday to Friday
Administrative Functions
Your company’s designated Online Banking for Business Customer Administrator must complete the following procedures.
G E T T I N G S T A R T E D
If you are already enrolled, you can link to and enrol in the service from the Main Menu once you have signed on.
Enter the following in your browser’s address field: http://www22.bmo.com/.
1. On the Online Banking for Business Home Page screen. The logon screen is displayed, enter your credentials and click “sign in”.
2. Once you have signed on with your Customer ID, User ID, and Password, the welcome
Page is displayed.

T a x a n d B i l l P a y m e n t s U s e r G u i d e
For assistance, please call the Help Desk at 1-800-565-6444
December 2010
4
3. Select the Payments & Receivables tab,
a. Then select Tax & Bill Payment from the menu on the left hand side. 1. You will either see the Tax & Bill Payments Overview 2. Or The Tax and Bill Payment agreement.
If you receive an overview please contact your company’s customer administrator in order to enrol your userid onto Tax & Bill Payment.

T a x a n d B i l l P a y m e n t s U s e r G u i d e
For assistance, please call the Help Desk at 1-800-565-6444
December 2010
5
4. Once you have read through the information, click Enrol to enrol your company in the
Tax & Bill Payments module. The Tax & Bill Payment Agreement screen is displayed.
5. Once you have read the Tax & Bill Payment Agreement thoroughly, click to accept the terms of the agreement.
6. Print this page from your browser for your records. 7. Once you have clicked I Agree, the Enrol New Payment Profile screen is displayed.
E N R O L L I N G A N E W P A Y M E N T P R O F I L E
After Enrolling, you must create a new company profile before you can begin using the Tax & Bill Payments Service. To add a new profile for your company, follow these steps:

T a x a n d B i l l P a y m e n t s U s e r G u i d e
For assistance, please call the Help Desk at 1-800-565-6444
December 2010
6
Note: Several profiles can be created for your company, according to your business needs, e.g. by division, or region.
A maximum of 20 profiles can be created with 20 payment types per profile
1. Enter a name for the profile in the Profile Name field. 2. Enter the name of the person in your company who will act as the contact for this profile
in the Contact Name field. 3. Select the Province/Time Zone for your company from the drop-down list provided. 4. Select the English or French radio button to indicate the billing language for this profile.
Transaction fees will be included with your monthly billing statement in the selected language.
The Payment Approval Method and Number of Approvers selected and the amount specified in the Company Limit will be applied to all Payment profiles.
5. Select the Payment Approval Method from the drop-down list provided.
6. Select the Number of Approvers from the drop-down list provided.
7. If “Method 2” was selected from the Payment Approval Method list box, enter an
amount in the Company Limit.
T a x a n d B i l l P a y m e n t s U s e r G u i d e
For assistance, please call the Help Desk at 1-800-565-6444
December 2010
7
Do not use commas to separate numeric values. For instance, enter ten thousand dollars as $10000—not as $10,000. Use proper punctuation for dollar and cent amounts.
8. Select the check box(es) next to the account(s) that you want to assign to this profile. 9. When complete, click Save. The Enrol New Payment Profile Results screen is
displayed
10. Once you have confirmed that the information displayed is correct, click OK to return to the Enrol New Profile screen. You are now enrolled as the first user in the Tax & Bill Payment module.
E N R O L L I N G A N O T H E R P A Y M E N T P R O F I L E
New feature on Online Banking for Business is being able to sort lists of items alphanumerically. Each list will have a title, users can click on the title tab which will sort Ascending or Descending. An arrow will appear which will indicate how it is sorted.
T a x a n d B i l l P a y m e n t s U s e r G u i d e
For assistance, please call the Help Desk at 1-800-565-6444
December 2010
8
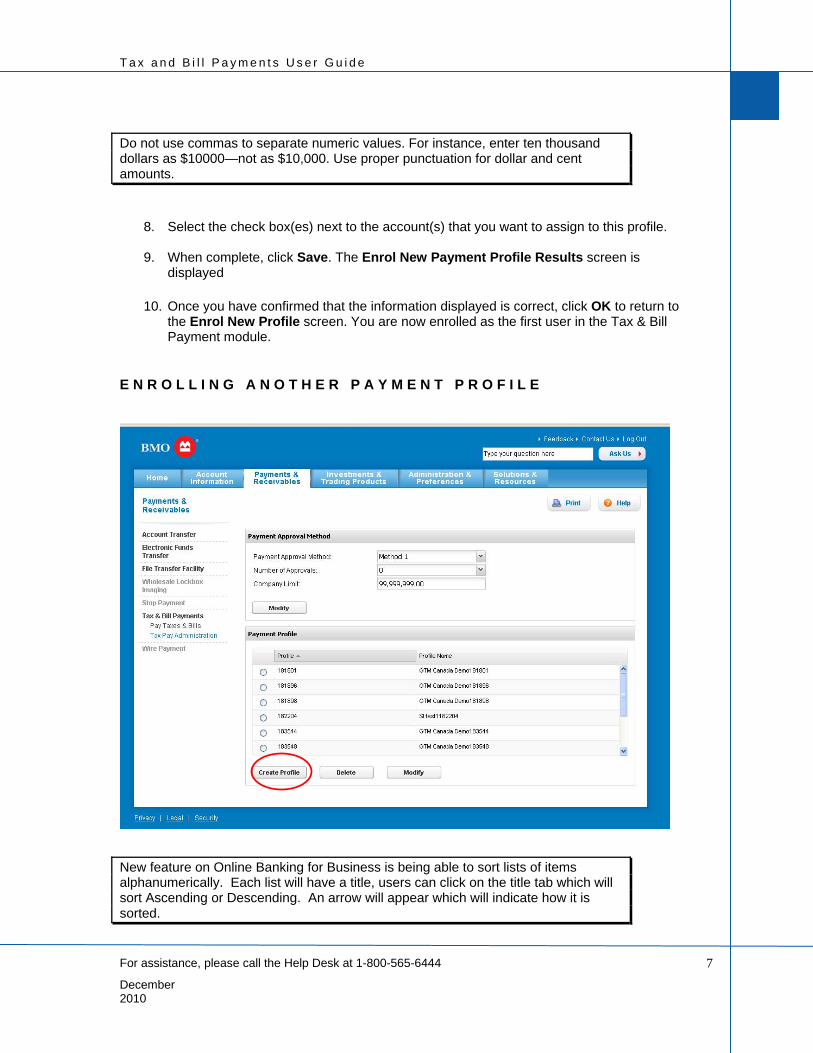
1. From the Payments & Receivables tab a. Select Tax pay Administration b. Then click Create Profile. The Create payment profile screen is displayed.
2. Enter a name for the profile in the Profile Name field.
3. Enter the name of the person in your company who will act as the contact for this Profile in the Contact Name field.
4. Select the Province/Time Zone for your company from the drop-down list provided.
5. Select the English or French radio button to indicate the billing language for this Profile.
Transaction fees will be included with your monthly billing statement in the selected language.
6. Select the check box(es) next to the account(s) that you want to assign to this Profile.
7. When complete, click Save. The following screen will display “Payment Profile
successfully updated.”
M O D I F Y I N G A P A Y M E N T P R O F I L E
If you modify a Payment Profile, you may also need to modify any future-dated Payments that you have made using that profile to ensure that payments are not rejected.

T a x a n d B i l l P a y m e n t s U s e r G u i d e
For assistance, please call the Help Desk at 1-800-565-6444
December 2010
9
1. From the Payments & Receivables tab a. Select Tax Pay Administration b. Then select the Payment Profile. c. Once the payment profile had been selected click on “Modify” The Modify
Payment Profile screen is displayed.
T a x a n d B i l l P a y m e n t s U s e r G u i d e
For assistance, please call the Help Desk at 1-800-565-6444
December 2010
10
2. If you want to change the name of the Profile, enter a new name in the Profile Name field.
3. Select accounts to be added to the profile, or deselect them if you want to remove them
from the profile.
4. Once complete, click Save. The following screen will display “Payment Profile successfully updated.”
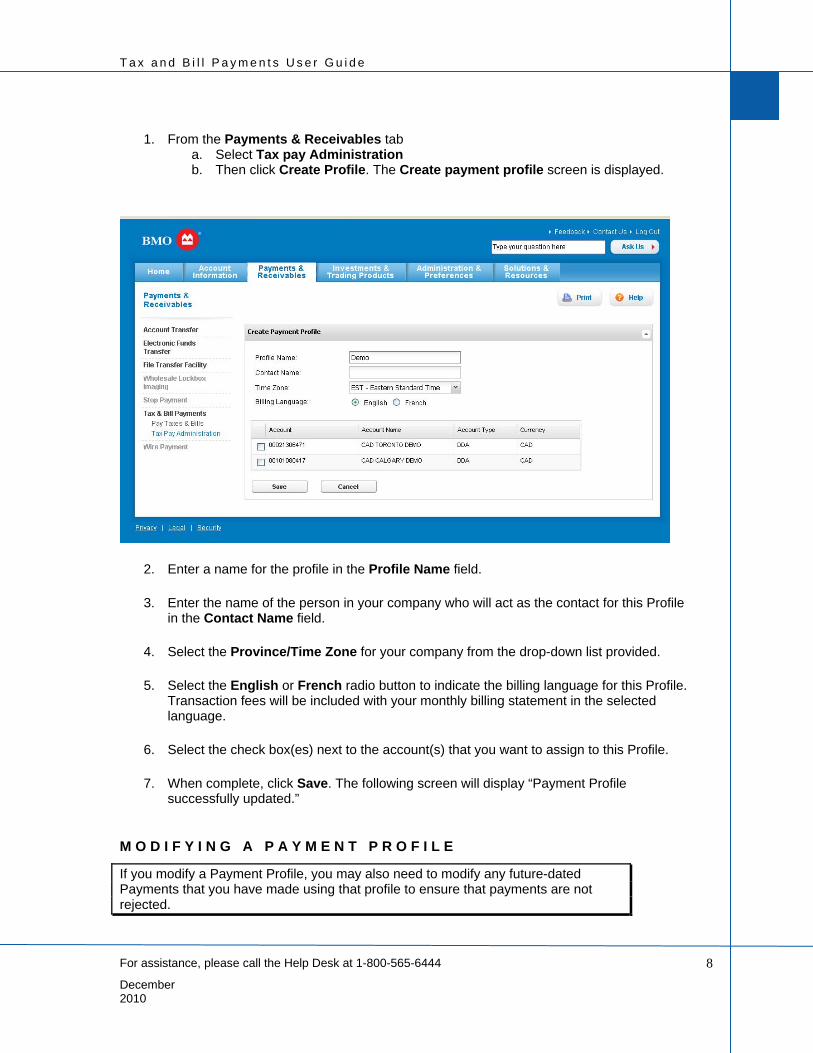
M O D I F Y I N G A P A Y M E N T A P P R O V A L M E T H O D
If you modify a payment approval method, it will be applied to all Payment Profiles that you have created and new Payment Profiles that you will create in the future.
These changes only apply to new payments. Payments that are in a pending state will use the payment approval method in place when it was created.
1. From the Payments & Receivables tab
a. Select Tax Pay Administration,The Payment Approval Method screen is displayed.

T a x a n d B i l l P a y m e n t s U s e r G u i d e
For assistance, please call the Help Desk at 1-800-565-6444
December 2010
11
2. If you want to change the number of approvers, select the desired number of approvers from the Number of Approvers drop down list.
3. If you selected “Method 2” from the Payment Approval Method and you want to change
the company limit, enter an amount in the Company Limit.
4. Once complete, click Modify. The following dialog box will be displayed:
5. Click OK. The screen will display “Payment Approval Method is successfully updated”
E N R O L L I N G A T A X & B I L L P A Y M E N T S U S E R
To enrol new users, you must be a Customer Administrator. The individual you are enrolling must be a registered user of Online Banking for Business.
The Tax & Bill Payments module allows you to set up and administer your own users. Anyone in your company who is already a user can be enrolled as a user for Tax & Bill Payments.
To enrol a new user in the Tax & Bill Payments module, follow these steps:
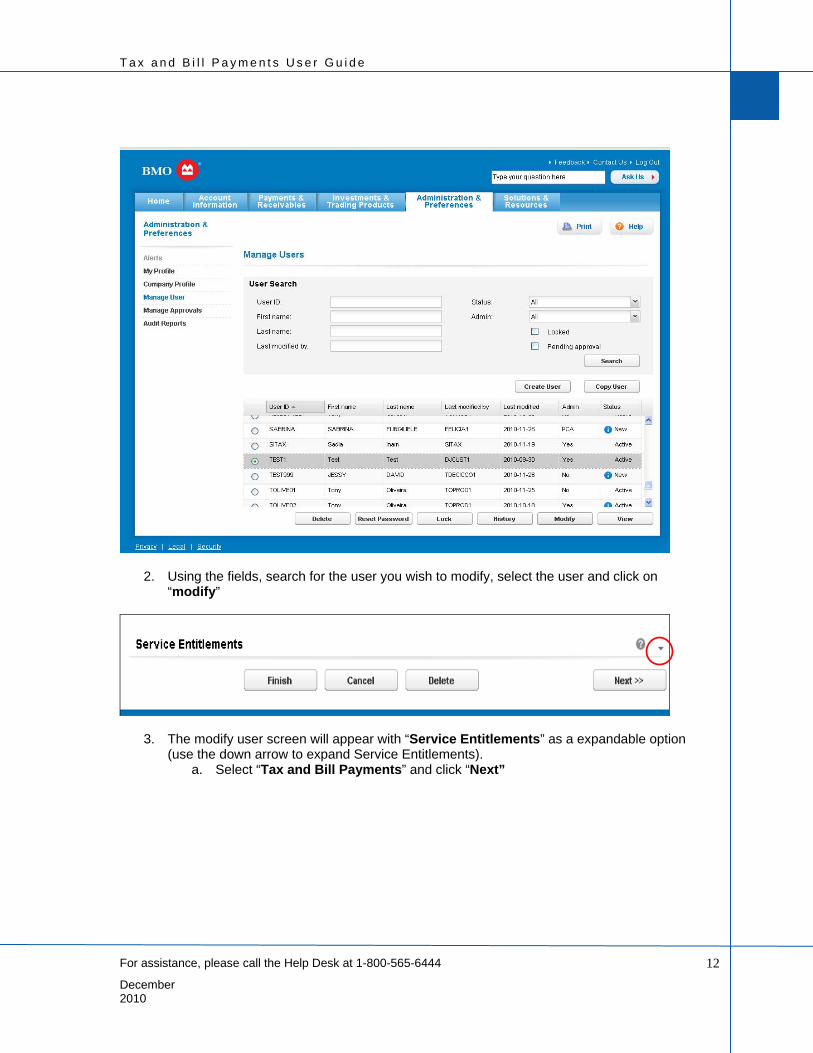
1. Select the Administration and Preferences tab a. Select Manage User on the left hand side.
T a x a n d B i l l P a y m e n t s U s e r G u i d e
For assistance, please call the Help Desk at 1-800-565-6444
December 2010
12
2. Using the fields, search for the user you wish to modify, select the user and click on “modify”
3. The modify user screen will appear with “Service Entitlements” as a expandable option (use the down arrow to expand Service Entitlements).
a. Select “Tax and Bill Payments” and click “Next”

T a x a n d B i l l P a y m e n t s U s e r G u i d e
For assistance, please call the Help Desk at 1-800-565-6444
December 2010
13
Under Tax & Bill Payments will be the list of functionality and Payment profiles.
4. Select one of the following
a. Use Only – will allow a user to have access to profiles assigned. b. Admin Only – will provide Tax Pay Administration to the user – allowed only for
Online Business for banking Customer Administrators c. Both Admin and Use – will allow the user to have administrative functions and
access to profiles assigned
5. Payment Profiles - Select the payment profiles this user is entitled to, provide their function “Admin” vs “Filer” and provide a transaction limit (max $99,999,999)
6. When complete, click on “Finish”, the following screen will advise the user was updated. 7. Once a user has been created they must log into the system and Enable the profiles they
wish to utilize (see section “Adding a Payment Type” of user guide).
The user must have transfer access to the accounts assigned to the Payment Profile.
A user can be assigned to several Profiles.
A D D I N G A P A Y M E N T T Y P E
Select Pay Taxes & Bills and from the menu and select the profile you wish to pay from by clicking “Pay”
T a x a n d B i l l P a y m e n t s U s e r G u i d e
For assistance, please call the Help Desk at 1-800-565-6444
December 2010
14
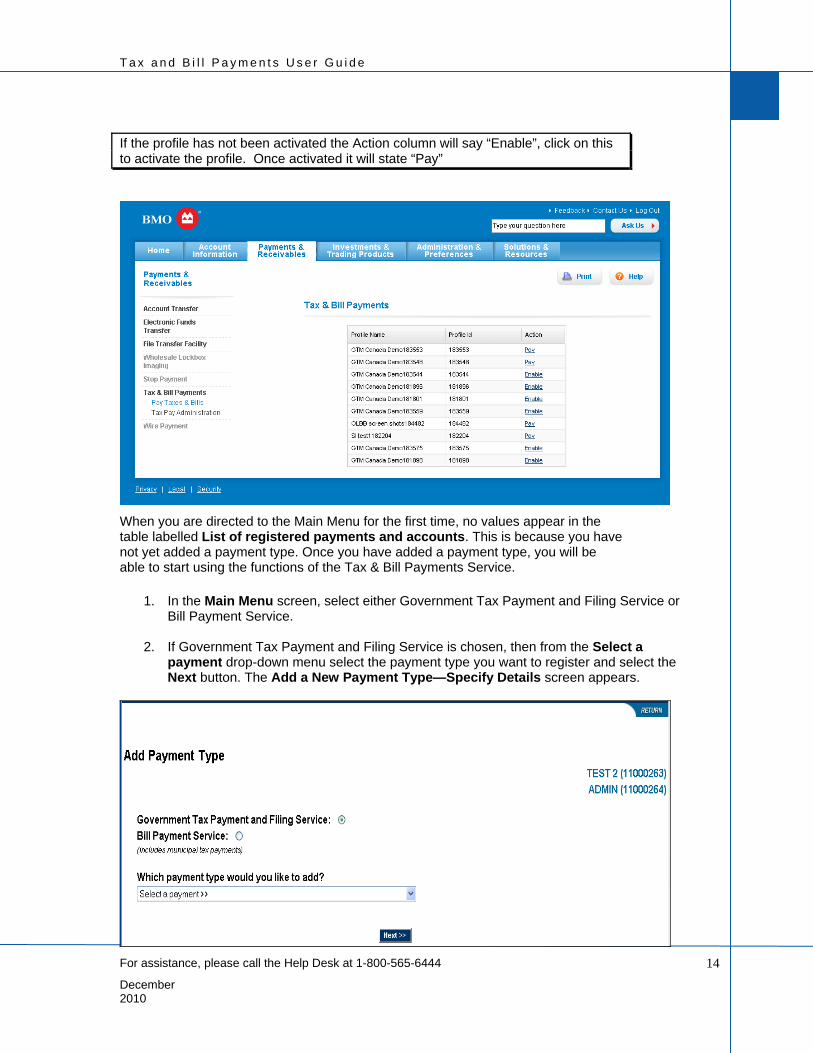
If the profile has not been activated the Action column will say “Enable”, click on this to activate the profile. Once activated it will state “Pay”
When you are directed to the Main Menu for the first time, no values appear in the table labelled List of registered payments and accounts. This is because you have not yet added a payment type. Once you have added a payment type, you will be able to start using the functions of the Tax & Bill Payments Service.
1. In the Main Menu screen, select either Government Tax Payment and Filing Service or Bill Payment Service.
2. If Government Tax Payment and Filing Service is chosen, then from the Select a
payment drop-down menu select the payment type you want to register and select the Next button. The Add a New Payment Type—Specify Details screen appears.

T a x a n d B i l l P a y m e n t s U s e r G u i d e
For assistance, please call the Help Desk at 1-800-565-6444
December 2010
15
3. If Bill Payment Service is chosen, a ‘Contain keyword’ field will appear. Enter the
company name as it appears on the bill and click ‘Search’ or a minimum of 2 characters of the name for a partial search. Select the biller that you would like to add from the ‘Which payment type would you like to add?’ list and click ‘Next’. The Add a New Payment Type—Specify Details screen appears.
4. Fill in the fields as required and/or select appropriate values from the drop-down menus.
The fields that appear in the Add Payment Type screen vary, depending upon the payment type you are adding.
If you make a mistake when you enter information in these fields, select the Clear All button, then enter the correct information.
T a x a n d B i l l P a y m e n t s U s e r G u i d e
For assistance, please call the Help Desk at 1-800-565-6444
December 2010
16
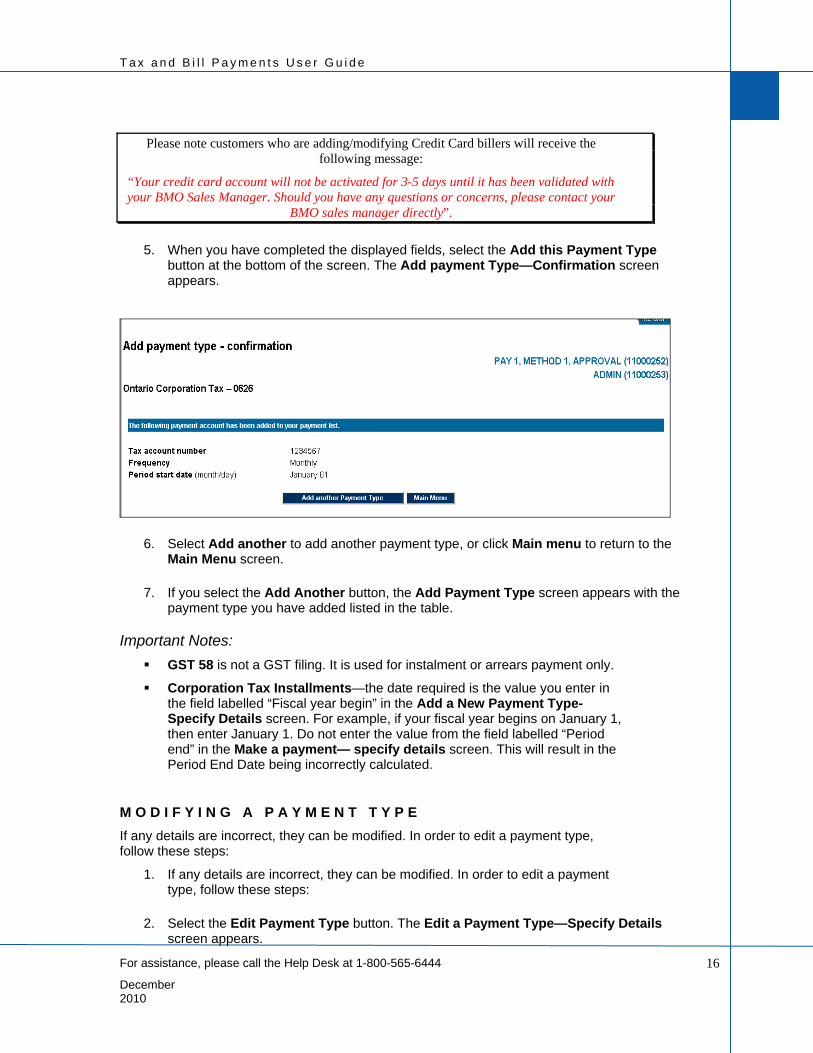
Please note customers who are adding/modifying Credit Card billers will receive the following message:
“Your credit card account will not be activated for 3-5 days until it has been validated with your BMO Sales Manager. Should you have any questions or concerns, please contact your
BMO sales manager directly”.
5. When you have completed the displayed fields, select the Add this Payment Type
button at the bottom of the screen. The Add payment Type—Confirmation screen appears.
6. Select Add another to add another payment type, or click Main menu to return to the Main Menu screen.
7. If you select the Add Another button, the Add Payment Type screen appears with the
payment type you have added listed in the table.
Important Notes:
GST 58 is not a GST filing. It is used for instalment or arrears payment only.
Corporation Tax Installments—the date required is the value you enter in the field labelled “Fiscal year begin” in the Add a New Payment Type-Specify Details screen. For example, if your fiscal year begins on January 1, then enter January 1. Do not enter the value from the field labelled “Period end” in the Make a payment— specify details screen. This will result in the Period End Date being incorrectly calculated.
M O D I F Y I N G A P A Y M E N T T Y P E
If any details are incorrect, they can be modified. In order to edit a payment type, follow these steps:
1. If any details are incorrect, they can be modified. In order to edit a payment type, follow these steps:
2. Select the Edit Payment Type button. The Edit a Payment Type—Specify Details
screen appears.

T a x a n d B i l l P a y m e n t s U s e r G u i d e
For assistance, please call the Help Desk at 1-800-565-6444
December 2010
17
3. Adjust the information in the fields or select valid information from the drop-down menus provided.
4. Select the Save Changes button. The Edit Payment Type Confirmation screen is
displayed.
5. You have now edited the Payment Type. Click Main menu to return to the Main Menu screen.
R E M O V I N G A P A Y M E N T T Y P E
Before removing a payment type, you must first cancel any future-dated payments you have associated with the payment type.
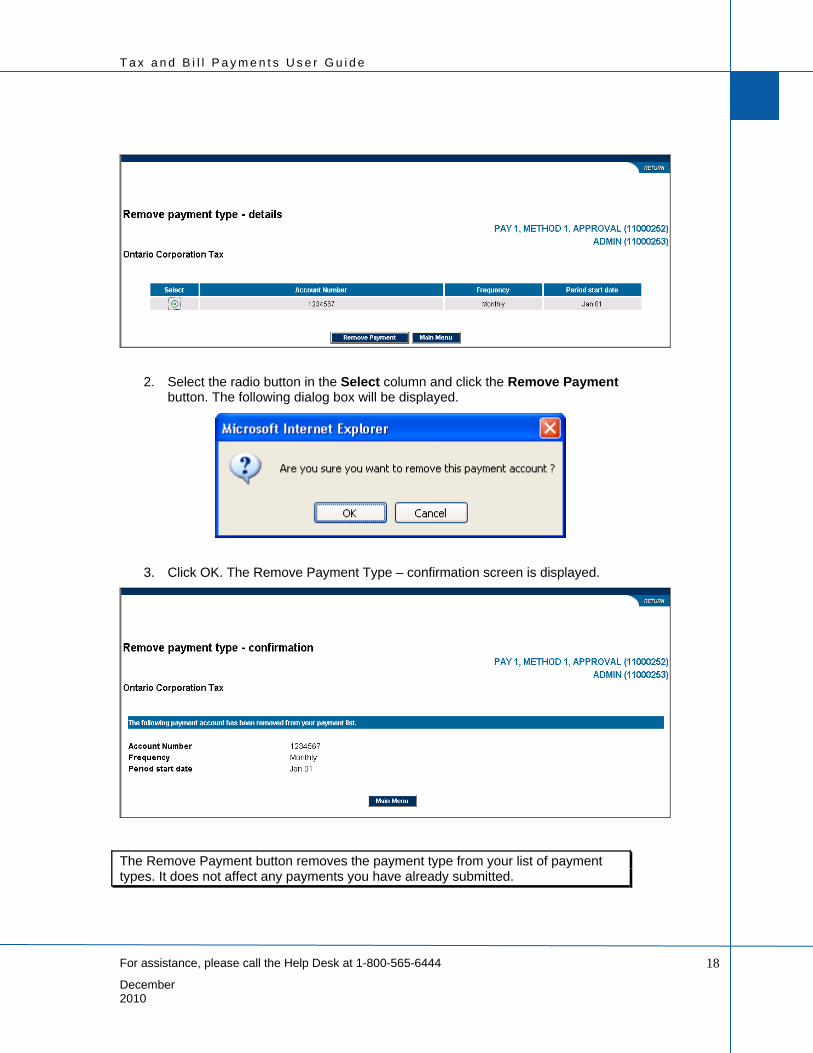
1. If you want to remove a payment type entirely, on the Main Menu screen select the radio button beside the payment type you want to remove and click the Remove Payment Type button. The Remove Payment Type—Details screen is displayed.
T a x a n d B i l l P a y m e n t s U s e r G u i d e
For assistance, please call the Help Desk at 1-800-565-6444
December 2010
18
2. Select the radio button in the Select column and click the Remove Payment button. The following dialog box will be displayed.
3. Click OK. The Remove Payment Type – confirmation screen is displayed.
The Remove Payment button removes the payment type from your list of payment types. It does not affect any payments you have already submitted.

T a x a n d B i l l P a y m e n t s U s e r G u i d e
For assistance, please call the Help Desk at 1-800-565-6444
December 2010
19
R E M O V I N G A C R E D I T C A R D B I L L E R
Before a credit card has been approved, you can delete the credit card pending approval. Users must attempt to add or modify the same credit card type in order to delete current pending credit cards.
1. Select payment types
2. Select the same credit biller as previously added
3. The Add a new payment type - specify details screen will appear, a table will appear with current credit cards that are pending approval
4. To delete the credit card, Double click on a row to delete it from the pending list and a pop up window will appear confirming the action to delete.
R E V I E W I N G O R C H A N G I N G Y O U R P R O F I L E I N F O R M A T I O N
To change contact information, such as your legal business name, preferred billing language, contact name, or your telephone number, follow these steps:
1. From the Main Menu screen, select Modify Profile. The Modify Profile -Request screen is displayed.
2. On this screen adjust the information as required. You can edit the contact information,
including the billing language, your contact name, and phone number.
3. Once you have modified the information as required, click Save changes. The Modify Profile - confirmation screen is displayed.
4. Click Main menu to return to the Main Menu screen.
M O D I F Y I N G A P A Y M E N T U S E R
If you modify the details for a Payment User, the changes will be applied to new payments created by the user enrolled in the Payment Profile.
To modify the details for a Payment User, follow these steps:

T a x a n d B i l l P a y m e n t s U s e r G u i d e
For assistance, please call the Help Desk at 1-800-565-6444
December 2010
20
1. Select the Administration and Preferences tab
a. Select Manage User
b. Then using the provided fields, search for the user or click “Search” for all users
c. Select the user you wish to modify by selecting the radio button on the left then click on modify
2. From the User Profile Screen, click “next”

T a x a n d B i l l P a y m e n t s U s e r G u i d e
For assistance, please call the Help Desk at 1-800-565-6444
December 2010
21
3. The following screen will allow you to change the authorization function or the transaction limit
4. Click “Finish” when complete. The following screen will state the user was successfully updated.

T a x a n d B i l l P a y m e n t s U s e r G u i d e
For assistance, please call the Help Desk at 1-800-565-6444
December 2010
22
D E L E T I N G A P A Y M E N T P R O F I L E
This option removes the Payment Profile from your list of Payment Profiles. It does not affect any payments you have already submitted using this profile. If you need to cancel future dated payments created using this profie, you must contact our Help Desk for assisstance.
To delete a Payment Profile, follow these steps:
1. Select the Payments and Receivables tab
a. Then select Tax & Bill payments
b. Then Select Tax Pay Administration, the list of profiles will appear
, 2. Select the payment profile you wish to delete and then hit delete, the following message
will appear
3. Click OK and the profile will be deleted..
R E M O V I N G A P A Y M E N T U S E R
This option removes the Payment User from a Payment Profile.
1. From the Administration and Preferences Tab
a. Select Manage Users
b. Search for the User
c. Select the user and click modify

T a x a n d B i l l P a y m e n t s U s e r G u i d e
For assistance, please call the Help Desk at 1-800-565-6444
December 2010
23
2. Expand the Service entitlement section of Modify user. 3. To remove the user from Tax and Bill payment remove the check mark beside Tax and
Bill payment.
4. Click Finish. The following will display the message User is successfully updated
Payment Filer Functions
Any individual within your company who has been enrolled in a Profile as a Payment Filer or a Payment Admin can perform the following procedures.
Payment filers can not add payment types, only users with Tax and Bill payment Admin status can.

T a x a n d B i l l P a y m e n t s U s e r G u i d e
For assistance, please call the Help Desk at 1-800-565-6444
December 2010
24
M A K I N G A P A Y M E N T
Tax & Bill Payments are not processed until the payment date indicated on your request. The funds, or adequate credit must be available in your account at the beginning of the business day on the payment date; if there are insufficient funds the transaction will be rejected.
Once you have set up your payment types, you can file or pay up to midnight (local Time) on the day before the payment is due. The payment types you have set up appear in the Main Menu screen in a table labelled List of registered payments and accounts.
Local time refers to the Province/Time Zone selected by your Customer Administrator in the Payment Profile.
1. From the Pay Taxes & Bills menu, select the Payment Profile with which you would like
to make a payment.
2. If there are transactions that are pending approval, expired or pending deletion, the following dialog box will be displayed: Otherwise, the Main Menu screen is displayed – proceed to step 5.
3. Click OK. The Pending Approval – List screen is displayed.
4. Click Main Menu. The Main Menu screen is displayed.
T a x a n d B i l l P a y m e n t s U s e r G u i d e
For assistance, please call the Help Desk at 1-800-565-6444
December 2010
25
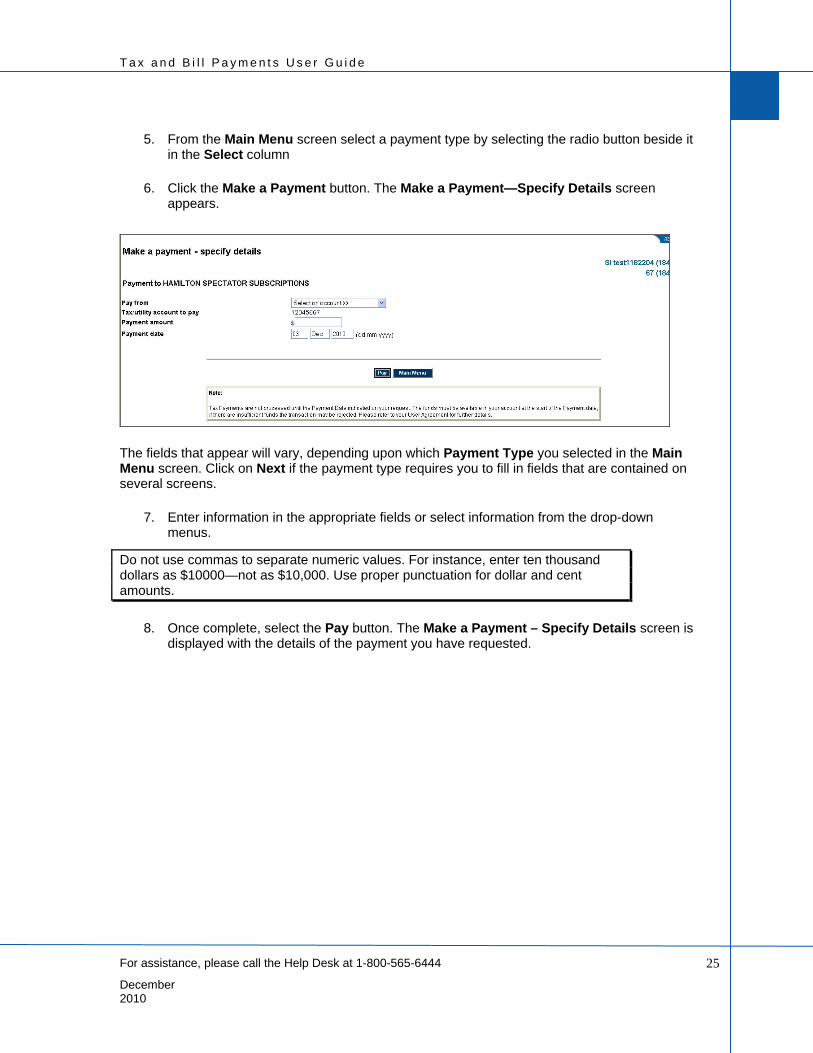
5. From the Main Menu screen select a payment type by selecting the radio button beside it in the Select column
6. Click the Make a Payment button. The Make a Payment—Specify Details screen
appears.
The fields that appear will vary, depending upon which Payment Type you selected in the Main Menu screen. Click on Next if the payment type requires you to fill in fields that are contained on several screens.
7. Enter information in the appropriate fields or select information from the drop-down menus.
Do not use commas to separate numeric values. For instance, enter ten thousand dollars as $10000—not as $10,000. Use proper punctuation for dollar and cent amounts.
8. Once complete, select the Pay button. The Make a Payment – Specify Details screen is
displayed with the details of the payment you have requested.
T a x a n d B i l l P a y m e n t s U s e r G u i d e
For assistance, please call the Help Desk at 1-800-565-6444
December 2010
26
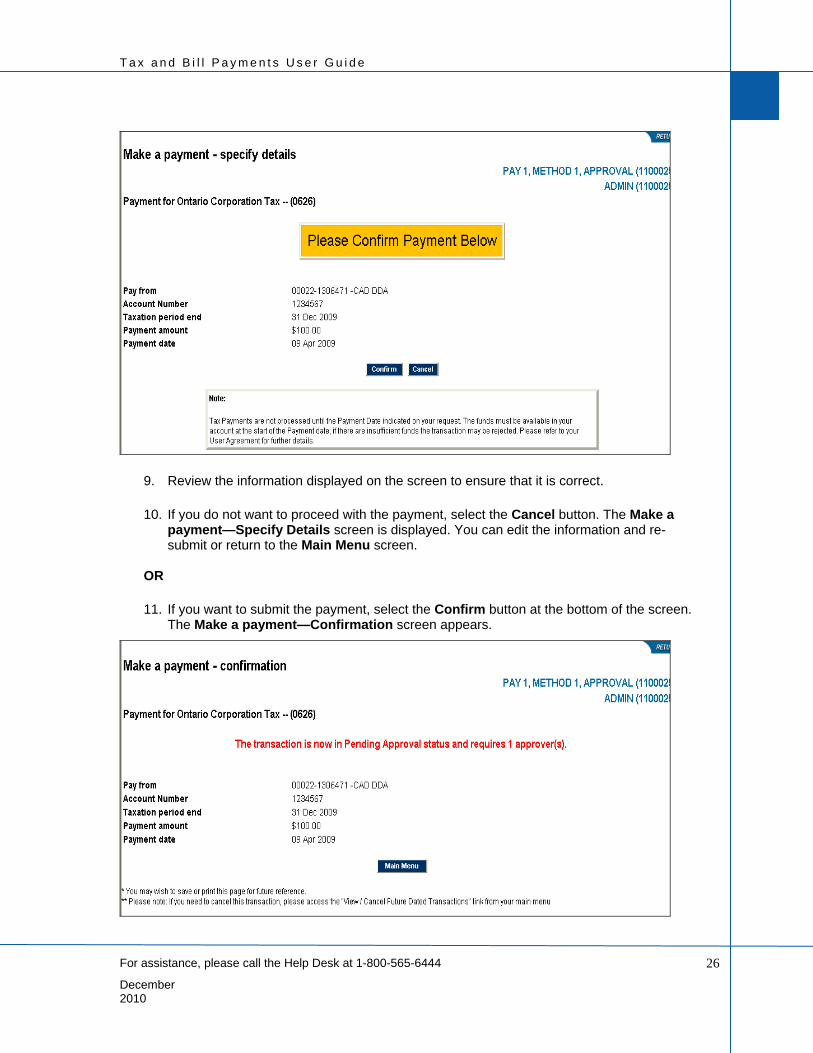
9. Review the information displayed on the screen to ensure that it is correct.
10. If you do not want to proceed with the payment, select the Cancel button. The Make a payment—Specify Details screen is displayed. You can edit the information and re-submit or return to the Main Menu screen.
OR
11. If you want to submit the payment, select the Confirm button at the bottom of the screen.
The Make a payment—Confirmation screen appears.

T a x a n d B i l l P a y m e n t s U s e r G u i d e
For assistance, please call the Help Desk at 1-800-565-6444
December 2010
27
This screen lists the details of your payment. If the payment requires approvals, a message will appear informing you that the payment is “in Pending Approval status” and the number of approvers required to approve the payment.
After the funds for this transaction are withdrawn on the payment date, the confirmation number and a description of the payment will appear on your BMO account statement.
12. When you select the Confirm button in the Confirm Payment screen, the system
determines if information you are submitting appears to conflict with or resemble a previous transaction. If the system detects an inconsistency, an additional confirmation screen is displayed.
13. If the additional confirmation screen is displayed, confirm the transaction by selecting the
Pay button, or cancel the transaction by clicking Cancel.
Payments can be modified or deleted up until midnight local time, as specified in your Payment Profile, the day before the payment due date by selecting Future-Dated Payments from the Main Menu screen.
P A Y M E N T D A T E S
There are three classifications of dates referred to within the Tax & Bill Payments module:
Payment Initiation Date This refers to the date on which the payment is entered in the Tax & Bill Payments module. You can initiate a payment at any time, on any day, including non-business days, up to midnight local time the day before the payment is due which is defined as Province/time zone in your Payment Profile. Payment can be initiated up to one year in advance of the payment date.
Due Date The due date is the date the payment is due to the government entity or agency. In most federal transactions the due date is a specific calendar date, such as the end of the month for GST, or the 15th of the month for a monthly payroll.
T a x a n d B i l l P a y m e n t s U s e r G u i d e
For assistance, please call the Help Desk at 1-800-565-6444
December 2010
28
Payment Date The payment date is the date on which funds are debited from your BMO account. Usually the due date and the payment date are the same. It is possible in certain cases to pay a tax earlier than the day it is due, in which case the payment date will be earlier than the due date. Payment in arrears may have a due date earlier than the payment date.
Notes:
Reporting Period Dates The reporting period dates are on a drop-down menu. Ensure that you select the correct month.
Payment dates default to the due date If the payment date falls on a weekend or Federal statutory holiday, the system automatically displays a warning. It will then adjust the payment date to the following business day (a business day is any weekday other than Federal statutory holidays). In order to avoid late payments, if your payment is due on a weekend or a Federal statutory holiday, be sure to enter the payment two business days ahead of the due date.
Payment date must be in the future
The payment date must be at least one business day in the future, up to a maximum of one year in the future. In other words, if your payment is due tomorrow, you must submit your payment today at the latest. The payment will be processed on the payment date specified
Troubleshooting dates and calculations Date and calculation logic is built into most transactions. If the dates or calculations appear to be Incorrect you can check the data by going to the Edit Payment Type screen from the Main Menu screen.
The forms displayed on the Internet are used to enter information that is used to process appropriate calculations. If the system’s calculations differ from your calculations, re-check the data that you entered on the screen.
P R O C E S S I N G P A Y M E N T S F O R B I - W E E K L Y P A Y R O L L S Federal payroll deductions submitted electronically can be made either weekly, twice-monthly, or monthly. To make bi-weekly payments, choose the Weekly Payment Type option and file every two weeks.
Having added the Weekly Payroll Deductions payment type, when you make a payroll payment enter correct values in the Date payment made to employees fields. When you enter these values, the system will automatically calculate the payment due date and display the information in the Payment due date fields.
T a x a n d B i l l P a y m e n t s U s e r G u i d e
For assistance, please call the Help Desk at 1-800-565-6444
December 2010
29
W E E K L Y P A Y R O L L D E D U C T I O N S
Make your remittance by the third working day (not counting Saturdays, Sundays, or holidays) after the end of the following periods:
7th
day of the month
14th
day of the month
21st
day of the month
The last day of the month.
These dates mark the end of each weekly pay period.
For example, if you use a bi-weekly payroll and employees are paid on the 12th of the month, the payroll period is the 8th through the 14th resulting in the payment due date being the 17th of the month.
On the next bi-weekly payroll run, payment is made to employees on the 26th (12th
plus 14 days) then the payroll period is the 22nd through the last day of the month. Therefore the payment due date will be the 3rd day of the following month.
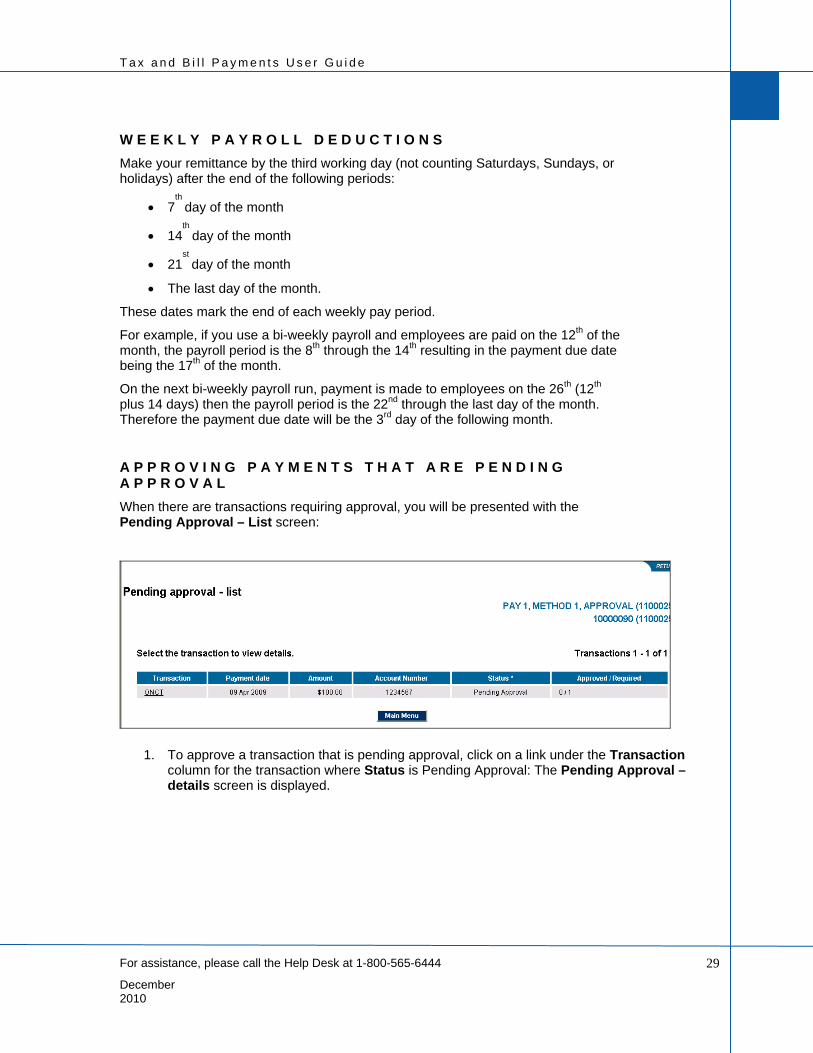
A P P R O V I N G P A Y M E N T S T H A T A R E P E N D I N G A P P R O V A L
When there are transactions requiring approval, you will be presented with the Pending Approval – List screen:
1. To approve a transaction that is pending approval, click on a link under the Transaction column for the transaction where Status is Pending Approval: The Pending Approval – details screen is displayed.

T a x a n d B i l l P a y m e n t s U s e r G u i d e
For assistance, please call the Help Desk at 1-800-565-6444
December 2010
30
2. To add an approval, click Approve.
You can only approve a transaction if you are not the transaction creator and have a user transaction limit that is equal to or greater than the transaction amount. The Approve button will not be displayed if you do not meet these criteria.
3. The following dialog box is displayed:
4. Click OK. The Pending Approval – Confirmation screen is displayed. If the transaction is still only partially approved then the following confirmation screen will be displayed:

T a x a n d B i l l P a y m e n t s U s e r G u i d e
For assistance, please call the Help Desk at 1-800-565-6444
December 2010
31
If the transaction is fully approved, the following confirmation screen will be displayed, indicating the payment or filing information has been submitted; that is, it is saved in a database to be activated on the payment date.
C A N C E L L I N G P A Y M E N T S T H A T A R E P E N D I N G A P P R O V A L
If the transaction required approvers to make the payment, it will also require the same number of approvers to cancel the payment.
When there are transactions requiring further approval, you will be presented with the Pending Approval – List screen:
1. To cancel a transaction that is not fully approved (still awaiting approval), click on a link under the Transaction column for the transaction where Status is Pending Approval: The Pending Approval – details screen is displayed. Only users with a transaction limit

T a x a n d B i l l P a y m e n t s U s e r G u i d e
For assistance, please call the Help Desk at 1-800-565-6444
December 2010
32
equal to or greater than the transaction amount can cancel a payment that is in pending approval state.
You can only cancel a transaction if you are not the transaction creator and have a user transaction limit that is equal to or greater than the transaction amount. The Cancel button will not be displayed if you do not meet these criteria.
2. Click Cancel this transaction. The following dialog box will be displayed:
3. Click OK. The Pending Approval – Confirmation screen is displayed
C A N C E L L I N G F U T U R E D A T E D P A Y M E N T S
1. From the Main Menu screen, click on Future Dated Payments from the main menu.
The Future dated transaction – request screen is displayed.

T a x a n d B i l l P a y m e n t s U s e r G u i d e
For assistance, please call the Help Desk at 1-800-565-6444
December 2010
33
2. Enter your search criteria by selecting one or a combination of the following: payment type (from Select a payment type(s) drop down list), account number, payment date, amount, and confirmation number.
3. Click View transactions. The Future dated transaction – results screen is displayed.
4. Select the link under the Transaction associated with the transaction that you want to cancel. The Payment details screen is displayed.

T a x a n d B i l l P a y m e n t s U s e r G u i d e
For assistance, please call the Help Desk at 1-800-565-6444
December 2010
34
5. To cancel the transaction click Cancel this transaction. The following dialog box will be displayed:
6. Click OK. The following screen will be displayed.
If the transaction did not require approvers to make the payment, the following screen is displayed and the payment is cancelled.

T a x a n d B i l l P a y m e n t s U s e r G u i d e
For assistance, please call the Help Desk at 1-800-565-6444
December 2010
35
A P P R O V I N G P A Y M E N T S T H A T A R E P E N D I N G C A N C E L L A T I O N
To approve a transaction that is pending cancellation, from the Pending Approval – List screen click on a link under the Transaction column for the transaction where Status is Pending Cancellation: The Pending Approval – details screen is displayed.
1. To add an approval, click on Approve.
You can only approve the cancellation of a transaction if you are not the transaction creator and have a transaction limit that is equal to or greater than the transaction amount. The Approve button will not be displayed if you do not meet these criteria.
You cannot approve the same transaction more than once.
2. The following dialog box is displayed:

T a x a n d B i l l P a y m e n t s U s e r G u i d e
For assistance, please call the Help Desk at 1-800-565-6444
December 2010
36
3. Click OK.
If this is the last approval required before the transaction is processed, the following confirmation screen is displayed
If the transaction is still only partially approved then the following confirmation screen will be displayed.

T a x a n d B i l l P a y m e n t s U s e r G u i d e
For assistance, please call the Help Desk at 1-800-565-6444
December 2010
37
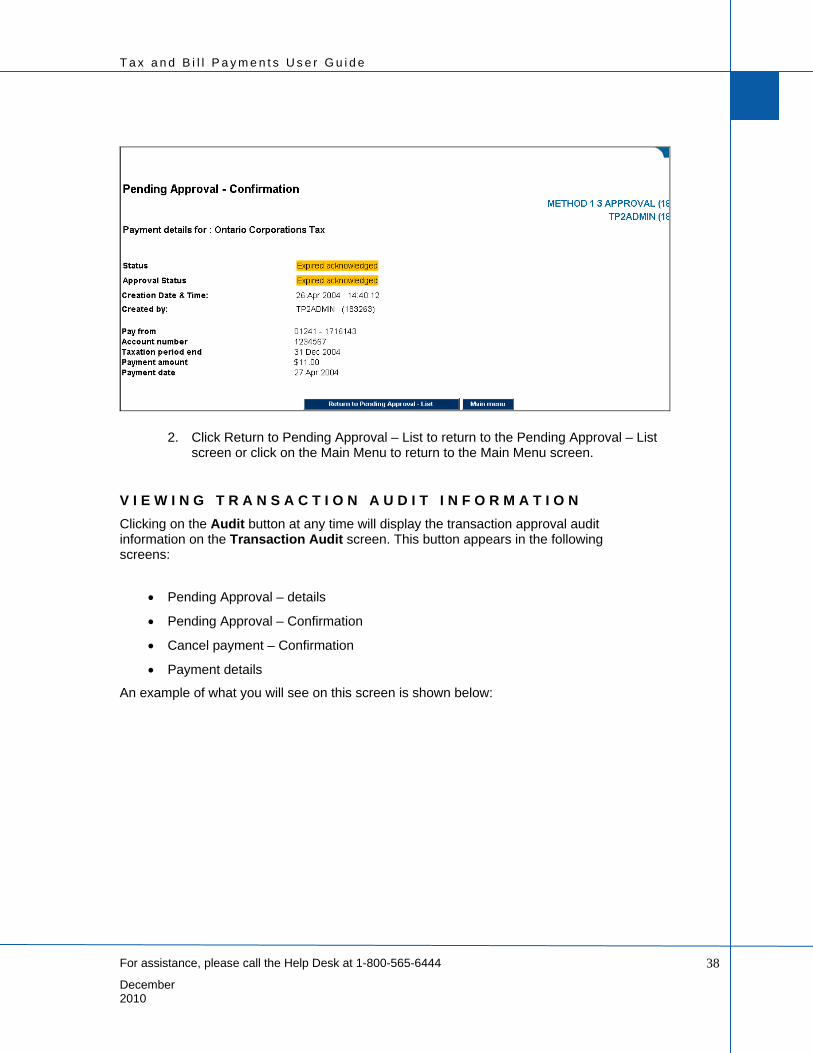
A C K N O W L E D G I N G E X P I R E D P A Y M E N T S
Expired payments are payments that did not get fully approved by the payment due date.
To acknowledge a payment that has expired, click on a link under the Transaction column for the transaction where Status is Expired: The Pending Approval – details screen is displayed.
You can only acknowledge an expired transaction if you were not the transaction creator and have a user transaction limit that is equal to or greater than the transaction amount. The Approve button will not be displayed if you do not meet these criteria
1. To acknowledge the expiration of the transaction, click Acknowledge. The Pending
Approval – Confirmation screen is displayed.
T a x a n d B i l l P a y m e n t s U s e r G u i d e
For assistance, please call the Help Desk at 1-800-565-6444
December 2010
38
2. Click Return to Pending Approval – List to return to the Pending Approval – List screen or click on the Main Menu to return to the Main Menu screen.
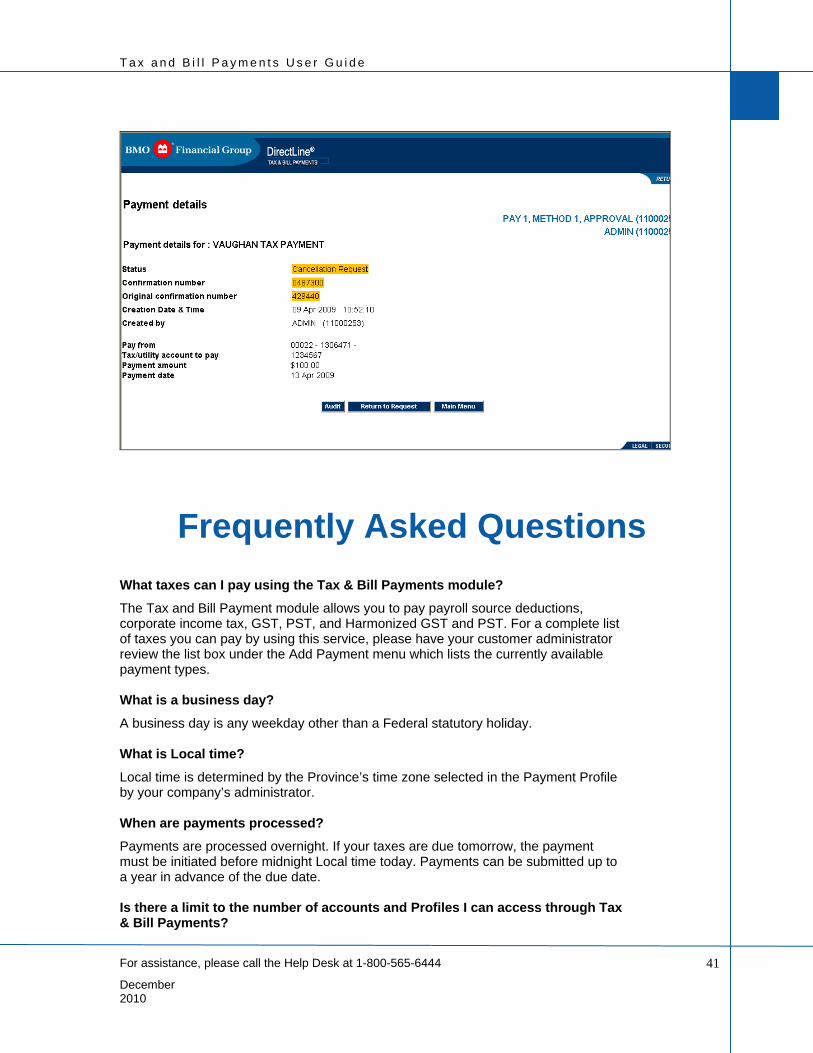
V I E W I N G T R A N S A C T I O N A U D I T I N F O R M A T I O N
Clicking on the Audit button at any time will display the transaction approval audit information on the Transaction Audit screen. This button appears in the following screens:
Pending Approval – details
Pending Approval – Confirmation
Cancel payment – Confirmation
Payment details
An example of what you will see on this screen is shown below:

T a x a n d B i l l P a y m e n t s U s e r G u i d e
For assistance, please call the Help Desk at 1-800-565-6444
December 2010
39
This page will detail the following: Initiator
Name ID
Creation Date and Time
Number of Approvers
Company Limit
User Limit Approver
Name ID
Creation Date and Time
User Limit
Two columns exist, one on the left for transaction creation and approvals and one on the right for transaction deletion and approvals.
V I E W I N G T R A N S A C T I O N H I S T O R Y
Currently, all transaction history is available online for 13 months or the last 200 transactions. Older records may be accessible by special request, and a service fee may apply.
1. To locate a transaction, select the Transaction History option from the Main Menu
screen. The Transaction History – request screen is displayed.

T a x a n d B i l l P a y m e n t s U s e r G u i d e
For assistance, please call the Help Desk at 1-800-565-6444
December 2010
40
2. Enter the search criteria for the transaction you are looking for in the fields provided. Once complete, click the View transactions button.
3. The Transaction History results for your search are displayed by payment date
order, with the earliest transaction first.
4. Click on a transaction to retrieve detailed information.
T a x a n d B i l l P a y m e n t s U s e r G u i d e
For assistance, please call the Help Desk at 1-800-565-6444
December 2010
41
Frequently Asked Questions
What taxes can I pay using the Tax & Bill Payments module?
The Tax and Bill Payment module allows you to pay payroll source deductions, corporate income tax, GST, PST, and Harmonized GST and PST. For a complete list of taxes you can pay by using this service, please have your customer administrator review the list box under the Add Payment menu which lists the currently available payment types. What is a business day?
A business day is any weekday other than a Federal statutory holiday. What is Local time?
Local time is determined by the Province’s time zone selected in the Payment Profile by your company’s administrator. When are payments processed?
Payments are processed overnight. If your taxes are due tomorrow, the payment must be initiated before midnight Local time today. Payments can be submitted up to a year in advance of the due date. Is there a limit to the number of accounts and Profiles I can access through Tax & Bill Payments?
T a x a n d B i l l P a y m e n t s U s e r G u i d e
For assistance, please call the Help Desk at 1-800-565-6444
December 2010
42
You can have up to 20 Profiles available on the service at any time and a maximum of 20 accounts per Profile. How do I receive a refund from the Federal Government?
When you submit a transaction that indicates a refund is due, the government, after it receives the information, verifies it. If the information is validated, the government then issues a refund cheque. You should receive the cheque in about two weeks. How far in advance can I future date a transaction?
Most transactions can be future-dated up to one year in advance. The only exceptions are transactions to the province of Quebec which can be future dated up to only two months in advance. Can one person input payments and another person authorize them?
Yes, you can tailor payment approvals to meet your business requirements. I made a mistake. Can I recall my payment?
You can cancel a future-dated payment until midnight the day before the payment date. Once the payment date has passed you cannot recall the payment. Can I enter negative numbers in fields in the transaction pages?
No. All amounts must be positive, although the values you enter may, when calculated, result in a negative amount and therefore qualify you for a refund.