Embed Size (px)
Citation preview
OneStop Reporting
OSR Budgeting 4.5
User Guide

Doc. Version 1.3
Updated: 19-Dec-14
Copyright OneStop Reporting AS
Page | i
Contents
Introduction ..................................................................................................................................................... 1
Two Different Setup Strategies and Use of OSR Budgeting ................................................................................. 1
Who should read this manual .............................................................................................................................. 1
What’s included in this manual ............................................................................................................................ 1
Symbols and conventions..................................................................................................................................... 2
Installation ........................................................................................................................................................... 2
Overview of OSR Budgeting ............................................................................................................................. 3
The architecture and modules of OSR Budgeting ................................................................................................ 3
The Extension Tables and Attributes ................................................................................................................... 3
Example of use ............................................................................................................................................. 4
Constraints and limitations in this version ........................................................................................................... 5
Last saved data overwrites .......................................................................................................................... 5
No workflow or assignment control ............................................................................................................ 5
How to use the OSR Applications for budgeting ............................................................................................... 6
OSR Report Designer for creating forms .............................................................................................................. 6
Example: Creating a Budget form ................................................................................................................ 6
The original Operating Expenses Report ..................................................................................................... 7
Converting the Report into a Form ............................................................................................................ 10
The Budgeting tab - Mapping Dimensions for storage .............................................................................. 13
Budgeting tab – Reference Guide .............................................................................................................. 14
Define storage............................................................................................................................................ 15
Reference data ........................................................................................................................................... 18
More advanced write-back: Calculated Value ........................................................................................... 20
Report Properties ...................................................................................................................................... 22
Upload form to the OSR Portal .................................................................................................................. 23
Using forms in the OSR Portal ........................................................................................................................ 24
Tools and functions ............................................................................................................................................ 24
Menu items ................................................................................................................................................ 24
Manual input ............................................................................................................................................. 24
The Spreading Tool .................................................................................................................................... 25
Delete data from a budget form ................................................................................................................ 27
Line Item Detail .................................................................................................................................................. 28
Multiple form instances ..................................................................................................................................... 29

Doc. Version 1.3
Updated: 19-Dec-14
Copyright OneStop Reporting AS
Page | ii
Data Manager ................................................................................................................................................ 31
Introduction ....................................................................................................................................................... 31
The use of the Data Manager ............................................................................................................................. 31
Extension tables ......................................................................................................................................... 31
How to access Data Manager ............................................................................................................................. 32
Permission and rights ......................................................................................................................................... 32
Using the OSR Data Manager ............................................................................................................................. 33
Using the OSR Data Manager for OSR Data Warehouse and BI360 Data Warehouse .............................. 33
Using Data Manager with the ERP system ................................................................................................. 35
The main menu in the OSR Data Manager ................................................................................................ 35
Editing Data in Data Manager - Dimensions .............................................................................................. 36
OSR Budgeting User Guide
Page | 1
Introduction
OSR Budgeting is the module for web-based budgeting included in the OneStop Reporting product suite. Though it is not separate from the current OSR products, its functionality is controlled by the license system. In order to start using OSR Budgeting, you will need to purchase a license specifically for OSR Budgeting.
The end-user part of OSR Budgeting is included in OSR Portal. The form creation part of OSR Budgeting is included in OSR Report Designer. There is also a one-time Budgeting setup in the OSR Administration application in the event you are using the direct write-back functionality. With the direct write-back functionality, the data is stored directly into the ERP systems’ own budgeting table(s).
Two Different Setup Strategies and Use of OSR Budgeting
There are two different ways to use OSR Budgeting functionality. For a full blown budgeting application, the OSR Data Warehouse is needed. This will be available in later versions of the OSR product suite. Hence, the procedures on how to setup an OSR Data Warehouse is not handled in this document.
The second and easiest way to setup OSR Budgeting for your budgeting process is to use the OSR Budgeting for direct write-back to your ERP system.
Note 1: It is important to note that the OSR application does not write to or update the ERP systems’ own data or tables. One exception to this is the ERP systems’ Budget transaction table. When using OSR Budgeting with direct write-back to the ERP system, data is inserted into the ERP systems’ budget transaction table by the OSR Budgeting application. The additional information is inserted into OSR-prefixed tables.
Note 2: Not all OSR supported ERP systems are available for the direct write-back budgeting option. Please ask your vendor whether the ERP system you use is supported or not. Also refer to the OSR web site for more information about supported ERP systems.
Who should read this manual
This manual is designed for OSR budget users, who are responsible for the budgeting process within your company. It is assumed that the reader of this manual is an experienced user of OSR Report Designer.
What’s included in this manual
This manual is designed to give an in-depth understanding of how to use the features of the OSR Budgeting module. It will give an overview of the different OSR applications and concepts that play a part in the setup and implementation of the tools for the budgeting process. It will be more of a reference guide rather than an instructional guide on how to implement the financial budgeting model itself. Please consult with your partner or software vendor for help and advice on building a complete financial budgeting model.
OSR Budgeting User Guide
Page | 2
Symbols and conventions
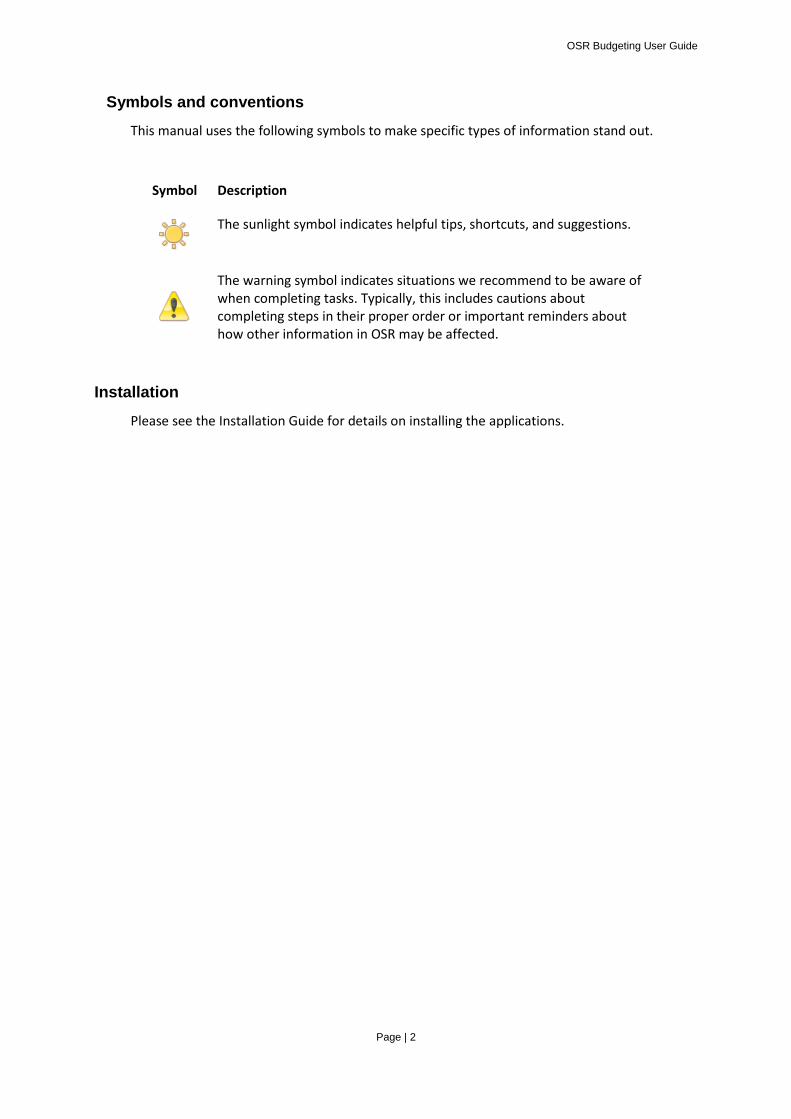
This manual uses the following symbols to make specific types of information stand out.
Symbol Description
The sunlight symbol indicates helpful tips, shortcuts, and suggestions.
The warning symbol indicates situations we recommend to be aware of when completing tasks. Typically, this includes cautions about completing steps in their proper order or important reminders about how other information in OSR may be affected.
Installation
Please see the Installation Guide for details on installing the applications.

OSR Budgeting User Guide
Page | 3
Overview of OSR Budgeting
OSR Budgeting offers a way to write data back to a database. This is made possible by the OSR Metadata layer that defines which tables in a database will support data write-back.
In the case of an ERP system, only the Budget transaction table(s) can be written back to. While some ERP Systems have only one budget transaction table, others may have multiple budget transaction tables for several modules and may even include forecast transaction tables. In the first version of the OSR Budgeting module, only the main budget transaction table will be enabled for write-back. Successively, more budget and forecast tables will be enabled.
The OSR Data Warehouse supports data write-back as the dimension tables are enabled for editing data. The OSR Data Manager will be used for that. See the section for Data Manager later in this document.
The architecture and modules of OSR Budgeting
The following diagram shows the structure of the Budgeting design process and which components are involved.
The Extension Tables and Attributes
The budgeting functionality in many of the ERP systems is not very extensive. They lack attributes in the dimensions that makes it possible to create a full budgeting model including payroll and employee budgeting. Some example attributes could be Social Cost and Vacation Accrual where you would like to store data for and have access to in the budget forms.
ERP Database
OSR Portal
Data
Manager
OSR Report
Designer
OSR Portal - Budgeting Forms
The administrator
designs Budgeting
forms and upload
them to the OSR
Portal for end-users
End-Users enter
budget figures into
the forms in the
OSR Portal
The Data Manager
is used to maintain
master data in the
DW
OSR Budgeting User Guide
Page | 4
With OSR Budgeting you can handle all your budgeting entry through a web-based user interface. The budget numbers are directly saved into your ERP database. It also offers the capability to enter additional properties to the Account and Employee dimensions in your ERP system using Extension tables in order to create budgeting models that cover expense as well as payroll budgeting. Please refer to the OSR Administration User Guide for more details about this.
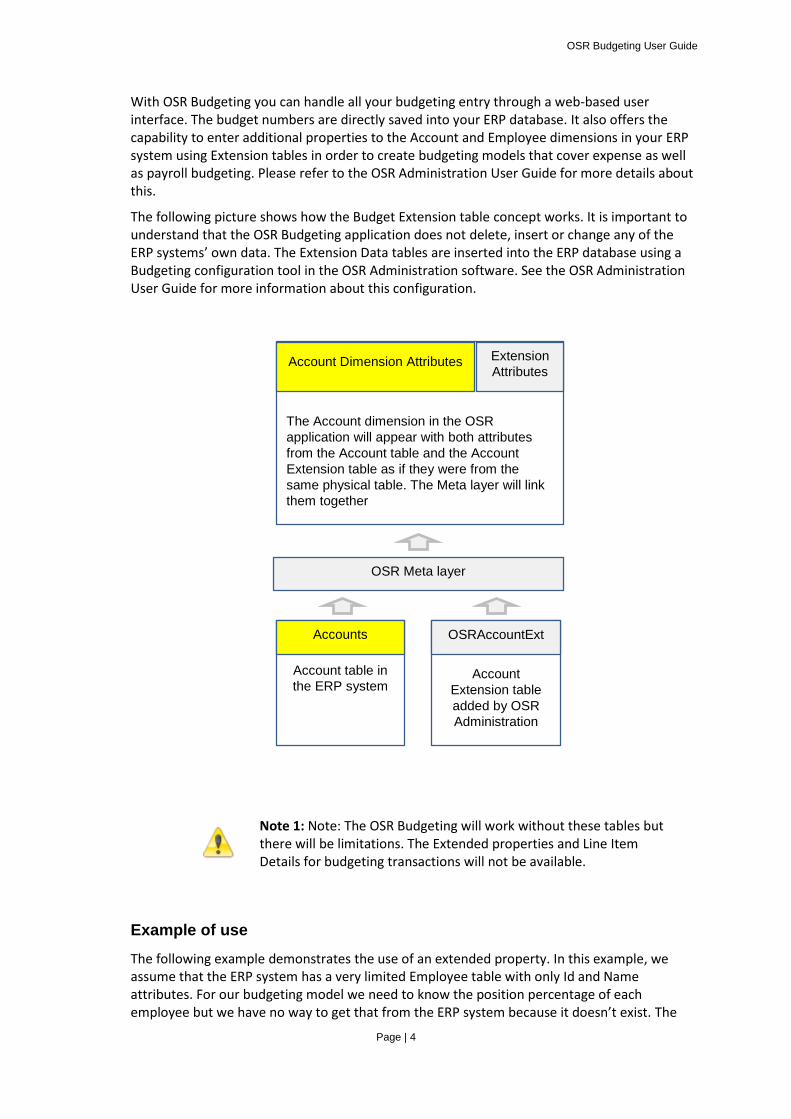
The following picture shows how the Budget Extension table concept works. It is important to understand that the OSR Budgeting application does not delete, insert or change any of the ERP systems’ own data. The Extension Data tables are inserted into the ERP database using a Budgeting configuration tool in the OSR Administration software. See the OSR Administration User Guide for more information about this configuration.
Note 1: Note: The OSR Budgeting will work without these tables but there will be limitations. The Extended properties and Line Item Details for budgeting transactions will not be available.
Example of use
The following example demonstrates the use of an extended property. In this example, we assume that the ERP system has a very limited Employee table with only Id and Name attributes. For our budgeting model we need to know the position percentage of each employee but we have no way to get that from the ERP system because it doesn’t exist. The
Account table in
the ERP system
Accounts
Account
Extension table
added by OSR
Administration
OSRAccountExt
OSR Meta layer
The Account dimension in the OSR
application will appear with both attributes
from the Account table and the Account
Extension table as if they were from the
same physical table. The Meta layer will link
them together
Account Dimension Attributes Extension
Attributes
OSR Budgeting User Guide
Page | 5
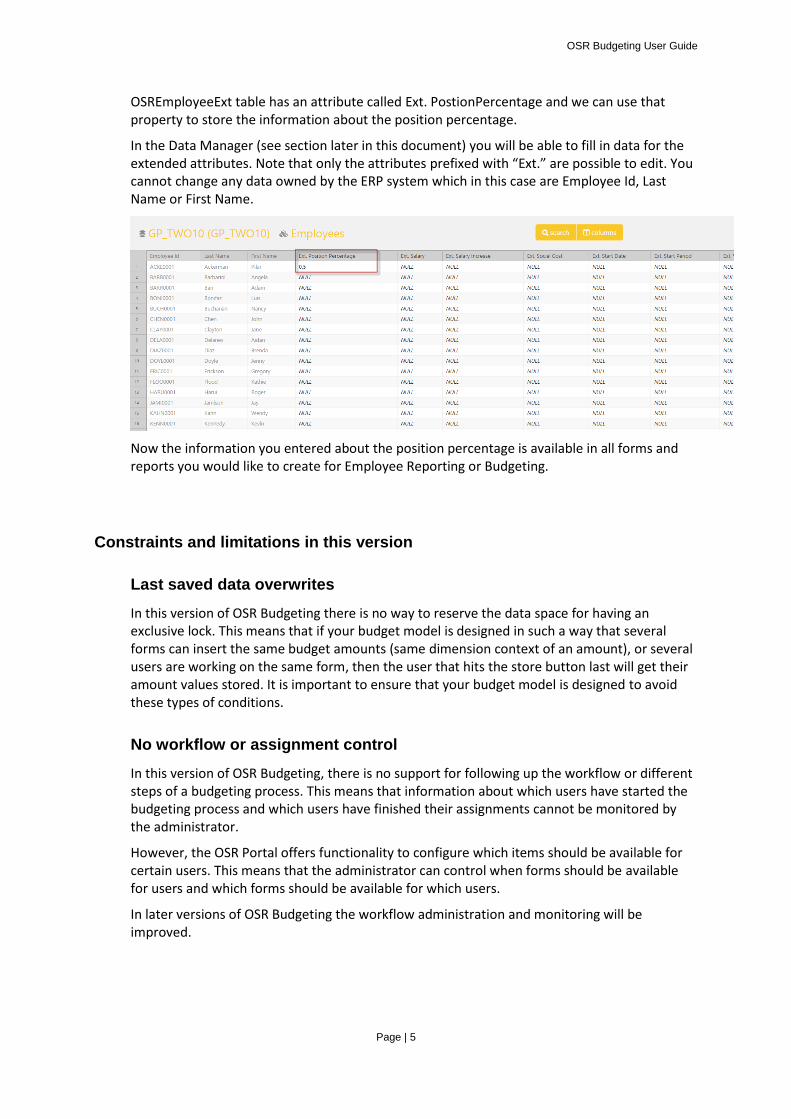
OSREmployeeExt table has an attribute called Ext. PostionPercentage and we can use that property to store the information about the position percentage.
In the Data Manager (see section later in this document) you will be able to fill in data for the extended attributes. Note that only the attributes prefixed with “Ext.” are possible to edit. You cannot change any data owned by the ERP system which in this case are Employee Id, Last Name or First Name.
Now the information you entered about the position percentage is available in all forms and reports you would like to create for Employee Reporting or Budgeting.
Constraints and limitations in this version
Last saved data overwrites
In this version of OSR Budgeting there is no way to reserve the data space for having an exclusive lock. This means that if your budget model is designed in such a way that several forms can insert the same budget amounts (same dimension context of an amount), or several users are working on the same form, then the user that hits the store button last will get their amount values stored. It is important to ensure that your budget model is designed to avoid these types of conditions.
No workflow or assignment control
In this version of OSR Budgeting, there is no support for following up the workflow or different steps of a budgeting process. This means that information about which users have started the budgeting process and which users have finished their assignments cannot be monitored by the administrator.
However, the OSR Portal offers functionality to configure which items should be available for certain users. This means that the administrator can control when forms should be available for users and which forms should be available for which users.
In later versions of OSR Budgeting the workflow administration and monitoring will be improved.
OSR Budgeting User Guide
Page | 6
How to use the OSR Applications for budgeting
OSR Report Designer for creating forms
The OneStop Reporting 4.5 Budget forms are created in OSR Report Designer similar to creating any other OSR report definition. A new addition to the Layout Designer, in the form of a new tab, makes it possible to define storage rules. The storage rules define what values should be stored into the budgeting database or budgeting table in your ERP system.
The following section will show how to use the write-back functionality in OSR Report designer by going through an example.
Example: Creating a Budget form
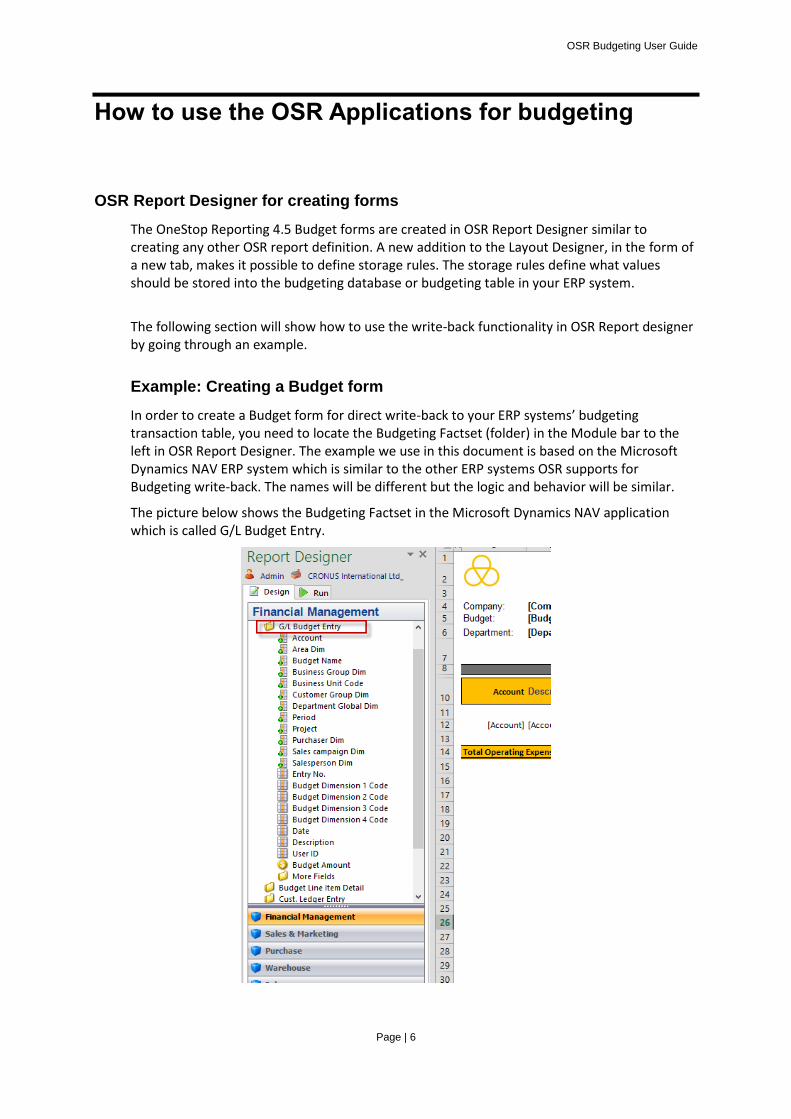
In order to create a Budget form for direct write-back to your ERP systems’ budgeting transaction table, you need to locate the Budgeting Factset (folder) in the Module bar to the left in OSR Report Designer. The example we use in this document is based on the Microsoft Dynamics NAV ERP system which is similar to the other ERP systems OSR supports for Budgeting write-back. The names will be different but the logic and behavior will be similar.
The picture below shows the Budgeting Factset in the Microsoft Dynamics NAV application which is called G/L Budget Entry.
OSR Budgeting User Guide
Page | 7
Normally the Budget form will include some dimensions and one or a few measures. In this example we assume that the reader is familiar with how a report is created from the start.
We will show the process of Converting the “Operating Expenses per Department” report for the current year into a Budget form allowing End-Users to enter their budgets for next year. Please note that the order of steps shown in this document does not indicate the order in which they can/should be performed unless stated otherwise.
The original Operating Expenses Report
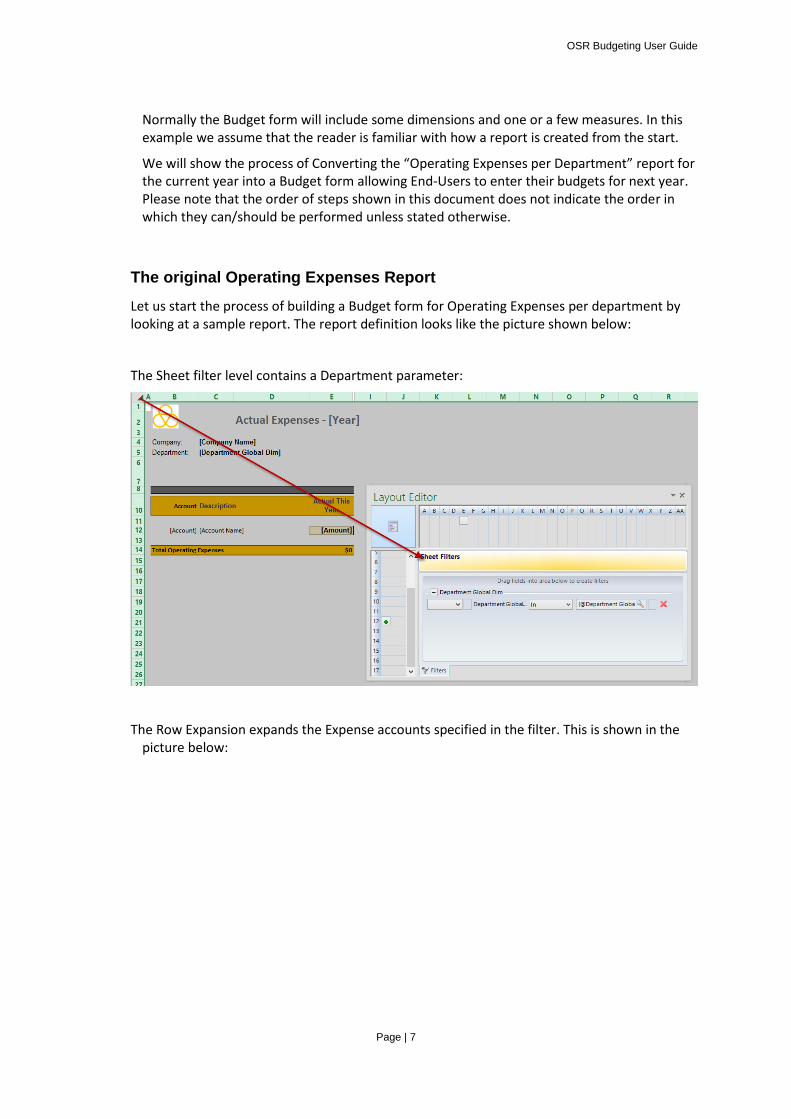
Let us start the process of building a Budget form for Operating Expenses per department by looking at a sample report. The report definition looks like the picture shown below:
The Sheet filter level contains a Department parameter:
The Row Expansion expands the Expense accounts specified in the filter. This is shown in the picture below:
OSR Budgeting User Guide
Page | 8
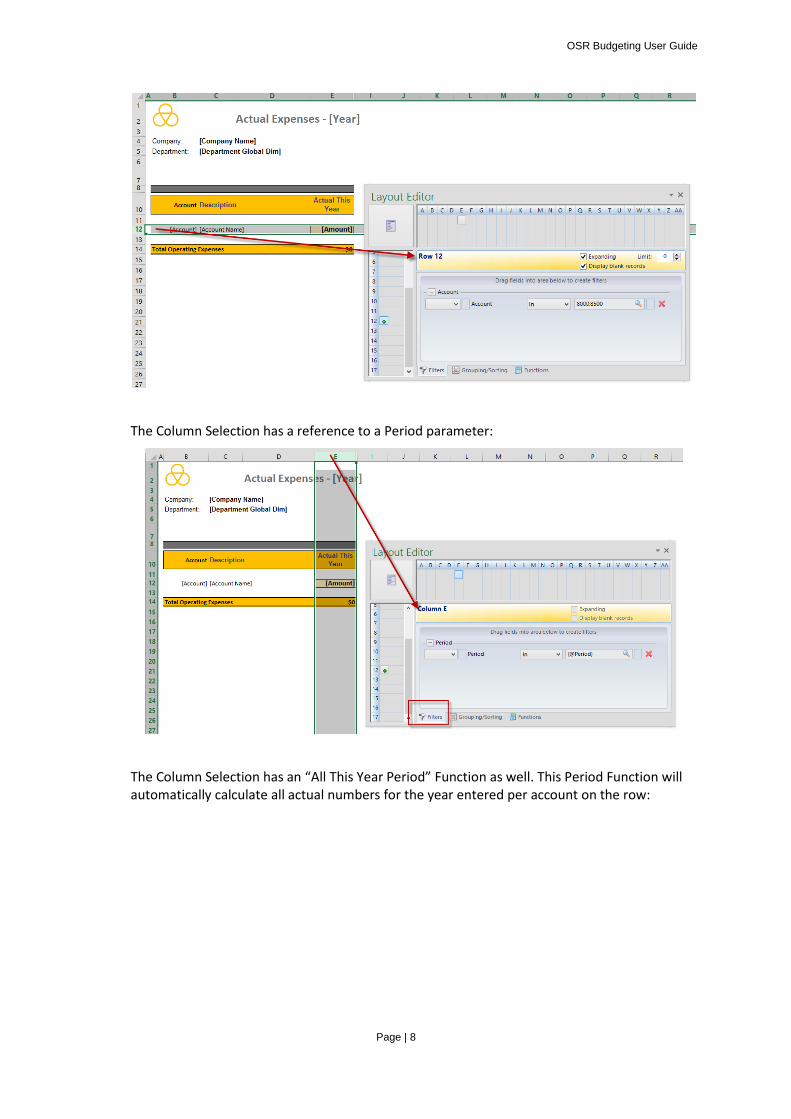
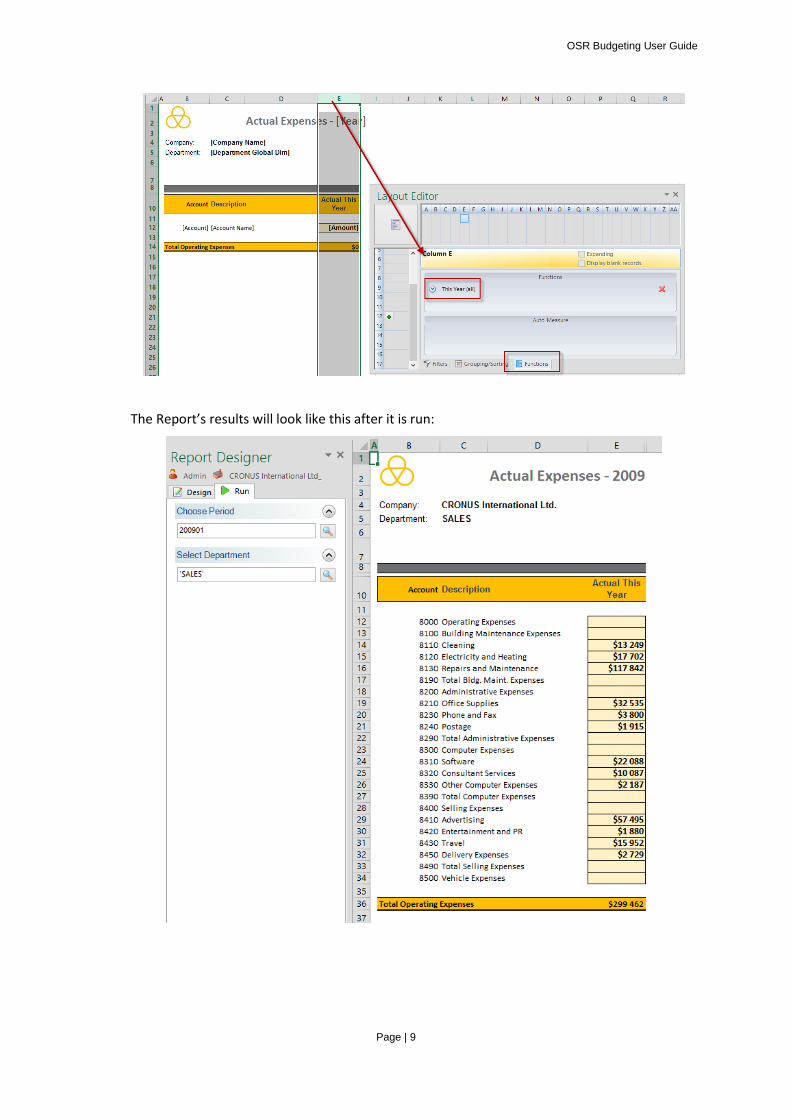
The Column Selection has a reference to a Period parameter:
The Column Selection has an “All This Year Period” Function as well. This Period Function will automatically calculate all actual numbers for the year entered per account on the row:
OSR Budgeting User Guide
Page | 9
The Report’s results will look like this after it is run:
OSR Budgeting User Guide
Page | 10
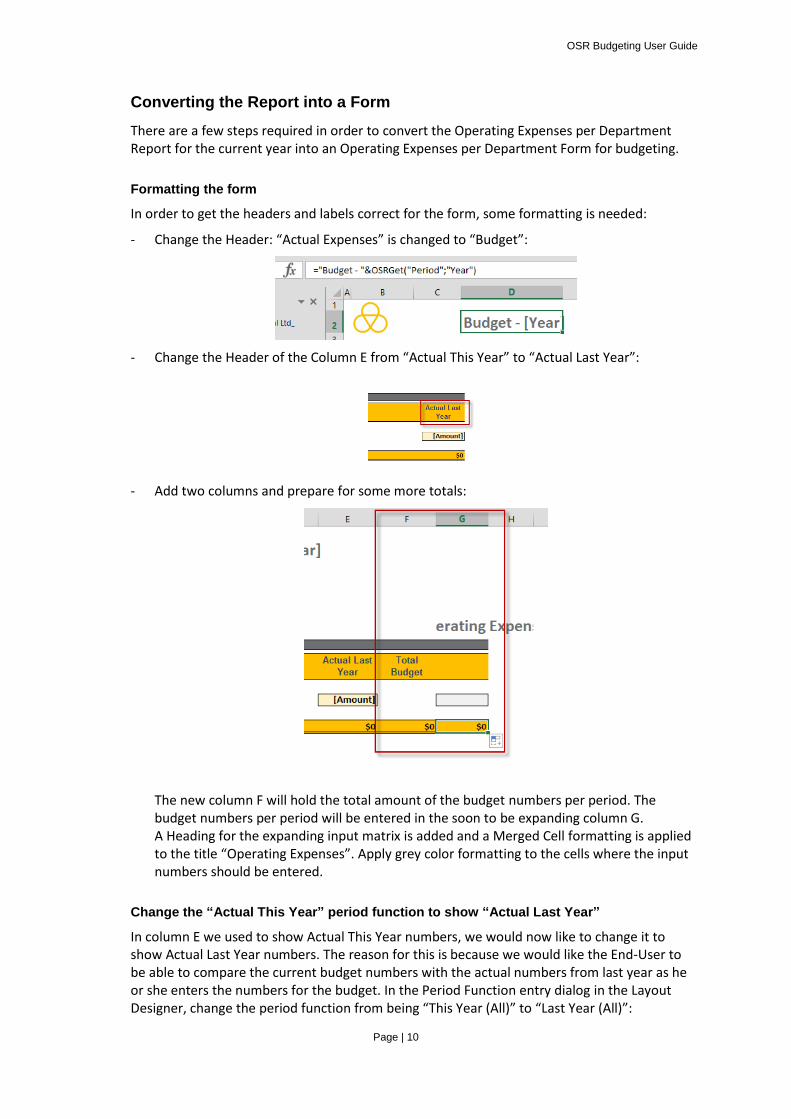
Converting the Report into a Form
There are a few steps required in order to convert the Operating Expenses per Department Report for the current year into an Operating Expenses per Department Form for budgeting.
Formatting the form
In order to get the headers and labels correct for the form, some formatting is needed:
- Change the Header: “Actual Expenses” is changed to “Budget”:
- Change the Header of the Column E from “Actual This Year” to “Actual Last Year”:
- Add two columns and prepare for some more totals:
The new column F will hold the total amount of the budget numbers per period. The budget numbers per period will be entered in the soon to be expanding column G. A Heading for the expanding input matrix is added and a Merged Cell formatting is applied to the title “Operating Expenses”. Apply grey color formatting to the cells where the input numbers should be entered.
Change the “Actual This Year” period function to show “Actual Last Year”
In column E we used to show Actual This Year numbers, we would now like to change it to show Actual Last Year numbers. The reason for this is because we would like the End-User to be able to compare the current budget numbers with the actual numbers from last year as he or she enters the numbers for the budget. In the Period Function entry dialog in the Layout Designer, change the period function from being “This Year (All)” to “Last Year (All)”:
OSR Budgeting User Guide
Page | 11
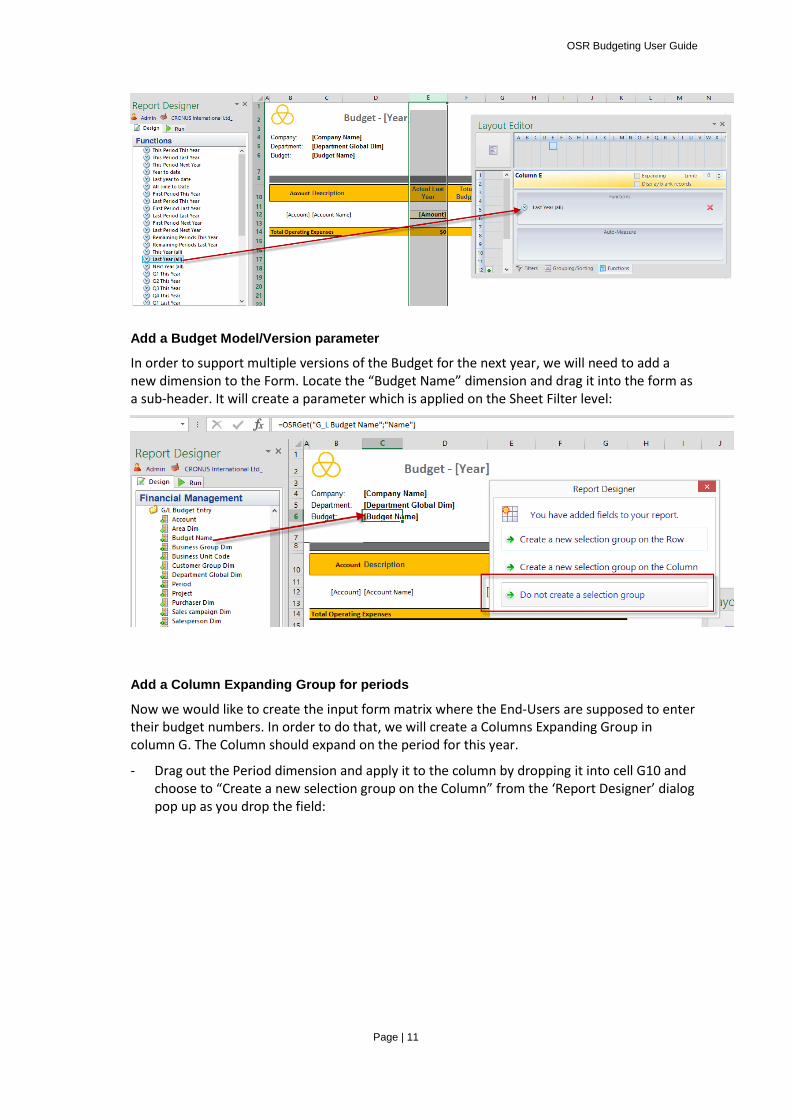
Add a Budget Model/Version parameter
In order to support multiple versions of the Budget for the next year, we will need to add a new dimension to the Form. Locate the “Budget Name” dimension and drag it into the form as a sub-header. It will create a parameter which is applied on the Sheet Filter level:
Add a Column Expanding Group for periods
Now we would like to create the input form matrix where the End-Users are supposed to enter their budget numbers. In order to do that, we will create a Columns Expanding Group in column G. The Column should expand on the period for this year.
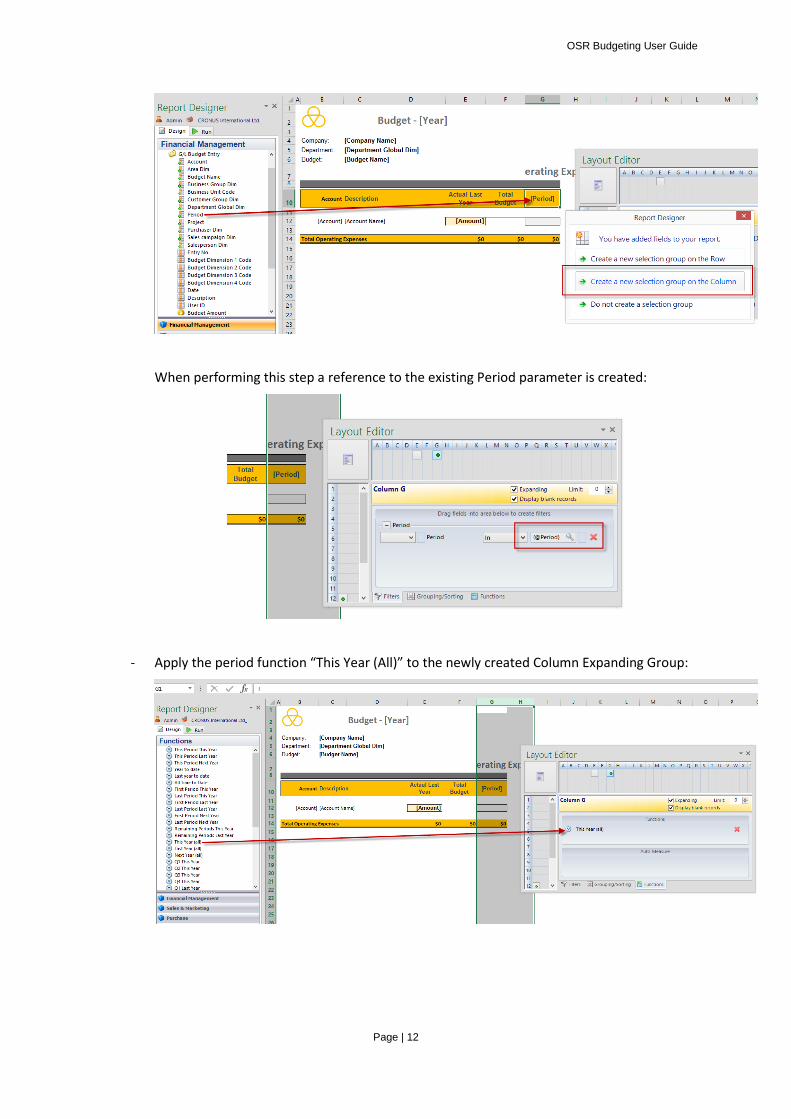
- Drag out the Period dimension and apply it to the column by dropping it into cell G10 and choose to “Create a new selection group on the Column” from the ‘Report Designer’ dialog pop up as you drop the field:
OSR Budgeting User Guide
Page | 12
When performing this step a reference to the existing Period parameter is created:
- Apply the period function “This Year (All)” to the newly created Column Expanding Group:
OSR Budgeting User Guide
Page | 13
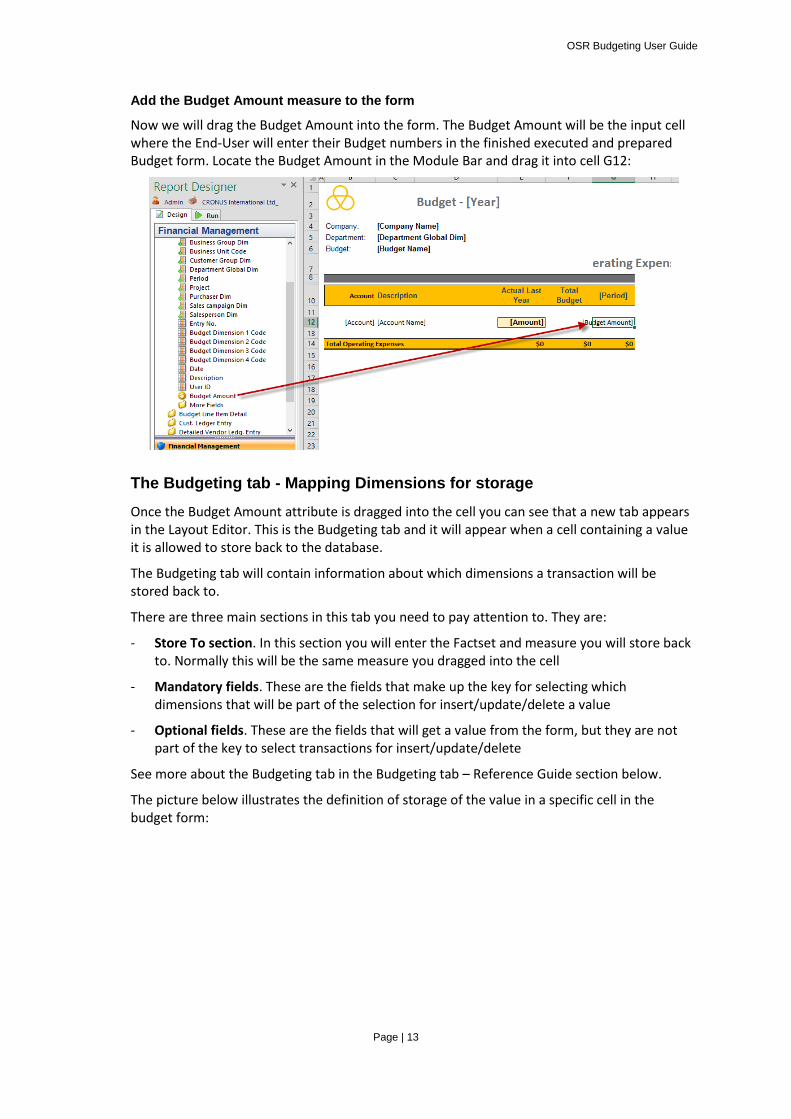
Add the Budget Amount measure to the form
Now we will drag the Budget Amount into the form. The Budget Amount will be the input cell where the End-User will enter their Budget numbers in the finished executed and prepared Budget form. Locate the Budget Amount in the Module Bar and drag it into cell G12:
The Budgeting tab - Mapping Dimensions for storage
Once the Budget Amount attribute is dragged into the cell you can see that a new tab appears in the Layout Editor. This is the Budgeting tab and it will appear when a cell containing a value it is allowed to store back to the database.
The Budgeting tab will contain information about which dimensions a transaction will be stored back to.
There are three main sections in this tab you need to pay attention to. They are:
- Store To section. In this section you will enter the Factset and measure you will store back to. Normally this will be the same measure you dragged into the cell
- Mandatory fields. These are the fields that make up the key for selecting which dimensions that will be part of the selection for insert/update/delete a value
- Optional fields. These are the fields that will get a value from the form, but they are not part of the key to select transactions for insert/update/delete
See more about the Budgeting tab in the Budgeting tab – Reference Guide section below.
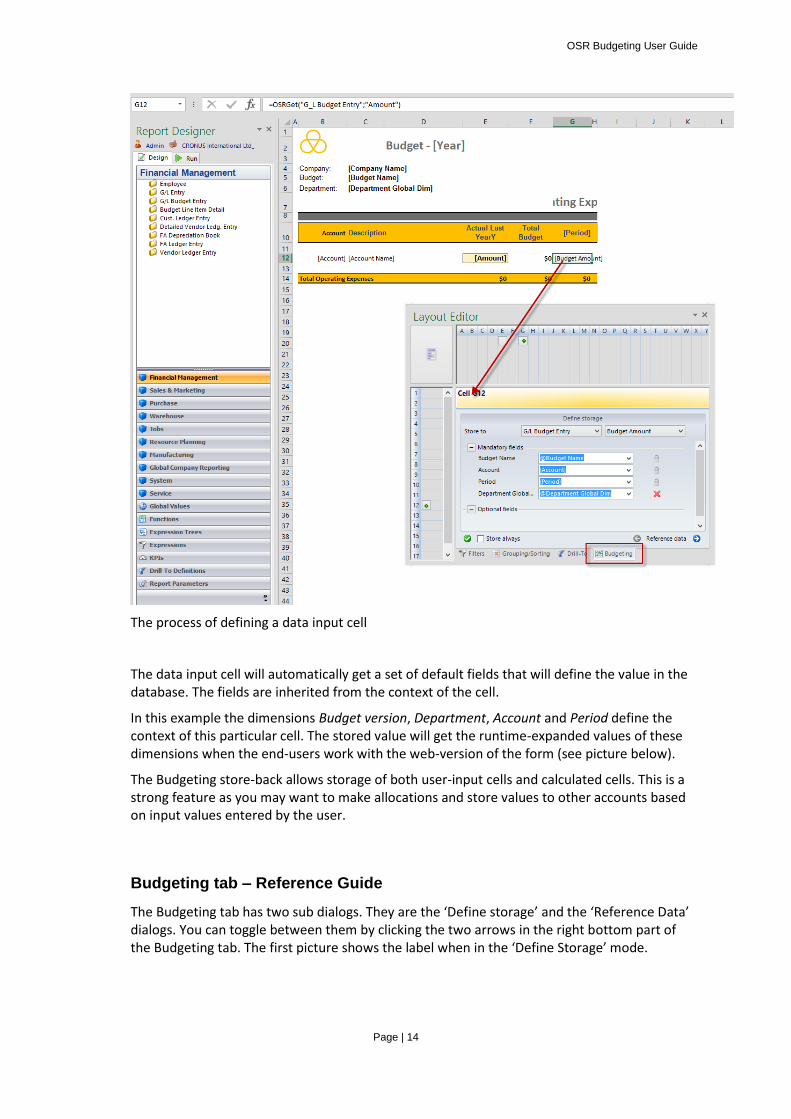
The picture below illustrates the definition of storage of the value in a specific cell in the budget form:
OSR Budgeting User Guide
Page | 14
The process of defining a data input cell
The data input cell will automatically get a set of default fields that will define the value in the database. The fields are inherited from the context of the cell.
In this example the dimensions Budget version, Department, Account and Period define the context of this particular cell. The stored value will get the runtime-expanded values of these dimensions when the end-users work with the web-version of the form (see picture below).
The Budgeting store-back allows storage of both user-input cells and calculated cells. This is a strong feature as you may want to make allocations and store values to other accounts based on input values entered by the user.
Budgeting tab – Reference Guide
The Budgeting tab has two sub dialogs. They are the ‘Define storage’ and the ‘Reference Data’ dialogs. You can toggle between them by clicking the two arrows in the right bottom part of the Budgeting tab. The first picture shows the label when in the ‘Define Storage’ mode.
OSR Budgeting User Guide
Page | 15
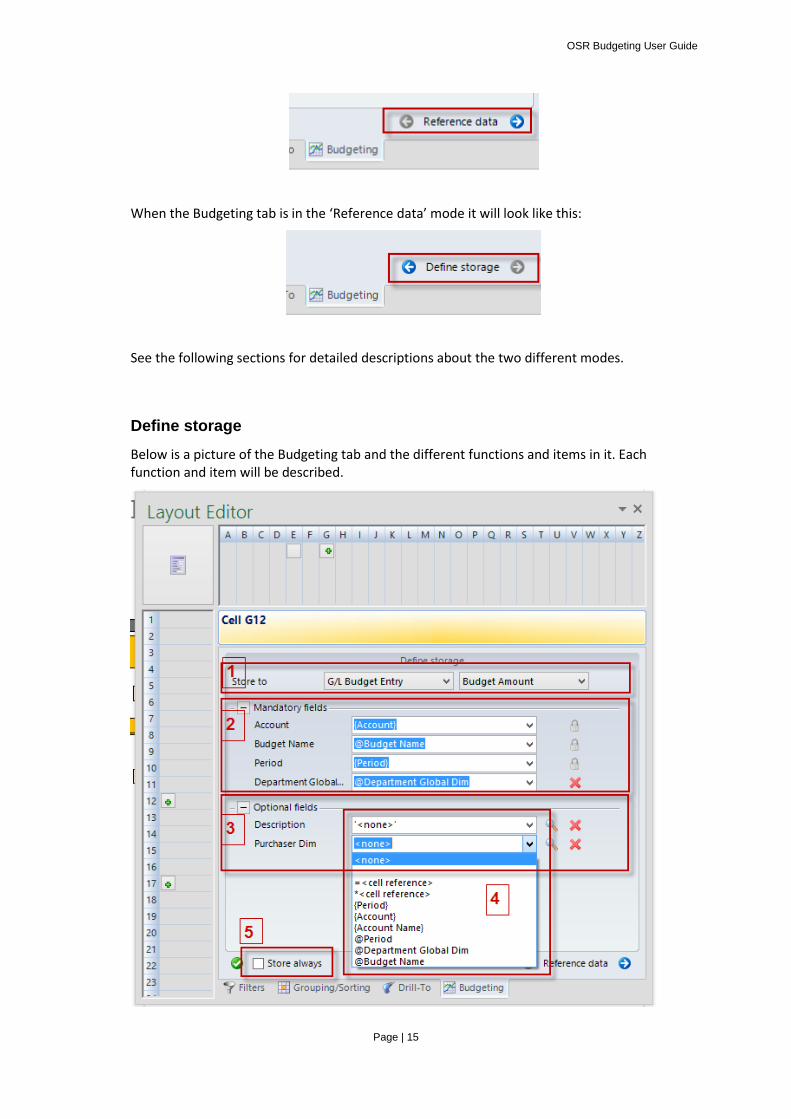
When the Budgeting tab is in the ‘Reference data’ mode it will look like this:
See the following sections for detailed descriptions about the two different modes.
Define storage
Below is a picture of the Budgeting tab and the different functions and items in it. Each function and item will be described.
OSR Budgeting User Guide
Page | 16
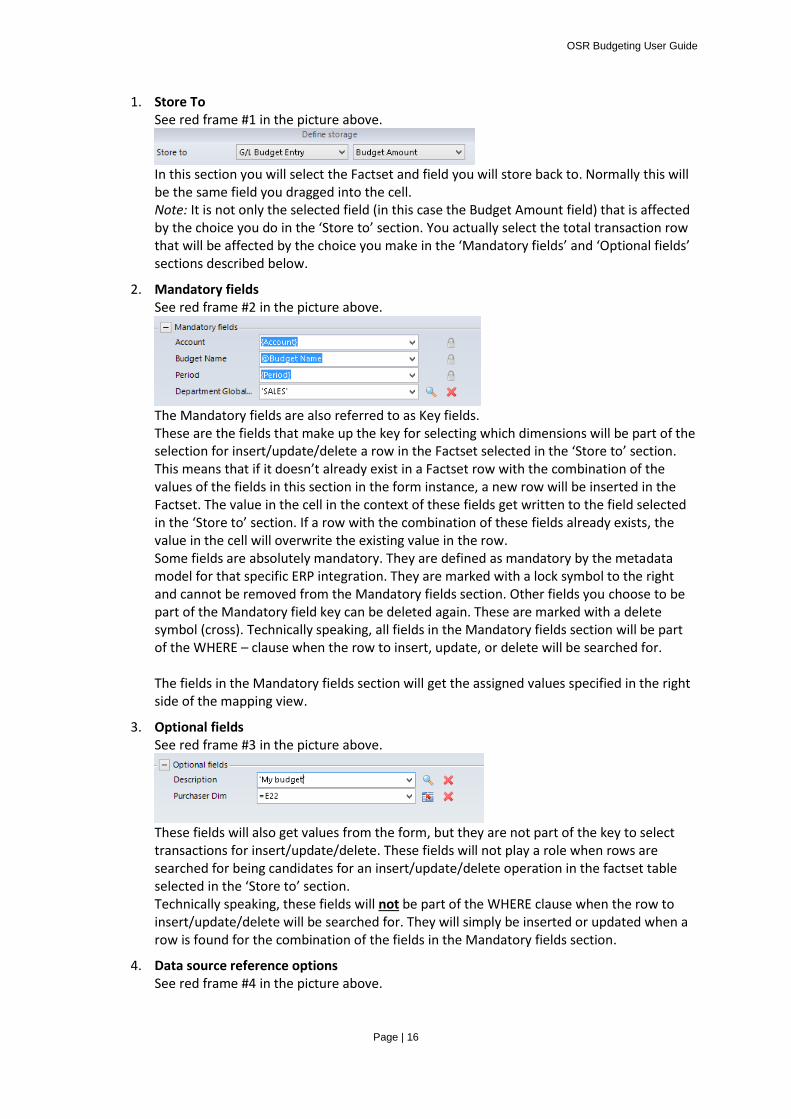
1. Store To See red frame #1 in the picture above.
In this section you will select the Factset and field you will store back to. Normally this will be the same field you dragged into the cell. Note: It is not only the selected field (in this case the Budget Amount field) that is affected by the choice you do in the ‘Store to’ section. You actually select the total transaction row that will be affected by the choice you make in the ‘Mandatory fields’ and ‘Optional fields’ sections described below.
2. Mandatory fields See red frame #2 in the picture above.
The Mandatory fields are also referred to as Key fields. These are the fields that make up the key for selecting which dimensions will be part of the selection for insert/update/delete a row in the Factset selected in the ‘Store to’ section. This means that if it doesn’t already exist in a Factset row with the combination of the values of the fields in this section in the form instance, a new row will be inserted in the Factset. The value in the cell in the context of these fields get written to the field selected in the ‘Store to’ section. If a row with the combination of these fields already exists, the value in the cell will overwrite the existing value in the row. Some fields are absolutely mandatory. They are defined as mandatory by the metadata model for that specific ERP integration. They are marked with a lock symbol to the right and cannot be removed from the Mandatory fields section. Other fields you choose to be part of the Mandatory field key can be deleted again. These are marked with a delete symbol (cross). Technically speaking, all fields in the Mandatory fields section will be part of the WHERE – clause when the row to insert, update, or delete will be searched for. The fields in the Mandatory fields section will get the assigned values specified in the right side of the mapping view.
3. Optional fields See red frame #3 in the picture above.
These fields will also get values from the form, but they are not part of the key to select transactions for insert/update/delete. These fields will not play a role when rows are searched for being candidates for an insert/update/delete operation in the factset table selected in the ‘Store to’ section. Technically speaking, these fields will not be part of the WHERE clause when the row to insert/update/delete will be searched for. They will simply be inserted or updated when a row is found for the combination of the fields in the Mandatory fields section.
4. Data source reference options See red frame #4 in the picture above.
OSR Budgeting User Guide
Page | 17
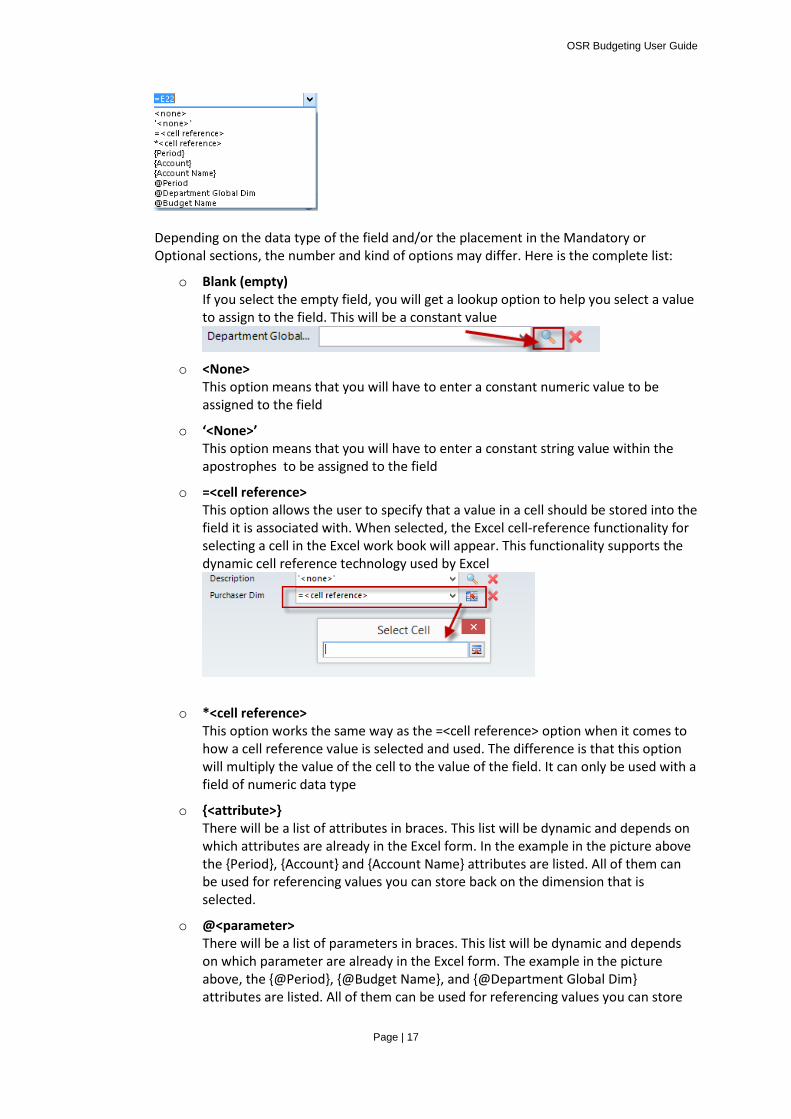
Depending on the data type of the field and/or the placement in the Mandatory or Optional sections, the number and kind of options may differ. Here is the complete list:
o Blank (empty) If you select the empty field, you will get a lookup option to help you select a value to assign to the field. This will be a constant value
o <None> This option means that you will have to enter a constant numeric value to be assigned to the field
o ‘<None>’ This option means that you will have to enter a constant string value within the apostrophes to be assigned to the field
o =<cell reference> This option allows the user to specify that a value in a cell should be stored into the field it is associated with. When selected, the Excel cell-reference functionality for selecting a cell in the Excel work book will appear. This functionality supports the dynamic cell reference technology used by Excel
o *<cell reference> This option works the same way as the =<cell reference> option when it comes to how a cell reference value is selected and used. The difference is that this option will multiply the value of the cell to the value of the field. It can only be used with a field of numeric data type
o {<attribute>} There will be a list of attributes in braces. This list will be dynamic and depends on which attributes are already in the Excel form. In the example in the picture above the {Period}, {Account} and {Account Name} attributes are listed. All of them can be used for referencing values you can store back on the dimension that is selected.
o @<parameter> There will be a list of parameters in braces. This list will be dynamic and depends on which parameter are already in the Excel form. The example in the picture above, the {@Period}, {@Budget Name}, and {@Department Global Dim} attributes are listed. All of them can be used for referencing values you can store
OSR Budgeting User Guide
Page | 18
back on the dimension that is selected.
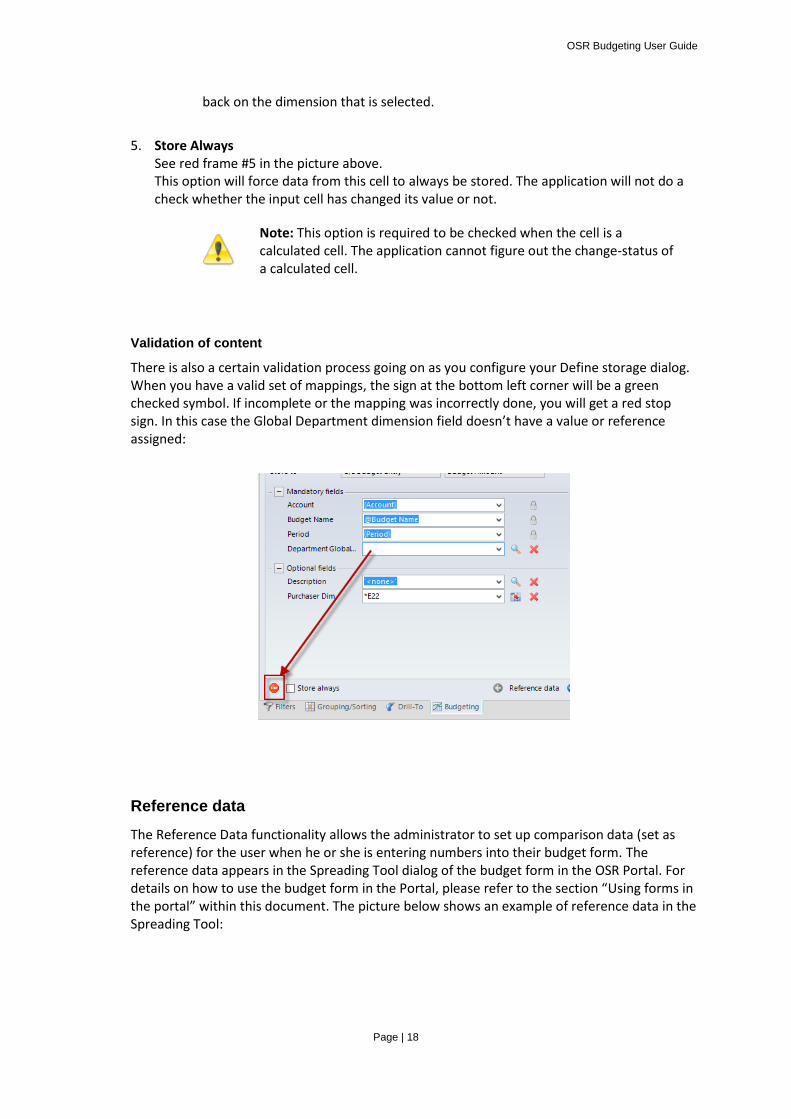
5. Store Always See red frame #5 in the picture above. This option will force data from this cell to always be stored. The application will not do a check whether the input cell has changed its value or not.
Note: This option is required to be checked when the cell is a calculated cell. The application cannot figure out the change-status of a calculated cell.
Validation of content
There is also a certain validation process going on as you configure your Define storage dialog. When you have a valid set of mappings, the sign at the bottom left corner will be a green checked symbol. If incomplete or the mapping was incorrectly done, you will get a red stop sign. In this case the Global Department dimension field doesn’t have a value or reference assigned:
Reference data
The Reference Data functionality allows the administrator to set up comparison data (set as reference) for the user when he or she is entering numbers into their budget form. The reference data appears in the Spreading Tool dialog of the budget form in the OSR Portal. For details on how to use the budget form in the Portal, please refer to the section “Using forms in the portal” within this document. The picture below shows an example of reference data in the Spreading Tool:
OSR Budgeting User Guide
Page | 19
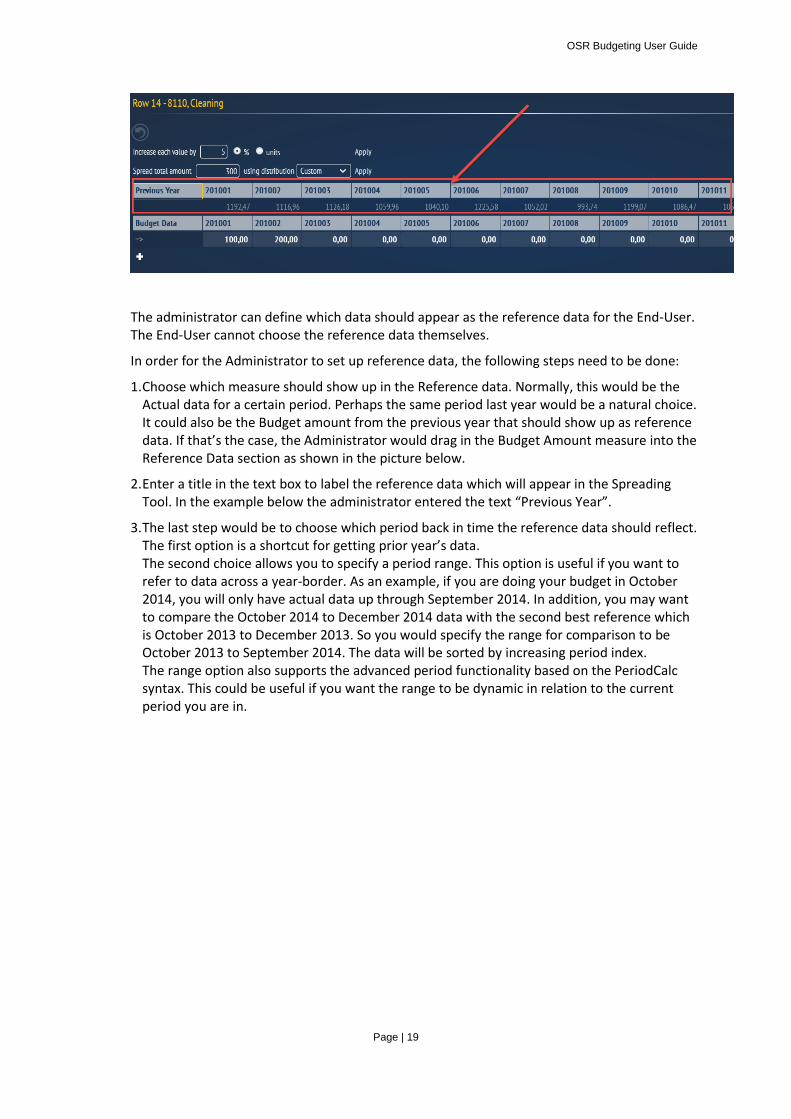
The administrator can define which data should appear as the reference data for the End-User. The End-User cannot choose the reference data themselves.
In order for the Administrator to set up reference data, the following steps need to be done:
1. Choose which measure should show up in the Reference data. Normally, this would be the Actual data for a certain period. Perhaps the same period last year would be a natural choice. It could also be the Budget amount from the previous year that should show up as reference data. If that’s the case, the Administrator would drag in the Budget Amount measure into the Reference Data section as shown in the picture below.
2. Enter a title in the text box to label the reference data which will appear in the Spreading Tool. In the example below the administrator entered the text “Previous Year”.
3. The last step would be to choose which period back in time the reference data should reflect. The first option is a shortcut for getting prior year’s data. The second choice allows you to specify a period range. This option is useful if you want to refer to data across a year-border. As an example, if you are doing your budget in October 2014, you will only have actual data up through September 2014. In addition, you may want to compare the October 2014 to December 2014 data with the second best reference which is October 2013 to December 2013. So you would specify the range for comparison to be October 2013 to September 2014. The data will be sorted by increasing period index. The range option also supports the advanced period functionality based on the PeriodCalc syntax. This could be useful if you want the range to be dynamic in relation to the current period you are in.
OSR Budgeting User Guide
Page | 20
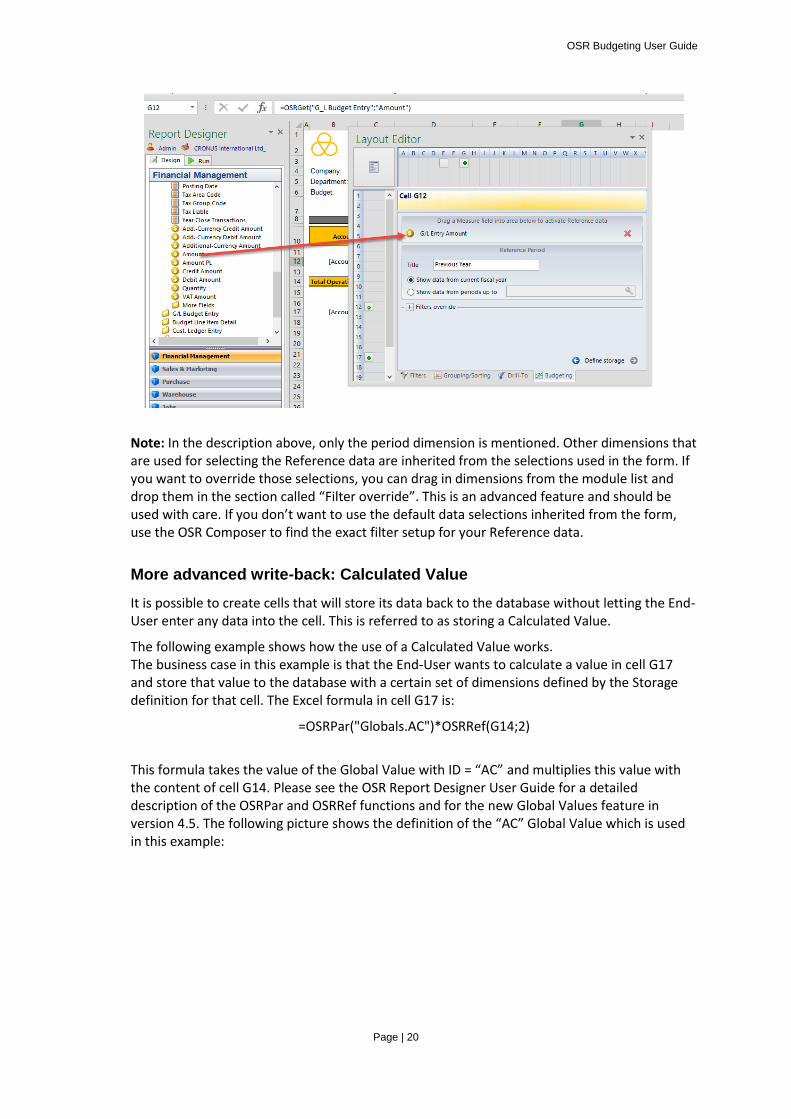
Note: In the description above, only the period dimension is mentioned. Other dimensions that are used for selecting the Reference data are inherited from the selections used in the form. If you want to override those selections, you can drag in dimensions from the module list and drop them in the section called “Filter override”. This is an advanced feature and should be used with care. If you don’t want to use the default data selections inherited from the form, use the OSR Composer to find the exact filter setup for your Reference data.
More advanced write-back: Calculated Value
It is possible to create cells that will store its data back to the database without letting the End-User enter any data into the cell. This is referred to as storing a Calculated Value.
The following example shows how the use of a Calculated Value works. The business case in this example is that the End-User wants to calculate a value in cell G17 and store that value to the database with a certain set of dimensions defined by the Storage definition for that cell. The Excel formula in cell G17 is:
=OSRPar("Globals.AC")*OSRRef(G14;2)
This formula takes the value of the Global Value with ID = “AC” and multiplies this value with the content of cell G14. Please see the OSR Report Designer User Guide for a detailed description of the OSRPar and OSRRef functions and for the new Global Values feature in version 4.5. The following picture shows the definition of the “AC” Global Value which is used in this example:

OSR Budgeting User Guide
Page | 21
In row 17 in the Form definition, we see that the author has defined a filter for Account 5800:
If we take a look at the Storage definition for the cell in G17 we see the following:
OSR Budgeting User Guide
Page | 22
The value calculated in Cell G17 will be stored into the Budget Amount field in the G/L Budget Entry transaction table along with the dimensions’ values taken from the form instance context values for each dimension:
Account: Inherited from the Account specification at the row level. In this case it will always be account 5800 since the instance will only generate one row for Account 5800.
Budget Name: Inherited from the @Budget Name parameter at the Sheet level
Period: Inherited from the Column in the executed form instance.
Department: Inherited from the @Department Global Dim at the Sheet level
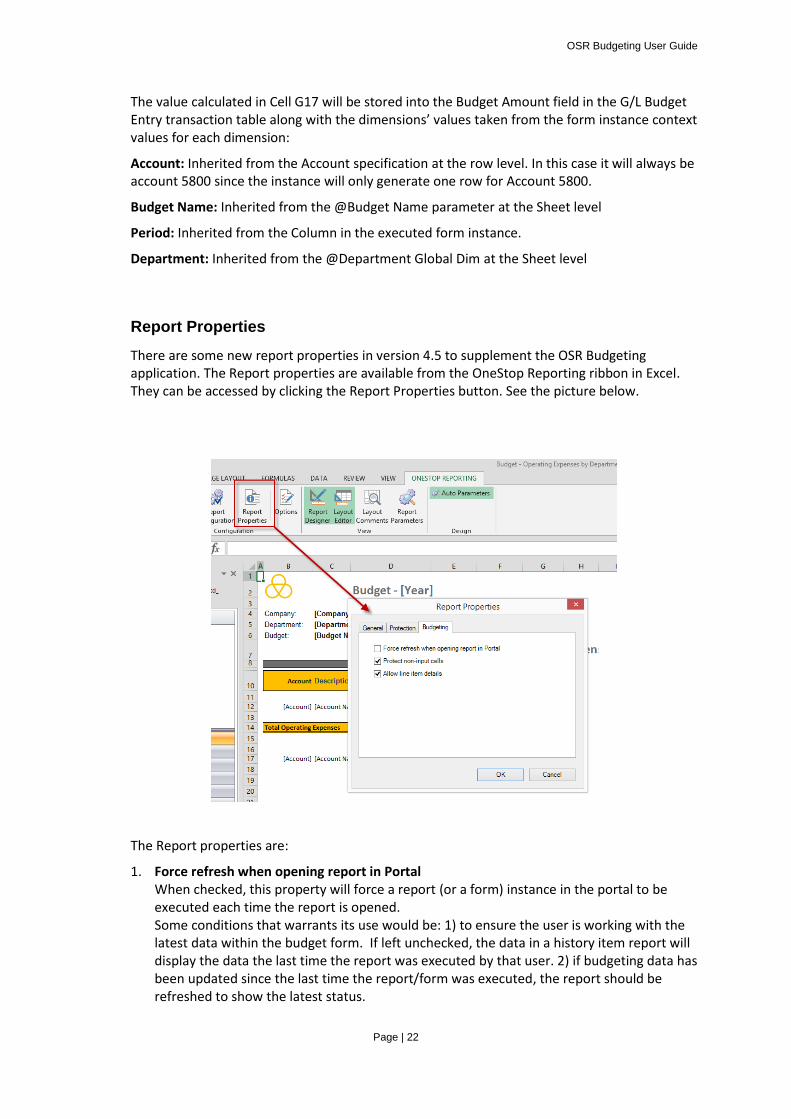
Report Properties
There are some new report properties in version 4.5 to supplement the OSR Budgeting application. The Report properties are available from the OneStop Reporting ribbon in Excel. They can be accessed by clicking the Report Properties button. See the picture below.
The Report properties are:
1. Force refresh when opening report in Portal When checked, this property will force a report (or a form) instance in the portal to be executed each time the report is opened. Some conditions that warrants its use would be: 1) to ensure the user is working with the latest data within the budget form. If left unchecked, the data in a history item report will display the data the last time the report was executed by that user. 2) if budgeting data has been updated since the last time the report/form was executed, the report should be refreshed to show the latest status.
OSR Budgeting User Guide
Page | 23
Note: Checking this property means that the execution will also happen when clicking on a history item (previously run report) in the left menu of the report page in the Portal. You should keep this in mind if reports are heavy and takes a long time to run.
2. Protect non-input cells When checked, this automatically protects all cells that do not have a Budgeting – Define storage rule set when uploading to the OSR Portal. This means that End-users will be prevented from editing cells requiring data input. For advanced budgeting forms having a combination of Storage rules with cells requiring user input and/or cells with calculated values where input is not required, you will need to use Excel functionality to protect the sheet and unlocking input cells. To do this, uncheck the automatic OSR protection property.
3. Allow Line Item Detail The OSR Budgeting module allows for specifying line item details of budget transactions. For example, as an administrator, you would like the End-user to specify additional details about travel expenses. To enable this, you need to make sure this option is checked. Please see the section about using OSR Budgeting as an End-user for more details on how the Line Item Detail functionality is used.
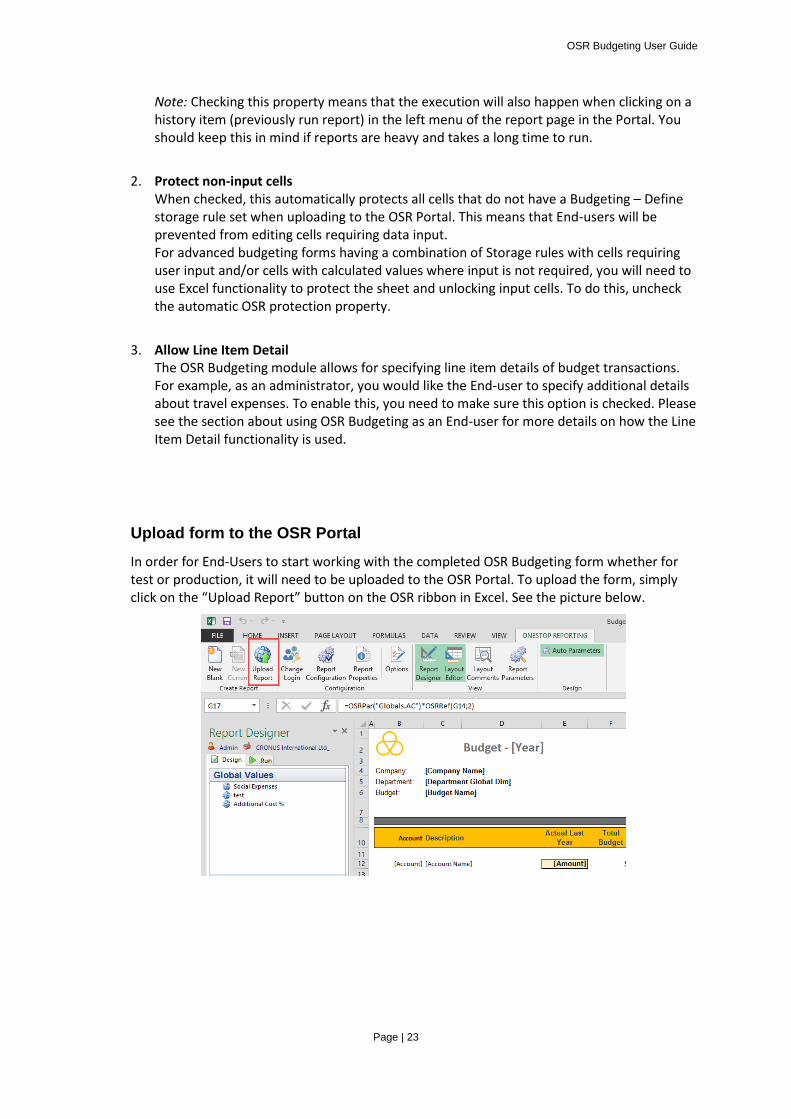
Upload form to the OSR Portal
In order for End-Users to start working with the completed OSR Budgeting form whether for test or production, it will need to be uploaded to the OSR Portal. To upload the form, simply click on the “Upload Report” button on the OSR ribbon in Excel. See the picture below.
OSR Budgeting User Guide
Page | 24
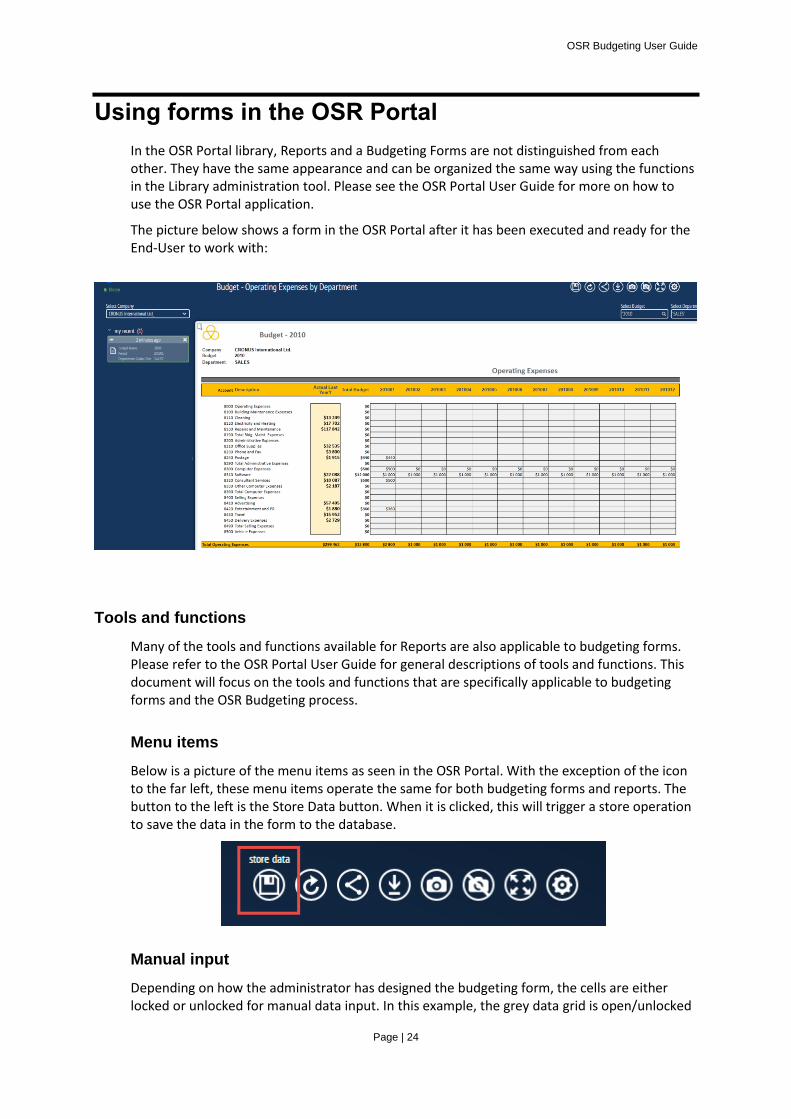
Using forms in the OSR Portal
In the OSR Portal library, Reports and a Budgeting Forms are not distinguished from each other. They have the same appearance and can be organized the same way using the functions in the Library administration tool. Please see the OSR Portal User Guide for more on how to use the OSR Portal application.
The picture below shows a form in the OSR Portal after it has been executed and ready for the End-User to work with:
Tools and functions
Many of the tools and functions available for Reports are also applicable to budgeting forms. Please refer to the OSR Portal User Guide for general descriptions of tools and functions. This document will focus on the tools and functions that are specifically applicable to budgeting forms and the OSR Budgeting process.
Menu items
Below is a picture of the menu items as seen in the OSR Portal. With the exception of the icon to the far left, these menu items operate the same for both budgeting forms and reports. The button to the left is the Store Data button. When it is clicked, this will trigger a store operation to save the data in the form to the database.
Manual input
Depending on how the administrator has designed the budgeting form, the cells are either locked or unlocked for manual data input. In this example, the grey data grid is open/unlocked
OSR Budgeting User Guide
Page | 25
for manual data input. The End-User can position the cursor in one of the cells and enter the budget amount they want. The picture below shows a cell having been selected for input with an entered value of 1000.
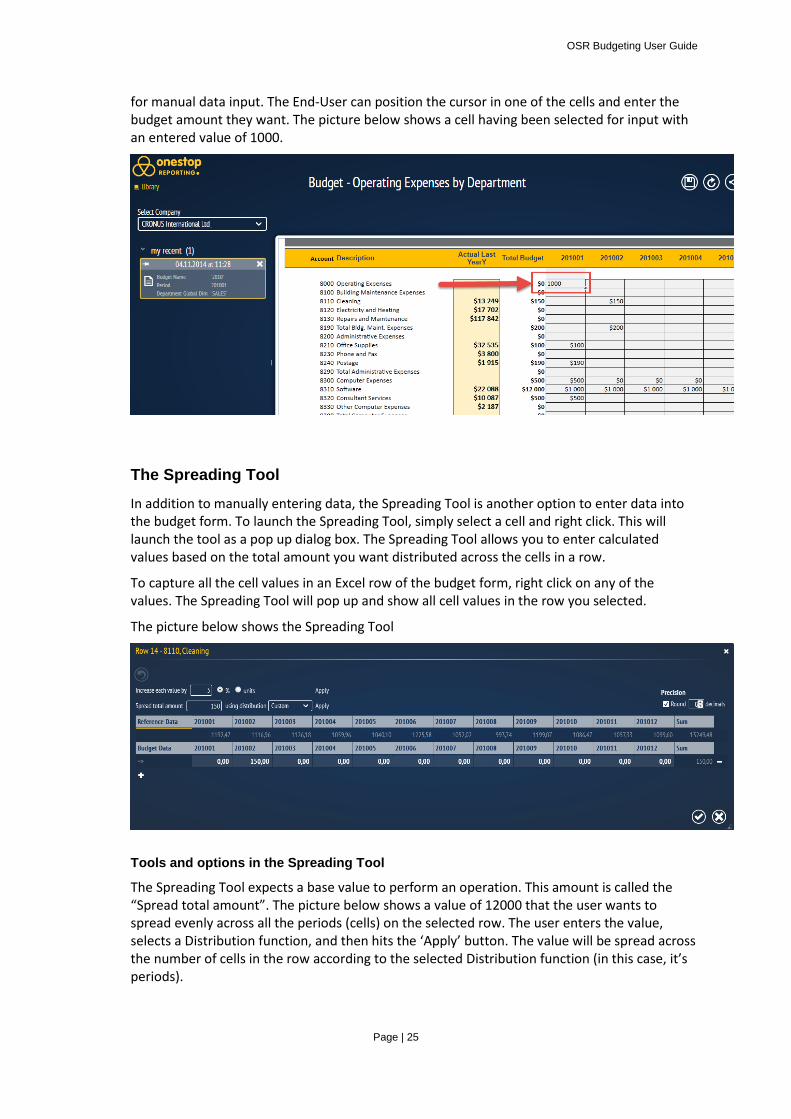
The Spreading Tool
In addition to manually entering data, the Spreading Tool is another option to enter data into the budget form. To launch the Spreading Tool, simply select a cell and right click. This will launch the tool as a pop up dialog box. The Spreading Tool allows you to enter calculated values based on the total amount you want distributed across the cells in a row.
To capture all the cell values in an Excel row of the budget form, right click on any of the values. The Spreading Tool will pop up and show all cell values in the row you selected.
The picture below shows the Spreading Tool
Tools and options in the Spreading Tool
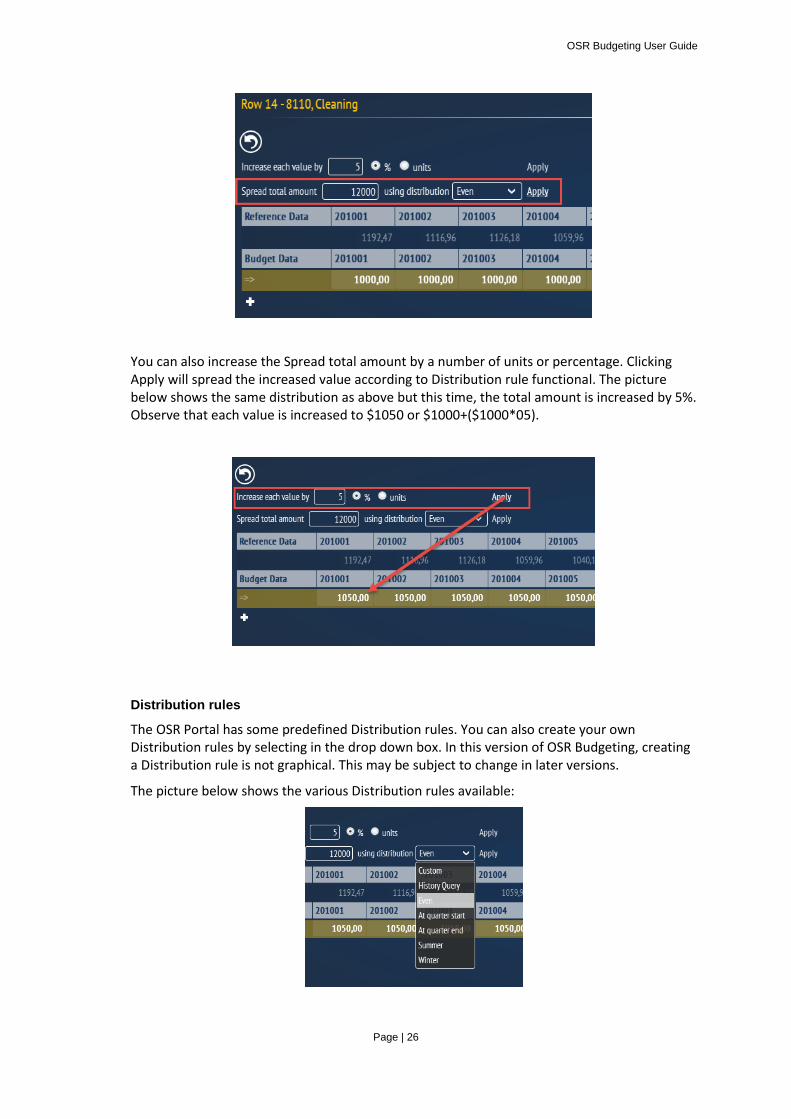
The Spreading Tool expects a base value to perform an operation. This amount is called the “Spread total amount”. The picture below shows a value of 12000 that the user wants to spread evenly across all the periods (cells) on the selected row. The user enters the value, selects a Distribution function, and then hits the ‘Apply’ button. The value will be spread across the number of cells in the row according to the selected Distribution function (in this case, it’s periods).
OSR Budgeting User Guide
Page | 26
You can also increase the Spread total amount by a number of units or percentage. Clicking Apply will spread the increased value according to Distribution rule functional. The picture below shows the same distribution as above but this time, the total amount is increased by 5%. Observe that each value is increased to $1050 or $1000+($1000*05).
Distribution rules
The OSR Portal has some predefined Distribution rules. You can also create your own Distribution rules by selecting in the drop down box. In this version of OSR Budgeting, creating a Distribution rule is not graphical. This may be subject to change in later versions.
The picture below shows the various Distribution rules available:
OSR Budgeting User Guide
Page | 27
To create your own Distribution rules please follow this procedure:
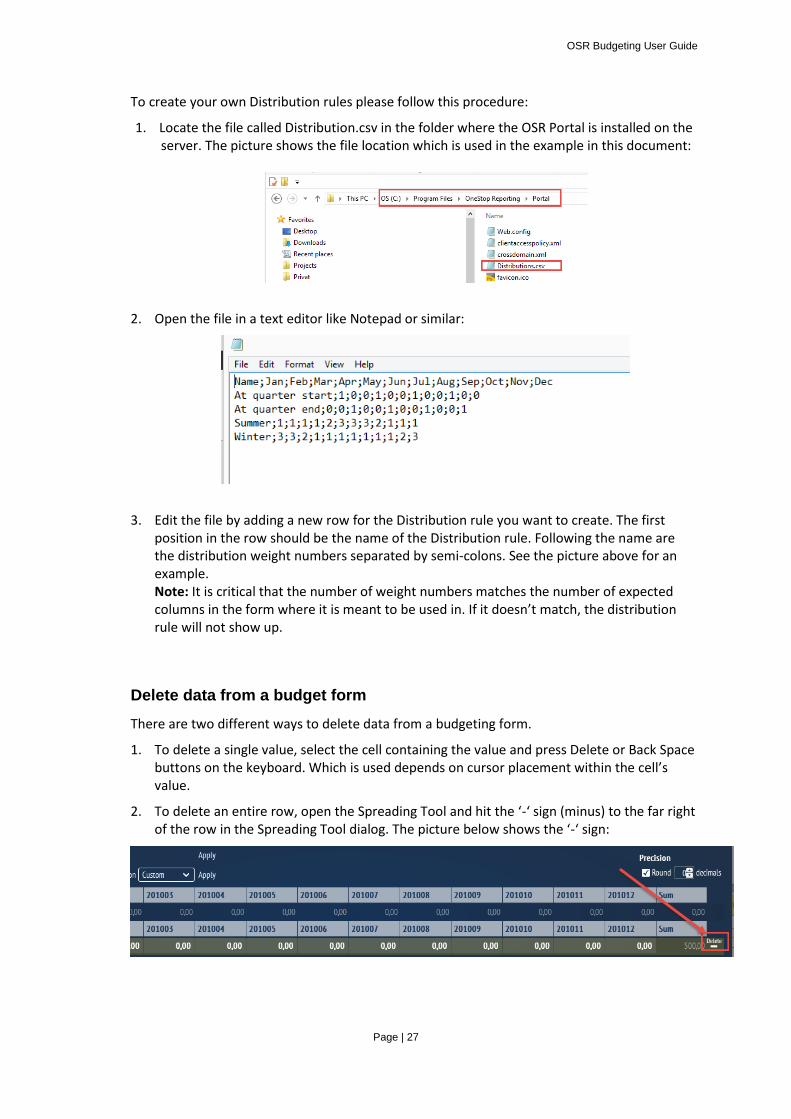
1. Locate the file called Distribution.csv in the folder where the OSR Portal is installed on the server. The picture shows the file location which is used in the example in this document:
2. Open the file in a text editor like Notepad or similar:
3. Edit the file by adding a new row for the Distribution rule you want to create. The first position in the row should be the name of the Distribution rule. Following the name are the distribution weight numbers separated by semi-colons. See the picture above for an example. Note: It is critical that the number of weight numbers matches the number of expected columns in the form where it is meant to be used in. If it doesn’t match, the distribution rule will not show up.
Delete data from a budget form
There are two different ways to delete data from a budgeting form.
1. To delete a single value, select the cell containing the value and press Delete or Back Space buttons on the keyboard. Which is used depends on cursor placement within the cell’s value.
2. To delete an entire row, open the Spreading Tool and hit the ‘-‘ sign (minus) to the far right of the row in the Spreading Tool dialog. The picture below shows the ‘-‘ sign:

OSR Budgeting User Guide
Page | 28
Line Item Detail
The Line Item Detail functionality is found within the Spreading Tool dialog pop up. It allows the user to specify more details on the same dimension value. For example, the user may want to specify a detailed list of expenses on the same account. To do so, simply right click the cell in the budget form you want to specify additional details for. The picture below shows the Spreading Tool dialog where you can create Line Item Details for account “8310 Software”.
Clicking the ‘+’ sign will create a new line under the “Budget Data” section. The picture below shows two new additional lines:
You can enter as many detail lines as you wish. Click the ‘+’ sign for each new line you want to add. The amount you enter into the cell will add up to the total amount shown for Budget Data. You can also enter a comment for each cell of the detailed specifications as shown in the picture above.
OSR Budgeting User Guide
Page | 29
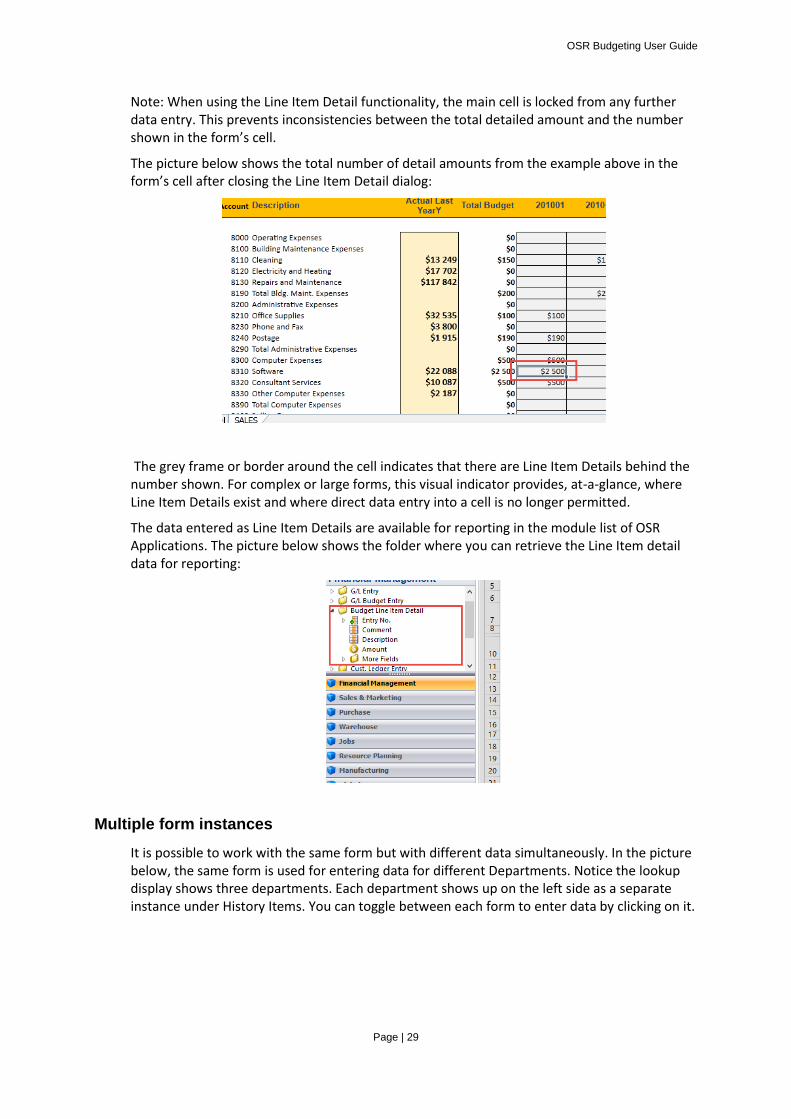
Note: When using the Line Item Detail functionality, the main cell is locked from any further data entry. This prevents inconsistencies between the total detailed amount and the number shown in the form’s cell.
The picture below shows the total number of detail amounts from the example above in the form’s cell after closing the Line Item Detail dialog:
The grey frame or border around the cell indicates that there are Line Item Details behind the number shown. For complex or large forms, this visual indicator provides, at-a-glance, where Line Item Details exist and where direct data entry into a cell is no longer permitted.
The data entered as Line Item Details are available for reporting in the module list of OSR Applications. The picture below shows the folder where you can retrieve the Line Item detail data for reporting:
Multiple form instances
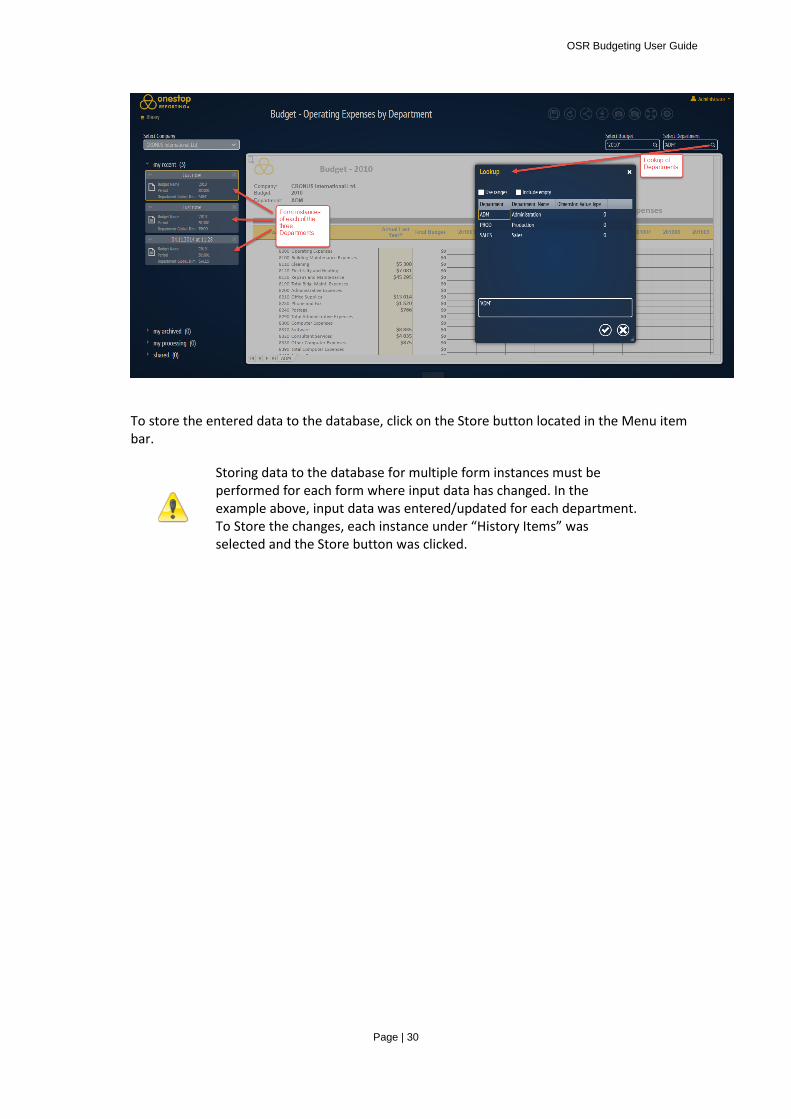
It is possible to work with the same form but with different data simultaneously. In the picture below, the same form is used for entering data for different Departments. Notice the lookup display shows three departments. Each department shows up on the left side as a separate instance under History Items. You can toggle between each form to enter data by clicking on it.
OSR Budgeting User Guide
Page | 30
To store the entered data to the database, click on the Store button located in the Menu item bar.
Storing data to the database for multiple form instances must be performed for each form where input data has changed. In the example above, input data was entered/updated for each department. To Store the changes, each instance under “History Items” was selected and the Store button was clicked.
OSR Budgeting User Guide
Page | 31
Data Manager
Introduction
The OSR Portal version 4.5 offers an application to maintain data in the database through a web-based user-interface.
The Data Manager is available for the following deployments of the OSR Portal application:
1. For customers using the OSR Data Warehouse or BI360 Data Warehouse
2. For customers using the OSR Budgeting module and the direct write-back functionality (available for certain supported ERP Systems).
Access to the Data Manager is controlled by the permission system in OSR Administration application: Security Management -> Access Management and is set on Role level. There are more details in the section, Permissions and Rights, further down.
The use of the Data Manager
As mentioned in the Introduction, the Data Manager is available for the following deployments:
1. For customers using the OSR Data Warehouse or BI360 Data Warehouse. Users having the rights and permissions to use the OSR Data Manager, all tables in the OSR Data Warehouse will be available for Insert/Update/Delete of data through a web-based grid control. In this version of the OSR Data Manager, only simple manual editing of data is possible. Import/Export functionality is not available. This will be added in later versions of the application.
2. For customers using the OSR Budgeting module and the direct write-back functionality (available for certain supported ERP Systems). The Data Manager allows the user to add additional properties to specific tables called Extension tables. See the OSR Budgeting User Guide and Release Notes for which ERP systems are supported for direct write-back of budgeting data into the ERP systems’ budgeting tables.
Extension tables
Many of the ERP systems don’t have enough properties in the Account and Employee master data (dimensions) to create a full budgeting model which may include expense and payroll budgeting. Extension tables have been introduced to enable the storage of such properties. Please refer to the OSR Budgeting User Guide for an overview of the different components of the OSR Budgeting product offering.
The Data Manager offers editing of Extension table data in the following dimensions:
Chart of Accounts
Employees
Budget Models/Versions
In addition, the Data Manager offers editing of the budget transactions that has been entered using the OSR Budgeting application. Please refer to the OSR Budgeting User Guide for how budgeting forms are created and used.
OSR Budgeting User Guide
Page | 32
Extension tables are OSR tables inserted into your ERP system database during an OSR Budgeting setup and configuration process performed by the administrator. Please refer to the OSR Administration User Guide for more information on how this works.
Note : It is important to note that the Extension concept does not allow the user to change the ERP systems’ data by any means. It is only the OSR Extended properties that can be edited. It is not possible to add, change, or delete Accounts or Employees in the ERP system using the Data Manager.
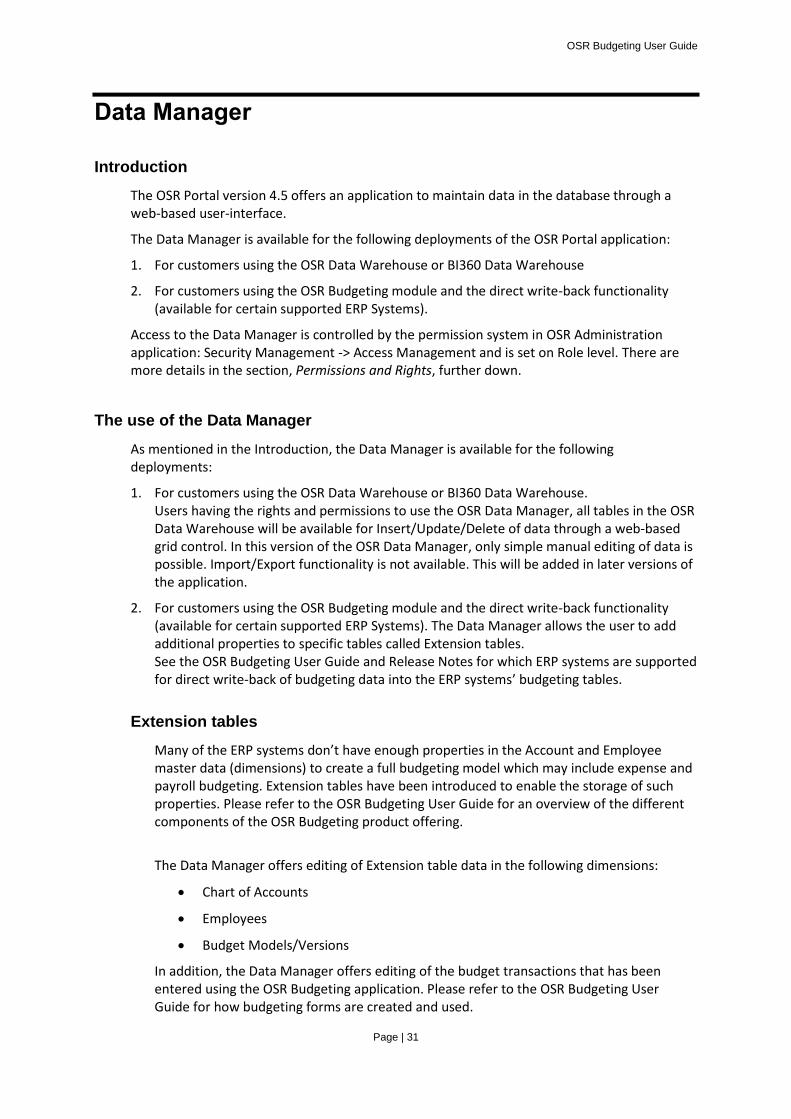
How to access Data Manager
The picture below shows how to access the OSR Data Manager in the OSR Portal. When logged into the system, simply click the User icon in the upper right corner to access the menu for launching the OSR Data Manager:
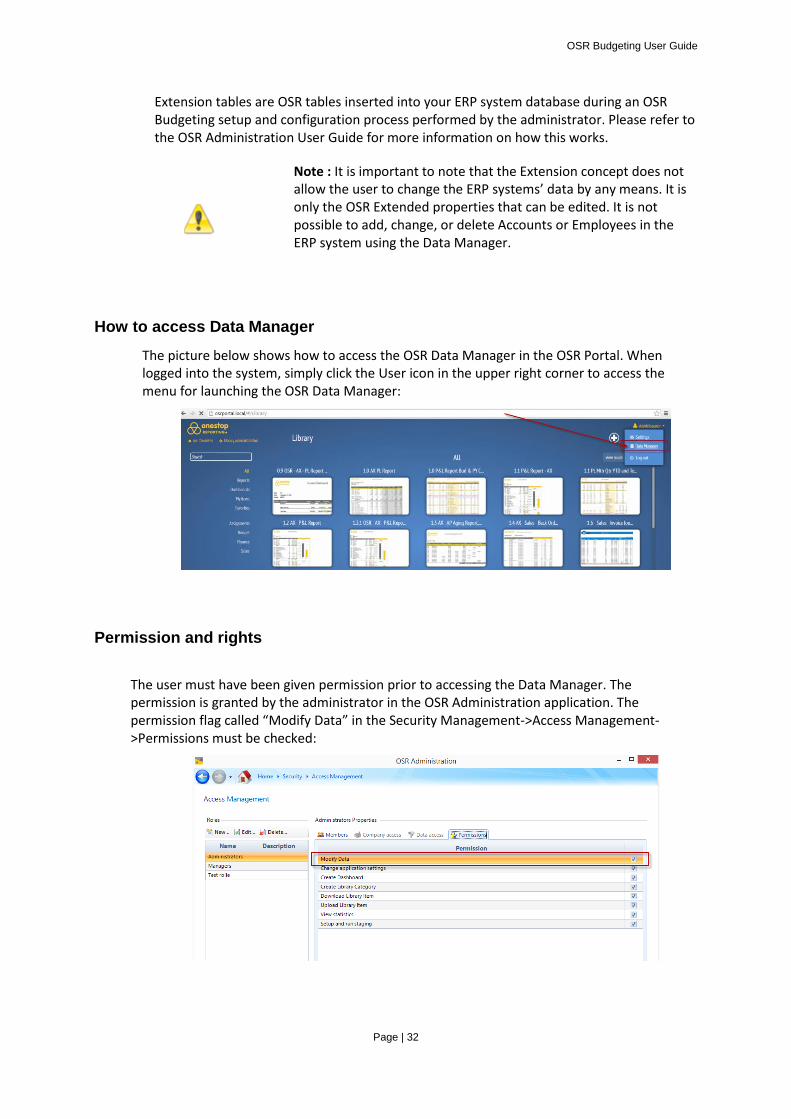
Permission and rights
The user must have been given permission prior to accessing the Data Manager. The permission is granted by the administrator in the OSR Administration application. The permission flag called “Modify Data” in the Security Management->Access Management->Permissions must be checked:
OSR Budgeting User Guide
Page | 33
Using the OSR Data Manager
This section describes how to use the Data Manager for the two different deployment scenarios.
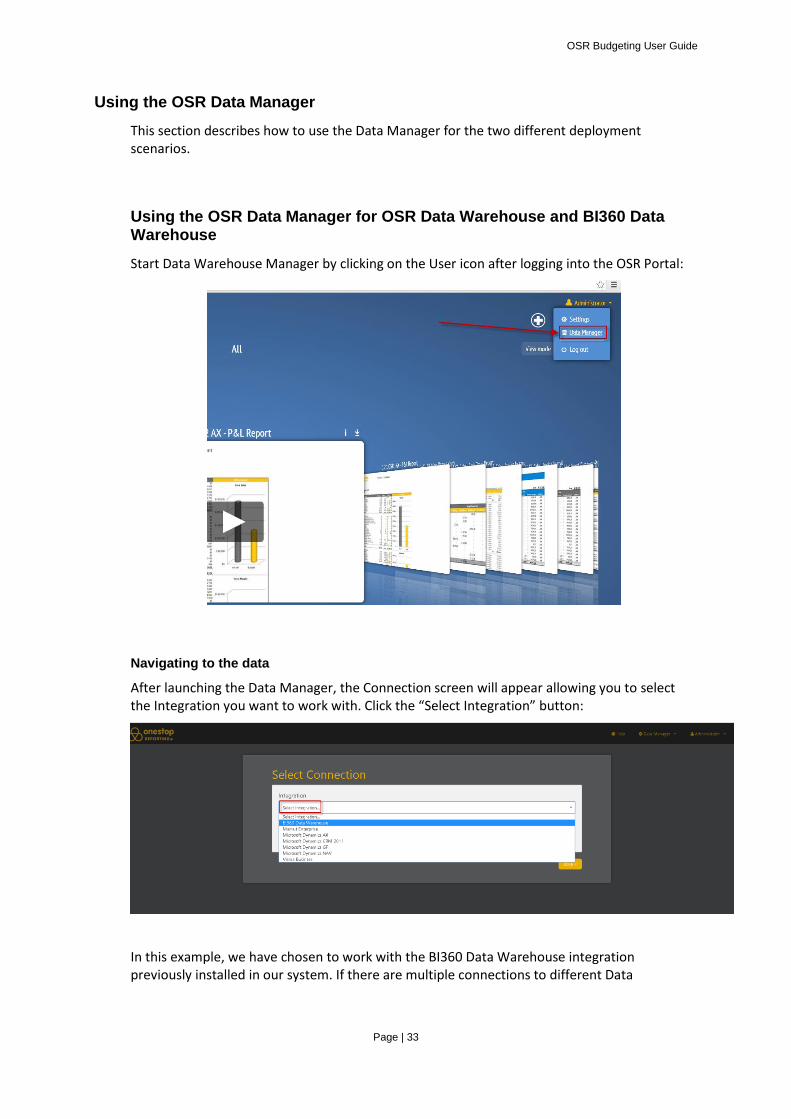
Using the OSR Data Manager for OSR Data Warehouse and BI360 Data Warehouse
Start Data Warehouse Manager by clicking on the User icon after logging into the OSR Portal:
Navigating to the data
After launching the Data Manager, the Connection screen will appear allowing you to select the Integration you want to work with. Click the “Select Integration” button:
In this example, we have chosen to work with the BI360 Data Warehouse integration previously installed in our system. If there are multiple connections to different Data
OSR Budgeting User Guide
Page | 34
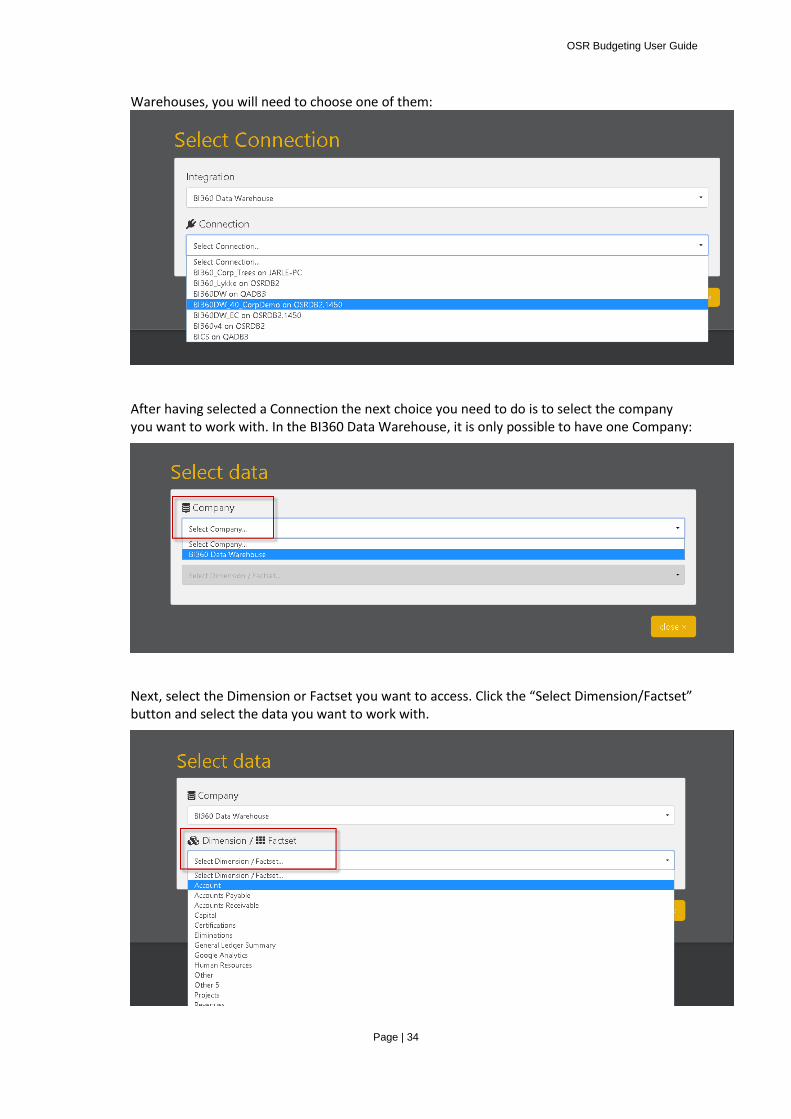
Warehouses, you will need to choose one of them:
After having selected a Connection the next choice you need to do is to select the company you want to work with. In the BI360 Data Warehouse, it is only possible to have one Company:
Next, select the Dimension or Factset you want to access. Click the “Select Dimension/Factset” button and select the data you want to work with.
OSR Budgeting User Guide
Page | 35
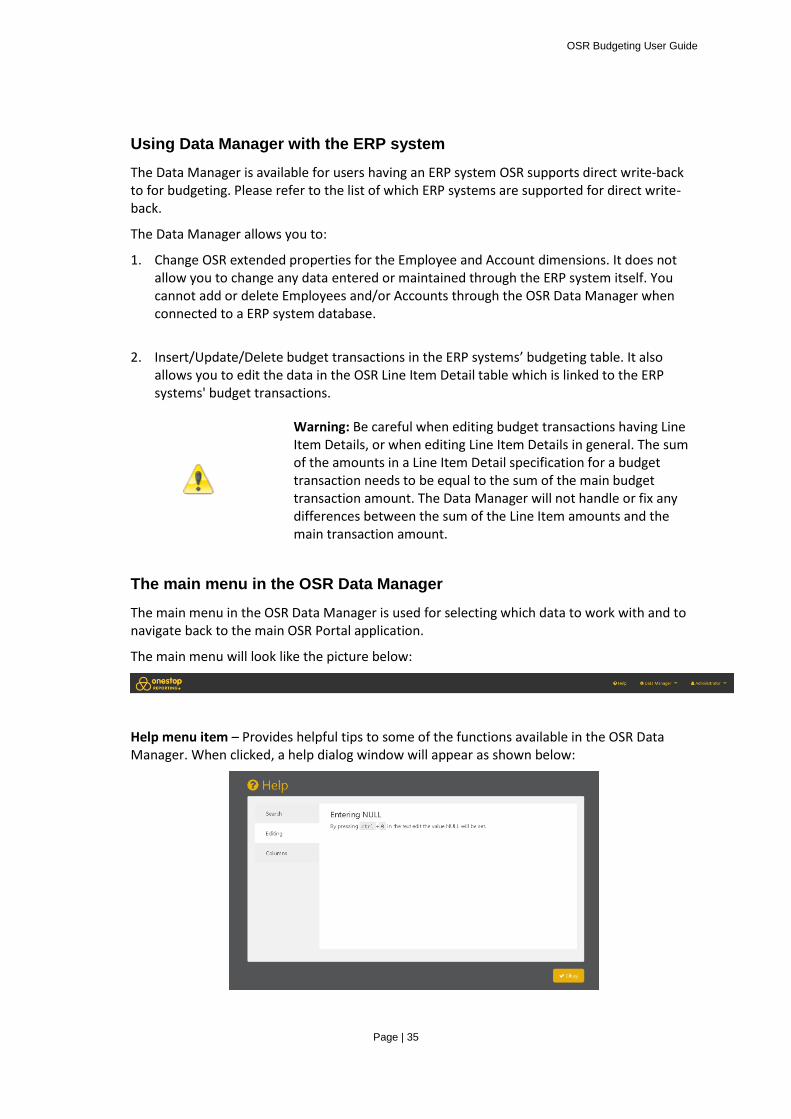
Using Data Manager with the ERP system
The Data Manager is available for users having an ERP system OSR supports direct write-back to for budgeting. Please refer to the list of which ERP systems are supported for direct write-back.
The Data Manager allows you to:
1. Change OSR extended properties for the Employee and Account dimensions. It does not allow you to change any data entered or maintained through the ERP system itself. You cannot add or delete Employees and/or Accounts through the OSR Data Manager when connected to a ERP system database.
2. Insert/Update/Delete budget transactions in the ERP systems’ budgeting table. It also allows you to edit the data in the OSR Line Item Detail table which is linked to the ERP systems' budget transactions.
Warning: Be careful when editing budget transactions having Line Item Details, or when editing Line Item Details in general. The sum of the amounts in a Line Item Detail specification for a budget transaction needs to be equal to the sum of the main budget transaction amount. The Data Manager will not handle or fix any differences between the sum of the Line Item amounts and the main transaction amount.
The main menu in the OSR Data Manager
The main menu in the OSR Data Manager is used for selecting which data to work with and to navigate back to the main OSR Portal application.
The main menu will look like the picture below:
Help menu item – Provides helpful tips to some of the functions available in the OSR Data Manager. When clicked, a help dialog window will appear as shown below:
OSR Budgeting User Guide
Page | 36
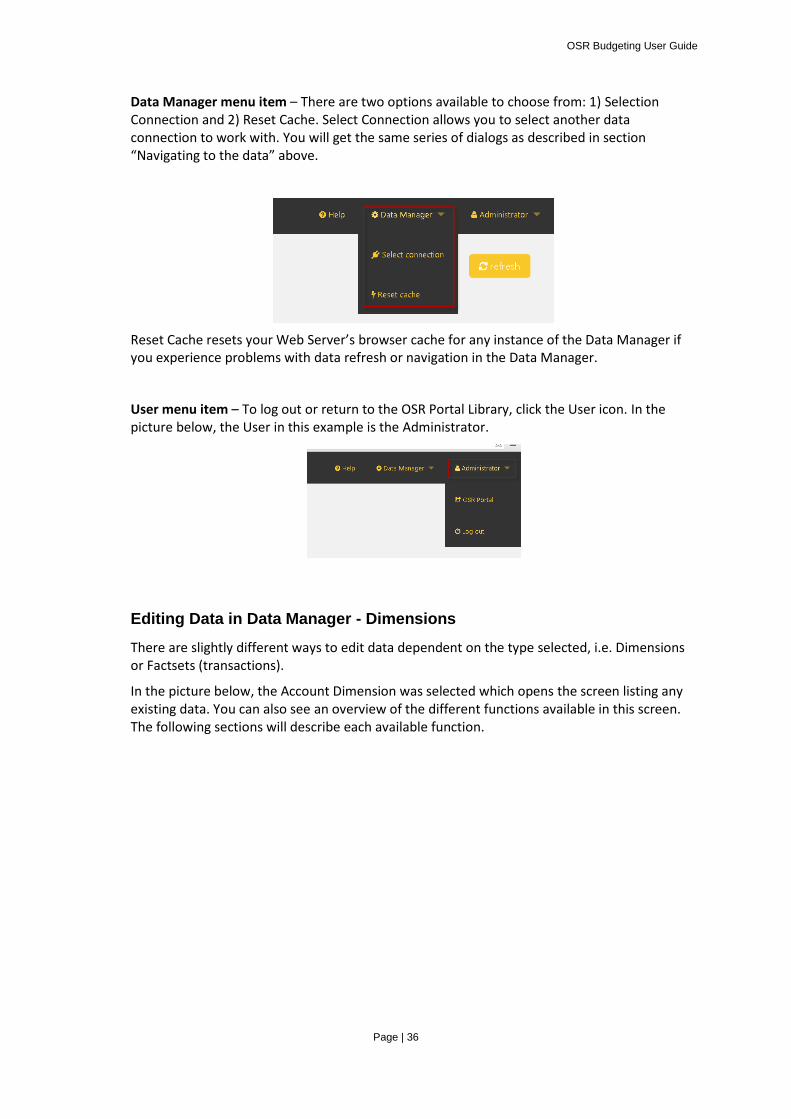
Data Manager menu item – There are two options available to choose from: 1) Selection Connection and 2) Reset Cache. Select Connection allows you to select another data connection to work with. You will get the same series of dialogs as described in section “Navigating to the data” above.
Reset Cache resets your Web Server’s browser cache for any instance of the Data Manager if you experience problems with data refresh or navigation in the Data Manager.
User menu item – To log out or return to the OSR Portal Library, click the User icon. In the picture below, the User in this example is the Administrator.
Editing Data in Data Manager - Dimensions
There are slightly different ways to edit data dependent on the type selected, i.e. Dimensions or Factsets (transactions).
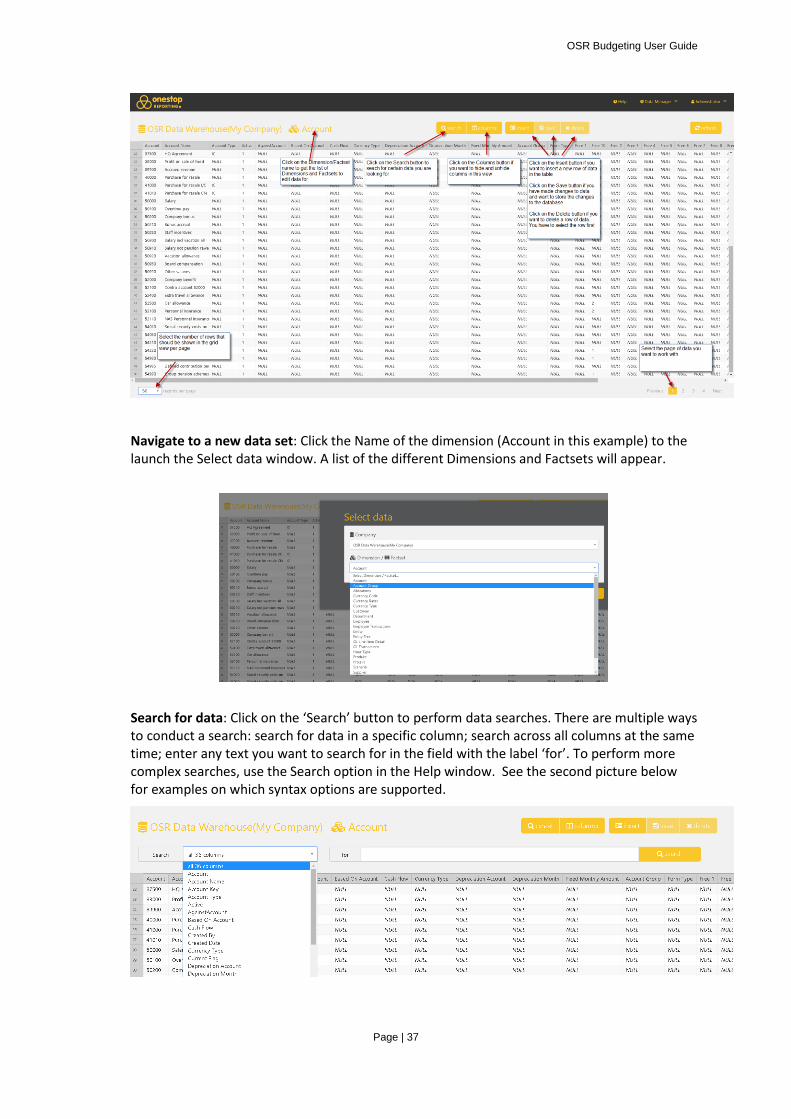
In the picture below, the Account Dimension was selected which opens the screen listing any existing data. You can also see an overview of the different functions available in this screen. The following sections will describe each available function.
OSR Budgeting User Guide
Page | 37
Navigate to a new data set: Click the Name of the dimension (Account in this example) to the launch the Select data window. A list of the different Dimensions and Factsets will appear.
Search for data: Click on the ‘Search’ button to perform data searches. There are multiple ways to conduct a search: search for data in a specific column; search across all columns at the same time; enter any text you want to search for in the field with the label ‘for’. To perform more complex searches, use the Search option in the Help window. See the second picture below for examples on which syntax options are supported.
OSR Budgeting User Guide
Page | 38
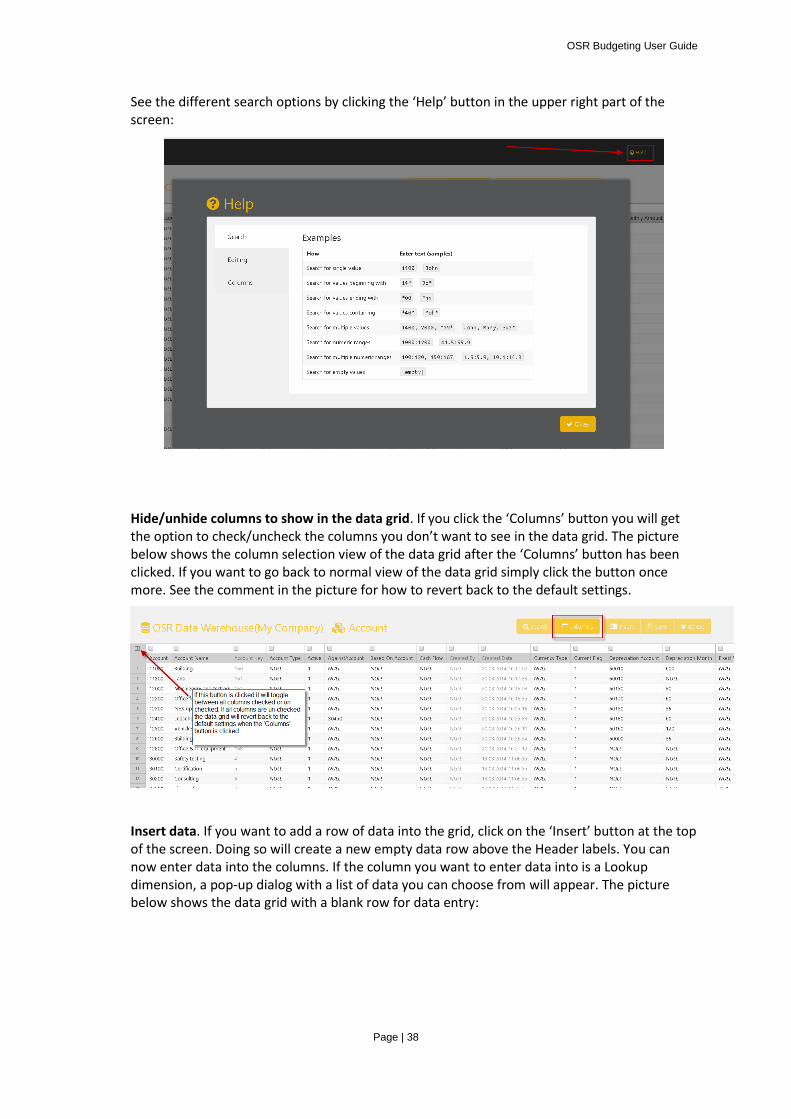
See the different search options by clicking the ‘Help’ button in the upper right part of the screen:
Hide/unhide columns to show in the data grid. If you click the ‘Columns’ button you will get the option to check/uncheck the columns you don’t want to see in the data grid. The picture below shows the column selection view of the data grid after the ‘Columns’ button has been clicked. If you want to go back to normal view of the data grid simply click the button once more. See the comment in the picture for how to revert back to the default settings.
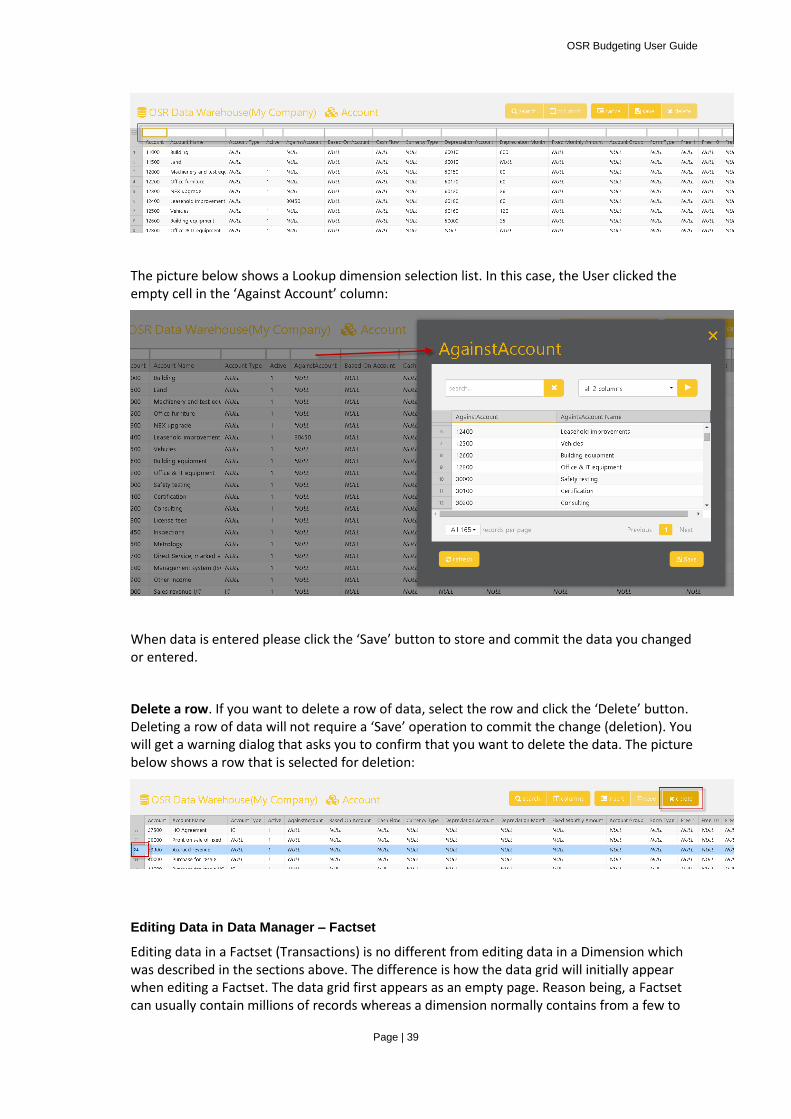
Insert data. If you want to add a row of data into the grid, click on the ‘Insert’ button at the top of the screen. Doing so will create a new empty data row above the Header labels. You can now enter data into the columns. If the column you want to enter data into is a Lookup dimension, a pop-up dialog with a list of data you can choose from will appear. The picture below shows the data grid with a blank row for data entry:
OSR Budgeting User Guide
Page | 39
The picture below shows a Lookup dimension selection list. In this case, the User clicked the empty cell in the ‘Against Account’ column:
When data is entered please click the ‘Save’ button to store and commit the data you changed or entered.
Delete a row. If you want to delete a row of data, select the row and click the ‘Delete’ button. Deleting a row of data will not require a ‘Save’ operation to commit the change (deletion). You will get a warning dialog that asks you to confirm that you want to delete the data. The picture below shows a row that is selected for deletion:
Editing Data in Data Manager – Factset
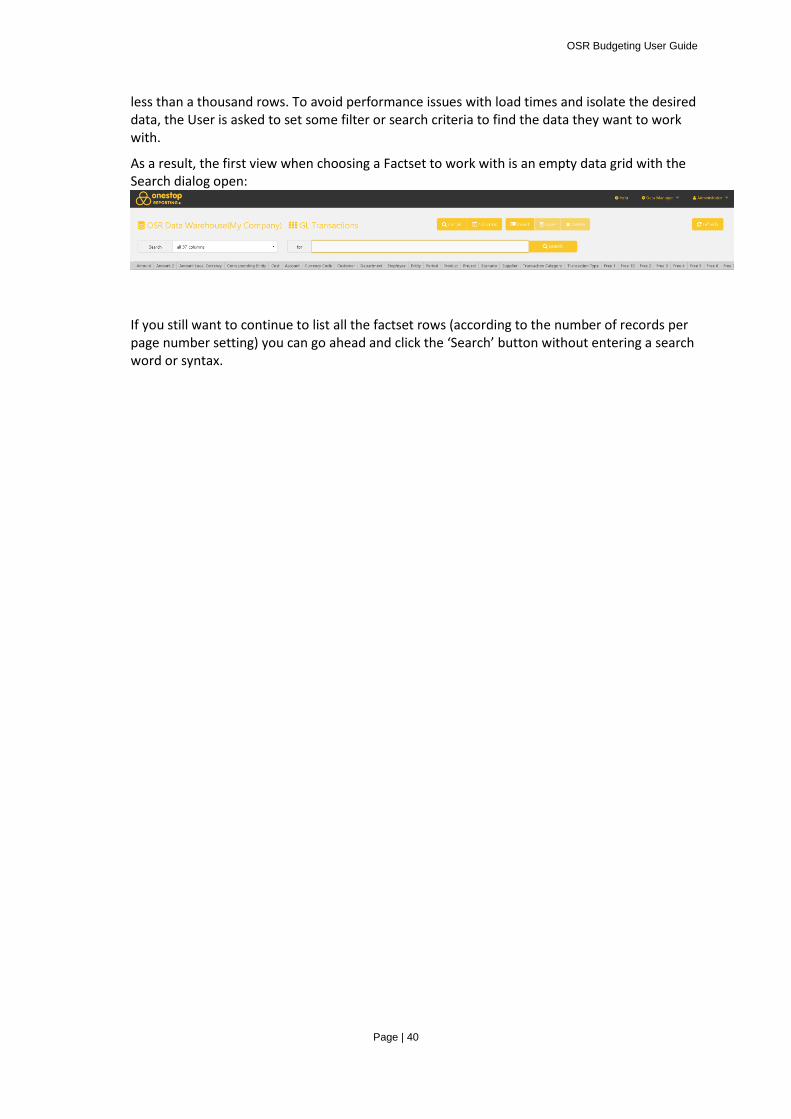
Editing data in a Factset (Transactions) is no different from editing data in a Dimension which was described in the sections above. The difference is how the data grid will initially appear when editing a Factset. The data grid first appears as an empty page. Reason being, a Factset can usually contain millions of records whereas a dimension normally contains from a few to
OSR Budgeting User Guide
Page | 40
less than a thousand rows. To avoid performance issues with load times and isolate the desired data, the User is asked to set some filter or search criteria to find the data they want to work with.
As a result, the first view when choosing a Factset to work with is an empty data grid with the Search dialog open:
If you still want to continue to list all the factset rows (according to the number of records per page number setting) you can go ahead and click the ‘Search’ button without entering a search word or syntax.


![找到【LAXIA3-V45】软件 find the [lexia-3 v45]software](https://img.pdfslide.us/doc/110x75/6158cf44007ff071b13588e4/laxia3-v45.jpg)