Embed Size (px)
Citation preview
Disclaimer
Pi Research Limited makes no representation or warranties of any kind whatsoever with respect to the contents hereof and specifically disclaims any implied warranties of mer-chantability or fitness for any particular purpose. Pi Research Limited shall not be liable for any errors contained herein or for incidental or consequential damages in connection with the furnishing, performance or use of the software, associated hardware, or this written material.
Pi Research Limited reserves the right to revise this publication from time to time, and to make changes in the content hereof without obligation to notify any person of such revi-sion or changes.
Please contact Pi Support regarding any product functionality that may be available but not explained within this guide
A copy of the Pi Research Terms and Conditions of Sale is available on request, and includes a declaration of the warranty and limitation of liability which apply to all Pi Research products and services.
Health and Safety information
Under the terms of European and UK Health and Safety legislation, Pi Research is required to classify any hazardous materials in the products it supplies and to provide relevant safety information to users.
Any hazardous materials in Pi products are clearly marked with appropriate symbols. Prod-uct Safety Data Sheets relating to these materials are available on request.
ii
Contents
Introduction .......................................................................................................... 1
System requirements ........................................................................................... 2System display ............................................................................................ 2Standalone unit ........................................................................................... 2
Installation ............................................................................................................ 3Installing an Omega dash ........................................................................... 3
Omega dash overview ......................................................................................... 5Parts of the Omega dash display ................................................................ 5Omega dash controls .................................................................................. 6Dash backlight ............................................................................................ 7Display pages ............................................................................................. 7Onboard Sensors and Channels................................................................. 7Gears .......................................................................................................... 8Alarms ......................................................................................................... 8Fuel ............................................................................................................. 9
Omega dash setup ............................................................................................. 10Getting Started .......................................................................................... 10Initial Setup ............................................................................................... 10Factory default settings ............................................................................. 15
Before an outing ................................................................................................. 16Calibrating sensors ................................................................................... 17Configuring Channels ............................................................................... 19Pit Lane Setup .......................................................................................... 28Watching Channels ................................................................................... 31
During an outing ................................................................................................ 33Start mode ................................................................................................ 33Race mode................................................................................................ 33Changing display pages............................................................................ 34Alarms ....................................................................................................... 35
Omega Dash Quick Start Guide
iii
After an outing .................................................................................................... 37Telltale mode ............................................................................................ 37Channel Help ............................................................................................ 38
Using Club Qualifying Mode ............................................................................. 39Club qualifying mode operating modes..................................................... 39Resetting CQM stored lap data................................................................. 41
Dimensions ......................................................................................................... 42Omega dash ............................................................................................. 42Panel cutout .............................................................................................. 42
Contact information ........................................................................................... 43
Omega Dash Quick Start Guide
iv
Omega Dash Quick Start Guide
Intr
od
uct
ion
1
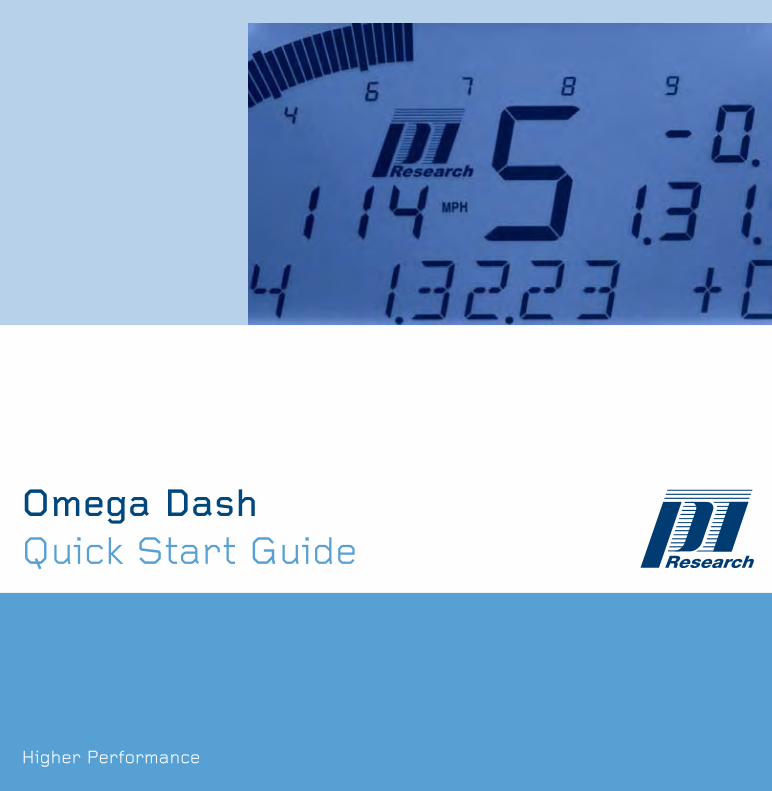
Introduction
The Omega dash is one of a range of Pi Research dashes that are designed to replace the normal set of analogue instruments in a race car. The Omega dash has an LCD that can be used to display channel values from on-vehicle sensors, supported Engine Control Units (ECUs), and Pi Delta or Pi Sigma systems.
Note. For details of the full range of supported ECUs, contact Pi Research Support.
When used as part of a Delta or Sigma system, the Omega dash can be used with a number of Satellite modules. The Omega dash contains circuitry to drive and power up to eight Satellite modules connected together in a ‘daisy chain’. The Satellite module range consists of an Alarm module, a Gear/shift light module, a 5 digit 7-segment LED Numeric display module and a 5 digit 7–segment LCD Numeric display module.
A dual colour blue/red LED back-light is fitted to the Omega dash. This illuminates the Omega dash display, and improves contrast in low light conditions.
Omega Dash Quick Start Guide
2
System requirements
System display
To use the Omega dash as a system display you will need one of the following systems:
Pi Delta logger n
Pi Sigma logger (Elite or LLB) n
Pectel SQ6 ECU n
The Omega dash should be configured in SQ6 Defined or Logger Defined display mode as detailed in the Initial Setup section. All further setup is then performed using the system software. For setup details you will need to refer to the Hardware Reference and User Guide for your system.
Standalone unit
To use the Omega dash as a standalone unit with a set of on-vehicle sensors, you should install a supported set of Pi Research analogue sensors (such as those supplied as part of your Omega dash kit). Contact Pi Research for details on the sensors that can be used with an Omega dash.
The Omega dash can also receive and display data from a supported ECU (Pectel or MBE). Contact Pi Research for details on the ECUs that can be used with an Omega dash.
If you wish to record the data provided by your sensors, you can connect a Pi Research Compact Logger (available separately).
Omega Dash Quick Start Guide
Inst
alla
tion
3
Installation
You can either adapt your existing dash panel or make up a new one specifically for the Omega dash.
When choosing a location for the Omega dash remember that:
The Omega dash must be electrically and mechanically isolated from n
the vehicle chassis;the Omega dash display must remain visible once any removable n
control units (such as the steering wheel) are in place;the Omega dash should be viewed head-on (i.e. perpendicular with n
the driver’s line of vision).
Installing an Omega dash
Caution: The Omega dash can be used to drive a number of Satellite display modules. To prevent damage to your Pi System from a current overload, the Omega dash must be connected through a separate fused connection to the vehicle battery.
When installing the Omega dash:
Make sure that there is sufficient space behind the dash panel for the 1.
cables to exit.
Refer to the figures in the 2. Dimensions section of this manual for Omega
dash overall dimensions and dash panel drilling dimensions.
Use the supplied anti-vibration mounts to install the Omega dash.3.
Make a cable exit hole that is large enough for the AutoSport connectors 4.
and looms to pass through.
Do not bend looms so that they place a strain on the AutoSport 5.
connectors.
Omega Dash Quick Start Guide
4
Remote Shift / Alarm LED module
The remote shift / alarm LED module can be mounted on the top of the Omega dash using the supplied screws, or in an alternative location in the vehicle to aid visibility.
Remote driver switch
The remote driver switch loom consists of a single toggle switch connected to a loom that plugs into a loom connector on the rear of the Omega dash.
The remote switch can be fitted anywhere that the driver can comfortably reach.
The switch should be mounted so that it is switched up and down from the central posi-tion.
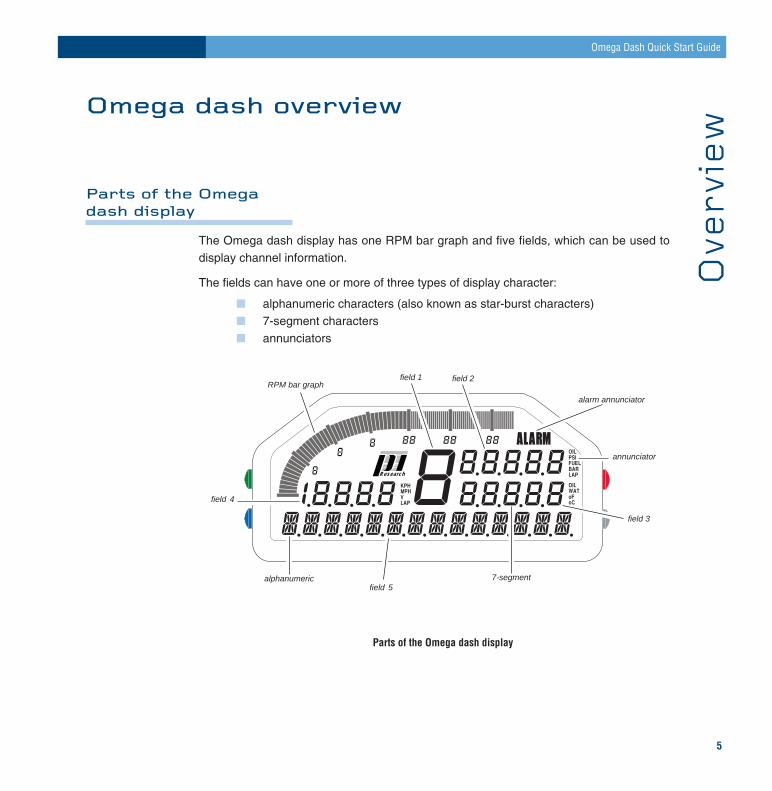
annunciator
7-segmentalphanumeric
RPM bar graphfield 2
field 3
field 4
field 5
alarm annunciator
field 1
Research
Parts of the Omega dash display
Omega Dash Quick Start Guide
Ove
rvie
w5
Omega dash overview
Parts of the Omega dash display
The Omega dash display has one RPM bar graph and five fields, which can be used to display channel information.
The fields can have one or more of three types of display character:
alphanumeric characters (also known as star-burst characters) n
7-segment characters n
annunciators n
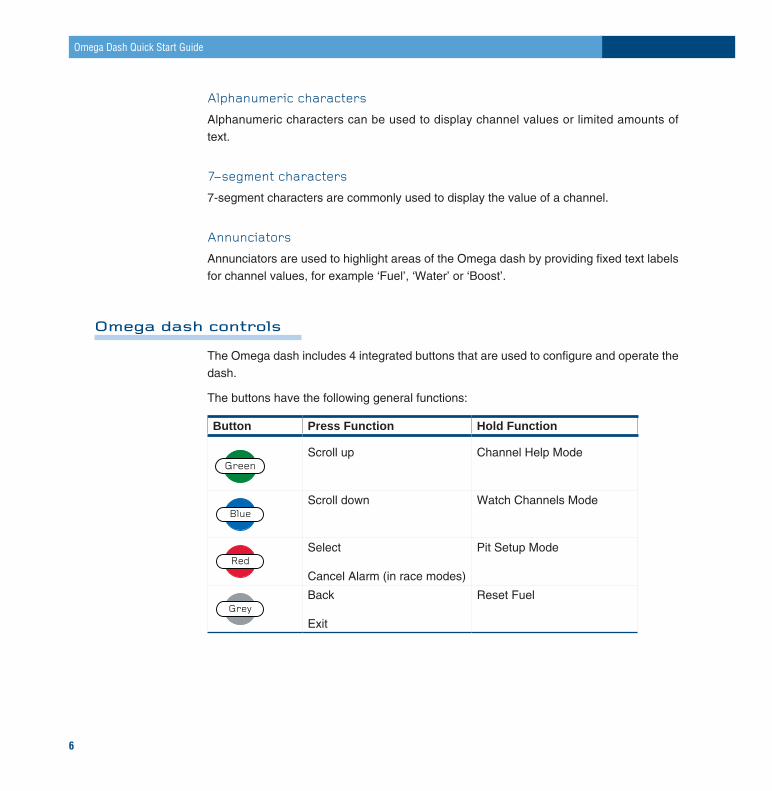
Alphanumeric characters
Alphanumeric characters can be used to display channel values or limited amounts of text.
7-segment characters
7-segment characters are commonly used to display the value of a channel.
Annunciators
Annunciators are used to highlight areas of the Omega dash by providing fixed text labels for channel values, for example ‘Fuel’, ‘Water’ or ‘Boost’.
Omega dash controls
The Omega dash includes 4 integrated buttons that are used to configure and operate the dash.
The buttons have the following general functions:
Button Press Function Hold Function
GreenScroll up Channel Help Mode
BlueScroll down Watch Channels Mode
RedSelect
Cancel Alarm (in race modes)
Pit Setup Mode
GreyBack
Exit
Reset Fuel
Omega Dash Quick Start Guide
6
Dash backlight
The Omega dash backlight can be set to the ideal brightness and colour for optimal vis-ibility in your vehicle. Two-colour LEDs enable you to select a range of colours from blue, through purple, to red.
Display pages
The information displayed on the Omega dash is organised in pages. There are three types of page; pit, race and telltale. The channels on these pages are grouped together, giving suitable channels for starting the engine and checking sensor channels, a race session and an outing summary. The Omega dash has a default set of channels for each page, however if you are using the dash as a system display for a Pectel SQ6 ECU or Pi Delta or Sigma system you can change the channels that are displayed using the appropriate setup software (see your system User Guide for details).
Onboard Sensors and Channels
The Omega dash includes the following onboard sensors and channels:
Sensor / Channel Description
Accelerometer Provides data to calculate cornering speed and generate outing maps if the Omega dash is used with a suitable logger (e.g. Pi Research Compact Logger).
Battery Voltage Supply voltage sensor
Gear Number Speed and RPM input values are used to calculate gear number. (See Gears section for more details)
Sensor Inputs
The Omega dash displays values from the following inputs when used as a standalone unit with on-vehicle sensors and / or a supported ECU (or Pi Interport):
Omega Dash Quick Start Guide
Ove
rvie
w7
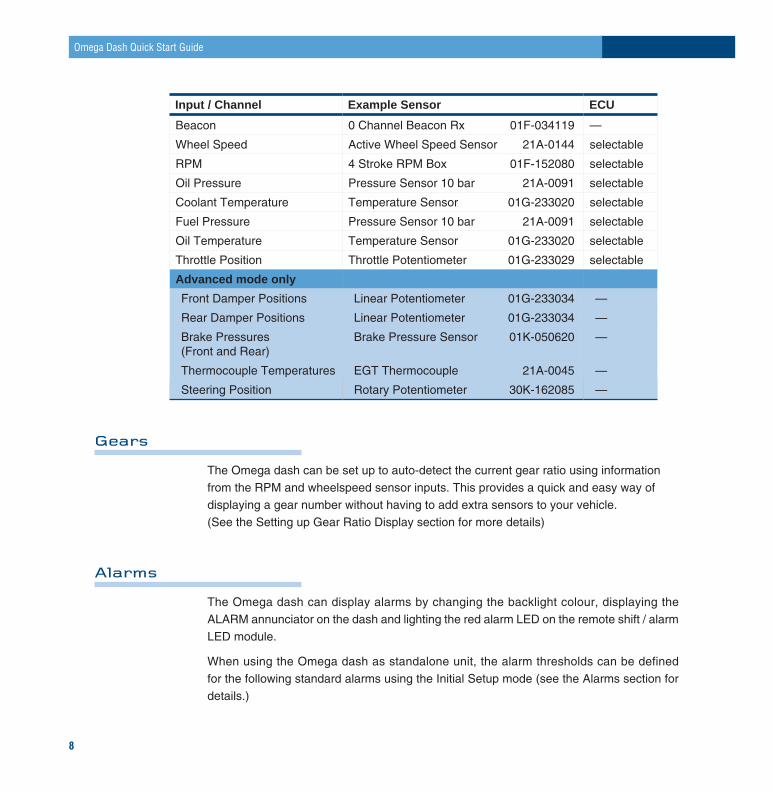
Input / Channel Example Sensor ECU
Beacon 0 Channel Beacon Rx 01F-034119 —
Wheel Speed Active Wheel Speed Sensor 21A-0144 selectable
RPM 4 Stroke RPM Box 01F-152080 selectable
Oil Pressure Pressure Sensor 10 bar 21A-0091 selectable
Coolant Temperature Temperature Sensor 01G-233020 selectable
Fuel Pressure Pressure Sensor 10 bar 21A-0091 selectable
Oil Temperature Temperature Sensor 01G-233020 selectable
Throttle Position Throttle Potentiometer 01G-233029 selectable
Advanced mode only
Front Damper Positions Linear Potentiometer 01G-233034 —
Rear Damper Positions Linear Potentiometer 01G-233034 —
Brake Pressures (Front and Rear)
Brake Pressure Sensor 01K-050620 —
Thermocouple Temperatures EGT Thermocouple 21A-0045 —
Steering Position Rotary Potentiometer 30K-162085 —
Gears
The Omega dash can be set up to auto-detect the current gear ratio using information from the RPM and wheelspeed sensor inputs. This provides a quick and easy way of displaying a gear number without having to add extra sensors to your vehicle. (See the Setting up Gear Ratio Display section for more details)
Alarms
The Omega dash can display alarms by changing the backlight colour, displaying the ALARM annunciator on the dash and lighting the red alarm LED on the remote shift / alarm LED module.
When using the Omega dash as standalone unit, the alarm thresholds can be defined for the following standard alarms using the Initial Setup mode (see the Alarms section for details.)
Omega Dash Quick Start Guide
8
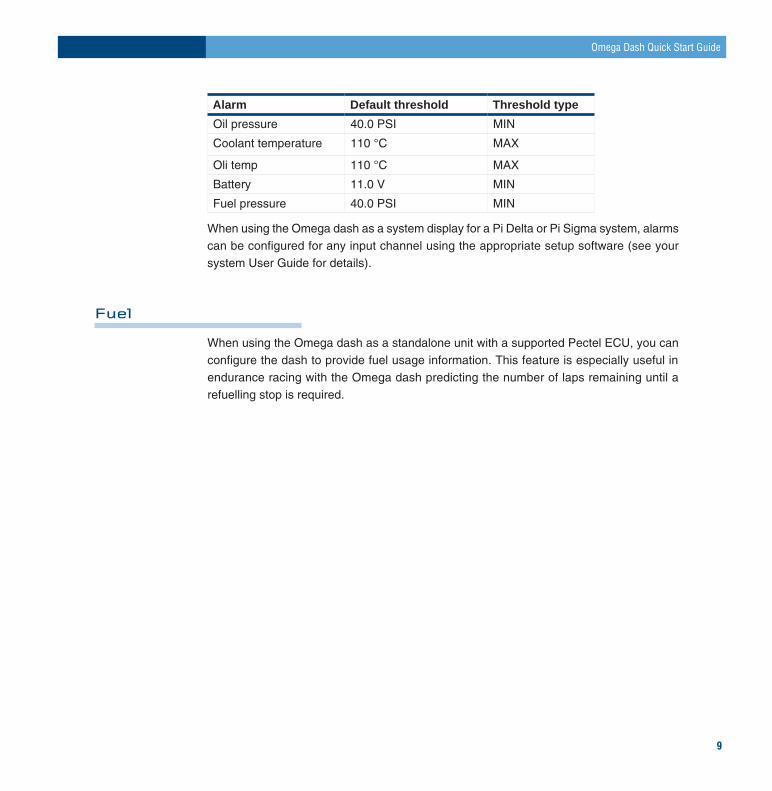
Alarm Default threshold Threshold type
Oil pressure 40.0 PSI MIN
Coolant temperature 110 °C MAX
Oli temp 110 °C MAX
Battery 11.0 V MIN
Fuel pressure 40.0 PSI MIN
When using the Omega dash as a system display for a Pi Delta or Pi Sigma system, alarms can be configured for any input channel using the appropriate setup software (see your system User Guide for details).
Fuel
When using the Omega dash as a standalone unit with a supported Pectel ECU, you can configure the dash to provide fuel usage information. This feature is especially useful in endurance racing with the Omega dash predicting the number of laps remaining until a refuelling stop is required.
Omega Dash Quick Start Guide
9
Initial Setup
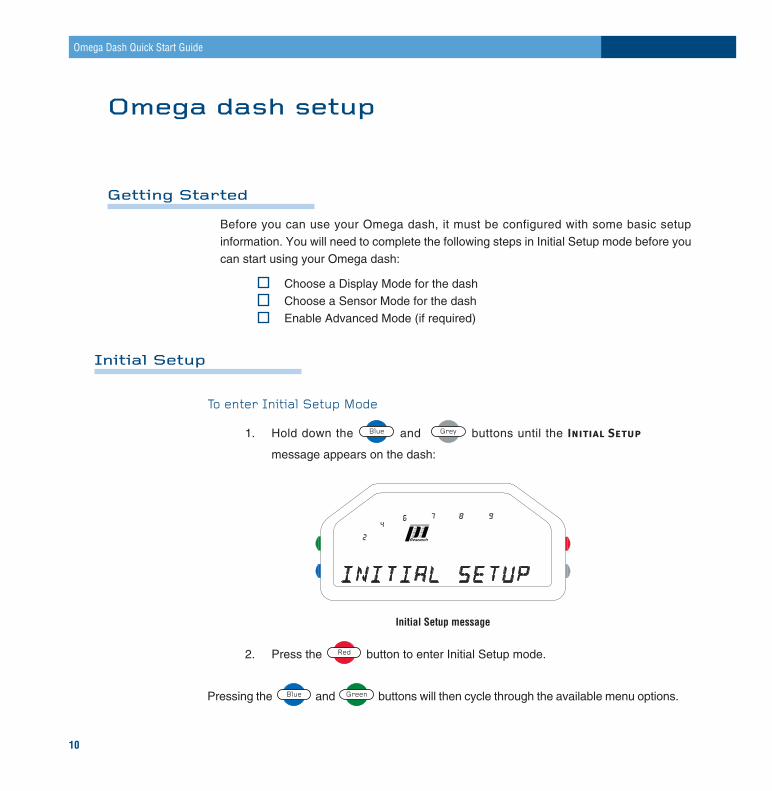
To enter Initial Setup Mode
Hold down the 1. Blue and Grey buttons until the Initial Setup
message appears on the dash:
Research
Initial Setup message
Press the 2. Red button to enter Initial Setup mode.
Pressing the Blue and Green buttons will then cycle through the available menu options.
Omega Dash Quick Start Guide
10
Omega dash setup
Getting Started
Before you can use your Omega dash, it must be configured with some basic setup information. You will need to complete the following steps in Initial Setup mode before you can start using your Omega dash:
Choose a Display Mode for the dash
Choose a Sensor Mode for the dashEnable Advanced Mode (if required)
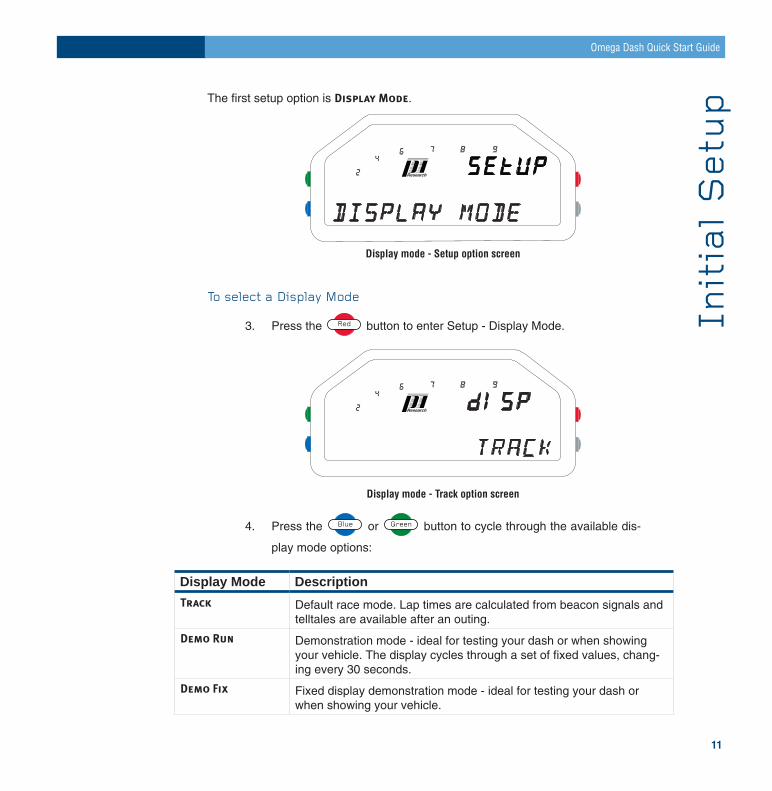
The first setup option is Display Mode.
Research
Display mode - Setup option screen
To select a Display Mode
Press the 3. Red button to enter Setup - Display Mode.
Research
Display mode - Track option screen
Press the 4. Blue or Green button to cycle through the available dis-
play mode options:
Display Mode Description
Track Default race mode. Lap times are calculated from beacon signals and telltales are available after an outing.
Demo Run Demonstration mode - ideal for testing your dash or when showing your vehicle. The display cycles through a set of fixed values, chang-ing every 30 seconds.
Demo Fix Fixed display demonstration mode - ideal for testing your dash or when showing your vehicle.
Omega Dash Quick Start Guide
Init
ial
Setu
p11
Display Mode Description
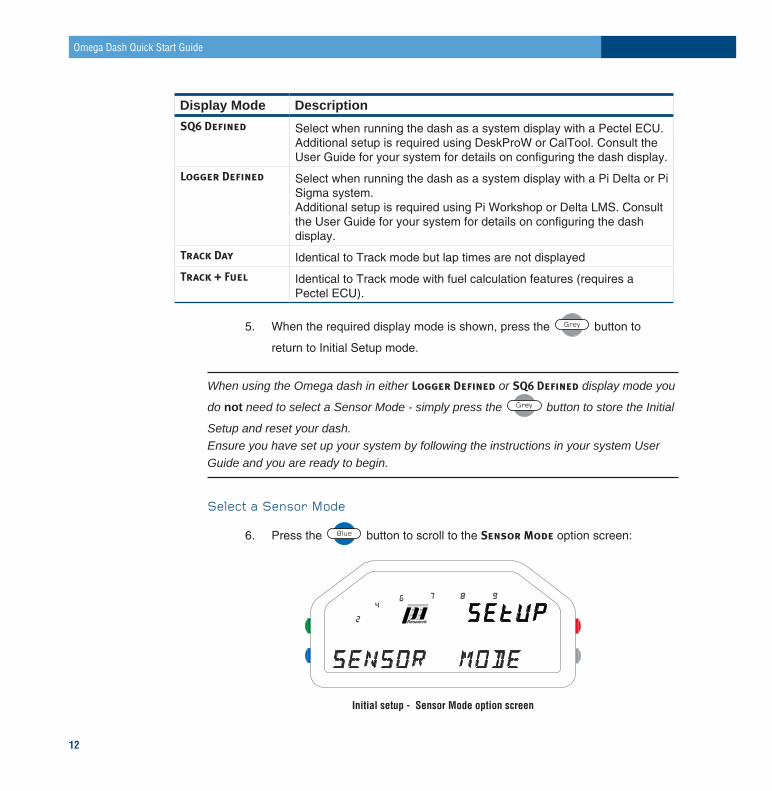
SQ6 Defined Select when running the dash as a system display with a Pectel ECU. Additional setup is required using DeskProW or CalTool. Consult the User Guide for your system for details on configuring the dash display.
Logger Defined Select when running the dash as a system display with a Pi Delta or Pi Sigma system.Additional setup is required using Pi Workshop or Delta LMS. Consult the User Guide for your system for details on configuring the dash display.
Track Day Identical to Track mode but lap times are not displayed
Track + Fuel Identical to Track mode with fuel calculation features (requires a Pectel ECU).
When the required display mode is shown, press the 5. Grey button to
return to Initial Setup mode.
When using the Omega dash in either Logger Defined or SQ6 Defined display mode you
do not need to select a Sensor Mode - simply press the Grey button to store the Initial
Setup and reset your dash. Ensure you have set up your system by following the instructions in your system User Guide and you are ready to begin.
Select a Sensor Mode
Press the 6. Blue button to scroll to the Sensor Mode option screen:
Research
Initial setup - Sensor Mode option screen
Omega Dash Quick Start Guide
12
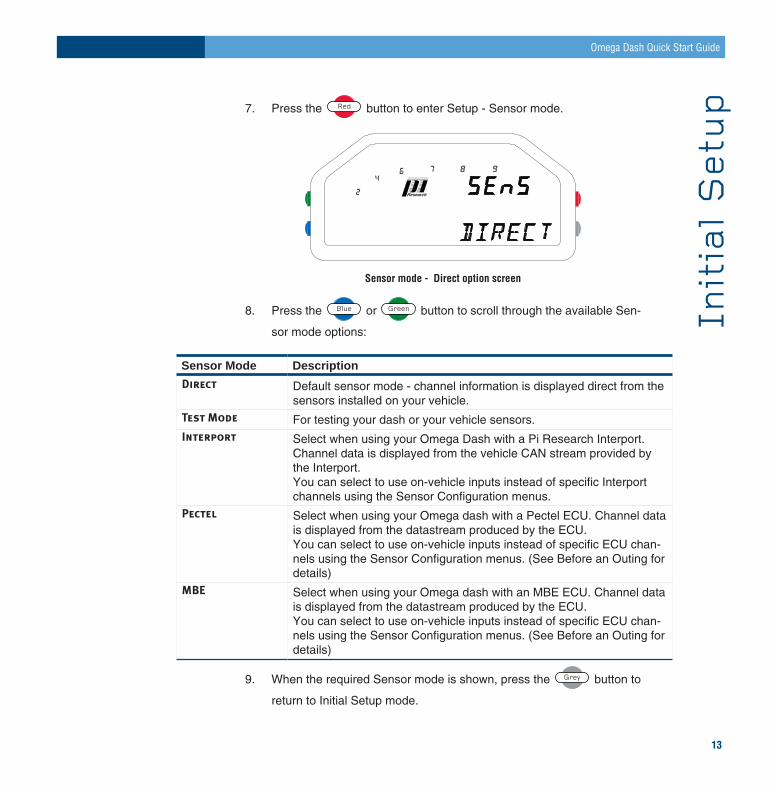
Press the 7. Red button to enter Setup - Sensor mode.
Research
Sensor mode - Direct option screen
Press the 8. Blue or Green button to scroll through the available Sen-
sor mode options:
Sensor Mode Description
Direct Default sensor mode - channel information is displayed direct from the sensors installed on your vehicle.
Test Mode For testing your dash or your vehicle sensors.Interport Select when using your Omega Dash with a Pi Research Interport.
Channel data is displayed from the vehicle CAN stream provided by the Interport. You can select to use on-vehicle inputs instead of specific Interport channels using the Sensor Configuration menus.
Pectel Select when using your Omega dash with a Pectel ECU. Channel data is displayed from the datastream produced by the ECU. You can select to use on-vehicle inputs instead of specific ECU chan-nels using the Sensor Configuration menus. (See Before an Outing for details)
MBE Select when using your Omega dash with an MBE ECU. Channel data is displayed from the datastream produced by the ECU. You can select to use on-vehicle inputs instead of specific ECU chan-nels using the Sensor Configuration menus. (See Before an Outing for details)
When the required Sensor mode is shown, press the 9. Grey button to
return to Initial Setup mode.
Omega Dash Quick Start Guide
Init
ial
Setu
p13
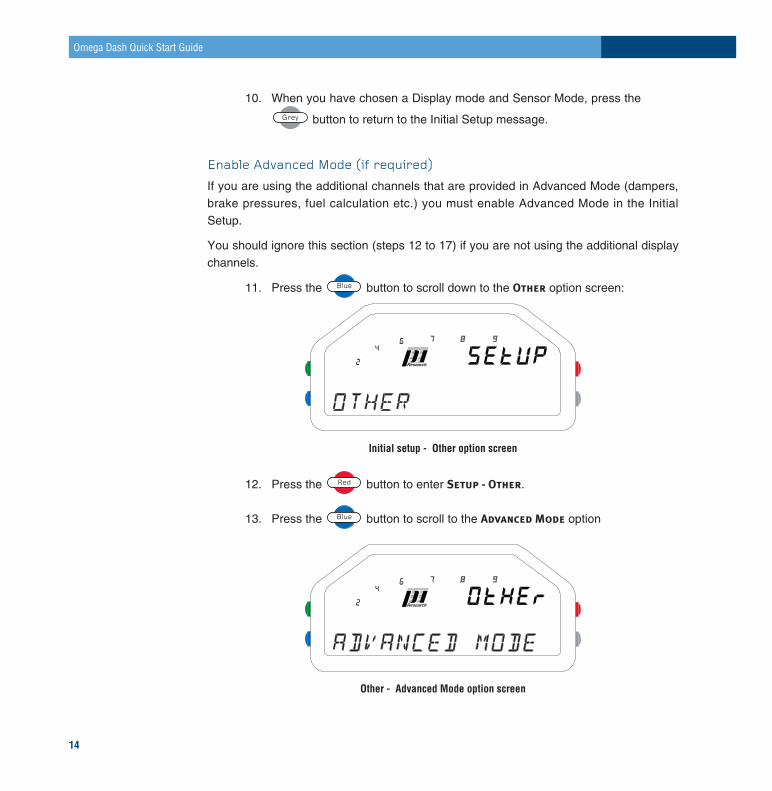
When you have chosen a Display mode and Sensor Mode, press the 10.
Grey button to return to the Initial Setup message.
Enable Advanced Mode (if required)
If you are using the additional channels that are provided in Advanced Mode (dampers, brake pressures, fuel calculation etc.) you must enable Advanced Mode in the Initial Setup.
You should ignore this section (steps 12 to 17) if you are not using the additional display channels.
Press the 11. Blue button to scroll down to the Other option screen:
Research
Initial setup - Other option screen
Press the 12. Red button to enter Setup - Other.
Press the 13. Blue button to scroll to the Advanced Mode option
Research
Other - Advanced Mode option screen
Omega Dash Quick Start Guide
14
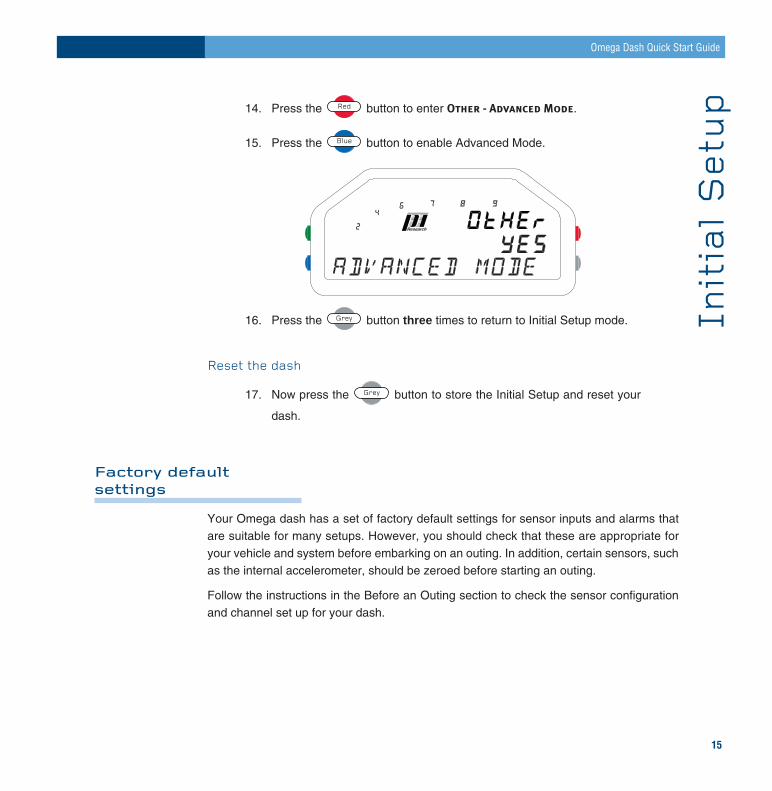
Press the 14. Red button to enter Other - Advanced Mode.
Press the 15. Blue button to enable Advanced Mode.
Research
Press the 16. Grey button three times to return to Initial Setup mode.
Reset the dash
Now press the 17. Grey button to store the Initial Setup and reset your
dash.
Factory default settings
Your Omega dash has a set of factory default settings for sensor inputs and alarms that are suitable for many setups. However, you should check that these are appropriate for your vehicle and system before embarking on an outing. In addition, certain sensors, such as the internal accelerometer, should be zeroed before starting an outing.
Follow the instructions in the Before an Outing section to check the sensor configuration and channel set up for your dash.
Omega Dash Quick Start Guide
Init
ial
Setu
p15
Before an outing
You should ensure that your Omega dash display settings, sensor configurations and serial output are correctly configured before embarking on an outing.
If you are using the Omega dash as a standalone unit with a set of on-vehicle sensors and / or a supported ECU (or Pi Interport), you should perform the following tasks:
in Initial Setup
Calibrate your sensors
Check your Omega dash input channel settingsCheck the RPM scale, red-line and start line settingsCheck the Serial Output Stream setting (if required) Check the Gear settingsCheck the Fuel calculation settings (if required)
in Pit Lane Setup
Reset the dash lap count (if required) Zero your sensorsSetup Club Qualifying Mode (if required)
in Watch Channels mode
Verify your setup is providing the required values.
If you are using the Omega dash as a system display with a Pectel SQ6 ECU, Pi Delta or Pi Sigma system, consult your system User Guide for details on tasks that should be carried out before an outing.
Omega Dash Quick Start Guide
16
Calibrating sensors
So that your Omega dash displays accurate values you should calibrate the throttle position (and steering position if using Advanced Mode) before an outing.
To calibrate throttle position
Hold down the 1. Blue and Grey buttons until the Initial Setup
message appears on the dash:
Press the 2. Red button to enter Initial Setup Mode
Press the 3. Blue button to scroll through the options until the Throttle
option is displayed.
Press the 4. Red button to enter Setup - Throttle.
Press the 5. Blue button to scroll to the Set Minimum option.
Ensure no throttle is applied, and press the 6. Red button to set the
minimum throttle position.
Press the 7. Blue button to scroll to the Set Maximum option.
Apply full throttle, and press the 8. Red button to set the maximum
throttle position.
Press the 9. Grey button to return to Initial Setup mode and proceed to
calibrating the steering position.
To calibrate steering position (Advanced Mode only)
Press the 10. Blue button to scroll through the Initial Setup mode options
until the Steering option is displayed.
Press the 11. Red button to enter Setup - Steering.
Omega Dash Quick Start Guide
Ca
lib
rati
ng
Sen
sors
17
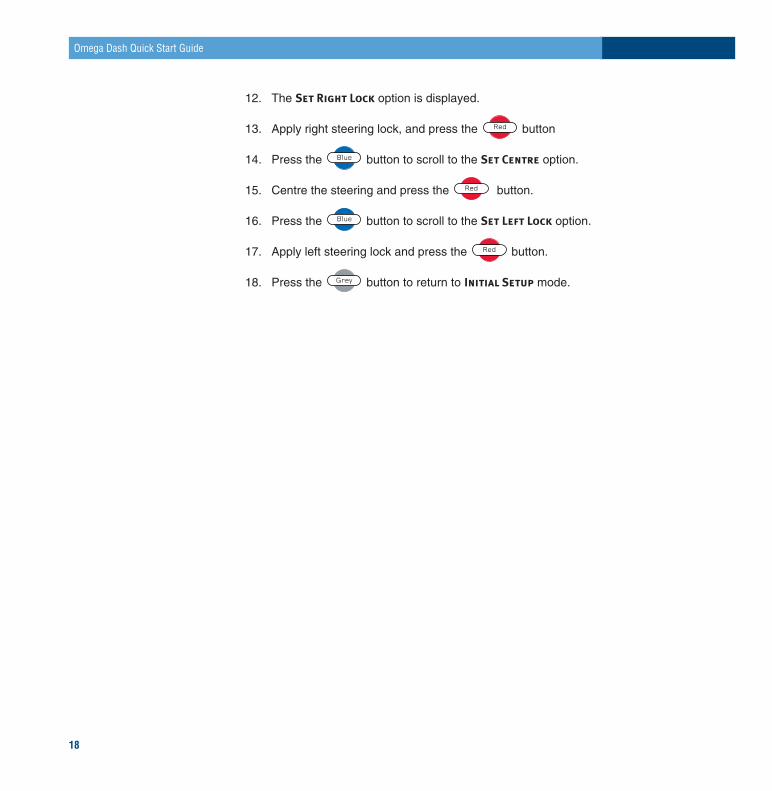
The 12. Set Right Lock option is displayed.
Apply right steering lock, and press the 13. Red button
Press the 14. Blue button to scroll to the Set Centre option.
Centre the steering and press the 15. Red button.
Press the 16. Blue button to scroll to the Set Left Lock option.
Apply left steering lock and press the 17. Red button.
Press the 18. Grey button to return to Initial Setup mode.
Omega Dash Quick Start Guide
18
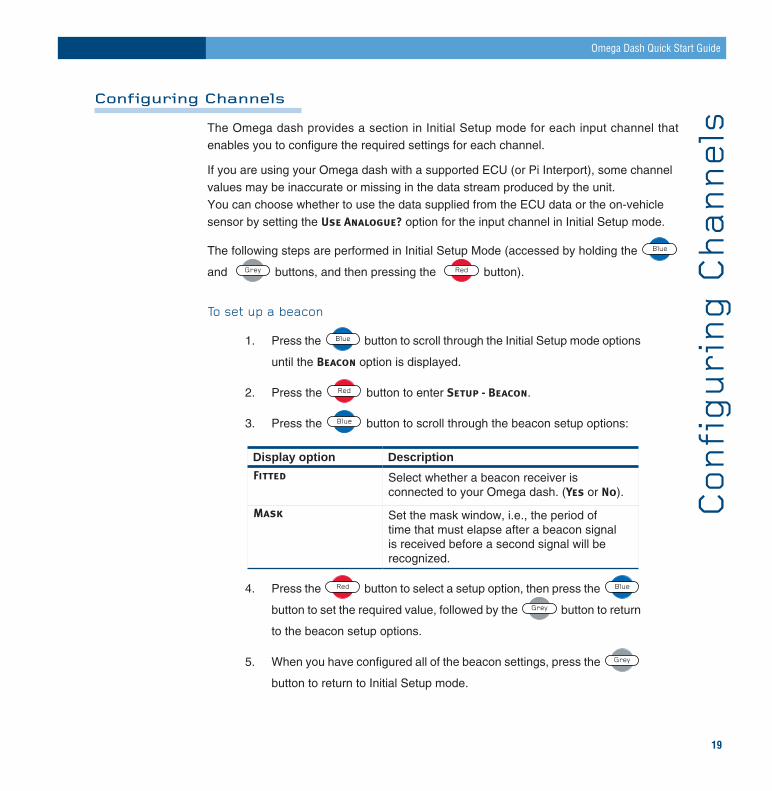
Configuring Channels
The Omega dash provides a section in Initial Setup mode for each input channel that enables you to configure the required settings for each channel.
If you are using your Omega dash with a supported ECU (or Pi Interport), some channel values may be inaccurate or missing in the data stream produced by the unit. You can choose whether to use the data supplied from the ECU data or the on-vehicle sensor by setting the Use Analogue? option for the input channel in Initial Setup mode.
The following steps are performed in Initial Setup Mode (accessed by holding the Blue
and Grey buttons, and then pressing the Red button).
To set up a beacon
Press the 1. Blue button to scroll through the Initial Setup mode options
until the Beacon option is displayed.
Press the 2. Red button to enter Setup - Beacon.
Press the 3. Blue button to scroll through the beacon setup options:
Display option Description
Fitted Select whether a beacon receiver is connected to your Omega dash. (Yes or No).
Mask Set the mask window, i.e., the period of time that must elapse after a beacon signal is received before a second signal will be recognized.
Press the 4. Red button to select a setup option, then press the Blue
button to set the required value, followed by the Grey button to return
to the beacon setup options.
When you have configured all of the beacon settings, press the 5. Grey
button to return to Initial Setup mode.
Omega Dash Quick Start Guide
Con
fig
uri
ng
Ch
an
nels
19

To set up a wheel speed sensor
Press the 1. Blue button to scroll through the Initial Setup mode options
until the Wheel Speed option is displayed.
Press the 2. Red button to enter Setup - Wheel Speed.
Press the 3. Blue button to scroll through the Wheel Speed setup op-
tions:
Display option Description
Units Set the units for wheel speed display (MPH or KPH).
Diameter Set the wheel diameter for your vehicle.Mode Select an operation mode for the wheel speed
sensor. Real or latchOuting Speed Set an outing speed threshold (i.e., the speed
at which the dash automatically switches from Pit Lane mode to Race mode
Triggers Set the number of triggers on your wheel.Type Select the type of sensor that you are using
(Active or Passive)
Press the 4. Red button to select a setup option, then press the Blue
button to set the required value, followed by the Grey button to return
to the Wheel Speed setup options.
When you have configured all of the wheel speed settings, press the 5.
Grey button to return to Initial Setup mode.
Omega Dash Quick Start Guide
20
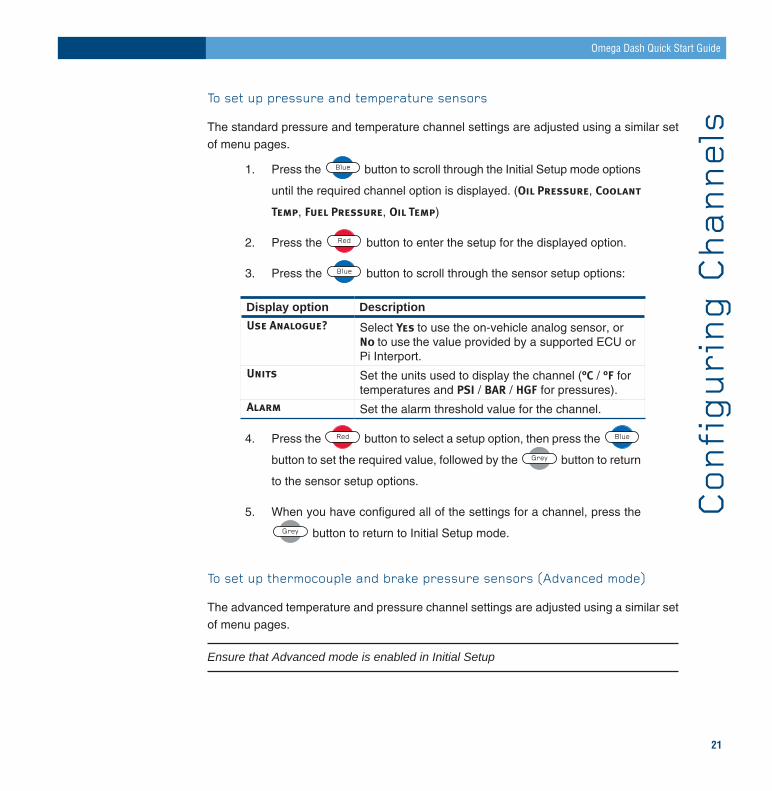
To set up pressure and temperature sensors
The standard pressure and temperature channel settings are adjusted using a similar set of menu pages.
Press the 1. Blue button to scroll through the Initial Setup mode options
until the required channel option is displayed. (Oil Pressure, Coolant
Temp, Fuel Pressure, Oil Temp)
Press the 2. Red button to enter the setup for the displayed option.
Press the 3. Blue button to scroll through the sensor setup options:
Display option Description
Use Analogue? Select Yes to use the on-vehicle analog sensor, or No to use the value provided by a supported ECU or Pi Interport.
Units Set the units used to display the channel (¡C / ¡F for temperatures and PSI / BAR / HGF for pressures).
Alarm Set the alarm threshold value for the channel.
Press the 4. Red button to select a setup option, then press the Blue
button to set the required value, followed by the Grey button to return
to the sensor setup options.
When you have configured all of the settings for a channel, press the 5.
Grey button to return to Initial Setup mode.
To set up thermocouple and brake pressure sensors (Advanced mode)
The advanced temperature and pressure channel settings are adjusted using a similar set of menu pages.
Ensure that Advanced mode is enabled in Initial Setup
Omega Dash Quick Start Guide
Con
fig
uri
ng
Ch
an
nels
21
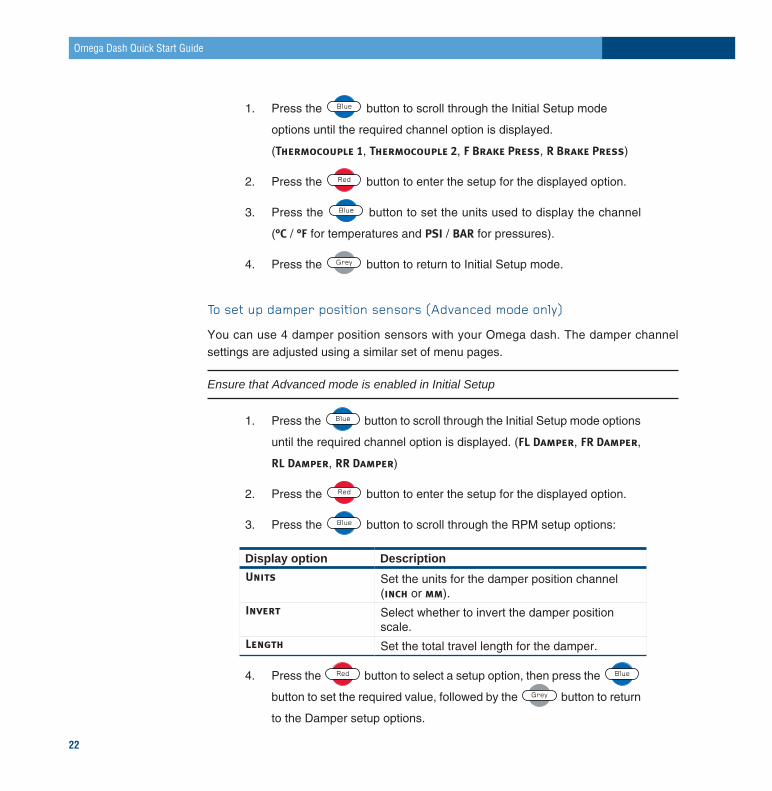
Press the 1. Blue button to scroll through the Initial Setup mode
options until the required channel option is displayed.
(Thermocouple 1, Thermocouple 2, F Brake Press, R Brake Press)
Press the 2. Red button to enter the setup for the displayed option.
Press the 3. Blue button to set the units used to display the channel
(¡C / ¡F for temperatures and PSI / BAR for pressures).
Press the 4. Grey button to return to Initial Setup mode.
To set up damper position sensors (Advanced mode only)
You can use 4 damper position sensors with your Omega dash. The damper channel settings are adjusted using a similar set of menu pages.
Ensure that Advanced mode is enabled in Initial Setup
Press the 1. Blue button to scroll through the Initial Setup mode options
until the required channel option is displayed. (FL Damper, FR Damper,
RL Damper, RR Damper)
Press the 2. Red button to enter the setup for the displayed option.
Press the 3. Blue button to scroll through the RPM setup options:
Display option Description
Units Set the units for the damper position channel (inch or mm).
Invert Select whether to invert the damper position scale.
Length Set the total travel length for the damper.
Press the 4. Red button to select a setup option, then press the Blue
button to set the required value, followed by the Grey button to return
to the Damper setup options.
Omega Dash Quick Start Guide
22
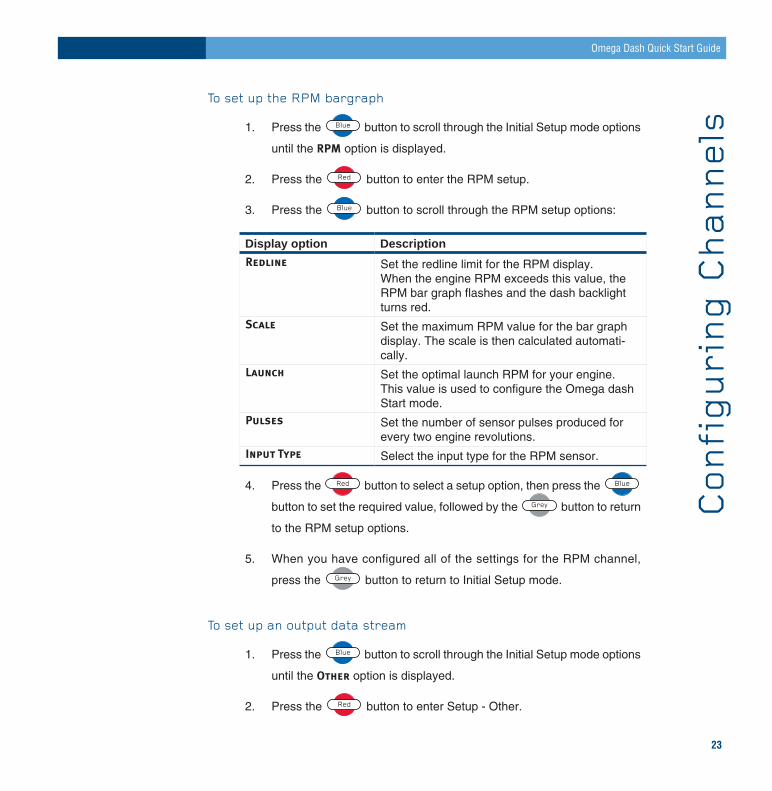
To set up the RPM bargraph
Press the 1. Blue button to scroll through the Initial Setup mode options
until the RPM option is displayed.
Press the 2. Red button to enter the RPM setup.
Press the 3. Blue button to scroll through the RPM setup options:
Display option Description
Redline Set the redline limit for the RPM display.When the engine RPM exceeds this value, the RPM bar graph flashes and the dash backlight turns red.
Scale Set the maximum RPM value for the bar graph display. The scale is then calculated automati-cally.
Launch Set the optimal launch RPM for your engine.This value is used to configure the Omega dash Start mode.
Pulses Set the number of sensor pulses produced for every two engine revolutions.
Input Type Select the input type for the RPM sensor.
Press the 4. Red button to select a setup option, then press the Blue
button to set the required value, followed by the Grey button to return
to the RPM setup options.
When you have configured all of the settings for the RPM channel, 5.
press the Grey button to return to Initial Setup mode.
To set up an output data stream
Press the 1. Blue button to scroll through the Initial Setup mode options
until the Other option is displayed.
Press the 2. Red button to enter Setup - Other.
Omega Dash Quick Start Guide
Con
fig
uri
ng
Ch
an
nels
23
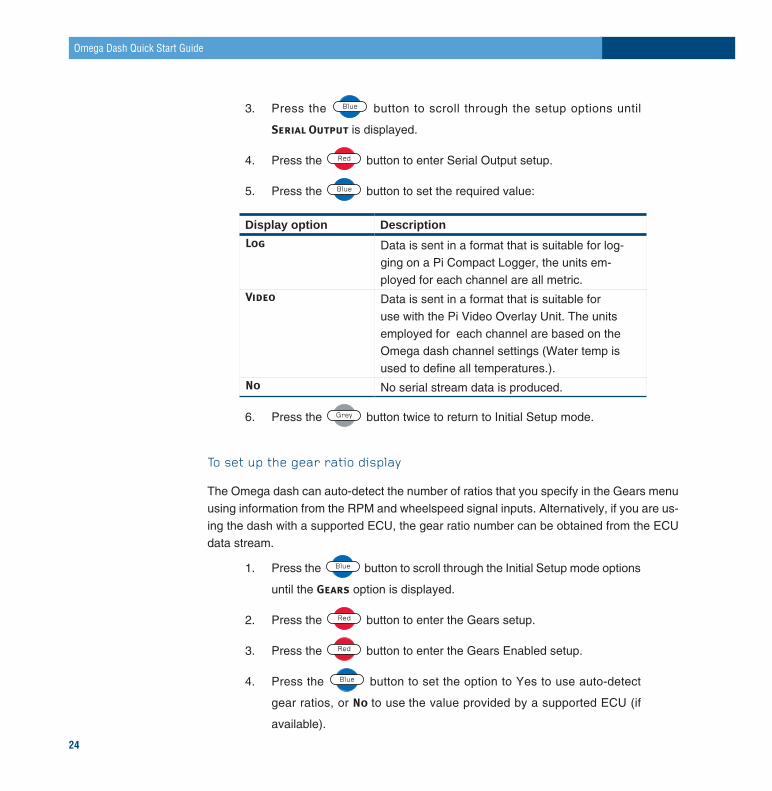
Press the 3. Blue button to scroll through the setup options until
Serial Output is displayed.
Press the 4. Red button to enter Serial Output setup.
Press the 5. Blue button to set the required value:
Display option Description
Log Data is sent in a format that is suitable for log-ging on a Pi Compact Logger, the units em-ployed for each channel are all metric.
Video Data is sent in a format that is suitable for use with the Pi Video Overlay Unit. The units employed for each channel are based on the Omega dash channel settings (Water temp is used to define all temperatures.).
No No serial stream data is produced.
Press the 6. Grey button twice to return to Initial Setup mode.
To set up the gear ratio display
The Omega dash can auto-detect the number of ratios that you specify in the Gears menu using information from the RPM and wheelspeed signal inputs. Alternatively, if you are us-ing the dash with a supported ECU, the gear ratio number can be obtained from the ECU data stream.
Press the 1. Blue button to scroll through the Initial Setup mode options
until the Gears option is displayed.
Press the 2. Red button to enter the Gears setup.
Press the 3. Red button to enter the Gears Enabled setup.
Press the 4. Blue button to set the option to Yes to use auto-detect
gear ratios, or No to use the value provided by a supported ECU (if
available).
Omega Dash Quick Start Guide
24
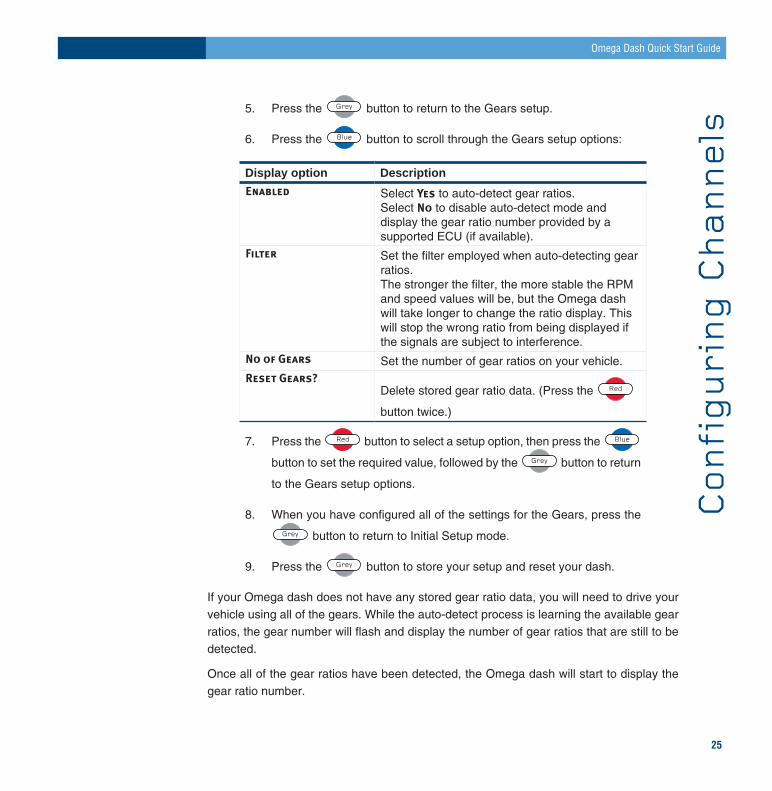
Press the 5. Grey button to return to the Gears setup.
Press the 6. Blue button to scroll through the Gears setup options:
Display option Description
Enabled Select Yes to auto-detect gear ratios. Select No to disable auto-detect mode and display the gear ratio number provided by a supported ECU (if available).
Filter Set the filter employed when auto-detecting gear ratios.The stronger the filter, the more stable the RPM and speed values will be, but the Omega dash will take longer to change the ratio display. This will stop the wrong ratio from being displayed if the signals are subject to interference.
No of Gears Set the number of gear ratios on your vehicle. Reset Gears?
Delete stored gear ratio data. (Press the Red
button twice.)
Press the 7. Red button to select a setup option, then press the Blue
button to set the required value, followed by the Grey button to return
to the Gears setup options.
When you have configured all of the settings for the Gears, press the 8.
Grey button to return to Initial Setup mode.
Press the 9. Grey button to store your setup and reset your dash.
If your Omega dash does not have any stored gear ratio data, you will need to drive your vehicle using all of the gears. While the auto-detect process is learning the available gear ratios, the gear number will flash and display the number of gear ratios that are still to be detected.
Once all of the gear ratios have been detected, the Omega dash will start to display the gear ratio number.
Omega Dash Quick Start Guide
Con
fig
uri
ng
Ch
an
nels
25
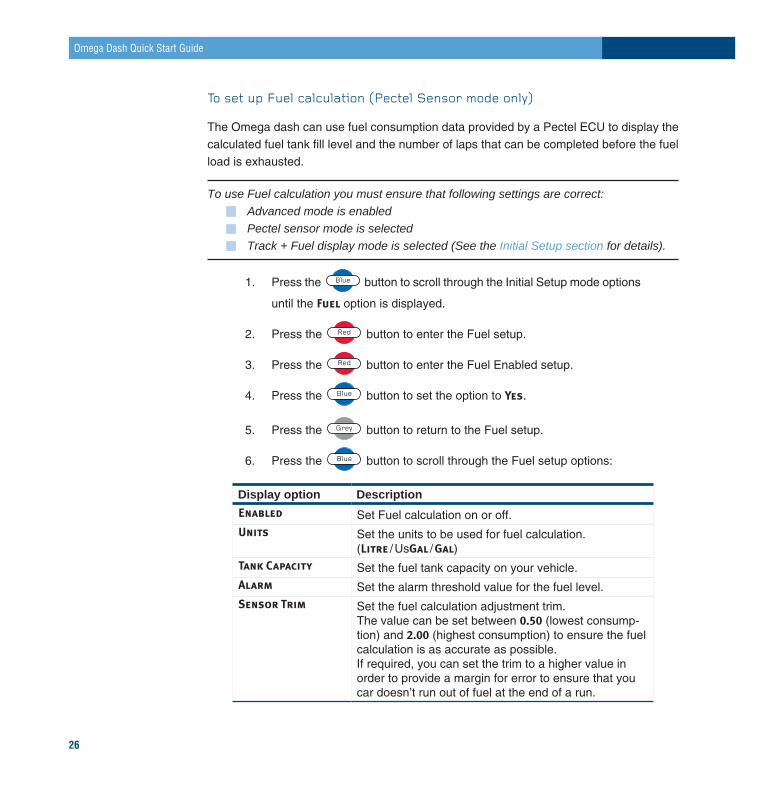
To set up Fuel calculation (Pectel Sensor mode only)
The Omega dash can use fuel consumption data provided by a Pectel ECU to display the calculated fuel tank fill level and the number of laps that can be completed before the fuel load is exhausted.
To use Fuel calculation you must ensure that following settings are correct: n Advanced mode is enabled n Pectel sensor mode is selected n Track + Fuel display mode is selected (See the Initial Setup section for details).
Press the 1. Blue button to scroll through the Initial Setup mode options
until the Fuel option is displayed.
Press the 2. Red button to enter the Fuel setup.
Press the 3. Red button to enter the Fuel Enabled setup.
Press the 4. Blue button to set the option to Yes.
Press the 5. Grey button to return to the Fuel setup.
Press the 6. Blue button to scroll through the Fuel setup options:
Display option Description
Enabled Set Fuel calculation on or off.Units Set the units to be used for fuel calculation.
(Litre / UsGal / Gal) Tank Capacity Set the fuel tank capacity on your vehicle.Alarm Set the alarm threshold value for the fuel level. Sensor Trim Set the fuel calculation adjustment trim.
The value can be set between 0.50 (lowest consump-tion) and 2.00 (highest consumption) to ensure the fuel calculation is as accurate as possible.If required, you can set the trim to a higher value in order to provide a margin for error to ensure that you car doesn’t run out of fuel at the end of a run.
Omega Dash Quick Start Guide
26
Press the 7. Red button to select a setup option, then press the Blue
button to set the required value, followed by the Grey button to return
to the Fuel setup options.
When you have configured all of the settings, press the 8. Grey button
to return to Initial Setup mode.
Press the 9. Grey button to store your setup and reset your dash.
Press and hold the 10. Grey button to reset the fuel level on you dash.
You must reset the fuel level on the dash each time the fuel tank is filled.
Omega Dash Quick Start Guide
Con
fig
uri
ng
Ch
an
nels
27
Research
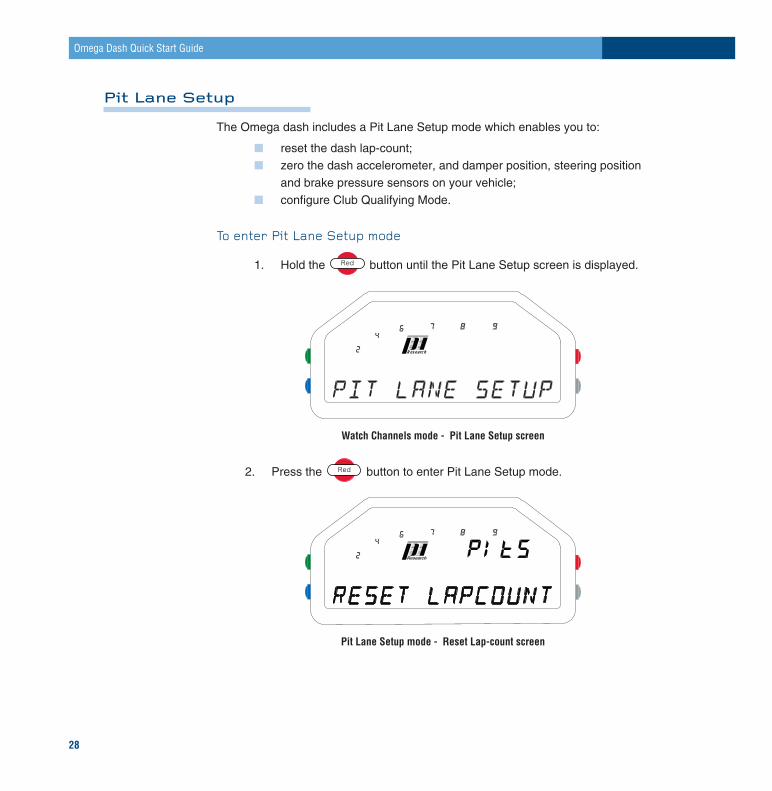
Watch Channels mode - Pit Lane Setup screen
Press the 2. Red button to enter Pit Lane Setup mode.
Research
Pit Lane Setup mode - Reset Lap-count screen
Omega Dash Quick Start Guide
28
Pit Lane Setup
The Omega dash includes a Pit Lane Setup mode which enables you to:
reset the dash lap-count; n
zero the dash accelerometer, and damper position, steering position n
and brake pressure sensors on your vehicle;configure Club Qualifying Mode. n
To enter Pit Lane Setup mode
Hold the 1. Red button until the Pit Lane Setup screen is displayed.
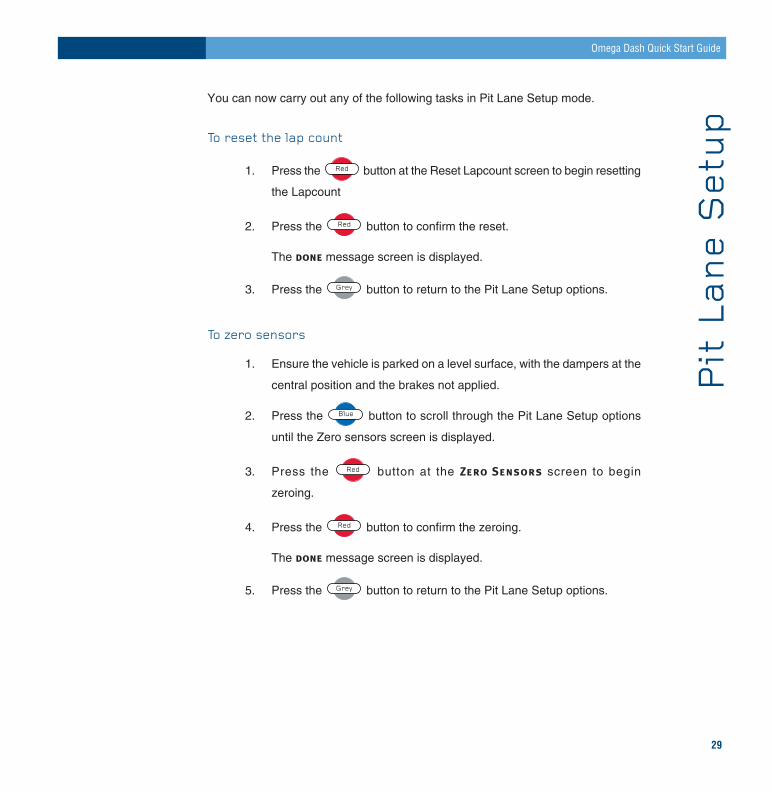
You can now carry out any of the following tasks in Pit Lane Setup mode.
To reset the lap count
Press the 1. Red button at the Reset Lapcount screen to begin resetting
the Lapcount
Press the 2. Red button to confirm the reset.
The done message screen is displayed.
Press the 3. Grey button to return to the Pit Lane Setup options.
To zero sensors
Ensure the vehicle is parked on a level surface, with the dampers at the 1.
central position and the brakes not applied.
Press the 2. Blue button to scroll through the Pit Lane Setup options
until the Zero sensors screen is displayed.
Press the 3. Red button at the Zero Sensors screen to begin
zeroing.
Press the 4. Red button to confirm the zeroing.
The done message screen is displayed.
Press the 5. Grey button to return to the Pit Lane Setup options.
Omega Dash Quick Start Guide
Pit
La
ne S
etu
p29
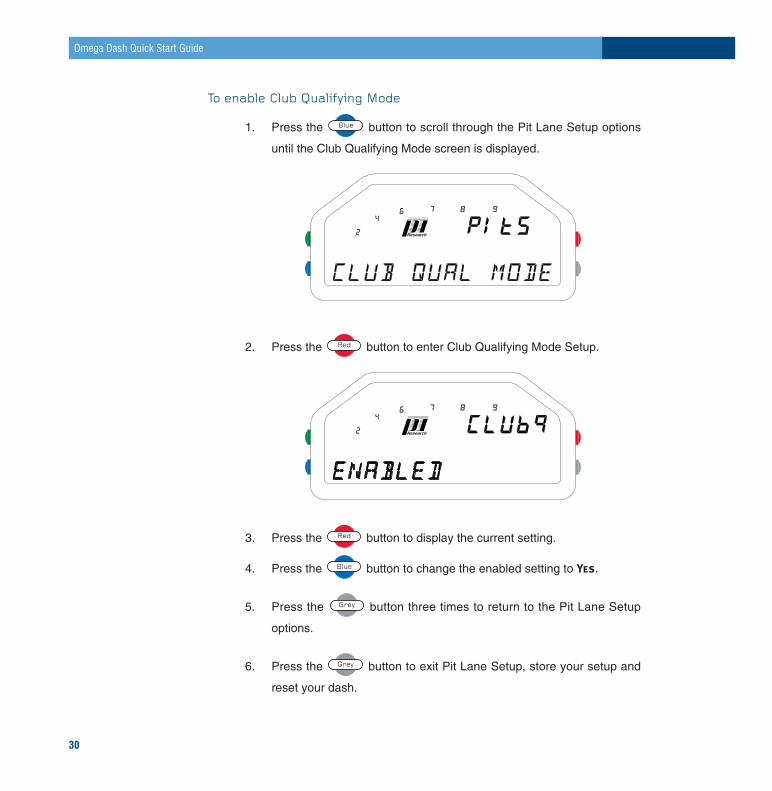
To enable Club Qualifying Mode
Press the 1. Blue button to scroll through the Pit Lane Setup options
until the Club Qualifying Mode screen is displayed.
Research
Press the 2. Red button to enter Club Qualifying Mode Setup.
Research
Press the 3. Red button to display the current setting.
Press the 4. Blue button to change the enabled setting to Yes.
Press the 5. Grey button three times to return to the Pit Lane Setup
options.
Press the 6. Grey button to exit Pit Lane Setup, store your setup and
reset your dash.
Omega Dash Quick Start Guide
30
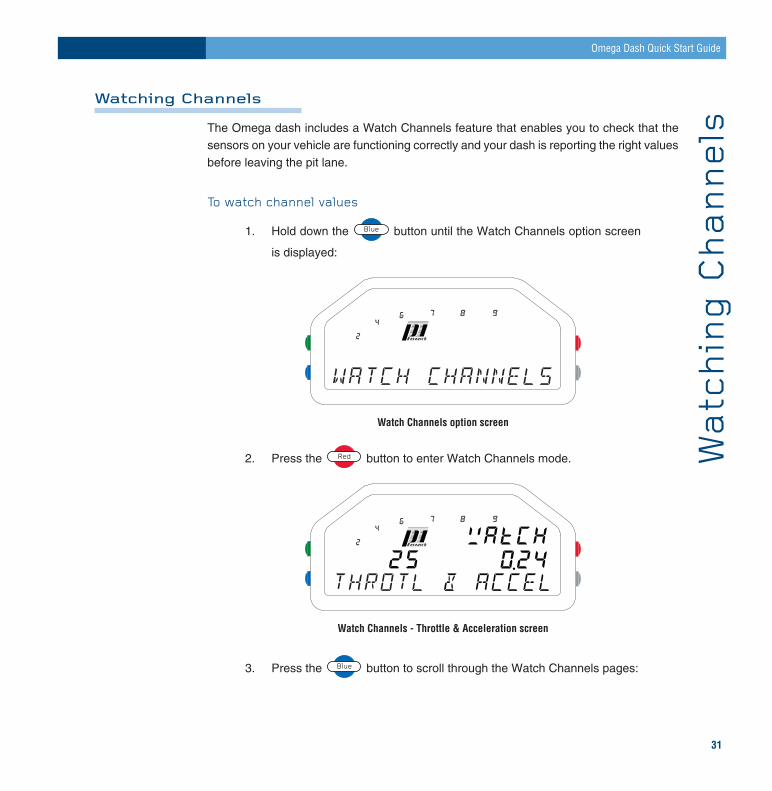
Watching Channels
The Omega dash includes a Watch Channels feature that enables you to check that the sensors on your vehicle are functioning correctly and your dash is reporting the right values before leaving the pit lane.
To watch channel values
Hold down the 1. Blue button until the Watch Channels option screen
is displayed:
Research
Watch Channels option screen
Press the 2. Red button to enter Watch Channels mode.
Research
Watch Channels - Throttle & Acceleration screen
Press the 3. Blue button to scroll through the Watch Channels pages:
Omega Dash Quick Start Guide
Wa
tch
ing
Ch
an
nels
31
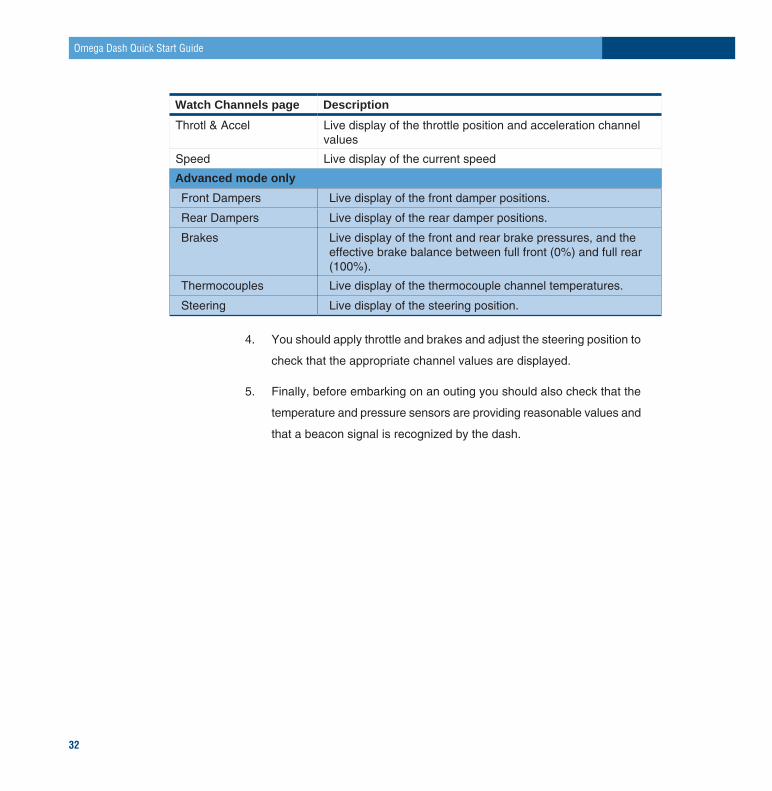
Watch Channels page Description
Throtl & Accel Live display of the throttle position and acceleration channel values
Speed Live display of the current speed
Advanced mode only
Front Dampers Live display of the front damper positions.
Rear Dampers Live display of the rear damper positions.
Brakes Live display of the front and rear brake pressures, and the effective brake balance between full front (0%) and full rear (100%).
Thermocouples Live display of the thermocouple channel temperatures.
Steering Live display of the steering position.
You should apply throttle and brakes and adjust the steering position to 4.
check that the appropriate channel values are displayed.
Finally, before embarking on an outing you should also check that the 5.
temperature and pressure sensors are providing reasonable values and
that a beacon signal is recognized by the dash.
Omega Dash Quick Start Guide
32
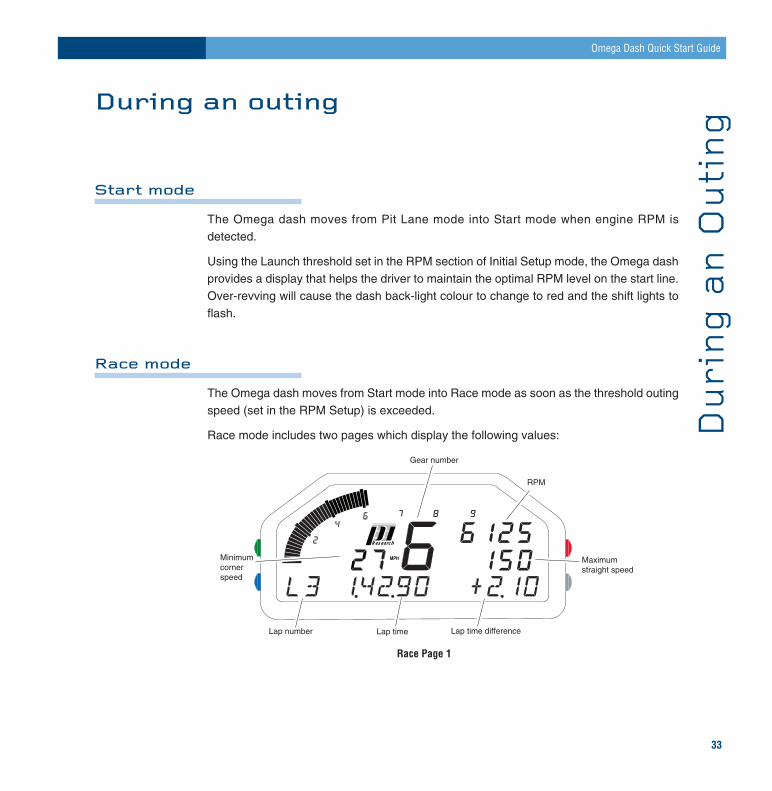
During an outing
Start mode
The Omega dash moves from Pit Lane mode into Start mode when engine RPM is detected.
Using the Launch threshold set in the RPM section of Initial Setup mode, the Omega dash provides a display that helps the driver to maintain the optimal RPM level on the start line. Over-revving will cause the dash back-light colour to change to red and the shift lights to flash.
Race mode
The Omega dash moves from Start mode into Race mode as soon as the threshold outing speed (set in the RPM Setup) is exceeded.
Race mode includes two pages which display the following values:
Research
Lap time difference
Gear number
Minimumcornerspeed
Maximum straight speed
RPM
Lap number Lap time
Race Page 1
Omega Dash Quick Start Guide
Du
rin
g a
n O
uti
ng
33
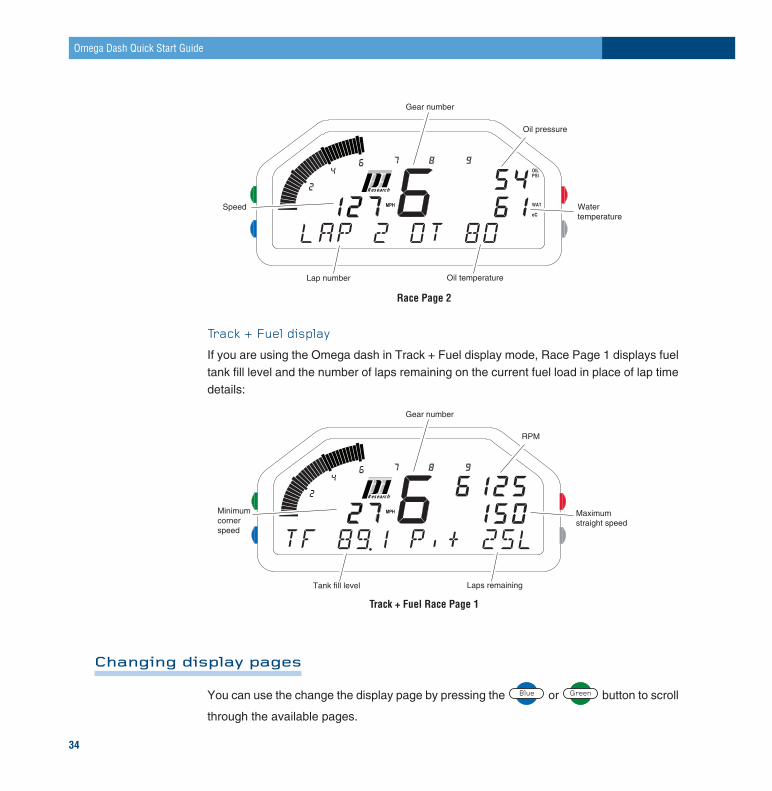
Research
Oil temperature
Gear number
Speed Water temperature
Oil pressure
Lap number
Race Page 2
Track + Fuel display
If you are using the Omega dash in Track + Fuel display mode, Race Page 1 displays fuel tank fill level and the number of laps remaining on the current fuel load in place of lap time details:
Research
Laps remaining
Gear number
Minimumcorner speed
Maximumstraight speed
RPM
Tank fill level
Track + Fuel Race Page 1
Changing display pages
You can use the change the display page by pressing the Blue or Green button to scroll
through the available pages.
Omega Dash Quick Start Guide
34
Alarms
Alarms warn of abnormal conditions, for example, a temperature being too high, or a pres-sure too low.
Acknowledging an alarm
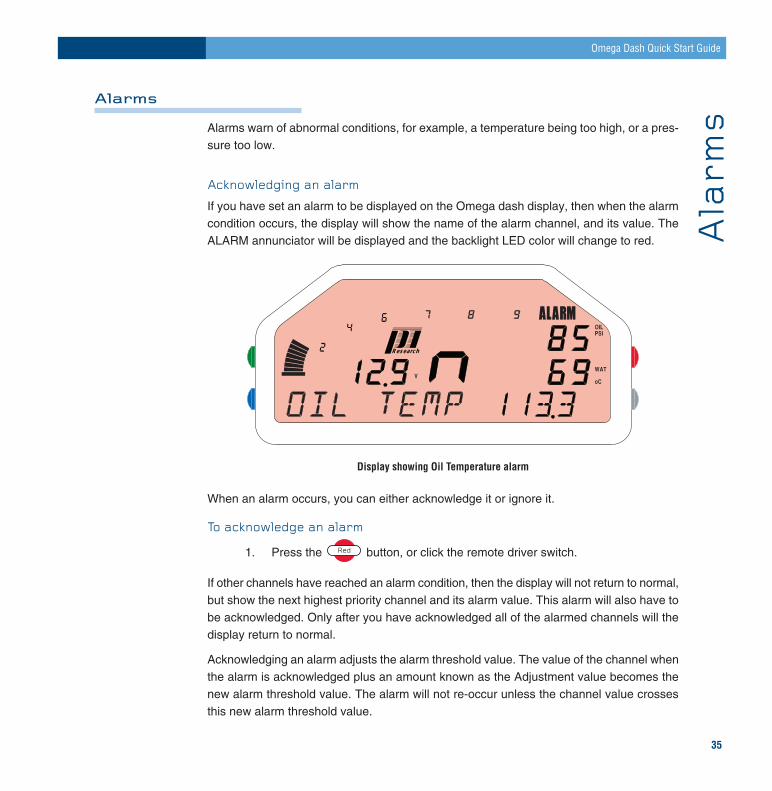
If you have set an alarm to be displayed on the Omega dash display, then when the alarm condition occurs, the display will show the name of the alarm channel, and its value. The ALARM annunciator will be displayed and the backlight LED color will change to red.
Research
Display showing Oil Temperature alarm
When an alarm occurs, you can either acknowledge it or ignore it.
To acknowledge an alarm
Press the 1. Red button, or click the remote driver switch.
If other channels have reached an alarm condition, then the display will not return to normal, but show the next highest priority channel and its alarm value. This alarm will also have to be acknowledged. Only after you have acknowledged all of the alarmed channels will the display return to normal.
Acknowledging an alarm adjusts the alarm threshold value. The value of the channel when the alarm is acknowledged plus an amount known as the Adjustment value becomes the new alarm threshold value. The alarm will not re-occur unless the channel value crosses this new alarm threshold value.
Omega Dash Quick Start Guide
Ala
rms
35
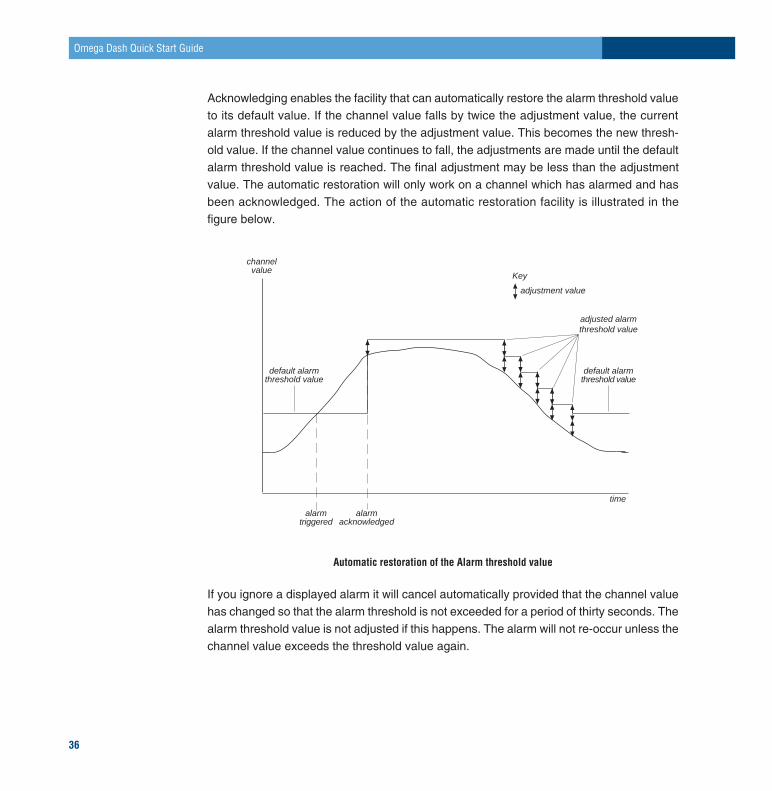
Acknowledging enables the facility that can automatically restore the alarm threshold value to its default value. If the channel value falls by twice the adjustment value, the current alarm threshold value is reduced by the adjustment value. This becomes the new thresh-old value. If the channel value continues to fall, the adjustments are made until the default alarm threshold value is reached. The final adjustment may be less than the adjustment value. The automatic restoration will only work on a channel which has alarmed and has been acknowledged. The action of the automatic restoration facility is illustrated in the figure below.
channelvalue
time
default alarmthreshold value
alarmtriggered
alarmacknowledged
adjusted alarmthreshold value
adjustment value
default alarmthreshold value
Key
Automatic restoration of the Alarm threshold value
If you ignore a displayed alarm it will cancel automatically provided that the channel value has changed so that the alarm threshold is not exceeded for a period of thirty seconds. The alarm threshold value is not adjusted if this happens. The alarm will not re-occur unless the channel value exceeds the threshold value again.
Omega Dash Quick Start Guide
36
After an outing
Telltale mode
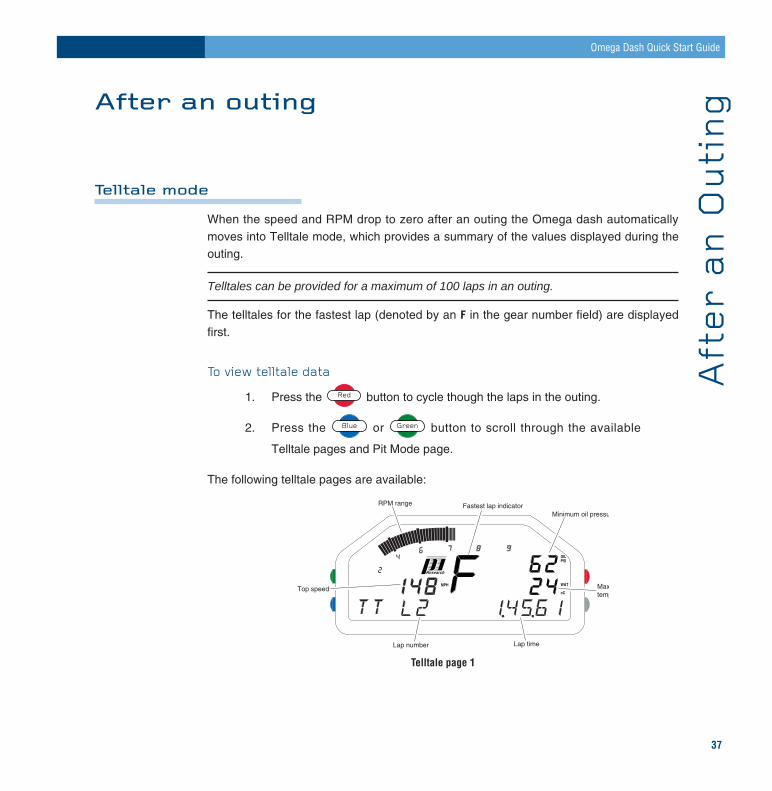
When the speed and RPM drop to zero after an outing the Omega dash automatically moves into Telltale mode, which provides a summary of the values displayed during the outing.
Telltales can be provided for a maximum of 100 laps in an outing.
The telltales for the fastest lap (denoted by an F in the gear number field) are displayed first.
To view telltale data
Press the 1. Red button to cycle though the laps in the outing.
Press the 2. Blue or Green button to scroll through the available
Telltale pages and Pit Mode page.
The following telltale pages are available:
Research
Lap number Lap time
RPM range Fastest lap indicator
Top speed
Minimum oil pressure
Maximum watertemperature
Telltale page 1
Omega Dash Quick Start Guide
Aft
er
an
Ou
tin
g37
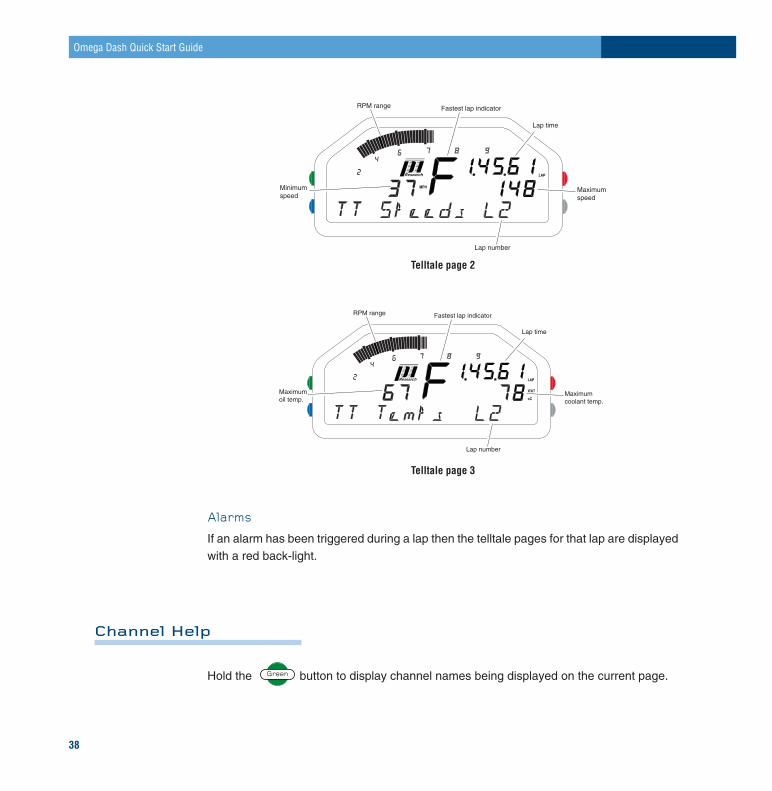
Research
Lap number
RPM range Fastest lap indicator
Minimumspeed
Maximumspeed
Lap time
Telltale page 2
Research
Lap number
RPM range Fastest lap indicator
Maximumoil temp.
Maximumcoolant temp.
Lap time
Telltale page 3
Alarms
If an alarm has been triggered during a lap then the telltale pages for that lap are displayed with a red back-light.
Channel Help
Hold the Green button to display channel names being displayed on the current page.
Omega Dash Quick Start Guide
38

Using Club Qualifying Mode
To use Club Qualifying Mode (CQM) on your Omega dash, the beacon receiver must be configured correctly in the dash Initial Setup and Club Qualifying Mode must be enabled in the dash Pit Lane Setup.
Club qualifying mode operating modes
Club qualifying mode has two modes, Learn mode and Operating mode .
Learn mode
Learn mode is initiated when the Omega dash has no stored lap data. This occurs with either a new Omega dash or when the stored lap data has been reset.
Learn mode comprises three separate stages that are shown on the Omega dash Laptime display field.
The running Laptime and the words LRN 1, or LRN 2 or LRN 3 are alternately shown on the Omega dash.
Word Meaning
LRN 1 The Omega dash is looking for the first beacon trigger used for synchronisationLRN 2 The Omega dash is now synchronised and is looking for another beacon to measure the lap distance.LRN 3 The Omega dash now has a stored lap of distance only. This lap has been split into sixteen equal distance segments and is collecting time stamps for each of the segments
At the end of stage LRN 3 the distance of that lap is compared to the distance of the lap stored in LRN 2. If the distances are within 5% of each another, the lap of LRN 3 is stored in the Omega dash and can then be used for normal CQM operation.
Omega Dash Quick Start Guide
Clu
b Q
ua
lify
ing
Mod
e39
Operating mode
Once a lap has been learned the Omega dash can be used in Operating mode.
Operating mode needs to be synchronised before it will determine Qualifying Times. This is automatic when in Learn mode and as soon as learning is complete the Omega dash is already synchronised and laptime comparison begins.
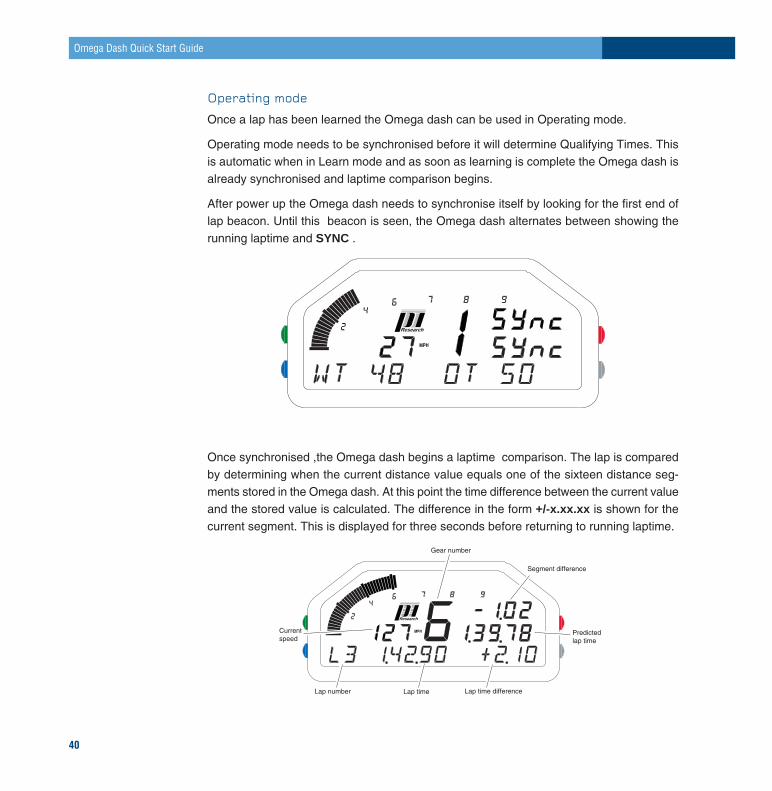
After power up the Omega dash needs to synchronise itself by looking for the first end of lap beacon. Until this beacon is seen, the Omega dash alternates between showing the running laptime and SYNC .
Research
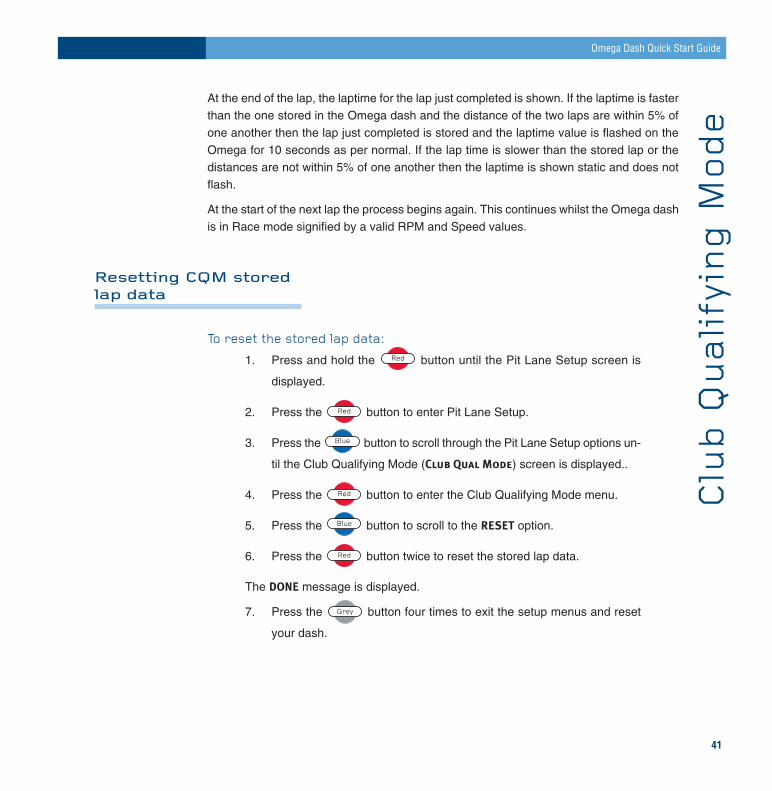
Once synchronised ,the Omega dash begins a laptime comparison. The lap is compared by determining when the current distance value equals one of the sixteen distance seg-ments stored in the Omega dash. At this point the time difference between the current value and the stored value is calculated. The difference in the form +/-x.xx.xx is shown for the current segment. This is displayed for three seconds before returning to running laptime.
Research
Lap time difference
Gear number
Currentspeed
Predicted lap time
Segment difference
Lap number Lap time
Omega Dash Quick Start Guide
40
At the end of the lap, the laptime for the lap just completed is shown. If the laptime is faster than the one stored in the Omega dash and the distance of the two laps are within 5% of one another then the lap just completed is stored and the laptime value is flashed on the Omega for 10 seconds as per normal. If the lap time is slower than the stored lap or the distances are not within 5% of one another then the laptime is shown static and does not flash.
At the start of the next lap the process begins again. This continues whilst the Omega dash is in Race mode signified by a valid RPM and Speed values.
Resetting CQM stored lap data
To reset the stored lap data:
Press and hold the 1. Red button until the Pit Lane Setup screen is
displayed.
Press the 2. Red button to enter Pit Lane Setup.
Press the 3. Blue button to scroll through the Pit Lane Setup options un-
til the Club Qualifying Mode (Club Qual Mode) screen is displayed..
Press the 4. Red button to enter the Club Qualifying Mode menu.
Press the 5. Blue button to scroll to the RESET option.
Press the 6. Red button twice to reset the stored lap data.
The DONE message is displayed.
Press the 7. Grey button four times to exit the setup menus and reset
your dash.
Omega Dash Quick Start Guide
Clu
b Q
ua
lify
ing
Mod
e41
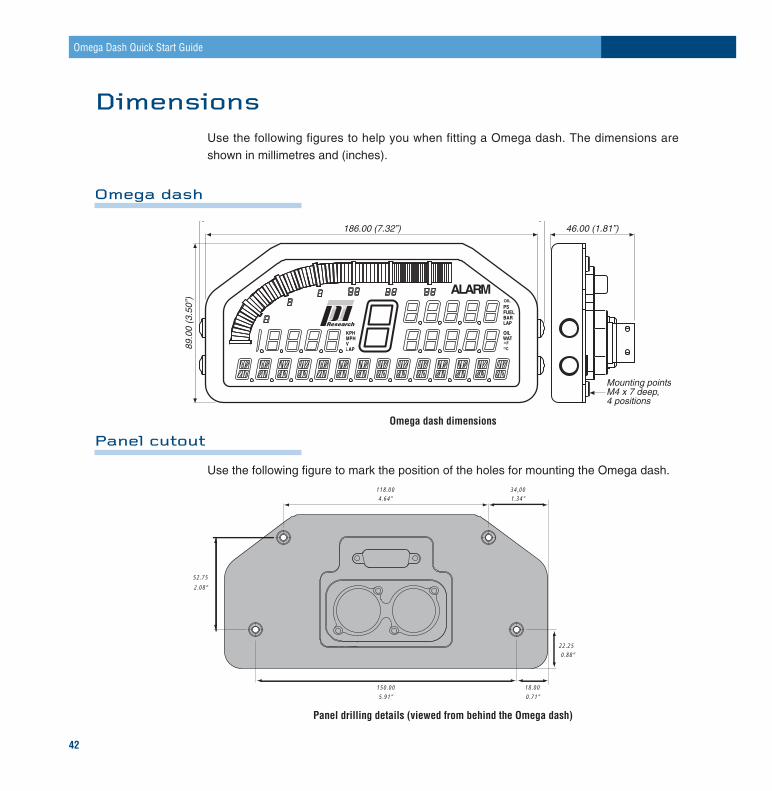
DimensionsUse the following figures to help you when fitting a Omega dash. The dimensions are shown in millimetres and (inches).
Omega dash
Omega dash dimensions
Panel cutout
Use the following figure to mark the position of the holes for mounting the Omega dash.
150.00
34,00118.00
52.75
18.00
22.25
4.64" 1.34"
2.08"
0.88"
5.91" 0.71"
Panel drilling details (viewed from behind the Omega dash)
Omega Dash Quick Start Guide
42
Contact information
For more information about Pi Research products and details of worldwide authorized agents, please contact:
Pi Research LimitedBrookfield Motorsports CentreTwentypence RoadCottenhamCAMBRIDGEUK Customer Support Tel +44 (0) 1954 253600CB24 8PS Fax +44 (0) 1954 253601
Pi Research, Inc.8250 HaverstickSuite #275IndianapolisIN 46240 Tel +1 (317) 259-8900USA Fax +1 (317) 259-0137
Part Number: 29D-071550-1E
Issue 1.0 July 2007
Pi and the Pi logo are trademarks of Pi Group Limited
© Pi Research Limited, 2007
www.piresearch.com
Omega Dash Quick Start Guide
Con
tact
In
form
ati
on
43