Embed Size (px)
Citation preview

1
Oklahoma State Department of Education Wave TLE Roster Verification Import Application Manual
MARCH 4, 2015 VERSION 01.01
Oklahoma State Department of Education 2500 North Lincoln Boulevard
Oklahoma City, OK 73105-4599
2
TableofContents1 – Introduction ......................................................................................................................................................................................................... 2
1.1 - Purpose ....................................................................................................................................................... 2 1.2 - How to use this document .................................................................................................................. 2
2 – Access to the TLE Roster Verification Import ........................................................................................................................................ 3 2.1 Go to the Wave Portal ............................................................................................................................ 3 2.2 Go to the TLE Roster Verification Import .................................................................................. 4 2.3 Select Site and Reporting Status ........................................................................................................ 5 2.4 General Navigation ................................................................................................................................. 6
3 – Prepopulated Data ............................................................................................................................................................................................. 7 4 – On Screen Data Entry ...................................................................................................................................................................................... 8
4.1 Adding, Editing or Deleting Records .............................................................................................. 8 4.2 Importing a Data File ............................................................................................................................. 9 4.3 Restore Original File - Caution ........................................................................................................ 10
5 – Final Report ....................................................................................................................................................................................................... 12 5.1 Filter Grid .................................................................................................................................................. 12 5.2 Change the Report View .................................................................................................................... 13 5.3 Export the Final Report ...................................................................................................................... 14 5.4 Confirm the Report .............................................................................................................................. 14
6 – Find Missing Students ................................................................................................................................................................................... 16 6.1 Find Missing Students Page .............................................................................................................. 16
7 – Reporting Tools ............................................................................................................................................................................................... 17 7.1 Navigating the Report .......................................................................................................................... 17
8 – Superintendent Responsibilities .................................................................................................................................................................. 18
W a v e T L E R o s t e r V e r i f i c a t i o n I m p o r t A p p l i c a t i o n M a r c h 4 , 2 0 1 5
2 v 01.01
1 – Introduction The purpose of the TLE Roster Verification Import application located on the Wave Web site is to assist schools in reporting the teacher/student/course link data that will be used in the Battelle for Kids Roster Verification process by the teachers. The Wave TLE Roster Verification Import application allows “data people” at the district the ability to add, edit, and delete pre-populated information from their system and provides a means for importing the entire teacher/student/course file for a whole school. 1.1 - Purpose
The purpose of this manual is to provide a step-by-step resource for accessing and submitting the TLE Roster Verification Import to The Oklahoma State Department of Education for loading into the Battelle for Kids system.
1.2 - How to use this document
This document is intended to be a step-by-step guide for reviewing and submitting the TLE Roster Verification Import. To access successfully, follow the steps outlined in this document. For assistance with a specific section, identify the exact area in the Table of Contents and navigate to that section with a click of the mouse to follow the instructional steps. If you have any questions regarding this report, please contact the State Department of Education at 405.521.3301 for assistance.
W a v e T L E R o s t e r V e r i f i c a t i o n I m p o r t A p p l i c a t i o n M a r c h 4 , 2 0 1 5
3 v 01.01
2 – Access to the TLE Roster Verification Import Access to the TLE Roster Verification Import is provided to a user by the District Superintendent or District Single Sign On Logon Administrator through the Single Sign On System. Individuals who already have the “District Superintendent,” “Site Principal,” or “District Administrator” role assigned to them in the Wave will automatically be granted access to the TLE Roster Verification Import. All others will need to have the “Roster Verification Report Access” role assigned to them.
The Superintendent or Logon Administrator will need to grant access to each person whom they would like to review or submit the report. This will include the site level person who will complete each site level report and any other individuals.
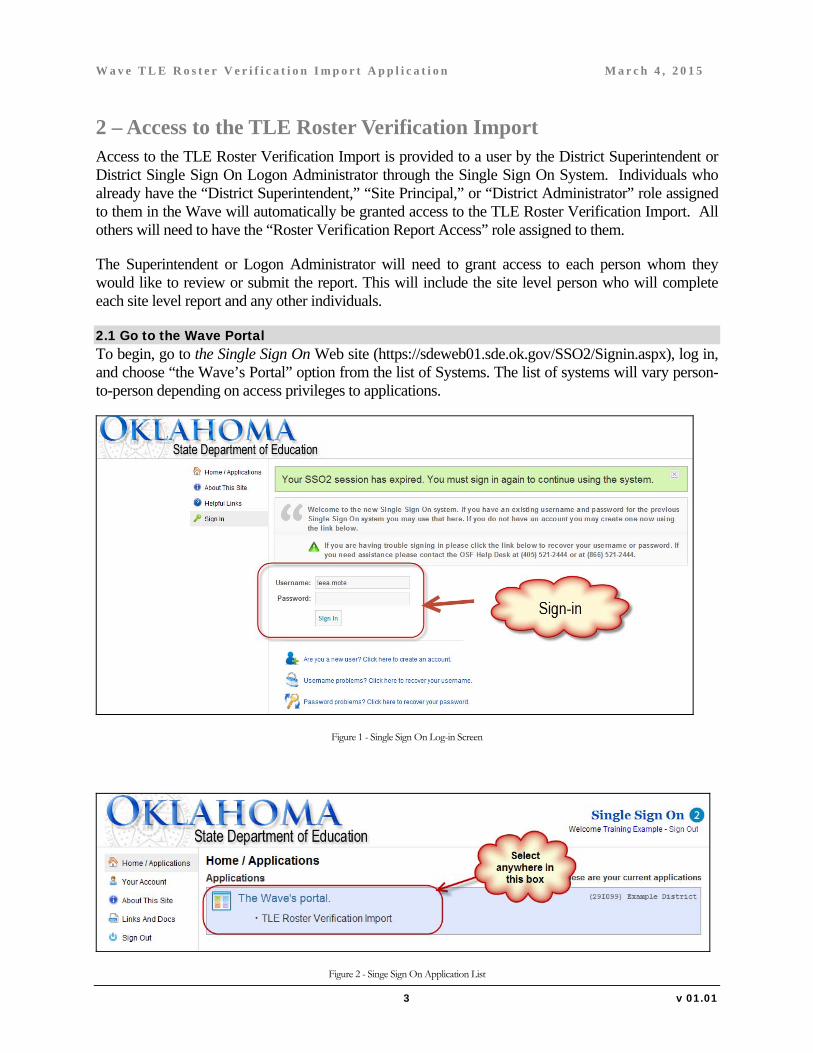
2.1 Go to the Wave Portal To begin, go to the Single Sign On Web site (https://sdeweb01.sde.ok.gov/SSO2/Signin.aspx), log in, and choose “the Wave’s Portal” option from the list of Systems. The list of systems will vary person-to-person depending on access privileges to applications.
Figure 1 - Single Sign On Log-in Screen
Figure 2 - Singe Sign On Application List
W a v e T L E R o s t e r V e r i f i c a t i o n I m p o r t A p p l i c a t i o n M a r c h 4 , 2 0 1 5
4 v 01.01
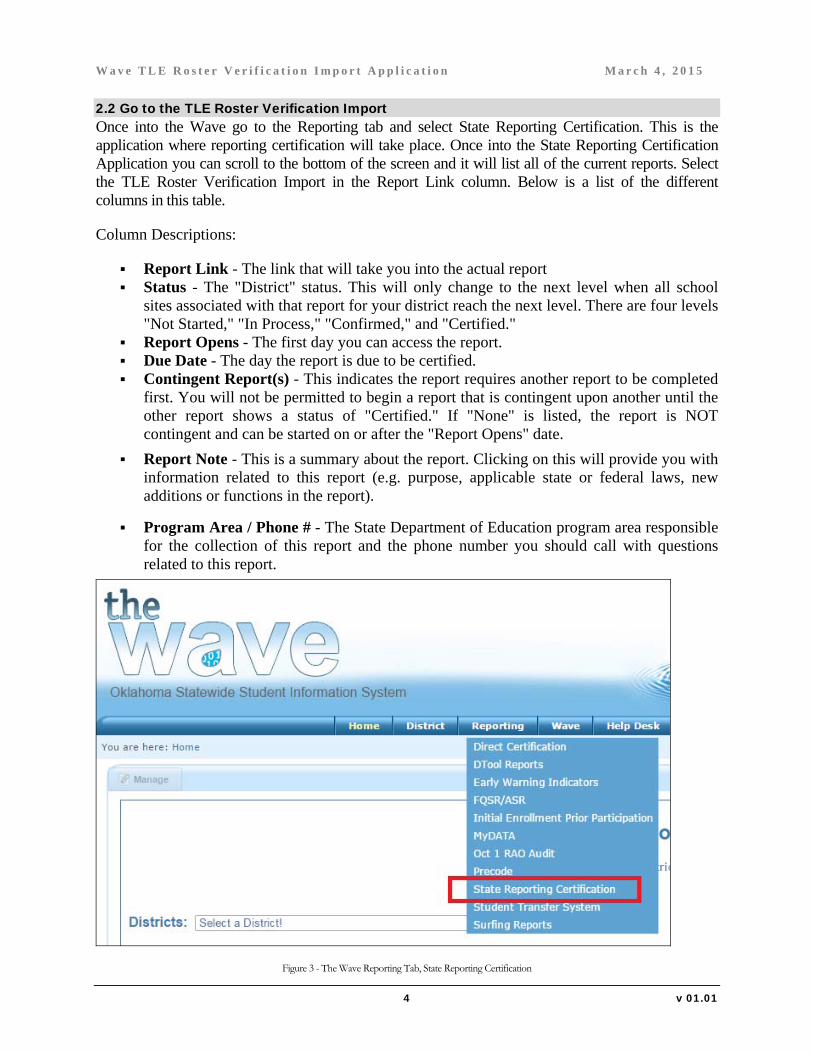
2.2 Go to the TLE Roster Verification Import Once into the Wave go to the Reporting tab and select State Reporting Certification. This is the application where reporting certification will take place. Once into the State Reporting Certification Application you can scroll to the bottom of the screen and it will list all of the current reports. Select the TLE Roster Verification Import in the Report Link column. Below is a list of the different columns in this table.
Column Descriptions:
Report Link - The link that will take you into the actual report Status - The "District" status. This will only change to the next level when all school
sites associated with that report for your district reach the next level. There are four levels "Not Started," "In Process," "Confirmed," and "Certified."
Report Opens - The first day you can access the report. Due Date - The day the report is due to be certified. Contingent Report(s) - This indicates the report requires another report to be completed
first. You will not be permitted to begin a report that is contingent upon another until the other report shows a status of "Certified." If "None" is listed, the report is NOT contingent and can be started on or after the "Report Opens" date.
Report Note - This is a summary about the report. Clicking on this will provide you with information related to this report (e.g. purpose, applicable state or federal laws, new additions or functions in the report).
Program Area / Phone # - The State Department of Education program area responsible for the collection of this report and the phone number you should call with questions related to this report.
Figure 3 - The Wave Reporting Tab, State Reporting Certification
W a v e T L E R o s t e r V e r i f i c a t i o n I m p o r t A p p l i c a t i o n M a r c h 4 , 2 0 1 5
5 v 01.01
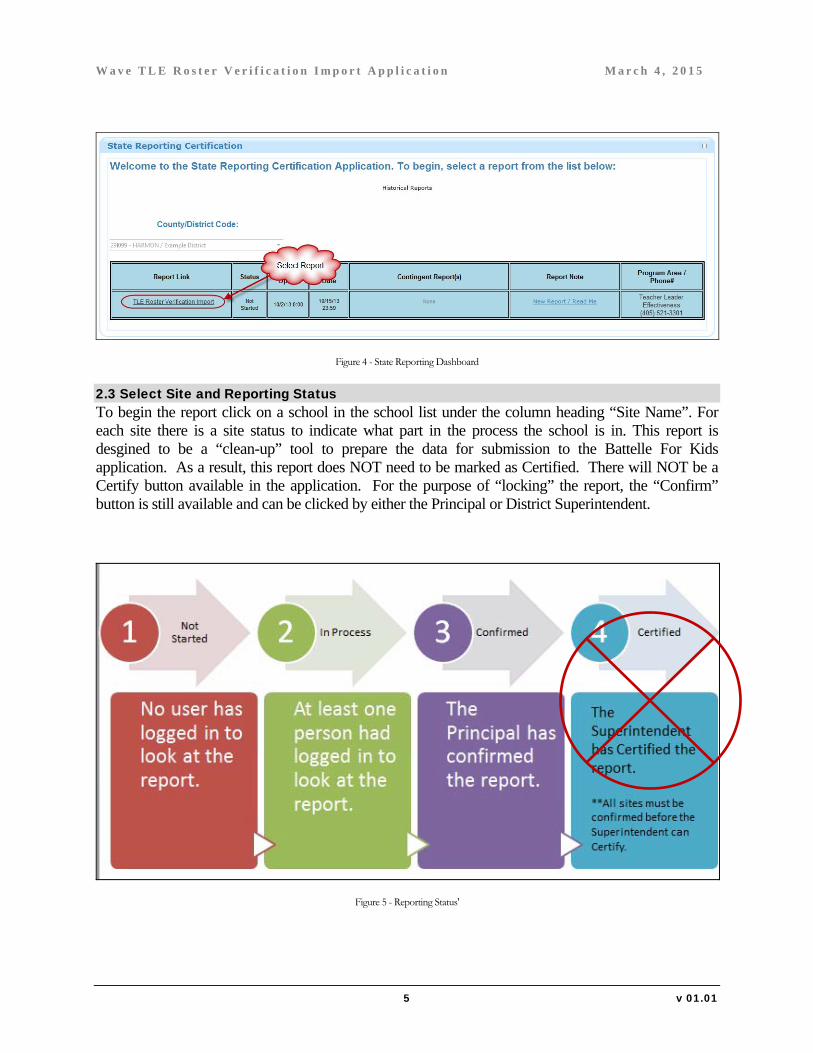
Figure 4 - State Reporting Dashboard
2.3 Select Site and Reporting Status To begin the report click on a school in the school list under the column heading “Site Name”. For each site there is a site status to indicate what part in the process the school is in. This report is desgined to be a “clean-up” tool to prepare the data for submission to the Battelle For Kids application. As a result, this report does NOT need to be marked as Certified. There will NOT be a Certify button available in the application. For the purpose of “locking” the report, the “Confirm” button is still available and can be clicked by either the Principal or District Superintendent.
Figure 5 - Reporting Status'
W a v e T L E R o s t e r V e r i f i c a t i o n I m p o r t A p p l i c a t i o n M a r c h 4 , 2 0 1 5
6 v 01.01
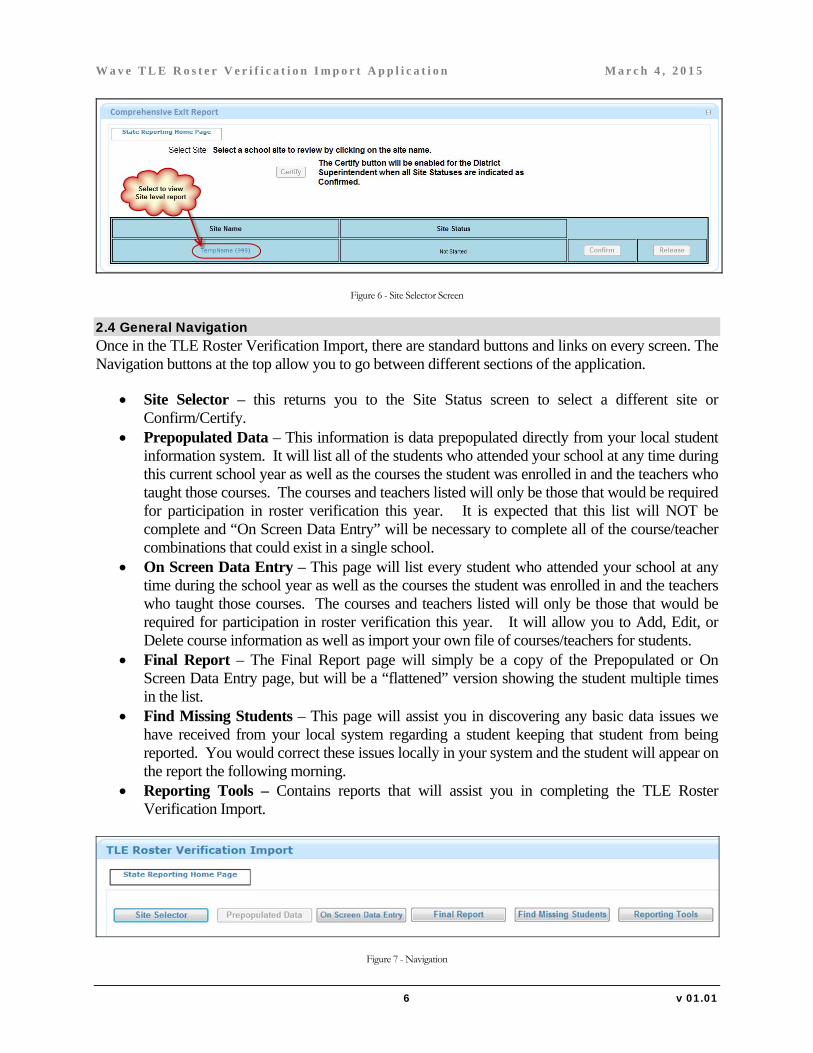
Figure 6 - Site Selector Screen
2.4 General Navigation Once in the TLE Roster Verification Import, there are standard buttons and links on every screen. The Navigation buttons at the top allow you to go between different sections of the application.
Site Selector – this returns you to the Site Status screen to select a different site or Confirm/Certify.
Prepopulated Data – This information is data prepopulated directly from your local student information system. It will list all of the students who attended your school at any time during this current school year as well as the courses the student was enrolled in and the teachers who taught those courses. The courses and teachers listed will only be those that would be required for participation in roster verification this year. It is expected that this list will NOT be complete and “On Screen Data Entry” will be necessary to complete all of the course/teacher combinations that could exist in a single school.
On Screen Data Entry – This page will list every student who attended your school at any time during the school year as well as the courses the student was enrolled in and the teachers who taught those courses. The courses and teachers listed will only be those that would be required for participation in roster verification this year. It will allow you to Add, Edit, or Delete course information as well as import your own file of courses/teachers for students.
Final Report – The Final Report page will simply be a copy of the Prepopulated or On Screen Data Entry page, but will be a “flattened” version showing the student multiple times in the list.
Find Missing Students – This page will assist you in discovering any basic data issues we have received from your local system regarding a student keeping that student from being reported. You would correct these issues locally in your system and the student will appear on the report the following morning.
Reporting Tools – Contains reports that will assist you in completing the TLE Roster Verification Import.
Figure 7 - Navigation

W a v e T L E R o s t e r V e r i f i c a t i o n I m p o r t A p p l i c a t i o n M a r c h 4 , 2 0 1 5
7 v 01.01
3 – Prepopulated Data The Prepopulated Data Screen contains data that came directly from your local student information system. By clicking the plus sign (+) to the left of a student’s record, you can expand the information to see the courses/teachers associated with that student.
The data populates onto this page nightly from your local student information system. The course/teacher information that appears is directly related to how the course/section information is set up in your local system. If the data is not complete, you can update your local schedules or choose to enter the data right on the screen by clicking the “On Screen Data Entry” button. Once “On Screen Data Entry” is selected, the “Prepopulated Data” button will disappear and the report will no longer update nightly.
Figure 8 – Prepopulated Data Screen
W a v e T L E R o s t e r V e r i f i c a t i o n I m p o r t A p p l i c a t i o n M a r c h 4 , 2 0 1 5
8 v 01.01
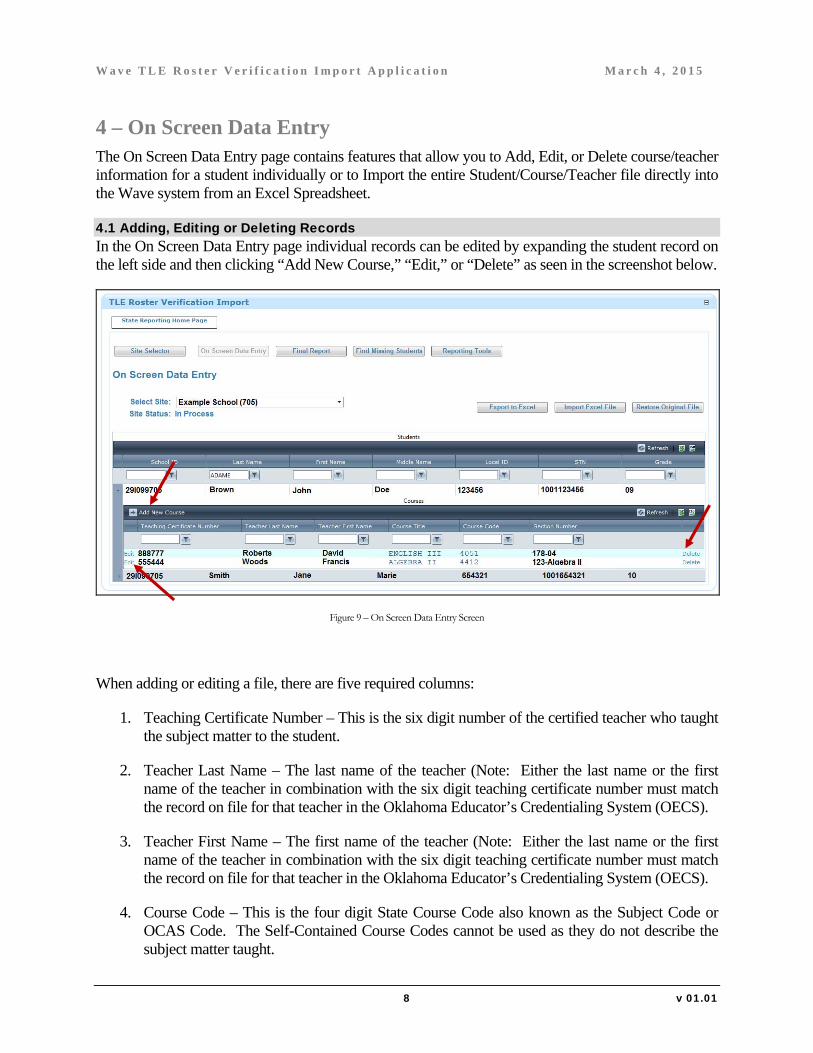
4 – On Screen Data Entry The On Screen Data Entry page contains features that allow you to Add, Edit, or Delete course/teacher information for a student individually or to Import the entire Student/Course/Teacher file directly into the Wave system from an Excel Spreadsheet.
4.1 Adding, Editing or Deleting Records
In the On Screen Data Entry page individual records can be edited by expanding the student record on the left side and then clicking “Add New Course,” “Edit,” or “Delete” as seen in the screenshot below.
Figure 9 – On Screen Data Entry Screen
When adding or editing a file, there are five required columns:
1. Teaching Certificate Number – This is the six digit number of the certified teacher who taught the subject matter to the student.
2. Teacher Last Name – The last name of the teacher (Note: Either the last name or the first name of the teacher in combination with the six digit teaching certificate number must match the record on file for that teacher in the Oklahoma Educator’s Credentialing System (OECS).
3. Teacher First Name – The first name of the teacher (Note: Either the last name or the first name of the teacher in combination with the six digit teaching certificate number must match the record on file for that teacher in the Oklahoma Educator’s Credentialing System (OECS).
4. Course Code – This is the four digit State Course Code also known as the Subject Code or OCAS Code. The Self-Contained Course Codes cannot be used as they do not describe the subject matter taught.
W a v e T L E R o s t e r V e r i f i c a t i o n I m p o r t A p p l i c a t i o n M a r c h 4 , 2 0 1 5
9 v 01.01
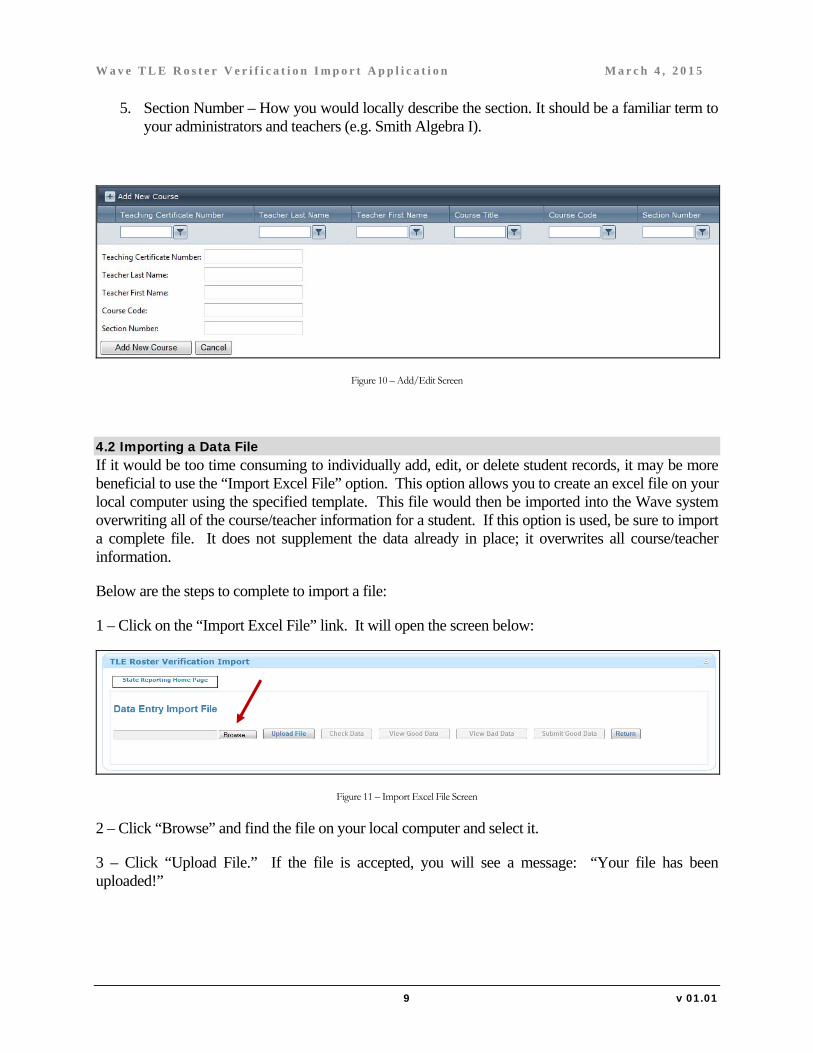
5. Section Number – How you would locally describe the section. It should be a familiar term to your administrators and teachers (e.g. Smith Algebra I).
Figure 10 – Add/Edit Screen
4.2 Importing a Data File
If it would be too time consuming to individually add, edit, or delete student records, it may be more beneficial to use the “Import Excel File” option. This option allows you to create an excel file on your local computer using the specified template. This file would then be imported into the Wave system overwriting all of the course/teacher information for a student. If this option is used, be sure to import a complete file. It does not supplement the data already in place; it overwrites all course/teacher information.
Below are the steps to complete to import a file:
1 – Click on the “Import Excel File” link. It will open the screen below:
Figure 11 – Import Excel File Screen
2 – Click “Browse” and find the file on your local computer and select it.
3 – Click “Upload File.” If the file is accepted, you will see a message: “Your file has been uploaded!”
W a v e T L E R o s t e r V e r i f i c a t i o n I m p o r t A p p l i c a t i o n M a r c h 4 , 2 0 1 5
10 v 01.01
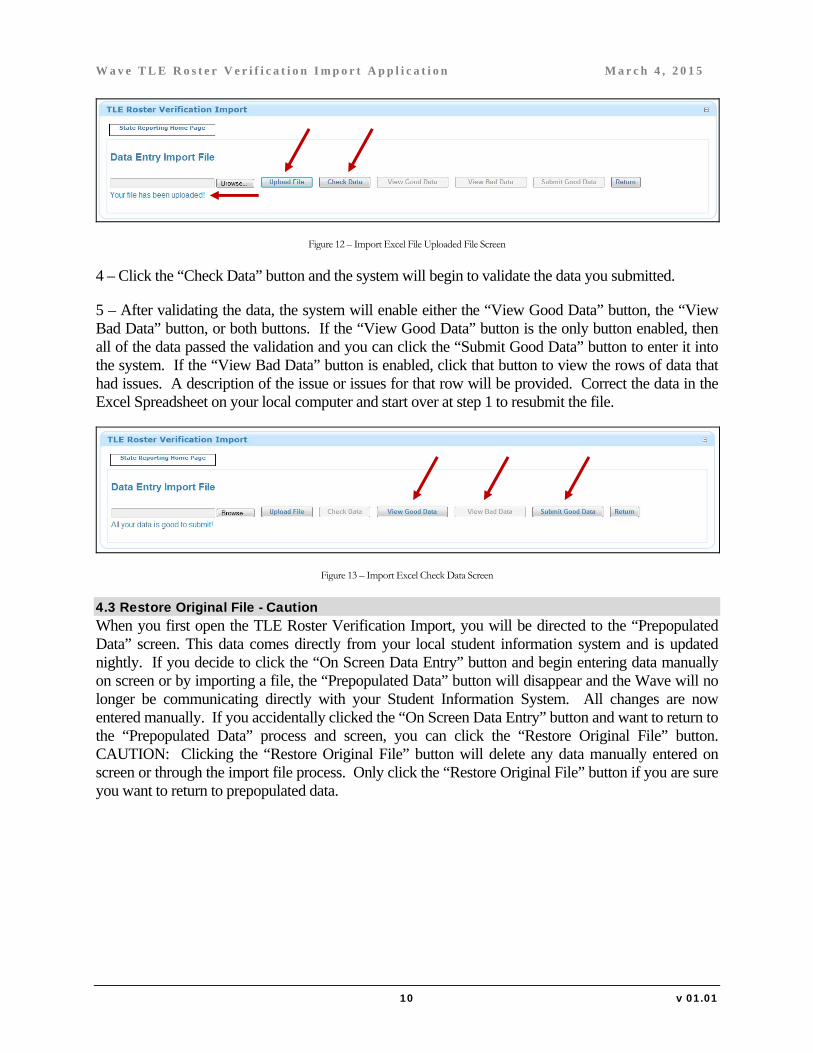
Figure 12 – Import Excel File Uploaded File Screen
4 – Click the “Check Data” button and the system will begin to validate the data you submitted.
5 – After validating the data, the system will enable either the “View Good Data” button, the “View Bad Data” button, or both buttons. If the “View Good Data” button is the only button enabled, then all of the data passed the validation and you can click the “Submit Good Data” button to enter it into the system. If the “View Bad Data” button is enabled, click that button to view the rows of data that had issues. A description of the issue or issues for that row will be provided. Correct the data in the Excel Spreadsheet on your local computer and start over at step 1 to resubmit the file.
Figure 13 – Import Excel Check Data Screen
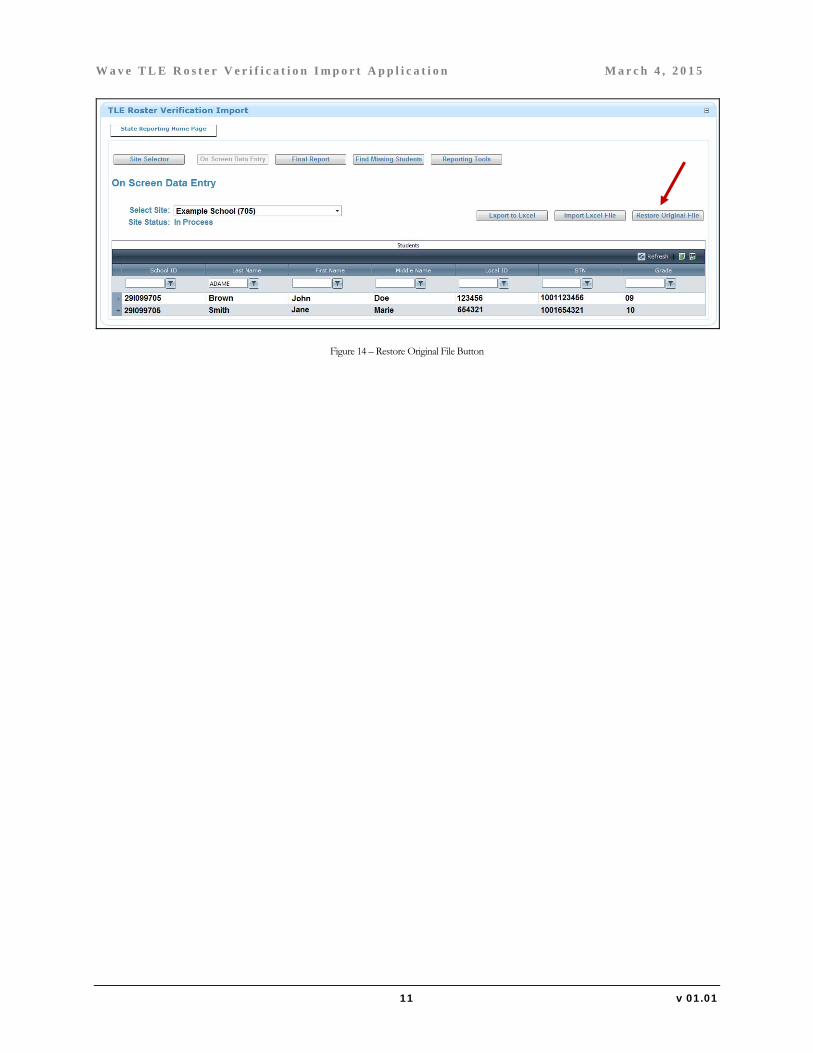
4.3 Restore Original File - Caution
When you first open the TLE Roster Verification Import, you will be directed to the “Prepopulated Data” screen. This data comes directly from your local student information system and is updated nightly. If you decide to click the “On Screen Data Entry” button and begin entering data manually on screen or by importing a file, the “Prepopulated Data” button will disappear and the Wave will no longer be communicating directly with your Student Information System. All changes are now entered manually. If you accidentally clicked the “On Screen Data Entry” button and want to return to the “Prepopulated Data” process and screen, you can click the “Restore Original File” button. CAUTION: Clicking the “Restore Original File” button will delete any data manually entered on screen or through the import file process. Only click the “Restore Original File” button if you are sure you want to return to prepopulated data.
W a v e T L E R o s t e r V e r i f i c a t i o n I m p o r t A p p l i c a t i o n M a r c h 4 , 2 0 1 5
11 v 01.01
Figure 14 – Restore Original File Button
W a v e T L E R o s t e r V e r i f i c a t i o n I m p o r t A p p l i c a t i o n M a r c h 4 , 2 0 1 5
12 v 01.01
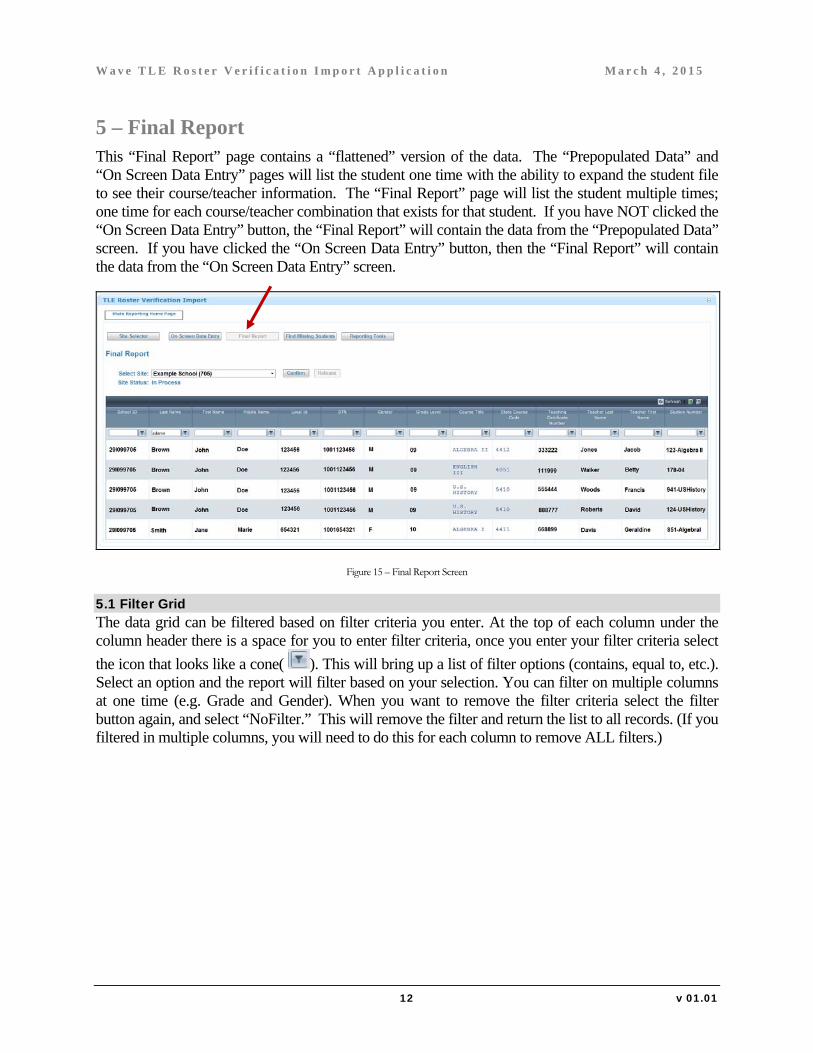
5 – Final Report This “Final Report” page contains a “flattened” version of the data. The “Prepopulated Data” and “On Screen Data Entry” pages will list the student one time with the ability to expand the student file to see their course/teacher information. The “Final Report” page will list the student multiple times; one time for each course/teacher combination that exists for that student. If you have NOT clicked the “On Screen Data Entry” button, the “Final Report” will contain the data from the “Prepopulated Data” screen. If you have clicked the “On Screen Data Entry” button, then the “Final Report” will contain the data from the “On Screen Data Entry” screen.
Figure 15 – Final Report Screen
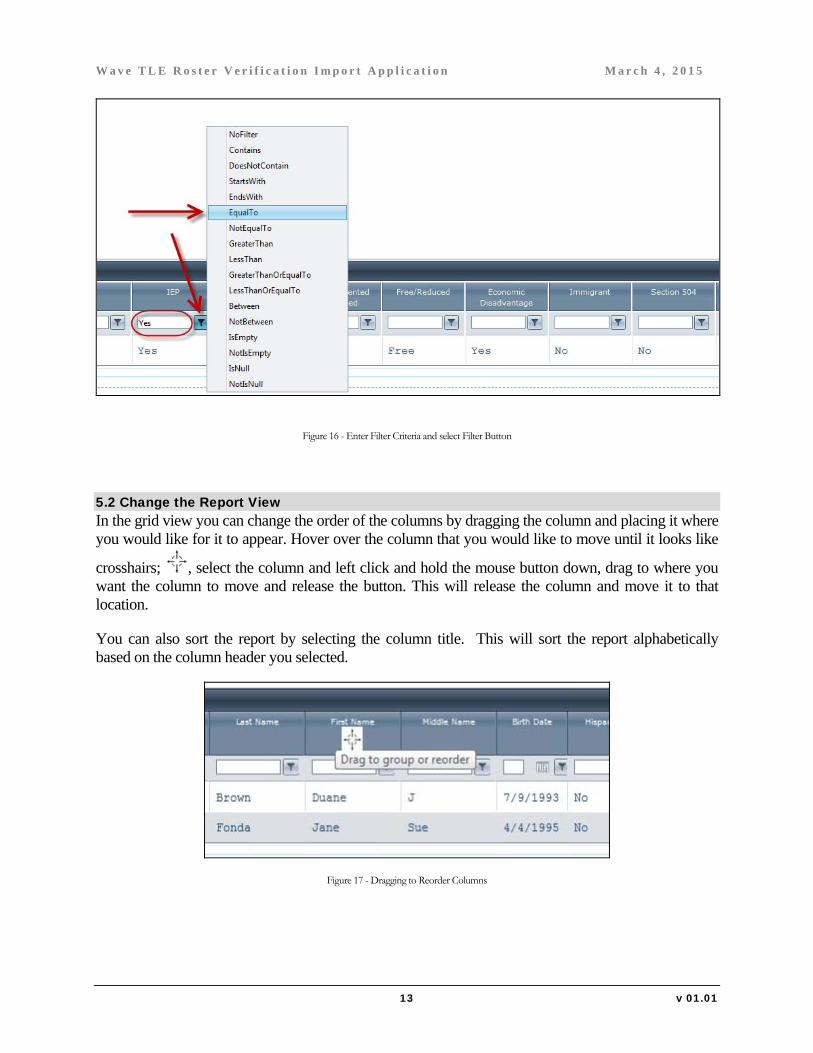
5.1 Filter Grid The data grid can be filtered based on filter criteria you enter. At the top of each column under the column header there is a space for you to enter filter criteria, once you enter your filter criteria select
the icon that looks like a cone( ). This will bring up a list of filter options (contains, equal to, etc.). Select an option and the report will filter based on your selection. You can filter on multiple columns at one time (e.g. Grade and Gender). When you want to remove the filter criteria select the filter button again, and select “NoFilter.” This will remove the filter and return the list to all records. (If you filtered in multiple columns, you will need to do this for each column to remove ALL filters.)
W a v e T L E R o s t e r V e r i f i c a t i o n I m p o r t A p p l i c a t i o n M a r c h 4 , 2 0 1 5
13 v 01.01
Figure 16 - Enter Filter Criteria and select Filter Button
5.2 Change the Report View In the grid view you can change the order of the columns by dragging the column and placing it where you would like for it to appear. Hover over the column that you would like to move until it looks like
crosshairs; , select the column and left click and hold the mouse button down, drag to where you want the column to move and release the button. This will release the column and move it to that location.
You can also sort the report by selecting the column title. This will sort the report alphabetically based on the column header you selected.
Figure 17 - Dragging to Reorder Columns
W a v e T L E R o s t e r V e r i f i c a t i o n I m p o r t A p p l i c a t i o n M a r c h 4 , 2 0 1 5
14 v 01.01
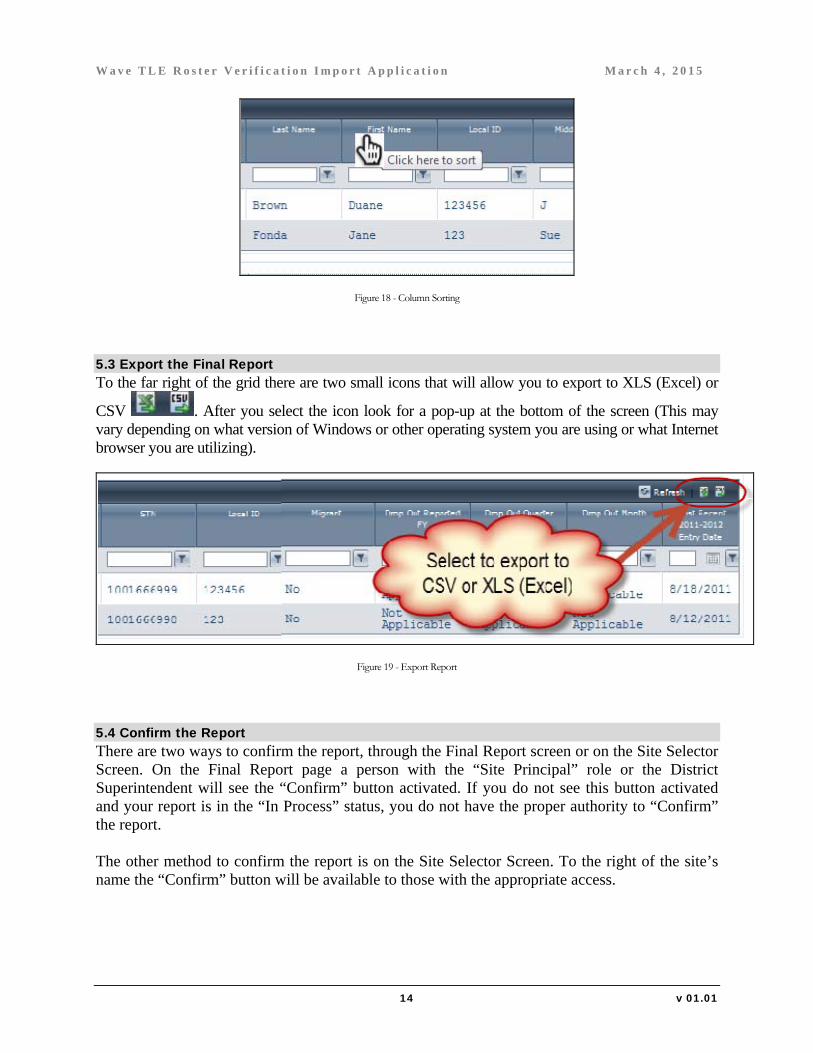
Figure 18 - Column Sorting
5.3 Export the Final Report To the far right of the grid there are two small icons that will allow you to export to XLS (Excel) or
CSV . After you select the icon look for a pop-up at the bottom of the screen (This may vary depending on what version of Windows or other operating system you are using or what Internet browser you are utilizing).
Figure 19 - Export Report
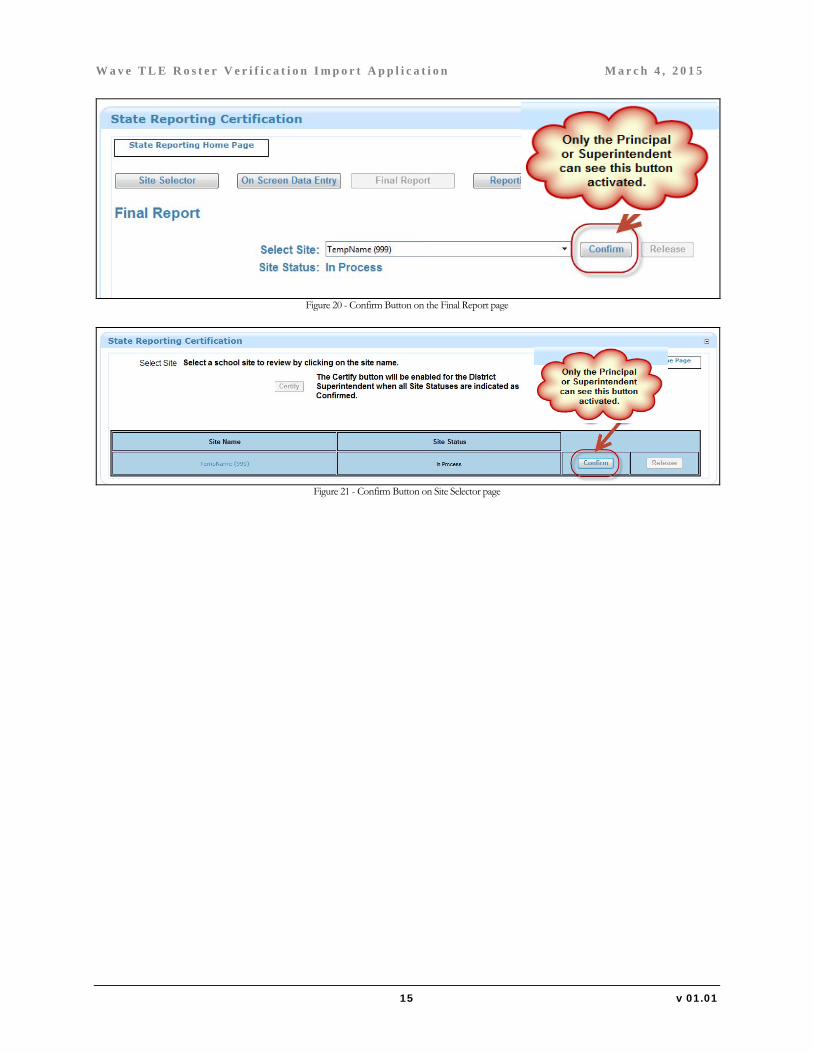
5.4 Confirm the Report There are two ways to confirm the report, through the Final Report screen or on the Site Selector Screen. On the Final Report page a person with the “Site Principal” role or the District Superintendent will see the “Confirm” button activated. If you do not see this button activated and your report is in the “In Process” status, you do not have the proper authority to “Confirm” the report. The other method to confirm the report is on the Site Selector Screen. To the right of the site’s name the “Confirm” button will be available to those with the appropriate access.
W a v e T L E R o s t e r V e r i f i c a t i o n I m p o r t A p p l i c a t i o n M a r c h 4 , 2 0 1 5
15 v 01.01
Figure 20 - Confirm Button on the Final Report page
Figure 21 - Confirm Button on Site Selector page
W a v e T L E R o s t e r V e r i f i c a t i o n I m p o r t A p p l i c a t i o n M a r c h 4 , 2 0 1 5
16 v 01.01
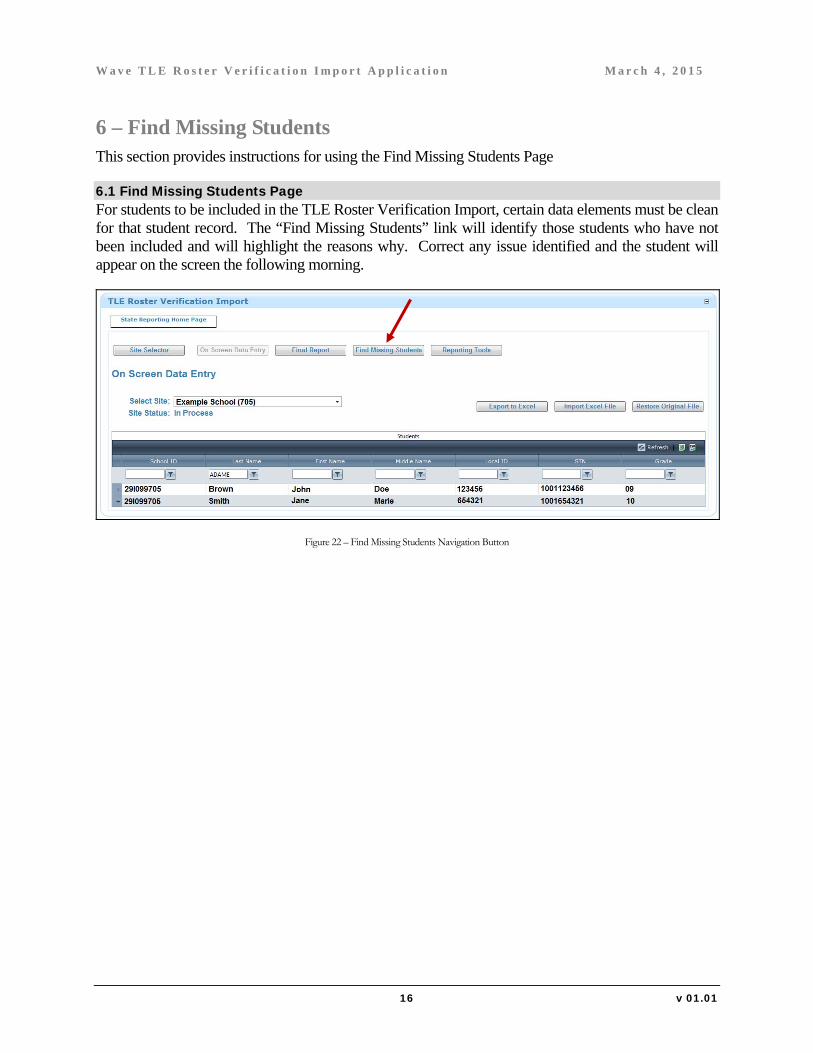
6 – Find Missing Students This section provides instructions for using the Find Missing Students Page
6.1 Find Missing Students Page For students to be included in the TLE Roster Verification Import, certain data elements must be clean for that student record. The “Find Missing Students” link will identify those students who have not been included and will highlight the reasons why. Correct any issue identified and the student will appear on the screen the following morning.
Figure 22 – Find Missing Students Navigation Button
W a v e T L E R o s t e r V e r i f i c a t i o n I m p o r t A p p l i c a t i o n M a r c h 4 , 2 0 1 5
17 v 01.01
7 – Reporting Tools This section provides instructions for the Reporting Tools section of the report.
The Reporting Tools Section is designed to provide reports that allow you to look at the data in different ways.
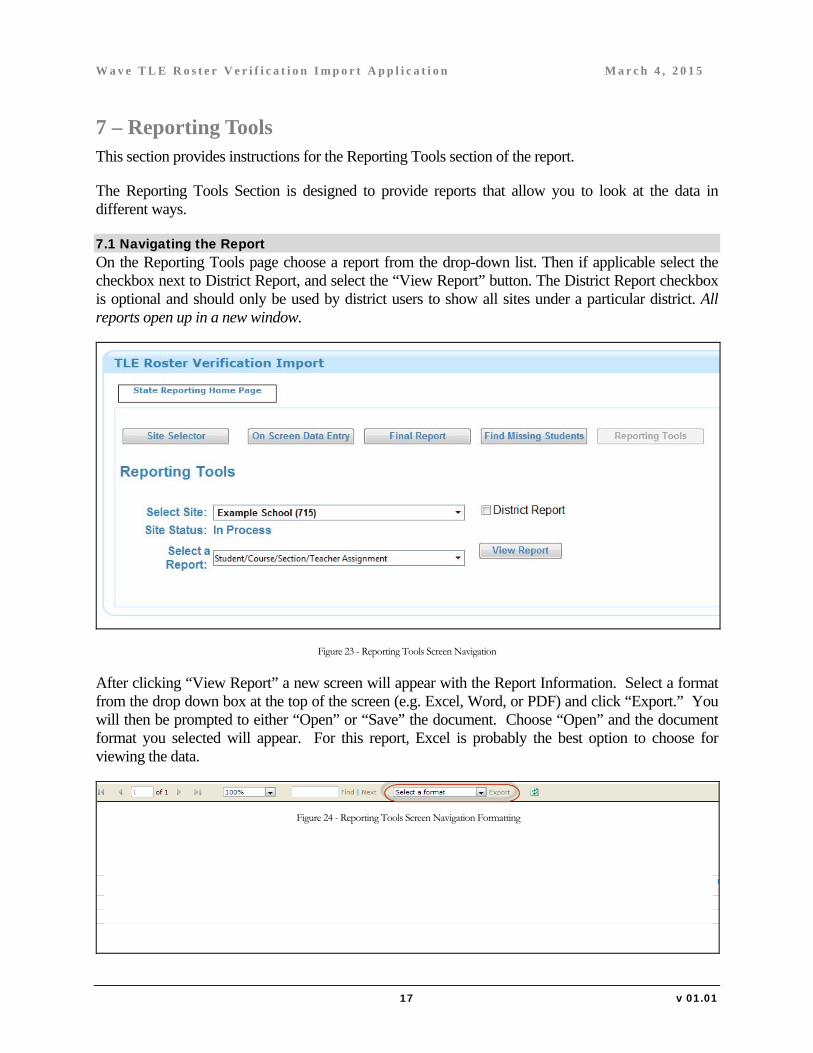
7.1 Navigating the Report On the Reporting Tools page choose a report from the drop-down list. Then if applicable select the checkbox next to District Report, and select the “View Report” button. The District Report checkbox is optional and should only be used by district users to show all sites under a particular district. All reports open up in a new window.
Figure 23 - Reporting Tools Screen Navigation
After clicking “View Report” a new screen will appear with the Report Information. Select a format from the drop down box at the top of the screen (e.g. Excel, Word, or PDF) and click “Export.” You will then be prompted to either “Open” or “Save” the document. Choose “Open” and the document format you selected will appear. For this report, Excel is probably the best option to choose for viewing the data.
Figure 24 - Reporting Tools Screen Navigation Formatting

W a v e T L E R o s t e r V e r i f i c a t i o n I m p o r t A p p l i c a t i o n M a r c h 4 , 2 0 1 5
18 v 01.01
8 – Superintendent Responsibilities The Wave TLE Roster Verification Import application is only a tool used for the purpose of cleaning the data to prepare it for submission to the Battelle for Kids application. As a result, there is no need for this report to be certified by the District Superintendent. A certify button will NOT be available in the application.