Embed Size (px)
Citation preview

TM
OKI PCL Plugin for C9650 color laser printersVersion 1.6r1
April 2013
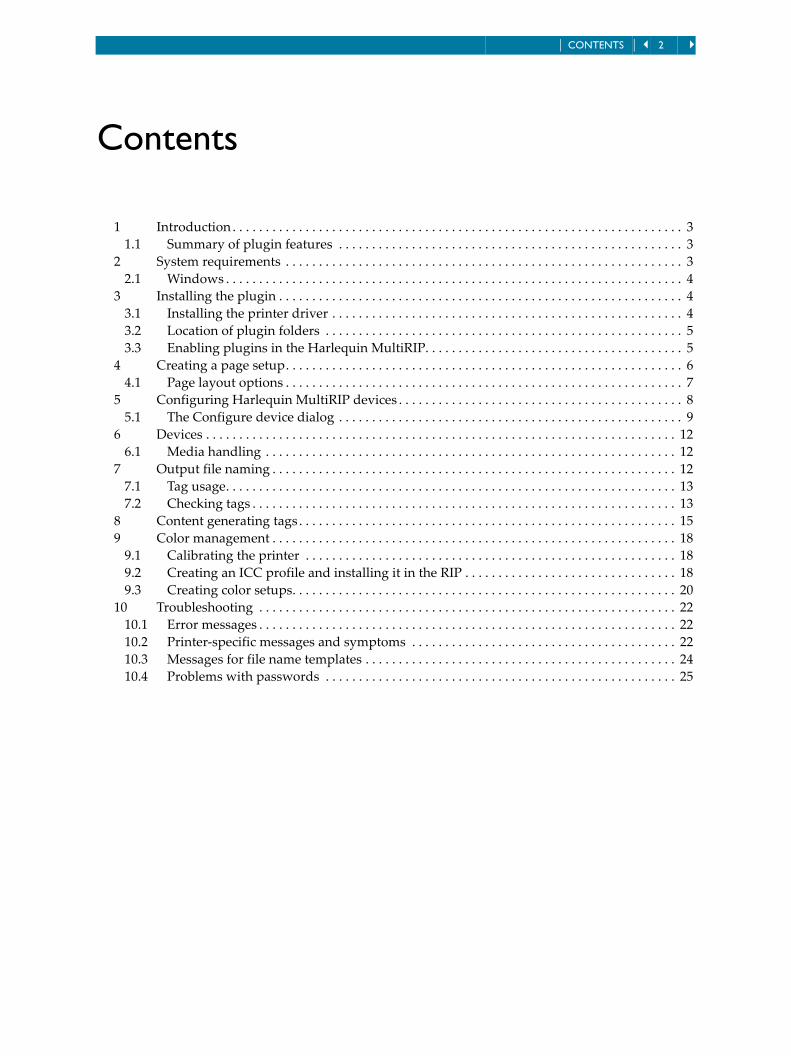
CONTENTS 2
Contents
1 Introduction . . . . . . . . . . . . . . . . . . . . . . . . . . . . . . . . . . . . . . . . . . . . . . . . . . . . . . . . . . . . . . . . . . . . 3
1.1 Summary of plugin features . . . . . . . . . . . . . . . . . . . . . . . . . . . . . . . . . . . . . . . . . . . . . . . . . . . . 3
2 System requirements . . . . . . . . . . . . . . . . . . . . . . . . . . . . . . . . . . . . . . . . . . . . . . . . . . . . . . . . . . . . 3
2.1 Windows . . . . . . . . . . . . . . . . . . . . . . . . . . . . . . . . . . . . . . . . . . . . . . . . . . . . . . . . . . . . . . . . . . . . . 4
3 Installing the plugin . . . . . . . . . . . . . . . . . . . . . . . . . . . . . . . . . . . . . . . . . . . . . . . . . . . . . . . . . . . . . 4
3.1 Installing the printer driver . . . . . . . . . . . . . . . . . . . . . . . . . . . . . . . . . . . . . . . . . . . . . . . . . . . . . 4
3.2 Location of plugin folders . . . . . . . . . . . . . . . . . . . . . . . . . . . . . . . . . . . . . . . . . . . . . . . . . . . . . . 5
3.3 Enabling plugins in the Harlequin MultiRIP. . . . . . . . . . . . . . . . . . . . . . . . . . . . . . . . . . . . . . . 5
4 Creating a page setup. . . . . . . . . . . . . . . . . . . . . . . . . . . . . . . . . . . . . . . . . . . . . . . . . . . . . . . . . . . . 6
4.1 Page layout options . . . . . . . . . . . . . . . . . . . . . . . . . . . . . . . . . . . . . . . . . . . . . . . . . . . . . . . . . . . . 7
5 Configuring Harlequin MultiRIP devices . . . . . . . . . . . . . . . . . . . . . . . . . . . . . . . . . . . . . . . . . . . 8
5.1 The Configure device dialog . . . . . . . . . . . . . . . . . . . . . . . . . . . . . . . . . . . . . . . . . . . . . . . . . . . . 9
6 Devices . . . . . . . . . . . . . . . . . . . . . . . . . . . . . . . . . . . . . . . . . . . . . . . . . . . . . . . . . . . . . . . . . . . . . . . 12
6.1 Media handling . . . . . . . . . . . . . . . . . . . . . . . . . . . . . . . . . . . . . . . . . . . . . . . . . . . . . . . . . . . . . . 12
7 Output file naming . . . . . . . . . . . . . . . . . . . . . . . . . . . . . . . . . . . . . . . . . . . . . . . . . . . . . . . . . . . . . 12
7.1 Tag usage. . . . . . . . . . . . . . . . . . . . . . . . . . . . . . . . . . . . . . . . . . . . . . . . . . . . . . . . . . . . . . . . . . . . 13
7.2 Checking tags . . . . . . . . . . . . . . . . . . . . . . . . . . . . . . . . . . . . . . . . . . . . . . . . . . . . . . . . . . . . . . . . 13
8 Content generating tags . . . . . . . . . . . . . . . . . . . . . . . . . . . . . . . . . . . . . . . . . . . . . . . . . . . . . . . . . 15
9 Color management . . . . . . . . . . . . . . . . . . . . . . . . . . . . . . . . . . . . . . . . . . . . . . . . . . . . . . . . . . . . . 18
9.1 Calibrating the printer . . . . . . . . . . . . . . . . . . . . . . . . . . . . . . . . . . . . . . . . . . . . . . . . . . . . . . . . 18
9.2 Creating an ICC profile and installing it in the RIP . . . . . . . . . . . . . . . . . . . . . . . . . . . . . . . . 18
9.3 Creating color setups. . . . . . . . . . . . . . . . . . . . . . . . . . . . . . . . . . . . . . . . . . . . . . . . . . . . . . . . . . 20
10 Troubleshooting . . . . . . . . . . . . . . . . . . . . . . . . . . . . . . . . . . . . . . . . . . . . . . . . . . . . . . . . . . . . . . . 22
10.1 Error messages . . . . . . . . . . . . . . . . . . . . . . . . . . . . . . . . . . . . . . . . . . . . . . . . . . . . . . . . . . . . . . . 22
10.2 Printer‐specific messages and symptoms . . . . . . . . . . . . . . . . . . . . . . . . . . . . . . . . . . . . . . . . 22
10.3 Messages for file name templates . . . . . . . . . . . . . . . . . . . . . . . . . . . . . . . . . . . . . . . . . . . . . . . 24
10.4 Problems with passwords . . . . . . . . . . . . . . . . . . . . . . . . . . . . . . . . . . . . . . . . . . . . . . . . . . . . . 25
OKI PCL PLUGIN CONTENTS 3
OKI PCL Plugin
Note to OEMs: This document is presented for inclusion in end‐user documentation such as a manual based upon the OEM Manual, or for use as a supple‐ment to that manual. You may wish to change the introduction to this document to suit the presentation you choose. (Notes like this one are not meant for onward publication to end‐users. They give information of interest only to staff at GGSL and its OEMs.)
1 IntroductionThis manual describes the OKI PCL plugin for C9650 color laser printers. This is a high‐speed, high‐quality, color and monochrome, A3, A4, A5 and A6 printer capable of printing onto heavy materials.
The C9650 color laser printer permits long pages and can be used as a replacement for a low volume 2 color printing press, and as an Envelope Press.
1.1 Summary of plugin features• Support for 1 bit‐per‐pixel CMYK raster data images.
• Custom size up to 1200 mm length including banners.
• Supported resolutions: 600 x 600 and 600 x1200 dpi.
• Communication with the printer via the Windows Spooler.
• Instant, expert color management.
• Supports output to printer and file.
Note: The C9650 color laser printer understands the concept of “jobs” to mean the whole submitted document rather than a collection of unrelated pages. Consequently, aborting a job will abort all the pages contained within that job.
Note: The OKI PCL plugin for C9650 color laser printers is compatible with the Harlequin VariData™ feature (HVD) in internal mode. External mode is not supported. For more information on Harlequin VariData see the API Reference document.
2 System requirements To operate correctly the OKI PCL plugin requires the following system resources:
• Harlequin MultiRIP v10 or later RIP.
• Connection interface:
Ethernet supporting TCP/IP.
Note: C9650 printers support connections using Ethernet (100 BT). However the plugin will not drive the printer directly. The plugin writes to the Windows print spooler subsystem, which in turn com‐municates with the printer. The plugin supports both File and Windows Spooler output. For more information see “Output to” on page 9.
OKI PCL PLUGIN CONTENTS 4
2.1 WindowsThese are the minimum platform requirements for a Windows operating system. Some RIP features will work better with a more powerful system.
Note: The plugin is supported on the same platform as the Harlequin MultiRIP release.
3 Installing the pluginThe plugin may be supplied as part of your standard Harlequin MultiRIP installation media. If so, installing the RIP is sufficient to install the plugin.
If you receive separate installation media, or an updated plugin, install it using this procedure.
1. The OKI PCL plugin requires the Harlequin MultiRIP to be installed on the target machine. Install the RIP, if this is a new installation.
2. Run the setup program for the operating system you are running. Click Next to move onto the next screen. Use Previous to go back to the previous screen.
Note: Ensure you run the installer appropriate for 32‐bit or 64‐bit machines.
3. In the “Choose Install Folder” window you must specify the Harlequin MultiRIP installation folder as the destination for the plugin files. Click Next.
If you select an invalid or incorrect RIP folder an error message will appear. Use the browser to select the correct RIP folder and click Next.
4. In the “Choose Plugins” window choose OKI Plugin X.Xrx plugin along with any other plugins you want to install. Click Next.
5. Read the agreement displayed in the “Plugin License Agreement” window. You must click the I accept... option to continue. Click Next.
6. In the “Pre‐installation Summary” window, check that your selections are correct and then click Install.
7. When the “Install Complete” window appears click Done.
8. After installing the plugin start the Harlequin MultiRIP.
If you have correctly installed the plugin the following message will appear in the RIP monitor when you next start up the RIP:
OKI PCL Plugin Version X.Xrx - Copyright (c) 2012 Global Graphics Software Ltd. All Rights Reserved.
To use the plugin, choose OKI PCL Halftone in the Device list in the Page Setup dialog box. Configure the device as described in Section 5, page 8 and choose options in the Page Setup dialog box as described in Section 4, page 6.
Note: If OKI PCL Halftone does not appear as an option in the Device list in the Page Setup dialog, see Section 4.
3.1 Installing the printer driverThe primary communication method between the RIP and the printer is via the Windows Spooler. To use this method, connect the printer to your network and add the OKI PCL printer using the standard Windows Add a printer wizard. When adding the printer make sure that “OKI PCL” is included as part of the printer’s name.
OKI PCL PLUGIN CONTENTS 5
3.2 Location of plugin foldersTable 1 shows the correct Harlequin MultiRIP installation folders for the OKI PCL plugin. This infor‐mation is provided for reference only. Unless instructed by Technical Support, you should not move these folders or delete information contained in them or the plugins may cease to function correctly.
3.3 Enabling plugins in the Harlequin MultiRIPIf you are using Sentinel LDK security you may be required to use a new product key. For information on how to use the Sentinel LDK see the Sentinel LDK security document.
If you are using HLS you may be required to enter a password before you can use a plugin or other options such as color management. If the OKI PCL Halftone option does not appear as an option in the Device list in the Page Setup dialog box, follow this procedure.
When requesting the password from your supplier you may be asked to give the serial number of your RIP. The RIP displays this number in the main Harlequin MultiRIP window when starting up, in the form:
Serial number: 1234-56
You must also tell your supplier the platform for which you require the password. The platform is the combination of operating system and processor type. For example, you might specify Windows 7, and Intel processor.
1. Once you have a password, use the File > Configure RIP menu option to display the Configure RIP dialog box.
2. Click the Extras button in the Configure RIP dialog box to display the Extras dialog box.
3. Select the entry for OKI, OKIPCL laser, and click Add.
4. Enter the password for this option given to you by your supplier, and click OK.
5. Click OK in each of the Extras and Configure RIP dialog boxes.
Once the plugin is installed fully, you can choose it as an entry in the Device list in the Page Setup dia‐log box. Once you have chosen the device, you can click Configure Device to see the configuration dia‐log box shown in Figure 4.
You can now create page setups which use the C9650 devices to process jobs for the C9650 printer, as described in the next section.
Source folder Description Destination folder
\okipcl\ OKI PCL plugin …\<RIP‐folder>\SW\Devices\
Table 1 Default installation folders for supplied plugins
OKI PCL PLUGIN CONTENTS 6
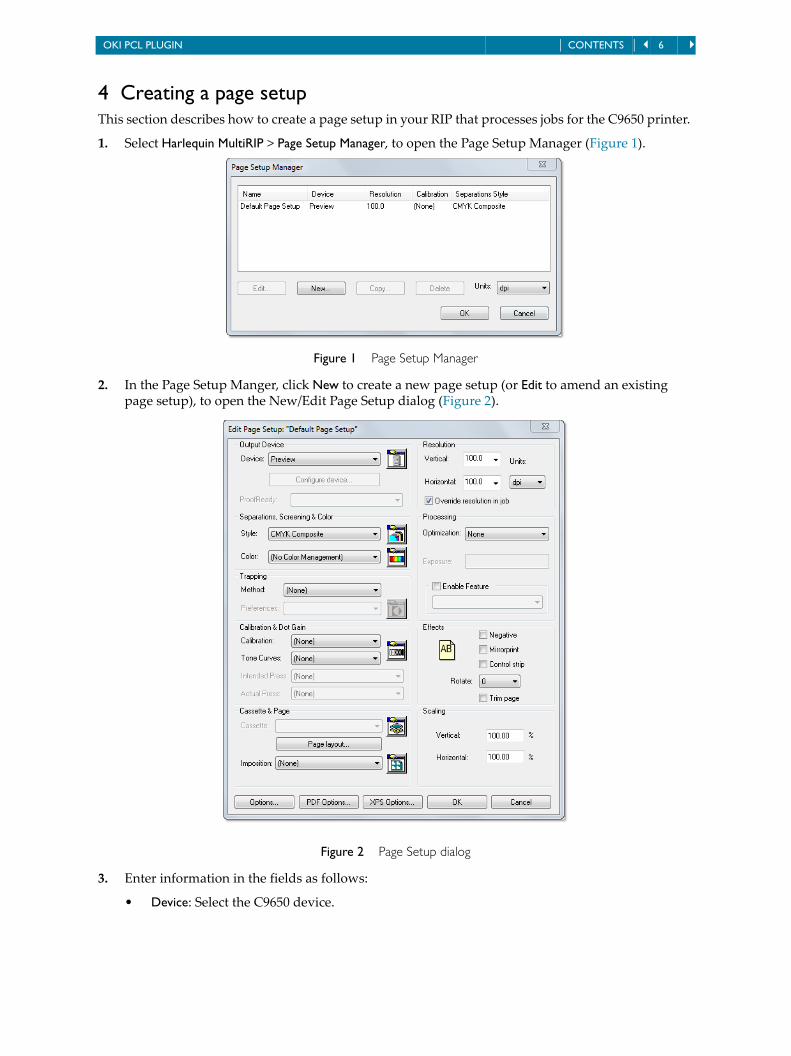
4 Creating a page setupThis section describes how to create a page setup in your RIP that processes jobs for the C9650 printer.
1. Select Harlequin MultiRIP > Page Setup Manager, to open the Page Setup Manager (Figure 1).
Figure 1 Page Setup Manager
2. In the Page Setup Manger, click New to create a new page setup (or Edit to amend an existing page setup), to open the New/Edit Page Setup dialog (Figure 2).
Figure 2 Page Setup dialog
3. Enter information in the fields as follows:
• Device: Select the C9650 device.
OKI PCL PLUGIN CONTENTS 7
Note: For CMYK devices the ProofReady option will be activated only once an ICC profile is imported and configured. For more information see “Install the ICC profile in your RIP” on page 20.
• Resolution: Choose your desired resolution settings.
• Style: For the C9650 device CMYK Composite is selected. This can be edited to use a different halftone screen.
• Color: This setting is automatically chosen to suit the selected profile. However, if you wish
to use your own color profile, choose it instead from the list. See, “Creating color setups” on
page 20 for a description of how to create your own color setups.
• Calibration: Set this to (None). Calibration is performed by the printer for the selected media.
4. Click Configure Device to open the Configure Device dialog, which allows you to specify output options for the selected device. For example, it allows you to specify the output method (file, net‐work, including a print server), media type, duplexing and finishing options. For more informa‐tion see “The Configure device dialog” on page 9.
5. Click Page Layout and choose one of the paper sizes installed in the printer. If the job is an EPS file, or the job does not contain page size information (most jobs do), set the page size too.
6. If it is necessary to do so, you can adjust the positioning of the output on the media by adjusting the page margin values. See, “Page layout options” on page 7 for details.
7. Click Save As and choose an appropriate name for your new page setup.
8. Click OK to close the Page Setup Manager.
The page setup has now been created and may be used to process jobs. Remember to create page set‐ups for each type of paper that you use in your printer.
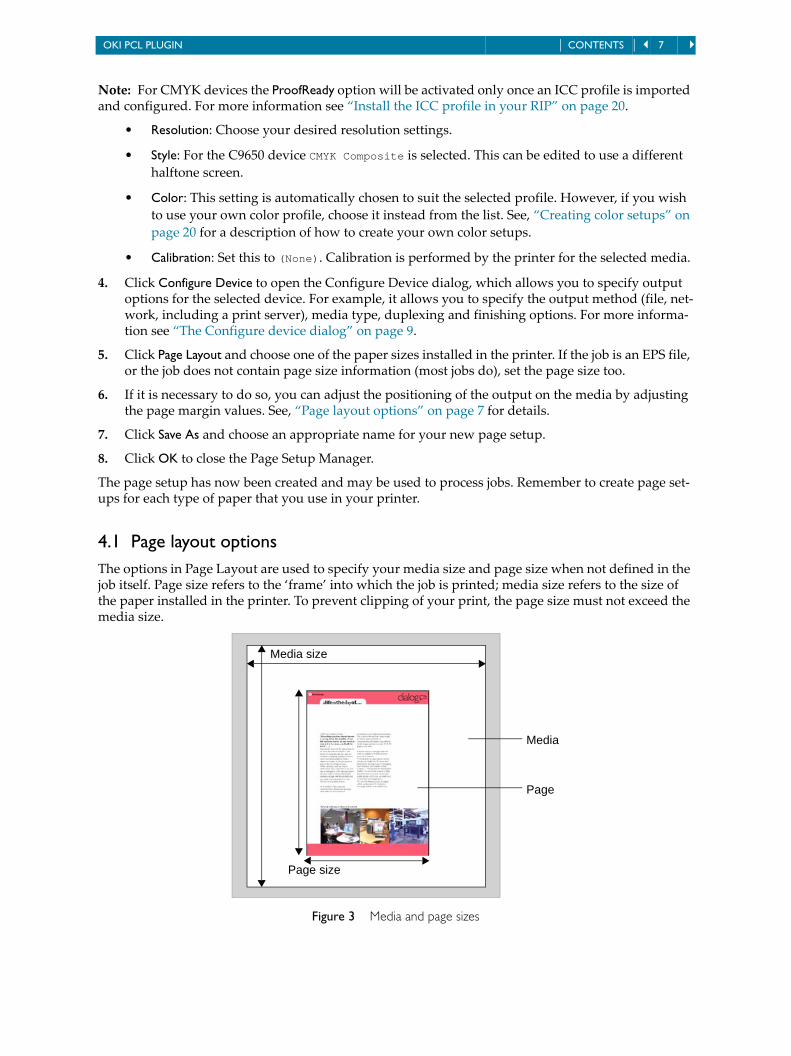
4.1 Page layout optionsThe options in Page Layout are used to specify your media size and page size when not defined in the job itself. Page size refers to the ‘frame’ into which the job is printed; media size refers to the size of the paper installed in the printer. To prevent clipping of your print, the page size must not exceed the media size.
Figure 3 Media and page sizes
Page size
Media size
Media
Page
OKI PCL PLUGIN CONTENTS 8
In most jobs the page size has been defined in the page design and embedded in the PDF or PostScript language file. The page size in Page Layout has no effect on these types of jobs. In EPS files, or other jobs where page size is not defined, you must select the correct page size from those listed in Page Layout.
When changing the margins be careful not to increase the margins beyond the limit of the media. Set‐ting a value for the bottom margin beyond the media size on sheet fed devices will result in a loss of printable space on the media.
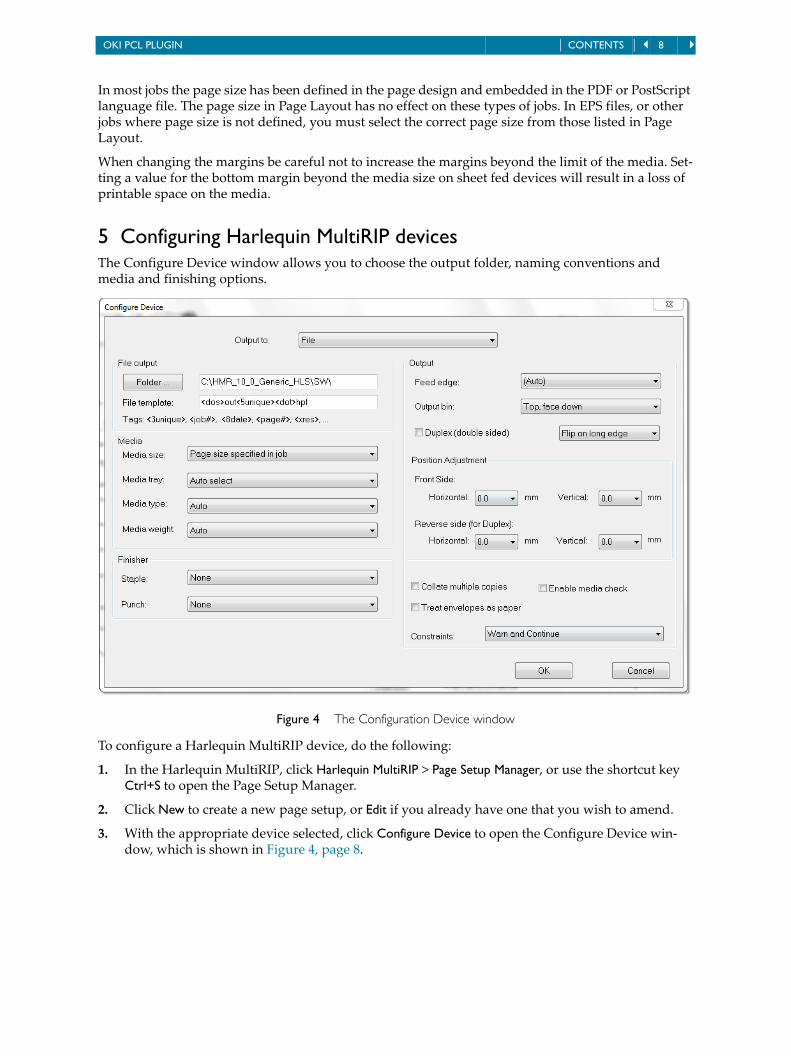
5 Configuring Harlequin MultiRIP devicesThe Configure Device window allows you to choose the output folder, naming conventions and media and finishing options.
Figure 4 The Configuration Device window
To configure a Harlequin MultiRIP device, do the following:
1. In the Harlequin MultiRIP, click Harlequin MultiRIP > Page Setup Manager, or use the shortcut key Ctrl+S to open the Page Setup Manager.
2. Click New to create a new page setup, or Edit if you already have one that you wish to amend.
3. With the appropriate device selected, click Configure Device to open the Configure Device win‐dow, which is shown in Figure 4, page 8.
OKI PCL PLUGIN CONTENTS 9
5.1 The Configure device dialogThe following device configuration options are available from the Configure device menu:
5.1.1 Output toThe primary communication method is via the Windows Spooler. This is represented by prefixing “SPL:” to the printerʹs name in the Output to menu on the Configure device dialog. To use this method, connect the printer to your computer via TCP/IP and add the C9650 printer using the stan‐dard Windows Add a printer wizard. When adding the printer make sure that “OKI PCL” is included as part of the printer’s name.
Select the output method from the following choices:
File (Default option). Output is saved to the location specified in the File output option, and named according to the settings in File template.
When output is to file, it is always done as whole jobs (not pages). Therefore, If an error occurs or the job is aborted, any pages remaining in the job are discarded, whether or not they can be rendered.
SPL The SPL option is available where the already‐installed device driver for a Windows printer is used to get data to the printer. This is the primary communication method with the printer.
When output is to Windows Spooler, it is always done as whole jobs (not pages). Therefore, if an error occurs or the job is aborted, any pages remaining in the job are discarded, whether or not they can be rendered. Where possible, the Windows Spooler job submission will also be aborted.
5.1.2 File outputThe options in this section allow you to specify the output location when File is selected as the output method. If you do not change the location, output is placed in …RIP folder\SW\.
Note: You can send files to a printer using Windows print spooling by installing Windows printer drivers on a PC print server, and by entering the name of the print server in this text box.
File template
This option allows you to use tags to construct the name of the output file. For example, <dos>out<5unique><dot>hpf produces out00001.hpf, out00002.hpf. For more information see “Output file naming” on page 12 and Table 4, page 15 for a complete list of permitted tags.
Note: The tag construction displayed on the menu is just an example and may not suit your particu‐lar requirements.
5.1.3 MediaThe Media options allow you to choose the Media size, tray, type and weight.
Media size
This option allows you to specify the size of your page. There are four options.
Page size specified in job: The printed page will have the same size and orientation, as was specified in the job.
OKI PCL PLUGIN CONTENTS 10
Media size from Page Layout: This is used in conjunction with the Feed edge selection and the Media selected in the Page Layout.
If, for example, you have the printer tray loaded with “Letter” paper with a Long Edge orienta‐tion, and selected from the Page Layout dialog Letter, you must select Long Edge for the Feed edge option. If the job is Letter size, the RIP will present it to the printer rotated by 90 degrees so that it fits the paper.
If the job is Letter Landscaped, the RIP will not rotate it but will, again, present it to the printer so that it fits the paper in the tray.
Shrink to Media size from Page Layout: This works in the same way as Media size from Page Layout, but will shrink any job that is bigger than the paper so that it fits onto the paper.
Media size & Feed edge from Page Layout: This option ignores the Feed edge setting and will produce a raster which is the same size as the job and with a Media size as selected from the Page Layout option. This means that if, as in the example above, you have loaded the tray with “Let‐ter” paper with a Long Edge orientation and you are printing a job that is Letter portrait, you must remember to rotate the job in the Page Setup and remember to select Letter LEF from the Page Layout Media Size selection.
Media tray
This option allows you to choose a specific tray or to use Auto select which automatically selects the paper source that contains the paper size specified in the Device Configuration dialog box. If the specified paper size is unavailable an appropriate alternative is chosen automatically.
Media type
The media type options list the available media types: Bond, Cardstock, Glossy and so on. When Auto is selected the media type is selected automatically.
Note that when Auto is selected the printer might not correctly select the media type. Therefore, if you have, for example, glossy paper loaded it is better to select that option.
Media weight
This option is used to select the weight of the selected media: Heavy, Light, Medium and so on. When Auto is selected the media weight is selected automatically.
If the printer detects a media weight which is different to that selected a message is displayed.
5.1.4 OutputThe options in this section determine the orientation and position of the output.
Feed edge
The options are: Auto, Long Edge and Short Edge.
For media that can be fed into the printer both Long Edge First (LEF) and Short Edge First (SEF) (A4, Letter and B5), choosing Long Edge/ Short Edge will rotate the image to fit on the chosen Media, when Media size is Media size from Page Layout or Shrink to Media size from Page Layout. Therefore, the selected feed tray is loaded with A4 (LEF) and Media size A4 is selected in the Page Layout, and Long edge, and you are printing an A4 portrait, the image is rotated to fit on the A4 LEF.
For media that can only be fed into the printer one way, choosing Long Edge or Short Edge, will rotate the image to fit on the paper.
OKI PCL PLUGIN CONTENTS 11
The Auto option leaves the orientation as was specified in the job. Auto is enforced when Media size is Page size specified in job.
Output bin
The options available are: Top face down, Left face up, Finisher, face down and Finisher, face up.
Note: The top face down stacker and the Finisher stackers are not available for very heavy paper, banners or envelopes. Please refer to the printer’s user guide for details.
Duplex (double-sided)
This can be switch on or off. When selected you can choose to flip the page on the Long Edge or Short Edge.
Note: Duplex is not available for all Media Weights and Media Types. Please refer to the printer’s user guide for more details.
Collate multiple copies
With this option selected multiple copies of a job are collated as separate documents.
Treat envelopes as paper
This option allows for faster printing with envelope page sizes when you have selected an enve‐lope page size in the page layout options.
Enable media check
When this option is selected the printer displays a message asking you to check that the correct media is loaded.
5.1.4.5 Position Adjustment
Front side
The Horizontal and Vertical options are in steps of 0.25 from -2.0 mm to 2.0 mm and allow adjustment of the image on the front of the page. Negative values move the image left or up, pos‐itive values move the image to the right and/or down.
Reverse side (for Duplex)
The Horizontal and Vertical options are in steps of 0.25 from -2.0 mm to 2.0 mm and allow adjustment of the image on the back of the page. Positive values move the image left or up, nega‐tive values move the image to the right and/or down.
5.1.4.6 Constraints
The printer imposes constraints on the paper type, weight and size that can be used with the finisher, duplex, trays and stackers. These options allow you to specify what to do with a job when the options selected conflict with the abilities of the printer.
The options are: Warn and Continue or Abort.
With Warn and Continue selected, the plugin automatically corrects the conflicting options with a bias on the Media Type/Weight/Size and then outputs the job. The conflicts and corrections appear as warnings in the RIP’s monitor window.
OKI PCL PLUGIN CONTENTS 12
With Abort selected, the plugin aborts the job with Error 25: Combination of input/output selections is not supported by the printer. The conflicting settings are displayed in the RIP’s monitor window.
5.1.5 FinisherThe finisher options allow you to choose from various stapling and punch settings, and are only avail‐able for printers that have a finisher unit attached.
Staple
This allows you to choose the position of the staple. The options are: None, Top Left, Top Right and Middle. When selecting Middle the document is saddle stitched and is passed through the inverter to be folded.
Punch
This allows you to choose from various punch options:
None: no punch.
PNCC2A: 2 hole punch for Europe (and Japan)
PNCC3A: 2 or 3 hole punch for North America
PNCC4A: 4 hole punch for Europe
PNCC4B: 4 hole punch for Sweden
6 DevicesThe OKI PCL plugin adds the following single device to the Harlequin MultiRIP for selection in your page setups.
With CMYK devices ColorPro is used to perform color management using an ICC profile made by the printer.
The OKI PCL plugin works with the ColorPro™ color management option.
6.1 Media handlingThe OKI PCL plugin currently supports only the media types that the printer is aware of.
You can view the list of available media types by selecting the Media Type field of the Configure Device menu. You can view the same list by opening, in a text editor, one of the device files in \SW\Devices\<plug in name>\MediaTypeNames.
See also “Error messages” on page 22 for information on a related error message.
7 Output file namingUsing variable tags and fixed text you can set up a file naming template for your output files. Using a template ensures your output files will be named consistently, and, depending on which tags you use, with appropriate job information to identify the output file correctly.
Plugin Device Dot type Screening modes Color modes
okipcl.i32 OKI PCL Halftone N/A Device Screening CMYK Composite
Table 2 Devices installed by the plugin
OKI PCL PLUGIN CONTENTS 13
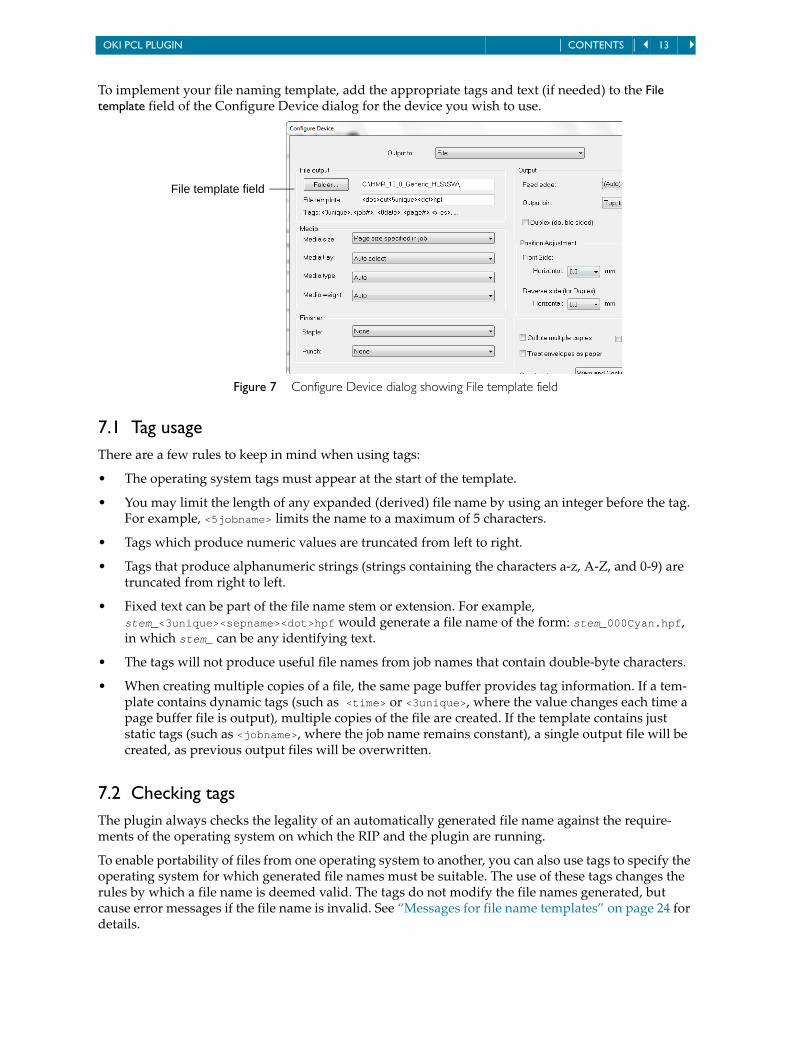
To implement your file naming template, add the appropriate tags and text (if needed) to the File template field of the Configure Device dialog for the device you wish to use.
Figure 7 Configure Device dialog showing File template field
7.1 Tag usageThere are a few rules to keep in mind when using tags:
• The operating system tags must appear at the start of the template.
• You may limit the length of any expanded (derived) file name by using an integer before the tag. For example, <5jobname> limits the name to a maximum of 5 characters.
• Tags which produce numeric values are truncated from left to right.
• Tags that produce alphanumeric strings (strings containing the characters a‐z, A‐Z, and 0‐9) are truncated from right to left.
• Fixed text can be part of the file name stem or extension. For example, stem_<3unique><sepname><dot>hpf would generate a file name of the form: stem_000Cyan.hpf, in which stem_ can be any identifying text.
• The tags will not produce useful file names from job names that contain double‐byte characters.
• When creating multiple copies of a file, the same page buffer provides tag information. If a tem‐plate contains dynamic tags (such as <time> or <3unique>, where the value changes each time a page buffer file is output), multiple copies of the file are created. If the template contains just static tags (such as <jobname>, where the job name remains constant), a single output file will be created, as previous output files will be overwritten.
7.2 Checking tagsThe plugin always checks the legality of an automatically generated file name against the require‐ments of the operating system on which the RIP and the plugin are running.
To enable portability of files from one operating system to another, you can also use tags to specify the operating system for which generated file names must be suitable. The use of these tags changes the rules by which a file name is deemed valid. The tags do not modify the file names generated, but cause error messages if the file name is invalid. See “Messages for file name templates” on page 24 for details.
File template field
OKI PCL PLUGIN CONTENTS 14
For example, you can create the template <dos>Averylongfilename<dot>hpf, but an error is gener‐ated. This error occurs because DOS file names require the 8.3 format for stem and extension, which this template fails to meet by having 17 characters in its stem. Table 3 lists the operating system tags.
Examples of tag usage:
The following examples demonstrate the format of strings produced by individual tags. Some exam‐ples also show how the tags may be used in combination to form a template. The examples are based on these job details:
Page buffer name: 1. Uncalibrated Target: Default CMYK + spot colors target
Date: 29th of January, 2010
Compression: Lossy (JPEG)
Quality: Best
Tag Description
<ascii> Limits the character set of the file name (from the point of the tag onwards) to ascii characters in the range 32 (0x20) to 126 (0x7E). Characters outside this range are discarded. To substitute invalid characters rather than discarding them, prefix the tag with the sub‐stitution character value in decimal.
<dos> Verifies that the file name is a legal file name for the MS‐DOS operating system.
The use of this tag verifies that the file name is suitable for use in a DOS operating system. Illegal characters such as a colon, and white space characters cause an error.
For example, the template <dos><jobname><dot>hpf, would gener‐ate an illegal file name because the job name could be greater than the eight characters allowed in DOS operating systems. Truncation can be forced by using the template <dos><8jobname><dot>hpf, which produces the file name Uncalibr.hpf.
<mac> Verifies that the file name is a legal file name for the Macintosh operating system.
The use of this tag verifies that the file name is suitable for use in a Macintosh operating system. Illegal characters such as an asterisk, colon, and quotation marks cause an error. The maximum length of a file name is thirty‐one characters (including the file extension).
For example, using the template <mac><28jobname><dot>hpf pro‐duces the file name Uncalibrated Target Default.hpf.
<macosx> Verifies that the file name is a legal file name for the Mac OS X oper‐ating system.
Table 3 Operating system tags
OKI PCL PLUGIN CONTENTS 15
8 Content generating tagsThe following tags are available and can be used in any order.
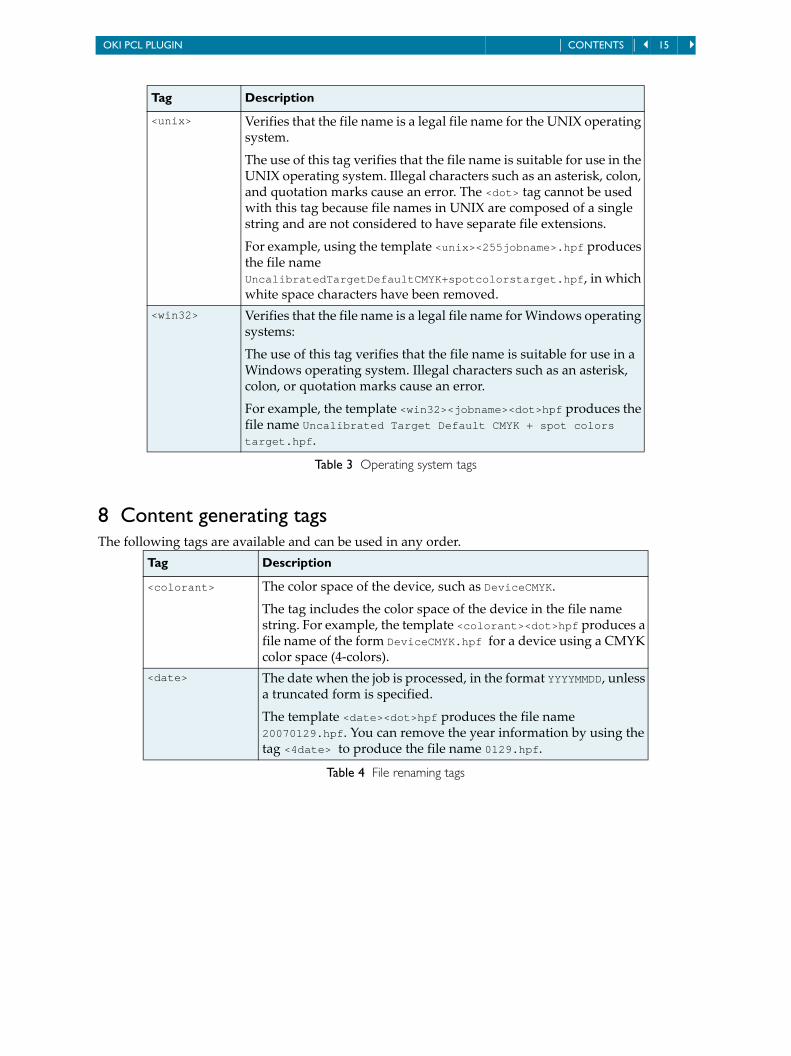
<unix> Verifies that the file name is a legal file name for the UNIX operating system.
The use of this tag verifies that the file name is suitable for use in the UNIX operating system. Illegal characters such as an asterisk, colon, and quotation marks cause an error. The <dot> tag cannot be used with this tag because file names in UNIX are composed of a single string and are not considered to have separate file extensions.
For example, using the template <unix><255jobname>.hpf produces the file name UncalibratedTargetDefaultCMYK+spotcolorstarget.hpf, in which white space characters have been removed.
<win32> Verifies that the file name is a legal file name for Windows operating systems:
The use of this tag verifies that the file name is suitable for use in a Windows operating system. Illegal characters such as an asterisk, colon, or quotation marks cause an error.
For example, the template <win32><jobname><dot>hpf produces the file name Uncalibrated Target Default CMYK + spot colors target.hpf.
Tag Description
<colorant> The color space of the device, such as DeviceCMYK.
The tag includes the color space of the device in the file name string. For example, the template <colorant><dot>hpf produces a file name of the form DeviceCMYK.hpf for a device using a CMYK color space (4‐colors).
<date> The date when the job is processed, in the format YYYYMMDD, unless a truncated form is specified.
The template <date><dot>hpf produces the file name 20070129.hpf. You can remove the year information by using the tag <4date> to produce the file name 0129.hpf.
Table 4 File renaming tags
Tag Description
Table 3 Operating system tags
OKI PCL PLUGIN CONTENTS 16
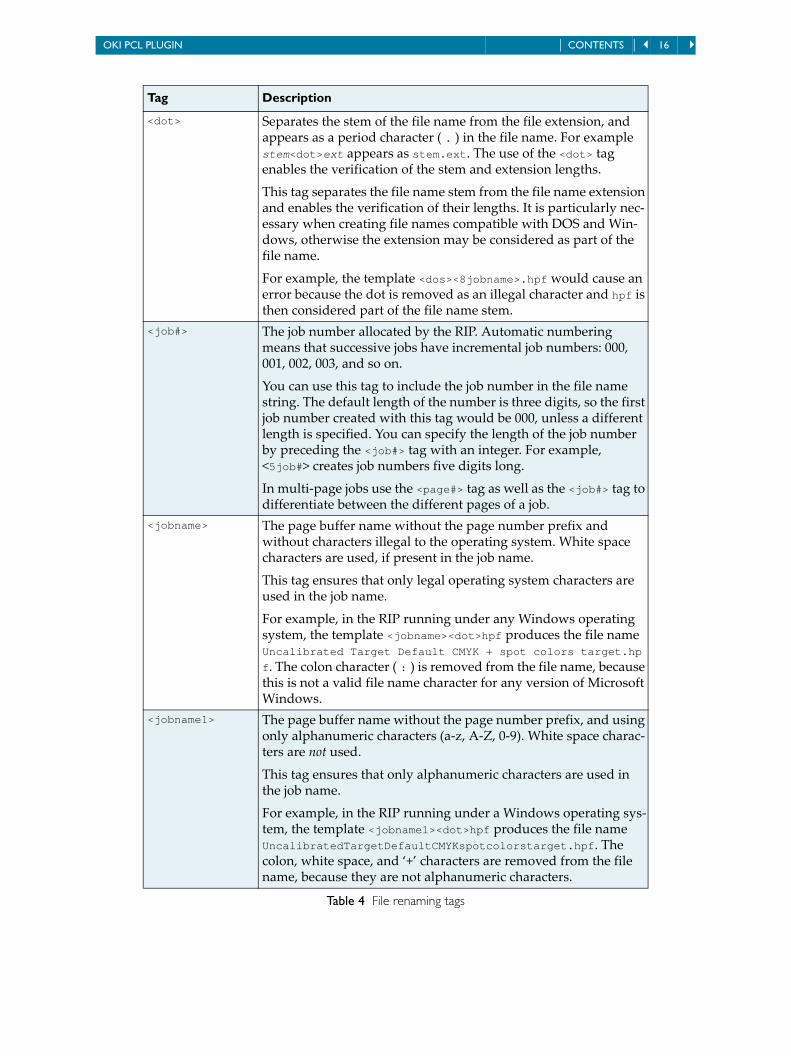
<dot> Separates the stem of the file name from the file extension, and appears as a period character ( . ) in the file name. For example stem<dot>ext appears as stem.ext. The use of the <dot> tag enables the verification of the stem and extension lengths.
This tag separates the file name stem from the file name extension and enables the verification of their lengths. It is particularly nec‐essary when creating file names compatible with DOS and Win‐dows, otherwise the extension may be considered as part of the file name.
For example, the template <dos><8jobname>.hpf would cause an error because the dot is removed as an illegal character and hpf is then considered part of the file name stem.
<job#> The job number allocated by the RIP. Automatic numbering means that successive jobs have incremental job numbers: 000, 001, 002, 003, and so on.
You can use this tag to include the job number in the file name string. The default length of the number is three digits, so the first job number created with this tag would be 000, unless a different length is specified. You can specify the length of the job number by preceding the <job#> tag with an integer. For example, <5job#> creates job numbers five digits long.
In multi‐page jobs use the <page#> tag as well as the <job#> tag to differentiate between the different pages of a job.
<jobname> The page buffer name without the page number prefix and without characters illegal to the operating system. White space characters are used, if present in the job name.
This tag ensures that only legal operating system characters are used in the job name.
For example, in the RIP running under any Windows operating system, the template <jobname><dot>hpf produces the file name Uncalibrated Target Default CMYK + spot colors target.hp
f. The colon character ( : ) is removed from the file name, because this is not a valid file name character for any version of Microsoft Windows.
<jobname1> The page buffer name without the page number prefix, and using only alphanumeric characters (a‐z, A‐Z, 0‐9). White space charac‐ters are not used.
This tag ensures that only alphanumeric characters are used in the job name.
For example, in the RIP running under a Windows operating sys‐tem, the template <jobname1><dot>hpf produces the file name UncalibratedTargetDefaultCMYKspotcolorstarget.hpf. The colon, white space, and ‘+’ characters are removed from the file name, because they are not alphanumeric characters.
Tag Description
Table 4 File renaming tags
OKI PCL PLUGIN CONTENTS 17
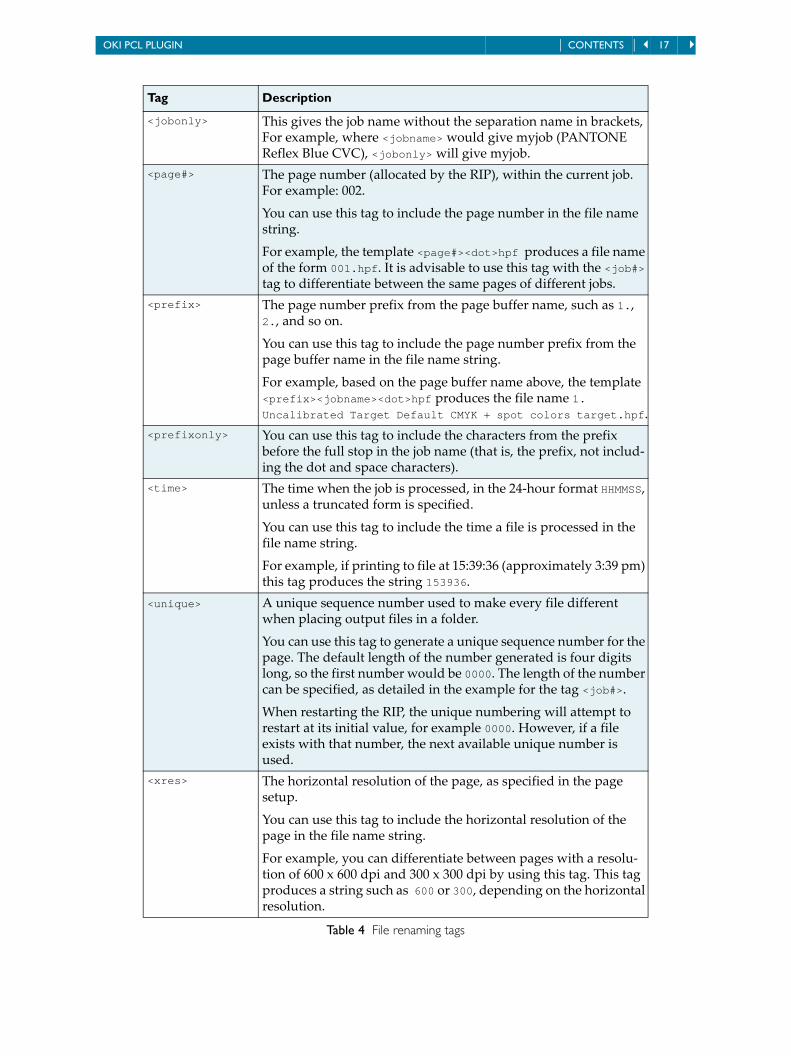
<jobonly> This gives the job name without the separation name in brackets, For example, where <jobname> would give myjob (PANTONE Reflex Blue CVC), <jobonly> will give myjob.
<page#> The page number (allocated by the RIP), within the current job. For example: 002.
You can use this tag to include the page number in the file name string.
For example, the template <page#><dot>hpf produces a file name of the form 001.hpf. It is advisable to use this tag with the <job#> tag to differentiate between the same pages of different jobs.
<prefix> The page number prefix from the page buffer name, such as 1., 2., and so on.
You can use this tag to include the page number prefix from the page buffer name in the file name string.
For example, based on the page buffer name above, the template <prefix><jobname><dot>hpf produces the file name 1. Uncalibrated Target Default CMYK + spot colors target.hpf.
<prefixonly> You can use this tag to include the characters from the prefix before the full stop in the job name (that is, the prefix, not includ‐ing the dot and space characters).
<time> The time when the job is processed, in the 24‐hour format HHMMSS, unless a truncated form is specified.
You can use this tag to include the time a file is processed in the file name string.
For example, if printing to file at 15:39:36 (approximately 3:39 pm) this tag produces the string 153936.
<unique> A unique sequence number used to make every file different when placing output files in a folder.
You can use this tag to generate a unique sequence number for the page. The default length of the number generated is four digits long, so the first number would be 0000. The length of the number can be specified, as detailed in the example for the tag <job#>.
When restarting the RIP, the unique numbering will attempt to restart at its initial value, for example 0000. However, if a file exists with that number, the next available unique number is used.
<xres> The horizontal resolution of the page, as specified in the page setup.
You can use this tag to include the horizontal resolution of the page in the file name string.
For example, you can differentiate between pages with a resolu‐tion of 600 x 600 dpi and 300 x 300 dpi by using this tag. This tag produces a string such as 600 or 300, depending on the horizontal resolution.
Tag Description
Table 4 File renaming tags

OKI PCL PLUGIN CONTENTS 18
9 Color managementThe OKI PCL plugin works with the ColorPro
™ color management option.
For more information on color management solutions, see the ColorPro™ User’s Guide and Chapter 13
of the OEM Manual, “Calibration”.
This section briefly describes the complete color management process, including:
• “Calibrating the printer” on page 18.
• “Creating an ICC profile and installing it in the RIP” on page 18.
• “Creating color setups” on page 20.
9.1 Calibrating the printerThe C9650 color laser printer has two color management systems: Office Color and Graphics Pro. The Graphics Pro method is based on ICC profiles and is recommended for superior color results.
9.2 Creating an ICC profile and installing it in the RIPCreating an ICC profile and installing it in the RIP consists of:
1. “Creating a suitable page setup” on page 18.
2. “Printing and measuring an ICC target” on page 19.
3. “Install the ICC profile in your RIP” on page 20.
9.2.1 Creating a suitable page setupTo process the ICC profiling targets and output them to a printer, you will need to create a page setup which uses the correct printer model, media type, ink and output quality, as described in “Creating a page setup” on page 6. The page setup must not have any color management or calibration options selected; these should be set to (None) or (No color management) as applicable. Or, if you have cre‐ated a “Golden State” profile for the printer, using Global Graphics’ SetGold utility for example, you may select the profile and use it as a suitable reference state for the printer. See Chapter 5—Configur‐ing Output Formats in the OEM Manual for more information about creating page setups.
Note to OEMs: The SetGold utility can be used to create a suitable reference state cali‐bration profile. See the SetGold User Guide for details. Alternatively, you can manually create a linearization profile by referring to the manual Profiles and Calibration.
Having created a suitable page setup, use it to print the ICC profiling target and measure it using an appropriate software package.
<yres> The vertical resolution of the page, as specified in the page setup.
You can use this tag to include the vertical resolution of the page in the file name string. For example, on a page with the resolution 600 x 600, this tag produces the string 600.
Tag Description
Table 4 File renaming tags
OKI PCL PLUGIN CONTENTS 19
The exact procedure you should use varies from package to package, but it is possible to give some general hints:
• Total area coverage: For some paper types the total area coverage should be limited. This depends on the paper, ink type, resolution and screening used, but a good guide is to limit the coverage for coated media (Premium) to 280%, whereas matte media should be around 320%. Some experimentation may be required to determine the optimum setting.
• Number of patches: Although the number of color patches printed and measured is not always a guide to color quality, it is generally true that printing more patches produces better results for any given ICC profiling package.
Having created the ICC profile, install it using the menu option Color > Install ICC Profile. In the Linear Calibration From menu in the Install ICC Profile dialog box choose either:
• Linear if the page setup you used contained no color management data (raw state); or
• The name of the calibration profile or calibration set that you used in the page setup (golden state). The calibration data is incorporated into the ICC profile when you import it. This means you can delete the temporary calibration profile or calibration set once you have imported the ICC profile.
You can create a color setup using this profile (see “Creating color setups” on page 20 for details).
9.2.2 Printing and measuring an ICC targetUsing your page setup, print the ICC target and measure it with your favorite profiling tool, and save the profile to a suitable location.
Some hints for obtaining better results:
• Total area coverage: For some paper types the total area coverage should be limited. This depends on the paper, resolution and screening used, but a good guide is to limit the coverage to 280% for uncoated papers and to 340% for coated papers. Some experimentation may be required to determine the optimum setting.
• Black generation: The presence of black ink in highlights can in some cases be objectionable and can introduce an unnecessarily grainy appearance to some images. Select a setting which images black only in dark regions. (If it is not clear which settings will image black only in dark regions, select the minimum amount of black generation allowed by the ICC profiling package.)
• Number of patches: Although the number of color patches printed and measured is not always a guide to color quality, it is generally true that printing more patches produces better results for any given ICC profiling package.
For greater accuracy it is recommended that you create an ICC profile. The created ICC profile is then uploaded to the requesting computer. This ICC profile is installed into the Harlequin MultiRIP as a device profile for the appropriate device (such as 2020 Halftone). Once this is done a ColorPro setup can be created which uses the new ICC profile.
For more information see “Install the ICC profile in your RIP” on page 20.
OKI PCL PLUGIN CONTENTS 20
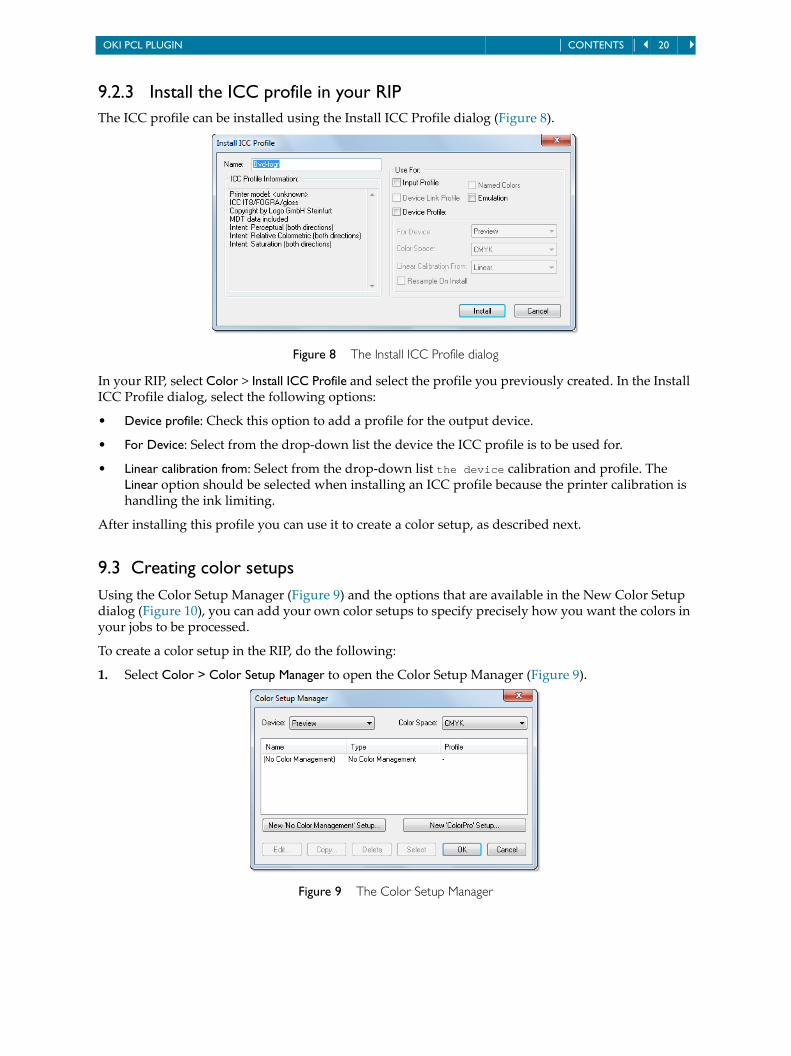
9.2.3 Install the ICC profile in your RIP The ICC profile can be installed using the Install ICC Profile dialog (Figure 8).
Figure 8 The Install ICC Profile dialog
In your RIP, select Color > Install ICC Profile and select the profile you previously created. In the Install ICC Profile dialog, select the following options:
• Device profile: Check this option to add a profile for the output device.
• For Device: Select from the drop‐down list the device the ICC profile is to be used for.
• Linear calibration from: Select from the drop‐down list the device calibration and profile. The Linear option should be selected when installing an ICC profile because the printer calibration is handling the ink limiting.
After installing this profile you can use it to create a color setup, as described next.
9.3 Creating color setupsUsing the Color Setup Manager (Figure 9) and the options that are available in the New Color Setup dialog (Figure 10), you can add your own color setups to specify precisely how you want the colors in your jobs to be processed.
To create a color setup in the RIP, do the following:
1. Select Color > Color Setup Manager to open the Color Setup Manager (Figure 9).
Figure 9 The Color Setup Manager
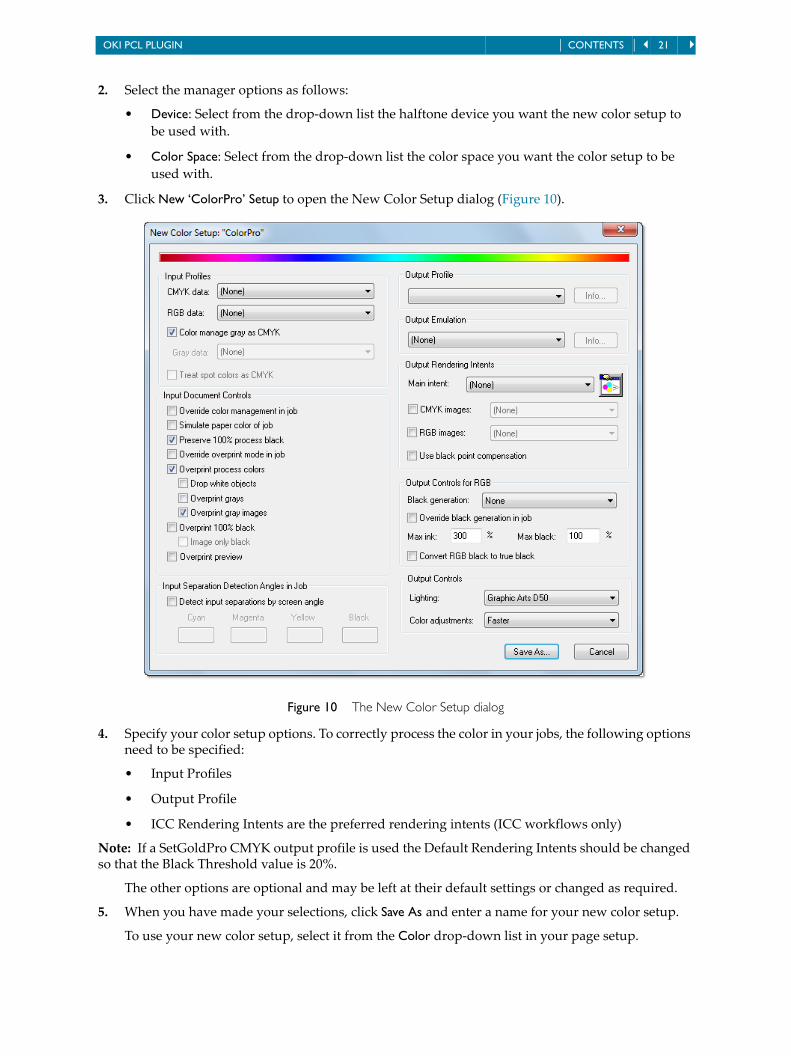
OKI PCL PLUGIN CONTENTS 21
2. Select the manager options as follows:
• Device: Select from the drop‐down list the halftone device you want the new color setup to
be used with.
• Color Space: Select from the drop‐down list the color space you want the color setup to be
used with.
3. Click New ‘ColorPro’ Setup to open the New Color Setup dialog (Figure 10).
Figure 10 The New Color Setup dialog
4. Specify your color setup options. To correctly process the color in your jobs, the following options need to be specified:
• Input Profiles
• Output Profile
• ICC Rendering Intents are the preferred rendering intents (ICC workflows only)
Note: If a SetGoldPro CMYK output profile is used the Default Rendering Intents should be changed so that the Black Threshold value is 20%.
The other options are optional and may be left at their default settings or changed as required.
5. When you have made your selections, click Save As and enter a name for your new color setup.
To use your new color setup, select it from the Color drop‐down list in your page setup.
OKI PCL PLUGIN CONTENTS 22
10 TroubleshootingThe OKI PCL plugin for the Harlequin MultiRIP is an advanced piece of software which contains var‐ious configuration options and settings. The error messages shown below are all from interpreting and rendering and not from the actual printing. The errors are viewed in the main RIP console win‐dow, and are described in this section.
Error messages from the print stage are shown on the printer console and are documented in the printer’s user manual.
10.1 Error messages%%[ Printer error 21; The selected resolution is not supported by the printer for this media. ]%%
Symptoms: The selected quality setting does not match the resolution setting. This usually means that you have selected a paper for which the selected resolution cannot be used. That is, the selected resolution cannot be used with the selected paper type.
Solution: Change the settings to suit the media.
Not enough system memory to output this page.
Symptoms: May occur when the RIP is using more memory than is necessary for safe operation of the operating system (OS).
Solution: For PC systems add more RAM to the machine.
10.2 Printer-specific messages and symptomsMany of the printer‐specific warnings are informative messages, which can be ignored without any adverse effects. Other messages can often be cleared by aborting output from the RIP, clearing any used media from the printer and starting the job again.
Error 25: Combination of input/output selections is not supported by the printer
Symptoms: May occur when Abort is selected in the Output section of the Configure device dia‐log. The conflicting settings are displayed in the RIP’s monitor window.
Solution: Note the conflicting settings and change them.
Page Layout media size is less than the Configure Device paper size - clipping may occur.
Symptoms: May occur when a custom paper size page setup is used that is subsequently changed to use a larger paper size. Clipping may occur in the output as the media values used for the custom paper size are still associated with the page setup.
Solution: Change the media values in Page Layout so they are larger than the paper size selected in Configure Device, or create a completely new page setup.
Job output for "job name", sent on <date> <time>
Symptoms: Occurs when the RIP has finished sending a job to the printer.
Solution: The message is for information only and can be ignored.
Job output for "job name", filename "full path name of output file", finished on <date> <time>
Symptoms: Occurs when the RIP has finished creating an output file for the job.
OKI PCL PLUGIN CONTENTS 23
Solution: The message is for information only and can be ignored.
Printer communication failed ( error details )Unable to connect to printer ( error details )
Symptoms: The RIP is unable to communicate with the printer, as described by the error details.
Solution: Refer to the error code for the cause of the failure.
Unable to open output (error details) Open error (error details)
Symptoms: The RIP is unable to communicate with the printer, as described by the error details.
Solution: Refer to the error code for the cause of the failure.
Unable to create file - "full path name of output file"
Symptoms: IP is not able to create an output file for the job.
Solution: Make sure there is sufficient disk space for the output file. Also, make sure a file of the same name does not already exist, and that the disk is not read‐only.
Unable to create file using path "full path name of output file" and template "file name template"
Symptoms: RIP is not able to create an output file for the job.
Solution: Make sure the output path is valid and is writable. Also, confirm the template file name is valid, as specified in Configure Device.
Job output for "job name" is aborting
Symptoms: May occur when an output file is being written.
Solution: The message is for information only and can be ignored.
Job output for "job name", aborted on <date> <time>
Symptoms: Occurs after a job has been aborted.
Solution: The message is for information only and may be ignored.
Job output for "job name", filename "full path name of output file", aborted on <date> <time>
Symptoms: Occurs after a job has been aborted.
Solution: The message is for information only and can be ignored.
Job output for "job name" using path "full path name of output file" and template "file name template", aborted on <date> <time>
Symptoms: Occurs after a job has been aborted.
Solution: The message is for information only and can be ignored.
Printer ejects paper before completing a page
Symptoms: The page is ejected from the printer before it has finished printing.
Solutions: There are a number of possible solutions:
• Reset the printer and try printing the page again.
OKI PCL PLUGIN CONTENTS 24
Poor or erratic image quality
Symptoms: The print quality is poor.
Solution: There are a number of possible solutions:
• Check the printer is operating correctly and is able to print a self‐diagnostic test page. Your
printer manual will have details on how to print a test page.
• Make a note of any error or warning messages issued by the RIP/plugin and use the recom‐
mended troubleshooting procedures, as described in this section, to fix the problem.
• Check the settings used in the Harlequin MultiRIP page setup. You may have used an inap‐
propriate setting for resolution or print quality.
No output
Symptoms: No output from the printer.
Solution: Check the status of the printer: make sure it is online, powered and connected. Also, check ink and media are loaded and ready to be used. If necessary, print a self‐diagnostic test page. Your printer manual will have details on how to print a test page.
PhotoInk color management fails to preserve 100% process black
Symptoms: Black is not printed as 100% process black when a job is color managed.
Solution: To prevent black being color managed, add a page feature to your page setup that runs the following PostScript language command:
<</ReuseColorChains false>> setsystemparams
Refer to the OEM manual for details on creating and using page features.
10.3 Messages for file name templatesThis section details possible error messages that may appear in the RIP monitor window due to the use of incorrect file name templates (see Section 7). Suggestions are offered to prevent these errors from occurring.
Filename too long for target platform
This message appears when the combined file name stem and extension are too long for the target platform. For example, the combined length of the file name stem and extension must not exceed 255 characters on a Windows platform or 31 characters on a Macintosh platform. To pre‐vent this error, use truncated tags, as shown in the example for the <dos> tag on 15.
File stem too long for target platform
This message appears when the file name stem is too long for the target platform. To prevent this error, restrict the length of the stem by reducing the fixed text, or by using truncated tags. The example for the <dos> tag on 15 demonstrates truncation.
Extension too long for target platform
This message appears when the file name extension is too long for the target platform. For exam‐ple, file names in UNIX are not considered to have a separate file name extension. Using the <dot> tag in conjunction with the <unix> tag would generate this error. To prevent this error, create a template such as <unix><jobname>.hpf rather than using the <dot> tag.

OKI PCL PLUGIN CONTENTS 25
Full pathname too long for target platform
This message appears when the full path name (combination of the file path and the file name) is too long for the target platform. For example, in Windows operating systems the full path name must not exceed 259 characters. To prevent this error, examine the number of characters in the file path of the output file (for example, C:\SW53\RIP\FILES\) and create a template in which the combined length of the file path and the file name do not exceed the limit for the platform.
The path was not supplied
This message appears when the file path is not specified in the Folder... text box within the Config‐uration dialog box. To prevent this error, provide a valid file path.
Unknown tag found in template
This message appears when an unknown tag is found in the template. This is most likely due to a spelling error.
Tag delimiter not found
This message appears when a tag delimiter, either < or >, is missing from a tag. Check that all the tags have both delimiter characters.
An extension is required but not found
This message appears when a file extension is expected but is not specified in the template. For example, if using the <dot> tag, a file extension must be given.
File requested is not writeable
This message appears when trying to write to a file that already exists and that has read‐only access. If you wish to overwrite the file, you must change the file permissions to provide write access.
Unique requested but not satisfied
This message appears when no further unique numbers are available. For example, if using the template stem<1unique><dot>hpf, this error would occur once the file names stem1.hpf through stem9.hpf had been generated, because no further unique numbers are available.
10.4 Problems with passwordsIf you have problems enabling a device or option you should confirm with your supplier the pass‐word or password file. They may provide you with a new password or password file. If this is the case, you may need to provide the serial number of your RIP. The RIP displays this number in the RIP monitor window when starting up, in the form:
Serial number: 1234-56
You must also tell your supplier the platform for which you require the password or password file. The platform is the combination of operating system and processor type. For example, you might specify Windows XP, and Intel processor (CPU).
Once you have a valid password or password file, follow the relevant steps:
Password file Copy the password file into the Passwords folder, which is a sub‐folder of the SW folder. See the OEM Manual for further details.

OKI PCL PLUGIN CONTENTS 26
Password Use the File > Configure RIP menu option to display the Configure RIP dialog box. Click Extras in the Configure RIP dialog box to display the Extras dialog box. Select the entry for the device or option that you wish to add, and click Add to display the Enable Feature dialog box. Enter the password given to you by your supplier, and click OK.

CONTENTS 27
Copyright and Trademarks
OKI PCL plugin
Version 1.6r1
Document issue 113
Part number:HQ‐1.6r1‐OKIPCL
April 2013
Copyright © 2013 Global Graphics Software Ltd. All rights reserved.
Certificate of Computer Registration of Computer Software. Registration No. 2006SR05517
No part of this publication may be reproduced, stored in a retrieval system, or transmitted, in any form or by any means, electronic, mechanical, photocopying, recording, or otherwise, without the prior written permission of Global Graphics Software Ltd.
The information in this publication is provided for information only and is subject to change without notice. Global Graphics Software Ltd and its affiliates assume no responsibility or liability for any loss or damage that may arise from the use of any information in this publication. The software described in this book is furnished under license and may only be used or copied in accordance with the terms of that license.
Harlequin is a registered trademark of Global Graphics Software Ltd.
The Global Graphics Software logo, the Harlequin at Heart Logo, Cortex, Harlequin RIP, Harlequin ColorPro, EasyTrap, FireWorks, FlatOut, Harlequin Color Management System (HCMS), Harlequin Color Production Solu‐tions (HCPS), Harlequin Color Proofing (HCP), Harlequin Error Diffusion Screening Plugin 1‐bit (HEDS1), Har‐lequin Error Diffusion Screening Plugin 2‐bit (HEDS2), Harlequin Full Color System (HFCS), Harlequin ICC Profile Processor (HIPP), Harlequin Standard Color System (HSCS), Harlequin Chain Screening (HCS), Harle‐quin Display List Technology (HDLT), Harlequin Dispersed Screening (HDS), Harlequin Micro Screening (HMS), Harlequin Precision Screening (HPS), HQcrypt, Harlequin Screening Library (HSL), ProofReady, Scalable Open Architecture (SOAR), SetGold, SetGoldPro, TrapMaster, TrapWorks, TrapPro, TrapProLite, Harlequin RIP Eclipse Release, Harlequin RIP Genesis Release, Harlequin MultiRIP, Harlequin Parallel Pages and Harlequin VariData are all trademarks of Global Graphics Software Ltd.
Protected by U.S. Patents 5,579,457; 5,808,622; 5,784,049; 5,862,253; 6,343,145; 6,330,072; 6,483,524; 6,380,951; 6,755,498; 6,624,908; 6,809,839.
Other U.S. Patents Pending
Protected by European Patents 0 803 160; 0 772 934; 0 896 771; 672 29 760.8‐08.
Portions licensed under U.S. Patent No. 5,212,546; 4,941,038.
TrueType is a registered trademark of Apple Computer, Inc.
The ECI and FOGRA ICC color profiles supplied with this Harlequin RIP are distributed with the kind permis‐sion of the ECI (European Color Initiative) and FOGRA respectively, and of Heidelberger Druckmaschinen AG (HEIDELBERG).
The IFRA ICC profiles supplied with this Global Graphics Software are distributed with the kind permission of IFRA and of GretagMacbeth.
International Cooperation for Integration of Processes in Prepress, Press and Postpress, CIP4, Job Definition For‐mat, JDF and the CIP4 logo are trademarks of CIP4.
Adobe, Adobe Photoshop, Adobe Type Manager, Acrobat, Display PostScript, Adobe Illustrator, PostScript, Dis‐tiller and PostScript 3 are either registered trademarks or trademarks of Adobe Systems Incorporated in the United States and/or other countries which may be registered in certain jurisdictions.
Global Graphics Software Ltd is a licensee of Pantone, Inc. PANTONE® Colors generated by ScriptWorks are four‐color process simulations and may not match PANTONE‐identified solid color standards. Consult current PANTONE Color Publications for accurate color. PANTONE®, Hexachrome®, and PANTONE CALIBRATED™ are trademarks of Pantone, Inc. © Pantone, Inc., 1991.
Other brand or product names are the registered trademarks or trademarks of their respective holders.

CONTENTS 28
US Government Use
Harlequin MultiRIP software is a computer software program developed at private expense and is subject to the following Restricted Rights Leg‐end: “Use, duplication, or disclosure by the United States Government is subject to restrictions as set forth in (i) FAR 52.227‐14 Alt III or (ii) FAR 52.227‐19, as applicable. Use by agencies of the Department of Defense (DOD) is subject to Global Graphics Software’s customary commercial license as contained in the accompanying license agreement, in accordance with DFAR 227.7202‐1(a). For purposes of the FAR, the Software shall be deemed to be ‘unpublished’ and licensed with disclosure prohibitions, rights reserved under the copyright laws of the United States.” Global Graphics Software Incorporated, Somerset Court, Suite 320, 281 Winter Street, Waltham, MA 02451.


![DIALux4[1].0- · PDF filedialux 2 plugin. 1.X. plugin , plugin. luminaire selection Plugin plugin . home page, Intenet Explorer](https://img.pdfslide.us/doc/110x75/5a715aac7f8b9a98538cccda/dialux410-wwwpowerengineeringblogfacomssuacirkhadamatkarkonanarticlesbarghdialux4-learningpdfpdf.jpg)