Embed Size (px)
Citation preview

OK EdPlan™
Administrator Manual July 1, 2015

OK EdPlan™ | Administrator Manual July 2015
1 © Public Consulting Group, Inc.
TABLE OF CONTENTS
WHO IS PUBLIC CONSULTING GROUP (PCG) ......................................................................................... 3
PCG’S REVENUE CASE MANAGEMENT (RCMS) ..................................................................................... 3
OK EdPlan™ SYSTEM OVERVIEW ............................................................................................................ 4
Creating an IEP in Subsequent Years ....................................................................................................... 5
EdPlan™ GENERAL INFORMATION .......................................................................................................... 6
Security ...................................................................................................................................................... 6
User Access and Permissions ................................................................................................................... 6
Navigation .................................................................................................................................................. 6
Saving Changes ........................................................................................................................................ 7
Important Symbols in EdPlan™ ................................................................................................................ 7
Logging into the System ............................................................................................................................ 7
Password Policy ........................................................................................................................................ 8
Electronic End-User Agreement ................................................................................................................ 9
MAIN MENU TAB ........................................................................................................................................ 10
Message of the Day ................................................................................................................................. 10
Tags ......................................................................................................................................................... 10
Alignment ................................................................................................................................................. 11
Color ........................................................................................................................................................ 11
Bold .......................................................................................................................................................... 12
Italics ........................................................................................................................................................ 12
MESSAGE BOARD ..................................................................................................................................... 13
To send a Question, Bug Report, Comment or Suggestion .................................................................... 13
Accessing Your Messages ...................................................................................................................... 14
UPLOADED FILES ..................................................................................................................................... 15
MY INFO TAB ............................................................................................................................................. 16
To Change Your Password ..................................................................................................................... 16
Calendar .................................................................................................................................................. 18
Progress Reporting Periods .................................................................................................................... 22
Custom Calendars ................................................................................................................................... 22
OK EdPlan™ | Administrator Manual July 2015
© Public Consulting Group, Inc. 2
USERS TAB ................................................................................................................................................ 23
Changing a User’s Password and Updating Their Personal Information ................................................ 23
Adding New Users ................................................................................................................................... 26
Deleting Users ......................................................................................................................................... 27
SCHOOLS TAB ........................................................................................................................................... 28
Add a New School ................................................................................................................................... 28
To View School Compliance ................................................................................................................... 29
To Edit School Information or Delete a School ....................................................................................... 30
WIZARDS .................................................................................................................................................... 31
Caseload Administration Wizard .............................................................................................................. 31
STUDENTS TAB ......................................................................................................................................... 34
Student Overview .................................................................................................................................... 34
Add a New Student .................................................................................................................................. 36
Inactivate a Student ................................................................................................................................. 38
Reactivate a Student ............................................................................................................................... 39
Student Compliance Overview ................................................................................................................ 40
Definitions of compliance symbols .......................................................................................................... 41
LOGGING OUT OF EdPlan™..................................................................................................................... 42
To log out of EdPlan™ ............................................................................................................................ 42
REMINDERS ............................................................................................................................................... 42

OK EdPlan™ | Administrator Manual July 2015
3 © Public Consulting Group, Inc.
WHO IS PUBLIC CONSULTING GROUP (PCG)
Public Consulting Group, Inc. (PCG) is a management consulting firm committed to providing the highest level of service and quality products to state and local government clients and assisting them in endeavors to enhance revenue, reduce costs, increase operational performance, improve efficiency and streamline technology. Established in 1986, PCG focuses on targeted lines of business and on building lasting client relationships in the areas of education, government finance and health and human services.
PCG’S REVENUE CASE MANAGEMENT (RCMS)
PCG’s Revenue Case Management (RCMS) has achieved numerous successes working with School Districts, State Departments of Education, and Medicaid Agencies across the nation since 1992. Working with school districts ranging in size from 200 students to 435,000 students, PCG offers full service consulting integrated with innovative and scalable technology solutions to address the changing needs of the K-12 education community. Our expertise spans across various education administrative functions and our objective is to provide districts with the resources they need to accomplish their goals utilizing one vendor. Below we highlight several of our RCMS services. Our service and product offerings include: Special Education Consulting Services: PCG offers comprehensive services and
customized technology solutions to special education departments. o EdPlan™ EasyIEP™ is an internet-based solution for the development of
Individualized Education Program (IEPs) and for the management of special education reporting. EasyIEP™ provides administrators with a powerful management tool, extensive reporting capabilities and instant access to student information securely via the internet.
Medicaid Reimbursement Consulting Services: PCG has extensive experience working
with school districts to maximize Medicaid reimbursement for health-related services and administrative outreach activities.
o EasyTRAC™: Internet and tablet based solution for the documentation of health-related services provided to special education students. Clinicians can easily document services provided – anytime, anywhere.

OK EdPlan™ | Administrator Manual July 2015
© Public Consulting Group, Inc. 4
OK EDPLAN™ SYSTEM OVERVIEW
OK EdPlan™ (EdPlan™) will enable you to have comprehensive electronic student files giving you valuable information in a matter of a few clicks of the mouse. Using our EasyIEP™ internet-based solution to complete student IEPs may be new to users but we feel that its process is similar to using a digital camera as depicted below. In EdPlan™, Data is entered into the system through a series of “tabs” that relate to the respective IEP sections. Once the data has been entered, EdPlan™ takes a ‘snapshot’ of the data and creates a viewable .pdf IEP document that is stored in the student’s electronic file. As in a digital camera, you are able to view a ‘snapshot’ of the picture you took. If you want to change the picture, you are able to snap another picture until you have the ‘snapshot’ that you are looking for. [Draft] documents are stored for 30 days, while [Final] documents are stored permanently.

OK EdPlan™ | Administrator Manual July 2015
5 © Public Consulting Group, Inc.
Creating an IEP in Subsequent Years
The following diagram illustrates the steps of EdPlan™ EasyIEP and the benefit of the system in subsequent years. Once an IEP is created, the data is stored in the student’s records. After the child’s first IEP is created, creating an IEP in subsequent years (years 2 and beyond) is as simple as making updates/changes to the data and creating a new document ‘snapshot’.

OK EdPlan™ | Administrator Manual July 2015
© Public Consulting Group, Inc. 6
EDPLAN™ GENERAL INFORMATION
Security
All EdPlan™ information is confidential. The server uses Secure Socket Layer (SSL) technology to encrypt all information as it flows across the Internet. This is the same technology that online merchants and banks use to protect your credit card number and other sensitive information. Please adhere to the following procedures to ensure security:
• Do not give your account name or password to anyone. • Do not write your password down where it can be seen by others. • Do not save documents or reports to an unsecured computer. • Always log off of EdPlan™ and close your browser when you are finished.
*Note: EdPlan™ will automatically log you out of the system after a period of 30 minutes of inactivity. The system recognizes the saving of data as activity while typing is not recognized.
User Access and Permissions
Access to the various areas of EdPlan™ and the permission to execute various functions are controlled by the user type assigned to each user. Examples of common user types include EdPlan/EasyIEP™ Administrator, Psychologist, School/District Lead, and Special Educator. Depending on the user type, individuals are assigned either ‘View’ or ‘Edit’ access.
• Users with ‘View’ access only see information on a given screen and cannot edit that information.
• Users with ‘Edit’ access can view and edit information in EdPlan™.
Navigation
EdPlan™ is menu bar driven with tabs along the top on the screen that are used to navigate through the system. Clicking different tabs takes the user to different parts of the database. End users will primary use the “Students” tab to complete work while Administrators will primarily use the Administrator tab.

OK EdPlan™ | Administrator Manual July 2015
7 © Public Consulting Group, Inc.
Saving Changes
After a change is made it is very important to click either the ‘Update the Database’, ‘Save’, or ‘Save and Continue’ button at the bottom of each screen to save the changes. ‘Update the Database’ is equivalent to Save. Any information entered will be lost if Users forget to click one of these buttons.
Important Symbols in EdPlan™
Below is a list of icons and a description of functionality for each that appears on many system pages:
Help: This link shows general help information. See the End User Manual for updated, specific information.
Drop down menu: Click on the arrow to make a selection. Only one selection can be made within this list.
Check box: More than one selection can be made. To add or remove a check, click once on the box.
and Expand/Collapse: Click either of these buttons to view an expanded list of options to view/select.
Spell Check icon: Click on the icon to launch the spell check function for a specific textbox.
Calendar icon: To add a date, click on the calendar and scroll through the screens to find the appropriate date.
Logging into the System
1. Open a web browser and enter your district’s URL in the address bar. We recommend that you save this to your “favorites” or add a short-cut link to your desk top.
My URL is: https://ok.pcgeducation.com/okdistrictsiteiep 2. Enter your username: (First Name <space> Last Name) not case sensitive. 3. Enter your password. (see Password Requirements that follows) 4. Click the ‘Login’ button.
OK EdPlan™ | Administrator Manual July 2015
© Public Consulting Group, Inc. 8
*Note: EdPlan™ is a web-based system. You can gain access using your name and password through any internet service provider on any computer or device with internet access.
Password Policy
As part of on-going efforts to uphold security of the data managed, PCG Education™ is moving its suite of hosted application to use hardened passwords for system access. The hardened password policy is as follows:
• Requires use of complex passwords • A minimum of 8 characters • At least one upper case character • At least one alphanumeric character • At least one numeric character • At least one special character, like @, #, $, % …etc.

OK EdPlan™ | Administrator Manual July 2015
9 © Public Consulting Group, Inc.
• Must not match the last 3 passwords the User selected • Password expires every 90 days • Forgotten password link for Users, with CAPTCHA option (only available if the User
forgets password)
NOTE: Do not leave your password for others to see or select ‘Yes’ in the checkbox to respond to the question “Would you like the browser to remember this password?”
Electronic End-User Agreement
Upon initial login to the system, users must acknowledge they have read and understand the ‘End-User Agreement’ policy of the EdPlan™ system. They acknowledge this by clicking the ‘Agree’ button on the initial log-in page. If a User does not acknowledge and agree by clicking the ‘Don’t Agree’ button they are automatically logged out of the EdPlan™ system.

OK EdPlan™ | Administrator Manual July 2015
© Public Consulting Group, Inc.
10
MAIN MENU TAB
Message of the Day
At the top of the “Main Menu” page you will find the ‘Message of the Day’scrolling message bar. This is used to alert users of any important information. Please check this message each time you log in to stay informed with district-wide changes or updates. To edit the ‘Message of the Day,’ select the ‘Edit Message’ link:
All messages are in HTML format. You can use the following information to personalize your messages.
Tags
<H1> </H1> First level heading. Large text. • <H2> </H2> Second level heading. Smaller text. • <H*> </H*> Successive levels where * is a number. The larger the number the smaller
the text. • <P> </P> Paragraph tag. Used for paragraphs. Uses browser defined paragraph style. • <br> New line. Inserts a new line character.
Example: <h1> This is a test. </h1> The example above will print the text "This is a test." in large text in the Message of the Day area.
OK EdPlan™ | Administrator Manual July 2015
11 © Public Consulting Group, Inc.
Alignment
The alignment tag allows you to align text to the left, center, or the right of the screen. • <P ALIGN="left"> This is a test. </P> • <P ALIGN="right"> This is a test. </P> • <P ALIGN="center"> This is a test. </P>
Color
The color tag will allow you to add color to your test in the ‘Message of the Day’ section. • <H2> <FONT COLOR="RED" > This is a Test. </FONT></H2> • <H2> <FONT COLOR="green" > This is a Test. </FONT></H2> • <H2> <FONT COLOR="blue" > This is a Test. </FONT></H2> • <H2> <FONT COLOR="yellow" > This is a Test. </FONT></H2> • <H2> <FONT COLOR="purple" > This is a Test. </FONT></H2> • <H2> <FONT COLOR="gray" > This is a Test. </FONT></H2>
Example: <H2> <FONT COLOR="RED" > This is a Test. </FONT></H2> <H2> <FONT COLOR="green" > This is a Test. </FONT></H2>
Example: <P ALIGN="left"> This is a test - align Left. </P> <P ALIGN="right"> This is a test - align Right. </P> <P ALIGN="center"> This is a test - align Center. </P>

OK EdPlan™ | Administrator Manual July 2015
© Public Consulting Group, Inc.
12
Bold
The bold tag will allow you to bold items in the MOTD area. 1. <B> </B>
Example <P ALIGN="center"> This is a <B>test</B>. </P> In this example, the word "test" will be bold.
Italics
The italics tag will allow you to create italics font in the MOTD area. 2. <I> </I>
Example <P ALIGN="center"> This is a <I>test</I>. </P>
An example of a complex message: <h1 ALIGN="center"> <font color="red"> All Case Managers read the message below. </font><h1><br><h3 ALIGN="left"> You <i>MUST</i> review you caseload by the end of the week and email any problems to your building supervisor.</h3>

OK EdPlan™ | Administrator Manual July 2015
13 © Public Consulting Group, Inc.
MESSAGE BOARD To inform Public Consulting Group of any issue, we suggest that users ‘Send a Message’ via the following link on the EdPlan™ “Main Menu” page:
To send a Question, Bug Report, Comment or Suggestion
1. Select which type of message you would like to send by selecting the appropriate option from the drop down menu.
2. Type the specific subject of your message in the ‘Subject’ box, also noting the ‘Page Title (if applicable)’ and ‘Student (if applicable)’ in the appropriate textboxes.
3. Type your message in the ‘Enter the Message Here:’ textbox. 4. Click once on the ‘Send Message’ button.
Once PCG or the state responds to your message, you will receive an e-mail informing you that you have a new message in EdPlan™. All messages and responses are sent internally within the system (ensuring high security protection). Once you have received a reply, the ‘New Mail’
OK EdPlan™ | Administrator Manual July 2015
© Public Consulting Group, Inc.
14
icon will appear on the majority of EdPlan™ screens at the top of the page (enabling you to be aware of incoming mail while working within any student file).
Accessing Your Messages
If you have received a response to a message that was sent to the message board, this will appear on your My Messages widget on the Main Menu page.
If you would like to review a message that you have already read in the system you will click on the ‘View All Messages’ link on the “Main Menu” within the ‘My Messages’ widget. Choosing either link will direct users to the following screen, displaying ‘New Messages,’ as well as storing a user’s ‘Previous Messages.’
Once you have read all new messages, you will no longer see the ‘New Mail’ icon on any screen.

OK EdPlan™ | Administrator Manual July 2015
15 © Public Consulting Group, Inc.
UPLOADED FILES
At the bottom of the “Main Menu” page you will see files that have been made available for viewing, downloading, and/or printing. Files are arranged into a “tab format” (IEP tab, 504 tab, etc.), grouping the documents by category for easy sorting and access. To view a file, click on the name of the file (denoted by a blue hyperlink). The file will open and you will have the option of saving it to your computer. When you are finished viewing the file, click on the “Main Menu” tab at the top of your screen. Do not close your browser as you are still logged in to EdPlan™.
To add additional files to the document library, click the ‘Upload File(s)’ button.
• On the next screen, click the ‘Choose File’ button to locate the file on your computer. • An optional label can be added to name the file. The file label will default to the document’s
file name if this field is left blank. • If the uploaded file is an updated version of an existing file, choose the old version from the
‘Existing File to Replace’ dropdown menu to delete the old document. • To place the file within a certain “document category”/tab, select a category from the ‘File
Category field. For your individual district documents you will need to select District from the dropdown menu.
• Click Upload File(s) when complete.

OK EdPlan™ | Administrator Manual July 2015
© Public Consulting Group, Inc.
16
MY INFO TAB
The first time you login to EdPlan™ you will need to change your password. Click on the How to choose a good password hyperlink if you need help.
To Change Your Password
1. From the “Main Menu,” click on the “My Info” tab.
2. Enter your current password. 3. Type your new password in both the ‘New Password’ and ‘New Password (to verify)’ boxes. 4. Verify your e-mail address and phone numbers are correct. 5. Click the ‘Update the Database’ button.

OK EdPlan™ | Administrator Manual July 2015
17 © Public Consulting Group, Inc.
After updating the database, a confirmation box will open. By clicking ‘OK’ in the confirmation box, you will have successfully changed your password (as well as saved any other information that was modified/added). District system administrators will have the ability to change your password should you forget it and/or you are unable to log in.

OK EdPlan™ | Administrator Manual July 2015
© Public Consulting Group, Inc.
18
Calendar
A new District Calendar is essential for each school year. Follow the steps below for adding a new District Calendar in EasyIEP™.
1. Add the new school year to the Calendar. Click on the Calendar icon on the main menu bar. Scroll to the bottom and click on the ‘Edit School Years’ button.

OK EdPlan™ | Administrator Manual July 2015
19 © Public Consulting Group, Inc.
2. Scroll to the bottom and Click the ‘Add next school year’ button to add the new school year.
It is crucial to have at least three future Calendar years is the list of school years. The future school years are used with the calculation of the Project IEP Date and Projected Eligibility Date located on the Student’s Eligibility Process/Referral page. Future Calendars use temporary ‘place holder’ dates that are easily updated when your school board determines the actual District Calendar dates. A good set of placeholder dates are the federal reporting period dates of July 1 as begin date and June 30 of the following year as the end date. When the actual District Calendar dates are determined by the school board, enter the first instructional date as the begin date for the current school year on the School years page.
3. Enter the ‘Begin Date’ and ‘End Date’ for the new school year. Click on the Calendar icon again to return to the ‘Calendar’ view page. When the actual District Calendar dates are determined by the school board, enter the first instructional date as the begin date for the current school year on the School years page.

OK EdPlan™ | Administrator Manual July 2015
© Public Consulting Group, Inc.
20
Updating the school year Calendar dates on the ‘Edit School Years’ page sets all of the week days to instructional school days (green). Additionally, the District needs to enter any noninstructional days and summer days.
4. Select the ‘Month’ and ‘Year’ to view each month of the school year. Click on a specific date to identify as a non-school day.
5. Select the ‘Day Type’ from the drop down menu options and enter a ‘Label’ to appear on the Calendar.
6. Click ‘Update the database’.
7. To mark multiple days as non-school days, click on the first date in the series.

OK EdPlan™ | Administrator Manual July 2015
21 © Public Consulting Group, Inc.
8. Select the ‘Day Type’ from the drop down menu options and enter a ‘Label’ to appear on the Calendar. Enter the date range using the format described in the ‘Note’ and in the example below. Click ‘Update the Database’ to save changes. Continue through each month in the District Calendar from the first day of school to the last day of school.
Be sure to mark Summer days with a day type of Summer. Summer days may include the last of May, June, July and beginning of August depending on the begin date of the next school year. It is important to mark Summer days because this effects the calculation of the Projected Eligibility Date and Projected IEP Date located on the Student’s Eligibility tab.
All Summer days show as blue on the calendar.

OK EdPlan™ | Administrator Manual July 2015
© Public Consulting Group, Inc.
22
Progress Reporting Periods
1. Set up the Progress Report Periods to coordinate with your Progress Report and Report Card schedule. Click on the Calendar icon on the main menu bar. Scroll to the bottom and click on ‘Edit School Years’. Click the ‘Edit’ button in the ‘Report Periods’ column for the new school year. 2. Click the ‘Add Another Reporting Period’ button until the list contains the correct number of report card periods for the District. 3. Scroll down and click the ‘Auto-fill Begin and End Dates’ button or define periods by entering specific ‘Begin and End Dates’. Clicking the Update the Database button saves the report periods and updates the ‘Cal Days’ and ‘Sch Days’ fields.
Custom Calendars
If your District has any Schools with a different School Day Calendar than the rest of the District, create a Custom Calendar for that School. Go to the Schools tab and click on the Calendar icon beside the School. Follow the same steps to add the Calendar days and ADM Reporting Periods and Progress Reporting Periods.

OK EdPlan™ | Administrator Manual July 2015
23 © Public Consulting Group, Inc.
USERS TAB
Changing a User’s Password and Updating Their Personal Information
1. From the “Main Menu,” click on the Administrator Tab and select “Users” from the dropdown.
2. Enter a user’s last name and click ‘View User(s)’.

OK EdPlan™ | Administrator Manual July 2015
© Public Consulting Group, Inc.
24
3. Select the user’s name to view or edit that user’s information.
4. The “Edit User Info” page is divided into three sections. The top section is the user’s personal information. You can change or edit any of these fields by typing into the textboxes. Changing a user’s first name, middle name, or last name will change his/her login user name. A user’s password can be changed by typing a new password into the ‘Password’ and ‘Password (again)’ textboxes. Click ‘Update the Database’ at the bottom of the page to save the modifications/additions.
5. The second section of the “Edit User Information” page is the user type and school association
area. Choose a user’s ‘User Type’ from the dropdown menu. The user type dictates what information a user will be able to view or edit in EdPlan™. User types with an asterisk (*) next to their name have access to all schools within the current site/district. Click ‘Update the database’ at the bottom of the page to save the modifications/additions.

OK EdPlan™ | Administrator Manual July 2015
25 © Public Consulting Group, Inc.
6. The last section of the “Edit User Information” page is the ‘Disability and Service Certifications’ table. The Disability Certification table is not currently used in Oklahoma, but the Service Certification table will give related service providers access to their logging wizards. If a user is able to provide a service check the “Can Provide” box next to their service name. Speech pathologists should have both Speech/Language and Special Education-SI selected as services. Click “Update the database” at the bottom of the page to save the information.
If the user is certified to provide services, click the View button next to the related service. Then click the Add Certification button. Enter the certifying agency, choose the certification type, and enter certification begin and end dates (if that information is available). Click Add Certifications to save the information. PCG will only bill Medicaid for services provided by certified related service providers.

OK EdPlan™ | Administrator Manual July 2015
© Public Consulting Group, Inc.
26
Adding New Users
1. To add a new user into EdPlan™, click the ‘Add New User’ button at the bottom of the “Users” tab.
2. Enter a user’s demographic information as outlined in numbers 4, 5, and 6 of the Changing a User’s Password and Updating Their Personal Information section of this manual. ‘First Name,’ ‘Last Name,’ ‘User Code,’ ‘Password,’ ‘Password (again),’ ‘User Type,’ and ‘School(s)’ are all required fields. The ‘User Code’ can be any unique ID assigned to that user. Employee IDs are good codes to use but something as simple as a person’s first and

OK EdPlan™ | Administrator Manual July 2015
27 © Public Consulting Group, Inc.
last name (without a space) will suffice. Click the ‘Add User to Database’ button at the bottom of the screen to save the information.
*Note: PCG has created User Code’s for the initial users imported into the system. Districts may elect to change this code to match the District’s HR Employee ID if that is preferred.
Deleting Users
1. Search for a user from the “Users” tab.
2. Click the ‘Del’ (delete) checkbox to the left of the student’s name and select ‘Inactivate Selected Users’.
3. Select, “Yes, I’m sure” to confirm the inactivation.

OK EdPlan™ | Administrator Manual July 2015
© Public Consulting Group, Inc.
28
SCHOOLS TAB
Add a New School
1. From the “Main Menu,” click the Administraion Tab and select the “Schools” option. 2. Select the ‘Add new school’ button at the bottom of the page.
3. Enter the school information and click ‘Add School to Database.’ The ‘School Name,’
‘Abbreviation,’ and ‘Units Per Day’ are required fields. The ‘School Code’ field is the state assigned school ID.
The schools tab allows users to check compliance for individual schools. Any ‘red’ slice in the compliance symbol next to the school name indicates something is out of compliance for one or more users within that school. Users will be able to view school specific information, including compliance by individual users and students.

OK EdPlan™ | Administrator Manual July 2015
29 © Public Consulting Group, Inc.
To View School Compliance
1. From the “Main Menu,” click on the “Schools” tab. 2. Click on the compliance symbol next to a specific school.
3. Click on the compliance symbol next to a specific user. This will show you student-specific compliance.
4. From here you can click on the student’s name to go to the student’s tab/pages, or you can
click on the compliance symbol to view student history.
OK EdPlan™ | Administrator Manual July 2015
© Public Consulting Group, Inc.
30
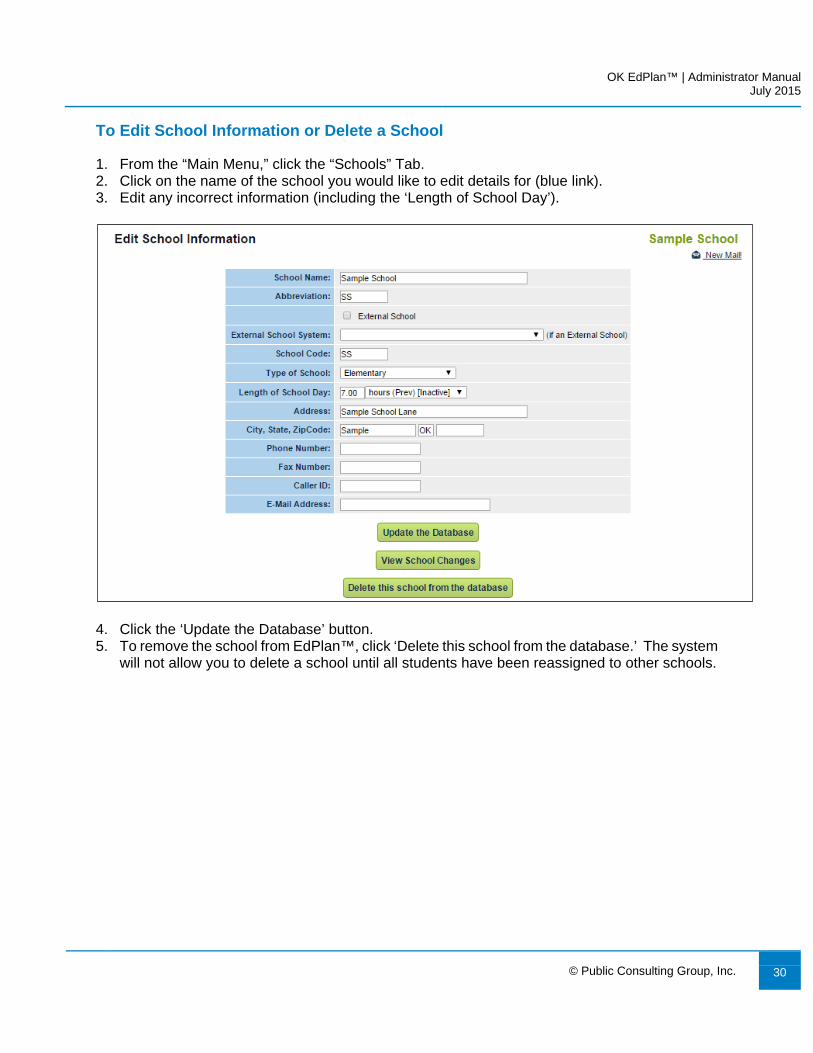
To Edit School Information or Delete a School
1. From the “Main Menu,” click the “Schools” Tab. 2. Click on the name of the school you would like to edit details for (blue link). 3. Edit any incorrect information (including the ‘Length of School Day’).
4. Click the ‘Update the Database’ button. 5. To remove the school from EdPlan™, click ‘Delete this school from the database.’ The system
will not allow you to delete a school until all students have been reassigned to other schools.

OK EdPlan™ | Administrator Manual July 2015
31 © Public Consulting Group, Inc.
WIZARDS
Caseload Administration Wizard
The EdPlan™ system provides a number of options for assigning students to a Case Manger (Teacher of Record) in the system. The following outlines methods of associating students with teachers in the system. If your district determines that one person at the district or school level is responsible for establishing caseload for a group of users the Caseload Administration Wizard would be used as follows: 1. From the Main Menu click the Wizards tab.
2. Select the Caseload Administration Wizard link from the list of Available Wizards. 3. Search for the User by ‘School’, ‘User Type’, ‘Last Name’, ‘Title’, and/or ‘User Code’. 4. Select the User by clicking on the appropriate name. 5. The Current Caseload page appears. 6. You can adjust the user’s role on the team under case manager or team member, or 7. Use the ‘Check All’ and ‘Check None’ buttons as needed. 8. Click the ‘Add More Students to Caseload’ button to search for more Students to place in a
User’s caseload. 9. Click the ‘Update the Database’ button to save information and leave the page.

OK EdPlan™ | Administrator Manual July 2015
© Public Consulting Group, Inc.
32
If your district determines that each user is responsible for establishing caseload for themselves the Caseload Setup Wizard would be used as follows: 1. From the Main Menu click the Wizards tab.
2. Select the Caseload Administration Wizard link from the list of Available Wizards.
Once selected a User’s current caseload appears. This caseload will show all students that the user is a member of the team as well as holds case manager responsibility.
3. If the user needs to add a new student to their caseload they can click ‘Add More Students
to Caseload’ and search for the student by ‘Last Name’, ‘School’, or ‘STN’.

OK EdPlan™ | Administrator Manual July 2015
33 © Public Consulting Group, Inc.
4. Once the user finds the student(s) that needs to be added from the list they can find and
click the role they will need on the student’s team. Once complete the user can select to ‘Add Student to Caseload’ or ‘Add Students to Caseload and Find More’ as necessary until all students have been added.

OK EdPlan™ | Administrator Manual July 2015
© Public Consulting Group, Inc.
34
STUDENTS TAB
Student Overview
When searching for students, remember that EdPlan™ receives demographic information from the WAVE system for all students. The system will only allow a certain number of students to appear on the screen at once. You can narrow your search by entering the ‘State Testing Number (STN),’ School, or choosing either ‘General Education’ or ‘Special Education’ and the beginning letters of the child’s last name. Some users might not be able to search for students and may only be able to view their individual caseload. 1. From the “Main Menu,” click the “Students” tab. 2. Enter the criteria you wish to search by, such as ‘Student Last Name.’
3. Advanced Student Search Page: Select the ‘Advanced Student Search’ button at the bottom
of the “Students” tab/page. Use the “Advanced Student Search” page to search for Students by compliance status, disability, special education, or related services (among other options).

OK EdPlan™ | Administrator Manual July 2015
35 © Public Consulting Group, Inc.

OK EdPlan™ | Administrator Manual July 2015
© Public Consulting Group, Inc.
36
4. After searching for a student, the student’s record will appear if that student fits the entered
criteria. 5. To select a specific student record, click on the name of the student.
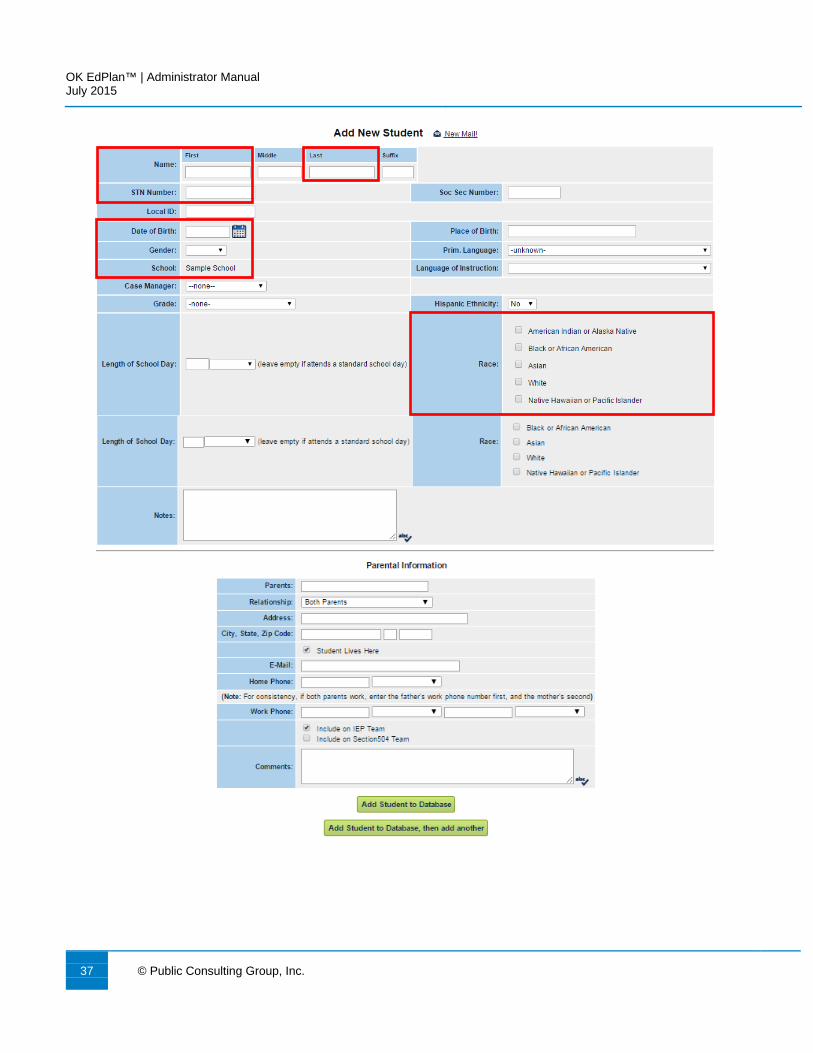
Add a New Student
Only a small number of users will be able to manually enter students into the EdPlan™ system. This assists with data cleanliness as well as the ability to prevent duplication of records in the EdPlan™ system. The most common students that will be entered manually will be those students who are transitioning to EdPlan™ from Sooner Start or students that have been referred from private school settings. 1. From the “Main Menu,” click the “Students” tab. 2. At the bottom of the page, choose a school from the dropdown menu next to the ‘Add new
student to’ button. 3. After selecting a school, click the ‘Add new student to’ button
4. Enter all of the students’ information. ‘First Name’, ‘Last Name’, ‘Date of Birth’, ‘STN’, ‘Race’, ‘Gender’, and ‘School’ are all required.
5. Type the information into the blank textboxes and select information from the dropdown menus when applicable.
6. After you have entered all of the information, click the ‘Add Student to Database’ button. 7. To add another student, click the ‘Add Student to Database, then add another’ button.
OK EdPlan™ | Administrator Manual July 2015
37 © Public Consulting Group, Inc.

OK EdPlan™ | Administrator Manual July 2015
© Public Consulting Group, Inc.
38
Inactivate a Student
1. From the “Main Menu,” click the “Students” tab. 2. Search for a student and click on his/her name. 3. Click on the ‘Make this Student Inactive’ button at the bottom of the “Personal” page.
4. The following screen will appear:
5. Fill out the ‘Exit Questionnaire’ for the student. 6. Click the ‘Save and Continue’ button when finished.

OK EdPlan™ | Administrator Manual July 2015
39 © Public Consulting Group, Inc.
Reactivate a Student
1. From the “Main Menu,” click the “School System” tab. 2. Click the “Inactive Students” button. 3. Fill in the criteria to search for an inactive student. 4. Click the ‘View Inactive Students’ button.
5. Select the student to reactivate by clicking on his/her name. 6. Click the ‘Re-Activate this Student in the Database’ button.

OK EdPlan™ | Administrator Manual July 2015
© Public Consulting Group, Inc.
40
Student Compliance Overview Every student in EdPlan™ has a compliance symbol associated with their name. The compliance symbol can be found in two places: the “Select a Student” page and the “Eligibility Process” tab for that student. In both locations, the compliance symbols are found next to the student’s name. When viewing your caseload, the compliance symbols are a quick way for you to see which students are in or out of compliance, as well as students who have approaching deadlines.
Definitions of compliance symbols are on the next page.

EdPlan™ | Oklahoma Administrator Manual July 2015
41 © Public Consulting Group, Inc.
Definitions of compliance symbols
Symbol Meaning What to do
It has been > 1095 days (3 years) since this student's Eligibility Date. A triennial re-evaluation is due.
When a re-evaluation is performed, you should update the student Eligibility Date. You can do that on the student's Eligibility page.
It has been > 1035 days since this student's Eligibility Date. A triennial re-evaluation is due within 2 months.
Same as above.
Either 1) it has been > 365 days since this student's Last IEP Date, or 2) it has been > 30 days since this student's Eligibility Date and no IEP has been recorded (i.e. the student's Last IEP Date field is empty).
When you generate an IEP for this student using EdPlan™, the Last IEP Date will automatically be updated. However, if you do a hand-written IEP, you will need to manually update this student's Last IEP Date. You can do that on the student's Eligibility page.
Either 1) it has been > 335 days since this student's Last IEP Date, or 2) it has been > 23 days since this student's Eligibility Date and no IEP has been recorded (i.e. the student's Last IEP Date field is empty).
Same as above.
It has been > 97 days since this student's Referral Date and Eligibility has not yet been determined.
When a student's Eligibility status is determined, that, along with the date of the Eligibility determination, should be entered on the student's Eligibility page.
It has been > 77 days since this student's Referral Date and Eligibility has not yet been determined.
Same as above.
All appropriate Eligibility and IEP information has been entered for this student.
Make sure the student has a final IEP and option in the system.
No Eligibility or IEP information has been entered for this student; this usually denotes a regular education student.
To enter the student into special education, fill in the Eligibility page.
All appropriate Eligibility and 504 information has been entered for this student.
Make sure the student has a final Eligibility Report and 504 Service Plan in the system.

EdPlan™ | Oklahoma Administrator Manual July 2015
© Public Consulting Group, Inc.
42
LOGGING OUT OF EdPlan™
** Always Log Out and Exit the Browser ** If you do not log out and close your browser, anyone can access information in EdPlan™ or record information under your log-in name.
To log out of EdPlan™
1. Click the “Log Out” button in the top right of the menu toolbar. 2. After you log out, close your browser:
• Mac users: Click the in the upper left hand corner of your screen. • PC users: Click the ‘X’ in the upper right hand corner of your screen.
*Important Notes:
• You can log out from any part of the system. • You do not have to go back to the “Main Menu.” • You must log out of EdPlan™ and close your browser if you:
o Step away from your computer. o Finish using the system. o Leave for the day.
REMINDERS
• EdPlan™ Help Desk: 1-866-702-6489. • Use the Message Board for EdPlan™ Help Desk questions, report bugs or post suggestions.
This is found on the Main Menu page of EdPlan™. • All Message Board requests must include a student’s full name and date of birth for further
research by the EdPlan™ Help Desk. If the requests are in reference to users or user types, please include specific examples.
• To request an IEP transfer, post a message including the following information: Student’s full name, date of birth, sending district, and receiving district
• Use the Navigational Toolbar to navigate through the screens. • Always ‘Update the database’/’Save’/’Save and Continue’ to save data entered. • When typing long quantities of notes (e.g. “Strengths/Needs, Special Factors, and Parent
Concerns” page), save your data frequently. • A finalized IEP document is required to create an IEP-At-a-Glance document. • A finalized IEP document is required to create a Progress Report. • Do not use the ‘Back’ button on the browser tool bar. • Make sure each user has entered their email which will enable their use of the ‘Forgotten
Password’ feature.

www.publicconsultinggroup.com