Embed Size (px)
Citation preview
Office 2007 – New Features DoIT – Professional Technical Education University of Wisconsin - Madison Cliff Cunningham [email protected] 608-890-1310 www.wisc.edu/pte
Overview of Office 2007
2 of 14
Copyright: UW Madison, Professional Technical Education
Thanks to University of Michigan: Library Instructional Technology for sharing materials with the CIC.
Table of Contents
Introduction .............................................................................................................................. 3
The Changes (Overview) .......................................................................................................................... 3
The Office Button ..................................................................................................................... 4
A Few Options Tips .................................................................................................................................. 4
The Quick Access Toolbar ...................................................................................................... 5
The Customize Quick Access Toolbar menu ........................................................................................... 5
More Commands… .................................................................................................................................. 5
Understanding Ribbons .......................................................................................................... 6
Contextual Ribbons .................................................................................................................................. 6
Minimize the Ribbon ................................................................................................................................ 6
New Extensions & File Sharing ............................................................................................... 7
Files created in Office 2003...................................................................................................................... 7
Files created in Office 2007...................................................................................................................... 7 Option #1: Saving Office 2007 files to a pre-XML format ................................................................... 7 Option #2: Installing the Compatibility Pack on the 2003 machine .................................................... 7
Changing the Default File Type ............................................................................................................... 8
Compatibility Mode .................................................................................................................................. 8
Compatibility Checker .............................................................................................................................. 9
Using Word 97-2003 Templates............................................................................................................... 9
Creating PDF files in Office 2007 applications ........................................................................................ 9
A Few Tips for Word ...............................................................................................................10
Styles ...................................................................................................................................................... 10
Page Layout Ribbon ............................................................................................................................... 10
Format Ribbon ........................................................................................................................................ 10
A Few Tips for Excel ...............................................................................................................11
Formula Ribbon ...................................................................................................................................... 11
Adding a Chart ....................................................................................................................................... 11
A Few Tips PowerPoint ..........................................................................................................12
Adding New Slides ................................................................................................................................. 12
Slide Design Ribbon ............................................................................................................................... 12
Slide Master ............................................................................................................................................ 13
Working with Charts .............................................................................................................................. 13
Other Notes ............................................................................................................................................. 13
Resources ...............................................................................................................................14
Overview of Office 2007
3 of 14 3 of 14
Copyright: UW Madison, Professional Technical Education Thanks to University of Michigan: Library Instructional Technology for sharing materials with the CIC.
Introduction
The latest version of Microsoft Office for Windows – Office 2007 – looks very different from Office
2003. While it has much of the same functionality as the previous versions of Word and Excel, you have
to learn where to find the tools you are used to using. (Note: Most keyboard shortcuts are exactly the
same. So, if you are accustomed to using those, carry on!). This handout is designed to give you a general
orientation to the biggest differences between these two versions. This will allow you to continue your
work as efficiently as possible as you transition to Office 2007. We will be developing more in-depth
handouts for Word and Excel. This handout does not cover Microsoft Access or PowerPoint, in either
version.
The Changes (Overview)
In addition to visual changes, Microsoft has introduced some new terminology. These act the same across
all the applications, and look very similar as well. The following pages explore these items in greater
detail.
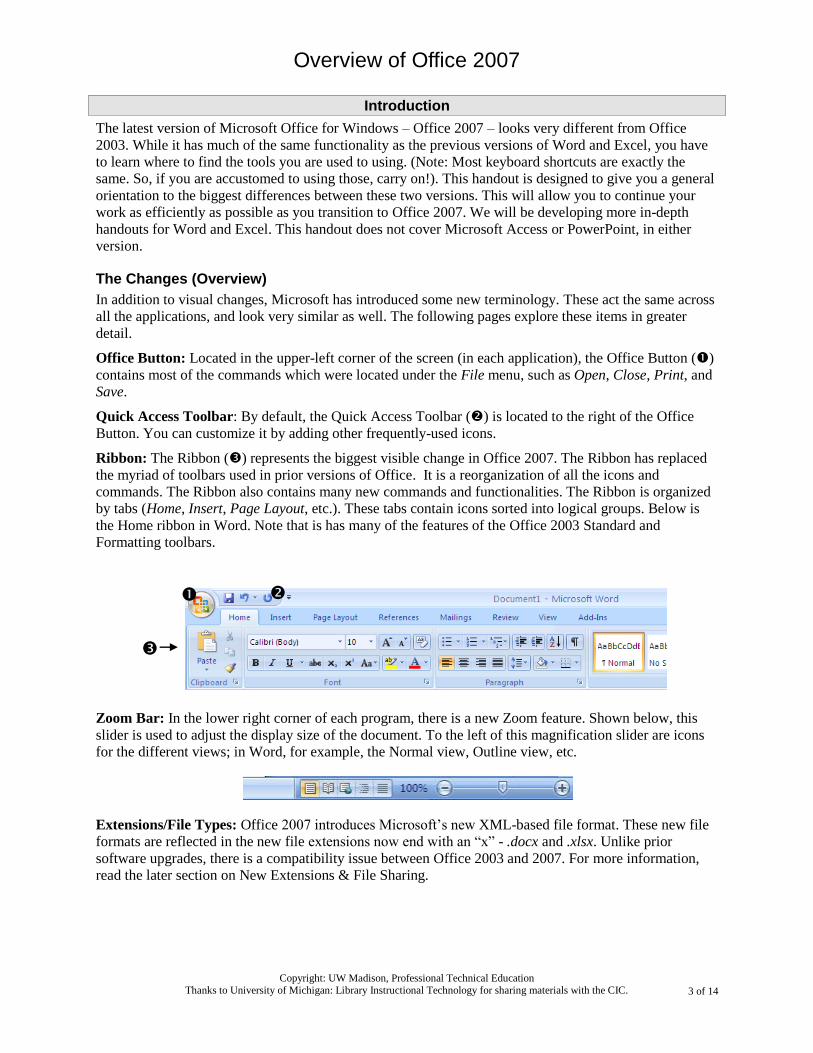
Office Button: Located in the upper-left corner of the screen (in each application), the Office Button ()
contains most of the commands which were located under the File menu, such as Open, Close, Print, and
Save.
Quick Access Toolbar: By default, the Quick Access Toolbar () is located to the right of the Office
Button. You can customize it by adding other frequently-used icons.
Ribbon: The Ribbon () represents the biggest visible change in Office 2007. The Ribbon has replaced
the myriad of toolbars used in prior versions of Office. It is a reorganization of all the icons and
commands. The Ribbon also contains many new commands and functionalities. The Ribbon is organized
by tabs (Home, Insert, Page Layout, etc.). These tabs contain icons sorted into logical groups. Below is
the Home ribbon in Word. Note that is has many of the features of the Office 2003 Standard and
Formatting toolbars.
Zoom Bar: In the lower right corner of each program, there is a new Zoom feature. Shown below, this
slider is used to adjust the display size of the document. To the left of this magnification slider are icons
for the different views; in Word, for example, the Normal view, Outline view, etc.
Extensions/File Types: Office 2007 introduces Microsoft’s new XML-based file format. These new file
formats are reflected in the new file extensions now end with an “x” - .docx and .xlsx. Unlike prior
software upgrades, there is a compatibility issue between Office 2003 and 2007. For more information,
read the later section on New Extensions & File Sharing.
Overview of Office 2007
4 of 14 4 of 14
Copyright: UW Madison, Professional Technical Education Thanks to University of Michigan: Library Instructional Technology for sharing materials with the CIC.
The Office Button
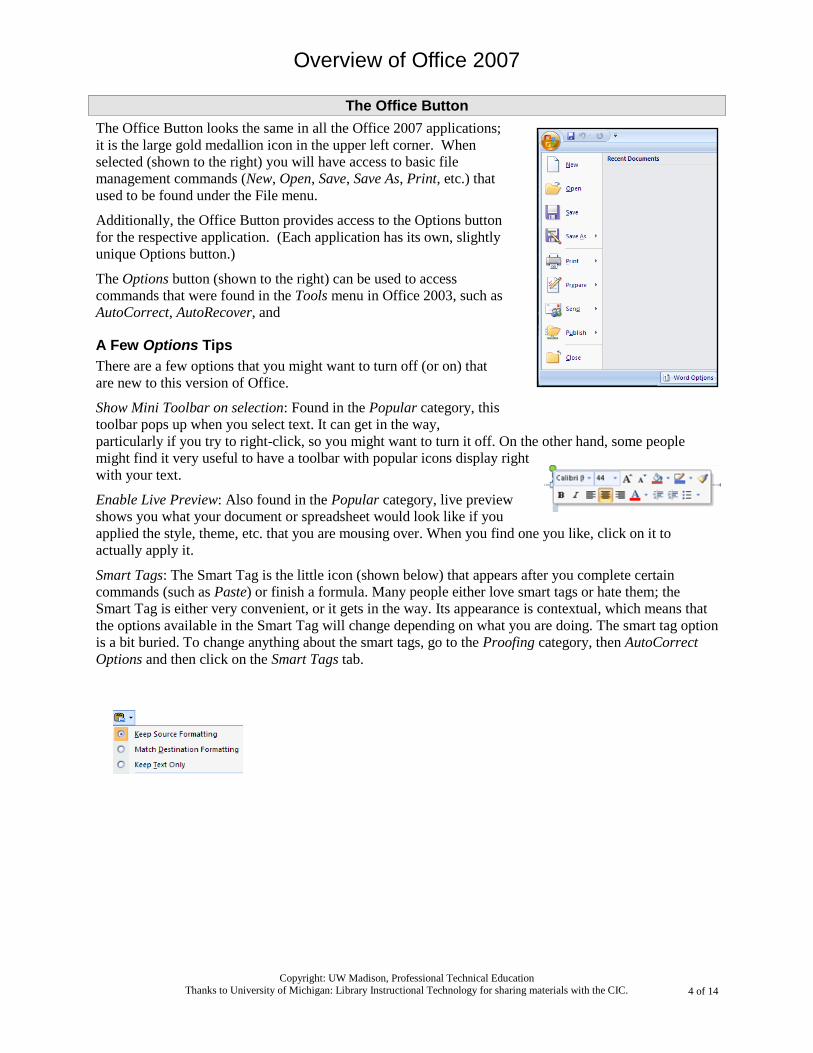
The Office Button looks the same in all the Office 2007 applications;
it is the large gold medallion icon in the upper left corner. When
selected (shown to the right) you will have access to basic file
management commands (New, Open, Save, Save As, Print, etc.) that
used to be found under the File menu.
Additionally, the Office Button provides access to the Options button
for the respective application. (Each application has its own, slightly
unique Options button.)
The Options button (shown to the right) can be used to access
commands that were found in the Tools menu in Office 2003, such as
AutoCorrect, AutoRecover, and
A Few Options Tips
There are a few options that you might want to turn off (or on) that
are new to this version of Office.
Show Mini Toolbar on selection: Found in the Popular category, this
toolbar pops up when you select text. It can get in the way,
particularly if you try to right-click, so you might want to turn it off. On the other hand, some people
might find it very useful to have a toolbar with popular icons display right
with your text.
Enable Live Preview: Also found in the Popular category, live preview
shows you what your document or spreadsheet would look like if you
applied the style, theme, etc. that you are mousing over. When you find one you like, click on it to
actually apply it.
Smart Tags: The Smart Tag is the little icon (shown below) that appears after you complete certain
commands (such as Paste) or finish a formula. Many people either love smart tags or hate them; the
Smart Tag is either very convenient, or it gets in the way. Its appearance is contextual, which means that
the options available in the Smart Tag will change depending on what you are doing. The smart tag option
is a bit buried. To change anything about the smart tags, go to the Proofing category, then AutoCorrect
Options and then click on the Smart Tags tab.
Overview of Office 2007
5 of 14 5 of 14
Copyright: UW Madison, Professional Technical Education Thanks to University of Michigan: Library Instructional Technology for sharing materials with the CIC.
The Quick Access Toolbar
The Customize Quick Access Toolbar menu
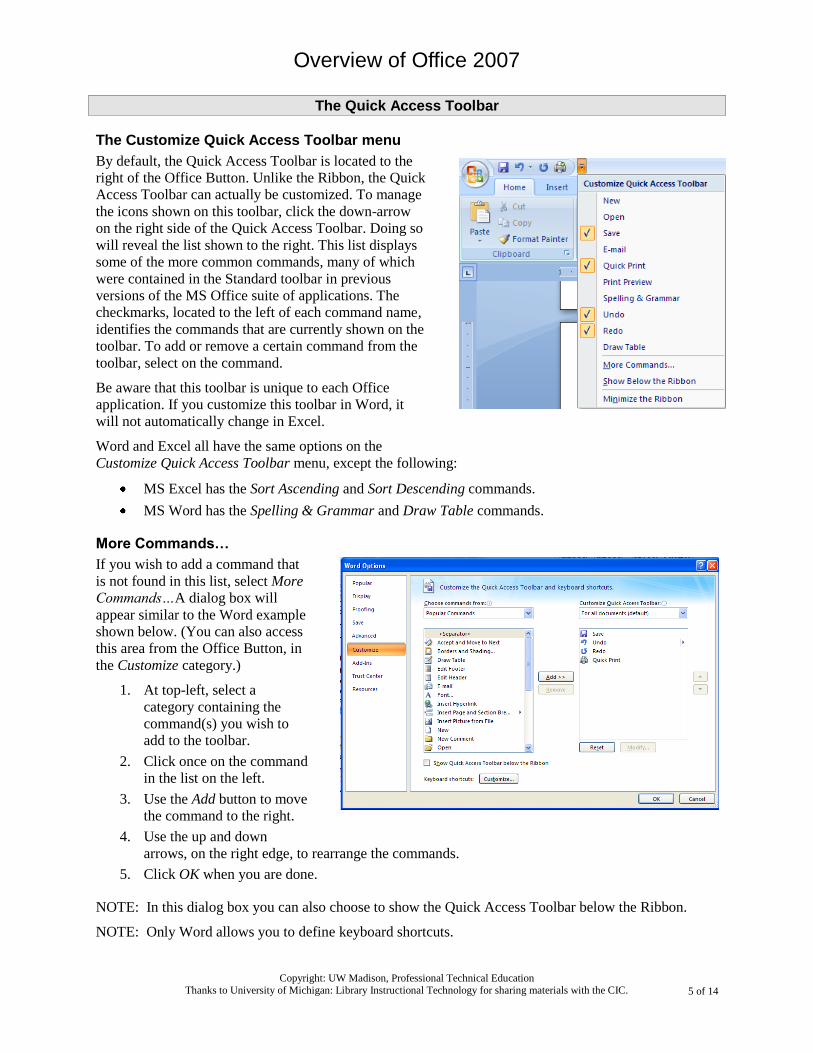
By default, the Quick Access Toolbar is located to the
right of the Office Button. Unlike the Ribbon, the Quick
Access Toolbar can actually be customized. To manage
the icons shown on this toolbar, click the down-arrow
on the right side of the Quick Access Toolbar. Doing so
will reveal the list shown to the right. This list displays
some of the more common commands, many of which
were contained in the Standard toolbar in previous
versions of the MS Office suite of applications. The
checkmarks, located to the left of each command name,
identifies the commands that are currently shown on the
toolbar. To add or remove a certain command from the
toolbar, select on the command.
Be aware that this toolbar is unique to each Office
application. If you customize this toolbar in Word, it
will not automatically change in Excel.
Word and Excel all have the same options on the
Customize Quick Access Toolbar menu, except the following:
MS Excel has the Sort Ascending and Sort Descending commands.
MS Word has the Spelling & Grammar and Draw Table commands.
More Commands…
If you wish to add a command that
is not found in this list, select More
Commands…A dialog box will
appear similar to the Word example
shown below. (You can also access
this area from the Office Button, in
the Customize category.)
1. At top-left, select a
category containing the
command(s) you wish to
add to the toolbar.
2. Click once on the command
in the list on the left.
3. Use the Add button to move
the command to the right.
4. Use the up and down
arrows, on the right edge, to rearrange the commands.
5. Click OK when you are done.
NOTE: In this dialog box you can also choose to show the Quick Access Toolbar below the Ribbon.
NOTE: Only Word allows you to define keyboard shortcuts.
Overview of Office 2007
6 of 14 6 of 14
Copyright: UW Madison, Professional Technical Education Thanks to University of Michigan: Library Instructional Technology for sharing materials with the CIC.
Understanding Ribbons
The Ribbon is the most visible change that you will observe in Office 2007. It replaces the numerous
toolbars use in previous versions of MS Office. The purpose behind this transition is to reorganize the
icons and commands in a more logical way. The Ribbon is divided into tabs (Home, Insert, Page Layout,
etc.). Each tab is divided into “groups”, such as (in the first example below) Pages, Tables, or
Illustrations.
The Home Ribbon has much of what used to be on the Standard and Formatting toolbars.
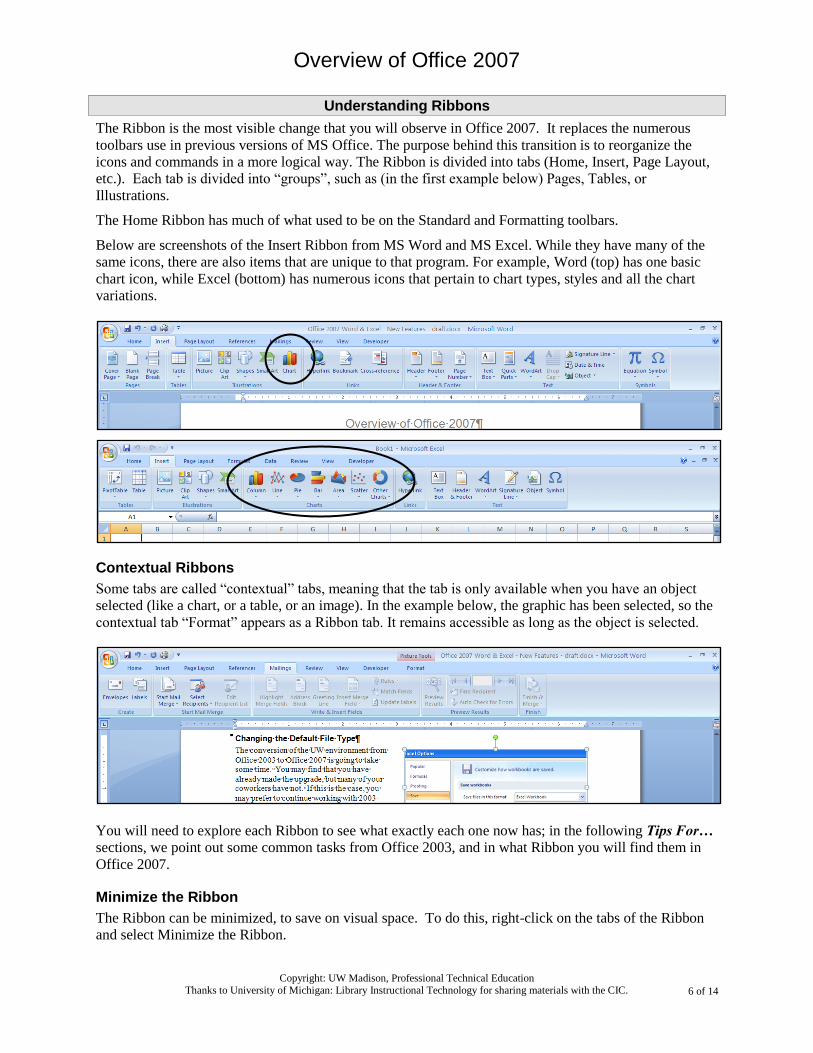
Below are screenshots of the Insert Ribbon from MS Word and MS Excel. While they have many of the
same icons, there are also items that are unique to that program. For example, Word (top) has one basic
chart icon, while Excel (bottom) has numerous icons that pertain to chart types, styles and all the chart
variations.
Contextual Ribbons
Some tabs are called “contextual” tabs, meaning that the tab is only available when you have an object
selected (like a chart, or a table, or an image). In the example below, the graphic has been selected, so the
contextual tab “Format” appears as a Ribbon tab. It remains accessible as long as the object is selected.
You will need to explore each Ribbon to see what exactly each one now has; in the following Tips For…
sections, we point out some common tasks from Office 2003, and in what Ribbon you will find them in
Office 2007.
Minimize the Ribbon
The Ribbon can be minimized, to save on visual space. To do this, right-click on the tabs of the Ribbon
and select Minimize the Ribbon.
Overview of Office 2007
7 of 14 7 of 14
Copyright: UW Madison, Professional Technical Education Thanks to University of Michigan: Library Instructional Technology for sharing materials with the CIC.
New Extensions & File Sharing
Office 2007 uses an XML-based file format. This is why the file extensions now end with an “x”, as in
.docx and .xlsx. Because of this change, there are some compatibility issues you need to consider when
sharing files.
Files created in Office 2003
Any file created in Office 2003 is compatible with Office 2007. Users of Office 2007 will be able to open,
edit and save these older-version files. After doing so, the files will still be usable in MS Office 2003
applications.
However, if a 2003 file is opened in a 2007 application, the 2007 application will run in “Compatibility
Mode”. This means that some new functionality, introduced in MS Office 2007, will not be available to
the user. To gain access to those new functionalities, the user will need to convert the 2003 file (.doc or
.xls) into the new XML-based format (.docx or .xlsx). This conversion is very easy to do, and can be
performed by using the Convert command, found under the Office Button.
Until the conversion takes place, the file can continue to be used (opened, edited and saved) in both the
Office 2003 and Office 2007 versions of the application.
Files created in Office 2007
Any file created in Office 2007 files will not be immediately accessible by the Office 2003 application.
If files created in the Office 2007 application need to be shared with users using Office 2003, there are a
few options you may consider.
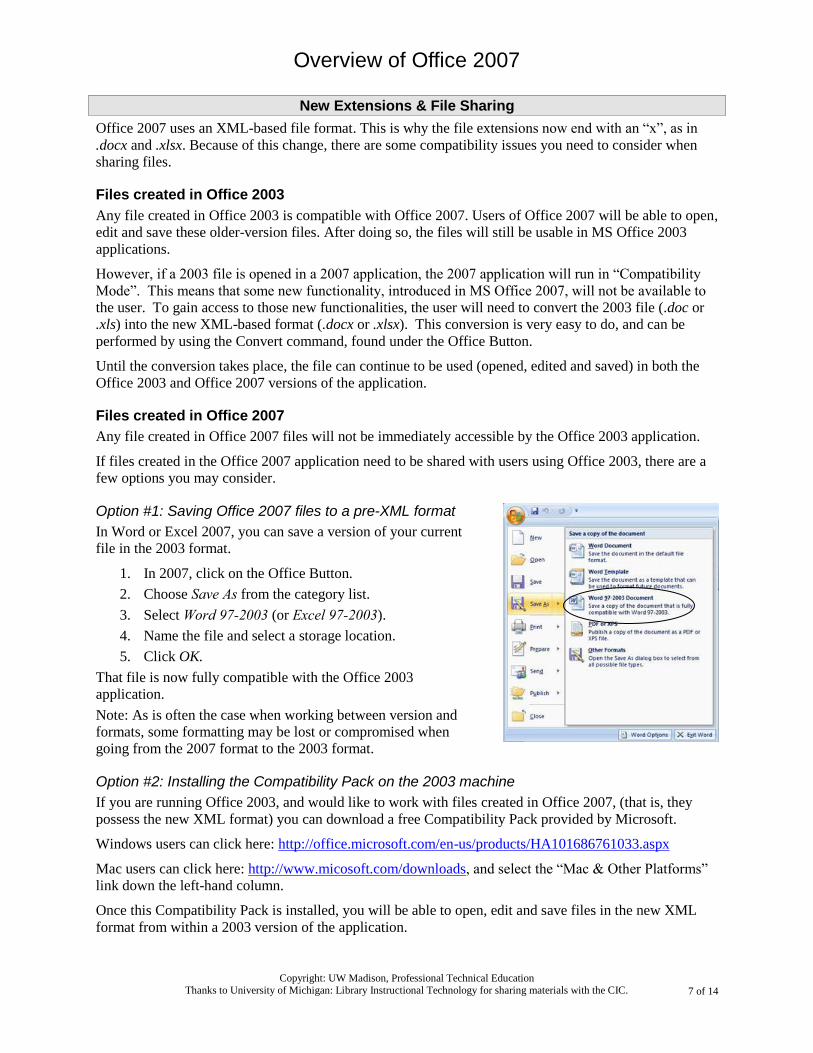
Option #1: Saving Office 2007 files to a pre-XML format
In Word or Excel 2007, you can save a version of your current
file in the 2003 format.
1. In 2007, click on the Office Button.
2. Choose Save As from the category list.
3. Select Word 97-2003 (or Excel 97-2003).
4. Name the file and select a storage location.
5. Click OK.
That file is now fully compatible with the Office 2003
application.
Note: As is often the case when working between version and
formats, some formatting may be lost or compromised when
going from the 2007 format to the 2003 format.
Option #2: Installing the Compatibility Pack on the 2003 machine
If you are running Office 2003, and would like to work with files created in Office 2007, (that is, they
possess the new XML format) you can download a free Compatibility Pack provided by Microsoft.
Windows users can click here: http://office.microsoft.com/en-us/products/HA101686761033.aspx
Mac users can click here: http://www.micosoft.com/downloads, and select the “Mac & Other Platforms”
link down the left-hand column.
Once this Compatibility Pack is installed, you will be able to open, edit and save files in the new XML
format from within a 2003 version of the application.
Overview of Office 2007
8 of 14 8 of 14
Copyright: UW Madison, Professional Technical Education Thanks to University of Michigan: Library Instructional Technology for sharing materials with the CIC.
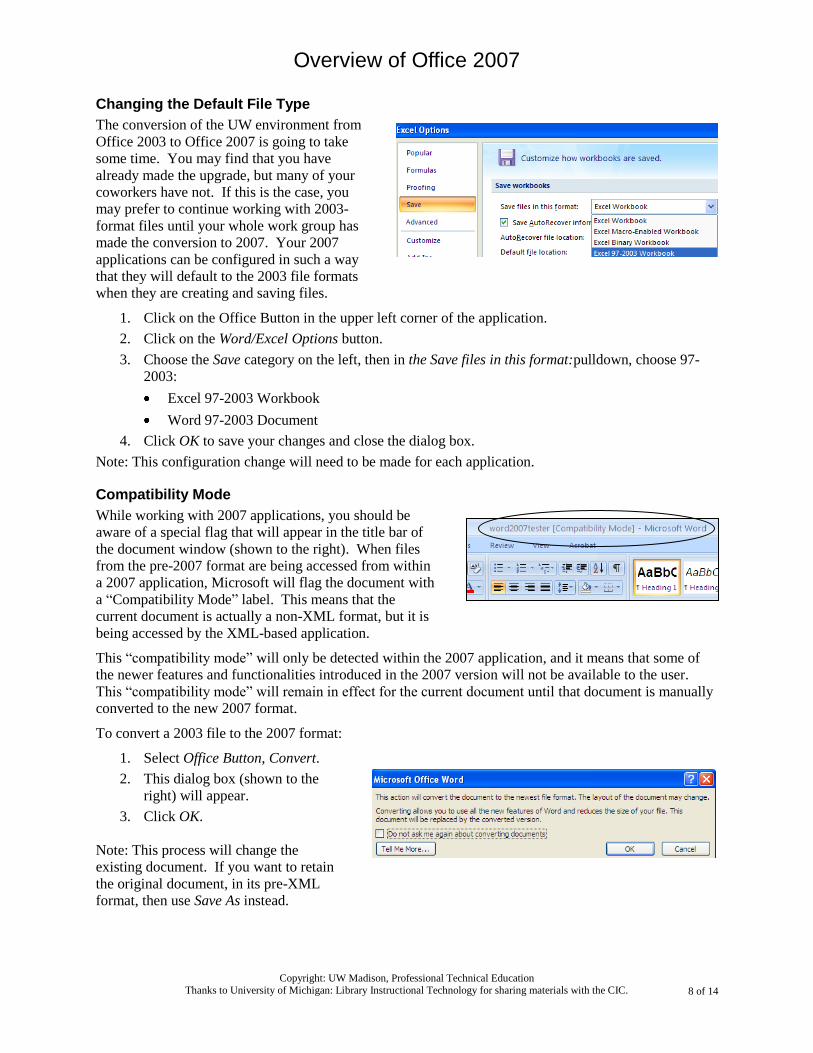
Changing the Default File Type
The conversion of the UW environment from
Office 2003 to Office 2007 is going to take
some time. You may find that you have
already made the upgrade, but many of your
coworkers have not. If this is the case, you
may prefer to continue working with 2003-
format files until your whole work group has
made the conversion to 2007. Your 2007
applications can be configured in such a way
that they will default to the 2003 file formats
when they are creating and saving files.
1. Click on the Office Button in the upper left corner of the application.
2. Click on the Word/Excel Options button.
3. Choose the Save category on the left, then in the Save files in this format:pulldown, choose 97-
2003:
Excel 97-2003 Workbook
Word 97-2003 Document
4. Click OK to save your changes and close the dialog box.
Note: This configuration change will need to be made for each application.
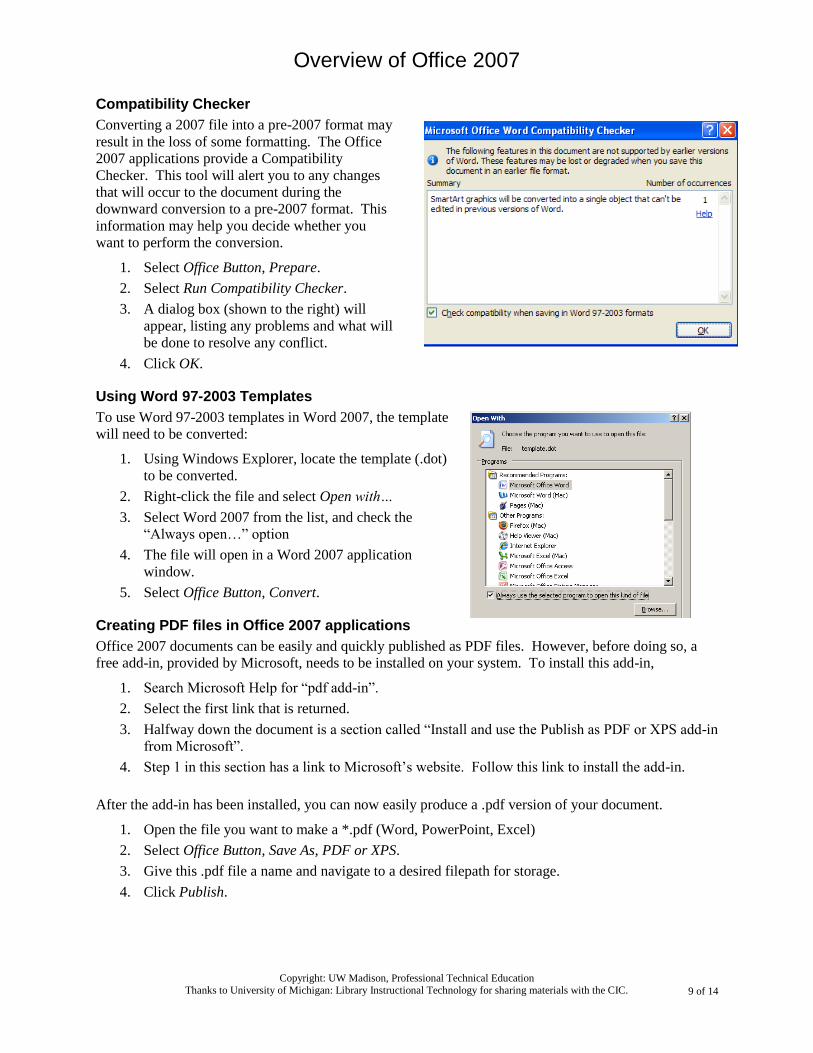
Compatibility Mode
While working with 2007 applications, you should be
aware of a special flag that will appear in the title bar of
the document window (shown to the right). When files
from the pre-2007 format are being accessed from within
a 2007 application, Microsoft will flag the document with
a “Compatibility Mode” label. This means that the
current document is actually a non-XML format, but it is
being accessed by the XML-based application.
This “compatibility mode” will only be detected within the 2007 application, and it means that some of
the newer features and functionalities introduced in the 2007 version will not be available to the user.
This “compatibility mode” will remain in effect for the current document until that document is manually
converted to the new 2007 format.
To convert a 2003 file to the 2007 format:
1. Select Office Button, Convert.
2. This dialog box (shown to the
right) will appear.
3. Click OK.
Note: This process will change the
existing document. If you want to retain
the original document, in its pre-XML
format, then use Save As instead.
Overview of Office 2007
9 of 14 9 of 14
Copyright: UW Madison, Professional Technical Education Thanks to University of Michigan: Library Instructional Technology for sharing materials with the CIC.
Compatibility Checker
Converting a 2007 file into a pre-2007 format may
result in the loss of some formatting. The Office
2007 applications provide a Compatibility
Checker. This tool will alert you to any changes
that will occur to the document during the
downward conversion to a pre-2007 format. This
information may help you decide whether you
want to perform the conversion.
1. Select Office Button, Prepare.
2. Select Run Compatibility Checker.
3. A dialog box (shown to the right) will
appear, listing any problems and what will
be done to resolve any conflict.
4. Click OK.
Using Word 97-2003 Templates
To use Word 97-2003 templates in Word 2007, the template
will need to be converted:
1. Using Windows Explorer, locate the template (.dot)
to be converted.
2. Right-click the file and select Open with…
3. Select Word 2007 from the list, and check the
“Always open…” option
4. The file will open in a Word 2007 application
window.
5. Select Office Button, Convert.
Creating PDF files in Office 2007 applications
Office 2007 documents can be easily and quickly published as PDF files. However, before doing so, a
free add-in, provided by Microsoft, needs to be installed on your system. To install this add-in,
1. Search Microsoft Help for “pdf add-in”.
2. Select the first link that is returned.
3. Halfway down the document is a section called “Install and use the Publish as PDF or XPS add-in
from Microsoft”.
4. Step 1 in this section has a link to Microsoft’s website. Follow this link to install the add-in.
After the add-in has been installed, you can now easily produce a .pdf version of your document.
1. Open the file you want to make a *.pdf (Word, PowerPoint, Excel)
2. Select Office Button, Save As, PDF or XPS.
3. Give this .pdf file a name and navigate to a desired filepath for storage.
4. Click Publish.
Overview of Office 2007
10 of 14 10 of 14
Copyright: UW Madison, Professional Technical Education Thanks to University of Michigan: Library Instructional Technology for sharing materials with the CIC.
A Few Tips for Word
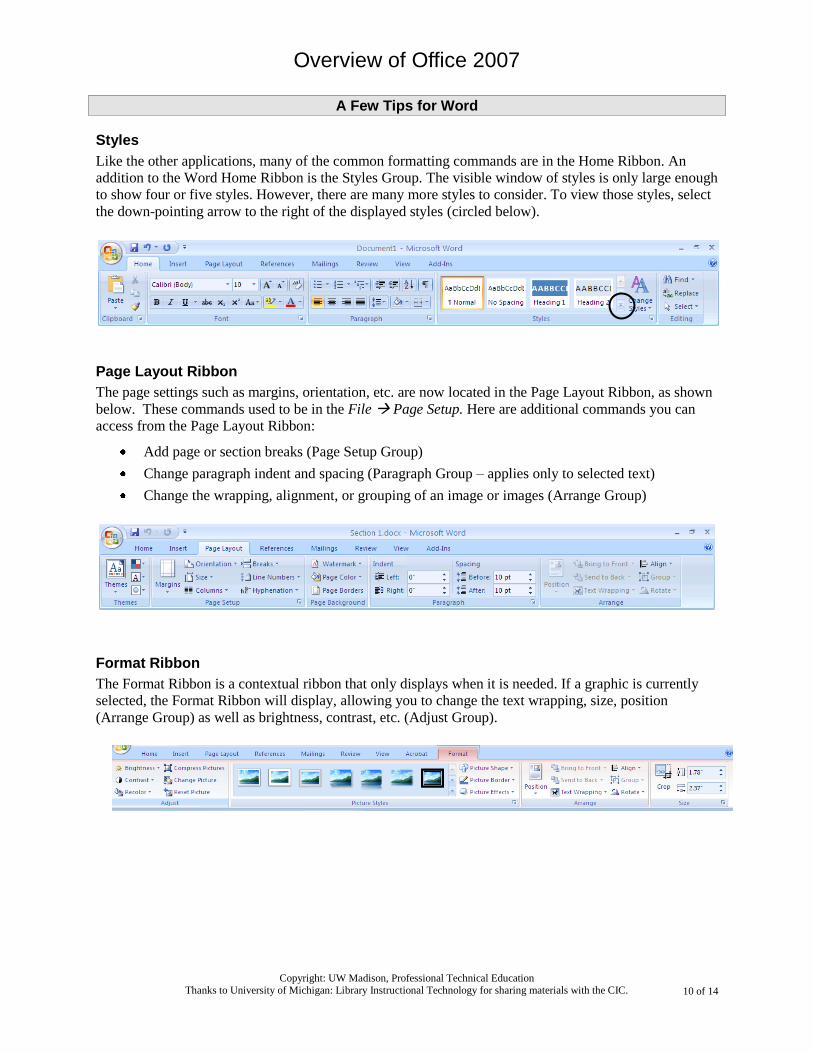
Styles
Like the other applications, many of the common formatting commands are in the Home Ribbon. An
addition to the Word Home Ribbon is the Styles Group. The visible window of styles is only large enough
to show four or five styles. However, there are many more styles to consider. To view those styles, select
the down-pointing arrow to the right of the displayed styles (circled below).
Page Layout Ribbon
The page settings such as margins, orientation, etc. are now located in the Page Layout Ribbon, as shown
below. These commands used to be in the File Page Setup. Here are additional commands you can
access from the Page Layout Ribbon:
Add page or section breaks (Page Setup Group)
Change paragraph indent and spacing (Paragraph Group – applies only to selected text)
Change the wrapping, alignment, or grouping of an image or images (Arrange Group)
Format Ribbon
The Format Ribbon is a contextual ribbon that only displays when it is needed. If a graphic is currently
selected, the Format Ribbon will display, allowing you to change the text wrapping, size, position
(Arrange Group) as well as brightness, contrast, etc. (Adjust Group).
Overview of Office 2007
11 of 14 11 of 14
Copyright: UW Madison, Professional Technical Education Thanks to University of Michigan: Library Instructional Technology for sharing materials with the CIC.
A Few Tips for Excel
Like the other applications, many of the common formatting commands are in the Home Ribbon. In
addition, as shown below, the Excel Home Ribbon also has the following:
Number Group: specify the format of the cell (such as currency, time, etc.)
Cells Group: insert, delete, or format individual cells, rows or columns
Editing Group: insert common formulas as well as sort, filter and find
Formula Ribbon
The Formula Ribbon is also new in this version. In one Ribbon you can see all the different categories of
formulas.
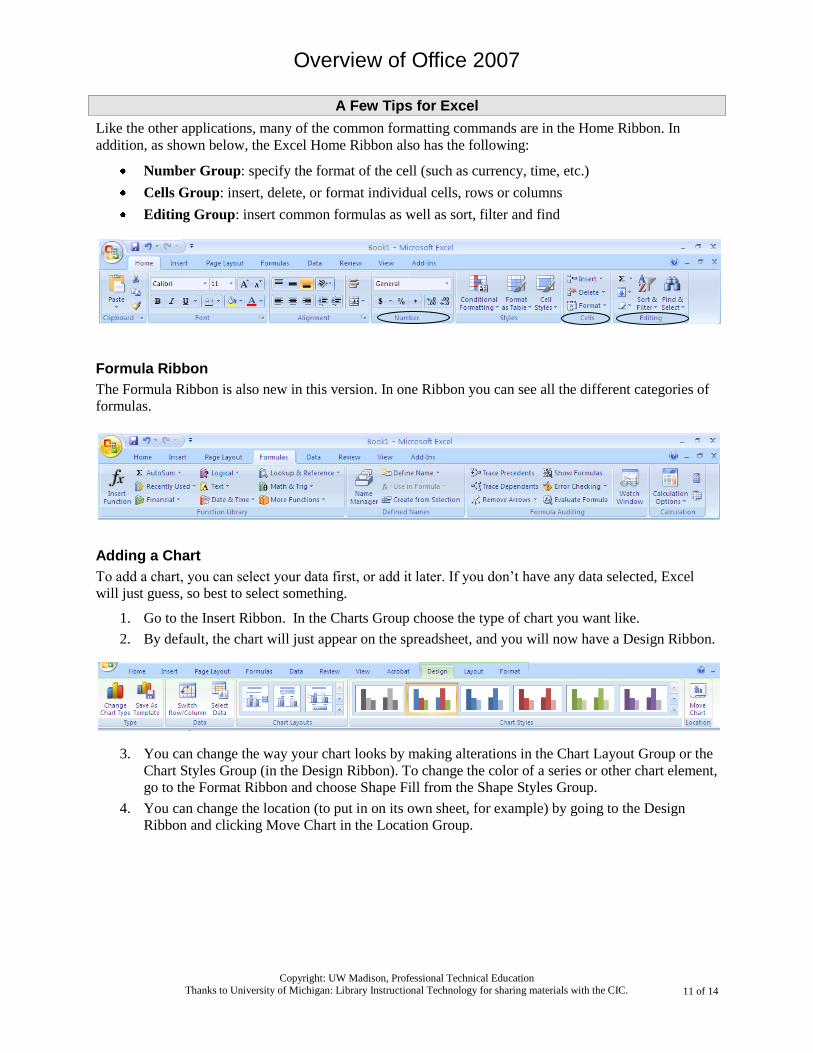
Adding a Chart
To add a chart, you can select your data first, or add it later. If you don’t have any data selected, Excel
will just guess, so best to select something.
1. Go to the Insert Ribbon. In the Charts Group choose the type of chart you want like.
2. By default, the chart will just appear on the spreadsheet, and you will now have a Design Ribbon.
3. You can change the way your chart looks by making alterations in the Chart Layout Group or the
Chart Styles Group (in the Design Ribbon). To change the color of a series or other chart element,
go to the Format Ribbon and choose Shape Fill from the Shape Styles Group.
4. You can change the location (to put in on its own sheet, for example) by going to the Design
Ribbon and clicking Move Chart in the Location Group.
Overview of Office 2007
12 of 14 12 of 14
Copyright: UW Madison, Professional Technical Education Thanks to University of Michigan: Library Instructional Technology for sharing materials with the CIC.
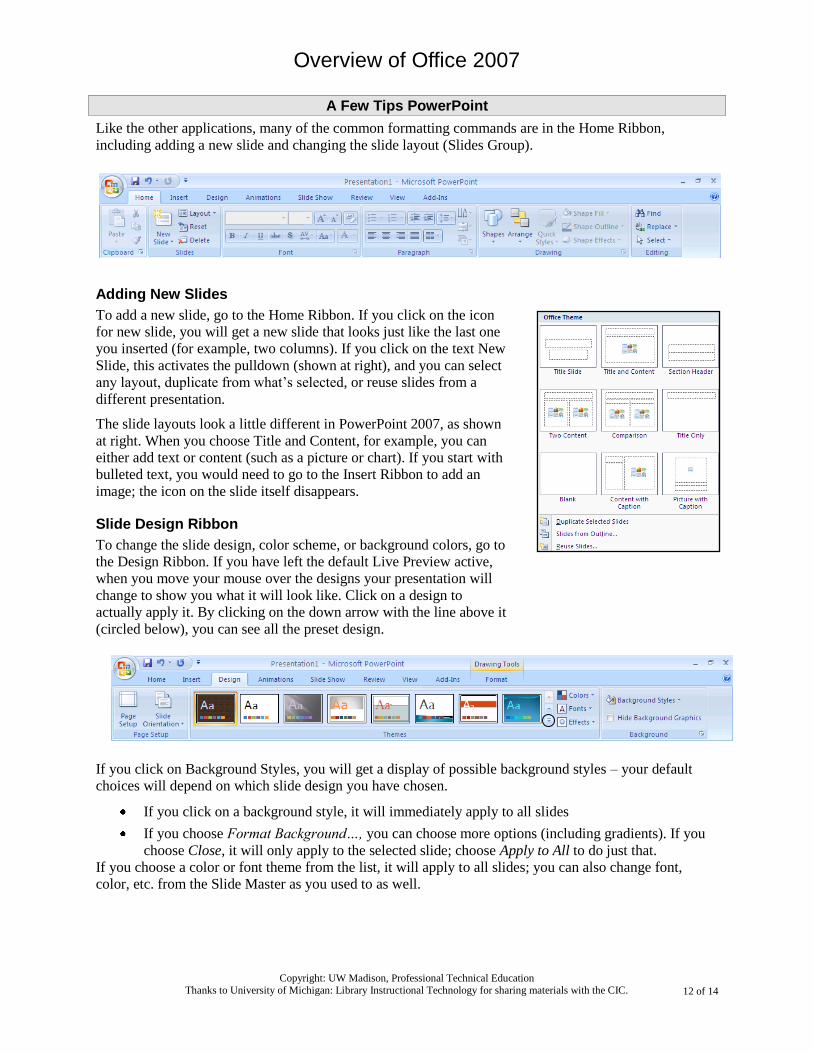
A Few Tips PowerPoint
Like the other applications, many of the common formatting commands are in the Home Ribbon,
including adding a new slide and changing the slide layout (Slides Group).
Adding New Slides
To add a new slide, go to the Home Ribbon. If you click on the icon
for new slide, you will get a new slide that looks just like the last one
you inserted (for example, two columns). If you click on the text New
Slide, this activates the pulldown (shown at right), and you can select
any layout, duplicate from what’s selected, or reuse slides from a
different presentation.
The slide layouts look a little different in PowerPoint 2007, as shown
at right. When you choose Title and Content, for example, you can
either add text or content (such as a picture or chart). If you start with
bulleted text, you would need to go to the Insert Ribbon to add an
image; the icon on the slide itself disappears.
Slide Design Ribbon
To change the slide design, color scheme, or background colors, go to
the Design Ribbon. If you have left the default Live Preview active,
when you move your mouse over the designs your presentation will
change to show you what it will look like. Click on a design to
actually apply it. By clicking on the down arrow with the line above it
(circled below), you can see all the preset design.
If you click on Background Styles, you will get a display of possible background styles – your default
choices will depend on which slide design you have chosen.
If you click on a background style, it will immediately apply to all slides
If you choose Format Background…, you can choose more options (including gradients). If you
choose Close, it will only apply to the selected slide; choose Apply to All to do just that.
If you choose a color or font theme from the list, it will apply to all slides; you can also change font,
color, etc. from the Slide Master as you used to as well.
Overview of Office 2007
13 of 14 13 of 14
Copyright: UW Madison, Professional Technical Education Thanks to University of Michigan: Library Instructional Technology for sharing materials with the CIC.
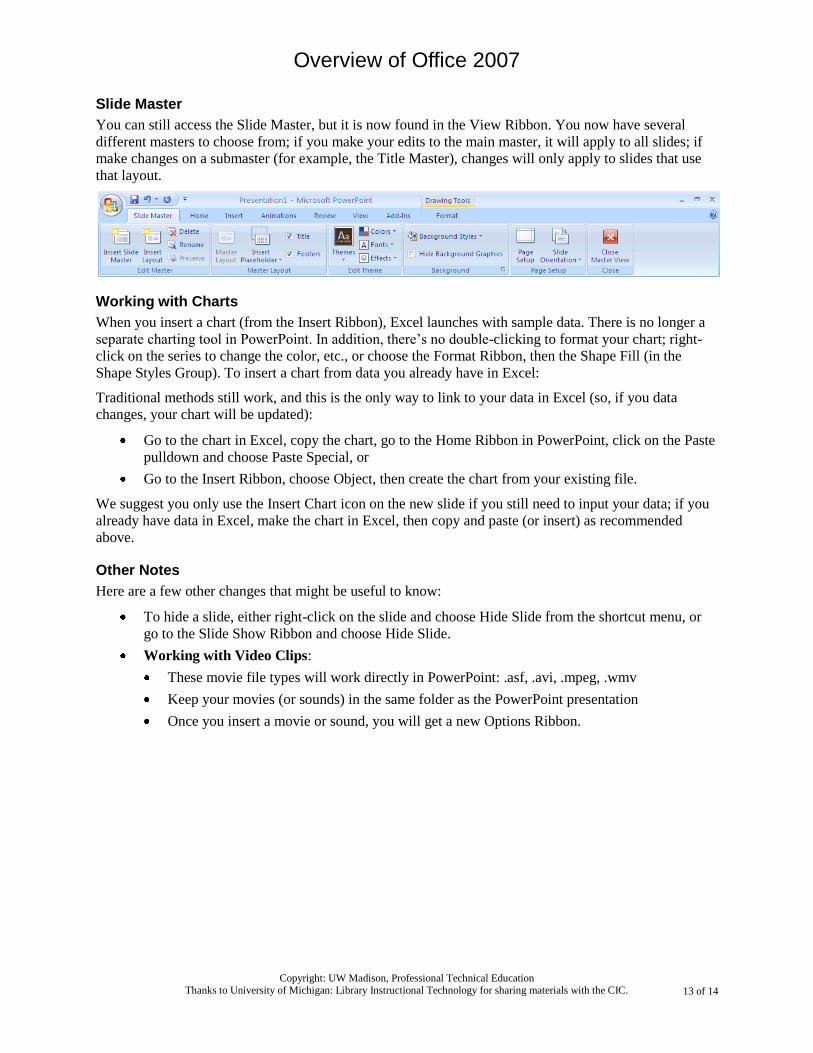
Slide Master
You can still access the Slide Master, but it is now found in the View Ribbon. You now have several
different masters to choose from; if you make your edits to the main master, it will apply to all slides; if
make changes on a submaster (for example, the Title Master), changes will only apply to slides that use
that layout.
Working with Charts
When you insert a chart (from the Insert Ribbon), Excel launches with sample data. There is no longer a
separate charting tool in PowerPoint. In addition, there’s no double-clicking to format your chart; right-
click on the series to change the color, etc., or choose the Format Ribbon, then the Shape Fill (in the
Shape Styles Group). To insert a chart from data you already have in Excel:
Traditional methods still work, and this is the only way to link to your data in Excel (so, if you data
changes, your chart will be updated):
Go to the chart in Excel, copy the chart, go to the Home Ribbon in PowerPoint, click on the Paste
pulldown and choose Paste Special, or
Go to the Insert Ribbon, choose Object, then create the chart from your existing file.
We suggest you only use the Insert Chart icon on the new slide if you still need to input your data; if you
already have data in Excel, make the chart in Excel, then copy and paste (or insert) as recommended
above.
Other Notes
Here are a few other changes that might be useful to know:
To hide a slide, either right-click on the slide and choose Hide Slide from the shortcut menu, or
go to the Slide Show Ribbon and choose Hide Slide.
Working with Video Clips:
These movie file types will work directly in PowerPoint: .asf, .avi, .mpeg, .wmv
Keep your movies (or sounds) in the same folder as the PowerPoint presentation
Once you insert a movie or sound, you will get a new Options Ribbon.
Overview of Office 2007
14 of 14 14 of 14
Copyright: UW Madison, Professional Technical Education Thanks to University of Michigan: Library Instructional Technology for sharing materials with the CIC.
Resources
General Microsoft Help
http://office.microsoft.com
Get Started with the 2007 Microsoft Office System:
http://office.microsoft.com/en-us/getstarted/FX101055081033.aspx
MS Office 2007 FAQ:
http://office.microsoft.com/en-us/products/HA101686561033.aspx
“Microsoft Office Compatibility Pack”, first hit
“Microsoft Office Save As PDF”, first hit
“Microsoft Business Contact Manager”, first hit
“Microsoft Business Contact Manager”, first hit
“Microsoft Business Contact Manager Product Guide”, first hit (2MB, 34 pgs)