Embed Size (px)
Citation preview
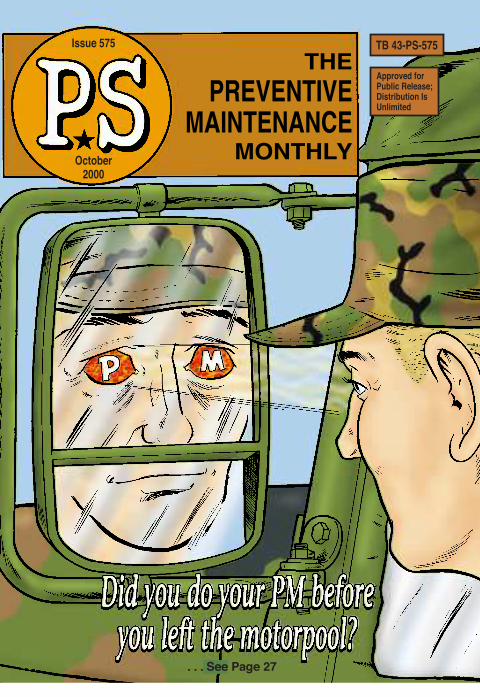
October2000
TB 43-PS-575Issue 575
Approved forPublic Release;Distribution IsUnlimited
no�wonder�it won't�start!
. . . See Page 27

ISSUE 575 OCTOBER 2000
PS, The Preventive Maintenance Monthly (ISSN 0475-2953) is published monthly by the Department of the Army, Redstone Arsenal,AL 35898-7466. Periodical Postage is paid at the Huntsville, AL post office and at additional mailing offices.Postmaster: Send address changes to PS, The Preventive Maintenance Monthly, LOGSA, Redstone Arsenal, AL 35898-7466.
Tractor-Trailers 2-4HMMWV Camo Covers, Doors 5Vehicle Taillight Lenses 5HEMTT Tires 6-7Adhesive Letters, Numbers Decals 8-10Antifreeze Test Kits 11
WHEELED VEHICLES 2
PS 575 1 OCT 00
MSE LOS, RAU Grounding 49MSE Battery 50-5115-,30-,60-KW Generator Oil Pressure 523-KW Generator Diesel Conversion Kits 53
COMMUNICATIONS 49
TOW 2 Missile Vehicular Mount 38-39
MISSILES 38
You are invited to send PS your ideas for improving maintenanceprocedures, questions on maintenance and supply problems,and questions or comments on material published in PS. Justwrite to:
MSG Half-MastThe Preventive Maintenance MonthlyLOGSA, Bldg. 5307Redstone Arsenal, AL 35898-7466
Or E-mail to:[email protected]
Internet Address:http://www.logsa.army.mil/psmag/pshome.html
M1-Series Tanks Ammo Door Screws 12M1-Series Tanks Sprockets, Bolts 13M2/M3-Series Bradleys NBC Systems 14-15MLRS Carrier Instrument Panel Ground 15MLRS Carrier Generator Pulleys 16M88A1 Recovery Vehicle Torsion Bars 17AVLB Torsion Bars, Bridge Rivets 17-19Combat Vehicle Ground Hopping 19G/VLLD 20-21
COMBAT VEHICLES 12
TB 43-PS-575, The Preventive Maintenance Monthly, is anofficial publication of the Department of the Army, providinginformation for all soldiers assigned to combat and combatsupport units and all soldiers with unit maintenance and supplyduties. All information published has been reviewed and ap-proved by the agency responsible for the equipment, publicationor policy discussed. Application of the information is optionalwith the user. Masculine pronouns may refer to both genders.
DLA On-Line Tracking System 57MWO Web Site 58Z-LINs 59Maintenance Excellence Award Winners 60
LOGISTICS MANAGEMENT 57
Data Transfer Cartridge Battery Contacts 35OH-58D Oil Filter Bowl Safety Wire Holes 36OH-58D Gun Buffer Repair 37Aircraft Cold Weather Publications 37
AVIATION 35
DEUCE Battery, Blade Switch 22SEE Fuel Prefilter Strainer 23SEE Transmission Shaft Water Damage 24D7G Tractor Winch Roller 24D7G Tractor Air Filter Indicator Painting 25130G Grader Battery Box 26M917A1 Dump Truck Wheel Rim 26
COMBAT ENGINEERING 22
M2 Machine Gun Timing, Headspacing 44-48
SMALL ARMS 44
JOEL B. HUDSONAdministrative Assistant to the Secretary of the Army
0021702
M40/M42 Mask PM 40-43
NBC 40
ime seems to rule our lives. Hurry up and wait. Wait and then hurry up.
Well, sure, some things—like PT tests—are supposed to be governed by
time.
But other things should not be governed by time. Maintenance, for example.
Maintenance is done when it’s done. It’s done when the right tools are used
in the right way with the right result.
That doesn’t mean you can’t work fast. It just means you have to work smart.
Follow the procedures in your TMs and the SOPs of your unit.
Students in the hurry-up school of maintenance have to learn phrases like:
Flammable Storage Containers 54-55GP Small Tent Pole Locking Pins 56Water, Petroleum Web Sites 56
SOLDIER SUPPORT 54
The hurry-up school of maintenance is what leads to a split ring putting a big
dent in somebody’s head. It leads to trucks breaking down during a mission, or
runaway .50-cal machine guns, or generator sets that won’t start.
Never cut corners. Don’t try to save time by ignoring safety or using the
wrong tool.
No amount of saved time can undo an injury or death.
“I didn’t have timeto get safety
goggles...”
“There was nobodyaround to be myground guide...”
“Sure, I shouldhave gotten
somebody to helpme lift it, but...”
By Order of the Secretary of the Army:
ERIC K. SHINSEKIGeneral, United States Army Chief of Staff
Official:
PS 575 3PS 575 2 OCT 00
Tractor-Trailer Rigs . . .
Brakes/Air SystemTo check the trailer’s brakes and air
system, you’ll need the tractor. Set thetrailer’s brakes with the tractor’s trailerbrake hand control. Move the tractorslightly ahead to make sure the brakeshold—then release them. Note: Makesure you completely release the brakes.
Eyeball the gladhands. Take a lookat their air lines for chafing, bendingor crimping.
Eyeball the air lines from the airtanks to the brake diaphragm. Makesure there are no cut or pinched lines.
eavy haulers need heavy doses ofpreventive maintenance, especially intimes of heavy use. Tractors generallyget the big end of maintenance, ’causeif they can’t pull, the load doesn’t go!
However, if the trailer’s not main-tained just as well, what’s that tractorgot to pull? Zip, zero, zilch!
Here are several tractor-trailer PMtips that’ll come in handy for keepingyour rig on the road and haulin’:
Frame/SuspensionFor the tractor to pull any trailer, the
fifth wheel’s got to be in good PMcondition. A light coat of GAA is allthat’s needed on the fifth wheel baseplate and approach plate. Lube them
Fifth wheel
according to the vehicle’s LO, usuallyevery 1,000 miles or monthly. A 1/4-incoating will do.
Too much lube attracts dirt and crudand can damage the fifth wheel or thetrailer’s kingpin.
On trailers, lookfor cracks around
welds, bolts andrivets at these sites:
Crossmembers,tiedown points,side rails, upper
coupler, subframeand rear bumper.
Get under the trailerand eyeball the
springs for cracksor breaks. Kick the
U-bolts to see ifthey’re loose. Takea look at the axles
for bending oralignment problems.
yee haw!!
sing�it purt y,�
willie!
H
If the brakes remain on the least bit,they’ll heat up and maybe catch fire.
Lightly coat with GAA
Springs
Broken springs? Loose U-boltsor hardware? Axles bent or
out-of-alignment?
Brakes
Test trailer brakes with hand control
Air lines
Eyeball air lines at brake diaphragms forbent or pinched lines
Gladhands / hoses
Test trailer brakes with hand control
PS 575 5 OCT 00
he HMMWV parts TM is real good for infoon tan and green vinyl covers and doors for thecab and cargo areas, but it’s real short on info onwoodland camouflage covers and doors.
That’ll be changed with the next revision tothe TMs, but until then, use this info to keepeverything under cover:
HMMWVs . . .
Item NSN2-man crew soft-top kit 2540-01-434-86002-man crew soft top only 2540-01-450-40174-man crew soft-top kit 2540-01-434-85984-man crew soft top only 2540-01-450-4019Cargo area soft-top kit 2540-01-434-8599Cargo area soft top only 2540-01-450-4024Troop area soft-top kit 2540-01-434-8602Troop area soft top only 2540-01-450-40154-man crew curtainassembly 254001-450-5477Front door, left hand 2510-01-450-5480Front door, right hand 2510-01-450-5479Rear door, left hand 2510-01-450-5483Rear door, right hand 2510-01-450-5482
Wheeled Vehicles . . .
Match Lenses to BodiesA few mechanics have found out the hard way that you can’t use a plastic andaluminum taillight lens on a plastic taillight body. Neither can you use an all-plastic lens on a metal taillight body. The lens assemblies are interchangeable,but the parts are not.
So use NSN 6220-00-179-4324 to get a plastic and aluminum lens. It carriespart number 11639535. Use NSN 6220-01-359-2870 to get an all-plastic lens. Itcarries part number 12375841.
Eyeball the wheel rims for dented orbent rim flanges.
the tire, report it. Also, eyeball the hub’soil level. Make sure it’s up to the mark.
Lights/ReflectorsWalk around the trailer and look at
the taillights, clearance lights and re-flectors. Lenses should be clean andundamaged.
Make sure the trailer’s lights work.If they don’t, let your mechanic knowabout it.
Eyeball the space between dual tires.Remove any rocks wedged betweenthem.
Tires/WheelsTires and wheels on trailers take
a beating from highway and cross-country travel.
Always make sure the tires are in-flated to -10 TM levels. Overinflatedor underinflated tires wear out early.
Wheel nuts can loosen by themselvesfrom vibration, so take a look at thenuts on every wheel. Look for chippedpaint, shiny spots or rust flakes arounda nut. That’s a clue to loose fasteners.
Axle covers on M870-series trailersare born leakers. When covers leakenough oil, axle bearings go dry andburn out. If you see oil dripping down
Anything�you find that�
you can’t fix, let�your mechanic�
know.
PS 575 4
i'm short on�cargo covers, kits�
and doors. use�this chart. . .
Lights /reflectors
Burned out, missing, broken or cloudy?
Lug nuts
Axle covers
Oil dripping down tire?
Wheels
Tires
Lug nuts or rim clamps missingor loose?
Rocks or debris wedged in between?
Rims dented? Flanges bent?
PS 575 7 OCT 00PS 575 6 OCT 00
hree different tires are approvedfor use on HEMTT vehicles. Two ofthem work well with each other, butthe other one is a loner. Here are thedetails:
When you order a replacement tireusing NSN 2610-01-126-1576 from
HEMTT . . .
Note that the XZL is used on theM1070 heavy equipment transporterand the M1074/M1075 palletized load-ing system tractor. Just because theXZL can be used on the HEMTT doesnot mean that the XL or AT2A can be
used on the HET or PLS. They cannot!The XL is not large enough for eithervehicle, and the AT2A did not pass theuse test for either truck.
All three tires have non-directionaltread, so it does not matter how theyare mounted on the wheels. The treadcan point forward or backward, eventhough the XL tread appears to be di-rectional.
Some or all of these tires may rubagainst the HEMTT’s front axle equal-izer beam during a hard left or hardright turn. Eyeball the beam for evi-dence of rubbing. There must be atleast 1 inch of clearance between thetread and the beam when the wheel isturned as far as possible to the left andright.
If you find evidence of rubbing, re-port it. Your DS shop must adjust thesteering stop bolts to the correct clear-ance. The adjustment information isfound in TM 9-2320-279-34-2. DSshould note that TACOM has increasedthe clearance from 3/4 inch to 1 inchsince the TM was printed.
TM 9-2320-279-24P, you get either aMichelin XL (16.00R20, load range J)or a Goodyear AT2A (16.00R20, loadrange M).
Both tires can be used on the sametruck without damage to the tires orthe truck. It’s a common practice touse all the same tires on a single axle,but it is not necessary. Both tires weretested together and are compatible onthe same axle.
Here’s the word from Para 2-7 ofTM 9-2610-200-14, Care, Mainte-nance, Repair, and Inspection of Pneu-matic Tires and Inner Tubes: “Minorvariations of tread designs, as encoun-tered from one manufacturer to another,may be used providing the sizes andtire constructions (bias or radial) arecompatible.”
There is another NSN shown in theHEMTT parts TM: NSN 2610-01-334-2694. This tire, a Michelin XZL(16.00R20, load range M), can be usedon the truck only in a full set of eighttires. It cannot be mixed with the othertires, however, because its tread is notcompatible.
GoodyearAT2A radial
MichelinXL radial Michelin
XZL radial
Check for tire rub on equilizer bar
➤
➤
we're�compatible with�
each other!
but you're�not compatible�
with us!
i'm used�on the het�
and pls, and�you can't�
be!
➤
➤
PS 575 7 OCT 00PS 575 6 OCT 00
9PS 575 8
Adhesive Decals . . .
Painting�names and�ranks on�
the windows�of your�tactical�vehicles�is a real�
pain—�especially�when it’s�time to�remove�
’em.
�End that�
problem by�using pressure-�sensitive decals�on the windows�
instead of�paint.
The decals�come in black and�
white and most are�available in�
packages of 10�or 20.�
�
*A limited supply ofthese decals are
still in stock. Onceexhausted, they will
no longer beavailable.
Lusterless White Letters: NSN 7690-00-Letter 1-in 11/2-in 2-in 3-in 4-in
A 857-9664 857-9615 858-3367 310-9617 329-0212B 857-9665 857-9616 858-3368 310-9619 329-0215C 857-9666 857-9617 858-3369 310-9632 329-0216D 857-9667 857-9618 858-3370 310-9750 329-0217*E 857-9668 857-9619 858-3371 310-9751 329-0218F 857-9669 857-9620 858-3372* 311-0639 329-0219*G 857-9670 857-9621 858-3373 311-2088 329-0220H 857-9671 857-9622 858-3374 311-2365 329-0221I 857-9672 857-9623 858-3375 311-2368 329-0222J 857-9673 857-9624 858-3376 311-3249 329-0226K 857-9674 857-9625 858-3377 311-3593 329-0228L 857-9675 857-9626 858-3378 311-3937 329-0231M 857-9676 857-9627 858-3379 311-5760 329-0232N 857-9677 857-9628 858-3380 311-5768 329-0236*O 857-9678 857-9629 858-3381 311-6923 329-0239P 857-9679 857-9630 858-3382 311-6929 329-0243Q 857-9680 857-9631 858-3383 311-6941 329-0252*R 857-9681 857-9632 858-3384 311-6954 329-0257S 857-9682 857-9633 858-3385 311-6955 329-0262T 857-9683 857-9634 858-3386 311-6956 329-0265U 022-9764 857-9635 858-3387 311-6964 329-0309V 857-9684 857-9636 858-3388 311-6966 329-0311*W 857-9685 857-9637 858-3389 311-6973 329-0346X 857-9686 857-9638 858-3390 311-6981 329-0353Y 857-9687 857-9639 858-3391 311-6992 329-0363Z 022-9768 857-9640 858-3392 311-6995 329-0364
Lusterless White Numerals: NSN 7690-00-Number 1-in 11/2-in 2-in 3-in 4-in
1 857-9688 857-9641 858-3393 311-7002 329-03652 857-9689 857-9642 858-3394 311-7032 329-03713 857-9690 857-9643 858-3395 311-7088 329-03964 857-9691 857-9644 858-3396 311-7089 329-03975 857-9692 857-9645 858-3397 311-7128 329-04006 857-9693 857-9646 858-3398 311-7140 329-04037 857-9694 857-9647 858-3399 311-7148 329-04428 857-9695 857-9648 858-3400 311-7149 329-04439 857-9696 857-9649 858-3401 311-7164 329-04450 857-9697 310-6605 858-3402 311-6923 329-0456
Lusterless Black Numerals: NSN 7690-01-Number 1-in 11/2-in 2-in 3-in 4-in
1 030-8556 031-4673 032-0728 031-9559 032-45952 030-8557 031-4674 032-0729 031-9560 032-45963 030-8558 031-4675 032-2421 031-9561 032-45974 030-8559 031-4676 032-2422 031-9562 032-45985 030-8560 031-4677 032-1401 031-9563 032-45996 030-8561 031-5534 032-2423 031-9564 032-4600*7 030-8562 031-4678 032-2424 031-9565 032-46018 030-8563 031-4679 032-2425 031-9566 032-24529 030-8561 031-4680 032-0730 031-9567 032-24530 030-8545 031-4681 032-0731 031-9568 032-2454
PS 575 11 OCT 00PS 575 10
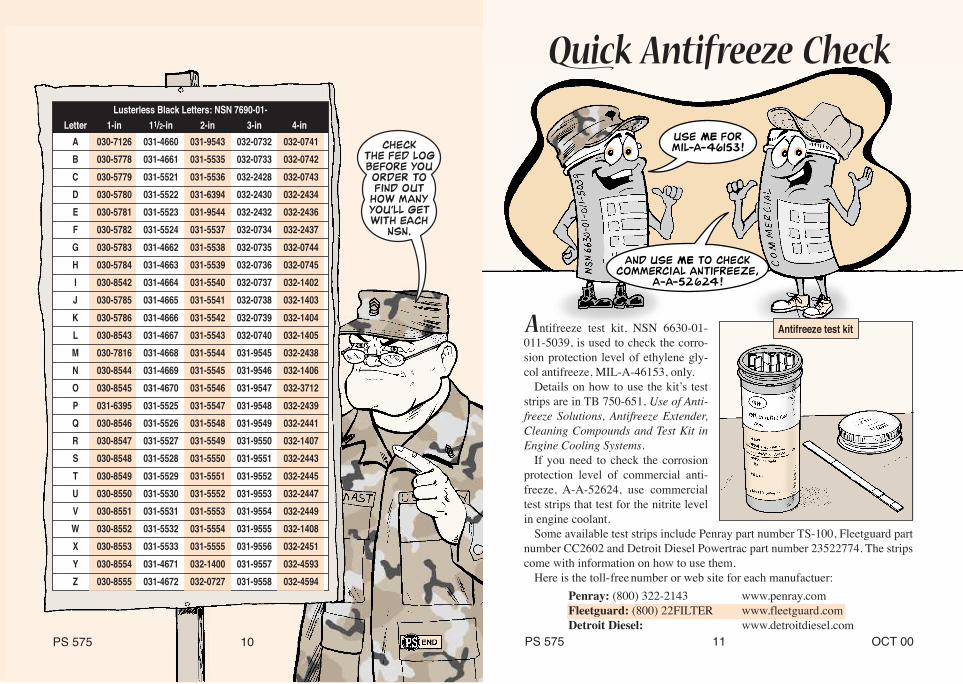
Antifreeze test kitntifreeze test kit, NSN 6630-01-011-5039, is used to check the corro-sion protection level of ethylene gly-col antifreeze, MIL-A-46153, only.
Details on how to use the kit’s teststrips are in TB 750-651, Use of Anti-freeze Solutions, Antifreeze Extender,Cleaning Compounds and Test Kit inEngine Cooling Systems.
If you need to check the corrosionprotection level of commercial anti-freeze, A-A-52624, use commercialtest strips that test for the nitrite levelin engine coolant.
Some available test strips include Penray part number TS-100, Fleetguard partnumber CC2602 and Detroit Diesel Powertrac part number 23522774. The stripscome with information on how to use them.
Here is the toll-freenumber or web site for each manufactuer: Penray: (800) 322-2143 www.penray.com Fleetguard: (800) 22FILTER www.fleetguard.com Detroit Diesel: www.detroitdiesel.com
use me for�mil-a-46153!
and use me to check�commercial antifreeze,�
a-a-52624!
Lusterless Black Letters: NSN 7690-01-Letter 1-in 11/2-in 2-in 3-in 4-in
A 030-7126 031-4660 031-9543 032-0732 032-0741B 030-5778 031-4661 031-5535 032-0733 032-0742C 030-5779 031-5521 031-5536 032-2428 032-0743D 030-5780 031-5522 031-6394 032-2430 032-2434E 030-5781 031-5523 031-9544 032-2432 032-2436F 030-5782 031-5524 031-5537 032-0734 032-2437G 030-5783 031-4662 031-5538 032-0735 032-0744H 030-5784 031-4663 031-5539 032-0736 032-0745I 030-8542 031-4664 031-5540 032-0737 032-1402J 030-5785 031-4665 031-5541 032-0738 032-1403K 030-5786 031-4666 031-5542 032-0739 032-1404L 030-8543 031-4667 031-5543 032-0740 032-1405M 030-7816 031-4668 031-5544 031-9545 032-2438N 030-8544 031-4669 031-5545 031-9546 032-1406O 030-8545 031-4670 031-5546 031-9547 032-3712P 031-6395 031-5525 031-5547 031-9548 032-2439Q 030-8546 031-5526 031-5548 031-9549 032-2441R 030-8547 031-5527 031-5549 031-9550 032-1407S 030-8548 031-5528 031-5550 031-9551 032-2443T 030-8549 031-5529 031-5551 031-9552 032-2445U 030-8550 031-5530 031-5552 031-9553 032-2447V 030-8551 031-5531 031-5553 031-9554 032-2449W 030-8552 031-5532 031-5554 031-9555 032-1408X 030-8553 031-5533 031-5555 031-9556 032-2451Y 030-8554 031-4671 032-1400 031-9557 032-4593Z 030-8555 031-4672 032-0727 031-9558 032-4594
check�the FED LOG�before you�order to�find out�
how many�you’ll get�with each�
NSN.��
�
PS 575 12 OCT 00
Dear Half-Mast,
We try to take good care of the track and suspension systems on ourM1-series tanks. That includes the annual reversal of sprockets to preventuneven wear and lengthen sprocket life.
Even though we’re careful to properlyre-torque all the bolts when reversingthe sprockets, we inevitably run intotrouble a few hundred miles later. Onmost of our tanks, the sprocketmounting bolts start coming looseor shear off entirely.
Any idea what we’re doing wrong?
SSG K.W.D.
M1-Series Tanks . . .
Dear Sergeant K.W.D.,Your problem is likely caused by dirt getting between the bearing surfaces of the
bolt and sprocket. It is very important that these two surfaces be clean before youtighten the bolt.
It’s also a good idea to lubricate the threads and bearing faces before tighteningthe bolt. Either lubricating oil, NSN 9150-00-231-2361, or WTA grease, NSN9150-01-262-3358, is ok, but WTA is best.
M1-Series Tanks . . .
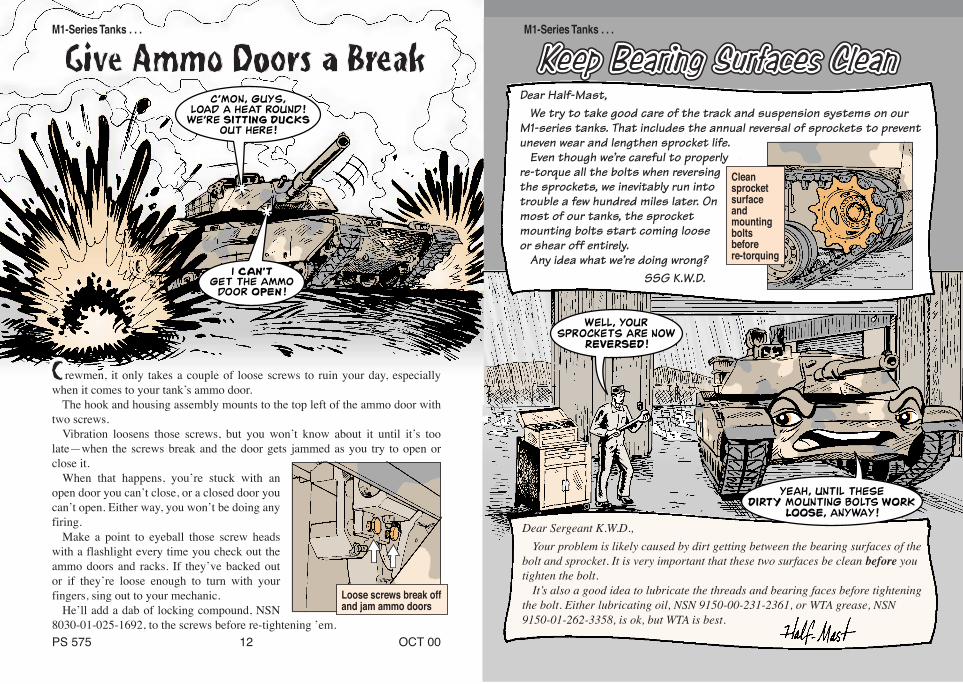
Loose screws break offand jam ammo doors
c'mon, guys,�load a heat round!�
we're sitting ducks�out here!
i can't�get the ammo�
door open!
rewmen, it only takes a couple of loose screws to ruin your day, especiallywhen it comes to your tank’s ammo door.
The hook and housing assembly mounts to the top left of the ammo door withtwo screws.
Vibration loosens those screws, but you won’t know about it until it’s toolate—when the screws break and the door gets jammed as you try to open orclose it.
When that happens, you’re stuck with anopen door you can’t close, or a closed door youcan’t open. Either way, you won’t be doing anyfiring.
Make a point to eyeball those screw headswith a flashlight every time you check out theammo doors and racks. If they’ve backed outor if they’re loose enough to turn with yourfingers, sing out to your mechanic.
He’ll add a dab of locking compound, NSN8030-01-025-1692, to the screws before re-tightening ’em.
Cleansprocketsurfaceandmountingboltsbeforere-torquing
well, your�sprockets are now�
reversed!
yeah, until these�dirty mounting bolts work�
loose, anyway!
PS 57514 OCT 00
MLRS Carrier . . .
Check the GroundDrivers, sudden electrical problems with the instrument
panel on your MLRS might be caused by a bad ground.Vibration can loosen the ground on the instrument
panel’s utility outlet. When that happens, gaugesand lights on the panel stop working.
Call in your mechanic to clean and tightenthe utility outlet ground.
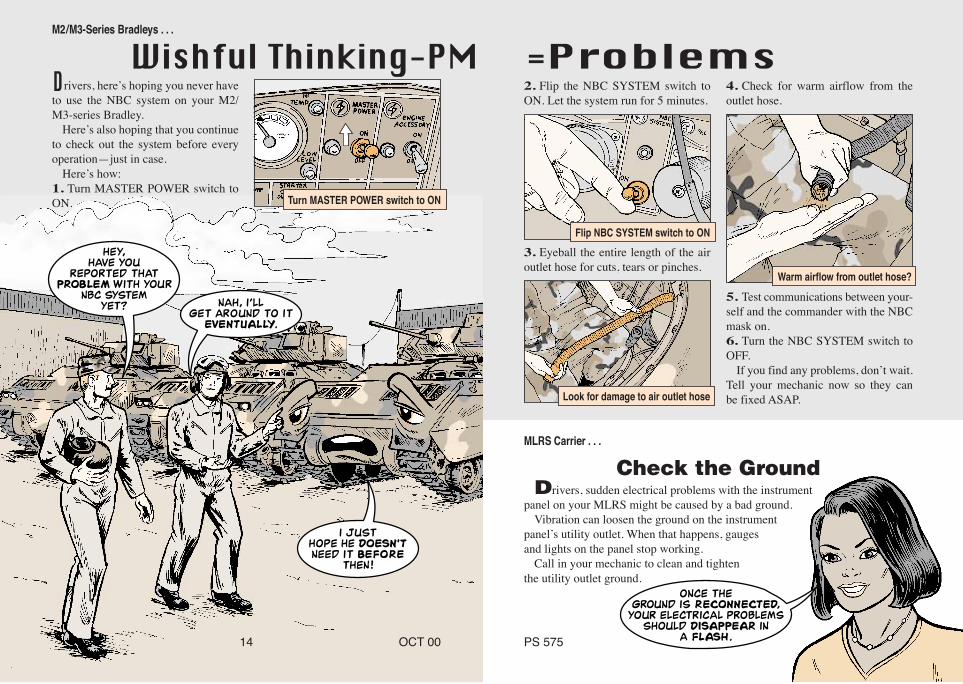
rivers, here’s hoping you never haveto use the NBC system on your M2/M3-series Bradley.
Here’s also hoping that you continueto check out the system before everyoperation—just in case.
Here’s how:1. Turn MASTER POWER switch toON.
M2/M3-Series Bradleys . . .
5. Test communications between your-self and the commander with the NBCmask on.6. Turn the NBC SYSTEM switch toOFF.
If you find any problems, don’t wait.Tell your mechanic now so they canbe fixed ASAP.
4. Check for warm airflow from theoutlet hose.
Warm airflow from outlet hose?
3. Eyeball the entire length of the airoutlet hose for cuts, tears or pinches.
Look for damage to air outlet hose
2. Flip the NBC SYSTEM switch toON. Let the system run for 5 minutes.
Flip NBC SYSTEM switch to ON
Turn MASTER POWER switch to ON
hey,�have you�
reported that�problem with your�
nbc system�yet? nah, i'll�
get around to it�eventually.
i just�hope he doesn't�need it before�
then!
once the�ground is reconnected,�
your electrical problems�should disappear in�
a flash.14 OCT 00
PS 575 17 OCT 00PS 575 16 OCT 00
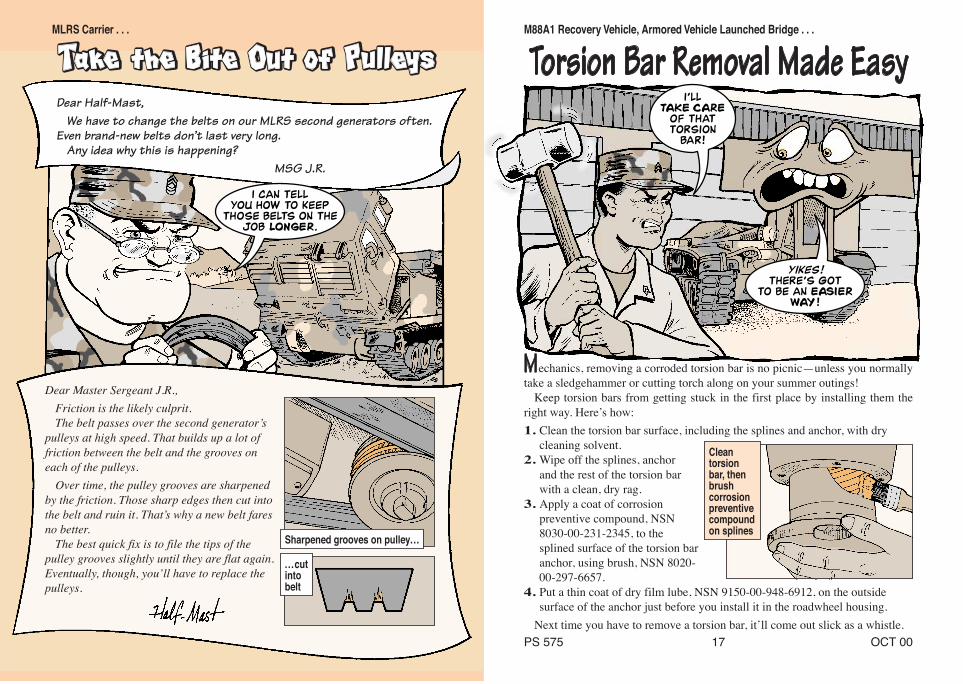
echanics, removing a corroded torsion bar is no picnic—unless you normallytake a sledgehammer or cutting torch along on your summer outings!
Keep torsion bars from getting stuck in the first place by installing them theright way. Here’s how:1. Clean the torsion bar surface, including the splines and anchor, with dry
cleaning solvent.2. Wipe off the splines, anchor
and the rest of the torsion barwith a clean, dry rag.
3. Apply a coat of corrosionpreventive compound, NSN8030-00-231-2345, to thesplined surface of the torsion baranchor, using brush, NSN 8020-00-297-6657.
4. Put a thin coat of dry film lube, NSN 9150-00-948-6912, on the outsidesurface of the anchor just before you install it in the roadwheel housing.
Next time you have to remove a torsion bar, it’ll come out slick as a whistle.
Dear Half-Mast,
We have to change the belts on our MLRS second generators often.Even brand-new belts don’t last very long.
Any idea why this is happening?
MSG J.R.
M88A1 Recovery Vehicle, Armored Vehicle Launched Bridge . . .MLRS Carrier . . .
Dear Master Sergeant J.R.,Friction is the likely culprit.The belt passes over the second generator’s
pulleys at high speed. That builds up a lot offriction between the belt and the grooves oneach of the pulleys.
Over time, the pulley grooves are sharpenedby the friction. Those sharp edges then cut intothe belt and ruin it. That’s why a new belt faresno better.
The best quick fix is to file the tips of thepulley grooves slightly until they are flat again.Eventually, though, you’ll have to replace thepulleys.
...cutintobelt
Sharpened grooves on pulley...
Cleantorsionbar, thenbrushcorrosionpreventivecompoundon splines
i can tell�you how to keep�
those belts on the�job longer.
i'll�take care�
of that�torsion�
bar!
yikes!�there's got�
to be an easier�way!
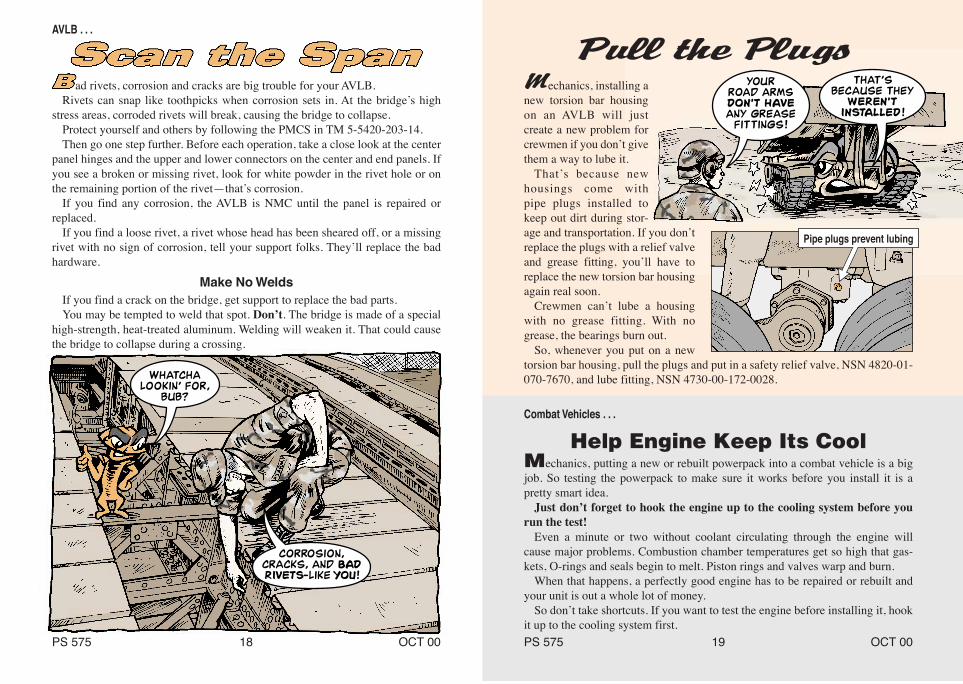
echanics, installing anew torsion bar housingon an AVLB will justcreate a new problem forcrewmen if you don’t givethem a way to lube it.
That’s because newhousings come withpipe plugs installed tokeep out dirt during stor-age and transportation. If you don’treplace the plugs with a relief valveand grease fitting, you’ll have toreplace the new torsion bar housingagain real soon.
Crewmen can’t lube a housingwith no grease fitting. With nogrease, the bearings burn out.
So, whenever you put on a newtorsion bar housing, pull the plugs and put in a safety relief valve, NSN 4820-01-070-7670, and lube fitting, NSN 4730-00-172-0028.
Combat Vehicles . . .
Help Engine Keep Its CoolMechanics, putting a new or rebuilt powerpack into a combat vehicle is a bigjob. So testing the powerpack to make sure it works before you install it is apretty smart idea.
Just don’t forget to hook the engine up to the cooling system before yourun the test!
Even a minute or two without coolant circulating through the engine willcause major problems. Combustion chamber temperatures get so high that gas-kets, O-rings and seals begin to melt. Piston rings and valves warp and burn.
When that happens, a perfectly good engine has to be repaired or rebuilt andyour unit is out a whole lot of money.
So don’t take shortcuts. If you want to test the engine before installing it, hookit up to the cooling system first.
AVLB . . .
whatcha�lookin' for,�
bub?
corrosion,�cracks, and bad�rivets-like you!
ad rivets, corrosion and cracks are big trouble for your AVLB.Rivets can snap like toothpicks when corrosion sets in. At the bridge’s high
stress areas, corroded rivets will break, causing the bridge to collapse.Protect yourself and others by following the PMCS in TM 5-5420-203-14.Then go one step further. Before each operation, take a close look at the center
panel hinges and the upper and lower connectors on the center and end panels. Ifyou see a broken or missing rivet, look for white powder in the rivet hole or onthe remaining portion of the rivet—that’s corrosion.
If you find any corrosion, the AVLB is NMC until the panel is repaired orreplaced.
If you find a loose rivet, a rivet whose head has been sheared off, or a missingrivet with no sign of corrosion, tell your support folks. They’ll replace the badhardware.
Make No WeldsIf you find a crack on the bridge, get support to replace the bad parts.You may be tempted to weld that spot. Don’t. The bridge is made of a special
high-strength, heat-treated aluminum. Welding will weaken it. That could causethe bridge to collapse during a crossing.
your�road arms�don't have�any grease�
fittings!
that's�because they�
weren't�installed!
Pipe plugs prevent lubing
PS 575 19 OCT 00PS 575 18 OCT 00
PS 575 21 OCT 00PS 575 20 OCT 00
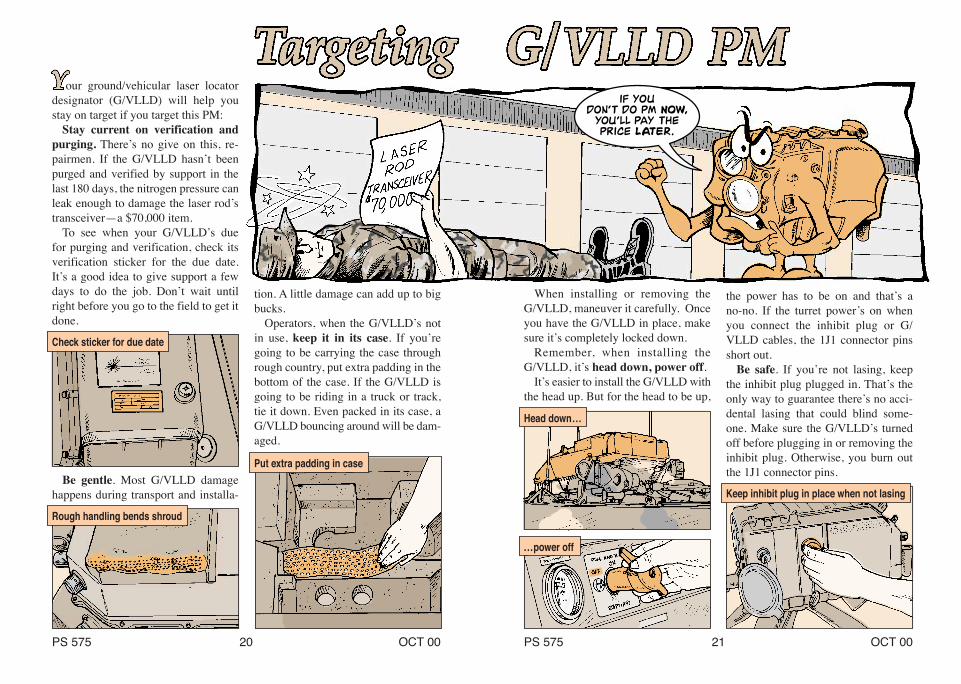
the power has to be on and that’s ano-no. If the turret power’s on whenyou connect the inhibit plug or G/VLLD cables, the 1J1 connector pinsshort out.
Be safe. If you’re not lasing, keepthe inhibit plug plugged in. That’s theonly way to guarantee there’s no acci-dental lasing that could blind some-one. Make sure the G/VLLD’s turnedoff before plugging in or removing theinhibit plug. Otherwise, you burn outthe 1J1 connector pins.
Keep inhibit plug in place when not lasing
Head down...
...power off
When installing or removing theG/VLLD, maneuver it carefully. Onceyou have the G/VLLD in place, makesure it’s completely locked down.
Remember, when installing theG/VLLD, it’s head down, power off.
It’s easier to install the G/VLLD withthe head up. But for the head to be up,
tion. A little damage can add up to bigbucks.
Operators, when the G/VLLD’s notin use, keep it in its case. If you’regoing to be carrying the case throughrough country, put extra padding in thebottom of the case. If the G/VLLD isgoing to be riding in a truck or track,tie it down. Even packed in its case, aG/VLLD bouncing around will be dam-aged.
Be gentle. Most G/VLLD damagehappens during transport and installa-
Check sticker for due date
Rough handling bends shroud
Put extra padding in case
if you�don't do pm now,�
you'll pay the�price later.
our ground/vehicular laser locatordesignator (G/VLLD) will help youstay on target if you target this PM:
Stay current on verification andpurging. There’s no give on this, re-pairmen. If the G/VLLD hasn’t beenpurged and verified by support in thelast 180 days, the nitrogen pressure canleak enough to damage the laser rod’stransceiver—a $70,000 item.
To see when your G/VLLD’s duefor purging and verification, check itsverification sticker for the due date.It’s a good idea to give support a fewdays to do the job. Don’t wait untilright before you go to the field to get itdone.
perating in rough terrain causes wearand tear on your DEUCE. But if youmake quick checks every day, you’llstay on the move.
Battery ClampBouncing around in the rough stuff
loosens battery clamps. A loose con-nection keeps your battery from re-charging and your dozer from starting.
So play it safe. Before each day’soperation, gently test the tightness ofthe battery clamps. Using your thumband two fingers, try to move cable-to-clamp connections.
Deployable Universal Combat Earthmover . . . SEE . . .
3. Use clean rag to wipeany crud out of bowl
...then loosen wing nutand push clip aside
Blade Switch Brush-OffBulldozing through heavy brush can
damage the blade down limit switchthat’s mounted below the cab door.Limbs disconnect the switch or tear itoff the vehicle’s frame.
Without the switch, the DEUCE can’trun in the EARTH-MOVING mode.Then your construction operationscome to a halt.
So eyeball the switch to make sureit’s in place and not damaged or dis-connected. Call in your mechanic ifit’s damaged or dangling.
Then make sure the battery indicatorand ammeter gauge are in theCHARGE range before you go.
make these�checks every day to�
keep me moving!
why�no go?
i'm dying�'cause you forgot�to clean my fuel�
strainer!
4. Wash the strainer in clean dieselfuel.5. Screw the strainer and bowl backinto place.6. Push the clip back in place andtighten the wing nut.7. Open the fuel shut-off cock.
1. Close fuelshut-off cock...
PS 575 22 OCT 00
perators, the strainer that fits intothe SEE’s fuel prefilter bowl helps fil-ter out crud before it gets into thevehicle’s fuel system.
Never, ever, run the vehicle withoutthat fuel prefilter strainer in place. Ifyou do, crud can get into the fuel sys-tem, clog the engine’s fuel injectorsand make the engine run rough, or notat all.
To keep things running smoothly,clean the prefilter at least once a week.Here’s how:
2. Unscrew bowl, then strainer
Connections loose?
Heavy brush can damageblade down limit switch
D7G Tractor . . .
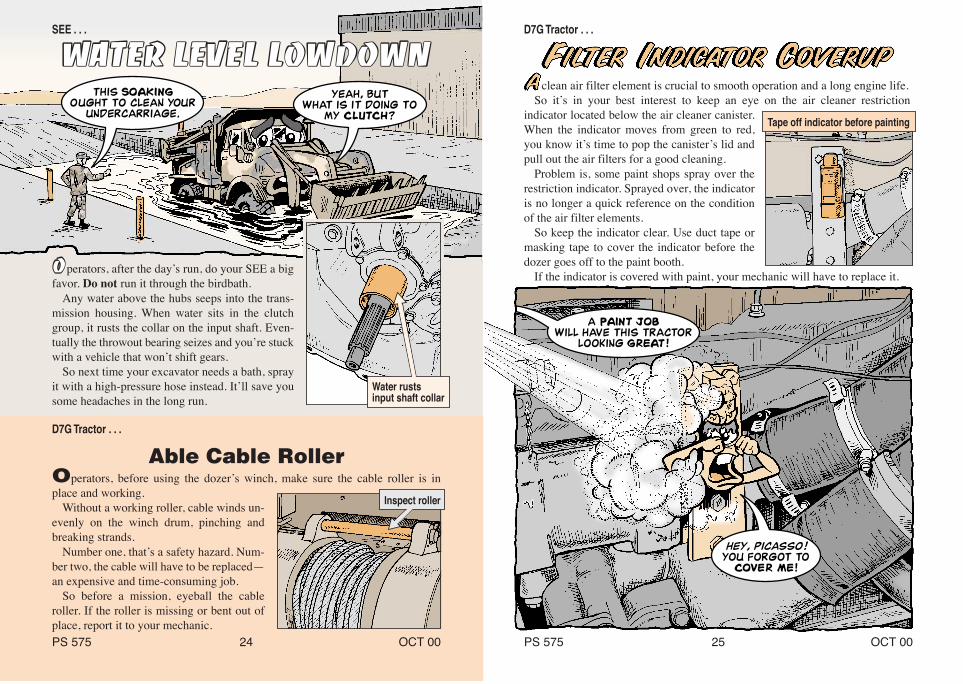
Able Cable RollerOperators, before using the dozer’s winch, make sure the cable roller is inplace and working.
Without a working roller, cable winds un-evenly on the winch drum, pinching andbreaking strands.
Number one, that’s a safety hazard. Num-ber two, the cable will have to be replaced—an expensive and time-consuming job.
So before a mission, eyeball the cableroller. If the roller is missing or bent out ofplace, report it to your mechanic.
SEE . . . D7G Tractor . . .
this soaking�ought to clean your�
undercarriage.
yeah, but�what is it doing to�
my clutch?
a paint job�will have this tractor�
looking great!
hey, picasso!�you forgot to�
cover me!
Water rustsinput shaft collar
Inspect roller
perators, after the day’s run, do your SEE a bigfavor. Do not run it through the birdbath.
Any water above the hubs seeps into the trans-mission housing. When water sits in the clutchgroup, it rusts the collar on the input shaft. Even-tually the throwout bearing seizes and you’re stuckwith a vehicle that won’t shift gears.
So next time your excavator needs a bath, sprayit with a high-pressure hose instead. It’ll save yousome headaches in the long run.
Tape off indicator before painting
PS 575 24 OCT 00 PS 575 25 OCT 00
clean air filter element is crucial to smooth operation and a long engine life.So it’s in your best interest to keep an eye on the air cleaner restriction
indicator located below the air cleaner canister.When the indicator moves from green to red,you know it’s time to pop the canister’s lid andpull out the air filters for a good cleaning.
Problem is, some paint shops spray over therestriction indicator. Sprayed over, the indicatoris no longer a quick reference on the conditionof the air filter elements.
So keep the indicator clear. Use duct tape ormasking tape to cover the indicator before thedozer goes off to the paint booth.
If the indicator is covered with paint, your mechanic will have to replace it.
PS 575 26 OCT 00
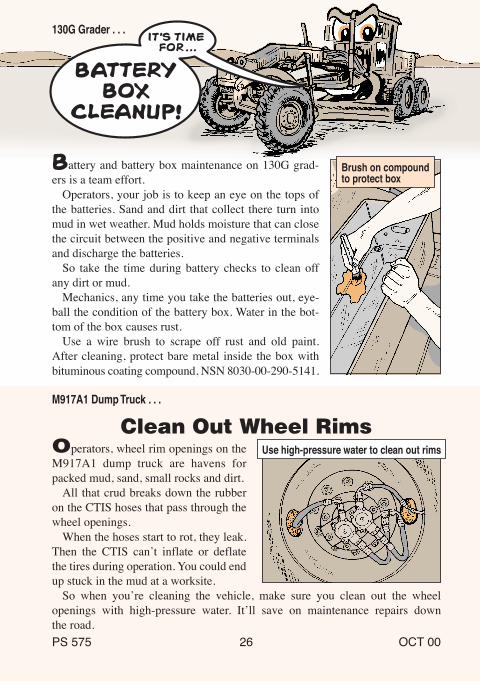
M917A1 Dump Truck . . .
Clean Out Wheel RimsOperators, wheel rim openings on theM917A1 dump truck are havens forpacked mud, sand, small rocks and dirt.
All that crud breaks down the rubberon the CTIS hoses that pass through thewheel openings.
When the hoses start to rot, they leak.Then the CTIS can’t inflate or deflatethe tires during operation. You could endup stuck in the mud at a worksite.
So when you’re cleaning the vehicle, make sure you clean out the wheelopenings with high-pressure water. It’ll save on maintenance repairs downthe road.
attery and battery box maintenance on 130G grad-ers is a team effort.
Operators, your job is to keep an eye on the tops ofthe batteries. Sand and dirt that collect there turn intomud in wet weather. Mud holds moisture that can closethe circuit between the positive and negative terminalsand discharge the batteries.
So take the time during battery checks to clean offany dirt or mud.
Mechanics, any time you take the batteries out, eye-ball the condition of the battery box. Water in the bot-tom of the box causes rust.
Use a wire brush to scrape off rust and old paint.After cleaning, protect bare metal inside the box withbituminous coating compound, NSN 8030-00-290-5141.
130G Grader . . .
Use high-pressure water to clean out rims
Brush on compoundto protect box
PS 575 26 OCT 00
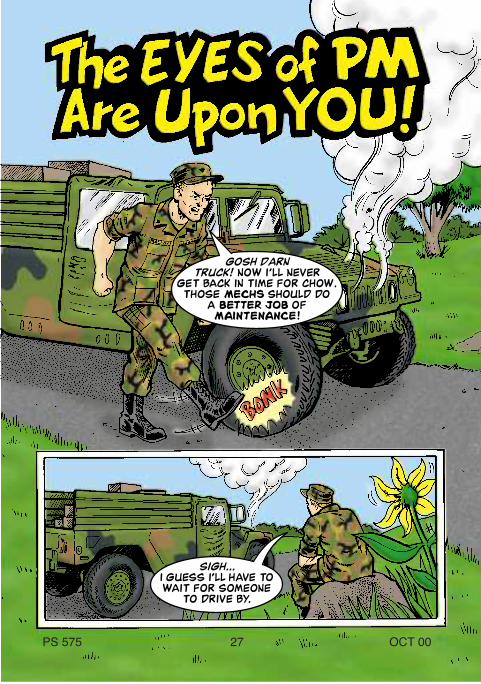
gosh darn�truck! now i'll never�
get back in time for chow.�those mechs should do�
a better job of�maintenance!
sigh...�i guess i'll have to�wait for someone�
to drive by.
PS 575 27 OCT 00
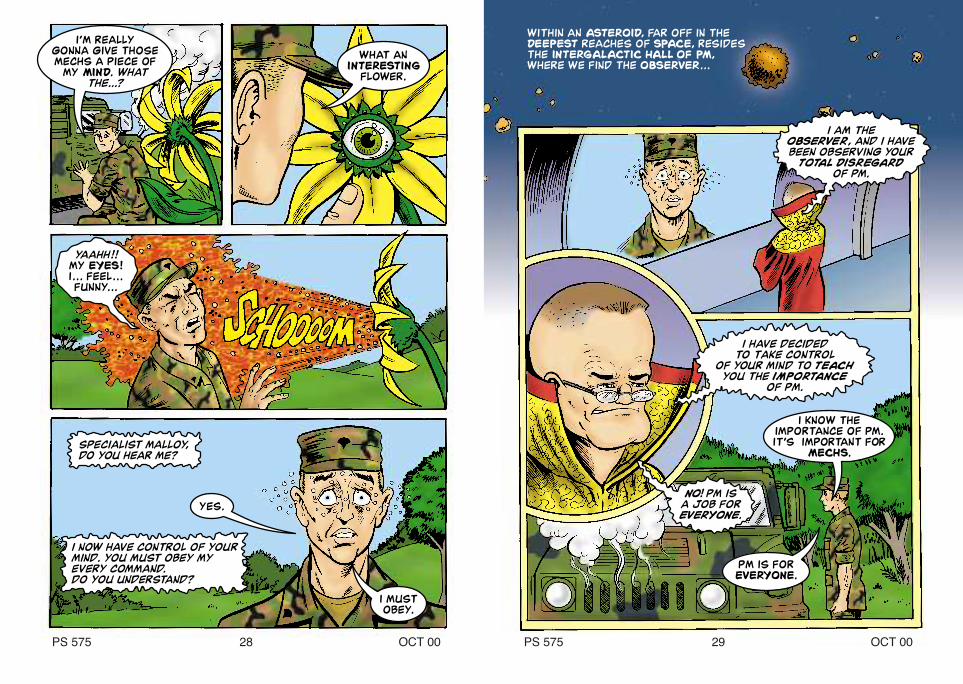
i'm really�gonna give those�mechs a piece of�
my mind. what�the...?
what an�interesting�
flower.
yaahh!!�my eyes!�i . . . feel...�funny...
specialist malloy,�do you hear me?
yes.
i now have control of your�mind. you must obey my�every command.�do you understand?
i must�obey.
i am the�observer, and i have�been observing your�
total disregard�of pm.
i have decided�to take control�
of your mind to teach�you the importance�
of pm.
i know the�importance of pm.�it's important for�
mechs.
no! pm is�a job for�everyone.
pm is for�everyone.
within an asteroid, far off in the�deepest reaches of space, resides�the intergalactic hall of pm,�where we find the observer...
PS 575 29 OCT 00PS 575 28 OCT 00

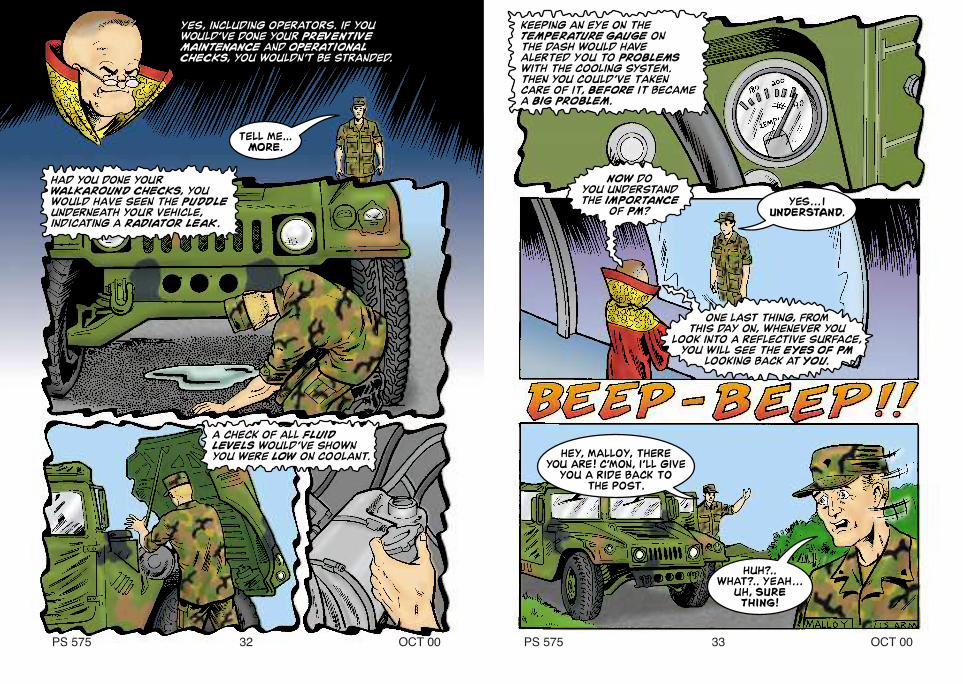
yes, including operators. if you�would've done your preventive�maintenance and operational�checks, you wouldn't be stranded.
tell me...�more.
had you done your�walkaround checks, you�would have seen the puddle�underneath your vehicle,�indicating a radiator leak.
a check of all fluid�levels would've shown�you were low on coolant.
keeping an eye on the�temperature gauge on�the dash would have�alerted you to problems�with the cooling system.�then you could've taken�care of it, before it became�a big problem.
now do�you understand�the importance�
of pm?yes... i�
understand.�
one last thing, from�this day on, whenever you�
look into a reflective surface,�you will see the eyes of pm�
looking back at you.
hey, malloy, there�you are! c'mon, i'll give�
you a ride back to�the post.
huh?..�what?.. yeah...�
uh, sure�thing!
PS 575 33 OCT 00PS 575 32 OCT 00
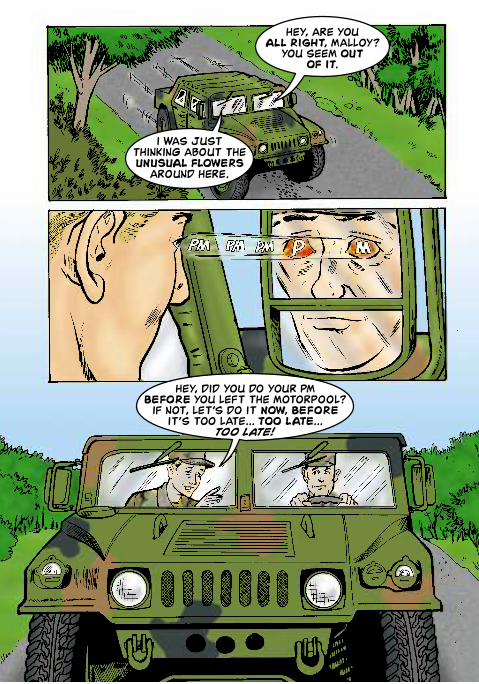
hey, are you�all right, malloy?�
you seem out�of it.
i was just�thinking about the�unusual flowers�
around here.
hey, did you do your pm�before you left the motorpool?�
if not, let's do it now, before�it's too late... too late...�
too late!�
PS 575 35 OCT 00
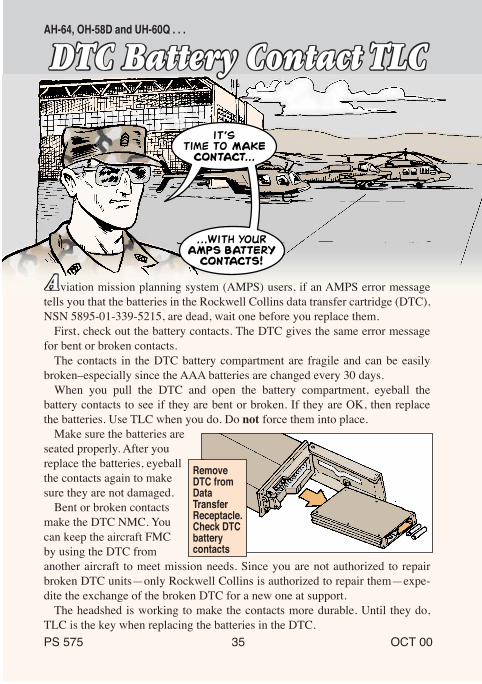
viation mission planning system (AMPS) users, if an AMPS error messagetells you that the batteries in the Rockwell Collins data transfer cartridge (DTC),NSN 5895-01-339-5215, are dead, wait one before you replace them.
First, check out the battery contacts. The DTC gives the same error messagefor bent or broken contacts.
The contacts in the DTC battery compartment are fragile and can be easilybroken–especially since the AAA batteries are changed every 30 days.
When you pull the DTC and open the battery compartment, eyeball thebattery contacts to see if they are bent or broken. If they are OK, then replacethe batteries. Use TLC when you do. Do not force them into place.
Make sure the batteries areseated properly. After youreplace the batteries, eyeballthe contacts again to makesure they are not damaged.
Bent or broken contactsmake the DTC NMC. Youcan keep the aircraft FMCby using the DTC fromanother aircraft to meet mission needs. Since you are not authorized to repairbroken DTC units—only Rockwell Collins is authorized to repair them—expe-dite the exchange of the broken DTC for a new one at support.
The headshed is working to make the contacts more durable. Until they do,TLC is the key when replacing the batteries in the DTC.
AH-64, OH-58D and UH-60Q . . .
it's�time to make�
contact...
. . .with your�amps battery�
contacts!
RemoveDTC fromDataTransferReceptacle.Check DTCbatterycontacts
PS 575 35 OCT 00
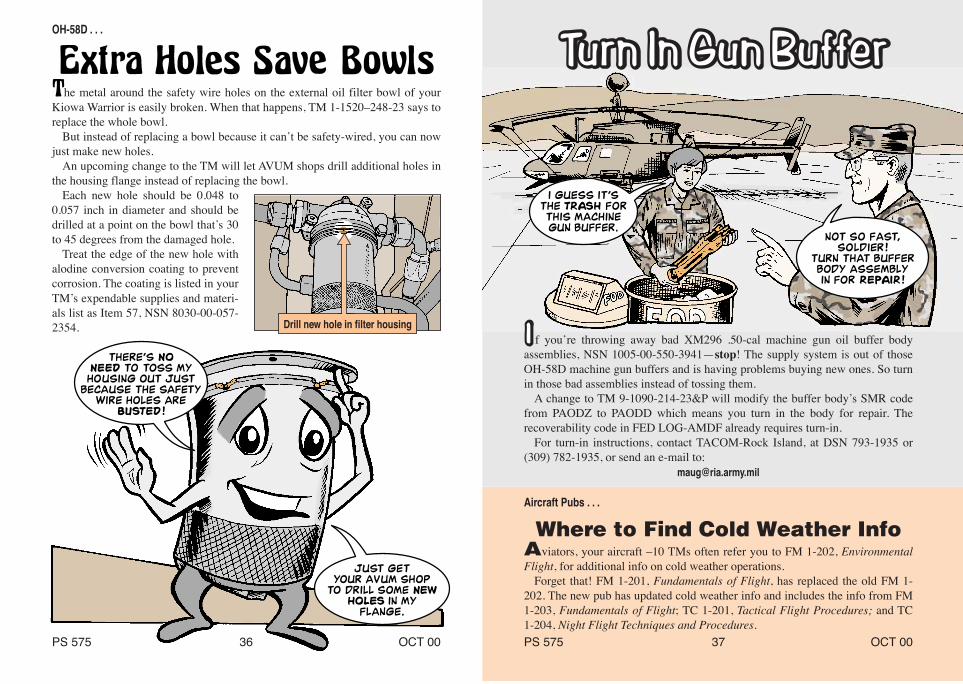
he metal around the safety wire holes on the external oil filter bowl of yourKiowa Warrior is easily broken. When that happens, TM 1-1520–248-23 says toreplace the whole bowl.
But instead of replacing a bowl because it can’t be safety-wired, you can nowjust make new holes.
An upcoming change to the TM will let AVUM shops drill additional holes inthe housing flange instead of replacing the bowl.
Each new hole should be 0.048 to0.057 inch in diameter and should bedrilled at a point on the bowl that’s 30to 45 degrees from the damaged hole.
Treat the edge of the new hole withalodine conversion coating to preventcorrosion. The coating is listed in yourTM’s expendable supplies and materi-als list as Item 57, NSN 8030-00-057-2354.
f you’re throwing away bad XM296 .50-cal machine gun oil buffer bodyassemblies, NSN 1005-00-550-3941—stop! The supply system is out of thoseOH-58D machine gun buffers and is having problems buying new ones. So turnin those bad assemblies instead of tossing them.
A change to TM 9-1090-214-23&P will modify the buffer body’s SMR codefrom PAODZ to PAODD which means you turn in the body for repair. Therecoverability code in FED LOG-AMDF already requires turn-in.
For turn-in instructions, contact TACOM-Rock Island, at DSN 793-1935 or(309) 782-1935, or send an e-mail to:
Aircraft Pubs . . .
Where to Find Cold Weather InfoAviators, your aircraft –10 TMs often refer you to FM 1-202, EnvironmentalFlight, for additional info on cold weather operations.
Forget that! FM 1-201, Fundamentals of Flight, has replaced the old FM 1-202. The new pub has updated cold weather info and includes the info from FM1-203, Fundamentals of Flight; TC 1-201, Tactical Flight Procedures; and TC1-204, Night Flight Techniques and Procedures.
OH-58D . . .
there's no�need to toss mY�HOUSING out just�
because THE safety�wire holes are�
busted!
just get�your avum shop�
to drill some new�holes in my�
flange.
i guess it's�the trash for�this machine�gun buffer.
not so fast,�soldier!�
turn that buffer�body assembly�in for repair!
Drill new hole in filter housing
PS 575 37 OCT 00PS 575 36 OCT 00
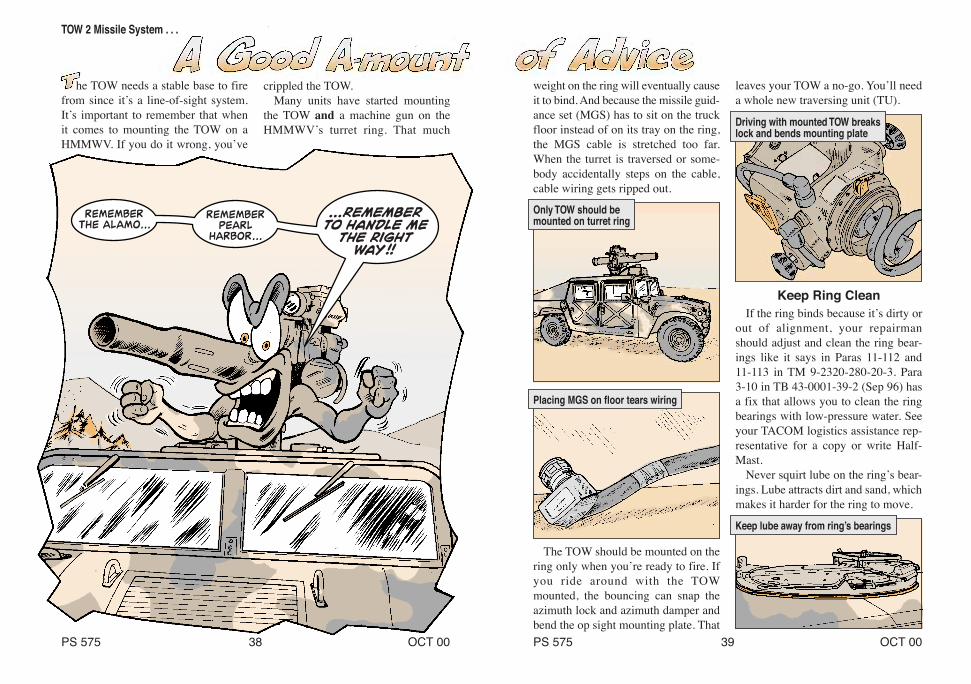
he TOW needs a stable base to firefrom since it’s a line-of-sight system.It’s important to remember that whenit comes to mounting the TOW on aHMMWV. If you do it wrong, you’ve
TOW 2 Missile System . . .
Keep Ring CleanIf the ring binds because it’s dirty or
out of alignment, your repairmanshould adjust and clean the ring bear-ings like it says in Paras 11-112 and11-113 in TM 9-2320-280-20-3. Para3-10 in TB 43-0001-39-2 (Sep 96) hasa fix that allows you to clean the ringbearings with low-pressure water. Seeyour TACOM logistics assistance rep-resentative for a copy or write Half-Mast.
Never squirt lube on the ring’s bear-ings. Lube attracts dirt and sand, whichmakes it harder for the ring to move.
leaves your TOW a no-go. You’ll needa whole new traversing unit (TU).
The TOW should be mounted on thering only when you’re ready to fire. Ifyou ride around with the TOWmounted, the bouncing can snap theazimuth lock and azimuth damper andbend the op sight mounting plate. That
Driving with mounted TOW breakslock and bends mounting plate
weight on the ring will eventually causeit to bind. And because the missile guid-ance set (MGS) has to sit on the truckfloor instead of on its tray on the ring,the MGS cable is stretched too far.When the turret is traversed or some-body accidentally steps on the cable,cable wiring gets ripped out.
Placing MGS on floor tears wiring
crippled the TOW.Many units have started mounting
the TOW and a machine gun on theHMMWV’s turret ring. That much
remember�the Alamo...
remember�pearl�
harbor...
...remember�to handle me�
the right�way!!
Keep lube away from ring’s bearings
Only TOW should bemounted on turret ring
PS 575 39 OCT 00PS 575 38 OCT 00
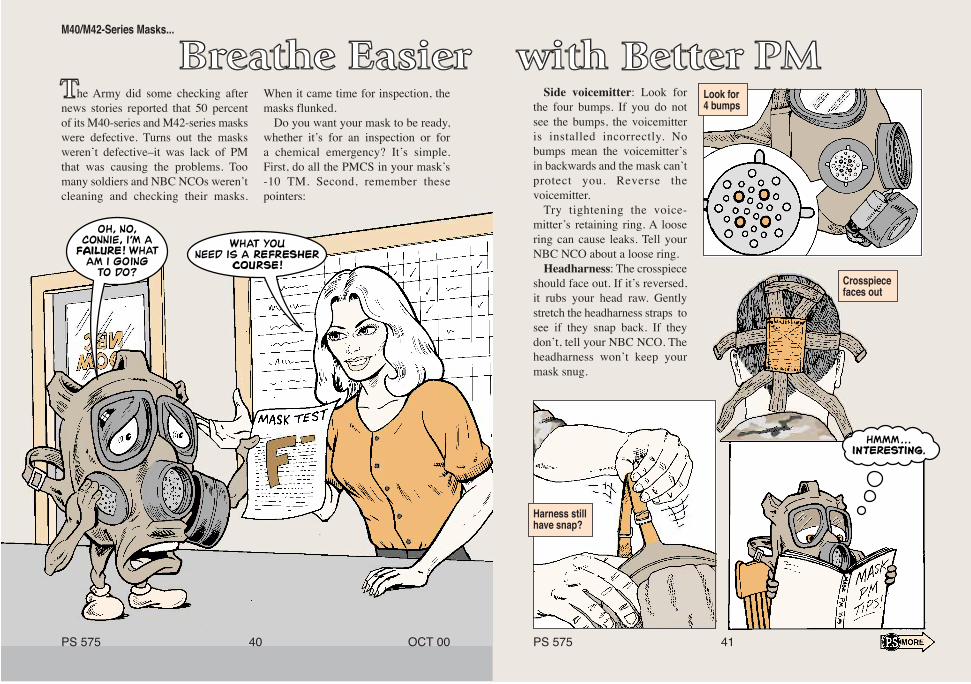
he Army did some checking afternews stories reported that 50 percentof its M40-series and M42-series maskswere defective. Turns out the masksweren’t defective–it was lack of PMthat was causing the problems. Toomany soldiers and NBC NCOs weren’tcleaning and checking their masks.
M40/M42-Series Masks...
Side voicemitter: Look forthe four bumps. If you do notsee the bumps, the voicemitteris installed incorrectly. Nobumps mean the voicemitter’sin backwards and the mask can’tprotect you. Reverse thevoicemitter.
Try tightening the voice-mitter’s retaining ring. A loosering can cause leaks. Tell yourNBC NCO about a loose ring.
Headharness: The crosspieceshould face out. If it’s reversed,it rubs your head raw. Gentlystretch the headharness straps tosee if they snap back. If theydon’t, tell your NBC NCO. Theheadharness won’t keep yourmask snug.
Crosspiecefaces out
When it came time for inspection, themasks flunked.
Do you want your mask to be ready,whether it’s for an inspection or fora chemical emergency? It’s simple.First, do all the PMCS in your mask’s-10 TM. Second, remember thesepointers:
PS 575 41PS 575 40 OCT 00
oh, no,�connie, i'm a�
failure! what�am i going�
to do?
what you�need is a refresher�
course!
hmmm...�interesting.
Harness stillhave snap?
Look for4 bumps
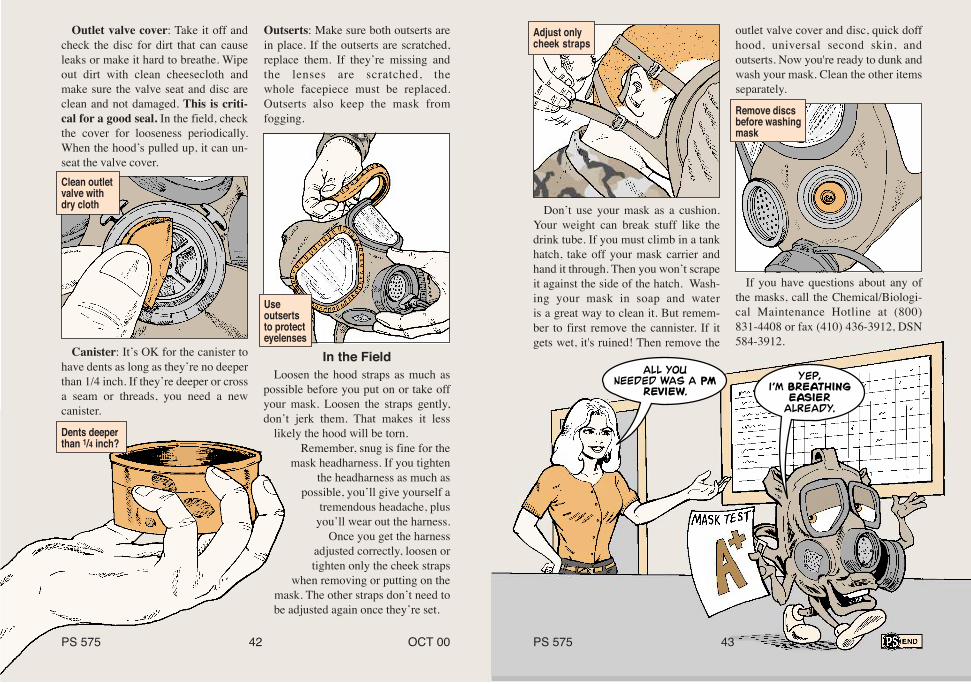
outlet valve cover and disc, quick doffhood, universal second skin, andoutserts. Now you're ready to dunk andwash your mask. Clean the other itemsseparately.
Outserts: Make sure both outserts arein place. If the outserts are scratched,replace them. If they’re missing andthe lenses are scratched, thewhole facepiece must be replaced.Outserts also keep the mask fromfogging.
Outlet valve cover: Take it off andcheck the disc for dirt that can causeleaks or make it hard to breathe. Wipeout dirt with clean cheesecloth andmake sure the valve seat and disc areclean and not damaged. This is criti-cal for a good seal. In the field, checkthe cover for looseness periodically.When the hood’s pulled up, it can un-seat the valve cover.Clean outletvalve withdry cloth
Canister: It’s OK for the canister tohave dents as long as they’re no deeperthan 1/4 inch. If they’re deeper or crossa seam or threads, you need a newcanister.
If you have questions about any ofthe masks, call the Chemical/Biologi-cal Maintenance Hotline at (800)831-4408 or fax (410) 436-3912, DSN584-3912.
Don’t use your mask as a cushion.Your weight can break stuff like thedrink tube. If you must climb in a tankhatch, take off your mask carrier andhand it through. Then you won’t scrapeit against the side of the hatch. Wash-ing your mask in soap and wateris a great way to clean it. But remem-ber to first remove the cannister. If itgets wet, it's ruined! Then remove the
In the FieldLoosen the hood straps as much as
possible before you put on or take offyour mask. Loosen the straps gently,don’t jerk them. That makes it less
likely the hood will be torn.Remember, snug is fine for the
mask headharness. If you tighten the headharness as much as
possible, you’ll give yourself atremendous headache, plus
you’ll wear out the harness.Once you get the harness
adjusted correctly, loosen ortighten only the cheek straps
when removing or putting on themask. The other straps don’t need tobe adjusted again once they’re set.
Remove discsbefore washingmask
Dents deeperthan 1/4 inch?
PS 575 43PS 575 42 OCT 00
all you�needed was a pm�
review.
yep,�i'm breathing�
easier�already.
Useoutsertsto protecteyelenses
Adjust onlycheek straps
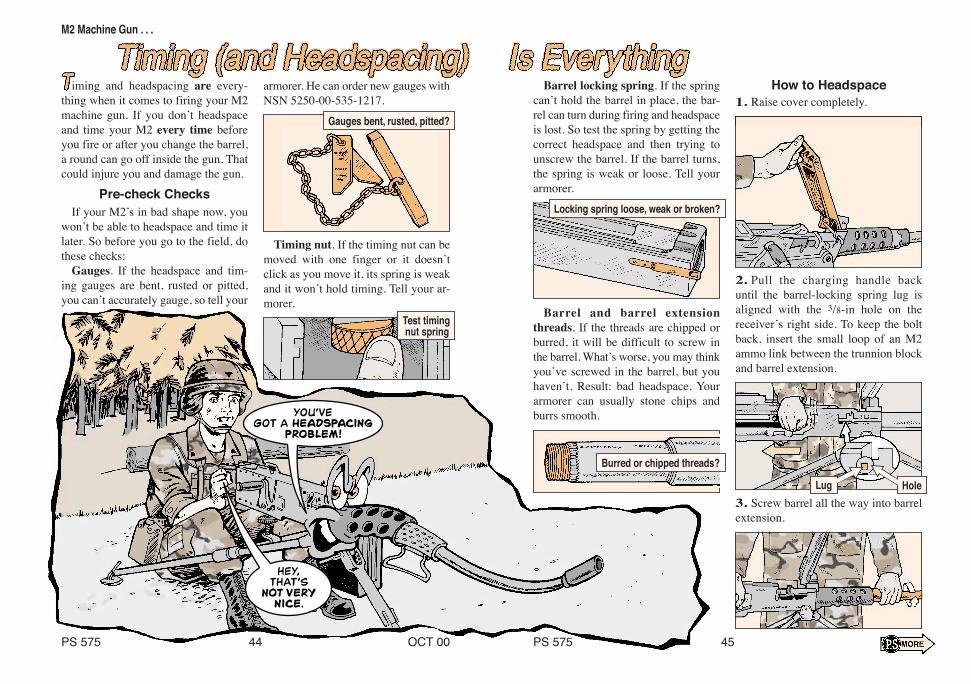
Timing nut. If the timing nut can bemoved with one finger or it doesn’tclick as you move it, its spring is weakand it won’t hold timing. Tell your ar-morer.
2. Pull the charging handle backuntil the barrel-locking spring lug isaligned with the 3/8-in hole on thereceiver’s right side. To keep the boltback, insert the small loop of an M2ammo link between the trunnion blockand barrel extension.
How to Headspace
Barrel and barrel extensionthreads. If the threads are chipped orburred, it will be difficult to screw inthe barrel. What’s worse, you may thinkyou’ve screwed in the barrel, but youhaven’t. Result: bad headspace. Yourarmorer can usually stone chips andburrs smooth.
Gauges bent, rusted, pitted?
Locking spring loose, weak or broken?
Burred or chipped threads?
iming and headspacing are every-thing when it comes to firing your M2machine gun. If you don’t headspaceand time your M2 every time beforeyou fire or after you change the barrel,a round can go off inside the gun. Thatcould injure you and damage the gun.
Pre-check ChecksIf your M2’s in bad shape now, you
won’t be able to headspace and time itlater. So before you go to the field, dothese checks:
Gauges. If the headspace and tim-ing gauges are bent, rusted or pitted,you can’t accurately gauge, so tell your
PS 575 45PS 575 44 OCT 00
M2 Machine Gun . . .
Barrel locking spring. If the springcan’t hold the barrel in place, the bar-rel can turn during firing and headspaceis lost. So test the spring by getting thecorrect headspace and then trying tounscrew the barrel. If the barrel turns,the spring is weak or loose. Tell yourarmorer.
armorer. He can order new gauges withNSN 5250-00-535-1217.
you've�got a headspacing�
problem!
hey,�thAT'S�
NOT VERY�NICE.
1. Raise cover completely.
3. Screw barrel all the way into barrelextension.
Test timing nut spring
Lug Hole
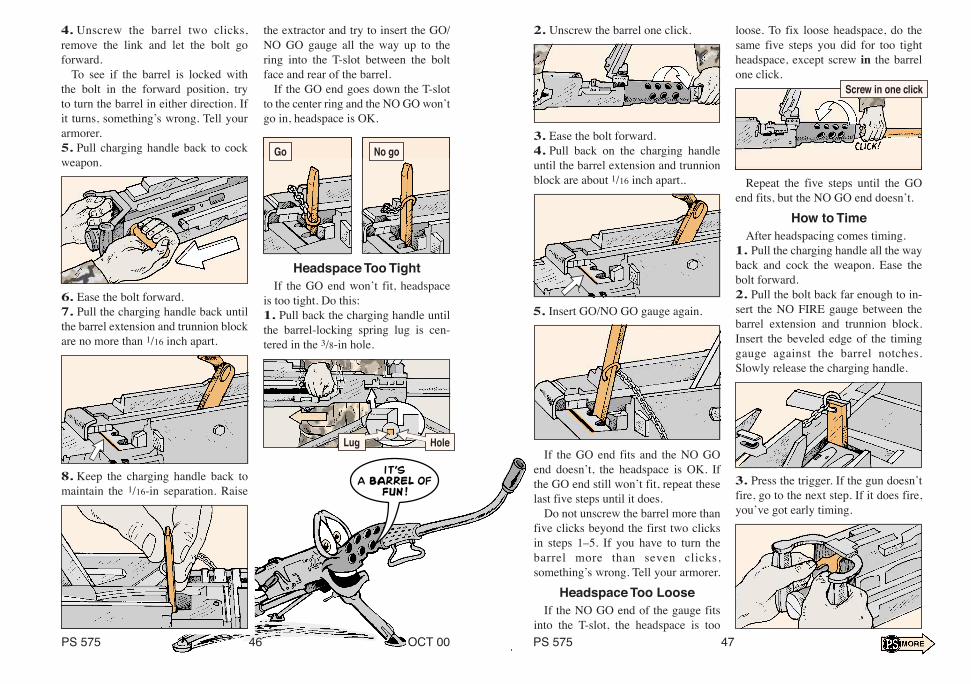
3. Press the trigger. If the gun doesn’tfire, go to the next step. If it does fire,you’ve got early timing.
If the GO end fits and the NO GOend doesn’t, the headspace is OK. Ifthe GO end still won’t fit, repeat theselast five steps until it does.
Do not unscrew the barrel more thanfive clicks beyond the first two clicksin steps 1–5. If you have to turn thebarrel more than seven clicks,something’s wrong. Tell your armorer.
Headspace Too LooseIf the NO GO end of the gauge fits
into the T-slot, the headspace is too
3. Ease the bolt forward.4. Pull back on the charging handleuntil the barrel extension and trunnionblock are about 1/16 inch apart..
2. Unscrew the barrel one click.
Headspace Too TightIf the GO end won’t fit, headspace
is too tight. Do this:1. Pull back the charging handle untilthe barrel-locking spring lug is cen-tered in the 3/8-in hole.
the extractor and try to insert the GO/NO GO gauge all the way up to thering into the T-slot between the boltface and rear of the barrel.
If the GO end goes down the T-slotto the center ring and the NO GO won’tgo in, headspace is OK.
6. Ease the bolt forward.7. Pull the charging handle back untilthe barrel extension and trunnion blockare no more than 1/16 inch apart.
Go No go
Repeat the five steps until the GOend fits, but the NO GO end doesn’t.
How to TimeAfter headspacing comes timing.
1. Pull the charging handle all the wayback and cock the weapon. Ease thebolt forward.2. Pull the bolt back far enough to in-sert the NO FIRE gauge between thebarrel extension and trunnion block.Insert the beveled edge of the timinggauge against the barrel notches.Slowly release the charging handle.
PS 575 47PS 575 46 OCT 00
loose. To fix loose headspace, do thesame five steps you did for too tightheadspace, except screw in the barrelone click.
4. Unscrew the barrel two clicks,remove the link and let the bolt goforward.
To see if the barrel is locked withthe bolt in the forward position, tryto turn the barrel in either direction. Ifit turns, something’s wrong. Tell yourarmorer.5. Pull charging handle back to cockweapon.
8. Keep the charging handle back tomaintain the 1/16-in separation. Raise
IT'S�A BARREL OF�
FUN!
5. Insert GO/NO GO gauge again.
Lug Hole
Screw in one click
7. After the gun fires, turn the nut tothe right two more clicks and stop.8. Take out the gauge and put on theback plate. Cock the gun, then ease thebolt forward.9. Recheck the timing two more timeswith the back plate on. If the timingstill isn’t right, do the early/late timingprocedure one more time.
Still no luck? Tell your armorer.Something’s wrong.
4. Pull the bolt back only far enoughto insert the FIRE gauge, and slowlyrelease the charging handle.
PS 575 49 OCT 00PS 575 48
4. Pull the bolt back just far enough totake out the NO FIRE gauge and putin the FIRE gauge with the bevelededge against the barrel notches. Slowlyrelease the charging handle.
5. Press the trigger. If the M2 fires,timing is OK. If it doesn’t fire, youhave late timing.
Early/Late TimingNever cock your M2 with the back
plate off. The driving spring rod couldgo through your chest. The bolt mustbe forward before you take off theback plate.1. Take the gauge out of the re-ceiver. Cock the M2, then ease the boltforward.2. Take off the back plate.3. Turn timing nut all the way downto the left.
6. Turn the timing adjustment nut oneclick to the right. Push up on the trig-ger bar. Continue to alternate turningthe timing adjustment nut one clickright and pushing up on the trigger baruntil the M2 fires.
Mobile Subscriber Equipment . . .
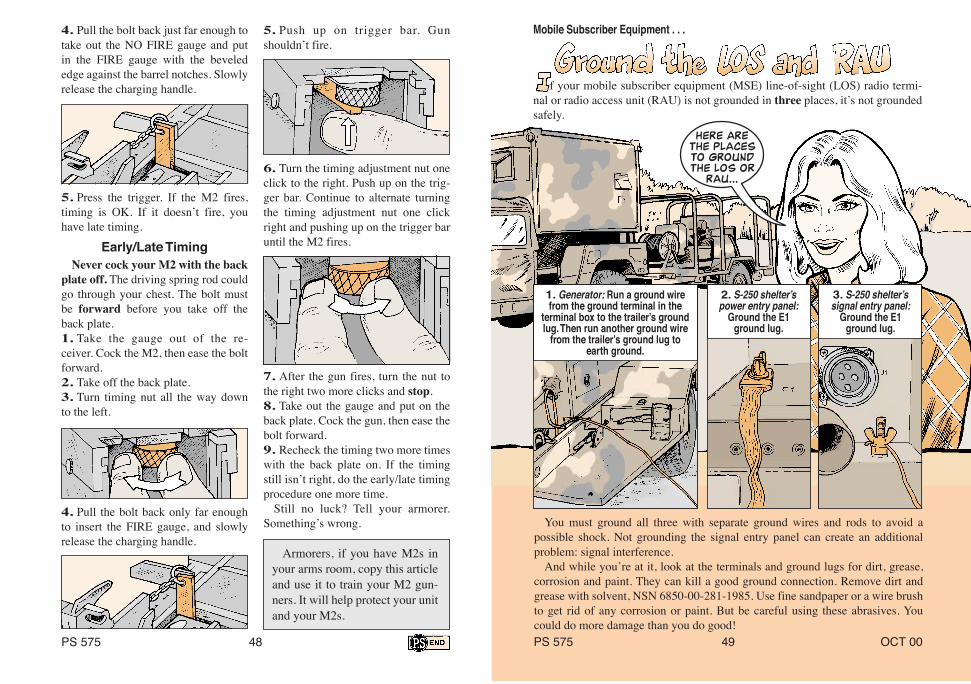
You must ground all three with separate ground wires and rods to avoid apossible shock. Not grounding the signal entry panel can create an additionalproblem: signal interference.
And while you’re at it, look at the terminals and ground lugs for dirt, grease,corrosion and paint. They can kill a good ground connection. Remove dirt andgrease with solvent, NSN 6850-00-281-1985. Use fine sandpaper or a wire brushto get rid of any corrosion or paint. But be careful using these abrasives. Youcould do more damage than you do good!
1. Generator: Run a ground wirefrom the ground terminal in the
terminal box to the trailer’s groundlug. Then run another ground wire
from the trailer’s ground lug toearth ground.
2. S-250 shelter’spower entry panel:
Ground the E1ground lug.
3. S-250 shelter’ssignal entry panel:
Ground the E1ground lug.
Here are�the places�to ground�the LOS or�
RAU...
5. Push up on trigger bar. Gunshouldn’t fire.
Armorers, if you have M2s inyour arms room, copy this articleand use it to train your M2 gun-ners. It will help protect your unitand your M2s.
f your mobile subscriber equipment (MSE) line-of-sight (LOS) radio termi-nal or radio access unit (RAU) is not grounded in three places, it’s not groundedsafely.
3. Check terminal posts, clamps,cables, battery hold-downs and the bat-tery box for dirt or corrosion. Corro-sion eats up metal parts on and aroundbatteries. Dirt and corrosion on the tipsof the batteriescan holdmoisture thatcan close thecircuit betweenthe positive andnegativeterminals anddischarge yourbattery.
Wipe off light dirt and corrosion witha cloth. To fight heavy corrosion, takeout the battery and any metal parts thatcan be removed. Scrub the battery withwater and baking soda.
After cleaning, rinse with lots ofclean water and dry well. Protect baremetal with bituminous coating com-pound, NSN 8030-00-290-5141. Shineup battery posts and clamps with bat-tery terminal brush, NSN 5120-00-926-5175.
4. Make sure a light coat of GAAgrease isappliedand covers allposts andterminals afterclamping downthe battery.Keep greasefrom betweenposts andterminals.
5. Check forcracks or bulges in the battery and anysigns of leaking electrolyte. If you seeany of these signs, get your support onthe job.
MSE operator/maintainers, pullingPM on your shelter’s two lead-acidbackup batteries is your job. And fromthe looks of some of those batteries,more than a few of you should be fired!
Here are five things you should al-ways do:
1. Make sure battery plates are cov-ered with electrolyte by adding dis-tilled water when needed. It must be
Mobile Subscriber Equipment . . .
Leakage?
1/2 inch above the top of the plates.Some batteries have lips inside or in-dicators to show where the electrolytelevel should be. If yours don’t, you’llhave to eyeball them.
The chemical action between theelectrolyte and the cell plates produceselectricity. Without it, batteries dis-charge and die.
But remember, more is not better.Too much water—like filling cells tothe top—is just as bad as too little.When the cell is too full, electrolyte isflushed out during charging. Since thebattery can’t recharge itself, it dies.
You can get six 1-gal bottles of dis-tilled water with NSN 6810-00-682-6867. Get one 5-gal bottle with NSN6810-00-356-4936.50
Electrolyte level OK?
hey, i've�got a pain in my�
batteries! how�about a�pm pill? Posts and terminals greased?
Corrosion?
In a pinch—to save the battery—rainwater, air conditioner condensationor even tap water will do. But, filter itthrough a clean cloth before using it.
2. Always make sure the vent holesin vent caps are open to let gases es-cape. Also, make sure the caps arescrewed down tight. If you haveclogged caps that can’t be cleaned, ormissing caps, replace them with NSN6140-01-387-5045.
Vent holes clear?
PS 575 51 OCT 00PS 575 OCT 00

he handwriting is on the wall and it says that dieselfuel now moves the Army.
So should you scrap all those 3-KW gasoline-engine MEP-16A and -21A generators that have beenworkhorses for your unit?
No way! That’s like chucking nine grand down arathole. Here’s a $2,500 alternative.
Order retrofit kit, NSN 2815-01-440-4426, thatwill exchange your gasoline engine for a dieselengine. The kit has 53 parts, including a 7-HPengine.
3-KW GED Generators . . .
looks like�you've got to go,�old gas friend.
wait! you�can change me�
to diesel!
PS 575 53 OCT 00
15-KW, 30-KW, 60-KW TQG . . .
hey, buddy,�i've got trouble! my�oil pressure gauge�
is pegged.
no�problem.�
you're still�safe.
the kit will�bring me in line with�
the rest of the�diesel army.
f the oil pressure gauge on your tactical quietgenerator (TQG) shows 70 psi, is that too muchoil pressure? What about 80?
According to your operator’s TM, it is toomuch. Right there in Table 1-1 it tells you thatthe right oil pressure is between 25–60 psi.
But there’s a problem. It seems your oilpressure gauge and the sending unit are not veryaccurate. Also, the engine manufacturers say theTQGs can safely operate at oil pressures over the gauge’s top end—80 psi.
The tolerances and this new information are bringing a change. Table 1-1 inTM 9-6115-643-10, TM 9-6115-644-10 and TM 9-6115-645-10 will eventuallybe changed from “25–60” to “25–85 psi.”
But you can make the change now. Just pencil the new psi into your TM andkeep that TQG humming even if the guage pegs out.
25–85 psiis OK
Storage Cabinets . . .
Cabinet description NSN 7125-01-084-Yellow with bright red decal “Flammable-Keep Fire Away” across 6954both doors, 43 inches wide x 44 inches high x 18 inches deepYellow, 43 inches wide x 65 inches high x 18 inches deep 6955
once you have�the cabinet you need for�
storing flammables, follow�these steps to make sure�
you do it safely.
tighten�all container�
lids!
make safety�your priority in�
storing flammables�such as petroleum,�
oil, lubricants�and paints.
you are�authorized storage�
cabinets under cta 50-909. fed�log has cabinets in all shapes,�sizes, and colors. but here are�
two that should fit most�of your needs.
oops!�wet clean-�up on aisle�
three.
oops! watch�it!
sigh!�forgotten but�
not gone.
if you don't have�these pubs, call your safety�office. they can fill you in on�
any local regulations.
�
❑
❑
❑
❑
❑
❑
❑
PS 575 5554 OCT 00
Never exceed the maximum storagecapacity of your cabinet. To determinestorage capacity and the type of mate-rial you can store in your cabinet, checkwith your local safety office, fire de-partment or the installation HAZMAToffice.
Store cumbustible item in one cabi-net, flammable liquids in another.
Cabinets used indoors must be keptaway from areas where spark-produc-ing tools and equipment are used. Keepthem away from areas where heat,fumes and gases can build. Don’t putcabinets where they will be in the way.
Keep cabinets locked and issue keysonly to personnel who need them.
You will find valuable informationin the National Fire Code 30, Flam-mable and Combustible Liquids, andAR 420-90, Fire Protection.Remove any leaking containers im-
mediately. If there are any spills, cleanthem up immediately following yourunit’s HAZMAT SOP.
Outdoor cabinets must be 50 feetfrom combustible structures. If pos-sible, keep cabinets under protectivecover from weather. Make sure “NoSmoking” signs are in place and strictlyenforced. Don’t allow weeds and de-bris to build up around the cabinet.

Water and Petroleum Equipment . . .
Sites to Get Your PAWS OnGot a question or need info on the Army’s petroleum and water systems(PAWS)? Check out these web sites:
Program manager, PAWS—Petroleum and water equipment, with POCs, at theTank-automotive and Armaments Command (TACOM):
http://www.tacom.army.mil/dsa/pmtaws/pm_paws49th Quartermaster Group—the Army’s only active duty petroleum and water
equipment QM group:http://www.lee.army.mil/quartermaster/49thgrp/
Petroleum and Water Department at the Quartermaster School:http://www.quartermaster.army.mil/pwd/
GP Small Tent . . .
ooking for requisition status, shipping info, on-hand stock, weapons systemdata or general supply info for items managed by the Defense Logistics Agency(DLA)?
DLA’s Web-based Customer Account Tracking System (WebCATS) providesone-stop shopping for supply info on DLA-managed items.
It doesn’t matter where the DLA manager is located—the Defense SupplyCenter(DSC)-Columbus (S9C/S9E), DSC-Philadelphia (S9I) or DSC-Richmond(S9G)—WebCATS gets the supply info you need.
Just input your query by NSN/NIIN, weapon system designator code or requi-sition document number.
Since WebCATS is password-controlled, you need to go to its website andfollow the instructions:
http://www.dscr.dla.mil/procurement/cats/catlogon.htmWhen you get your logon ID and password, access WebCATS at:
http://www.dscr.dla.mil/procurement /cats/cri.htmOnce there, click on: “Registered Users: Please click here to enter” and the
login screen will appear.If it doesn’t, call the DCSR IT Helpline at 804-279-HELP (4357) or at DSN
695-HELP (4357). You may e-mail them at:[email protected]
Supply . . .
this is�great! one site�
for all dla items�except s9m�
and s9t! thanks to�webcats!
PS 575 56 OCT 00
Pin Size NSN(inches) 8340-01-036-3/8 x 11/2 3781
3/8 x 2 37823/8 x 21/2 3783
1/4 x 1 37791/4 x 11/2 3780
Centerpole
Eavepole
Hang on to the pins by wrap-ping electrical straps, NSN 5975-00-570-9598, over the pin’s wireand around the tent pole. That’llkeep the pins with the poles.
f you’ve lost the locking pinsthat keep the aluminum poles ex-tended on your GP small tents,don’t go looking for replacementsin TM 10-8340-211-24P. They’renot listed. Look here instead:
here are�the numbers to�
replace your tent's�lost locking�
pins.

ave all applicable modificationwork orders (MWOs) been applied toyour unit’s equipment? If you’re notsure, then you need to visit the modifi-cation management information system(MMIS) web site at:
http://208.242.67.250/mwoThe MWO file is password protected
so the first thing you need to do isclick on the logon request form fieldand apply for a password.
With your password, you can queryMMIS by equipment model number,UIC or serial number. You can limityour search to emergency, urgent orroutine MWOs.
So far, the only MWOs loaded arethose confirmed as being applied bythe equipment program manager (PM),
our unit’s total package fielding(TPF) will be less than “total” if theTPF team issues your equipment withonly its developmental line item num-ber (Z-LIN).
TPF is great at getting new equip-ment into the hands of the user quickly.But the fielding’s not complete untilthe equipment gets its standard LIN.
That’s because your unit can’t ac-count for the equipment or order re-pair parts with a Z-LIN. Z-LINs areonly used during the development ofthe weapon or end item.
Maintenance Management . . .
an AMC major subordinate command(MSC) or a MACOM MWO coordi-nator. So, your equipment may not bethere.
If it’s not, then its MWO data wasnot reported. You can submit MWOinformation on your equipment throughthe MMIS on-line reporting module ore-mail it to:
[email protected] you have questions about MMIS,
contact David Coomes, HQDA, at(703) 614-7051, DSN 224-7051 or viae-mail it at:
[email protected] MMIS has been established as
the official Army MWO database bythe new AR 750-10, Army Modifica-tion Program.
So make sure you’re not a victim ofnot-so-total fielding. Check out the LINblock on each property book page andreport every LIN beginning with a Zto the USAMC Logistics Support Ac-tivity (LOGSA) SB 700-20 Team.
This team maintains the SB 700-20,Army Adopted/Other Items Selected forAuthorization; List of Reportable Items,and will work to resolve your Z-LINproblem before it bites you. Call themat (800) 878-2869, (256) 955-0499,DSN 645-0499 or e-mail at:
some mwo info�is at our fingertips�
now.
great, so�we can finally see�if our equipment�
is current.
logsa?�i've got just one�
question...��
who am i?!!�
Total Package Fielding . . .
PS 575 59 OCT 00PS 575 58 OCT 00

PS 575 60
ACTIVE ARMY MTOE ORGANIZATIONSLIGHT CATEGORY
Winner: A Co, 202nd MI Bn (Ft Gordon, GA)Runner-up: HHC, 7th Sig Bde (Mannheim, Germany)
INTERMEDIATE CATEGORYWinner: 268th Sig Co (Mannheim, Germany)Runner-up: 201st MI Bn (Ft Gordon, GA)
HEAVY CATEGORYWinner: 230th MP Co (Kaiserslautern, Germany)Runner-up: 532nd MI Bn (Yongsan, Korea)
ACTIVE ARMY TDA UNITSLIGHT CATEGORY
Winner: Ground Mobility Division, 1st Bn, 81st Armor (Ft Knox, KY)Runner-up: AMSA 121(G) (Charleston, SC)
INTERMEDIATE CATEGORYWinner: 58th Trans Bn (Ft Leonard Wood, MO)Runner-up: 721st MI Bn (Ft. Gordon, GA)
HEAVY CATEGORYWinner: 751st MI Bn (Camp Humphries, Korea)Runner-up: 1st Bn, 29th Inf Regt (Ft Benning, GA)
U.S. ARMY RESERVE MTOE UNITSLIGHT CATEGORY
Winner: HHD, 349th Spt Bn (Ames, IA)Runner-up: 125th Trans Co (Lexington, KY)
INTERMEDIATE CATEGORYWinner: 737th Trans Co (Yakima, WA)Runner-up: A Co, 321st Engr Bn (Boise, ID)
HEAVY CATEGORYWinner: 1007th Maint Co (Hagerstown, MD)Runner-up: HHC, 489th Engr Bn (North Little Rock, AR)
U.S. ARMY NATIONAL GUARD MTOE UNITSLIGHT CATEGORY
Winner: 540th QM Bn (Lenoir, NC)Runner-up: None selected
INTERMEDIATE CATEGORYWinner: HHB, 113th FA Bde (Greensboro, NC)Runner-up: Svc Btry, 1st Bn, 161st FA (Appleton, MN)
HEAVY CATEGORYWinner: 842nd Engr Co (Spearfish, SD)Runner-up: 691th Maint Co (Fremont, NC)
congrats�to this�year's�
winners!
MWO Adds Clamp to MaskMWO 3-4240-347-20-1 added a retainingclamp to all M40-series masks’ outletvalve assemblies. The clamp helpsprevent the valve housing from separating.NBC NCOs, if your masks haven’t beenmodified, contact your local MWOcoordinator or SBCCOM logisticsassistance representative.
M88A2 Transmission OilThe transmission in your M88A2 recoveryvehicle uses CAT 10 oil, not OE/HDO-10like the M88A1. The wrong oil could causethe transmission to seize up. A quart ofCAT 10 comes with NSN 9150-01-424-7696,5 gallons with NSN 9150-01-424-7692, and55 gallons with NSN 9150-01-424-7698. Thetransmission holds 17 gallons.
M35A3 CTIS NSNsFig 117 of TM 9-2320-386-24P gives youwrong info on part numbers for Items 11and 12, the grommet and the nut for theCTIS valve. Use part number (PN) RG22,NSN 5325-01-437-5810, for Item 11 and PNHN80, NSN 5310-01-445-6872, for Item 12.Make a note until the TM is updated.
M2 Breech LocksNot all M2 machine gun breech locks needto be tested for hardness. New breech locksmanufactured by UNI-Star with a CAGEcode of 054Q8 and a contract number ofSP075099MJ178 meet the hardnessrequirements called for in TACOM-RockIsland Safety-of-Use message (SOUM) 99-03. All other breech locks should be testedper the SOUM. See your TACOM-RockIsland logistics assistance representativefor a copy of the SOUM.
FMTV Air Pressure BuzzerGet the low air pressure buzzer for FMTVsby using NSN 6350-01-455-9287. It buzzesto let you know when there’s not enoughair pressure to safely operate the vehicle.The NSN was not available when TM 9-2320-365-24P and TM 9-2320-366-24P wereprinted. Make a note for Item 7 in Fig 50 ofboth TMs ’til the next update.
HEMTT Transmission FilterGet a replacement transmission oil filterhousing and element for your HEMTTswith NSN 2910-01-167-2932. Make a notefor Item 4, Fig 158, in TM 9-2320-279-24P-1 until it’s updated to change the partnumber to 25010975.
FMTV Seat CoversYou can get covers for the bottom andback of FMTV seats without having toorder the entire seat. Get a bottom coverwith NSN 2540-01-460-8048 and a backcover with NSN 2540-01-463-8394. Thesenumbers are shown in the Jun 98editions of your -24Ps.
HMMWV Blackout LightItem numbers for the HMMWV’s blackoutlamp door and lens retainer are reversedin Fig 55 of TM 9-2320-280-24P-1. To getthe lamp door, Item 4, order part numberDC8217 (NSN 6220-01-128-0087), whichis shown as Item 2. To get the lensretainer, order part number DC8218 (NSN6220-01-107-2613), which is shown asItem 4.
October2000
TB 43-PS-575Issue 575
Approved forPublic Release;Distribution IsUnlimited
no�wonder�it won't�start!
. . . See Page 27