Embed Size (px)
Citation preview

intel' Object Programming Language User's Guide

OBJECT PROGRAMMING LANGUAGE USER'S GUIDE
Manual Order Numper: 171823-002, Rev. B
Copyright © 1981 Intel Corporation Intel Corporation, 3585 S.W. 198th Avenue, Aloha, Oregon 97007
ii
Additional copie~ of this manual or other Inlellilcrature may be obtained from:
Lileralule Department Inlel Corporation 3065 Bower~ A \ enue Santa Clara. C A 95051
The information in !hi~ document is ~ubject to change without notice.
Intel Corporal ion mal.e~ no warranty of any kind with regard 10 Ihis material. includinF. but not limited 10. the implied warranties of merchantability and fitness for a particulal purpose. Intel Corporation a~sumt's no resromibility for any errors that may appear in this document. Intel Corporal ion make\ no commitment to update nor to keep current the information contained in thi~ document.
Intel Corporation assumes no responsibility for the use of any circuitry other than circuitry embodied in an Intel product. No other circuit patent licenses are implied.
Intel sofn,ale products are copyrighted by and shall remain the propeny of Intel Corporation. Use. duplicatiotl or disclosure is subject 10 restrictiom stated in Intel's software license. or as defined in ASPR 7·104 .9(al(91.
No pan of this document may be copied or reproduced in any form or by any means without the prior writlen consent of Intel Corporation.
The following are trademarks of Intel Corporation and its affiliate, and may be used only to id!=ntify Intel products:
8\P Intcll"\ i~lon \hlllibu\ eRr-DIl Inlrlir..: "ullimoouir , iR~I\' Ptu,· .... B,,~blr ICF iSIiC PRO'IPT ,('S ,S8\ Promy.afl"
'm Librar~ t-bnlltf RM\'!I/) Imilt' MCS ~~'Itm 2(X)O
lnltl Mt"ill'ha'J\j~ l'Pt inlrl M~'romar ~!.<or><
and the combination of ICE, iCS, iRMX. iSBC. iSBX. MCS, or RMX and a numerical suffix.

PREFACE
This document is both a tutorial and a reference ,for Obj ect Programming Language, the language available on the Intellec 432/100 computer system.
Chapter 1 contains an overview of the language and introduces the concepts of class, object, message, method, window, and workspace. These concepts are of fundamental importance to OPL and are related to architectural features of the iAPX 432.
Chapter 2 provides a guided tour through the five elementary Classes: Number, Boolean,String, Atom, and List. A conversational style is employed, using many examples.
Chapter 3 continues the tour with Window, Class, and the predefined utility objects. At the end of the chapter a new class (Stack) is defined in enough detail that it can serve as a model for user-defined classes.
Chapter 4 describes the Class Editor in the course of using it to create a new class (Elevator).
Chapter 5 covers the use of disk files: saving and loading workspaces, storing and reading data files, and interpreting OPL source files.
Appendix A describes all the predefined classes and to which they respond.
Appendix B lists the predefined Utility Objects and to which they respond.
Appendix C lists the OPL error messages.
Appendix D contains a table of the ASCII codes.
Other Intel documents that may prove useful to OPL include:
Getting Started on the Intellec 432/100 iAPX 432 Object Primer iSBC 432/100 Hardware User's Guide iAPX 432 Components User's Guide Introduction to the iAPX 432 Architecture iAPX 432 GDP Architecture Reference Manual Object Builder User's Guide
plus
Intellec Series II, Series III, and ISIS manuals
the messages
the messages
users


TABLE OF CONTENTS
Chapter Overview of Object Programming Language 1.1 Introduction ........................................ 1-1 1.2 Classes and Instances ............................•. 1-1 1 .3 Obj ects and Messages ............................... 1-3 1.4 Windows and Workspaces .............................. 1-4
Chapter 2 Elementary OPL Programming 2.1 Introduction ....................................... 2-1 2.2 Preliminaries ...................................... 2-1 2.2.1 Typing in a Dialog Window ....................... 2-3 2.2.2 Execution of OPL Statements ..................... 2-4 2.3 The Classes Number, Boolean, and String ............ 2-5 2.3.1 Common Messages ....................•............. 2-7 2.3.2 Relational Messages ............•................ 2-B 2.3.3 Logical Messages ................................ 2-B 2.3.4 Substring Manipulation Messages ................. 2-9 2.3.5 Concatenation Message ........................... 2-9 2.3.6 Conversion Message ....................•..•...... 2-10 2.4 The Process of Sending a Message .....•............. 2-10 2.4.1 Identifying the Rec~iver .......•....•........... 2-11 2.4.2 Resolving the Message ........................... 2-11 2.4.3 Replies and Multiple Messages ....•.............. 2-12 2.4.4 Termination ..................................... 2-12 2.5 Atoms .............................................. 2-12 2.6 Class ·List ......................................... 2-15 2.7 Dialog Loops ............... ~ ....................... 2-17 2.7.1 The repeat Object .....................•......... 2-17 2.7.2 The read Object ................................. 2-18 2.7.3 The -.-.-.-eval Message ............................ 2-19 2.7.4 The ... print Message ....•...................... 2-19 2.7.5 The cr Object ................................... 2-20 2.7.6 New Dialog Loops ................................ 2-20 2.8 Using Class Class, Part 1: New Instances ........... 2-20
Chapter 3 OPL Programming :3.1 Class Window ...................................... 3-1 3.1 .1 Window Messages ................................. 3-1 3.1.2 New Windows ..................................... 3-2 3.2 Using Class Class, Part 2: New Messages ......•....• 3-3 3.3 Using Class Class, Part 3: Variables ......•........ 3-5 3.3.1 Temporary Variables ..•.•.•...................... 3-6 3.3.2 Instance Variables ...•.......................... 3-6 3.3.3 Class Variables ................................. 3-6 :3.3.4 Scope Rules ................................ , ..... 3-6 3.4 Using Utility Objects ...................•.......... 3-B 3.4.1 Conditionals and the done Object ................ 3-B 3.4.2 The to Object ........ ~ ....................... 3-9 3.4.3 The for Object .................................. 3-10 3.4.4 The "Iiidisp Obj'ect •..................•...•...•... 3-11 3.4.5 The forget Object ......•....................•..• 3-11 3.4.6 The catch and throw Objects ..................... 3-12 3 . 5 The Mous e .............................. ' . ........... 3 -1 3 3.6 Using Class Class, Part 4: New Classes .........•... 3-14

Chapter 4 The Class Editor 4.1 Introduction ................ . 4.1 .1 Invoking the Editor .. 4.1.2 Editing Commands. 4.2 Editing Messages ... . 4.3 Editing Methods .... . 4.3.1 Commands for Methods. 4.3.2 Methods for Class Elevator. 4.4 4.5
Editing Variables ...... . Running Class Elevator ..
5 Using Disk Files With OPL Chapter 5.1 5.2 5.3 5.4 5.4.1 5.4.2
Appendix A.1 A.2 A.3 A.4 A.5 A.6 A.7 A.8
Introduction ............... . Saving and Loading Workspaces .. Class File ....... . OPL Source Files~
Filing in .. Filing out ...... .
A Predefined Number .. Boolean. String .. Atom .. List. Window .. Class. File ..
Classes and their
B Predefined Utility Objects
Messages
· .. 4-1 · .4-1 · .4-3 .4-3
· .. 4-5 . ... 4-5
· ...... . 4-6 . .... . 4-8 ..... 4-11
· .. 5-1 .5-1
. .... . 5-2 · ...... . 5-4
.5-4 ·5-4
.A-2 · .A-4
· .. A-5 · . A-7
. ... . A-8 · • A-1 0
. ........... . A-1 :3 · ...... . A-1 5
Appendix B.1 B.2
Objects Objects
Whose Classes are Inaccessible .. ... . B-1 in UTIL.WRK ...... . .B-.6
Appendix C Error Messages. ................................ '. C-1
Appendix D ASCII Codes ..................................... D-1
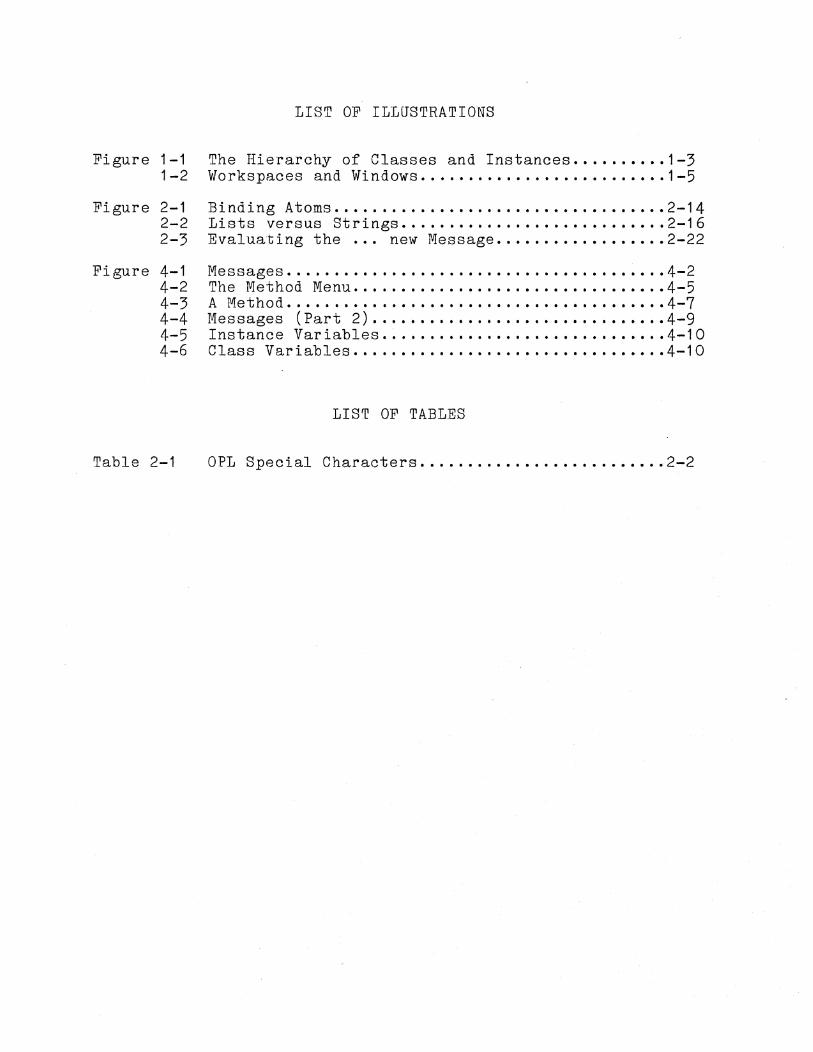
LIST OF ILLUSTRATIONS
Figure 1-1 The Hierarchy of Classes and Instances .......... 1-3 1-2 Workspaces and Windows .......................... 1-5
Figure 2-1 Binding Atoms .................................................................... 2-14 2-2 Lists versus Strings ............................ 2-16 2-3 Evaluating the ... new Message .................. 2-22
Figure 4-1 Messages ................................................................................ 4-2 4-2 The Method Menu .................................................................. 4-5 4-3 A Method ................................................................................ 4-7 4-4 Messages (Part 2) ............................... 4-9 4-5 Instance Variables .............................. 4-10 4-6 Class Variables .................................................................. 4-10
LIST OF TABLES
Table 2-1 OPL Special Characters .....................•...• 2-2


CHAPTER 1 OVERVIEW OF OBJECT PROGRAMMING LANGUAGE
1.1 Introduction
Object Programming Language (OPL) is an interactive, objectoriented language whose structure parallels many of the features of the iAP.X 432 object-based architecture. It uses a single uniform notation for all operations; it is extensible, both syntactically and semantically; and it supports a modular, tool-building programming style.
OPL shares many features with the educational programming language, Xerox Small talk 72, which was in turn based on the earlier languages Logo, Simula 67, and to a certain extent Lisp.
The following four rules define the basic structure of OPL:
1. Every entity in OPL is an object.
2. Every object is an instance of a class, and behaves in the manner prescribed by the class definition (although an object also maintains information unique to its own instance).
3. Classes are defined by the messages they recognize and the methods they use to reply to these messages.
4. Programming in OPL consists of defining classes, creating instances of these classes, and sending messages to the instances.
These concepts can be grouped into two categories, one centering around the notions of class and instance of class, the other around the idea of sending messages to objects. Classes are found in a few other programming languages (Simula 67, for example, has classes, and Ada uses the term "package" for a similar construction.) However, in their use of messages and objects, OPL and Smalltalk are unique.
OPL has a fundamentally interactive nature, a nature supported by the concepts of windows and workspaces, two other important features of the language. The workspace idea i,s found in the language APL, but the use of windows as primitive language elements is unique to OPL and Small talk.
1.2 Classes and Instances
An OPL class is a kind of template that can be used to create many individual entities with similar behavior. The class defines the common features of these entities, just as a cookie cutter defines a pattern that is repeated in all the cookies it
1-1
stamps out. For example, the clas·s Number defines the laws of arithmetic, and the instances of the class (individual numbers such as 2, 5, or 27) obey those laws.
Classes are tools for. extending a language in a modular ·way. The OPL user can easily customize his system by defining new classes or adding new features to existing classes. The necessary programming is done conversationally, testing each definition as it is entered. By creating new classes the OPL user creates objects modelling his own abstract ideas, and invents his own notation for using them as well. Extensibility permits new facilities to be used as if they were built in. The user interacts with new objects through the same notation as with the old. Separately written tools can be combined with relative ease.
Classes should not be confused with user-defined types, which are allowed in many languages, Pascal and C, for example. In these programming languages, types are just labels placed on collections of variables. An OPL class, on the other hand, defines the operations that these variables may perform. To specify that an item is in a class is to define the behavior of the item. To specify that a variable is of a certain type is usually just to place it in a labelled box. (This is true, for example, of the typedef operation in the language C, which allows users to define customized data types. Declaring a C variable to be of some customized type says nothing about the operations that may be performed on the variable.)
On the other hand, an OPL class is closely related to an abstract data type, a concept that has emerged in the last decade from research into programming languages. The language Simula 67 -- an ancestor of OPL -- was the first language to implement abstract data types with the class construction. More recently, CLU, Alphard, Concurrent Pascal, Ada, and Smalltalk have all implemented versions of the same idea.
The iAPX 432 suppor·ts abstract data types (in Intel terminology, type managers) in the architecture itself. A type manager is a collection of procedures that manipulate data structures of one typ~. The iAPX 432 architecture provides hardware-recognized structures that are used to implement type managers. Type managers are discussed in more detail in the Introduction to the iAPX 432 Architecture.
The key word in "abstract data types" is abstract, and in fact the notion of abstraction underlies the whole class concept. Th~ basic idea of abstraction is to capture the "essential" behavior of a set of related instances. Abstraction allows the separation of the invariant common features from the idiosyncratic behavior of individual instances. In the context of programming, abstraction. allows the separation of what the instances of a class do from how they do it.
1-2

Even though the concept of abstact data type and class are only now being implemented in programming languages, the basic ideas of class and instance have a very long pedigree in Western intellectual history; they can be traced back directly to Plato's theory of Forms. Plato believed that an abstract "Form" exis~ed for every collection of things which we perceive to be similar in some way, a Form which captured the essence of the similarity. He thought that behind the many tables in the world, for example, there was a single ideal Table that somehow described the essence of "tableness". Classes function in OPL much as Plato thought Forms did in the world.
Since every entity in OPL is an instance of a class, classes must also be instances of some class. In fact, classes are instances of a special class, named Class, which has the unique property of being an instance of itself. The class Class defines the essential properties that all classes have in common. Figure 1-1 shows the relationships among Class, classes, and instances of classes.
CLASS OF CLASSES. IAN INST ANC~ OF ITSELFI
CLASSES (INSTANCES OF CLASS!
~CLASS
~/\""'" ( PRE.DEFINED) (~~~R DEFINED) CLASSES CLASSES
/ / ..... /' .................. ..
"Ii'" ·"~:r'· TO~ ... '-... ,c!'r ( PRE-DEFINED) f PRE-DEFINED ) (PRE-DEFINED) ( USER ) ( USER-DEFINED )
INSTANCE \UTlLITY OBJECT!: INSTANCES 1~~~lNNEgE' INSTANCES ONLY
I \ I I ! \ . . e' e2 85 repea' disp w
OBJECTS (lNST ANCES OF CLASSES)
Figure 1-1. The Hierarchy of Classes and Instances
1.3 9bjects and Messages
One can distinguish between an action-oriented view of programming and an object-oriented view. In the acticn-oriented view,
. programs are the fundamental entities and objects are auxiliary entities on which programs operate. In the object-oriented view, objects are fundamental, and actions are the auxiliary entities that describe the behavior of objects.
OPL is an object-oriented language. As a result programs are conceived as collections of objects, which send and receive messages and respond to these messages by actively doing things. An object cannot be operated upon directly; it can only be sent requests to perform actions and return replies. This view
1-3

differs from the conv~ntional picture, implici~ in most programming languages, of a static data structure being acted on by procedures.
Literally everything in OPL is an object. Every object is a member of some class which describes its representation, the messages it can receive, and the methods it uses to answer them. OPL is easily ext~nded with new classes of objects and new syntax for messages.
The OPL world-view may seem rather unusual compared with other programming languages. But, with experience, the object-oriented viewpoint becomes second nature. Objects can be thought of almost as intelligent creatures inside the computer who know how to perform certain kinds of tasks. The number 3, for instance, is a creature that knows how to do arithmetic. Objects that behave in the same way are grouped into classes. The ability to do arithmetic is a property of all numbers, since they all belong to the class Number.
1 .4. Windows and Workspaces
OPL is an environment for interactive problem solving. This environment is populated by a diverse assortment of objects, each of which can respond to a set of messages. The entire instantaneous environment is called a workspace. All objects and classes remain in the workspace after they have been created, unless they are explicitly destroyed.
The entire OPL environment is rather like a workshop,with each workspace a separate bench. Programmer.s can go from one workspace to another in the same manner as one can go from a metalworking area to a woodworking area. Different sets of tools will be in different workspaces, just as the set of metalworking tools will differ from the set of woodworking tools.
A window is a kind of viewport into a workspace. Figure 1-2 illustrates this relationship. OPL users are free to create any number of windows (which appear as rectangular boxes on the terminal screen) and associate them with any objects. The object uses the window as a means of communicating with the user. Windows themselves are objects, so they can be sent messages. Windows can be moved to any position and grown to any size. They can overlap, just as pieces of paper on a desk can overlap, without destroying any data. Together with workspaces they help to make the OPL environment a "friendly" place.
1-4

o object o
workspace
Figure } .. 2. Workspaces and Windows
1-5

2.1 Introduction
CHAPT.ER 2 ELEMENTARY OPL PROGRAMMING
This chapter and the two that follow contain a self-paced learning guide to the OPL language. This part of the manual should be read while sitting at the terminal of your Intellec 432/100 system.
OPL is an extensible language -- in fact programming really consists of extending the language to encompass new classes of objects. Consequently, the line between the basic language itself and applications is to a certain extent an arbitrary one. For the purposes of this manual, "OPL" is defined by the contents of the ISIS file, EDITOR.WRK, on your distribution diskette.
Appendices A and B constitute a reference document for all the classes and objects available in the EDITOR.WRK version of OPL. After you have worked through this chapter and Chapters 3 and 4, you will probably have to consult only these appendices when using OPL in the future.
You will inevitably make errors when programming in OPL. Whenever your error can be detected by the interpreter, the following message will be typed on the screen:
Error n
where n is a number. Appendix C contains a list of these error codes and their meanings. (The actual error messages themselves are not stored in the system, in order to conserve memory for workspaces.)
2.2 Preliminaries
Before proceding any further, make sure you have followed the instructions in Getting Started on the Intellec 432/100 that show how to install and back up your software. Then refer to Getting Started again for the procedure which loads the OPL interpreter from an ISIS disk file into memory.
When this program has loaded the screen will clear and a rectangular box will appear at the bottom with the characters "? " in it. You will also see a cursor character (the actual -character depends on your terminal -- see Table 2-1) in the bottom right corner of the screen; this is the "mouse" symbol.
2-1

The keyboard includes several keys which have special meanings to OPL. These keys and the character codes they produce differ on the different terminals that can be configured in an Intellec 432/100 system. (See Table 2-1 for a chart of the special keys.) In this manual, the generic key names found in the left column of the chart will always be used. For example, the key whose function is to cause OPL code to be executed will be called DOlT or !, but on your terminal this key will be represented by RETURN.
Table 2-1. OPL Special Characters
+--------------------------------------------------------------+ i Name i Meaning iTerminal Key or Symbol I +------------+-------------------------+-----------------------+
! or DOlT I send message
NEWLINE
STOP
, , lmove cursor to next , , I stop execution , ,
MOUSE LEFT I move mouse left , , ,MOUSE , RIGHT I move mouse right , , , iMOUSE UP I move mouse up , , , , iMOUSE DOWN i move mouse down , , , , iMOUSE BUTTON set mouse button , , BACK SPACE
, , , , ,
delete character
CLEAR LINE I delete line , ,
line
<RETURN)
<LINE FEED)
<CTRL)C
<CTRL)A
<CTRL)S
<CTRL)W
<CTRL)Z
<CTRL)B
Hazeltine 1500: <BACKSPACE) or <DELETE) Hazeltine 1510:
<BACKSPACE) or <RUB) VT52: <DELETE) ADM 3: <RUB)
<CTRL)L
RE READ ldelete all to last prompt: <CTRL)X , +-------+------------------------------------------------------+
screen prompt ? I
screen DOlT echo
screen mouse symbol Hazeltine 1500: • All others: •
, , , , , , , , , , , , screen cursor symbol I
+--------------------------------------------------------------+
2-2

Now type the following command
load ":fn:editor.wrk"
and press the DOlT key. This command will load in the EDITOR.WRK workspace from the corresponding ISIS file on disk drive n. (ISIS does not distinguish between upper and lower case for filenames. Throughout this manual we will use lower case filenames in the actual OPL statements, but upper case names in text.) As a result of this action, the rectangular box will vanish, then reappear with the new heading, Editor.
(In order to return from OPL to ISIS at the end of an interactive session, you should type
isis
and press the DOlT key.)
2.2.1 Typing in a Dialog Window
The rectangular box showing at the bottom of the screen is a dialog window. Dialog windows are used for typing in OPL code for immediate evaluation. Keystrokes and the result of each evaluation will be printed in the window. The "?" is a prompt indicating that the dialog window is ready for receiving input. The "_" is a typing cursor.
Dialog windows behave like miniature terminals. Whenever a word will not fit at the end of a line in a window, that word will be moved down to the beginning of the next line. Pressing the NEW LINE key while typing on the bottom line in the window will cause the text to scroll up inside the window. Dialog windows offer the following simple text editing features:
- To delete the last character typed, press the BACKSPACE key. Only the current line is affected.
- To delete the entire current line, press the CLEAR-LINE key.
To delete everything that has been typed since the last prompt, press the RE-READ key. The letters "DEL" and a new prompt will appear.
Try typing a few lines of text, then experiment with the editing features.
2-3

2.2.2 Execution of OPL Statements
A dialog window will not do anything with keyboard input until the DOlT key is pressed. Until DOlT is pressed, you can edit your input in the manner described above. You can use the NEW LINE key to move to a new line.
Now try some simple arithmetic. Type
2 + 2
then press the DOlT key; OPL echos "!" and types the answer "4" on the next line. OPL allows integer addition (+), subtraction (-), multiplication (*), and division (/). The range of allowable integers is from -16,384 to 16,383. If you get a number that is out of range, OPL will answer "no". Operator precedence is not followed (i.e. multiplications are not necessarily performed before additions in complex expressions), so you should use parentheses to make your meaning clear (see section 2.3.2). Negative numbers cannot be entered directly, but must be expressed as (O-x). Now experiment with some simple, calculatorlike problems. Don't forget to press DOlT.
Actually, OPL interprets even these simple expressions as objects being sent messages. The above example, 2 + 2, is interpreted as the message "+ 2" sent to the object "2". The object 2 has a method for answering this message, and that method replies with the object "4".
The general format of an OPL statment (i.e. a message sending) is the following:
object message 1.
The object is called the receiver of the message. We use the symbol 1. to represent DOlT.
Everything in OPL is an object, including the dialog window. The dialog window is called disp, and it can be sent a number of messages, two of which are "move to (1) (c)" and "grow to (h) (w)", where 1 is a line number, c is a column number, h is height, and w is width. These messages can be used to change the position and size or shape of the window. Try typing
disp move to 2 21
The dialog window will mpve to the top of the screen. (The coordinates (2,2) are used instead of (1,1) in order to keep the border of disp visible.)
2-4

Now type
disp grow to 22 351
The dialog window will change shape to cover the left 1/2 of the screen. This window format is often convenient, because previous commands remain visible as they scroll up the screen.
Spend a few minutes moving the window around and changing its size and shape until you are comfortable with it. In the process you will familiarize yourself with the parameters of your screen. Don't be alarmed if you accidentally move part or all of the window off the screen, even the part containing the cursor. The window will continue to respond to messages. (In the remainder of this chapter we will assume that your dialog window is at position 2 2, with size 22 35. If you have not chosen this format, you may have to make adjustments to some of the examples that follow.)
2.3 The Classes Number, Boolean, and String
In this section we will discuss three predefined classes of objects -- Number, Boolean, and String -- and messages that these classes answer. The class Number contains 32,768 objects, the integers from -16,384 to 16,383. The class Boolean has two objects, ~ and no. The class String contains objects consisting of sequences of bytes (a byte is a number between 0 and 255). Strings consisting exclusively of bytes between 0 and 127 (ASCII characters -- see Appendix D) may be -typed in a dialog window as sequences of characters enclosed in quotation marks (e.g. "hello").
We represent the syntax of a message by the message pattern
message
where " .•.. " indicates the object that receives the message.
Here are the message patterns for some of the most important predefined messages recognized by number, boolean, and string objects:
A message common to all classes:
•.. is ?
2-5'

Messages specific to each class:
NUMBERS
arithmetic:
+ (n)
- (n)
* (n)
/ (n)
relational:
= (n)
<> (n)
> (n)
< (n)
conversion:
. .. chars
BOOLEANS
logical:
and (b)
or (b)
STRINGS
concatenation:
. .. + (s)
substring manipulation:
[ (n) ]
find first (s)
[ (n 1) to (n2) J length
relational:
= (s)
< > (s)
> (s)
< (s)
where (n), (n1), and (n2) represent either numbers or expressions that evaluate to numbers; (b) represents either a boolean or an expression that evaluates to a boolean; and (s) represents a string or an expression that evaluates to a string.
For example, to count the number of characters in the string "antidisestablishmentarianism" type
"antidisestablishmentarianism" lengthl
In this statement the message receiver is the string "antidisestablishmentarianism", and "length" is the message being sent to the string.
In message patterns, the use of parentheses, e.g (n1), indicates a parameter that the user must replace with an object of some type or an expression that evaluates to an object. In the actual message sending, parentheses will not ordinarily be used. For example, the message sending
2-6
"hi" + "there"!
is an instance of the message pattern
. .. + (s)
of the class String. This message results in two strings being concatenated. Instead of substituting a string for the parameter (s), you could substitute an expression that evaluates to a string. For example, the expression
"th" + "ere"
could be substituted for (s). Try it:
"hi" + ("th" + "ere")..!..
(Actually, the parentheses are not needed, as we shall see in section 2.4.2.)
You have already been exposed to the arithmetic messages for Class Number (see section 2.2.2). In this section we will cover six other groups of messages: a message common to all classes, relational messages for both numbers and strings, logical messages for Class Boolean, substring manipulation messages for Class String, the string concatenation message, and the conversion messages for numbers and strings.
2.3.1 Common Messages
The message ... is? is common to all predefined classes. (It is also automatically definBd for all newly-specified user classes --see section 4.2.) The message ..• is ? can be sent to any object in order to find out its class. For example, try
23 is ?!
no is ?!
"dog" is ?!
The messages ... print and ... isnew are also common to all classes. The ... print mess~ge is described in section 2.4.3, while the ... isnew message is described in section 2.7. The ... isnew message cannot be explicitly sent; it is sent implicitly under the circumstances explained in section 2.7.
2-7

2.3.2 Relational Messages
Both the Class Number and the Class String recognize a group of relational messages. These messages implement the operations Equals, Does Not Equal, Greater Than, and Less Than. For numbers, numerical order is used; for strings alphabetical order is used. (Actually, numerical order is used for strings as well, since each entry in a string is really a number between 0 and 255. In the ASCII code (numbers 0-127), lower case letters are greater than upper case letters, which are in turn greater than numerals. See Appendix D for a table of the ASCII code.) Try these examples:
23 < 351.
45 <> 461.
"Jean" > "Jim"!
(The reply is no. Since the first letters are the same in both strings, the comparison is by the second letter; and "e" is less than "i", not greater.)
"Bill" = "Billy"1.
(The reply is no. To be equal, strings must match at every position of both strings, so strings of different length cannot be equal.)
"Jim" < "Jimmy"1.
(The reply is ~. A string equal to the first n characters ot a longer string is defined to be less than the longer string.)
2.3.3 Logical Messages
Two messages defined for Class Boolean are used to implement the operations Logical And and Logical Or. Try the following examples
yes and no!
yes and yes1.
yes or yes1.
(The answer is ~, because in OPL Logical Or is Inclusive.)
yes or (3 = 4)1.
2-8

The last example illustrates the use of an expression (i.e. 3 = 4) as a message. The expression must be evaluated before it can be sent. In this case, the expression evaluates to no, so the message ... or no is sent to the object~. The expression itself is interpreted as a message sending, as are all statements in OPL; it is interpreted as the object 3 being sent the message ... = 4. Section 2.4.2 explains in more detail the use of expressions as messages.
2.3.4 Substring Manipulation Messages
Objects of the Class String recognize four messages that facilitate the manipulation of substrings. The message patterns of these messages are ... length, ... [(n)], ... find first (s), and ... [(n1) to (n2)]. Try the following examples:
"micromainframe" lengthl
"micromainframe"[5Jl
(The result is 111, the ASCII code for "0", which is the 5th entry in the string.)
"micromainframe" find first "o"!
(The result is 5, the'position in "micromainframe" of the first "0".)
"micromainframe" [5 to 5Jl
(The result is "0", the 1-byte substring beginning at position 5. )
"micromainframe" find first "main"!
(The result is 6, the position in "micromainframe" of the first letter of "main".)
"micromainframe" [6 to 9Jl
(The result is "main", the substring of "micromainframe" extending from position 6 to position 9.)
2.3.5 Concatenation Message
The message ... + (s) is used to concatenate strings. The parameter (s) can be a byte, a string or an expression. For example, type
"com" + "puter"l
"star" + 116!
2-9

(The number 116 is the ASCII code for the 1-byte string "t".)
~he pattern "" + byte can be used to convert a number between 0 and 127 into a 1-byte string consisting of the corresponding ASCII character. For example, try
"" + 651
The result is "A".
(The predefined utility object kb -- defined in Appendix B -can be used to perform the reverse operation; it returns the ASCII numerical code for the next character typed at the keyboard. Try
kb!
OPL now waits for you to type a character, for example
A
The result is 65.)
2.3.6 Conversion Message
The message ... chars is used to convert numbers to the equivalent strings of numeric characters. For example, type
432 chars1
"iAPX " + 432 chars!
2.4 The Process of Sending a Message
In this section, we will examine in a step-by-step manner the process carried out by the OPL interpreter when messages are sent to objects and the objects reply. Only numbers, strings, ~nd booleans will be used, and the messages will be relatively elementary. For a more detailed discussion of many of these topics, consult section 2.7, Dialog Loops.
2-10

2.4.1 Identifying the Receiver
The first step OPL takes in executing a statement is to determine what object is to be the first message receiver. The first object in the statement is taken to be the receiver, unless parentheses indicate that an expression is to be evaluated and the result is to be used as the receiver. Consider the following examples:
statement
3 + 4! "abc"-length! (3 = 4) or yes! (3 + 4) * 51 -
receiver
3 "abc" no 7
2.4.2 Resolving the Message
:message
+ 4 length or .yes * 5
Once the receiver is obtained, OPL begins matching the allowed message patterns against the actual message that has been sent. Matching proceeds from left to right, evaluating expressions as they are encountered. No operator precedence is used; the longest possible match is taken. See if you can predict how OPL will evaluate the following statement:
1 + 2 * 3 + 4 * 5 + 6 * 7!
Did you get it right? The evaluation proceeds by recursion:
first: 1 is the receiver and the expression ... + (2 * 3 + 4 * 5 + 6 * 7) is the message. But OPL must evaluate the expression before the message can be sent. So,
second: 2 is the receiver and ... * (3 + 4 * 5 + 6 * 7) is the message. Again the expression must be evaluated before the message can be sent. This process continues until,
finally 6 is the receiver and ... * 7 is the message. The result is sent to 5, and so on back to 1. Effectively, the statement is interpreted as
1 + (2 * (3 + (4 * (5 + (6 * 7)))))1
Test by typing this expression.
Some objects recognize the empty message, for example the utility objects isis and kb that were introduced in sections 2.2 and 2.3.5, respectively. Typing these objects by themselves constitutes an entire message sending. If OPL can't match the actual message that was sent with any of the standard message
2-11
patterns recognized by the receiver object, it checks to see if the receiver recognizes the empty message; if the receiver does recognize the empty message, OP1 assumes that this was in fact the intended message.
2.4.3 Replies and Multiple Messages
Since everything in OPL is an object, the reply to a message must also be an object. The choice of a reply is arbitrary but is generally whatever will be most helpful. Hence, the number 3 will reply to the message "+ 4" with the number 7. Since the reply is an object, it too can be sent a message. Thus it is possible to stack several messages into a sequence. Try
"computer" length + 40l
In this case, the string "computer" is sent the message ... length. The reply is a number, 8, which is then sent the message ... + 40. This process of piling one message on top of another can continue indefinitely, as long as each reply recognizes the following message.
2.4.4 Termination
In OPL, statements are terminated normally or abnormally. Normal termination is accomplished with the DOlT key or with a period. DOlT causes the statement to be immediately executed; periods simply separate one statement from the next in an OPL program. Periods are used to separate several statements, when it is not intended for the reply of one message to become the receiver of the next. Normal termination is explained in section 2.7, Dialog Loops, where several examples are shown. Abnormal termination is caused by use of the STOP key or by the occurance of an OPL error conditlon. Abnormal termination is discussed in section 3.4.6, The catch and throw Objects.
2.5 Atoms
Not much programming can be accomplished if all strings and numbers have to be written explicitly. You are probably familiar with the use of variables to stand in for numbers in other programming languages. For example, Pascal uses assignment statements such as "x := 34" to bind the value "34" to the variable "x". The variable can then be used in any expression where 34 itself can be used.
OPL has a similar concept, but it is far more generalized. In OPL certain objects called atoms can be bound to any other object, not just to numbers. The following are some of the most important messages recognized by atoms.
2-12
is ?
<- (object)
eval
The binding of atoms to other objects is accomplished with the <- (object) message. Try the following:
@n <- 4 o OJ..
@n <- n + 32J..
@s <- "iAPX " , s!
s + n chars!
The @ symbol is very important in OPL. It is a predefined utility object (see Appendix B) which indicates that what follows immediately after @ is to be taken literally. (It serves the same purpose as the QUOTE function in Lisp.) @a means "the atom a itself", not what a is bound to (i. e. not the"value" of a). In programming languages other than OPL or Lisp this concept is difficult to convey. In Pascal, for example, one cannot distinguish between the variable x itself and the current value of x.
The following examples may help clarify this notion:
s is ?!
@s is ?!
n is ?!
@n is ?!
The message ..• eval has the opposite effect. An atom replies to .•. eval with the object to which it is bound (i.e. its "value"). For example:
@s eval!
is equivalent to
s!
2-13

Figure 2-1 shows the relationships of three different atoms to each other and to a string object.
CD @I - ". leslsl,ln,"
• (AI om)
CD@lC-@'
Figure 2-1. Binding Atoms
b (Alom)
Atom a was bound to the string via the message
@a <- "a test string"l
Atom b was also bound to the same string, but with a different message:
@b <- a!
(Note that a by itself refers to the string, since the atom a is bound to the string.) The third atom, £, is bound to the atom a, via the message
@c <- @a!
(Notice the difference between this message and the previous one. )
Test the bindings of each of these atoms by typing
@a eval!
@b eval!
@c eval!
2-14 .
Now try the following example, which illustrates the binding of atoms to objects in an interesting way.
@buffer <- "Now is the time for all good men to come to the aid of their party."l.
@start <- 1!
@end<- buffer lengthl.
@search <- "men"!
@replace <- "women"!
@pointer <- buffer find first search!
@buffer <- buffer[start to pointer - 1] + replace + buffer[search length + pointer to endJl.
(We have shown this statement on three lines for clarity; if you want to follow this format, use the NEW LINE key to separate the lines.)
buffer!
These statements have the following effect:
The string, buffer, contains the text "Now is the time for all good men to come to the aid of their party."
This string is split apart and the substring, search, containing the text "men" is removed.
Then the substring, replace, containing the text "women", is joined together with two of the pieces of the string, buffer, to create a new string, also named buffer.
The result of these operations is that "men" has been replaced by "women" in the string buffer. These few statements may suggest a simple search-and-replace tool to you. In section 3.4.2 we will construct just such a tool.
2.6 Class List
Lists. are somewhat like strings, except that they are not limited to characters; any object may appear at any position of a list. (See Figure 2-2 for an illustration of the difference between strings and lists.)
2-15

SIring { I "Ihlsll. Itrlngl" I ~ CI ... 01 Oblect
121 Number
I "hello,ul 2 String
mJ 3 Number list I ". long string" I 4 String
01"'lrlng b"l[~ 5 lilt
~ • Boole.n
Figure 2;.2. Lists versus Strings
The utility object vars generates a list of all named objects in the workspace. Try typing
vars!
Lists are typed and printed enclosed in parentheses. In fact, OPL interprets as a list any sequence containing a combination of atoms, strings, numbers, or lists enclosed in parentheses. The following are the message patterns for some of the most important of the predefined messages recognized by objects of the Class List:
is ?
length
eval
. . . [(n)J
where (n). is a number or an expression that evaluates to a numb.er-.-
When a list is typed explicitly, it must be preceded by an @ symbol, otherwise it will be interpreted by OPL as a par·entnesised expression and an attempt will be made to evaluate it. For example, try
2-16

@(3 + 2) is ?l
(3 + 2) is ?l
Now try these other examples.
@(3 + 2) lengthl
@(3 +2) print lengthl
@(3 + 2) eval!
(3 + 2)l
The last two of these examples mean the same thing. Lists respond to the ... eval message by running themselves as OPL code.
Atoms can be bound to lists just as they can be bound to numbers or strings. Try
@m <- @(3 + 2)l
m!
m is ?!
m lengthl
m eval!
2.7 Dialog Loops
The program that monitors the dialog window and executes typedin statements is called a dialog loop. This program has a very simple format:
repeat {read eval print. cr)l
In this section we will examine the dialog loop, word by word, and explain some of its features. It is very important for you to understand how the dialog loop works.
2.7.1 The repeat Object
The predefined utility object repeat is defined in Appendix B. Basically, repeat executes over-and-over as OPL code any message that is sent to it. The message sent to repeat must be enclosed
2-17

in parentheses. Repeat loops can be exited by pressing the STOP key; another way is by using a conditional expression and the done object (see section 3.4.1).
2.7.2 The read Object
The object read responds to the empty message by taking a sequence of characters from the keyboard and producing a list of tokens. The list contains everything between the prompt? and the DOlT !. Each entry in the list is a separate token. Tokens may be divided into five categories:
category
Atom
Number
String
List
symbol
definition
A sequence of characters beginning with a letter and followed by zero or more letters or digits.
A sequence of one or more digits.
A sequence of printing characters between" marks (except" itself). In general, a sequence of bytes, (i.e. numbers between 0 and 255).
A sequence of tokens between left and right parentheses.
@ (ASCII 64): the literal symbol ~ (ASCII 26): the statement sep-arator
<-, <=, <>, >=, => : the defined double-characters.
«, », ==, ><, =< : the reserved double-characters.
Any other printing character that does not have a special meaning to OPL. (For example, +, *, -, /, =) Nonprinting characters are ignored.
For example, in a dialog loop, when you type
@s <- "hello"!
the object read produces a four-element list. To verify this, type
2-18
read!
@s <- "hello"!
You will get the list (@ s <- "hello").
2.7.3 The ... eval Message
The message ... eval is recognized by objects of the class List (see section 2.6); it causes lists to execute themselves as OPL code. In the dialog loop, this message is used to execute the list of tokens produced by the read object. The reply to this message is the final object produced when the list is executed. For example, the final object produced by the statement
"hello" length + 41
is the object 9. So, if you type this statement in a dialog loop, read will produce a 4-element list ("hello" length + 4), and the reply of ... eval will be 9.
When several statements are separated by periods, the reply from the last statement becomes the reply of the whole. For example, type
"statement 1" • "statement 2" . "statement 3"!
The reply of the entire statement is the string "statement 3" and in the dialog loop "statement 3" is the reply of the ... eval message.
2.7.4 The ... print Message
The message
is common to objects of all predefined classes. The reply to this message is the receiving object itself; in addition some representation of the receiving object is printed in disp.
The ... print message is used in the dialog loop to,print the reply of the ... eval message. For example, type these two statements
2-19

40 + 40!
(40 + 40) printJ..
In the first example, the reply of the entire statement is 80, which is therefore the reply of the ... eval message in the dialog loop. This reply is then sent the message ... print in the dialog loop, so 80 is printed in disp.
In the second example, 80 is printed twice. The reply of the expression (40 + 40) is sent the message ... print, which causes the receiver (i.e. 80) to be printed the first time and also returns the number 80 as the reply of the whole statement. Thus 80 is the reply of the ... eval message in the dialog loop; so again 80 is sent the message ..• print, and it is printed a second time.
2.7.5 The cr object
The period (.) in the program of the dialog loop separates two statements: -read eval print and cr. The last of these is a predefined utility object that recognizes the empty message and replies by printing a NEW LINE character in disp. This object is not critical to the dialog loop; it merely serves to make the format of dialog windows easier to read.
2.7.6 New Dialog Loops
To get a new dialog loop for disp that runs on top of the old one, type the dialog loop program statement
repeat (read eval print . cr)l
To return to the original loop, type the utility object done, which is defined in Appendix B. (These lower-level dialog loops are also terminated by STOP or by any OPL error. See section 3.4.6, The catch and throw Objects.) The utility object indisp lets you define new dialog windows with their own dialog loops (see section 3.4.4).
2.8 Using Class Class, Part 1: New Instances
Classes are themselves instances of the class Class. In this section we will examine only one of the messages recognized by Class Class:
... new
2-20
This message causes the receiver class to create a new instance of itself. For example
List new 10!
creates a new list of length 10. All the positions in the list are initialized to the object "nil". This statement is not useful, however, because the new list is not bound to any atom which can be used as an identifier (it has no name). Thus the new list is inaccessible. The new list must be bound to an atom in some manner, for example
@m <- List new 10!
This statement results in the creation of a new list of length 10, which is bound to the atom "m". Again the positions are initialized to nil.
Actually, this message is a little more complicated than we have indicated. The message •.. new is a Class message, which can be sent to any class. But the parameter "10" is not associated with the message ..• new. Instead "10" is a parameter for ... isnew (a1) which is a List message. The class messages only refer to the things all classes have in common, but length is not a property of all classes by any means. The classes Number and Boolean don't have a length parameter, for instance.
The connection between the Class message ... new and the List message ... isnew (a1) is very simple. The ... new message causes List to create a new uninitialized instance of itself. Then the uninitialized instance is sent the message ... isnew (a1) with whatever parameters follow the ... new (in this case "10") substituted for a1. The ... isnew 10 message creates an initialized list of length 10 (all the positions are initialized to nil, of course). This initialized list is finally bound to the atom m by the •.. <- (object) message.
The ... isnew message can only be used in this manner, that is, only to initialize objects that are uninitialized. Therefore, ... isnew can only be sent as part of the ..• new message; it cannot be sent explicitly to an object.
Thus, the message
@m <- List new 10!
really consists of three sequential messages:
2-21
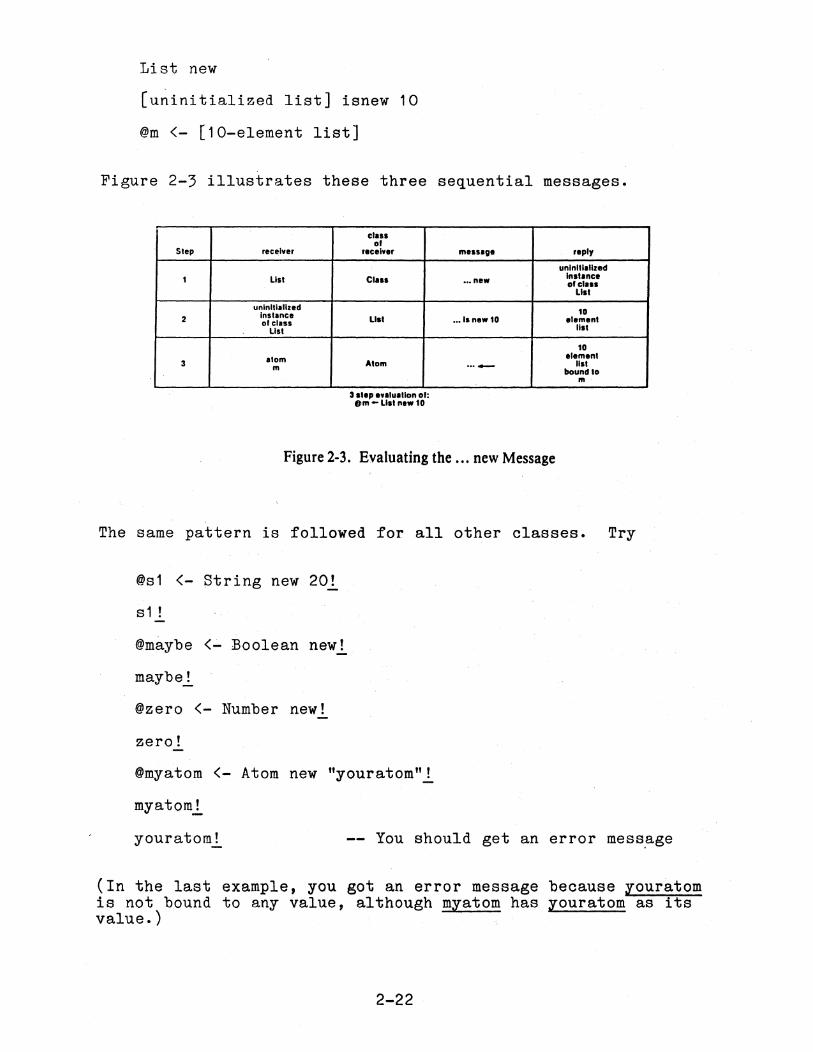
List new
[u~initialized list] isnew 10
@m <- [10-element list]
Figure 2-3 illustrates these three sequential messages.
Step
,
2
3
receiver
List
unlnlliallzed Instance 01 class
LIst
alom m
cla.1 DI
receive,
Clall
LIlt
Atom
:I Itep evaluallon 01: om .. LIlt new 10
melsage
••. new
••• llnew 10
... .-
Figure 2-3. Evaluating the ... new Message
reply
unlnillalized Inltance Dlcl .. 1
LIlt
10 element
nit
'0 element
nit bound to
m
The same pattern is followed for all other classes. Try
@s1 <- String new 20!
s1 !
@maybe <- Boolean new!
maybel
@zero <- Number new!
zero!
@myatom <- Atom new "youratom"l
myatoml
youratom l -- You should get an error mess,age
(In the last example, you got an error message because youratom is not bound to any value, although myatom has youratom as its value. )
2-22

New strings are not initialized to any default value, although the space for them is allocated. The value of new strings can be changed by sending them messages. Neither boolean objects nor numbers need ever be created in this manner. A new number would be set to O. New boolean objects would be ~.
Now turn to Appendix A and study sections A.1 through A.5. In these sections all the predefined messages for the classes Number, Boolean, String, Atom, and List are described. Experiment with some of the messages you haven't used.
2-23

3.1 Class Window
CHAPTER 3 OPL PROGRAMMING
The class Window is one of most useful features of OPL. Instances of this class can be made to appear as rectangular boxes on the screen in any location. They can be manipulated in the same way as disp was manipulated in section 2.2.2, and text can be printed in them as easily as it can be printed in disp. Windows provide a striking visual component to OPL; they seem to make objects "real" to users.
3.1.1 Window Messages
Windows recognize several primitive messages, which are described in Appendix A. The one predefined instance of class Window is disp. To refresh your memory, type
disp move to 2 10!
disp grow to 2 2
disp move to 2 2 grow to 22 35!
If you are wondering what disp's reply to each message was, the text "<Window>" that was :printed is a clue. In the dialog loop (discussed in section 2.7) the reply from the ... eval message gets sent the message ... print. Objects in predefined classes respond to the ... print message by printing some textual representation of themselves in disp. In the examples above disp was asked to print itself (because in these cases the reply to the ... eval message was the object disp itself). Now some objects, such as numbers, have natural ways of printing themselves, but many objects have no obvious printable representation. In lieu of a printable representation of itself, an object will print the name of its class in angle brackets. You can supply more helpful printing methods if you so desire.
The actual window bound to the atom @disp may be changed by using the indisp object described in section 3.4.4. This feature allows OPL terminal responses to be directed to arbitrary objects that answer the message ... <- (text).
Now spend some time sending messages to disp. For example:
3-1

disp unframe!
disp frame!
disp unframe frame!
In the last example, disp first receives a message to unframe itself, and responds by erasing its frame. Since windows reply to this message with themselves, disp immediately becomes the receiver of the next message, and so re-draws its frame. Again the reply is disp itself, which in the monitor receives the message to print, and hence prints "<Window>".
repeat (disp unframe frame)l
(Press the STOP key when you get tired of this one.)
disp clearl
repeat (disp <- "*")1
disp hide showl
3.1.2 New Windows
As discussed in section 2.6, the Class message ... new is used to create new instances of classes. This message can be used to create new windows.
To create a new window and name it w, type
@w <- Window new 5 25 2 40 show
This statement creates a new uninitialized window, which immediately receives the message "isnew 5 25 2 40". The new window initializes its height and width to 5 lines of 25 columns and its screen location to line 2, column 40. Then the message ... show causes the window to appear on the screen.
Now try sending some messages to w, for example:
w move to 15 401
w grow to 5 10!
w <- "hi there"!
3-2

w unframe frame!
w at 4 3 <- "HELLO"!
Make up some of your own.
3.2 Using Class Class, Part 2: New Messages
One can extend or modify the definitions of existing classes, both predefined classes of OPL and those created by the user. (We will consider user-defined classes in Section 3.6.) The class definitions are extended by adding new messages and the methods that are used to answer them. (We have not had to discuss methods before because the methods of primitive messages in predefined classes are invisible.) New messages and methods are added by sending the Class message
... answer (a1) by (a2)
to the class to which you wish to add the message. The parameters a1 and a2 in this pattern are replaced by lists. List a1 containS-the new message, while list a2 contains the method for the new message (i.e. the OPL code that, when executed, performs the function requested by the message).
As a simple example, suppose we want windows to be able to "flash" themselves in order to attract our attention. We will extend the class Window to include a "flash" message. In order to do this we must define two things: the syntax of the message and the method used to answer it. Our new message syntax will be
flash (n) times
The method for flashing will be to erase and redraw the window's frame the requested number of times. We can add this capability to class Window by evaluating
@list1 <- @(flash (n) times)l
@list2 <- @(do n (self unframe frame»l
Window answer list1 by list2!
or, more compactly,
Window answer @(flash (n) times) by @(do n (self unframe frame))l
3-3

The method uses two utility objects that have not yet been explained. Consult Appendix B for definitions of do (n) (@code) and self. The do object replies to the ... (n) 1@code) message in much the same-Way that repeat replies to the ... (@code) message, except that the code is evaluated only (n) times instead of indefinitely. The object self replies to the empty message with the receiver of the current message; it allows objects to send themselves messages.
In more detail, the object do answers a message of the form
... (n) (@code)
There are two components to this message; both are parameters. The first parameter n is evaluated. The second parameter code is received by do unevaluated. This is indicated by the @ symbol preceding the-variable name in the message pattern. The parameter is not initially evaluated by the interpreter because do will evaluate code itself; in fact, do's response to this -message is to evaluate the code you send it the specified number of times, as in:
do 3*4 (disp unframe frame)l
When do receives this message, n is 12 and code is the literal list "Tdisp unframe frame)"; do-answers this message by evaluating the code 12 times, causing disp to blink its frame off and on.
After you add this new message to Window, all previously defined windows will be able to respond to it. For example:
w flash 20 times!
disp flash 5 timesl
A method can refer to an object's private data by mentioning its instance variable names. For example, the method that answers the Window message •.. move to (a1) (a2) must reference the instance variables sl and sc, which specify the current line number and column number of the window.
A class may reveal as much or as little of its representation as it desires in the messages its instances answer. It can grant full access to its representation if it answers the message
... 's (@code)
3-4

by the method
(code eval)
(Methods will be shown enclosed in parentheses because they are treated as lists by the OPL interpreter.)
When this message is sent, code is an unevaluated piece of OPL code, and the object replies with the result of evaluating that code in its private context. Use of this message can be dangerous. For example, if the message is defined for windows, sending
disp's(@h <- h+2)1
increases disp's height without making a corresponding adjustment to its text buffer and will cause an error the next time disp is asked to show.
3.3 Using Class Class, Part 3: Variabl~s
Every OPL object may maintain some private data that can be directly accessed only by itself. These instance variables are common to all instances of a class, but each instance has its own values for them. For example, a window's size is described by two variables: h, its height in lines, and w its width in columns. Each window has its own values for these variables and refers to them whenever it is asked to show on the screen. You cannot change these values directly, but a window will do so if asked by the now familiar message:
disp grow to 10 301
Sending this message has the visible effect of setting disp's size to 10 lines of 30 columns each. To accomplish this, disp has to hide itself, adjust its text buffer to 300 characters, update its hand w values, and show itself again. Because unauthorized access to these variables in prohibited, the window is able to ensure that its buffer size and visible appearance remain consistent with its height and width. (Return disp to a more convenient size by typing: disp grow to 22 35 1.) There are actually three sets of variables accessible when a message is evaluated and its method is executed: temporary variables, instance variables, and class variables. For each class there are three dictionaries, each of which is a list of one set of variables. To access these dictionaries, OPL provides three Class messages:
3-5

tdict
idict
cdict
3.3.1 Temporary Variables
The values of temporary variables are assigned when a message is sent and disappear as soon as a reply is made. They may be used as scratchpad storage while the method is running. Certain temporaries are initialized with values from the message and thus serve as formal parameters. To see the temporary variables for class Window, type:
Window tdict!
Compare the result with the message patterns for Window in Appendix A. Note that all the message parameters are temporary variables.
3.3.2 Instance Variables
Instance variables are names for the data that is unique to each instance of a class. Their values persist between messages, as long as the object itself exists. The height, width, column number, and line number are all instance variables. To see Window's instance variables, type
Window idict!
3.3.3 Class Variables
Class variables play the role often filled by global variables in other languages, but in a more secure and modular way. The shared information held in class variables is accessible only to members of the class and not to the world at large. Window has no class variables (unless you define some). To verify this fact, type
Window cdict!
3.3.4 Scope Rules
One important aspect of programming languages such as Pascal is that the meaning of a particular variable name often depends on the routine in which it is encountered. This dependency defines the scope of the variable. An analogous situation exists in OPL, but here the scope depends on the variable's class. When
3-6
OPL is trying to find the value bound to a variable, it searches the dictionaries associated with the current receiver's class in the order tdict, idict, cdict. When a name is mentioned that is not in one of the three dictionaries of the current receiver's class, OPL looks for it in the dictionaries associated with the "surrounding" class. (The surrounding class is the one which had a method, part of which resulted in the current message being sent to the current receiver. This method corresponds to the calling routine in Pascal. The method of the current message corresponds to the called routine.) The search ehds in the user's workspace.
Thus if a particular variable name is entered in a dictionary of the current class, any other variable with that same name in a dictionary that would be searched later is effectively hidden from vie,,,. Conversely, any variables that are not masked in this manner are accessible at every level, even from the innermost object. Thus, to avoid scope conflicts it is important to enter all variables in their appropriate dictionary. Parameters are automatically entered into tdict, but all other variables must be entered explicitly into their dictionary. If a parameter is passed unevaluated (i.e. preceded by a "@" symbol), the potential exists for conflict with names in the receiver's dictionary. For example, if the atom @param were passed in, and the entry param existed in the tdict of the receiver, then any assignments to @param would actually be bound to the entry in tdict, not to the name in the sender's class.
Variables may be entered in particular dictionaries by using the three Class messages
tdict <- (a1)
idict <- (a1)
cdict <- (a1)
where the a1 parameter is a list that replaces the dictionary. Temporary variables corresponding to parameters cannot be deleted as long as the class recognizes the message with the parameters. The idict of a class cannot be changed if any instances exist. Class variables may be simultaneously bound to values and
placed in cdict with the Class message
cvar (@x) <- (a1)
which is explained in Appendix A, section A.7. When a class is given a new cdict, variables that appear in both the old and the new cdict retain their values.
3-7
3.4 Using Utility Objects
So far we have introduced several predefined utility objects:
@
do
isis
kb
cr
read
repeat
self
vars
Consult Appendix B for concise definitions of each one.
In this section we will introduce several more useful utility objects and give a few examples of how they can be used.
3.4.1 Conditionals and the done Object
OPL's conditional expression provides a way to execute code if a condition is met. Its syntax is as follows:
(expr1) => (@ alternative1) (expr2) => (@ alternative2)
(exprN) => (@ alternativeN)
If the result of evaluating expr1 is anything other than the object no, the code alternative1 is evaluated and its reply becomes~he reply of the entire method. If the result of evaluating expr1 is no, alternative1 is skipped and expr2 is evaluated, and so on-.-
For example, the following expression replies with the smaller of x and y. Try it.
@x <- 10!
@y <- 91 x < y => (x) y1
3-8

Since x (10) is greater than y (9), in this case the result is 10. Here is a slightly more complex example: Set the variable sex eClual to "M", "F", or some other string. Then execute the following e'xpression:
(sex="M" => ("John") sex="F" => ("Jane") "Baby") + "Doe"!
This expression produces the results "John Doe", "Jane Doe", or "Baby Doe", depending on the value of sex.
The object done is used to exit from loops -- repeat loops, do loops, and dialog loops. The done object recognizes two messages: the empty message and the message ... with (x), where ~ is a reply sent to ,disp.
Conditional expressions are freCluently used in conjunction with done. For example, type
repeat (kb <> 65 => (disp <- "no" . cr) done with yes)l
Now type any key; the word no will appear in disp until you type A (65 in ASCII).
3.4.2 The to Object
The object to is useful for creating "verbs" or "procedures". The syntax is
to (@object_name+message_pattern) (@code)
Where "object name" is the first word of a list of tokens, and "message pattern" contains the remaining tokens. The to object creates a temporary class (object name class) that answers the message ..• message pattern. Then a single instance (object name) of the temporary class is created and the class itself is deleted (using the forget object -- see 3.4.5). The idict of the temporary class is empty. Try the following:
to (flash (win)) (do 10 (win unframe frame))l
flash displ
flash w!
3-9

The above message to to creates an object named flash which is the only instance of flash class. (You can ask flash for its class by sending it the message ... is?) The object flash answers the message pattern ... (win) by unframing and framing ten times the window specified by the parameter (win)~
The to object can be used to extend the "search and replace" method we outlined in section 2.4. Try the following:
to (search (buffer) for (old) replace with (new)) (@pointer <- buffer find first old. @leng <- old length. @buffer <- buffer[1 to pointer -1] + new + buffer[pointer + leng to buffer length])l
Now put the variables pointer and leng into the cdict for search class. This avoids problems that might arise if these variables w~re in vars (i.e. in the user's workspace). See section 3.2.4 for a discussion of the problems. To add these two variables to cdict, type
search class cdict <- @(pointer leng)l
Now fill up some string with text:
@s1 <- "Now is the time for all good men."
You can search s1 for any substring and replace with any other substring. Try
search s1 for "time" replace with "minute"l
This example illustrates the tool-building approach of OPL.
3.4.3 The for Object
The object for, which is contained in UTIL.WRK, implements a for-loop control structure. For example:
for k <- 1 to 10 do (k print. sp)l
Try some other examples.
3-10

3.4.4 The indisp Object
The object indisp lets you temporarily name an object "disp" in order to print in it. The format for the indisp object + message is
ind isp (disp) (@code)
The result is that code is executed in an environment where the object replacing the parameter disp acts as the dialog window. For example:
@w2 <- Window new 10 20 2 40 show! indisp w2 (v~rs print.)l -
(The period in the second statement is necessary to prevent vars from printing in the old disp.)
Try this more complicated example:
to dialog (@w2 <- Window new 5 30 15 40 show. indisp w2 (repeat (read eval print. cr)))l
dialogl
This code uses to to create the object dialog which will up a dialog loop-in a new window positioned arbitrarily. dialog loop is identical to the one you normally run in. back to the dialog window you came from, simply type the object.
start The To get
done
The object replacing the parameter disp can be a file object (see Chapter 5). This allows information that is normally sent to the dialog window to be preserved.
3.4.5 The forget Object
Objects can be eliminated from the workspace by using the for~ object. (In order to delete the object from the workspace, all atoms bound to the object must be forgotten.) For example, ~delete wand w2, type
forget (w w2)l
This feature may prove useful if memory is limited. However, be careful not to delete any of the utility objects, unless it is absolutely necessary. The forget object can be used in con-
3-11

junction with mem compact (see Appendix B) to recover contiguous sections of memory for later use by other objects.
3.4.6 The catch and throw Objects
The objects catch and throw provide a mechanism for jumping out of a segment of OPL code and resuming execution elsewhere. This mechanism is similar to the use of goto in Pascal as a way to break out of a loop into the surrounding code. Control is transferred from code containing a throw to the code following the catch. Like goto in Pascal, throw specifies a label identifying the target of the jump., An object may also be transferred along with the transfer of control; any object may be "thrown" and "caught" in this manner. The most recent label and object can be examined by sending messages to catch. Thus, you can catch an object, examine it, and if you decide not to use it, you can throw it to a higher-level catch.
Labels must be atoms. Certain labels, for example @error, have been predefined. OPL error conditions result in a number being thrown to the label @error. This number identifies the error condition (see Appendix C). If you don't supply a catch for this label, the default error handler will catch throws to @error and print a message (e.g. Error 6) in disp.
The catch and throw objects each answer several messages, which are described in Appendix B. To illustrate the use of these objects, consider a new dialog loop as described in section 2~7.7, except now errors will be caught by our own error handler. Type
catch @error in @(repeat (read eval print. cr» do @(catch value = 3 => (disp <- "Atom not bound
to value.") throw @error with catch value)l
The outer "catch @error ... " catches all throws to label @error from the dialog loop (i.e all OPL error condi~ions). If the error number is 3, the text "Atom not bound to value" is printed in disp, otherwise the error number is rethrown to the default error handler.
To test the new error handler, type a few valid expressions (e.g. 2 + 2!), then type an expression containing an unbound atom, e. g.: -
Paul!
The result should be our error message. You are now back in the main dialog loop; test this by typing Paul! again. This time "Error 3" should appear.
3-12

The thrown object (catch value) and label (catch label) are available for inspection until the next throw. If no object is thrown, the catch value will be nil. In the above example, "throw catch label with catch value" could have been used instead of "throw @error with catch value".
The STOP key causes the predefined label, @STOP, to be thrown. (Afterwards, catch value is nil.) As with @error, a default handler is provided for the @STOP label. You can intercept throws to @STOP by defining your own handler. For example, type
catch @STOP in @(repeat (disp <- "*")) do @(disp <- "Had enough?")l
Now press STOP.
3.5 The Mouse
The solid character on your screen is the mouse; it is used primarily as a pointing device. You can drive the mouse around by pressing the MOUSE UP, DOWN, LEFT, and RIGHT keys on your keyboard (see Table 2-1). Try this. You can move the mouse at any time, even while simultaneously running OPL code. Try the following:
repeat (disp <- "*")1
Now drive the mouse around on the screen with the mouse keys. You will continue to see stars print in disp; you'll also notice that the mouse moves somewhat more slowly now that you're doing two things at once. Press the STOP key to regain control.
You can ask the mouse where it is from OPL. The object ml will tell you what screen line the mouse is on; mc will tell you the mouse's column position. A common use of mr-and mc is to position a window with the mouse. Try this:
@w <- Window new 5 10 2 40 show!
repeat (mb. w move to ml+1 mc+1)1
The object mb waits for the MOUSE BUTTON key to be pressed and released. The effect of the above code is to wait on the mouse button each time before moving w. In this way you can drive the mouse wherever you want, then press the mouse button, and the window w will move to where the mouse is sitting. The window is positioned so that the upper left corner of the frame is on top of the mouse.
3-13

Sometimes it is useful to ask if the mouse button was the last key to be pressed. You can do this by sending the "?" message to mb; the reply will be ~ if the mouse button was pressed, and no otherwise. For example:
repeat (mb? => (mb.w move to ml+1 mc+1) disp <- "*,,) J..
With this code you ask if the mouse button is pressed; if it is w is moved to the mouse, otherwise stars print in disp. Type this in, play with the mouse keys, and watch what happens.
One final way to use the mouse is with the "has mouse" message answered by windows. A window replies to this message with yes if the mouse is anywhere on top of its frame or text area; it replies no otherwise. Hence, by sending this message to a window, you can ask if the mouse is touching it. This capability can be used to point to windows in order to "wake them up" so that you may interact with them. As a very simple example, try the following:
repeat (w has mouse => (w <- "*"»J..
Type this in and then move the mouse on and away from w. Whenever the mouse touches w, asterisks will appear in the-window.
3.6 Using Class Class, Part 4: New Classes
So far, all the classes you have learned were predefined. You can define your own classes by sending the Class message ... new to the class Class. For example, type:
@Stack <- Class new!
Of course, the new class must be given variable dictionaries, message patterns, and methods for it to be useful.
To add messages and methods, you must use the Class message
... answer (a1) by (a2)
where (a1) and (a2) are lists containing the new message and method~spectively. For example, let's define the messages
3-14

... push (a)
... pop
The first message asks a stack to push an object (a) on the top of the stack, the second asks the stack to pop the topmost object off the stack. We can use the following methods to accomplish this objective.
for push (a), type:
@pushmethod <-@(self full => (error "stack full")
@top <- top + 1. array[topJ <- a. self)J.
for pop, type:
@popmethod <-@(self empty => (error "stack empty")
@x <- array[topJ. @top <- top - 1. x)J.
Note that in pushes the stack pointer (top) is incremented before the item is placed on the stack, while in pops the pointer is decremented after the data goes off the stack.
Now type the two statements that actually add these messages to Class Stack:
Stack answer @(push (a)) by pushmethodJ.
Stack answer @(pop) by popmethodJ.
These two methods require two additional Stack messages:
... full
... empty
which will signal stack overflow and underflow. We also need an object error, which will print an error message to an appropriate window. We need to create an instance of a List, called array, and to classify it as an instance variable so it will
3-15

remain between messages. We need another instance variable !£E, which which points to the current top of the stack. The list array will actually hold the items pushed onto the stack.
The following statements should be used to add the messages ... full and ... empty
for full, type:
Stack answer @(full) by @(top >= array length)l
for empty, type:
Stack answer @(empty) by @(top = 0)1
The next step is to redefine the default .. . isnew method (which is simply "self"; check this by typing "Stack method for @(isnew)l") so it can initialize top and create array. We will need to pass ... isnew a parameter for the stack length. The following message and method will do the trick:
message: ... isnew (1)
method: (@array <- List new 1 . @top <- 0 . self)
To create this combination, type
Stack answer @(isnew (1)) by @(@array <- List new 1. @top <- 0 . self)l
Then create the error object by using to:
to (error (msg)) (disp <- msg . cr)l
Finally, put the instance and temporary variables in their dictionaries by using the Class message:
Stack idict <- @(array top) tdict <- @(a 1 x)l
You are now ready to create a stack instance and push and pop:
3-16

@s <- Stack new 10!
s push "colin"!
s push 29!
s push "jim"..!.
s push 31..!.
do 5 (s pop print. cr)..!.
The last statement should produce a stack underflow error message, "stack empty".
Although you could use the procedures outlined in this chapter to construct any new class or add any message, it is usually much more convenient to make use of the class editor, a software development tool described in the next chapter.
3-17


CHAPTER 4 THE CLASS EDITOR
4.1 Introduction
The Class Editor can be used to examine or modify the messages, methods, and variables of any class. It is an extremely useful tool for program development.
The editor is part of the workspace contained in EDITOR.WRK, so if you followed the loading procedure in Chapter 2, you can use it immediately. (The other workspace on your distribution diskette, UTIL.WRK, contains all the objects in EDITOR.WRK except the editor itself.) If your workspace contains the editor, you can edit a class by sending it the message ... edit.
We will explore the features of the editor in the course of defining a new class: Elevator. Objects of this class appear on the screen as small rectangular boxes that have some of the stereotypical properties of elevators. In particular:
Elevators will move up and down in shafts.
They will move smoothly.
They will operate in a four-story building.
They will move from any floor to any other floor.
As they reach each floor, they will announce the floor number.
4.1.1 Invoking the Editor
Fi rst, 'in order to make more memory available, you should eliminate any unnecessary objects created earlier. This is accomplished with the forget object that was described in section 3.4.5. (Be careful not to delete any useful utility objects.)
Second, create the new class, Elevator, by typing
@Elevator <- Class new title <- "Elevator"!
~hird, invoke the editor:
Elevator edit!
You will see several windows appear in the upper left corner of the screen, in an arrangement similar to Figure 4-1.
4-1

+-----------------------------------------+ : Elevator messages : +---------------------------------+-------+ : isnew : up : is ? : down : print : Answer : : Change : : Forget : : method
: Quit I I I I I I I
I I I I
+---------------------------------+ I I I I I
+---------------------------------+-------+
Figure 4-1. Messages
The four windows that make up the editor's display have different functions:
-The window at the top describes what is being edited. The initial view of a class is of its messages, so "Elevator Messages" appears in this window.
-The large window in the middle (the text window) displays what is being edited; initially a list of message patterns will appear.
-The bottom window is a dialog window used for typing text to be inserted and for displaying error messages from the editor. If an error message appears in this window, press any key to clear the window and resume editing.
-The window at the right is a menu of editing commands. Selections from this menu are made by pressing single keys corresponding to the first character of a command name (" ... " is selected by pressing ~).
It is important to note that the difference between upper case and lower case initial letters is very significant in the command menus found in the editor. For example, in Figure 4-2, the down command and the Delete command are distinguished solely by the case of their initial letter.
4-2

As a general rule, menu choices that begin with an upper case letter are used to modify some part of the class definition. Menu choices that begin with a lower case letter are simply used to change your view, for example to scroll the text up or down, or to view a different part of the class definition.
The mouse is used to point at an item to edit in the text window. To point at a particular token, place the mouse anywhere on top of the token or in the blank spaces to its left. When the mouse is to the right of the last token on a line it is considered to be pointing at the first token on the next line.
4.1.2 Editing Commands
The commands in the menu of Figure 4-1 can be divided into five catego.ries:
up and down are used to scroll lines in the text window. The editor's text window acts much like a viewport placed on top of a scrolling sheet of paper. Lines clipped outside of this window can be scrolled into. view by the menu choices "up" and "down". Try using these commands to scroll the messages up and down. (The "down" command moves messages onto the screen from the bottom -- if any are available -- and off the screen at the top, until the last line has been scrolled off. The "up" command moves messages on the screen from the top -- if any are available, and off the screen at the bottom, until no more messages are available to be moved on.)
Answer, Change, and Forget are used to edit the current messages and to add new ones.- See section 4.2.
method ,is used to bring into view a menu of commands for editing the method of any message in the text window. The mouse must be pointing at a message before this command is given. See section 4.3.
Quit is used to return from the editor to OPL itself .
..• is used to bring into view a new menu of additional commands for editing messages. See section 4.4. (Only those commands currently appearing in the menu can be selected.)
4.2 Editing Messages
The three menu choices "Answer", "Forget", and "Change" are specifically for editing current messages and adding new messages. "Answer" (press A) is used to add messages. "Forget" (press F) is used to delete the message that the mouse is currently 'pointing at. "Change" (press C) is used to change the syntax of a message pattern, while keeping the same method.
For the Elevator example, we will add the following four messages:
4-3
roof
three
two
lobby
each of which will cause elevator objects to move to one of the four floors in our four-story building. The methods of these four messages will make use of the additional messages
up
down
which cause elevators to move up or down one floor. We will also change
isnew
to
isnew (newcolumn)
so that elevator objects can be created in a particular column (newcolumn) of the screen: the "shaft" of the elevator. We will define the methods for these messages so that elevators move slowly from floor to floor and print the floor number in their window as they reach each floor.
To add messages press the Answer key; the prompt "Answer?" will appear in the bottom window. At the the same time, the menu clears to indicate that no choices from it can be made. Type in the first new message pattern, "roof", and press DOlT (do not type the " ... "; this is just a notational convention). Since you are typing in a dialog window, all the conventions, such as word wraparound and the CLEAR-LINE key, are supported.
When you press DOlT, the menu will reappear. Repeat the process of adding all the new messages. Finally, move the mouse to the " . .. isnew" token and press the Change key; the prompt "Change message to ?" will appear in the bottom window. Type in the new version, "isnew (newcolumn) " , then press DOlT.
You are now finished adding and modifiying messages. The next step is to specify the methods for these messages.
4-4

4.3 Editing Methods
Point the mouse at the first new message ( ... roof) and press method. A new window arrangement will appear that will look very much like Figure 4-2.The top window will display <Elevator> "roof" to indicate that you are now viewing the method that an instance of class Elevator uses to answer the " ... roof" message. The text window will of course be empty, since there is no method as yet. You should also notice that the menu has a new set of commands.
+-----------------------------------------+ i <Elevator> roof i +---------------------------------+-------+ i up i : down i i in i i out i i top i : Add I
+---------------------------------+ I I I I I I I I
Delete Replace Move Paren Unparen message
+---------------------------------+-------+
Figure 4-2. The Method Menu
4.3.1 Commands for Methods
The set of commands in the method menu can also be divided into five categories.
up and down have the same effect as the corresponding commands described in section 4.1.1.
in, out, and top are used to descend into subexpression of methods and come out of subexpressions. The editor knows about the structure of OPL code and uses this knowledge to format the displayed code attractively. The OPL code is always sho~n neatly indented, with each statement starting on a new line. Whenever the text is altered it is immediately reformatted. Only the current level of the code is displayed; parenthesized subexpressions are simply shown as "{III. The lIinll command (press i) descends into one of these subexpressions (which must be pOinted to by the mouse) to see its top level; the II out II
4-5
(press 0) command brings you back out again. The "top" command (press t) immediately transfers you to the highest level from any other level.
Add is used to add a new method to a message that has no method, or to add pieces of code to an existing method at the location pointed to by the mouse. An example of this command is given in the next section. Unparen is used to remove parentheses and raise to the current level the subexpression pointed to by the mouse.
Delete, Replace, Move, and Paren all require you to delimit a piece of-text. The left edge of the text is marked by the position of the mouse at the time you select the command. To mark the right edge of the text, position the mouse to the right of the last token you wish to delimit and press the mouse button. If this last token is not visible, use the "down" command to scroll it into view. The meanings of these commands should be fairly obvious from their names.
4.3.2 Methods for Class Elevator
So far you have added six new messages and modified one message. Then you pressed the method key with the mouse pointing to the ... roof message. You now will type the method for ... roof. Press Add; you will get the prompt "Add?" in the dialog window. Now type the following method:
repeat (floor < 4 => (self up) done). wait. self
then press DOlT. The bottom window will clear, the menu will reappear, and the text you just typed will appear in the text window. The text window should now show the information that can be seen in Figure 4-3.
4-6

+-----------------------------------------+ l <Elevator> roof l +---------------------------------+-------+ l repeat II . up l I °t d I l wa1 . own I
self in l out
+---------------------------------+ I I I I I I I I
top Add Delete Replace Move . Paren Unparen message
+---------------------------------+-------+
Figure 4-3. A Method
After typing the method for ..• roof, you should return to the message menu with the message key, move the mouse to the three message, then press the method key again. You should then type in the following method :-
repeat (floor < 3 => (self up) floor > 3 => (self down) done).
wait. self
The same process should be repeated for the ... two message, the lobby message, the ... up message, the ... down message, and
the .•• isnew (newcolumn) message. The following methods are used:
two: repeat (floor < 2 => (self up)
floor > 2 => (self down) done).
wait. self
lobby: repeat (floor > 1 => (self down)
done). wait. self
4-7

up: win clear. do floorheight (win move to win's sl-1 win's sc). @floor <- floor + 1. win at 1 1 <- floorname [floor]. self
down: win clear. do floorheight (win move to win's sl+1 win's sc). @floor <- floor - 1. win at 1 1 <- floorname [floor]. self
isnew (newcolumn): @floor <- 1. @win <- Window new height width lobbyline newcolumn
show at 1 1 <- " LOBBY". self
Experiment with the Delete, Replace, Move, Paren, and Unparen commands using the ... up method. Try putting the "win's sl-1" subexpression in line 2 into parentheses. Descend into the {} expression with the "in" command and verify that "win's sl-1" is now at a lower level. Return to the highest level using the "out" or "top" commands.
After all the methods have been typed, you must return to the message menu with the message command in order.to edit the variables.
4.4 Editing Variables
To edit the variables, press the " ... " selection when you are in the message menu. The screen will-then have the appearance shown in Figure 4-4.
4-8

+-----------------------------------------+ : Elevator messages : +---------------------------------+-------+
I I I I I I I I I I
isnew (newcolumn) Title is ? tdict print idict roof cdict three vars two lobby up down
+---------------------------------+ I I I I I I I I I
+---------------------------------+-------+
Figure 4-4. Messages (part 2)
Now simply use the tdict, idict, and cdict keys in turn to get menus for the dictionaries~ These menus have the standard commands: up, down, Add, and Delete, which can be used to add and delete variables in the dictionaries. Use the Add command to add the following variables to their dictionaries:
temporary variables: newcolumn (added automatically because it is a parameter)
instance variables: win floor
class variables: width height floorname lobbyline floorheight
The screen should look much like Figure 4-5 after you have added the instance variables.
4-9

+-----------------------------------------+ I idict I +---------------------------------+-------+
win floor up
+---------------------------------+ 1 1 1 1 1 1
down Add Delete class
1 1 1
+---------------------------------+-------+
Figure 4-5. Instance Variables
After adding the variables, press class to return to the message menu show in Figure 4-4. From here you can select vars to initialize the class variables. After you have made this selection, the screen will look much like Figure 4-6.
+---------_._-----------------------------+ I Elevator cvars I +---------------------------------+-------+ I width height floorname lobbyline Title
floorheight tdict
+---------------------------------+ 1 1 1 1 I? 1 1,- 1
idict cdict vars
+---------------------------------+-------+
Figure 4-6 .. Class Variable
4-10

You enter a dialog loop in the bottom dialog window (indicated by the cursor?). You can now assign values to the variables in cdict. Type-the following
@width <- 8!
@height <- 4J..
@floorname <- List new 4 • floorname[1J <- " LOBBY" floorname[2] <-" 2". floorname[3] <-" 3". floorname[4] <-" ROOF"!
@lobbyline <- 20J..
@floorheight <- 6!
done!
The final done exits from the dialog loop and returns you to the menu show in Figure 4-4. You can now select Title to change the title of class Elevator or you can select .. ~ to return to the message menu shown in Figure 4-1, then you-can press Quit to get out of the editor. -
4.5 Running Class Elevator
Now that you have created class Elevator, you must create the wait obj'ect that is referenced in the Elevator methods. Type
to (wait) (do 20 ())J..
You can now create 2 or 3 instances of class Elevator and send them messages.
First, make sure that disp is properly positioned by typing
disp move to 2 2 grow to 22 35J..
Then try the following:
@e1 <- Elevator new 40!
@e2 <- Elevator new 50J..
@e3 .<- Elevator new 60!
4-11
These statements create three elevators located in columns 40, 50, and 60 of the screen. Now set these elevators in motion with the following messages:
e1 three!
e2 up
do 10 (e2 two three lobby roof)l
do 10 (e2 roof three.e1 two lobby.e3 three roof lobby)l
See if you can improve this example by modifying the methods or by adding new messages to Class Elevator.
You have now learned the most important parts of OPL. You have learned the predefined messages associated with most of the predefined classes; you have learned how to create new objects in these classes; you have learned how to create new messages and methods in the predefined classes; you have learned how to create your own classes; and finally, in this chapter, you learned to use the class editor to speed up the process of creating and modifying class definitions. The only topic not yet covered is the use of disk files for permanent storage of information.
4-12

CHAPTER 5 USING DISK FILES WITH OPL
5.1 Introduction
In the Intellec 432/100 disk files are used for three purposes:
-to store workspaces for later use. (By workspace we mean a snapshot of an OPL environment.) Files with the extension .WRK contain workspaces. For example, on your distribution disk, the file EDITOR.WRK contains the starting workspace.
-to store OPL source code. Files with the extension .ASC contain source code. These files can be read into an OPL workspace and executed by using the filein object described in this chapter.
-to store miscellaneous data. No standard extension has been defined for data files, but it is useful to distinguish them by appending a distinctive extension.
All these file types are supported under the ISIS operating system.
5.2 Saving and Loading Workspaces
The easiest disk-oriented operations are saving and loading workspaces. The objects used are save(f) and load(f), where f is the name of an ISIS file. So for example, to save the current workspace in a disk file named "crnt.wrkn on drive 2, type
save n:f2:crnt.wrk"!
To reload that file, type
load ":f2:crnt.wrk"!
(The ".wrk" extensions can be omitted, since they are added automatically.) Neither save nor load restores the mouse. B~th save and load can sometimes take several minutes to transfer a workspace-.--
If an ISIS error occurs during a load, or if the workspace in the file has been damaged, the message
»> Disk error: workspace lost. Hit key.
5-1
will appear at the top of the screen. Pressing any key will return you to ISIS. As we said in Chapter 2, the standard way to leave the OPL environment and return to ISIS is to type the object
isis!
Typing this object causes the current workspace to be lost, so you must use the save object if you want to preserve the workspace. Individual classes and objects can be preserved only with the fileout object described in section 5.4.
5.3 Class File
Before proceeding to source files, it is important to introduce the concept of an OPL file object, an instance of the predefined class File, whose messages are defined in Appendix A.
In order to communicate between OPL and a disk file, several steps must be taken.
1. A file object must be created, i.e. an instance of class File. For example:
@f <- File new!
2. ISIS must be instructed to create a disk file with a certain name. For example:
f create ":f2:newfl"!
Note that ISIS files can have no more than six characters in their name.
3. A communications channel must be opened between the file object and the ISIS file. The ... create message does this automatically when the file is first created, and the ... open message can be used when the file is accessed in the future. For example
f open ": f2: newfl"1.
4. The file pointer must be positioned to the correct starting byte in the file before data is transferred. Like ISIS, OPL organizes files in blocks of 128 bytes, so the file pointer is a pair of the form (block, offset). The messages .. ~open and ...
5-2

create both initialize the file pointer to (0, 0); the message ... at (a1) (a2) can be used at any time to reposition the file pointer.
5. Data can be transferred from disk to object or from object to disk. The ... <- (text) message is used for transfers to the disk. For example
f <- "hello world."!
The messages ... next and ... next for (a1) can be used to transfer data from the disk. For example, the statements:
f at 0 O!
f next for 12!
reposition the file pointer to (0, 0) after the previous disk write, then read the first 12 bytes of data.
The object read may also be used to transfer data from the disk. For exampl~ry
f at 0 O!
read of f!
6. Finally, the communications channel between the disk file and the file object should be closed. For example:
f close!
The object forget automatically closes files, so you can forget files without having to close them first. All files should be closed before the workspace is saved.
Notes: Data is transferred to disk files in 128-byte blocks. Additional characters will be appended to your data to pad out the block.
OPL ignores the keyboard during I/O, so STOP cannot be used.
Files are opened in update mode, so the diskettes should not be write-protected.
5-3

5.4 OPL Source Files
The process of reading a file of source text and converting it to real OPL objects is called filing in. Similarly, writing out objects as source text is filing out. To make these tasks easier, two objects, filein and fileout have been provided.
5.4.1 Filing in
Assuming you have filein in your workspace, and have on disk drive 2 an .ASC file, say ELEV.ASC, containing a program that defines a class; you can file in that program by typing
filein: ":f2:elev"!
(filein assumes that the disk file has the extension ".ASC".)
The name of the class is defined in the program, it is not necessarily the same as the name of the disk file.
When filein operates, the amount of free memory is displayed in the upper right corner. If you have more than 16,383 free bytes, display will read
free words: no
Filing in a large program may fail due to memory fragmentation. A way to overcome this problem is to put "mem compact" messages every so often in the file. When "mem compact" is read and evaluated, all of the free space will be compacted into a single large chunk. After a compaction has occurred you will have to manually restart the filing in process. If you use filein, all you have to do to resume filing in is say
(See Appendix B for a description of the ~ object.)
5.4.2 Filing out
The utility object fileout can be used to file out classes, and also objects created with to. All parts of a class are filed out except the class variables. There are two ways fileout can be used. One way is to file out a single class to a file and close that file. For example, to file out the class Elevator to a file on drive 2, you can type
5-4

fileout: Elevator as ":f2:elev.asc"!
To file out the for object, you actually file out the class that for is an instan~of. This class can be filed out to a file on drive 2 by typing
fileout: for is ? as ":f2:for.asc"!
One thing must be kept in mind when using fileout with classes that have defined class variables: the values of the class variables are not saved. They must be restored when the class is filed in, or else a special object must be created which automatically initializes the class variables; then this object can be filed out in the same file as the class itself.
If you want to file out several things to the same file, you can create the file yourself and·use the other fileout message. Between filing out classes you can file out comments, do simple formatting, and file out arbitrary OPL expressions by sending the appropriate text to the file. For example, to file out the class Elevator and an object, cinit, which intializes Elevator's class variables, to the file NEWCL.ASC on drive 2, type:
to (cinit) (Elevator cvar height <- 4 cvar width <- 8 cvar lobbyline <- 20 cvar floorheight <- 6 cvar floorname <- @(" LOBBY"" 2"" 3"" ROOF"»
@QUOTE<- 34. @NL <- 10.
@f <- File new create ":f2:newcl.asc".
f <- QUOTE <- "NEWCL.ASC" <- QUOTE <-
f <- NL <- NL.
fileout: Elevator to f.
f <- NL <- NL.
fileout: cinit is ? to f.
f <- NL <- NL.
fileout: wait is ? to f.
f <- NL <- NL.
f <- "cinit!"
f <- "done!".
f close!
5-5
" I " . .

In this example, the cinit object is created, then the atom QUOTE is bound to the ASCII value for II and the atom NL is bound to the value for NEW LINE. The file is opened and a header is constructed. Then the three classes (Elevator, cinit class, and wait class) are output, separated by pairs of carriage returns. Finally, the statement invoking cinit and the object done are added to the file, and then the file is closed. The done object signals the end of file to a filein loop. ----
5-6

APPENDIX A. PREDEFINED CLASSES AND THEIR MESSAGES
This appendix describes the predefined classes. The description of a class includes its title, its variable dictionaries, and the messages answered by its instances. The title of any predefined class is simply its name; for example the title of the class Atom is "Atom". In this document class names are capitalized, but this is only a convention, not a requirement.
Most of the methods used to answer messages of the predefined classes are primitive methods. If a class is asked to tell its method for one of these messages, it will reply with a number. The primitive methods cannot be changed, nor can a class be made to forget a message which uses a primitive method. A few of the predefined methods are OPL methods, which can be changed. These methods will be given along with their message in the summary that follows.
In the message patterns that follow, the symbols (a1), (a2), (a3), (a4), and (a5) stand for parameters that the user must replace with the appropriate objects. The class of the object that replaces a parameter will be indicated. In most cases, OP1 attempts to evaluate parameters before they are passed to the receiver. For example, the messages
@a <- 4!
disp move to 2+2 a!
have the same effect as the message
disp move to 4 41
because the parameters (a 1) and (a2) in the ... move to (a 1) ( a2) message are evaluated before the message is sent to disp.
However, in a few messages, parameters are not evaluated before they are sent to the receiver. Instead, the receiver evaluates the parameter. In the message patterns for these messages the parameter is preceeded by an @ symbol. This @ symbol should not be typed; it simply indicates-that the parameter is not evaluated. See section 3.3 for more details.
A-1

A.1 Number
Numbers are integers in the range -16384 to +16383. (Negative numbers cannot be typed explicitly, they must be entered as (O-n).) Arithmetic on numbers that would yield a result outside this range will reply no instead. No class or instance variables are defined. Numbers recognize the following messages, in which the parameter (a1 ) must be replaced by a number or an expression that evaluates to a number:
message
isnew
is ?
is (a1)
chars
• •• + (an
. .. - (an
* (a 1 )
/ (a 1 )
mod (a1)
•.• < (an
= (an
... > (a1)
reply
Replies with the number O. This message cannot be sent explicitly. It is sent implicitly by the ... new Class message.
Prints the number in disp. Reply is the receiver-.---
Reply is the class Number.
The reply is yes if a1 is the word Number, no otherwise.
Replies the string representation of the receiver.
Replies the sum of the receiver and a1.
Replies the difference of the receiver and a1.
Replies the product of the receiver and a1.
Replies the integer quotient of the receiver and a1.
Replies the integer remainder of the receiver divided by a1. (Integer division and remainder are defined by the relation A=(A/B)+(A mod B).)
Replies ~ if the receiver is less than ~; replies no otherwise.
Replies ~ if the receiver is equal to ~; replies no otherwise .
Replies ~ if the receiver is greater than a1; replies no otherwise. -- --
A-2

••. <= (a1)
••• <> (a1)
•.• >= (a1)
... bits (a1)
Replies ~ if the receiver is less than or equal to ~; replies no otherwise .
Replies yes if the receiver is not equal to a1; replies no otherwise .
Replies yes if the rec~iver is greater than or equal to a1; replies no otherwise. --
Replies ~ string of length a1 of ASCII 111 liS and 1I0"S. The absolute value of the receiver is converted to binary. The order of the bits is the reverse of the binary value of the receiver. If the receiver has more than a1 significant bits, the reply is~runcated to the right. If the receiver has fewer than a1 significant bits the reply is padded with "OilS.
A-3
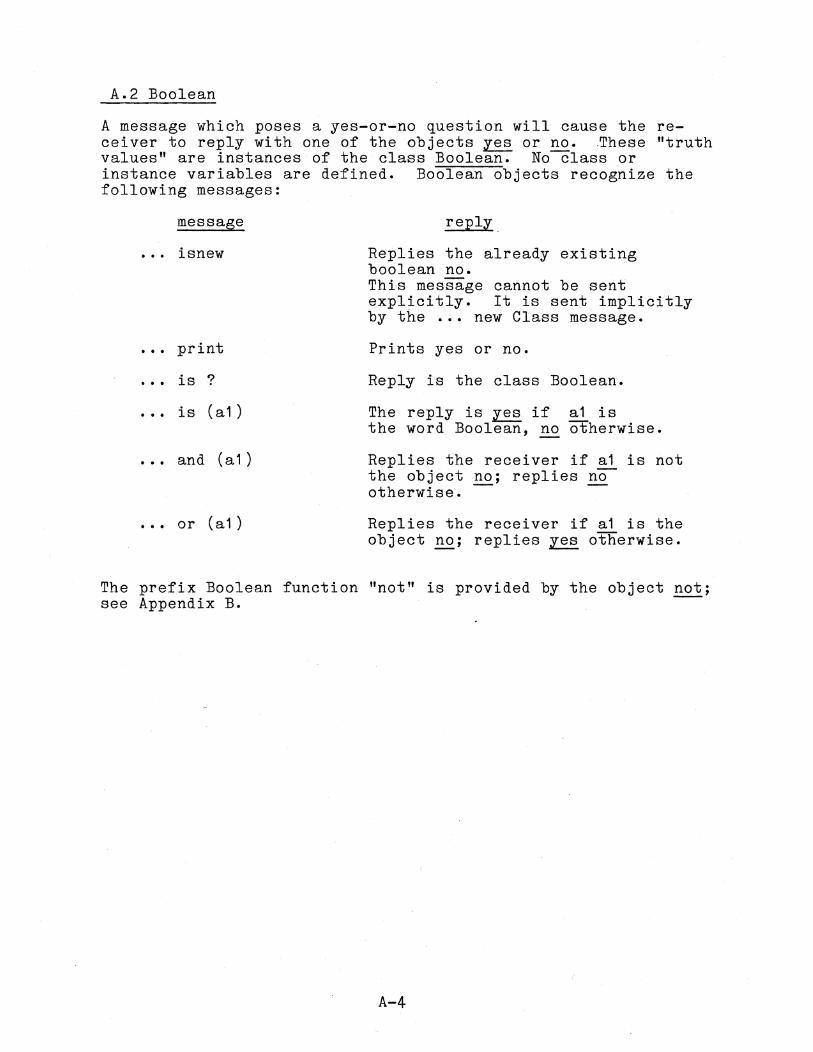
A.2 Boolean
A message which poses a yes-or-no question will cause the receiver to reply with one of the objects ~ or no. .These "truth values" are instances of the class Boolean. Noclass or instance variables are defined. Boolean objects recognize the following messages:
message
isnew
is ?
is (a 1 )
. . . and (a1)
. .• or (a 1 )
reply_
Replies the already existing boolean no. This message cannot be sent explicitly. It is sent implicitly by the new Class message.
Prints yes or no.
Reply is the class Boolean.
The reply is ~ if a1 is the word Boolean, no otherwise.
Replies the receiver if a1 is not the object no; replies nO-otherwise. -- --
Replies the receiver if a1 is the object no; replies ~ otherwise.
The prefix Boolean function "not" is provided by the object not; see Appendix B.
A-4

A.3 String
Strings are used to represent text; each position of a string can hold a single byte. (The words "byte" and "character" both mean a number between 0 and 255.) Strings are indexed from 1 and cannot be longer than 16,383 positions. No class or instance variables are defined. Strings recognize the following messages:
message
isnew (a1)
is ?
is (a 1 )
length
[ (a 1 ) ]
[ (a1) ] <- (a2)
[ (a1) to (a2) ]
reply
Replies a new string of length a1. The bytes of the new string are-uninitialized. This message cannot be sent explicitly. It is sent implicitly by the ... new Class message.
OPL method: disp <- 34 <- self <- 34. self
Reply is the class String.
The reply is yes if a1 is the word String, no otherwise.
Replies the length of the receiver.
Replies the ~th byte.
Replaces the ~th byte by a2.
Replies with a copy of the substring from position a1 to a2. If a1 > a2 the reply is the-empty string .
... [ (a1) to (a2) ] <- all (a3) Fills positions a1 to a2 with byte a3. Reply is a3.
[ (a1) to (a2) ] <- (a3)
••• < (a1)
Replaces the substring from positions a1 to a2 by the string a3 of the-Same length. Reply isa3 .
Replies ~ if the receiver is less than a1; replies no otherwise. A formal definition is:"" < s1 for any string s1 of length greater than 0; s1 and s2 are identical up to position k-1, s1 < s2 if s1[k to s1 lengthJ < s2[k to s2 lengthJ.
A-5

= (a 1 )
.•• > (an
•• • <= (an
•.• <> (a1)
•.. >= (a1)
..• + (an
replies ~ if the two strings are identical; replies no otherwise. A formal definition is: "" - "". - , s1 = s2 if s1 length = s2 length and s1[i] = s2[i] for i from 1 to s1 length •
Replies no if self < a1 or self = a1; replies yes otherwise .
Replies ~ if self < ~ or self = ~; replies no otherwise .
Replies ~ if self < a1 or self > ~; replies no otherwise .
Replies ~ if self> a1 or self = ~; replies no otherwise .
Replies a copy of the string formed by appending ~ to the end of the receiver .
... find first (a1) Replies the number of the first position where a1 occurs in the receiver, or no-rf no occurence is found. a1-may be a single byte or a string-.-
... find first non (a1) Replies the number of the first position in the receiver where a character not in a1 occurs; replies no if every character in the receiver is in a1. a1 may be a single byte or-a string .
. .. find [ (a1) to (a2) ] first (a3) Like the " ... find first" message, but only searches the subrange from
position ~ to a2 .
... find [ (a1) to (a2) ] first non (a3) Like the " ... find first non" message, but only searches the subrange from position ~ to a2 .
... reverse Replies with a string that is the reverse of the receiver (e.g. the string "abc" becomes "cba").
A-6

A.4 Atom
Atoms are used as variables. An atom may be identified by the special utility object @ which is placed immediately before .the atom itself. An atom is-used as a variable by bin'ding it to a value (i.e an object). An atom has a spelling which is represented by a string. Atoms are unique; no two atoms have the same spelling. No class or instance variables are defined. Atoms recognize the following messages:
message
isnew (a1)
is ?
is (a1)
<- (a1)
... eval
chars
= (a 1 )
reply
Replies the unique atom whose spelling is a1, which is a string. This message-Cannot be sent explicitly. It is sent implicitly by the new Class message.
Prints the receiver's spelling in disp.
Reply is the class Atom.
The reply is ~ if ~ is the word Atom, no otherwise.
Binds the object a1 to the receiver in the current context. Reply is a1. a1 may be any object. - -
Replies the object currently bound to the receiver.
Replies with the receiver spelling.
Replies ~ if the receiver and ~ are the same atom. Replies no if a1 is a different atom or anYother object.
A-7

A.5 List
A list is an object containing a fixed number of locations, each of which may contain any object. The positions are numbered from 1 to the length of the list (a maximum of 16,379 entries). Different lists can have different lengths. Viewed as storage objects, lists resemble one-dimensional arrays in other languages. OPL also uses lists to represent OPL programs. No class or instance variables are defined. Lists recognize the following messages:
message
isnew (a1)
. .. pr int
[ (an]
is ?
is (a 1 )
[ (a 1) ] <- (a2)
[ (a 1) to (a2) ]
••• + (a1)
length
eval
reply
Replies a new list of length a1. Each position contains nil. This message cannot be sent explicitly. It is sent implicitly by the ... new Class message.
OPL method: @BACKSPACE <- 127 disp <- "(". self length = a =>
(disp <- "),, . self) self each a do
(a print. disp <- " ".) diSp <- BACKSPACE <- ")". self
Replies the object in the a1th position.
Reply is the class List.
The reply is ~ if ~ is the word List, no otherwise.
Puts the object a2 in the a1th position. Reply-rs a2.
Replies a copy of the sublist from position a1 to position a2. If a1 > a2 the reply is the-empty list .
Replies a copy of the list formed by appending the list a1 to the end of the receiver.
Replies the length of the receiver.
Runs the receiver as OPL code (using the variable scope of the receiver's class).
A-8

... eval in sender Runs the receiver as OPL code (using the variable scope of the sender's class) .
... each (@a1) do (@a2) Iterates over the receiver, temporarily binding a1 to each element in turn and running the code a2. reply is niL
(The @ symbols should not be typed when the last message is sent;-they simply indicate that a1 and a2 are not immediately evaluated, but rather are evaluated by the receiver. a2, however, must be enclosed in parentheses. For example: --
@n <- @("Andrew" "John" "Bill" "Scott" "Dennis")l
n each s do (s length print. cr)l
will successively bind s to each of the strings in the list n and print the length of-each string. See section 3.3.)
A-9

A.6 Window
All screen activity is done through windows. Windows display themselves as rectangular areas on the screen, optionally bordered by a frame. Each window has ten instance variables:
sl the screen line number of the window's first text line sc -- the screen column number of the window's first text
column h the height in lines w -- the width in columns 1 -- the line number within the window's text area of its
cursor. c -- the column number within the window's text area of its
cursor. status -- a number containing some statQs information text -- a string containing the window's text scroll -- either nil or a list of OPL code; if code, it is
run whenever the window is about to scroll. dfparm -- a string of compiled information for reshowing the
window.
No class variables are defined for windows. Each window may be written into, scrolled, cleared, moved, shrunk or enlarged independently of the rest of the screen. Text written into a window obeys word wraparound rules.
A window may be as small as one line by one column or as large as 100 lines by 150 columns. A window's screen position is given relative to the upper left corner of its text area. Numbering of screen lines and columns begins in the upper left hand corner of the screen. Hence, a window moved to line 1 and column 1 of the screen will show all of its text but the top and left sides of the frame will be clipped off the screen. A window may be placed anywhere.
Windows recognize the following messages:
message reply
isnew (a1) (a2) (a3) (a4) Initializes a new window to a1 lines and a2 columns in size-,placed at line a3 and column a4 on the screen. ~he new windoW-has a frame but is not showing, allowing windows to be made and written into before they are shown. The text of a new window is initially blank. This message cannot be sent explicitly. It is sent implicitly by the ... new Class message .
... print OPL method: disp <- "<Window>". self
A-10

is ?
is (a 1 )
... <- (a1)
... show
· .. hi de
... frame
· .. unframe
... clear
· . . at ( a 1) ( a2 )
... move to (a1) (a2)
· .. grow to (a1) (a2)
... ' s (@code)
Reply is the class Window.
The reply is yes if a1 is the word Window, no-otherwise .
Writes the text a1 into the window at the current position of its cursor. a1 may be a string or a single byte. Reply is the receiver .
Displays the window on the screen. Reply is the receiver. Receiver will overwrite other windows, but cannot permanently obscure disp.
Erases the window from the screen. Previously obstructed parts of other windows are brought into view. Reply is the receiver.
Gives the window a frame. Reply "is the receiver.
Erases the window's frame. Reply is the receiver.
Fills the window's text buffer with blanks and erases contents of window's screen area. Reply is the receiver.
Sets the window's write cursor to its own line (a1) column (a2). No changes are made to the screen appearance; however, the next text written in the window will appear at the new cursor postion .
Moves the window to line a1 and column a2 on the screen. ~eply is the receiver.
Changes the window's size to be a1 lines of a2 columns. Any text in the window is retained if possible. Reply is the receiver .
Runs the code code in the context of the receive~The @ symbol should not be typed, nor are the parentheses required.) OPL method: code eval. See also section 3.3.
A-11
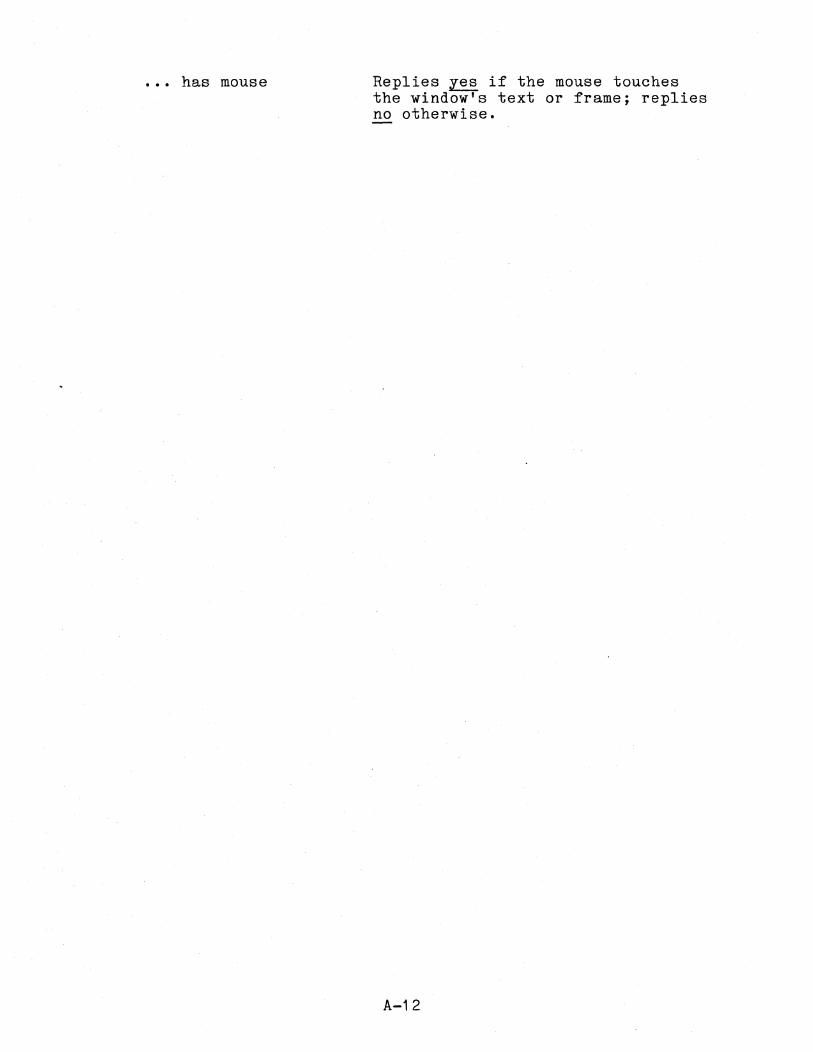
· .. has mouse Replies ~ if the mouse touches the window's text or frame; replies no otherwise.
A-12

A.7 Class
Classes define objects; the class Class defines classes themselves. The instance variables of a class are its dictionaries for temporary, instance, and class variables, the list of messages answered by its instances, the class variables, and its title. The editor is a class variable. Classes recognize the following messages:
isnew
is ?
is (a 1 )
.•. new
•.. edit
messages
reply
Replies a new, uninitialized class. The new class's dictionaries and class variables are empty lists and its title is "" The new class has default methods for answering the messages .•. isnew, •.• is ?, and •.. print. This message cannot be sent explicitly. It is sent implicitly by the new Class message.
Prints the receiver's title in disp.
Reply is the class Class.
The reply is ~ if ~ is the word Class, no otherwise.
Replies a new, uninitialized instance of the class. The new instance will immediately receive a message beginning with the token isnew •
Invokes the class editor on the receiver. The reply is the edited class. This message has no method in workspaces that do not contain the class editor; it will reply nil.
Replies a list of the messages answered by the class's instances.
... answer (at) by (a2) Tells the receiver class to answer
•.. forget (af)
the message a1 by the method a2; a1 and a2 are-lists. Reply isthe receiver .
Deletes the message a1 from the messages answered by~he. class's instances. A message which is answered by a primitive method cannot be deleted. Reply is the receiver.
A-13
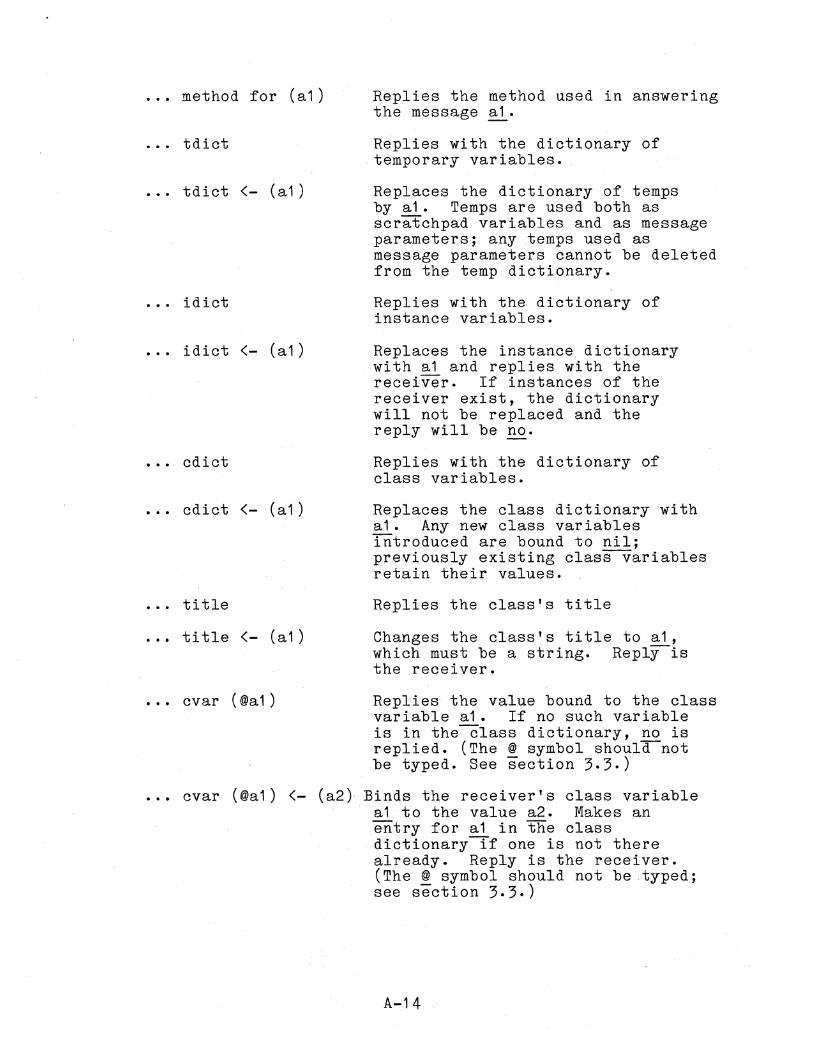
method for (a1) Replies the method used in answering the message ~ .
... tdict Replies with the dictionary of temporary variables .
... tdict <- (a1) Replaces the dictionary of temps bya1. Temps are used both as scratchpad variables and as message parameters; any temps used as message parameters cannot be deleted from the temp dictionary .
... idict Replies with the dictionary of instance variables .
... idict <- (a1) Replaces the instance dictionary with a1 and replies with the receiver. If instances of the receiver exist, the dictionary will not be replaced and the reply will be no .
... cdict Replies with the dictionary of class variables .
... cdict <- (a1) Replaces the class dictionary with a1. Any new class variables introduced are bound to nil; previously existing class variables retain their values.
title Replies the class's title
title <- (a1) Changes the class's title to a1, which must be a string. ReplY-is the receiver .
... cvar (@a1) Replies the value bound to the class variable a1. If no such variable is in the-Class dictionary, no is replied. (The @ symbol shoul~not be typed. See section 3.3.)
... cvar (@a1) <- (a2) Binds the receiver's class variable a1 to the value a2. Makes an entry for a1 in the class dictionary-rf one is not there already. Reply is the receiver. (The @ symbol should not be typed; see section 3.3.)
A-14

A.8 File
A file is an object that can be used to communicate with an ISIS file on disk. It is not the actual file on disk. The same file object can be used at different times to communicate with any number of different ISIS files. Two hidden instance variables are defined, but no class variables.
Files can be read and written either sequentially or randomly. They recognize the following messages:
message
isnew
is ?
open (a1)
..• create (a1)
... close
. . . at (a 1) (a2 )
reply
Replies with a new file object ready to have a file assigned to it. This message cannot be sent explicitly. It is sent implicitly by the ... new Class message.
OPL method: disp <- "<File>" . self
Reply is the class File.
Opens a communication channel between the receiver and the ISIS file named a1. The file name a1 must be a-string containing a valid ISIS file name. The reply is no if the file does not exist; otherwise the reply is the message receiver .
Creates a new file named a1. If a file with this name already exists it is first deleted. Replies the receiver.
Closes the communication channel between the receiver and the ISIS file, writing any buffered text not yet written. The OPL file object can be used to read or write another ISIS file if desired.
Positions the file at block a1, byte a2. Blocks and offsets-within-blocks are numbered from O. Blocks are 128 bytes long, so the byte offset may be any number between 0 and 127. Reply is the receiver.
A-15

... <- (a1)
... next
... next for (a1)
Writes the text a1 to the file at its current position. a1 may be a string or a single byte-.- Notice the similarity between this message and message used to write text into windows .
Replies with the byte from the file's current position, advancing the position one byte. Replies no if no record has ever been written at the file's current position .
Replies with a string of the next a1 bytes of the file from its current position, advancing the position. If fewer than a1 bytes follow, everything up through the last record is returned~ Replies the empty string if no record has ever been written at the file's current position.
A file can be deleted using the delete object described in Appendix B.
A-16

APPENDIX B PREDEFINED UTILITY OBJECTS
Predefined utility objects are unique instances of anonymous classes. In this appendix, the combination of object and message will be shown instead of the " .. . message" pattern, which indicates an arbitrary receiver.
B.1 Objects Whose Classes are Inaccessible
In this category belongs all the utility objects which belong to classes that cannot be accessed at all. New instances, therefore, cannot be created. The possible receiver-message combinations are as follows:
object+message reply or result
@anything
The @-symbol is used to refer to something literally; or put another way, to prevent something from being evaluated. It has the same function as QUOTE in Lisp. For example, evaluating @(1 + 2) replies the list (1 + 2), but evaluating (1 + 2) replies 3. More precisely, the format of this object + message combination is @ (@x), where @x indicates that the x parameter is sent to @ unevaluated; the second @ symbol-is not actually typed.
catch (label) in (code)
If the atom label is thrown while code is running (see throw), control returns to the point after the catch. Reply is nil.
catch (label) in (code1) do (code2)
If the atom label is thrown while code1 is running, code2 is executed, and control returns to the point after the catch. Reply is nil.
catch any in (code)
Like "catch (label) in (code)", but any label is caught.
catch any in (code1) do (code2)
Like "catch (label) in (code1) do (code2)", but any label is caught.
B-1
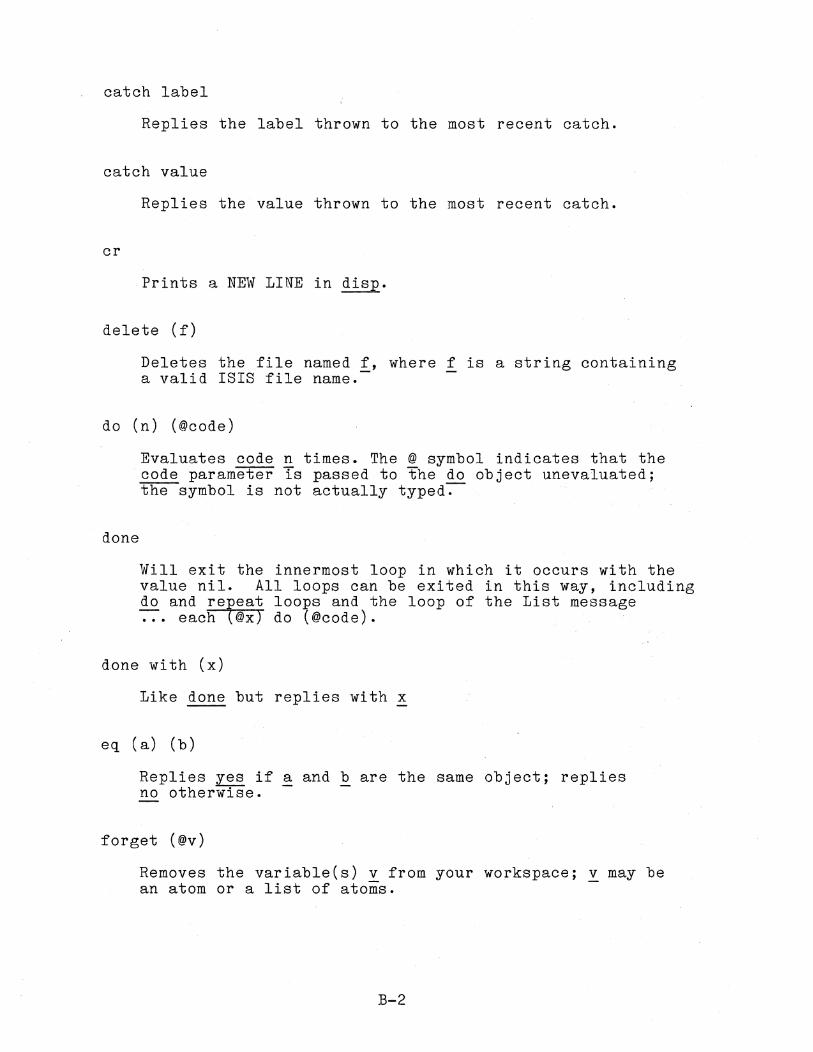
catch label
Replies the label thrown to the most recent catch.
catch value
Replies the value thrown to the most recent catch.
cr
Prints a NEW LINE in disp.
delete (f)
Deletes the file named f, where f is a string containing a valid ISIS file name.-
do (n) (@code)
done
Evaluates code n times. The @ symbol indicates that the code parameter is passed to the do object unevaluated; the symbol is not actually typed-.-
Will exit the innermost loop in which it occurs with the value nil. All loops can be exited in this way, including do and refeat loops and the loop of the List message ... each @x) do (@code).
done with (x)
Like done but replies with x
eq (a) (b)
Replies ~ if a and b are the same object; replies no otherwise.
forget (@v)
Removes the variable(s) v from your workspace; v may be an atom or a list of atoms.
B-2

go
Restarts a file interrupted by mem compact.
isis
kb
Returns to ISIS.
Waits for a key to be pressed, then replies with the ASCII code of the key pressed. The MOUSE and STOP keys are not seen by kb.
kb ?
If a key is pressed its ASCII code is replied. If no key is pressed, no is replied.
load (f)
mb
mb ?
mc
Loads a previously saved workspace from an ISIS file named f. See save. (The default file extension is .WRK.)
Waits for the mouse button to be pressed.
Replies yes if the mouse button is pressed; replies no otherwise.-
Replies with the column position of the mouse.
mem compact
Exits all execution and compacts memory. Use this when OPL signals "Error 4".
mem ?
Replies with the number of words (a word is two bytes) of free space remaining in your workspace.
B-3

ml
Replies with the line position of the mouse.
nil
Default initial object.
not (b)
read
Replies ~ if b is no; replies no otherwise.
Replies with a list of tokens read .from the keyboard. A token is an instance of one of the classes Atom, Number, String, List, or symbol.
Keyboard input is echoed in the window named disp. The prompt "?" first appears in disp followed by a typing cursor. You may type your input in free format; NEW LINES and extra spaces between tokens are ignored. The BACKSPACE key will delete the last key typed; typing CLEAR-LINE will delete the entire current line; typing RE-READ will eliminate everything that has been typed and give a new prompt. Press the DOlT key to signal read that typing is complete.
read in (w)
Like read but echoes what you type in the window w.
read of (ob)
In this form of read, ob may be a string, a file, or any object that replies to~he message ... next with a character.
The effect is as if the characters were typed in to read from the keyboard, except no echoing is done. Reading is terminated by a character value of 26, by reaching the end of the string when ob is a string, or by a reply of no when ob is a file or-some other object that is sent the ... next message.
read text
Similar to read but returns a string of the characters you type. Reading is terminated by DOlT.
B-4
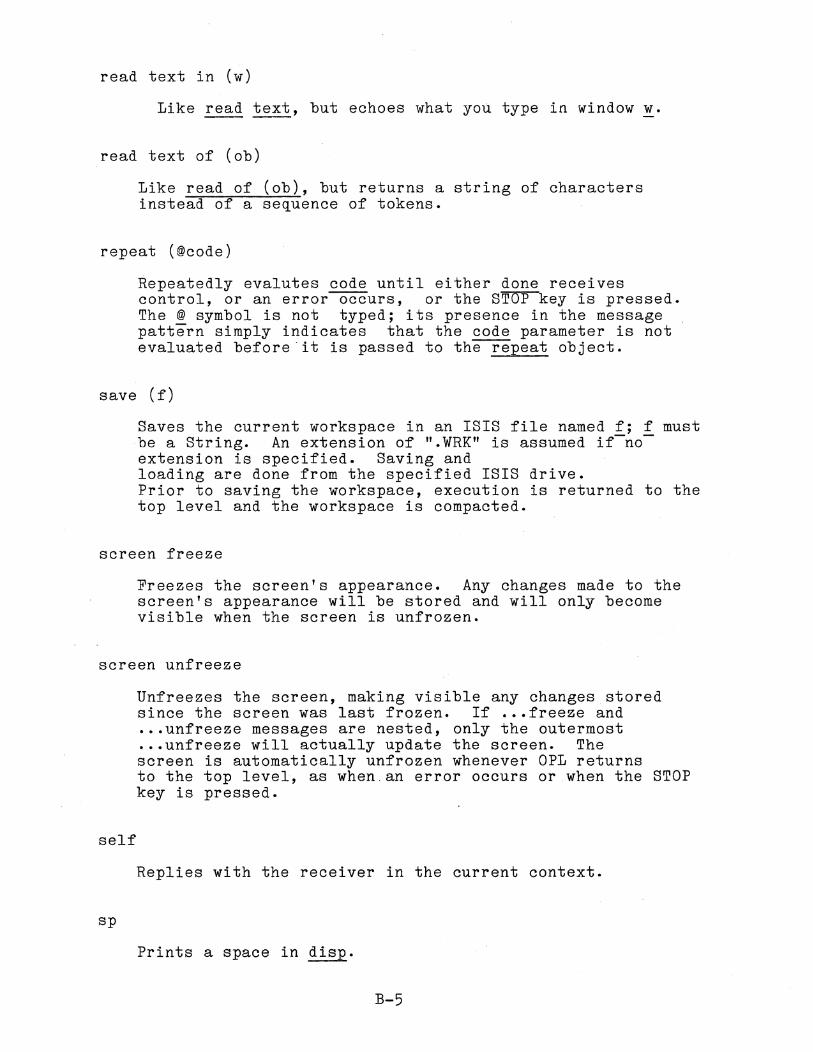
read text in (w)
Like read text, but echoes what you type in window w.
read text of (ob)
Like read of (ob), but returns a string of characters instead of a sequence of tokens.
repeat (@code)
Repeatedly evalutes code until either done receives control, or an error occurs, or the STOPkey is pressed. The @ symbol is not typed; its presence in the message pattern simply indicates that the code parameter is not evaluated before·it is passed to the-r8peat object.
save (f)
Saves the current workspace in an ISIS file named f; f must be a String. An extension of ".WRK" is assumed if-noextension is specified. Saving and loading are done from the specified ISIS drive. Prior to saving the workspace, execution is returned to the top level and the workspace is compacted.
screen freeze
Freezes the screen's appearance. Any changes made to the screen's appearance will be stored and will only become visible when the screen is unfrozen.
screen unfreeze
self
sp
Unfreezes the screen, making visible any changes stored since the screen was last frozen. If .•. freeze and ... unfreeze messages are nested, only the outermost ..• unfreeze will actually update the screen. The screen is automatically unfrozen whenever OPL returns to the top level, as when. an error occurs or.when the STOP key is pressed.
Replies with the receiver in the current context.
Prints a space in disp.
B-5

throw (label)
Throws the atom label to the most recent catch for that label. (See catch.) A subsequent "catch value" will reply nil.
throw (label) with (value)
vars
Like "throw (label)", but the object value is also thrown to the most recent catch for that label.
Replies with a List of all the user-defined variables in your workspace.
B.2 Objects inUTIL.WRK
UTIL.WRK is a workspace without the editor, but containing several objects that have been created separately from the objects described in the previous section. These objects, which can be listed using the vars object, are to, for, indisp, filein, and fileout. The classes which define these objects may be obtained by using the •.. is ? message. The workspace EDITOR.WRK also contains these objects; they may be deleted from the workspace by using the forget object. The possible objectmessage combinations are as follows:
filein: (f)
Reads OPL source lines in from file f and executes them, a line at a time, until a done is encountered. (The default file extension is .ASC.)----
fileout: (c) as (f)
Stores the messages and methods used to create class c as a list of OPL source lines in file f. Automatically creates, opens, and closes file f when required. (The default file extension is .ASC.)
fileout: (c) to (f)
Similar to immediately preceding message,except that the file is not created, opened, or closed automatically. The default file extension is .ASC.)
B-6

to (@p) (@code)
Creates an object-and-message combination E that executes code'when the message is sent to the objec~. Neither @ symbols should be typed; they merely indicate that the E and code parameters are passed to the to object unevaluated. The object in E is an instance of a class that can be obtained by sending the ... is ? message to the object.
for (@var) <- (10) to (hi) do (@code)
Implements a loop. Executes code repeatedly while var is between the values hi and 10. Neither@ symbol should be typed, they simply indicate-that the parameters code and var are passed t,o the for ob j ect unevaluated.
indisp (disp) (@code)
Executes code in a new environment where "disp" means the object whose name is passed as the parameter. The @ symbol should not be typed; it simply indicates that the code parameter is passed to indisp unevaluated.
B-7

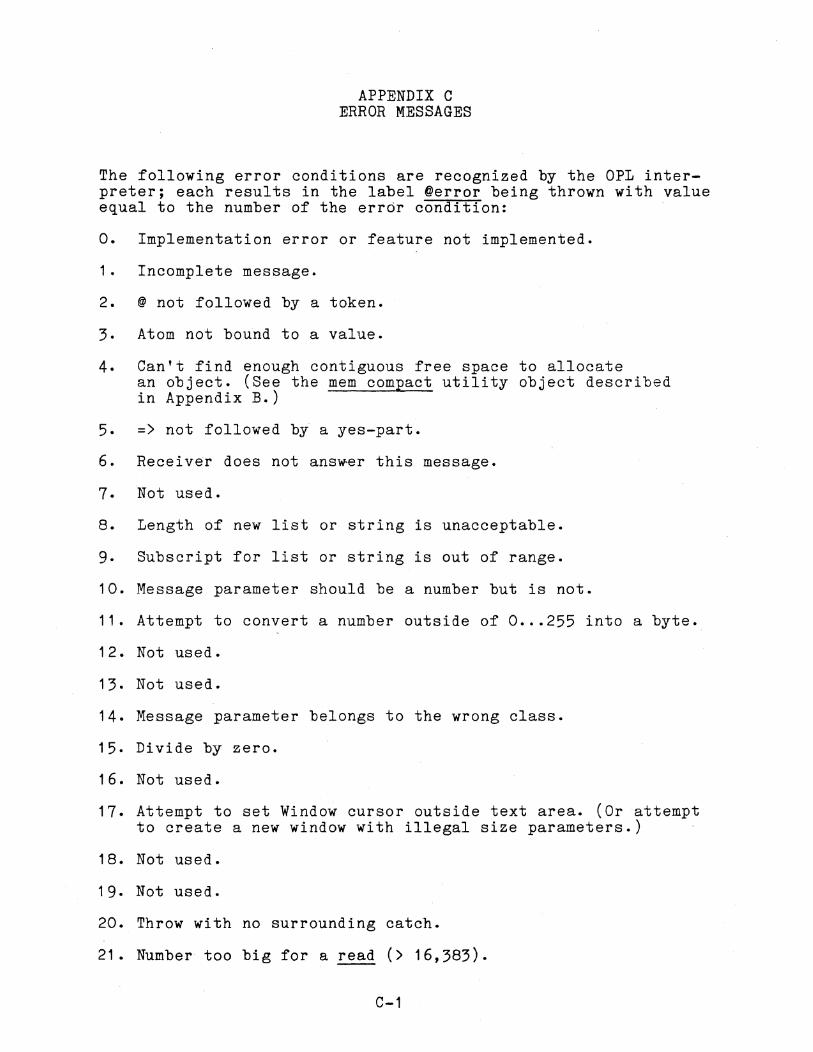
APPENDIX C ERROR MESSAGES
The following error conditions are recognized by the OPL interpreter; each results in the label @error being thrown with value equal to the number of the error condition:
o. Implementation error or feature not implemented.
1. Incomplete message.
2. @ not followed by a token.
3. Atom not bound to a value.
4. Can't find enough contiguous free space to allocate an object. (See the mem compact utility object described in Appendix B.)
5. => not followed by a yes-part.
6. Receiver does not answ-er this message.
7. Not used.
8. Length of new list or string is unacceptable.
9. Subscript for list or string is out of range.
10. Message parameter should be a number but is not.
11. Attempt to convert a number outside of 0 ... 255 into a byte.
1 2. Not us e d .
13. Not used.
14. Message parameter belongs to the wrong class.
15. Divide by zero.
16. Not used.
17. Attempt to set Window cursor outside text area. (Or attempt to create a new window with illegal size parameters.)
18. Not used.
19. Not used.
20. Throw with no surrounding catch.
21. Number too big for a read (> 16,383).
C-1

22. "read of (ob)" did not reply with a number or no.
23. disp is not bound to a <Window>, so can't echo keyboard.
24. OPL stack overflow.
25. Attempt to use a string of length <> 1.
26. In " ..• + (a1)" message for lists and strings, the, concatenated length is greate.r than 16,383 bytes.
27. Not used.
28. Yes part of a conditional is not a list.
29. In "<String> [ (a1) to (a2) 1 <- (a3)" message, the length of string a3 must be the same as the length of the substring to be replaced.
30. Message pattern syntax is incorrect.
31. Workspace not saved due to lack of space or some other ISIS file error.
32. Workspace is incompatible with present system.
33. In "load (f)", f does not exist.
34. Disk read error while attempting "load (f)".
35. Can't redefine pre-defined workspace variables.
36. Error in "<File> create".
37. Error in "<File> close".
38. Error in "<File> open."
39. Disk write error (e.g. not enough space on the disk).
40. File name does not have proper ISIS format.
41. File not open.
42. Disk error encountered when trying to change file pointer position.
99. The default error catcher was thrown something other than a number.
C-2

Code
00 01 02 03 04 05 06 07 08 09 10 1 1 1 2 13 14 1 5 1 6 17 18 19 20 21 22 23 24 25 26 27 28 29 30 31 32 33 34 35 36 37 38 39 40 41
Character
NULL Character Start of Heading Start of Text End of Text End of Transmission Enquiry Acknowledge Bell Backspace Horizontal Tabulation Line Feed Vertical Tabulation Form Feed Carriage Return Shift· Out Shift· In Data Link Escape Device Control 1 Device Control 2 Device Control 3 Device Control 4 Negative Acknowledge Synchronous Idle
APPENDIX D ASCII CODES
Code Character
42 * 43 + 44 45 46 . 47 / 48 0 49 1 50 2 51 3 52 4 53 5 54 6 55 7 56 8 57 9 58 59 . , 60 < 61 = 62 > 63 ? 64 @
End of Transmission Block 65 A Cancel 66 B End of Medium 67 C Substitute 68 D Escape 69 E File Separator 70 F Group Separator 71 G Record Separator 72 H Unit Separator 73 I Space 74 J , 75 K " 76 L # 77 M $ 78 N % 79 0 & 80 P .. 81 Q ( 82 R ) 83 S
D-1
Code Character
84 T 85 U 86 V 87 W 88 X 89 Y 90 Z 91 [ 92 j 93 94
A
95 96 T
97 a 98 b 99 c 100 d 101 e 102 f 103 g 104 h 105 i 106 j 107 k 108 1 109 m 110 n 111 0 112 p 113 q 114 r 115 s 116 t 117 u 118 v 119 w 120 x 121 Y 122 z 123 { 124 I
I
125 1 126 127 Delete


REQUEST FOR READER'S COMMENTS
Object Programming Language User's Guide
171823-002
Intel Corporation attempts to provide documents that meet the needs of all Intel product users. This form lets you participate directly in the documentation process .
. Please restrict your comments to the usability, accuracy, readability, organization, and completeness of this document.
1, Please specify by page any errors you found in this manual.
2, Does the document cover the information you expected or required? Please make suggestions for improvement.
3. Is this the right type of document for your needs? Is it at the right level? What other types of documents are needed?
4. Did you have any difficulty understanding descriptions or wording? Where?
5. Please rate this document on a scale of 1 to 10 with 10 being the best rating.
NAME ___________________________________________________ DATE __________ __
TITLE
COMPANY NAME/DEPARTMENT ______________________________________________ __
ADDRESS ____________________________________________________________ __
CITY _______________________________________ STATE ___ ZIP CODE ______ __
Please check here if you require a written reply. 0
WE'D LIKE YOUR COMMENTS ...
This document is one of a series describing I ntel products. Your comments on the back of this form will help us produce better manuals. Each reply will be carefully reviewed by the responsible person. All comments and suggestions become the property of Intel Corporation.
BUSINESS REPLY MAIL FIRST CLASS PERMIT NO. 79 BEAVERTON, OR
POSTAGE WILL BE PAID BY ADDRESSEE
Intel Corporation SSO Technical Publications Dept. 3585 SW 198th Ave. Aloha, OR 97007
AL3-2-4B5
IIIIII NO POSTAGE NECESSARY
IF MAILED IN THE
UNITED STATES

inter INTEL CORPORATION , 3585 S.w. 198th Avenue, Aloha, Oregon 97007 • (503) 681-8080
Printed in U.S.AlY73/ 1 Kl0881 / AP
![Object-oriented Programming with PHP · Object-oriented Programming with PHP [2 ] Object-oriented programming Object-oriented programming is a popular programming paradigm where concepts](https://img.pdfslide.us/doc/110x75/5e1bb46bfe726d12f8517bf0/object-oriented-programming-with-php-object-oriented-programming-with-php-2-object-oriented.jpg)


![Object-oriented Programming with PHP · PDF fileObject-oriented Programming with PHP [2 ] Object-oriented programming Object-oriented programming is a popular programming paradigm](https://img.pdfslide.us/doc/110x75/5a728d6d7f8b9aa7538da894/object-oriented-programming-with-php-nbsppdf-fileobject-oriented-programming.jpg)