Embed Size (px)
DESCRIPTION
OBIEE GUIDE2
Citation preview

Oracle® Business IntelligenceNew Features Guide
Release 10.1.3.4
Part No. E10416-05
August 2008

Oracle Business Intelligence New Features Guide, Release 10.1.3.4
Part No. E10416-05
Copyright © 2008 Oracle. All rights reserved.
The Programs (which include both the software and documentation) contain proprietary information; they are provided under a license agreement containing restrictions on use and disclosure and are also protected by copyright, patent, and other intellectual and industrial property laws. Reverse engineering, disassembly, or decompilation of the Programs, except to the extent required to obtain interoperability with other independently created software or as specified by law, is prohibited.
The information contained in this document is subject to change without notice. If you find any problems in the documentation, please report them to us in writing. This document is not warranted to be error-free. Except as may be expressly permitted in your license agreement for these Programs, no part of these Programs may be reproduced or transmitted in any form or by any means, electronic or mechanical, for any purpose.
If the Programs are delivered to the United States Government or anyone licensing or using the Programs on behalf of the United States Government, the following notice is applicable:
U.S. GOVERNMENT RIGHTS Programs, software, databases, and related documentation and technical data delivered to U.S. Government customers are "commercial computer software" or "commercial technical data" pursuant to the applicable Federal Acquisition Regulation and agency-specific supplemental regulations. As such, use, duplication, disclosure, modification, and adaptation of the Programs, including documentation and technical data, shall be subject to the licensing restrictions set forth in the applicable Oracle license agreement, and, to the extent applicable, the additional rights set forth in FAR 52.227-19, Commercial Computer Software--Restricted Rights (June 1987). Oracle USA, Inc., 500 Oracle Parkway, Redwood City, CA 94065.
The Programs are not intended for use in any nuclear, aviation, mass transit, medical, or other inherently dangerous applications. It shall be the licensee's responsibility to take all appropriate fail-safe, backup, redundancy and other measures to ensure the safe use of such applications if the Programs are used for such purposes, and we disclaim liability for any damages caused by such use of the Programs.
Oracle, JD Edwards, PeopleSoft, and Siebel are registered trademarks of Oracle Corporation and/or its affiliates. Other names may be trademarks of their respective owners.
The Programs may provide links to Web sites and access to content, products, and services from third parties. Oracle is not responsible for the availability of, or any content provided on, third-party Web sites. You bear all risks associated with the use of such content. If you choose to purchase any products or services from a third party, the relationship is directly between you and the third party. Oracle is not responsible for: (a) the quality of third-party products or services; or (b) fulfilling any of the terms of the agreement with the third party, including delivery of products or services and warranty obligations related to purchased products or services. Oracle is not responsible for any loss or damage of any sort that you may incur from dealing with any third party.
iii
Contents
Preface ............................................................................................................................................................... xiii
Audience..................................................................................................................................................... xiiiDocumentation Accessibility ................................................................................................................... xiiiRelated Documents ................................................................................................................................... xivConventions ............................................................................................................................................... xiv
Part I General New Features
1 Oracle BI Answers-Based Metadata Dictionary Feature
1.1 Configuration for the Oracle BI Answers-Based Metadata Dictionary Feature ................ 1-1
2 Multi-Select Dashboard Prompts Feature
2.1 Configuration for the Multi-Select Dashboard Prompts Feature ........................................ 2-1
3 Office Integration with BI Dashboard Feature
3.1 Configuration for the Office Integration with BI Dashboard Feature................................. 3-1
4 Dashboard Link Types Feature
4.1 Using Bookmark Links............................................................................................................... 4-14.2 Using Prompted Links ............................................................................................................... 4-14.3 Configuration for the Dashboard Prompt Types Feature..................................................... 4-2
5 Import Oracle Catalog Feature
6 Embedded Database Functions Feature
6.1 EVALUATE Function................................................................................................................. 6-16.2 EVALUATE_AGGR Function................................................................................................... 6-16.3 EVALUATE_PREDICATE Function........................................................................................ 6-2
iv
7 Drag and Drop XMLA Metadata Objects Feature
8 General New Features in Release 10.1.3.3.1
8.1 Oracle Business Intelligence Installer Now Deploys BI Components into One OC4J Container ....................................................................................................... 8-1
8.1.1 Upgrading to Version 10.1.3.3.1 from a BIEE 10.1.3.x Release Prior to 10.1.3.3.1 ...... 8-18.2 DataDirect Connect ODBC Drivers for Linux and UNIX Operating Systems
Bundled with Oracle BI EE 10.1.3.3.1 ............................................................................. 8-28.2.1 Using the DataDirect Connect ODBC Drivers ................................................................ 8-28.2.1.1 For connectivity to Microsoft SQL Server database ................................................ 8-28.2.1.2 For connectivity to Sybase ASE Database................................................................. 8-38.2.1.3 For connectivity to Informix Database ...................................................................... 8-48.3 Support for Charts in Oracle BI EE for Arabic, Thai, and Hebrew...................................... 8-58.3.1 Prerequisites ......................................................................................................................... 8-58.3.2 Integrate the Data Sources.................................................................................................. 8-58.3.2.1 Adding the Oracle BI Server as a Data Source ......................................................... 8-68.3.2.2 Integrating with Oracle Presentation Services ......................................................... 8-68.3.3 Create a Report and Layout in BI Publisher .................................................................... 8-68.3.4 Embed the BI Publisher Report in a Dashboard ............................................................. 8-88.3.5 Supported Graph Types ..................................................................................................... 8-88.3.6 Known Limitations.............................................................................................................. 8-8
9 General New Features in Release 10.1.3.3.2
9.1 Support for Hyperion Essbase as a Data Source .................................................................... 9-19.1.1 Supported Versions of Hyperion Essbase with Oracle BI EE 10.1.3.3.2 ...................... 9-19.1.2 Enabling the Use of Hyperion Essbase as a Data Source............................................... 9-19.1.2.1 Essbase Client Libraries ............................................................................................... 9-19.1.2.2 BI Server Configuration for UNIX and Linux Platforms........................................ 9-19.1.2.2.1 Solaris: Oracle BI 64 bit mode.............................................................................. 9-19.1.2.2.2 Solaris: Oracle BI 32 bit mode.............................................................................. 9-29.1.2.2.3 HP-UX PARISC: Oracle BI 32 bit mode ............................................................. 9-29.1.2.2.4 HP-UX Itanium: Oracle BI 64 bit mode.............................................................. 9-29.1.2.2.5 AIX Oracle BI 32 bit and 64 bit modes ............................................................... 9-39.1.2.2.6 Linux: Oracle BI 32 bit mode ............................................................................... 9-39.1.2.3 Import Process .............................................................................................................. 9-39.1.3 Guidelines and Limitations ................................................................................................ 9-59.1.3.1 Measures ........................................................................................................................ 9-59.1.3.2 Unique Member Names .............................................................................................. 9-59.1.3.3 Time Series Functions .................................................................................................. 9-69.1.3.4 Evaluate Function for MDX Sources.......................................................................... 9-69.1.3.5 User-Defined Attributes .............................................................................................. 9-79.1.3.6 Substitution Variables.................................................................................................. 9-79.1.3.7 Attribute Dimensions................................................................................................... 9-79.1.3.8 Unbalanced Hierarchies .............................................................................................. 9-89.2 Using BI EE OC4J Components with IIS via the IIS Plug-in................................................. 9-99.2.1 Prerequisites ......................................................................................................................... 9-99.2.2 Configuration Steps............................................................................................................. 9-9
v
10 General New Features in Release 10.1.3.3.3
11 General New Features in Release 10.1.3.4
11.1 Overview of New Features..................................................................................................... 11-111.2 Migration of Oracle BI Discoverer Metadata ....................................................................... 11-211.3 New Line Chart for Time Series Data ................................................................................... 11-211.4 New Sample Oracle BI Application and Data Set ............................................................... 11-311.4.1 OBI EE Web Dashboard Samples ................................................................................... 11-311.4.2 OBI EE RPD Constructs Samples ................................................................................... 11-411.5 Integration with Oracle Enterprise Performance Management Workspace,
Fusion Edition .............................................................................................................. 11-511.5.1 Overview of the Integration............................................................................................ 11-511.5.2 Documentation for the Integration ................................................................................ 11-511.5.2.1 Installation Documentation for the Integration .................................................... 11-611.5.2.2 Integration of Oracle BI Answers, Interactive Dashboards, and Delivers,
with EPM Workspace ...................................................................................... 11-611.5.2.3 Integration of Oracle BI Publisher with EPM Workspace ................................... 11-611.5.3 Installing and Configuring Oracle BI Presentation Services with
EPM Workspace ..................................................................................................... 11-611.5.3.1 Registering the Oracle BI Presentation Services Components with the
Hyperion Registry ........................................................................................... 11-711.5.3.2 Specifying the External Login for Single Sign-On with EPM Workspace......... 11-811.5.3.3 Configuring Javahost to Enable the Hyperion Common Security
System Authenticator ...................................................................................... 11-911.5.3.4 Specifying the Hyperion_Home Environment Variable ..................................... 11-911.5.3.5 Configuring the Repository to Use a Custom Authenticator............................ 11-1011.5.3.6 Configuring the Web Server for EPM Workspace.............................................. 11-1111.5.3.6.1 Configuring Graphically ................................................................................. 11-1111.5.3.6.2 Configuring Manually ..................................................................................... 11-1211.5.3.7 Verifying the Web Server Configuration ............................................................. 11-1211.5.3.8 Provisioning Hyperion Shared Services Users in Oracle BI
Presentation Services ..................................................................................... 11-1311.5.4 Using Oracle BI Presentation Services Components in EPM Workspace,
Fusion Edition ...................................................................................................... 11-1311.5.4.1 Specifying Oracle BI Preferences Within EPM Workspace ............................... 11-1311.5.4.2 Performing Oracle BI Presentation Services Administration Tasks Within
EPM Workspace ............................................................................................ 11-1311.5.4.3 Launching Oracle BI Presentation Services Components in
EPM Workspace ............................................................................................ 11-1411.5.4.4 Using BI Answers .................................................................................................... 11-1411.5.4.5 Using BI Interactive Dashboards........................................................................... 11-1411.5.4.6 Using BI Delivers ..................................................................................................... 11-1511.6 Integration with Oracle Smart Space, Fusion Edition ...................................................... 11-1511.6.1 Overview of the Integration.......................................................................................... 11-1511.6.2 Documentation for the Integration .............................................................................. 11-1511.6.2.1 Installation Documentation for the Integration .................................................. 11-1611.6.2.2 Integration of Oracle BI Answers, Interactive Dashboards, and
Delivers with Oracle Smart Space .................................................................. 11-16
vi
11.6.2.3 Integration of Oracle BI Publisher with Oracle Smart Space ............................ 11-1711.6.3 Performing Oracle BI Tasks in Smart Space ............................................................... 11-1711.6.3.1 Tasks from Right-Click Menus .............................................................................. 11-1711.6.3.2 Folder Management ................................................................................................ 11-1811.6.3.3 Oracle BI Delivers iBots .......................................................................................... 11-1811.6.3.4 Authentication ......................................................................................................... 11-1811.6.4 Downloading Oracle Smart Space and Smart View from Oracle BI
Presentation Services ........................................................................................... 11-1811.6.4.1 Setting Up to Download Oracle Smart Space and Smart View from Oracle BI
Presentation Services .................................................................................... 11-1911.6.4.1.1 Smart View ........................................................................................................ 11-1911.6.4.1.2 Oracle Smart Space........................................................................................... 11-1911.6.4.2 Initiating the Download ......................................................................................... 11-2011.7 Certification of Oracle WebLogic Server 10.x .................................................................... 11-2011.7.1 Configuring Oracle BI EE for WebLogic Server......................................................... 11-2011.7.2 Configuring Oracle BI Publisher for WebLogic Server............................................. 11-21
Part II New Features for Oracle BI Publisher
12 Oracle BI Publisher Template Builder Enhancements
12.1 Changes to the Oracle BI Publisher Menu ........................................................................... 12-112.2 Integration with Oracle BI Discoverer .................................................................................. 12-212.3 Microsoft PowerPoint Output Support ............................................................................... 12-212.4 Advanced Form Field Support .............................................................................................. 12-312.4.1 Edit Data Fields ................................................................................................................. 12-312.4.2 Advanced Tab ................................................................................................................... 12-412.4.3 Insert and Edit Repeating Groups.................................................................................. 12-512.4.3.1 Creating Repeating Groups ..................................................................................... 12-512.4.3.2 Create Grouping Fields Around a Block................................................................ 12-612.4.4 Insert Conditional Formatting ........................................................................................ 12-712.4.5 Inserting and Editing Conditional Regions .................................................................. 12-812.5 Chart Builder Enhancements ................................................................................................. 12-912.5.1 Support for Charts Inside a Grouping........................................................................... 12-912.5.2 New Chart Types ............................................................................................................ 12-1012.5.3 New Chart Subtypes ...................................................................................................... 12-11
13 Flash Templates for Oracle BI Publisher
13.1 Changes to the BI Publisher User Interface.......................................................................... 13-113.2 Prerequisites ............................................................................................................................ 13-113.3 Building Templates.................................................................................................................. 13-213.3.1 Adding the Data Source................................................................................................... 13-213.3.2 Creating the Layout.......................................................................................................... 13-413.3.2.1 Adding a Chart .......................................................................................................... 13-613.3.3 Data Binding...................................................................................................................... 13-613.3.3.1 Binding the DataGrid................................................................................................ 13-713.3.3.2 Binding the Chart ...................................................................................................... 13-813.4 Loading Templates .................................................................................................................. 13-9
vii
13.5 Setting Properties for PDF Output ........................................................................................ 13-913.6 Summary ................................................................................................................................. 13-10
14 Oracle BI Publisher PowerPoint Output
14.1 Supported Versions of PowerPoint ....................................................................................... 14-114.2 Configuring Fonts for BI Publisher Server........................................................................... 14-114.3 Configuring Fonts for BI Publisher Template Builder ....................................................... 14-114.4 Usage and Limitations ............................................................................................................ 14-2
15 Oracle BI Publisher Integration with Oracle BI Discoverer
15.1 Configuring the Oracle BI Publisher and Discoverer Integration .................................... 15-115.1.1 Step 1: Install the Discoverer Web Service .................................................................... 15-215.1.2 Step 2: Install Oracle BI Publisher 10.1.3 ....................................................................... 15-215.1.3 Step 3: Configure Discoverer to Use Oracle Application Server
Identity Management ............................................................................................. 15-215.1.4 Step 4: Set Up a Dedicated User to Access the Discoverer Web Service from
Oracle BI Publisher ................................................................................................. 15-215.1.5 Step 5: Configure Oracle BI Publisher to Use the Discoverer Web Service.............. 15-315.1.6 Discoverer Web Service Configuration Settings .......................................................... 15-415.2 Creating Reports Based on Discoverer Worksheets ........................................................... 15-415.2.1 About Creating a Report Based on a Discoverer Worksheet ..................................... 15-415.2.2 Creating a Report Directly Through the Oracle BI Publisher Web Interface........... 15-515.2.3 Creating a Report Indirectly Through Oracle BI Publisher Template Builder ....... 15-815.2.3.1 About Creating Layout Templates........................................................................ 15-1115.2.3.2 Creating a Layout Template Offline ..................................................................... 15-1115.2.3.3 Creating a Layout Template Online .................................................................... 15-1815.2.3.4 Viewing and Scheduling Reports.......................................................................... 15-2015.2.4 Prerequisites, Limitations, and Known Issues ........................................................... 15-2015.2.4.1 Prerequisites ............................................................................................................. 15-2015.2.4.2 Limitations................................................................................................................ 15-2115.2.4.3 Known Issues ........................................................................................................... 15-21
16 Performance Improvements for Oracle BI Publisher
16.1 Multithreading for Bursting ................................................................................................... 16-116.2 Multithreading for Document Generation........................................................................... 16-2
17 Converting Reports from Oracle Reports to Oracle BI Publisher
17.1 Overview................................................................................................................................... 17-117.2 Prerequisites ............................................................................................................................. 17-117.2.1 Reports and Oracle Reports XML Format..................................................................... 17-217.2.2 Update CLASSPATH with Needed JAR Files.............................................................. 17-217.2.3 JDK Version 1.1.8 .............................................................................................................. 17-217.3 Conversion Utility.................................................................................................................... 17-217.3.1 Output Files ....................................................................................................................... 17-317.4 Upload PL/SQL Package to the Database ........................................................................... 17-417.5 Putting Converted Reports into the Oracle BI Publisher Repository............................... 17-4
viii
17.6 Testing and Tweaking Your Reports .................................................................................... 17-517.6.1 Data Template and PL/SQL Files .................................................................................. 17-517.6.2 RTF Layout Template File ............................................................................................... 17-5
18 Support for Digital Signature in PDF Documents
18.1 Introduction .............................................................................................................................. 18-118.2 Prerequisites ............................................................................................................................. 18-118.3 Limitations ................................................................................................................................ 18-218.4 Integration With Oracle BI Publisher.................................................................................... 18-218.4.1 Digital Signature ID Registration And Allowed Role Assignment........................... 18-218.4.2 Specify the Signature Display Field or Location ......................................................... 18-418.4.2.1 Designating a Field in a PDF Template for the Digital Signature ...................... 18-418.4.2.2 Specifying a Location in the Document to Insert the Digital Signature
(for RTF and PDF Templates) .......................................................................... 18-618.4.3 Running and Signing Reports with the Digital Signature .......................................... 18-718.4.4 Additional PDF Security Features.................................................................................. 18-8
19 Support for PostScript Printers
19.1 Introduction .............................................................................................................................. 19-119.2 Setting Up the Print Server to Use the Converter ............................................................... 19-119.3 Limitations ................................................................................................................................ 19-2
20 Additional New Features in Release 10.1.3.3
20.1 Support for CSV Output ......................................................................................................... 20-120.2 Report Definition Features ..................................................................................................... 20-120.3 Report Viewing Features ........................................................................................................ 20-220.4 New Property for LDAP Security Model ............................................................................. 20-2
21 New Features in Release 10.1.3.3.1
21.1 Time Out Value for Web Service Data Sources ................................................................... 21-121.2 Bidirectional Function for eText Data Fields ....................................................................... 21-121.3 Default Repository .................................................................................................................. 21-2
22 New Features in Release 10.1.3.3.2
22.1 Support for Document Cache................................................................................................. 22-122.2 Support for New Output Types............................................................................................. 22-1
23 New Features in Release 10.1.3.3.3
23.1 BI Publisher Scheduler Setup Updates Including the Bundling of DataDirect Connect for JDBC Drivers .......................................................................................................... 23-1
23.1.1 Recommendations for Using DataDirect Connect or Native Database Drivers...... 23-123.1.2 Setting Up Connection to Your Scheduler Database Using the DataDirect Connect
for JDBC Drivers .................................................................................................... 23-223.1.2.1 Entering Connection Information for IBM DB2.................................................... 23-223.1.2.2 Entering Connection Information for Microsoft SQL Server .............................. 23-3
ix
23.1.2.3 Entering Connection Information for Oracle ........................................................ 23-323.1.2.4 Entering Connection Information for MySQL ...................................................... 23-323.1.3 Setting the BLOB Column Size ....................................................................................... 23-423.2 "Link to This Report" Can Now Be Set as a Report Option ............................................... 23-423.3 Enhanced Support for Pagination Control in RTF Output ................................................ 23-423.3.1 Support for "Keep Paragraph with the Next Paragraph" ........................................... 23-523.3.2 Keep Paragraph Intact...................................................................................................... 23-523.3.3 Support for Table "Heading Rows Repeat"................................................................... 23-523.3.4 Support for "Table Row Keep Together"....................................................................... 23-523.4 Support for Multiple Cascading Parameters ....................................................................... 23-523.5 Support for Vertical Alignment of External Graphics........................................................ 23-623.6 Support for Multiple Currency Symbol Displays in Report.............................................. 23-623.6.1 Sample Usage .................................................................................................................... 23-7
24 New Features in Release 10.1.3.4
25 Oracle Business Intelligence Publisher Web Services
25.1 Overview of the Oracle BI Publisher Web Services ............................................................ 25-125.1.1 Functionality Overview ................................................................................................... 25-125.1.2 WSDL Definition for PublicReportService.................................................................... 25-125.2 Oracle BI Publisher Web Services Data Types..................................................................... 25-225.2.1 Base Data Types ................................................................................................................ 25-225.2.2 XML-to-Java Data Type Mappings ................................................................................ 25-225.2.3 Complex Types ................................................................................................................. 25-225.3 Oracle BI Publisher Web Services Operations ..................................................................... 25-725.3.1 About Using the Code Samples...................................................................................... 25-725.3.2 Operations for Validation of Privileges......................................................................... 25-825.3.3 Operations to Get Information About Reports and the Repository........................ 25-1025.3.4 Operations to Run and Schedule Reports ................................................................... 25-1425.3.5 Messages for Errors ........................................................................................................ 25-1725.4 Debugging Web Service Applications ................................................................................ 25-1725.5 Oracle BI Publisher Web Services WSDL ........................................................................... 25-19
Part III New Features for Oracle Business Intelligence for Microsoft Office
26 Installing Oracle Business Intelligence for Microsoft Office
26.1 System Requirements .............................................................................................................. 26-126.1.1 Supported Client Operating Systems ............................................................................ 26-126.1.2 Supported Versions of Microsoft Office........................................................................ 26-226.1.3 Supported Application Servers ...................................................................................... 26-226.2 Installing the BI Office Server ................................................................................................ 26-226.2.1 Deployment of the bioffice.ear........................................................................................ 26-226.2.2 Initialization of the BI Office Configuration File.......................................................... 26-226.2.3 Location of the Installed Client OracleBIOffice.exe File ............................................. 26-326.3 Deploying the BI Office Server on J2EE Application Servers............................................ 26-326.4 Installing the BI Office Client ................................................................................................. 26-4
x
26.4.1 Performing a Maintenance or Upgrade Install............................................................. 26-626.4.2 Configuring the Client ..................................................................................................... 26-626.5 Setting Properties in the bioffice.xml Configuration File................................................... 26-726.6 Setting Up SSL-Enabled OC4J for BI Office ....................................................................... 26-1126.7 Setting Up an SSO-Enabled Oracle BI Presentation Server for BI Office for Releases
Prior to 10.1.3.4 ........................................................................................................... 26-1426.8 Setting Up an SSO-Enabled Oracle BI Presentation Server for BI Office for
Releases 10.1.3.4 and Later ......................................................................................... 26-1526.8.1 Prerequisites .................................................................................................................... 26-1526.8.2 Integrating BI Office with SSO-Enabled Oracle BI .................................................... 26-1626.8.3 Alternative Configuration Method .............................................................................. 26-1726.9 Setting Up an NTLM-Enabled Oracle BI Presentation Server for BI Office for
Releases 10.1.3.4 and Later ......................................................................................... 26-1826.9.1 Example of Deploying and Configuring BI Office with NTLM Authentication... 26-1926.9.2 Prerequisite Tasks........................................................................................................... 26-2026.9.2.1 Configure Oracle Business Intelligence to enable single sign-on..................... 26-2026.9.2.2 Optionally install and configure Active Directory or another third-party
LDAP server .................................................................................................. 26-2026.9.2.3 Create a second BI Presentation Services servlet to bypass authentication.... 26-2026.9.2.3.1 Method 1: Install a Standalone Instance of Your Web Server and Deploy
and Configure the Presentation Services Plug-in .................................... 26-2026.9.2.3.2 Method 2: Create a Duplicate SAWBridge Servlet in the web.XML File . 26-2126.9.3 Installing the NTLM Module ........................................................................................ 26-2126.9.4 Configuring BI Office to Enable NTML ...................................................................... 26-2326.9.5 Testing Your NTLM Deployment ................................................................................ 26-24
27 Microsoft Office Support
28 New Features in Release 10.1.3.3.1
28.1 Configure the BI Office Connection URL............................................................................. 28-128.2 Language Support.................................................................................................................... 28-1
29 New Features in Release 10.1.3.3.3
30 New Features in Release 10.1.3.4
30.1 Server Independence ............................................................................................................... 30-130.2 BI Office Client Changes ......................................................................................................... 30-130.2.1 Ability to Enable Logging................................................................................................ 30-130.2.2 Enhanced BI Catalog Task Pane ..................................................................................... 30-230.2.3 Ability to Preserve Excel Conditional Formatting During Refreshes ....................... 30-230.2.4 Support for Gauge View.................................................................................................. 30-230.2.5 Support for Funnel View ................................................................................................. 30-230.2.6 Edit Prompts and Levels After Insert ............................................................................ 30-230.2.7 Enhanced Prompts Selection UI ..................................................................................... 30-230.2.8 Support for Grand Totals in Table Views ..................................................................... 30-330.3 Support for Combined Request Views ................................................................................. 30-3

xi
30.4 Transparent Compression of Results .................................................................................... 30-330.5 NTLM Support ......................................................................................................................... 30-3

xii
xiii
Preface
This guide describes the new features in Releases 10.1.3.3, 10.1.3.3.1, 10.1.3.3.2, and 10.1.3.3.3 of Oracle Business Intelligence Enterprise Edition (Oracle BI Enterprise Edition) and Oracle Business Intelligence Publisher (Oracle BI Publisher).
This preface contains the following sections:
■ Audience
■ Documentation Accessibility
■ Related Documents
■ Conventions
AudienceThis document is intended for:
■ Oracle BI Enterprise Edition report and dashboard creators
■ Oracle BI Enterprise Edition administrators
■ Oracle Business Intelligence Publisher administrators, report authors, and end users
Documentation AccessibilityOur goal is to make Oracle products, services, and supporting documentation accessible, with good usability, to the disabled community. To that end, our documentation includes features that make information available to users of assistive technology. This documentation is available in HTML format, and contains markup to facilitate access by the disabled community. Accessibility standards will continue to evolve over time, and Oracle is actively engaged with other market-leading technology vendors to address technical obstacles so that our documentation can be accessible to all of our customers. For more information, visit the Oracle Accessibility Program Web site at http://www.oracle.com/accessibility/.
Accessibility of Code Examples in DocumentationScreen readers may not always correctly read the code examples in this document. The conventions for writing code require that closing braces should appear on an otherwise empty line; however, some screen readers may not always read a line of text that consists solely of a bracket or brace.

xiv
Accessibility of Links to External Web Sites in DocumentationThis documentation may contain links to Web sites of other companies or organizations that Oracle does not own or control. Oracle neither evaluates nor makes any representations regarding the accessibility of these Web sites.
TTY Access to Oracle Support ServicesOracle provides dedicated Text Telephone (TTY) access to Oracle Support Services within the United States of America 24 hours a day, 7 days a week. For TTY support, call 800.446.2398. Outside the United States, call +1.407.458.2479.
Related DocumentsIn addition to this new features guide, Oracle BI Enterprise Edition has the following documentation:
■ Oracle BI Enterprise Edition component-level Online Help (for example, Oracle BI Answers Help, Oracle BI Administration Tool Help)
You can also refer to the following:
■ The Oracle BI Enterprise Edition Documentation Web site:
http://www.oracle.com/technology/documentation/bi_ee.html
■ The Oracle BI Enterprise Edition Product Web site:
http://www.oracle.com/technology/products/bi/enterprise-edition.html
■ The latest information on supported versions is on the Certify application at:
http://metalink.oracle.com
■ The Oracle BI Enterprise Edition Release Notes are available on SupportWeb at:
http://supportweb.siebel.com
■ The Oracle Business Intelligence Publisher Documentation pages:
http://www.oracle.com/technology/products/xml-publisher/xmlpdocs.html
■ The Oracle Business Intelligence Publisher Product web site:
http://www.oracle.com/technology/products/xml-publisher/index.html
ConventionsThe following text conventions are used in this document:
Convention Meaning
boldface Boldface type indicates graphical user interface elements associated with an action, or terms defined in text or the glossary.
italic Italic type indicates book titles, emphasis, or placeholder variables for which you supply particular values.
monospace Monospace type indicates commands within a paragraph, URLs, code in examples, text that appears on the screen, or text that you enter.

Part IPart I General New Features
Part I contains the following chapters:
■ Chapter 1, "Oracle BI Answers-Based Metadata Dictionary Feature"
■ Chapter 2, "Multi-Select Dashboard Prompts Feature"
■ Chapter 3, "Office Integration with BI Dashboard Feature"
■ Chapter 4, "Dashboard Link Types Feature"
■ Chapter 5, "Import Oracle Catalog Feature"
■ Chapter 6, "Embedded Database Functions Feature"
■ Chapter 7, "Drag and Drop XMLA Metadata Objects Feature"
■ Chapter 8, "General New Features in Release 10.1.3.3.1"
■ Chapter 9, "General New Features in Release 10.1.3.3.2"
■ Chapter 10, "General New Features in Release 10.1.3.3.3"
■ Chapter 11, "General New Features in Release 10.1.3.4"


1
Oracle BI Answers-Based Metadata Dictionary Feature 1-1
1 Oracle BI Answers-Based MetadataDictionary Feature
This new feature enables administrators to analyze metadata repository statistics in Oracle BI Answers.
The Oracle BI Server can generate a Metadata Dictionary that describes the metrics contained within the repository as well as the attributes of repository objects. The Metadata Dictionary output is a static set of XML documents. For more information about the Metadata Dictionary, see Oracle Business Intelligence Server Administration Guide.
In this release, this Metadata Dictionary can now be accessed directly from the Oracle BI Answers selection pane where specific metadata information will be shown to guide report construction. Once this Oracle BI Answers-based functionality has been enabled as described in this section, an icon will appear next to each Subject Area, Table name, and Column shown in the selection pane for that Subject Area. The Subject Area icon is always displayed, whereas the Table name and Column name icons are only displayed on mouse-over. Clicking on the icon will open up a specific Metadata Dictionary page to show information for that element and links to related repository information.
1.1 Configuration for the Oracle BI Answers-Based Metadata Dictionary Feature
This section explains how to configure the Oracle BI Answers Based Metadata Dictionary feature.
To configure this functionality, a Metadata Dictionary should first be generated using the Oracle BI Administration Tool, as follows:
1. On the machine where Oracle BI is installed, launch the Oracle BI Administration Tool.
2. Log in to the desired repository in "Offline" mode.
3. Create the dictionary using: Tools -> Utilities -> Generate Metadata Dictionary.
Once the newly-generated Metadata Dictionary has been saved, it should then be packaged and deployed to the application server as appropriate for your installation. If you are using IIS as a web server, placing the Metadata Dictionary in the "OracleBIData" directory is a recommended practice - for example, within OracleBIData\web\res\dictionary. Any http-based location will also work.

Configuration for the Oracle BI Answers-Based Metadata Dictionary Feature
1-2 Oracle Business Intelligence New Features Guide
The following "SubjectAreaMetadata" node will need to be added to the Presentation Services instanceconfig.xml file to specify this selected location. It should be added under the "ServerInstance" node. Please see the "Making Oracle BI Presentation Services Configuration Changes" section within the Oracle Business Intelligence Presentation Services Administration Guide for more information on editing the instanceconfig.xml configuration file.
Here is an example showing a relative reference to the IIS location previously mentioned. For any other application server this path would point to where the WAR file had been deployed.
<SubjectAreaMetadata> <DictionaryURLPrefix>/analyticsres/dictionary/</DictionaryURLPrefix> </SubjectAreaMetadata>
Generate the Metadata Dictionary, make this configuration change, then restart Presentation Services to use this feature. Best practices include keeping repository names to less than 156 characters in order to prevent truncated URLs. Access to the Metadata Dictionary through Oracle BI Answers can also be administered using a new Access to Metadata Dictionary privilege. Finally, some versions of browsers (like IE6 or Firefox 1.6) might have problems showing these XML-based files if they are not configured to access data sources across domains. This setting should be enabled.
2
Multi-Select Dashboard Prompts Feature 2-1
2 Multi-Select Dashboard Prompts Feature
This new feature enables users to analyze data more easily with an easier to use and more powerful screen for specifying dashboard prompts. For example, users can now use multi-select to specify prompt values, and a more powerful search facility.
Prior to this release, a multi-select dashboard prompt with a large number of values could become difficult to work with. A new search feature adds the ability to better navigate and select values from a multi-select prompt when there are many (possibly hundreds or thousands) of values. Modifications to the existing multi-select dashboard prompt now allow the user to search through the available values using four matching schemes: begins with, ends with, contains, and is Like (Pattern Match). Wildcards like % can also be used in the query. A more sophisticated paging mechanism is also now present which allows the user to page ahead according to a configured search set size as needed. A plus sign following the "Choices Returned" number and the "More..." button indicate additional values have not yet been shown. Configurations for the search set size are described below.
As with the previous multi-select prompt, to add values to be filtered, choices are selected and moved via the shuttle buttons to the left pane. A single mouse click selects a single value. Multiple values can be selected by clicking while holding down the Ctrl key. Range selection is done by holding down the Shift key while clicking. Buttons then allow the user to move single values, these sets of values, or all visible values to or from the "Selected" pane.
Once in the "Selected" pane, the collection of values may be edited by clicking on the Edit button. This action will show an editable dialog where new values could be typed in or lists of values could be copied and pasted in or out of the prompt. A list of values in Excel, for example, could easily be pasted in and thus "imported" into the prompt. This edit dialog will interpret sequences of values separated by carriage returns/line feeds, tab delimiters, and/or pipe (|) characters. Please also note that while manually typing in values, only carriage returns/line feeds and "|" can be used as value separators. Tab is a valid value separator only when user copy pastes values, which are tab, separated.
2.1 Configuration for the Multi-Select Dashboard Prompts FeatureThis section explains how to configure the Multi-Select Dashboard Prompts feature.
For configuration, instanceconfig.xml can be edited to specify the number of values returned per search set. The following "Prompts" node will need to be added under the "ServerInstance" node:
<Prompts><MaxScrollValues>20</MaxScrollValues></Prompts>

Configuration for the Multi-Select Dashboard Prompts Feature
2-2 Oracle Business Intelligence New Features Guide
See the "Making Oracle BI Presentation Services Configuration Changes" section within the Oracle Business Intelligence Presentation Services Administration Guide for more information on editing the instanceconfig.xml configuration file.
3
Office Integration with BI Dashboard Feature 3-1
3 Office Integration with BI Dashboard Feature
This new feature enables users to save reports in Powerpoint format, and paste reports directly into MS Office applications.
Two new Interactive Dashboard features have been added to this release that provide additional interactivity with Microsoft Office. These features complement the new Oracle BI Office Add-ins for PowerPoint and Excel that provide functionality natively within those Office applications. For more information on the Oracle BI Office Add-ins for PowerPoint and Excel, see Chapter 26, "Installing Oracle Business Intelligence for Microsoft Office"and Chapter 27, "Microsoft Office Support".
The first new Dashboard feature is "Download to PowerPoint", which adds PowerPoint alongside Excel as a targeted application for downloaded reports. This new link is found within the "Report Links" Download menu and will download a static version of that report to PowerPoint. Like the other Download options, when the link is first clicked, the user will have the choice of directly saving the report to disk or opening it immediately. The Oracle BI Office Add-in does not need to be installed to use this functionality.
The second new Dashboard feature provides a means to copy and paste Dashboard reports directly into Office applications. This functionality is also made available along with the other Dashboard Report Links configured using the Dashboard Editor. A new "Copy" link can be added to a report that will copy the XML definition of the current report to the Windows clipboard. Pasting this link using the Paste function found in the Oracle BI menu will convert the copied XML into an Office version of that report. Naturally this functionality will only be present in versions of either PowerPoint or Excel where the Oracle BI Office Add-in has been installed. Once pasted, this Dashboard report will then be translated into native Office objects that can be subsequently refreshed with live data at any point. Pasting the link directly using Edit/Paste either in Office or any other application (like a text editor) will copy the request XML without translation.
3.1 Configuration for the Office Integration with BI Dashboard FeatureAccess to both of these Dashboard Report Links can be administered using a new Access to Oracle BI Office Add-in privilege.

Configuration for the Office Integration with BI Dashboard Feature
3-2 Oracle Business Intelligence New Features Guide
4
Dashboard Link Types Feature 4-1
4 Dashboard Link Types Feature
This new feature enables users to users to share reports and collaborate more easily by providing shortcut links to them, including prompts.
Two new types of Dashboard links can be generated using this release. Intended for collaboration, these are the:
■ Bookmark Link
■ Prompted Link
4.1 Using Bookmark LinksThe Bookmark Link provides a mechanism whereby a user may obtain a shortcut link to a Dashboard page, which contains all aspects of page state. This link can then be e-mailed to another user who (assuming they had identical permissions and access) can enter that link into the URL line of a browser and view the same page content. The recipient could then further analyze the data in the Dashboard. Technically, page state is too complex to capture in a URL so this functionality writes an object to the Presentation Services catalog, which is called by the Bookmark Link URL. To create a Bookmark Link the user selects the "Create Bookmark Link" from the Dashboard "Page Options" menu. Once selected, the Dashboard message bar will show that "A Bookmark Link suitable for saving or sharing has been created for this page. This Link can be found in the browser's Address Bar." Inspection will reveal the URL has indeed changed in the Address Bar to show the Bookmark Link. At this point the user can copy and paste this link from the Address Bar and either save it or share it most likely via e-mail. After a Bookmark Link has been generated, the user may continue to modify the content of the page, e.g., add or delete reports. The Bookmark link will attempt to match up context between the Bookmark Link and the Dashboard Page. The existing Dashboard Saved Selections functionality exploits a similar matching mechanism. For example, if a specific filter on the original Dashboard page were included in the saved Bookmark Link, but all reports containing that filter were later removed from that Dashboard, the Bookmark Link would still work. The Bookmark Link would simply contain a small amount of extraneous information, which would not be applied. All other page context still appropriate would be applied, however.
4.2 Using Prompted LinksA second variant of this functionality generates a Prompted Link, which does not capture all aspects of state, but instead provides a simplified link to the Dashboard Page, which contains both the path to that page and a simplified presentation of Dashboard Prompts. This Prompted Link is intended to support both manual and programmatic manipulation of that link and also aims to provide a simple URL-based
Configuration for the Dashboard Prompt Types Feature
4-2 Oracle Business Intelligence New Features Guide
API for generating and customizing Dashboard content. Unlike the Bookmark Link, this link is dynamic, which maps to no saved catalog content.
When configured to show this feature, the Dashboard Page Options menu will show a "Create Prompted Link" option. Selecting this option will generate the Prompted Link and the user will see a message indicating, "A Prompted link capturing the prompts and values of this page has been created."
This is the Prompted Link syntax:
<Content Path>, Action=Navigate, Column1 (col1), Operator1 (op1), Values1(val1), Column2 (col2), Operator2 (op2), Values2 (val2) ...
Values are separated by pluses and to further simplify this syntax the operator parameter is not needed for equal (eq). Double quotes are also optional if there are no white spaces inside the values.
These are Prompted Link examples:
...Action=Navigate&col1=Products.Color&val1=Armory
...Action=Navigate&col1=Products.Color&val1=Armory+Clear
...Action=Navigate&col1=Products.Color&op1=bet&val1=Armory+Clear
...Action=Navigate&col1=Products.Color&val1="Armory"+"Clear"&col2=Periods."Month"&val2="04/01/1998%2012:00:00%20AM"...Action=Navigate&col1=Products.Color&val1="Armory"+"Clear"&col2=Periods."Month"&op2=gt&val2="05/01/1998%2012:00:00%20AM"
Here is an example of the Full URL:
@http://localhost/aruba/saw.dll?Dashboard&PortalPath=%2Fshared%2Fnew%2F_portal%2Fprompt&Page=page%252&Action=Navigate&col1=Products.Color&val1="Armory"+"Clear"&col2=Periods."Month"&op2=gt&val2="05/01/1998%2012:00:00%20AM"
As these links are extensions of the existing Go URL, a full list of operators can be found in the "Using the Oracle BI Presentation Services Go URL to Issue SQL and Pass Filters" section found in the Oracle Business Intelligence Presentation Services Administration Guide.
4.3 Configuration for the Dashboard Prompt Types FeatureThis section explains how to configure the new Dashboard Prompt Types feature.
For configuration, the Create Bookmark Link is enabled by default. The following nodes must be added to the instanceconfig.xml under the "ServerInstance" node:
<Dashboard> <EnableBookmarkURL>True</EnableBookmarkURL><EnablePromptedURL>True</EnablePromptedURL><BookmarkExpirationDays>30</BookmarkExpirationDays></Dashboard>
"EnableBookmarkURL" controls whether or not the "Create Bookmark Link" is shown in the "Page Options" menu while "EnablePromptedURL" controls the appearance of the "Create Prompted Link." The Bookmark Link refers to a stub saved in the Presentation Services catalog and "BookmarkExpirationDays" allows an administrator to set a lifespan for how long these should persist.
Please see the "Making Oracle BI Presentation Services Configuration Changes" section within the Oracle Business Intelligence Presentation Services Administration Guide for more information on editing the instanceconfig.xml configuration file.

Configuration for the Dashboard Prompt Types Feature
Dashboard Link Types Feature 4-3
For advanced applications, and for both the "Create Bookmark Link" and "Create Prompted Link" functionality, two Javascript functions can be called to retrieve these values from custom scripts embedded on the originating Dashboard Page. Note, for Javascript functions to work a HardenXSSconfiguration must be set to false in instanceconfig.xml.
For the Bookmark Link, the function linkToPage(bInlineDrill,bGetBookmarkOnly) can be called. If the second argument is omitted or set to "false," the browser address bar will be updated with the bookmark URL. If the second argument is set to "true," the browser address bar won't be refreshed. In either case, the bookmark URL is retrieved asynchronously and put into variable saw.bookmarkURL. Polling the value of saw.bookmarkURL will give the link. This variable is set to empty string when the function is invoked. As for the first argument, if you see the "Page Options" menu on the page, set it to true, otherwise, set it to false.
For the Prompted Link, the function GetPURL( ) returns the Prompted Link as a string.

Configuration for the Dashboard Prompt Types Feature
4-4 Oracle Business Intelligence New Features Guide
5
Import Oracle Catalog Feature 5-1
5 Import Oracle Catalog Feature
This new feature enables administrators to import Database objects through a native Oracle OCI connection.
The Oracle BI Administration Tool now supports importing of physical Database objects through a native Oracle OCI connection and reuses the same OCI connection for queries. This feature mitigates the need to setup an ODBC connection to an Oracle Database purely for importing metadata objects into the Administration Tool.

5-2 Oracle Business Intelligence New Features Guide
6
Embedded Database Functions Feature 6-1
6 Embedded Database Functions Feature
This new feature enables users and administrators to create more powerful reports by directly calling Database functions from either Oracle BI Answers or by using a Logical column (in the Logical Table source) within the Metadata (repository).
The Oracle BI server now supports the capability to directly call functions defined within the Database from either the Answers interface or using a Logical column (in the Logical Table source) within the Metadata (repository). This feature is restricted to support SQL sources in this release.
The following new database functions are supported:
■ EVALUATE
For more information, see Section 6.1, "EVALUATE Function".
■ EVALUATE_AGGR
For more information, see Section 6.2, "EVALUATE_AGGR Function".
■ EVALUATE_PREDICATE
For more information, see Section 6.3, "EVALUATE_PREDICATE Function".
6.1 EVALUATE FunctionThis function is intended for scalar and analytic calculations.
Syntax: EVALUATE('DB_Function(%1)', <Comma separated Expression>)
Example: SELECT e.lastname,sales.revenue,EVALUATE('dense_rank() over(order by %1 )',sales.revenue) FROM sales s, employee e;
6.2 EVALUATE_AGGR FunctionThis function is intended for aggregate functions with group by clause.
Syntax: EVALUATE_AGGR('DB_Aggregate_Function(%1)', <comma separated Expression)
Example: SELECT year.year, sales.qtysold, EVALUATE_AGGR('sum(%1)', sales.quantity) From SnowFlakeSales;
Note: MDX or MOLAP data sources are not supported in this release.

EVALUATE_PREDICATE Function
6-2 Oracle Business Intelligence New Features Guide
6.3 EVALUATE_PREDICATE FunctionThis function is intended for functions with a return type of boolean.
Syntax: EVALUATE_PREDICATE('DB_Function(%1)', <comma separated Expression)
Example: SELECT year, Sales as DOUBLE,CAST(EVALUATE('OLAP_EXPRESSION(%1,''LAG(units_cube_sales, 1, time, time LEVELREL time_levelrel)'')', OLAP_CALC) AS DOUBLE) FROM "Global".Time, "Global"."Facts - sales" WHERE EVALUATE_PREDICATE('OLAP_CONDITION(%1, ''LIMIT time KEEP ''''1'''', ''''2'''', ''''3'''', ''''4'''' '') =1', OLAP_CALC) order by year;

7
Drag and Drop XMLA Metadata Objects Feature 7-1
7 Drag and Drop XMLA Metadata ObjectsFeature
The Oracle BI Administration Tool supports the drag and drop feature for XMLA data sources (SAP/BW and Microsoft Analysis Server). Using this capability, you can drag and drop physical metadata objects (cubes) into the Business Model and Mapping layer as fully configured Logical Model Metadata (Subject area), which retains metrics, attributes, and dimensions. This mitigates the need to redefine manually logical dimensional models from data sources, which already contain rich dimensional metadata constructs.

7-2 Oracle Business Intelligence New Features Guide
8
General New Features in Release 10.1.3.3.1 8-1
8 General New Features in Release 10.1.3.3.1
The 10.1.3.3.1 release of the Oracle Business Intelligence Enterprise Edition introduces three new BI Server features. This chapter describes the following new features:
■ Section 8.1, "Oracle Business Intelligence Installer Now Deploys BI Components into One OC4J Container"
■ Section 8.2, "DataDirect Connect ODBC Drivers for Linux and UNIX Operating Systems Bundled with Oracle BI EE 10.1.3.3.1"
■ Section 8.3, "Support for Charts in Oracle BI EE for Arabic, Thai, and Hebrew"
8.1 Oracle Business Intelligence Installer Now Deploys BI Components into One OC4J Container
In 10.1.3.x releases prior to version 10.1.3.3.1, during an Advanced installation, the Oracle BI Installer created the following OC4J containers and deployed BI components in them:
■ bianalytics - for BI Presentation Services Plug-in component
■ bipublisher - for BI Publisher component
■ bijmx - for BI Systems Management component
■ bioffice - for BI Office server component (in Oracle BI EE version 10.1.3.3)
With Oracle BI EE 10.1.3.3.1, during an Advanced installation, the Oracle BI Installer deploys the BI components into one OC4J container called "home". The memory footprint for the OC4J instance will be between 512 -1024 MB.
8.1.1 Upgrading to Version 10.1.3.3.1 from a BIEE 10.1.3.x Release Prior to 10.1.3.3.1On upgrade to Oracle BI EE 10.1.3.3.1, if the "Keep User Modified Configurations" upgrade option is selected on the BI Installer screen, the old OC4J containers for BI will be deleted and the BI components will be deployed into the OC4J container named "home". The configuration files for the BI component applications deployed in the individual BI OC4J containers are migrated into the deployed application in the OC4J instance named "home".
The configuration files that are migrated are:
$ORACLE_HOME/j2ee/bianalytics/applications/analytics/analytics/WEB-INF/web.xml to
$ORACLE_HOME/j2ee/home/applications/analytics/analytics/WEB-INF/web.xmland
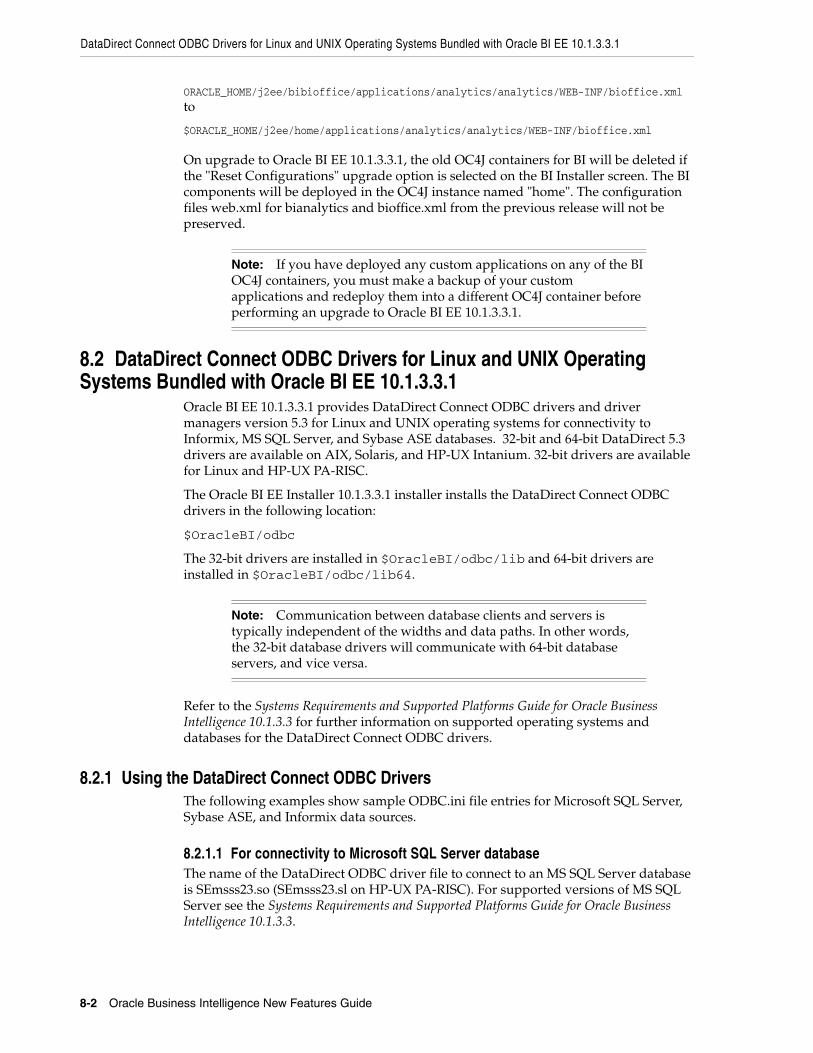
DataDirect Connect ODBC Drivers for Linux and UNIX Operating Systems Bundled with Oracle BI EE 10.1.3.3.1
8-2 Oracle Business Intelligence New Features Guide
ORACLE_HOME/j2ee/bibioffice/applications/analytics/analytics/WEB-INF/bioffice.xml to
$ORACLE_HOME/j2ee/home/applications/analytics/analytics/WEB-INF/bioffice.xml
On upgrade to Oracle BI EE 10.1.3.3.1, the old OC4J containers for BI will be deleted if the "Reset Configurations" upgrade option is selected on the BI Installer screen. The BI components will be deployed in the OC4J instance named "home". The configuration files web.xml for bianalytics and bioffice.xml from the previous release will not be preserved.
8.2 DataDirect Connect ODBC Drivers for Linux and UNIX Operating Systems Bundled with Oracle BI EE 10.1.3.3.1
Oracle BI EE 10.1.3.3.1 provides DataDirect Connect ODBC drivers and driver managers version 5.3 for Linux and UNIX operating systems for connectivity to Informix, MS SQL Server, and Sybase ASE databases. 32-bit and 64-bit DataDirect 5.3 drivers are available on AIX, Solaris, and HP-UX Intanium. 32-bit drivers are available for Linux and HP-UX PA-RISC.
The Oracle BI EE Installer 10.1.3.3.1 installer installs the DataDirect Connect ODBC drivers in the following location:
$OracleBI/odbc
The 32-bit drivers are installed in $OracleBI/odbc/lib and 64-bit drivers are installed in $OracleBI/odbc/lib64.
Refer to the Systems Requirements and Supported Platforms Guide for Oracle Business Intelligence 10.1.3.3 for further information on supported operating systems and databases for the DataDirect Connect ODBC drivers.
8.2.1 Using the DataDirect Connect ODBC DriversThe following examples show sample ODBC.ini file entries for Microsoft SQL Server, Sybase ASE, and Informix data sources.
8.2.1.1 For connectivity to Microsoft SQL Server databaseThe name of the DataDirect ODBC driver file to connect to an MS SQL Server database is SEmsss23.so (SEmsss23.sl on HP-UX PA-RISC). For supported versions of MS SQL Server see the Systems Requirements and Supported Platforms Guide for Oracle Business Intelligence 10.1.3.3.
Note: If you have deployed any custom applications on any of the BI OC4J containers, you must make a backup of your custom applications and redeploy them into a different OC4J container before performing an upgrade to Oracle BI EE 10.1.3.3.1.
Note: Communication between database clients and servers is typically independent of the widths and data paths. In other words, the 32-bit database drivers will communicate with 64-bit database servers, and vice versa.
DataDirect Connect ODBC Drivers for Linux and UNIX Operating Systems Bundled with Oracle BI EE 10.1.3.3.1
General New Features in Release 10.1.3.3.1 8-3
On Linux, AIX, Solaris, HP-UX PA-RISC and HP-UX Intanium operating systems, the 32-bit driver is located in $OracleBI/odbc/lib. On AIX, Solaris and HP-UX Itanium operating systems, the 64-bit driver is located in $OracleBI/odbc/lib64.
To use the DataDirect ODBC Driver to connect to MS SQL Server:
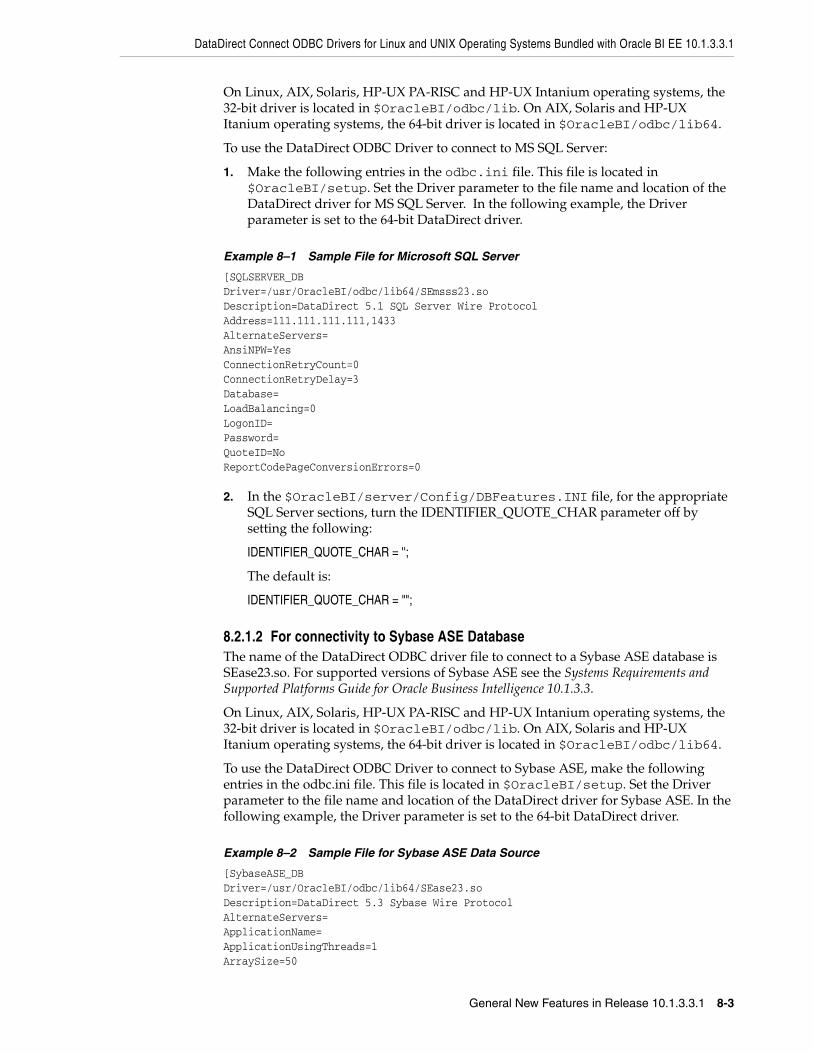
1. Make the following entries in the odbc.ini file. This file is located in $OracleBI/setup. Set the Driver parameter to the file name and location of the DataDirect driver for MS SQL Server. In the following example, the Driver parameter is set to the 64-bit DataDirect driver.
Example 8–1 Sample File for Microsoft SQL Server
[SQLSERVER_DBDriver=/usr/OracleBI/odbc/lib64/SEmsss23.soDescription=DataDirect 5.1 SQL Server Wire ProtocolAddress=111.111.111.111,1433AlternateServers=AnsiNPW=YesConnectionRetryCount=0ConnectionRetryDelay=3Database=LoadBalancing=0LogonID=Password=QuoteID=NoReportCodePageConversionErrors=0
2. In the $OracleBI/server/Config/DBFeatures.INI file, for the appropriate SQL Server sections, turn the IDENTIFIER_QUOTE_CHAR parameter off by setting the following:
IDENTIFIER_QUOTE_CHAR = '';
The default is:
IDENTIFIER_QUOTE_CHAR = "";
8.2.1.2 For connectivity to Sybase ASE DatabaseThe name of the DataDirect ODBC driver file to connect to a Sybase ASE database is SEase23.so. For supported versions of Sybase ASE see the Systems Requirements and Supported Platforms Guide for Oracle Business Intelligence 10.1.3.3.
On Linux, AIX, Solaris, HP-UX PA-RISC and HP-UX Intanium operating systems, the 32-bit driver is located in $OracleBI/odbc/lib. On AIX, Solaris and HP-UX Itanium operating systems, the 64-bit driver is located in $OracleBI/odbc/lib64.
To use the DataDirect ODBC Driver to connect to Sybase ASE, make the following entries in the odbc.ini file. This file is located in $OracleBI/setup. Set the Driver parameter to the file name and location of the DataDirect driver for Sybase ASE. In the following example, the Driver parameter is set to the 64-bit DataDirect driver.
Example 8–2 Sample File for Sybase ASE Data Source
[SybaseASE_DBDriver=/usr/OracleBI/odbc/lib64/SEase23.soDescription=DataDirect 5.3 Sybase Wire ProtocolAlternateServers=ApplicationName=ApplicationUsingThreads=1ArraySize=50
DataDirect Connect ODBC Drivers for Linux and UNIX Operating Systems Bundled with Oracle BI EE 10.1.3.3.1
8-4 Oracle Business Intelligence New Features Guide
AuthenticationMethod=0Charset=ConnectionRetryCount=0ConnectionRetryDelay=3CursorCacheSize=1Database=NorthwindDefaultLongDataBuffLen=1024EnableDescribeParam=0EnableQuotedIdentifiers=0EncryptionMethod=0GSSClient=nativeHostNameInCertificate=InitializationString=Language=LoadBalancing=0LogonID=NetworkAddress=111.111.111.111,5005OptimizePrepare=1PacketSize=0Password=RaiseErrorPositionBehavior=0ReportCodePageConversionErrors=0SelectMethod=0ServicePrincipalName=TruncateTimeTypeFractions=0TrustStore=TrustStorePassword=ValidateServerCertificate=1WorkStationID=
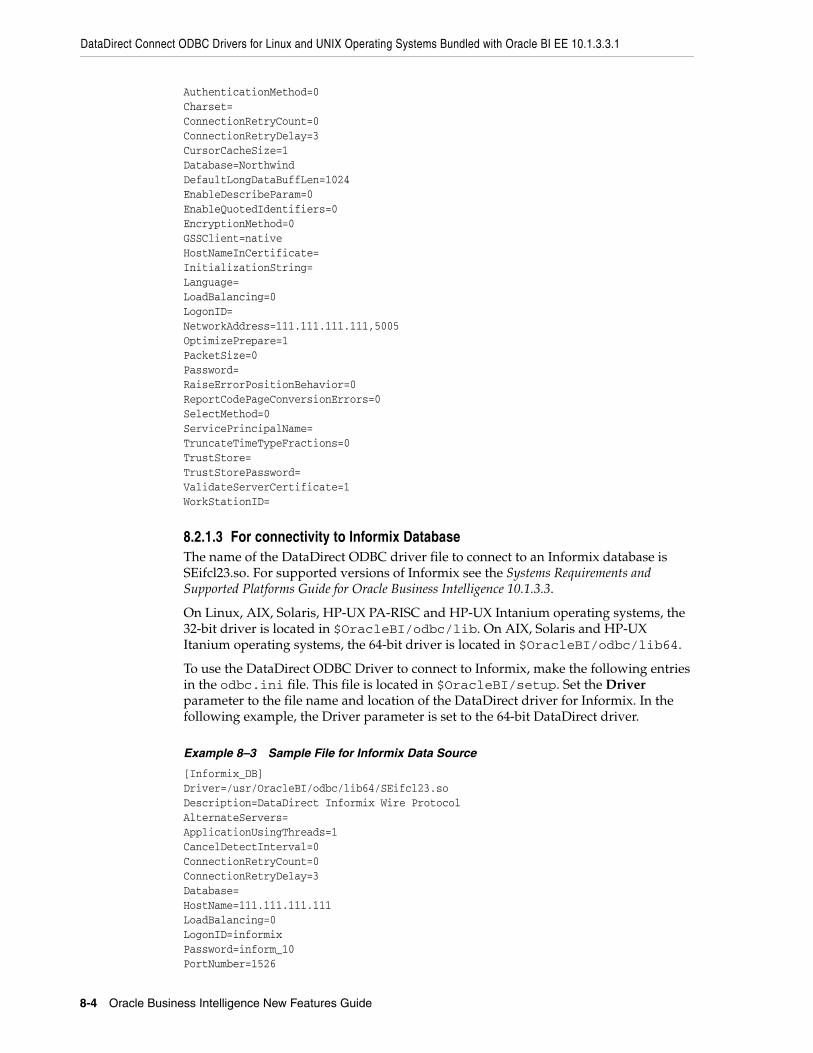
8.2.1.3 For connectivity to Informix DatabaseThe name of the DataDirect ODBC driver file to connect to an Informix database is SEifcl23.so. For supported versions of Informix see the Systems Requirements and Supported Platforms Guide for Oracle Business Intelligence 10.1.3.3.
On Linux, AIX, Solaris, HP-UX PA-RISC and HP-UX Intanium operating systems, the 32-bit driver is located in $OracleBI/odbc/lib. On AIX, Solaris and HP-UX Itanium operating systems, the 64-bit driver is located in $OracleBI/odbc/lib64.
To use the DataDirect ODBC Driver to connect to Informix, make the following entries in the odbc.ini file. This file is located in $OracleBI/setup. Set the Driver parameter to the file name and location of the DataDirect driver for Informix. In the following example, the Driver parameter is set to the 64-bit DataDirect driver.
Example 8–3 Sample File for Informix Data Source
[Informix_DB]Driver=/usr/OracleBI/odbc/lib64/SEifcl23.soDescription=DataDirect Informix Wire ProtocolAlternateServers=ApplicationUsingThreads=1CancelDetectInterval=0ConnectionRetryCount=0ConnectionRetryDelay=3Database=HostName=111.111.111.111LoadBalancing=0LogonID=informixPassword=inform_10PortNumber=1526
Support for Charts in Oracle BI EE for Arabic, Thai, and Hebrew
General New Features in Release 10.1.3.3.1 8-5
ReportCodePageConversionErrors=0ServerName=TrimBlankFromIndexName=1
8.3 Support for Charts in Oracle BI EE for Arabic, Thai, and HebrewOracle Business Intelligence Enterprise Edition version 10.1.3.3.1 offers support for Arabic , Thai, and Hebrew. Due to a limitation in the charting engine that is used in Oracle BI EE, bidirectional and Thai language characters do not render properly in charts.
To overcome this limitation and enable charting in Oracle BI EE for Arabic, Thai and Hebrew, you can use Oracle BI Publisher charting capabilities. BI Publisher charts are based on the Oracle BI Beans technology. A BI Publisher report containing a chart may be embedded in an Oracle BI Interactive Dashboard in order to meet charting requirements.
To implement this solution, perform the following steps described below:
■ Integrate the Data Sources
■ Create a Report and Layout in BI Publisher
■ Embed the BI Publisher Report in a Dashboard
8.3.1 PrerequisitesThis procedure assumes that you have already performed the following:
■ Set up users in Oracle BI EE and Oracle BI Publisher with appropriate privileges.
You must integrate the user security between Oracle Business Intelligence and Oracle BI Publisher using one of the security models available. Within Oracle BI Presentation Services the user must have privileges to update Dashboards. Within Oracle BI Publisher users must be granted the BI Publisher Developer Role.
For more information on setting up security in Oracle BI, refer to "Security in Oracle BI" in the Oracle Business Intelligence Server Administration Guide and "Managing Oracle Presentation Services Security" in the Oracle Business Intelligence Presentation Services Administration Guide. For information on setting up security in Oracle BI Publisher, refer to "Defining a Security Model" in the Oracle Business Intelligence Publisher Report Designer's Guide.
■ Created an Answers request that contains the data you wish to display in a chart.
■ Installed the BI Publisher Template Builder for Microsoft Word.
The Oracle BI Publisher Template Builder for Microsoft Word Add-in can be installed from the BI Publisher application for users with the appropriate roles assigned (that is, BI Publisher Administrator, BI Publisher Developer, or BI Publisher Template Designer). The download link appears on the Developer Tools region. See the topic "Installing Oracle BI Publisher Desktop" in the Oracle Business Intelligence Infrastructure Installation and Configuration Guide.
8.3.2 Integrate the Data SourcesYou must set up the Oracle BI Server as a data source in BI Publisher. To use an Answers request as a data source, you must also set up integration with Oracle BI Presentation Services.
Support for Charts in Oracle BI EE for Arabic, Thai, and Hebrew
8-6 Oracle Business Intelligence New Features Guide
8.3.2.1 Adding the Oracle BI Server as a Data SourceIf you included BI Publisher in your Oracle BI Enterprise Edition installation, the Oracle BI Server will automatically be configured as a data source in BI Publisher. If you did not include BI Publisher during your BI EE install, you must manually add the BI Server as a data source using BI Publisher’s Admin interface. For detailed steps, see the topic: "Adding the Oracle BI Server as a JDBC Data Source" in the Oracle Business Intelligence Publisher Report Designer’s Guide.
8.3.2.2 Integrating with Oracle Presentation ServicesBy setting up integration with Oracle BI Presentation Services you enable connection to Oracle BI Answers requests as data sources for your reports.
The BI Publisher Admin interface provides a specific page for integration with Oracle BI Presentation Services. Navigate to this page from the Admin page by selecting Oracle BI Presentation Services under the Integration subheading.
If you included BI Publisher in your Oracle BI Enterprise Edition installation, the Oracle BI installer will set the Presentation Services host name, port, and URL values. However, you must manually enter the Presentation Services username and password on the Oracle BI Presentation Services integration page.
8.3.3 Create a Report and Layout in BI PublisherFollowing are summary steps for creating a report and layout in BI Publisher. For detailed description refer to the following sources:
For detailed steps to create a report in BI Publisher, see the chapter "Creating a New Report" in the Oracle Business Intelligence Publisher Report Designer’s Guide.For for information on using the Template Builder for Microsoft Word, see the Template Builder online help.1. Open Microsoft Word (with the Template Builder for Word installed).
2. From the Oracle BI Publisher menu, select Log On and enter appropriate credentials (the user must have either the Administrator, Report Designer, or Developer role assigned).
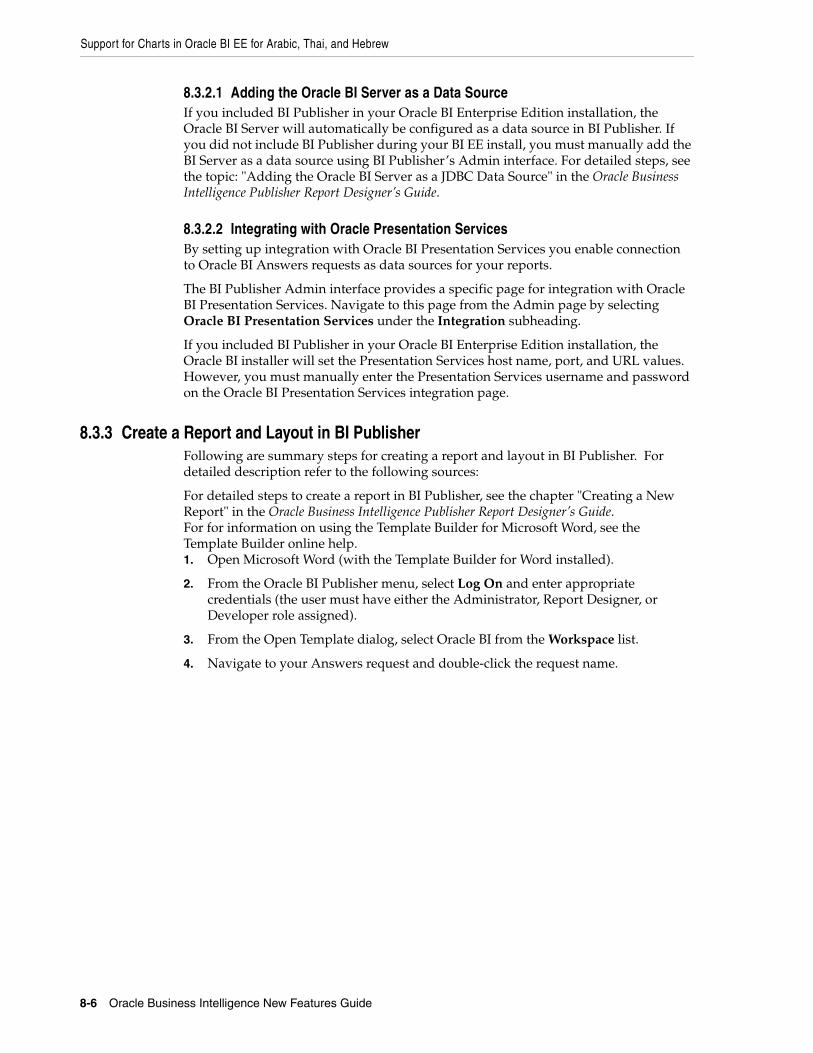
3. From the Open Template dialog, select Oracle BI from the Workspace list.
4. Navigate to your Answers request and double-click the request name.
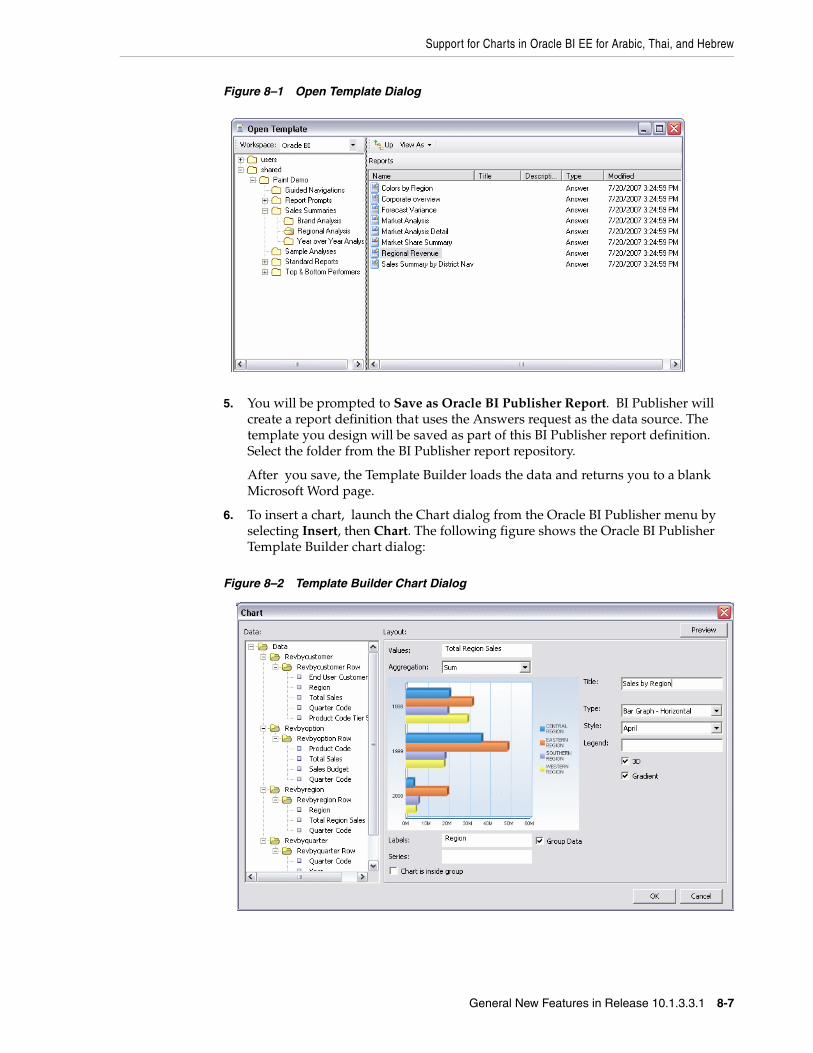
Support for Charts in Oracle BI EE for Arabic, Thai, and Hebrew
General New Features in Release 10.1.3.3.1 8-7
Figure 8–1 Open Template Dialog
5. You will be prompted to Save as Oracle BI Publisher Report. BI Publisher will create a report definition that uses the Answers request as the data source. The template you design will be saved as part of this BI Publisher report definition. Select the folder from the BI Publisher report repository.
After you save, the Template Builder loads the data and returns you to a blank Microsoft Word page.
6. To insert a chart, launch the Chart dialog from the Oracle BI Publisher menu by selecting Insert, then Chart. The following figure shows the Oracle BI Publisher Template Builder chart dialog:
Figure 8–2 Template Builder Chart Dialog
Support for Charts in Oracle BI EE for Arabic, Thai, and Hebrew
8-8 Oracle Business Intelligence New Features Guide
7. After inserting the chart, upload the template to the BI Publisher report repository. From the Oracle BI Publisher menu select Upload Template As. Enter a name for the template.
The report is now available as a BI Publisher object that can be added to a dashboard.
8.3.4 Embed the BI Publisher Report in a DashboardThe following describes how to embed the BI Publisher report in a Dashboard. For more detailed instructions and options, refer to the topic: "Adding an Oracle BI Publisher Report to an Oracle BI Interactive Dashboard Page" in the Oracle Business Intelligence Answers, Delivers, and Interactive Dashboards User Guide.
1. In the dashboard page, click the Page Options button, and click Edit Dashboard.
2. From the selection pane, drag and drop the BI Publisher Report object from the Dashboard Objects area into a section on the dashboard page.
3. Click the newly placed BI Publisher report object’s Properties button.
4. In the BI Publisher Report Properties dialog, browse for and select the Oracle BI Publisher report.
5. Click Save to return to the dashboard and view your added report.
8.3.5 Supported Graph TypesThe following graph types are supported in BI Publishe:.
■ Area
■ Horizontal Bar
■ Bubble
■ Vertical Bar
■ Line
■ Line Bar Combo
■ Pareto
■ Pie
■ Radar
■ Scatter
■ Step
8.3.6 Known LimitationsThe BI Publisher chart is static.
The locale information from the Oracle BI Server is not inherited by BI Publisher. BI Publisher charts embedded in the dashboard will take the locale setting from BI Publisher. To ensure consistency, set the same locale for both applications.
Note: In release 10.1.3.3.1, there is no longer a limitation of one BI Publisher Report per dashboard.
9
General New Features in Release 10.1.3.3.2 9-1
9 General New Features in Release 10.1.3.3.2
The 10.1.3.3.2 release of the Oracle Business Intelligence Enterprise Edition introduces the following new BI Server features:
■ Section 9.1, "Support for Hyperion Essbase as a Data Source"
■ Section 9.2, "Using BI EE OC4J Components with IIS via the IIS Plug-in"
9.1 Support for Hyperion Essbase as a Data SourceOracle Business Intelligence Enterprise Edition 10.1.3.3.2 now supports Hyperion Essbase as a physical data source. This topic describes the process to import Essbase structures into the Oracle BI Server metadata repository, as well as usage guidelines and limitations.
9.1.1 Supported Versions of Hyperion Essbase with Oracle BI EE 10.1.3.3.2At the time of this release, Hyperion Essbase version 7.1.6 and later can be used as a data source with Oracle BI EE 10.1.3.3.2. For the most current information regarding supported versions, please see the System Requirements and Supported Platforms for Oracle Business Intelligence Suite Enterprise Edition.
9.1.2 Enabling the Use of Hyperion Essbase as a Data SourceThis section describes the steps required to enable Essbase as a data source.
9.1.2.1 Essbase Client LibrariesOracle BI Server connectivity to Essbase is through the Essbase client libraries. The client libraries must be installed on the Oracle BI Server. Please see the most current System Requirements and Supported Platforms for Oracle Business Intelligence Suite Enterprise Edition document for the supported versions of the Essbase Client for connectivity to the Oracle BI Server.
9.1.2.2 BI Server Configuration for UNIX and Linux PlatformsPerform the following configuration steps to access the Essbase client libraries through the BI server on UNIX and Linux Platforms:
9.1.2.2.1 Solaris: Oracle BI 64 bit mode
1. Define ARBORPATH = <Essbase Client installation folder>
For example:
export ARBORPATH=/export/home/Hyperion/AnalyticServicesClient
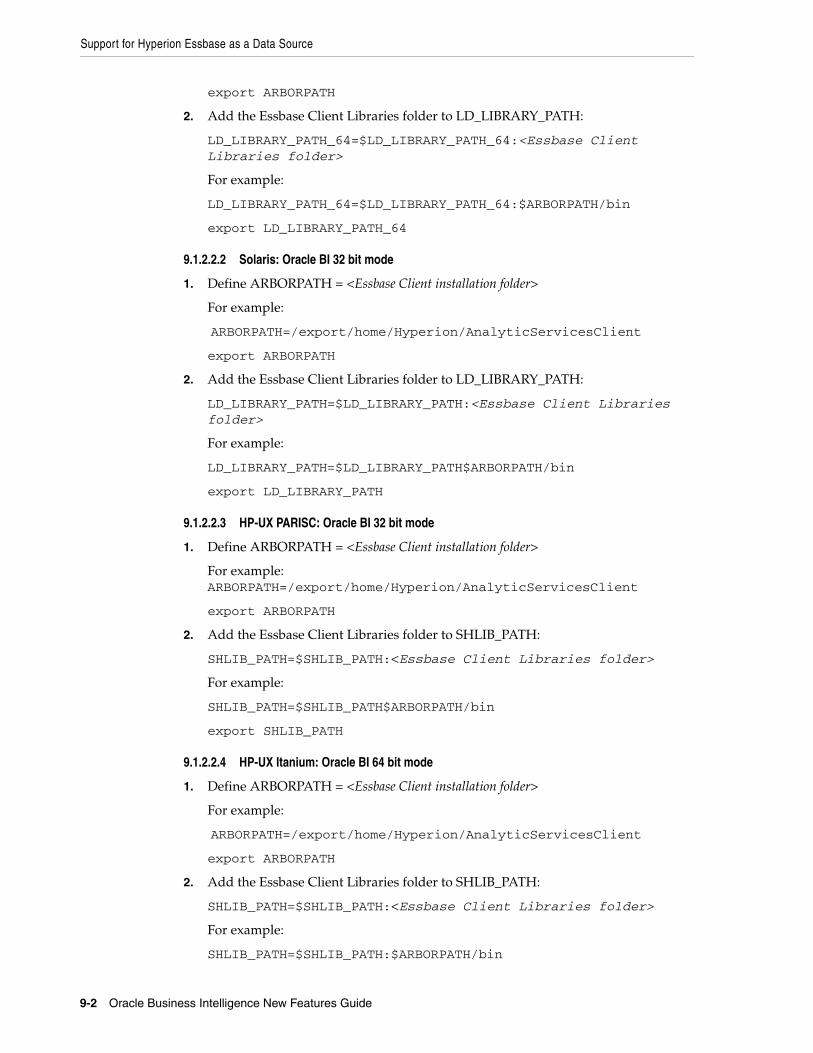
Support for Hyperion Essbase as a Data Source
9-2 Oracle Business Intelligence New Features Guide
export ARBORPATH
2. Add the Essbase Client Libraries folder to LD_LIBRARY_PATH:
LD_LIBRARY_PATH_64=$LD_LIBRARY_PATH_64:<Essbase Client Libraries folder>
For example:
LD_LIBRARY_PATH_64=$LD_LIBRARY_PATH_64:$ARBORPATH/bin
export LD_LIBRARY_PATH_64
9.1.2.2.2 Solaris: Oracle BI 32 bit mode
1. Define ARBORPATH = <Essbase Client installation folder>
For example:
ARBORPATH=/export/home/Hyperion/AnalyticServicesClient
export ARBORPATH
2. Add the Essbase Client Libraries folder to LD_LIBRARY_PATH:
LD_LIBRARY_PATH=$LD_LIBRARY_PATH:<Essbase Client Libraries folder>
For example:
LD_LIBRARY_PATH=$LD_LIBRARY_PATH$ARBORPATH/bin
export LD_LIBRARY_PATH
9.1.2.2.3 HP-UX PARISC: Oracle BI 32 bit mode
1. Define ARBORPATH = <Essbase Client installation folder>
For example: ARBORPATH=/export/home/Hyperion/AnalyticServicesClient
export ARBORPATH
2. Add the Essbase Client Libraries folder to SHLIB_PATH:
SHLIB_PATH=$SHLIB_PATH:<Essbase Client Libraries folder>
For example:
SHLIB_PATH=$SHLIB_PATH$ARBORPATH/bin
export SHLIB_PATH
9.1.2.2.4 HP-UX Itanium: Oracle BI 64 bit mode
1. Define ARBORPATH = <Essbase Client installation folder>
For example:
ARBORPATH=/export/home/Hyperion/AnalyticServicesClient
export ARBORPATH
2. Add the Essbase Client Libraries folder to SHLIB_PATH:
SHLIB_PATH=$SHLIB_PATH:<Essbase Client Libraries folder>
For example:
SHLIB_PATH=$SHLIB_PATH:$ARBORPATH/bin

Support for Hyperion Essbase as a Data Source
General New Features in Release 10.1.3.3.2 9-3
export SHLIB_PATH
3. Define ESSLANG and LANG
For example:
ESSLANG=English_UnitedStates.UTF-8@Binary
export ESSLANG
LANG=en_US.utf8
export LANG
4. Comment out the following three lines from the NQSConfig.ini file:
[ GENERAL ]
// Localization/Internationalization parameters.
LOCALE="English-usa";
SORT_ORDER_LOCALE="English-usa";
SORT_TYPE="binary";
9.1.2.2.5 AIX Oracle BI 32 bit and 64 bit modes
1. Define ARBORPATH = <Essbase Client installation folder>
For example:
ARBORPATH=/export/home/Hyperion/AnalyticServicesClient
export ARBORPATH
2. Add the Essbase Client Libraries folder to LIBPATH:
LIBPATH=$LIBPATH:<Essbase Client Libraries folder>
For example:
LIBPATH=$LIBPATH:$ARBORPATH/bin
export LIBPATH
9.1.2.2.6 Linux: Oracle BI 32 bit mode
1. Define ARBORPATH = <Essbase Client installation folder>
For example:
ARBORPATH=/export/home/Hyperion/AnalyticServicesClient
export ARBORPATH
2. Add the Essbase Client Libraries folder to LD_LIBRARY_PATH:
LD_LIBRARY_PATH=$LD_LIBRARY_PATH:<Essbase Client Libraries folder>
For example:
LD_LIBRARY_PATH=$LD_LIBRARY_PATH:$ARBORPATH/bin
export LD_LIBRARY_PATH
9.1.2.3 Import ProcessEssbase cube structures are imported via the "Import from Multi-dimensional" option in the Oracle BI Administration tool, shown in the following figure:
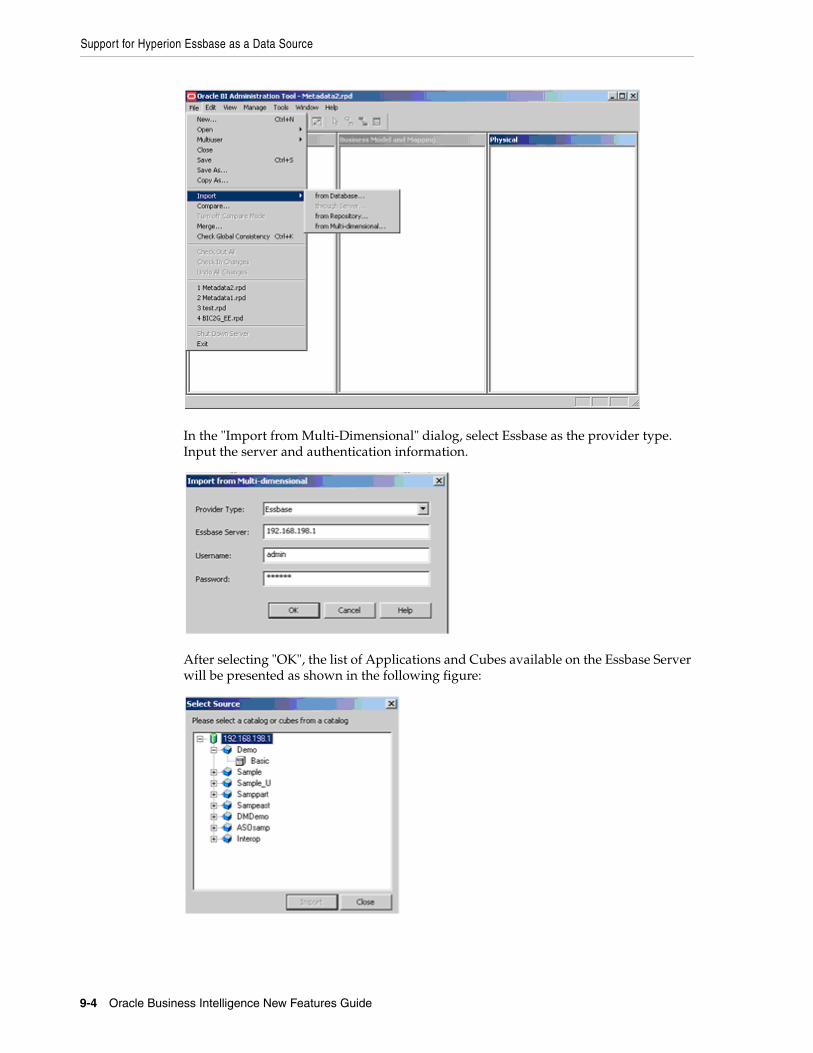
Support for Hyperion Essbase as a Data Source
9-4 Oracle Business Intelligence New Features Guide
In the "Import from Multi-Dimensional" dialog, select Essbase as the provider type. Input the server and authentication information.
After selecting "OK", the list of Applications and Cubes available on the Essbase Server will be presented as shown in the following figure:
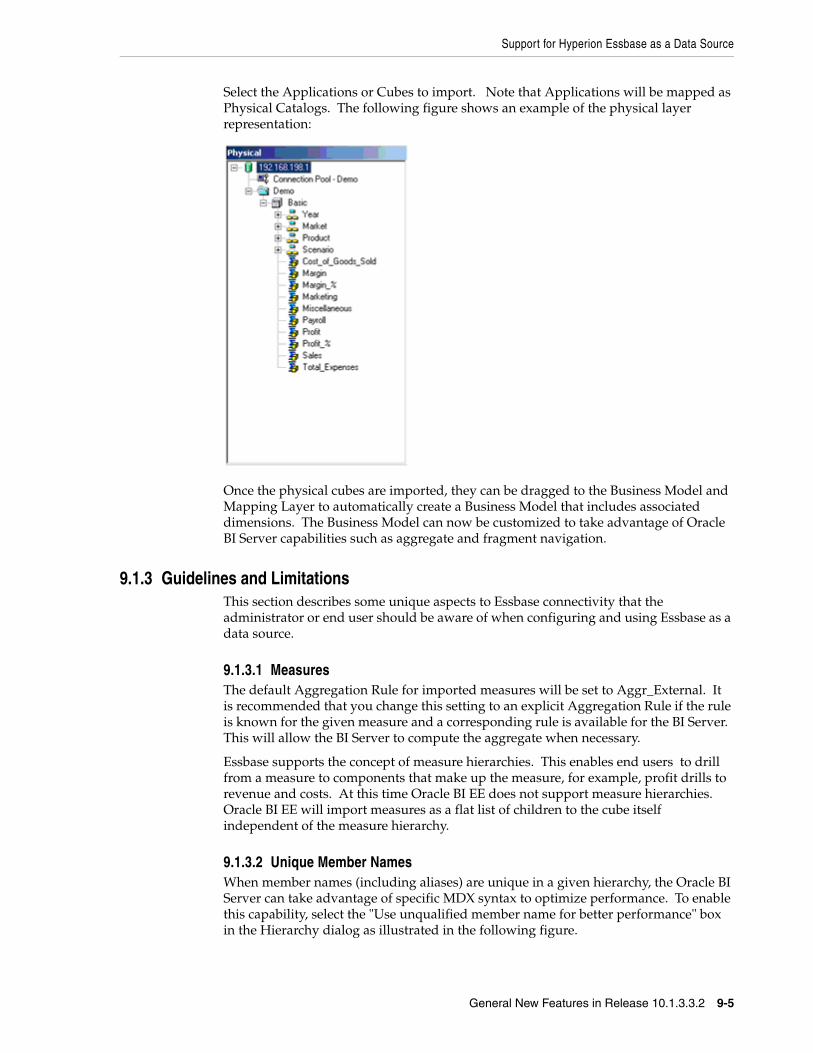
Support for Hyperion Essbase as a Data Source
General New Features in Release 10.1.3.3.2 9-5
Select the Applications or Cubes to import. Note that Applications will be mapped as Physical Catalogs. The following figure shows an example of the physical layer representation:
Once the physical cubes are imported, they can be dragged to the Business Model and Mapping Layer to automatically create a Business Model that includes associated dimensions. The Business Model can now be customized to take advantage of Oracle BI Server capabilities such as aggregate and fragment navigation.
9.1.3 Guidelines and LimitationsThis section describes some unique aspects to Essbase connectivity that the administrator or end user should be aware of when configuring and using Essbase as a data source.
9.1.3.1 MeasuresThe default Aggregation Rule for imported measures will be set to Aggr_External. It is recommended that you change this setting to an explicit Aggregation Rule if the rule is known for the given measure and a corresponding rule is available for the BI Server. This will allow the BI Server to compute the aggregate when necessary.
Essbase supports the concept of measure hierarchies. This enables end users to drill from a measure to components that make up the measure, for example, profit drills to revenue and costs. At this time Oracle BI EE does not support measure hierarchies. Oracle BI EE will import measures as a flat list of children to the cube itself independent of the measure hierarchy.
9.1.3.2 Unique Member NamesWhen member names (including aliases) are unique in a given hierarchy, the Oracle BI Server can take advantage of specific MDX syntax to optimize performance. To enable this capability, select the "Use unqualified member name for better performance" box in the Hierarchy dialog as illustrated in the following figure.
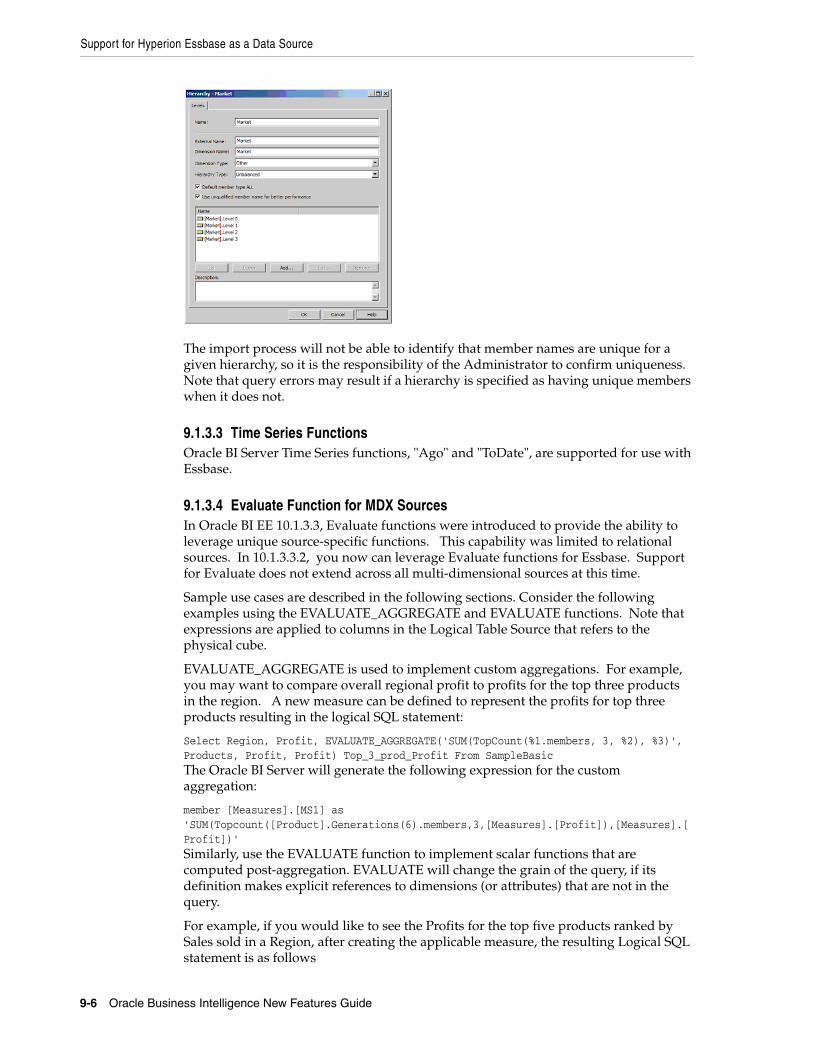
Support for Hyperion Essbase as a Data Source
9-6 Oracle Business Intelligence New Features Guide
The import process will not be able to identify that member names are unique for a given hierarchy, so it is the responsibility of the Administrator to confirm uniqueness. Note that query errors may result if a hierarchy is specified as having unique members when it does not.
9.1.3.3 Time Series FunctionsOracle BI Server Time Series functions, "Ago" and "ToDate", are supported for use with Essbase.
9.1.3.4 Evaluate Function for MDX SourcesIn Oracle BI EE 10.1.3.3, Evaluate functions were introduced to provide the ability to leverage unique source-specific functions. This capability was limited to relational sources. In 10.1.3.3.2, you now can leverage Evaluate functions for Essbase. Support for Evaluate does not extend across all multi-dimensional sources at this time.
Sample use cases are described in the following sections. Consider the following examples using the EVALUATE_AGGREGATE and EVALUATE functions. Note that expressions are applied to columns in the Logical Table Source that refers to the physical cube.
EVALUATE_AGGREGATE is used to implement custom aggregations. For example, you may want to compare overall regional profit to profits for the top three products in the region. A new measure can be defined to represent the profits for top three products resulting in the logical SQL statement:
Select Region, Profit, EVALUATE_AGGREGATE('SUM(TopCount(%1.members, 3, %2), %3)', Products, Profit, Profit) Top_3_prod_Profit From SampleBasicThe Oracle BI Server will generate the following expression for the custom aggregation:
member [Measures].[MS1] as 'SUM(Topcount([Product].Generations(6).members,3,[Measures].[Profit]),[Measures].[Profit])'Similarly, use the EVALUATE function to implement scalar functions that are computed post-aggregation. EVALUATE will change the grain of the query, if its definition makes explicit references to dimensions (or attributes) that are not in the query.
For example, if you would like to see the Profits for the top five products ranked by Sales sold in a Region, after creating the applicable measure, the resulting Logical SQL statement is as follows
Support for Hyperion Essbase as a Data Source
General New Features in Release 10.1.3.3.2 9-7
Select Region, EVALUATE('TopCount(%1.members, 5, %2)' as VARCHAR(20), Products, Sales), Profits From SampleBasicThe Oracle BI Server will generate the following expression to retrieve the top five products:
set [Evaluate0] as '{Topcount([Product].Generations(6).members,5,[Measures].[Sales]) }'
9.1.3.5 User-Defined AttributesEssbase supports the concept of user-defined attributes (UDAs). A UDA is essentially any arbitrary textual string that can be associated with any member from a dimension. A member can have multiple strings associated to it. Oracle BI EE will suppress UDAs upon import.
Users can still query using UDAs by leveraging the EVALUATE function. Consider the following example where "Major Market" is a UDA:
After creating the applicable column, the resulting logical SQL statement is as follows:
Select EVALUATE('FILTER( %1.Members, isUDA([%2.Dimension, "Major Market"))', State, State), SalesFrom SampleBasicThe Oracle BI Server will generate the following expression for the custom column:
set [Evaluate0] as '{FILTER([Customer].Generations(3).members,isUDA([Customer].Generations(3).Dimension,"Major Market")) }'
9.1.3.6 Substitution VariablesEssbase substitution variables are automatically retrieved and populated into corresponding BI Server dynamic system variables.
Depending on the scope of the Essbase variable, the naming convention for the BI Server variable is as described below.
Server instance scope
<server name>:<var name>
Application scope
<server name>:<app name>:<var name>
Cube scope
<server name>:<app name>:<cube name>:<var name>
The refresh interval should be set appropriately to reflect anticipated update cycles for Essbase variables.
9.1.3.7 Attribute DimensionsMember attributes are not automatically associated to corresponding dimensions and levels during the import process. To manually create the association, the Oracle BI Administrator may choose one of the following:
■ Map the member attribute to the appropriate Logical Table in the Business Model Layer
■ Include the attribute in the appropriate Presentation Table in the Presentation Layer
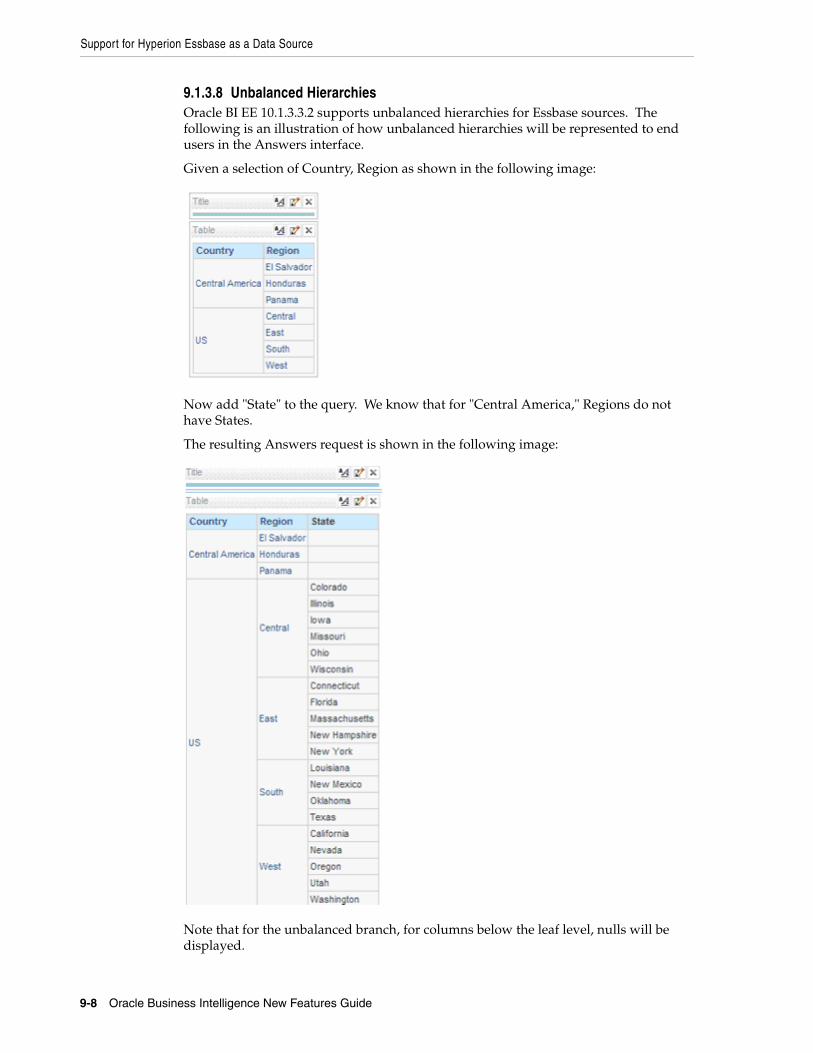
Support for Hyperion Essbase as a Data Source
9-8 Oracle Business Intelligence New Features Guide
9.1.3.8 Unbalanced HierarchiesOracle BI EE 10.1.3.3.2 supports unbalanced hierarchies for Essbase sources. The following is an illustration of how unbalanced hierarchies will be represented to end users in the Answers interface.
Given a selection of Country, Region as shown in the following image:
Now add "State" to the query. We know that for "Central America," Regions do not have States.
The resulting Answers request is shown in the following image:
Note that for the unbalanced branch, for columns below the leaf level, nulls will be displayed.
Using BI EE OC4J Components with IIS via the IIS Plug-in
General New Features in Release 10.1.3.3.2 9-9
9.2 Using BI EE OC4J Components with IIS via the IIS Plug-inThere are two components of the BI EE installation that require Oracle Containers for Java (OC4J) and will not run natively on Microsoft's Internet Information Server (IIS), those components are:
■ Oracle BI Publisher
■ Oracle BI Office Server
IIS can be configured as a listener for OC4J. This is accomplished via an IIS proxy plug-in that is provided with the BI EE installation files. When configured, the requests are routed from IIS to OC4J so that it appears to the user that everything is being executed by IIS.
9.2.1 PrerequisitesFollowing are the prerequisites to use the IIS plug-in:
■ Certified Windows Operating System as documented in the System Requirements and Supported Platforms for Oracle Business Intelligence Suite Enterprise Edition (SRSP).
■ Certified version of IIS as documented in the SRSP.
■ Oracle BI EE version 10.1.3.3.1 or later, installed and running with default configuration.
9.2.2 Configuration StepsThe Oracle Application Server Proxy Plug-in is called oracle_proxy.dll and is located in your Oracle BI EE installation files. The following steps describe how to configure your system to use the IIS plug-in:
1. From your BI EE install files, locate oracle_proxy.dll. The navigation path is as follows:
<CD-Drive>\Server\Oracle_Business_Intelligence\oc4jproxy\oracle_proxy.dll
2. Create a folder on an accessible drive, for example: c:\proxy. Copy oracle_proxy.dll to this folder.
3. In the same folder, create a configuration file called "proxy.conf ". This configuration file is for the OracleAS Proxy Plug-in which will be used to define the proxy server behavior. Following is a sample configuration file:
# Server names that the proxy plug-in will recognize.oproxy.serverlist=ias1
# Hostname to use when communicating with a specific server. oproxy.ias1.hostname=hostname.domain
# Port to use when communicating with a specific server. oproxy.ias1.port=9704
# Description of URL(s) that will be redirected to this server. oproxy.ias1.urlrule=/xmlpserver/* oproxy.ias1.urlrule=/xmlpserver oproxy.ias1.urlrule=/bioffice/* oproxy.ias1.urlrule=/bioffice
Using BI EE OC4J Components with IIS via the IIS Plug-in
9-10 Oracle Business Intelligence New Features Guide
When you complete this Step, there will be two files (oracle_proxy.dll and proxy.conf) in the folder that you created in Step 2.
4. Define the OracleAS Proxy Plug-in Registry as follows:
1. Edit your registry to create a new registry key named HKEY_LOCAL_MACHINE\SOFTWARE\Oracle\IIS Proxy Adapter.
2. Specify the exact location of your configuration file with the name server_defs, and a value pointing to the location of your configuration file, for example: c:\proxy\proxy.conf.
3. (Optional) Specify a log_file and log_level: Add a string value with the name log_file, and the desired location of the log file, for example, c:\proxy\plugin.log. Add a string value with the name log_level, and a value for the desired log level. Valid values are "debug", "inform", "error", and "emerg".
5. Create the "oproxy" virtual directory in IIS as follows:
1. Using the IIS management console, add a new virtual directory to your IIS Web site with the same physical path as that of oracle_proxy.dll. Name the directory "oproxy" and give it execute access.
2. Using the IIS management console, add oracle_proxy.dll as a filter in your IIS Web site. The name of the filter should be "oproxy" and its executable must point to the directory that contains oracle_proxy.dll, for example, c:\proxy\oracle_proxy.dll.
3. Restart IIS (stop and then start the IIS server), ensuring that the filter is marked with a green arrow pointing up.
6. Check the following configuration files to remove the port 9704 because now IIS is routing all the calls to OC4J.
\oracleBIData\web\Config\instanceconfig.xml\oracleBI\xmlp\Admin\configutation\xmlp-server-config.xml\OracleBI\oc4j_bi\j2ee\home\applications\bioffice\bioffice\WEB-INF\bioffice.xml7. To access BI Servlets from the IIS / OracleAS Proxy Plug-in, you must specify the
complete URL for example:
http://localhost/xmlpserver/login.jsp
or
http://localhost/bioffice/about.jsp
and
http://localhost/analytics/saw.dll?Answers.

10
General New Features in Release 10.1.3.3.3 10-1
10 General New Features in Release 10.1.3.3.3
The 10.1.3.3.3 release of the Oracle Business Intelligence Enterprise Edition introduces no new features.

10-2 Oracle Business Intelligence New Features Guide
11
General New Features in Release 10.1.3.4 11-1
11 General New Features in Release 10.1.3.4
The 10.1.3.4 release of the Oracle Business Intelligence Enterprise Edition introduces several new features. This chapter describes those features in the following sections:
■ Section 11.1, "Overview of New Features"
■ Section 11.2, "Migration of Oracle BI Discoverer Metadata"
■ Section 11.3, "New Line Chart for Time Series Data"
■ Section 11.4, "New Sample Oracle BI Application and Data Set"
■ Section 11.5, "Integration with Oracle Enterprise Performance Management Workspace, Fusion Edition"
■ Section 11.6, "Integration with Oracle Smart Space, Fusion Edition"
■ Section 11.7, "Certification of Oracle WebLogic Server 10.x"
11.1 Overview of New FeaturesThe 10.1.3.4 release of the Oracle Business Intelligence Enterprise Edition introduces the following new features:
■ The ability to migrate relational metadata from Oracle BI Discoverer to Oracle BI Enterprise Edition Plus metadata.
For complete information, see Section 11.2, "Migration of Oracle BI Discoverer Metadata."
■ A new type of line chart to plot time series data. For complete information, see Section 11.3, "New Line Chart for Time Series Data."
■ A new sample Oracle BI application and data set called "Sample Sales" has been designed to better and more fully illustrate the capabilities of Oracle BI 10.1.3.4.
For complete information, see Section 11.4, "New Sample Oracle BI Application and Data Set."
■ The ability to integrate Oracle BI EE and BI Publisher with EPM Workspace. EPM Workspace is a component of Foundation Services. It is the central web interface for all users to access PM system content. EPM Workspace provides a consistent, interactive and a fully thin-client environment for users to consume all EPM content. With its ease-of-use and flexibility, EPM Workspace provides users with a "windows-on-the-Web" experience.
For complete information, see Section 11.5, "Integration with Oracle Enterprise Performance Management Workspace, Fusion Edition."
Migration of Oracle BI Discoverer Metadata
11-2 Oracle Business Intelligence New Features Guide
■ The ability to integrate Oracle BI EE and BI Publisher with Oracle Smart Space, Fusion Edition. Oracle Smart Space includes the first gadget-based user interface designed specifically for Enterprise Performance Management and Business Intelligence. Offered as part of Oracle's EPM Shared Services, Oracle Smart Space consists of a set of configurable gadgets that run on the desktop providing continuous access to financial, operational and performance related information. In addition, Oracle Smart Space includes a development toolkit for creating additional gadgets that employs common development languages and methodologies and a secure instant messaging system for shared decision making.
For complete information, see Section 11.6, "Integration with Oracle Smart Space, Fusion Edition."
■ The ability to use Oracle BI EE and Oracle BI Publisher with Oracle WebLogic Server 10.x.
For complete information, see Section 11.7, "Certification of Oracle WebLogic Server 10.x."
11.2 Migration of Oracle BI Discoverer MetadataRelease 10.1.3.4 includes a utility to accelerate the migration of Oracle BI Discoverer metadata (in the form of an EEX file) to Oracle BI Enterprise Edition Plus metadata (in the form of an RPD file). The utility is a command line executable file that can be found in the \OracleBI\Server\bin directory. An accompanying instruction document can be found in the \OracleBI\Server\Document directory. This release migrates only Discoverer metadata and only for relational data sources.
11.3 New Line Chart for Time Series DataRelease 10.1.3.4 introduces a new type of line chart to plot time series data when the time intervals between data points are irregular. The time-aware line chart automatically scales the X-axis based on the time that has elapsed between data points.
Much of the information in the section "Showing Results in Charts Using Oracle BI Chart View" in the Oracle Business Intelligence Answers, Delivers, and Interactive Dashboards User Guide applies to this new chart type, with the following exceptions and additions.
■ The time-aware line chart requires a single date or date-time data column to be selected on the X-axis. The chart has a single Y-axis, but supports multiple data series. This chart type does not support drill-down on the time dimension where data types other than date or date-time are used.
■ There are several formatting restrictions for this chart type. In particular, no data formatting options are available for the time axis labels or data labels. You can modify font characteristics, but any other formatting selections will be ignored for this chart type. The "Stagger labels" and "Skip labels" formatting options are not supported. You cannot set start and end value or tick increments on the X-axis.
■ Labels that display on the time axis are locale-sensitive. For example, month and day names use the appropriate locale-sensitive short names. Data labels for this chart type display the data value, as well as the X-axis time value.
New Sample Oracle BI Application and Data Set
General New Features in Release 10.1.3.4 11-3
11.4 New Sample Oracle BI Application and Data SetA new sample Oracle BI application and data set called "Sample Sales" has been designed to better and more fully illustrate the capabilities of Oracle BI 10.1.3.4. This new set offers an extended coverage of sample materials (reports and RPD constructs), providing help by example in using Oracle BI features with specific functional cases. The content is designed to demonstrate as much as possible of OBI EE capabilities and is primarily meant to help customers who want examples and templates to extract ideas from. The new sample set offers examples on two layers:
■ Section 11.4.1, "OBI EE Web Dashboard Samples"
■ Section 11.4.2, "OBI EE RPD Constructs Samples"
This new set is meant to replace the former Paint sample content. Customers who want to retain their pre-10.1.3.4 sample Oracle BI application and any customizations that it contains should back up the BI Presentation Services Catalog, RPD file, and data files before upgrading to Release 10.1.3.4.
11.4.1 OBI EE Web Dashboard SamplesThe new Sample Sales application includes numerous reports organized in 20 dashboard pages around the following:
■ Rankings and Toppers
■ Trends and History
■ Tiering and Distribution
■ Detailed Reports
■ Lists and Segmentation (Marketing)
These dashboards and reports showcase specific Answers features (Answers formula building, Presentation Variables, Filtering, Layouts, Navigations, and so on) to deliver pertinent and visual insight with reduced impact on OBI EE Repository and underlying physical data model.
Figure 11–1 shows a sample dashboard.
Note: Oracle Business Intelligence for Microsoft Office relies on Oracle Business Intelligence Web Services to fetch data for views that a user inserts in Office documents. Because this functionality returns data based on the request definition and not the view definition, it is possible when inserting views copied from a Dashboard page that the data may not match. This is a known limitation that has no workaround.
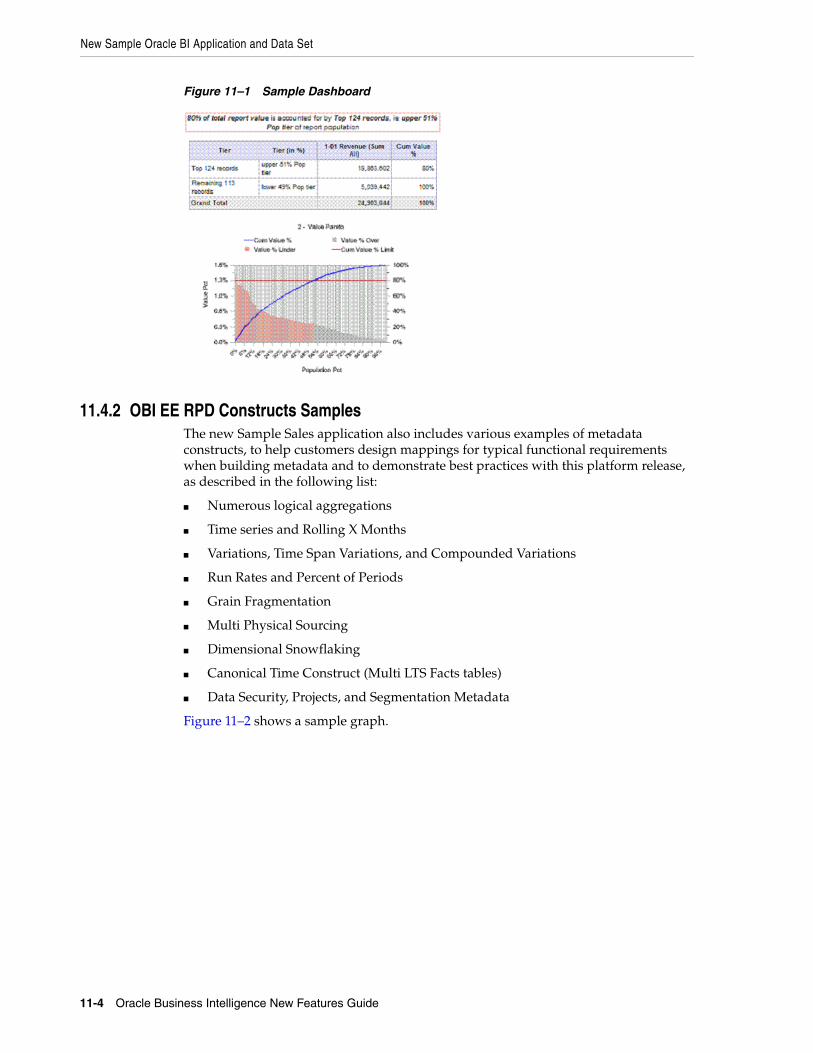
New Sample Oracle BI Application and Data Set
11-4 Oracle Business Intelligence New Features Guide
Figure 11–1 Sample Dashboard
11.4.2 OBI EE RPD Constructs SamplesThe new Sample Sales application also includes various examples of metadata constructs, to help customers design mappings for typical functional requirements when building metadata and to demonstrate best practices with this platform release, as described in the following list:
■ Numerous logical aggregations
■ Time series and Rolling X Months
■ Variations, Time Span Variations, and Compounded Variations
■ Run Rates and Percent of Periods
■ Grain Fragmentation
■ Multi Physical Sourcing
■ Dimensional Snowflaking
■ Canonical Time Construct (Multi LTS Facts tables)
■ Data Security, Projects, and Segmentation Metadata
Figure 11–2 shows a sample graph.
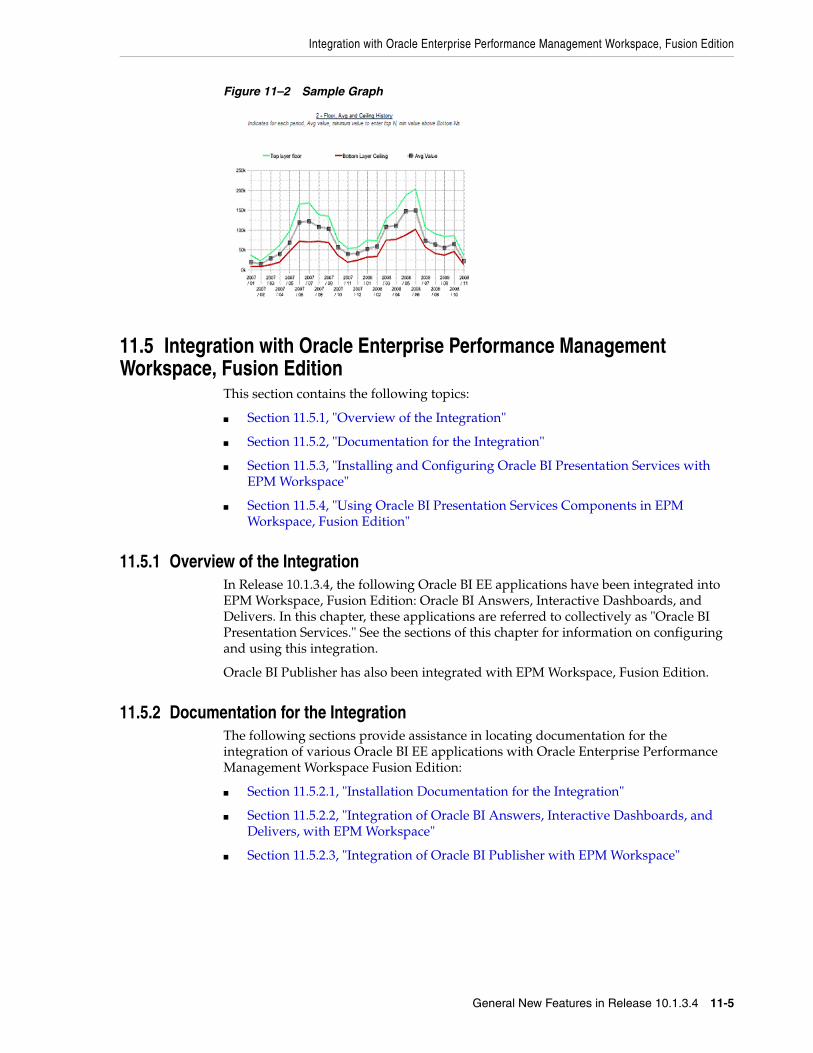
Integration with Oracle Enterprise Performance Management Workspace, Fusion Edition
General New Features in Release 10.1.3.4 11-5
Figure 11–2 Sample Graph
11.5 Integration with Oracle Enterprise Performance Management Workspace, Fusion Edition
This section contains the following topics:
■ Section 11.5.1, "Overview of the Integration"
■ Section 11.5.2, "Documentation for the Integration"
■ Section 11.5.3, "Installing and Configuring Oracle BI Presentation Services with EPM Workspace"
■ Section 11.5.4, "Using Oracle BI Presentation Services Components in EPM Workspace, Fusion Edition"
11.5.1 Overview of the IntegrationIn Release 10.1.3.4, the following Oracle BI EE applications have been integrated into EPM Workspace, Fusion Edition: Oracle BI Answers, Interactive Dashboards, and Delivers. In this chapter, these applications are referred to collectively as "Oracle BI Presentation Services." See the sections of this chapter for information on configuring and using this integration.
Oracle BI Publisher has also been integrated with EPM Workspace, Fusion Edition.
11.5.2 Documentation for the IntegrationThe following sections provide assistance in locating documentation for the integration of various Oracle BI EE applications with Oracle Enterprise Performance Management Workspace Fusion Edition:
■ Section 11.5.2.1, "Installation Documentation for the Integration"
■ Section 11.5.2.2, "Integration of Oracle BI Answers, Interactive Dashboards, and Delivers, with EPM Workspace"
■ Section 11.5.2.3, "Integration of Oracle BI Publisher with EPM Workspace"
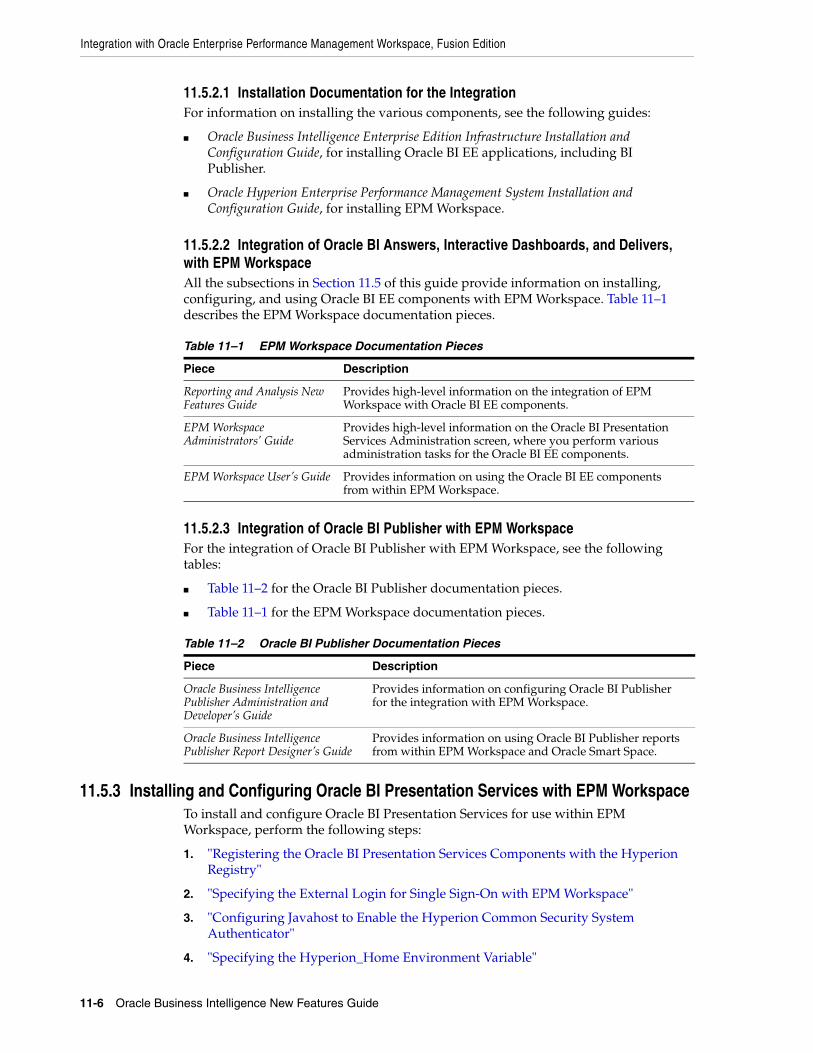
Integration with Oracle Enterprise Performance Management Workspace, Fusion Edition
11-6 Oracle Business Intelligence New Features Guide
11.5.2.1 Installation Documentation for the IntegrationFor information on installing the various components, see the following guides:
■ Oracle Business Intelligence Enterprise Edition Infrastructure Installation and Configuration Guide, for installing Oracle BI EE applications, including BI Publisher.
■ Oracle Hyperion Enterprise Performance Management System Installation and Configuration Guide, for installing EPM Workspace.
11.5.2.2 Integration of Oracle BI Answers, Interactive Dashboards, and Delivers, with EPM WorkspaceAll the subsections in Section 11.5 of this guide provide information on installing, configuring, and using Oracle BI EE components with EPM Workspace. Table 11–1 describes the EPM Workspace documentation pieces.
11.5.2.3 Integration of Oracle BI Publisher with EPM WorkspaceFor the integration of Oracle BI Publisher with EPM Workspace, see the following tables:
■ Table 11–2 for the Oracle BI Publisher documentation pieces.
■ Table 11–1 for the EPM Workspace documentation pieces.
11.5.3 Installing and Configuring Oracle BI Presentation Services with EPM WorkspaceTo install and configure Oracle BI Presentation Services for use within EPM Workspace, perform the following steps:
1. "Registering the Oracle BI Presentation Services Components with the Hyperion Registry"
2. "Specifying the External Login for Single Sign-On with EPM Workspace"
3. "Configuring Javahost to Enable the Hyperion Common Security System Authenticator"
4. "Specifying the Hyperion_Home Environment Variable"
Table 11–1 EPM Workspace Documentation Pieces
Piece Description
Reporting and Analysis New Features Guide
Provides high-level information on the integration of EPM Workspace with Oracle BI EE components.
EPM Workspace Administrators’ Guide
Provides high-level information on the Oracle BI Presentation Services Administration screen, where you perform various administration tasks for the Oracle BI EE components.
EPM Workspace User’s Guide Provides information on using the Oracle BI EE components from within EPM Workspace.
Table 11–2 Oracle BI Publisher Documentation Pieces
Piece Description
Oracle Business Intelligence Publisher Administration and Developer’s Guide
Provides information on configuring Oracle BI Publisher for the integration with EPM Workspace.
Oracle Business Intelligence Publisher Report Designer’s Guide
Provides information on using Oracle BI Publisher reports from within EPM Workspace and Oracle Smart Space.
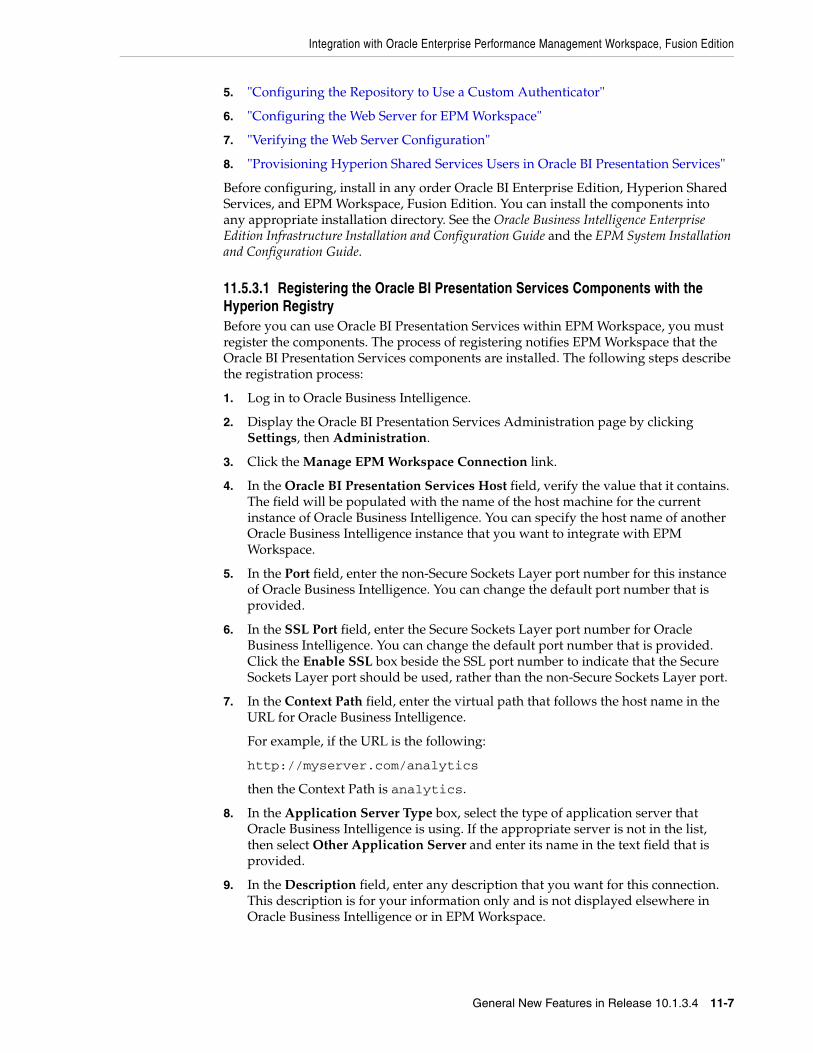
Integration with Oracle Enterprise Performance Management Workspace, Fusion Edition
General New Features in Release 10.1.3.4 11-7
5. "Configuring the Repository to Use a Custom Authenticator"
6. "Configuring the Web Server for EPM Workspace"
7. "Verifying the Web Server Configuration"
8. "Provisioning Hyperion Shared Services Users in Oracle BI Presentation Services"
Before configuring, install in any order Oracle BI Enterprise Edition, Hyperion Shared Services, and EPM Workspace, Fusion Edition. You can install the components into any appropriate installation directory. See the Oracle Business Intelligence Enterprise Edition Infrastructure Installation and Configuration Guide and the EPM System Installation and Configuration Guide.
11.5.3.1 Registering the Oracle BI Presentation Services Components with the Hyperion RegistryBefore you can use Oracle BI Presentation Services within EPM Workspace, you must register the components. The process of registering notifies EPM Workspace that the Oracle BI Presentation Services components are installed. The following steps describe the registration process:
1. Log in to Oracle Business Intelligence.
2. Display the Oracle BI Presentation Services Administration page by clicking Settings, then Administration.
3. Click the Manage EPM Workspace Connection link.
4. In the Oracle BI Presentation Services Host field, verify the value that it contains. The field will be populated with the name of the host machine for the current instance of Oracle Business Intelligence. You can specify the host name of another Oracle Business Intelligence instance that you want to integrate with EPM Workspace.
5. In the Port field, enter the non-Secure Sockets Layer port number for this instance of Oracle Business Intelligence. You can change the default port number that is provided.
6. In the SSL Port field, enter the Secure Sockets Layer port number for Oracle Business Intelligence. You can change the default port number that is provided. Click the Enable SSL box beside the SSL port number to indicate that the Secure Sockets Layer port should be used, rather than the non-Secure Sockets Layer port.
7. In the Context Path field, enter the virtual path that follows the host name in the URL for Oracle Business Intelligence.
For example, if the URL is the following:
http://myserver.com/analytics
then the Context Path is analytics.
8. In the Application Server Type box, select the type of application server that Oracle Business Intelligence is using. If the appropriate server is not in the list, then select Other Application Server and enter its name in the text field that is provided.
9. In the Description field, enter any description that you want for this connection. This description is for your information only and is not displayed elsewhere in Oracle Business Intelligence or in EPM Workspace.
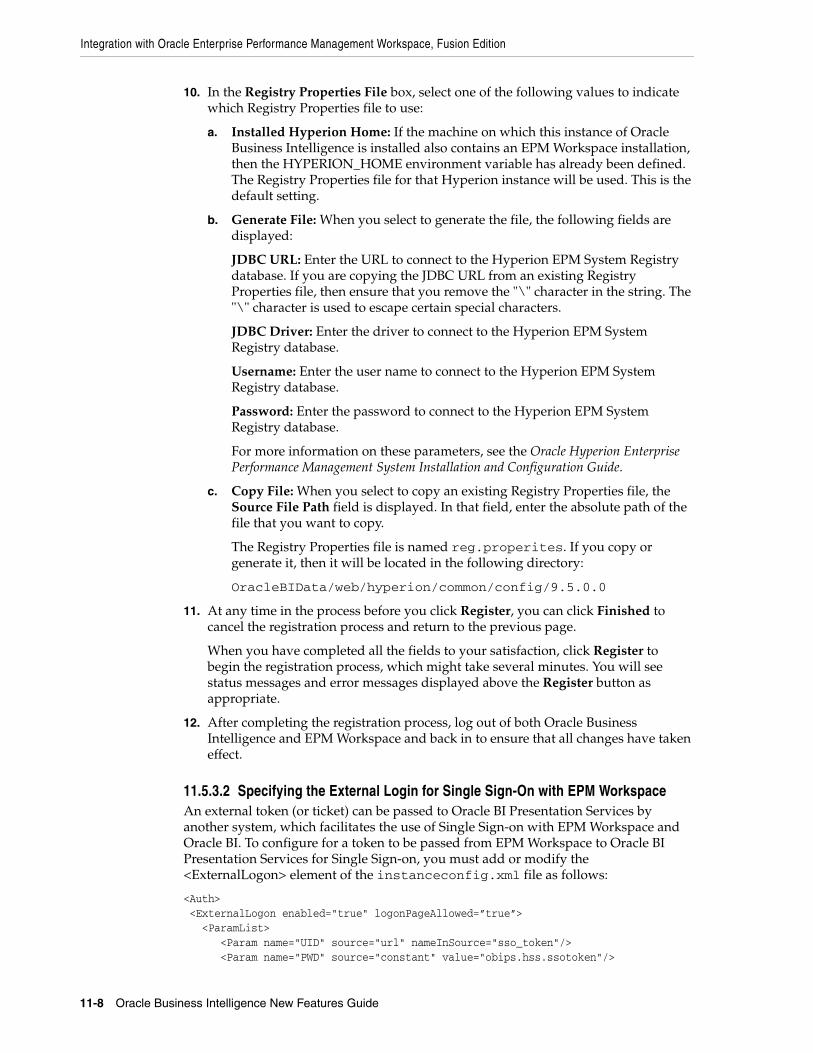
Integration with Oracle Enterprise Performance Management Workspace, Fusion Edition
11-8 Oracle Business Intelligence New Features Guide
10. In the Registry Properties File box, select one of the following values to indicate which Registry Properties file to use:
a. Installed Hyperion Home: If the machine on which this instance of Oracle Business Intelligence is installed also contains an EPM Workspace installation, then the HYPERION_HOME environment variable has already been defined. The Registry Properties file for that Hyperion instance will be used. This is the default setting.
b. Generate File: When you select to generate the file, the following fields are displayed:
JDBC URL: Enter the URL to connect to the Hyperion EPM System Registry database. If you are copying the JDBC URL from an existing Registry Properties file, then ensure that you remove the "\" character in the string. The "\" character is used to escape certain special characters.
JDBC Driver: Enter the driver to connect to the Hyperion EPM System Registry database.
Username: Enter the user name to connect to the Hyperion EPM System Registry database.
Password: Enter the password to connect to the Hyperion EPM System Registry database.
For more information on these parameters, see the Oracle Hyperion Enterprise Performance Management System Installation and Configuration Guide.
c. Copy File: When you select to copy an existing Registry Properties file, the Source File Path field is displayed. In that field, enter the absolute path of the file that you want to copy.
The Registry Properties file is named reg.properites. If you copy or generate it, then it will be located in the following directory:
OracleBIData/web/hyperion/common/config/9.5.0.0
11. At any time in the process before you click Register, you can click Finished to cancel the registration process and return to the previous page.
When you have completed all the fields to your satisfaction, click Register to begin the registration process, which might take several minutes. You will see status messages and error messages displayed above the Register button as appropriate.
12. After completing the registration process, log out of both Oracle Business Intelligence and EPM Workspace and back in to ensure that all changes have taken effect.
11.5.3.2 Specifying the External Login for Single Sign-On with EPM WorkspaceAn external token (or ticket) can be passed to Oracle BI Presentation Services by another system, which facilitates the use of Single Sign-on with EPM Workspace and Oracle BI. To configure for a token to be passed from EPM Workspace to Oracle BI Presentation Services for Single Sign-on, you must add or modify the <ExternalLogon> element of the instanceconfig.xml file as follows:
<Auth> <ExternalLogon enabled="true" logonPageAllowed=”true”> <ParamList> <Param name="UID" source="url" nameInSource="sso_token"/> <Param name="PWD" source="constant" value="obips.hss.ssotoken"/>
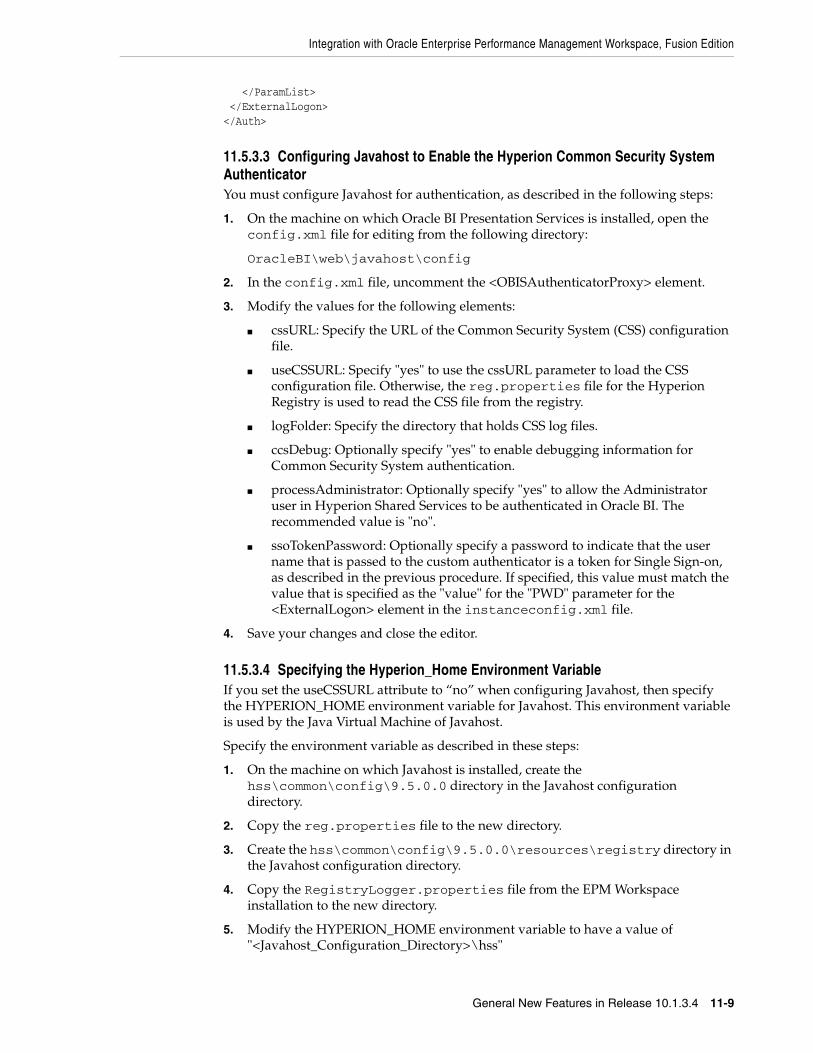
Integration with Oracle Enterprise Performance Management Workspace, Fusion Edition
General New Features in Release 10.1.3.4 11-9
</ParamList> </ExternalLogon></Auth>
11.5.3.3 Configuring Javahost to Enable the Hyperion Common Security System AuthenticatorYou must configure Javahost for authentication, as described in the following steps:
1. On the machine on which Oracle BI Presentation Services is installed, open the config.xml file for editing from the following directory:
OracleBI\web\javahost\config
2. In the config.xml file, uncomment the <OBISAuthenticatorProxy> element.
3. Modify the values for the following elements:
■ cssURL: Specify the URL of the Common Security System (CSS) configuration file.
■ useCSSURL: Specify "yes" to use the cssURL parameter to load the CSS configuration file. Otherwise, the reg.properties file for the Hyperion Registry is used to read the CSS file from the registry.
■ logFolder: Specify the directory that holds CSS log files.
■ ccsDebug: Optionally specify "yes" to enable debugging information for Common Security System authentication.
■ processAdministrator: Optionally specify "yes" to allow the Administrator user in Hyperion Shared Services to be authenticated in Oracle BI. The recommended value is "no".
■ ssoTokenPassword: Optionally specify a password to indicate that the user name that is passed to the custom authenticator is a token for Single Sign-on, as described in the previous procedure. If specified, this value must match the value that is specified as the "value" for the "PWD" parameter for the <ExternalLogon> element in the instanceconfig.xml file.
4. Save your changes and close the editor.
11.5.3.4 Specifying the Hyperion_Home Environment VariableIf you set the useCSSURL attribute to “no” when configuring Javahost, then specify the HYPERION_HOME environment variable for Javahost. This environment variable is used by the Java Virtual Machine of Javahost.
Specify the environment variable as described in these steps:
1. On the machine on which Javahost is installed, create the hss\common\config\9.5.0.0 directory in the Javahost configuration directory.
2. Copy the reg.properties file to the new directory.
3. Create the hss\common\config\9.5.0.0\resources\registry directory in the Javahost configuration directory.
4. Copy the RegistryLogger.properties file from the EPM Workspace installation to the new directory.
5. Modify the HYPERION_HOME environment variable to have a value of "<Javahost_Configuration_Directory>\hss"
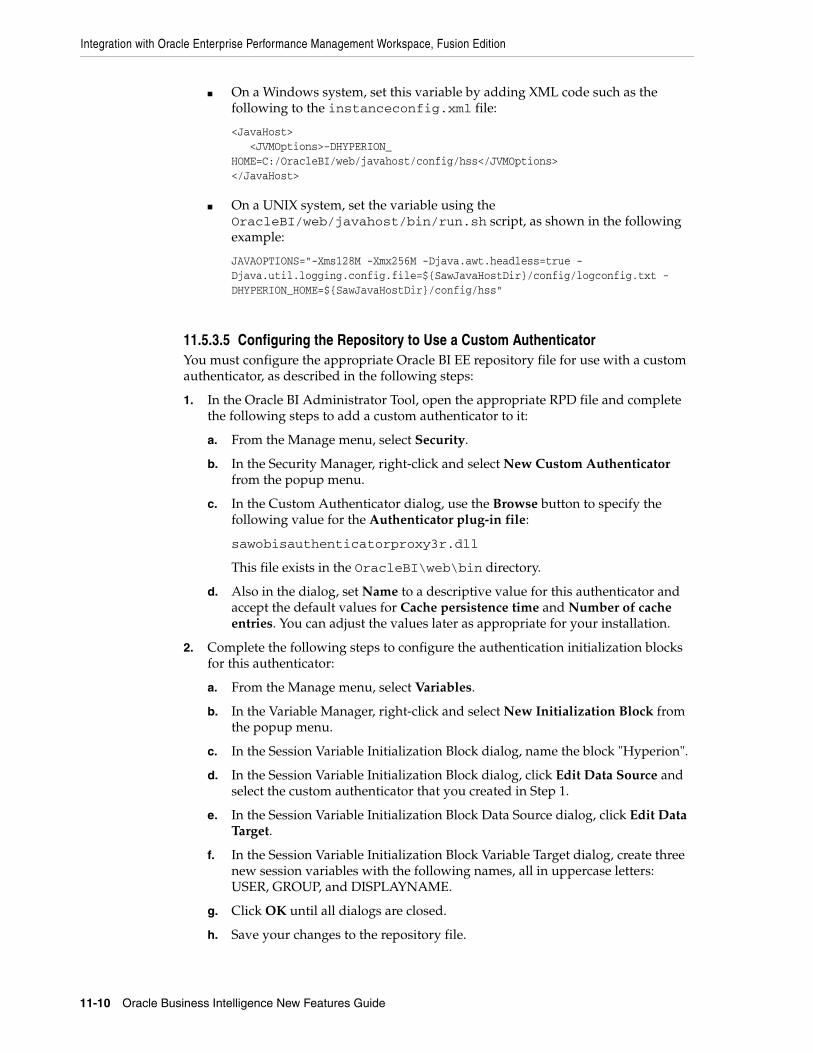
Integration with Oracle Enterprise Performance Management Workspace, Fusion Edition
11-10 Oracle Business Intelligence New Features Guide
■ On a Windows system, set this variable by adding XML code such as the following to the instanceconfig.xml file:
<JavaHost> <JVMOptions>–DHYPERION_HOME=C:/OracleBI/web/javahost/config/hss</JVMOptions></JavaHost>
■ On a UNIX system, set the variable using the OracleBI/web/javahost/bin/run.sh script, as shown in the following example:
JAVAOPTIONS="-Xms128M -Xmx256M -Djava.awt.headless=true - Djava.util.logging.config.file=${SawJavaHostDir}/config/logconfig.txt - DHYPERION_HOME=${SawJavaHostDir}/config/hss"
11.5.3.5 Configuring the Repository to Use a Custom AuthenticatorYou must configure the appropriate Oracle BI EE repository file for use with a custom authenticator, as described in the following steps:
1. In the Oracle BI Administrator Tool, open the appropriate RPD file and complete the following steps to add a custom authenticator to it:
a. From the Manage menu, select Security.
b. In the Security Manager, right-click and select New Custom Authenticator from the popup menu.
c. In the Custom Authenticator dialog, use the Browse button to specify the following value for the Authenticator plug-in file:
sawobisauthenticatorproxy3r.dll
This file exists in the OracleBI\web\bin directory.
d. Also in the dialog, set Name to a descriptive value for this authenticator and accept the default values for Cache persistence time and Number of cache entries. You can adjust the values later as appropriate for your installation.
2. Complete the following steps to configure the authentication initialization blocks for this authenticator:
a. From the Manage menu, select Variables.
b. In the Variable Manager, right-click and select New Initialization Block from the popup menu.
c. In the Session Variable Initialization Block dialog, name the block "Hyperion".
d. In the Session Variable Initialization Block dialog, click Edit Data Source and select the custom authenticator that you created in Step 1.
e. In the Session Variable Initialization Block Data Source dialog, click Edit Data Target.
f. In the Session Variable Initialization Block Variable Target dialog, create three new session variables with the following names, all in uppercase letters: USER, GROUP, and DISPLAYNAME.
g. Click OK until all dialogs are closed.
h. Save your changes to the repository file.
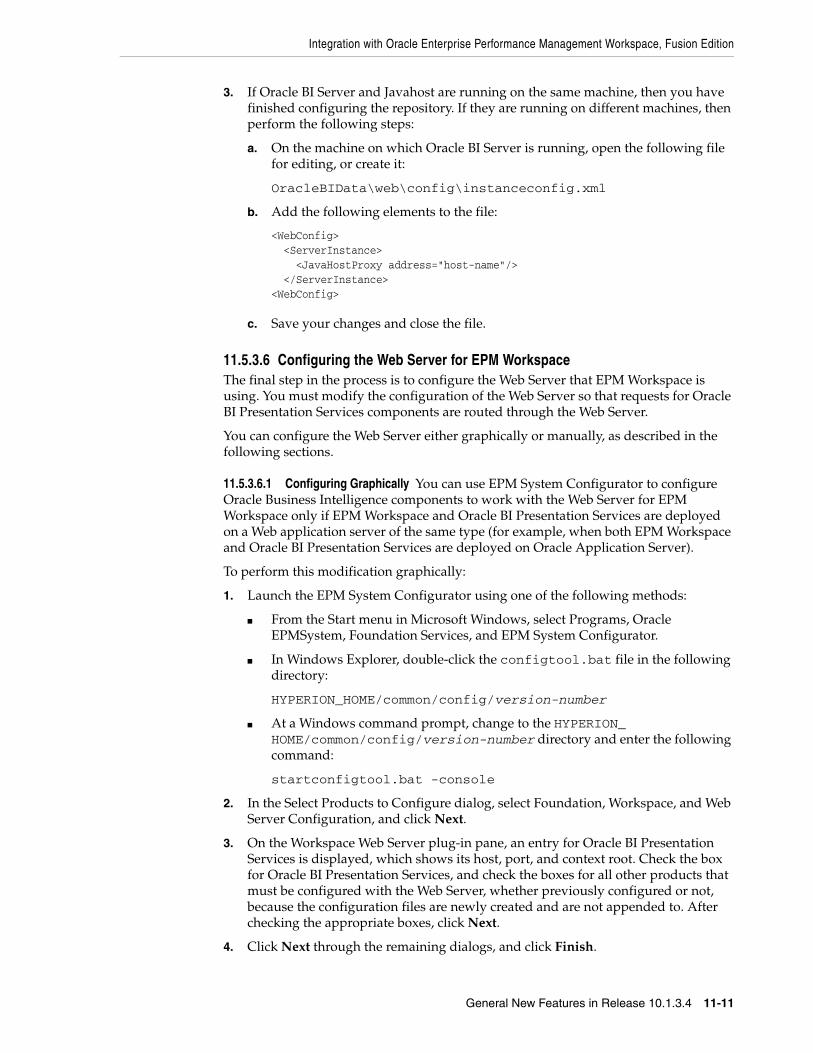
Integration with Oracle Enterprise Performance Management Workspace, Fusion Edition
General New Features in Release 10.1.3.4 11-11
3. If Oracle BI Server and Javahost are running on the same machine, then you have finished configuring the repository. If they are running on different machines, then perform the following steps:
a. On the machine on which Oracle BI Server is running, open the following file for editing, or create it:
OracleBIData\web\config\instanceconfig.xml
b. Add the following elements to the file:
<WebConfig> <ServerInstance> <JavaHostProxy address="host-name"/> </ServerInstance><WebConfig>
c. Save your changes and close the file.
11.5.3.6 Configuring the Web Server for EPM WorkspaceThe final step in the process is to configure the Web Server that EPM Workspace is using. You must modify the configuration of the Web Server so that requests for Oracle BI Presentation Services components are routed through the Web Server.
You can configure the Web Server either graphically or manually, as described in the following sections.
11.5.3.6.1 Configuring Graphically You can use EPM System Configurator to configure Oracle Business Intelligence components to work with the Web Server for EPM Workspace only if EPM Workspace and Oracle BI Presentation Services are deployed on a Web application server of the same type (for example, when both EPM Workspace and Oracle BI Presentation Services are deployed on Oracle Application Server).
To perform this modification graphically:
1. Launch the EPM System Configurator using one of the following methods:
■ From the Start menu in Microsoft Windows, select Programs, Oracle EPMSystem, Foundation Services, and EPM System Configurator.
■ In Windows Explorer, double-click the configtool.bat file in the following directory:
HYPERION_HOME/common/config/version-number
■ At a Windows command prompt, change to the HYPERION_HOME/common/config/version-number directory and enter the following command:
startconfigtool.bat -console
2. In the Select Products to Configure dialog, select Foundation, Workspace, and Web Server Configuration, and click Next.
3. On the Workspace Web Server plug-in pane, an entry for Oracle BI Presentation Services is displayed, which shows its host, port, and context root. Check the box for Oracle BI Presentation Services, and check the boxes for all other products that must be configured with the Web Server, whether previously configured or not, because the configuration files are newly created and are not appended to. After checking the appropriate boxes, click Next.
4. Click Next through the remaining dialogs, and click Finish.
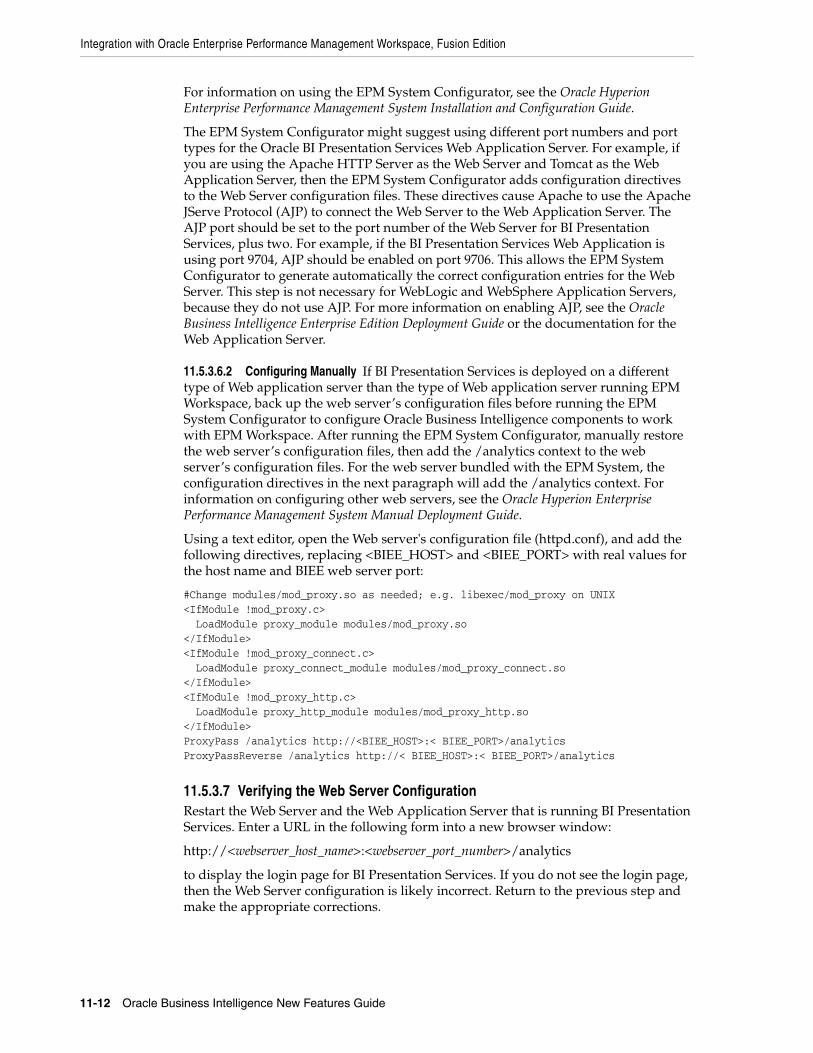
Integration with Oracle Enterprise Performance Management Workspace, Fusion Edition
11-12 Oracle Business Intelligence New Features Guide
For information on using the EPM System Configurator, see the Oracle Hyperion Enterprise Performance Management System Installation and Configuration Guide.
The EPM System Configurator might suggest using different port numbers and port types for the Oracle BI Presentation Services Web Application Server. For example, if you are using the Apache HTTP Server as the Web Server and Tomcat as the Web Application Server, then the EPM System Configurator adds configuration directives to the Web Server configuration files. These directives cause Apache to use the Apache JServe Protocol (AJP) to connect the Web Server to the Web Application Server. The AJP port should be set to the port number of the Web Server for BI Presentation Services, plus two. For example, if the BI Presentation Services Web Application is using port 9704, AJP should be enabled on port 9706. This allows the EPM System Configurator to generate automatically the correct configuration entries for the Web Server. This step is not necessary for WebLogic and WebSphere Application Servers, because they do not use AJP. For more information on enabling AJP, see the Oracle Business Intelligence Enterprise Edition Deployment Guide or the documentation for the Web Application Server.
11.5.3.6.2 Configuring Manually If BI Presentation Services is deployed on a different type of Web application server than the type of Web application server running EPM Workspace, back up the web server’s configuration files before running the EPM System Configurator to configure Oracle Business Intelligence components to work with EPM Workspace. After running the EPM System Configurator, manually restore the web server’s configuration files, then add the /analytics context to the web server’s configuration files. For the web server bundled with the EPM System, the configuration directives in the next paragraph will add the /analytics context. For information on configuring other web servers, see the Oracle Hyperion Enterprise Performance Management System Manual Deployment Guide.
Using a text editor, open the Web server's configuration file (httpd.conf), and add the following directives, replacing <BIEE_HOST> and <BIEE_PORT> with real values for the host name and BIEE web server port:
#Change modules/mod_proxy.so as needed; e.g. libexec/mod_proxy on UNIX<IfModule !mod_proxy.c> LoadModule proxy_module modules/mod_proxy.so</IfModule><IfModule !mod_proxy_connect.c> LoadModule proxy_connect_module modules/mod_proxy_connect.so</IfModule><IfModule !mod_proxy_http.c> LoadModule proxy_http_module modules/mod_proxy_http.so</IfModule>ProxyPass /analytics http://<BIEE_HOST>:< BIEE_PORT>/analyticsProxyPassReverse /analytics http://< BIEE_HOST>:< BIEE_PORT>/analytics
11.5.3.7 Verifying the Web Server ConfigurationRestart the Web Server and the Web Application Server that is running BI Presentation Services. Enter a URL in the following form into a new browser window:
http://<webserver_host_name>:<webserver_port_number>/analytics
to display the login page for BI Presentation Services. If you do not see the login page, then the Web Server configuration is likely incorrect. Return to the previous step and make the appropriate corrections.
Integration with Oracle Enterprise Performance Management Workspace, Fusion Edition
General New Features in Release 10.1.3.4 11-13
11.5.3.8 Provisioning Hyperion Shared Services Users in Oracle BI Presentation ServicesAdministrators can create groups in Oracle BI Presentation Services and assign users to these groups. Such groups can be granted access to various components, such as Interactive Dashboards.
To provision Hyperion Shared Services users in these groups, create corresponding groups in Hyperion Shared Services. For example, if Oracle BI Presentation Services has a group called “Sales”, create the same group “Sales” in Hyperion Shared Services and add the users to this group. The Hyperion Shared Services users now belong to the “Sales” group in Oracle BI Presentation Services.
Similarly for provisioning users as Administrators in Oracle BI Presentation Services, create the Presentation Services Administrators group in Hyperion Shared Services and add Hyperion Shared Services users to this group.
11.5.4 Using Oracle BI Presentation Services Components in EPM Workspace, Fusion Edition
After you configure Oracle BI Presentation Services to run within EPM Workspace, you can begin using the components there, as described in the following sections:
■ Section 11.5.4.1, "Specifying Oracle BI Preferences Within EPM Workspace"
■ Section 11.5.4.2, "Performing Oracle BI Presentation Services Administration Tasks Within EPM Workspace"
■ Section 11.5.4.3, "Launching Oracle BI Presentation Services Components in EPM Workspace"
■ Section 11.5.4.4, "Using BI Answers"
■ Section 11.5.4.5, "Using BI Interactive Dashboards"
■ Section 11.5.4.6, "Using BI Delivers"
11.5.4.1 Specifying Oracle BI Preferences Within EPM WorkspaceAs you work with the Oracle BI Presentation Services components in EPM Workspace, you will likely want to specify preferences to customize your experience.
To specify preferences, complete the following steps:
1. From the File menu, select Preferences.
2. From the left-hand list, select Oracle BI.
3. On the My Account page, update the information as appropriate.
The Locale and User Interface Languages lists are read-only, because you cannot modify them. The locale and language are inherited from EPM Workspace. See the Oracle Enterprise Performance Management Workspace, Fusion Edition Administrator's Guide for information on setting the locale and language.
4. When you are finished, click OK.
11.5.4.2 Performing Oracle BI Presentation Services Administration Tasks Within EPM WorkspaceTo allow users to work effectively in EPM Workspace, you might need to perform Oracle BI Presentation Services Administration tasks.
Integration with Oracle Enterprise Performance Management Workspace, Fusion Edition
11-14 Oracle Business Intelligence New Features Guide
To perform these tasks, complete the following steps:
1. From the Navigate menu, select Administer, then BI Presentation Services.
2. On the Oracle BI Presentation Services Administration page, perform the appropriate activities, such as managing the Presentation Catalog and interactive dashboards.
11.5.4.3 Launching Oracle BI Presentation Services Components in EPM WorkspaceTo launch Oracle BI Presentation Services Components, use the Navigate menu in the upper-left corner of the EPM Workspace window.
Select Navigate, then Applications, then the appropriate component: Oracle BI Answers, Oracle BI Interactive Dashboards, or Oracle BI Delivers.
11.5.4.4 Using BI AnswersBI Answers runs in a new tab in the EPM Workspace and adds various menu items for creating and opening content, as described in the following list:
1. To launch from the Navigate menu, select Applications, then Oracle BI Answers.
2. From the File menu, select New, then the appropriate BI Answers item such as Request, Filter, or Dashboard Prompt.
3. From the File menu, select Open, then Oracle BI Catalog to display a dialog from which you can open a BI Answers item.
4. From the File menu, select Save to begin the process of saving a BI Answers item.
You can also use the Save icon on the toolbar.
5. From the Tools menu, select Manage Catalog to edit and organize the content in the Presentation Catalog.
6. From the Tools menu, select Install, then Oracle BI for Microsoft Office to begin the process of installing that component.
11.5.4.5 Using BI Interactive DashboardsOracle BI Interactive Dashboards runs in a new tab in EPM Workspace and adds various menu items for navigating in and editing dashboards, as described in the following list:
1. To launch from the Navigate menu, select Applications, then Oracle BI Interactive Dashboards.
2. From the Dashboards menu, select the items for navigating among dashboards.
3. From the Edit menu, select Edit Dashboard to display the Dashboard Editor, or use the other options on the Edit menu to perform appropriate Interactive Dashboards functions. These options are the same as those found on the Page Options menu that is available when Interactive Dashboards runs as part of Oracle Business Intelligence Enterprise Edition.
4. To see an alert (if one is available), select Alerts from the View menu or click the Alerts icon on the toolbar.
Tip: To create a new database request, select New from the File menu, then select Request. Select Create Direct Request in the resulting dialog.
Integration with Oracle Smart Space, Fusion Edition
General New Features in Release 10.1.3.4 11-15
11.5.4.6 Using BI DeliversBI Delivers runs in a new tab in EPM Workspace and adds various menu items for creating and opening iBots, as described in the following list:
1. To launch from the Navigate menu, select Applications, then Oracle BI Delivers.
2. From the File menu, select New, then iBot.
3. From the File menu, select Save to begin the process of saving the iBot.
4. From the File menu, select iBots Acting on My Behalf to see any iBots that are available.
5. To see an alert (if one is available), select Alerts from the View menu or click the Alerts icon on the toolbar.
11.6 Integration with Oracle Smart Space, Fusion EditionThis section contains the following topics:
■ Section 11.6.1, "Overview of the Integration"
■ Section 11.6.2, "Documentation for the Integration"
■ Section 11.6.3, "Performing Oracle BI Tasks in Smart Space"
■ Section 11.6.4, "Downloading Oracle Smart Space and Smart View from Oracle BI Presentation Services"
11.6.1 Overview of the IntegrationRelease 10.1.3.4 introduces the following two types of integration of Oracle BI EE with Oracle Smart Space:
■ Section 11.6.3, "Performing Oracle BI Tasks in Smart Space": You can launch and interact with Oracle BI Interactive Dashboards and Answers requests in the Smart Space Content Viewer and Smart Book gadget and add them to the Favorites gadget. You can use Smart Space Collaborator to share Oracle BI content with other Smart Space users. You can also configure iBot results to be sent as Smart Space notifications and view these in the Notification gadget.
■ Section 11.6.4, "Downloading Oracle Smart Space and Smart View from Oracle BI Presentation Services": You can set up for users to download Oracle Smart Space and Oralce Smart View for Microsoft Office from within Oracle BI.
11.6.2 Documentation for the IntegrationThe following sections provide assistance in locating documentation for the integration of various Oracle BI EE applications with Oracle Smart Space:
■ Section 11.6.2.1, "Installation Documentation for the Integration"
■ Section 11.6.2.2, "Integration of Oracle BI Answers, Interactive Dashboards, and Delivers with Oracle Smart Space"
■ Section 11.6.2.3, "Integration of Oracle BI Publisher with Oracle Smart Space"
Integration with Oracle Smart Space, Fusion Edition
11-16 Oracle Business Intelligence New Features Guide
11.6.2.1 Installation Documentation for the IntegrationFor information on installing the various components, see the following books:
■ Oracle Business Intelligence Enterprise Edition Infrastructure Installation and Configuration Guide, for installing Oracle BI EE applications, including BI Publisher.
■ Oracle Hyperion Enterprise Performance Management System Installation and Configuration Guide, for installing Oracle Smart Space.
See the Oracle Smart Space Configuration Guide for additional information on installing and configuring Oracle Smart Space with Oracle BI EE components, including BI Publisher
11.6.2.2 Integration of Oracle BI Answers, Interactive Dashboards, and Delivers with Oracle Smart SpaceThe following tables describes where you can find information for the integration of Oracle BI Answers, Oracle BI Interactive Dashboards, and Oracle BI Delivers with Oracle Smart Space.
Table 11–3 describes the Oracle BI EE documentation pieces.
Table 11–4 describes the Oracle Smart Space documentation pieces.
Table 11–3 Oracle BI EE Documentation Pieces
Piece Description
Section 11.6, "Integration with Oracle Smart Space, Fusion Edition" in this guide
Provides information on using Oracle BI EE components within Oracle Smart Space and on downloading Oracle Smart Space and Smart View from Oracle BI Answers.
Tech Note 559596.1 Using Oracle Delivers iBots, you can send notifications to Smart Space users. To set up iBots in Oracle BI Delivers for use with Smart Space, see Tech Note 559596.1 on Oracle Metalink 3 at the following URL:
http://metalink3.oracle.com
Oracle BI Delivers uses intelligence bots called iBots which are software-based agents that detect specific results. iBot messages can be sent as notifications to Smart Space Collaborator users
Table 11–4 Oracle Smart Space Documentation Pieces
Piece Description
Oracle Smart Space New Features Guide
Provides high-level information on the integration of Oracle Smart Space with Oracle BI EE components, including BI Publisher.
Oracle Smart Space Configuration Guide
Provides information on installing and configuring Oracle Smart Space with Oracle BI EE components, including BI Publisher.
Oracle Smart Space Administrator’s Guide
Provides information on configuring services to access Oracle BI EE content, including BI Publisher reports, from Oracle Smart Space.
Oracle Smart Space User’s Guide
Provides information on accessing Oracle BI EE content, including BI Publisher reports, from Oracle Smart Space.

Integration with Oracle Smart Space, Fusion Edition
General New Features in Release 10.1.3.4 11-17
11.6.2.3 Integration of Oracle BI Publisher with Oracle Smart SpaceFor the integration of Oracle BI Publisher with Oracle Smart Space, see the following tables:
■ Table 11–2 for the Oracle BI Publisher documentation pieces.
■ Table 11–4 for the Oracle Smart Space documentation pieces.
11.6.3 Performing Oracle BI Tasks in Smart SpaceOnce Smart Space is connected to Oracle BI, you can use Windows Explorer to browse the Oracle BI Presentation Catalog and see the folders (Shared Folders and My Folders) and documents (Dashboard and Answers request) that are available to you. The following sections provide information on the tasks that you can perform for Oracle BI from within Smart Space:
■ Section 11.6.3.1, "Tasks from Right-Click Menus"
■ Section 11.6.3.2, "Folder Management"
■ Section 11.6.3.3, "Oracle BI Delivers iBots"
■ Section 11.6.3.4, "Authentication"
11.6.3.1 Tasks from Right-Click MenusFrom Windows Explorer, right-click a document to see the available Oracle BI functions.
The following list details the right-click menus available for Oracle BI documents in Smart Space.
■ Answers Requests:
– Open: Opens the Answers request in the Smart Space Content Viewer for viewing and interacting. The Oracle BI masthead is not available.
– Open in Browser: Opens the Answers request in Oracle BI in a browser and loads the request for viewing and interacting. The Oracle BI masthead is not available.
– Edit: Opens Oracle BI in a browser and loads the Answers request for editing. The Oracle BI masthead is available for navigating to other Oracle BI pages.
– Cut: Places the Answers request on the Windows Clipboard for moving into another folder within the Presentation Catalog on the same Oracle BI Server.
– Copy: Places a copy of the Answers request on the Windows Clipboard for copying into another folder within the Presentation Catalog on the same Oracle BI Server.
– Paste: Pastes the Answers request into a folder, after the request has been cut or copied to the Windows Clipboard.
– Delete: Removes the Answers request from the Presentation Catalog.
– Rename: Renames the Answers request within the Presentation Catalog. When Answers requests are renamed, Smart Space automatically preserves references to the previous name of this item.
Access to cut, copy, paste, delete and rename is based on the privileges that are defined for you in the Oracle BI Presentation Catalog.
Integration with Oracle Smart Space, Fusion Edition
11-18 Oracle Business Intelligence New Features Guide
■ Interactive Dashboards:
– Open: Opens the dashboard in the Smart Space Content Viewer for viewing and interacting. The Oracle BI masthead is not available.
– Edit: Opens the Dashboard Editor screen of Oracle BI in a browser with the dashboard loaded for editing.
– Open in Browser: Opens the Interactive Dashboards screen in Oracle BI in a browser and loads the dashboard for viewing and interacting. The Oracle BI masthead is available for navigating to other Oracle BI pages.
My Dashboard appears directly underneath the “My Folders” folder.
11.6.3.2 Folder ManagementSmart Space’s integration with Windows Explorer also allows you to create, rename and delete folders (both Shared Folders and My Folders). Access to these functions is based on the privileges that are defined for you in the Oracle BI Presentation Catalog.
11.6.3.3 Oracle BI Delivers iBotsUsing Oracle Delivers iBots, you can send notifications to Smart Space users. To set up iBots in Oracle BI Delivers for use with Smart Space, see Tech Note 559596.1 on Oracle Metalink 3 at the following URL:
http://metalink3.oracle.com
Oracle BI Delivers uses intelligence bots called iBots which are software-based agents that detect specific results. iBot messages can be sent as notifications to Smart Space Collaborator users
11.6.3.4 AuthenticationSmart Space supports the following authentication methods for Oracle BI: Oracle BI native authentication and OracleAS Single Sign-On.
11.6.4 Downloading Oracle Smart Space and Smart View from Oracle BI Presentation Services
In Release 10.1.3.4, you can download one of the following Microsoft Office Add-ins from within Oracle BI Presentation Services: Oracle BI for Microsoft Office, Smart View for Microsoft Office, or Oracle Smart Space. This section contains the following topics:
■ Section 11.6.4.1, "Setting Up to Download Oracle Smart Space and Smart View from Oracle BI Presentation Services"
■ Section 11.6.4.2, "Initiating the Download"
For more information, refer to the following:
■ For information on Oracle Smart Space, see the Oracle Smart Space User’s Guide.
■ For information on Oracle Hyperion Smart View for Office, Fusion Edition, see the Oracle Hyperion Smart View for Office User’s Guide.
■ For information on downloading Oracle BI For Microsoft Office, see Chapter 26, "Installing Oracle Business Intelligence for Microsoft Office."

Integration with Oracle Smart Space, Fusion Edition
General New Features in Release 10.1.3.4 11-19
11.6.4.1 Setting Up to Download Oracle Smart Space and Smart View from Oracle BI Presentation ServicesBefore you can see the menu options for downloading an add-in, you must perform configure tasks for each one.
11.6.4.1.1 Smart View Complete the following steps in the specified order to set up to download Smart View. While the order of installation is not important, Provider Services must be started before users can connect to Oracle BI EE using Smart View.
1. Install and start Provider Services. Smart View uses Provider Services for accessing Oracle BI EE content.
For information on installing Provider Services, see the Oracle Hyperion EPM System Installation Start Here Guide.
2. Install Oracle BI.
For information, see the Oracle Business Intelligence Infrastructure Installation and Configuration Guide.
3. Set up a connection to Oracle BI EE using the Smart View Data Source Manager in the Smart View client.
For information, see the chapter on connecting to data sources in the Oracle Smart View, Fusion Edition User’s Guide.
4. Update the Oracle BI EE instanceconfig.xml file with Smart View Client download information, as shown in the following example:
<WebConfig> <ServerInstance> <SmartViewInstallerURL>http://<URL to download SmartView client>/</SmartViewInstallerURL> </ServerInstance></WebConfig>
For information on the instanceconfig.xml file, see the Oracle Business Intelligence Presentation Services Administration Guide.
5. Restart Oracle BI to see the new menu option for Smart View.
11.6.4.1.2 Oracle Smart Space Complete the following steps to set up to download Oracle Smart Space.
1. Install Oracle BI.
For information, see the Oracle Business Intelligence Infrastructure Installation and Configuration Guide.
2. Install Oracle Smart Space.
For information, see the Hyperion EMP System Installation and Configuration Guide.
Note: There is no separate administration tool for configuring data sources for use with Smart View. Administrators can install Smart View using the standalone installer, if they want to set up connections prior to enabling the Smart View download for users. The assumption is that the Oracle BI installation has been completed and the services are running along with the Provider Services.

Certification of Oracle WebLogic Server 10.x
11-20 Oracle Business Intelligence New Features Guide
3. Ask the Oracle Smart Space administrator to configure Smart Space with Oracle BI registration information.
For information, see the Oracle Smart Space, Fusion Edition Administrator’s Guide.
4. Update the instanceconfig.xml file with information to generate the link for Oracle Smart Space start.html page for installing the Smart Space client, as shown in the following example:
<WebConfig> <ServerInstance> <SmartSpaceInstallerURL>http://<URL to download SmartSpace client/</SmartSpaceInstallerURL> </ServerInstance></WebConfig>
5. Restart Oracle BI to see the new menu option.
11.6.4.2 Initiating the DownloadTo initiate the download of an add-in, perform these steps:
1. Log in to Oracle Business Intelligence.
2. Click the More Products link, then click one of the following:
■ Download Oracle BI for Microsoft Office
See Chapter 26.4, "Installing the BI Office Client" for information on installing the Oracle BI add-in, which is not a new feature for Release 10.1.3.4.
■ Download Smart View for Microsoft Office
■ Download Smart Space
11.7 Certification of Oracle WebLogic Server 10.xYou can use Oracle BI EE and Oracle BI Publisher with the Oracle WebLogic Server. The following sections describes the steps that are required to configure for that application server.
11.7.1 Configuring Oracle BI EE for WebLogic ServerThe following steps provide information on configuring to use WebLogic Server with Oracle BI EE. See the WebLogic Server documentation for additional information.
1. Create a new WebLogic Server domain using a JDK such as Sun JDK 1.5.x or higher, in place of JRockit.
2. Create an exploded archive directory from the analytics.ear or analytics.war file using the new domain, by following these steps:
a. Copy the analytics.ear or analytics.war file in the \OracleBI\web directory to a destination directory, as shown in the following example.
-mkdir c:mydestination\BIEE\-cp c:\OracleBI\web\analytics.war to c:mydestination\BIEE\
b. Manually unpack the analytics.ear or analytics.war file using a jar command, as shown in the following example.
jar -xvf manual\generic\analytics.war
Certification of Oracle WebLogic Server 10.x
General New Features in Release 10.1.3.4 11-21
By running the jar command, you create a directory called "analytics." This is the directory where the application will be deployed.
Note the following about exploded archive directories: Do not deploy the analytics.war or analytics.ear file on the WebLogic Server by uploading it from the WebLogic console, because the console deploys the application (or Web module) in an archived file format.
3. If the BI Presentation Services Server runs on a different machine from the WebLogic Server, then edit the web.xml file for the WebLogic Server to account for this difference.
4. In a Web browser, start the WebLogic Administration Console, as shown in the following example.
http://hostname:7001/console
5. If you have not already done so, in the Change Center of the Administration Console, click Lock & Edit.
6. In the left pane of the Administration Console, click Deployments.
7. Install the deployment as an application by completing the following steps:
a. In the right pane, click Install.
b. Select c:mydestination\BIEE and click Next.
c. Select Install this deployment as an application and click Next.
d. Select I will make the deployment accessible from the following location from Source accessibility.
e. Click Finish.
8. To activate these changes, in the Change Center of the Administration Console, click Activate Changes.
9. Start the service by clicking Deployments, then analytics.
11.7.2 Configuring Oracle BI Publisher for WebLogic ServerThe following steps provide information on configuring to use WebLogic Server with Oracle BI Publisher. See the WebLogic Server documentation for additional information.
1. Create a new WebLogic Server domain using a JDK such as Sun JDK 1.5.x or higher, in place of JRockit.
2. Create an exploded archive directory from the xmlpserver.ear or xmlpserver.war file using the new domain, by following these steps:
a. Copy the xmlpserver.ear or xmlpserver.war file in the \xmlpserver\web directory to a destination directory, as shown in the following example.
-mkdir c:mydestination\xmlpserver\-cp c:\xmlpserver\web\xmlpserver.war to c:mydestination\xmlpserver\
b. Manually unpack the xmlpserver.ear or xmlpserver.war file using a jar command, as shown in the following example.
jar -xvf manual\generic\xmlpserver.war
By running the jar command, you create a directory called "xmlpserver." This is the directory where the application will be deployed.

Certification of Oracle WebLogic Server 10.x
11-22 Oracle Business Intelligence New Features Guide
Note the following about exploded archive directories: Do not deploy the xmlpserver.war or xmlpserver.ear file on the WebLogic Server by uploading it from the WebLogic console, because the console deploys the application (or Web module) in an archived file format. This is problematic to a BI Publisher configuration, because you must update WEB-INF/xmlp-server-config.xml manually after the deployment. To work around this issue, use an "exploded archive" directory.
3. If you need to make any changes to the BI Publisher configuration files, such as to update the catalog path in the xmlp-server-config.xml file, then do so before deployment.
4. In a Web browser, start the WebLogic Administration Console, as shown in the following example.
http://hostname:7001/console
5. If you have not already done so, in the Change Center of the Administration Console, click Lock & Edit.
6. In the left pane of the Administration Console, click Deployments.
7. Install the deployment as an application by completing the following steps:
a. In the right pane, click Install.
b. Select c:mydestination\xmlpserver and click Next.
c. Select Install this deployment as an application and click Next.
d. Select I will make the deployment accessible from the following location from Source accessibility.
e. Click Finish.
8. To activate these changes, in the Change Center of the Administration Console, click Activate Changes.
9. Configure the BI Publisher repository and install fonts as described in the Oracle Business Intelligence Publisher Installation Guide.
10. Start the service by clicking Deployments, then xmlpserver.
Part IIPart II New Features for Oracle BI Publisher
Part II contains the following chapters:
■ Chapter 12, "Oracle BI Publisher Template Builder Enhancements"
■ Chapter 13, "Flash Templates for Oracle BI Publisher"
■ Chapter 14, "Oracle BI Publisher PowerPoint Output"
■ Chapter 15, "Oracle BI Publisher Integration with Oracle BI Discoverer"
■ Chapter 16, "Performance Improvements for Oracle BI Publisher"
■ Chapter 17, "Converting Reports from Oracle Reports to Oracle BI Publisher"
■ Chapter 18, "Support for Digital Signature in PDF Documents"
■ Chapter 19, "Support for PostScript Printers"
■ Chapter 20, "Additional New Features in Release 10.1.3.3"
■ Chapter 21, "New Features in Release 10.1.3.3.1"
■ Chapter 22, "New Features in Release 10.1.3.3.2"
■ Chapter 23, "New Features in Release 10.1.3.3.3"
■ Chapter 24, "New Features in Release 10.1.3.4"
■ Chapter 25, "Oracle Business Intelligence Publisher Web Services"

12
Oracle BI Publisher Template Builder Enhancements 12-1
12 Oracle BI Publisher Template BuilderEnhancements
This chapter describes enhancements to the Oracle BI Publisher Template Builder that were introduced in Release 10.1.3.3 and that apply to Releases 10.1.3.3 through 10.1.3.4. Information about these features is also provided in the BI Publisher documentation set that has been updated for Release 10.1.3.4.
There are many new and exciting enhancements to the Oracle BI Publisher Template Builder. These new features enable users to use Discoverer worksheets as data sources, generate reports in MS PowerPoint format, and to use more powerful formatting facilities and charts. The new features include the following:
■ Integration with Discoverer
■ Support for Microsoft PowerPoint Output
■ Advanced Form Field Support
■ Enhanced Chart Builder Features
12.1 Changes to the Oracle BI Publisher MenuIn support of these new features, the Oracle BI Publisher menu contains the following new items:
Added to the Insert menu:
■ Repeating Group
■ Conditional Format
■ Conditional Region
For information on these menu items, see Section 12.4, "Advanced Form Field Support".
Added to the Preview menu: PowerPoint
For information on this menu item, see Section 12.3, "Microsoft PowerPoint Output Support".
In addition, two menu items have been changed:
■ Update Layout Template is now Upload Template
■ Publish Template As is now Upload Template As
The functionality of these two menu items has not changed.
Integration with Oracle BI Discoverer
12-2 Oracle Business Intelligence New Features Guide
12.2 Integration with Oracle BI DiscovererIn this release BI Publisher accepts Discoverer worksheets as report data sources. To facilitate building reports from the Discoverer worksheets, the Template Builder enables you to connect to Discoverer, browse worksheets, and load data to the Template Builder directly from Discoverer.
To open a Discoverer Report in the Template Builder:
Prerequisite: You must have set up integration with Oracle BI Discoverer in the BI Publisher Admin page. For more information see Chapter 15, "Oracle BI Publisher Integration with Oracle BI Discoverer".
1. From the Oracle BI Publisher menu, select Log On.
2. Enter your credentials for Oracle BI Publisher. After successfully logging on, the Open Template dialog will launch.
3. From the Workspace list, select Discoverer. The Select Data Connection dialog will launch.
4. From the Select Data Connection dialog, select your connection to Discoverer.
5. Browse the Discoverer folders to locate the worksheet you want to open in the Template Builder. Double click the worksheet. A dialog prompts you to save As Oracle BI Publisher Report.
6. From the dialog, select the folder on the BI Publisher server where you want to save your BI Publisher report that will use this Discoverer worksheet as the data source.
7. Click OK to create a report in the folder. This also loads the report structure and data to the Template Builder.
8. You can now design the template using the full range of Template Builder features on your Discoverer data source.
9. When finished designing your layout template, save your template to the BI Publisher server by selecting Upload Template from the Oracle BI Publisher menu.
12.3 Microsoft PowerPoint Output Support In this release, BI Publisher now supports Microsoft PowerPoint as an output option. The Template Builder also supports PowerPoint as a preview option.
To preview your report in PowerPoint, select PowerPoint from the Oracle BI Publisher Preview menu.
This action will launch Microsoft PowerPoint and display your report as a PowerPoint presentation. Each report page will be displayed on a new slide.
Note that to view BI Publisher PowerPoint output, you must have Microsoft PowerPoint 2003 or later installed on your computer.
For additional information regarding usage and limitations of the PowerPoint output feature, seeChapter 14, "Oracle BI Publisher PowerPoint Output".

Advanced Form Field Support
Oracle BI Publisher Template Builder Enhancements 12-3
12.4 Advanced Form Field SupportIn previous releases, BI Publisher inserted abbreviated XSL code into the Form Field Help Text Dialog. Long code strings required inserting code into both the Status Bar and Help Key tabs of the Form Field Help Text Dialog. This made it challenging if you wanted to edit this code. With this release, you can now edit code in the form fields in a single window in the BI Publisher Properties dialog. Further, several additional dialogs have been added to enable you to insert common format constructs in your template and the Template Builder generates the code for you.
The new dialogs simplify the insertion and editing of the following report elements:
■ Data field Properties
■ Repeating Groups
■ Conditional Formatting
■ Conditional Regions
To open the Properties dialog for a field, perform one of the following:
■ Double-click the form field in your template.
■ Right-click the form field, from the menu select BI Publisher and then select Properties.
For recognized code patterns (for example: data value, for-each, for-each-group, conditional formatting) the dialog displays a Properties tab and an Advanced tab (the Repeating Group dialog also displays a Sorting tab). The Properties tab displays modifiable properties for the field. The Advanced tab displays the underlying code. If the code pattern is not recognized, the Properties dialog displays only the Advanced tab with the code from the form field.
Note that each dialog includes a Properties button that enables you to access the Microsoft Word Form Field Help Text dialog.
12.4.1 Edit Data FieldsThe following screenshot displays the Properties dialog invoked for a data field:
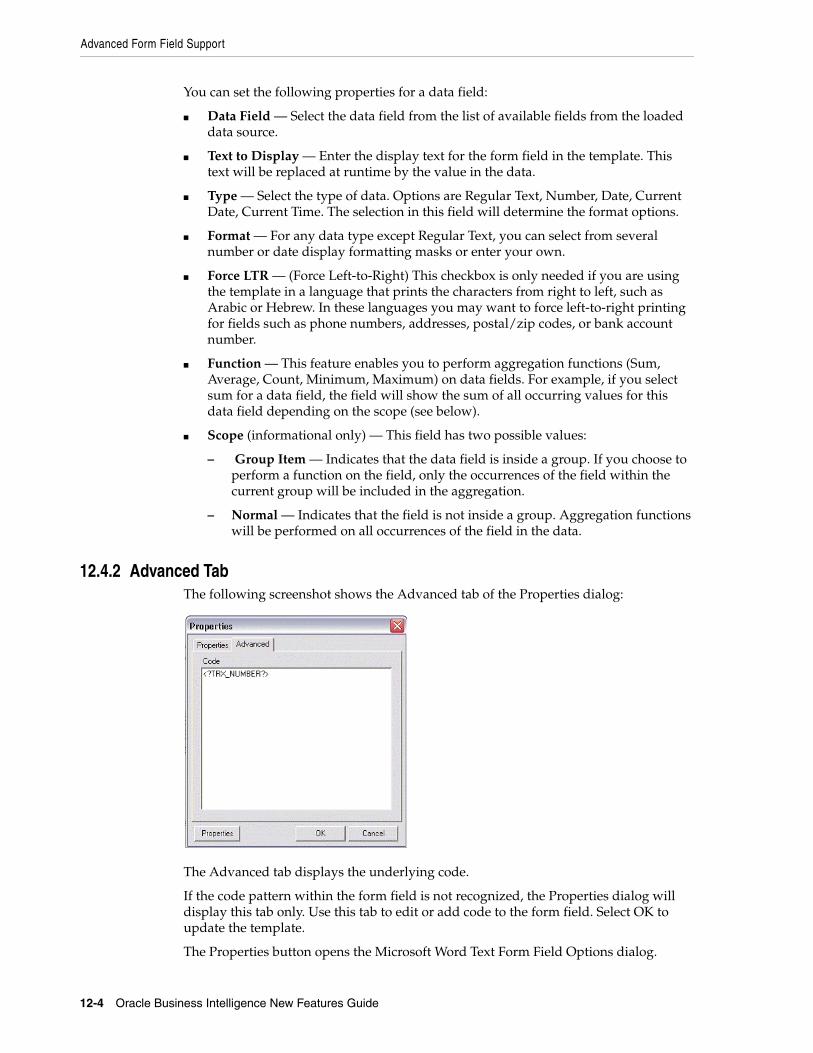
Advanced Form Field Support
12-4 Oracle Business Intelligence New Features Guide
You can set the following properties for a data field:
■ Data Field — Select the data field from the list of available fields from the loaded data source.
■ Text to Display — Enter the display text for the form field in the template. This text will be replaced at runtime by the value in the data.
■ Type — Select the type of data. Options are Regular Text, Number, Date, Current Date, Current Time. The selection in this field will determine the format options.
■ Format — For any data type except Regular Text, you can select from several number or date display formatting masks or enter your own.
■ Force LTR — (Force Left-to-Right) This checkbox is only needed if you are using the template in a language that prints the characters from right to left, such as Arabic or Hebrew. In these languages you may want to force left-to-right printing for fields such as phone numbers, addresses, postal/zip codes, or bank account number.
■ Function — This feature enables you to perform aggregation functions (Sum, Average, Count, Minimum, Maximum) on data fields. For example, if you select sum for a data field, the field will show the sum of all occurring values for this data field depending on the scope (see below).
■ Scope (informational only) — This field has two possible values:
– Group Item — Indicates that the data field is inside a group. If you choose to perform a function on the field, only the occurrences of the field within the current group will be included in the aggregation.
– Normal — Indicates that the field is not inside a group. Aggregation functions will be performed on all occurrences of the field in the data.
12.4.2 Advanced TabThe following screenshot shows the Advanced tab of the Properties dialog:
The Advanced tab displays the underlying code.
If the code pattern within the form field is not recognized, the Properties dialog will display this tab only. Use this tab to edit or add code to the form field. Select OK to update the template.
The Properties button opens the Microsoft Word Text Form Field Options dialog.

Advanced Form Field Support
Oracle BI Publisher Template Builder Enhancements 12-5
12.4.3 Insert and Edit Repeating GroupsThe Template Builder now enables you to insert and edit for-each and for-each group fields using a Field Properties dialog. Use the dialog to choose the data elements to group and the data element to group them by.
12.4.3.1 Creating Repeating GroupsTo create a repeating group:
1. Select the section of the template that contains the elements you want repeated.
2. From the Oracle BI Publisher menu, select Insert, then Repeating Group.
3. Enter the appropriate fields in the Field Properties dialog:
■ For Each — Select the repeating element to create the loop. When you select the For Each data field you are telling BI Publisher that for each occurrence of the field in the data you want the elements and processing instructions contained within the loop to be repeated.
Please note the following about creating repeating groups:
– For loops and groupings not inside another group (that is, outer groups or loops) you must select the repeating XML element to be used. For example if the data set is flat, the only repeatable element is /DATA/ROWSET/ROW. In cases with multiple data sources or hierarchical XML you can choose the data set.
– If you are creating nested groups (inserting a loop or group inside of another loop in the template), the For Each field is not updateable because it is already defined by the preexisting outer loop. The For Each field will display "Group Item" to inform you that an outer group is already defined.
■ Absolute Path — Select this check box to use the Absolute Path to the element in the XML structure. This is important if your data contains the same element name grouped under different parent elements.
■ Group By — Select a field from the list by which you want to group the data. If you just want to create a simple loop, do not select a group by element.
■ Section break — Select this box if you wish to create a section break between each loop. It is important to note the following characteristics of this feature:
– The section break can be created only on outer loops that surround the whole document.
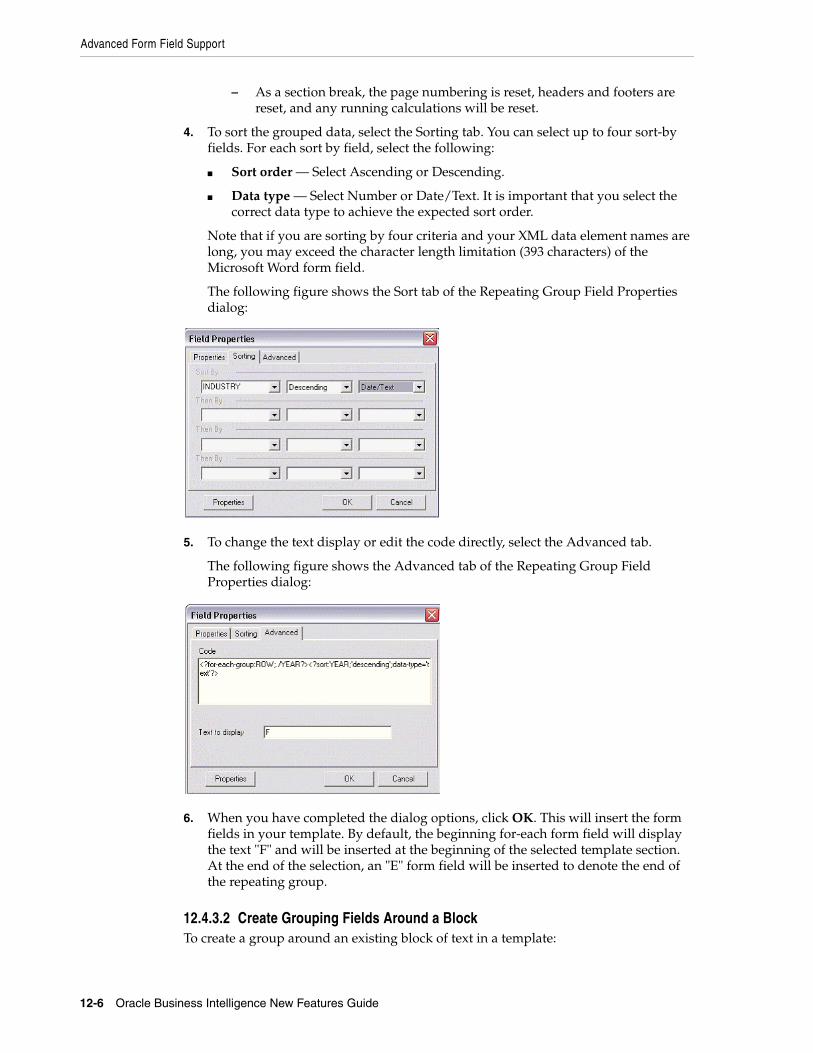
Advanced Form Field Support
12-6 Oracle Business Intelligence New Features Guide
– As a section break, the page numbering is reset, headers and footers are reset, and any running calculations will be reset.
4. To sort the grouped data, select the Sorting tab. You can select up to four sort-by fields. For each sort by field, select the following:
■ Sort order — Select Ascending or Descending.
■ Data type — Select Number or Date/Text. It is important that you select the correct data type to achieve the expected sort order.
Note that if you are sorting by four criteria and your XML data element names are long, you may exceed the character length limitation (393 characters) of the Microsoft Word form field.
The following figure shows the Sort tab of the Repeating Group Field Properties dialog:
5. To change the text display or edit the code directly, select the Advanced tab.
The following figure shows the Advanced tab of the Repeating Group Field Properties dialog:
6. When you have completed the dialog options, click OK. This will insert the form fields in your template. By default, the beginning for-each form field will display the text "F" and will be inserted at the beginning of the selected template section. At the end of the selection, an "E" form field will be inserted to denote the end of the repeating group.
12.4.3.2 Create Grouping Fields Around a BlockTo create a group around an existing block of text in a template:
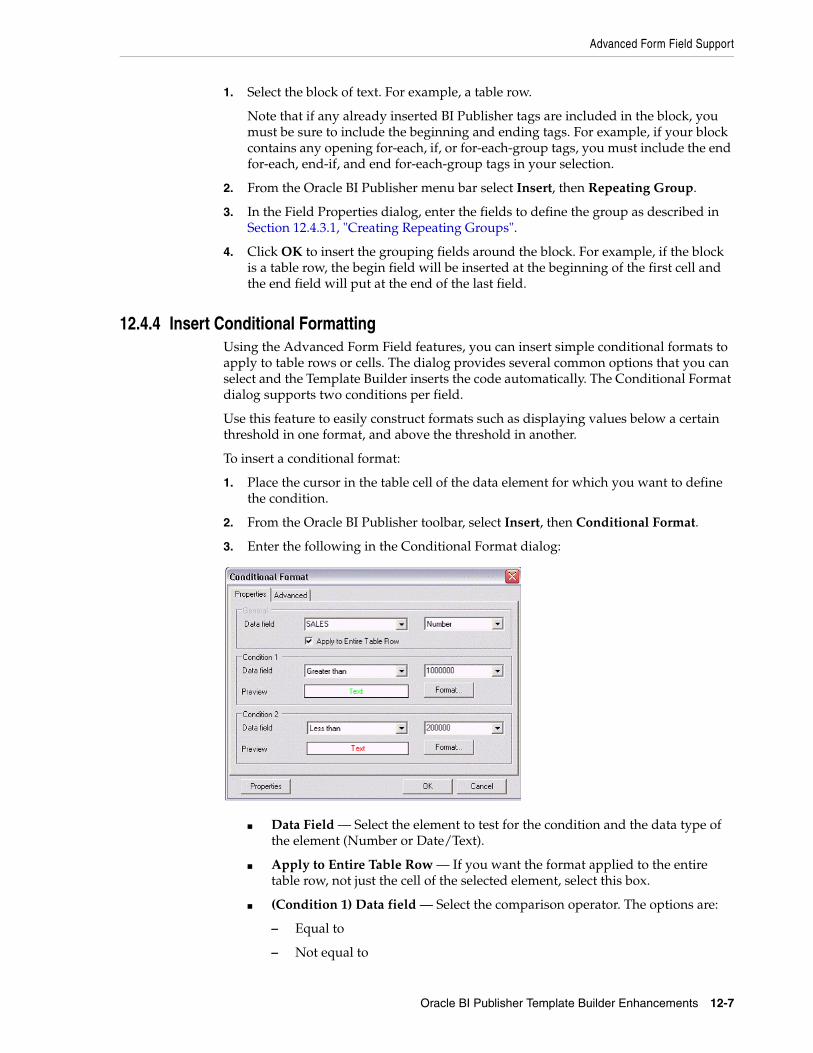
Advanced Form Field Support
Oracle BI Publisher Template Builder Enhancements 12-7
1. Select the block of text. For example, a table row.
Note that if any already inserted BI Publisher tags are included in the block, you must be sure to include the beginning and ending tags. For example, if your block contains any opening for-each, if, or for-each-group tags, you must include the end for-each, end-if, and end for-each-group tags in your selection.
2. From the Oracle BI Publisher menu bar select Insert, then Repeating Group.
3. In the Field Properties dialog, enter the fields to define the group as described in Section 12.4.3.1, "Creating Repeating Groups".
4. Click OK to insert the grouping fields around the block. For example, if the block is a table row, the begin field will be inserted at the beginning of the first cell and the end field will put at the end of the last field.
12.4.4 Insert Conditional FormattingUsing the Advanced Form Field features, you can insert simple conditional formats to apply to table rows or cells. The dialog provides several common options that you can select and the Template Builder inserts the code automatically. The Conditional Format dialog supports two conditions per field.
Use this feature to easily construct formats such as displaying values below a certain threshold in one format, and above the threshold in another.
To insert a conditional format:
1. Place the cursor in the table cell of the data element for which you want to define the condition.
2. From the Oracle BI Publisher toolbar, select Insert, then Conditional Format.
3. Enter the following in the Conditional Format dialog:
■ Data Field — Select the element to test for the condition and the data type of the element (Number or Date/Text).
■ Apply to Entire Table Row — If you want the format applied to the entire table row, not just the cell of the selected element, select this box.
■ (Condition 1) Data field — Select the comparison operator. The options are:
– Equal to
– Not equal to
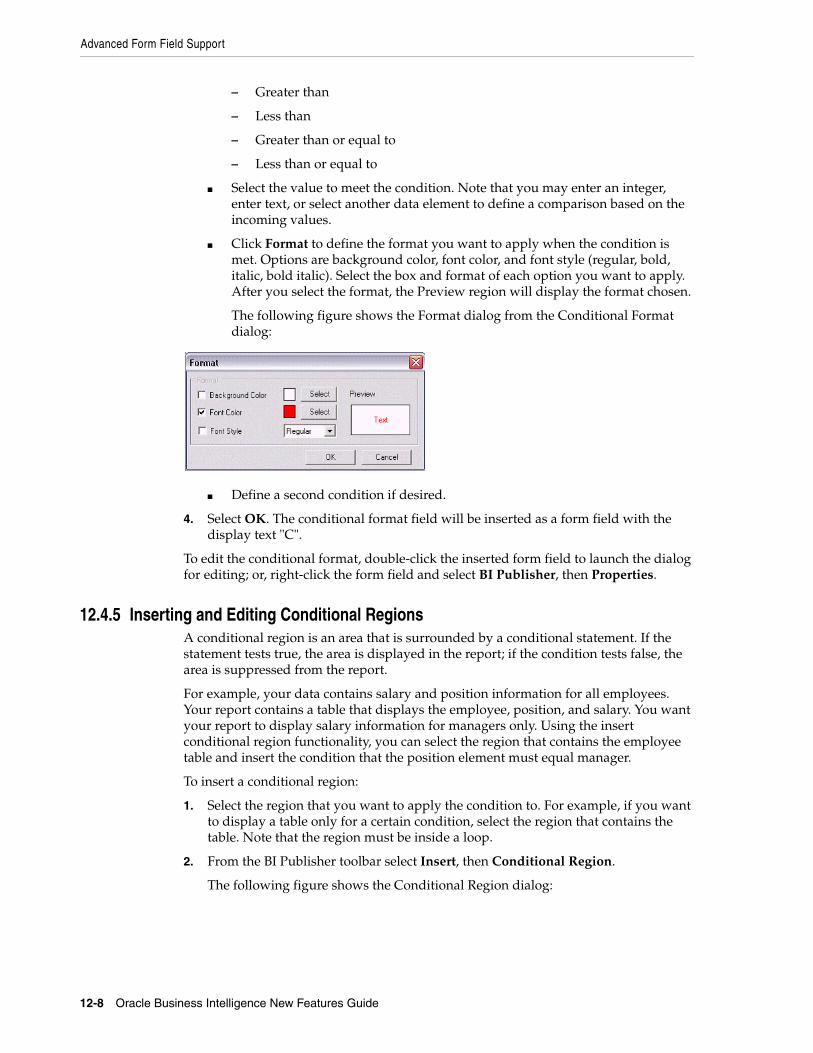
Advanced Form Field Support
12-8 Oracle Business Intelligence New Features Guide
– Greater than
– Less than
– Greater than or equal to
– Less than or equal to
■ Select the value to meet the condition. Note that you may enter an integer, enter text, or select another data element to define a comparison based on the incoming values.
■ Click Format to define the format you want to apply when the condition is met. Options are background color, font color, and font style (regular, bold, italic, bold italic). Select the box and format of each option you want to apply. After you select the format, the Preview region will display the format chosen.
The following figure shows the Format dialog from the Conditional Format dialog:
■ Define a second condition if desired.
4. Select OK. The conditional format field will be inserted as a form field with the display text "C".
To edit the conditional format, double-click the inserted form field to launch the dialog for editing; or, right-click the form field and select BI Publisher, then Properties.
12.4.5 Inserting and Editing Conditional RegionsA conditional region is an area that is surrounded by a conditional statement. If the statement tests true, the area is displayed in the report; if the condition tests false, the area is suppressed from the report.
For example, your data contains salary and position information for all employees. Your report contains a table that displays the employee, position, and salary. You want your report to display salary information for managers only. Using the insert conditional region functionality, you can select the region that contains the employee table and insert the condition that the position element must equal manager.
To insert a conditional region:
1. Select the region that you want to apply the condition to. For example, if you want to display a table only for a certain condition, select the region that contains the table. Note that the region must be inside a loop.
2. From the BI Publisher toolbar select Insert, then Conditional Region.
The following figure shows the Conditional Region dialog:
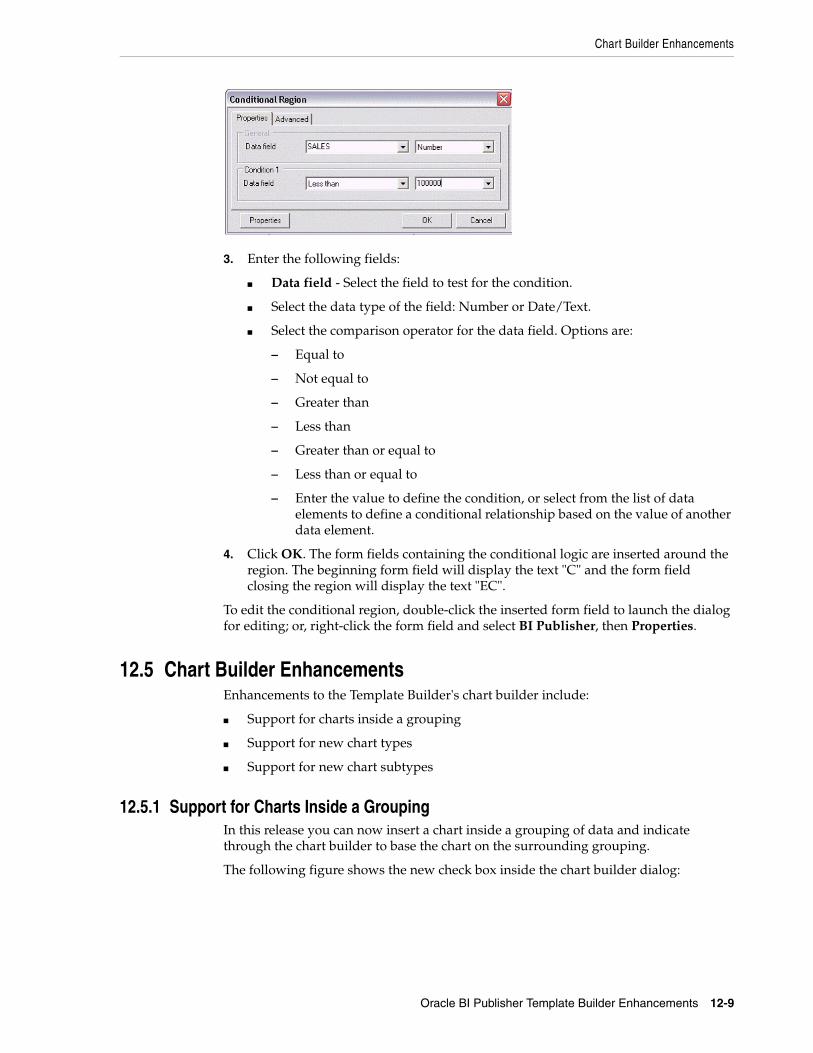
Chart Builder Enhancements
Oracle BI Publisher Template Builder Enhancements 12-9
3. Enter the following fields:
■ Data field - Select the field to test for the condition.
■ Select the data type of the field: Number or Date/Text.
■ Select the comparison operator for the data field. Options are:
– Equal to
– Not equal to
– Greater than
– Less than
– Greater than or equal to
– Less than or equal to
– Enter the value to define the condition, or select from the list of data elements to define a conditional relationship based on the value of another data element.
4. Click OK. The form fields containing the conditional logic are inserted around the region. The beginning form field will display the text "C" and the form field closing the region will display the text "EC".
To edit the conditional region, double-click the inserted form field to launch the dialog for editing; or, right-click the form field and select BI Publisher, then Properties.
12.5 Chart Builder EnhancementsEnhancements to the Template Builder's chart builder include:
■ Support for charts inside a grouping
■ Support for new chart types
■ Support for new chart subtypes
12.5.1 Support for Charts Inside a GroupingIn this release you can now insert a chart inside a grouping of data and indicate through the chart builder to base the chart on the surrounding grouping.
The following figure shows the new check box inside the chart builder dialog:
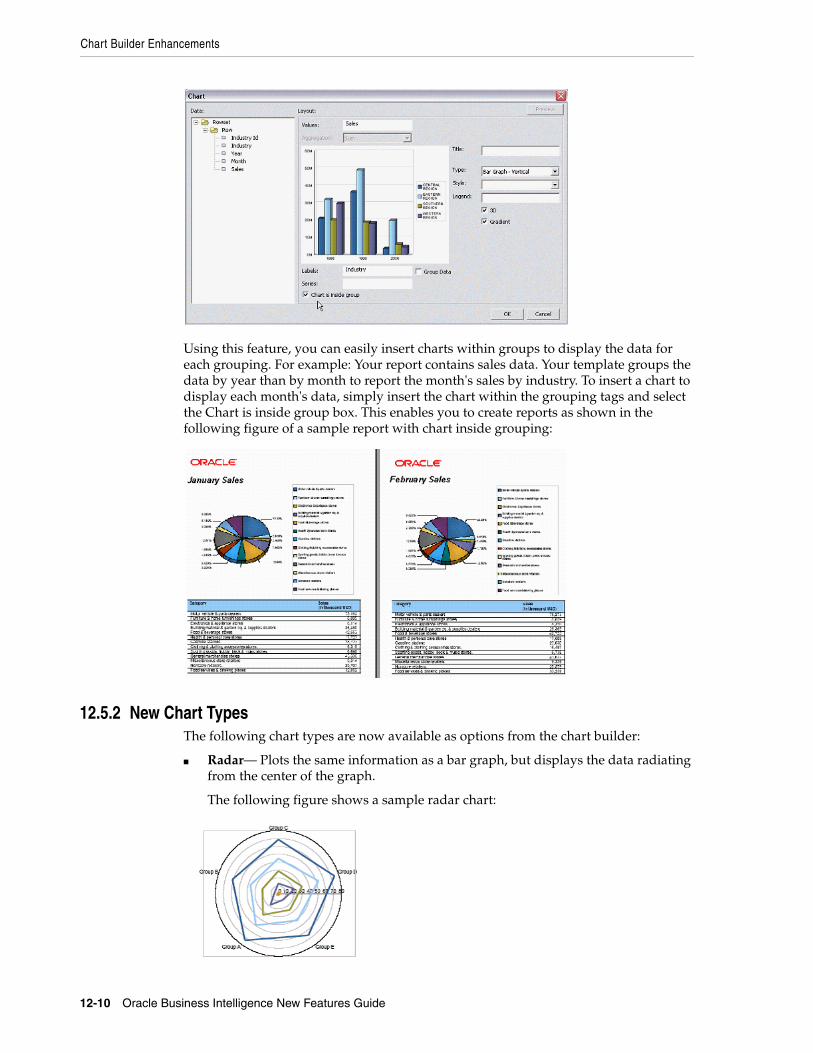
Chart Builder Enhancements
12-10 Oracle Business Intelligence New Features Guide
Using this feature, you can easily insert charts within groups to display the data for each grouping. For example: Your report contains sales data. Your template groups the data by year than by month to report the month's sales by industry. To insert a chart to display each month's data, simply insert the chart within the grouping tags and select the Chart is inside group box. This enables you to create reports as shown in the following figure of a sample report with chart inside grouping:
12.5.2 New Chart TypesThe following chart types are now available as options from the chart builder:
■ Radar— Plots the same information as a bar graph, but displays the data radiating from the center of the graph.
The following figure shows a sample radar chart:
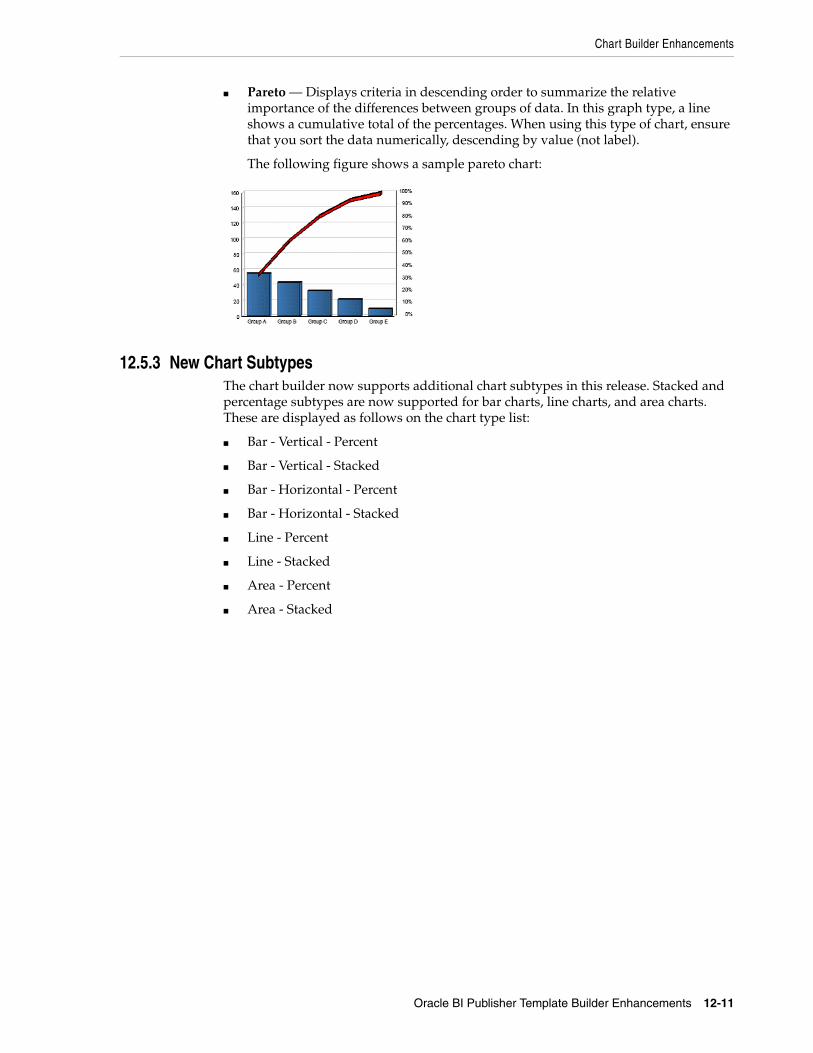
Chart Builder Enhancements
Oracle BI Publisher Template Builder Enhancements 12-11
■ Pareto — Displays criteria in descending order to summarize the relative importance of the differences between groups of data. In this graph type, a line shows a cumulative total of the percentages. When using this type of chart, ensure that you sort the data numerically, descending by value (not label).
The following figure shows a sample pareto chart:
12.5.3 New Chart SubtypesThe chart builder now supports additional chart subtypes in this release. Stacked and percentage subtypes are now supported for bar charts, line charts, and area charts. These are displayed as follows on the chart type list:
■ Bar - Vertical - Percent
■ Bar - Vertical - Stacked
■ Bar - Horizontal - Percent
■ Bar - Horizontal - Stacked
■ Line - Percent
■ Line - Stacked
■ Area - Percent
■ Area - Stacked

Chart Builder Enhancements
12-12 Oracle Business Intelligence New Features Guide
13
Flash Templates for Oracle BI Publisher 13-1
13 Flash Templates for Oracle BI Publisher
This chapter describes a feature of BI Publisher that was introduced in Release 10.1.3.3 and that applies to Releases 10.1.3.3 through 10.1.3.4. Information about this feature is also provided in the BI Publisher documentation set that has been updated for Release 10.1.3.4.
This new feature enables report authors to develop Adobe FLEX templates that can be applied to BI Publisher reports to generate highly interactive Flash output documents.
Beginning in Release 10.1.3.3, BI Publisher offers support for Adobe Corporation's new document format for building interactive forms and reports, called Flex. You can build Flex templates, test them on your desktop, and deploy them to the BI Publisher server to generate Flash output. Users can then run the reports from the BI Publisher user interface or schedule them for delivery to report consumers.
This chapter describes how to set up a Flex template with a BI Publisher "flat" data source (that is, there is no hierarchy in the XML data) and describes the simpler objects such as tables and charts. For more information about interactivity, connectivity between components, and more advanced topics, refer to Adobe's Flex documentation.
13.1 Changes to the BI Publisher User InterfaceTo support Flash templates, the following changes are made in the BI Publisher user interface:
■ On the Edit Report page, under Layouts, General Settings, the Template Type list now includes the option Flash Template.
■ On the View Report page, the output selection list will now include the option Flash when a Flash Template is selected as the Template Type. Flash templates only support the output types: Flash, PDF, and data.
■ A new set of "Flash" properties have been added to the Runtime Configuration page.
13.2 Prerequisites The prerequisites are as follows:
■ For viewing output:
– To view the report output from the Flash Template, you must have Adobe Flash Player 9 installed on your computer.
■ For building templates:
Building Templates
13-2 Oracle Business Intelligence New Features Guide
– The FlexBuilder IDE from Adobe. Oracle BI Publisher is currently certified with version 2.0.1. The tool can be downloaded and purchased from the Adobe Web site - http://www.adobe.com/products/flex/.
Please note that the charting functionality is available for an additional license fee.
– A report data model set up in BI Publisher that generates flat XML.
13.3 Building TemplatesThis section includes the following topics:
■ "Adding the Data Source"
■ "Creating the Layout"
■ "Data Binding"
13.3.1 Adding the Data Source1. Generate a sample data file from your report data model. From the BI Publisher
Report Editor or from the Reports page, select View. If no layouts are defined for your report, then the output type will default to xml. Otherwise, choose Data for the output type. Select Export and save the results as an XML file to a local directory. This example is based on the following data:
<ROWSET><ROW><NAME>Neena Kochhar</NAME><FIRST_NAME>Neena</FIRST_NAME><LAST_NAME>Kochhar</LAST_NAME><SALARY>17000</SALARY><ANNUAL_SALARY>204000</ANNUAL_SALARY><FED_WITHHELD>57120</FED_WITHHELD><JOB_TITLE>Administration Vice President</JOB_TITLE><DEPARTMENT_NAME>Executive</DEPARTMENT_NAME><MANAGER>Steven King</MANAGER></ROW><ROW>...</ROWSET>
This data is generated from the following simple query-based report:
selecte.first_name || ' ' || e.last_name name,e.first_name,e.last_name,e.salary,e.salary*12 ANNUAL_SALARY,e.salary*12*0.28 FED_WITHHELD,j.job_title,d.department_name,m.first_name || ' ' || m.last_name manager
from employees e,employees m,departments d,jobs j
where e.department_id = d.department_idand j.job_id = e.job_id
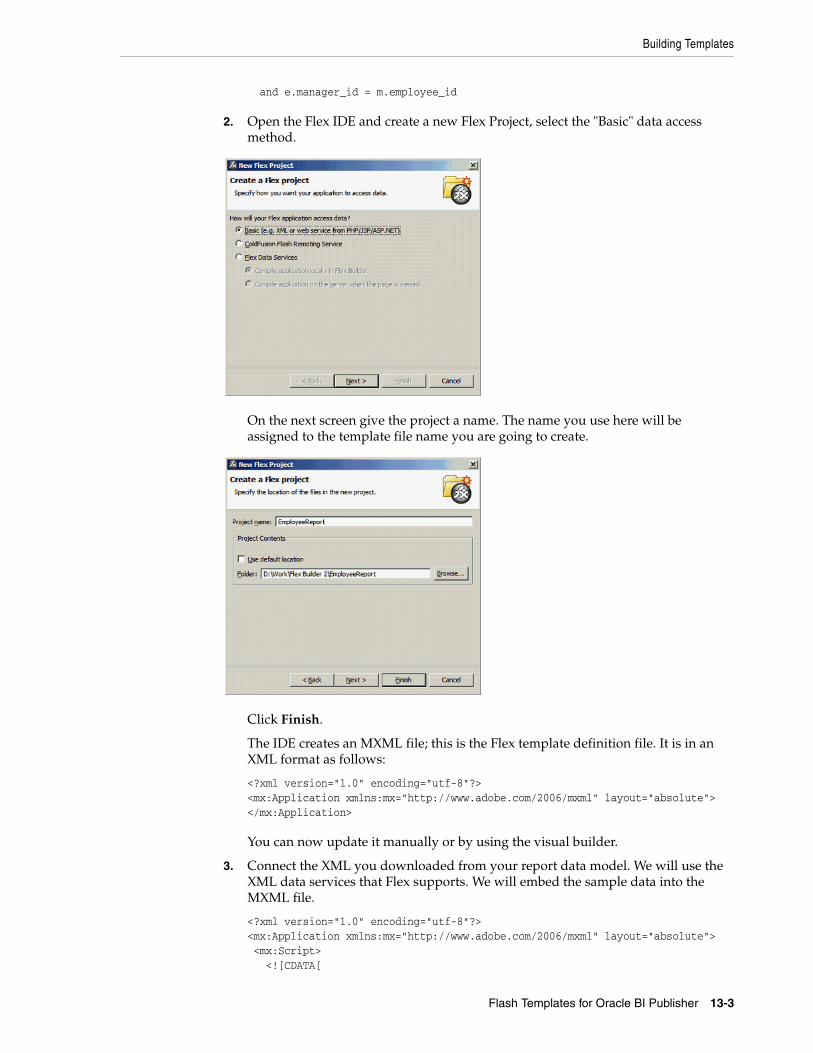
Building Templates
Flash Templates for Oracle BI Publisher 13-3
and e.manager_id = m.employee_id
2. Open the Flex IDE and create a new Flex Project, select the "Basic" data access method.
On the next screen give the project a name. The name you use here will be assigned to the template file name you are going to create.
Click Finish.
The IDE creates an MXML file; this is the Flex template definition file. It is in an XML format as follows:
<?xml version="1.0" encoding="utf-8"?><mx:Application xmlns:mx="http://www.adobe.com/2006/mxml" layout="absolute"></mx:Application>
You can now update it manually or by using the visual builder.
3. Connect the XML you downloaded from your report data model. We will use the XML data services that Flex supports. We will embed the sample data into the MXML file.
<?xml version="1.0" encoding="utf-8"?><mx:Application xmlns:mx="http://www.adobe.com/2006/mxml" layout="absolute"><mx:Script><
Building Templates
13-4 Oracle Business Intelligence New Features Guide
[Bindable]public var dataXML:XML =
<ROWSET><ROW><NAME>Neena Kochhar</NAME><FIRST_NAME>Neena</FIRST_NAME><LAST_NAME>Kochhar</LAST_NAME><SALARY>17000</SALARY><ANNUAL_SALARY>204000</ANNUAL_SALARY><FED_WITHHELD>57120</FED_WITHHELD><JOB_TITLE>Administration Vice President</JOB_TITLE><DEPARTMENT_NAME>Executive</DEPARTMENT_NAME><MANAGER>Steven King</MANAGER></ROW><ROW>...</ROWSET>;
]]></mx:Script></mx:Application>
The XML portion should look familiar as the data you downloaded. The important components to note are:
■ <mx:Script> — This denotes the start of the template scripting code. There is also a closing </mx:Script> statement.
■ [Bindable] — This denotes that the following variable is bindable to a layout component.
■ public var dataXML:XML — This is the data variable declaration:
– public — The value of the variable is available to the whole template.
– var — Declares there is a variable in the report.
– dataXML — The name of the variable. Note this is a compulsory name. You must use this name to use the template with BI Publisher.
– :XML — Declares that the variable is an XML type.
■ ; — Notice the semicolon after the end of XML data you provided.
At runtime the BI Publisher server will generate the runtime data from the report and inject it into the Flex template replacing the sample data held within the dataXML variable. This feature allows the Flex report to be distributed to users without needing to connect to the server.
13.3.2 Creating the LayoutNow we can start adding report objects to the layout palette. This example uses the Flex Design tab to add the objects to the layout. Click the Design tab to see the available objects in the Component Navigator pane.
The following figure shows an example of the available objects in the Component Navigator pane:
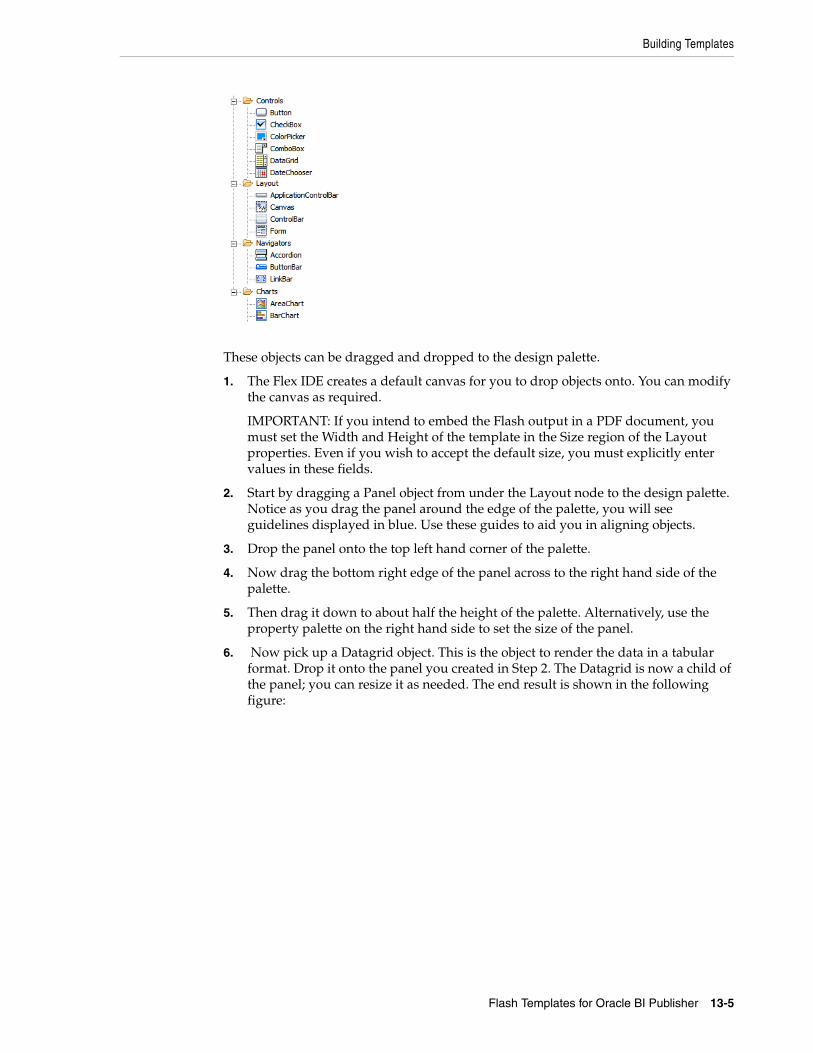
Building Templates
Flash Templates for Oracle BI Publisher 13-5
These objects can be dragged and dropped to the design palette.
1. The Flex IDE creates a default canvas for you to drop objects onto. You can modify the canvas as required.
IMPORTANT: If you intend to embed the Flash output in a PDF document, you must set the Width and Height of the template in the Size region of the Layout properties. Even if you wish to accept the default size, you must explicitly enter values in these fields.
2. Start by dragging a Panel object from under the Layout node to the design palette. Notice as you drag the panel around the edge of the palette, you will see guidelines displayed in blue. Use these guides to aid you in aligning objects.
3. Drop the panel onto the top left hand corner of the palette.
4. Now drag the bottom right edge of the panel across to the right hand side of the palette.
5. Then drag it down to about half the height of the palette. Alternatively, use the property palette on the right hand side to set the size of the panel.
6. Now pick up a Datagrid object. This is the object to render the data in a tabular format. Drop it onto the panel you created in Step 2. The Datagrid is now a child of the panel; you can resize it as needed. The end result is shown in the following figure:
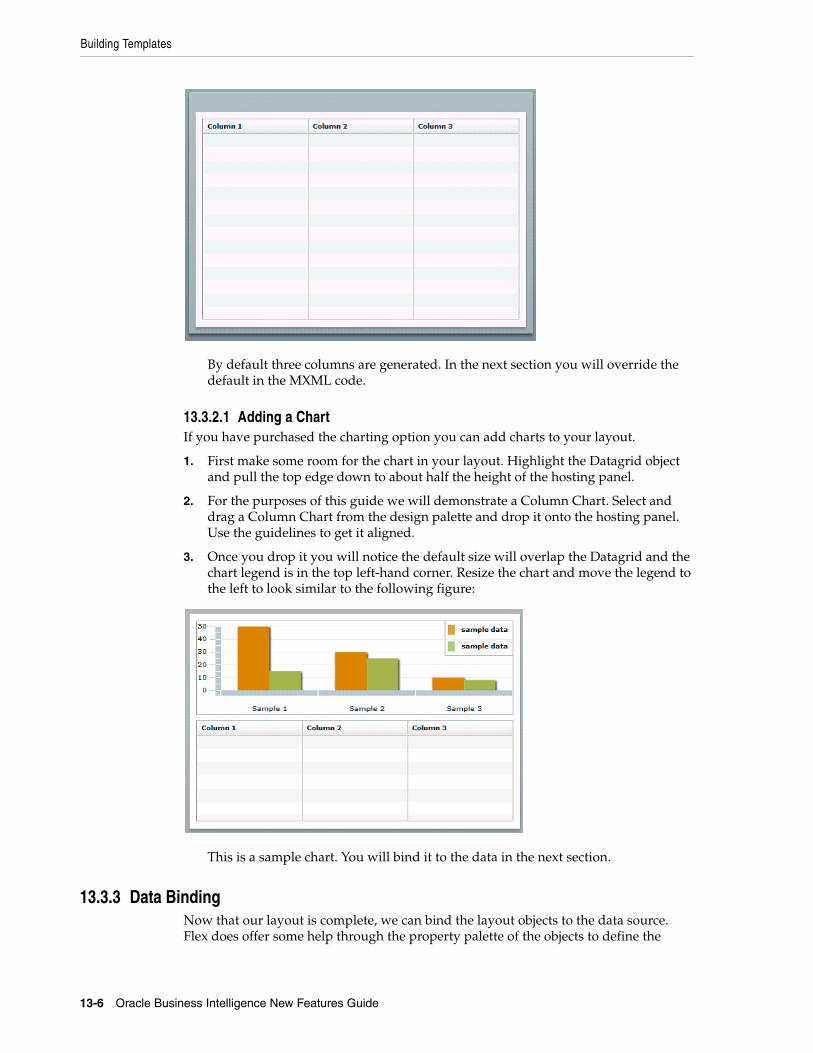
Building Templates
13-6 Oracle Business Intelligence New Features Guide
By default three columns are generated. In the next section you will override the default in the MXML code.
13.3.2.1 Adding a ChartIf you have purchased the charting option you can add charts to your layout.
1. First make some room for the chart in your layout. Highlight the Datagrid object and pull the top edge down to about half the height of the hosting panel.
2. For the purposes of this guide we will demonstrate a Column Chart. Select and drag a Column Chart from the design palette and drop it onto the hosting panel. Use the guidelines to get it aligned.
3. Once you drop it you will notice the default size will overlap the Datagrid and the chart legend is in the top left-hand corner. Resize the chart and move the legend to the left to look similar to the following figure:
This is a sample chart. You will bind it to the data in the next section.
13.3.3 Data BindingNow that our layout is complete, we can bind the layout objects to the data source. Flex does offer some help through the property palette of the objects to define the
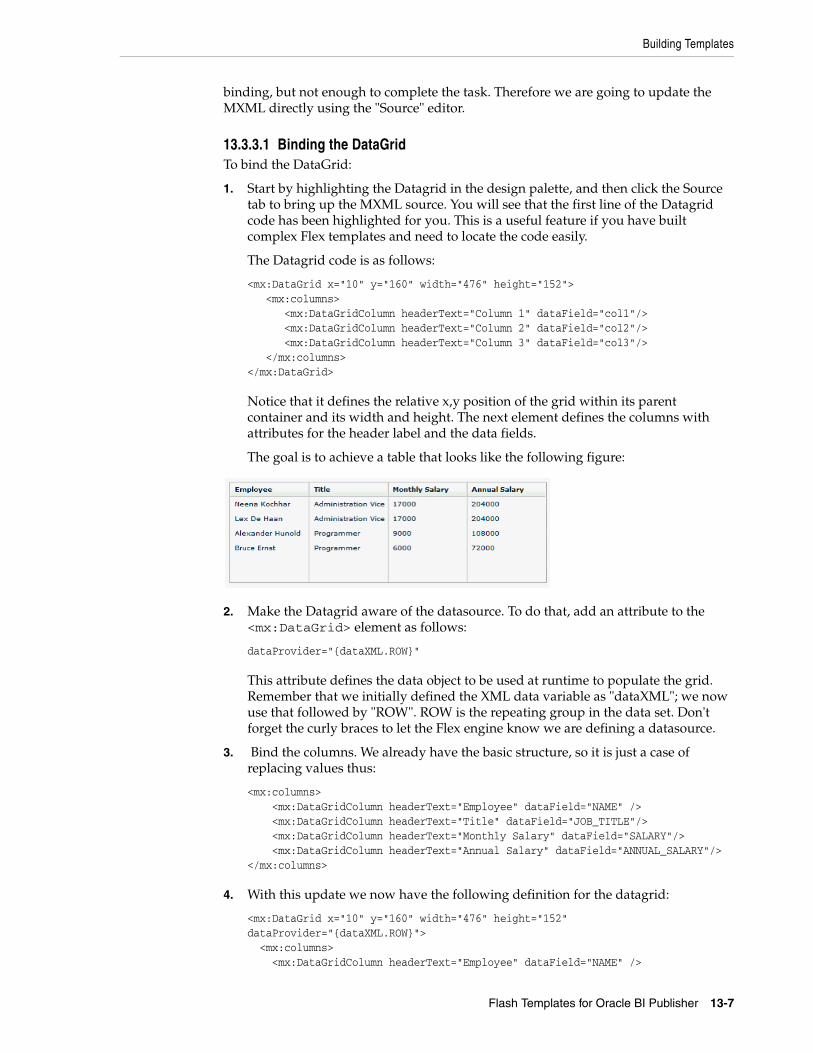
Building Templates
Flash Templates for Oracle BI Publisher 13-7
binding, but not enough to complete the task. Therefore we are going to update the MXML directly using the "Source" editor.
13.3.3.1 Binding the DataGridTo bind the DataGrid:
1. Start by highlighting the Datagrid in the design palette, and then click the Source tab to bring up the MXML source. You will see that the first line of the Datagrid code has been highlighted for you. This is a useful feature if you have built complex Flex templates and need to locate the code easily.
The Datagrid code is as follows:
<mx:DataGrid x="10" y="160" width="476" height="152"><mx:columns>
<mx:DataGridColumn headerText="Column 1" dataField="col1"/><mx:DataGridColumn headerText="Column 2" dataField="col2"/><mx:DataGridColumn headerText="Column 3" dataField="col3"/>
</mx:columns></mx:DataGrid>
Notice that it defines the relative x,y position of the grid within its parent container and its width and height. The next element defines the columns with attributes for the header label and the data fields.
The goal is to achieve a table that looks like the following figure:
2. Make the Datagrid aware of the datasource. To do that, add an attribute to the <mx:DataGrid> element as follows:
dataProvider="{dataXML.ROW}"
This attribute defines the data object to be used at runtime to populate the grid. Remember that we initially defined the XML data variable as "dataXML"; we now use that followed by "ROW". ROW is the repeating group in the data set. Don't forget the curly braces to let the Flex engine know we are defining a datasource.
3. Bind the columns. We already have the basic structure, so it is just a case of replacing values thus:
<mx:columns><mx:DataGridColumn headerText="Employee" dataField="NAME" /><mx:DataGridColumn headerText="Title" dataField="JOB_TITLE"/><mx:DataGridColumn headerText="Monthly Salary" dataField="SALARY"/><mx:DataGridColumn headerText="Annual Salary" dataField="ANNUAL_SALARY"/>
</mx:columns>
4. With this update we now have the following definition for the datagrid:
<mx:DataGrid x="10" y="160" width="476" height="152" dataProvider="{dataXML.ROW}"> <mx:columns><mx:DataGridColumn headerText="Employee" dataField="NAME" />

Building Templates
13-8 Oracle Business Intelligence New Features Guide
<mx:DataGridColumn headerText="Title" dataField="JOB_TITLE"/><mx:DataGridColumn headerText="Monthly Salary" dataField="SALARY"/><mx:DataGridColumn headerText="Annual Salary" dataField="ANNUAL_SALARY"/>
</mx:columns></mx:DataGrid>
5. You can now try the template with your sample data. Use the Run > Run EmployeeReport. This will open a new browser window and render the table with your sample data as seen in Step 1.
13.3.3.2 Binding the ChartTo bind the chart:
1. Start by bringing up the Design tab and highlight the Chart, then flip back to the Source view to find the chart code:
<mx:ColumnChart x="10" y="10" id="columnchart1" width="476" height="142"><mx:series><mx:ColumnSeries displayName="Series 1" yField=""/>
</mx:series></mx:ColumnChart><mx:Legend dataProvider="{columnchart1}" x="383" y="10"/>
2. To bind the data source to the chart object, add the dataProvider attribute to the <mx:ColumnChart> as follows:
dataProvider="{dataXML.ROW}"
3. Next add in the binding for the horizontal axis and the column series. This requires a little more effort. Check the Flex help files for more details. We want to create a chart showing salaries by employees, similar to the following:
To achieve this format, modify the <series> group and add a <horizontalAxis> element thus:
<mx:ColumnChart x="10" y="10" id="columnchart1" width="476" height="142" dataProvider="{dataXML.ROW}">
<mx:horizontalAxis><mx:CategoryAxis categoryField="NAME" />
</mx:horizontalAxis><mx:series ><mx:ColumnSeries xField="NAME" yField="SALARY" displayName="Salary"/>
</mx:series></mx:ColumnChart><mx:Legend dataProvider="{columnchart1}" x="383" y="10"/>
The <mx:horizontalAxis> element has been added and the categoryField attribute has the NAME data element assigned. This element is required to render the chart.
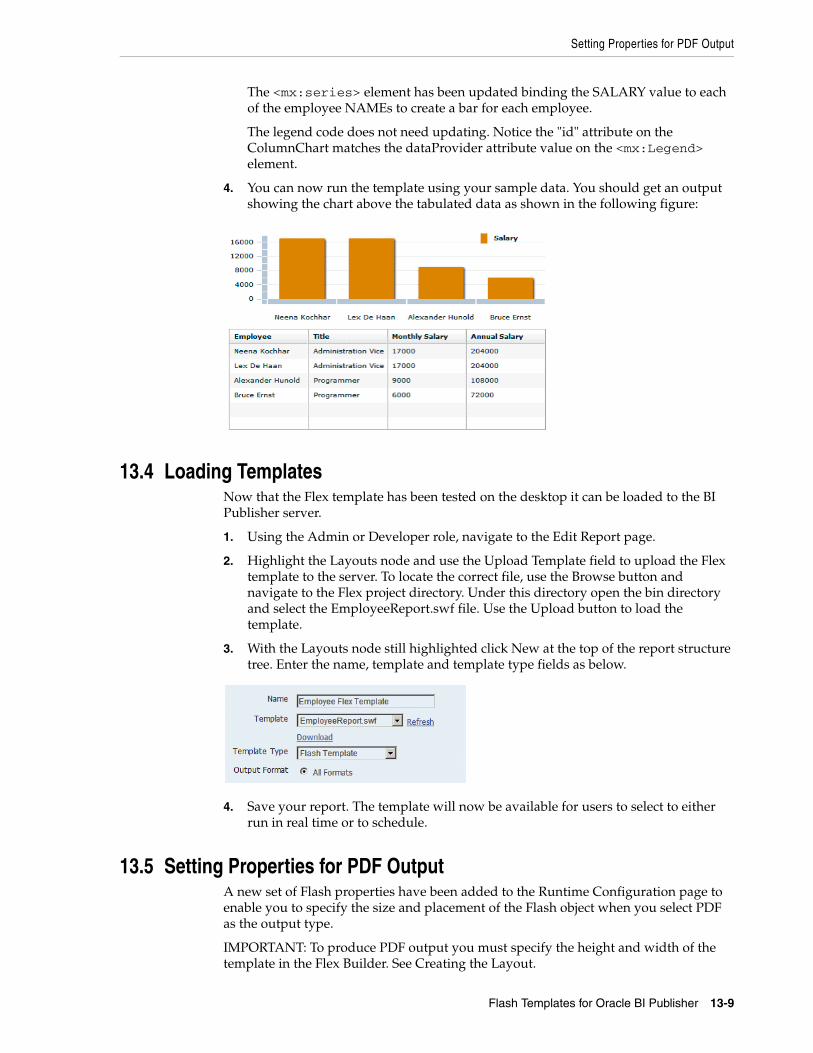
Setting Properties for PDF Output
Flash Templates for Oracle BI Publisher 13-9
The <mx:series> element has been updated binding the SALARY value to each of the employee NAMEs to create a bar for each employee.
The legend code does not need updating. Notice the "id" attribute on the ColumnChart matches the dataProvider attribute value on the <mx:Legend> element.
4. You can now run the template using your sample data. You should get an output showing the chart above the tabulated data as shown in the following figure:
13.4 Loading TemplatesNow that the Flex template has been tested on the desktop it can be loaded to the BI Publisher server.
1. Using the Admin or Developer role, navigate to the Edit Report page.
2. Highlight the Layouts node and use the Upload Template field to upload the Flex template to the server. To locate the correct file, use the Browse button and navigate to the Flex project directory. Under this directory open the bin directory and select the EmployeeReport.swf file. Use the Upload button to load the template.
3. With the Layouts node still highlighted click New at the top of the report structure tree. Enter the name, template and template type fields as below.
4. Save your report. The template will now be available for users to select to either run in real time or to schedule.
13.5 Setting Properties for PDF OutputA new set of Flash properties have been added to the Runtime Configuration page to enable you to specify the size and placement of the Flash object when you select PDF as the output type.
IMPORTANT: To produce PDF output you must specify the height and width of the template in the Flex Builder. See Creating the Layout.
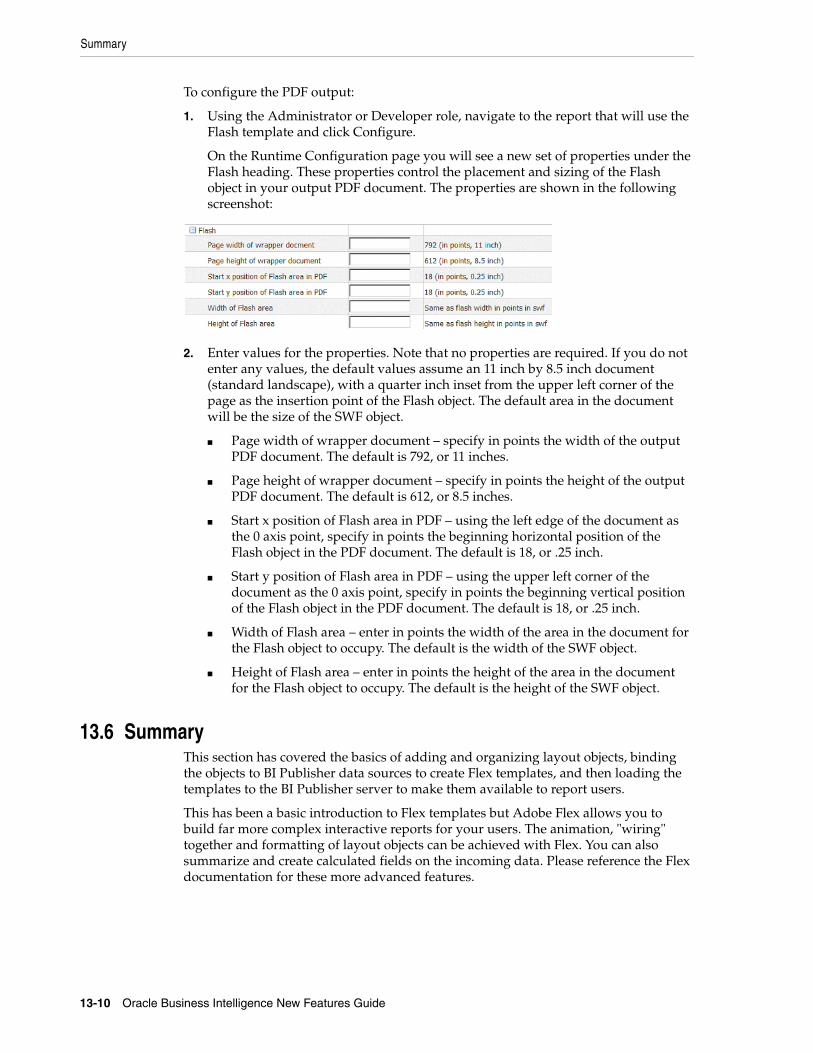
Summary
13-10 Oracle Business Intelligence New Features Guide
To configure the PDF output:
1. Using the Administrator or Developer role, navigate to the report that will use the Flash template and click Configure.
On the Runtime Configuration page you will see a new set of properties under the Flash heading. These properties control the placement and sizing of the Flash object in your output PDF document. The properties are shown in the following screenshot:
2. Enter values for the properties. Note that no properties are required. If you do not enter any values, the default values assume an 11 inch by 8.5 inch document (standard landscape), with a quarter inch inset from the upper left corner of the page as the insertion point of the Flash object. The default area in the document will be the size of the SWF object.
■ Page width of wrapper document – specify in points the width of the output PDF document. The default is 792, or 11 inches.
■ Page height of wrapper document – specify in points the height of the output PDF document. The default is 612, or 8.5 inches.
■ Start x position of Flash area in PDF – using the left edge of the document as the 0 axis point, specify in points the beginning horizontal position of the Flash object in the PDF document. The default is 18, or .25 inch.
■ Start y position of Flash area in PDF – using the upper left corner of the document as the 0 axis point, specify in points the beginning vertical position of the Flash object in the PDF document. The default is 18, or .25 inch.
■ Width of Flash area – enter in points the width of the area in the document for the Flash object to occupy. The default is the width of the SWF object.
■ Height of Flash area – enter in points the height of the area in the document for the Flash object to occupy. The default is the height of the SWF object.
13.6 SummaryThis section has covered the basics of adding and organizing layout objects, binding the objects to BI Publisher data sources to create Flex templates, and then loading the templates to the BI Publisher server to make them available to report users.
This has been a basic introduction to Flex templates but Adobe Flex allows you to build far more complex interactive reports for your users. The animation, "wiring" together and formatting of layout objects can be achieved with Flex. You can also summarize and create calculated fields on the incoming data. Please reference the Flex documentation for these more advanced features.
14
Oracle BI Publisher PowerPoint Output 14-1
14
Oracle BI Publisher PowerPoint Output
This chapter describes a feature of BI Publisher that was introduced in Release 10.1.3.3 and that applies to Releases 10.1.3.3 through 10.1.3.4. Information about this feature is also provided in the BI Publisher documentation set that has been updated for Release 10.1.3.4.
Release 10.1.3.3 adds support for PowerPoint output. This enables you to get report data into your key business presentations.
In this initial version of this functionality, the PowerPoint document that is generated is a simple export of the formatted data and charts to PowerPoint. In a future release, there will be more sophisticated integration that allows for direct embedding and refreshing from within PowerPoint.
14.1 Supported Versions of PowerPointThe supported versions of PowerPoint are:
■ Microsoft Office PowerPoint 2003
■ Microsoft Office PowerPoint 2007
14.2 Configuring Fonts for BI Publisher ServerSupport for PowerPoint output does not include the font fallback mechanism that is used for other types of output in BI Publisher. On the BI Publisher server, you must configure each font used in the RTF template for generating PowerPoint output. You will need to copy these fonts to your BI Publisher Server and define the Font Mappings for RTF templates. This can be done for the entire system or for individual reports.
See the Oracle Business Intelligence Publisher Report Designer’s Guide section "Defining Font Mappings" for more details:
http://download.oracle.com/docs/cd/B40078_02/doc/bi.1013/b40017/T421739T421745.htm#453835
14.3 Configuring Fonts for BI Publisher Template BuilderIn order to correctly preview PPT output that uses non-English or non-standard fonts, you will need to define the fonts in the BI Publisher configuration file. This configuration file is called xdo.cfg and is typically found in:
C:\Oracle\BI Publisher\BI Publisher Desktop\Template Builder for Word\config\
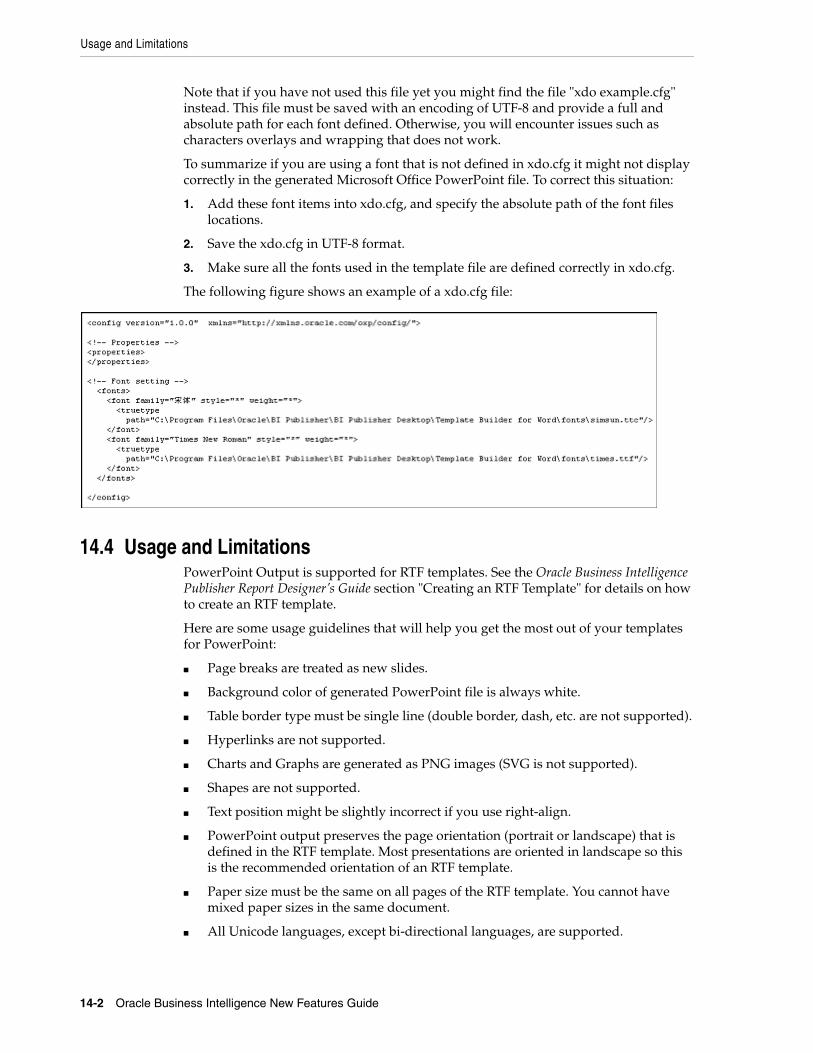
Usage and Limitations
14-2 Oracle Business Intelligence New Features Guide
Note that if you have not used this file yet you might find the file "xdo example.cfg" instead. This file must be saved with an encoding of UTF-8 and provide a full and absolute path for each font defined. Otherwise, you will encounter issues such as characters overlays and wrapping that does not work.
To summarize if you are using a font that is not defined in xdo.cfg it might not display correctly in the generated Microsoft Office PowerPoint file. To correct this situation:
1. Add these font items into xdo.cfg, and specify the absolute path of the font files locations.
2. Save the xdo.cfg in UTF-8 format.
3. Make sure all the fonts used in the template file are defined correctly in xdo.cfg.
The following figure shows an example of a xdo.cfg file:
14.4 Usage and LimitationsPowerPoint Output is supported for RTF templates. See the Oracle Business Intelligence Publisher Report Designer’s Guide section "Creating an RTF Template" for details on how to create an RTF template.
Here are some usage guidelines that will help you get the most out of your templates for PowerPoint:
■ Page breaks are treated as new slides.
■ Background color of generated PowerPoint file is always white.
■ Table border type must be single line (double border, dash, etc. are not supported).
■ Hyperlinks are not supported.
■ Charts and Graphs are generated as PNG images (SVG is not supported).
■ Shapes are not supported.
■ Text position might be slightly incorrect if you use right-align.
■ PowerPoint output preserves the page orientation (portrait or landscape) that is defined in the RTF template. Most presentations are oriented in landscape so this is the recommended orientation of an RTF template.
■ Paper size must be the same on all pages of the RTF template. You cannot have mixed paper sizes in the same document.
■ All Unicode languages, except bi-directional languages, are supported.

Usage and Limitations
Oracle BI Publisher PowerPoint Output 14-3
■ Text position might be slightly incorrect for Chinese, Japanese, and Korean fonts when using bold or italic effects on characters. This is because Microsoft has bold/italic emulation when there is no bold/italic font.
Once you have uploaded an RTF template to a report, you have the option to determine if PowerPoint is a suitable output format for the template by selecting the Limit Output Format to radio button choice and checking or un-checking the box next to Powerpoint. See the following figure.
You can then set the output to PowerPoint when viewing the report.

Usage and Limitations
14-4 Oracle Business Intelligence New Features Guide
15
Oracle BI Publisher Integration with Oracle BI Discoverer 15-1
15
Oracle BI Publisher Integration with Oracle BIDiscoverer
This chapter describes a feature of BI Publisher that was introduced in Release 10.1.3.3 and that applies to Releases 10.1.3.3 through 10.1.3.4. Information about this feature is also provided in the BI Publisher documentation set that has been updated for Release 10.1.3.4.
BI Publisher uses a modern report architecture that separates the report data model from the report layout. By doing so, it allows users to create multiple layouts for a single data model. BI Publisher also supports many types of data sources such as SQL query against a database using JDBC, file data, HTTP feed, and web service.
Using the new Discoverer web service, you can create reports based on the data that is returned from Discoverer worksheets. Once you install the Discoverer web service and configure Oracle BI Publisher to use it, the web service returns data from selected worksheets that provide the data for BI Publisher reports.
BI Publisher 10.1.3.3 includes the ability to use Oracle BI Discoverer worksheets as the data set for a report. This provides the following three key benefits to Discoverer users:
■ Create highly formatted reports
■ Schedule execution and delivery of reports to a wide range of destinations
■ Generate reports in a greater range of formats
This chapter describes how to:
■ Configure Discoverer and Oracle BI Publisher to work with each other
■ Create reports and layouts based on Discoverer worksheets
15.1 Configuring the Oracle BI Publisher and Discoverer IntegrationThe process to configure the Oracle BI Publisher and Discoverer integration includes the following steps:
Step 1: Install the Discoverer Web Service
Step 2: Install Oracle BI Publisher 10.1.3
Step 3: Configure Discoverer to Use Oracle Application Server Identity Management
Step 4: Set Up a Dedicated User to Access the Discoverer Web Service from Oracle BI Publisher
Step 5: Configure Oracle BI Publisher to Use the Discoverer Web Service
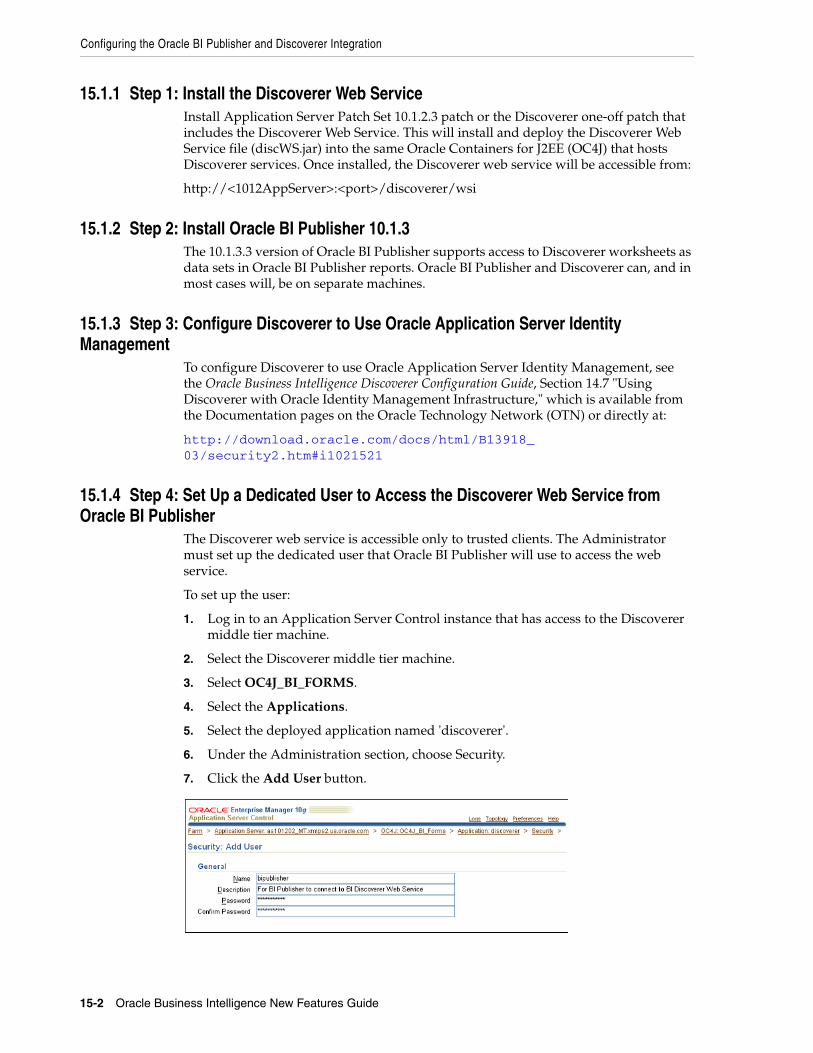
Configuring the Oracle BI Publisher and Discoverer Integration
15-2 Oracle Business Intelligence New Features Guide
15.1.1 Step 1: Install the Discoverer Web ServiceInstall Application Server Patch Set 10.1.2.3 patch or the Discoverer one-off patch that includes the Discoverer Web Service. This will install and deploy the Discoverer Web Service file (discWS.jar) into the same Oracle Containers for J2EE (OC4J) that hosts Discoverer services. Once installed, the Discoverer web service will be accessible from:
http://<1012AppServer>:<port>/discoverer/wsi
15.1.2 Step 2: Install Oracle BI Publisher 10.1.3The 10.1.3.3 version of Oracle BI Publisher supports access to Discoverer worksheets as data sets in Oracle BI Publisher reports. Oracle BI Publisher and Discoverer can, and in most cases will, be on separate machines.
15.1.3 Step 3: Configure Discoverer to Use Oracle Application Server Identity Management
To configure Discoverer to use Oracle Application Server Identity Management, see the Oracle Business Intelligence Discoverer Configuration Guide, Section 14.7 "Using Discoverer with Oracle Identity Management Infrastructure," which is available from the Documentation pages on the Oracle Technology Network (OTN) or directly at:
http://download.oracle.com/docs/html/B13918_03/security2.htm#i1021521
15.1.4 Step 4: Set Up a Dedicated User to Access the Discoverer Web Service from Oracle BI Publisher
The Discoverer web service is accessible only to trusted clients. The Administrator must set up the dedicated user that Oracle BI Publisher will use to access the web service.
To set up the user:
1. Log in to an Application Server Control instance that has access to the Discoverer middle tier machine.
2. Select the Discoverer middle tier machine.
3. Select OC4J_BI_FORMS.
4. Select the Applications.
5. Select the deployed application named 'discoverer'.
6. Under the Administration section, choose Security.
7. Click the Add User button.
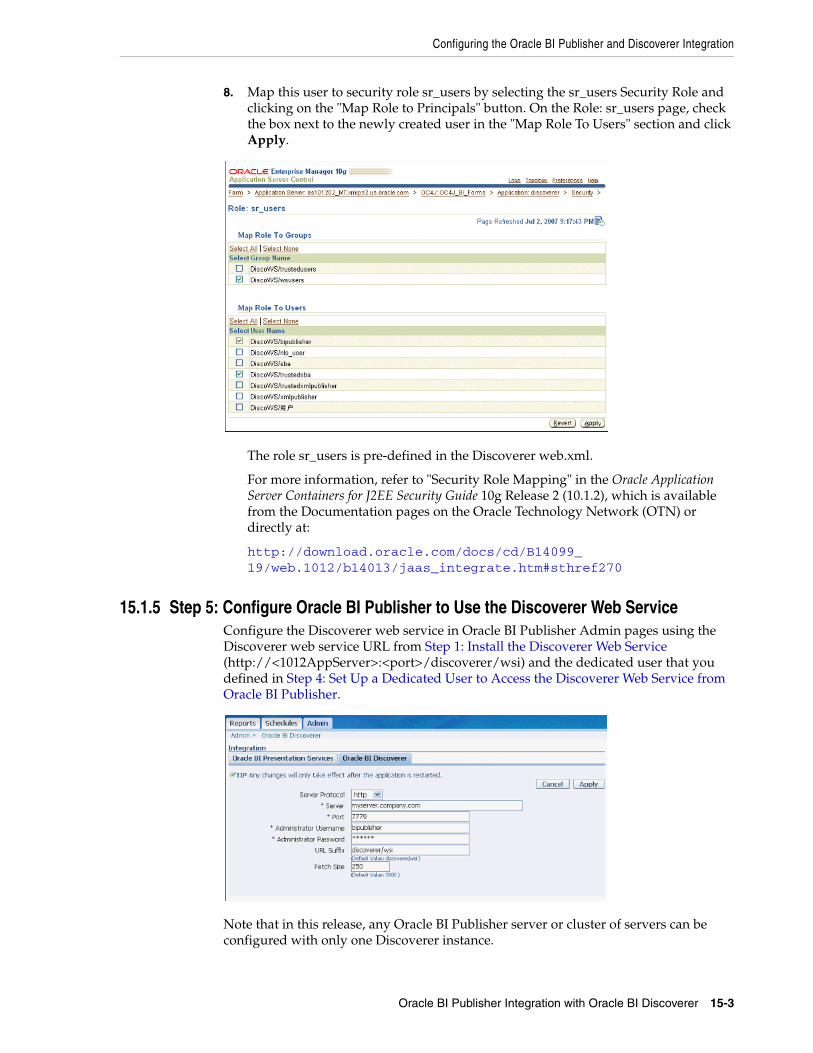
Configuring the Oracle BI Publisher and Discoverer Integration
Oracle BI Publisher Integration with Oracle BI Discoverer 15-3
8. Map this user to security role sr_users by selecting the sr_users Security Role and clicking on the "Map Role to Principals" button. On the Role: sr_users page, check the box next to the newly created user in the "Map Role To Users" section and click Apply.
The role sr_users is pre-defined in the Discoverer web.xml.
For more information, refer to "Security Role Mapping" in the Oracle Application Server Containers for J2EE Security Guide 10g Release 2 (10.1.2), which is available from the Documentation pages on the Oracle Technology Network (OTN) or directly at:
http://download.oracle.com/docs/cd/B14099_19/web.1012/b14013/jaas_integrate.htm#sthref270
15.1.5 Step 5: Configure Oracle BI Publisher to Use the Discoverer Web ServiceConfigure the Discoverer web service in Oracle BI Publisher Admin pages using the Discoverer web service URL from Step 1: Install the Discoverer Web Service (http://<1012AppServer>:<port>/discoverer/wsi) and the dedicated user that you defined in Step 4: Set Up a Dedicated User to Access the Discoverer Web Service from Oracle BI Publisher.
Note that in this release, any Oracle BI Publisher server or cluster of servers can be configured with only one Discoverer instance.
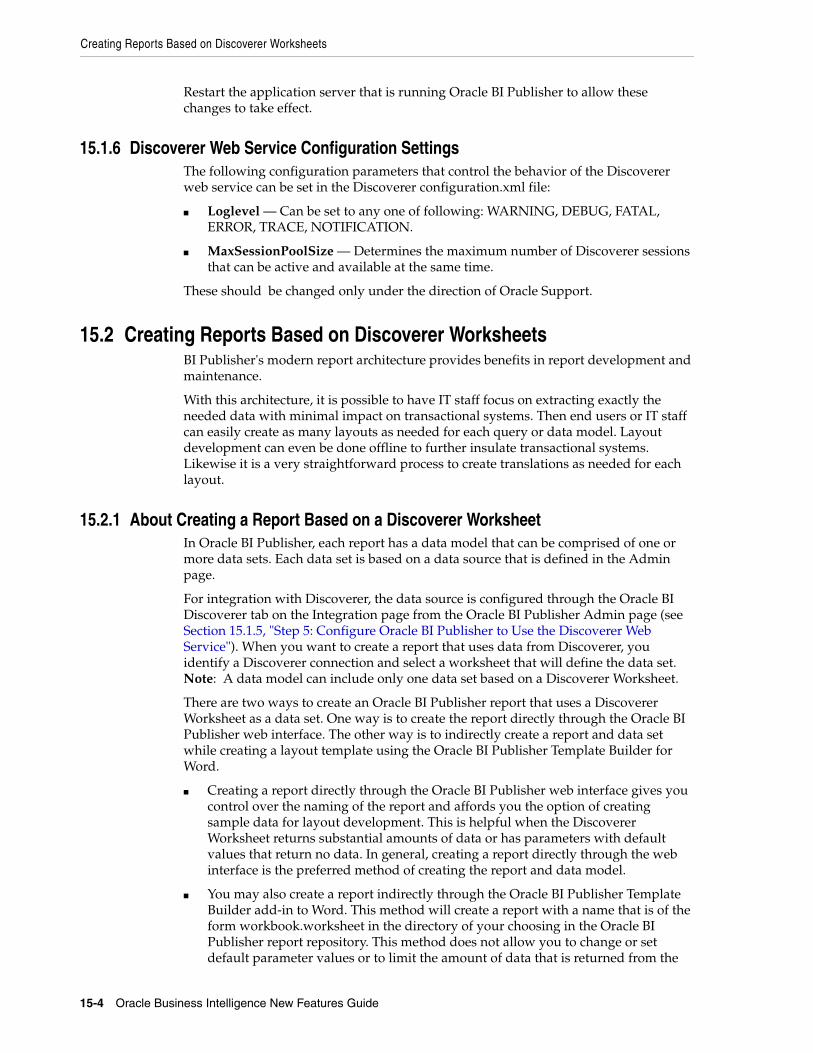
Creating Reports Based on Discoverer Worksheets
15-4 Oracle Business Intelligence New Features Guide
Restart the application server that is running Oracle BI Publisher to allow these changes to take effect.
15.1.6 Discoverer Web Service Configuration SettingsThe following configuration parameters that control the behavior of the Discoverer web service can be set in the Discoverer configuration.xml file:
■ Loglevel — Can be set to any one of following: WARNING, DEBUG, FATAL, ERROR, TRACE, NOTIFICATION.
■ MaxSessionPoolSize — Determines the maximum number of Discoverer sessions that can be active and available at the same time.
These should be changed only under the direction of Oracle Support.
15.2 Creating Reports Based on Discoverer WorksheetsBI Publisher's modern report architecture provides benefits in report development and maintenance.
With this architecture, it is possible to have IT staff focus on extracting exactly the needed data with minimal impact on transactional systems. Then end users or IT staff can easily create as many layouts as needed for each query or data model. Layout development can even be done offline to further insulate transactional systems. Likewise it is a very straightforward process to create translations as needed for each layout.
15.2.1 About Creating a Report Based on a Discoverer WorksheetIn Oracle BI Publisher, each report has a data model that can be comprised of one or more data sets. Each data set is based on a data source that is defined in the Admin page.
For integration with Discoverer, the data source is configured through the Oracle BI Discoverer tab on the Integration page from the Oracle BI Publisher Admin page (see Section 15.1.5, "Step 5: Configure Oracle BI Publisher to Use the Discoverer Web Service"). When you want to create a report that uses data from Discoverer, you identify a Discoverer connection and select a worksheet that will define the data set. Note: A data model can include only one data set based on a Discoverer Worksheet.
There are two ways to create an Oracle BI Publisher report that uses a Discoverer Worksheet as a data set. One way is to create the report directly through the Oracle BI Publisher web interface. The other way is to indirectly create a report and data set while creating a layout template using the Oracle BI Publisher Template Builder for Word.
■ Creating a report directly through the Oracle BI Publisher web interface gives you control over the naming of the report and affords you the option of creating sample data for layout development. This is helpful when the Discoverer Worksheet returns substantial amounts of data or has parameters with default values that return no data. In general, creating a report directly through the web interface is the preferred method of creating the report and data model.
■ You may also create a report indirectly through the Oracle BI Publisher Template Builder add-in to Word. This method will create a report with a name that is of the form workbook.worksheet in the directory of your choosing in the Oracle BI Publisher report repository. This method does not allow you to change or set default parameter values or to limit the amount of data that is returned from the
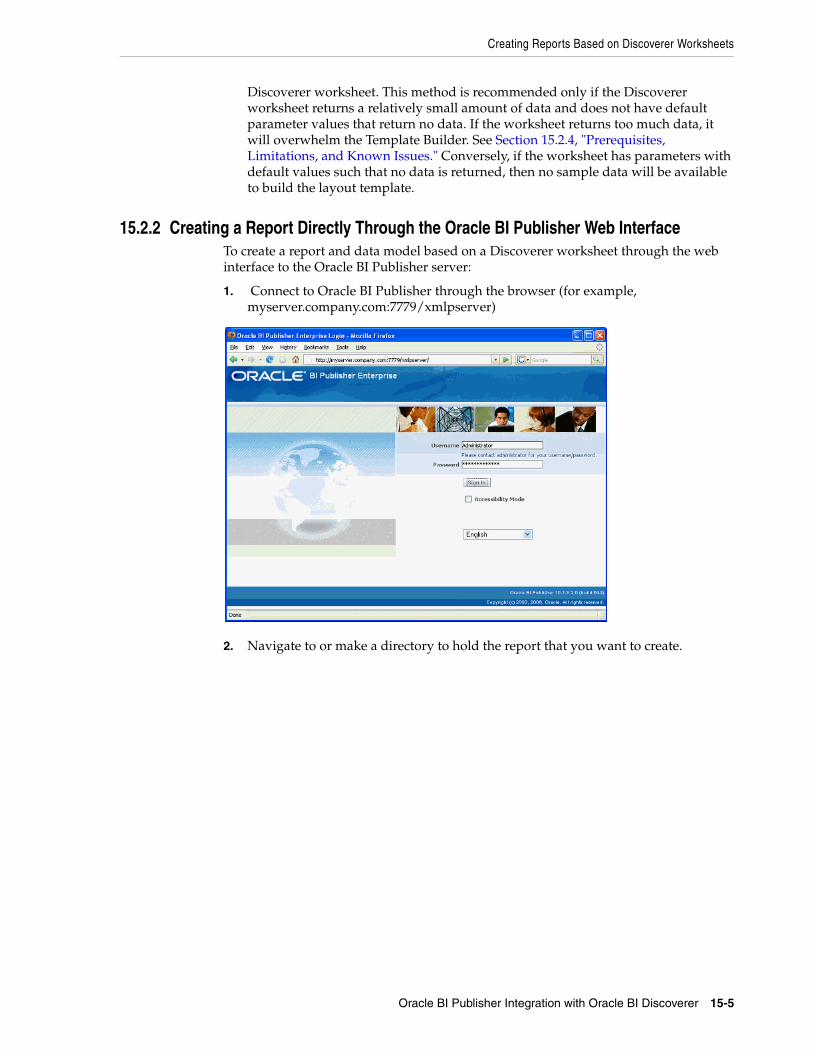
Creating Reports Based on Discoverer Worksheets
Oracle BI Publisher Integration with Oracle BI Discoverer 15-5
Discoverer worksheet. This method is recommended only if the Discoverer worksheet returns a relatively small amount of data and does not have default parameter values that return no data. If the worksheet returns too much data, it will overwhelm the Template Builder. See Section 15.2.4, "Prerequisites, Limitations, and Known Issues." Conversely, if the worksheet has parameters with default values such that no data is returned, then no sample data will be available to build the layout template.
15.2.2 Creating a Report Directly Through the Oracle BI Publisher Web InterfaceTo create a report and data model based on a Discoverer worksheet through the web interface to the Oracle BI Publisher server:
1. Connect to Oracle BI Publisher through the browser (for example, myserver.company.com:7779/xmlpserver)
2. Navigate to or make a directory to hold the report that you want to create.
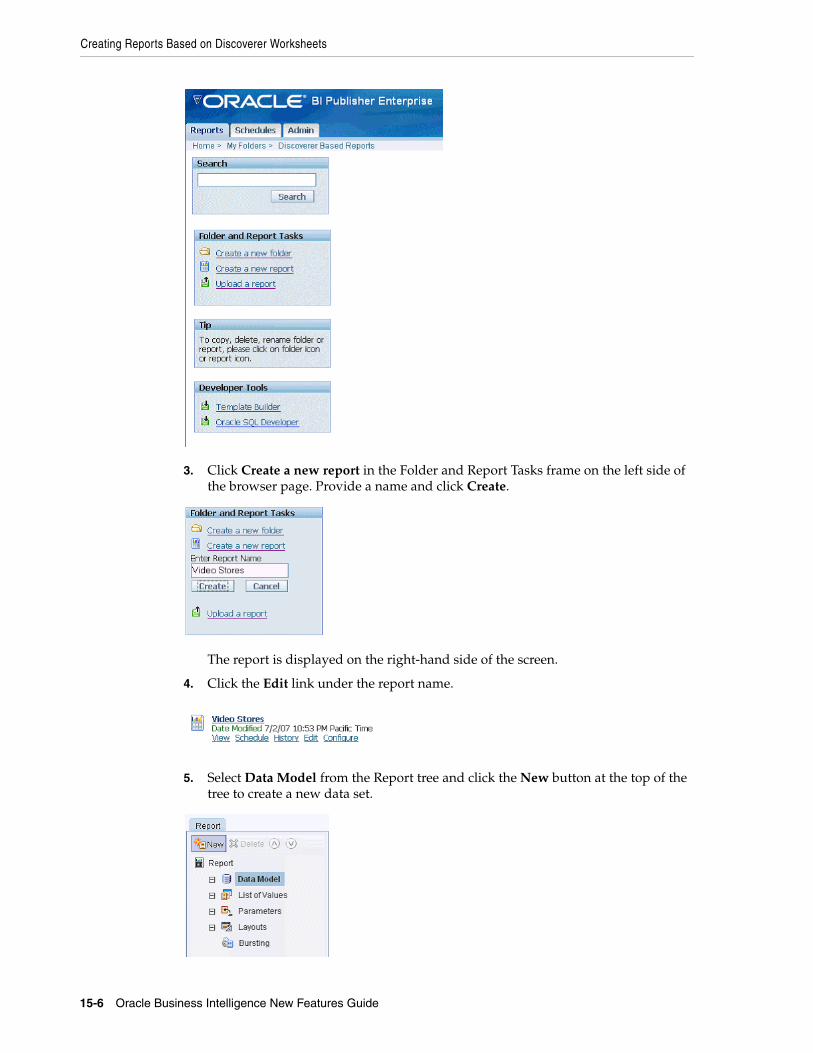
Creating Reports Based on Discoverer Worksheets
15-6 Oracle Business Intelligence New Features Guide
3. Click Create a new report in the Folder and Report Tasks frame on the left side of the browser page. Provide a name and click Create.
The report is displayed on the right-hand side of the screen.
4. Click the Edit link under the report name.
5. Select Data Model from the Report tree and click the New button at the top of the tree to create a new data set.
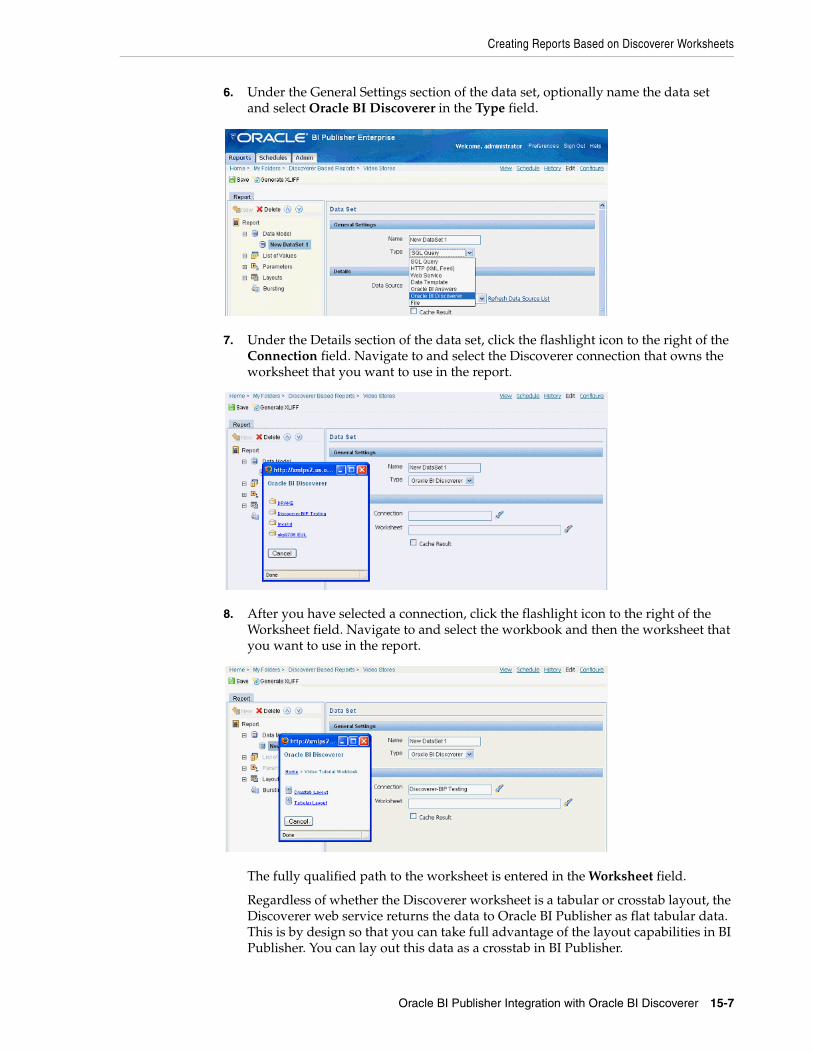
Creating Reports Based on Discoverer Worksheets
Oracle BI Publisher Integration with Oracle BI Discoverer 15-7
6. Under the General Settings section of the data set, optionally name the data set and select Oracle BI Discoverer in the Type field.
7. Under the Details section of the data set, click the flashlight icon to the right of the Connection field. Navigate to and select the Discoverer connection that owns the worksheet that you want to use in the report.
8. After you have selected a connection, click the flashlight icon to the right of the Worksheet field. Navigate to and select the workbook and then the worksheet that you want to use in the report.
The fully qualified path to the worksheet is entered in the Worksheet field.
Regardless of whether the Discoverer worksheet is a tabular or crosstab layout, the Discoverer web service returns the data to Oracle BI Publisher as flat tabular data. This is by design so that you can take full advantage of the layout capabilities in BI Publisher. You can lay out this data as a crosstab in BI Publisher.
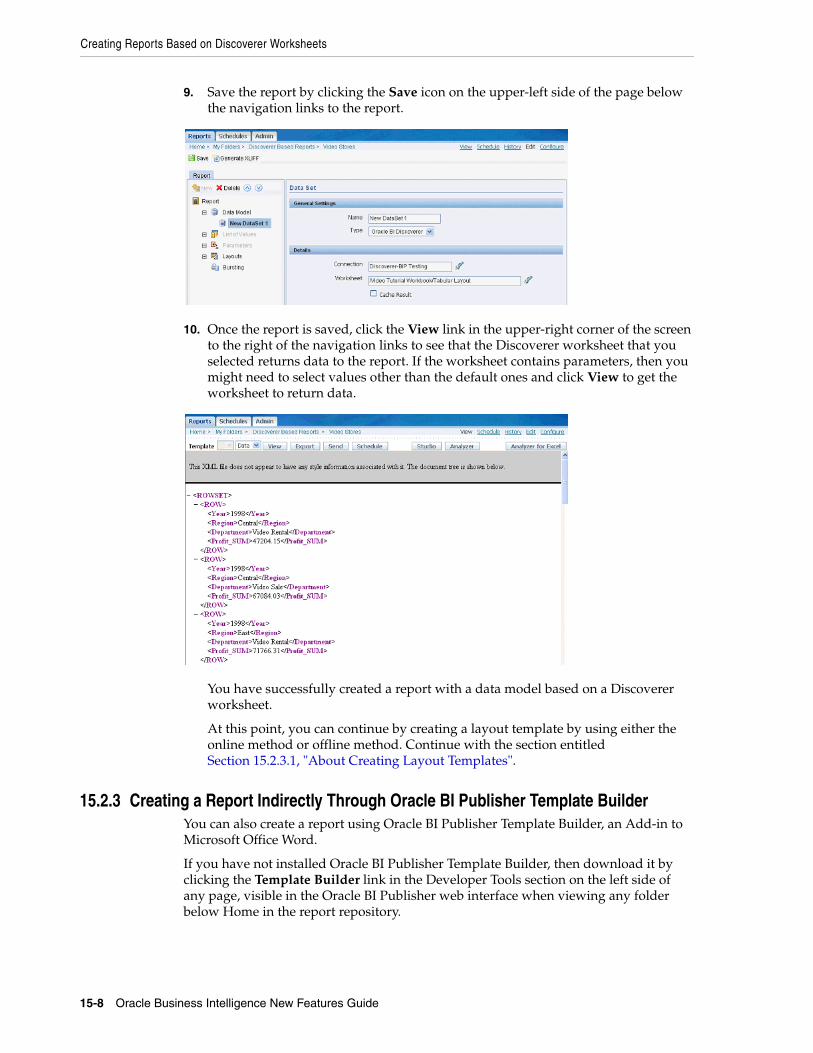
Creating Reports Based on Discoverer Worksheets
15-8 Oracle Business Intelligence New Features Guide
9. Save the report by clicking the Save icon on the upper-left side of the page below the navigation links to the report.
10. Once the report is saved, click the View link in the upper-right corner of the screen to the right of the navigation links to see that the Discoverer worksheet that you selected returns data to the report. If the worksheet contains parameters, then you might need to select values other than the default ones and click View to get the worksheet to return data.
You have successfully created a report with a data model based on a Discoverer worksheet.
At this point, you can continue by creating a layout template by using either the online method or offline method. Continue with the section entitled Section 15.2.3.1, "About Creating Layout Templates".
15.2.3 Creating a Report Indirectly Through Oracle BI Publisher Template Builder You can also create a report using Oracle BI Publisher Template Builder, an Add-in to Microsoft Office Word.
If you have not installed Oracle BI Publisher Template Builder, then download it by clicking the Template Builder link in the Developer Tools section on the left side of any page, visible in the Oracle BI Publisher web interface when viewing any folder below Home in the report repository.
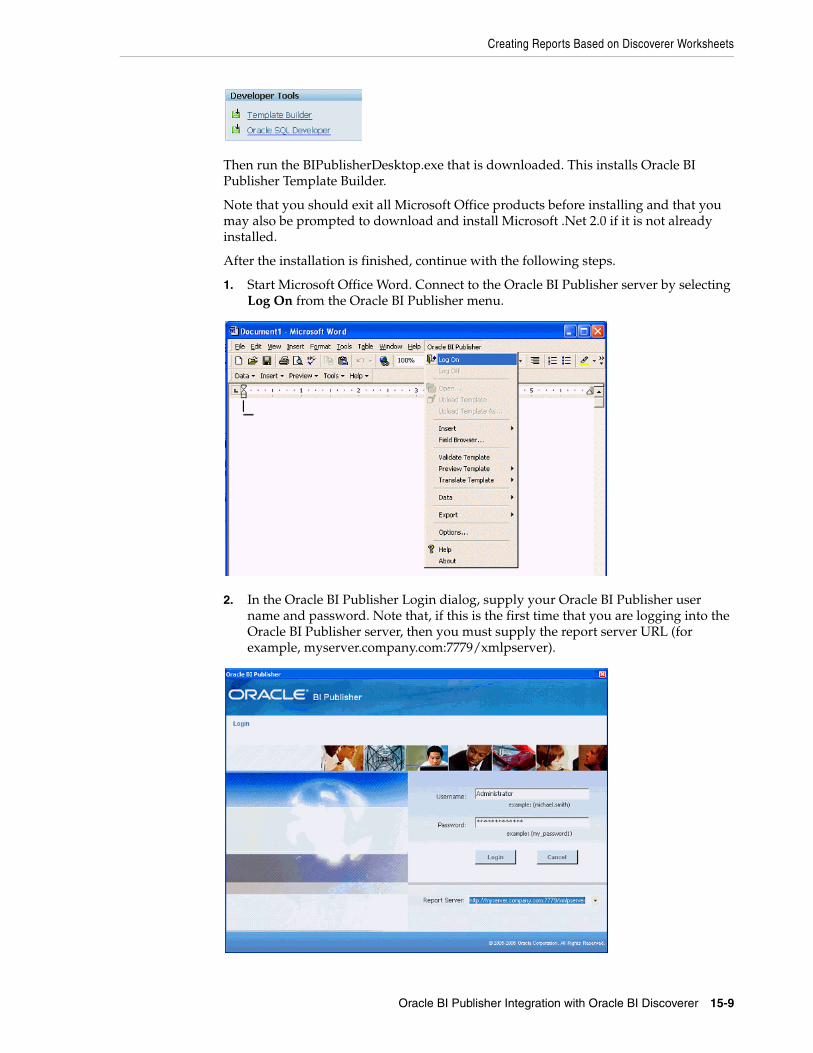
Creating Reports Based on Discoverer Worksheets
Oracle BI Publisher Integration with Oracle BI Discoverer 15-9
Then run the BIPublisherDesktop.exe that is downloaded. This installs Oracle BI Publisher Template Builder.
Note that you should exit all Microsoft Office products before installing and that you may also be prompted to download and install Microsoft .Net 2.0 if it is not already installed.
After the installation is finished, continue with the following steps.
1. Start Microsoft Office Word. Connect to the Oracle BI Publisher server by selecting Log On from the Oracle BI Publisher menu.
2. In the Oracle BI Publisher Login dialog, supply your Oracle BI Publisher user name and password. Note that, if this is the first time that you are logging into the Oracle BI Publisher server, then you must supply the report server URL (for example, myserver.company.com:7779/xmlpserver).
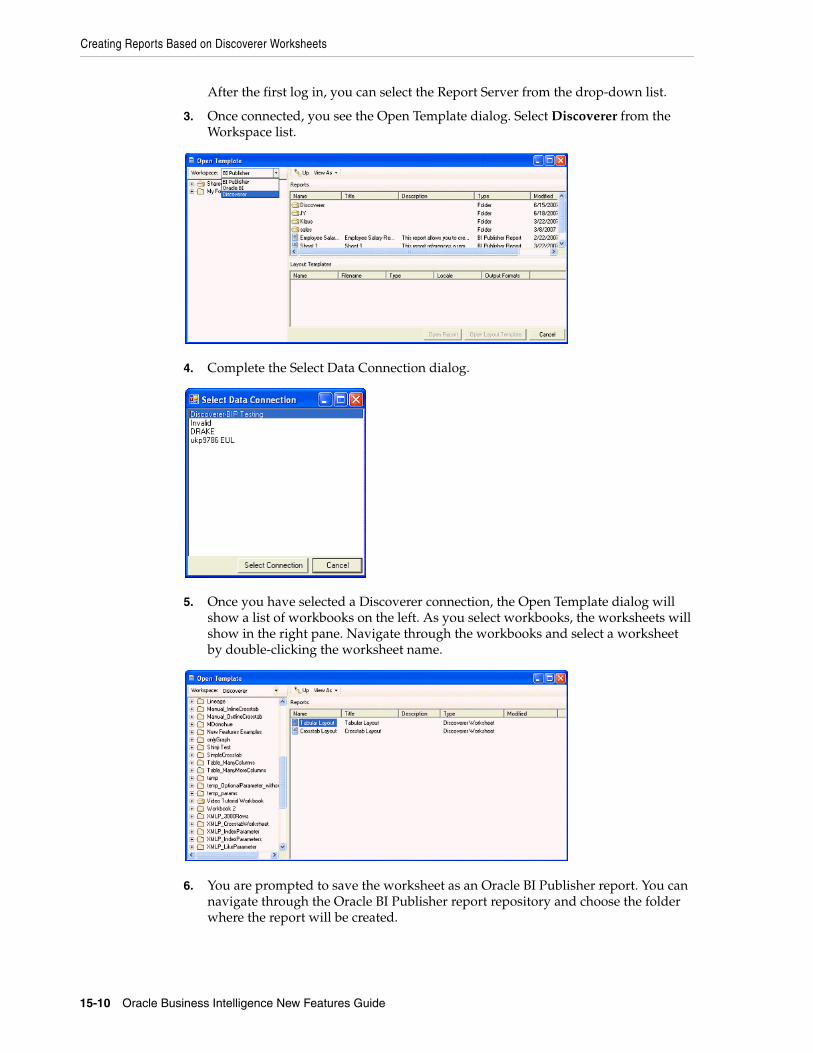
Creating Reports Based on Discoverer Worksheets
15-10 Oracle Business Intelligence New Features Guide
After the first log in, you can select the Report Server from the drop-down list.
3. Once connected, you see the Open Template dialog. Select Discoverer from the Workspace list.
4. Complete the Select Data Connection dialog.
5. Once you have selected a Discoverer connection, the Open Template dialog will show a list of workbooks on the left. As you select workbooks, the worksheets will show in the right pane. Navigate through the workbooks and select a worksheet by double-clicking the worksheet name.
6. You are prompted to save the worksheet as an Oracle BI Publisher report. You can navigate through the Oracle BI Publisher report repository and choose the folder where the report will be created.
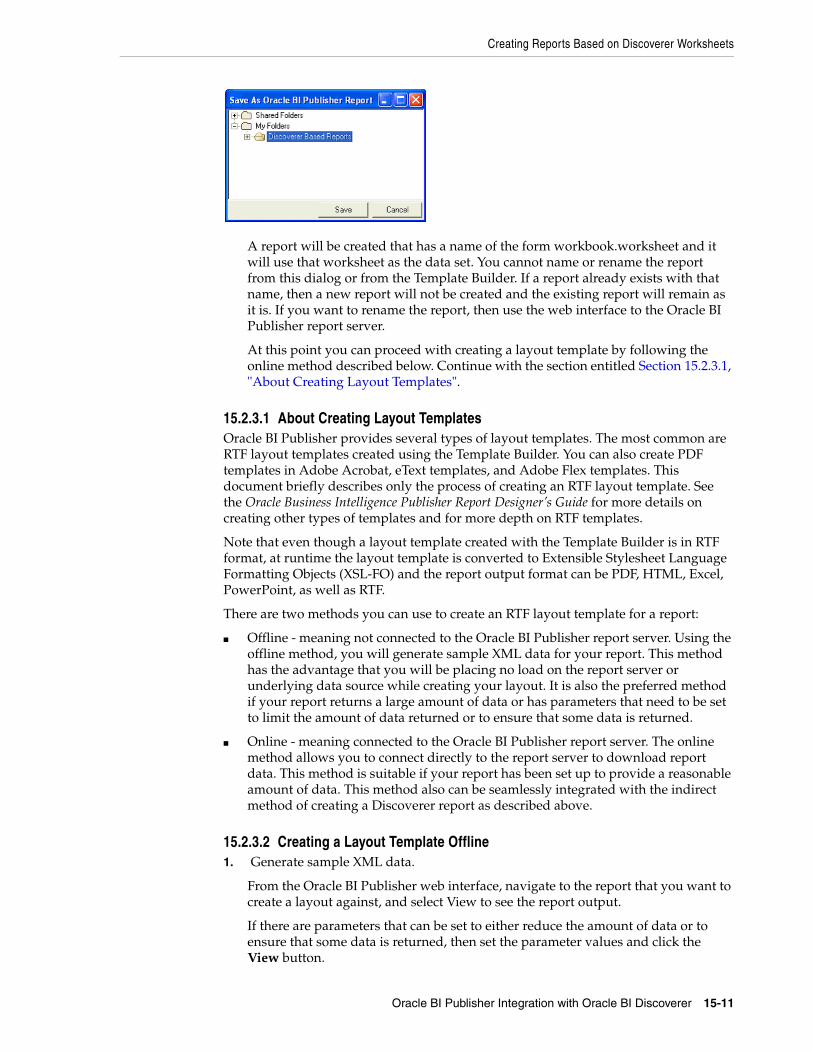
Creating Reports Based on Discoverer Worksheets
Oracle BI Publisher Integration with Oracle BI Discoverer 15-11
A report will be created that has a name of the form workbook.worksheet and it will use that worksheet as the data set. You cannot name or rename the report from this dialog or from the Template Builder. If a report already exists with that name, then a new report will not be created and the existing report will remain as it is. If you want to rename the report, then use the web interface to the Oracle BI Publisher report server.
At this point you can proceed with creating a layout template by following the online method described below. Continue with the section entitled Section 15.2.3.1, "About Creating Layout Templates".
15.2.3.1 About Creating Layout TemplatesOracle BI Publisher provides several types of layout templates. The most common are RTF layout templates created using the Template Builder. You can also create PDF templates in Adobe Acrobat, eText templates, and Adobe Flex templates. This document briefly describes only the process of creating an RTF layout template. See the Oracle Business Intelligence Publisher Report Designer’s Guide for more details on creating other types of templates and for more depth on RTF templates.
Note that even though a layout template created with the Template Builder is in RTF format, at runtime the layout template is converted to Extensible Stylesheet Language Formatting Objects (XSL-FO) and the report output format can be PDF, HTML, Excel, PowerPoint, as well as RTF.
There are two methods you can use to create an RTF layout template for a report:
■ Offline - meaning not connected to the Oracle BI Publisher report server. Using the offline method, you will generate sample XML data for your report. This method has the advantage that you will be placing no load on the report server or underlying data source while creating your layout. It is also the preferred method if your report returns a large amount of data or has parameters that need to be set to limit the amount of data returned or to ensure that some data is returned.
■ Online - meaning connected to the Oracle BI Publisher report server. The online method allows you to connect directly to the report server to download report data. This method is suitable if your report has been set up to provide a reasonable amount of data. This method also can be seamlessly integrated with the indirect method of creating a Discoverer report as described above.
15.2.3.2 Creating a Layout Template Offline1. Generate sample XML data.
From the Oracle BI Publisher web interface, navigate to the report that you want to create a layout against, and select View to see the report output.
If there are parameters that can be set to either reduce the amount of data or to ensure that some data is returned, then set the parameter values and click the View button.
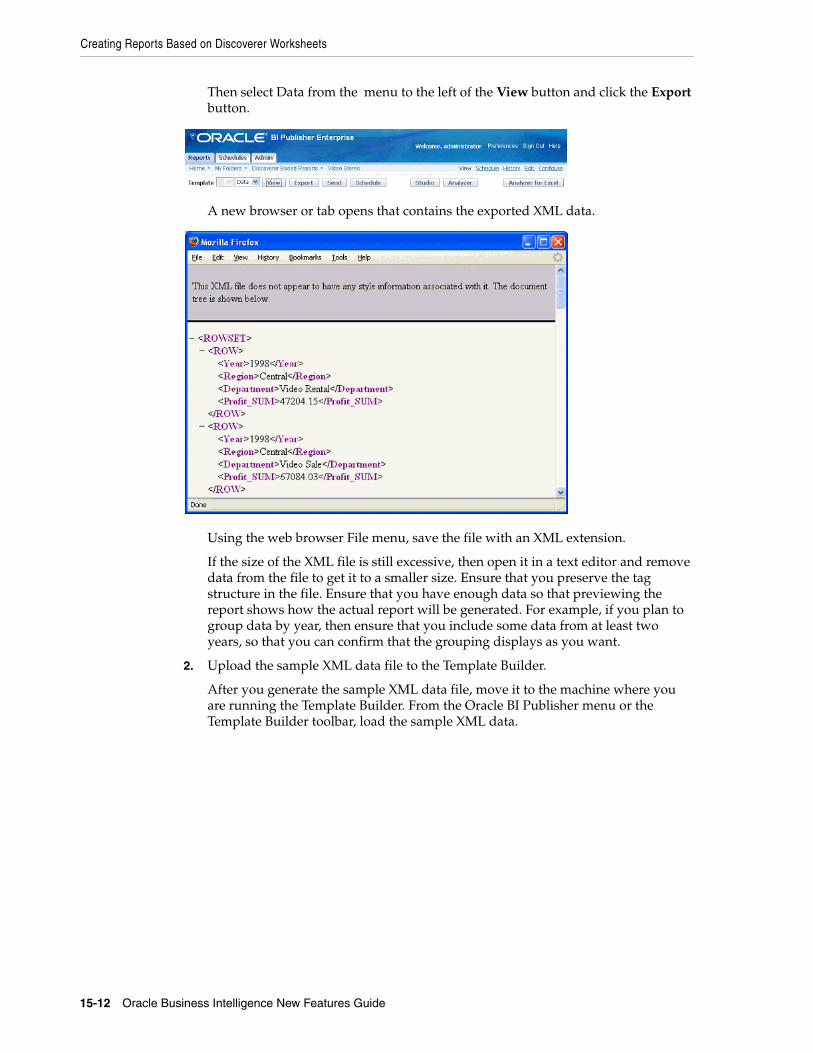
Creating Reports Based on Discoverer Worksheets
15-12 Oracle Business Intelligence New Features Guide
Then select Data from the menu to the left of the View button and click the Export button.
A new browser or tab opens that contains the exported XML data.
Using the web browser File menu, save the file with an XML extension.
If the size of the XML file is still excessive, then open it in a text editor and remove data from the file to get it to a smaller size. Ensure that you preserve the tag structure in the file. Ensure that you have enough data so that previewing the report shows how the actual report will be generated. For example, if you plan to group data by year, then ensure that you include some data from at least two years, so that you can confirm that the grouping displays as you want.
2. Upload the sample XML data file to the Template Builder.
After you generate the sample XML data file, move it to the machine where you are running the Template Builder. From the Oracle BI Publisher menu or the Template Builder toolbar, load the sample XML data.
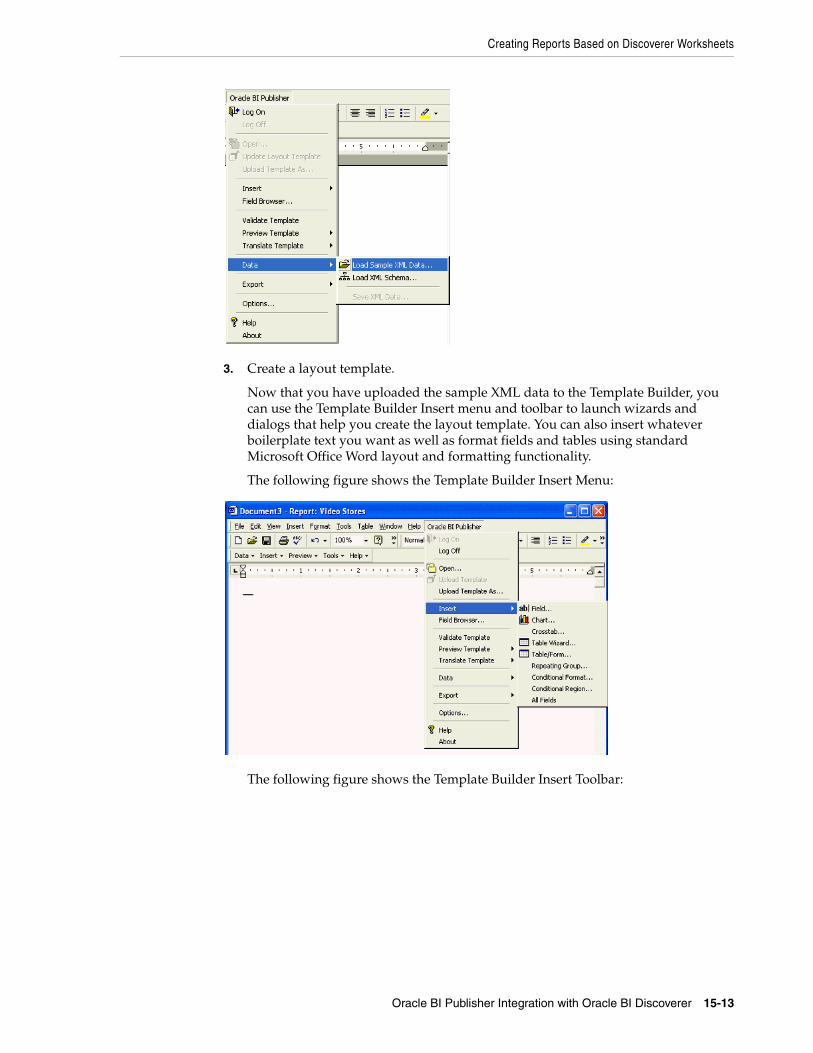
Creating Reports Based on Discoverer Worksheets
Oracle BI Publisher Integration with Oracle BI Discoverer 15-13
3. Create a layout template.
Now that you have uploaded the sample XML data to the Template Builder, you can use the Template Builder Insert menu and toolbar to launch wizards and dialogs that help you create the layout template. You can also insert whatever boilerplate text you want as well as format fields and tables using standard Microsoft Office Word layout and formatting functionality.
The following figure shows the Template Builder Insert Menu:
The following figure shows the Template Builder Insert Toolbar:
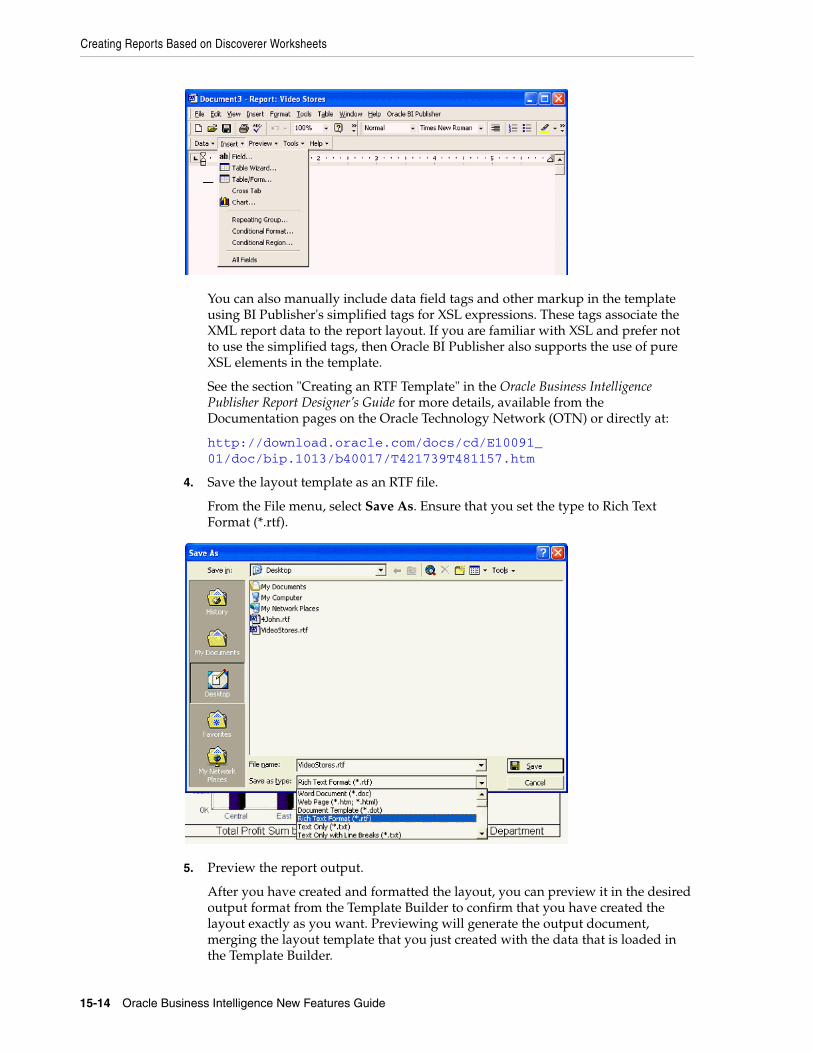
Creating Reports Based on Discoverer Worksheets
15-14 Oracle Business Intelligence New Features Guide
You can also manually include data field tags and other markup in the template using BI Publisher's simplified tags for XSL expressions. These tags associate the XML report data to the report layout. If you are familiar with XSL and prefer not to use the simplified tags, then Oracle BI Publisher also supports the use of pure XSL elements in the template.
See the section "Creating an RTF Template" in the Oracle Business Intelligence Publisher Report Designer’s Guide for more details, available from the Documentation pages on the Oracle Technology Network (OTN) or directly at:
http://download.oracle.com/docs/cd/E10091_01/doc/bip.1013/b40017/T421739T481157.htm
4. Save the layout template as an RTF file.
From the File menu, select Save As. Ensure that you set the type to Rich Text Format (*.rtf).
5. Preview the report output.
After you have created and formatted the layout, you can preview it in the desired output format from the Template Builder to confirm that you have created the layout exactly as you want. Previewing will generate the output document, merging the layout template that you just created with the data that is loaded in the Template Builder.
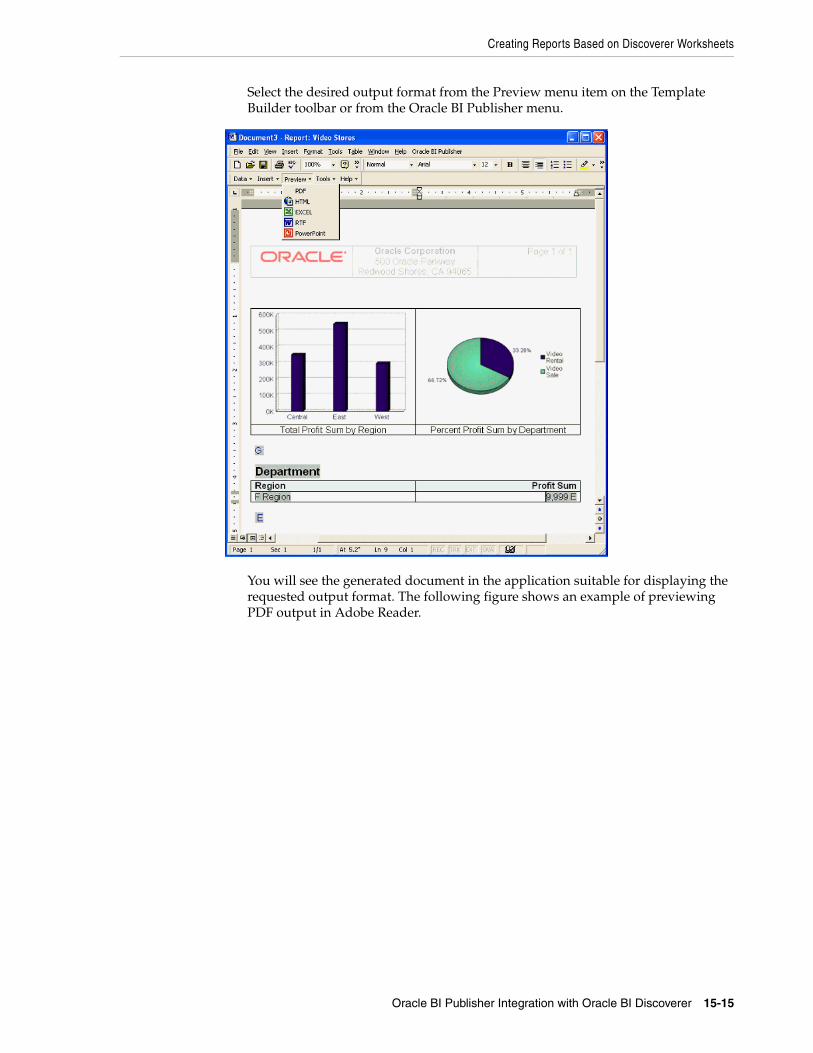
Creating Reports Based on Discoverer Worksheets
Oracle BI Publisher Integration with Oracle BI Discoverer 15-15
Select the desired output format from the Preview menu item on the Template Builder toolbar or from the Oracle BI Publisher menu.
You will see the generated document in the application suitable for displaying the requested output format. The following figure shows an example of previewing PDF output in Adobe Reader.
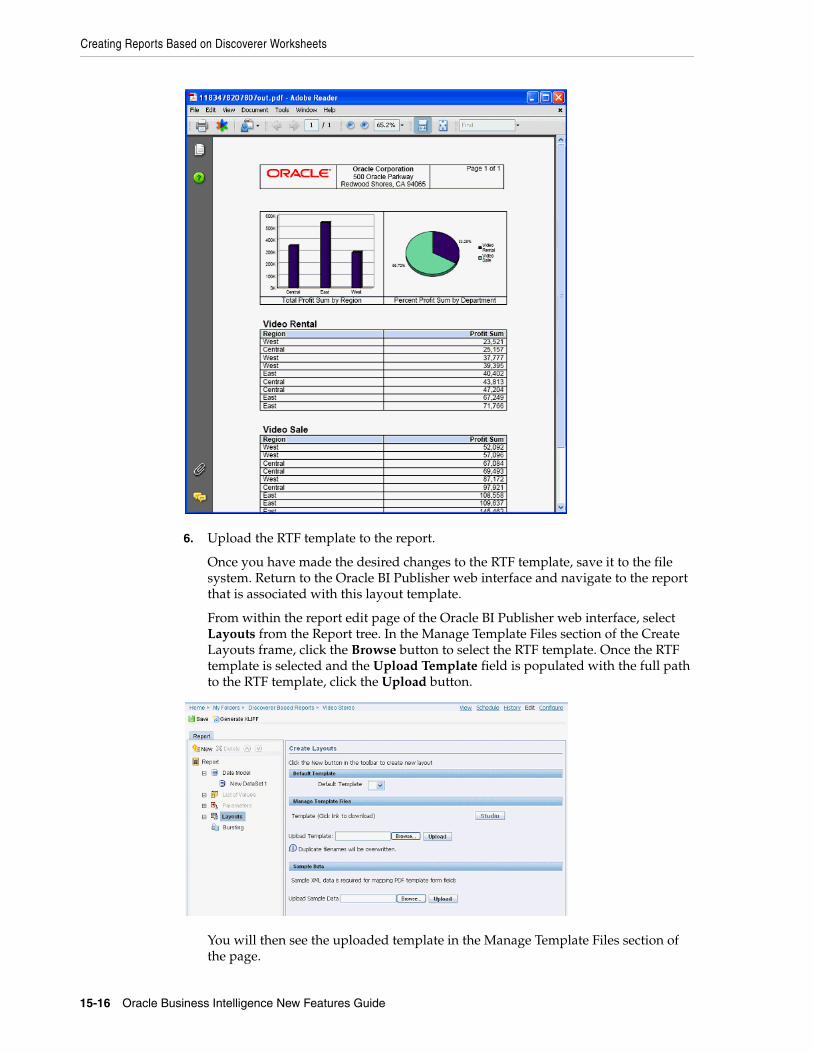
Creating Reports Based on Discoverer Worksheets
15-16 Oracle Business Intelligence New Features Guide
6. Upload the RTF template to the report.
Once you have made the desired changes to the RTF template, save it to the file system. Return to the Oracle BI Publisher web interface and navigate to the report that is associated with this layout template.
From within the report edit page of the Oracle BI Publisher web interface, select Layouts from the Report tree. In the Manage Template Files section of the Create Layouts frame, click the Browse button to select the RTF template. Once the RTF template is selected and the Upload Template field is populated with the full path to the RTF template, click the Upload button.
You will then see the uploaded template in the Manage Template Files section of the page.
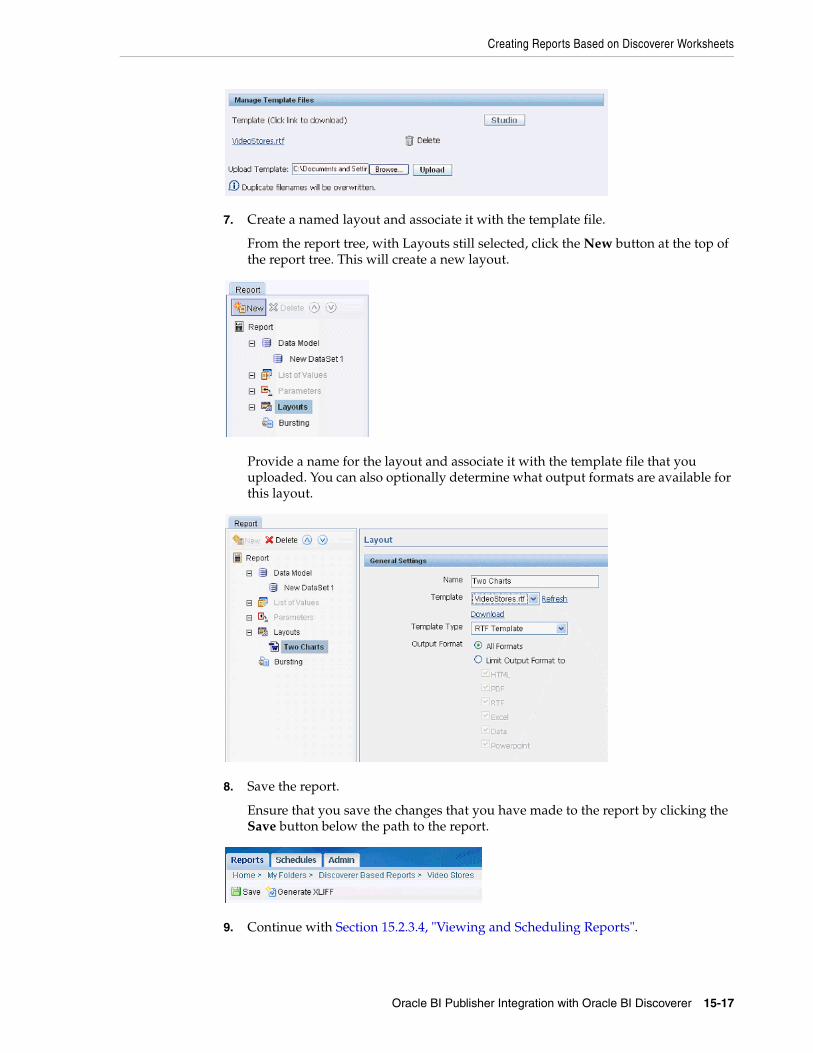
Creating Reports Based on Discoverer Worksheets
Oracle BI Publisher Integration with Oracle BI Discoverer 15-17
7. Create a named layout and associate it with the template file.
From the report tree, with Layouts still selected, click the New button at the top of the report tree. This will create a new layout.
Provide a name for the layout and associate it with the template file that you uploaded. You can also optionally determine what output formats are available for this layout.
8. Save the report.
Ensure that you save the changes that you have made to the report by clicking the Save button below the path to the report.
9. Continue with Section 15.2.3.4, "Viewing and Scheduling Reports".
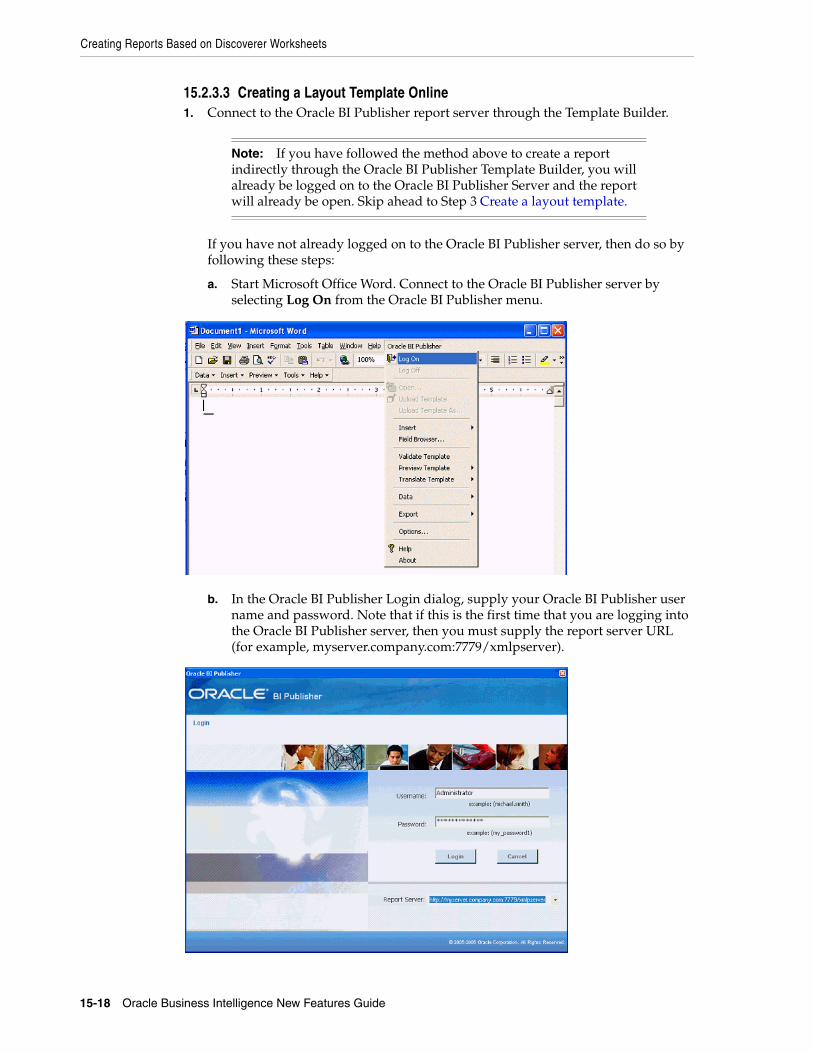
Creating Reports Based on Discoverer Worksheets
15-18 Oracle Business Intelligence New Features Guide
15.2.3.3 Creating a Layout Template Online 1. Connect to the Oracle BI Publisher report server through the Template Builder.
If you have not already logged on to the Oracle BI Publisher server, then do so by following these steps:
a. Start Microsoft Office Word. Connect to the Oracle BI Publisher server by selecting Log On from the Oracle BI Publisher menu.
b. In the Oracle BI Publisher Login dialog, supply your Oracle BI Publisher user name and password. Note that if this is the first time that you are logging into the Oracle BI Publisher server, then you must supply the report server URL (for example, myserver.company.com:7779/xmlpserver).
Note: If you have followed the method above to create a report indirectly through the Oracle BI Publisher Template Builder, you will already be logged on to the Oracle BI Publisher Server and the report will already be open. Skip ahead to Step 3 Create a layout template.
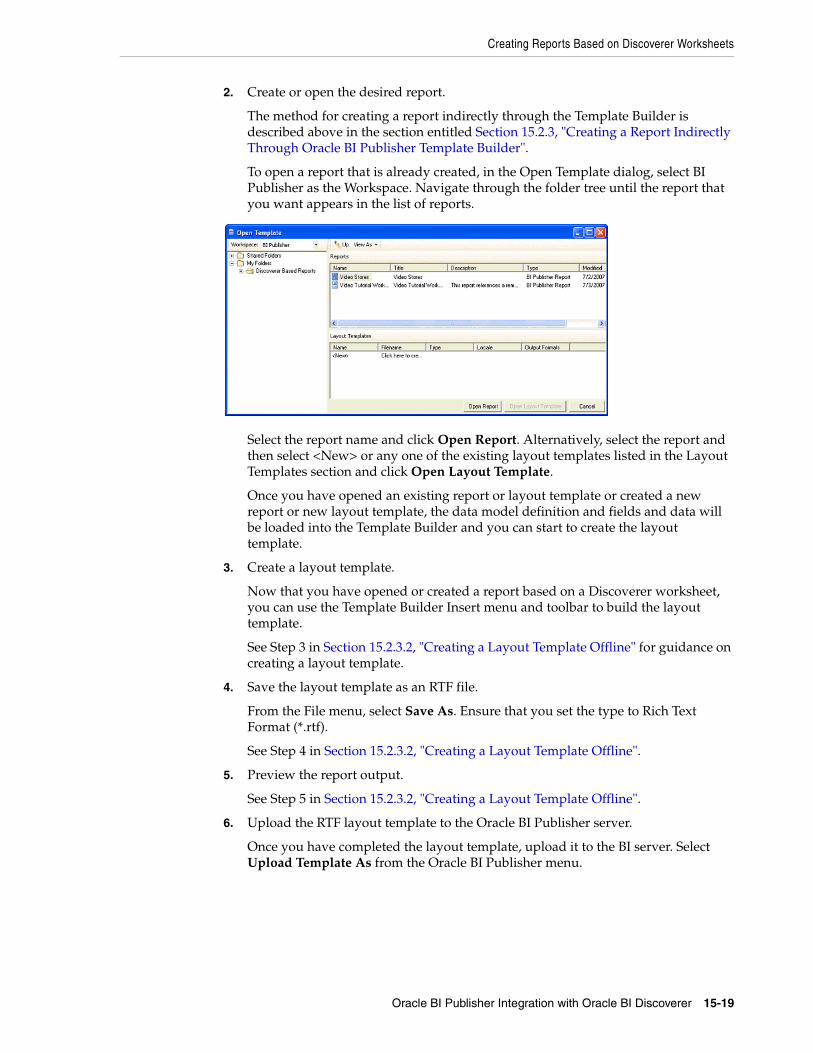
Creating Reports Based on Discoverer Worksheets
Oracle BI Publisher Integration with Oracle BI Discoverer 15-19
2. Create or open the desired report.
The method for creating a report indirectly through the Template Builder is described above in the section entitled Section 15.2.3, "Creating a Report Indirectly Through Oracle BI Publisher Template Builder".
To open a report that is already created, in the Open Template dialog, select BI Publisher as the Workspace. Navigate through the folder tree until the report that you want appears in the list of reports.
Select the report name and click Open Report. Alternatively, select the report and then select <New> or any one of the existing layout templates listed in the Layout Templates section and click Open Layout Template.
Once you have opened an existing report or layout template or created a new report or new layout template, the data model definition and fields and data will be loaded into the Template Builder and you can start to create the layout template.
3. Create a layout template.
Now that you have opened or created a report based on a Discoverer worksheet, you can use the Template Builder Insert menu and toolbar to build the layout template.
See Step 3 in Section 15.2.3.2, "Creating a Layout Template Offline" for guidance on creating a layout template.
4. Save the layout template as an RTF file.
From the File menu, select Save As. Ensure that you set the type to Rich Text Format (*.rtf).
See Step 4 in Section 15.2.3.2, "Creating a Layout Template Offline".
5. Preview the report output.
See Step 5 in Section 15.2.3.2, "Creating a Layout Template Offline".
6. Upload the RTF layout template to the Oracle BI Publisher server.
Once you have completed the layout template, upload it to the BI server. Select Upload Template As from the Oracle BI Publisher menu.
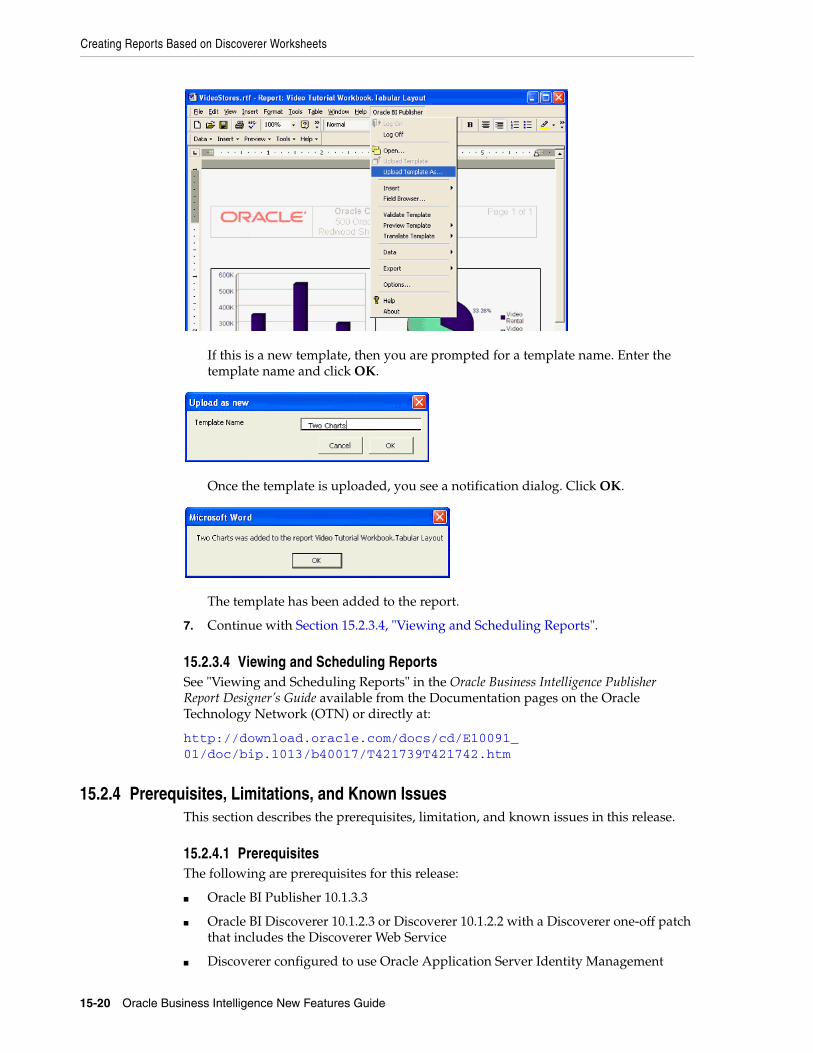
Creating Reports Based on Discoverer Worksheets
15-20 Oracle Business Intelligence New Features Guide
If this is a new template, then you are prompted for a template name. Enter the template name and click OK.
Once the template is uploaded, you see a notification dialog. Click OK.
The template has been added to the report.
7. Continue with Section 15.2.3.4, "Viewing and Scheduling Reports".
15.2.3.4 Viewing and Scheduling ReportsSee "Viewing and Scheduling Reports" in the Oracle Business Intelligence Publisher Report Designer’s Guide available from the Documentation pages on the Oracle Technology Network (OTN) or directly at:
http://download.oracle.com/docs/cd/E10091_01/doc/bip.1013/b40017/T421739T421742.htm
15.2.4 Prerequisites, Limitations, and Known IssuesThis section describes the prerequisites, limitation, and known issues in this release.
15.2.4.1 PrerequisitesThe following are prerequisites for this release:
■ Oracle BI Publisher 10.1.3.3
■ Oracle BI Discoverer 10.1.2.3 or Discoverer 10.1.2.2 with a Discoverer one-off patch that includes the Discoverer Web Service
■ Discoverer configured to use Oracle Application Server Identity Management

Creating Reports Based on Discoverer Worksheets
Oracle BI Publisher Integration with Oracle BI Discoverer 15-21
15.2.4.2 LimitationsThe following are limitations with this release:
■ Only one Discoverer Web Service may be configured per Oracle BI Publisher server or cluster.
■ An Oracle BI Publisher report may only contain one data set based on a Discoverer worksheet.
■ Discoverer web service does not support Oracle Applications Single Sign On (SSO), Oracle Applications ICX and non-SSO modes.
15.2.4.3 Known IssuesThe following are known issues in this release:
Issue: Unable to enter parameter values directly for parameters that have associated list of values.
Description: For Discoverer worksheets that have parameter based on a List of Values (LOV) or an underlying item has an associated LOV, BI Publisher will only allow parameter value selection from the LOV. Users cannot directly enter parameter values as they can in Discoverer.
Workaround: If users want to allow users to enter parameter values directly, then they must remove the associated LOV in the Discoverer worksheet or item.
Issue: Oracle BI Publisher cannot communicate with Discoverer web service when Discoverer is configured with Secure Socket Layer (SSL) (i.e. uses https://)
Description: You might be unable to make any calls to the Discoverer web service. You might see errors such as "SSL received a record that exceeded the maximum permissible length."
Workaround: When using a web service that is protected via SSL, you might need to export the certificate from the web server that is hosting the web service and import it into the Java keystore on the machine that is running BI Publisher. This step should not be required if the server certificate is linked to some certificate authority (such as Verisign); the default Java keystore can handle that. But if the web service server is using some self-generated certificate (e.g., in a testing environment), then you must perform the export and import.
Issue: Discoverer server CPU hits 100%.
Description: If a report that is based on a Discoverer worksheet takes several minutes to return data and a user becomes impatient and repeatedly clicks the View or Export buttons, then this can overwhelm the Discoverer Server with requests and it might stop responding.
Workaround: There is no workaround for this issue except to not repeatedly click on the View or Export buttons while waiting for a report to return data.
Issue: Oracle BI Publisher does not return values for a Discoverer worksheet parameter's list of values past the 1000th value.
Description: Oracle BI Publisher limits the number of values in a list of values to 1000.
Creating Reports Based on Discoverer Worksheets
15-22 Oracle Business Intelligence New Features Guide
Workaround: Administrators can change this limit by setting the property DISCO_LOV_LIMIT in the xmlp-server-config.xml file. Example:
<property name=" DISCO_LOV_LIMIT " value="2000"/>
Note that the larger the list of values, the slower it will render.
Issue: See the following error when trying to open a report in the Template Builder: "'Error occurred. Please check the settings and try again.'"
Description: You might be loading a report that returns too much data for the Template Builder to handle.
Workaround: Use the method described above for creating a layout template offline. Ensure that you reduce the amount of data in the generated XML file.
16
Performance Improvements for Oracle BI Publisher 16-1
16
Performance Improvements for Oracle BIPublisher
This chapter describes a feature of BI Publisher that was introduced in Release 10.1.3.3 and that applies to Releases 10.1.3.3 through 10.1.3.4. Information about this feature is also provided in the BI Publisher documentation set that has been updated for Release 10.1.3.4.
Release 10.1.3.3 has added performance improvements to BI Publisher’s already fast Formatting Objects Processor (FOP) and Bursting engine. If you are running BI Publisher on a multiprocessor machine or on multicore processors, then you can take better advantage of the hardware.
To enable these performance improvements, display the Runtime Configuration page on the Admin page or follow the Configure link for a specific report.
16.1 Multithreading for BurstingIf you have a multiprocessor machine or even a machine with a dual core single processor, then you might be able to achieve even higher bursting throughput using the new multithreading functionality for Bursting.
Under the Bursting section on the Runtime Configuration page, you set two properties. Set "Enable multithreading" to True and set "Thread count" to a number greater than 1 and up to the number of processors or cores on that machine.
If the report delivery channel is File System, then there will be no considerable performance gain using multithreading. For delivery destinations other then File delivery, you should notice the performance gain.
Due to other processes that might be running on the system, you might need to determine empirically what is the optimal setting for "Thread count." Try a series of tests by varying the setting "Thread count" to see what is optimal for your environment.
Note: Leave these settings at the default if your system does not have multicore processors or more than one processor. Setting "Enable multithreading" to True and "Thread count" to a number greater than the number of cores on the machine will lead to higher CPU usage without any gain in performance.
Multithreading for Document Generation
16-2 Oracle Business Intelligence New Features Guide
16.2 Multithreading for Document GenerationIf you have a multiprocessor machine or even a machine with a dual core single processor, then you might be able to achieve even faster document generation using the new multithreading functionality for FO Processing.
Under the FO Processor section of the properties, set "Enable multithreading" to True.
The amount of performance gain that you see by enabling this setting depends on how much the current system resources are utilized.
On a system that runs numerous users and relatively high CPU utilizations, you will likely see only minor improvements after setting "Enable multithreading" to True.
If the system is used by only a few users, if reports are scheduled sequentially one at a time, or if the number of CPUs is more than the number of concurrent reports, then turning on multiple threads will speed up report generation.
These properties can be set at the server and report level. See "Setting Runtime Properties" in the Oracle Business Intelligence Publisher Report Designer’s Guide for more information on setting properties.
Note: Memory utilization is likely to increase once "Enable multithreading" is set to True.
Note: If you are running BI Publisher on a single-core, one processor machine, then leave these multithreading configuration settings at the default value of False.
17
Converting Reports from Oracle Reports to Oracle BI Publisher 17-1
17
Converting Reports from Oracle Reports toOracle BI Publisher
This chapter describes a feature of BI Publisher that was introduced in Release 10.1.3.3 and that applies to Releases 10.1.3.3 through 10.1.3.4. Information about this feature is also provided in the BI Publisher documentation set that has been updated for Release 10.1.3.4.
Release 10.1.3.3 introduces the ability to convert reports from Oracle Reports to Oracle BI Publisher, as described in this chapter.
17.1 OverviewOracle BI Publisher provides a utility for converting reports from Oracle Reports to Oracle BI Publisher.
In Oracle Reports, the data model (SQL query or extraction logic) and layout are contained in a single file. In Oracle BI Publisher the data model and the layout are separate objects. The conversion utility therefore generates several files that will make up your report in Oracle BI Publisher. In most cases this will include a PL/SQL specification and body that you will need to create in the database that contains the data for the report. The utility will also generate a report definition file and a layout template file that you will upload to the Oracle BI Publisher repository.
Once uploaded, test the report to ensure that the output is as expected and make any changes to the report as needed. Some reports will contain structures that the utility cannot convert. These must be manually implemented in the converted reports.
The overall flow for the conversion process is as follows:
1. Run the conversion utility.
2. Load the PL/SQL package into the database.
3. Upload the report to the Oracle BI Publisher repository.
4. Test the report and check the conversion log files to identify any manual modifications needed to complete the conversion.
17.2 PrerequisitesThis section describes the steps required before running the conversion utility.
Conversion Utility
17-2 Oracle Business Intelligence New Features Guide
17.2.1 Reports and Oracle Reports XML FormatDuring the conversion process, the source reports must eventually be in Oracle Reports XML format. Oracle Reports XML format is supported in Oracle Reports 9i and above.
If your source reports are not in Oracle Reports XML format, the conversion utility will do this conversion automatically. However, this requires Oracle Reports Designer 9i or later on the same machine where you will do the conversion so that the Oracle BI Publisher conversion utility can call the rwconverter executable to get the reports into Oracle Reports XML format.
To get Oracle Reports Designer, download Oracle Developer Suite 10g (10.1.2.0.2) from:
http://www.oracle.com/technology/software/products/ids/index.html
and install Reports Designer.
If your reports are already in Oracle Reports XML format, there is no need to install Oracle Reports.
17.2.2 Update CLASSPATH with Needed JAR FilesTo run the conversion utilities you need the following jar files in your classpath:
■ Collections.zip -
■ xmlparserv2-904.jar -
■ xdocore.jar
■ aolj.jar
For customers using Oracle Enterprise Business Suite (EBS), these libraries are available under JAVA_TOP. If these libraries are not there, the corresponding classes will be there under the JAVA_TOP.
For customer using Oracle BI Publisher Enterprise (sometimes referred to as "standalone"), all these libraries are available under WEB-INF\lib. Example:
C:\Oracle\bi\oc4j_bi\j2ee\home\applications\xmlpserver\xmlpserver\WEB-INF\lib
17.2.3 JDK Version 1.1.8The conversion utility requires JDK version 1.1.8 or later.
17.3 Conversion UtilityBIPBatchConversion is the utility to migrate reports from Oracle Reports to BI Publisher.
It takes the following parameters:
■ -source — (required) Source directory for Oracle Reports files. All reports must be in the same format - either RDF or XML.
■ -target — (required) Target directory to create Oracle BI Publisher report objects. This includes the Oracle BI Publisher Report file (.xdo), the layout template file (.rtf), the PL/SQL package, and log file.
Conversion Utility
Converting Reports from Oracle Reports to Oracle BI Publisher 17-3
■ -oraclehome — (optional) If your reports are in Oracle Reports XML format do not specify this parameter. If your reports are not in Oracle Reports XML format, specify the Oracle home path where Oracle Report Designer (9i or later version) is installed. BIPBatchMigration assumes that rwconverter is contained in the bin directory beneath the Oracle Home path.
BIPBatchConversion requires rwconverter from Oracle Reports to convert the report from RDF format to XML format.
■ -debug — (optional) To run the utility in debug mode and write debug statements to the log file.
Command Line Usage:
java ... BIPBatchConversion [-debug] -source SourceDirectory -target TargetDirectory [-oraclehome OracleHomePath]
Sample Commands to run BIPBatchConversion:
Example 17–1 Source Report in Oracle Reports RDF File
This example requires you to specify the -oraclehome path.
java.exe -classpath D:\Jdev\project\xdocore.jar;d:\Jdev\project\collections.zip;d:\Jdev\project\aolj.jar;d:\Jdev\project\xmlparserv2-904.jar oracle.apps.xdo.rdfparser.BIPBatchConversion -source d:\reports\pay -target d:\reports\pay\output -oraclehome D:\oracle\BIToolsHome_1 -debug
Example 17–2 Source Report in Oracle Reports XML Format
Do not specify the -oraclehome parameter in this example.
java.exe -classpath D:\Jdev\project\xdocore.jar;d:\Jdev\project\collections.zip;d:\Jdev\project\aolj.jar;d:\Jdev\project\xmlparserv2-904.jar oracle.apps.xdo.rdfparser.BIPBatchConversion -source d:\reports\pay -target d:\reports\pay\output -debug
See the Oracle BI Publisher 10.1.3.3 Java API reference (Javadoc) for more details on this utility and other related conversion APIs in the rdfparser package.
17.3.1 Output FilesThe conversion utility will generate the following output files for each report:
■ Report definition file that includes the Data Model (for example: REPORT.xdo)
(Note: This file is not needed for E-Business Suite users; see the following note under DataTemplate.)
■ DataTemplate (for example: REPORT_template.xml)
(Note: this is not required for Oracle BI Publisher Enterprise users because the data template is embedded in REPORT.xdo.)
■ Default PL/SQL package specification (for example: REPORTS.pls)
■ Default PL/SQL package body (for example: REPORTB.pls)
■ RTF Layout Template (for example: REPORT.rtf)
■ Log file (for example: REPORT.log)
Upload PL/SQL Package to the Database
17-4 Oracle Business Intelligence New Features Guide
For example, assume you have a report called raxinv.rdf located in D:\reports\pay. Running this command:
java.exe -classpath D:\Jdev\project\xdocore.jar;d:\Jdev\project\collections.zip;d:\Jdev\project\aolj.jar;d:\Jdev\project\xmlparserv2-904.jar oracle.apps.xdo.rdfparser.BIPBatchConversion -source d:\reports\pay -target d:\reports\pay\output -oraclehome D:\oracle\BIToolsHome_1 -debug
Will generate the following output files:
■ PL/SQL Package Specification: C:\BIPublisher_reports\ raxinv\raxinvS.pls
■ PL/SQL Package Body: C:\BIPublisher_reports\ raxinv\raxinvB.pls
■ Report definition file: C:\BIPublisher_reports\ raxinv\raxinv.xdo
■ DataTemplate: C:\BIPublisher_reports\ raxinv\raxinv_template.xml
■ RTF Layout Template: C:\BIPublisher_reports\raxinv\raxinv.rtf
■ Log file: C:\BIPublisher_reports\raxinv\raxinv.log
17.4 Upload PL/SQL Package to the DatabaseMany converted Oracle Reports will generate a PL/SQL package specification file and a PL/SQL package body file as follows:
■ <report_name>S.pls
■ <report_name>B.pls
Run the PL/SQL package files against your Oracle Database as follows. This will create the PL/SQL package specification and body.
SQL> @C:\BIPublisher_reports\ raxinv\raxinvS.plsSQL> @C:\BIPublisher_reports\ raxinv\raxinvB.pls
17.5 Putting Converted Reports into the Oracle BI Publisher RepositoryMaking your reports visible in the Oracle BI Publisher repository is a two-step process:
1. Copy the report folders into the repository.
2. Refresh the repository metadata.
If you have a file-based repository, copy the report folder structure to the file system. For example, suppose your repository path was set to:
C:\oracle\bi\xmlp\XMLP
For the report in the previous example, simply copy the report directory and all its files to the desired folder structure in the existing report repository.
For example:
> copy C:\BIPublisher_reports\raxinv C:\oracle\bi\xmlp\XMLP\Shared Folders\Converted reports
If you are using the XML DB functionality of the Oracle Database as your report repository, there are several ways you can upload content. One method is through WebDAV.
Testing and Tweaking Your Reports
Converting Reports from Oracle Reports to Oracle BI Publisher 17-5
For options and details on how to load reports into your XML DB based repository, please refer to the following topics in the Oracle XML DB Developer's Guide (http://download.oracle.com/docs/cd/B19306_01/appdev.102/b14259/toc.htm):
■ "Loading XML Content into Oracle XML DB"
■ "FTP, HTTP(S), and WebDAV Access to Repository Data"
Once you have loaded report directories into your repository, log on to Oracle BI Publisher with administrator privileges and select "Refresh Metadata" from the System Maintenance Section of the Oracle BI Publisher Admin page. Now all reports should be available for testing and execution.
17.6 Testing and Tweaking Your ReportsNow that you have successfully converted your reports, created the needed PL/SQL package, and moved the report definition and RTF template files into the Oracle BI Publisher repository, you should test your reports to make sure they are providing the data and formatting that you want.
Most converted reports will run exactly as expected without further modification. More complex reports may require some additional modification to work as desired. Following are some common issues with converted reports.
17.6.1 Data Template and PL/SQL FilesOccasionally when converting a more complex Oracle Reports report, the Data Template or PL/SQL may contain minor errors and require manual correction.
The conversion utility will move all formula columns to the select clause of the SQL query in the data model. In most cases this will not cause a problem. However, if any of the arguments to the formula is a summary column, this will not work because the summary column will not be calculated at the time the query is executed.
To correct this problem you will need to remove this formula from the select clause and implement the formula as XSL in your layout template. Most of these formulas are used either for simple addition or summation or currency conversion, formatting, and rounding.
17.6.2 RTF Layout Template FileThe majority of Oracle Reports reports use simple 'if' formatting logic that is automatically converted to equivalent XSL-FO and inserted into form fields in the RTF layout template. However, there is no support for PL/SQL in RTF layout templates. The conversion utility does not convert any PL/SQL format trigger logic present in the report. Instead the conversion utility writes all the format trigger code to a log file. You will need to implement any corresponding PL/SQL logic as XSL code.
To aid in this process, the resulting RTF template will contain form fields that hold the format trigger names that are called; these fields will be highlighted in red. You can then refer to the log to find the actual PL/SQL code used in the original Oracle Report. You will need to rewrite these PL/SQL triggers as XSL-FO.
For more information, see the "Supported XSL-FO Elements" section of the Oracle Business Intelligence Publisher Report Designer’s Guide (http://download.oracle.com/docs/cd/E10091_01/doc/bip.1013/b40017/toc.htm)

Testing and Tweaking Your Reports
17-6 Oracle Business Intelligence New Features Guide
18
Support for Digital Signature in PDF Documents 18-1
18
Support for Digital Signature in PDFDocuments
This chapter describes a feature of BI Publisher that was introduced in Release 10.1.3.3 and that applies to Releases 10.1.3.3 through 10.1.3.4. Information about this feature is also provided in the BI Publisher documentation set that has been updated for Release 10.1.3.4.
Release 10.1.3.3 introduces BI Publisher’s support for Digital Signature in PDF Documents, as described in this chapter.
18.1 IntroductionYou can add a digital signature to PDF output documents. Digital signatures enable you to verify the authenticity of the documents that you send and receive.
BI Publisher can access a digital ID file from a central, secure location and at runtime, sign the PDF output with the digital ID. The digital signature verifies the signer’s identity and ensures that the document has not been altered after it was signed.
For additional information on digital signatures, see the following sources:
■ Digital ID Introduction by Verisign
– http://www.verisign.com/support/tlc/per/whitepaper.htm
– http://www.verisign.com/stellent/groups/public/documents/guides/005326.pdf
■ Digital Signature by Adobe
– http://www.adobe.com/security/digsig.html
■ Digital Signatures in PDF and Acrobat
– http://www.acrobatusers.com/articles/2006/07/digital_signatures/index.php
18.2 PrerequisitesBefore you can implement digital signatures with BI Publisher output documents, you need the following:
■ A digital ID obtained from a public certificate authority or from a private/internal certificate authority (if for internal use only). You must copy the digital ID file to a secure location of the file system on the server that is accessible by the BI Publisher server.
Limitations
18-2 Oracle Business Intelligence New Features Guide
18.3 LimitationsUse of digital signatures with BI Publisher output documents has the following limitations:
■ Only a single digital ID can be registered with BI Publisher in this release. Future releases will support multiple digital IDs.
■ Only reports submitted through BI Publisher's Schedule Report interface can include the digital signature.
■ The digital signature is enabled at the report level; therefore, multiple templates assigned to the same report share the digital signature properties.
18.4 Integration With Oracle BI PublisherThe following steps summarize the tasks required to set up and use digital signature with Oracle BI Publisher:
1. Register the digital ID in the BI Publisher Admin interface.
2. Specify the Roles that are authorized to sign documents.
3. (Optional for PDF templates) Add a signature field to the PDF template in which to place the digital signature at runtime.
4. Enable Digital Signature for the report in the Runtime Configuration properties and specify the position to place the digital signature on the completed document. This can be a signature field (for PDF templates), general location (top left, top center, or top right), or you can specify x and y coordinates.
5. Log in to BI Publisher as a user with an authorized role and submit the report through the BI Publisher scheduler, choosing PDF output. When the report completes it will be signed with your digital ID in the specified location of the document.
18.4.1 Digital Signature ID Registration And Allowed Role AssignmentIn this release, BI Publisher supports the identification of a single digital ID file only. Register the digital ID in the BI Publisher Admin page as follows:
1. Log in to BI Publisher with Administrator credentials.
2. Select the Admin tab, and then from the Security Center menu select Digital Signature.
The following screenshot shows the new Digital Signature entry available from the Admin tab.
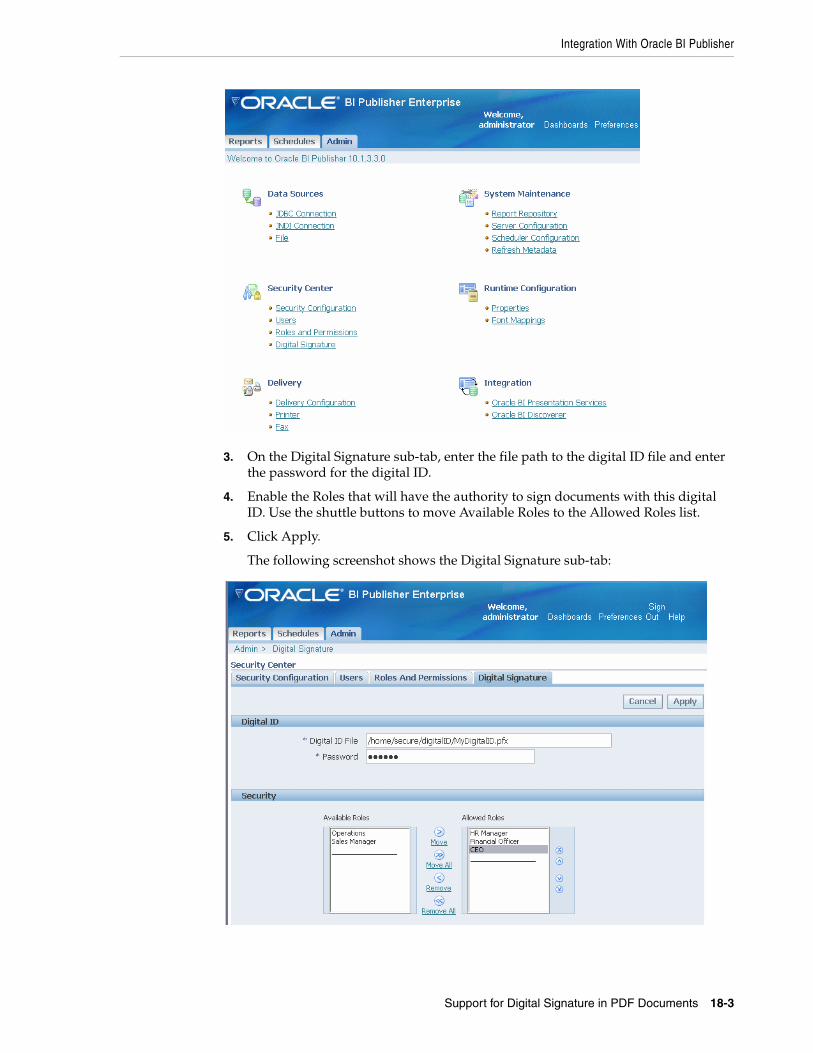
Integration With Oracle BI Publisher
Support for Digital Signature in PDF Documents 18-3
3. On the Digital Signature sub-tab, enter the file path to the digital ID file and enter the password for the digital ID.
4. Enable the Roles that will have the authority to sign documents with this digital ID. Use the shuttle buttons to move Available Roles to the Allowed Roles list.
5. Click Apply.
The following screenshot shows the Digital Signature sub-tab:
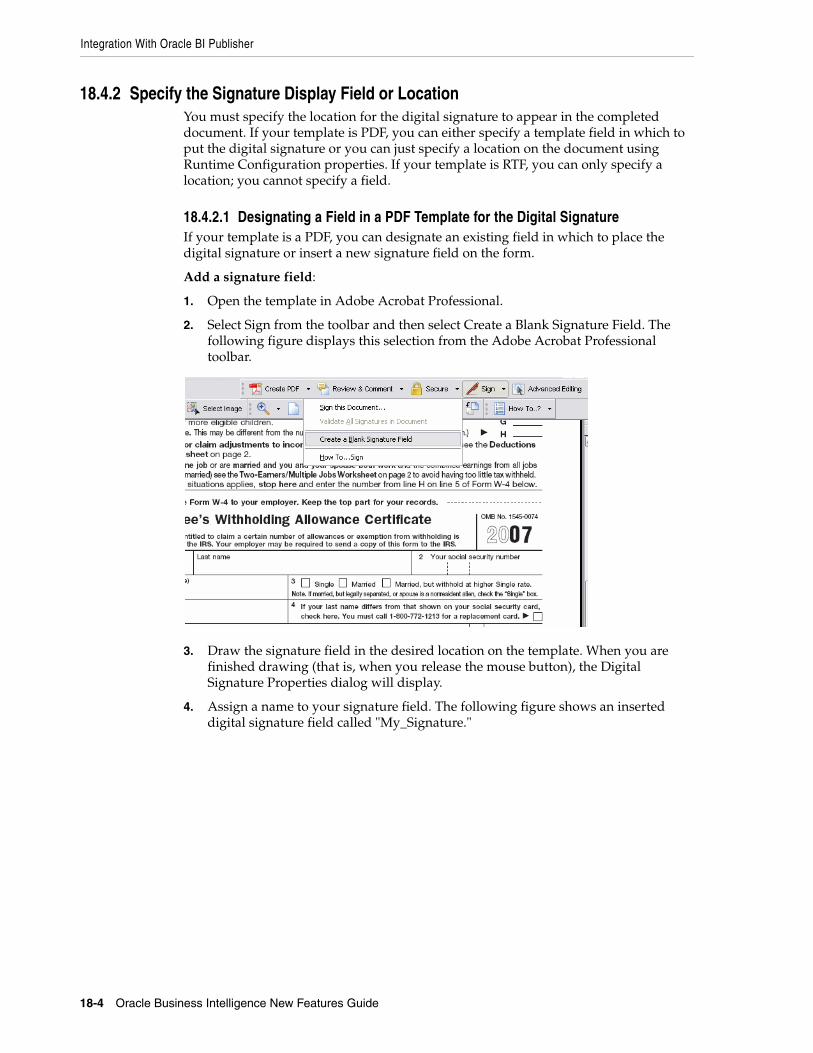
Integration With Oracle BI Publisher
18-4 Oracle Business Intelligence New Features Guide
18.4.2 Specify the Signature Display Field or Location You must specify the location for the digital signature to appear in the completed document. If your template is PDF, you can either specify a template field in which to put the digital signature or you can just specify a location on the document using Runtime Configuration properties. If your template is RTF, you can only specify a location; you cannot specify a field.
18.4.2.1 Designating a Field in a PDF Template for the Digital SignatureIf your template is a PDF, you can designate an existing field in which to place the digital signature or insert a new signature field on the form.
Add a signature field:
1. Open the template in Adobe Acrobat Professional.
2. Select Sign from the toolbar and then select Create a Blank Signature Field. The following figure displays this selection from the Adobe Acrobat Professional toolbar.
3. Draw the signature field in the desired location on the template. When you are finished drawing (that is, when you release the mouse button), the Digital Signature Properties dialog will display.
4. Assign a name to your signature field. The following figure shows an inserted digital signature field called "My_Signature."
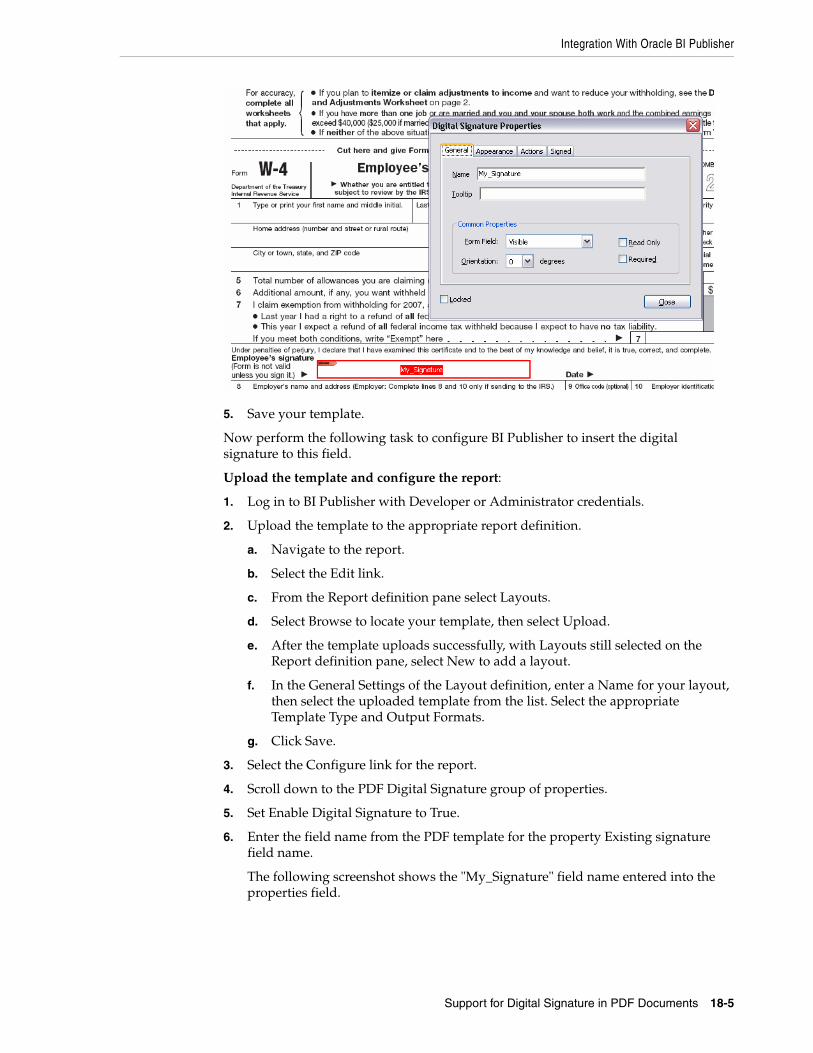
Integration With Oracle BI Publisher
Support for Digital Signature in PDF Documents 18-5
5. Save your template.
Now perform the following task to configure BI Publisher to insert the digital signature to this field.
Upload the template and configure the report:
1. Log in to BI Publisher with Developer or Administrator credentials.
2. Upload the template to the appropriate report definition.
a. Navigate to the report.
b. Select the Edit link.
c. From the Report definition pane select Layouts.
d. Select Browse to locate your template, then select Upload.
e. After the template uploads successfully, with Layouts still selected on the Report definition pane, select New to add a layout.
f. In the General Settings of the Layout definition, enter a Name for your layout, then select the uploaded template from the list. Select the appropriate Template Type and Output Formats.
g. Click Save.
3. Select the Configure link for the report.
4. Scroll down to the PDF Digital Signature group of properties.
5. Set Enable Digital Signature to True.
6. Enter the field name from the PDF template for the property Existing signature field name.
The following screenshot shows the "My_Signature" field name entered into the properties field.
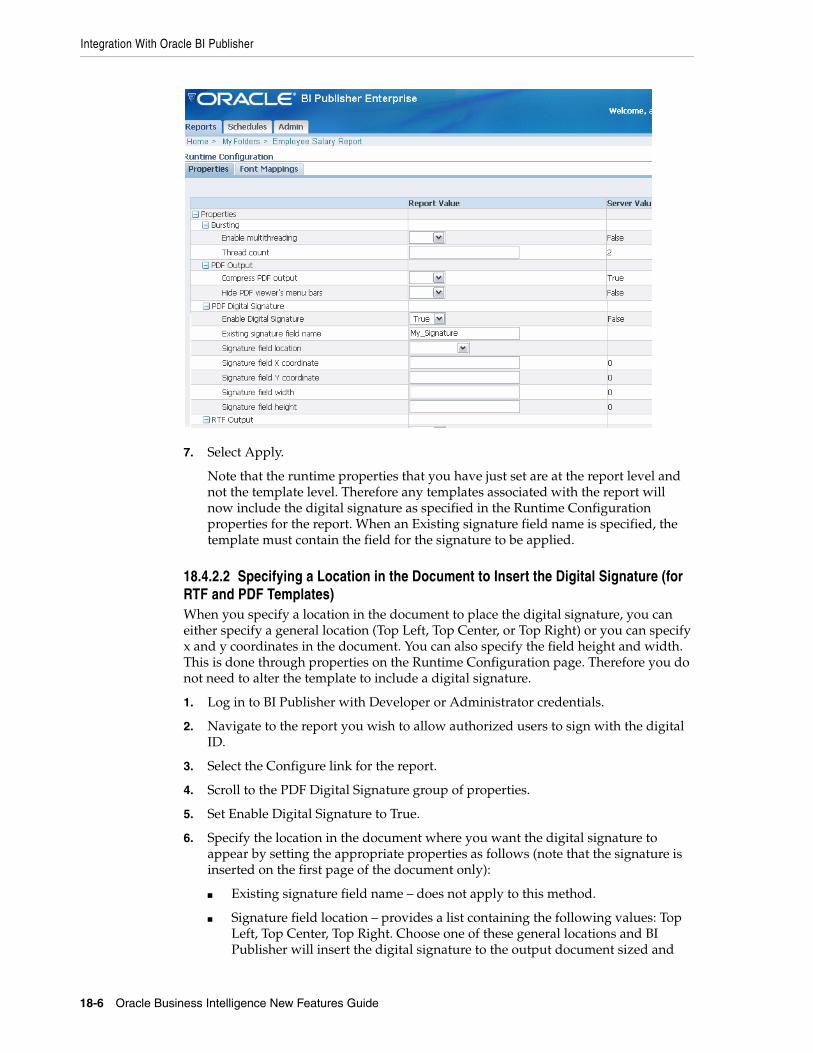
Integration With Oracle BI Publisher
18-6 Oracle Business Intelligence New Features Guide
7. Select Apply.
Note that the runtime properties that you have just set are at the report level and not the template level. Therefore any templates associated with the report will now include the digital signature as specified in the Runtime Configuration properties for the report. When an Existing signature field name is specified, the template must contain the field for the signature to be applied.
18.4.2.2 Specifying a Location in the Document to Insert the Digital Signature (for RTF and PDF Templates)When you specify a location in the document to place the digital signature, you can either specify a general location (Top Left, Top Center, or Top Right) or you can specify x and y coordinates in the document. You can also specify the field height and width. This is done through properties on the Runtime Configuration page. Therefore you do not need to alter the template to include a digital signature.
1. Log in to BI Publisher with Developer or Administrator credentials.
2. Navigate to the report you wish to allow authorized users to sign with the digital ID.
3. Select the Configure link for the report.
4. Scroll to the PDF Digital Signature group of properties.
5. Set Enable Digital Signature to True.
6. Specify the location in the document where you want the digital signature to appear by setting the appropriate properties as follows (note that the signature is inserted on the first page of the document only):
■ Existing signature field name – does not apply to this method.
■ Signature field location – provides a list containing the following values: Top Left, Top Center, Top Right. Choose one of these general locations and BI Publisher will insert the digital signature to the output document sized and
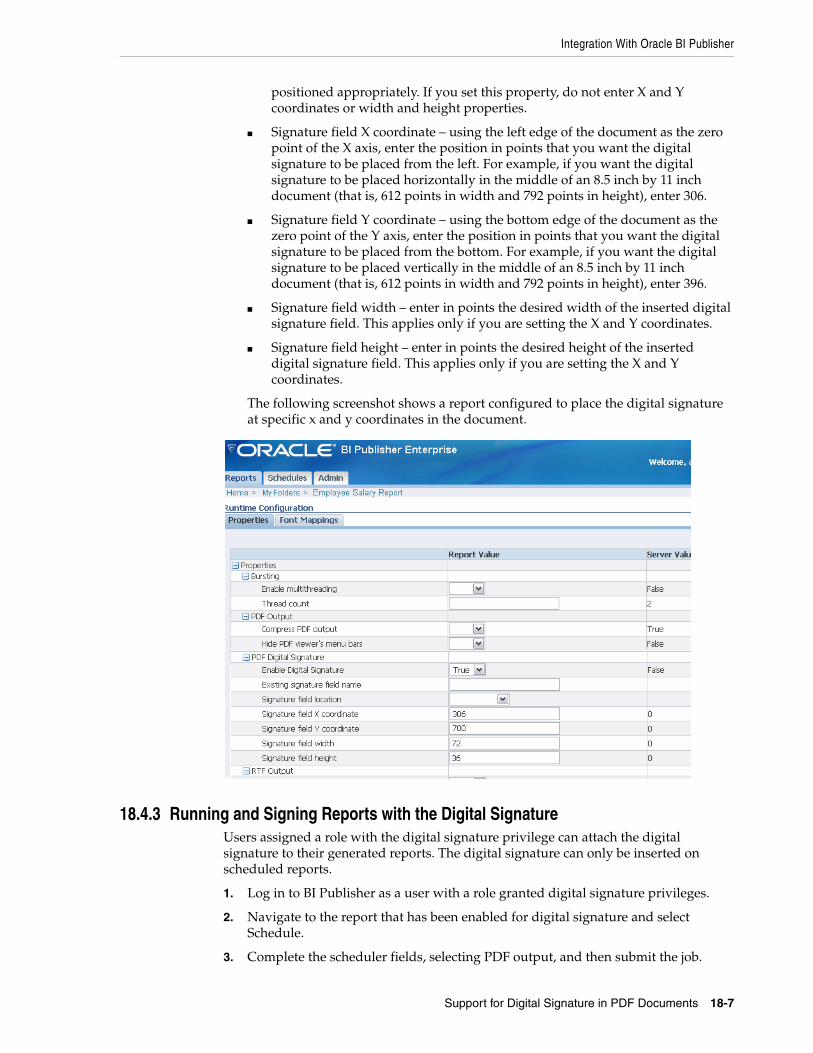
Integration With Oracle BI Publisher
Support for Digital Signature in PDF Documents 18-7
positioned appropriately. If you set this property, do not enter X and Y coordinates or width and height properties.
■ Signature field X coordinate – using the left edge of the document as the zero point of the X axis, enter the position in points that you want the digital signature to be placed from the left. For example, if you want the digital signature to be placed horizontally in the middle of an 8.5 inch by 11 inch document (that is, 612 points in width and 792 points in height), enter 306.
■ Signature field Y coordinate – using the bottom edge of the document as the zero point of the Y axis, enter the position in points that you want the digital signature to be placed from the bottom. For example, if you want the digital signature to be placed vertically in the middle of an 8.5 inch by 11 inch document (that is, 612 points in width and 792 points in height), enter 396.
■ Signature field width – enter in points the desired width of the inserted digital signature field. This applies only if you are setting the X and Y coordinates.
■ Signature field height – enter in points the desired height of the inserted digital signature field. This applies only if you are setting the X and Y coordinates.
The following screenshot shows a report configured to place the digital signature at specific x and y coordinates in the document.
18.4.3 Running and Signing Reports with the Digital SignatureUsers assigned a role with the digital signature privilege can attach the digital signature to their generated reports. The digital signature can only be inserted on scheduled reports.
1. Log in to BI Publisher as a user with a role granted digital signature privileges.
2. Navigate to the report that has been enabled for digital signature and select Schedule.
3. Complete the scheduler fields, selecting PDF output, and then submit the job.
Integration With Oracle BI Publisher
18-8 Oracle Business Intelligence New Features Guide
4. The completed PDF will display the digital signature.
18.4.4 Additional PDF Security FeaturesBI Publisher also supports secured PDF to prevent unauthorized users from opening, printing, updating or cutting and pasting the PDF document contents. Digital signature is also supported for PDF reports configured with these security features enabled.
Users with the Developer or Administrator role can change PDF security settings for a report. To set PDF security properties, select the Configure link for the report. For more information about the PDF security properties, see the topic: Setting Runtime Properties in the Oracle Business Intelligence Publisher Report Designer’s Guide.
19
Support for PostScript Printers 19-1
19
Support for PostScript Printers
This chapter describes a feature of BI Publisher that was introduced in Release 10.1.3.3 and that applies to Releases 10.1.3.3 through 10.1.3.4. Information about this feature is also provided in the BI Publisher documentation set that has been updated for Release 10.1.3.4.
Release 10.1.3.3 introduces BI Publisher’s support for PostScript printers, as described in this chapter.
19.1 IntroductionPDF is a popular output format for business reports and is printable from viewer software such as Adobe Reader. However, some reports require printing directly from the report server. For example, paychecks and invoices are usually printed as scheduled batch jobs. Some newer printers with PostScript Level 3 compliant Raster Image Processing can natively support PDF documents, but there are still many printers in business use that support only PostScript Level 2 that cannot print PDF documents directly.
BI Publisher provides native support for PostScript Level printers. Previously, to enable printing from the BI Publisher server to a PostScript printer, you configured a filter to invoke a third-party utility to perform the conversion. Now BI Publisher provides the utility to convert PDF to PostScript 2.0. If the printer supports PostScript 2.0, you are no longer required to use a third-party utility to print directly from the server.
19.2 Setting Up the Print Server to Use the ConverterThe conversion utility is provided as an option from the Filter list of the Print Server definition page:
1. Log in to Oracle BI Publisher as an Administrator.
2. From the Admin tab, under the Delivery heading, select Printer.
3. Select an existing print server, or to add a new one, click Add Server.
4. Under the General properties, select PDF to PostScript from the Filter field list. The following screenshot shows the Filter field list of the print server definition.
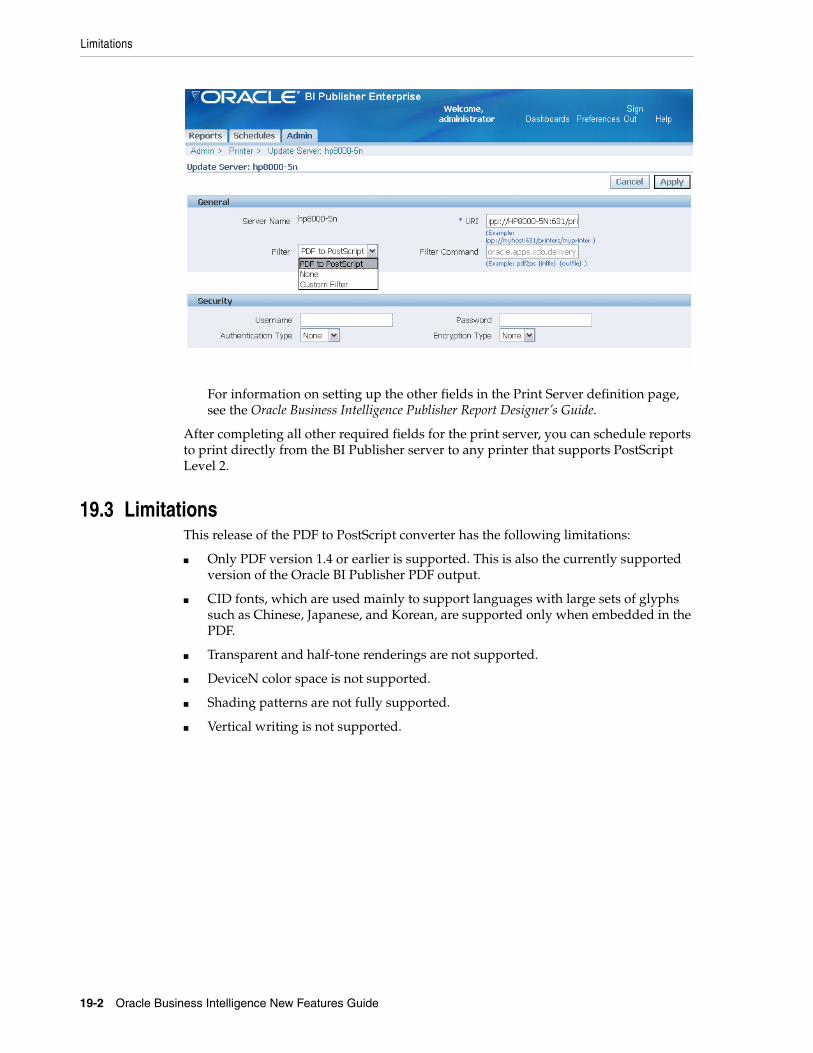
Limitations
19-2 Oracle Business Intelligence New Features Guide
For information on setting up the other fields in the Print Server definition page, see the Oracle Business Intelligence Publisher Report Designer’s Guide.
After completing all other required fields for the print server, you can schedule reports to print directly from the BI Publisher server to any printer that supports PostScript Level 2.
19.3 LimitationsThis release of the PDF to PostScript converter has the following limitations:
■ Only PDF version 1.4 or earlier is supported. This is also the currently supported version of the Oracle BI Publisher PDF output.
■ CID fonts, which are used mainly to support languages with large sets of glyphs such as Chinese, Japanese, and Korean, are supported only when embedded in the PDF.
■ Transparent and half-tone renderings are not supported.
■ DeviceN color space is not supported.
■ Shading patterns are not fully supported.
■ Vertical writing is not supported.

20
Additional New Features in Release 10.1.3.3 20-1
20Additional New Features in Release 10.1.3.3
This chapter describes features of BI Publisher that were introduced in Release 10.1.3.3 and that apply to Releases 10.1.3.3 through 10.1.3.4. Information about these feature is also provided in the BI Publisher documentation set that has been updated for Release 10.1.3.4. This chapter contains the following sections:
■ Section 20.1, "Support for CSV Output"
■ Section 20.2, "Report Definition Features"
■ Section 20.3, "Report Viewing Features"
■ Section 20.4, "New Property for LDAP Security Model"
20.1 Support for CSV OutputYou can use Comma Separated Value (CSV) as an output type for any report with a simple <rowset>/<row> data structure. Support for this output type is based on the structure of the data. No template is required.
20.2 Report Definition FeaturesThe following new features have been added to enhance options when defining reports:
■ BI Publisher's data template data source provides native support for BLOB, CLOB, long, and raw data types.
■ When defining parameters for a report, if you select Menu as your parameter type, you have the option under the "Can select all" check box to choose between "Null value passed" and "All values passed". Previously, selecting "all" passed a null value by default.
■ The following properties are added to the Runtime Configuration page:
– RTF Output: Default Font - enter the default font name and size (for example: Arial:12) to use when no font is defined. This is particularly useful for controlling the sizing of empty table cells in generated reports.
– HTML Output: Use percentage width for table columns - set this property to True to render table columns according to a percentage value of the total width of the table rather than as a value in points.
– FO Processing:
* Disable external references - a "True" setting (default) disallows the importing of secondary files such as subtemplates or other XML
Report Viewing Features
20-2 Oracle Business Intelligence New Features Guide
documents during XSL processing and XML parsing. This increases the security of your system. Set this to "False" if the report or template calls external files.
* FO Parsing Buffer Size - (default 1,000,000) sets the size of the buffer for the FO Processor. When the buffer is full, the elements from the buffer are rendered in the report. Reports with large tables or crosstabs might require a larger buffer to properly render those objects in the report. Increase the size of the buffer at the report level for these reports. Note that increasing this value will affect the memory consumption of your system.
20.3 Report Viewing FeaturesThe following new features are available from the View report page:
■ Views created in the online Analyzer can be saved as templates.
■ When in View mode, you see "Link to this Report" displayed on the page. This enables you to capture the URL of the currently viewed report. The Link to this Report selection has four options:
– Current Page
– No Header
– No Parameters
– Document Only
20.4 New Property for LDAP Security ModelFor the LDAP security model, a new property, Group Retrieval Size, has been added. This enables support of the LDAPv3 control extension for simple paging of search results. By default, pagination is not used. If this property is provided then the value determines the number of results to return on a page (for example, 200).
Your LDAP server must support control type 1.2.840.113556.1.4.319 to support this feature, such as OID 10.1.4. See your LDAP server documentation for information on support of this control type. For more information about LDAP pagination and the required control type, see the article: RFC 2696 - LDAP Control Extension for Simple Paged Results Manipulation (http://www.faqs.org/rfcs/rfc2696.html) .
21
New Features in Release 10.1.3.3.1 21-1
21 New Features in Release 10.1.3.3.1
This chapter describes features of BI Publisher that were introduced in Release 10.1.3.3.1 and that apply to Releases 10.1.3.3.1 through 10.1.3.4. Information about these features is also provided in the BI Publisher documentation set that has been updated for Release 10.1.3.4. This chapter contains the following sections:
■ Section 21.1, "Time Out Value for Web Service Data Sources"
■ Section 21.2, "Bidirectional Function for eText Data Fields"
■ Section 21.3, "Default Repository"
21.1 Time Out Value for Web Service Data SourcesYou can now set a time out value when creating a data set based on a Web service. The Data Set Details definition page contains the "Time Out" field. The default is 60 seconds. Enter a numeric value to equal the number of seconds that BI Publisher will wait for a response from the Web service before giving up.
To set the time out value for a Web service data set:
1. Navigate to the report, and select Edit.
2. Under the report Data Model region, select the Web service data set.
3. In the Details region, enter the desired time out period in seconds (default is 60 seconds).
21.2 Bidirectional Function for eText Data FieldsStarting with 10.1.3.3.1 there is a new BIDI function to preserve the correct order of characters for bidirectional languages in eText templates. If you have data fields that contain bidirectional data (for example, Arabic or Hebrew fields) you can use the BIDI function to preserve the correct right to left ordering of the characters.
To use the BIDI function, enter the following in your template for each field that will contain data to be treated as bidirectional:
BIDI(ELEMENT_NAME)For example:
<POSITION> <LENGTH> <FORMAT> <PAD> <DATA> <COMMENTS> 9 21 Alpha L,’ ’ BIDI(VENDOR_ADDRESS) Vendor Address In this example, the data for the element VENDOR_ADDRESS will be treated as bidirectional.
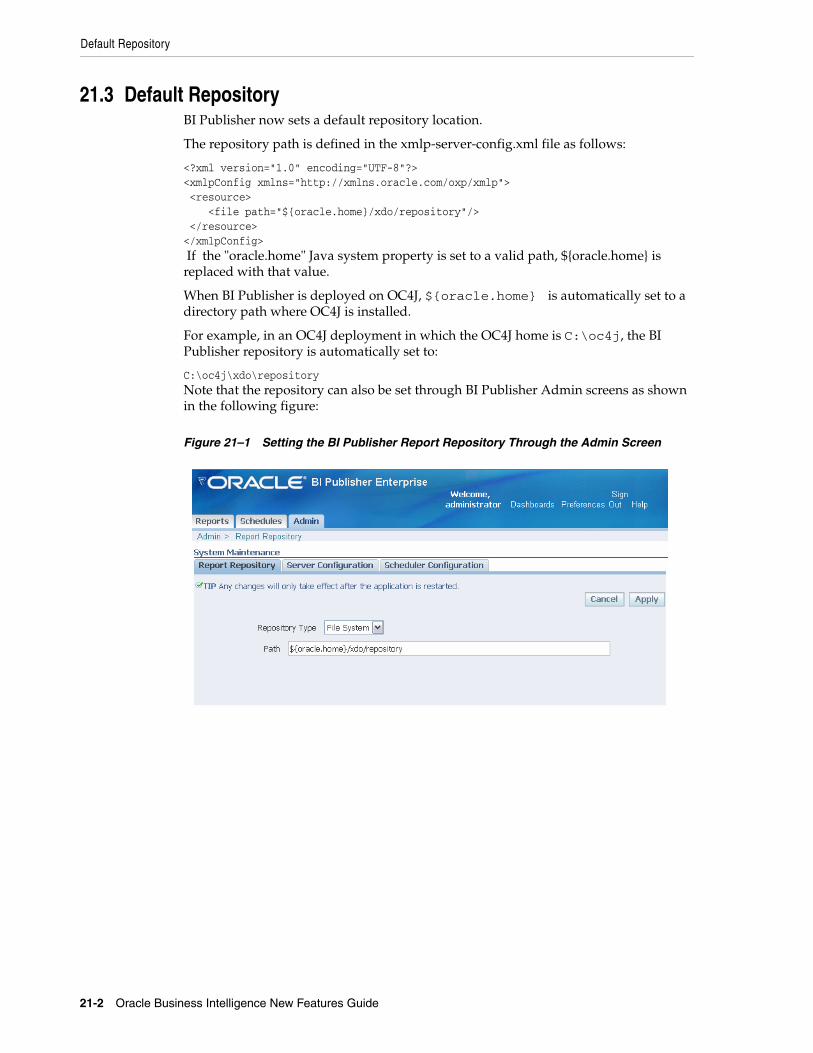
Default Repository
21-2 Oracle Business Intelligence New Features Guide
21.3 Default Repository BI Publisher now sets a default repository location.
The repository path is defined in the xmlp-server-config.xml file as follows:
<?xml version="1.0" encoding="UTF-8"?><xmlpConfig xmlns="http://xmlns.oracle.com/oxp/xmlp"> <resource> <file path="${oracle.home}/xdo/repository"/> </resource></xmlpConfig> If the "oracle.home" Java system property is set to a valid path, ${oracle.home} is replaced with that value.
When BI Publisher is deployed on OC4J, ${oracle.home} is automatically set to a directory path where OC4J is installed.
For example, in an OC4J deployment in which the OC4J home is C:\oc4j, the BI Publisher repository is automatically set to:
C:\oc4j\xdo\repositoryNote that the repository can also be set through BI Publisher Admin screens as shown in the following figure:
Figure 21–1 Setting the BI Publisher Report Repository Through the Admin Screen
22
New Features in Release 10.1.3.3.2 22-1
22New Features in Release 10.1.3.3.2
This chapter describes two features of BI Publisher that were introduced in Release 10.1.3.3.2 and apply to Releases 10.1.3.3.2 through 10.1.3.4. Information about these features is also provided in the BI Publisher documentation set that has been updated for Release 10.1.3.4. This chapter contains the following sections:
■ Section 22.1, "Support for Document Cache"
■ Section 22.2, "Support for New Output Types"
22.1 Support for Document CacheIn release 10.1.3.3.2, BI Publisher introduces document caching. Document caching is enabled at the report level. With document cache enabled, when a user views the report online, the document (data plus layout) will be placed in cache. When the same user uses the online Report Viewer to view the exact same report (same layout, same output type, same parameter selections) the document will be retrieved from cache. The document will remain in cache according to the cache specifications set in BI Publisher's System Maintenance page. Note that scheduled reports do not use document cache.
To enable document cache for a report, navigate to the report and select the Edit link. On the Report Editor page, view the Report Properties. Under General Settings, select Enable Document Cache.
For information on setting the cache specifications, see the Oracle Business Intelligence Publisher Report Designer’s Guide.
22.2 Support for New Output TypesThe 10.1.3.3.2 release of BI Publisher introduces the following changes to the report output types available:
■ MHTML - (Mime HyperText Markup Language) this format enables you to save a Web page and its resources as a single MHTML file (.mht), in which all images and linked files will be saved as a single entity. Use this option if you want to send or save HTML output and retain the embedded images and stylesheet formatting.
■ Excel2000 - choose this output type if you have Microsoft Excel 2000 or 2002. Note that although Excel2000 is a new choice, it is actually the Excel option that was available in previous releases. This option generates HTML that can be opened in Excel. It does not support embedded images.

Support for New Output Types
22-2 Oracle Business Intelligence New Features Guide
■ Excel - choose this output type if you have Microsoft Excel 2003 or later installed. This option generates an MHTML format file that can be opened in Excel 2003 or later. This option supports embedded images, such as charts and logos.
23
New Features in Release 10.1.3.3.3 23-1
23New Features in Release 10.1.3.3.3
This chapter describes features of BI Publisher that were introduced in Release 10.1.3.3.3 and apply to Releases 10.1.3.3.3 through 10.1.3.4. Information about these features is also provided in the BI Publisher documentation set that has been updated for Release 10.1.3.4. This chapter contains the following sections:
■ Section 23.1, "BI Publisher Scheduler Setup Updates Including the Bundling of DataDirect Connect for JDBC Drivers"
■ Section 23.2, ""Link to This Report" Can Now Be Set as a Report Option"
■ Section 23.3, "Enhanced Support for Pagination Control in RTF Output"
■ Section 23.4, "Support for Multiple Cascading Parameters"
■ Section 23.5, "Support for Vertical Alignment of External Graphics"
■ Section 23.6, "Support for Multiple Currency Symbol Displays in Report"
23.1 BI Publisher Scheduler Setup Updates Including the Bundling of DataDirect Connect for JDBC Drivers
The 10.1.3.3.3 release of BI Publisher includes the Hyperion-branded DataDirect Connect for JDBC drivers that you can use to set up connection to your BI Publisher scheduler database. These drivers can be used as an alternative to the native JDBC drivers provided by your database vendor. Because the DataDirect drivers are now packaged with BI Publisher, you no longer need to download and install the drivers manually.
DataDirect Connect for JDBC drivers are provided for the following databases:
■ IBM DB2 v8.1, v9.1
■ Microsoft SQL Server 2000, 2005
■ Oracle 9i, Oracle 10g
Also in this release, the BI Publisher Scheduler Configuration page has been enhanced to facilitate the setup of the supported scheduler databases.
23.1.1 Recommendations for Using DataDirect Connect or Native Database DriversThe following table displays the driver recommendations for the supported scheduler databases:
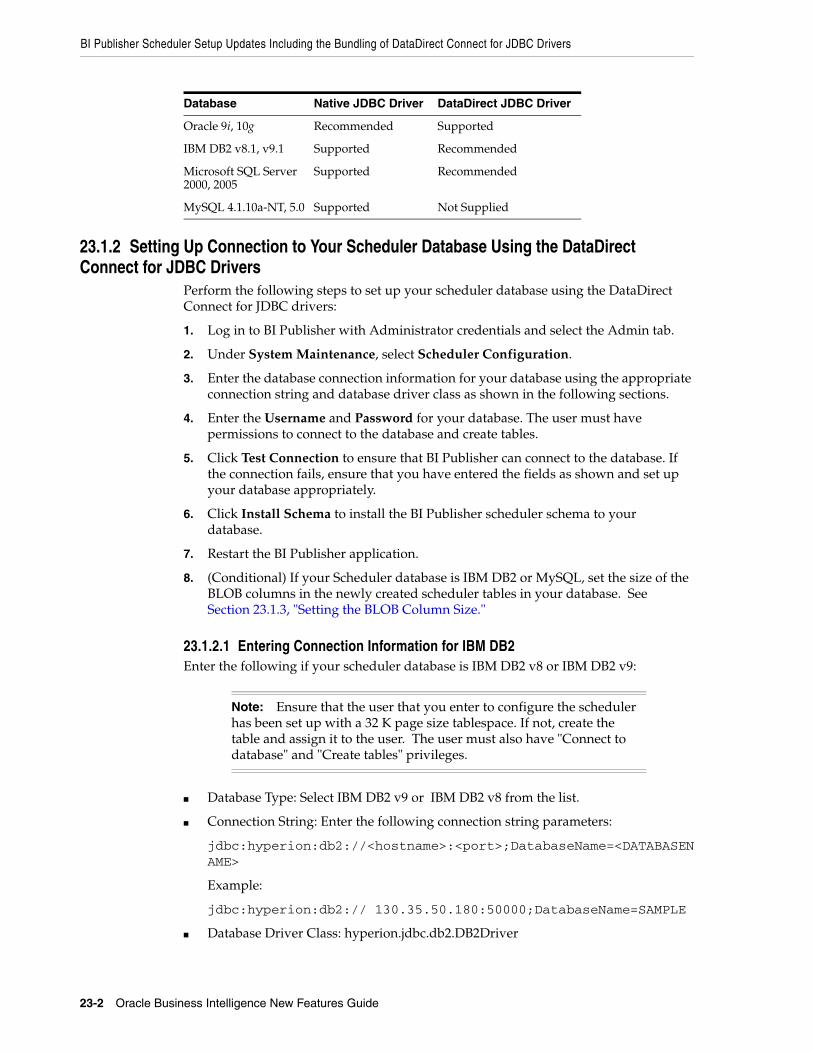
BI Publisher Scheduler Setup Updates Including the Bundling of DataDirect Connect for JDBC Drivers
23-2 Oracle Business Intelligence New Features Guide
23.1.2 Setting Up Connection to Your Scheduler Database Using the DataDirect Connect for JDBC Drivers
Perform the following steps to set up your scheduler database using the DataDirect Connect for JDBC drivers:
1. Log in to BI Publisher with Administrator credentials and select the Admin tab.
2. Under System Maintenance, select Scheduler Configuration.
3. Enter the database connection information for your database using the appropriate connection string and database driver class as shown in the following sections.
4. Enter the Username and Password for your database. The user must have permissions to connect to the database and create tables.
5. Click Test Connection to ensure that BI Publisher can connect to the database. If the connection fails, ensure that you have entered the fields as shown and set up your database appropriately.
6. Click Install Schema to install the BI Publisher scheduler schema to your database.
7. Restart the BI Publisher application.
8. (Conditional) If your Scheduler database is IBM DB2 or MySQL, set the size of the BLOB columns in the newly created scheduler tables in your database. See Section 23.1.3, "Setting the BLOB Column Size."
23.1.2.1 Entering Connection Information for IBM DB2Enter the following if your scheduler database is IBM DB2 v8 or IBM DB2 v9:
■ Database Type: Select IBM DB2 v9 or IBM DB2 v8 from the list.
■ Connection String: Enter the following connection string parameters:
jdbc:hyperion:db2://<hostname>:<port>;DatabaseName=<DATABASENAME>
Example:
jdbc:hyperion:db2:// 130.35.50.180:50000;DatabaseName=SAMPLE
■ Database Driver Class: hyperion.jdbc.db2.DB2Driver
Database Native JDBC Driver DataDirect JDBC Driver
Oracle 9i, 10g Recommended Supported
IBM DB2 v8.1, v9.1 Supported Recommended
Microsoft SQL Server 2000, 2005
Supported Recommended
MySQL 4.1.10a-NT, 5.0 Supported Not Supplied
Note: Ensure that the user that you enter to configure the scheduler has been set up with a 32 K page size tablespace. If not, create the table and assign it to the user. The user must also have "Connect to database" and "Create tables" privileges.
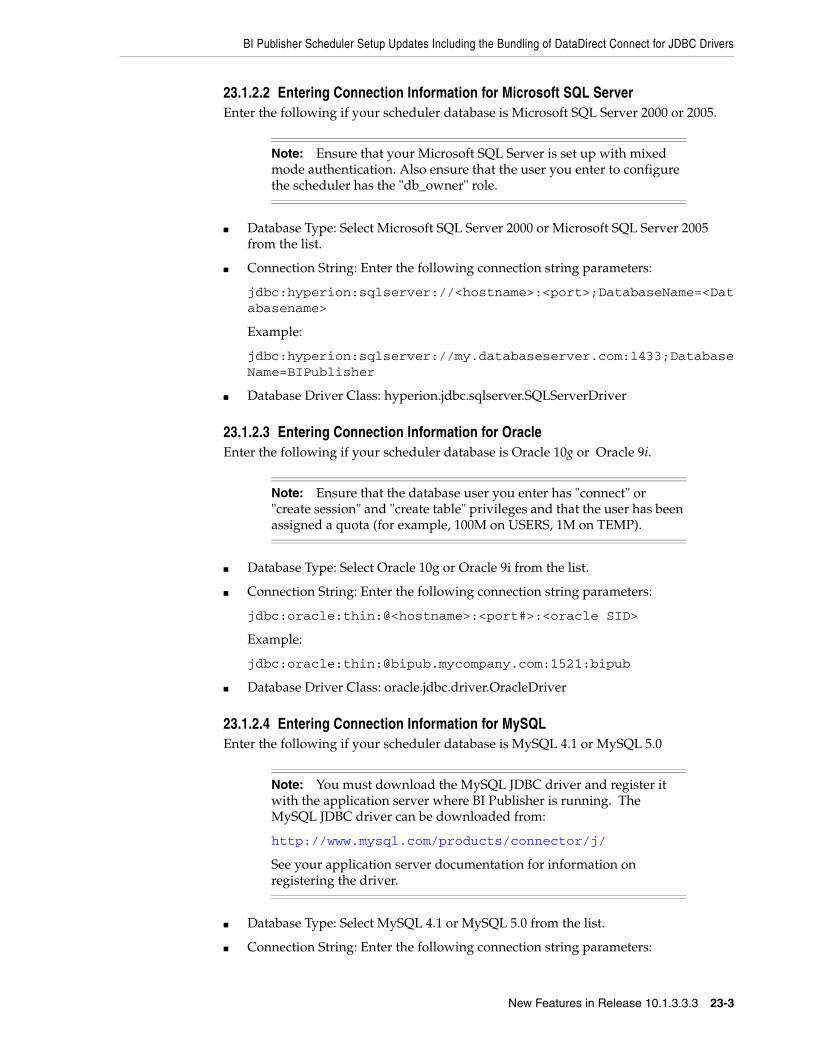
BI Publisher Scheduler Setup Updates Including the Bundling of DataDirect Connect for JDBC Drivers
New Features in Release 10.1.3.3.3 23-3
23.1.2.2 Entering Connection Information for Microsoft SQL ServerEnter the following if your scheduler database is Microsoft SQL Server 2000 or 2005.
■ Database Type: Select Microsoft SQL Server 2000 or Microsoft SQL Server 2005 from the list.
■ Connection String: Enter the following connection string parameters:
jdbc:hyperion:sqlserver://<hostname>:<port>;DatabaseName=<Databasename>
Example:
jdbc:hyperion:sqlserver://my.databaseserver.com:1433;DatabaseName=BIPublisher
■ Database Driver Class: hyperion.jdbc.sqlserver.SQLServerDriver
23.1.2.3 Entering Connection Information for OracleEnter the following if your scheduler database is Oracle 10g or Oracle 9i.
■ Database Type: Select Oracle 10g or Oracle 9i from the list.
■ Connection String: Enter the following connection string parameters:
jdbc:oracle:thin:@<hostname>:<port#>:<oracle SID>
Example:
jdbc:oracle:thin:@bipub.mycompany.com:1521:bipub
■ Database Driver Class: oracle.jdbc.driver.OracleDriver
23.1.2.4 Entering Connection Information for MySQLEnter the following if your scheduler database is MySQL 4.1 or MySQL 5.0
■ Database Type: Select MySQL 4.1 or MySQL 5.0 from the list.
■ Connection String: Enter the following connection string parameters:
Note: Ensure that your Microsoft SQL Server is set up with mixed mode authentication. Also ensure that the user you enter to configure the scheduler has the "db_owner" role.
Note: Ensure that the database user you enter has "connect" or "create session" and "create table" privileges and that the user has been assigned a quota (for example, 100M on USERS, 1M on TEMP).
Note: You must download the MySQL JDBC driver and register it with the application server where BI Publisher is running. The MySQL JDBC driver can be downloaded from:
http://www.mysql.com/products/connector/j/
See your application server documentation for information on registering the driver.
"Link to This Report" Can Now Be Set as a Report Option
23-4 Oracle Business Intelligence New Features Guide
jdbc:mysql://<hostname>:<port#>:<database name>
Example:
jdbc:mysql://localhost:3306/bipublisher
■ Database Driver Class: com.mysql.jdbc.Driver
23.1.3 Setting the BLOB Column SizeWhen BI Publisher installs the scheduler schema to your database, it creates a table called XMLP_SCHED_OUTPUT. This table contains the BLOB columns that will hold your BI Publisher scheduler output and data. It is recommended that the BLOB columns are set to be at least 2 GB, otherwise the scheduler may not be able to process large reports. If you are installing the scheduler schema to an IBM DB2 or MySQL database you must update the size of the BLOB columns listed below.
Following are the BLOB columns in the XMLP_SCHED_OUTPUT table. Reset the size of these columns to at least 2 GB.
■ XML_DATA
■ DOCUMENT_DATA
The following example shows the command to update the column size for an IBM DB2 database:
alter table xmlp_sched_output alter column STATUS_DETAIL set data type BLOB(1000000000);See your database documentation for instructions on resetting the column size.
23.2 "Link to This Report" Can Now Be Set as a Report OptionWhen you view a report in BI Publisher's report viewer, a "Link to this Report" link displays enabling you to copy the URL of the current report. Previously the display of this link could not be disabled. In 10.1.3.3.3 this feature is now a report property, "Show Report Links" that can be set on the General Settings page of the Report definition. This enhancement enables you to choose whether you want the report link available to users.
By default, the "Show Report Links" property is enabled.
To change the setting for a report:
1. Log in to BI Publisher with Administrator or Report Developer credentials.
2. Navigate to the desired report and click the Edit link.
3. In the Report Properties pane of the report definition, under General Settings, select the Show Report Links box to enable the "Link to this Report" feature for the report. Deselect the box to disable the feature for the report.
23.3 Enhanced Support for Pagination Control in RTF OutputPreviously BI Publisher recognized the following pagination control commands for PDF output only.
■ Keep paragraph with the next paragraph
■ Keep paragraph intact
■ Table heading rows repeat
Support for Multiple Cascading Parameters
New Features in Release 10.1.3.3.3 23-5
■ Table row keep together
In 10.1.3.3.3, these are supported for RTF output as well.
23.3.1 Support for "Keep Paragraph with the Next Paragraph"The RTF standard includes a command that enables you to "keep a paragraph with the next paragraph." This command prevents a page break between the paragraph for which it is enabled and the following (or next) paragraph.
To enable "keep paragraph with the next paragraph" in Microsoft Word:
1. Select the paragraphs you want to keep together on a page.
2. From the Format menu, select Paragraph, and then click the Line and Page Breaks tab.
3. Select the Keep with Next box.
23.3.2 Keep Paragraph IntactThe RTF standard includes a command that enables you to keep all the lines of a paragraph together ("keep paragraph intact") and prevent the paragraph from breaking across pages.
To enable "keep paragraph intact" in Microsoft Word:
1. From the Format menu, select Paragraph, and then select the Line and Page Breaks tab.
2. Deselect the Keep lines together check box.
23.3.3 Support for Table "Heading Rows Repeat"The RTF standard includes a command that enables the repeat of the table heading rows when the table breaks across pages.
To enable "heading rows repeat" in Microsoft Word:
1. Select the heading row or rows.
2. From the Table menu, select Heading Rows Repeat.
23.3.4 Support for "Table Row Keep Together"The RTF standard includes a command that enables you to prevent a table row from breaking across pages.
To enable "table row keep together" in Microsoft Word:
1. Select the table.
2. From the Table menu, select Table Properties, and then select the Row tab.
3. Deselect the Allow row to break across pages check box.
23.4 Support for Multiple Cascading ParametersCascading parameters enable you to filter available values for each parameter in a set of parameters that have a relationship. The choice you make from the first parameter in a set of cascading parameters determines the available values for the next parameter. In this way, you can filter choices down to a manageable number for each cascading parameter. Previously only two levels of cascading parameters could be

Support for Vertical Alignment of External Graphics
23-6 Oracle Business Intelligence New Features Guide
supported. In 10.1.3.3.3, BI Publisher now supports cascading parameters beyond two levels.
23.5 Support for Vertical Alignment of External GraphicsSupport for the attribute "vertical-align" for the FO element "external-graphic" has been added in the 10.1.3.3.3 release of BI Publisher. This enables you to format the alignment of an externally referenced image inline with text. This attribute can be applied when coding an XSL-FO template or an RTF template.
The valid values for the attribute are:
■ bottom
■ top
■ middle
■ text-top
■ text-bottom
Follow the guidelines in the Oracle Business Intelligence Publisher Report Designer’s Guide for inserting an image using a URL reference:
1. In your template, insert a dummy image.
2. Select the image and open Microsoft Word's Format Picture dialog. Select the Web tab.
3. In the Alternative text region, enter the following syntax to reference the image URL:
url:{'http://image location'}
For example:
url:{'http://www.oracle.com/images/ora_logo.gif'}
4. To format the vertical alignment, declare the XSL attribute value before the URL. For example, to align the image to the bottom of the text (text-bottom), enter the following:
<xsl:attribute name="vertical-align">text-bottom</xsl:attribute> url:{'http://www.oracle.com/images/ora_logo.gif'}
23.6 Support for Multiple Currency Symbol Displays in ReportThe format-currency function now accepts a third parameter, "displaySymbolOrNot" to enable the display of multiple currency codes in a single report. The International Standards Organization (ISO) currency code must be present in the report data to pass to the format-currency function.
The parameters for the format-currency function are as follows:
<?format-currency:Amount;CurrencyCode;displaySymbolOrNot?>
where
Amount takes the tag name of the XML element that holds the amount value in your data.
CurrencyCode takes the tag name of the XML element that holds the ISO three-letter currency code. An element containing the currency code must be present in the data.
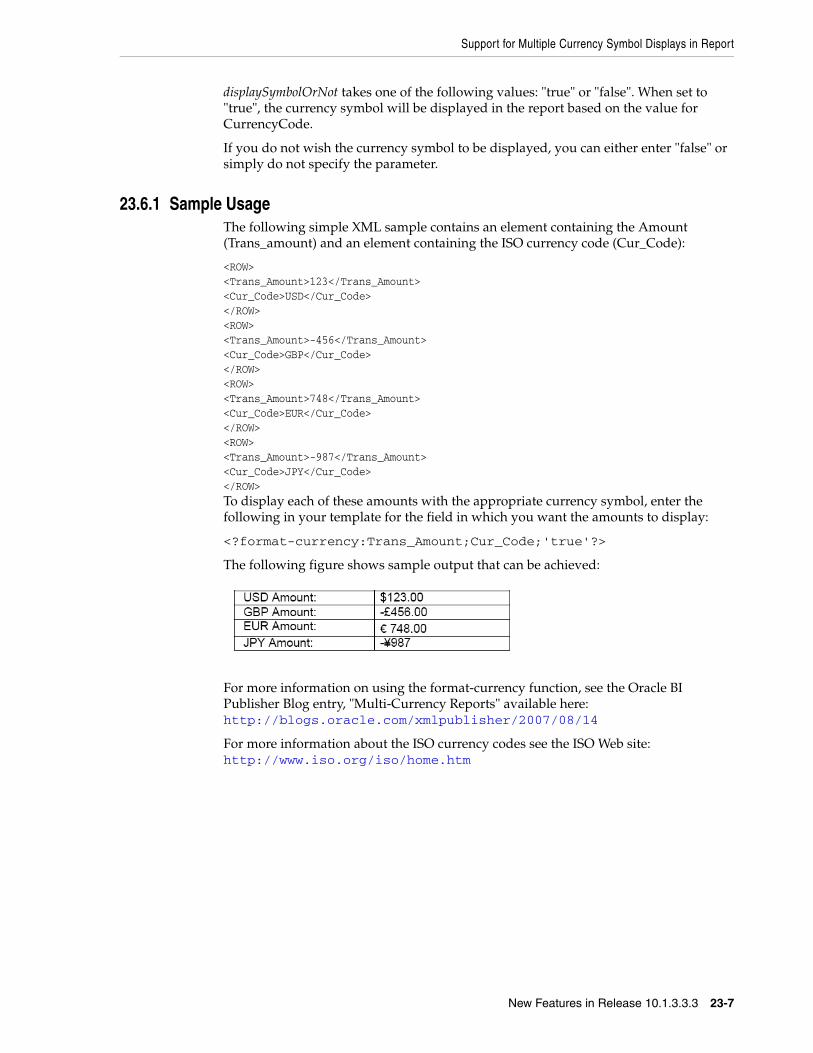
Support for Multiple Currency Symbol Displays in Report
New Features in Release 10.1.3.3.3 23-7
displaySymbolOrNot takes one of the following values: "true" or "false". When set to "true", the currency symbol will be displayed in the report based on the value for CurrencyCode.
If you do not wish the currency symbol to be displayed, you can either enter "false" or simply do not specify the parameter.
23.6.1 Sample UsageThe following simple XML sample contains an element containing the Amount (Trans_amount) and an element containing the ISO currency code (Cur_Code):
<ROW><Trans_Amount>123</Trans_Amount><Cur_Code>USD</Cur_Code></ROW><ROW><Trans_Amount>-456</Trans_Amount><Cur_Code>GBP</Cur_Code></ROW><ROW><Trans_Amount>748</Trans_Amount><Cur_Code>EUR</Cur_Code></ROW><ROW><Trans_Amount>-987</Trans_Amount><Cur_Code>JPY</Cur_Code></ROW>To display each of these amounts with the appropriate currency symbol, enter the following in your template for the field in which you want the amounts to display:
<?format-currency:Trans_Amount;Cur_Code;'true'?>
The following figure shows sample output that can be achieved:
For more information on using the format-currency function, see the Oracle BI Publisher Blog entry, "Multi-Currency Reports" available here: http://blogs.oracle.com/xmlpublisher/2007/08/14
For more information about the ISO currency codes see the ISO Web site: http://www.iso.org/iso/home.htm

Support for Multiple Currency Symbol Displays in Report
23-8 Oracle Business Intelligence New Features Guide
24
New Features in Release 10.1.3.4 24-1
24New Features in Release 10.1.3.4
Release 10.1.3.4 of Oracle Business Intelligence Enterprise Edition includes several new features for Oracle BI Publisher. These are outlined in the following list and explained in detail in the updated documentation for BI Publisher Release 10.1.3.4:
Integration with Oracle Enterprise Performance Management WorkspaceOracle Enterprise Performance Management Workspace (EPM Workspace) is a component of Oracle's Hyperion Foundation Services. It is the central Web interface for users to access all Performance Management content and tools. With its ease-of-use and flexibility, EPM Workspace provides users with a "windows-on-the-Web" experience. In Release 10.1.3.4, Oracle BI Publisher can be integrated into the Oracle Enterprise Performance Management Workspace, Fusion Edition 11.1.1 release.
For more information, see the topic "Setting Up Integration with Oracle Enterprise Performance Management Workspace," in the Oracle Business Intelligence Publisher Administrator's and Developer's Guide.
Integration with Oracle Smart SpaceOracle Smart Space, Fusion Edition is a personalized information delivery solution for Business Intelligence and Enterprise Performance Management that uses configurable desktop gadgets to deliver BI and EPM to every user in the enterprise, utilizing the Windows desktop. In addition, Oracle Smart Space includes a development toolkit for creating additional gadgets that employs common development languages and methodologies and a secure instant messaging system for shared decision making.
You can use gadgets from Oracle Smart Space, Fusion Edition 11.1.1 release to access and interact with the Release 10.1.3.4 BI Publisher reports repository. For example, you can launch BI Publisher reports in the Oracle Smart Space Content Viewer and add BI Publisher reports to a Smart Book gadget and a Favorites gadget. You can use Oracle Smart Space Collaborator to share BI Publisher content with other Oracle Smart Space users.
For more information, see the topic: "Using Oracle BI Publisher in Oracle Smart Space, Fusion Edition," in the Oracle Business Intelligence Publisher Report Designer's Guide.
This integration also enables you to set up a link to the Oracle Smart Space client download page that will be accessible to all BI Publisher users. For more information see the topic: "Setting Up Integration with the Oracle Smart Space Client Download Page," in the Oracle Business Intelligence Publisher Administrator's and Developer's Guide.
Support for Multidimensional Data SourcesBI Publisher now enables you to connect to databases that are configured for online analytical processing (OLAP) and submit an MDX query to return the report XML. In
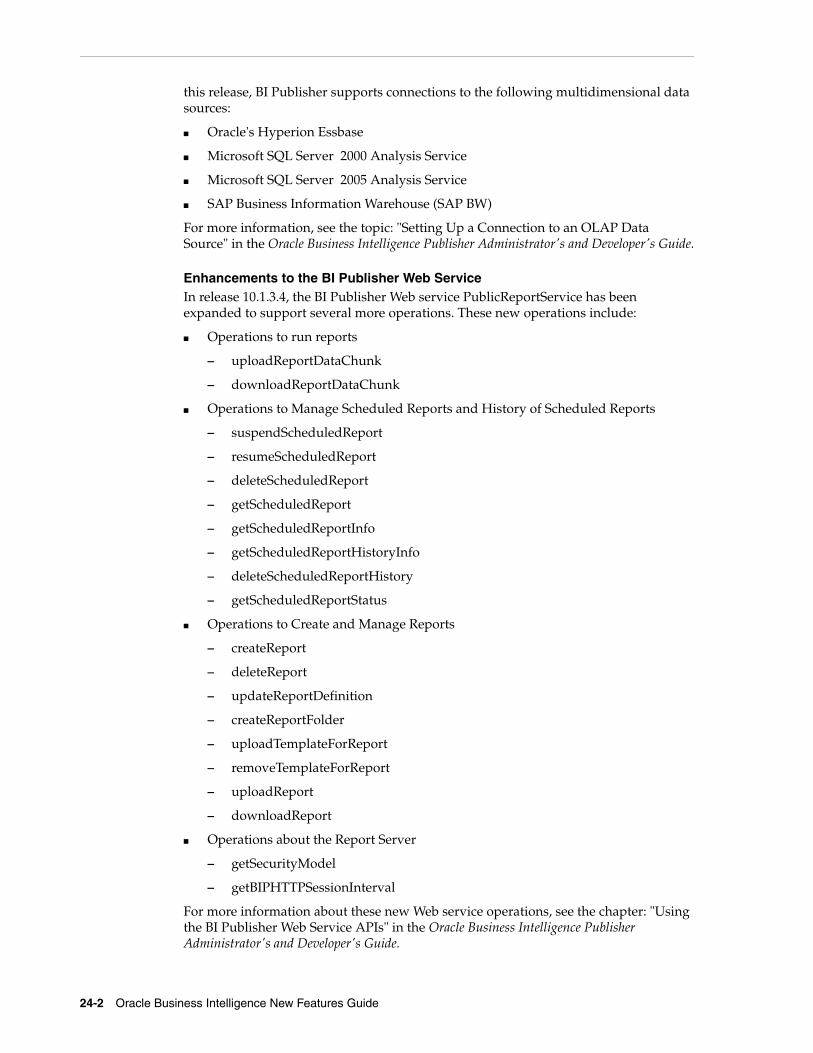
24-2 Oracle Business Intelligence New Features Guide
this release, BI Publisher supports connections to the following multidimensional data sources:
■ Oracle's Hyperion Essbase
■ Microsoft SQL Server 2000 Analysis Service
■ Microsoft SQL Server 2005 Analysis Service
■ SAP Business Information Warehouse (SAP BW)
For more information, see the topic: "Setting Up a Connection to an OLAP Data Source" in the Oracle Business Intelligence Publisher Administrator's and Developer's Guide.
Enhancements to the BI Publisher Web ServiceIn release 10.1.3.4, the BI Publisher Web service PublicReportService has been expanded to support several more operations. These new operations include:
■ Operations to run reports
– uploadReportDataChunk
– downloadReportDataChunk
■ Operations to Manage Scheduled Reports and History of Scheduled Reports
– suspendScheduledReport
– resumeScheduledReport
– deleteScheduledReport
– getScheduledReport
– getScheduledReportInfo
– getScheduledReportHistoryInfo
– deleteScheduledReportHistory
– getScheduledReportStatus
■ Operations to Create and Manage Reports
– createReport
– deleteReport
– updateReportDefinition
– createReportFolder
– uploadTemplateForReport
– removeTemplateForReport
– uploadReport
– downloadReport
■ Operations about the Report Server
– getSecurityModel
– getBIPHTTPSessionInterval
For more information about these new Web service operations, see the chapter: "Using the BI Publisher Web Service APIs" in the Oracle Business Intelligence Publisher Administrator's and Developer's Guide.
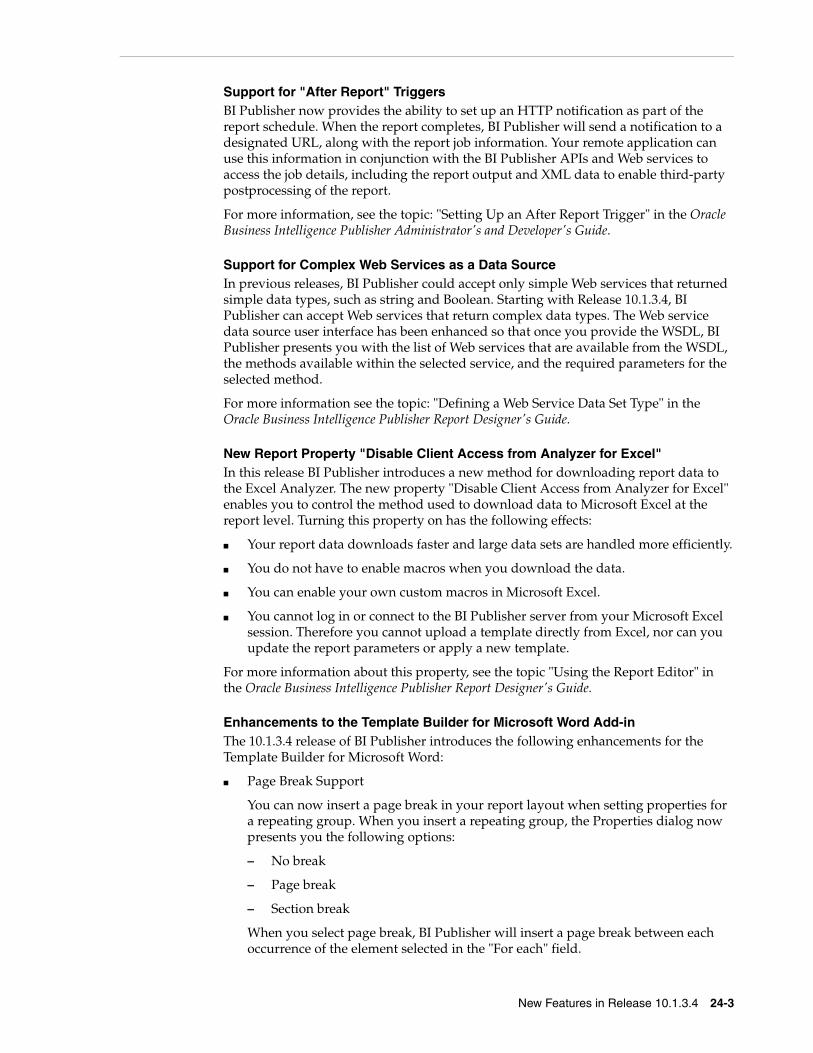
New Features in Release 10.1.3.4 24-3
Support for "After Report" TriggersBI Publisher now provides the ability to set up an HTTP notification as part of the report schedule. When the report completes, BI Publisher will send a notification to a designated URL, along with the report job information. Your remote application can use this information in conjunction with the BI Publisher APIs and Web services to access the job details, including the report output and XML data to enable third-party postprocessing of the report.
For more information, see the topic: "Setting Up an After Report Trigger" in the Oracle Business Intelligence Publisher Administrator's and Developer's Guide.
Support for Complex Web Services as a Data SourceIn previous releases, BI Publisher could accept only simple Web services that returned simple data types, such as string and Boolean. Starting with Release 10.1.3.4, BI Publisher can accept Web services that return complex data types. The Web service data source user interface has been enhanced so that once you provide the WSDL, BI Publisher presents you with the list of Web services that are available from the WSDL, the methods available within the selected service, and the required parameters for the selected method.
For more information see the topic: "Defining a Web Service Data Set Type" in the Oracle Business Intelligence Publisher Report Designer's Guide.
New Report Property "Disable Client Access from Analyzer for Excel"In this release BI Publisher introduces a new method for downloading report data to the Excel Analyzer. The new property "Disable Client Access from Analyzer for Excel" enables you to control the method used to download data to Microsoft Excel at the report level. Turning this property on has the following effects:
■ Your report data downloads faster and large data sets are handled more efficiently.
■ You do not have to enable macros when you download the data.
■ You can enable your own custom macros in Microsoft Excel.
■ You cannot log in or connect to the BI Publisher server from your Microsoft Excel session. Therefore you cannot upload a template directly from Excel, nor can you update the report parameters or apply a new template.
For more information about this property, see the topic "Using the Report Editor" in the Oracle Business Intelligence Publisher Report Designer's Guide.
Enhancements to the Template Builder for Microsoft Word Add-inThe 10.1.3.4 release of BI Publisher introduces the following enhancements for the Template Builder for Microsoft Word:
■ Page Break Support
You can now insert a page break in your report layout when setting properties for a repeating group. When you insert a repeating group, the Properties dialog now presents you the following options:
– No break
– Page break
– Section break
When you select page break, BI Publisher will insert a page break between each occurrence of the element selected in the "For each" field.

24-4 Oracle Business Intelligence New Features Guide
The break options are also available within the Table Wizard when defining groups for a table.
For more information, see the topic: "Inserting a Repeating Group" in the Template Builder online help.
■ Support for Additional Chart Types
The following chart types are now supported by the Template Builder chart wizard:
– Combination Charts
– Scatter Plot
– Bubble Chart
– Stock Charts
For more information, see the topic: "Inserting a Chart" in the Template Builder online help.
■ More Properties Supported for Charts
This release includes expanded support for setting chart properties within the Chart Wizard. You can now set properties for the following:
– Fonts - you can define the font size, family, weight, color (and effect) for the x-axis and y-axis, the chart legend, and chart labels.
– Colors - you can now specify the color for bars and lines, the chart plot area and legend, the background, and the border of the plot area and legend.
– Chart legend properties - you can now define the look and feel of the legend including the legend background and border color and the legend font family and font size. You can also define the position of the legend as follows: bottom, top, left, right.
■ Support for Multiple Measures in Charts
The chart builder now supports multiple measures. You can also specify the name displayed in the legend for each measure.
■ Enhanced Crosstab Features
The crosstab builder has been enhanced to support the following:
– Total Options - previously, only the sum was displayed and it was always displayed. Now you can define whether you wish to show totals or totals based on sum, count, min, max or average.
– Number Formatting - you can now define the number formatting for the crosstab measures within the crosstab builder.
– Create and Omit Subtotal and Totals - the crosstab builder now enables you to choose whether to display total and subtotal rows or columns.
– Row Layout Options - you can now select whether you want the row groups to be displayed inline (as in a financial report) or not inline (as in Microsoft Excel).
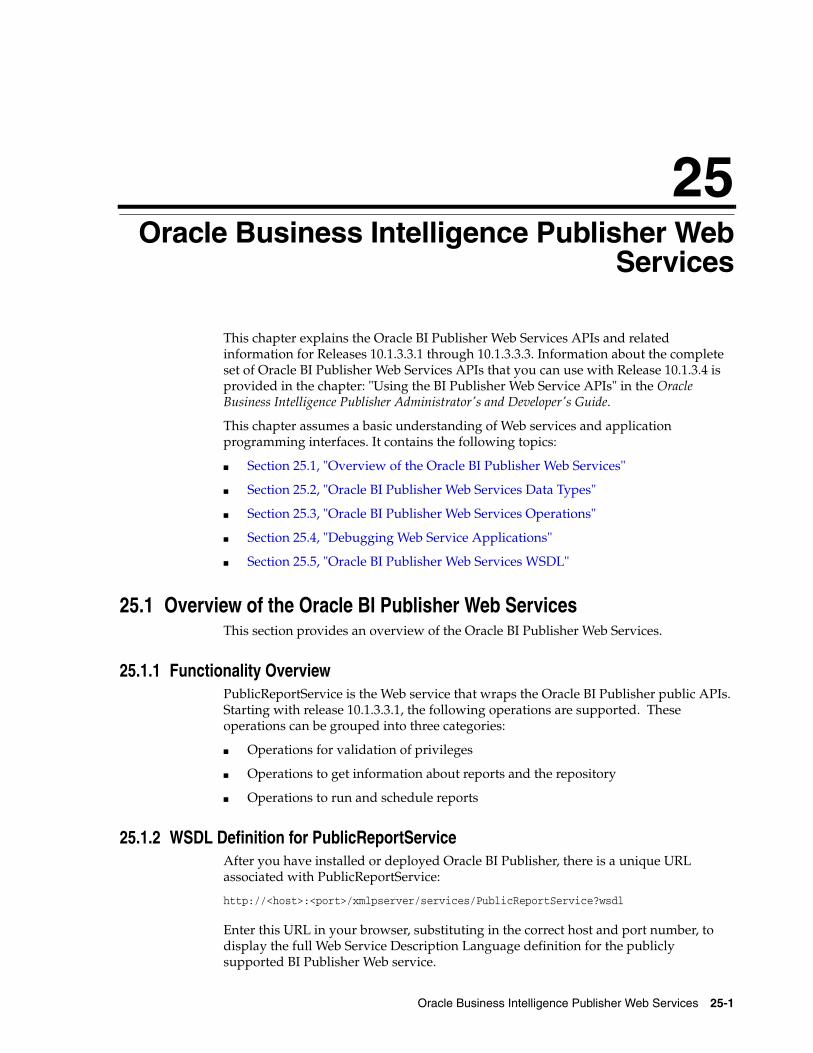
25
Oracle Business Intelligence Publisher Web Services 25-1
25 Oracle Business Intelligence Publisher WebServices
This chapter explains the Oracle BI Publisher Web Services APIs and related information for Releases 10.1.3.3.1 through 10.1.3.3.3. Information about the complete set of Oracle BI Publisher Web Services APIs that you can use with Release 10.1.3.4 is provided in the chapter: "Using the BI Publisher Web Service APIs" in the Oracle Business Intelligence Publisher Administrator's and Developer's Guide.
This chapter assumes a basic understanding of Web services and application programming interfaces. It contains the following topics:
■ Section 25.1, "Overview of the Oracle BI Publisher Web Services"
■ Section 25.2, "Oracle BI Publisher Web Services Data Types"
■ Section 25.3, "Oracle BI Publisher Web Services Operations"
■ Section 25.4, "Debugging Web Service Applications"
■ Section 25.5, "Oracle BI Publisher Web Services WSDL"
25.1 Overview of the Oracle BI Publisher Web ServicesThis section provides an overview of the Oracle BI Publisher Web Services.
25.1.1 Functionality OverviewPublicReportService is the Web service that wraps the Oracle BI Publisher public APIs. Starting with release 10.1.3.3.1, the following operations are supported. These operations can be grouped into three categories:
■ Operations for validation of privileges
■ Operations to get information about reports and the repository
■ Operations to run and schedule reports
25.1.2 WSDL Definition for PublicReportServiceAfter you have installed or deployed Oracle BI Publisher, there is a unique URL associated with PublicReportService:
http://<host>:<port>/xmlpserver/services/PublicReportService?wsdl
Enter this URL in your browser, substituting in the correct host and port number, to display the full Web Service Description Language definition for the publicly supported BI Publisher Web service.
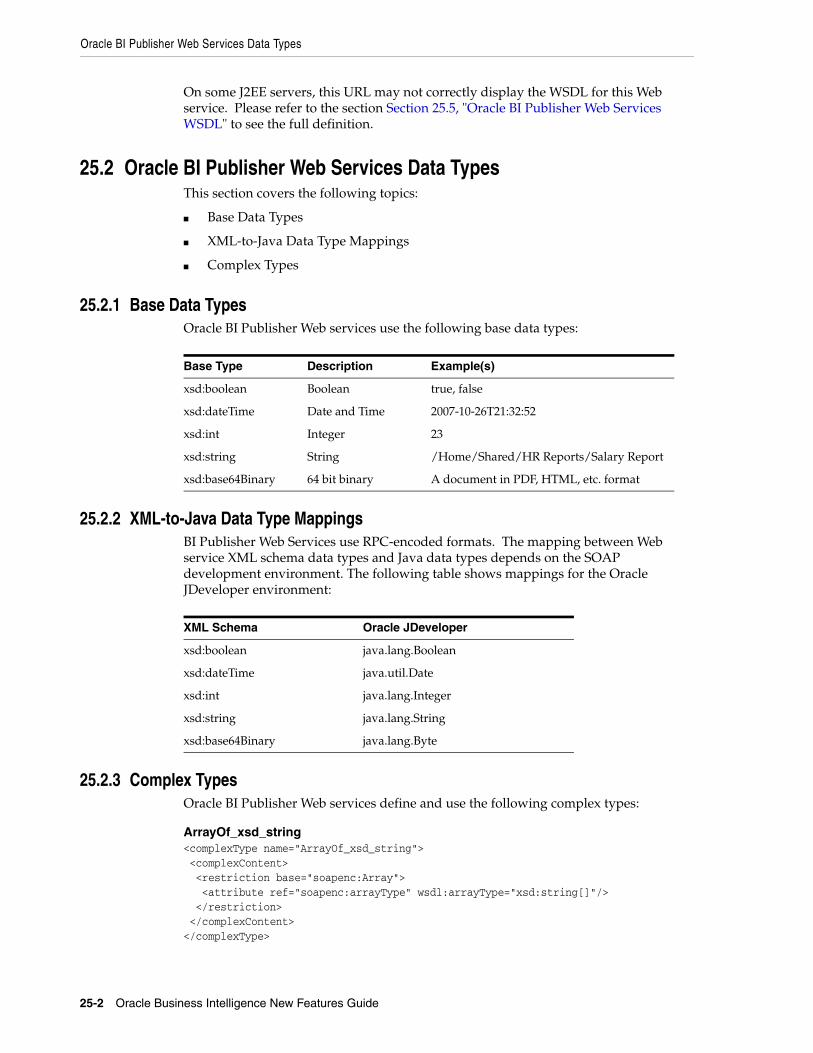
Oracle BI Publisher Web Services Data Types
25-2 Oracle Business Intelligence New Features Guide
On some J2EE servers, this URL may not correctly display the WSDL for this Web service. Please refer to the section Section 25.5, "Oracle BI Publisher Web Services WSDL" to see the full definition.
25.2 Oracle BI Publisher Web Services Data TypesThis section covers the following topics:
■ Base Data Types
■ XML-to-Java Data Type Mappings
■ Complex Types
25.2.1 Base Data TypesOracle BI Publisher Web services use the following base data types:
25.2.2 XML-to-Java Data Type MappingsBI Publisher Web Services use RPC-encoded formats. The mapping between Web service XML schema data types and Java data types depends on the SOAP development environment. The following table shows mappings for the Oracle JDeveloper environment:
25.2.3 Complex TypesOracle BI Publisher Web services define and use the following complex types:
ArrayOf_xsd_string<complexType name="ArrayOf_xsd_string"> <complexContent> <restriction base="soapenc:Array"> <attribute ref="soapenc:arrayType" wsdl:arrayType="xsd:string[]"/> </restriction> </complexContent></complexType>
Base Type Description Example(s)
xsd:boolean Boolean true, false
xsd:dateTime Date and Time 2007-10-26T21:32:52
xsd:int Integer 23
xsd:string String /Home/Shared/HR Reports/Salary Report
xsd:base64Binary 64 bit binary A document in PDF, HTML, etc. format
XML Schema Oracle JDeveloper
xsd:boolean java.lang.Boolean
xsd:dateTime java.util.Date
xsd:int java.lang.Integer
xsd:string java.lang.String
xsd:base64Binary java.lang.Byte
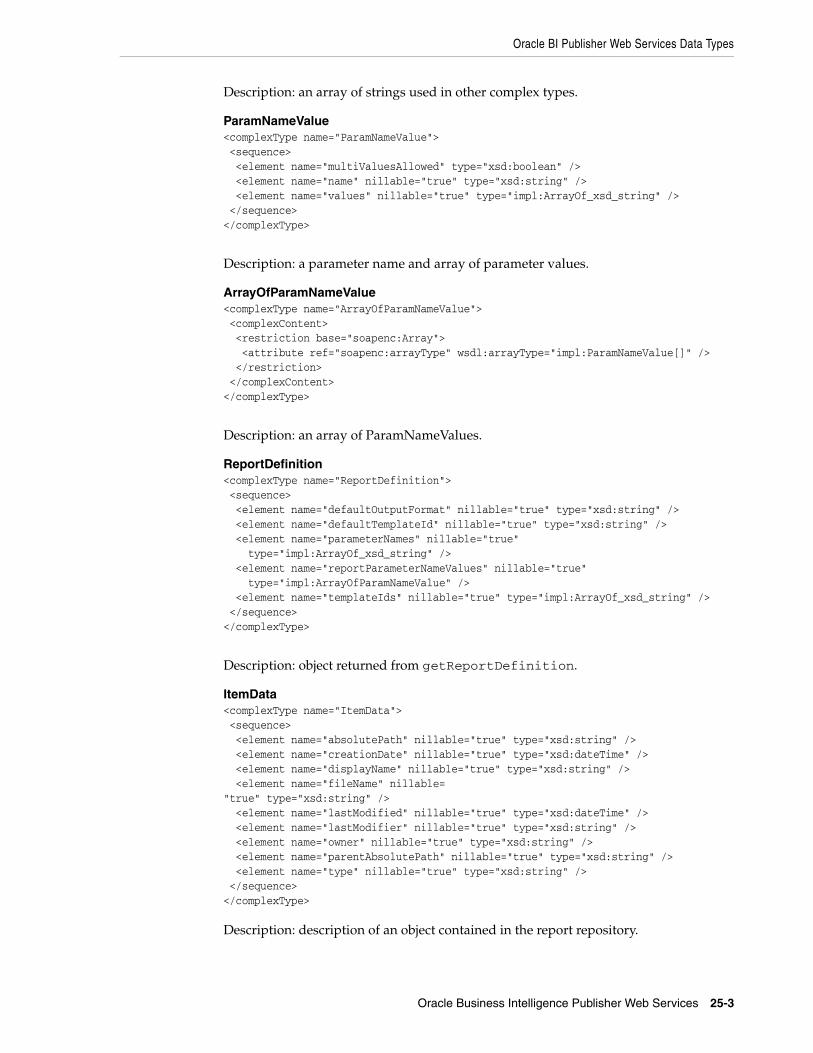
Oracle BI Publisher Web Services Data Types
Oracle Business Intelligence Publisher Web Services 25-3
Description: an array of strings used in other complex types.
ParamNameValue<complexType name="ParamNameValue"> <sequence> <element name="multiValuesAllowed" type="xsd:boolean" /> <element name="name" nillable="true" type="xsd:string" /> <element name="values" nillable="true" type="impl:ArrayOf_xsd_string" /> </sequence></complexType>
Description: a parameter name and array of parameter values.
ArrayOfParamNameValue<complexType name="ArrayOfParamNameValue"> <complexContent> <restriction base="soapenc:Array"> <attribute ref="soapenc:arrayType" wsdl:arrayType="impl:ParamNameValue[]" /> </restriction> </complexContent></complexType>
Description: an array of ParamNameValues.
ReportDefinition<complexType name="ReportDefinition"> <sequence> <element name="defaultOutputFormat" nillable="true" type="xsd:string" /> <element name="defaultTemplateId" nillable="true" type="xsd:string" /> <element name="parameterNames" nillable="true" type="impl:ArrayOf_xsd_string" /> <element name="reportParameterNameValues" nillable="true" type="impl:ArrayOfParamNameValue" /> <element name="templateIds" nillable="true" type="impl:ArrayOf_xsd_string" /> </sequence></complexType>
Description: object returned from getReportDefinition.
ItemData<complexType name="ItemData"> <sequence> <element name="absolutePath" nillable="true" type="xsd:string" /> <element name="creationDate" nillable="true" type="xsd:dateTime" /> <element name="displayName" nillable="true" type="xsd:string" /> <element name="fileName" nillable="true" type="xsd:string" /> <element name="lastModified" nillable="true" type="xsd:dateTime" /> <element name="lastModifier" nillable="true" type="xsd:string" /> <element name="owner" nillable="true" type="xsd:string" /> <element name="parentAbsolutePath" nillable="true" type="xsd:string" /> <element name="type" nillable="true" type="xsd:string" /> </sequence></complexType>
Description: description of an object contained in the report repository.
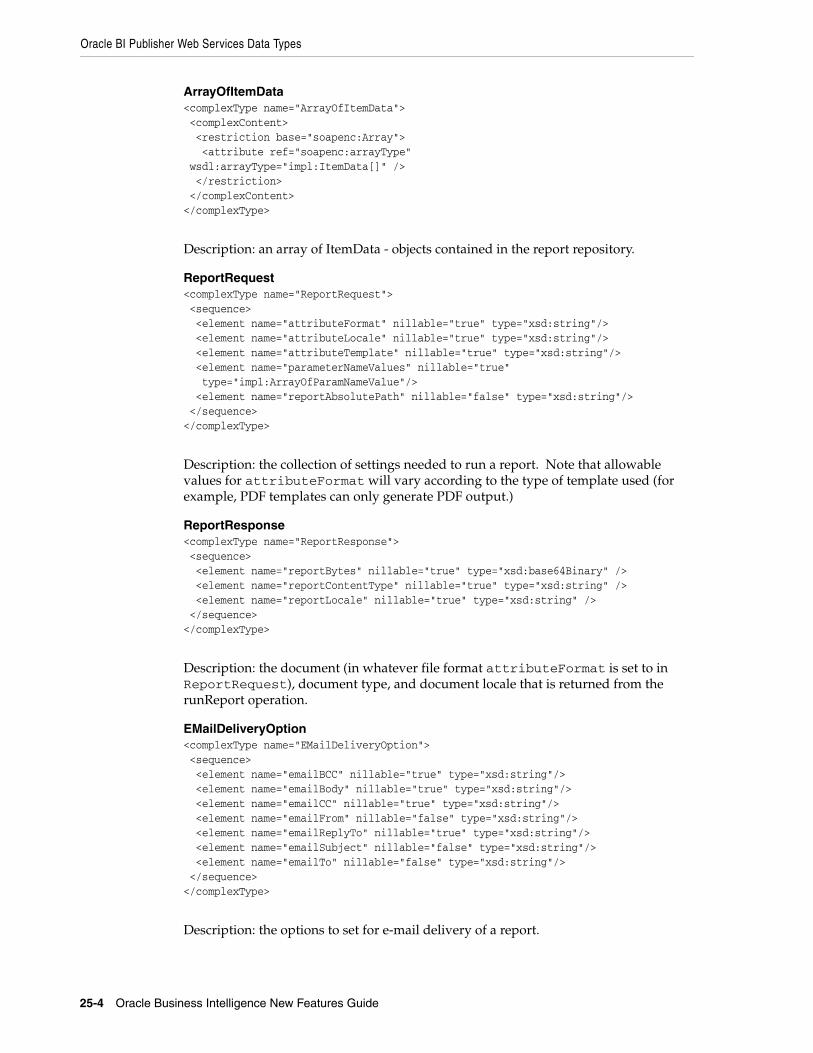
Oracle BI Publisher Web Services Data Types
25-4 Oracle Business Intelligence New Features Guide
ArrayOfItemData<complexType name="ArrayOfItemData"> <complexContent> <restriction base="soapenc:Array"> <attribute ref="soapenc:arrayType" wsdl:arrayType="impl:ItemData[]" /> </restriction> </complexContent></complexType>
Description: an array of ItemData - objects contained in the report repository.
ReportRequest<complexType name="ReportRequest"> <sequence> <element name="attributeFormat" nillable="true" type="xsd:string"/> <element name="attributeLocale" nillable="true" type="xsd:string"/> <element name="attributeTemplate" nillable="true" type="xsd:string"/> <element name="parameterNameValues" nillable="true" type="impl:ArrayOfParamNameValue"/> <element name="reportAbsolutePath" nillable="false" type="xsd:string"/> </sequence></complexType>
Description: the collection of settings needed to run a report. Note that allowable values for attributeFormat will vary according to the type of template used (for example, PDF templates can only generate PDF output.)
ReportResponse<complexType name="ReportResponse"> <sequence> <element name="reportBytes" nillable="true" type="xsd:base64Binary" /> <element name="reportContentType" nillable="true" type="xsd:string" /> <element name="reportLocale" nillable="true" type="xsd:string" /> </sequence></complexType>
Description: the document (in whatever file format attributeFormat is set to in ReportRequest), document type, and document locale that is returned from the runReport operation.
EMailDeliveryOption<complexType name="EMailDeliveryOption"> <sequence> <element name="emailBCC" nillable="true" type="xsd:string"/> <element name="emailBody" nillable="true" type="xsd:string"/> <element name="emailCC" nillable="true" type="xsd:string"/> <element name="emailFrom" nillable="false" type="xsd:string"/> <element name="emailReplyTo" nillable="true" type="xsd:string"/> <element name="emailSubject" nillable="false" type="xsd:string"/> <element name="emailTo" nillable="false" type="xsd:string"/> </sequence></complexType>
Description: the options to set for e-mail delivery of a report.
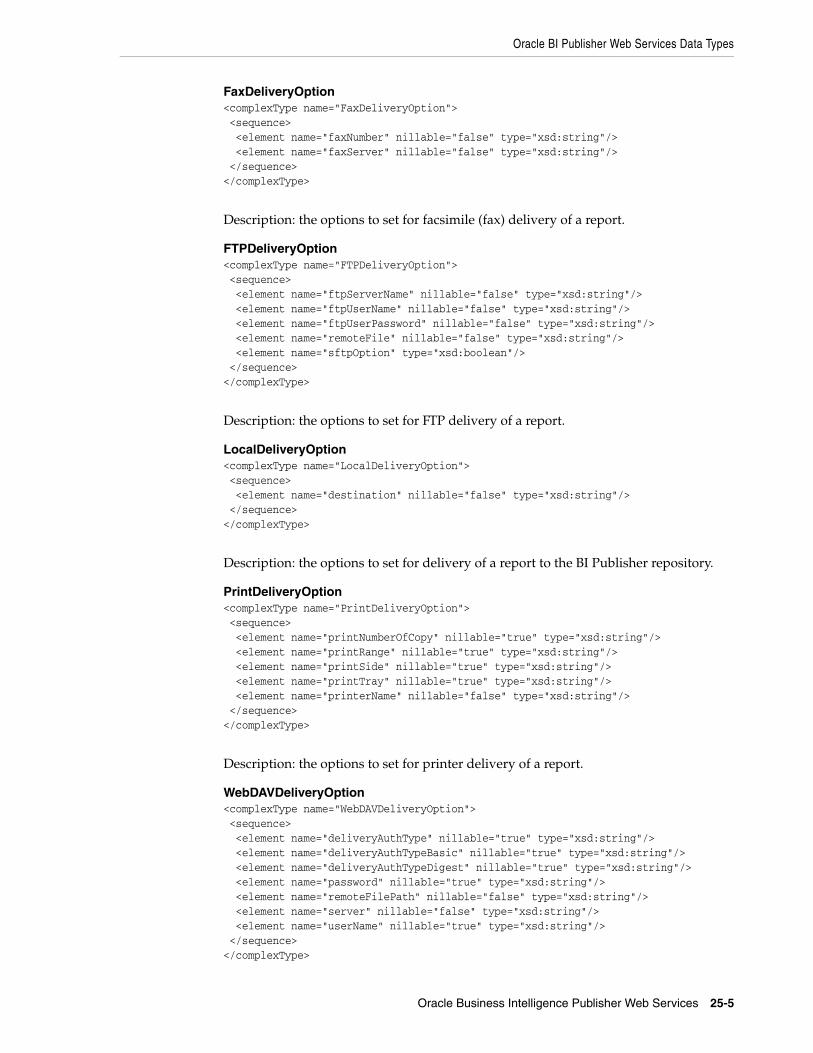
Oracle BI Publisher Web Services Data Types
Oracle Business Intelligence Publisher Web Services 25-5
FaxDeliveryOption<complexType name="FaxDeliveryOption"> <sequence> <element name="faxNumber" nillable="false" type="xsd:string"/> <element name="faxServer" nillable="false" type="xsd:string"/> </sequence></complexType>
Description: the options to set for facsimile (fax) delivery of a report.
FTPDeliveryOption<complexType name="FTPDeliveryOption"> <sequence> <element name="ftpServerName" nillable="false" type="xsd:string"/> <element name="ftpUserName" nillable="false" type="xsd:string"/> <element name="ftpUserPassword" nillable="false" type="xsd:string"/> <element name="remoteFile" nillable="false" type="xsd:string"/> <element name="sftpOption" type="xsd:boolean"/> </sequence></complexType>
Description: the options to set for FTP delivery of a report.
LocalDeliveryOption<complexType name="LocalDeliveryOption"> <sequence> <element name="destination" nillable="false" type="xsd:string"/> </sequence></complexType>
Description: the options to set for delivery of a report to the BI Publisher repository.
PrintDeliveryOption<complexType name="PrintDeliveryOption"> <sequence> <element name="printNumberOfCopy" nillable="true" type="xsd:string"/> <element name="printRange" nillable="true" type="xsd:string"/> <element name="printSide" nillable="true" type="xsd:string"/> <element name="printTray" nillable="true" type="xsd:string"/> <element name="printerName" nillable="false" type="xsd:string"/> </sequence></complexType>
Description: the options to set for printer delivery of a report.
WebDAVDeliveryOption<complexType name="WebDAVDeliveryOption"> <sequence> <element name="deliveryAuthType" nillable="true" type="xsd:string"/> <element name="deliveryAuthTypeBasic" nillable="true" type="xsd:string"/> <element name="deliveryAuthTypeDigest" nillable="true" type="xsd:string"/> <element name="password" nillable="true" type="xsd:string"/> <element name="remoteFilePath" nillable="false" type="xsd:string"/> <element name="server" nillable="false" type="xsd:string"/> <element name="userName" nillable="true" type="xsd:string"/> </sequence></complexType>
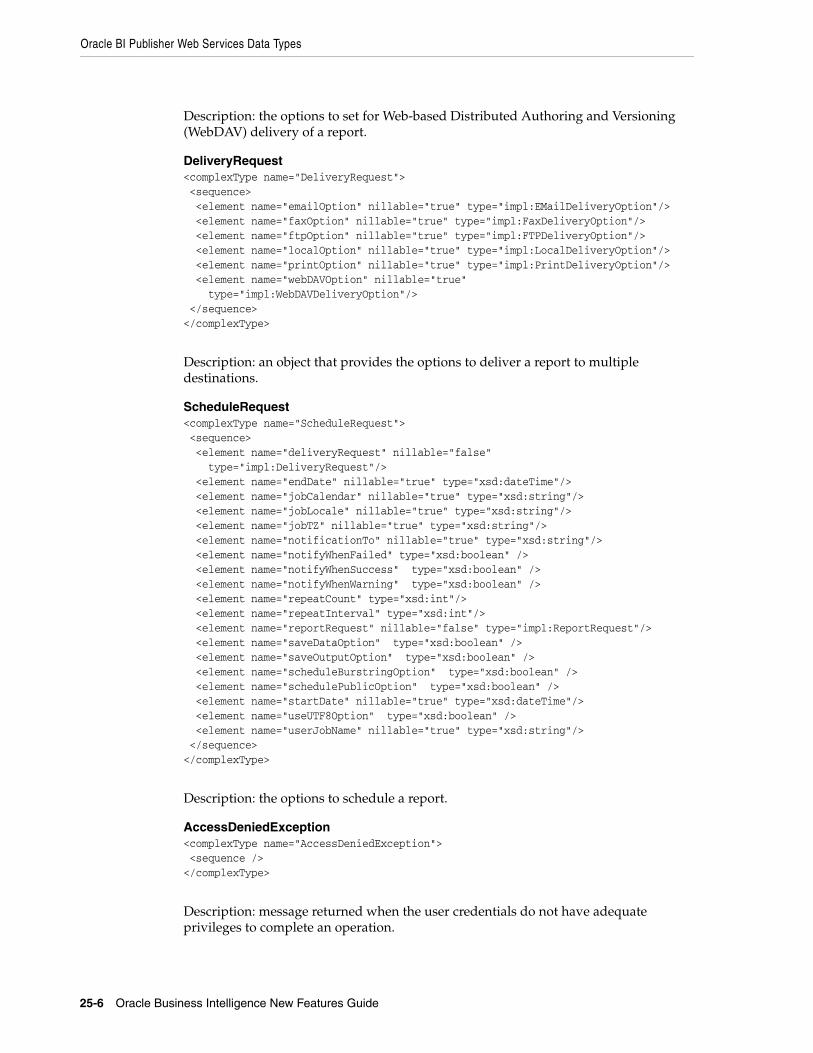
Oracle BI Publisher Web Services Data Types
25-6 Oracle Business Intelligence New Features Guide
Description: the options to set for Web-based Distributed Authoring and Versioning (WebDAV) delivery of a report.
DeliveryRequest<complexType name="DeliveryRequest"> <sequence> <element name="emailOption" nillable="true" type="impl:EMailDeliveryOption"/> <element name="faxOption" nillable="true" type="impl:FaxDeliveryOption"/> <element name="ftpOption" nillable="true" type="impl:FTPDeliveryOption"/> <element name="localOption" nillable="true" type="impl:LocalDeliveryOption"/> <element name="printOption" nillable="true" type="impl:PrintDeliveryOption"/> <element name="webDAVOption" nillable="true" type="impl:WebDAVDeliveryOption"/> </sequence></complexType>
Description: an object that provides the options to deliver a report to multiple destinations.
ScheduleRequest<complexType name="ScheduleRequest"> <sequence> <element name="deliveryRequest" nillable="false" type="impl:DeliveryRequest"/> <element name="endDate" nillable="true" type="xsd:dateTime"/> <element name="jobCalendar" nillable="true" type="xsd:string"/> <element name="jobLocale" nillable="true" type="xsd:string"/> <element name="jobTZ" nillable="true" type="xsd:string"/> <element name="notificationTo" nillable="true" type="xsd:string"/> <element name="notifyWhenFailed" type="xsd:boolean" /> <element name="notifyWhenSuccess" type="xsd:boolean" /> <element name="notifyWhenWarning" type="xsd:boolean" /> <element name="repeatCount" type="xsd:int"/> <element name="repeatInterval" type="xsd:int"/> <element name="reportRequest" nillable="false" type="impl:ReportRequest"/> <element name="saveDataOption" type="xsd:boolean" /> <element name="saveOutputOption" type="xsd:boolean" /> <element name="scheduleBurstringOption" type="xsd:boolean" /> <element name="schedulePublicOption" type="xsd:boolean" /> <element name="startDate" nillable="true" type="xsd:dateTime"/> <element name="useUTF8Option" type="xsd:boolean" /> <element name="userJobName" nillable="true" type="xsd:string"/> </sequence></complexType>
Description: the options to schedule a report.
AccessDeniedException<complexType name="AccessDeniedException"> <sequence /> </complexType>
Description: message returned when the user credentials do not have adequate privileges to complete an operation.
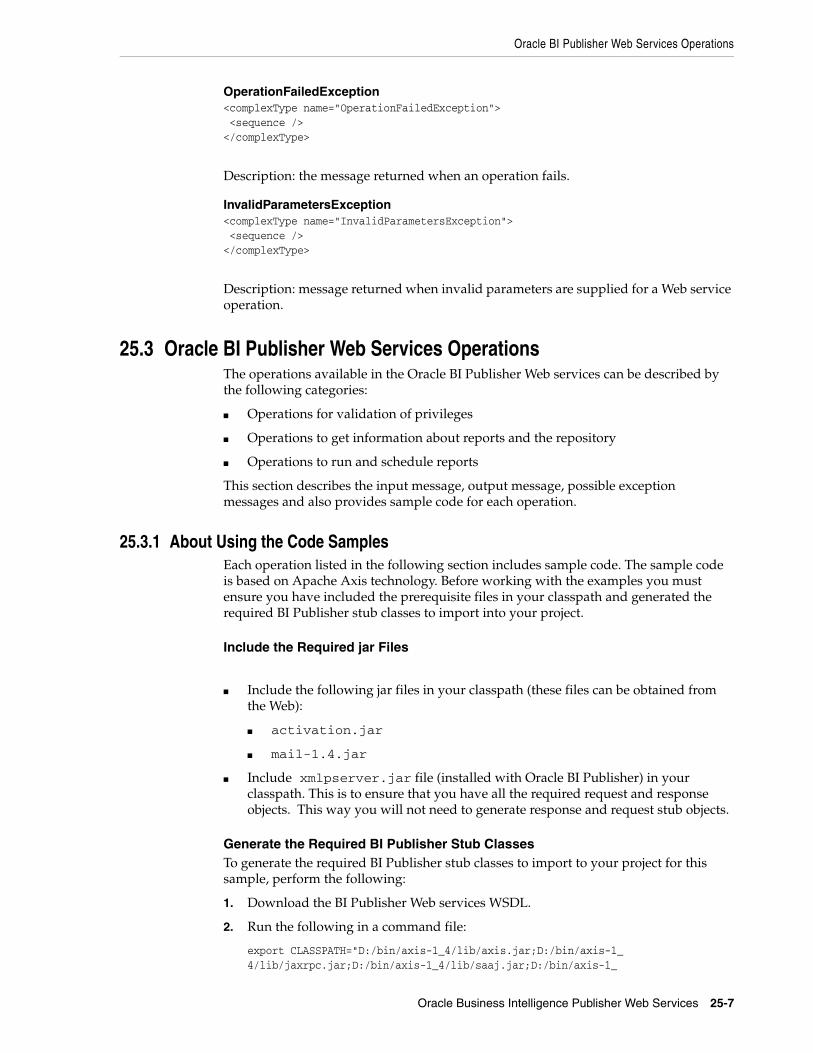
Oracle BI Publisher Web Services Operations
Oracle Business Intelligence Publisher Web Services 25-7
OperationFailedException<complexType name="OperationFailedException"> <sequence /> </complexType>
Description: the message returned when an operation fails.
InvalidParametersException<complexType name="InvalidParametersException"> <sequence /> </complexType>
Description: message returned when invalid parameters are supplied for a Web service operation.
25.3 Oracle BI Publisher Web Services OperationsThe operations available in the Oracle BI Publisher Web services can be described by the following categories:
■ Operations for validation of privileges
■ Operations to get information about reports and the repository
■ Operations to run and schedule reports
This section describes the input message, output message, possible exception messages and also provides sample code for each operation.
25.3.1 About Using the Code SamplesEach operation listed in the following section includes sample code. The sample code is based on Apache Axis technology. Before working with the examples you must ensure you have included the prerequisite files in your classpath and generated the required BI Publisher stub classes to import into your project.
Include the Required jar Files
■ Include the following jar files in your classpath (these files can be obtained from the Web):
■ activation.jar
■ mail-1.4.jar
■ Include xmlpserver.jar file (installed with Oracle BI Publisher) in your classpath. This is to ensure that you have all the required request and response objects. This way you will not need to generate response and request stub objects.
Generate the Required BI Publisher Stub ClassesTo generate the required BI Publisher stub classes to import to your project for this sample, perform the following:
1. Download the BI Publisher Web services WSDL.
2. Run the following in a command file:
export CLASSPATH="D:/bin/axis-1_4/lib/axis.jar;D:/bin/axis-1_4/lib/jaxrpc.jar;D:/bin/axis-1_4/lib/saaj.jar;D:/bin/axis-1_

Oracle BI Publisher Web Services Operations
25-8 Oracle Business Intelligence New Features Guide
4/lib/commons-logging.jar;D:/bin/axis-1_4/lib/commons-discovery.jar;D:/bin/axis-1_4/lib/wsdl4j.jar"echo $CLASSPATHjava org.apache.axis.wsdl.WSDL2Java PublicReportService.wsdl
This will generate the following BI Publisher stub classes for you to import into your project:
import com.oracle.xmlns.oxp.service.PublicReportService.ItemData;import com.oracle.xmlns.oxp.service.PublicReportService.ReportRequest;import com.oracle.xmlns.oxp.service.PublicReportService.ReportResponse;import com.oracle.xmlns.oxp.service.PublicReportService.ParamNameValue;import com.oracle.xmlns.oxp.service.PublicReportService.ReportDefinition;import com.oracle.xmlns.oxp.service.PublicReportService.ScheduleRequest;import com.oracle.xmlns.oxp.service.PublicReportService.DeliveryRequest;import com.oracle.xmlns.oxp.service.PublicReportService.EMailDeliveryOption;
Import the Required Apache Axis and Java Stub ClassesIn addition to importing the BI Publisher Web service stub classes that you generated, you must also import the following Apache Axis and Java classes:
import java.io.FileOutputStream;import java.io.OutputStream;import java.util.Calendar;import org.apache.axis.client.Call;import org.apache.axis.client.Service;import org.apache.axis.encoding.XMLType;import org.apache.axis.encoding.ser.BeanDeserializerFactory;import org.apache.axis.encoding.ser.BeanSerializerFactory;import javax.xml.namespace.QName;import javax.xml.rpc.ParameterMode;import java.net.URL;
25.3.2 Operations for Validation of Privileges
validateLoginUse validateLogin to validate that a UserID and Password have the privilege to access the Oracle BI Publisher report server.
Example 25–1 Sample Code for validateLogin
public static void validateLogin() throws Exception { final String bipEndpoint = "http://mycompany.com:9999/xmlpserver/services/PublicReportService?wsdl"; final String bipNamespace = "http://xmlns.oracle.com/oxp/service/PublicReportService";
input message validateLoginRequest
<wsdl:message name="validateLoginRequest"> <wsdl:part name="userID" type="xsd:string"/> <wsdl:part name="password" type="xsd:string"/></wsdl:message>
output message validateLoginResponse
<wsdl:message name="validateLoginResponse"> <wsdl:part name="validateLoginReturn" type="xsd:boolean"/></wsdl:message>
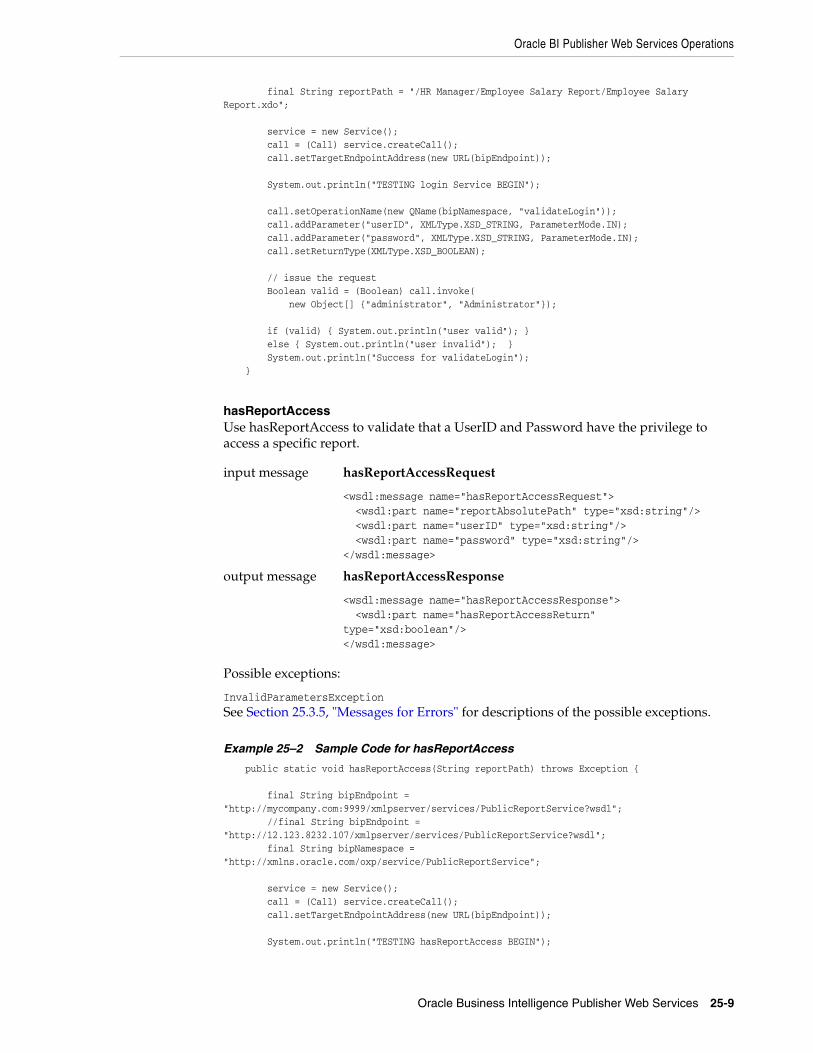
Oracle BI Publisher Web Services Operations
Oracle Business Intelligence Publisher Web Services 25-9
final String reportPath = "/HR Manager/Employee Salary Report/Employee Salary Report.xdo"; service = new Service(); call = (Call) service.createCall(); call.setTargetEndpointAddress(new URL(bipEndpoint)); System.out.println("TESTING login Service BEGIN"); call.setOperationName(new QName(bipNamespace, "validateLogin")); call.addParameter("userID", XMLType.XSD_STRING, ParameterMode.IN); call.addParameter("password", XMLType.XSD_STRING, ParameterMode.IN); call.setReturnType(XMLType.XSD_BOOLEAN); // issue the request Boolean valid = (Boolean) call.invoke( new Object[] {"administrator", "Administrator"}); if (valid) { System.out.println("user valid"); } else { System.out.println("user invalid"); } System.out.println("Success for validateLogin"); }
hasReportAccessUse hasReportAccess to validate that a UserID and Password have the privilege to access a specific report.
Possible exceptions:
InvalidParametersExceptionSee Section 25.3.5, "Messages for Errors" for descriptions of the possible exceptions.
Example 25–2 Sample Code for hasReportAccess
public static void hasReportAccess(String reportPath) throws Exception { final String bipEndpoint = "http://mycompany.com:9999/xmlpserver/services/PublicReportService?wsdl"; //final String bipEndpoint = "http://12.123.8232.107/xmlpserver/services/PublicReportService?wsdl"; final String bipNamespace = "http://xmlns.oracle.com/oxp/service/PublicReportService"; service = new Service(); call = (Call) service.createCall(); call.setTargetEndpointAddress(new URL(bipEndpoint)); System.out.println("TESTING hasReportAccess BEGIN");
input message hasReportAccessRequest
<wsdl:message name="hasReportAccessRequest"> <wsdl:part name="reportAbsolutePath" type="xsd:string"/> <wsdl:part name="userID" type="xsd:string"/> <wsdl:part name="password" type="xsd:string"/></wsdl:message>
output message hasReportAccessResponse
<wsdl:message name="hasReportAccessResponse"> <wsdl:part name="hasReportAccessReturn" type="xsd:boolean"/></wsdl:message>
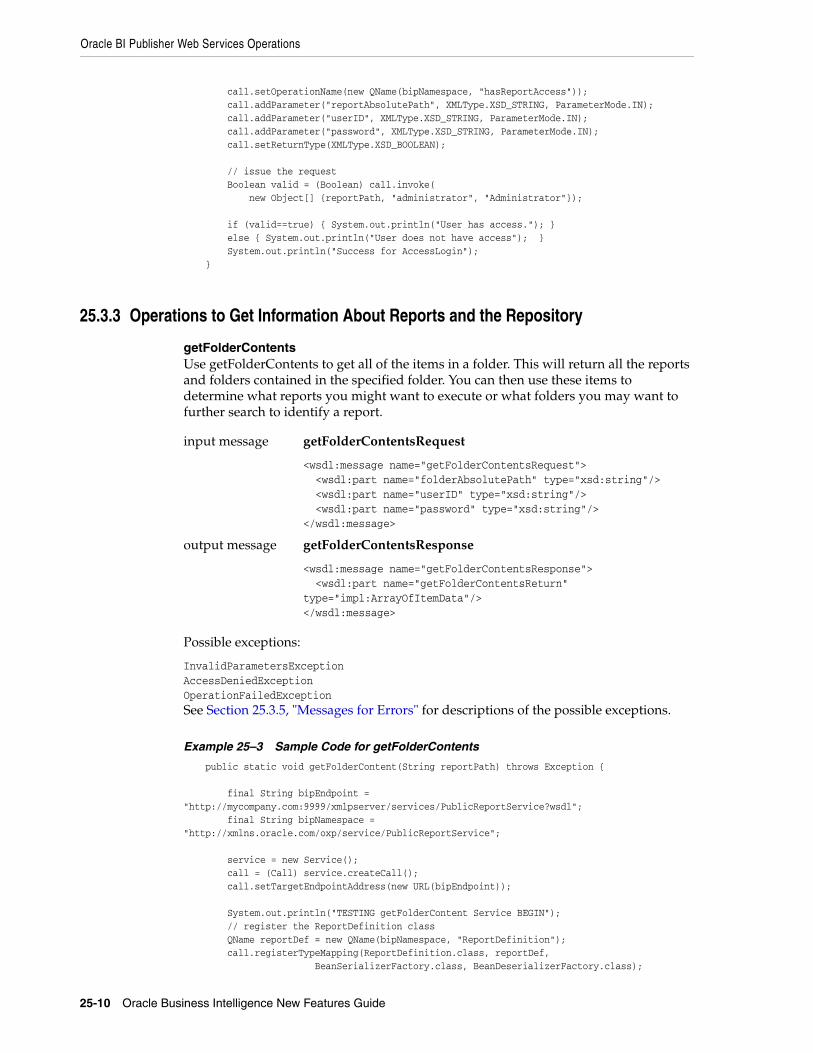
Oracle BI Publisher Web Services Operations
25-10 Oracle Business Intelligence New Features Guide
call.setOperationName(new QName(bipNamespace, "hasReportAccess")); call.addParameter("reportAbsolutePath", XMLType.XSD_STRING, ParameterMode.IN); call.addParameter("userID", XMLType.XSD_STRING, ParameterMode.IN); call.addParameter("password", XMLType.XSD_STRING, ParameterMode.IN); call.setReturnType(XMLType.XSD_BOOLEAN); // issue the request Boolean valid = (Boolean) call.invoke( new Object[] {reportPath, "administrator", "Administrator"}); if (valid==true) { System.out.println("User has access."); } else { System.out.println("User does not have access"); } System.out.println("Success for AccessLogin"); }
25.3.3 Operations to Get Information About Reports and the Repository
getFolderContentsUse getFolderContents to get all of the items in a folder. This will return all the reports and folders contained in the specified folder. You can then use these items to determine what reports you might want to execute or what folders you may want to further search to identify a report.
Possible exceptions:
InvalidParametersExceptionAccessDeniedExceptionOperationFailedExceptionSee Section 25.3.5, "Messages for Errors" for descriptions of the possible exceptions.
Example 25–3 Sample Code for getFolderContents
public static void getFolderContent(String reportPath) throws Exception { final String bipEndpoint = "http://mycompany.com:9999/xmlpserver/services/PublicReportService?wsdl"; final String bipNamespace = "http://xmlns.oracle.com/oxp/service/PublicReportService"; service = new Service(); call = (Call) service.createCall(); call.setTargetEndpointAddress(new URL(bipEndpoint)); System.out.println("TESTING getFolderContent Service BEGIN"); // register the ReportDefinition class QName reportDef = new QName(bipNamespace, "ReportDefinition"); call.registerTypeMapping(ReportDefinition.class, reportDef, BeanSerializerFactory.class, BeanDeserializerFactory.class);
input message getFolderContentsRequest
<wsdl:message name="getFolderContentsRequest"> <wsdl:part name="folderAbsolutePath" type="xsd:string"/> <wsdl:part name="userID" type="xsd:string"/> <wsdl:part name="password" type="xsd:string"/></wsdl:message>
output message getFolderContentsResponse
<wsdl:message name="getFolderContentsResponse"> <wsdl:part name="getFolderContentsReturn" type="impl:ArrayOfItemData"/></wsdl:message>
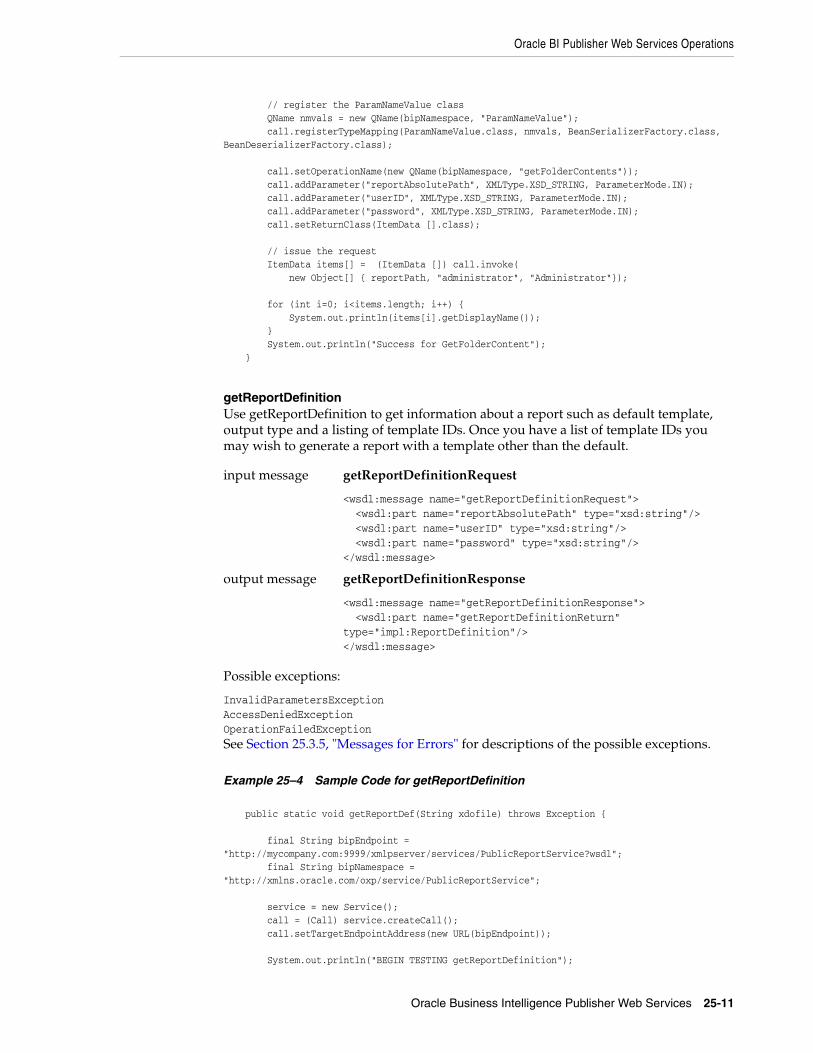
Oracle BI Publisher Web Services Operations
Oracle Business Intelligence Publisher Web Services 25-11
// register the ParamNameValue class QName nmvals = new QName(bipNamespace, "ParamNameValue"); call.registerTypeMapping(ParamNameValue.class, nmvals, BeanSerializerFactory.class, BeanDeserializerFactory.class); call.setOperationName(new QName(bipNamespace, "getFolderContents")); call.addParameter("reportAbsolutePath", XMLType.XSD_STRING, ParameterMode.IN); call.addParameter("userID", XMLType.XSD_STRING, ParameterMode.IN); call.addParameter("password", XMLType.XSD_STRING, ParameterMode.IN); call.setReturnClass(ItemData [].class); // issue the request ItemData items[] = (ItemData []) call.invoke( new Object[] { reportPath, "administrator", "Administrator"}); for (int i=0; i<items.length; i++) { System.out.println(items[i].getDisplayName()); } System.out.println("Success for GetFolderContent"); }
getReportDefinitionUse getReportDefinition to get information about a report such as default template, output type and a listing of template IDs. Once you have a list of template IDs you may wish to generate a report with a template other than the default.
Possible exceptions:
InvalidParametersExceptionAccessDeniedExceptionOperationFailedExceptionSee Section 25.3.5, "Messages for Errors" for descriptions of the possible exceptions.
Example 25–4 Sample Code for getReportDefinition
public static void getReportDef(String xdofile) throws Exception { final String bipEndpoint = "http://mycompany.com:9999/xmlpserver/services/PublicReportService?wsdl"; final String bipNamespace = "http://xmlns.oracle.com/oxp/service/PublicReportService"; service = new Service(); call = (Call) service.createCall(); call.setTargetEndpointAddress(new URL(bipEndpoint)); System.out.println("BEGIN TESTING getReportDefinition");
input message getReportDefinitionRequest
<wsdl:message name="getReportDefinitionRequest"> <wsdl:part name="reportAbsolutePath" type="xsd:string"/> <wsdl:part name="userID" type="xsd:string"/> <wsdl:part name="password" type="xsd:string"/></wsdl:message>
output message getReportDefinitionResponse
<wsdl:message name="getReportDefinitionResponse"> <wsdl:part name="getReportDefinitionReturn" type="impl:ReportDefinition"/></wsdl:message>
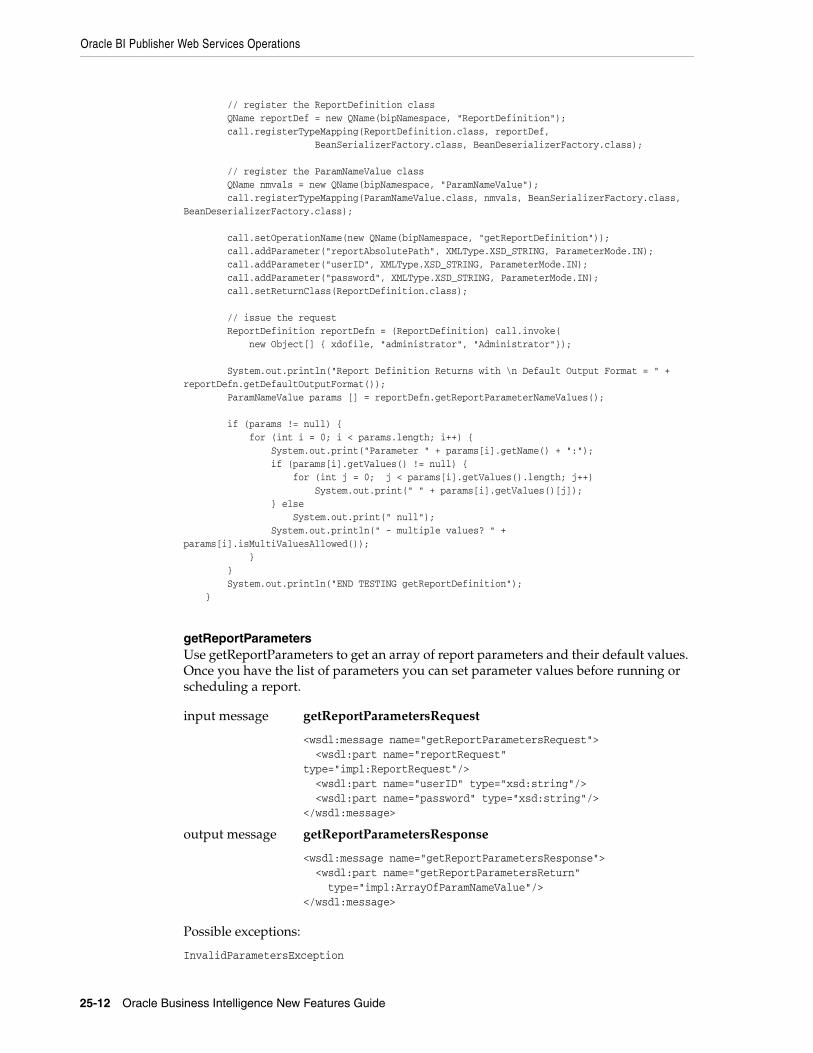
Oracle BI Publisher Web Services Operations
25-12 Oracle Business Intelligence New Features Guide
// register the ReportDefinition class QName reportDef = new QName(bipNamespace, "ReportDefinition"); call.registerTypeMapping(ReportDefinition.class, reportDef, BeanSerializerFactory.class, BeanDeserializerFactory.class); // register the ParamNameValue class QName nmvals = new QName(bipNamespace, "ParamNameValue"); call.registerTypeMapping(ParamNameValue.class, nmvals, BeanSerializerFactory.class, BeanDeserializerFactory.class); call.setOperationName(new QName(bipNamespace, "getReportDefinition")); call.addParameter("reportAbsolutePath", XMLType.XSD_STRING, ParameterMode.IN); call.addParameter("userID", XMLType.XSD_STRING, ParameterMode.IN); call.addParameter("password", XMLType.XSD_STRING, ParameterMode.IN); call.setReturnClass(ReportDefinition.class); // issue the request ReportDefinition reportDefn = (ReportDefinition) call.invoke( new Object[] { xdofile, "administrator", "Administrator"}); System.out.println("Report Definition Returns with \n Default Output Format = " + reportDefn.getDefaultOutputFormat()); ParamNameValue params [] = reportDefn.getReportParameterNameValues(); if (params != null) { for (int i = 0; i < params.length; i++) { System.out.print("Parameter " + params[i].getName() + ":"); if (params[i].getValues() != null) { for (int j = 0; j < params[i].getValues().length; j++) System.out.print(" " + params[i].getValues()[j]); } else System.out.print(" null"); System.out.println(" - multiple values? " + params[i].isMultiValuesAllowed()); } } System.out.println("END TESTING getReportDefinition"); }
getReportParametersUse getReportParameters to get an array of report parameters and their default values. Once you have the list of parameters you can set parameter values before running or scheduling a report.
Possible exceptions:
InvalidParametersException
input message getReportParametersRequest
<wsdl:message name="getReportParametersRequest"> <wsdl:part name="reportRequest" type="impl:ReportRequest"/> <wsdl:part name="userID" type="xsd:string"/> <wsdl:part name="password" type="xsd:string"/></wsdl:message>
output message getReportParametersResponse
<wsdl:message name="getReportParametersResponse"> <wsdl:part name="getReportParametersReturn" type="impl:ArrayOfParamNameValue"/></wsdl:message>

Oracle BI Publisher Web Services Operations
Oracle Business Intelligence Publisher Web Services 25-13
AccessDeniedExceptionOperationFailedExceptionSee Section 25.3.5, "Messages for Errors" for descriptions of the possible exceptions.
Example 25–5 Sample Code for getReportParameters
public static void getParameters(String xdofile) throws Exception { //final String bipEndpoint = "http://10.138.232.107/xmlpserver/services/PublicReportService?wsdl"; final String bipEndpoint = "http://mycompany.com:9999/xmlpserver/services/PublicReportService?wsdl"; final String bipNamespace = "http://xmlns.oracle.com/oxp/service/PublicReportService"; service = new Service(); call = (Call) service.createCall(); call.setTargetEndpointAddress(new URL(bipEndpoint)); System.out.println("BEGIN TESTING: getParameters Service"); // register the ReportRequest class QName reportReq = new QName(bipNamespace, "ReportRequest"); call.registerTypeMapping(ReportRequest.class, reportReq, BeanSerializerFactory.class, BeanDeserializerFactory.class); // register the ParamNameValue class QName nmvals = new QName(bipNamespace, "ParamNameValue"); call.registerTypeMapping(ParamNameValue.class, nmvals, BeanSerializerFactory.class, BeanDeserializerFactory.class); // Define parameters ParamNameValue[] paramNmVals = new ParamNameValue[2]; paramNmVals[0] = new ParamNameValue(false, false, "dept", null) ; paramNmVals[1] = new ParamNameValue(false, false, "emp", new String[] {"*"}) ; ReportRequest req = new ReportRequest("pdf", "en-US", "Simple", paramNmVals, xdofile); call.setOperationName(new QName(bipNamespace, "getReportParameters")); call.addParameter( "ReportRequest", reportReq, ParameterMode.IN ); call.addParameter("userID", XMLType.XSD_STRING, ParameterMode.IN); call.addParameter("password", XMLType.XSD_STRING, ParameterMode.IN); call.setReturnClass(ParamNameValue [].class); // issue the request ParamNameValue params [] = (ParamNameValue []) call.invoke( new Object[] { req, "administrator", "Administrator"}); if (params != null) { for (int i = 0; i < params.length; i++) { System.out.print("Parameter " + params[i].getName() + ":"); if (params[i].getValues() != null) { for (int j = 0; j < params[i].getValues().length; j++) System.out.print(" " + params[i].getValues()[j]); } else System.out.print(" null"); System.out.println(" - multiple values? " + params[i].isMultiValuesAllowed()); } } System.out.println("END TESTING: getParameters"); }
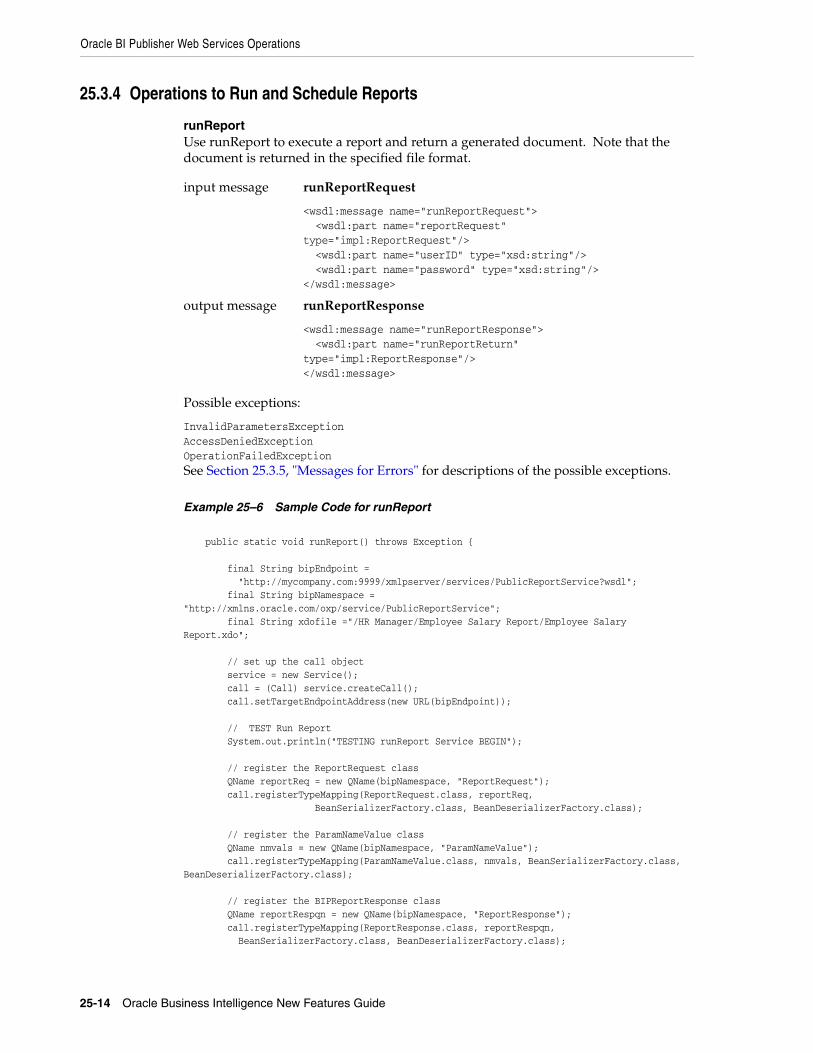
Oracle BI Publisher Web Services Operations
25-14 Oracle Business Intelligence New Features Guide
25.3.4 Operations to Run and Schedule Reports
runReportUse runReport to execute a report and return a generated document. Note that the document is returned in the specified file format.
Possible exceptions:
InvalidParametersExceptionAccessDeniedExceptionOperationFailedExceptionSee Section 25.3.5, "Messages for Errors" for descriptions of the possible exceptions.
Example 25–6 Sample Code for runReport
public static void runReport() throws Exception { final String bipEndpoint = "http://mycompany.com:9999/xmlpserver/services/PublicReportService?wsdl"; final String bipNamespace = "http://xmlns.oracle.com/oxp/service/PublicReportService"; final String xdofile ="/HR Manager/Employee Salary Report/Employee Salary Report.xdo"; // set up the call object service = new Service(); call = (Call) service.createCall(); call.setTargetEndpointAddress(new URL(bipEndpoint)); // TEST Run Report System.out.println("TESTING runReport Service BEGIN"); // register the ReportRequest class QName reportReq = new QName(bipNamespace, "ReportRequest"); call.registerTypeMapping(ReportRequest.class, reportReq, BeanSerializerFactory.class, BeanDeserializerFactory.class); // register the ParamNameValue class QName nmvals = new QName(bipNamespace, "ParamNameValue"); call.registerTypeMapping(ParamNameValue.class, nmvals, BeanSerializerFactory.class, BeanDeserializerFactory.class); // register the BIPReportResponse class QName reportRespqn = new QName(bipNamespace, "ReportResponse"); call.registerTypeMapping(ReportResponse.class, reportRespqn, BeanSerializerFactory.class, BeanDeserializerFactory.class);
input message runReportRequest
<wsdl:message name="runReportRequest"> <wsdl:part name="reportRequest" type="impl:ReportRequest"/> <wsdl:part name="userID" type="xsd:string"/> <wsdl:part name="password" type="xsd:string"/></wsdl:message>
output message runReportResponse
<wsdl:message name="runReportResponse"> <wsdl:part name="runReportReturn" type="impl:ReportResponse"/></wsdl:message>
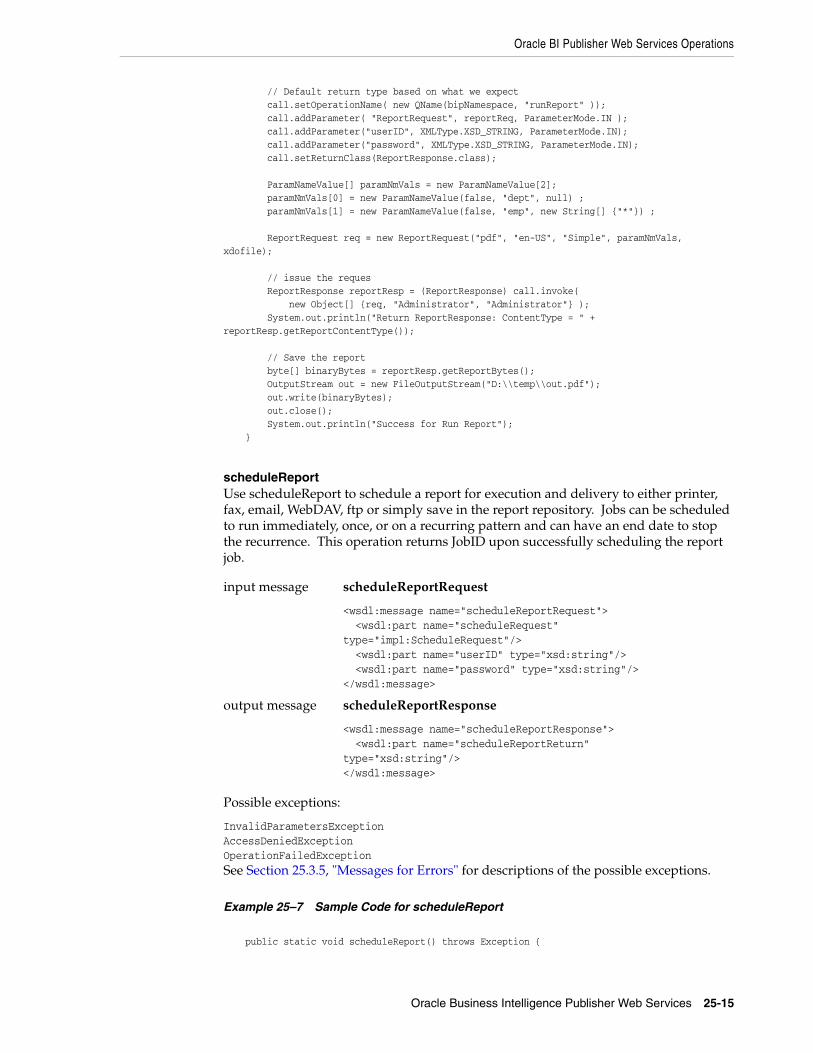
Oracle BI Publisher Web Services Operations
Oracle Business Intelligence Publisher Web Services 25-15
// Default return type based on what we expect call.setOperationName( new QName(bipNamespace, "runReport" )); call.addParameter( "ReportRequest", reportReq, ParameterMode.IN ); call.addParameter("userID", XMLType.XSD_STRING, ParameterMode.IN); call.addParameter("password", XMLType.XSD_STRING, ParameterMode.IN); call.setReturnClass(ReportResponse.class); ParamNameValue[] paramNmVals = new ParamNameValue[2]; paramNmVals[0] = new ParamNameValue(false, "dept", null) ; paramNmVals[1] = new ParamNameValue(false, "emp", new String[] {"*"}) ; ReportRequest req = new ReportRequest("pdf", "en-US", "Simple", paramNmVals, xdofile); // issue the reques ReportResponse reportResp = (ReportResponse) call.invoke( new Object[] {req, "Administrator", "Administrator"} ); System.out.println("Return ReportResponse: ContentType = " + reportResp.getReportContentType()); // Save the report byte[] binaryBytes = reportResp.getReportBytes(); OutputStream out = new FileOutputStream("D:\\temp\\out.pdf"); out.write(binaryBytes); out.close(); System.out.println("Success for Run Report"); }
scheduleReportUse scheduleReport to schedule a report for execution and delivery to either printer, fax, email, WebDAV, ftp or simply save in the report repository. Jobs can be scheduled to run immediately, once, or on a recurring pattern and can have an end date to stop the recurrence. This operation returns JobID upon successfully scheduling the report job.
Possible exceptions:
InvalidParametersExceptionAccessDeniedExceptionOperationFailedExceptionSee Section 25.3.5, "Messages for Errors" for descriptions of the possible exceptions.
Example 25–7 Sample Code for scheduleReport
public static void scheduleReport() throws Exception {
input message scheduleReportRequest
<wsdl:message name="scheduleReportRequest"> <wsdl:part name="scheduleRequest" type="impl:ScheduleRequest"/> <wsdl:part name="userID" type="xsd:string"/> <wsdl:part name="password" type="xsd:string"/></wsdl:message>
output message scheduleReportResponse
<wsdl:message name="scheduleReportResponse"> <wsdl:part name="scheduleReportReturn" type="xsd:string"/></wsdl:message>
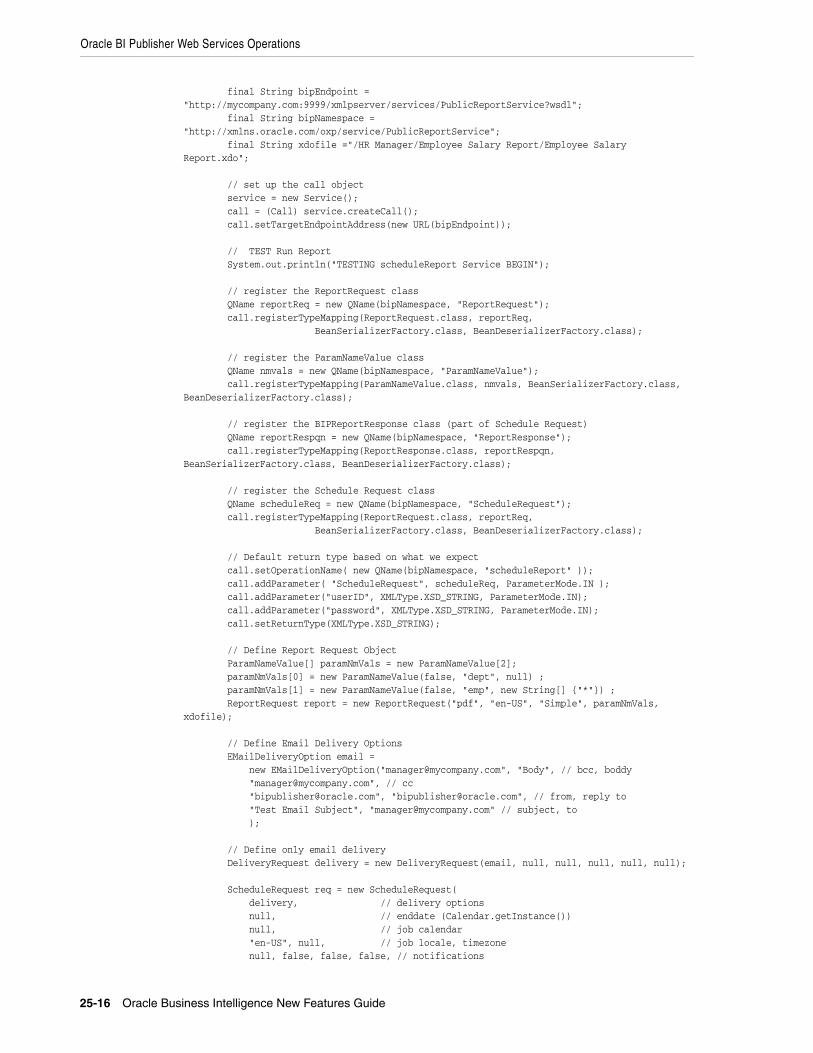
Oracle BI Publisher Web Services Operations
25-16 Oracle Business Intelligence New Features Guide
final String bipEndpoint = "http://mycompany.com:9999/xmlpserver/services/PublicReportService?wsdl"; final String bipNamespace = "http://xmlns.oracle.com/oxp/service/PublicReportService"; final String xdofile ="/HR Manager/Employee Salary Report/Employee Salary Report.xdo"; // set up the call object service = new Service(); call = (Call) service.createCall(); call.setTargetEndpointAddress(new URL(bipEndpoint)); // TEST Run Report System.out.println("TESTING scheduleReport Service BEGIN"); // register the ReportRequest class QName reportReq = new QName(bipNamespace, "ReportRequest"); call.registerTypeMapping(ReportRequest.class, reportReq, BeanSerializerFactory.class, BeanDeserializerFactory.class); // register the ParamNameValue class QName nmvals = new QName(bipNamespace, "ParamNameValue"); call.registerTypeMapping(ParamNameValue.class, nmvals, BeanSerializerFactory.class, BeanDeserializerFactory.class); // register the BIPReportResponse class (part of Schedule Request) QName reportRespqn = new QName(bipNamespace, "ReportResponse"); call.registerTypeMapping(ReportResponse.class, reportRespqn, BeanSerializerFactory.class, BeanDeserializerFactory.class); // register the Schedule Request class QName scheduleReq = new QName(bipNamespace, "ScheduleRequest"); call.registerTypeMapping(ReportRequest.class, reportReq, BeanSerializerFactory.class, BeanDeserializerFactory.class); // Default return type based on what we expect call.setOperationName( new QName(bipNamespace, "scheduleReport" )); call.addParameter( "ScheduleRequest", scheduleReq, ParameterMode.IN ); call.addParameter("userID", XMLType.XSD_STRING, ParameterMode.IN); call.addParameter("password", XMLType.XSD_STRING, ParameterMode.IN); call.setReturnType(XMLType.XSD_STRING); // Define Report Request Object ParamNameValue[] paramNmVals = new ParamNameValue[2]; paramNmVals[0] = new ParamNameValue(false, "dept", null) ; paramNmVals[1] = new ParamNameValue(false, "emp", new String[] {"*"}) ; ReportRequest report = new ReportRequest("pdf", "en-US", "Simple", paramNmVals, xdofile); // Define Email Delivery Options EMailDeliveryOption email = new EMailDeliveryOption("[email protected]", "Body", // bcc, boddy "[email protected]", // cc "[email protected]", "[email protected]", // from, reply to "Test Email Subject", "[email protected]" // subject, to ); // Define only email delivery DeliveryRequest delivery = new DeliveryRequest(email, null, null, null, null, null); ScheduleRequest req = new ScheduleRequest( delivery, // delivery options null, // enddate (Calendar.getInstance()) null, // job calendar "en-US", null, // job locale, timezone null, false, false, false, // notifications
Debugging Web Service Applications
Oracle Business Intelligence Publisher Web Services 25-17
1, 1, // repeat count, repeat interval report, // Report and Parameters "true", "true", // Save Data, Save Output "false", "true", // Bursting, Public null, // start date "true", // Use UTF-8 "my Job4" // job name ); // issue the request String result = (String) call.invoke( new Object[] {req, "Administrator", "Administrator"} ); System.out.println("Success for Schedule Report"); }
25.3.5 Messages for ErrorsOne of the following messages may be returned to any of the operations if there is an error that occurs in the execution of the operation.
OperationFailedException<wsdl:message name="OperationFailedException"> <wsdl:part name="fault" type="impl:OperationFailedException"/></wsdl:message>
AccessDeniedException<wsdl:message name="AccessDeniedException"> <wsdl:part name="fault" type="impl:AccessDeniedException"/></wsdl:message>
InvalidParametersException<wsdl:message name="InvalidParametersException"> <wsdl:part name="fault" type="impl:InvalidParametersException"/></wsdl:message>
25.4 Debugging Web Service ApplicationsAs a Web service developer you may need to see the SOAP request messages being used to invoke Web services along with the SOAP response to those request messages. Oracle BI Publisher bundles the Apache Axis SOAP Monitor utility to monitor the SOAP message flow without requiring any special configuration or restarting of the server.
The client sample code sends a SOAP request to listening port 8888, and then takes advantage of Axis TCP monitor to route SOAP request to port 8080, where the PublicReportService is running. This will be a useful debugging tool for the Web service developer.
To start Axis TCP Monitor (tcpmon), from the command line enter the following:
% java org.apache.axis.utils.tcpmon This launches the TCP monitor window. A sample of the window without any of the optional arguments is shown in the following figure:
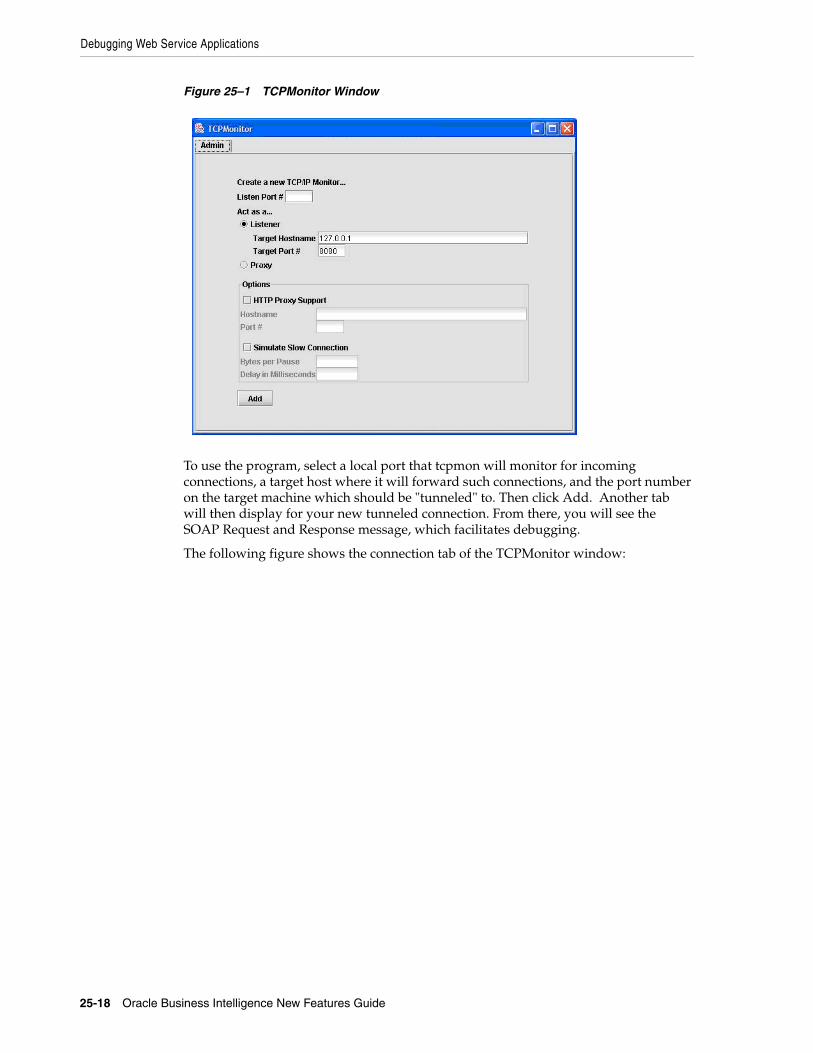
Debugging Web Service Applications
25-18 Oracle Business Intelligence New Features Guide
Figure 25–1 TCPMonitor Window
To use the program, select a local port that tcpmon will monitor for incoming connections, a target host where it will forward such connections, and the port number on the target machine which should be "tunneled" to. Then click Add. Another tab will then display for your new tunneled connection. From there, you will see the SOAP Request and Response message, which facilitates debugging.
The following figure shows the connection tab of the TCPMonitor window:
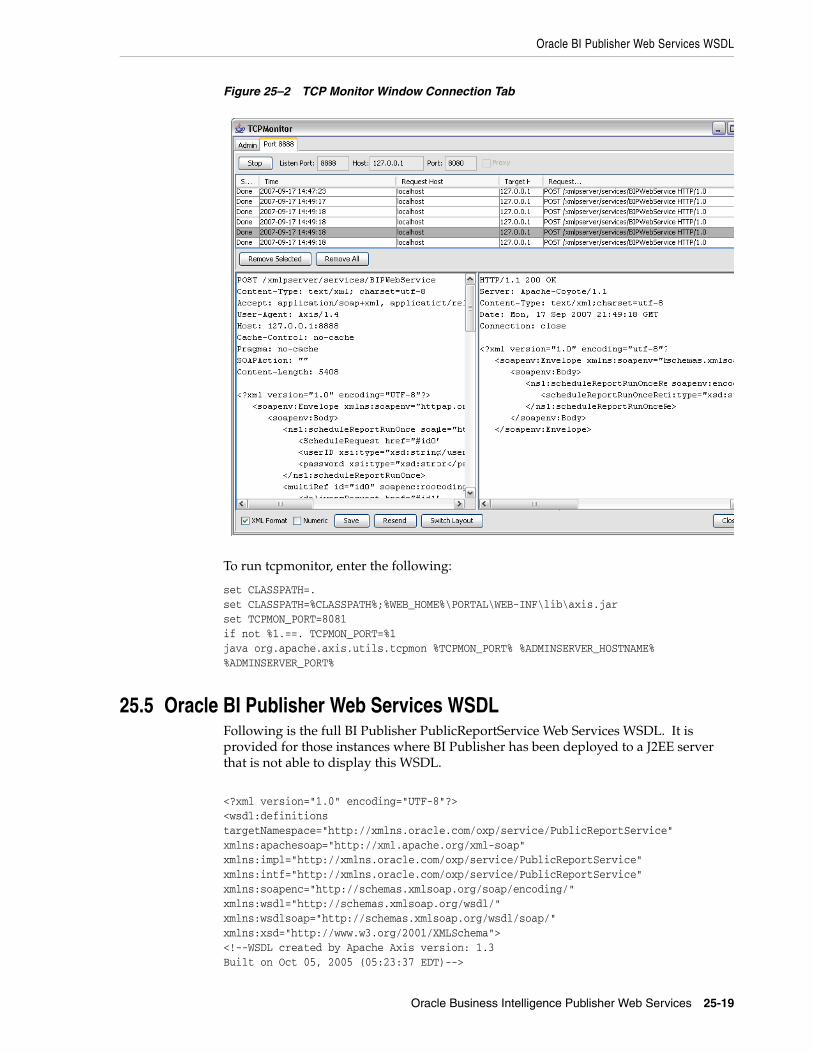
Oracle BI Publisher Web Services WSDL
Oracle Business Intelligence Publisher Web Services 25-19
Figure 25–2 TCP Monitor Window Connection Tab
To run tcpmonitor, enter the following:
set CLASSPATH=.set CLASSPATH=%CLASSPATH%;%WEB_HOME%\PORTAL\WEB-INF\lib\axis.jarset TCPMON_PORT=8081if not %1.==. TCPMON_PORT=%1java org.apache.axis.utils.tcpmon %TCPMON_PORT% %ADMINSERVER_HOSTNAME% %ADMINSERVER_PORT%
25.5 Oracle BI Publisher Web Services WSDLFollowing is the full BI Publisher PublicReportService Web Services WSDL. It is provided for those instances where BI Publisher has been deployed to a J2EE server that is not able to display this WSDL.
<?xml version="1.0" encoding="UTF-8"?><wsdl:definitions targetNamespace="http://xmlns.oracle.com/oxp/service/PublicReportService" xmlns:apachesoap="http://xml.apache.org/xml-soap" xmlns:impl="http://xmlns.oracle.com/oxp/service/PublicReportService" xmlns:intf="http://xmlns.oracle.com/oxp/service/PublicReportService" xmlns:soapenc="http://schemas.xmlsoap.org/soap/encoding/" xmlns:wsdl="http://schemas.xmlsoap.org/wsdl/" xmlns:wsdlsoap="http://schemas.xmlsoap.org/wsdl/soap/" xmlns:xsd="http://www.w3.org/2001/XMLSchema"><!--WSDL created by Apache Axis version: 1.3Built on Oct 05, 2005 (05:23:37 EDT)-->
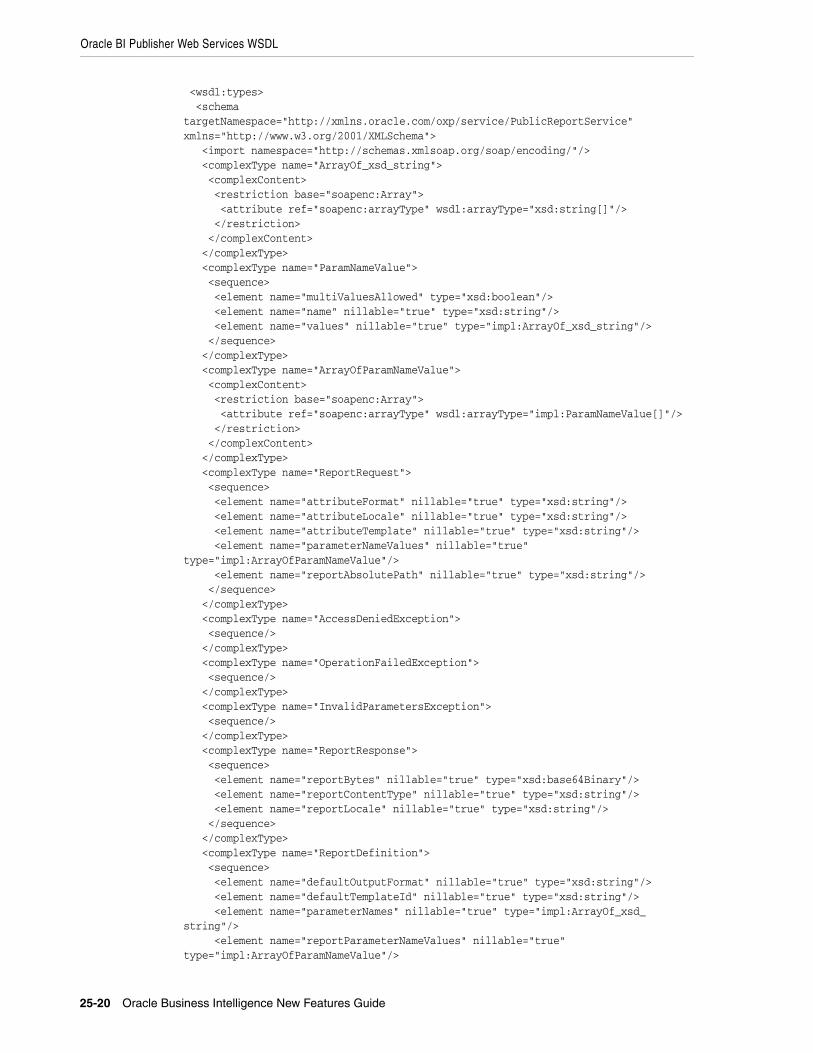
Oracle BI Publisher Web Services WSDL
25-20 Oracle Business Intelligence New Features Guide
<wsdl:types> <schema targetNamespace="http://xmlns.oracle.com/oxp/service/PublicReportService" xmlns="http://www.w3.org/2001/XMLSchema"> <import namespace="http://schemas.xmlsoap.org/soap/encoding/"/> <complexType name="ArrayOf_xsd_string"> <complexContent> <restriction base="soapenc:Array"> <attribute ref="soapenc:arrayType" wsdl:arrayType="xsd:string[]"/> </restriction> </complexContent> </complexType> <complexType name="ParamNameValue"> <sequence> <element name="multiValuesAllowed" type="xsd:boolean"/> <element name="name" nillable="true" type="xsd:string"/> <element name="values" nillable="true" type="impl:ArrayOf_xsd_string"/> </sequence> </complexType> <complexType name="ArrayOfParamNameValue"> <complexContent> <restriction base="soapenc:Array"> <attribute ref="soapenc:arrayType" wsdl:arrayType="impl:ParamNameValue[]"/> </restriction> </complexContent> </complexType> <complexType name="ReportRequest"> <sequence> <element name="attributeFormat" nillable="true" type="xsd:string"/> <element name="attributeLocale" nillable="true" type="xsd:string"/> <element name="attributeTemplate" nillable="true" type="xsd:string"/> <element name="parameterNameValues" nillable="true" type="impl:ArrayOfParamNameValue"/> <element name="reportAbsolutePath" nillable="true" type="xsd:string"/> </sequence> </complexType> <complexType name="AccessDeniedException"> <sequence/> </complexType> <complexType name="OperationFailedException"> <sequence/> </complexType> <complexType name="InvalidParametersException"> <sequence/> </complexType> <complexType name="ReportResponse"> <sequence> <element name="reportBytes" nillable="true" type="xsd:base64Binary"/> <element name="reportContentType" nillable="true" type="xsd:string"/> <element name="reportLocale" nillable="true" type="xsd:string"/> </sequence> </complexType> <complexType name="ReportDefinition"> <sequence> <element name="defaultOutputFormat" nillable="true" type="xsd:string"/> <element name="defaultTemplateId" nillable="true" type="xsd:string"/> <element name="parameterNames" nillable="true" type="impl:ArrayOf_xsd_string"/> <element name="reportParameterNameValues" nillable="true" type="impl:ArrayOfParamNameValue"/>
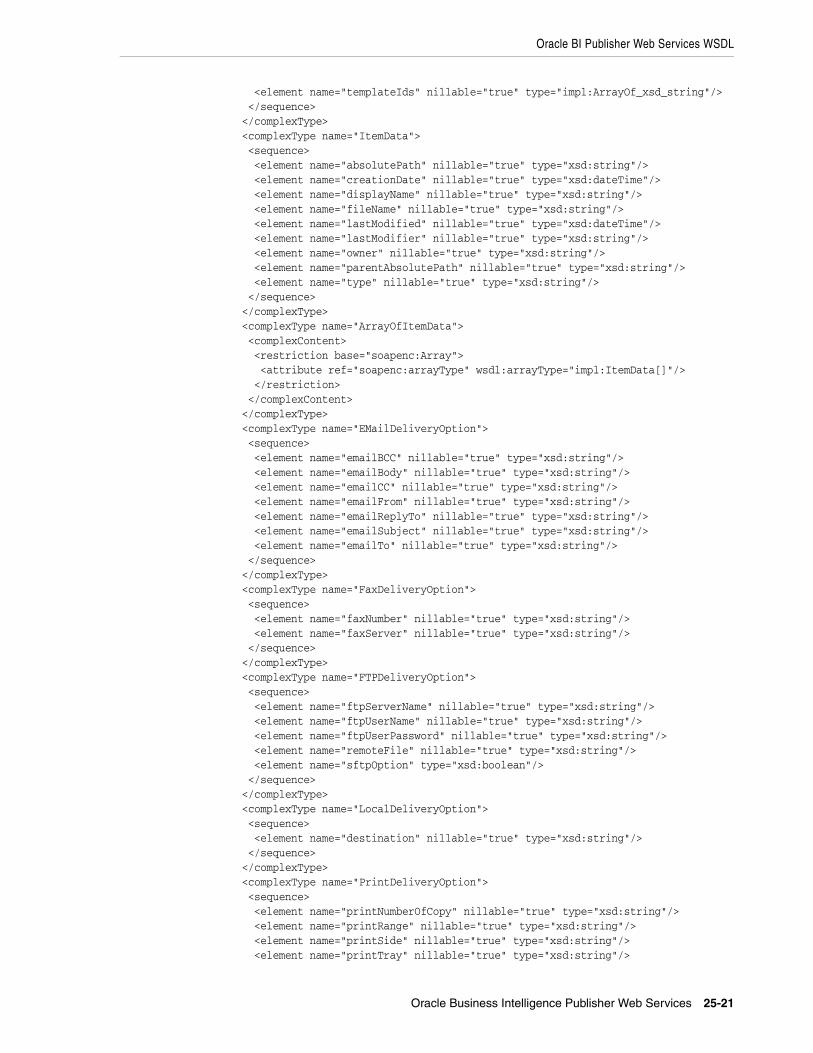
Oracle BI Publisher Web Services WSDL
Oracle Business Intelligence Publisher Web Services 25-21
<element name="templateIds" nillable="true" type="impl:ArrayOf_xsd_string"/> </sequence> </complexType> <complexType name="ItemData"> <sequence> <element name="absolutePath" nillable="true" type="xsd:string"/> <element name="creationDate" nillable="true" type="xsd:dateTime"/> <element name="displayName" nillable="true" type="xsd:string"/> <element name="fileName" nillable="true" type="xsd:string"/> <element name="lastModified" nillable="true" type="xsd:dateTime"/> <element name="lastModifier" nillable="true" type="xsd:string"/> <element name="owner" nillable="true" type="xsd:string"/> <element name="parentAbsolutePath" nillable="true" type="xsd:string"/> <element name="type" nillable="true" type="xsd:string"/> </sequence> </complexType> <complexType name="ArrayOfItemData"> <complexContent> <restriction base="soapenc:Array"> <attribute ref="soapenc:arrayType" wsdl:arrayType="impl:ItemData[]"/> </restriction> </complexContent> </complexType> <complexType name="EMailDeliveryOption"> <sequence> <element name="emailBCC" nillable="true" type="xsd:string"/> <element name="emailBody" nillable="true" type="xsd:string"/> <element name="emailCC" nillable="true" type="xsd:string"/> <element name="emailFrom" nillable="true" type="xsd:string"/> <element name="emailReplyTo" nillable="true" type="xsd:string"/> <element name="emailSubject" nillable="true" type="xsd:string"/> <element name="emailTo" nillable="true" type="xsd:string"/> </sequence> </complexType> <complexType name="FaxDeliveryOption"> <sequence> <element name="faxNumber" nillable="true" type="xsd:string"/> <element name="faxServer" nillable="true" type="xsd:string"/> </sequence> </complexType> <complexType name="FTPDeliveryOption"> <sequence> <element name="ftpServerName" nillable="true" type="xsd:string"/> <element name="ftpUserName" nillable="true" type="xsd:string"/> <element name="ftpUserPassword" nillable="true" type="xsd:string"/> <element name="remoteFile" nillable="true" type="xsd:string"/> <element name="sftpOption" type="xsd:boolean"/> </sequence> </complexType> <complexType name="LocalDeliveryOption"> <sequence> <element name="destination" nillable="true" type="xsd:string"/> </sequence> </complexType> <complexType name="PrintDeliveryOption"> <sequence> <element name="printNumberOfCopy" nillable="true" type="xsd:string"/> <element name="printRange" nillable="true" type="xsd:string"/> <element name="printSide" nillable="true" type="xsd:string"/> <element name="printTray" nillable="true" type="xsd:string"/>
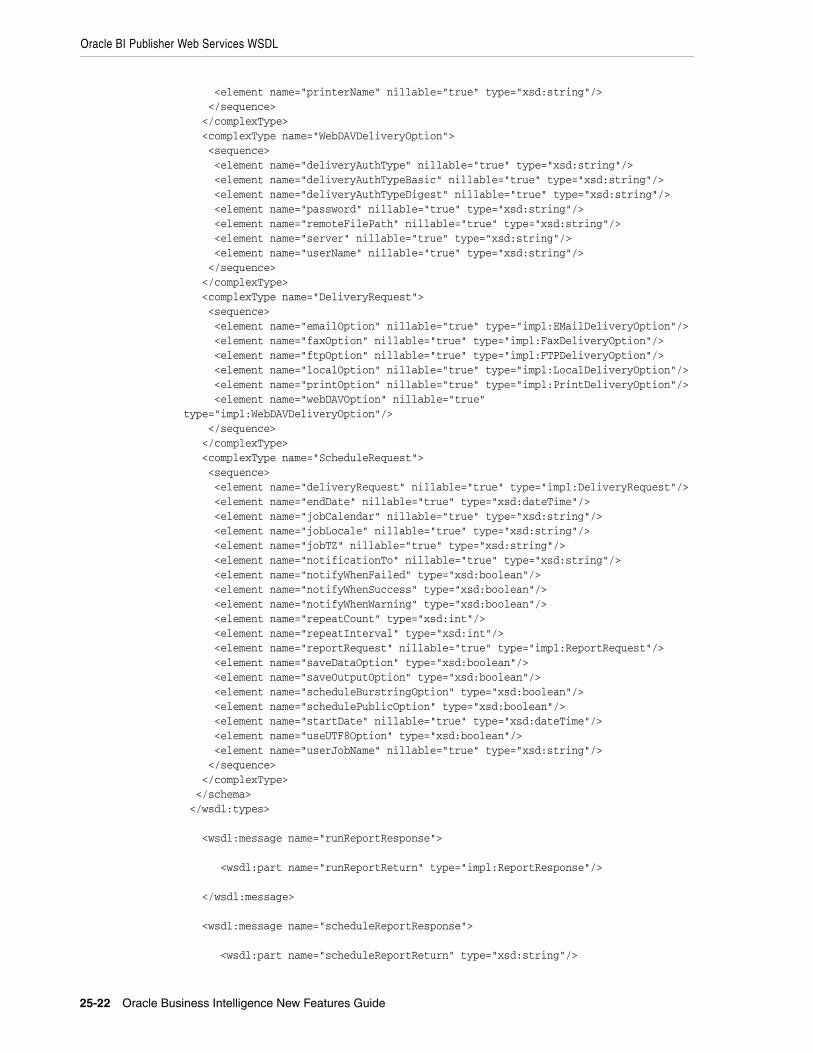
Oracle BI Publisher Web Services WSDL
25-22 Oracle Business Intelligence New Features Guide
<element name="printerName" nillable="true" type="xsd:string"/> </sequence> </complexType> <complexType name="WebDAVDeliveryOption"> <sequence> <element name="deliveryAuthType" nillable="true" type="xsd:string"/> <element name="deliveryAuthTypeBasic" nillable="true" type="xsd:string"/> <element name="deliveryAuthTypeDigest" nillable="true" type="xsd:string"/> <element name="password" nillable="true" type="xsd:string"/> <element name="remoteFilePath" nillable="true" type="xsd:string"/> <element name="server" nillable="true" type="xsd:string"/> <element name="userName" nillable="true" type="xsd:string"/> </sequence> </complexType> <complexType name="DeliveryRequest"> <sequence> <element name="emailOption" nillable="true" type="impl:EMailDeliveryOption"/> <element name="faxOption" nillable="true" type="impl:FaxDeliveryOption"/> <element name="ftpOption" nillable="true" type="impl:FTPDeliveryOption"/> <element name="localOption" nillable="true" type="impl:LocalDeliveryOption"/> <element name="printOption" nillable="true" type="impl:PrintDeliveryOption"/> <element name="webDAVOption" nillable="true" type="impl:WebDAVDeliveryOption"/> </sequence> </complexType> <complexType name="ScheduleRequest"> <sequence> <element name="deliveryRequest" nillable="true" type="impl:DeliveryRequest"/> <element name="endDate" nillable="true" type="xsd:dateTime"/> <element name="jobCalendar" nillable="true" type="xsd:string"/> <element name="jobLocale" nillable="true" type="xsd:string"/> <element name="jobTZ" nillable="true" type="xsd:string"/> <element name="notificationTo" nillable="true" type="xsd:string"/> <element name="notifyWhenFailed" type="xsd:boolean"/> <element name="notifyWhenSuccess" type="xsd:boolean"/> <element name="notifyWhenWarning" type="xsd:boolean"/> <element name="repeatCount" type="xsd:int"/> <element name="repeatInterval" type="xsd:int"/> <element name="reportRequest" nillable="true" type="impl:ReportRequest"/> <element name="saveDataOption" type="xsd:boolean"/> <element name="saveOutputOption" type="xsd:boolean"/> <element name="scheduleBurstringOption" type="xsd:boolean"/> <element name="schedulePublicOption" type="xsd:boolean"/> <element name="startDate" nillable="true" type="xsd:dateTime"/> <element name="useUTF8Option" type="xsd:boolean"/> <element name="userJobName" nillable="true" type="xsd:string"/> </sequence> </complexType> </schema> </wsdl:types> <wsdl:message name="runReportResponse"> <wsdl:part name="runReportReturn" type="impl:ReportResponse"/> </wsdl:message> <wsdl:message name="scheduleReportResponse"> <wsdl:part name="scheduleReportReturn" type="xsd:string"/>
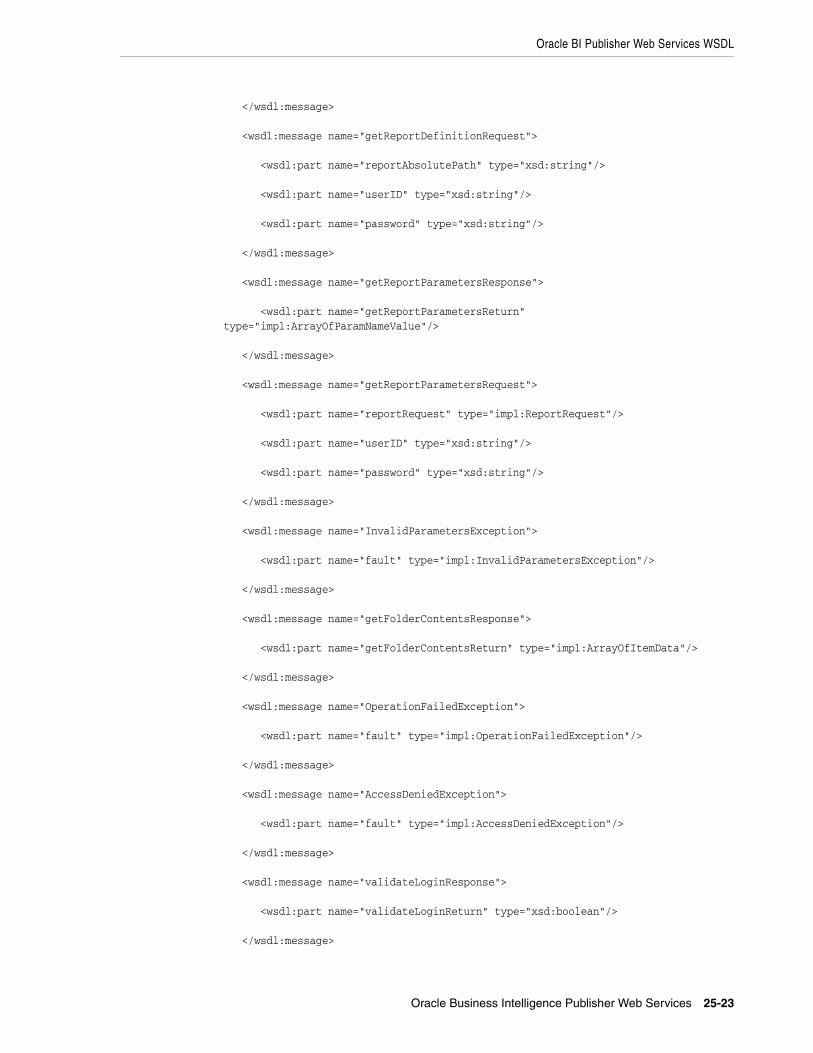
Oracle BI Publisher Web Services WSDL
Oracle Business Intelligence Publisher Web Services 25-23
</wsdl:message> <wsdl:message name="getReportDefinitionRequest"> <wsdl:part name="reportAbsolutePath" type="xsd:string"/> <wsdl:part name="userID" type="xsd:string"/> <wsdl:part name="password" type="xsd:string"/> </wsdl:message> <wsdl:message name="getReportParametersResponse"> <wsdl:part name="getReportParametersReturn" type="impl:ArrayOfParamNameValue"/> </wsdl:message> <wsdl:message name="getReportParametersRequest"> <wsdl:part name="reportRequest" type="impl:ReportRequest"/> <wsdl:part name="userID" type="xsd:string"/> <wsdl:part name="password" type="xsd:string"/> </wsdl:message> <wsdl:message name="InvalidParametersException"> <wsdl:part name="fault" type="impl:InvalidParametersException"/> </wsdl:message> <wsdl:message name="getFolderContentsResponse"> <wsdl:part name="getFolderContentsReturn" type="impl:ArrayOfItemData"/> </wsdl:message> <wsdl:message name="OperationFailedException"> <wsdl:part name="fault" type="impl:OperationFailedException"/> </wsdl:message> <wsdl:message name="AccessDeniedException"> <wsdl:part name="fault" type="impl:AccessDeniedException"/> </wsdl:message> <wsdl:message name="validateLoginResponse"> <wsdl:part name="validateLoginReturn" type="xsd:boolean"/> </wsdl:message>
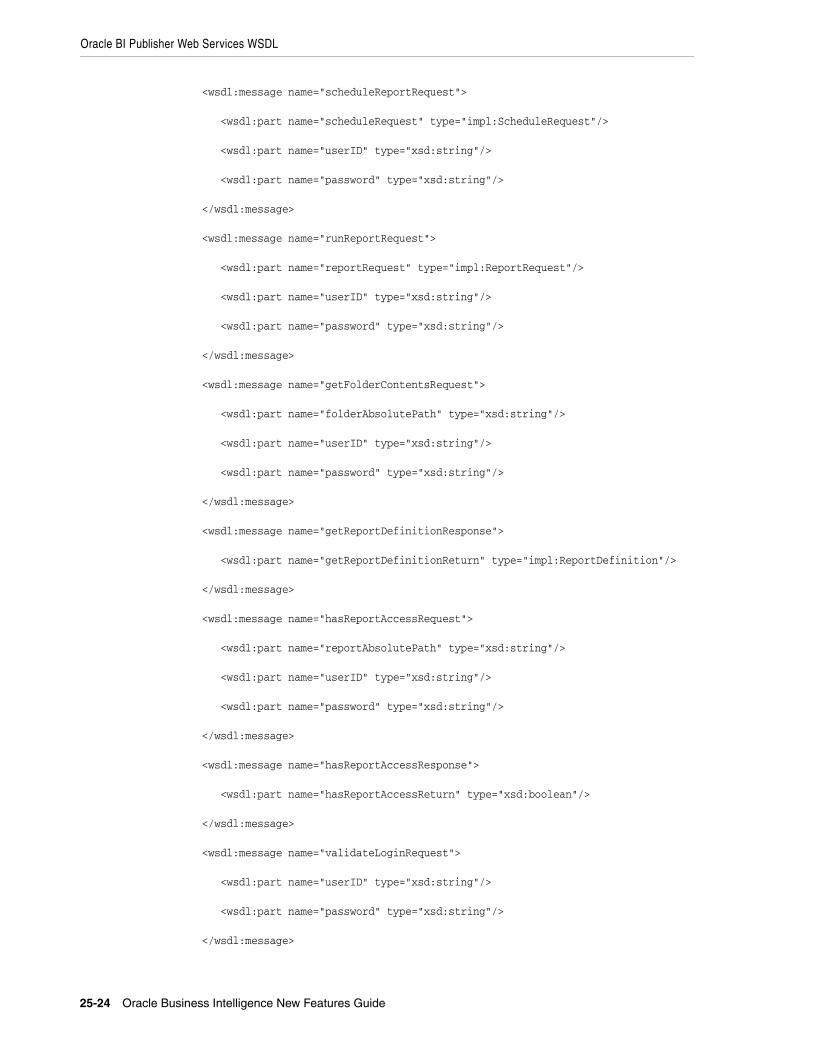
Oracle BI Publisher Web Services WSDL
25-24 Oracle Business Intelligence New Features Guide
<wsdl:message name="scheduleReportRequest"> <wsdl:part name="scheduleRequest" type="impl:ScheduleRequest"/> <wsdl:part name="userID" type="xsd:string"/> <wsdl:part name="password" type="xsd:string"/> </wsdl:message> <wsdl:message name="runReportRequest"> <wsdl:part name="reportRequest" type="impl:ReportRequest"/> <wsdl:part name="userID" type="xsd:string"/> <wsdl:part name="password" type="xsd:string"/> </wsdl:message> <wsdl:message name="getFolderContentsRequest"> <wsdl:part name="folderAbsolutePath" type="xsd:string"/> <wsdl:part name="userID" type="xsd:string"/> <wsdl:part name="password" type="xsd:string"/> </wsdl:message> <wsdl:message name="getReportDefinitionResponse"> <wsdl:part name="getReportDefinitionReturn" type="impl:ReportDefinition"/> </wsdl:message> <wsdl:message name="hasReportAccessRequest"> <wsdl:part name="reportAbsolutePath" type="xsd:string"/> <wsdl:part name="userID" type="xsd:string"/> <wsdl:part name="password" type="xsd:string"/> </wsdl:message> <wsdl:message name="hasReportAccessResponse"> <wsdl:part name="hasReportAccessReturn" type="xsd:boolean"/> </wsdl:message> <wsdl:message name="validateLoginRequest"> <wsdl:part name="userID" type="xsd:string"/> <wsdl:part name="password" type="xsd:string"/> </wsdl:message>

Oracle BI Publisher Web Services WSDL
Oracle Business Intelligence Publisher Web Services 25-25
<wsdl:portType name="PublicReportService"> <wsdl:operation name="getReportParameters" parameterOrder="reportRequest userID password"> <wsdl:input message="impl:getReportParametersRequest" name="getReportParametersRequest"/> <wsdl:output message="impl:getReportParametersResponse" name="getReportParametersResponse"/> <wsdl:fault message="impl:InvalidParametersException" name="InvalidParametersException"/> <wsdl:fault message="impl:AccessDeniedException" name="AccessDeniedException"/> <wsdl:fault message="impl:OperationFailedException" name="OperationFailedException"/> </wsdl:operation> <wsdl:operation name="validateLogin" parameterOrder="userID password"> <wsdl:input message="impl:validateLoginRequest" name="validateLoginRequest"/> <wsdl:output message="impl:validateLoginResponse" name="validateLoginResponse"/> </wsdl:operation> <wsdl:operation name="runReport" parameterOrder="reportRequest userID password"> <wsdl:input message="impl:runReportRequest" name="runReportRequest"/> <wsdl:output message="impl:runReportResponse" name="runReportResponse"/> <wsdl:fault message="impl:InvalidParametersException" name="InvalidParametersException"/> <wsdl:fault message="impl:AccessDeniedException" name="AccessDeniedException"/> <wsdl:fault message="impl:OperationFailedException" name="OperationFailedException"/> </wsdl:operation> <wsdl:operation name="getReportDefinition" parameterOrder="reportAbsolutePath userID password"> <wsdl:input message="impl:getReportDefinitionRequest" name="getReportDefinitionRequest"/> <wsdl:output message="impl:getReportDefinitionResponse" name="getReportDefinitionResponse"/> <wsdl:fault message="impl:InvalidParametersException"
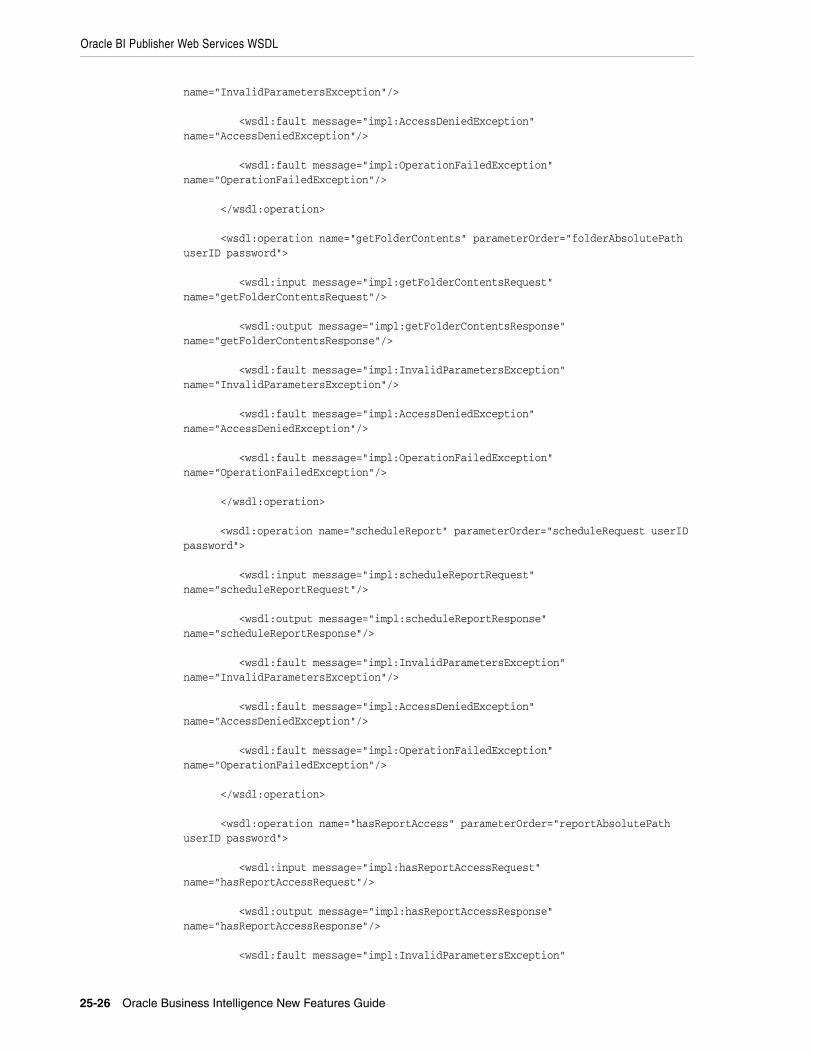
Oracle BI Publisher Web Services WSDL
25-26 Oracle Business Intelligence New Features Guide
name="InvalidParametersException"/> <wsdl:fault message="impl:AccessDeniedException" name="AccessDeniedException"/> <wsdl:fault message="impl:OperationFailedException" name="OperationFailedException"/> </wsdl:operation> <wsdl:operation name="getFolderContents" parameterOrder="folderAbsolutePath userID password"> <wsdl:input message="impl:getFolderContentsRequest" name="getFolderContentsRequest"/> <wsdl:output message="impl:getFolderContentsResponse" name="getFolderContentsResponse"/> <wsdl:fault message="impl:InvalidParametersException" name="InvalidParametersException"/> <wsdl:fault message="impl:AccessDeniedException" name="AccessDeniedException"/> <wsdl:fault message="impl:OperationFailedException" name="OperationFailedException"/> </wsdl:operation> <wsdl:operation name="scheduleReport" parameterOrder="scheduleRequest userID password"> <wsdl:input message="impl:scheduleReportRequest" name="scheduleReportRequest"/> <wsdl:output message="impl:scheduleReportResponse" name="scheduleReportResponse"/> <wsdl:fault message="impl:InvalidParametersException" name="InvalidParametersException"/> <wsdl:fault message="impl:AccessDeniedException" name="AccessDeniedException"/> <wsdl:fault message="impl:OperationFailedException" name="OperationFailedException"/> </wsdl:operation> <wsdl:operation name="hasReportAccess" parameterOrder="reportAbsolutePath userID password"> <wsdl:input message="impl:hasReportAccessRequest" name="hasReportAccessRequest"/> <wsdl:output message="impl:hasReportAccessResponse" name="hasReportAccessResponse"/> <wsdl:fault message="impl:InvalidParametersException"
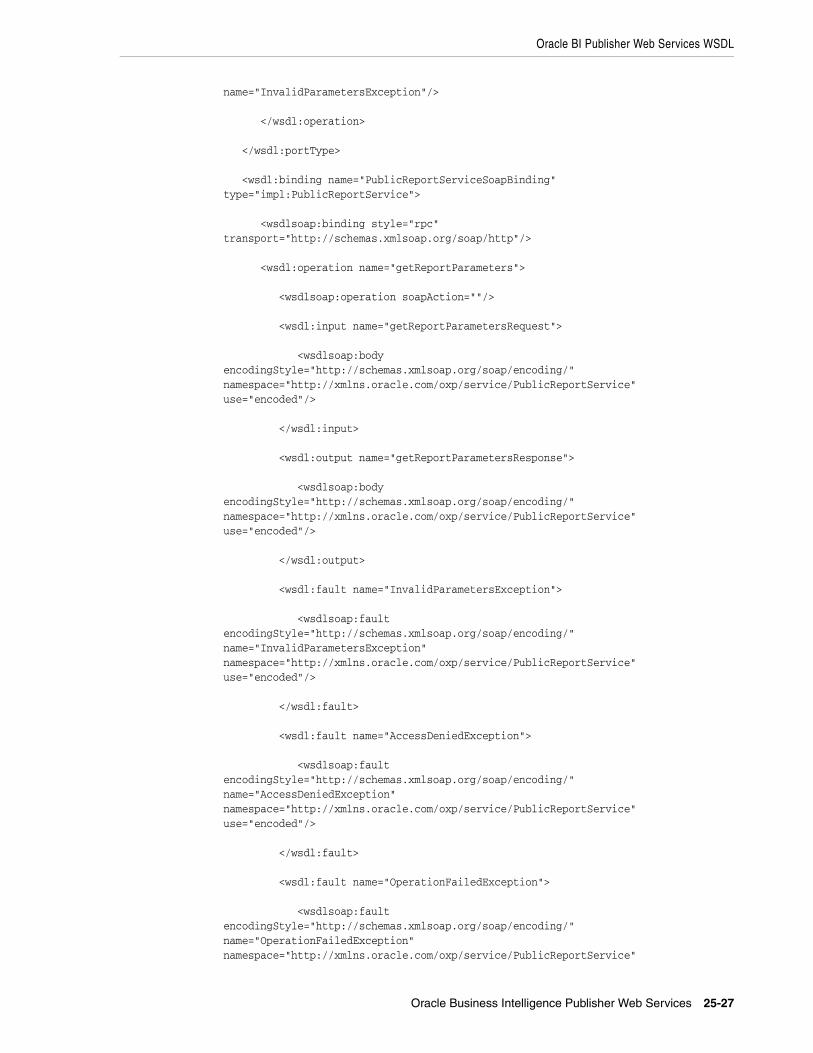
Oracle BI Publisher Web Services WSDL
Oracle Business Intelligence Publisher Web Services 25-27
name="InvalidParametersException"/> </wsdl:operation> </wsdl:portType> <wsdl:binding name="PublicReportServiceSoapBinding" type="impl:PublicReportService"> <wsdlsoap:binding style="rpc" transport="http://schemas.xmlsoap.org/soap/http"/> <wsdl:operation name="getReportParameters"> <wsdlsoap:operation soapAction=""/> <wsdl:input name="getReportParametersRequest"> <wsdlsoap:body encodingStyle="http://schemas.xmlsoap.org/soap/encoding/" namespace="http://xmlns.oracle.com/oxp/service/PublicReportService" use="encoded"/> </wsdl:input> <wsdl:output name="getReportParametersResponse"> <wsdlsoap:body encodingStyle="http://schemas.xmlsoap.org/soap/encoding/" namespace="http://xmlns.oracle.com/oxp/service/PublicReportService" use="encoded"/> </wsdl:output> <wsdl:fault name="InvalidParametersException"> <wsdlsoap:fault encodingStyle="http://schemas.xmlsoap.org/soap/encoding/" name="InvalidParametersException" namespace="http://xmlns.oracle.com/oxp/service/PublicReportService" use="encoded"/> </wsdl:fault> <wsdl:fault name="AccessDeniedException"> <wsdlsoap:fault encodingStyle="http://schemas.xmlsoap.org/soap/encoding/" name="AccessDeniedException" namespace="http://xmlns.oracle.com/oxp/service/PublicReportService" use="encoded"/> </wsdl:fault> <wsdl:fault name="OperationFailedException"> <wsdlsoap:fault encodingStyle="http://schemas.xmlsoap.org/soap/encoding/" name="OperationFailedException" namespace="http://xmlns.oracle.com/oxp/service/PublicReportService"
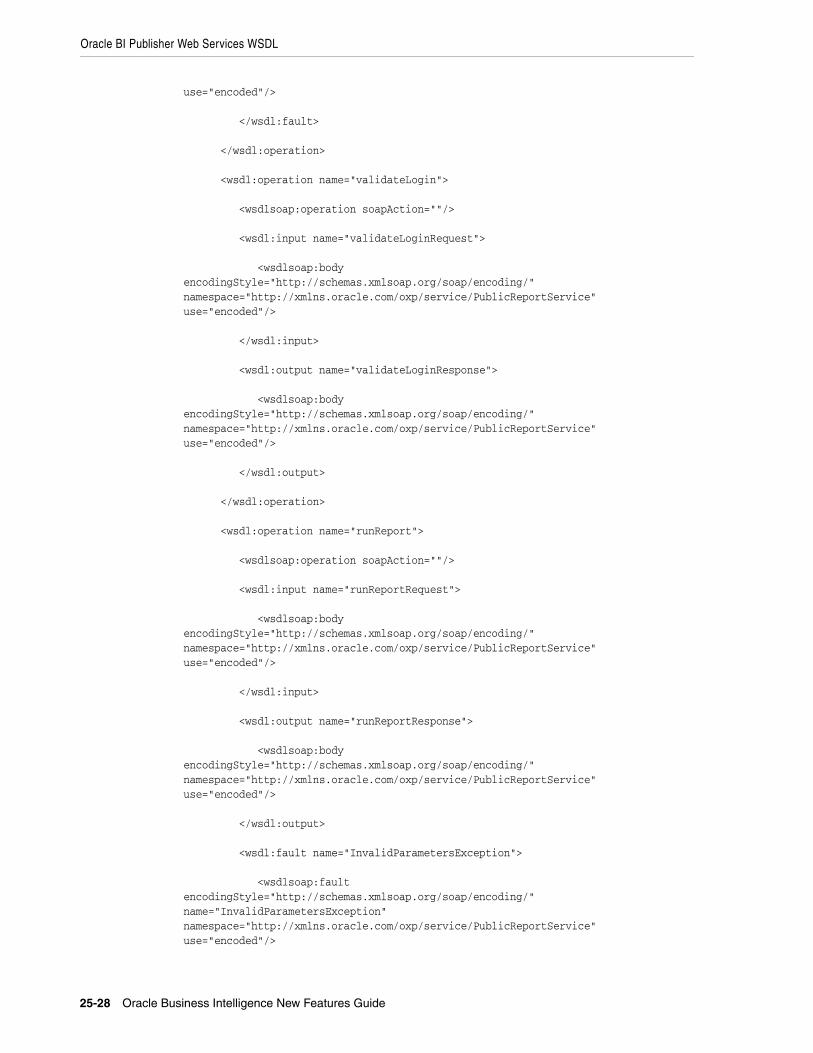
Oracle BI Publisher Web Services WSDL
25-28 Oracle Business Intelligence New Features Guide
use="encoded"/> </wsdl:fault> </wsdl:operation> <wsdl:operation name="validateLogin"> <wsdlsoap:operation soapAction=""/> <wsdl:input name="validateLoginRequest"> <wsdlsoap:body encodingStyle="http://schemas.xmlsoap.org/soap/encoding/" namespace="http://xmlns.oracle.com/oxp/service/PublicReportService" use="encoded"/> </wsdl:input> <wsdl:output name="validateLoginResponse"> <wsdlsoap:body encodingStyle="http://schemas.xmlsoap.org/soap/encoding/" namespace="http://xmlns.oracle.com/oxp/service/PublicReportService" use="encoded"/> </wsdl:output> </wsdl:operation> <wsdl:operation name="runReport"> <wsdlsoap:operation soapAction=""/> <wsdl:input name="runReportRequest"> <wsdlsoap:body encodingStyle="http://schemas.xmlsoap.org/soap/encoding/" namespace="http://xmlns.oracle.com/oxp/service/PublicReportService" use="encoded"/> </wsdl:input> <wsdl:output name="runReportResponse"> <wsdlsoap:body encodingStyle="http://schemas.xmlsoap.org/soap/encoding/" namespace="http://xmlns.oracle.com/oxp/service/PublicReportService" use="encoded"/> </wsdl:output> <wsdl:fault name="InvalidParametersException"> <wsdlsoap:fault encodingStyle="http://schemas.xmlsoap.org/soap/encoding/" name="InvalidParametersException" namespace="http://xmlns.oracle.com/oxp/service/PublicReportService" use="encoded"/>
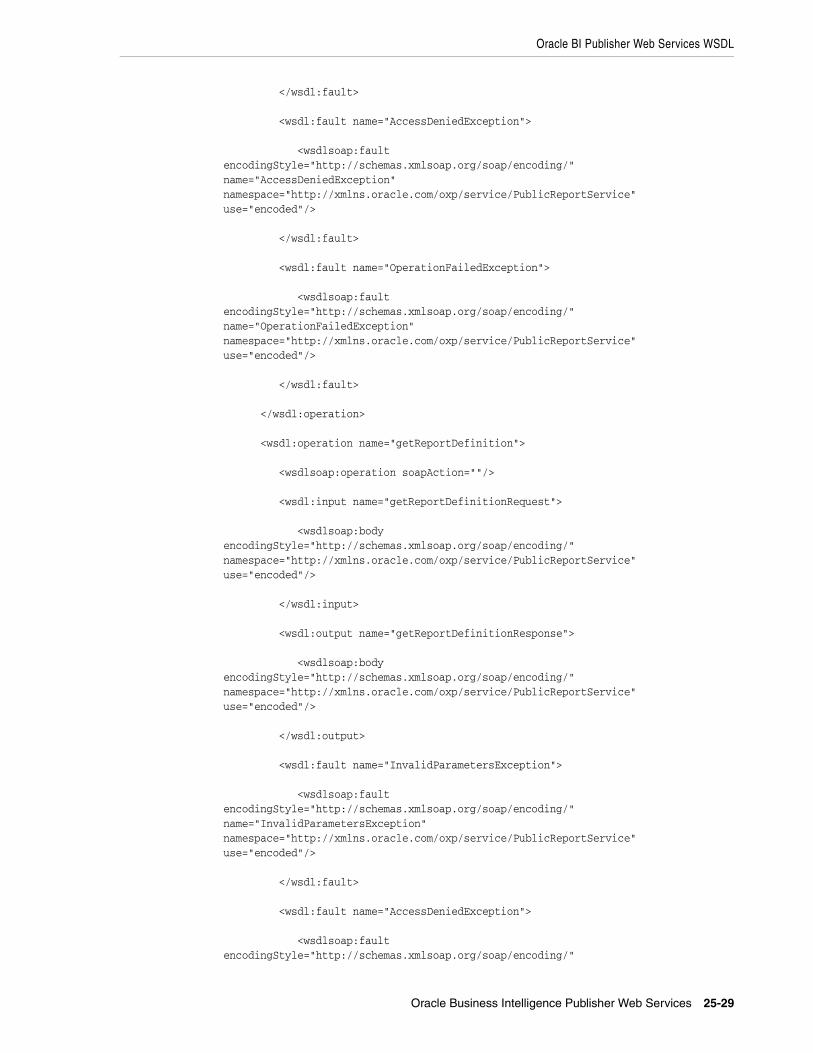
Oracle BI Publisher Web Services WSDL
Oracle Business Intelligence Publisher Web Services 25-29
</wsdl:fault> <wsdl:fault name="AccessDeniedException"> <wsdlsoap:fault encodingStyle="http://schemas.xmlsoap.org/soap/encoding/" name="AccessDeniedException" namespace="http://xmlns.oracle.com/oxp/service/PublicReportService" use="encoded"/> </wsdl:fault> <wsdl:fault name="OperationFailedException"> <wsdlsoap:fault encodingStyle="http://schemas.xmlsoap.org/soap/encoding/" name="OperationFailedException" namespace="http://xmlns.oracle.com/oxp/service/PublicReportService" use="encoded"/> </wsdl:fault> </wsdl:operation> <wsdl:operation name="getReportDefinition"> <wsdlsoap:operation soapAction=""/> <wsdl:input name="getReportDefinitionRequest"> <wsdlsoap:body encodingStyle="http://schemas.xmlsoap.org/soap/encoding/" namespace="http://xmlns.oracle.com/oxp/service/PublicReportService" use="encoded"/> </wsdl:input> <wsdl:output name="getReportDefinitionResponse"> <wsdlsoap:body encodingStyle="http://schemas.xmlsoap.org/soap/encoding/" namespace="http://xmlns.oracle.com/oxp/service/PublicReportService" use="encoded"/> </wsdl:output> <wsdl:fault name="InvalidParametersException"> <wsdlsoap:fault encodingStyle="http://schemas.xmlsoap.org/soap/encoding/" name="InvalidParametersException" namespace="http://xmlns.oracle.com/oxp/service/PublicReportService" use="encoded"/> </wsdl:fault> <wsdl:fault name="AccessDeniedException"> <wsdlsoap:fault encodingStyle="http://schemas.xmlsoap.org/soap/encoding/"
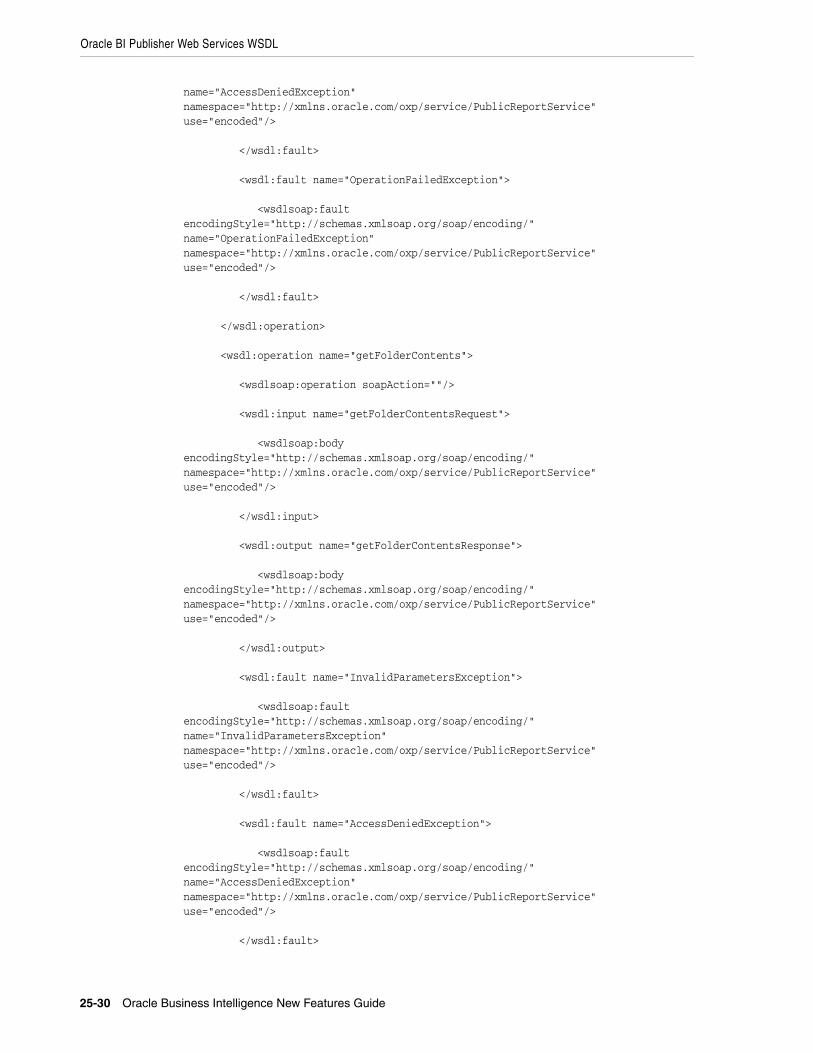
Oracle BI Publisher Web Services WSDL
25-30 Oracle Business Intelligence New Features Guide
name="AccessDeniedException" namespace="http://xmlns.oracle.com/oxp/service/PublicReportService" use="encoded"/> </wsdl:fault> <wsdl:fault name="OperationFailedException"> <wsdlsoap:fault encodingStyle="http://schemas.xmlsoap.org/soap/encoding/" name="OperationFailedException" namespace="http://xmlns.oracle.com/oxp/service/PublicReportService" use="encoded"/> </wsdl:fault> </wsdl:operation> <wsdl:operation name="getFolderContents"> <wsdlsoap:operation soapAction=""/> <wsdl:input name="getFolderContentsRequest"> <wsdlsoap:body encodingStyle="http://schemas.xmlsoap.org/soap/encoding/" namespace="http://xmlns.oracle.com/oxp/service/PublicReportService" use="encoded"/> </wsdl:input> <wsdl:output name="getFolderContentsResponse"> <wsdlsoap:body encodingStyle="http://schemas.xmlsoap.org/soap/encoding/" namespace="http://xmlns.oracle.com/oxp/service/PublicReportService" use="encoded"/> </wsdl:output> <wsdl:fault name="InvalidParametersException"> <wsdlsoap:fault encodingStyle="http://schemas.xmlsoap.org/soap/encoding/" name="InvalidParametersException" namespace="http://xmlns.oracle.com/oxp/service/PublicReportService" use="encoded"/> </wsdl:fault> <wsdl:fault name="AccessDeniedException"> <wsdlsoap:fault encodingStyle="http://schemas.xmlsoap.org/soap/encoding/" name="AccessDeniedException" namespace="http://xmlns.oracle.com/oxp/service/PublicReportService" use="encoded"/> </wsdl:fault>
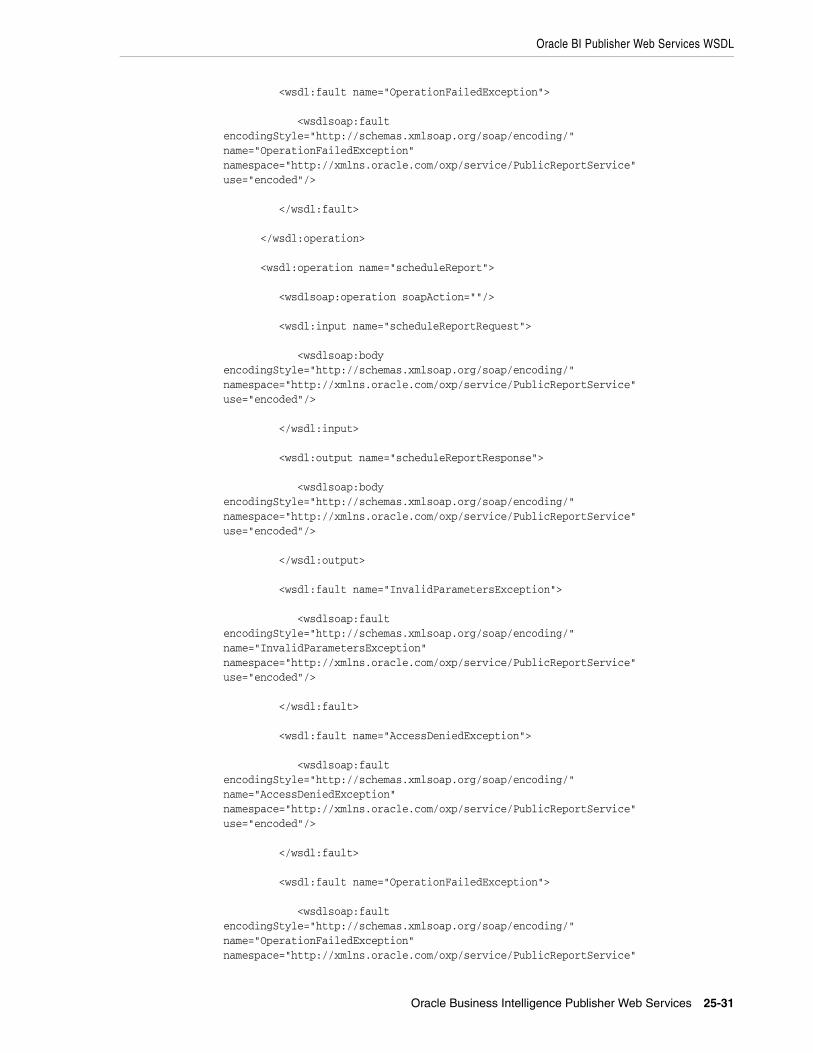
Oracle BI Publisher Web Services WSDL
Oracle Business Intelligence Publisher Web Services 25-31
<wsdl:fault name="OperationFailedException"> <wsdlsoap:fault encodingStyle="http://schemas.xmlsoap.org/soap/encoding/" name="OperationFailedException" namespace="http://xmlns.oracle.com/oxp/service/PublicReportService" use="encoded"/> </wsdl:fault> </wsdl:operation> <wsdl:operation name="scheduleReport"> <wsdlsoap:operation soapAction=""/> <wsdl:input name="scheduleReportRequest"> <wsdlsoap:body encodingStyle="http://schemas.xmlsoap.org/soap/encoding/" namespace="http://xmlns.oracle.com/oxp/service/PublicReportService" use="encoded"/> </wsdl:input> <wsdl:output name="scheduleReportResponse"> <wsdlsoap:body encodingStyle="http://schemas.xmlsoap.org/soap/encoding/" namespace="http://xmlns.oracle.com/oxp/service/PublicReportService" use="encoded"/> </wsdl:output> <wsdl:fault name="InvalidParametersException"> <wsdlsoap:fault encodingStyle="http://schemas.xmlsoap.org/soap/encoding/" name="InvalidParametersException" namespace="http://xmlns.oracle.com/oxp/service/PublicReportService" use="encoded"/> </wsdl:fault> <wsdl:fault name="AccessDeniedException"> <wsdlsoap:fault encodingStyle="http://schemas.xmlsoap.org/soap/encoding/" name="AccessDeniedException" namespace="http://xmlns.oracle.com/oxp/service/PublicReportService" use="encoded"/> </wsdl:fault> <wsdl:fault name="OperationFailedException"> <wsdlsoap:fault encodingStyle="http://schemas.xmlsoap.org/soap/encoding/" name="OperationFailedException" namespace="http://xmlns.oracle.com/oxp/service/PublicReportService"
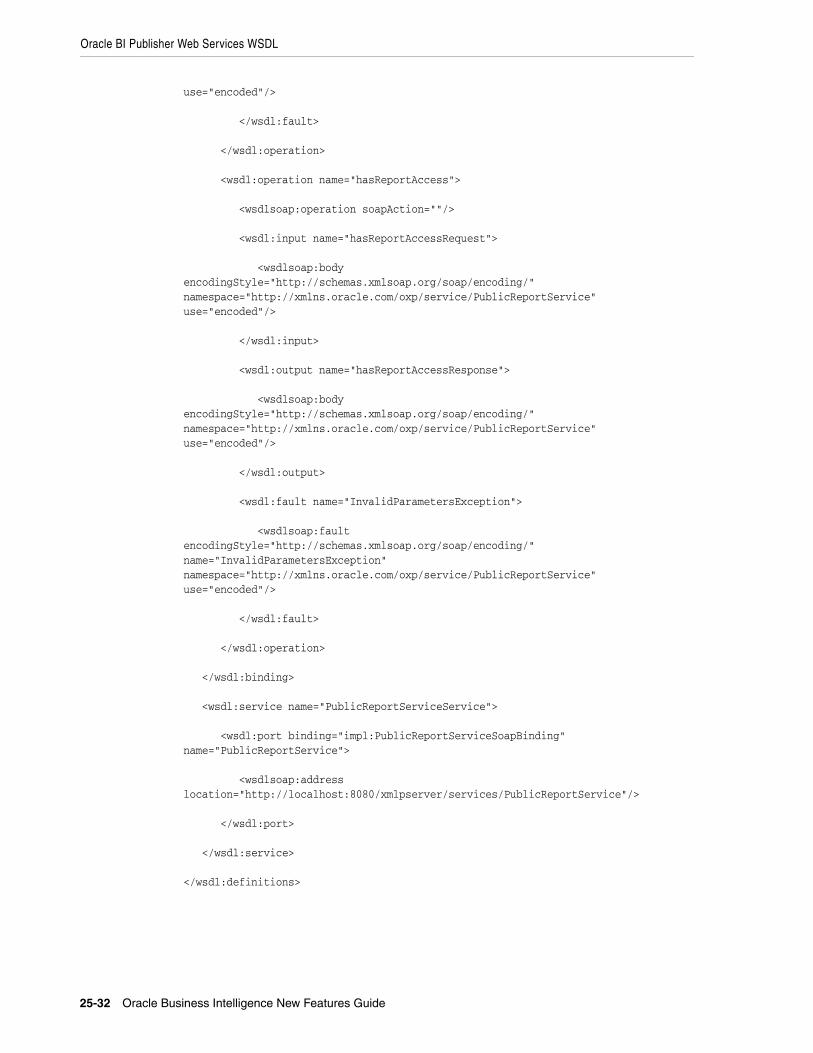
Oracle BI Publisher Web Services WSDL
25-32 Oracle Business Intelligence New Features Guide
use="encoded"/> </wsdl:fault> </wsdl:operation> <wsdl:operation name="hasReportAccess"> <wsdlsoap:operation soapAction=""/> <wsdl:input name="hasReportAccessRequest"> <wsdlsoap:body encodingStyle="http://schemas.xmlsoap.org/soap/encoding/" namespace="http://xmlns.oracle.com/oxp/service/PublicReportService" use="encoded"/> </wsdl:input> <wsdl:output name="hasReportAccessResponse"> <wsdlsoap:body encodingStyle="http://schemas.xmlsoap.org/soap/encoding/" namespace="http://xmlns.oracle.com/oxp/service/PublicReportService" use="encoded"/> </wsdl:output> <wsdl:fault name="InvalidParametersException"> <wsdlsoap:fault encodingStyle="http://schemas.xmlsoap.org/soap/encoding/" name="InvalidParametersException" namespace="http://xmlns.oracle.com/oxp/service/PublicReportService" use="encoded"/> </wsdl:fault> </wsdl:operation> </wsdl:binding> <wsdl:service name="PublicReportServiceService"> <wsdl:port binding="impl:PublicReportServiceSoapBinding" name="PublicReportService"> <wsdlsoap:address location="http://localhost:8080/xmlpserver/services/PublicReportService"/> </wsdl:port> </wsdl:service> </wsdl:definitions>
Part IIIPart III New Features for Oracle Business
Intelligence for Microsoft Office
Part III contains the following chapters:
■ Chapter 26, "Installing Oracle Business Intelligence for Microsoft Office"
■ Chapter 27, "Microsoft Office Support"
■ Chapter 28, "New Features in Release 10.1.3.3.1"
■ Chapter 29, "New Features in Release 10.1.3.3.3"
■ Chapter 30, "New Features in Release 10.1.3.4"


26
Installing Oracle Business Intelligence for Microsoft Office 26-1
26
Installing Oracle Business Intelligence forMicrosoft Office
Oracle Business Intelligence for Microsoft Office includes the Oracle Business Intelligence Office server and the Oracle Business Intelligence Add-in for Microsoft Office client. The client includes both the Oracle BI Office Add-In for Microsoft Excel and the Oracle BI Office Add-in for Microsoft PowerPoint. This chapter describes how to install and configure the BI Office server and client.
This chapter includes the following topics:
■ Section 26.1, "System Requirements"
■ Section 26.2, "Installing the BI Office Server"
■ Section 26.3, "Deploying the BI Office Server on J2EE Application Servers"
■ Section 26.4, "Installing the BI Office Client"
■ Section 26.5, "Setting Properties in the bioffice.xml Configuration File"
■ Section 26.6, "Setting Up SSL-Enabled OC4J for BI Office"
■ Section 26.7, "Setting Up an SSO-Enabled Oracle BI Presentation Server for BI Office for Releases Prior to 10.1.3.4"
■ Section 26.8, "Setting Up an SSO-Enabled Oracle BI Presentation Server for BI Office for Releases 10.1.3.4 and Later"
■ Section 26.9, "Setting Up an NTLM-Enabled Oracle BI Presentation Server for BI Office for Releases 10.1.3.4 and Later"
26.1 System RequirementsFollowing are the required components for the BI Office client and server. For the detailed list of system requirements for Oracle Business Intelligence Enterprise Edition and for updates to this list, see System Requirements and Supported Platforms for Oracle Business Intelligence Suite Enterprise Edition, Version 10.1.3.4.
26.1.1 Supported Client Operating Systems■ Windows XP
■ Windows Vista
Installing the BI Office Server
26-2 Oracle Business Intelligence New Features Guide
26.1.2 Supported Versions of Microsoft Office■ Microsoft Office 2003
■ Microsoft Office 2007
26.1.3 Supported Application Servers■ Oracle Application Server (OC4J/HTTP) 10.1.3.1 on Linux
■ Oracle Application Server 10.1.3.3
■ Apache Tomcat 5.5x on Linux
■ BEA Weblogic 9.x
■ IBM Websphere Application Server 5.1 on Windows
■ IBM Websphere Application Server 6.0, 6.1
■ Sun Java System Web Server 6.1, 7.0
26.2 Installing the BI Office ServerThe Oracle BI EE version 10.1.3.3 (and later) installer installs the BI Office server. The installer performs the following tasks:
■ Deploys the bioffice.ear file.
■ Initializes values in the BI Office configuration file.
■ Copies the client OracleBIOffice.exe file to the location where Presentation Services is running.
■ Updates the instanceconfig.xml file with the location of the client OracleBIOffice.exe.
■ Backs up the BI Office server configuration file, bioffice.xml, to a subdirectory under <OracleBI_Home>/Install_Backup/<upgrade_timestamp>.
26.2.1 Deployment of the bioffice.earThe Oracle BI Enterprise Edition 10.1.3.3 (and later) installer installs the Oracle BI Office server into the J2EE container with the Presentation Services Plug-in.
■ The basic BI EE install option deploys the bioffice.ear to the standalone OC4J home.
■ The advanced BI EE install option creates a new OC4J instance called "bioffice" in Oracle Application Server and deploys the bioffice.ear to this new OC4J instance.
26.2.2 Initialization of the BI Office Configuration FileThe BI Office configuration file is bioffice.xml. The location of the file depends on your installation type. For example:
■ In a BI EE basic install, it is installed under <OracleBI_Home>/oc4j_bi/j2ee/home/applications/bioffice/bioffice/WEB-INF/bioffice.xml
Note: During an upgrade installation, this file is used to retain the existing configuration settings.
Deploying the BI Office Server on J2EE Application Servers
Installing Oracle Business Intelligence for Microsoft Office 26-3
■ In a BI EE advanced install, it is installed under ORACLE_HOME/j2ee/bibioffice/applications/bioffice/bioffice/WEB-INF/bioffice.xml
■ In a BI EE install with IBM WebSphere 5.1 (Windows), it is installed under C:\Program Files\WebSphere\AppServer\installedApps\<server name>\bioffice.ear\bioffice.war
■ In a BI EE install with Apache Tomcat 5.5 (Windows), it is installed under C:\Program Files\<Apache_Home>\Tomcat 5.5\webapps\bioffice
■ In other non-Oracle Application Servers, it is installed under the bioffice application directory, parallel to the Oracle BI analytics application.
The Oracle BI EE installer configures the BI Office server to point to the Oracle BI Presentation Services server by setting the property "SawBaseURL" in the bioffice.xml file. To configure the Oracle BI Office server to point to a different Presentation Services server, modify this property with the new Presentation Services URL. For more details about other properties in the bioffice.xml file, see Section 26.5, "Setting Properties in the bioffice.xml Configuration File".
26.2.3 Location of the Installed Client OracleBIOffice.exe FileThe installer copies the client/OracleBIOffice.exe file to the location where Presentation Services is running and updates the instanceconfig.xml file with this location. This makes the client install executable available for download from the More Products menu in Oracle BI Interactive Dashboards and Oracle BI Answers.
For example, in an OC4J install, the OracleBIOffice.exe is installed to <OracleBI_Home>/oc4j_bi/j2ee/home/applications/analytics/analytics/client/OracleBIOffice.exe.
In an Oracle Application Server install, the OracleBIOffice.exe is installed to ORACLE_HOME/j2ee/bianalytics/applications/analytics/analytics/client/OracleBIOffice.exe.
The installer modifies the instanceconfig.xml (OracleBIData/web/config/instanceconfig.xml) by adding the new element <BIforOfficeURL> and initializing the property to point to the location of the client download. For example:
<BIforOfficeURL>client/OracleBIOffice.exe</BIforOfficeURL>
26.3 Deploying the BI Office Server on J2EE Application ServersIf you deployed Oracle BI Enterprise Edition on a non-Oracle J2EE Application Server, then you must manually deploy the bioffice.ear or bioffice.war file. It is not included in the analytics.ear file. The bioffice application must be deployed to the same container as the analytics application.
To deploy the BI Office server:
1. From a browser, open the Web application deployment page for the J2EE application server.
2. Locate the bioffice.ear or bioffice.war under OracleBI/office/server.
3. Using the guidelines for your application server, deploy the bioffice.ear or bioffice.war file as an application named "bioffice" to your J2EE application server environment.
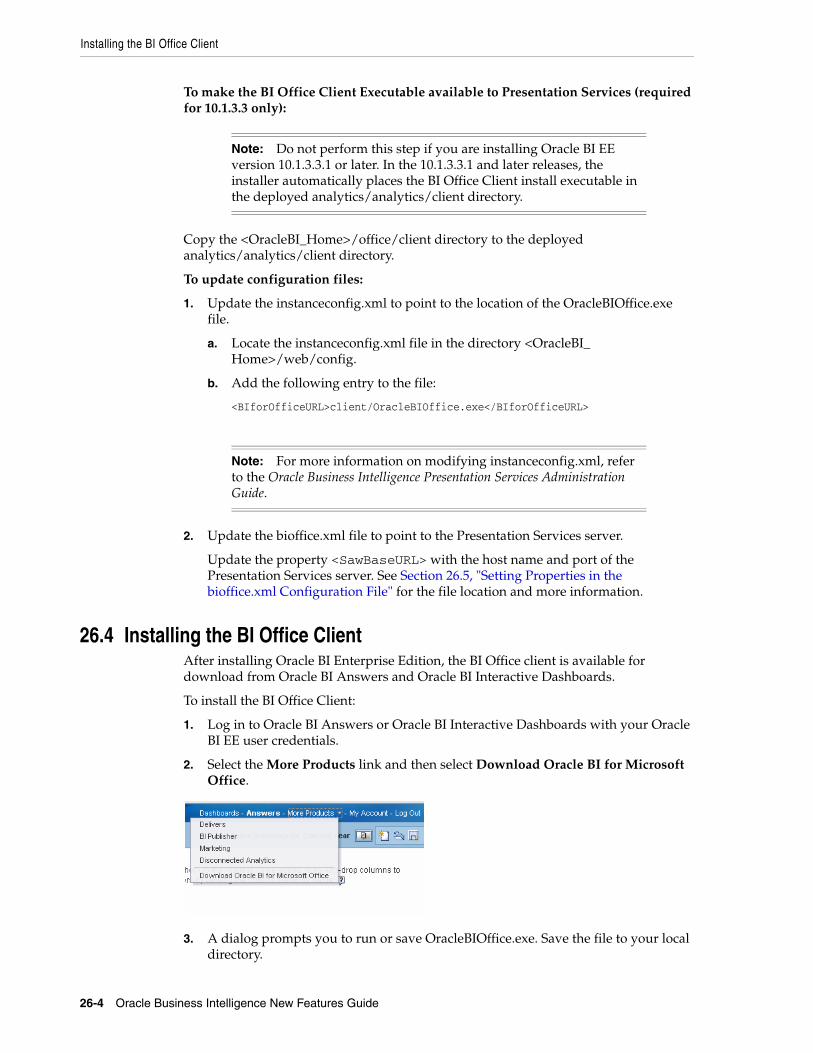
Installing the BI Office Client
26-4 Oracle Business Intelligence New Features Guide
To make the BI Office Client Executable available to Presentation Services (required for 10.1.3.3 only):
Copy the <OracleBI_Home>/office/client directory to the deployed analytics/analytics/client directory.
To update configuration files:
1. Update the instanceconfig.xml to point to the location of the OracleBIOffice.exe file.
a. Locate the instanceconfig.xml file in the directory <OracleBI_Home>/web/config.
b. Add the following entry to the file:
<BIforOfficeURL>client/OracleBIOffice.exe</BIforOfficeURL>
2. Update the bioffice.xml file to point to the Presentation Services server.
Update the property <SawBaseURL> with the host name and port of the Presentation Services server. See Section 26.5, "Setting Properties in the bioffice.xml Configuration File" for the file location and more information.
26.4 Installing the BI Office ClientAfter installing Oracle BI Enterprise Edition, the BI Office client is available for download from Oracle BI Answers and Oracle BI Interactive Dashboards.
To install the BI Office Client:
1. Log in to Oracle BI Answers or Oracle BI Interactive Dashboards with your Oracle BI EE user credentials.
2. Select the More Products link and then select Download Oracle BI for Microsoft Office.
3. A dialog prompts you to run or save OracleBIOffice.exe. Save the file to your local directory.
Note: Do not perform this step if you are installing Oracle BI EE version 10.1.3.3.1 or later. In the 10.1.3.3.1 and later releases, the installer automatically places the BI Office Client install executable in the deployed analytics/analytics/client directory.
Note: For more information on modifying instanceconfig.xml, refer to the Oracle Business Intelligence Presentation Services Administration Guide.
Installing the BI Office Client
Installing Oracle Business Intelligence for Microsoft Office 26-5
4. Navigate to the saved location. Close all Microsoft Office applications. Double-click OracleBIOffice.exe to launch the installer.
Microsoft .Net Framework 2.0 is required for the BI Office client. If it is not installed on your computer, then you are prompted to exit and install Microsoft .Net Framework 2.0 from the Microsoft Web site.
In addition, if the following prerequisites do not exist on your computer, you are prompted to install them:
■ Office2003-kb907417sfxcab-ENU_Patch
■ Shared Add-In Extensibility Microsoft .Net 2.0
■ Shared Add-In Support Update Microsoft .Net 2.0
After installing the prerequisites, you might be prompted to restart the computer.
After restarting, navigate back to the location of the OracleBIOffice.exe file and double-click to reinitiate the install.
5. From the Welcome screen, select Next.
6. In the Customer Information screen, enter your User Name and Company Name, and select the desired sharing option.
7. On the Setup Type screen, choose one of the following:
■ Typical — Performs installation of both add-ins to C:\Program Files\Oracle\BIOffice
■ Custom — Enables you to select the install directory, and choose which components to install.
8. After all components are installed, the InstallShield Wizard Complete dialog will be displayed. Click Finish.
Note: In the Oracle BI EE version 10.1.3.3, Microsoft .Net Framework 2.0 was included with the BI Office client installer. If you are installing this version, then you are prompted to install Microsoft .Net Framework 2.0 without being required to exit.
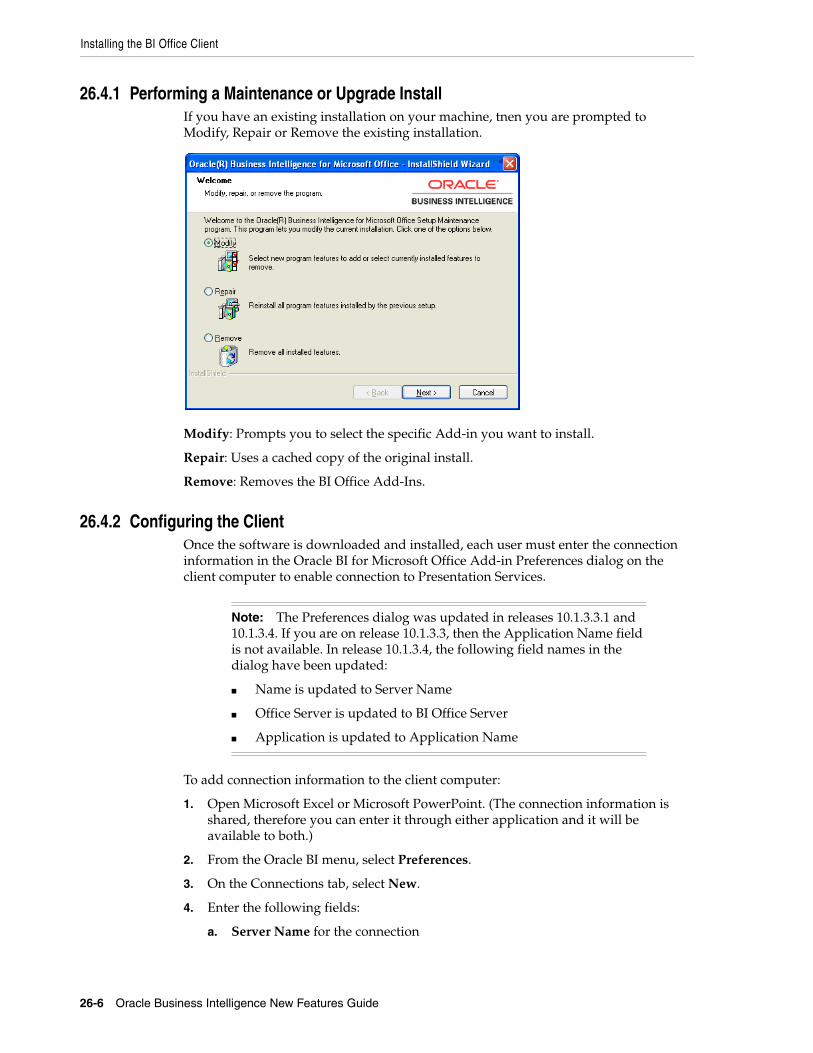
Installing the BI Office Client
26-6 Oracle Business Intelligence New Features Guide
26.4.1 Performing a Maintenance or Upgrade InstallIf you have an existing installation on your machine, tnen you are prompted to Modify, Repair or Remove the existing installation.
Modify: Prompts you to select the specific Add-in you want to install.
Repair: Uses a cached copy of the original install.
Remove: Removes the BI Office Add-Ins.
26.4.2 Configuring the ClientOnce the software is downloaded and installed, each user must enter the connection information in the Oracle BI for Microsoft Office Add-in Preferences dialog on the client computer to enable connection to Presentation Services.
To add connection information to the client computer:
1. Open Microsoft Excel or Microsoft PowerPoint. (The connection information is shared, therefore you can enter it through either application and it will be available to both.)
2. From the Oracle BI menu, select Preferences.
3. On the Connections tab, select New.
4. Enter the following fields:
a. Server Name for the connection
Note: The Preferences dialog was updated in releases 10.1.3.3.1 and 10.1.3.4. If you are on release 10.1.3.3, then the Application Name field is not available. In release 10.1.3.4, the following field names in the dialog have been updated:
■ Name is updated to Server Name
■ Office Server is updated to BI Office Server
■ Application is updated to Application Name
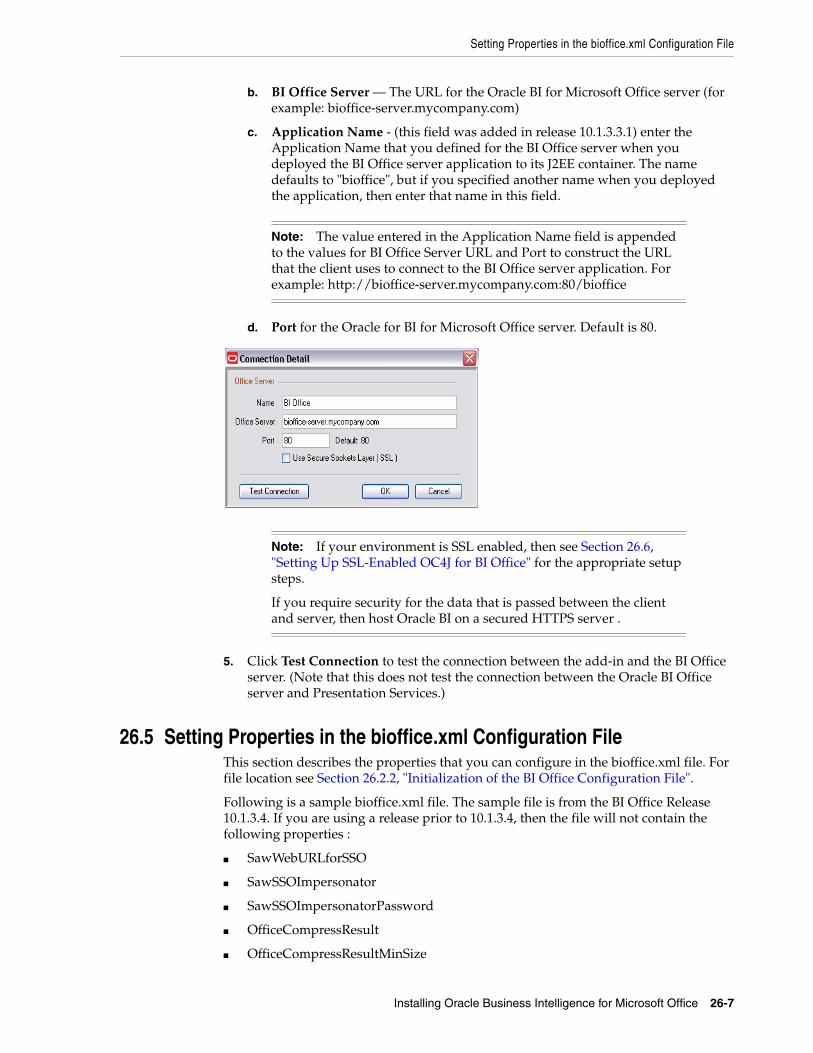
Setting Properties in the bioffice.xml Configuration File
Installing Oracle Business Intelligence for Microsoft Office 26-7
b. BI Office Server — The URL for the Oracle BI for Microsoft Office server (for example: bioffice-server.mycompany.com)
c. Application Name - (this field was added in release 10.1.3.3.1) enter the Application Name that you defined for the BI Office server when you deployed the BI Office server application to its J2EE container. The name defaults to "bioffice", but if you specified another name when you deployed the application, then enter that name in this field.
d. Port for the Oracle for BI for Microsoft Office server. Default is 80.
5. Click Test Connection to test the connection between the add-in and the BI Office server. (Note that this does not test the connection between the Oracle BI Office server and Presentation Services.)
26.5 Setting Properties in the bioffice.xml Configuration FileThis section describes the properties that you can configure in the bioffice.xml file. For file location see Section 26.2.2, "Initialization of the BI Office Configuration File".
Following is a sample bioffice.xml file. The sample file is from the BI Office Release 10.1.3.4. If you are using a release prior to 10.1.3.4, then the file will not contain the following properties :
■ SawWebURLforSSO
■ SawSSOImpersonator
■ SawSSOImpersonatorPassword
■ OfficeCompressResult
■ OfficeCompressResultMinSize
Note: The value entered in the Application Name field is appended to the values for BI Office Server URL and Port to construct the URL that the client uses to connect to the BI Office server application. For example: http://bioffice-server.mycompany.com:80/bioffice
Note: If your environment is SSL enabled, then see Section 26.6, "Setting Up SSL-Enabled OC4J for BI Office" for the appropriate setup steps.
If you require security for the data that is passed between the client and server, then host Oracle BI on a secured HTTPS server .
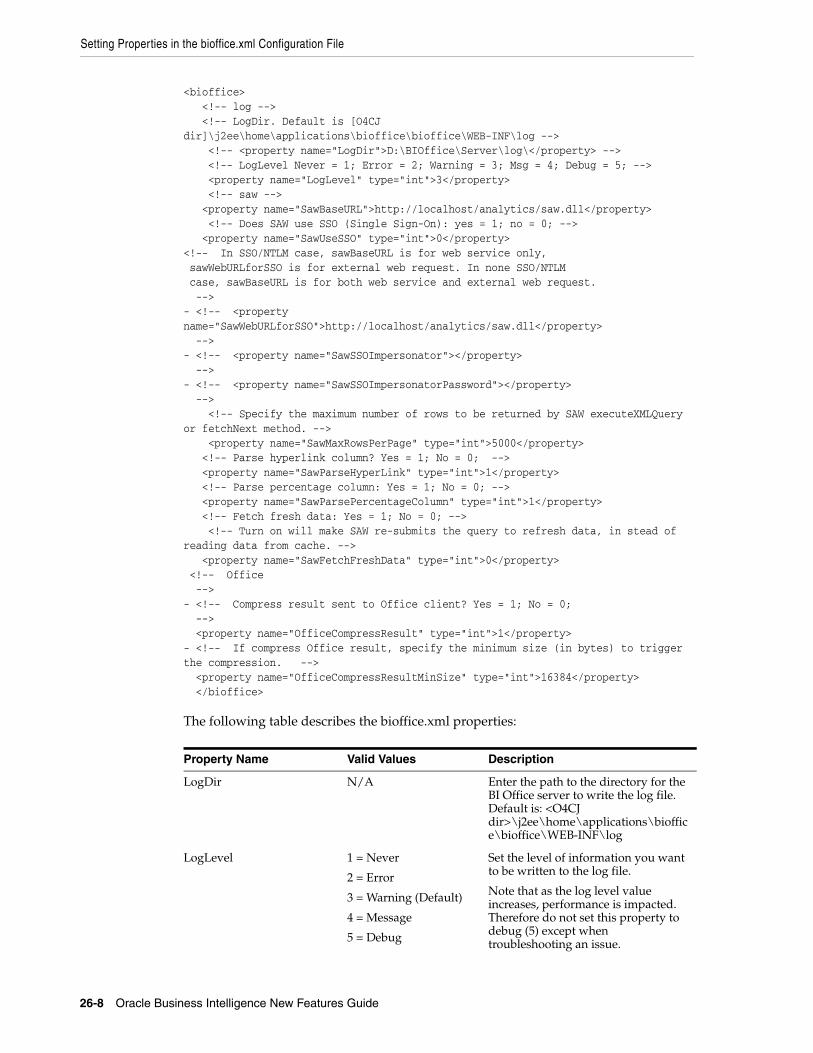
Setting Properties in the bioffice.xml Configuration File
26-8 Oracle Business Intelligence New Features Guide
<bioffice><!-- log --><!-- LogDir. Default is [O4CJ
dir]\j2ee\home\applications\bioffice\bioffice\WEB-INF\log --> <!-- <property name="LogDir">D:\BIOffice\Server\log\</property> -->
<!-- LogLevel Never = 1; Error = 2; Warning = 3; Msg = 4; Debug = 5; --> <property name="LogLevel" type="int">3</property> <!-- saw --><property name="SawBaseURL">http://localhost/analytics/saw.dll</property> <!-- Does SAW use SSO (Single Sign-On): yes = 1; no = 0; --><property name="SawUseSSO" type="int">0</property>
<!-- In SSO/NTLM case, sawBaseURL is for web service only, sawWebURLforSSO is for external web request. In none SSO/NTLM case, sawBaseURL is for both web service and external web request. --> - <!-- <property name="SawWebURLforSSO">http://localhost/analytics/saw.dll</property> --> - <!-- <property name="SawSSOImpersonator"></property> --> - <!-- <property name="SawSSOImpersonatorPassword"></property> -->
<!-- Specify the maximum number of rows to be returned by SAW executeXMLQuery or fetchNext method. -->
<property name="SawMaxRowsPerPage" type="int">5000</property><!-- Parse hyperlink column? Yes = 1; No = 0; --><property name="SawParseHyperLink" type="int">1</property><!-- Parse percentage column: Yes = 1; No = 0; --><property name="SawParsePercentageColumn" type="int">1</property><!-- Fetch fresh data: Yes = 1; No = 0; -->
<!-- Turn on will make SAW re-submits the query to refresh data, in stead of reading data from cache. -->
<property name="SawFetchFreshData" type="int">0</property> <!-- Office --> - <!-- Compress result sent to Office client? Yes = 1; No = 0; --> <property name="OfficeCompressResult" type="int">1</property> - <!-- If compress Office result, specify the minimum size (in bytes) to trigger the compression. --> <property name="OfficeCompressResultMinSize" type="int">16384</property> </bioffice>
The following table describes the bioffice.xml properties:
Property Name Valid Values Description
LogDir N/A Enter the path to the directory for the BI Office server to write the log file. Default is: <O4CJ dir>\j2ee\home\applications\bioffice\bioffice\WEB-INF\log
LogLevel 1 = Never
2 = Error
3 = Warning (Default)
4 = Message
5 = Debug
Set the level of information you want to be written to the log file.
Note that as the log level value increases, performance is impacted. Therefore do not set this property to debug (5) except when troubleshooting an issue.
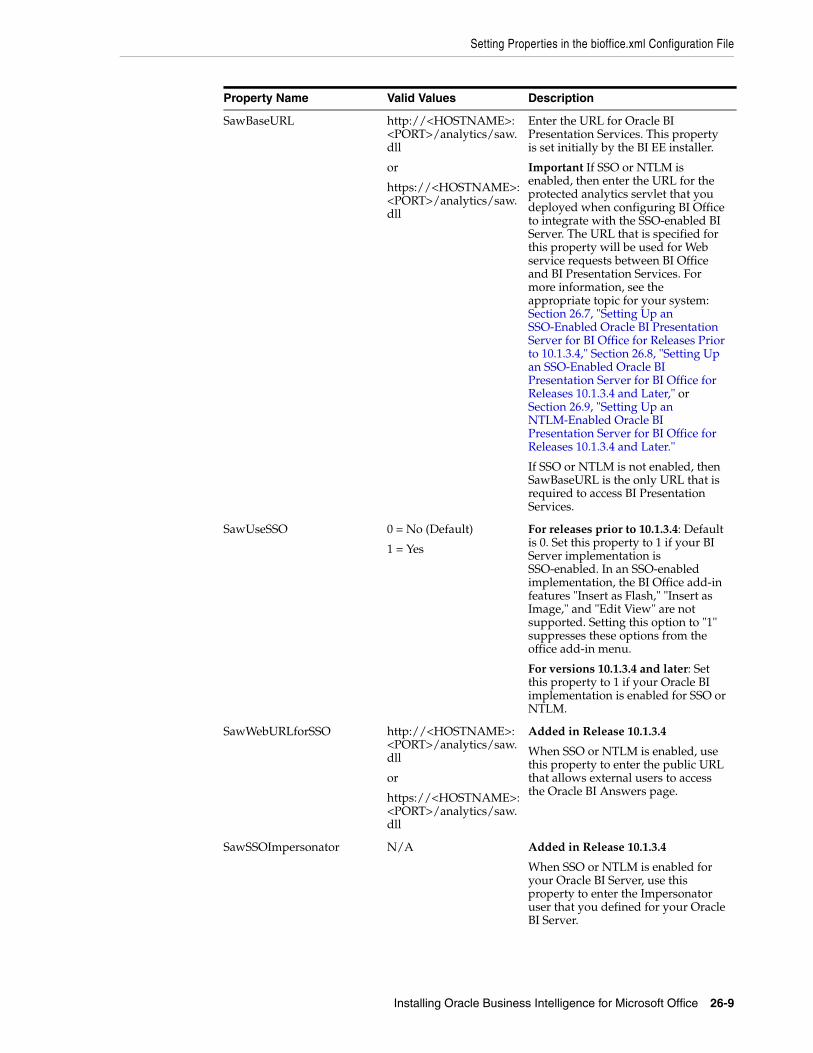
Setting Properties in the bioffice.xml Configuration File
Installing Oracle Business Intelligence for Microsoft Office 26-9
SawBaseURL http://<HOSTNAME>:<PORT>/analytics/saw.dll
or
https://<HOSTNAME>:<PORT>/analytics/saw.dll
Enter the URL for Oracle BI Presentation Services. This property is set initially by the BI EE installer.
Important If SSO or NTLM is enabled, then enter the URL for the protected analytics servlet that you deployed when configuring BI Office to integrate with the SSO-enabled BI Server. The URL that is specified for this property will be used for Web service requests between BI Office and BI Presentation Services. For more information, see the appropriate topic for your system: Section 26.7, "Setting Up an SSO-Enabled Oracle BI Presentation Server for BI Office for Releases Prior to 10.1.3.4," Section 26.8, "Setting Up an SSO-Enabled Oracle BI Presentation Server for BI Office for Releases 10.1.3.4 and Later," or Section 26.9, "Setting Up an NTLM-Enabled Oracle BI Presentation Server for BI Office for Releases 10.1.3.4 and Later."
If SSO or NTLM is not enabled, then SawBaseURL is the only URL that is required to access BI Presentation Services.
SawUseSSO 0 = No (Default)
1 = Yes
For releases prior to 10.1.3.4: Default is 0. Set this property to 1 if your BI Server implementation is SSO-enabled. In an SSO-enabled implementation, the BI Office add-in features "Insert as Flash," "Insert as Image," and "Edit View" are not supported. Setting this option to "1" suppresses these options from the office add-in menu.
For versions 10.1.3.4 and later: Set this property to 1 if your Oracle BI implementation is enabled for SSO or NTLM.
SawWebURLforSSO http://<HOSTNAME>:<PORT>/analytics/saw.dll
or
https://<HOSTNAME>:<PORT>/analytics/saw.dll
Added in Release 10.1.3.4
When SSO or NTLM is enabled, use this property to enter the public URL that allows external users to access the Oracle BI Answers page.
SawSSOImpersonator N/A Added in Release 10.1.3.4
When SSO or NTLM is enabled for your Oracle BI Server, use this property to enter the Impersonator user that you defined for your Oracle BI Server.
Property Name Valid Values Description
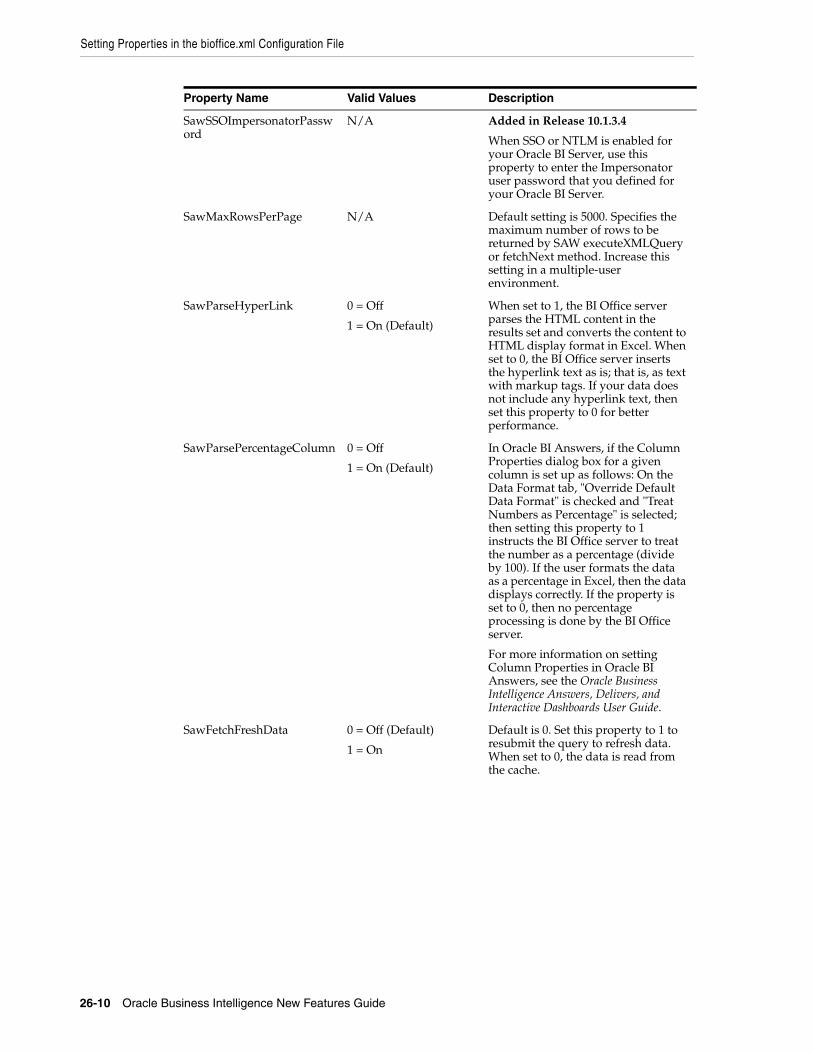
Setting Properties in the bioffice.xml Configuration File
26-10 Oracle Business Intelligence New Features Guide
SawSSOImpersonatorPassword
N/A Added in Release 10.1.3.4
When SSO or NTLM is enabled for your Oracle BI Server, use this property to enter the Impersonator user password that you defined for your Oracle BI Server.
SawMaxRowsPerPage N/A Default setting is 5000. Specifies the maximum number of rows to be returned by SAW executeXMLQuery or fetchNext method. Increase this setting in a multiple-user environment.
SawParseHyperLink 0 = Off
1 = On (Default)
When set to 1, the BI Office server parses the HTML content in the results set and converts the content to HTML display format in Excel. When set to 0, the BI Office server inserts the hyperlink text as is; that is, as text with markup tags. If your data does not include any hyperlink text, then set this property to 0 for better performance.
SawParsePercentageColumn 0 = Off
1 = On (Default)
In Oracle BI Answers, if the Column Properties dialog box for a given column is set up as follows: On the Data Format tab, "Override Default Data Format" is checked and "Treat Numbers as Percentage" is selected; then setting this property to 1 instructs the BI Office server to treat the number as a percentage (divide by 100). If the user formats the data as a percentage in Excel, then the data displays correctly. If the property is set to 0, then no percentage processing is done by the BI Office server.
For more information on setting Column Properties in Oracle BI Answers, see the Oracle Business Intelligence Answers, Delivers, and Interactive Dashboards User Guide.
SawFetchFreshData 0 = Off (Default)
1 = On
Default is 0. Set this property to 1 to resubmit the query to refresh data. When set to 0, the data is read from the cache.
Property Name Valid Values Description
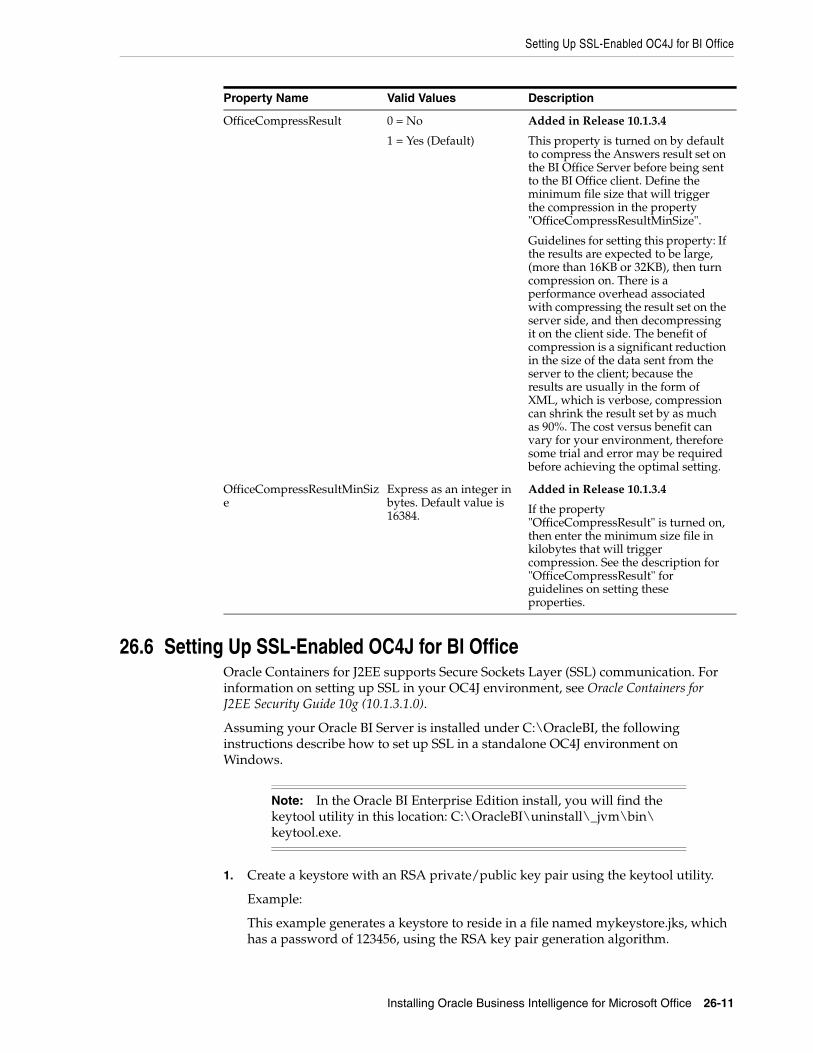
Setting Up SSL-Enabled OC4J for BI Office
Installing Oracle Business Intelligence for Microsoft Office 26-11
26.6 Setting Up SSL-Enabled OC4J for BI OfficeOracle Containers for J2EE supports Secure Sockets Layer (SSL) communication. For information on setting up SSL in your OC4J environment, see Oracle Containers for J2EE Security Guide 10g (10.1.3.1.0).
Assuming your Oracle BI Server is installed under C:\OracleBI, the following instructions describe how to set up SSL in a standalone OC4J environment on Windows.
1. Create a keystore with an RSA private/public key pair using the keytool utility.
Example:
This example generates a keystore to reside in a file named mykeystore.jks, which has a password of 123456, using the RSA key pair generation algorithm.
OfficeCompressResult 0 = No
1 = Yes (Default)
Added in Release 10.1.3.4
This property is turned on by default to compress the Answers result set on the BI Office Server before being sent to the BI Office client. Define the minimum file size that will trigger the compression in the property "OfficeCompressResultMinSize".
Guidelines for setting this property: If the results are expected to be large, (more than 16KB or 32KB), then turn compression on. There is a performance overhead associated with compressing the result set on the server side, and then decompressing it on the client side. The benefit of compression is a significant reduction in the size of the data sent from the server to the client; because the results are usually in the form of XML, which is verbose, compression can shrink the result set by as much as 90%. The cost versus benefit can vary for your environment, therefore some trial and error may be required before achieving the optimal setting.
OfficeCompressResultMinSize
Express as an integer in bytes. Default value is 16384.
Added in Release 10.1.3.4
If the property "OfficeCompressResult" is turned on, then enter the minimum size file in kilobytes that will trigger compression. See the description for "OfficeCompressResult" for guidelines on setting these properties.
Note: In the Oracle BI Enterprise Edition install, you will find the keytool utility in this location: C:\OracleBI\uninstall\_jvm\bin\ keytool.exe.
Property Name Valid Values Description

Setting Up SSL-Enabled OC4J for BI Office
26-12 Oracle Business Intelligence New Features Guide
cd C:\OracleBI\oc4j_bi\j2ee\home\configkeytool -genkey -keyalg RSA -keystore mykeystore.jks -storepass 123456
The keytool prompts you for additional information, as follows:
What is your first and last name?
[Unknown]: Test User
What is the name of your organizational unit?
[Unknown]: Support
What is the name of your organization?
[Unknown]: Oracle
What is the name of your City or Locality?
[Unknown]: Redwood Shores
What is the name of your State or Province?
[Unknown]: CA
What is the two-letter country code for this unit?
[Unknown]: US
Is <CN=Test User, OU=Support, O=Oracle, L=Redwood Shores, ST=CA, C=US> correct?
[no]: yes
Enter key password for <mykey>
(RETURN if same as keystore password):
Always press RETURN for the key password. In OC4J 10.1.3.x implementations, the keystore password must be the same as the key entry password.
The mykeystore file is created in the current directory. The default alias of the key is mykey.
2. If you do not have a secure-web-site.xml file, then create one in the following location: C:\OracleBI\j2ee\home\config\secure-web-site.xml. You can start by copying content from default-web-site.xml.
3. Update secure-web-site.xml with the following elements:
a. Update the <web-site> element to add secure="true" and to set the port value to some available port. (For example, port="4443". To use the default of 4443, you have to be a super user.) For standalone OC4J, use HTTP protocol, which is the default setting. (The setting protocol="http" in combination with secure="true" results in HTTPS being used.)
<web-site port="4443" secure="true" protocol="http" display-name="Default OracleAS Containers for J2EE Web Site" > ...</web-site>
b. Add the following under the <web-site> element to define the keystore and password.
<ssl-config keystore="./mykeystore.jks" keystore-password="123456" />
Note that the relative path and file name extensions are used, for example: ./mykeystore.jks.
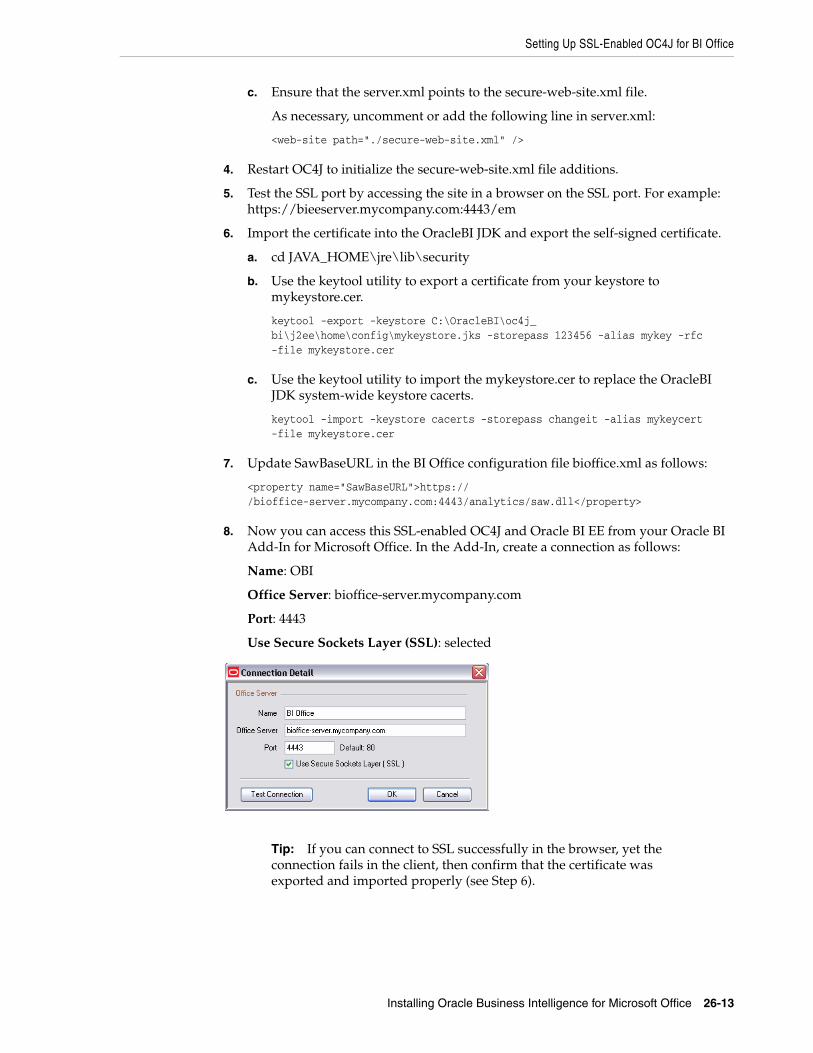
Setting Up SSL-Enabled OC4J for BI Office
Installing Oracle Business Intelligence for Microsoft Office 26-13
c. Ensure that the server.xml points to the secure-web-site.xml file.
As necessary, uncomment or add the following line in server.xml:
<web-site path="./secure-web-site.xml" />
4. Restart OC4J to initialize the secure-web-site.xml file additions.
5. Test the SSL port by accessing the site in a browser on the SSL port. For example: https://bieeserver.mycompany.com:4443/em
6. Import the certificate into the OracleBI JDK and export the self-signed certificate.
a. cd JAVA_HOME\jre\lib\security
b. Use the keytool utility to export a certificate from your keystore to mykeystore.cer.
keytool -export -keystore C:\OracleBI\oc4j_bi\j2ee\home\config\mykeystore.jks -storepass 123456 -alias mykey -rfc -file mykeystore.cer
c. Use the keytool utility to import the mykeystore.cer to replace the OracleBI JDK system-wide keystore cacerts.
keytool -import -keystore cacerts -storepass changeit -alias mykeycert -file mykeystore.cer
7. Update SawBaseURL in the BI Office configuration file bioffice.xml as follows:
<property name="SawBaseURL">https:// /bioffice-server.mycompany.com:4443/analytics/saw.dll</property>
8. Now you can access this SSL-enabled OC4J and Oracle BI EE from your Oracle BI Add-In for Microsoft Office. In the Add-In, create a connection as follows:
Name: OBI
Office Server: bioffice-server.mycompany.com
Port: 4443
Use Secure Sockets Layer (SSL): selected
Tip: If you can connect to SSL successfully in the browser, yet the connection fails in the client, then confirm that the certificate was exported and imported properly (see Step 6).
Setting Up an SSO-Enabled Oracle BI Presentation Server for BI Office for Releases Prior to 10.1.3.4
26-14 Oracle Business Intelligence New Features Guide
26.7 Setting Up an SSO-Enabled Oracle BI Presentation Server for BI Office for Releases Prior to 10.1.3.4
Oracle BI Office currently cannot be fully integrated with SSO. If your Oracle BI Enterprise Edition implementation is SSO-enabled, then users can use their SSO credentials from the Microsoft Excel or PowerPoint add-in to log in to the Oracle BI Office system. However, the following options from the client add-in Insert menu are not supported:
■ Edit View
■ Insert as Image
■ Insert as Flash
To enable the integration of BI Office with SSO-enabled Oracle BI, you must deploy a separate Presentation Services Plug-in (analytics.ear) and grant trusted IP address access privileges to the new Presentation Services Plug-in from the IP address of the BI Office server. This enables Web service requests from the trusted BI Office server IP address to be handled by the Presentation Services Plug-in without going through SSO authentication. You then must configure the BI Office server to send Web service requests to this Presentation Services Plug-in that bypasses SSO.
Depending on your SSO server type, the configuration may differ. Following is an example of how to integrate BI Office with Oracle SSO-enabled Oracle BI:
1. On the same machine where BI Presentation Services Plug-in has been deployed, deploy another Presentation Services Plug-in using the file analytics.ear:
Locate analytics.ear in the directory OracleBI_HOME/web.
2. Name the new Plug-in "analyticsSOAP".
Make the same modifications to the web.xml file for this analyticsSOAP servlet that were made to the web.xml file for the default "analytics" servlet. For more information on updating the web.xml file, see the topic "Configuring BI Presentation Services Plug-in" in the Oracle Business Business Intelligence Enterprise Edition Deployment Guide.
3. Make the following modification to the file mod_osso.conf to open analyticsSOAP to requests from the BI Office server:
(The mod_osso.conf is located in the directory Oracle_HOME/Apache/Apache/conf.)
<Location /analyticsSOAP> Require valid-user AuthType Basic Allow from <IP address of BI Office server> Satisfy Any</Location>where
<IP address of BI Office Server> is the IP address of the BI Office server, for example: 10.155.224.7
4. Locate the Office Server configuration file (bioffice.xml). The configuration file bioffice.xml can be found in the directory:
OAS_HOME\j2ee\home\applications\bioffice\bioffice\WEB-INF
Setting Up an SSO-Enabled Oracle BI Presentation Server for BI Office for Releases 10.1.3.4 and Later
Installing Oracle Business Intelligence for Microsoft Office 26-15
5. Update the following properties:
■ "SawBaseURL" to point to the new analyticsSOAP deployed in the previous steps
■ "SawUseSSO" to indicate that you have enabled SSO for BI Office and Presentation Services. Set the value to "1". This setting suppresses the unsupported options from the client add-in insert menu.
Example:
<property name="SawBaseURL">http://localhost:port/analyticsSOAP/saw.dll</property><!-- Does SAW use SSO (Single Sign-On): yes = 1; no = 0; --><property name="SawUseSSO" type="int">1</property>
For more information on the bioffice.xml file, see Section 26.5, "Setting Properties in the bioffice.xml Configuration File".
26.8 Setting Up an SSO-Enabled Oracle BI Presentation Server for BI Office for Releases 10.1.3.4 and Later
Oracle BI Office currently cannot be fully integrated with SSO. If your Oracle BI Enterprise Edition implementation is SSO-enabled, users can use their SSO credentials from the Microsoft Excel or PowerPoint add-in to log in to the Oracle BI Office system.
To enable the integration of BI Office with SSO-enabled Oracle BI, you must deploy a separate Presentation Services Plug-in (analytics.ear) and grant trusted IP address access privileges to the new Presentation Services Plug-in from the IP address of the BI Office server. This enables Web service requests from the trusted BI Office server IP address to be handled by the Presentation Services Plug-in without going through SSO authentication. You then must configure the BI Office server to send Web service requests to this Presentation Services Plug-in that bypasses SSO.
To perform the Edit View function in BI Office, you must configure the BI Office server to route these requests to the public URL for Presentation Services. The user will be challenged for credentials to sign in to Oracle BI to launch the Answers page for editing.
26.8.1 PrerequisitesFollowing are the prerequisites for configuring Oracle BI Office with an SSO-enabled Oracle BI Server:
1. Install Oracle Business Intelligence Enterprise Edition, Release 10.1.3.4. For more information, see the Oracle Business Intelligence Infrastructure Installation and Configuration Guide.
2. Configure the Oracle BI Server to enable Single Sign-on. See the chapter: "Enabling Oracle Single Sign-on For Oracle Business Intelligence" in the Oracle Business Business Intelligence Enterprise Edition Deployment Guide for more information.
Note: There is an alternative method that you can use that does not require the deployment of a second Presentation Services Plug-in. See the Section 26.8.3, "Alternative Configuration Method" at the end of this section.
Setting Up an SSO-Enabled Oracle BI Presentation Server for BI Office for Releases 10.1.3.4 and Later
26-16 Oracle Business Intelligence New Features Guide
When enabling SSO for the Oracle BI Server you are required to set up an Impersonator user. You will need this Impersonator user name and password to complete the configuration of the BI Office server. For more information, see the topic "Creating the Oracle BI Server Impersonator User" in the Oracle Business Business Intelligence Enterprise Edition Deployment Guide.
26.8.2 Integrating BI Office with SSO-Enabled Oracle BIDepending on the SSO server type, the configuration may differ. Following is an example of how to integrate BI Office with Oracle SSO-enabled Oracle BI:
1. On the same machine where BI Presentation Services Plug-in has been deployed, deploy another Presentation Services Plug-in using the file analytics.ear:
Locate analytics.ear in the directory OracleBI_HOME/web.
2. Name the new Plug-in "analyticsSOAP".
Make the same modifications to the web.xml file for this analyticsSOAP servlet that were made to the web.xml file for the default "analytics" servlet. For more information on updating the web.xml file, see the topic "Configuring BI Presentation Services Plug-in" in the Oracle Business Business Intelligence Enterprise Edition Deployment Guide.
3. Make the following modification to the file mod_osso.conf to open analyticsSOAP to requests from the BI Office server:
(The mod_osso.conf is located in the directory Oracle_HOME/Apache/Apache/conf.)
<Location /analyticsSOAP> Require valid-user AuthType Basic Allow from <IP address of BI Office server> Satisfy Any</Location>
where
<IP address of BI Office Server> is the IP address of the BI Office server, for example: 10.155.224.7
4. Locate the Office Server configuration file (bioffice.xml). The configuration file bioffice.xml can be found in the directory:
OAS_HOME\j2ee\home\applications\bioffice\bioffice\WEB-INF
5. Update the following properties:
■ "SawBaseURL" to point to the new analyticsSOAP deployed in the previous steps
■ "SawWebURLforSSO" to point to the URL used for public and external users to access the Oracle BI Answers page.
Setting Up an SSO-Enabled Oracle BI Presentation Server for BI Office for Releases 10.1.3.4 and Later
Installing Oracle Business Intelligence for Microsoft Office 26-17
■ "SawSSOImpersonator" with the Impersonator user you set up for the Oracle BI Server.
■ "SawSSOImpersonatorPassword" with the password for the Impersonator user.
■ "SawUseSSO" to indicate that you have enabled SSO for BI Office and Presentation Services. Set the value to "1".
Example:
<property name="SawBaseURL">http://localhost:port/analyticsSOAP/saw.dll</property><!-- Does SAW use SSO (Single Sign-On): yes = 1; no = 0; --><property name="SawWebURLforSSO>http://localhost:port/analytics/saw.dll</property><property name="SawSSOImpersonator">Impersonator</property> <property name="SawSSOImpersonatorPassword">password<property> <property name="SawUseSSO" type="int">1</property>
For more information on the bioffice.xml file, see Section 26.5, "Setting Properties in the bioffice.xml Configuration File".
26.8.3 Alternative Configuration MethodAs an alternative to deploying a second Presentation Services Plug-in, you can perform the following configuration steps:
1. Modify the web.xml file (located at OracleBI\oc4j_bi\j2ee\home\applications\analytics\analytics\WEB-INF\web.xml) by entering a duplicate of the servlet SAWBridge and the servlet mappings. Give a different servlet name and URL pattern to your duplicate entry.
2. Restart the Web server. Now you have two different servlets with two different URL patterns.
3. Follow the instructions in the Section 26.8.2, starting with Step 3 to unprotect the second servlet and configure the bioffice.xml file.
Following is a sample web.xml file showing the duplicate entry:
Note: When specifying the URL for SawWebURLforSSO, you can use the domain names in the URL. However, note the following special cases:
■ If the Oracle BI Server, the BI Office server, and the client machine are running in different domains, then you must specify the complete domain name. For example, you would specify:
http://myserver.mycompany.com:443/analytics/saw.dll
not
http://myserver:443/analytics/saw.dll
■ If the BI Server or the BI Office server is running on a computer that has two or more IP addresses configured, then you must specify the correct IP address in the URL for the location of the Oracle BI Server.
Setting Up an NTLM-Enabled Oracle BI Presentation Server for BI Office for Releases 10.1.3.4 and Later
26-18 Oracle Business Intelligence New Features Guide
<?xml version="1.0" encoding="UTF-8"?><!DOCTYPE web-app PUBLIC "-//Sun Microsystems, Inc.//DTD Web Application 2.2//EN" http://java.sun.com/j2ee/dtds/web-app_2_2.dtd"> <web-app> <servlet> <servlet-name>SAWBridge</servlet-name> <servlet-class>com.siebel.analytics.web.SAWBridge</servlet-class> <init-param> <param-name>oracle.bi.presentation.sawserver.Host</param-name> <param-value>localhost</param-value> </init-param> <init-param> <param-name>oracle.bi.presentation.sawserver.Port</param-name> <param-value>9710</param-value> </init-param> </servlet> <servlet-mapping> <servlet-name>SAWBridge</servlet-name> <url-pattern>/saw.dll</url-pattern> </servlet-mapping> <servlet> <servlet-name>SAWBridge2</servlet-name> <servlet-class>com.siebel.analytics.web.SAWBridge</servlet-class> <init-param> <param-name>oracle.bi.presentation.sawserver.Host</param-name> <param-value>localhost</param-value> </init-param> <init-param> <param-name>oracle.bi.presentation.sawserver.Port</param-name> <param-value>9710</param-value> </init-param> </servlet> <servlet-mapping> <servlet-name>SAWBridge2</servlet-name> <url-pattern>/soap</url-pattern> </servlet-mapping> <mime-mapping> <extension>xsd</extension> <mime-type>text/xml</mime-type> </mime-mapping> <welcome-file-list> <welcome-file>default.jsp</welcome-file> </welcome-file-list></web-app>
26.9 Setting Up an NTLM-Enabled Oracle BI Presentation Server for BI Office for Releases 10.1.3.4 and Later
BI Office connections running on supported Windows client operating systems that use Active Directory as the LDAP server for Windows authentication can now log in to Oracle BI Enterprise Edition without requiring the user to enter a login user name and password, provided that Oracle Business Intelligence is configured to authenticate against the same Active Directory server.

Setting Up an NTLM-Enabled Oracle BI Presentation Server for BI Office for Releases 10.1.3.4 and Later
Installing Oracle Business Intelligence for Microsoft Office 26-19
NT LAN Manager (NTLM) Authentication Protocol is the name of a family of security protocols in Windows. Starting with Release 10.1.3.4, BI Office supports NTLM protocol to achieve the following features:
■ Single user repository - When using Microsoft systems, BI Office can leverage NTLM protocol to authenticate users against the Windows user repository, eliminating the need for a separate user repository for BI Office and the Oracle BI Enterprise Edition applications.
■ Silent Sign-on -When accessing the BI Office client add-in from an authorized machine, a user will not be challenged for credentials. The NTLM protocol authenticates the user and silently logs the authenticated user on to the system.
For details on NTLM, refer to the Microsoft Web sites at www.microsoft.com and msdn.microsoft.com.
26.9.1 Example of Deploying and Configuring BI Office with NTLM AuthenticationThis section provides an example of deploying and configuring BI Office with NTLM authentication. This example uses the following components:
■ Windows Operating System
■ Apache HTTP Server
■ OC4J Web server
Deployment and configuration steps may differ if you choose different components for your system.
The following diagram displays a sample deployment topology:
Features of this topology:
■ Every external HTTP request will go through the HTTP server with NTLM enabled. These requests are authenticated by the NTLM module.
■ The BI Office server and Presentation Services Plug-in modules, as well as Presentation Services and Oracle BI Server, are deployed behind the HTTP server. These components therefore cannot be accessed without passing HTTP server authentication.
■ In this example a second Presentation Services Plug-in is deployed on a dedicated instance of an OC4J Web server. Access to the Web server is restricted to protected
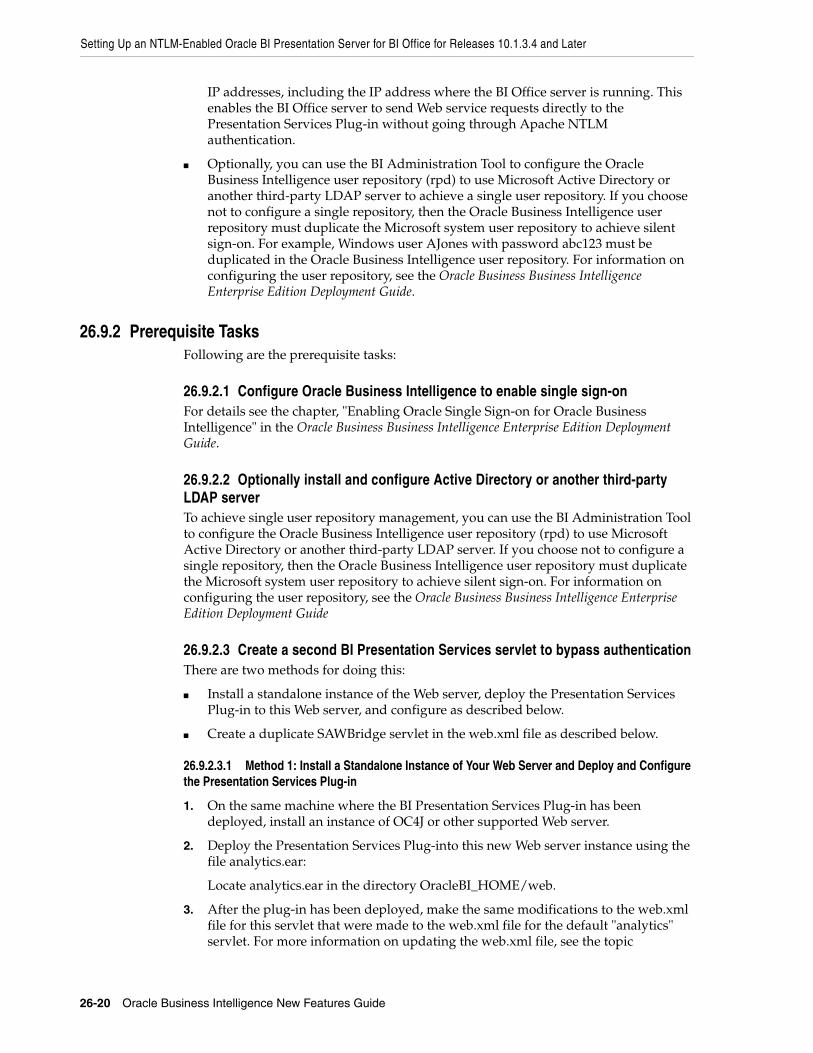
Setting Up an NTLM-Enabled Oracle BI Presentation Server for BI Office for Releases 10.1.3.4 and Later
26-20 Oracle Business Intelligence New Features Guide
IP addresses, including the IP address where the BI Office server is running. This enables the BI Office server to send Web service requests directly to the Presentation Services Plug-in without going through Apache NTLM authentication.
■ Optionally, you can use the BI Administration Tool to configure the Oracle Business Intelligence user repository (rpd) to use Microsoft Active Directory or another third-party LDAP server to achieve a single user repository. If you choose not to configure a single repository, then the Oracle Business Intelligence user repository must duplicate the Microsoft system user repository to achieve silent sign-on. For example, Windows user AJones with password abc123 must be duplicated in the Oracle Business Intelligence user repository. For information on configuring the user repository, see the Oracle Business Business Intelligence Enterprise Edition Deployment Guide.
26.9.2 Prerequisite TasksFollowing are the prerequisite tasks:
26.9.2.1 Configure Oracle Business Intelligence to enable single sign-onFor details see the chapter, "Enabling Oracle Single Sign-on for Oracle Business Intelligence" in the Oracle Business Business Intelligence Enterprise Edition Deployment Guide.
26.9.2.2 Optionally install and configure Active Directory or another third-party LDAP serverTo achieve single user repository management, you can use the BI Administration Tool to configure the Oracle Business Intelligence user repository (rpd) to use Microsoft Active Directory or another third-party LDAP server. If you choose not to configure a single repository, then the Oracle Business Intelligence user repository must duplicate the Microsoft system user repository to achieve silent sign-on. For information on configuring the user repository, see the Oracle Business Business Intelligence Enterprise Edition Deployment Guide
26.9.2.3 Create a second BI Presentation Services servlet to bypass authenticationThere are two methods for doing this:
■ Install a standalone instance of the Web server, deploy the Presentation Services Plug-in to this Web server, and configure as described below.
■ Create a duplicate SAWBridge servlet in the web.xml file as described below.
26.9.2.3.1 Method 1: Install a Standalone Instance of Your Web Server and Deploy and Configure the Presentation Services Plug-in
1. On the same machine where the BI Presentation Services Plug-in has been deployed, install an instance of OC4J or other supported Web server.
2. Deploy the Presentation Services Plug-into this new Web server instance using the file analytics.ear:
Locate analytics.ear in the directory OracleBI_HOME/web.
3. After the plug-in has been deployed, make the same modifications to the web.xml file for this servlet that were made to the web.xml file for the default "analytics" servlet. For more information on updating the web.xml file, see the topic
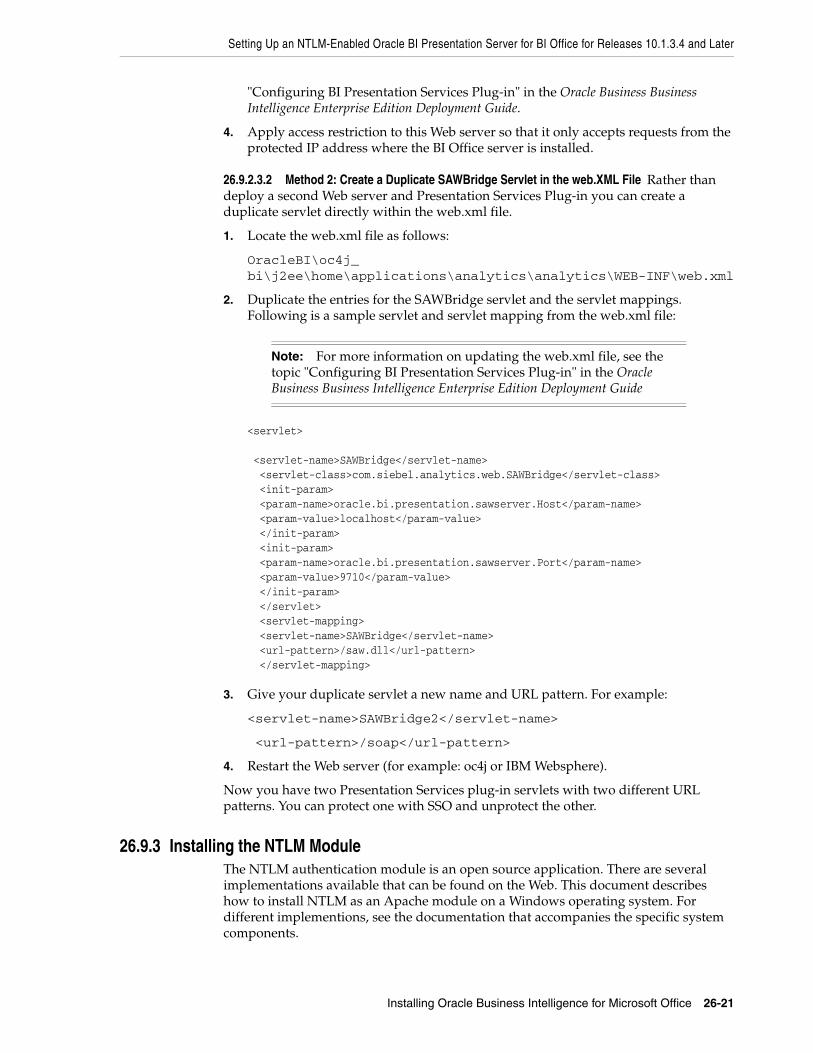
Setting Up an NTLM-Enabled Oracle BI Presentation Server for BI Office for Releases 10.1.3.4 and Later
Installing Oracle Business Intelligence for Microsoft Office 26-21
"Configuring BI Presentation Services Plug-in" in the Oracle Business Business Intelligence Enterprise Edition Deployment Guide.
4. Apply access restriction to this Web server so that it only accepts requests from the protected IP address where the BI Office server is installed.
26.9.2.3.2 Method 2: Create a Duplicate SAWBridge Servlet in the web.XML File Rather than deploy a second Web server and Presentation Services Plug-in you can create a duplicate servlet directly within the web.xml file.
1. Locate the web.xml file as follows:
OracleBI\oc4j_bi\j2ee\home\applications\analytics\analytics\WEB-INF\web.xml
2. Duplicate the entries for the SAWBridge servlet and the servlet mappings. Following is a sample servlet and servlet mapping from the web.xml file:
<servlet> <servlet-name>SAWBridge</servlet-name> <servlet-class>com.siebel.analytics.web.SAWBridge</servlet-class> <init-param> <param-name>oracle.bi.presentation.sawserver.Host</param-name> <param-value>localhost</param-value> </init-param> <init-param> <param-name>oracle.bi.presentation.sawserver.Port</param-name> <param-value>9710</param-value> </init-param> </servlet> <servlet-mapping> <servlet-name>SAWBridge</servlet-name> <url-pattern>/saw.dll</url-pattern> </servlet-mapping>
3. Give your duplicate servlet a new name and URL pattern. For example:
<servlet-name>SAWBridge2</servlet-name>
<url-pattern>/soap</url-pattern>
4. Restart the Web server (for example: oc4j or IBM Websphere).
Now you have two Presentation Services plug-in servlets with two different URL patterns. You can protect one with SSO and unprotect the other.
26.9.3 Installing the NTLM ModuleThe NTLM authentication module is an open source application. There are several implementations available that can be found on the Web. This document describes how to install NTLM as an Apache module on a Windows operating system. For different implementions, see the documentation that accompanies the specific system components.
Note: For more information on updating the web.xml file, see the topic "Configuring BI Presentation Services Plug-in" in the Oracle Business Business Intelligence Enterprise Edition Deployment Guide
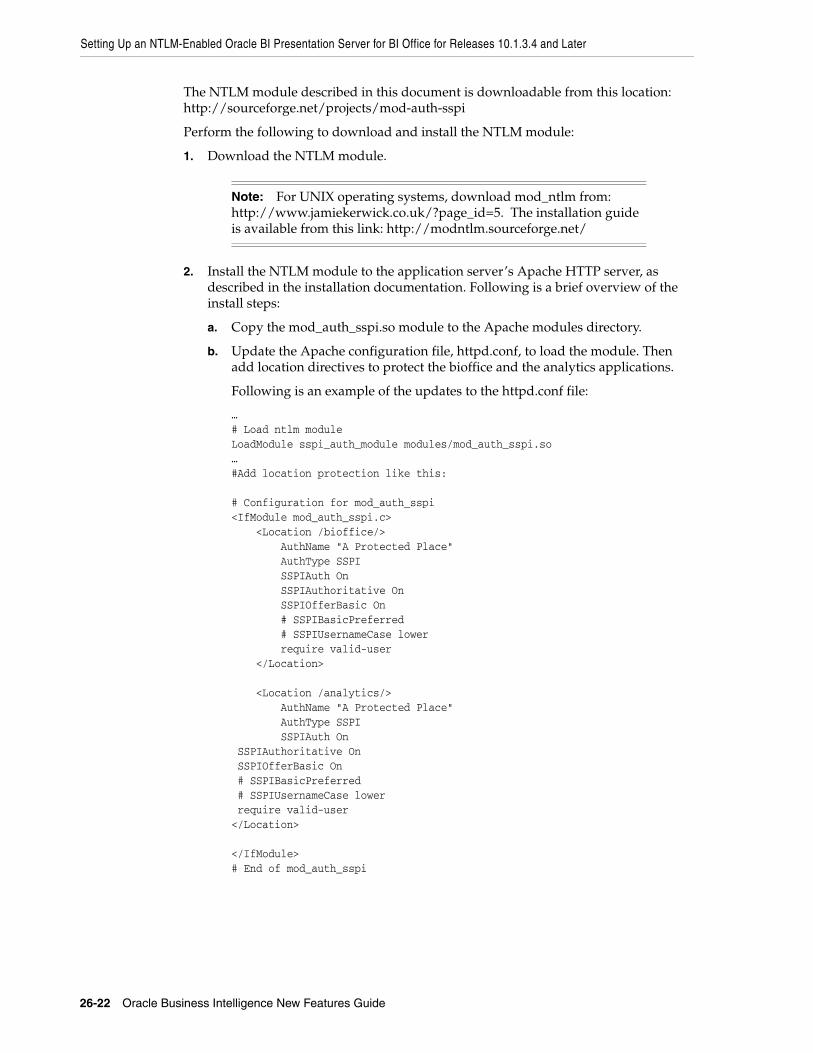
Setting Up an NTLM-Enabled Oracle BI Presentation Server for BI Office for Releases 10.1.3.4 and Later
26-22 Oracle Business Intelligence New Features Guide
The NTLM module described in this document is downloadable from this location: http://sourceforge.net/projects/mod-auth-sspi
Perform the following to download and install the NTLM module:
1. Download the NTLM module.
2. Install the NTLM module to the application server’s Apache HTTP server, as described in the installation documentation. Following is a brief overview of the install steps:
a. Copy the mod_auth_sspi.so module to the Apache modules directory.
b. Update the Apache configuration file, httpd.conf, to load the module. Then add location directives to protect the bioffice and the analytics applications.
Following is an example of the updates to the httpd.conf file:
…# Load ntlm moduleLoadModule sspi_auth_module modules/mod_auth_sspi.so…#Add location protection like this: # Configuration for mod_auth_sspi<IfModule mod_auth_sspi.c> <Location /bioffice/> AuthName "A Protected Place" AuthType SSPI SSPIAuth On SSPIAuthoritative On SSPIOfferBasic On # SSPIBasicPreferred # SSPIUsernameCase lower require valid-user </Location> <Location /analytics/> AuthName "A Protected Place" AuthType SSPI SSPIAuth On SSPIAuthoritative On SSPIOfferBasic On # SSPIBasicPreferred # SSPIUsernameCase lower require valid-user</Location> </IfModule># End of mod_auth_sspi
Note: For UNIX operating systems, download mod_ntlm from: http://www.jamiekerwick.co.uk/?page_id=5. The installation guide is available from this link: http://modntlm.sourceforge.net/

Setting Up an NTLM-Enabled Oracle BI Presentation Server for BI Office for Releases 10.1.3.4 and Later
Installing Oracle Business Intelligence for Microsoft Office 26-23
26.9.4 Configuring BI Office to Enable NTMLPerform the following steps to enable NTLM for BI Office.
1. Locate the Office Server configuration file (bioffice.xml). The configuration file bioffice.xml can be found in the directory:
OAS_HOME\j2ee\home\applications\bioffice\bioffice\WEB-INF
2. Update the following properties:
■ "SawBaseURL" to point to the new Presentation Services Plug-in that you installed on the dedicated Web server. Web service requests from BI Office to the Oracle BI Server will be routed through this Presentation Services Plug-in specified in this property. These requests will bypass NTLM authentication.
■ "SawWebURLforSSO" to point to the URL used for public and external users to access the Oracle BI Answers page.
■ "SawSSOImpersonator" with the Impersonator user you set up for the Oracle BI Server.
■ "SawSSOImpersonatorPassword" with the password for the Impersonator user.
■ "SawUseSSO" to indicate that you have enabled SSO for BI Office and Presentation Services. Set the value to "1".
Example:
<property name="SawBaseURL">http://152.68.81.15:443/analytics/saw.dll</property><!-- Does SAW use SSO (Single Sign-On): yes = 1; no = 0; --><property name="SawWebURLforSSO>http://152.68.196.231:443/analytics/saw.dll</property><property name="SawSSOImpersonator">Impersonator</property> <property name="SawSSOImpersonatorPassword">password<property> <property name="SawUseSSO" type="int">1</property>For more information on the bioffice.xml file, see Section 26.5, "Setting Properties in the bioffice.xml Configuration File".
Note: When specifying the URL for SawWebURLforSSO, you can use the domain names in the URL. However, note the following special cases:
■ If the Oracle BI Server, the BI Office server, and the client machine are running in different domains, then you must specify the complete domain name. For example, specify:
https://myserver.mycompany.com:443/analytics/saw.dll
not
https://myserver:443/analytics/saw.dll
■ If the BI Server or the BI Office server is running on a computer that has two or more IP addresses configured, then you must specify the correct IP address in the URL for the location of the Oracle BI Server.

Setting Up an NTLM-Enabled Oracle BI Presentation Server for BI Office for Releases 10.1.3.4 and Later
26-24 Oracle Business Intelligence New Features Guide
26.9.5 Testing Your NTLM DeploymentAfter you have completed the setup steps, to test your deployment, access BI Office from a computer within the authenticated Microsoft system domain. You will be silently signed on to BI Office without being challenged for credentials.
Select the Edit View link for a request. You will be silently signed on to Oracle BI Presentation Services and the Answers request Edit page will be displayed.
27
Microsoft Office Support 27-1
27
Microsoft Office Support
This new feature enables you to analyze and deploy business intelligence reports more easily in MS Office.
This release of Oracle BI Enterprise Edition features an improved version of Oracle Business Intelligence Add-in for Microsoft Office, with a new Excel and PowerPoint Add-in. These add-ins allow you to insert BI EE views as native Office tables and BI chart views as native Office charts, as static but refreshable images, or even as high-quality Flash objects, leveraging Office functionality while referencing the Oracle BI semantic layer, thus ensuring that a single version of the truth is available to users across an enterprise.
Oracle BI for Microsoft Office provides the following functionality:
■ Oracle BI Add-in for Microsoft Excel.
■ Oracle BI Add-in for Microsoft PowerPoint.
■ When installed on Excel 2007, the Oracle BI Add-in's functionality is made available via a native Office ribbon interface. When installed on Excel 2003 ,the Oracle BI Add-in's functionality is made available via a menu and a toolbar. In both cases, an Office pane is available for browsing the BI Presentation Catalog and for selecting views to insert inside Office documents.
■ Oracle BI Office Server. This is a server-side J2EE application that communicates between the BI Office client and the BI Presentation Server using Web services.
■ Ability to secure BI data in BI views inserted inside Excel spreadsheets or PowerPoint presentations. Metadata that describes the BI view is preserved, but all data is removed by the BI Add-in. You can obtain the latest data available by refreshing BI views using the BI Add-in.
■ You can copy views from Answers and Interactive Dashboards pages and then paste them into Excel and PowerPoint documents using the "Paste" feature of the Oracle BI Add-in. Copied views are pasted as Office documents: Excel or PowerPoint tables and charts. This functionality also extends to copying compound views from Answers and Interactive Dashboards. Compound views copied from Answers or Interactive Dashboards are pasted into Office documents as native Office tables and charts. Only BI views supported by the Oracle BI Add-in are pasted into Office documents. Gauge and funnel views are pasted as refreshable images when using this feature in Release 10.1.3.4.
■ You can use this "Copy" feature to copy the state of BI views in Interactive Dashboards and paste this state into Office documents. You can drill on a chart from year to quarter, then drill from region to the district level, using the "Copy" link, if available for that view, to copy this state and then paste it into an Office document using the BI Add-in. When you refresh the BI views inside the Office

27-2 Oracle Business Intelligence New Features Guide
document, the data is refreshed and displayed based on this state of the request. Prompt definitions are preserved when using this feature in Release 10.1.3.4 and can be changed subsequently in Excel or PowerPoint documents.
For more information on how the "Copy" feature works from Answers and Dashboards, see the previous item that describes the "Paste" feature.
■ In versions of BI Office prior to 10.1.3.4, a "Flat Data View" is provided for every request. This view provides the entire data set for the original request in a simple tabular format. This view is more suited when you want to obtain only the data and then use Excel's functionality to perform further analysis on the data.
■ The table view displays results in a tabular format. You can add totals, customize headings, and change the formula or aggregation rule for a column. (In versions prior to 10.1.3.4, column drilling is also supported in Excel tables. If users have the BI Office Add-in installed, they can make use of this drilling functionality even in offline mode, without being connected to a BI Presentation Server.)
■ The pivot table view, available in the Excel Add-in, presents data from BI requests with page items as well as a section-based layout if these had been defined in the BI pivot table view for the request in Answers.
■ Support for the Oracle BI Security model, including support for both encrypted (SSL) and Single-Sign On modes. The same login that you use for Answers or Interactive Dashboards is available for the BI Office Add-in. For release 10.1.3.4 and later, if your environment is NTLM-enabled, you can use the BI Office Add-in’s support for NTLM-based authentication to enable silent and single sign-on.
■ The BI Presentation Catalog browser is presented as a pane in Excel and PowerPoint to browse requests, both user-created and shared. You can also display the individual views that are available for each request.
■ Ability to insert table, pivot table, and chart views into Excel documents as Excel tables and Excel charts (subject to the limitations of Excel).
■ Support for prompts that are defined in the BI request.
■ If a view selected for insertion has multiple levels from one or more dimensions, then you can choose to limit the data for each dimension by unchecking these levels from a "level selection" dialog.
■ Ability to insert table and chart views into PowerPoint presentations as PowerPoint tables and charts (subject to the limitations of PowerPoint).
■ Ability to insert chart views as images inside Excel spreadsheets and PowerPoint presentations that can be refreshed using the Oracle BI Add-in.
■ Ability to insert chart views as high-quality Flash objects inside PowerPoint presentations that can then be refreshed using the Oracle BI Add-in.
■ For Release 10.1.3.4, the ability to insert BI gauge views as an image or as a Flash object. Flash support for gauges is available only in PowerPoint.
■ For Release 10.1.3.4, the ability to insert BI funnel views as an image in Excel and PowerPoint.
■ You can define Excel-specific conditional formats to data from BI views. These conditional formats are preserved during data refreshes.
■ You can change the formats of data items that are displayed in BI views in Excel and PowerPoint documents. To change the format of an item in an Excel sheet, you must modify the style for that cell. These formatting changes are then preserved
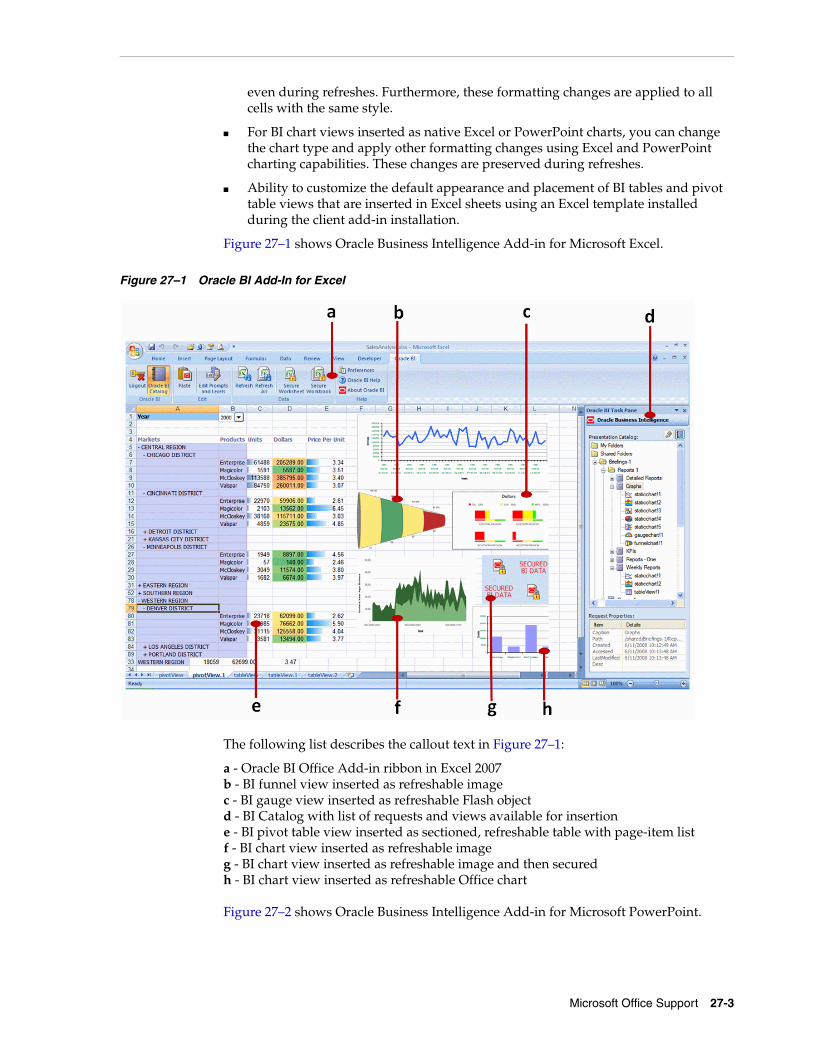
Microsoft Office Support 27-3
even during refreshes. Furthermore, these formatting changes are applied to all cells with the same style.
■ For BI chart views inserted as native Excel or PowerPoint charts, you can change the chart type and apply other formatting changes using Excel and PowerPoint charting capabilities. These changes are preserved during refreshes.
■ Ability to customize the default appearance and placement of BI tables and pivot table views that are inserted in Excel sheets using an Excel template installed during the client add-in installation.
Figure 27–1 shows Oracle Business Intelligence Add-in for Microsoft Excel.
Figure 27–1 Oracle BI Add-In for Excel
The following list describes the callout text in Figure 27–1:
a - Oracle BI Office Add-in ribbon in Excel 2007b - BI funnel view inserted as refreshable imagec - BI gauge view inserted as refreshable Flash objectd - BI Catalog with list of requests and views available for insertione - BI pivot table view inserted as sectioned, refreshable table with page-item listf - BI chart view inserted as refreshable imageg - BI chart view inserted as refreshable image and then securedh - BI chart view inserted as refreshable Office chart
Figure 27–2 shows Oracle Business Intelligence Add-in for Microsoft PowerPoint.
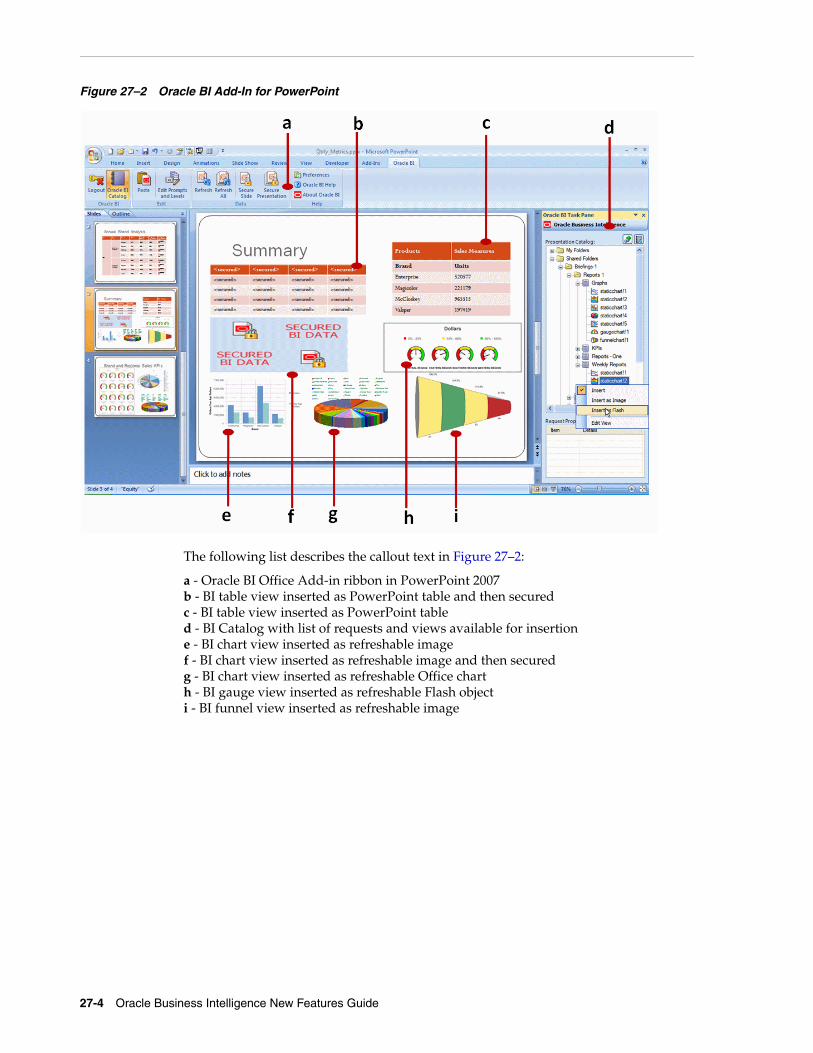
27-4 Oracle Business Intelligence New Features Guide
Figure 27–2 Oracle BI Add-In for PowerPoint
The following list describes the callout text in Figure 27–2:
a - Oracle BI Office Add-in ribbon in PowerPoint 2007b - BI table view inserted as PowerPoint table and then securedc - BI table view inserted as PowerPoint tabled - BI Catalog with list of requests and views available for insertione - BI chart view inserted as refreshable imagef - BI chart view inserted as refreshable image and then securedg - BI chart view inserted as refreshable Office charth - BI gauge view inserted as refreshable Flash objecti - BI funnel view inserted as refreshable image
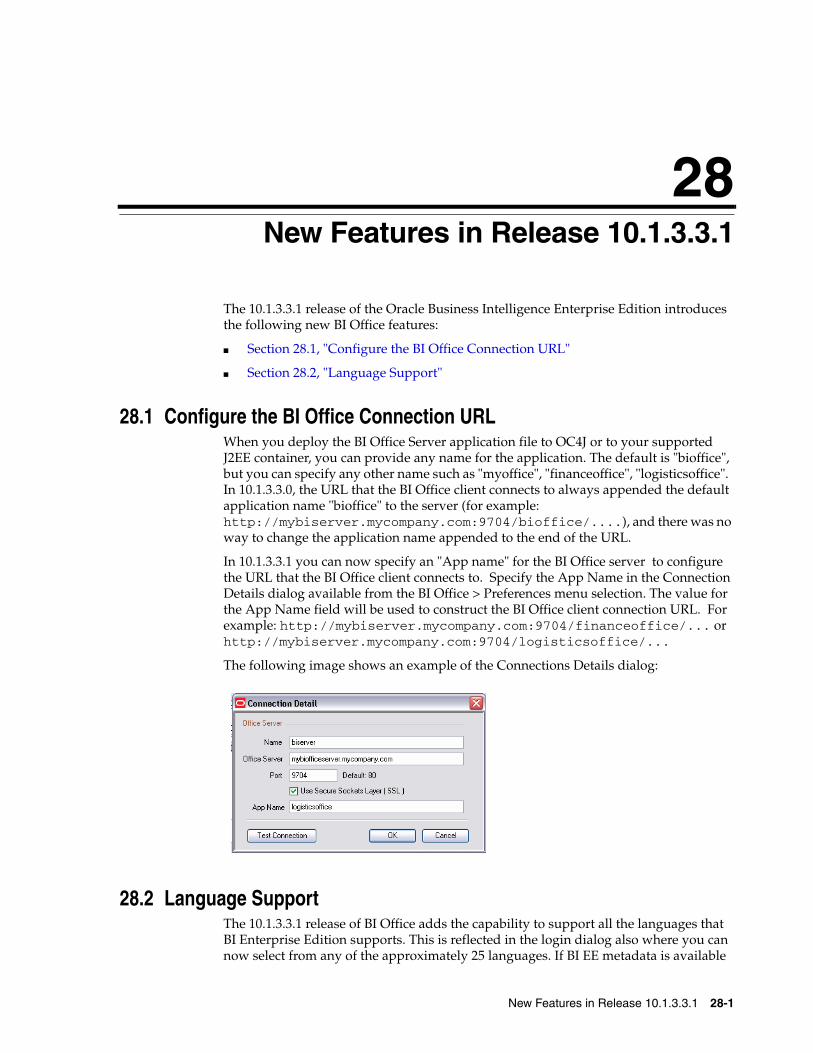
28
New Features in Release 10.1.3.3.1 28-1
28 New Features in Release 10.1.3.3.1
The 10.1.3.3.1 release of the Oracle Business Intelligence Enterprise Edition introduces the following new BI Office features:
■ Section 28.1, "Configure the BI Office Connection URL"
■ Section 28.2, "Language Support"
28.1 Configure the BI Office Connection URLWhen you deploy the BI Office Server application file to OC4J or to your supported J2EE container, you can provide any name for the application. The default is "bioffice", but you can specify any other name such as "myoffice", "financeoffice", "logisticsoffice". In 10.1.3.3.0, the URL that the BI Office client connects to always appended the default application name "bioffice" to the server (for example: http://mybiserver.mycompany.com:9704/bioffice/....), and there was no way to change the application name appended to the end of the URL.
In 10.1.3.3.1 you can now specify an "App name" for the BI Office server to configure the URL that the BI Office client connects to. Specify the App Name in the Connection Details dialog available from the BI Office > Preferences menu selection. The value for the App Name field will be used to construct the BI Office client connection URL. For example: http://mybiserver.mycompany.com:9704/financeoffice/... or http://mybiserver.mycompany.com:9704/logisticsoffice/...
The following image shows an example of the Connections Details dialog:
28.2 Language SupportThe 10.1.3.3.1 release of BI Office adds the capability to support all the languages that BI Enterprise Edition supports. This is reflected in the login dialog also where you can now select from any of the approximately 25 languages. If BI EE metadata is available

Language Support
28-2 Oracle Business Intelligence New Features Guide
in multiple languages then BI Office shall also display this metadata in the language selected. For example, the language you choose to display BI EE metadata such as dimensions, ('country', 'brand'), items, and measures ('Sales', 'Profits') will also be used when you connect to this BI EE instance from BI Office.
29
New Features in Release 10.1.3.3.3 29-1
29 New Features in Release 10.1.3.3.3
The 10.1.3.3.3 release of the Oracle Business Intelligence Enterprise Edition introduces no new features for BI Office. However, additional configuration instructions for Single Sign-On have been included in this document. See Chapter 26, "Installing Oracle Business Intelligence for Microsoft Office" for information.

29-2 Oracle Business Intelligence New Features Guide
30
New Features in Release 10.1.3.4 30-1
30New Features in Release 10.1.3.4
The 10.1.3.4 release of the Oracle Business Intelligence Enterprise Edition introduces the following new BI Office features:
■ Section 30.1, "Server Independence"
■ Section 30.2, "BI Office Client Changes"
■ Section 30.3, "Support for Combined Request Views"
■ Section 30.4, "Transparent Compression of Results"
■ Section 30.5, "NTLM Support"
30.1 Server IndependenceViews inserted in Excel and PowerPoint documents by the BI Office Add-in connected to one server can now be refreshed by connecting BI Office against a different server, as long as the view definitions are the same.
30.2 BI Office Client ChangesThe following changes were made for the BI Office client:
■ Section 30.2.1, "Ability to Enable Logging"
■ Section 30.2.2, "Enhanced BI Catalog Task Pane"
■ Section 30.2.3, "Ability to Preserve Excel Conditional Formatting During Refreshes"
■ Section 30.2.4, "Support for Gauge View"
■ Section 30.2.5, "Support for Funnel View"
■ Section 30.2.6, "Edit Prompts and Levels After Insert"
■ Section 30.2.7, "Enhanced Prompts Selection UI"
■ Section 30.2.8, "Support for Grand Totals in Table Views"
For more information about these changes, see the BI Office Help system.
30.2.1 Ability to Enable LoggingYou can enable logging in the BI Office Add-in on the Advanced tab of the Preferences dialog. Log messages are written in an HTML format to files in the BI Office Add-in installation folder.
BI Office Client Changes
30-2 Oracle Business Intelligence New Features Guide
30.2.2 Enhanced BI Catalog Task PaneChart views in the BI Catalog are identified by a chart type icon that is specific to that chart type. There are icons for bar, area, horizontal bar, line, line-bar combo, pareto, pie, and scatter chart types. This icons help you identify a chart type before inserting it into an Office document.
30.2.3 Ability to Preserve Excel Conditional Formatting During RefreshesThe BI Office Add-in can preserve any conditional formatting on data that you define using Microsoft Excel functionality. This requires the add-in to perform cell-level comparisons to preserve the formatting while updating the cell values with updated data, which is performance-intensive. To improve performance, use an option that allows you to specify whether to preserve Excel conditional formatting during refreshes. Select the Preserve Conditional Formatting option in the General tab of the Preferences dialog.
30.2.4 Support for Gauge ViewYou can add gauge views to Microsoft PowerPoint and Excel documents. The gauge view is available for insertion from the BI Catalog in the following formats::
■ Image: in Excel and PowerPoint
■ Flash: in PowerPoint only
If you use the Copy to Clipboard feature in Answers and Dashboards and then paste the view in your BI Office document, the view will be inserted as an image.
30.2.5 Support for Funnel ViewYou can add funnel views to PowerPoint and Excel documents. The funnel view is available for insertion from the BI Catalog as an image in both Excel and PowerPoint.
30.2.6 Edit Prompts and Levels After InsertWhen you insert a view in an Excel or PowerPoint document, you can edit or change the levels or prompts for that view. To do so, select the view and click the Edit Prompts and Levels menu item, toolbar button, or ribbon item.
You can edit or change the levels or prompts for the following types of views:
■ Views that you inserted using the BI Catalog task pane inside Excel and PowerPoint.
■ Views that you copied using the Copy Request XML to Clipboard link in Answers and Dashboards and pasted into Excel and PowerPoint documents using the BI Office Add-in's Paste option.
30.2.7 Enhanced Prompts Selection UISupport for prompts has been enhanced to provide the following prompt properties that are available in Answers:
■ Multi-selection of values
■ Search for prompt values
■ Shuttle UI for selecting multiple values
NTLM Support
New Features in Release 10.1.3.4 30-3
■ Cascading prompts where the value of one prompt limits the values available in a subsequent prompt (Year = 2008 will restrict Quarters to only Q1)
■ Skip prompts
■ Enter ranges of values
30.2.8 Support for Grand Totals in Table ViewsYou can enter grand totals in table views.
30.3 Support for Combined Request ViewsBI Office supports inserting BI Answers request views to Excel and PowerPoint that have been constructed using Set operations. Set operations combine results from two or more requests into a single request. The request can be constructed using any of the following Set operations: Union, Union All, Intersect, or Minus. For more information on using Set operations to build an Answers request, see the "Combining Oracle BI Request Criteria Using Set Operations" section in the Oracle Business Intelligence Answers, Delivers, and Interactive Dashboards User Guide.
Note that if you added a grand total when you created the combined request in Answers, the grand total will not be shown when the view is inserted to Excel. Subtotals will be displayed.
30.4 Transparent Compression of ResultsNew settings have been added in the BI Office Server configuration file that allow an administrator to specify whether compression of results should take place before they are transmitted to the BI Office client, and to specify the minimum size of the result set beyond which the results should be compressed. The BI Office client detects this result set as compressed and decompresses the result, transparently to and without any intervention on the part of the user.
30.5 NTLM SupportBI Office connections that run on supported Windows client operating systems that use Active Directory as the LDAP server for Windows authentication can now connect to Oracle BI Enterprise Edition without requiring the user to enter a user name and password, provided that Oracle BI EE is configured to authenticate against the same Active Directory server.
NT LAN Manager (NTLM) Authentication Protocol is the name of a family of security protocols in Windows. In Release 10.1.3.4, BI Office supports the NTLM protocol to achieve the following features:
■ Single user repository: BI Office leverages the NTLM protocol to authenticate against the Windows user repository. The client no longer needs to maintain a separate user repository for the Oracle BI EE or BI Office application.
■ Silent Sign-on: When accessing the BI Office add-in from an authorized machine, a user is no longer explicitly asked to log in. The NTLM protocol verifies the user's credentials in the background and silently logs in the authenticated user.
To enable NTLM-based or another type of single sign-on, you must make the appropriate changes to the bioffice.xml configuration file. For details on NTLM, refer to the following:

NTLM Support
30-4 Oracle Business Intelligence New Features Guide
■ Chapter 26, "Installing Oracle Business Intelligence for Microsoft Office"
■ msdn.microsoft.com
■ www.microsoft.com