Embed Size (px)
Citation preview
White Paper
On
Oracle Application Framework
By
Amol Pallod
Zensar Technologies Ltd.

Table of Contents
What is OA Framework?.................................................................................................................3OAF Characteristics.........................................................................................................................3Model View Controller....................................................................................................................3OAF and MVC................................................................................................................................5
View in OA Framework..............................................................................................................5Model in OAF..............................................................................................................................6Controller in OAF........................................................................................................................7
Architecture Summary.....................................................................................................................8Personalization and Extension.........................................................................................................8
Personalization.............................................................................................................................8Benefits of Personalization......................................................................................................8Personalization Levels.............................................................................................................8Profile Options.........................................................................................................................9Personalization Examples........................................................................................................9Functional Administrator Responsibility.................................................................................9
Extensibility...............................................................................................................................10Onion Ring.............................................................................................................................10Entity Object..........................................................................................................................11View Object...........................................................................................................................11Application Module...............................................................................................................11Controller...............................................................................................................................11
JDeveloper Setup...........................................................................................................................12First OA Framework Page.............................................................................................................12
Establishing the Database connection.......................................................................................12Creating a New OA Workspace................................................................................................14Creating an Entity Object..........................................................................................................17Create a VO...............................................................................................................................21Create an AM.............................................................................................................................23Create the Page..........................................................................................................................25Create a Controller.....................................................................................................................30Create and Attach a List of Values............................................................................................33
Application Deployment................................................................................................................38Standards for Extending Business Objects....................................................................................40“About this page” Link..................................................................................................................40Conclusion.....................................................................................................................................41
What is OA Framework?To start with what is a framework? In object-oriented terms, it is a set built in classes, packages, functions, etc. which can be reused to build your own application.
OA Framework is the framework provided by Oracle for development and deployment of HTML-based applications. It is a 100% Java and XML based framework. Oracle JDeveloper For OA extension is the tool available for developing the OAF applications.
OAF Characteristics1. Declarative application development
It is declarative because you can build or customize the application without writing a single line of code. Some of the customization can be done using the build in features of Jdeveloper.
2. Rapid Development Environment The JDeveloper IDE has many built in features which helps in rapid application development. Also, OAF provides a huge library of built in packages which could be used.
3. Consistent and Compelling UI Currently we have forms based and html based application like CRM and regular Applications forms. In OAF, UI will be same across all the applications. Oracle is planning to implement this across more than 60 modules.
4. Built-in durable personalization Personalizations are durable in the sense that they survive the upgrades and patches. OAF creates a separate layer of all the personalization above the original one. Upgrades and patches affect only the original ones. Also, the other advantage is that if you feel that you don’t need particular personalization, you can just remove it from your application without touching the original one. We will see how to do this later.
5. Extensible UI and business logic There is no meaning in having the application without this feature. Customizing the application according to the client requirement is the basic and most important feature of Oracle applications.
6. J2EE based, Java and XML OAF is 100% Java and XML based
7. MVC architecture OAF uses the good old, tried and tested MVC design pattern.
Model View Controller MVC design pattern separates core business functionality from the presentation and control logic. To put in simple terms, MVC design pattern enforces separation between the input, processing and the output of an application. To achieve this, it is divided into three parts, Model-View-Controller.

Model object encapsulates the business logic, knows all about the data and the operations which can be performed on the data. However it knows nothing about the GUI.View object Accesses enterprise data through the model and specifies how that data should be presented. It is the view's responsibility to maintain consistency in its presentation when the model changes. This can be achieved by using a push model, where the view registers itself with the model for change notifications, or a pull model, where the view is responsible for calling the model when it needs to retrieve the most current data. The controller object knows about the physical means by which users manipulate data within the model. Based on the user interaction, controller calls the model and view as necessary to fulfill the request. So when the user clicks a Web link or submits an HTML form, the controller itself doesn’t output anything or perform any real processing. It takes the request and determines which model components to invoke and which formatting to apply to the resulting data.
Below picture depicts the MVC design pattern:
Fig 1. MVC Design Pattern
The primary advantage of MVC design patter is that the model (business logic) can be used by multiple views (clients). Below pictures shows how different views can use the same model.
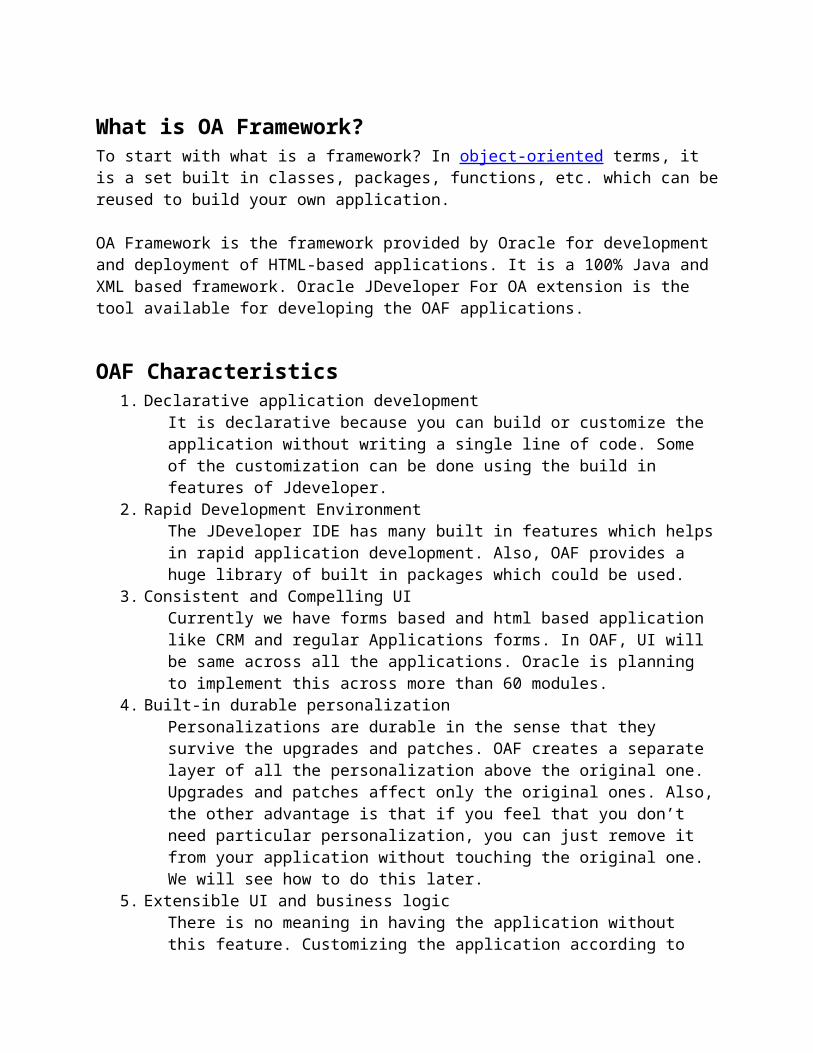
Fig 2. Advantage of MVC Design Pattern
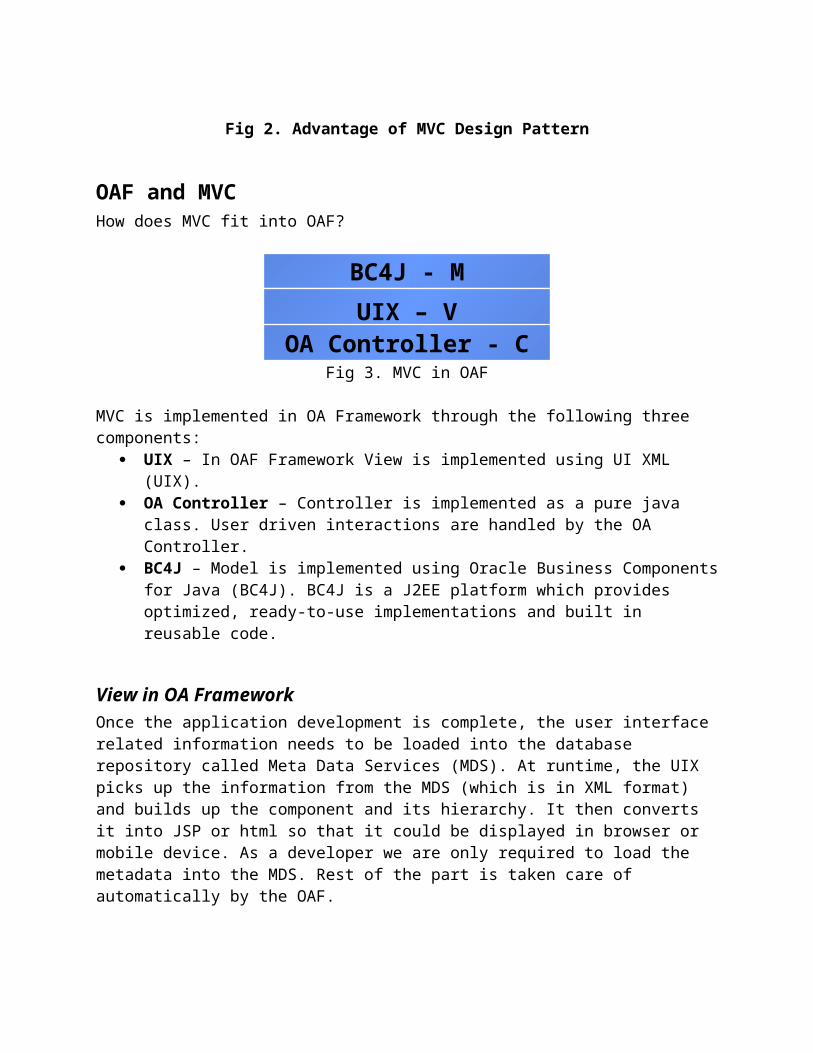
OAF and MVCHow does MVC fit into OAF?
Fig 3. MVC in OAF
MVC is implemented in OA Framework through the following three components: UIX – In OAF Framework View is implemented using UI XML (UIX). OA Controller – Controller is implemented as a pure java class. User driven interactions
are handled by the OA Controller. BC4J – Model is implemented using Oracle Business Components for Java (BC4J).
BC4J is a J2EE platform which provides optimized, ready-to-use implementations and built in reusable code.
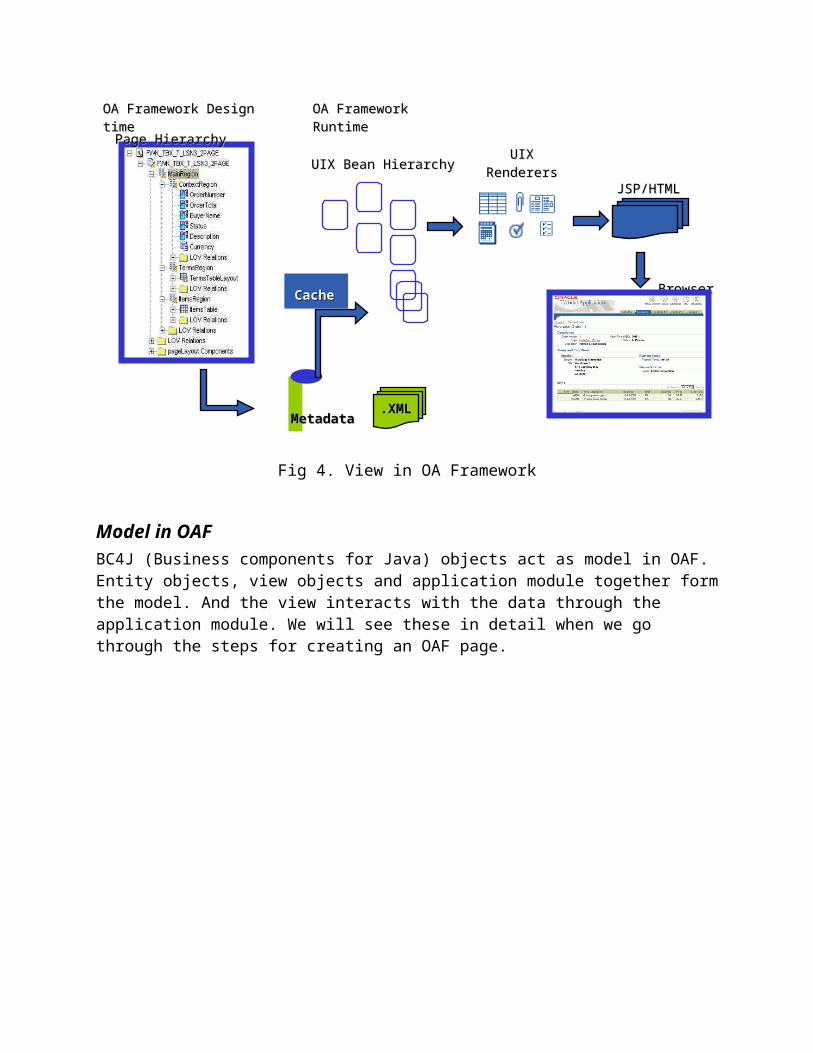
View in OA FrameworkOnce the application development is complete, the user interface related information needs to be loaded into the database repository called Meta Data Services (MDS). At runtime, the UIX picks up the information from the MDS (which is in XML format) and builds up the component and its
BC4J - M
UIX – VOA Controller - C

hierarchy. It then converts it into JSP or html so that it could be displayed in browser or mobile device. As a developer we are only required to load the metadata into the MDS. Rest of the part is taken care of automatically by the OAF.
Fig 4. View in OA Framework
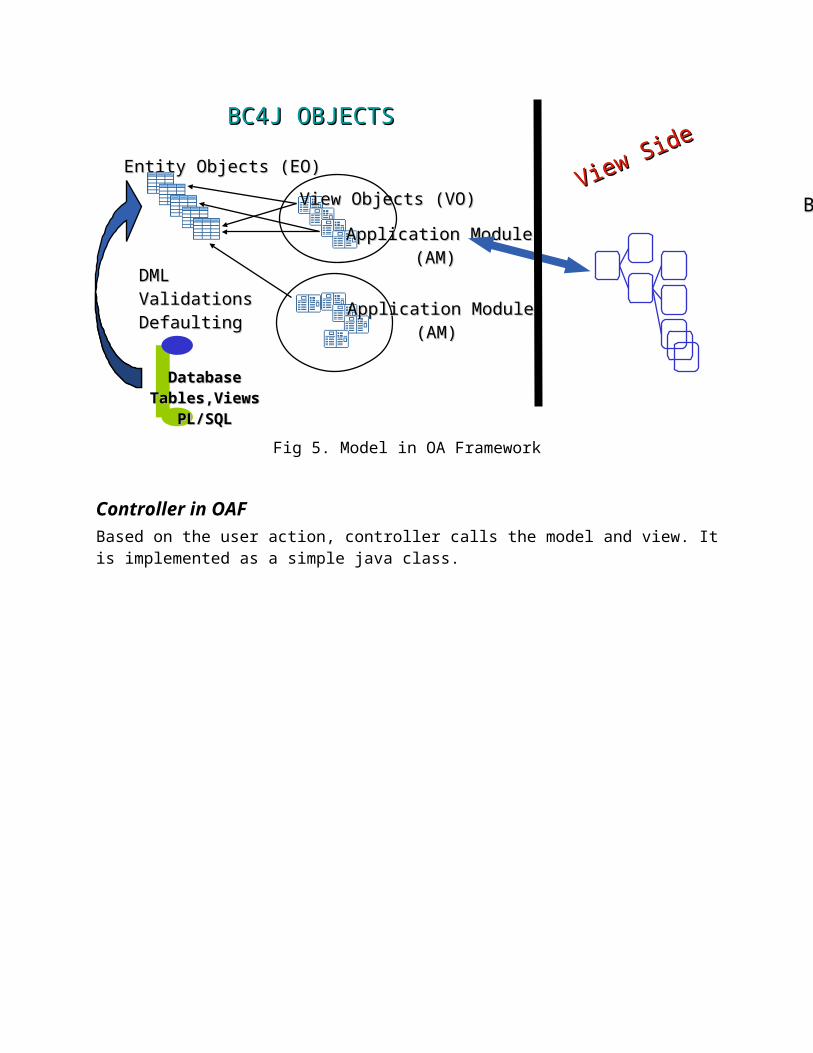
Model in OAFBC4J (Business components for Java) objects act as model in OAF. Entity objects, view objects and application module together form the model. And the view interacts with the data through the application module. We will see these in detail when we go through the steps for creating an OAF page.
Page HierarchyPage Hierarchy
MetadataMetadata
OA Framework RuntimeOA Framework RuntimeOA Framework Design timeOA Framework Design time
UIX Bean HierarchyUIX Bean HierarchyUIXUIX
RenderersRenderersJSP/HTMLJSP/HTML
BrowserBrowser
.XML.XML
Cache Cache
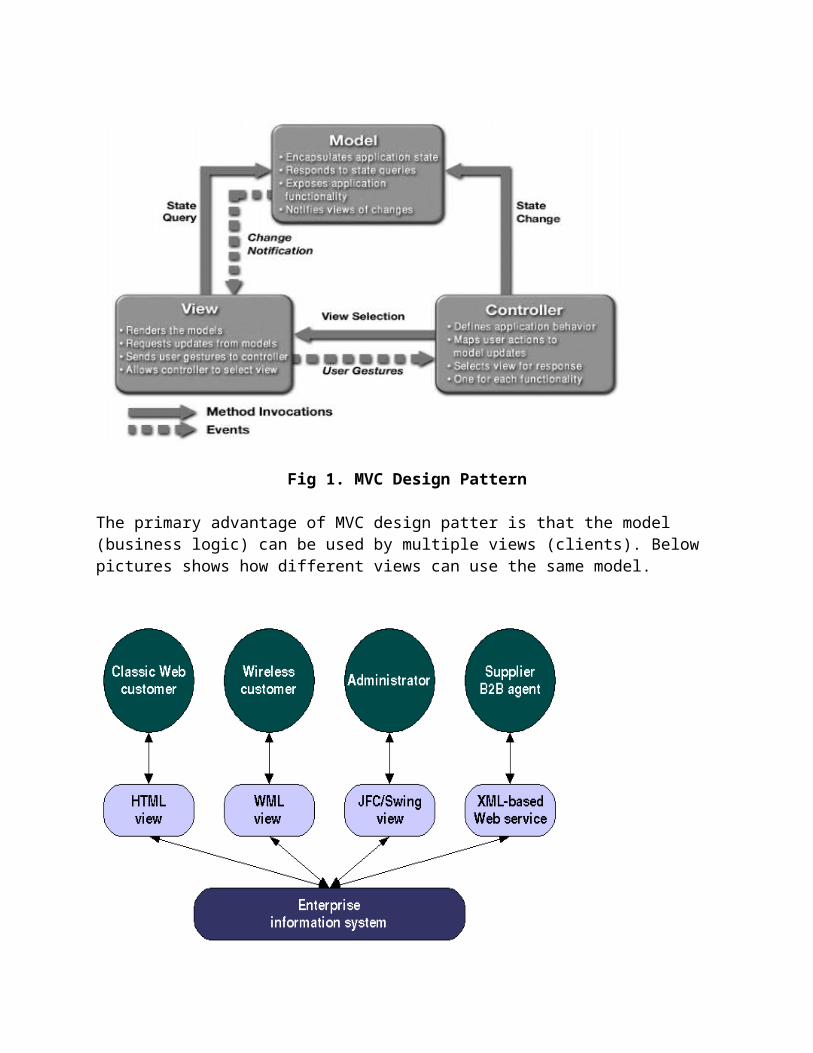
Fig 5. Model in OA Framework
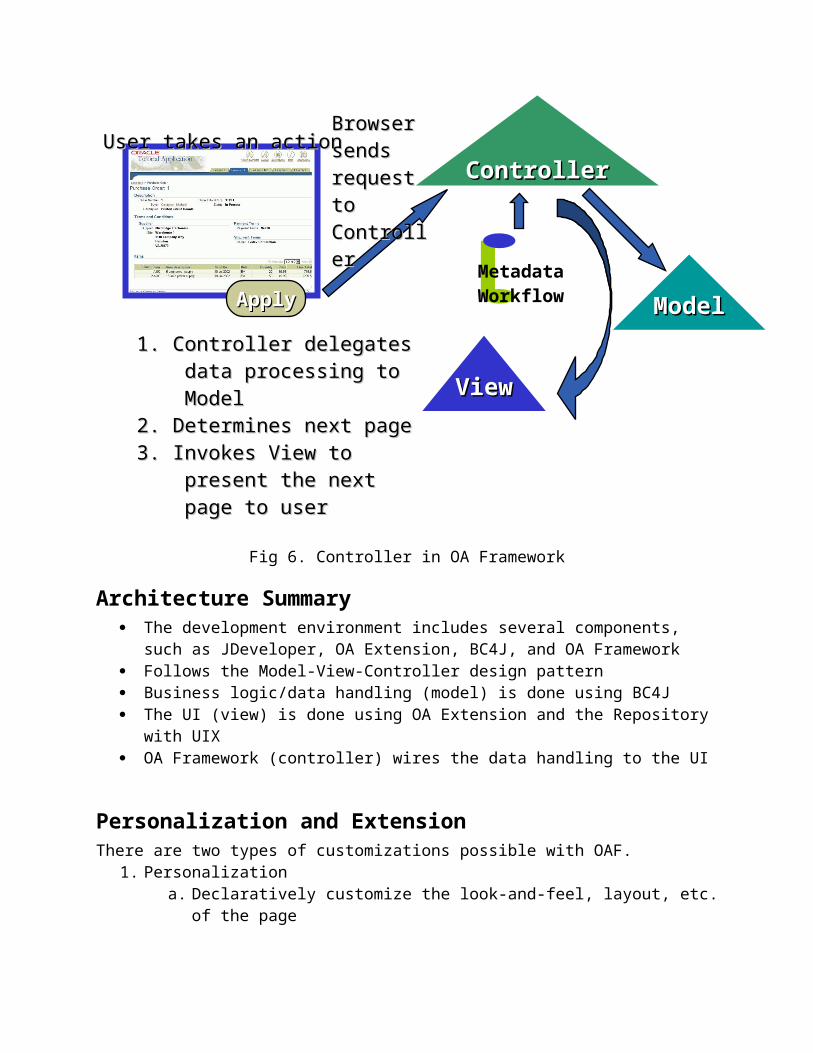
Controller in OAFBased on the user action, controller calls the model and view. It is implemented as a simple java class.
Fig 6. Controller in OA Framework
DatabaseDatabaseTables,ViewsTables,Views
PL/SQLPL/SQL
Entity Objects (EO)Entity Objects (EO)
View Objects (VO)View Objects (VO)
Application ModuleApplication Module(AM)(AM)
Application ModuleApplication Module(AM)(AM)
DMLDMLValidationsValidationsDefaultingDefaulting
UIX UIX Bean HierarchyBean Hierarchy
View Side
View SideBC4J OBJECTSBC4J OBJECTS
ApplyApply
User takes an actionUser takes an actionBrowserBrowsersendssendsrequest torequest toControllerController
MetadataWorkflow
ModelModel
ControllerController
ViewView
1. Controller delegates data 1. Controller delegates data processing to Modelprocessing to Model
2. Determines next page2. Determines next page3. Invokes View to present the 3. Invokes View to present the
next page to usernext page to user
Architecture Summary The development environment includes several components, such as JDeveloper, OA
Extension, BC4J, and OA Framework Follows the Model-View-Controller design pattern Business logic/data handling (model) is done using BC4J The UI (view) is done using OA Extension and the Repository with UIX OA Framework (controller) wires the data handling to the UI
Personalization and ExtensionThere are two types of customizations possible with OAF.
1. Personalization a. Declaratively customize the look-and-feel, layout, etc. of the pageb. Oracle provides a Personalization Framework which can be used.
2. Extensiona. Extending the functionality of the application like adding new business logic,
changing the existing logic, etc.b. Need to use the Oracle 9i JDeveloper
PersonalizationPersonalize by clicking a link on the runtime screen, no development tool is needed. When you set certain profile options, you will see a line “Personalize Page” on top of each page. Using this link you can personalize the page. Personalizations are overlaid on top of base page components. This keeps the base application clean and easy to maintain. So if you wish to remove the personalization you can do it easily. This also helps the personalization survive the upgrades and patches.
Benefits of Personalization These are Durable – Survives upgrades and patches Admin personalization available on any component User personalization on tables/inquiries Can implement personalization on test system Personalization feedback is immediate Administrator can easily disable personalization for debugging
Personalization Levels Admin Level Personalization
Site, Organization, Responsibility• Single view at each level
User Level Personalization User Views
• Several views per User
Each level overlay the levels below it, and all overlay the base page's XML metadata in MDS.
Profile OptionsThere are few profile options which you need to set before performing any personalization. These profile options are also useful while debugging.
1. Personalize Self-Service DefnIf set to Yes, you will see the link ‘Personalize Page’ at the top of each page. This profile option can be set at responsibility and user level as well. So if it is set to Yes for a particular user, then only he would be able to use the personalization feature.
2. Disable Self-Service PersonalIf this is set to Yes, then all the personalizations made will not be applied (its like custom code off). All the pages will show the original definitions. This is useful when you are debugging the application.
3. FND: Personalization Region Link Enableda. If set to Yes, it displays the “Personalize Region” link above each region on the
page. b. If set to No, then no link is displayed and the global link needs to be used.c. If set to Minimal, it displays the link but minimizes the no. of links displayed
based on some rule. 4. FND: Diagnostics
a. This is one of the most important profile options in OA Framework from developers point of view. It is the first step towards resolving any errors.
b. If set to Yes, displays a developer friendly error messages whenever there is an error.
c. If set to No, then displays very generic error message like: ‘Error occurred. Contact your system administrator’.
d. You should turn this profile option off in PROD.
Personalization Examples Change the prompt for a field and other text on a page Set whether a field or region is visible Reorder the fields or components on a page Restrict the data that a user can access Add new buttons, links, text items, images, etc.
Functional Administrator ResponsibilityThis is a very important responsibility. You can use this to manage the personalization, remove them completely, etc. This also provides the ability to import and export the personalization across the instances.
ExtensibilityThis is the mechanism to extend the business rules, add new rules to suit the business needs. Extension is achieved by using BC4J components: Entity Object, View Object, Application Module
Onion Ring
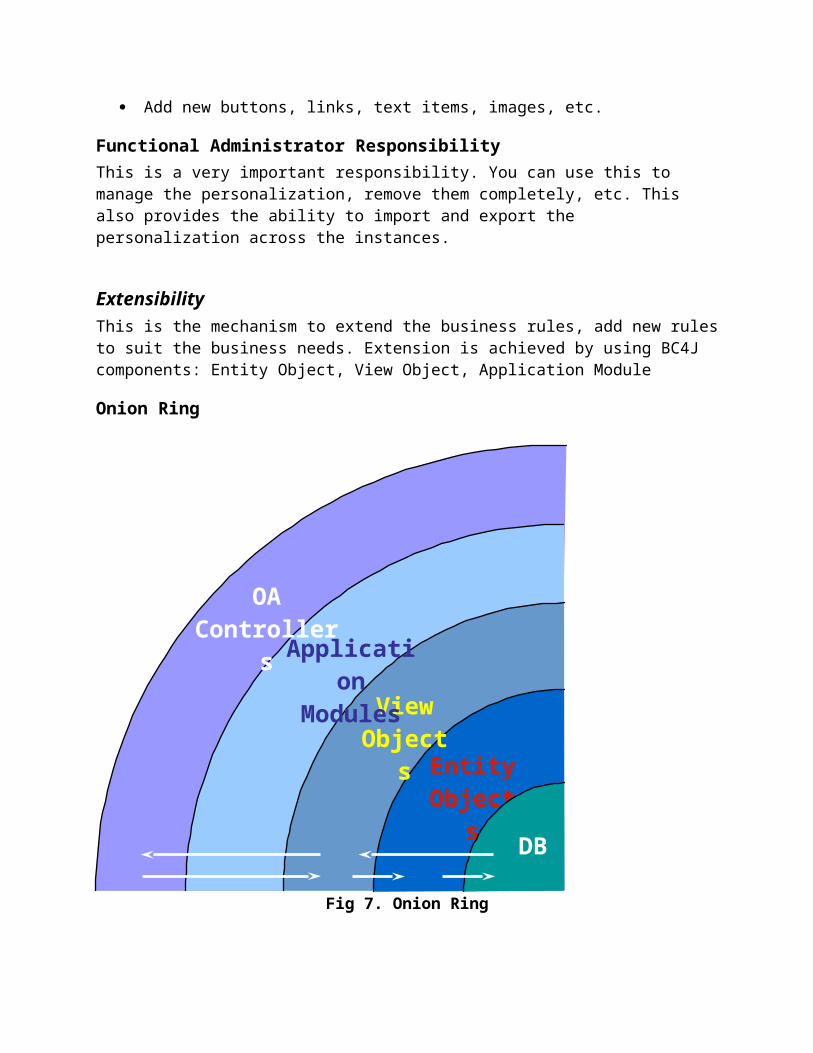
Fig 7. Onion Ring
OAF Model structure can be compared to the onion ring structure. The inner most layer is the database layer, followed by the Entity Object (EO), View Object (VO), Application Module (AM) and Controller (CO). Each layer only “knows” about the layers below it. The encapsulation across various layers has to be maintained, i.e. the controller can’t access the entity object or view object directly, it has to go through the application module. Also, only entity object can perform database operations like insert update delete. Similarly, one cannot access the application module or controller from EO. The advantage of having this kind of structure is that you can reuse the objects at any of the layer boundries. Multiple AM’s can use the same VO’s, the business logic built in the entity object can be used by any View (and not just OA Framework user interface)
Entity Objects
DB
ViewObjects
ApplicationModules
OAControllers
Entity ObjectEntity Objects encapsulates the business rules, validations, etc. associated with a row in Database table. It can be a table, view, synonym or a snapshot. When you create the EO’s it is the standard practice to include all the columns from the table. EO’s use a declarative mapping between their attributes and the underlying database columns to automatically implement insert updates and deletes. So the only thing we need to add is the validation logic. You should use EO’s to insert, update or delete from the underlying oracle tables. All the EO’s should be placed under the following directory structure:
<company>.oracle.apps.<cust_top>.xxx.schema.server
View ObjectView Objects encapsulates database queries and provide access to the associated entity objects. There are two types of VO’s you can create:
o Based on simple SQL and the other o Based on Entity Object
If you are going to change the state of the database, then you need to base your VO’s on EO’s else if it is only for query then use SQL.All the VO’s should be placed under the following directory structure:
<company>.oracle.apps.<cust_top>.xxx.server
Application ModuleIt establishes transaction context. If you have multiple pages and if you need to maintain the session across the pages, then AM can do it. It is mandatory that each page should have a root application module. Without AM you won’t be able to run your page. If your page does not need a custom EO, VO, AM then you can use the standard AM provided by the framework: oracle.apps.fnd.framework.server.OAApplicationModule. An AM can consist of all the related VO’s.All the AM’s should be placed under the following directory structure:
<company>.oracle.apps.<cust_top>.xxx.server
ControllerYou can use controller to handle the user events like button press. You can programmatically create web beans using controllers. But the drawback is these web beans can’t use the personalization feature of OAF. As already discussed, this kind of UI creation is not declarative and hence can’t use personalization. Business logic should be included only in the model and not in controller. You can associate controllers with the region and not items. All the AM’s should be placed under the following directory structure:
<company>.oracle.apps.<cust_top>.xxx.webui
JDeveloper SetupDownload the JDeveloper for OA extension. Once you download it, unzip in some local directory. This is what is needed to install JDeveloper. You don’t need to run any setup or exe file to install. Once this is done, create a JDEV_USER_HOME environment variable which will have the actual path of the JDev home directory (Directory under which the files were unzipped).
First OA Framework PageFor this purpose, we will assume that a simple database table (zen_emp) which will store the employee information is created with four columns: Name, Address, etc. The main objective of this exercise would be to create an OA Framework page which will insert data into this table.
Note: Wherever possible please use the wizards. The wizards are very powerful to start with and most of the time they serve the purpose. Going forward, Oracle is going to make them more powerful and user friendly. It is highly recommended to use wizards.
There is standard package structure for each of the objects:EO’s go in schema.server. So your package structure should be like:
zensar.oracle.apps.zenpo.xxx.schema.serverVO’s and AM’s go in server:
zensar.oracle.apps.zenpo.xxx.serverActual Pages should go in webui:
zensar.oracle.apps.zenpo.xxx.webui
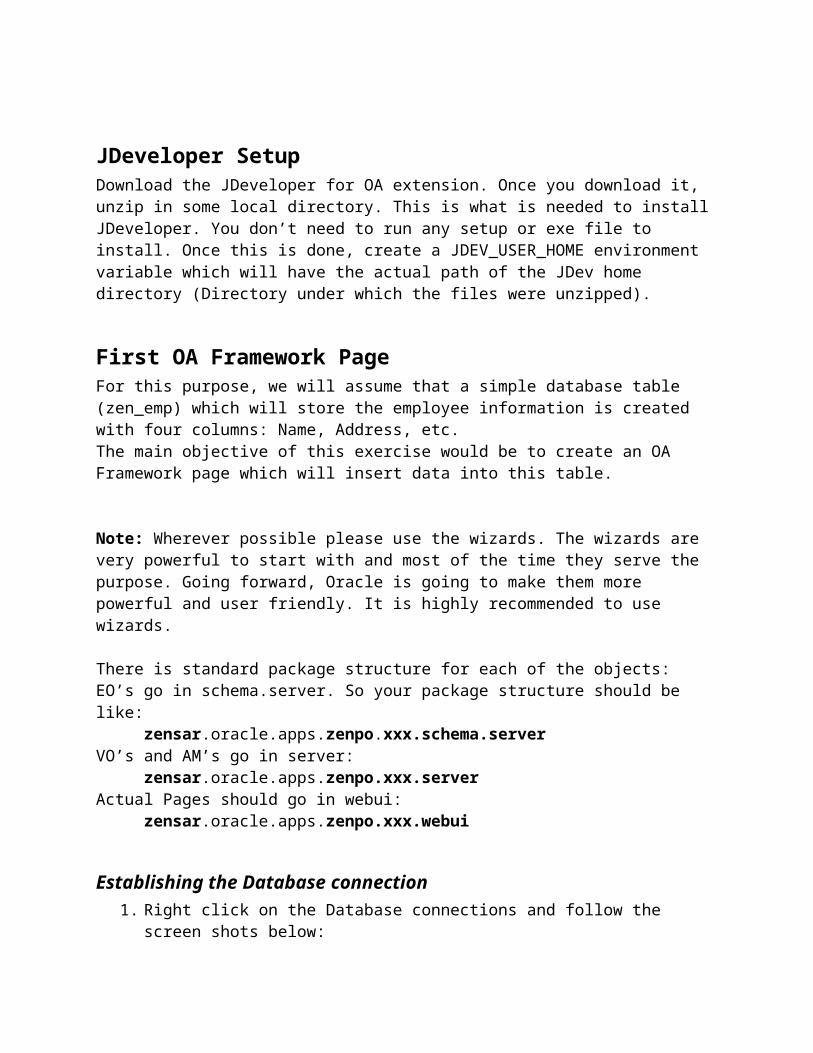
Establishing the Database connection1. Right click on the Database connections and follow the screen shots below:
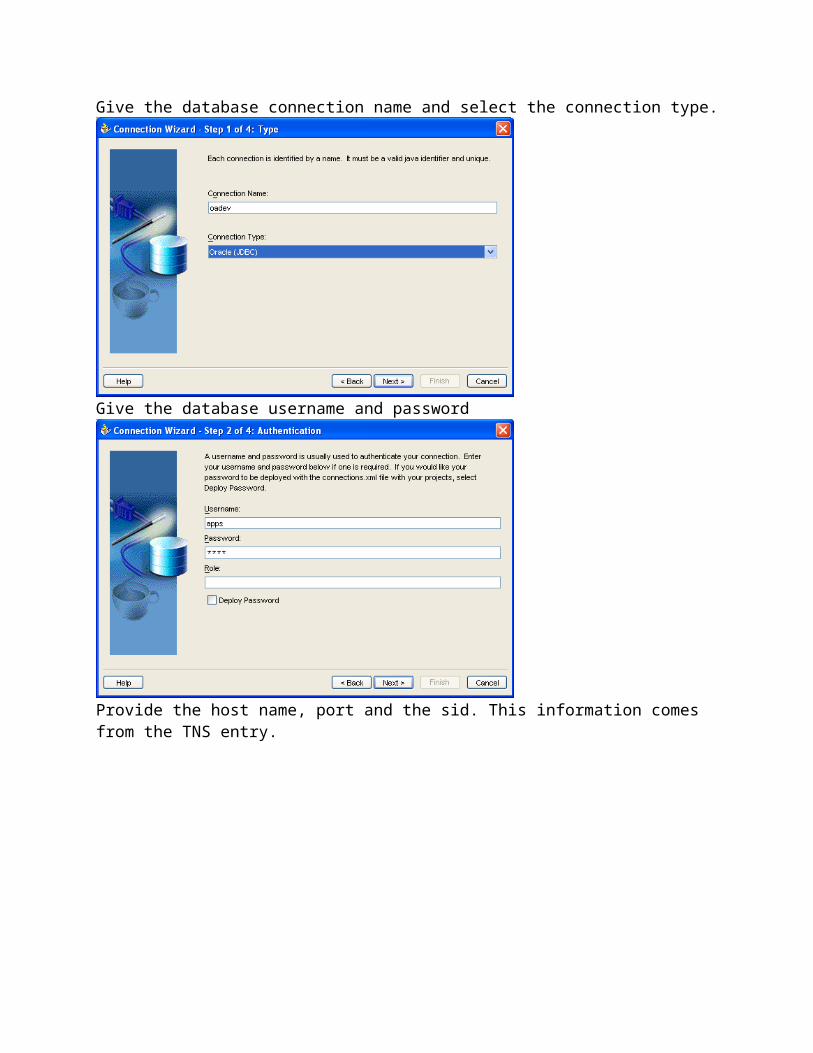
Give the database connection name and select the connection type.
Give the database username and password
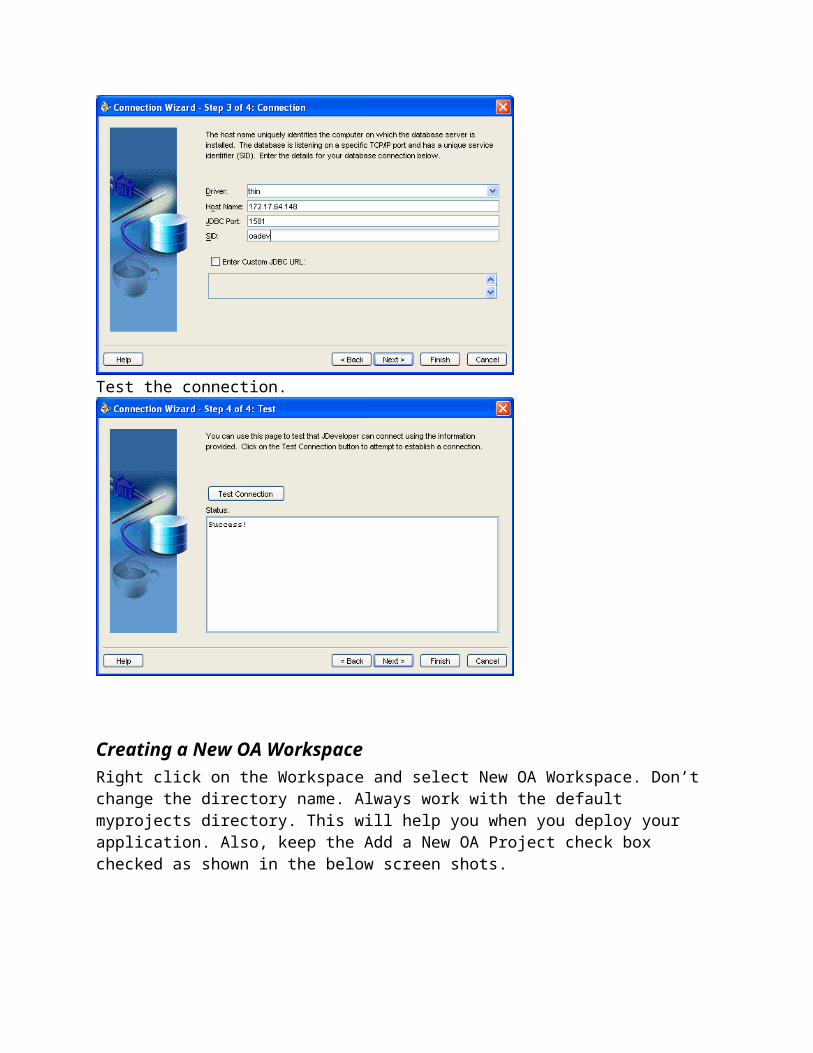
Provide the host name, port and the sid. This information comes from the TNS entry.
Test the connection.
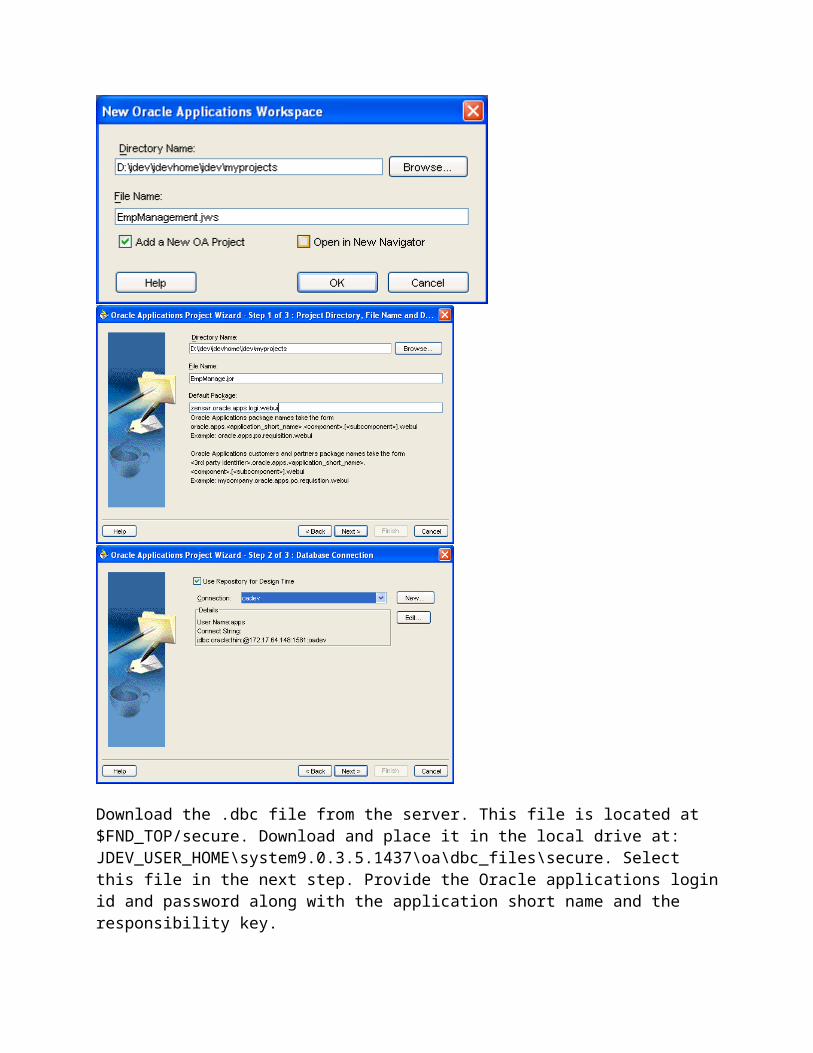
Creating a New OA WorkspaceRight click on the Workspace and select New OA Workspace. Don’t change the directory name. Always work with the default myprojects directory. This will help you when you deploy your application. Also, keep the Add a New OA Project check box checked as shown in the below screen shots.

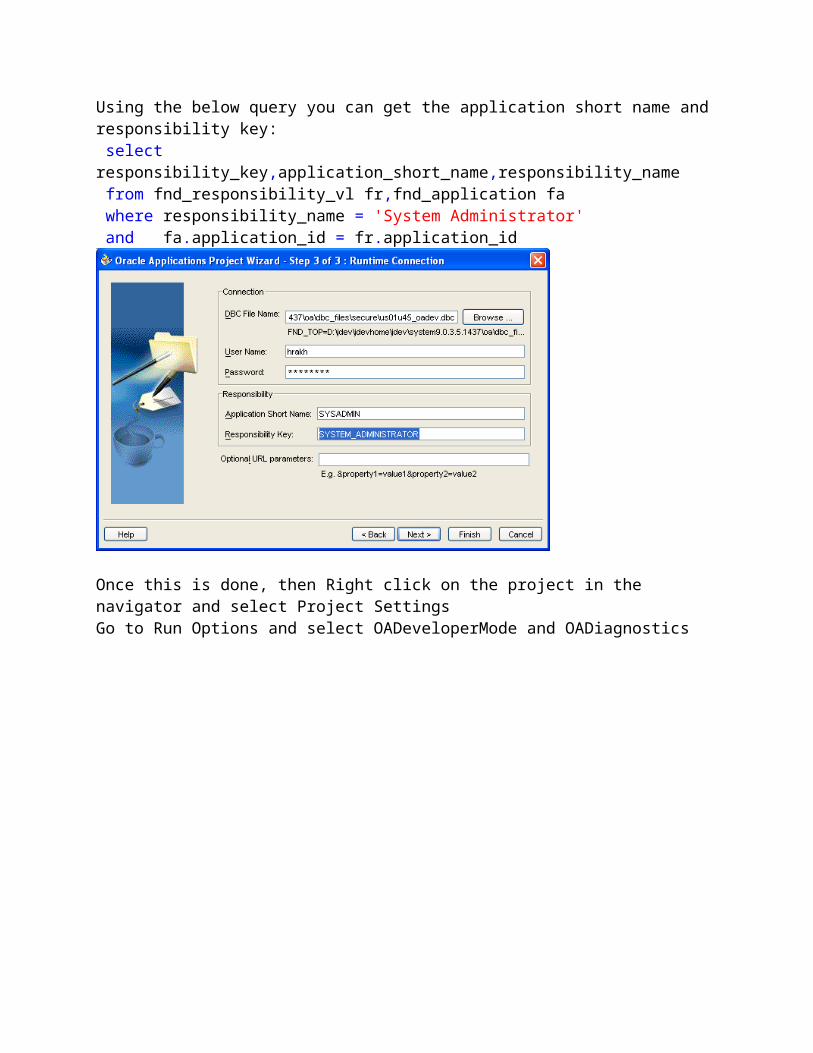
Download the .dbc file from the server. This file is located at $FND_TOP/secure. Download and place it in the local drive at: JDEV_USER_HOME\system9.0.3.5.1437\oa\dbc_files\secure. Select this file in the next step. Provide the Oracle applications login id and password along with the application short name and the responsibility key. Using the below query you can get the application short name and responsibility key: select responsibility_key,application_short_name,responsibility_name from fnd_responsibility_vl fr,fnd_application fa where responsibility_name = 'System Administrator'
and fa.application_id = fr.application_id
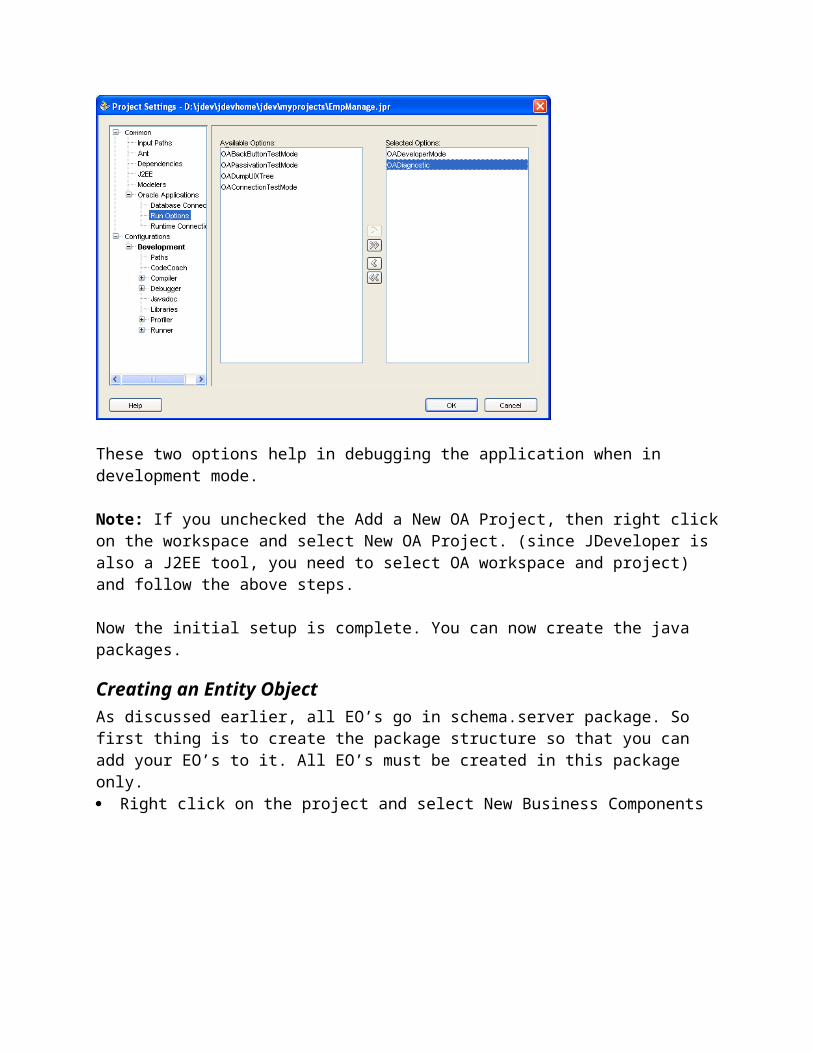
Once this is done, then Right click on the project in the navigator and select Project SettingsGo to Run Options and select OADeveloperMode and OADiagnostics
These two options help in debugging the application when in development mode.
Note: If you unchecked the Add a New OA Project, then right click on the workspace and select New OA Project. (since JDeveloper is also a J2EE tool, you need to select OA workspace and project) and follow the above steps.
Now the initial setup is complete. You can now create the java packages.
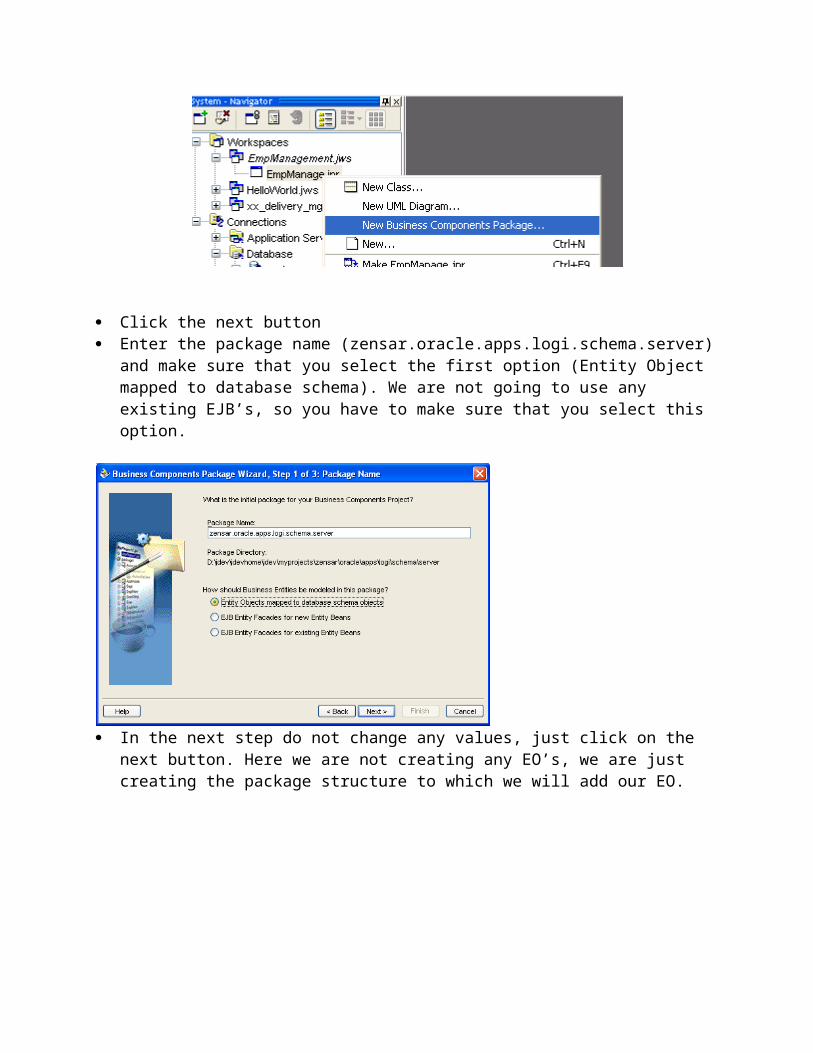
Creating an Entity ObjectAs discussed earlier, all EO’s go in schema.server package. So first thing is to create the package structure so that you can add your EO’s to it. All EO’s must be created in this package only. Right click on the project and select New Business Components
Click the next button Enter the package name (zensar.oracle.apps.logi.schema.server) and make sure that you
select the first option (Entity Object mapped to database schema). We are not going to use any existing EJB’s, so you have to make sure that you select this option.
In the next step do not change any values, just click on the next button. Here we are not
creating any EO’s, we are just creating the package structure to which we will add our EO.
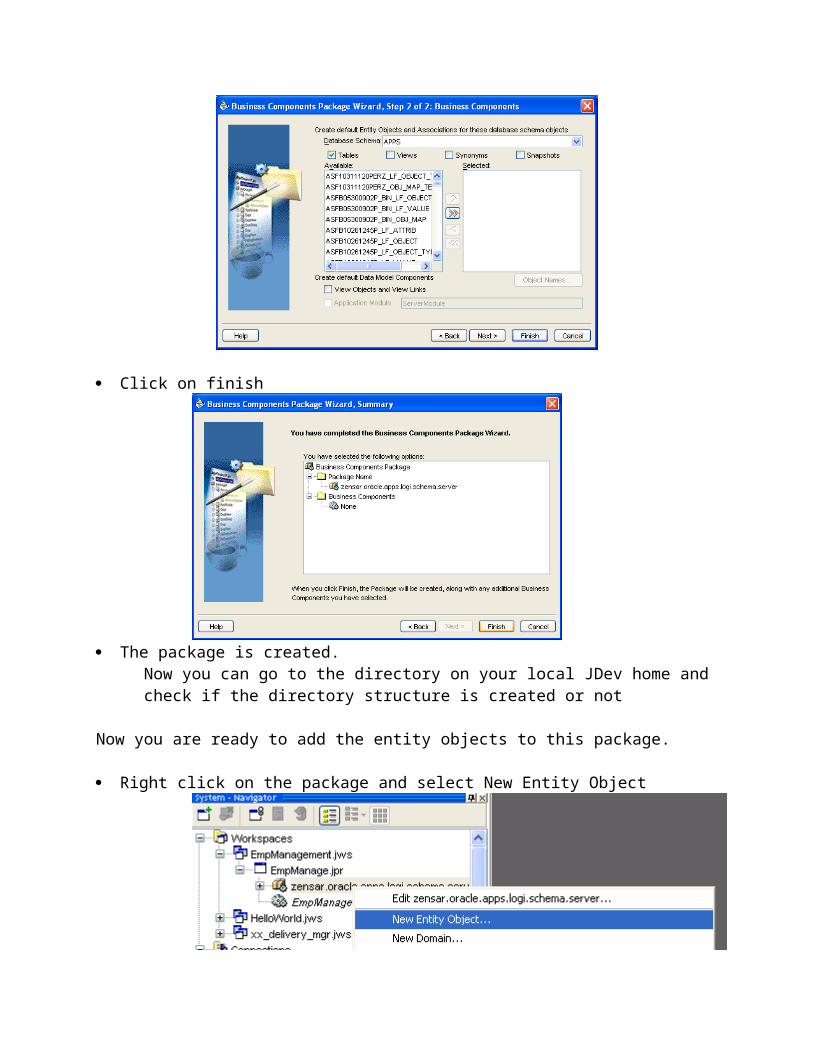
Click on finish
The package is created. Now you can go to the directory on your local JDev home and check if the directory structure is created or not
Now you are ready to add the entity objects to this package.
Right click on the package and select New Entity Object
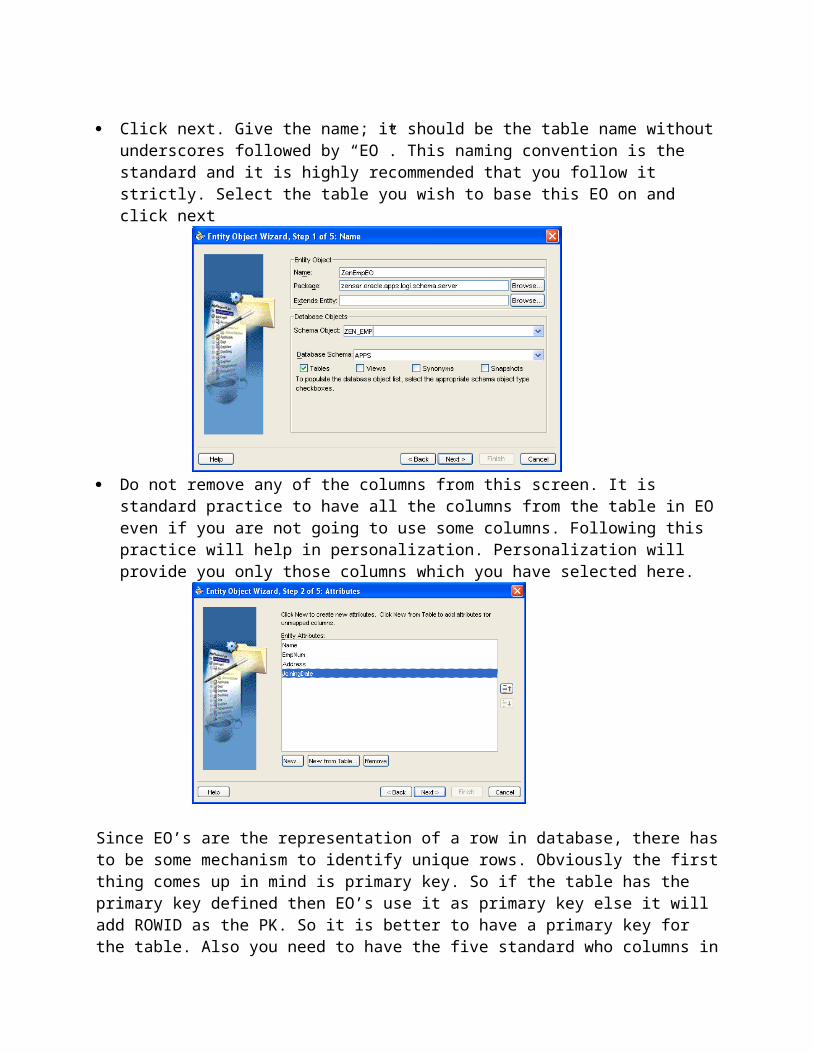
Click next. Give the name; it should be the table name without underscores followed by “EO”. This naming convention is the standard and it is highly recommended that you follow it strictly. Select the table you wish to base this EO on and click next
Do not remove any of the columns from this screen. It is standard practice to have all the columns from the table in EO even if you are not going to use some columns. Following this practice will help in personalization. Personalization will provide you only those columns which you have selected here.
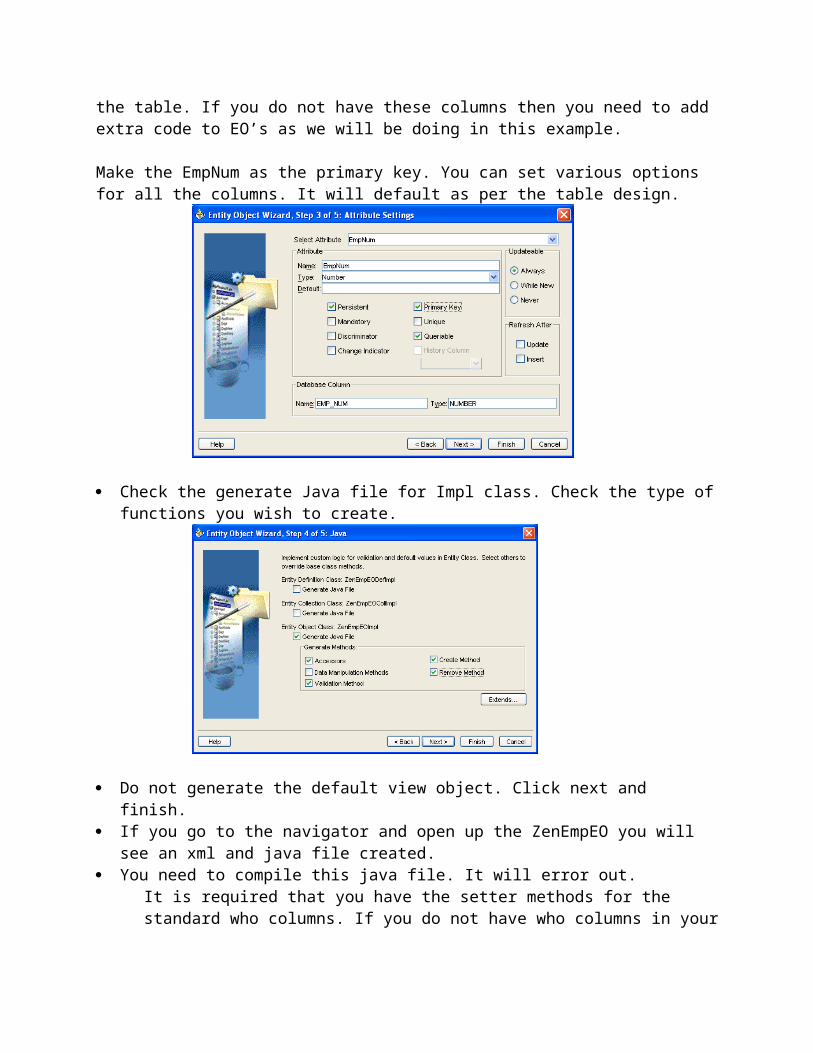
Since EO’s are the representation of a row in database, there has to be some mechanism to identify unique rows. Obviously the first thing comes up in mind is primary key. So if the table has the primary key defined then EO’s use it as primary key else it will add ROWID as the PK. So it is better to have a primary key for the table. Also you need to have the five standard who columns in the table. If you do not have these columns then you need to add extra code to EO’s as we will be doing in this example.
Make the EmpNum as the primary key. You can set various options for all the columns. It will default as per the table design.
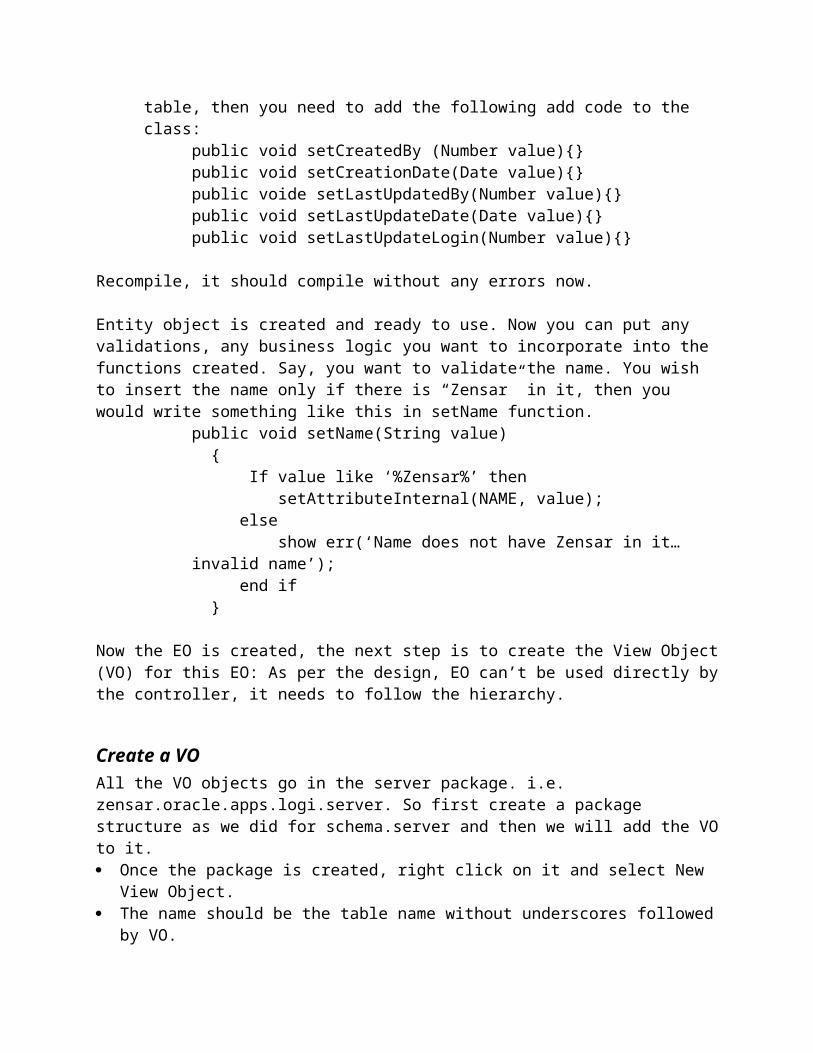
Check the generate Java file for Impl class. Check the type of functions you wish to create.
Do not generate the default view object. Click next and finish. If you go to the navigator and open up the ZenEmpEO you will see an xml and java file
created. You need to compile this java file. It will error out.
It is required that you have the setter methods for the standard who columns. If you do not have who columns in your table, then you need to add the following add code to the class:
public void setCreatedBy (Number value){}public void setCreationDate(Date value){}public voide setLastUpdatedBy(Number value){}public void setLastUpdateDate(Date value){}public void setLastUpdateLogin(Number value){}
Recompile, it should compile without any errors now.
Entity object is created and ready to use. Now you can put any validations, any business logic you want to incorporate into the functions created. Say, you want to validate the name. You wish
to insert the name only if there is “Zensar” in it, then you would write something like this in setName function.
public void setName(String value) { If value like ‘%Zensar%’ then setAttributeInternal(NAME, value); else show err(‘Name does not have Zensar in it… invalid name’); end if }
Now the EO is created, the next step is to create the View Object (VO) for this EO: As per the design, EO can’t be used directly by the controller, it needs to follow the hierarchy.
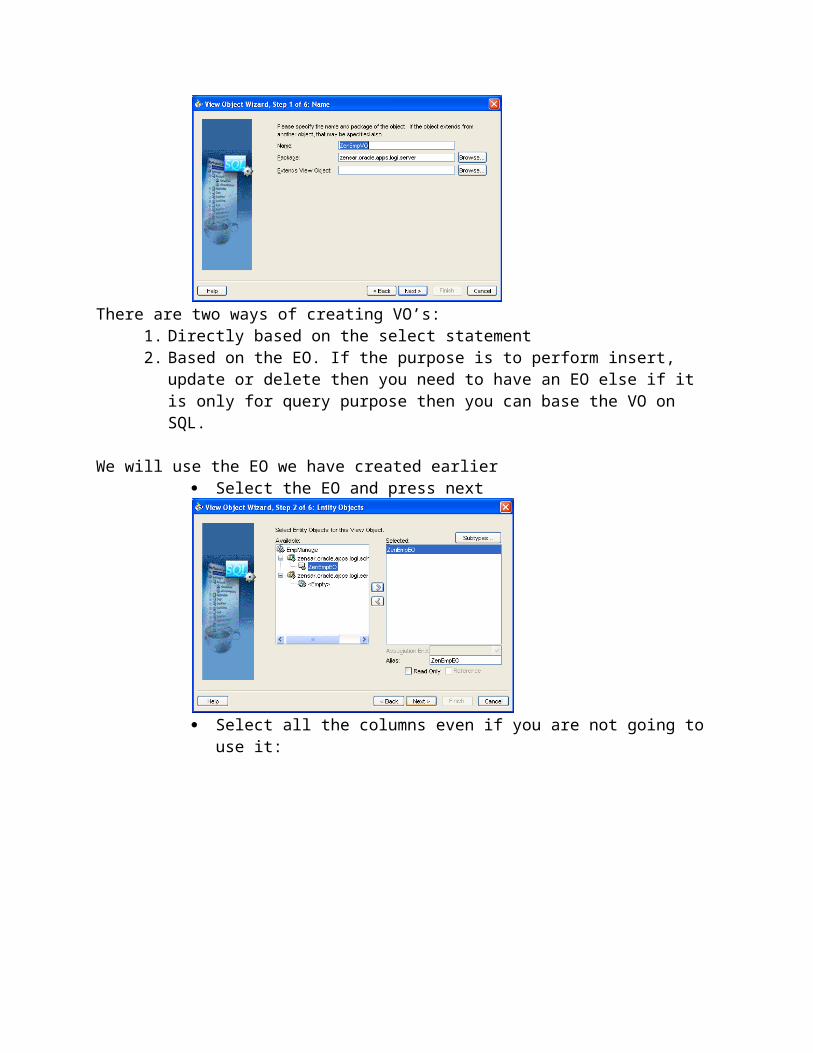
Create a VOAll the VO objects go in the server package. i.e. zensar.oracle.apps.logi.server. So first create a package structure as we did for schema.server and then we will add the VO to it. Once the package is created, right click on it and select New View Object. The name should be the table name without underscores followed by VO.
There are two ways of creating VO’s:1. Directly based on the select statement 2. Based on the EO. If the purpose is to perform insert, update or delete then you need to
have an EO else if it is only for query purpose then you can base the VO on SQL.
We will use the EO we have created earlier Select the EO and press next
Select all the columns even if you are not going to use it:
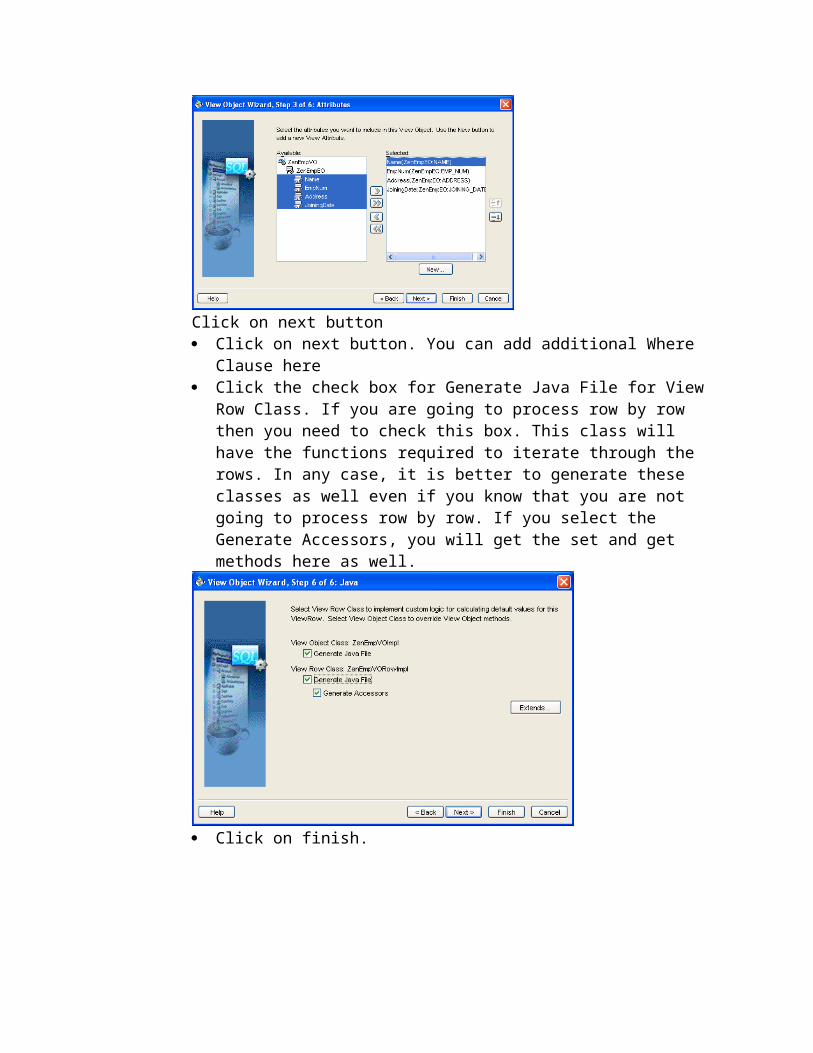
Click on next button Click on next button. You can add additional Where Clause here Click the check box for Generate Java File for View Row Class. If you are
going to process row by row then you need to check this box. This class will have the functions required to iterate through the rows. In any case, it is better to generate these classes as well even if you know that you are not going to process row by row. If you select the Generate Accessors, you will get the set and get methods here as well.
Click on finish.
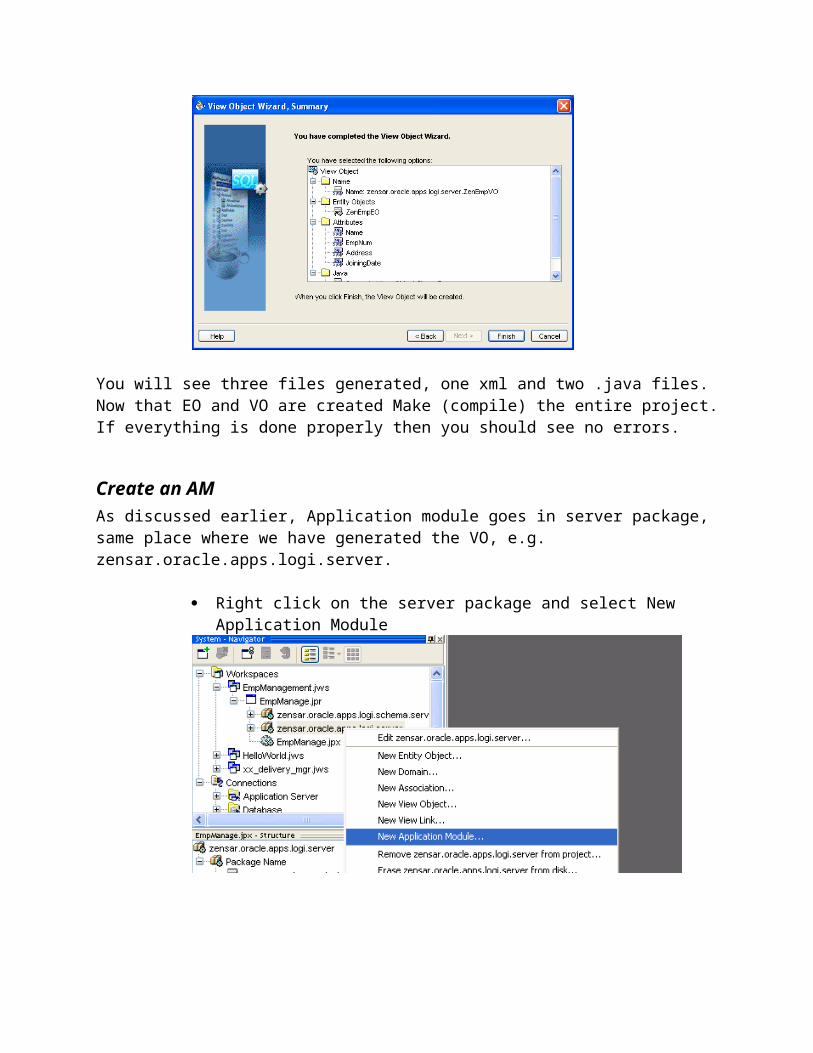
You will see three files generated, one xml and two .java files. Now that EO and VO are created Make (compile) the entire project. If everything is done properly then you should see no errors.
Create an AMAs discussed earlier, Application module goes in server package, same place where we have generated the VO, e.g. zensar.oracle.apps.logi.server.
Right click on the server package and select New Application Module
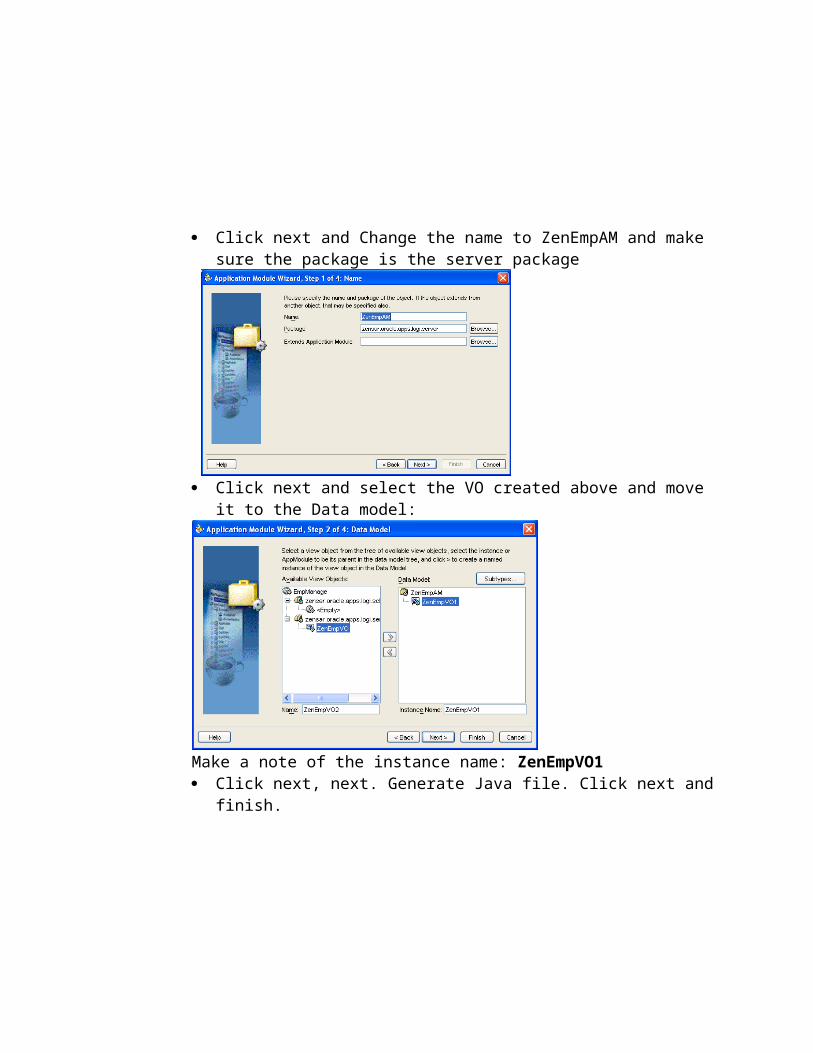
Click next and Change the name to ZenEmpAM and make sure the package is the server package
Click next and select the VO created above and move it to the Data model:
Make a note of the instance name: ZenEmpVO1 Click next, next. Generate Java file. Click next and finish.
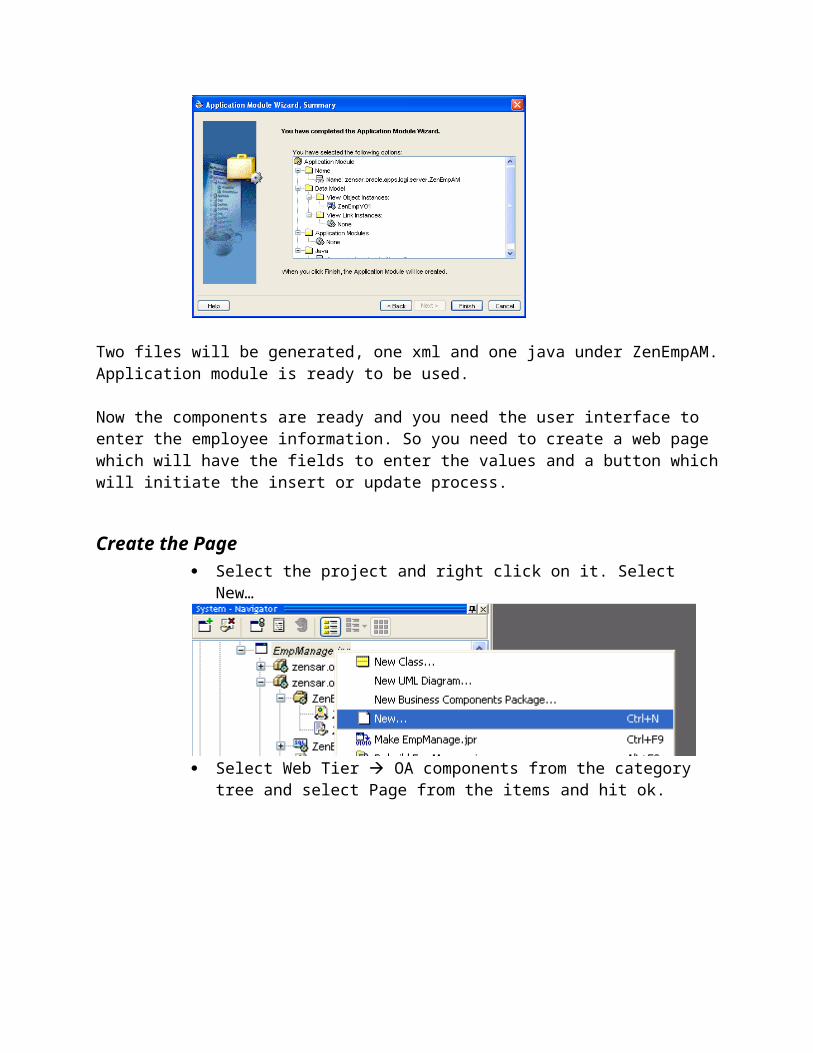
Two files will be generated, one xml and one java under ZenEmpAM. Application module is ready to be used.
Now the components are ready and you need the user interface to enter the employee information. So you need to create a web page which will have the fields to enter the values and a button which will initiate the insert or update process.
Create the Page Select the project and right click on it. Select New…
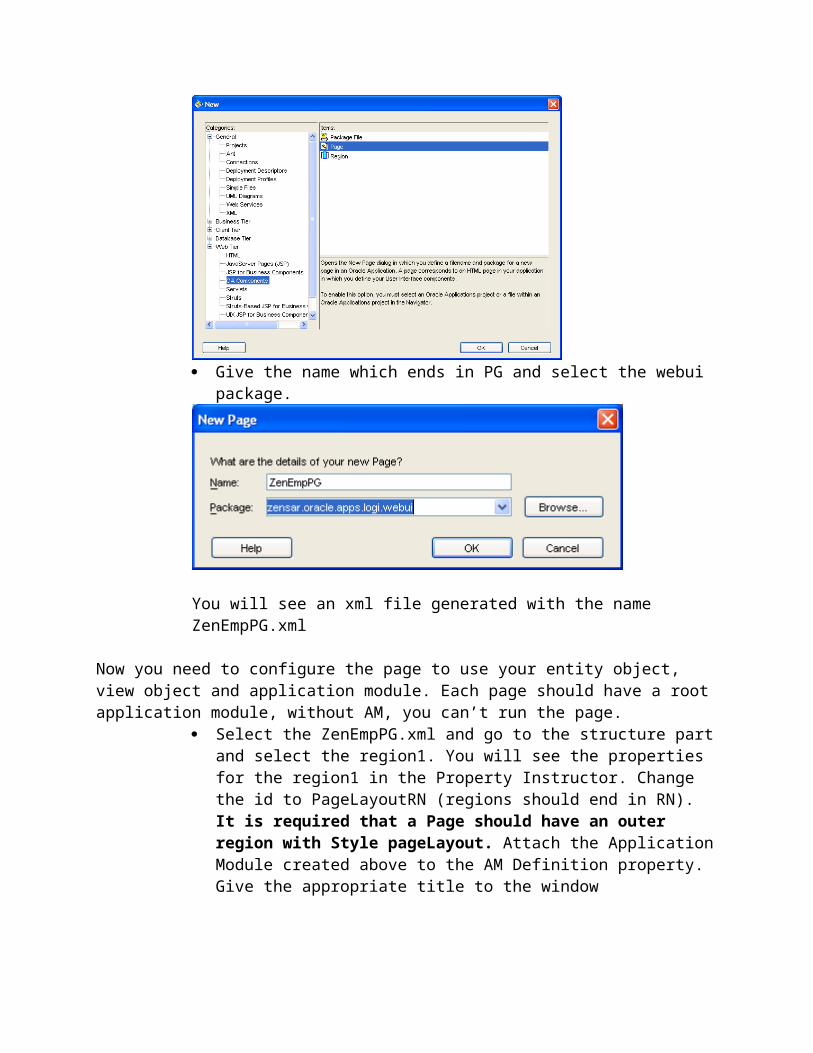
Select Web Tier OA components from the category tree and select Page from the items and hit ok.
Give the name which ends in PG and select the webui package.
You will see an xml file generated with the name ZenEmpPG.xml
Now you need to configure the page to use your entity object, view object and application module. Each page should have a root application module, without AM, you can’t run the page.
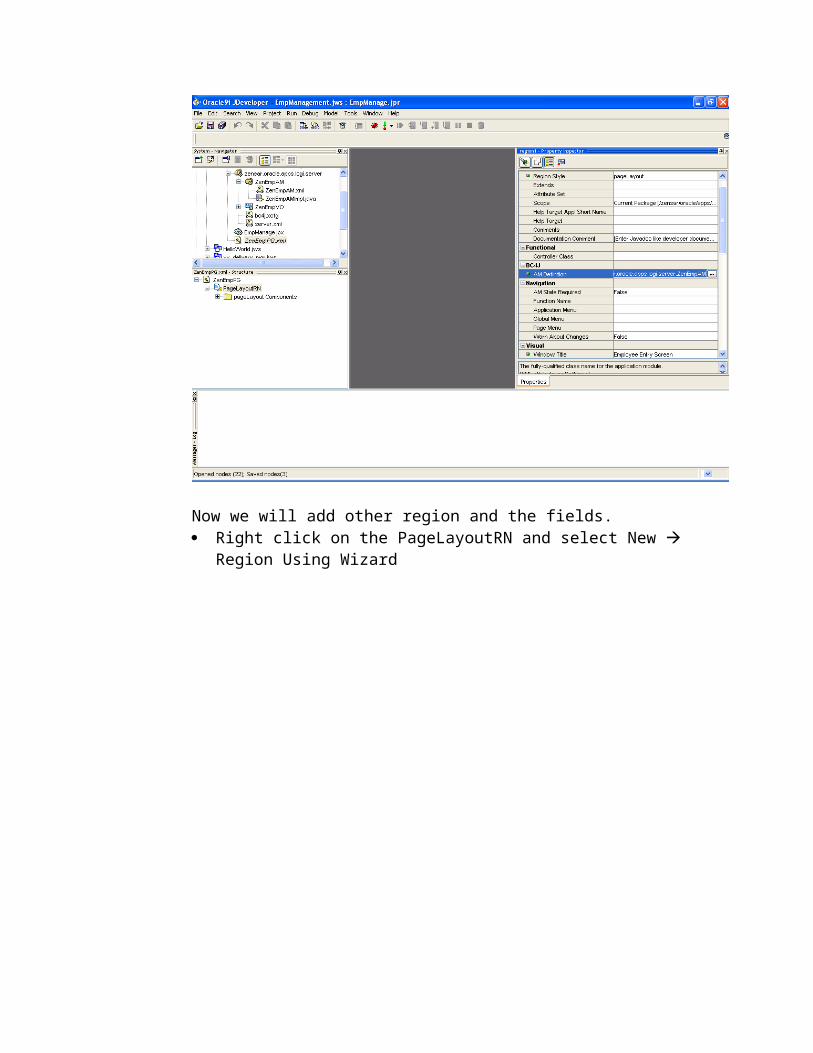
Select the ZenEmpPG.xml and go to the structure part and select the region1. You will see the properties for the region1 in the Property Instructor. Change the id to PageLayoutRN (regions should end in RN). It is required that a Page should have an outer region with Style pageLayout. Attach the Application Module created above to the AM Definition property. Give the appropriate title to the window
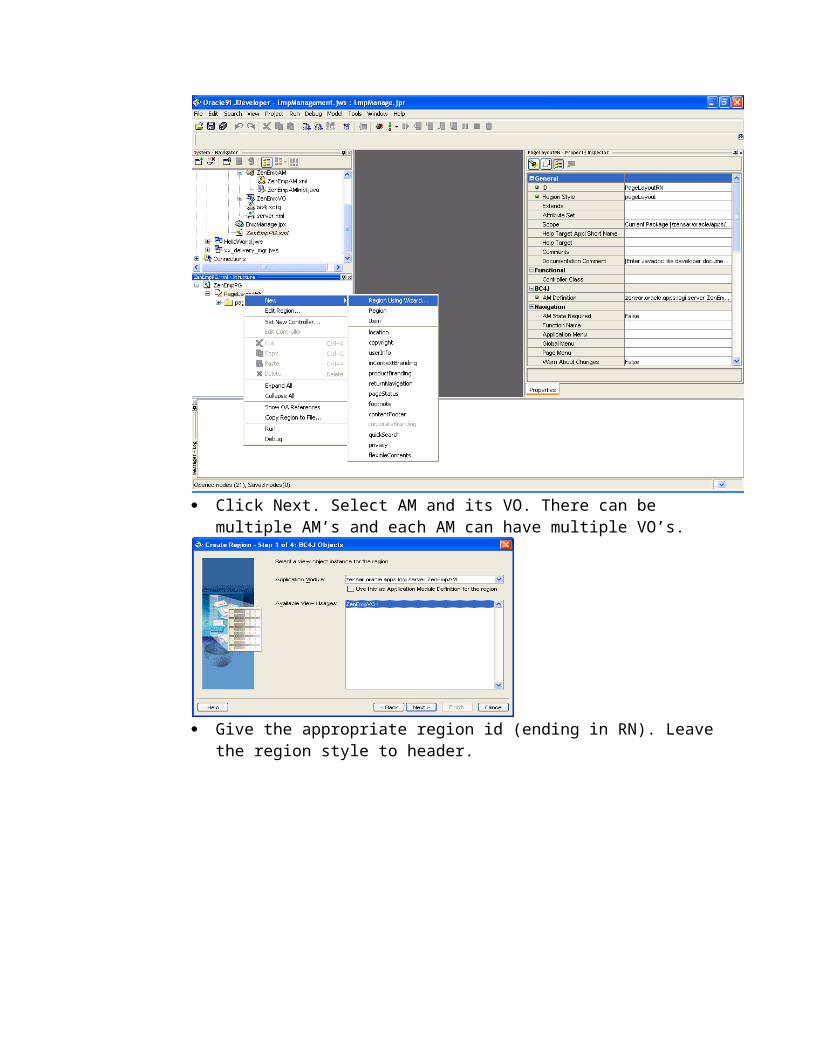
Now we will add other region and the fields. Right click on the PageLayoutRN and select New Region Using Wizard
Click Next. Select AM and its VO. There can be multiple AM’s and each AM can have multiple VO’s.
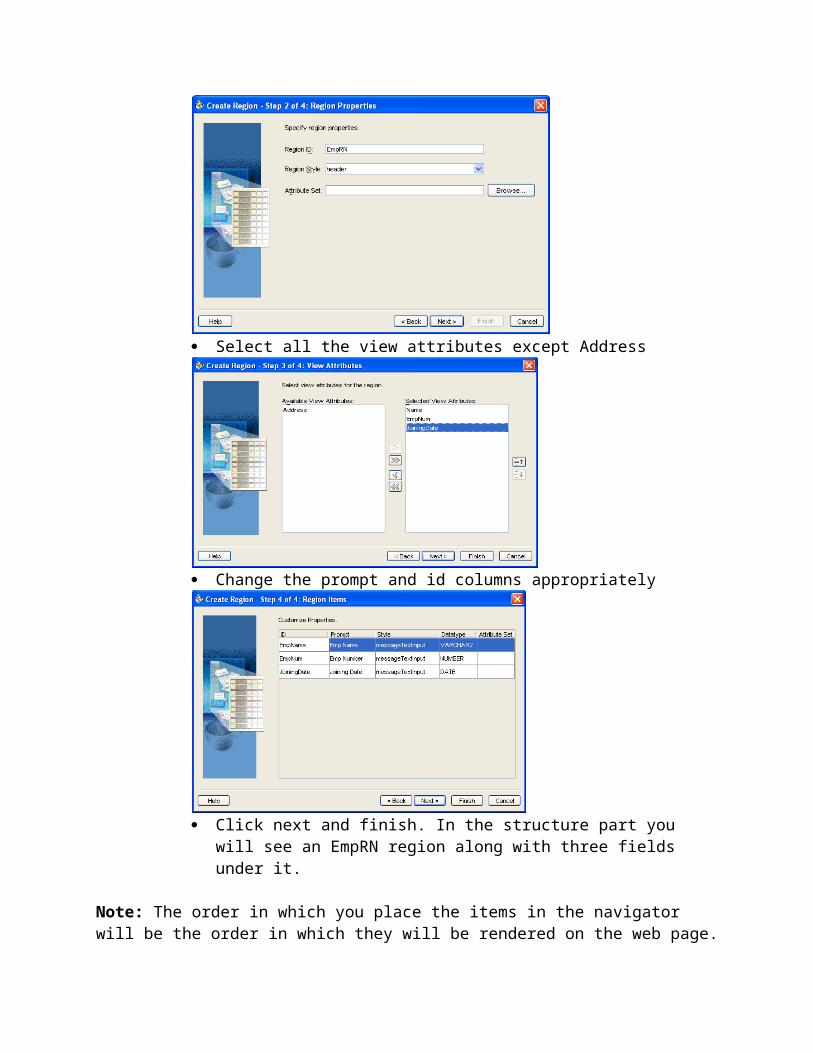
Give the appropriate region id (ending in RN). Leave the region style to header.
Select all the view attributes except Address
Change the prompt and id columns appropriately
Click next and finish. In the structure part you will see an EmpRN region along with three fields under it.
Note: The order in which you place the items in the navigator will be the order in which they will be rendered on the web page.
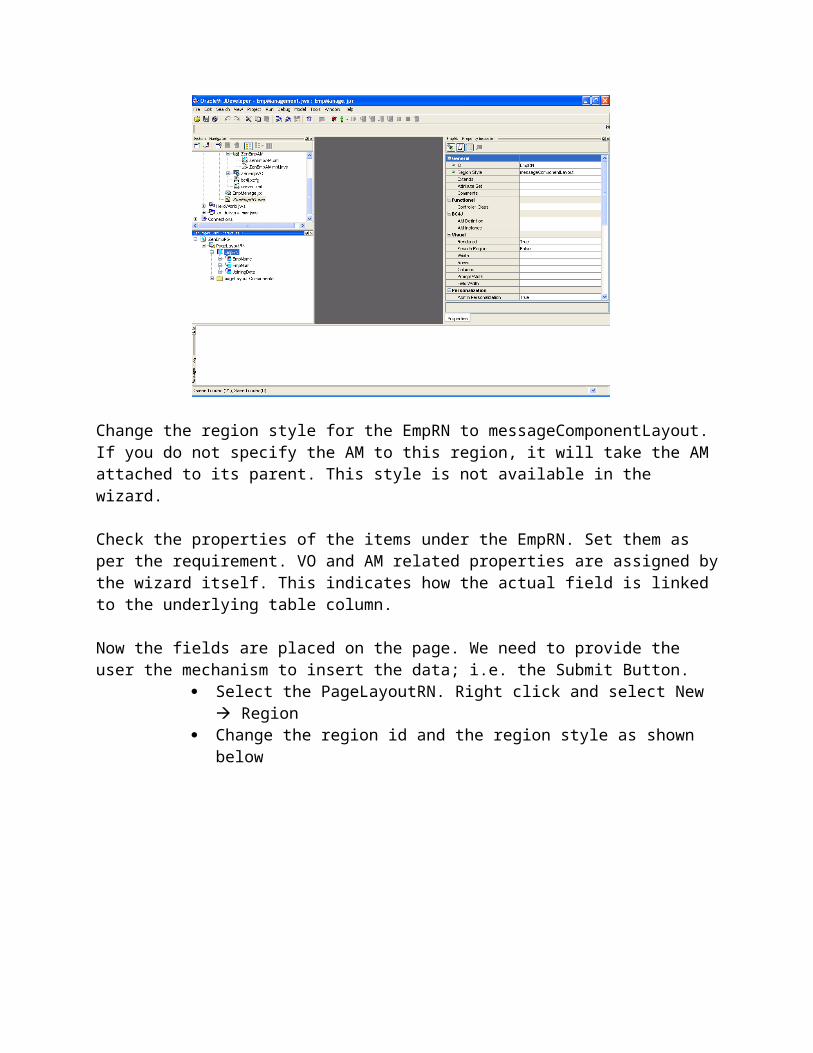
Change the region style for the EmpRN to messageComponentLayout. If you do not specify the AM to this region, it will take the AM attached to its parent. This style is not available in the wizard.
Check the properties of the items under the EmpRN. Set them as per the requirement. VO and AM related properties are assigned by the wizard itself. This indicates how the actual field is linked to the underlying table column.
Now the fields are placed on the page. We need to provide the user the mechanism to insert the data; i.e. the Submit Button.
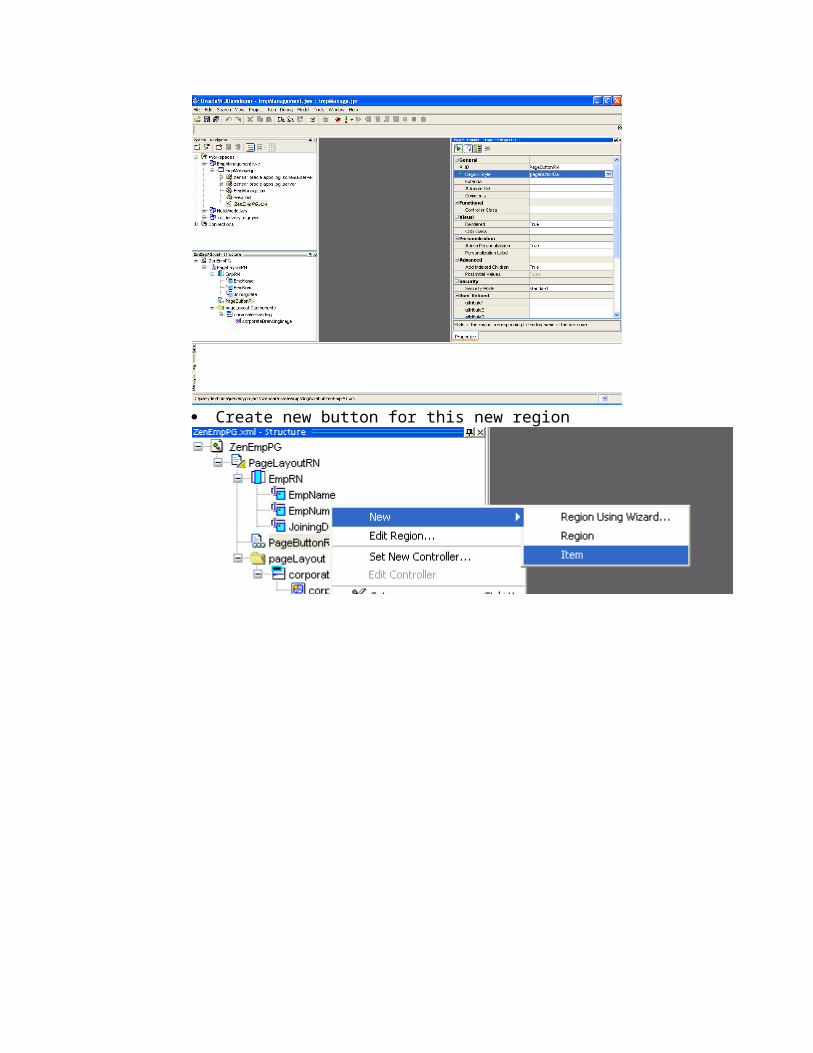
Select the PageLayoutRN. Right click and select New Region Change the region id and the region style as shown below
Create new button for this new region
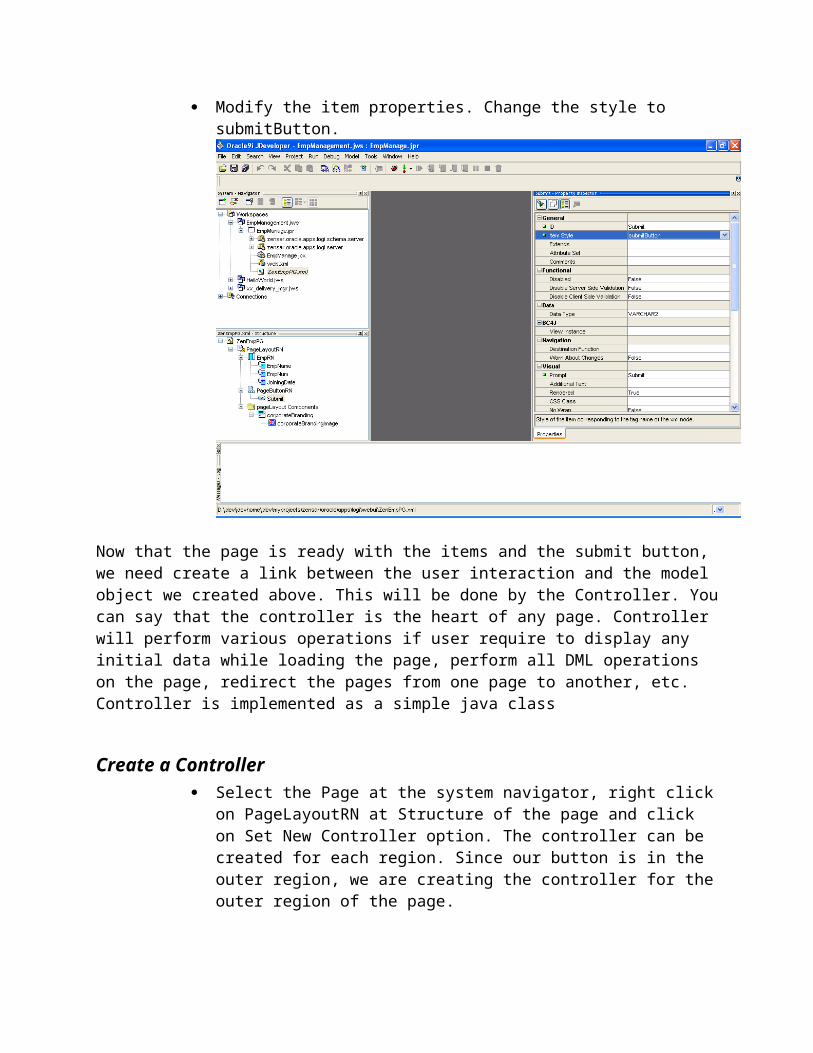
Modify the item properties. Change the style to submitButton.
Now that the page is ready with the items and the submit button, we need create a link between the user interaction and the model object we created above. This will be done by the Controller. You can say that the controller is the heart of any page. Controller will perform various operations if user require to display any initial data while loading the page, perform all DML operations on the page, redirect the pages from one page to another, etc. Controller is implemented as a simple java class
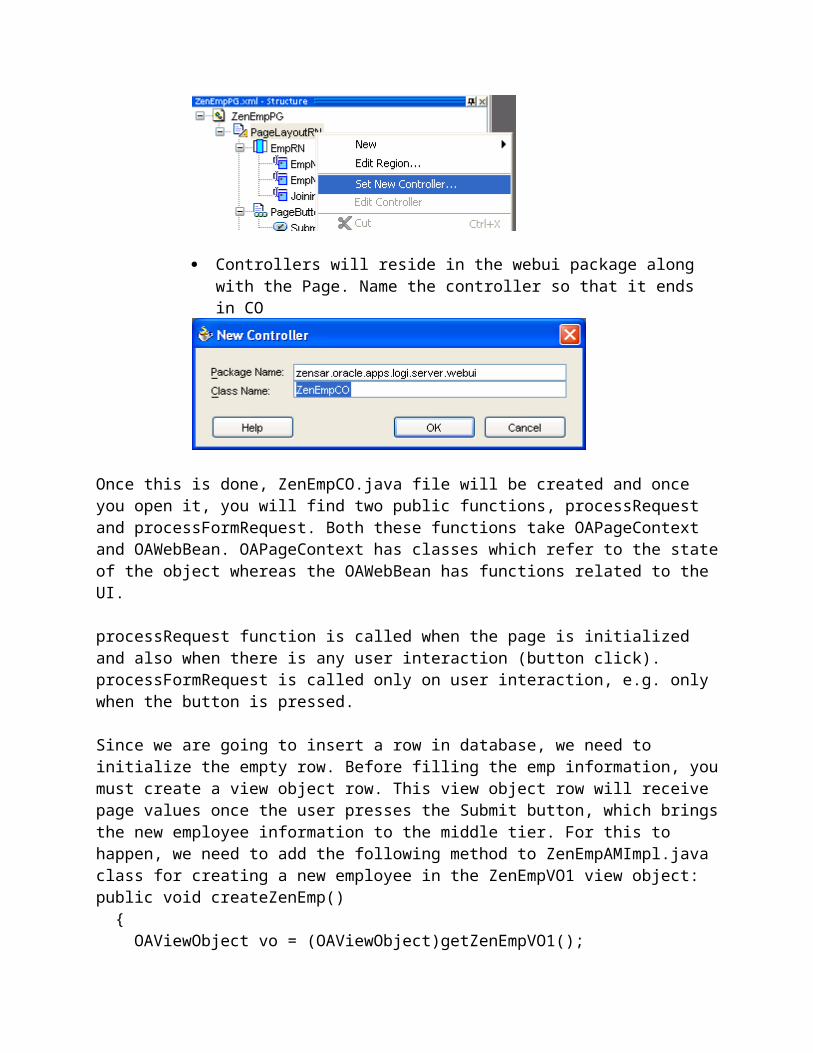
Create a Controller Select the Page at the system navigator, right click on PageLayoutRN at
Structure of the page and click on Set New Controller option. The controller
can be created for each region. Since our button is in the outer region, we are creating the controller for the outer region of the page.
Controllers will reside in the webui package along with the Page. Name the controller so that it ends in CO
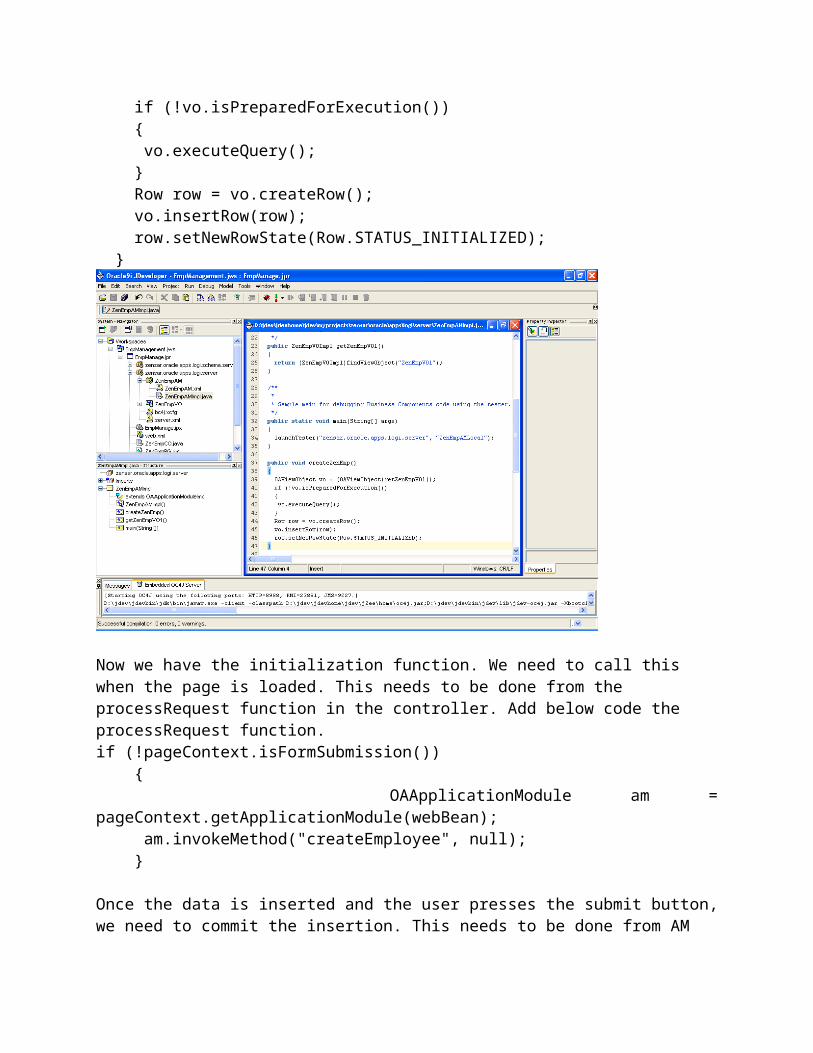
Once this is done, ZenEmpCO.java file will be created and once you open it, you will find two public functions, processRequest and processFormRequest. Both these functions take OAPageContext and OAWebBean. OAPageContext has classes which refer to the state of the object whereas the OAWebBean has functions related to the UI.
processRequest function is called when the page is initialized and also when there is any user interaction (button click). processFormRequest is called only on user interaction, e.g. only when the button is pressed.
Since we are going to insert a row in database, we need to initialize the empty row. Before filling the emp information, you must create a view object row. This view object row will receive page values once the user presses the Submit button, which brings the new employee information to the middle tier. For this to happen, we need to add the following method to ZenEmpAMImpl.java class for creating a new employee in the ZenEmpVO1 view object:public void createZenEmp() { OAViewObject vo = (OAViewObject)getZenEmpVO1(); if (!vo.isPreparedForExecution()) { vo.executeQuery(); } Row row = vo.createRow(); vo.insertRow(row); row.setNewRowState(Row.STATUS_INITIALIZED); }
Now we have the initialization function. We need to call this when the page is loaded. This needs to be done from the processRequest function in the controller. Add below code the processRequest function.if (!pageContext.isFormSubmission()) { OAApplicationModule am = pageContext.getApplicationModule(webBean); am.invokeMethod("createEmployee", null); }
Once the data is inserted and the user presses the submit button, we need to commit the insertion. This needs to be done from AM since controller should not access server side objects except the AM. So we need to add the code to the ZenEmpAMImpl class:public void submit() { getTransaction().commit(); }
Now we need to apply this transaction when the user presses the Submit button. This needs to be done in the controller in the processFormRequest function. OAApplicationModule am = pageContext.getApplicationModule(webBean); if (pageContext.getParameter("Apply") != null) { am.invokeMethod("apply"); }
Rebuild and Run the page. Insert the data and test. You can enhance this application to do some validations, have the ability to cancel/clear the form, etc.
Create and Attach a List of ValuesNow lets say we want to add LOV for the name field. Follow the below steps to create an LOV:Step 1: Create a package logi.oracle.apps.lfnd.lov.server. All the lov’s go in a different package: lov.server. It is a good practice to create external LOV’s instead of internal ones. That way they can be reused across the pages.Step 2: Create a new VO object for the lov. Since it is going to be query only, we can base it on Select statement.
Step 3: Now the LOV VO is created, you need to have an AM to hold this VO. Create an AM EmpNameLovAM as we did earlier. LOV AM will go in same package as LOV VO.Step 4: Now you need to create a LOV webui component. You need to create a lov.webui package, i.e. logi.oracle.apps.lfnd.lov.webuiStep 5: Create a Lov region for the name. For this right click on the project and select New. Step 6. Select OA components Region and click ok
Step 7: Enter the details for the region. Please note the style selected (listOfValues)
Step 8: You will see the LogiEmpNameLovRN in the navigator. Select it and click on the region in Structure part. In the property inspector, change the scope to public, change the AM definition to the AM we created for the LOV.
Step 9: Now we need to add item to the LOV region. To do this right click on the region in structure pane and select New table using wizard
Step 10: Select the LOV AM and the view instance.
Step11: Enter region id and the style
Step12: Select the view attribute
Step13: Click next and finish. LOV region items would be created in the structure pane. Step 14: Set the lov region item properties as shown. Search Allowed should be true, Select Search Criteria should be true.
Now that your public lov is ready, we need to attach it to Page item.
Step 15: Select the name field from the structure pane for page LogiEmpPG. Change the item style for this field to messageLovInput. Please note that once you change the item style, it create a new region with lovmappings under the EmpName field. Now change the External LOV property of the EmpName field. Set it to the lov region we created above
Step 16: You will see lovMap1 item under lovMappings. Now we need to create the lov mapping item and the return itemRight Click on the lovMapping and select New LovMap
Step 17: Set the LOV region Item and Return item and criteria item properties of lovMap1 item to UserName and EmpName and EmpName.
At last, the LOV is setup and attached to the field. Still there is one step you need to do. You need to import the Lov RN into MDS.
Once this is done, then the final step is to deploy it on the server and create a function and menu for it.
Application DeploymentThis is the last part of the OA Framework application development. You need to deploy the pages and the class files on the server. .java files are not needed to be uploaded on the server only the .class files should be uploaded.Step1: Copy your application directory structure (as is) from myclasses to $JAVA_TOP on the server. Make sure that you move the entire folder structure along with the xml files and .class files. Step2: Import the .xml file (for PG’s and RN’s). Pages and regions as mentioned earlier are stored in MDS, meta data services. We need to make an entry of the pages we created into the MDS using following command. This command has to be run from the command prompt of your local machine.
Import script is at location: JDEV_USER_HOME\jdevbin\jdev\binUse the below command at the command prompt:import <JDEV_USER_HOME>\myprojects\logi\oracle\apps\lfnd\webui -rootdir <JDEV_USER_HOME>\myprojects -mmddir <JDEV_USER_HOME>\myhtml\OA_HTML\jrad -username apps -password apps -dbconnection "(description=(address_list=(address=(community=tcp.world)(protocol=tcp)(host=US01U45.logitech.com)(port=1581)))(connect_data=(sid=oadev)))" -jdk13
Once the import is completed successfully, you need to bounce the apache server. To bounce, you can use the below commonad from $COMMON_TOP/admin/scripts/<instance>:
./adapcctl.sh stop ./adapcctl.sh start
Create a form function for your page as shown below:
The two important tabs are Properties (Type) and Web HTML (HTML Call). The type has to be “JSP Interoperable with OA” and html call should point to the page: OA.jsp?page=/logi/oracle/apps/lfnd/webui/LogiEmpPG
Once the function is created then you need to attach it to the appropriate menu (in this case Navigator Menu - System Administrator GUI) and responsibility. Attach the function to the menu Attach menu to Responsibility Attach Responsibility to User Login into the Application and check the page
This was about the new OA Framework page creation. You will also be required to customize an existing page. But once you know what all things are involved in creating a page, it will be much easier to understand the standard application and reverse engineer.
Standards for Extending Business Objects You should not work on the standard object, instead extend the existing object. Use the substitution mechanism to let OA Framework start using the extended version of the
object Don’t change base objects' references to old object subject to extension Substitution will happen automatically at runtime
“About this page” LinkIf you set the profile option FND: Diagnostics to Yes then the link “About this page” will appear at the bottom of each OAF page. This will also appear when you set the Personalize Self-Service Defn to Yes. It consists of lots of information about the components involved, various pages, EO’s, VO’s, controllers, etc. When customizing the existing application, this link will give all the details and it will be the starting point.
ConclusionOracle Application Framework (OA Framework) is the Oracle Applications development and deployment platform for HTML-based business applications. It is based on the industry-standard J2EE MVC design pattern. Oracle9i JDeveloper with OA Extension (OA Extension) is a world class J2EE-based integrated development environment which helps in rapid application development. It provides Durable Personalization and Extension capabilities and also the mechanism for code reusability.
Since this is a new and vast topic, it is not possible to cover all its aspects. This paper should give a head start for the developer to explore more advanced topics. Oracle Application Framework Developer’s guide should be a very good reference guide for further reading.