Embed Size (px)
Citation preview
Clinical Case
NX3 and OptiBond XTR in Total dark-cure mode: A challenging three-unit bridge based on endocrown
Dr. Aleksander Maj
The cementation of adhesive restorations differs greatly from the cementation of retentive restorations. In the case of the latter, a number of factors play a role, including the total surface area, the degree of convergence of the abutment, the height of its walls and its anti-rotation features. An adhesive restoration has for all intents and purposes, no retention. Ensuring that such a restoration is permanently fixed in place depends solely and exclusively on the bonding process (adhesion) and this must be done painstakingly using the appropriate materials. Not without significance here is the choice of the bonding system and composite cement. In the case study presented below we used OptiBond XTR and a conventional Nexus NX3 resin composite cement that is compatible with it. Their compatibility lies in the fact that the ingredients of the cement trigger polymerisation of the bond, as a consequence of which the bonding agent does not have to be light-cured separately. If it were light-cured it would be only 10 microns thick. An additional advantage of OptiBond XTR is that it can be used as a replacement for a silane.
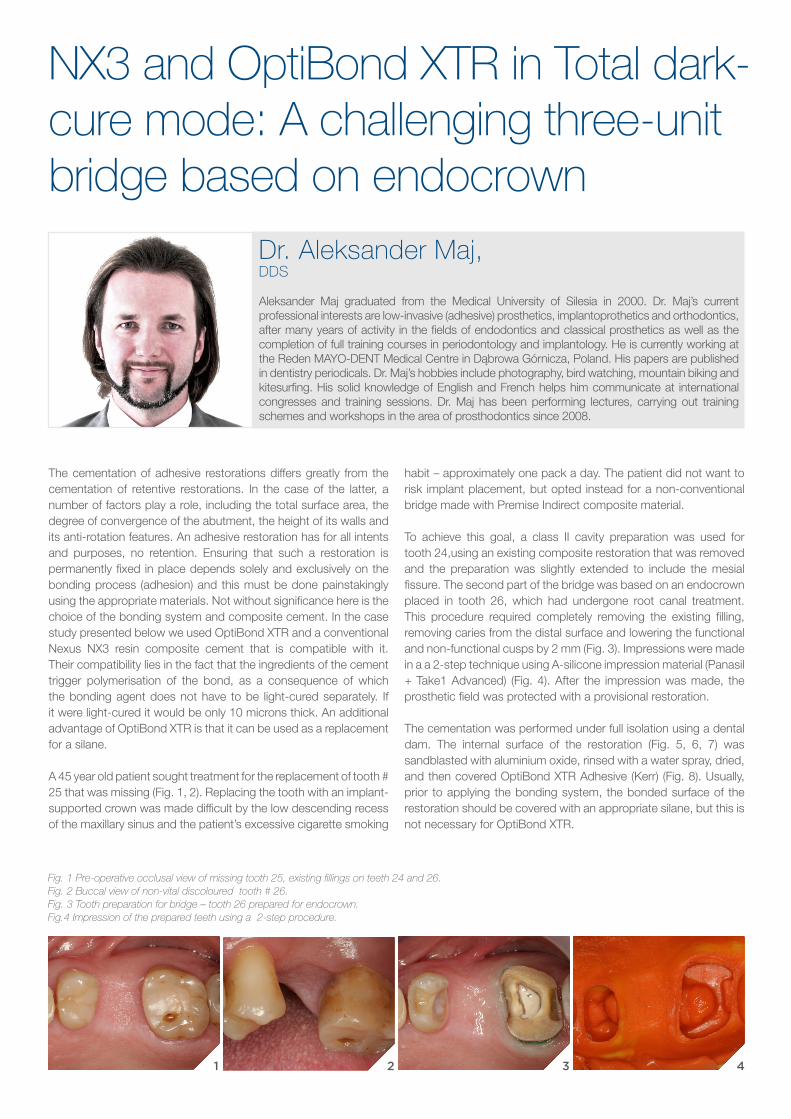
A 45 year old patient sought treatment for the replacement of tooth # 25 that was missing (Fig. 1, 2). Replacing the tooth with an implant-supported crown was made difficult by the low descending recess of the maxillary sinus and the patient’s excessive cigarette smoking
habit – approximately one pack a day. The patient did not want to risk implant placement, but opted instead for a non-conventional bridge made with Premise Indirect composite material.
To achieve this goal, a class II cavity preparation was used for tooth 24,using an existing composite restoration that was removed and the preparation was slightly extended to include the mesial fissure. The second part of the bridge was based on an endocrown placed in tooth 26, which had undergone root canal treatment. This procedure required completely removing the existing filling, removing caries from the distal surface and lowering the functional and non-functional cusps by 2 mm (Fig. 3). Impressions were made in a a 2-step technique using A-silicone impression material (Panasil + Take1 Advanced) (Fig. 4). After the impression was made, the prosthetic field was protected with a provisional restoration.
The cementation was performed under full isolation using a dental dam. The internal surface of the restoration (Fig. 5, 6, 7) was sandblasted with aluminium oxide, rinsed with a water spray, dried, and then covered OptiBond XTR Adhesive (Kerr) (Fig. 8). Usually, prior to applying the bonding system, the bonded surface of the restoration should be covered with an appropriate silane, but this is not necessary for OptiBond XTR.
NX3 and OptiBond XTR in Total dark-cure mode: A challenging three-unit bridge based on endocrown
Dr. Aleksander Maj, DDS
Aleksander Maj graduated from the Medical University of Silesia in 2000. Dr. Maj’s current professional interests are low-invasive (adhesive) prosthetics, implantoprothetics and orthodontics, after many years of activity in the fields of endodontics and classical prosthetics as well as the completion of full training courses in periodontology and implantology. He is currently working at the Reden MAYO-DENT Medical Centre in Dąbrowa Górnicza, Poland. His papers are published in dentistry periodicals. Dr. Maj’s hobbies include photography, bird watching, mountain biking and kitesurfing. His solid knowledge of English and French helps him communicate at international congresses and training sessions. Dr. Maj has been performing lectures, carrying out training schemes and workshops in the area of prosthodontics since 2008.
1 32
Fig. 1 Pre-operative occlusal view of missing tooth 25, existing fillings on teeth 24 and 26.Fig. 2 Buccal view of non-vital discoloured tooth # 26. Fig. 3 Tooth preparation for bridge – tooth 26 prepared for endocrown.Fig.4 Impression of the prepared teeth using a 2-step procedure.
4

The provisional restoration was then removed. The remainder of the temporary cement was removed with OptiClean (Kerr) and the surface area of the previously applied bonding agent was refreshed with a sandblaster. The abutment teeth were rinsed and gently dried with an air stream. The tissue surfaces were covered with OptiBond XTR (Fig. 9), applying in sequence the self-etching OptiBond XTR Primer and OptiBond XTR Adhesive bonding agent. The Primer was rubbed into the surface for 20 seconds and smoothed out with a medium air stream for 5 seconds. Next, OptiBond XTR Adhesive was applied and gently rubbed in for 15 seconds. The bonding agent was first spread out with a gentle and later with a strong air stream so as to achieve a uniform, thin layer on the surface of the abutments.
For cementation purposes NX3 (Kerr) composite cement was used, the components of which allow the OptiBond XTR bonding agent to harden, thereby eliminating the need for separate polymerisation of the bonding agent applied on the restoration and preparation surface. On the one hand, this made the work easier, and on the other it protected against any possible polymerisation of an overly thick layer of bonding agent, which as a consequence may impede proper seating of the restoration, although with a thin layer of OptiBond XTR equal to 10 microns (as declared by the manufacturer) this should not pose any problem.
The spaciousness of the endocrown suggested the need for the use of the dual cured NX3 Clear shade cement (Fig. 10). In this mode,
certain that polymerisation would occur in full. Excess cement (Fig. 11) was removed with a flat plastic instrument, following brief, preliminary polymerisation, when the cement had achieved gel form (Fig. 12, 13). After the excess cement was removed, the margins of the restoration were light cured with a Demi Ultra (Kerr) lamp, for 20 seconds on each side. Small amounts of excess material were removed with a fine-grained, diamond coated bur and the whole polished with an Opti1Step (Kerr) rubber and an Occlubrush (Kerr) brush.
Protecting the molar following root canal treatment with an endocrown is a good alternative to a classic crown, mainly on account of the savings made in terms of prepared tissue. The diversity of adhesive restorations that simply require “bonding” to the remaining surface of a tooth and without the need for retentive grinding allows for the use of hybrid bridges that connect together different types of restorations. In the present case we used a bridge consisting of an inlay and an endocrown as well as a span bridge modelled with polyethylene fibres embedded into the Premise Indirect material (Fig. 14, 15, 16, 17).
14 1615 17
10 1211 13
6 87 9
5
Fig. 5 Adhesive bridge made with Premise Indirect composite resin material.Fig.6 Details of anatomy of occlusal surface.Fig. 7 View from preparation side Fig.8 Sixth generation bonding system OptiBond XTR (Kerr) in disposable Unidose packs. Fig. 9 Application of bonding agent to tissue surface.Fig. 10 Cement NX3 – dual-cure version (self/light-cure), Clear shade.Fig. 11 View immediately after placement of restoration –
excess cement is visible.Figs 12,13 Removal of excess cement after brief, preliminary light polymerisationFig. 14 Occlusal view of bonded restoration.Fig. 15 Buccal view of bonded restorationFigs 16,17 Follow-up after 16 months.