Embed Size (px)
Citation preview
1
NWN Toolset and ScriptEase Module Construction Tutorial Introduction .................................................................................................................................................... 2 Tutorial 1: Loading and Working with the Module in the Aurora Toolset .................................... 2 Tutorial 2: Placeable Objects .................................................................................................................... 3 Tutorial 3: Customizing your Objects...................................................................................................... 5 Tutorial 4: Items............................................................................................................................................ 7 Tutorial 5: Inventory .................................................................................................................................... 8 Tutorial 6: Actions....................................................................................................................................... 10 Tutorial 7: Doors .......................................................................................................................................... 12 Tutorial 8: Creatures .................................................................................................................................. 14 Tutorial 9: Secret Doors ........................................................................................................................... 15 Tutorial 10: Avoiding Repetition .............................................................................................................. 16 Tutorial 11: NPCs and Factions................................................................................................................. 17 Tutorial 12: Conversations......................................................................................................................... 18 Tutorial 13: Triggers ...................................................................................................................................20 Tutorial 14: Barriers ...................................................................................................................................22 Tutorial 15: Behaviours...............................................................................................................................23 Tutorial 16: Introduction to Plot Tokens..............................................................................................28 Tutorial 17: Conversations Using Plot Tokens .....................................................................................29 Appendix ......................................................................................................................................................... 31 Tutorial A1: How to make locked doors with keys............................................................................. 31 Tutorial A2: Talking to and Attacking creatures............................................................................... 31
2
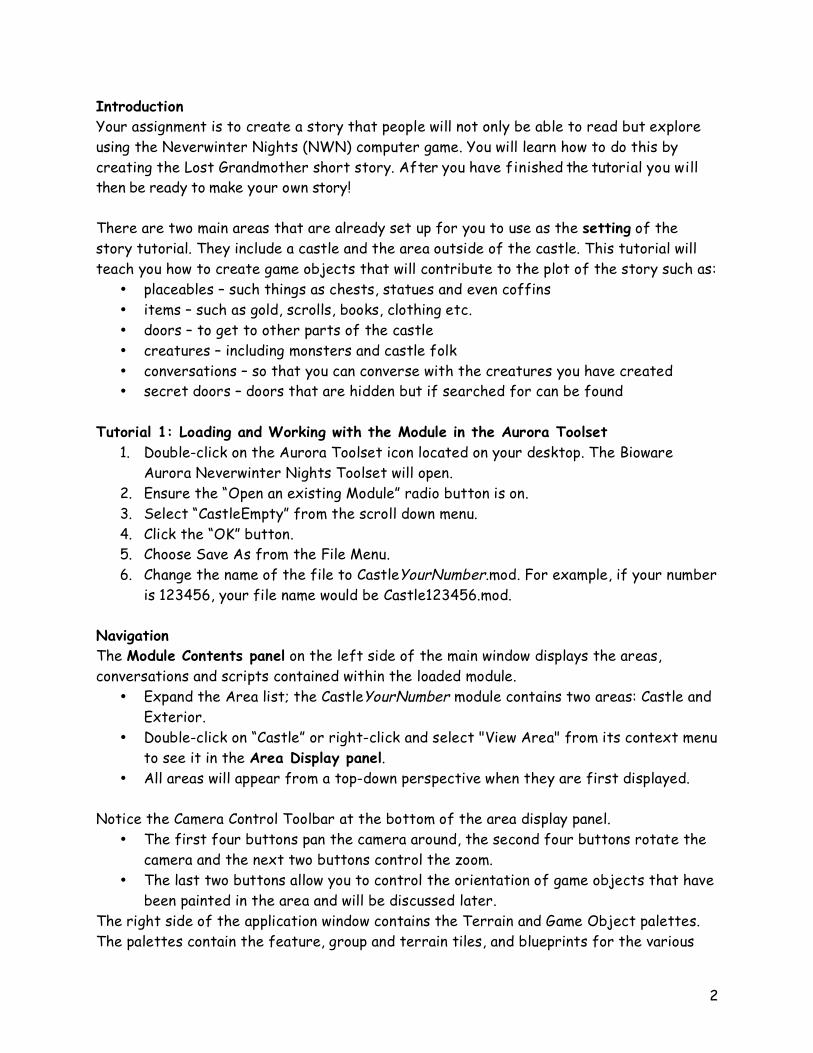
Introduction Your assignment is to create a story that people will not only be able to read but explore using the Neverwinter Nights (NWN) computer game. You will learn how to do this by creating the Lost Grandmother short story. After you have finished the tutorial you will then be ready to make your own story! There are two main areas that are already set up for you to use as the setting of the story tutorial. They include a castle and the area outside of the castle. This tutorial will teach you how to create game objects that will contribute to the plot of the story such as:
• placeables – such things as chests, statues and even coffins • items – such as gold, scrolls, books, clothing etc. • doors – to get to other parts of the castle • creatures – including monsters and castle folk • conversations – so that you can converse with the creatures you have created • secret doors – doors that are hidden but if searched for can be found
Tutorial 1: Loading and Working with the Module in the Aurora Toolset
1. Double-click on the Aurora Toolset icon located on your desktop. The Bioware Aurora Neverwinter Nights Toolset will open.
2. Ensure the “Open an existing Module” radio button is on. 3. Select “CastleEmpty” from the scroll down menu. 4. Click the “OK” button. 5. Choose Save As from the File Menu. 6. Change the name of the file to CastleYourNumber.mod. For example, if your number
is 123456, your file name would be Castle123456.mod. Navigation The Module Contents panel on the left side of the main window displays the areas, conversations and scripts contained within the loaded module.
• Expand the Area list; the CastleYourNumber module contains two areas: Castle and Exterior.
• Double-click on “Castle” or right-click and select "View Area" from its context menu to see it in the Area Display panel.
• All areas will appear from a top-down perspective when they are first displayed. Notice the Camera Control Toolbar at the bottom of the area display panel.
• The first four buttons pan the camera around, the second four buttons rotate the camera and the next two buttons control the zoom.
• The last two buttons allow you to control the orientation of game objects that have been painted in the area and will be discussed later.
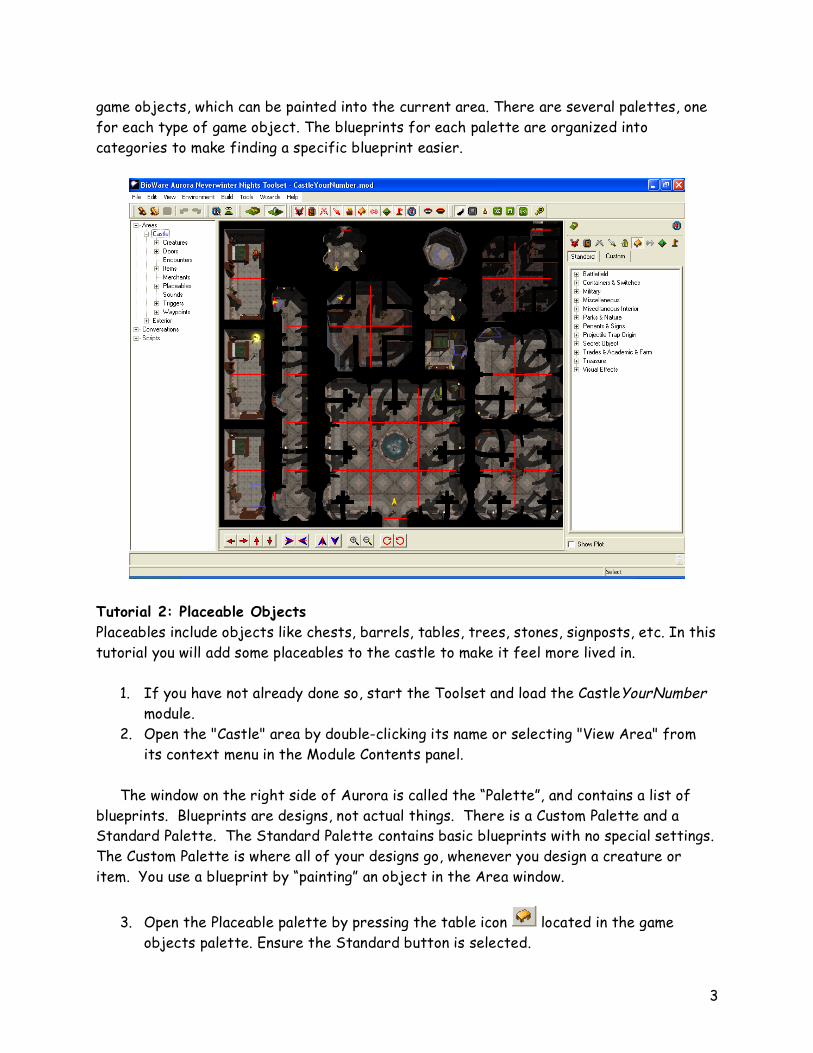
The right side of the application window contains the Terrain and Game Object palettes. The palettes contain the feature, group and terrain tiles, and blueprints for the various
3
game objects, which can be painted into the current area. There are several palettes, one for each type of game object. The blueprints for each palette are organized into categories to make finding a specific blueprint easier.
Tutorial 2: Placeable Objects Placeables include objects like chests, barrels, tables, trees, stones, signposts, etc. In this tutorial you will add some placeables to the castle to make it feel more lived in.
1. If you have not already done so, start the Toolset and load the CastleYourNumber module.
2. Open the "Castle" area by double-clicking its name or selecting "View Area" from its context menu in the Module Contents panel.
The window on the right side of Aurora is called the “Palette”, and contains a list of
blueprints. Blueprints are designs, not actual things. There is a Custom Palette and a Standard Palette. The Standard Palette contains basic blueprints with no special settings. The Custom Palette is where all of your designs go, whenever you design a creature or item. You use a blueprint by “painting” an object in the Area window.
3. Open the Placeable palette by pressing the table icon located in the game objects palette. Ensure the Standard button is selected.
4
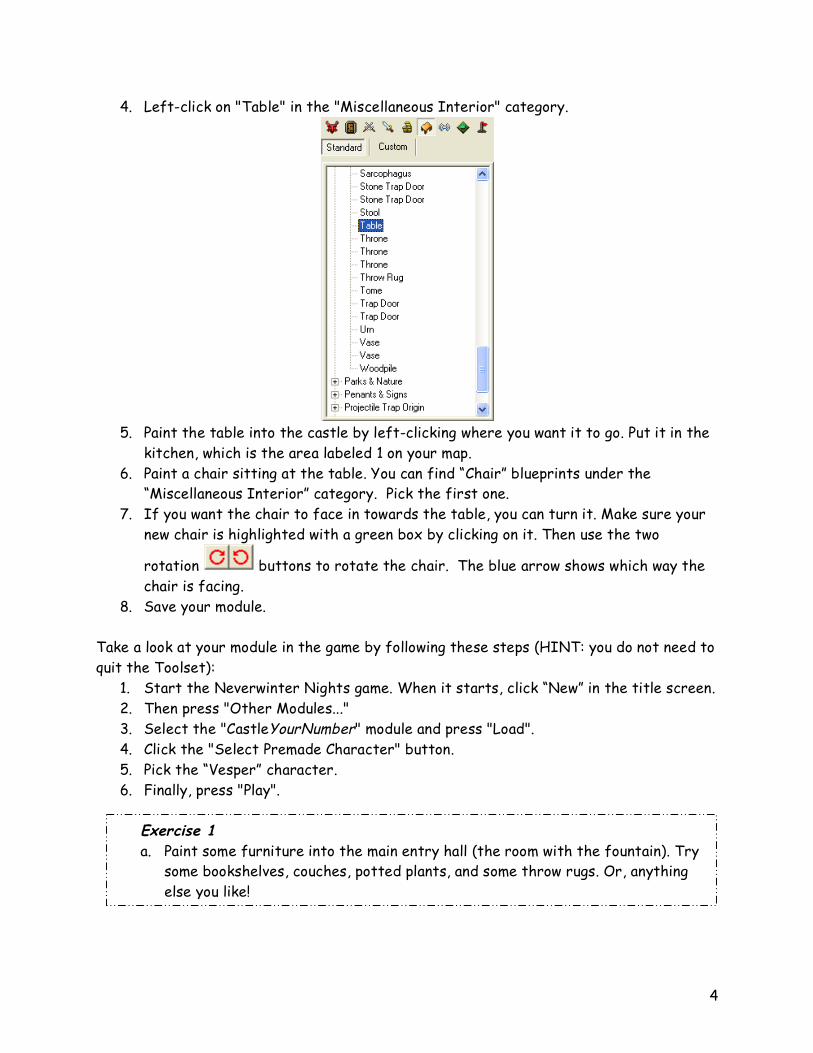
4. Left-click on "Table" in the "Miscellaneous Interior" category.
5. Paint the table into the castle by left-clicking where you want it to go. Put it in the kitchen, which is the area labeled 1 on your map.
6. Paint a chair sitting at the table. You can find “Chair” blueprints under the “Miscellaneous Interior” category. Pick the first one.
7. If you want the chair to face in towards the table, you can turn it. Make sure your new chair is highlighted with a green box by clicking on it. Then use the two
rotation buttons to rotate the chair. The blue arrow shows which way the chair is facing.
8. Save your module. Take a look at your module in the game by following these steps (HINT: you do not need to quit the Toolset):
1. Start the Neverwinter Nights game. When it starts, click “New” in the title screen. 2. Then press "Other Modules..." 3. Select the "CastleYourNumber" module and press "Load". 4. Click the "Select Premade Character" button. 5. Pick the “Vesper” character. 6. Finally, press "Play".
Exercise 1 a. Paint some furniture into the main entry hall (the room with the fountain). Try
some bookshelves, couches, potted plants, and some throw rugs. Or, anything else you like!
5
Tutorial 3: Customizing your Objects Since the chairs and table we added in the last tutorial were painted from the "Standard" palette, we can't make them do anything interesting. To customize them for your story, you have to create a "Custom" blueprint. In this tutorial we will make a special chair that the player can sit on.
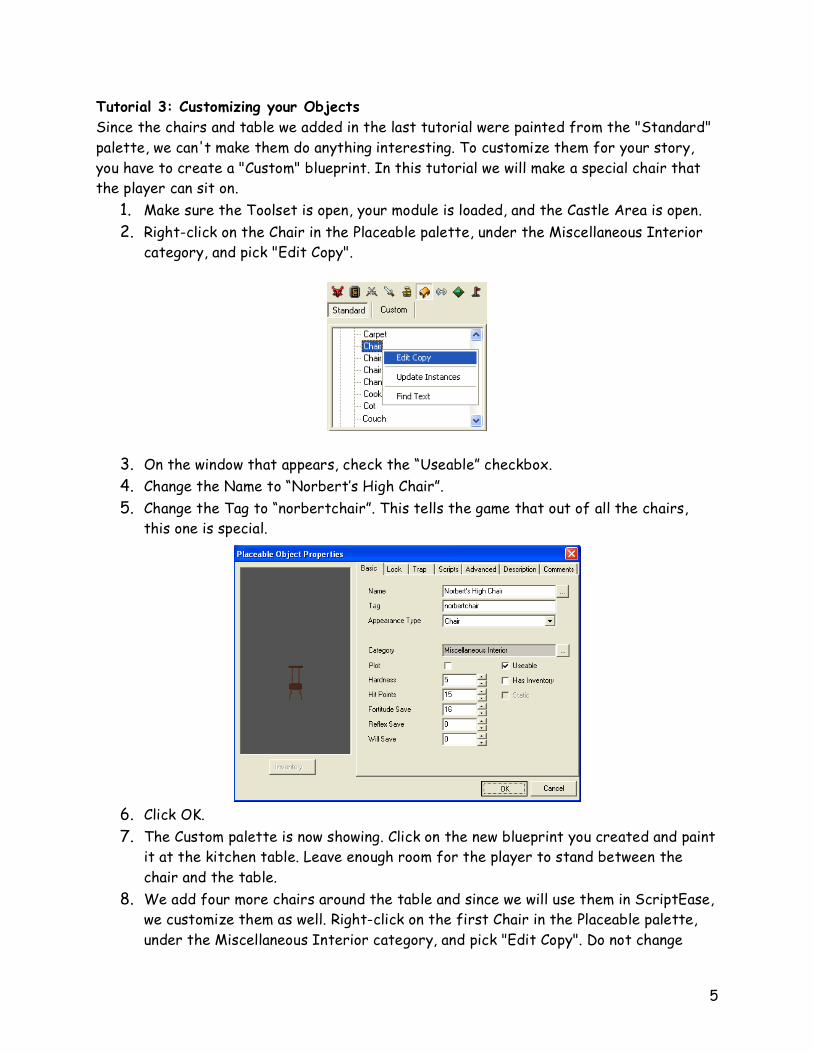
1. Make sure the Toolset is open, your module is loaded, and the Castle Area is open. 2. Right-click on the Chair in the Placeable palette, under the Miscellaneous Interior
category, and pick "Edit Copy".
3. On the window that appears, check the “Useable” checkbox. 4. Change the Name to “Norbert’s High Chair”. 5. Change the Tag to “norbertchair”. This tells the game that out of all the chairs,
this one is special.
6. Click OK. 7. The Custom palette is now showing. Click on the new blueprint you created and paint
it at the kitchen table. Leave enough room for the player to stand between the chair and the table.
8. We add four more chairs around the table and since we will use them in ScriptEase, we customize them as well. Right-click on the first Chair in the Placeable palette, under the Miscellaneous Interior category, and pick "Edit Copy". Do not change
6
anything in the window that appears, just click OK and paint it four times around the table.
9. Take a moment to save your module and look at your new chairs in the game. When you hold your mouse over Norbert’s High Chair, it should turn blue, because we made it Useable, but nothing else happens yet.
In the Neverwinter Nights game, the player cannot normally sit on the furniture. We will use ScriptEase to allow the player to sit on our new chair.
10. Save your module, and then pick “Close” from the File menu. You cannot have your module open in both the Toolset and ScriptEase at the same time.
11. Open ScriptEase by double-clicking on the icon on your desktop. 12. Open your module by picking “Open Module…” from the File menu. 13. If you can’t see your module in the file selection dialog, navigate to
“C:\NeverwinterNights\NWN\modules”. Once you have found your module, click OK.
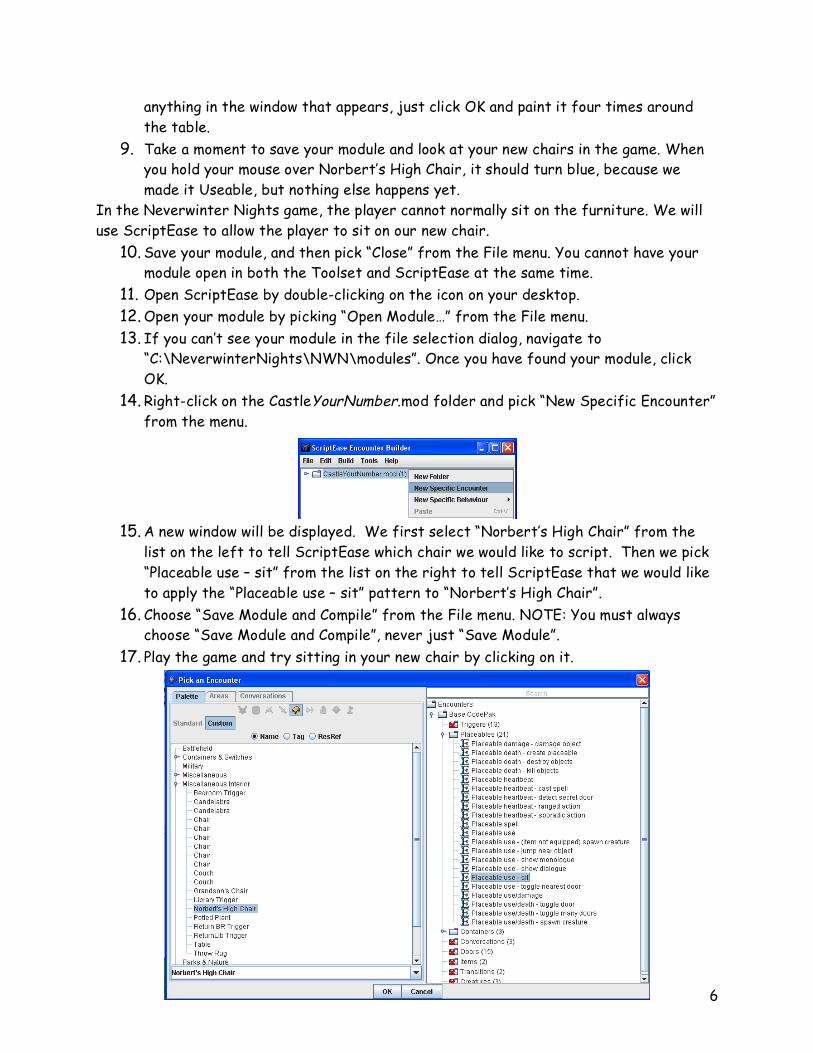
14. Right-click on the CastleYourNumber.mod folder and pick “New Specific Encounter” from the menu.
15. A new window will be displayed. We first select “Norbert’s High Chair” from the list on the left to tell ScriptEase which chair we would like to script. Then we pick “Placeable use – sit” from the list on the right to tell ScriptEase that we would like to apply the “Placeable use – sit” pattern to “Norbert’s High Chair”.
16. Choose “Save Module and Compile” from the File menu. NOTE: You must always choose “Save Module and Compile”, never just “Save Module”.
17. Play the game and try sitting in your new chair by clicking on it.
7
Tutorial 4: Items Items are objects that the player can pick up and put in her inventory. They include things such as books, jewelry, weapons, gold etc.
1. Load your module in the Toolset and open the “Exterior” area.
2. Open the Items palette by pressing the sword icon . 3. Make a custom copy of the "Potion of Cure Moderate Wounds" standard blueprint,
under Miscellaneous Potions. Change the Tag to “brucepotion”. 4. Paint the potion at the spot numbered 1 on the Exterior map. 5. Now we will use ScriptEase to reward the player when she picks up the potion. Save
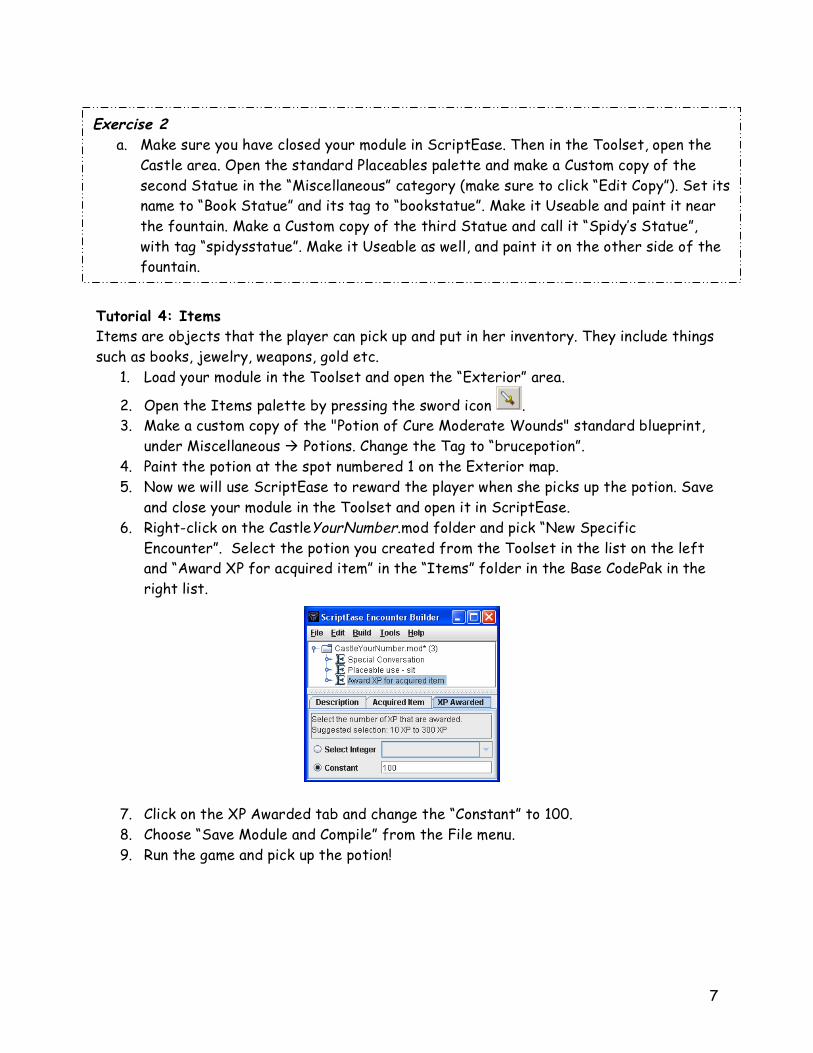
and close your module in the Toolset and open it in ScriptEase. 6. Right-click on the CastleYourNumber.mod folder and pick “New Specific
Encounter”. Select the potion you created from the Toolset in the list on the left and “Award XP for acquired item” in the “Items” folder in the Base CodePak in the right list.
7. Click on the XP Awarded tab and change the “Constant” to 100. 8. Choose “Save Module and Compile” from the File menu. 9. Run the game and pick up the potion!
Exercise 2 a. Make sure you have closed your module in ScriptEase. Then in the Toolset, open the
Castle area. Open the standard Placeables palette and make a Custom copy of the second Statue in the “Miscellaneous” category (make sure to click “Edit Copy”). Set its name to “Book Statue” and its tag to “bookstatue”. Make it Useable and paint it near the fountain. Make a Custom copy of the third Statue and call it “Spidy’s Statue”, with tag “spidysstatue”. Make it Useable as well, and paint it on the other side of the fountain.
8
Tutorial 5: Inventory Placeables can contain items. In this tutorial we will put the “Origin of Magic” in the Book Statue you created in Exercise 2a.
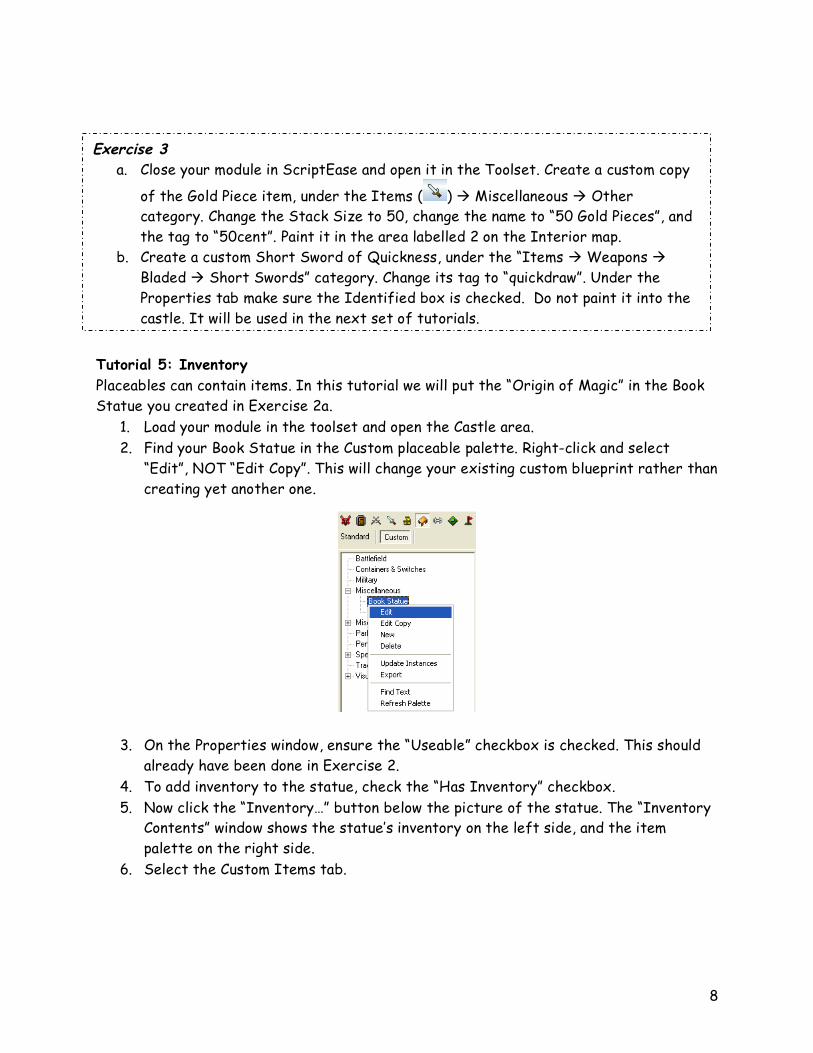
1. Load your module in the toolset and open the Castle area. 2. Find your Book Statue in the Custom placeable palette. Right-click and select
“Edit”, NOT “Edit Copy”. This will change your existing custom blueprint rather than creating yet another one.
3. On the Properties window, ensure the “Useable” checkbox is checked. This should
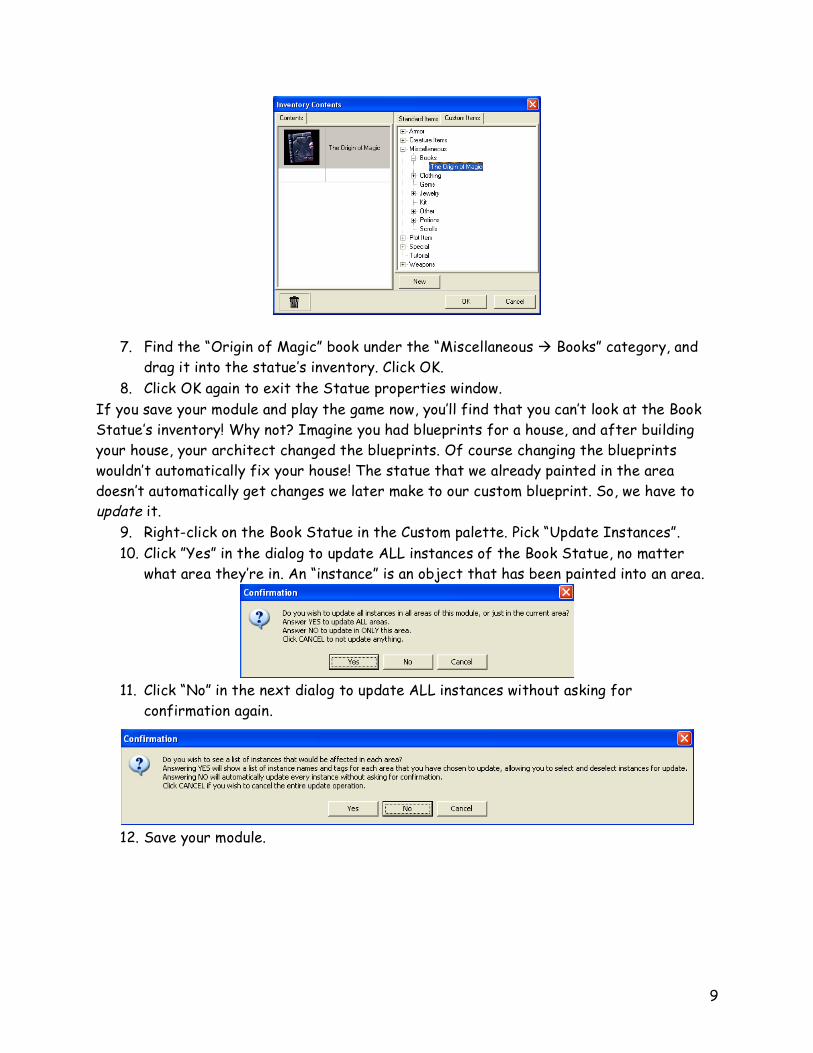
already have been done in Exercise 2. 4. To add inventory to the statue, check the “Has Inventory” checkbox. 5. Now click the “Inventory…” button below the picture of the statue. The “Inventory
Contents” window shows the statue’s inventory on the left side, and the item palette on the right side.
6. Select the Custom Items tab.
Exercise 3 a. Close your module in ScriptEase and open it in the Toolset. Create a custom copy
of the Gold Piece item, under the Items ( ) Miscellaneous Other category. Change the Stack Size to 50, change the name to “50 Gold Pieces”, and the tag to “50cent”. Paint it in the area labelled 2 on the Interior map.
b. Create a custom Short Sword of Quickness, under the “Items Weapons Bladed Short Swords” category. Change its tag to “quickdraw”. Under the Properties tab make sure the Identified box is checked. Do not paint it into the castle. It will be used in the next set of tutorials.
9
7. Find the “Origin of Magic” book under the “Miscellaneous Books” category, and
drag it into the statue’s inventory. Click OK. 8. Click OK again to exit the Statue properties window.
If you save your module and play the game now, you’ll find that you can’t look at the Book Statue’s inventory! Why not? Imagine you had blueprints for a house, and after building your house, your architect changed the blueprints. Of course changing the blueprints wouldn’t automatically fix your house! The statue that we already painted in the area doesn’t automatically get changes we later make to our custom blueprint. So, we have to update it.
9. Right-click on the Book Statue in the Custom palette. Pick “Update Instances”. 10. Click ”Yes” in the dialog to update ALL instances of the Book Statue, no matter
what area they’re in. An “instance” is an object that has been painted into an area.
11. Click “No” in the next dialog to update ALL instances without asking for confirmation again.
12. Save your module.
10
Tutorial 6: Actions Now that we have the book in the statue’s inventory, we can give the player a message when she takes it.
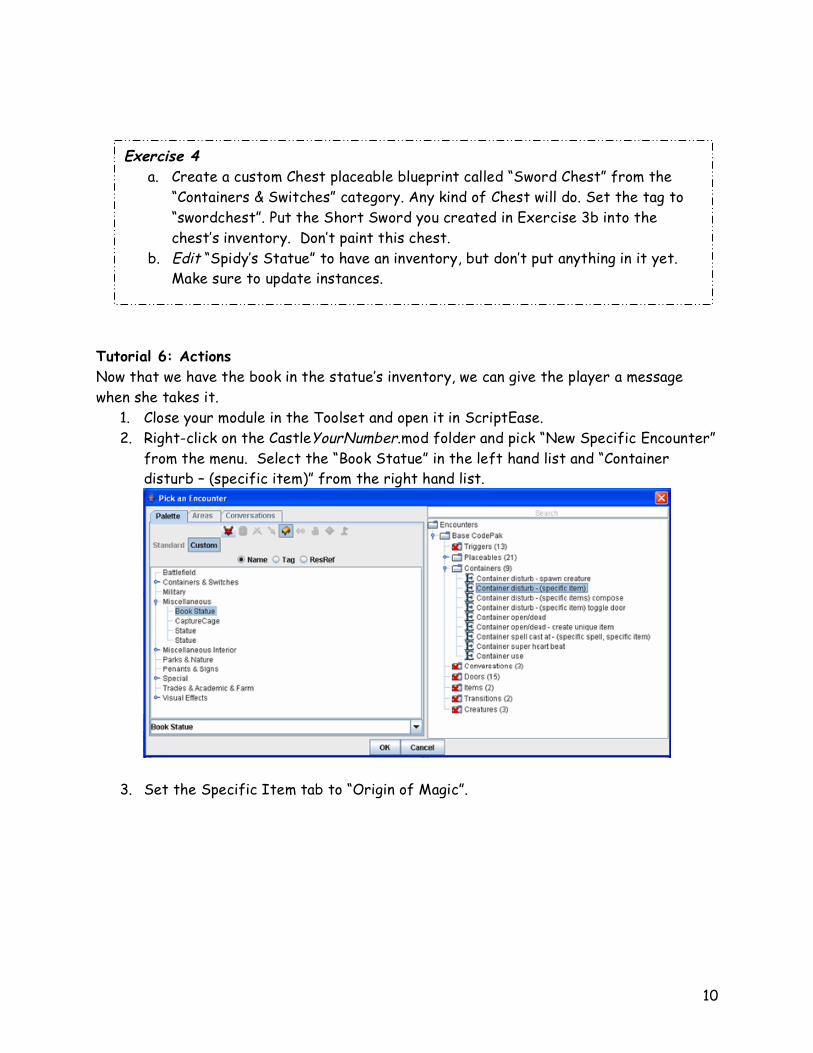
1. Close your module in the Toolset and open it in ScriptEase. 2. Right-click on the CastleYourNumber.mod folder and pick “New Specific Encounter”
from the menu. Select the “Book Statue” in the left hand list and “Container disturb – (specific item)” from the right hand list.
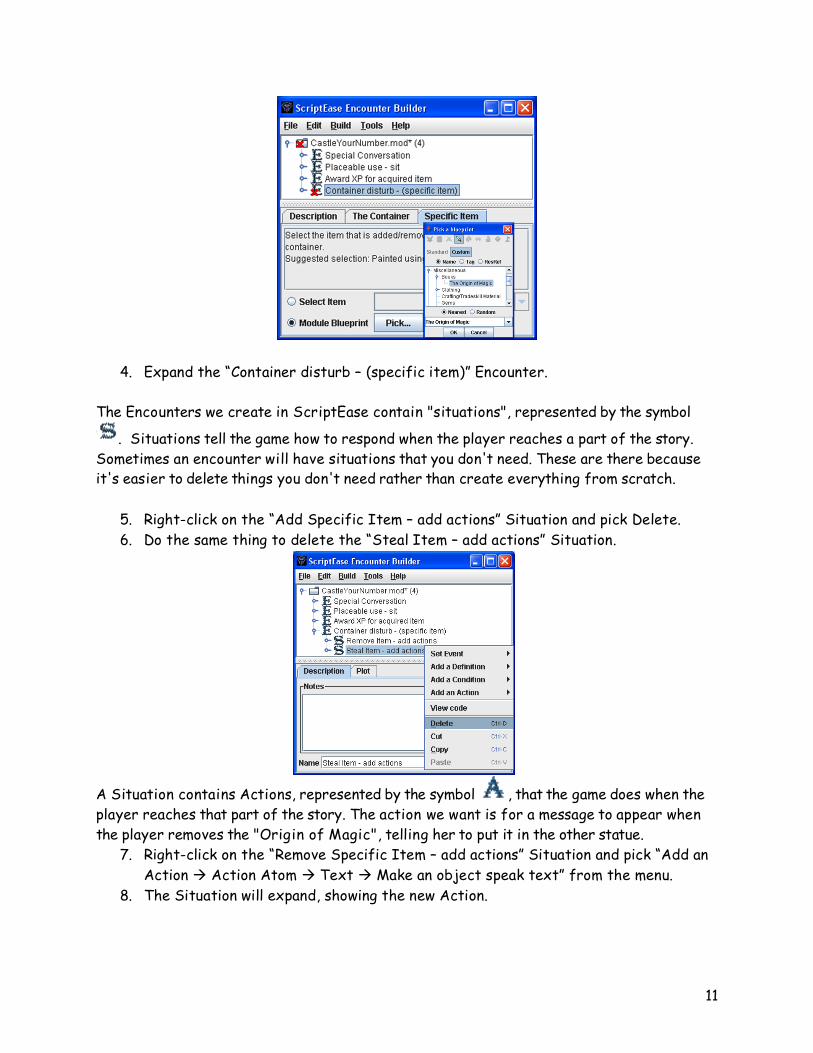
3. Set the Specific Item tab to “Origin of Magic”.
Exercise 4 a. Create a custom Chest placeable blueprint called “Sword Chest” from the
“Containers & Switches” category. Any kind of Chest will do. Set the tag to “swordchest”. Put the Short Sword you created in Exercise 3b into the chest’s inventory. Don’t paint this chest.
b. Edit “Spidy’s Statue” to have an inventory, but don’t put anything in it yet. Make sure to update instances.
11
4. Expand the “Container disturb – (specific item)” Encounter.
The Encounters we create in ScriptEase contain "situations", represented by the symbol
. Situations tell the game how to respond when the player reaches a part of the story. Sometimes an encounter will have situations that you don't need. These are there because it's easier to delete things you don't need rather than create everything from scratch.
5. Right-click on the “Add Specific Item – add actions” Situation and pick Delete. 6. Do the same thing to delete the “Steal Item – add actions” Situation.
A Situation contains Actions, represented by the symbol , that the game does when the player reaches that part of the story. The action we want is for a message to appear when the player removes the "Origin of Magic", telling her to put it in the other statue.
7. Right-click on the “Remove Specific Item – add actions” Situation and pick “Add an Action Action Atom Text Make an object speak text” from the menu.
8. The Situation will expand, showing the new Action.
12
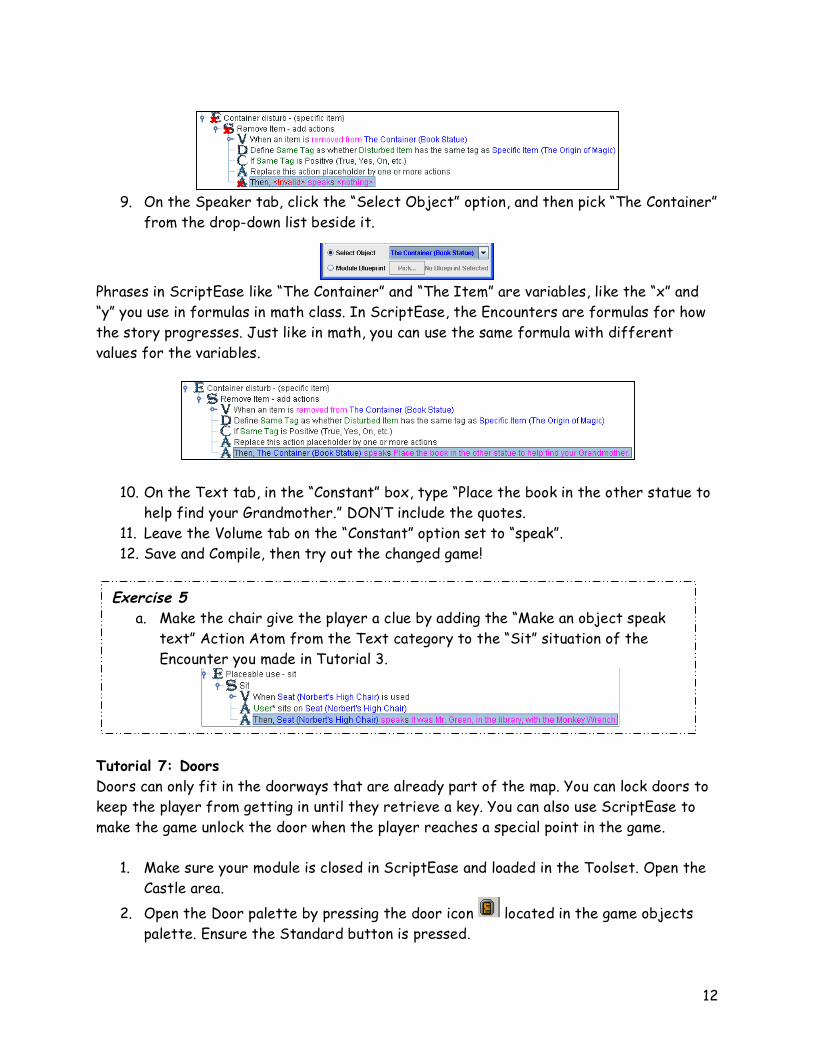
9. On the Speaker tab, click the “Select Object” option, and then pick “The Container” from the drop-down list beside it.
Phrases in ScriptEase like “The Container” and “The Item” are variables, like the “x” and “y” you use in formulas in math class. In ScriptEase, the Encounters are formulas for how the story progresses. Just like in math, you can use the same formula with different values for the variables.
10. On the Text tab, in the “Constant” box, type “Place the book in the other statue to
help find your Grandmother.” DON’T include the quotes. 11. Leave the Volume tab on the “Constant” option set to “speak”. 12. Save and Compile, then try out the changed game!
Tutorial 7: Doors Doors can only fit in the doorways that are already part of the map. You can lock doors to keep the player from getting in until they retrieve a key. You can also use ScriptEase to make the game unlock the door when the player reaches a special point in the game.
1. Make sure your module is closed in ScriptEase and loaded in the Toolset. Open the Castle area.
2. Open the Door palette by pressing the door icon located in the game objects palette. Ensure the Standard button is pressed.
Exercise 5 a. Make the chair give the player a clue by adding the “Make an object speak
text” Action Atom from the Text category to the “Sit” situation of the Encounter you made in Tutorial 3.
13
3. Create a custom Door from the first blueprint in the “Universal Wood” category. 4. Set the name and tag to “halltolibrary”. 5. Check the Plot checkbox. This means the player can never bash down the door –
they have to unlock the door to get through. 6. On the Advanced tab, change the “Blueprint ResRef” to “halltolibrary”. 7. On the Lock tab, check the “Locked” checkbox and the “Key required to unlock or
lock” checkbox. Click OK. 8. We will paint the door in the doorway labeled 3 on the Castle map. You may have to
zoom in or adjust your view to see the empty door space. When your mouse is in the correct place to paint it, the door should stop spinning. Click to paint the door.
If you try out your module in the game at this point, you will notice you cannot open the door. There is no key for this door. Since we want the player to find the clues in Spidy’s journal before entering the library, we will use ScriptEase to make the door unlock when the player takes the book from the statue.
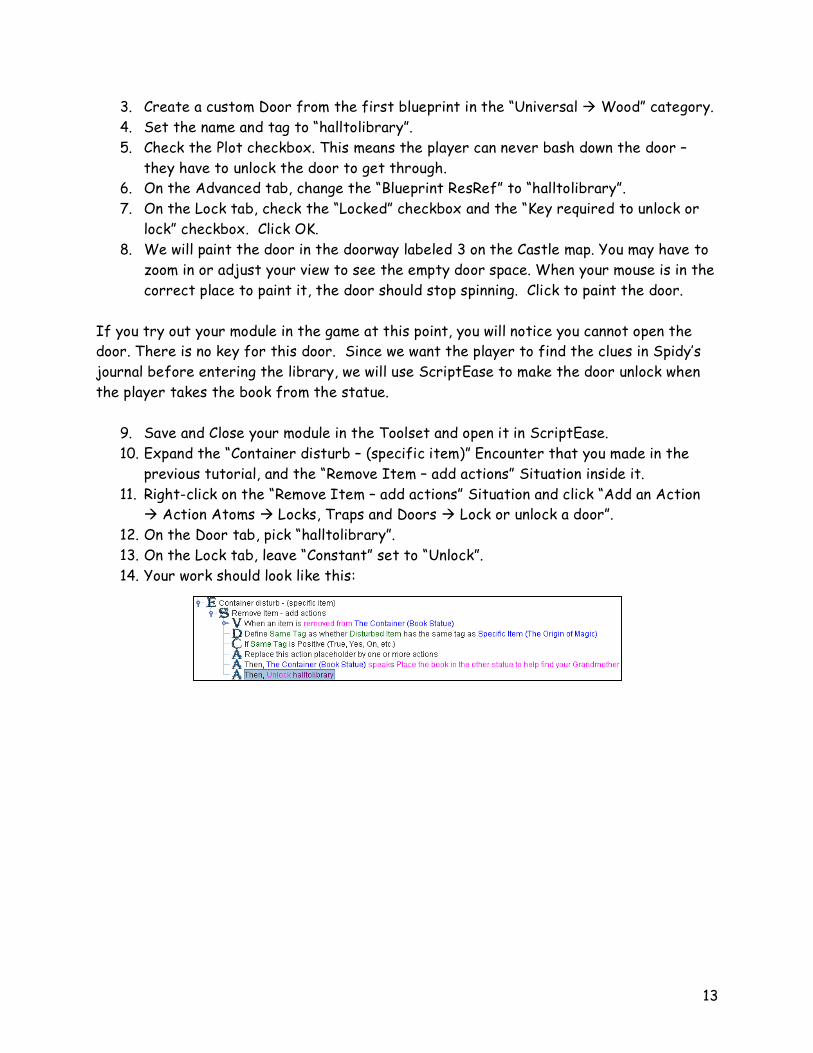
9. Save and Close your module in the Toolset and open it in ScriptEase. 10. Expand the “Container disturb – (specific item)” Encounter that you made in the
previous tutorial, and the “Remove Item – add actions” Situation inside it. 11. Right-click on the “Remove Item – add actions” Situation and click “Add an Action
Action Atoms Locks, Traps and Doors Lock or unlock a door”. 12. On the Door tab, pick “halltolibrary”. 13. On the Lock tab, leave “Constant” set to “Unlock”. 14. Your work should look like this:
14
15. Save and Compile. Try your module in the game! Tutorial 8: Creatures Creatures can be your friends and your enemies. The Toolset comes with a wide selection of blueprints for monsters and humans. You can customize your own.
1. Close your module in ScriptEase and open it in the Toolset. Don’t forget to save and
compile first. Open the "Castle" area.
2. Open the Creature palette by pressing the button. Ensure the Standard button is selected.
3. Make a custom Skeleton, under the “Monsters Undead Skeleton” category. Name your skeleton “Mr. Bones”. We won’t use ScriptEase on Mr. Bones so we don’t need to set the Tag.
4. Open Mr. Bones’ inventory. If a warning screen appears, click "OK". 5. Add the Custom Item “Skeleton Key” from the “Plot Item” category to Mr. Bones’
inventory. 6. Select the Skeleton Key you added and check the “Dropable” checkbox on the lower
right. This will ensure that the key appears when Mr. Bones is killed. 7. Paint an instance of Mr. Bones in the back of the room labeled 6. 8. Save your module. If you visit Mr. Bones, you will notice that he attacks you. When
he dies, he leaves behind a key.
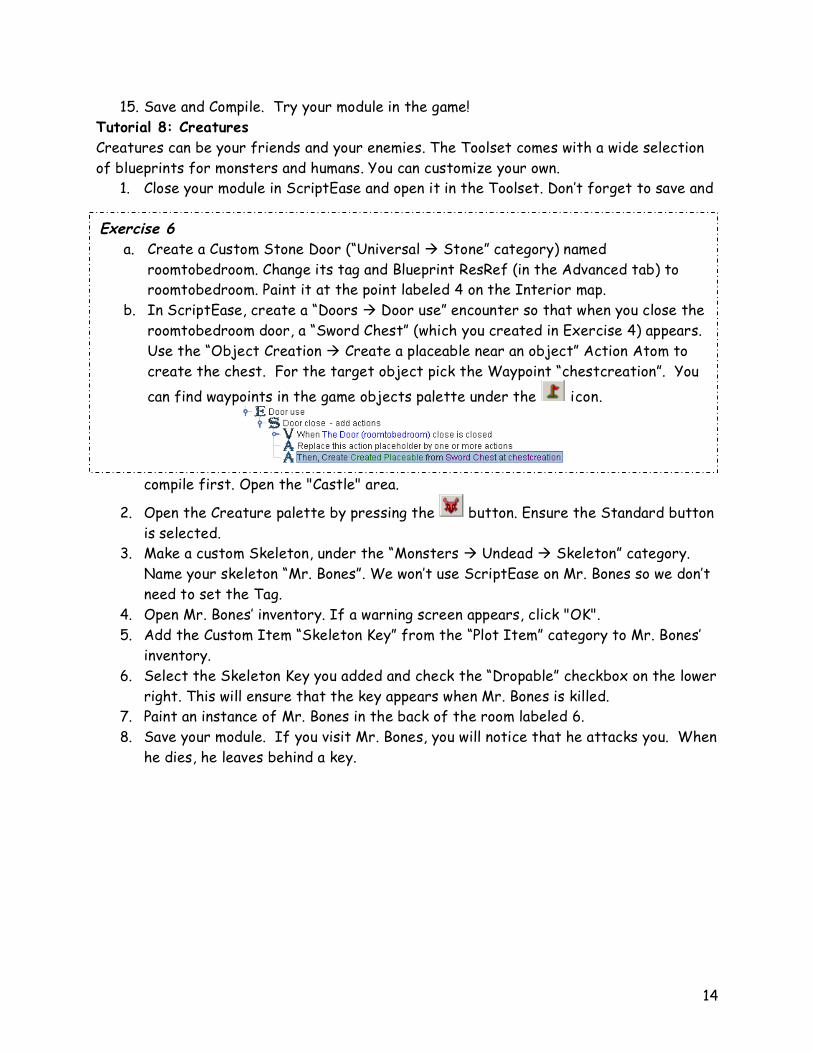
Exercise 6 a. Create a Custom Stone Door (“Universal Stone” category) named
roomtobedroom. Change its tag and Blueprint ResRef (in the Advanced tab) to roomtobedroom. Paint it at the point labeled 4 on the Interior map.
b. In ScriptEase, create a “Doors Door use” encounter so that when you close the roomtobedroom door, a “Sword Chest” (which you created in Exercise 4) appears. Use the “Object Creation Create a placeable near an object” Action Atom to create the chest. For the target object pick the Waypoint “chestcreation”. You
can find waypoints in the game objects palette under the icon.
15
Tutorial 9: Secret Doors Secret Doors are special kinds of doors that are invisible unless the player gets near them. In this tutorial, we will create the secret door in the cook’s bedroom.
1. Load your module in the Toolset and open the Castle area. 2. Create a custom “Hidden Wall Door Trigger” placeable from the “Miscellaneous
Interior” category. Name it “Bedroom Trigger” and set its Tag to “BRsecretdoor”. 3. Paint the placeable against the wall close to the point labeled 10 on the interior
map. The placeable will be invisible but you can see the green box around it. Make sure the blue arrow is facing away from the wall.
4. Create another custom “Hidden Wall Door Trigger” placeable and name it “Return Trigger”. Set its Tag to “HRsecretdoor”.
5. Paint the Return Trigger against the wall close to the point labeled 11 on the map. Again, make sure the blue arrow is pointing away from the wall.
6. Save and close your module in the Toolset and open it in ScriptEase. 7. Add a "Placeables Placeable Heartbeat - detect secret door" Encounter on the
"Bedroom Trigger".
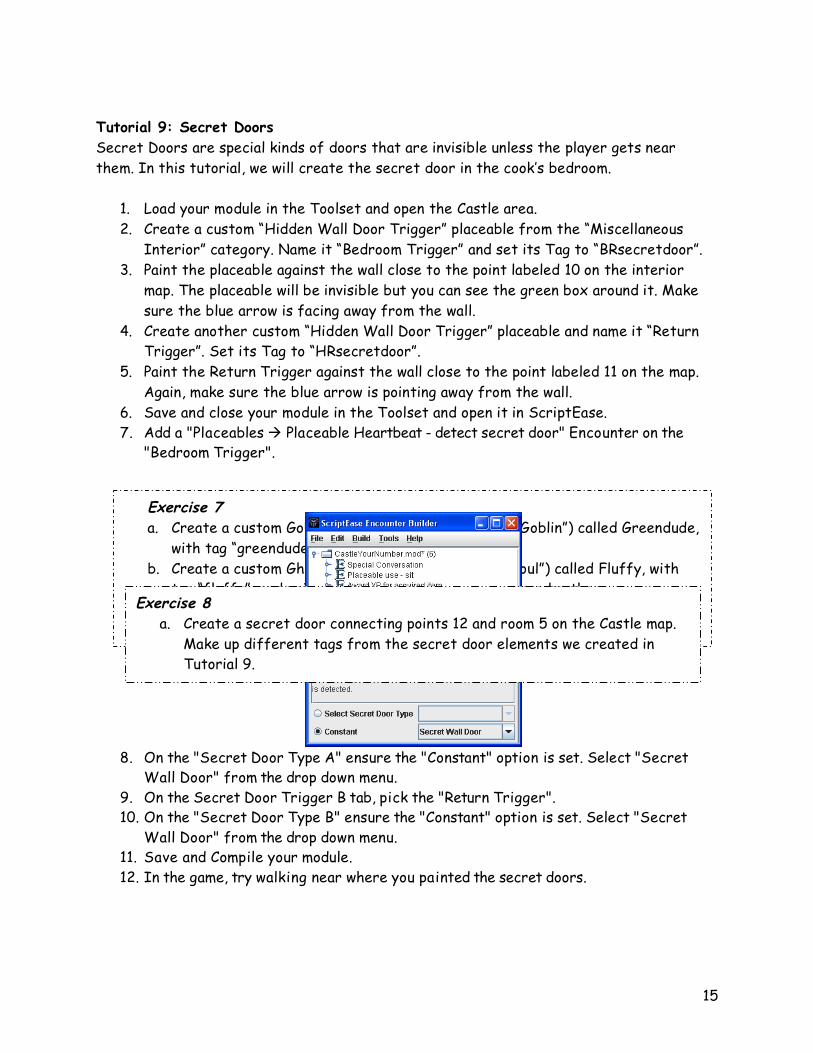
8. On the "Secret Door Type A" ensure the "Constant" option is set. Select "Secret Wall Door" from the drop down menu.
9. On the Secret Door Trigger B tab, pick the "Return Trigger". 10. On the "Secret Door Type B" ensure the "Constant" option is set. Select "Secret
Wall Door" from the drop down menu. 11. Save and Compile your module. 12. In the game, try walking near where you painted the secret doors.
Exercise 7 a. Create a custom Goblin (“Monsters Humanoid Goblin”) called Greendude,
with tag “greendude”, and paint it into room 11. b. Create a custom Ghoul (“Monsters Undead Ghoul”) called Fluffy, with
tag “fluffy”, and paint it into room 14, in front of Grandmother. c. Create a custom Fire Beetle (“Monsters Insects Beetles”) called Hot
Stuff, with tag “hotstuff”, and paint into the back of room 13 by the bed.
Exercise 8 a. Create a secret door connecting points 12 and room 5 on the Castle map.
Make up different tags from the secret door elements we created in Tutorial 9.
16
Tutorial 10: Avoiding Repetition In Exercise 5 we made Norbert’s Chair speak a clue when the player sits in it. The chair will speak the same clue every time the player gets up and sits back down again. Sometimes we only want the game to do an action the first time the player does something. In this tutorial we will make Spidy appear when the player puts the “Origin of Magic” in the second statue. Spidy will only appear the first time the player does this.
1. Load your module in the Toolset and open the Castle Area. 2. Create a custom Giant Spider (“Monsters Insects Spiders”) called “Spidy”,
with Tag “spidy”. 3. Put “Spidy’s Adventure” (from the “Plot Item” category) in its Inventory, and make
it “Dropable”. 4. Save and close your module in the Toolset, and open it in ScriptEase 5. In ScriptEase, add a “Container disturb – (specific item)” Encounter on “Spidy’s
Statue”. 6. On the Specific Item tab, pick “The Origin of Magic”.
Now we have two Encounters called “Container disturb – (specific item)”. To tell them apart, we can change their names.
7. On the Description tab, change the “Instance Name” to “Add the Book to Spidy’s Statue”.
8. Expand the Encounter and add the Action Atom “Object Creation Spawn a creature near an object” to the “Add Specific Item…” Situation.
9. On the Creature Blueprint tab, pick “Spidy”. 10. On the Target tab, pick “The Container” from the “Select Object” list. 11. Save and Compile, and try the game. If you put the “Origin of Magic” back in the
Spidy Statue, and then take it out again, Spidy will appear again! We only want Spidy to appear once.
12. In ScriptEase, open the “Add the Book to Spidy’s Statue” Encounter, and select the “Add Specific Item – add actions” Situation.
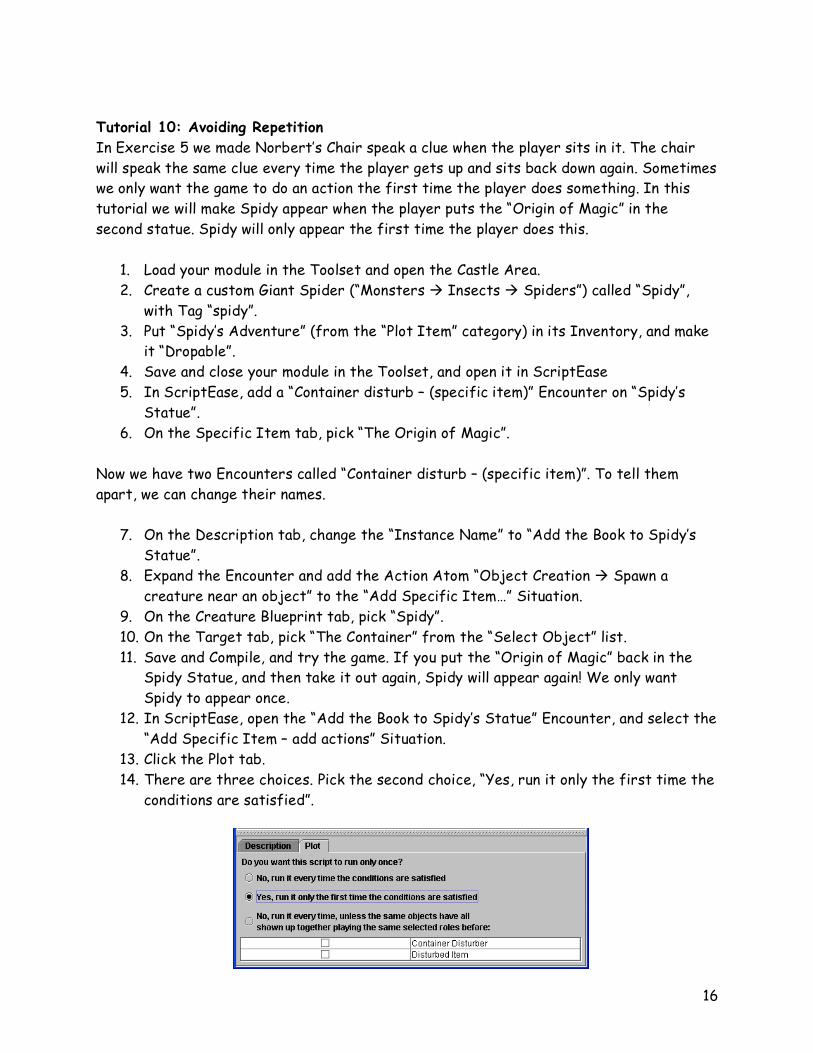
13. Click the Plot tab. 14. There are three choices. Pick the second choice, “Yes, run it only the first time the
conditions are satisfied”.
17
15. Save and Compile, and try the game. Now Spidy should appear only the first time
the player puts the book in the statue.
Tutorial 11: NPCs and Factions The player can talk to creatures in the game to gain clues about the story. In this tutorial we will place Bruce outside the castle doors. In a later tutorial, we will give him the gift of speech.
1. In the Toolset, open the “Exterior” area. 2. Create a custom “House Guard” from the “Creatures NPCs Humans” category.
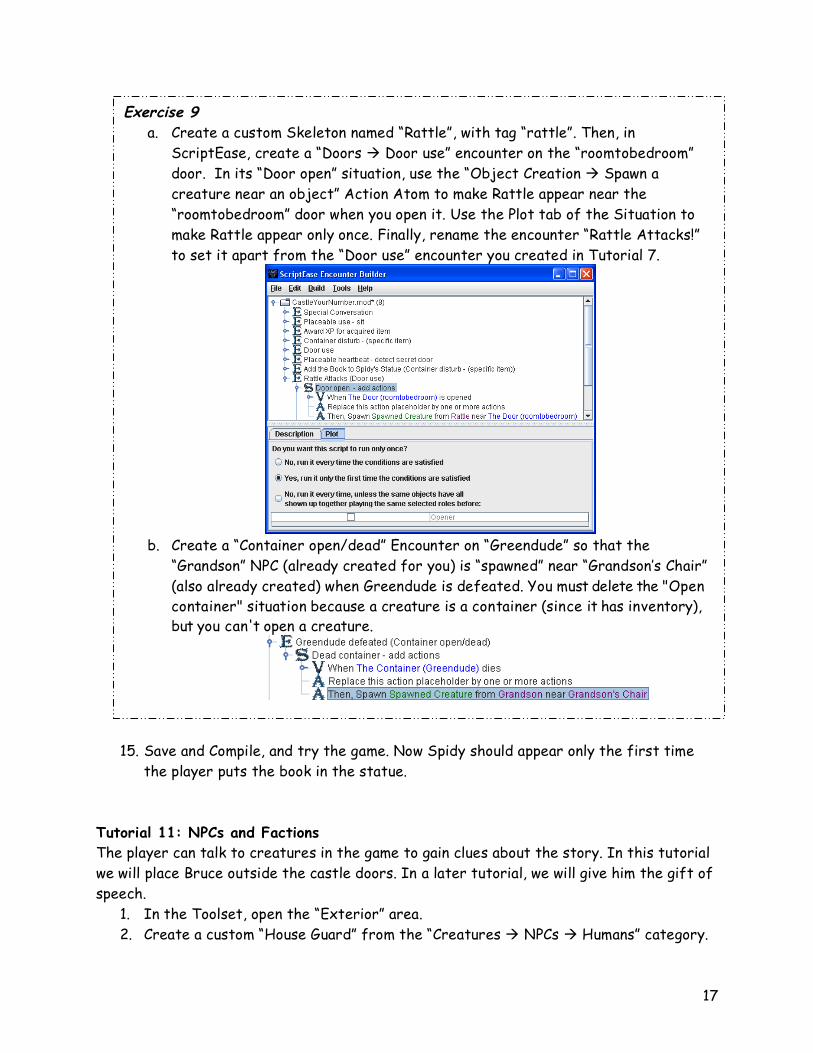
Exercise 9 a. Create a custom Skeleton named “Rattle”, with tag “rattle”. Then, in
ScriptEase, create a “Doors Door use” encounter on the “roomtobedroom” door. In its “Door open” situation, use the “Object Creation Spawn a creature near an object” Action Atom to make Rattle appear near the “roomtobedroom” door when you open it. Use the Plot tab of the Situation to make Rattle appear only once. Finally, rename the encounter “Rattle Attacks!” to set it apart from the “Door use” encounter you created in Tutorial 7.
b. Create a “Container open/dead” Encounter on “Greendude” so that the
“Grandson” NPC (already created for you) is “spawned” near “Grandson’s Chair” (also already created) when Greendude is defeated. You must delete the "Open container" situation because a creature is a container (since it has inventory), but you can't open a creature.
18
Give him the First Name “Bruce”, and Tag “bruce”. 3. On the Advanced tab, under “Faction”, change the “Hostile” setting to “Defender”.
In Neverwinter Nights, every creature belongs to a gang, called a Faction. Some gangs are at peace, and some gangs are at war. The player is in her own gang. The “Defender” faction will not attack the player. The “Hostile” faction will attack both the player and Defenders but will leave the “Commoner” faction alone. You will not be able to talk to a creature who is hostile to you, and a creature who is friendly to you will attack you if you attack
someone in its faction.
4. Paint Bruce at the position labeled 2 on the Exterior map. 5. Walk up to Bruce in the game and notice that he doesn’t attack you.
Tutorial 12: Conversations In a traditional short story, a conversation between characters is a single sequence of statements – one character says something, and then another character responds, and so on. In an interactive story, the player can choose from several responses, to make the conversation follow different branches. When you are writing your interactive story, you set up all the different branches of the conversation ahead of time. This makes the conversation like a tree.
1. In the Toolset, right-click on your custom Bruce blueprint and select “Edit”. Remember that we use “Edit” on existing custom blueprints, not “Edit Copy”.
2. On the Basic tab, press the "Edit" button next to the Conversation drop-down at the bottom of the window. This launches the Conversation Editor with a new, empty
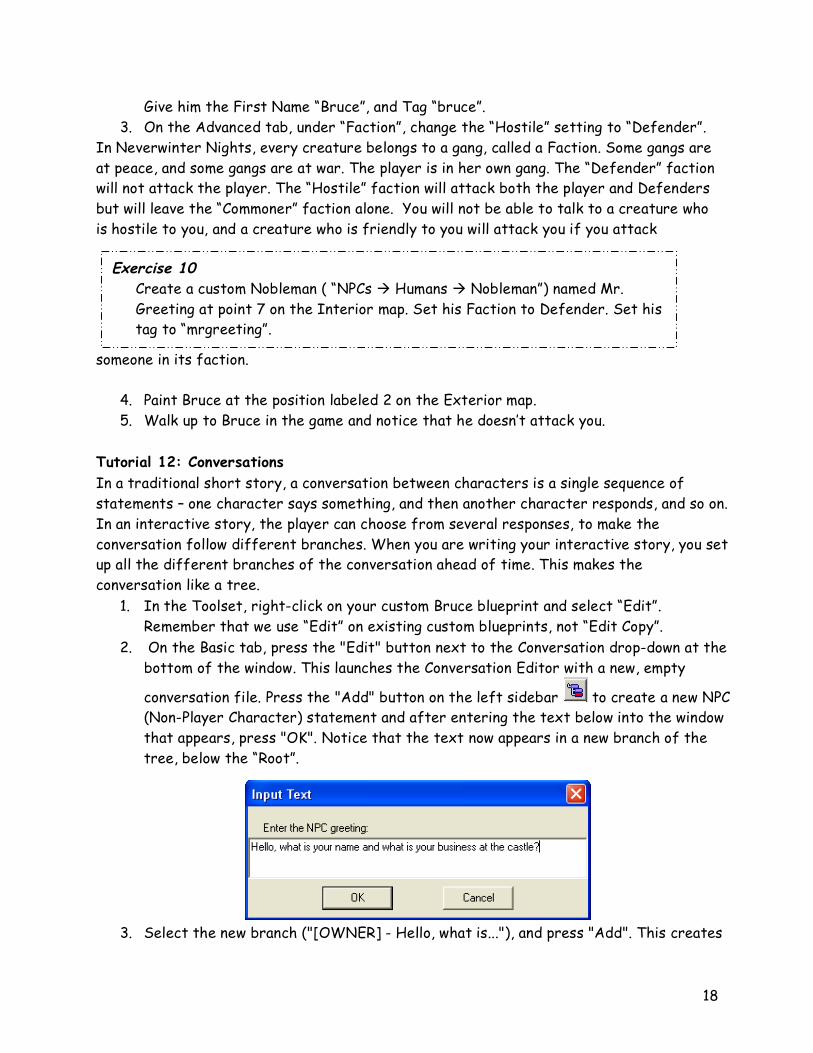
conversation file. Press the "Add" button on the left sidebar to create a new NPC (Non-Player Character) statement and after entering the text below into the window that appears, press "OK". Notice that the text now appears in a new branch of the tree, below the “Root”.
3. Select the new branch ("[OWNER] - Hello, what is..."), and press "Add". This creates
Exercise 10 Create a custom Nobleman ( “NPCs Humans Nobleman”) named Mr. Greeting at point 7 on the Interior map. Set his Faction to Defender. Set his tag to “mrgreeting”.

19
a new PC (Player Character – that’s you!) response node. Enter this text:
Note: “<FirstName>" is a token. A token is a special word that the game replaces with some other text depending on the context. In this case, the game would replace “<FirstName>” with the first name of the player to whom the NPC is speaking.
4. With the new branch ("My name is...") selected, press "Add" again. This creates another NPC branch. Enter this text:
5. With the very first NPC branch ("[OWNER] - Hello, what is...") selected, press "Add" again and enter this text as an alternative response for the PC.
6. With the new branch ("You must be…") selected, press "Add" again and enter this
text for the new NPC response.
7. Your conversation should now look like this:
Not like this:
8. Click the Save As button at the top of the window. Save the conversation under the name "bruce", close the Conversation Editor, and click OK on the Bruce Creature
I didn’t realize who you are, I’m a new guard at the castle. There is a useful potion on the exterior grounds that you should obtain before entering the castle. I hear there are hostile creatures about.
You must be new! My name is <FirstName>. My grandmother lives here.
My name is <FirstName>. I have come to visit my grandmother.
Yes I am new. There is a useful potion on the exterior grounds that you should obtain before entering the castle. I hear there are hostile creatures about.
20
Properties window. 9. Since we already painted a Bruce outside, we have to “Update Instances” so he can
use the new conversation. Right-click your Bruce blueprint and follow the steps in Tutorial 5.
10. Save your module and try talking to Bruce in the game.
Tutorial 13: Triggers A trigger is like a tripwire that surrounds a space on the floor. When the player enters or leaves the area, we can make the game do an action.
1. In the Toolset, load the Castle area.
2. Open the Trigger palette by pressing the green icon located in the game objects palette. Ensure the Standard palette is selected.
3. Under the “Generic Trigger” category, create a custom “New Generic” trigger. Change its name to “Cook’s Trigger” and its tag to “cookstrigger”.
4. Paint a Cook’s Trigger inside the cook’s bedroom (room 10 on the Interior map), in front of his door, by drawing a square with the mouse. Double-click to finish drawing.
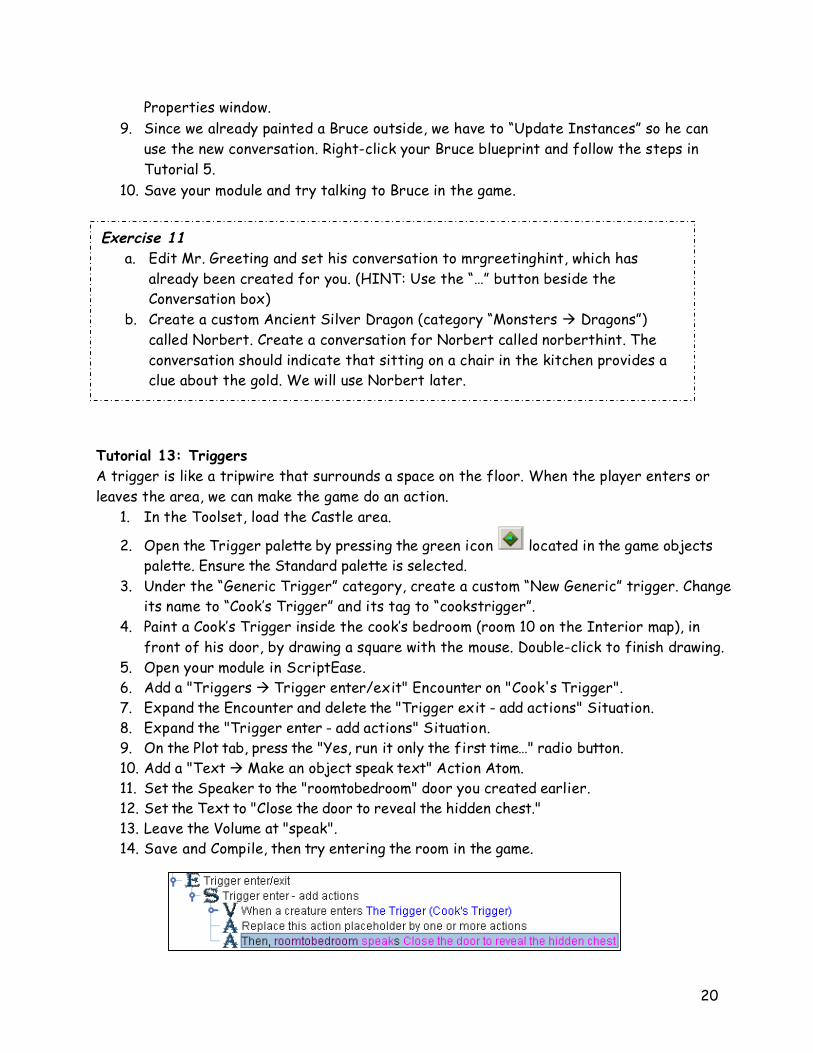
5. Open your module in ScriptEase. 6. Add a "Triggers Trigger enter/exit" Encounter on "Cook's Trigger". 7. Expand the Encounter and delete the "Trigger exit - add actions" Situation. 8. Expand the "Trigger enter - add actions" Situation. 9. On the Plot tab, press the "Yes, run it only the first time…" radio button. 10. Add a "Text Make an object speak text" Action Atom. 11. Set the Speaker to the "roomtobedroom" door you created earlier. 12. Set the Text to "Close the door to reveal the hidden chest." 13. Leave the Volume at "speak". 14. Save and Compile, then try entering the room in the game.
Exercise 11 a. Edit Mr. Greeting and set his conversation to mrgreetinghint, which has
already been created for you. (HINT: Use the “…” button beside the Conversation box)
b. Create a custom Ancient Silver Dragon (category “Monsters Dragons”) called Norbert. Create a conversation for Norbert called norberthint. The conversation should indicate that sitting on a chair in the kitchen provides a clue about the gold. We will use Norbert later.
21
According to the story, the door should only whisper the clue if the player is carrying the "Origin of Magic". We can use Definitions to get details about what the player has done.
Conditions allow you to carry out Actions based on whether a Definition is true or false.
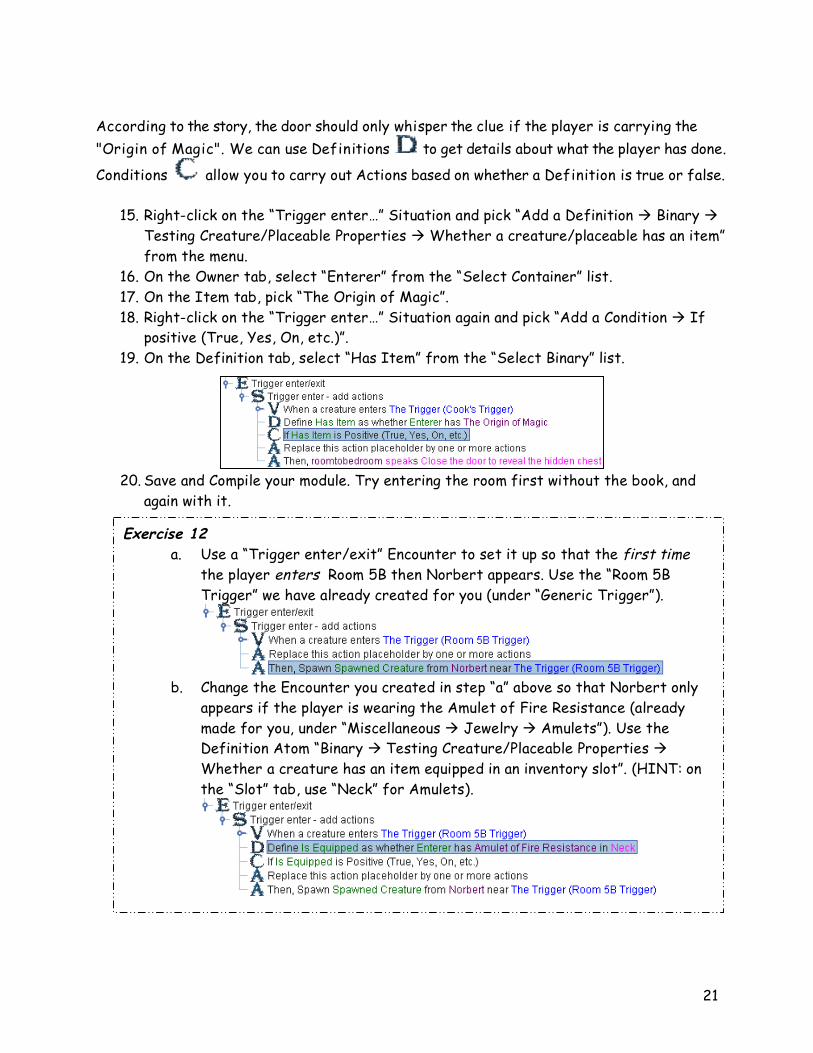
15. Right-click on the “Trigger enter…” Situation and pick “Add a Definition Binary Testing Creature/Placeable Properties Whether a creature/placeable has an item” from the menu.
16. On the Owner tab, select “Enterer” from the “Select Container” list. 17. On the Item tab, pick “The Origin of Magic”. 18. Right-click on the “Trigger enter…” Situation again and pick “Add a Condition If
positive (True, Yes, On, etc.)”. 19. On the Definition tab, select “Has Item” from the “Select Binary” list.
20. Save and Compile your module. Try entering the room first without the book, and again with it.
Exercise 12 a. Use a “Trigger enter/exit” Encounter to set it up so that the first time
the player enters Room 5B then Norbert appears. Use the “Room 5B Trigger” we have already created for you (under “Generic Trigger”).
b. Change the Encounter you created in step “a” above so that Norbert only
appears if the player is wearing the Amulet of Fire Resistance (already made for you, under “Miscellaneous Jewelry Amulets”). Use the Definition Atom “Binary Testing Creature/Placeable Properties Whether a creature has an item equipped in an inventory slot”. (HINT: on the “Slot” tab, use “Neck” for Amulets).

22
Tutorial 14: Barriers When you are writing a story on paper it is easy to give the reader just the facts you want them to have, to keep them in suspense. Similarly, with an interactive story we want to be able to stop the character from going certain places until plot events have unfolded. This tutorial shows you how to block the character from going into a certain room. We will use ScriptEase to make it so that the Sword of Quickness gives the player the courage to enter.
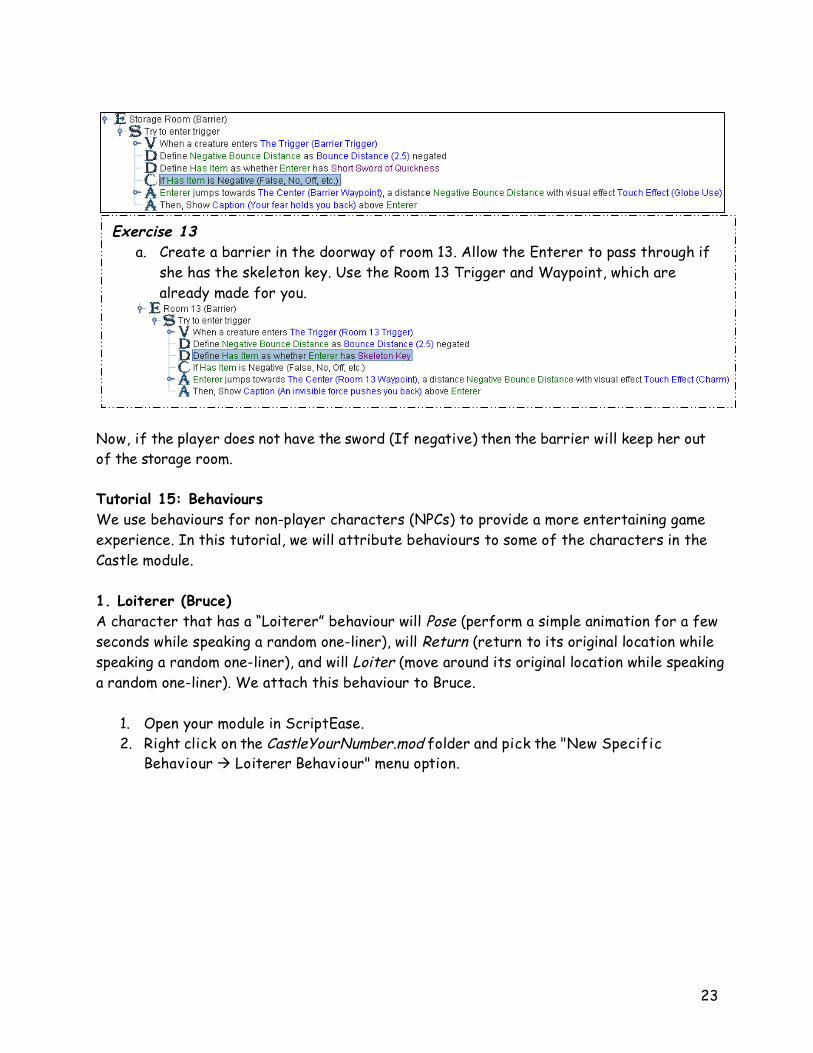
1. Load your module in ScriptEase. 2. Add the encounter "Triggers Trigger enter/exit - barrier" on the "Barrier
Trigger", which has been created for you. 3. On the Description tab, change the Instance Name to "Storage Room (Barrier)". 4. On the Center tab, pick "Waypoints Barrier Waypoint", which has also been
created already. 5. On the Touch Effect tab, ensure the "Constant" option is set. Select "Globe Use"
from the list. 6. On the Destroy Effect tab, ensure the "Constant" option is set. Select
"Dispel" from the list. 7. On the Bounce Distance tab, ensure the "Constant" option is set. Type "2.5". 8. On the Caption tab, ensure the "Constant" option is set. Type “Your fear holds you
back.” 9. Delete the "Try to exit trigger", "Destroy barrier on entry", and "Destroy barrier on
exit" Situations. We have now set up the encounter. However, we must add a Definition and a Condition in order to make sure the character is in possession of the sword to pass through. Play the game and see what happens when you try to go into the storage room.
10. Right-click on the "Try to enter trigger…" situation and add the definition "Binary Testing Creature/Placeable Properties Whether a creature/placeable has an item".
11. On the Owner tab of the new Definition, ensure the "Select Container" radio button is pressed and choose "Enterer" from the drop down menu.
12. On the Item tab, pick the Item "Weapons Bladed Short Swords Short Sword of Quickness".
13. Add the condition "If negative". 14. On the Definition tab of the condition, select "Has Item" from the "Select Binary"
list.
23
Now, if the player does not have the sword (If negative) then the barrier will keep her out of the storage room. Tutorial 15: Behaviours We use behaviours for non-player characters (NPCs) to provide a more entertaining game experience. In this tutorial, we will attribute behaviours to some of the characters in the Castle module.
1. Loiterer (Bruce) A character that has a “Loiterer” behaviour will Pose (perform a simple animation for a few seconds while speaking a random one-liner), will Return (return to its original location while speaking a random one-liner), and will Loiter (move around its original location while speaking a random one-liner). We attach this behaviour to Bruce.
1. Open your module in ScriptEase. 2. Right click on the CastleYourNumber.mod folder and pick the "New Specific
Behaviour Loiterer Behaviour" menu option.
Exercise 13 a. Create a barrier in the doorway of room 13. Allow the Enterer to pass through if
she has the skeleton key. Use the Room 13 Trigger and Waypoint, which are already made for you.
24
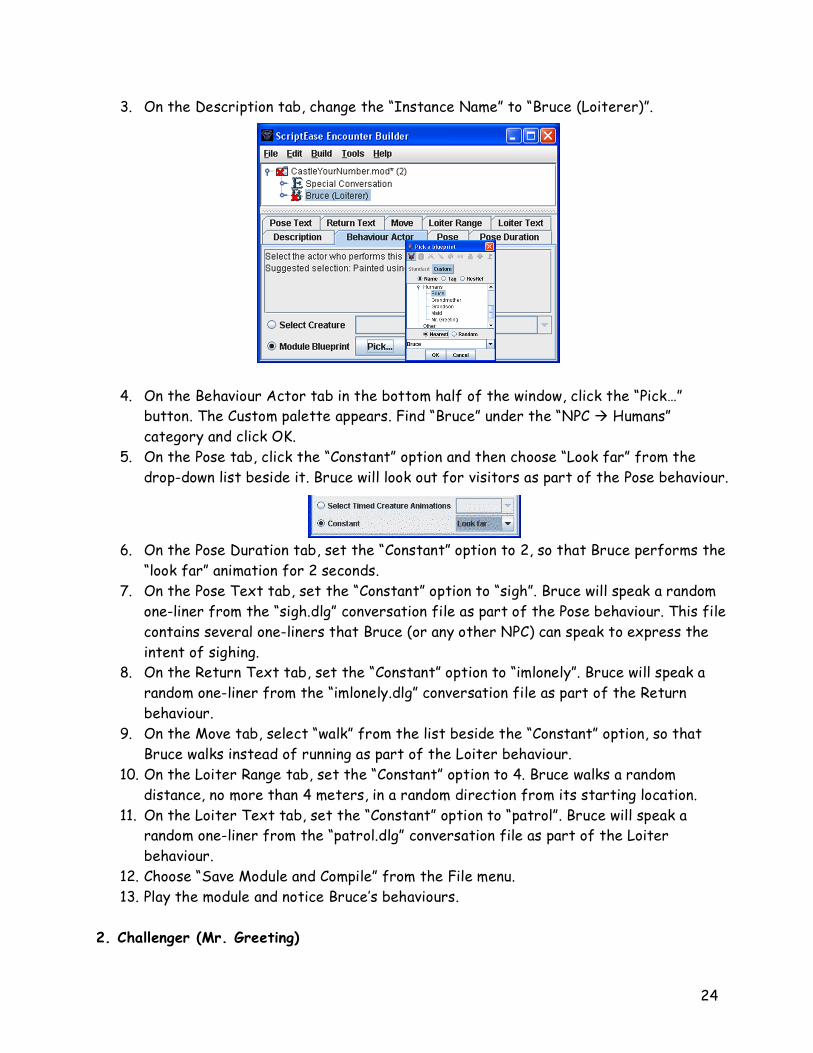
3. On the Description tab, change the “Instance Name” to “Bruce (Loiterer)”.
4. On the Behaviour Actor tab in the bottom half of the window, click the “Pick…”
button. The Custom palette appears. Find “Bruce” under the “NPC Humans” category and click OK.
5. On the Pose tab, click the “Constant” option and then choose “Look far” from the drop-down list beside it. Bruce will look out for visitors as part of the Pose behaviour.
6. On the Pose Duration tab, set the “Constant” option to 2, so that Bruce performs the “look far” animation for 2 seconds.
7. On the Pose Text tab, set the “Constant” option to “sigh”. Bruce will speak a random one-liner from the “sigh.dlg” conversation file as part of the Pose behaviour. This file contains several one-liners that Bruce (or any other NPC) can speak to express the intent of sighing.
8. On the Return Text tab, set the “Constant” option to “imlonely”. Bruce will speak a random one-liner from the “imlonely.dlg” conversation file as part of the Return behaviour.
9. On the Move tab, select “walk” from the list beside the “Constant” option, so that Bruce walks instead of running as part of the Loiter behaviour.
10. On the Loiter Range tab, set the “Constant” option to 4. Bruce walks a random distance, no more than 4 meters, in a random direction from its starting location.
11. On the Loiter Text tab, set the “Constant” option to “patrol”. Bruce will speak a random one-liner from the “patrol.dlg” conversation file as part of the Loiter behaviour.
12. Choose “Save Module and Compile” from the File menu. 13. Play the module and notice Bruce’s behaviours.
2. Challenger (Mr. Greeting)
25
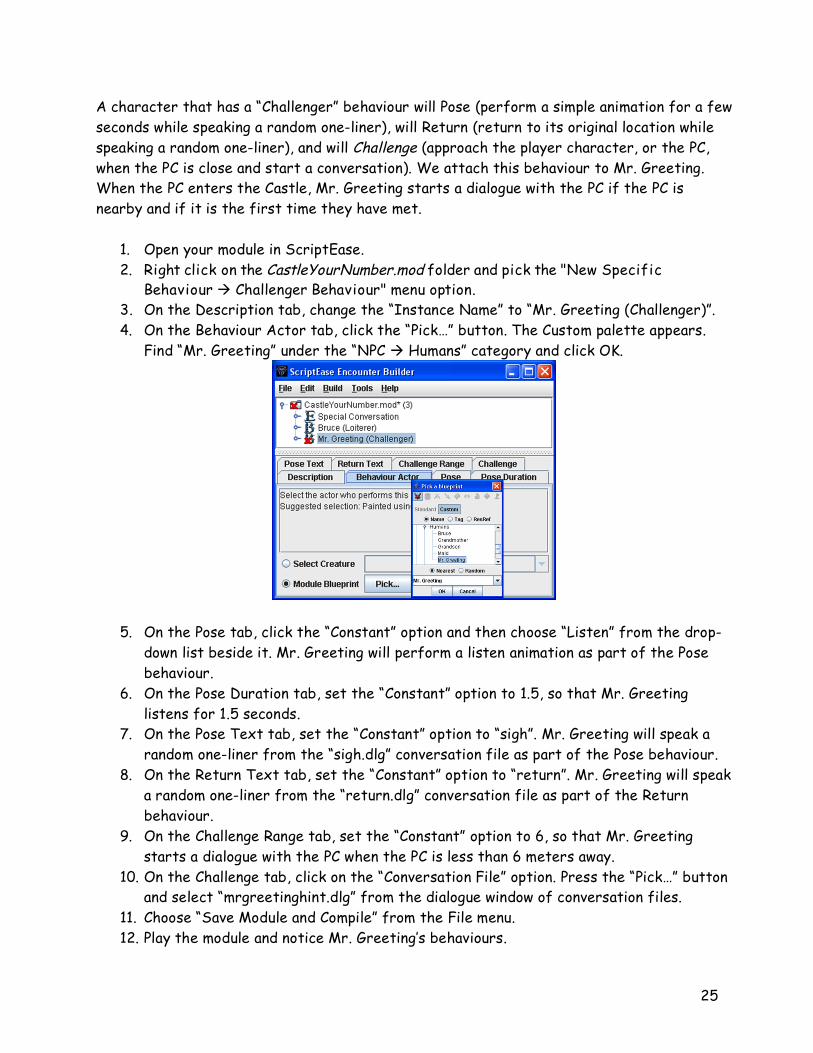
A character that has a “Challenger” behaviour will Pose (perform a simple animation for a few seconds while speaking a random one-liner), will Return (return to its original location while speaking a random one-liner), and will Challenge (approach the player character, or the PC, when the PC is close and start a conversation). We attach this behaviour to Mr. Greeting. When the PC enters the Castle, Mr. Greeting starts a dialogue with the PC if the PC is nearby and if it is the first time they have met.
1. Open your module in ScriptEase. 2. Right click on the CastleYourNumber.mod folder and pick the "New Specific
Behaviour Challenger Behaviour" menu option. 3. On the Description tab, change the “Instance Name” to “Mr. Greeting (Challenger)”. 4. On the Behaviour Actor tab, click the “Pick…” button. The Custom palette appears.
Find “Mr. Greeting” under the “NPC Humans” category and click OK.
5. On the Pose tab, click the “Constant” option and then choose “Listen” from the drop-
down list beside it. Mr. Greeting will perform a listen animation as part of the Pose behaviour.
6. On the Pose Duration tab, set the “Constant” option to 1.5, so that Mr. Greeting listens for 1.5 seconds.
7. On the Pose Text tab, set the “Constant” option to “sigh”. Mr. Greeting will speak a random one-liner from the “sigh.dlg” conversation file as part of the Pose behaviour.
8. On the Return Text tab, set the “Constant” option to “return”. Mr. Greeting will speak a random one-liner from the “return.dlg” conversation file as part of the Return behaviour.
9. On the Challenge Range tab, set the “Constant” option to 6, so that Mr. Greeting starts a dialogue with the PC when the PC is less than 6 meters away.
10. On the Challenge tab, click on the “Conversation File” option. Press the “Pick…” button and select “mrgreetinghint.dlg” from the dialogue window of conversation files.
11. Choose “Save Module and Compile” from the File menu. 12. Play the module and notice Mr. Greeting’s behaviours.
26
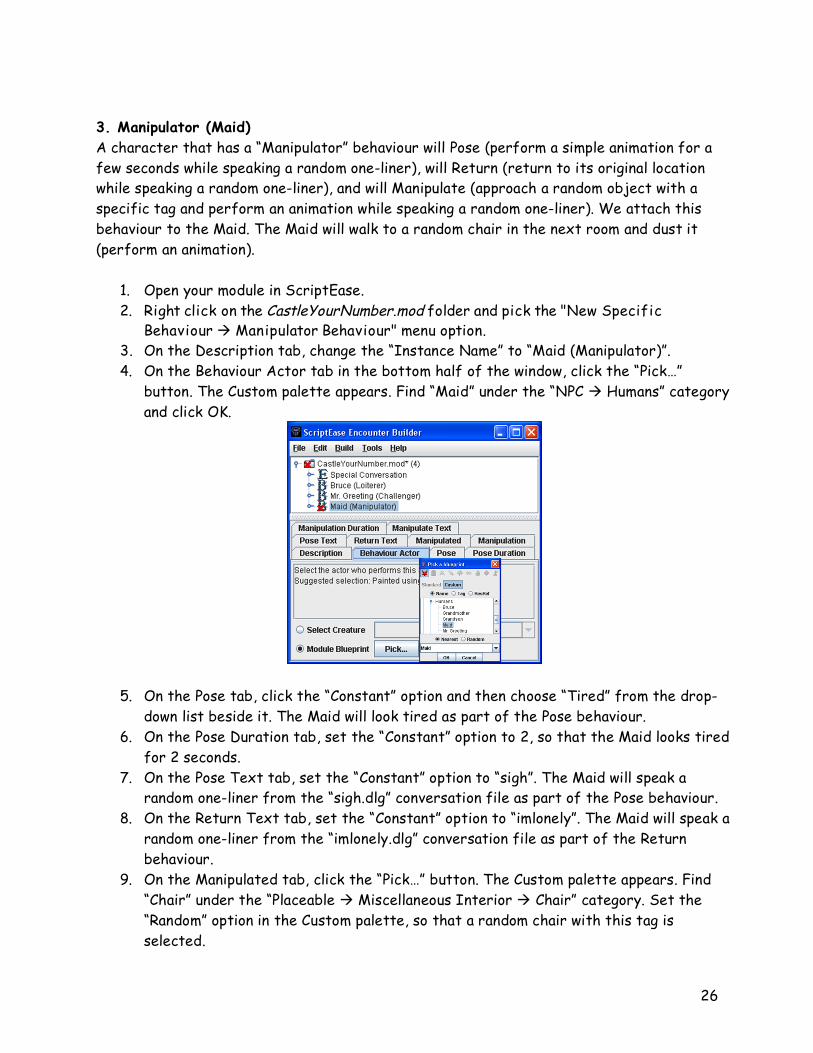
3. Manipulator (Maid) A character that has a “Manipulator” behaviour will Pose (perform a simple animation for a few seconds while speaking a random one-liner), will Return (return to its original location while speaking a random one-liner), and will Manipulate (approach a random object with a specific tag and perform an animation while speaking a random one-liner). We attach this behaviour to the Maid. The Maid will walk to a random chair in the next room and dust it (perform an animation).
1. Open your module in ScriptEase. 2. Right click on the CastleYourNumber.mod folder and pick the "New Specific
Behaviour Manipulator Behaviour" menu option. 3. On the Description tab, change the “Instance Name” to “Maid (Manipulator)”. 4. On the Behaviour Actor tab in the bottom half of the window, click the “Pick…”
button. The Custom palette appears. Find “Maid” under the “NPC Humans” category and click OK.
5. On the Pose tab, click the “Constant” option and then choose “Tired” from the drop-
down list beside it. The Maid will look tired as part of the Pose behaviour. 6. On the Pose Duration tab, set the “Constant” option to 2, so that the Maid looks tired
for 2 seconds. 7. On the Pose Text tab, set the “Constant” option to “sigh”. The Maid will speak a
random one-liner from the “sigh.dlg” conversation file as part of the Pose behaviour. 8. On the Return Text tab, set the “Constant” option to “imlonely”. The Maid will speak a
random one-liner from the “imlonely.dlg” conversation file as part of the Return behaviour.
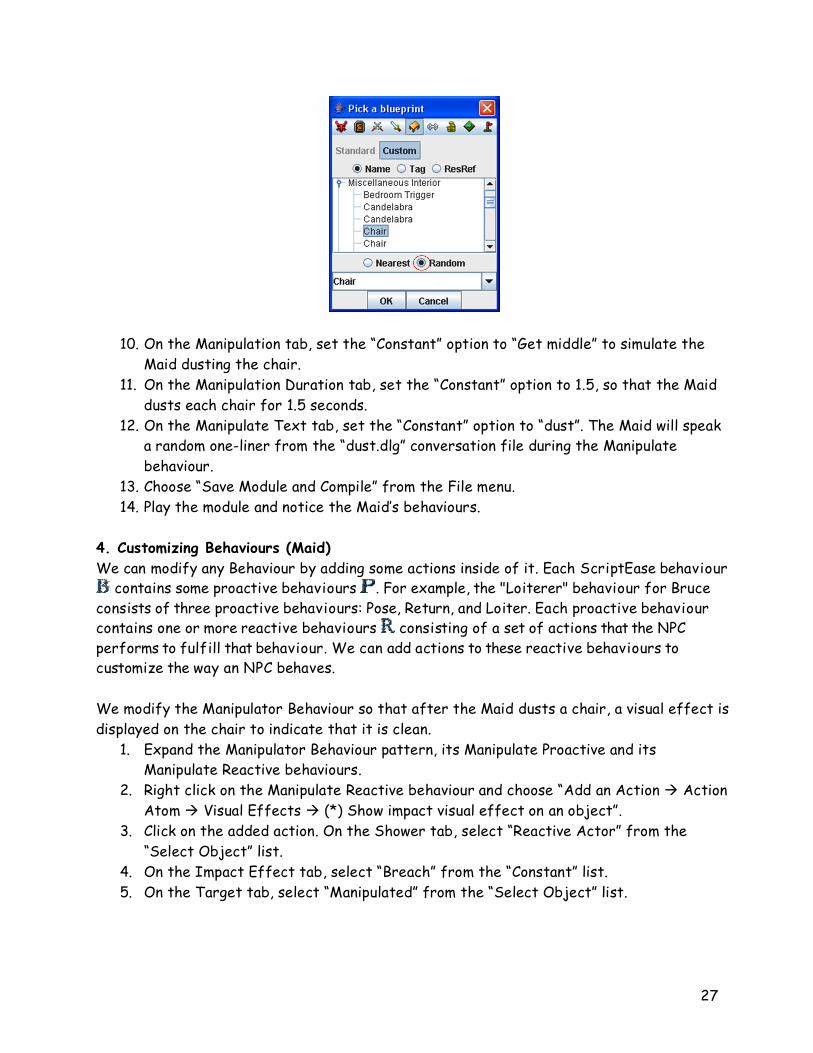
9. On the Manipulated tab, click the “Pick…” button. The Custom palette appears. Find “Chair” under the “Placeable Miscellaneous Interior Chair” category. Set the “Random” option in the Custom palette, so that a random chair with this tag is selected.
27
10. On the Manipulation tab, set the “Constant” option to “Get middle” to simulate the
Maid dusting the chair. 11. On the Manipulation Duration tab, set the “Constant” option to 1.5, so that the Maid
dusts each chair for 1.5 seconds. 12. On the Manipulate Text tab, set the “Constant” option to “dust”. The Maid will speak
a random one-liner from the “dust.dlg” conversation file during the Manipulate behaviour.
13. Choose “Save Module and Compile” from the File menu. 14. Play the module and notice the Maid’s behaviours.
4. Customizing Behaviours (Maid) We can modify any Behaviour by adding some actions inside of it. Each ScriptEase behaviour
contains some proactive behaviours . For example, the "Loiterer" behaviour for Bruce consists of three proactive behaviours: Pose, Return, and Loiter. Each proactive behaviour contains one or more reactive behaviours consisting of a set of actions that the NPC performs to fulfill that behaviour. We can add actions to these reactive behaviours to customize the way an NPC behaves. We modify the Manipulator Behaviour so that after the Maid dusts a chair, a visual effect is displayed on the chair to indicate that it is clean.
1. Expand the Manipulator Behaviour pattern, its Manipulate Proactive and its Manipulate Reactive behaviours.
2. Right click on the Manipulate Reactive behaviour and choose “Add an Action Action Atom Visual Effects (*) Show impact visual effect on an object”.
3. Click on the added action. On the Shower tab, select “Reactive Actor” from the “Select Object” list.
4. On the Impact Effect tab, select “Breach” from the “Constant” list. 5. On the Target tab, select “Manipulated” from the “Select Object” list.

28
6. Choose “Save Module and Compile” from the File menu. 7. Play the game and observe the chairs sparkling after they are dusted. There are other behaviours that you can choose from the Behaviour Patterns library. Try a few of them out!
Tutorial 16: Introduction to Plot Tokens Plot tokens are invisible items that the player gets after accomplishing tasks in the game. Later in the game, you can test which plot tokens the character has, to determine what should happen next. They are very useful for tying plot events together. In our case, we want to give our main character a plot token when they defeat Hot Stuff. The castle will not be safe for your Grandmother until the player has this plot token.
1. Open your module in ScriptEase. 2. Add the encounter "Container Container open/dead" on the creature "Hot Stuff",
which you created earlier. 3. Change the Encounter description to "Boss Defeated". 4. Delete the "Open container" situation. 5. From the Tools menu at the top of the window select Plot Token Builder. 6. Right-click in the white part of the Plot Token Builder choosing "New Plot Token".
Exercise 14 Create a custom Halfling by choosing the second Halfling in the Standard creatures category (“NPC Halflings Halfling”), call it Frago with tag “frago”, and paint it outside the Castle. Select the “New Specific Behaviour Behaviour Patterns Follower” so that Frago can follow the PC at a certain distance. Set Pose to “Talk laughingly”, “Pose Duration” to 2, “Pose Text” to “sigh”, “Follow Distance” to 3, and “Follow Text” to “imlonely”.
29
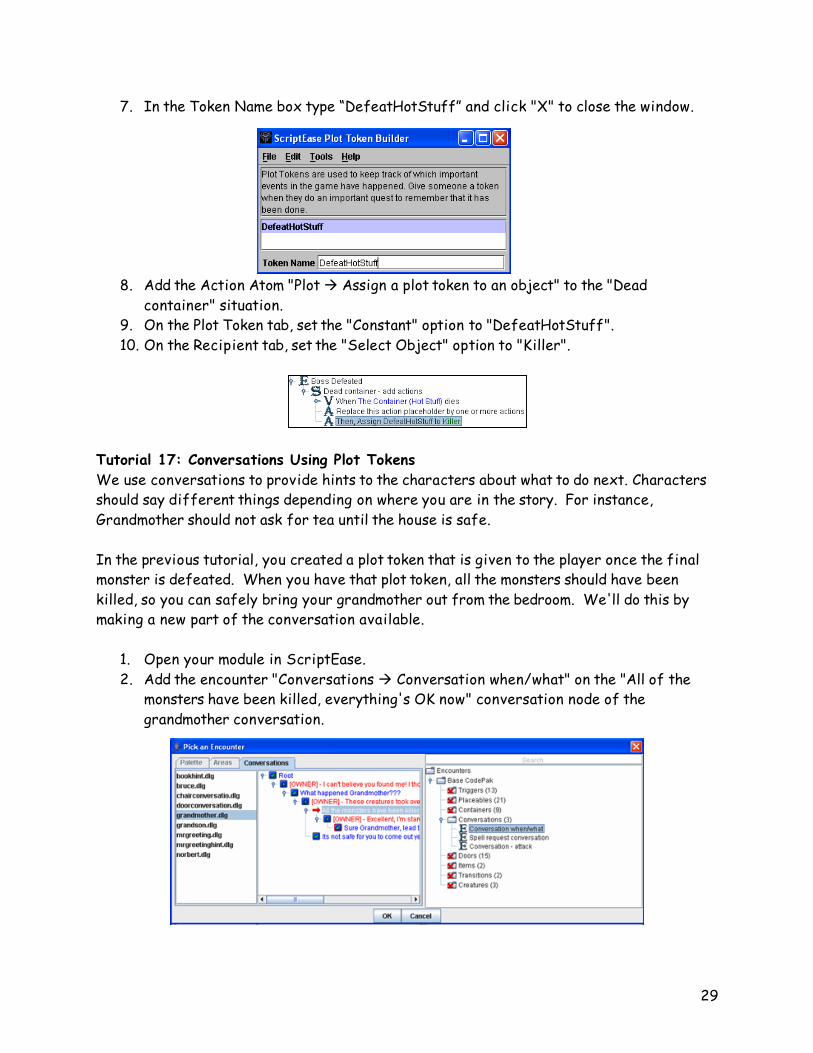
7. In the Token Name box type “DefeatHotStuff” and click "X" to close the window.
8. Add the Action Atom "Plot Assign a plot token to an object" to the "Dead container" situation.
9. On the Plot Token tab, set the "Constant" option to "DefeatHotStuff". 10. On the Recipient tab, set the "Select Object" option to "Killer".
Tutorial 17: Conversations Using Plot Tokens We use conversations to provide hints to the characters about what to do next. Characters should say different things depending on where you are in the story. For instance, Grandmother should not ask for tea until the house is safe. In the previous tutorial, you created a plot token that is given to the player once the final monster is defeated. When you have that plot token, all the monsters should have been killed, so you can safely bring your grandmother out from the bedroom. We'll do this by making a new part of the conversation available.
1. Open your module in ScriptEase. 2. Add the encounter "Conversations Conversation when/what" on the "All of the
monsters have been killed, everything's OK now" conversation node of the grandmother conversation.

30
3. Change the Description to "Grandmother - After Defeating Hot Stuff". 4. Expand the Encounter "Grandmother - After Defeating Hot Stuff". 5. Expand the Situation "When a conversation node is displayed". 6. Delete the Condition "Always Positive…". 7. Right-click "When a conversation node is displayed ", then click "Add Definition
Binary Plot Whether an object owns a plot token". 8. On the Owner tab, click "Select Object" and choose "PC Speaker". 9. In the The Token tab, click "Constant" and choose "DefeatHotStuff". 10. Right-click "When a conversation node is displayed ", then click "Add a Condition
If positive…" 11. On the Definition tab, click "Select Binary" and select "Owns". 12. Delete the situation "What happens when a conversation node is displayed".
Now the player can only tell Grandmother that it's okay if she has killed Hot Stuff. We will now make the module end when the player's Grandmother asks her to tea.
13. Add the encounter "Conversations Conversation when/what" to the "Sure grandmother, you lead the way" conversation node of the grandmother conversation.
14. Change the Description to "End Module". 15. Expand "End Module". 16. Delete "When a conversation node is displayed". 17. Expand the "What happens when a conversation node is displayed" item. 18. Delete the placeholder action. 19. Right-click the "What happens when a conversation node is displayed" item. Click
"Add an Action Action Atom Game Control End the module." 20. Set the Delay Time to 1.0 and the End Movie to "The End".
21. Now play what you've created!
Exercise 15 a. The maid is already set to use the “bookhint” conversation. In ScriptEase,
add a “Conversations Conversation when/what” encounter to the conversation node in bookhint.dlg where the maid gives the player an invisibility potion. Set its Description to “Maid gives potion”. Use the Action Atom “Items and Equipment (*) Give an item to a creature/placeable”. The potion is under “Miscellaneous Potions Potion of Invisibility”, and the Maid already has one in her inventory.
31
Appendix The Appendix teaches some extra techniques that you may want to use in your own story. You may not need them, but feel free to have a look. Tutorial A1: How to make locked doors with keys This tutorial will teach you how to set up a locked door that the player cannot open unless she is carrying a special key. For this tutorial we will not work with the CastleYourNumber.mod. You are expected to be working with your own module.
1. Open your module in the Toolset. 2. First we’ll create a brand-new custom key item from scratch. Go to the “Wizards”
menu and pick “Item Wizard”. 3. Pick “Key” from the list of item types. Click “Next”. 4. Enter a name for your key in the “Name” field. We shall enter the tag later. Click
“Next”. 5. Pick a category your key will go into. “Plot Item” is a good choice. Click “Next”. 6. On the “Finish” screen, click the “Launch Item Properties” checkbox and then click
“Finish”. 7. The Toolset has automatically given your key a tag. You can use the default or
change it. Whatever you do, you must use this tag again when we set up the door, so remember it exactly!
8. Click “OK”. 9. Create a custom Door blueprint. Use whichever door you wish. Give your door a
unique descriptive name and tag. On the Advanced tab, change the “Blueprint ResRef” to something unique.
10. On the Basic tab, make sure the “Plot” checkbox is checked. This makes it so the player cannot bash down the door.
11. Go to the Lock tab. Click the “Locked” checkbox and the “Key required to unlock or lock” checkbox. In the “Key Tag” field enter the tag for the key item you created in steps 2-7. Remember, it must be exactly the same, including capitalization.
12. Now paint your door into a doorway of your choosing, and make sure the player has some way to get the key!
Tutorial A2: Talking to and Attacking creatures This tutorial will teach you how to make a friendly creature attack you after you talk to it.
1. Open your module in the Toolset. 2. Create a custom Creature or NPC. Set its name and tag to something unique.
32
3. On the Advanced tab, change the Faction to “Neutral”. We created the Neutral Faction for this tutorial. If you create a new module you will have to create a similar Faction yourself, which is outside the scope of this tutorial.
4. On the Basic tab, in the “Conversation” box, click the “Edit” button. 5. Create your conversation however you want. However, you must have at least one
PC response in the conversation (a blue line of text). 6. Click “Done” and save your conversation with whatever file name you like. 7. Make sure your conversation is selected in the “Conversation” box. 8. Click “OK”. 9. Paint your character wherever you would like in the module. 10. Save and close your module in the Toolset. Open it in ScriptEase. 11. Add a new “Specific Encounter Conversations Conversation – attack” to the
creature you’d like this to apply to. 12. On the Conversation Node tab, pick the conversation node from your conversation
where you would like the NPC to attack the player. 13. Save and compile. Try your module.