Embed Size (px)
Citation preview
NVE 7003-15B 11/18-05
Title Page
installation/upgrade guide
for version 7.4
BakBone Software9540 Pacific Heights Drive, Suite 100 � San Diego, California 92121 � 866.484.2663
CopyrightsNetVault Upgrade Guide (for Version 7.4)Software Copyright © 2005 BakBone SoftwareDocumentation Copyright © 2005 BakBone Software
This documentation and its associated software product are copyrighted and all rights are reserved. The distribution and sale of this product are intended for the use of the original purchaser only per the terms of the License Agreement. All other product trademarks are the property of their respective owners.
This document may not, in whole or part, be copied, photocopied, reproduced, translated, reduced or transferred to any electronic medium or machine-readable form without prior consent in writing from BakBone Software.
THIS PUBLICATION IS PROVIDED “AS IS” WITHOUT WARRANTY OF ANY KIND, EITHER EXPRESS OR IMPLIED, INCLUDING, BUT NOT LIMITED TO, THE IMPLIED WARRANTIES OF MERCHANTABILITY, FITNESS FOR A PARTICULAR PURPOSE, OR NON-INFRINGEMENT.
THIS PUBLICATION COULD INCLUDE TECHNICAL INACCURACIES OR TYPOGRAPHICAL ERRORS. CHANGES ARE PERIODICALLY ADDED TO THE INFORMATION HEREIN; THESE CHANGES WILL BE INCORPORATED INTO NEW EDITIONS OF THE PUBLICATION. BAKBONE SOFTWARE MAY MAKE IMPROVEMENTS AND/OR CHANGES IN THE PRODUCT(S) AND/OR THE PROGRAM(S) DESCRIBED IN THIS PUBLICATION AT ANY TIME.
installation/upgrade guide
Chapter 1: Phase 1: Introduction and Pre-Requisites 9
• Introduction - New Installations ..................................................................................... 11- The NetVault “Step” Methodology ........................................................................................ 11
• Phase 1: Pre-Installation Requirements ........................................................................ 11- Step 1: NetVault Server/Client Determination ........................................................................ 11- Step 2: Accommodating the NetVault Database .................................................................... 12- Step 3: TCP/IP Connectivity and Resolvable Name Set Up..................................................... 14- Step 4: Backup Device Mapping/Connections ....................................................................... 14- Step 5: Determining NetVault Names ................................................................................... 15- Step 6: Disable Anti-Virus Software...................................................................................... 16- Step 7: Set Required “ulimit” Variables to a Proper Value (UNIX-based O/S ONLY) .................. 17- Step 8: Remove Remote Storage Control (Windows-based O/S Only) ..................................... 17- Step 9: Review the End User’s Release Notes Document ...................................................... 18- Pre-Installation Review ....................................................................................................... 18
Chapter 2: Phase 2: NetVault Server Installation 21
• Phase 2: NetVault Server Installation ............................................................................ 23- IBM AIX 5.x NetVault Server ............................................................................................... 23- Linux (Intel x86 - 2.4/2.6 Kernel) NetVault Server .................................................................. 25- Microsoft Windows 2000/2003 NetVault Server ..................................................................... 26- NCR UNIX SVR 5.4 MP-RAS 03 NetVault Server .................................................................. 27- Solaris (SPARC) NetVault Server ........................................................................................ 29
• Example Installation Procedures ................................................................................... 30- Example Installation on a Linux/UNIX-based System ............................................................. 31- Example Installation on a Windows-based System ................................................................ 34
Chapter 3: Phase 3: NetVault Client Installation 39
• Phase 3: Installing NetVault Clients ............................................................................... 41
Table of Contents
Section 1: Performing a New Installation
NetVault®: BackupInstallation/Upgrade Guide iv
- IBM AIX 5.x NetVault Client................................................................................................. 41- Linux (Intel x86 - 2.4/2.6 Kernel) NetVault Client.................................................................... 43- Microsoft Windows 2000/2003 NetVault Client ...................................................................... 44- NCR UNIX SVR 5.4 MP-RAS 03 NetVault Client ................................................................... 45- Solaris (SPARC) NetVault Client.......................................................................................... 46
• Installation Completion ................................................................................................... 47- Other Installation Procedures .............................................................................................. 47
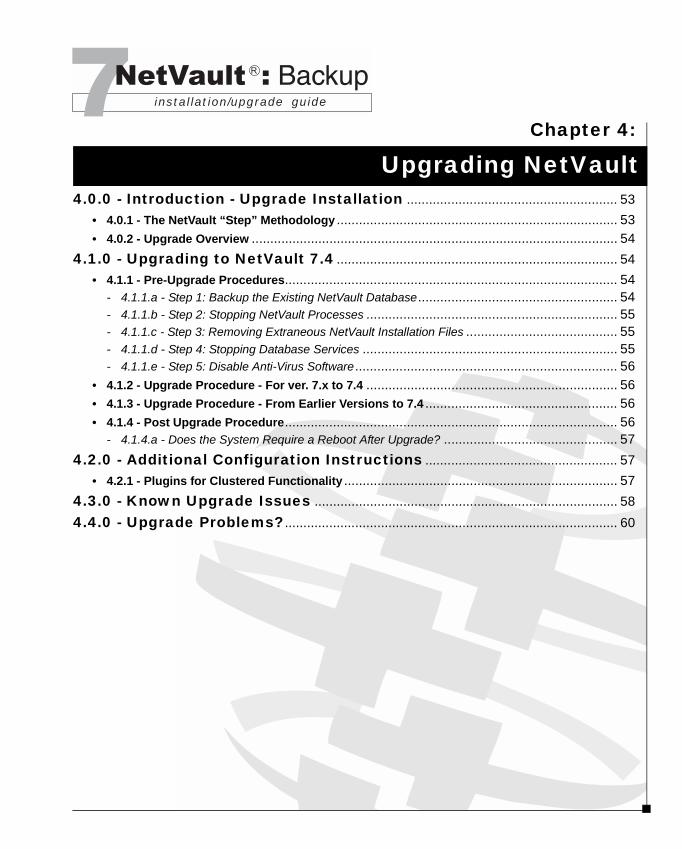
Chapter 4: Upgrading NetVault 51
• Introduction - Upgrade Installation ................................................................................ 53- The NetVault “Step” Methodology ........................................................................................ 53- Upgrade Overview ............................................................................................................. 54
• Upgrading to NetVault 7.4 ............................................................................................... 54- Pre-Upgrade Procedures .................................................................................................... 54- Upgrade Procedure - For ver. 7.x to 7.4................................................................................ 56- Upgrade Procedure - From Earlier Versions to 7.4................................................................. 56- Post Upgrade Procedure..................................................................................................... 56
• Additional Configuration Instructions ........................................................................... 57- Plugins for Clustered Functionality ....................................................................................... 57
• Known Upgrade Issues ................................................................................................... 58• Upgrade Problems?......................................................................................................... 60
Chapter 5: Other Installation Procedures 63
• Introduction - Other Installation Operations ................................................................. 65• Licensing NetVault........................................................................................................... 65
- Phase 1: Locating Machine IDs ........................................................................................... 65- Phase 2: Requesting a NetVault License Key........................................................................ 66- Phase 3: Installing a License Key ........................................................................................ 66
• Uninstalling NetVault ....................................................................................................... 67- Uninstalling from a Linux/UNIX-based O/S............................................................................ 67- Uninstalling from Microsoft Windows 2000/2003.................................................................... 69
• Installing NetVault Plugins and APMs ........................................................................... 72
Section 2: Upgrading NetVault
Section 3: Other Installation Procedures

NetVault®: BackupInstallation/Upgrade Guide v
- Installing Optional Plugins and APMs ................................................................................... 72- Installing NetVault Core Plugins........................................................................................... 72- Removing a Plugin or APM ................................................................................................. 74
• Technical Support............................................................................................................ 75- Helpdesk Support Lines...................................................................................................... 75- BakBone Software’s Web Site ............................................................................................. 75

installation/upgrade guide
S E C T I O N 1 :
Performing a New Installation

installation/upgrade guide
Chapter 1:
1.0.0 - Introduction - New Installations................................................................ 11• 1.0.1 - The NetVault “Step” Methodology ............................................................................ 11
1.1.0 - Phase 1: Pre-Installation Requirements ................................................ 11• 1.1.1 - Step 1: NetVault Server/Client Determination............................................................ 11
- 1.1.1.a - System Requirements ......................................................................................... 12• 1.1.2 - Step 2: Accommodating the NetVault Database ........................................................ 12
- 1.1.2.a - Example Calculation............................................................................................ 13- 1.1.2.b - NetVault Database Index Entry Size Limitations ..................................................... 14
• 1.1.3 - Step 3: TCP/IP Connectivity and Resolvable Name Set Up........................................ 14• 1.1.4 - Step 4: Backup Device Mapping/Connections .......................................................... 14• 1.1.5 - Step 5: Determining NetVault Names........................................................................ 15
- 1.1.5.a - Best Practice Recommendation - Assign the NetVault Server a Different Name ......... 16• 1.1.6 - Step 6: Disable Anti-Virus Software.......................................................................... 16• 1.1.7 - Step 7: Set Required “ulimit” Variables to a Proper Value (UNIX-based O/S ONLY).... 17• 1.1.8 - Step 8: Remove Remote Storage Control (Windows-based O/S Only) ....................... 17• 1.1.9 - Step 9: Review the End User’s Release Notes Document.......................................... 18• 1.1.10 - Pre-Installation Review........................................................................................... 18
Phase 1: Introduction and Pre-Requisites

Chapter 1Phase 1: Introduction and Pre-Requisites10
NetVault®: BackupInstallation/Upgrade Guide 11
1.0.0 Introduction - New InstallationsThis section of the NetVault®: Backup Installation/Upgrade Guide is broken down into three chapters that cover how to perform a new installation of NetVault. Each chapter in this section covers a specific phase of the installation process and each is arranged in the order they should be performed.
1.0.1 The NetVault “Step” MethodologyTo create continuity in NetVault’s documentation, a “step by step” approach is being utilized when referencing each guide used for the NetVault ®:Backup product. By adhering to this step by step process, you will find it easy to install and get up and running with NetVault.
As displayed on the cover, this guide represents “Step 1” in the NetVault process, which consists of the following four phases:
� Step 1: The NetVault ®: Backup Installation/Upgrade Guide - This guide which provides full instructions for installing and upgrading NetVault
� Step 2: The NetVault Getting Started Guide - Basic instructions for getting up and running with NetVault
� Step 3: The NetVault®: Backup Administrator’s Guide - Complete, comprehensive guide that outlines all functionary available in NetVault
� Step 4: The NetVault Configurator Guide - A guide dedicated to describing the functionality available in NetVault’s companion utility, the NetVault Configurator
1.1.0 Phase 1: Pre-Installation RequirementsCertain actions/decisions must be performed prior to installing either version of NetVault (i.e., Client vs. Server) and each of these requirements are discussed in the sub-sections that follow:
1.1.1 Step 1: NetVault Server/Client DeterminationInstallation of NetVault involves installing a NetVault Server and any number of NetVault Clients. The Server must always be established first, with the Server version of NetVault installed there, followed by each individual Client. Therefore, the first step in the operation is to determine which machine will serve as the NetVault Server, and which machines will be Clients:
Important: All of the guides outlined in the points above are included on the NetVault installation CD or they can be downloaded from BakBone Software’s web site, by clicking on the “NetVault” link located on the following page:
http://www.bakbone.com/support/product_documentation/
Chapter 1Phase 1: Introduction and Pre-Requisites12
� NetVault Server - This machine will house the Server version of NetVault and it will accessed to manage all NetVault operations (i.e., administer backup and recovery operations for any number of NetVault Clients).
� NetVault Client(s) - Each of these machines will house the Client version of NetVault and each will serve as backup/restore targets.
1.1.1.a System RequirementsThe list that follows consists of specific hardware/operating system requirements that must be met on each machine that is to house an installation of NetVault (i.e., both Server and Client versions).
� NetVault Graphic Requirements - To run the NetVault GUI, a minimum graphic display resolution of 800 x 600 pixels displaying 256 colors is required under Microsoft Windows-based O/S or Linux/UNIX X-Windows.
� Permissions - All target machines must have O/S permissions set that will allow the user to install software components.
� System Memory - Memory requirements on a target system can vary based on the intended use: � NetVault Server - The amount of memory installed in the NetVault Server
varies based on the work load it will maintain. While NetVault only requires 128 Mb be available for use, it is recommended that more be installed, based on the intended workload.
� NetVault Client - A minimum of 128 Mb is required per Client machine.
1.1.2 Step 2: Accommodating the NetVault DatabaseWith the machine that is to serve as the NetVault Server determined, the next step in the pre-installation process is to choose a directory on a drive/volume with enough free space to house NetVault and its database. The typical NetVault Server installation requires about 50MB of free disk space. However, the NetVault Database will grow as operations are performed in NetVault (e.g., Backups, restores and reports generated). It is critical that space considerations be made for the growing of this database. NetVault operations could halt if its database can not be updated due to space limitations.
When the NetVault Server software is installed, the installation includes a NetVault Database directory (db or nvdb) containing four sub-directories:
� Install - Very small directory. Contains the modules binary file detailing which modules are installed).
� Keys - Very small directory. Contains license key files for the main software and any plugins or APMs installed.
Important: Once established, a NetVault Server can serve as a Client unto itself (i.e., the Server can be accessed and backups/restores of its own local data can be performed).
NetVault®: BackupInstallation/Upgrade Guide 13
� MediaDatabase - This directory grows to be rather large with use of NetVault. Holds records for media and backups performed.
� ScheduleDatabase - Small directory (generally less than 10 MB in size) Holds records for all backup and restore jobs).
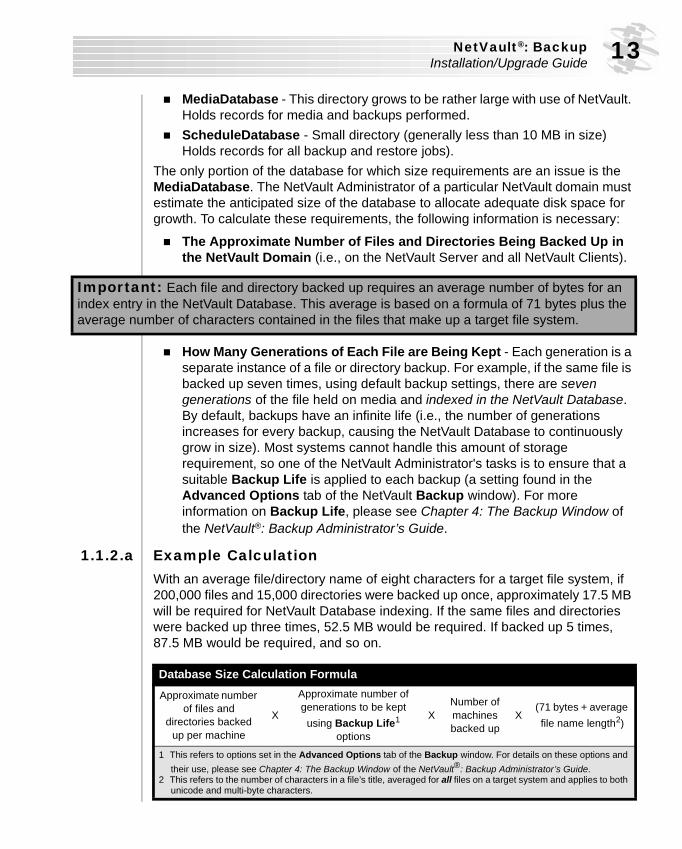
The only portion of the database for which size requirements are an issue is the MediaDatabase. The NetVault Administrator of a particular NetVault domain must estimate the anticipated size of the database to allocate adequate disk space for growth. To calculate these requirements, the following information is necessary:
� The Approximate Number of Files and Directories Being Backed Up in the NetVault Domain (i.e., on the NetVault Server and all NetVault Clients).
� How Many Generations of Each File are Being Kept - Each generation is a separate instance of a file or directory backup. For example, if the same file is backed up seven times, using default backup settings, there are seven generations of the file held on media and indexed in the NetVault Database. By default, backups have an infinite life (i.e., the number of generations increases for every backup, causing the NetVault Database to continuously grow in size). Most systems cannot handle this amount of storage requirement, so one of the NetVault Administrator's tasks is to ensure that a suitable Backup Life is applied to each backup (a setting found in the Advanced Options tab of the NetVault Backup window). For more information on Backup Life, please see Chapter 4: The Backup Window of the NetVault®: Backup Administrator’s Guide.
1.1.2.a Example CalculationWith an average file/directory name of eight characters for a target file system, if 200,000 files and 15,000 directories were backed up once, approximately 17.5 MB will be required for NetVault Database indexing. If the same files and directories were backed up three times, 52.5 MB would be required. If backed up 5 times, 87.5 MB would be required, and so on.
Important: Each file and directory backed up requires an average number of bytes for an index entry in the NetVault Database. This average is based on a formula of 71 bytes plus the average number of characters contained in the files that make up a target file system.
Database Size Calculation FormulaApproximate number
of files and directories backed
up per machine
X
Approximate number of generations to be kept
using Backup Life1 options
XNumber of machines backed up
X(71 bytes + average file name length2)
1 This refers to options set in the Advanced Options tab of the Backup window. For details on these options and their use, please see Chapter 4: The Backup Window of the NetVault®: Backup Administrator’s Guide.
2 This refers to the number of characters in a file’s title, averaged for all files on a target system and applies to both unicode and multi-byte characters.
Chapter 1Phase 1: Introduction and Pre-Requisites14
1.1.2.b NetVault Database Index Entry Size LimitationsA single NVDB index entry is generated for each NetVault backup job created/submitted. It is important to note that NetVault must adhere to a maximum size requirement of two Gigabytes (2 GB) for each of these individual index entries. Index entries of this size will only occur with very large jobs (e.g., a backup job that contains a few million files and directories). If a backup job is run that requires an index entry larger than this maximum, it will most likely fail. Therefore it is recommended that large jobs requiring the backup of a few million files be broken down into multiple jobs to avoid this. For complete details on backing up data, please see Chapter 4: The Backup Window of the NetVault®: Backup Administrator’s Guide.
1.1.3 Step 3: TCP/IP Connectivity and ResolvableName Set UpOnce the machines which will host the NetVault Server and Client software have been established, it is necessary to ensure that good TCP/IP connectivity and Name Resolution exists between the proposed NetVault Server and each potential NetVault Client.
1.1.4 Step 4: Backup Device Mapping/ConnectionsNext it is necessary to determine what backup devices are to be used (e.g., tape libraries and standalone drives) and map them out. Generally, the NetVault Server is set up to contain one or more of these devices (i.e., they are directly attached to the machine acting as the NetVault Server). However, this is not required and a usable backup device can be attached to a machine configured as a NetVault
Important: 1. For some types of backup (e.g., online backup of some databases) it is necessary to keep
a large number of generations. If space considerations are likely to be an issue, contact BakBone Technical Support (see the section, Technical Support of Chapter 5 on page 75) for further details.
2. Under normal circumstances, it is reasonable to set a Backup Life option of Discard after seven (7) Full Backups (for backups using NetVault’s native File System Plugin). With this option set, only seven generations of files/directories are retained for a particular backup selection within the NetVault Database. On the eighth backup, the first backup set of files/directories is discarded and removed from the NetVault Database index.
Important: If the NetVault software is only to be installed in a Standalone Configuration, this type of network is not necessary. A Standalone Configuration is one in which the Server version of NetVault is installed on a single machine for the purpose of backing up only that machine to a locally attached device).
NetVault®: BackupInstallation/Upgrade Guide 15
Client. This is referred to as a NetVault SmartClientTM. It is also important to ensure that these devices are connected and functional and that backups can be performed to them (e.g., through the use of any native O/S tools used for minimal backup operations on the device. If these native backup tools can't see an attached backup device, then neither will NetVault).
1.1.5 Step 5: Determining NetVault NamesDuring the installation process of the NetVault software (regardless of installation type (e.g., Client vs. Server) or Operating System platform), it is necessary to input a NetVault name for the machine. This name is used in NetVault for the purpose of recognizing it over the network. At default, a value will be displayed matching the machine’s Operating System-tied name. With this in mind, the following should be taken into consideration:
� Illegal Characters in a Machine Name - Although the core software will still function regardless of how the machine is named, certain aspects of NetVault may not function properly when the NetVault machine name includes any of the following characters:� Non-Number/Letter Alpha-Numeric Characters - This includes, “! @ #
$ % ^ & * ( )” as well as the colon (“:”), and hyphen (“-”).� Japanese/Korean/Chinese Characters
� The Underscore Character in a Machine Name - It is possible to use an underscore (“_”) in the name of a NetVault machine (e.g., as a substitute for a space -- “NetVault_Server”, or to replace any of the illegal characters named in the point above). However, conflicts will arise when referencing a machine named in this manner in NetVault’s Command Line Interface (CLI). The CLI sees the use of an underscore in its syntax as a replacement for a space, because a space is not recognized. For example, if a machine whose actual name is “NetVault_Server” is included in a CLI command, NetVault will, in reality, search for a machine named “NetVault Server”. Not finding a machine named this, the CLI request will fail and return an error. Therefore, if the CLI is to be used with the target machine, it is recommended that the machine be given a name that does not include any underscore characters.
Important: It is of critical importance that the following points be reviewed in order to properly name a NetVault Server/Client for complete use.
Important: It is highly recommended that only the following characters be used when generating a NetVault machine name: standard uppercase characters (e.g., “A - Z”), standard lowercase characters (e.g., “a - z”), and standard numerals (e.g., “0 - 9”).
Chapter 1Phase 1: Introduction and Pre-Requisites16
1.1.5.a Best Practice Recommendation - Assign the NetVault Server a Different NameWhen performing an installation to establish the NetVault Server, it is recommended that the NetVault name used be different than the machine’s O/S-tied name (as well as nothing machine-specific). As a recommended example, use a name value signifying that the machine is the NetVault Server. This is recommended in case it is ever necessary to relocate the NetVault Server to a different machine (e.g., because of hardware failure). In relocating a NetVault Server, a backup of the NetVault Server Database (NVDB) is required. The NVDB is integral to NetVault operations and is tied to the NetVault Server via its NetVault name. If relocating, a fresh installation of the Server version of NetVault would be required on the new machine, followed by a restore of the backed up NVDB to this new machine. During the installation, the NetVault name assigned must be the same as the name used for the original installation, in order to successfully proceed to the restore of the NVDB. Therefore, if the original NetVault Server was named using the default setting of it’s O/S-tied name, the relocation target’s installation of NetVault would have to be named using this same O/S-generated name, even though its actual machine name is something different. This could result in confusion when performing future backups and restores, especially if the machine previously set up as the NetVault Server is ever brought back on line.
1.1.6 Step 6: Disable Anti-Virus SoftwareWhile it is possible to leave anti-virus software running on a target machine, it is recommended that you disable this software, before attempting to perform an upgrade of NetVault. The NetVault installation process may conflict with anti-virus software during installation and various NetVault operations may not function properly after the installation.
Important: For complete details on the use of NetVault’s CLI utility, please see Appendix C: NetVault’s Command Line Interface of the NetVault®: Backup Administrator’s Guide.
Important: For details on relocation of the NetVault Database, please see Chapter 20: The NetVault Databases Plugin of the NetVault®: Backup Administrator’s Guide.
NetVault®: BackupInstallation/Upgrade Guide 17
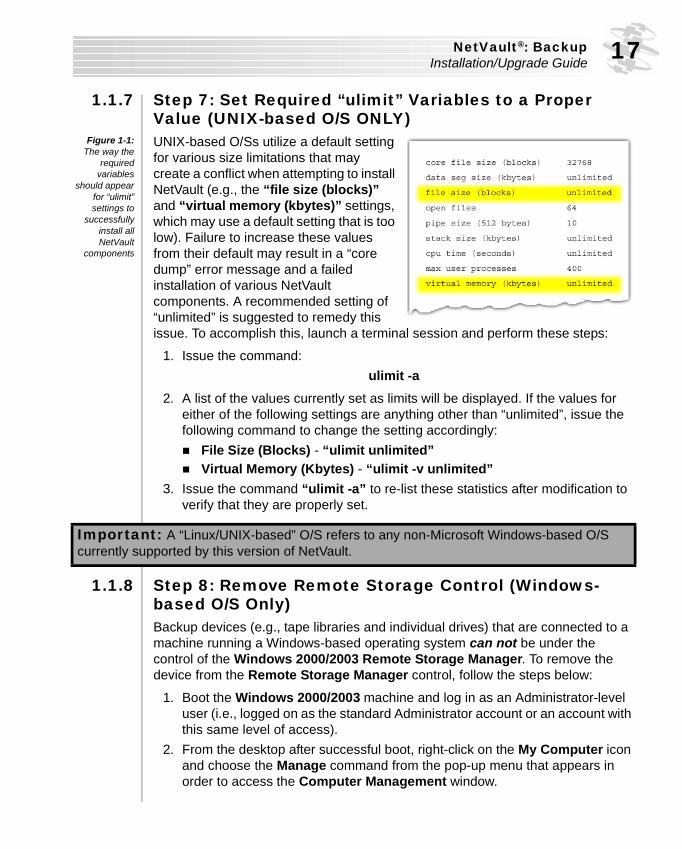
1.1.7 Step 7: Set Required “ulimit” Variables to a Proper Value (UNIX-based O/S ONLY)
Figure 1-1:The way the
requiredvariables
should appearfor “ulimit”settings to
successfullyinstall allNetVault
components
UNIX-based O/Ss utilize a default setting for various size limitations that may create a conflict when attempting to install NetVault (e.g., the “file size (blocks)” and “virtual memory (kbytes)” settings, which may use a default setting that is too low). Failure to increase these values from their default may result in a “core dump” error message and a failed installation of various NetVault components. A recommended setting of “unlimited” is suggested to remedy this issue. To accomplish this, launch a terminal session and perform these steps:
1. Issue the command:ulimit -a
2. A list of the values currently set as limits will be displayed. If the values for either of the following settings are anything other than “unlimited”, issue the following command to change the setting accordingly:� File Size (Blocks) - “ulimit unlimited” � Virtual Memory (Kbytes) - “ulimit -v unlimited”
3. Issue the command “ulimit -a” to re-list these statistics after modification to verify that they are properly set.
1.1.8 Step 8: Remove Remote Storage Control (Windows-based O/S Only)Backup devices (e.g., tape libraries and individual drives) that are connected to a machine running a Windows-based operating system can not be under the control of the Windows 2000/2003 Remote Storage Manager. To remove the device from the Remote Storage Manager control, follow the steps below:
1. Boot the Windows 2000/2003 machine and log in as an Administrator-level user (i.e., logged on as the standard Administrator account or an account with this same level of access).
2. From the desktop after successful boot, right-click on the My Computer icon and choose the Manage command from the pop-up menu that appears in order to access the Computer Management window.
Important: A “Linux/UNIX-based” O/S refers to any non-Microsoft Windows-based O/S currently supported by this version of NetVault.
Chapter 1Phase 1: Introduction and Pre-Requisites18
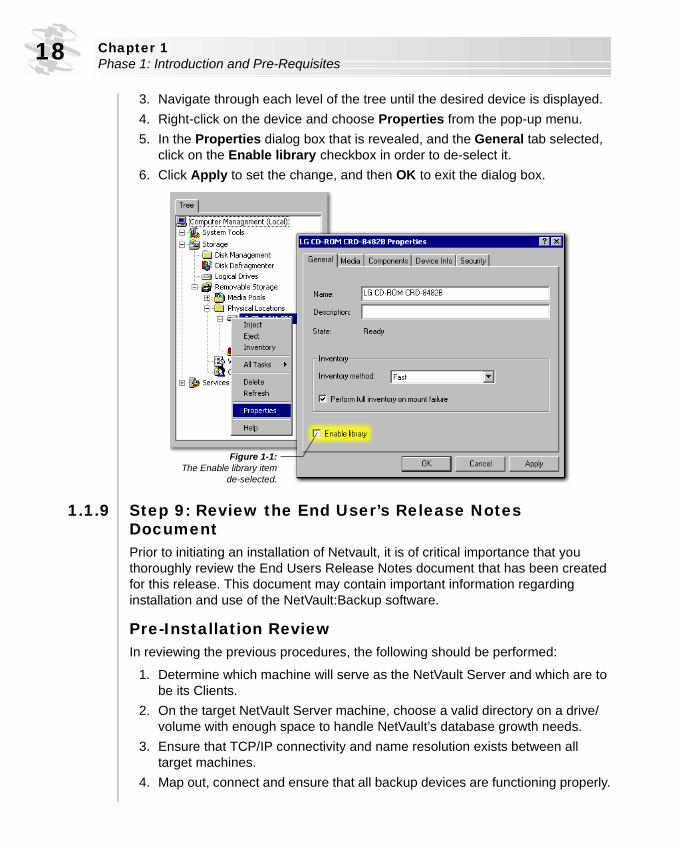
3. Navigate through each level of the tree until the desired device is displayed.4. Right-click on the device and choose Properties from the pop-up menu.5. In the Properties dialog box that is revealed, and the General tab selected,
click on the Enable library checkbox in order to de-select it.6. Click Apply to set the change, and then OK to exit the dialog box.
1.1.9 Step 9: Review the End User’s Release Notes DocumentPrior to initiating an installation of Netvault, it is of critical importance that you thoroughly review the End Users Release Notes document that has been created for this release. This document may contain important information regarding installation and use of the NetVault:Backup software.
Pre-Installation ReviewIn reviewing the previous procedures, the following should be performed:
1. Determine which machine will serve as the NetVault Server and which are to be its Clients.
2. On the target NetVault Server machine, choose a valid directory on a drive/volume with enough space to handle NetVault’s database growth needs.
3. Ensure that TCP/IP connectivity and name resolution exists between all target machines.
4. Map out, connect and ensure that all backup devices are functioning properly.
Figure 1-1:The Enable library item
de-selected.
NetVault®: BackupInstallation/Upgrade Guide 19
5. Determine appropriate name values for each installation of NetVault (i.e., for all Clients and the NetVault Server).
6. Disable Anti-virus software on any target machines.7. Set the “ulimit” variable to a proper value for each Linux/UNIX-based
machine that is to exist in the NetVault domain.8. Remove locally attached backup devices from Remote Storage Manager
control on any applicable Windows-based machines.9. Thoroughly review the NetVault:Backup End User Release Notes document
for this release to see if any additional installation instructions apply.

Chapter 1Phase 1: Introduction and Pre-Requisites20
installation/upgrade guide
Chapter 2:
2.0.0 - Phase 2: NetVault Server Installation .................................................... 23• 2.0.1 - IBM AIX 5.x NetVault Server ..................................................................................... 23
- 2.0.1.a - Installing from a Downloaded Binary File ............................................................... 23- 2.0.1.b - Installing from the Installation CD-ROM ................................................................. 24
• 2.0.2 - Linux (Intel x86 - 2.4/2.6 Kernel) NetVault Server ...................................................... 25- 2.0.2.a - Post-Installation Instructions (Debian 3.1 O/S ONLY) .............................................. 26
• 2.0.3 - Microsoft Windows 2000/2003 NetVault Server ......................................................... 26• 2.0.4 - NCR UNIX SVR 5.4 MP-RAS 03 NetVault Server ........................................................ 27
- 2.0.4.a - Installing from a Downloaded Binary File ............................................................... 27- 2.0.4.b - Installing from the Installation CD-ROM ................................................................. 28
• 2.0.5 - Solaris (SPARC) NetVault Server .............................................................................. 29- 2.0.5.a - Installing from a Downloaded Binary File ............................................................... 29- 2.0.5.b - Installing from the Installation CD-ROM ................................................................. 30
2.1.0 - Example Installation Procedures.............................................................. 30• 2.1.1 - Example Installation on a Linux/UNIX-based System ................................................ 31• 2.1.2 - Example Installation on a Windows-based System ................................................... 34
Phase 2: NetVault Server Installation

Chapter 2Phase 2: NetVault Server Installation22
NetVault®: BackupInstallation/Upgrade Guide 23
2.0.0 Phase 2: NetVault Server InstallationOnce all pre-installation procedures have been performed, the first step in installing NetVault, is to establish the NetVault Server and install the Server version of the software. The following sub-sections illustrate the required steps to perform a Server-based installation (each part exists in this sub-section in alphabetical order, based on O/S name).
Figure 2-1:With all pre-
requisiteprocedures
completed, thenext phase inthe operationis to establisha machine asthe NetVault
Server andinstall thatversion ofNetVault
2.0.1 IBM AIX 5.x NetVault ServerTo install the Server version of NetVault on an IBM AIX machine, follow one of the procedures detailed below, based on how the installation file was obtained (i.e., NetVault installation CD-ROM vs. downloaded binary file from BakBone Software’s web site):
2.0.1.a Installing from a Downloaded Binary FileThese instructions assume that a user has successfully downloaded an installation binary file from BakBone Software’s web site. To complete an installation of this type, follow the steps outlined below:
Step 1: Installing the NetVault SCSI DriverUse AIX’s SMIT utility to load the NetVault SCSI Driver contained in the file image. For complete installation instructions, please see the PDF file for the NetVault Implementation Guide: Driver Installation for Library Devices Running in an IBM AIX Environment. This guide is available for download from BakBone Software’s web site, from the “NetVault” link of the following page:
http://www.bakbone.com/support/product_documentation
Important: Prior to attempting an installation of either version of NetVault, Server or Client, ensure that all of the pre-requisites covered in Chapter 1: Phase 1: Introduction and Pre-Requisites on page 9 have been reviewed and met.
Chapter 2Phase 2: NetVault Server Installation24
Step 2: Running the Installation File1. The downloaded file will be in a compressed state and must first be
decompressed (i.e., using the necessary IBM AIX O/S-related decompression software). Once complete, initiate a terminal session and navigate to the directory in which the decompressed files reside.
2. Execute the “install” file, by typing the following:� ./install
3. With the installation successfully initiated, a step-by-step set up process will begin. Follow the on-screen prompts as they are given and provide the desired information.
4. When confronted with the “Should a Client or Server version of NetVault be installed?” select “S” for a NetVault Server installation and press Enter to continue.
2.0.1.b Installing from the Installation CD-ROMStep 1: Mounting the CD-ROM DriveIf not already performed, it is necessary to mount the CD-ROM drive. Mount it using AIX’s SMIT utility.
Step 2: Installing the NetVault SCSI DriverUse AIX’s SMIT utility to load the NetVault SCSI Driver contained in the file image. For complete installation instructions, please see the PDF file for the NetVault Implementation Guide: Driver Installation for Library Devices Running in an IBM AIX Environment. This guide is available for download from BakBone Software’s web site, from the “NetVault” link of the following page:
http://www.bakbone.com/support/product_documentation
Step 3: Running the Installation FileWith the CD-ROM drive successfully mounted and the SCSI driver installed, follow the steps below to initiate an installation of NetVault:
1. While still logged on with the root level account, insert the CD-ROM into the drive and initiate a terminal session. From the prompt, issue the command:
2. From the prompt, issue the command:
Important: All of the prompts revealed during this process have a default selection for which it is possible to simply hit the Enter key to automatically select this default value and continue. These options will appear at the end of each prompt, enclosed in brackets (“[ ]”). For a detailed example of these prompts, please see the section Example Installation on a Linux/UNIX-based System on page 31.
NetVault®: BackupInstallation/Upgrade Guide 25
� cd /cdrom/netvault74/aix_51_52/netvault� ./install
3. With the installation successfully initiated, a step-by-step set up process will begin. Follow the on-screen prompts as they are given and provide the desired information.
4. When confronted with the “Should a Client or Server version of NetVault be installed?” select “S” for a NetVault Server installation and press Enter to continue.
2.0.2 Linux (Intel x86 - 2.4/2.6 Kernel) NetVault ServerTo install NetVault software to a Linux (2.4/2.6 Kernel) system, follow these steps:
1. Log on to the target machine with the root level account.2. Access the software for installation (based on how it was obtained):
� Downloaded Binary File from BakBone’s Web Site - The downloaded file will be in a compressed state and must first be decompressed (i.e., using Linux’s native decompression utilities either via its GUI or a terminal session). Once complete, navigate to the directory in which the decompressed files reside.
� NetVault Installation CD - With the CD-ROM in the drive, initiate a terminal session and input the following command (assuming that all 2.4/2.6 Kernel versions of Linux should automount the CD-ROM drive):� cd /cdrom/netvault73/linux24/netvault
3. Execute the “install” file, by typing the following:� ./install
4. With the installation successfully initiated, a step-by-step set up process will begin. Follow the on-screen prompts as they are given and provide the desired information.
5. When confronted with the “Should a Client or Server version of NetVault be installed?” select “S” for a NetVault Server installation and press Enter to continue.
Important: All of the prompts revealed during this process have a default selection for which it is possible to simply hit the Enter key to automatically select this default value and continue. These options will appear at the end of each prompt, enclosed in brackets (“[ ]”). For a detailed example of these prompts, please see the section Example Installation on a Linux/UNIX-based System on page 31.
Chapter 2Phase 2: NetVault Server Installation26
2.0.2.a Post-Installation Instructions (Debian 3.1 O/S ONLY)The following steps must be performed on this O/S after installation:
1. While logged in as the root-level user, initiate a terminal session prompt. 2. Issue the following commands in succession:
� ln -s `head -n 1 /etc/.nv6_home`/etc/startup.sh /etc/rc0.d/K99netvault� ln -s `head -n 1 /etc/.nv6_home`/etc/startup.sh /etc/rc1.d/K99netvault� ln -s `head -n 1 /etc/.nv6_home`/etc/startup.sh /etc/rc2.d/K99netvault� ln -s `head -n 1 /etc/.nv6_home`/etc/startup.sh /etc/rc3.d/K99netvault� ln -s `head -n 1 /etc/.nv6_home`/etc/startup.sh /etc/rc2.d/S99netvault� ln -s `head -n 1 /etc/.nv6_home`/etc/startup.sh /etc/rc3.d/S99netvault� ln -s `head -n 1 /etc/.nv6_home`/etc/startup.sh /etc/rc4.d/S99netvault� ln -s `head -n 1 /etc/.nv6_home`/etc/startup.sh /etc/rc5.d/S99netvault� ln -s `head -n 1 /etc/.nv6_home`/etc/startup.sh /etc/rc6.d/S99netvault� mkdir /var/lock.subsys
2.0.3 Microsoft Windows 2000/2003 NetVault Server
To complete an installation of the NetVault Software on a Windows 2000/2003 machine, follow the procedure detailed below:
Important: All of the prompts revealed during the installation process have a default selection for which it is possible to simply hit the Enter key to automatically select this default value and continue. These options will appear at the end of each prompt, enclosed in brackets (“[ ]”). For a detailed example of these prompts, please see the section Example Installation on a Linux/UNIX-based System on page 31.
Important: 1. Backup devices (e.g., tape libraries and individual drives) that are connected to a machine
running a Windows-based operating system can not be under the control of the Windows 2000/2003 Remote Storage Manager. Before installing any version of NetVault on a target machine with a device directly attached, ensure that the steps outlined in the section, Step 8: Remove Remote Storage Control (Windows-based O/S Only) of Chapter 1 on page 17 have been followed.
2. On a Windows 2003 Server running in Terminal Services mode, an additional Installation Wizard window may launch when attempting to install NetVault. A Windows 2003 Server in this state has a concept of an “install mode” and an “execute mode”. Therefore, when attempting an installation of software, the Server attempts to both “execute” and “install”, resulting in two installation wizards running. This is considered normal behavior and one of the wizards can simply be ignored (and closed).
NetVault®: BackupInstallation/Upgrade Guide 27
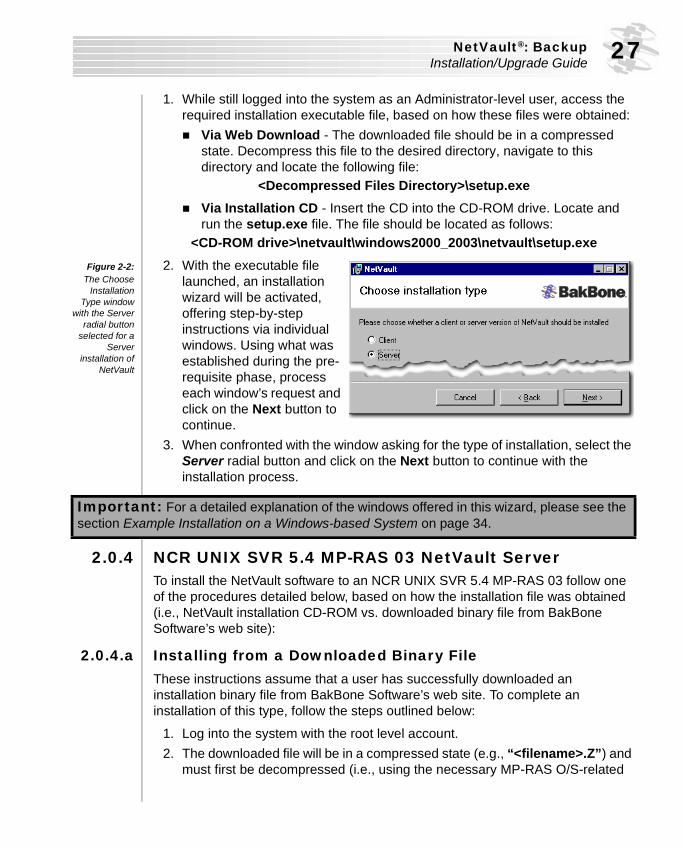
1. While still logged into the system as an Administrator-level user, access the required installation executable file, based on how these files were obtained: � Via Web Download - The downloaded file should be in a compressed
state. Decompress this file to the desired directory, navigate to this directory and locate the following file:
<Decompressed Files Directory>\setup.exe� Via Installation CD - Insert the CD into the CD-ROM drive. Locate and
run the setup.exe file. The file should be located as follows: <CD-ROM drive>\netvault\windows2000_2003\netvault\setup.exe
Figure 2-2:The Choose
InstallationType window
with the Serverradial button
selected for aServer
installation ofNetVault
2. With the executable file launched, an installation wizard will be activated, offering step-by-step instructions via individual windows. Using what was established during the pre-requisite phase, process each window’s request and click on the Next button to continue.
3. When confronted with the window asking for the type of installation, select the Server radial button and click on the Next button to continue with the installation process.
2.0.4 NCR UNIX SVR 5.4 MP-RAS 03 NetVault ServerTo install the NetVault software to an NCR UNIX SVR 5.4 MP-RAS 03 follow one of the procedures detailed below, based on how the installation file was obtained (i.e., NetVault installation CD-ROM vs. downloaded binary file from BakBone Software’s web site):
2.0.4.a Installing from a Downloaded Binary FileThese instructions assume that a user has successfully downloaded an installation binary file from BakBone Software’s web site. To complete an installation of this type, follow the steps outlined below:
1. Log into the system with the root level account.2. The downloaded file will be in a compressed state (e.g., “<filename>.Z”) and
must first be decompressed (i.e., using the necessary MP-RAS O/S-related
Important: For a detailed explanation of the windows offered in this wizard, please see the section Example Installation on a Windows-based System on page 34.
Chapter 2Phase 2: NetVault Server Installation28
decompression software). Once complete, initiate a terminal session and add the package for installation, by typing the following:� pkgadd -d /<full path to installation files>/netvault
3. With the installation successfully initiated, a step-by-step set up process will begin. Follow the on-screen prompts as they are given and provide the desired information.
4. When confronted with the “Should a Client or Server version of NetVault be installed?” select “S” for a NetVault Server installation and press Enter to continue.
2.0.4.b Installing from the Installation CD-ROM
Step 1: Mounting the CD-ROM DriveIf the CD-ROM drive is not currently mounted, this must be done in order to access the drive for installation. To manually mount the CD-ROM, use the following commands (the below example assumes that the mount point “/cdrom/cdrom0” already exists):
1. Initiate a command line terminal and issue the following commands:� su root� mount -r -F cdfs <CD-ROM device node> /cdrom
Step 2: Running the Installation FileNetVault software is installed to an MP-RAS machine through a standard “pkgadd” installation. The mount point information for the CD-ROM drive is required (as illustrated in the previous section) in order to issue proper command from a command line prompt.
1. Log on to the target machine with the root level account.2. With the CD-ROM inserted in the drive, initiate a terminal session and
issue the command listed below:� pkgadd -d /cdrom/netvault74/mpras/netvault
3. With the installation successfully initiated, a step-by-step set up process will begin. Follow the on-screen prompts as they are given and provide the desired information.
Important: All of the prompts revealed during this process have a default selection for which it is possible to simply hit the Enter key to automatically select this default value and continue. These options will appear at the end of each prompt, enclosed in brackets (“[ ]”). For a detailed example of these prompts, please see the section Example Installation on a Linux/UNIX-based System on page 31.
NetVault®: BackupInstallation/Upgrade Guide 29
4. When confronted with the “Should a Client or Server version of NetVault be installed?” select “S” for a NetVault Server installation and press Enter to continue.
2.0.5 Solaris (SPARC) NetVault ServerTo install the Server version of NetvVault 7.4 on a Solaris (SPARC) system, follow one of the procedures detailed below, based on how the installation file was obtained (i.e., NetVault installation CD-ROM vs. downloaded binary file from BakBone Software’s web site).
2.0.5.a Installing from a Downloaded Binary FileThese instructions assume that a user has successfully downloaded an installable binary file from BakBone Software’s web site. To complete an installation of this type, follow these steps:
1. Log into the target machine using the Super User ID.2. The downloaded file will be in a compressed state (e.g., “<filename>.Z”) and
must first be decompressed (i.e., using the necessary Solaris (SPARC) O/S-related decompression software). Once complete, initiate a terminal session and navigate to the directory in which the decompressed files reside.
3. Add the package for installation by typing the following:� pkgadd -d
4. With the installation successfully initiated, a step-by-step set up process will begin. Follow the on-screen prompts as they are given and provide the desired information.
5. When confronted with the “Should a Client or Server version of NetVault be installed?”, select “S” for a NetVault Server installation and press Enter to continue.
Important: All of the prompts revealed during this process have a default selection for which it is possible to simply hit the Enter key to automatically select this default value and continue. These options will appear at the end of each prompt, enclosed in brackets (“[ ]”). For a detailed example of these prompts, please see the section Example Installation on a Linux/UNIX-based System on page 31.
Important: All of the prompts revealed during this process have a default selection for which it is possible to simply hit the Enter key to automatically select this default value and continue. These options will appear at the end of each prompt, enclosed in brackets (“[ ]”). For a detailed example of these prompts, please see the section Example Installation on a Linux/UNIX-based System on page 31.
Chapter 2Phase 2: NetVault Server Installation30
2.0.5.b Installing from the Installation CD-ROM Step 1: Mounting the CD-ROM DriveIf the CD-ROM drive is not currently mounted, this must be done in order to access the drive for installation. To manually mount the CD-ROM, use the following commands (the below example assumes that the mount point “/cdrom/cdrom0” already exists):
1. Initiate a command line terminal and issue the following commands:� su root� mount -r -F cdfs <CD-ROM device node> /cdrom
Step 2: Running the Installation FileNetVault software is installed to a Solaris machine through a standard “pkgadd” installation. The mount point information for the CD-ROM drive is required (as illustrated in the previous section) in order to issue proper command from a command line prompt.
1. Log on to the target machine with the super user ID.2. With the CD-ROM inserted in the drive, initiate a terminal session and
issue the command listed below:� pkgadd -d /cdrom/netvault74/solaris/netvault
3. With the installation successfully initiated, a step-by-step set up process will begin. Follow the on-screen prompts as they are given and provide the desired information.
4. When confronted with the “Should a Client or Server version of NetVault be installed?” select “S” for a NetVault Server installation and press Enter to continue.
2.1.0 Example Installation ProceduresThis sub-section is comprised of various parts, each of which offers an outline of the installation process for NetVault in a specific Operating System environment (i.e., Linux/UNIX-based, and Windows-based). The processes illustrated offer a full description of NetVault installation and are not specific to installation type (i.e., Client vs. Server installation). Each O/S type is revealed here in alphabetic order.
Important: All of the prompts revealed during this process have a default selection for which it is possible to simply hit the Enter key to automatically select this default value and continue. These options will appear at the end of each prompt, enclosed in brackets (“[ ]”). For a detailed example of these prompts, please see the section Example Installation on a Linux/UNIX-based System on page 31.
NetVault®: BackupInstallation/Upgrade Guide 31
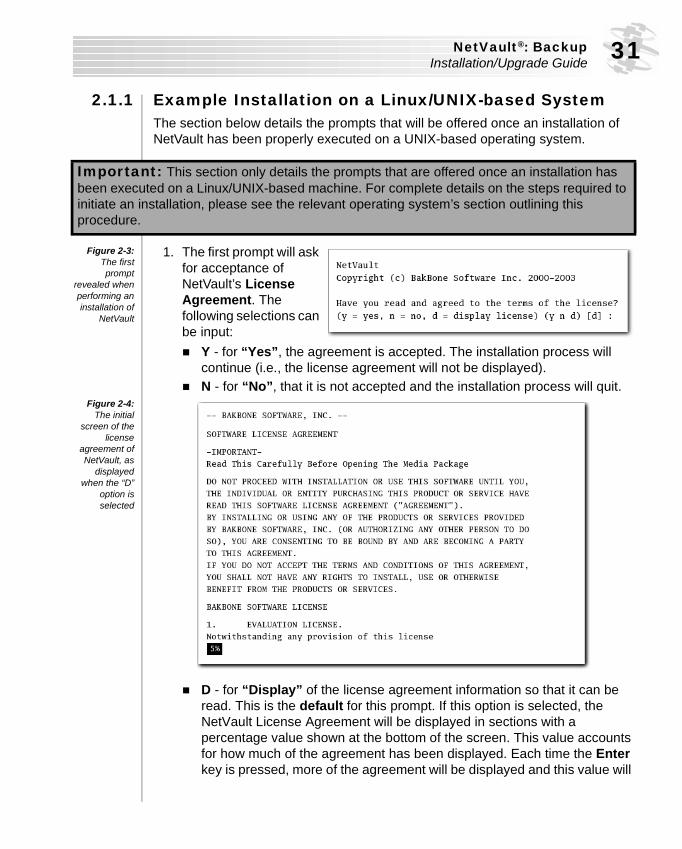
2.1.1 Example Installation on a Linux/UNIX-based SystemThe section below details the prompts that will be offered once an installation of NetVault has been properly executed on a UNIX-based operating system.
Figure 2-3:The firstprompt
revealed whenperforming aninstallation of
NetVault
1. The first prompt will ask for acceptance of NetVault’s License Agreement. The following selections can be input:� Y - for “Yes”, the agreement is accepted. The installation process will
continue (i.e., the license agreement will not be displayed).� N - for “No”, that it is not accepted and the installation process will quit.
Figure 2-4:The initial
screen of thelicense
agreement ofNetVault, as
displayedwhen the “D”
option isselected
� D - for “Display” of the license agreement information so that it can be read. This is the default for this prompt. If this option is selected, the NetVault License Agreement will be displayed in sections with a percentage value shown at the bottom of the screen. This value accounts for how much of the agreement has been displayed. Each time the Enter key is pressed, more of the agreement will be displayed and this value will
Important: This section only details the prompts that are offered once an installation has been executed on a Linux/UNIX-based machine. For complete details on the steps required to initiate an installation, please see the relevant operating system’s section outlining this procedure.
Chapter 2Phase 2: NetVault Server Installation32
increase. Continuously holding down the Enter key will scroll through the entire agreement, and end with the next prompt.
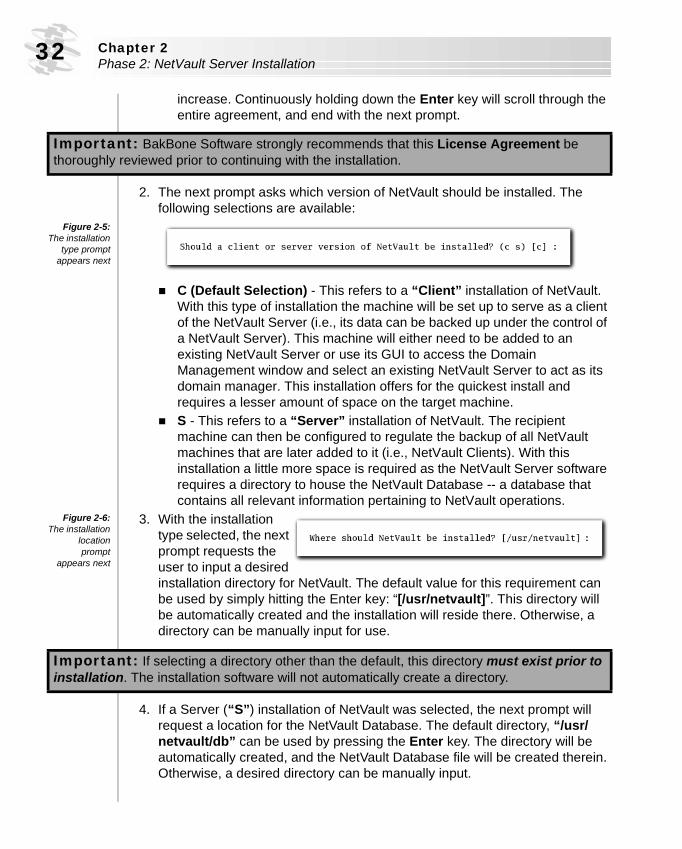
2. The next prompt asks which version of NetVault should be installed. The following selections are available:
Figure 2-5:The installation
type promptappears next
� C (Default Selection) - This refers to a “Client” installation of NetVault. With this type of installation the machine will be set up to serve as a client of the NetVault Server (i.e., its data can be backed up under the control of a NetVault Server). This machine will either need to be added to an existing NetVault Server or use its GUI to access the Domain Management window and select an existing NetVault Server to act as its domain manager. This installation offers for the quickest install and requires a lesser amount of space on the target machine.
� S - This refers to a “Server” installation of NetVault. The recipient machine can then be configured to regulate the backup of all NetVault machines that are later added to it (i.e., NetVault Clients). With this installation a little more space is required as the NetVault Server software requires a directory to house the NetVault Database -- a database that contains all relevant information pertaining to NetVault operations.
Figure 2-6:The installation
locationprompt
appears next
3. With the installation type selected, the next prompt requests the user to input a desired installation directory for NetVault. The default value for this requirement can be used by simply hitting the Enter key: “[/usr/netvault]”. This directory will be automatically created and the installation will reside there. Otherwise, a directory can be manually input for use.
4. If a Server (“S”) installation of NetVault was selected, the next prompt will request a location for the NetVault Database. The default directory, “/usr/netvault/db” can be used by pressing the Enter key. The directory will be automatically created, and the NetVault Database file will be created therein. Otherwise, a desired directory can be manually input.
Important: BakBone Software strongly recommends that this License Agreement be thoroughly reviewed prior to continuing with the installation.
Important: If selecting a directory other than the default, this directory must exist prior to installation. The installation software will not automatically create a directory.
NetVault®: BackupInstallation/Upgrade Guide 33
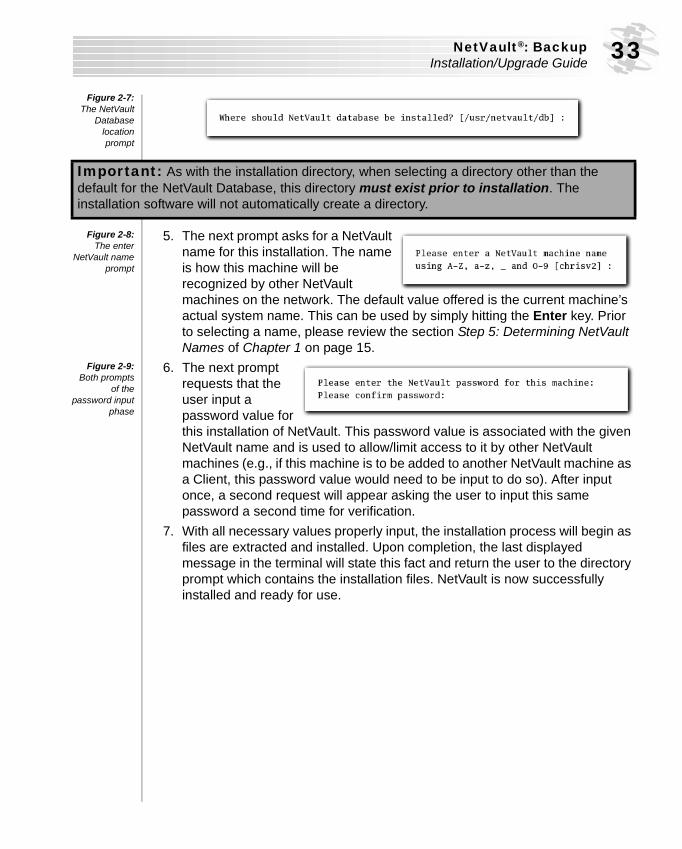
Figure 2-7:The NetVault
Databaselocationprompt
Figure 2-8:The enter
NetVault nameprompt
5. The next prompt asks for a NetVault name for this installation. The name is how this machine will be recognized by other NetVault machines on the network. The default value offered is the current machine’s actual system name. This can be used by simply hitting the Enter key. Prior to selecting a name, please review the section Step 5: Determining NetVault Names of Chapter 1 on page 15.
Figure 2-9:Both prompts
of thepassword input
phase
6. The next prompt requests that the user input a password value for this installation of NetVault. This password value is associated with the given NetVault name and is used to allow/limit access to it by other NetVault machines (e.g., if this machine is to be added to another NetVault machine as a Client, this password value would need to be input to do so). After input once, a second request will appear asking the user to input this same password a second time for verification.
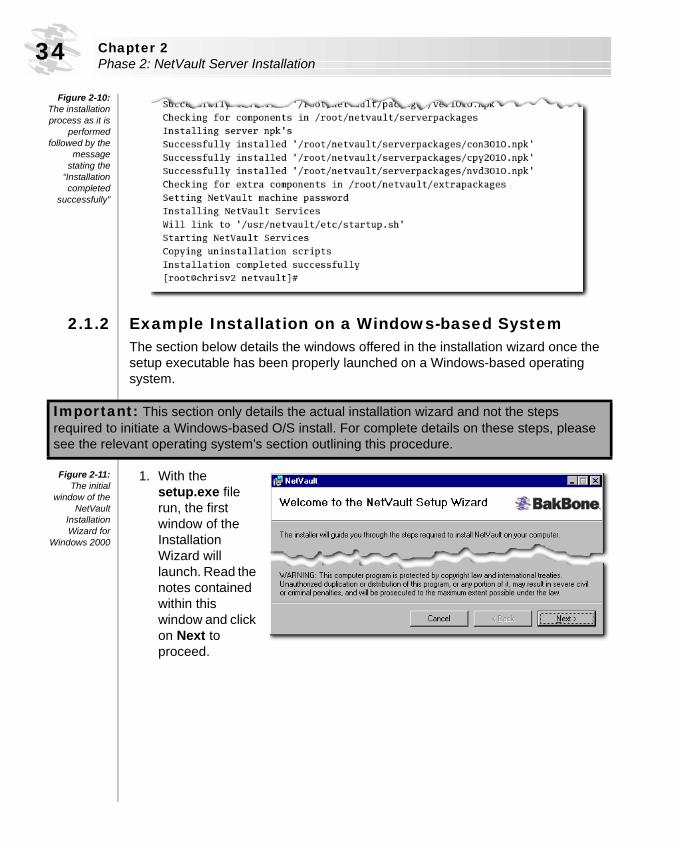
7. With all necessary values properly input, the installation process will begin as files are extracted and installed. Upon completion, the last displayed message in the terminal will state this fact and return the user to the directory prompt which contains the installation files. NetVault is now successfully installed and ready for use.
Important: As with the installation directory, when selecting a directory other than the default for the NetVault Database, this directory must exist prior to installation. The installation software will not automatically create a directory.
Chapter 2Phase 2: NetVault Server Installation34
Figure 2-10:The installationprocess as it is
performedfollowed by the
messagestating the
“Installationcompleted
successfully”
2.1.2 Example Installation on a Windows-based SystemThe section below details the windows offered in the installation wizard once the setup executable has been properly launched on a Windows-based operating system.
Figure 2-11:The initial
window of theNetVault
InstallationWizard for
Windows 2000
1. With the setup.exe file run, the first window of the Installation Wizard will launch. Read the notes contained within this window and click on Next to proceed.
Important: This section only details the actual installation wizard and not the steps required to initiate a Windows-based O/S install. For complete details on these steps, please see the relevant operating system’s section outlining this procedure.
NetVault®: BackupInstallation/Upgrade Guide 35
Figure 2-12:A cut-away
version of theLicense
Agreementwindow as
revealed in theInstallation
Wizard
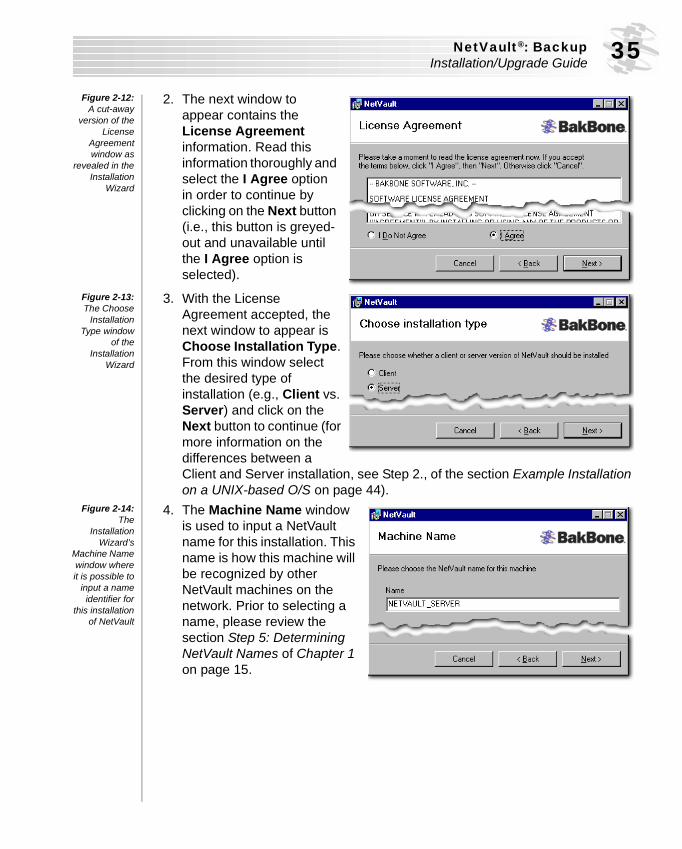
2. The next window to appear contains the License Agreement information. Read this information thoroughly and select the I Agree option in order to continue by clicking on the Next button (i.e., this button is greyed-out and unavailable until the I Agree option is selected).
Figure 2-13:The Choose
InstallationType window
of theInstallation
Wizard
3. With the License Agreement accepted, the next window to appear is Choose Installation Type. From this window select the desired type of installation (e.g., Client vs. Server) and click on the Next button to continue (for more information on the differences between a Client and Server installation, see Step 2., of the section Example Installation on a UNIX-based O/S on page 44).
Figure 2-14:The
InstallationWizard’s
Machine Namewindow whereit is possible to
input a nameidentifier for
this installationof NetVault
4. The Machine Name window is used to input a NetVault name for this installation. This name is how this machine will be recognized by other NetVault machines on the network. Prior to selecting a name, please review the section Step 5: Determining NetVault Names of Chapter 1 on page 15.
Chapter 2Phase 2: NetVault Server Installation36
Figure 2-15:The Choose
Passwordwindow which
allows aninstaller topassword
protect thisinstallation of
NetVault
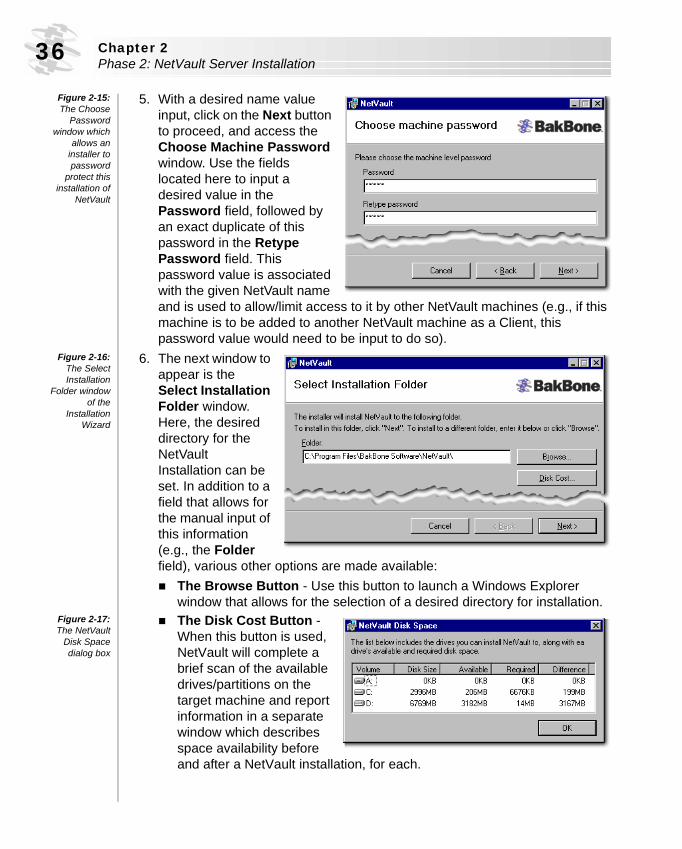
5. With a desired name value input, click on the Next button to proceed, and access the Choose Machine Password window. Use the fields located here to input a desired value in the Password field, followed by an exact duplicate of this password in the Retype Password field. This password value is associated with the given NetVault name and is used to allow/limit access to it by other NetVault machines (e.g., if this machine is to be added to another NetVault machine as a Client, this password value would need to be input to do so).
Figure 2-16:The SelectInstallation
Folder windowof the
InstallationWizard
6. The next window to appear is the Select Installation Folder window. Here, the desired directory for the NetVault Installation can be set. In addition to a field that allows for the manual input of this information (e.g., the Folder field), various other options are made available:� The Browse Button - Use this button to launch a Windows Explorer
window that allows for the selection of a desired directory for installation.Figure 2-17:The NetVault
Disk Spacedialog box
� The Disk Cost Button - When this button is used, NetVault will complete a brief scan of the available drives/partitions on the target machine and report information in a separate window which describes space availability before and after a NetVault installation, for each.
NetVault®: BackupInstallation/Upgrade Guide 37
Figure 2-18:The Select
NetVaultDatabase
Folder windowof the
InstallationWizard
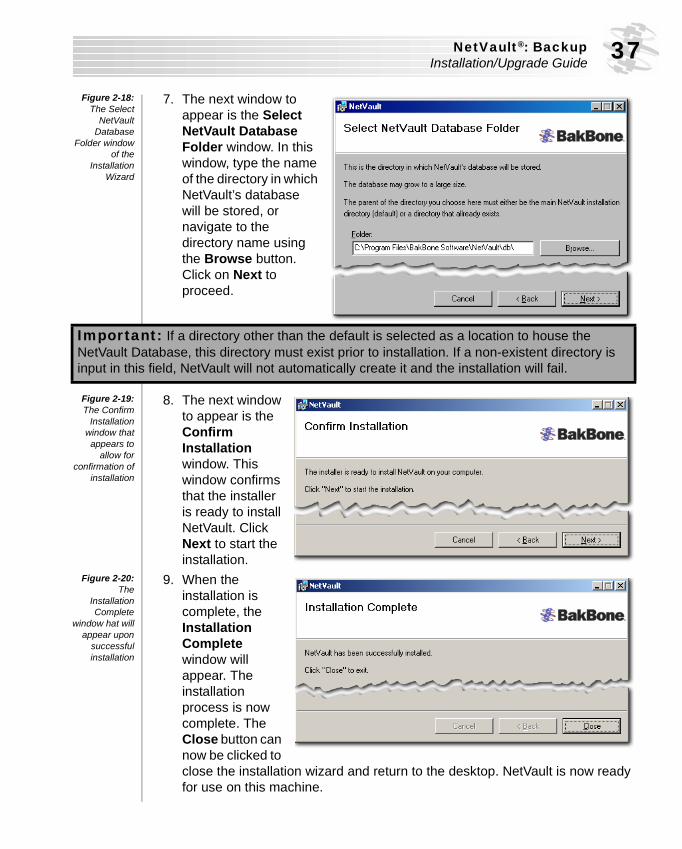
7. The next window to appear is the Select NetVault Database Folder window. In this window, type the name of the directory in which NetVault’s database will be stored, or navigate to the directory name using the Browse button. Click on Next to proceed.
Figure 2-19:The Confirm
Installationwindow thatappears to
allow forconfirmation of
installation
8. The next window to appear is the Confirm Installation window. This window confirms that the installer is ready to install NetVault. Click Next to start the installation.
Figure 2-20:The
InstallationComplete
window hat willappear upon
successfulinstallation
9. When the installation is complete, the Installation Complete window will appear. The installation process is now complete. The Close button can now be clicked to close the installation wizard and return to the desktop. NetVault is now ready for use on this machine.
Important: If a directory other than the default is selected as a location to house the NetVault Database, this directory must exist prior to installation. If a non-existent directory is input in this field, NetVault will not automatically create it and the installation will fail.

installation/upgrade guide
Chapter 3:
3.0.0 - Phase 3: Installing NetVault Clients........................................................ 41• 3.0.1 - IBM AIX 5.x NetVault Client ...................................................................................... 41
- 3.0.1.a - Installing from a Downloaded Binary File ............................................................... 41- 3.0.1.b - Installing from the Installation CD-ROM ................................................................. 42
• 3.0.2 - Linux (Intel x86 - 2.4/2.6 Kernel) NetVault Client........................................................ 43- 3.0.2.a - Linux (Intel x86 - 2.4/2.6 Kernel) NetVault Client..................................................... 43
• 3.0.3 - Microsoft Windows 2000/2003 NetVault Client .......................................................... 44• 3.0.4 - NCR UNIX SVR 5.4 MP-RAS 03 NetVault Client ......................................................... 45
- 3.0.4.a - Installing from a Downloaded Binary File ............................................................... 45- 3.0.4.b - Installing from the Installation CD-ROM ................................................................. 45
• 3.0.5 - Solaris (SPARC) NetVault Client ............................................................................... 46- 3.0.5.a - Installing from a Downloaded Binary File ............................................................... 46- 3.0.5.b - Installing from the Installation CD-ROM ................................................................. 46
3.1.0 - Installation Completion .................................................................................. 47• 3.1.1 - Other Installation Procedures .................................................................................. 47
Phase 3: NetVault Client Installation

Chapter 3Phase 3: NetVault Client Installation40
NetVault®: BackupInstallation/Upgrade Guide 41
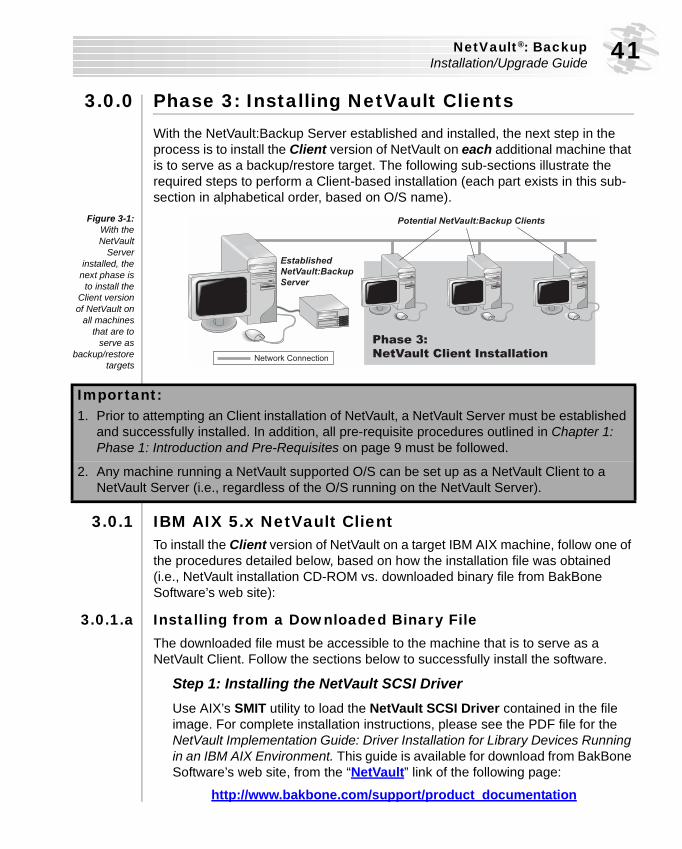
3.0.0 Phase 3: Installing NetVault ClientsWith the NetVault:Backup Server established and installed, the next step in the process is to install the Client version of NetVault on each additional machine that is to serve as a backup/restore target. The following sub-sections illustrate the required steps to perform a Client-based installation (each part exists in this sub-section in alphabetical order, based on O/S name).
Figure 3-1:With theNetVault
Serverinstalled, the
next phase isto install the
Client versionof NetVault on
all machinesthat are to
serve asbackup/restore
targets
3.0.1 IBM AIX 5.x NetVault ClientTo install the Client version of NetVault on a target IBM AIX machine, follow one of the procedures detailed below, based on how the installation file was obtained (i.e., NetVault installation CD-ROM vs. downloaded binary file from BakBone Software’s web site):
3.0.1.a Installing from a Downloaded Binary FileThe downloaded file must be accessible to the machine that is to serve as a NetVault Client. Follow the sections below to successfully install the software.
Step 1: Installing the NetVault SCSI DriverUse AIX’s SMIT utility to load the NetVault SCSI Driver contained in the file image. For complete installation instructions, please see the PDF file for the NetVault Implementation Guide: Driver Installation for Library Devices Running in an IBM AIX Environment. This guide is available for download from BakBone Software’s web site, from the “NetVault” link of the following page:
http://www.bakbone.com/support/product_documentation
Important: 1. Prior to attempting an Client installation of NetVault, a NetVault Server must be established
and successfully installed. In addition, all pre-requisite procedures outlined in Chapter 1: Phase 1: Introduction and Pre-Requisites on page 9 must be followed.
2. Any machine running a NetVault supported O/S can be set up as a NetVault Client to a NetVault Server (i.e., regardless of the O/S running on the NetVault Server).
Chapter 3Phase 3: NetVault Client Installation42
Step 2: Running the Installation File1. Repeat Steps 1 - 3, as outlined in the section, Step 2: Running the
Installation File of Chapter 2 on page 24.2. When confronted with the “Should a Client or Server version of
NetVault be installed?” select “C” for a NetVault Client installation and press Enter to continue.
3.0.1.b Installing from the Installation CD-ROM
Step 1: Mounting the CD-ROM DriveIf not already performed, it is necessary to mount the CD-ROM drive. Mount it using AIX’s SMIT utility.
Step 2: Installing the NetVault SCSI DriverUse AIX’s SMIT utility to load the NetVault SCSI Driver contained in the file image. For complete installation instructions, please see the PDF file for the NetVault Implementation Guide: Driver Installation for Library Devices Running in an IBM AIX Environment. This guide is available for download from BakBone Software’s web site, from the “NetVault” link of the following page:
http://www.bakbone.com/support/product_documentation
Important: The NetVault SCSI Driver outlined only needs to be installed on potential Client machines that have a backup device directly attached to them (i.e., a NetVault “SmartClient”). If a potential IBM AIX Client does not have a device locally attached, this procedure can be skipped.
Important: For a detailed example of the installation process, please see the section Example Installation on a Linux/UNIX-based System of Chapter 2 on page 31.
Important: The NetVault SCSI Driver outlined only needs to be installed on potential Client machines that have a backup device directly attached to them (i.e., a NetVault “SmartClient”). If a potential IBM AIX Client does not have a device locally attached, this procedure can be skipped.
NetVault®: BackupInstallation/Upgrade Guide 43
Step 3: Running the Installation FileWith the CD-ROM drive successfully mounted (and the SCSI driver installed, if applicable), follow the steps below to initiate a Client installation of NetVault:
1. Repeat Steps 1 - 3, as outlined in the section, Step 3: Running the Installation File of Chapter 3 on page 43.
2. When confronted with the “Should a Client or Server version of NetVault be installed?” select “C” for a NetVault Client installation and press Enter to continue.
3.0.2 Linux (Intel x86 - 2.4/2.6 Kernel) NetVault ClientTo install NetVault software to a Linux (Intel x86 - 2.4/2.6 Kernel) system, follow these steps:
1. Repeat Steps 1 - 4, as outlined in the section, Linux (Intel x86 - 2.4/2.6 Kernel) NetVault Server of Chapter 2 on page 25.
2. When confronted with the “Should a Client or Server version of NetVault be installed?” select “C” for a NetVault Client installation and press Enter to continue.
Important: For a detailed example of the installation procedure, please see the section Example Installation on a Linux/UNIX-based System of Chapter 2 on page 31.
Important: For a detailed example of the installation process, please see the section Example Installation on a Linux/UNIX-based System on page 31.
Chapter 3Phase 3: NetVault Client Installation44
3.0.2.a Post-Installation Instructions (Debian 3.1 O/S ONLY)The following steps must be performed on this O/S after installation:
1. While logged in as the root-level user, initiate a terminal session prompt. 2. Issue the following commands in succession:
� ln -s `head -n 1 /etc/.nv6_home`/etc/startup.sh /etc/rc0.d/K99netvault� ln -s `head -n 1 /etc/.nv6_home`/etc/startup.sh /etc/rc1.d/K99netvault� ln -s `head -n 1 /etc/.nv6_home`/etc/startup.sh /etc/rc2.d/K99netvault� ln -s `head -n 1 /etc/.nv6_home`/etc/startup.sh /etc/rc3.d/K99netvault� ln -s `head -n 1 /etc/.nv6_home`/etc/startup.sh /etc/rc2.d/S99netvault� ln -s `head -n 1 /etc/.nv6_home`/etc/startup.sh /etc/rc3.d/S99netvault� ln -s `head -n 1 /etc/.nv6_home`/etc/startup.sh /etc/rc4.d/S99netvault� ln -s `head -n 1 /etc/.nv6_home`/etc/startup.sh /etc/rc5.d/S99netvault� ln -s `head -n 1 /etc/.nv6_home`/etc/startup.sh /etc/rc6.d/S99netvault� mkdir /var/lock.subsys
3.0.3 Microsoft Windows 2000/2003 NetVault Client
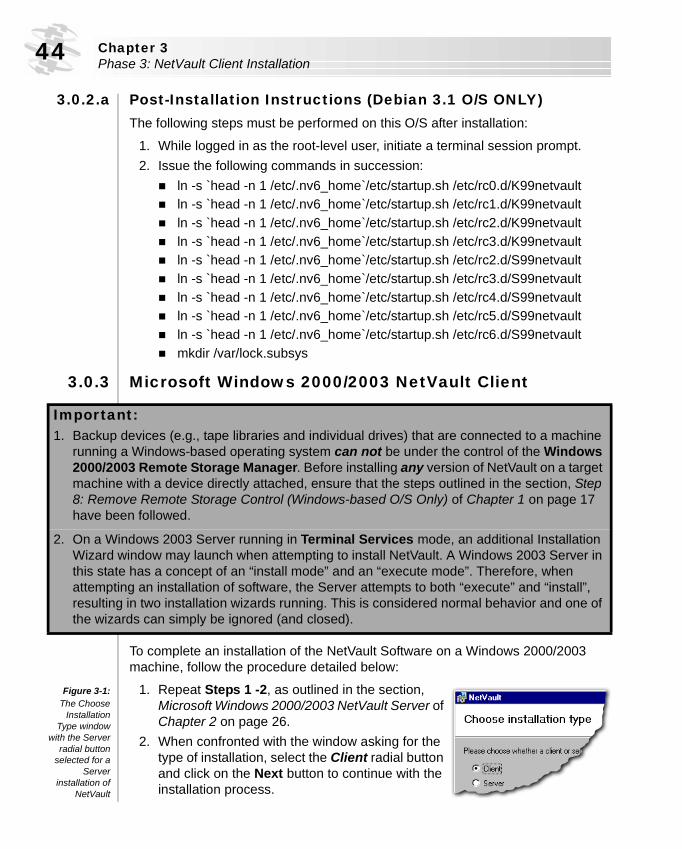
To complete an installation of the NetVault Software on a Windows 2000/2003 machine, follow the procedure detailed below:
Figure 3-1:The Choose
InstallationType window
with the Serverradial button
selected for aServer
installation ofNetVault
1. Repeat Steps 1 -2, as outlined in the section, Microsoft Windows 2000/2003 NetVault Server of Chapter 2 on page 26.
2. When confronted with the window asking for the type of installation, select the Client radial button and click on the Next button to continue with the installation process.
Important: 1. Backup devices (e.g., tape libraries and individual drives) that are connected to a machine
running a Windows-based operating system can not be under the control of the Windows 2000/2003 Remote Storage Manager. Before installing any version of NetVault on a target machine with a device directly attached, ensure that the steps outlined in the section, Step 8: Remove Remote Storage Control (Windows-based O/S Only) of Chapter 1 on page 17 have been followed.
2. On a Windows 2003 Server running in Terminal Services mode, an additional Installation Wizard window may launch when attempting to install NetVault. A Windows 2003 Server in this state has a concept of an “install mode” and an “execute mode”. Therefore, when attempting an installation of software, the Server attempts to both “execute” and “install”, resulting in two installation wizards running. This is considered normal behavior and one of the wizards can simply be ignored (and closed).
NetVault®: BackupInstallation/Upgrade Guide 45
3.0.4 NCR UNIX SVR 5.4 MP-RAS 03 NetVault ClientTo install the NetVault software to an NCR UNIX SVR 5.4 MP-RAS 03 follow one of the procedures detailed below, based on how the installation file was obtained (i.e., NetVault installation CD-ROM vs. downloaded binary file from BakBone Software’s web site):
3.0.4.a Installing from a Downloaded Binary FileThese instructions assume that a user has successfully downloaded an installation binary file from BakBone Software’s web site. To complete an installation of this type, follow the steps outlined below:
1. Repeat Steps 1 - 3, as outlined in the section, Installing from a Downloaded Binary File of Chapter 2 on page 27.
2. When confronted with the “Should a Client or Server version of NetVault be installed?” select “C” for a NetVault Client installation and press Enter to continue.
3.0.4.b Installing from the Installation CD-ROMStep 1: Mounting the CD-ROM DriveIf the CD-ROM drive is not currently mounted, this must be done in order to access the drive for installation. To manually mount the CD-ROM, use the following commands (the below example assumes that the mount point “/cdrom/cdrom0” already exists):
1. Initiate a command line terminal and issue the following commands:� su root� mount -r -F cdfs <CD-ROM device node> /cdrom
Step 2: Running the Installation FileNetVault software is installed to an MP-RAS machine through a standard “pkgadd” installation. The mount point information for the CD-ROM drive is required (as illustrated in the previous section) in order to issue proper command from a command line prompt.
1. Repeat Steps 1 -3, as outlined in the section, Installing from the Installation CD-ROM of Chapter 2 on page 28.
Important: For a detailed explanation of the windows offered in this wizard, please see the section Example Installation on a Windows-based System of Chapter 2 on page 34.
Important: For a detailed example of the installation process, please see the section Example Installation on a Linux/UNIX-based System of Chapter 2 on page 31.
Chapter 3Phase 3: NetVault Client Installation46
2. When confronted with the “Should a Client or Server version of NetVault be installed?” select “S” for a NetVault Server installation and press Enter to continue.
3.0.5 Solaris (SPARC) NetVault ClientTo install the Client version of NetvVault 7.4 on a Solaris (SPARC) system, follow one of the procedures detailed below, based on how the installation file was obtained (i.e., NetVault installation CD-ROM vs. downloaded binary file from BakBone Software’s web site).
3.0.5.a Installing from a Downloaded Binary FileThese instructions assume that a user has successfully downloaded an installable binary file from BakBone Software’s web site. To complete an installation of this type, follow these steps:
1. Repeat Steps 1 - 5 as outlined in the section, Installing from a Downloaded Binary File of Chapter 2 on page 29.
2. When confronted with the message “Should a Client or Server version of NetVault be installed?”, select “C” for a NetVault Client installation and press Enter to continue.
3.0.5.b Installing from the Installation CD-ROM Step 1: Mounting the CD-ROM DriveIf the CD-ROM drive is not currently mounted, this must be done in order to access the drive for installation. To manually mount the CD-ROM, use the following commands (the below example assumes that the mount point “/cdrom/cdrom0” already exists):
1. Initiate a command line terminal and issue the following commands:� su root� mount -r -F cdfs <CD-ROM device node> /cdrom
Step 2: Running the Installation FileNetVault software is installed to a Solaris machine through a standard “pkgadd” installation. The mount point information for the CD-ROM drive is required (as illustrated in the previous section) in order to issue proper command from a command line prompt.
Important: For a detailed example of the installation process, please see the section Example Installation on a Linux/UNIX-based System of Chapter 2 on page 31.
Important: For a detailed example of the installation process, please see the section Example Installation on a Linux/UNIX-based System of Chapter 2 on page 31.
NetVault®: BackupInstallation/Upgrade Guide 47
1. Repeat Steps 1 - 3 as outlined in the section, Installing from the Installation CD-ROM of Chapter 2 on page 30.
2. When confronted with the “Should a Client or Server version of NetVault be installed?” select “C” for a NetVault Client installation and press Enter to continue.
3.1.0 Installation CompletionWith the NetVault Server properly installed, and the Client version of NetVault successfully installed on all backup/restore targets, the installation process is complete. At this point, either of the following NetVault documents can be consulted for further instruction on working with NetVault:
� The NetVault®: Backup Getting Started Guide - This guide offers a condensed, yet comprehensive set of instructions that describe the steps that are required to get up and running with NetVault.
� The NetVault®: Backup Administrator’s Guide - This guide offers complete instructions on all aspects of NetVault, from a functional description point of view (i.e., The NetVault GUI is broken down, and each function is fully described).
3.1.1 Other Installation ProceduresThe final section of this guide is dedicated to additional installation instructions that can be used with a completed NetVault installation. Instructions for operations such as Licensing NetVault and removing an installation are covered here.
Important: For a detailed example of the installation process, please see the section Example Installation on a Linux/UNIX-based System of Chapter 2 on page 31.
Important: In addition to other installation procedures, complete contact information for BakBone Technical Support is offered in this final chapter, in the section, Technical Support on page 75.

installation/upgrade guide
S E C T I O N 2 :
Upgrading NetVault

installation/upgrade guide
Chapter 4:
4.0.0 - Introduction - Upgrade Installation ......................................................... 53• 4.0.1 - The NetVault “Step” Methodology ............................................................................ 53• 4.0.2 - Upgrade Overview ................................................................................................... 54
4.1.0 - Upgrading to NetVault 7.4 ............................................................................ 54• 4.1.1 - Pre-Upgrade Procedures.......................................................................................... 54
- 4.1.1.a - Step 1: Backup the Existing NetVault Database...................................................... 54- 4.1.1.b - Step 2: Stopping NetVault Processes .................................................................... 55- 4.1.1.c - Step 3: Removing Extraneous NetVault Installation Files ......................................... 55- 4.1.1.d - Step 4: Stopping Database Services ..................................................................... 55- 4.1.1.e - Step 5: Disable Anti-Virus Software....................................................................... 56
• 4.1.2 - Upgrade Procedure - For ver. 7.x to 7.4 .................................................................... 56• 4.1.3 - Upgrade Procedure - From Earlier Versions to 7.4 .................................................... 56• 4.1.4 - Post Upgrade Procedure.......................................................................................... 56
- 4.1.4.a - Does the System Require a Reboot After Upgrade? ............................................... 574.2.0 - Additional Configuration Instructions .................................................... 57
• 4.2.1 - Plugins for Clustered Functionality .......................................................................... 574.3.0 - Known Upgrade Issues .................................................................................. 584.4.0 - Upgrade Problems? .......................................................................................... 60
Upgrading NetVault

Chapter 4Upgrading NetVault52
NetVault®: BackupInstallation/Upgrade Guide 53
4.0.0 Introduction - Upgrade InstallationThis section is composed of a single chapter which offers instructions for upgrading to NetVault version 7.4. Upgrading is a relatively simple procedure, but the guidelines and procedures in this guide should be reviewed prior to attempting an upgrade. It is also important to note that this chapter does not offer instructions for performing a new install or removal of existing NetVault software. For detailed instructions on these procedures, please see the relevant chapter(s) of this guide:
� New Installations - The chapters covered in the section, Performing a New Installation beginning on page 7.
� Removing NetVault/Other Installation Operations - Please see Chapter 5: Other Installation Procedures on page 63.
4.0.1 The NetVault “Step” MethodologyTo create continuity in NetVault’s documentation, a “step by step” approach is being utilized when referencing each guide used for the NetVault ®:Backup product. By adhering to this step by step process, you will find it easy to install and get up and running with NetVault.
As displayed on the cover of this guide, this guide represents “Step 1” in the NetVault process, which consists of the following four phases:
� Step 1: The NetVault ®: Backup Installation/Upgrade Guide - This guide which provides full instructions for installing and upgrading NetVault
� Step 2: The NetVault Getting Started Guide - Basic instructions for getting up and running with NetVault
� Step 3: The NetVault®: Backup Administrator’s Guide - Complete, comprehensive guide that outlines all functionary available in NetVault
� Step 4: The NetVault Configurator Guide - A guide dedicated to describing the functionality available in NetVault’s companion utility, the NetVault Configurator
Important: All of the guides outlined in the points above are included on the NetVault installation CD or they can be downloaded from BakBone Software’s web site, by clicking on the “NetVault” link located on the following page:
http://www.bakbone.com/support/product_documentation/
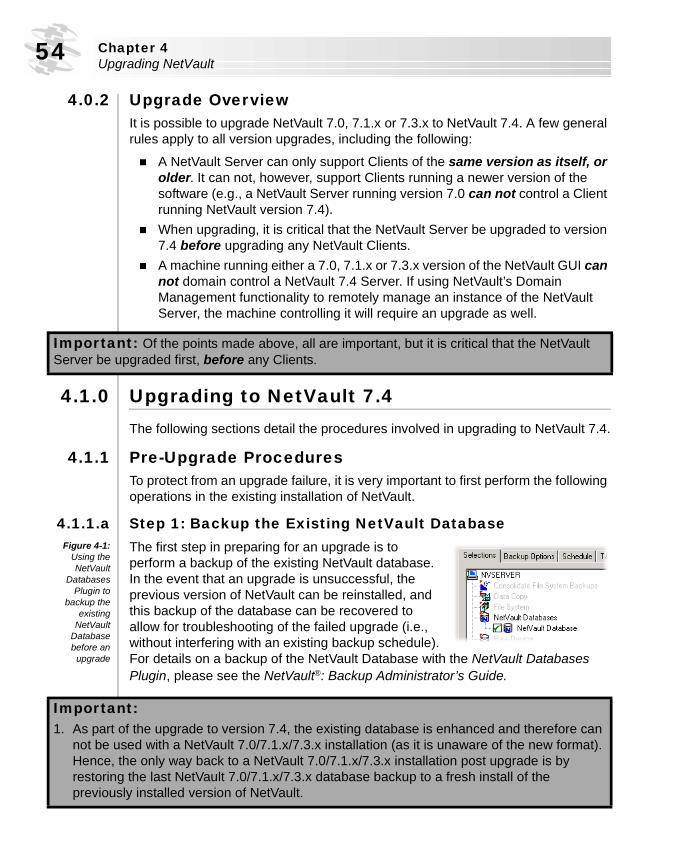
Chapter 4Upgrading NetVault54
4.0.2 Upgrade OverviewIt is possible to upgrade NetVault 7.0, 7.1.x or 7.3.x to NetVault 7.4. A few general rules apply to all version upgrades, including the following:
� A NetVault Server can only support Clients of the same version as itself, or older. It can not, however, support Clients running a newer version of the software (e.g., a NetVault Server running version 7.0 can not control a Client running NetVault version 7.4).
� When upgrading, it is critical that the NetVault Server be upgraded to version 7.4 before upgrading any NetVault Clients.
� A machine running either a 7.0, 7.1.x or 7.3.x version of the NetVault GUI can not domain control a NetVault 7.4 Server. If using NetVault’s Domain Management functionality to remotely manage an instance of the NetVault Server, the machine controlling it will require an upgrade as well.
4.1.0 Upgrading to NetVault 7.4The following sections detail the procedures involved in upgrading to NetVault 7.4.
4.1.1 Pre-Upgrade ProceduresTo protect from an upgrade failure, it is very important to first perform the following operations in the existing installation of NetVault.
4.1.1.a Step 1: Backup the Existing NetVault DatabaseFigure 4-1:
Using theNetVault
DatabasesPlugin to
backup theexisting
NetVaultDatabasebefore an
upgrade
The first step in preparing for an upgrade is to perform a backup of the existing NetVault database. In the event that an upgrade is unsuccessful, the previous version of NetVault can be reinstalled, and this backup of the database can be recovered to allow for troubleshooting of the failed upgrade (i.e., without interfering with an existing backup schedule). For details on a backup of the NetVault Database with the NetVault Databases Plugin, please see the NetVault®: Backup Administrator’s Guide.
Important: Of the points made above, all are important, but it is critical that the NetVault Server be upgraded first, before any Clients.
Important: 1. As part of the upgrade to version 7.4, the existing database is enhanced and therefore can
not be used with a NetVault 7.0/7.1.x/7.3.x installation (as it is unaware of the new format). Hence, the only way back to a NetVault 7.0/7.1.x/7.3.x installation post upgrade is by restoring the last NetVault 7.0/7.1.x/7.3.x database backup to a fresh install of the previously installed version of NetVault.
NetVault®: BackupInstallation/Upgrade Guide 55
4.1.1.b Step 2: Stopping NetVault ProcessesBefore upgrading, it is necessary to close the NetVault Configurator. If NetVault detects that any of its processes are running during an upgrade, the upgrade will fail and the user will get an error message referring to the output of a pre-install script. If this occurs, close the NetVault Configurator and re-attempt the upgrade.
4.1.1.c Step 3: Removing Extraneous NetVault Installation FilesNetVault version 7.1.1 included a file entitled “pchXXXX.npk” that was used to properly update earlier installations (where “XXXX” will vary based on the O/S in use on the target machine). When version 7.1.1 is installed, this file is placed in the following directory (where “...” refers to the complete path to the NetVault installation directory):
.../netvault/packages/standardDuring an upgrade installation to version 7.4, NetVault will attempt to automatically add any previously installed “.npk” files, as it locates them. As a result, this file will be loaded and NetVault will appear to upgrade successfully. However, when attempting to launch the GUI, an error message will be launched and the GUI will be inaccessible. Therefore, it is necessary to manually remove any files entitled “pchsXXXX.npk” from this directory before attempting an upgrade to version 7.4.
4.1.1.d Step 4: Stopping Database ServicesIn the event that the machine to be upgraded is currently administering a database software (e.g., the upgrade is being performed on the machine that is also configured as an Oracle Online Database Server, an Oracle RMAN Server, a Microsoft SQL Server, etc), it is necessary to stop any currently running database services before attempting an upgrade of NetVault. The services can then be restarted once the upgrade has successfully completed. For details on stopping and re-starting database services, please see the relevant documentation for the database software in question.
2. After the successful recovery of the NetVault Database, all details pertaining to all previous logs will be stored in the “logs_restored_<YYYYMMDD>” library (i.e., where “<YYYYMMDD>” pertains to date information, in the format “YearMonthDate”).
Important: This pre-requisite only applies to upgrades from version 7.1.x to NetVault 7.4. If upgrading from an earlier version, this requirement can be ignored.
Important: Failure to stop database services may result in a failed upgrade of NetVault.
Chapter 4Upgrading NetVault56
4.1.1.e Step 5: Disable Anti-Virus SoftwareWhile it is possible to leave anti-virus software running on a target machine, it is recommended that you disable this software, before attempting to perform an upgrade of NetVault. The NetVault installation process may conflict with anti-virus software during installation and various NetVault operations may not function properly after the installation.
4.1.2 Upgrade Procedure - For ver. 7.x to 7.4Based on the operating system in use, run the install program as usual. The installation software will scan the system for an existing installation of NetVault and once found, a prompt will appear noting that NetVault is already installed and ask to upgrade the existing version to NetVault 7.4. Once confirmed, the upgrade procedure will begin and use the existing directories for the current installation (e.g., “.../netvault6/” for older upgrade installations, and “.../netvault/” for 7.x and later installations).
4.1.3 Upgrade Procedure - From Earlier Versions to 7.4If using a version of NetVault earlier than the ones mentioned in the previous section (e.g., versions 6.5.x and earlier), it is not possible to perform a straight upgrade installation to NetVault 7.4. It is first necessary to successfully upgrade the system to version 7.0, and then perform the upgrade to 7.4. Please contact BakBone Technical Support for information on obtaining the necessary software to perform a successful upgrade. This contact information can be found in the section Technical Support of Chapter 5 on page 75.
4.1.4 Post Upgrade ProcedureA backup taken of a 7.0/7.1.x/7.3.x version of the NetVault Database can not be restored to a NetVault 7.4 installation because the database will have changed format after upgrade. However, all pre-existing data contained within the database pre-upgrade will still be present after a successful upgrade to 7.4. Therefore, it is highly recommended that a backup of this newly updated version of the NetVault Database be the first job performed, so a valid fail safe will be available.
Important: 1. An evaluation version of NetVault ver. 7.0 can be downloaded from BakBone Software’s
web site and installed to meet this primary upgrade requirement. With this successfully installed, an upgrade installation to version 7.3 is possible. To obtain this evaluation version, log onto to BakBone Software’s web site, at the URL listed below:
http://www.bakbone.com/products/downloads/
2. All procedures illustrated in this guide that pertain to upgrading NetVault ver. 6.5.2 and 6.5.3 also apply to the initial upgrade of earlier versions (e.g., 6.5.1) to version 7.0. Before upgrading, ensure that the NetVault database is backed up.
NetVault®: BackupInstallation/Upgrade Guide 57
Post-Upgrade NetVault Database Summary1. Backup the NetVault 7.0/7.1.x/7.3.x Database - To preserve its contents
in the event of a failed upgrade (i.e., this backup can then be re-applied to a repair installation of the old version of NetVault)
2. Run the Install Program to Perform the Upgrade3. Backup the New NetVault 7.4 Database - To create a fail safe backup
image of the newly created version of the database
4.1.4.a Does the System Require a Reboot After Upgrade?Once all of the preceding procedures have been completed and NetVault is opened, if it starts successfully, the upgrade can be assumed to have been successful. If NetVault will not start then a reboot will be required.
4.2.0 Additional Configuration InstructionsThis section provides configuration information specific to various operating systems and database applications that need to be performed prior to using NetVault 7.3 in the named environment.
4.2.1 Plugins for Clustered FunctionalityIf upgrading from an earlier version of NetVault than 7.3.x, it is necessary to obtain cluster-friendly versions of the MS SQL Server, MS Exchange 2000/2003, and Exchange Mailbox plugins, in order to use the clustered application support available in NetVault 7.4. Please contact NetVault Technical Support for information on obtaining these versions (if applicable).
Important: 1. If upgrading from a 7.3.x version of NetVault, these components will already be available
and will not need to be obtained (i.e., unless they were not obtained during initial install/upgrade of NetVault to version 7.3.
2. The versions of the APMs/Plugin mentioned are only required if NetVault’s application cluster support is to be used. For more information on this support, please see the Appendix section of the NetVault®: Backup Administrator’s Guide.
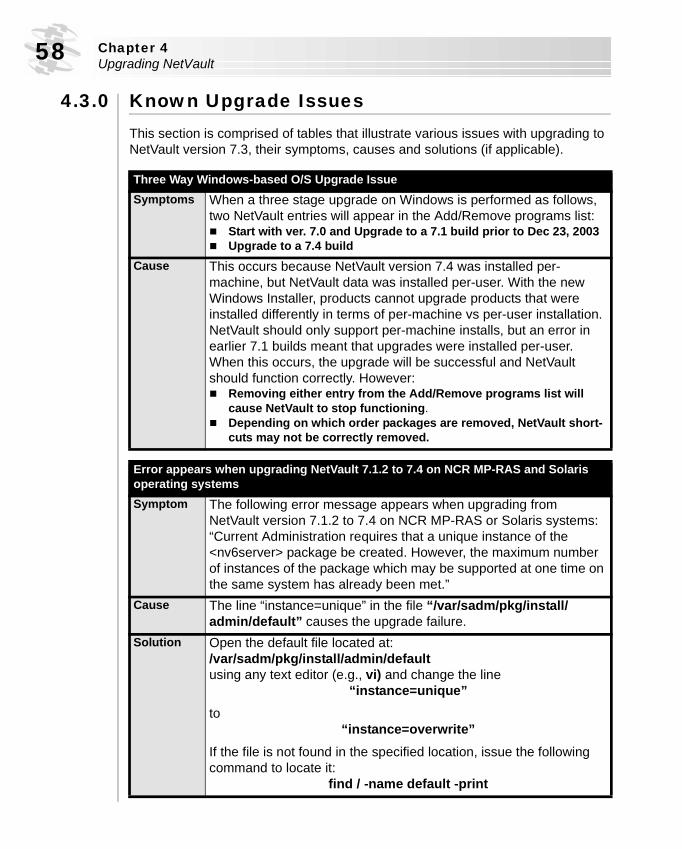
Chapter 4Upgrading NetVault58
4.3.0 Known Upgrade IssuesThis section is comprised of tables that illustrate various issues with upgrading to NetVault version 7.3, their symptoms, causes and solutions (if applicable).
Three Way Windows-based O/S Upgrade IssueSymptoms When a three stage upgrade on Windows is performed as follows,
two NetVault entries will appear in the Add/Remove programs list:� Start with ver. 7.0 and Upgrade to a 7.1 build prior to Dec 23, 2003� Upgrade to a 7.4 build
Cause This occurs because NetVault version 7.4 was installed per-machine, but NetVault data was installed per-user. With the new Windows Installer, products cannot upgrade products that were installed differently in terms of per-machine vs per-user installation. NetVault should only support per-machine installs, but an error in earlier 7.1 builds meant that upgrades were installed per-user. When this occurs, the upgrade will be successful and NetVault should function correctly. However:� Removing either entry from the Add/Remove programs list will
cause NetVault to stop functioning. � Depending on which order packages are removed, NetVault short-
cuts may not be correctly removed.
Error appears when upgrading NetVault 7.1.2 to 7.4 on NCR MP-RAS and Solaris operating systemsSymptom The following error message appears when upgrading from
NetVault version 7.1.2 to 7.4 on NCR MP-RAS or Solaris systems:“Current Administration requires that a unique instance of the <nv6server> package be created. However, the maximum number of instances of the package which may be supported at one time on the same system has already been met.”
Cause The line “instance=unique” in the file “/var/sadm/pkg/install/admin/default” causes the upgrade failure.
Solution Open the default file located at: /var/sadm/pkg/install/admin/defaultusing any text editor (e.g., vi) and change the line
“instance=unique”to
“instance=overwrite”If the file is not found in the specified location, issue the following command to locate it:
find / -name default -print
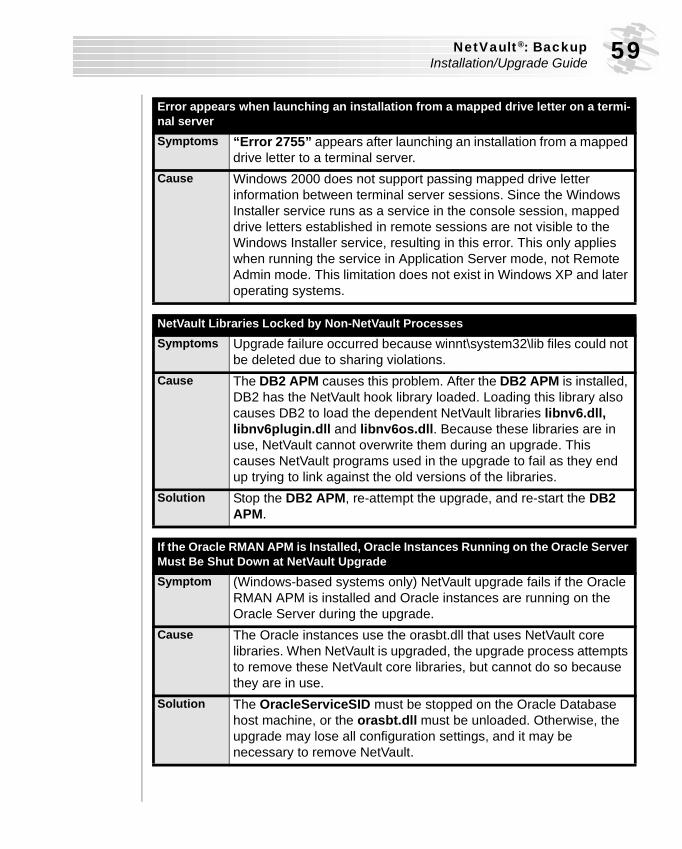
NetVault®: BackupInstallation/Upgrade Guide 59
Error appears when launching an installation from a mapped drive letter on a termi-nal serverSymptoms “Error 2755” appears after launching an installation from a mapped
drive letter to a terminal server.Cause Windows 2000 does not support passing mapped drive letter
information between terminal server sessions. Since the Windows Installer service runs as a service in the console session, mapped drive letters established in remote sessions are not visible to the Windows Installer service, resulting in this error. This only applies when running the service in Application Server mode, not Remote Admin mode. This limitation does not exist in Windows XP and later operating systems.
NetVault Libraries Locked by Non-NetVault ProcessesSymptoms Upgrade failure occurred because winnt\system32\lib files could not
be deleted due to sharing violations. Cause The DB2 APM causes this problem. After the DB2 APM is installed,
DB2 has the NetVault hook library loaded. Loading this library also causes DB2 to load the dependent NetVault libraries libnv6.dll, libnv6plugin.dll and libnv6os.dll. Because these libraries are in use, NetVault cannot overwrite them during an upgrade. This causes NetVault programs used in the upgrade to fail as they end up trying to link against the old versions of the libraries.
Solution Stop the DB2 APM, re-attempt the upgrade, and re-start the DB2 APM.
If the Oracle RMAN APM is Installed, Oracle Instances Running on the Oracle Server Must Be Shut Down at NetVault UpgradeSymptom (Windows-based systems only) NetVault upgrade fails if the Oracle
RMAN APM is installed and Oracle instances are running on the Oracle Server during the upgrade.
Cause The Oracle instances use the orasbt.dll that uses NetVault core libraries. When NetVault is upgraded, the upgrade process attempts to remove these NetVault core libraries, but cannot do so because they are in use.
Solution The OracleServiceSID must be stopped on the Oracle Database host machine, or the orasbt.dll must be unloaded. Otherwise, the upgrade may lose all configuration settings, and it may be necessary to remove NetVault.
Chapter 4Upgrading NetVault60
4.4.0 Upgrade Problems?BakBone Software offers complete, comprehensive and friendly technical support for all manner of upgrade operations. For details on contacting a technical support representative in your area, please see the section, Technical Support of Chapter 5 on page 75.
installation/upgrade guide
S E C T I O N 3 :
OtherInstallationProcedures

installation/upgrade guide
Chapter 5:
5.0.0 - Introduction - Other Installation Operations....................................... 655.1.0 - Licensing NetVault ........................................................................................... 65
• 5.1.1 - Phase 1: Locating Machine IDs ................................................................................ 65• 5.1.2 - Phase 2: Requesting a NetVault License Key............................................................ 66
- 5.1.2.a - Contacting BakBone Licensing Support ................................................................. 66• 5.1.3 - Phase 3: Installing a License Key ............................................................................. 66
5.2.0 - Uninstalling NetVault ...................................................................................... 67• 5.2.1 - Uninstalling from a Linux/UNIX-based O/S ............................................................... 67
- 5.2.1.a - IBM AIX 5.x ........................................................................................................ 67- 5.2.1.b - Linux (Intel x86 -- 2.4/2.6 Kernel) .......................................................................... 68- 5.2.1.c - NCR UNIX SVR 5.4 MP-RAS 03........................................................................... 68- 5.2.1.d - Solaris (SPARC) ................................................................................................. 69
• 5.2.2 - Uninstalling from Microsoft Windows 2000/2003....................................................... 69- 5.2.2.a - Completing the Uninstall: Editing the Windows Registry .......................................... 70
5.3.0 - Installing NetVault Plugins and APMs .................................................... 72• 5.3.1 - Installing Optional Plugins and APMs ...................................................................... 72• 5.3.2 - Installing NetVault Core Plugins ............................................................................... 72
- 5.3.2.a - Re-Installing a NetVault Core Plugin ..................................................................... 72• 5.3.3 - Removing a Plugin or APM ...................................................................................... 74
- 5.3.3.a - Removing NetVault Core Plugins .......................................................................... 74- 5.3.3.b - Removing Optional Plugins and APMs .................................................................. 74
5.4.0 - Technical Support ............................................................................................. 75• 5.4.1 - Helpdesk Support Lines........................................................................................... 75• 5.4.2 - BakBone Software’s Web Site .................................................................................. 75
Other Installation Procedures

Chapter 5Other Installation Procedures64
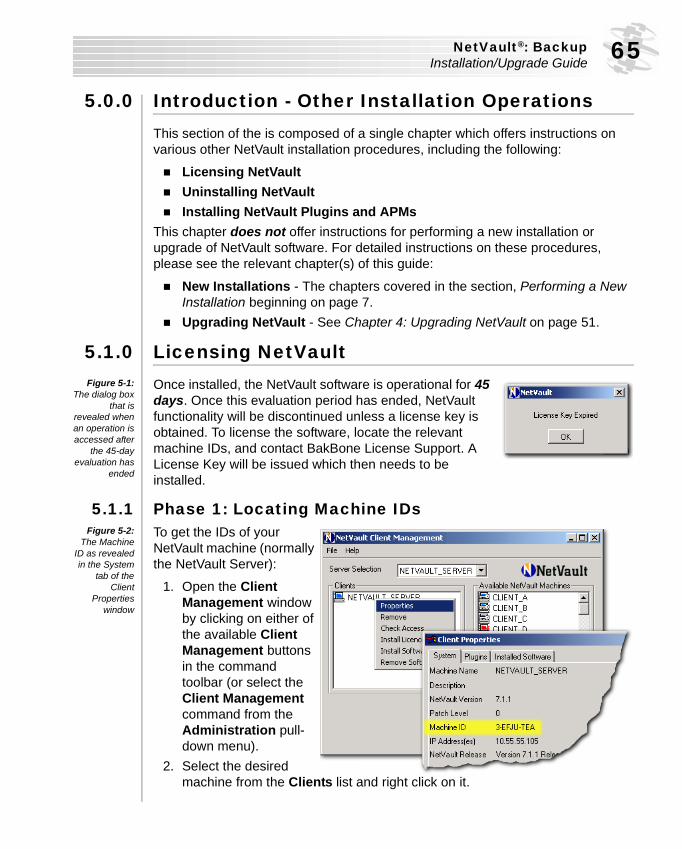
NetVault®: BackupInstallation/Upgrade Guide 65
5.0.0 Introduction - Other Installation OperationsThis section of the is composed of a single chapter which offers instructions on various other NetVault installation procedures, including the following:
� Licensing NetVault� Uninstalling NetVault� Installing NetVault Plugins and APMs
This chapter does not offer instructions for performing a new installation or upgrade of NetVault software. For detailed instructions on these procedures, please see the relevant chapter(s) of this guide:
� New Installations - The chapters covered in the section, Performing a New Installation beginning on page 7.
� Upgrading NetVault - See Chapter 4: Upgrading NetVault on page 51.
5.1.0 Licensing NetVaultFigure 5-1:
The dialog boxthat is
revealed whenan operation isaccessed after
the 45-dayevaluation has
ended
Once installed, the NetVault software is operational for 45 days. Once this evaluation period has ended, NetVault functionality will be discontinued unless a license key is obtained. To license the software, locate the relevant machine IDs, and contact BakBone License Support. A License Key will be issued which then needs to be installed.
5.1.1 Phase 1: Locating Machine IDsFigure 5-2:
The MachineID as revealedin the System
tab of theClient
Propertieswindow
To get the IDs of your NetVault machine (normally the NetVault Server):
1. Open the Client Management window by clicking on either of the available Client Management buttons in the command toolbar (or select the Client Management command from the Administration pull-down menu).
2. Select the desired machine from the Clients list and right click on it.
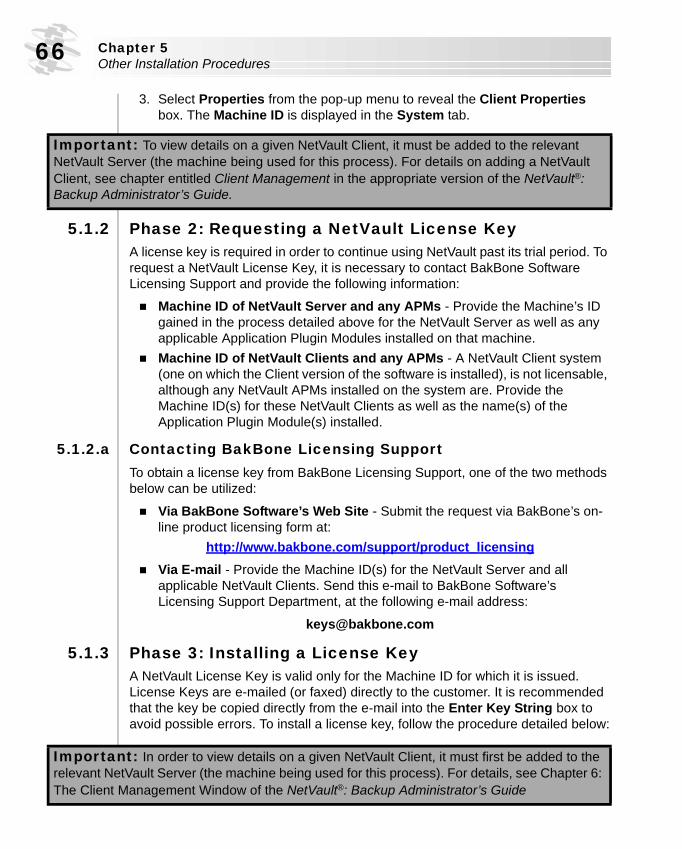
Chapter 5Other Installation Procedures66
3. Select Properties from the pop-up menu to reveal the Client Properties box. The Machine ID is displayed in the System tab.
5.1.2 Phase 2: Requesting a NetVault License KeyA license key is required in order to continue using NetVault past its trial period. To request a NetVault License Key, it is necessary to contact BakBone Software Licensing Support and provide the following information:
� Machine ID of NetVault Server and any APMs - Provide the Machine’s ID gained in the process detailed above for the NetVault Server as well as any applicable Application Plugin Modules installed on that machine.
� Machine ID of NetVault Clients and any APMs - A NetVault Client system (one on which the Client version of the software is installed), is not licensable, although any NetVault APMs installed on the system are. Provide the Machine ID(s) for these NetVault Clients as well as the name(s) of the Application Plugin Module(s) installed.
5.1.2.a Contacting BakBone Licensing SupportTo obtain a license key from BakBone Licensing Support, one of the two methods below can be utilized:
� Via BakBone Software’s Web Site - Submit the request via BakBone’s on-line product licensing form at:
http://www.bakbone.com/support/product_licensing� Via E-mail - Provide the Machine ID(s) for the NetVault Server and all
applicable NetVault Clients. Send this e-mail to BakBone Software’s Licensing Support Department, at the following e-mail address:
5.1.3 Phase 3: Installing a License KeyA NetVault License Key is valid only for the Machine ID for which it is issued. License Keys are e-mailed (or faxed) directly to the customer. It is recommended that the key be copied directly from the e-mail into the Enter Key String box to avoid possible errors. To install a license key, follow the procedure detailed below:
Important: To view details on a given NetVault Client, it must be added to the relevant NetVault Server (the machine being used for this process). For details on adding a NetVault Client, see chapter entitled Client Management in the appropriate version of the NetVault®: Backup Administrator’s Guide.
Important: In order to view details on a given NetVault Client, it must first be added to the relevant NetVault Server (the machine being used for this process). For details, see Chapter 6: The Client Management Window of the NetVault®: Backup Administrator’s Guide
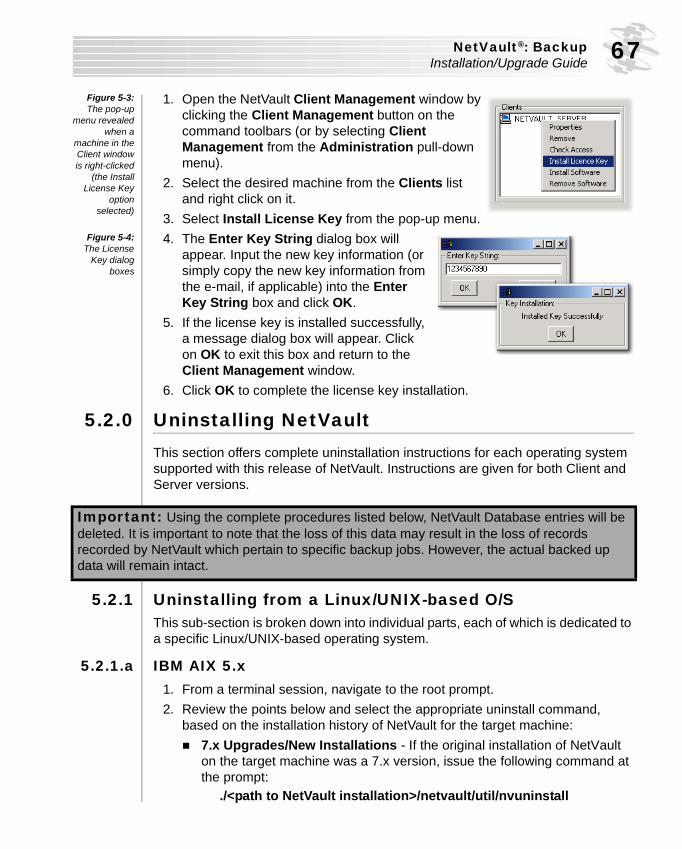
NetVault®: BackupInstallation/Upgrade Guide 67
Figure 5-3:The pop-up
menu revealedwhen a
machine in theClient windowis right-clicked
(the InstallLicense Key
optionselected)
1. Open the NetVault Client Management window by clicking the Client Management button on the command toolbars (or by selecting Client Management from the Administration pull-down menu).
2. Select the desired machine from the Clients list and right click on it.
3. Select Install License Key from the pop-up menu.Figure 5-4:
The LicenseKey dialog
boxes
4. The Enter Key String dialog box will appear. Input the new key information (or simply copy the new key information from the e-mail, if applicable) into the Enter Key String box and click OK.
5. If the license key is installed successfully, a message dialog box will appear. Click on OK to exit this box and return to the Client Management window.
6. Click OK to complete the license key installation.
5.2.0 Uninstalling NetVaultThis section offers complete uninstallation instructions for each operating system supported with this release of NetVault. Instructions are given for both Client and Server versions.
5.2.1 Uninstalling from a Linux/UNIX-based O/SThis sub-section is broken down into individual parts, each of which is dedicated to a specific Linux/UNIX-based operating system.
5.2.1.a IBM AIX 5.x1. From a terminal session, navigate to the root prompt. 2. Review the points below and select the appropriate uninstall command,
based on the installation history of NetVault for the target machine:� 7.x Upgrades/New Installations - If the original installation of NetVault
on the target machine was a 7.x version, issue the following command at the prompt:
./<path to NetVault installation>/netvault/util/nvuninstall
Important: Using the complete procedures listed below, NetVault Database entries will be deleted. It is important to note that the loss of this data may result in the loss of records recorded by NetVault which pertain to specific backup jobs. However, the actual backed up data will remain intact.
Chapter 5Other Installation Procedures68
� Older Upgrade Installations - If the original installation on the target machine was a 6.x version of NetVault that has been upgraded to a 7.x version, issue the following command at the prompt:
./<path to NetVault installation>/netvault/util/nvuninstall3. Follow the on-screen instructions to remove the software.
5.2.1.b Linux (Intel x86 -- 2.4/2.6 Kernel)1. From a terminal session, navigate to the root prompt. 2. Review the points below and select the appropriate uninstall command,
based on the installation history of NetVault for the target machine:� 7.x Upgrades/New Installations - If the original installation of NetVault
on the target machine was a 7.x version, issue the following command at the prompt:
./<path to NetVault installation>/netvault/util/nvuninstall� Older Upgrade Installations - If the original installation on the target
machine was a 6.x version of NetVault that has been upgraded to a 7.x version, issue the following command at the prompt:
./<path to NetVault installation>/netvault/util/nvuninstall3. Follow the on-screen instructions to remove the software.
5.2.1.c NCR UNIX SVR 5.4 MP-RAS 031. To remove the software (based on installation type), choose from the sections
below and follow the steps provided:� 7.x Upgrades/New Installations - If the original installation of NetVault
on the target machine was a 7.x version, follow the instructions below:� All Installations (Client or Server) - Initiate a terminal session prompt
and issue the following command:pkgrm netvault
� Older Upgrade Installations - If the original installation on the target machine was a 6.x version of NetVault that has been upgraded to a 7.x version, follow the instructions below:� Step 1: Remove the Upgrade Installation - All installations (Client or
Server), run the command “pkgrm netvault”.� Step 2: Remove the Original Installation - For a NetVault Server
installation, run the command “pkgrm nv6server”; for a NetVault Client installation, run the command, “pkgrm nv6client”.
2. Follow the on-screen instructions to remove the software.
NetVault®: BackupInstallation/Upgrade Guide 69
5.2.1.d Solaris (SPARC)1. To uninstall or remove the software log on to the target machine using the
super user ID and initiate a terminal session.2. Navigate to the directory where tNetVault:Backup is installed.3. Remove the package by issuing the following command:
pkgrm -d4. Follow the on-screen instructions to remove the software.
5.2.2 Uninstalling from Microsoft Windows 2000/20031. Access the Control Panel window in Windows (e.g., via Start > Settings >
Control Panel).2. From this window, locate the Add/Remove Programs icon and double-click
on it to launch this utility.3. In the list of installed programs, navigate to the “NetVault” item. Select it and
click on the Remove button. A dialog box will launch requesting confirmation of the remove request. Click on Yes to continue (or No to abort).
4. The removal process will begin, and several dialog boxes will be launched, monitoring its progress.
5. Not all NetVault files are removed during the previous process. Therefore, it is necessary to manually remove the NetVault installation directory and all of its contents. This directory will be located as follows (where “...” represents the path to the installation):
“.../NetVault”6. With the directory deleted, NetVault 7.4 has been uninstalled.
Important: Some NetVault directories are not removed when NetVault:Backup is uninstalled from a Solaris machine. To remove them, follow these steps:
1. Initiate a terminal session on the target machine and navigate to the following directory (i.e., where "…" refers to the complete path to the installation of NetVault):
…/netvault
2. Issue the following command to remove the link that locks the NetVault “tmp” directory:unlink ./tmp
3. Back out of the NetVault directory, and remove the link that locks the NetVault installation directory by inputting the following two commands in sequence:
cd ..unlink ./netvault
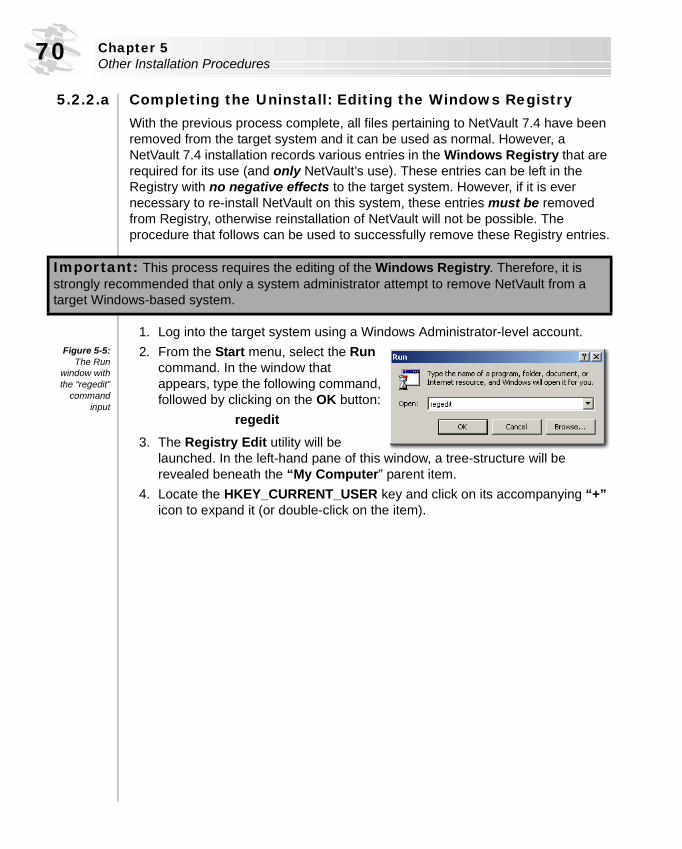
Chapter 5Other Installation Procedures70
5.2.2.a Completing the Uninstall: Editing the Windows RegistryWith the previous process complete, all files pertaining to NetVault 7.4 have been removed from the target system and it can be used as normal. However, a NetVault 7.4 installation records various entries in the Windows Registry that are required for its use (and only NetVault’s use). These entries can be left in the Registry with no negative effects to the target system. However, if it is ever necessary to re-install NetVault on this system, these entries must be removed from Registry, otherwise reinstallation of NetVault will not be possible. The procedure that follows can be used to successfully remove these Registry entries.
1. Log into the target system using a Windows Administrator-level account.Figure 5-5:
The Runwindow withthe “regedit”
commandinput
2. From the Start menu, select the Run command. In the window that appears, type the following command, followed by clicking on the OK button:
regedit3. The Registry Edit utility will be
launched. In the left-hand pane of this window, a tree-structure will be revealed beneath the “My Computer” parent item.
4. Locate the HKEY_CURRENT_USER key and click on its accompanying “+” icon to expand it (or double-click on the item).
Important: This process requires the editing of the Windows Registry. Therefore, it is strongly recommended that only a system administrator attempt to remove NetVault from a target Windows-based system.
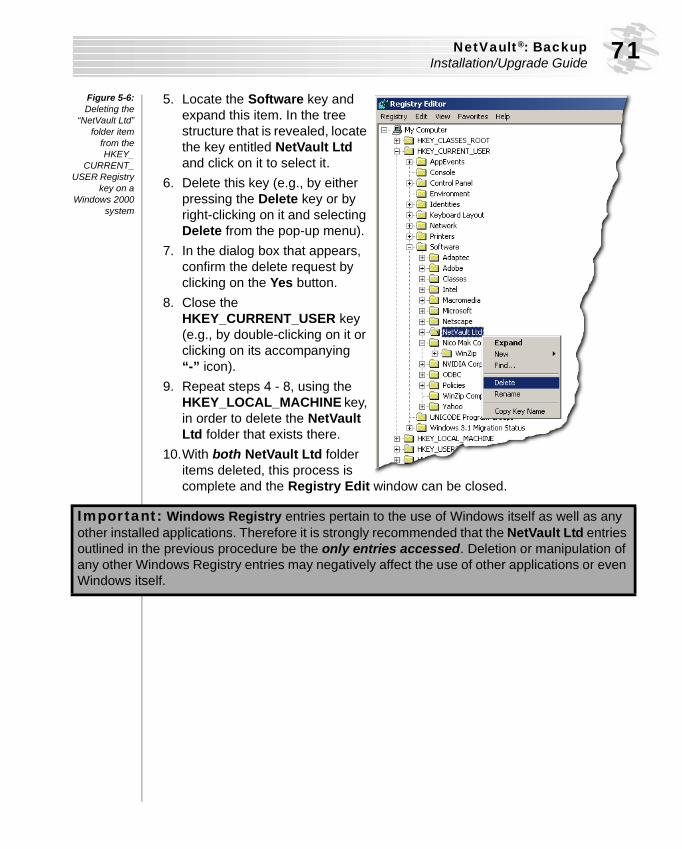
NetVault®: BackupInstallation/Upgrade Guide 71
Figure 5-6:Deleting the
“NetVault Ltd”folder item
from theHKEY_
CURRENT_USER Registry
key on aWindows 2000
system
5. Locate the Software key and expand this item. In the tree structure that is revealed, locate the key entitled NetVault Ltd and click on it to select it.
6. Delete this key (e.g., by either pressing the Delete key or by right-clicking on it and selecting Delete from the pop-up menu).
7. In the dialog box that appears, confirm the delete request by clicking on the Yes button.
8. Close the HKEY_CURRENT_USER key (e.g., by double-clicking on it or clicking on its accompanying “-” icon).
9. Repeat steps 4 - 8, using the HKEY_LOCAL_MACHINE key, in order to delete the NetVault Ltd folder that exists there.
10.With both NetVault Ltd folder items deleted, this process is complete and the Registry Edit window can be closed.
Important: Windows Registry entries pertain to the use of Windows itself as well as any other installed applications. Therefore it is strongly recommended that the NetVault Ltd entries outlined in the previous procedure be the only entries accessed. Deletion or manipulation of any other Windows Registry entries may negatively affect the use of other applications or even Windows itself.
Chapter 5Other Installation Procedures72
5.3.0 Installing NetVault Plugins and APMsNetVault offers a selection of components that are used in conjunction with the NetVault GUI to perform specific backup and recovery operations -- either to backup specific types of data or to add more functionality to the GUI itself. These are broken down into two families
� Optional Plugins and Application Plugin Modules (APMs) - This pertains to any number of components that are obtained in addition to the NetVault Administrator Application GUI to include additional functionality.
� Core NetVault Plugins - This consists of the plugins that are automatically installed with a default installation of NetVault.
The following sections offer information and instructions on the installation of these APMs and plugins.
5.3.1 Installing Optional Plugins and APMsDue to specific pre- and post-installation instructions that are required on a per-APM/plugin basis, individual user’s guides have been generated that offer complete installation instructions. Please refer to BakBone Software’s web site to obtain these individual user’s guides:
http://www.bakbone.com/support/product_documentation/
5.3.2 Installing NetVault Core PluginsSeparate installation procedures are not required for NetVault’s Core Plugins, which are automatically included with a standard installation of the software. Core Plugins include the following:
� The File System Plugin� The Consolidate Incremental Backups Plugin� The NetVault Database Plugin� The Data Copy Plugin� The Raw Devices Plugin� The Encryption Plugin
5.0.0.a Re-Installing a NetVault Core PluginIn the event that a NetVault Core Plugin was removed from a target system, the instructions that follow can be utilized to re-install it.
Important: NetVault’s Encryption Plugin can not be uninstalled, so re-installation will never be required. However, this plugin can be disabled. For complete details on the use of this Core Plugin, please see the NetVault®: Backup Administrator’s Guide.
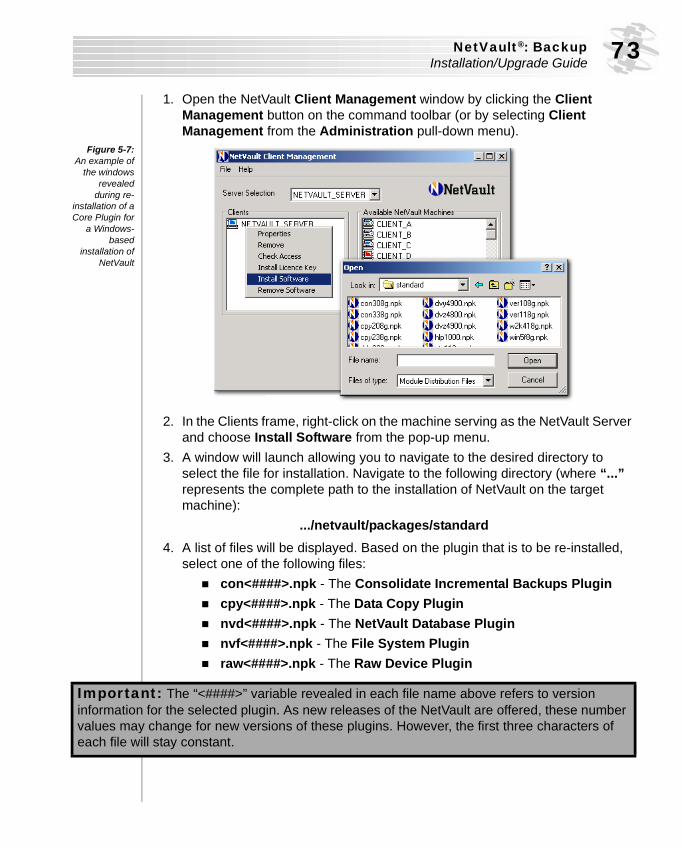
NetVault®: BackupInstallation/Upgrade Guide 73
1. Open the NetVault Client Management window by clicking the Client Management button on the command toolbar (or by selecting Client Management from the Administration pull-down menu).
Figure 5-7:An example of
the windowsrevealed
during re-installation of aCore Plugin for
a Windows-based
installation ofNetVault
2. In the Clients frame, right-click on the machine serving as the NetVault Server and choose Install Software from the pop-up menu.
3. A window will launch allowing you to navigate to the desired directory to select the file for installation. Navigate to the following directory (where “...” represents the complete path to the installation of NetVault on the target machine):
.../netvault/packages/standard4. A list of files will be displayed. Based on the plugin that is to be re-installed,
select one of the following files:� con<####>.npk - The Consolidate Incremental Backups Plugin� cpy<####>.npk - The Data Copy Plugin� nvd<####>.npk - The NetVault Database Plugin� nvf<####>.npk - The File System Plugin� raw<####>.npk - The Raw Device Plugin
Important: The “<####>” variable revealed in each file name above refers to version information for the selected plugin. As new releases of the NetVault are offered, these number values may change for new versions of these plugins. However, the first three characters of each file will stay constant.
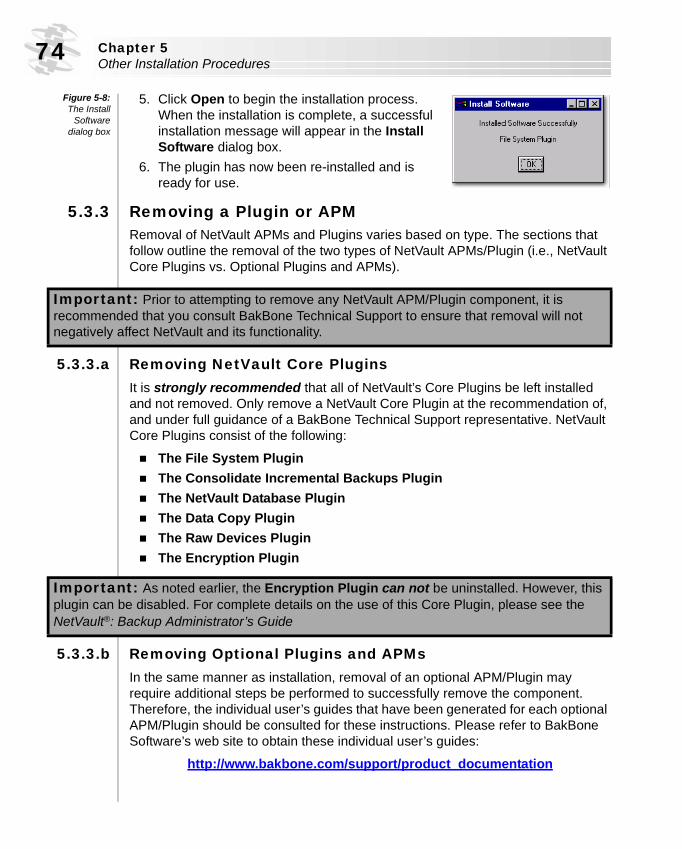
Chapter 5Other Installation Procedures74
Figure 5-8:The Install
Softwaredialog box
5. Click Open to begin the installation process. When the installation is complete, a successful installation message will appear in the Install Software dialog box.
6. The plugin has now been re-installed and is ready for use.
5.3.3 Removing a Plugin or APMRemoval of NetVault APMs and Plugins varies based on type. The sections that follow outline the removal of the two types of NetVault APMs/Plugin (i.e., NetVault Core Plugins vs. Optional Plugins and APMs).
5.3.3.a Removing NetVault Core PluginsIt is strongly recommended that all of NetVault’s Core Plugins be left installed and not removed. Only remove a NetVault Core Plugin at the recommendation of, and under full guidance of a BakBone Technical Support representative. NetVault Core Plugins consist of the following:
� The File System Plugin� The Consolidate Incremental Backups Plugin� The NetVault Database Plugin� The Data Copy Plugin� The Raw Devices Plugin� The Encryption Plugin
5.3.3.b Removing Optional Plugins and APMsIn the same manner as installation, removal of an optional APM/Plugin may require additional steps be performed to successfully remove the component. Therefore, the individual user’s guides that have been generated for each optional APM/Plugin should be consulted for these instructions. Please refer to BakBone Software’s web site to obtain these individual user’s guides:
http://www.bakbone.com/support/product_documentation
Important: Prior to attempting to remove any NetVault APM/Plugin component, it is recommended that you consult BakBone Technical Support to ensure that removal will not negatively affect NetVault and its functionality.
Important: As noted earlier, the Encryption Plugin can not be uninstalled. However, this plugin can be disabled. For complete details on the use of this Core Plugin, please see the NetVault®: Backup Administrator’s Guide
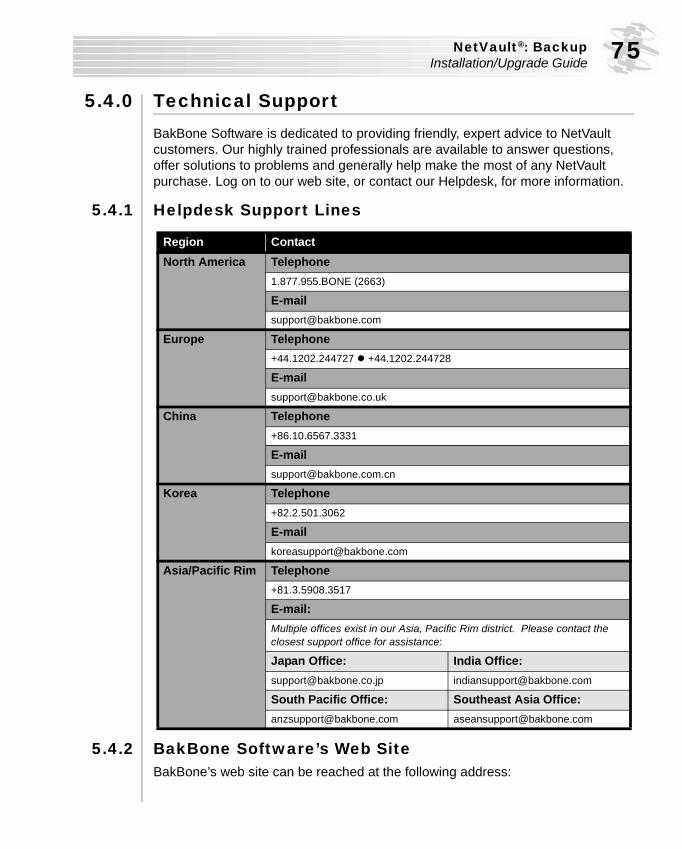
NetVault®: BackupInstallation/Upgrade Guide 75
5.4.0 Technical SupportBakBone Software is dedicated to providing friendly, expert advice to NetVault customers. Our highly trained professionals are available to answer questions, offer solutions to problems and generally help make the most of any NetVault purchase. Log on to our web site, or contact our Helpdesk, for more information.
5.4.1 Helpdesk Support Lines
5.4.2 BakBone Software’s Web SiteBakBone’s web site can be reached at the following address:
Region ContactNorth America Telephone
1.877.955.BONE (2663)
E-mail [email protected]
Europe Telephone+44.1202.244727 � +44.1202.244728
China Telephone+86.10.6567.3331
Korea Telephone+82.2.501.3062
Asia/Pacific Rim Telephone+81.3.5908.3517
E-mail: Multiple offices exist in our Asia, Pacific Rim district. Please contact the closest support office for assistance:
Japan Office: India Office:[email protected] [email protected]
South Pacific Office: Southeast Asia Office:[email protected] [email protected]