Embed Size (px)
Citation preview

Owner’s Manual & Complete Recipe Book
NuWave Brio® 3QDigital Air Fryer

NuWave Brio® 6QDigital Air Fryer
NuWave Oven® Pro Plus
Super-heated air cooksyour food to crispy,tender perfection.The digital touch screen gives you precise temperature control.
Cook healthier meals faster and more efficiently with Triple Combo Cooking Power.
NuWave PIC®
(Precision Induction Cooktop)
Cook faster, safer, and more efficiently than you ever could on your gas or electric stovetop.
For more about our innovative products, visit:

NuWave Nutri-Pot® 6QDigital Pressure Cooker
Easily cook rice, poultry, vegetables, and more all with the press of a button! The Nutri-Pot’s safety release valve and hinged lid make for convenient and safe operation.
NuWave Electric Skillet
Coated with Duralon® Healthy Ceramic Non-Stick coating for easy cleanup. Includes a premium Tempered Glass Lid.
1-877-689-2838
NuWaveNow.com

NuWave Flavor-Lockers®
with Vacuum-Seal TechnologyKeep food fresh for up to 21 days! Slow the growth of mold by removing trapped oxygen with a few easy pumps.
NuWave Duralon® Healthy Ceramic Non-Stick
CookwareCoated with Duralon Healthy Ceramic Non-Stick coating for easy cleanup, this versatile cookware is perfect for use in ovens or on gas, electric, and even induction cooktops.
For more about our innovative products, visit:

NuWave Nutri-Master® Slow JuicerThe Nutri-Master, with a low 48 RPM, is both incredibly quiet and powerful enough to extract juice from nuts and hard vegetables.
1-877-689-2838
NuWaveNow.com
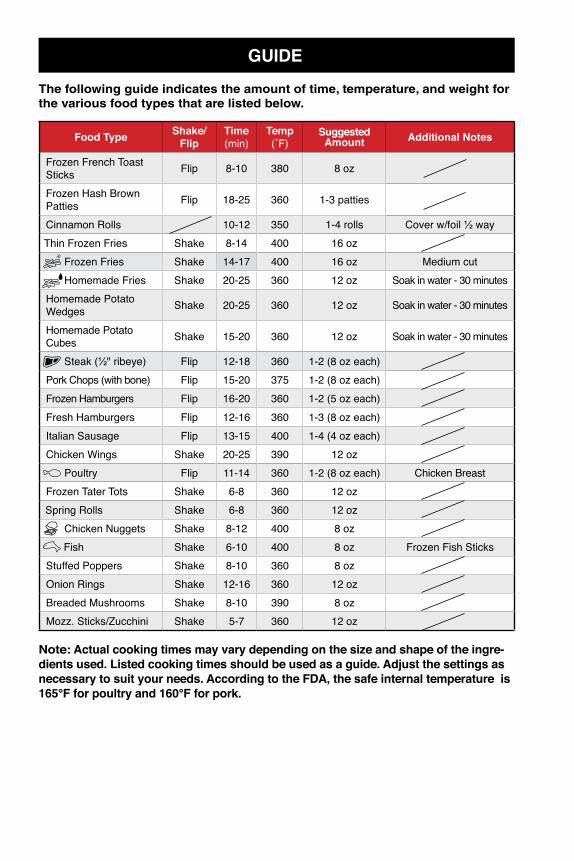
Note: Actual cooking times may vary depending on the size and shape of the ingre-dients used. Listed cooking times should be used as a guide. Adjust the settings as necessary to suit your needs. According to the FDA, the safe internal temperature is 165°F for poultry and 160°F for pork.
The following guide indicates the amount of time, temperature, and weight for the various food types that are listed below.
Food Type Shake/Flip
Time(min)
Temp (˚F)
Suggested Amount Additional Notes
Frozen French Toast Sticks Flip 8-10 380 8 oz
Frozen Hash Brown Patties Flip 18-25 360 1-3 patties
Cinnamon Rolls 10-12 350 1-4 rolls Cover w/foil ½ wayThin Frozen Fries Shake 8-14 400 16 oz
Frozen Fries Shake 14-17 400 16 oz Medium cutHomemade Fries Shake 20-25 360 12 oz Soak in water - 30 minutes
Homemade Potato Wedges Shake 20-25 360 12 oz Soak in water - 30 minutes
Homemade Potato Cubes Shake 15-20 360 12 oz Soak in water - 30 minutes
Steak (½" ribeye) Flip 12-18 360 1-2 (8 oz each)Pork Chops (with bone) Flip 15-20 375 1-2 (8 oz each)Frozen Hamburgers Flip 16-20 360 1-2 (5 oz each)Fresh Hamburgers Flip 12-16 360 1-3 (8 oz each)Italian Sausage Flip 13-15 400 1-4 (4 oz each)Chicken Wings Shake 20-25 390 12 oz
Poultry Flip 11-14 360 1-2 (8 oz each) Chicken BreastFrozen Tater Tots Shake 6-8 360 12 ozSpring Rolls Shake 6-8 360 12 oz
Chicken Nuggets Shake 8-12 400 8 oz Fish Shake 6-10 400 8 oz Frozen Fish SticksStuffed Poppers Shake 8-10 360 8 ozOnion Rings Shake 12-16 360 12 ozBreaded Mushrooms Shake 8-10 390 8 ozMozz. Sticks/Zucchini Shake 5-7 360 12 oz
GUIDE

TABLE OF CONTENTS
Guide ........................................................... 6
Important Safeguards ............................. 8-9
Additional Safeguards ............................. 10
Parts Description .......................................11
Operating Instructions ........................ 12-15
Care & Maintenance ................................. 16
Care & Use For Accessories ................... 17
Troubleshooting Guide ....................... 18-19
Warranty .................................................... 20
Recipes
Baked Potato ............................................ 22
Roasted Brussel Sprouts ......................... 23
Home Fries ............................................... 24
Air Baked Eggs ........................................ 25
Air Fried Tortilla Chips .............................. 26
Sliders ...................................................... 27
Buffalo Wings .......................................... 28
Chicken Kiev ............................................ 29
Chicken Satay .......................................... 30
Grilled Chicken Tenders ........................... 31
Parmesan Chicken Tenders ..................... 32
Roasted Cornish Game Hen w/Honey Mustard Glaze .......................................... 33 Cajun Shrimp ........................................... 34
Chimichurri Skirt Steak ............................ 35
Grilled Ham and Cheese.......................... 36
Tortilla Crusted Tilapia .............................. 37
Tuna Sliders ............................................. 38
Turkey Sliders ........................................... 39
Pork Loin Sandwiches .............................. 40
Citrus Green Beans ................................. 41
Crispy Tofu ............................................... 42
Air Fryer Curry Calamari .......................... 43
Party Meatballs ........................................ 44
Kale Chips ................................................ 45
Roasted Tomatoes ................................... 46
Roasted Root Vegetables ......................... 47
Apple Pie Egg Rolls ................................. 48
Banana and Nutella Wontons .................. 49
Pineapple Crescents ................................ 50
Crescents Rolls ........................................ 51
Spanish Manual ...................................52-67
www.NuWaveNow.com

8 Owner’s Manual
When using electrical units, basic safety precautions should always be followed including the following:
1. To protect against electrical shock, do not immerse cord, plugs, or the unit in water or other liquid.
2. Close supervision is necessary when any unit is used by or near children.3. Unplug from outlet when not in use and before cleaning. Allow to cool before putting
on or taking off parts.4. The use of other accessories that are not intended to be use with this unit is not
recommended. Doing so may damage the unit and can cause accidents.5. NOT INTENDED FOR OUTDOOR USE.6. Do not let cord hang over edge of table or counter, or touch hot surface. 7. Do not place on or near a hot gas, electric burner and or in a heated oven.8. Extreme caution must be used when moving unit containing hot oil or other hot
liquids.9. To disconnect, turn any control “OFF”, then remove plug from the wall outlet.
10. Never put the appliance against the wall or other appliances. There should be at least 3 inches of free space for the back side. Left/right sides and the upper side of the appliance. Do not place anything on top of appliance.
11. During air frying, hot steam is released from the air outlet opening. Keep your hands and face distance from the steam and from the air outlet opening. Also, be careful of hot steam and air when you remove the Fry Pan Basket from the appliance.
12. Make sure the ingredients prepared in this appliance come out golden yellow instead of dark or brown. Remove burnt remnants.
13. Do not operate any appliance with a damaged cord, damaged plug or after the appliance malfunctions or is damaged in any manner. Return the appliance to the nearest authorized service facility for examination, repair or adjustment.
14. Do not use appliance for other than intended use.
READ ALL INSTRUCTIONS
WARNINGPlease immediately cut off circuit and send unit to our Customer
Service Department in case of other problems.1-877-689-2838 • Email: [email protected]
IMPORTANT SAFEGUARDS

9Owner’s Manual
CAUTION
• Always put the ingredients to be fried in the Fry Pan Basket to prevent direct contact with the heating components.
• Do not cover the air inlet and outlet opening while the appliance is operating.
• Do not pour oil into the Base Tray, this may create a fire hazard.• Never touch the inside of the appliance while it is operating.
15. HOUSEHOLD USE ONLY.a) A short power supply cord should be used to reduce the risk of cords becoming entangled or users tripping over longer cords.b) Longer extension cords are available and may be used if care is exercised in their use.c) If a longer extension cord is used: 1. The marked electrical rating of the cord set or extension cold should be at least as great as the electrical rating of the appliance; and 2. The cord should be arranged so that it will not drape over the counter-top or table top where it can be pulled on by children or tripped over unintentionally. If the appliance is of the grounded type, the extension cord should be a grounding-type 3-wire cord.
Accessories:The Grill Pan, Baking Pan and Reversible Rack become extremely HOT during the cooking process. Do not touch the accessories during and immediately after cooking. Only hold the grill pan by the handle and use caution when removing these items from the unit. Always wear oven mitts or use pot holders when handling potentially hot accessories. Allow everything to cool completely before cleaning.
1. Do not use the Grill Pan, Baking Pan or Reversible Rack in a microwave, toaster oven, convection oven, conventional oven, ceramic cooktop, electric coil, gas burner range or an outdoor grill.
2. Do not use sharp edged metal utensils or knives as doing so will scratch the non-stick surface.
3. Do not fill the Base Tray, Basket or Grill Pan with oil or any other liquid.Note: Put the appliance on a surface that is horizontal, even and stable. This appliance is intended normal household use. It is not intended to be used in environments such as staff kitchen of shops, offices, farms or other work environments. Nor is it intended to be used by clients in hotels, motels, bed and breakfast and other residential environments.
IMPORTANT SAFEGUARDS (Continued)
This appliance has a polarized plug (one blade is wider than the other). To reduce the risk of electric shock, this plug is intended to fit into a polarized outlet only one way. If the plug does not fit fully into the outlet, reverse the plug. If it still does not fit, contact a qualified electrician. Do not modify the plug in any way.

10 Owner’s Manual
ADDITIONAL SAFEGUARDS
1. Do not place the unit close to flammable materials heating units or wet environments.
2. Height of ingredients placed in the Fry Pan Basket should comply with the directions listed under “Operation Instructions”.
3. Do not replace with other parts that are not designed specifically for the NuWave Brio Digital Air Fryer.
4. Do not put any other cooking pans in the Fry Pan Basket. Do not replace any parts with other containers.
5. If a lot of smoke is escaping from the air vent during operation, unplug the unit immediately and contact customer service.*
6. Do not move the unit while in operation. Only after the NuWave Brio Digital Air Fryer has completely cooled down should you attempt to move it. Always wait for the NuWave Brio Digital Air Fryer to cool down prior to handling it.
7. Never use a towel to block the vent.8. If any troubles arise during operation, any necessary service must be done
by NuWave, LLC or authorized by the manufacturer for repairs.9. Do not disassemble the unit on your own or replace any parts.
10. Do not use metal utensils with the coated Fry Pan Basket as this can damage the surface.
11. If the power cord is damaged, do not attempt to operate the unit.*12. Keep the unit out of reach of children when the unit is operating or cooling down.13. Keep hands and face away from the venting outlet or where heat is being released.14. Make sure NuWave Brio Digital Air Fryer is always clean prior to cooking. 15. It is normal for some smoke to escape the unit when heating for the first time.
*Customer Service Department at 1-877-689-2838 or email at [email protected]

11Owner’s Manual
1
2 3
1. Air Fryer Power BasePart #: 36231 5. Baking Pan*
Part #: 36207 9. Grill Pan*Part #: 36205
2. Base Tray Part #: 36232 6. Silicone Mat*
Part #: 36208Carrying Case*Part #: 26016
3. Fry Pan BasketPart #: 36233 7. Silicone Cup Cake Liners*
Part #: 36209 (10 Pack)
4. Fry Pan Basket NetPart #: 36204 8. Reversible Rack*
Part #: 36206
4
5
*Optional
6
7
8
9
PARTS DESCRIPTION

12 Owner’s Manual
OPERATING INSTRUCTIONS
Before Use:1. Remove all the packaging materials.2. Remove the glue and labels on the appliance.3. Clean the Fry Pan Basket, Base Tray, thoroughly with hot water, a nonabrasive sponge
and a mild dish detergent, or in the dishwasher, top rack only.4. Wipe the inside and outside of the appliance with a wet cloth. Do not immerse the
appliance in water.5. The NuWave Brio 3Q Digital Air Fryer comes with a special housing underneath for
easy and convenient chord storage. You will see a portion sticking out and the rest of chord neatly wound in the housing.
Note: This appliance cooks using hot air. DO NOT fill the basket with oil.
Operation Preparation:1. Place the appliance on a level, even, and stable heat-resistant surface.2. Place the Base Tray and Fry Pan Basket in the NuWave Brio 3Q Digital Air Fryer3. Plug the appliance into a standard wall socket. Note: Do not cover or block the vent located on the back of the NuWave Brio 3Q Digital Air Fryer. Doing so can prevent proper ventilation and will adversely affect the cooking results.
Operation Functions - On/Off Function:Press “On/Off” button once to turn the unit on. The control panel should display “0” indicating that no cooking time or temperature has been selected and the unit is powered on. Press “On/Off” button again to turn the unit off.
Start Function:Press “Start” button once to begin cooking, ":15" will be displayed as well as a fan icon, and the NuWave Brio 3Q Digital Air Fryer will start to countdown. The default is 360˚F for 15 minutes.
ONOFF
START
Pause/Clear Function:• To interrupt the cooking or preheating process, press the “Pause/Clear” button once. “5” will be flashing on the display indicating a 5-minute countdown. If no other actions are taken during this countdown, “0” will be shown on the display. To resume after the unit has been paused, press the “Start” button once.
• To clear the programmed cooking time and temperature, press the “Pause/Clear” button a second time. This will erase the current cooking functions. “0” will be shown on the display.
PAUSECLEAR

13Owner’s Manual
OPERATING INSTRUCTIONS (Continued)
Food Type Time(minutes) Temp Food Amount
(ounces) Fries (Homemade Thick cut) 25 360˚F 12Frozen Fries (Medium cut) 15 400˚F 16Chicken Nuggets 8 400˚F 8Steak (½" ribeye) 12 360˚F 8 oz eachPoultry (Chicken breast) 12 360˚F 8 oz eachFish (Frozen Fish Sticks) 8 400˚F 8
Pre-Heat Function:The “Pre-Heat” function ensures that the NuWave 3Q Brio Digital Air Fryer reaches the desired temperature before you begin cooking your food. The “Pre-Heat” function is the perfect choice for foods that require a crispier finish, such as frozen appetizers, French fries, or chicken wings.
Press the “Pre-Heat” button. The control panel will display “Pre-Heat”. Press the arrows above the temperature and time icons before pressing “Start”. The default temperature is set to 360ºF. If needed, you can manually adjust the cooking temperature and time by pressing the arrows above and below the temperature and time icon.
Once the NuWave 3Q Brio Digital Air Fryer reaches the set temperature, the control panel will display “Ready” and the NuWave 3Q Brio Digital Air Fryer will beep once. The NuWave 3Q Brio Digital Air Fryer will start a countdown of 5 minutes and the number “5” will start flashing. It will remain at this temperature for up to 5 minutes, or until you remove the Fry Pan Basket, whichever comes first. Once the food has been added to the Fry Pan Basket, insert the Fry Pan Basket back in place. This will start the countdown on the set cooking time.
Note: If you remove the Fry Pan Basket at any point during the preheating stage, the NuWave 3Q Brio Digital Air Fryer will automatically pause, start a countdown of 5 minutes until you replace the Fry Pan Basket. If you cook another batch of food shortly after cooking in the NuWave Brio 3Q Digital Air Fryer, you do not need to use the “Pre-Heat” Function as the NuWave 3Q Brio Digital Air Fryer will already be hot. If you wish to cook your food longer, simply place the Base Tray and Fry Pan Basket back into the appliance and continue cooking in 2-3 minute increments until desired consistency has been reached.
PRE-HEAT
Menu Selection:Press "Menu", the red light above fries will illuminate and "25" will be displayed. Press "Start" to begin cooking, the countdown will begin. To choose a different food from below, before you press "Start", simply press "Menu" to select the food. See chart below for pre-programmed "Menu" selections. To get out of the menu selection, press menu again until the red light above the food type is no longer lit. If using the Pre-Heat function, press "Pre-Heat" before "Menu" to ensure proper temperature. All menu selections default to 1300 watts.
MENU

14 Owner’s Manual
OPERATING INSTRUCTIONS (Continued)
Adjusting Temperature:The NuWave 3Q Brio Digital Air Fryer is set to cook at 360°F by default. To set a different cooking temperature, press the arrows above and below Temp icon. The display will show “360F". “Temp” will be flashing. To adjust the temperature, continue to press the “Up” and “Down” arrows. You can adjust your temperature in 5-degree increments between 100˚F and 400˚F.To quickly adjust the temperature in large increments, simply hold down the “Up” or “Down” arrow to adjust the temperature by 50-degree increments. You can change the cooking temperature at any point during the cooking process. Press the arrows above and below the Temp icon. Programed temperature will be displayed. “Temp” will be flashing. Press the “Up” or “Down” arrow until you reach your desired temperature.
Once your temperature has been selected, the NuWave 3Q Brio Digital Air Fryer will automatically adjust to the new temperature and the display will show the remaining cooking time. If no new temperature has been selected within 3 seconds, the NuWave Brio Digital Air Fryer display will once again show the remaining cooking time.Adjusting Time:The NuWave 3Q Brio Digital Air Fryer is set to cook for 15 minutes by default. To set a different cooking time, press the up and down arrows above and below the Time icon. The display will show “15”. “Time” will be flashing. To adjust the time, continue to press the “Up” and “Down” arrows. You can adjust your cooking time in 1 minute increments.
To quickly adjust the time in large increments, simply hold down the “Up” or “Down” arrow to adjust the time by 10-minute increments, followed by 20-minute increments, followed by 30-minute increments. The minimum selectable cooking time is 1 minute. The maximum selectable cooking time differs depending on the selected cooking temperature.
• 100˚F – 345˚F maximum cooking time is 99:59 hours• 350˚F – 400˚F maximum cooking time is 1 hour
You can change the cooking time at any point during the cooking process. Press the up and down arrows above and below the Time icon. The remaining cooking time will be displayed. Press the “Up” or “Down” arrow until you reach your desired cooking time. Once your cooking time has been selected, the display will show the new remaining cooking time.
Note: After timer reaches 1 minute, the display will begin showing the remaining time in seconds (59, 58, etc.).
Reheat Function: The default setting is programmed at 360F for 4 minutes. This function is perfect for reheating single portion-sized foods. Press the “Reheat” button, then press “Start”. If needed, you can manually adjust the cooking temperature and time by pressing the arrows above and below the temperature and time icon. When using reheat, you can place the food directly in the basket, any oven safe dish or even foil.
REHEAT

15Owner’s Manual
OPERATING INSTRUCTIONS (Continued)
For Best ResultsAfter you have selected your cooking time and temperature and you are ready to add your ingredients to the NuWave Brio Digital Air Fryer: Pull out the Base Tray and Fry Pan Basket from the NuWave Brio Digital Air Fryer. (Fig. 1)
Note: Do not fill more than 4/5 full. Slip the Fry Pan Basket in place in the NuWave Brio Digital Air Fryer. Do not use the Base Tray without the Fry Pan Basket in it. (Fig. 2)
Note: Do not touch the inside of the Base Tray immediately after cooking as the pan can become very hot. Only hold the pan by the handle.Shaking Food:Some foods require shaking halfway through cooking. To properly shake the food, hold the handle, remove the Base Tray from the appliance and shake. Once the food has been adequately shaken, slide the Base Tray and Fry Pan Basket back into the NuWave Brio Digital Air Fryer. (Fig. 3) 2
1
3
DO NOT PRESS THE DEMOUNTING BUTTON WHILE SHAKING.
How To Use Grill Pan:1. Pull out the Fry Pan Basket from the Base Tray
and place it on a flat surface.2. Lift up the safety cover and press the demounting
button.3. Lift the Fry Pan Basket, and replace this with the Grill Pan. 4. To remove Grill Pan or Fry Pan Basket from the Base Tray lift open the safety cover, press the demounting button.
Fry Pan Basket
Base Tray
Grill Pan
This will reduce the extra weight of the Base Tray and makes it easier to pour smaller foods, such as French fries.

16 Owner’s Manual
Cleaning:Clean the appliance after every use or in between a large amount of batches.The Fry Pan Basket and the Base Tray have a non-stick coating with removable stainless steel basket net. Do not use metal utensils or harsh abrasives when cleaning as this can damage the coating.
• Unplug the appliance and make sure it cools completely. Note: Remove the Base Tray and Fry Pan Basket, place on a heat resistant surface to help cool the appliance quicker.• Use a damp cloth to wipe the outside of the appliance.• Clean the Fry Pan Basket and inside components with a nonabrasive sponge, hot water and mild detergent.
Note: If you place the Base Tray and Fry Pan Basket into the dishwasher, use the top rack only. Tip: If there is residual food in the Base Tray and Fry Pan Basket, add some hot water and let it soak separately for easier cleaning.
• Clean the inside of the appliance with a nonabrasive sponge and hot water.• Clean the heating components with a cleaning brush to remove any lingering food.
Storage:• Unplug the appliance and let it cool down completely.• Make sure that all the parts are cleaned and dry.• The NuWave Brio 3Q Digital Air Fryer comes with a special housing underneath for
easy and convenient chord storage. You will see a portion sticking out and the rest of chord neatly wound in the housing.
IMPORTANT - Do not immerse unit in water or attempt to cycle through dishwasher. The outer surface may be cleaned by wiping carefully with a damp dishcloth or sponge. Make sure unit has cooled completely prior to cleaning.
Any other servicing should be performed by anauthorized service representative.
CARE & MAINTENANCE
17Owner’s Manual
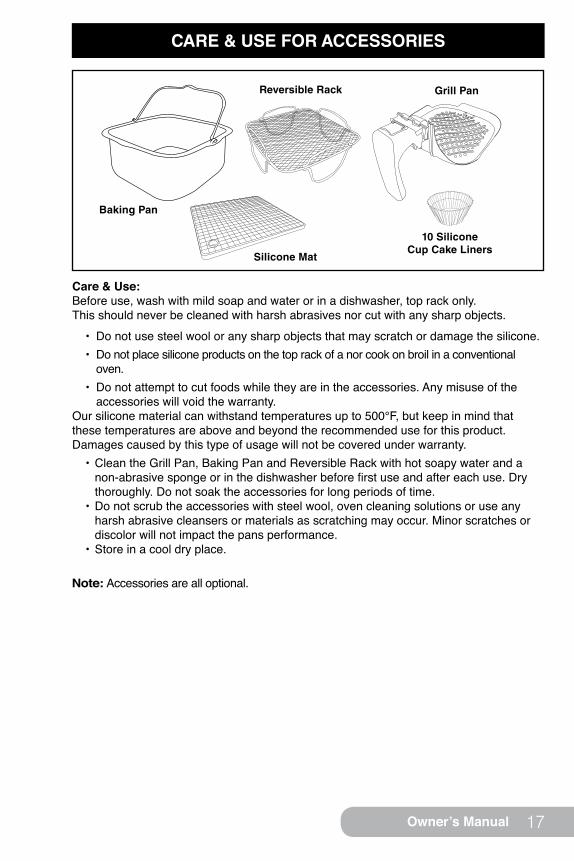
CARE & USE FOR ACCESSORIES
Care & Use:Before use, wash with mild soap and water or in a dishwasher, top rack only. This should never be cleaned with harsh abrasives nor cut with any sharp objects.
• Do not use steel wool or any sharp objects that may scratch or damage the silicone. • Do not place silicone products on the top rack of a nor cook on broil in a conventional
oven.• Do not attempt to cut foods while they are in the accessories. Any misuse of the
accessories will void the warranty.Our silicone material can withstand temperatures up to 500°F, but keep in mind that these temperatures are above and beyond the recommended use for this product. Damages caused by this type of usage will not be covered under warranty.
• Clean the Grill Pan, Baking Pan and Reversible Rack with hot soapy water and a non-abrasive sponge or in the dishwasher before first use and after each use. Dry thoroughly. Do not soak the accessories for long periods of time.
• Do not scrub the accessories with steel wool, oven cleaning solutions or use any harsh abrasive cleansers or materials as scratching may occur. Minor scratches or discolor will not impact the pans performance.
• Store in a cool dry place.
Grill Pan
Baking Pan
Reversible Rack
Silicone Mat
10 SiliconeCup Cake Liners
Note: Accessories are all optional.

18 Owner’s Manual
TROUBLESHOOTING GUIDE
PROBLEM POSSIBLE CAUSE(S) RESOLUTION(S)The NuWave Brio Digital Air Fryer does not work.
The appliance is not plugged in. Did not press On/OFF button. Fry Pan Basket is not in the NuWave Brio Digital Air Fryer.
Insert the plug into an appropriate grounded power socket. Press ON/OFF button after settings are selected. Place the Fry Pan Basket in the NuWave Brio Digital Air Fryer.
The ingredients fried in the Fry Pan Basket are not completely cooked.
Too many ingredients were used. The cooking temperature is too low. The cooking time is too short.
Remove some ingredients from the Fry Pan Basket. Smaller batches are fried more evenly. Fry at a higher temperature. Set the NuWave Brio Digital Air Fryer to fry for a longer time.
The food is fried unevenly.
Certain types of ingredients need to be shaken halfway through the preparation time.
Ingredients that are on the top need to be shaken halfway through the preparation time.
Fried snacks are not crispy when they come out of the NuWave Brio Digital Air Fryer.
You used a type of snack meant to be prepared in a traditional deep fryer.
Use snacks designed to be baked in a traditional oven, or lightly brush some olive oil onto the snacks for a crispier result.
I cannot slide the Fry Pan Basket into the appliance properly.
The Fry Pan Basket is overfilled. The Fry Pan Basket is not placed in the Base Tray correctly.
Do not fill the Fry Pan Basket more than 4/5. Push the Fry Pan Basket down into the Base Tray until you hear a click.
White smoke is coming out of the product.
You are frying greasy foods. The pan contains greasy residue from previous uses.
When you are preparing greasy ingredients in the NuWave Brio Digital Air Fryer, large amounts of oil can smoke and infiltrate into the pan. The oil will produce white smoke and the frying pan might become hotter than usual. This will not affect the final cooking effect. White smoke is caused by greasy heating up in the pan. Make sure you clean the frying pan properly after each use.
French fries are fried unevenly in the NuWave Brio Digital Air Fryer.
You did not soak the potato sticks properly before you fried them. You did not use the right potato type.
Soak potato sticks in a bowl of water for at least 30 minutes, take them out and dry them with paper towel. Use fresh potatoes and make sure they stay firm during frying.

19Owner’s Manual
TROUBLESHOOTING GUIDE (Continued)
Contact Costumer Service if any of these errors occur
Code
Error
E1 E2 E3Sensor open
endedSensor short
circuit Over heat
French fries are not crispy when they come out of the NuWave Brio Digital Air Fryer.
The crispiness of the fries depends on the amount of oil and water in the fries.
Make sure you dry the potato sticks properly before you add the oil. Cut the potato sticks smaller for a crispier result. Add slightly more oil for a crispier result.
If the unit needs to be replaced or returned to the manufacturer, please contact our Customer Service Department at:
1-877-689-2838 or email at [email protected]

20 Owner’s Manual
WARRANTY
The NuWave Brio® 3Q Digital Air Fryer THE MANUFACTURER WARRANTSThe NuWave Brio Digital Air Fryer, including the Base Tray, Fry Pan Basket, Fry Pan Basket Net, along with the optional Baking Pan, Silicone Mat, Silicone Cupcake Liners, Reversible Rack and Grill Pan are to be free from manufacturer defects. The Manufacturer will provide the necessary parts and labor to repair any part of the NuWave Brio Digital Air Fryer at NuWave, LLC Service Department. After the expiration of the warranty, the cost of the labor and parts will be the responsibility of the owner.THE WARRANTY DOES NOT COVERThe Limited Warranty is voided if repairs are made by an unauthorized dealer and/or the serial number data plate is removed and/or defaced. Normal deterioration of finish due to use or exposure is not covered by this Warranty. This Limited Warranty does not cover failure, damages or inadequate performance due to accident, acts of God (such as lightning), fluctuations in electric power, alterations, abuse, misuse, misapplications, corrosive type atmospheres, improper installation, failure to operate in accordance with the Manufacturer’s written instructions, abnormal use or commercial use. NuWave, LLC reserves the right to void the Limited Warranty, where allowable by law, for products purchased from an unauthorized dealer.TO OBTAIN SERVICE The owner shall have the obligation and responsibility to: Pay for all services and parts not covered by the warranty; Prepay the freight to and from Service Department for any part or system returned under this warranty; Carefully package the product using adequate padding material to prevent damage in transit. The original container is ideal for this purpose. Include in the package the owner’s name, address, day time telephone number, a detailed description of the problem, and your “RGA number.” Call 1-877-689-2838 or e-mail [email protected] to obtain the RGA number (Return Goods Authorization number). Provide the cooking system model & serial number and proof of date of purchase (a copy of the receipt) when making claims under this warranty.MANUFACTURER’S OBLIGATIONThe Manufacturer’s obligation under this Limited Warranty is limited, to the extent allowable by law, to repairing or replacing any part covered by this Limited Warranty which upon examination is found to be defective under normal use. The Limited Warranty is applicable only within the continental United States and only to the original purchaser of the manufacturer’s authorized channels of distribution. THE LIMITED WARRANTY MA Y NOT BE ALTERED, VARIED OR EXTENDED EXCEPT BY A WRITTEN INSTRUMENT EXECUTED BY THE MANUFACTURER. THE REMEDY OF REPAIR OR REPLACEMENT AS PROVIDED UNDER THIS LIMITED WARRANTY IS EXCLUSIVE. IN NO EVENT SHALL THE MANUFACTURER BE LIABLE FOR ANY CONSEQUENTIAL OR INCIDENTAL DAMAGES TO ANY PERSON, WHETHER OR NOT OCCASIONED BY NEGLIGENCE OF THE MANUFACTURER, INCLUDING WITHOUT LIMITATION, DAMAGES FOR LOSS OF USE, COSTS OF SUBSTITUTION, PROPERTY DAMAGE, OR OTHER MONEY LOSS.Some states do not allow the exclusion or limitation of incidental or consequential damages, so the above limitation exclusions may not apply. This Limited Warranty gives specific legal rights, and there may also be other rights which vary from state to state. EXCEPT AS OTHERWISE EXPRESSLY PROVIDED ABOVE, THE MANUFACTURER MAKES NO WARRANTIES EXPRESSED OR IMPLIED ARISING BY LAW OR OTHERWISE, INCLUDING WITHOUT LIMITATION, THE IMPLIED WARRANTIES OF MERCHANTABILITY AND FITNESS FOR A PARTICULAR PURPOSE TO ANY OTHER PERSON. READ YOUR OWNER’S MANUAL. IF YOU STILL HAVE ANY QUESTIONS ABOUT OPERATION OR WARRANTY OF THE PRODUCT, PLEASE CONTACT NUWAVE, LLC.READ YOUR OWNER’S MANUAL: If you still have any questions about operation or warranty of the product, please contact NuWave, LLC at: 1-877-689-2838 or e-mail [email protected].

Pressure Canning
Recipes

22 Recipes
Baked Potato (Serves 2)Prep Time: 5 minutes Cook Time: 40 minutes Total: 45 minutesTemp: 350˚F
Ingredients:2 idaho or russet baking potatoes1-2 teaspoons olive oil1 tablespoon salt1 tablespoon granulated garlic1 teaspoon parsley
Directions:
1. Wash potatoes and then pierce the skin with a fork.2. Press “Pre-Heat”, set temperature at 350˚F and set cooking time at 40 minutes.
Press “Start”.3. Drizzle olive oil onto potatoes and rub seasonings evenly over potatoes.4. Once ready, place coated potatoes in Fry Pan Basket, and cook until fork tender.5. Cook for an additional 5 minutes if necessary.

23Recipes
Roasted Brussels Sprouts (Serves 4)
Prep Time: 10 minutes Cook Time: 10 minutesTotal: 20 minutesTemp: 400˚F
Ingredients:1 pound fresh brussels sprouts2 teaspoons olive oil½ teaspoon kosher salt½ teaspoon black pepper ½ teaspoon granulated garlic
Directions:
1. Remove any tough or bruised outer Brussels sprouts leaves.2. Trim the stems on the sprouts and cut in half vertically. 3. Rinse sprouts, shake dry and set aside.4. Press “Pre-Heat”, set temperature at 400°F and set cooking time at 10 minutes.
Press “Start”.5. Combined salt, pepper garlic and olive oil in bowl.6. Add sprouts to bowl and toss to coat.7. Once ready, place sprouts in Fry Pan Basket and cook, pausing occasionally to
shake.Tip: The sprouts are done when the centers are tender and the outsides are caramelized and a bit crispy.

24 Recipes
Directions:
1. Cut potatoes into quarters, soak them in cold water for 20-30 minutes and then pat dry.2. In a mixing bowl, mix oil, garlic, paprika, salt and pepper and then toss them well with
the potato quarters.3. Press “Pre-Heat”, set temperature at 360˚F and set cooking time at 20-25 minutes.
Press “Start”.4. Once ready, add the potato wedges to Fry Pan Basket skin side down, being careful not
to overcrowd.5. Cook wedges until golden brown.
Home Fries (Serves 6)Prep Time: 40 minutes Cook Time: 20-25 minutesTotal: 65 minutesTemp: 360˚F
Ingredients:6 medium russet potatoes2 tablespoons oil½ tablespoon granulated garlic
1½ teaspoons paprika½ teaspoon black pepper½ teaspoon salt

25Recipes
Air Baked Eggs (Serves 3)Prep Time: 10 minutes Cook Time: 7 minutes Total: 17 minutesTemp: 300˚F
Ingredients:3 ramekins6 ounces diced ham3 large eggs 3-6 spinach leaves (optional)3 teaspoons milk, dividednon-stick cooking spray or buttersalt and pepper to taste
Directions:
1. Press “Pre-Heat”, set temperature at 300˚F and set cooking time at 7 minutes. Press “Start”.
2. Spray ramekins with non-stick spray.3. Add spinach, ham, 1 egg, 1 teaspoon milk, salt and pepper to each ramekin.4. Once ready, place ramekins in Fry Pan Basket and cook.

26 Recipes
Air Fried Tortilla Chips (Serves 4)Prep: 5 minutes Cook: 4 minutesTotal: 9 minutesTemp: 390˚F
Ingredients:8 corn tortillas 1 teaspoon olive oil salt to taste
Directions:
1. Press “Pre-Heat”, set temperature at 390˚F and set cooking time for 4 minutes. Press “Start”.
2. Brush tortillas with olive oil. 3. Cut tortillas into triangles. 4. Once ready, place in Fry Pan Basket and cook.5. Season with salt and enjoy.
Tip: Serve with your favorite salsa or guacamole.

27Recipes
Prep Time: 5 minutes Cook Time: 10 minutes Total: 15 minutesTemp: 390˚F
Ingredients:8 oz ground beef 2 slices cheddar cheese 2 dinner rolls ¼ teaspoon granulated garlic powder ¼ teaspoon salt ¼ teaspoon pepper
Directions:
1. Press “Pre-Heat”, set temperature at 390˚F and set cooking time at 10 minutes. Press “Start”.
2. Form the ground beef into 2 (4 oz). patties and season with salt pepper and garlic.3. Once ready, add burgers to Fry Pan Basket and cook.4. Open Air Fryer, top each burger with cheese, set cooking time for 1 minute and
cook until cheese has melted.Tip: You can adjust the cooking time, depending on the level of doneness you prefer your burgers.
Sliders (Serves 2)
28 Recipes
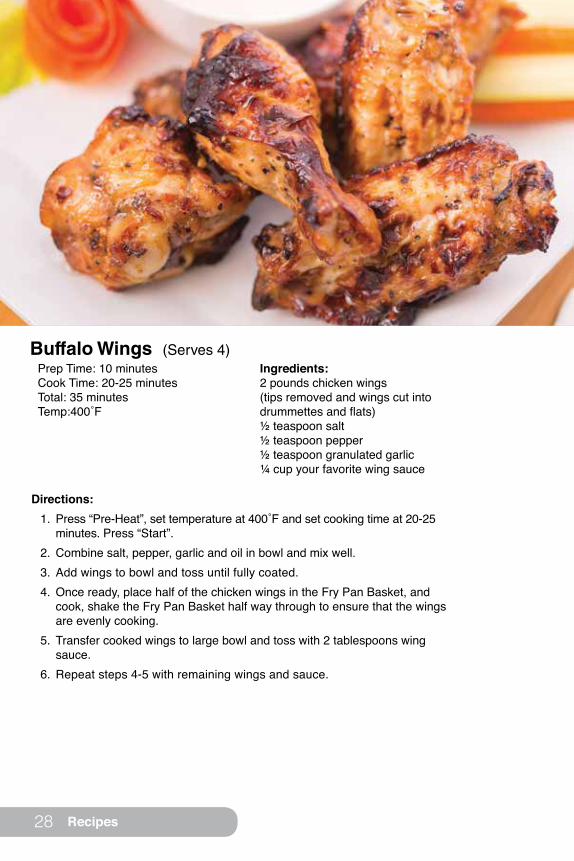
Buffalo Wings (Serves 4)Prep Time: 10 minutes Cook Time: 20-25 minutes Total: 35 minutesTemp:400˚F
Ingredients:2 pounds chicken wings(tips removed and wings cut into drummettes and flats)½ teaspoon salt ½ teaspoon pepper ½ teaspoon granulated garlic ¼ cup your favorite wing sauce
Directions:
1. Press “Pre-Heat”, set temperature at 400˚F and set cooking time at 20-25 minutes. Press “Start”.
2. Combine salt, pepper, garlic and oil in bowl and mix well.3. Add wings to bowl and toss until fully coated.4. Once ready, place half of the chicken wings in the Fry Pan Basket, and
cook, shake the Fry Pan Basket half way through to ensure that the wings are evenly cooking.
5. Transfer cooked wings to large bowl and toss with 2 tablespoons wing sauce.
6. Repeat steps 4-5 with remaining wings and sauce.

29Recipes
Chicken Kiev (Serves 2)Prep Time: 10 minutes Cook Time: 25 minutes Total: 35 minutes Temp: 350˚F
Ingredients:1 medium chicken breast4 oz soft cheese½ teaspoon chopped garlic1 teaspoon parsley, divided1 medium egg, beatenBreadcrumbsSalt and pepper to taste
Directions:
1. Combine cheese, garlic and ½ teaspoon parsley in small bowl; set aside.2. Using a meat tenderizer, pound chicken breast flat and slice in half
lengthwise.3. In mixing bowl, combine breadcrumbs, salt, pepper and remaining parsley.4. Press “Pre-Heat”, set temperature at 350˚F and set cooking time at 25
minutes. Press “Start”.5. Coat chicken in beaten egg and roll in prepared breadcrumbs, ensuring all
sides are coated.6. Place chicken in small, oven-safe dish or line Fry Pan Basket with foil
before adding the chicken to the Fry Pan Basket.7. Once ready, place chicken in Fry Pan Basket, and cook.
Tip: Use garlic and herb flavored cheese for maximum flavor. Wrap the chicken in plastic wrap when tenderizing to minimize the mess. Placing the chicken in a small, oven-safe dish inside the NuWave Brio Digital Air Fryer or lining the Fry Pan Basket with foil helps minimize the mess.

30 Recipes
Chicken Satay (Serves 4)
Directions:
1. Cut each thigh into strips, trim excess fat.2. Combine all the other ingredients into a large mixing bowl and mix well.3. Place chicken onto skewers.4. Add skewered chicken to mixing bowl and spoon marinade onto chicken
to coat all sides.5. Cover and refrigerate chicken for at least 2 hours, up to 24 hours.6. Press “Pre-Heat”, set temperature at 390˚F and set cooking time at 6-8
minutes. Press “Start”. 7. Once ready place skewers in the Fry Pan Basket and cook.8. Repeat steps 6-7 with remaining skewers.
Tip: If using wooden skewers, soak the skewers in water before adding chicken to keep them from burning.
Prep Time: 15 minutes Cook Time: 6-8 minutes Total: 25 minutesTemp: 390˚F
Ingredients:1 pound boneless chicken thighs ½ cup soy sauce ½ cup pineapple juice ¼ cup sesame oil 4 garlic cloves, chopped fine4 scallions, chopped 1 tablespoon grated ginger 2 teaspoons toasted sesame seeds 1 pinch black pepper

31Recipes
Grilled Chicken Tenders (Serves 3)Prep Time: 5 minutes Cook Time: 15 minutes Total: 20 minutesTemp: 390˚F
Ingredients:½ pound boneless chicken tenderloins¼ cup creamy caesar dressing1 tablespoon olive oilDash garlic powder½ teaspoon dried basil leaves1 teaspoon dried minced onionDash pepper
Directions:
1. Rinse chicken and pat dry. 2. Combine chicken with all remaining ingredients in bowl or food storage bag.3. Seal or cover chicken and refrigerate for 1-2 hours.4. Press “Pre-Heat”, set temperature at 390˚F and set cooking time at 15 minutes.
Press “Start”.5. Once ready, place chicken in Fry Pan Basket, and cook, halfway through to flip the
tenders to ensure they are evenly cooked.
32 Recipes
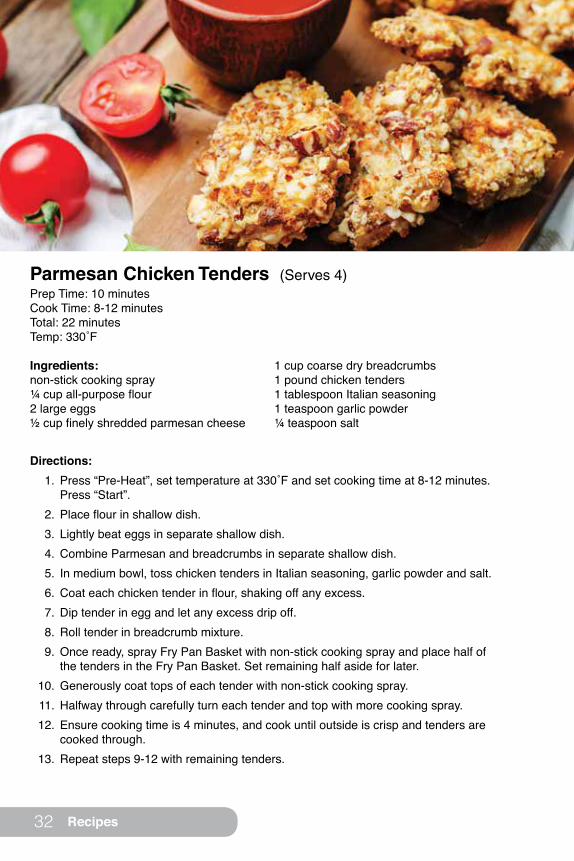
Parmesan Chicken Tenders (Serves 4)Prep Time: 10 minutes Cook Time: 8-12 minutes Total: 22 minutesTemp: 330˚F
Ingredients:non-stick cooking spray¼ cup all-purpose flour2 large eggs½ cup finely shredded parmesan cheese
1 cup coarse dry breadcrumbs 1 pound chicken tenders1 tablespoon Italian seasoning1 teaspoon garlic powder¼ teaspoon salt
Directions:
1. Press “Pre-Heat”, set temperature at 330˚F and set cooking time at 8-12 minutes. Press “Start”.
2. Place flour in shallow dish.3. Lightly beat eggs in separate shallow dish.4. Combine Parmesan and breadcrumbs in separate shallow dish.5. In medium bowl, toss chicken tenders in Italian seasoning, garlic powder and salt.6. Coat each chicken tender in flour, shaking off any excess.7. Dip tender in egg and let any excess drip off.8. Roll tender in breadcrumb mixture.9. Once ready, spray Fry Pan Basket with non-stick cooking spray and place half of
the tenders in the Fry Pan Basket. Set remaining half aside for later.10. Generously coat tops of each tender with non-stick cooking spray.11. Halfway through carefully turn each tender and top with more cooking spray.12. Ensure cooking time is 4 minutes, and cook until outside is crisp and tenders are
cooked through.13. Repeat steps 9-12 with remaining tenders.

33Recipes
Roasted Cornish Game Hen w/Honey Mustard Glaze (Serves 4)Prep: 15 minutesCook: 20 minutesTotal: 35-40 minutes Temp: 400˚F
Ingredients:1 (1½ pound) cornish hen½ teaspoon kosher salt½ teaspoon freshly ground black Pepper1 bay leaf
4 garlic cloves, peeled & smashed2 teaspoon dried thyme½ teaspoon chili flakes2 tablespoons olive oil¼ cup honey¼ cup stone ground dijon mustard1½ teaspoons balsamic vinegar½ teaspoon ground cumin1 tablespoon fresh cilantro, chopped (optional)
Directions:
1. Press “Pre-Heat”, set temperature at 400˚F and set cooking time at 20 minutes. Press “Start”.
2. Season hen inside and out with salt and pepper.3. Place bay leaf, garlic, thyme and chili flakes inside the cavity of the hen.4. Brush hen with oil.5. Once ready, place hen, breast side down, in Fry Pan Basket and roast.6. Meanwhile, combine the honey, mustard, vinegar, cumin and cilantro in a
bowl.7. Brush over the hen.8. Continue cooking for an additional 5 minutes.
Tip: Check the hen after roasting to see if the leg pulls away easily from the body and the meat is no longer pink. Cover with foil, and flip half way through. If the meat is still pink, roast for an additional 5-10 minutes.

34 Recipes
Cajun Shrimp (Serves 2)Prep Time: 5 minutes Cook Time: 6 minutes Total: 11 minutesTemp: 390˚F
Ingredients:½ pound shrimp, peeled and deveined ¼ teaspoon cayenne pepper½ teaspoon old bay seasoning ¼ teaspoon smoked paprika1 tablespoon olive oil pinch of salt
Directions:
1. Press “Pre-Heat”, set temperature at 390˚F and set cooking time at 6 minutes. Press “Start”.
2. Add all ingredients to mixing bowl and mix until shrimp is completely coated.
3. Once ready, place shrimp in Fry Pan Basket and cook.

35Recipes
Chimichurri Skirt Steak (Serves 2)Prep Time: 1 hr 30 minutes Cook Time: 10 minutes with 5 minutes restTotal: 1 hr 45 minutesTemp: 390˚F
Sauce Ingredients:1 bunch flat leaf parsley, roughly chopped (about 1 cup, packed)5 large garlic cloves, roughly chopped (about 3 tablespoons)1 tablespoon dried oregano1 teaspoon crushed red pepper flakes½ cup distilled white vinegar
Directions:
1. Place all sauce ingredients in food processor or blender and blend until just combined; set aside.
2. Place steak in bowl or container.3. Add 4 tablespoons chimichurri sauce to container, spreading evenly on all sides
of the steak4. Let steak marinate at room temperature for 1 hour, or in the refrigerator for at
least 2 hours, or overnight.5. Press “Pre-Heat”, set temperature at 390˚F and set cooking time at 8-10 minutes.
Press “Start”.6. Once ready, season steak with salt and pepper and place in Fry Pan Basket.7. Press Start cook steak. Add additional time if you prefer your steak more done.8. Let steak rest for 5 minutes, then slice against the grain.9. Serve steak with remaining chimichurri sauce.
Tip: Marinate the steak in a container made from non-reactive materials, such as plastic, enamel, glass or stainless steel. If you marinate the steak in the refrigerator, allow the steak to return to room temperature before s cooking. This should take about 30 minutes. Chimichurri sauce is best served at room temperature.
½ cup extra virgin olive oil1 teaspoon salt1 teaspoon pepper
Steak Ingredients:1 pound skirt steak salt and pepper to taste
36 Recipes
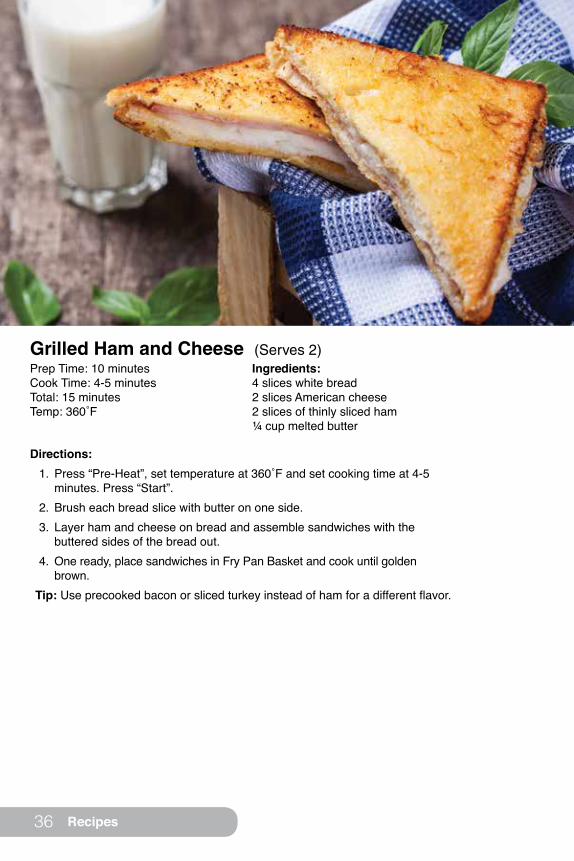
Grilled Ham and Cheese (Serves 2)Prep Time: 10 minutes Cook Time: 4-5 minutes Total: 15 minutesTemp: 360˚F
Ingredients:4 slices white bread2 slices American cheese 2 slices of thinly sliced ham ¼ cup melted butter
Directions:
1. Press “Pre-Heat”, set temperature at 360˚F and set cooking time at 4-5 minutes. Press “Start”.
2. Brush each bread slice with butter on one side.3. Layer ham and cheese on bread and assemble sandwiches with the
buttered sides of the bread out.4. One ready, place sandwiches in Fry Pan Basket and cook until golden
brown.Tip: Use precooked bacon or sliced turkey instead of ham for a different flavor.

37Recipes
Tortilla Crusted Tilapia (Serves 2)Prep Time: 5 minutes Cook Time: 15 minutes Total: 20 minutesTemp: 375˚F
Ingredients:1 whole jalapeño, seeded & deveined¾ cup cilantro½ teaspoon chili powder¼ teaspoon cumin¼ teaspoon onion powder
1 teaspoon seasoning salt18 whole tortilla chips1 whole large egg, beaten2 whole tilapia fillets
Directions:
1. Press “Pre-Heat”, set temperature at 375˚F and set cooking time at 12-15 minutes. Press “Start”.
2. Add jalapeño, cilantro, chili powder, cumin, onion powder and salt to food processor and mix to combine.
3. Add tortilla chips to food processor and mix until mixture forms small chunks.4. Transfer chip mixture to plate.5. Place beaten egg in small dish.6. Dredge each tilapia filet in egg, then chip mixture, ensuring mixture adheres to
each side.7. Once ready, spray Fry Pan Basket with non-stick cooking spray and place breaded
filets in Fry Pan Basket and cook till golden.

38 Recipes
Tuna Sliders (Serves 2)Prep: 25 minutes Cook: 6-10 minutesTotal: 35 minutesTemp: 390˚F
Directions:
1. Press “Pre-Heat”, set temperature at 390˚F and set cooking time at 6-10 minutes. Press “Start”.
2. Combine all ingredients in medium bowl and mix to combine.3. Shape tuna mixture into 8 (½-inch thick) patties.4. Once ready, add patties to Fry Pan Basket, press Start and cook, halfway
through to flip the sliders to ensure they are evenly cooked.
Ingredients:2 (6.4-oz) pouches chunk light tuna in Water1 Egg¼ teaspoon black pepper¼ teaspoon granulated garlic¼ cup dry, unseasoned breadcrumbs

39Recipes
Turkey Sliders (Serves 2)
Prep Time: 5 minutes Cook Time: 10 minutes Total: 15 minutesTemp: 390˚F
Ingredients:1 pound ground turkey 2 slices colby jack cheese, cut in half 4 mini rolls
½ teaspoon granulated garlic powder ½ teaspoon salt ½ teaspoon pepper
Directions:
1. Press “Pre-Heat”, set temperature at 390˚F and set cooking time at 10 minutes. Press “Start”.
2. Form ground turkey into 4 (4-ounce) patties and season with salt, pepper and garlic.3. Once ready, add burgers to Fry Pan Basket and cook. Halfway through to flip the
tenders to ensure they are evenly cooked.4. Open Air Fryer and top each burger with cheese.5. Set cooking time at 1 minute, press Start and cook burgers until cheese has melted.
40 Recipes
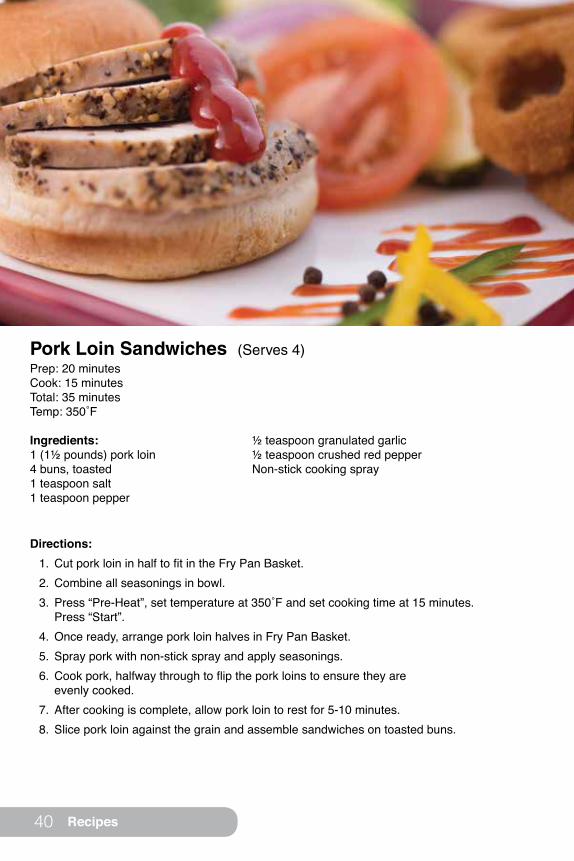
Pork Loin Sandwiches (Serves 4)Prep: 20 minutes Cook: 15 minutesTotal: 35 minutes Temp: 350˚F
Ingredients:1 (1½ pounds) pork loin 4 buns, toasted 1 teaspoon salt1 teaspoon pepper
½ teaspoon granulated garlic ½ teaspoon crushed red pepper Non-stick cooking spray
Directions:
1. Cut pork loin in half to fit in the Fry Pan Basket.2. Combine all seasonings in bowl.3. Press “Pre-Heat”, set temperature at 350˚F and set cooking time at 15 minutes.
Press “Start”.4. Once ready, arrange pork loin halves in Fry Pan Basket. 5. Spray pork with non-stick spray and apply seasonings.6. Cook pork, halfway through to flip the pork loins to ensure they are
evenly cooked.7. After cooking is complete, allow pork loin to rest for 5-10 minutes. 8. Slice pork loin against the grain and assemble sandwiches on toasted buns.

41Recipes
Citrus Green Beans (Serves 4)Prep Time: 10 minutes Cook Time: 10 minutes Total: 20 minutesTemp: 390˚F
Ingredients:1 pound green beans, washed & de-stemmedJuice from 1 lemonPinch saltBlack pepper to taste¼ teaspoon olive oil
Directions:
1. Press “Pre-Heat”, set temperature at 390˚F and set cooking time at 10 minutes. Press “Start”.
2. Once ready, place green beans in Fry Pan Basket3. Squeeze lemon juice onto green beans.4. Season green beans with salt and pepper and top with oil.

42 Recipes
Crispy Tofu (Serves 6)Prep: 10 minutes Cook: 8 minutesTotal: 18 minutes Temp: 350˚F
Ingredients:12 ounces low fat, extra firm tofu1 teaspoon sesame oil1 teaspoon teriyaki sauce1 tablespoon honey
2 tablespoons Sriracha sauce2 tablespoons low sodium soy sauce1 teaspoon oil
Directions:
1. Cut tofu into 1-inch cubes; set aside in medium bowl.2. Combine all remaining ingredients and pour over tofu, mixing to combine.3. Let tofu marinate for at least 30 minutes, tossing a few times. 4. Press “Pre-Heat”, set temperature at 350˚F and set cooking time at 8
minutes. Press “Start”.5. Once ready, add marinated tofu to Fry Pan Basket, and cook, halfway
through to flip the tofu to ensure they are evenly cooked.
43Recipes
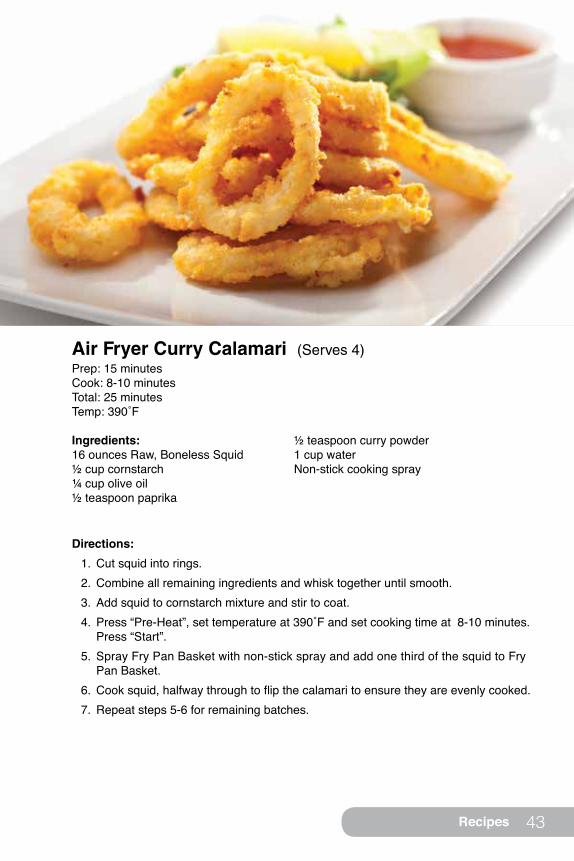
Air Fryer Curry Calamari (Serves 4)Prep: 15 minutes Cook: 8-10 minutesTotal: 25 minutes Temp: 390˚F
Ingredients:16 ounces Raw, Boneless Squid½ cup cornstarch¼ cup olive oil½ teaspoon paprika
½ teaspoon curry powder1 cup waterNon-stick cooking spray
Directions:
1. Cut squid into rings.2. Combine all remaining ingredients and whisk together until smooth.3. Add squid to cornstarch mixture and stir to coat.4. Press “Pre-Heat”, set temperature at 390˚F and set cooking time at 8-10 minutes.
Press “Start”.5. Spray Fry Pan Basket with non-stick spray and add one third of the squid to Fry
Pan Basket.6. Cook squid, halfway through to flip the calamari to ensure they are evenly cooked.7. Repeat steps 5-6 for remaining batches.

44 Recipes
Party Meatballs (Serves 4)Prep: 20 minutes Cook: 8-10 minutesTotal: 30 minutes Temp: 400˚F
Ingredients:1 pound ground beef¾ cup tomato ketchup1 tablespoon tabasco sauce2 teaspoons worcestershire sauce¼ cup vinegar
1 tablespoon lemon juice½ cup brown sugar½ teaspoon dry mustard3 gingersnaps, crushed
Directions:
1. Add all seasonings to large mixing bowl and mix to combine.2. Add beef to bowl and mix well.3. Press “Pre-Heat”, set temperature at 400˚F and set cooking time at 8-10 minutes.
Press “Start”.4. Form beef into medium sized meatballs.5. Once ready, place meatballs in Fry Pan Basket and cook.
Tip: Do not overcrowd the Fry Pan Basket. Cook in batches if you need to.

45Recipes
Kale Chips (Serves 4)Prep: 5 minutes Cook: 2-3 minutesTotal: 8 minutes Temp: 390˚F
Ingredients:1 head kale1 teaspoon olive oil1 teaspoon soy sauce
Directions:
1. Press “Pre-Heat”, set temperature at 390˚F and set cooking time at 2-3 minutes. Press “Start”.
2. Remove the center stem from kale and cut leaves into 1½-inch pieces. 3. Wash kale pieces and dry thoroughly.4. Toss kale with the olive oil and soy sauce.5. Once ready, place kale in Fry Pan Basket, and cook, halfway through to flip the kale
chips to ensure they are evenly cooked.Tip: Place the Reversible Rack on top of the kale to prevent the leaves from moving during the cooking process.
46 Recipes
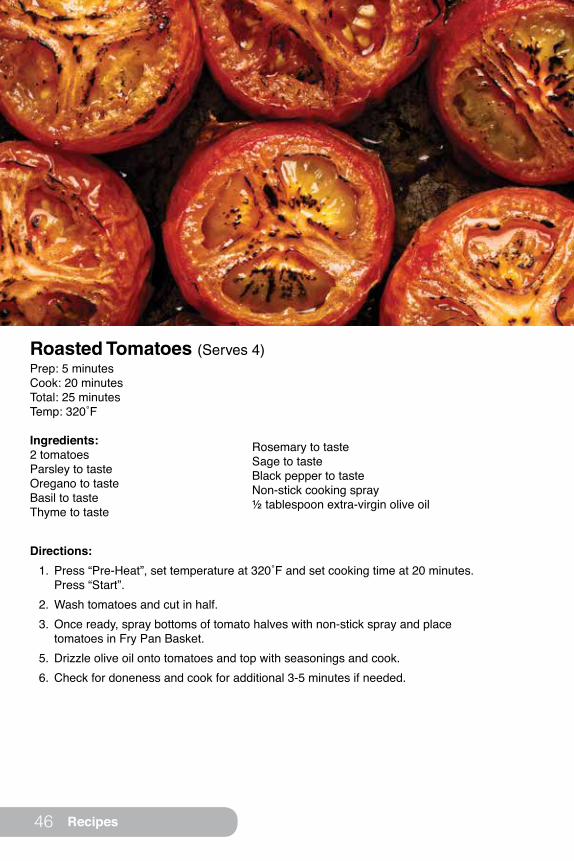
Roasted Tomatoes (Serves 4)Prep: 5 minutes Cook: 20 minutesTotal: 25 minutes Temp: 320˚F
Ingredients:2 tomatoesParsley to tasteOregano to tasteBasil to tasteThyme to taste
Rosemary to tasteSage to tasteBlack pepper to tasteNon-stick cooking spray½ tablespoon extra-virgin olive oil
Directions:
1. Press “Pre-Heat”, set temperature at 320˚F and set cooking time at 20 minutes. Press “Start”.
2. Wash tomatoes and cut in half.3. Once ready, spray bottoms of tomato halves with non-stick spray and place
tomatoes in Fry Pan Basket.5. Drizzle olive oil onto tomatoes and top with seasonings and cook.6. Check for doneness and cook for additional 3-5 minutes if needed.

47Recipes
Directions:
1. Press “Pre-Heat”, set temperature at 400˚F and set cooking time at 20 minutes. Press “Start”.
2. Place all vegetables into bowl and drizzle with vegetable oil.3. Add cumin seeds, coriander, garlic, salt and pepper to bowl and stir well to combine.4. Once ready, place vegetables in Fry Pan Basket, and cook, pausing halfway
through to shake.
Roasted Root Vegetables (Serves 4)
Prep Time: 10 minutes Cook Time: 20 minutes Total: 30 minutesTemp: 400˚F
Ingredients:2 carrots, peeled, halved & cut into chunks2 parsnips, peeled, halved & cut into chunks½ butternut squash, de-seeded, peeled & cut into chunks
4 celery stalks, peeled and cut into chunks1 teaspoon ground cumin seeds1 teaspoon ground coriander1 tablespoon vegetable oil1 teaspoon granulated garlic Salt and pepper to taste
48 Recipes
Directions:
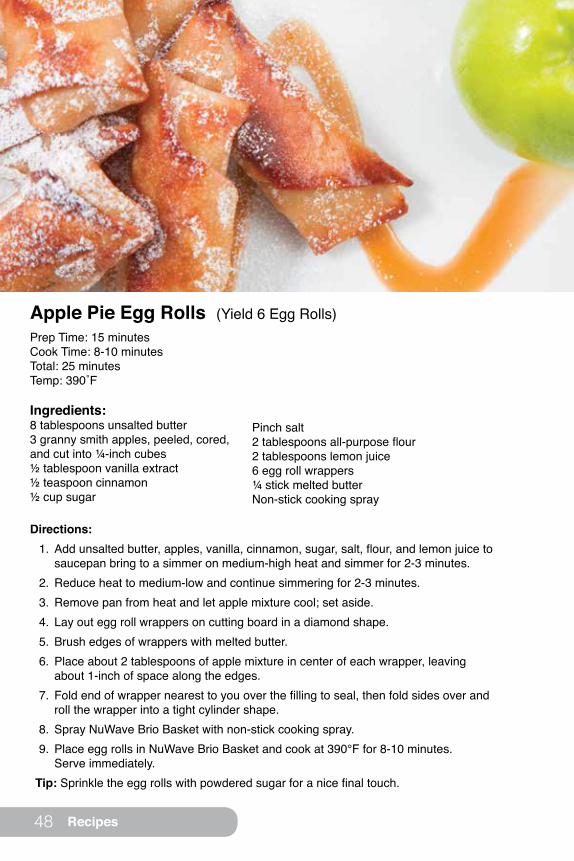
1. Add unsalted butter, apples, vanilla, cinnamon, sugar, salt, flour, and lemon juice to saucepan bring to a simmer on medium-high heat and simmer for 2-3 minutes.
2. Reduce heat to medium-low and continue simmering for 2-3 minutes.3. Remove pan from heat and let apple mixture cool; set aside.4. Lay out egg roll wrappers on cutting board in a diamond shape.5. Brush edges of wrappers with melted butter.6. Place about 2 tablespoons of apple mixture in center of each wrapper, leaving
about 1-inch of space along the edges.7. Fold end of wrapper nearest to you over the filling to seal, then fold sides over and
roll the wrapper into a tight cylinder shape.8. Spray NuWave Brio Basket with non-stick cooking spray.9. Place egg rolls in NuWave Brio Basket and cook at 390°F for 8-10 minutes.
Serve immediately.Tip: Sprinkle the egg rolls with powdered sugar for a nice final touch.
Prep Time: 15 minutes Cook Time: 8-10 minutesTotal: 25 minutesTemp: 390˚F
Ingredients:8 tablespoons unsalted butter3 granny smith apples, peeled, cored, and cut into ¼-inch cubes½ tablespoon vanilla extract½ teaspoon cinnamon½ cup sugar
Pinch salt2 tablespoons all-purpose flour2 tablespoons lemon juice6 egg roll wrappers¼ stick melted butterNon-stick cooking spray
Apple Pie Egg Rolls (Yield 6 Egg Rolls)
49Recipes
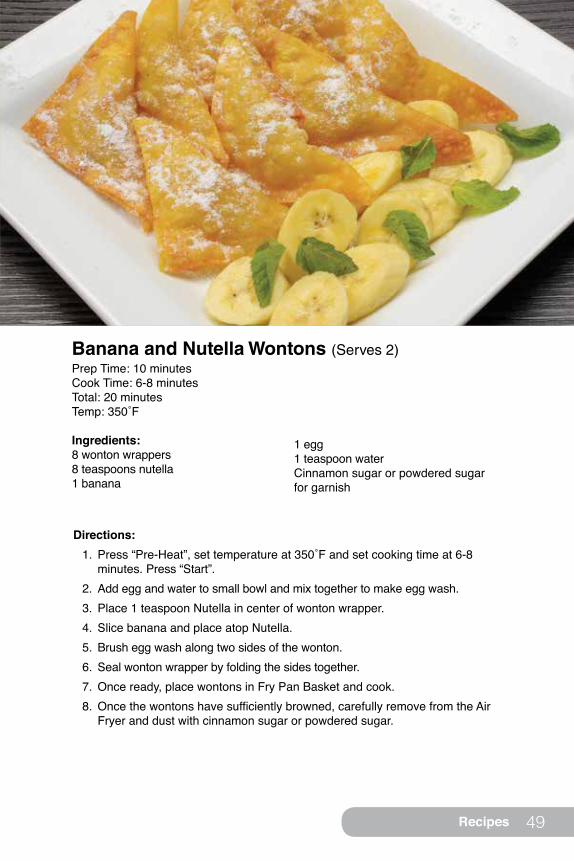
Banana and Nutella Wontons (Serves 2)Prep Time: 10 minutes Cook Time: 6-8 minutes Total: 20 minutesTemp: 350˚F
Ingredients:8 wonton wrappers 8 teaspoons nutella1 banana
1 egg1 teaspoon waterCinnamon sugar or powdered sugar for garnish
Directions:
1. Press “Pre-Heat”, set temperature at 350˚F and set cooking time at 6-8 minutes. Press “Start”.
2. Add egg and water to small bowl and mix together to make egg wash.3. Place 1 teaspoon Nutella in center of wonton wrapper.4. Slice banana and place atop Nutella.5. Brush egg wash along two sides of the wonton.6. Seal wonton wrapper by folding the sides together.7. Once ready, place wontons in Fry Pan Basket and cook.8. Once the wontons have sufficiently browned, carefully remove from the Air
Fryer and dust with cinnamon sugar or powdered sugar.

50 Recipes
Prep Time: 20 minutes Cook Time: 10 minutesTotal: 30 minutesTemp: 350˚F
Ingredients:½ pineapple½ cup shredded coconut 1 small sprig fresh mint 1 cup vanilla yogurt
Directions:
1. Cut pineapple into ½-inch thick slices, then cut slices in half and remove the core.2. Press “Pre-Heat”, set temperature at 350˚F and set cooking time at 10 minutes.
Press “Start”.3. Dip pineapple slices into shredded coconut.4. Once ready, gently place pineapple in Fry Pan Basket and cook.5. While pineapple cooks, finely dice mint leaves and stir into vanilla yogurt.6. Serve pineapple with yogurt dip.
Pineapple Crescents (Serves 4)
51Recipes
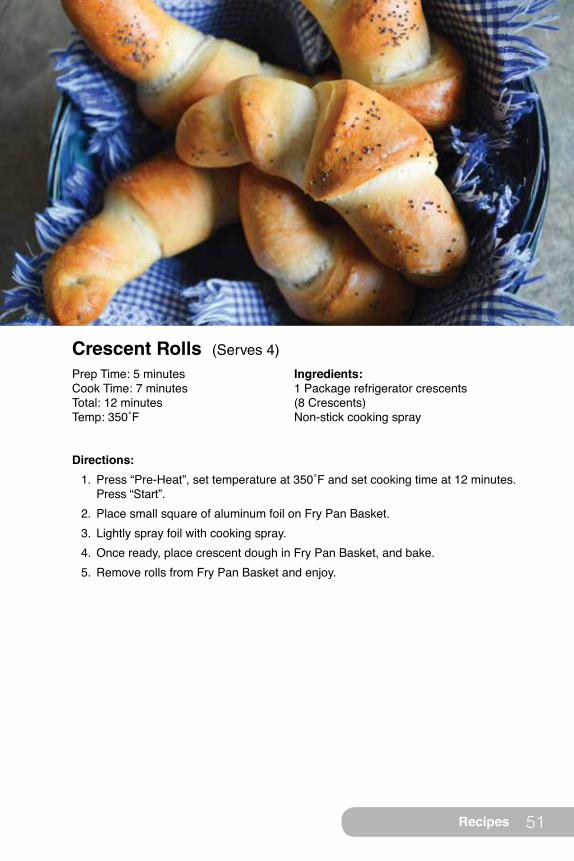
Prep Time: 5 minutes Cook Time: 7 minutesTotal: 12 minutesTemp: 350˚F
Ingredients:1 Package refrigerator crescents (8 Crescents) Non-stick cooking spray
Directions:
1. Press “Pre-Heat”, set temperature at 350˚F and set cooking time at 12 minutes. Press “Start”.
2. Place small square of aluminum foil on Fry Pan Basket.3. Lightly spray foil with cooking spray.4. Once ready, place crescent dough in Fry Pan Basket, and bake.5. Remove rolls from Fry Pan Basket and enjoy.
Crescent Rolls (Serves 4)

Manual del Usuario
NuWave Brio® 3QFreidora Digital de Aire
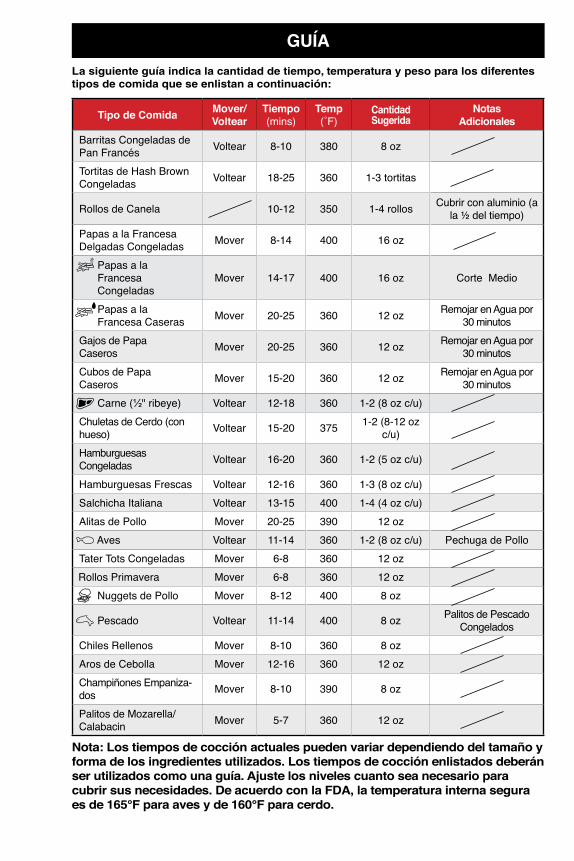
La siguiente guía indica la cantidad de tiempo, temperatura y peso para los diferentes tipos de comida que se enlistan a continuación:
Tipo de Comida Mover/Voltear
Tiempo(mins)
Temp (˚F)
Cantidad Sugerida
Notas Adicionales
Barritas Congeladas de Pan Francés Voltear 8-10 380 8 oz
Tortitas de Hash Brown Congeladas Voltear 18-25 360 1-3 tortitas
Rollos de Canela 10-12 350 1-4 rollos Cubrir con aluminio (a la ½ del tiempo)
Papas a la Francesa Delgadas Congeladas Mover 8-14 400 16 oz
Papas a la Francesa Congeladas
Mover 14-17 400 16 oz Corte Medio
Papas a la Francesa Caseras Mover 20-25 360 12 oz Remojar en Agua por
30 minutosGajos de Papa Caseros Mover 20-25 360 12 oz Remojar en Agua por
30 minutosCubos de Papa Caseros Mover 15-20 360 12 oz Remojar en Agua por
30 minutosCarne (½" ribeye) Voltear 12-18 360 1-2 (8 oz c/u)
Chuletas de Cerdo (con hueso) Voltear 15-20 375 1-2 (8-12 oz
c/u)Hamburguesas Congeladas Voltear 16-20 360 1-2 (5 oz c/u)
Hamburguesas Frescas Voltear 12-16 360 1-3 (8 oz c/u)Salchicha Italiana Voltear 13-15 400 1-4 (4 oz c/u)Alitas de Pollo Mover 20-25 390 12 oz
Aves Voltear 11-14 360 1-2 (8 oz c/u) Pechuga de PolloTater Tots Congeladas Mover 6-8 360 12 ozRollos Primavera Mover 6-8 360 12 oz
Nuggets de Pollo Mover 8-12 400 8 oz
Pescado Voltear 11-14 400 8 oz Palitos de Pescado Congelados
Chiles Rellenos Mover 8-10 360 8 ozAros de Cebolla Mover 12-16 360 12 ozChampiñones Empaniza-dos Mover 8-10 390 8 oz
Palitos de Mozarella/Calabacin Mover 5-7 360 12 oz
GUÍA
Nota: Los tiempos de cocción actuales pueden variar dependiendo del tamaño y forma de los ingredientes utilizados. Los tiempos de cocción enlistados deberán ser utilizados como una guía. Ajuste los niveles cuanto sea necesario para cubrir sus necesidades. De acuerdo con la FDA, la temperatura interna segura es de 165°F para aves y de 160°F para cerdo.

54 Manual e Instrucciones
MEDIDAS DE SEGURIDAD IMPORTANTES
Al utilizar unidades eléctricas, siempre deben tomarse precauciones básicas de seguridad, incluyendo las siguientes:
Lea todas las instrucciones
ADVERTENCIACorte la energía inmediatamente y envíe la unidad a nuestro
Departamento de Servicio al Cliente en caso de otros problemas.1-877-689-2838 o escriba a [email protected]
1. No toque las superficies calientes. 2. Para evitar una descarga eléctrica, no sumerja el cable, la clavija o la unidad en
agua u otros líquidos.3. Cuando una unidad sea usada por o cerca de niños, debe haber una supervisión
de cerca.4. Desenchufela del tomacorriente cuando no se use y antes de limpiar. Permita que
se enfríe antes de quitar o colocar cualquier parte. 5. No se recomienda el uso de otros accesorios no diseñados para esta unidad. Al
hacerlo, la unidad podría provocar accidentes.6. NO ES APTO PARA USO EN EXTERIORES. 7. No permita que el cable cuelgue de la orilla de la mesa o barra, o que toque la
superficie caliente. 8. No coloque sobre o cerca de alguna estufa eléctrica o de gas, o dentro de un horno
caliente. 9. Extrema precaución debe ser utilizada cuando mueva la unidad que contenga
aceite caliente u otros líquidos calientes.10. Para desconectar, gire todos los controles a “OFF” y luego retire la clavija del
tomacorriente. 11. Nunca coloque el aparato pegado a la pared u otros aparatos. Debe haber al
menos 3 pulgadas de espacio a la parte de atrás, los lados o la parte de arriba. No coloque nada encima del aparato.
12. Durante el freído se libera vapor caliente por la salida de aire. Mantenga sus manos y rostro a distancia de esta salida. También tenga cuidado con el vapor caliente cuando retire la Canastilla.
13. Asegúrese de que los alimentos salgan dorados y no oscuros o cafés. Retire los restos de quemadura.
Accessorios:Parrilla para Asado, la Parrilla para Hornear y la Rejilla Reversible se calientan demasiado al cocinar. No toque los accesorios mientras cocina o inmediatamente al terminar de hacerlo. Sujete la parrilla sólo del mango y tenga cuidado cuando retire esas partes del aparato. Siempre use guantes o agarradores cuando toque los accesorios que pudieran estar calientes. Deja enfriar todo antes de limpiarlo.
1. No use la Parrilla para Asar, la Parrilla para Hornear o la Rejilla Reversible en un microondas, horno tostador, horno de convección, horno convencional, estufa cerámica, bobina eléctrica, gama de quemadores de gas o una parrilla al aire libre.
55Manual e Instrucciones
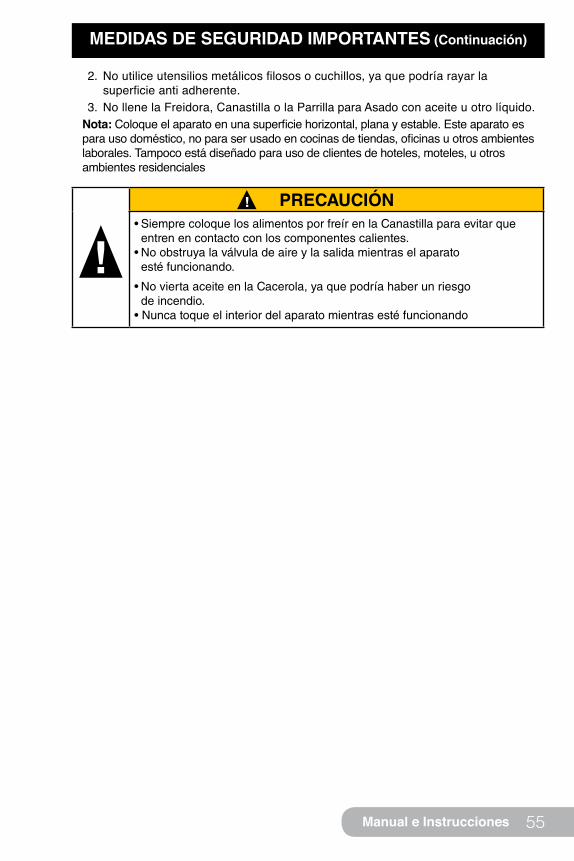
MEDIDAS DE SEGURIDAD IMPORTANTES (Continuación)
PRECAUCIÓN• Siempre coloque los alimentos por freír en la Canastilla para evitar que entren en contacto con los componentes calientes.
• No obstruya la válvula de aire y la salida mientras el aparato esté funcionando.
• No vierta aceite en la Cacerola, ya que podría haber un riesgo de incendio.• Nunca toque el interior del aparato mientras esté funcionando
2. No utilice utensilios metálicos filosos o cuchillos, ya que podría rayar la superficie anti adherente.
3. No llene la Freidora, Canastilla o la Parrilla para Asado con aceite u otro líquido.Nota: Coloque el aparato en una superficie horizontal, plana y estable. Este aparato es para uso doméstico, no para ser usado en cocinas de tiendas, oficinas u otros ambientes laborales. Tampoco está diseñado para uso de clientes de hoteles, moteles, u otros ambientes residenciales

56 Manual e Instrucciones
GUARDE ESTAS INSTRUCCIONES
1. No coloque la unidad cerca de materiales inflamables, cosas calientes o en ambientes húmedos.
2. La altura de los ingredientes a colocar en la Canastilla debe cumplir con lo señalado en las “Instrucciones de Funcionamiento”.
3. No remplace con otras partes que no estén diseñadas para la Freidora Digital de Aire NuWave Brio.
4. No coloque ninguna otra cacerola en la Canastilla. No reemplace ninguna parte con otros contenedores.
5. Si sale mucho humo del respiradero mientras está funcionando, desconecte la unidad inmediatamente y contacte a Servicio al Cliente.*
6. No mueva el aparato mientras esté funcionando. Sólo intente manejarlo hasta que la Freidora Digital de Aire NuWave Brio se haya enfriado completamente.
7. Nunca obstruya el respiradero con una toalla. 8. Si aparece algún problema durante la operación, toda reparación debe hacerse
por parte de NuWave, LLC o alguien autorizado por el fabricante. 9. No desarme el aparato por su cuenta ni reemplace ninguna parte.
10. No utilice utensilios de metal con la cacerola recubierta ya que podría dañar la superficie.
11. No intente usar el aparato si el cable esta dañado.*12. Mantenga el aparato fuera del alcance de los niños mientras esté funcionando o
enfriándose. 13. Mantenga manos y rostro lejos de la salida de ventilación o de donde el vapor
esté saliendo. 14. Asegúrese de que la Freidora Digital de Aire NuWave Brio esté siempre limpia
antes de cocinar.15. Es normal que salga un poco de humo cuando se use por primera vez.
*Departamento de Servicio al Cliente al 1-877-689-2838 o escriba a [email protected]

57Manual e Instrucciones
DESCRIPCIÓN DE LAS PARTES
1.La Base del La Freidora de AireParte #: 36231
4. Malla de la CanastillaParte #: 36204 7.
Molde de Silicón para Cup Cake *Part #: 36209
2. Sartén Parte #: 36232 5. Parrilla para Hornear*
Part #: 36207 8. Rejilla Reversible*Part #: 36206
3. CanastillaParte #: 36233 6. Tapete de Silicón*
Part #: 36208 9. Parrilla para Asado*Part #: 36205
*Opcional Estuche Portátil*Parte #: 26016
1
2 3
4
5
6
7
8
9

58 Manual e Instrucciones
INSTRUCCIONES DE FUNCIONAMIENTO
Antes de Usarse:1. Retire todo el material de empaque.2. Retire el pegamento y las etiquetas del aparato.3. Limpie muy bien la Canastilla y la Cacerola con agua caliente, esponja y detergente
suave o, en el lavavajillas, sólo en la parte superior.4. Limpie con un trapo húmedo el interior y exterior del aparato. No lo sumerja en agua.5. La Freidora de Aire Brio 3Q viene con una carcasa especial debajo para un
almacenaje del acorde fácil y conveniente. Usted vera una parte que sobresale, el resto del acorde se enrollara cuidadosamente en la caja.
Nota: Este aparato cocina usando aire caliente. NO llene la canastilla con aceite.
Preparación para el Uso:1. Coloque el aparato en una superficie plana, estable y resistente al calor.2. Coloque la Cacerola y la Canastilla en la NuWave Brio 3Q Freidora Digital de Aire3. Conecte el aparato en un enchufe de pared estándar. Nota: No cubra u obstruya el respiradero localizado en la parte de arriba de NuWave Brio 3Q Freidora Digital de Aire para que tenga buena ventilación y no afecte los resultados de cocción.
Función Encendido/Apagado:Presione el botón “On/Off” una vez para encender el aparato. El panel de control mostrará “0” indicando que aún no se ha seleccionado tiempo o temperatura y el aparato está encendido. Presione “On/Off” otra vez para apagar la unidad. Función de Rápido:Presione el botón “Pause/Clear” una vez para empezar a cocinar, se mostrará un ":15" así como un ícono de ventilador y la NuWave Brio 3Q Freidora Digital de Aire comenzará la cuenta regresiva. Está automáticamente en 360˚F por 15 minutos.Función de Inicio Pausa/Borrar:• Para interrumpir el proceso de cocción o precalentamiento, pulse una vez el botón "Pause/Clear". "5" aparecerá en la pantalla indicando una cuenta atrás de 5 minutos. Si no se toman otras acciones durante esta cuenta regresiva, "0" aparecerá en la pantalla. Para reanudar una vez que la unidad ha estado en pausa, presione el botón "Start" una vez.
• Para borrar el tiempo de cocción programado y la temperatura, pulse el botón "Pause/Clear" una segunda vez. Esto borrará las funciones actuales de cocción. "0" aparecerá en la pantalla.
ONOFF
START
PAUSECLEAR

59Manual e Instrucciones
INSTRUCCIONES DE FUNCIONAMIENTO (Continuación)
Tipo de Platillo Tiempo(minutos) Temp Cantidad
(onzas) Papas a la Francesa (Caseras y gruesas) 25 360˚F 12
Papas a la Francesa Congeladas (corte medio) 15 400˚F 16
Nuggets de Pollo 8 400˚F 8Carne (½" ribeye) 12 360˚F 8 oz eachAves (Pechuga de pollo) 12 360˚F 8 oz eachPescado (Palitos de Pescado Congelados) 8 400˚F 8
Función de Precalentar:La función de Precalentar asegura que la NuWave Brio 3Q Freidora Digital de Aire alcance la temperatura deseada antes de que comience a cocinar sus alimentos. La función Precalentar es la opción perfecta para alimentos que requieren una textura más crujiente, como botanas congeladas, papas a la francesa o alitas de pollo.
Presione el botón de "Pre-Heat". La pantalla de control mostrará "Pre-Heat". Pulse las flechas por encima de los iconos de temperatura y el tiempo antes de pulsar "Pause/Clear". La temperatura predeterminada se establece en 360°F. Si es necesario, usted puede ajustar manualmente la temperatura y el tiempo de cocción pulsando las flechas arriba y abajo usando el icono de tiempo y temperatura.Una vez que la NuWave Brio 3Q Freidora Digital de Aire alcanza la temperatura elegida, el panel de control mostrará “Ready” y NuWave Brio 3Q Freidora Digital de Aire sonará una vez. NuWave Brio 3Q Freidora Digital de Aire comenzará una cuenta regresiva de 5 minutos y el número “5” parpadeará. Se mantendrá a esta temperatura por hasta 5 minutos o hasta que se retire la Canastilla. Una vez que los alimentos se hayan colocado en la Canastilla, insértela de regreso en su lugar. Así comenzará la cuenta regresiva del tiempo elegido.
PRE-HEAT
Selección de Menú:Presione "Menu". La luz roja sobre las papas a la francesa se iluminará y se mostrará un “360”. Presione "Start" para comenzar a cocinar. La cuenta regresiva iniciará. Para seleccionar un platillo diferente, presione “Menu” para elegirlo antes de presionar “Start”. Vea la siguiente tabla de selecciones pre-programadas de “Menu”. Para salir de la selección de Menu, presione “Menu” otra vez hasta que la luz roja sobre los tipos de platillos ya no está iluminada. Si utiliza la función de Precalentar, presione "Pre-Heat" antes de "Menu" para asegurarse de usar la temperatura adecuada. Todas las selecciones de menú están automáticamente a 1300 watts.
MENU

60 Manual e Instrucciones
Ajuste de Temperatura:La NuWave Brio 3Q Freidora Digital de Aire está programada para cocinar automáticamente a 360°F. Para establecer una temperatura diferente, presione las flechas arriba y abajo del ícono Temp. la pantalla otra mostrará “360°F” y “Temp” parpadeará. Para ajustar la temperatura, continúe presionando las flechas de arriba o abajo. Se puede ajustar la temperatura en incrementos de 5 grados desde 100°F hasta 400°F. Para ajustar rápidamente la temperatura en incrementos grandes, solamente mantenga presionada la flecha (de arriba o abajo) para ajustar la temperatura en incrementos de 10°. Se puede cambiar la temperatura en cualquier momento del proceso. Presione las flechas arriba y abajo del ícono Temp. La temperatura programada se mostrará y “Temp” parpadeará. Presione la flecha de arriba o la de abajo hasta alcanzar la temperatura deseada.
Una vez elegida la temperatura, la NuWave Brio 3Q Freidora Digital de Aire automáticamente se ajustará a la nueva temperatura y la pantalla mostrará el tiempo restante. Si no se selecciona una nueva temperatura en 3 segundos, la NuWave Brio 3Q Freidora Digital de Aire mostrará nuevamente el tiempo restante. Ajuste de Tiempo:La NuWave Brio 3Q Freidora Digital de Aire está programada para cocinar automáticamente por 15 minutos. Para establecer un tiempo diferente, presione las flechas arriba y abajo del ícono Time. La pantalla mostrará “15” y “Time” parpadeará. Para ajustar el tiempo continúe presionando las flechas “Up” (arriba) o “Down” (abajo). Se puede ajustar el tiempo en incrementos de 1 minuto. Para ajustar rápidamente el tiempo en incrementos grandes, solamente mantenga presionada la flecha “Up” o “Down” (arriba o abajo) para ajustar en incrementos de 10 minutos, seguido por incrementos de 20 minutos, seguido por incrementos de 30 minutos. El tiempo mínimo a seleccionar es de 1 minuto y el máximo dependerá de la temperatura seleccionada.
• Para 100˚F – 345˚F, el tiempo máximo es de 99:59 horas• Para 350˚F – 400˚F, el tiempo máximo es de 1 hora
Se puede cambiar el tiempo en cualquier momento del proceso. Presione las flechas arriba y abajo del ícono Time y el tiempo restante se mostrará. Presione la flecha de arriba o la de abajo hasta alcanzar el tiempo deseado. Una vez elegido el tiempo, la pantalla mostrará el nuevo tiempo restante
Nota: Si se retira la Canastilla en cualquier momento de la etapa de precalentamiento, la NuWave Brio 3Q Freidora Digital de Aire automáticamente se pausará y comenzará una cuenta de 5 minutos hasta que se vuelva a colocar la Canastilla. Si usted cocinara otra porcion de comida casi inmediatamente después de usar la NuWave Brio 3Q Freidora Digital de Aire no necesitará usar la función de Precalentar ya que la NuWave Brio 3Q Freidora Digital de Aire ya estará caliente. Si usted desea cocinar su comida más tiempo, solamente coloque la Cacerola y la Canastilla dentro del aparato y continúe cocinando por incrementos de 2-3 minutos hasta alcanzar la consistencia deseada.
PRE-HEAT
INSTRUCCIONES DE FUNCIONAMIENTO (Continuación)

61Manual e Instrucciones
Nota: Una vez que el tiempo alcance 1 minuto, la pantalla comenzará a mostrar el tiempo restante en segundos (59, 58, etc.).
Selección de Menú:Presione "Menu". La luz roja sobre las papas a la francesa se iluminará y se mostrará un “360”. Presione "Start" para comenzar a cocinar. La cuenta regresiva iniciará. Para seleccionar un platillo diferente, presione “Menu” para elegirlo antes de presionar “Start”. Vea la siguiente tabla de selecciones pre-programadas de “Menu”. Para salir de la selección de Menu, presione “Menu” otra vez hasta que la luz roja sobre los tipos de platillos ya no está iluminada. Si utiliza la función de Precalentar, presione "Pre-Heat" antes de "Menu" para asegurarse de usar la temperatura adecuada. Todas las selecciones de menú están automáticamente a 1300 watts.
MENU
INSTRUCCIONES DE FUNCIONAMIENTO (Continuación)
Para Mejor ResultadosUna vez seleccionado el tiempo y la temperatura y estar listo para colocar los alimentos en la Freidora de Aire NuWave Brio: Jale la Cacerola y la Canastilla de la Freidora de Aire NuWave Brio. (Fig. 1) Nota: No llene más de 4/5. Deslice la cacerola de regreso a la Freidora de Aire NuWave Brio. No utilice la Cacerola sin la Canastilla adentro. (Fig. 2)Nota: No toque la Cacerola inmediatamente después de cocinar, ya que puede estar muy caliente. Sólo tómela del mango.Agitar los Alimentos:Algunos alimentos necesitan agitarse a la mitad de la cocción. Para agitar los alimentos de la Canastilla tome el mango, jale la Cacerola fuera del aparato y mueva. Una vez que se haya realizado adecuadamente, deslice la Cacerola y la Canastilla dentro de la Freidora de Aire NuWave Brio. (Fig.3)
NO PRESIONE EL BOTÓN DE DESMONTAJE MIENTRAS AGITA.
2
1
3

62 Manual e Instrucciones
Canastilla
Sartén
Parrilla para Asado
Como Usar La Caserola De La Parrilla:1. Saque la cesta de la bandeja de la base y
colóquela en una superficie plana.2. Levante la tapa de seguridad y presione el botón
de desmontaje.3. Levante la cesta de el sarten y reemplácela por la
bandeja de la parrilla 4. Para quitar la bandeja de la parrilla o cesto de
la cacerola de la bandeja base, abra la tapa de seguridad y presione el botón de desmontaje.
Esto reducirá el peso adicional de la bandeja base y hara que sea mas fácil para verter alimentos mas pequeños, como las papas fritas.
INSTRUCCIONES DE FUNCIONAMIENTO (Continuación)
CUIDADO & MANTENIMIENTOLimpieza:
Limpie el aparato después de cada uso o entre una gran cantidad de lotes. La canasta de la freidora y la bandeja de la base tienen un revestimiento antiadherente con una cesta desmontable de acero inoxidable. No utilice utensilios de metal o abrasivos fuertes al limpiar, ya que esto puede dañar el revestimiento.• Desconecte el aparato y asegúrese de que se enfríe completamente. Note: Retire la Cacerola y la Canastilla y colóquelas sobre una superficie resistente al calor para ayudar a que se enfríen más rápido. • Utilice un trapo húmedo para limpiar la parte exterior del aparato.• Limpie la Canastilla y los componentes internos con una esponja y detergente
suaves y agua caliente. Note: Si coloca la Cacerola o la Canastilla en el lavavajillas, utilice sólo la parte superior.
Consejo: Si queda comida pegada en la Cacerola o la Canastilla, agregue un poco de agua caliente y deje remojar para limpiarla más fácilmente.
• Limpie el interior del aparato con una esponja suave y agua caliente.• Limpie los componentes para calentar con un cepillo para quitar cualquier rastro de
comida pegada. Almacenamiento:
• Desconecte el aparato y déjelo enfriar completamente. • Asegúrese de que todas las partes estén limpias y secas.• La Freidora de Aire Brio 3Q viene con una carcasa especial debajo para un almacenaje del acorde fácil y conveniente. Usted vera una parte que sobresale, el resto del acorde se enrollara cuidadosamente en la caja.
IMPORTANTE - No sumerja la unidad en agua ni intente lavarla en el lavavajillas. La superficie exterior puede limpiarse cuidadosamente con un trapo humedo o esponja. Asegurese de que la unidad se haya enfriado completamente antes de limpiarla.

63Manual e Instrucciones
USO & CUIDADO DE LOS ACCESORIOS
Uso & Cuidado:Antes de usarse, lave con jabón suave y agua, o en un lavavajillas, sólo en la parte superior. Nunca deberá limpiarse con abrasivos o cortado con ningún objeto filoso.
• No utilice fibra metálica o algún otro objeto filoso que pueda rayar o dañar el silicón.
• No coloque los productos de silicón en la rejilla más alta o el asador de un horno convencional.
• No intente cortar alimentos que estén dentro de los accesorios. Cualquier mal uso de los accesorios invalidará la garantía.
Nuestro material de silicón puede resistir temperaturas de hasta 500°F, pero tenga en cuenta que esas temperaturas están por encima de las recomendadas para este producto. Los daños causados por este tipo de uso no estarán cubiertos por la garantía.
• Limpie la Parrilla para Asado, la Parrilla para Hornear y la Rejilla Reversible con agua caliente jabonosa y una esponja no abrasiva, o en el lavavajillas antes del primer uso y después de cada uso. Enjuague completamente. No remoje los accesorios por largos periodos de tiempo.
• No talle los accesorios con fibras metálicas, soluciones limpiadoras para horno, ni utilice limpiadores o materiales abrasivos, ya que podrían rayarse. Los raspones menores o la decoloración no impactará en el funcionamiento de las partes.
• Guarde en un lugar seco y fresco.Nota: Los accesorios son opcionales
Parrilla para Asado
Parrallia para Hornear
Rejilla Reversible
Tapete de Silicón
10 Moldes de Silicón para Cup cake
64 Manual e Instrucciones
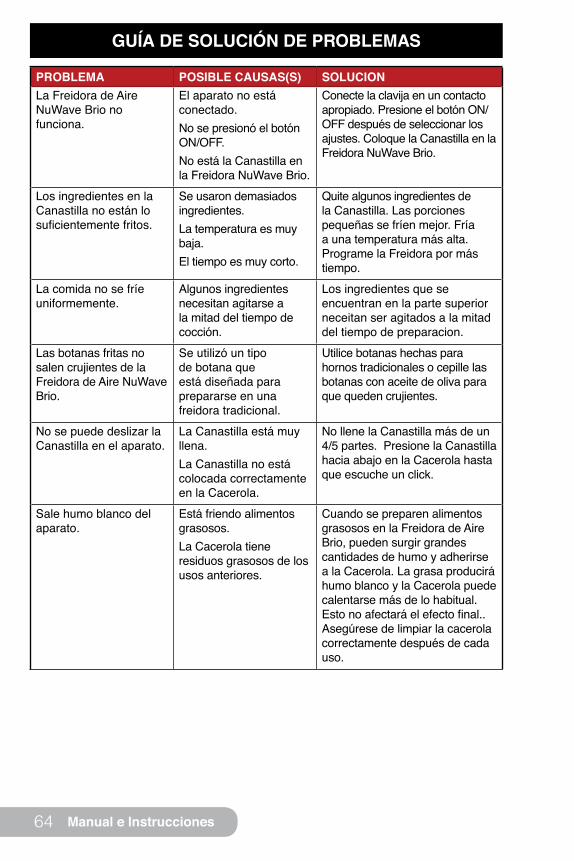
GUÍA DE SOLUCIÓN DE PROBLEMAS
PROBLEMA POSIBLE CAUSAS(S) SOLUCIONLa Freidora de Aire NuWave Brio no funciona.
El aparato no está conectado.No se presionó el botón ON/OFF.No está la Canastilla en la Freidora NuWave Brio.
Conecte la clavija en un contacto apropiado. Presione el botón ON/OFF después de seleccionar los ajustes. Coloque la Canastilla en la Freidora NuWave Brio.
Los ingredientes en la Canastilla no están lo suficientemente fritos.
Se usaron demasiados ingredientes.La temperatura es muy baja.El tiempo es muy corto.
Quite algunos ingredientes de la Canastilla. Las porciones pequeñas se fríen mejor. Fría a una temperatura más alta. Programe la Freidora por más tiempo.
La comida no se fríe uniformemente.
Algunos ingredientes necesitan agitarse a la mitad del tiempo de cocción.
Los ingredientes que se encuentran en la parte superior neceitan ser agitados a la mitad del tiempo de preparacion.
Las botanas fritas no salen crujientes de la Freidora de Aire NuWave Brio.
Se utilizó un tipo de botana que está diseñada para prepararse en una freidora tradicional.
Utilice botanas hechas para hornos tradicionales o cepille las botanas con aceite de oliva para que queden crujientes.
No se puede deslizar la Canastilla en el aparato.
La Canastilla está muy llena.La Canastilla no está colocada correctamente en la Cacerola.
No llene la Canastilla más de un 4/5 partes. Presione la Canastilla hacia abajo en la Cacerola hasta que escuche un click.
Sale humo blanco del aparato.
Está friendo alimentos grasosos.La Cacerola tiene residuos grasosos de los usos anteriores.
Cuando se preparen alimentos grasosos en la Freidora de Aire Brio, pueden surgir grandes cantidades de humo y adherirse a la Cacerola. La grasa producirá humo blanco y la Cacerola puede calentarse más de lo habitual. Esto no afectará el efecto final.. Asegúrese de limpiar la cacerola correctamente después de cada uso.
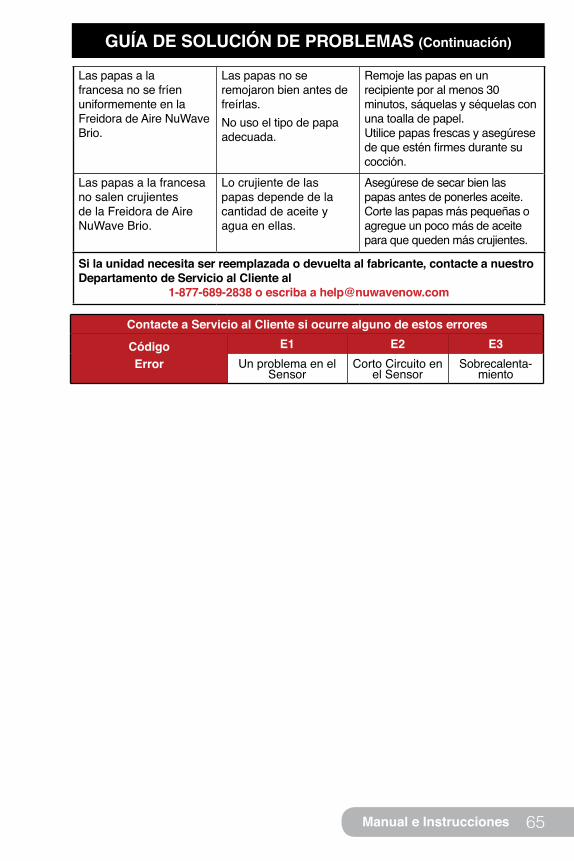
65Manual e Instrucciones
Contacte a Servicio al Cliente si ocurre alguno de estos errores
CódigoError
E1 E2 E3Un problema en el
Sensor Corto Circuito en
el SensorSobrecalenta-
miento
GUÍA DE SOLUCIÓN DE PROBLEMAS (Continuación)
Las papas a la francesa no se fríen uniformemente en la Freidora de Aire NuWave Brio.
Las papas no se remojaron bien antes de freírlas. No uso el tipo de papa adecuada.
Remoje las papas en un recipiente por al menos 30 minutos, sáquelas y séquelas con una toalla de papel. Utilice papas frescas y asegúrese de que estén firmes durante su cocción.
Las papas a la francesa no salen crujientes de la Freidora de Aire NuWave Brio.
Lo crujiente de las papas depende de la cantidad de aceite y agua en ellas.
Asegúrese de secar bien las papas antes de ponerles aceite. Corte las papas más pequeñas o agregue un poco más de aceite para que queden más crujientes.
Si la unidad necesita ser reemplazada o devuelta al fabricante, contacte a nuestro Departamento de Servicio al Cliente al
1-877-689-2838 o escriba a [email protected]
66 Manual e Instrucciones
GARANTÍA
NuWave Brio® 3Q Friedora de Aire Digital
LAS GARANTÍAS DEL FABRICANTELa Brio 3Q Freidora de Aire Digital, incluyendo la Base de Poder, Sartén, Canastilla, y La Malla de la Canastilla deben estar libres de defectos del fabricante . Todos los componentes eléctricos están garantizados por un año a partir de la fecha de compra, bajo uso doméstico normal y cuando son operados de acuerdo con las instrucciones escritas del fabricante.El fabricante proporcionará las piezas y mano de obra necesarias para reparar cualquier parte de la Freidora de Aire Digital en el Departamento de Servicio de NuWave, LLC. Después de la expiración de la garantía, el costo de la mano de obra y las piezas serán responsabilidad del propietario.LA GARANTÍA NO CUBRELa Garantía Limitada se invalida si la reparación es hecha por un distribuidor no autorizado o si la placa del número de serie es retirada o maltratada. El deterioro normal del acabado, por uso o exposición, no está cubierto por esta Garantía. Esta Garantía Limitada tampoco cubre fallas, daños o desempeño inadecuado por accidentes, desastres naturales (como relámpagos), variaciones en la potencia eléctrica, alteraciones, abuso, mal uso, ambientes corrosivos, instalación inadecuada, o falla en la operación de acuerdo con las instrucciones escritas por el Fabricante, uso no normal o comercial.PARA OBTENER EL SERVICIOEl propietario tendrá la obligación y responsabilidad de: Pagar por todos los servicios y partes no cubiertas por la garantía; Prepagar el envío al y desde el Departamento de Servicio para cualquier parte o sistema devuelto bajo esta garantía; Empacar cuidadosamente el producto utilizando el material de relleno adecuado para prevenir cualquier daño durante el tránsito. El empaque original es ideal para este propósito. Incluya en el empaque el nombre del propietario, dirección, teléfono durante el día, una descripción detallada del problema y su “número RGA” (Llame al 1-877-689-2838o escriba a [email protected]) para obtener el RGA (Número de Autorización de Devolución del Producto). Proporcione el modelo del producto, el número de serie y comprobante de la fecha de compra (una copia del recibo) cuando reclame su garantía.OBLIGACIONES DEL FABRICANTELas obligaciones del Fabricante bajo esta Garantía Limitada están restringidas a la reparación o reemplazo de cualquier parte cubierta por esta Garantía Limitada que sea encontrada defectuosa, una vez revisada, bajo un uso normal. La Garantía Limitada aplica únicamente en los Estados Unidos y sólo para el comprador original en los canales de distribución autorizados por el fabricante.LA GARANTÍA LIMITADA NO PUEDE SER ALTERADA, CAMBIADA O EXTENDIDA EXCEPTO POR UN INSTRUMENTO POR ESCRITO REALIZADO POR EL FABRICANTE. LA SOLUCIÓN DE REPARACIÓN O REEMPLAZO INCLUIDA EN ESTA GARANTÍA ES EXCLUSIVA. EN NINGÚN CASO EL FABRICANTE SERÁ RESPONSABLE POR DAÑOS CONSEQUENTES O INCIDENTALES A CUALQUIER PERSONA. SEA O NO OCASIONADO POR LA NEGLIGENCIA DEL FABRICANTE, INCLUYENDO SIN LIMITIACION DAÑOS POR PÉRDIDA POR USO, COSTO DE REEMPLAZO, DAÑO A LA PROPIEDAD, U OTRAS PÉRDIDAS MONETARIAS.Algunos estados no permiten la exclusión o limitación de daños relevantes o fortuitos, así que la exclusión mencionada podría no aplicar. Esta Garantía Limitada proporciona derechos legales específicos y podrían haber otros derechos que varíen entre estado y estado. EXCEPTO POR LO QUE YA SE EXPRESÓ DE FORMA DIFERENTE, EL FABRICANTE

67Manual e Instrucciones
GARANTÍA (Continuación)
NO GARANTIZA EXPRESA O IMPLÍCITAMENTE POR LEY U OTRAS, INCLUYENDO SIN LIMITACIONES, LAS GARANTÍAS IMPLÍCITAS DE COMERCIALIZACIÓN Y EJERCICIO PARA UN PROPÓSITO PARTICULAR A CUALQUIER OTRA PERSONA. LEA EL MANUAL DEL USUARIO. SI TUVIERA ALGUNA DUDA SOBRE EL FUNCIONAMIENTO O LA GARANTÍA DEL PRODUCTO, CONTACTE A NUWAVE, LLC.LEA EL MANUAL DEL PROPIETARIO: Si aún tiene alguna pregunta sobre el funcionamiento o la garantía del producto, comuníquese con NuWave, LLC al: 1-877-689-2838 o por correo electrónico [email protected].

Item No. BM 36011ARev. 03J
Model: 36011,36012, 120V, 60Hz, 1300 WattsFor patent information please go to: www.nuwavenow.com/legal/patent
Designed & Developed in USA by: NuWave, LLC1755 N. Butterfield Rd.Libertyville, IL 60048, U.S.A.
Customer Service:[email protected] • www.NuWaveNow.com
Made in China©2017 NuWave, LLC • All Rights Reserved.
www.NuWaveNow.com
FOR HOUSEHOLD USE ONLY