Embed Size (px)
Citation preview

METRO NORTH EDUCATION DISTRICT
NSC: CAPS
HTML TRAINING
2013
Notes and Programme
compiled by:
P.W. Frans
2 | P a g e
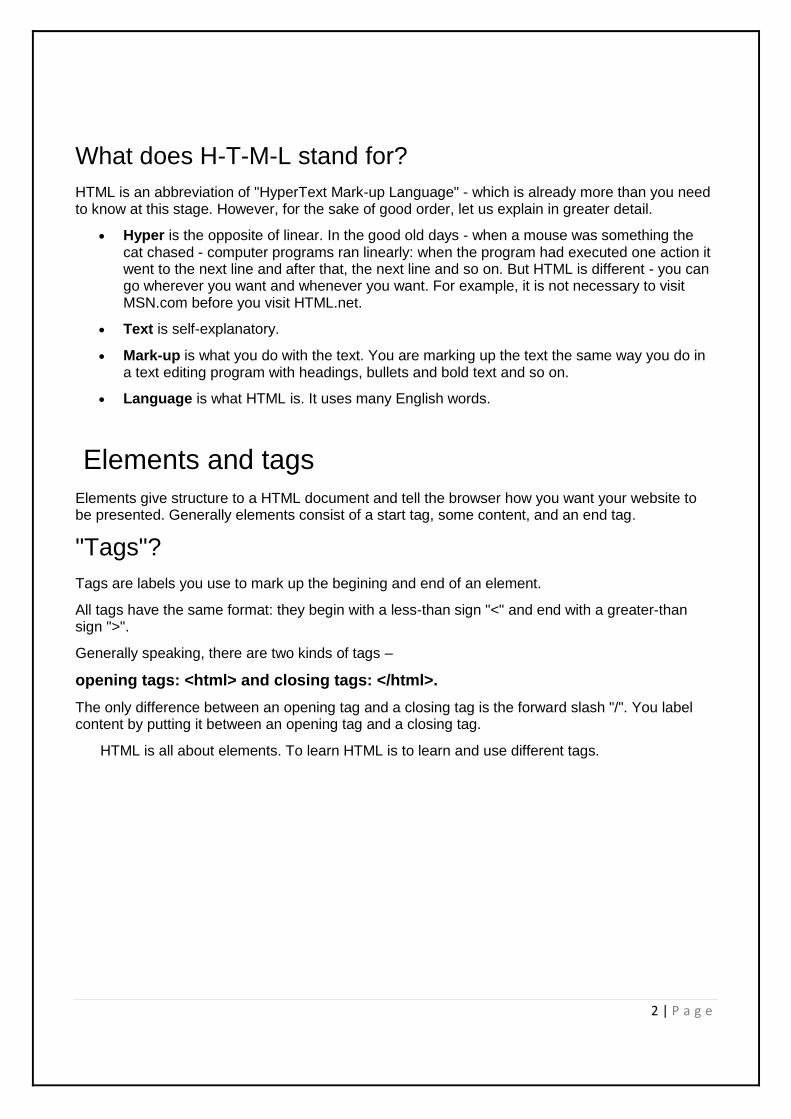
What does H-T-M-L stand for?
HTML is an abbreviation of "HyperText Mark-up Language" - which is already more than you need to know at this stage. However, for the sake of good order, let us explain in greater detail.
Hyper is the opposite of linear. In the good old days - when a mouse was something the cat chased - computer programs ran linearly: when the program had executed one action it went to the next line and after that, the next line and so on. But HTML is different - you can go wherever you want and whenever you want. For example, it is not necessary to visit MSN.com before you visit HTML.net.
Text is self-explanatory.
Mark-up is what you do with the text. You are marking up the text the same way you do in a text editing program with headings, bullets and bold text and so on.
Language is what HTML is. It uses many English words.
Elements and tags
Elements give structure to a HTML document and tell the browser how you want your website to be presented. Generally elements consist of a start tag, some content, and an end tag.
"Tags"?
Tags are labels you use to mark up the begining and end of an element.
All tags have the same format: they begin with a less-than sign "<" and end with a greater-than sign ">".
Generally speaking, there are two kinds of tags –
opening tags: <html> and closing tags: </html>.
The only difference between an opening tag and a closing tag is the forward slash "/". You label content by putting it between an opening tag and a closing tag.
HTML is all about elements. To learn HTML is to learn and use different tags.

3 | P a g e
Getting Organised
Create a folder for your first Web Pages (for instance in your Hard Drive, or in a Subdirectory, or in
your Desktop) - call it, for instance: Mywebpage - or, for simple projects, you may work directly on
your Desktop.
In this Course you will create a folder called HTML Folder in Windows Desktop.
The new Folder in your Desktop will appear like this:
The html document
Open your Notepad++

4 | P a g e
Enter the following:
<html>
</html>
You have written the very first and most important HTML instructions for your Browser.
Each of the two instructions above is called a TAG.
The first is a STARTING TAG, and the second is a CLOSING TAG.
To make a CLOSING TAG, simply add a / to a STARTING TAG.
Most TAGS (but not all) come in similar pairs: STARTING TAG and CLOSING TAG, (or,
Instruction Start and Instruction End).
With TAGS you give instructions to your Browser:
the TAG <HTML> tells the Browser: "Hey, Browser, this is the start of an HTML Document"
(or "Page")
and, similarly, the </HTML> TAG tells him: "this is the end of an HTML Document".
Head and Title of an html document
To create the HEAD of an HTML Document you write another pair of TAGS "within"
your HTML TAGS:
<HTML>
<HEAD>
</HEAD>
</HTML>
Note the order in which the TAGS are written:
First comes the <HTML> TAG, which means: this is the START of an HTML
Document

5 | P a g e
Then comes the <HEAD> TAG, which means: this is the START of the Document's
HEAD
Then comes the </HEAD> TAG, which means: this is the END of the Document's
HEAD
The comes the </HTML> TAG, which
means: this is the END of the HTML
Document
This fashion of ordering TAGS is
called "nesting": all TAGS must be
"nested" in order for your Browser to
understand the instructions you are
giving, and this rule is very important.
Now you can insert a TITLE for your
Document:
<HTML>
<HEAD>
<TITLE></TITLE>
</HEAD>
</HTML>
We have inserted another pair of TAGS (<TITLE> and </TITLE>), to let our Browser
understand that your Document has a TITLE. The textual Title itself goes between the two
TITLE TAGS. Choose a name for it, for instance
"My First Web Page".
<HTML>
<HEAD>
<TITLE> My First Web Page </TITLE>
</HEAD>
</HTML>
The TITLE is what
appears at the very top
of the Browser's
window, in the blue
"Title Bar".

6 | P a g e
Body of an html document
The bulk of your page "content" will be in the BODY of the Document.
To create a BODY we need another pair of TAGS just below the HEAD section: -
Tip: The body is always under a head (or a
head is on top of a body),
<HTML>
<HEAD>
<TITLE>My First Web Page</TITLE>
</HEAD>
<BODY>
</BODY>
</HTML>
Let's add some simple text.
Within the BODY TAGS type: This is my
first Web Page !!!
Your HTML Document will look like this:
<HTML>
<HEAD>
<TITLE>My experimental Web
Page</TITLE>
</HEAD>
<BODY>This is my first Web Page
!!!</BODY>
</HTML>

7 | P a g e
Saving a html document
An HTML Document must be saved as .html and not as text..
In your Notepad window click on the Menu File then Save As, like this:
Select the folder in which you have decided to save your document, in this case it will be saved
directly in the HTML Folder you created created in your Desktop.
Your Folder HTML Folder is empty, like in the image below. Decide a file name for your page: for
instance, call it "My first HTML".
Where it says File name: delete "Untitled" and type in my first HTML.html

8 | P a g e
Now your Notepad window will look like this: Now it is no longer "Untitled" but has a filename: "My first HTML.htm
Depending on which Browser you have installed in your PC, the file you have created will appear in
your My first HTML folder as follows:

9 | P a g e
Opening an html document
It is recommended that you have both versions open at the first time.
The Web page will appear in the Browser

10 | P a g e
Go back to the folder “HTML Folder”, right click and select “Edit in Notepad++”
For convenience it is best to edit within Notepad and view the changes on the web page in the
browser.
Note: After entering code in the Notepad editor, you first need to Save it (Ctrl-S) and click on the
Browser, press F5 to refresh.
There isn't much, yet, as you can see, because you have only done the skeleton of your first Web
Page

11 | P a g e
Adding Headings to the html document
There are 6 levels of Headings in the HTML Standard, and they are obtained through the use of 6
different pairs of Tags:
<H1></H1>
<H2></H2>
<H3></H3>
<H4></H4>
<H5></H5>
<H6></H6>
Text contained in a pair of Heading Tags gets displayed by Browsers in very large (H1, H2..) to
very small (H5, H6) font size, without using the FONT Tag at all.
Normally, the text inside a H4 Heading gets displayed as ordinary size text (size 3).
The FACE used is normally the default FONT (Times New Roman).
The default text colour is normally black.
Type in the following heading: <h1> to <h6> Output in Browser

12 | P a g e
Adding Paragraph text to the html document
Any text containing more than a few lines (or sometimes even more) should exist inside of a paragraph tag <p>. This tag is reserved specifically for blocks of text, such as those you would expect to find inside your favourite novel.
HTML <p> Tag Code:

13 | P a g e
Line Breaks
A line break is used in HTML text elements, and it is the equivalent of pressing Enter or Return on your keyboard.
In short, a line break ends the line you are currently on and resumes on the next line. Each paragraph element begins and ends with a line break, which creates an empty space between the start of a paragraph element and the end of a paragraph element.
Line break elements are a little different from most of the tags we have seen so far because they do not require a
closing tag. Instead, their opening and closing tags are combined into a single line break element. Placing <br /> within the code is the same as pressing the return key in a word processor. Use the <br /> tag within other elements such as paragraphs (<p>).
Line Break
inserted

14 | P a g e
The Horizontal Rule
Horizontal rules are used to visually break up sections of a document. The <hr> tag creates a line
from the current position in the document to the right margin and breaks the line accordingly.
The <hr /> tag is an example of an empty element, where you do not need opening and closing
tags, as there is nothing to go in between them.
Horizontal line

15 | P a g e
Formatting html web pages
Bold, Italics and Underline
Style tags in the CAPS curriculum
HTML Result
<b>This is Bold...</b>
<i>This is Italic...</i>
<u>This is Underlined...</u>
This is Bold
This is Italic
This is Typewriter
Note how you can combine the style tags as long as they are correctly nested, the italic tags are both within the bold tags. Note also, that the order does not matter. Apply the italic style tag to heading 1 and the Bold style to Heading 2. Practice it on any other text of your choice.

16 | P a g e
Lists
HTML lists appear in web browsers as bulleted lines of text. There are actually three different types
of HTML lists, including UNORDERED LISTS lists (bullets), ORDERED LISTS (numbers).
Unordered Lists (Bulleted Lists)
The necessary HTML TAGS that will construct that are: <ul> STARTING TAG </ul> CLOSING TAG Those are container Tags - they obtain no effect by themselves, they need other Tags nested inside. The 2 ul TAGS must be placed just before, respectively, and just after the items to be listed.
Besides, there must be a STANDALONE TAG <li> before each item in the list.
17 | P a g e
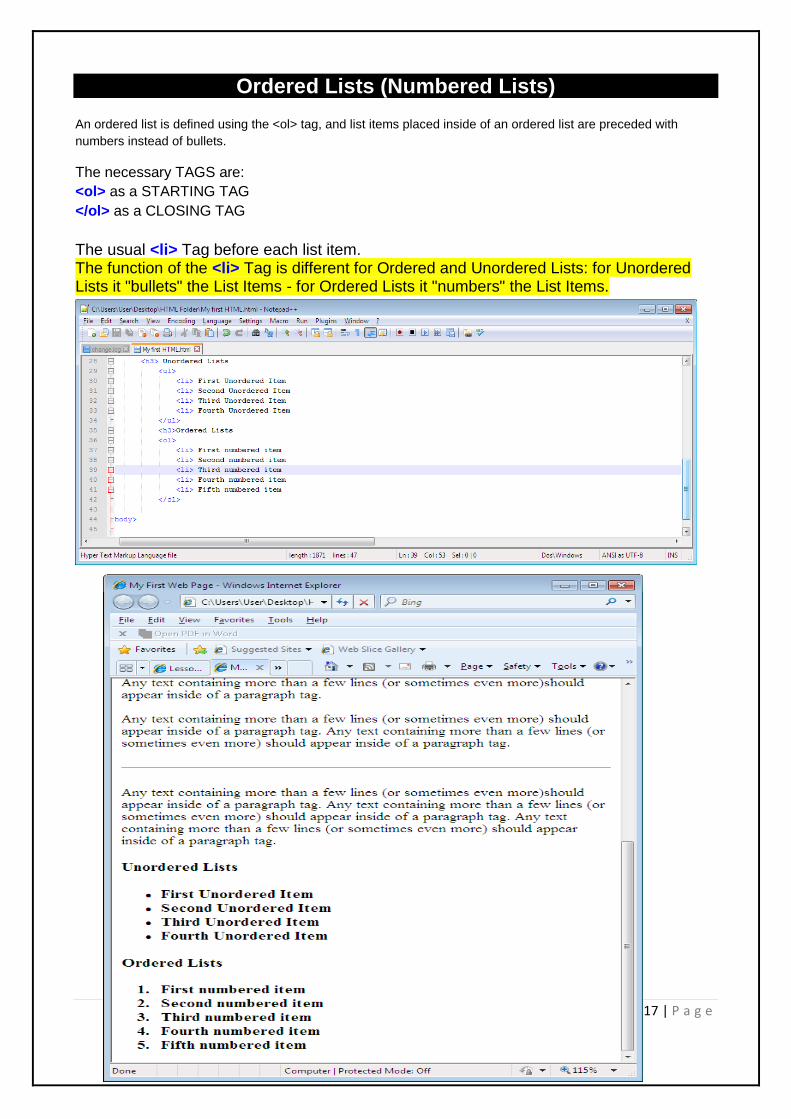
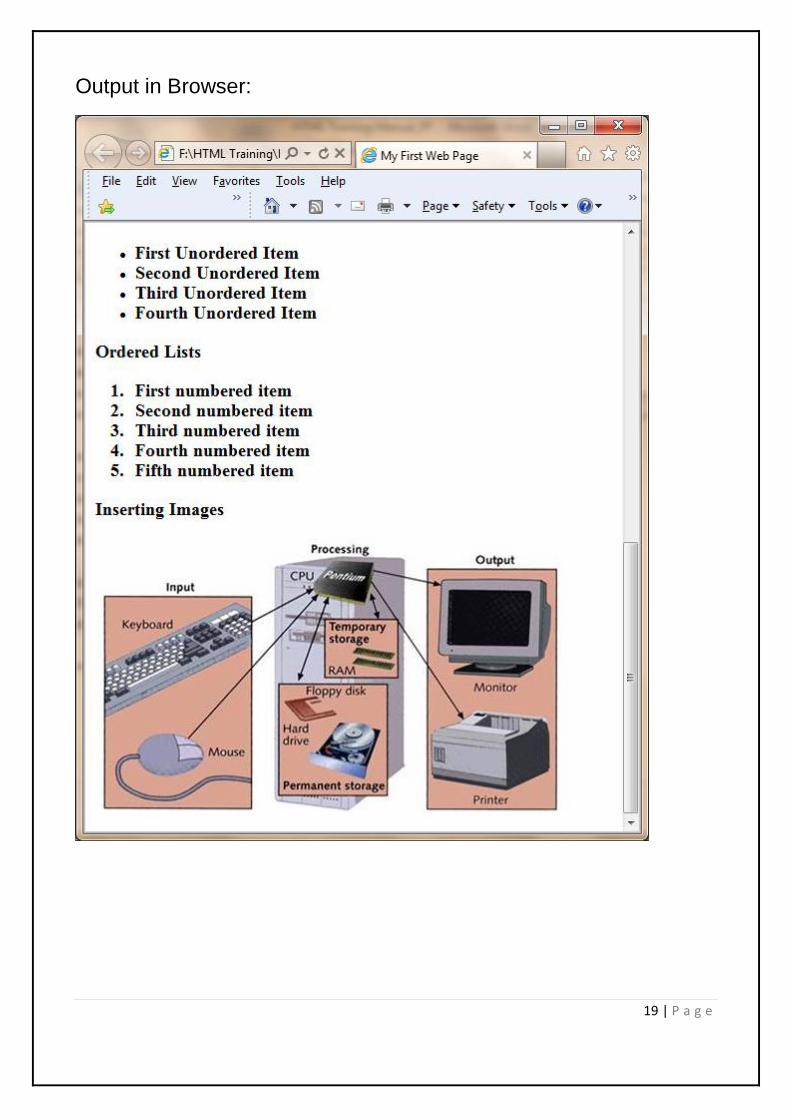
Ordered Lists (Numbered Lists)
An ordered list is defined using the <ol> tag, and list items placed inside of an ordered list are preceded with
numbers instead of bullets.
The necessary TAGS are:
<ol> as a STARTING TAG
</ol> as a CLOSING TAG
The usual <li> Tag before each list item. The function of the <li> Tag is different for Ordered and Unordered Lists: for Unordered Lists it "bullets" the List Items - for Ordered Lists it "numbers" the List Items.

18 | P a g e
Inserting images
We need a new TAG, the <img> Tag. Under the HTML 4 Standard this is a "standalone" Tag (it does not require a closing Tag). As such, and being an empty Element, it must have a closing / (slash) at the end and becomes <img />. This Tag is an Inline Element. So, it can be inserted in a normal flow of Code without generating a new Browser line.
This Tag needs a few compulsory Attributes and accepts several optional ones.
Compulsory Attributes: src - specifies the Image "Source", e.g. its file name and location width - sets the Image Width, in pixels height - sets the Image Height, in pixels
Optional Attributes: alt - sets an "alternative" textual content, should the Image not display, and has other functions border - sets the thickness of an optional frame around the Image align - manages the relative alignment of text and Image
<img src="picture.gif" />
19 | P a g e
Output in Browser:

20 | P a g e
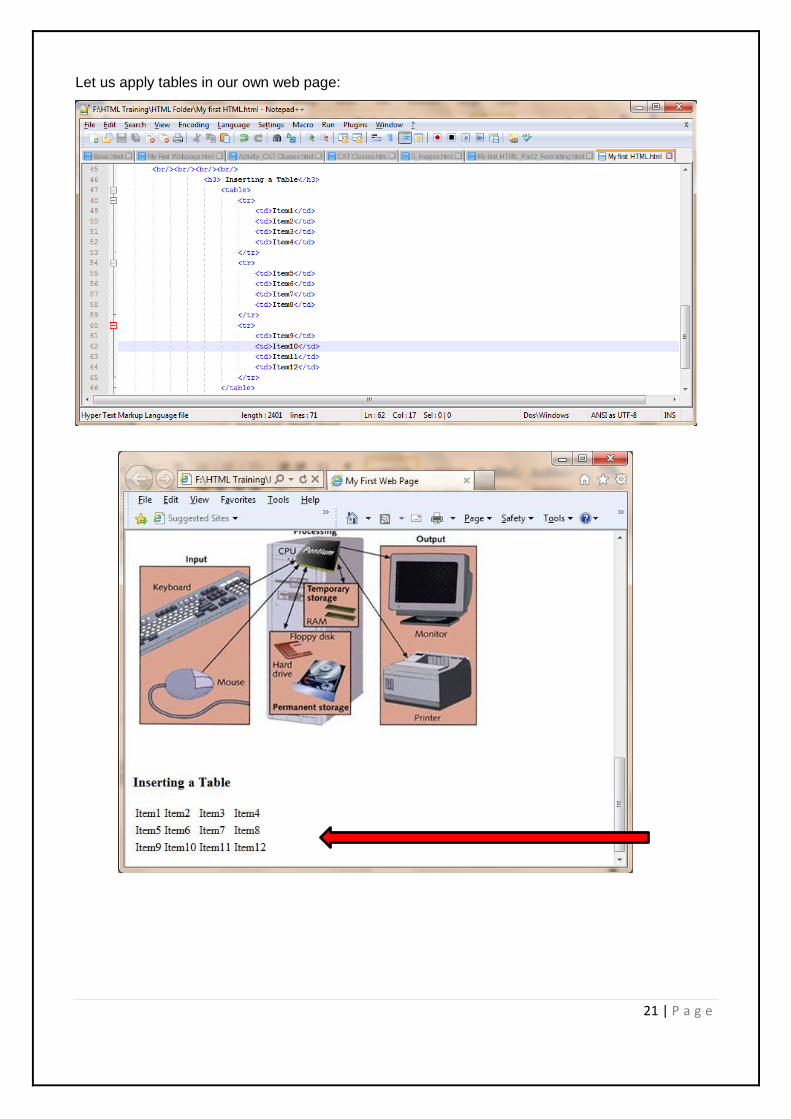
Inserting Tables
Tables are used when you need to show "tabular data" i.e. information that is logically presented in rows and columns.
The different Table tags:
3 different elements are used to insert tables:
The opening tag <table> and the closing tag </table> starts and ends the table.
<tr> stands for "table row" and starts and ends horizontal rows.
<td> is short for "table data". This tag starts and ends each cell in the rows of your table. All simple and logical.
Summarising Table Tags:
Opening a Table: <table>
Closing a Table: </table>
A Table is divided in table rows and table Data
Table Row: <tr> and </tr>
Table Data: <td> and </td>
Example:
<table>
<tr>
<td>Cell 1</td>
<td>Cell 2</td>
</tr>
<tr>
<td>Cell 3</td>
<td>Cell 4</td>
</tr>
</table>
Output in Browser: (No borders are actually shown in the browser)
Cell 1 Cell 2
Cell 3 Cell 4
21 | P a g e
Let us apply tables in our own web page:
22 | P a g e
Formatting html web pages
What are the usual formatting attributes we know?
1. Colour: Page colour, font colour etc. 2. Font: Type, Size, Colour 3. Alignment: Left, Centre, Right 4. Borders: Border size, cell spacing, cell padding 5. Image formatting: Size, Alignment etc.
Let’s apply the above attributes in our web page
Note: Save “My first HTML” to
“My first HTML_Part2_Formatting” in the same folder
Background of an html document
To change BODY Colour insert the ATTRIBUTE (another form of instruction) BGCOLOR in the BODY STARTING TAG, like this:
<BODY BGCOLOR="#XXXXXX">
The generic XXXXXX is the Colour Code
Note that there is always a space between a TAG and an ATTRIBUTE in the Tag A Tag tells the Browser what to do (for instance: "start the Body section of this
Document") - an Attribute tells the Browser "how" to do it (for instance: "make this Body background colour green")
BGCOLOR is short for BACKGROUNDCOLOR - but note the spelling, COLOR not COLOUR -
ATTRIBUTES normally have a "setting" and a "value" (in this case ="#XXXXXX" is the full setting and #XXXXXX is the value of the setting) - a setting is obtained always through the use of an = sign and quotation marks to contain the specified value
Also note the # sign preceding the Colour Code (Colour Codes are explained below).
Here are some basic Colour Codes: RED= FF0000
GREEN= 00FF00
BLUE= 0000FF
BLACK= 000000

23 | P a g e
Apply this to your new HTML web page and note the change to the change in colour. Experiment with other colours as well:
HTML offers several tags for adding style to your text. Just remember to be judicious and consistent in the use of styles; too much can make the text uncomfortable to read...
Changing Fonts:
To use a different Font, and/or a different Size, and/or a different Colour, the new TAG to be used is <FONT>. The text to be rendered in a different style is positioned between the <FONT> opening Tag and the </FONT> closing Tag
The FONT Tag takes three ATTRIBUTES: FACE to specify the Font type SIZE to specify the Font size COLOR to specify the Font colour (note the American spelling: COLOR, not COLOUR)
You may specify only one ATTRIBUTE in a TAG, a few, or all of them, always separated by a space. For instance, if you wish your text to be displayed in Arial, size 5 and red, you will need this code:
<BODY BGCOLOR="#FFFFFF"> < FONT COLOR="#FF0000" FACE="Arial" SIZE="5">A different Web Page !!!</FONT> < /BODY>

24 | P a g e
Output:
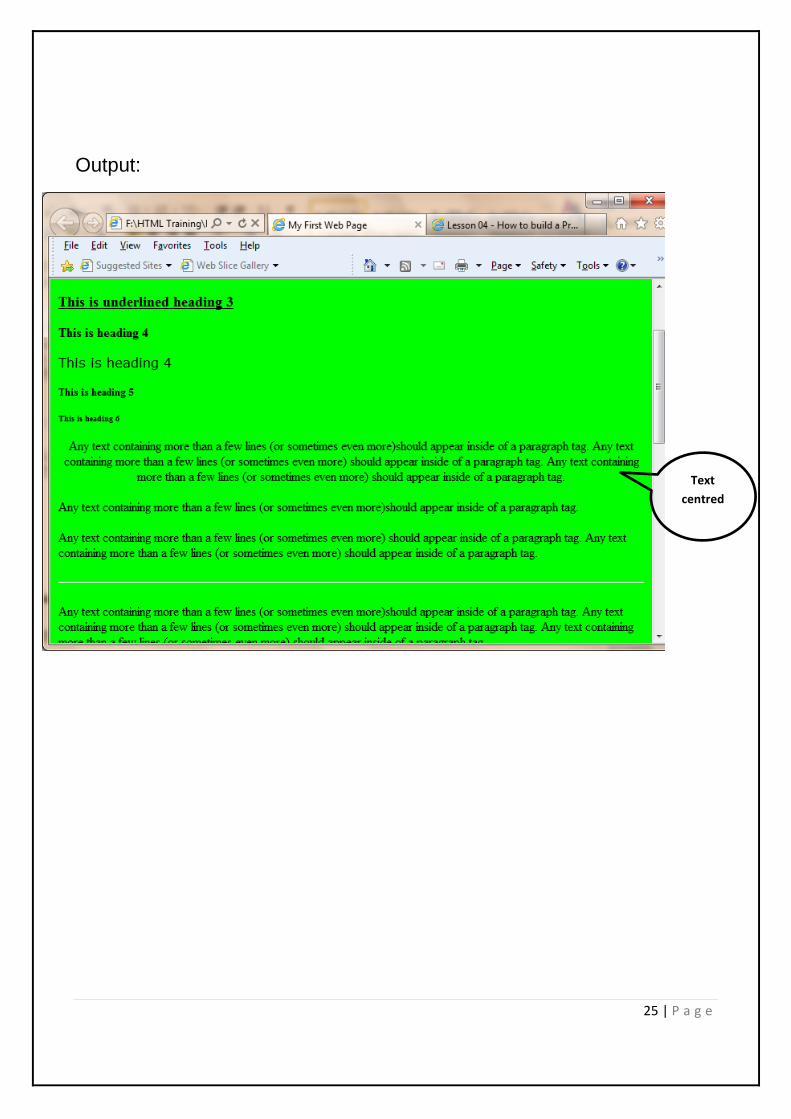
Another way of aligning text is through the use of the (already seen) Paragraph P Tag and its Attribute ALIGN. Something I did not tell you earlier, in fact, is that the P Tag accepts several Attributes including the ALIGN one.
The syntax is identical to that of the DIV Tag so I am not going to repeat it but just give you an example:
<BODY> < P>Hello pussy cat ! <P ALIGN="left">How is life pussy cat ?</P> < P ALIGN="center"><I>Did you catch any mouse today ?</I></P> < P ALIGN="right"><FONT FACE="verdana, arial" SIZE="3" COLOR="#990033">Would like some prawns for supper ?</FONT> < /BODY>
25 | P a g e
Output:
Text
centred

26 | P a g e
Formatting unordered and ordered lists
[ADDITIONAL]
How to improve unordered lists
You may change the "default" solid dot (called "disc") into a "circle" or a "square" by using the Attribute TYPE in the <UL> Opening Tag.
This Attribute has three available "Settings": TYPE="disc" (default) TYPE="circle" TYPE="square"
Edit the following in our example:
Output: Square bullets
Experiment with “circle” and “disc”

27 | P a g e
How to improve ordered lists
By intervening on the counting style of the Ordered List.
In the <OL> Opening Tag use the Attributes TYPE and, if necessary, START. Let's see TYPE:
TYPE="1" is the default setting, which will render default numbers (1, 2, 3, etc.) TYPE="A" will render the list with capital letters (A, B, C, etc.) TYPE="a" will render the list with lower case letters (a, b, c, etc.) TYPE="I" will render the list with Large Roman Numerals (I, II, III, etc.) TYPE="i" will render the list with small roman numerals (i, ii, iii, etc.)
Edit the following in our example:
Output: Roman Numerical List:

28 | P a g e
How to adjust images size
Compulsory Attributes: src - specifies the Image "Source", e.g. its file name and location width - sets the Image Width, in pixels height - sets the Image Height, in pixels
<body> < img src="picture.gif" width="75" height="76" /> < /body>
Applying to our example:
Output:

29 | P a g e
Table Attributes: Borders & Cell Padding
The border attribute
The TABLE (opening) Tag accepts the Attribute border, which specifies the "thickness" of a Border around the Table. The setting is in pixels., a Border of 4 pixels. This is the Code:
<table border="3">
Applying to our example:

30 | P a g e
The attributes width and height
Or you can play with your own sizes. The TABLE Tag accepts the Attributes width and
height, which can be set at "absolute" values (pixels) or "relative" values (%) exactly like in
the case of the Horizontal Rule
<table border="4" width="300" height="100">
Output:
31 | P a g e
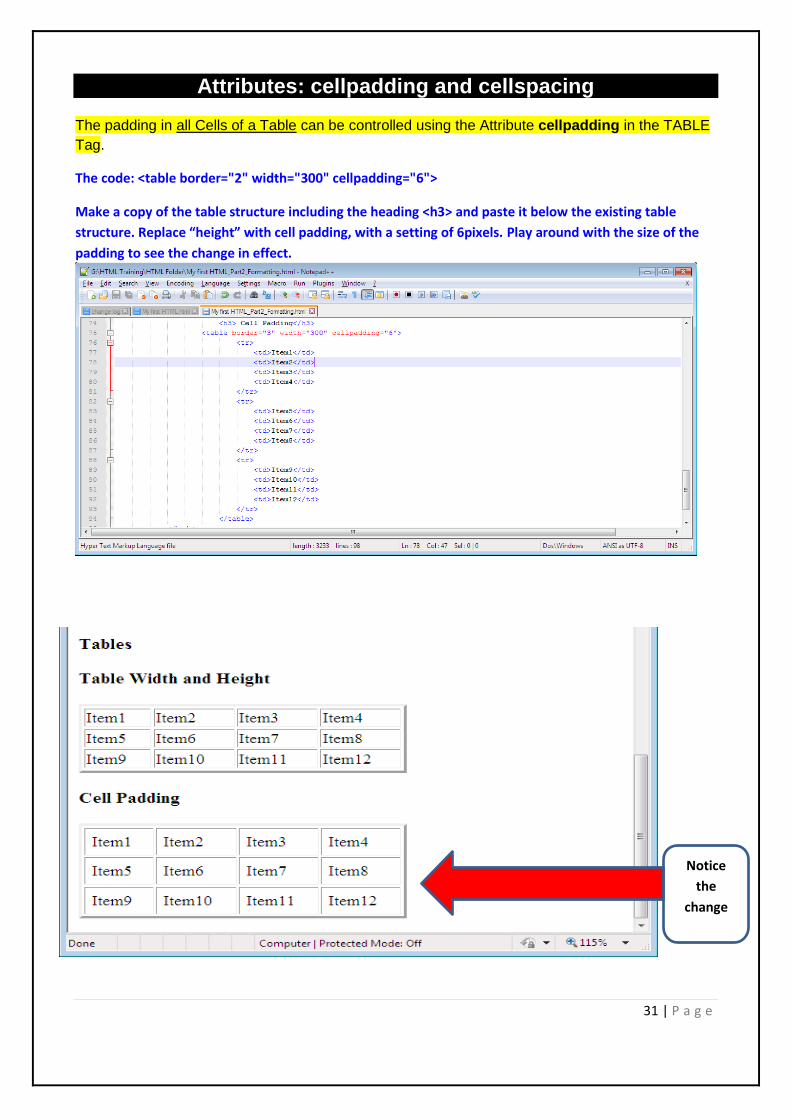
Attributes: cellpadding and cellspacing
The padding in all Cells of a Table can be controlled using the Attribute cellpadding in the TABLE
Tag.
The code: <table border="2" width="300" cellpadding="6">
Make a copy of the table structure including the heading <h3> and paste it below the existing table
structure. Replace “height” with cell padding, with a setting of 6pixels. Play around with the size of the
padding to see the change in effect.
Notice
the
change

32 | P a g e
The Cellspacing attribute, defaulting to 2 pixels, sets the horizontal and vertical "space" between Cells and between Cells and Table outer Border.
The Code: <table border="2" width="300" cellpadding="20" cellspacing="20">

33 | P a g e
Enrichment: Adding colour to the table
Add colour attributes to the table, any of the table rows and table data and notice the effects:
The Code: <table border="2" width="50%" cellpadding="6" cellspacing="6" bgcolor="yellow">
Positioning a table
A Table may be centred in a Page simply using the CENTER Tag,:
<center>
<table border="2" width="50%" cellpadding="6" cellspacing="6" bgcolor="#cc99ff">
</center>
The second table is centred

34 | P a g e
Dealing with links
What is a Link ?
A Link (or Hyperlink) is a way of instructing a Browser to go to or to connect to:
a particular area in the same document, thus saving a Visitor the trouble of scrolling up and down a (long) Page
another HTML document (or an Image) located in the same Web Site a particular area in another HTML document located in the same Web Site any other address (Web Site address, HTML document address) in the Web
The Tag that does the work is the <a> Tag, or anchor Tag. It needs a compulsory Closing
Tag </a>.
This is the most important Tag in the HTML Language, and the one that has made Internet
possible.
It can transform ordinary text into hyper text, or text that is clickable and capable of
issuing "target" instructions to a Browser.
You will now realise why HTML (Hyper Text Mark-up Language) is so called - because
of this property of creating clickable "Hyper Text" !
The Tag <a></a> and its content is an Inline Element
To create a Link, the <a> Tag needs the Attribute href, short for Hyper Reference: through this Attribute, we embed the target address of a Link, like this:
<a href="http://www.yahoo.com">go to Yahoo</a>
go to Yahoo

35 | P a g e
Link to Google

36 | P a g e
Acknowledgements:
Notes have been reworked from the resources available on:
1. PSWB Lessons from: http://www.modus2000.com/webbuild
2. The w3schools website: http://www.w3schools.com/html/default/asp
3. Tizag Tutorials: http://www.tizag.com/
4. Writing HTML Tutorial: http://www..mcli.dist.maricopa.edu/tut/