Embed Size (px)
Citation preview
NovelRank Enterprise Edition – Ubuntu Install GuideLast Updated: August 26, 2014
This guide will give you every step you need to install NovelRank Enterprise Edition onto an Ubuntu Desktop installation. This guide assumes you have already downloaded Ubuntu Desktop 14.04 LTS. Ifnot, you can retrieve it here: http://www.ubuntu.com/download
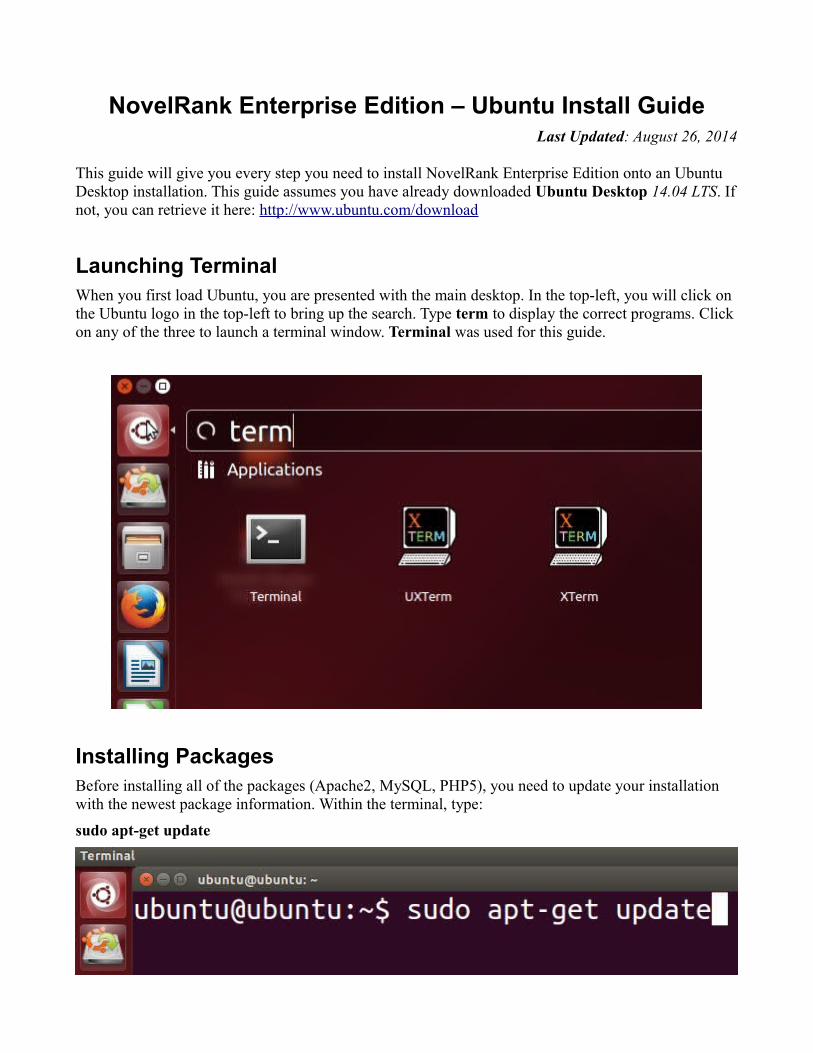
Launching TerminalWhen you first load Ubuntu, you are presented with the main desktop. In the top-left, you will click on the Ubuntu logo in the top-left to bring up the search. Type term to display the correct programs. Click on any of the three to launch a terminal window. Terminal was used for this guide.
Installing PackagesBefore installing all of the packages (Apache2, MySQL, PHP5), you need to update your installation with the newest package information. Within the terminal, type:
sudo apt-get update
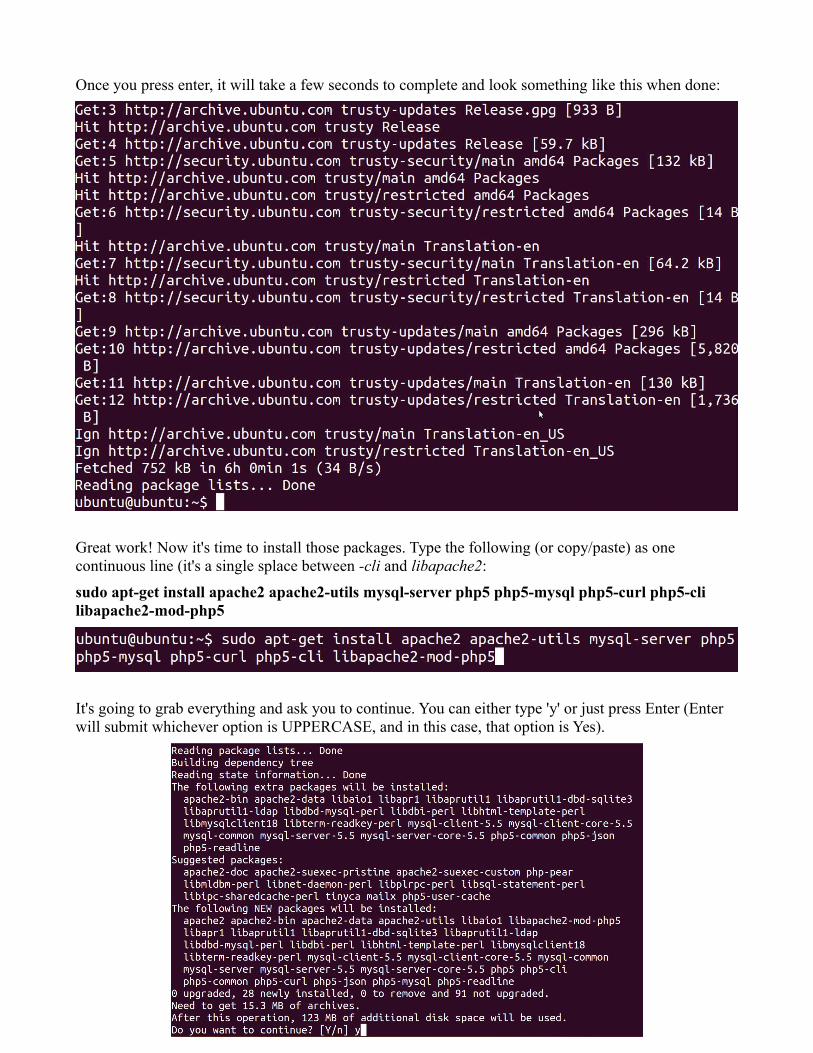
Once you press enter, it will take a few seconds to complete and look something like this when done:
Great work! Now it's time to install those packages. Type the following (or copy/paste) as one continuous line (it's a single splace between -cli and libapache2:
sudo apt-get install apache2 apache2-utils mysql-server php5 php5-mysql php5-curl php5-cli libapache2-mod-php5
It's going to grab everything and ask you to continue. You can either type 'y' or just press Enter (Enter will submit whichever option is UPPERCASE, and in this case, that option is Yes).
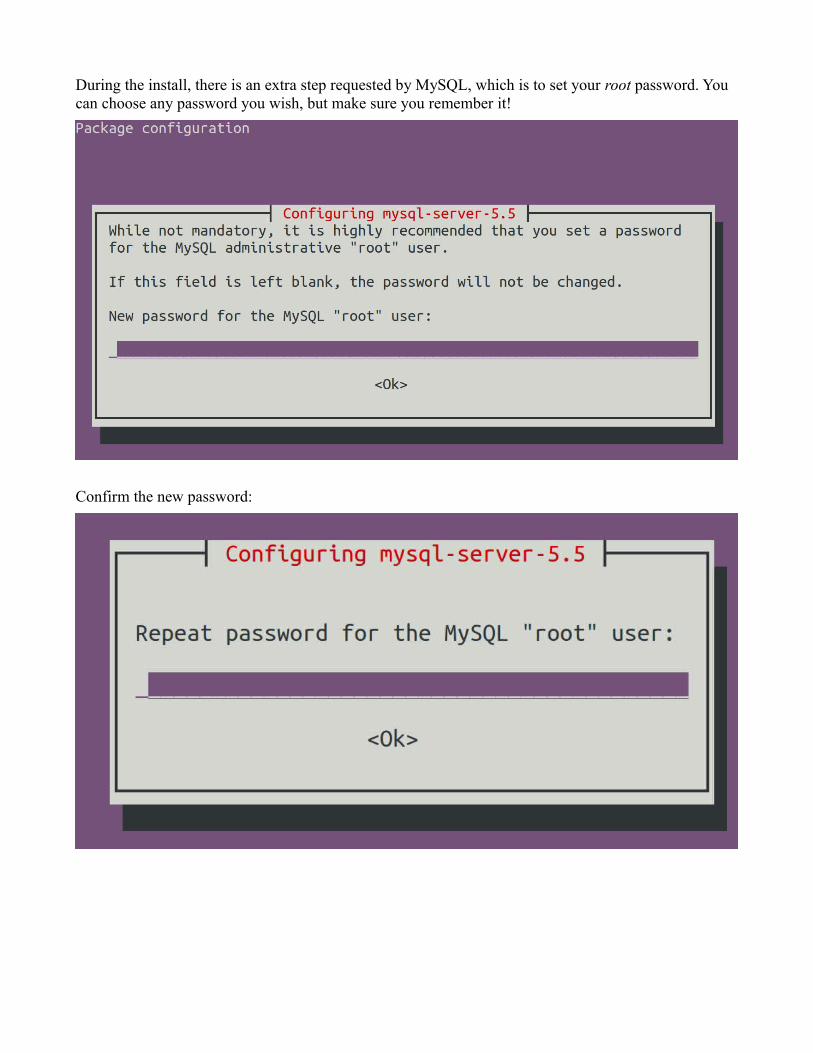
During the install, there is an extra step requested by MySQL, which is to set your root password. You can choose any password you wish, but make sure you remember it!
Confirm the new password:
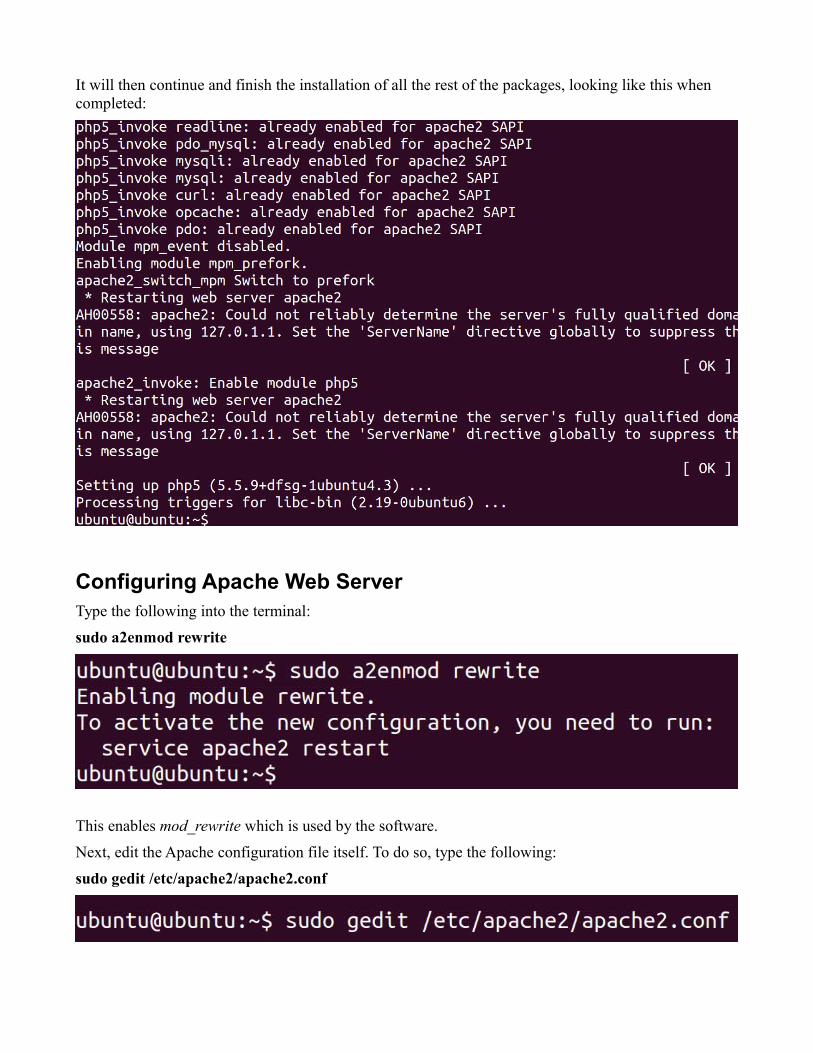
It will then continue and finish the installation of all the rest of the packages, looking like this when completed:
Configuring Apache Web ServerType the following into the terminal:
sudo a2enmod rewrite
This enables mod_rewrite which is used by the software.
Next, edit the Apache configuration file itself. To do so, type the following:
sudo gedit /etc/apache2/apache2.conf
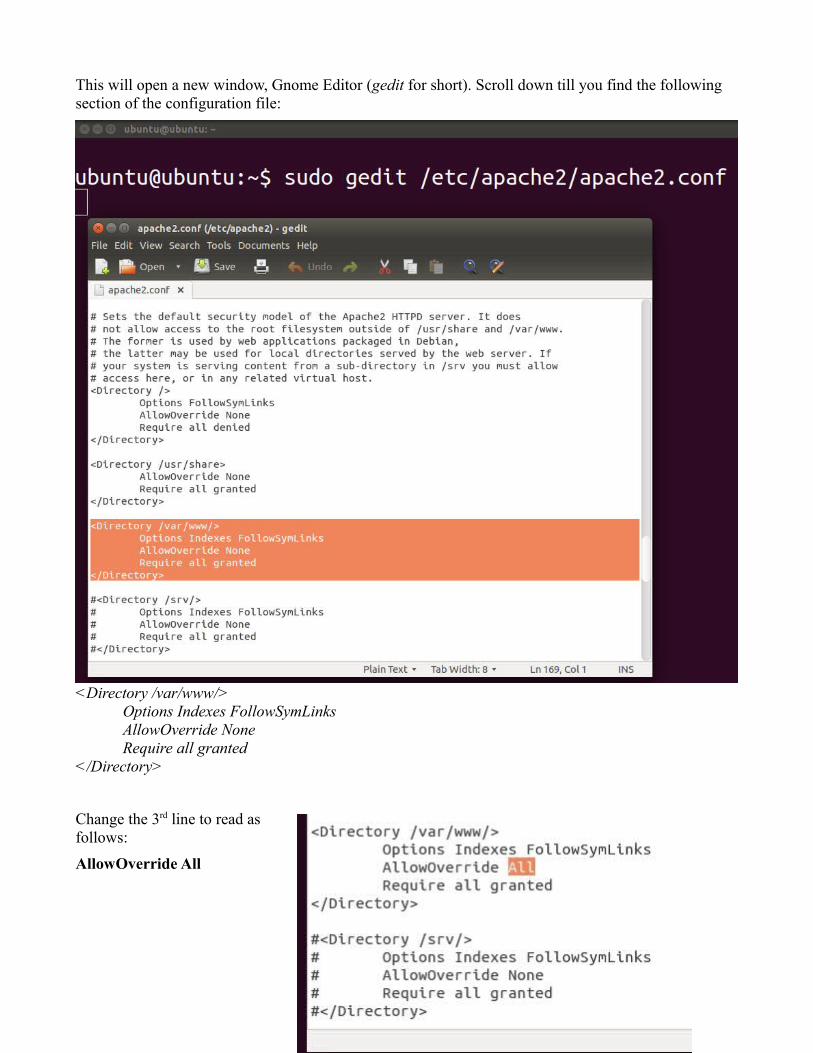
This will open a new window, Gnome Editor (gedit for short). Scroll down till you find the following section of the configuration file:
<Directory /var/www/>Options Indexes FollowSymLinksAllowOverride NoneRequire all granted
</Directory>
Change the 3rd line to read asfollows:
AllowOverride All
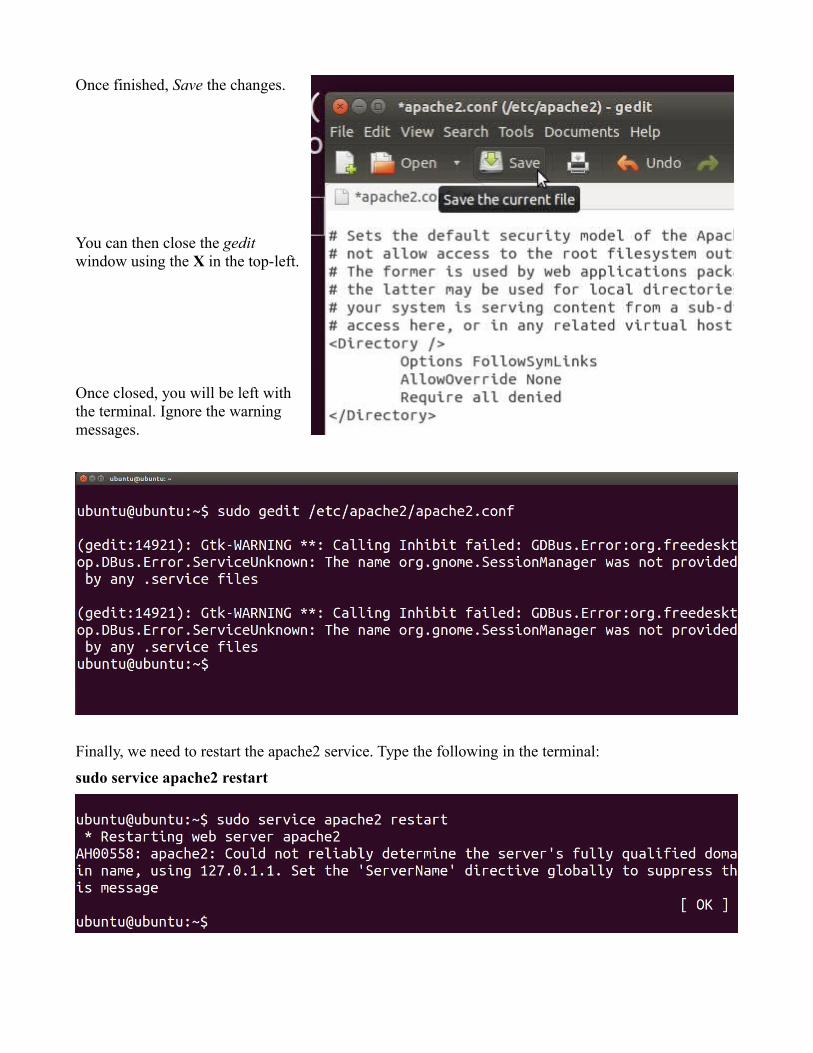
Once finished, Save the changes.
You can then close the geditwindow using the X in the top-left.
Once closed, you will be left withthe terminal. Ignore the warningmessages.
Finally, we need to restart the apache2 service. Type the following in the terminal:
sudo service apache2 restart
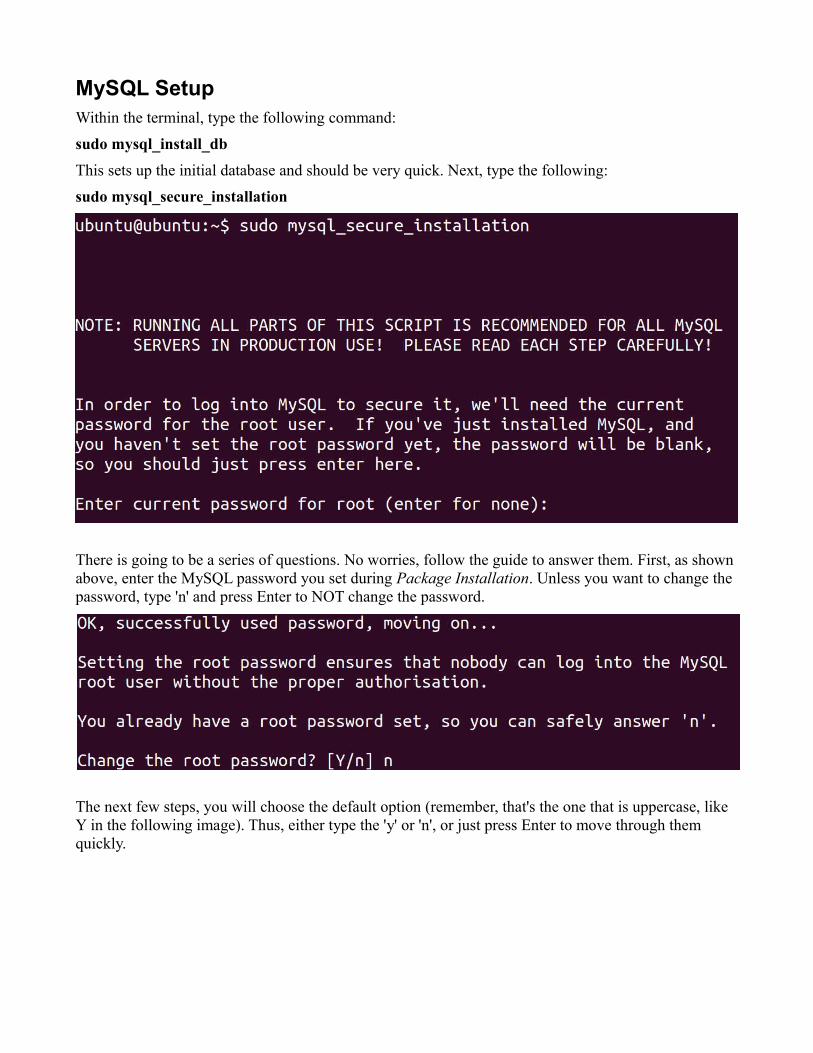
MySQL SetupWithin the terminal, type the following command:
sudo mysql_install_db
This sets up the initial database and should be very quick. Next, type the following:
sudo mysql_secure_installation
There is going to be a series of questions. No worries, follow the guide to answer them. First, as shown above, enter the MySQL password you set during Package Installation. Unless you want to change the password, type 'n' and press Enter to NOT change the password.
The next few steps, you will choose the default option (remember, that's the one that is uppercase, like Y in the following image). Thus, either type the 'y' or 'n', or just press Enter to move through them quickly.
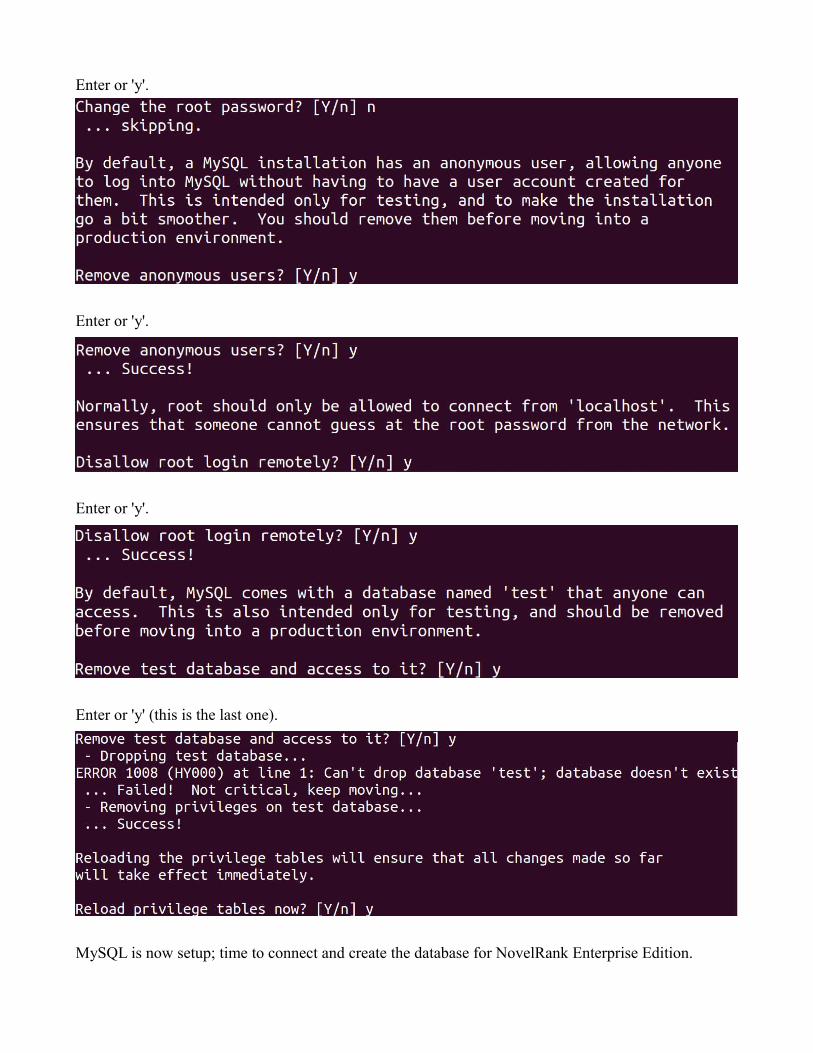
Enter or 'y'.
Enter or 'y'.
Enter or 'y'.
Enter or 'y' (this is the last one).
MySQL is now setup; time to connect and create the database for NovelRank Enterprise Edition.
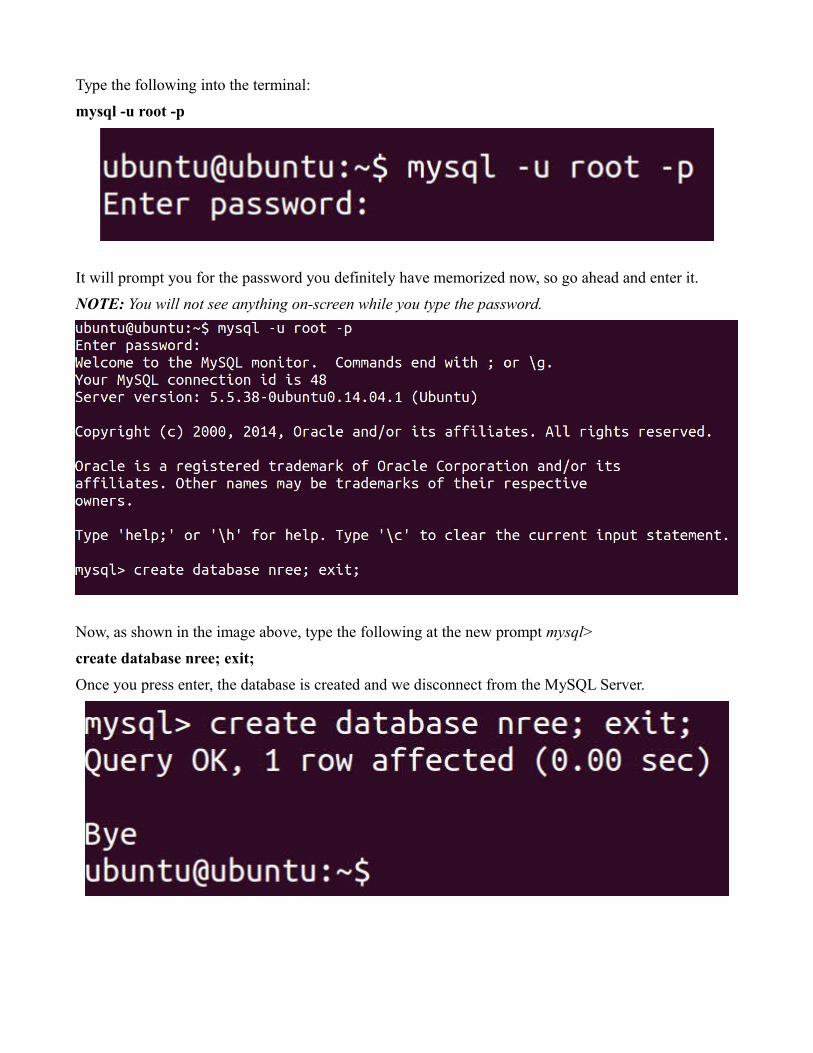
Type the following into the terminal:
mysql -u root -p
It will prompt you for the password you definitely have memorized now, so go ahead and enter it.
NOTE: You will not see anything on-screen while you type the password.
Now, as shown in the image above, type the following at the new prompt mysql>
create database nree; exit;
Once you press enter, the database is created and we disconnect from the MySQL Server.
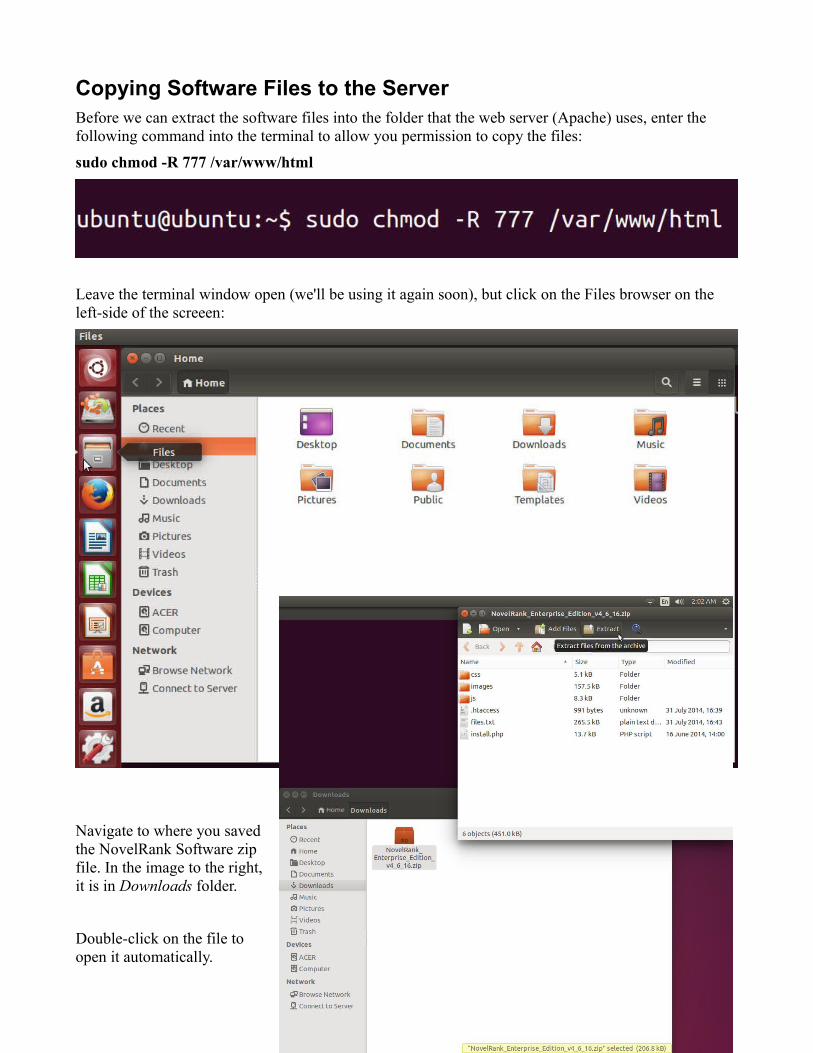
Copying Software Files to the ServerBefore we can extract the software files into the folder that the web server (Apache) uses, enter the following command into the terminal to allow you permission to copy the files:
sudo chmod -R 777 /var/www/html
Leave the terminal window open (we'll be using it again soon), but click on the Files browser on the left-side of the screeen:
Navigate to where you savedthe NovelRank Software zipfile. In the image to the right, it is in Downloads folder.
Double-click on the file to open it automatically.
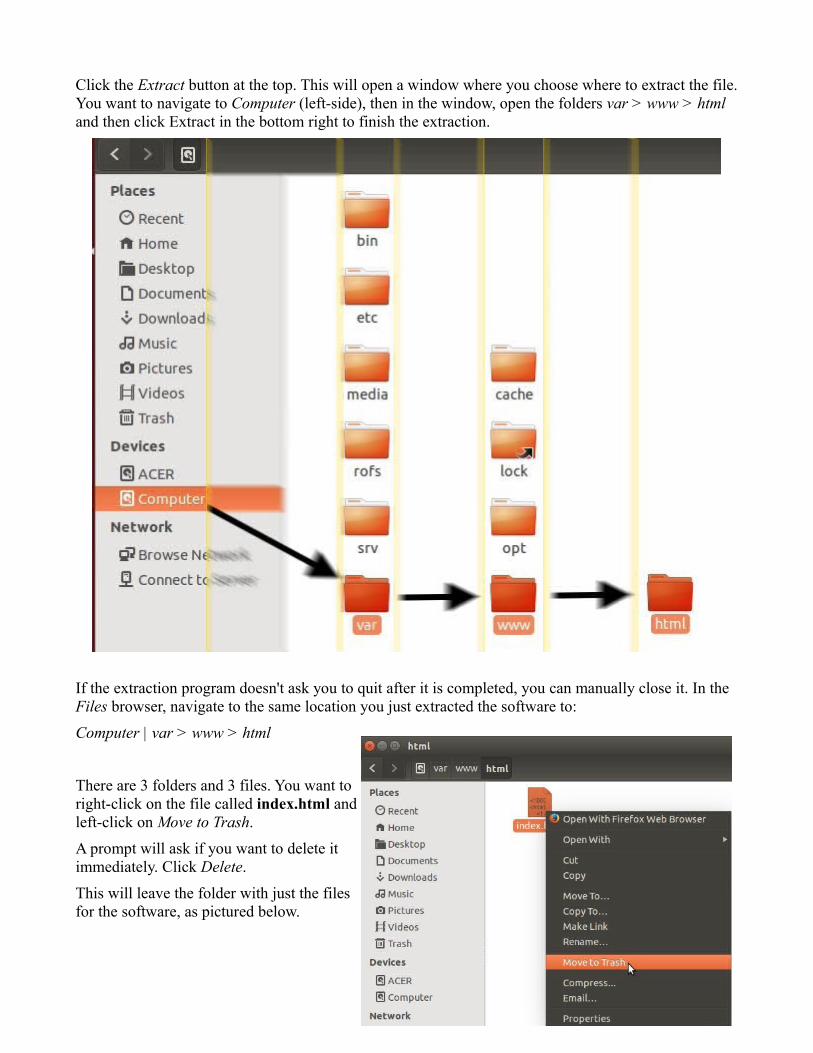
Click the Extract button at the top. This will open a window where you choose where to extract the file.You want to navigate to Computer (left-side), then in the window, open the folders var > www > html and then click Extract in the bottom right to finish the extraction.
If the extraction program doesn't ask you to quit after it is completed, you can manually close it. In the Files browser, navigate to the same location you just extracted the software to:
Computer | var > www > html
There are 3 folders and 3 files. You want toright-click on the file called index.html andleft-click on Move to Trash.
A prompt will ask if you want to delete itimmediately. Click Delete.
This will leave the folder with just the filesfor the software, as pictured below.
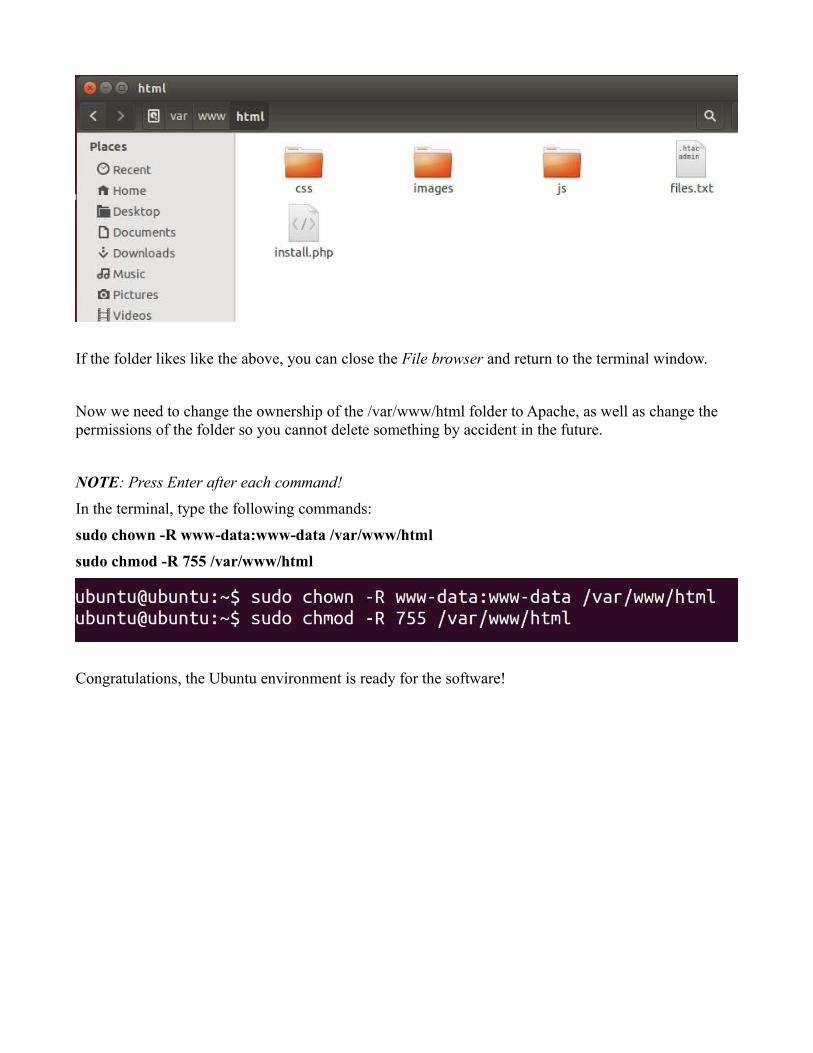
If the folder likes like the above, you can close the File browser and return to the terminal window.
Now we need to change the ownership of the /var/www/html folder to Apache, as well as change the permissions of the folder so you cannot delete something by accident in the future.
NOTE: Press Enter after each command!
In the terminal, type the following commands:
sudo chown -R www-data:www-data /var/www/html
sudo chmod -R 755 /var/www/html
Congratulations, the Ubuntu environment is ready for the software!
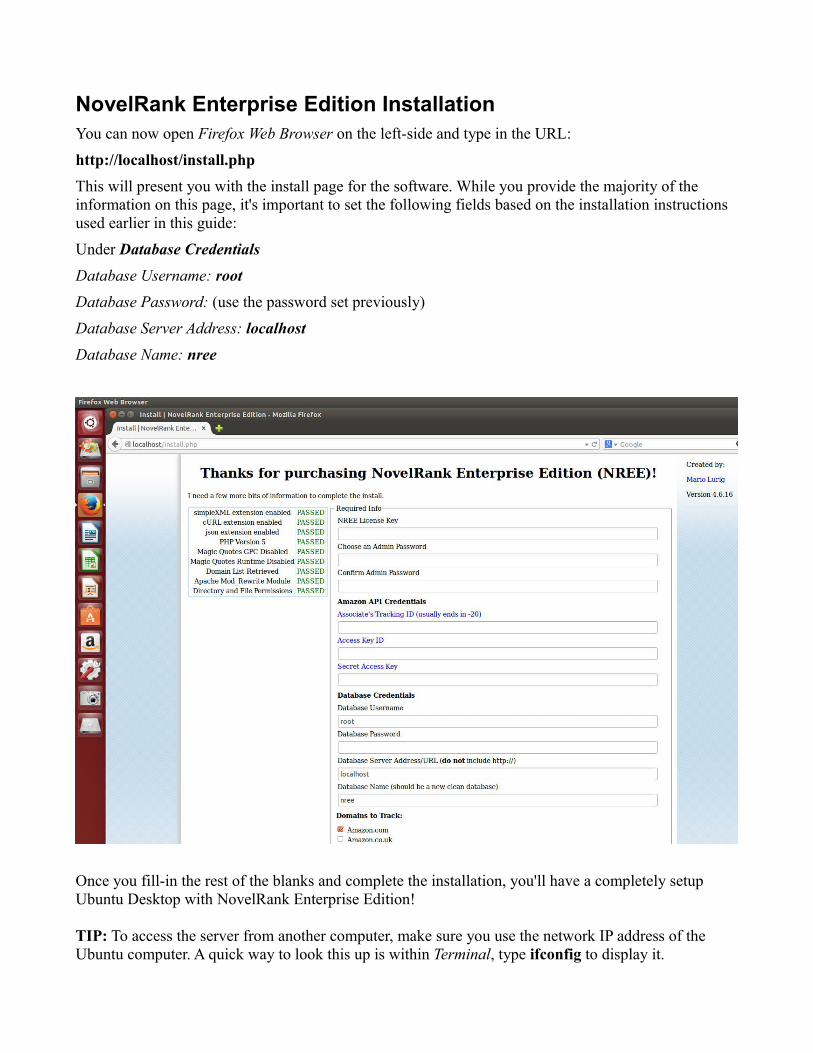
NovelRank Enterprise Edition InstallationYou can now open Firefox Web Browser on the left-side and type in the URL:
http://localhost/install.php
This will present you with the install page for the software. While you provide the majority of the information on this page, it's important to set the following fields based on the installation instructions used earlier in this guide:
Under Database Credentials
Database Username: root
Database Password: (use the password set previously)
Database Server Address: localhost
Database Name: nree
Once you fill-in the rest of the blanks and complete the installation, you'll have a completely setup Ubuntu Desktop with NovelRank Enterprise Edition!
TIP: To access the server from another computer, make sure you use the network IP address of the Ubuntu computer. A quick way to look this up is within Terminal, type ifconfig to display it.