Embed Size (px)
Citation preview
Novell
m
Manual 3/17/03103Novell Confidential 00Front.fm last saved 8/6/03
w w w . n o v e l l . c o
NetWare® 6.5
J u l y 2 8 , 2 0 0 3N
O V E L L I P R I N T A D M I N I S T R A T I O N G U I D E
Manual 3/17/03103Novell Confidential 00Front.fm last saved 8/6/03
Legal NoticesNovell, Inc. makes no representations or warranties with respect to the contents or use of this documentation, and specifically disclaims any express or implied warranties of merchantability or fitness for any particular purpose. Further, Novell, Inc. reserves the right to revise this publication and to make changes to its content, at any time, without obligation to notify any person or entity of such revisions or changes.
Further, Novell, Inc. makes no representations or warranties with respect to any software, and specifically disclaims any express or implied warranties of merchantability or fitness for any particular purpose. Further, Novell, Inc. reserves the right to make changes to any and all parts of Novell software, at any time, without any obligation to notify any person or entity of such changes.
You may not export or re-export this product in violation of any applicable laws or regulations including, without limitation, U.S. export regulations or the laws of the country in which you reside.
Copyright © 2001-2003 Novell, Inc. All rights reserved. No part of this publication may be reproduced, photocopied, stored on a retrieval system, or transmitted without the express written consent of the publisher.
U.S. Patent No. 5,157,663; 5,349,642; 5,455,932; 5,553,139; 5,553,143; 5,572,528; 5,594,863; 5,608,903; 5,633,931; 5,652,854; 5,671,414; 5,677,851; 5,692,129; 5,701,459; 5,717,912; 5,758,069; 5,758,344; 5,781,724; 5,781,733; 5,784,560; 5,787,439; 5,818,936; 5,828,882; 5,832,274; 5,832,275; 5,832,483; 5,832,487; 5,859,978; 5,870,561; 5,870,739; 5,873,079; 5,878,415; 5,884,304; 5,893,118; 5,903,650; 5,903,720; 5,905,860; 5,910,803; 5,913,025; 5,913,209; 5,915,253; 5,925,108; 5,933,503; 5,933,826; 5,946,002; 5,946,467; 5,956,718; 5,956,745; 5,964,872; 5,974,474; 5,983,223; 5,983,234; 5,987,471; 5,991,810; 6,002,398; 6,014,667; 6,016,499; 6,023,586; 6,029,247; 6,052,724; 6,061,726; 6,061,740; 6,061,743; 6,065,017; 6,081,774; 6,081,814; 6,094,672; 6,098,090; 6,105,062; 6,105,069; 6,105,132; 6,115,039; 6,119,122; 6,144,959; 6,151,688; 6,157,925; 6,167,393; 6,173,289; 6,216,123; 6,219,652; 6,233,859; 6,247,149; 6,269,391; 6,286,010; 6,308,181; 6,314,520; 6,324,670; 6,338,112; 6,345,266; 6,353,898; 6,424,976; 6,466,944; 6,477,583; 6,477,648; 6,484,186; 6,496,865; 6,510,450; 6,516,325; 6,519,610; 6,532,451; 6,532,491; 6,539,381; RE37,178. Patents Pending.
Novell, Inc.1800 South Novell PlaceProvo, UT 84606U.S.A.
www.novell.com
Novell iPrint Administration Guide for NetWare 6.5July 28, 2003
Online Documentation: To access the online documentation for this and other Novell products, and to get updates, see www.novell.com/documentation.

Manual 3/17/03103Novell Confidential 00Front.fm last saved 8/6/03
Novell TrademarkseDirectory is a trademark of Novell, Inc.Internetwork Packet Exchange and IPX are trademarks of Novell, Inc.NetWare is a registered trademark of Novell, Inc. in the United States and other countries.NetWare Loadable Module and NLM are trademarks of Novell, Inc.Novell is a registered trademark of Novell, Inc. in the United States and other countries.Novell Client is a trademark of Novell, Inc.Novell Distributed Print Services is a trademark of Novell, Inc. and NDPS is a registered trademark of Novell, Inc. in the United States and other countries.
ZENworks is a registered trademark of Novell, Inc. in the United States and other countries.
Third-Party TrademarksAll third-party trademarks are the property of their respective owners.

Manual 3/17/03103Novell Confidential 00Front.fm last saved 8/6/03

Manual 3/17/03103Novell Confidential iprintTOC.fm last saved 8/6/03
Contents
About This Guide 11
1 Overview 13What Is iPrint? . . . . . . . . . . . . . . . . . . . . . . . . . . . . . . . . . . . . . . . . . . . . . . . . . . . . . . 13iPrint Component Overview. . . . . . . . . . . . . . . . . . . . . . . . . . . . . . . . . . . . . . . . . . . . . . . . 14iPrint Solutions . . . . . . . . . . . . . . . . . . . . . . . . . . . . . . . . . . . . . . . . . . . . . . . . . . . . . . 14
Printing across the Internet . . . . . . . . . . . . . . . . . . . . . . . . . . . . . . . . . . . . . . . . . . . . . . 14Mobile Users . . . . . . . . . . . . . . . . . . . . . . . . . . . . . . . . . . . . . . . . . . . . . . . . . . . . . 15Printing Instead of Faxing . . . . . . . . . . . . . . . . . . . . . . . . . . . . . . . . . . . . . . . . . . . . . . . 15
What’s New . . . . . . . . . . . . . . . . . . . . . . . . . . . . . . . . . . . . . . . . . . . . . . . . . . . . . . . . 15What’s Next . . . . . . . . . . . . . . . . . . . . . . . . . . . . . . . . . . . . . . . . . . . . . . . . . . . . . . . . 17
2 Setting Up iPrint on Your Server 19iPrint Setup Requirements . . . . . . . . . . . . . . . . . . . . . . . . . . . . . . . . . . . . . . . . . . . . . . . . 19Installing iPrint Software . . . . . . . . . . . . . . . . . . . . . . . . . . . . . . . . . . . . . . . . . . . . . . . . . 20
Upgrading to Novell iPrint . . . . . . . . . . . . . . . . . . . . . . . . . . . . . . . . . . . . . . . . . . . . . . . 20Setting Up DNS for the Print Manager . . . . . . . . . . . . . . . . . . . . . . . . . . . . . . . . . . . . . . . . . . 21
Adding the DNS Name to the DNS Name Server. . . . . . . . . . . . . . . . . . . . . . . . . . . . . . . . . . . 22Enabling DNS on the Print Manager . . . . . . . . . . . . . . . . . . . . . . . . . . . . . . . . . . . . . . . . . 22
Creating a Broker . . . . . . . . . . . . . . . . . . . . . . . . . . . . . . . . . . . . . . . . . . . . . . . . . . . . . 22Creating a Print Manager . . . . . . . . . . . . . . . . . . . . . . . . . . . . . . . . . . . . . . . . . . . . . . . . . 23Creating a Printer . . . . . . . . . . . . . . . . . . . . . . . . . . . . . . . . . . . . . . . . . . . . . . . . . . . . . 24
Prerequisites . . . . . . . . . . . . . . . . . . . . . . . . . . . . . . . . . . . . . . . . . . . . . . . . . . . . . 24Procedure . . . . . . . . . . . . . . . . . . . . . . . . . . . . . . . . . . . . . . . . . . . . . . . . . . . . . . . 25
Enabling iPrint on Existing Printers . . . . . . . . . . . . . . . . . . . . . . . . . . . . . . . . . . . . . . . . . . . . 25
3 Setting Up iPrint on Client Workstations 27Installing the iPrint Client . . . . . . . . . . . . . . . . . . . . . . . . . . . . . . . . . . . . . . . . . . . . . . . . . 27
Client Requirements . . . . . . . . . . . . . . . . . . . . . . . . . . . . . . . . . . . . . . . . . . . . . . . . . 27Downloading and Installing the iPrint Client . . . . . . . . . . . . . . . . . . . . . . . . . . . . . . . . . . . . . . . 27
Creating Location-based Printing . . . . . . . . . . . . . . . . . . . . . . . . . . . . . . . . . . . . . . . . . . . 28Using ZENworks to Distribute iPrint. . . . . . . . . . . . . . . . . . . . . . . . . . . . . . . . . . . . . . . . . . 28
Performing an Auto-client Update . . . . . . . . . . . . . . . . . . . . . . . . . . . . . . . . . . . . . . . . . . . . 29Using iPrint with NetIdentity . . . . . . . . . . . . . . . . . . . . . . . . . . . . . . . . . . . . . . . . . . . . . . . 29Using a Proxy Server . . . . . . . . . . . . . . . . . . . . . . . . . . . . . . . . . . . . . . . . . . . . . . . . . . . 29Installing User Printers . . . . . . . . . . . . . . . . . . . . . . . . . . . . . . . . . . . . . . . . . . . . . . . . . . 30Configuring iPrint on Terminal Servers . . . . . . . . . . . . . . . . . . . . . . . . . . . . . . . . . . . . . . . . . . 30
Installing the iPrint Client to a Terminal Server . . . . . . . . . . . . . . . . . . . . . . . . . . . . . . . . . . . . 30Configure iPrint for Terminal Server Clients . . . . . . . . . . . . . . . . . . . . . . . . . . . . . . . . . . . . . 30
Creating an Installed Printer Name Profile . . . . . . . . . . . . . . . . . . . . . . . . . . . . . . . . . . . . . . . . 31Uninstalling the Novell iPrint Client . . . . . . . . . . . . . . . . . . . . . . . . . . . . . . . . . . . . . . . . . . . . 32
4 Advanced iPrint Features 33Using Novell iCapture LPT Port Redirector Utility . . . . . . . . . . . . . . . . . . . . . . . . . . . . . . . . . . . . 33Implementing iPrint Using DOS Commands . . . . . . . . . . . . . . . . . . . . . . . . . . . . . . . . . . . . . . . 33
Using Icapture.exe to Capture Printer Ports . . . . . . . . . . . . . . . . . . . . . . . . . . . . . . . . . . . . . 34Using Iprntcmd.exe to Install iPrint Printers . . . . . . . . . . . . . . . . . . . . . . . . . . . . . . . . . . . . . . 34
Contents 5

Novell Confidential iprintTOC.fm last saved 8/6/03 Manual Version: 3/17/03103
Setting Printer Persistence . . . . . . . . . . . . . . . . . . . . . . . . . . . . . . . . . . . . . . . . . . . . . . . . 35Setting Up Printer Pooling . . . . . . . . . . . . . . . . . . . . . . . . . . . . . . . . . . . . . . . . . . . . . . . . . 36Using Print Auditing . . . . . . . . . . . . . . . . . . . . . . . . . . . . . . . . . . . . . . . . . . . . . . . . . . . . 36
Enabling Auditing . . . . . . . . . . . . . . . . . . . . . . . . . . . . . . . . . . . . . . . . . . . . . . . . . . . 37Viewing Auditing Information . . . . . . . . . . . . . . . . . . . . . . . . . . . . . . . . . . . . . . . . . . . . . 37Managing Audit Logs . . . . . . . . . . . . . . . . . . . . . . . . . . . . . . . . . . . . . . . . . . . . . . . . . 39Downloading an Audit Report . . . . . . . . . . . . . . . . . . . . . . . . . . . . . . . . . . . . . . . . . . . . . 40
5 Customizing iPrint 41Setting Up Location-Based Printing . . . . . . . . . . . . . . . . . . . . . . . . . . . . . . . . . . . . . . . . . . . . 41
Creating Location-Based Maps with iPrint Map Designer . . . . . . . . . . . . . . . . . . . . . . . . . . . . . . . 41Creating Printer Lists . . . . . . . . . . . . . . . . . . . . . . . . . . . . . . . . . . . . . . . . . . . . . . . . . 44
Customizing the iPrint HTML Interface . . . . . . . . . . . . . . . . . . . . . . . . . . . . . . . . . . . . . . . . . . 45Changing Printer Driver Default Install Options . . . . . . . . . . . . . . . . . . . . . . . . . . . . . . . . . . . . . . 46
6 Managing Your Print System 47Managing the Print Manager . . . . . . . . . . . . . . . . . . . . . . . . . . . . . . . . . . . . . . . . . . . . . . . 47
Using the Print Manager Health Monitor . . . . . . . . . . . . . . . . . . . . . . . . . . . . . . . . . . . . . . . . 47Optimizing Fault Tolerance . . . . . . . . . . . . . . . . . . . . . . . . . . . . . . . . . . . . . . . . . . . . . . 49Moving the Print Manager . . . . . . . . . . . . . . . . . . . . . . . . . . . . . . . . . . . . . . . . . . . . . . . 50Print Manager Startup Switches . . . . . . . . . . . . . . . . . . . . . . . . . . . . . . . . . . . . . . . . . . . . 50
Managing Printers . . . . . . . . . . . . . . . . . . . . . . . . . . . . . . . . . . . . . . . . . . . . . . . . . . . . . 51Enabling/Disabling iPrint on Individual Printers . . . . . . . . . . . . . . . . . . . . . . . . . . . . . . . . . . . . 52Moving Printer Agents to Another Print Manager . . . . . . . . . . . . . . . . . . . . . . . . . . . . . . . . . . . 52Manage Printer Agents . . . . . . . . . . . . . . . . . . . . . . . . . . . . . . . . . . . . . . . . . . . . . . . . 52Managing Print Jobs . . . . . . . . . . . . . . . . . . . . . . . . . . . . . . . . . . . . . . . . . . . . . . . . . . 53Modifying the Printer’s Gateway Load Commands . . . . . . . . . . . . . . . . . . . . . . . . . . . . . . . . . . 55Installing Printers on Workstations Automatically . . . . . . . . . . . . . . . . . . . . . . . . . . . . . . . . . . . 56Using Remote Printer Management . . . . . . . . . . . . . . . . . . . . . . . . . . . . . . . . . . . . . . . . . . 56Setting Up Printer Configurations . . . . . . . . . . . . . . . . . . . . . . . . . . . . . . . . . . . . . . . . . . . 57Optimizing Event Notification . . . . . . . . . . . . . . . . . . . . . . . . . . . . . . . . . . . . . . . . . . . . . 61Setting Print Job Spooling . . . . . . . . . . . . . . . . . . . . . . . . . . . . . . . . . . . . . . . . . . . . . . . 63Supporting Queue-Based Client Workstations. . . . . . . . . . . . . . . . . . . . . . . . . . . . . . . . . . . . . 63
Managing the Broker . . . . . . . . . . . . . . . . . . . . . . . . . . . . . . . . . . . . . . . . . . . . . . . . . . . 64Accessing the Broker Health Monitor . . . . . . . . . . . . . . . . . . . . . . . . . . . . . . . . . . . . . . . . . 64Adding or Updating Brokered Resources . . . . . . . . . . . . . . . . . . . . . . . . . . . . . . . . . . . . . . . 64Changing the Location of a Broker . . . . . . . . . . . . . . . . . . . . . . . . . . . . . . . . . . . . . . . . . . 65Adding Banner Pages . . . . . . . . . . . . . . . . . . . . . . . . . . . . . . . . . . . . . . . . . . . . . . . . . 65Adding or Updating Printer Drivers . . . . . . . . . . . . . . . . . . . . . . . . . . . . . . . . . . . . . . . . . . 67Enabling Event Notification Delivery Methods . . . . . . . . . . . . . . . . . . . . . . . . . . . . . . . . . . . . . 68Enabling and Disabling Brokered Services . . . . . . . . . . . . . . . . . . . . . . . . . . . . . . . . . . . . . . 69Reconfiguring a Broker . . . . . . . . . . . . . . . . . . . . . . . . . . . . . . . . . . . . . . . . . . . . . . . . 69Broker Startup Switches . . . . . . . . . . . . . . . . . . . . . . . . . . . . . . . . . . . . . . . . . . . . . . . . 70
7 Setting Up a Secure Printing Environment 73Setting Access Control for Your Print System. . . . . . . . . . . . . . . . . . . . . . . . . . . . . . . . . . . . . . . 73
Setting Access Control for Printers . . . . . . . . . . . . . . . . . . . . . . . . . . . . . . . . . . . . . . . . . . 74Setting Access Control for the Print Manager . . . . . . . . . . . . . . . . . . . . . . . . . . . . . . . . . . . . . 76Setting Access Control for Brokers . . . . . . . . . . . . . . . . . . . . . . . . . . . . . . . . . . . . . . . . . . 77
Setting Printer Security Levels . . . . . . . . . . . . . . . . . . . . . . . . . . . . . . . . . . . . . . . . . . . . . . 78Secure Printing Using SSL . . . . . . . . . . . . . . . . . . . . . . . . . . . . . . . . . . . . . . . . . . . . . . . . 78
Considerations When Changing Printer Security . . . . . . . . . . . . . . . . . . . . . . . . . . . . . . . . . . . 79Enabling SSL . . . . . . . . . . . . . . . . . . . . . . . . . . . . . . . . . . . . . . . . . . . . . . . . . . . . . 79Saving Passwords for Secure Printers. . . . . . . . . . . . . . . . . . . . . . . . . . . . . . . . . . . . . . . . . 79
A Configuring the iPrint HTML Interface 81
6 Novell iPrint Administration Guide for NetWare 6.5

Manual 3/17/03103Novell Confidential iprintTOC.fm last saved 8/6/03
iPrint Client HTML Interface Description . . . . . . . . . . . . . . . . . . . . . . . . . . . . . . . . . . . . . . . . . 81Internet Explorer Browser Customization . . . . . . . . . . . . . . . . . . . . . . . . . . . . . . . . . . . . . . . 81Netscape Browser Customization. . . . . . . . . . . . . . . . . . . . . . . . . . . . . . . . . . . . . . . . . . . 82
HTML Parameters . . . . . . . . . . . . . . . . . . . . . . . . . . . . . . . . . . . . . . . . . . . . . . . . . . . . 83call-back-url . . . . . . . . . . . . . . . . . . . . . . . . . . . . . . . . . . . . . . . . . . . . . . . . . . . . . . 83debug . . . . . . . . . . . . . . . . . . . . . . . . . . . . . . . . . . . . . . . . . . . . . . . . . . . . . . . . . 83driver-options . . . . . . . . . . . . . . . . . . . . . . . . . . . . . . . . . . . . . . . . . . . . . . . . . . . . . 83error-type . . . . . . . . . . . . . . . . . . . . . . . . . . . . . . . . . . . . . . . . . . . . . . . . . . . . . . . 84file-path-name. . . . . . . . . . . . . . . . . . . . . . . . . . . . . . . . . . . . . . . . . . . . . . . . . . . . . 84job-list . . . . . . . . . . . . . . . . . . . . . . . . . . . . . . . . . . . . . . . . . . . . . . . . . . . . . . . . . 84job-list-options. . . . . . . . . . . . . . . . . . . . . . . . . . . . . . . . . . . . . . . . . . . . . . . . . . . . . 84persistence . . . . . . . . . . . . . . . . . . . . . . . . . . . . . . . . . . . . . . . . . . . . . . . . . . . . . . 85printer-url . . . . . . . . . . . . . . . . . . . . . . . . . . . . . . . . . . . . . . . . . . . . . . . . . . . . . . . 85result-type . . . . . . . . . . . . . . . . . . . . . . . . . . . . . . . . . . . . . . . . . . . . . . . . . . . . . . . 85target-frame . . . . . . . . . . . . . . . . . . . . . . . . . . . . . . . . . . . . . . . . . . . . . . . . . . . . . . 86
Supported Operations Strings . . . . . . . . . . . . . . . . . . . . . . . . . . . . . . . . . . . . . . . . . . . . . . 86op-client-interface version. . . . . . . . . . . . . . . . . . . . . . . . . . . . . . . . . . . . . . . . . . . . . . . 87op-client-is-printer-installed . . . . . . . . . . . . . . . . . . . . . . . . . . . . . . . . . . . . . . . . . . . . . . 87op-client-version-info . . . . . . . . . . . . . . . . . . . . . . . . . . . . . . . . . . . . . . . . . . . . . . . . . 87op-job-cancel . . . . . . . . . . . . . . . . . . . . . . . . . . . . . . . . . . . . . . . . . . . . . . . . . . . . . 87op-job-get-info. . . . . . . . . . . . . . . . . . . . . . . . . . . . . . . . . . . . . . . . . . . . . . . . . . . . . 88op-job-hold . . . . . . . . . . . . . . . . . . . . . . . . . . . . . . . . . . . . . . . . . . . . . . . . . . . . . . 88op-job-hold-release . . . . . . . . . . . . . . . . . . . . . . . . . . . . . . . . . . . . . . . . . . . . . . . . . . 88op-printer-get-info . . . . . . . . . . . . . . . . . . . . . . . . . . . . . . . . . . . . . . . . . . . . . . . . . . . 88op-printer-get-status . . . . . . . . . . . . . . . . . . . . . . . . . . . . . . . . . . . . . . . . . . . . . . . . . 89op-printer-install . . . . . . . . . . . . . . . . . . . . . . . . . . . . . . . . . . . . . . . . . . . . . . . . . . . . 89op-printer-list-all-jobs . . . . . . . . . . . . . . . . . . . . . . . . . . . . . . . . . . . . . . . . . . . . . . . . . 89op-printer-pause . . . . . . . . . . . . . . . . . . . . . . . . . . . . . . . . . . . . . . . . . . . . . . . . . . . 89op-printer-purge-jobs . . . . . . . . . . . . . . . . . . . . . . . . . . . . . . . . . . . . . . . . . . . . . . . . . 90op-printer-remove . . . . . . . . . . . . . . . . . . . . . . . . . . . . . . . . . . . . . . . . . . . . . . . . . . . 90op-printer-resume . . . . . . . . . . . . . . . . . . . . . . . . . . . . . . . . . . . . . . . . . . . . . . . . . . . 90op-printer-send-file . . . . . . . . . . . . . . . . . . . . . . . . . . . . . . . . . . . . . . . . . . . . . . . . . . 90op-printer-send-test-page . . . . . . . . . . . . . . . . . . . . . . . . . . . . . . . . . . . . . . . . . . . . . . . 90
B Understanding iPrint and Novell Distributed Print Services 91Overview of NDPS Infrastructure . . . . . . . . . . . . . . . . . . . . . . . . . . . . . . . . . . . . . . . . . . . . . 92
Bi-directional Feedback and Control . . . . . . . . . . . . . . . . . . . . . . . . . . . . . . . . . . . . . . . . . 92Configurable Event Notification . . . . . . . . . . . . . . . . . . . . . . . . . . . . . . . . . . . . . . . . . . . . 93Tight Integration with eDirectory . . . . . . . . . . . . . . . . . . . . . . . . . . . . . . . . . . . . . . . . . . . 93Automatic Printer Driver Download and End User Convenience . . . . . . . . . . . . . . . . . . . . . . . . . . . 93Printer and Job Configuration Options . . . . . . . . . . . . . . . . . . . . . . . . . . . . . . . . . . . . . . . . 94Job Scheduling Options. . . . . . . . . . . . . . . . . . . . . . . . . . . . . . . . . . . . . . . . . . . . . . . . 94Protocol Independence . . . . . . . . . . . . . . . . . . . . . . . . . . . . . . . . . . . . . . . . . . . . . . . . 94Compatibility with Multiple Clients, Applications, and Operating Systems . . . . . . . . . . . . . . . . . . . . . . 94Support for Existing Printers (Full Backward Compatibility). . . . . . . . . . . . . . . . . . . . . . . . . . . . . . 95
Comparing NDPS with Queue-Based Print Services. . . . . . . . . . . . . . . . . . . . . . . . . . . . . . . . . . . 95Understanding NDPS Printers . . . . . . . . . . . . . . . . . . . . . . . . . . . . . . . . . . . . . . . . . . . . . . 96Understanding the Architecture of NDPS. . . . . . . . . . . . . . . . . . . . . . . . . . . . . . . . . . . . . . . . . 97Understanding Printer Agents . . . . . . . . . . . . . . . . . . . . . . . . . . . . . . . . . . . . . . . . . . . . . . 97Understanding the NDPS Manager. . . . . . . . . . . . . . . . . . . . . . . . . . . . . . . . . . . . . . . . . . . . 99Understanding Printer Gateways . . . . . . . . . . . . . . . . . . . . . . . . . . . . . . . . . . . . . . . . . . . . 100Understanding the Broker . . . . . . . . . . . . . . . . . . . . . . . . . . . . . . . . . . . . . . . . . . . . . . . 101
Understanding the Service Registry Service . . . . . . . . . . . . . . . . . . . . . . . . . . . . . . . . . . . . 102Understanding the Event Notification Service. . . . . . . . . . . . . . . . . . . . . . . . . . . . . . . . . . . . 103Understanding the Resource Management Service . . . . . . . . . . . . . . . . . . . . . . . . . . . . . . . . 104
C Planning the Migration to iPrint 105
Contents 7
Novell Confidential iprintTOC.fm last saved 8/6/03 Manual Version: 3/17/03103
General Transition Guidelines. . . . . . . . . . . . . . . . . . . . . . . . . . . . . . . . . . . . . . . . . . . . . . 105Making the Transition Gradually . . . . . . . . . . . . . . . . . . . . . . . . . . . . . . . . . . . . . . . . . . . 106Maintaining Your Queues during the Transition . . . . . . . . . . . . . . . . . . . . . . . . . . . . . . . . . . . 106Understanding Your Implementation Options . . . . . . . . . . . . . . . . . . . . . . . . . . . . . . . . . . . . 106
Migrating from Queue-Based Printing to iPrint . . . . . . . . . . . . . . . . . . . . . . . . . . . . . . . . . . . . . 107Associating a Printer Agent with a Queue. . . . . . . . . . . . . . . . . . . . . . . . . . . . . . . . . . . . . . . . 108
D Configuring Remote Printers 111Configuring Remote Printers Using NPRINTER. . . . . . . . . . . . . . . . . . . . . . . . . . . . . . . . . . . . . 111Configuring Remote Printers Running in RP Mode . . . . . . . . . . . . . . . . . . . . . . . . . . . . . . . . . . . 112Configuring Remote Printers Running in LPR Mode . . . . . . . . . . . . . . . . . . . . . . . . . . . . . . . . . . 113
E Troubleshooting Your Print System 115Initial Troubleshooting Steps . . . . . . . . . . . . . . . . . . . . . . . . . . . . . . . . . . . . . . . . . . . . . . 116
A1. Attempt to resolve the error and try again . . . . . . . . . . . . . . . . . . . . . . . . . . . . . . . . . . . . 116A2. Try some quick fixes. . . . . . . . . . . . . . . . . . . . . . . . . . . . . . . . . . . . . . . . . . . . . . . 116A3. Determining your printing environment . . . . . . . . . . . . . . . . . . . . . . . . . . . . . . . . . . . . . 117A4. All queue-based environment . . . . . . . . . . . . . . . . . . . . . . . . . . . . . . . . . . . . . . . . . . 117A5. All iPrint environment . . . . . . . . . . . . . . . . . . . . . . . . . . . . . . . . . . . . . . . . . . . . . . 118A6. Mixed iPrint and queue-based environment . . . . . . . . . . . . . . . . . . . . . . . . . . . . . . . . . . . 118
Narrowing Your Focus. . . . . . . . . . . . . . . . . . . . . . . . . . . . . . . . . . . . . . . . . . . . . . . . . . 119B1. Send job to same printer from other workstations . . . . . . . . . . . . . . . . . . . . . . . . . . . . . . . . 119B2. Has workstation printed to this printer before? . . . . . . . . . . . . . . . . . . . . . . . . . . . . . . . . . 119B3. Gather information on setup and configuration . . . . . . . . . . . . . . . . . . . . . . . . . . . . . . . . . 120B4. Has printing ever worked with the current configuration? . . . . . . . . . . . . . . . . . . . . . . . . . . . . 120
Determining Your Platform When Problem Affects Only One Workstation . . . . . . . . . . . . . . . . . . . . . . . 121C1. Are queues being serviced by an iPrint printer?. . . . . . . . . . . . . . . . . . . . . . . . . . . . . . . . . 121C2. All queue-based printing. . . . . . . . . . . . . . . . . . . . . . . . . . . . . . . . . . . . . . . . . . . . . 121C3. Queue-iPrint integration . . . . . . . . . . . . . . . . . . . . . . . . . . . . . . . . . . . . . . . . . . . . . 122C4. Look in Novell iManager for Printer objects . . . . . . . . . . . . . . . . . . . . . . . . . . . . . . . . . . . 122
Isolating Printing Problems Affecting Only One Windows Workstation . . . . . . . . . . . . . . . . . . . . . . . . . 123D1. Check status of printer in Windows Control Panel . . . . . . . . . . . . . . . . . . . . . . . . . . . . . . . 123D2. Check to see what network object the installed printer is servicing . . . . . . . . . . . . . . . . . . . . . . . 123D3. Check status of printer in NDPS Print Manger . . . . . . . . . . . . . . . . . . . . . . . . . . . . . . . . . 124D4. Determine problem from error message. . . . . . . . . . . . . . . . . . . . . . . . . . . . . . . . . . . . . 124D5. NetWare queue object. . . . . . . . . . . . . . . . . . . . . . . . . . . . . . . . . . . . . . . . . . . . . . 124D6. Are queues going to a printer? . . . . . . . . . . . . . . . . . . . . . . . . . . . . . . . . . . . . . . . . . 124D7. Queue-iPrint integration . . . . . . . . . . . . . . . . . . . . . . . . . . . . . . . . . . . . . . . . . . . . . 124D8. All queue-based printing. . . . . . . . . . . . . . . . . . . . . . . . . . . . . . . . . . . . . . . . . . . . . 124D9. Printer is set for working offline . . . . . . . . . . . . . . . . . . . . . . . . . . . . . . . . . . . . . . . . . 124D10. Other possibilities . . . . . . . . . . . . . . . . . . . . . . . . . . . . . . . . . . . . . . . . . . . . . . . 125
Tracking Jobs from a Workstation . . . . . . . . . . . . . . . . . . . . . . . . . . . . . . . . . . . . . . . . . . . . 125E1. Pause output of printer . . . . . . . . . . . . . . . . . . . . . . . . . . . . . . . . . . . . . . . . . . . . . 125E2. Check job list in Novell iManager . . . . . . . . . . . . . . . . . . . . . . . . . . . . . . . . . . . . . . . . 126E3. Resume printer output . . . . . . . . . . . . . . . . . . . . . . . . . . . . . . . . . . . . . . . . . . . . . . 126E4. Job printed this time but nothing was changed . . . . . . . . . . . . . . . . . . . . . . . . . . . . . . . . . 126E5. Job did not print and is still in the job list . . . . . . . . . . . . . . . . . . . . . . . . . . . . . . . . . . . . 126E6. Job did not print but is no longer in the job list. . . . . . . . . . . . . . . . . . . . . . . . . . . . . . . . . . 126
Checking Printer Output and Using Test Files . . . . . . . . . . . . . . . . . . . . . . . . . . . . . . . . . . . . . 127F1. Check availability of network printer . . . . . . . . . . . . . . . . . . . . . . . . . . . . . . . . . . . . . . . 127F2. Check for error messages . . . . . . . . . . . . . . . . . . . . . . . . . . . . . . . . . . . . . . . . . . . . 127F3. Test file prints but jobs from application do not . . . . . . . . . . . . . . . . . . . . . . . . . . . . . . . . . 128F4. Job is being held in spooler . . . . . . . . . . . . . . . . . . . . . . . . . . . . . . . . . . . . . . . . . . . 128F5. Job did not print but is no longer in the job list. . . . . . . . . . . . . . . . . . . . . . . . . . . . . . . . . . 128
Printing Problems Affecting All Users . . . . . . . . . . . . . . . . . . . . . . . . . . . . . . . . . . . . . . . . . . 129G1. Determine severity and scope of printing problems . . . . . . . . . . . . . . . . . . . . . . . . . . . . . . . 129
8 Novell iPrint Administration Guide for NetWare 6.5

Manual 3/17/03103Novell Confidential iprintTOC.fm last saved 8/6/03
G2. No print jobs are printing from any network printer . . . . . . . . . . . . . . . . . . . . . . . . . . . . . . . 130G3. No print jobs are coming from a specific printer . . . . . . . . . . . . . . . . . . . . . . . . . . . . . . . . 130G4. Jobs are printing slowly or are corrupted . . . . . . . . . . . . . . . . . . . . . . . . . . . . . . . . . . . . 130G5. Check status of the Printer in Novell iManager . . . . . . . . . . . . . . . . . . . . . . . . . . . . . . . . . 130G6. A problem is identified in an error message . . . . . . . . . . . . . . . . . . . . . . . . . . . . . . . . . . 131G7. Jobs are getting to the job list but the printer is unable to print them. . . . . . . . . . . . . . . . . . . . . . 131
Problems Integrating with Queue-Based Components . . . . . . . . . . . . . . . . . . . . . . . . . . . . . . . . . 131H1. Check the printer's spooling configuration . . . . . . . . . . . . . . . . . . . . . . . . . . . . . . . . . . . 132H2. Reconfigure spooling for this printer . . . . . . . . . . . . . . . . . . . . . . . . . . . . . . . . . . . . . . 132H3. Check the job list for the queue. . . . . . . . . . . . . . . . . . . . . . . . . . . . . . . . . . . . . . . . . 132H4. Make sure the job is being redirected to the queue properly . . . . . . . . . . . . . . . . . . . . . . . . . . 132
Contents 9

Novell Confidential iprintTOC.fm last saved 8/6/03 Manual Version: 3/17/03103
10 Novell iPrint Administration Guide for NetWare 6.5

Manual (ENU) 3/17/03103Novell Confidential 00preface.fm last saved 8/6/03
About This Guide
This guide describes how to install, configure, and customize Novell® iPrint. It is intended for network administrators and is divided into the following sections:
Chapter 1, “Overview,” on page 13
Chapter 2, “Setting Up iPrint on Your Server,” on page 19
Chapter 3, “Setting Up iPrint on Client Workstations,” on page 27
Chapter 4, “Advanced iPrint Features,” on page 33
Chapter 5, “Customizing iPrint,” on page 41
Chapter 6, “Managing Your Print System,” on page 47
Chapter 7, “Setting Up a Secure Printing Environment,” on page 73
Appendix A, “Configuring the iPrint HTML Interface,” on page 81
Appendix B, “Understanding iPrint and Novell Distributed Print Services,” on page 91
Appendix C, “Planning the Migration to iPrint,” on page 105
Appendix D, “Configuring Remote Printers,” on page 111
Appendix E, “Troubleshooting Your Print System,” on page 115
Documentation Updates
The latest version of this Novell iPrint Administration Guide for NetWare 6.5 is available at the Novell documentation Web site (http://www.novell.com/documentation/lg/nw65).
Documentation Conventions
In this documentation, a greater-than symbol (>) is used to separate actions within a step and items in a cross-reference path.
A trademark symbol (®, TM, etc.) denotes a Novell trademark. An asterisk (*) denotes a third-party trademark.
When a single pathname can be written with a backslash for some platforms or a forward slash for other platforms, the pathname is presented with a backslash. Users of platforms that require a forward slash, such as UNIX*, should use forward slashes as required by your software.
About This Guide 11

Novell Confidential 00preface.fm last saved 8/6/03 Manual Version: 3/17/03103
12 Novell iPrint Administration Guide for NetWare 6.5
Manual (ENU) 3/14/03103Novell Confidential 01ovw.fm last saved 8/6/03
1 Overview
This section will help you understand the following:
What Is iPrint? (page 13)
iPrint Component Overview (page 14)
iPrint Solutions (page 14)
What’s New (page 15)
What Is iPrint?iPrint lets mobile employees, business partners, and customers access printers from a variety of remote locations using existing Internet connections. Whether users are located in an office building, telecommuting from home, or attending a sales meeting in another country, iPrint ensures that they can print documents quickly, easily, and reliably.
Using a Web browser, users point to a Web page that displays the available printers. By clicking a printer, the iPrint client is installed (if not installed previously), the printer’s driver is downloaded, and a printer is created in the user’s Printer folder, enabling the user to send documents to the printer from any application on the desktop.
Using iPrint, mobile users no longer need to contact a busy network administrator to find out a printer’s name and context and the required print driver. Instead, mobile users work within a Web browser to locate nearby printers and download and install the latest print drivers. Companies can reduce communication costs by reducing the need to fax documents between offices. Instead, companies can use their existing Internet connections to print documents to remote printers.
iPrint Uses Industry Standards
iPrint uses the Internet Printing Protocol (IPP), an industry standard, to eliminate the complexities of printing over the Internet and to make location-based printing a reality.
The benefits of IPP include the following:
Uses the IP protocol
Provides broad vendor support
Works over local networks and the Internet
Provides for print data encryption (SSL, TLS)
Provides a standard print protocol for all platforms (Windows*, Macintosh*, Linux*, UNIX*, etc.)
For more information about IPP, see the documents available at the Printer Working Group (http://www.pwg.org/ipp/index.html) Web site.
Overview 13

Novell Confidential 01ovw.fm last saved 8/6/03 Manual Version: 3/14/03103
iPrint Benefits
In addition to the benefits of IPP, Novell’s implementation of iPrint adds the following value:
Print driver download and installation
Location-based printing
Browser-enabled print interface
Customizable user interface
Secure information transfer
For secure printing needs, iPrint integrates with Novell® eDirectoryTM to ensure that only authorized users can access the printer. Users are required to authenticate with their eDirectory username and password. Print data is also encrypted to ensure that sensitive print data is kept secure and unaltered.
iPrint Component OverviewNovell iPrint utilizes the NDPS® infrastructure. iPrint enhances the users’ experience by providing a Web view of their printing environment. In addition to NDPS, iPrint uses the following components:
A print provider and a set of browser plug-ins.
These are installed on a user’s workstation. The Novell ClientTM is not required.
Ippsrvr.nlm. This runs on the NetWare® server.
When an eDirectory Printer object is configured as an iPrint printer, the Print Manager automatically loads this NLMTM on the server, which generates a URL for the printer.
A set of HTML pages.
These are provided to install the iPrint client software and printers as well as to view and manage print jobs. These pages are customizable. For more information, see Chapter 5, “Customizing iPrint,” on page 41.
After setting up iPrint for your network, it easily expands to support the following scenarios.
iPrint Solutions
Printing across the InternetJohn is an employee working at home who wants to send a document to a printer at his office. John does not want to dial into the company’s network, but he has access to the Internet.
1. John points his Web browser to the company’s print URL, http://Printing.MyCompany.Com/ipp.
2. From the Web page, John selects the printer to install. The iPrint client is automatically downloaded and installed on his computer. The printer driver is also downloaded and the printer installed in his computer’s Printers folder.
3. From any application on his home computer, John can now print to the company’s printer.
14 Novell iPrint Administration Guide for NetWare 6.5
Manual 3/14/03103Novell Confidential 01ovw.fm last saved 8/6/03
Mobile UsersGail is visiting her company’s branch office in Paris. She needs to print a handout for an upcoming meeting. Gail knows she can print to the branch office printer, even though she does not know the printer’s name, eDirectory context, make, model, or required print driver.
1. Gail connects her laptop to the company network, clicks the iPrint link on the company’s intranet Web page, and then clicks a link for the branch office she is visiting. A map of the branch office and iPrint printers displays.
2. Gail locates the office she is using and clicks the icon for the printer just outside her office.
3. The print driver is downloaded and a printer is created in the her laptop’s Printer folder. She didn’t need to install the iPrint client software again because she had used iPrint previously at a different branch office.
4. From her application, Gail prints her handouts for the upcoming meeting.
Printing Instead of FaxingDan has just returned to his hotel room in Chicago after visiting with some clients. While checking his e-mail, he is reminded that he needs to submit a report to his boss in the corporate office in New York. The report is due by 8 a.m. Although he could send the report by fax, he wants a high-quality printout in color and he does not want to incur long distance telephone charges.
1. Dan uses his laptop to dial in to a local Internet Service Provider.
2. Using his Web browser, Dan accesses the company’s intranet Web page. Using the iPrint map pages, he locates an iPrint color printer adjacent to his boss’ office.
3. After downloading and installing the print driver, Dan uses his application to send the report to the printer.
4. Dan returns to the iPrint Web page and clicks the printer again to display printer management options. He monitors the printer job list to see that his print job is completed.
5. Dan sends an e-mail to his boss telling him that the report is available at the printer.
What’s NewThe following changes and enhancements were added to iPrint for NetWare 6.5:
iPrint Map Designer
Multiselect printer icons and simultaneous property modifications.
Set print driver default properties such as paper size, orientation, color, collate, etc.
Set an attribute on a printer so that after it is installed, the printer is removed from the workstation upon the next reboot.
Obtain a list of printers from the Print Manager without having to authenticate.
Novell iManager
View and manage retained print jobs and remove or set holds on print jobs. See “Managing Print Jobs” on page 53.
Added links to NetWare Remote Manager for Broker Health and Print Manager Health
Added a tab for XP Driver support.
Overview 15
Novell Confidential 01ovw.fm last saved 8/6/03 Manual Version: 3/14/03103
Move printer agents to a different Print Manager. See “Moving Printer Agents to Another Print Manager” on page 52.
Load and unload the Print Manager and Broker from iManager.
Complete printer control (startup/shutdown, pause/resume input and output, etc.). See “Manage Printer Agents” on page 52.
Added a page to edit the Gateway load commands for a printer agent. See “Modifying the Printer’s Gateway Load Commands” on page 55
iPrint Client
Manage printers from the command line. See “Implementing iPrint Using DOS Commands” on page 33.
Capture LPT ports and redirect print jobs to an iPrint printer using the icapture.exe command or LPT Port Redirection Windows utility.
Install printers on a Windows NT/2000/XP workstation without having Power User or Administrator rights. See “Installing User Printers” on page 30.
Set a proxy server for iPrint. See “Using a Proxy Server” on page 29.
Set up iPrint to run on terminal servers. See “Configuring iPrint on Terminal Servers” on page 30.
When an updated iPrint client is released, you can control how workstations are automatically updated. See “Performing an Auto-client Update” on page 29.
Create a printer pool. See “Setting Up Printer Pooling” on page 36.
View auditing information on a per user or printer basis. See “Using Print Auditing” on page 36.
Set a printer’s persistence so that printers are removed automatically. See “Setting Printer Persistence” on page 35.
Integrated with the NetIdentity client.
Redesigned default page. See http://server_IP_ address_or_dns_name/ipp.
General iPrint Enhancements
iPrint runs on the Apache Web Server.
iPrint information and links available from the NetWare 6.5 Welcome page (http://server_IP_address).
You can bind to network interface cards other than the primary card for the Broker and Print Manager and their services.
You can create an Installed Printer Name Profile to show a shorter installed printer name. See “Creating an Installed Printer Name Profile” on page 31.
Display SNMP traps from the Novell Gateway using NetWare Remote Manager.
A command line switch, /NOADVERT, has been added to the Broker to turn off SRS advertising.
The Print Manager database does an automatic backup five minutes after the creation of a Printer Agent.
A command line switch, /NOSRS, has been added to the Print Manager to turn off SRS advertising.
16 Novell iPrint Administration Guide for NetWare 6.5
Manual 3/14/03103Novell Confidential 01ovw.fm last saved 8/6/03
You can shut down and restart a printer agent using the Print Manager Health Monitor in NetWare Remote Manager.
You create reports about your print system using the Print Manager Health Monitor in NetWare Remote Manager. See “Using the Print Manager Health Monitor” on page 47.
The Print Manager uses the server’s IP address by default, if a DNS name is not assigned to the Print Manager using the /dnsname=DNS_name command line switch.
You must authenticate before accessing the Print Manager Health Monitor.
The Novell Gateway is the default gateway when creating a new Printer.
You can load and unload the Broker or Print Manager from Novell iManager.
What’s Next“iPrint Setup Requirements” on page 19
“Setting Up DNS for the Print Manager” on page 21
“Enabling iPrint on Existing Printers” on page 25
Overview 17

Novell Confidential 01ovw.fm last saved 8/6/03 Manual Version: 3/14/03103
18 Novell iPrint Administration Guide for NetWare 6.5
Manual (ENU) 3/17/03103Novell Confidential inst_srvr.fm last saved 8/6/03
2 Setting Up iPrint on Your Server
Complete the following tasks to create an iPrint print system:
1. Meet iPrint system setup requirements.
2. Install iPrint (if not already installed).
3. Set up DNS for the print manager.
4. Configure iPrint.
iPrint Setup RequirementsBefore you set up iPrint printers, you should complete the following:
Novell® iManager: iManager provides browser-based management of Novell eDirectoryTM. The iPrint plug-in for Novell iManager works only with Internet Explorer 5.5 with Service Pack 2 or later. For more information, see the Novell iManager 2.0 Administration Guide.
Set up DNS: When you create an iPrint printer, a URL is associated with the printer. If DNS is not setup for printing, the URL will contain the server’s IP address.
For more information about DNS, see, “Setting Up DNS for the Print Manager” on page 21.
Create a Broker: A broker provides three network support services: Service Registry Service, Event Notification Service, and Resource Management Service. The resource management service stores printer drivers that are automatically downloaded and installed on client workstations.
For more information, see “Creating a Broker” on page 22.
Install a Print Manager: A Print Manager communicates print job information between users and printers, while also providing print job management, security and spooling.
For more information, see “Creating a Print Manager” on page 23.
Create Printer Objects: Printer objects represent the printer in eDirectory and are associated to a printer agent that combines the functions previously performed by a printer, print queue, print server, and spooler.
For more information, see “Creating a Printer” on page 24.
For information on Client requirements, see “Client Requirements” on page 27.IMPORTANT: In NetWare® 6.5, iPrint runs on Apache 2. By default, Apache has Access Logging turned on, which will log all printing-related access information. The Access Logging log file is stored on sys:. The resulting log file might cause you to run out of disk space, causing printing to stop.
To avoid running out of disk space, periodically remove old log files from sys:\apache2\logs, specify a different volume for the log file, or disable Access Logging. For more information, see "Working with Server Logs" in the Apache Web Server Administration Guide for NetWare 6.5 or the log directives on the Apache Web site (http://httpd.apache.org/docs/logs.html).
Setting Up iPrint on Your Server 19

Novell Confidential inst_srvr.fm last saved 8/6/03 Manual Version: 3/17/03103
Installing iPrint SoftwareIf iPrint was selected during the during the NetWare® 6.5 installation, the iPrint software components were automatically installed on the server. If iPrint was not selected during the installation, you need to install the iPrint software.
1 From the GUI screen on the server, click Novell > Install.
2 (Conditional) If an entry does not exist, click Add.
If an iPrint entry is listed, iPrint is already installed.
3 Insert the NetWare 6.5 CD 2 (Products) CD into the drive.
4 Browse to and select the product.ni file at the root of the CD.
5 Follow the installation prompts to install iPrint.
Upgrading to Novell iPrint“Upgrading Existing iPrint Systems to NetWare 6.5” on page 20
“Upgrading from NDPS to iPrint” on page 20
“Migrating from Print Queues” on page 20
Upgrading Existing iPrint Systems to NetWare 6.5
To upgrade a NetWare 5.1 or NetWare 6 server running iPrint, choose your upgrade method and run the upgrade. For more information on upgrading, see the NetWare 6.5 Overview and Installation Guide.IMPORTANT: When upgrading a NetWare 5.1 or 6.0 server with the Novonyx Web Server installed to NetWare 6.5, the document root is not updated. The document root from the Novonyx Web Server is copied to Apache’s httpd.conf file, instead of the document root for the Apache Web server. If iPrint does not work, edit the Apache configuration file (sys:\apache2\conf\httpd.conf) and change the DocumentRoot to the Apache document root (sys:\apache2\htdocs).You might need to change other entries in the .conf file.
Upgrading from NDPS to iPrint
To upgrade from Novell Distributed Print Services® (NDPS®) 2.0 or Enterprise NDPS, choose your upgrade method and run the upgrade. For more information on upgrading, see the NetWare 6.5 Overview and Installation Guide.IMPORTANT: When upgrading a NetWare 5.1 or 6.0 server with the Novonyx Web Server installed to NetWare 6.5, the document root is not updated. The document root from the Novonyx Web Server is copied to Apache’s httpd.conf file, instead of the document root for the Apache Web server. If iPrint does not work, edit the Apache configuration file (sys:\apache2\conf\httpd.conf) and change the DocumentRoot to the Apache document root (sys:\apache2\htdocs).You might need to change other entries in the .conf file.
After your server is upgraded to NetWare 6.5, enable iPrint for your printers.
Migrating from Print Queues
You can make the transition gradually from queues to Novell iPrint. If your users are running the Novell ClientTM with the NDPS component installed, you can first replace the server components of your legacy printing system with the iPrint server components. Because the Print Manager (ndpsm.nlm) and the Print Server (pserver.nlm) can run simultaneously on a server, this transition can be accomplished one queue/printer at a time. Users can then be gradually switched to print directly to iPrint printers instead of queues.
20 Novell iPrint Administration Guide for NetWare 6.5
Manual 3/17/03103Novell Confidential inst_srvr.fm last saved 8/6/03
If your users do not have the NDPS component installed—later versions of the Novell Client did not install the NDPS component by default—then skip task 6 below. After creating your iPrint system, have your users remove their old printers and install the iPrint client and printers.
Complete the following tasks to migrate from print queues:
1. Understand the Migration guidelines.
2. Set Up DNS.
3. Create a Broker.
4. Create a Print Manager.
5. Create a Printer Agent.
6. Associate a Printer Agent with a queue.
7. Have users install the iPrint Client and iPrint printers.
8. Once all queues have been migrated to iPrint, you can delete the Print Server, Printer, and Print Queue objects, and unload pserver.nlm from the server.
IMPORTANT: When upgrading a NetWare 5.1 or 6.0 server with the Novonyx Web Server installed to NetWare 6.5, the document root is not updated. The document root from the Novonyx Web Server is copied to Apache’s httpd.conf file, instead of the document root for the Apache Web server. If iPrint does not work, edit the Apache configuration file (sys:\apache2\conf\httpd.conf) and change the DocumentRoot to the Apache document root (sys:\apache2\htdocs).You might need to change other entries in the .conf file.
Setting Up DNS for the Print Manager Prior to configuring printers for iPrint, you should configure a DNS name for each Print Manager. When iPrint is enabled for a printer, a URL is generated based upon the Print Manager’s IP address or assigned DNS Name. Beginning with NetWare 6.5, if a DNS name is not assigned to a Print Manager, by default the Print Manager will use the server’s IP address when generating the printer URL.
For example, if a Print Manager resides on a server using an IP address of 172.16.123.25 and the printer name is Printer1, then iPrint generates a URL of ipp://172.16.123.25/ipp/Printer1. If you assign a DNS name to the Print Manager of Printing.MyCompany.Com and the printer name is Printer1, then the URL is ipp://Printing.MyCompany.Com/ipp/Printer1.
By using a DNS name, you can change the server’s IP addresses without affecting a printer’s URL.
To correctly enable DNS for each Print Manager, you must complete the following tasks:
1. Add the DNS Name to the DNS Name Server
2. Enable DNS on the Print Manager
If you do not implement DNS before using iPrint or change a Print Manager’s DNS name, be aware of the following issues:
If DNS is not set up for the Print Manager and the manager is moved to another server, users must reinstall their iPrint printers.
If a DNS name is added to the Print Manager after iPrint is set up, iPrint printers enabled before DNS will not use the DNS name until the manager is restarted.
If users install printers before the DNS name is added, their printing will work only until the IP address of the Print Manager changes. Then users must reinstall their printers.
Setting Up iPrint on Your Server 21
Novell Confidential inst_srvr.fm last saved 8/6/03 Manual Version: 3/17/03103
Adding the DNS Name to the DNS Name ServerAfter you enable the DNS name on the Print Manager, you need to add the DNS name to your DNS name server. For more information, see the Novell DNS/DHCP Services Administration Guide for NetWare 6.5.
Enabling DNS on the Print ManagerTo configure a DNS name for the print manager, use the Print Manager command line startup switch, /dnsname=DNS_name. If you use a DNS name that is not contained in the server’s sys:etc\hosts
Syntax
ndpsm Print_Manager_Object_Name /dnsname=Print_Manager_DNS_Name
Example
ndpsm PrintManager1 /dnsname=Printing.MyCompany.Com
where PrintManager1 is the Print Manager name and Printing.MyCompany.Com is the desired DNS name.
You need to use the DNS startup switch only once. After the startup switch is used, the Print Services Manager will remember the DNS name until a different DNS name is specified. To change the DNS Name, use the switch with the new DNS name. If you do not specify an IP address or DNS name when you load the Print Manager, the manager uses the server’s IP address. If either the IP address or DNS name specified on the command line or in the sys:etc\hosts file is invalid, you will receive the following error:
IP Address xxx.xxx.xxx.xxx, specified at load time, is not bound. Program execution cannot continue normally. Press Escape to continue.
To resolve this error, use a valid DNS name or IP address at the system console prompt or edit the sys:\etc\hosts to contain a valid address.NOTE: When loaded, the Print Manager appears in the IP Management list of NetWare Remote Manager. However, if IP Management cannot validate the DNS name being used, the Print Manager does not appear in the list. If you want the Print Manager to appear in the IP Management list, you must add the DNS name you assigned to the Print Manager to sys:etc\hosts.
Creating a BrokerIdeally, you should place a broker on each server running a Print Manager. This requires you to create a separate broker object in eDirectory for each broker that will be loaded.This configuration allows the Print Manager to connect directly with each broker without sending data across the network.
If you are unable to place a Broker on each server running a Print Manager, you will want your Brokers sufficiently well distributed so that your brokered services (Service Registry Service, Event Notification Service, and Resource Management Service) will be readily available on the system when needed. Each eDirectory tree should have at least one Broker.
22 Novell iPrint Administration Guide for NetWare 6.5
Manual 3/17/03103Novell Confidential inst_srvr.fm last saved 8/6/03
To minimize traffic across a WAN link, you might want one Broker running at each physical WAN location.
1 In Novell iManager, click iPrint > Create Broker.
2 Fill in the fields.
Click Help for explanations about the fields.
3 Click OK.
4 To autoload the Broker when you bring up the server, add the following line to your server's autoexec.ncf file:
load broker Broker_name_and_context
For example:
load broker .broker1.corp.acme
To modify the Broker properties, click Manage Broker, and then select the Broker you want to modify.
Creating a Print ManagerA Print Manager provides a platform for Printer Agents that reside on the server. The Print Manager object stores information used by the NetWare Loadable ModuleTM (NLMTM), ndpsm.nlm. You can manually load this NLM at the server console. A Print Manager must be created as an object in the eDirectory tree before you can create server-based Printer Agents.
A single Print Manager can control any number of Printer Agents.
Although you can perform some configuration and management tasks directly through the Print Manager console interface, Novell iManager is the main tool for performing these tasks.
Use the following guidelines to determine where and when to place a Print Manager.
Only one Print Manager can be loaded per server. A server that has a printer connected directly to it requires a Print Manager to be loaded on that server.
Whenever possible, place the Print Manager and the printers it controls on the same LAN segment for optimal performance.
You might want to consider distributing your printer agents across multiple NDPS Managers so that if one NDPS Print Manger goes down, not all of the printer agents are impacted.
Ensure that you have Supervisor rights for the container where the Print Manager object will be reside. For each Print Manager that will be loaded, a separate eDirectory Print Manager object needs to be created.
1 In Novell iManager, click iPrint > Create Print Manager.
2 Fill in the fields.
Click Help for explanations about the fields.IMPORTANT: If you move the Print Manager to a different server, its database also moves. As a result, local printers assigned to this Print Manager no longer work. To avoid this, you can assign a DNS name to the Manager before creating Printer Agents associated to it using the /dnsname= startup switch. For more information, see “Print Manager Startup Switches” on page 50.
Any printer you designate as a local printer when you are configuring Printer Agents assigned to this Print Manager must be directly attached to this server.
Setting Up iPrint on Your Server 23
Novell Confidential inst_srvr.fm last saved 8/6/03 Manual Version: 3/17/03103
3 Click OK.
4 To autoload the Print Manager when you bring up the server, add the following line to your server's autoexec.ncf file:
load ndpsm Print_Manager_name_and_context
For example:
load ndpsm .sales_manager.corp.acme
To modify the Print Manager properties, click Manage Print Manager, then select the Manager you want to modify.
For a discussion of Access Control roles, see “Setting Access Control for the Print Manager” on page 76.
Creating a PrinterPrinters can be either public access (no eDirectory printer object exists) or controlled access (access is controlled by eDirectory). In most cases, you should make all of your printers controlled access printers as soon as possible in order to take full advantage of the management and security benefits offered by eDirectory.
Before you can create a printer, you must first create a Print Manager on your server. See “Creating a Print Manager” on page 23 for more information.
After creating a Print Manager, you can create printers. Printers added to the eDirectory tree by Novell iManager are referred to as controlled access printers. As eDirectory objects, access to the printers can be controlled depending on the level of security chosen and if SSL is required.
When you use Novell iManager to create a Printer object you will need to select a gateway. The gateway handles communication between the Print Manager and the printer. Most printers will work with the Novell gateway (ndpsgw.nlm). Some printer vendors have created their own gateways to provide proprietary printer specific information. Unless you need this additional information, you should use the Novell gateway.
When you use NetWare Administrator to create a Printer object and select the Novell Gateway, the Novell gateway comprised of ph.nlm and ndpds.nlm is used. This is the only version of the gateway that supports the RP protocol and local ports. For more information, see Appendix D, “Configuring Remote Printers,” on page 111
To use a third-party print vendor’s gateway, you must use NetWare Administrator to create the Printer object.
PrerequisitesHave Supervisor rights for the destination container where its associated Printer object will reside
Be designated as a Manager of the Print Manager that will control this Printer Agent
Have a Broker running
Have a Print Manager running
24 Novell iPrint Administration Guide for NetWare 6.5
Manual 3/17/03103Novell Confidential inst_srvr.fm last saved 8/6/03
ProcedureWhen you create a new Printer, iPrint is enabled by default.
1 In Novell iManager, click iPrint > Create Printer.
2 Fill in the fields.
Click Help for explanations about the fields.
3 Click OK.
4 Select the printer driver for each client operating system.
These drivers will be automatically downloaded to users' workstations when they install this printer in the future.
If you choose a Windows 3.x driver but not a Windows 95/98/ME or Windows NT/2000 driver, a 16-bit driver will be selected. Normally this will not create problems.
Because the list of printer drivers shipped with this product is limited, you can add drivers to the Resource Management Service database. (See “Adding or Updating Printer Drivers” on page 67 for more information.)
If the driver you need is not in the drivers list, rather than adding it to the RMS, you can select [None] at the top of each list. Users will then be asked to provide a disk with the appropriate driver the first time they install this printer on their workstations.
5 Click Continue.
Enabling iPrint on Existing PrintersWhen you create new printers with Novell iManager, iPrint is enabled by default. If you have existing printers and want to enable iPrint, complete the following steps.
If you have a large number of printers that you want to enable iPrint on, use this iManager task to avoid enabling iPrint on each individual Printer object.
1 In Novell iManager, click iPrint > Enable iPrint Access.
2 Browse to and select the print manager you want to enable IPP printing on.
3 To enable all printers associated with this Print Manager, check the first check box next to Enabled.
To select printers individually, check the check box next to each printer in the Enabled column.
4 (Optional) To enable all printers associated with this Print Manager to use Secure printing, check the first check box next to Secure.
To select secure printers for specific printers, check the check box next to each printer in the Secure column.
For more information on implementing secure printing, see “Secure Printing Using SSL” on page 78.
5 To update the printer settings, click Apply or OK.
Setting Up iPrint on Your Server 25

Novell Confidential inst_srvr.fm last saved 8/6/03 Manual Version: 3/17/03103
26 Novell iPrint Administration Guide for NetWare 6.5

Manual (ENU) 3/17/03103Novell Confidential inst_clnt.fm last saved 8/6/03
3 Setting Up iPrint on Client Workstations
In order for users to use iPrint, they need to install the Novell® iPrint Client software and a printer. When a user selects a printer to be installed by iPrint, iPrint checks to see if the Novell iPrint Client software is installed and then installs it if necessary. Then the printer driver is downloaded and the printer is installed in the user’s Printer folder.
iPrint Client files and printers can be installed from a iPrint Default Printer List Web page, or they can be distributed using ZENworks®. For more information, see “Using ZENworks to Distribute iPrint” on page 28.
This chapter helps you with the following:
Installing the iPrint Client (page 27)
Performing an Auto-client Update (page 29)
Installing User Printers (page 30)
“Using a Proxy Server” on page 29
Configuring iPrint on Terminal Servers (page 30)
Uninstalling the Novell iPrint Client (page 32)
Installing the iPrint Client
Client RequirementsIn order for iPrint to work properly, workstations should have the following:
Windows 95/98/ME or Windows NT*/2000/XPIMPORTANT: To install a printer on Windows NT/2000/XP, you must have Administrator rights or be a Power User on Windows NT/2000.
Web browser with JavaScript* enabled and
Microsoft Internet Explorer 5.0 or later
Netscape 4.76 (iPrint is not supported on Netscape 6)
Downloading and Installing the iPrint ClientYou can download and install the iPrint client from the default printer list page that resides on the server where the Print Manager is loaded. To reach the default page, enter the following URL in your Web browser: http://server_IP_ address_or_dns_name/ipp. After installing the iPrint client, you can install the printers from the list.
Setting Up iPrint on Client Workstations 27
Novell Confidential inst_clnt.fm last saved 8/6/03 Manual Version: 3/17/03103
For example, if the DNS name for printing is printing.mycompany.com, then the user would access iPrint from the following URL:
http://printing.mycompany.com/ipp
If users need to print through a secure port using SSL, they should use /ipps instead of /ipp in the URL. This requires users to authenticate using their eDirectoryTM usernames and passwords. Using the above example, this URL would be the following:
https://printing.mycompany.com/ipps
1 From a Netscape or Internet Explorer browser, enter the iPrint URL.
2 If the iPrint client is not installed, you are prompted to install it.
3 From the list of available printers, click the printer you want to install.
During the printer install, iPrint downloads and installs the printer driver, if one is associated with the printer and adds the printer to the user’s Printer Folder. The first time a printer is installed, printer drivers are forced to the workstation, even if the workstation contains a newer driver. Periodically, iPrint checks to see if a newer driver has been added to iPrint’s Resource Management Service. For more information on using Resource Management Systems to distribute and update printer drivers, see Appendix D, “Configuring Remote Printers,” on page 111.
4 Users can print to the printer by selecting the printer from any application.
You can also make the iPrint client and printers available by creating location-based printing or using ZENworks.
Creating Location-based PrintingLocation-based printing lets users select printers based on location by using a list view or a map. Using a list view, printer locations can be displayed by building, office location, eDirectory context, etc. You can configure the lists in a way that best suits the users’ needs.
For more information, see “Creating Printer Lists” on page 44.
Using the iPrint Map Designer, you can create maps of printer locations by using drag-and-drop technology. Once the maps are created, they can be posted on a Web server for users to access. As users view the maps, they find a printer close to their location and then click its icon. The client software (if not yet installed) and the printer are installed on their workstation.
For more information, see “Creating Location-Based Maps with iPrint Map Designer” on page 41.
Using ZENworks to Distribute iPrintYou can use ZENworks to distribute the Novell iPrint Client and printers to users’ workstations. You take a snapshot of a workstation before installing the client and another snapshot after. ZENworks creates a list of files to install and makes the necessary changes to the Windows Registry.
You could also use ZENworks to install an HTML file on the users’ workstations that would take them to your iPrint Web site. This would save you from having to distribute a URL to your users. Many other implementations are at your fingertips depending on your specific needs. For more information on using ZENworks, see the ZENworks online documentation (http://www.novell.com/documentation-index/index.jsp?category=ZENworks).
28 Novell iPrint Administration Guide for NetWare 6.5
Manual 3/17/03103Novell Confidential inst_clnt.fm last saved 8/6/03
Performing an Auto-client UpdatePeriodically, users will need to update their Novell® iPrint client. When a user starts his machine, iPrint checks the default printer to ensure the user is using the latest Novell iPrint Client. When needed, a newer client is installed. Using a configuration file, you can control how this update takes place.
An iprint.ini file is located in sys:\apache2\htdocs\ippdocs on each server where iPrint is installed. This file controls whether the user should be prompted before the updated client is installed or the updated client is installed without user intervention. When the client is installed without user intervention, the user will still see the installation program.
Using a text editor, edit the iprint.ini file to reflect the settings you want. Information on the different settings is contained in the file.IMPORTANT: The iprint.ini file should be synchronized across all servers where iPrint and a Print Manager are running.
Using iPrint with NetIdentityThe NetIdentity agent works with eDirectoryTM authentication to provide background authentication to Windows Web-based applications that require eDirectory authentication. iPrint supports the NetIdentity agent included with NetWare 6.5 running on Windows NT/2000/XP only. If the NetIdentity agent is installed on the workstation, iPrint will use NetIdentity when authenticating. For more information on using NetIdentity, see the NetIdentity Administration Guide for NetWare 6.5.
Using a Proxy ServerA proxy server sits between a client and another server that the client is trying to communicate with. Often proxy servers are used in conjunction with a firewall to keep internal addresses private while only exposing the proxy server’s address to external users. If you are using a proxy server and have users that need to submit print jobs through a proxy server, you can use the iPrint Clients Proxy setting. The client sends all print-related requests, like a print job, to the proxy server. The proxy server then redirects the print job to the correct iPrint server.
For example, Juan is a laptop user and has installed and printed to a variety of iPrint printers at the company’s headquarters. While out on the road, Juan wants to submit a report to his boss. Rather than sending the report by e-mail or fax, Juan decides to send it to the printer near his boss. When he tries to send the report to the printer, he receives an error that the printer cannot be found. He knows that the company uses a firewall and a proxy server. He types the proxy server address in the iPrint Proxy settings, then tries to print the report again. This time the print job is accepted. The print job travels from his laptop to the proxy server. The proxy server redirects the print job to the printer’s Print Manager, where the print job is spooled and forwarded to the printer.
To set the proxy server address in iPrint:
1 Click Start > Programs > Novell iPrint > iPrint Settings > Proxy.
2 To use a proxy server, check the check box and then specify the URL for the proxy server.
3 Click OK.
To disable using a proxy server, uncheck the check box.
Setting Up iPrint on Client Workstations 29

Novell Confidential inst_clnt.fm last saved 8/6/03 Manual Version: 3/17/03103
Installing User PrintersTo install an iPrint Printer, and the associated print driver users must have Administrator rights on Windows NT/2000/XP or Power User rights on Windows NT/2000. User Printers allows users to install a printer without having those rights, but that printer is available only to that individual user when he or she logs on to Windows. NOTE: To install the iPrint client you must have Administrator rights on Windows NT/2000/XP or Power User rights on Windows NT/2000.
For example, three workers — Albert, Juan and Carla — share the same computer during the day. Albert prints to an accounting printer, Juan prints to a plotter, and Carla prints to a printer in the CEO’s office. Using User Printers, each worker can install the printer they need but will not see printers installed by the other users.
To configure User Printers, edit the iprint.ini file located in the sys:\apache2\htdocs\ippdocs directory of the server where the iPrint html pages are installed by changing the value for the AllowUserPrinters = entry. The iprint.ini file contains information about the different possible values for this entry.
Configuring iPrint on Terminal ServersYou can set up iPrint on a terminal server to allow terminal server clients to install and print to iPrint printers.
Installing the iPrint Client to a Terminal Server1 Log in to the terminal server with Administrator or equivalent rights.
2 Install the iPrint client.
The iPrint client can be downloaded from the iPrint default page or by copying and executing nipp.exe from the iPrint server in sys:\apache2\htdocs\ippdocs.
NOTE: On terminal servers, the client auto update will not work. To update the client with a newer release, you must install it manually.
Configure iPrint for Terminal Server ClientsYou can configure iPrint to work in one of the following ways, depending on the rights the terminal server client has.
Install User Printers Only: User printers can only be installed and deleted by the user who installed the printer. User printers are not available to other users on the workstation.
Install Workstation Printers Only: Workstation printers can only be installed and deleted by users with sufficient rights. After a workstation printer is installed, all users using the workstation can print to it.
Try to Install Workstation Printer First: If the user has insufficient rights to install the printer, the printer is installed as a user printer.
To configure the iPrint for terminal server clients:
1 Log in to the terminal server with Administrator or equivalent rights.
2 Click Start > Programs > Novell iPrint > iPrint Settings.
3 Click Terminal Server.
30 Novell iPrint Administration Guide for NetWare 6.5

Manual 3/17/03103Novell Confidential inst_clnt.fm last saved 8/6/03
4 Select the configuration option you want.
5 Click OK.
Creating an Installed Printer Name ProfileBy default, the installed printer name on the client follows the full UNC/URL format: \\ipp://dns_name\printer_name. An example of a printer name in this format is \\ipp://Printing.MyCompany.Com\ColorPrinter. These printer names are often too long to fit in an applications display field for the printer’s name. Using an Installed Printer Name Profile, you can replace the UNC server name (or dns_name) for all printers on a Print Manager with any name you want to be displayed. For example, if you want to display just the company name, the above example would display as \\MyCompany\ColorPrinter.
The Installed Printer Name Profile is available only on Windows NT, 2000, and XP workstations. When you implement an Installed Printer Name Profile, printers that are already installed are not affected. Only newly installed printers after the change will have the shortened name. For printers already installed, you have to delete and reinstall the printers to realize any changes to their names.
1 Open sys:\apache2\htdocs\ippdocs\iprint.ini in a text editor.
2 Change the value of the ShortInstallName parameter to the value you want displayed.
ShortInstallName=your_name
where your_name is the value you want displayed. To reset the parameter to its default setting, use “default” as the value.
IMPORTANT: The iprint.ini file should be synchronized across all servers where iPrint and a Print Manager are running. The Installed Printer Name Profile affects all printers on a Print Manager.
Setting Up iPrint on Client Workstations 31

Novell Confidential inst_clnt.fm last saved 8/6/03 Manual Version: 3/17/03103
Uninstalling the Novell iPrint ClientTo remove the Novell iPrint Client, use Remove Programs option in the Windows Control Panel, or use the uninstall program that is available under the Novell iPrint program group in the Start menu.WARNING: When you uninstall the iPrint client, all iPrint printers are removed from the workstation.
32 Novell iPrint Administration Guide for NetWare 6.5
Manual (ENU) 3/14/03103Novell Confidential adviprint.fm last saved 8/6/03
4 Advanced iPrint Features
The following iPrint features will help you to install and configure printers.
Using Novell iCapture LPT Port Redirector Utility (page 33)
Implementing iPrint Using DOS Commands (page 33)
Setting Printer Persistence (page 35)
Setting Up Printer Pooling (page 36)
Using Print Auditing (page 36)
Using Novell iCapture LPT Port Redirector Utility Novell iCapture LPT Port Redirector lets you capture LPT ports and redirect the output to iPrint printers. Novell iCapture is installed when you install the iPrint Client. Before using the LPT Port Redirector, you must have iPrint printers installed on the workstation and the Print Manager and Printer Agents must be up and running.
To run the utility:
1 Click Start > Programs > Novell iPrint > iPrint Settings > iCapture.
2 Select the port you want to capture.
3 Click Select Printer, select the iPrint printer you want, then click Capture.
If the printer you want is not listed, check to see that the printer agent is up and running and that the printer has been installed as an iPrint printer.
4 Click Close.
You can also use the LPT Port Redirector to end a printer capture by selecting a port and clicking End Capture.IMPORTANT: Existing port assignments are not displayed, and iPrint port assignments will supersede all other port assignments. iPrint port assignments remain in effect, even after the workstation restarts, until you end the capture.
Implementing iPrint Using DOS CommandsThe following DOS commands let you install iPrint printers without a Web browser and capture LPT ports to iPrint printers. These commands are useful when you have legacy applications that require output to an LPT port, or you want to add printers through a login script.
Advanced iPrint Features 33
Novell Confidential adviprint.fm last saved 8/6/03 Manual Version: 3/14/03103
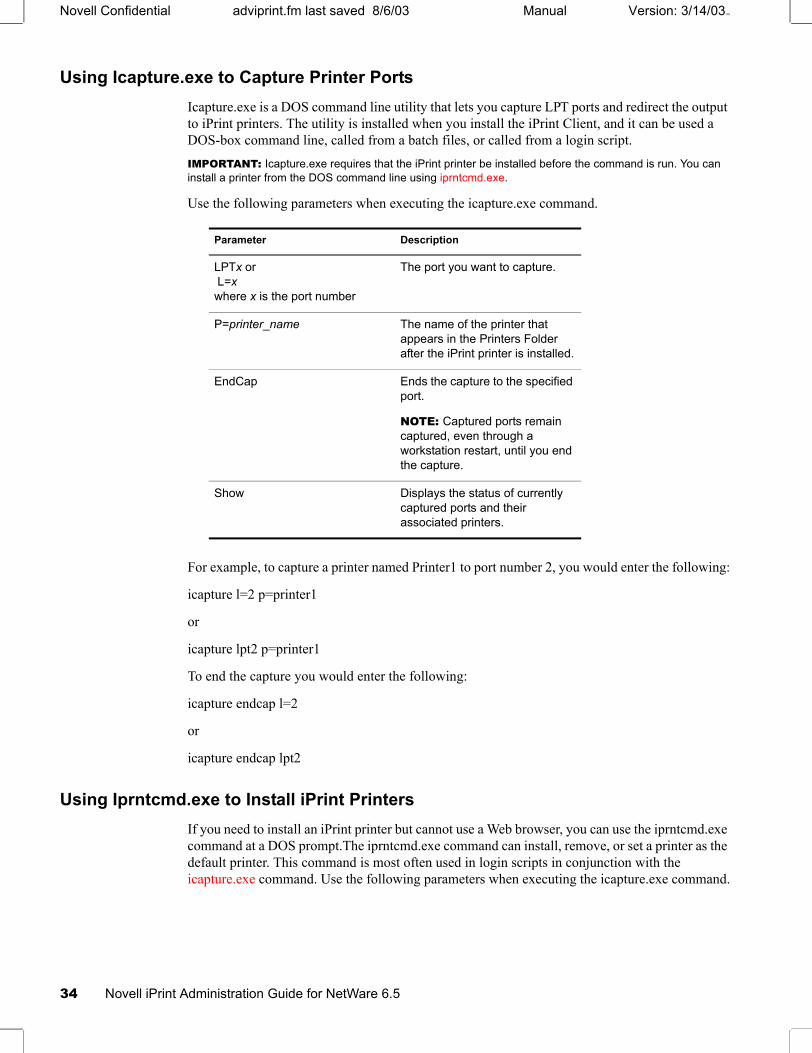
Using Icapture.exe to Capture Printer PortsIcapture.exe is a DOS command line utility that lets you capture LPT ports and redirect the output to iPrint printers. The utility is installed when you install the iPrint Client, and it can be used a DOS-box command line, called from a batch files, or called from a login script.IMPORTANT: Icapture.exe requires that the iPrint printer be installed before the command is run. You can install a printer from the DOS command line using iprntcmd.exe.
Use the following parameters when executing the icapture.exe command.
For example, to capture a printer named Printer1 to port number 2, you would enter the following:
icapture l=2 p=printer1
or
icapture lpt2 p=printer1
To end the capture you would enter the following:
icapture endcap l=2
or
icapture endcap lpt2
Using Iprntcmd.exe to Install iPrint PrintersIf you need to install an iPrint printer but cannot use a Web browser, you can use the iprntcmd.exe command at a DOS prompt.The iprntcmd.exe command can install, remove, or set a printer as the default printer. This command is most often used in login scripts in conjunction with the icapture.exe command. Use the following parameters when executing the icapture.exe command.
Parameter Description
LPTx or L=xwhere x is the port number
The port you want to capture.
P=printer_name The name of the printer that appears in the Printers Folder after the iPrint printer is installed.
EndCap Ends the capture to the specified port.
NOTE: Captured ports remain captured, even through a workstation restart, until you end the capture.
Show Displays the status of currently captured ports and their associated printers.
34 Novell iPrint Administration Guide for NetWare 6.5
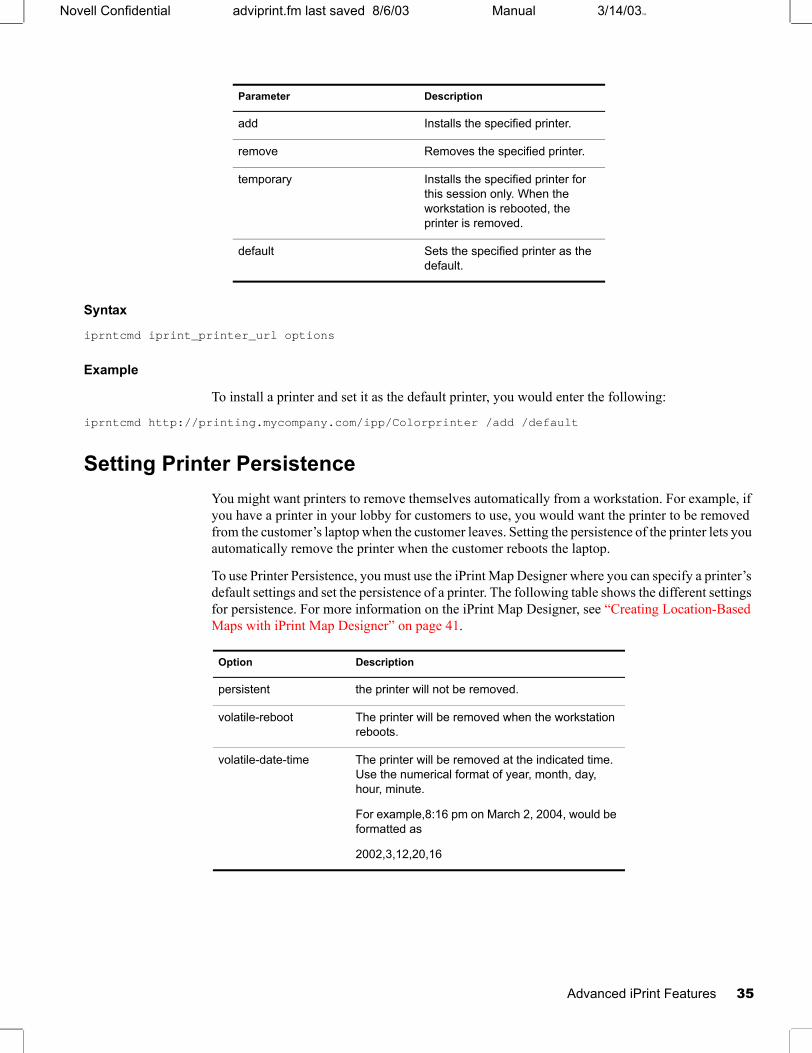
Manual 3/14/03103Novell Confidential adviprint.fm last saved 8/6/03
Syntax
iprntcmd iprint_printer_url options
Example
To install a printer and set it as the default printer, you would enter the following:
iprntcmd http://printing.mycompany.com/ipp/Colorprinter /add /default
Setting Printer PersistenceYou might want printers to remove themselves automatically from a workstation. For example, if you have a printer in your lobby for customers to use, you would want the printer to be removed from the customer’s laptop when the customer leaves. Setting the persistence of the printer lets you automatically remove the printer when the customer reboots the laptop.
To use Printer Persistence, you must use the iPrint Map Designer where you can specify a printer’s default settings and set the persistence of a printer. The following table shows the different settings for persistence. For more information on the iPrint Map Designer, see “Creating Location-Based Maps with iPrint Map Designer” on page 41.
Parameter Description
add Installs the specified printer.
remove Removes the specified printer.
temporary Installs the specified printer for this session only. When the workstation is rebooted, the printer is removed.
default Sets the specified printer as the default.
Option Description
persistent the printer will not be removed.
volatile-reboot The printer will be removed when the workstation reboots.
volatile-date-time The printer will be removed at the indicated time. Use the numerical format of year, month, day, hour, minute.
For example,8:16 pm on March 2, 2004, would be formatted as
2002,3,12,20,16
Advanced iPrint Features 35
Novell Confidential adviprint.fm last saved 8/6/03 Manual Version: 3/14/03103
Setting Up Printer PoolingYou can create a pool of printers to share the load of printing. Users install one of the printers in the pool. When a printer in the pool has a print job waiting, the Print Manager can redirect that print job to an idle printer in the pool. The Print Manager attempts to evenly distribute print jobs among all printers in a pool. For example, if 4 printers are in the pool and the first printer is printing a 100 page job, then the next print job will be sent to the second printer. If the second printer completes the print job, and the first printer is still busy, the next print job will be sent to the third printer. Printer pools are specific to the Print Manager, and a printer pool cannot span multiple Print Managers.
Printers that are included in a pool should be the same model and use the same print drivers. You can only include printers from the same Print Manager in a pool.
When you create a printer pool, the pool information resides in the Print Manager and can only be viewed using Novell iManager. Unlike the Printers, and the Print Manager, a separate eDirectory object for a printer pool is not created.
After you set up a printer pool, users install only one of the printers in the pool on their workstation. When a user submits a print job to the installed printer, the Print Manager will use the method above to send the print job to the next available printer in the pool. Users should be reminded that their print job might be printed by any printer in the pool. For this reason, the physical printers that are members of a printer pool should be located close to one another. You might also want to enable banner pages, depending on the type of documents being printed.
To set up printer pooling:
1 From Novell iManager, click iPrint > Printer Pooling.
2 Select the print services manager for this pool.
3 Select Create Pool from the Select An Operation list, then click Next.
4 Specify the name of the printer pool.
This name is only used to identify the pool within Novell iManager.
5 Select the printers you want included in the pool.
6 Click Create.
To modify or delete a pool, follow the above steps and select the desired action from the Select an Operation list.
Using Print AuditingWhen auditing is enabled for a printer agent, a log file is created indicating who printed how many pages to which printer on a given date. The log file is in a comma-separated format (.csv). The data from this log file can be viewed from the Health Monitor, or downloaded into a spreadsheet.
36 Novell iPrint Administration Guide for NetWare 6.5
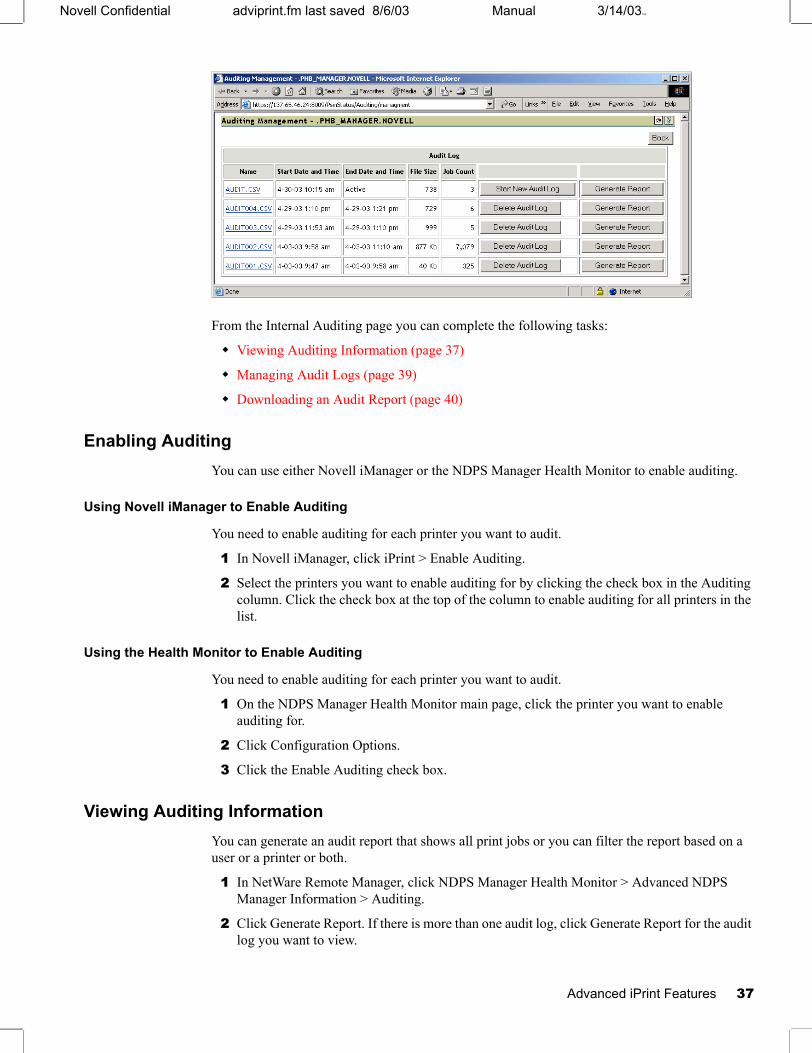
Manual 3/14/03103Novell Confidential adviprint.fm last saved 8/6/03
From the Internal Auditing page you can complete the following tasks:
Viewing Auditing Information (page 37)
Managing Audit Logs (page 39)
Downloading an Audit Report (page 40)
Enabling AuditingYou can use either Novell iManager or the NDPS Manager Health Monitor to enable auditing.
Using Novell iManager to Enable Auditing
You need to enable auditing for each printer you want to audit.
1 In Novell iManager, click iPrint > Enable Auditing.
2 Select the printers you want to enable auditing for by clicking the check box in the Auditing column. Click the check box at the top of the column to enable auditing for all printers in the list.
Using the Health Monitor to Enable Auditing
You need to enable auditing for each printer you want to audit.
1 On the NDPS Manager Health Monitor main page, click the printer you want to enable auditing for.
2 Click Configuration Options.
3 Click the Enable Auditing check box.
Viewing Auditing InformationYou can generate an audit report that shows all print jobs or you can filter the report based on a user or a printer or both.
1 In NetWare Remote Manager, click NDPS Manager Health Monitor > Advanced NDPS Manager Information > Auditing.
2 Click Generate Report. If there is more than one audit log, click Generate Report for the audit log you want to view.
Advanced iPrint Features 37

Novell Confidential adviprint.fm last saved 8/6/03 Manual Version: 3/14/03103
3 (Optional) Filter the search by using the Limit Search by User and Limit Search by Printer filters.
4 Click Generate Report to view the report. Only 250 print jobs are listed at a time. To view more print jobs in the report, click Next.
The following table discusses what is displayed in the report.
38 Novell iPrint Administration Guide for NetWare 6.5
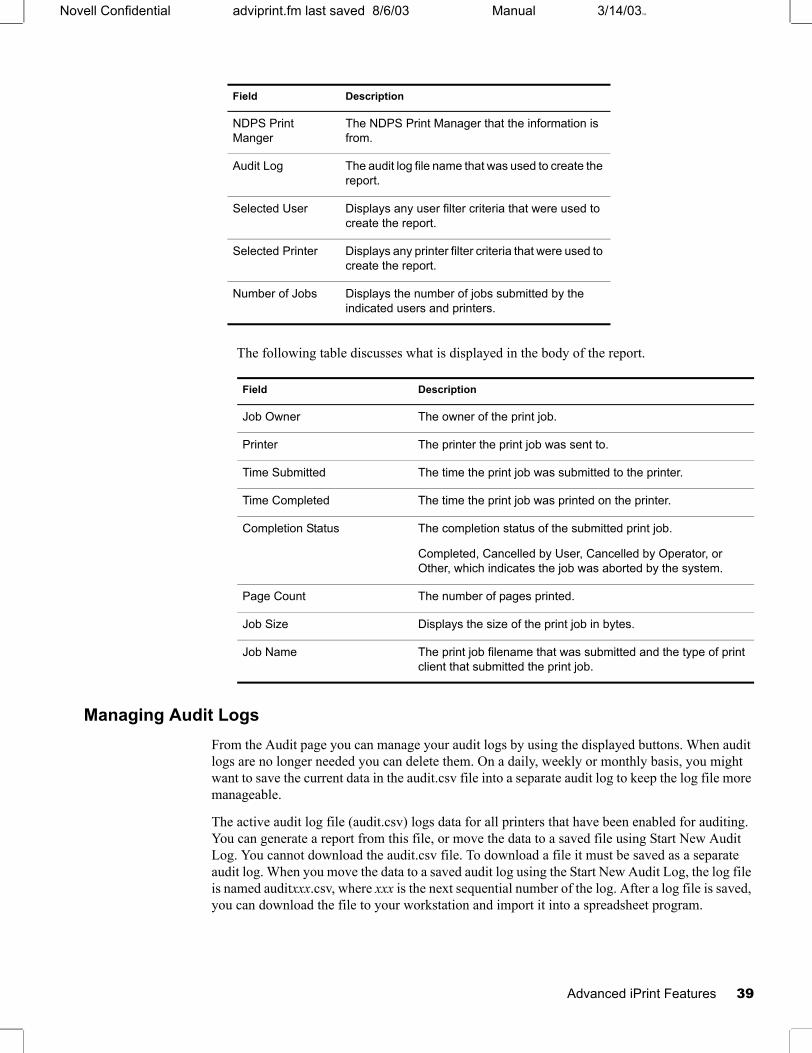
Manual 3/14/03103Novell Confidential adviprint.fm last saved 8/6/03
The following table discusses what is displayed in the body of the report.
Managing Audit LogsFrom the Audit page you can manage your audit logs by using the displayed buttons. When audit logs are no longer needed you can delete them. On a daily, weekly or monthly basis, you might want to save the current data in the audit.csv file into a separate audit log to keep the log file more manageable.
The active audit log file (audit.csv) logs data for all printers that have been enabled for auditing. You can generate a report from this file, or move the data to a saved file using Start New Audit Log. You cannot download the audit.csv file. To download a file it must be saved as a separate audit log. When you move the data to a saved audit log using the Start New Audit Log, the log file is named auditxxx.csv, where xxx is the next sequential number of the log. After a log file is saved, you can download the file to your workstation and import it into a spreadsheet program.
Field Description
NDPS Print Manger
The NDPS Print Manager that the information is from.
Audit Log The audit log file name that was used to create the report.
Selected User Displays any user filter criteria that were used to create the report.
Selected Printer Displays any printer filter criteria that were used to create the report.
Number of Jobs Displays the number of jobs submitted by the indicated users and printers.
Field Description
Job Owner The owner of the print job.
Printer The printer the print job was sent to.
Time Submitted The time the print job was submitted to the printer.
Time Completed The time the print job was printed on the printer.
Completion Status The completion status of the submitted print job.
Completed, Cancelled by User, Cancelled by Operator, or Other, which indicates the job was aborted by the system.
Page Count The number of pages printed.
Job Size Displays the size of the print job in bytes.
Job Name The print job filename that was submitted and the type of print client that submitted the print job.
Advanced iPrint Features 39

Novell Confidential adviprint.fm last saved 8/6/03 Manual Version: 3/14/03103
Downloading an Audit Report1 On the NDPS Manager Health Monitor main page, click Advanced NDPS Manager
Information > Auditing.
2 Click the name of the audit log you want to download.
3 Follow the prompts and save the file to your desired location.
When the file is downloaded, you can open the report in a spreadsheet application to sort, view, and format the data to meet your needs. The active audit log, audit.csv, cannot be downloaded. You must first start a new audit log and download the new audit log.
40 Novell iPrint Administration Guide for NetWare 6.5
Manual (ENU) 3/14/03103Novell Confidential 05custom.fm last saved 8/6/03
5 Customizing iPrint
This chapter describes how to customize iPrint for your company by using the iPrint Map Designer and modifying the HTML pages and iPrint Client interface.
“Setting Up Location-Based Printing” on page 41
“Customizing the iPrint HTML Interface” on page 45
“Changing Printer Driver Default Install Options” on page 46
Setting Up Location-Based PrintingWhen setting up location-based printing, you can use the iPrint Map designer to map the location of printers or create printer lists to help users find a printer closest to them.
“Creating Location-Based Maps with iPrint Map Designer” on page 41
“Creating Printer Lists” on page 44
Creating Location-Based Maps with iPrint Map DesignerUsing the iPrint Map Designer tool, you can quickly create a map showing printer locations. The tool lets you import floor plans as background images that can be used to drag and drop printers on to show actual locations. These maps are then published on a Web server so users can install printers that are closest to their location.
Prerequisites
Microsoft Internet Explorer 5.5 or later
Novell® iPrint Client installed on the workstation
When the map is created, you must use the iPrint Map Designer to modify or update your maps. Changes to a map file that are made outside of the iPrint Map Designer are not supported. If you need to add links to a map, you should create a frameset file and then display the map file in one frame and display your links in a different frame.
Creating a Map for Printing (page 42)
Adding Printers from Different Print Managers (page 43)
Hosting Maps on a Web Server (page 43)
Modifying Printer Driver Defaults and Printer Persistence on a Map (page 43)
Using the Keyboard with iPrint Map Designer (page 44)
Customizing iPrint 41

Novell Confidential 05custom.fm last saved 8/6/03 Manual Version: 3/14/03103
Creating a Map for Printing
Before creating the map, ensure the following:
Ippsrvr.nlm must be loaded.NOTE: If you run the map tool using HTTP and ippsrvr.nlm is not loaded, then you will receive a 503 Service not available error. To resolve this, you need to enable iPrint on one of the printers so that ippsrvr.nlm will automatically be loaded.
All of your background images (maps) are copied to sys:\apache2\htdocs\ippdocs\images\maps on the server, and any custom printer icon images are copied to sys:\apache2\htdocs\ippdocs\images\printers.
A default set of printer icons is included.
These files are detected by iPrint Map Designer at startup.
File types that can be used for background and printer icon images are JPEG, GIF, and BMP.
1 To start iPrint Map Designer, do one of the following:
Using a mapped drive, open sys:\apache2\htdocs\ippdocs\maptool.htm in Microsoft Internet Explorer.
Open http://server_address:port/apache2/htdocs/ippdocs/maptool.htm where server_address is the server’s IP address or DNS name of the server where the printer agent is running.
If you are want to save the map to this server, you need to be authenticated to the server.
2 Select a map from the Background drop-down list.
3 (Optional) Add a printer to the map.
3a Click the printer icon and drag the printer to the desired location on the map.
3b From the printer Icon field, select the type of printer and size.
Sizes range from 1 to 6, with 1 being the largest. Icons with a C indicate color printers.
3c Next to the Printer List field, click the Browse icon and enter the IP address or DNS name of the server where the Print Manager is running.
3d From the printer list, select the printer agent you want associated with this printer icon.
If the printer is not listed, then you have not enabled IPP for the printer. See “Enabling/Disabling iPrint on Individual Printers” on page 52 for more information.
The Printer URL and Mouse Over Text is automatically filled in with the printer agent information.
Printer URL: The URL created for the printer when IPP is enabled for the printer. You should not need to change the URL.
Mouse Over Text: By default, displays the printer agent’s name. You can override this information by entering the text you want to display when a user moves the mouse over the Printer icon.
3e (Optional) In the Printer Caption field, enter the information to display, using Enter to parse the information onto multiple lines.
3f (Optional) From the menu bar, click Driver Settings to set the installed driver settings for this printer. These settings included paper size, orientation, copies, duplex, color, collate, and removing the printer when the workstation is rebooted.
42 Novell iPrint Administration Guide for NetWare 6.5
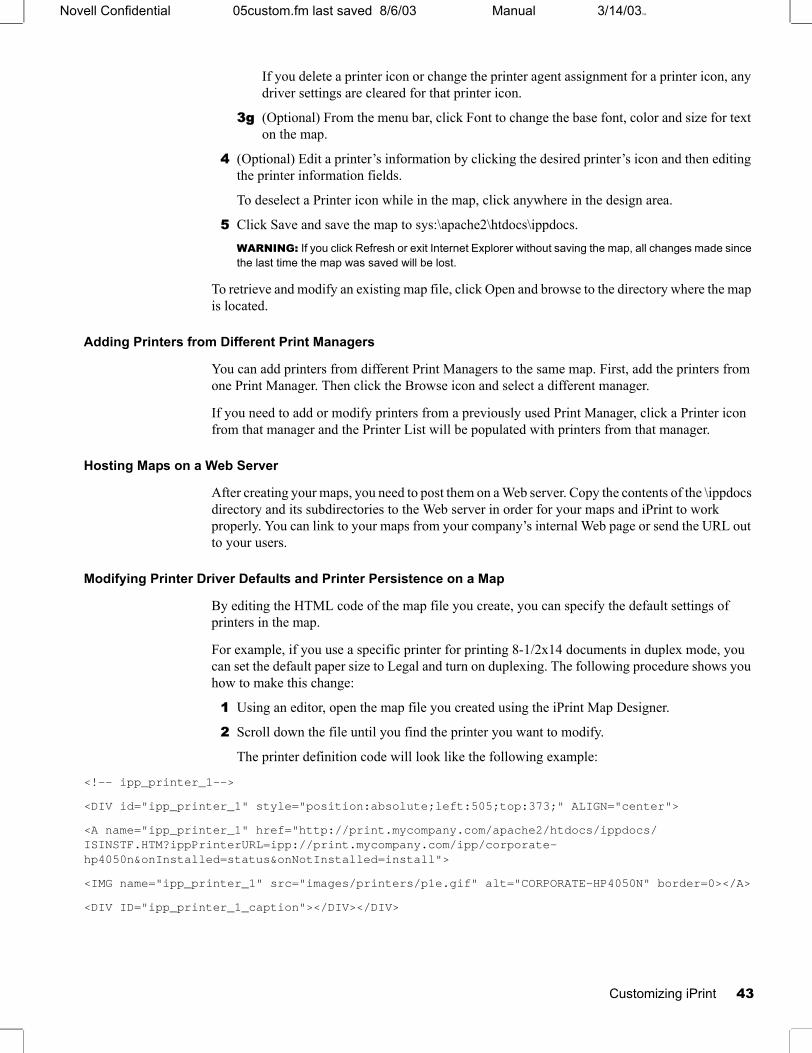
Manual 3/14/03103Novell Confidential 05custom.fm last saved 8/6/03
If you delete a printer icon or change the printer agent assignment for a printer icon, any driver settings are cleared for that printer icon.
3g (Optional) From the menu bar, click Font to change the base font, color and size for text on the map.
4 (Optional) Edit a printer’s information by clicking the desired printer’s icon and then editing the printer information fields.
To deselect a Printer icon while in the map, click anywhere in the design area.
5 Click Save and save the map to sys:\apache2\htdocs\ippdocs.WARNING: If you click Refresh or exit Internet Explorer without saving the map, all changes made since the last time the map was saved will be lost.
To retrieve and modify an existing map file, click Open and browse to the directory where the map is located.
Adding Printers from Different Print Managers
You can add printers from different Print Managers to the same map. First, add the printers from one Print Manager. Then click the Browse icon and select a different manager.
If you need to add or modify printers from a previously used Print Manager, click a Printer icon from that manager and the Printer List will be populated with printers from that manager.
Hosting Maps on a Web Server
After creating your maps, you need to post them on a Web server. Copy the contents of the \ippdocs directory and its subdirectories to the Web server in order for your maps and iPrint to work properly. You can link to your maps from your company’s internal Web page or send the URL out to your users.
Modifying Printer Driver Defaults and Printer Persistence on a Map
By editing the HTML code of the map file you create, you can specify the default settings of printers in the map.
For example, if you use a specific printer for printing 8-1/2x14 documents in duplex mode, you can set the default paper size to Legal and turn on duplexing. The following procedure shows you how to make this change:
1 Using an editor, open the map file you created using the iPrint Map Designer.
2 Scroll down the file until you find the printer you want to modify.
The printer definition code will look like the following example:
<!-- ipp_printer_1-->
<DIV id="ipp_printer_1" style="position:absolute;left:505;top:373;" ALIGN="center">
<A name="ipp_printer_1" href="http://print.mycompany.com/apache2/htdocs/ippdocs/ISINSTF.HTM?ippPrinterURL=ipp://print.mycompany.com/ipp/corporate-hp4050n&onInstalled=status&onNotInstalled=install">
<IMG name="ipp_printer_1" src="images/printers/p1e.gif" alt="CORPORATE-HP4050N" border=0></A>
<DIV ID="ipp_printer_1_caption"></DIV></DIV>
Customizing iPrint 43

Novell Confidential 05custom.fm last saved 8/6/03 Manual Version: 3/14/03103
3 Edit the code using either or both of the following syntaxes:
&driver-options=parameter:value;
&persistence=parameter:value;
The resulting code will look like this:
<A name="ipp_printer_1" href="http://print.mycompany.com/apache2/htdocs/ippdocs/ISINSTF.HTM?ippPrinterURL=ipp://print.mycompany.com/ipp/corporate-hp4050n&onInstalled=status&onNotInstalled=install&driver-options=papersize:legal;duplex:yes;persistence=volatile-reboot">
4 Save the file.
For more information on these settings, see “Changing Printer Driver Default Install Options” on page 46 and “Setting Printer Persistence” on page 35.
Using the Keyboard with iPrint Map Designer
You can use the keyboard to create maps using iPrint Map Designer. The following table lists the tasks to complete and the corresponding keystrokes required.
Creating Printer ListsPrinter lists allow users to select printers using categories that are meaningful to them. For example, you could create a list of printers by building location, department names, eDirectory Context, etc. iPrint provides a default list of printers organized by Print Manager. To create a custom list, you must use an HTML editor and create links to the printer’s IPP URL. This URL is displayed when you enable IPP for a printer.
To view a printer’s URL:
1 From Novell iManager, click iPrint > Manage Printer.
2 Browse to and select the printer you want.
3 Click Client Support > IPP Support.
The printer’s URL is displayed under Accepted IPP URL.
Task Press
Move between fields Tab
Insert printer icon
NOTE: Before you can insert a printer, your focus must be the design area.
Insert
Move printer icon within the design area Arrow keys
Select a field Enter
44 Novell iPrint Administration Guide for NetWare 6.5

Manual 3/14/03103Novell Confidential 05custom.fm last saved 8/6/03
Customizing the iPrint HTML InterfaceYou can edit any of the HTML files provided or you can create your own to customize iPrint for your environment. The HTML files are installed in the sys:apache2\htdocs\ippdocs directory. For information on the HTML interface, see Appendix A, “Configuring the iPrint HTML Interface,” on page 81.
Some examples of ways to present printers to users are located in the sys:apache2\htdocs\ippdocs\examples directory:
Example 1 shows a fully graphical interface for locating and installing printers using standard HTML. This type of approach can also be created using the iPrint Map Designer. For more information, see “Creating Location-Based Maps with iPrint Map Designer” on page 41.
Using your Web browser, view this example from sys:\apache2\htdocs\ippdocs\examples\example1\innerweb.htm
Customizing iPrint 45

Novell Confidential 05custom.fm last saved 8/6/03 Manual Version: 3/14/03103
Example 2 shows a lower maintenance approach for locating and installing printers using standard HTML.
Using your Web browser, view this example from sys:\apache2\htdocs\ippdocs\examples\example2\innerweb.htm
Changing Printer Driver Default Install OptionsYou can choose the default settings for a printer driver when it is installed on the workstation. For example, in a law office you might want the default paper size to be 8-1/2 x 14. This means every time the printer and corresponding driver are installed on a workstation, the paper size is set to 8-1/2 x 14.
To set modify the printer’s default settings, you must use the iPrint Map Designer where you can specify a variety of printer settings. The following table shows the different settings and corresponding values. For more information on the iPrint Map Designer, see “Creating Location-Based Maps with iPrint Map Designer” on page 41.
Printer Setting Acceptable Parameter Values
orientation landscape, portrait
papersize letter, lettersmall, tabloid, ledger, legal, statement, executive, A3, A4, A4small, A5, B4, B5, folio, quatro, 10x14, 11x17, note, env_9, env_10, env_11, env_12, env_14, csheet, dsheet, esheet, env_dl, env_c4, env_c5, env_c6, env_c3, env_c65, env_b4, env_b5, env_b6, env_italy, env_monarch, env_personal, fanfold_us, fanfold_std_german, fanfold_lgl_german, iso_b4, japanese_postcard, 9x11, 10x11, 15x11, env_invite, letter_extra, legal_extra, tabloid_extra, letter_transverse, A4_extra, letter_extra_transverse, a_plus, b_plus, letter_plus, A4_plus, A4_transverse, A5_transverse, B5_transverse, A3_extra, A5_extra, B5_extra, A2, A3_transverse, A3_extra_transverse
copies The number of copies you want printed.
color Yes indicates the printer supports color.
No or false indicates that the printer is monochrome printer.
duplex simplex, horizontal, vertical
collate yes or true=collate
no=do not collate
46 Novell iPrint Administration Guide for NetWare 6.5

Manual (ENU) 3/17/03103Novell Confidential Manage.fm last saved 8/6/03
6 Managing Your Print System
The following sections will help you manage the different components of your iPrint system.
“Managing the Print Manager” on page 47
“Managing Printers” on page 51
“Managing the Broker” on page 64
Managing the Print ManagerAlthough the default settings allow your users to print without further configuration being necessary, you will probably want to modify some of those settings so that you can manage your printing resources most effectively.
This chapter discusses the following:
Using the Print Manager Health Monitor (page 47)
Optimizing Fault Tolerance (page 49)
Moving the Print Manager (page 50)
Print Manager Startup Switches (page 50)
Using the Print Manager Health MonitorThe Print Manager Health Monitor provides administrators with a global view of their print system. The Health Monitor’s shows you the current status of printer agents, and allows you to configure settings and generate reports about your system.
Understanding the Print Manager Health Monitor
The Print Manager Health Monitor is a powerful tool to manage and troubleshoot your print system. The following examples show some of the features and information available in the Health Monitor.
How can I tell which printers are not being used?
The opening page of the Health Monitor shows all of your printers, their current state, and general statistics including the number of print jobs printed in the last hour, last day, and since the Print Manager was last started.
A quick look at these statistics will help you identify which printers are not being used. By clicking a printer name, you can see additional details about the printer that can help you troubleshoot why users are not using this printer.
Managing Your Print System 47

Novell Confidential Manage.fm last saved 8/6/03 Manual Version: 3/17/03103
For example, if the printer status shows Error printing, then you click the printer for a list of known problems. If one of the known problems is Printer not connected, then use the IP address listed in the Load String field to ping the printer to determine if the IP address is valid.
By looking at the statistical information, you can correct printer problems or make decisions about redeploying under used printers to departments that print a lot.
Are there any public access printers still in my print system?
Many companies implemented print systems with public access printers—printers that are accessible to anyone. As security and budgets have become important issues, companies are migrating their public access printers to control access printers so that access to the printers can be managed through eDirectoryTM.
Using the Print Manager Health Monitor, you can quickly scan all printers and determine if any public access printers still exist in the print system by generating a report of printer agents using the Associated NDS Printers report item. As you scan the report, you look for a printers with a listing of False, meaning they do not have an associated NDS® Printer object. If a printer does not have an associated Printer object, then it is a public access printer.
I am migrating to iPrint. How can I tell if the printers have the correct settings?
In order for iPrint to work correctly, printers must have IPP enabled and an associated printer driver. While you could use Novell iManager to look at each printer individually, you will find that generating a report showing all of your printers with these two settings to be a real time saver.
Go to the Generate a report page, check the iPrint Enabled and driver types check boxes, and then generate a report. Now you can see which printers still need to be enabled for iPrint and which printers still need printer driver associated with them.
Accessing the Print Manager Health Monitor
The Health Monitor can be accessed from NetWare Remote Manager or from the Manage Print Manager page in iManager. From NetWare Remote Manager, complete the following.
1 User your Web browser to log on to NetWare Remote Manager.
2 Under Diagnose Server, click NDPS Manager Health.
You can now view current printer agent states, startup/shutdown printer agents, and view other information about your print system.
Generating Reports
The report feature of the Health Monitor allows you to generate a report that can be displayed on the page or saved as a comma-separated-value (.CSV) file that can be used in a spreadsheet program.
1 From the NDPS Manager Health Monitor main page, click Advanced NDPS Manager Information > Generate Report.
2 Select the information you want included in the report by checking the corresponding check boxes.
3 (Optional) If you want to save the report as a file, click the File Options settings.
4 Click Generate report.
48 Novell iPrint Administration Guide for NetWare 6.5

Manual 3/17/03103Novell Confidential Manage.fm last saved 8/6/03
Configuring Health Monitor Settings That Affect NetWare Remote Manager
You can configure settings in the Health Monitor to control how the Health Monitor affects the NetWare Remote Manager’s overall health indicator.
1 From the NDPS Manager Health Monitor, click Configure Settings and Error Thresholds.
2 Adjust the settings
See the online help for more information about the available settings.
Posting Administrator Messages about a Printer
Suppose a printer has been taken offline and sent to the manufacture for repairs, but you keep getting phone calls from other administrators that the printer has an error in the Health Monitor. This can quickly be corrected by leaving a message about the printer in Health Monitor. Users can see the message, but only administrators can edit it.
1 From the NDPS Manager Health Monitor, click the printer you want.
2 Click Message From Admin.
3 Type the text you want displayed for this printer in the NDPS Manager Health Monitor.
4 Click Apply.
To remove a message, follow the steps above but delete the text in Step 3.
Optimizing Fault ToleranceThe Print Manager uses a database to store information about the printers it controls. This database is backed up and replicated in eDirectoryTM. The database is automatically backed up, by default, once a day. You can modify the backup options or manually backup the database using server console interface for the Manager.
If the database fails to load through normal mechanisms, you can retrieve the database from eDirectory and load the Print Manager on any other server in the eDirectory tree.IMPORTANT: You cannot restore a database from eDirectory to the same server that it was backed up from. In order to restore a database from eDirectory to its original source server, you must first restore it to a different server, and then back the database up to eDirectory from that server. You can then restore it to its original server.
Modifying the Database Backup Options
1 At the server console, go to the Available Options menu for the Print Manager.
2 Select NDPS Manager Status and Control > Database Options.
3 Modify the desired settings.
4 Escape back out to the Available Options menu.
Restoring a Database from eDirectory
1 At the server where you want to restore the database, enter
load ndpsm /dbvolume
See “Print Manager Startup Switches” on page 50 for more information.
2 Select the name of the Print Manager whose database you want to restore.
Managing Your Print System 49

Novell Confidential Manage.fm last saved 8/6/03 Manual Version: 3/17/03103
If the server with the original database is up and running, its name will appear in this menu. If the server is down, no server name will appear here. The only Source option available will be eDirectory (existing jobs will be lost).
3 Select the source of the backup you want to restore.
In most cases, you will be selecting eDirectory as the source.
You will be prompted to select a volume.
4 Select the volume where you want the database placed.
The restored database is then copied to the location you selected.
Moving the Print ManagerSometimes it is necessary to move the Print Manager from one server to another. If you assigned a DNS name to the Print Manager, you should update the DNS entry with the new IP Address the Manager is running on.WARNING: The URLs generated by iPrint are based on the server’s IP address or a DNS name. If you move a Print Manager to a server that has a different IP address or a different DNS name, a new URL is generated. Users must delete and reinstall their iPrint printers. If you are using NDPS Printers, printing is not affected.
1 If the Print Manager is currently running, exit the Manager.WARNING: All printing associated with this Print Manager will cease and waiting print jobs will be lost.
2 At the other server console enter
load ndpsm
If you need to use a startup switch, see “Print Manager Startup Switches” on page 50.
3 Select the Print Manager object you want to load.
A specific Print Manager can run only once.
You will be prompted to download the database, and the Manager will start running.
Print Manager Startup SwitchesSyntax:
load ndpsm Print_Manager_name_and_context /startup parameter
Example:
load ndpsm .sales_manager.corp.acme /dbvolume=sales_sys
The following table lists the startup switches you can use when loading ndpsm.nlm.
Startup Parameter Description
nodatabase Load the Print Manager without opening the database. The Database Options menu is displayed which lets you examine, backup, restore, resynchronize, and uninstall the Print Manager database.
noipx The Print Manager will not support the IPXTM protocol.
noip The Print Manager will not support the IP protocol.
50 Novell iPrint Administration Guide for NetWare 6.5

Manual 3/17/03103Novell Confidential Manage.fm last saved 8/6/03
Managing PrintersAlthough the default settings allow your users to print without further configuration being necessary, you will probably want to modify some of those settings so that you can manage your printing resources most effectively. While most tasks can be done in Novell iManager, some tasks will require you to use NetWare® Administrator.
This section discusses the following:
Enabling/Disabling iPrint on Individual Printers (page 52)
Moving Printer Agents to Another Print Manager (page 52)
Manage Printer Agents (page 52)
Installing Printers on Workstations Automatically (page 56)
Using Remote Printer Management (page 56)
Setting Up Printer Configurations (page 57)
Creating Configurations (page 58)
Optimizing Event Notification (page 61)
Setting Print Job Spooling (page 63)
Supporting Queue-Based Client Workstations (page 63)
dbvolume=full_DNS_volume name Download the database from NDS® and reconnect pointers to the local server where the command is executed. This is useful for moving the Print Manager to a new volume.
dbvolume=nocheck The Print Manager will not validate that the database volume is local. This is used with Clustering.
setens=broker_name Set the Event Notification Service to the specified broker for all printers associated this Print Manager.
setrms=broker_name Set the Resource Management Service to the specified broker for all printers associated this Print Manager.
qloadbalance The Print Manager evenly distributes the waiting print jobs among printers that are ready. This is used when pooling printers.
iprinton The iPrint attribute is turned on for all printers associated with the Print Manager.
dnsname=NDPSM_DNS_name This sets a DNS name to a Print Manager object. You will need to include the DNS information in your DNS lookup tables.
You use this switch only once, and the Print Manager will use the same DNS name each time it is loaded. To change the DNS name, use the switch with the new name.
If you included the DNS Name before deploying printing with this manager, then you can easily move the Print Manager to another server without disrupting printing.
NOTE: The DNS name must be assigned before printing on the Print Manager is deployed.
Startup Parameter Description
Managing Your Print System 51
Novell Confidential Manage.fm last saved 8/6/03 Manual Version: 3/17/03103
nt to move.
Enabling/Disabling iPrint on Individual Printers1 In Novell iManager, click iPrint > Manage Printer.
2 Browse to and select the printer you want to enable IPP printing for.
3 Click Client Support > IPP Support.
4 Check the Enable IPP Access check box.
The URL that appears in the Accepted IPP URL(s) box is the URL used when the printer is created on a workstation. This is also the URL you should use when creating iPrint maps. For more information, see “Creating Location-Based Maps with iPrint Map Designer” on page 41.
To disable iPrint, uncheck the check box.
5 (Optional) For secure printing, check the Require Security check box.
For more information, see “Secure Printing Using SSL” on page 78.
This requires users to authenticate to eDirectory using their usernames and passwords.
6 To update the printer settings, click Apply or OK.
Moving Printer Agents to Another Print ManagerUsing Novell iManager, you can move printer agents to a different Print Manager. WARNING: The URLs generated by iPrint are based on the server’s IP address or a DNS name. If you move a Printer to a server that has a different IP address or a different DNS name, a new URL is generated. Users must delete and reinstall their printers. If you are using NDPS Printers, printing is not affected.
1 From Novell iManager, click iPrint > Manage Print Manager.
2 Select the Print Manager where the printer agent is currently located, and click Next.
3 Under the Manager Control Tab, click Printer Agents and then select the printer agents you wa
4 Click Move, and then select the Print Manager where you want the printer agents moved to.
5 Click Ok.
You will want to ensure that the same print drivers are available to the printer agents.
Manage Printer AgentsUsing iManager you can manage printer agents. You can startup/shutdown a printer agent, pause/resume input and output, view printer information, set configuration settings and change the printer drivers.
1 From your Web browser, log in to Novell iManager.
2 Click iPrint > Manage Printer.
3 Select the printer you want to manage.
4 Use the tabs to complete the task you want.
52 Novell iPrint Administration Guide for NetWare 6.5
Manual 3/17/03103Novell Confidential Manage.fm last saved 8/6/03
Managing Print JobsThe following sections provide specific information about the print job management features. All of the procedures listed below can be performed either through NetWare Administrator or through the Novell Printer Manager. Users designated as Managers or Operators for a printer can perform these tasks for all jobs routed to that printer; individual job owners can only perform these tasks for their own print jobs.
Viewing Print Job Information
You can view information about individual print jobs waiting to be processed by a specific printer by using the following procedure.
1 In Novell iManager, click Print > Manage Printer.
2 Browse to and select the printer the job was sent to.
3 Click Printer Control > Jobs.
Information about the print jobs is displayed.
Deleting Print Jobs
Administrators can delete any print job after it has been submitted if the job has not yet started printing. Users can delete only their own print jobs.
You can delete a print job from the jobs list by using the following procedure.
1 In Novell iManager, click Print > Manage Printer.
2 Browse to and select the printer the job was sent to.
3 Click Printer Control > Jobs.
4 Check the check box next to the job you want to delete.
5 Click delete.
Changing the Order of Print Jobs
Occasionally, you might need to print a job sooner than other jobs that have already been submitted to a printer and are awaiting servicing. Administrators can move jobs up or down the list. Users can only move jobs down the list.
Administrators can reorder any print job after it has been submitted if the job has not yet started printing. Users can reorder only their own print jobs.
The following procedure explains how this is done.
1 In Novell iManager, click Print > Manage Printer.
2 Browse to and select the printer the job was sent to.
3 Click Printer Control > Jobs.
4 Check the check box next to the job you want to modify.
5 Click Promote to move a print job up the list.
Managing Your Print System 53
Novell Confidential Manage.fm last saved 8/6/03 Manual Version: 3/17/03103
Moving Print Jobs
You can allow operators and job owners to copy or move a print job to another printer. The target printer must be running on the same server (managed by the same Print Manager) as the printer on which the job currently resides. Also, the target printer must be compatible with the driver that formatted the job. For example, if a job was formatted with an HP5si driver, it should not be copied or moved to an HP LaserJet* III.
Administrators can copy or move any print job after it has been submitted if the job has not yet started printing. Users can copy or move only for their own print jobs.
To move a print job using Novell iManager, do the following.
1 In Novell iManager, click Print > Manage Printer.
2 Browse to and select the printer the job was sent to.
3 Click Printer Control > Jobs.
4 Check the check box next to the job you want to modify.
5 Click Move to move the print job to another printer in the list.
Modifying Print Jobs
You can modify a print job in two ways:
Modifying the printer configuration
Before the job is submitted, you can modify the printer configuration on your workstation. Then every time you send a job to that printer, those modifications will be used. For information, see “Modifying Configurations” on page 60.
Modifying the specific job
When a job is submitted, it inherits the properties of the installed printer's configuration. The configuration of the job can then be modified, if needed, by the job's owner or the printer's Operator.
When jobs are modified, additional configurable properties are available which are not included in the original printer configuration. For example, the job can be delayed, and advanced attributes can be viewed and modified.
Administrators can modify any print job after it has been submitted if the job has not yet started printing. Users can modify only their own print jobs.
To modify a job, do the following.
1 In NetWare Administrator, select the printer the job was sent to from the browser window, and then click Jobs/Job List.
If you want to see a list of jobs already processed and being retained, click the Show Retained Jobs option.
2 Select the job you want to modify.
3 Click Job Configuration > Job Options and then select Configurations from the drop-down list.
4 Select the properties you want and click OK.
54 Novell iPrint Administration Guide for NetWare 6.5
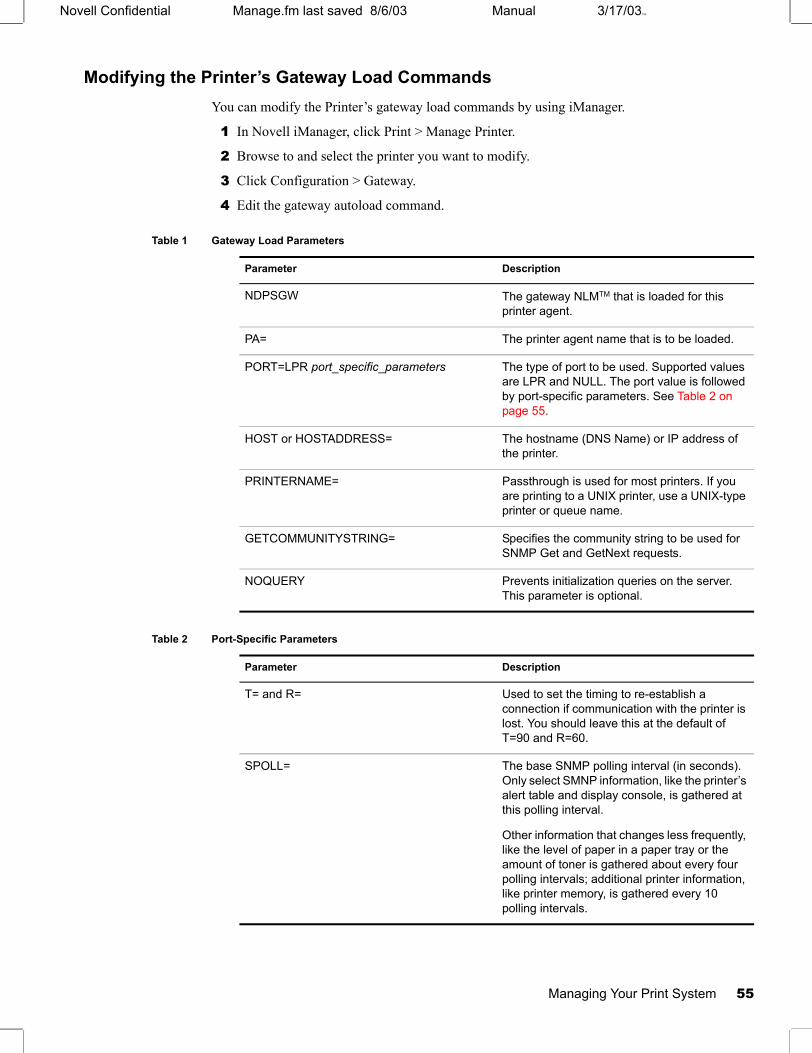
Manual 3/17/03103Novell Confidential Manage.fm last saved 8/6/03
Modifying the Printer’s Gateway Load CommandsYou can modify the Printer’s gateway load commands by using iManager.
1 In Novell iManager, click Print > Manage Printer.
2 Browse to and select the printer you want to modify.
3 Click Configuration > Gateway.
4 Edit the gateway autoload command.
Table 1 Gateway Load Parameters
Table 2 Port-Specific Parameters
Parameter Description
NDPSGW The gateway NLMTM that is loaded for this printer agent.
PA= The printer agent name that is to be loaded.
PORT=LPR port_specific_parameters The type of port to be used. Supported values are LPR and NULL. The port value is followed by port-specific parameters. See Table 2 on page 55.
HOST or HOSTADDRESS= The hostname (DNS Name) or IP address of the printer.
PRINTERNAME= Passthrough is used for most printers. If you are printing to a UNIX printer, use a UNIX-type printer or queue name.
GETCOMMUNITYSTRING= Specifies the community string to be used for SNMP Get and GetNext requests.
NOQUERY Prevents initialization queries on the server. This parameter is optional.
Parameter Description
T= and R= Used to set the timing to re-establish a connection if communication with the printer is lost. You should leave this at the default of T=90 and R=60.
SPOLL= The base SNMP polling interval (in seconds). Only select SMNP information, like the printer’s alert table and display console, is gathered at this polling interval.
Other information that changes less frequently, like the level of paper in a paper tray or the amount of toner is gathered about every four polling intervals; additional printer information, like printer memory, is gathered every 10 polling intervals.
Managing Your Print System 55
Novell Confidential Manage.fm last saved 8/6/03 Manual Version: 3/17/03103
The gateway load command parameters can be displayed at the server console by entering load ndpsgw help.
5 Click OK to save the changes.
Installing Printers on Workstations AutomaticallyBy designating printers to be automatically installed on user workstations through the Remote Printer Management feature available in Novell iManager. See “Using Remote Printer Management” on page 56 for more information.
Certain drivers (mostly older drivers) will not work when the printer name/port name has a long name (32 characters or more). The port name looks something like \\tree_name\server_name\installed_printer_name.
To resolve this problem, a new flag has been added to the Windows registry that will allow for printer names to be less than 31 characters in length so that old applications can still print. The key is as follows:
HKEY_LOCAL_MACHINE\Software\NDPS\RPM\TruncatePrinterNames0 = use long names1 = truncate the printer names
Using Remote Printer ManagementWhile you can allow users to download and install printer drivers on their workstations, the Remote Printer Management feature also allows administrators to designate printers to be downloaded and installed automatically. These printers then appear in the Windows Printer Folder for the user's workstation. Administrators can also use this feature to remove printers, assign a printer to be the default printer, and update printer drivers from the Broker’s Resource Management Service database (RESDIR).
Remote Printer Management configures printing on workstations based on a User object, group membership, and container.
How Remote Printer Management Works
After a printer has been designated for automatic installation on a user's workstation, this information is stored on the eDirectory container object where the administrator has configured it. When a user logs in after the machine is rebooted, the workstation's client software checks the container object where the User object resides for the Remote Printer Management configuration. The client software compares time stamps stored on the workstation and in eDirectoryTM to determine whether any changes have occurred. If the time stamp is different, action is taken, and the printer list on the client is automatically updated to match the printer list maintained by eDirectory on the container.
If the client finds a printer designated for installation that has not yet been installed, it is automatically installed.
If a currently installed printer is added to the Printers to Remove list, that printer will be uninstalled automatically.
If you designate a different printer to be the default in the Remote Printer Management list, the change will be automatically made on each client when it logs in.
If the Do Not Update Workstations control is checked, you can update the Remote Printer Management configuration, but no changes will occur on the workstation.
56 Novell iPrint Administration Guide for NetWare 6.5
Manual 3/17/03103Novell Confidential Manage.fm last saved 8/6/03
When you install a printer using Remote Printer Management, its installed name will be limited to no more than 31 characters (including the periods). The name will be broken off at a logical point from the beginning of the installed name. This will not affect the ability of the printer to service jobs.
The reason that names are limited to this length is that some applications cannot handle printer names of over 31 characters.
Designating a Default Printer
When you use the Remote Printer Management (RPM) feature to designate a printer for automatic installation on each user workstation, you can also designate that printer to be the default for users in the same context (container). This way, the user never has to install or configure that printer or designate it as the default. Instead, a configured default printer is installed automatically on each workstation.
The assignments made through the RPM are limited to the specific container. They do not flow down to subcontainers.
Even though you designate a printer as the default, users can specify a different default printer if they want.
Accessing Remote Printer Management
Remote Printer Management can be accessed in any of the following ways using NetWare Administrator. Somewhat different functionality is available at each location.
From the Tools menu in NetWare Administrator.
By selecting the NDPS Remote Printer Management option from this menu, you can manage printers in all containers for which you have the Supervisor right at the container object.
From the Details page for the Container object
By pressing the NDPS Remote Printer Management button from this page, you can manage printers for this container only.
From the Details page for a specific printer
By pressing the NDPS Remote Printer Management button from this page, you can remotely manage that printer.
From Users and Groups
Setting Up Printer ConfigurationsIf you use configurations wisely, they can help you manage your system more effectively. You can also create configurations that will help workstation users meet their specific printing needs efficiently and conveniently.
Configurations are properties assigned to a Printer object that specify how the printer will handle print jobs. For example, configuration properties can specify the number of copies to print, event notification, what kind of media to use, job priority, banner instructions, and whether to hold or retain a job and for how long.
The print system automatically assigns a default configuration to all Printer objects when they are created. However, administrators can modify that configuration or create new configurations for use by workstation users.
Managing Your Print System 57

Novell Confidential Manage.fm last saved 8/6/03 Manual Version: 3/17/03103
Printer objects can have multiple configurations. When a user installs a printer on his or her workstation, that user chooses one of those configurations. Each time a job with a particular configuration is submitted, the printer will handle the job according to the instructions contained in that configuration.
When a job is submitted, it inherits the properties of the installed printer’s configuration. The configuration of the job can then be modified, if needed, by the job’s owner or a printer Operator. When configurations are modified at the individual job level, additional configurable properties are available which are not included in the original configuration. For example, the job can be delayed, and advanced attributes can be viewed and modified.
Creating Configurations (page 58)
Configuration Options (page 58)
Modifying Configurations (page 60)
Setting Configuration Locks (page 60)
Creating Configurations
Use the following procedure in NetWare Administrator to create a new configuration based on the current Default Configuration.
1 Select the Printer object that you want to create a configuration for.
2 Click the Configuration button.
The Printer Configurations window in that dialog lists the Default Printer Configuration and any other configurations that have been created for this printer in NetWare Administrator.
3 Click Create.
4 Enter the name you want to assign to this configuration.
5 Assign the configuration properties you want for print jobs.
For specific information about these tabs, see “Configuration Options” on page 58.
If you want to lock certain configuration properties so that workstation users cannot modify them, see “Setting Configuration Locks” on page 60.
6 Click OK in the Printer Configuration dialog box.
7 Click OK in the NDPS Printer Details dialog box.
Your new configuration will not be saved until you have done this.
Configuration Options
The following sections describes the configuration options that are available.
General Properties
Copies: The number of copies that will be printed for this configuration.
Max Copies: The maximum number of copies that a user can print using this printer.
Priority: The priority assigned to jobs using this configuration.
Max Priority: The maximum priority (Low, Medium, High) set by the administrator for jobs using this printer. This setting determines when the job will print in relation to other jobs with different priorities sent to this printer.
58 Novell iPrint Administration Guide for NetWare 6.5

Manual 3/17/03103Novell Confidential Manage.fm last saved 8/6/03
Banner: A list of banner pages users can select from. Banner pages will be printed at the beginning of print jobs using the configuration. (If multiple copies of a document are printed, the banner page will only be printed at the beginning of the first copy.)
If your client, printer, and server are not all configured for the same language, you might experience problems with the output of your banner pages, such as the job name being corrupted. If you are working in this type of mixed environment, you should consider not using banner pages.
Medium: The medium (form) on which jobs can be printed without stopping the printer to mount a different medium (form). The default on the printer is Any Medium, which allows jobs to be printed using the currently mounted medium regardless of media specified in the job data. If a medium is specified for this configuration, and a different medium (anything other than Any Medium) is mounted on the printer, this condition will cause the printer to pause for the given amount of time (default is 15 minutes) or until the new media is mounted. If this Job Wait Time expires, the job is placed on hold and returned to the spooling area.
Media are mounted by the administrator or Operator at the Printer Control/Control pull-down menu of NetWare Administrator.
Job Hold Properties
Operator Hold. Jobs do not print until the Operator releases them.
User Hold. Jobs do not print until the user who submitted the job releases it.
Delay Printing Until. Jobs do not begin printing until the time and date specified.
Pause Printer on Job Start. Force the printer to pause at the beginning of jobs submitted using this configuration. The message entered is sent to the printer Operator. Only an Operator can release the pause. (By default, the printer will resume printing after a 15-minute pause if an Operator does not intervene. This setting can be changed at the server console by changing the Configuration setting Job Wait Time.)
Pause Printer on Job End. Force the printer to pause after printing each job that is submitted using this configuration. The message entered is sent to the printer Operator. Only an Operator can release the pause. (By default, the printer will resume printing after a 15-minute pause if an Operator does not intervene. This setting can be changed at the server console by changing the Configuration setting Job Wait Time.)
Retain Job No Longer Than. The maximum amount of time that jobs using this configuration can be retained after printing before being deleted (Minutes, Hours, Days, Years). By default, jobs are not retained.
Retain Job For. The amount of time that a job using this configuration should be retained (regardless of when it is printed) until it is deleted (Minutes, Hours, Days, Years).
Event Notification Properties
By specifying event notification for a printer configuration, you allow job owners to receive notification of printer or job events that occur during the processing and printing of a job. Notification configured in this way is sent by pop-up message box only.
Print job notification allows you to designate the event types for which notification messages should be generated (warnings, errors, or reports). For more information, see “Optimizing Event Notification” on page 61.
In NetWare Administrator, administrators can use the Access Control feature to configure event notification for interested parties, that is, non-job-owners you wish to be notified of specific
Managing Your Print System 59
Novell Confidential Manage.fm last saved 8/6/03 Manual Version: 3/17/03103
events. See “Configuring Interested-Party Notification” on page 62 for more information. At the workstation, individual users can use the Novell Printer Manager to configure event notification pertaining to their own jobs only. See “Configuring Job-Owner Notification” on page 62 for more information.
Modifying Configurations
To modify an existing configuration, complete the following procedure.
1 At the main Printer Details window in NetWare Administrator, click the Configuration button.
2 In Printer Manager, select the printer you want to work with and then select the Printer/Configuration option.
The Printer Configurations window lists the default printer configuration and any other configurations that have been created for this printer in NetWare Administrator.
3 Select the configuration you want to modify and click Modify.
4 Assign the configuration properties you want for print jobs.
For specific information about these tabs, see “Configuration Options” on page 58.
If you want to lock certain configuration properties so that workstation users cannot modify them, see “Setting Configuration Locks” on page 60.
5 Click OK in the Printer Configuration dialog box.
6 Click OK in the Printer Details dialog box.
Your changes will not be saved until you have done this.
Setting Configuration Locks
Properties of the Default Printer Configuration can be locked by the administrator to be nonconfigurable; that is, they cannot be modified or overridden by the user. Locked properties can be either of the following:
Maximum limits. Certain properties, those that specify limits, are always locked: Maximum Copies, Maximum Priority, and Retain Job No Longer Than. Even if the Manager does not specify a limit for these properties, they are grayed out and inaccessible to users who are modifying their own configurations.
These properties relate to a range in which the maximum value in that range is specified. For example, if the default configuration has a locked property limiting the maximum number of copies of a job that can be printed to five, any number of copies up to five is allowed, but a job calling for 10 copies will be rejected.
Individual locked properties. Many properties are tied to a specific setting. For example, you can lock the priority of jobs to be printed using this configuration, or designate a specific banner page that must be used when jobs are submitted.
Once a default configuration property has been locked, it will be locked for all jobs submitted to that printer and for all new configurations created for that printer as well, whether that configuration has been created with NetWare Administrator or by a workstation user when creating a new configuration for an installed printer.
Any job submitted to an old configuration must conform to the new locked property or the job will be rejected.
60 Novell iPrint Administration Guide for NetWare 6.5
Manual 3/17/03103Novell Confidential Manage.fm last saved 8/6/03
To lock one or more properties for a printer:
1 In Novell iManager, click iPrint > Manage Printer.
2 Browse to and select the printer you want to lock a property on.
3 Click the Configuration tab.
4 Check the check boxes of the properties you want to lock.
5 Click OK.
Optimizing Event NotificationIn NetWare Administrator, administrators can configure event notification for users who want to be notified of a defined printer or server event that occurs during the processing and printing of a job.
For example, the administrator for a specific printer (by default a Manager of that printer) can designate an Operator to be notified if the printer runs out of paper or if the toner is low.
Notification Types
In NetWare Administrator, administrators can configure two types of event notification:
Job-owner notification. You can configure event notification for job owners only through the printer's Configuration dialog box. When notification is part of a configuration, the owner of a job submitted to a printer with that configuration will receive the notification specified. For more information, see “Configuring Job-Owner Notification” on page 62.
At the workstation, individual users can use the Novell Printer Manager to configure event notification pertaining to their own jobs.
Interested-party notification. You can use the Access Control Notification feature to configure notification to be sent to a printer's Managers, Operators, or other interested parties about specified events, normally those that require intervention of some kind.
Because this feature is tied to the Printer Access Control feature, it allows you to restrict the list of individuals who will be receiving this notification as much as you want. For more information, see “Configuring Interested-Party Notification” on page 62.
Delivery Methods
The availability of the following delivery options are dependent on which of them you have enable. See “Enabling Event Notification Delivery Methods” on page 68 for more information.
Pop-up notification. Messages will pop up on the screen of individuals designated to receive them. Users designated for pop-up notification must have a default server defined in their User Environment specified in NetWare Administrator. They also must be currently authenticated to that server or they will not receive notification.
SMTP notification. Messages will be sent to the recipient through SMTP (Simple Mail Transfer Protocol) in IP-based systems.
Log file notification. Messages are written to a file at a designated location on a NetWare server that the recipient has rights to. This is especially useful for keeping a record of printing events for auditing purposes (such as job completions, how often the toner ran out, etc.).
Managing Your Print System 61
Novell Confidential Manage.fm last saved 8/6/03 Manual Version: 3/17/03103
Programmatic notification methods. Two programmatic notification delivery methods are shipped: SPXTM and RPC.
Third-party notification methods. The open architecture of the print system allows third parties to develop additional delivery methods.
Configuring Job-Owner Notification
Job-owner notification can be configured for specific print jobs or for printer configurations. This section provides procedures for each method.
Notification for Specific Print Jobs
Configuring notification for a specific print job can be done as follows.
1 From the main Printer Control view of the printer's Details page, click Jobs/Job List.
2 (Conditional) If you want to see a list of jobs being retained and not currently scheduled for processing, click Show Retained Jobs.
3 Click Options and select Configurations from the drop-down list.
4 Click Notification.
5 Select the notification methods and events you want.
6 Click OK.
Notification for a Configuration
The following procedure explains how to configure job-owner notification by modifying an existing configuration. You can also configure job-owner notification when creating a new configuration.
1 In NetWare Administrator, select the printer that you want to configure.
2 Click the Configuration button.
The Printer Configurations window lists the default printer configuration and any other configurations that have been created for this printer in NetWare Administrator.
3 Select the configuration you want to modify and click Modify.
4 Click the Notification tab.
5 Click the icon representing the method you want to use.
6 Select the notification methods and events you want.
7 Click OK.
Configuring Interested-Party Notification
The following procedure allows you to specify the users who will receive event notification for a Printer object, the method of notification, and the types of events they will receive notification for.
1 In NetWare Administrator, select the Printer you want to configure.
2 Click the Access Control button.
Three roles are available: Manager, Operator, and User.
3 Select the role you want to configure Access Control notification for.
4 Select the object you want to configure notification for and click Notification.
62 Novell iPrint Administration Guide for NetWare 6.5
Manual 3/17/03103Novell Confidential Manage.fm last saved 8/6/03
5 Click the icon representing the method you want to use.
6 Select the notification methods and events you want.
7 Click OK.
Setting Print Job SpoolingAlthough you do not need to send print jobs through queues, jobs submitted to printers will often need to be stored somewhere when the printer is already processing other jobs or when the job is on hold or retain status. Job spooling allows you to specify where you want jobs to be stored while they await processing.
By default, the spooling area for a printer is located on the same volume as the database for the Print Manager supporting that printer. However, the Spooling Configuration option allows you to spool jobs to a different location through the following procedure.
Job spooling offers greater simplicity and management convenience than queue-based printing. Spooling requires only that a directory be designated where jobs can be stored while awaiting processing.
You can modify job spooling at any time, even when a job is already being processed.
The following procedure explains how to optimize job spooling:
1 In Novell iManager, click iPrint > Manage Printer.
2 Browse to and select the printer you want to enable Access Control for.
3 Click Configuration > Spooling.
4 Modify the spooling information.
Spooling Location: Specify the path where print job data will be stored while waiting to be printed. By default, the spooling area for a printer will be located in the same volume as the database for the Print Manager supporting that printer.
Available Disk Space: The amount of disk space available on the volume.
Limit Disk Space: To limit the amount of disk space to be used for spooling, check the check box and sent the limits you want.
Spooling Space: The total amount of disk space in kilobytes (KB) you want to set aside for print job spooling.
Retained Job Space: The amount of disk space in kilobytes (KB) you want to set aside for holding retained print jobs. This amount should be sufficiently less than the total spooling space to ensure that new print jobs can be processed efficiently.
There are four common job scheduling algorithms available: First In, First Out, Print Shortest Job First, Minimize Media Changes, Backward Compatibility.
5 Click OK.
Supporting Queue-Based Client WorkstationsIf your network includes clients like Macintosh and OS/2 that are not able to send jobs to Printer Agents directly, the backward compatibility of the Novell print system allows these clients to submit jobs to the same queues they always have. Then the Printer Agent can retrieve jobs from these queues and print them.
Managing Your Print System 63
Novell Confidential Manage.fm last saved 8/6/03 Manual Version: 3/17/03103
To set up a printer to service legacy queues:
1 In Novell iManager click iPrint > Manage Printer.
2 Browse to and select the printer you want to enable Access Control for.
3 Click Client Support > QMS Support.
4 Modify (add to/delete from) the Service Jobs from NetWare Queues list.
5 Click OK or Apply to save the settings.
Managing the BrokerAlthough the default settings allow your users to print without further configuration being necessary, you will probably want to modify some settings so that you can manage your printing resources most effectively.
This chapter discusses the following:
“Accessing the Broker Health Monitor” on page 64
“Adding or Updating Brokered Resources” on page 64
“Changing the Location of a Broker” on page 65
“Adding Banner Pages” on page 65
“Adding or Updating Printer Drivers” on page 67
“Enabling Event Notification Delivery Methods” on page 68
“Enabling and Disabling Brokered Services” on page 69
“Reconfiguring a Broker” on page 69
“Broker Startup Switches” on page 70
Accessing the Broker Health MonitorYou can use the Broker Health Monitor to monitor and view statistics about the brokered services. To access the Health Monitor from NetWare Remote Manager, complete the following
1 User your Web browser to logon to NetWare Remote Manager.
2 Under Diagnose Server, click NDPS Broker Health.
Adding or Updating Brokered ResourcesThe following procedure explains how to add banner pages, printer drivers, and printer definition (NPD) files to the resource database available through a Broker's Resource Management Service.
Resources cannot be installed from multiple diskettes. If a printer driver or other resource is shipped on more than one diskette, copy the files to a directory on a hard disk or network drive and install it from there.
To add new resources through the Resource Management Service, do the following.
1 Make sure the Resource Management Service is enabled either in Novell iManager or by going to your server console and viewing the Broker status page.
2 In Novell iManager, click Manage Broker and then browse to and select the Broker you want to work with.
64 Novell iPrint Administration Guide for NetWare 6.5
Manual 3/17/03103Novell Confidential Manage.fm last saved 8/6/03
3 Click Resource Management Service and then the resource you want to work with.
4 Add or delete resources.
5 Click OK.
Changing the Location of a BrokerYou can customize your printing setup for maximum efficiency. You might occasionally want to change the location of one or more Brokers. For example, you might want a Broker to be in a different eDirectory container. If you want to change the location of a Broker after it has been created, you can use NetWare Administrator to move the Broker object into the desired container, provided you have Supervisor or equivalent rights to the new container.
Adding Banner PagesBanner pages are pages that are printed at the beginning of a print job and that normally contain job identification information. Banner pages can be configured for PostScript*, PCL*, and text formats.
There are a variety of options for creating and selecting banner page designs. You can choose from several ready-to-use banner page designs, or you might create a unique design that includes your company's logo, a drawing, or even a photograph.
When you add a new banner, it will be immediately available for printer configurations. If you want a banner page to be printed, you can select which banner design you want to use at the General tab on the Configuration page. The Configuration page lists only banners available in the format your printer supports. For example, if you are using a PostScript printer, only banners in PostScript format will be available at the General configuration page.
Each banner page includes the following information in an information box at the bottom of the page: Job Name, Job Owner, Time Printed, Date Printed.
If your client, printer, and server are not all configured for the same language, you might experience problems with the output of your banner pages, such as the job name being corrupted. If you are working in this type of mixed environment, you should consider not using banner pages.
Banners are added to the resource database through the Broker's Resource Management Service.
See the following topics for information about specific tasks associated with using banners.
Adding Banners to the Resource Management Service
1 Make sure the Resource Management Service is enabled either in Novell iManager or by going to your server console and viewing the Broker status page.
2 In Novell iManager, click Manage Broker and then browse to and select the Broker you want to work with.
3 Click Resource Management Service > Banners.
4 Add or delete banners.
5 Click OK.
Managing Your Print System 65
Novell Confidential Manage.fm last saved 8/6/03 Manual Version: 3/17/03103
What Printer Types Support What Kind of Banner
A list of supported banners is supplied by both the Novell Gateway (through the PDS) and third-party gateways. The gateway first determines which file extension (.pcl, .ps, or .txt) is appropriate for the way the Printer object (or Printer Agent) was configured during creation. It then queries the associated Broker for a list of banner page files with that extension. For a list of formats supported by a specific printer, go to the main Printer Details page and click the Features button.
Creating Banner Files
Administrators with knowledge of printer languages can create custom banners. Three types of custom banners are currently supported:
PCL (.pcl extension). See “Creating a PCL Banner” on page 66.
PostScript (.ps extension). See “Creating a PostScript Banner” on page 67.
Generic text (.txt extension). See “Creating a Generic Text File” on page 67.
All custom banners that are created should have one of these extensions. When creating custom banners, keep in mind that complex banners will increase the print time for jobs. Here are some tips for creating an efficient banner:
Use internal/resident printer fonts instead of rasterized system fonts.
When using graphics, use vector graphics when possible. Bitmaps take up a lot more space.
Avoid half-toned images.
Creating a PCL Banner
A working knowledge of the Hewlett Packard* (HP*) PCL printer language is needed in order to create a custom PCL banner. The easiest way to create a PCL banner is to create the banner using an application like WordPerfect or MS Write. Be sure to leave the lower third of the custom banner page blank because the print system will overlay the following information in a PCL banner page:
Job NameJob OwnerTime PrintedDate Printed
1 After formatting the banner page, print the banner document to a file using the appropriate PCL printer definition.
The driver properties need to be changed from printing to a port/network to printing to a file on disk. All PCL banners must have the .pcl extension.
2 Remove the form feed and reset commands in the file that was printed to disk.
You will need a binary editor to remove the form feed and any reset commands from the file. The form feed and reset commands will be in the overlay that the print system provides. A form feed in PCL is a decimal 12 (hex 0C). There are several possible reset commands that need to be removed. Decimal 27, 69 (hex 1B,45) is the printer reset in PCL. The following Universal Exit Command (UEL) also needs to be removed:
Decimal 27,37,45,49,50,51,52,53,88
(Hex 1B,25,2D,31,32,33,34,35,58)
After the form feed and reset are removed, you have a banner file that can be used.
66 Novell iPrint Administration Guide for NetWare 6.5

Manual 3/17/03103Novell Confidential Manage.fm last saved 8/6/03
3 Add the banner to the Resource Management Service.
See “Adding or Updating Brokered Resources” on page 64 for more information.
Creating a PostScript Banner
A working knowledge of the Adobe* PostScript printer definition language is needed in order to create a custom PostScript banner. The easiest way to create a PostScript banner is to create the banner using an application like WordPerfect or MS Write. Be sure to leave the lower third of the custom banner page blank because the print system will overlay the following information in a .ps banner page:
Job NameJob OwnerTime PrintedDate Printed
1 After formatting the banner page, print the banner document to a file using the appropriate PostScript printer definition.
The driver properties need to be changed from printing to a port/network to printing to a file on disk. All PostScript banners must have the .ps extension.
2 Using a text editor, remove the PostScript operator called showpage from the file that was printed to disk.
The driver will probably have a procedure that includes the showpage command. (The showpage command will be in the overlay.) Sometimes showpage is embedded in another function within the driver and you must use care in removing it.
3 Add the banner to the Resource Management Service.
See “Adding or Updating Brokered Resources” on page 64 for more information.
Creating a Generic Text File
A generic text banner must have a .txt extension. The banner can be formatted in any printer language. The print system will not overlay any additional information on this banner page.
Adding or Updating Printer DriversA printer driver is a software entity that directly supports a physical printer, enabling it to carry out the functions it is intended to perform.
Hardware vendors develop printer drivers, which are specific to each printer. Most printers require different printer drivers for each operating system they interact with. You can view a complete list of printer drivers currently loaded in the Broker's Resource Management Service (RMS) for Windows, and to add additional printer drivers from diskettes and Windows .cab files.
The print system ships with only English-language drivers. To make drivers in other languages available for installation on workstations, you will first need to add those drivers to the RMS through the procedure described in this section.
While the majority of printer drivers in common use today can be used, some cannot. A few drivers do not work on a network at all, while others might not contain an index file or have an index file that is incorrectly formatted. If you attempt to add a printer driver to the Resource Management Service from a diskette and receive an error message stating that a printer driver cannot be found, you should contact the driver's vendor.
Managing Your Print System 67

Novell Confidential Manage.fm last saved 8/6/03 Manual Version: 3/17/03103
Prerequisite
Printer drivers cannot be installed to the Resource Management Service from multiple floppy disks. If a printer driver is shipped on more than one disk, copy the files to a directory on a hard drive or network drive and install the driver from there.
Procedure
1 Make sure the Resource Management Service is enabled either in Novell iManager or by going to your server console and viewing the Broker status page.
2 In Novell iManager, click Manager Broker and then select the Broker you want to work with.
3 Click Resource Management Service and then the type of printer driver you want to add.
4 Add or delete printer drivers to or from the list.
When adding a resource, you will need to browse to the location of the print driver’s .inf file. If the file contains multiple print drivers, you will need to select the drivers you want to add to RMS.
5 Click OK or Apply to save your changes to the database.
The drivers will not be added to the database until you do this.
The process described above might not work if the driver installation .inf file uses subdirectory paths in filename designations within the Copy Files sections of the .inf file. This format is not currently supported. There are two possible solutions for this problem:
Look for an .inf file that does not use this format for filenames. Often one exists in a subdirectory of the installation disk.
Edit the .inf file and remove path information from filenames. Then ensure that all the files are in the same directory as the .inf file.
Enabling Event Notification Delivery MethodsThe Broker provides an Event Notification Service (ENS) that allows printers to send customized notifications to users and operators about printer events and print job status. ENS supports a variety of delivery methods, including pop-up messages, log files, e-mail and programmatic. Third parties can also develop additional methods.
The Event Notification Service allows you to enable delivery methods such as e-mail and third-party methods not provided directly. The executable files for these methods have an .enm extension (filename.enm) and must be added to the server\sys:system directory or another location in the server's search path.
For more information about Event Notification, see “Enabling and Disabling Brokered Services” on page 69.
1 Be sure the Event Notification Service is enabled by going to your server console and viewing the Broker status page.
2 In NetWare Administrator, select the Broker you want to work with.
3 Select the Event Notification view.
4 Click the Load or Unload button.WARNING: Do not unload the RPC and SPXTM Programmatic Notification methods. These are needed for communication between printers and the workstation Printer Manager utility to occur and for driver download to take place.
68 Novell iPrint Administration Guide for NetWare 6.5
Manual 3/17/03103Novell Confidential Manage.fm last saved 8/6/03
5 Specify the ENM filename for the notification method you want to load.
This ENM must be in your server\sys:system directory or in another location in your server's search path in order to be loaded.
The Broker object will load this notification method automatically in the future.
Enabling and Disabling Brokered ServicesWhen the print system is initially installed, the three network services provided by the Broker are automatically enabled on the Broker object. As your printing needs grow or change and you add additional Brokers to your network, you might want to disable certain services provided through a Broker on a specific server and allow them to be provided through a different Broker (to save disk space on the first server, for example), or you might want to enable services on a Broker that are currently disabled. This procedure explains how these tasks are performed.
1 In NetWare Administrator, select the Broker object you want to work with.
2 Click the button for the service you want to enable or disable.
3 At the Service Status line, select either Enable or Disable.
The service is now either enabled or disabled. If disabled, services will need to be provided by a different Broker.
Printer Agents using the services that were disabled will automatically search for another Broker on the network that will provide these services, so normally these printers should continue to be available for processing jobs.
However, if you want to specify a preferred Broker for a Printer Agent to use for these services, you must do this from each printer's Printer Control page in NetWare Administrator by selecting Features/Services.
If a Broker is unloaded and then is brought back up, Printer Agents that have designated that Broker as their preferred service provider will not be automatically reconnected to it. In order to reconnect to the preferred service provider, you must either unload each Printer Agent and bring it back up, or unload the Print Manager that controls the affected Printer Agents and bring it back up, thus bringing up all the Printer Agents with it.
If the Resource Management Service cannot be enabled, check for one of the following problems:
The Broker object does not have rights to access the RMS data storage area (the default is ndps\resdir\). Use NetWare Administrator to grant the Supervisor right to the Broker for that subdirectory.
The RMS data storage area has a directory name that is longer than eight characters or includes invalid characters.
Reconfiguring a BrokerIn most instances, the default configuration for the three support services it provides will result in satisfactory performance. However, in certain circumstances you might want to change that configuration. Here are a couple of examples:
As you gain experience with your print system setup, you might want to reconfigure the default properties assigned to the Broker.
If disk space on your volume is limited, you might want to move the managed resources database accessed by the Resource Management Service to a different volume on the same
Managing Your Print System 69
Novell Confidential Manage.fm last saved 8/6/03 Manual Version: 3/17/03103
server or to a different server in the same eDirectory tree where more disk space is available. (The default location for the RMS resources is server\sys:ndps\resdir\)
Prerequisites
To reconfigure a Broker, you should have Supervisor rights for the container where the Broker resides.
If you change the location of your Resource Management Service database, you need to have rights to the new location.
If you change the location of your Resource Management Service database, you need to have an existing Resource Management Service database directory to point to when you specify the volume for the RMS during this process. The path you specify must point to a directory that currently exists and that already contains resources. (The RMS data storage area must not have a directory name that is longer than eight characters or includes invalid characters.) If you point to an empty directory, you will receive an error message from the server when loading the Broker saying that the Broker cannot be enabled. (You can copy resources from another RMS to this directory if you want.)
Procedure
The following procedure explains how to reconfigure an existing Broker object or move your brokered resources to a different location.
1 In NetWare Administrator, select the Broker object you want to reconfigure.
2 If you want to change the location of your resources, complete the following:
2a Click Resource Management.
2b Enter in the resource path you want to use for storing these resources.
You might need to assign the Broker all rights (Supervisor right) to the new area.
3 If you want to modify the Access Control list, click Access Control and add or remove users from the Managers list.
See “Managing the Broker” on page 64 for more information.
4 If you want to enable or disable your Service Registry, click Service Registry Service.
See “Enabling and Disabling Brokered Services” on page 69 for more information.
5 If you want to load or unload Notification methods, click Event Notification.
See “Enabling Event Notification Delivery Methods” on page 68 for more information.
Broker Startup Switches
Syntax:
load broker broker_name_and_context /startup_parameter
Example:
load broker .sales_manager.corp.acme /dbvolume=sales_sys
70 Novell iPrint Administration Guide for NetWare 6.5

Manual 3/17/03103Novell Confidential Manage.fm last saved 8/6/03
The following table lists the startup switches you can use when loading broker.nlm.
Startup Parameter Description
noui Loads the Broker without displaying the user interface.
noipx The Print Manager will not support the IPXTM protocol.
noip The Print Manager will not support the IP protocol.
allowdup The NLMTM will not check for two brokers using the same Broker object.
Managing Your Print System 71
Novell Confidential Manage.fm last saved 8/6/03 Manual Version: 3/17/03103
72 Novell iPrint Administration Guide for NetWare 6.5

Manual (ENU) 3/17/03103Novell Confidential 08security.fm last saved 8/6/03
7 Setting Up a Secure Printing Environment
Setting up a secure printing environment can be done on three different levels.
Access Control lets you assign users to a User, Operator, or Manager role to control printers, Print Managers, and brokers.
Printer Security defines how rights to a printer are determined and enforced.
Using SSL with iPrint requires users to authenticate before installing and printing to a printer.
Setting Access Control for Your Print SystemYour print system is designed to take full advantage of eDirectoryTM. You receive all the benefits of eDirectory security and the easy management provided by the industry's most advanced and robust directory service. The Access Control feature allows you to specify the access each User, Group, or container object must your printing resources.
Access control roles are mutually exclusive, even though the same individual might need to perform tasks reserved for different roles. For example, only printer Managers can add or delete printer Operators or printer Users. In a similar way, Managers and Operators must also be designated as Users for a printer before they can submit print jobs to it.
In actual implementation, the defaults prevent most problems that might occur from these distinctions. For example, a printer Manager is automatically designated an Operator and User as well, while an Operator of a printer is automatically designated a User of that printer also. You cannot remove the User role from an Operator, and you cannot remove the Operator and User roles from a Manager.
The creator of an object is automatically granted privileges for all available roles for the type of object being created.
The following sections illustrate some of the security issues and features you might find useful as you plan your print system setup.
“Setting Printer Security Levels” on page 78
“Setting Access Control for Printers” on page 74
“Setting Access Control for the Print Manager” on page 76
“Setting Access Control for Brokers” on page 77
Setting Up a Secure Printing Environment 73
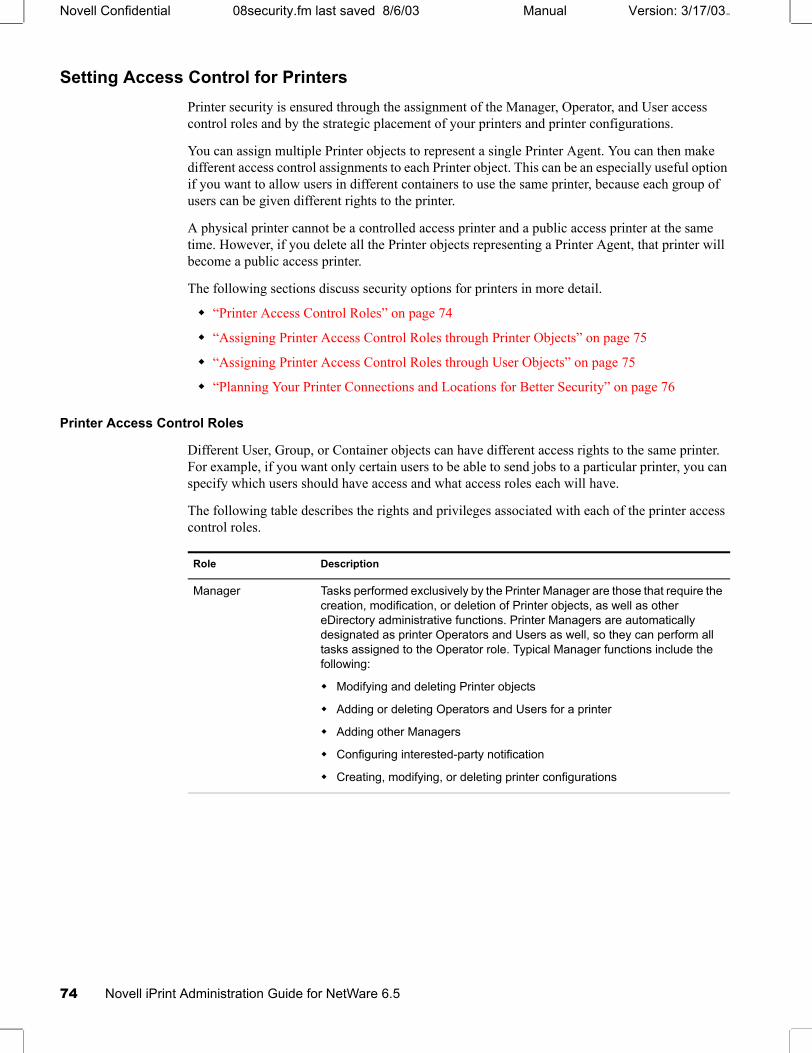
Novell Confidential 08security.fm last saved 8/6/03 Manual Version: 3/17/03103
Setting Access Control for PrintersPrinter security is ensured through the assignment of the Manager, Operator, and User access control roles and by the strategic placement of your printers and printer configurations.
You can assign multiple Printer objects to represent a single Printer Agent. You can then make different access control assignments to each Printer object. This can be an especially useful option if you want to allow users in different containers to use the same printer, because each group of users can be given different rights to the printer.
A physical printer cannot be a controlled access printer and a public access printer at the same time. However, if you delete all the Printer objects representing a Printer Agent, that printer will become a public access printer.
The following sections discuss security options for printers in more detail.
“Printer Access Control Roles” on page 74
“Assigning Printer Access Control Roles through Printer Objects” on page 75
“Assigning Printer Access Control Roles through User Objects” on page 75
“Planning Your Printer Connections and Locations for Better Security” on page 76
Printer Access Control Roles
Different User, Group, or Container objects can have different access rights to the same printer. For example, if you want only certain users to be able to send jobs to a particular printer, you can specify which users should have access and what access roles each will have.
The following table describes the rights and privileges associated with each of the printer access control roles.
Role Description
Manager Tasks performed exclusively by the Printer Manager are those that require the creation, modification, or deletion of Printer objects, as well as other eDirectory administrative functions. Printer Managers are automatically designated as printer Operators and Users as well, so they can perform all tasks assigned to the Operator role. Typical Manager functions include the following:
Modifying and deleting Printer objects
Adding or deleting Operators and Users for a printer
Adding other Managers
Configuring interested-party notification
Creating, modifying, or deleting printer configurations
74 Novell iPrint Administration Guide for NetWare 6.5
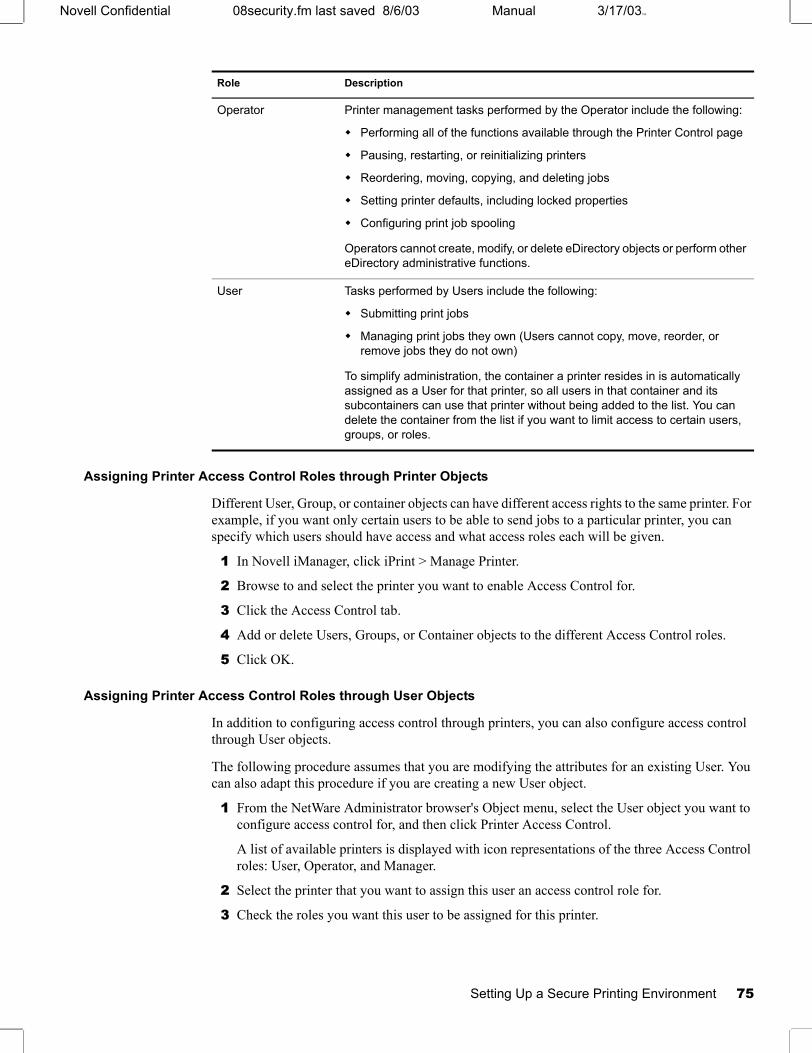
Manual 3/17/03103Novell Confidential 08security.fm last saved 8/6/03
Assigning Printer Access Control Roles through Printer Objects
Different User, Group, or container objects can have different access rights to the same printer. For example, if you want only certain users to be able to send jobs to a particular printer, you can specify which users should have access and what access roles each will be given.
1 In Novell iManager, click iPrint > Manage Printer.
2 Browse to and select the printer you want to enable Access Control for.
3 Click the Access Control tab.
4 Add or delete Users, Groups, or Container objects to the different Access Control roles.
5 Click OK.
Assigning Printer Access Control Roles through User Objects
In addition to configuring access control through printers, you can also configure access control through User objects.
The following procedure assumes that you are modifying the attributes for an existing User. You can also adapt this procedure if you are creating a new User object.
1 From the NetWare Administrator browser's Object menu, select the User object you want to configure access control for, and then click Printer Access Control.
A list of available printers is displayed with icon representations of the three Access Control roles: User, Operator, and Manager.
2 Select the printer that you want to assign this user an access control role for.
3 Check the roles you want this user to be assigned for this printer.
Operator Printer management tasks performed by the Operator include the following:
Performing all of the functions available through the Printer Control page
Pausing, restarting, or reinitializing printers
Reordering, moving, copying, and deleting jobs
Setting printer defaults, including locked properties
Configuring print job spooling
Operators cannot create, modify, or delete eDirectory objects or perform other eDirectory administrative functions.
User Tasks performed by Users include the following:
Submitting print jobs
Managing print jobs they own (Users cannot copy, move, reorder, or remove jobs they do not own)
To simplify administration, the container a printer resides in is automatically assigned as a User for that printer, so all users in that container and its subcontainers can use that printer without being added to the list. You can delete the container from the list if you want to limit access to certain users, groups, or roles.
Role Description
Setting Up a Secure Printing Environment 75
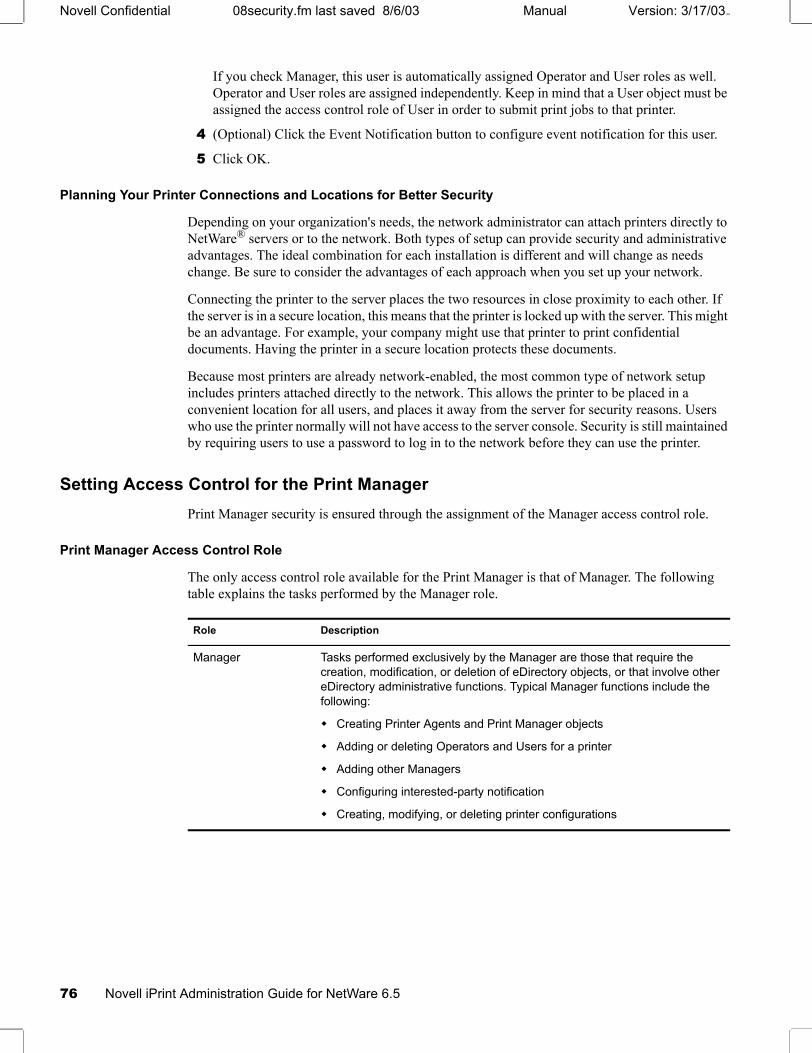
Novell Confidential 08security.fm last saved 8/6/03 Manual Version: 3/17/03103
If you check Manager, this user is automatically assigned Operator and User roles as well. Operator and User roles are assigned independently. Keep in mind that a User object must be assigned the access control role of User in order to submit print jobs to that printer.
4 (Optional) Click the Event Notification button to configure event notification for this user.
5 Click OK.
Planning Your Printer Connections and Locations for Better Security
Depending on your organization's needs, the network administrator can attach printers directly to NetWare® servers or to the network. Both types of setup can provide security and administrative advantages. The ideal combination for each installation is different and will change as needs change. Be sure to consider the advantages of each approach when you set up your network.
Connecting the printer to the server places the two resources in close proximity to each other. If the server is in a secure location, this means that the printer is locked up with the server. This might be an advantage. For example, your company might use that printer to print confidential documents. Having the printer in a secure location protects these documents.
Because most printers are already network-enabled, the most common type of network setup includes printers attached directly to the network. This allows the printer to be placed in a convenient location for all users, and places it away from the server for security reasons. Users who use the printer normally will not have access to the server console. Security is still maintained by requiring users to use a password to log in to the network before they can use the printer.
Setting Access Control for the Print ManagerPrint Manager security is ensured through the assignment of the Manager access control role.
Print Manager Access Control Role
The only access control role available for the Print Manager is that of Manager. The following table explains the tasks performed by the Manager role.
Role Description
Manager Tasks performed exclusively by the Manager are those that require the creation, modification, or deletion of eDirectory objects, or that involve other eDirectory administrative functions. Typical Manager functions include the following:
Creating Printer Agents and Print Manager objects
Adding or deleting Operators and Users for a printer
Adding other Managers
Configuring interested-party notification
Creating, modifying, or deleting printer configurations
76 Novell iPrint Administration Guide for NetWare 6.5
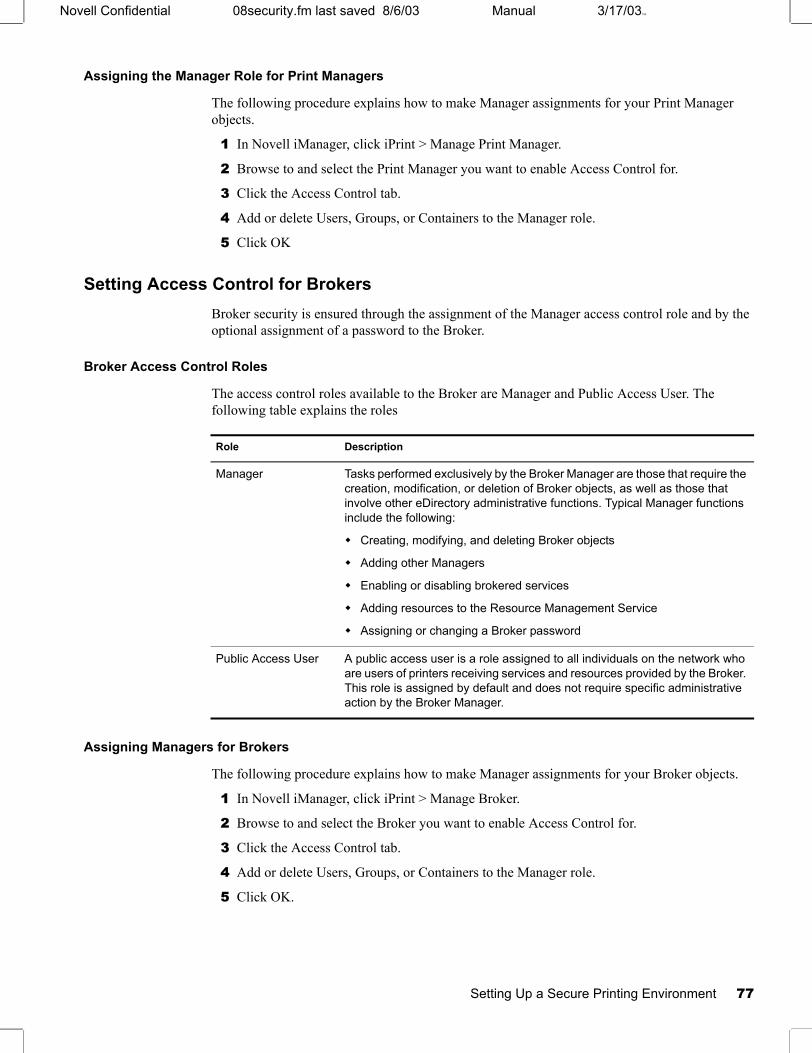
Manual 3/17/03103Novell Confidential 08security.fm last saved 8/6/03
Assigning the Manager Role for Print Managers
The following procedure explains how to make Manager assignments for your Print Manager objects.
1 In Novell iManager, click iPrint > Manage Print Manager.
2 Browse to and select the Print Manager you want to enable Access Control for.
3 Click the Access Control tab.
4 Add or delete Users, Groups, or Containers to the Manager role.
5 Click OK
Setting Access Control for BrokersBroker security is ensured through the assignment of the Manager access control role and by the optional assignment of a password to the Broker.
Broker Access Control Roles
The access control roles available to the Broker are Manager and Public Access User. The following table explains the roles
Assigning Managers for Brokers
The following procedure explains how to make Manager assignments for your Broker objects.
1 In Novell iManager, click iPrint > Manage Broker.
2 Browse to and select the Broker you want to enable Access Control for.
3 Click the Access Control tab.
4 Add or delete Users, Groups, or Containers to the Manager role.
5 Click OK.
Role Description
Manager Tasks performed exclusively by the Broker Manager are those that require the creation, modification, or deletion of Broker objects, as well as those that involve other eDirectory administrative functions. Typical Manager functions include the following:
Creating, modifying, and deleting Broker objects
Adding other Managers
Enabling or disabling brokered services
Adding resources to the Resource Management Service
Assigning or changing a Broker password
Public Access User A public access user is a role assigned to all individuals on the network who are users of printers receiving services and resources provided by the Broker. This role is assigned by default and does not require specific administrative action by the Broker Manager.
Setting Up a Secure Printing Environment 77

Novell Confidential 08security.fm last saved 8/6/03 Manual Version: 3/17/03103
Setting Printer Security LevelsPrinter security levels affect how rights to a printer are determined and enforced. The default security level is Medium. With sensitive print data, you might want to set the security level to High; however, performance will be effected.
To set a printer’s security level, do the following:
1 In Novell iManager, click iPrint > Manage Printer.
2 Browse to and select the printer you want to enable Access Control for.
3 Click the Access Control > Security.
4 Select the level of security you want for the printer.
5 Click OK or Apply to save your changes.
Secure Printing Using SSLSecure printing takes advantage of SSL, which requires users to authenticate using their eDirectory usernames and passwords. Users authenticate once per eDirectory tree per session. The print data is encrypted, and all print communication uses port 443. Without secure printing, the printer is available to anyone inside the firewall on the network and the print data is not encrypted. Secure printing works in conjunction with the security level set for the printer.
The following table shows how access is determined, depending on the level of printer security and if secure printing is enabled or disabled.
Table 3 Effects of Printer Security
For more information on printer security levels, see “Setting Printer Security Levels” on page 78.
Printer Security Level Secure Printing Enabled
Low Security is enforced by the client applications only
Medium (default) Security is enforced by Print Manager if print data integrity is involved. Otherwise, security is enforced by the client applications.
High Security is enforced by the Print Manager for all operations.
Printer Security Level Secure Printing Disabled (No SSL) Secure Printing Enabled (With SSL)
Low Full access eDirectory authentication
Medium (Default) Users granted access as if they had been assigned the User role.
eDirectory authentication and check user’s effective rights
High Users must use SSL and authenticate to eDirectory
Users might receive an error if SSL is not enabled. (See “High Security Requires User Authentication” on page 79.)
eDirectory authentication, check user’s effective roles, and connection verification
SSL is automatically enabled when a printer’s security is changed to High when using Novell iManager.
78 Novell iPrint Administration Guide for NetWare 6.5

Manual 3/17/03103Novell Confidential 08security.fm last saved 8/6/03
Considerations When Changing Printer Security
High Security Requires User Authentication
If you change the printer agent security level to high, the Requires Security check box (enabling SSL) on the IPP Support page of the printer’s Client Support Page in Novell® iManager is enabled automatically.NOTE: When setting printer agent security at the server console, SSL is not enabled automatically, and users might receive the following error
Error message: iPrint Client - "The request requires user authentication."
To avoid the error, ensure that the Requires Security check box is checked when a printer agent’s security is changed to High. For more information, see “Enabling SSL” on page 79.
Enabling SSL Changes the Printer URL
When you check the Requires Security check box, the URL for the associated printer will change. Users who have already installed this printer must delete and reinstall the printer in order to use the updated URL.
Lowering Printer Security
Once a printer’s security is set to High and SSL is enabled with the Requires Security check box, SSL remains enabled even if the security level is lowered. If SSL is disabled, then the URL will change and users must reinstall the printer.
Enabling SSL Uses LDAP for Authentication
When you enable SSL or set a printer’s security to High, iPrint uses LDAP to authenticate users. When a user authenticates, LDAP begins searching for the user beginning at the root most part of the eDirectory tree by default. If this search method becomes an issue, you might want to change the starting point for the search to a container closer to the users. The starting point for the search can be changed by editing sys:apache2\iprint\ipp.conf and changing the value for the AuthLDAPURL parameter. See Apache’s AuthLDAPURL Directive (http://httpd.apache.org/docs-2.1/en/mod/mod_auth_ldap.html) for more information.
Enabling SSL1 From Novell iManager, click iPrint > Manage Printer.
2 Browse to and select the Printer object you want to modify.
3 Click Client Support > IPP Support.
4 Check/Uncheck the Requires Security check box.
5 Click Apply or OK to update the printer settings.
Saving Passwords for Secure PrintersWhen users print to a secure printer, they are prompted for the eDirectory username and password. Users can select to have their workstations remember their password for printing. For Windows NT/2000 users, passwords are saved on a per-user basis.
Setting Up a Secure Printing Environment 79

Novell Confidential 08security.fm last saved 8/6/03 Manual Version: 3/17/03103
By default, the Remember Password feature is enabled. To disable it, use a text editor to edit the sys:\apache2\htdocs\ippdocs\iprint.ini file to reflect the settings you want. Information on the settings is contained in the file.IMPORTANT: The iprint.ini file should be synchronized across all servers where iPrint and a Print Manager are running.
80 Novell iPrint Administration Guide for NetWare 6.5

Manual (ENU) 3/17/03103Novell Confidential appdx1htmlinf.fm last saved 8/6/03
A Configuring the iPrint HTML Interface
This appendix discusses the HTML parameters and operations used in the iPrint interface. This information is provided to give administrators insight into how to customize their HTML files.
Using this information, HTML developers can create and edit iPrint Web pages to customize them for their companies.
The iPrint HTML files are located in the sys:\apache2\htdocs\ippdocs directory.
The following sections will help you customize the HTML interface:
“iPrint Client HTML Interface Description” on page 81
“HTML Parameters” on page 83
“Supported Operations Strings” on page 86
iPrint Client HTML Interface DescriptionThe list of operations and identifiers is the same for each browser. The printer name and the operation to be performed are required parameters for all operations except “op-client-interface version” on page 87 and “op-client-version-info” on page 87. All other parameters are operation-specific or optional. Operation-specific parameters that are used out of context are ignored.
If the desired output from the plug-in is HTML, a frameset needs to be used. This is to prevent some browsers from failing when they try to write to the document that invoked the plug-in. The name of the frame to receive the HTML page generated by the plug-in can be passed in using the target frame option. This target frame needs to be a named frame in the same frameset as the frame invoking the plug-in.
Internet Explorer Browser Customization“HTML Script Example” on page 81
“HTML Code Example” on page 82
HTML Script Example
The ExecuteRequest() entry point simplifies HTML coding when working with Internet Explorer. It lets you pass/get information from the iPrint without having to reload a Web page.
A result type called object is implemented and should be used only in conjunction with ExecuteRequest(). You can use ExecuteRequest and have it return results via HTML, URL, message box, or cookie. All data can be passed via the ExecuteRequest() second parameter. The first parameter is the operation. Both of the parameters are strings.
Configuring the iPrint HTML Interface 81
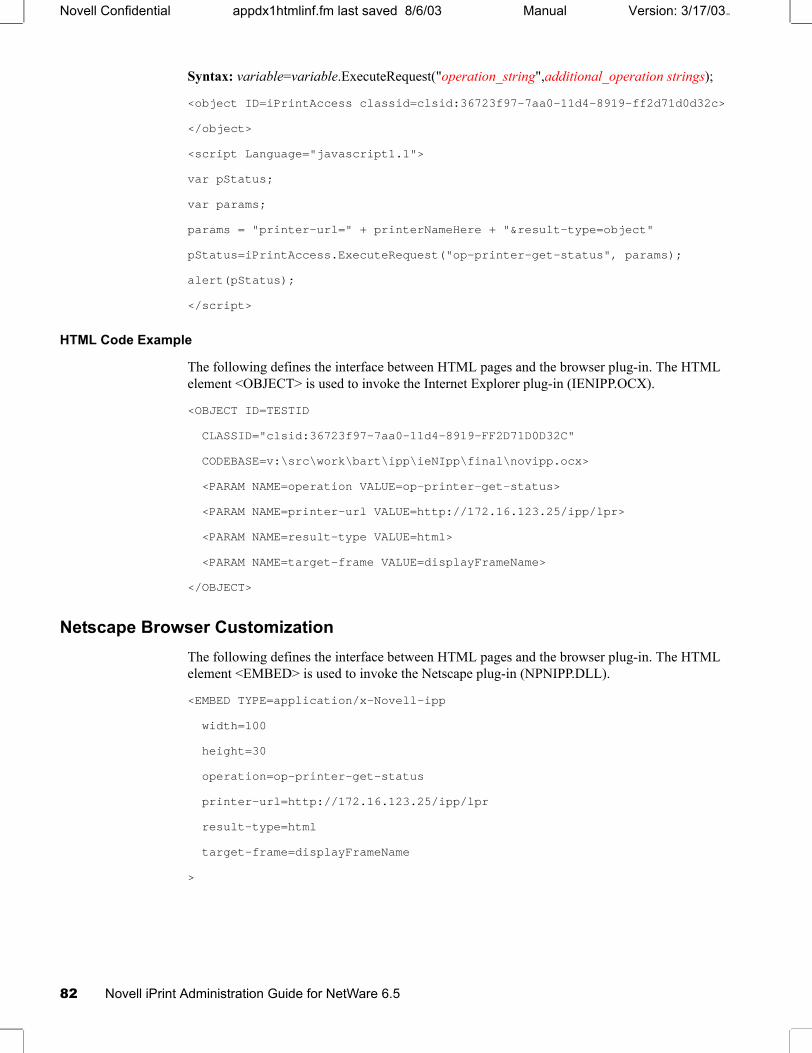
Novell Confidential appdx1htmlinf.fm last saved 8/6/03 Manual Version: 3/17/03103
Syntax: variable=variable.ExecuteRequest("operation_string",additional_operation strings);
<object ID=iPrintAccess classid=clsid:36723f97-7aa0-11d4-8919-ff2d71d0d32c>
</object>
<script Language="javascript1.1">
var pStatus;
var params;
params = "printer-url=" + printerNameHere + "&result-type=object"
pStatus=iPrintAccess.ExecuteRequest("op-printer-get-status", params);
alert(pStatus);
</script>
HTML Code Example
The following defines the interface between HTML pages and the browser plug-in. The HTML element <OBJECT> is used to invoke the Internet Explorer plug-in (IENIPP.OCX).
<OBJECT ID=TESTID
CLASSID="clsid:36723f97-7aa0-11d4-8919-FF2D71D0D32C"
CODEBASE=v:\src\work\bart\ipp\ieNIpp\final\novipp.ocx>
<PARAM NAME=operation VALUE=op-printer-get-status>
<PARAM NAME=printer-url VALUE=http://172.16.123.25/ipp/lpr>
<PARAM NAME=result-type VALUE=html>
<PARAM NAME=target-frame VALUE=displayFrameName>
</OBJECT>
Netscape Browser CustomizationThe following defines the interface between HTML pages and the browser plug-in. The HTML element <EMBED> is used to invoke the Netscape plug-in (NPNIPP.DLL).
<EMBED TYPE=application/x-Novell-ipp
width=100
height=30
operation=op-printer-get-status
printer-url=http://172.16.123.25/ipp/lpr
result-type=html
target-frame=displayFrameName
>
82 Novell iPrint Administration Guide for NetWare 6.5
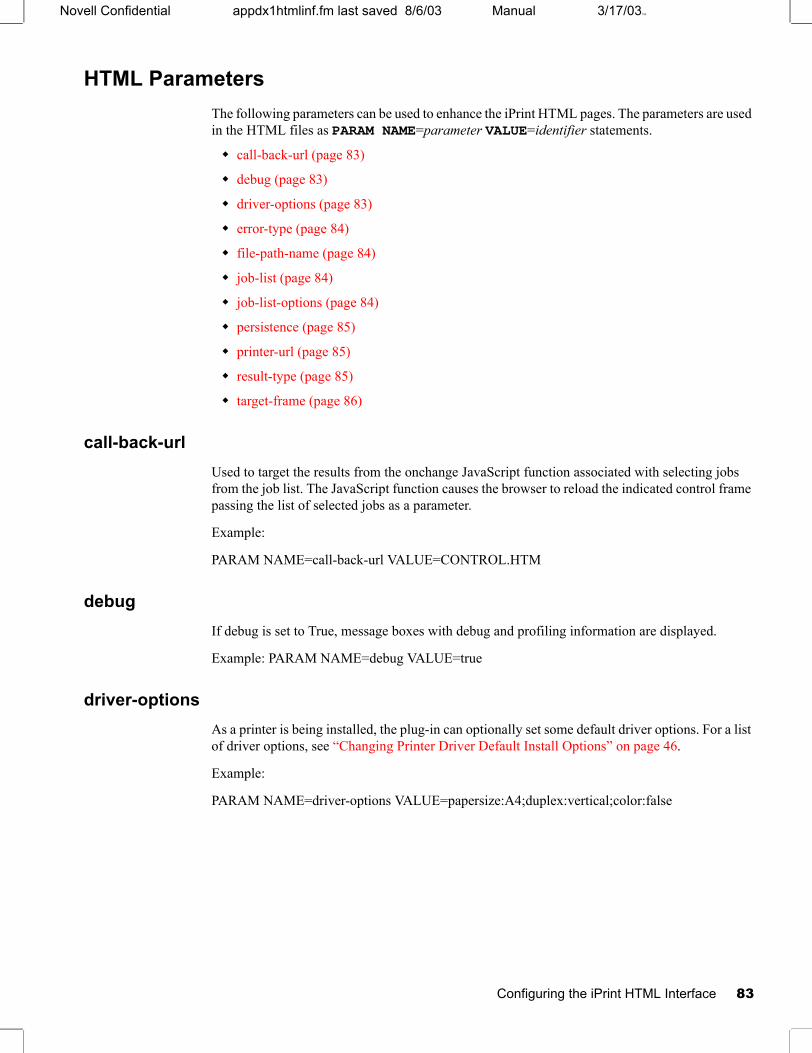
Manual 3/17/03103Novell Confidential appdx1htmlinf.fm last saved 8/6/03
HTML ParametersThe following parameters can be used to enhance the iPrint HTML pages. The parameters are used in the HTML files as PARAM NAME=parameter VALUE=identifier statements.
call-back-url (page 83)
debug (page 83)
driver-options (page 83)
error-type (page 84)
file-path-name (page 84)
job-list (page 84)
job-list-options (page 84)
persistence (page 85)
printer-url (page 85)
result-type (page 85)
target-frame (page 86)
call-back-urlUsed to target the results from the onchange JavaScript function associated with selecting jobs from the job list. The JavaScript function causes the browser to reload the indicated control frame passing the list of selected jobs as a parameter.
Example:
PARAM NAME=call-back-url VALUE=CONTROL.HTM
debugIf debug is set to True, message boxes with debug and profiling information are displayed.
Example: PARAM NAME=debug VALUE=true
driver-optionsAs a printer is being installed, the plug-in can optionally set some default driver options. For a list of driver options, see “Changing Printer Driver Default Install Options” on page 46.
Example:
PARAM NAME=driver-options VALUE=papersize:A4;duplex:vertical;color:false
Configuring the iPrint HTML Interface 83

Novell Confidential appdx1htmlinf.fm last saved 8/6/03 Manual Version: 3/17/03103
error-typeUsed to tell the plug-in how to report errors associated with the requested operation. The plug-in has the ability to return the errors in.
The plug-in defaults to the same reply mechanism that is specified in results-type if error-type is not specified.
Example:
PARAM NAME=error-type VALUE=html
file-path-nameSpecifies a printer ready file that can be passed to the plug-in for printing. This mechanism bypasses the print provider and the print driver. The printer does not need to be installed on the workstation to use this operation.
Example:
PARAM NAME= file-path-name VALUE=directory path\filename
job-listThe plug-in can perform several operations on jobs. job-list is a comma-delimited string of job IDs to indicate which jobs to operate on. A job list with the job ID of -1 is equivalent to selecting all jobs
Example:
PARAM NAME=job-list VALUE=3,5,7
job-list-optionsWhen the plug-in creates the HTML for job-list, it can add buttons to allow the user to hold, resume, delete, or display information for selected jobs. This parameter is used to specify which buttons to display and support.
The following are the possible buttons:
op-job-hold (page 88)
op-job-hold-release (page 88)
op-job-cancel (page 87)
op-job-get-info (page 88)
Option Description
none No response.
msgBox Display results in a message box.
html Display results as an HTML page generated by the plug-in.
cookie Put the error information in a cookie.
url Pass the results as a url parameter.
84 Novell iPrint Administration Guide for NetWare 6.5
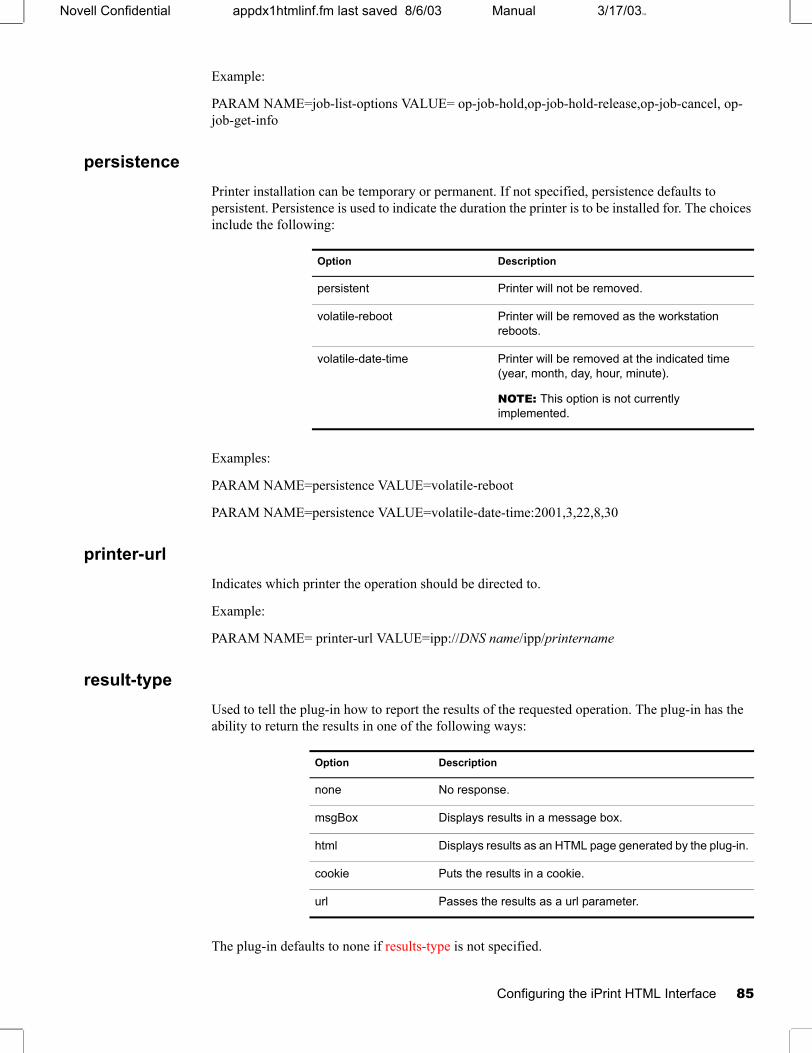
Manual 3/17/03103Novell Confidential appdx1htmlinf.fm last saved 8/6/03
Example:
PARAM NAME=job-list-options VALUE= op-job-hold,op-job-hold-release,op-job-cancel, op-job-get-info
persistencePrinter installation can be temporary or permanent. If not specified, persistence defaults to persistent. Persistence is used to indicate the duration the printer is to be installed for. The choices include the following:
Examples:
PARAM NAME=persistence VALUE=volatile-reboot
PARAM NAME=persistence VALUE=volatile-date-time:2001,3,22,8,30
printer-urlIndicates which printer the operation should be directed to.
Example:
PARAM NAME= printer-url VALUE=ipp://DNS name/ipp/printername
result-typeUsed to tell the plug-in how to report the results of the requested operation. The plug-in has the ability to return the results in one of the following ways:
The plug-in defaults to none if results-type is not specified.
Option Description
persistent Printer will not be removed.
volatile-reboot Printer will be removed as the workstation reboots.
volatile-date-time Printer will be removed at the indicated time (year, month, day, hour, minute).
NOTE: This option is not currently implemented.
Option Description
none No response.
msgBox Displays results in a message box.
html Displays results as an HTML page generated by the plug-in.
cookie Puts the results in a cookie.
url Passes the results as a url parameter.
Configuring the iPrint HTML Interface 85
Novell Confidential appdx1htmlinf.fm last saved 8/6/03 Manual Version: 3/17/03103
Example:
PARAM NAME=result-type VALUE=html
target-frameUsed to specify the name of the frame in which to put the results and/or error information into. If the operation results type is url, the target frame will be the one reloaded with the indicated URL.
Example:
PARAM NAME=target-frame VALUE=FrameName
Supported Operations StringsAll requests to the plug-in have two required parameters. The first is operation, and the second is results-type. All operations except op-client-interface-version and op-client-version-info require the parameter printer-url. All requests support the optional parameter error-type.
With the exception of op-printer-send-test-page and op-printer-remove the printer does not need to be installed to use the following operations:
op-client-interface version (page 87)
op-client-is-printer-installed (page 87)
op-client-version-info (page 87)
op-job-cancel (page 87)
op-job-get-info (page 88)
op-job-hold (page 88)
op-job-hold-release (page 88)
op-printer-get-info (page 88)
op-printer-get-status (page 89)
op-printer-install (page 89)
op-printer-list-all-jobs (page 89)
op-printer-pause (page 89)
op-printer-purge-jobs (page 90)
op-printer-remove (page 90)
op-printer-resume (page 90)
op-printer-send-file (page 90)
op-printer-send-test-page (page 90)
86 Novell iPrint Administration Guide for NetWare 6.5
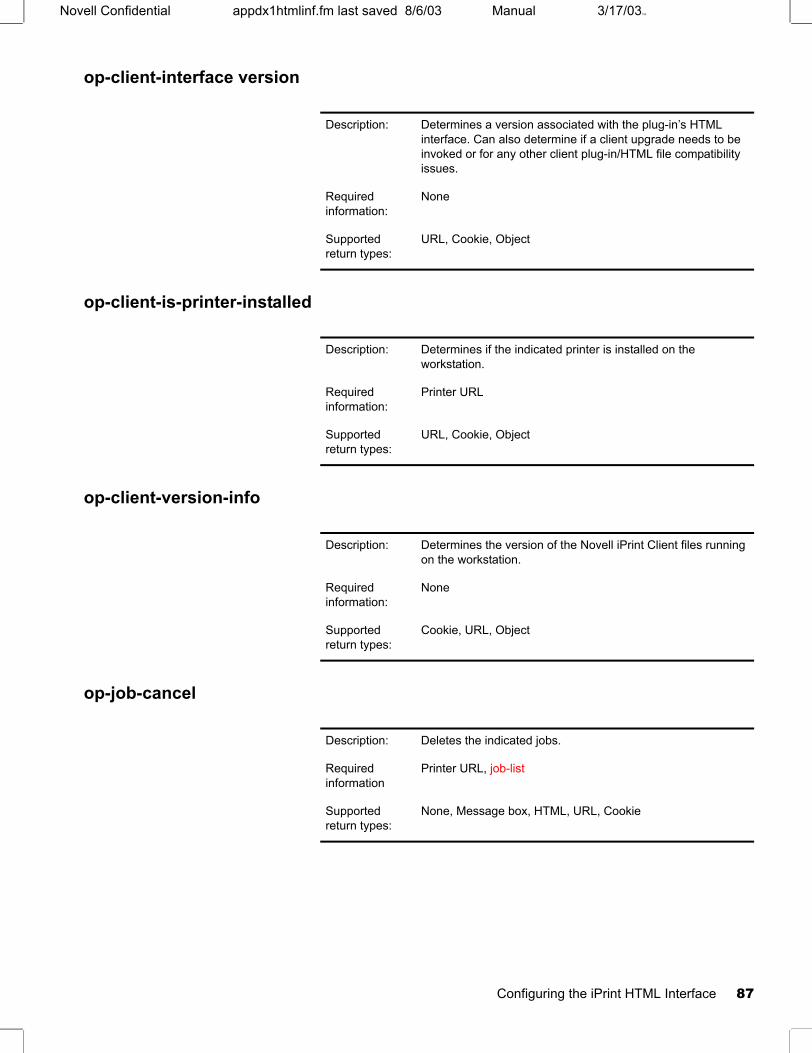
Manual 3/17/03103Novell Confidential appdx1htmlinf.fm last saved 8/6/03
op-client-interface version
op-client-is-printer-installed
op-client-version-info
op-job-cancel
Description: Determines a version associated with the plug-in’s HTML interface. Can also determine if a client upgrade needs to be invoked or for any other client plug-in/HTML file compatibility issues.
Required information:
None
Supported return types:
URL, Cookie, Object
Description: Determines if the indicated printer is installed on the workstation.
Required information:
Printer URL
Supported return types:
URL, Cookie, Object
Description: Determines the version of the Novell iPrint Client files running on the workstation.
Required information:
None
Supported return types:
Cookie, URL, Object
Description: Deletes the indicated jobs.
Required information
Printer URL, job-list
Supported return types:
None, Message box, HTML, URL, Cookie
Configuring the iPrint HTML Interface 87
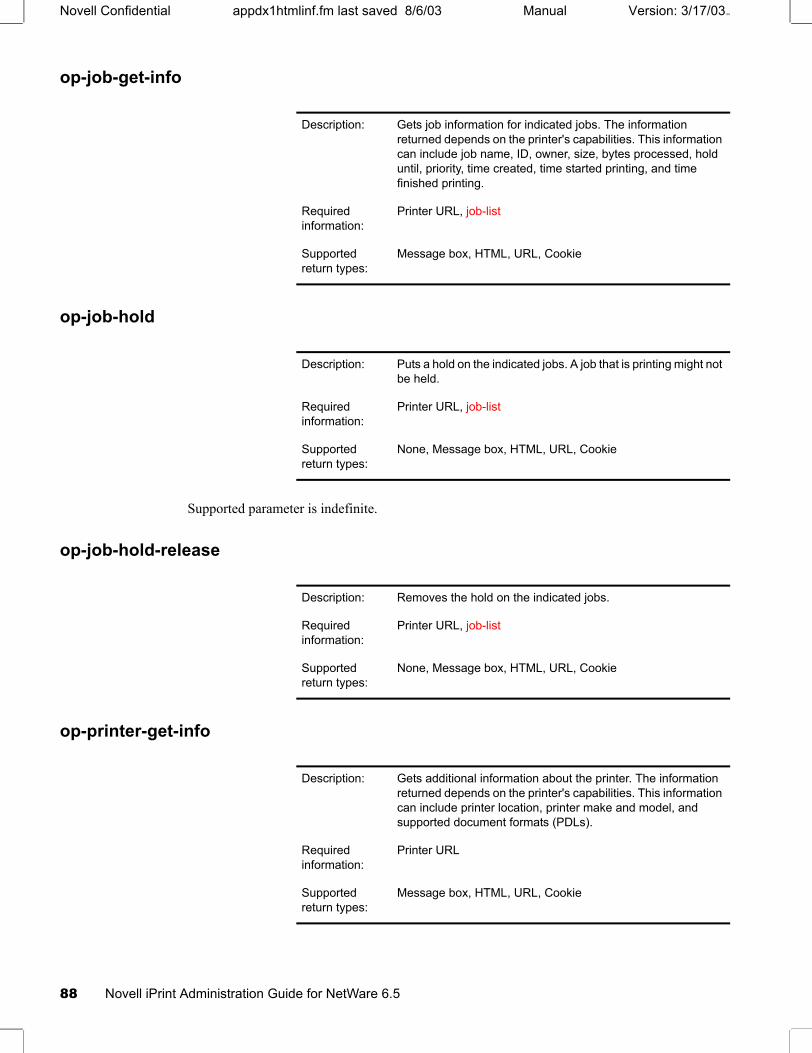
Novell Confidential appdx1htmlinf.fm last saved 8/6/03 Manual Version: 3/17/03103
op-job-get-info
op-job-hold
Supported parameter is indefinite.
op-job-hold-release
op-printer-get-info
Description: Gets job information for indicated jobs. The information returned depends on the printer's capabilities. This information can include job name, ID, owner, size, bytes processed, hold until, priority, time created, time started printing, and time finished printing.
Required information:
Printer URL, job-list
Supported return types:
Message box, HTML, URL, Cookie
Description: Puts a hold on the indicated jobs. A job that is printing might not be held.
Required information:
Printer URL, job-list
Supported return types:
None, Message box, HTML, URL, Cookie
Description: Removes the hold on the indicated jobs.
Required information:
Printer URL, job-list
Supported return types:
None, Message box, HTML, URL, Cookie
Description: Gets additional information about the printer. The information returned depends on the printer's capabilities. This information can include printer location, printer make and model, and supported document formats (PDLs).
Required information:
Printer URL
Supported return types:
Message box, HTML, URL, Cookie
88 Novell iPrint Administration Guide for NetWare 6.5
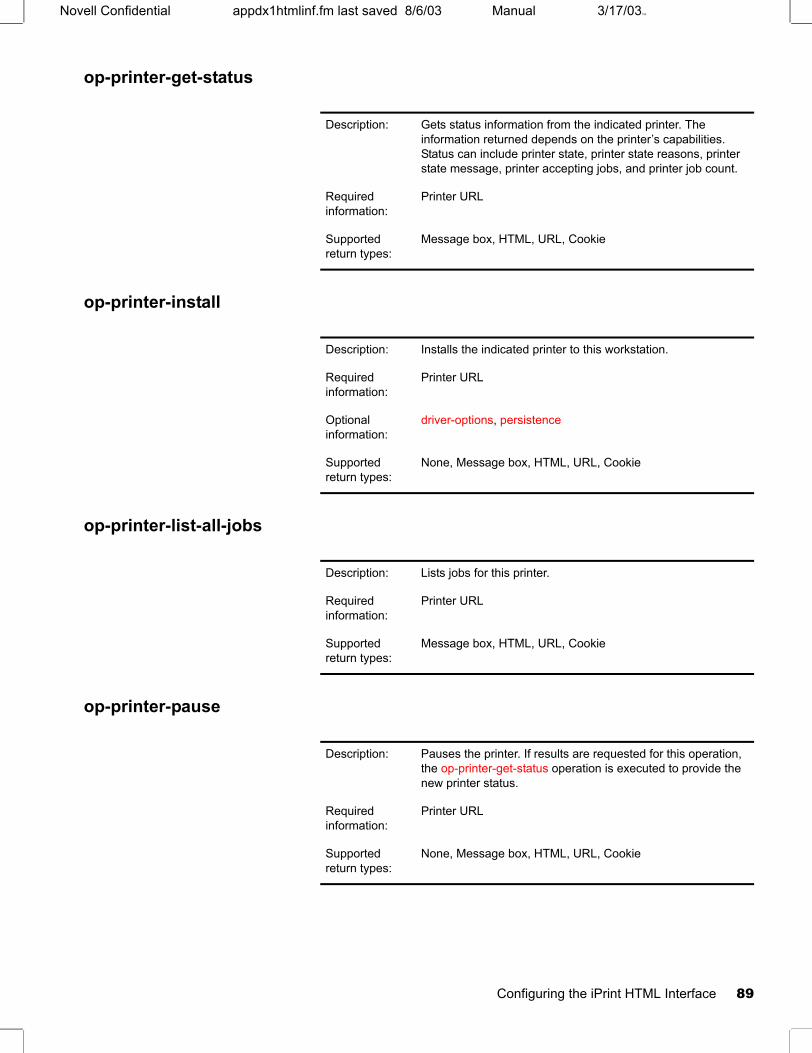
Manual 3/17/03103Novell Confidential appdx1htmlinf.fm last saved 8/6/03
op-printer-get-status
op-printer-install
op-printer-list-all-jobs
op-printer-pause
Description: Gets status information from the indicated printer. The information returned depends on the printer’s capabilities. Status can include printer state, printer state reasons, printer state message, printer accepting jobs, and printer job count.
Required information:
Printer URL
Supported return types:
Message box, HTML, URL, Cookie
Description: Installs the indicated printer to this workstation.
Required information:
Printer URL
Optional information:
driver-options, persistence
Supported return types:
None, Message box, HTML, URL, Cookie
Description: Lists jobs for this printer.
Required information:
Printer URL
Supported return types:
Message box, HTML, URL, Cookie
Description: Pauses the printer. If results are requested for this operation, the op-printer-get-status operation is executed to provide the new printer status.
Required information:
Printer URL
Supported return types:
None, Message box, HTML, URL, Cookie
Configuring the iPrint HTML Interface 89

Novell Confidential appdx1htmlinf.fm last saved 8/6/03 Manual Version: 3/17/03103
op-printer-purge-jobs
op-printer-remove
op-printer-resume
op-printer-send-file
op-printer-send-test-page
Description: Deletes all jobs for this printer.
Required information:
Printer URL
Supported return types:
None, Message box, HTML, URL, Cookie
Description: Deletes the indicated printer from this workstation.
Required information:
Printer URL
Supported return types:
None, Message box, HTML
Description: Resumes the printer. If results are requested for this operation, the op-printer-get-status operation is executed to provide the new printer status.
Required information:
Printer URL
Supported return types:
None, Message box, HTML, URL, Cookie
Description: Sends a printer-ready file to this printer.
Required information:
Printer URL, file-path-name
Supported return types:
None, Message box, HTML, URL, Cookie
Description: Sends a test page to this printer.
Required information:
Printer URL
Supported return types:
None, Message box, HTML, URL, Cookie
90 Novell iPrint Administration Guide for NetWare 6.5

Manual (99a) 3/17/03103Novell Confidential apdx_und.fm last saved 8/6/03
B Understanding iPrint and Novell Distributed Print Services
Novell iPrint utilizes the Novell® Distributed Print ServicesTM (NDPS®) infrastructure. iPrint enhances the users’ experience by providing a Web view of their printing environment. In addition to NDPS, iPrint uses the following components:
A print provider and a set of browser plug-ins.
These are installed on a user’s workstation. The Novell ClientTM is not required.
Ippsrvr.nlm. This runs on the NetWare® server.
When an eDirectory Printer object is configured as an iPrint printer, the Print Manager automatically loads this NLMTM on the server, which generates a URL for the printer.
A set of HTML pages.
These are provided to install the iPrint client software and printers as well as to view and manage print jobs. These pages are customizable. For more information, see Chapter 5, “Customizing iPrint,” on page 41.
NDPS infrastructure is designed to handle the increased complexity of managing printing devices in any type of network environment, ranging in size from small workgroups to enterprise-wide systems. NDPS allows you to use Novell iManager, Novell’s Web-based management tool. You can also designate those printers for automatic installation on user workstations, without any action by your users.
NDPS replaces the existing queue-based printing technology. You don't need to set up print queues, printer objects, or print servers, and link them together. Instead, all of your management tasks are focused on the printer itself, which can be configured as an eDirectoryTM object.
To better understand how NDPS works, read the following sections:
“Overview of NDPS Infrastructure” on page 92
“Comparing NDPS with Queue-Based Print Services” on page 95
“Understanding NDPS Printers” on page 96
“Understanding the Architecture of NDPS” on page 97
Understanding iPrint and Novell Distributed Print Services 91

Novell Confidential apdx_und.fm last saved 8/6/03 Manual Version: 3/17/03103
Overview of NDPS InfrastructureThe NDPS infrastructure is automatically installed when you choose to install iPrint. Novell's legacy, queue-based print system is also fully supported, which allows your users to continue printing as they always have until you complete the transition to iPrint.
Some of the most significant features of NDPS include the following:
Bi-directional Feedback and Control (page 92)
Configurable Event Notification (page 93)
Tight Integration with eDirectory (page 93)
Automatic Printer Driver Download and End User Convenience (page 93)
Printer and Job Configuration Options (page 94)
Job Scheduling Options (page 94)
Protocol Independence (page 94)
Compatibility with Multiple Clients, Applications, and Operating Systems (page 94)
Support for Existing Printers (Full Backward Compatibility) (page 95)
Bi-directional Feedback and ControlNovell Distributed Print Services lets clients and printers exchange information about printers and print jobs. For example, this interchange allows users and administrators to get real-time information about a printer such as
Its status
For example, it reports such information as whether the printer needs toner or paper, whether it is online, and whether the lid is open.
Its configuration properties and features
For example, does it support color? Duplexing? How many pages has it printed since it was last serviced?
NDPS also lets you view information about a print job's properties and status, including
The number of copies being printed
Job hold and scheduling information
Notification when the job has actually been completed
The bi-directional feedback provided by NDPS is limited only by the bi-directional capabilities of the printer itself. In many cases, NDPS actually enhances information provided about printers that do not have bi-directional capabilities.
printer is available
toner is low
duplex, tabloid-size, color, . . .
five copies will be printed
upper tray, transparency
job has been printed
is the printer available?
what is the status of the printer?
what features are available?
how many copies are printing?
what media is being used?
has the job actually printed out?
92 Novell iPrint Administration Guide for NetWare 6.5
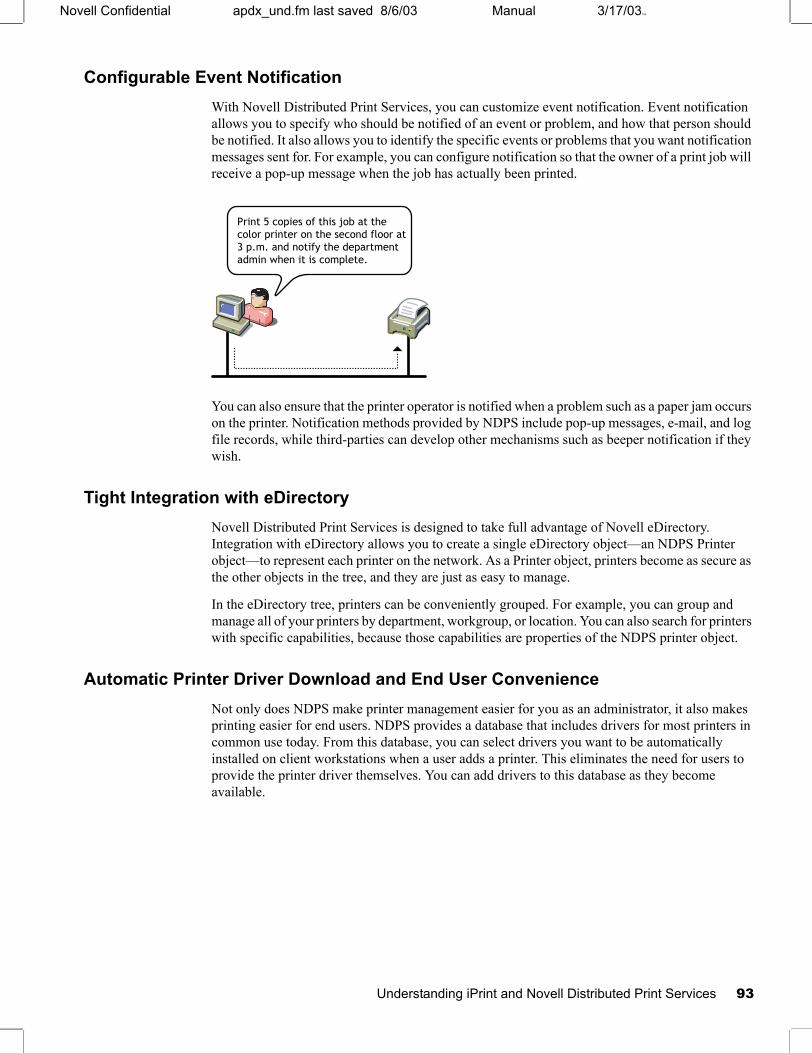
Manual 3/17/03103Novell Confidential apdx_und.fm last saved 8/6/03
Configurable Event NotificationWith Novell Distributed Print Services, you can customize event notification. Event notification allows you to specify who should be notified of an event or problem, and how that person should be notified. It also allows you to identify the specific events or problems that you want notification messages sent for. For example, you can configure notification so that the owner of a print job will receive a pop-up message when the job has actually been printed.
You can also ensure that the printer operator is notified when a problem such as a paper jam occurs on the printer. Notification methods provided by NDPS include pop-up messages, e-mail, and log file records, while third-parties can develop other mechanisms such as beeper notification if they wish.
Tight Integration with eDirectoryNovell Distributed Print Services is designed to take full advantage of Novell eDirectory. Integration with eDirectory allows you to create a single eDirectory object—an NDPS Printer object—to represent each printer on the network. As a Printer object, printers become as secure as the other objects in the tree, and they are just as easy to manage.
In the eDirectory tree, printers can be conveniently grouped. For example, you can group and manage all of your printers by department, workgroup, or location. You can also search for printers with specific capabilities, because those capabilities are properties of the NDPS printer object.
Automatic Printer Driver Download and End User ConvenienceNot only does NDPS make printer management easier for you as an administrator, it also makes printing easier for end users. NDPS provides a database that includes drivers for most printers in common use today. From this database, you can select drivers you want to be automatically installed on client workstations when a user adds a printer. This eliminates the need for users to provide the printer driver themselves. You can add drivers to this database as they become available.
Print 5 copies of this job at the color printer on the second floor at 3 p.m. and notify the department admin when it is complete.
Understanding iPrint and Novell Distributed Print Services 93
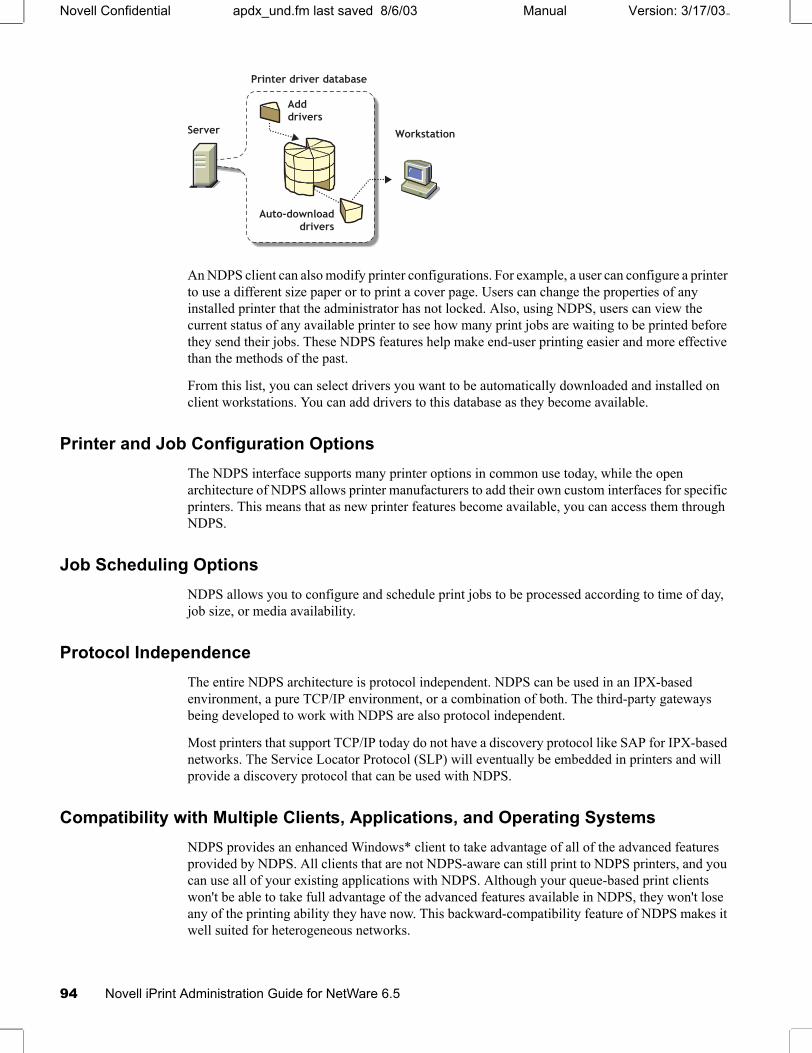
Novell Confidential apdx_und.fm last saved 8/6/03 Manual Version: 3/17/03103
An NDPS client can also modify printer configurations. For example, a user can configure a printer to use a different size paper or to print a cover page. Users can change the properties of any installed printer that the administrator has not locked. Also, using NDPS, users can view the current status of any available printer to see how many print jobs are waiting to be printed before they send their jobs. These NDPS features help make end-user printing easier and more effective than the methods of the past.
From this list, you can select drivers you want to be automatically downloaded and installed on client workstations. You can add drivers to this database as they become available.
Printer and Job Configuration OptionsThe NDPS interface supports many printer options in common use today, while the open architecture of NDPS allows printer manufacturers to add their own custom interfaces for specific printers. This means that as new printer features become available, you can access them through NDPS.
Job Scheduling OptionsNDPS allows you to configure and schedule print jobs to be processed according to time of day, job size, or media availability.
Protocol IndependenceThe entire NDPS architecture is protocol independent. NDPS can be used in an IPX-based environment, a pure TCP/IP environment, or a combination of both. The third-party gateways being developed to work with NDPS are also protocol independent.
Most printers that support TCP/IP today do not have a discovery protocol like SAP for IPX-based networks. The Service Locator Protocol (SLP) will eventually be embedded in printers and will provide a discovery protocol that can be used with NDPS.
Compatibility with Multiple Clients, Applications, and Operating SystemsNDPS provides an enhanced Windows* client to take advantage of all of the advanced features provided by NDPS. All clients that are not NDPS-aware can still print to NDPS printers, and you can use all of your existing applications with NDPS. Although your queue-based print clients won't be able to take full advantage of the advanced features available in NDPS, they won't lose any of the printing ability they have now. This backward-compatibility feature of NDPS makes it well suited for heterogeneous networks.
Server Workstation
Printer driver database
Adddrivers
Auto-downloaddrivers
94 Novell iPrint Administration Guide for NetWare 6.5
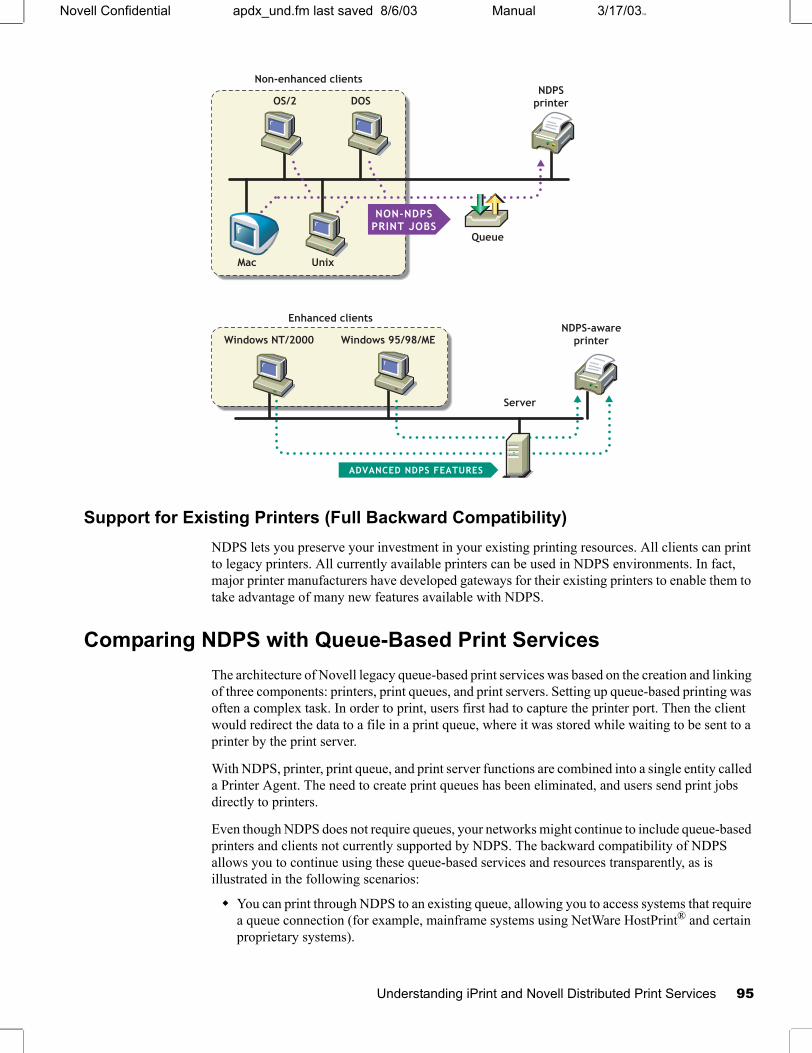
Manual 3/17/03103Novell Confidential apdx_und.fm last saved 8/6/03
Support for Existing Printers (Full Backward Compatibility)NDPS lets you preserve your investment in your existing printing resources. All clients can print to legacy printers. All currently available printers can be used in NDPS environments. In fact, major printer manufacturers have developed gateways for their existing printers to enable them to take advantage of many new features available with NDPS.
Comparing NDPS with Queue-Based Print ServicesThe architecture of Novell legacy queue-based print services was based on the creation and linking of three components: printers, print queues, and print servers. Setting up queue-based printing was often a complex task. In order to print, users first had to capture the printer port. Then the client would redirect the data to a file in a print queue, where it was stored while waiting to be sent to a printer by the print server.
With NDPS, printer, print queue, and print server functions are combined into a single entity called a Printer Agent. The need to create print queues has been eliminated, and users send print jobs directly to printers.
Even though NDPS does not require queues, your networks might continue to include queue-based printers and clients not currently supported by NDPS. The backward compatibility of NDPS allows you to continue using these queue-based services and resources transparently, as is illustrated in the following scenarios:
You can print through NDPS to an existing queue, allowing you to access systems that require a queue connection (for example, mainframe systems using NetWare HostPrint® and certain proprietary systems).
Non-enhanced clients
DOSOS/2NDPS
printer
UnixMac
NON-NDPSPRINT JOBS
Queue
Enhanced clients
Windows 95/98/MENDPS-aware
printer
Server
Windows NT/2000
ADVANCED NDPS FEATURES
Understanding iPrint and Novell Distributed Print Services 95
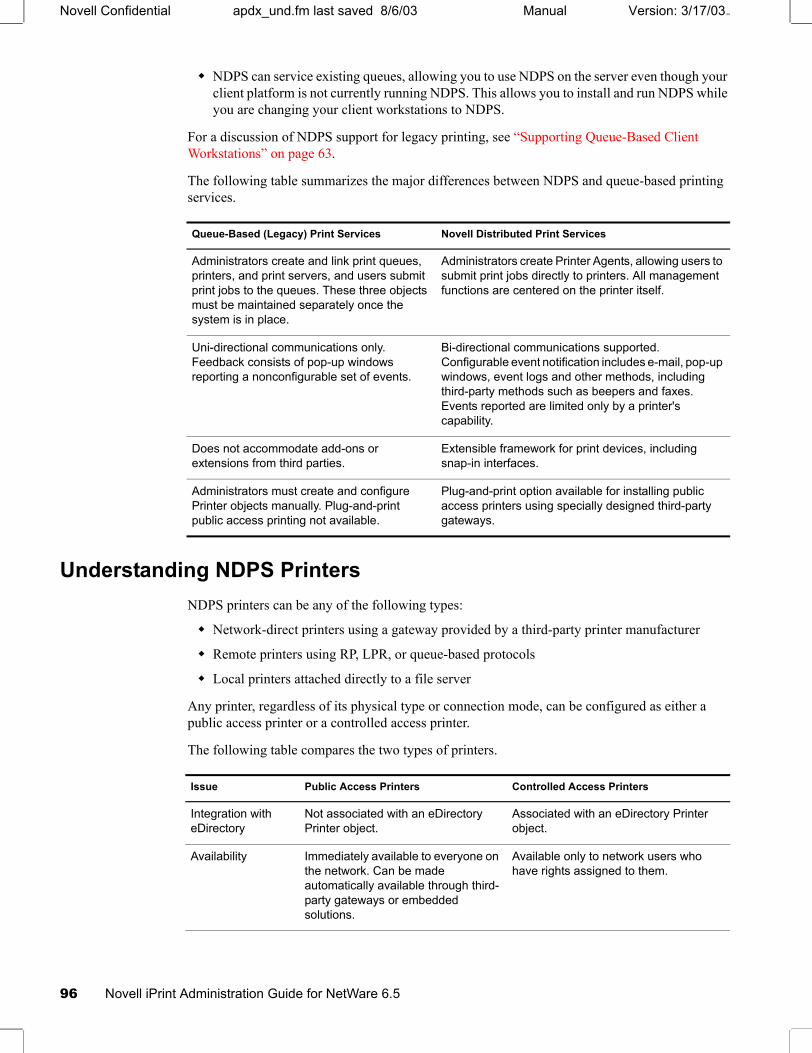
Novell Confidential apdx_und.fm last saved 8/6/03 Manual Version: 3/17/03103
NDPS can service existing queues, allowing you to use NDPS on the server even though your client platform is not currently running NDPS. This allows you to install and run NDPS while you are changing your client workstations to NDPS.
For a discussion of NDPS support for legacy printing, see “Supporting Queue-Based Client Workstations” on page 63.
The following table summarizes the major differences between NDPS and queue-based printing services.
Understanding NDPS PrintersNDPS printers can be any of the following types:
Network-direct printers using a gateway provided by a third-party printer manufacturer
Remote printers using RP, LPR, or queue-based protocols
Local printers attached directly to a file server
Any printer, regardless of its physical type or connection mode, can be configured as either a public access printer or a controlled access printer.
The following table compares the two types of printers.
Queue-Based (Legacy) Print Services Novell Distributed Print Services
Administrators create and link print queues, printers, and print servers, and users submit print jobs to the queues. These three objects must be maintained separately once the system is in place.
Administrators create Printer Agents, allowing users to submit print jobs directly to printers. All management functions are centered on the printer itself.
Uni-directional communications only. Feedback consists of pop-up windows reporting a nonconfigurable set of events.
Bi-directional communications supported. Configurable event notification includes e-mail, pop-up windows, event logs and other methods, including third-party methods such as beepers and faxes. Events reported are limited only by a printer's capability.
Does not accommodate add-ons or extensions from third parties.
Extensible framework for print devices, including snap-in interfaces.
Administrators must create and configure Printer objects manually. Plug-and-print public access printing not available.
Plug-and-print option available for installing public access printers using specially designed third-party gateways.
Issue Public Access Printers Controlled Access Printers
Integration with eDirectory
Not associated with an eDirectory Printer object.
Associated with an eDirectory Printer object.
Availability Immediately available to everyone on the network. Can be made automatically available through third-party gateways or embedded solutions.
Available only to network users who have rights assigned to them.
96 Novell iPrint Administration Guide for NetWare 6.5
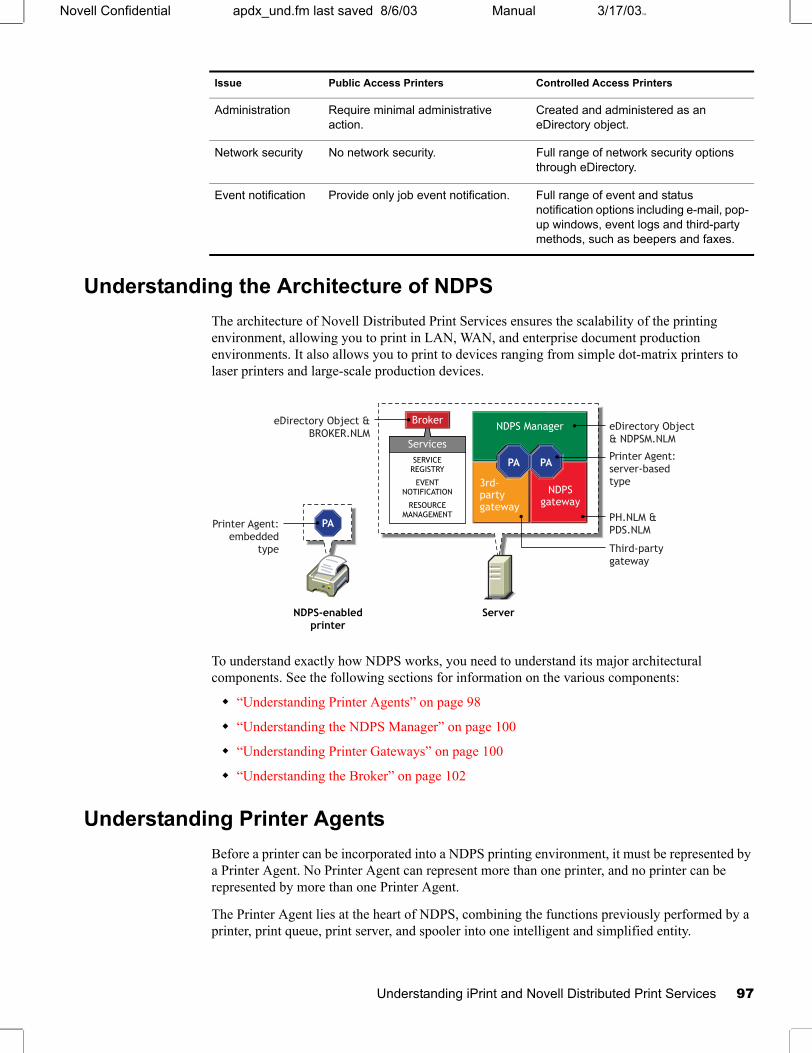
Manual 3/17/03103Novell Confidential apdx_und.fm last saved 8/6/03
Understanding the Architecture of NDPSThe architecture of Novell Distributed Print Services ensures the scalability of the printing environment, allowing you to print in LAN, WAN, and enterprise document production environments. It also allows you to print to devices ranging from simple dot-matrix printers to laser printers and large-scale production devices.
To understand exactly how NDPS works, you need to understand its major architectural components. See the following sections for information on the various components:
“Understanding Printer Agents” on page 98
“Understanding the NDPS Manager” on page 100
“Understanding Printer Gateways” on page 100
“Understanding the Broker” on page 102
Understanding Printer AgentsBefore a printer can be incorporated into a NDPS printing environment, it must be represented by a Printer Agent. No Printer Agent can represent more than one printer, and no printer can be represented by more than one Printer Agent.
The Printer Agent lies at the heart of NDPS, combining the functions previously performed by a printer, print queue, print server, and spooler into one intelligent and simplified entity.
Administration Require minimal administrative action.
Created and administered as an eDirectory object.
Network security No network security. Full range of network security options through eDirectory.
Event notification Provide only job event notification. Full range of event and status notification options including e-mail, pop-up windows, event logs and third-party methods, such as beepers and faxes.
Issue Public Access Printers Controlled Access Printers
PA
PA PA
NDPS Manager
3rd-partygateway
NDPSgateway
Broker
ServicesSERVICE
REGISTRY
EVENTNOTIFICATION
RESOURCEMANAGEMENT
Printer Agent:server-basedtype
PH.NLM &PDS.NLM
Third-partygateway
eDirectory Object& NDPSM.NLM
eDirectory Object &BROKER.NLM
Printer Agent:embedded
type
NDPS-enabledprinter
Server
Understanding iPrint and Novell Distributed Print Services 97
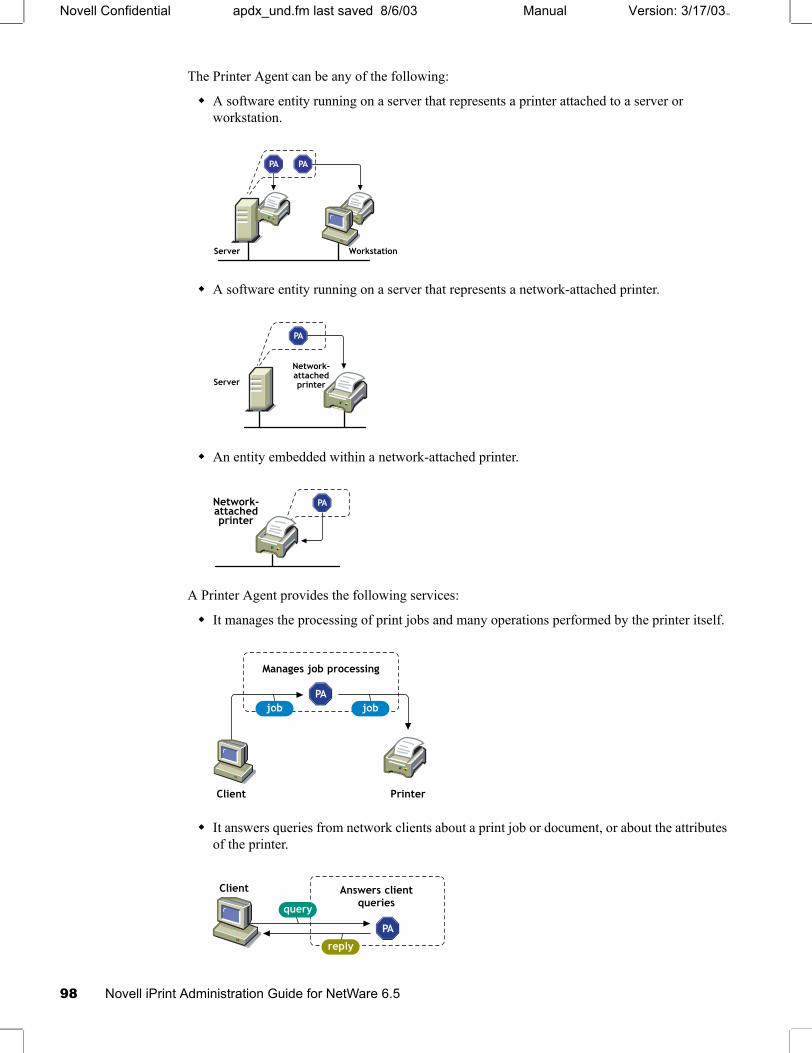
Novell Confidential apdx_und.fm last saved 8/6/03 Manual Version: 3/17/03103
The Printer Agent can be any of the following:
A software entity running on a server that represents a printer attached to a server or workstation.
A software entity running on a server that represents a network-attached printer.
An entity embedded within a network-attached printer.
A Printer Agent provides the following services:
It manages the processing of print jobs and many operations performed by the printer itself.
It answers queries from network clients about a print job or document, or about the attributes of the printer.
WorkstationServer
PA PA
Server
Network-attachedprinter
PA
Network-attachedprinter
PA
Client Printer
Manages job processing
job jobPA
Client Answers clientqueriesquery
reply
PA
98 Novell iPrint Administration Guide for NetWare 6.5
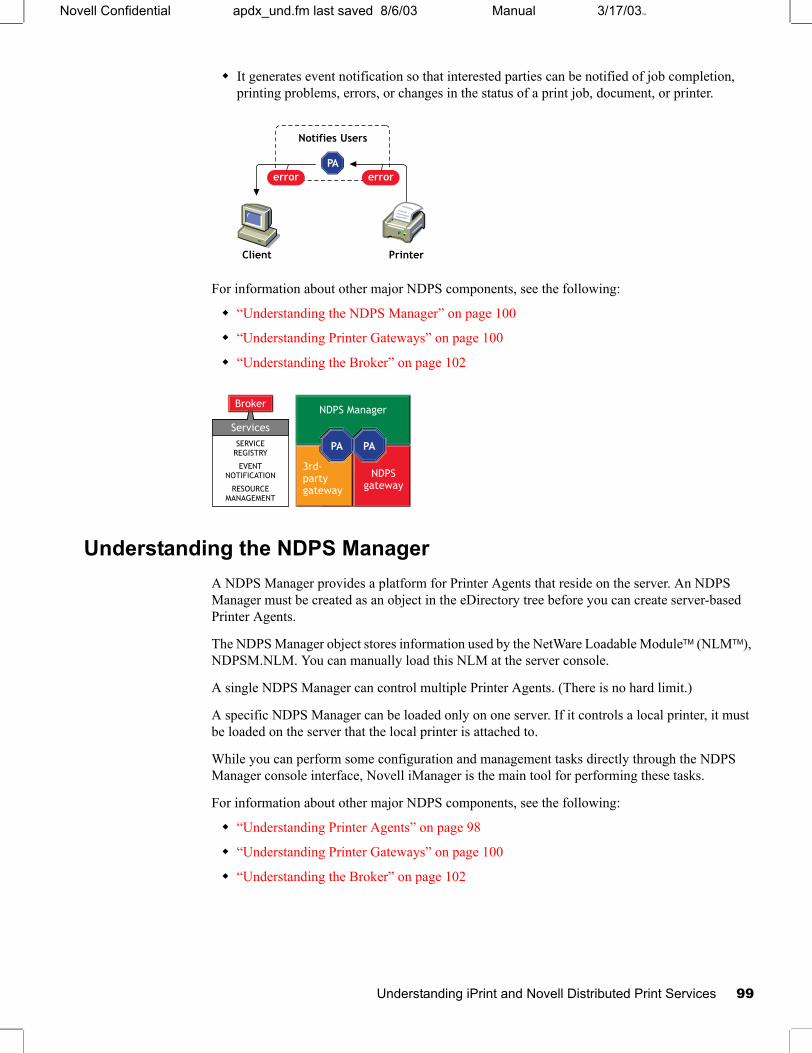
Manual 3/17/03103Novell Confidential apdx_und.fm last saved 8/6/03
It generates event notification so that interested parties can be notified of job completion, printing problems, errors, or changes in the status of a print job, document, or printer.
For information about other major NDPS components, see the following:
“Understanding the NDPS Manager” on page 100
“Understanding Printer Gateways” on page 100
“Understanding the Broker” on page 102
Understanding the NDPS ManagerA NDPS Manager provides a platform for Printer Agents that reside on the server. An NDPS Manager must be created as an object in the eDirectory tree before you can create server-based Printer Agents.
The NDPS Manager object stores information used by the NetWare Loadable ModuleTM (NLMTM), NDPSM.NLM. You can manually load this NLM at the server console.
A single NDPS Manager can control multiple Printer Agents. (There is no hard limit.)
A specific NDPS Manager can be loaded only on one server. If it controls a local printer, it must be loaded on the server that the local printer is attached to.
While you can perform some configuration and management tasks directly through the NDPS Manager console interface, Novell iManager is the main tool for performing these tasks.
For information about other major NDPS components, see the following:
“Understanding Printer Agents” on page 98
“Understanding Printer Gateways” on page 100
“Understanding the Broker” on page 102
Client Printer
Notifies Users
error errorPA
PA PA
NDPS Manager
3rd-partygateway
NDPSgateway
Broker
ServicesSERVICE
REGISTRY
EVENTNOTIFICATION
RESOURCEMANAGEMENT
Understanding iPrint and Novell Distributed Print Services 99

Novell Confidential apdx_und.fm last saved 8/6/03 Manual Version: 3/17/03103
Understanding Printer GatewaysGateways allow NDPS clients to send jobs to printers that are not NDPS-aware (that is, printers that are not equipped with embedded NDPS Printer Agents). You select and configure a printer gateway when you create a new Printer Agent.
Gateways translate NDPS queries or commands to printer-specific language that the physical printer can use. This is possible because gateways are configured to know the specific type (make and model) of printer being used.
The following diagram illustrates a typical gateway configuration.
Third-party gateways are developed by printer manufacturers to support printers directly attached to the network. Because these gateways are developed to interact with specific proprietary printers, they can provide a wider array of information and offer options that are not available for the generic Novell gateway. Some third-party gateways provide utilities that can be configured to automatically create Printer Agents when one of their printers is attached to the network.
The Novell gateway (illustrated below) supports LPR/LPD and IPP printing, local and remote printers, including those using NPRINTER or queue-based technology as well as those configured with RP mode enabled in IPX environments or LPR mode enabled in TCP/IP environments.
PA PA
NDPS Manager
3rd-partygateway
NDPSgateway
Broker
ServicesSERVICE
REGISTRY
EVENTNOTIFICATION
RESOURCEMANAGEMENT
Gateway
Third-party gateway
PrinterAgent
NDPSclient
Existingprinter
NDPSserver
GWPA
Novell GatewayPrinterAgent
Local printerattached to
server
NDPSserver
NPRINTERattached to
workstation orremote server
PDS PHPA
100 Novell iPrint Administration Guide for NetWare 6.5
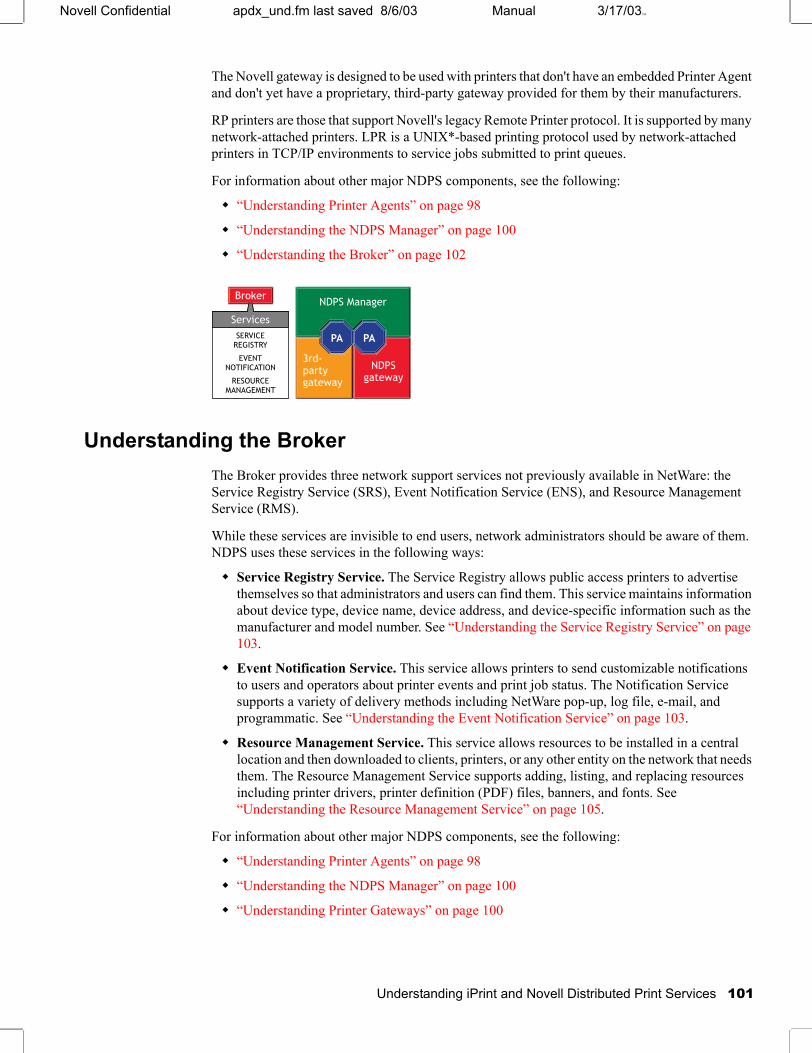
Manual 3/17/03103Novell Confidential apdx_und.fm last saved 8/6/03
The Novell gateway is designed to be used with printers that don't have an embedded Printer Agent and don't yet have a proprietary, third-party gateway provided for them by their manufacturers.
RP printers are those that support Novell's legacy Remote Printer protocol. It is supported by many network-attached printers. LPR is a UNIX*-based printing protocol used by network-attached printers in TCP/IP environments to service jobs submitted to print queues.
For information about other major NDPS components, see the following:
“Understanding Printer Agents” on page 98
“Understanding the NDPS Manager” on page 100
“Understanding the Broker” on page 102
Understanding the BrokerThe Broker provides three network support services not previously available in NetWare: the Service Registry Service (SRS), Event Notification Service (ENS), and Resource Management Service (RMS).
While these services are invisible to end users, network administrators should be aware of them. NDPS uses these services in the following ways:
Service Registry Service. The Service Registry allows public access printers to advertise themselves so that administrators and users can find them. This service maintains information about device type, device name, device address, and device-specific information such as the manufacturer and model number. See “Understanding the Service Registry Service” on page 103.
Event Notification Service. This service allows printers to send customizable notifications to users and operators about printer events and print job status. The Notification Service supports a variety of delivery methods including NetWare pop-up, log file, e-mail, and programmatic. See “Understanding the Event Notification Service” on page 103.
Resource Management Service. This service allows resources to be installed in a central location and then downloaded to clients, printers, or any other entity on the network that needs them. The Resource Management Service supports adding, listing, and replacing resources including printer drivers, printer definition (PDF) files, banners, and fonts. See “Understanding the Resource Management Service” on page 105.
For information about other major NDPS components, see the following:
“Understanding Printer Agents” on page 98
“Understanding the NDPS Manager” on page 100
“Understanding Printer Gateways” on page 100
PA PA
NDPS Manager
3rd-partygateway
NDPSgateway
Broker
ServicesSERVICE
REGISTRY
EVENTNOTIFICATION
RESOURCEMANAGEMENT
Understanding iPrint and Novell Distributed Print Services 101
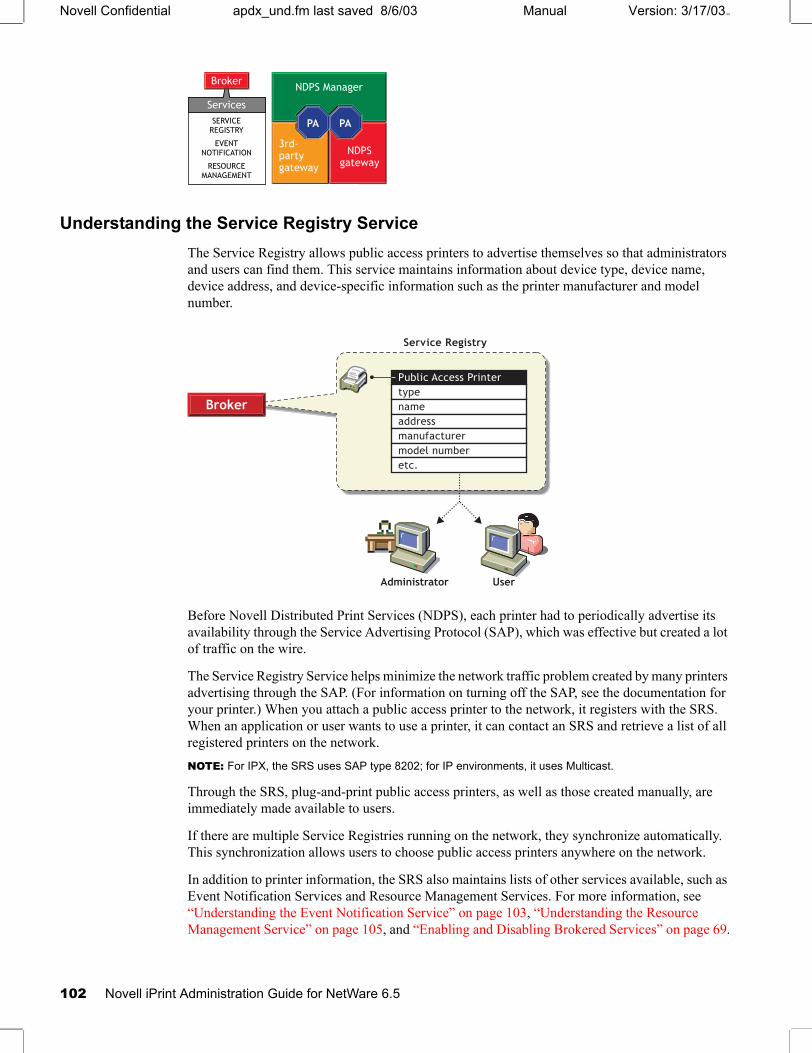
Novell Confidential apdx_und.fm last saved 8/6/03 Manual Version: 3/17/03103
Understanding the Service Registry ServiceThe Service Registry allows public access printers to advertise themselves so that administrators and users can find them. This service maintains information about device type, device name, device address, and device-specific information such as the printer manufacturer and model number.
Before Novell Distributed Print Services (NDPS), each printer had to periodically advertise its availability through the Service Advertising Protocol (SAP), which was effective but created a lot of traffic on the wire.
The Service Registry Service helps minimize the network traffic problem created by many printers advertising through the SAP. (For information on turning off the SAP, see the documentation for your printer.) When you attach a public access printer to the network, it registers with the SRS. When an application or user wants to use a printer, it can contact an SRS and retrieve a list of all registered printers on the network.NOTE: For IPX, the SRS uses SAP type 8202; for IP environments, it uses Multicast.
Through the SRS, plug-and-print public access printers, as well as those created manually, are immediately made available to users.
If there are multiple Service Registries running on the network, they synchronize automatically. This synchronization allows users to choose public access printers anywhere on the network.
In addition to printer information, the SRS also maintains lists of other services available, such as Event Notification Services and Resource Management Services. For more information, see “Understanding the Event Notification Service” on page 103, “Understanding the Resource Management Service” on page 105, and “Enabling and Disabling Brokered Services” on page 69.
PA PA
NDPS Manager
3rd-partygateway
NDPSgateway
Broker
ServicesSERVICE
REGISTRY
EVENTNOTIFICATION
RESOURCEMANAGEMENT
Broker
Administrator User
Public Access Printer
type
name
address
manufacturer
model number
etc.
Service Registry
102 Novell iPrint Administration Guide for NetWare 6.5

Manual 3/17/03103Novell Confidential apdx_und.fm last saved 8/6/03
Understanding the Event Notification ServiceNovell Distributed Print Services (NDPS) printers can be configured to provide event notification regarding print jobs and printer status. Administrators can configure event notification for interested parties, that is, non-job-owners that you wish to be notified of a defined printer or server event that occurs during the processing and printing of a job. See “Configuring Interested-Party Notification” on page 62 for more information.
The Event Notification service supports both consumers of events (users) and suppliers of events (printers). Users can register with the ENS by identifying the types of events they want to be notified about, while the printer can register the kinds of events it is capable of reporting. For example, the administrator for a specific printer (by default a Manager of that printer) can designate an Operator to be notified if the printer runs out of paper or if the toner is low. Similarly, users can be notified when their jobs have finished printing.
Delivery Methods
The availability of the following delivery options is dependent on which of them you have enabled. (See “Enabling Event Notification Delivery Methods” on page 68 for more information.)
Pop-up notification. Messages will pop up on the screen for individuals designated to receive them. (Pop-up notification is always enabled when the ENS is enabled.)
SMTP notification. Messages will be sent to the recipient through SMTP (Simple Mail Transfer Protocol) in IP-based systems.
Log file notification. Messages are written to a file at a designated location on a NetWare server that the recipient has rights to.
Programmatic notification. Two programmatic notification delivery methods are shipped with NDPS: SPXTM and RPC.
The open architecture of NDPS allows third parties to develop additional delivery methods as well.
NDPS is enabled to work with SNMP. In addition, some third-party gateways are SNMP-enabled independently of the NDPS software.
Broker
User
Notification Service
screenpop-up
logfile
e-mail 3rd-partynotify
Operator
printer events,print job status,etc.
Understanding iPrint and Novell Distributed Print Services 103

Novell Confidential apdx_und.fm last saved 8/6/03 Manual Version: 3/17/03103
For more information about other brokered services, see the following:
“Understanding the Service Registry Service” on page 103
“Understanding the Resource Management Service” on page 105
Understanding the Resource Management ServiceThis service allows resources to be installed in a central location and then downloaded to clients, printers, or any other entity on the network that needs that resource. It provides a single place where a variety of file types are stored for immediate access by Novell Distributed Print Services (NDPS). The Resource Management Service (RMS) supports adding, listing, and replacing resources including printer drivers, printer definition files (PDFs), banners, and fonts.
Resources
The Resource Management Service allows you to add, list, and replace the following resources:
Banners (see “Adding Banner Pages” on page 65)
Windows printer drivers (see “Adding or Updating Printer Drivers” on page 67)
Benefits
Some of the benefits offered by the Resource Management Service include
Improved resource sharing
More manageable resource distribution and updating
Automatic printer driver download from a central repository
Plug-and-print printer availability
Availability of network resources to applications through a common interface
For more information about other brokered services, see the following:
“Understanding the Service Registry Service” on page 103
“Understanding the Event Notification Service” on page 103
drivers banners definitionfiles
Broker
Resource Management Service
Allows adding,listing,
or replacingof . . .
104 Novell iPrint Administration Guide for NetWare 6.5

Manual (ENU) 3/17/03103Novell Confidential migration.fm last saved 8/6/03
C Planning the Migration to iPrint
Use the following sections to prepare your print system to be migrated to iPrint.
“General Transition Guidelines” on page 105
“Migrating from Queue-Based Printing to iPrint” on page 107
“Associating a Printer Agent with a Queue” on page 108
General Transition GuidelinesThe following guidelines generically apply to any transition scenario and should help you understand the migration process.
You can make the transition gradually from queues to Novell® iPrint. If your users are running the Novell ClientTM with the NDPS® component installed, you can first replace the server components of your legacy printing system with the iPrint server components. Because the Print Manager (ndpsm.nlm) and the Print Server (pserver.nlm) can run simultaneously on a server, this transition can be accomplished one queue/printer at a time. Users can then be gradually switched to print directly to iPrint printers instead of queues.
This transitional configuration would look this way:
If your users do not have the NDPS component installed—later versions of the Novell Client did not install the NDPS component by default—create your iPrint system, then have your users remove their old printers and install the iPrint client and printers.
See “Maintaining Your Queues during the Transition” on page 106 for more details on this printing configuration.
Eventually, only a few queues serviced by Printer Agents will remain to support your DOS and Windows DOS-box printing needs. These few users can be migrated from queues by other methods. See “Using Novell iCapture LPT Port Redirector Utility” on page 33 or “Using Icapture.exe to Capture Printer Ports” on page 34 for more information.
Planning the Migration to iPrint 105
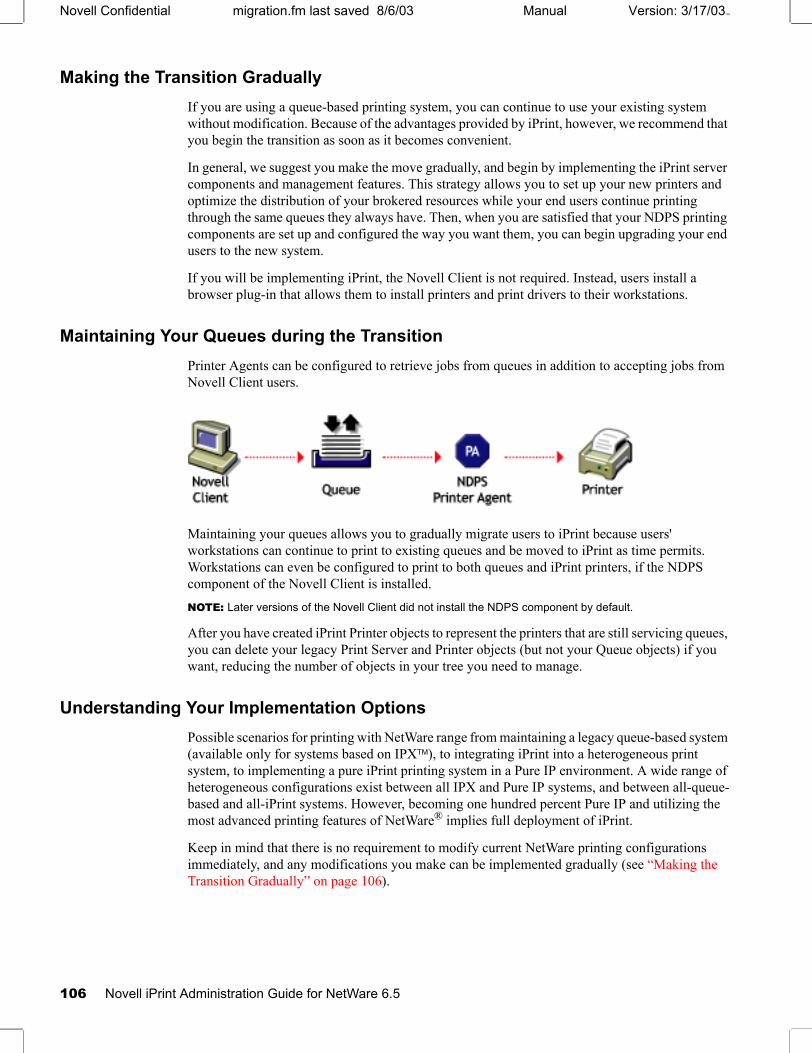
Novell Confidential migration.fm last saved 8/6/03 Manual Version: 3/17/03103
Making the Transition GraduallyIf you are using a queue-based printing system, you can continue to use your existing system without modification. Because of the advantages provided by iPrint, however, we recommend that you begin the transition as soon as it becomes convenient.
In general, we suggest you make the move gradually, and begin by implementing the iPrint server components and management features. This strategy allows you to set up your new printers and optimize the distribution of your brokered resources while your end users continue printing through the same queues they always have. Then, when you are satisfied that your NDPS printing components are set up and configured the way you want them, you can begin upgrading your end users to the new system.
If you will be implementing iPrint, the Novell Client is not required. Instead, users install a browser plug-in that allows them to install printers and print drivers to their workstations.
Maintaining Your Queues during the TransitionPrinter Agents can be configured to retrieve jobs from queues in addition to accepting jobs from Novell Client users.
Maintaining your queues allows you to gradually migrate users to iPrint because users' workstations can continue to print to existing queues and be moved to iPrint as time permits. Workstations can even be configured to print to both queues and iPrint printers, if the NDPS component of the Novell Client is installed.NOTE: Later versions of the Novell Client did not install the NDPS component by default.
After you have created iPrint Printer objects to represent the printers that are still servicing queues, you can delete your legacy Print Server and Printer objects (but not your Queue objects) if you want, reducing the number of objects in your tree you need to manage.
Understanding Your Implementation OptionsPossible scenarios for printing with NetWare range from maintaining a legacy queue-based system (available only for systems based on IPXTM), to integrating iPrint into a heterogeneous print system, to implementing a pure iPrint printing system in a Pure IP environment. A wide range of heterogeneous configurations exist between all IPX and Pure IP systems, and between all-queue-based and all-iPrint systems. However, becoming one hundred percent Pure IP and utilizing the most advanced printing features of NetWare® implies full deployment of iPrint.
Keep in mind that there is no requirement to modify current NetWare printing configurations immediately, and any modifications you make can be implemented gradually (see “Making the Transition Gradually” on page 106).
106 Novell iPrint Administration Guide for NetWare 6.5

Manual 3/17/03103Novell Confidential migration.fm last saved 8/6/03
Migrating from Queue-Based Printing to iPrintMost queue-based printing in NetWare networks is currently realized through one of the following configurations:
When migrating to iPrint from any of these configurations, you should first consider the protocols, connection methods used, and potential need to configure the printer in determining which gateway to use. If a third-party gateway is used, the resulting configuration would look as follows:
The Novell gateway provides a straightforward migration path. The iPrint configurations corresponding to the queue-based printing configurations illustrated earlier, as well as an additional configuration for Pure IP support, are shown in the following illustration.
Novellclient
Printer
NDPS Manager
3rd-partygateway
PAPrinterAgent
Planning the Migration to iPrint 107

Novell Confidential migration.fm last saved 8/6/03 Manual Version: 3/17/03103
The configuration 1 is not recommended because a back-end queue is still required, increasing network traffic and delaying job completion. In addition, while transitioning to iPrint, there would be two queues in the print path as shown.
If you are migrating a QServer-mode printer, we recommend that you reconfigure it for LPR as in configuration 5 or RP as in configuration 2 if possible. Choose configuration 5 if the network supports IP and the printer supports LPR/LPD. Choose configuration 2 if the network supports IPX and the printer supports RP. Configurations 3 and 4 are available if the printer does not support LPR or RP, but you still want to benefit from many iPrint features without the need for a queue. Configurations 2 through 5 require you to configure the print device to enable a new protocol.
If the nprinter.exe in configuration 3 is running on a NetWare client, it is possible to realize IP-only printing to a remote printer, though not Pure IP. However, if IP is desired, configuration 5 is preferable and is Pure IP.
Because iPrint is based upon Novell Distributed Print Services® as the back end, you must first implement NDPS. For more information on migrating to NDPS, see Planning (http://www.novell.com/documentation/lg/nw51/ndps_enu/data/hoktwpmn.html) in the Novell Distributed Print Services Administration Guide for NetWare 5.1.
Associating a Printer Agent with a QueueUse NWAdmin to manage queue-based print systems. Implementation of this phase will in no way disable your current eDirectory queue-based printing environment.
1 From NWAdmin, right-click the iPrint Printer object you want users to print to, then select Details.
If the previous procedures were performed properly, you should now see all the buttons activated within the printer's opening bitmap.
2 Click Jobs-V.
3 From the menu, select Spooling Configuration.
At the bottom of the form, you will see a field labeled Service Jobs from NetWare Queues.
108 Novell iPrint Administration Guide for NetWare 6.5

Manual 3/17/03103Novell Confidential migration.fm last saved 8/6/03
4 Click Add and select the existing NDS queues you want to assign for the printer.
5 Click OK and close the bitmap.
6 Remaining inside NWAdmin, find the existing NDS Print Server object that represents the NDS Print Queue object you just transitioned, right-click it, and select Details.
7 Click Assignments.
8 Select the printer object that was servicing the NDS print queue object or was just transitioned, then click Delete.
9 Click OK, then click Close.
10 Remaining inside NWAdmin, find the existing NDS Printer object that represents the NDS Print Queue object you just transitioned, right-click on it, and select Details.
11 Click Assignments.
From the bottom page, verify that the Default Print Queue is unchanged.
The Print Server field should now be empty. Do not delete the queue field.
Planning the Migration to iPrint 109

Novell Confidential migration.fm last saved 8/6/03 Manual Version: 3/17/03103
110 Novell iPrint Administration Guide for NetWare 6.5
Manual (ENU) 3/17/03103Novell Confidential 10apx_rp.fm last saved 8/6/03
D Configuring Remote Printers
You can configure all of your current remote printers so that they will work just as they always have, whether they are attached to a workstation or a remote file server or are directly attached to the network running in RP mode. A remote printer controlled by an Printer Agent will emulate a legacy print server (PServer Emulation) and will no longer require PSERVER.NLM.
We recommend that you reconfigure your direct-connect printers currently configured for Queue Server mode to run in RP mode so that they can take advantage of the advanced features.
For detailed information, see the following:
“Configuring Remote Printers Using NPRINTER” on page 111
“Configuring Remote Printers Running in RP Mode” on page 112
“Configuring Remote Printers Running in LPR Mode” on page 113
Configuring Remote Printers Using NPRINTERUse the following procedure to configure a new printer attached to a workstation client or remote server that is running NPRINTER.EXE or NPRINTER.NLM.
1 In NetWare Administrator, select the container where you want the Printer object to reside.
2 From the Object menu, click Create > NDPS Printer.
3 Enter a name in the Printer Name field.
The name should distinguish it from other printers on your system.
4 In the Printer Agent Source field, select Create a New Printer Agent and click Create.
5 Confirm the Printer Agent name (default is the name of the new printer you are creating) and browse to select the Print Manager you want to assign it to.
6 In the Gateway Types window, select the Novell Printer Gateway.
7 Configure the PDS by selecting the Printer Type and Port Type and then click OK.
8 Configure the Connection Type as Remote and specify the Port Type as LPT, COM, or Other. Then click Next.
9 In the PServer Emulation field, modify or use the default SAP Name, specify a Printer Number, if needed, and specify any address restrictions you want to impose for this printer. Then click Next.
10 Configure the Controller Type and Interrupts, if needed, and then click Finish.
11 Select the printer driver for each client operating system.
These drivers will be automatically downloaded to users' workstations when they install this printer in the future. Select a driver for each operating system.
Configuring Remote Printers 111

Novell Confidential 10apx_rp.fm last saved 8/6/03 Manual Version: 3/17/03103
If you choose a Windows 3.x driver but not a Windows 95/98/ME or Windows NT/2000 driver, a 16-bit driver will be selected. Normally this will not create problems.
Because the list of printer drivers shipped with this product is limited, you can add drivers to the Resource Management Service database. (See “Adding or Updating Printer Drivers” on page 67 for more information.)
If the driver you need is not in the drivers list, rather than adding it to the RMS, you can select [None] at the top of each list. Users will then be asked to provide a disk with the appropriate driver the first time they install this printer on their workstations.
12 Click OK.
The main browser window appears with your new controlled access printer listed.
13 At the workstation or remote server that this printer is attached to, run NPRINTER and select the SAP name specified in Step 10.
Workstation users can now select the printer and print to it.
Configuring Remote Printers Running in RP ModeThese instructions are for configuring a printer attached directly to the network and running in RP mode, unless that printer is an HP printer.
If you are using a direct-connect printer configured for Queue-Server mode, we recommend that you reconfigure that printer to RP mode and then configure it as a printer using RP. This allows you to gain the management benefits while eliminating a Queue object from your system.
1 From the browser's Object menu for the organization or organizational unit, click Create > NDPS Printer.
2 Enter a name in the Printer Name field.
3 In the Printer Agent Source field, select Create a New Printer Agent and click Create.
4 Confirm the Printer Agent name (default is the name of the new printer you are creating) and browse to select the Print Manager you want to assign it to.
5 In the Gateway Types window, select the gateway you want to use.
6 Configure the Novell PDS by selecting the Printer Type and Port Type, and then click OK.
7 Configure the Connection Type as Remote and specify the Port Type as LPT, COM, or Other. Then click Next.
8 In the PServer Emulation field, modify or use the default SAP Name, specify a Printer Number, if needed, and specify any address restrictions you want to impose for this printer. Then click Next.
9 Configure the Controller Type and Interrupts, as needed, then click Finish.
10 Select the printer driver for each client operating system.
These drivers will be automatically downloaded to users' workstations when they install this printer in the future. Select a driver for each operating system.
If you choose a Windows 3.x driver but not a Windows 95/98/ME or Windows NT/2000 driver, a 16-bit driver will be selected. Normally this will not create problems.
Because the list of printer drivers shipped with this product is limited, you can add drivers to the Resource Management Service database. (See “Adding or Updating Printer Drivers” on page 67 for more information.)
112 Novell iPrint Administration Guide for NetWare 6.5

Manual 3/17/03103Novell Confidential 10apx_rp.fm last saved 8/6/03
If the driver you need is not in the drivers list, rather than adding it to the RMS, you can select [None] at the top of each list. Users will then be asked to provide a disk with the appropriate driver the first time they install this printer on their workstations.
11 Click Continue.
Configuring Remote Printers Running in LPR ModeUse the following procedure to configure a remote printer running in LPR mode in TCP/IP environments, unless that printer is an HP printer.
LPR will work only if TCP/IP is configured correctly.
1 From the browser's Object menu for the organization or organizational unit, click Create > NDPS Printer.
2 Enter a name in the Printer Name field.
3 In the Printer Agent Source field, select Create a New Printer Agent and click Create.
4 Confirm the Printer Agent name (default is the name of the new printer you are creating) and browse to select the Print Manager you want to assign it to.
5 In the Gateway Types window, select the Novell gateway.
6 Configure the Novell PDS by selecting the Printer Type and Port Type, and then click OK.
7 Configure the Connection Type as Remote LPR/TCPIP and specify the Port Type as LPT, COM, or Other. Then click Next.
8 Select the printer driver for each client operating system.
These drivers will be automatically downloaded to users' workstations when they install this printer in the future. Select a driver for each operating system.
If you choose a Windows 3.x driver but not a Windows 95/98/ME or Windows NT/2000 driver, a 16-bit driver will be selected. Normally this will not create problems.
Because the list of printer drivers shipped with this product is limited, you can add drivers to the Resource Management Service database. (See “Adding or Updating Printer Drivers” on page 67 for more information.)
If the driver you need is not in the drivers list, rather than adding it to the RMS, you can select [None] at the top of each list. Users will then be asked to provide a disk with the appropriate driver the first time they install this printer on their workstations.
9 Click Continue.
The main browser window appears with your new controlled access printer listed.
Configuring Remote Printers 113

Novell Confidential 10apx_rp.fm last saved 8/6/03 Manual Version: 3/17/03103
114 Novell iPrint Administration Guide for NetWare 6.5
Manual (ENU) 3/17/03103Novell Confidential apdx_troubleshooting.fm last saved 8/6/
E Troubleshooting Your Print System
This appendix focuses on troubleshooting issues that might arise during printing. It also presents general principles that can be of value for a variety of network printer configurations, and it provides help for troubleshooting problems with the printer itself.
“Initial Troubleshooting Steps” on page 115
“Narrowing Your Focus” on page 118
“Determining Your Platform When Problem Affects Only One Workstation” on page 120
“Isolating Printing Problems Affecting Only One Windows Workstation” on page 122
“Tracking Jobs from a Workstation” on page 124
“Checking Printer Output and Using Test Files” on page 126
“Printing Problems Affecting All Users” on page 128
“Problems Integrating with Queue-Based Components” on page 131
Troubleshooting Your Print System 115
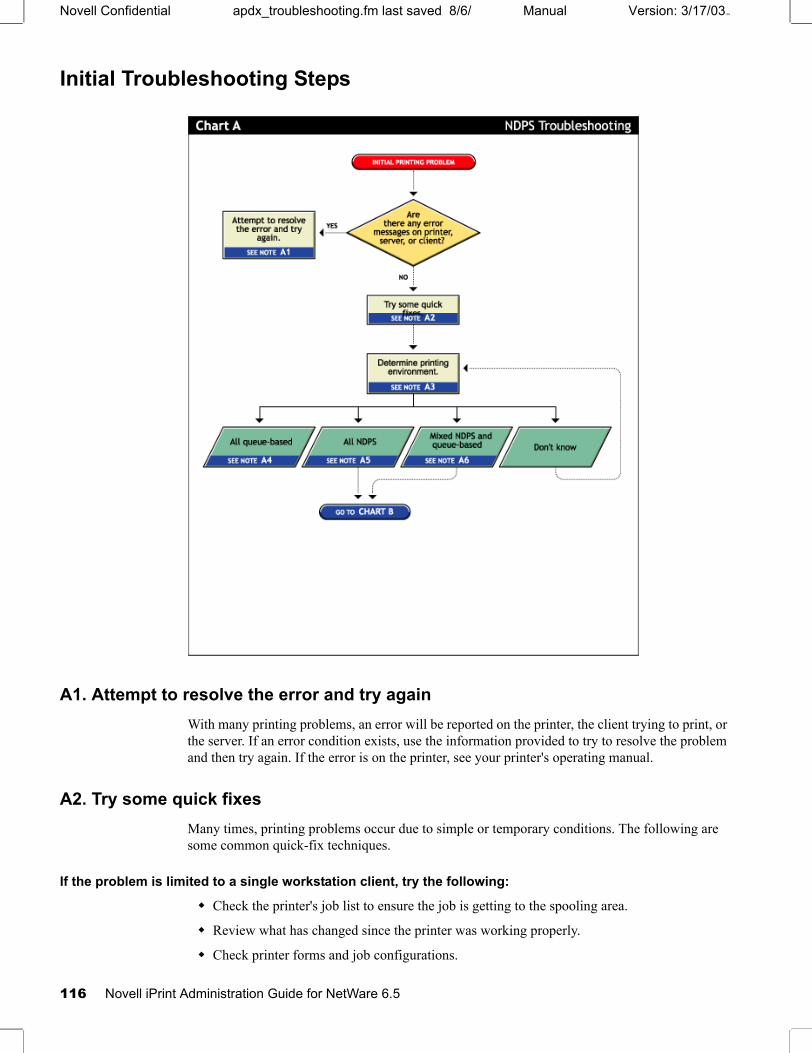
Novell Confidential apdx_troubleshooting.fm last saved 8/6/ Manual Version: 3/17/03103
Initial Troubleshooting Steps
A1. Attempt to resolve the error and try againWith many printing problems, an error will be reported on the printer, the client trying to print, or the server. If an error condition exists, use the information provided to try to resolve the problem and then try again. If the error is on the printer, see your printer's operating manual.
A2. Try some quick fixesMany times, printing problems occur due to simple or temporary conditions. The following are some common quick-fix techniques.
If the problem is limited to a single workstation client, try the following:
Check the printer's job list to ensure the job is getting to the spooling area.
Review what has changed since the printer was working properly.
Check printer forms and job configurations.
116 Novell iPrint Administration Guide for NetWare 6.5
Manual 3/17/03103Novell Confidential apdx_troubleshooting.fm last saved 8/6/
Troubleshooting Your Print System 117
If the problem is affecting other workstation clients, try the following:
Check Printer Information in the Novell iManager for printing error messages.
Look for printer error conditions (such as beeps or LCD panel lights) and printing error messages.
Turn the printer off and on.
Check the printer's cabling.
Look for messages on the server console.
Check the printer's job list to ensure the job is getting to the spooling area.
Review what has changed since the printer was working properly.
Check printer forms and job configurations.
Search the online Novell Support ConnectionTM for known issues.
Make sure you have the most current iPrint software.
A3. Determining your printing environmentIf there is no obvious solution to the problem, then you will need to begin analyzing your printing system. In order to find the problem, the printing environment being used must be identified.
NetWare provides two printing environments: the legacy queue-based printing (see “A4. All queue-based environment” on page 117) and iPrint (see “A5. All iPrint environment” on page 118). Either print system can be used alone or the two can be used together (see “A6. Mixed iPrint and queue-based environment” on page 118). Here are some ways to determine your printing environment:
User. If the client platform is DOS, Macintosh, OS/2, or UNIX, these clients are not directly supported by iPrint and can only print to a network printer by submitting jobs to queues or use LPR printing.
If the client platform is Windows, then they can be using either iPrint or queues. Check the printer configuration under the Windows control panel and check its network setting. Identify the network object being printed to and determine if it is a Queue object or a Printer object.
Server files. At the server console look to see if the following are loaded:
ndpsm.nlm (the server providing print services)
pserver.nlm (the server has been, or still is, using queue-based printing)
Novell iManager. Load Novell iManager and look at printing object configurations to determine printing setup.
A4. All queue-based environmentIf clients are submitting jobs to NetWare queues and the jobs are sent to the printer through the pserver.nlm, then you are using queue-based printing.
Printing in a queue-based system consists of submitting jobs to a queue, from which the print server sends the job to the printer based on the settings of the Printer object. In queue-based printing, a problem usually occurs in one of three general areas:
Getting the print job into the print queue
Transferring the job to the printer in the proper format
Printing the job properly

Novell Confidential apdx_troubleshooting.fm last saved 8/6/ Manual Version: 3/17/03103
For more information, see Troubleshooting General Printing Problems (http://www.novell.com/documentation/lg/nw51/printenu/data/hlgnvvum.html) in NetWare 5.1 Queue-Based Print Services.
A5. All iPrint environmentIf you have the new client software and are submitting jobs to the printer through Printer Agents and a Print Device Subsystem, then you are using iPrint. See “Narrowing Your Focus” on page 118 for more information.
A6. Mixed iPrint and queue-based environmentFor backward compatibility, it is possible to be using both queue-based printing and iPrint together. Here are the two ways this can happen:
Clients such as DOS, Macintosh, OS/2, and UNIX are unaware of iPrint and are unable to submit jobs to Printer Agents directly. The clients must therefore send jobs to a print queue. A Printer Agent can be configured to emulate a print server and service jobs from the queue to an iPrint printer.
Some network printers can receive jobs only from a NetWare queue and print server (for example, remote printers). If a client is configured to send jobs only to a Printer Agent, the Printer Agent might be configured to transfer the job to a queue where it can be serviced by a print server.
Because two different print systems are being used, the problem could exist in either print system. See “Narrowing Your Focus” on page 118 to continue.
118 Novell iPrint Administration Guide for NetWare 6.5

Manual 3/17/03103Novell Confidential apdx_troubleshooting.fm last saved 8/6/
Narrowing Your Focus
B1. Send job to same printer from other workstationsTry printing to the same printer from one or more different workstation. This will help you narrow your search to the specific workstation or to the whole printing system.
B2. Has workstation printed to this printer before?Has this workstation submitted jobs to this printer that printed successfully? Determine the following:
Is this a new setup?
Is this the first time printing was attempted from this workstation since any changes were made?
Has this setup been working before and now is not?
If this is a new setup or a new configuration, then something might not be configured.
Troubleshooting Your Print System 119
Novell Confidential apdx_troubleshooting.fm last saved 8/6/ Manual Version: 3/17/03103
If a job sent from this workstation has been printed successfully before, go to “Determining Your Platform When Problem Affects Only One Workstation” on page 120 to further track the problem.
B3. Gather information on setup and configurationThe initial setup might have been done incorrectly. Refer to “Creating a Printer” on page 24 for more information.
B4. Has printing ever worked with the current configuration?Have any users been able to print jobs from their workstations using this configuration? Determine the following:
Is this a new setup?
Is this the first time printing since any changes were made?
Has this setup been working before and now is not?
If this is a new setup, or a new configuration then something might not be configured properly.
If other users have been printing successfully, then go to “Tracking Jobs from a Workstation” on page 124 to further track the problem.
120 Novell iPrint Administration Guide for NetWare 6.5

Manual 3/17/03103Novell Confidential apdx_troubleshooting.fm last saved 8/6/
Determining Your Platform When Problem Affects Only One Workstation
C1. Are queues being serviced by an iPrint printer?Clients running on DOS, Macintosh, OS/2, and UNIX platforms are either queue-based, meaning that they print to network printers by redirecting jobs to a queue, or set up for LPR printing. You will need to determine whether the network printer is being serviced by a queue-based print server (such as pserver.nlm) or if iPrint is redirecting jobs through a Printer Agent.
C2. All queue-based printingIf clients are submitting jobs to a queue that is being serviced by a print server, then the printing environment is all queue-based. For more information, see Troubleshooting General Printing Problems (http://www.novell.com/documentation/lg/nw51/printenu/data/hlgnvvum.html) in NetWare 5.1 Queue-Based Print Services.
Troubleshooting Your Print System 121
Novell Confidential apdx_troubleshooting.fm last saved 8/6/ Manual Version: 3/17/03103
C3. Queue-iPrint integrationThe clients are unaware of iPrint and are unable to submit jobs to Printer Agents directly. The clients must therefore send jobs to a print queue. A Printer Agent can be configured to emulate a print server and service jobs from the queue to a printer. See “Supporting Queue-Based Client Workstations” on page 63 for more information. Then go to “Printing Problems Affecting All Users” on page 128.
C4. Look in Novell iManager for Printer objectsLoad Novell iManager and look to see if any Printer objects are defined.
If no Printer objects are defined, there should be a Print Server object. Check the configuration of the print server to if the queue is configured to be serviced by it.
If there are objects defined, look at the Printer objects to see if they are configured to emulate a print server and service jobs from a queue.
122 Novell iPrint Administration Guide for NetWare 6.5
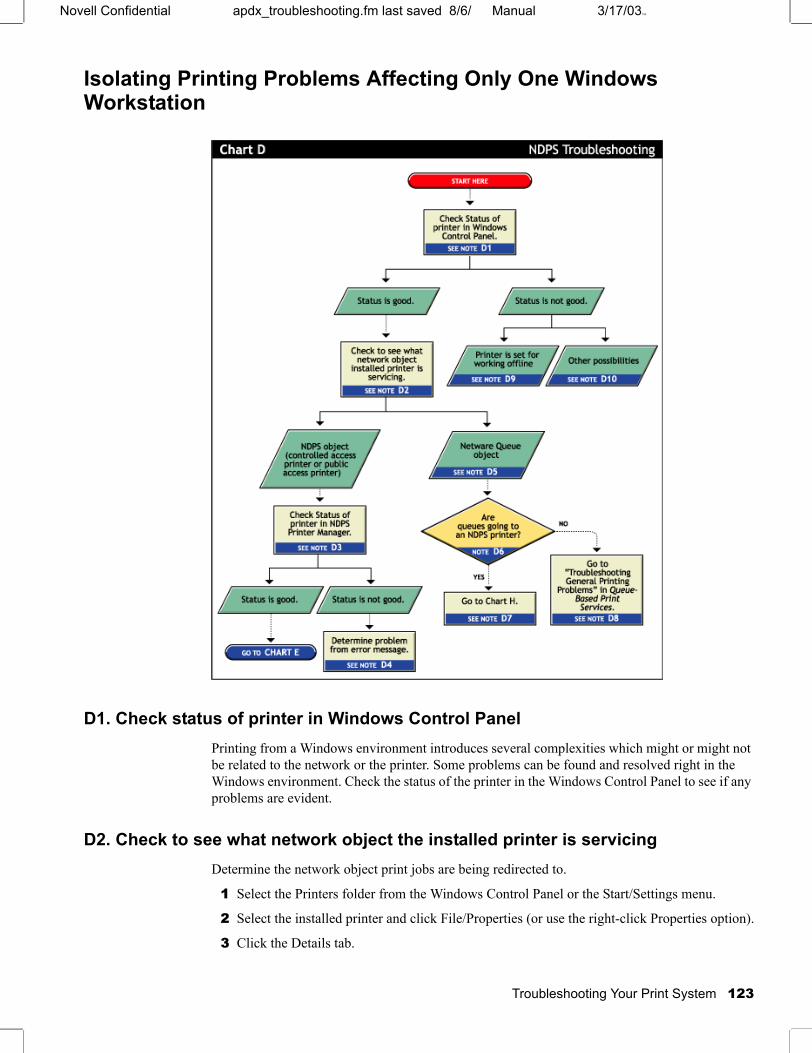
Manual 3/17/03103Novell Confidential apdx_troubleshooting.fm last saved 8/6/
Isolating Printing Problems Affecting Only One Windows Workstation
D1. Check status of printer in Windows Control PanelPrinting from a Windows environment introduces several complexities which might or might not be related to the network or the printer. Some problems can be found and resolved right in the Windows environment. Check the status of the printer in the Windows Control Panel to see if any problems are evident.
D2. Check to see what network object the installed printer is servicingDetermine the network object print jobs are being redirected to.
1 Select the Printers folder from the Windows Control Panel or the Start/Settings menu.
2 Select the installed printer and click File/Properties (or use the right-click Properties option).
3 Click the Details tab.
Troubleshooting Your Print System 123

Novell Confidential apdx_troubleshooting.fm last saved 8/6/ Manual Version: 3/17/03103
4 Look at Print to the Following Port.
Identify the network object being printed to and determine if it is a Queue object or a Printer object.
D3. Check status of printer in NDPS Print MangerIf the job did not appear in the job list, view information about the specific installed printer using the NDPS Print Manger Health Monitor, which is part of the NetWare Remote Manager.
D4. Determine problem from error messageWith many printing problems, an error will be reported on the printer, the client trying to print, or the server. If an error condition exists, use the information provided to try to resolve the problem and then try again. If the error is on the printer, see your printer's operating manual.
D5. NetWare queue objectThis printer is queue-based, meaning that the print driver prints to network printers by redirecting jobs to a queue.
D6. Are queues going to a printer?The next thing you need to know is whether the network printer is being serviced by a queue-based print server (such as pserver.nlm) or if iPrint is redirecting jobs through a Printer Agent. Load Novell iManager and look to see if any iPrint Printer objects are defined.
If no Printer objects are defined, there should be a Print Server object. Check the configuration of the print server to see if the queue is configured to be serviced by it.
If there are Print objects defined, look at the Printer objects to see if they are configured to emulate a print server and service jobs from a queue.
D7. Queue-iPrint integrationThe clients are submitting jobs to a print queue which is then being serviced by Printer Agents. See “Problems Integrating with Queue-Based Components” on page 131 for more information.
D8. All queue-based printingIf clients are submitting jobs to a queue that are being serviced by a print server, then the printing environment is all queue-based. For more information, see Troubleshooting General Printing Problems (http://www.novell.com/documentation/lg/nw51/printenu/data/hlgnvvum.html) in NetWare 5.1 Queue-Based Print Services.
D9. Printer is set for working offlineUnder certain circumstances, the printer might be set for working offline. This can happen if Windows loses communication with the network, for example. A user can also set it offline. If the printer is set to work offline, reset it to online and try to print. If you cannot set the printer to online, then Windows has lost communication with the network print system. Reboot the workstation and if the condition still exists, check the client's connection to the network.
124 Novell iPrint Administration Guide for NetWare 6.5

Manual 3/17/03103Novell Confidential apdx_troubleshooting.fm last saved 8/6/
D10. Other possibilitiesOther negative status flags.
Tracking Jobs from a Workstation
E1. Pause output of printerOne method of troubleshooting is putting stops in the printing process and then resending a job and testing how far in the process the job gets. The first stop you can make is pausing the printer output.
Pausing printer output is a common technique used when troubleshooting printing; it forces iPrint to spool your print job and save it as a file. Stopping and evaluating the printing process midway helps you to identify early problems and limits your troubleshooting to a few components.
Troubleshooting Your Print System 125
Novell Confidential apdx_troubleshooting.fm last saved 8/6/ Manual Version: 3/17/03103
To pause printer output for a controlled access printer:
1 Locate the Printer object in Novell iManager.
2 Double-click the Printer object to open its Details page.
3 Click the Pause Output button.
The Pause Output button changes to a Resume Output button.
E2. Check job list in Novell iManagerYou can view the job list for a printer from Novell iManager, the server console, or the workstation Printer Manager. To view the job list from Novell iManager, see “Managing Print Jobs” on page 53.
The job list for a public access printer can be viewed from either the server console or the Novell Printer Manager.
E3. Resume printer outputTo resume printer output for a controlled access printer, do the following:
1 In Novell iManager, click Manage Printer and then select the printer you want to control.
2 Click the Resume Output button.
The Resume Output button changes to a Pause Output button.
E4. Job printed this time but nothing was changedIf the job printed now, there is no authoritative explanation as to why it didn't print the first time. If you followed these steps, no configurations have been changed; the job was only paused and released. Try printing the job again and see if normal printing continues. If not, try pausing the printer again and see if any other symptoms occur.
E5. Job did not print and is still in the job listIf the job does not print and is still in the job list, then check for job holds, delays, and priority settings.
E6. Job did not print but is no longer in the job listIf the job did not print, but it is not in the job list, then the job was sent to the printer and no error was reported back to the system. Check these issues:
Are you are checking the correct physical printer?
Are you are using the correct print driver in your application?
Are your drivers and printers talking the same language (for example Postscript or PCL)?
126 Novell iPrint Administration Guide for NetWare 6.5

Manual 3/17/03103Novell Confidential apdx_troubleshooting.fm last saved 8/6/
Checking Printer Output and Using Test Files
F1. Check availability of network printerMake sure that the printer is set to accept jobs. In Novell iManager, verify that input is not paused.
F2. Check for error messagesWith many printing problems, an error will be reported on the printer, the client trying to print, or the server. If an error condition exists, use the information provided to try to resolve the problem and then try again. If the error is on the printer, see your printer's operating manual.
Also confirm that your Print objects are configured properly.
Troubleshooting Your Print System 127
Novell Confidential apdx_troubleshooting.fm last saved 8/6/ Manual Version: 3/17/03103
F3. Test file prints but jobs from application do notIf the test file prints but jobs from the application do not, then there is a problem with the way the job is being formatted by the application or handled by the driver. Reinstall the current print driver provided by the printer manufacturer. Also try printing from different applications to determine whether one application works while another does not. If this is the case, the problem is related to the application itself.
F4. Job is being held in spoolerThe job is being held in the job spooler. Check for job holds, delays, and priority settings. If one of these conditions exists, change the status to print the job. If the job prints, then see “F3. Test file prints but jobs from application do not” on page 128.
F5. Job did not print but is no longer in the job listIf the job did not print but it is not in the job list, then the job was sent to the printer and no error was reported back to the system. Make sure you are checking the right physical printer.
128 Novell iPrint Administration Guide for NetWare 6.5

Manual 3/17/03103Novell Confidential apdx_troubleshooting.fm last saved 8/6/
Printing Problems Affecting All Users
G1. Determine severity and scope of printing problemsIf printing is affecting all users, determine the degree of severity of the printing problems. Can no users print from specific printers, or are no jobs printing from any network printer? Or are jobs printing, but printing slowly?
Troubleshooting Your Print System 129
Novell Confidential apdx_troubleshooting.fm last saved 8/6/ Manual Version: 3/17/03103
G2. No print jobs are printing from any network printerIf no users can print at all from any network printer, the problem is probably a universal problem such as
The printing system is disabled or printing system files are unloaded.
The servers are in a critical state due to problems with memory, disk space, LAN connections, etc.
The LAN has a bottleneck or is otherwise dysfunctional.
G3. No print jobs are coming from a specific printerIf the printing problem is limited to a certain printer, then the problem is either at the printer itself or the configuration of the printer. Continue to determine which printing environment you are using.
G4. Jobs are printing slowly or are corruptedJobs might be printing but are either slow or appear corrupt.
Slow Printing
There are several explanations for slow printing.
If only one workstation is having problems with slow printing, the application might be generating the output for the printer. This can cause a long delay before the job is even sent to the spooler. Look at the print status of the application to determine if this is the case.
If all workstations are having the problem, one of the following conditions might exist:
Interrupt conflicts might exist between the port and another device. Configure the printer for no interrupts (polled mode).
The baud rate might be slow (serial printers).
XON/XOFF might need to be enabled (serial printers).
Your hardware (cable, port, printer) might be faulty.
Job Corruption
If jobs are printing in pieces, the printer might not have sufficient memory to hold the entire page to be printed. If it does not, it will print the part of the page it has in memory and continue printing on the next page. This problem occurs when printing jobs that contain large graphics.
G5. Check status of the Printer in Novell iManagerFrom Novell iManager, click Manage Printer and then select the printer you want to check. View the information on the Printer Control page.
130 Novell iPrint Administration Guide for NetWare 6.5
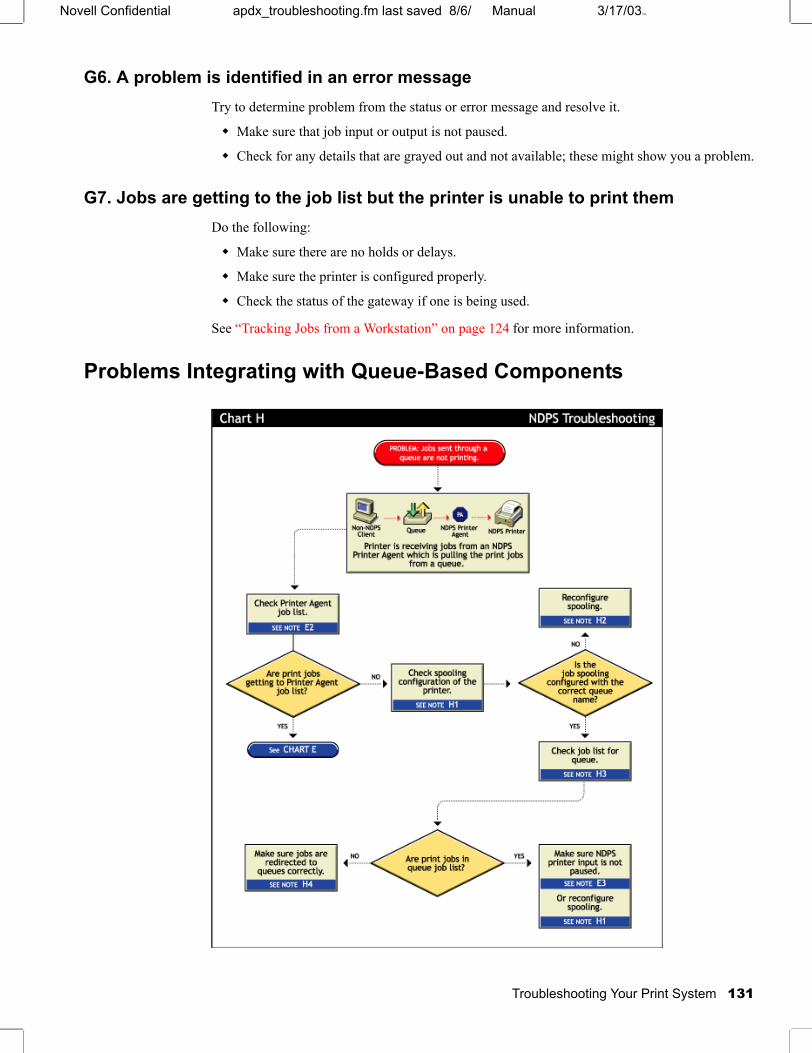
Manual 3/17/03103Novell Confidential apdx_troubleshooting.fm last saved 8/6/
G6. A problem is identified in an error messageTry to determine problem from the status or error message and resolve it.
Make sure that job input or output is not paused.
Check for any details that are grayed out and not available; these might show you a problem.
G7. Jobs are getting to the job list but the printer is unable to print themDo the following:
Make sure there are no holds or delays.
Make sure the printer is configured properly.
Check the status of the gateway if one is being used.
See “Tracking Jobs from a Workstation” on page 124 for more information.
Problems Integrating with Queue-Based Components
Troubleshooting Your Print System 131

Novell Confidential apdx_troubleshooting.fm last saved 8/6/ Manual Version: 3/17/03103
H1. Check the printer's spooling configurationMake sure the printer is configured to service the queue you are expecting the job to go to. See “Setting Print Job Spooling” on page 63 for more information.
H2. Reconfigure spooling for this printerThe spooling configuration specifies a different queue than the one you want this printer to service. See “Setting Print Job Spooling” on page 63 for information on how to configure job spooling.
H3. Check the job list for the queueMake sure the job is actually getting to the queue.
H4. Make sure the job is being redirected to the queue properlyMany applications are not designed for network printing. CAPTURE is a command line utility that configures print job redirection from applications not designed for NetWare print services.
132 Novell iPrint Administration Guide for NetWare 6.5