Embed Size (px)
Citation preview

www.novell.com/documentation
Installation GuideMessenger 3.0November 2015

Legal Notices
Novell, Inc., makes no representations or warranties with respect to the contents or use of this documentation, and specifically disclaims any express or implied warranties of merchantability or fitness for any particular purpose. Further, Novell, Inc., reserves the right to revise this publication and to make changes to its content, at any time, without obligation to notify any person or entity of such revisions or changes.
Further, Novell, Inc., makes no representations or warranties with respect to any software, and specifically disclaims any express or implied warranties of merchantability or fitness for any particular purpose. Further, Novell, Inc., reserves the right to make changes to any and all parts of Novell software, at any time, without any obligation to notify any person or entity of such changes.
Any products or technical information provided under this Agreement may be subject to U.S. export controls and the trade laws of other countries. You agree to comply with all export control regulations and to obtain any required licenses or classification to export, re-export or import deliverables. You agree not to export or re-export to entities on the current U.S. export exclusion lists or to any embargoed or terrorist countries as specified in the U.S. export laws. You agree to not use deliverables for prohibited nuclear, missile, or chemical biological weaponry end uses. See the Novell International Trade Services website (http://www.novell.com/info/exports/) for more information on exporting Novell software. Novell assumes no responsibility for your failure to obtain any necessary export approvals.
Copyright © 2007-2015 Novell, Inc. All rights reserved. No part of this publication may be reproduced, photocopied, stored on a retrieval system, or transmitted without the express written consent of the publisher.
Novell, Inc.
1800 South Novell Place
Provo, UT 84606
U.S.A.
www.novell.com
Online Documentation: To access the latest online documentation for this and other Novell products, see the Novell Documentation website (http://www.novell.com/documentation).
Novell Trademarks
For Novell trademarks, see the Novell Trademark and Service Mark list (http://www.novell.com/company/legal/trademarks/tmlist.html).
Third-Party Materials
All third-party trademarks are the property of their respective owners.

Contents
About This Guide 5
1 What Is Novell Messenger? 7
2 Novell Messenger Hardware and Software Requirements 92.1 Messenger System Requirements . . . . . . . . . . . . . . . . . . . . . . . . . . . . . . . . . . . . . . . . . . . . . . . . . . . . 9
2.1.1 Messenger Server Requirements . . . . . . . . . . . . . . . . . . . . . . . . . . . . . . . . . . . . . . . . . . . . . 92.1.2 Installation User Rights Requirements. . . . . . . . . . . . . . . . . . . . . . . . . . . . . . . . . . . . . . . . . 10
2.2 Messenger Client Workstation Requirements . . . . . . . . . . . . . . . . . . . . . . . . . . . . . . . . . . . . . . . . . . 102.2.1 Windows Client . . . . . . . . . . . . . . . . . . . . . . . . . . . . . . . . . . . . . . . . . . . . . . . . . . . . . . . . . . 102.2.2 Linux Client . . . . . . . . . . . . . . . . . . . . . . . . . . . . . . . . . . . . . . . . . . . . . . . . . . . . . . . . . . . . . 102.2.3 Mac Client . . . . . . . . . . . . . . . . . . . . . . . . . . . . . . . . . . . . . . . . . . . . . . . . . . . . . . . . . . . . . . 112.2.4 Mobile Clients . . . . . . . . . . . . . . . . . . . . . . . . . . . . . . . . . . . . . . . . . . . . . . . . . . . . . . . . . . . 11
2.3 Supported Environments . . . . . . . . . . . . . . . . . . . . . . . . . . . . . . . . . . . . . . . . . . . . . . . . . . . . . . . . . . 112.3.1 IPV6 Support . . . . . . . . . . . . . . . . . . . . . . . . . . . . . . . . . . . . . . . . . . . . . . . . . . . . . . . . . . . . 112.3.2 Clustering Support . . . . . . . . . . . . . . . . . . . . . . . . . . . . . . . . . . . . . . . . . . . . . . . . . . . . . . . . 112.3.3 Virtual Machine Support. . . . . . . . . . . . . . . . . . . . . . . . . . . . . . . . . . . . . . . . . . . . . . . . . . . . 122.3.4 Support for Mobile Workspace Solutions. . . . . . . . . . . . . . . . . . . . . . . . . . . . . . . . . . . . . . . 12
3 Installing a Novell Messenger System 133.1 Planning Your Novell Messenger System . . . . . . . . . . . . . . . . . . . . . . . . . . . . . . . . . . . . . . . . . . . . . 13
3.1.1 Determining Installation Locations . . . . . . . . . . . . . . . . . . . . . . . . . . . . . . . . . . . . . . . . . . . . 133.1.2 Planning Your Novell Messenger System . . . . . . . . . . . . . . . . . . . . . . . . . . . . . . . . . . . . . . 143.1.3 Planning the Novell Messenger Agents . . . . . . . . . . . . . . . . . . . . . . . . . . . . . . . . . . . . . . . . 18
3.2 Installing and Setting Up Your Novell Messenger System . . . . . . . . . . . . . . . . . . . . . . . . . . . . . . . . . 213.2.1 Installation Prerequisites . . . . . . . . . . . . . . . . . . . . . . . . . . . . . . . . . . . . . . . . . . . . . . . . . . . 223.2.2 Installing and Setting Up a Messenger System on Windows. . . . . . . . . . . . . . . . . . . . . . . . 223.2.3 Installing and Setting Up a Messenger System on Linux. . . . . . . . . . . . . . . . . . . . . . . . . . . 273.2.4 Setting Up the High Availability Service. . . . . . . . . . . . . . . . . . . . . . . . . . . . . . . . . . . . . . . . 323.2.5 Setting Up Non-root Access on an NSS Volume on Novell Open Enterprise Server Linux. 33
3.3 Monitoring Novell Messenger with GroupWise Monitor . . . . . . . . . . . . . . . . . . . . . . . . . . . . . . . . . . . 353.4 What’s Next . . . . . . . . . . . . . . . . . . . . . . . . . . . . . . . . . . . . . . . . . . . . . . . . . . . . . . . . . . . . . . . . . . . . 353.5 Novell Messenger Worksheet . . . . . . . . . . . . . . . . . . . . . . . . . . . . . . . . . . . . . . . . . . . . . . . . . . . . . . 36
4 Installing the Messenger Client 394.1 Downloading and Installing the Messenger Client from Your Web Browser . . . . . . . . . . . . . . . . . . . 394.2 Starting the Messenger Client . . . . . . . . . . . . . . . . . . . . . . . . . . . . . . . . . . . . . . . . . . . . . . . . . . . . . . 404.3 Additional Client Installation Methods . . . . . . . . . . . . . . . . . . . . . . . . . . . . . . . . . . . . . . . . . . . . . . . . 41
5 Updates 435.1 What’s New in Novell Messenger 3.0. . . . . . . . . . . . . . . . . . . . . . . . . . . . . . . . . . . . . . . . . . . . . . . . . 435.2 Understanding the Update Process . . . . . . . . . . . . . . . . . . . . . . . . . . . . . . . . . . . . . . . . . . . . . . . . . . 43
5.2.1 Extending the NetIQ eDirectory Schema. . . . . . . . . . . . . . . . . . . . . . . . . . . . . . . . . . . . . . . 445.2.2 Installing the Novell Messenger Software . . . . . . . . . . . . . . . . . . . . . . . . . . . . . . . . . . . . . . 445.2.3 Updating the Novell Messenger Client . . . . . . . . . . . . . . . . . . . . . . . . . . . . . . . . . . . . . . . . 445.2.4 Updating the Novell Messenger Agents. . . . . . . . . . . . . . . . . . . . . . . . . . . . . . . . . . . . . . . . 44
Contents 3

4 Nov
6 Migration 456.1 Migrating eDirectory to Linux . . . . . . . . . . . . . . . . . . . . . . . . . . . . . . . . . . . . . . . . . . . . . . . . . . . . . . . 456.2 Moving Messenger Agents to Linux . . . . . . . . . . . . . . . . . . . . . . . . . . . . . . . . . . . . . . . . . . . . . . . . . . 45
6.2.1 Making a Windows Server Visible from Linux . . . . . . . . . . . . . . . . . . . . . . . . . . . . . . . . . . . 456.2.2 Copying the Startup Files. . . . . . . . . . . . . . . . . . . . . . . . . . . . . . . . . . . . . . . . . . . . . . . . . . . 466.2.3 Client/Server SSL Certificates . . . . . . . . . . . . . . . . . . . . . . . . . . . . . . . . . . . . . . . . . . . . . . . 466.2.4 Trusted Root Certificates . . . . . . . . . . . . . . . . . . . . . . . . . . . . . . . . . . . . . . . . . . . . . . . . . . . 476.2.5 Installing the Messenger Agents on Linux . . . . . . . . . . . . . . . . . . . . . . . . . . . . . . . . . . . . . . 476.2.6 Enabling Messenger Agent Monitoring on Linux . . . . . . . . . . . . . . . . . . . . . . . . . . . . . . . . . 48
6.3 Copying System Data. . . . . . . . . . . . . . . . . . . . . . . . . . . . . . . . . . . . . . . . . . . . . . . . . . . . . . . . . . . . . 486.3.1 Copying the Archive Store and Archive Indexes . . . . . . . . . . . . . . . . . . . . . . . . . . . . . . . . . 486.3.2 Copying the Archive Queue. . . . . . . . . . . . . . . . . . . . . . . . . . . . . . . . . . . . . . . . . . . . . . . . . 496.3.3 Copying the Messaging Queue . . . . . . . . . . . . . . . . . . . . . . . . . . . . . . . . . . . . . . . . . . . . . . 496.3.4 Copying the Archive Agent Log Files. . . . . . . . . . . . . . . . . . . . . . . . . . . . . . . . . . . . . . . . . . 506.3.5 Copying the Messaging Agent Log Files . . . . . . . . . . . . . . . . . . . . . . . . . . . . . . . . . . . . . . . 506.3.6 Deleting and Regenerating the Archive Agent Indexes . . . . . . . . . . . . . . . . . . . . . . . . . . . . 51
6.4 ConsoleOne Verification. . . . . . . . . . . . . . . . . . . . . . . . . . . . . . . . . . . . . . . . . . . . . . . . . . . . . . . . . . . 51
A Third-Party Materials 53A.1 OpenSSL . . . . . . . . . . . . . . . . . . . . . . . . . . . . . . . . . . . . . . . . . . . . . . . . . . . . . . . . . . . . . . . . . . . . . . 53A.2 NET-SNMP Open Source Package . . . . . . . . . . . . . . . . . . . . . . . . . . . . . . . . . . . . . . . . . . . . . . . . . . 55
A.2.1 ---- Part 1: CMU/UCD copyright notice: (BSD like) ----- . . . . . . . . . . . . . . . . . . . . . . . . . . . . 55A.2.2 ---- Part 2: Networks Associates Technology, Inc copyright notice (BSD) ----- . . . . . . . . . . 55A.2.3 ---- Part 3: Cambridge Broadband Ltd. copyright notice (BSD) ----- . . . . . . . . . . . . . . . . . . 56A.2.4 ---- Part 4: Sun Microsystems, Inc. copyright notice (BSD) ----- . . . . . . . . . . . . . . . . . . . . . 56
A.3 Libegg . . . . . . . . . . . . . . . . . . . . . . . . . . . . . . . . . . . . . . . . . . . . . . . . . . . . . . . . . . . . . . . . . . . . . . . . 57A.4 JRE . . . . . . . . . . . . . . . . . . . . . . . . . . . . . . . . . . . . . . . . . . . . . . . . . . . . . . . . . . . . . . . . . . . . . . . . . . 58
ell Messenger 3.0 Installation Guide
About This Guide
This Novell Messenger 3.0 Installation Guide helps you install a new Novell Messenger system. The guide is intended for network administrators who install and administer Messenger and is divided into the following sections:
Chapter 1, “What Is Novell Messenger?,” on page 7 Chapter 2, “Novell Messenger Hardware and Software Requirements,” on page 9 Chapter 3, “Installing a Novell Messenger System,” on page 13 Chapter 4, “Installing the Messenger Client,” on page 39 Chapter 5, “Updates,” on page 43 Appendix A, “Third-Party Materials,” on page 53
AudienceThis guide is intended for Novell Messenger administrators.
FeedbackWe want to hear your comments and suggestions about this manual and the other documentation included with this product. Please use the comment on this topic feature at the bottom of each page of the online documentation, or go to www.novell.com/documentation/feedback.html and enter your comments there.
Documentation UpdatesFor the most recent version of the Messenger 3.0 Installation Guide, visit the Novell Messenger 3.0 documentation website (http://www.novell.com/documentation/novell_messenger30)
Additional DocumentationFor additional Messenger documentation, see the Novell Messenger 3.0 documentation website (http://www.novell.com/documentation/novell_messenger30).
About This Guide 5

6 Novell Messenger 3.0 Installation Guide

1 1What Is Novell Messenger?
Novell Messenger is a corporate, cross-platform instant messaging product that is based on NetIQ eDirectory. Your Messenger system can be set up on Linux or Windows.
Messenger features include the following:
Sending instant messages in a secure environment (user authentication through eDirectory and SSL encryption of messages)
Creating a contact list and displaying user information from the contact list (based on user information already available in eDirectory)
Displaying user presence (online, busy, away, idle, and so on) Blocking others from seeing your presence Creating custom statuses to define your presence Participating in multi-user conversations Saving personal conversations Creating and searching a corporate-level conversation archive Broadcasts Personal history Chat rooms
A Messenger system consists of three software components (Messaging Agent, Archive Agent, and Messenger snap-in to ConsoleOne) and various eDirectory objects where Messenger configuration information is stored. This Messenger 3.0 Installation Guide lists system requirements, helps you plan and install your Messenger system, and describes the easiest way to distribute the Novell Messenger client software to users. The Novell Messenger 3.0 Administration Guide describes your Messenger system in detail and helps you configure and manage your Messenger system to meet your users’ needs.
What Is Novell Messenger? 7

8 Novell Messenger 3.0 Installation Guide

2 2Novell Messenger Hardware and Software Requirements
Section 2.1, “Messenger System Requirements,” on page 9 Section 2.2, “Messenger Client Workstation Requirements,” on page 10 Section 2.3, “Supported Environments,” on page 11
2.1 Messenger System RequirementsBefore installing Messenger, ensure that your system meets the following server installation requirements:
Section 2.1.1, “Messenger Server Requirements,” on page 9 Section 2.1.2, “Installation User Rights Requirements,” on page 10
2.1.1 Messenger Server Requirements 32-bit/x86 processor or 64-bit/x86 processor
On a 64-bit processor, Messenger still runs as a 32-bit application.
Any of the following server operating systems for the Messenger agents:
Novell Open Enterprise Server 11 or Novell Open Enterprise Server 15, plus the latest Support Pack
SUSE Linux Enterprise Server 11 or SUSE Linux Enterprise Server 12, plus the latest Support PackWhen installing on SLES 12, be aware of the following: The Linux client must be installed as an RPM file on SLES 12.
Windows Server 2008, Windows Server 2008 R2, Windows Server 2012, Windows Server 2012 R2, plus the latest Service Pack for your version of Windows.
Adequate server memory as required by the operating system
eDirectory 8.7 or later, plus the latest Support Pack
ConsoleOne 1.3.6h or later, with the LDAP snap-in installed
On Linux, ConsoleOne requires Java Virtual Machine (JVM) 1.4.2, plus the X Window System, version X11R6 or later. If you do not already have it installed, ConsoleOne for Linux is available to install in the Messenger download file.On Windows, ConsoleOne also requires the Novell Client. ConsoleOne 1.3.6h requires Novell Client 4.91 SP3 or later. If necessary, you can download the latest Novell Client from the Novell Product Downloads site (http://download.novell.com).
Windows 2008, Windows 2012, and the Novell Client on any administrator Windows machine where you run ConsoleOne or the Messenger Installation program
Novell Messenger Hardware and Software Requirements 9

If you do not already have it installed, ConsoleOne for Windows is available to install in the Messenger download file.If necessary, you can download the Novell Client from the Novell Product Downloads site (http://download.novell.com).
The Messenger agents are highly scalable. If you are setting up a large Messenger system, you should run the Messaging Agent on a dedicated server with dual processor speeds of 3 GHz and with 4 GB of RAM. The Messaging Agent has been tested to easily support 1000 active conversations on such hardware. If you assume that 2% of Messenger users might be conversing simultaneously, you could plan on your Messenger system including as many as 50,000 users.
2.1.2 Installation User Rights Requirements You must have the following rights when you run the Messenger Installation program:
Supervisor rights at the root of the eDirectory tree to extend the eDirectory schema Read and Create rights in any containers where Messenger objects will be created File, Super user, or Administrator rights (depending on the operating system) to the server
or workstation where the Messenger snap-in to ConsoleOne and the Messenger agents will be installed
Additionally, if you run the Messenger Windows Installation program from a Windows workstation, you must have the following: Access to the eDirectory tree Novell Client
2.2 Messenger Client Workstation Requirements Section 2.2.1, “Windows Client,” on page 10 Section 2.2.2, “Linux Client,” on page 10 Section 2.2.3, “Mac Client,” on page 11 Section 2.2.4, “Mobile Clients,” on page 11
2.2.1 Windows Client Any of the following desktop operating systems for the Novell Messenger Windows client:
Windows XP Windows 7 Windows 8 and 8.1 Windows 10
2.2.2 Linux Client SUSE Linux Enterprise Desktop 11, plus the KDE desktop or the GNOME desktop
10 Novell Messenger 3.0 Installation Guide

2.2.3 Mac Client Any of the following desktop operating systems:
Mac OS 10.8 (Mountain Lion) Mac OS 10.9 (Mavericks) Mac OS 10.10 (Yosemite) Mac OS 10.11 (El Capitan)
2.2.4 Mobile ClientsNative applications for Novell Messenger are available for mobile devices with the following operating systems:
iOS 8 or later (available from the Apple iTunes App Store) Android 2.3 or later (available from the Google Play App Store, formerly Android Market) BlackBerry PlayBook and Z10 (the native application is available in the BlackBerry World app
store)
Applications work on both phone and tablet devices.
For more information about using Messenger on your mobile device, see “Using Novell Messenger on Your Mobile Device” in the Novell Messenger 3.0 Client User Guide.
2.3 Supported Environments Section 2.3.1, “IPV6 Support,” on page 11 Section 2.3.2, “Clustering Support,” on page 11 Section 2.3.3, “Virtual Machine Support,” on page 12 Section 2.3.4, “Support for Mobile Workspace Solutions,” on page 12
2.3.1 IPV6 SupportThe Messaging Agent and Archive Agent support the IPV6 protocol when it is available on the server. If IPV6 is available, the agent detects it and supports it by default, along with IPV4.
As you configure your Messenger system and specify the network address of an IPV6 server, you must specify its DNS hostname. IP Address fields in ConsoleOne do not accommodate the IPV6 address format.
IPV6 support is available both on Linux and Windows.
2.3.2 Clustering SupportYou can set up your Messenger system in many different clustering environments, as described in the GroupWise 2014 Interoperability Guide (https://www.novell.com/documentation/groupwise2014/gw2014_guide_interop/data/interop_front.html).
If you are using one of these clustering environments, follow the installation instructions in the GroupWise 2014 Interoperability Guide (https://www.novell.com/documentation/groupwise2014/gw2014_guide_interop/data/interop_front.html), rather than the installation instructions in this guide.
Novell Messenger Hardware and Software Requirements 11

2.3.3 Virtual Machine SupportYou can install components of your Messenger system in virtual environments where a software program enables one physical server to function as if it were two or more physical servers. The following virtualization software is supported:
Xen virtualization on SUSE Linux Enterprise Server 10, or Xen virtualization on SUSE Linux Enterprise Server 11
VMware GSX Server, an enterprise-class virtual infrastructure for x86-based servers VMware ESX Server, a data-center-class virtual infrastructure for mission-critical environments
For more information, see the VMware website (http://www.vmware.com).
2.3.4 Support for Mobile Workspace SolutionsThe Novell Messenger client runs successfully when used with mobile workspace solutions such as Citrix and Terminal Services, provided that the solution is using a supported operating system. For information about which operating systems are supported, see Section 2.1, “Messenger System Requirements,” on page 9.
12 Novell Messenger 3.0 Installation Guide

3 3Installing a Novell Messenger System
The following sections present the background information and installation instructions you need to successfully implement your Novell Messenger system.
Section 3.1, “Planning Your Novell Messenger System,” on page 13 Section 3.2, “Installing and Setting Up Your Novell Messenger System,” on page 21 Section 3.3, “Monitoring Novell Messenger with GroupWise Monitor,” on page 35 Section 3.4, “What’s Next,” on page 35 Section 3.5, “Novell Messenger Worksheet,” on page 36
3.1 Planning Your Novell Messenger SystemThe Messenger Installation program helps you install and set up your Messenger system. The Installation program also provides information to guide you through the process.
Review the following sections while filling out Section 3.5, “Novell Messenger Worksheet,” on page 36. The worksheet lists all the information you are prompted for as you run the Installation program.
Section 3.1.1, “Determining Installation Locations,” on page 13 Section 3.1.2, “Planning Your Novell Messenger System,” on page 14 Section 3.1.3, “Planning the Novell Messenger Agents,” on page 18
3.1.1 Determining Installation LocationsThe Installation program prompts you for information about the eDirectory tree where you will create Messenger objects and the network server locations where you will create Messenger directories and install files. The following sections prepare you to supply the required information:
“eDirectory” on page 13 “ConsoleOne” on page 14
eDirectoryMessenger is administered through the eDirectory directory service. All Messenger components and users are configured through objects in eDirectory. Ensure that you have eDirectory installed in your environment. See “Novell Messenger Hardware and Software Requirements” on page 9 for more information.
Extending the eDirectory Tree’s SchemaThe Installation program must extend the schema of the eDirectory tree where you plan to create your Messenger system. Because all objects in a Messenger system must reside in the same eDirectory tree, only one tree needs to be extended.
Installing a Novell Messenger System 13
ConsoleOneMessenger administration is performed through ConsoleOne. When you install Messenger, the Messenger snap-in files are copied into an existing ConsoleOne installation. The Messenger snap-in files extend the functionality of ConsoleOne to let you administer Messenger. ConsoleOne considerations differ by platform:
Windows: For a Messenger system on Windows, you need to decide which ConsoleOne location you want to use to administer Messenger. This can be a ConsoleOne location on a network server or it can be on a local workstation. ConsoleOne 1.3.6 is included in the downloaded Novell Messenger 3.0 image, so you can update your ConsoleOne installation if necessary. If you plan to use ConsoleOne on a local workstation, you need to perform the Messenger installation from that workstation.
Linux: If you will be administering a Messenger system on Linux, ConsoleOne must be installed before you set up Messenger. ConsoleOne 1.3.6 is included in the downloaded Novell Messenger 3.0 image, so you can update your ConsoleOne installation if necessary. If you plan to use ConsoleOne on a local workstation, you need to perform the Messenger installation from that workstation. Ensure that ConsoleOne is installed on the Linux server where you plan to create your Messenger system.
After your initial Messenger installation, you can install ConsoleOne and the Messenger snap-in to additional locations as needed.
3.1.2 Planning Your Novell Messenger SystemYour Novell Messenger system is a collection of eDirectory objects to which the Messenger agents need access. In addition, the Messenger agents need access to all User objects that will be included in your Messenger system. The following sections help you decide how to implement your Messenger system in eDirectory:
“Messenger System Location” on page 15 “Messenger User Locations” on page 15 “eDirectory Access and Authentication” on page 16 “Messenger System Security” on page 17
WORKSHEET
Under Item 4: Tree Name, enter the eDirectory tree where you will create the Messenger objects.
WORKSHEET
Under Item 14: Admin Configuration, indicate whether you need to update your ConsoleOne installation, and specify the path to the ConsoleOne software directory.
14 Novell Messenger 3.0 Installation Guide

Messenger System LocationYou can create your Messenger system in any context in your eDirectory tree, except at the root of the tree. Within the Messenger system container you will have server, agent, policy, scope profile, LDAP profile, host, and chat objects.
The default name of the object that represents your Messenger system is MessengerService. The default object name for the server where you install the Messenger agents is the server’s DNS hostname with SERVER appended to it. You can change these object names, if necessary.
After you have completed the installation of your Messenger system, the following structure is created in eDirectory:
Figure 3-1 Messenger Service Container and Contents
These objects are explained in “Understanding Your Novell Messenger System” in the Novell Messenger 3.0 Administration Guide.
Messenger User LocationsThe Messenger agents scan eDirectory to obtain information about users. During installation, you can specify one or more eDirectory contexts where User objects are located. You can include subcontexts if necessary. The list of contexts you supply establishes the initial scope of your Messenger system.
User objects located in those contexts are considered part of your Messenger system and their associated users can communicate with each other by using the Messenger client. User objects located outside those contexts are not considered part of your Messenger system and their associated users cannot use Messenger.
NOTE: GroupWise External Entity objects are not treated as User objects and are not considered part of your Messenger system.
WORKSHEET
Under Item 5: Messenger System Context, specify the eDirectory context where you want to create your Messenger system. Ensure that the context exists in your eDirectory tree.
Under Item 6: Messenger System Objects, provide alternate names for the Messenger system and server objects if you do not want to use the default names.
Installing a Novell Messenger System 15

Using the information you provide during installation, the Installation program creates a Scope Profile object in your Messenger system. When you view the properties of this object in the tree, you see the contexts you specified during installation. You can change the scope of your Messenger system as needed after installation, as described in “Adding Users to Your Messenger System” in “Managing Messenger Client Users” in the Novell Messenger 3.0 Administration Guide.
eDirectory Access and AuthenticationMessenger is a directory-based application. Messenger agent configuration information, user information, and settings are stored in eDirectory. You can choose between two different methods of eDirectory access:
Direct Access: The Messenger agents can log directly into eDirectory to obtain the information they need. An advantage of direct access is fast access to a local eDirectory replica.
LDAP Access: The Messenger agents can be configured to access eDirectory through an LDAP server.
The initial eDirectory access method that you set up during installation determines how Messenger agents access eDirectory to obtain their configuration information and how the Messaging Agent accesses eDirectory on behalf of Messenger users when they log in to Messenger, search for contacts, establish conversations, and so on. Additional directory access alternatives can be configured after installation, as described in “Customizing eDirectory Access for Users” in the Novell Messenger 3.0 Administration Guide.
During installation, you must provide an eDirectory user name and password for the Messenger agents to use when accessing eDirectory. The simplest approach is to let them log in as an Admin equivalent user.
If you do not want to let the Messenger agents log in to eDirectory as an Admin equivalent user, you must set up an eDirectory user that meets these specific requirements:
Must be visible to the Messenger agents using the eDirectory access method you have selected (direct or LDAP).
WORKSHEET
Under Item 11: User Configuration, list the eDirectory contexts where User objects are located and mark whether you want to include subcontexts.
On Linux, you cannot automatically include subcontexts during installation. You must list each subcontext separately or use ConsoleOne after installation to include subcontexts, as described in “Editing the Default Scope Profile to Include Additional eDirectory Users” in “Managing Messenger Client Users” in the Novell Messenger 3.0 Administration Guide.
WORKSHEET
Under Item 9: Directory Access, mark whether you want the Messenger agents to use direct access or LDAP access to eDirectory.
If you are installing the Messenger agents on a Windows or Linux server, specify the IP address of an eDirectory replica. You can use only an IPV4 IP address for the eDirectory replica.
If you want to use LDAP access, specify the hostname and port number where the Messenger agents can communicate with the LDAP server. The default port number is 389 for non-SSL and 636 for SSL.
16 Novell Messenger 3.0 Installation Guide

Must be a trustee of your Messenger system object (MessengerService, by default) and have the following rights as a trustee in order to access the Messenger agent objects:
Must be a trustee of the eDirectory tree object or of the highest-level container object that contains all User objects that will be part of your Messenger system, and have the following rights as a trustee in order to access User objects:
Without sufficient rights to the Messenger system object, the Messenger agents cannot access their configuration information in eDirectory. Without sufficient rights to User objects, the Messaging Agent cannot access users’ contact lists, Messenger client settings, and other user-specific information.
For step-by-step instructions on setting up the required rights, see “Assigning Required Rights for eDirectory Access” in “Managing Messenger Client Users” in the Novell Messenger 3.0 Administration Guide.
Messenger System Security “Securing Communication between Messenger and eDirectory” on page 18 “Securing Messenger Internal Communication” on page 18
Property Rights
[All Attribute Rights] Compare, Read, and Write
Inheritable
[Entry Rights] Browse, Create, Rename, and Delete
Inheritable
Property Rights
[All Attribute Rights] Compare and Read
Inheritable
[Entry Rights] Browse
Inheritable
nnmBlockingnnmBlockingAllowListnnmBlockingDenyListnnmClientSettingsnnmContactListnnmCustomStatusListnnmLastLogin
Compare, Read, and Write
Inheritable
WORKSHEET
Under Item 10: Directory Authentication, supply the user name and password that the Messenger agents can use to authenticate to eDirectory with the required rights.
Installing a Novell Messenger System 17

Securing Communication between Messenger and eDirectoryBy default, communication between the Messenger agents and eDirectory is not secure. Information obtained from eDirectory is not encrypted.
If you want to enable SSL encryption between the Messenger agents and eDirectory, you must use LDAP access, not direct access, to eDirectory. The Messenger agents must communicate with the LDAP server on the LDAP SSL port of 636, rather than on the default LDAP port of 389.
For additional security between the Messenger agents and eDirectory when using LDAP access, you can reference the root certificate for the server where the eDirectory replica accessed by the agents is located. Typically, the root certificate is named rootcert.der. On a Linux or Windows server, it is exported to a user-specified location after installation of eDirectory.
IMPORTANT: If you do not specify a root certificate, your LDAP server must be configured to accept clear text passwords.
Root certificates can be exported from ConsoleOne or iManager at any time after eDirectory is installed. For information about how to export a root certificate from iManager, see Exporting a Trusted Root or Public Key Certificate (https://www.netiq.com/documentation/edir88/crtadmin88/data/a2ebopb.html#a2ebopd) in the NetIQ Certificate Server Administration Guide (https://www.netiq.com/documentation/edir88/crtadmin88/data/bookinfo.html).
Securing Messenger Internal CommunicationInternal communication in Messenger can either use an internal certificate, or an external certificate. If you decide to use an internal certificate, Messenger will create the certificate file and its private key for you. If you want to use an external certificate and private key, they must be available on your Messenger server.
If you want to move from internal certificates to external certificate or update your external certificates, follow the steps in “Configuring Messaging Security with SSL Encryption” in “Managing the Messaging Agent” in the Novell Messenger 3.0 Administration Guide.
3.1.3 Planning the Novell Messenger AgentsYour Novell Messenger system can include two agents:
Messaging Agent: Your Messenger system requires one Messaging Agent. The Messenger client communicates with the Messaging Agent for messaging, presence, and searching for users to add to the Messenger Contact List. The Messaging Agent also manages the queue for archiving conversations.
WORKSHEET
Under Item 9: Directory Access, specify 636 as the LDAP port number and, if desired, provide the full path to the root certificate.
WORKSHEET
Under Item 15: Security Configuration, specify the full path to the certificate file, your private key file (if separate from the certificate file), and the private key password.
18 Novell Messenger 3.0 Installation Guide

Archive Agent: If you want to enable archiving, your Messenger system requires one Archive Agent. The Archive Agent archives conversations, indexes conversations, and performs searches on the archive when contacted by an authorized Messenger user.
The following sections prepare you to supply the information required when installing the Messenger agents. Depending on the operating system you are installing to, some of these options might not apply:
“Agent Platform” on page 19 “Agent Software Location” on page 19 “Agent Network Address and Ports” on page 19 “Clustering Option for the Messenger Agents” on page 20 “Linux Agent High Availability” on page 20 “Windows Server Options for the Windows Messenger Agents” on page 21
Agent PlatformThe agents are available as Linux executables and Windows executables.
Agent Software LocationOn Windows, you can specify where you want to install the Messenger agents. By default, they are installed to drive:\novell\nm where drive represents a mapped drive letter from the perspective of the Windows machine where you will run the Messenger Installation program.
On Linux, the Messenger agents are always installed to the bin and lib subdirectories of /opt/novell/messenger.
Agent Network Address and PortsThe Messenger Installation program obtains the IP address and DNS hostname of the server where you want to install the Messenger agents based on the agent software location you provide. If the server has multiple IP addresses and DNS hostnames associated with it, you can specify different information from what the Installation program obtained automatically.
In addition to the IP address and DNS hostname information, the Installation program also establishes the ports on which the Messenger agents listen for service requests. By default, the Messaging Agent listens for the Messenger client on client/server port 8300, meaning that conversations take place on port 8300. By default, the Archive Agent listens for the Messenger client on client/server port 8310, meaning that archive searches take place on port 8310. If a default port number is already in use on the server, select a different port number.
WORKSHEET
Under Item 1: Server Information, mark the type of agents (Linux or Windows) that you want to install.
WORKSHEET
Under Item 3: Installation Path, specify the full path to the directory where you want to install the Windows Messenger agent software. If the directory does not exist, it will be created.
Installing a Novell Messenger System 19

If you are using IPV6 for your Messenger agents, you must use the DNS hostname instead of the IP address for the agents.
Clustering Option for the Messenger AgentsNovell Cluster Services is a server clustering system that ensures high availability and manageability of critical network resources, including applications (such as the Messaging Agent and the Archive Agent) and volumes (where the Messenger queues and archive reside). Novell Cluster Services supports failover, failback, and migration of individually managed cluster resources. Novell Cluster Services is only available for OES Linux.
The Messenger agents can be configured to take advantage of the fault-tolerant environment provided by Novell Cluster Services. The Installation program adds a /cluster switch to the Messenger agent startup files. This tells the Messenger agents to use the cluster virtual server name rather than the specific server name in path names obtained from the Agent object properties in eDirectory or from startup switches.
In addition to Novell Cluster Services, Messenger also supports PolyServe and Heartbeat clusters. For additional information on how to install and configure PolyServe and Heartbeat clusters, see the GroupWise 2014 Interoperability Guide (https://www.novell.com/documentation/groupwise2014/gw2014_guide_interop/data/interop_front.html).
For more information on clustering Messenger, see the GroupWise 2014 Interoperability Guide (https://www.novell.com/documentation/groupwise2014/gw2014_guide_interop/data/interop_front.html).
Linux Agent High AvailabilityThe GroupWise High Availability service makes sure that if the Messaging Agent or the Archiving Agent goes down for any reason, it starts again automatically. On Windows, Microsoft Clustering Services automatically restarts a service that is not responding. On Linux, Novell Cluster Services does not include this capability, so it is built into the Novell Messenger Linux agents.
The GroupWise High Availability service (gwha) must be installed from the downloaded from the GroupWise image that you are running. After the gwha service has been installed, it starts when your server boots and makes sure that the Messaging Agent and the Archiving Agent are running. If it detects that one of these agents is no longer running, it immediately issues the command to start it. The High Availability service uses the GroupWise Monitor Agent to periodically check the status of the agents that it is responsible for restarting. For instructions on how to set up the High Availability service, see Section 3.2.4, “Setting Up the High Availability Service,” on page 32. For information on configuring Monitor for the Novell Messaging agents, see “Monitoring Messaging Agent Status” in the Novell Messenger 3.0 Administration Guide.
WORKSHEET
Under Item 12: Server Address, list the IP address or DNS hostname of the server where you want to install the Messenger agents. If the default port numbers are in use on the server, specify unique port numbers for the Messenger agents.
WORKSHEET
Under Item 13: Configure Agents for Clustering, mark whether you want to configure the Messenger agents for clustering.
20 Novell Messenger 3.0 Installation Guide
Windows Server Options for the Windows Messenger AgentsYou can run the Windows Messenger agents as Windows applications or as Windows services. When you run the agents as Windows services, they can run under a specific Windows user account, or they can run under the local system account, with no user name or password required. As with all Windows services, you can start the agents manually or have them start automatically each time the Windows server starts.
If you want to use an SNMP manager program (such as the Management and Monitoring Services component of Novell ZENworks for Servers) to monitor the Windows Messenger agents, you must install some SNMP components along with the Windows Messenger agent software.
If this option is dimmed during installation, the SNMP service has not been set up on the Windows server where you are installing the Messenger agents. If you want to monitor the agents from an SNMP management program, the SNMP service must be enabled so that you can select this option. For information about setting up SNMP on a Windows server, see “Using SNMP Monitoring Programs” in “Managing the Messaging Agent” in the Novell Messenger 3.0 Administration Guide.
3.2 Installing and Setting Up Your Novell Messenger SystemYou should have already reviewed Section 3.1, “Planning Your Novell Messenger System,” on page 13 and filled out the worksheet. The following sections guide you through the installation process:
Section 3.2.1, “Installation Prerequisites,” on page 22 Section 3.2.2, “Installing and Setting Up a Messenger System on Windows,” on page 22 Section 3.2.3, “Installing and Setting Up a Messenger System on Linux,” on page 27 Section 3.2.4, “Setting Up the High Availability Service,” on page 32 Section 3.2.5, “Setting Up Non-root Access on an NSS Volume on Novell Open Enterprise
Server Linux,” on page 33
WORKSHEET
Under Item 2: Windows Server Options, select Install Agents as Windows Services if you want to run the Messenger agents as Windows services.
If you will run the agents as Windows services, under Item 8: Windows Service Options, record the account that the agents will run under (unless they will run under the local system account) and, if necessary, the password for the account. Also select whether you want the service to start automatically or manually.
WORKSHEET
Under Item 2: Windows Server Options, select Install and Configure SNMP for Novell Messenger Agents if you want to use an SNMP manager program.
Installing a Novell Messenger System 21

3.2.1 Installation PrerequisitesBefore starting the Messenger Installation program, ensure that your system has been prepared for the Messenger system configuration for which you have planned. In addition to this list, ensure that the server requirements have been met.
Ensure that the container object exists where you want to create your Messenger system. If you are planning to have the Messenger agents use LDAP access to eDirectory but you are
not providing a root certificate, ensure that your LDAP server supports clear text passwords. In ConsoleOne, check the properties of the LDAP Group object that your LDAP server is a part of. Depending on your version of eDirectory, the Allow Clear Text Passwords option should be selected or the Require SSL/TSL option should be deselected.
If you are planning to install the Windows Messenger agents as Windows services and you do not want them to run under the local system account, ensure that the account you want them to use has been created on the Windows server.
If you are running the Messenger Installation program at a Windows workstation or server, ensure that you are logged in as an Admin equivalent to the eDirectory tree where you are planning to create your Messenger system. If you are installing the Messaging agents on a Windows server, you should run the Installation program at that server.
Follow the setup instructions for the platform where you are creating your Messenger system:
Section 3.2.2, “Installing and Setting Up a Messenger System on Windows,” on page 22 Section 3.2.3, “Installing and Setting Up a Messenger System on Linux,” on page 27
3.2.2 Installing and Setting Up a Messenger System on Windows “Installing ConsoleOne on Windows” on page 22 “Starting the Messenger Installation Program” on page 22 “Creating Your Messenger System” on page 23 “Installing the Messenger Software” on page 27
Installing ConsoleOne on WindowsIf ConsoleOne is not already installed on the Windows server where you plan to install Messenger, you need to install it.
1 At a Windows workstation or server, download the consoleone.zip file from the Novell Customer Center (NCC) (https://www.novell.com/center).
2 Unzip the consoleone.zip file on your Windows workstation or server.3 In the ConsoleOne directory, run the install.exe file and complete the installation wizard.4 Continue with Starting the Messenger Installation Program.
Starting the Messenger Installation Program1 At a Windows workstation or server, download the Novell Messenger 3.0 image.2 In the server directory, run the setup.exe file to start the installation program.3 Select the language in which you want to run the Installation program, then click OK.
22 Novell Messenger 3.0 Installation Guide

4 Click Yes to accept the License Agreement.5 Continue with Creating Your Messenger System.
Creating Your Messenger SystemThe Installation Options page lets you select what type of installation you want to perform.
Throughout the installation process, you can refer to the Installation Guide by clicking Installation Guide in the lower-left corner of each Installation program page.
Figure 3-2 Installation Options Dialog Box
1 Select Create or Update a System, then click Next to display the Installation Path page.
2 Specify the directory path or browse to and select the directory where you want to install the Messenger agents as planned under item 3 of the worksheet, then click Next to display the System Configuration page.
Installing a Novell Messenger System 23

3 Provide the Messenger system configuration information as planned under item 4 through item 6 of the worksheet, then click Next to display the Installation Components page.
4 Leave all the components selected for your initial Messenger installation, then click Next.If you are installing the Windows Messenger agents and selected to install them as Windows services, the Windows Service Options page appears.
5 For the Windows Messenger agents, provide the Windows service information as planned under item 8 of the worksheet, then click Next to display the Directory Access page.
24 Novell Messenger 3.0 Installation Guide

6 Provide the eDirectory access information as planned under item 9 of the worksheet, then click Next to display the Directory Authentication page.
7 Provide the eDirectory authentication information as planned under item 10 of the worksheet, then click Next to display the User Configuration page.
The context of the eDirectory user is automatically added to the context list.8 If necessary, click Add, then browse to and select another user context as planned under item 11
of the worksheet.
Installing a Novell Messenger System 25
9 Select Include subcontexts if User objects exist in nested container objects beneath the selected context.
IMPORTANT: If you do not select Include subcontexts, User objects in containers beneath the selected context are not considered part of your Messenger system.
10 Click OK to add the context to the contact list.11 Repeat Step 8 through Step 10 for each context where User objects reside, then click Next to
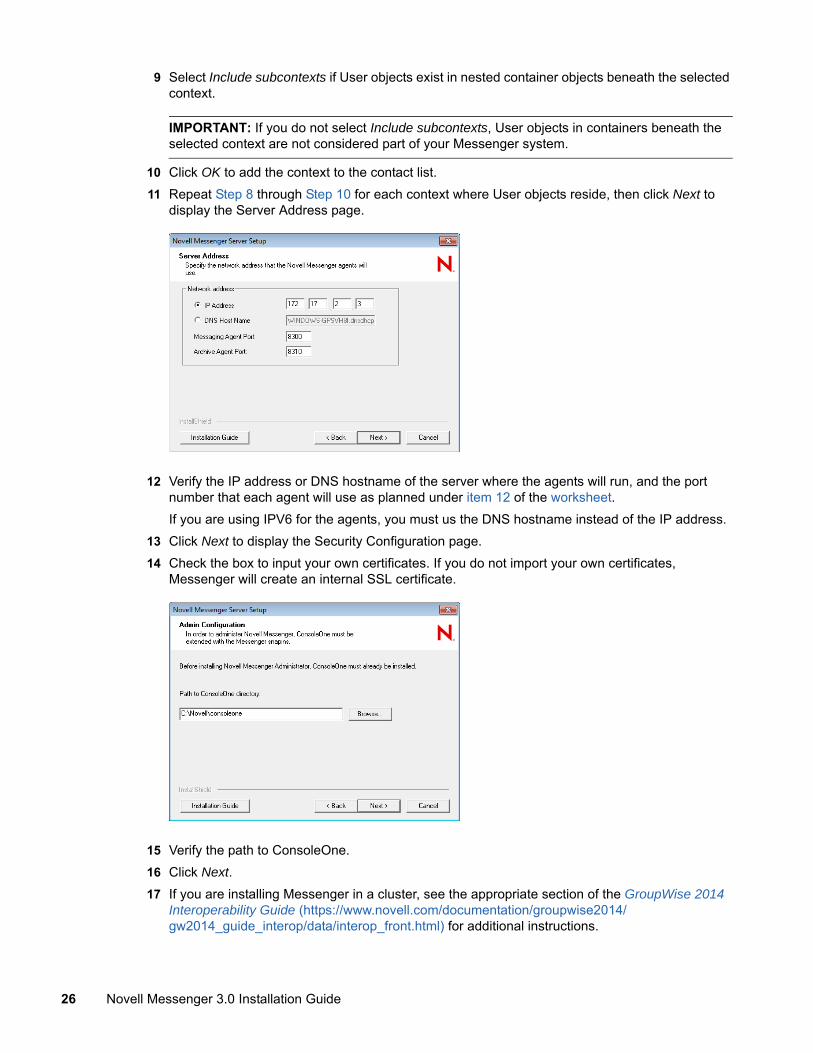
display the Server Address page.
12 Verify the IP address or DNS hostname of the server where the agents will run, and the port number that each agent will use as planned under item 12 of the worksheet.If you are using IPV6 for the agents, you must us the DNS hostname instead of the IP address.
13 Click Next to display the Security Configuration page.14 Check the box to input your own certificates. If you do not import your own certificates,
Messenger will create an internal SSL certificate.
15 Verify the path to ConsoleOne. 16 Click Next.17 If you are installing Messenger in a cluster, see the appropriate section of the GroupWise 2014
Interoperability Guide (https://www.novell.com/documentation/groupwise2014/gw2014_guide_interop/data/interop_front.html) for additional instructions.
26 Novell Messenger 3.0 Installation Guide

18 Specify if you want to allow product improvement to collect and send information to Micro Focus.19 Continue with “Installing the Messenger Software” on page 27.
Installing the Messenger SoftwareThe installation summary lets you review the information you have provided before the installation actually begins.
Figure 3-3 Installation Summary Dialog Box
1 Review the summary of the selections you have made.If necessary, click Back to change information as needed before proceeding with the installation.
2 Click Next to begin the installation.When the installation is complete, you can choose to view the Readme or start the Messenger agents immediately.
3 Select the post-installation options you want, then click Finish. 4 Continue with Section 3.4, “What’s Next,” on page 35.
3.2.3 Installing and Setting Up a Messenger System on Linux “Installing ConsoleOne on Linux” on page 27 “Starting the Messenger Installation Program on Linux” on page 28 “Configuring Your Messenger System on Linux” on page 28 “Configuring the Linux Messenger Agents for SSL” on page 30 “Starting the Linux Messenger Agents” on page 31
Installing ConsoleOne on LinuxIf ConsoleOne is not already installed on the Linux server where you plan to install Messenger, you need to install it.
1 At a Linux server, download the consoleone.tar.gz file from the Novell Customer Center (https://www.novell.com/center).
2 Untar the consoleone.tar.gz file on your Linux server.
Installing a Novell Messenger System 27

3 In a terminal window, become root by entering su - and the root password.4 Change to the consoleone/Linux subdirectory of the software image.5 Check to see if an older version of ConsoleOne is already installed on the Linux server:
ls /usr/ConsoleOne
6 (Conditional) If the ConsoleOne directory exists, uninstall ConsoleOne:./c1-uninstall
7 Install ConsoleOne:./c1-install
8 Enter the numbers for the languages that you want to install.9 Enter 3 to install the LDAP snap-in.
10 When asked whether to install the IBM JRE, select Yes.11 Continue with Starting the Messenger Installation Program on Linux.
Starting the Messenger Installation Program on Linux1 At the Linux server, become root by entering su and the root password.2 Change to the /server directory on the downloaded Messenger 3.0 image.3 Ensure that the install.sh file has execute permissions. If it does not, enter chmod +x
install.sh.4 Enter the following:
./install.sh
5 Press Enter to continue and display the license agreement.6 Press Enter or the Spacebar to scroll through the license agreement. At the end of the license
agreement, enter y to accept the agreement, or enter n to not accept the license agreement.7 If you accept the license agreement, the necessary .rpm files are installed to the server. Enter y
to continue with the installation.8 Continue with Configuring Your Messenger System on Linux.
Configuring Your Messenger System on Linux1 After the packages are installed, enter y to configure the Messenger system.
The following options are displayed:
1) Create a new system2) Install a new server to an existing system3) Extend schema only
2 Enter 1 to create a new system.If you are installing from a support pack file:Enter Y when asked Are you installing to a cluster? (y/n). For additional clustering configuration steps, see the GroupWise 2014 Interoperability Guide (https://www.novell.com/documentation/groupwise2014/gw2014_guide_interop/data/interop_front.html).The following options are displayed:
1) Use LDAP to access eDirectory2) Use eDirectory libraries for direct access
28 Novell Messenger 3.0 Installation Guide

3 Enter 1 or 2 (worksheet item 9).If 32-bit eDirectory is not installed on the Linux server, only the option for using LDAP is displayed.
4 If you selected LDAP in Step 3, specify the following information: The IP address of the LDAP server. y or n to select whether to use SSL. The port of the LDAP server (worksheet item 9). If you select to use SSL, you next need to enter the path to the LDAP server’s root
certificate (worksheet item 15). For more information, see “Messenger System Security” on page 17.
orIf you selected direct access, specify the name of the eDirectory tree to extend and create objects in, and the replica address for that tree (IP address of the server running eDirectory) (worksheet item 9).
5 Specify the context to create the objects in, for example, ou=linuxsystem,o=novell (worksheet item 5).
6 Specify the Messenger system object name (worksheet item 6). You can press Enter to accept the default name of MessengerService.
7 Specify the Messenger server object name (worksheet item 6). You can press Enter to accept the default name, which is the Linux server name plus the word server.
8 Specify the full context of the directory user object that will be used to extend the schema and create the objects. For example, cn=admin,ou-linuxsystem,o=novell.This user must have rights to extend the schema and create objects in eDirectory. This user is not saved to disk and is deleted from memory after the installation.
9 Specify the full context of the directory user object that will be used by the agents to access the directory. For example, cn=admin,ou=linuxsystem,o=novell (worksheet item 10). For more information, see “eDirectory Access and Authentication” on page 16.
10 Enter the password for this user twice (worksheet item 10).11 Specify the default contexts where Messenger will authenticate and search for users. For
example, ou=linuxsystem,o=novell (worksheet item 11). For more information, see “Messenger User Locations” on page 15.
12 Specify the IP address of the Linux server (worksheet item 12).13 Specify y or n to select whether to use your own SSL certificate or to use a Messenger created
certificate.If you select y, specify the path to the server’s root certificate and the path to the server’s root certificate key, then enter the password for the server’s root certificate.If you select n, Messenger will automatically configure the certificate for you. You need to enter the host name or IP address that users will use to connect to Messenger and the certificate path for the server.
14 Enter a non-root system user for the Messenger service to run as.You can press Enter to accept the default name of nvlmsgr.If you are installing to an NSS volume, select root as the default user. For additional information on configuring Novell Messenger for an NSS volume, see Section 3.2.5, “Setting Up Non-root Access on an NSS Volume on Novell Open Enterprise Server Linux,” on page 33.
Installing a Novell Messenger System 29
15 Specify if you want to allow product improvement to collect and send information to Micro Focus.A summary of the information you supplied is displayed.
16 Enter y to continue with the installation.17 After the installation and configuration are complete, enter n to not start the agents at this time.18 Continue with Configuring the Linux Messenger Agents for SSL.
Configuring the Linux Messenger Agents for SSLThe Messenger Cross-Platform client requires an SSL connection with the Messenger agents. If you are not already familiar with SSL, or if SSL is not already set up on your system, you can add SSL security to your Messenger system, as described in “Configuring Messaging Security with SSL Encryption” in “Managing the Messaging Agent” in the Novell Messenger 3.0 Administration Guide.
NOTE: The Messenger Windows client does not require an SSL connection with the Messenger agents.
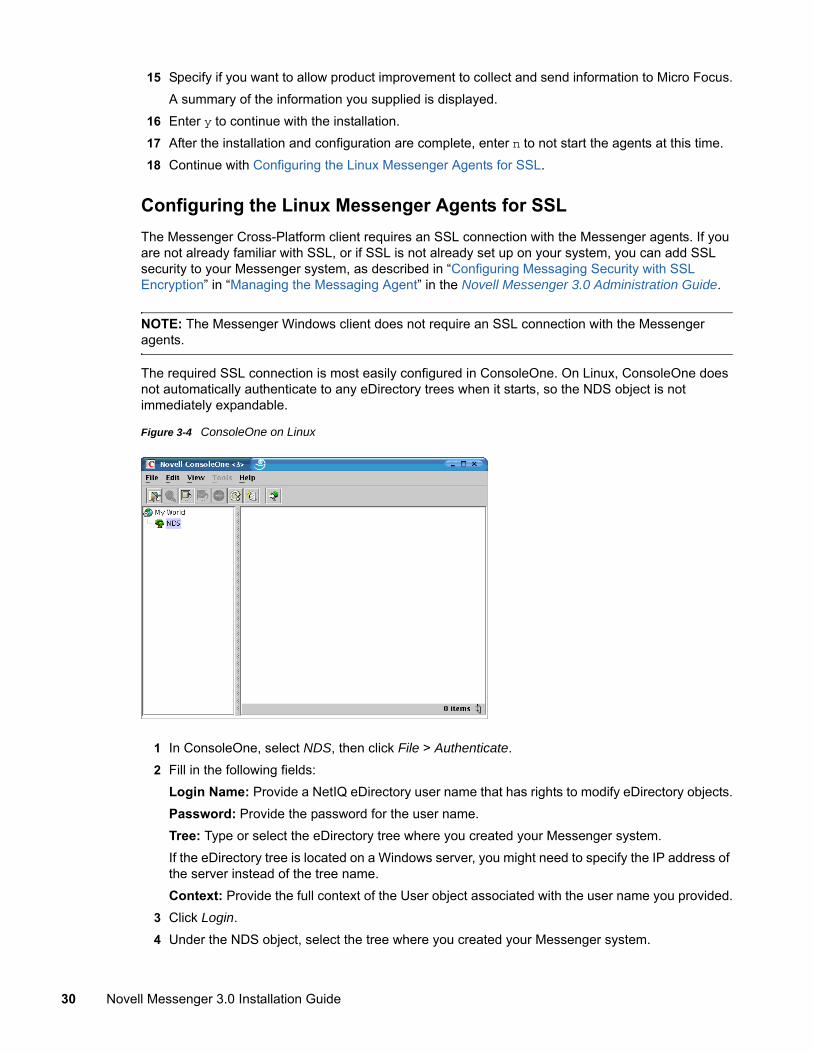
The required SSL connection is most easily configured in ConsoleOne. On Linux, ConsoleOne does not automatically authenticate to any eDirectory trees when it starts, so the NDS object is not immediately expandable.
Figure 3-4 ConsoleOne on Linux
1 In ConsoleOne, select NDS, then click File > Authenticate.2 Fill in the following fields:
Login Name: Provide a NetIQ eDirectory user name that has rights to modify eDirectory objects.Password: Provide the password for the user name.Tree: Type or select the eDirectory tree where you created your Messenger system.If the eDirectory tree is located on a Windows server, you might need to specify the IP address of the server instead of the tree name.Context: Provide the full context of the User object associated with the user name you provided.
3 Click Login.4 Under the NDS object, select the tree where you created your Messenger system.
30 Novell Messenger 3.0 Installation Guide

5 Browse to and right-click the Server object in your Messenger system, then click Properties.6 Click Server > Security.
7 Fill in the fields (worksheet item 15).8 Click OK to save the security settings.9 Continue with Starting the Linux Messenger Agents.
Starting the Linux Messenger AgentsTo start the agents manually, use the startup scripts provided in the /etc/init.d directory.
1 At the Linux server, become root by entering su and the root password.2 Change to the /etc/init.d directory.3 To start the Messaging Agent, enter the following command:
./novell-nmma start
4 To start the Archive Agent, enter the following command:./novell-nmaa start
You can also use the stop, restart, and status options for these agents from the same directory.Messenger agent log files are created in the /var/opt/novell/log/messenger directory. The Messenger agents can be monitored by using the agent web consoles from your browser, as described in “Using the Messaging Agent Web Console” in “Managing the Messaging Agent” in the Novell Messenger 3.0 Administration Guide.For additional agent startup alternatives, see “Starting the Messaging Agent” and “Starting the Archive Agent” in the Novell Messenger 3.0 Administration Guide.
5 Skip to Section 3.4, “What’s Next,” on page 35.
Installing a Novell Messenger System 31

3.2.4 Setting Up the High Availability ServiceThe High Availability service uses the GroupWise Monitor Agent to periodically check the status of the agents that it is responsible for restarting. For information on configuring Monitor for the GroupWise Messaging agents, see “Monitoring the Messaging Agent” in the Novell Messenger 3.0 Administration Guide.
1 Become root by entering su and the root password.2 Copy the novell-groupwise-gwha RPM file to your local drive.3 From the location that you copied the novell-groupwise-gwha rpm, enter the following command
to install the gwha service:rpm -Uvf novell-groupwise-gwha-7.0.xxxxxxxx.i386.rpm
4 Modify the GroupWise High Availability service file (gwha):4a Change to the /etc/xinetd.d directory.4b Edit the gwha file in a text editor.4c In the port = field, specify a unique port number, for example 8303.4d Save the file, then exit the text editor.
5 If you use SSL, you need to modify the High Availability service configuration file.5a Change to the /etc/opt/novell/groupwise directory.5b Edit the gwha.conf file in a text editor.5c Under the [gwha] section, fill in the fields as follows:
[gwha]ssl = yeskey = filename.keycert = filename.crtpassword = password
5d Save the file, then exit the text editor.6 Enable the High Availability service:
6a In YaST, click Network Services > Network Services (inetd).6b If necessary, select Enable to activate the list of services.6c Scroll down to the gwha line, select it, then click Toggle Status (On or Off) to change the
status to On.6d Click Finish.
7 Start the agents as daemons.7a Change to the /etc/init.d directory.7b Enter the following commands to start the Messaging Agent and the Archiving Agent:
./novell-nmma start
./novell-nmaa start
7c If the agents started correctly, a message displays indicating “Done.”8 Create a new user and associated password on your Linux server to represent the High
Availability service.You might name it gwha.
9 Test your configuration of the High Availability service.
32 Novell Messenger 3.0 Installation Guide

NOTE: If you configured the High Availability service for SSL, you cannot use a telnet session to test it. The connection will be refused. You can try to test it by killing the PID for the Agents and watch for Monitor to restart the Agents.
9a Telnet into the High Availability server.For example, on the Linux server where you have configured the High Availability service, you could use the following command:telnet localhost port_number
Use the unique port number you specified in Step 4c.9b Specify the user name and password that you set up in Step 8.
If telnet returns 000 Ok, then the gwha service is configured correctly.9c To exit the telnet session, press Ctrl+].
3.2.5 Setting Up Non-root Access on an NSS Volume on Novell Open Enterprise Server LinuxWhen the Novell Messenger agents are located on a Novell Open Enterprise Server (OES) Linux NSS volume, you must create an eDirectory user for the agents to run as, and you must LUM-enable that user. On OES Linux, you can use Novell iManager to accomplish these tasks.
After you have installed the agents on OES Linux, you need to configure the agents to switch users after startup and provide access to an NSS volume.
“Creating an eDirectory User” on page 33 “Enabling a LUM User” on page 33 “Configuring Novell Messenger for the NSS Volume” on page 34
Creating an eDirectory UserYou might want to create a new user specifically for the Novell Messenger service, perhaps named novellmsgr.
1 On the Open Enterprise Server Welcome page in your browser, expand Network Management, then click iManager 2.5.x.
2 In the iManager Links box, click Open Novell iManager 2.5.3 To log in to iManager, specify a user name, a password, and a tree.4 In the left pane, expand Users, then click Create User.5 Provide the required information, then click OK.
The user does not need a password.
Enabling a LUM UserTo LUM-enable the user you just created:
1 In the left pane, expand Linux User Management, then click Enable User for LUM.2 Browse to and select the user you just created, then click OK.
Installing a Novell Messenger System 33

3 Browse to and select a primary group for the LUM user.4 Select /bin/false as the desired shell (because the LUM user does not need a shell), then click
OK.
Configuring Novell Messenger for the NSS VolumeAfter you have finished LUM-enabling the eDirectory user, you need to set the user as the default user for the Novell Messenger service. In addition, you need to change the store path, queue path, and log path to be on the NSS volume.
“Changing the Service User” on page 34 “Changing the Store Path” on page 34 “Changing the Messenger Agent Queue Path” on page 34 “Changing the Archive Agent Queue Path” on page 34 “Changing the Messenger Agent Log Path” on page 35 “Changing the Archive Agent Log Path” on page 35 “Granting Access to the LUM-Enabled User” on page 35
Changing the Service User1 In a terminal window, enter the following command:
cd /etc/opt/novell/messenger
2 Using a text editor, edit the uid.conf file, remove root as the user, and add the LUM-enabled user.
Changing the Store Path1 In ConsoleOne, log in to the eDirectory tree containing your Novell Messenger service.2 Browse to the File Module object, right-click it, then select Properties.
The File Module object is located at eDirectory Tree > Messenger Service > Messenger server > Archive Agent > File Module.
3 Change the Store Path to the NSS volume, then click OK.
Changing the Messenger Agent Queue Path1 In ConsoleOne, log in to the eDirectory tree containing your Novell Messenger service.2 Browse to the Messenger Agent object, right-click it, then select Properties.3 Change the Queue Path to the NSS volume, then click OK.
Changing the Archive Agent Queue Path1 In ConsoleOne, log in to the eDirectory tree containing your Novell Messenger service.2 Browse to the Archive Agent object, right-click it, then select Properties.3 Change the Queue Path to the NSS volume, then click OK.
34 Novell Messenger 3.0 Installation Guide

Changing the Messenger Agent Log Path1 In ConsoleOne, log in to the eDirectory tree containing your Novell Messenger service.2 Browse to the Messenger Agent object, right-click it, then select Properties.3 Change the Log Path to the NSS volume, then click OK.
Changing the Archive Agent Log Path1 In ConsoleOne, log in to the eDirectory tree containing your Novell Messenger service.2 Browse to the Archive Agent object, right-click it, then select Properties.3 Change the Log Path to the NSS volume, then click OK.
Granting Access to the LUM-Enabled UserThe new LUM-enabled user must have rights to the store, queue, and log paths on the NSS volumes.
In a terminal window, use the following command to grant the user the required rights to the directories that the agents need to access on the local server:
rights -f /directory -r rwcemf trustee user.context.tree
When you have finished changing the rights to the directories, you must stop and then start the agents.
3.3 Monitoring Novell Messenger with GroupWise MonitorNovell GroupWise Monitor is a monitoring and management tool that allows you to monitor GroupWise agents and Novell Messenger agents from any location where you are connected to the Internet and have access to a browser. Some agent administration can also be performed from your browser. For information on how to install and configure GroupWise Monitor, see “Planning GroupWise Monitor” in the GroupWise 2014 Installation Guide “Installing GroupWise Monitor” in the GroupWise 8 Installation Guide.
3.4 What’s NextAfter you have created your Messenger system and installed the Messenger software, you are ready to continue with the following configuration and administration tasks that are covered in the Novell Messenger 3.0 Administration Guide:
Set up corporate-level conversation archiving. See “Enabling and Managing Archiving.” Add SSL encryption to the Messaging Agent’s connections with Novell Messenger clients. See
“Configuring Messaging Security with SSL Encryption” in “Managing the Messaging Agent.” Add SSL encryption to the Messaging Agent’s eDirectory access, if you didn’t set it up during
installation. See “Using LDAP Access for the Messaging Agent” in “Managing the Messaging Agent.”
Provide customized LDAP authentication for Novell Messenger users. See “Customizing eDirectory Access for Users” in “Managing Messenger Client Users.”
Installing a Novell Messenger System 35

Customize the functionality of the Novell Messenger client. See “Setting User Policies” in “Managing Messenger Client Users.”
Decide how to most efficiently distribute the Novell Messenger client software to users. See “Distributing the Messenger Client Software” in “Managing Messenger Client Users.”
3.5 Novell Messenger WorksheetThe Novell Messenger Installation program helps you create your Messenger system and install the Messenger software. The Installation program prompts you for the information in the worksheet. Print the worksheet and fill in the information for your Messenger system before you start the Messenger Installation program.
Depending on the operating system you are installing to, some of these options might not apply.
Item Explanation
1) Server Information
Linux
Microsoft Windows Server
Select the platform where you plan to install and run the Messenger agents.
See “Agent Platform” on page 19.
2) Windows Server Options
Install agents as Windows services
Install and configure SNMP for Novell Messenger Agents
For a Windows server, specify the server options you plan to use.
See “Windows Server Options for the Windows Messenger Agents” on page 21.
3) Installation Path Specify a new directory path or browse to and select an existing directory where you plan to install the Windows agent software. If the directory does not exist, it will be created. If you are installing to Linux, the agents are always installed to /opt/novell/messenger/bin.
See “Agent Software Location” on page 19.
4) Tree Name Select the eDirectory tree where you want to create your Messenger system. Because Messenger introduces new objects into the tree, the schema must be extended.
See “eDirectory” on page 13.
5) Messenger System Context
Browse to and select the context where you want to create the Messenger system container and objects. Ensure the context exists.
See “eDirectory” on page 13.
6) Messenger System Objects
MessengerService
server_nameSERVER
If you do not want to use the default Messenger object names, specify different object names as needed.
See “eDirectory” on page 13.
36 Novell Messenger 3.0 Installation Guide

7) Install Components
Messaging Agent
Archive Agent
Administrative Files
For your initial installation, leave all components selected.
8) Windows Service Options
Use local system account
Use this Windows user account:User Name:Password:
Startup: AutomaticManual
If you are installing the Windows Messenger agents as Windows services, provide the required service configuration information.
See “Windows Server Options for the Windows Messenger Agents” on page 21.
9) Directory Access
Use direct accessReplica IP address:(Windows only)
Use LDAP to access the directoryHost:Port:Root certificate:
Select how you want the Messenger agents to access eDirectory and provide the information required for the selected access method.
See “eDirectory Access and Authentication” on page 16.
10) Directory Authentication
User Name:
Password:
Provide the user name and password that will enable the Messenger agents to access eDirectory.
See “eDirectory Access and Authentication” on page 16.
11) User Configuration
Contexts:
Include Subcontexts?
List the eDirectory contexts where User objects are located that you want to include in your Messenger system.
See “Messenger User Locations” on page 15.
12) Server Address
IP Address or DNS hostname:
Messaging Agent Port:(default=8300)
Archive Agent Port:(default=8310)
Specify the IP address or DNS hostname of the server where the Messenger agents will run. If you are using an IPV6 IP address, you must use the DNS hostname for the server instead of the IP address. If the default port numbers are already in use on the server, specify unique port numbers for the Messenger agents.
See “Agent Network Address and Ports” on page 19.
13) Configure Agents for Clustering?
Yes
No
Mark whether or not you want to configure the Messenger agents for use with Novell Cluster Services.
See “Clustering Option for the Messenger Agents” on page 20.
Item Explanation
Installing a Novell Messenger System 37

14) Admin Configuration
Update ConsoleOne?
Path to ConsoleOne Directory:
Specify the path to a ConsoleOne location (version 1.3.4 or later), either on the local workstation or on a network server. The Messenger Installation program installs the Messenger snap-in files in the specified location.
See “ConsoleOne” on page 14.
15) Security Configuration
Internal or External Certificate?
Certificate file:Key file:Key password:
Choose whether you are going to use internal or external certificates for Messenger. If external, specify the certificate file, key file, and key password.
See “Messenger System Security” on page 17.
Item Explanation
38 Novell Messenger 3.0 Installation Guide

4 4Installing the Messenger Client
The Novell Messenger client can be easily installed from the Messenger client download page. After installation, it is easy to start the Messenger client from your desktop. Administrators can employ more automated installation methods if necessary.
Section 4.1, “Downloading and Installing the Messenger Client from Your Web Browser,” on page 39
Section 4.2, “Starting the Messenger Client,” on page 40 Section 4.3, “Additional Client Installation Methods,” on page 41
4.1 Downloading and Installing the Messenger Client from Your Web BrowserAfter you create your Messenger system, you can use the Novell Messenger Download page to install the Messenger client software.
1 Ensure you have installed the Messenger system. See Section 3.2, “Installing and Setting Up Your Novell Messenger System,” on page 21.
2 Ensure you have started the Messaging Agent.3 In your browser, enter the IP address of the Novell Messenger Download page.
This is the IP address and port of the Messaging Agent. By default, the Messaging Agent port is 8300. For example, if you installed to a server with an IP address of 172.16.5.18, the Novell Messenger download page would be http://172.16.5.18:8300.The following download page displays:
Installing the Messenger Client 39

4 Follow the instructions to download and install the client.5 Skip to Section 4.2, “Starting the Messenger Client,” on page 40.
4.2 Starting the Messenger Client “For the Windows Client” on page 40 “For the Linux Cross-Platform Client” on page 41 “For the Mac Cross-Platform Client” on page 41
For the Windows Client1 Double-click the Messenger client icon on your Windows desktop.2 Specify your user name and password, then click Advanced.3 Specify the IP address and port number of your Novell Messenger server, then click OK.
If you do not know the IP address or port number for your Novell Messenger server, contact your system administrator.
40 Novell Messenger 3.0 Installation Guide
For the Linux Cross-Platform Client1 Click the Novell Messenger icon on your Linux desktop.2 Specify your user name and password, then click Advanced.3 Specify the IP address and port number of your Novell Messenger server, then click OK.
If you do not know the IP address or port number for your Novell Messenger server, contact your system administrator.
For the Mac Cross-Platform Client1 Click the Novell Messenger icon on your Mac desktop.2 Specify your user name and password, then click Advanced.3 Specify the IP address and port number of your Novell Messenger server, then click OK.
If you do not know the IP address or port number for your Novell Messenger server, contact your system administrator.
4.3 Additional Client Installation MethodsOther Messenger client installation methods, which require additional setup and configuration, include the following. These installation methods might not apply to all operating systems.
“Configuring Your Web Server to Download the Messenger Client” “Using ZENworks Configuration Management to Distribute the Messenger Windows Client” “Using Red Carpet on Linux to Distribute the Cross-Platform Messenger Client Software”
These client installation alternatives are described in “Distributing the Messenger Client Software” in “Managing Messenger Client Users” in the Novell Messenger 3.0 Administration Guide.
Installing the Messenger Client 41

42 Novell Messenger 3.0 Installation Guide

5 5Updates
Section 5.1, “What’s New in Novell Messenger 3.0,” on page 43 Section 5.2, “Understanding the Update Process,” on page 43
5.1 What’s New in Novell Messenger 3.0Novell Messenger 3.0 provides the following key improvements over prior releases of Novell Messenger:
Mobile Applications: Novell Messenger 3.0 provides native applications for iOS and Android devices. For more information, see “Using Novell Messenger on Your Mobile Device” in the Novell Messenger 3.0 Client User Guide.
For information about the administrative tasks associated with Messenger mobile applications, see “Managing Messenger Mobile Applications” in the Novell Messenger 3.0 Administration Guide.
Simultaneous Client Connections: Novell Messenger 3.0 allows you to maintain simultaneous connections to your Messenger client from multiple workstations or devices. For example, you can be connected to Messenger on your workstation, and then connect to Messenger from a mobile device without being logged out of Messenger on your workstation.For more information about this feature, see “Limiting Physical Access to Client Workstations” in “Securing Novell Messenger” in the Novell Messenger 3.0 Administration Guide.
Updated Clients (Look and Feel): Novell Messenger 3.0 provides an updated look and feel for both the Windows and Linux/Mac client interfaces.
The Messenger 3.0 release also contains the following changes:
Removal of NetWare support: With Messenger 3.0 and later, NetWare is no longer supported. ConsoleOne download option: GroupWise 2014 no longer requires ConsoleOne, and
therefore it is not included in the GroupWise distribution. If you have not already installed ConsoleOne, it is available with the Messenger distribution.
5.2 Understanding the Update ProcessYou can update Novell Messenger 2.x to Novell Messenger 3.0.
Before you begin updating your Novell Messenger system to Novell Messenger 3.0, you should review the following sections. These sections, which describe the process to follow when updating, help you plan and implement a successful update strategy:
Section 5.2.1, “Extending the NetIQ eDirectory Schema,” on page 44 Section 5.2.2, “Installing the Novell Messenger Software,” on page 44 “Updating the Novell Messenger Client” on page 44 Section 5.2.4, “Updating the Novell Messenger Agents,” on page 44
Updates 43

5.2.1 Extending the NetIQ eDirectory SchemaNovell Messenger 3.0 includes new functionality that requires you to extend the schema of any NetIQ eDirectory trees where you have Novell Messenger objects. The Novell Messenger Setup automatically extends the schema for any trees you select.
5.2.2 Installing the Novell Messenger SoftwareThe Novell Messenger 3.0 software requirements are different from previous Novell Messenger software requirements. To review the requirements, see Section 2.1, “Messenger System Requirements,” on page 9.
ConsoleOneNovell Messenger 3.0 is administered through ConsoleOne, using the version listed in Section 2.1, “Messenger System Requirements,” on page 9. You can use the same version of ConsoleOne to administer earlier Novell Messenger components in your GroupWise system.
IMPORTANT: Earlier versions of ConsoleOne should not be used to administer Novell Messenger 3.0 objects.
If you do not already have it installed, ConsoleOne is available to install in the Messenger download file. Install it before starting to install Novell Messenger.
5.2.3 Updating the Novell Messenger ClientAfter you have updated the version of your agents, users can run the Novell Messenger 3.0 Windows client or Cross-Platform client on workstations listed in Section 2.2, “Messenger Client Workstation Requirements,” on page 10. If necessary, they can also continue to run their older Novell Messenger clients, but they will not have Novell Messenger 3.0 functionality.
For a list of new features in the Novell Messenger 3.0 client, see Section 5.1, “What’s New in Novell Messenger 3.0,” on page 43.
5.2.4 Updating the Novell Messenger AgentsTo update the Novell Messenger Agents, you need to run the setup program. For information on running the setup program, see Chapter 3, “Installing a Novell Messenger System,” on page 13.
44 Novell Messenger 3.0 Installation Guide

6 6Migration
This section is designed for those who are moving existing Messenger 3.0 agents to Linux.
NOTE: If you have Messenger 2.x, review Section 5.2.4, “Updating the Novell Messenger Agents,” on page 44 to acquaint yourself with the issues involved in updating from one version of Messenger to another. You should update your Messenger system to Messenger 3.0 before migrating to Linux.
Section 6.1, “Migrating eDirectory to Linux,” on page 45 Section 6.2, “Moving Messenger Agents to Linux,” on page 45 Section 6.3, “Copying System Data,” on page 48 Section 6.4, “ConsoleOne Verification,” on page 51
6.1 Migrating eDirectory to LinuxAs part of the migration process, you might want to migrate eDirectory to Linux. Step-by-step instructions for migrating eDirectory to Linux are beyond the scope of this Messenger Installation Guide, but the following documentation can provide assistance:
If you are migrating to OES Linux, review Consolidating Data to OES Linux and Migrating Data from NetWare Servers in the Novell Server Consolidation and Migration Toolkit Administration Guide (http://www.novell.com/documentation/scmt/index.html).
For situations not covered in the above guide, the eDirectory migration process includes installing eDirectory on Linux, creating an eDirectory replica on one or more Linux servers, and ultimately making one of the Linux replicas the master replica so that you can phase out the replicas on other platforms. For guidance, see the documentation for your version of eDirectory: eDirectory 8.8 (https://www.netiq.com/documentation/edir88/)
6.2 Moving Messenger Agents to LinuxMoving the Messenger Agents to Linux includes installing the agents to the Linux server, copying the data stores, and providing updated configuration information in ConsoleOne.
Section 6.2.1, “Making a Windows Server Visible from Linux,” on page 45 Section 6.2.2, “Copying the Startup Files,” on page 46 Section 6.2.3, “Client/Server SSL Certificates,” on page 46 Section 6.2.4, “Trusted Root Certificates,” on page 47 Section 6.2.5, “Installing the Messenger Agents on Linux,” on page 47 Section 6.2.6, “Enabling Messenger Agent Monitoring on Linux,” on page 48
6.2.1 Making a Windows Server Visible from LinuxTo make a Windows server visible from Linux, you mount the directory you need access to as a Linux file system:
Migration 45

mount -t smbfs //Windows_server_name/sharename /Linux_mount_location/mount_point_directory -o username=Windows_username
To use this command, the WINS protocol must be functioning properly on your network. The specified Windows user must have sufficient rights to access the Messenger directories.
6.2.2 Copying the Startup FilesIf you have made changes to the default startup files for Messenger, you need to copy the files to the Linux server before you install the Messenger system on Linux.
1 Copy the Messaging Agent and Archive Agent startup files to the default Linux location.The default startup files are located in the following areas:
2 From a terminal window on Linux, use the dos2unix program to convert the startup files to UNIX format by using the following commands:dos2unix /etc/opt/novell/messenger/strtup.ma
dos2unix /etc/opt/novell/messenger/strtup.aa
3 Make the following edits to the startup files: Remove all paths from the startup files so they use the Linux default paths.
orChange the paths to the correct location on Linux to use custom paths.
Change the IP address or hostname to the IP address or hostname of the Linux server. Change the path to any certificates to the Linux path. If you have made any other custom changes to your startup file, adjust those changes for
the Linux paths.
6.2.3 Client/Server SSL CertificatesIf the Linux server has a different IP address than the Windows server, you need to generate new certificates. If the Linux server has the same IP address as the Windows server, you can copy the SSL certificates to the Linux server. When you copy the certificates to the Linux server, ensure that you copy the certificates to the path you specified in the startup files.
For instructions on how to create new SSL certificates, see “Configuring the Linux Messenger Agents for SSL” on page 30.
Windows: C:\novell\NM\agent\startup.xx
Linux: /etc/opt/novell/messenger/strtup.xx
46 Novell Messenger 3.0 Installation Guide

6.2.4 Trusted Root CertificatesIf you want to use LDAP SSL to connect to your target eDirectory, a copy of the target directory’s replica’s trusted root certificate must be made available to the Messenger installation program.
If you previously used LDAP SSL with Messenger, a copy of the replica’s trusted root certificate should exist at c:\novell\nm\certs for Windows. You need to be able to browse to this location from the Linux server. To do this, you must mount the Windows server. For information on how to create a mount to a Windows server, see Section 6.2.1, “Making a Windows Server Visible from Linux,” on page 45.
If the certificate does not exist, you can export a trusted root certificate by performing the following steps, which require the eDirectory ConsoleOne snap-ins:
1 From the Linux server, run ConsoleOne and connect to the eDirectory replica server.2 Browse to the LDAP Server object in the tree, right-click the LDAP Server object, then select
Properties.3 Click the SSL/TLS Configuration tab. The certificate name is displayed in the Server Certificate
field.4 In the ConsoleOne tree, browse to the certificate that was displayed in the Server Certificate
field.5 Right-click the certificate, then select Properties.6 Click the Certificate tab, then select Trusted Root Certificate.7 Click Export.8 Select No to not export the private key, then click Next.9 Select File in binary DER format.
10 Specify the location and file name to save the certificate as, then click Next.11 Click Finish to export the trusted root certificate.
During the Messenger installation, you need to specify the path to the trusted root certificate to use LDAP SSL.
6.2.5 Installing the Messenger Agents on LinuxBefore you can migrate your Messenger Agents to Linux, you must first install a Messenger system on Linux. During the configuration process of this installation, the startup files that you copied to the Linux server are read and the information from the startup files is included in the installation. For information on how to install a Messenger system on Linux, see Section 3.2.3, “Installing and Setting Up a Messenger System on Linux,” on page 27.
If you use direct mode to access eDirectory, you must have eDirectory installed before you install the Messenger system.
When you have finished installing your Messenger system on Linux, do not start the agents. If you have already started your Messenger Agents, you can stop them by performing the following steps:
1 At the Linux server, become root by entering su and the root password.2 Change to the /etc/init.d directory.3 To stop the Messaging Agent, enter the following command:
./novell-nmma stop
Migration 47

4 To stop the Archive Agent, enter the following command:./novell-nmaa stop
6.2.6 Enabling Messenger Agent Monitoring on LinuxThere is no user interface for the Linux Messenger Agents. To monitor the Messenger agents and perform manual logging and archiving actions, you need to enable the Web Console for both the Messaging Agent and the Archive Agent. For information on how to enable the Web Console for your Messaging Agent, see “Setting Up the Messaging Agent Web Console” in the Novell Messenger 3.0 Administration Guide. For information on how to enable the Web Console for the Archive Agent, see “Using the Archive Agent Web Console and GroupWise Monitor” in the Novell Messenger 3.0 Administration Guide.
6.3 Copying System DataMessenger system data consists of the following:
Archive Store: Messages that have been added to the archive. Archive Indexes: Archive store indexes that have been created for faster searches. Archive Queue: Messages that are waiting to be archived. Messaging Queue: Messages that are waiting to be transferred to the Archive Agent. Agent Logs: All the log files for the agents.
Before copying your system data from the Windows server to the Linux server, you must first shut down the agents on the server. Before shutting down your system, you might want to send out a system broadcast informing users that the Messenger system will be shut down for a time. In addition, if you are changing the IP address, you might want to include the new IP address of the Linux server in the system broadcast.
Section 6.3.1, “Copying the Archive Store and Archive Indexes,” on page 48 Section 6.3.2, “Copying the Archive Queue,” on page 49 Section 6.3.3, “Copying the Messaging Queue,” on page 49 Section 6.3.4, “Copying the Archive Agent Log Files,” on page 50 Section 6.3.5, “Copying the Messaging Agent Log Files,” on page 50 Section 6.3.6, “Deleting and Regenerating the Archive Agent Indexes,” on page 51
6.3.1 Copying the Archive Store and Archive Indexes1 From the Windows server, stop the Messaging Agent and Archive Agent.
For information on starting the Messaging Agent, see “Starting the Messaging Agent” in the Novell Messenger 3.0 Administration Guide.For information on starting the Archive Agent, see “Starting the Archive Agent” in the Novell Messenger 3.0 Administration Guide.
2 From the Linux server, verify that the Messaging and Archive Agents are stopped. If they are running, stop both agents.
3 From the Linux server, copy the Archive Store and Archive Indexes from the Windows server to the Linux server. For example, you could use the following command from a terminal window:
48 Novell Messenger 3.0 Installation Guide

cp -r /mnt/winserver/C:/Novell/NM/aa/store/ /var/opt/novell/messenger/aa/
The following table displays the default store location for each operating system:
4 If the user that the Messenger agents on the Linux server will run as is not root, you need to change the ownership of the files to the Messenger user. To change the ownership of the files, use the following command in a terminal window:
chown -R nvlmsgr:nvlmsgr /var/opt/novell/messenger/aa/store
6.3.2 Copying the Archive Queue1 From the Windows server, stop the Messaging Agent and Archive Agent. 2 From the Linux server, verify that the Messaging and Archive Agents are stopped. If they are
running, stop both agents.3 From the Linux server, copy the Archive Queue from the Windows server to the Linux server.
For example, you could use the following command from a terminal window:cp -r /mnt/winserver/C:/Novell/NM/aa/queue /var/opt/novell/messenger/aa/queue
The following table displays the default store location for each operating system:
4 If the user that the Messenger agents on the Linux server will run as is not root, you need to change the ownership of the files to the Messenger user. To change the ownership of the files, use the following command in a terminal window:chown -R nvlmsgr:nvlmsgr /var/opt/novell/messenger/aa/queue
6.3.3 Copying the Messaging Queue1 From the Windows server, stop the Messaging Agent and Archive Agent. 2 From the Linux server, verify that the Messaging and Archive Agents are stopped. If they are
running, stop both agents.3 From the Linux server, copy the Messaging Queue from the Windows server to the Linux server.
For example, you could use the following command from a terminal window:cp -r /mnt/winserver/C:/Novell/NM/ma/queue /var/opt/novell/messenger/ma/queue
The following table displays the default store location for each operating system:
Operating System Default Location
Windows C:\Novell\NM\aa\store
Linux /var/opt/novell/messenger/aa/store
Operating System Default Location
Windows C:\Novell\NM\aa\queue
Linux /var/opt/novell/messenger/aa/queue
Migration 49

4 If the user that the Messenger agents on the Linux server will run as is not root, you need to change the ownership of the files to the Messenger user. To change the ownership of the files, use the following command in a terminal window:chown -R nvlmsgr:nvlmsgr /var/opt/novell/messenger/ma/queue
6.3.4 Copying the Archive Agent Log Files1 From the Windows server, stop the Messaging Agent and Archive Agent. 2 From the Linux server, verify that the Messaging and Archive Agents are stopped. If they are
running, stop both agents.3 From the Linux server, copy the Archive Agent log files from the Windows server to the Linux
server. For example, you could use the following command from a terminal window:cp -r /mnt/winserver/C:/Novell/NM/aa/logs /var/opt/novell/log/messenger/aa
The following table displays the default store location for each operating system:
4 If the user that the Messenger agents on the Linux server will run as is not root, you need to change the ownership of the files to the Messenger user. To change the ownership of the files, use the following command in a terminal window:chown -R nvlmsgr:nvlmsgr /var/opt/novell/log/messenger/aa
6.3.5 Copying the Messaging Agent Log Files1 From the Windows server, stop the Messaging Agent and Archive Agent. 2 From the Linux server, verify that the Messaging and Archive Agents are stopped. If they are
running, stop both agents.3 From the Linux server, copy the Messaging Agent log files from the Windows server to the Linux
server. For example, you could use the following command from a terminal window:cp -r /mnt/winserver/C:/Novell/NM/ma/logs /var/opt/novell/log/messenger/ma
The following table displays the default store location for each operating system:
Operating System Default Location
Windows C:\Novell\NM\ma\queue
Linux /var/opt/novell/messenger/ma/queue
Operating System Default Location
Windows C:\Novell\NM\aa\logs
Linux /var/opt/novell/log/messenger/aa
50 Novell Messenger 3.0 Installation Guide

4 If the user that the Messenger agents on the Linux server will run as is not root, you need to change the ownership of the files to the Messenger user. To change the ownership of the files, use the following command in a terminal window:chown -R nvlmsgr:nvlmsgr /var/opt/novell/log/messenger/ma
6.3.6 Deleting and Regenerating the Archive Agent IndexesAfter conducting the migration, ensure that the index files are correct and up to date.
1 From the agent server, start the Messaging Agent and the Archive Agent.2 Open the Web Console for your Archive Aget.
For information on how to do this, see “Accessing the Messaging Agent Web Console from Your Web Browser” in the Novell Messenger 3.0 Administration Guide.
3 Click the Configuration tab.4 Click Archive Maintenance.5 Select Delete & Regenerate Indexes, then click Submit.6 Wait for the archive agent to finish deleting and regenerating the indexes.
6.4 ConsoleOne VerificationWhen you have finished copying the last log files to the Linux server, you should verify that all the paths and IP address are correct for the Messenger objects.
1 In ConsoleOne, log in to your eDirectory tree.2 Browse to and right-click the Messenger Server object, then click Properties.3 On the Server Identification page, verify that the IP address or DNS hostname is correct for the
Linux server.4 Click the Server tab, then click General.5 Verify that the software path and work path are correct for the Linux server.6 Click the Server tab, then click Security.7 If you are using Client/Server SSL, verify that the certificate path, SSL certificate, and SSL key
are correct for the Linux server.8 Browse to and right-click the Messaging Agent object, then click Properties.9 On the Agent Identification page, verify that the IP address or DNS hostname is correct for the
Linux server.10 Click the Agent tab, then click General.11 Verify that the work path is correct for the Linux server.12 Click the Agent tab, then click Security.
Operating System Default Location
Windows C:\Novell\NM\ma\logs
Linux /var/opt/novell/log/messenger/ma
Migration 51

13 If you are using Client/Server SSL, verify that the certificate path, SSL certificate, and SSL key are correct for the Linux server.
14 Click the Agent tab, then click Log Settings.15 Verify that the log file path is correct for the Linux server.16 Click the Agent tab, then click Messaging.17 Verify that the messaging queue path is correct for Linux.18 Browse to and right-click the Archive Agent object, then click Properties.19 On the Agent Identification page, verify that the certificate path, SSL certificate, and SSL key are
correct for the Linux server.20 Click the Agent tab, then click General.21 Verify that the work path is correct for the Linux server.22 Click the Agent tab, then click Security.23 If you are using Client/Server SSL, verify that the certificate path, SSL certificate, and SSL key
are correct for the Linux server.24 Click the Agent tab, then click Log Settings.25 Verify that the log file path is correct for the Linux server.26 Click the Agent tab, then click Messaging.27 Verify that the queue path is correct for Linux.28 Browse to and right-click the FileModule object, then click Properties.29 On the Module Store Settings page, verify that the store path is correct for Linux.30 Open the Web Console for your Archive Aget.
For information on how to do this, see “Accessing the Messaging Agent Web Console from Your Web Browser” in the Novell Messenger 3.0 Administration Guide.
31 Click the Configuration tab.32 Click Archive Maintenance.33 Select Delete & Regenerate Indexes, then click Submit.34 Wait for the archive agent to finish deleting and regenerating the indexes.
When you have verified and made any changes to IP address and paths in ConsoleOne, you can then start the Messaging Agent and Archive Agent on the Linux server.
To start the Messaging Agent, enter the following command from a terminal window:
./novell-nmma start
To start the Archive Agent, enter the following command from a terminal window:
./novell-nmaa start
52 Novell Messenger 3.0 Installation Guide

A AThird-Party Materials
The following third-party software is included in Novell Messenger 3.0:
Section A.1, “OpenSSL,” on page 53 Section A.2, “NET-SNMP Open Source Package,” on page 55 Section A.3, “Libegg,” on page 57 Section A.4, “JRE,” on page 58
A.1 OpenSSLOpenSSL LicenseCopyright (c) 1998-2002 The OpenSSL Project. All rights reserved.
Redistribution and use in source and binary forms, with or without modification, are permitted provided that the following conditions are met:
1 Redistributions of source code must retain the above copyright notice, this list of conditions and the following disclaimer.
2 Redistributions in binary form must reproduce the above copyright notice, this list of conditions and the following disclaimer in the documentation and/or other materials provided with the distribution.
3 All advertising materials mentioning features or use of this software must display the following acknowledgment:"This product includes software developed by the OpenSSL Project for use in the OpenSSL Toolkit. (http://www.openssl.org/)"
4 The names "OpenSSL Toolkit" and "OpenSSL Project" must not be used to endorse or promote products derived from this software without prior written permission. For written permission, please contact [email protected].
5 Products derived from this software may not be called "OpenSSL" nor may "OpenSSL" appear in their names without prior written permission of the OpenSSL Project.
6 Redistributions of any form whatsoever must retain the following acknowledgment:"This product includes software developed by the OpenSSL Project for use in the OpenSSL Toolkit (http://www.openssl.org/)"
THIS SOFTWARE IS PROVIDED BY THE OpenSSL PROJECT ``AS IS’’ AND ANY EXPRESSED OR IMPLIED WARRANTIES, INCLUDING, BUT NOT LIMITED TO, THE IMPLIED WARRANTIES OF MERCHANTABILITY AND FITNESS FOR A PARTICULAR PURPOSE ARE DISCLAIMED. IN NO EVENT SHALL THE OpenSSL PROJECT OR ITS CONTRIBUTORS BE LIABLE FOR ANY DIRECT, INDIRECT, INCIDENTAL, SPECIAL, EXEMPLARY, OR CONSEQUENTIAL DAMAGES (INCLUDING, BUT NOT LIMITED TO, PROCUREMENT OF SUBSTITUTE GOODS OR SERVICES; LOSS OF USE, DATA, OR PROFITS; OR BUSINESS INTERRUPTION) HOWEVER CAUSED AND ON ANY THEORY OF LIABILITY, WHETHER IN CONTRACT, STRICT LIABILITY, OR TORT (INCLUDING NEGLIGENCE OR OTHERWISE) ARISING IN ANY WAY OUT OF THE USE OF THIS SOFTWARE, EVEN IF ADVISED OF THE POSSIBILITY OF SUCH DAMAGE.
Third-Party Materials 53

This product includes cryptographic software written by Eric Young ([email protected]). This product includes software written by Tim Hudson ([email protected]).
Original SSLeay License
Copyright (C) 1995-1998 Eric Young ([email protected])All rights reserved.
This package is an SSL implementation written by Eric Young ([email protected]). The implementation was written so as to conform with Netscape’s SSL.
This library is free for commercial and non-commercial use as long as the following conditions are adhered to. The following conditions apply to all code found in this distribution, be it the RC4, RSA, lhash, DES, etc., code; not just the SSL code. The SSL documentation included with this distribution is covered by the same copyright terms except that the holder is Tim Hudson ([email protected]).
Copyright remains Eric Young’s, and as such any Copyright notices in the code are not to be removed. If this package is used in a product, Eric Young should be given attribution as the author of the parts of the library used. This can be in the form of a textual message at program startup or in documentation (online or textual) provided with the package.
Redistribution and use in source and binary forms, with or without modification, are permitted provided that the following conditions are met:
1 Redistributions of source code must retain the copyright notice, this list of conditions and the following disclaimer.
2 Redistributions in binary form must reproduce the above copyright notice, this list of conditions and the following disclaimer in the documentation and/or other materials provided with the distribution.
3 All advertising materials mentioning features or use of this software must display the following acknowledgement: "This product includes cryptographic software written by Eric Young ([email protected])" The word “cryptographic” can be left out if the routines from the library being used are not cryptographic related :-).
4 If you include any Windows specific code (or a derivative thereof) from the apps directory (application code) you must include an acknowledgement: "This product includes software written by Tim Hudson ([email protected])"
THIS SOFTWARE IS PROVIDED BY ERIC YOUNG ``AS IS’’ AND ANY EXPRESS OR IMPLIED WARRANTIES, INCLUDING, BUT NOT LIMITED TO, THE IMPLIED WARRANTIES OF MERCHANTABILITY AND FITNESS FOR A PARTICULAR PURPOSE ARE DISCLAIMED. IN NO EVENT SHALL THE AUTHOR OR CONTRIBUTORS BE LIABLE FOR ANY DIRECT, INDIRECT, INCIDENTAL, SPECIAL, EXEMPLARY, OR CONSEQUENTIAL DAMAGES (INCLUDING, BUT NOT LIMITED TO, PROCUREMENT OF SUBSTITUTE GOODS OR SERVICES; LOSS OF USE, DATA, OR PROFITS; OR BUSINESS INTERRUPTION) HOWEVER CAUSED AND ON ANY THEORY OF LIABILITY, WHETHER IN CONTRACT, STRICT LIABILITY, OR TORT (INCLUDING NEGLIGENCE OR OTHERWISE) ARISING IN ANY WAY OUT OF THE USE OF THIS SOFTWARE, EVEN IF ADVISED OF THE POSSIBILITY OF SUCH DAMAGE.
The licence and distribution terms for any publicly available version or derivative of this code cannot be changed; i.e. this code cannot simply be copied and put under another distribution licence [including the GNU Public Licence.]
54 Novell Messenger 3.0 Installation Guide

A.2 NET-SNMP Open Source PackageVarious copyrights apply to this package, listed in 4 separate parts below. Please make sure that you read all the parts. Up until 2001, the project was based at UC Davis, and the first part covers all code written during this time. From 2001 onwards, the project has been based at SourceForge, and Networks Associates Technology, Inc hold the copyright on behalf of the wider Net-SNMP community, covering all derivative work done since then. An additional copyright section has been added as Part 3 below also under a BSD license for the work contributed by Cambridge Broadband Ltd. to the project since 2001. An additional copyright section has been added as Part 4 below also under a BSD license for the work contributed by Sun Microsystems, Inc. to the project since 2003.
A.2.1 ---- Part 1: CMU/UCD copyright notice: (BSD like) -----Copyright 1989, 1991, 1992 by Carnegie Mellon UniversityDerivative Work - 1996, 1998-2000Copyright 1996, 1998-2000 The Regents of the University of CaliforniaAll Rights Reserved
Permission to use, copy, modify and distribute this software and its documentation for any purpose and without fee is hereby granted, provided that the above copyright notice appears in all copies and that both that copyright notice and this permission notice appear in supporting documentation, and that the name of CMU and The Regents of the University of California not be used in advertising or publicity pertaining to distribution of the software without specific written permission.
CMU AND THE REGENTS OF THE UNIVERSITY OF CALIFORNIA DISCLAIM ALL WARRANTIES WITH REGARD TO THIS SOFTWARE, INCLUDING ALL IMPLIED WARRANTIES OF MERCHANTABILITY AND FITNESS. IN NO EVENT SHALL CMU OR THE REGENTS OF THE UNIVERSITY OF CALIFORNIA BE LIABLE FOR ANY SPECIAL, INDIRECT OR CONSEQUENTIAL DAMAGES OR ANY DAMAGES WHATSOEVER RESULTING FROM THE LOSS OF USE, DATA OR PROFITS, WHETHER IN AN ACTION OF CONTRACT, NEGLIGENCE OR OTHER TORTIOUS ACTION, ARISING OUT OF OR IN CONNECTION WITH THE USE OR PERFORMANCE OF THIS SOFTWARE.
A.2.2 ---- Part 2: Networks Associates Technology, Inc copyright notice (BSD) -----Copyright (c) 2001-2003, Networks Associates Technology, IncAll rights reserved.
Redistribution and use in source and binary forms, with or without modification, are permitted provided that the following conditions are met:
Redistributions of source code must retain the above copyright notice, this list of conditions and the following disclaimer.
Redistributions in binary form must reproduce the above copyright notice, this list of conditions and the following disclaimer in the documentation and/or other materials provided with the distribution.
Neither the name of the Networks Associates Technology, Inc nor the names of its contributors may be used to endorse or promote products derived from this software without specific prior written permission.
Third-Party Materials 55

THIS SOFTWARE IS PROVIDED BY THE COPYRIGHT HOLDERS AND CONTRIBUTORS “AS IS” AND ANY EXPRESS OR IMPLIED WARRANTIES, INCLUDING, BUT NOT LIMITED TO, THE IMPLIED WARRANTIES OF MERCHANTABILITY AND FITNESS FOR A PARTICULAR PURPOSE ARE DISCLAIMED. IN NO EVENT SHALL THE COPYRIGHT HOLDERS OR CONTRIBUTORS BE LIABLE FOR ANY DIRECT, INDIRECT, INCIDENTAL, SPECIAL, EXEMPLARY, OR CONSEQUENTIAL DAMAGES (INCLUDING, BUT NOT LIMITED TO, PROCUREMENT OF SUBSTITUTE GOODS OR SERVICES; LOSS OF USE, DATA, OR PROFITS; OR BUSINESS INTERRUPTION) HOWEVER CAUSED AND ON ANY THEORY OF LIABILITY, WHETHER IN CONTRACT, STRICT LIABILITY, OR TORT (INCLUDING NEGLIGENCE OR OTHERWISE) ARISING IN ANY WAY OUT OF THE USE OF THIS SOFTWARE, EVEN IF ADVISED OF THE POSSIBILITY OF SUCH DAMAGE.
A.2.3 ---- Part 3: Cambridge Broadband Ltd. copyright notice (BSD) -----Portions of this code are copyright (c) 2001-2003, Cambridge Broadband Ltd.All rights reserved.
Redistribution and use in source and binary forms, with or without modification, are permitted provided that the following conditions are met:
Redistributions of source code must retain the above copyright notice, this list of conditions and the following disclaimer.
Redistributions in binary form must reproduce the above copyright notice, this list of conditions and the following disclaimer in the documentation and/or other materials provided with the distribution.
The name of Cambridge Broadband Ltd. may not be used to endorse or promote products derived from this software without specific prior written permission.
THIS SOFTWARE IS PROVIDED BY THE COPYRIGHT HOLDER “AS IS” AND ANY EXPRESS OR IMPLIED WARRANTIES, INCLUDING, BUT NOT LIMITED TO, THE IMPLIED WARRANTIES OF MERCHANTABILITY AND FITNESS FOR A PARTICULAR PURPOSE ARE DISCLAIMED. IN NO EVENT SHALL THE COPYRIGHT HOLDER BE LIABLE FOR ANY DIRECT, INDIRECT, INCIDENTAL, SPECIAL, EXEMPLARY, OR CONSEQUENTIAL DAMAGES (INCLUDING, BUT NOT LIMITED TO, PROCUREMENT OF SUBSTITUTE GOODS OR SERVICES; LOSS OF USE, DATA, OR PROFITS; OR BUSINESS INTERRUPTION) HOWEVER CAUSED AND ON ANY THEORY OF LIABILITY, WHETHER IN CONTRACT, STRICT LIABILITY, OR TORT (INCLUDING NEGLIGENCE OR OTHERWISE) ARISING IN ANY WAY OUT OF THE USE OF THIS SOFTWARE, EVEN IF ADVISED OF THE POSSIBILITY OF SUCH DAMAGE.
A.2.4 ---- Part 4: Sun Microsystems, Inc. copyright notice (BSD) -----Copyright © 2003 Sun Microsystems, Inc., 4150 Network Circle, Santa Clara, California 95054, U.S.A. All rights reserved.
Use is subject to license terms below.
This distribution may include materials developed by third parties.
Sun, Sun Microsystems, the Sun logo and Solaris are trademarks or registered trademarks of Sun Microsystems, Inc. in the U.S. and other countries.
56 Novell Messenger 3.0 Installation Guide
Redistribution and use in source and binary forms, with or without modification, are permitted provided that the following conditions are met:
Redistributions of source code must retain the above copyright notice, this list of conditions and the following disclaimer.
Redistributions in binary form must reproduce the above copyright notice, this list of conditions and the following disclaimer in the documentation and/or other materials provided with the distribution.
Neither the name of the Sun Microsystems, Inc. nor the names of its contributors may be used to endorse or promote products derived from this software without specific prior written permission.
THIS SOFTWARE IS PROVIDED BY THE COPYRIGHT HOLDERS AND CONTRIBUTORS “AS IS” AND ANY EXPRESS OR IMPLIED WARRANTIES, INCLUDING, BUT NOT LIMITED TO, THE IMPLIED WARRANTIES OF MERCHANTABILITY AND FITNESS FOR A PARTICULAR PURPOSE ARE DISCLAIMED. IN NO EVENT SHALL THE COPYRIGHT HOLDERS OR CONTRIBUTORS BE LIABLE FOR ANY DIRECT, INDIRECT, INCIDENTAL, SPECIAL, EXEMPLARY, OR CONSEQUENTIAL DAMAGES (INCLUDING, BUT NOT LIMITED TO, PROCUREMENT OF SUBSTITUTE GOODS OR SERVICES; LOSS OF USE, DATA, OR PROFITS; OR BUSINESS INTERRUPTION) HOWEVER CAUSED AND ON ANY THEORY OF LIABILITY, WHETHER IN CONTRACT, STRICT LIABILITY, OR TORT (INCLUDING NEGLIGENCE OR OTHERWISE) ARISING IN ANY WAY OUT OF THE USE OF THIS SOFTWARE, EVEN IF ADVISED OF THE POSSIBILITY OF SUCH DAMAGE.
A.3 LibeggLibegg License
<libeggtray.so: used for icon display in system tray>Copyright (C) 2003 Sun Microsystems, Inc.
This library is free software; you can redistribute it and/or modify it under the terms of the GNU Lesser General Public License as published by the Free Software Foundation; either version 2.1 of the License, or at your option) any later version.
This library is distributed in the hope that it will be useful, but WITHOUT ANY WARRANTY; without even the implied warranty of MERCHANTABILITY or FITNESS FOR A PARTICULAR PURPOSE. See the GNU Lesser General Public License for more details.
You should have received a copy of the GNU Lesser General Public License along with this library; if not, write to the Free Software Foundation, Inc., 59 Temple Place, Suite 330, Boston, MA 02111-1307 USA
To obtain a copy of the source code, go to:
http://cvs.gnome.org/lxr/source/libegg/
You may contact the Novell Customer Response center by any of the methods listed below.
Email: [email protected]: 1.888.321.4CRC
Novell, Inc., hereby disclaims all copyright interest in the library “libeggtray.so” written by Sun Microsystems, Inc.
Third-Party Materials 57

A.4 JREORACLE AMERICA, INC. ("ORACLE"), FOR AND ON BEHALF OF ITSELF AND ITS SUBSIDIARIES AND AFFILIATES UNDER COMMON CONTROL, IS WILLING TO LICENSE THE SOFTWARE TO YOU ONLY UPON THE CONDITION THAT YOU ACCEPT ALL OF THE TERMS CONTAINED IN THIS BINARY CODE LICENSE AGREEMENT AND SUPPLEMENTAL LICENSE TERMS (COLLECTIVELY "AGREEMENT"). PLEASE READ THE AGREEMENT CAREFULLY. BY SELECTING THE "ACCEPT LICENSE AGREEMENT" (OR THE EQUIVALENT) BUTTON AND/OR BY USING THE SOFTWARE YOU ACKNOWLEDGE THAT YOU HAVE READ THE TERMS AND AGREE TO THEM. IF YOU ARE AGREEING TO THESE TERMS ON BEHALF OF A COMPANY OR OTHER LEGAL ENTITY, YOU REPRESENT THAT YOU HAVE THE LEGAL AUTHORITY TO BIND THE LEGAL ENTITY TO THESE TERMS. IF YOU DO NOT HAVE SUCH AUTHORITY, OR IF YOU DO NOT WISH TO BE BOUND BY THE TERMS, THEN SELECT THE "DECLINE LICENSE AGREEMENT" (OR THE EQUIVALENT) BUTTON AND YOU MUST NOT USE THE SOFTWARE ON THIS SITE OR ANY OTHER MEDIA ON WHICH THE SOFTWARE IS CONTAINED.
1. DEFINITIONS. "Software" means the software identified above in binary form that you selected for download, install or use (in the version You selected for download, install or use) from Oracle or its authorized licensees, any other machine readable materials (including, but not limited to, libraries, source files, header files, and data files), any updates or error corrections provided by Oracle, and any user manuals, programming guides and other documentation provided to you by Oracle under this Agreement. "General Purpose Desktop Computers and Servers" means computers, including desktop and laptop computers, or servers, used for general computing functions under end user control (such as but not specifically limited to email, general purpose Internet browsing, and office suite productivity tools). The use of Software in systems and solutions that provide dedicated functionality (other than as mentioned above) or designed for use in embedded or function-specific software applications, for example but not limited to: Software embedded in or bundled with industrial control systems, wireless mobile telephones, wireless handheld devices, kiosks, TV/STB, Blu-ray Disc devices, telematics and network control switching equipment, printers and storage management systems, and other related systems are excluded from this definition and not licensed under this Agreement. "Programs" means (a) Java technology applets and applications intended to run on the Java Platform, Standard Edition platform on Java-enabled General Purpose Desktop Computers and Servers; and (b) JavaFX technology applications intended to run on the JavaFX Runtime on JavaFX-enabled General Purpose Desktop Computers and Servers. “Commercial Features” means those features identified in Table 1-1 (Commercial Features In Java SE Product Editions) of the Java SE documentation accessible at http://www.oracle.com/technetwork/java/javase/documentation/index.html. “README File” means the README file for the Software accessible at http://www.oracle.com/technetwork/java/javase/documentation/index.html.
2. LICENSE TO USE. Subject to the terms and conditions of this Agreement including, but not limited to, the Java Technology Restrictions of the Supplemental License Terms, Oracle grants you a non-exclusive, non-transferable, limited license without license fees to reproduce and use internally the Software complete and unmodified for the sole purpose of running Programs. THE LICENSE SET FORTH IN THIS SECTION 2 DOES NOT EXTEND TO THE COMMERCIAL FEATURES. YOUR RIGHTS AND OBLIGATIONS RELATED TO THE COMMERCIAL FEATURES ARE AS SET FORTH IN THE SUPPLEMENTAL TERMS ALONG WITH ADDITIONAL LICENSES FOR DEVELOPERS AND PUBLISHERS.
3. RESTRICTIONS. Software is copyrighted. Title to Software and all associated intellectual property rights is retained by Oracle and/or its licensors. Unless enforcement is prohibited by applicable law, you may not modify, decompile, or reverse engineer Software. You acknowledge that the Software is developed for general use in a variety of information management applications; it is not developed or intended for use in any inherently dangerous applications, including applications that may create a risk of personal injury. If you use the Software in dangerous applications, then you shall be responsible to take all appropriate fail-safe, backup,
58 Novell Messenger 3.0 Installation Guide
redundancy, and other measures to ensure its safe use. Oracle disclaims any express or implied warranty of fitness for such uses. No right, title or interest in or to any trademark, service mark, logo or trade name of Oracle or its licensors is granted under this Agreement. Additional restrictions for developers and/or publishers licenses are set forth in the Supplemental License Terms.
4. DISCLAIMER OF WARRANTY. THE SOFTWARE IS PROVIDED "AS IS" WITHOUT WARRANTY OF ANY KIND. ORACLE FURTHER DISCLAIMS ALL WARRANTIES, EXPRESS AND IMPLIED, INCLUDING WITHOUT LIMITATION, ANY IMPLIED WARRANTIES OF MERCHANTABILITY, FITNESS FOR A PARTICULAR PURPOSE OR NONINFRINGEMENT.
5. LIMITATION OF LIABILITY. IN NO EVENT SHALL ORACLE BE LIABLE FOR ANY INDIRECT, INCIDENTAL, SPECIAL, PUNITIVE OR CONSEQUENTIAL DAMAGES, OR DAMAGES FOR LOSS OF PROFITS, REVENUE, DATA OR DATA USE, INCURRED BY YOU OR ANY THIRD PARTY, WHETHER IN AN ACTION IN CONTRACT OR TORT, EVEN IF ORACLE HAS BEEN ADVISED OF THE POSSIBILITY OF SUCH DAMAGES. ORACLE'S ENTIRE LIABILITY FOR DAMAGES HEREUNDER SHALL IN NO EVENT EXCEED ONE THOUSAND DOLLARS (U.S. $1,000).
6. TERMINATION. This Agreement is effective until terminated. You may terminate this Agreement at any time by destroying all copies of Software. This Agreement will terminate immediately without notice from Oracle if you fail to comply with any provision of this Agreement. Either party may terminate this Agreement immediately should any Software become, or in either party's opinion be likely to become, the subject of a claim of infringement of any intellectual property right. Upon termination, you must destroy all copies of Software.
7. EXPORT REGULATIONS. You agree that U.S. export control laws and other applicable export and import laws govern your use of the Software, including technical data; additional information can be found on Oracle's Global Trade Compliance web site (http://www.oracle.com/us/products/export). You agree that neither the Software nor any direct product thereof will be exported, directly, or indirectly, in violation of these laws, or will be used for any purpose prohibited by these laws including, without limitation, nuclear, chemical, or biological weapons proliferation.
8. TRADEMARKS AND LOGOS. You acknowledge and agree as between youand Oracle that Oracle owns the ORACLE and JAVA trademarks and all ORACLE- and JAVA-related trademarks, service marks, logos and other branddesignations ("Oracle Marks"), and you agree to comply with the ThirdParty Usage Guidelines for Oracle Trademarks currently located athttp://www.oracle.com/us/legal/third-party-trademarks/index.html . Any use you make of the Oracle Marks inures to Oracle's benefit.
9. U.S. GOVERNMENT LICENSE RIGHTS. If Software is being acquired by or on behalf of the U.S. Government or by a U.S. Government prime contractor or subcontractor (at any tier), then the Government's rights in Software and accompanying documentation shall be only those set forth in this Agreement.
10. GOVERNING LAW. This agreement is governed by the substantive and procedural laws of California. You and Oracle agree to submit to the exclusive jurisdiction of, and venue in, the courts of San Francisco, or Santa Clara counties in California in any dispute arising out of or relating to this agreement.
11. SEVERABILITY. If any provision of this Agreement is held to be unenforceable, this Agreement will remain in effect with the provision omitted, unless omission would frustrate the intent of the parties, in which case this Agreement will immediately terminate.
12. INTEGRATION. This Agreement is the entire agreement between you and Oracle relating to its subject matter. It supersedes all prior or contemporaneous oral or written communications, proposals, representations and warranties and prevails over any conflicting or additional terms of
Third-Party Materials 59

any quote, order, acknowledgment, or other communication between the parties relating to its subject matter during the term of this Agreement. No modification of this Agreement will be binding, unless in writing and signed by an authorized representative of each party.
SUPPLEMENTAL LICENSE TERMS
These Supplemental License Terms add to or modify the terms of the Binary Code License Agreement. Capitalized terms not defined in these Supplemental Terms shall have the same meanings ascribed to them in the Binary Code License Agreement. These Supplemental Terms shall supersede any inconsistent or conflicting terms in the Binary Code License Agreement, or in any license contained within the Software.
A. COMMERCIAL FEATURES. You may not use the Commercial Features for running Programs, Java applets or applications in your internal business operations or for any commercial or production purpose, or for any purpose other than as set forth in Sections B, C, D and E of these Supplemental Terms. If You want to use the Commercial Features for any purpose other than as permitted in this Agreement, You must obtain a separate license from Oracle.
B. SOFTWARE INTERNAL USE FOR DEVELOPMENT LICENSE GRANT. Subject to the terms and conditions of this Agreement and restrictions and exceptions set forth in the README File incorporated herein by reference, including, but not limited to the Java Technology Restrictions of these Supplemental Terms, Oracle grants you a non-exclusive, non-transferable, limited license without fees to reproduce internally and use internally the Software complete and unmodified for the purpose of designing, developing, and testing your Programs.
C. LICENSE TO DISTRIBUTE SOFTWARE. Subject to the terms and conditions of this Agreement and restrictions and exceptions set forth in the README File, including, but not limited to the Java Technology Restrictions and Limitations on Redistribution of these Supplemental Terms, Oracle grants you a non-exclusive, non-transferable, limited license without fees to reproduce and distribute the Software, provided that (i) you distribute the Software complete and unmodified and only bundled as part of, and for the sole purpose of running, your Programs, (ii) the Programs add significant and primary functionality to the Software, (iii) you do not distribute additional software intended to replace any component(s) of the Software, (iv) you do not remove or alter any proprietary legends or notices contained in the Software, (v) you only distribute the Software subject to a license agreement that: (a) is a complete, unmodified reproduction of this Agreement; or (b) protects Oracle's interests consistent with the terms contained in this Agreement and that includes the notice set forth in Section H, and (vi) you agree to defend and indemnify Oracle and its licensors from and against any damages, costs, liabilities, settlement amounts and/or expenses (including attorneys' fees) incurred in connection with any claim, lawsuit or action by any third party that arises or results from the use or distribution of any and all Programs and/or Software. The license set forth in this Section C does not extend to the Software identified in Section G.
D. LICENSE TO DISTRIBUTE REDISTRIBUTABLES. Subject to the terms and conditions of this Agreement and restrictions and exceptions set forth in the README File, including but not limited to the Java Technology Restrictions and Limitations on Redistribution of these Supplemental Terms, Oracle grants you a non-exclusive, non-transferable, limited license without fees to reproduce and distribute those files specifically identified as redistributable in the README File ("Redistributables") provided that: (i) you distribute the Redistributables complete and unmodified, and only bundled as part of Programs, (ii) the Programs add significant and primary functionality to the Redistributables, (iii) you do not distribute additional software intended to supersede any component(s) of the Redistributables (unless otherwise specified in the applicable README File), (iv) you do not remove or alter any proprietary legends or notices contained in or on the Redistributables, (v) you only distribute the Redistributables pursuant to a license agreement that: (a) is a complete, unmodified reproduction of this Agreement; or (b) protects Oracle's interests consistent with the terms contained in the Agreement and includes the notice set forth in Section H, (vi) you agree to defend and indemnify Oracle and its licensors from and against any damages, costs, liabilities, settlement amounts and/or expenses (including attorneys' fees) incurred in connection with any claim, lawsuit or
60 Novell Messenger 3.0 Installation Guide

action by any third party that arises or results from the use or distribution of any and all Programs and/or Software. The license set forth in this Section D does not extend to the Software identified in Section G.
E. DISTRIBUTION BY PUBLISHERS. This section pertains to your distribution of the JavaTM SE Development Kit Software (“JDK”) with your printed book or magazine (as those terms are commonly used in the industry) relating to Java technology ("Publication"). Subject to and conditioned upon your compliance with the restrictions and obligations contained in the Agreement, Oracle hereby grants to you a non-exclusive, nontransferable limited right to reproduce complete and unmodified copies of the JDK on electronic media (the "Media") for the sole purpose of inclusion and distribution with your Publication(s), subject to the following terms: (i) You may not distribute the JDK on a stand-alone basis; it must be distributed with your Publication(s); (ii) You are responsible for downloading the JDK from the applicable Oracle web site; (iii) You must refer to the JDK as JavaTM SE Development Kit; (iv) The JDK must be reproduced in its entirety and without any modification whatsoever (including with respect to all proprietary notices) and distributed with your Publication subject to a license agreement that is a complete, unmodified reproduction of this Agreement; (v) The Media label shall include the following information: “Copyright [YEAR], Oracle America, Inc. All rights reserved. Use is subject to license terms. ORACLE and JAVA trademarks and all ORACLE- and JAVA-related trademarks, service marks, logos and other brand designations are trademarks or registered trademarks of Oracle in the U.S. and other countries.” [YEAR] is the year of Oracle's release of the Software; the year information can typically be found in the Software’s “About” box or screen. This information must be placed on the Media label in such a manner as to only apply to the JDK; (vi) You must clearly identify the JDK as Oracle's product on the Media holder or Media label, and you may not state or imply that Oracle is responsible for any third-party software contained on the Media; (vii) You may not include any third party software on the Media which is intended to be a replacement or substitute for the JDK; (viii) You agree to defend and indemnify Oracle and its licensors from and against any damages, costs, liabilities, settlement amounts and/or expenses (including attorneys' fees) incurred in connection with any claim, lawsuit or action by any third party that arises or results from the use or distribution of the JDK and/or the Publication; ; and (ix) You shall provide Oracle with a written notice for each Publication; such notice shall include the following information: (1) title of Publication, (2) author(s), (3) date of Publication, and (4) ISBN or ISSN numbers. Such notice shall be sent to Oracle America, Inc., 500 Oracle Parkway, Redwood Shores, California 94065 U.S.A , Attention: General Counsel.
F. JAVA TECHNOLOGY RESTRICTIONS. You may not create, modify, or change the behavior of, or authorize your licensees to create, modify, or change the behavior of, classes, interfaces, or subpackages that are in any way identified as "java", "javax", "sun", “oracle” or similar convention as specified by Oracle in any naming convention designation.
G. LIMITATIONS ON REDISTRIBUTION. You may not redistribute or otherwise transfer patches, bug fixes or updates made available by Oracle through Oracle Premier Support, including those made available under Oracle's Java SE Support program.
H. COMMERCIAL FEATURES NOTICE. For purpose of complying with Supplemental Term Section C.(v)(b) and D.(v)(b), your license agreement shall include the following notice, where the notice is displayed in a manner that anyone using the Software will see the notice:
Use of the Commercial Features for any commercial or production purpose requires a separate license from Oracle. “Commercial Features” means those features identified Table 1-1 (Commercial Features In Java SE Product Editions) of the Java SE documentation accessible at http://www.oracle.com/technetwork/java/javase/documentation/index.html
I. SOURCE CODE. Software may contain source code that, unless expressly licensed for other purposes, is provided solely for reference purposes pursuant to the terms of this Agreement. Source code may not be redistributed unless expressly provided for in this Agreement.
Third-Party Materials 61

J. THIRD PARTY CODE. Additional copyright notices and license terms applicable to portions of the Software are set forth in the THIRDPARTYLICENSEREADME file accessible at http://www.oracle.com/technetwork/java/javase/documentation/index.html. In addition to any terms and conditions of any third party opensource/freeware license identified in the THIRDPARTYLICENSEREADME file, the disclaimer of warranty and limitation of liability provisions in paragraphs 4 and 5 of the Binary Code License Agreement shall apply to all Software in this distribution.
K. TERMINATION FOR INFRINGEMENT. Either party may terminate this Agreement immediately should any Software become, or in either party's opinion be likely to become, the subject of a claim of infringement of any intellectual property right.
L. INSTALLATION AND AUTO-UPDATE. The Software's installation and auto-update processes transmit a limited amount of data to Oracle (or its service provider) about those specific processes to help Oracle understand and optimize them. Oracle does not associate the data with personally identifiable information. You can find more information about the data Oracle collects as a result of your Software download at http://www.oracle.com/technetwork/java/javase/documentation/index.html.
For inquiries please contact: Oracle America, Inc., 500 Oracle Parkway,
Redwood Shores, California 94065, USA.
Last updated 02 April 2013
62 Novell Messenger 3.0 Installation Guide