Embed Size (px)
Citation preview

n
Novell Linux Point of Service 9 Installation GuideNovell
ovdocx (EN
U) 10 A
ugust 2006
w w w . n o v e l l . c o m
Linux Point of Service
9
A u g u s t 1 5 , 2 0 0 6
I N S T A L L A T I O N G U I D E
novdocx (EN
U) 10 A
ugust 2006
Legal Notices
Novell, Inc. makes no representations or warranties with respect to the contents or use of this documentation, and specifically disclaims any express or implied warranties of merchantability or fitness for any particular purpose. Further, Novell, Inc. reserves the right to revise this publication and to make changes to its content, at any time, without obligation to notify any person or entity of such revisions or changes.
Further, Novell, Inc. makes no representations or warranties with respect to any software, and specifically disclaims any express or implied warranties of merchantability or fitness for any particular purpose. Further, Novell, Inc. reserves the right to make changes to any and all parts of Novell software, at any time, without any obligation to notify any person or entity of such changes.
You may not use, export, or re-export this product in violation of any applicable laws or regulations including, without limitation, U.S. export regulations or the laws of the country in which you reside. See the Novell International Trade Services Web page (http://www.novell.com/info/exports/) for more information on exporting Novell software.
Copyright © 2006 Novell, Inc. All rights reserved. No part of this publication may be reproduced, photocopied, stored on a retrieval system, or transmitted without the express written consent of the publisher.
Novell, Inc. has intellectual property rights relating to technology embodied in the product that is described in this document. In particular, and without limitation, these intellectual property rights may include one or more of the U.S. patents listed on the Novell Legal Patents Web page (http://www.novell.com/company/legal/patents/) and one or more additional patents or pending patent applications in the U.S. and in other countries.
Novell, Inc.404 Wyman Street, Suite 500Waltham, MA 02451U.S.A.www.novell.com
Online Documentation: To access the online documentation for this and other Novell products, and to get updates, see www.novell.com/documentation.

novdocx (EN
U) 10 A
ugust 2006
Novell Trademarks
For a list of Novell trademarks, see the Novell Trademark and Service Mark list (http://www.novell.com/company/legal/trademarks/tmlist.html).
Third-Party Materials
All third-party trademarks are the property of their respective owners.

novdocx (EN
U) 10 A
ugust 2006

Contents
novdocx (EN
U) 10 A
ugust 2006
About This Guide 9
1 Overview 111.1 Architectural Overview. . . . . . . . . . . . . . . . . . . . . . . . . . . . . . . . . . . . . . . . . . . . . . . . . . . . . . . 111.2 Images Overview . . . . . . . . . . . . . . . . . . . . . . . . . . . . . . . . . . . . . . . . . . . . . . . . . . . . . . . . . . . 12
1.2.1 Types of Images . . . . . . . . . . . . . . . . . . . . . . . . . . . . . . . . . . . . . . . . . . . . . . . . . . . . 121.2.2 About ImageBuilder . . . . . . . . . . . . . . . . . . . . . . . . . . . . . . . . . . . . . . . . . . . . . . . . . . 14
1.3 Deployment Overview . . . . . . . . . . . . . . . . . . . . . . . . . . . . . . . . . . . . . . . . . . . . . . . . . . . . . . . 151.3.1 Design Guidelines for Large Environments. . . . . . . . . . . . . . . . . . . . . . . . . . . . . . . . 161.3.2 Installation Summary. . . . . . . . . . . . . . . . . . . . . . . . . . . . . . . . . . . . . . . . . . . . . . . . . 16
1.4 What's New . . . . . . . . . . . . . . . . . . . . . . . . . . . . . . . . . . . . . . . . . . . . . . . . . . . . . . . . . . . . . . . 18
2 Installing Novell Linux Point of Service Software 212.1 Preparing Your Servers . . . . . . . . . . . . . . . . . . . . . . . . . . . . . . . . . . . . . . . . . . . . . . . . . . . . . . 212.2 Meeting the System Requirements . . . . . . . . . . . . . . . . . . . . . . . . . . . . . . . . . . . . . . . . . . . . . 212.3 Obtaining the Software . . . . . . . . . . . . . . . . . . . . . . . . . . . . . . . . . . . . . . . . . . . . . . . . . . . . . . 222.4 Planning Your Installation . . . . . . . . . . . . . . . . . . . . . . . . . . . . . . . . . . . . . . . . . . . . . . . . . . . . 222.5 YaST Installation Screens . . . . . . . . . . . . . . . . . . . . . . . . . . . . . . . . . . . . . . . . . . . . . . . . . . . . 22
2.5.1 Starting the YaST Utility . . . . . . . . . . . . . . . . . . . . . . . . . . . . . . . . . . . . . . . . . . . . . . 232.5.2 The Installation Settings Screen . . . . . . . . . . . . . . . . . . . . . . . . . . . . . . . . . . . . . . . . 282.5.3 The YaST Configuration Phase. . . . . . . . . . . . . . . . . . . . . . . . . . . . . . . . . . . . . . . . . 41
3 Migrating from SLRS 8 to Novell Linux Point of Service 9 57
4 Setting Up the Administration Server 594.1 Meeting System Requirements . . . . . . . . . . . . . . . . . . . . . . . . . . . . . . . . . . . . . . . . . . . . . . . . 594.2 Installing the Administration Server . . . . . . . . . . . . . . . . . . . . . . . . . . . . . . . . . . . . . . . . . . . . . 59
4.2.1 Installing the Novell Linux Point of Service Software . . . . . . . . . . . . . . . . . . . . . . . . 604.3 Initializing the LDAP Directory . . . . . . . . . . . . . . . . . . . . . . . . . . . . . . . . . . . . . . . . . . . . . . . . . 61
4.3.1 Running posInitLdap.sh. . . . . . . . . . . . . . . . . . . . . . . . . . . . . . . . . . . . . . . . . . . . . . . 614.3.2 Running posInitEdir.sh . . . . . . . . . . . . . . . . . . . . . . . . . . . . . . . . . . . . . . . . . . . . . . . 624.3.3 Verifying the LDAP Directory. . . . . . . . . . . . . . . . . . . . . . . . . . . . . . . . . . . . . . . . . . . 63
4.4 Copying the Default Boot Images . . . . . . . . . . . . . . . . . . . . . . . . . . . . . . . . . . . . . . . . . . . . . . 634.5 Creating Point of Service Images . . . . . . . . . . . . . . . . . . . . . . . . . . . . . . . . . . . . . . . . . . . . . . 644.6 Copying the Client Image Files . . . . . . . . . . . . . . . . . . . . . . . . . . . . . . . . . . . . . . . . . . . . . . . . 644.7 What’s Next . . . . . . . . . . . . . . . . . . . . . . . . . . . . . . . . . . . . . . . . . . . . . . . . . . . . . . . . . . . . . . . 65
5 Setting Up a Dedicated Image Building Server 675.1 Meeting System Requirements . . . . . . . . . . . . . . . . . . . . . . . . . . . . . . . . . . . . . . . . . . . . . . . . 675.2 Installing a Dedicated Image Building Server . . . . . . . . . . . . . . . . . . . . . . . . . . . . . . . . . . . . . 67
5.2.1 Installing the Novell Linux Point of Service Software . . . . . . . . . . . . . . . . . . . . . . . . 675.2.2 Copying the Boot Images to the Administration Server. . . . . . . . . . . . . . . . . . . . . . . 68
5.3 Creating Point of Service Images . . . . . . . . . . . . . . . . . . . . . . . . . . . . . . . . . . . . . . . . . . . . . . 695.4 Copying the Client Image Files to the Administration Server. . . . . . . . . . . . . . . . . . . . . . . . . . 69
Contents 5

6 Novell Linux
novdocx (EN
U) 10 A
ugust 2006
6 Setting Up a Branch Server 716.1 Meeting System Requirements . . . . . . . . . . . . . . . . . . . . . . . . . . . . . . . . . . . . . . . . . . . . . . . . 716.2 Creating Branch Server Objects in LDAP. . . . . . . . . . . . . . . . . . . . . . . . . . . . . . . . . . . . . . . . . 72
6.2.1 Creating organizationalUnit Objects. . . . . . . . . . . . . . . . . . . . . . . . . . . . . . . . . . . . . . 726.2.2 Creating an scLocation Object . . . . . . . . . . . . . . . . . . . . . . . . . . . . . . . . . . . . . . . . . . 736.2.3 Adding an scServerContainer Object . . . . . . . . . . . . . . . . . . . . . . . . . . . . . . . . . . . . . 746.2.4 Adding an scBranchServer Object . . . . . . . . . . . . . . . . . . . . . . . . . . . . . . . . . . . . . . . 746.2.5 Defining the Branch Server Hardware . . . . . . . . . . . . . . . . . . . . . . . . . . . . . . . . . . . . 756.2.6 Defining the Branch Server Services . . . . . . . . . . . . . . . . . . . . . . . . . . . . . . . . . . . . . 766.2.7 Creating Point of Service Terminal Objects . . . . . . . . . . . . . . . . . . . . . . . . . . . . . . . . 77
6.3 Installing and Configuring the Branch Server . . . . . . . . . . . . . . . . . . . . . . . . . . . . . . . . . . . . . . 776.3.1 Installing the Novell Linux Point of Service Software . . . . . . . . . . . . . . . . . . . . . . . . . 776.3.2 Configuring the Branch Server. . . . . . . . . . . . . . . . . . . . . . . . . . . . . . . . . . . . . . . . . . 78
6.4 Downloading Images from the Administration Server . . . . . . . . . . . . . . . . . . . . . . . . . . . . . . . 796.5 Starting the Core Script . . . . . . . . . . . . . . . . . . . . . . . . . . . . . . . . . . . . . . . . . . . . . . . . . . . . . . 79
7 Setting Up High Availability Branch Servers 817.1 Meeting System Requirements . . . . . . . . . . . . . . . . . . . . . . . . . . . . . . . . . . . . . . . . . . . . . . . . 817.2 Creating Objects for High Availability Branch Servers in LDAP . . . . . . . . . . . . . . . . . . . . . . . . 83
7.2.1 Creating Branch Objects . . . . . . . . . . . . . . . . . . . . . . . . . . . . . . . . . . . . . . . . . . . . . . 837.2.2 Creating Point of Service Terminal Objects . . . . . . . . . . . . . . . . . . . . . . . . . . . . . . . . 87
7.3 Installing and Configuring High Availability Branch Servers. . . . . . . . . . . . . . . . . . . . . . . . . . . 877.3.1 Installing the Novell Linux Point of Service Software . . . . . . . . . . . . . . . . . . . . . . . . . 877.3.2 Configuring the Branch Servers . . . . . . . . . . . . . . . . . . . . . . . . . . . . . . . . . . . . . . . . . 907.3.3 Configuring drbd. . . . . . . . . . . . . . . . . . . . . . . . . . . . . . . . . . . . . . . . . . . . . . . . . . . . . 90
7.4 Downloading Images from the Administration Server . . . . . . . . . . . . . . . . . . . . . . . . . . . . . . . 937.5 Starting the Core Script . . . . . . . . . . . . . . . . . . . . . . . . . . . . . . . . . . . . . . . . . . . . . . . . . . . . . . 937.6 Heartbeat Configuration Files. . . . . . . . . . . . . . . . . . . . . . . . . . . . . . . . . . . . . . . . . . . . . . . . . . 94
7.6.1 ha.cf . . . . . . . . . . . . . . . . . . . . . . . . . . . . . . . . . . . . . . . . . . . . . . . . . . . . . . . . . . . . . . 947.6.2 authkeys. . . . . . . . . . . . . . . . . . . . . . . . . . . . . . . . . . . . . . . . . . . . . . . . . . . . . . . . . . . 957.6.3 haresources . . . . . . . . . . . . . . . . . . . . . . . . . . . . . . . . . . . . . . . . . . . . . . . . . . . . . . . . 95
7.7 drbd Configuration File . . . . . . . . . . . . . . . . . . . . . . . . . . . . . . . . . . . . . . . . . . . . . . . . . . . . . . . 967.8 Updating High Availability Branch Servers . . . . . . . . . . . . . . . . . . . . . . . . . . . . . . . . . . . . . . . . 96
8 Setting Up an Admin/Branch Server Combo 998.1 Meeting System Requirements . . . . . . . . . . . . . . . . . . . . . . . . . . . . . . . . . . . . . . . . . . . . . . . . 998.2 Installing an Admin/Branch Server Combo. . . . . . . . . . . . . . . . . . . . . . . . . . . . . . . . . . . . . . . . 99
8.2.1 Installing the Novell Linux Point of Service Software . . . . . . . . . . . . . . . . . . . . . . . . 1008.3 Initializing the LDAP Directory . . . . . . . . . . . . . . . . . . . . . . . . . . . . . . . . . . . . . . . . . . . . . . . . 101
8.3.1 Running posInitLdap.sh . . . . . . . . . . . . . . . . . . . . . . . . . . . . . . . . . . . . . . . . . . . . . . 1018.3.2 Running posInitEdir.sh . . . . . . . . . . . . . . . . . . . . . . . . . . . . . . . . . . . . . . . . . . . . . . . 1028.3.3 Verifying the LDAP Directory . . . . . . . . . . . . . . . . . . . . . . . . . . . . . . . . . . . . . . . . . . 102
8.4 Creating the Required LDAP Objects. . . . . . . . . . . . . . . . . . . . . . . . . . . . . . . . . . . . . . . . . . . 1038.5 Copying the Default Boot Images. . . . . . . . . . . . . . . . . . . . . . . . . . . . . . . . . . . . . . . . . . . . . . 1048.6 Creating Point of Service Images . . . . . . . . . . . . . . . . . . . . . . . . . . . . . . . . . . . . . . . . . . . . . . 1048.7 Copying the Client Image Files. . . . . . . . . . . . . . . . . . . . . . . . . . . . . . . . . . . . . . . . . . . . . . . . 1048.8 Configuring the Branch Server . . . . . . . . . . . . . . . . . . . . . . . . . . . . . . . . . . . . . . . . . . . . . . . . 105
8.8.1 Running the Initialization Script . . . . . . . . . . . . . . . . . . . . . . . . . . . . . . . . . . . . . . . . 1058.8.2 Copying Images to the tftpboot Directories . . . . . . . . . . . . . . . . . . . . . . . . . . . . . . . 1068.8.3 Starting the Core Script . . . . . . . . . . . . . . . . . . . . . . . . . . . . . . . . . . . . . . . . . . . . . . 106
Point of Service 9 Installation Guide

novdocx (EN
U) 10 A
ugust 2006
9 Setting Up a POSBranch Terminal 1079.1 Preparing the Administration Server . . . . . . . . . . . . . . . . . . . . . . . . . . . . . . . . . . . . . . . . . . . 1079.2 Building the POSBranch Image . . . . . . . . . . . . . . . . . . . . . . . . . . . . . . . . . . . . . . . . . . . . . . . 108
9.2.1 Cloning the Image Description Tree . . . . . . . . . . . . . . . . . . . . . . . . . . . . . . . . . . . . 1089.2.2 Adding branch.xml to the Parent Image Specification Document . . . . . . . . . . . . . . 1089.2.3 Generating the POSBranch Image . . . . . . . . . . . . . . . . . . . . . . . . . . . . . . . . . . . . . 109
9.3 Creating a Bootable CD for the POSBranch Terminal. . . . . . . . . . . . . . . . . . . . . . . . . . . . . . 1109.3.1 Creating the CD Setup Directory. . . . . . . . . . . . . . . . . . . . . . . . . . . . . . . . . . . . . . . 1109.3.2 Creating the config.image File. . . . . . . . . . . . . . . . . . . . . . . . . . . . . . . . . . . . . . . . . 1109.3.3 Generating the CDBoot Image . . . . . . . . . . . . . . . . . . . . . . . . . . . . . . . . . . . . . . . . 1139.3.4 Creating the CD ISO Image . . . . . . . . . . . . . . . . . . . . . . . . . . . . . . . . . . . . . . . . . . 1139.3.5 Burning the Boot CD . . . . . . . . . . . . . . . . . . . . . . . . . . . . . . . . . . . . . . . . . . . . . . . . 114
9.4 Booting the POSBranch Terminal . . . . . . . . . . . . . . . . . . . . . . . . . . . . . . . . . . . . . . . . . . . . . 114
10 Automatic Branch Server Installation 11510.1 Preparing the Administration Server . . . . . . . . . . . . . . . . . . . . . . . . . . . . . . . . . . . . . . . . . . . 11510.2 Creating the Branch Server Definition in the LDAP Directory . . . . . . . . . . . . . . . . . . . . . . . . 11610.3 Modifying the Branch Server Configuration Template (template.xml) . . . . . . . . . . . . . . . . . . 11910.4 Generating the Automatic Branch Server Installation Image. . . . . . . . . . . . . . . . . . . . . . . . . 12010.5 Creating the Boot Media . . . . . . . . . . . . . . . . . . . . . . . . . . . . . . . . . . . . . . . . . . . . . . . . . . . . 121
10.5.1 Creating the Boot CD . . . . . . . . . . . . . . . . . . . . . . . . . . . . . . . . . . . . . . . . . . . . . . . 12210.5.2 Creating the Floppy Disk . . . . . . . . . . . . . . . . . . . . . . . . . . . . . . . . . . . . . . . . . . . . . 122
10.6 Starting Up the Branch Server . . . . . . . . . . . . . . . . . . . . . . . . . . . . . . . . . . . . . . . . . . . . . . . . 122
11 Deploying Point of Service Terminals 12511.1 Creating Point of Service Images . . . . . . . . . . . . . . . . . . . . . . . . . . . . . . . . . . . . . . . . . . . . . 12511.2 Creating the LDAP Objects Required for the Point of Service Terminals . . . . . . . . . . . . . . . 126
11.2.1 Creating an scCashRegister Object . . . . . . . . . . . . . . . . . . . . . . . . . . . . . . . . . . . . 12611.2.2 Creating an scRAMDisk Object . . . . . . . . . . . . . . . . . . . . . . . . . . . . . . . . . . . . . . . . 12811.2.3 Creating an scHarddisk Object . . . . . . . . . . . . . . . . . . . . . . . . . . . . . . . . . . . . . . . . 12811.2.4 Creating an scConfigFileTemplate Object. . . . . . . . . . . . . . . . . . . . . . . . . . . . . . . . 12911.2.5 Creating an scConfigFileSyncTemplate Object. . . . . . . . . . . . . . . . . . . . . . . . . . . . 13011.2.6 Creating scPosImage Objects. . . . . . . . . . . . . . . . . . . . . . . . . . . . . . . . . . . . . . . . . 13111.2.7 Activating Images . . . . . . . . . . . . . . . . . . . . . . . . . . . . . . . . . . . . . . . . . . . . . . . . . . 13211.2.8 Assigning an Image to a Point of Service Terminal. . . . . . . . . . . . . . . . . . . . . . . . . 13311.2.9 Removing an Assigned Image . . . . . . . . . . . . . . . . . . . . . . . . . . . . . . . . . . . . . . . . 134
11.3 Distributing Images to Point of Service Terminals . . . . . . . . . . . . . . . . . . . . . . . . . . . . . . . . . 13411.3.1 Copying Images to the Administration Server RSYNC Directory . . . . . . . . . . . . . . 13411.3.2 Distributing Images to the Branch Server . . . . . . . . . . . . . . . . . . . . . . . . . . . . . . . . 13511.3.3 Distributing Images to Point of Service Terminals. . . . . . . . . . . . . . . . . . . . . . . . . . 13611.3.4 Image Install Notification . . . . . . . . . . . . . . . . . . . . . . . . . . . . . . . . . . . . . . . . . . . . . 136
11.4 Booting the Point of Service Terminal . . . . . . . . . . . . . . . . . . . . . . . . . . . . . . . . . . . . . . . . . . 13611.4.1 Network PXE Boot. . . . . . . . . . . . . . . . . . . . . . . . . . . . . . . . . . . . . . . . . . . . . . . . . . 13811.4.2 CDBoot . . . . . . . . . . . . . . . . . . . . . . . . . . . . . . . . . . . . . . . . . . . . . . . . . . . . . . . . . . 140
12 Testing Your Novell Linux Point of Service Environment 14312.1 Monitoring the Terminal Bootup. . . . . . . . . . . . . . . . . . . . . . . . . . . . . . . . . . . . . . . . . . . . . . . 14312.2 Troubleshooting Terminal Bootup Problems . . . . . . . . . . . . . . . . . . . . . . . . . . . . . . . . . . . . . 144
A Installation RPM Lists 147A.1 NLPOS Admin/Branch Server RPMs. . . . . . . . . . . . . . . . . . . . . . . . . . . . . . . . . . . . . . . . . . . 147
Contents 7

8 Novell Linux
novdocx (EN
U) 10 A
ugust 2006
A.2 NLPOS Image Server RPMs . . . . . . . . . . . . . . . . . . . . . . . . . . . . . . . . . . . . . . . . . . . . . . . . . 149
B Changing the Server Language 151B.1 Changing the Language Selection . . . . . . . . . . . . . . . . . . . . . . . . . . . . . . . . . . . . . . . . . . . . . 151B.2 Copying the Required RPMs . . . . . . . . . . . . . . . . . . . . . . . . . . . . . . . . . . . . . . . . . . . . . . . . . 151B.3 Modifying the System Language File . . . . . . . . . . . . . . . . . . . . . . . . . . . . . . . . . . . . . . . . . . . 153
C Documentation Updates 155C.1 August 15, 2006 (NLPOS 9 SSP3). . . . . . . . . . . . . . . . . . . . . . . . . . . . . . . . . . . . . . . . . . . . . 155
C.1.1 Overview . . . . . . . . . . . . . . . . . . . . . . . . . . . . . . . . . . . . . . . . . . . . . . . . . . . . . . . . . 155C.1.2 Setting Up High Availability Branch Servers . . . . . . . . . . . . . . . . . . . . . . . . . . . . . . 155C.1.3 Testing Your Novell Linux Point of Service Environment . . . . . . . . . . . . . . . . . . . . . 156C.1.4 Changing the Server Language . . . . . . . . . . . . . . . . . . . . . . . . . . . . . . . . . . . . . . . . 156
Point of Service 9 Installation Guide

novdocx (EN
U) 10 A
ugust 2006
About This Guide
Welcome to Novell® Linux Point of Service 9. This guide contains instructions on how to install and deploy the components in your Novell Linux Point of Service system.
This guide contains the following chapters:
Chapter 1, “Overview,” on page 11Chapter 2, “Installing Novell Linux Point of Service Software,” on page 21Chapter 3, “Migrating from SLRS 8 to Novell Linux Point of Service 9,” on page 57 Chapter 4, “Setting Up the Administration Server,” on page 59Chapter 5, “Setting Up a Dedicated Image Building Server,” on page 67Chapter 6, “Setting Up a Branch Server,” on page 71Chapter 7, “Setting Up High Availability Branch Servers,” on page 81 Chapter 8, “Setting Up an Admin/Branch Server Combo,” on page 99Chapter 9, “Setting Up a POSBranch Terminal,” on page 107Chapter 10, “Automatic Branch Server Installation,” on page 115 Chapter 11, “Deploying Point of Service Terminals,” on page 125Chapter 12, “Testing Your Novell Linux Point of Service Environment,” on page 143Appendix A, “Installation RPM Lists,” on page 147Appendix B, “Changing the Server Language,” on page 151Appendix C, “Documentation Updates,” on page 155
Audience
This documentation targets Linux* system administrators. It assumes a proficient knowledge of the Linux operating system and administration procedures.
Feedback
We want to hear your comments and suggestions about this manual and the other documentation included with this product. To contact us, use the User Comment feature at the bottom of each page of the online documentation, or go to www.novell.com/documentation/feedback.html and enter your comments there.
Documentation Updates
For the latest version of this documentation, see the Novell Documentation Web site (http://www.novell.com/documentation/nlpos9/).
Additional Documentation
For information on managing Novell Linux Point of Service 9, see the Novell Linux Point of Service 9 Administration Guide.
About This Guide 9

10 Novell Linux
novdocx (EN
U) 10 A
ugust 2006
Documentation Conventions
In Novell documentation, a greater-than symbol (>) is used to separate actions within a step and items in a cross-reference path.
A trademark symbol (®, TM, etc.) denotes a Novell trademark. An asterisk (*) denotes a third-party trademark.
Point of Service 9 Installation Guide
1novdocx (E
NU
) 10 August 2006
1Overview
Novell® Linux Point of Service 9 is a secure and reliable Linux platform optimized for enterprise retail organizations. Built on the solid foundation of SUSE® Linux Enterprise Server 9 and Novell Linux Desktop 9, it is the only enterprise-class Linux operating system tailored specifically for retail point of sale terminals, kiosk and self-service systems, and reverse-vending systems.
This section provides an architectural overview of the Novell Linux Point of Service product, along with an overview of images, the deployment process, and a summary of new features in Novell Linux Point of Service 9.
Section 1.1, “Architectural Overview,” on page 11Section 1.2, “Images Overview,” on page 12Section 1.3, “Deployment Overview,” on page 15Section 1.4, “What's New,” on page 18
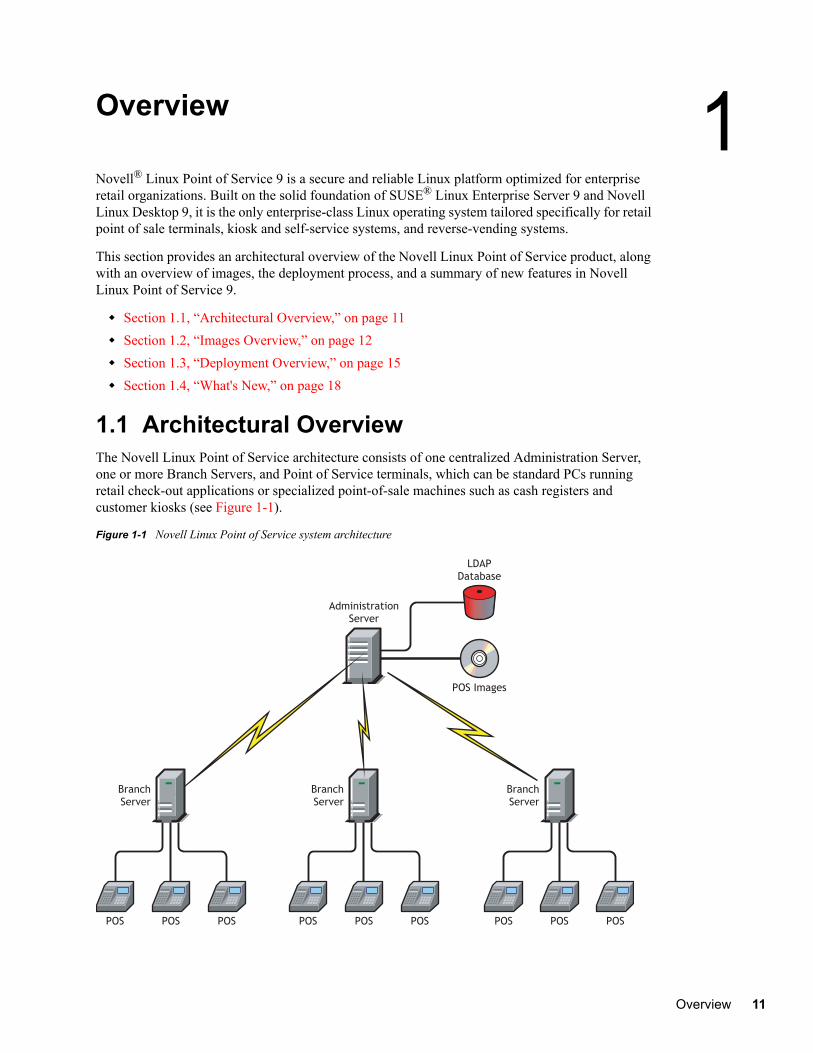
1.1 Architectural OverviewThe Novell Linux Point of Service architecture consists of one centralized Administration Server, one or more Branch Servers, and Point of Service terminals, which can be standard PCs running retail check-out applications or specialized point-of-sale machines such as cash registers and customer kiosks (see Figure 1-1).
Figure 1-1 Novell Linux Point of Service system architecture
LDAP
Database
Administration
Server
Branch
Server
Branch
Server
Branch
Server
POS POS POS POS POS POS POS POS POS
POS Images
Overview 11
12 Novell Linux
novdocx (EN
U) 10 A
ugust 2006
All system information (system structure, the configuration and deployment method for each Branch Server and Point of Service terminal, image information, and so forth) is stored in an LDAP database on the Administration Server. The Administration Server is also the master repository for the images required to boot and configure Point of Service terminals and it provides the utilities required to build those images.
NOTE: By default, the utilities required to build Point of Service images are installed as part of the Administration Server installation. If you have a large system and want to offload the image building function from the Administration Server, you can create a dedicated image building server.
During the system initialization, each Branch Server downloads the system information and images required for its local Point of Service terminals from the Administration Server. The Point of Service terminals, in turn, download their respective images from the Branch Server when they boot.
WARNING: Because Branch Servers contain sensitive information, they should be secured. You should close unused ports and allow only the root user to have access to the server console.
Novell Linux Point of Service is broadly scalable so that a small shop with five Point of Service terminals can be managed just as well as a large chain with a thousand branches. For organizations with several Branch Servers, the link between the branch and administrative servers is maintained over WAN links. During execution of administrative tasks, such as installation of new Point of Service terminals in a branch, steps must be taken to ensure that the WAN link to the Administration Server is available.
The Novell Linux Point of Service architecture is highly centralized; however, administrative tasks can be delegated to subunits for role-based administration. Moreover, although the LDAP directory is not replicated on the Branch Server, the Branch Server provides all the services necessary for the operation and management of the Point of Service terminals. Consequently, the Branch Server and Point of Service terminals can function independently of the Administration Server in the event of server failure or a downed connection.
1.2 Images OverviewNovell Linux Point of Service is designed to automate the roll-out of Point of Service terminals as much as possible. To assist this automation, the product makes extensive use of image building technology. For each type of terminal, whether it is a non-graphical system or a full desktop environment, you can create customized images to be downloaded automatically from the Branch Server when the terminal boots.
1.2.1 Types of ImagesTo help get you started, Novell Linux Point of Service comes with a set of pre-built image files that you can customize to set up your own system. Every Point of Service terminal requires two images: a boot image and a client image.
Two customizable boot image templates provide the minimum your Point of Service terminals need to initially start up either from a bootable CD or from the network via standard Preboot Execution Environment (PXE) remote boot technology:
CDBoot includes all the files and directories required to boot diskless and preinstalled diskful systems from CD.
Point of Service 9 Installation Guide

novdocx (EN
U) 10 A
ugust 2006
Novell Linux Point of Service includes a binary version of the CDBoot image. This image must be combined with a client image and a config.image configuration file to create a CD that can be used to boot the Point of Service terminal.DiskNetBoot includes all the files and directories (including partitioning and boot loader installation) required to boot diskful and diskless terminals from the network. Novell Linux Point of Service includes binary versions of the first and second stage boot images used to PXE boot Point of Service terminals. The first stage image is a bootstrap image called initrd because it initializes a RAM disk in the terminal’s memory and performs the PXE boot. The second stage image is called linux because it loads the Linux kernel into the RAM disk so that the terminal can become network-capable, contact the Branch Server, and begin downloading the appropriate client image via the Trivial File Transfer Protocol (TFTP).
Four customizable client image templates are specially designed for the most common types of retail Point of Service terminals:
The Minimal image contains only the runtime environment for native-code applications (C and C++) and the ncurses library for non-graphical user interface support. The Minimal image supports only console-based applications. Its maximum size is 35 MB compressed, and 64 MB of RAM is required to boot the image.The Java image includes the features of the Minimal operating system image and adds essential graphical interface capabilities as well as the ability to run Java programs. The Java image supports console-based C/C++ applications, Java programs in a Java2 runtime environment, and X11 applications. Its maximum size is 100 MB compressed, and 128 MB of RAM is required to boot the image.The Browser image includes the features of the Java operating system image and essential graphical interface capabilities, and adds the Mozilla* Web browser. The Browser image supports console-based C/C++ applications, Java programs in a Java2 runtime environment, X11 applications, and basic browser-based applications. Its maximum size is 150 MB compressed, and although it is intended to be loaded on diskful systems with 256 MB of RAM, you can load it on a diskless system that has adequate memory (at least 1 GB of RAM is recommended).The Desktop image is for high-functionality clients with full graphical user interface capabilities for a traditional desktop experience. It includes the Mozilla Web browser with plug-ins, and a full graphical desktop environment (GNOME 2.6 or KDE 3.2). The Desktop image supports console-based C/C++ applications, Java programs in a Java2 runtime environment, X11 applications, browser-based applications, and GNOME*-based or KDE*-based programs. It is intended to be loaded on diskful systems, but you can load it on a diskless system that has adequate memory (at least 1 GB of RAM is recommended).
In general, most Point of Service client images are created using the Novell Linux Desktop (NLD) 9 distribution. NLD is a general-purpose desktop platform that can be tailored for use in information kiosks, call-center terminals, or single-use PC workstations. However, because NLD shares a system core with SUSE Linux Enterprise Server (SLES) 9, you can build images using either NLD or SLES as the base. The only Point of Service images that require the SLES distribution are POSBranch images.
You can extend Point of Service client images to include add-on features such as:
Advanced Linux Sound Architecture (ALSA) library for audio supportEvTouch touchscreen driverGNOME or KDE desktop environments
Overview 13
14 Novell Linux
novdocx (EN
U) 10 A
ugust 2006
IBM* Java technology supportFirefox and other Web browsersSamba 3 Client for SMB/CIFS connectivity to Microsoft* Windows* serversVNC 4 Remote Control Client to allow other computers to remotely control the terminal
Client images that you create are initially stored on the Administration Server. Before you deploy your Point of Service terminals, you run a script to transmit the client images via the RSYNC service to specific directories on the Branch Server where, in turn, they can be downloaded to Point of Service terminals at boot time.
When a Point of Service terminal is started for the first time, it performs a PXE boot (or boots from CD) and then registers with the Branch Server to obtain the information it needs to download its client image. The TFTP service on the Branch Server automatically delivers the matching client image to the Point of Service terminal.
To make this work as designed, you must create reference objects in the LDAP directory for the types of Point of Service terminals you intend to deploy in your system. Taking the time to correctly create and configure these objects when you install the Branch Servers saves you from separately managing the startup of each Point of Service terminal.
1.2.2 About ImageBuilderImageBuilder is a Perl-based tool that provides a command line interface for creating images. It is installed when you select the NLPOS Image Server software selection during the Administration Server installation.
When you build a client image, ImageBuilder compiles all the information required to run a Point of Service terminal—the Linux operating system, drivers, configuration settings, application files, and so forth—into a single image file. This file can then be electronically distributed to Point of Service terminals over the network, or you can generate an ISO version of the image file that can be burned to a CD for manual distribution.
ImageBuilder comes in two versions: standard (scr) and XML-based (xscr).
scr
scr builds images using an Image Description Tree and an AdminServer.conf file. The Image Description Tree is a specific file system directory structure that defines the version information, component list, scripts, configuration files, and other components required to build client images.
The AdminServer.conf file defines the paths to the distribution directories where you have copied the Novell Linux Point of Service source CDs.
NOTE: scr generates client images with the Novell Linux Desktop distribution only.
xscr
xscr builds images using an Image Description Tree and two XML documents: an Image Specification Document (ImageSpecification.xml) and a Distribution Source Document (Distribution.xml). These documents contain XML elements that define the version information, component list, configuration files, and other components required to build client images.
Point of Service 9 Installation Guide
novdocx (EN
U) 10 A
ugust 2006
The Image Description Tree contains one parent Image Specification Document at its root. This allows you to define global settings that affect the implementation of image subcomponents.
Image Specification Document templates for the CDBoot, DiskNetboot, Minimal, Java, Browser, Desktop, and POSBranch images specify the RPMs and drivers required to build their respective images and are included as child documents in their parent Image Specification Document at the root of the Image Description Tree. Child Image Specification Document templates for the client image add-on options such as GNOME, KDE, Samba 3 Client, and VNC 4 Remote Control Client are also included.
The Distribution Source Document (Distribution.xml) defines the paths to the distribution directories where you have copied the Novell Linux Point of Service source CDs.
NOTE: xscr can generate client images with either NLD or SLES distributions.
The XML-based Image Specification Document and Distribution Source Document provide significant advantages in image design and manageability:
You can manage image subcomponents as discrete elements. Drivers, RPMs, and even features can be separately managed within the Image Specification Document. This allows you to easily add features, RPMs, and drivers to an image.You can define global settings in the parent Image Specification Document to customize the implementation of image subcomponents. For example, in the parent document, you can choose to include or exclude specific drivers or RPMs.
This granular level of control is made possible by the structure of the Novell Linux Point of Service XML schema, which organizes the template components in discrete elements so they can be individually managed.
1.3 Deployment OverviewNovell Linux Point of Service requires the following components for a functional system:
Administration ServerImage Building ServerBranch ServersPoint of Service Terminals
The way in which these components are deployed depends on your system requirements. For example, systems that maintain hundreds of client images might require a dedicated image building server, whereas smaller systems can have the image building utilities installed on the Administration Server. Similarly, some customers might install the Administration and Branch Servers on a single box, while others deploy the Branch Server on a Point of Service terminal.
The flexibility of the architecture provides broad scalability so that in large environments components can be distributed to improve system performance, while in smaller environments components can be consolidated to maximize the use of system resources.
Overview 15

16 Novell Linux
novdocx (EN
U) 10 A
ugust 2006
1.3.1 Design Guidelines for Large EnvironmentsEvery retail environment is different in terms of network speed, server hardware, Point of Service terminal hardware, size of images, frequency of updates, etc. This section presents some design guidelines for large environments, based on scalability and reliability improvements made in Novell Linux Point of Service 9 SSP3. These recommendations do not apply to previous releases of Novell Linux Point of Service 9.
The recommended maximum number of Point of Service terminals being serviced by a single Branch Server is 100. You can adjust this number up or down depending on how frequently the Point of Service terminals are reimaged and whether you can control when the terminals come online.
NOTE: For every 100 terminals coming online at the same time, it can take up to 10 minutes for the terminals to download larger desktop images. If the terminals are simply booting from an existing image, it can take 2-3 minutes per 100 terminals.
1.3.2 Installation SummaryThe following summary outlines the general steps required to deploy a Novell Linux Point of Service system. It also identifies the configuration options for each system component and notes where you can go to find detailed instructions.
1 If you are migrating from SUSE Linux Retail Solution 8 (SLRS 8) to Novell Linux Point of Service 9, back up the LDAP directory and any SLRS 8 image files you want to continue to deploy to Point of Service terminals.
For detailed instructions, see Chapter 3, “Migrating from SLRS 8 to Novell Linux Point of Service 9,” on page 57.
2 Install the Administration Server using one of the following configurations:Install an Administration Server that includes the ImageBuilder utilities (scr and xscr) and all the files and directories required to create Point of Service images. For detailed instructions, see Chapter 4, “Setting Up the Administration Server,” on page 59.Install an Administration Server and a dedicated Image Building Server. For detailed instructions, see Chapter 5, “Setting Up a Dedicated Image Building Server,” on page 67.Install an Admin/Branch Server combination. For detailed instructions, see Chapter 8, “Setting Up an Admin/Branch Server Combo,” on page 99.
3 Create the LDAP directory on your Administration Server using one of the following methods:If you are migrating from SLRS 8 to Novell Linux Point of Service 9, import the SLRS 8 LDAP directory from the backup copy you made in Step 1. For detailed instructions, see Chapter 3, “Migrating from SLRS 8 to Novell Linux Point of Service 9,” on page 57.If this is a new installation, create the Novell Linux Point of Service 9 LDAP directory. For detailed instructions, see Section 4.3, “Initializing the LDAP Directory,” on page 61.
Point of Service 9 Installation Guide

novdocx (EN
U) 10 A
ugust 2006
4 Create the Point of Service images required to deploy your Point of Service terminals. 4a Copy the image source files to your Image Building Server.
For detailed instructions, see “Copying the Novell Linux Point of Service CDs” in the Novell Linux Point of Service 9 Administration Guide.
4b Define the location of the image source files. For detailed instructions, see “Generating AdminServer.conf or Distribution.xml” in the Novell Linux Point of Service 9 Administration Guide.
4c Build the Point of Service image files. For detailed instructions, see “Building Images with scr” or “Building Images with xscr” in the Novell Linux Point of Service 9 Administration Guide.
4d Copy the image files you have created to the appropriate directories on the Administration Server so they will be ready for the Branch Servers to download.
IMPORTANT: Client images must be located in /opt/SLES/POS/rsync/image/ and boot images must be located in /opt/SLES/POS/rsync/boot/ on the Administration Server before the RSYNC service can transmit the images to the Branch Server.
5 Create the required LDAP objects for each Branch Server and its Point of Service terminals in the LDAP tree.For detailed instructions, see “Creating Branch Server Objects in LDAP” on page 72.
6 Install the Branch Servers using one of the following configurations:
NOTE: If you install an Admin/Branch Server combination, this step is already completed. For instructions on how to configure the Admin/Branch Server combination, see Chapter 8, “Setting Up an Admin/Branch Server Combo,” on page 99.
Install a standard Branch Server. For detailed instructions, see Chapter 6, “Setting Up a Branch Server,” on page 71.Install a high availability Branch Server cluster of two nodes in an active/passive setup. For detailed instructions, see Chapter 7, “Setting Up High Availability Branch Servers,” on page 81.For stores where the Branch Server is only running the Point of Service infrastructure (that is, the Branch Server is running no additional applications), the Branch Server can be installed as a control terminal running on Point of Service hardware. For more information, see Chapter 9, “Setting Up a POSBranch Terminal,” on page 107.If the Branch Server is in a remote location where no onsite system expertise is available, you can create an Automatic Branch Server Installation image. The resulting ISO file can then be burned to a CD and used to install the Branch Server at the remote location. For detailed instructions, see Chapter 10, “Automatic Branch Server Installation,” on page 115.
7 After a Branch Server is installed, you must complete the following steps to initialize the Branch Server before attempting to boot its Point of Service terminals:7a Run the posInitBranchserver.sh script to initialize and configure the Branch
Server.For detailed instructions, see “Configuring the Branch Server” on page 78.
Overview 17

18 Novell Linux
novdocx (EN
U) 10 A
ugust 2006
7b Run possyncimages.pl to download the Point of Service images from the Administration Server to the /tftpboot/ directories on the Branch Server.For detailed instructions, see “Downloading Images from the Administration Server” on page 79.
7c Start the core script (posleases2ldap) as a daemon process on the Branch Server. This script controls all other scripts.For more information, see “Starting the Core Script” on page 79.
8 Deploy the Point of Service terminals, following the general instructions in Chapter 11, “Deploying Point of Service Terminals,” on page 125. Depending on your network configuration and terminal hardware, you must prepare the Point of Service terminals to boot using one of the following procedures:
If the Point of Service terminals have access to the network, the terminals can PXE boot and download their image files from the Branch Server. This method is typically used for diskless workstations.For more information on this process, see “Network PXE Boot” on page 138.If the Point of Service terminals do not have access to the network, create a CDBoot image and deploy the image at the terminal. This method can be used for either diskless or diskful workstations that have a CD drive.For information on creating a CDBoot image, see “Building a CDBoot Image” in the Novell Linux Point of Service 9 Administration Guide.For information on the CDBoot process, see “CDBoot” on page 140.If a Point of Service terminal cannot boot from the network or from a CD, it attempts to boot from the hard drive.For more information, see “Booting the Point of Service Terminal” on page 136.
9 Test your Novell Linux Point of Service installation to ensure that it is functioning correctly.For detailed instructions, see Chapter 12, “Testing Your Novell Linux Point of Service Environment,” on page 143.
1.4 What's NewThe following features are new in the initial release of Novell Linux Point of Service 9:
New operating system base: The original release of Novell Linux Point of Service 9 is built on SUSE Linux Enterprise Server 9 SP1 and Novell Linux Desktop 9 SP1. Subsequent releases of Novell Linux Point of Service 9 may require newer OS support packs.Improved installation: The installation of Administration Servers and Branch Servers has been simplified and improved. For information on installing Novell Linux Point of Service 9, see Chapter 2, “Installing Novell Linux Point of Service Software,” on page 21.Backward compatibility for OS image deployment: Novell Linux Point of Service 9 Branch Servers can deliver SUSE Linux Retail Solution (SLRS) 8 client images. For more information on this configuration, see Chapter 3, “Migrating from SLRS 8 to Novell Linux Point of Service 9,” on page 57.Combined Branch Server/Point of Service terminal for small store environments: For smaller stores where the Branch Server is only running the Point of Service infrastructure (that is, the Branch Server is running no additional applications), the Branch Server can be deployed
Point of Service 9 Installation Guide

novdocx (EN
U) 10 A
ugust 2006
as a control terminal running on Point of Service hardware. For more information, see Chapter 9, “Setting Up a POSBranch Terminal,” on page 107.Easier image creation through an XML interface: The Novell Linux Point of Service XML schema organizes the image components in discrete elements so they can be individually managed. This provides greater flexibility and ease of use when building custom images. For more information, see “Building Images with the xscr ImageBuilder Tool” in the Novell Linux Point of Service 9 Administration Guide. Client image add-on features: Novell Linux Point of Service includes several add-on features such as the Mozilla* and Firefox* browsers, the Samba 3 client, and the VNC 4 Remote Control Client that can be added to client images generated with xscr. For more information, see “Adding Features to Client Images” in the Novell Linux Point of Service 9 Administration Guide.
See the Readme files (http://www.novell.com/documentation/nlpos9) for information about new features and enhancements in subsequent Support Pack releases of Novell Linux Point of Service 9.
Overview 19

20 Novell Linux
novdocx (EN
U) 10 A
ugust 2006
Point of Service 9 Installation Guide

2novdocx (E
NU
) 10 August 2006
2Installing Novell Linux Point of Service Software
This section reviews the system requirements and processes for installing Novell® Linux Point of Service software.
Section 2.1, “Preparing Your Servers,” on page 21Section 2.2, “Meeting the System Requirements,” on page 21Section 2.4, “Planning Your Installation,” on page 22Section 2.5, “YaST Installation Screens,” on page 22
2.1 Preparing Your ServersBefore installing the Novell Linux Point of Service software, you must prepare the server as follows:
The Novell Linux Point of Service installation program wipes the hard drive. Therefore, you must back up anything you want to save before installing the Novell Linux Point of Service software. If you are migrating from SUSE® Linux Retail Solution (SLRS) 8 to Novell Linux Point of Service 9, refer to Chapter 3, “Migrating from SLRS 8 to Novell Linux Point of Service 9,” on page 57 for the migration procedure.
2.2 Meeting the System RequirementsTable 2-1 lists the Novell Linux Point of Service system requirements for Administration Servers and Branch Servers.
Table 2-1 System requirements for Administration Servers and Branch Servers.
Administration Server Only Administration Server with Image Building Components Branch Server
Supported Processor Platforms
x86 x86 x86
Disk Space
Minimum: 4 GB
Recommended: 15 GB
Minimum: 4 GB
Recommended: 25 GB
Minimum: 4 GB
Recommended: 10 GB
RAM Minimum: 256 MB
Recommended: 512 MB - 3 GB; at least 256 MB per CPU
Minimum: 512 MB
Recommended: 512 MB - 3 GB; at least 512 MB per CPU
Minimum: 256 MB
Recommended: 512 MB - 3 GB; at least 256 MB per CPU
Installing Novell Linux Point of Service Software 21

22 Novell Linux
novdocx (EN
U) 10 A
ugust 2006
2.3 Obtaining the SoftwareTo obtain the software you need to install Novell Linux Point of Service 9, go the the Novell Downloads Web site (http://www.novell.com/download) and select the Novell Linux Point of Service product. Click Search and then select Novell Linux Point of Service 9 from the results list. Click Proceed to Download and log in to your Novell Account to access the downloadable CD images.
After downloading the .iso files, verify the MD5 checksums to ensure that the images downloaded fully and without any errors. Burn the .iso files to CDs using the CD burning software of your choice. Label the CDs using the names of the .iso files.
2.4 Planning Your InstallationBefore you install Novell Linux Point of Service, you must decide which system configuration to use. This choice determines how many servers you need and what software packages you install on each one.
For the Administration Server, you have three configuration options:
Administration Server with Image Building ToolsAdministration Server with separate Image Building ServerAdmin/Branch Server combination
For the Branch Server, you have four configuration options:
Branch ServerHigh Availability Branch ServerBranch Server running on a Point of Sale terminalBranch Server as part of the Admin/Branch Server combination
IMPORTANT: The Admin/Branch Server combination is supported only for single site, self-contained installations. No additional Branch Servers can connect to the Admin/Branch Server. You can, however, configure an Admin/Branch Server combination in a two-node heartbeat cluster with one server acting as the primary server and the other as the secondary server.
The installation process for each type of server is essentially the same. You use the SuSE Linux YaST utility for all installations; the main difference is the software you select to install on the server.
For instructions on how to select software packages during the installation, see “Software Selection Screen” on page 34.
2.5 YaST Installation ScreensThis section provides an overview of the YaST installation utility that you will use to install the Novell Linux Point of Service software on your servers.
Point of Service 9 Installation Guide

novdocx (EN
U) 10 A
ugust 2006
This section is intended as a reference only. The specific step-by-step procedures for installing each type of server are found in the following sections:
Chapter 4, “Setting Up the Administration Server,” on page 59Chapter 5, “Setting Up a Dedicated Image Building Server,” on page 67Chapter 6, “Setting Up a Branch Server,” on page 71Chapter 7, “Setting Up High Availability Branch Servers,” on page 81Chapter 8, “Setting Up an Admin/Branch Server Combo,” on page 99
IMPORTANT: The procedure for installing updates of Novell Linux Point of Service 9 might require additional steps that are not documented in this manual. For the latest information, refer to the Readme file and installation instructions that are included with the software for new releases of Novell Linux Point of Service 9.
For additional information about the SUSE Linux Enterprise Server 9 installation process, refer to the SUSE LINUX Enterprise Server Administration and Installation Guide (http://www.novell.com/documentation/sles9/treetitl.html).
The following sections show the screens you will encounter as you go through the installation, along with an explanation of the various options you can select.
2.5.1 Starting the YaST UtilityTo start the YaST installation program for Novell Linux Point of Service, you insert Novell Linux Point of Service 9 CD 1 into the drive and then reboot the computer.
Installing Novell Linux Point of Service Software 23

24 Novell Linux
novdocx (EN
U) 10 A
ugust 2006
SuSE Boot Screen
Figure 2-1 shows the SuSE Linux boot screen. In most cases, you select the Installation option to proceed in normal installation mode with all standard hardware functions enabled.
Figure 2-1 SuSE Linux boot screen
Following is a brief explanation of the other options in the boot screen:
Boot from Hard Disk boots the system on the hard disk (the system normally booted when the machine is started).Installation - ACPI Disabled installs without the Advanced Configuration and Power Interface (ACPI). If the normal installation fails, your system hardware might not support ACPI, in which case you can use this option to install without ACPI support.Installation - Safe Settings boots the system with Direct Memory Access (DMA) mode and any interfering power management functions disabled. DMA is used for CD drives. Experts can also use the command line to enter or change kernel parameters.Manual Installation allows you to manually load drivers during the installation. By default, drivers are loaded automatically during the installation. If this appears to cause problems, you can use this option to load drivers manually. (This does not work if you use a USB keyboard on your machine.)Rescue System starts a minimal Linux system without a graphical user interface that allows experts to access disk partitions to troubleshoot and repair an installed system. Less-experienced users can use the system repair tool supplied with YaST.
Point of Service 9 Installation Guide

novdocx (EN
U) 10 A
ugust 2006
Memory Test tests your system RAM using repeated read and write cycles. This process is repeated in an endless loop because memory corruption often shows up very sporadically and many read and write cycles might be necessary to detect it. If you suspect that your RAM might be defective, start this test and let it run for several hours. If no errors are detected after a long time period, you can assume that the memory is intact. Terminate the test by rebooting.
You can use these function keys to further manipulate the installation:
Press F1 to access help for the currently active screen element of the boot screen.Press F2 to select the installation’s graphical display mode. You can also select text mode, which is useful if graphical mode causes problems with the installation.Press F3 to designates the installation media. Normally, the installation is run from the inserted installation disk. However, in some cases, you might want to select another source, such as FTP or NFS. Press F4 to define the display language for the installation.Press F5 to define the mode for displaying Linux kernel diagnostic messages. By default, Linux kernel diagnostic messages are not displayed during system start-up. You only see a progress bar. To display these messages, select Native. For a maximum of information, select Verbose.Press F6 to tell the system you have an optional disk with a driver update for SuSE Linux. You will be asked to insert the update disk at the appropriate point in the installation process.
After you select the Installation option, the utility loads a minimal Linux system to run the installation. If you enable Native or Verbose diagnostic mode, a number of messages and copyright notices appear. At the end of the loading process, the YaST installation program starts.
Software License Agreement
YaST displays the Novell Software License Agreement for you to read and agree to.
Installing Novell Linux Point of Service Software 25

26 Novell Linux
novdocx (EN
U) 10 A
ugust 2006
Language Selection
Figure 2-2 shows the language selection screen. Your selection here determines the operating system langauge and the default keyboard layout. YaST also uses this language setting to guess a time zone for the system clock.
Figure 2-2 Language selection screen
Currently, Novell Linux Point of Service is available only in English. The language selection affects only the SLES operating system and keyboard layout; it does not affect the Novell Linux Point of Service scripts or utilities.
Point of Service 9 Installation Guide

novdocx (EN
U) 10 A
ugust 2006
Installation Mode
Figure 2-3 shows the installation mode screen, which allows you to specify what type of installation procedure you want to perform. This screen appears only if data exists on the server’s hard disk.
Figure 2-3 Installation mode screen
IMPORTANT: To install Novell Linux Point of Service, you must select New Installation. This option install SUSE Linux and Novell Linux Point of Service on a new system.
Following is a brief explanation of the other options in the Installation Mode screen:
Update an Existing System updates the currently installed SUSE Linux system with the system on CD. This option is relevant only if SUSE Linux is already installed on the system.Repair Installed System attempts to repair the currently installed Linux system with the system on CD. This option is an alternative to the advanced Rescue System option in the boot screen. You can select this option if the installed SUSE Linux system fails to boot. This option is relevant only if SUSE Linux is already installed on the system.Boot Installed System boots the currently installed Linux system. This option is relevant only if SUSE Linux is already installed on the system.Abort Installation terminates the installation program.
Installing Novell Linux Point of Service Software 27
28 Novell Linux
novdocx (EN
U) 10 A
ugust 2006
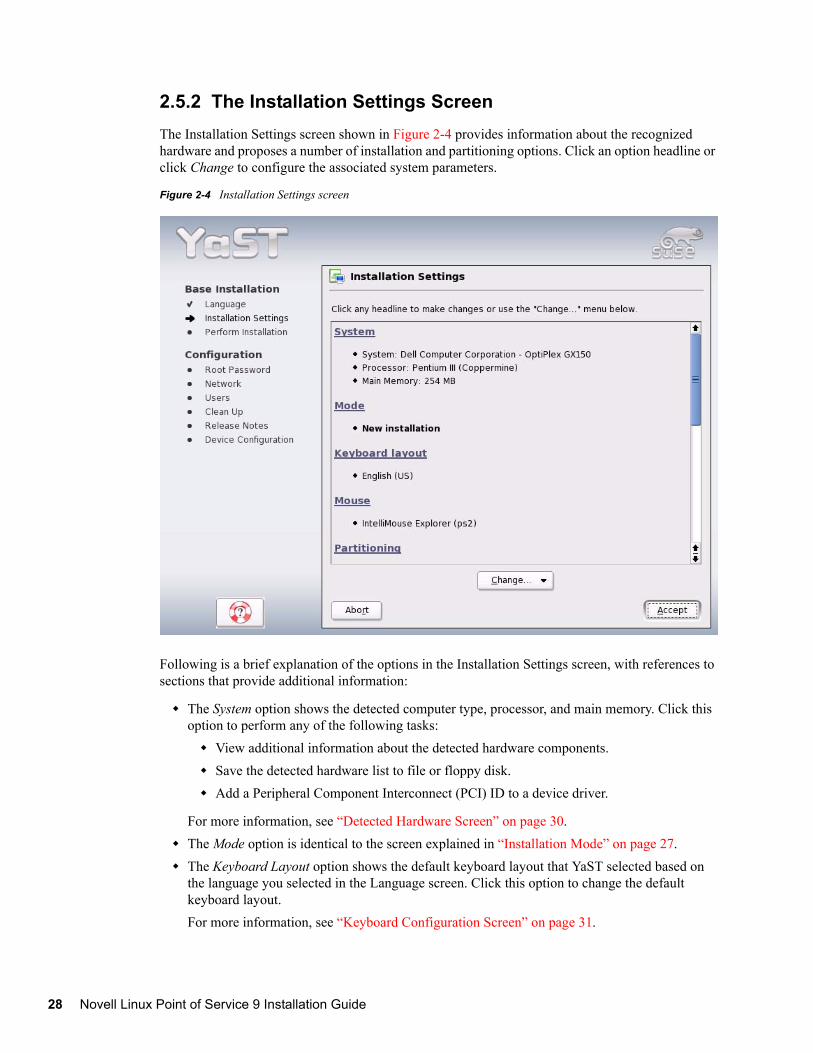
2.5.2 The Installation Settings ScreenThe Installation Settings screen shown in Figure 2-4 provides information about the recognized hardware and proposes a number of installation and partitioning options. Click an option headline or click Change to configure the associated system parameters.
Figure 2-4 Installation Settings screen
Following is a brief explanation of the options in the Installation Settings screen, with references to sections that provide additional information:
The System option shows the detected computer type, processor, and main memory. Click this option to perform any of the following tasks:
View additional information about the detected hardware components.Save the detected hardware list to file or floppy disk.Add a Peripheral Component Interconnect (PCI) ID to a device driver.
For more information, see “Detected Hardware Screen” on page 30.The Mode option is identical to the screen explained in “Installation Mode” on page 27.The Keyboard Layout option shows the default keyboard layout that YaST selected based on the language you selected in the Language screen. Click this option to change the default keyboard layout. For more information, see “Keyboard Configuration Screen” on page 31.
Point of Service 9 Installation Guide

novdocx (EN
U) 10 A
ugust 2006
The Mouse option shows the default mouse that YaST selected based on the system’s detected hardware. Click this option to change the default mouse type.For more information, see “Mouse Configuration Screen” on page 32.The Partitioning option provides a suggested partitioning scheme for the system’s hard disks. Click this option to modify the suggested partition formats or to create a custom partition setup.For more information on how to partition the system for Novell Linux Point of Service, see “Partitioning Screen” on page 32.The Software option lists the software packages to be installed on the current system. Click this option to select additional software packages you want to install.For more information, see “Software Selection Screen” on page 34.The Booting option displays the Boot Loader Setup. Click this option to change the boot loader setup.For more information, see “Boot Loader Setup Screen” on page 37.The Time Zone option shows the default time zone that YaST selected based on the language you selected in “Language Selection” on page 26. Click this option to set the system clock and time zone configuration.For more information, see “Clock and Time Zone Configuration Screen” on page 38.The Language option lets you to select the operating system language, similar to the “Language Selection” on page 26. Click this option to change the system language, set the Locale Settings for the user root, and choose UTF-8 encoding.For more information, see “Language Selection Screen” on page 38.The Default Runlevel option displays the current runlevel. Click this option to set a different default runlevel (level 2 or 3).For more information, see “Default Runlevel Screen” on page 40.
Installing Novell Linux Point of Service Software 29

30 Novell Linux
novdocx (EN
U) 10 A
ugust 2006
Detected Hardware Screen
Clicking the System option in the Installation Settings screen opens the Detected Hardware screen shown in Figure 2-5, which provides a detailed listing of your system’s detected hardware.
Figure 2-5 Detected Hardware screen
You have the following options in this screen:
Click PCI ID to add a Peripheral Component Interconnect (PCI) ID to a device driver. Click Details to view additional information about any hardware component. Click Save to File to save the hardware list to a file or floppy disk.
NOTE: The floppy drive must be mounted before you can save the file to floppy disk.
Point of Service 9 Installation Guide

novdocx (EN
U) 10 A
ugust 2006
Keyboard Configuration Screen
The Keyboard Configuration screen shown in Figure 2-6 allows you to select which keyboard layout (language) you want to use. By default, the layout corresponds to the language selected during installation (see “Language Selection” on page 26).
Figure 2-6 Keyboard Configuration screen
When you select a keyboard layout, you can type Y, Z, and special characters in the Keyboard Test field to verify the keyboard selection is correct.
Click Expert Settings to define the following:
Repeat RateDelay before Repetition StartsStart-up States for Num Lock, Caps Lock, and Scroll LockDevices on which the values for Num Lock, Caps Lock, and Scroll Lock should be setDisable Caps Lock
Installing Novell Linux Point of Service Software 31

32 Novell Linux
novdocx (EN
U) 10 A
ugust 2006
Mouse Configuration Screen
Figure 2-7 shows the Mouse Configuration screen which allows you to select a mouse type.
Figure 2-7 Mouse Configuration screen
If YaST failed to detect your mouse:
1 In the Installation Settings screen, press Tab until Mouse is selected.2 Press the Spacebar to open the mouse type list.3 Use Up-arrow and Down-arrow to select a mouse type.4 After selecting a mouse type, press Alt+T to test whether the device works correctly.
If the mouse does not behave as expected, use the keyboard to select another type and test again.
5 When the correct mouse is selected, click Accept to apply the setting and return to the Installation Settings screen.
Partitioning Screen
The Partitioning screen provides suggested partition formats. In most cases, YaST proposes a reasonable partitioning scheme that can be accepted without change. However, you can also modify the suggested partition formats or create a custom partition setup.
Point of Service 9 Installation Guide

novdocx (EN
U) 10 A
ugust 2006
When you click Partitioning, you can choose one of the following actions:
Accept proposal as-isBase partition setup on this proposalCreate custom partition setup (this option is recommended only for experienced administrators)
NOTE: YaST cannot select pre-existing partitions for deletion.
For Novell Linux Point of Service servers, all partitions should be formatted with a journaling file system (ext3) with the exception of the swap partition, where swap should be selected. Table 2-2 provides a base guideline of the size requirements for the Novell Linux Point of Service directories.
Table 2-2 Size guidelines for Novell Linux Point of Service directories
* These directories will grow during production and should be as large as possible.
For more detailed information about partitioning, refer to “Expert Partitioning with YaST” in Chapter 1 of the SUSE Linux Enterprise Server Installation and Administration Guide (http://www.novell.com/documentation/sles9/treetitl.html).
Server Partition Directory Size
Administration Server
/ 512 MB+
/usr 2.5 GB+
/var 2 GB+ *
/tmp 1 GB+
/var/log 2 GB+ *
/opt/SLES/POS 2 GB+ *
/opt/SLES/POS/rsync 5 GB+ *
swap 2x size of RAM, > 0.5 GB
Dedicated Image Building Server
/opt/SLES/dist 5 GB+ * (depends on if you put the image source files in this directory)
/opt/SLES/POS/image/ 5 GB+ * (varies depending on the size of your images)
Branch Server
/tftpboot/ 5 GB+ (varies depending on the size of your images)
High Availability Branch Server
drbd 5 GB+ (accommodates all your images plus several configuration files, so the size will vary depending on the size of your images)
Installing Novell Linux Point of Service Software 33

34 Novell Linux
novdocx (EN
U) 10 A
ugust 2006
Software Selection Screen
Figure 2-8 shows the Software Selection screen, which lets you select the software packages to be installed on the server.
Figure 2-8 Software Selection screen
The Minimum system includes the core operating system with various services but without any graphical user interface. The machine can only be operated using ASCII consoles. This system type is especially suitable for server scenarios that require little direct user interaction.
The Minimuim graphical system (without KDE) includes The X Window System* and a basic window manager. It lets you run programs that have their own graphical user interface. This option is for those who do not want the KDE desktop or for machines with insufficient disk space for a desktop environment.
Depending on what type of Novell Linux Point of Service server you are installing, you will select one of these two options:
NLPOS Image Server (with KDE) includes the Novell Linux Point of Service image building utility (ImageBuilder) and the image templates. It also includes all the packages required to run the Administration and Branch Servers along with the KDE desktop, most of the KDE programs, and the CUPS print server.NLPOS Admin/Branch Server (with KDE) includes all the packages required to run the Administration and Branch Servers. It does not include ImageBuilder or the image templates.
Table 2-3 identifies the software selection options you should select to create each server.
Point of Service 9 Installation Guide

novdocx (EN
U) 10 A
ugust 2006
Table 2-3 Software selections for Novell Linux Point of Service servers
To add or remove individual packages from one of the default software selections:
1 Select one of the default software selections as a starting point for your software selection. 2 Click Detailed Selection.
The YaST Package Manager screen appears, as shown in Figure 2-9.
Figure 2-9 YaST Package Manager.
The Filter box is located at the top left under the menu bar. The default filter is Selections, which groups program packages by function, such as Image Building System or Administration and Branch Server. The Package window lists the individual packages included in each package group. The package groups and individual packages that are included in the current software selection are preselected.
Server Type Software Selection Option
Administration Server with Image Building Tools NLPOS Image Server
Administration Server without Image Building Tools NLPOS Admin/Branch Server (with KDE)
Dedicated Image Building Server NLPOS Image Server
Admin/Branch Server Combination NLPOS Image Server
Branch Server NLPOS Admin/Branch Server (with KDE)
High Availability Branch Server NLPOS Admin/Branch Server (with KDE) plusHigh-Availability packages
NOTE: You must select the High Availability packages under the Software Selection Details.
Installing Novell Linux Point of Service Software 35

36 Novell Linux
novdocx (EN
U) 10 A
ugust 2006
Table 2-4 lists the package groups you see when installing Novell Linux Point of Service software.
Table 2-4 Software package groups for Novell Linux Point of Service
3 Click the check boxes to select or deselect the packages you want to install on the server, then click Accept. Appendix A, “Installation RPM Lists,” on page 147 lists the RPMs that are installed on the Administration and Branch Servers by default.
4 Click Check Dependencies to verify that you have selected all the packages required to run the selected options.
IMPORTANT: If you selected Minimum System instead of Minimum Graphical System as the base system, you are asked to resolve a dependency for the GL graphics subsystem when you add the NLPOS Branch and Admin Server Minimum System package. We recommend that you select the MesaSoft package.
5 Click Accept to add the selected packages to the installation.YaST informs you of packages that it has automatically added to the software selection to resolve dependences.
6 Click Continue to return to the Installation Settings screen.
Software Selection Description
NLPOS Admin Server Image Building System
Installs the ImageBuilder scripts (scr and xscr) and the image templates.
NLPOS Branch and Admin Server Minimum System
Installs the services and scripts required to run the Administration and Branch Servers.
Basis Runtime System Installs base components necessary for the Linux operating system.
YaST Installs the YaST2 configuration modules. This option is recommended because it provides an easy-to-use configuration program and online update services.
Graphical Base System Installs the minimal system with X11.
Linux Tools Installs the Linux operating system tools.
KDE Desktop Environment Installs the KDE graphical desktop environment.
Help & Support Documentation
Installs the SLES Administration Guide and SUSE Help System.
C/C++ Compiler and Tools Installs the C/C++ Compiler and tools.
Basis Sound Libraries and Tools
Adds the Advanced Linux Sound Library (ALSA) which provides audio and MIDI functionality.
GNOME system Installs the GNOME* graphical desktop environment.
File Server (NFS, Samba) Installs NFS and Samba file services.
High-Availability Installs drbd and heartbeat services for two-node clustering.
Point of Service 9 Installation Guide

novdocx (EN
U) 10 A
ugust 2006
Boot Loader Setup Screen
Figure 2-10 shows the Boot Loader Setup screen, which provides a suggested boot configuration for your system. In most cases, you can leave these settings unchanged. However, if you need a custom setup, you can modify the proposal for your system.
Figure 2-10 Boot Loader Setup screen
One possibility is to configure the boot mechanism to rely on a special boot floppy. Although this has the disadvantage that it requires the floppy to be in the drive when booting, it leaves an existing boot mechanism untouched. Normally this should not be necessary because YaST can configure the boot loader to boot existing operating systems as well. Another possibility with the configuration is to change the location of the boot mechanism on the hard disk.
For detailed information about creating a custom boot configuration, see “Configuring the Boot Loader with YaST” in Chapter 8 of the SUSE LINUX Enterprise Server Installation and Administration Guide (http://www.novell.com/documentation/sles9/treetitl.html).
Installing Novell Linux Point of Service Software 37

38 Novell Linux
novdocx (EN
U) 10 A
ugust 2006
Clock and Time Zone Configuration Screen
The Clock and Time Zone Configuration screen shown in Figure 2-11 allows you to set the clock and time zone for the server.
Figure 2-11 Clock and Time Zone Configuration screen
YaST guesses the default time zone based on the language selected during the installation (see “Language Selection” on page 26). To change the time zone, select the desired region and time zone from the lists provided.
To change the system time and date, click Change Time or Date, make the desired setting, and then click Apply.
To set the hardware clock to UTC or local time, click the Hardware clock set to drop-down menu. In general, you can choose UTC (Universal Time Coordinated) for servers that have only Linux installed. UTC corresponds to GMT (Greenwich Mean Time) and allows Linux to switch from standard time to daylight saving time and back automatically. Choose Local Time for servers that have other operating systems installed. When finished, click Accept.
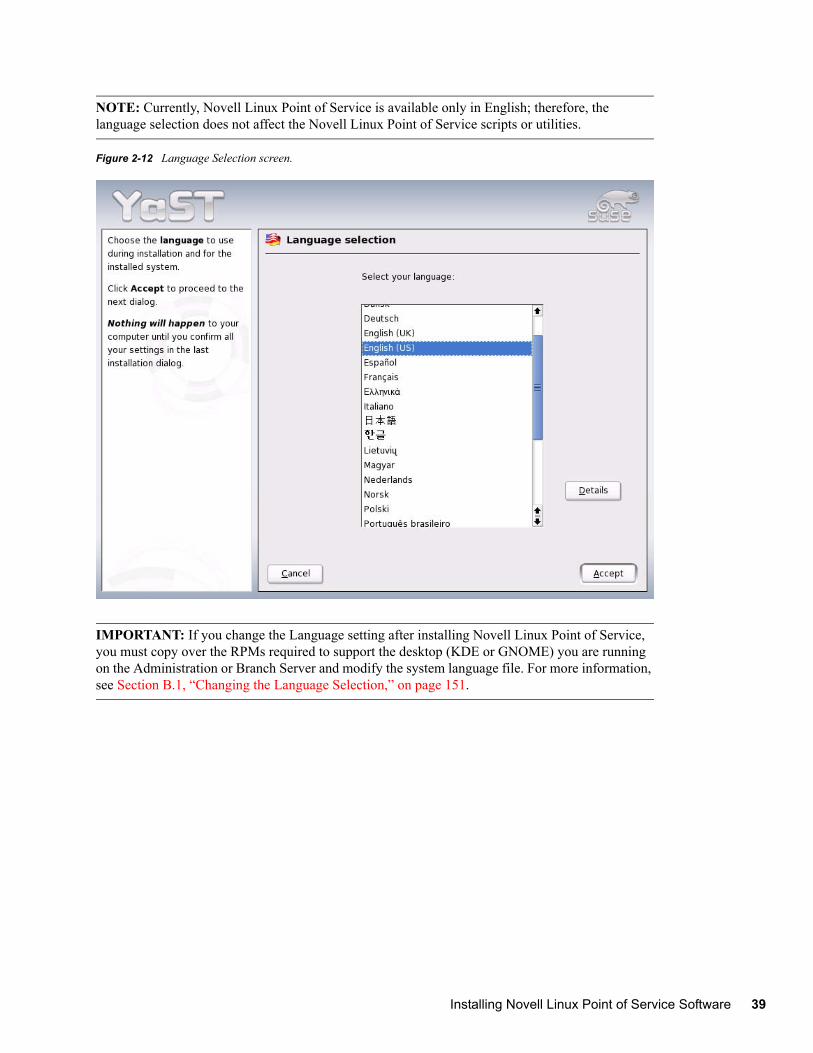
Language Selection Screen
The Language Selection screen shown in Figure 2-12 allows you to change the language on the current system. The language selected in YaST applies to the entire system, including YaST and the desktop environment (KDE or GNOME). You can also slick Details to set the locale setting for the root user and to specify whether or not to use UTF-8 encoding.
Point of Service 9 Installation Guide
novdocx (EN
U) 10 A
ugust 2006
NOTE: Currently, Novell Linux Point of Service is available only in English; therefore, the language selection does not affect the Novell Linux Point of Service scripts or utilities.
Figure 2-12 Language Selection screen.
IMPORTANT: If you change the Language setting after installing Novell Linux Point of Service, you must copy over the RPMs required to support the desktop (KDE or GNOME) you are running on the Administration or Branch Server and modify the system language file. For more information, see Section B.1, “Changing the Language Selection,” on page 151.
Installing Novell Linux Point of Service Software 39
40 Novell Linux
novdocx (EN
U) 10 A
ugust 2006
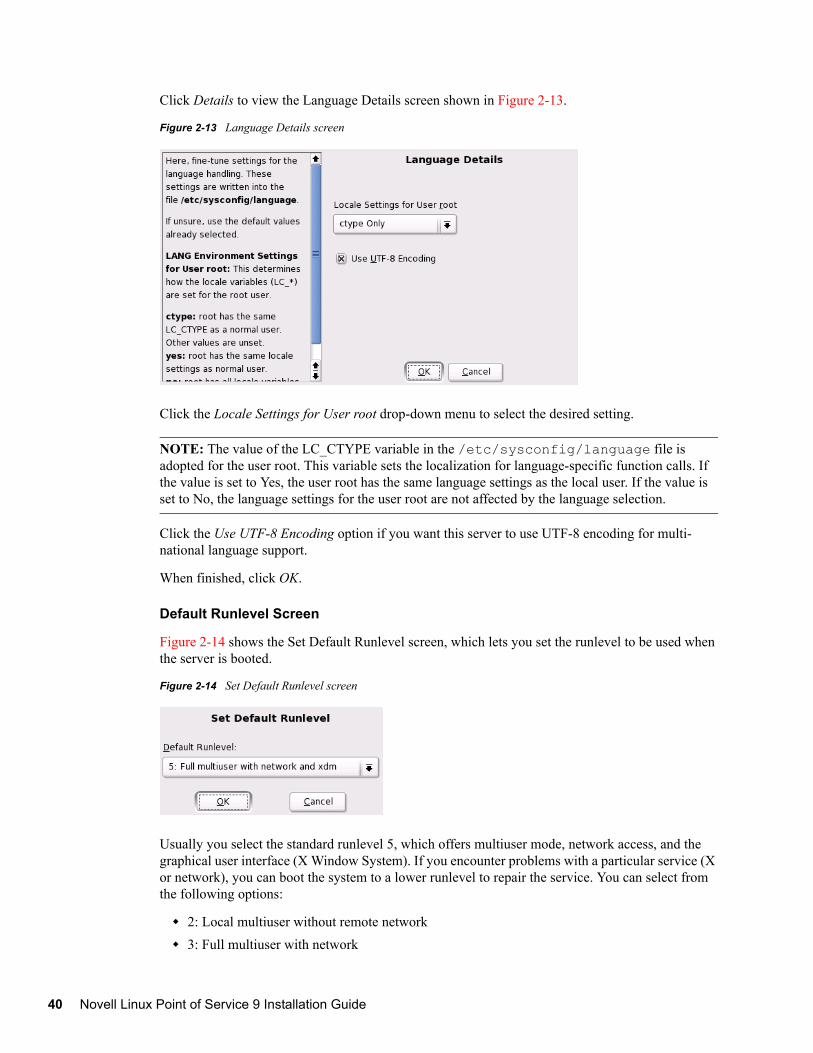
Click Details to view the Language Details screen shown in Figure 2-13.
Figure 2-13 Language Details screen
Click the Locale Settings for User root drop-down menu to select the desired setting.
NOTE: The value of the LC_CTYPE variable in the /etc/sysconfig/language file is adopted for the user root. This variable sets the localization for language-specific function calls. If the value is set to Yes, the user root has the same language settings as the local user. If the value is set to No, the language settings for the user root are not affected by the language selection.
Click the Use UTF-8 Encoding option if you want this server to use UTF-8 encoding for multi-national language support.
When finished, click OK.
Default Runlevel Screen
Figure 2-14 shows the Set Default Runlevel screen, which lets you set the runlevel to be used when the server is booted.
Figure 2-14 Set Default Runlevel screen
Usually you select the standard runlevel 5, which offers multiuser mode, network access, and the graphical user interface (X Window System). If you encounter problems with a particular service (X or network), you can boot the system to a lower runlevel to repair the service. You can select from the following options:
2: Local multiuser without remote network3: Full multiuser with network
Point of Service 9 Installation Guide
novdocx (EN
U) 10 A
ugust 2006
WARNING: Incorrect settings for runlevels and system services can render your system useless. To retain the operability of your system, consider the possible consequences before modifying any of these settings.
Click OK to apply your setting.
2.5.3 The YaST Configuration PhaseAfter you have accepted your selections in the Installation Settings screen, YaST proceeds with the Base Installation which includes partitioning the hard drive, setting the system language, applying the installation settings, and copying the files from the NLPOS and SLES 9 CDs to disk.
The system then reboots and YaST starts again for the Configuration portion of the installation.
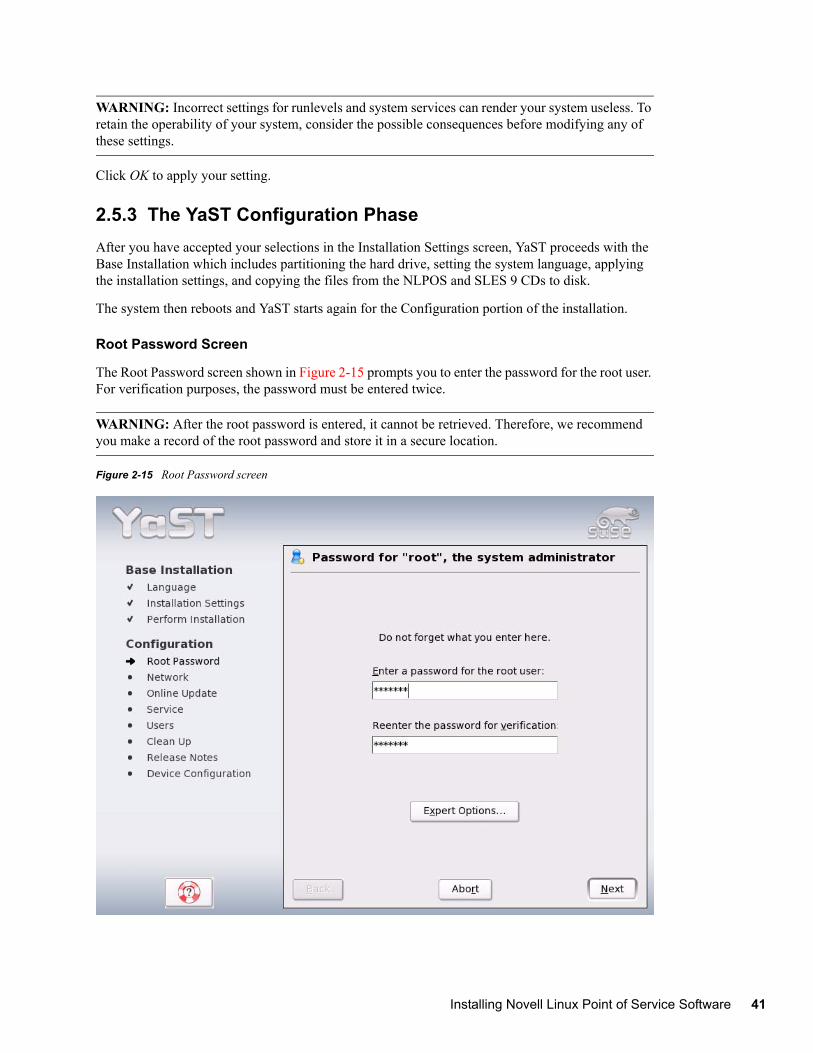
Root Password Screen
The Root Password screen shown in Figure 2-15 prompts you to enter the password for the root user. For verification purposes, the password must be entered twice.
WARNING: After the root password is entered, it cannot be retrieved. Therefore, we recommend you make a record of the root password and store it in a secure location.
Figure 2-15 Root Password screen
Installing Novell Linux Point of Service Software 41

42 Novell Linux
novdocx (EN
U) 10 A
ugust 2006
The name of the superuser, or administrator of the system, is root. Unlike regular users, which may or may not have permission to do certain things on the system, root has unlimited power to do anything: change the system configuration, install programs, and set up new hardware. If users forget their passwords or have other problems with the system, root can help. The root account should only be used for system administration, maintenance, and repair. Logging in as root for daily work is not recommended because a single mistake could lead to the irretrievable loss of many system files.
Network Configuration Screen
Figure 2-16 shows the Network Configuration screen where you can click the headlines to configure your network settings.
Figure 2-16 Network Configuration screen
Following is a brief explanation of each option in the Network Configuration screen:
Click Network Interfaces to configure the Network Interface Cards (NICs).
For more information, see “Network Interfaces” on page 43.Click DSL Connections to configure a DSL connection if this server uses one to connect to other servers in your Point of Service network.For detailed information on this procedure, see “DSL” in Chapter 21 of the SUSE Linux Enterprise Server Installation and Administration Guide (http://www.novell.com/documentation/sles9/treetitl.html).
Point of Service 9 Installation Guide

novdocx (EN
U) 10 A
ugust 2006
Click ISDN Adapters to configure an ISDN connection if this server uses one to connect to other servers in your Point of Service network.For detailed information on this procedure, see “ISDN” in Chapter 21 of the SUSE Linux Enterprise Server Installation and Administration Guide (http://www.novell.com/documentation/sles9/treetitl.html)The Modems option is not applicable to Novell Linux Point of Service servers.Click Proxy if your system uses an Internet connection with a Proxy server to connect to other servers in your Point of Service network. For more information, see “Proxy” on page 50.Click VNC Remote Administrator if you want to have remote administrative access to the current server.For more information, see “VNC Remote Administration” on page 51.
Network Interfaces
In most instances, YaST correctly detects the server NICs. However, if it does not detect a NIC, or if you want to modify a NIC configuration, you can manually add and configure server NICs.
NOTE: Branch Servers require a minimum of two NICs, and in the case of High Availability Branch Servers, you will need four NICs. For more information, see Chapter 6, “Setting Up a Branch Server,” on page 71 and Chapter 7, “Setting Up High Availability Branch Servers,” on page 81.
To manually configure a NIC:
1 Click Network Interfaces in the Network Configuration screen.
Installing Novell Linux Point of Service Software 43

44 Novell Linux
novdocx (EN
U) 10 A
ugust 2006
The Network Cards Configuration screen (Figure 2-17) displays the currently configured devices.
Figure 2-17 Network Cards Configuration screen
2 Click Change to manually configure a NIC.
Point of Service 9 Installation Guide

novdocx (EN
U) 10 A
ugust 2006
3 In the Network Card Configuration Overview screen (Figure 2-18), click Add to create a new NIC configuration.
Figure 2-18 Network Card Configuration Overview screen
Installing Novell Linux Point of Service Software 45

46 Novell Linux
novdocx (EN
U) 10 A
ugust 2006
4 In the Manual Network Card Configuration screen (Figure 2-19), configure the network card.
Figure 2-19 Manual Network Card Configuration screen
Following is a brief description of each option in the Manual Network Card Configuration screen. The network card configuration values are written to /etc/modprove.conf.
Device Type is the type of NIC you are configuring. Available device types include the following:
ARCnetDummyEthernetFDDIMyrinetToken RingUSBWireless
Configuration Name is the number to be appended to the default name for the current network card (for example, eth for Ethernet cards). Standard convention dictates that numbering starts with zero (0).Hardware Configuration Name is a user-defined name for the current configuration profile. Module Name is the network card driver. If two cards are configured with the same module name, options are merged while saving.
Point of Service 9 Installation Guide
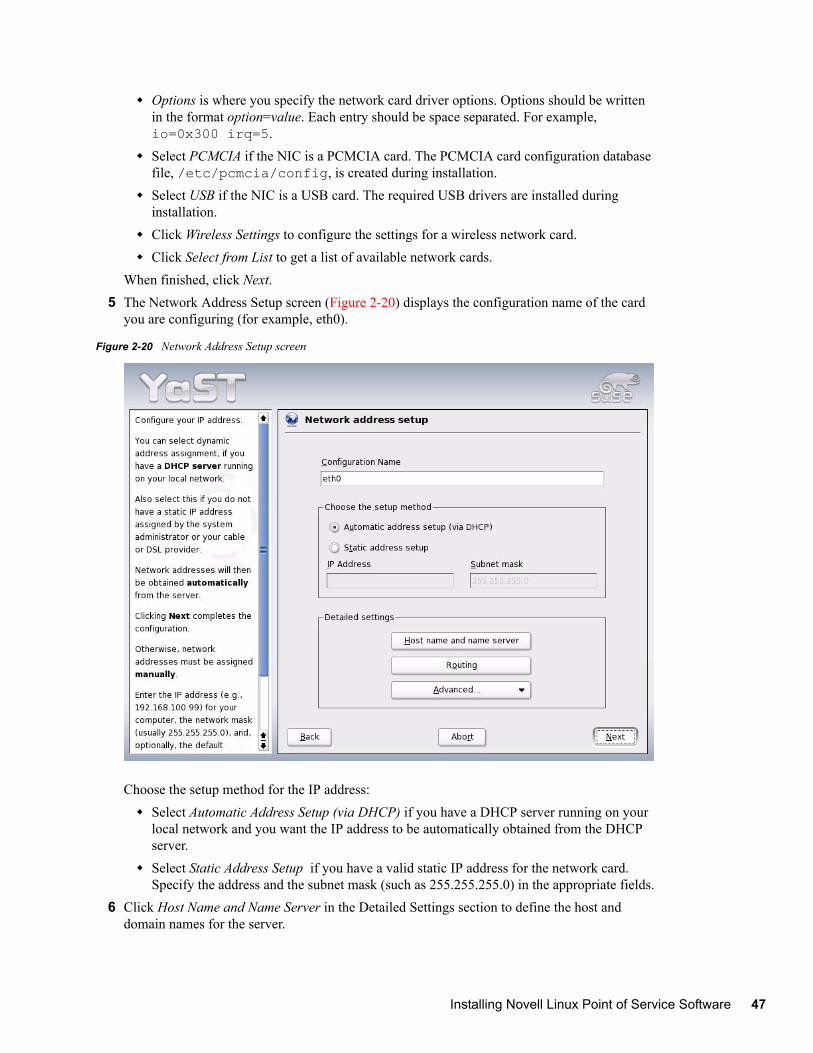
novdocx (EN
U) 10 A
ugust 2006
Options is where you specify the network card driver options. Options should be written in the format option=value. Each entry should be space separated. For example, io=0x300 irq=5.Select PCMCIA if the NIC is a PCMCIA card. The PCMCIA card configuration database file, /etc/pcmcia/config, is created during installation.Select USB if the NIC is a USB card. The required USB drivers are installed during installation.Click Wireless Settings to configure the settings for a wireless network card.Click Select from List to get a list of available network cards.
When finished, click Next.5 The Network Address Setup screen (Figure 2-20) displays the configuration name of the card
you are configuring (for example, eth0).
Figure 2-20 Network Address Setup screen
Choose the setup method for the IP address:Select Automatic Address Setup (via DHCP) if you have a DHCP server running on your local network and you want the IP address to be automatically obtained from the DHCP server. Select Static Address Setup if you have a valid static IP address for the network card. Specify the address and the subnet mask (such as 255.255.255.0) in the appropriate fields.
6 Click Host Name and Name Server in the Detailed Settings section to define the host and domain names for the server.
Installing Novell Linux Point of Service Software 47
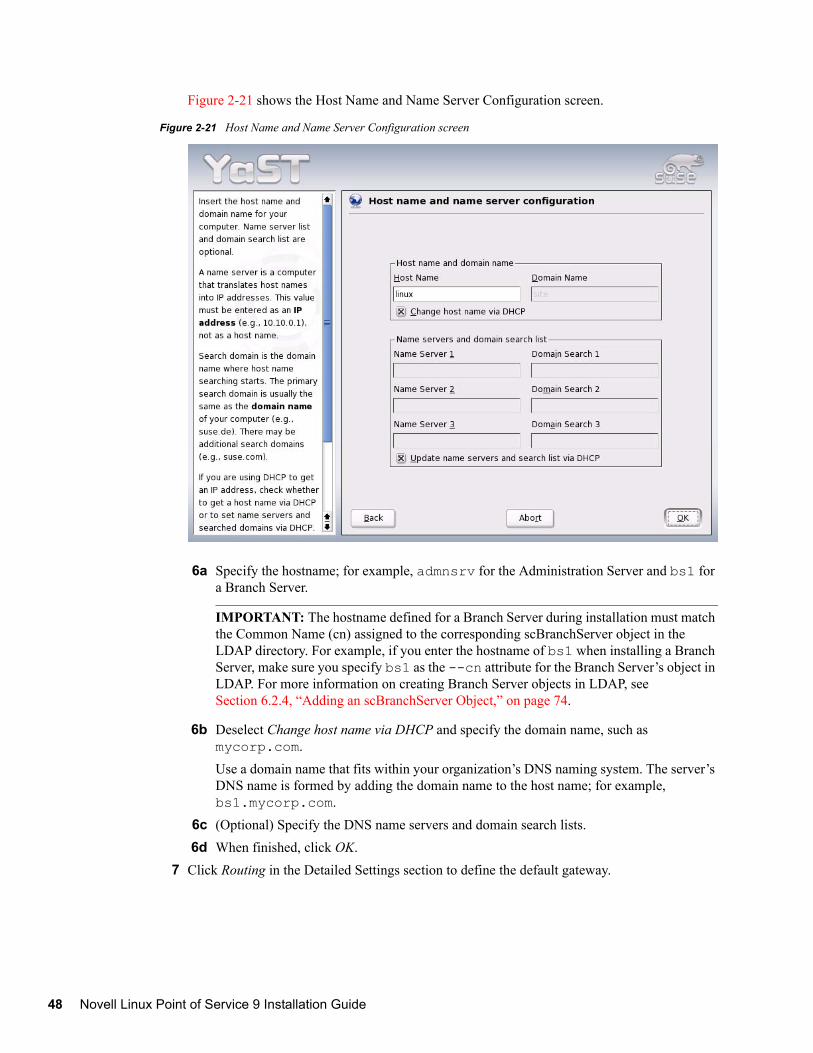
48 Novell Linux
novdocx (EN
U) 10 A
ugust 2006
Figure 2-21 shows the Host Name and Name Server Configuration screen.
Figure 2-21 Host Name and Name Server Configuration screen
6a Specify the hostname; for example, admnsrv for the Administration Server and bs1 for a Branch Server.
IMPORTANT: The hostname defined for a Branch Server during installation must match the Common Name (cn) assigned to the corresponding scBranchServer object in the LDAP directory. For example, if you enter the hostname of bs1 when installing a Branch Server, make sure you specify bs1 as the --cn attribute for the Branch Server’s object in LDAP. For more information on creating Branch Server objects in LDAP, see Section 6.2.4, “Adding an scBranchServer Object,” on page 74.
6b Deselect Change host name via DHCP and specify the domain name, such as mycorp.com.Use a domain name that fits within your organization’s DNS naming system. The server’s DNS name is formed by adding the domain name to the host name; for example, bs1.mycorp.com.
6c (Optional) Specify the DNS name servers and domain search lists. 6d When finished, click OK.
7 Click Routing in the Detailed Settings section to define the default gateway.
Point of Service 9 Installation Guide

novdocx (EN
U) 10 A
ugust 2006
Figure 2-22 shows the Routing Configuration screen.
Figure 2-22 Routing Configuration screen
7a Select the Default Gateway from the drop-down list or type the IP address of a known gateway.
7b Select Expert Configuration to manually define the routing table.The route’s destination is in the first column. This column can contain the IP address of a network or host or, in the case of reachable name servers, the fully qualified network or hostname.The second column contains the default gateway or a gateway through which a host or a network can be accessed. The third column contains the netmask for networks or hosts behind a gateway. For example, the mask is 255.255.255.255 for a host behind a gateway. The last column is only relevant for networks connected to the local host such as loopback, ethernet, ISDN, PPP, and dummy device. The device name must be entered here.
NOTE: The routing table is set up in Linux using the configuration files /etc/sysconfig/network/routes and /etc/sysconfig/network/ifroute-*. All the static routes required by the various system tasks are located in the routes file; that is, routes to a host, routes to a host via a gateway, and routes to a network.
7c Select Enable IP Forwarding if the system is a router. 7d When finished, click OK.
Installing Novell Linux Point of Service Software 49

50 Novell Linux
novdocx (EN
U) 10 A
ugust 2006
8 (Optional) Click Advanced in the Network Address Setup screen to define Hardware Details (NIC configuration), DHCP Client Options, Detailed Settings (Maximum Transfer Unit and Device Activation), and Virtual Aliases. When you have finished defining these options, click OK.
9 After you have completed the NIC configuration in the Network Address Setup screen, click Next then Finish to return to the Network Configuration screen.
Proxy
If your system uses an Internet connection with a proxy server to connect to Branch Servers in your Point of Service network, click Proxy in the Network Configuration screen to define your Internet proxy settings.
Figure 2-23 shows the Proxy Configuration screen.
Figure 2-23 Proxy Configuration screen
To define your Internet proxy settings:
1 In the Proxy Configuration screen, select Enable Proxy.2 Configure the proxy settings as follows:
HTTP Proxy URL is the name of the proxy server you use to access the World Wide Web. For example, http://proxy.provider.com:3128/.FTP Proxy URL is the name of the proxy server you use to access file transfer services (FTP).
Point of Service 9 Installation Guide

novdocx (EN
U) 10 A
ugust 2006
No Proxy Domains is a list of domains for which requests should be directly processed without caching.If you are using a proxy server with authorization, fill in Proxy User Name and Proxy Password.
3 When finished, click Finish to return to the Network Configuration screen.
For more information on proxy server configuration, see “Internet” in the SUSE LINUX Enterprise Server Installation and Administration Guide (http://www.novell.com/documentation/sles9/treetitl.html).
VNC Remote Administration
VNC (virtual network computing) is a client/server solution that allows a remote X server to be managed via a slim and easy-to-use client.
To enable remote VNC administrative access on the server:
1 Click VNC Remote Administrator in the Network Configuration screen.2 Select Allow Remote Administration.
This installs the VNC server on the server. 3 Click Finish to return to the Network Configuration screen.
Installing Novell Linux Point of Service Software 51

52 Novell Linux
novdocx (EN
U) 10 A
ugust 2006
User Authentication Method Screen
Figure 2-24 shows the User Authentication Method screen, where you select an authentication method for users.
Figure 2-24 User Authentication Method screen
The options for user authentication method are:
NIS. User account data is managed centrally by a Network Information Service (NIS) server. For information on managing user accounts through NIS, see “Configuring the Host as a NIS Client” in the SUSE Linux Enterprise Server Installation and Administration Guide (http://www.novell.com/documentation/sles9/treetitl.html)LDAP. User account data is centrally managed by an LDAP server. For more information on managing user accounts through LDAP, see “LDAP-A Directory Service” in the SUSE LinuxEnterprise Server Installation and Administration Guide (http://www.novell.com/documentation/sles9/treetitl.html)Local. This default setup permits users to log in without a network connection. All data related to local user accounts (name, login, password, etc.) are stored and managed on the server using the /etc/passwd file. This authentication method does not support users logging in from remote locations. If you select this method, continue with “Creating Local User Accounts” on page 53.
Point of Service 9 Installation Guide

novdocx (EN
U) 10 A
ugust 2006
Creating Local User Accounts
If you selected the Local user authentication method, YaST displays the Add a New Local User screen (Figure 2-25) for you to create local user accounts on the server.
Figure 2-25 Add a New Local User screen
It is recommended that you do not use the root user account to manage the server. Therefore, you should create a local user with root rights.
If you do not want to create a local administrative user account at this time, click Next. When warned that the user options are blank, answer Yes to continue the installation. Skip to “SUSE Linux Release Notes” on page 54.
Enter the user data according to these guidelines:
Full User Name is the user’s first and last name.User Login is the name the user will use to log in. Click Suggestion for the system to automatically generate a user login name.You are required to enter the user’s password twice for confirmation.To provide effective security, a password should be between five and eight characters long. The maximum length for a password is 128 characters. However, if no special security modules are loaded, only the first eight characters are used to discern the password. Passwords are case-sensitive. Special characters like umlauts are not allowed. Other special characters (7-bit ASCII) and the digits 0 to 9 are allowed.
Installing Novell Linux Point of Service Software 53

54 Novell Linux
novdocx (EN
U) 10 A
ugust 2006
Select Receive System Mail if you want the user to receive messages created by the system services. By default, system messages are sent to user root. This option allows other administrative accounts to receive system messages. Select Auto Login to automatically log the current user into the system when it starts. This is useful if the computer is operated by only one user. For the automatic login to work, the option must be explicitly enabled. (This option is available only if KDE is used as the default desktop environment.)
WARNING: With the automatic login enabled, the system boots straight into your desktop with no authentication. Therefore, if you store sensitive data on your system, you should not enable this option if the computer can be accessed by other users.
Select Password Settings to configure the user’s password expiration settings.Select Details to define user profile options such as the user ID, home directory, login shell, and default group.Select User Management to select the User and Group Administration console. From this screen you can add, modify, or delete users and groups, set filters, and configure expert options such as Defaults for New Users, Password Encryption, Authentication and User Sources, Login Settings, and filter options.
SUSE Linux Release Notes
Read the Release Notes for the version of SUSE Linux Enterprise Server you have installed, then click Next.
Hardware Configuration Screen
Figure 2-26 shows the Hardware Configuration screen, which provides configuration information about the server’s graphics cards, printers, and sound configuration. For the most part, YaST
Point of Service 9 Installation Guide

novdocx (EN
U) 10 A
ugust 2006
automatically detects and configures these hardware devices. However, you can click a headline to review or modify a device configuration.
Figure 2-26 Hardware Configuration screen
Following is a brief explanation of the options in the Installation Settings screen, with references to more complete documentation:
Click Graphics Cards to modify the default graphics card configuration. Although the display settings automatically configured by YaST should be generally acceptable, you can customize the resolution, color depth, and other graphics features.
For more information on Graphics Card configuration, see “Graphics Card and Monitor (SaX2)” in Chapter 2 of the SUSE Linux Enterprise Server Installation and Administration Guide (http://www.novell.com/documentation/sles9/treetitl.html).Click Printers to configure the server’s available printers.For more information on printer configuration, see “Printer” in Chapter 2 of the SUSE Linux Enterprise Server Installation and Administration Guide (http://www.novell.com/documentation/sles9/treetitl.html).Click Sound to modify the default sound card configuration.For more information on sound card configuration, see “Sound” in Chapter 2 of the SUSE Linux Enterprise Server Installation and Administration Guide (http://www.novell.com/documentation/sles9/treetitl.html).
Installing Novell Linux Point of Service Software 55

56 Novell Linux
novdocx (EN
U) 10 A
ugust 2006
Point of Service 9 Installation Guide

3novdocx (E
NU
) 10 August 2006
3Migrating from SLRS 8 to Novell Linux Point of Service 9
If you are currently using SUSE® Linux Retail Solution 8 (SLRS 8), you can migrate your existing LDAP directory to Novell® Linux Point of Service 9. Furthermore, if you want to continue using your SLRS 8 images, you can migrate the images to your Novell Linux Point of Service 9 Administration Server so they can be distributed to your Point of Service terminals.
NOTE: This migration procedure does not migrate Novell eDirectoryTM or IBM* Directory. You must use the respective directory tools to migrate eDirectory or IBM Directory.
To migrate from SLRS 8 to Novell Linux Point of Service 9:
1 Execute the following commands to export the SLRS 8 LDAP directory to an LDIF file:
rcldap stopslapcat -l ldif_file
2 Save the LDIF file to a location off the box. 3 (Optional) If you want to continue using your SLRS 8 images, do the following:
3a Back up the /opt/SLES/POS/rsync/ directories to a location off the box. /opt/SLES/POS/rsync/image/
You must copy both the client images and their MD5 checksums./opt/SLES/POS/rsync/boot/
You must back up the DiskNetboot images (initrd and linux) to provide the Linux kernel required to boot the SLRS 8 images./opt/SLES/POS/rsync/config/
You must copy all the configuration files required for existing scConfigFileSyncTemplate objects in the LDAP directory.
3b Rename the SLRS 8 initrd.gz file to initrd-slrs8.gz.3c Rename the SLRS 8 linux file to k_pos_ibm.
NOTE: Leave the pxelinux.0 and pxelinux.cfg files as they are. They are not needed for the migration.
4 (Optional) Maintain an SLRS 8 image server from your SLRS 8 system. This is required only if you want to continue to generate SLRS 8 images.
5 Install the Novell Linux Point of Service 9 Administration Server. For specific instructions, see Chapter 4, “Setting Up the Administration Server,” on page 59.
6 Copy the LDIF file you exported in Step 1 to a location where the Novell Linux Point of Service 9 Administration Server can see it (for example, a floppy drive, pen drive, or NFS server).
7 Run the following command to import the LDIF file:posInitLdap.sh --ldif=path_to_ldif_file
Migrating from SLRS 8 to Novell Linux Point of Service 9 57

58 Novell Linux
novdocx (EN
U) 10 A
ugust 2006
This command performs the following functions:Imports the SLRS 8 LDAP Directory.Creates the SLRS 8 scDistributionContainer object.Moves all existing scPosImage objects under the SLRS 8 scDistributionContainer object.Updates all existing scCashRegister objects to point to scPOSimage objects in the SLRS 8 Distribution Container.Changes the initrd.gz property in the scCashRegister objects to initrd-slrs8.gz.
8 Copy the files you backed up in Step 3a to the corresponding RSYNC directories on the Novell Linux Point of Service 9 Administration Server.
9 Use the following command to copy the initrd file to the /opt/SLES/POS/rsync/boot/ directory as initrd.gz (type the command all on one line):cp /opt/SLES/POS/image/initrd-disknetboot-version-date.gz/opt/SLES/POS/rsync/boot/initrd.gz
IMPORTANT: The Novell Linux Point of Service 9 initrd file is required to boot SLRS8 images.
10 Use the following command to copy the linux kernel file to the /opt/SLES/POS/rsync/boot/ directory as linux (type the command all on one line):cp /opt/SLES/POS/image/initrd-disknetboot-version-date.kernel.kernel_version /opt/SLES/POS/rsync/boot/linux
IMPORTANT: The Novell Linux Point of Service 9 kernel file is required to boot SLRS8 images.
11 Install the Branch Servers. For specific instructions, see Chapter 6, “Setting Up a Branch Server,” on page 71.
12 Run possyncimages.pl to pull the SLRS8 and Novell Linux Point of Service 9 images down to the Branch Servers.
IMPORTANT: The Novell Linux Point of Service 9 kernel and initrd files are required to boot SLRS8 images; therefore, you must run possyncimages.pl to download linux and initrd.gz from the /rsync/boot/ directory on the Administration Server to the /tftpboot/boot/ directory on each Branch Server before you can boot SLRS 8 images on your Point of Service terminals.
13 Run either posldap2crconfig.pl --dumpall or posAdmin --updateconfig to update the hardware configuration information on the Branch Server.These commands regenerate the hardware configuration and config.MAC_address files for all Point of Service terminals found in LDAP. For more information on the posldap2crconfig.pl command, see “posldap2crconfig.pl” in the Novell Linux Point of Service 9 Administration Guide. For information on the posAdmin --updateconfig command, see “Updating config.MAC_address and Hardware Configuration Files” in the Novell Linux Point of Service 9 Administration Guide.
Point of Service 9 Installation Guide

4novdocx (E
NU
) 10 August 2006
4Setting Up the Administration Server
The Administration Server is the central administration point for Novell® Linux Point of Service. All system information (system structure, the configuration and deployment method for each Branch Server and Point of Service terminal, image information, and so forth) is stored in an LDAP directory on the Administration Server. The Administration Server is also the central distribution point for the images required to boot and configure Point of Service terminals and can run the utilities required to build those images.
NOTE: The utilities required to build Point of Service images can be installed with the Administration Server or you can install them on a dedicated image building server. For more information on creating a dedicated image building server, see Chapter 5, “Setting Up a Dedicated Image Building Server,” on page 67.
This section presents the procedures required to set up an Administration Server, either with or without the Image Builder software:
“Meeting System Requirements” on page 59“Installing the Administration Server” on page 59“Initializing the LDAP Directory” on page 61“Copying the Default Boot Images” on page 63“Creating Point of Service Images” on page 64“Copying the Client Image Files” on page 64
4.1 Meeting System RequirementsThe following list identifies the system requirements for an Administration Server:
One server with an x86 processorA minimum of 4 GB hard disk space; recommended 15 GB
NOTE: This will vary depending on the size of your images.
A minimum of 256 MB RAM; recommended 512 MB - 3 GB (at least 256 MB per CPU)One network card
4.2 Installing the Administration ServerThis section describes how to install the Novell Linux Point of Service software and set up an Administration Server.
Setting Up the Administration Server 59
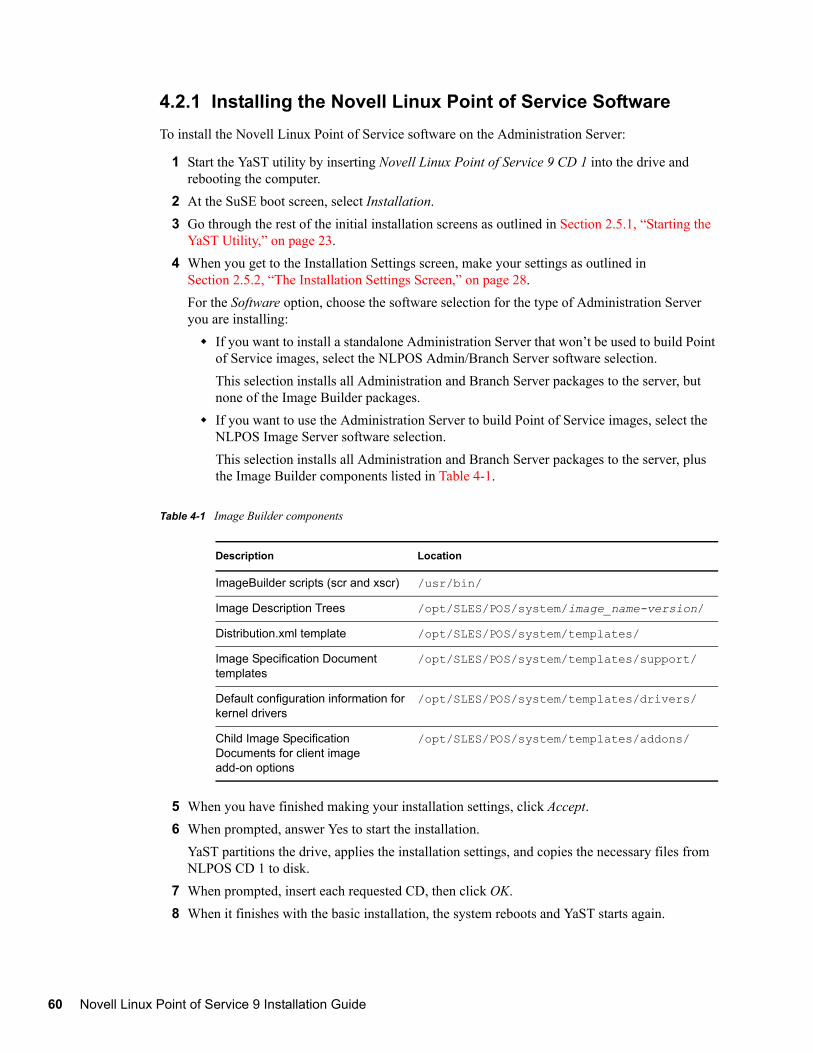
60 Novell Linux
novdocx (EN
U) 10 A
ugust 2006
4.2.1 Installing the Novell Linux Point of Service SoftwareTo install the Novell Linux Point of Service software on the Administration Server:
1 Start the YaST utility by inserting Novell Linux Point of Service 9 CD 1 into the drive and rebooting the computer.
2 At the SuSE boot screen, select Installation.3 Go through the rest of the initial installation screens as outlined in Section 2.5.1, “Starting the
YaST Utility,” on page 23.4 When you get to the Installation Settings screen, make your settings as outlined in
Section 2.5.2, “The Installation Settings Screen,” on page 28.For the Software option, choose the software selection for the type of Administration Server you are installing:
If you want to install a standalone Administration Server that won’t be used to build Point of Service images, select the NLPOS Admin/Branch Server software selection. This selection installs all Administration and Branch Server packages to the server, but none of the Image Builder packages.If you want to use the Administration Server to build Point of Service images, select the NLPOS Image Server software selection. This selection installs all Administration and Branch Server packages to the server, plus the Image Builder components listed in Table 4-1.
Table 4-1 Image Builder components
5 When you have finished making your installation settings, click Accept.6 When prompted, answer Yes to start the installation.
YaST partitions the drive, applies the installation settings, and copies the necessary files from NLPOS CD 1 to disk.
7 When prompted, insert each requested CD, then click OK.8 When it finishes with the basic installation, the system reboots and YaST starts again.
Description Location
ImageBuilder scripts (scr and xscr) /usr/bin/
Image Description Trees /opt/SLES/POS/system/image_name-version/
Distribution.xml template /opt/SLES/POS/system/templates/
Image Specification Document templates
/opt/SLES/POS/system/templates/support/
Default configuration information for kernel drivers
/opt/SLES/POS/system/templates/drivers/
Child Image Specification Documents for client image add-on options
/opt/SLES/POS/system/templates/addons/
Point of Service 9 Installation Guide

novdocx (EN
U) 10 A
ugust 2006
Continue through the screens as outlined in Section 2.5.3, “The YaST Configuration Phase,” on page 41.
9 After you have completed the options in the Hardware Configuration screen, click Next.10 Remove any CDs from the drive, and then click Finish to complete the installation.
The system reboots.11 Log in as root.
You are now ready to initialize the Novell Linux Point of Service LDAP directory.
4.3 Initializing the LDAP DirectoryAll system information (system structure, the configuration and deployment method for each Branch Server, available client images, and Point of Service terminal types) is stored in an LDAP directory on the Administration Server.
Novell Linux Point of Service can use the following LDAP directories: OpenLDAP, eDirectoryTM, or IBM Directory Services. The posInitLdap script defines the LDAP directory schema and the initial records for OpenLDAP. Likewise, the posInitEdir script defines the directory schema and the initial records required for eDirectory.
NOTE: To run the LDAP directory on IBM Directory Services, run posInitLdap, then import the /etc/opt/SLES/POS/template/ldif.pos file into IBM Tivoli* Directory Server.
The following sections review the procedure required to run posInitLdap or posInitEdir and verify the LDAP directory.
Section 4.3.1, “Running posInitLdap.sh,” on page 61Section 4.3.2, “Running posInitEdir.sh,” on page 62Section 4.3.3, “Verifying the LDAP Directory,” on page 63
4.3.1 Running posInitLdap.shThe posInitLdap script defines the LDAP directory schema and the initial records for OpenLDAP. It cannot add the Novell Linux Point of Service LDAP directory to an existing openLDAP tree; it creates an entirely new LDAP directory tree.
To create the Novell Linux Point of Service LDAP directory for OpenLDAP:
1 After you have installed the Novell Linux Point of Service Administration Server, log in as root on the Administration Server.
2 Run posInitLdap.sh. 3 Specify your company name without spaces or special characters. 4 Specify your country abbreviation.
Use de for Germany, us for United States, uk for United Kingdom, and so forth.5 Specify the LDAP administrator password.
Setting Up the Administration Server 61

62 Novell Linux
novdocx (EN
U) 10 A
ugust 2006
NOTE: You are assigning the password for the LDAP directory administrator account. The Branch Server uses this account to access the LDAP directory and this account is required to use posAdmin to add objects to the LDAP directory.
6 Determine if you want to use SSL when the Branch Server connects to the LDAP directory on the Administration Server.
Select Y to use an SSL connection when the Branch Server connects to the LDAP Directory. Select N to disable SSL.
posInitLdap creates the certificates and keys required to run SSL regardless of whether or not SSL is enabled. This allows you to switch to SSL at a later time if desired.
NOTE: The keys and certificates are located in the /etc/opt/SLES/POS/keys/ directory on both the Administration and Branch Servers.
7 posInitLdap provides a summary of the LDAP directory data based on your input. If all data is correct, press Enter.If there is something wrong with the input data, abort the installation by pressing Ctrl+C.
8 The script initializes the basic LDAP database structure and performs some tests, then displays a summary of the configuration and test results. When the tests are successfully completed, the script displays a success message. To complete the initialization, press Enter.
4.3.2 Running posInitEdir.shThe posInitEdir script defines the LDAP directory schema and the initial records for eDirectory. It cannot add the Novell Linux Point of Service LDAP directory to an existing eDirectory tree; it creates an entirely new tree.
To create the Novell Linux Point of Service LDAP directory for eDirectory:
1 After you have installed the Novell Linux Point of Service Administration Server, log in as root on the Administration Server.
2 Install eDirectory on the Administration Server.3 Run posInitEdir.sh. 4 Specify the eDirectory tree name you want to create.
IMPORTANT: posInitEdir does not add to an existing eDirectory tree.
5 Specify your company name without spaces or special characters. 6 Specify your country abbreviation.
Use de for Germany, uk for United Kingdom, us for United States, and so forth.7 Specify the LDAP administrator password.
NOTE: This password is for the account the Branch Server uses to access the LDAP directory.
8 posInitEdir provides a summary of the LDAP directory data based on your input. If all data is correct, press Enter.If there is something wrong with the input data, abort the installation by pressing Ctrl+C.
Point of Service 9 Installation Guide

novdocx (EN
U) 10 A
ugust 2006
9 The script initializes the basic LDAP database structure and performs some tests, then displays a summary of the configuration and test results. When the tests are successfully completed, the script displays a success message. To complete the initialization, press Enter.
4.3.3 Verifying the LDAP DirectoryAfter you run posInitLdap or posInitEdir, the LDAP directory has been initialized on the Administration Server and the LDAP service is available. At this point, you should have a basic tree structure with a root, a Country container, and an Organization container.
You can verify that the LDAP structure is accessible using a GUI-based LDAP browser, such as GQ, or an ldapsearch command. Table 4-2 lists the parameters required to access the LDAP directory using GQ.
Table 4-2 Parameters for accessing the LDAP directory with GQ
Before you create a Branch Server, you must use the posAdmin command to create the LDAP objects required to configure the Branch Server and boot its Point of Service terminals. For detailed instructions on creating these objects, see Section 6.2, “Creating Branch Server Objects in LDAP,” on page 72.
4.4 Copying the Default Boot ImagesThis section explains how to copy the default boot images (initrd and the Linux kernel file) to the appropriate directories on the Administration Server so they are ready to be transferred to the Branch Servers.
NOTE: These steps apply only if you selected to install the Image Builder components on the Administration Server.
1 Use the following command to copy the initrd file to the /opt/SLES/POS/rsync/boot/ directory as initrd.gz (type the command all on one line):cp /opt/SLES/POS/image/initrd-disknetboot-version-date.gz /opt/SLES/POS/rsync/boot/initrd.gz
2 Use the following command to copy the kernel file to the /opt/SLES/POS/rsync/boot/ directory as linux (type the command all on one line):cp /opt/SLES/POS/image/initrd-disknetboot-version-date.kernel.kernel_version /opt/SLES/POS/rsync/boot/linux
Parameter Value
LDAP Host IP address of the Administration Server
LDAP Port Port assigned to LDAP; for example, 389
Base DN Distinguished name of the base container; for example, o=mycorp,c=us
Bind DN Distinguished name of the administrative user; for example, cn=admin,o=mycorp,c=us
Bind Password LDAP administrator password defined when you ran posInitLdap or posInitEdir.
Setting Up the Administration Server 63

64 Novell Linux
novdocx (EN
U) 10 A
ugust 2006
4.5 Creating Point of Service ImagesBefore you can deploy Point of Service terminals, you must first create image files that contain the operating system and application files required to boot the terminals.
Novell Linux Point of Service provides image templates that can be customized and generated using the Image Builder tool. When you select the NLPOS Image Server during the Administration Server installation, the ImageBuilder utilities (scr and xscr) are installed on the Administration Server along with all the files and directories required to create Point of Service images.
To create the Point of Service images required to deploy your Point of Service terminals:
1. Copy the image source files to your image building server.
For detailed instructions, see “Copying the Novell Linux Point of Service CDs” in the Novell Linux Point of Service 9 Administration Guide.
2. Define the location of the image source files.For detailed instructions, see “Generating AdminServer.conf or Distribution.xml” in the Novell Linux Point of Service 9 Administration Guide.
3. Build the Point of Service image files. For detailed instructions, see “Building Images with the scr ImageBuilder Tool” or “Building Images with the xscr ImageBuilder Tool” in the Novell Linux Point of Service 9 Administration Guide.
After you have created the images required for your Point of Service terminals, you must copy the images to the appropriate directories on the Administration Server so that the RSYNC service can transmit the images to the Branch Server. Proceed with Section 4.6, “Copying the Client Image Files,” on page 64.
4.6 Copying the Client Image FilesClient images must be located in the /opt/SLES/POS/rsync/image/ directory on the Administration Server. The boot image must be located in /opt/SLES/POS/rsync/boot/. The Branch Servers can then download the image files and deploy them on Point of Service terminals.
1 Use the following command to copy the client images to the /opt/SLES/POS/rsync/image/ directory (type the command all on one line):cp /opt/SLES/POS/image/image_filename /opt/SLES/POS/rsync/image/image_filename
2 Use the following command to copy the corresponding MD5 checksum files to the /opt/SLES/POS/rsync/image/ directory (type the command all on one line):cp /opt/SLES/POS/image/MD5_checksum_filename /opt/SLES/POS/rsync/image/MD5_checksum_filename
IMPORTANT: Both the client image files and their MD5 checksum files must be located in the /opt/SLES/POS/rsync/image/ directory on the Administration Server before the Branch Server can distribute the images to Point of Service terminals.
Point of Service 9 Installation Guide

novdocx (EN
U) 10 A
ugust 2006
4.7 What’s NextIf you need to install a dedicated Image Building Server, follow the instructions in Chapter 5, “Setting Up a Dedicated Image Building Server,” on page 67 before you install your Branch Servers.
The next step is to set up your Branch Servers. Refer to the section corresponding to the type of Branch Server you want to install:
Chapter 6, “Setting Up a Branch Server,” on page 71Chapter 7, “Setting Up High Availability Branch Servers,” on page 81Chapter 8, “Setting Up an Admin/Branch Server Combo,” on page 99Chapter 9, “Setting Up a POSBranch Terminal,” on page 107Chapter 10, “Automatic Branch Server Installation,” on page 115
Setting Up the Administration Server 65

66 Novell Linux
novdocx (EN
U) 10 A
ugust 2006
Point of Service 9 Installation Guide

5novdocx (E
NU
) 10 August 2006
5Setting Up a Dedicated Image Building Server
Although a dedicated image building server requires an additional server on your Novell® Linux Point of Service network, it provides several advantages, particularly for large systems that manage a large number of Point of Service images. Providing a dedicated image building server offloads the processor and memory load required to generate images from the Administration Server and it protects the Administration Server and LDAP directory from any possible corruption or user errors that might occur while building Point of Service images.
This section reviews the procedures required to set up a dedicated image building server:
Section 5.1, “Meeting System Requirements,” on page 67Section 5.2, “Installing a Dedicated Image Building Server,” on page 67Section 5.3, “Creating Point of Service Images,” on page 69Section 5.4, “Copying the Client Image Files to the Administration Server,” on page 69
5.1 Meeting System RequirementsThe following list identifies the system requirements for a dedicated image building server:
One server with an x86 processorA minimum of 4 GB hard disk space; recommended 25 GB
NOTE: This will vary depending on the size of your images.
A minimum of 512 MB RAM; recommended 512 MB - 3 GB (at least 256 MB per CPU)One network card
5.2 Installing a Dedicated Image Building ServerYou should have already installed the Administration Server as described in Chapter 4, “Setting Up the Administration Server,” on page 59.
The following procedure outlines the steps required to set up a dedicated image building server.
5.2.1 Installing the Novell Linux Point of Service SoftwareTo install the Novell Linux Point of Service software on the image building server:
1 Start the YaST utility by inserting Novell Linux Point of Service 9 CD 1 into the drive and rebooting the computer.
2 At the SuSE boot screen, select Installation.3 Go through the rest of the initial installation screens as outlined in Section 2.5.1, “Starting the
YaST Utility,” on page 23.
Setting Up a Dedicated Image Building Server 67

68 Novell Linux
novdocx (EN
U) 10 A
ugust 2006
4 When you get to the Installation Settings menu, make your settings as outlined in Section 2.5.2, “The Installation Settings Screen,” on page 28.For the Software option, select the NLPOS Image Server software selection.This selection installs all Administration and Branch Server packages to the server, plus the Image Builder components listed in Table 4-1.
Table 5-1 Image Builder components
5 When you have finished making your installation settings, click Accept.6 When prompted, answer Yes to start the installation.
YaST partitions the drive, applies the installation settings, and copies the necessary files from NLPOS CD 1 to disk.
7 As prompted, insert each requested CD, then click OK.8 When it finishes with the basic installation, the system reboots and YaST starts again.
Continue through the screens as outlined in Section 2.5.3, “The YaST Configuration Phase,” on page 41.
9 After you have completed the options in the Hardware Configuration menu, click Next.10 Remove any CDs from the drive, and then click Finish to complete the installation.
The system reboots.11 Log in as root.
You are now ready to copy the default boot images to the Administration Server.
5.2.2 Copying the Boot Images to the Administration ServerTo copy the default boot images from the image building server to the Administration Server:
1 Copy /opt/SLES/POS/image/initrd-disknetboot-version-date.gz on the image server to the /opt/SLES/POS/rsync/boot/ directory on the Administration Server as initrd.gz.
Description Location
ImageBuilder scripts (scr and xscr) /usr/bin/
Image Description Trees /opt/SLES/POS/system/image_name-version/
Distribution.xml template /opt/SLES/POS/system/templates/
Image Specification Document templates
/opt/SLES/POS/system/templates/support/
Default configuration information for kernel drivers
/opt/SLES/POS/system/templates/drivers/
Child Image Specification Documents for client image add-on options
/opt/SLES/POS/system/templates/addons/
Point of Service 9 Installation Guide

novdocx (EN
U) 10 A
ugust 2006
2 Copy /opt/SLES/POS/image/initrd-disknetboot-version-date.kernel. kernel_ version on the image server to the /opt/SLES/POS/rsync/boot/ directory on the Administration Server as linux.
5.3 Creating Point of Service ImagesWith the image building server up and running, you can create client images required for your Point of Service terminals. Before doing so, however, you must copy the image source files from the Novell Linux Point of Service CDs to the image building server and define their location.
1 Copy the image source files to your image building server using either the POSCDTool or the POSCopyTool script.
For detailed instructions, see “Copying the Novell Linux Point of Service CDs” in the Novell Linux Point of Service 9 Administration Guide.
2 Define the location of the image source files in either the AdminServer.conf file (used by scr) or the Distribution.xml file (used by xscr). These files define the paths to the distribution directories where you have copied the Novell Linux Point of Service CDs. ImageBuilder searches these paths to locate the RPM packages required to build images.For detailed instructions, see “Generating AdminServer.conf or Distribution.xml” in the Novell Linux Point of Service 9 Administration Guide.
3 Build the Point of Service image files. For detailed instructions, see “Building Images with scr” or “Building Images with xscr” in the Novell Linux Point of Service 9 Administration Guide.
5.4 Copying the Client Image Files to the Administration ServerAfter you have created the client images you need, you must copy the image files and their corresponding MD5 checksums from the image server to the /opt/SLES/POS/rsync/image/ directory on the Administration Server.
IMPORTANT: Client image files and their MD5 checksum files must be located in the /opt/SLES/POS/rsync/image/ directory on the Administration Server before the Branch Servers can distribute the images to Point of Service terminals.
For detailed instructions, see “Copying the Client Image Files” on page 64.
Setting Up a Dedicated Image Building Server 69

70 Novell Linux
novdocx (EN
U) 10 A
ugust 2006
Point of Service 9 Installation Guide

6novdocx (E
NU
) 10 August 2006
6Setting Up a Branch Server
The Branch Server provides the network boot and system management infrastructure for the Novell® Linux Point of Service terminals as well as a generic system platform for in-store applications, such as database systems and back ends for the Point of Service applications.
This section reviews the procedures required to set up a standard Branch Server:
Section 6.1, “Meeting System Requirements,” on page 71Section 6.2, “Creating Branch Server Objects in LDAP,” on page 72Section 6.3, “Installing and Configuring the Branch Server,” on page 77Section 6.4, “Downloading Images from the Administration Server,” on page 79Section 6.5, “Starting the Core Script,” on page 79
If you are setting up a high-availability Branch Server, follow the instructions in Chapter 7, “Setting Up High Availability Branch Servers,” on page 81.
If you are setting up an Admin/Branch Server combination, follow the instructions in Chapter 8, “Setting Up an Admin/Branch Server Combo,” on page 99.
If you are setting up a POS Branch Terminal, follow the instructions in Chapter 9, “Setting Up a POSBranch Terminal,” on page 107.
If you want to create a CD to automatically set up a remote Branch Server, follow the instructions in Chapter 10, “Automatic Branch Server Installation,” on page 115.
6.1 Meeting System RequirementsThe following list identifies the system requirements for a Branch Server:
One server with an x86 processorA minimum of 4 GB hard disk space; recommended 10 GB
NOTE: This will vary depending on the size of the images you distribute to your Point of Service terminals.
A minimum of 256 MB RAM; recommended 512 MB - 3 GB (at least 256 MB per CPU)At least two network cards per server:
One network card for the Administration Server’s public networkOne network card for the Branch Server’s private network
WARNING: Because Branch Servers contain sensitive information, they should be secured. We recommend that you close unused ports and allow only the root user to have access to the server console.
Setting Up a Branch Server 71

72 Novell Linux
novdocx (EN
U) 10 A
ugust 2006
6.2 Creating Branch Server Objects in LDAPBefore you can configure and deploy a Branch Server, you must first create the necessary objects in the LDAP directory. These objects include:
One or more organizationalUnit objects to represent your organizational structure.An scLocation object for each site where a Branch Server is located.An scServerContainer to contain all the Branch Server objects for a given site.An scBranchServer object and its associated configuration objects for each Branch Server in your system.Additional objects for the Point of Service terminals associated with each Branch Server.
NOTE: Each LDAP object has two types of attributes: must and may attributes. The must attributes are required for an object; the may attributes are optional. The tables in this section list only those may attributes that are relevant to Novell Linux Point of Service.
6.2.1 Creating organizationalUnit ObjectsIn a Novell Linux Point of Service system, Organizational Unit (organizationalUnit) objects are containers that typically represent regions, divisions, or branches within a company. These objects can be nested to visually represent the structure or organization of your company. Branch location objects are created in organizationalUnit containers within the LDAP directory.
Here is the posAdmin command syntax for adding an organizationalUnit object in LDAP (type the command all on one line):posAdmin.pl --user dn_of_admin_user --password password --base base_context --add --organizationalUnit --ou ou_name [--description ‘string’]
Table 6-1 summarizes the organizationalUnit object attributes.
Table 6-1 Attributes for organizationalUnit objects
For example, the following command adds the boston organizational unit to the LDAP directory and gives it the description “main headquarters”: posAdmin.pl --user cn=admin,o=mycorp,c=us --password secret --base o=mycorp,c=us --add --organizationalUnit --ou boston --description ‘main headquarters'
The LDAP context of the newly created organizationalUnit is ou=boston,o=mycorp,c=us directory.
Attribute Type Explanation
--ou ou_name must Specifies the name of the organizational unit. For example, --ou boston.
IMPORTANT: Use only alphanumeric characters.
--description ‘string’ may Contains a human-readable description of the object.
Point of Service 9 Installation Guide

novdocx (EN
U) 10 A
ugust 2006
6.2.2 Creating an scLocation ObjectAn scLocation object typically is used to represent a branch office; that is, a site where a Branch Server and Point of Service terminals are located. scLocation containers are used to store information about the Branch Servers and the deployed Point of Service terminals. This and all other information that can be modified at the Branch Server should be stored or referenced in the Location containers to limit the need to grant write privileges to subtrees.
Here is the posAdmin command syntax to add an scLocation object in LDAP (type the command all on one line):posAdmin.pl --user dn_of_admin_user --password password --base base_context --add --scLocation --cn location_name --ipNetworkNumber ip_address --ipNetmaskNumber subnet_mask --scDhcpRange ip_address,ip_address --scDhcpFixedRange ip_address,ip_address --scDefaultGw ip_address --scDynamicIp TRUE | FALSE --scWorkstationBasename string --scEnumerationMask number [--associatedDomain ldap_context]
Table 6-2 summarizes the command options which correspond to the scLocation object attributes.
Table 6-2 Attributes for scLocation objects
Attribute Type Explanation
--cn location_name must Specifies the common name of the location object.
--ipNetworkNumber ip_address
must Identifies the network address of the subnet of the branch. For example,192.168.1.0.
--ipNetmaskNumber subnet_mask
must Identifies the netmask of the subnet of the branch. For example, 255.255.255.0.
--scDhcpRange ip_address,ip_address
must Specifies the dynamic IP address range of the subnet’s DHCP server.This is needed to register the Point of Service terminals. It is a comma-separated value pair. For example, 192.168.1.10, 192.168.1.50.
--scDhcpFixedRange ip_address,ip_address
must Specifies the DHCP server’s fixed IP address range reserved for the Point of Service terminals. It is also a comma-separated value pair, such as 192.168.1.51, 192.168.1.150.
--scDefaultGw ip_address must Identifies the default gateway for this location. This is normally a router to the corporate wide area network.
--scDynamicIp TRUE | FALSE
must Enables (TRUE) or disables (FALSE) the dynamic IP address range of the DHCP server.
--scWorkstationBasename string
must Specifies the base name of the Point of Service terminals of a branch. The base name, in combination with the scEnumerationMask, is used to create a unique name for each terminal, which is then associated with an IP address in the scDhcpFixedRange. For example, if the DHCP fixed range starts at 192.168.1.51, the scWorkstationBasename is CR, and the scEnumerationMask is 000, the first terminal to register gets the name CR001 and the IP address 192.168.1.51, the next terminal is named CR002 and gets the IP address 192.168.1.52, and so on.
Setting Up a Branch Server 73

74 Novell Linux
novdocx (EN
U) 10 A
ugust 2006
For example, the following command adds the Harbor scLocation to the LDAP directory, sets the IP addresses and DHCP ranges to the indicated values, and specifies a base name of CR and an enumeration mask of 000 (type the command all on one line): posAdmin.pl --user cn=admin,o=mycorp,c=us --password secret --base ou=boston,o=mycorp,c=us --add --scLocation --cn harbor --ipNetworkNumber 192.168.1.0 --ipNetmaskNumber 255.255.255.0 --scDhcpRange 192.168.1.10,192.168.1.50 --scDhcpFixedRange 192.168.1.51,192.168.1.151 --scDefaultGw 192.168.1.254 --scDynamicIp TRUE --scWorkstationBasename CR --scEnumerationMask 000
6.2.3 Adding an scServerContainer ObjectBefore you can add the scBranchServer object to an scLocation object, you must define an scServerContainer.
Here is the posAdmin command syntax for adding an scServerContainer object in LDAP (type the command all on one line):posAdmin.pl --user dn_of_admin_user --password password --base base_context --add --scServerContainer --cn object_name
For example, the following command adds an scBranchServer object named server to the LDAP directory: posAdmin.pl --user cn=admin,o=mycorp,c=us --password secret --base cn=east,ou=boston,o=mycorp,c=us --add --scServerContainer --cn server
6.2.4 Adding an scBranchServer ObjectThe next step is to add an scBranchServer object to the new scServerContainer. The scBranchServer object stores configuration information that is specific to each Branch Server. It is located in the LDAP tree via an scLocation object. There must be an scBranchServer object for every Branch Server in the Novell Linux Point of Service system.
IMPORTANT: The location of the scBranchServer object in the LDAP directory must correspond to the hostname defined for the Branch Server during installation. For example, if the hostname is bs.east.boston.mycorp.us, the dn of the scBranchServer object would be cn=bs,cn=server, cn=east,ou=boston,o=mycorp,c=us. You must create the scBranchServer object and its supporting organizational structure before you can run posInitBranchserver and deploy the Branch Server. For more information on defining the server hostname during installation, see “Network Interfaces” on page 43.
--scEnumerationMask number
must Specifies the last portion of the Point of Service terminal name. Refer to the explanation of scWorkstationBasename above.
--associatedDomain ldap_context
may This optional entry configures the DNS domain and the domain part of the hostnames of the Point of Service terminals to be in the stated domain. If this entry is left empty (the default), the domain is derived from the LDAP structure of the scLocation entry DN. With this entry, a different domain can be chosen.
Attribute Type Explanation
Point of Service 9 Installation Guide
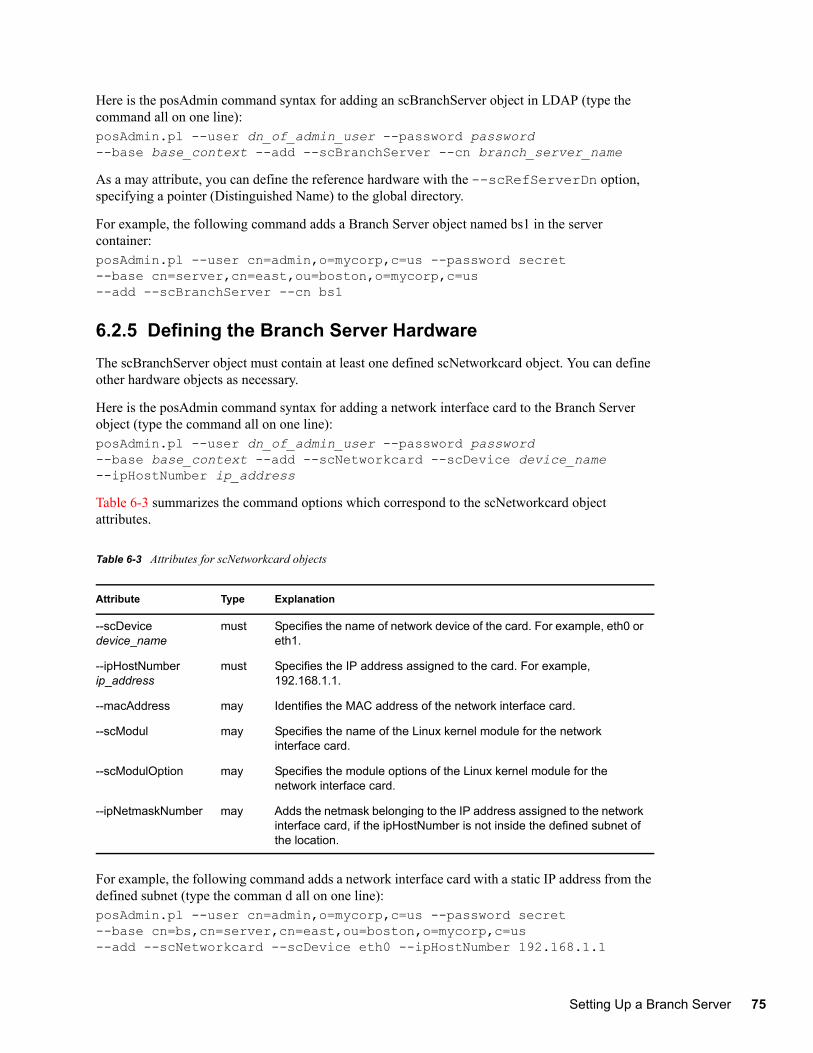
novdocx (EN
U) 10 A
ugust 2006
Here is the posAdmin command syntax for adding an scBranchServer object in LDAP (type the command all on one line):posAdmin.pl --user dn_of_admin_user --password password--base base_context --add --scBranchServer --cn branch_server_name
As a may attribute, you can define the reference hardware with the --scRefServerDn option, specifying a pointer (Distinguished Name) to the global directory.
For example, the following command adds a Branch Server object named bs1 in the server container:posAdmin.pl --user cn=admin,o=mycorp,c=us --password secret --base cn=server,cn=east,ou=boston,o=mycorp,c=us --add --scBranchServer --cn bs1
6.2.5 Defining the Branch Server HardwareThe scBranchServer object must contain at least one defined scNetworkcard object. You can define other hardware objects as necessary.
Here is the posAdmin command syntax for adding a network interface card to the Branch Server object (type the command all on one line):posAdmin.pl --user dn_of_admin_user --password password--base base_context --add --scNetworkcard --scDevice device_name --ipHostNumber ip_address
Table 6-3 summarizes the command options which correspond to the scNetworkcard object attributes.
Table 6-3 Attributes for scNetworkcard objects
For example, the following command adds a network interface card with a static IP address from the defined subnet (type the comman d all on one line): posAdmin.pl --user cn=admin,o=mycorp,c=us --password secret --base cn=bs,cn=server,cn=east,ou=boston,o=mycorp,c=us --add --scNetworkcard --scDevice eth0 --ipHostNumber 192.168.1.1
Attribute Type Explanation
--scDevice device_name
must Specifies the name of network device of the card. For example, eth0 or eth1.
--ipHostNumber ip_address
must Specifies the IP address assigned to the card. For example, 192.168.1.1.
--macAddress may Identifies the MAC address of the network interface card.
--scModul may Specifies the name of the Linux kernel module for the network interface card.
--scModulOption may Specifies the module options of the Linux kernel module for the network interface card.
--ipNetmaskNumber may Adds the netmask belonging to the IP address assigned to the network interface card, if the ipHostNumber is not inside the defined subnet of the location.
Setting Up a Branch Server 75

76 Novell Linux
novdocx (EN
U) 10 A
ugust 2006
6.2.6 Defining the Branch Server ServicesThe scBranchServer also contains objects representing services such as DHCP and DNS. At a minimum, you should define the required DHCP, DNS, and TFTP.
Here is the posAdmin command syntax for defining an scService object in LDAP (type the command all on one line):posAdmin.pl --user dn_of_admin_user --password password --base base_context --add --scService --cn service_name --ipHostNumber ip_address --scDnsName dns_name --scServiceName string --scServiceStartScript filename --scServiceStatus TRUE; | FALSE;
Table 6-4 provides a description of scService attributes.
Table 6-4 Attributes for scService objects
The following examples demonstrate how to add the DHCP, DNS, and TFTP services (type the commands all on one line). posAdmin.pl --user cn=admin,o=mycorp,c=us --password secret --base cn=bs,cn=server,cn=east,ou=boston,o=mycorp,c=us --add --scService --cn dhcp --ipHostNumber 192.168.1.1 --scDnsName dhcp --scServiceName dhcp --scServiceStartScript dhcpd --scServiceStatus TRUEposAdmin.pl --user cn=admin,o=mycorp,c=us --password secret --base cn=bs,cn=server,cn=east,ou=boston,o=mycorp,c=us --add --scService --cn dns --ipHostNumber 192.168.1.1 --scDnsName dns; --scServiceName dns --scServiceStartScript named --scServiceStatus TRUEposAdmin.pl --user cn=admin,o=mycorp,c=us --password secret --base cn=bs,cn=server,cn=east,ou=boston,o=mycorp,c=us --add --scService --cn tftp --ipHostNumber 192.168.1.1 --scDnsName tftp --scServiceName tftp --scServiceStartScript atftpd --scServiceStatus TRUE
Attribute Type Explanation
--cn service_name must Specifies the common name of the service.
--ipHostNumber ip_address
must Specifies the IP address of the Branch Server hosting the service.
--scDnsName dns_name
must Specifies the DNS name of the service.
--scServiceName string must Specifies the name of the service. For example: dhcp, dns, or tftp.
--scServiceStartScript filename
must The name of the init script in /etc/init.d. For example, atftpd for the tftp service.
--scServiceStatus TRUE | FALSE
must The service status. TRUE or FALSE are possible values.
Point of Service 9 Installation Guide

novdocx (EN
U) 10 A
ugust 2006
6.2.7 Creating Point of Service Terminal ObjectsBefore you can boot the Point of Service terminals associated with a Branch Server, you must create additional objects in the branch portion of the LDAP directory. These include an scCashRegister object and its associated configuration objects for each type of Point of Service terminal in your system, and scPosImage objects for the client image files you want the Branch Server to distribute to Point of Service terminals.
For instructions on how to create these objects, see Section 11.2, “Creating the LDAP Objects Required for the Point of Service Terminals,” on page 126.
6.3 Installing and Configuring the Branch ServerThis section describes how to install the Novell Linux Point of Service software and set up a Branch Server.
6.3.1 Installing the Novell Linux Point of Service SoftwareTo install the Novell Linux Point of Service software on the Branch Server:
1 Start the YaST utility by inserting Novell Linux Point of Service 9 CD 1 into the drive and rebooting the computer.
2 At the SuSE boot screen, select Installation.3 Go through the rest of the initial installation screens as outlined in Section 2.5.1, “Starting the
YaST Utility,” on page 23.4 When you get to the Installation Settings menu, make your settings as outlined in Section 2.5.2,
“The Installation Settings Screen,” on page 28.For the Software option, choose the NLPOS Admin/Branch Server software selection option.This selection installs all the necessary Branch Server packages to the server. For more information, see “Software Selection Screen” on page 34.
5 When you have finished making your installation settings, click Accept.6 When prompted, answer Yes to start the installation.
YaST partitions the drive, applies the installation settings, and copies the necessary files from NLPOS CD 1 to disk.
7 When prompted, insert each requested CD, then click OK.8 When it finishes with the basic installation, the system reboots and YaST starts again.
Continue through the screens as outlined in Section 2.5.3, “The YaST Configuration Phase,” on page 41.
9 After you have completed the options in the Hardware Configuration menu, click Next.10 Remove any CDs from the drive, and then click Finish to complete the installation.
The system reboots.11 Log in as root on the Branch Server.
You are now ready to configure the Branch Server.
Setting Up a Branch Server 77

78 Novell Linux
novdocx (EN
U) 10 A
ugust 2006
6.3.2 Configuring the Branch ServerThis section describes the Branch Server configuration with the posInitBranchServer.sh script.
IMPORTANT: You must have created the scBranchServer object and its supporting organizational structure before you can run posInitBranchserver.sh to configure the Branch Server. For more information, see Section 6.2, “Creating Branch Server Objects in LDAP,” on page 72.
1 Before starting the configuration script, ensure that the Branch Server can find its object in the LDAP directory.
IMPORTANT: The Branch Server’s hostname must resolve to the IP address defined in the --ipHostNumber attribute of the scNetworkcard object; for example, 192.168.2.1. Otherwise, the Branch Server cannot find the scBranchServer object in the LDAP directory.
To ensure this resolution, add the following line to the Branch Server’s /etc/hosts file:ip_address_of_scNetworkcard fully_distinguished_name hostname
For example,192.168.2.1 bs1.boston.mycorp.com bs1
2 Execute posInitBranchserver.sh at the Branch Server console.3 Specify your company name without spaces or special characters. 4 Specify your country abbreviation.
Use de for Germany, uk for United Kingdom, us for United States, and so forth.5 Specify the IP address of the Administration Server.
Set the value according to the IP address you assigned when you configured the Administration Server.
6 The script attempts to connect to the Administration Server. If it fails, you are prompted again for the company name, country name, and password. Otherwise, the script tries to determine the Branch Server’s IP address, hostname, and domain name as it is defined in the LDAP database. If it fails, you are prompted for the Branch Server’s IP address. If the Branch Server configuration is successful, the script displays the Branch Server’s name, IP address, and domain name, along with a success message.
7 Verify that the necessary LDAP objects have been created by using a GUI-based LDAP browser or an ldapsearch command. For example: ldapsearch -x -h administration_server_name -b base_context -s base -D dn_of_admin_user -w password
Point of Service 9 Installation Guide

novdocx (EN
U) 10 A
ugust 2006
6.4 Downloading Images from the Administration ServerAfter the Branch Server is up and running, you can run the possyncimages.pl script to download the Point of Service images that have been created from the Administration Server to the /tftpboot/ directories on the Branch Server.
1 Verify the scPosImage object settings for the Point of Service images in the /tftpboot/image/ directory.
IMPORTANT: You must create the scPosImage objects and set the scPosImageVersion attribute to Active before you boot the Point of Service terminals. The Point of Service terminals require an scPosImage object with an active scPosImageVersion attribute before they can download the corresponding physical image from the Branch Server at boot time. For more information on setting the scPosImageVersion attribute to Active, see “Activating Images” in the Novell Linux Point of Service 9 Administration Guide.
2 Run possyncimages.pl at the Branch Server console to download the Point of Service images.
NOTE: The possyncimages.pl script can also be used to update Point of Service images on the Branch Server. However, to implement image version changes, you must also activate the version changes inside the corresponding scPosImage objects in the LDAP directory. Otherwise Point of Service terminals already registered in LDAP and on the Branch Server cannot boot the new image version.
3 Verify the result of the possyncimages.pl command by checking the contents of the following Branch Server directories:
/tftpboot/boot/
/tftpboot/image/
For more information on the Administration and Branch Server directory structure, see “Novell Linux Point of Service Files and Directory Structure” in the Novell Linux Point of Service 9 Administration Guide.
6.5 Starting the Core ScriptStart the core script (posleases2ldap) as a daemon process on the Branch Server.
To verify that posleases2ldap is currently running, execute the following command:
rcposleases2ldap status
To manually start the posleases2ldap service, execute the following command:rcposleases2ldap start
To ensure the Branch Server automatically starts the core script at boot time, execute the following command:chkconfig posleases2ldap on
You are now ready to deploy the Point of Service terminals. For more information on this process, see Chapter 11, “Deploying Point of Service Terminals,” on page 125.
Setting Up a Branch Server 79

80 Novell Linux
novdocx (EN
U) 10 A
ugust 2006
Point of Service 9 Installation Guide
7novdocx (E
NU
) 10 August 2006
7Setting Up High Availability Branch Servers
In a Novell® Linux Point of Service system, it is possible to deploy Branch Servers in a high availability (HA) setup. High availability, in this context, means an HA cluster of two nodes in an active/passive setup. One of the nodes runs all services. The other node is a hot standby which can take over all services in the event the active node fails.
This section outlines the requirements and procedures needed to configure an HA Branch Server pair.
Section 7.1, “Meeting System Requirements,” on page 81Section 7.2, “Creating Objects for High Availability Branch Servers in LDAP,” on page 83Section 7.3, “Installing and Configuring High Availability Branch Servers,” on page 87Section 7.4, “Downloading Images from the Administration Server,” on page 93Section 7.5, “Starting the Core Script,” on page 93Section 7.6, “Heartbeat Configuration Files,” on page 94Section 7.7, “drbd Configuration File,” on page 96Section 7.8, “Updating High Availability Branch Servers,” on page 96
7.1 Meeting System RequirementsThe following list identifies the system requirements for an HA Branch Server configuration:
Two servers with x86 processorsA minimum of 4 GB hard disk space; recommended 10 GB
NOTE: This will vary depending on the size of the images you distribute to your Point of Service terminals.
A minimum of 256 MB RAM; recommended 512 MB - 3 GB (at least 256 MB per CPU)heartbeat softwareThe Linux heartbeat software package is used to monitor nodes in a cluster. It exchanges “heartbeats” on the network interfaces of the cluster members to find out which nodes in the cluster are active. If a node fails, it stops emiting a signal. In this case, heartbeat ensures that another node takes over the relevant tasks and identity and makes the failover known within the network. This means that the cluster remains consistent. At present, the heartbeat failover function is limited to two nodes.drbd softwareDistributed replicated block device (drbd) mirrors partitions and logical volumes (data areas) by means of a normal TCP/IP network. Each node has a particular drbd resource active and all changes are mirrored over the network as secure transactions. In comparison with RAID1, drbd has additional features for local disks that enable the resynchronization time to be minimized after the two nodes have been disconnected briefly. It
Setting Up High Availability Branch Servers 81

82 Novell Linux
novdocx (EN
U) 10 A
ugust 2006
also performs a robust check after various malfunctions to establish which side has the latest, consistent data. Network devices for mirroring and heartbeat
NOTE: The Branch Server uses a network block device to replicate the data to the standby node; therefore, no shared storage device is needed.
Two crosslink network cables to connect the drbd and heartbeat interfaces At least two network cards per server; however, the recommend configuration calls for four cards as illustrated in Figure 7-1.
Figure 7-1 Recommended network card configuration for HA Branch Servers
One network card for the Administration Server’s public network; for example:node1: eth0 151.158.181.28 node2: eth0 151.155.181.29
One network card for the Branch Server’s network from the private range; for example: node1: eth1 192.168.1.1 node2: eth1 192.168.1.2virtual IP eth1:0 192.168.1.3
One network card for drbd (a gigabit network card is preferred) from the private range; for example: node1: eth2 192.168.2.1 node2: eth2 192.168.2.2
One network card for the Linux HA Heartbeat from the private range; for example: node1: eth3 192.168.3.1 node2: eth3 192.168.3.2
WARNING: Because Branch Servers contain sensitive information, they should be secured. We recommend that you close unused ports and allow only the root user to have access to the server console.
Administration
Server
HA Branch
Server
HA Branch
Server
Branch LAN
DRBD
Heartbeat
POS POS
Point of Service 9 Installation Guide
novdocx (EN
U) 10 A
ugust 2006
7.2 Creating Objects for High Availability Branch Servers in LDAPBefore you can configure and deploy a high availability Branch Server pair, you must first create the necessary objects in the LDAP directory. HA Branch Servers require the same LDAP objects as standard Branch Servers, with the following differences:
The scNetworkcard objects include a virtual IP address (eth1:0) that represents both servers. The scHAService objects must reference the virtual IP address.Branch Server services are configured with scHAService objects instead of scService objects.
NOTE: Each LDAP object has two types of attributes: must and may attributes. The must attributes are required for an object; the may attributes are optional.
7.2.1 Creating Branch ObjectsThis section outlines the steps to add the necessary HA branch objects to the LDAP directory. The posAdmin command examples are based on the sample configuration shown in Figure 7-1 on page 82. Modify the commands as necessary for your particular scenario.
NOTE: For ease of reference, the following procedure refers to the active node as BS1 and the standby node as BS2.
The branch objects you will create include:
One or more organizationalUnit objects to represent your organizational structure.An scLocation object for each site where a Branch Server is located. An scServerContainer to contain all the Branch Server objects for a given site.An scBranchServer object and its associated configuration objects for the active and static Branch Servers (BS1 and BS2) in your HA configuration.
1 Create an organizationalUnit object.
For example:posAdmin.pl --user cn=admin,o=mycorp,c=us --password secret --base o=mycorp,c=us --add --organizationalUnit --ou boston
2 Create the scLocation object.For example:posAdmin.pl --user cn=admin,o=mycorp,c=us --password secret --base ou=boston,o=mycorp,c=us --add --scLocation --cn branch --ipNetworkNumber 192.168.1.0 --ipNetmaskNumber 255.255.255.0 --scDhcpRange 192.168.1.4,192.168.1.99 --scDhcpFixedRange 192.168.1.100,192.168.1.199 --scDefaultGw 192.168.1.1 --scDynamicIp TRUE --scWorkstationBasename CR --scEnumerationMask 000
3 Create an scServerContainer object. For example:
Setting Up High Availability Branch Servers 83

84 Novell Linux
novdocx (EN
U) 10 A
ugust 2006
posAdmin.pl --user cn=admin,o=mycorp,c=us --password secret --base cn=branch,ou=boston,o=mycorp,c=us --add --scServerContainer --cn server
4 In the new server container, create two Branch Server objects. For example: posAdmin.pl --user cn=admin,o=mycorp,c=us --password secret --base cn=server,cn=east,ou=boston,o=mycorp,c=us --add --scBranchServer --cn bs1
andposAdmin.pl --user cn=admin,o=mycorp,c=us --password secret --base cn=server,cn=east,ou=boston,o=mycorp,c=us --add --scBranchServer --cn bs2
5 Define the network interface cards for each Branch Server. Depending on network traffic and the desired performance, you can configure one to four network interface cards per Branch Server. The recommended four-card configuration is illustrated in Figure 7-1 on page 82. For more information on entering the network interface card configuration in YaST, see “Network Interfaces” on page 43.Table 7-1 summarizes the command options which correspond to the scNetworkcard object attributes.
Table 7-1 Attributes for scNetworkcard objects
The following examples demonstrate how to add network interface cards for the Branch Server, drbd, and heartbeat interfaces.
Branch Server 1 Network Interface Card Configurationeth0 on BS1 for the public interface:posAdmin.pl --user cn=admin,o=mycorp,c=us --password novell --base cn=bs1,cn=server,cn=east,ou=boston,o=mycorp,c=us --add --scNetworkcard --scDevice eth0 --ipHostNumber 151.155.173.111
eth1 on BS1 for the Branch Server interface:
Attribute Type Explanation
--scDevice must Specifies the name of network device of the card. For example, eth0 or eth1.
--ipHostNumber must Specifies the IP address. For example, 192.168.1.1.
--macAddress may Specifies the MAC address of the network interface card.
--scModul may Specifies the name of the Linux kernel module for the network interface card.
--scModulOption may Specifies the module options of the Linux kernel module for the network interface card.
--ipNetmaskNumber may Adds the netmask belonging to the IP address assigned to the network interface card, if the ipHostNumber is not inside the defined subnet of the location.
Point of Service 9 Installation Guide

novdocx (EN
U) 10 A
ugust 2006
posAdmin.pl --user cn=admin,o=mycorp,c=us --password secret --base cn=bs1,cn=server,cn=east,ou=boston,o=mycorp,c=us--add --scNetworkcard --scDevice eth1 --ipHostNumber 192.168.1.1 --ipNetmaskNumber 255.255.255.0
eth2 on BS1 for the drbd interface:posAdmin.pl --user cn=admin,o=mycorp,c=us --password secret --base cn=bs1,cn=server,cn=east,ou=boston,o=mycorp,c=us --add --scNetworkcard --scDevice eth2 --ipHostNumber 192.168.2.1
eth3 on BS1 for the heartbeat interface:posAdmin.pl --user cn=admin,o=mycorp,c=us --password secret --base cn=bs1,cn=server,cn=east,ou=boston,o=mycorp,c=us --add --scNetworkcard --scDevice eth3 --ipHostNumber 192.168.3.1
eth1:0 on BS1 for the Branch Server interface virtual IP:posAdmin.pl --user cn=admin,o=mycorp,c=us --password secret --base cn=bs1,cn=server,cn=east,ou=boston,o=mycorp,c=us --add --scNetworkcard --scDevice eth1:0 --ipHostNumber 192.168.1.3
Branch Server 2 Network Interface Card Configurationeth0 on BS2 for the public interface:posAdmin.pl --user cn=admin,o=a35,c=us --password secret --base cn=bs2,cn=server,cn=branch,ou=provo,o=a35,c=us --add --scNetworkcard --scDevice eth0 --ipHostNumber 151.155.173.112
eth1 on BS2 for the Branch Server interface:posAdmin.pl --user cn=admin,o=mycorp,c=us --password secret--base cn=bs2,cn=server,cn=east,ou=boston,o=mycorp,c=us --add --scNetworkcard --scDevice eth1 --ipHostNumber 192.168.1.2 --ipNetmaskNumber 255.255.255.0
eth2 on BS2 for the drbd interface:posAdmin.pl --user cn=admin,o=mycorp,c=us --password secret --base cn=bs2,cn=server,cn=east,ou=boston,o=mycorp,c=us --add --scNetworkcard --scDevice eth2 --ipHostNumber 192.168.2.2
eth3 on BS2 for the Heartbeat interface:posAdmin.pl --user cn=admin,o=mycorp,c=us --password secret --base cn=bs2,cn=server,cn=east,ou=boston,o=mycorp,c=us --add --scNetworkcard --scDevice eth3 --ipHostNumber 192.168.3.2
eth1:0 on BS1 for the Branch Server interface virtual IP:posAdmin.pl --user cn=admin,o=mycorp,c=us --password secret --base cn=bs2,cn=server,cn=east,ou=boston,o=mycorp,c=us --add --scNetworkcard --scDevice eth1:0 --ipHostNumber 192.168.1.3
6 Add DHCP, DNS, and TFTP as HA services. Table 7-2 summarizes the command options which correspond to the scHAService object attributes.
Setting Up High Availability Branch Servers 85
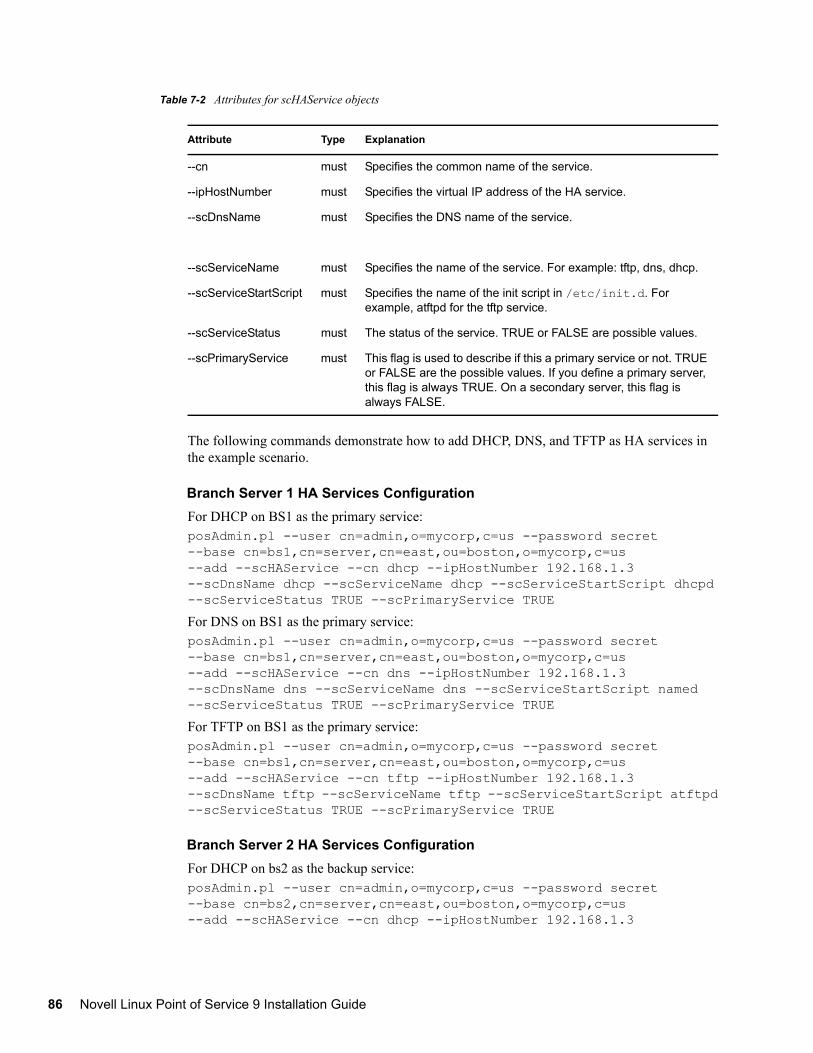
86 Novell Linux
novdocx (EN
U) 10 A
ugust 2006
Table 7-2 Attributes for scHAService objects
The following commands demonstrate how to add DHCP, DNS, and TFTP as HA services in the example scenario.
Branch Server 1 HA Services ConfigurationFor DHCP on BS1 as the primary service:posAdmin.pl --user cn=admin,o=mycorp,c=us --password secret --base cn=bs1,cn=server,cn=east,ou=boston,o=mycorp,c=us --add --scHAService --cn dhcp --ipHostNumber 192.168.1.3 --scDnsName dhcp --scServiceName dhcp --scServiceStartScript dhcpd--scServiceStatus TRUE --scPrimaryService TRUE
For DNS on BS1 as the primary service:posAdmin.pl --user cn=admin,o=mycorp,c=us --password secret --base cn=bs1,cn=server,cn=east,ou=boston,o=mycorp,c=us --add --scHAService --cn dns --ipHostNumber 192.168.1.3 --scDnsName dns --scServiceName dns --scServiceStartScript named --scServiceStatus TRUE --scPrimaryService TRUE
For TFTP on BS1 as the primary service:posAdmin.pl --user cn=admin,o=mycorp,c=us --password secret --base cn=bs1,cn=server,cn=east,ou=boston,o=mycorp,c=us --add --scHAService --cn tftp --ipHostNumber 192.168.1.3 --scDnsName tftp --scServiceName tftp --scServiceStartScript atftpd--scServiceStatus TRUE --scPrimaryService TRUE
Branch Server 2 HA Services ConfigurationFor DHCP on bs2 as the backup service:posAdmin.pl --user cn=admin,o=mycorp,c=us --password secret --base cn=bs2,cn=server,cn=east,ou=boston,o=mycorp,c=us --add --scHAService --cn dhcp --ipHostNumber 192.168.1.3
Attribute Type Explanation
--cn must Specifies the common name of the service.
--ipHostNumber must Specifies the virtual IP address of the HA service.
--scDnsName must Specifies the DNS name of the service.
--scServiceName must Specifies the name of the service. For example: tftp, dns, dhcp.
--scServiceStartScript must Specifies the name of the init script in /etc/init.d. For example, atftpd for the tftp service.
--scServiceStatus must The status of the service. TRUE or FALSE are possible values.
--scPrimaryService must This flag is used to describe if this a primary service or not. TRUE or FALSE are the possible values. If you define a primary server, this flag is always TRUE. On a secondary server, this flag is always FALSE.
Point of Service 9 Installation Guide

novdocx (EN
U) 10 A
ugust 2006
--scDnsName dhcp --scServiceName dhcp --scServiceStartScript dhcpd--scServiceStatus TRUE --scPrimaryService FALSE
For DNS on BS2 as the backup service:posAdmin.pl --user cn=admin,o=mycorp,c=us --password secret --base cn=bs2,cn=server,cn=east,ou=boston,o=mycorp,c=us --add --scHAService --cn dns --ipHostNumber 192.168.1.3 --scDnsName dns --scServiceName dns --scServiceStartScript named--scServiceStatus TRUE --scPrimaryService FALSE
For TFTP on BS2 as the backup service:posAdmin.pl --user cn=admin,o=mycorp,c=us --password secret --base cn=bs2,cn=server,cn=east,ou=boston,o=mycorp,c=us --add --scHAService --cn tftp --ipHostNumber 192.168.1.3--scDnsName tftp --scServiceName tftp --scServiceStartScript atftpd--scServiceStatus TRUE --scPrimaryService FALSE
7.2.2 Creating Point of Service Terminal ObjectsBefore you can boot the Point of Service terminals associated with a Branch Server, you must create additional objects in the branch portion of the LDAP directory. These include an scCashRegister object and its associated configuration objects for each type of Point of Service terminal in your system, and scPosImage objects for the client image files you want the Branch Server to distribute to Point of Service terminals.
For instructions on how to create these objects, see Section 11.2, “Creating the LDAP Objects Required for the Point of Service Terminals,” on page 126.
7.3 Installing and Configuring High Availability Branch ServersThis section outlines the steps required to set up a highly available Branch Server pair.
NOTE: For ease of reference, the following procedure refers to the active node as BS1 and the passive (standby) node as BS2.
7.3.1 Installing the Novell Linux Point of Service SoftwareTo install the Novell Linux Point of Service software on each Branch Server:
1 Start the YaST utility by inserting Novell Linux Point of Service 9 CD 1 into the drive and rebooting the computer.
2 At the SuSE boot screen, select Installation.3 Go through the rest of the initial installation screens as outlined in Section 2.5.1, “Starting the
YaST Utility,” on page 23.4 When you get to the Installation Settings menu, make your settings as outlined in Section 2.5.2,
“The Installation Settings Screen,” on page 28.For the Partitioning option, you must set up drbd partitions on BS1 and BS2.4a Select Create Custom Partition Setup and then click Next.4b Make sure the primary and SWAP partitions are defined on the drive.
Setting Up High Availability Branch Servers 87

88 Novell Linux
novdocx (EN
U) 10 A
ugust 2006
4c Click Create to define the drbd partition. Figure 7-2 shows the partition creation screen.
Figure 7-2 drbd partition creation screen.
4d Specify the size of the partition.The size depends on your needs. The partition accommodates all your images plus several configuration files. A size of 5 GB should be sufficient for most installations.
IMPORTANT: The drbd partitions must be the same size on both Branch Servers.
4e Set the Mount Point as /drbd.4f Click OK to apply your changes.
The drbd partition is now listed in the partition table. 5 For the Software option, choose the NLPOS Admin/Branch Server software selection and add
the High Availability packages (heartbeat and drbd) via Detailed Selection.This selection installs all the necessary Branch Server and High Availability packages to the server. For more information, see “Software Selection Screen” on page 34.
6 When you have finished making your installation settings, click Accept.7 When prompted, answer Yes to start the installation.
YaST partitions the drive, applies the installation settings, and copies the necessary files from NLPOS CD 1 to disk.
8 As prompted, insert each requested CD and click OK.9 When it finishes with the basic installation, the system reboots and YaST starts again.
10 In the Root Password screen, enter the password for the root user twice, then click Next.11 In the Network Configuration screen, set up the network cards for drbd, heartbeat, and the
Administration Server and Branch Server networks. Make sure they can communicate. The recommended four-card configuration is illustrated in Figure 7-1 on page 82. For more
Point of Service 9 Installation Guide

novdocx (EN
U) 10 A
ugust 2006
information on entering the network interface card configuration in YaST, see “Network Interfaces” on page 43.
12 Continue through the screens as outlined in Section 2.5.3, “The YaST Configuration Phase,” on page 41.After you have completed the options in the Hardware Configuration screen, click Next.
13 Remove any CDs from the drive, and then click Finish to complete the installation.The system reboots.
14 Login in as root on each Branch Server.15 Unmount the drbd partition on both BS1 and BS2.
umount /drbd
16 On BS1 and BS2, edit the /etc/fstab file and remove the line that mounts the drbd partition.
17 Verify that the LDAP database on the Administration Server is accessible using a GUI-based LDAP browser or an ldapsearch command. For example: ldapsearch -x -h administration_server_name -b base_context -s base -D dn_of_admin_user -w password
18 Temporarily configure the heartbeat software on BS1 and BS2. 18a Copy the ha.cf file from /etc/opt/SLES/POS/ha/ to the /etc/ha.d/
directory and make the following changes:Configure either the bcast or ucast line. If you activate bcast, the interface should be the heartbeat interface (eth3). If you activate ucast, the IP address is the heartbeat interface IP address on BS2 (for example, eth3 192.168.3.2).Make sure the node lines have the correct server names for BS1 and BS2.
18b Copy the authkeys file from /etc/opt/SLES/POS/ha/ to the /etc/ha.d/ directory and change the permissions as follows:chmod 600 authkeys
18c Copy the haresources file from /etc/opt/SLES/POS/ha/ to the /etc/ha.d/ directory. Set the last line to the virtual IP address as follows:bs1 192.168.1.3 #drbddisk::r0 Filesystem::/dev/drbd0::/drbd::ext3 # named dhcpd atftpd
NOTE: The rest of the line is commented out because drbd is not yet configured.
19 Use the following command to start heartbeat on BS1:rcheartbeat start
20 Execute ifconfig on BS1 to verify that the virtual IP interface (eth1:0) is active.
NOTE: This can take some time.
For more information on the ha.cf, authkeys, and haresrouces files, see Section 7.6, “Heartbeat Configuration Files,” on page 94.
Setting Up High Availability Branch Servers 89
90 Novell Linux
novdocx (EN
U) 10 A
ugust 2006
7.3.2 Configuring the Branch ServersThis section describes the Branch Server configuration with the posInitBranchServer.sh script. Follow these steps for both nodes in the high availability Branch Server pair.
IMPORTANT: You must have created the scBranchServer object and its supporting organizational structure before you can run posInitBranchserver.sh and configure the Branch Server. For more information, see Section 6.2, “Creating Branch Server Objects in LDAP,” on page 72.
1 Before starting the configuration script, ensure that the Branch Server can find its objects in the LDAP directory.
IMPORTANT: The Branch Server’s hostname must resolve to the IP address defined in the --ipHostNumber attribute of the scNetworkcard object; for example, 192.168.2.1. Otherwise, the Branch Server cannot find the scBranchServer object in the LDAP directory.
To ensure this resolution, make sure that, on each node, the /etc/hosts file includes the other node. For example:192.168.1.1 bs1.east.boston.mycorp.us bs1192.168.1.2 bs2.east.boston.mycorp.us bs2
2 Execute posInitBranchserver.sh at the BS1 server console only. 3 Specify your company name without spaces or special characters. 4 Specify your country abbreviation.
Use us for United States, uk for United Kingdom, de for Germany, and so forth.5 Specify the IP address of the Administration Server.
Set the value according to the IP address you assigned when you configured the Administration Server.
6 The script attempts to connect to the Administration Server. If it fails, you are prompted again for the company name, country name, and password. Otherwise, the script tries to determine the IP address, hostname, and domain name as it is defined in the LDAP database. If it fails, you are prompted for the Branch Server’s IP address. If the Branch Server configuration is successful, the script displays the Branch Server’s name, IP address, and domain name, along with a success message.
7 Verify that the LDAP objects have been created for the Branch Servers using a GUI-based LDAP browser or an ldapsearch command. For example:ldapsearch -x -h administration_server_name -b base_context -s base -D dn_of_admin_user -w password
7.3.3 Configuring drbdContinue with these steps to configure the drbd service.
1 Configure drbd on BS1 and BS2.1a Copy the drbd.conf file from /etc/opt/SLES/POS/ha/ to the /etc/ directory.1b Make sure you have the right drbd partitions in the BS1 and BS2 sections of the
drbd.conf file.
Point of Service 9 Installation Guide

novdocx (EN
U) 10 A
ugust 2006
1c Make sure the IP addresses designated in the drbd.conf file are the drbd interface IP addresses.In this example, the IP addresses are 192.168.2.1 and 192.168.2.2.
1d Execute the following command to make sure drbd is started automatically:chkconfig dbrd on
For more information, see Section 7.7, “drbd Configuration File,” on page 96.2 Execute the following commands on BS1 to start drbd and define BS1 as the primary server: rcdrbd start abort the wait drbdsetup /dev/drbd0 primary mke2fs -j /dev/drbd0
3 Start drbd on BS2 and control the synchronization of the network block device /dev/drbd0:rcdrbd start
Wait for the sync to finish. This can take a while, and you might have to check the /var/log/messages file or run rcdrbd status and monitor progress.
4 Mount the drbd partition on BS1:mount /dev/drbd0 /drbd
5 (optional) Verify that drbd is working.5a Write to a file on the /drbd partition on BS1.5b Unmount the drbd partition on BS1.5c Define BS1 as the secondary server:
drbdsetup /dev/drbd0 secondary
5d Define BS2 as the primary server:drbdsetup /dev/drbd0 primary
5e Mount the drbd partition on BS2.mount /dev/drbd0 /drbd
5f Verify that the file with the correct data is there.5g Unmount the drbd partition on BS2.5h Define BS2 as the secondary server:
drbdsetup /dev/drbd0 secondary
5i Define BS1 as the primary server:drbdsetup /dev/drbd0 primary
5j Mount the drbd partition on BS1.mount /dev/drbd0 /drbd
6 Execute the following commands to stop all Branch Server services on BS1 and BS2:rcdhcpd stop rcnamed stop rcatftpd stop
7 Change permissions for the bsha_config.sh file on BS1 and BS2.chmod to a+rx bsha_config.sh
8 Run the /bsha_config.sh script on BS1 and BS2.
Setting Up High Availability Branch Servers 91

92 Novell Linux
novdocx (EN
U) 10 A
ugust 2006
This script performs the following functions: It creates the following directories on the Branch Server:
drbd/etc/
drbd/tftpboot/
drbd/var/
It moves all the data required for the Branch Server services to the drbd directories on the Branch Server. It creates the following links on the Branch Server:
/etc/opt/SLES/POS is linked to /drbd/etc/opt/SLES/POS./var/lib/named is linked to /drbd/var/lib/named./var/lib/dhcp is linked to /drbd/var/lib/dhcp.
9 Modify the last line of the /etc/ha.d/haresources file on BS1 and BS2 as follows:bs1 192.168.1.3 drbddisk::r0 Filesystem::/dev/drbd0::/drbd::ext3 # named dhcpd atftpd
NOTE: The drbd portion no longer needs to be commented out because drbd is now configured. However, leave the services commented out until after you test data replication.
10 Start heartbeat on BS1:umount /dev/drbd0rcheartbeat start
11 Start heartbeat on BS2:rcheartbeat start
12 Execute ifconfig on BS1 to verify that the virtual IP interface (eth1:0) is active.
NOTE: This can take several seconds.
13 Verify that the drbd partition is mounted on BS1.14 (optional) Verify that heartbeat is failing over and failing back correctly:
14a Stop heartbeat on BS1:rcheartbeat stop
14b After a few seconds, verify that the virtual IP interface and drbd partition are unmounted on BS1 and activated on BS2.
14c Start heartbeat on BS1:rcheartbeat start
14d After a few seconds, verify that the virtual IP interface and drbd partition migrated back to BS1.
15 Modify the last line of the /etc/ha.d/haresources file on BS1 and BS2 as follows:bs1 192.168.1.3 drbddisk::r0 Filesystem::/dev/drbd0::/drbd::ext3 named dhcpd atftpd
NOTE: The entire line can now be uncommented because drbd is configured and data replication has been tested.
16 Execute the following commands on BS1 and BS2 to turn off automatic startup of the services during boot. Heartbeat takes care of starting these services.
Point of Service 9 Installation Guide

novdocx (EN
U) 10 A
ugust 2006
chkconfig dhcpd offchkconfig named offchkconfig atftpd offchkconfig heartbeat on
For information about testing a newly installed Novell Linux Point of Service system, refer to Chapter 12, “Testing Your Novell Linux Point of Service Environment,” on page 143.
7.4 Downloading Images from the Administration ServerAfter the primary Branch Server is up and running, you can run the possyncimages.pl script to download the Point of Service images that you have created from the Administration Server to the /tftpboot/ directories on the Branch Server. They are then copied to the secondary Branch Server via drbd.
1 Verify the scPosImage object settings for the Point of Service images in the /tftpboot/image/ directory.
IMPORTANT: You must create the scPosImage objects and set the scPosImageVersion attribute to Active before you boot the Point of Service terminals. The Point of Service terminals require an scPosImage object with an active scPosImageVersion attribute before they can download the corresponding physical image from the Branch Server at boot time. For more information on setting the scPosImageVersion attribute to Active, see Section 11.2.7, “Activating Images,” on page 132.
2 On BS1 only, run possyncimages.pl to download the Point of Service images.
NOTE: The possyncimages.pl script can also be used to update Point of Service images on the Branch Server. However, to implement image version changes, you must also activate the version changes inside the corresponding scPosImage objects in the LDAP directory. Otherwise Point of Service terminals already registered in LDAP and on the Branch Server cannot boot the new image version.
3 Verify the result of running the possyncimages.pl script by checking the contents of the following Branch Server directories:
/tftpboot/boot
/tftpboot/image
For more information on the Administration and Branch Server directory structure, see “Novell Linux Point of Service Files and Directory Structure”in the Novell Linux Point of Service 9 Administration Guide.
7.5 Starting the Core ScriptStart the core script (posleases2ldap) as a daemon process on BS1.
To verify that posleases2ldap is currently running, execute the following command:
rcposleases2ldap status
To manually start the posleases2ldap service, execute the following command:
Setting Up High Availability Branch Servers 93

94 Novell Linux
novdocx (EN
U) 10 A
ugust 2006
rcposleases2ldap start
To ensure the Branch Server automatically starts the core script at boot time, execute the following command:chkconfig posleases2ldap on
You are now ready to deploy the Point of Service terminals. For more information on this process, see Chapter 11, “Deploying Point of Service Terminals,” on page 125.
7.6 Heartbeat Configuration FilesThree files are required to configure the Linux heartbeat software for Novell Linux Point of Service:
ha.cf
authkeys
haresources
IMPORTANT: Templates of these files are provided in the /etc/opt/SLES/POS/ha/ directory; however, all three files must be copied to the /etc/ha.d/ directory on the active and standby servers to run HA services.
The following sections provide explanations and samples of these heartbeat configuration files.
7.6.1 ha.cfha.cf is the High Availability configuration file. There are many options in this file; however, the only parameters you must set are a set of nodes and the port or interface (serial, bcast, mcast, or ucast) for heartbeat.
IMPORTANT: The configuration file is read line by line, so the order of the configuration entries is very important. In particular, make sure that the timings and udpport are set before the heartbeat media are defined. If you maintain the original order of the items in the template file, everything will work correctly.
During the configuration of the HA Branch Server pair, you must modify the following parameters in the ha.cf file: # What UDP port to use for communication?# [used by bcast and ucast]#udpport694## What interfaces to broadcast heartbeats over?#bcast eth0 # Linux#bcast eth1 eth2 # Linuxbcast eth3 # Linux#bcast le0 # Solaris#bcast le1 le2 # Solaris## Tell what machines are in the cluster node# nodename ...-- must match uname -n#ucast eth2 192.168.2.2
Point of Service 9 Installation Guide

novdocx (EN
U) 10 A
ugust 2006
## Watchdog is the watchdog timer. If our own heart doesn’t beat# for a minute, then our machine will reboot.## Tell what machines are in the cluster node# nodename ...-- must match uname -nnode bs1node bs2
7.6.2 authkeysauthkeys is the authentication file used to authenticate failover between the active (BS1) and standby (BS2) servers.
The available authentication methods are CRC, SHA1, and MD5. The default method is CRC; however, this method only verifies packet integrity-it provides no security. Therefore, it should be used only on physically secure networks.
To run HA services, this file must be in mode 600. For more information, see Step 18b on page 89.
The file format is as follows:auth 11 crc#2 sha1 HI!#3 md5 Hello!
7.6.3 haresources
IMPORTANT: The haresources files must be identical on all nodes of the cluster. The node name listed in front of the resource group information is the name of the preferred node to run the service. It is not necessarily the name of the current machine. If you are running nice_failback OFF, these services start on the preferred node any time it is up. If you are running with nice_failback ON, the node information is used for a simultaneous start-up. In either case, the haresources files must be identical. If your files are different, the HA services do not work.
haresources contains a list of resources that move from machine to machine as nodes go down and come up in the cluster. These resources are represented either as IP addresses or the name of scripts to run to “start” or “stop” the given resource.
The format is as follows:
node-name resource1 resource2 resource3 ...
If a resource name contains an :: in the middle, the part after the :: is passed to the resource script as an argument. Multiple arguments are separated by the :: delimiter
In IP addresses, the resource script name IPaddr is implied. For example, the IP address 135.9.8.7 could also be represented as IPaddr::135.9.8.7
IMPORTANT: Do not include “administrative” or fixed IP addresses in this file.
Setting Up High Availability Branch Servers 95

96 Novell Linux
novdocx (EN
U) 10 A
ugust 2006
7.7 drbd Configuration Filedrbd is a block device which is designed to build high availability clusters by mirroring a whole block device using a dedicated network. It can be seen as a network RAID-1.
To simplify a high availability configuration, the configuration scripts soft-link the configuration files for the DHCP and DNS service. For this reason, the DHCP daemon must not run in chroot(1) environments. Choose the configuration DHCPD\_RUN\_CHROOTED=’no’ in the /etc/sysconfig/dhcpd file.
The drbd.conf file is the configuration file for the drbd service. It defines the following parameters:
NOTE: These parameters are required to run drbd; additional parameters can be defined for fine tuning. For more information on these parameters, refer to the comments in the drbd.conf file.
The hostnames for BS1 and BS2. The device name of your drbd disk.The drbd disk.(optional) drbd meta-disks. Meta-disk is either “internal” or “/dev/ice/name [idx].” You can use a single block device to store meta-data for multiple drbd’s. For example, use meta-disk /dev/hde6[0]; and meta-disk /dev/hde6[1]; for two different resources. In this case the meta-disk would need to be at least 256 MB in size.“internal” means that the last 128 MB of the lower device are used to store the metadata.
NOTE: Do not give an index with “internal.”
The IP address and port of the drbd network on the server.
The format of these parameters in the drbd.conf file is defined as follows:on bs1 { device /dev/drbd0; disk /dev/hda3; address 192.168.2.1:7788; meta-disk internal; }on bs2 { device /dev/drbd0; disk /dev/hda3; address 192.168.2.2:7788; meta-disk internal; }
7.8 Updating High Availability Branch ServersThis section outlines the procedure to update a high availability Branch Server pair to a new support pack release of Novell Linux Point of Service 9. For ease of reference, the steps refer to the primary
Point of Service 9 Installation Guide

novdocx (EN
U) 10 A
ugust 2006
Branch Server as BS1 and the secondary Branch Server as BS2. Substitute your own server names as necessary.
1 On the secondary Branch Server (BS2), stop Heartbeat by entering the command rcheartbeat stop.
2 Upgrade the primary Branch Server (BS1) to the latest SLES 9 support pack release, following the steps in the Novell Linux Point of Service 9 Support Pack Readme (http://www.novell.com/documentation/nlpos9).
3 Reboot BS1.4 Upgrade BS1 to the latest Novell Linux Point of Service 9 support pack release, following the
steps in the Novell Linux Point of Service 9 Support Pack Readme.5 Restart Heartbeat on BS2 with the command rcheartbeat start.6 Stop Heartbeat on BS1 and wait for BS2 to become the primary.7 Repeat Steps 2 through 4 to upgrade SLES 9, reboot the server, and upgrade the Novell Linux
Point of Service 9 software on BS2 (the secondary Branch Server now acting as the primary).8 On BS1, enter rcheartbeat start to switch it back to being the primary Branch Server.9 After updating the Branch Servers, turn off automatic startup of the dhcp, named, and atftpd
services during boot by entering the following commands on both servers:chkconfig dhcpd offchkconfig named offchkconfig atftpd off
10 Enable automatic startup of Heartbeat by entering the following command:chkconfig heartbeat on
Setting Up High Availability Branch Servers 97

98 Novell Linux
novdocx (EN
U) 10 A
ugust 2006
Point of Service 9 Installation Guide

8novdocx (E
NU
) 10 August 2006
8Setting Up an Admin/Branch Server Combo
For single store installations, the Administration and Branch Servers can be deployed on a single server. The Administration/Branch Server combination provides full Novell® Linux Point of Service system functionality (Administration Server, Branch Server, and Image Building Server) from a single server.
The Admin/Branch Server combination is supported only for self-contained installations. No additional Branch Servers can connect to the Admin/Branch Server. You can, however, create a two-node heartbeat cluster by installing two Admin/Branch Servers and configuring one as the primary and the other as the secondary.
This section reviews the procedures required to set up an Admin/Branch Server combination:
Section 8.1, “Meeting System Requirements,” on page 99Section 8.2, “Installing an Admin/Branch Server Combo,” on page 99Section 8.3, “Initializing the LDAP Directory,” on page 101Section 8.4, “Creating the Required LDAP Objects,” on page 103Section 8.5, “Copying the Default Boot Images,” on page 104Section 8.6, “Creating Point of Service Images,” on page 104Section 8.7, “Copying the Client Image Files,” on page 104Section 8.8, “Configuring the Branch Server,” on page 105
8.1 Meeting System RequirementsThe following list identifies the system requirements for an Administration/Branch Server combination:
One server with an x86 processorA minimum of 4 GB hard disk space; recommended 25 GB
NOTE: This will vary depending on the size of your images.
A minimum of 512 MB RAM; recommended 512 MB - 3 GB (at least 256 MB per CPU)One network card
WARNING: Because Admin/Branch Servers contain sensitive information, they should be secured. We recommend that you close unused ports and allow only the root user to have access to the server console.
8.2 Installing an Admin/Branch Server ComboThe following procedure outlines the steps required to set up an Admin/Branch Server combo.
Setting Up an Admin/Branch Server Combo 99
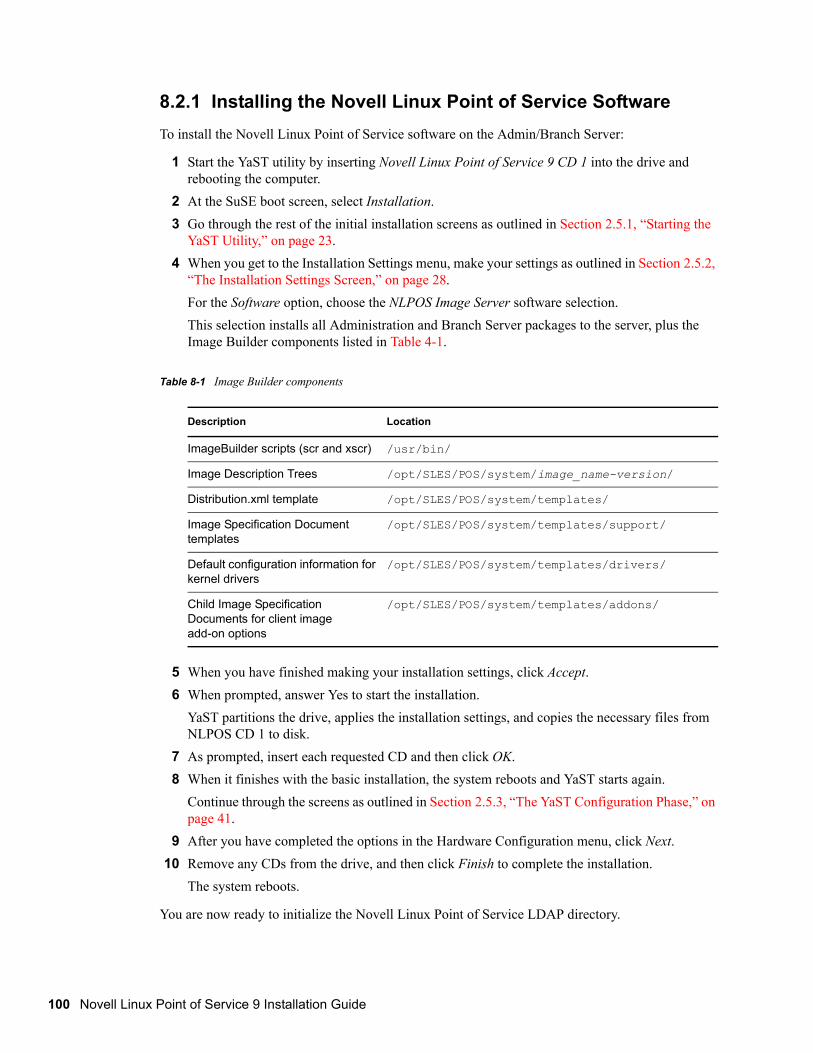
100 Novell Linux
novdocx (EN
U) 10 A
ugust 2006
8.2.1 Installing the Novell Linux Point of Service SoftwareTo install the Novell Linux Point of Service software on the Admin/Branch Server:
1 Start the YaST utility by inserting Novell Linux Point of Service 9 CD 1 into the drive and rebooting the computer.
2 At the SuSE boot screen, select Installation.3 Go through the rest of the initial installation screens as outlined in Section 2.5.1, “Starting the
YaST Utility,” on page 23.4 When you get to the Installation Settings menu, make your settings as outlined in Section 2.5.2,
“The Installation Settings Screen,” on page 28.For the Software option, choose the NLPOS Image Server software selection. This selection installs all Administration and Branch Server packages to the server, plus the Image Builder components listed in Table 4-1.
Table 8-1 Image Builder components
5 When you have finished making your installation settings, click Accept.6 When prompted, answer Yes to start the installation.
YaST partitions the drive, applies the installation settings, and copies the necessary files from NLPOS CD 1 to disk.
7 As prompted, insert each requested CD and then click OK.8 When it finishes with the basic installation, the system reboots and YaST starts again.
Continue through the screens as outlined in Section 2.5.3, “The YaST Configuration Phase,” on page 41.
9 After you have completed the options in the Hardware Configuration menu, click Next.10 Remove any CDs from the drive, and then click Finish to complete the installation.
The system reboots.
You are now ready to initialize the Novell Linux Point of Service LDAP directory.
Description Location
ImageBuilder scripts (scr and xscr) /usr/bin/
Image Description Trees /opt/SLES/POS/system/image_name-version/
Distribution.xml template /opt/SLES/POS/system/templates/
Image Specification Document templates
/opt/SLES/POS/system/templates/support/
Default configuration information for kernel drivers
/opt/SLES/POS/system/templates/drivers/
Child Image Specification Documents for client image add-on options
/opt/SLES/POS/system/templates/addons/
Point of Service 9 Installation Guide

novdocx (EN
U) 10 A
ugust 2006
8.3 Initializing the LDAP DirectoryAll system information (system structure, the configuration and deployment method for the Branch Server, available client images, and Point of Service terminal types) is stored in an LDAP directory on the Admin/Branch Server.
Novell Linux Point of Service can use the following LDAP directories: IBM Directory Services, eDirectoryTM, or OpenLDAP. The posInitLdap script defines the LDAP directory schema and the initial records for OpenLDAP. Likewise, the posInitEdir script defines the directory schema and the initial records required for eDirectory.
NOTE: To run the LDAP directory on IBM Directory Services, run posInitLdap, then import the /etc/opt/SLES/POS/template/ldif.pos file into IBM Tivoli* Directory Server.
The following sections review the procedure required to run posInitLdap or posInitEdir and verify the LDAP directory.
Section 4.3.1, “Running posInitLdap.sh,” on page 61Section 4.3.2, “Running posInitEdir.sh,” on page 62Section 4.3.3, “Verifying the LDAP Directory,” on page 63
8.3.1 Running posInitLdap.shThe posInitLdap script defines the LDAP directory schema and the initial records for OpenLDAP. It cannot add the Novell Linux Point of Service LDAP directory to an existing openLDAP tree; it creates an entirely new LDAP directory tree.
To create the Novell Linux Point of Service LDAP directory for OpenLDAP:
1 After you have installed the Novell Linux Point of Service Admin/Branch Server, log in as root on the server.
2 Execute posInitLdap.sh. 3 Specify your company name without spaces or special characters. 4 Specify your country abbreviation.
Use de for Germany, uk for United Kingdom, us for United States, and so forth.5 Specify the LDAP administrator password.
NOTE: You are assigning the password for the LDAP directory administrator account. The Admin/Branch Server uses this account to access the LDAP directory and this account is required to use posAdmin to add objects to the LDAP directory.
6 Determine if you want to use SSL when the Admin/Branch Server connects to the LDAP directory.
Select Y to use an SSL connection when the Admin/Branch Server connects to the LDAP directory. Select N to disable SSL.
7 posInitLdap creates the certificates and keys required to run SSL regardless of whether or not SSL is enabled. This allows you to switch to SSL at a later time if desired.
Setting Up an Admin/Branch Server Combo 101

102 Novell Linux
novdocx (EN
U) 10 A
ugust 2006
NOTE: The keys and certificates are located in the /etc/opt/SLES/POS/keys/ directory on the Admin/Branch Server.
8 posInitLdap provides a summary of the LDAP directory data based on your input. If all data is correct, press Enter.If there is something wrong with the input data, abort the installation by pressing Ctrl+C.
9 The script initializes the basic LDAP database structure and performs some tests, then displays a summary of the configuration and test results. When the tests are successfully completed, the script displays a success message. To complete the initialization, press Enter.
8.3.2 Running posInitEdir.shThe posInitEdir script defines the LDAP directory schema and the initial records for eDirectory. It cannot add the Novell Linux Point of Service LDAP directory to an existing eDirectory tree; it creates an entirely new tree.
To create the Novell Linux Point of Service LDAP directory for eDirectory:
1 After you have installed the Novell Linux Point of Service Admin/Branch Server, log in as root on the server.
2 Install eDirectory on the Admin/Branch Server.3 Execute posInitEdir.sh. 4 Specify the eDirectory tree name you want to create.
IMPORTANT: posInitEdir does not add to an existing eDirectory tree.
5 Specify your company name without spaces or special characters. 6 Specify your country abbreviation.
Use de for Germany, uk for United Kingdom, us for United States, and so forth.7 Specify the LDAP administrator password.
NOTE: This password is for the account the Admin/Branch Server uses to access the LDAP directory.
8 posInitEdir provides a summary of the LDAP directory data based on your input. If all data is correct, press Enter.If there is something wrong with the input data, abort the installation by pressing Ctrl+C.
9 The script initializes the basic LDAP database structure and performs some tests, then displays a summary of the configuration and test results. When the tests are successfully completed, the script displays a success message. To complete the initialization, press Enter.
8.3.3 Verifying the LDAP DirectoryAfter you run posInitLdap or posInitEdir, the LDAP directory has been initialized on the Admin/Branch Server and the LDAP service is available. At this point, you should have a basic tree structure with a root, a Country container, and an Organization container.
You can verify that the LDAP directory is accessible and that these objects have been created by using a GUI-based LDAP browser or an ldapsearch command.
Point of Service 9 Installation Guide

novdocx (EN
U) 10 A
ugust 2006
For example: ldapsearch -x -h administration_server_name -b o=mycorp,c=us -s base -D cn=admin,o=mycorp,c=us -w password
8.4 Creating the Required LDAP ObjectsNext, you must use the posAdmin command to create the LDAP objects required to configure the Branch Server and boot its Point of Service terminals.
Branch ObjectsOne or more organizationalUnit objects to represent your organizational structure.An scLocation object for the site where the Admin/Branch Server is located.An scServerContainer to contain the BranchServer objects.An scBranchServer object and its associated configuration objects for the Branch Server.
IMPORTANT: You must create the scBranchServer object and its supporting organizational structure before you can run posInitBranchserver.sh to configure the Branch Server.The Common Name (cn) of the scBranchServer object in the LDAP directory must match the hostname defined when you installed the Admin/Branch Server. For example, if the hostname is bs1, specify that for the --cn attribute of the scBranchServer object. For more information on defining the Branch Server hostname during installation, see “Network Interfaces” on page 43.
An scCashRegister object and its associated configuration objects for each type of Point of Service terminal in your system:
IMPORTANT: You must create scCashRegister and its associated objects before you can boot the Point of Service terminals.
scHarddisk or scRamDiskscConfigFileTemplate (optional)scConfigFileSyncTemplate (optional)
An scPosImage objects for each client image file that you want the Branch Server to distribute to Point of Service terminals.
IMPORTANT: You must create the scPosImage objects and set the scPosImageVersion attribute to Active before you boot the Point of Service terminals. The Point of Service terminals require an scPosImage object with an active scPosImageVersion attribute before they can download the corresponding physical image from the Branch Server at boot time. For more information on setting the scPosImageVersion attribute to Active, see “Activating Images” on page 132.
For detailed instructions on creating these objects, see Section 6.2, “Creating Branch Server Objects in LDAP,” on page 72.
Setting Up an Admin/Branch Server Combo 103

104 Novell Linux
novdocx (EN
U) 10 A
ugust 2006
8.5 Copying the Default Boot ImagesThis section explains how to copy the default boot images (initrd and the Linux kernel file) to the appropriate directories on the Admin/Branch Server so they are ready to be distributed to the Point of Service terminals.
1 Use the following command to copy the default initrd file to the /opt/SLES/POS/rsync/boot/ directory as initrd.gz (type the command all on one line):cp /opt/SLES/POS/image/initrd-disknetboot-version-date.gz /opt/SLES/POS/rsync/boot/initrd.gz
2 Use the following command to copy the default kernel file to the /opt/SLES/POS/rsync/boot/ directory as linux (type the command all on one line):cp /opt/SLES/POS/image/initrd-disknetboot-version-date.kernel. kernel_version /opt/SLES/POS/rsync/boot/linux
8.6 Creating Point of Service ImagesBefore you can deploy Point of Service terminals, you must first create image files that contain the operating system and application files required to boot the terminals. Before doing so, however, you must copy the image source files from the Novell Linux Point of Service CDs to the Admin/Branch Server and define their location.
1 Copy the image source files to your Admin/Branch Server using either the POSCDTool script or the POSCopyTool script.
For detailed instructions, see “Managing Image Source Files with POSCDTool and POSCopyTool” in the Novell Linux Point of Service 9 Administration Guide.
2 Define the location of the image source files in either the AdminServer.conf file (used by scr) or the Distribution.xml file (used by xscr).For detailed instructions, see “Generating AdminServer.conf or Distribution.xml” in the Novell Linux Point of Service 9 Administration Guide.
3 Build the Point of Service image files. For more information on this procedure, see “Building Images with scr” or “Building Images with xscr” in the Novell Linux Point of Service 9 Administration Guide.
8.7 Copying the Client Image FilesAfter you have created the client images you need, you must copy the image files and their corresponding MD5 checksum files to the /opt/SLES/POS/rsync/image/ directory. The Admin/Branch Server can then distribute the image files to the Point of Service terminals.
IMPORTANT: Both the client image files and their MD5 checksum files must be located in the /opt/SLES/POS/rsync/image/ directory on the Admin/Branch Server before they can be distributed to Point of Service terminals when they are booted up.
The boot image files must be located in /opt/SLES/POS/rsync/boot/, as explained in Section 8.5, “Copying the Default Boot Images,” on page 104.
Point of Service 9 Installation Guide

novdocx (EN
U) 10 A
ugust 2006
8.8 Configuring the Branch ServerThis section describes the Branch Server configuration with the posInitBranchServer.sh script.
8.8.1 Running the Initialization Script
IMPORTANT: You must have created the scBranchServer object and its supporting organizational structure before you can run posInitBranchserver.sh to configure the Branch Server. For more information, see Section 6.2.1, “Creating organizationalUnit Objects,” on page 72.
1 Before starting the configuration script, ensure that the Branch Server can find its object in the LDAP directory.
IMPORTANT: The Branch Server’s hostname must resolve to the IP address defined in the--ipHostNumber attribute of the scNetworkcard object; for example, 192.168.2.1. Otherwise, the Branch Server cannot find the scBranchServer object in the LDAP directory.
To ensure this resolution, add the following line to the Branch server’s /etc/hosts file:
ip_address fully_distinguished_name hostname
For example,
192.168.2.1 bs1.boston.mycorp.com bs1
2 Execute posInitBranchserver.sh at the Branch Server console. 3 Specify your company name without spaces or special characters. 4 Specify your country abbreviation.
Use de for Germany, uk for United Kingdom, us for United States, and so forth.5 Specify the IP address of the Administration Server.
NOTE: Because in this case the Administration and Branch Server are on the same machine, they have the same IP address. You can specify the machine’s actual IP address or use loopback (127.0.0.1) or localhost.
6 The script attempts to connect to the Administration Server. If it fails, you are prompted again for the company name, country name, and password. Otherwise, the script tries to determine the Branch Server’s IP address, hostname, and domain name as it is defined in the LDAP database. If it fails, you are prompted for the Branch Server’s IP address. If the Branch Server configuration is successful, the script displays the Branch Server’s name, IP address, and domain name, along with a success message.
7 Verify that the necessary LDAP objects have been created by using a GUI-based LDAP browser, such as GQ, or an ldapsearch command. For example:ldapsearch -x -h administration_server_name -b o=mycorp,c=us -s base -D cn=admin,o=mycorp,c=us -w password
Setting Up an Admin/Branch Server Combo 105
106 Novell Linux
novdocx (EN
U) 10 A
ugust 2006
8.8.2 Copying Images to the tftpboot DirectoriesAfter the Branch Server has been configured, you can run the possyncimages.pl script to copy the Point of Service images you have created to the /tftpboot/ directories.
1 Verify the scPosImage object settings for the Point of Service images in the /tftpboot/image/ directory.
IMPORTANT: You must create the scPosImage objects and set the scPosImageVersion attribute to Active before you boot the Point of Service terminals. The Point of Service terminals require an scPosImage object with an active scPosImageVersion attribute before they can download the corresponding physical image from the Branch Server at boot time. For more information on setting the scPosImageVersion attribute to Active, see “Activating Images” in the Novell Linux Point of Service 9 Administration Guide.
2 Run possyncimages.pl to copy the Point of Service images to the /tftpboot/ directories on the Branch Server.
3 Verify the results of running the script by checking the contents of the following directories:/tftpboot/boot/
/tftpboot/image/
For more information on the Administration and Branch Server directory structure, see “Novell Linux Point of Service Files and Directory Structure” in the Novell Linux Point of Service 9 Administration Guide.
NOTE: The possyncimages.pl script can also be used to update Point of Service images on the Branch Server. However, to implement image version changes, you must also activate the version changes inside the corresponding scPosImage objects in the LDAP directory. Otherwise Point of Service terminals already registered in LDAP and on the Branch Server cannot boot the new image version.
8.8.3 Starting the Core ScriptStart the core script (posleases2ldap) as a daemon process on the Admin/Branch Server.
To verify that posleases2ldap is currently running, execute the following command:
rcposleases2ldap status
To manually start the posleases2ldap service, execute the following command:rcposleases2ldap start
To ensure that the Admin/Branch Server automatically starts the core script at boot time, execute the following command:chkconfig posleases2ldap on
You are now ready to boot the Point of Service terminals. For more information on this process, see Section 11.4, “Booting the Point of Service Terminal,” on page 136.
Point of Service 9 Installation Guide

9novdocx (E
NU
) 10 August 2006
9Setting Up a POSBranch Terminal
For stores where the Branch Server is only running the Novell® Linux Point of Service infrastructure (that is, the Branch Server is running no additional applications), the Branch Server can be deployed as a control terminal running on Point of Service hardware.
This configuration requires that you build a POSBranch image using xscr and install the image on a Point of Service terminal. For more information on building images using xscr, see “Building Images with the xscr ImageBuilder Tool” in the Novell Linux Point of Service 9 Administration Guide.
WARNING: Because the POSBranch terminal contains sensitive information, it should be secured. We recommend that you close unused ports and allow only the root user to have access to the server console.
This section reviews the steps required to build a POSBranch image and use it to boot a POSBranch terminal.
Section 9.1, “Preparing the Administration Server,” on page 107Section 9.2, “Building the POSBranch Image,” on page 108Section 9.3, “Creating a Bootable CD for the POSBranch Terminal,” on page 110Section 9.4, “Booting the POSBranch Terminal,” on page 114
9.1 Preparing the Administration ServerTo prepare for creating the POSBranch image:
You must have installed the ImageBuilder tools either on the Administration Server or on a dedicated Image Building Server.
For more information on installing ImageBuilder, see Chapter 4, “Setting Up the Administration Server,” on page 59 or Chapter 5, “Setting Up a Dedicated Image Building Server,” on page 67.Copy the SLES image source files from the Novell Linux Point of Service CDs to a central distribution directory. For more information, see “Copying the Novell Linux Point of Service CDs to a Central Distribution Directory” in the Novell Linux Point of Service 9 Administration Guide.Define the location of the image source files in the AdminServer.conf.sles file. This file is automatically generated when you create AdminServer.conf. For more information, see “Defining the Location of the Image Source Files ” in the Novell Linux Point of Service 9 Administration Guide.Provide access to a CD writer to create the boot media.
NOTE: The CD writer does not need to be installed on the Administration Server if the CD images can be transferred through the network to a machine equipped with a CD recorder.
Setting Up a POSBranch Terminal 107

108 Novell Linux
novdocx (EN
U) 10 A
ugust 2006
9.2 Building the POSBranch ImageThis section explains how to build the image for the POSBranch terminal.
9.2.1 Cloning the Image Description Treexscr builds images using a specific file system directory structure known as the Image Description Tree. The Image Description Tree provides the XML documents, scripts, configuration files, and other components required to build client images for Point of Service systems.
To create a POSBranch image, you can use any of the client Image Description Trees provided with Novell Linux Point of Service (Minimal, Java, Browser, or Desktop). The Image Description Trees are located at /opt/SLES/POS/system/image_name-version/.
To maintain a standardized source tree and simplify the upgrade process, it is recommended that you maintain the default Image Description Trees provided with Novell Linux Point of Service as master copies. To build a POSBranch image, you can clone one of the default Image Description Trees, then modify the cloned tree.
When you clone an Image Description Tree using xscr, you can define the image distribution as NLD or SLES (--dist nld | sles). POSBranch images require the SLES distribution.
NOTE: NLD is the default distribution type. Therefore, if you do not specify the image distribution when cloning the Image Description Tree, xscr defaults to NLD.
When you define the image distribution as SLES, xscr adds a child document (image_name-sles.xml) to the parent Image Specification Document that includes the SLES RPMs in the image.
Here is the syntax to clone an Image Description Tree to create a POSBranch image (type the command all on one line): xscr --create image_name-version --image image_name-version --dist sles
For example, the following command clones the Desktop-2.0.21 Image Description Tree to create a new SLES-based Image Description Tree named myImage-1.1.1:xscr --create myImage-1.1.1 --image desktop-2.0.21 --dist sles
The new Image Description Tree is located at /opt/SLES/POS/system/myImage-1.1.1. You can then modify this cloned Image Description Tree as required to create the POSBranch image.
For a description of the individual Image Description Tree components, see “Image Description Tree” and “Novell Linux Point of Service Files and Directory Structure” in the Novell Linux Point of Service 9 Administration Guide.
9.2.2 Adding branch.xml to the Parent Image Specification DocumentImage Specification Documents contain XML elements that define the structure, configuration, and other components required to build images for Point of Service terminals. In general, a master Image Specification Document (or parent document) defines general image parameters and individual
Point of Service 9 Installation Guide

novdocx (EN
U) 10 A
ugust 2006
image subcomponents such as add-on features, custom applications, and so forth are defined in sub-documents referred to as child documents.
The default Image Description Trees provided with Novell Linux Point of Service have a parent Image Specification Document at the root of the tree. After you clone the tree you want to use to build the POSBranch image, you must add branch.xml as a child document in the IncludeSpecificationList element within the parent Image Specification Document. For more information, see “IncludeSpecificationList” in the Novell Linux Point of Service 9 Administration Guide.
The syntax to include the branch.xml document in the IncludeSpecificationList element is as follows: <IncludeSpecificationList> <IncludeSpecification URI="/opt/SLES/POS/system/templates/ support/branch.xml"/></IncludeSpecificationList>
The branch.xml document provides the following Branch Server components:
All the RPMs required for a functional Branch Server. The RPM database so YAST2-Online Update can be used to update the image.The Linux Kernel Crash Dump (LKCD) to provide a system for detecting, saving and examining system crashes.Branch Server configuration information obtained from the LDAP directory.
9.2.3 Generating the POSBranch ImageThe POSBranch image must be deployed on a bootable CD. This requires that you generate the POSBranch image with a CDBoot image.
Novell Linux Point of Service provides a default Image Description Tree (/opt/SLES/POS/system/cdboot-version) and Image Specification Document (/opt/SLES/POS/system/templates/support/cdboot.xml) for CDBoot images. You can use these components to generate the CDBoot image.
You must also create a config.image file. ImageBuilder uses the parameters defined in the config.image file to build the CDBoot and POSBranch images. For information on creating this file, see Section 9.3.2, “Creating the config.image File,” on page 110.
To build the CDBoot image, you must use ImageBuilder’s CD boot feature. This feature requires the CD setup directory as a parameter so ImageBuilder can locate the config.image file. It then uses the parameters defined in the config.image file to create the CDBoot image. When you generate the CDBoot image, ImageBuilder also builds the client image designated in the config.image file’s IMAGE parameter.
IMPORTANT: You must designate the POSBranch image in the config.image file’s IMAGE parameter.
Here is the syntax to generate the CDBoot and POSBranch images (type the command all on one line):xscr --prepare --build --image image_name-version --feature boot_cd:config=CD_setup_directory --destdir directory
Setting Up a POSBranch Terminal 109

110 Novell Linux
novdocx (EN
U) 10 A
ugust 2006
For example, the following command creates the CDboot and client images as specified in the config.image file in the /tmp/cdsetup directory and saves the images to /tmp/mycd.xscr --prepare --build --image cdboot-2.0.21 --feature boot_cd:config=/tmp/cdsetup --destdir /tmp/mycd
9.3 Creating a Bootable CD for the POSBranch TerminalAfter the CDBoot and client images are generated, you are ready to create the final ISO image.
The ImageBuilder utility includes an option to generate CDBoot images. ImageBuilder generates an ISO9660-compliant CD image that is bootable according to the El Torito specification. The resulting CD contains a minimal Linux system image (CDBoot), a Linux system client image (Minimal, Java, Browser, or Desktop), and a config.image configuration file. The configuration file controls whether the client image is written into a RAM disk or if it must be placed on the hard disk of the booting node.
To create a CDBoot image, you must complete the following steps:
1 Create the CD setup directory.2 Create the config.image file.3 Generate the CDBoot image and its associated client image.4 Generate the CD ISO image.
These steps are discussed in the following sections.
9.3.1 Creating the CD Setup DirectoryBecause all the files for a CDBoot image must be part of the CD, they must be centrally located in a setup directory. Therefore, the first step in preparing the CDBoot image is putting all the required configuration files into a centralized setup directory. This includes the config.image file and any other files required to configure the Point of Service terminal, such as XF86Config files.
Use the following command to create a CD setup directory:mkdir /tmp/cdsetup_directory
After you have created the CD setup directory, you are ready to create the config.image file and copy other configuration files required for the CDBoot image.
9.3.2 Creating the config.image FileThe config.image file contains the parameters required to configure a specific Point of Service terminal during a CDBoot; that is, it indicates which client image the terminal should load and how to do it. The config.image file is an ASCII, line-based file that can be created in a text editor. It must be named “config.image” and it must be located in the CD setup directory.
The format of the config.image file is as follows: IMAGE=device;name;versionCONF=source;dest,...,source;destPART=size;id;Mount,...,size;id;MountJOURNAL=ext3
Point of Service 9 Installation Guide

novdocx (EN
U) 10 A
ugust 2006
DISK=deviceFEATURE=contents of the --feature optionEXTEND=contents of the --extend optionPARAMS=additional options of type bool
Table 9-1 provides a detailed description of each parameter in config.image.
Table 9-1 Parameters for the config.image file
Parameter Description
IMAGE=device;name;version Specifies the client image (name) and version (version) that will be loaded on the Point of Service terminal. When you generate the CDBoot image, ImageBuilder uses this information to generate the client image with the CDBoot image.
device is the storage device to which the image is linked; for example, /dev/hda2 or /dev/ram1.
NOTE: For a Point of Service terminal with a hard disk, partition hda1 is used for the swap partition and hda2 defines the root ( / ) file system. The RAM device should not be confused with the hard disk device which uses a partition table. On a RAM disk device, /dev/ram0 is used for the initial RAM disk and cannot be used as storage device for the client image. It is recommended that you use /dev/ram1 for the RAM disk.
name is the client image to load on the Point of Service terminal.
version is the version of the client image to load on the Point of Service terminal.
CONF=source;dest, . . .,source;dest Specifies the configuration files to download to the Point of Service terminal. The data is provided in a comma-separated list in the form source;dest where
source is the path to the source configuration file.
dest in an absolute path below the client image where the configuration file is saved.
PART=size;id;Mount,...,size;id;Mount Specifies hard disk partitioning data. The data is provided in a comma-separated list in the form size;id;Mount where
size is the size of the partition
If a partition should take all the space left on a disk, use a lowercase x as the size specification.
id is the partition type number
Mount is the partition mount point
IMPORTANT: The swap partition must not contain a mount point. A lowercase letter x must be set instead.
The first element of the list defines the swap partition. The second element of the list defines the root partition.
Setting Up a POSBranch Terminal 111

112 Novell Linux
novdocx (EN
U) 10 A
ugust 2006
JOURNAL=ext3 Specifies a journal to be added to the file system.
The value for this parameter must be set to ext3 because that is the only journaled filesystem Novell Linux Point of Service supports.
NOTE: If you have an existing ext2 image, you can change the file system by setting a flag in the scCashRegister or scWorkstation object rather than re-creating the image. If ext3 is specified in either LDAP object, the Point of Service terminal extends the file system to ext3 when the image is deployed.
The JOURNAL parameter is evaluated only if the DISK parameter is set.
DISK=device Defines the device through which the hard disk can be addressed; for example /dev/hda.
This parameter is used only with PART.
FEATURE=string The value of the --feature option used for building the client image. This optional parameter is only pertinent while the client image is created.
For information, refer to “scr Commands” or “xscr Commands” in the Novell Linux Point of Service 9 Administration Guide.
EXTEND=string The value of EXTEND is the value of the --extend option used to extend an image with an additional RPM package. This optional parameter is only pertinent while the client image is created.
IMPORTANT: The EXTEND parameter can be used only for CDBoot images generated with scr. The xscr utility uses the ImageSpecification.xml document to add additional packages to the CDBoot image.
For information, refer to “scr Commands” in the Novell Linux Point of Service 9 Administration Guide.
PARAMS=string The value consists of bool options that are used for special actions. This optional parameter is only pertinent while the client image is created.
This parameter can be used with the --gzip option to compress the image. The CDboot linuxrc recognizes a compressed image referring to the suffix .gz. A compressed CD image is uncompressed on the fly while the image is installed.
For POSBranch images, it is recommended that you add the following line to the config.image file: PARAMS=--keep-rpm
This allows you to use the YaST2 interface to configure POSBranch terminals. However, it adds approximately 30 MB to the size of the image. If the size of the image is an issue, you can leave out the RPMs; however, you will not have YaST2 functionality.
Parameter Description
Point of Service 9 Installation Guide
novdocx (EN
U) 10 A
ugust 2006
9.3.3 Generating the CDBoot ImageTo build the CDBoot image, you must use ImageBuilder’s CD boot feature. This feature requires the CD setup directory as a parameter so ImageBuilder can locate the config.image file. It then uses the parameters defined in the config.image file to create the CDBoot image. When you generate the CDBoot image, ImageBuilder also builds the client image designated in the config.image file’s IMAGE parameter. For information on the config.image file’s format and parameters, see Section 9.3.2, “Creating the config.image File,” on page 110.
IMPORTANT: Because ImageBuilder automatically generates the client image when it builds the CDBoot image, the Image Description Trees for both the CDBoot and client images must be complete before generating the CDBoot image.
The CDBoot build syntax is as follows (type the command all on one line):xscr --prepare --build --image image_name-version --feature boot_cd:config=CD_setup_directory --destdir directory
For example, the following command creates the CDboot and client images as specified in the config.image file in the /tmp/cdsetup directory and saves the images to /tmp/mycd/:xscr --prepare --build --image cdboot-2.0.21 --feature boot_cd:config=/tmp/cdsetup --destdir /tmp/mycd
NOTE: The syntax and example shown above are for using xscr; however, the processes are the same for scr and xscr; only the executable changes.
9.3.4 Creating the CD ISO ImageAfter the CDBoot and client images are generated, you are ready to create the final ISO image. ImageBuilder’s --create-iso option builds the following components in the ISO image:
The CD directory structureAll necessary boot manager filesThe CDBoot and client images
The --create-iso command syntax is as follows:xscr --create-iso image_name.iso --destdir directory
For example, the following command creates an ISO image named mycd.iso in the /tmp/mycd directory. xscr --create-iso mycd.iso --destdir /tmp/mycd
The --destdir parameter defines the target and the source directory. The CDBoot and client images you previously created must be located in the destination directory. At the end of the process, you will have three images in the directory: the CDBoot image, the client image, and the final ISO image.
NOTE: The syntax and example shown above are for xscr; however, the processes are the same for scr and xscr; only the executable changes.
Setting Up a POSBranch Terminal 113

114 Novell Linux
novdocx (EN
U) 10 A
ugust 2006
9.3.5 Burning the Boot CDWhen the process is complete, use a CD recording program to burn the ISO image (for example, /tmp/mycd/mycd.iso) to a CD.
9.4 Booting the POSBranch TerminalAfter you have burned the CDBoot ISO image to a CD, you can use the CD to boot and configure the POSBranch terminal.
NOTE: If there are multiple CD drives in the Point of Service terminal, there is no way to designate which CD drive to use; the system chooses the first one it finds. If the Point of Service terminal does not find the drive with the boot CD, it returns BIOS errors. To correct the problem, insert the CD in the bootable CD drive.
Depending on the client image you used to build the POSBranch image (Minimal, Java, Browser, or Desktop), you should note the following restrictions:
The Point of Service terminal needs to be upgraded with enough RAM to hold the client image.There must be enough available RAM on diskless Point of Service terminals to load the first and second stage boot images. Otherwise, the terminal returns a kernel panic error.
NOTE: Keep in mind that onboard VGA reduces the Point of Service terminal’s available RAM.
The behavior of Point of Service terminals booting from CD is similar to Point of Service terminals that receive the first and second stage boot image over the LAN from a Branch Server:
1. The POSBranch image is installed to a RAM or hard disk drive on the Point of Service terminal.
The partition information resides in the config.image file located on the CD.
NOTE: For electronic distributions, the partition information is created based on LDAP entries on the Administration Server.
2. The installed client image is booted from the RAM or hard disk drive on the Point of Service terminal.
Point of Service 9 Installation Guide

10novdocx (E
NU
) 10 August 2006
10Automatic Branch Server Installation
In the two-tiered Administration Server and Branch Server architecture, the Branch Servers are assumed to be in a remote environment, sometimes far from knowledgeable Linux administrators. To simplify Branch Server installation, Novell® Linux Point of Service 9 provides a toolkit that enables administrators to create autoinstall media to automatically install and set up Branch Servers with very little on-site effort.
This functionality is provided through AutoYaST. AutoYaST provides an automatic installation option that allows new branches to be set up at minimal expense. An AutoYaST control file is provided for the basic setup and the description files are generated from the LDAP directory. The resulting ISO file is then burned to a CD for deployment at the Branch Server site.
NOTE: Automatic Branch Server images are created only in ISO format; therefore, CD is the only supported media.
This section outlines the steps required to build an Automatic Branch Server Installation image:
Section 10.1, “Preparing the Administration Server,” on page 115Section 10.2, “Creating the Branch Server Definition in the LDAP Directory,” on page 116Section 10.3, “Modifying the Branch Server Configuration Template (template.xml),” on page 119Section 10.4, “Generating the Automatic Branch Server Installation Image,” on page 120Section 10.5, “Creating the Boot Media,” on page 121Section 10.6, “Starting Up the Branch Server,” on page 122
10.1 Preparing the Administration ServerTo prepare for creating the POSBranch image:
You must have installed the ImageBuilder tools either on the Administration Server or on a dedicated Image Building Server.
For more information on installing ImageBuilder, see Chapter 4, “Setting Up the Administration Server,” on page 59 or Chapter 5, “Setting Up a Dedicated Image Building Server,” on page 67.Copy the SLES image source files from the Novell Linux Point of Service CDs to a central distribution directory. For more information, see “Copying the Novell Linux Point of Service CDs to a Central Distribution Directory” in the Novell Linux Point of Service 9 Administration Guide.Define the location of the image source files in the AdminServer.conf.sles file. This file is automatically generated when you create AdminServer.conf. For more information, see “Defining the Location of the Image Source Files ” in the Novell Linux Point of Service 9 Administration Guide.
Automatic Branch Server Installation 115

116 Novell Linux
novdocx (EN
U) 10 A
ugust 2006
Provide access to a CD writer to create the boot media.
NOTE: The CD writer does not need to be installed on the Administration Server if the CD images can be transferred through the network to a machine equipped with a CD recorder.
10.2 Creating the Branch Server Definition in the LDAP DirectoryTo enable the autoinstall system to configure the branch server, detailed information about the hard disk and the network interfaces must be defined in the LDAP directory. Figure 10-1 represents the LDAP objects required to define the structure for a Branch Server.
Figure 10-1 LDAP objects required for Branch Server definition
Table 10-1 reviews the attributes for each LDAP object required to provide the Branch Server definition. For more information about the LDAP directory, refer to “The Novell Linux Point of Service LDAP Directory” in the Novell Linux Point of Service 9 Administration Guide.
Table 10-1 Attributes for Branch Server LDAP objects.
LDAP Object Required Properties
scLocation Defines general information about the Branch Server network. Required attributes include the following:
cn
ipNetworkNumber
ipNetmaskNumber
scDhcpRange
scDhcpFixedRange
scDefaultGw
scDynamicIp
For more information, see “Creating an scLocation Object” on page 73.
Point of Service 9 Installation Guide

novdocx (EN
U) 10 A
ugust 2006
scServerContainer Specifies a container for the Branch Server definition. The only required attribute for this container object is the cn.
For information, see “Adding an scBranchServer Object” on page 74.
scBranchServer Specifies a container for the hardware objects that provide the Branch Server definition. The only required attribute for this container object is the cn.
For more information, see “Adding an scBranchServer Object” on page 74.
scNetworkcard Provides the configuration for a Branch Server network interface card. Required attributes include the following:
scDevice, the network device (such as eth0 or eth1)
ipHostNumber, the IP address of the Branch Server
ipNetmaskNumber, the netmask of the Branch Server’s network
scModul, the loadable module (driver) that is necessary to activate the network card
For example:posAdmin.pl --user cn=admin,o=mycorp,c=us --password secret --base cn=bs,cn=server,cn=lab,ou=boston, o=mycorp,c=us --add --scNetworkcard --scDevice eth2 --ipHostNumber 192.168.1.150 --ipNetmaskNumber 255.255.248.0 --scModul e100
LDAP Object Required Properties
Automatic Branch Server Installation 117

118 Novell Linux
novdocx (EN
U) 10 A
ugust 2006
For more information about using posAdmin to create LDAP objects, see “Using posAdmin to Manage the LDAP Directory” in the Novell Linux Point of Service 9 Administration Guide.
scHarddisk Provides the configuration for the Branch Server’s boot hard disk. Required attributes include the following:
cn
scDevice
scHdSize
scPartitionsTable
The partitioning scheme for Branch Servers is the same as for Point of Service terminals. For scPartitionsTable, use the form ‘size type mount;...’, where size is specified in megabytes, type is either L for Linux file systems or S for swap space, and mount specifies where in the file system hierarchy the partition is mounted.
For size, you can use the wildcard “x” to automatically compute the size of the file system as follows:
S partitions are created at twice the RAM size
L partitions with mount point /boot get approximately 20 megabytes
(Optional) The last partition entry in the list can specify an x to use up the remaining space on the hard disk.
Separate partition entries with a semicolon (;). For swap space partitions, “x” must be used as the mount point.
For a simple branch server, the scPartitionsTable value of ‘x S x;x L /’ is suggested, which creates the default swap space and one large root file system.
For example:posAdmin.pl --user cn=admin,o=mycorp,c=us --password secret --base cn=bs,cn=server,cn=lab,ou=boston, o=mycorp,c=us --add --scHarddisk --cn sda --scDevice /dev/sda --scHdSize 40960 --scPartitionsTable 'x S x;x L /'
scService Defines Branch Server services, which can include DHCP, DNS, FTFP, NTP, and RSYNC. Required attributes include the following:
cn
ipHostNumber
scDnsName
scServiceName
scServiceStartScript
scServiceStatus
NOTE: High Availability services (scHAServices) are not supported for Automatic Branch Server Installation.
For more information, see “Adding an scBranchServer Object” on page 74.
LDAP Object Required Properties
Point of Service 9 Installation Guide
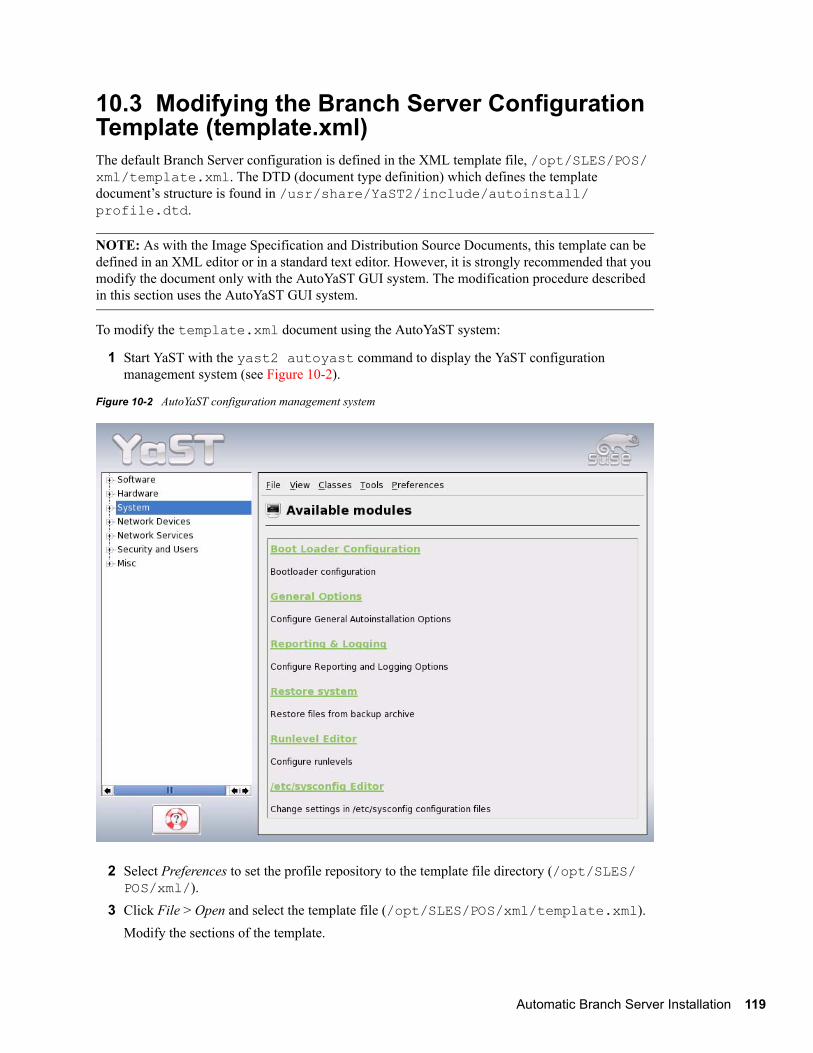
novdocx (EN
U) 10 A
ugust 2006
10.3 Modifying the Branch Server Configuration Template (template.xml)The default Branch Server configuration is defined in the XML template file, /opt/SLES/POS/xml/template.xml. The DTD (document type definition) which defines the template document’s structure is found in /usr/share/YaST2/include/autoinstall/profile.dtd.
NOTE: As with the Image Specification and Distribution Source Documents, this template can be defined in an XML editor or in a standard text editor. However, it is strongly recommended that you modify the document only with the AutoYaST GUI system. The modification procedure described in this section uses the AutoYaST GUI system.
To modify the template.xml document using the AutoYaST system:
1 Start YaST with the yast2 autoyast command to display the YaST configuration management system (see Figure 10-2).
Figure 10-2 AutoYaST configuration management system
2 Select Preferences to set the profile repository to the template file directory (/opt/SLES/POS/xml/).
3 Click File > Open and select the template file (/opt/SLES/POS/xml/template.xml). Modify the sections of the template.
Automatic Branch Server Installation 119
120 Novell Linux
novdocx (EN
U) 10 A
ugust 2006
You can change time zone, add software packages, and change system parameters. A menu system similar to the YaST configuration interface allows you to modify specific sections of the template.
4 After the XML template has been modified with AutoYaST, remove the DOCTYPE entry because it cannot be parsed correctly by the XSLT processor that is used to transform the file. To perform this operation, run the following command to clean the template file:xmllint --dropdtd template-yast2.xml >template.xml
10.4 Generating the Automatic Branch Server Installation ImageThe posldap2autoinstcd.pl script is used to create the Automatic Branch Server Installation images. It generates an ISO file (autoinst.iso) and an XML document (autoinst.xml). This utility is located in the /usr/sbin directory.
Here is the command syntax to generate the Automatic Branch Server Installation images:posldap2autoinstcd.pl [options]
Table 10-2 gives a description of the command options.
Table 10-2 Command options for posldap2autoinstcd.pl
Option Description
--DN branchserverdn Defines the distinguished name (DN) of the Branch Server, which is used to create the following:
An ISO image, autoinst.iso, that fits the description in the template file. It contains all necessary software.
An XML template file, autoinst.xml, that instructs AutoYaST to install the system, set up network interfaces, and configure the Branch Server system so it is ready to use.
This parameter is required.
[--user ldapuser] Defines the user account the Branch Server uses to connect to the LDAP directory on the Administration Server.
This parameter is optional. If it is not defined, the Branch Server uses the admin account and password created by the posInitLdap.sh or posInitEdir.sh script during the initial configuration of the Administration Server.
[--pasword ldap_password] Defines the password the Branch Server uses to connect to the LDAP directory on the Administration Server.
This parameter is optional. If it is not defined, the Branch Server uses the admin account and password created by the posInitLdap.sh or posInitEdir.sh script during the initial configuration of the Administration Server.
Point of Service 9 Installation Guide
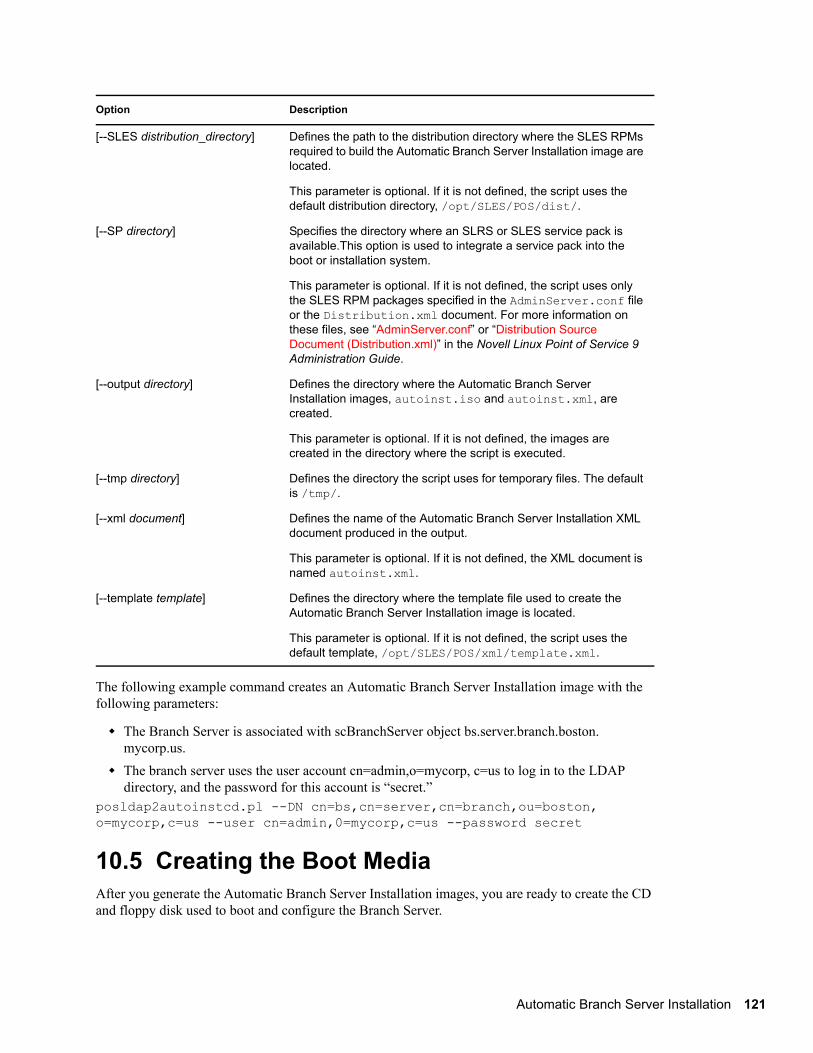
novdocx (EN
U) 10 A
ugust 2006
The following example command creates an Automatic Branch Server Installation image with the following parameters:
The Branch Server is associated with scBranchServer object bs.server.branch.boston. mycorp.us.The branch server uses the user account cn=admin,o=mycorp, c=us to log in to the LDAP directory, and the password for this account is “secret.”
posldap2autoinstcd.pl --DN cn=bs,cn=server,cn=branch,ou=boston, o=mycorp,c=us --user cn=admin,0=mycorp,c=us --password secret
10.5 Creating the Boot MediaAfter you generate the Automatic Branch Server Installation images, you are ready to create the CD and floppy disk used to boot and configure the Branch Server.
[--SLES distribution_directory] Defines the path to the distribution directory where the SLES RPMs required to build the Automatic Branch Server Installation image are located.
This parameter is optional. If it is not defined, the script uses the default distribution directory, /opt/SLES/POS/dist/.
[--SP directory] Specifies the directory where an SLRS or SLES service pack is available.This option is used to integrate a service pack into the boot or installation system.
This parameter is optional. If it is not defined, the script uses only the SLES RPM packages specified in the AdminServer.conf file or the Distribution.xml document. For more information on these files, see “AdminServer.conf” or “Distribution Source Document (Distribution.xml)” in the Novell Linux Point of Service 9 Administration Guide.
[--output directory] Defines the directory where the Automatic Branch Server Installation images, autoinst.iso and autoinst.xml, are created.
This parameter is optional. If it is not defined, the images are created in the directory where the script is executed.
[--tmp directory] Defines the directory the script uses for temporary files. The default is /tmp/.
[--xml document] Defines the name of the Automatic Branch Server Installation XML document produced in the output.
This parameter is optional. If it is not defined, the XML document is named autoinst.xml.
[--template template] Defines the directory where the template file used to create the Automatic Branch Server Installation image is located.
This parameter is optional. If it is not defined, the script uses the default template, /opt/SLES/POS/xml/template.xml.
Option Description
Automatic Branch Server Installation 121

122 Novell Linux
novdocx (EN
U) 10 A
ugust 2006
10.5.1 Creating the Boot CDThe create the boot CD:
NOTE: In this example, cdrecord is used to burn the CD image on a CD recorder. cdrecord is a Linux command line program that can burn data or audio onto a CD or DVD recorder.
1 Use the following command to find your CD recorder device:cdrecord -scanbus
Linux returns the following information: cdrecord dev=2,0,0 2,0,0 200) 'PIONEER' 'DVD-RW DVR-106D' '1.07' Removable CD-ROM
2 Burn the Automatic Branch Server Installation ISO image (autoinst.iso) to the CD:cdrecord dev=2,0,0 autoinst.iso
10.5.2 Creating the Floppy DiskTo create the floppy disk;
1 Create a file named info to control the AutoYaST process. It must contain the following lines:install=cd:///autoyast=floppy:///autoinst.xmlautoyast2=floppy:///autoinst.xml
2 Create a file named posInitBranchserver.auto.cfg to control the automatic setup of the branch server software. It must contain the following lines:COMPANYNAME="your_company_name"COUNTRY="country"ADMINSERVER="IP_address"POSADMINDN="dn"PASSWORD="username_password"
If the password should not be set up automatically for security reasons, it can be omitted. In this case, posInitBranchserver.sh requests the password when the Branch Server starts.
3 Copy the three files to an MS-DOS formatted floppy disk:info
posInitBranchserver.auto.cfg
autoinst.xml
10.6 Starting Up the Branch ServerAt the Branch Server site, boot and configure the Branch Server as follows:
1 Set the branch server to boot from CD.2 Insert the floppy disk and CD into the appropriate drives.3 Boot the server.
The automatic installation system starts. It requests confirmation at the start of the installation, but otherwise runs without interaction.
Point of Service 9 Installation Guide

novdocx (EN
U) 10 A
ugust 2006
4 After the system is installed, log in as the root user to start the automatic configuration of the Branch Server software. The posInitBranchserver.sh script automatically starts, sets the parameters as specified in the posInitBranchserver.auto.cfg file, and requests any missing parameters.
5 Run possyncimages.pl to download the client images from the Administration Server.
Automatic Branch Server Installation 123

124 Novell Linux
novdocx (EN
U) 10 A
ugust 2006
Point of Service 9 Installation Guide

11novdocx (E
NU
) 10 August 2006
11Deploying Point of Service Terminals
Point of Service terminals are the end point in the Novell® Linux Point of Service architecture. They provides customer service functions such as a Point of Sale terminal or bank teller workstation.
This section reviews the procedures required to deploy Point of Service terminals.
Section 11.1, “Creating Point of Service Images,” on page 125Section 11.2, “Creating the LDAP Objects Required for the Point of Service Terminals,” on page 126Section 11.3, “Distributing Images to Point of Service Terminals,” on page 134Section 11.4, “Booting the Point of Service Terminal,” on page 136
11.1 Creating Point of Service ImagesBefore you can deploy Point of Service terminals, you must first create image files that contain the operating system, application files, and system settings required to boot the terminals.
Novell Linux Point of Service provides image templates that can be customized and generated on an Administration Server or a dedicated image building server using the ImageBuilder tool. For information on the available image templates, see “Point of Service Images” in the Novell Linux Point of Service 9 Administration Guide.
To create the Point of Service images required to deploy your Point of Service terminals, you must do the following:
1. Copy the image source files to your image building server.
For detailed instructions, see “Copying the Novell Linux Point of Service CDs” in the Novell Linux Point of Service 9 Administration Guide.
2. Define the location of the image source files.For detailed instructions, see “Generating AdminServer.conf or Distribution.xml” in the Novell Linux Point of Service 9 Administration Guide.
3. Build the Point of Service image files. For detailed instructions, see “Building Images with scr” or “Building Images with xscr” in the Novell Linux Point of Service 9 Administration Guide.
Deploying Point of Service Terminals 125
126 Novell Linux
novdocx (EN
U) 10 A
ugust 2006
11.2 Creating the LDAP Objects Required for the Point of Service TerminalsBefore you can boot the Point of Service terminals, you must use posAdmin to create the following objects in the LDAP directory:
An scCashRegister object and its associated configuration objects for each type of Point of Service terminal in your system:
scHarddisk or scRamDiskscConfigFileTemplate (optional)scConfigFileSyncTemplate (optional)
An scPosImage object for each client image file that you want the Branch Server to distribute to Point of Service terminals.
IMPORTANT: You must create the scPosImage objects and set the scPosImageVersion attribute to Active before you boot the Point of Service terminals. The Point of Service terminals require an scPosImage object with an active scPosImageVersion attribute before they can download the corresponding physical image from the Branch Server at boot time. For more information on setting the scPosImageVersion attribute to Active, see “Activating Images” on page 132.
With posAdmin, you can add, remove, and modify Point of Service terminal hardware assets such as Point of Service terminals, hard disks, network interface cards, and configuration files with the use of reference objects in the LDAP directory. Hardware reference objects are typically located in the global container in the LDAP directory.
NOTE: Each LDAP object has two types of attributes: must and may attributes. The must attributes are the minimum requirements for an object; the may attributes are optional.
The following sections review the procedures required to create and manage these objects.
Section 11.2.1, “Creating an scCashRegister Object,” on page 126Section 11.2.2, “Creating an scRAMDisk Object,” on page 128Section 11.2.3, “Creating an scHarddisk Object,” on page 128Section 11.2.4, “Creating an scConfigFileTemplate Object,” on page 129Section 11.2.5, “Creating an scConfigFileSyncTemplate Object,” on page 130Section 11.2.6, “Creating scPosImage Objects,” on page 131Section 11.2.7, “Activating Images,” on page 132Section 11.2.8, “Assigning an Image to a Point of Service Terminal,” on page 133Section 11.2.9, “Removing an Assigned Image,” on page 134
11.2.1 Creating an scCashRegister ObjectThe first step to register new Point of Service hardware is to define the name and model type of the Point of Service terminal. The scCashRegister object stores information about Point of Service hardware. Typically, you should define a scCashRegister object for each type of terminal used on the Novell Linux Point of Service system; however, if a Point of Service terminal does not have an
Point of Service 9 Installation Guide
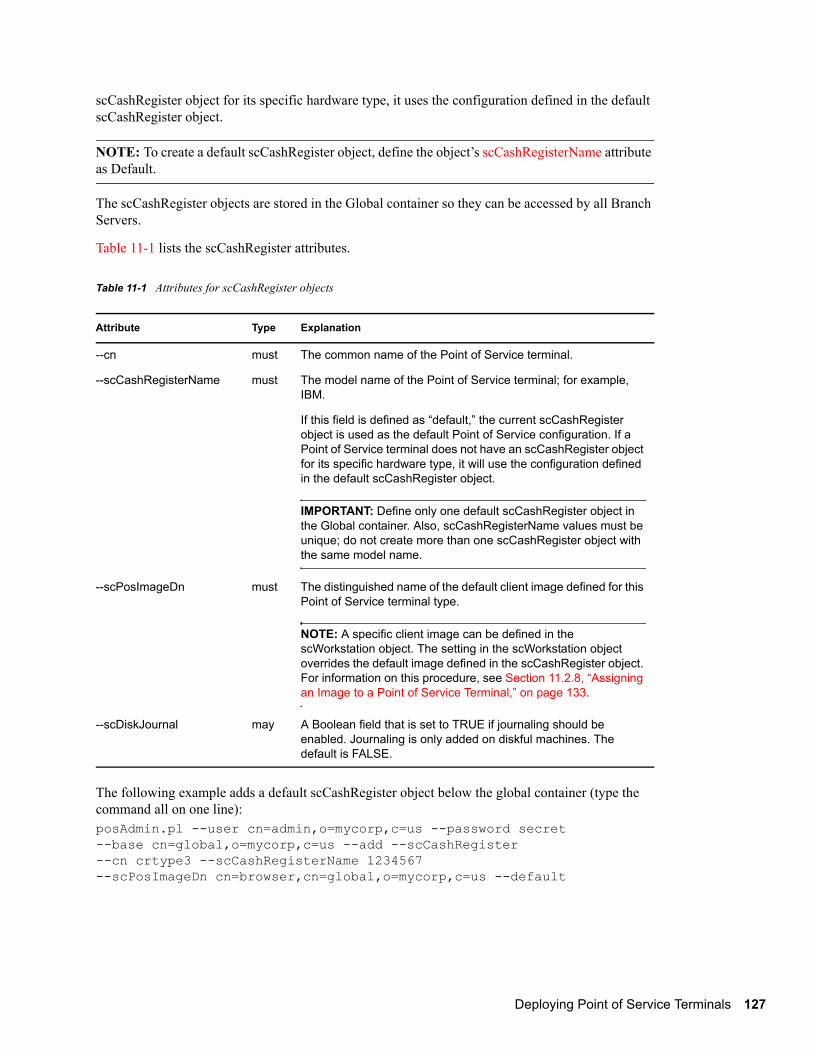
novdocx (EN
U) 10 A
ugust 2006
scCashRegister object for its specific hardware type, it uses the configuration defined in the default scCashRegister object.
NOTE: To create a default scCashRegister object, define the object’s scCashRegisterName attribute as Default.
The scCashRegister objects are stored in the Global container so they can be accessed by all Branch Servers.
Table 11-1 lists the scCashRegister attributes.
Table 11-1 Attributes for scCashRegister objects
The following example adds a default scCashRegister object below the global container (type the command all on one line):posAdmin.pl --user cn=admin,o=mycorp,c=us --password secret --base cn=global,o=mycorp,c=us --add --scCashRegister --cn crtype3 --scCashRegisterName 1234567 --scPosImageDn cn=browser,cn=global,o=mycorp,c=us --default
Attribute Type Explanation
--cn must The common name of the Point of Service terminal.
--scCashRegisterName must The model name of the Point of Service terminal; for example, IBM.
If this field is defined as “default,” the current scCashRegister object is used as the default Point of Service configuration. If a Point of Service terminal does not have an scCashRegister object for its specific hardware type, it will use the configuration defined in the default scCashRegister object.
IMPORTANT: Define only one default scCashRegister object in the Global container. Also, scCashRegisterName values must be unique; do not create more than one scCashRegister object with the same model name.
--scPosImageDn must The distinguished name of the default client image defined for this Point of Service terminal type.
NOTE: A specific client image can be defined in the scWorkstation object. The setting in the scWorkstation object overrides the default image defined in the scCashRegister object. For information on this procedure, see Section 11.2.8, “Assigning an Image to a Point of Service Terminal,” on page 133.
--scDiskJournal may A Boolean field that is set to TRUE if journaling should be enabled. Journaling is only added on diskful machines. The default is FALSE.
Deploying Point of Service Terminals 127
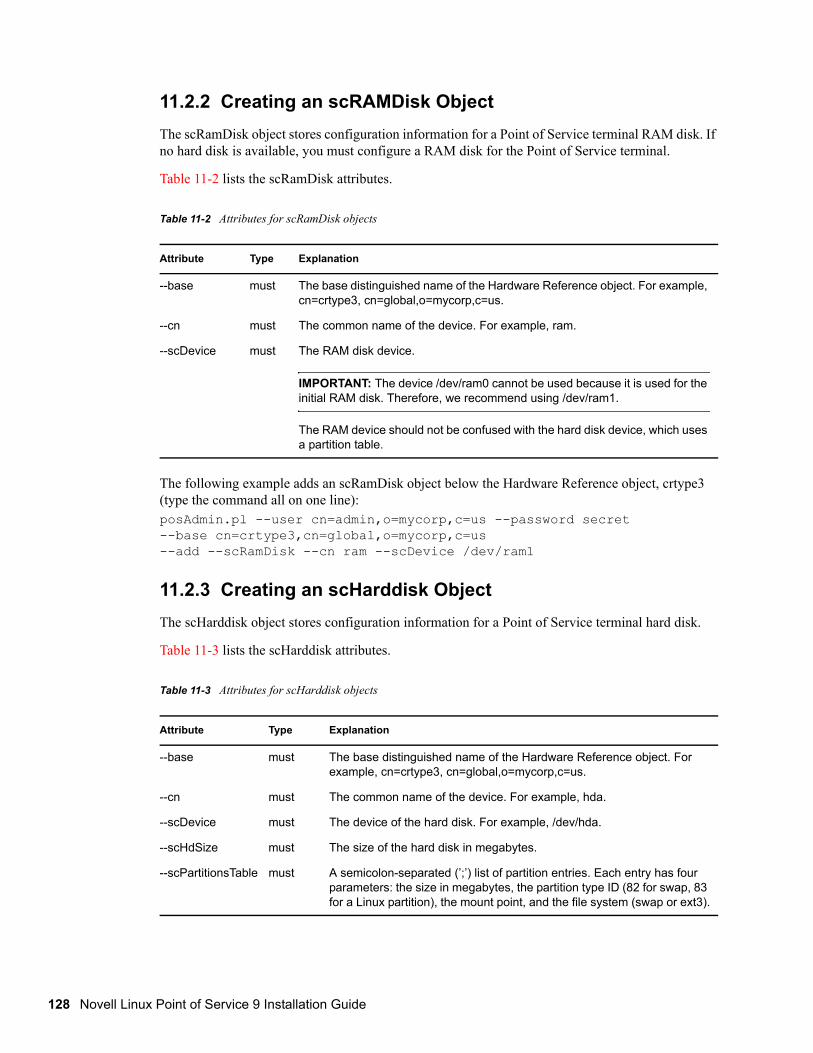
128 Novell Linux
novdocx (EN
U) 10 A
ugust 2006
11.2.2 Creating an scRAMDisk ObjectThe scRamDisk object stores configuration information for a Point of Service terminal RAM disk. If no hard disk is available, you must configure a RAM disk for the Point of Service terminal.
Table 11-2 lists the scRamDisk attributes.
Table 11-2 Attributes for scRamDisk objects
The following example adds an scRamDisk object below the Hardware Reference object, crtype3 (type the command all on one line):posAdmin.pl --user cn=admin,o=mycorp,c=us --password secret --base cn=crtype3,cn=global,o=mycorp,c=us --add --scRamDisk --cn ram --scDevice /dev/ram1
11.2.3 Creating an scHarddisk ObjectThe scHarddisk object stores configuration information for a Point of Service terminal hard disk.
Table 11-3 lists the scHarddisk attributes.
Table 11-3 Attributes for scHarddisk objects
Attribute Type Explanation
--base must The base distinguished name of the Hardware Reference object. For example, cn=crtype3, cn=global,o=mycorp,c=us.
--cn must The common name of the device. For example, ram.
--scDevice must The RAM disk device.
IMPORTANT: The device /dev/ram0 cannot be used because it is used for the initial RAM disk. Therefore, we recommend using /dev/ram1.
The RAM device should not be confused with the hard disk device, which uses a partition table.
Attribute Type Explanation
--base must The base distinguished name of the Hardware Reference object. For example, cn=crtype3, cn=global,o=mycorp,c=us.
--cn must The common name of the device. For example, hda.
--scDevice must The device of the hard disk. For example, /dev/hda.
--scHdSize must The size of the hard disk in megabytes.
--scPartitionsTable must A semicolon-separated (’;’) list of partition entries. Each entry has four parameters: the size in megabytes, the partition type ID (82 for swap, 83 for a Linux partition), the mount point, and the file system (swap or ext3).
Point of Service 9 Installation Guide
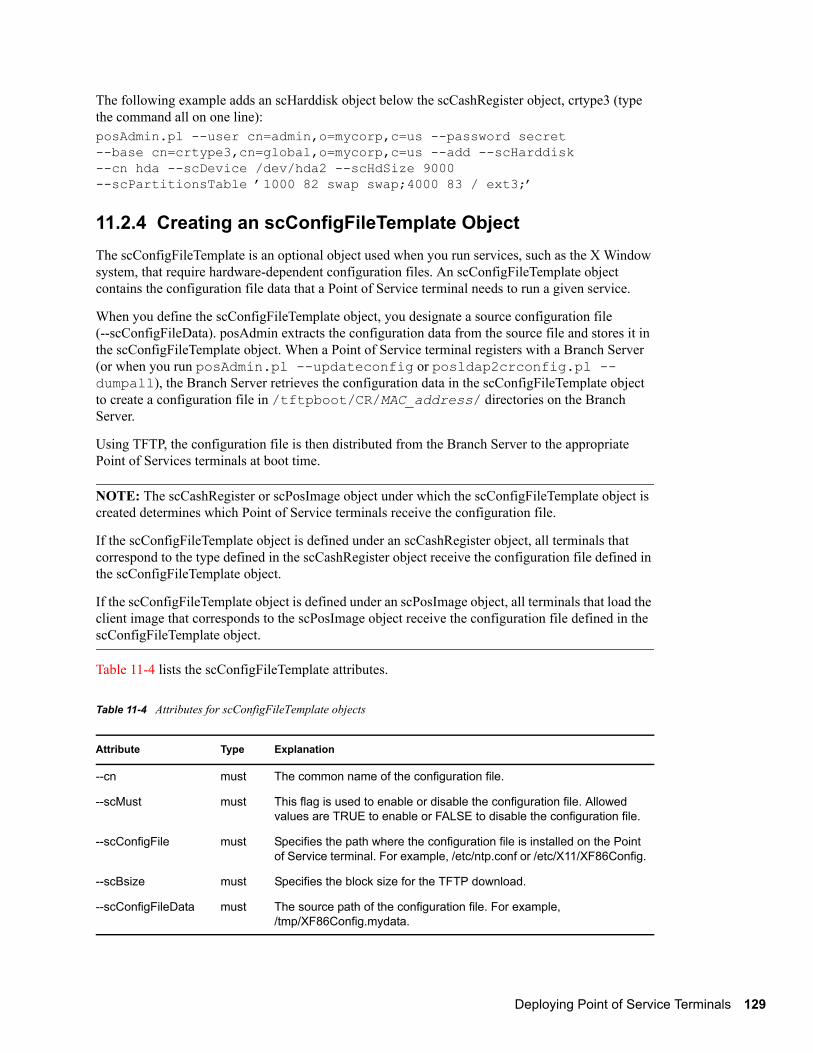
novdocx (EN
U) 10 A
ugust 2006
The following example adds an scHarddisk object below the scCashRegister object, crtype3 (type the command all on one line):posAdmin.pl --user cn=admin,o=mycorp,c=us --password secret --base cn=crtype3,cn=global,o=mycorp,c=us --add --scHarddisk --cn hda --scDevice /dev/hda2 --scHdSize 9000 --scPartitionsTable ’1000 82 swap swap;4000 83 / ext3;’
11.2.4 Creating an scConfigFileTemplate ObjectThe scConfigFileTemplate is an optional object used when you run services, such as the X Window system, that require hardware-dependent configuration files. An scConfigFileTemplate object contains the configuration file data that a Point of Service terminal needs to run a given service.
When you define the scConfigFileTemplate object, you designate a source configuration file (--scConfigFileData). posAdmin extracts the configuration data from the source file and stores it in the scConfigFileTemplate object. When a Point of Service terminal registers with a Branch Server (or when you run posAdmin.pl --updateconfig or posldap2crconfig.pl --dumpall), the Branch Server retrieves the configuration data in the scConfigFileTemplate object to create a configuration file in /tftpboot/CR/MAC_address/ directories on the Branch Server.
Using TFTP, the configuration file is then distributed from the Branch Server to the appropriate Point of Services terminals at boot time.
NOTE: The scCashRegister or scPosImage object under which the scConfigFileTemplate object is created determines which Point of Service terminals receive the configuration file.
If the scConfigFileTemplate object is defined under an scCashRegister object, all terminals that correspond to the type defined in the scCashRegister object receive the configuration file defined in the scConfigFileTemplate object.
If the scConfigFileTemplate object is defined under an scPosImage object, all terminals that load the client image that corresponds to the scPosImage object receive the configuration file defined in the scConfigFileTemplate object.
Table 11-4 lists the scConfigFileTemplate attributes.
Table 11-4 Attributes for scConfigFileTemplate objects
Attribute Type Explanation
--cn must The common name of the configuration file.
--scMust must This flag is used to enable or disable the configuration file. Allowed values are TRUE to enable or FALSE to disable the configuration file.
--scConfigFile must Specifies the path where the configuration file is installed on the Point of Service terminal. For example, /etc/ntp.conf or /etc/X11/XF86Config.
--scBsize must Specifies the block size for the TFTP download.
--scConfigFileData must The source path of the configuration file. For example, /tmp/XF86Config.mydata.
Deploying Point of Service Terminals 129

130 Novell Linux
novdocx (EN
U) 10 A
ugust 2006
The following example adds a scConfigFileTemplate object below the Hardware Reference object, crtype3 (type the command all on one line):posAdmin.pl --user cn=admin,o=mycorp,c=us --password secret --base cn=crtype3,cn=global,o=mycorp,c=us --add --scConfigFileTemplate --cn XF86Config --scConfigFile /etc/X11/XF86Config --scBsize 1024 --scConfigFileData /mydata/XF86Config.1234567
11.2.5 Creating an scConfigFileSyncTemplate ObjectThe scConfigFileSyncTemplate is an optional object used when you run services, such as the X Window system, that require hardware-dependent configuration files. This object points to the configuration file that a Point of Service terminal needs to run a given service. This object differs from scConfigFileTemplate objects because the configuration data is not stored in the object; rather, the object points to a configuration file outside the LDAP directory.
When a Point of Service terminal registers with a Branch Server (or when you run posAdmin.pl --updateconfig or posldap2crconfig.pl --dumpall), the Branch Server uses RSYNC to transfer the configuration file designated in the scConfigFileSyncTemplate object from the /opt/SLES/POS/rsync/config/ directory on the Administration Server to /tftpboot/CR/MAC_address/ directories on the Branch Server.
IMPORTANT: Any configuration files referenced in the scConfigFileSyncTemplate object must be located in the /opt/SLES/POS/rsync/config/ directory on the Administration Server.
Using TFTP, the configuration file is then distributed from the Branch Server to the appropriate Point of Service terminals at boot time.
NOTE: The scCashRegister or scPosImage object under which the scConfigFileSyncTemplate object is created determines which Point of Service terminals receive the configuration file.
If the scConfigFileSyncTemplate object is defined under an scCashRegister object, all terminals that correspond to the type defined in the scCashRegister object receive the configuration file designated in the scConfigFileSyncTemplate object.
If the scConfigFileSyncTemplate object is defined under an scPosImage object, all terminals that load the client image that corresponds to the scPosImage object receive the configuration file designated in the scConfigFileSyncTemplate object.
Table 11-5 lists the scConfigFileSyncTemplate attributes.
Table 11-5 Attributes for scConfigFileSyncTemplate objects
Attribute Type Explanation
--cn must The common name of the configuration file.
--scMust must This flag is used to enable or disable the configuration file. Allowed values are TRUE to enable or FALSE to disable the configuration file.
Point of Service 9 Installation Guide

novdocx (EN
U) 10 A
ugust 2006
The following example adds an scConfigFileSyncTemplate object below the hardware reference object, crtype3 (type the command all on one line):posAdmin.pl --user cn=admin,o=mycorp,c=us --password secret --base cn=crtype3,cn=global,o=mycorp,c=us --add --scConfigFileSyncTemplate --cn XF86Config --scConfigFile /etc/X11/XF86Config --scMust TRUE --scBsize 1024 --scConfigFileLocalPath /opt/SLES/POS/rsync/config/XF86Config.1234567
11.2.6 Creating scPosImage ObjectsImages are managed in LDAP with scPosImage objects. Each scPosImage object stores information about an image stored on the Administration Server. Every client image that you want to distribute to Point of Service terminals must have a corresponding scPosImage object in the LDAP directory.
IMPORTANT: You must create the scPosImage objects and set the scPosImageVersion attribute to Active before you boot the Point of Service terminals. The Point of Service terminals require an scPosImage object with an active scPosImageVersion attribute before they can download the corresponding physical image from the Branch Server at boot time.
The scPosImage objects that correspond to the client images you want to distribute to Point of Service terminals are typically organized within Distribution Container objects under the Global container in the LDAP tree.
NOTE: Boot images do not have scPosImage objects; they are referenced in the scInitrdName attribute in the scDistributionContainer object.
After the installation and configuration of the Novell Linux Point of Service, an scPosImage object for the Minimal image is automatically added to the Default Distribution Container. This default LDAP entry is intended to serve as an example and should not be deleted. You must manually add an scPosImage object for each client image you want to distribute to Point of Service terminals.
IMPORTANT: The images that ship with Novell Linux Point of Service 9 are built on Novell Linux Desktop (NLD) which runs the Linux 2.6 kernel. Therefore, the reference objects for Novell Linux Point of Service 9 images must be created in the Default Distribution Container.
If you migrate from SLRS 8 to Novell Linux Point of Service 9, the migration script creates the SLRS 8 distribution container. This container references the SLRS 8 kernel and therefore must store all the scPosImage objects for SLRS 8 images. For more information, see Chapter 3, “Migrating from SLRS 8 to Novell Linux Point of Service 9,” on page 57.
Table 11-6 lists the scPosImage attributes.
--scConfigFile must Specifies the path where the configuration file is installed on the Point of Service terminal; for example, /etc/ntp.conf or /etc/X11/XF86Config.
--scBsize must Specifies the block size for the TFTP download.
--scConfigFileLocalPath must The local source path of the configuration file; for example, /opt/SLES/POS/rsync/config/XF86Config.mydata.
Attribute Type Explanation
Deploying Point of Service Terminals 131

132 Novell Linux
novdocx (EN
U) 10 A
ugust 2006
Table 11-6 Attributes for scPosImage objects
The following example adds a scPosImage object below the Global container for a modified Java client image (type the command all on one line):posAdmin.pl --user cn=admin,o=mycorp,c=us --password secret --base cn=global,o=mycorp,c=us --add --scPosImage --cn myJava --scImageName myJava --scPosImageVersion "2.0.21;active" --scDhcpOptionsRemote /boot/pxelinux.0 --scDhcpOptionsLocal LOCALBOOT--scImageFile myJava --scConfigFile /etc/X11/XF86Config
11.2.7 Activating ImagesEach image can be available in several versions, as shown in Table 11-7. The scPosImageVersion attribute in each scPosImage object must be set to either active or passive. Active versions are downloaded by the Branch Server. If there are multiple active versions of a single image, the Branch Server selects the highest active version. Passive image versions are never downloaded to the Branch Server unless they are explicitly configured in the scWorkstation entry for the individual Point of Service terminal.
Attribute Type Explanation
--base must The base distinguished name of the scPosImage object; for example, cn=global,o=mycorp,c=us.
--cn must The common name of the client image; for example, myjava.
--scImageName must The name of the client image; for example, myjava.
--scPosImageVersion must The version number of the client image, followed by the flag passive or active; for example, 2.3.10; active. The version number and the flag are semicolon-separated (’;’). Possible combinations of this attribute are described in Table 11-7.
--scDhcpOptionsRemote must The boot option of the Point of Service terminal.The mandatory value is /boot/pxelinux.0.
--scDhcpOptionsLocal reserved This attribute is reserved for future extension of Novell Linux Point of Service and is not used at this time.
--scImageFile must The filename of the image, which the terminal will download from the Branch Server; for example, myjava.
--scBsize must Specifies the block size for the TFTP download of the client image; for example, 8192. Possible values are: 4096 (4 KB) for image sizes less than 128 MB, 8192 (8 KB) for image sizes less than 256MB, 16384 (16 KB) for image sizes less than 512 MB and 32768 (32 KB) for image sizes less than 1GB. You must select a TFTP block size of 32 KB for the full-featured Desktop image, because there is a limitation of the block counter for TFTP.
--scConfigFile may Specifies the path where the configuration file is installed on the Point of Service terminal; for example, /etc/ntp.conf or /etc/X11/XF86Config.
Point of Service 9 Installation Guide
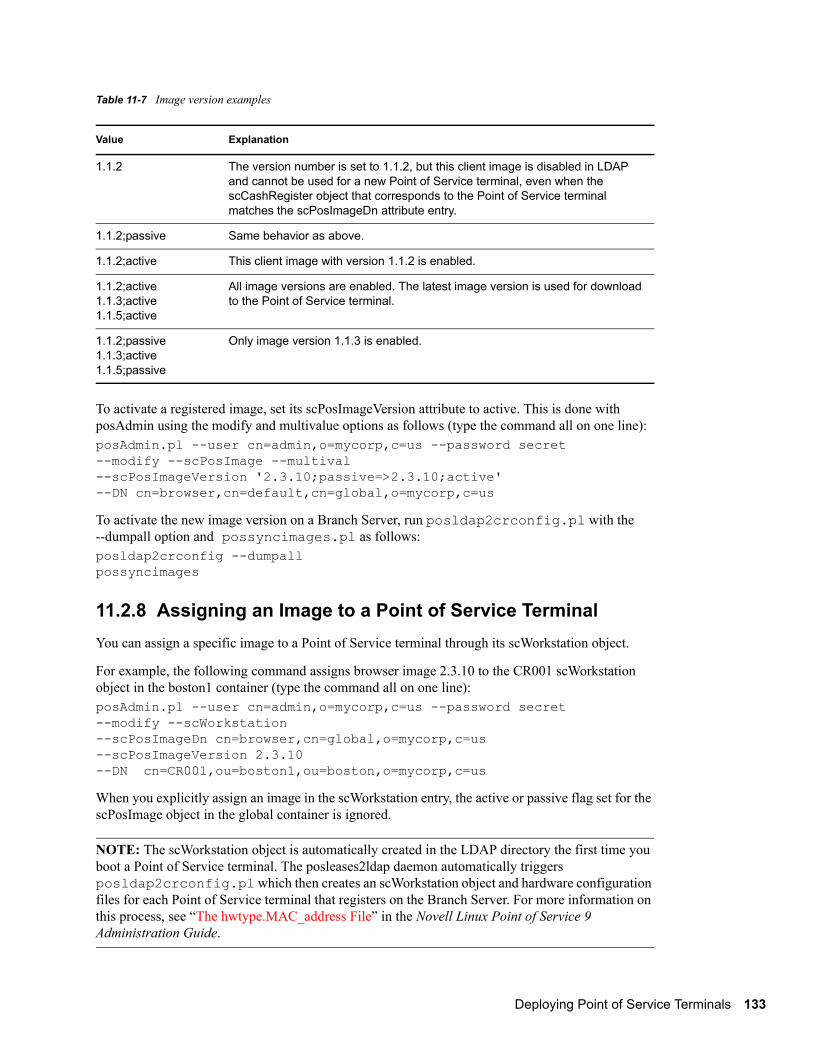
novdocx (EN
U) 10 A
ugust 2006
Table 11-7 Image version examples
To activate a registered image, set its scPosImageVersion attribute to active. This is done with posAdmin using the modify and multivalue options as follows (type the command all on one line):posAdmin.pl --user cn=admin,o=mycorp,c=us --password secret --modify --scPosImage --multival --scPosImageVersion '2.3.10;passive=>2.3.10;active' --DN cn=browser,cn=default,cn=global,o=mycorp,c=us
To activate the new image version on a Branch Server, run posldap2crconfig.pl with the --dumpall option and possyncimages.pl as follows: posldap2crconfig --dumpallpossyncimages
11.2.8 Assigning an Image to a Point of Service TerminalYou can assign a specific image to a Point of Service terminal through its scWorkstation object.
For example, the following command assigns browser image 2.3.10 to the CR001 scWorkstation object in the boston1 container (type the command all on one line):posAdmin.pl --user cn=admin,o=mycorp,c=us --password secret --modify --scWorkstation --scPosImageDn cn=browser,cn=global,o=mycorp,c=us--scPosImageVersion 2.3.10 --DN cn=CR001,ou=boston1,ou=boston,o=mycorp,c=us
When you explicitly assign an image in the scWorkstation entry, the active or passive flag set for the scPosImage object in the global container is ignored.
NOTE: The scWorkstation object is automatically created in the LDAP directory the first time you boot a Point of Service terminal. The posleases2ldap daemon automatically triggers posldap2crconfig.pl which then creates an scWorkstation object and hardware configuration files for each Point of Service terminal that registers on the Branch Server. For more information on this process, see “The hwtype.MAC_address File” in the Novell Linux Point of Service 9 Administration Guide.
Value Explanation
1.1.2 The version number is set to 1.1.2, but this client image is disabled in LDAP and cannot be used for a new Point of Service terminal, even when the scCashRegister object that corresponds to the Point of Service terminal matches the scPosImageDn attribute entry.
1.1.2;passive Same behavior as above.
1.1.2;active This client image with version 1.1.2 is enabled.
1.1.2;active 1.1.3;active 1.1.5;active
All image versions are enabled. The latest image version is used for download to the Point of Service terminal.
1.1.2;passive 1.1.3;active 1.1.5;passive
Only image version 1.1.3 is enabled.
Deploying Point of Service Terminals 133

134 Novell Linux
novdocx (EN
U) 10 A
ugust 2006
11.2.9 Removing an Assigned ImageTo remove the image assigned to a workstation, run the following command (type the command all on one line):posAdmin.pl --user cn=admin,o=mycorp,c=us --password secret--remove --scWorkstation --scPosImageDn --scPosImageVersion --DN cn=CR001,ou=boston1,ou=boston,o=mycorp,c=us
11.3 Distributing Images to Point of Service Terminals To electronically distribute new or updated client images, you must first copy the images into the central RSYNC directory of the Administration Server and then transfer the images to the Branch Servers. From there the images are distributed to the Point of Service terminals when they boot.
This section reviews each step in the electronic distribution process.
“Copying Images to the Administration Server RSYNC Directory” on page 134“Distributing Images to the Branch Server” on page 135“Distributing Images to Point of Service Terminals” on page 136“Image Install Notification” on page 136
NOTE: If you are unable to electronically distribute Point of Service images over your network, you must manually distribute the images uses CDBoot images. For more information on creating a CDBoot image, see “Building a CDBoot Image” in the Novell Linux Point of Service 9 Administration Guide.
11.3.1 Copying Images to the Administration Server RSYNC DirectoryThe first step to distribute new client images is to copy the images from the /opt/SLES/POS/image directory to the RSYNC directory, /opt/SLES/POS/rsync/. Before the RSYNC service can transmit the images to the Branch Server, client images must be located in the /opt/SLES/POS/rsync/image/ directory on the Administration Server, and the boot image must be located in /opt/SLES/POS/rsync/boot/.
NOTE: Copying the client images to the RSYNC directory is done manually to control which client image types and versions are distributed to the Branch Servers.
Copying Client Images to the Administration Server’s RSYNC Directory
The following example demonstrates how to put a previously-extended Browser client image in the Administration Server’s RSYNC directory so it can be received, on request, by the Branch Server:
1 Copy the extended Browser client image:cp /opt/SLES/POS/image/Browser-2.0.21-2004-12-05 /opt/SLES/POS/rsync/image/browser-2.0.21
2 Copy the corresponding Browser image MD5 checksum file:
Point of Service 9 Installation Guide

novdocx (EN
U) 10 A
ugust 2006
cp /opt/SLES/POS/image/Browser-2.0.21-2004-12-05.md5 /opt/SLES/POS/rsync/image/Browser-2.0.21.md5
Copying Boot Images to the Administration Server’s RSYNC Directory
The following example demonstrates how to copy the first and second stage boot images to the Administrations Server’s RSYNC directory so they can be received, on request, by the Branch Server:
NOTE: Point of Service terminals boot two images, a first stage image (initrd.gz) and a second stage image (linux). For more information, see Section 11.4, “Booting the Point of Service Terminal,” on page 136.
1 Copy the initrd-disknetboot image as initrd.gz: cp /opt/SLES/POS/image/initrd-disknetboot-version-date.gz /opt/SLES/POS/rsync/boot/initrd.gz
2 Copy the kernel image as linux:cp /opt/SLES/POS/image/initrd-disknetboot-version-date.kernel. kernel_version /opt/SLES/POS/rsync/boot/linux
11.3.2 Distributing Images to the Branch ServerIf you create a new image or change an image version, you can run the possyncimages.pl command at the Branch Server to transfer new or updated images to the Branch Server after the images are in the Administration Server’s RSYNC directory.
IMPORTANT: The RSYNC service must be properly configured and running on the Administration Server for the possynimages.pl script to run. For more information, see “Adding an scBranchServer Object” on page 74.
Additionally, each client image must have an associated scPosImage object in LDAP and the object’s scPosImageVersion attribute must be set to active before possyncimages.pl will transfer the images to the Branch Server. For more information, see “Activating Images” on page 132.
The basic process is as follows:
1 The possyncimages.pl script initially checks via the PID file to determine if an instance is already running.
2 The image files are then copied from the Administration Server to the Branch Server. Boot images are copied from the /opt/SLES/POS/rsync/boot/ directory on the Administration Server to the /tftpboot/boot/ directory on the Branch Server. Client images and their associated MD5 checksum files are copied from /opt/SLES/POS/rsync/image/ to /tftpboot/image/.During this process, the TFTP server must be stopped or otherwise prevented from transmitting the image files to clients.
For more information on the possyncimages.pl script, see “possyncimages.pl” in the Novell Linux Point of Service 9 Administration Guide.
Deploying Point of Service Terminals 135

136 Novell Linux
novdocx (EN
U) 10 A
ugust 2006
IMPORTANT: Remember that distributing client images from the Administration Server to the Branch Servers is only one part of the process required to deploy new versions of a client image. You must also update the scPosImageVersion attribute within the Image Reference object (scPosImage) in the LDAP tree; otherwise, Point of Service terminals already registered in LDAP cannot boot the new client image version.
For more details, refer to “Creating scPosImage Objects” on page 131 and “posldap2crconfig.pl” in the Novell Linux Point of Service 9 Administration Guide. For an illustration of Novell Linux Point of Service system dependences, see “Dependencies Between LDAP, Branch Server, and Point of Service Terminal” in the Novell Linux Point of Service 9 Administration Guide.
After executing the possyncimages.pl script, verify the result by checking the contents of the following directories:
/tftpboot/image
/tftpboot/boot
11.3.3 Distributing Images to Point of Service TerminalsNew or updated images are distributed to Point of Service terminals at boot time. For information on this process, see Section 11.4, “Booting the Point of Service Terminal,” on page 136.
11.3.4 Image Install NotificationWhen the Branch Server distributes a new image to a Point of Service terminal, the system provides notification that the image was successfully installed on the Point of Service terminal. The notification is stored in the scWorkstation object in the LDAP directory on the Administration Server.
When the image is successfully installed on the Point of Service terminal, the linuxrc script running on the Point of Service terminal creates the bootversion.MAC_Address file in the /tftpboot/upload directory on the Branch Server.The posleases2ldap process then transfers the information to the scNotifiedimage attribute in the scWorkstation object in LDAP and deletes the bootversion.MAC_address file.
11.4 Booting the Point of Service TerminalIMPORTANT: Before you can boot the Point of Service terminals, you must create an scCashRegister object and its associated objects. For more information, see “Creating an scCashRegister Object” on page 126.
Typically, when you boot a Point of Service terminal, it first tries to boot from CD. If a CD is not available, the terminal attempts a network PXE boot. If the network is not available, it then boots from the hard drive.
NOTE: You can override this order with the BIOS settings.
The first time you boot the Point of Service terminals, the posleases2ldap daemon automatically triggers posldap2crconfig.pl which then creates a Workstation (scWorkstation) object and hardware configuration files for the Point of Service terminals that register on the Branch Server.
Point of Service 9 Installation Guide

novdocx (EN
U) 10 A
ugust 2006
For more information on this process, see “The hwtype.MAC_address File” in the Novell Linux Point of Service 9 Administration Guide.
Figure 11-1 provides a simplified overview of the Point of Service boot process for a network PXE boot, a hard disk boot, and a CD boot.
Figure 11-1 Point of Service terminal boot process.
Deploying Point of Service Terminals 137

138 Novell Linux
novdocx (EN
U) 10 A
ugust 2006
Detailed information of each boot process is provided in the following sections:
Section 11.4.1, “Network PXE Boot,” on page 138Section 11.4.2, “CDBoot,” on page 140
11.4.1 Network PXE BootTo boot Point of Service terminals from the network, the following conditions must be met:
The terminal must have a network connection to the Branch Server.The TFTP service must be properly configured and running on the Branch Server.For more information on Branch Server configuration, see Chapter 6, “Setting Up a Branch Server,” on page 71.The terminal must have an associated scCashRegister object in the LDAP directory.For more information, see Section 11.2, “Creating the LDAP Objects Required for the Point of Service Terminals,” on page 126.The Point of Service boot images must be located in the /tftpboot/boot/ directory on the Branch Server and the client images must be located in the /tftpboot/image/ directory.For more information, see Section 11.3, “Distributing Images to Point of Service Terminals,” on page 134.The Point of Service client images must have an associated scPosImage object in the LDAP directory and the object’s scPosImageVersion attribute must be set to Active. For more information, see Section 11.2.6, “Creating scPosImage Objects,” on page 131.
If these conditions are met, the Point of Service terminal can successfully boot from the network.
The following is a detailed description of what takes place when a Point of Service terminal boots from the network:
1. The Point of Service terminal makes a DHCP request. 2. The Point of Service terminal downloads pxelinux.0.
The pxelinux.0 image is the first bootstrap image used to PXE boot the Point of Service terminals.
3. The Point of Service terminal downloads the linux file. The linux file is actually the DiskNetboot-version-date.kernel.version-SLRS image. The Linux image provides the Linux kernel used to PXE boot the Point of Service terminals.
4. Using PXE network boot or boot manager (GRUB), the Point of Service terminal boots the initrd image (initrd.gz) that it receives from the Branch Server. If no PXE boot is possible, the Point of Service terminal tries to boot via hard disk, if one is accessible.
5. The linuxrc script begins.6. The file systems required to receive system data are mounted; for example, the proc file
system.7. The Point of Service hardware type (hwtype) is detected.
Point of Service 9 Installation Guide

novdocx (EN
U) 10 A
ugust 2006
The Point of Service hardware manufacturer provides a program to do this. The first time the Point of Service terminal boots, this information is used to register the Point of Service terminal and create the terminal’s config.MAC_address file. This information is also used to determine which configuration files the terminal should use.
8. The Point of Service BIOS version (hwbios) is detected.The Point of Service hardware manufacturer provides a program to do this.
9. Network support is activated. The required kernel module is determined from a static table by selecting the entry corresponding to the hardware type. If no known hardware type is detected, a default list of modules is used and types are tried one after the other.
10. The module is loaded using modprobe. Any dependencies to other modules are cleared at that time.
11. The network interface is set up via DHCP. 12. After the interface has been established, the DHCP variables are exported into the /var/lib/
dhcpcd/dhcpcd-eth0.info file and the contents of DOMAIN and DNS are used to generate a /etc/resolv.conf file.
13. The TFTP server address is acquired. During this step, a check is first made to determine whether the hostname tftp.\$DOMAIN can be resolved. If not, the DHCP server is used as the TFTP server.
14. The Point of Service configuration file, config.MAC_address, is loaded from the Branch Server’s /tftpboot/CR directory over TFTP. If this is the Point of Service terminal’s first time booting, the terminal’s config.MAC_address file does not yet exist. The Point of Service terminal must first register on the system.A new Point of Service terminal registers as follows:
a. An optional alias name can be set for the new Point of Service terminal. During the creation of one of the boot images, you can enable the system alias setting using the POSSetAlias feature module. By default, there is no question for the system alias name.
b. A Point of Service control file (hwtype.MAC_address) is uploaded to the TFTP server’s upload directory: /tftpboot/upload.The hwtype.MAC_address file indicates the Point of Service hardware type, the BIOS version, and the Point of Service alias name. The system uses this information to create the terminal’s config.MAC_address file. For more information on this process, see “The hwtype.MAC_address File” in the Novell Linux Point of Service 9 Administration Guide.
c. After the upload, the Point of Service terminal renews the DHCP lease (dhcpcd -n). d. The Point of Service terminal attempts to load its new config.MAC_address file
from the TFTP server. e. If the config.MAC_address file is not yet available, the Point of Service terminal
waits 60 seconds before repeating steps c and d.15. When the config.MAC_address file loads, the system begins an analysis of its contents.
For more information about the content and file format of the config.MAC_address file, refer to “The config.MAC_address File” in the Novell Linux Point of Service 9 Administration Guide.
16. First, the PART line in the config.MAC_address file is analyzed (if there is a PART line).
Deploying Point of Service Terminals 139

140 Novell Linux
novdocx (EN
U) 10 A
ugust 2006
A check is made using the image version to see whether any local system needs to be updated.If no system update is required, no image download occurs and the Point of Service terminal boots from the hard drive.If a system update is required, the Point of Service hard disk is partitioned according to the parameters specified in the PART line.
17. Next, the SYNC line in the Point of Service configuration file is evaluated. The file indicated in the SYNC line is downloaded over TFTP. The only value the file contains is the number of seconds to wait (sleep) before the multicast download of the client image starts. If the file is not present, the boot process proceeds immediately.
18. Indicated images are downloaded with multicast TFTP.19. If the image is compressed, it is copied then decompressed.20. The image checksums are verified.
If they do not match, the images are re-downloaded.21. The CONF line in the Point of Service configuration file is evaluated.
All the indicated files are loaded from the TFTP server and stored in a /config/ path.22. All the user-land processes based on the boot image (dhcpcd -k) are terminated.23. The client image is mounted.24. The configuration files stored in the /config/ path are copied to the mounted client image.25. If this is a new image, Image Install Notification occurs.
a. The bootversion.MAC_Address file is created in /tftpboot/upload.b. posleases2ldap transfers the information to the scNotifiedimage attribute in the
scWorkstation object in LDAP.26. The system switches to the mounted client image. 27. The root file system is converted to the client image using pivot_root.
All the required configuration files are now present because they had been stored in the client image or have been downloaded via TFTP.The file systems that are mounted read-only can be stored in cramfs-compressed RAM file systems to save Point of Service RAM resources.
28. The boot image is unmounted using an exec umount call.29. When linuxrc or the exec call terminates, the kernel initiates the init process, which starts
processing the boot scripts as specified in /etc/inittab.
11.4.2 CDBootIf you are unable to electronically distribute Point of Service images over your network, you must manually distribute the images uses CDBoot images. For more information on creating a CDBoot image, see “Building a CDBoot Image” in the Novell Linux Point of Service 9 Administration Guide
Depending on the client image that resides on the boot CD (Minimal, Java, Browser, or Desktop), you should note the following restrictions:
The Point of Service terminal needs to be upgraded with enough RAM to hold the client image.
Point of Service 9 Installation Guide

novdocx (EN
U) 10 A
ugust 2006
On diskless Point of Service terminals, there must be enough available RAM to load the first and second stage boot images. Otherwise, the terminal returns a kernel panic error.
NOTE: Keep in mind that onboard VGA reduces the Point of Service terminal’s available RAM.
The behavior of Point of Service terminals booting from CD is similar to Point of Service terminals that receive the first and second stage boot images over the LAN from a Branch Server. The following is a general description of what takes place when a Point of Service terminal boots from CD:
1. The client image (for example, the Browser image) is installed to a RAM or hard disk drive on the Point of Service terminal.
The partition information resides in the config.image file located on the CD. For more information, see “The config.image File” in the Novell Linux Point of Service 9 Administration Guide.
2. The installed client image is booted from the RAM or hard disk drive on the Point of Service terminal.
Deploying Point of Service Terminals 141

142 Novell Linux
novdocx (EN
U) 10 A
ugust 2006
Point of Service 9 Installation Guide
12novdocx (E
NU
) 10 August 2006
12Testing Your Novell Linux Point of Service Environment
To complete the Novell® Linux Point of Service installation process, it is recommended that you verify the installation by booting at least one Point of Service client attached to Branch Server.
Section 12.1, “Monitoring the Terminal Bootup,” on page 143Section 12.2, “Troubleshooting Terminal Bootup Problems,” on page 144
12.1 Monitoring the Terminal BootupTo verify and test your Novell Linux Point of Service installation:
1 Attach a Point of Service client to the Branch Server network.2 (Optional) Verify the LDAP structure on the Administration Server using a GUI-based LDAP
browser, such as GQ, or an ldapsearch command.For example: ldapsearch -x -h administration_server_name -b o=mycorp,c=us -s base -D cn=admin,o=mycorp,c=us -w password
3 Verify the following LDAP object settings:The scCashRegister object which matches the model type of the Point of Service client must exist in LDAP; for example, IBMSurePOS300Series.There must be an scPosImage object for each image in the /tftpboot/image/ directory on the Branch Server. The scPosImageDn attribute within each object must correspond to an existing Point of Service image.
IMPORTANT: You must create the scPosImage objects and set the scPosImageVersion attribute to Active before you boot the Point of Service terminals. The Point of Service terminals require an scPosImage object with an active scPosImageVersion attribute before they can download the corresponding physical image from the Branch Server at boot time. For more information on setting the scPosImageVersion attribute to Active, see “Activating Images” on page 132.
For further information how to modify and add LDAP entries for your specific Novell Linux Point of Service system environment, refer to “Using posAdmin to Manage the LDAP Directory” in the Novell Linux Point of Service 9 Administration Guide.
4 Verify that the Point of Service client images and their corresponding MD5 checksum files are available in /tftpboot/image/ directory on the Branch Server.
5 Verify that the initrd.gz and linux images are available in the /tftpboot/boot/ directory on the Branch Server.
6 Power on the Point of Service client.You can watch the Branch Server log messages using the following command:tail -f /var/log/messages
7 While the Point of Service client is booting, check if there are tftpd entries.
Testing Your Novell Linux Point of Service Environment 143

144 Novell Linux
novdocx (EN
U) 10 A
ugust 2006
For example:
.. bs1 tftpd[31434]: Serving /boot/pxelinux.0 to 192.168.2.15:2070
.. bs1 tftpd[31435]: Serving /boot/pxelinux.cfg/C0A8020F to 192.168.2.15:57217
.. bs1 tftpd[31436]: Serving /boot/pxelinux.cfg/C0A8020 to 192.168.2.15:57090
.. bs1 tftpd[31437]: Serving /boot/pxelinux.cfg/C0A802 to 192.168.2.15:56963
.. bs1 tftpd[31438]: Serving /boot/pxelinux.cfg/C0A80 to 192.168.2.15:56836
.. bs1 tftpd[31439]: Serving /boot/pxelinux.cfg/C0A8 to 192.168.2.15:56709
.. bs1 tftpd[31440]: Serving /boot/pxelinux.cfg/C0A to 192.168.2.15:56582
.. bs1 tftpd[31441]: Serving /boot/pxelinux.cfg/C0 to 192.168.2.15:56455
.. bs1 tftpd[31442]: Serving /boot/pxelinux.cfg/C to 192.168.2.15:56328
.. bs1 tftpd[31443]: Serving /boot/pxelinux.cfg/default to 192.168.2.15:56201
.. bs1 tftpd[31444]: Serving /boot/linux to 192.168.2.15:56202
.. bs1 tftpd[31445]: Serving /boot/initrd.gz to 192.168.2.15:56203
.. bs1 dhcpd: DHCPDISCOVER from 00:06:29:e3:02:e6 via eth0
.. bs1 dhcpd: DHCPOFFER on 192.168.2.15 to 00:06:29:e3:02:e6 via eth0
.. bs1 dhcpd: DHCPREQUEST for 192.168.2.15 (192.168.2.1) from 00:06:29:e3:02:e6 via eth0
.. bs1 dhcpd: DHCPACK on 192.168.2.15 to 00:06:29:e3:02:e6 via eth0
.. bs1 tftpd[31454]: Serving CR/config.00:06:29:E3:02:E6 to 192.168.2.15:32768
.. bs1 tftpd[31455]: Fetching from 192.168.2.15 to upload/hwtype.00:06:29:E3:02:E6The Point of Service terminal performs a PXE boot to receive the Linux kernel and its first stage boot image, initrd.gz. For detailed information on the Point of Service boot process, see Section 11.4, “Booting the Point of Service Terminal,” on page 136.
8 Watch for the hwtype.MAC_address file below the /tftpboot/upload directory (for example, hwtype.00:06:29:E3:02:E6). This file contains the information required to create the terminal’s workstation object (scWorkstation) in LDAP and determine which image and configuration settings should be included in the terminal’s configuration file. For more information, see “The hwtype.MAC_address File” in the Novell Linux Point of Service 9 Administration Guide.
9 Watch to see if the Point of Service client is able to boot the second stage image. This is the client image configured in LDAP (scPosImage) and downloaded from the /tftpboot/image/ directory on the Branch Server (for example, the browser-2.0.21 image).
10 If everything proceeds normally, the Point of Service terminal boots and you will see the login prompt. If the boot is successful, the config.MAC_address for the terminal is written below the /tftpboot/CR/MAC_address/ directory on the Branch Server. For example, if a terminal’s MAC address is 00:06:29:E3:02:E6, the config.00:06:29:E3:02:E6 file will be located in the /tftpboot/CR/00:06:29:E3:02:E6 directory. Additionally, the scWorkstation object for the Point of Service terminal is created in the LDAP directory.
12.2 Troubleshooting Terminal Bootup ProblemsIf the Point of Service terminal does not successfully boot, check the following:
Verify that an scCashRegister object exists for the Point of Service terminal. For more information, see Section 11.2.1, “Creating an scCashRegister Object,” on page 126.
Point of Service 9 Installation Guide

novdocx (EN
U) 10 A
ugust 2006
Verify the configuration of the scCashRegister object for the Point of Service terminal: There must either be an scCashRegister object that corresponds to the HWTYPE attribute in the Point of Service terminal’s hwtype.MAC_address file in the /tftpboot/upload/hwtype directory, or a default scCashRegister object that will work for the Point of Service terminal.Verify that the Point of Service image configured in the scPosImageDn attribute of the scCashRegister object is available in the /tftpboot/image/ directory on the Branch Server.Verify that the scPosImageVersion attribute in the scPosImage object is set to Active. For more information, see Section 11.2.7, “Activating Images,” on page 132. Do not delete any of the default LDAP objects that are created when you install Novell Linux Point of Service 9. In particular, do not delete the global default “minimal” scPosImage object that is created in the “default” Distribution Container, even if you do not plan to use the minimal image. Deleting this LDAP object prevents Point of Service terminals from performing a successful PXE boot.Each type of Point of Service terminal hardware must have a unique model name defined in the scCashRegisterName attribute of the scCashRegister object in LDAP. If two terminals have the same hardware name defined in their scPosImage objects, neither of them boots successfully, but a “HWtype” error is displayed on the Branch Server. To resolve the problem, change the scCashRegisterName value for one of the Point of Service terminals.
Testing Your Novell Linux Point of Service Environment 145

146 Novell Linux
novdocx (EN
U) 10 A
ugust 2006
Point of Service 9 Installation Guide

Anovdocx (E
NU
) 10 August 2006
AInstallation RPM Lists
This section lists the RPM packages included in the Novell® Linux Point of Service 9 software.
NOTE: This list does not include the SUSE® Linux Enterprise Server (SLES) RPM packages. For more information on the RPM packages installed with SLES, see SUSE LINUX Enterprise Server Package Descriptions (http://www.novell.com/products/linuxenterpriseserver/packages.html).
Section A.1, “NLPOS Admin/Branch Server RPMs,” on page 147Section A.2, “NLPOS Image Server RPMs,” on page 149
A.1 NLPOS Admin/Branch Server RPMsThis section lists the packages installed with the NLPOS Admin/Branch Server software selection.
NOTE: For more information on this installation option, see “Software Selection Screen” on page 34.
admind-clientalice-compatatftpaudiofileautoyast2bind9bind9-utilsbinutilscups-libsdhcp-basedhcp-relaydhcp-serverdhcp-toolsesoundexpatgdbgdk-pixbufgettextgnome-libsgqlibpcaplibxsltlkcdutilsmkisofsmozillanfs-utils
Installation RPM Lists 147

148 Novell Linux
novdocx (EN
U) 10 A
ugust 2006
openldap2orbitpcmciaperl-Convert-ASN1perl-Convert-BERperl-Crypt-DESperl-Cursesperl-CursesWidgetsperl-DateManipperl-Digest-HMACperl-Digest-SHA1perl-HTML-Parserperl-HTML-Tagsetperl-IO-Socket-SSLperl-ldapperl-ldap-sslperl-libwww-perlperl-Net_SSLeayperl-NetAddr-IPperl-Net-DNSperl-Net-extperl-Net-IPperl-Net-IPv4Addrperl-Parse-Yappperl-TermReadKeyperl-TimeDateperl-Time-Periodperl-Unix-Syslogperl-URIperl-XML-DOMperl-XML-Generatorperl-XML-Parserperl-XML-RegExpperl-XML-Writerperl-XML-XQLpidentdPOS_Server2POS_Server-Admin2POS_Server-AdminTools2POS_Server-AutoInstall2POS_Server-BranchTools2POS_Server-Modules2pythonrsyncsablot
Point of Service 9 Installation Guide

novdocx (EN
U) 10 A
ugust 2006
sambasamba-winbindsudotcpdumptripwireulibghttpulimitunzipxntpyast2-firewallyast2-printerzip
A.2 NLPOS Image Server RPMsIn addition to the RPMs included in the NLPOS Admin/Branch Server package, Novell Linux Point of Service installs the following packages when you select the NLPOS Image Server installation:
NOTE: For more information on this installation option, see “Software Selection Screen” on page 34.
bootsplashPOS_Image2POS_Image-Browser2POS_Image-Builder2POS_Image-Desktop2POS_Image-DiskNetboot2POS_Image-DiskNetboot-Binary2POS_Image-Java2POS_Image-Minimal2POS_Image-Minimal-Binary2
Installation RPM Lists 149

150 Novell Linux
novdocx (EN
U) 10 A
ugust 2006
Point of Service 9 Installation Guide

Bnovdocx (E
NU
) 10 August 2006
BChanging the Server Language
If you need to change the language that was defined during the initial installation of a Novell® Linux Point of Service Administration Server or Branch Server, you can do so by rerunning the YaST utility and selecting a different system language. However, you must also manually copy the RPMs required to support the features you are running on the server (such as the KDE or GNOME desktop or the Mozilla browser) and modify the system language file.
Section B.1, “Changing the Language Selection,” on page 151Section B.2, “Copying the Required RPMs,” on page 151Section B.3, “Modifying the System Language File,” on page 153
B.1 Changing the Language SelectionTo change the language of your Administration or Branch Server:
1 Start the YaST2 utility.2 In the YaST Control Center, select System > Choose Language.3 Select the desired language, then click Accept.
The language selected in YaST applies to the operating system, including YaST and the desktop environment (KDE or GNOME). It does not affect the Novell Linux Point of Service scripts.
B.2 Copying the Required RPMsTo copy the RPMs required to support the features you are running on the server:
1 In the YaST Control Center, select Install and Remove Software.
Changing the Server Language 151

152 Novell Linux
novdocx (EN
U) 10 A
ugust 2006
The YaST Package Manager screen appears (see Figure B-1).
Figure B-1 YaST Package Manager
2 Use the Search option to verify that the RPMs required to provide language support for the Administration Server or Branch Server features are installed on your system. Table B-1 provides a listing of the RPMs required to provide language support for each feature (the KDE desktop environment, the GNOME desktop environment, the Mozilla browser, and the YaST configuration utility).
Table B-1 RPMs required for tstandard server features
KDE GNOME Mozilla YaST
French kde3-i18n-fr kde3-i18n-fr
aspell-fr
na yast2-trans-fr
German kde3-i18n-de kde3-i18n-de
aspell-de
mozilla-deat yast2-trans-de
Point of Service 9 Installation Guide
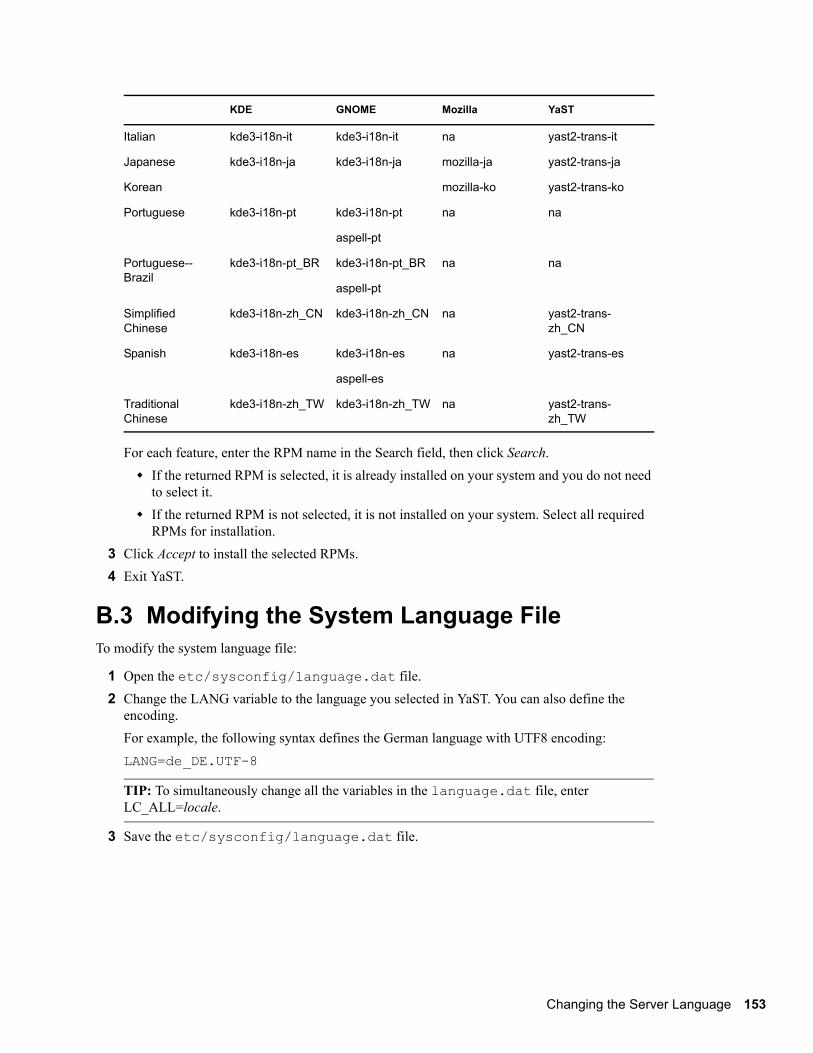
novdocx (EN
U) 10 A
ugust 2006
For each feature, enter the RPM name in the Search field, then click Search.If the returned RPM is selected, it is already installed on your system and you do not need to select it.If the returned RPM is not selected, it is not installed on your system. Select all required RPMs for installation.
3 Click Accept to install the selected RPMs. 4 Exit YaST.
B.3 Modifying the System Language FileTo modify the system language file:
1 Open the etc/sysconfig/language.dat file. 2 Change the LANG variable to the language you selected in YaST. You can also define the
encoding. For example, the following syntax defines the German language with UTF8 encoding:LANG=de_DE.UTF-8
TIP: To simultaneously change all the variables in the language.dat file, enter LC_ALL=locale.
3 Save the etc/sysconfig/language.dat file.
Italian kde3-i18n-it kde3-i18n-it na yast2-trans-it
Japanese kde3-i18n-ja kde3-i18n-ja mozilla-ja yast2-trans-ja
Korean mozilla-ko yast2-trans-ko
Portuguese kde3-i18n-pt kde3-i18n-pt
aspell-pt
na na
Portuguese--Brazil
kde3-i18n-pt_BR kde3-i18n-pt_BR
aspell-pt
na na
Simplified Chinese
kde3-i18n-zh_CN kde3-i18n-zh_CN na yast2-trans-zh_CN
Spanish kde3-i18n-es kde3-i18n-es
aspell-es
na yast2-trans-es
Traditional Chinese
kde3-i18n-zh_TW kde3-i18n-zh_TW na yast2-trans-zh_TW
KDE GNOME Mozilla YaST
Changing the Server Language 153

154 Novell Linux
novdocx (EN
U) 10 A
ugust 2006
Point of Service 9 Installation Guide
Cnovdocx (E
NU
) 10 August 2006
CDocumentation Updates
This section contains information about documentation content changes made to the Novell Linux Point of Service 9 Installation Guide since the initial release of Novell® Linux Point of Service 9. The information can help you to keep current on updates to the documentation.
All changes that are noted in this section were also made in the documentation. The documentation is provided on the Web in two formats: HTML and PDF. Both the HTML and PDF documentation are kept up-to-date with the documentation changes listed in this section.
The documentation update information is grouped according to the date the changes were published. Within a dated section, the changes are alphabetically listed by the names of the main table of contents sections for the guide.
If you need to know whether a copy of the PDF documentation you are using is the most recent, the PDF document contains the date it was published on the front title page.
This document was updated on the following dates:
Section C.1, “August 15, 2006 (NLPOS 9 SSP3),” on page 155
C.1 August 15, 2006 (NLPOS 9 SSP3)Throughout this document, version references have been updated, minor errors have been corrected, and the page design has been reformatted to comply with revised Novell documentation standards.
In addition, updates have been made to the following sections:
Section C.1.1, “Overview,” on page 155Section C.1.2, “Setting Up High Availability Branch Servers,” on page 155Section C.1.3, “Testing Your Novell Linux Point of Service Environment,” on page 156Section C.1.4, “Changing the Server Language,” on page 156
C.1.1 OverviewThe following changes have been made to this section:
C.1.2 Setting Up High Availability Branch ServersThe following changes have been made to this section:
Location Change
Section 1.2, “Images Overview,” on page 12
This section is new.
Section 1.3.1, “Design Guidelines for Large Environments,” on page 16
Added this section to provide system design recommendations for large retail environments.
Documentation Updates 155

156 Novell Linux
novdocx (EN
U) 10 A
ugust 2006
C.1.3 Testing Your Novell Linux Point of Service EnvironmentThe following changes have been made to this section:
C.1.4 Changing the Server LanguageThe following changes have been made to this section:
Location Change
Section 7.8, “Updating High Availability Branch Servers,” on page 96
This section is new.
Location Change
Section 12.2, “Troubleshooting Terminal Bootup Problems,” on page 144
Added new troubleshooting information.
Location Change
Appendix B, “Changing the Server Language,” on page 151
Moved this information to an appendix to improve the logical flow of the installation procedures.
Point of Service 9 Installation Guide