Embed Size (px)
Citation preview

Novell
m
w w w . n o v e l l . c oexteNdApplication Server
5 . 2F AC I L I T I E S G U ID E

Legal NoticesCopyright © 2004 Novell, Inc. All rights reserved. No part of this publication may be reproduced, photocopied, stored on a retrieval system, or transmitted without the express written consent of the publisher. This manual, and any portion thereof, may not be copied without the express written permission of Novell, Inc.
Novell, Inc. makes no representations or warranties with respect to the contents or use of this documentation, and specifically disclaims any express or implied warranties of merchantability or fitness for any particular purpose. Further, Novell, Inc. reserves the right to revise this publication and to make changes to its content, at any time, without obligation to notify any person or entity of such revisions or changes.
Further, Novell, Inc. makes no representations or warranties with respect to any software, and specifically disclaims any express or implied warranties of merchantability or fitness for any particular purpose. Further, Novell, Inc. reserves the right to makes changes to any and all parts of Novell software, at any time, without any obligation to notify any person or entity of such changes.
This product may require export authorization from the U.S. Department of Commerce prior to exporting from the U.S. or Canada.
Copyright ©1997, 1998, 1999, 2000, 2001, 2002, 2003 SilverStream Software, LLC. All rights reserved.
SilverStream software products are copyrighted and all rights are reserved by SilverStream Software, LLC
Title to the Software and its documentation, and patents, copyrights and all other property rights applicable thereto, shall at all times remain solely and exclusively with SilverStream and its licensors, and you shall not take any action inconsistent with such title. The Software is protected by copyright laws and international treaty provisions. You shall not remove any copyright notices or other proprietary notices from the Software or its documentation, and you must reproduce such notices on all copies or extracts of the Software or its documentation. You do not acquire any rights of ownership in the Software.
Patent pending.
Novell, Inc.404 Wyman Street, Suite 500Waltham, MA 02451U.S.A.
www.novell.com
exteNd Application ServerFacilities Guide
June 2004
Online Documentation: To access the online documemntation for this and other Novell products, and to get updates, see www.novell.com/documentation.

Novell TrademarksConsoleOne is a registered trademark of Novell, Inc.
eDirectory is a trademark of Novell, Inc.
GroupWise is a registered trademark of Novell, Inc.
exteNd is a trademark of Novell, Inc.
exteNd Composer is a trademark of Novell, Inc.
exteNd Director is a trademark of Novell, Inc.
iChain is a registered trademark of Novell, Inc.
jBroker is a trademark of Novell, Inc.
NetWare is a registered trademark of Novell, Inc.
Novell is a registered trademark of Novell, Inc.
Novell eGuide is a trademark of Novell, Inc.
SilverStream TrademarksSilverStream is a registered trademark of SilverStream Software, LLC.
Third-Party TrademarksAll third-party trademarks are the property of their respective owners.
Third-Party Software Legal Notices
The Apache Software License, Version 1.1Copyright (c) 2000 The Apache Software Foundation. All rights reserved.
Redistribution and use in source and binary forms, with or without modification, are permitted provided that the following conditions are met: 1. Redistributions of source code must retain the above copyright notice, this list of conditions and the following disclaimer. 2. Redistributions in binary form must reproduce the above copyright notice, this list of conditions and the following disclaimer in the documentation and/or other materials provided with the distribution. 3. The end-user documentation included with the redistribution, if any, must include the following acknowledgment: "This product includes software developed by the Apache Software Foundation (http://www.apache.org/)." Alternately, this acknowledgment may appear in the software itself, if and wherever such third-party acknowledgments normally appear. 4. The names "Apache" and "Apache Software Foundation" must not be used to endorse or promote products derived from this software without prior written permission. For written permission, please contact [email protected]. 5. Products derived from this software may not be called "Apache", nor may "Apache" appear in their name, without prior written permission of the Apache Software Foundation.
THIS SOFTWARE IS PROVIDED ``AS IS'' AND ANY EXPRESSED OR IMPLIED WARRANTIES, INCLUDING, BUT NOT LIMITED TO, THE IMPLIED WARRANTIES OF MERCHANTABILITY AND FITNESS FOR A PARTICULAR PURPOSE ARE DISCLAIMED. IN NO EVENT SHALL THE APACHE SOFTWARE FOUNDATION OR ITS CONTRIBUTORS BE LIABLE FOR ANY DIRECT, INDIRECT, INCIDENTAL, SPECIAL, EXEMPLARY, OR CONSEQUENTIAL DAMAGES (INCLUDING, BUT NOT LIMITED TO, PROCUREMENT OF SUBSTITUTE GOODS OR SERVICES; LOSS OF USE, DATA, OR PROFITS; OR BUSINESS INTERRUPTION) HOWEVER CAUSED AND ON ANY THEORY OF LIABILITY, WHETHER IN CONTRACT, STRICT LIABILITY, OR TORT (INCLUDING NEGLIGENCE OR OTHERWISE) ARISING IN ANY WAY OUT OF THE USE OF THIS SOFTWARE, EVEN IF ADVISED OF THE POSSIBILITY OF SUCH DAMAGE.
JDOM.JARCopyright (C) 2000-2002 Brett McLaughlin & Jason Hunter. All rights reserved.
Redistribution and use in source and binary forms, with or without modification, are permitted provided that the following conditions are met: 1. Redistributions of source code must retain the above copyright notice, this list of conditions, and the following disclaimer. 2. Redistributions in binary form must reproduce the above copyright notice, this list of conditions, and the disclaimer that follows these conditions in the documentation and/or other materials provided with the distribution. 3. The name "JDOM" must not be used to endorse or promote products derived from this software without prior written permission. For written permission, please contact [email protected]. 4. Products derived from this software may not be called "JDOM", nor may "JDOM" appear in their name, without prior written permission from the JDOM Project Management ([email protected]).
In addition, we request (but do not require) that you include in the end-user documentation provided with the redistribution and/or in the software itself an acknowledgement equivalent to the following: "This product includes software developed by the JDOM Project (http://www.jdom.org/)." Alternatively, the acknowledgment may be graphical using the logos available at http://www.jdom.org/images/logos.
THIS SOFTWARE IS PROVIDED ``AS IS'' AND ANY EXPRESSED OR IMPLIED WARRANTIES, INCLUDING, BUT NOT LIMITED TO, THE IMPLIED WARRANTIES OF MERCHANTABILITY AND FITNESS FOR A PARTICULAR PURPOSE ARE DISCLAIMED. IN NO EVENT SHALL THE JDOM AUTHORS OR THE PROJECT CONTRIBUTORS BE LIABLE FOR ANY DIRECT, INDIRECT, INCIDENTAL, SPECIAL, EXEMPLARY, OR CONSEQUENTIAL DAMAGES (INCLUDING, BUT NOT LIMITED TO, PROCUREMENT OF SUBSTITUTE GOODS OR SERVICES; LOSS OF USE, DATA, OR PROFITS; OR BUSINESS INTERRUPTION) HOWEVER CAUSED AND ON ANY THEORY OF LIABILITY, WHETHER IN CONTRACT, STRICT LIABILITY, OR TORT (INCLUDING NEGLIGENCE OR OTHERWISE) ARISING IN ANY WAY OUT OF THE USE OF THIS SOFTWARE, EVEN IF ADVISED OF THE POSSIBILITY OF SUCH DAMAGE.
SunSun Microsystems, Inc. Sun, Sun Microsystems, the Sun Logo Sun, the Sun logo, Sun Microsystems, JavaBeans, Enterprise JavaBeans, JavaServer

Pages, Java Naming and Directory Interface, JDK, JDBC, Java, HotJava, HotJava Views, Visual Java, Solaris, NEO, Joe, Netra, NFS, ONC, ONC+, OpenWindows, PC-NFS, SNM, SunNet Manager, Solaris sunburst design, Solstice, SunCore, SolarNet, SunWeb, Sun Workstation, The Network Is The Computer, ToolTalk, Ultra, Ultracomputing, Ultraserver, Where The Network Is Going, SunWorkShop, XView, Java WorkShop, the Java Coffee Cup logo, Visual Java, and NetBeans are trademarks or registered trademarks of Sun Microsystems, Inc. in the United States and other countries.
Indiana University Extreme! Lab Software LicenseVersion 1.1.1
Copyright (c) 2002 Extreme! Lab, Indiana University. All rights reserved.
Redistribution and use in source and binary forms, with or without modification, are permitted provided that the following conditions are met: 1. Redistributions of source code must retain the above copyright notice, this list of conditions and the following disclaimer. 2. Redistributions in binary form must reproduce the above copyright notice, this list of conditions and the following disclaimer in the documentation and/or other materials provided with the distribution. 3. The end-user documentation included with the redistribution, if any, must include the following acknowledgment: "This product includes software developed by the Indiana University Extreme! Lab (http://www.extreme.indiana.edu/)." Alternately, this acknowledgment may appear in the software itself, if and wherever such third-party acknowledgments normally appear. 4. The names "Indiana University" and "Indiana University Extreme! Lab" must not be used to endorse or promote products derived from this software without prior written permission. For written permission, please contact http://www.extreme.indiana.edu/. 5. Products derived from this software may not use "Indiana University" name nor may "Indiana University" appear in their name, without prior written permission of the Indiana University.
THIS SOFTWARE IS PROVIDED "AS IS" AND ANY EXPRESSED OR IMPLIED WARRANTIES, INCLUDING, BUT NOT LIMITED TO, THE IMPLIED WARRANTIES OF MERCHANTABILITY AND FITNESS FOR A PARTICULAR PURPOSE ARE DISCLAIMED. IN NO EVENT SHALL THE AUTHORS, COPYRIGHT HOLDERS OR ITS CONTRIBUTORS BE LIABLE FOR ANY DIRECT, INDIRECT, INCIDENTAL, SPECIAL, EXEMPLARY, OR CONSEQUENTIAL DAMAGES (INCLUDING, BUT NOT LIMITED TO, PROCUREMENT OF SUBSTITUTE GOODS OR SERVICES; LOSS OF USE, DATA, OR PROFITS; OR BUSINESS INTERRUPTION) HOWEVER CAUSED AND ON ANY THEORY OF LIABILITY, WHETHER IN CONTRACT, STRICT LIABILITY, OR TORT (INCLUDING NEGLIGENCE OR OTHERWISE) ARISING IN ANY WAY OUT OF THE USE OF THIS SOFTWARE, EVEN IF ADVISED OF THE POSSIBILITY OF SUCH DAMAGE.
PhaosThis Software is derived in part from the SSLavaTM Toolkit, which is Copyright ©1996-1998 by Phaos Technology Corporation. All Rights Reserved. Customer is prohibited from accessing the functionality of the Phaos software.
W3CW3C® SOFTWARE NOTICE AND LICENSE
This work (and included software, documentation such as READMEs, or other related items) is being provided by the copyright holders under the following license. By obtaining, using and/or copying this work, you (the licensee) agree that you have read, understood, and will comply with the following terms and conditions.
Permission to copy, modify, and distribute this software and its documentation, with or without modification, for any purpose and without fee or royalty is hereby granted, provided that you include the following on ALL copies of the software and documentation or portions thereof, including modifications: 1.The full text of this NOTICE in a location viewable to users of the redistributed or derivative work. 2.Any pre-existing intellectual property disclaimers, notices, or terms and conditions. If none exist, the W3C Software Short Notice should be included (hypertext is preferred, text is permitted) within the body of any redistributed or derivative code. 3. Notice of any changes or modifications to the files, including the date changes were made. (We recommend you provide URIs to the location from which the code is derived.)
THIS SOFTWARE AND DOCUMENTATION IS PROVIDED "AS IS," AND COPYRIGHT HOLDERS MAKE NO REPRESENTATIONS OR WARRANTIES, EXPRESS OR IMPLIED, INCLUDING BUT NOT LIMITED TO, WARRANTIES OF MERCHANTABILITY OR FITNESS FOR ANY PARTICULAR PURPOSE OR THAT THE USE OF THE SOFTWARE OR DOCUMENTATION WILL NOT INFRINGE ANY THIRD PARTY PATENTS, COPYRIGHTS, TRADEMARKS OR OTHER RIGHTS.
COPYRIGHT HOLDERS WILL NOT BE LIABLE FOR ANY DIRECT, INDIRECT, SPECIAL OR CONSEQUENTIAL DAMAGES ARISING OUT OF ANY USE OF THE SOFTWARE OR DOCUMENTATION.
The name and trademarks of copyright holders may NOT be used in advertising or publicity pertaining to the software without specific, written prior permission. Title to copyright in this software and any associated documentation will at all times remain with copyright holders.

Contents
About This Book. . . . . . . . . . . . . . . . . . . . . . . . . . . . . . . . . . . . . . . . . . . . . . . . . . . . . . . . . . . . . . . . . . . . . . . . . . . . . . . . . . . . . 7
1 JSP Deployment to the File System. . . . . . . . . . . . . . . . . . . . . . . . . . . . . . . . . . . . . . . . . . . . . . . . . . . . . . . . . . . . . . . . . 9Using JSP pages . . . . . . . . . . . . . . . . . . . . . . . . . . . . . . . . . . . . . . . . . . . . . . . . . . . . . . . . . . . . . . . . . . . . . . . . . . . . . . . . . 9
About JSP pages and Web applications . . . . . . . . . . . . . . . . . . . . . . . . . . . . . . . . . . . . . . . . . . . . . . . . . . . . . . . . . . . 9About file system deployment . . . . . . . . . . . . . . . . . . . . . . . . . . . . . . . . . . . . . . . . . . . . . . . . . . . . . . . . . . . . . . . . . . . 9Using exteNd Director deployment tools . . . . . . . . . . . . . . . . . . . . . . . . . . . . . . . . . . . . . . . . . . . . . . . . . . . . . . . . . . 10
Setting up your application . . . . . . . . . . . . . . . . . . . . . . . . . . . . . . . . . . . . . . . . . . . . . . . . . . . . . . . . . . . . . . . . . . . . . . . . 10Deploying your application to the file system. . . . . . . . . . . . . . . . . . . . . . . . . . . . . . . . . . . . . . . . . . . . . . . . . . . . . . . . . . . 11
Creating the deployment plan . . . . . . . . . . . . . . . . . . . . . . . . . . . . . . . . . . . . . . . . . . . . . . . . . . . . . . . . . . . . . . . . . . 11Deploying the application . . . . . . . . . . . . . . . . . . . . . . . . . . . . . . . . . . . . . . . . . . . . . . . . . . . . . . . . . . . . . . . . . . . . . 11
Updating your application . . . . . . . . . . . . . . . . . . . . . . . . . . . . . . . . . . . . . . . . . . . . . . . . . . . . . . . . . . . . . . . . . . . . . . . . . 12Putting your application into production. . . . . . . . . . . . . . . . . . . . . . . . . . . . . . . . . . . . . . . . . . . . . . . . . . . . . . . . . . . . . . . 13
2 J2EE Archive Deployment . . . . . . . . . . . . . . . . . . . . . . . . . . . . . . . . . . . . . . . . . . . . . . . . . . . . . . . . . . . . . . . . . . . . . . . 15Deploying archives . . . . . . . . . . . . . . . . . . . . . . . . . . . . . . . . . . . . . . . . . . . . . . . . . . . . . . . . . . . . . . . . . . . . . . . . . . . . . . 15EJB deployment tips . . . . . . . . . . . . . . . . . . . . . . . . . . . . . . . . . . . . . . . . . . . . . . . . . . . . . . . . . . . . . . . . . . . . . . . . . . . . . 16
Updating EJB 1.1 Finder methods . . . . . . . . . . . . . . . . . . . . . . . . . . . . . . . . . . . . . . . . . . . . . . . . . . . . . . . . . . . . . . 16Tips for completing the EJB deployment plan . . . . . . . . . . . . . . . . . . . . . . . . . . . . . . . . . . . . . . . . . . . . . . . . . . . . . . 17
Specifying classpath JARs on the server . . . . . . . . . . . . . . . . . . . . . . . . . . . . . . . . . . . . . . . . . . . . . . . . . . . . . . . . . . . . . 32Controlling thread usage for deployment. . . . . . . . . . . . . . . . . . . . . . . . . . . . . . . . . . . . . . . . . . . . . . . . . . . . . . . . . . . . . . 32
3 Deployment Plan DTDs . . . . . . . . . . . . . . . . . . . . . . . . . . . . . . . . . . . . . . . . . . . . . . . . . . . . . . . . . . . . . . . . . . . . . . . . . . 33About the deployment plan DTDs . . . . . . . . . . . . . . . . . . . . . . . . . . . . . . . . . . . . . . . . . . . . . . . . . . . . . . . . . . . . . . . . . . . 33Client JAR deployment plan DTD . . . . . . . . . . . . . . . . . . . . . . . . . . . . . . . . . . . . . . . . . . . . . . . . . . . . . . . . . . . . . . . . . . . 34EJB JAR deployment plan DTD. . . . . . . . . . . . . . . . . . . . . . . . . . . . . . . . . . . . . . . . . . . . . . . . . . . . . . . . . . . . . . . . . . . . . 35WAR deployment plan DTD. . . . . . . . . . . . . . . . . . . . . . . . . . . . . . . . . . . . . . . . . . . . . . . . . . . . . . . . . . . . . . . . . . . . . . . . 38RAR deployment plan DTD . . . . . . . . . . . . . . . . . . . . . . . . . . . . . . . . . . . . . . . . . . . . . . . . . . . . . . . . . . . . . . . . . . . . . . . . 40EAR deployment plan DTD . . . . . . . . . . . . . . . . . . . . . . . . . . . . . . . . . . . . . . . . . . . . . . . . . . . . . . . . . . . . . . . . . . . . . . . . 41
4 SilverCmd Reference. . . . . . . . . . . . . . . . . . . . . . . . . . . . . . . . . . . . . . . . . . . . . . . . . . . . . . . . . . . . . . . . . . . . . . . . . . . . 45Command locator . . . . . . . . . . . . . . . . . . . . . . . . . . . . . . . . . . . . . . . . . . . . . . . . . . . . . . . . . . . . . . . . . . . . . . . . . . . . . . . 45About SilverCmd . . . . . . . . . . . . . . . . . . . . . . . . . . . . . . . . . . . . . . . . . . . . . . . . . . . . . . . . . . . . . . . . . . . . . . . . . . . . . . . . 46
Running SilverCmd . . . . . . . . . . . . . . . . . . . . . . . . . . . . . . . . . . . . . . . . . . . . . . . . . . . . . . . . . . . . . . . . . . . . . . . . . . 46Specifying values in input files and deployment plans . . . . . . . . . . . . . . . . . . . . . . . . . . . . . . . . . . . . . . . . . . . . . . . 48
Alphabetical list of commands . . . . . . . . . . . . . . . . . . . . . . . . . . . . . . . . . . . . . . . . . . . . . . . . . . . . . . . . . . . . . . . . . . . . . . 49AddCP. . . . . . . . . . . . . . . . . . . . . . . . . . . . . . . . . . . . . . . . . . . . . . . . . . . . . . . . . . . . . . . . . . . . . . . . . . . . . . . . . . . . 49AddDatabase . . . . . . . . . . . . . . . . . . . . . . . . . . . . . . . . . . . . . . . . . . . . . . . . . . . . . . . . . . . . . . . . . . . . . . . . . . . . . . 52ClearDefaultURL. . . . . . . . . . . . . . . . . . . . . . . . . . . . . . . . . . . . . . . . . . . . . . . . . . . . . . . . . . . . . . . . . . . . . . . . . . . . 54ClearLog . . . . . . . . . . . . . . . . . . . . . . . . . . . . . . . . . . . . . . . . . . . . . . . . . . . . . . . . . . . . . . . . . . . . . . . . . . . . . . . . . . 54DeleteURL . . . . . . . . . . . . . . . . . . . . . . . . . . . . . . . . . . . . . . . . . . . . . . . . . . . . . . . . . . . . . . . . . . . . . . . . . . . . . . . . 55DeployCAR . . . . . . . . . . . . . . . . . . . . . . . . . . . . . . . . . . . . . . . . . . . . . . . . . . . . . . . . . . . . . . . . . . . . . . . . . . . . . . . . 56DeployEAR . . . . . . . . . . . . . . . . . . . . . . . . . . . . . . . . . . . . . . . . . . . . . . . . . . . . . . . . . . . . . . . . . . . . . . . . . . . . . . . . 57DeployEJB . . . . . . . . . . . . . . . . . . . . . . . . . . . . . . . . . . . . . . . . . . . . . . . . . . . . . . . . . . . . . . . . . . . . . . . . . . . . . . . . 59DeployRAR . . . . . . . . . . . . . . . . . . . . . . . . . . . . . . . . . . . . . . . . . . . . . . . . . . . . . . . . . . . . . . . . . . . . . . . . . . . . . . . . 60DeployWAR . . . . . . . . . . . . . . . . . . . . . . . . . . . . . . . . . . . . . . . . . . . . . . . . . . . . . . . . . . . . . . . . . . . . . . . . . . . . . . . 61GetConsole . . . . . . . . . . . . . . . . . . . . . . . . . . . . . . . . . . . . . . . . . . . . . . . . . . . . . . . . . . . . . . . . . . . . . . . . . . . . . . . . 62GetDefaultURL . . . . . . . . . . . . . . . . . . . . . . . . . . . . . . . . . . . . . . . . . . . . . . . . . . . . . . . . . . . . . . . . . . . . . . . . . . . . . 63LdapProvider. . . . . . . . . . . . . . . . . . . . . . . . . . . . . . . . . . . . . . . . . . . . . . . . . . . . . . . . . . . . . . . . . . . . . . . . . . . . . . . 64ListCP . . . . . . . . . . . . . . . . . . . . . . . . . . . . . . . . . . . . . . . . . . . . . . . . . . . . . . . . . . . . . . . . . . . . . . . . . . . . . . . . . . . . 64ModifyCP . . . . . . . . . . . . . . . . . . . . . . . . . . . . . . . . . . . . . . . . . . . . . . . . . . . . . . . . . . . . . . . . . . . . . . . . . . . . . . . . . 65
5

Prefs. . . . . . . . . . . . . . . . . . . . . . . . . . . . . . . . . . . . . . . . . . . . . . . . . . . . . . . . . . . . . . . . . . . . . . . . . . . . . . . . . . . . . . 66PrintLog . . . . . . . . . . . . . . . . . . . . . . . . . . . . . . . . . . . . . . . . . . . . . . . . . . . . . . . . . . . . . . . . . . . . . . . . . . . . . . . . . . . 67QueryCP . . . . . . . . . . . . . . . . . . . . . . . . . . . . . . . . . . . . . . . . . . . . . . . . . . . . . . . . . . . . . . . . . . . . . . . . . . . . . . . . . . 68RemoveCP. . . . . . . . . . . . . . . . . . . . . . . . . . . . . . . . . . . . . . . . . . . . . . . . . . . . . . . . . . . . . . . . . . . . . . . . . . . . . . . . . 68RemoveDatabase . . . . . . . . . . . . . . . . . . . . . . . . . . . . . . . . . . . . . . . . . . . . . . . . . . . . . . . . . . . . . . . . . . . . . . . . . . . 69ServerState . . . . . . . . . . . . . . . . . . . . . . . . . . . . . . . . . . . . . . . . . . . . . . . . . . . . . . . . . . . . . . . . . . . . . . . . . . . . . . . . 69SetDefaultURL . . . . . . . . . . . . . . . . . . . . . . . . . . . . . . . . . . . . . . . . . . . . . . . . . . . . . . . . . . . . . . . . . . . . . . . . . . . . . . 70SetSecurity. . . . . . . . . . . . . . . . . . . . . . . . . . . . . . . . . . . . . . . . . . . . . . . . . . . . . . . . . . . . . . . . . . . . . . . . . . . . . . . . . 71SetUserGroupInfo . . . . . . . . . . . . . . . . . . . . . . . . . . . . . . . . . . . . . . . . . . . . . . . . . . . . . . . . . . . . . . . . . . . . . . . . . . . 72Undeploy . . . . . . . . . . . . . . . . . . . . . . . . . . . . . . . . . . . . . . . . . . . . . . . . . . . . . . . . . . . . . . . . . . . . . . . . . . . . . . . . . . 78ValidateEAR. . . . . . . . . . . . . . . . . . . . . . . . . . . . . . . . . . . . . . . . . . . . . . . . . . . . . . . . . . . . . . . . . . . . . . . . . . . . . . . . 79ValidateEJB . . . . . . . . . . . . . . . . . . . . . . . . . . . . . . . . . . . . . . . . . . . . . . . . . . . . . . . . . . . . . . . . . . . . . . . . . . . . . . . . 79
5 SilverJ2EEClient . . . . . . . . . . . . . . . . . . . . . . . . . . . . . . . . . . . . . . . . . . . . . . . . . . . . . . . . . . . . . . . . . . . . . . . . . . . . . . . . 81About SilverJ2EEClient. . . . . . . . . . . . . . . . . . . . . . . . . . . . . . . . . . . . . . . . . . . . . . . . . . . . . . . . . . . . . . . . . . . . . . . . . . . . 81
SilverJ2EEClient features . . . . . . . . . . . . . . . . . . . . . . . . . . . . . . . . . . . . . . . . . . . . . . . . . . . . . . . . . . . . . . . . . . . . . 81Installing SilverJ2EEClient . . . . . . . . . . . . . . . . . . . . . . . . . . . . . . . . . . . . . . . . . . . . . . . . . . . . . . . . . . . . . . . . . . . . . . . . . 82
Hosting the SilverJ2EEClient installers on your server . . . . . . . . . . . . . . . . . . . . . . . . . . . . . . . . . . . . . . . . . . . . . . . 82Going to the SilverJ2EEClient install page. . . . . . . . . . . . . . . . . . . . . . . . . . . . . . . . . . . . . . . . . . . . . . . . . . . . . . . . . 82Installing on Windows . . . . . . . . . . . . . . . . . . . . . . . . . . . . . . . . . . . . . . . . . . . . . . . . . . . . . . . . . . . . . . . . . . . . . . . . 83Installing on UNIX or Linux. . . . . . . . . . . . . . . . . . . . . . . . . . . . . . . . . . . . . . . . . . . . . . . . . . . . . . . . . . . . . . . . . . . . . 83Installing from the product CD . . . . . . . . . . . . . . . . . . . . . . . . . . . . . . . . . . . . . . . . . . . . . . . . . . . . . . . . . . . . . . . . . . 84
Starting SilverJ2EEClient . . . . . . . . . . . . . . . . . . . . . . . . . . . . . . . . . . . . . . . . . . . . . . . . . . . . . . . . . . . . . . . . . . . . . . . . . . 84Running on Windows . . . . . . . . . . . . . . . . . . . . . . . . . . . . . . . . . . . . . . . . . . . . . . . . . . . . . . . . . . . . . . . . . . . . . . . . . 84Running on NetWare . . . . . . . . . . . . . . . . . . . . . . . . . . . . . . . . . . . . . . . . . . . . . . . . . . . . . . . . . . . . . . . . . . . . . . . . . 86Running on UNIX or Linux . . . . . . . . . . . . . . . . . . . . . . . . . . . . . . . . . . . . . . . . . . . . . . . . . . . . . . . . . . . . . . . . . . . . . 87Displaying a console window . . . . . . . . . . . . . . . . . . . . . . . . . . . . . . . . . . . . . . . . . . . . . . . . . . . . . . . . . . . . . . . . . . . 87Displaying your own splash screen . . . . . . . . . . . . . . . . . . . . . . . . . . . . . . . . . . . . . . . . . . . . . . . . . . . . . . . . . . . . . . 88SilverJ2EEClient in the development environment. . . . . . . . . . . . . . . . . . . . . . . . . . . . . . . . . . . . . . . . . . . . . . . . . . . 88
Using startup options . . . . . . . . . . . . . . . . . . . . . . . . . . . . . . . . . . . . . . . . . . . . . . . . . . . . . . . . . . . . . . . . . . . . . . . . . . . . . 88Using - options . . . . . . . . . . . . . . . . . . . . . . . . . . . . . . . . . . . . . . . . . . . . . . . . . . . . . . . . . . . . . . . . . . . . . . . . . . . . . . 89Using + options . . . . . . . . . . . . . . . . . . . . . . . . . . . . . . . . . . . . . . . . . . . . . . . . . . . . . . . . . . . . . . . . . . . . . . . . . . . . . 90
Passing application arguments . . . . . . . . . . . . . . . . . . . . . . . . . . . . . . . . . . . . . . . . . . . . . . . . . . . . . . . . . . . . . . . . . . . . . . 90Specifying the arguments to pass . . . . . . . . . . . . . . . . . . . . . . . . . . . . . . . . . . . . . . . . . . . . . . . . . . . . . . . . . . . . . . . 90Accessing the arguments from a client . . . . . . . . . . . . . . . . . . . . . . . . . . . . . . . . . . . . . . . . . . . . . . . . . . . . . . . . . . . 91
Supporting access to secured EJBs . . . . . . . . . . . . . . . . . . . . . . . . . . . . . . . . . . . . . . . . . . . . . . . . . . . . . . . . . . . . . . . . . . 91
6 Server Implementation Notes . . . . . . . . . . . . . . . . . . . . . . . . . . . . . . . . . . . . . . . . . . . . . . . . . . . . . . . . . . . . . . . . . . . . . 93J2EE containers . . . . . . . . . . . . . . . . . . . . . . . . . . . . . . . . . . . . . . . . . . . . . . . . . . . . . . . . . . . . . . . . . . . . . . . . . . . . . . . . . 93
Web container . . . . . . . . . . . . . . . . . . . . . . . . . . . . . . . . . . . . . . . . . . . . . . . . . . . . . . . . . . . . . . . . . . . . . . . . . . . . . . 93EJB container. . . . . . . . . . . . . . . . . . . . . . . . . . . . . . . . . . . . . . . . . . . . . . . . . . . . . . . . . . . . . . . . . . . . . . . . . . . . . . . 95Client container . . . . . . . . . . . . . . . . . . . . . . . . . . . . . . . . . . . . . . . . . . . . . . . . . . . . . . . . . . . . . . . . . . . . . . . . . . . . 100
Session-level failover . . . . . . . . . . . . . . . . . . . . . . . . . . . . . . . . . . . . . . . . . . . . . . . . . . . . . . . . . . . . . . . . . . . . . . . . . . . . 100EJB support for session-level failover . . . . . . . . . . . . . . . . . . . . . . . . . . . . . . . . . . . . . . . . . . . . . . . . . . . . . . . . . . . 100Web application support for session-level failover . . . . . . . . . . . . . . . . . . . . . . . . . . . . . . . . . . . . . . . . . . . . . . . . . . 101Application client support for session-level failover . . . . . . . . . . . . . . . . . . . . . . . . . . . . . . . . . . . . . . . . . . . . . . . . . 102
CORBA support . . . . . . . . . . . . . . . . . . . . . . . . . . . . . . . . . . . . . . . . . . . . . . . . . . . . . . . . . . . . . . . . . . . . . . . . . . . . . . . . 102XML support . . . . . . . . . . . . . . . . . . . . . . . . . . . . . . . . . . . . . . . . . . . . . . . . . . . . . . . . . . . . . . . . . . . . . . . . . . . . . . . . . . . 103
Application server support for XML . . . . . . . . . . . . . . . . . . . . . . . . . . . . . . . . . . . . . . . . . . . . . . . . . . . . . . . . . . . . . 103Resources for learning about XML. . . . . . . . . . . . . . . . . . . . . . . . . . . . . . . . . . . . . . . . . . . . . . . . . . . . . . . . . . . . . . 103
Internationalization support. . . . . . . . . . . . . . . . . . . . . . . . . . . . . . . . . . . . . . . . . . . . . . . . . . . . . . . . . . . . . . . . . . . . . . . . 103Database support. . . . . . . . . . . . . . . . . . . . . . . . . . . . . . . . . . . . . . . . . . . . . . . . . . . . . . . . . . . . . . . . . . . . . . . . . . . 103Client-side support . . . . . . . . . . . . . . . . . . . . . . . . . . . . . . . . . . . . . . . . . . . . . . . . . . . . . . . . . . . . . . . . . . . . . . . . . . 104
6 exteNd Application Server Facilities Guide

About This Book
Purpose
This book describes core facilities (tools, utilities, services) provided with the Novell® exteNd™ Application Server.
Audience
This book is for anyone who manages the application server or develops applications for it.
Prerequisites
This book assumes some familiarity with J2EE (Java 2 Enterprise Edition).
Organization
Here’s a summary of the topics you’ll find in this book:
Related resources
The Novell exteNd Application Server also provides several facilities that come with their own documentation. These include:
Novell exteNd Messaging Platform
Novell exteNd UDDI Services
Additional documentation
For the complete set of Novell exteNd documentation, see the Novell documentation Web site (www.novell.com/documentation/exteNd.html).
Chapter Description
Chapter 1, “JSP Deployment to the File System”
How to deploy a JSP application to the file system for a quick develop/test/refine cycle
Chapter 2, “J2EE Archive Deployment”
How to deploy J2EE-compatible archive files to the application server
Chapter 3, “Deployment Plan DTDs”
Reference documentation about the DTDs (XML document type definitions) used when deploying J2EE archives to the application server
Chapter 4, “SilverCmd Reference”
Reference documentation about SilverCmd and its utilities
Chapter 5, “SilverJ2EEClient” All about the facilities provided with the application server to host Java-based clients using SilverJ2EEClient
Chapter 6, “Server Implementation Notes”
Details about the application server’s implementation of various features, including its J2EE containers and its support for CORBA, XML, and internationalization
7

8 exteNd Application Server Facilities Guide

1 JSP Deployment to the File System
This chapter describes how to use the Novell exteNd Application Server’s JSP File System (JSP/FS) deployment to speed your JSP development. With JSP/FS you can deploy your Web application to the file system and instantly see the result of changes you make—without redeployment. The chapter contains these sections:
Using JSP pages
Setting up your application
Deploying your application to the file system
Updating your application
Putting your application into production
Using JSP pagesThis section provides a quick introduction to JSP pages and their deployment.
About JSP pages and Web applications
The JavaServer Pages technology is an important part of Sun’s J2EE platform, which recommends using JSP pages (with supporting servlets) to provide the core of the user interface of your application. JSP pages are typically used in Web-based J2EE applications (Web applications). A Web application includes JSP pages, servlets, JavaBeans, utility classes, images, and so on that are packaged in an archive called a Web application archive (WAR) file. These applications are accessed by browser clients.
The application server provides full support for JSP pages.
For more information on JSP pages and how to create them, see the exteNd Director™ help.
About file system deployment
To make your Web application available to users, you deploy it to an application server. Users access your application by specifying appropriate URLs in their browsers.
But when developing, testing, and refining your application, you want fast turnaround—you want to make a change to your JSP pages and immediately see the result in a browser without having to redeploy the application. With JSP/FS, you can.
After deploying your application to the file system, you can create or change a JSP page, refresh the browser, and immediately see the change. There is no need to redeploy.
Similarly, you can change any static resource in your application and see the change immediately. (A static resource is any file that the server serves as is. Static resources include HTML files, images files, and style sheets.)
JSP Deployment to the File System 9
JSP/FS is:
Meant only to enhance development. Don’t use it with your production applications, instead see “Putting your application into production” on page 13.
Not supported in a clustered environment.
Using exteNd Director deployment tools
If you are using Novell exteNd Director to do your development and deployment, you don’t have to perform the procedures described in the rest of this chapter. You need only to specify Enable Rapid Deployment in your project’s deployment settings when you deploy your WAR (or EAR containing a WAR). exteNd Director’s deployment tools will manage everything for you, including:
Updating the deployment plan with the proper specification for JSP/FS
Deploying the project to the file system
Managing changes you make in your project’s files (including creating and removing a RELOAD file as necessary, as described in “Making changes to Java source files” on page 12)
You continue to work with your project’s files as usual. Changes will be reflected immediately in your deployed application.
When you are ready to do your production deployment, simply deselect Enable Rapid Deployment in your project’s deployment settings and redeploy.
For more information, see exteNd Director help.
Setting up your applicationTo use file system deployment, you do not need to do anything special when you begin your Web application development. You’ll set up your development area using a directory structure that conforms to the format required for Web applications. Then when you are ready to test your application, you package it in a WAR file.
What must be in the WAR file To create your WAR file for file-system deployment, all you need is:
Any supporting files for your Web application, such as:
Compiled servlet and utility classes, either as class files (in WEB-INF/classes) or as JAR files (in WEB-INF/lib)
Tag libraries (typically in WEB-INF/tlds)
A deployment descriptor for the application. The file must be named web.xml and must be in the WEB-INF directory.
There are different versions of the Sun J2EE Web application DTD. Each version of the Java Servlet Specification provides complete documentation on each tag. You can find these documents on the Sun Java Web site at java.sun.com/j2ee/docs.html.
Creating the WAR file You can create the WAR file using the archive tool of your choice. For example, you can use Novell exteNd Director or Sun’s jar utility.
10 exteNd Application Server Facilities Guide

Deploying your application to the file systemOnce you have the WAR file, you are ready to deploy it to the file system. To deploy a J2EE archive (such as a WAR file), you create a deployment plan, an XML file that specifies application server–specific information about how to manage the Web application and how it should be deployed.
Creating the deployment plan
The WAR’s deployment plan must be in the correct format. The deployment plan DTDs are located in the server’s Resources/DTDCatalog directory. Different server versions use different DTDs. See Chapter 2, “J2EE Archive Deployment” for information on which DTD is appropriate for your server version.
The deployment plan for file-system deployment is the same as for a production deployment, with one exception: it includes a line within the <warJar> section that specifies that you want the server to deploy the application to the file system. To deploy to the file system, include this line in your deployment plan:
<deployToFilesystem type="Boolean">true</deployToFilesystem>
Example The following shows how to use the <deployToFilesystem> element:
<warJarName>C:\MyProjects\JSPSample\JSPSample.war</warJarName> <isEnabled type="Boolean">True</isEnabled> <deployToFilesystem type="Boolean">true</deployToFilesystem> <sessionTimeout type="String">5</sessionTimeout> <urls type="StringArray"> <el>JSPSample</el> </urls> <deployedObject type="String">JSPSample</deployedObject> </warJar></warJarOptions>
Deploying the application
Now run the DeployWAR SilverCmd to deploy your application (you can also use DeployEAR, as long as it includes your WAR file).
What happens The application is deployed to the file system as follows: the server expands the WAR file in the directory /webapps/DBname/URL in the server’s installation directory, where:
DBname is the name of the database containing the application deployed to the file system
URL is the URL specified in the deployment plan for the application (if you have specified more than one, the first one is used)
Example Here is the structure of the sample application whose deployment plan is shown above (entries in bold are directories):
JSPSamplejsps (directory containing the JSP pages)WEB-INF
web.xml (deployment descriptor)classes (directory containing the supporting class files)tlds (directory containing the TLD files)
Here is the deployment command line:
SilverCmd DeployWAR localhost JSPSampleDB JSPSample.war -f JSPSampleDeplPlan.xml -o
After deploying this application to the file system, the WAR file is expanded in /webapps in the server’s installation directory as follows:
JSP Deployment to the File System 11

ServerInstallDirwebapps
JSPSampleDB (directory whose name is the deployment database)JSPSample (directory whose name is the URL in the deployment plan)
com (directory where JSPs will be compiled -- see below)jspsWEB-INF
web.xmlclassestlds
The subdirectories under webapps/JSPSampleDB/JSPSample make up the deployment area, and you can work with the application there.
Updating your applicationOnce you have deployed your application to the file system, you can make changes in the deployment area and immediately see the result of the changes.
What you can change You can:
Change an existing JSP page
Add a new JSP page
Delete an existing JSP page
Change, add, or delete a static resource
To see the result To see the result of your change, simply save the file(s) in the deployment area, go to your browser, and specify the appropriate URL.
For example, to see the result of changing sample.jsp, you would specify an URL similar to this:
http://localhost/JSPSampleDB/JSPSample/jsps/sample.jsp
What the server does The application server checks to see whether the JSP page has ever been accessed. If not, it compiles it and displays the result in the browser. The server stores the resulting Java and class files in the com/sssw/gen/jsp directory in the deployment area.
Similarly, the server checks to see whether the JSP page (the JSP source file) has been updated since it was last accessed. If so, the file is recompiled and redisplayed.
Also, the server serves updated static resources as needed.
If there is an error If there are any JSP compilation errors for the requested page, the server generates an HTML page describing the error and returns it with a 500 status code to the client.
If there is an error compiling a JSP page other than the one requested, the server cannot intercept the failure. Depending on where in the compilation process the error occurred, you might see an error message in the generated JSP page with a link that describes the error. You can prevent the server from trying to compile JSP pages that are known to fail by using the <excludedJSPs> tag in the deployment plan.
Making changes to Java source files Sometimes in the course of development you will need to update utility classes, servlets, JAR files, and so on in the application and will want to refresh your deployment area.
To refresh the deployment area:
1 Make the changes in your development area.
2 Compile the classes and refresh any JARs that need updating.
12 exteNd Application Server Facilities Guide

3 Copy the updated CLASS and JAR files to the appropriate locations in the deployment area.
4 Create a file named RELOAD (all uppercase) in the root of the deployment area.
In the sample deployment, you would create RELOAD in webapps/JSPSampleDB/JSPSample.
TIP: To easily create the file, open a DOS command prompt, change to the directory, type copy con RELOAD, then press Return, Ctrl+Z, Return.
5 Access your application in the browser.
The server will automatically reload the application, getting all the updated files, and delete the RELOAD file.
You can now continue to make changes to JSP pages in the updated deployment area.
Redeploying the application to the file system After deploying to the file system, you shouldn’t redeploy your application to the file system with DeployWAR. Instead, work with your application as described above. When you are ready to put your application into production, follow the procedure in “Putting your application into production” next.
If (in error) you do redeploy your application to the file system with DeployWAR, the server notices that the deployment directory already exists in webapps. It renames that directory to DeploymentDir.1, then redeploys the application to the file system. That means the current application continues to be DeploymentDir, with the previous version archived as DeploymentDir.1. If you do the deployment again, DeploymentDir is renamed DeploymentDir.2, and so on. The current application is always DeploymentDir, and the version before that is archived as the highest numbered DeploymentDir.n. The server is responsive only to changes in DeploymentDir.
In the sample shown, if the application is deployed to the file system a second time, webapps/JSPSampleDB/JSPSample is renamed to JSPSample.1, and the current application is deployed to JSPSample.
Putting your application into productionJSP/FS is meant only for use in the development phase of your application. When you have completed the application and are ready to put it into production, do the following.
To put your application into production:
1 Bring your development area up to date with the changes you made in the deployment area.
2 Rebuild your WAR or EAR file.
3 Delete or comment out the <deployToFilesystem> line in the deployment plan.
4 Do a full deployment using DeployWAR or DeployEAR.
JSP Deployment to the File System 13

14 exteNd Application Server Facilities Guide

2 J2EE Archive Deployment
This chapter describes the requirements for deploying J2EE-compatible archive files to a Novell exteNd Application Server. It covers these topics:
Deploying archives
EJB deployment tips
Specifying classpath JARs on the server
Controlling thread usage for deployment
Using exteNd Director This chapter describes deployment using the application server deployment tools. To learn about developing, packaging, and deploying with Novell exteNd Director, see the exteNd Director help.
Deploying archivesTo deploy a J2EE archive to the application server, you’ll:
Step ActionArchive type Where to go for more information
1 Package the application in an archive file
Client application, EJB, EAR, and WAR
Sun establishes the requirements for each application type. For more information about writing or packaging J2EE applications, see the published specifications on the Sun Java Web site at:
http://java.sun.com/j2ee/docs.html
RAR For information about writing and packaging a RAR, see the J2EE Connector architecture specification, available from the Sun Java Web site at:
http://jcp.org/jsr/detail/016.jsp
2 Write a deployment plan
Client application
See “Client JAR deployment plan DTD” on page 34
NOTE: A deployment plan is only required if the application references EJBs, environment entries, or other external resources (such as databases). If the application does not include external references, a deployment plan is not required.
EJB See Chapter 3, “Deployment Plan DTDs”
EAR
RAR
WAR
J2EE Archive Deployment 15

EJB deployment tipsThis section describes some features specifically related to deploying EJB archives including:
Updating EJB 1.1 Finder methods
Tips for completing the EJB deployment plan
Updating EJB 1.1 Finder methods
If you have existing EJB 1.1 beans, you'll have to update the deployment plan to use the correct DTD. For more information on EJB deployment plans, see “EJB JAR deployment plan DTD” on page 35.
You can use the Novell exteNd Director Deployment Plan Editor to convert the deployment plan for you. For more information on using the Deployment Plan Editor to convert deployment plans, see the exteNd Director help.
When you use exteNd Director to update the deployment plan for CMP entity beans, Finder method definitions are converted from whereClause elements to sqlWhereClause elements.
The Deployment Plan Editor converts the EJB 1.1 Finder methods to simple expressions that include the WHERE clause of a SQL statement and one or more input parameters. It converts the first input parameter from the finder is converted to ?1, the second to ?2, and so on.
For example:
<sqlWhereClause>WHERE COL1=?1
</sqlWhereClause>
If you do not specify WHERE in the sqlWhereClause element, the container prepends it for you. So
<sqlWhereClause>WHERE PRICE>1
</sqlWhereClause>
and
<sqlWhereClause>PRICE>1
</sqlWhereClause>
are both valid.
To specify a findAll() method, just supply an empty string for the sqlWhereClause element.
For more information on upgrading, see the exteNd Director help.
3 Deploy the archive
Client application
See “DeployCAR” on page 56
EJB See “DeployEJB” on page 59
EAR See “DeployEAR” on page 57
RAR See “DeployRAR” on page 60
WAR See “DeployWAR” on page 61
Step ActionArchive type Where to go for more information
16 exteNd Application Server Facilities Guide

Tips for completing the EJB deployment plan
This section describes some tips and examples for completing the EJB deployment plan. It includes these sections:
Supporting autoincrement
Mapping CMP entity beans to a table
Mapping persistent fields
Using TRANSACTION_READ_COMMITTED isolation levels
Mapping relationships
Mapping a primary key
Mapping for message-driven beans
IOR configurations for EJB security
Supporting autoincrement
The container supports autoincrement through the deployment plan’s autoInc element. When autoInc is marked for a cmp-field, the database column that it maps to must support autoincrement, as follows:
Mapping CMP entity beans to a table
You map a CMP entity bean to one (and only one) table. You use the beanPersistenceInfo element of the deployment plan to map a bean to a table.
Suppose that you had a deployment descriptor with an entry for an entity bean, like this:
<entity> <ejb-name>BEAN_NAME</ejb-name> . . . </entity>
The corresponding entry in the deployment plan would be in the beanPersistenceInfo node. It would look something like this:
<beanPersistenceInfo> <beanName>BEAN_NAME</beanName> <dataSourceName>DATABASE_OR_POOL_NAME</dataSourceName> <sqlHandler>SQL_HANDLER</sqlHandler> <isolationLevel>ISOLATION_LEVEL</isolationLevel> <table> <name>DB_TABLE</name> . . . </table></beanPersistenceInfo>
Notes about the deployment plan:
The beanName element of the beanPersistenceInfo node must match the ejb-name element in the deployment descriptor (in this example, BEAN_NAME).
The dataSourceName element is the name of the database or connection pool where the table (in this example, DB_TABLE) resides.
Database Requirement
Oracle You must provide a sequence name through autoIncSequenceName element
Sybase, Microsoft, and IBM DB2 The column has to be an identity column
Informix The column has to be a SERIAL type
IBM Cloudscape The column type has to be autoincrement type
J2EE Archive Deployment 17

The sqlHandler element of the deployment plan can be one of the following:
NOTE: The sqlHandler element values are not case sensitive.
The isolationLevel element identifies the isolation level to be used. The container supports TRANSACTION_READ_COMMITTED or TRANSACTION_SERIALIZABLE. When TRANSACTION_ READ_COMMITTED isolation level is used, the container checks to make sure no values are changed by other users during a commit; if they are changed, the container throws a concurrency violation exception.
If you have multiple beans (mapped to different tables in the same database) using different isolation levels, you need multiple pools—except for Oracle databases (see just below).
Use TRANSACTION_SERIALIZABLE with caution, as the likelihood of deadlock increases.
Exceptions for Oracle For Oracle databases, all READ SQL statements for TRANSACTION_SERIALIZABLE are appended with FOR UPDATE to explicitly place a write lock on the row.
Mapping persistent fields
The persistent fields (the cmp-field elements) listed in the deployment descriptor must be mapped to a database column in the database table in the deployment plan. This enables the container to persist the fields appropriately. Suppose your deployment descriptor looked like this:
<entity> <ejb-name>BEAN_NAME</ejb-name> <cmp-field>field1</cmp-field> <cmp-field>field2</cmp-field> <cmp-field>field3</cmp-field> . . . </entity>
The cmp-field elements in the deployment descriptor would have a corresponding elements in the table node of the deployment plan—for example:
<table> <name>DB_TABLE</name> <field> <cmpFieldName>field1</cmpFieldName> <columnName>COLUMN1</columnName> </field> <field> <cmpFieldName>field2</cmpFieldName> <columnName>COLUMN2</columnName>
For this database or class Valid sqlHandler element values
Oracle Oracle
IBM Cloudscape Cloudscape
Sybase Adaptive Server Anywhere AdaptiveServerAnywhere
Sybase Adaptive Server Enterprise AdaptiveServerEnterprise
Informix Informix
Microsoft SQL Server MicrosoftSQLServer
IBM DB2 DB2
MYSQL MySQL
Class that implements com.sssw.shr.ejb2.api. AgiEJBSqlHandler
The fully qualified name of the class
18 exteNd Application Server Facilities Guide
</field> . . . </table>
Notes about the deployment plan:
The cmpFieldNames in the deployment plan must match the cmp-field elements in the deployment descriptor.
The columnName is an actual column name in the database. This field is case-sensitive and must exactly match the database column name returned by the JDBC getColumns() method. The container needs the correct name to locate the column.
Using TRANSACTION_READ_COMMITTED isolation levels
When you specify TRANSACTION_READ_COMMITTED for the isolation level, you may be able to specify some columns as deltaType columns in the deployment plan to improve performance.
The deltaType element specifies whether the column data is used to maintain a count or a total, such as total count or total sales. If you use this element, you should set up a database constraint to guard against overflow/underflow. For example, suppose you have a column that contains the quantity left for a specific product; many transactions may try to increase or decrease this quantity. Instead of generating SQL like this:
UPDATE table SET quantity = ? WHERE col1=old_col1_value AND col2 = old_col2_value
and
quantity = old_quantity
which will result in a concurrency violation if two users change them concurrently. The container generates SQL like this:
UPDATE table SET quantity = quantity + ? WHERE col1=old_col1_value AND col2 = old_col2_value
For this example, you would apply a constraint that does not allow the quantity to drop below zero, and the column should not allow NULL.
Using the deltaType element appropriately can greatly reduce the possibility of a CONCURRENCY_VIOLATION exception and improve performance. To use the deltaType element:
The column must represent a quantity—because the data type can only be a number type like an int, a short, a float, a double, a BigDecimal, and so on.
The field cannot be null.
It has no impact for TRANSACTION_SERIALIZABLE.
Mapping relationships
A relationship can exist between two entity beans that have CMP. This relationship is expressed via the relationships node of the deployment descriptor. The relationship is mapped to real tables via the relationsList node of the deployment plan.
Based on the contents of the deployment descriptor and the deployment plan, the container will be able to generate the appropriate SQL code to traverse the tables and get and set the appropriate values. To generate the SQL, the container needs to have the answers to these questions:
Does a relationship exist?
What beans are involved in the relationship?
What is the multiplicity of the relationship?
What is the direction of the relationship (bidirectional or unidirectional)? If unidirectional, which bean is the one that can access the other bean?
How do you navigate the relationship?
J2EE Archive Deployment 19

What are the foreign key/primary key relationships?
Does the relationship support cascade delete?
The container gets the all this information (except the foreign key mapping) from the deployment descriptor relationships node. The relationships node contains the elements shown here:
<relationships> <ejb-relation> <ejb-relationship-role> <multiplicity></multiplicity> <relationship-role-source> <ejb-name></ejb-name> </relationship-role-source> <cmr-field> <cmr-field-name></cmr-field-name> <cmr-field-type></cmr-field-type> </cmr-field> </ejb-relationship-role> <ejb-relationship-role> <multiplicity></multiplicity> <relationship-role-source> <ejb-name></ejb-name> </relationship-role-source> <cmr-field> <cmr-field-name></cmr-field-name> <cmr-field-type></cmr-field-type> </cmr-field> </ejb-relationship-role> </ejb-relation> . . . </relationships>
Notes about the relationship:
For each relationship there are exactly two ejb-relationship-role nodes.
The multiplicity element determines whether the relationship is one-to-one, one-to-many, many-to-one, or many-to-many.
For each cmr-field element in the deployment descriptor, there will be a corresponding set or get method in the bean class. So the cmr-field element (or lack of) determines the direction (unidirectional or bidirectional).
The <ejb-relation-name> element is optional (according to the EJB specification).
For a many-to-many relationship, a linkTable element (in the deployment plan) is required. The container allows the linkTable element to be used in a one-to-many relationship but does not recommend it.
Once you have the deployment descriptor, you can create a new deployment plan or complete an existing one.
How to express a one-to-one bidirectional relationship
This example illustrates how you would express a one-to-one bidirectional relationship for the CustomerEJB (which maps to the CUSTOMER table) and the AddressEJB (which maps to the ADDRESS table). The primary keys are CustomerID and AddressID respectively.
The deployment descriptor would look like this:
<ejb-relation> <ejb-relationship-role> <multiplicity>One</multiplicity> <relationship-role-source> <ejb-name>CustomerEJB</ejb-name> </relationship-role-source> <cmr-field> <cmr-field-name>address</cmr-field-name> </cmr-field>
20 exteNd Application Server Facilities Guide
</ejb-relationship-role> <ejb-relationship-role> <multiplicity>One</multiplicity> <relationship-role-source> <ejb-name>AddressEJB</ejb-name> </relationship-role-source> <cmr-field> <cmr-field-name>customer</cmr-field-name> </cmr-field> </ejb-relationship-role> </ejb-relation>
Notes about the deployment descriptor:
The multiplicity element in both ejb-relationship-roles is One to specify the one-to-one relationship.
Both ejb-relationship-role elements list cmr-field-names. This indicates that the relationship is bidirectional. The cmr-field-names do not actually represent columns or foreign keys in the related tables. You don’t know the actual names of the target columns until deployment; the cmr-field-names are just entries that represent the direction of the relationship.
Suppose you are ready to deploy the EJB JAR and now need to create the deployment plan that would represent the CustomerEJB and AddressEJB EJBs. You might be mapping the CustomerEJB and AddressEJB to a target database where the CUSTOMER table contained a foreign key to the ADDRESS table; the foreign key field name is ADDRESS_ID. The relation node of your deployment plan would look like this:
<relation> <relationRole> <beanName>CustomerEJB</beanName> <cmrFieldName>address</cmrFieldName> <columnNames> <el>ADDRESS_ID</el> </columnNames> </relationRole> <relationRole> <beanName>AddressEJB</beanName> <cmrFieldName>customer</cmrFieldName> </relationRole> </relation>
Notes about the deployment plan:
The beanName in the deployment plan must exactly match the ejb-name element of the deployment descriptor.
The cmrFieldName of the deployment plan (or lack of this element) must exactly match the cmr-field-name of the deployment descriptor.
The deployment plan’s columnName element is the column name of the foreign key in the table (CUSTOMER) to which it is mapped. This means that the container will construct SQL so that it can navigate from the customer to the associated address, and vice versa.
The cmrFieldName of the AddressEJB is not mapped to a column name. This is because the ADDRESS table does not (and should not) contain a foreign key to the CUSTOMER table.
The location of the foreign key does not determine the direction of the relationship.
If your database should be set up so that the ADDRESS table contained a foreign key CUSTOMER_ID, the deployment plan would look like this:
<relation> <relationRole> <beanName>CustomerEJB</beanName> <cmrFieldName>address</cmrFieldName> </relationRole> <relationRole> <beanName>AddressEJB</beanName>
<cmrFielName>customer</cmrFieldName>
J2EE Archive Deployment 21

<columnNames> <el>CUSTOMER_ID</el> </columnNames> </relationRole> </relation>
How to express a one-to-one unidirectional relationship
This example illustrates how you would express a one-to-one unidirectional relationship for CustomerEJB (which maps to the CUSTOMER table) and AddressEJB (which maps to the ADDRESS table). The primary keys are CustomerID and AddressID respectively.
The deployment descriptor would look like this:
<ejb-relation> <ejb-relationship-role> <multiplicity>One</multiplicity> <relationship-role-source> <ejb-name>CustomerEJB</ejb-name> </relationship-role-source> <cmr-field> <cmr-field-name>address</cmr-field-name> </cmr-field> </ejb-relationship-role> <ejb-relationship-role> <multiplicity>One</multiplicity> <relationship-role-source> <ejb-name>AddressEJB</ejb-name> </relationship-role-source> </ejb-relationship-role> </ejb-relation>
Notes about the deployment descriptor:
The multiplicity element in both ejb-relationship-roles is One to specify the one-to-one relationship.
The CustomerEJB includes a cmr-field-name element (in this case, address), but the AddressEJB does not. This specifies that the relationship is unidirectional—you can get to the AddressEJB from the CustomerEJB but not vice versa. (The CustomerEJB will include get and set methods for the ADDRESS EJB.)
The cmr-field-name address does not actually represent a column in the AddressEJB. When you create the deployment plan, you’ll have to map the address cmr-field to the actual foreign key column.
This deployment plan shows how to map the cmr-field-name when the CUSTOMER table includes the foreign key ADDRESS_ID:
<relation> <relationRole> <beanName>CustomerEJB</beanName> <cmrFieldName>address</cmrFieldName> <columnNames> <el>ADDRESS_ID</el> </columnNames> </relationRole> <relationRole> <beanName>AddressEJB</beanName> </relationRole> </relation>
Notes about the deployment plan:
The beanName in the deployment plan must exactly match the ejb-name element of the deployment descriptor.
22 exteNd Application Server Facilities Guide

The cmrFieldName of the deployment plan must exactly match the cmr-field-name of the deployment descriptor (this also means that the deployment plan should not have a cmrFieldName when the deployment descriptor does not have a cmr-field-name).
The deployment plan’s columnName element is the column name of the foreign key in the table (CUSTOMER) to which it is mapped. This specifies that the container will construct SQL so that it can navigate from the customer to the associated address.
The AddressEJB does not have a cmrFieldName or columnNames element, because the ADDRESS table does not (and should not) contain a foreign key to the CUSTOMER table.
Suppose your existing database used a different structure and the ADDRESS table had the foreign key CUSTOMER_ID. The deployment plan would look like this:
<relation> <relationRole> <beanName>CustomerEJB</beanName> <cmrFieldName>address</cmrFieldName> </relationRole> <relationRole> <beanName>AddressEJB</beanName> <columnNames> <el>CUSTOMER_ID</el> </columnNames> </relationRole> </relation>
Notes about the deployment plan:
The relationRole and cmrFieldNames exactly match the entries in the deployment descriptor as noted above—but this time the columnName is not included in this node of the relationRole element. This is because the foreign key is not in the CUSTOMER table (it’s in the ADDRESS table).
The relationship is still unidirectional, because only one cmrFieldName element is present.
You specify the foreign key in the table in which it belongs. The foreign key has nothing to do with the direction of the relationship.
Expressing a one-to-many bidirectional relationship
This example uses:
The OrderEJB (which maps to the ORDER table)
AND
The LineItemEJB (which maps to the LINEITEM table)
For each OrderEJB there can be many LineItems. You can navigate from the ORDER table to the LINEITEM table and back.
The deployment descriptor looks like this:
<ejb-relation> <ejb-relationship-role> <multiplicity>One</multiplicity> <relationship-role-source> <ejb-name>OrderEJB</ejb-name> </relationship-role-source> <cmr-field> <cmr-field-name>lineItems</cmr-field-name> <cmr-field-type>java.util.Collection</cmr-field-type> </cmr-field> </ejb-relationship-role> <ejb-relationship-role> <multiplicity>Many</multiplicity> <relationship-role-source> <ejb-name>LineItemEJB</ejb-name> </relationship-role-source>
J2EE Archive Deployment 23

<cmr-field> <cmr-field-name>order</cmr-field-name> </cmr-field> </ejb-relationship-role> </ejb-relation>
Notes about the deployment descriptor:
The OrderEJB includes a cmr-field-name element (in this case, lineitems), and the LineItemEJB also has a cmr-field-name element (in this case, order). This specifies that the relationship is bidirectional.
The data type of the lineitems cmr-field-name element includes a data type specification (a java.util.Collection), because more than one item can be returned.
Suppose you are writing a deployment descriptor for the situation where:
The OrderEJB bean maps to the ORDERS table (whose primary key is ORDERID)
The LineItemEJB bean maps to the LINEITEM table (whose primary key is LINEITEMID)
The LINEITEM table has a foreign key ORDER_ID
In this case the deployment plan would look like this:
<relation> <relationRole> <beanName>OrderEJB</beanName> <cmrFieldName>lineItems</cmrFieldName> </relationRole> <relationRole> <beanName>LineItemEJB</beanName> <cmrFieldName>order</cmrFieldName> <columnNames> <el>ORDER_ID</el> </columnNames> </relationRole> </relation>
Notes about the deployment plan:
As always, the beanName has to be the same as the ejb-name of the deployment descriptor, and the cmrFieldName has to be the same as the cmr-field-name of the deployment descriptor.
The LineItemEJB contains a columnName element that maps to the foreign key.
In a one-to-one relationship, the location of the foreign key may be in either table. In a one-to-many relationship, the foreign key always resides on the Many side. The location of the foreign key does not determine the direction of the relationship.
Expressing a one-to-many unidirectional relationship
This example illustrates how to express a one-to-many unidirectional relationship. This example uses the ProductEJB (which maps to the PRODUCT table) and the LineItemEJB (which maps to the LINEITEM table). For each ProductEJB there can be many LineItemEJBs. You can navigate from the LINEITEM table to the PRODUCT table but not back.
The deployment descriptor looks like this:
<ejb-relation> <ejb-relationship-role> <multiplicity>One</multiplicity> <relationship-role-source> <ejb-name>ProductEJB</ejb-name> </relationship-role-source> </ejb-relationship-role> <ejb-relationship-role> <multiplicity>Many</multiplicity> <relationship-role-source> <ejb-name>LineItemEJB</ejb-name> </relationship-role-source>
24 exteNd Application Server Facilities Guide
<cmr-field> <cmr-field-name>product</cmr-field-name> </cmr-field> </ejb-relationship-role> </ejb-relation>
The multiplicity element for the ProductEJB is One and for the LineItemEJB is Many—specifying that one ProductEJB can have many related LineItemEJBs.
The LineItemEJB includes a cmr-field-name element (in this case, products), but the ProductEJB does not have one. This indicates that the relationship goes in a single direction from LineItem to Product.
Suppose that you are writing a deployment plan for the deployment descriptor above where:
The ProductEJB bean maps to the PRODUCT table (whose primary key is PRODUCTID)
The LineItemEJB bean maps to the LINEITEM table (whose primary key is LINEITEMID)
The LINEITEM table has a foreign key PRODUCT_ID
In this case the deployment plan would look like this:
<relation> <relationRole> <beanName>ProductEJB</beanName> </relationRole> <relationRole> <beanName>LineItemEJB</beanName> <cmrFieldName>product</cmrFieldName> <columnNames> <el>PRODUCT_ID</el> </columnNames> </relationRole> </relation>
Notes about the deployment plan:
As always, the beanName must be the same as the ejb-name of the deployment descriptor, and the cmrFieldName must be the same as the cmr-field-name of the deployment descriptor.
The LineItemEJB contains a columnNames element that maps to the foreign key.
Using a link table
It is possible to use a link table (but not recommended). For example, the link table might be PROD_LINEITEM, which has the PRODUCT_ID and LINEITEM_ID, mapped to PRODUCTID and LINEITEMID respectively.
In this case the deployment plan would look like this:
<relation> <linkTable>PROD_LINEITEM</linkTable> <relationRole> <beanName>ProductEJB</beanName> <columnNames> <el>PRODUCT_ID</el> </columnNames> </relationRole> <relationRole> <beanName>LineItemEJB</beanName> <cmrFieldName>product</cmrFieldName> <columnNames> <el>LINEITEM_ID</el> </columnNames> </relationRole> </relation>
J2EE Archive Deployment 25

How to express a many-to-many unidirectional relationship
This example illustrates how you would express a many-to-many unidirectional relationship for the OrderEJB (which maps to the ORDER table) and the ProductEJB (which maps to the PRODUCT table). The primary keys are OrderID and ProductID respectively. Many-to-many relationships always use a linkTable.
The deployment descriptor would look like this:
<ejb-relation> <ejb-relationship-role> <multiplicity>Many</multiplicity> <relationship-role-source> <ejb-name>OrderEJB</ejb-name> </relationship-role-source> <cmr-field> <cmr-field-name>products</cmr-field-name> <cmr-field-type>java.util.Collection</cmr-field-type> </cmr-field> </ejb-relationship-role> <ejb-relationship-role> <multiplicity>Many</multiplicity> <relationship-role-source> <ejb-name>ProductEJB</ejb-name> </relationship-role-source> </ejb-relationship-role> </ejb-relation>
Notes about the deployment descriptor:
The multiplicity element for both ejb-relationship-roles is Many.
Suppose you had to write a deployment plan where:
The ProductEJB bean maps to the PRODUCT table (whose primary key is PRODUCTID)
The OrderEJB bean maps to the ORDERS table (whose primary key is ORDERID)
The link table is PROD_ORDER. The PROD_ORDER table’s primary keys are PRODUCT_ID and ORDER_ID (which are also foreign keys to the PRODUCT and ORDER tables).
In this case your deployment plan would look like this:
<relation> <linkTable>PROD_ORDER</linkTable> <relationRole> <beanName>OrderEJB</beanName> <cmrFieldName>products</cmrFieldName> <columnNames> <el>ORDER_ID</el> </columnNames> </relationRole> <relationRole> <beanName>ProductEJB</beanName> <columnNames> <el>PRODUCT_ID</el> </columnNames> </relationRole> </relation>
Notes about the deployment plan:
As always, the beanName must be the same as the ejb-name of the deployment descriptor, and the cmrFieldName must be the same as the cmr-field-name of the deployment descriptor.
The relation node would include the linkTable element that specifies the actual name of the database table.
The relation roles for both OrderEJB and ProductEJB include foreign key mappings (via the columnNames element) to the linkTable.
26 exteNd Application Server Facilities Guide

General restrictions on relationship mapping
Keep in the following in mind:
You can use a single column as both a cmp-field and a cmr-field; but when the single column is both a cmp-field and a cmr-field, the cmp-field should be read-only. Calling a set method on the cmp-field results in an Exception in this case.
You cannot use the same database column for more than one cmp-field or cmr-field.
The way to change a relationship is through its cmr-field (not the cmp-field).
Mapping a primary key
You specify the primary key for the entity bean using the primkey-field and/or the prim-key-class elements. (According to the EJB specification, the prim-key-class element is required, but the primkey-field is optional.)
For single-field primary keys, the primkey-field has to be one of the cmp-fields.
If the primary key is a multifield key:
Use the prim-key-class to specify the primary key.
All of the prim-key-class’s fields must be public.
The prim-key-class’s field names must correspond to the field names of the entity bean class.
A class is an unknown primary key (see the EJB 2.0 specification section 10.8.3) if the primkey-field element is missing and the prim-key-class element is a java.lang.Object. For unknown primary keys, the EJB container generates a unique key. The deployment plan primaryKey element is used to support the unknown primary key as follows:
You must specify a primaryKeyClass element for the primaryKey element.
The container supports java.lang.String, java.lang.Integer, or java.lang.Long for primaryKeyClass.
If the primaryKeyClass is java.lang.String, the autoInc element is ignored, and the column has to be able to store a 32-byte length of String data.
If primaryKeyClass is java.lang.Integer or java.lang.Long, then the autoInc element is required (and has to map to a column that supports autoincrement)—so that an autoincrement column can be used to generate unique primary keys.
In general, performance is better with autoincrement columns. The following shows what a primary key class entry in the deployment plan might look like:
<primaryKey> <primaryKeyClass>java.lang.Integer</primaryKeyClass> <columnName>AUTO_INC_COL</columnName> </autoInc> </primaryKey>
Mapping for message-driven beans
Message-driven beans use a JMS server to transmit and consume messages. For the container to locate the JMS server, you must specify at least the destinationName element and the ConnectionFactoryName element—for example:
<message> <destinationName>
corbaname:iiop:JMSServer:53506#queue/queueName </destinationName> <connectionFactoryName>
corbaname:iiop:JMSServer:53506#queue/xaConnectionFactory </connectionFactoryName>
</message>
NOTE: The specified ConnectionFactory must support global transactions.
J2EE Archive Deployment 27

IOR configurations for EJB security
This section describes the information you must supply in the deployment plan to support secure invocations of the EJB. You supply the information via the iorSecurityConfig element of the deployment plan. The iorSecurityConfig node is part of the entity and session elements.
Interoperable Object References
Every object that is remotely accessible using CORBA is referred to via an Interoperable Object Reference (IOR). The IOR is a remote reference to an object; it can be stored (in the CORBA or JNDI naming service, for example) and subsequently converted to a stub that can be used to call the remote object. So the IOR must contain all information that the client ORB needs to construct a stub for the remote object and to issue remote method calls on the stub. The information includes:
When the client looks up a remote CORBA object (such as an EJB) in the naming service (such as via JNDI), what’s returned is the IOR for the object. The client calls PortableRemoteObject.narrow() to convert the IOR into a stub. When the client attempts to call a method on the stub, the client’s ORB uses the information obtained from the IOR to decide the following: what type of connection (encrypted or plain) to create; what server address and port number to connect to; and whether or not to encode and send client identity, credentials, and transaction information on the call. The server in turn verifies that the information supplied matches what the IOR demands and then dispatches the call to the remote object.
Contents of the IOR security configuration
The IOR security configuration as supplied in the iorSecurityConfig element has three sections:
Information item Description
One or more addresses (host IP address and TCP port number) at which the remote object can be called
The Novell exteNd ORB will be listening at this address.
The object identifier assigned to the remote object by the server ORB when the object was created
The ORB uses this to find the object.
The object’s type (the list of remote interfaces the object implements)
The client uses this to determine what kind of stub to create.
Security information for the object The client uses this information to determine whether a secure (encrypted) connection should be used for calls to the object, and whether a client certficate, user name and password, or other caller ID and credential information should be passed to the object on each call. This is the information specified by the <iorSecurityConfig> element at deployment time (as described in detail in “Contents of the IOR security configuration” just below).
Transactional information for the object
The client uses this to decide whether to propagate two-phase commit transaction information to the object.
Section What it defines
Transport configuration Whether an encrypted communications channel is to be used; if so, it defines the encryption parameters and certificate information required
Authentication context configuration
What kind of authentication mechanism (such as user name and password) should be supplied on calls to this object, and whether anonymous calls to the object are allowed
28 exteNd Application Server Facilities Guide

Transport configuration
The transport configuration, as supplied in the transportConfig element, tells the client whether to use an encrypted communication channel (SSL or TLS) for calls to the object—and if so, which encryption algorithms should be used and whether the client must supply a client certificate for authentication purposes.
The contents of the <transportConfig> element are four attributes:
These flags interact; for example, the client must use SSL (or TLS) if any of the flags are set to REQUIRED. Similarly, it is legal to specify the use of SSL (by setting establishTrustInClient to REQUIRED) but not specify any particular cipher suites (by setting both integrity and confidentiality to none).
Client algorithm for choosing SSL If any of the four transportConfig flags is set to REQUIRED, the client must use SSL for calls to the object. If none is REQUIRED but at least one is SUPPORTED, the client must choose whether or not to use SSL. The client makes this decision based on the -AS_USE_SSL flag to SilverJ2EEClient. If the flag is set to true, the calls will use SSL; otherwise, they will not.
Security attributes context configuration
Whether or not caller identity propagation is supported for this object
Attribute Description
Integrity Specifies whether the object supports or requires encryption that at least guarantees message integrity (that can detect message corruption).
If set to REQUIRED, the caller must use SSL (or TLS) and will choose an appropriate cipher suite
If set to SUPPORTED, the caller may use SSL (see below for information on how the client makes the decision)
Confidentiality Specifies whether the object supports or requires encryption using an encryption algorithm that at least guarantees message confidentiality—that can prevent eavesdroppers from reading the message.
If set to REQUIRED, the caller must use SSL (or TLS) and will choose an appropriate cipher suite
If set to SUPPORTED, the caller may use SSL
establishTrustInClient Specifies whether the object requires that the client authenticate using a client certificate (x.509).
If set to REQUIRED, the client must supply a client certificate when setting up the SSL connection to this object; this also requires use of SSL (or TLS)
If set to SUPPORTED, the client may supply a client certificate
establishTrustInServer Specifies whether the object’s server must be able to authenticate itself to the client. At present the only mechanism for a server to authenticate itself to the client is via the use of SSL (or TLS); so this flag is equivalent to controlling use of SSL.
If set to REQUIRED, the client must use SSL (or TLS) on calls to this object
If set to SUPPORTED, the client may use SSL
Section What it defines
J2EE Archive Deployment 29

Cipher suites The sets of cipher suites that are used for message integrity and message protection may be explicitly specified in the deployment plan, using the integrityCipherSuites and confidentialityCipherSuites elements respectively. If supplied, each element is a String array of cipher suite names.
Authentication context configuration The asContext element describes the authentication information that will be passed from the client to the server as part of each method call on the object. This information is separate from any client certificate that may be passed when the SSL connection is established. The asContext element has three subelements:
Security attribute context configuration
The security attribute context configuration is specified in the <sasContext> element via callerPropagation, an attribute indicating whether or not this object supports caller identity propagation. Caller identity propagation is the ability for the client to propagate the caller’s identity to the server without supplying any credentials, such as a password. This is useful only if the server trusts the client and the client has already verified the caller’s identity—for example, if the caller is another application server owned by the organization that has already verified the client’s password. Possible values are:
The server determines whether the caller is trusted by the use of a list of trusted clients. The list of trusted clients can be set using the SMC.
In this situation This happens
If the integrityCipherSuites element is supplied
A cipher suite from the supplied list will be used for calls to any object that supports or requires integrity but does not support or require confidentiality
If the confidentialityCipherSuites element is supplied
A cipher suite from the supplied list will be used for calls to any object that supports or requires confidentiality
If either element is not supplied The server will supply a default list of cipher suites for that category
Subelement Description
authMethod The supported authentication method for callers. Possible values are:
NONE—No caller authentication can be supplied on calls to this object
USERNAME_PASSWORD—A user name and password string can be supplied on each call
realm Supports a well-known realm named default. The default realm matches any server-supported realm.
When the realm is specified as default, the user name and password are passed as qualified names, so that the server can distinguish LDAP user names from NT user names.
asContextRequired A boolean indicating whether or not the caller must supply a user name and password. If true, the authMethod element must not be NONE, and the caller must supply a user name and password on each call to the object.
Value Means
NONE Caller propagation is not supported for this object
SUPPORTED The caller may propagate an identity (subject to the server verifying that the caller is trusted)
REQUIRED The caller must propagate an identity
30 exteNd Application Server Facilities Guide

Suppose that multiple identities are supplied on the call (for example, a client certificate and identity asserted via identity propagation). The identities are determined as follows:
If a client certificate was supplied, use it to obtain the caller’s identity.
If an identity was asserted via caller propagation, use it as the caller’s identity.
If a user name and password were passed on the call, use them to obtain the caller’s identity.
Otherwise, treat the caller as Anonymous.
IOR configuration examples
Example 1 This example shows the IOR configuration for an object that:
Is to be called using SSL with message confidentiality preserved (encryption)
Supports passing caller identity via either client certificate or user name and password<iorConfig>
<transportConfig><integrity>NONE</integrity><confidentiality>REQUIRED</confidentiality><establishTrustInClient>SUPPORTED</establishTrustInClient><establishTrustInServer>SUPPORTED</establishTrustInServer>
</transportConfig><asConfig>
<authMethod>USERNAME_PASSWORD</authMethod><realm>default</realm><asContextRequired>FALSE</asContextRequired>
</asConfig><sasConfig>
<callerPropagation>NONE</callerPropagation></sasConfig>
</iorConfig>
Example 2 This example shows the IOR configuration for an object that:
Is to be called without SSL
But requires caller authentication using user name and password<iorConfig>
<transportConfig><integrity>NONE</integrity><confidentiality>NONE</confidentiality><establishTrustInClient>NONE</establishTrustInClient><establishTrustInServer>NONE</establishTrustInServer>
</transportConfig><asConfig>
<authMethod>USERNAME_PASSWORD</authMethod><realm>default</realm><asContextRequired>TRUE</asContextRequired>
</asConfig><sasConfig>
<callerPropagation>NONE</callerPropagation></sasConfig>
</iorConfig>
Example 3 This example shows the IOR configuration for an object that:
Is to be called using SSL, with message confidentiality protection
Passes a client certificate but supports caller propagation for server-to-server calls:<iorConfig>
<transportConfig><integrity>NONE</integrity><confidentiality>REQUIRED</confidentiality><establishTrustInClient>REQUIRED</establishTrustInClient><establishTrustInServer>NONE</establishTrustInServer>
J2EE Archive Deployment 31

</transportConfig><asConfig>
<authMethod>NONE</authMethod><realm>default</realm><asContextRequired>FALSE</asContextRequired>
</asConfig><sasConfig>
<callerPropagation>SUPPORTED</callerPropagation></sasConfig>
</iorConfig>
Specifying classpath JARs on the serverThe deployment plans for EJB 2.0, WAR 2.3, and EAR 1.3 support a classpathJars element that you can use to adjust the list of JAR files on your application’s classpath. This lets you access user-supplied JARs that you’ve copied to the server.
You may have one or more commonly used JARs that you’d rather locate directly on the server than deploy in multiple applications. You can copy such JARs to your server’s \userlib directory and then list them as needed in an archive’s deployment plan via classpathJars and its userlibJars subelement.
For example:
<classpathJars><userlibJars>
<el>MyJarA.jar</el><el>MyJarB.jar</el>
</userlibJars></classpathJars>
This will enable the deployed archive to find classes in the listed userlib JARs at runtime.
To learn about the syntax for the classpathJars element, see Chapter 3, “Deployment Plan DTDs”.
Controlling thread usage for deploymentYou can specify how many threads the deployer should use to upload objects to the server. By default, the deployer will use four threads for better performance.
To change the number of threads:
1 Edit the user.prefs file.
The user.prefs file is located in the server’s \Resources\Preferences directory.
2 Add the following lines before the last endobj to set the number of threads (this example specifies that only one thread will be used): DEPLOYER /ThreadNumber 1 endobj
32 exteNd Application Server Facilities Guide

3 Deployment Plan DTDs
This chapter provides reference documentation for the Novell exteNd Application Server deployment plan DTDs. Topics include:
About the deployment plan DTDs
Client JAR deployment plan DTD
EJB JAR deployment plan DTD
WAR deployment plan DTD
RAR deployment plan DTD
EAR deployment plan DTD
Before you begin A basic understanding of XML is recommended for this chapter.
About the deployment plan DTDsThe deployment plan DTD files are used when you deploy J2EE archives to the application server. These DTDs (XML document type definitions) describe the structure you must follow when writing deployment plans for particular kinds of archives.
DTD and sample XML files Here’s a summary of the names and locations of these files:
DTD documentation You can learn about the DTDs by looking at:
The DTD files themselves—for comments about the elements they define
This chapter—for details, hints, and examples for a subset of the elements
Editing deployment plans To create and edit a deployment plan, you can use:
The exteNd Director Deployment Plan Editor
An XML editor or text editor of your choice
To find Look here in your server’s install
The deployment plan DTD files \Resources\DTDCatalog directory
Sample deployment plan XML files that use the DTDs \Samples\SilverCmd directory
Deployment Plan DTDs 33

Client JAR deployment plan DTDThis section provides reference information about the application server’s client JAR deployment plan DTD:
DTD file
Selected elements
DTD file The client JAR deployment plan DTD is deploy-car_1_3.dtd.
Selected elements A subset of the elements defined by the client JAR deployment plan DTD are described below (in alphabetical order):
beanLink element<!ELEMENT beanLink (#PCDATA)>
Specifies the JNDI name of an EJB referenced by the application client. The referenced EJB can be located on a server other than the one the application client is deployed on.
Specifying the server host for a beanLink Whether you deploy your client JAR by itself or in an EAR, you must be careful about how you specify the application server host name for any EJB references you map — because the host name you type when invoking SilverJ2EEClient must exactly match the host name that appears in the beanLink elements of your deployment plan:
Guidelines For instance, if the host name portion of the beanLink specifies myserver:<beanLink>sssw://myserver/RMI/sbOrderSummary</beanLink>
the SilverJ2EEClient command line must also specify that name:SilverJ2EEClient myserver snuckerby appclient Sam
Alternatively, both may specify the IP address of that server — or both may specify localhost (although it’s generally best to avoid using localhost). If you specify the server’s port number (such as myserver:80) in one, you must specify it in both.
Troubleshooting If there isn’t an exact match (such as if one specifies the server’s host name while the other specifies its IP address), a runtime error will occur when your client tries to access an EJB:
java.rmi.RemoteException: Unable to get a valid session for a request
For EARs If you decide to deploy your client JAR within an EAR, this matching requirement still applies, whether you specify the host name in your EAR deployment plan or on the SilverCmd DeployEAR command line.
clientDataSource element<!ELEMENT clientDataSource (jdbcURL?, jdbcDriver?,
jdbcUsername?,jdbcPassword?)>
Container element that describes access to a javax.sql.DataSource accessed by the application client. Clients access data source resources directly, so the client must have the appropriate JDBC drivers installed for the data sources it needs to access. These values are passed as Strings. See the documentation for your particular data source for the correct syntax for jdbcURL, jdbcDriver, jdbcUsername, and jdbcPassword.
mailRefProperties element<!ELEMENT mailRefProperties (el+)>
Specifies the set of name/value pairs to associate with a resource reference of type javax.mail.Session, as determined by the JavaMail specification.
Some examples include:mail.hostmail.frommail.usermail.store.protocolmail.transport.protocolmail.debug
34 exteNd Application Server Facilities Guide
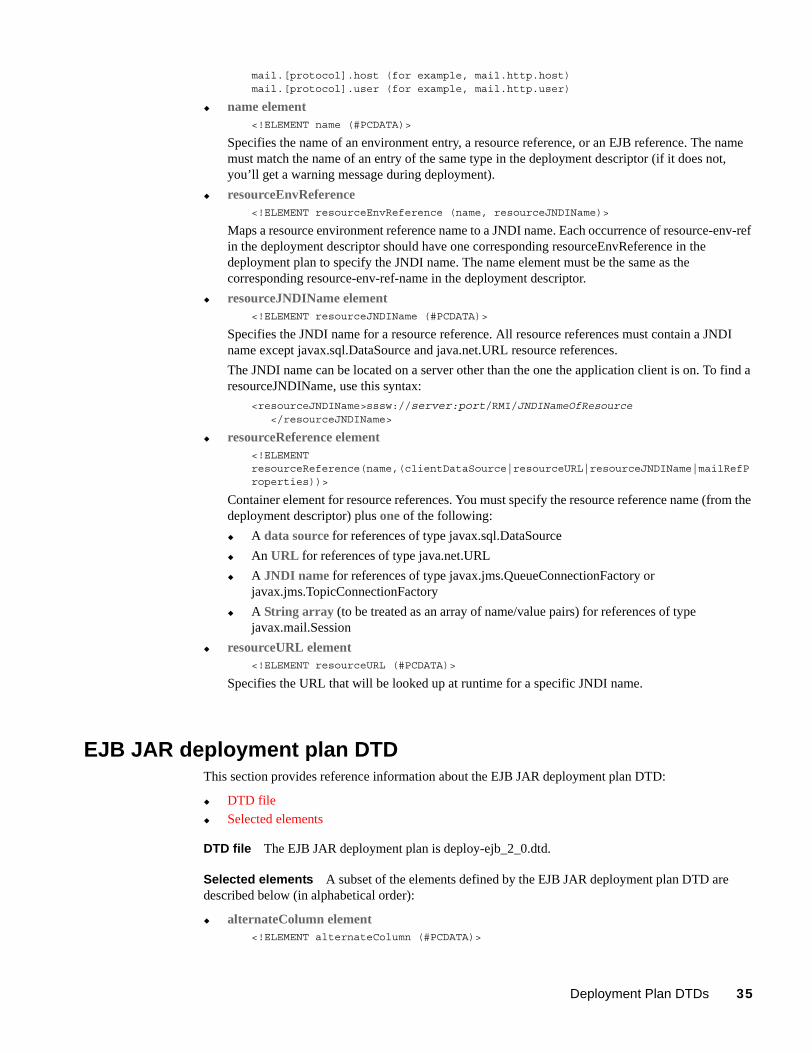
mail.[protocol].host (for example, mail.http.host)mail.[protocol].user (for example, mail.http.user)
name element<!ELEMENT name (#PCDATA)>
Specifies the name of an environment entry, a resource reference, or an EJB reference. The name must match the name of an entry of the same type in the deployment descriptor (if it does not, you’ll get a warning message during deployment).
resourceEnvReference<!ELEMENT resourceEnvReference (name, resourceJNDIName)>
Maps a resource environment reference name to a JNDI name. Each occurrence of resource-env-ref in the deployment descriptor should have one corresponding resourceEnvReference in the deployment plan to specify the JNDI name. The name element must be the same as the corresponding resource-env-ref-name in the deployment descriptor.
resourceJNDIName element<!ELEMENT resourceJNDIName (#PCDATA)>
Specifies the JNDI name for a resource reference. All resource references must contain a JNDI name except javax.sql.DataSource and java.net.URL resource references.
The JNDI name can be located on a server other than the one the application client is on. To find a resourceJNDIName, use this syntax:
<resourceJNDIName>sssw://server:port/RMI/JNDINameOfResource</resourceJNDIName>
resourceReference element<!ELEMENT resourceReference(name,(clientDataSource|resourceURL|resourceJNDIName|mailRefProperties))>
Container element for resource references. You must specify the resource reference name (from the deployment descriptor) plus one of the following:
A data source for references of type javax.sql.DataSource
An URL for references of type java.net.URL
A JNDI name for references of type javax.jms.QueueConnectionFactory or javax.jms.TopicConnectionFactory
A String array (to be treated as an array of name/value pairs) for references of type javax.mail.Session
resourceURL element<!ELEMENT resourceURL (#PCDATA)>
Specifies the URL that will be looked up at runtime for a specific JNDI name.
EJB JAR deployment plan DTDThis section provides reference information about the EJB JAR deployment plan DTD:
DTD file
Selected elements
DTD file The EJB JAR deployment plan is deploy-ejb_2_0.dtd.
Selected elements A subset of the elements defined by the EJB JAR deployment plan DTD are described below (in alphabetical order):
alternateColumn element<!ELEMENT alternateColumn (#PCDATA)>
Deployment Plan DTDs 35

Specifies an alternate column with a SQL type of BIGINT to manage the handling of data of type BLOB when isolationLevel is TRANSACTION_READ_COMMITTED.
autoInc element<!ELEMENT autoInc (autoIncSequenceName?, (schemaName?, autoIncTableName, columnName)?)>
Specifies the support for an autoincrement column:
For databases that support autoincrement (most databases), an empty autoInc element is all that is required.
For Oracle databases, the autoIncSequenceName element specifies the sequence name used.
For databases that do not support autoincrement, use the schemaName element, autoIncTableName element, and columnName element to generate a unique number.
beanJNDIName element<!ELEMENT beanJNDIName (#PCDATA)>
Specifies the JNDI name of an EJB. The JNDI name is used by the container to register the bean within the JNDI namespace. Any code that calls the bean must find it first using the JNDI name. JNDI names must be unique within a server and across servers in a cluster. You should consider using a hierarchical structure for naming your beans. You might even want to include the company name (or initials) within the hierarchy to ensure that EJBs are unique. Some examples include:
abccorp/samples/SalesDemo/Customerscom/sssw/samples/BankDemo/SessionBeans/AddCustomercom/sssw/samples/BankDemo/EntityBeans/Customer
The JNDI lookup for these examples would be (respectively):contextEnv.lookup(“RMI/abccorp/samples/SalesDemo/Customers”);contextEnv.lookup(“RMI/com/sssw/samples/BankDemo/SessionBeans/
AddCustomer”);contextEnv.lookup(“RMI/com/sssw/samples/BankDemo/EntityBeans/
Customer”);
beanLink element<!ELEMENT beanLink (#PCDATA)>
Specifies the JNDI name of a referenced EJB. That EJB can be located on another server.
Here are two examples of specifying the JNDI name of an EJB:
On the same server:<beanLink>SBBankATM</beanLink>
On a different server:<beanLink>sssw://myServer:80/RMI/SBBankATM</beanLink>
When you specify a link to an EJB that resides on a different server, you have to copy the remote JAR for the referenced bean to the server from which it is being referenced.
classpathJars element<!ELEMENT classpathJars (excludeJ2EEXMLJars?, userlibJars?)>
This element allows a list of JAR files to be used in an application without deploying them to the server. It also allows the user to disable the inclusion of the default XML JARs that are used to pass the CTS tests.
columnName element<!ELEMENT columnName (#PCDATA)>
Maps a cmp-field (a persistent field) to a database column. The name must match the COLUMN_NAME property returned by JDBC DataMetaData.getColumns().
delayInstantiation element<!ELEMENT delayInstantiation (#PCDATA)>
Specifies whether a CMP entity bean is instantiated immediately (FALSE—the default) or only when required (TRUE).
36 exteNd Application Server Facilities Guide

This element determines how the server will retrieve and cache data during finder method execution. Beans whose instantiation is delayed are called lazy beans.
Here are the possible scenarios:
deployedObject element<!ELEMENT deployedObject (#PCDATA)>
Specifies the name of the EJB deployed object to create on the application server. It is optional and can also be specified on the command line (when deploying with SilverCmd DeployEJB).
When this element is not specified, deployment generates a name by appending the word Deployed to the value of the ejbJarName element.
destinationName element<!ELEMENT destinationName (#PCDATA)>
Specifies the Queue or Topic Name. It must be specified like this:corbaname:iiop:JMSServer:53506#queue/queueName
Specifies the mapping of a CMP field to a database column.
mailRefProperties element<!ELEMENT mailRefProperties (el+)>
Specifies the set of name/value pairs to associate with a resource reference of type javax.mail.Session, as determined by the JavaMail specification.
Some examples include:
Scenario Description
You set delay instantiation to TRUE, but the finder method is not part of a transaction context (an unspecified context)
The server ignores the setting.
When you call a finder method, the server retrieves the primary key and does not cache any of the data. If your bean requires subsequent use of this data, the server must retrieve the data at that point.
You set delay instantiation to TRUE, and the finder method is part of a transaction context
The server retrieves only the primary key for each of the finder methods.
Any subsequent method calls on that bean cause the server to access the database again to retrieve the data and populate the fields for the bean.
Although this causes an additional trip to the database, it can be more efficient in cases where the data is large or the application is only interested in a single record. It allows the application to do some processing to determine which record it wants.
For applications that will only access a single bean, the initial load time for all beans might not be worth it.
You set delay instantiation to FALSE, and the finder method is part of a transaction context
The server retrieves the primary keys and also retrieves all values for all persistent mapped fields for each bean. The server caches this data.
If the client makes subsequent method calls for any of the fields, the server will not need to retrieve any additional data from the database (because it will have cached all records).
Depending on your data, this could improve or degrade your performance. It might degrade performance if the bean has a lot of fields or the fields contain large amounts of data. For example, if the beans you are retrieving contain a BLOB field and you do not need access to all of the records, this might not be the right strategy for your application.
Deployment Plan DTDs 37

mail.hostmail.frommail.usermail.store.protocolmail.transport.protocolmail.debugmail.[protocol].host (for example, mail.http.host)mail.[protocol].user (for example, mail.http.user)
relationRole element<!ELEMENT relationRole (beanName, cmrFieldName?, columnNames?)>
Defines a role within a relation and contains:
The bean name (from the deployment descriptor) for the source of a role that participates in the relationship. It needs to match that of the relationship-role-source element in the ejb-relationship-role node.
The CMR field name for the role (from the deployment descriptor). It needs to match the cmr-field-name (when there is no cmr-field-name this element shouldn’t exist either). The deployer uses beanName and cmrFieldName to match the relationship.
A list of column names (that most frequently contains only one element) the container uses to manage the relationships. These are typically the foreign keys. For many-to-many relationships, these are the foreign key column names in the link table that correspond to the primary key for the bean.
resourceEnvReference element<!ELEMENT resourceEnvReference (name, resourceJNDIName)>
Specifies the mapping of a resource environment reference name to a JNDI name. Each occurrence of resource-env-ref in the deployment descriptor should have one corresponding resourceEnvReference in the deployment plan, to specify the JNDI name. The name element must be the same as the corresponding resource-env-ref-name in the deployment descriptor.
WAR deployment plan DTDThis section provides reference information about the WAR deployment plan DTD:
DTD file
Selected elements
DTD file The WAR deployment plan DTD is deploy-war_2_3.dtd.
Selected elements A subset of elements defined by the WAR deployment plan DTD are described below (in alphabetical order):
beanLink element<!ELEMENT beanLink (#PCDATA)>
Specifies a link to a referenced EJB. This may be an internal name if the EJB is in the same JAR, or a JNDI name if it’s in a different JAR. The EJB can be located on a different server.
Here are two examples of specifying the JNDI name of an EJB:
On the same server:<beanLink>SBBankATM</beanLink>
On a different server:<beanLink>sssw://myServer:80/RMI/SBBankATM</beanLink>
classpathJars element<!ELEMENT classpathJars (excludeJ2EEXMLJars?, userlibJars?)>
38 exteNd Application Server Facilities Guide

This element allows a list of JAR files to be used in an application without deploying them to the server. It also allows the user to disable the inclusion of the default XML JARs that are used to pass the CTS tests.
deployedObject element<!ELEMENT deployedObject (#PCDATA)>
Specifies the name of the deployed object to create on the application server. When this element is not specified, deployment generates a name by appending the word Deployed to the value of the warJarName element.
deployToFilesystem element<!ELEMENT deployToFilesystem (#PCDATA)>
Specifies whether or not the application should be deployed to the file system on the application server. The default is FALSE (no file system deployment).
excludedJSPs element<!ELEMENT excludedJSPs (el+)>
List of JSP resources that should not be compiled. (Typically, JSP pages intended to be included in other JSP pages should not be compiled on their own.)
mailRefProperties element<!ELEMENT mailRefProperties (el+)>
Specifies the set of name/value pairs to associate with a resource reference of type javax.mail.Session, as determined by the JavaMail specification.
Some examples include:mail.hostmail.frommail.usermail.store.protocolmail.transport.protocolmail.debugmail.[protocol].host (for example, mail.http.host)mail.[protocol].user (for example, mail.http.user)
name element<!ELEMENT name (#PCDATA)>
Specifies the name of an environment entry, a resource reference, an EJB reference, a role mapping, or a context parameter entry. The name must match the name of an entry of the same type in the deployment descriptor (if it does not, you’ll get a warning message during deployment).
resourceJNDIName element<!ELEMENT resourceJNDIName (#PCDATA)>
Specifies the JNDI name for a resource reference. All resource references must contain a JNDI name, except for javax.sql.DataSource or java.net.URL resource references.
The JNDI name can be located on a server other than the one containing the WAR. When accessing a different server, use this syntax:
<resourceJNDIName>sssw://server:port/RMI/JNDINameOfResource</resourceJNDIName>
resourceReference element<!ELEMENT resourceReference (name, (dataSource | resourceURL |
resourceJNDIName | mailRefProperties))>
Container element for resource references. You must specify the resource reference name (from the deployment descriptor) plus one of the following:
A data source for references of type javax.sql.DataSource
An URL for references of type java.net.URL
A JNDI name for references of type javax.jms.QueueConnectionFactory or javax.jms.TopicConnectionFactory
Deployment Plan DTDs 39

A String array (to be treated as an array of name/value pairs) for references of type javax.mail.Session
sessionTimeout element<!ELEMENT sessionTimeout (#PCDATA)>
Specifies session timeout in minutes. Here is the hierarchy of session timeout precedence, from highest to lowest:
The timeout set programmatically with HttpSession.setMaxInactiveInterval() (in seconds)
The deployment plan (in minutes)
The deployment descriptor (in minutes)
The server’s default session timeout
RAR deployment plan DTDThis section provides reference information about the resource adapter archive (RAR) deployment plan DTD:
DTD file
Selected elements
DTD file The RAR deployment plan DTD is deploy-rar_1_0.dtd.
Selected elements A subset of the elements defined by the RAR deployment plan DTD are described below (in alphabetical order):
idleTimeout <!ELEMENT idleTimeout (#PCDATA)>
Specifies the number of seconds an unused connection remains in the pool before the server destroys it. The default is 60 seconds. The value you specify will depend on the type of applications that will rely on the connection pool. If you specify shorter timeout periods, the server may be forced to create connections more often—and creating connections is an expensive operation. But if you specify a timeout that is too long, other applications may be forced to wait for an available connection.
isEnabled <!ELEMENT isEnabled (#PCDATA)>
Specifies whether the RAR is enabled (the default) or not. You disable a deployed RAR by setting this flag to FALSE and redeploying the RAR.
name <!ELEMENT name (#PCDATA)>
Specifies the name of the ManagedConnectionFactory.
password <!ELEMENT password (#PCDATA)>
Specifies the password for the default connections created in the pool. A default connection is created when users invoke ConnectionFactory.getConnection(). This is the preferred method for obtaining a connection, because it allows the server to efficiently pool connections.
poolName <!ELEMENT poolName (#PCDATA)>
Specifies the name of the connection pool added to the server. Use this name to administer the connection pool.
resourceAdapterName <!ELEMENT resourceAdapterName (#PCDATA)>
40 exteNd Application Server Facilities Guide

Specifies the name under which the resource adapter will be deployed in the application server. This is a logical name.
user <!ELEMENT user (#PCDATA)>
Specifies the user name for the default connections created in the pool. A default connection is created when users invoke ConnectionFactory.getConnection(). This is the preferred method for obtaining a connection, because it allows the server to efficiently pool connections.
EAR deployment plan DTDThis section provides reference information about the EAR deployment plan DTD:
DTD file
Selected elements
DTD file The EAR deployment plan DTD is deploy-ear_1_3.dtd.
Selected elements A subset of elements are described below (in alphabetical order):
alternateDeplDesc element<!ELEMENT alternateDeplDesc (#PCDATA)>
Identifies a deployment descriptor to use for a specified module. Use this element when you do not want to use the deployment descriptor in the specified module’s archive. The alternate deployment descriptor that you specify must be in the EAR.
There are two situations when you might want to use this element:
If you want to use the same module twice but want to configure the two uses differently
If there are two instances of the module in the EAR (such as two EJB JARs) and you want to configure the modules differently
classpathJars element<!ELEMENT classpathJars (excludeJ2EEXMLJars?, userlibJars?)>
This element allows a list of JAR files to be used in an application without deploying them to the server. It also allows the user to disable the inclusion of the default XML JARs that are used to pass the CTS tests.
deployAs element<!ELEMENT deployAs (#PCDATA)>
Overrides the name under which the module would normally be deployed. By default, the EAR deployment process creates a deployment name that is a combination of the EAR name and the module name. For EJB modules, this name (if specified) is also used as the base name for the remote JAR. Use with caution.
earJarName element<!ELEMENT earJarName (#PCDATA)>
Specifies the name of the EAR to deploy. You may specify this in the deployment plan or on the command line (when deploying with SilverCmd DeployEAR). Values specified on the command line take precedence. You can specify a full path (if the EAR is on disk) or just the name. When you specify just the name and the EAR is not in the current directory, the EAR is assumed to already exist in the same database and server to which it is being deployed.
module element<!ELEMENT module (ejbJar | warJar | carJar)>
Describes a specific J2EE module in the EAR.
Deployment Plan DTDs 41

The information contained in this element is the deployment plan for the specific module. You should cut and paste the deployment plan from the application client JAR, EJB JAR, or WAR to complete this section.
For EJBs, the beanName components of the bean element must be unique within the EAR or you will encounter errors when deploying the EAR (because the bean names are used to resolve bean references within an EAR).
name element<!ELEMENT name (#PCDATA)>
Specifies the name of a role reference that must be mapped to a user or group name. It must match the name of a role reference entry in the deployment descriptor (if it does not, a warning is generated at deployment).
order element<!ELEMENT order (#PCDATA)>
Identifies the order of deployment of the modules. The smaller the number the higher its deployment priority. Modules without the order element are deployed after ordered modules.
roleMap element<!ELEMENT roleMap (roleMapping+)>
Container for EAR-level role mappings.
You might consider mapping security roles at the EAR level and not within individual modules (EJB JARs, WARs, and so on). This allows you to combine and simplify the security settings for the constituent J2EE modules.
Here are the basic rules:
If the individual modules do not contain any role maps, the EAR-level role map is used
If some or all individual modules and the EAR both contain a role map:
And the roles are unique, the role map used for each module is a union of the EAR-level role map and the module
And one or more of the roles are not unique, the module-level role map takes precedence for the duplicate role and the unique roles are added to the role map
This example illustrates how a role map is determined when roles are not unique. If the EAR-level role map contains the following values:
and an EJB module within the EAR contains this role map:
then the role map used for the EJBs will look like this:
This role Is mapped to this userOrGroupName
EJBAdmin Zack
User Mary
This role Is mapped to this userOrGroupName
Admin Joe
User Helen
This role Is mapped to this userOrGroupName
Admin Joe
User Helen
EJBAdmin Zack
42 exteNd Application Server Facilities Guide

In this case, the EJB module’s User role takes precedence. The Admin role is added to the EJB’s role mapping, because it is inherited from the EAR’s role map.
userOrGroupName element<!ELEMENT userOrGroupName (#PCDATA)>
Specifies the name of a principal in a security policy domain or a user group in the operational environment. This is mapped to a role reference name from the deployment descriptor. You can map a role reference to any of the security domains supported by the application server.
userlibJars element<!ELEMENT userlibJars (el+)>
Lists any additional JAR files that should be made available to the application. The JARs must reside in the server’s userlib directory. The value is a StringArray of JAR names, relative to (and contained within) the userlib directory.
Deployment Plan DTDs 43

44 exteNd Application Server Facilities Guide

4 SilverCmd Reference
This chapter describes the SilverCmd commands that work with the Novell exteNd Application Server. It describes how to run SilverCmd and includes the associated security and authentication issues and the purpose, syntax, and arguments for each command. It includes these sections:
Command locator
About SilverCmd
Alphabetical list of commands
Command locatorClick a command to display complete information:
Command Description
AddCP Adds a connection pool to the application server
AddDatabase Deprecated. Registers a database with the specified application server
ClearDefaultURL Clears a database or server default URL
ClearLog Clears records from the HTTP log, the error log, or the trace log
DeleteURL Deletes the directory at the specified URL.
DeployCAR Deploys a J2EE-compatible client application archive (CAR) to an application server
DeployEAR Deploys a J2EE-compatible enterprise application archive (EAR) to an application server
DeployEJB Deploys a J2EE-compatible enterprise JavaBean archive (EJB) to an application server
DeployRAR Deploys a J2EE-compatible resource adapter archive (RAR) to an application server
DeployWAR Deploys a J2EE-compatible Web archive (WAR) to an application server
GetConsole Redirects server console output to the local terminal
GetDefaultURL Displays the default URL for a database or server
LdapProvider Adds, deletes, or lists LDAP providers configured on a server
ListCP Lists the active connection pools on a server
ModifyCP Modifies a subset of the configuration properties for a connection pool
Prefs Updates various compiler settings for the preferences file
PrintLog Displays records from the HTTP log, error log, or trace log
SilverCmd Reference 45

About SilverCmdSilverCmd provides a way to perform operations from the command line. You can use SilverCmd to automate many of the tasks associated with managing the application server.
Separate ports SilverCmd communicates with the application server using the HTTP(S) protocol. The application server lets you define separate runtime and administration ports for different types of users and operations. Some commands require you to specify the administration port. Specifying an inappropriate port will result in a security error code. When necessary, the reference section for each command lists the type of port you must specify.
For more information about using separate ports, see the chapter on running the server in the Administrator’s Guide.
Running SilverCmd
SilverCmd resides in the server’s \bin directory. If you will be using SilverCmd frequently, consider adding the server’s \bin directory to your system path for convenience.
Authentication
If your server is running in a restricted environment, you will need to authenticate yourself using the -U and -P options to run commands that access the server.
Running SilverCmd from the command prompt
To run SilverCmd from the command prompt, use this syntax:
SilverCmd command arguments
To display the list of commands enter:
SilverCmd -?
ORSilverCmd -h
QueryCP Displays configuration properties for a connection pool
RemoveCP Removes a connection pool from a server
RemoveDatabase Deprecated. Removes a deployment database from a server’s list of accessible databases
ServerState Tests whether a server is running or shuts down the server
SetDefaultURL Sets the default URL for a database or server
SetSecurity Sets Read, Write, Protect, Select, and Execute security on application objects
SetUserGroupInfo Creates, deletes, and sets properties for Silver Security users and groups
Undeploy Undeploys any of the following J2EE archive types: EAR, EJB, CAR, RAR, or WAR
ValidateEAR Validates the deployment descriptor within an EAR
ValidateEJB Validates an EJB archive for correctness
Command Description
46 exteNd Application Server Facilities Guide

To display the usage for a specific command enter:
SilverCmd command -?
Normally when SilverCmd encounters an error, it stops execution, generates detailed error messages explaining the failure, and displays the messages in the command prompt window. If you specify -i, SilverCmd ignores the errors and continues execution. Here’s how you use the -i option:
SilverCmd command -i
Security
If you want a higher level of security, you can use HTTPS (instead of HTTP) as the communication protocol between SilverCmd and the application server.
To specify HTTPS, you must include the protocol and port number when specifying the server and port arguments. For example, to deploy an EJB using HTTPS, you would specify both HTTPS and the port 443, as shown here:
SilverCMD deployEJB HTTPS://localhost:443 myDB myEJB.jar -f EJB_depl_plan.xml
You cannot specify just the port, as shown here:
SilverCMD deployEJB localhost:443 myDB myEJB.jar -f EJB_depl_plan.xml
And you cannot specify HTTP with the HTTPS port, as shown here:
SilverCMD deployEJB HTTP://localhost:443 DB EJB.jar -f EJB_depl_plan.xml
If you do not specify HTTPS and the port number, SilverCmd assumes that you are deploying to an HTTP port and the command will be blocked until a socket time out occurs.
Running SilverCmd in execute mode
You can run one or more SilverCmds from a file. This is called execute mode. To run in execute mode, use this syntax:
SilverCmd Execute command-file
Command-file format The command file is a text file, and it must be structured so that each command is on its own line and contains the appropriate arguments. Do not specify the SilverCmd keyword on each line in the command file—specify SilverCmd only at the command line. For example:
ClearLog localhost:80 -E -U myusername -P mypasswordUndeploy localhost:80 SilverMaster50 myEAR -U myusername -P mypasswordRemoveCP localhost:80 myPool -U myusername -P mypassword
The file can have any extension, but you may want to use .SCD—because the server’s installation program automatically creates a file association for files with an .SCD extension.
The commands execute in the order in which they appear in the file. Running in execute mode is like repeatedly calling SilverCmd, except that when you run in execute mode you can avoid any performance penalty associated with starting SilverCmd repeatedly.
Using the i option in execute mode When you use the -i option in execute mode, you can ignore errors from any one command and proceed with the command that follows in the command file. To use -i in execute mode, specify it after the command-file name, like this:
SilverCmd Execute command-file -i
A subset of commands also allow you to specify the -i option. When used this way, -i means to continue on error within the set of operations of that command—for example:
SetSecurity localhost mydb -f myfile.xml -i
Using the -U and -P options The -U and -P options specify a user name and password combination for server authentication. When the server is running in a restricted environment, you must be authenticated to run commands that access the server.
SilverCmd Reference 47

When you run SilverCmd in execute mode, you can run all commands in the command file as a single authenticated user by specifying the -U and -P options after the command file, like this:
SilverCmd Execute command-file -U myusername -P mypassword
You can also run each command as a different authenticated user by specifying the -U and -P options with each command, like this:
ClearLog localhost:80 -E -U myusername -P mypasswordUndeploy localhost:80 SilverMaster50 myEAR -U myusername -P mypasswordRemoveCP localhost:80 myPool -U myusername -P mypassword
You can also specify SSL for some commands but not others by specifying HTTPS and the HTTPS port, like this:
ClearLog localhost:80 -E -U myusername -P mypasswordRemoveCP HTTPS://localhost:443 myPool -U myusername -P mypassword
For more information about supplying these values for each supported security realm, see the chapter on setting up security in the Administrator’s Guide.
Logging messages to a file
By default, SilverCmd logs informational messages, warnings, and errors to the command window. You can write the messages to a file using the standard redirect symbol (>), like this:
SilverCmd Execute command-file -i > SilverCmd.log
Permission to write temporary files when deploying
The SilverCmd deployment commands (such as DeployEAR) generate temporary files on disk. These files are created in the server’s installation directory, unless you have defined a HOME environment variable. If you have a HOME variable, the temporary files are created in %HOME%\.appsrv. So if you have a HOME environment variable defined, it must point to a reachable and writable location in order to deploy successfully.
Specifying values in input files and deployment plans
Some commands require an input file or a deployment plan (specified using the -f option); for other commands, the -f option is optional and provided as a convenience. For example:
Command Description
AddDatabase Requires you to supply the database name, database type, user name, password, and JDBC driver in an input file
Prefs Does not require an input file; you can specify a single preference at the command line, or you can specify a list of preferences within an input file
Undeploy Does not take an input file and will generate an error message if you attempt to use it
48 exteNd Application Server Facilities Guide

Input file and deployment plan format
Input files and deployment plans must be in XML format and must include a DOCTYPE statement. You do not need to be an XML expert to create input files. You can use exteNd Director’s Deployment Plan Editor to create deployment plans. For other commands (unrelated to deployment), there are sample XML files, and you can copy and paste the required DOCTYPE statement from the appropriate sample into your own XML input file:
The samples and DTDs are self-documenting. See them for the most up-to-date requirements.
Command line versus input file
For commands where values can be specified both at the command line and within an input file or deployment plan, values specified at the command line override input file settings.
Alphabetical list of commands
AddCP
Description Adds a connection pool to the server.
Syntax SilverCmd AddCP server[:port] poolName poolTypeFlag dataSourceOptions [options]
The valid arguments are:
The valid options for all pool types are:
Sample file Location
The DTD for each input file or deployment plan
The server’s \Resources\DTDCatalog directory
The XML sample for each file The server’s \Samples\SilverCmd directory
Server permissions DTD and sample input file
Modify server configuration None
Argument Description
server[:port] Specifies the name of the target server and the administration port
poolName Specifies the logical name for the pool
poolTypeFlag Specifies the type of pool to create. Values are:
-J—to create a JDBC connection pool
-C—to create a Connector connection pool
options Specifies any operating criteria for the command
Option Description
-? or -h Displays the usage message
SilverCmd Reference 49

Usage Adding JDBC1.0 connection pools To create a data source for a JDBC1.0 connection pool, you can specify either the JDBC driver class name or the LDS Key.
To specify the JDBC driver class name, use these options:
-A username and -W password
Specifies user name and password for connection pool resource manager authentication
-m minconn The minimum number of connections. The pool manager will attempt to maintain this minimum number of transactions (this is a soft limit)
-t timeout The idle timeout in seconds. The default is 60 seconds. When set to -1, idle timeout is disabled and no idle connections are ever closed
-U username and -P password
Specifies user name and password for server authentication
-w timeout The connection wait timeout in seconds. The default is 30 seconds. When set to -1, clients are forced to wait until a connection becomes available
-v log level Specifies the logging level. The logging levels are:
0 - logging disabled
1 - basic ConnectionFactory operations and settings
2 - level 1 plus detailed output from connection pool manager
3 - level 2 plus exception stack traces and logging information from underlying JDBC driver or Connector resource adapter
-N When used, the connections returned by the pool are not enlisted in XA transactions
-x max conn The maximum number of connections allowed by the pool. The default is 10. Use -1 to create a pool with no maximum
-z When used, the connections can more efficiently handle connections in shared transactions.
This option can only be used for connection pools for drivers or RARs that support the XA standard. The driver or adapter must be able to handle active delistment of resources from and reenlistment in a transaction.
Option Description
-d driver Specifies the fully qualified name of your JDBC driver class
-j url Specifies the JDBC URL string defined by the driver vendor to connect to your database
-a attributes (Optional) Specifies any additional URL attributes defined by the vendor that you can use to customize the driver connection. For example:
cache=100
Option Description
50 exteNd Application Server Facilities Guide

To specify the LDS Key, use these options:
Adding JDBC2.0 connection pools To create a data source for a JDBC2.0 connection pool, you can specify the JDBC LDS Key, the CPDS class name, or the XADS class name.
To specify the LDS key, use these options:
To specify the CPDS class name, use this option:
To specify the XADS class name, use this option:
Option Description
-l lds key Specifies the LDS key
-j url Specifies the JDBC URL string defined by the driver vendor to connect to your database
-a attributes (Optional) Specifies any additional URL attributes defined by the vendor that you can use to customize the driver connection. For example:
cache=100
Option Description
-l lds key Specifies the LDS key
-p properties Specifies the data source configuration properties
The format for these properties is:
name=value
For example: name1=value1, name2=value2, name3=value3, . . .
For names and property values, see your driver documentation
Option Description
-k class name Specifies the fully qualified Connection Pool DataSource class name
-p properties Specifies the data source configuration properties
The format for these properties is:
name=value
For example: name1=value1, name2=value2, name3=value3, . . .
For names and property values, see your driver documentation
Option Description
-g class name Specifies the fully qualified name of the XA DataSource class
-p properties Specifies the data source configuration properties
The format for these properties is:
name=value
For example: name1=value1, name2=value2, name3=value3, . . .
For names and property values, see your driver documentation
SilverCmd Reference 51

Adding connector connection pools To create a data source for a connector connection pool, use these options:
AddDatabase
Description Deprecated. Registers a SQL database with the specified server.
Syntax SilverCmd AddDatabase server[:port] -f file [options]
The valid arguments are:
The valid options are:
Option Description
-r adapter Specifies the resource adapter name
-p properties Specifies the properties for the ManagedConnectionFactory using the format:
name=value
For example: name1=value1, name2=value2, name3=value3, . . .
See your Resource Adapter documentation for these values
Server permissions DTD and sample input file
Modify server configuration DTD: add_database.dtd
Sample: add_database_sample.xml
Argument Description
server[:port] Specifies the name of the target server and the administration port
-f file Specifies the input file containing the database and connection information
If -s is also specified, the XML file must contain a System Tables node describing the connection information for the database containing the system tables
options Specifies any operating criteria for the command
Option Definition
-s Indicates that you want to store the system tables in a different database from the one you are adding
If you want to store the system tables in a different database, the input file must include a System Tables node that specifies the database name and connection information for the different database
-U username and -P password
Specifies user name and password for server authentication
? Displays the usage message
52 exteNd Application Server Facilities Guide

Usage AddDatabase input file The AddDatabase command requires an input file. The input file includes the following entries:
The following nodes are optional:
Valid database connection types To connect to a database, the server needs either of the following:
(a) The combination of:
Entry Description
Database name Specifies the fully qualified database name
Username and Password
Specifies the user account used by the server when accessing this database
The account must have read/write permissions for the database
Platform Specifies the database vendor name—for example: Oracle, DB2, or Sybase System 11
For more information, see “Valid database connection types” on page 53
Driver set Specifies the driver type for the database
Each database type has a default connection type that the server assumes if you do not specify a value
If you are using a value that is not in the list of database type/connection type values, you must specify Other JDBC Driver plus:
The fully qualified package name for the JDBC driver
The JDBC URL that tells the driver where to connect to the specified database
The URL attributes (which include properties like cache size)
This syntax is driver-dependent
Entry Description
Table list Specifies a subset of the tables that should be made available to the server
The table list can include:
A list of table names (which must exactly match the names in the database)
A list of table name patterns
NOTE: When you specify a pattern, you can use the % symbol to match any number of characters and the underscore (_) character to specify that you want to match any one character
A combination of names and patterns
System tables Stores system tables in a different database from the one you are adding
This section must include the following information about the database where you want to store the system tables: database, user name, password, database platform, and driver set or the LDS key
This entry is required when you specify the -s argument at the command line; otherwise, it is ignored
SilverCmd Reference 53

Platform name. Identifies the vendor and version of the database (for example, Oracle 7 or Microsoft SQL Server 7).
AND
Driver set. Identifies the database driver. It must include the package name so the server can locate it.
OR
(b) LDS key. The logical data source key. You can use this in place of the platform name and driver set.
The server has defined strings that resolve to these values. See add_database_sample.xml in the server’s \Samples\SilverCmd directory for the complete listing of supported values.
ClearDefaultURL
Description Clears the default URL for a server or a database.
Syntax SilverCmd ClearDefaultURL server[:port] [database] [options]
The valid arguments are:
The valid options are:
ClearLog
Description Removes records from the HTTP log, the error log, or the trace log. ClearLog can only delete records when server logging output is specified as database (not file- or user-defined).
For more information on specifying logging output using the SMC, see the chapter on running the
server in the Administrator’s Guide.
Server permissions DTD and sample input file
Modify server settings None
Argument Description
server[:port] Specifies the name of the target server and the administration port
database Specifies the database whose default URL you want to clear. If the database is not specified, ClearDefaultURL clears the server’s default URL
options Specifies operating criteria for the command
Option Definition
-? or -h Displays the usage message
-U username and -P password
Specifies user name and password for server authentication
Server permissions DTD and sample input file
Modify server configuration
None
54 exteNd Application Server Facilities Guide

Syntax SilverCmd ClearLog server:[port] logTypeFlags [options]
The valid arguments are:
The valid options are:
DeleteURL
Description Deletes the directory at the specified URL.
Use this command when a deployment fails with error messages indicating that the server is not able to create the context URL resources because the resource already exists.
This might happen when:
You deploy a WAR with a nested context path (such as myProject/myPortal/myTest).
You undeploy the WAR.
You deploy a WAR (or redeploy the same one) to a higher level location of the original URL (for example myProject/myPortal).
The deployment will fail unless you remove the myPortal directory.
To allow the deployment using the myProject/myPortal context path, use DeleteURL to delete the myPortal directory resource. The command would look like this:
SilverCmd DeleteURL http://localhost/SilverMaster50/myProject/myPortal
When DeleteURL completes you’ll be able to deploy using the myProject/myPortal context.
Syntax SilverCmd DeleteURL url [options]
Argument Description
server[:port] Specifies the name of the target server and the administration port
logTypeFlags Values are:
-E—Removes records from the error log
-H—Removes records from the HTTP log
-T—Removes records from the trace log
You can specify any combination in a space or comma separated list
options Specifies operating criteria for the command
Option Definition
-? or -h Displays the usage message
-U username and -P password
Specifies user name and password for server authentication
SilverCmd Reference 55

The valid arguments are:
The valid options are:
DeployCAR
Description Deploys a J2EE-compatible application client archive file to the specified application server.
Once the deployed object is on the server, any application client can access it using SilverJ2EEClient. All application components are automatically available for client requests; you do not need to restart the server.
The archive file must comply with the J2EE specification and must contain a manifest file that includes a Main-Class entry.
The deployed object is given the same name as the archive unless you specify the -d option.
Syntax SilverCmd DeployCAR server[:port] database jarfile [-f deployment_plan] [options]
The valid arguments are:
The valid options are:
Argument Description
url The full URL to the resource to delete including the protocol, the server name and port, for example:
http://localhost:80/SilverMaster50/myProject/MyPortal
This command deletes the MyPortal resource.
options Specifies any operating criteria for the command
Option Description
-? or -h Displays the usage message
-U username and -P password
Specifies user name and password for authentication by the server
Server permissions DTD and sample input file
Write to the Deployed Objects directory of the deployment database
DTD: deploy_car.dtd
Argument Description
server[:port] Specifies the name of the target server and the administration port
database Specifies the name of the target database
jarfile Specifies the name (and path) of the client application archive to deploy
options Specifies any operating criteria for the command
Option Description
-? or -h Displays the usage message
56 exteNd Application Server Facilities Guide

DeployEAR
Description Deploys an enterprise archive file (EAR) to the specified server. You can use this command to deploy EARs of any supported J2EE version.
DeployEAR performs these tasks:
1 Opens the EAR file and extracts all files to a local temporary directory.
2 Validates any EJBs.
3 Passes the -o flag (if specified) to each of the DeployXXX commands:
You might want to specify -o if you are redeploying an existing EAR.
You might not want to specify -o if you are deploying an EAR name which has not previously been deployed. This ensures that you will get an error if there’s one there already that you might not want to overwrite.
Syntax SilverCmd DeployEAR server[:port] database [EARFile] [-f deploymentPlan] [options]
The valid arguments are:
-d Specifies an alternate name for the deployed object
Use this option when you want to use the same client archive for multiple deployments
-f deployment plan Specifies the name (and path) of the deployment plan
If this option is not specified, DeployCAR looks in the CAR’s META-INF/appserver.xml file by default
-o Overwrites an existing deployed object of the same name
-U username and -P password
Specifies user name and password for authentication by the server
-v verbose-level Specifies the level of messages to output. Values range from 0 for no messages (default) to 5 for the most messages
Server permissions DTD and sample input file
Write to the Deployed Objects directory of the deployment database
DTD: See “EAR deployment plan DTD” on page 41
Argument Description
server[:port] Specifies the name of the target server and the administration port
database Specifies the name of the target database
EARFile Specifies the name and location (on disk) of the EAR file to deploy
This value can also be specified in the deployment plan (specified with -f). When specified in both places, the command-line value is used
Option Description
SilverCmd Reference 57

The valid options are:
-f deploymentPlan Specifies the name and location (on disk) of the XML-based deployment plan
If this option is not specified, DeployEAR will look for the EAR’s META-INF/appserver.xml by default
For more information on the structure of this file, see Chapter 3, “Deployment Plan DTDs”
options Specifies any operating criteria for the command
Option Description
-? or -h Displays the usage message
-d Specifies development mode deployment.
CAUTION: Do not use for production deployment.
When specified, DeployEAR determines if any modules in the EAR have changed (or been added) since the last deployment, and redeploys only the changed (or added) modules.
When the changed module is an EJB interface, DeployEAR:
Deploys the interface
Regenerates the stub classes
Repackages the other modules in the EAR with the new stub classes and uploads them to the server (instead of redeploying them).
NOTE: Does not detect changes in the deployment plan or deployment descriptor. If you change either of these, use -m instead.
-i Ignores errors when compiling JSP pages and deploys whatever builds successfully
-m modulename [,moduleName]
Specifies the name(s) of the module to deploy. You can specify a single module name or a comma-separated list of modules. The name corresponds to the <module> element of the EAR’s deployment descriptor.
This option is useful when you make changes to one or more modules of the EAR and want to deploy just those changed modules. When updating already deployed modules, use the -m option in conjunction with -o to ensure that the updated module overwrites the already deployed module.
-n Specifies that EJB validation should be skipped during deployment. If not present, SilverCmd ValidateEJB is executed before the EAR is deployed
-o If a deployed object (or remoteJar object for 1.2 deployments only) already exists on the server, this flag forces that object to be overwritten
Argument Description
58 exteNd Application Server Facilities Guide

DeployEJB
Description Deploys an EJB JAR on the specified server.
DeployEJB performs these tasks:
Validates the EJB JAR
Creates implementation classes for interfaces and generates wrapper classes that handle security and transactions
Generates a deployed object and uploads it to the server
If the ejb-client-jar element is present in the deployment descriptor, generates stub classes and puts them in the ejb-client-jar and uploads it to the server
NOTE: For external Java clients, you must manually copy this ejb-client-jar to each client that needs to access the deployed EJBs.
Enables the deployedObject for client access when allowed by the deployment plan
Syntax SilverCmd DeployEJB server[:port] database [EJBFile]
[-f deploymentPlan] [options]
The valid arguments are:
-t Used for debugging JSP pages using non–Latin-1 character sets: if specified, the JSP compiler outputs into the compile cache an additional Java file with the extension -local (for example, along with date_jsp_xxxxxxxxxxx.java you will also find date_jsp_xxxxxxxxxxx-local.java). The version of the file with -local is in the machine's local character set (instead of UTF-8)
By default, these files reside in compilecache/server/database/temp/sources//archive/com/sssw/gen/jsps
-U username and -P password
Specifies user name and password for authentication by the server
-v verbose-level The level of messages to write to the SilverCmd console window. Values range from 0 for no messages (default) to 5 for the most messages
Server permissions DTD and sample input file
Write to the Deployed Objects directory in the deployment database
DTD: deploy-ejb_2_0.dtd
Argument Description
server[:port] Specifies the name of the target application server and the administration port
database Specifies the name of the target database
EJBFile Specifies the name of the EJB archive to deploy
If not specified at the command line, the EJB archive must be specified in the deployment plan
Option Description
SilverCmd Reference 59

The valid options are:
DeployRAR
Description Uploads a resource adapter archive (RAR) to the specified application server and creates the associated connection pool(s).
Syntax SilverCmd DeployRAR server[:port] database RARFile [-f deployment plan] [options]
The valid arguments are:
-f deploymentPlan Specifies the name and path of the deployment plan
If this option is not specified, DeployEJB will look in the JAR’s META-INF/appserver.xml by default
For more information on the structure of this file, see Chapter 3, “Deployment Plan DTDs”
options Specifies operating criteria for the command
Option Description
-? or -h Displays the usage message
-U username and -P password
Specifies user name and password for application server authentication
-o Specifies that when the ejbDeployedObject or ejbRemoteJar values are used in the deploymentPlan and the object exists on the application server, the objects will be overwritten
-n Specifies that validation should be skipped. If not present, SilverCmd ValidateEJB is executed before DeployEJB
-t Specifies that DeployEJB should write temporary Java files in the local character set for debugging
-v verboseLevel The level of messages to write to the SilverCmd console window; values range from 0 for no messages (default) to 5 for the most messages
Server permissions DTD and sample input file
Write to the Deployed Objects directory of the deployment database
deploy-rar_1_0.dtd
deploy_rar_sample.xml
Argument Description
server[:port] Specifies the name of the target application server and the administration port
database Specifies the name of the target database
RARFile Specifies the name of the RAR to deploy
Argument Description
60 exteNd Application Server Facilities Guide

The valid options are:
DeployWAR
Description Deploys a J2EE-compatible Web archive (WAR) to an application server.
DeployWAR performs these tasks:
Compiles all JSP pages in the WAR into Java source files and then compiles these Java sources
Adds the compiled Java class files to the WAR file
Uploads the WAR file to the application server
(It does not include the Java source files in the WAR.)
Syntax SilverCmd DeployWAR server[:port] database [WARFile] [-f deploymentPlan] [options]
-f deploymentPlan Specifies the name of the deployment plan
If this option is not specified, DeployRAR looks in the RAR’s META-INF/appserver.xml by default
You can create the RAR deployment plan using exteNd Director’s Deployment Plan Editor
options Specifies operating criteria for the command
Option Definition
-? or -h Displays the usage message
-U username and -P password
Specifies user name and password for authentication by the application server
-o When specified, overwrites a RAR of the same name deployed in the same database
-n resource adapter name Specifies the name that the resource adapter will be deployed as on the server. This can also be specified in the deployment plan
-d extract directory Specifies the directory (on the deployer’s machine) that the contents of the RAR file are extracted to during deployment. This value can also be specified in the deployment plan
If -d is not specified, files are extracted to the compilecache directory
-v verboseLevel The level of messages to output. Values range from 0 for no messages (default) to 5 for the most messages
Server permissions DTD and sample input file
Write to the Deployed Objects directory of the target database
None
Argument Description
SilverCmd Reference 61
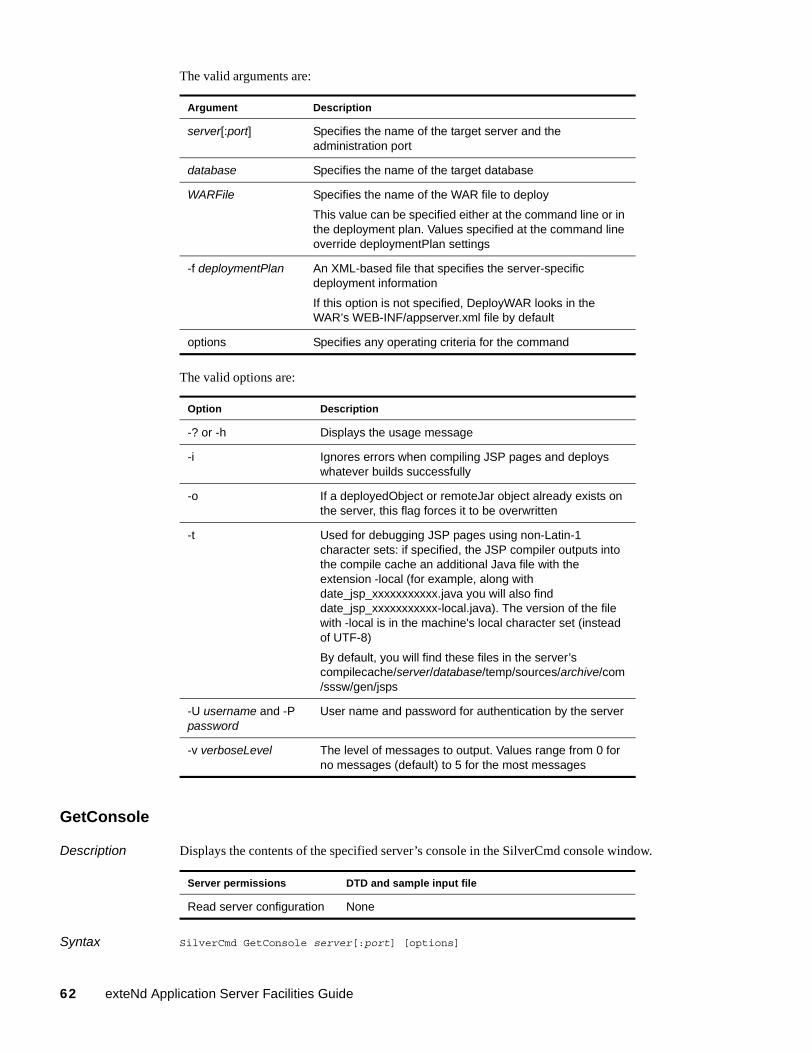
The valid arguments are:
The valid options are:
GetConsole
Description Displays the contents of the specified server’s console in the SilverCmd console window.
Syntax SilverCmd GetConsole server[:port] [options]
Argument Description
server[:port] Specifies the name of the target server and the administration port
database Specifies the name of the target database
WARFile Specifies the name of the WAR file to deploy
This value can be specified either at the command line or in the deployment plan. Values specified at the command line override deploymentPlan settings
-f deploymentPlan An XML-based file that specifies the server-specific deployment information
If this option is not specified, DeployWAR looks in the WAR’s WEB-INF/appserver.xml file by default
options Specifies any operating criteria for the command
Option Description
-? or -h Displays the usage message
-i Ignores errors when compiling JSP pages and deploys whatever builds successfully
-o If a deployedObject or remoteJar object already exists on the server, this flag forces it to be overwritten
-t Used for debugging JSP pages using non-Latin-1 character sets: if specified, the JSP compiler outputs into the compile cache an additional Java file with the extension -local (for example, along with date_jsp_xxxxxxxxxxx.java you will also find date_jsp_xxxxxxxxxxx-local.java). The version of the file with -local is in the machine's local character set (instead of UTF-8)
By default, you will find these files in the server’s compilecache/server/database/temp/sources/archive/com/sssw/gen/jsps
-U username and -P password
User name and password for authentication by the server
-v verboseLevel The level of messages to output. Values range from 0 for no messages (default) to 5 for the most messages
Server permissions DTD and sample input file
Read server configuration None
62 exteNd Application Server Facilities Guide

The valid arguments are:
The valid options are:
GetDefaultURL
Description Displays the default URL for the specified database or server.
Syntax SilverCmd GetDefaultURL server[:port] database [options]
The valid arguments are:
The valid options are:
Argument Description
server[:port] Specifies the name and optionally the administration port number of the target server
options Specifies operating criteria for the command
Options Description
-? or -h Displays the usage message
-p Specifies the port to use for the server console socket connection
-U username and -P password
Specifies user name and password for server authentication
Server permissions DTD and sample input file
Read server configuration None
Argument Description
server[:port] Specifies the name (and optionally the adminstration port) of the target server
database Specifies the name of the database whose default URL you want to get
options Specifies operating criteria for the command
Options Description
-? or -h Displays the usage message
-U username and -P password
Specifies user name and password for server authentication
SilverCmd Reference 63

LdapProvider
Description Adds or deletes LDAP security providers on the specified server. When using the command to add a provider, you must also supply an input file containing all of the configuration information. The input file must comply with the add_ldap_provider.dtd.
Syntax SilverCmd LdapProvider server[:port] [options]
The valid arguments are:
The valid options are:
ListCP
Description Lists the connection pools that are active on the specified server.
Syntax SilverCmd ListCP server[:port] [options]
The valid arguments are:
Server permissions DTD and sample input file
Modify server configuration add_ldap_provider.dtd
add_ldap_provider_sample.xml
Argument Description
server[:port] Specifies the name of the server and the administration port where you want to configure an LDAP provider
[options] Specifies operating criteria for the command
Option Definition
-? or -h Displays the usage message
-U username and -P password
Specifies the user name and password for server authentication
-a file Adds the LDAP providers listed in the file
-d name Deletes the named LDAP provider
-l Lists the LDAP providers currently configured
Server permissions DTD and sample input file
Read server configuration None
Argument Description
server[:port] Specifies the name of the server and the administration port for which you want the connection pool listing
[options] Specifies operating criteria for the command
64 exteNd Application Server Facilities Guide

The valid options are:
ModifyCP
Description Modifies a subset of connection pool properties. To change properties not listed, you must recreate the connection pool.
Syntax SilverCmd ModifyCP server[:port] poolName [options]
The valid arguments are:
The valid options are:
Option Definition
-? or -h Displays the usage message
-U username and -P password
Specifies the user name and password for server authentication
Server permissions DTD and sample input file
Modify server configuration None
Argument Description
server[:port] Specifies the name of the target server and the administration port
poolName Specifies the name of the connection pool whose properties you want to modify
options Specifies operating criteria for the command
Option Definition
-? or -h Displays the usage message
-m min conn The minimum number of connections. The pool manager will attempt to maintain this minimum number of transactions (this is a soft limit)
-x max conn Specifies the maximum number of connections allowed by the pool. The default is 10. Use -1 to create a pool with no maximum
-t timeout Specifies the idle timeout in seconds. The default is 60 seconds. When set to -1, idle timeout is disabled and no idle connections are ever closed
-w timeout The connection wait timeout in seconds. The default is 30 seconds. When set to -1, clients are forced to wait until a connection becomes available
-U username and -P password
Specifies the user name and password for server authentication
SilverCmd Reference 65

You must remove and recreate the connection pool to change these values.
Prefs
Description Updates the following compiler settings in the preferences file:
Compiler name and directory
Compiler flags
Compile cache directory
Server debug flags
The preferences file contains additional information that is not settable from the Prefs command line. Any compiler values not specified via the command line or in an input file are left unchanged in the preferences file.
Syntax SilverCmd Prefs [options]
The valid options are:
-v log level Specifies the logging level. The logging levels are:
0 - Logging disabled
1 - Basic connection factory operations and settings
2 - Level 1 plus detailed output from connection pool manager
3 - Level 2 plus exception stack traces and logging information from underlying JDBC driver or Connector resource adapter
Server permissions DTD and sample input file
None DTD: prefs.dtd
Sample: prefs_sample.xml
Option Description
-? or -h Displays the usage message
-a flags Sets the compiler-specific flags. It must be a quoted string
If compiler flags start with a hyphen (-), eliminate the space between the -a and the flags. For example:
SilverCmd Prefs -c sj “-a-nodeprecated -noinline”
-c name Sets the compiler type. The value must be one of the following:
Sun Javac In-Proc
Sun javac
Symantec cafe sj
Jikes Compiler jikes
-d dir Sets the compiler’s directory
-g true/false Turns debugging information on or off
Debug is off (false) by default
-t dir Sets the compile-cache directory
-r true/false Runs the rmi2iiop compiler in process (true) or not (false)
Option Definition
66 exteNd Application Server Facilities Guide
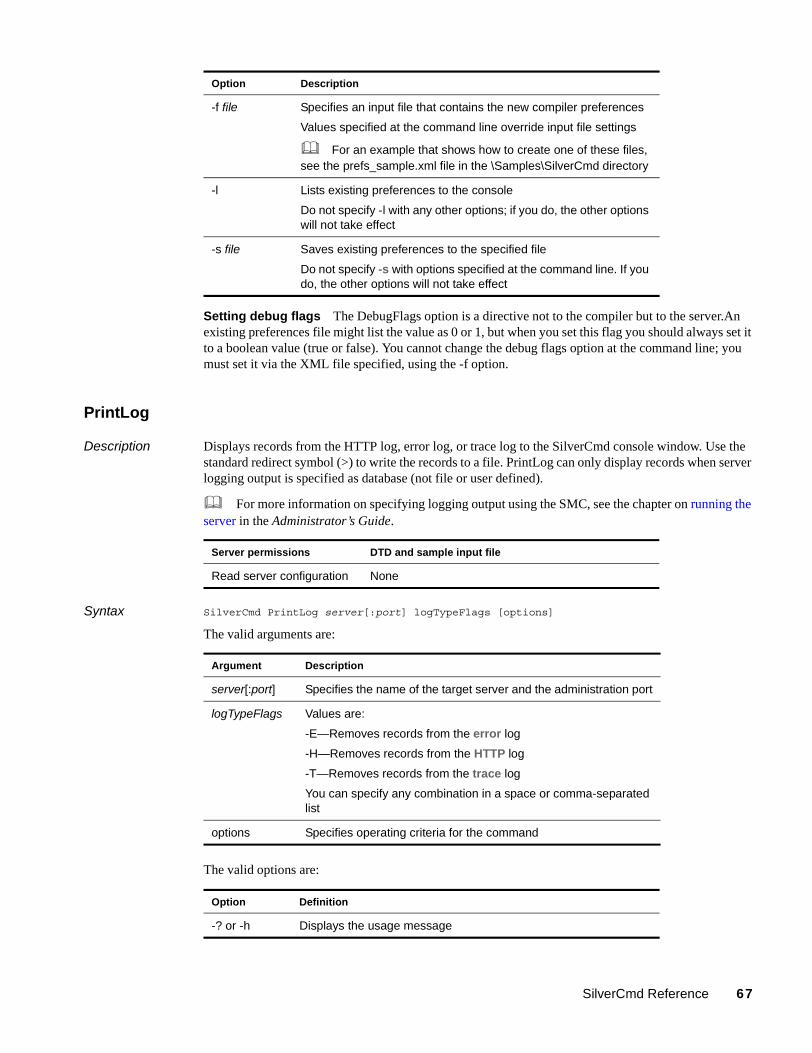
Setting debug flags The DebugFlags option is a directive not to the compiler but to the server.An existing preferences file might list the value as 0 or 1, but when you set this flag you should always set it to a boolean value (true or false). You cannot change the debug flags option at the command line; you must set it via the XML file specified, using the -f option.
PrintLog
Description Displays records from the HTTP log, error log, or trace log to the SilverCmd console window. Use the standard redirect symbol (>) to write the records to a file. PrintLog can only display records when server logging output is specified as database (not file or user defined).
For more information on specifying logging output using the SMC, see the chapter on running the server in the Administrator’s Guide.
Syntax SilverCmd PrintLog server[:port] logTypeFlags [options]
The valid arguments are:
The valid options are:
-f file Specifies an input file that contains the new compiler preferences
Values specified at the command line override input file settings
For an example that shows how to create one of these files, see the prefs_sample.xml file in the \Samples\SilverCmd directory
-l Lists existing preferences to the console
Do not specify -l with any other options; if you do, the other options will not take effect
-s file Saves existing preferences to the specified file
Do not specify -s with options specified at the command line. If you do, the other options will not take effect
Server permissions DTD and sample input file
Read server configuration None
Argument Description
server[:port] Specifies the name of the target server and the administration port
logTypeFlags Values are:
-E—Removes records from the error log
-H—Removes records from the HTTP log
-T—Removes records from the trace log
You can specify any combination in a space or comma-separated list
options Specifies operating criteria for the command
Option Definition
-? or -h Displays the usage message
Option Description
SilverCmd Reference 67

QueryCP
Description Displays configuration properties for a connection pool.
Syntax SilverCmd QueryCP server[:port] poolName [options]
The valid arguments are:
The valid options are:
RemoveCP
Description Shuts down the specified connection pool and removes it so that the server does not try to restart the connection pool during a server restart.
Syntax SilverCmd RemoveCP server[:port] poolName [options]
-U username and -P password
Specifies user name and password for server authentication
Server permissions DTD and sample input file
Read server configuration None
Argument Description
server[:port] Specifies the name of the target server and the administration port
poolName Specifies the connection pool name
options Specifies operating criteria for the command
Option Definition
-? or -h Displays the usage message
-a Displays all properties for a connection pool
When -a is not specified, only the settable properties are displayed. Settable properties include connection wait timeout, idle timeout, minimum, connections, maximum connections, and debug
-U username and -P password
Specifies user name and password for server authentication
Server permissions DTD and sample input file
Modify server configuration None
Option Definition
68 exteNd Application Server Facilities Guide

The valid arguments are:
The valid options are:
RemoveDatabase
Description Deprecated. Removes a deployment database from the server’s list of accessible databases.
Syntax SilverCmd RemoveDatabase server[:port] database [options]
The valid arguments are:
The valid options are:
ServerState
Description Manages the server’s state. Use it to shut down a server or test whether the server is currently running.
Argument Description
server[:port] Specifies the target server and administration port
poolName Specifies the name of the connection pool to remove
options Specifies operating criteria for the command
Option Definition
-? or -h Displays usage message
-U username and -P password
Specifies user name and password for server authentication
Server permissions DTD and sample input file
Modify server configuration None
Argument Definition
server[:port] Specifies the name of the source server and the administration port
database Specifies the name of the deployment database to remove
options Specifies operating criteria for the command
Option Definition
-? or -h Print the usage message
-U username and -P password
Specifies user name and password for application server authentication
SilverCmd Reference 69

NOTE: ServerState can be run on either (runtime or administration) port with the isrunning action—if you have configured separate ports. If you run ServerState with the shutdown action, you must specify the administration port.
Syntax SilverCmd ServerState server[:port] action [options]
The valid arguments are:
The valid options are:
SetDefaultURL
Description Sets the default URL for a server or database.
Syntax SilverCmd SetDefaultURL server[:port] [database] [options] -e URL
Server permissions DTD and sample input file
Modify server configuration when the action is shut down
Read server configuration with the action is isrunning
None
Argument Definition
server[:port] Specifies the name of the source server and the port. The required port depends on which of the following two actions you specify
action Specifies one of the following:
isrunning—Returns a message when the server is (or is not) running. You can run ServerState with the isrunning action on either (runtime or administration) port. This action must be run as part of a batch file or script
shutdown—Gracefully shuts down the server. You must enter the administration port when running this action; otherwise, a security error code is returned
options Specifies operating criteria for the command
Option Definition
-? or -h Displays the usage message
-U username and -P password
Specifies user name and password for server authentication
-d Deactivate the target server. For use only when action is shutdown
-r Restart the target server. For use only when action is shutdown
Server permissions DTD and sample input file
Modify server configuration None
70 exteNd Application Server Facilities Guide
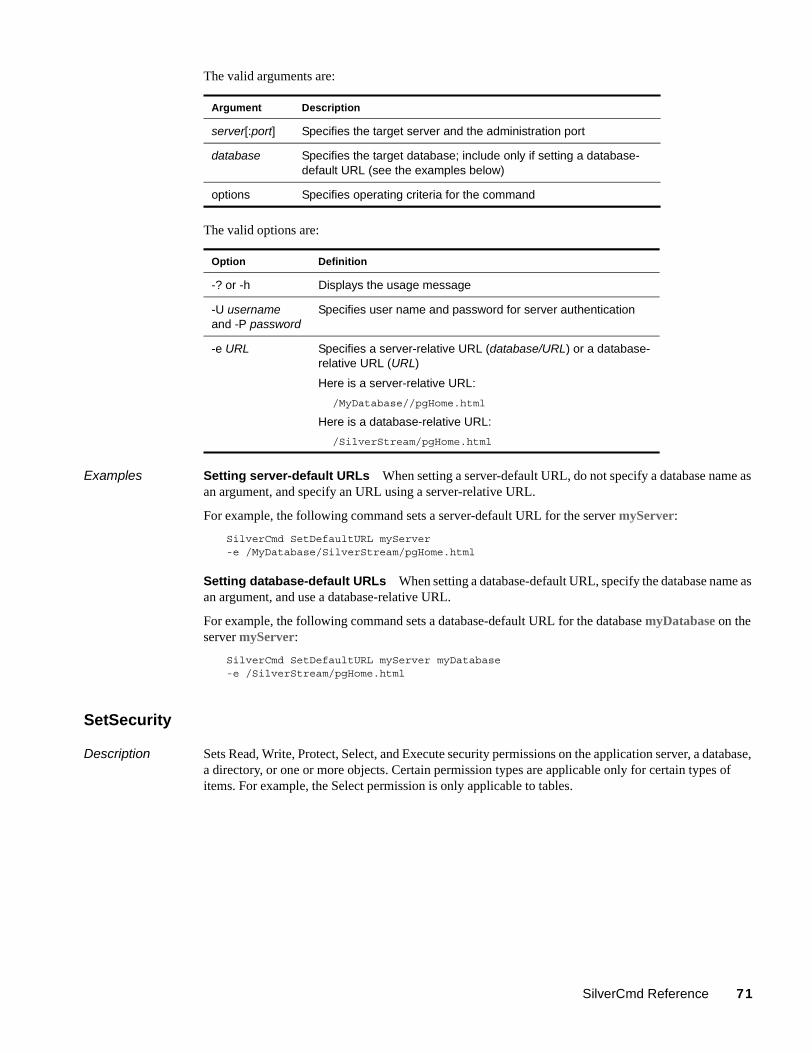
The valid arguments are:
The valid options are:
Examples Setting server-default URLs When setting a server-default URL, do not specify a database name as an argument, and specify an URL using a server-relative URL.
For example, the following command sets a server-default URL for the server myServer:
SilverCmd SetDefaultURL myServer -e /MyDatabase/SilverStream/pgHome.html
Setting database-default URLs When setting a database-default URL, specify the database name as an argument, and use a database-relative URL.
For example, the following command sets a database-default URL for the database myDatabase on the server myServer:
SilverCmd SetDefaultURL myServer myDatabase -e /SilverStream/pgHome.html
SetSecurity
Description Sets Read, Write, Protect, Select, and Execute security permissions on the application server, a database, a directory, or one or more objects. Certain permission types are applicable only for certain types of items. For example, the Select permission is only applicable to tables.
Argument Description
server[:port] Specifies the target server and the administration port
database Specifies the target database; include only if setting a database-default URL (see the examples below)
options Specifies operating criteria for the command
Option Definition
-? or -h Displays the usage message
-U username and -P password
Specifies user name and password for server authentication
-e URL Specifies a server-relative URL (database/URL) or a database-relative URL (URL)
Here is a server-relative URL:
/MyDatabase//pgHome.html
Here is a database-relative URL:
/SilverStream/pgHome.html
SilverCmd Reference 71

You can also set permissions on the Security directory of a server. The Read permission on this resource rules who can have access to user and group information such as lists of users and groups and user/group properties. The Protect permission rules who can set the permissions on the Security directory.
Syntax SilverCmd SetSecurity server[:port] [database] -f file [options]
The valid arguments are:
The valid options are:
SetUserGroupInfo
Description Creates and deletes Silver Security users and groups, adds users to groups, and sets properties for both. This command has eight optional actions (listed in “Actions” on page 73).
Syntax SilverCmd SetUserGroupInfo server[:port] [action action-parameters] [options]
The valid arguments are:
Server permissions DTD and sample input file
Set Permissions
Read Users and Groups
DTD: set_security.dtd
Sample: set_security_sample.xml, secure_application_sample.xml, secure_cluster_sample.xml, secure_server_sample.xml
Argument Definition
server[:port] Specifies the name of the server and the administration port
database Specifies the name of the target database
Not required when setting server permissions
-f file Specifies the fully qualified name for an input file whose contents specify the security permissions information
options Specifies the operating criteria for the command
Option Definition
-? or -h Displays the usage message
-U username and -P password
Specifies user name and password for server authentication
-i Continues on error
Server permissions DTD and sample input file
Modify server settings DTD: set_user_group_info.dtd
Sample: set_user_group_info_sample.xml
Argument Description
server[:port] Specifies the name of the server and the administration port
72 exteNd Application Server Facilities Guide

The valid options are:
Actions The SetUserGroupInfo actions are:
AddUserToGroup action
Description Adds an existing user from a known security realm (such as NT) to an existing Silver Security group.
Syntax SilverCmd SetUserGroupInfo server[:port] AddUserToGroup usernamegroupname [options]
action Specifies the action to perform—for example, CreateUser or DeleteUser
For a list of actions, see “Actions” below
action-parameters Specifies any special operating criteria for the action
options Specifies operating criteria for the command
Option Description
-? or -h Displays the usage message
-f file Specifies the name of a file containing data for the SetUserGroupInfo command
-i Continues on error
This is valid in batch mode only
-U username and -P password
Specifies user name and password for server authentication
Action Description
AddUserToGroup Adds a user to a Silver Security group
CreateGroup Creates a Silver Security group
CreateUser Creates a Silver Security user or certificate
DeleteGroup Deletes a Silver Security group from the server
DeleteUser Deletes a Silver Security user from the server
DeleteUserFromGroup Deletes a user from the specified Silver Security group
SetGroupProperties Specifies properties for an existing Silver Security group
SetUserProperties Specifies properties for an existing Silver Security user
Argument Description
SilverCmd Reference 73
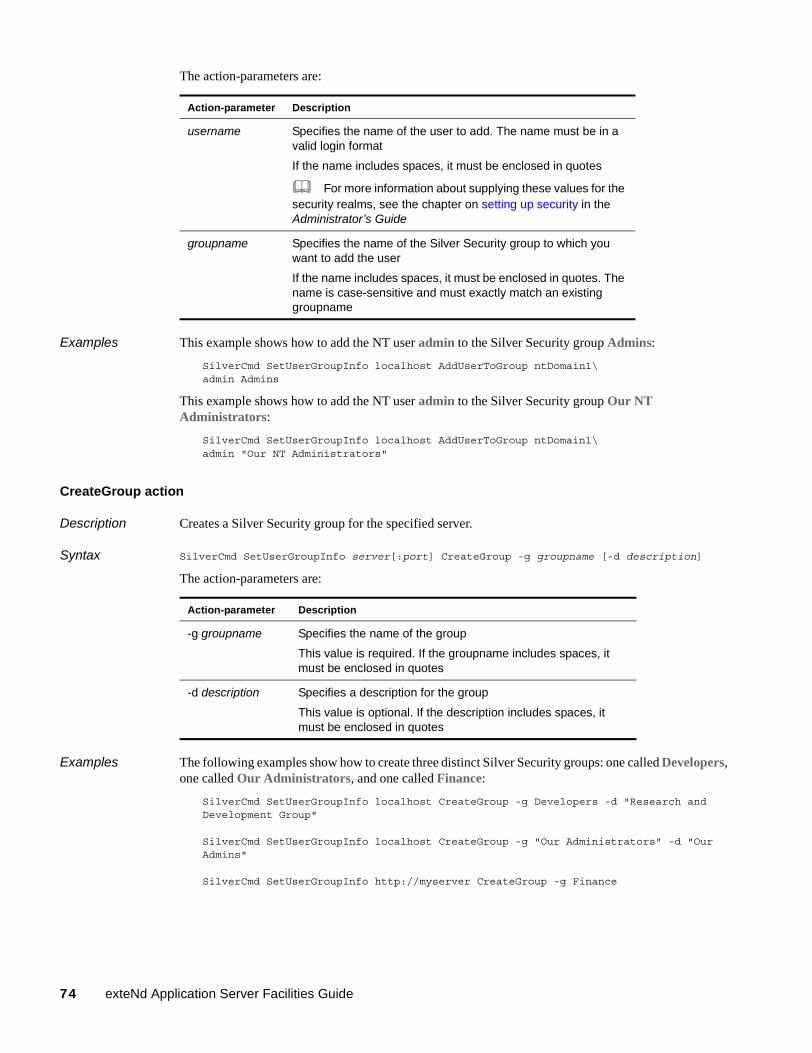
The action-parameters are:
Examples This example shows how to add the NT user admin to the Silver Security group Admins:
SilverCmd SetUserGroupInfo localhost AddUserToGroup ntDomain1\admin Admins
This example shows how to add the NT user admin to the Silver Security group Our NT Administrators:
SilverCmd SetUserGroupInfo localhost AddUserToGroup ntDomain1\admin "Our NT Administrators"
CreateGroup action
Description Creates a Silver Security group for the specified server.
Syntax SilverCmd SetUserGroupInfo server[:port] CreateGroup -g groupname [-d description]
The action-parameters are:
Examples The following examples show how to create three distinct Silver Security groups: one called Developers, one called Our Administrators, and one called Finance:
SilverCmd SetUserGroupInfo localhost CreateGroup -g Developers -d "Research and Development Group"
SilverCmd SetUserGroupInfo localhost CreateGroup -g "Our Administrators" -d "Our Admins"
SilverCmd SetUserGroupInfo http://myserver CreateGroup -g Finance
Action-parameter Description
username Specifies the name of the user to add. The name must be in a valid login format
If the name includes spaces, it must be enclosed in quotes
For more information about supplying these values for the security realms, see the chapter on setting up security in the Administrator’s Guide
groupname Specifies the name of the Silver Security group to which you want to add the user
If the name includes spaces, it must be enclosed in quotes. The name is case-sensitive and must exactly match an existing groupname
Action-parameter Description
-g groupname Specifies the name of the group
This value is required. If the groupname includes spaces, it must be enclosed in quotes
-d description Specifies a description for the group
This value is optional. If the description includes spaces, it must be enclosed in quotes
74 exteNd Application Server Facilities Guide

CreateUser action
Description Creates a Silver Security user by specifying a user name/password or a certificate user.
Syntax SilverCmd SetUserGroupInfo server[:port] CreateUser -u username [-p password] [-n
full-name] [-d description]
OR
SilverCmd SetUserGroupInfo server[:port] CreateUser -c client-certificate-file
The action-parameters are:
Examples These examples show how to create a new user:
SilverCmd SetUserGroupInfo http://myserver CreateUser -u user1 -p MyPassword -n “John Doe" -d "Applications Developer"
SilverCmd SetUserGroupInfo localhost CreateUser -u user1 -n "John Doe"
SilverCmd SetUserGroupInfo localhost CreateUser -u user1
This example shows how to create a certificate user, given a client certificate file:
SilverCmd SetUserGroupInfo localhost CreateUser -c c:\certs\ClientCert1.cer
DeleteGroup action
Description Deletes a Silver Security group.
Syntax SilverCmd SetUserGroupInfo server[:port] DeleteGroup groupname
The action-parameter is:
Action-parameter Description
-u username Specifies the name by which the new user will be known to the application server. This value is required except when specifying a client certificate file
Note that this value is different from the -U and -P (uppercase) parameters used for authenticating the user running SilverCmd
-p password Specifies the user’s password. This value is optional
Note that this value is different from the -U and -P (uppercase) parameters used for authenticating the user running SilverCmd
-n full-name Specifies the user’s full name. If the name includes spaces, it must be enclosed in quotes. This value is optional
-d description Specifies a description for the user. If the description includes spaces, it must be enclosed in quotes. This value is optional
-c client-certificate-file Specifies the client certificate file
Action-parameter Description
groupname Specifies the name of the group to delete. It must exactly match the existing groupname (it is case-sensitive). If the name includes spaces, it must be enclosed in quotes
SilverCmd Reference 75
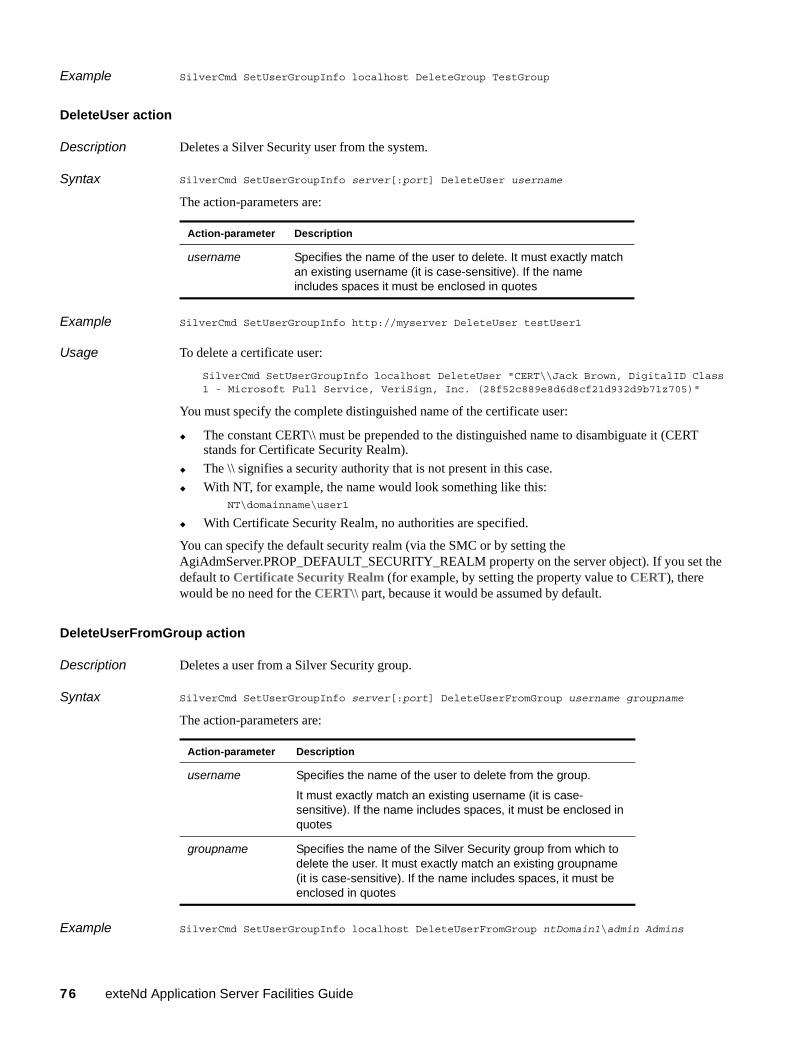
Example SilverCmd SetUserGroupInfo localhost DeleteGroup TestGroup
DeleteUser action
Description Deletes a Silver Security user from the system.
Syntax SilverCmd SetUserGroupInfo server[:port] DeleteUser username
The action-parameters are:
Example SilverCmd SetUserGroupInfo http://myserver DeleteUser testUser1
Usage To delete a certificate user:
SilverCmd SetUserGroupInfo localhost DeleteUser "CERT\\Jack Brown, DigitalID Class 1 - Microsoft Full Service, VeriSign, Inc. (28f52c889e8d6d8cf21d932d9b71z705)"
You must specify the complete distinguished name of the certificate user:
The constant CERT\\ must be prepended to the distinguished name to disambiguate it (CERT stands for Certificate Security Realm).
The \\ signifies a security authority that is not present in this case.
With NT, for example, the name would look something like this:NT\domainname\user1
With Certificate Security Realm, no authorities are specified.
You can specify the default security realm (via the SMC or by setting the AgiAdmServer.PROP_DEFAULT_SECURITY_REALM property on the server object). If you set the default to Certificate Security Realm (for example, by setting the property value to CERT), there would be no need for the CERT\\ part, because it would be assumed by default.
DeleteUserFromGroup action
Description Deletes a user from a Silver Security group.
Syntax SilverCmd SetUserGroupInfo server[:port] DeleteUserFromGroup username groupname
The action-parameters are:
Example SilverCmd SetUserGroupInfo localhost DeleteUserFromGroup ntDomain1\admin Admins
Action-parameter Description
username Specifies the name of the user to delete. It must exactly match an existing username (it is case-sensitive). If the name includes spaces it must be enclosed in quotes
Action-parameter Description
username Specifies the name of the user to delete from the group.
It must exactly match an existing username (it is case-sensitive). If the name includes spaces, it must be enclosed in quotes
groupname Specifies the name of the Silver Security group from which to delete the user. It must exactly match an existing groupname (it is case-sensitive). If the name includes spaces, it must be enclosed in quotes
76 exteNd Application Server Facilities Guide

SetGroupProperties action
Description Sets properties for a Silver Security group. Any properties that are not specified retain their original values.
Syntax SilverCmd SetUserGroupInfo server[:port] SetGroupProperties -g groupname [-d
description -l "is-locksmith"]
The action-parameters are:
Examples SilverCmd SetUserGroupInfo myserver SetGroupProperties -g testGroup -d "This is a test
group"
SilverCmd SetUserGroupInfo myserver SetGroupProperties -g "Our Administrators" -l false
SetUserProperties action
Description Modifies properties for a Silver Security or certificate user. Values not specified are not modified.
Syntax SilverCmd SetUserGroupInfo server[:port] SetUserProperties -u username -p password -n
full-name [-d description] [-l “is-locksmith”]
OR
SilverCmd SetUserGroupInfo server[:port] SetUserProperties -u username -p password -c certificate-file [-l is-locksmith]
The action-parameters are:
Action-parameter Description
-g groupname Specifies the name of the group. It must exactly match an existing groupname (it is case-sensitive). If the name includes spaces, it must be enclosed in quotes
-d description Provides a description of the group. If the name includes spaces, it must be enclosed in quotes
-l “is-locksmith” Specifies the Locksmith value, which may be true or false
You may set is-locksmith on any type of group, not just Silver Security groups
You can only grant Locksmith privileges if you have them—for example, if you are a Locksmith
The value true means grant the privilege, and false means revoke the privilege
Action-parameter Description
-u username Specifies the user name for the user whose properties you want to change. This value is required and is not configurable
-p password Specifies a new password for the user
-n full-name Specifies a full name for the user. If the name includes spaces, it must be enclosed in quotes
-d description Provides a description of the user. If the name includes spaces, it must be enclosed in quotes
SilverCmd Reference 77
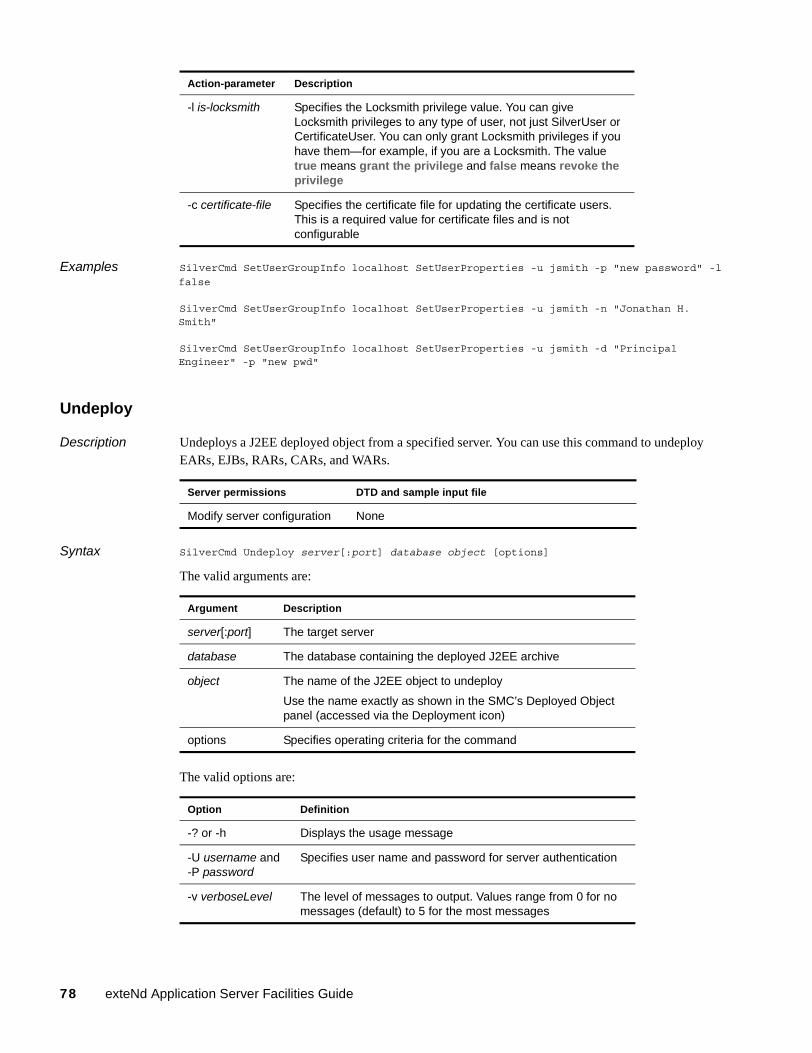
Examples SilverCmd SetUserGroupInfo localhost SetUserProperties -u jsmith -p "new password" -l
false
SilverCmd SetUserGroupInfo localhost SetUserProperties -u jsmith -n "Jonathan H. Smith"
SilverCmd SetUserGroupInfo localhost SetUserProperties -u jsmith -d "Principal Engineer" -p "new pwd"
Undeploy
Description Undeploys a J2EE deployed object from a specified server. You can use this command to undeploy EARs, EJBs, RARs, CARs, and WARs.
Syntax SilverCmd Undeploy server[:port] database object [options]
The valid arguments are:
The valid options are:
-l is-locksmith Specifies the Locksmith privilege value. You can give Locksmith privileges to any type of user, not just SilverUser or CertificateUser. You can only grant Locksmith privileges if you have them—for example, if you are a Locksmith. The value true means grant the privilege and false means revoke the privilege
-c certificate-file Specifies the certificate file for updating the certificate users. This is a required value for certificate files and is not configurable
Server permissions DTD and sample input file
Modify server configuration None
Argument Description
server[:port] The target server
database The database containing the deployed J2EE archive
object The name of the J2EE object to undeploy
Use the name exactly as shown in the SMC’s Deployed Object panel (accessed via the Deployment icon)
options Specifies operating criteria for the command
Option Definition
-? or -h Displays the usage message
-U username and -P password
Specifies user name and password for server authentication
-v verboseLevel The level of messages to output. Values range from 0 for no messages (default) to 5 for the most messages
Action-parameter Description
78 exteNd Application Server Facilities Guide

ValidateEAR
Description Validates the deployment descriptor within the specified EAR file. It reports any deployment descriptor problems, missing application assembly components, and class-related problems. The problems are written to the command window.
Use this command when you want to verify that the descriptor is correct before attempting to deploy the EAR on the server with DeployEAR.
Syntax SilverCmd ValidateEAR earfile [options]
The valid arguments are:
The valid options are:
ValidateEJB
Description Validates the beans, the deployment plan, and the deployment descriptor. It is automatically called by SilverCmd DeployEAR and DeployEJB and writes any errors or warnings to the SilverCmd console window.
Syntax SilverCmd ValidateEJB ejbJarFile deploymentPlan [options]
The valid arguments are:
The valid options are:
Server permissions DTD and sample input file
None None
Argument Description
earfile Specifies the name of the EAR file to validate
options Specifies any operating criteria for the command
Option Description
-? or -h Displays the usage message
Server permissions DTD and sample input file
None None
Argument Description
ejbJarFile Specifies the EJB JAR file whose beans are to be validated
deploymentPlan Specifies the EJB’s deployment plan
options Specifies operating criteria for the command
Option Description
-? or -h Displays the ValidateEJB usage message
-v verboseLevel The level of messages to output. Values range from 0 for no messages (default) to 5 for the most messages
SilverCmd Reference 79

80 exteNd Application Server Facilities Guide

5 SilverJ2EEClient
This chapter describes SilverJ2EEClient, the facility provided with the Novell exteNd Application Server to host Java-based clients for J2EE applications. Topics include:
About SilverJ2EEClient
Installing SilverJ2EEClient
Starting SilverJ2EEClient
Using startup options
Passing application arguments
Supporting access to secured EJBs
About SilverJ2EEClientIf your production environment includes J2EE application clients, the user machines running them will need to install and use SilverJ2EEClient. SilverJ2EEClient is a low-administration J2EE application client container that hosts your clients with a robust set of supporting J2EE services (including deployment, JNDI namespace access, and security authentication).
For information on developing J2EE application clients, see the exteNd Director help.
SilverJ2EEClient features
Users invoke SilverJ2EEClient to run J2EE application clients you’ve deployed to the application server. The features SilverJ2EEClient provides to support these clients include:
Feature Description
Container installation SilverJ2EEClient is easy to download from the server and install on user machines.
Client deployment When the user starts a particular client, SilverJ2EEClient checks whether the user machine already has the appropriate versions of that client’s deployed JAR files. If not, it automatically downloads them from the server.
Communication protocols
When downloading JARs from the server to a user machine, SilverJ2EEClient uses HTTP (or HTTPS) as the communication protocol. In all other cases (such as access to EJBs and other resources), it uses RMI-IIOP or RMI-IIOP over SSL (for secured EJBs). Beyond that, you’re free to code your client classes to use any communication protocols necessary for particular tasks.
User authentication When SilverJ2EEClient connects to the server to download client JARs, it automatically handles any user authentication required (such as by prompting for user name and password). Alternatively, it lets you pass user name and password command-line options (to support authentication during RMI-IIOP communication).
SilverJ2EEClient 81

Installing SilverJ2EEClientTo minimize administration effort, the Novell exteNd Application Server can host installers that users then download to set up the current version of SilverJ2EEClient. The server also offers an install page that users can browse to for easy selection of the appropriate installer flavor (Windows, UNIX, or Linux).
Hosting the SilverJ2EEClient installers on your server
The SilverJ2EEClient installers are not included when you install the Novell exteNd Application Server from the product CD. If you want to host these installers on your application server, you must obtain them from the Novell developer Web site and store them in the appropriate server directory.
To host the installers:
1 Download the SilverJ2EEClient installer files from developer.novell.com/ndk/j2eeclient.htm
2 Copy the downloaded installer files to the following Novell exteNd directory on your application server machine:
AppServer\Resources\SilverJ2EEClientInstall
When you complete these steps, the SilverJ2EEClient installers will be ready for users to access from your server.
Going to the SilverJ2EEClient install page
By default, the SilverJ2EEClient install page is available from your server at the following URL:
http://servername/SilverStream/Pages/SilverJ2EEClient.html
You can instruct users to type this URL directly in their browsers, or you can supply a page that links to it for easier access.
Using the install page Once displayed, the SilverJ2EEClient install page provides links that users can click to download:
A Windows version of the SilverJ2EEClient installer
UNIX or Linux versions of the SilverJ2EEClient installer (for supported platforms)
This page also includes instructions for using the installers and for starting SilverJ2EEClient once installed.
Server access When accessing the server, SilverJ2EEClient automatically takes care of establishing an RMI session. You don’t need to write any code for this in your client classes.
Namespace access SilverJ2EEClient automatically provides a JNDI namespace for your client. This gives your client classes access to environment entries, EJB references, and resource references.
Client portability Because SilverJ2EEClient handles the housekeeping, you are insulated from having to write vendor-specific code in your client classes.
Feature Description
82 exteNd Application Server Facilities Guide

Providing direct access to the installers You may want to let users download a SilverJ2EEClient installer directly, without going to the SilverJ2EEClient install page first. In that case you can instruct them to type one of the following URLs, or you can link to it from your own pages:
These URLs all begin with:
http://servername/SilverStream/SilverJ2EEClientInstall/
NetWare support for the installers On Novell NetWare, the application server can host the SilverJ2EEClient installers for Windows, UNIX, and Linux clients. To download these installers, users can access the SilverJ2EEClient install page from the application server. Because NetWare is a server platform, there isn’t a NetWare version of the SilverJ2EEClient installer for users to download.
SilverJ2EEClient itself is automatically installed on the NetWare machine when you install the application server. Also, you can use the Novell Clients Software CD that accompanies NetWare to install Novell exteNd Application Server Clients (which includes SilverJ2EEClient) on Microsoft Windows machines.
For more information on NetWare install issues, see Installing Novell exteNd.
Installing on Windows
Once you download the Windows version of the SilverJ2EEClient installer, you’ll have the following file on your local machine:
SilverJ2EEClientInstall.exe
Run this file to install SilverJ2EEClient and the supporting components it requires.
What gets installed When the installer is done, you’ll have a directory for SilverJ2EEClient on your local machine that contains:
SilverJ2EEClient executable (SilverJ2EEClient.exe)
exteNd runtime files (ZIPs and JARs of API packages and supporting files)
Java 2 Runtime Environment (JRE)
Java HotSpot Performance Engine
Novell exteNd ORB (a Java-based CORBA ORB, set up as the default ORB for the machine)
SilverJ2EEClient should now be ready to use on this machine.
Installing on UNIX or Linux
Once you download a UNIX or Linux version of the SilverJ2EEClient installer, you’ll have the following file on your local machine: SilverJ2EEClientInstallPlatform.sh. Run this file to install SilverJ2EEClient and the supporting components it requires.
For example:
In Solaris, type sh SilverJ2EEClientInstallSolaris.sh
In Linux, type sh SilverJ2EEClientInstallLinux.sh
To link directly to this version of the SilverJ2EEClient installer Use this URL
Windows SilverJ2EEClientInstall.exe
UNIX (Solaris) SilverJ2EEClientInstallSolaris.sh
Linux SilverJ2EEClientInstallLinux.sh
SilverJ2EEClient 83

What gets installed When the installer is done, you’ll have a directory for SilverJ2EEClient on your local machine that contains:
SilverJ2EEClient executable (SilverJ2EEClient)
exteNd runtime files (ZIPs and JARs of API packages and supporting files)
Java 2 Runtime Environment (JRE)
exteNd ORB (a Java-based CORBA ORB, set up as the default ORB for the machine)
SilverJ2EEClient should now be ready to use on this machine.
For detailed information about UNIX or Linux platform support, see the Release Notes.
Installing from the product CD
Another way to install SilverJ2EEClient is to use the Novell exteNd installation program from your product CD. This program enables you to install SilverJ2EEClient (and supporting files) alone or along with other application server components.
Installing SilverJ2EEClient this way is primarily for developers. The result is the same as accessing the SilverJ2EEClient install page (SilverJ2EEClient.html) from the server to do the installation.
For more information on using the Novell exteNd installation program, see Installing Novell exteNd.
If you’re using Novell NetWare, see “NetWare support for the installers” on page 83.
Starting SilverJ2EEClientYou can start SilverJ2EEClient in several different ways, depending on the platform you’re using (Windows, NetWare, UNIX, or Linux).
Running on Windows
In Windows, you can start SilverJ2EEClient by doing either of the following:
Using the executable
OR
Using SJC files
Using the executable You can start SilverJ2EEClient from the command prompt by invoking the executable program SilverJ2EEClient.exe. Enter:
installdirectory\bin\SilverJ2EEClient [options] [protocol://]hostname[:port] databasename clientname [appargs]
where:
Parameter What to specify
installdirectory The root directory where SilverJ2EEClient is installed on the user machine. For example:
c:\SilverJ2EEClient
84 exteNd Application Server Facilities Guide

For example:
c:\SilverJ2EEClient\bin\SilverJ2EEClient -as_username=sam -as_password=icecream http://corporate:8080 sales quotaclient myarg -myswitch -y 2003
If you don’t want to type the command every time, you can create a batch (BAT) file to issue it.
Using SJC files Another alternative to starting SilverJ2EEClient from the command prompt is to use SJC files. SJCs are SilverJ2EEClient application files in which you store all the arguments you’d otherwise type. Opening an SJC file automatically invokes the SilverJ2EEClient executable SilverJ2EEClient.exe and uses those arguments.
The association between the SJC file extension and SilverJ2EEClient.exe is automatically set up in Windows when you install SilverJ2EEClient.
To create an SJC file:
1 Open a new text file in an editor of your choice.
2 Type the following on a single line:
[options] [protocol://]hostname[:port] databasename clientname [appargs]
For example:-as_username=sam -as_password=icecream
http://corporate:8080 sales quotaclient myarg -myswitch -y 2003
options (Optional) Startup options for controlling the execution of SilverJ2EEClient. Specify zero or more of these. For example:
-as_username=sam -as_password=icecream
See “Using startup options” on page 88.
protocol (Optional) One of the following HTTP protocols:
http:// (default)
https:// (for SSL connections)
hostname The host name (or Internet address) of the Novell exteNd Application Server to access. For example:
corporate
port (Optional) The TCP/IP port number that server uses. For example:
8080
The default is 80.
databasename The name of the deployment database containing the client deployment to run. For example:
sales
clientname The name of the J2EE application client deployment to run. For example:
quotaclient
appargs (Optional) Application-specific arguments that you want to pass through to your client for processing. Specify zero or more of these. For example:
myarg -myswitch -y 2003
See “Passing application arguments” on page 90.
Parameter What to specify
SilverJ2EEClient 85

3 Save this text file with the extension SJC. For example:quota.sjc
Once you have an SJC file, you can:
Create a Windows shortcut to launch it
Send it to someone in e-mail
Link to it from any HTML page—for instance:<a href="quota.sjc">Quota Client</a>
Running on NetWare
In NetWare, you can start SilverJ2EEClient from the system console by invoking the executable program SilverJ2EEClient.nlm (installed in SYS:\exteNd\AppServer\bin). Enter:
SilverJ2EEClient [options] [protocol://]hostname[:port] databasename clientname [appargs]
where:
For example:
SilverJ2EEClient -as_username=sam -as_password=icecream http://corporate:83 sales quotaclient myarg -myswitch -y 2003
If you don’t want to type the command every time, you can create an NCF file to issue it.
Parameter What to specify
options (Optional) Startup options for controlling the execution of SilverJ2EEClient. Specify zero or more of these. For example:
-as_username=sam -as_password=icecream
See “Using startup options” on page 88.
protocol (Optional) One of the following HTTP protocols:
http:// (default)
https:// (for SSL connections)
hostname The host name (or Internet address) of the Novell exteNd Application Server to access. For example:
corporate
port (Optional) The TCP/IP port number that server uses. For example:
83
The default is 80.
databasename The name of the deployment database containing the client deployment to run. For example:
sales
clientname The name of the J2EE application client deployment to run. For example:
quotaclient
appargs (Optional) Application-specific arguments that you want to pass through to your client for processing. Specify zero or more of these. For example:
myarg -myswitch -y 2003
See “Passing application arguments” on page 90.
86 exteNd Application Server Facilities Guide

Running on UNIX or Linux
In UNIX or Linux, you can start SilverJ2EEClient from the command prompt by invoking the executable program SilverJ2EEClient. Enter:
installdirectory/bin/SilverJ2EEClient [options] [protocol://]hostname[:port] databasename clientname [appargs]
where:
For example:
/export/home/sam/SilverJ2EEClient/bin/SilverJ2EEClient -as_username=sam -as_password=icecream http://corporate:8888 sales quotaclient myarg -myswitch -y 2003
If you prefer to work in the desktop environment, you can set up an icon to issue the command or run from your file manager.
Displaying a console window
This section describes how developers can display console information on the screen when running SilverJ2EEClient in Windows.
Parameter What to specify
installdirectory The root directory where SilverJ2EEClient is installed on the user machine. For example:
/export/home/sam/SilverJ2EEClient
options (Optional) Startup options for controlling the execution of SilverJ2EEClient. Specify zero or more of these. For example:
-as_username=sam -as_password=icecream
See “Using startup options” on page 88.
protocol (Optional) One of the following HTTP protocols:
http:// (default)
https:// (for SSL connections)
hostname The host name (or Internet address) of the Novell exteNd Application Server to access. For example:
corporate
port (Optional) The TCP/IP port number that server uses. For example:
8888
The default is 8080.
databasename The name of the deployment database containing the client deployment to run. For example:
sales
clientname The name of the J2EE application client deployment to run. For example:
quotaclient
appargs (Optional) Application-specific arguments that you want to pass through to your client for processing. Specify zero or more of these. For example:
myarg -myswitch -y 2003
See “Passing application arguments” on page 90.
SilverJ2EEClient 87

Using the console version of SilverJ2EEClient The Novell exteNd Application Server development environment on Windows provides a way to display standard output and error messages from SilverJ2EEClient. SilverJ2EEClient_c.exe (in the server’s \bin directory) is a console version of SilverJ2EEClient that you can invoke instead of the usual end-user executable (SilverJ2EEClient.exe). You can start it from the command prompt by typing:
serverdirectory\bin\SilverJ2EEClient_c [options] [protocol://]hostname[:port] databasename clientname [appargs]
For example:
c:\Program Files\Novell\exteNdn\AppServer\bin\SilverJ2EEClient_c -as_username=sam -as_password=icecream http://corporate:8080 sales quotaclient myarg -myswitch -y 2003
Any standard output and error messages from SilverJ2EEClient then display in the command prompt window you’re running from. That includes messages related to startup issues.
Displaying your own splash screen
SilverJ2EEClient enables you to specify a JPG file of your choice as the splash screen to display whenever it starts up.
To specify the splash screen image:
1 Install your JPG file on the user machine in one of the following ways:
In the file system, on a path that ends with:com\sssw\jrunner\Splash.jpg
In a JAR or ZIP file containing that path
2 Set the AGCLASSPATH environment variable to specify either:
The path leading up to the com directoryset AGCLASSPATH=c:\myapp
The path of the JAR or ZIP fileset AGCLASSPATH=c:\myapp\mysplash.jar
SilverJ2EEClient in the development environment
When you invoke SilverJ2EEClient (or SilverJ2EEClient_c) in your development environment to test a client deployment, make sure the current directory is not the one containing your local development version of that client (compiled classes, JARs, and so on). Doing so causes classpath confusion that may prevent the client from running properly.
Using startup optionsThere are two kinds of options you can provide when starting SilverJ2EEClient:
- options These are options specific to the Novell exteNd Application Server environment. (They are passed to the JRunner class.)
+ options (Windows only) Some of these options are passed directly to the Java interpreter (at which time the + characters are changed to - characters). Others are handled by the SilverJ2EEClient executable to launch the Java interpreter.
88 exteNd Application Server Facilities Guide

Using - options
The following tables describe the - options you can provide when starting SilverJ2EEClient:
Client certificate options You can specify one of the following sets of options for client certificate support:
Option Description
-as_username=username Specifies the user name to use when logging in to a Novell exteNd Application Server. For example:
-as_username=sam
If you don’t supply this option and user authentication is required, you’ll get a dialog prompting for user name and password.
-as_password=password Specifies the password to use when logging in to a Novell exteNd Application Server. For example:
-as_password=icecream
If you don’t supply this option and user authentication is required, you’ll get a dialog prompting for user name and password.
-as_proxy=proxyserver Specifies a proxy server that you want to use. Include the proxy server name and (optionally) its port number (the default is 80). Examples:
-as_proxy=corpproxy-as_proxy=corpproxy:8080
Using SSL To use SSL with a proxy server, simply specify the HTTPS protocol for your Novell exteNd Application Server:
SilverJ2EEClient -as_proxy=corpproxyhttps://finance payroll salaryclient
To learn about configuring a Novell exteNd Application Server for SSL, see the chapter on setting up security in the Administrator’s Guide.
-as_use_ssl Enables protection for ORB communication.
-?
-h
-help
Displays usage information about SilverJ2EEClient and how to start it.
Set Option Description
1 -as_clientcertprompt Displays a dialog for specifying the PKCS12 DER file and password.
2 -as_pkcs12file=file Specifies the PKCS12 DER file containing the certificate and private key.
-as_pkcs12password=password Specifies the PKCS12 password.
3 -as_x509file=file1 Specifies the X509 certificate file (supporting both DER and PEM formats).
-as_pkcs8file=file2 Specifies the PKCS8 DER file containing the private key.
-as_pkcs8password=password Specifies the PKCS8 password.
SilverJ2EEClient 89

Using + options
The following table describes + options you can provide when starting SilverJ2EEClient in Windows:
You can also pass standard VM options directly to the Java interpreter by specifying them as + options. The + character is automatically converted to - as the option is passed.
For example, specifying:
+verbose
passes this option to the Java interpreter as:
-verbose
Passing application argumentsWhen developing a J2EE application client, you can code it to look for one or more application-specific arguments at runtime and then perform some processing based on those arguments. To help you do that, this section describes how to:
1 Pass application arguments to a client when starting SilverJ2EEClient
2 Enable the client to access and use those arguments
Specifying the arguments to pass
When starting SilverJ2EEClient, add any application arguments to the end of the command (after the name of the client to run). For instance, to pass the arguments -dollars and 2 to the client named rateclient (in the service database on the custserv server), you specify:
SilverJ2EEClient custserv service rateclient -dollars 2
Here are some additional rules to keep in mind:
Arguments before the client name are assumed to be startup options and are not passed to the client.
Arguments that begin with -as_ are assumed to be startup options and are not passed to the client (even if they are after the client name).
Startup options not beginning with -as_ must be before the client name. Otherwise, they are assumed to be application arguments and are passed to the client.
For more information on the command syntax, see “Starting SilverJ2EEClient” on page 84.
Option Description
+client or +server Specifies the VM to use.
For more information, see the section on specifying the JVM to use in the chapter on running the server in the Administrator’s Guide.
+profile Turns on profiling for the session.
+verbose:vmopts (For SilverJ2EEClient_c) Specifies that you want to output only startup options to the screen, without all the other information generated in verbose mode.
90 exteNd Application Server Facilities Guide

Accessing the arguments from a client
When SilverJ2EEClient starts a client, it invokes the main() method of the client’s main class and passes any application arguments to that method as a String array. You can then read them just as you would in any Java application.
Supporting access to secured EJBsAn Enterprise JavaBean (EJB) deployed on the Novell exteNd Application Server may be secured so that an IIOP over SSL connection is automatically used when someone tries to access it. To support this kind of connection, SilverJ2EEClient includes the following JAR file of CA (Certificate Authority) certificates: agrootca.jar (located in the SilverJ2EEClient \Common\lib directory).
If you need to use a CA certificate that isn’t in this file, you must add it. Use the JAR editing tool of your choice (such as the Sun JAR utility or WinZip).
For more information on secured connections to EJBs, see the chapter on setting up security in the Administrator’s Guide.
SilverJ2EEClient 91

92 exteNd Application Server Facilities Guide

6 Server Implementation Notes
This chapter presents some implementation details about the Novell exteNd Application Server. Topics include:
J2EE containers
Session-level failover
CORBA support
XML support
Internationalization support
J2EE containersAt the heart of the J2EE component model are containers. Containers are the runtime environments supplied by J2EE platform providers such as the Novell exteNd Application Server. Containers provide life-cycle management and other services, freeing application developers to focus on the presentation and business logic of their applications.
The application server implements each of the three kinds of J2EE container:
Web container
EJB container
Client container
Web container
The Web container contains Web applications, which are packaged in Web archive (WAR) files. Each WAR you deploy to the application server functions as a complete, standalone application. The WAR file must contain all JSP pages, servlets, JavaBeans components, utility classes, static HTML pages, images, and sounds used by the application.
JSP pages and servlets Once you’ve deployed a WAR to the server, each JSP page in the WAR behaves like a servlet. The page is associated with an URL. When a Web client or server-side object performs an operation on that URL, the server finds the associated servlet, instantiates it, and calls the init() and service() methods associated with the servlet. When the servlet is about to be unloaded, the server calls the destroy() method.
The servlet context for any JSP page (or servlet) within the WAR is the WAR itself. That means a JSP page or servlet cannot forward to (or include) a JSP page or servlet that resides in a different WAR, since the WAR defines the boundaries of the application.
Persistence JSP pages running on the application server are not persistent. A new instance of a JSP page might be created for each HTTP request (depending on whether the JSP page is defined as threadsafe in the deployment descriptor).
Server Implementation Notes 93

Response The application server uses the Servlet API to implement response buffering. It uses the following methods of the ServletResponse interface to buffer response data:
getBufferSize()
setBufferSize()
isCommitted()
reset()
flushBuffer()
Length If a servlet does not specify the length of its content by calling setContentLength(), the server uses HTTP 1.1 chunking to transfer the content as a series of chunks.
How URLs are processed
When a Web client or server-side object requests a resource in a WAR, the server breaks the request URL down into several components:
The following example shows the components of the URL for a WAR file deployed at myWar:
http://host/db/path/to/war/myWar/foo.jsp/pathinfo/for/jsp
Here the context path is /db/path/to/war, the servlet path is /myWar/foo.jsp, and the pathinfo is /pathinfo/for/jsp.
Dispatching requests within a WAR
A JSP page or servlet can forward to (or include) any other JSP page or servlet that resides in the same WAR.
If you use the <jsp:forward> or <jsp:include> action, the target URL can be context-relative or page-relative. A context-relative URL begins with a slash (/) and is interpreted relative to the WAR. A page-relative URL does not begin with a slash and is interpreted relative to the current page.
Suppose the complete URL for a JSP page is http://localhost/myDatabase/jsptests/myjsps/test.jsp, and the URL you give to the WAR at deployment time is jsptests. In this case you can forward a request to the page by embedding the following tag in a JSP page in the same WAR:
<jsp:forward page="/myjsps/test.jsp"/>
In a servlet, if you use the getRequestDispatcher() method of the ServletContext object to specify the target URL, the URL is context-relative. It must begin with a slash and is interpreted relative to the WAR. To forward a request to http://localhost/myDatabase/jsptests/myjsps/test.jsp, you could embed the following code in a servlet in the same WAR:
ServletConfig sconfig = getServletConfig();ServletContext sc = sconfig.getServletContext();RequestDispatcher rd =
sc.getRequestDispatcher("/myjsps/test.jsp");rd.forward(req, res);
The forward() method call passes the implicit request and response objects as arguments.
Component Description
context path Identifies the WAR
servlet path Identifies the requested item (JSP page, servlet, or other resource) in the WAR
pathinfo (Optional) Provides extra data to be passed to the servlet. In general, performance is better when query parameters (instead of pathinfo data) are passed to a request—because pathinfo slows down the lookup process, but parameters do not.
94 exteNd Application Server Facilities Guide

JSP pages and session management
The application server can use either cookies or URL rewriting to track sessions. It uses cookies if the browser supports cookies and uses URL rewriting if the browser does not.
For more information, see the section on session management in the chapter on server configuration in the Administrator’s Guide.
EJB container
The EJB container provides the runtime environment for EJB2.0 and EJB 1.1 beans. The runtime environment includes such low-level services as naming, remote access, security, and transaction support.
This section describes the features of the EJB container and includes these topics:
Supported EJBs
EJB container services
Supported EJBs
The EJB container supports:
Message-driven beans—Message-driven beans let you access messages from a queue or a topic managed by the JMS message server.
Session beans—Both stateful and stateless session beans.
Entity beans—Supports both bean-managed (BMP) and container-managed (CMP) entity beans. It supports the following entity bean features:
Feature Description
Container-managed persistence
Supports CMP via object-relational mapping, and supports access to legacy systems through Resource Adapters.
CMP entity beans can comply with the EJB 1.1 or 2.0 persistence model.
Autoincrement fields Supports autoincrement fields in target databases via the autoInc element in the deployment plan.
If the target database supports autoincrement fields, you need to add an empty autoInc element to the deployment plan. For databases that do not support autoincrement, you can use the schemaName, autoIncTableName, and columnName elements to generate a unique number. For Oracle databases, you can use the autoIncSequenceName element to specify the sequence name.
Concurrency Supports both optimistic and pessimistic concurrency. Use the isolationLevel element of the deployment plan to specify the concurrency strategy.
Controlling container-generated SQL
To view the container-generated SQL in the server console, start the server with EJBDebug=1. To override the container-generated SQL, specify the SQL you want in the sqlSubstitutionList element in the deployment plan. The container does not perform any error checking on the substituted SQL.
Data loading Supports both eager and lazy loading. Use the delayInstantiation element in the deployment plan to specify how to load data. The default is false (eager loading).
Server Implementation Notes 95

EJB container services
This section describes the services provided when an EJB is deployed an application server.
Debugging
The EJB container provides debugging support at both deployment time and runtime.
Deployment debugging support Deployment debugging support is provided through the command-line tool SilverCmd. The following table describes the commands that are most useful for debugging:
For more information on SilverCmd, see Chapter 4, “SilverCmd Reference”.
Link tables Supports link tables in many-to-many relationships and one-to-many relationships (although this is not recommended). Use the linkTable element in the deployment plan.
SilverCmd command Description
ValidateEJB Validates EJBs against the specification
Validates the deployment plan and the deployment descriptor
Is also called by both SilverCmd DeployEAR and DeployEJB
Generates errors and warnings
DeployEAR Allows you to specify verbose level (-v). You can specify three levels of messages:
Low: specify 1
Medium: specify 3
High: specify 5
To skip validation, use -n
DeployEJB
Feature Description
96 exteNd Application Server Facilities Guide

Runtime debugging support Runtime debugging support is provided through a server startup switch or a command shell from the server console. The following table describes the switches and how to use them:
Instance pooling
The EJB container supports instance pooling for entity, stateless session, and message-driven beans. Pooling is per bean and is specified in the deployment plan. To reconfigure the pool size, redeploy the bean with an updated deployment plan.
For entity and session beans, you specify values for the following:
Server switch Description
EJBDebug Lets you specify the types of messages the server should output. Use this syntax when starting the server:
SilverServer +DEJBDebug=n
Valid values for n are:
1: Shows the SQL the container generates for CMP entity beans (as an alternative, you can use sql.debug)
2: Shows transaction starts, commits, and rollbacks
4: Shows any Exceptions
8: Shows security
16: Shows EJB metadata
32: Shows the contents of the context pool
To specify more than one type of output Use the sum of values. For example, to see SQL and Exceptions, use the value 5.
Viewing messages You can view the messages for all deployed beans or for a specific bean. To see values for a subset of beans, use EJBDebugName (described next).
EJBDebugName Lets you specify a single bean or a set of beans for which you want to see EJB debug messages. Use this in conjunction with the EJBDebug flag (above). The syntax when starting the server is:
SilverServer +DEJBDebugName=name
where name:
Is the ejb-name element of the deployment descriptor
Is case-sensitive
Can be a single letter or a string (debug messages will display for any bean whose name contains the letter or string)
Deployment plan item What you do
initialPoolSize To preallocate pools, set this to a number greater than zero
maxPoolSize Set the maximum number of unused instances in the pool
The defaults are:
500 for session beans
0 for entity beans
5 for message-driven beans
poolingPolicy Define what happens when maximum pool size is reached
Values are CREATE and FAIL (described below)
Server Implementation Notes 97

Entity and stateless session bean pooling policies The EJB container does not create the instance pool when you deploy the bean; instead, it populates the pool as the need for instances increases:
When the poolingPolicy element is set to FAIL, the server throws an exception when maximum pool size is exceeded.
When the poolingPolicy element is set to CREATE, the server manages the pool as follows:
When the pool is below the maximum size, the container does not wait for an instance to be freed; it simply creates a new instance for the caller
Before the pool reaches maximum pool size, the container returns instances to the pool when clients are finished with them
While the pool is at maximum pool size, the container discards instances when clients are finished with them
When pool size is set to zero, instances are not pooled
For message-driven beans, the container provides instance pooling by implementing the ServerSessionPool interface.
Stateful session bean passivation The application server monitors memory usage by measuring the Garbage Collection (GC) rate. When the GC rate increases significantly, the server will start stateful session beans passivation. To disable the monitoring and passivation, add the following line to the httpd.props file:
http-server.com.sssw.srv.disableMemMonitor=false
The httpd.props file is located in the server’s \Resources directory.
Load balancing
Load balancing is per session. All EJBs used within a single session reside on one server within the cluster. Load balancing is transparent to the user; the client can do a normal JNDI lookup, and the naming server selects the server for the bean to run on.
When using EJBs within a cluster, you must start your servers on different name service ports. The default name service port is 54890. You can configure the name service port via the SMC.
For more information on application server clustering mechanisms, see the chapter on administering a cluster in the Administrator’s Guide.
Naming service
EJBs are registered in the root context of the Java Naming and Directory Interface (JNDI). If you specify a hierarchical naming structure for JNDI names, bean references, resource references, environment variables, or UserTransactions in the deployment plan, the container creates any intermediate subcontexts that do not already exist.
By default, the server registers bean references, environment variables, and resource references in the java:comp/env context. You can follow the recommendations of the EJB specification and store the objects in separate subcontexts, but the application server does not enforce these naming conventions. That means you can use the naming conventions that work best in your own production environment.
Remote access
The application server supports access to EJBs via RMI/IIOP using Novell exteNd ORB (Object Request Broker). exteNd ORB is an enterprise-class Java-based CORBA ORB and is part of the Novell exteNd Messaging Platform.
For more information on exteNd ORB, see the Novell exteNd Messaging Platform help.
For portable lookups for EJBs, use the CORBA name syntax—like this:
corbaname:iiop:host:port#name
98 exteNd Application Server Facilities Guide

For example:
corbaname:iiop:MyMachine:54520#MyEJB
Client access A client accessing an EJB needs a JAR that contains the EJB’s interfaces (for compile-time references) and the container-generated stubs (for runtime).
EJB developers should create an EJB client JAR and verify that the deployment descriptor includes the ejb-client-jar element. When this element is present, the container generates stub classes, places the stubs in the client JAR, and uploads the client JAR to the server.
Since the EJB client JAR is generated by the container and resides on the server, you’ll need to download the JAR from the server to the appropriate location on disk. Put the disk location of the EJB client JAR on the classpath of the client. Remember to download a new version of the EJB client JAR each time you make changes to the EJB and redeploy it.
Local access
To look up a local bean use:
EJBLocalHome/beanName
Security
The EJB container manages security at runtime using:
Authentication of principals
Access authorization for EJB calls and resource manager access
Secure communication with remote clients
Authentication and caller propagation
When you call an EJB, the server authenticates the user and uses the caller’s identity for the duration of the caller’s session on that server. All method calls run with the identity of that session. You can map a role name to a principal (user, group, or list of principals) in the deployment plan.
Access authorization
Access authorization is defined by the security-role and method-permission elements specified in the deployment descriptor. If you secure at least one method of a bean in the EJB JAR, you must secure all methods—or the container assumes all methods with unspecified security are restricted and cannot be called by any user. In addition, you can specify a set of methods that should not be called using the exclude-list element of the deployment descriptor. When a restricted method is called, the container throws an AccessRightsViolation Exception. Alternatively, you can choose a nonsecure mode by not securing any methods.
Secure communications
You can establish a secure connection between an EJB client and the application server using SSL. Novell exteNd ORB provides the IIOP over SSL support for RSA only.
You do not need to be running HTTPS. The following are required:
An RSA certificate must be installed on the server.
The deployment plan must specify:
One or more cipher suites for integrity and confidentiality (integrity and confidentiality may have different sets of cipher suites)
An iorSecurityConfig element for each session and entity bean
Clients also need the agrootca.jar, as described in “Supporting access to secured EJBs” on page 91.
Server Implementation Notes 99

For more information on establishing a secure connection between an EJB client and the application server, see the chapter on setting up security in the Administrator’s Guide.
Transaction support
The EJB container supports distributed transactions via the Novell exteNd JTS server, which fully implements Java Transaction Service (JTS).
If the transaction attribute is not specified in the deployment descriptor, the container uses the Supports attribute as the default transaction attribute.
Client container
J2EE application clients are the standard way to provide Java-based clients that run on user machines and access J2EE servers. They are hosted by a client container that (at a minimum) provides JNDI namespace access. Beyond that, the J2EE specification allows for a wide range of client container implementations, from basic to robust.
The application server supplies a client container named SilverJ2EEClient that users can invoke to run J2EE application clients you’ve deployed to the server. SilverJ2EEClient provides a robust set of supporting services, including:
Easy container installation
Automated client deployment to user machines
User authentication and session housekeeping
JNDI namespace access
For details, see Chapter 5, “SilverJ2EEClient”.
Session-level failoverThe application supports session-level failover for Web applications (WARs) and stateful session beans (EJB JARs). Session-level failover refers to the ability of an application to retain temporary user data (state) across server failures in a cluster. The data is stored in a persistent storage repository (such as a database or file system shared by the servers in the cluster) so that it can be recovered by any server in the cluster in the event of a server failure.
To support session-level failover, you must have a hardware dispatcher installed as the dispatcher for your cluster. All clients accessing the applications configured for session-level failover should access the application via the cluster’s (hardware) dispatcher.
Failover support is not a mechanism for load-balancing EJBs belonging to a single session across multiple servers.
EJB support for session-level failover
The EJB container supports session-level failover for stateful session beans (local and remote). The stateful session beans must meet these requirements:
The recoverable element in the deployment plan must be set to true.
The session bean must support activate and passivate as described in the section on instance passivation and conversational state in the EJB2.0 specification.
100 exteNd Application Server Facilities Guide

The session bean’s methods must be transactional (specified in the deployment descriptor). Changes to the session bean’s state that occur outside a transaction are not recoverable if the system crashes; changes to the session bean’s state that occur in the context of a transaction are recoverable.
How session-level failover works for stateful session beans
If your session beans meet the requirements listed above and a failure occurs, the recovery works like this:
1 At the end of each transaction that includes one or more recoverable stateful session beans, the EJB container passivates and serializes all recoverable beans used in the transaction and saves them to the database (the AgSessBeans table in the SilverMaster database).
2 As long as the server is up, the client will continue to use the same server.
3 If the client gets a communication failure on a remote call, it assumes the server failed:
If the failure occurs between transactions, the client automatically chooses another server in the cluster and retries the call to it (it does not require a hardware dispatcher). The session bean’s state is then restored from the database on the new server just as though the bean had been previously passivated.
If the failure occurs when there is already a transaction in progress, the call is not automatically retried. Instead, the transaction is rolled back and the client gets the exception. It is the client’s responsibility to recover from a transaction rollback (for example, the client can retry the call).
The performance of your EJB applications might be impacted if the recoverable session bean does a lot of work in the ejbActivate() method. For example, if the session bean allocates and caches a database connection.
Server settings to support session-level failover
To support session-level failover when using IIOP over SSL, you must also configure a range of ports for IIOP SSL communications for the server.
For more information on setting the range of ports, see the section on specifying ORB settings in the Administrator’s Guide.
Web application support for session-level failover
The WAR container supports session-level failover. The Web application must meet the following requirements:
The distributable element must be present in the deployment descriptor.
The recoverable element in the deployment plan must be set to true.
The components in the WAR must follow the rules about distributable objects outlined in the Servlet 2.3 specification.
The objects written to the HTTPSession object must be Serializable. The application server also supports failover of EJB references and UserTransaction objects.
State cannot be stored in static or instance variables.
How session-level failover works for Web applications
If your Web application meets the requirements listed above and a failure occurs, the session-level failover recovery works like this:
Server Implementation Notes 101

1 On each HTTP request to the Web application, the server serializes the HTTPSession state to the database (the AgSessBeans table of the SilverMaster) at the end of each request.
Because the container passivates, serializes, and saves the HTTPSession state to the database at the end of each HTTP request, this can impact the overall performance of the application.
2 As long as the server is up, client requests will continue to be directed to the same server.
3 If the server fails between requests and you have a hardware dispatcher, the dispatcher detects the server failure and sends the next request to a different server.
The new server restores the HTTPSession state from the database and the operation continues without interruption.
If the server fails during a request, the browser will eventually time out the response. When the user resubmits (assuming a hardware dispatcher), the resubmitted request goes to a new server that restores the HTTPSession state as described above.
If you do not have a hardware dispatcher
If you use the application server’s software Dispatcher (instead of a hardware dispatcher), the user application will have to manually return to the dispatcher after the failure to be redispatched. Once redispatched, the new server will not automatically restore the state, since the session ID cookie will be different.
When failover might not work
Because the HTTPSession state is not transactional, updates to the HTTPSession during a request can be lost under certain circumstances—for example, if the server crashes during a request (but before the state is saved). However, if the server crashes after the state is saved but before returning a reply, the state can be recovered.
Application client support for session-level failover
A J2EE client application can access Web application components or EJBs that support session-level failover as long as the Web components and EJBs meet the session-level failover requirements described in “Web application support for session-level failover” just above. The J2EE client must initially connect to the cluster’s (hardware) dispatcher like this:
SilverJ2EEClient dispatcher-name:port database-name application-name
For details on SilverJ2EEClient, see Chapter 5, “SilverJ2EEClient”.
CORBA supportThe application server includes Novell exteNd ORB. exteNd ORB is an enterprise-class Java-based CORBA ORB. You can use exteNd ORB from the application server, SilverJ2EEClient, or any browser. You can use exteNd ORB to develop, deploy, and manage Java-based CORBA applications. The application server uses the following subset of features:
Bootstrap protocol
COS naming
Java objects by value
Java RMI/IIOP
Objects by value support for IDL
IIOP over SSL
For more information on exteNd ORB, see the Novell exteNd Messaging Platform help.
102 exteNd Application Server Facilities Guide

XML supportXML (eXtensible Markup Language) allows you to create XML documents that can be used to exchange data between computer systems (of different types) and applications on the Web. This section describes the application server’s use of and support for XML documents and includes the following topics:
Application server support for XML
Resources for learning about XML
Application server support for XML
The application server uses XML documents for:
J2EE archive deployment descriptors and deployment plans
SilverCmd input files
For information, see:
Chapter 2, “J2EE Archive Deployment”
Chapter 4, “SilverCmd Reference”
Resources for learning about XML
If you’re new to XML or just need to explore a specific XML topic, try the following learning resources:
Internationalization supportThis section describes the following internationalization topics:
Database support
Client-side support
Database support
All JDBC drivers certified for use with the application server have been fully tested to support Western/Eastern European and Asian languages.
To use the multibyte version of the server’s JDBC-ODBC bridge driver:
1 Add the following line to AgUserIni.props in your server’s \Resources directory: com.sssw.srv.ambry.mbcs.AgOdbc=true
2 Restart the application server.
Resource Description Available at
Novell exteNd developer site
An index to XML learning and reference materials with links to many documents and Web sites
developer.novell.com/extend
XML.org site A directory of XML news and information www.xml.org
Server Implementation Notes 103

Client-side support
The application server includes runtime language libraries for Simplified and Traditional Chinese, English, French, German, Italian, Japanese, Korean, Portuguese, Russian, and Spanish.
If you encounter font-mapping problems in SilverJ2EEClient where the correct characters are not displaying, you can fix the problem by editing the JRE’s font.properties file. You must edit the font.properties.XX file in the Novell exteNd Common\jre\lib directory (where XX is the two-character language encoding for the language you are interested in). For example, you would edit font.properties.ko for Korean.
Two sections in the file There are two sections of interest in the file that appear one after the other. They are labeled name aliases and for backward compatibility.
The original version of font.properties.ko is:
# name aliases## alias.timesroman=serif# alias.helvetica=sansserif# alias.courier=monospaced# for backward compatibilitytimesroman.0=Times New Roman,ANSI_CHARSEThelvetica.0=Arial,ANSI_CHARSETcourier.0=Courier New,ANSI_CHARSETzapfdingbats.0=WingDings,SYMBOL_CHARSET
How to proceed The name aliases section maps nonexistent font names to font mappings defined in the file. You should uncomment those alias lines. (This is the preferred way of handling the mapping. The section for backward compatibility is the old way of mapping nonexistent font names to fonts described in the file.)
NOTE: You need to comment the first three lines of this section.
The updated version of the file would then be:
# name aliases#alias.timesroman=serifalias.helvetica=sansserifalias.courier=monospaced# for backward compatibility# timesroman.0=Times New Roman,ANSI_CHARSET# helvetica.0=Arial,ANSI_CHARSET# courier.0=Courier New,ANSI_CHARSETzapfdingbats.0=WingDings,SYMBOL_CHARSET
104 exteNd Application Server Facilities Guide

Index
AAddCP command, SilverCmd 49AddDatabase command, SilverCmd (deprecated) 52
input file requirements 53AddUserToGroup action 73agrootca.jar
with SilverJ2EEClient 91application arguments
passing from SilverJ2EEClient 90application clients
about 102deploying archives 56session-level failover 102
archivesJ2EE deployment 15
arguments, application 90asContextRequired 30authentication
and SilverCmd 46authMethod 30autoincrement
EJBs 17
Bbatch mode, SilverCmd 47
Ccipher suites 30classpath JARs
specifying on server 32ClearDefaultURL command, SilverCmd 54ClearLog command, SilverCmd 54client container 100client JAR deployment plan DTD 40CMP entity beans
mapping to a table 17compiler
setting preferences 66confidentiality
about 29cipher suites 30
consolesSilverJ2EEClient 87
containers, J2EEabout 93client container 100EJB container 95Web container 93
CORBAapplication server support 102
CreateGroup action 74CreateUser action 75
Ddatabases
removing 69debugging
EJBs 96DeleteGroup action 75DeleteURL command, 55DeleteUser action 76DeleteUserFromGroup action 76DeployCAR command, SilverCmd 56DeployEAR command, SilverCmd 57DeployEJB command, SilverCmd 59deploying
EARs 57EJB JARs 59EJBs 16, 59J2EE archives 15JSP pages to file system 9SilverJ2EEClient 81WARs 61
deployment descriptorvalidating 79
deployment plansabout 33client JAR deployment plan 34, 40EAR deployment plan 41EJB JAR deployment plan 35EJB tips 17files 33reference documentation 33samples 33WAR deployment plan 38see also DTDs
DeployRAR command, SilverCmd 60DeployWAR command, SilverCmd 61double-byte version of JDBC-ODBC bridge driver 103
105

DTDs (document type definitions) 33see also deployment plans
EEAR deployment plan DTD 41EARs
role maps 42EJB JAR deployment plan DTD 35EJB JARs
deploying 59EJBs (Enterprise JavaBeans)
about 17access authorization 99asContextRequired 30authentication context configuration 28authMethod 30cipher suites 30confidentiality 29container 95debugging 96deploying 16, 59establishTrustInClient 29instance pooling 97integrity 29IOR configuration examples 31IOR configurations 28isolation levels 19lazy beans 36load balancing 98mapping CMP entity beans 17mapping persistent fields 18primary key mapping 27realm 30relationship mapping 19security 99security and caller propagation 99security attribute context 29, 30session-level failover 100SilverJ2EEClient access via IIOP over SSL 91supporting autoincrement 17transaction support 100transport configuration 28
entity beansdelaying instantiation 36
error loggingSilverCmd 48
execute modeSilverCmd 47
exteNd ORB see Novell exteNd ORB
F-f startup option 48failover, session-level
about 102EJB support 100Web applications 101
file systemdeploying JSP pages to 9
font.properties files 104
GGetConsole command, SilverCmd 62GetDefaultURL command, SilverCmd 63groups
creating 74deleting 75managing 72setting properties for 77
Iinput files, with SilverCmd 48install page, SilverJ2EEClient 82instance pooling
EJBs 97Integrity
attribute 29cipher suites 30
internationalization support for the server 103IOR configurations 28isolation levels
specifying 19
JJ2EE
application clients, accessing arguments passed from SilverJ2EEClient 90
archive deployment 15client container 100containers 93EJB container 95Web container 93
JARson application classpath 32
JSP pagescompiling 61deploying 61deploying to the file system 9implementation in Web container 93URLs for JSP pages 94
JSP/FS 9
Llazy beans
entity beans 36link tables 25ListCP command, SilverCmd 64load balancing 98
106

Mmanaging users and groups 72message-driven beans
mapping 27ModifyCP command, SilverCmd 65multibyte version of JDBC-ODBC bridge driver 103
NNetWare
see Novell NetWareNovell exteNd ORB
default for machine 83, 84information needed 28installed 83, 84
Novell NetWareSilverJ2EEClient support 83, 86
OORB
see Novell exteNd ORB
Ppersistent fields
mapping 18preferences, setting 66Prefs command, SilverCmd 66primary keys 27PrintLog command, SilverCmd 67
QQueryCP command, SilverCmd 68
Rrealm
EJBs 30relationships, EJB
EJB mapping 19general restrictions 27link tables 25many-to-many unidirectional 26one-to-many bidirectional 23one-to-many unidirectional 24one-to-one bidirectional 20one-to-one unidirectional 22
RemoveCP command, SilverCmd 68RemoveDatabase command, SilverCmd (deprecated) 69removing databases 69role maps
EARs 42running SilverCmd 46runtime language libraries 104
Ssample input files, for SilverCmd 49security
EJBs 99IOR configurations 28setting permissions 71
security attribute context configuration 30server
shutting down 69ServerState command, SilverCmd 69session-level failover
see failover, session levelSetDefaultURL command, SilverCmd 70SetGroupProperties action 77SetSecurity command, SilverCmd
about 71SetUserGroupInfo command, SilverCmd
about 72AddUserToGroup action 73CreateGroup action 74CreateUser action 75DeleteGroup action 75DeleteUser action 76DeleteUserFromGroup action 76SetGroupProperties action 77SetUserProperties action 77
SetUserProperties action 77shutting down servers 69SilverCmd
about 45, 46AddCP command 49AddDatabase command (deprecated) 52AddDatabase driver set 53AddDatabase example input file 53AddDatabase valid database connection types 53and XML files 49ClearDefaultURL command 54ClearLog command 54DeleteURL command 55DeployCAR command 56DeployEAR command 57DeployEJB command 59DeployRAR command 60DeployWAR command 61DTDs 49execute mode 47-f option 48GetConsole command 62GetDefaultURL command 63input files 48ListCP command 64logging messages 48ModifyCP command 65Prefs command 66PrintLog command 67QueryCP command 68RemoveCP command 68RemoveDatabase command (deprecated) 69running 46running in batch mode 47
107
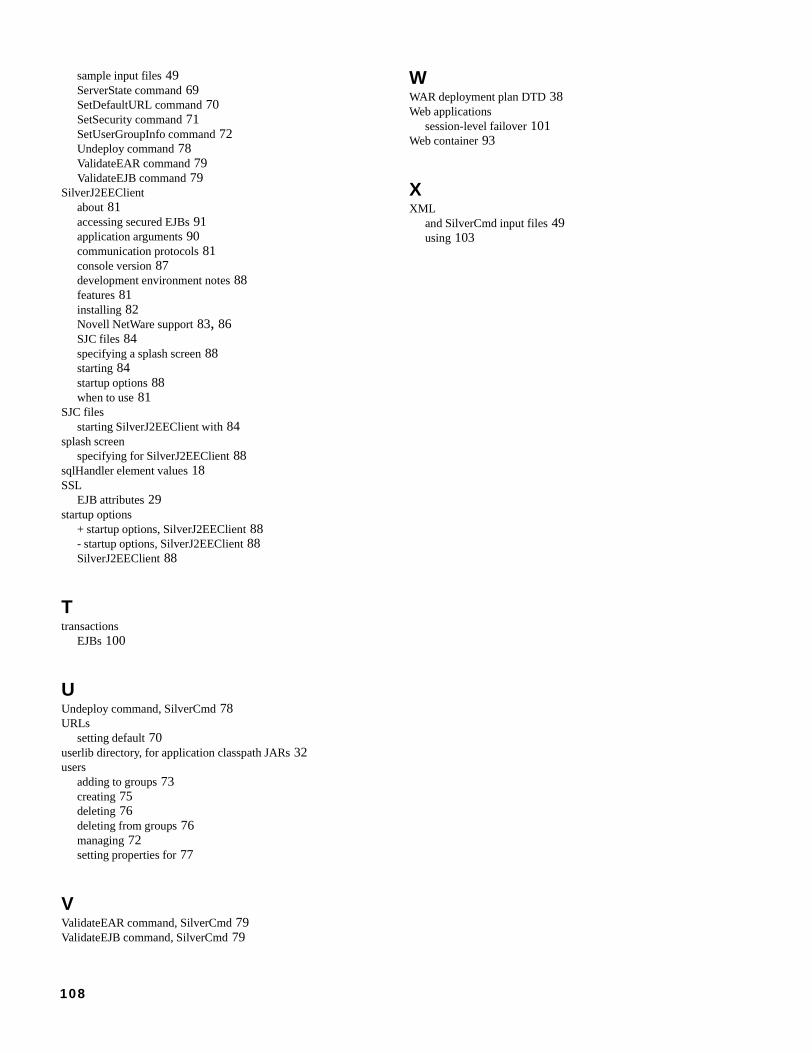
sample input files 49ServerState command 69SetDefaultURL command 70SetSecurity command 71SetUserGroupInfo command 72Undeploy command 78ValidateEAR command 79ValidateEJB command 79
SilverJ2EEClientabout 81accessing secured EJBs 91application arguments 90communication protocols 81console version 87development environment notes 88features 81installing 82Novell NetWare support 83, 86SJC files 84specifying a splash screen 88starting 84startup options 88when to use 81
SJC filesstarting SilverJ2EEClient with 84
splash screenspecifying for SilverJ2EEClient 88
sqlHandler element values 18SSL
EJB attributes 29startup options
+ startup options, SilverJ2EEClient 88- startup options, SilverJ2EEClient 88SilverJ2EEClient 88
Ttransactions
EJBs 100
UUndeploy command, SilverCmd 78URLs
setting default 70userlib directory, for application classpath JARs 32users
adding to groups 73creating 75deleting 76deleting from groups 76managing 72setting properties for 77
VValidateEAR command, SilverCmd 79ValidateEJB command, SilverCmd 79
WWAR deployment plan DTD 38Web applications
session-level failover 101Web container 93
XXML
and SilverCmd input files 49using 103
108

109

110