Embed Size (px)
Citation preview


NOVA QUICK OPERATION Start with both the Fade and Speed Masters UP. The Record LED must be ON (Green) to record Scenes, Chases, and Shows.
TWO PRESET AUTO-FADE OPERATION Both CHANNELS and PARK Masters should be moved up and down together. Start with both Masters DOWN: Preset the next Scene on the Channel faders, and preset the fade time on the Fade Master. Move both Masters UP to fade to the new cue. When the fade is complete, press [PARK], then take both Masters DOWN. Repeat these two steps to preset and fade in the next cues.
RECORDING SCENES, CHASES AND SHOWS Start with the CHANNELS, PARK, FADE, and SPEED Masters UP; set the current page using the Page Up or Down keys: Set up a Scene on the Channel faders and press [RECORD] The Record LED will change to red. Repeat step 1 to record the steps of a Chase, or the cue states of a Show. The Record LED will flash red. Hold [RECORD] down and press a Scenemaster Flash key to assign the recording as a Scene ( LED on) or a Chase ( flashing LED) on the current memory page. Shows must be assigned to a master marked "Shows".
SCENE PLAYBACK Fade the Scenemaster to Full, or press the flash key. Scenes fade at the Fade Master rate.
CHASE PLAYBACK Preset the Speed Master, then fade the Scenemaster to Full: the Chase steps at the preset speed. Press [STEP/STOP] to stop and then reverse the Chase. Hold [RECORD] then press [STEP/STOP] to change Chase playback to Bass Chase. The Speed Master sets the Bass mode, the Fade Master changes the Chase up and down fade times.
SHOW CUE AUTO-FADE PLAYBACK Preset the first cue fade time on the Fade Master, then set the Show Master to Full to fade up Cue 1 levels. Preset the next cue fade time on the Fade Master, then press [CUE GO] to cross-fade to the next cue state. To go back a cue, hold down [CUE GO], then press [PARK]. For further instructions, refer to the table of Contents or Index.

CONTENTS INTRODUCTION ..............................................................3 FEATURES ......................................................................5 FRONT PANEL LAYOUT .................................................7 BACK PANEL LAYOUT .................................................11 DESK SET-UP................................................................11 TWO PRESET MANUAL OPERATION...........................13
TWO PRESET MODE .................................................13 PRESETTING A SCENE .............................................13 PARKING A SCENE....................................................13 CROSS-FADING TO THE NEXT SCENE.....................13 TIMED CROSS-FADING .............................................15 HOLDING A TIMED FADE...........................................15 FLASHING CHANNELS ON OR OFF...........................15 FLASHING THE CHANNELS MASTER........................15 BLACKOUT.................................................................17 KILL MODE.................................................................17
MEMORY OPERATION..................................................18 RECORDING METHOD ..............................................18 SCENEMASTER RECORDINGS.................................18 RECORDING TYPES..................................................18 SCENEMASTER FLASH KEYS...................................19 SCENEMASTER FADERS ..........................................19 SCENEMASTER PAGES ............................................19
RECORD AND ERASE ENABLE....................................21 RECORD ENABLE......................................................21 ERASE MEMORY .......................................................21 RECORD DISABLE.....................................................21 RECORD CLEAR........................................................21
SCENE RECORDING AND PLAYBACK.........................23 RECORDING AND ASSIGNING A SCENE ..................23 SCENE PLAYBACK ....................................................23
FLASHING SCENES ...................................................23 RECORDING A SCENE BLIND....................................23
SCENE FADE PLAYBACK.............................................25 TIMED CROSS-FADING..............................................25 HOLDING A FADE.......................................................25 SNAP FADES..............................................................25 CHANGING PAGES ....................................................25
SCENE EDITING ............................................................27 EDITING SCENE LEVELS...........................................27 COPYING A SCENE LIVE ...........................................27 TRANSFERRING A SCENE TO ANOTHER PAGE.......27 DELETING A SCENE ..................................................29 OVER-WRITING A SCENE..........................................29 SAVING ORIGINAL LEVELS .......................................29
CHASE RECORDING AND PLAYBACK.........................31 RECORDING AND ASSIGNING A CHASE...................31 CHASE PLAYBACK.....................................................31 CHANGING PAGES ....................................................31 CHASE UP AND DOWN FADE TIMES.........................33 FLASHING CHASES ...................................................33 STOPPING AND REVERSING CHASES......................33 DELETING A CHASE ..................................................33 OVER-WRITING A CHASE..........................................35 EDITING CHASE LEVELS...........................................35 INSERTING OR DELETING CHASE STEP ..................35
BASS CHASE PLAYBACK.............................................37 SETTING BASS CHASE MODES ................................37 BASS RUN SLOW.......................................................37 BASS RUN FAST ........................................................37 BASS STEP SLOW .....................................................38 BASS STEP FAST.......................................................38

BASS SPEED SLOW ..................................................38 BASS SPEED FAST....................................................39 BASS AUTO SLOW.....................................................39 BASS AUTO FAST......................................................39
SHOW RECORDING AND PLAYBACK..........................41 RECORDING AND ASSIGNING A SHOW ...................41 SHOW PLAYBACK .....................................................41 OVER-RIDING A CUE FADE TIME..............................41 FLASHING SHOW CUES............................................43 CONTINUOUS SHOW CUE PLAYBACK .....................43 DELETING A SHOW ...................................................43 OVER-WRITING A SHOW...........................................43
SHOW EDITING .............................................................45 EDITING CUE LEVELS ...............................................45 INSERTING OR DELETING CUE STEP ......................45 COPYING A SHOW.....................................................45
REMOTE SHOW PLAYBACK ........................................46 REMOTE SHOW SET-UP ...........................................46 REMOTE CUE FORWARD..........................................46 REMOTE CUE REVERSE...........................................46 SHOW RESTART........................................................47 REMOTE INPUT SPECIFICATIONS............................47
PREVIEW MODES .........................................................49 READING CHANNEL LEVELS ....................................49 PREVIEWING THE NEXT CUE OF A SHOW...............49 PREVIEWING SCENES ..............................................49 PREVIEWING CHASES ..............................................49 PREVIEWING PARK...................................................49
SD CARD OPERATIONS................................................51 SAVING TO SD CARD.................................................51 RESTORING FROM SD CARD....................................51
NOVALINK INTRODUCTION..........................................53 NOVALINK FEATURES...............................................53
PATCH LIST EDITING....................................................55 READING PATCH LIST LEVELS .................................55 RESETTING TO A ZERO PATCH................................55 RESETTING TO A ONE-TO-ONE PATCH....................57 PATCH LIST EDITING.................................................57
READING LIVE CHANNEL AND DIMMER LEVELS........59 READING A CHANNEL LEVEL....................................59 READING ALL LIVE CHANNEL LEVELS .....................59 READING A DIMMER LEVEL ......................................59 READING ALL LIVE DIMMER LEVELS........................59
TEST AND FLASH MODES............................................61 CHANNEL TEST AND FLASH MODES........................61 DIMMER TEST AND FLASH MODES ..........................61 CHANGING TEST LEVEL............................................63 TESTING ALL CHANNELS OR DIMMERS...................63 PATCH EDITING IN TEST MODE................................63 CANCELLING TEST MODE.........................................63
MAINTENANCE..............................................................64 SPECIFICATIONS ..........................................................65 EXTERNAL CONNECTIONS ..........................................66 GLOSSARY....................................................................68 INDEX ............................................................................70


NOVA OPERATION 3
INTRODUCTION The Theatrelight Nova is a general purpose memory assisted lighting control desk available in two models, the Nova 24, and the Nova 36. Both models have been designed for simple operation but with more sophisticated functions than a manual preset desk, and make the Nova a perfect introduction for students of lighting design and operation. The single preset of 24 or 36 Channel faders is complemented by a second preset `Park' facility with dipless cross-fade, which allows the Nova to emulate a two preset manual desk when required without the space and expense of a second set of faders. Both models have a number of Scenemasters for recording and playing back lighting levels. Each Scenemaster can be recorded as a single Scene for manually or auto timed fades from 0.5 second to 30 minutes. A Scenemaster can also record a Chase which steps at the rate set by the Speed Master. Scenemasters marked "Shows" can record a Show, a sequence of cues stepped by the Cue Go key at the fade rate set by the Fade Master. The 8 playback Master faders of the 24 channel model are arranged in 10 pages for a total of 60 Scenes and Chases, and 20 Shows. The 20 playback Masters of the 36 channel model are arranged in 4 pages for a total of of 64 Scenes and Chases, and 16 Shows. A maximum of 60 steps can be stored under a Chase or a Show (40 steps in the 36 channel model). Page overlay memory keeps the last page master active until it is returned to zero thus allowing access to any page without change to the current lighting state. Up and Down editing keys allow easy modification of any recorded levels. Since each page can simultaneously play back a number of Chases or manually faded Scenes, or cross-fade through a large number of push button Show cues, the desks can cope with the busiest performance. Chase playback fade times can be set to Snap, Comet or Fade modes by setting the Fade Master. In addition the Nova features a variety of Bass operated Chase options using either the internal microphone or an external audio source, making this panel ideal for club lighting. A remote control input allows cue operation for automated or Audio-Visual applications from external devices such as projector control boxes, and a variety of decoders. Apart from controlling lighting dimmers, the Nova can be used to control many other effects such as motors, strobes, colour scrollers, moving lights, smoke machines and pyrotechnics used in Disco and Rock lighting. The output from the Nova is in industry standard DMX-512 1990 format allowing easy interface to all entertainment equipment. The facilities designed into the Nova result in an easy to learn, easy to operate, hands-on control panel for Schools, smaller Theatres, and Drama and small Television studios. The Bass and Chase features also make the Nova ideal for Disco, Club and Band lighting.

4 NOVA OPERATION

NOVA OPERATION 5
FEATURES The Scenemasters in the Nova can record Scenes or Chases. Scenemasters marked "Shows" can record Scenes or Shows. 24 Channel model memory capacity: 80 total Scenes (10 pages of 8 Scenemasters) 60 total Chases each of 60 steps for a total of 3600 Chase steps (10 pages of 6 Chase masters) 20 total Shows each of 60 cues for a total of 600 cue states (10 pages of 2 Show masters) Total cue states is 4800 (10 pages of 8 Scenemasters each of 60 Chase steps or Show cues) 36 Channel model memory capacity: 80 total Scenes (4 pages of 20 Scenemasters) 64 total Chases each of 40 steps for a total of 2400 Chase steps (4 pages of 16 Chase masters) 16 total Shows each of 40 cues for a total of 2400 cue states (4 pages of 4 Show masters) Total cue states is 3200 (4 pages of 20 Scenemasters each of 40 Chase steps or Show cues) . 5 year memory retention of all recorded levels during power off. Page overlay memory allows changing to any other page without change to the current lighting. Pre-settable auto fade times (instant, or half second to 30 minutes) for Scenes, or for Show cues. Single button cue cross-fade operation simplifies complex shows. Chases are level sensitive, and can be played as snap chases, comet chases, or as fade Chases. Sound to Light Chase effects may be operated from the internal microphone, or from external sound input. Fast editing of stored scene, chase and cue levels. Park mode enables the desk to emulate a two preset manual operation with manual or auto-timed dipless cross-fade. External control of cues for Audio-Visual applications or remote single button operation. Operator's instruction summary printed on the front panel. Dust guard protection on all faders for extended life. DMX-512 international communication standard to dimmers.

6 NOVA OPERATION

NOVA OPERATION 7
FRONT PANEL LAYOUT A INSTRUCTION SUMMARY lists commands for most Nova functions on the front panel as a convenient memory aid for the
operator. B CHANNEL FADERS allow setting of lighting levels for manual playback or recording.
CHANNEL FLASH KEYS give an instant flash of the channel to Full, or flash the channel off if it is at full. The flash keys are also used with the Edit Up and Down keys to edit recorded levels, to mimic levels, and for entry of Record and Erase codes. CHANNEL MIMIC DISPLAY shows all live channel outputs, and previewed channel outputs. The first ten LEDs are also used as a 0 to 10 scale (0 to 100%) to indicate the level of a selected channel. TAPE AREAS are provided for laying on marking tape as an aid to identification of Channels above each Flash key.
C SCENEMASTER FADERS Scenemasters can store Scenes, Chases, or Shows. SCENES FLASH KEYS give an instant flash of the Scene, Chase or Show cue to Full. These keys are also used with the Record key to assign recorded cues.
D CHANNELS MASTER controls the output of the Channel faders. CHANNELS FLASH KEY instantly flashes the Channels Master to Full, or Off if it is already at full. With Record, this key enable blind recording of the Channel fader levels when the Channels Master is off. PARK KEY A single press of the Park key instantly stores the current lighting levels under the Park Master fader, enabling split dipless cross-fades between Channel fader levels and levels stored under the Park fader. This gives the Nova in effect an extra preset of Channel faders in electronic memory.
E FADE MASTER defines the fade time of cross-fades between presets, and of recorded Scenes and Show cues. The scale extends from instant through 0.5 second to 30 minutes. The Fade Master also modifies the Up and Down fade time of Chases, from Snap (instant up and down) to Comet (fast up, slow down) to Chase Fade (equal up and down times). FADE LED flashes while a timed cross-fade of a Scene or Show cue is in progress. HOLD FADE position of the Fade Master freezes the current fade. CUE GO KEY steps forward through the cues of the current Show. With Park, this key gives a Cue Back function. With Record, the key gives a Record Disable function and is also used when entering the Erase Memory code numbers on the Channel Keys.

8 NOVA OPERATION

NOVA OPERATION 9
F SPEED MASTER controls the speed at which cues of a Chase are stepped, from Stop, and 1 per 60 seconds through to 1200 beats per minute. The Step LED mimics the step rate, as well as indicating chase direction Forward (Green) and Reverse (Red). If the Fade Master is set to Comet or Fade Chase, the Speed Master also changes the Up and Down times of the Chase step. In Bass Chase mode (when the Bass LED is on or flashing), the Speed Master changes themode of the Bass Chase. Bass Chase modes can be set to Bass Run (Burst or Stop), Bass Step, Base Speed, and Bass Auto Speed/Level.
STOP MODE position of the Speed Master stops all Chases. This setting can be used for single stepping forward (Step/Stop key) or backwards (Step/Stop and Cue Go key) through the steps of a Chase for editing Chase step levels. STEP/STOP KEY controls Chase Direction. Pressing the key momentarily changes the Chase Direction: when the Step LED is Green, all Chases step forward; when the LED is Red, all Chases step backwards. Holding the key down stops all Chases until released. With Cue Go, this key gives a Chase Back function if the Speed Master is set at Stop. Holding Record and pressing this key allows setting the Chase mode to Chase (Bass LED off), Bass Chase Slow (Bass LED on) or Bass Chase Fast (Bass LED flashing) for a variety of Sound to Light effects.
G DBO/KILL KEY blacks out all output levels when pressed, excepting that any flashed Channels, Scenes, Chases, or Shows stay on at full. With Record, this key clears any recorded steps in the Record buffer. EDIT UP and DOWN KEYS enable channels of recorded Scenes, Chase steps, or Show cues to be edited. The Speed Master must be in the Stop position to edit Chase step levels. If both Up and Down are pressed together, pressing any Channel Flash key shows that channel level on the first 10 channel mimic LEDS. PAGE UP and DOWN KEYS change the current page shown in the Page display. With Record, Page key clears the Record buffer. When both Page Up and Down keys are pressed together, pressing a Scenemaster keys mimics the Scene, Chase, and Show next cue levels on the channel mimic LEDs. BASS MODE LED shows the current Chase mode: LED Off: Chase; LED On: Bass Chase Slow; LED Flashing: Bass Chase Fast
H RECORD ENABLE LED shows the Record status. When the LED is off, Record is disabled, protecting all recorded Scenes, Chases and Shows. When the LED is Green, Record is enabled. A Red LED shows one scene has been recorded into the Record Buffer, and waits to be assigned to a Scenemaster. A flashing Red LED shows more than one step has been recorded and has yet to be assigned to a Scenemaster as a Chase or a Show. RECORD KEY when pressed records the current output of the desk into spare memory. Holding Record and pressing a Scenemaster Flash key then assigns that recording to the Scenemaster. Record is also used as a shift key for a number of other functions, such as changing the Chase mode, and Record Enable/Disable and Erase Memory functions.

10 NOVA OPERATION

NOVA OPERATION 11
BACK PANEL LAYOUT POWER SUPPLY socket is wired and labelled for either 120 or 240 volts AC, 50/60 Hertz supplies depending on model and country. POWER SWITCH AND FUSE may be fitted depending on model. REMOTE STEP socket enables Show cue step control from a push-button, or from external Audio-Visual, Midi, or SMPTE decoders. DMX-512 OUTPUT from the Nova carries multiplexed dimmer levels to the remote dimmers. INTERNAL MICROPHONE picks up local sound to provides a bass signal to operate the Bass Chase mode of the Nova. EXTERNAL AUDIO CONNECTOR may be used to input music from a disco mixer or other source to operate the Bass Chase mode.
DESK SET-UP Check that your Nova is rated for your mains supply. Plug up a correctly wired DMX-512 cable between the Nova and the dimmers, and power up the dimmers and the desk. The desk powers up in the state in which it was last turned off—for a clean start, set the following: 1 Set the DMX address Thumbwheel (if fitted) to 001 so Channel 1 of the Nova addresses Dimmer 1. 2 Set all preset faders DOWN. 3 Set the Channels Master DOWN, and the Park Master UP. 4 Set both the Fade and the Speed Masters UP. 5 Press the Page key to select Page 1. THIS PROCEDURE IS NECESSARY FOR CORRECT OPERATION OF THE EXAMPLES ON THE FOLLOWING PAGES

12 NOVA OPERATION

NOVA OPERATION 13
TWO PRESET MANUAL OPERATION
TWO PRESET MODE You can emulate the operation of a two preset manual panel by using the Park key and the Park Master fader. Pressing Park records the current output levels into an electronic memory or "preset". Playback from this preset is controlled by the Park Master. You will see that the Park Master scale is upside down: Full is at the bottom, Off is at the top of the scale. This makes cross-fading a one hand operation.
PRESETTING A SCENE You can preset a lighting state (a Scene) by setting levels on the Channel faders: 1 Set some levels on the Channel faders (the top row of faders) with the Channels Master at zero. 2 Move the Channels Master up to Full: all the levels on stage fade up together. Channels live on stage are shown by the Channel Mimic LEDs.
PARKING A SCENE You can store the present lighting state under the Park Master by pressing the Park key: 1 Press [PARK]. The display flashes to indicate the levels have been recorded. 2 Move both the Channels Master and the Park Master down together. The lighting state remains the same; the scene you set on the Channel Faders is now being played back through the Park Master. The Channels and Park Masters may be moved down fast so long as they are kept together.
CROSS-FADING TO THE NEXT SCENE Having preset a scene as above, you can now clear the Channel faders, and preset a new scene: 1 Set up the next scene levels on the Channel faders. Since the Channels Master is now at zero, there is no change on
stage. 2 On cue, fade both the Channels and the Park Masters UP together to fade in the new scene levels. When both are
full, press [PARK], then immediately take both Masters DOWN together to set up for the next scene. This two preset manual way of operating the Nova can be used at any time, even when using the memory Scenemasters for
playing back recorded Scenes, Chases and Show cues as described in the following pages.

14 NOVA OPERATION

NOVA OPERATION 15
TIMED CROSS-FADING You can use the Fade Master to time the cross-fade as follows: 1 With both Channels and Park Masters down, preset the next scene, and set a suitable fade time, say 5 seconds, on
the Fade Master. 2 On cue, move both Channels and the Park Masters UP quickly together for a dipless cross-fade to the new lighting.
The Fade LED above the Fade Master flashes to show a fade in progress. When the fade is complete (LED off), press [PARK], then immediately take both Masters DOWN together in order to preset the next scene.
The fade time can be changed during the fade—the fade will continue at the latest fade rate selected. A Channels/Park auto fade will always give a dipless cross-fade, but where thermal lag of higher wattage lamps is a problem, the new scene can be warmed by setting the Channels master at 10% for a few seconds before the fade. If the Park Master is left at Full, new flash or fader levels can be added to the total by pressing the Park key after each addition.
HOLDING A TIMED FADE While the Fade Master is set to the Hold position, the action of the fade timer is halted, and the current output lighting state will be held until the fade time is changed. You can use the Fade Master to stop a fade in progress, or to speed up or slow down fades at will. Hold has no effect on Chases.
FLASHING CHANNELS ON OR OFF If you press any of the Channels Flash keys the output level of that channel is set to Full. The Nova Flash keys are placed above the faders for easy one handed flash-hold operations use your index finger to flash the channel, then raise the fader with your thumb. Note that if the Channel output level is already at Full, pressing the Flash key flashes that channel OFF.
FLASHING THE CHANNELS MASTER If you press the Flash key above the Channels Master when it is down, the Channels Master is set instantly to Full: 1 Set the Channels Master at zero, and set some levels on the Channel faders. 2 Press the Flash key above the Channels Master. The levels flash instantly to those of the Channel faders. Note that if the Channels Master level is already at Full, pressing the Flash key flashes all Channel Fader levels OFF.

16 NOVA OPERATION

NOVA OPERATION 17
BLACKOUT Pressing the DBO key gives an instant dead blackout on stage.The blackout is held as long as the key is held down, and the original lighting restored instantly when the key is released. If you want to remain in a blackout, you can set the Channels Mastser (and Park Master) off before releasing the DBO key: 1 With some Channel faders live on stage, hold down [DBO]: the lighting will go immediately to black. 2 Release the keys: the original lighting is restored.
KILL MODE Normally, pressing a Channel Flash key sets that channel to Full without affecting other levels (Add mode). If the DBO key is pressed at the same time, all output is blacked out excepting the flashed channels: 1 Set levels on the Channel faders with the Channels Master at Full. 2 Press the Flash keys of some other Channels, pressing [DBO] at the same time. The Flashed channels go instantly to Full, while all other levels are blacked out.

18 NOVA OPERATION
MEMORY OPERATION
RECORDING METHOD Each time the Record Key is pressed, the channel levels of the current output of the desk are stored in spare memory. The output may come from any combination of the Channel Faders, the Park preset, or a mix of pre-recorded Scenes or Cues. Record can be pressed at any, even during a fade to obtain a snap-shot recording. Also, Blind recordings can be made directly from the Channel faders with the Channels Master down so the recorded levels do not show on stage. Pressing Record again adds another set of recorded levels to that already in spare memory. In this way you can record either one or up to 60 sets of channel levels (40 in the 36 channel Nova). This single or multiple recording must then be assigned to a Scenemaster for playback by holding down the Record key and pressing a Scenemaster Flash key. A single recording is assigned as a Scene, while multiple recordings are assigned as a Chase. Multiple recorded steps assigned to a Master marked "Shows" can be stepped with the Cue Go key. All recording operations can only be performed if the Record LED is lit.
SCENEMASTER RECORDINGS Each unmarked Scenemaster can hold two types of recordings—a Scene or a Chase. Scenemasters marked "Show" can hold either a Scene or a Show. The page overlay memory feature of the desk allows changing to a new page without changing the current lighting. Playback fade times of Scenes, and Show cues are controlled by the Fade Master. Chase speeds are controlled by the Speed Master, and Chase Up and Down fade times can also be modified by the Fade Master.
RECORDING TYPES Each recording under a Scenemaster is composed of one or more steps (cue states) which lists all Channel levels. Scenes are one step long, while Chases and Shows must have a minimum count of two steps or cue states. The maximum cue count of a Chase or a Show is limited to 60 (40 in the 36 channel Nova). SCENE A Scene is a single cue recording of all Channel levels under a Scenemaster. Scene playback fade time is controlled by the Fade Master. CHASE A Chase is a number of cue steps recorded under a Scenemaster, each cue step listing all Channel levels. Chase speed is controlled by the Speed Master, and by the bass beat if in some Bass Chase modes. Chase playback Up and Down fade times are modified by the Fade Master fades may be set to Snap, Comet, or Fade mode. Taking the Speed Master to Stop allows editing of Chase levels using the Edit Up and Down keys.

NOVA OPERATION 19
SHOW A Show is a number of cues recorded under a Scenemaster marked as a Show. Each cue step lists all Channel levels. Show playback fade time is set by the Fade Master. A Show can be single stepped forward through its cues with the Cue Go key, and stepped backward using the Cue Go and Park keys. Normally the main lighting is cued by setting a fade time on the Fade Master, and then pressing the Cue Go key, while independently timed effects may be flashed or faded from Scenes or Chases, or from the Channel Faders or Flash keys. Although in the Nova each Showmaster can only hold a maximum of 60 cue states (40 in the 36 channel Nova), hundreds of cues can be seamlessly cross-faded by splitting the lighting for an entire performance over a number of Show masters on all the pages. By recording an extra blackout cue at the start and end of each Showmaster you can cross-fade from the end of one show to the start of the next, even when the new Showmaster is on a different page. Splitting the lighting over a number of masters in this way also makes for ease of editing and playback.
SCENEMASTER FLASH KEYS The Scenemaster Flash keys can be used for an instant flash to Full of any Scene, Chase, or Show. Pressing the Flash key at the same time as the DBO key works the same as in manual mode—all lighting except the Flashed Scene or Chase is blacked out. The Scenemaster Flash keys are also used to assign recordings, and for mimic and preview functions.
SCENEMASTER FADERS The Scenemaster faders are used to fade up and down all Scenes, Chases, and Shows. You can have any number of Scenes or Chases up at once. Scenes are normally cross-faded in pairs—the new Scene up with the old Scene down. If you are running a Show using the Cue Go key, only one Show fader should be up at a time unless you are cross-fading to the next cue of a new Show on the same page, or to a new Show on a new page.
SCENEMASTER PAGES Page overlay memory keeps the last page master active until it is returned to zero thus allowing access to any page without change to the current lighting state.You can change the current page of Scenemasters by pressing the Page Up or Down keys: the playback of any Scenemasters which are up remain unaffected. New Scenemasters can be faded up on the new page to add to those from the previous page. Scenemasters can be live on only two pages at a time: if you change the page when masters are already up on two pages, the page number swaps back to the last page.

20 NOVA OPERATION

NOVA OPERATION 21
RECORD AND ERASE ENABLE Before you can record scenes the Record Enable LED must be set on using a key code. The Record and Erase codes will be found on a removable sticker on the back of the desk when you first take delivery.
RECORD ENABLE To allow any change to the permanent memory, the LED above the Record key must be on. If the Record LED is off all recordings are protected from modification. To turn on this LED (if it is off), enter the code as follows (if for example Record Code is 622): > Hold down [RECORD], then press 6, then 2, then 2 in succession on the Channel Flash keys: after a Mimic flash, the Record LED will light Green to show Record is enabled.
ERASE MEMORY Every Nova has a 4 digit code for erasing all recordings. This is only necessary if you are planning to record a completely new show. If your Erase code is for example, 1187: 1 Ensure that the Record LED is on as shown above. 2 Hold down [RECORD] and [CUE GO], then press 1, 1, 8, and 7 in succession on the Channel Flash keys. 3 Release [RECORD] and [CUE GO]: a long Mimic flash indicates that all previous recordings have been erased. As with the Record code, the Erase code can only be entered on the Channel Flash keys, 1 through 9. Entering the wrong Erase code affords extra protection by cancelling the Record LED, which must be enabled again before attempting an erase.
RECORD DISABLE To protect your recordings, you can disable Record (if it is on) as follows: > Hold [RECORD] then press [CUE GO]: the Record LED will turn off. Attempts to record or edit recorded scenes will now have no effect.
RECORD CLEAR If you press Record while enabled, the Record LED will change to Red (or flash Red) to indicate a recording has been made. You can clear the recording as follows: > Hold [RECORD] then press [DBO]: after a Mimic flash the Record LED will change to Green. Only the Record Buffer memory is cleared. This function is useful if you make a mistake in recording, or if you press the Record key accidentally. You should always make sure the Record LED is GREEN before recording any new levels.

22 NOVA OPERATION

NOVA OPERATION 23
SCENE RECORDING AND PLAYBACK Scene levels may be recorded into any Scenemaster, even those marked "Shows":
RECORDING AND ASSIGNING A SCENE You should always make sure the Record LED is GREEN before recording any new levels: if it is Red or flashing Red, the Record Buffer needs to be cleared: > Hold [RECORD] then press [DBO]: after a Mimic flash the Record LED will change to Green. The Record Buffer is now clear for recording new levels: 1 Set the Channels Master at Full, and set up levels on the Channel faders. 2 Press and release [RECORD].This records the output of the desk in spare memory; the Record LED turns Red. 3 Hold [RECORD] and press a Scenemaster Flash key to assign the recording to that fader on the current page. After a short Mimic flash the Record LED turns Green the Record Buffer memory is now empty, and the Scene is recorded under the Scenemaster fader. The LED above the Scenemaster is set On to show a Scene has been recorded. A Scene may be assigned to any Scenemaster, including those marked "Shows".
SCENE PLAYBACK With the Fade Master set at Instant, raising the fader level of a recorded Scene brings up the levels of that scene at the same speed as you move the fader. Scenes add levels on a highest takes precedence basis. Channels live are shown on the Mimic LEDs.
FLASHING SCENES Pressing the Flash key of a Scene instantly recalls the levels of that scene. A flashed Scene adds levels on a latest takes precedence basis flashed levels over 5% over-ride any other output level. This mode of operation is useful for turning some channels effectively off (flashed scene levels recorded at 5%), while others are turned on. Pressing a Scenes Flash key at the same time as the DBO key blacks out all other output, leaving only the flashed Scene levels.
RECORDING A SCENE BLIND Scenes can also be recorded blind (without showing on stage) from the Channel faders as follows: 1 Set the Channels Master Off, and set up some levels on the Channel faders. 2 Hold [RECORD] and press the [CHANNELS] key above the Channels Master to record the Channel fader levels. This Blind Scene can now be assigned to a Scenemaster for playback as described above.

24 NOVA OPERATION

NOVA OPERATION 25
SCENE FADE PLAYBACK For applications requiring accurate fade times, the desk allows fade times from 0.5 second to 30 minutes duration. To use timed fade playback, you must first record and assign Scenes as described previously.
TIMED CROSS-FADING You can play back Scenes with a timed cross-fade as follows: 1 Set a suitable fade time, say 5 seconds, on the Fade Master. 2 Set the new Scene QUICKLY to full, then take the last Scene QUICKLY to zero: the Fade LED (above the Fade
Master) flashes to show a fade in progress. After 5 seconds, it goes off to indicate the fade is complete. Repeating this operation gives a series of cross-fades between scenes. The fade time can be changed during the fade the fade will continue at the latest fade rate selected. Where thermal lag of higher wattage lamps is a problem, the new scene can be warmed by setting it at 10% for a few seconds, or raised a second before the last scene is taken out.
HOLDING A FADE While the Fade Master remains in the Hold position (master down), the action of the fade timer is stopped, and the current output lighting state will be held until the Fade Master is raised again. You can use this if a fade is progressing too fast for the action on stage.
SNAP FADES For a snap fade you can set the Fade Master to instant and move the Scenemasters fast. Better results may be obtained by holding the old scene on its Flash key, and releasing it at the same time as you flash on the new scene. The new scene can then be held by moving its fader to Full before releasing the Flash key: 1 Set the Fade Master to Instant. 2 Before the cue, press the Flash key of the Scenemaster, and set the master down. 3 On cue, press the Flash key of the new scene, and release the old key. 4 To hold the new scene, fade the new Scenemaster Fader to Full (use your thumb), then release the Flash key.
CHANGING PAGES You can change the current Page while the Scene is playing by pressing the Page Up or Down keys. The Page memory feature ensures that the lighting is not changed, but the page display LEDs will flash both the new page and the last page number to show you that a Scenemaster master is still active on that page. You can now fade in a new Scene (using a different master) on the new page. The Page LEDS will stop flashing the last page number after the old Scene is faded out.

26 NOVA OPERATION

NOVA OPERATION 27
SCENE EDITING You can edit the playback levels of any Scene using the Edit Up and Down keys. Editing must be done with the scene live on stage, with Record enabled. Editing Scene channel levels immediately changes the level in memory.
EDITING SCENE LEVELS The Edit Up and Down keys fade channel levels at a default 5 second rate to prevent obvious errors on stage. Channels which have been edited are written directly into the Scene memory. 1 Set the Fade Master at Instant, and the Scene to be edited at Full. Set all other Scenemasters off. 2 Hold [UP], and press any Channel Flash keys: those channels will fade up. 3 Hold [DOWN] and press any Channel Flash keys: those channels will fade down. When Up and Down are pressed with a Channel Flash key, the first ten Mimic LEDs display the level of that channel to the nearest 10% while the level is fading up or down.
COPYING A SCENE LIVE You can copy a Scene to any other fader on the same page by playing it back live, recording the output of the desk, and then assigning the recording as follows: 1 Set the Scene to copy at Full. Add other Scenes or Channels at any level if required. 2 Press [RECORD] to record the levels. 3 Hold [RECORD], then press the Flash key above the new Scenemaster fader to assign the recording.
TRANSFERRING A SCENE TO ANOTHER PAGE You can also copy a Scene to any other page as follows: 1 Set the Scene to copy at Full. Add other Scenes or Channels at any level if required. 2 Press [RECORD] to record the levels. 3 Press [PAGE] to move to another page. 4 Hold [RECORD], then press the Flash key above the new Scenemaster fader to assign the recording. This will record the new levels under that Scenemaster on the new page. If it is the same master as the last page, you will need to take the master to zero to release the last page playback. Bringing the master to full plays back the new scene on the new page.
28 NOVA OPERATION

NOVA OPERATION 29
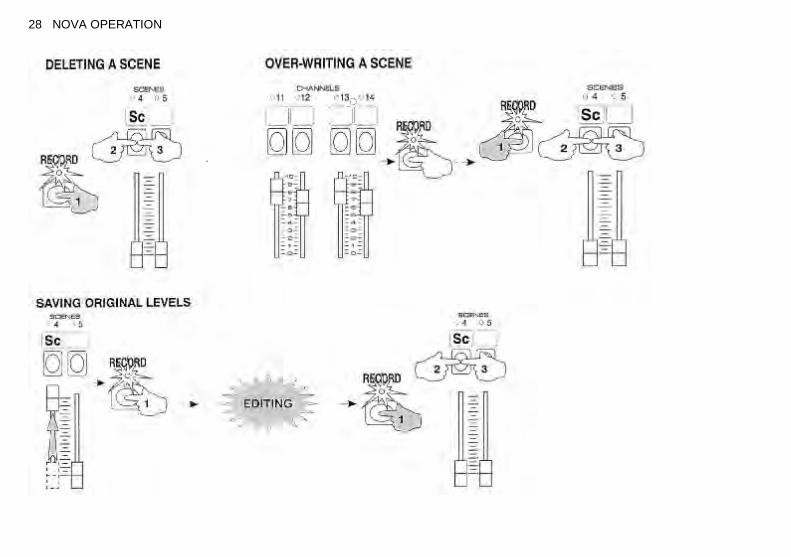
DELETING A SCENE You can delete any Scene as follows: > Hold [RECORD] and then press the Flash key of the Scene to be deleted. Wait for a long Mimic flash, then press it
again before releasing [RECORD]. The long Mimic flash after the first press of the Scenemaster Flash key is a warning that the master holds a previously recorded Scene. The short Mimic flash on the second press indicates the scene has been deleted. The Scenemaster LED will turn off, showing that the master is empty.
OVER-WRITING A SCENE You can over-write any previous recording with a new Scene as follows: 1 Set up a new Scene using the Channel faders, or a combination of other Scenes. 2 Press [RECORD] to record the levels. 3 Hold [RECORD], and press the Flash key of the old Scene. Wait for a long Mimic flash, then press it again before releasing [RECORD]. The long Mimic flash after the first press of the Scenemaster Flash key is a warning that the Scenemaster holds a recorded Scene. The short Mimic flash on the second press indicates the new Scene has been assigned, and the old Scene over-written.
SAVING ORIGINAL LEVELS Since editing Scene channel levels immediately changes the level in memory, you may want to keep a copy of the original levels in case they need to be restored. You can use the Record Buffer memory as a temporary store for this purpose: 1 Set the Scene to be edited at Full. 2 Press [RECORD] to store the Scene levels in spare memory. 3 Edit the Scene levels using the Up and Down keys as above. 4 If after editing you want to restore the original levels, hold [RECORD] and press the Scene flash key. Wait for a long
Mimic flash, then press it again to overwrite the edited Scene with the original levels. 5 If you keep the edited Scene, remember to empty the Record buffer: hold [RECORD] and press [REC CLEAR], the
DBO key. If you forget to clear the Record Buffer, the Scene(s) in the Buffer will be added to the start of the next recording you make.
You can also use the Park key to save original levels.

30 NOVA OPERATION
NOVA OPERATION 31
CHASE RECORDING AND PLAYBACK
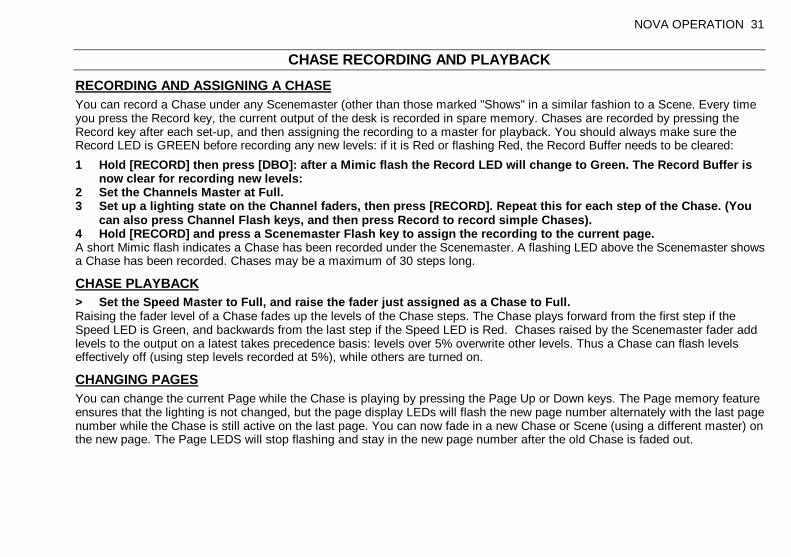
RECORDING AND ASSIGNING A CHASE You can record a Chase under any Scenemaster (other than those marked "Shows" in a similar fashion to a Scene. Every time you press the Record key, the current output of the desk is recorded in spare memory. Chases are recorded by pressing the Record key after each set-up, and then assigning the recording to a master for playback. You should always make sure the Record LED is GREEN before recording any new levels: if it is Red or flashing Red, the Record Buffer needs to be cleared: 1 Hold [RECORD] then press [DBO]: after a Mimic flash the Record LED will change to Green. The Record Buffer is
now clear for recording new levels: 2 Set the Channels Master at Full. 3 Set up a lighting state on the Channel faders, then press [RECORD]. Repeat this for each step of the Chase. (You
can also press Channel Flash keys, and then press Record to record simple Chases). 4 Hold [RECORD] and press a Scenemaster Flash key to assign the recording to the current page. A short Mimic flash indicates a Chase has been recorded under the Scenemaster. A flashing LED above the Scenemaster shows a Chase has been recorded. Chases may be a maximum of 30 steps long.
CHASE PLAYBACK > Set the Speed Master to Full, and raise the fader just assigned as a Chase to Full. Raising the fader level of a Chase fades up the levels of the Chase steps. The Chase plays forward from the first step if the Speed LED is Green, and backwards from the last step if the Speed LED is Red. Chases raised by the Scenemaster fader add levels to the output on a latest takes precedence basis: levels over 5% overwrite other levels. Thus a Chase can flash levels effectively off (using step levels recorded at 5%), while others are turned on.
CHANGING PAGES You can change the current Page while the Chase is playing by pressing the Page Up or Down keys. The Page memory feature ensures that the lighting is not changed, but the page display LEDs will flash the new page number alternately with the last page number while the Chase is still active on the last page. You can now fade in a new Chase or Scene (using a different master) on the new page. The Page LEDS will stop flashing and stay in the new page number after the old Chase is faded out.

32 NOVA OPERATION

NOVA OPERATION 33
CHASE UP AND DOWN FADE TIMES Chase Up and Down fade times are modified by the Fade Master as well as the Speed Master. The times change depending on whether the Fade Master is within the limits Snap, Comet, or Fade Chase marked on the right side of the Fade Master scale. SNAP Chase Up and Down fade times are both instant (up=0, dn=0). FADE Chase Up and Down fade times are both set to the same time as the Speed Master setting (t). For example if the Speed
Master is set to 1 second (t=1), the Chase will step every second, the Up fade time will be 1 second (up=t=1), and the Down fade time will be 1 second (dn=t=1).
COMET Chase Up times are set to instant (up=0). Down fade times are set to twice the Speed Master setting (dn=2t). For example if the Speed Master is set to 1 second, the Chase will step every second, the Up fade time will be instant (up=0), and the Down fade time will be 2 seconds (dn=2t=2). Note that if the Speed Master is set to longer than 4 seconds the Down Fade time will be the same time as the Speed Master (dn=t).
FLASHING CHASES Pressing the Flash key of a Chase instantly adds levels on a latest takes precedence basis. Note that Chase levels over 5% over-ride other output levels. This mode is useful for turning some channels effectively off (5%) while others are turned on.
STOPPING AND REVERSING CHASES When any new Chase is raised to Full either by fader or flash key, it starts from the first step if the Speed LED is Green, and from the last step if the Speed LED is Red. Chases can be stopped and reversed using the Step/Stop key. The key stops all Chases while it is held down; when released it reverses all Chases: 1 With a Chase running, hold down [STEP/STOP]: the Chase will stop. 2 Release [STEP/STOP]: the Chase will continue but in the reverse direction. 3 Tap the [STEP/STOP] key: the Chase reverses with each tap of the key.
DELETING A CHASE You can delete any Chase as for a Scene. Ensure first that the Record buffer is empty (Record LED GREEN), then: > Hold [RECORD] and then press the Flash key of the Chase to be deleted. Wait for a long Mimic flash, then press it again before releasing [RECORD]. The long flash after the first press of the Scenemaster Flash key is a warning that the master holds a recording. The short flash on the second press indicates the Chase has been deleted. The Scenemaster LED will turn off, showing the Chase has been deleted.

34 NOVA OPERATION
NOVA OPERATION 35
OVER-WRITING A CHASE You can over-write any previously recorded Chase as follows: 1 Set up a new Scene or step of a Chase using the Channel faders. 2 Press [RECORD] to record the levels. 3 Hold [RECORD], and press the Flash key of the old Chase. Wait for a long Mimic flash, then press it again. The long Mimic flash after the first press is a warning that the Scenemaster holds a recorded Scene or Chase. The short Mimic flash on the second press indicates the new Chase has been assigned, and the old recording over-written.
EDITING CHASE LEVELS You can edit the playback levels of any Chase step. Level editing of a step can only be carried out with the Chase stopped, and the Chase step live on stage. To stop the Chase you must set the Speed Master to Stop. It can then be stepped through using the Step/Stop key to step forward, and the Step/Stop with the Cue Go key to step backwards. You can then use the Up and Down keys to edit the step levels as previously described under Scene Editing. Record must be enabled for level editing. 1 Set the Fade Master at Instant, and the Speed Master at Stop. 2 Set the Scenemaster at Full so the first step of the chase is live onstage. 3 Press [STEP/STOP] (step forward), or [STEP/STOP] and [CUE GO] (step back) to select the chase step to edit. (You
can use the Speed Master for faster access, and then return it to Stop mode). 4 Hold [UP] or [DOWN] and press Channel flash keys to edit levels. The Channel mimic LEDs show the level of the
currently selected channel. Levels are edited directly in the Chase memory. Note that the Speed Master must be at Stop (at the bottom of the scale) when using the Edit Up and Down keys.
INSERTING OR DELETING CHASE STEP Chase steps cannot be inserted or deleted directly, but you can get the same effect in a short time by re-recording a new Chase using the steps from the old Chase and then overwrite the new chase into the old Scenemaster: 1 Set the Fade Master at Instant, and the Speed Master at Stop. 2 Set the Scenemaster at Full so the first step of the old chase is live onstage. 3 Press [STEP/STOP] (step forward), or [STEP/STOP] and [CUE GO] (step back) to select the chase step to re-record.
You can use the Speed Master for faster access, and then return it to Stop mode. 4 Record new steps from any other chase or scene (or the Channel faders) in order. 5 Hold [RECORD], and press the Flash key of the old Scenemaster. Wait for a long Mimic flash, then press it again
before releasing [RECORD]. The new Chase will now be in the recorded order.

36 NOVA OPERATION

NOVA OPERATION 37
BASS CHASE PLAYBACK The Nova is fitted with an internal microphone (and an external audio input) with a filter sensitive to bass music frequencies. Signals derived from the bass filter are used in Bass Chase mode in a number of ways to change the playback mode of Chases. Depending on the setting of the Speed Master and the Bass mode LED, a bass beat can step a Chase, stop a Chase, burst a Chase, or modulate the speed or intensity of a Chase. The Up and Down fade times of Bass Chases are also modified by setting the Fade Master to Snap, Comet, or Fade Chase in a similar fashion as described for normal Chase playback.
SETTING BASS CHASE MODES You can change the Chase playback mode from normal Chase to either Slow Bass or Fast Bass Chase as follows: 1 Hold [RECORD] then press [STEP/STOP]: after a Mimic flash the Bass Mode LED in the Page display will change to
On. This is Bass Chase Slow. 2 Repeat Step 1: after a Mimic flash the Bass Mode LED in the Page display will Flash. This is Bass Chase Fast. 3 Repeat Step 1 a third time: after a Mimic flash the Bass Mode LED in the Page display will turn Off. This turns Bass Mode Off, and returns to normal Chase mode. By keeping the Record key down and pressing the Step/Stop key several times, you can move quickly through the different Chase modes. Different settings of the Bass mode, Speed Master, and Fade Master alter the Chase playback as follows:
BASS RUN SLOW If the Bass mode LED is On (Bass Slow), each bass beat of the music bursts the Chase at the speed set on the Speed Master. The speed can be changed in the range of 120 BPM to 1200 BPM. The Chase direction is automatically reversed every 8 music beats. The Fade Master setting changes the Chase Up and Down fade times as follows: Snap Up fade times are instant (up=0). Down fade times are the same as the Speed Master setting (dn=t). Fade Up fade times are the same as the speed setting (up=t). Down fade times are twice the speed setting (dn=2t). Comet Up fade times are the same as the speed setting (up=t). Down fade times are four times the speed setting (dn=4t).
BASS RUN FAST If the Bass mode LED is Flashing (Bass Fast), each bass beat of the music stops the Chase. The Chase speed can be changed in the range of 120 BPM to 1200 BPM. The Chase direction is automatically reversed every 8 music beats. Snap Up and Down fade times are instant (up=0, dn=0). Fade Up fade times are half the Speed Master setting (up=t/2). Down fade times are the same as the speed setting (dn=t). Comet Up fade times are instant (up=0). Down fade times are twice the speed setting (dn=2t).

38 NOVA OPERATION
BASS STEP SLOW If the Bass mode LED is On (Bass Slow), each bass beat of the music steps the Chase to the next step. The Up and Down fade time of each step can be changed by moving the Speed Master within the range of 10 seconds up to 114 BPM (a fade time of nearly half a second). Chase direction is automatically reversed every 8 music beats. Snap Up fade times are instant (up=0). Down fade times are the same as the Speed Master setting (dn=t). Fade Up fade times are the same as the speed setting (up=t). Down fade times are twice the speed setting (dn=2t). Comet Up fade times are the same as the speed setting (up=t). Down fade times are four times the speed setting (dn=4t). Note
that if the Speed Master is set to longer than<N>4 seconds the Comet Down fade time reverts to the same time as the Speed Master (dn=t).
BASS STEP FAST If the Bass mode LED is Flashing (Bass Fast), each bass beat of the music steps the Chase to the next step. The Up and Down fade time of each step can be changed by moving the Speed Master within the range of 10 seconds to 114 BPM (a fade time of nearly half a second). Chase direction is automatically reversed every 8 music beats. Snap Up and Down fade times are instant (up=0, dn=0). Fade Up fade times are half the Speed Master setting (dn=t/2). Down fade times are the same as the speed setting (dn=t). Comet Up fade times are instant (up=0). Down fade times are twice the speed setting (dn=2t). Note that if the Speed Master is
set to longer than<N>4 seconds the Comet Down fade time reverts to the same time as the Speed Master (dn=t).
BASS SPEED SLOW If the Bass mode LED is On (Bass Slow), each bass beat of the music speeds up the Chase within the range 10 secs per step up to 120 BPM. Depending on the setting of the Fade Master, the Up and Down fade time of each step is changed to match the speed of the Chase. Chase direction is automatically reversed every 8 music beats. Snap Up fade times are instant (up=0). Down fade times are the same as the Speed Master setting (dn=t). Fade Up fade times are the same as the speed setting (up=t). Down fade times are twice the speed setting (dn=2t). Comet Up fade times are the same as the speed setting (up=t). Down fade times are four times the speed setting (dn=4t).

NOVA OPERATION 39
BASS SPEED FAST If the Bass mode LED is Flashing (Bass Fast), each bass beat of the music speeds up the Chase within the range 2 secs per step up to 1200 BPM. Depending on the setting of the Fade Master, the Up and Down fade time of each step is changed automatically to match the speed of the Chase. Chase direction is automatically reversed every 8 music beats. Snap Up and Down fade times are instant (up=0, dn=0). Fade Up fade times are half the Speed Master setting (dn=t/2). Down fade times are the same as the speed setting (dn=t). Comet Up fade times are instant (up=0). Down fade times are twice the speed setting (dn=2t).
BASS AUTO SLOW If the Bass mode LED is On (Bass Slow), each bass beat of the music intensifies the level and speeds up the Chase within the range 10 secs per step up to 120 BPM. Depending on the setting of the Fade Master, the Up and Down fade time of each step is changed to match the speed of the Chase. Chase direction is automatically reversed every 8 music beats. Snap Up fade times are instant (up=0). Down fade times are the same as the Speed Master setting (dn=t). Fade Up fade times are the same as the speed setting (up=t). Down fade times are twice the speed setting (dn=2t). Comet Up fade times are the same as the speed setting (up=t). Down fade times are four times the speed setting (dn=4t).
BASS AUTO FAST If the Bass mode LED is Flashing (Bass Fast), each bass beat of the music intensifies the level and speeds up the Chase within the range 2 secs per step up to 1200 BPM. Depending on the setting of the Fade Master, the Up and Down fade time of each step is changed automatically to match the speed of the Chase. Chase direction is automatically reversed every 8 music beats. Snap Up and Down fade times are instant (up=0, dn=0). Fade Up fade times are half the Speed Master setting (dn=t/2). Down fade times are the same as the speed setting (dn=t). Comet Up fade times are instant (up=0). Down fade times are twice the speed setting (dn=2t). In both Bass Auto modes, you can use the Bass beat to modulate up and down the levels of what appears to be a single Scene by recording 2 steps with the same levels. Depending on the music style, any of these Bass modes can be used to step one or more Chases for an everchanging display
of lighting. Although all Chases are stepped at once, having up two Chases of different lengths greatly increases the variety of the lighting. For example a Chase of 8 steps up at the same time as a Chase of 9 steps will only repeat the same look every 72 bass beats. If using the internal microphone, you can also tap the desk lightly with your fingers to provide your own rhythm.

40 NOVA OPERATION

NOVA OPERATION 41
SHOW RECORDING AND PLAYBACK The Show cue facility of the Nova gives you the ability to run a complex show—a number of cue states can be recorded into a Scenemaster, and played back on cue by setting a fade time and pushing the Cue Go button. At the same time, other special effects can be added by fading or flashing pre-recorded Scenes or Chases, or by fading or flashing channels on the Channel preset.
RECORDING AND ASSIGNING A SHOW You can record a Show under any Scenemaster marked "Shows" in a similar fashion to a Chase. Every time you press the Record key, the current output of the desk is recorded in spare memory. Shows cues are recorded by pressing the Record key after each scene set-up, and then assigning the recording to a Show Scenemaster for playback. You should always make sure the Record LED is GREEN before recording any new levels: if it is Red or flashing Red, the Record Buffer needs to be cleared: 1 Hold [RECORD] then press [DBO]: after a Mimic flash the Record LED will change to Green. 2 Set the Channels Master at Full, and the Fade Master at Instant. 3 Set up a lighting state on the Channel faders, then press [RECORD]. Repeat this for each cue step of the Show. 4 Hold [RECORD] and press a Scenemaster flash key marked "Shows" to assign the recording to current page. A short Mimic flash indicates a Show has been recorded under the Scenemaster. The LED above the Scenemaster flashes to show a Show has been recorded. Each Show Scenemaster can hold up to 30 cues.
SHOW PLAYBACK Raising the fader level of a Show fades up the levels of the first cue at the fade rate set on the Fade Master. Subsequent cues are introduced by pre-setting the Fade Master, and then pressing the Cue Go key. Show levels are added on a highest takes precedence basis. Only one Show should be up at a time. 1 Set the Fade Master to the first cue fade time. 2 Set the Show Scenemaster to Full: the Fade LED starts flashing to indicate Cue 1 fade is in progress. 3 For subsequent cues, preset the fade time for the cue, then press [CUE GO]. 4 To go back a cue, preset the fade time, hold [CUE GO], then press [PARK].
OVER-RIDING A CUE FADE TIME During a cue fade you can move the Fade Master to the Hold position to stop the fade fade, or to a new fade time—the fade will continue at the new rate. To skip cues, move the Fade Master to Hold while you step to the right cue, and then move the lever to a suitable fade time to introduce the new levels. During rehearsal, you may need to go to a new cue state without waiting for the fade to complete. You can do this by moving the Fade Master to Instant the lighting will snap instantly to the new cue state.

42 NOVA OPERATION

NOVA OPERATION 43
FLASHING SHOW CUES Pressing the Flash key of a Show during an automatic fade instantly flashes the cue: levels over 5% over-ride other levels.
CONTINUOUS SHOW CUE PLAYBACK You can cross-fade through hundreds of cues by splitting the lighting for an entire performance into segments over a number of Show masters on all the pages. By recording an extra blackout cue at the start and end of each Show master you can cross-fade from the end of one show to the start of the next, even when the new Show master is on a different page: 1 Starting with the first Show on the first page, record a number of cues, with the first cue an extra last cue as a
blackout. You can record up to thirty cues in each Show master. 2 Record cues into other Show masters for all the cues in the performance, moving to a new page as necessary. 3 Playback is simple: On Page 1, raise the first Show master (a blackout) and press [CUE GO] for opening lighting. 4 After the last cue but one of the first Show master, change page if required and raise the next Show master. 5 Pressing [CUE GO] will now step the old Show to black and cross-fade to the first live cue in the new Show. At the same time, by recording on the same page a number of Chases and Scenes needed during the cues in the current Show, you can make a busy performance easy to operate.
DELETING A SHOW You can delete any Chase as for a Scene. Ensure first that the Record buffer is empty (Record LED GREEN), then: > Hold [RECORD] and then press the Flash key of the Show to be deleted. Wait for a long Mimic flash, then press it
again before releasing [RECORD]. The long Mimic flash after the first press of the Scenemaster Flash key is a warning that the master holds a recording. The short Mimic flash on the second press indicates the recording has been deleted.
OVER-WRITING A SHOW You can over-write any previously recorded Show as follows: 1 Set up a new Scene or cue of a Show using the Channel faders. 2 Press [RECORD] to record the levels. 3 Hold [RECORD], and press the Flash key of the old Show. Wait for a long Mimic flash, then press it again before
releasing [RECORD]. The long Mimic flash after the first press of the Scenemaster Flash key is a warning that the master holds a previous recording. The short Mimic flash on the second press shows the new recording has been assigned, overwriting the old recording.

44 NOVA OPERATION

NOVA OPERATION 45
SHOW EDITING You can edit the playback levels of any cue of a Show while it live on stage using the Edit Up and Down keys:
EDITING CUE LEVELS Level editing of a cue must be done with only one Show master up, and all other masters down. The Cue Go and Cue Back commands are used to find the cue. You can then use the Up and Down keys to edit the cue levels. Remember Record must be on. 1 Set the Fade Master at Instant, then set the Show master at Full so the first cue is live onstage. 2 Press [CUE GO], or [CUE GO] and [PARK] to select the cue. 3 Hold [UP] or [DOWN] and press Channel Flash keys to edit levels. Remember that the Up and Down keys edit levels directly in cue memory. In case you need to revert to the original lighting, remember to record the cue into the Record or Park Buffers before editing the original cue can then be restored later if necessary.
INSERTING OR DELETING CUE STEP Cue steps cannot be inserted or deleted directly, but you can achieve the same effect by re-recording a new Show using the cues from the old Show (with or without new cues) and then overwrite the new Show into the old Scenemaster: 1 Set the Fade Master at Instant. 2 Set the Scenemaster at Full so the first cue of the old Show is live onstage. 3 Press [CUE GO] (cue forward), or [CUE GO] and [PARK] (cue back) to select the cue. Press [RECORD]. 4 Record further new cues from any other Show, Chase or Scene (or the Channel faders) in order. 5 Hold [RECORD], and press the Flash key of the old Show master. Wait for a long Mimic flash, then press it again
before releasing [RECORD].
COPYING A SHOW You can copy a Show to any other Scenemaster in the same or any other page as follows: 1 Set the Fade Master at Instant 2 Set the Scenemaster at Full so the first cue of the old Show is live onstage. Press [RECORD]. 3 Press [CUE GO]. Press [RECORD]. 4 Repeat step 3 until you have recorded all the cues of the Show. 5 Change to a new page if required, then hold [RECORD], and press the Flash key of the new Show Scenemaster. If there is a long Mimic flash indicating a previous recording under the new master, press the Flash key again to overwrite with the new Show before releasing [RECORD].

46 NOVA OPERATION
REMOTE SHOW PLAYBACK You can operate a Show by stepping it through the cues from a remote location. Control is provided for Forward Cue, Reverse, and Home—reset to Cue 1. The Forward, Reverse and Home commands require a simple three wire connection to two low current make-to-earth contacts, which can be a pair of manual push buttons or other source such as a musician's foot-switch, or electronic control from a daylight sensor, Audio Visual decoder box, SMPTE time decoder, Midi decoder, computers, or a tone decoder from a taped sound-track. The technical specifications are listed below. In the following example, assume the remote lines are connected to two push buttons marked Forward and Reverse.
REMOTE SHOW SET-UP Only one Show should be operated remotely at one time, and all cues will fade at the rate selected on the Fade Master. You can record other Remote Shows on the other Scenemasters if needed, but the masters and Page must be manually changed. Once the Show is recorded, proceed as follows: 1 Plug the stereo phone jack connected to the remote pushbuttons (or controller) into the Remote Control socket on
the back panel of the Scenemaster. 2 Set the Fade Master to the common fade time. 3 Set the Show Scenemaster to Full. This sets Cue 1 live on stage. The first cue state in this mode is more than likely to be a blackout or a reset state which may include public area lighting such as Houselights. The second cue state would then be the start of the performance. The Show can be controlled from the remote contacts, and from the Nova Cue Go key.
REMOTE CUE FORWARD If you press the Forward push-button briefly (10 milliseconds to 1 second), the Show will step forward one cue. Repeating pressing of the Forward button gives a series of cross-fade between cues, at the time set on the Fade Master. Cue stepping works on a latest takes precedence basis, that is all cue levels fade to the latest cue state at the latest cue fade time. Pressing Forward when the Show is on the last cue fades to the FIRST cue.
REMOTE CUE REVERSE If you press the Reverse push-button briefly (10 milliseconds to 1 second), the Show will step backwards one cue, at the time set on the Fade Master. Pressing Reverse when the Show is on the first cue fades to the LAST cue.
NOVA OPERATION 47
SHOW RESTART If you hold the Forward push-button down for a period exceeding 2 seconds, the Show will reset to Cue 1. Since the Scenemaster cycles back from the last cue to the first cue there will be a smooth restart to the Cue 1 state.
REMOTE INPUT SPECIFICATIONS The remote control input requires a stereo phone jack with the following connections: TIP Forward connection RING Reverse connection SLEEVE Common connection (chassis earth) The Forward, Reverse and Restart commands are given to the Scenemaster as follows: Forward Cue Connect tip to sleeve for a period of not less than 10 milliseconds and no greater than 1 second. Reverse Cue Connect ring to sleeve for a period of not less than 10 milliseconds and no greater than 1 second. Restart Show Connect tip to sleeve for a period of 3 seconds. The sleeve is connected to the Scenemaster chassis and is at Earth potential. The Forward and Reverse inputs have an internal pull-up resistor of 4700 ohms to 5 volts, and hence may be safely activated by any external switch such as a push-button, relay contact, or computer logic output including TTL, LS-TTL, CMOS, NMOS, open collector transistor output, or any other device which can sink 1 milliamp. Connection diagrams are given in the appendix at the end of this manual.

48 NOVA OPERATION

NOVA OPERATION 49
PREVIEW MODES You can view the contents of any Scenemaster or the Park Master on the Channel Mimic LEDs. Previewed levels are not visible on stage.
READING CHANNEL LEVELS You can read channel levels on the first 10 Mimic LEDs of the top preset by pressing both the Up and Down keys together: > Hold [UP] and [DOWN], and press any Flash key on the top preset The Channel mimics LEDs light to show the Channel level to the nearest 10%.
PREVIEWING THE NEXT CUE OF A SHOW You can view channel levels in the next cue when playing back a Show: > Hold [PAGE UP] and [PAGE DN], and press the Flash key above the Scenemaster playing back the current cue. After a short Mimic flash, the Channel LEDs light to show channels on in the next cue.
PREVIEWING SCENES You can view channels in any recorded Scene: > Hold [PAGE UP] and [PAGE DN], and press the Flash key above the Scenemaster. After a short Mimic flash, the Channel LEDs light to show channels on in the recorded Scene.
PREVIEWING CHASES You can view all the steps of any Chase in sequence: > Hold [PAGE UP] and [PAGE DN], and press the Flash key above the Scenemaster. The Channel Mimic LEDs show each Chase step as it is stepped forward from the first step to the last step.
PREVIEWING PARK You can view the channels recorded under the Park Master: > Hold [PAGE UP] and [PAGE DN], and press [PARK]. After a short Mimic flash, the Channel LEDs light to show channels on in the Park buffer.

50 NOVA OPERATION
NOVA OPERATION 51
SD CARD OPERATIONS On Novas fitted with an SD card, the entire memory of the Nova (all the scenes, chases, and shows on all pages) can be saved for backup or library purposes, and restored later. Moreover each SD card can save a number of different copies (“volumes”) of the Nova memory24 volumes on the 24 channel Nova, and 36 volumes on the 36 channel version.
SAVING TO SD CARD You can save the entire Nova memory to an SD card volume as follows: 1 Set the write protect switch on the SD card to Unlock (towards the contact end of the card) 2 Push the SD card, label uppermost, into the socket under the handle on the right side of the Nova 3 With the Record LED ON, hold [RECORD], then [UP] (Edit UP), then press any Flash key on the top preset After a short Mimic flash, the Page Display shows a dash ( - ) during the save process. If you pressed flash key 1, the Nova memory is saved to volume 1 in the card, while pressing flash key 5 saves to volume 5 in the same card etc. A short Mimic flash shows the end of the save with the return of the original page number. You can then remove the SD card (push to remove). To prevent accidental overwrites, set the write protect switch on the card to the Lock position. As each card can store up to 24 (or 36) volumes of Nova memory in the same card, it is advisable to make a written note of the card and the volume numbers used.
RESTORING FROM SD CARD You can restore the entire Nova memory from any SD card volume (saved from the same size Nova) as follows: 1 Push the SD card, label uppermost, into the socket under the handle on the right side of the Nova 2 With the Record LED ON, hold [RECORD] and [DOWN] (Edit DN), then press the top preset Flash key of any
previously saved volume After a short Mimic flash, the Page Display shows a dash ( - ), and the Nova starts restoring from the card. If you pressed flash key 1, the Nova memory is restored from volume 1 of the card. If you pressed flash key 5, the memory is restored from volume 5 of the same card etc. A short Mimic flash shows the end of the restore process with the return of the original page number. A long flash of the Mimic display during save or restore indicates an error. Error codes shown in the page display during the
flash are: C = Card not found; P = write Protect on; F = File/volume ID error; E = Errors during card initialisation/read/write. Nova 24 and 36 volumes may be saved on the same card. Saved volumes can only be restored to the same size Nova. As save and restore take a few seconds to complete, avoid SD card operations with lights live on stage. Each SD card volume may be written 100,000 times without degradation. Read operations are unlimited. SD card size can be from 16MB to 1GB. The Nova saves its data to SD card addresses starting at 800000H (8MB) so that if
the card is no longer required for Nova backup, it may be re-used in a PC after re-formatting.

52 NOVA OPERATION

NOVA OPERATION 53
NOVALINK INTRODUCTION The Theatrelight NovaLink is a Soft-Patch option added to the origina Nova 24 and 36 models. The NovaLink 24 has a patch to 512 dimmers, output on both the DMX A and B sockets. The NovaLink 36 has a patch to 1024 dimmers, with the first universe (DMX channels/dimmers 1-512) output on the DMX A socket, while the second universe (DMX channels/dimmers 513-1024), output on the DMX B socket. The NovaLink allows the same dimmer to be driven at different levels from different channels if required. In both models many dimmers at different levels can be patched to each channel, with a limit of 912 patch records in the 24 channel model or 1444 patch records in the 36 channel model. Each channel can thus represent a "scene" of dimmers or DMX channels. The entire contents of the desk – the patch list along with the Scene, Chase and Show levels and times – can be stored as a “volume” on the built-in SD Card. Each SD Card in the NovaLink 24 can store 24 volumes, with 36 volumes in the NovaLink 36. Before editing, the Patch List may be set to either a One-to-One patch (Channel 1 drives Dimmer 1 at Full etc.), or a Zero patch, in which no dimmers are connected to the channels.
NOVALINK FEATURES The soft-patch can drive 512 dimmers at any level from any of the 24 input channels (1024 dimmers in the NovaLink 36). Dedicated LCD display and keyboard for fast set-up of the soft-patch list. Patch List editing can start from either a One-to-One patch (Chn 1 drives Dimmer 1 at Full etc.), or a Zero patch. Read-back of all Patch List channel numbers with their dimmers and levels. Read-back of all live channel and dimmer levels. Test and auto test of both channels and dimmers for pre-show checks. All channels or all dimmers may be tested to the level of the Channels Master Fader for pre-show checks. Flash On/Off over-ride of any channel or dimmer for instant spot checks, focusing, and lamp/dimmer identification. The Soft-Patch is stored in the SD Card along with all cue levels for each show.
54 NOVA OPERATION
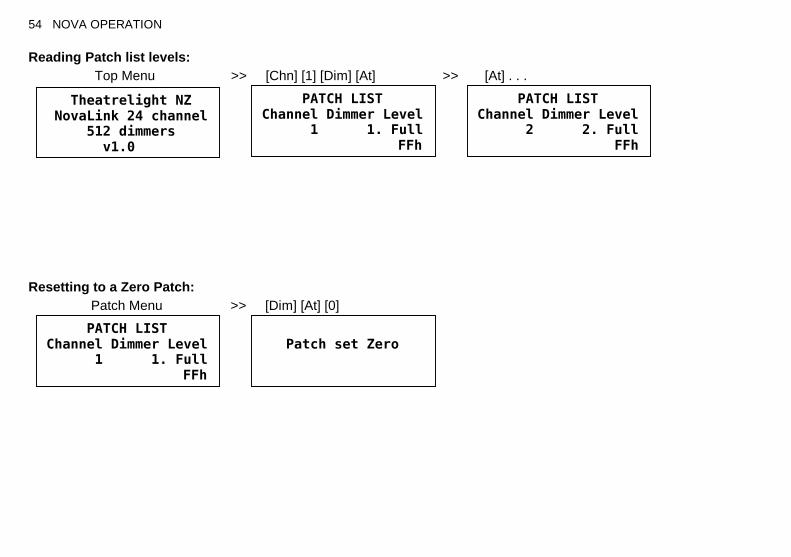
Reading Patch list levels: Top Menu >> [Chn] [1] [Dim] [At] >> [At] . . .
Resetting to a Zero Patch: Patch Menu >> [Dim] [At] [0]
PATCH LIST Channel Dimmer Level 1 1. Full FFh
PATCH LIST Channel Dimmer Level 2 2. Full FFh
Theatrelight NZ NovaLink 24 channel 512 dimmers v1.0
Patch set Zero
PATCH LIST Channel Dimmer Level 1 1. Full FFh

NOVA OPERATION 55
PATCH LIST EDITING The softpatch setup should be designed and entered into the NovaLink memory before plotting levels for a show. When the Nova is erased, the Patch List is reset to a One-to One patch by default. You can use this as a convenient start point and edit the patch to suit. You also have the option of starting from a Zero patch, where no dimmers are assigned to any of the channels. This may be faster in some circumstances. Number entry is the same as entering numbers into a calculatorthe numbers shift left. The Record LED must be On to edit the patch list.
READING PATCH LIST LEVELS After an Erase, the Patch List can be viewed to verify that the One-to-One setting has been installed as follows: 1 Press [Menu]. 2 Press [Chn] [1] [Dim] [At] : the LCD shows the Patch List display: Channel 1, Dimmer 1 at Level Full 3 Press [At] again to show Channel 2, Dimmer 2, Level Full.
The point after the last digit of the Dimmer display shows that the dimmer is the last (and this case the only) Dimmer patched to that channel. Patched dimmer Levels are shown as a % level, and also as a Hexadecimal level (00 to FFh) below as an aid in setting up accurate control levels often needed for LEDs and Moving Lights. If you continue to press the At key, the display will step through the patch list until the last dimmer listed for the last channel, when “LEVELS END” will show on the LCD with a flash of the Mimic LEDs. Pressing [At] again then restores the Patch List menu.
RESETTING TO A ZERO PATCH The current Patch List may be set to a Zero patch at any time as follows: 1 Ensure the Record LED is on. If necessary enter the Record Code. 2 Hold [Dim] and [At], then press [0]. After a Mimic flash, the Patch List will be set to a One-to-One lookup list. The
display shows “Patch set Zero” while any key remains down.
Since this can have a catastrophic effect on a well worked out patch list, the instruction is purposely difficult— all three keys must be pressed at the same time for correct operation. A Zero patch list may be edited in the same fashion as a One-to One list, but in this case all dimmer levels in the DMX output/s will be off until patch levels are set by key entry for each channel.

56 NOVA OPERATION
Resetting to a One to One Patch: Patch Menu >> [Dim] [At] [Full]
Patch list editing: Patch Menu >> [Chn] [1] [Dim] [1] [0] [At] >> [At] [7] [5] . . .
PATCH LIST Channel Dimmer Level 1 10 0% 00h
PATCH LIST Channel Dimmer Level 1 10. 75% Patch Edit ON
PATCH LIST Channel Dimmer Level 1 1. 0% 00h
Patch set One to One
PATCH LIST Channel Dimmer Level 1 1. 0% 00h

NOVA OPERATION 57
RESETTING TO A ONE-TO-ONE PATCH The current Patch List may be set to a One-to-One patch at any time as follows: 1 Ensure the Record LED is on. If necessary enter the Record Code. 2 Hold [Dim] and [At], then press [Full]. After a Mimic flash, the Patch List will be set to a One-to-One lookup list. The
display shows “Patch set One to One” while any key remains down.
PATCH LIST EDITING While Record is On, you can edit any dimmer/level combination for a channel. Patched Dimmers and their levels must be entered one at a time. The LCD will show “Patch Edited” to warn you that levels have changed the current patch. The following example sets both dimmers 10 and 12 at different levels on Channel 1, and sets Dimmer 1 off: 1 Press [Menu] if necessary. 2 Press [Chn] [1] [Dim] [1] [0] [At] [7] [5]. This sets Dimmer 10 at level 75 on Channel 1. 3 Press [Dim] [1] [2] [At] [Full]. This sets Dimmer 12 at level Full on Channel 1. 4 Press [Dim] [1] [At] [0]. This sets Dimmer 1 at level 0 on Channel 1.
If you now raise Channel 1 to Full on a live preset of the Nova, Dimmer 1 will not show, but Dimmer 10 will come up to level 75 and Dimmer 12 to Full. The process may be repeated from step 3 to patch more dimmers to the same channel, or from step 2 to edit a new channel. A dimmer may be driven from any number of channels; in this case the final dimmer level is the highest level of any combination. You can also edit the Patch list while live testing either channels or dimmers—see page 63. Due to the increaed memory occupied by the NovaLink patch list, the maximum number of steps per Chase in the Novalink
36 has been reduced to 39 from 40 in the Nova 36. The Novalink 24 can store 60 Steps per Chase, unchanged from the Nova 24.

58 NOVA OPERATION
Reading Live Channel levels: Top Menu >> [Chn] [1] [At]
Reading All Live Channel levels: Top Menu >> [Chn] [At] >> [At] . . .
Reading Live Dimmer levels: Top Menu >> [Dim] [1] [At]
Reading All Live Dimmer levels: Top Menu >> [Dim] [At] >> [At] . . .
CHANNEL LEVELS Channel Level 1 50% 80h
CHANNEL LEVELS Channel Level 2 FF% FFh
Theatrelight NZ NovaLink 24 channel 512 dimmers v1.0
CHANNEL LEVELS Channel Level 1 FF% FFh
Theatrelight NZ NovaLink 24 channel 512 dimmers v1.0
DIMMER LEVELS Dimmer Level 1 50% 80h
DIMMER LEVELS Dimmer Level 2 FF% FFh
Theatrelight NZ NovaLink 24 channel 512 dimmers v1.0
DIMMER LEVELS Dimmer Level 1 FF% FFh
Theatrelight NZ NovaLink 24 channel 512 dimmers v1.0

NOVA OPERATION 59
READING LIVE CHANNEL AND DIMMER LEVELS
READING A CHANNEL LEVEL You can find the playback level of any particular channel, for example Channel 1: 1 Press [Menu]. 2 Press [Chn] [1] [At]. The Level display will show the current level of Channel 1.
READING ALL LIVE CHANNEL LEVELS You can find the playback levels of all live channels as follows: 1 Press [Chn] [At]. The Channel display will show the first channel up, and its current level. 2 Press [At] again to show all live channels in order.
Holding down the AT key gives a continuous live read-out of the channel level. At the end of the list, the LCD shows “LEVELS END” with a flash of the Mimic LEDs. Another press of the At key then restores the Patch List display.
READING A DIMMER LEVEL You can find the playback level of any particular dimmer, for example Dimmer 1: 1 Press [Menu]. 2 Press [Dim] [1] [At]. The Level display will show the current level of Dimmer 1.
READING ALL LIVE DIMMER LEVELS You can find the current levels of all live dimmers as follows: 1 Press [Dim] [At]. The Dimmer display will show the first dimmer up, and its current level. 2 Press [At] again to show all live dimmers in order.
Holding down the AT key gives a continuous read-out of the dimmer level. At the end of the list, the LCD shows “LEVELS END” with a flash of the Mimic LEDs. Another press of the At key then restores the Patch List display. Note that if a dimmer number is entered when a channel number is in the Channel display, the LCD shows “Patch List” to
warn that all levels shown will refer to patch listings, NOT the live dimmer levels.

60 NOVA OPERATION
Channel Test: Top Menu >> [Chn] [Test] ] >> [Test] . . .
Channel AutoTest: Top Menu >> [Chn], hold [Test] >> After 2 secs . . .
Dimmer Test: Top Menu >> [Dim] [Test] ] >> [Test] . . .
Dimmer AutoTest: Top Menu >> [Dimmer], hold [Test] >> After 2 secs . . .
CHANNEL TEST Channel Level 1 FF% FFh
CHANNEL TEST Channel Level 2 FF% Test autorun FFh
Theatrelight NZ NovaLink 24 channel 512 dimmers v1.0
CHANNEL LEVELS Channel Level 12 FF% FFh
Theatrelight NZ NovaLink 24 channel 512 dimmers v1.0
CHANNEL TEST Channel Level 1 FF% FFh
CHANNEL TEST Channel Level
2 FF% FFh
Theatrelight NZ NovaLink 24 channel 512 dimmers v1.0
DIMMER TEST Dimmer Level 1 FF% FFh
DIMMER TEST Dimmer Level 1 FF% Test autorun FFh
Theatrelight NZ NovaLink 24 channel 512 dimmers v1.0
CHANNEL LEVELS Channel Level 12 FF% FFh
Theatrelight NZ NovaLink 24 channel 512 dimmers v1.0
DIMMER TEST Dimmer Level 1 FF% FFh
DIMMER TEST Dimmer Level 1 FF% FFh
Theatrelight NZ NovaLink 24 channel 512 dimmers v1.0
NOVA OPERATION 61
TEST AND FLASH MODES
CHANNEL TEST AND FLASH MODES You can test and flash on or off each channel (ie its patched dimmers) to check for correct operation. The LCD shows “CHANNEL TEST” as a warning that a channel level may have been over-ridden. To test all Channels in succession: 1 Press [Chn], then [Test] repeatedly. The dimmers patched to that channel are turned on live on stage. 2 Press the [6] key to reverse the test direction, press the [5] or [Test] key to go forward again. 3 While testing any channel, holding [0] or [Full] will set the channel Off or Full. 4 Hold [Test] for 2 seconds (until a mimic flash) for auto test mode. The LCD shows “Test autorun”. 5 To temporarily reverse the direction of the auto test, hold the [6] key. 6 To pause and then continue the auto test, press the [To] key. If paused, the LCD shows “Test paused…”. 7 In pause mode, you can fast forward or reverse the test by holding the [6] or [5] keys. 8 To cancel auto test, press [Menu].
To test or flash any particular channel (ie its patched dimmers) for example Channel 12: > Press [Chn] [1] [2], then [Test]. Then press [0], then [Full] repeatedly: Channel 12 will flash off and on. To cancel test mode, press [Test], or [Menu].
DIMMER TEST AND FLASH MODES You can test and flash on or off each dimmer for correct operation. The LCD shows “DIMMER TEST” as a warning that a dimmer level may have been over-ridden. Note that the NovaLink mimic LEDs do not dimmers on. To test all Dimmers in succession: 1 Press [Dim], then [Test] repeatedly. Each dimmer is turned on at Full live on stage. 2 Press the [6] key to reverse the test direction, press the [5] or [Test] key to go forward again. 3 While testing any dimmer, holding [0] or [Full] will hold the dimmer Off or Full. 4 Hold [Test] for 2 seconds (until a mimic flash) for auto test mode. The LCD shows “Test autorun”. 5 To temporarily reverse the direction of the auto test, hold the [6] key. 6 To pause/continue the auto test, press the [To] key. If paused, the LCD shows “Test paused…”. 7 In pause mode, you can fast forward or reverse the test by holding the [6] or [5] keys. 8 To cancel auto test, press [Menu].
To test or flash any particular dimmer for example Dimmer 12: > Press [Dim] [1] [2], then [Test]. Then press [0], then [Full] repeatedly: Dimmer 12 will flash off and on.

62 NOVA OPERATION
Changing Test Level: Top Menu >> hold [Test] hold [At] >> [9]
Test All Channels or Dimmers: Top Menu >> hold [Test], press [Chn] >> or - hold [Test], press [Dim]
Patching in Dimmer Test Mode: [Dim] [1] [Test] >> [Chn] [1] >> [Test] . . .
Patching in Channel Test Mode: [Chn] [1] [Test] >> [Dim] [1] [at] [5] [0] >> [Test] . . .
ALL CHANNELS TEST Level All channels at 15% 27h
ALL CHANNELS TEST Level All channels at 15% 27h
Theatrelight NZ NovaLink 24 channel 512 dimmers v1.0
CHANNEL LEVELS Channel Level 12 FF% FFh
Theatrelight NZ NovaLink 24 channel 512 dimmers v1.0
TEST LEVEL Channel Dimmer Level Full FFh
TEST LEVEL SET Channel Dimmer Level 90% E8h
Theatrelight NZ NovaLink 24 channel 512 dimmers v1.0
PATCH LIST Channel Dimmer Level 1 1 50% Patch Edit ON
CHANNEL TEST Channel Level 2 Full FFh
CHANNEL TEST Channel Level 1 Full FFh
ENTER CHN NUMBER Channel Dimmer Level 1 1 Full Patch Edit ON
DIMMER TEST Dimmer Level 2 Full FFh
DIMMER TEST Dimmer Level 1 Full FFh

NOVA OPERATION 63
CHANGING TEST LEVEL You can set the Test level to any 10% value including Off and Full as follows: > Press [Menu], then hold [Test] and [At], then press a number: 0, 1 through Full. The test level is restored to Full if the power is turned off or if the memory is erased.
TESTING ALL CHANNELS OR DIMMERS You can test all Channels or Dimmers to the level of the Channels Master fader as follows: 1 Set the Channels Master Fader to Off. This is important as otherwise the entire lighting rig may be turned on. 2 Press [Menu], then hold [Test] and press [Chn] to test all Channels (or hold [Test] then press [Dim] to test all
dimmers). The LCD shows “ALL CHANNELS TEST” (or “ALL DIMMERS TEST”). 3 Slowly raise the Channels Master Fader to test all Channels (or Dimmers) at the Channels Master level. 4 Press [Menu] to stop the test.
PATCH EDITING IN TEST MODE As an aid to fast patching, you can test the dimmers one at a time, and allocate them to a channel quickly: 1 Hold [Dim] and [At], then press [0]. This sets up a Zero patch on the current Patch List. 2 Press [Menu], then press [Dim] [1] [Test]: the circuit on Dimmer 1 will light at the test level (best set at Full). 3 To patch Dimmer 1 (at Full) to Channel 27, press [Chn] [2] [7]. Pressing [Test] again then records the patch, and
tests the next dimmer.
Repeating the last instruction will enable you to quickly identify the dimmers and patch them to the channels. Alternatively you can test each channel and edit the levels of the dimmers patched to that channel live on stage as follows: 1 Press [Menu], then press [Chn] [1] [Test]: Channel 1 (ie its dimmers) will light at the test level (best set at Full). 2 Press [Dim] [At] to read the first dimmer patched to Channel 1: enter a new level (or zero) if required. 3 Press [At] to read (and edit if required) other dimmer levels for that channel 3 Press [Test] to test the next channel and edit its dimmers.
CANCELLING TEST MODE As Test mode over-rides all other channel or dimmer levels, you must cancel Test mode to avoid leaving lights up on stage: > Press [Menu] to cancel all Test modes.

64 NOVA OPERATION
MAINTENANCE To keep your Nova looking and working well take note of these points: Keep the dust cover on when you are not using the desk: dust is detrimental to fader life. Do not drink, eat or smoke over the desk. Do not use excessive pressure on fader knobs or keys, or lean your elbows on the desk. Use a damp cloth to keep the desk clean. Never use contact cleaner or other solvents on the panel, or solvent based pens. Touring desks should travel in a sturdy road case with adequate protection from dust and vibration. Take care that all connections are firmly in place when operating the desk. If your local power supply is subject to low voltage or electrical noise, power the desk from a Uninterruptible Power Supply. During plotting, always make a written cue sheet showing all recorded levels. If liquids are spilt on the front panel, the desk must be turned off immediately, disassembled and the Lithium battery removed. If it is left connected, corrosion may damage the printed circuit board. The wetted parts should then be rinsed in clean warm water, air blasted, and dried thoroughly in hot air before reassembly. Contact Theatrelight or your agent if necessary. _______________________________________________________________________________________________________ If you have had difficulties in understanding the Nova or this operation manual, or if you have any suggestions to make, please write to Theatrelight or your Theatrelight agent with the following information: Your name and address. Your application of the Nova, with some indication of your experience. Your questions or suggestions. THEATRELIGHT NEW ZEALAND PO BOX 13159 AUCKLAND, NEW ZEALAND Phone 64-9-622-1187, 636-5805 Fax 64-9-636-5803 Web site: www.theatrelight.co.nz E-mail: [email protected]

NOVA OPERATION 65
SPECIFICATIONS CONSTRUCTION Epoxy powder coated black zintec steel panels. Front panels are 1.6 mm thick, legend screened in abrasion resistant two pot epoxy ink. FADERS 60mm stroke long life linear faders with custom moulded ABS knobs. All faders are protected by a built-in dust shield. FLASH KEYS Long life computer keys with custom moulded 19mm keycaps. ELECTRONICS CMOS microprocessor with 5 year lithium battery backed CMOS internal memory. Eight bit (256 step) record and playback of channel levels. POWER SUPPLY Swichable 110-220 or 220/240 VAC, 50-60Hz. Power consumption is less than 5 watts. DIMMER OUTPUT USITT DMX-512 1990 Digital multiplex system requiring twin twisted shielded cable approved for RS-422/485 of up to 600 metres for transmission to remote dimmers. Dimmer refresh rate is every 22 milliseconds. DMX DECODERS DMX-512 to optically isolated, analogue output receivers can be supplied by Theatrelight to drive any make of dimmer requiring plus or minus 10, 12, or 15 volts, with or without diode offset. Each receiver may be programmed with a channel offset DMX SPLITTERS DMX-512 splitters can be supplied by Theatrelight for larger installations. The splitter re-shapes and buffers the received DMX and drives a number of DMX transmitters. Splitters may be cascaded. Splitters are available in either 19 inch, 1 U rack mounting configuration, or as a standalone portable version.

66 NOVA OPERATION
EXTERNAL CONNECTIONS

NOVA OPERATION 67
EXTERNAL CONNECTIONS POWER Internal power supply switchable to 120 or 220/240 VAC 50/60 Hz, 5 watts, via IEC 630 male socket, DIMMER OUTPUT EIA-485 250 K Baud to DMX-512 1990 standard via 5 pin Cannon XLR female socket. REMOTE STEP Two channel short to earth via 6.25 mm Stereo jack socket. AUDIO INPUT 100 millivolts input via 6.25 mm Stereo jack socket. DIMENSIONS NOVA MODELS Length Depth Height Weight 24 channel Nova 500mm 295mm 88mm 7.5Kg 36 channel Nova 738mm 295mm 88mm 9.5Kg

68 NOVA OPERATION
GLOSSARY ADD MODE Mode in which pressing a channel Flash key adds the channel to the other lighting. ASSIGN Allocate a recording to a Scenemaster. BLACKOUT All lights out on stage. BLIND Not showing on stage. BO Blackout; all lights out on stage. BPM Beats per minute: applied to music rhythms. CHANNEL One of the controlled output lines from a lighting desk; usually connected to one or more dimmers. CHASE A repetitive pattern of lighting changes. CROSS-FADE A smooth change from one lighting state to another. CUE An action which results in new lighting on stage; the state of current lighting. DBO Dead Black-out: no light on stage. DIMMER A power controller which changes the brilliance of lights connected to it. DIPLESS Applied to a cross-fade where a dimmer up at the same level on both the new and the old lighting states does not change level during the cross-fade. DMX-512 A method of transmitting dimmer levels digitally over a two wire cable. (Digital MultipleX, 512 dimmers) ERASE To clear and reset the memory. FADER A slider control. FADE TIME The time taken to complete a fade from full off to full on. FLASH KEY Any key which flashes a channel or scene to Full. Sometimes called Bump keys (USA). GRAND MASTER A master fader which controls the final output levels of a lighting desk. KILL Turn off a light. KILL MODE Mode in which pressing a Flash key turns off all other lighting. Sometimes called Solo or Swap mode. LED Light Emitting Diode.

NOVA OPERATION 69
LEVEL The brightness of a channel or dimmer as a number from 0 (off), to 10 (full on), or from 0% to 100%. MASTER A fader which has overall control of a number of levels or some other major function. MIMIC DISPLAY A display often using Light Emitting Diodes (LEDs) representing the channels on in a scene. PAGE A set of Scenemasters. PARK STORE A single memory store of all channel levels in the Nova. An electronic `preset'. Sometimes called Grab. PRESET A row of faders representing all the channels in a scene; to set up faders in advance of a cue. PREVIEW To view a set of recorded levels without showing on stage. RECORD BUFFER In the Nova, spare memory used for recording one or more scenes before assigning to a playback
master. SCENE A recording which stores a single set of all channel levels. SCENEMASTER A master fader which controls the playback of a scene of recorded levels. SEQUENCE A repetitive pattern of lighting changes. SHOW A performance. In the Nova, a Scenemaster which stores a sequence of cues of recorded levels. SOLO MODE Another name for Kill mode. SNAP FADE An instant change from one lighting state to another. STEP To change from one scene or cue to another. Also, one scene of a Show or Chase. USITT United States Institute of Theatre Technicians. Arbiters of the DMX-512 standard.

70 NOVA OPERATION
INDEX Add mode.......................................................................17 Audio input ............................................................... 11, 37 Bass mode LED..........................................................9, 37 Bass modes.......................................................... 9, 37, 38 Blackout .....................................................................9, 17 Recording.........................................................................7 Blind recording...................................................... 7, 18, 23 Channel faders ................................................... 13, 23, 31 Channel Faders ................................................................7 Channel flash keys..........................................................31 Channel Flash Keys..........................................................7 Channel Masters...............................................................7 Channel mimic............................................................7, 13 Flashing..........................................................................15 Masters .................................................................... 13, 15 Channels master.............................................................41 Channels Master....................................................... 13, 15 Flashing..........................................................................15 Channels Master flash key ..........................................7, 15 Chase Back ......................................................................9 Chase definition..............................................................18 Chase direction.................................................................9 Chase fade................................................. 7, 9, 33, 37, 38 Chases
Bass mode..................................................................37 Deleting ................................................................ 33, 35 Editing levels...............................................................35 Flashing ......................................................................33 Overwrititng.................................................................35 Playing back................................................................31 Recording ...................................................................31 Reversing....................................................................33 Stopping......................................................................33
Comet fade ................................................. 7, 9, 33, 37, 38 Copying scenes ..............................................................27 Copying shows................................................................45 Cross-Fader Presets ........................................................ 7 Scenes ...........................................................................15 Cross-fading cues ...........................................................41 Cross-fading remote cues................................................46 Cross-fading scenes..................................................19, 25 Cue back ........................................................................19 Cue definition..................................................................19 Cue go key ....................................7, 18, 19, 21, 35, 41, 45 Cues
Deleting.......................................................................45 Editing levels ...............................................................45 Over-riding fade times..................................................41 Recording....................................................................41
DBO ...............................................................................17 DBO key ......................................................... 9, 19, 21, 23 Deleting chases ........................................................33, 35 Deleting cues ..................................................................45 Deleting scenes ..............................................................29 Deleting shows................................................................43 Dimmer end-point............................................................55 Displays
Dimmer end point ........................................................55 DMX-512 ........................................................................11 Down key........................................................ 9, 27, 35, 45 Editing
Patch list .....................................................................55 Editing chases.................................................................35 Editing cues ....................................................................45 Editing scenes.................................................................27 Editing shows..................................................................45

NOVA OPERATION 71
Erase code................................................................. 9, 21 Erase memory............................................................ 9, 21 LEDs.......................................................................... 7, 15 Masters............................................................................ 7 Fade LED........................................................7, 15, 25, 41 Fade master ............................ 7, 33, 35, 37, 38, 41, 45, 46 Flashing
Channels .................................................................... 61 Dimmers..................................................................... 61
Flashing chases ....................................................... 19, 33 Flashing scenes ....................................................... 19, 23 Flashing shows......................................................... 19, 43 Full key .......................................................................... 57 Glossary......................................................................... 68 Hold fade ........................................................7, 15, 25, 41 Scenes........................................................................... 15 Instruction Summary......................................................... 7 Kill mode ........................................................................ 17 LEDs
Bass mode.................................................................. 37 Fade..................................................................... 25, 41 Level ...............................................................27, 49, 51 Mimic.......................................................................... 23 Mimic.......................................................................... 35 Page........................................................................... 25 Record........................................................................ 21
LEDs, Level...................................................................... 7 LEDs, Mimic..................................................................... 7 Level LEDs............................................................... 49, 51 Maintenance................................................................... 64 Manual preset mode....................................................... 13 Masters
Channel ...................................................................... 41 Fade........................................ 33, 35, 37, 38, 41, 45, 46
Speed ......................................................................... 18 Speed ..................................................31, 33, 35, 37, 38
Memory erase ..................................................................9 Memory operation........................................................... 18 Menu key ................................................55, 57, 59, 61, 63 LEDs.............................................................................. 13 Mmemory capacity............................................................5 One-to-one patch............................................................ 55 Overwriting scenes ......................................................... 29 Overwriting shows .......................................................... 43 Overwrititng chases ........................................................ 35 LEDs................................................................................9 Page key .............................................9, 25, 27, 31, 49, 51 Page LED................................................................... 9, 25 Pages....................................................................... 19, 25 Masters .......................................................................... 13 Park key ....................................................7, 13, 41, 45, 49 Park master.................................................................... 13 Patch list
Editing .................................................................. 55, 57 One-to-one patch ........................................................ 55 Reading levels ............................................................ 55 Zero patch............................................................. 55, 57
Playing back chases ....................................................... 31 Playing back scenes ................................................. 23, 25 Playing back shows .................................................. 41, 43 Power supply.................................................................. 11 Cross-fading................................................................... 13 Preview modes......................................................... 49, 51 Reading channel and dimmer levels ................................ 59 LEDs................................................................................9 Record clear ................................................................... 21 Record code................................................................... 21 Record disable........................................................ 7, 9, 21

72 NOVA OPERATION
Record enable ............................................................9, 21 Record key .......................................................................9 Record LED................................................................9, 21 Recording blind......................................................... 18, 23 Recording chases ...........................................................31 Recording cues...............................................................41 Recording method...........................................................18 Recording scenes ..................................................... 23, 25 Recording shows ............................................................41 Remote show control ......................................................46 Remote step ............................................................. 11, 46 Saving original levels ......................................................29 Scene definition ..............................................................18 Scene Faders ...................................................................7 Scene Flash Keys.............................................................7 Scenemasters.................................................................19 Cross-fading ...................................................................15 Scenes
Copying ......................................................................27 Cross-fading................................................................25 Deleting ......................................................................29 Editing levels...............................................................27 Flashing ......................................................................23 Overwriting..................................................................29 Playing back.......................................................... 23, 25 Recording ...................................................................25 Recording ...................................................................25 Transferring.................................................................27
Setting a scene...............................................................13
Show definition................................................................19 Shows
Copying.......................................................................45 Deleting.......................................................................43 Deleting cues...............................................................45 Editing.........................................................................45 Editing cue levels.........................................................45 Flashing ......................................................................43 Over-riding fade times..................................................41 Overwriting..................................................................43 Playing back..........................................................41, 43 Recording....................................................................41 Remote control ............................................................46
Snap fade ................................................. 7, 25, 33, 37, 38 Specifications..................................................................65 Masters............................................................................ 9 Speed master.................................9, 18, 31, 33, 35, 37, 38 LEDs ............................................................................... 9 Step/Stop key.................................................. 9, 33, 35, 37 Stop mode ..................................................................9, 35 Test all levels ..................................................................63 Test key..........................................................................61 Test level ........................................................................63 Test mode.......................................................................61 Test mode patch set-up...................................................63 Transerring scenes..........................................................27 Up key ............................................................ 9, 27, 35, 45 Zero patch ................................................................55, 57